configuring botnet traffic filtering using cisco security ... · 2 configuring botnet traffic...
TRANSCRIPT

Configuring Botnet Traffic Filtering Using Cisco Security Manager 4.0
First Published: June 2010
AbstractBotnets are a collection of malicious software or “bots” covertly installed on endpoints and controlled by another entity through a communications channel such as IRC, peer-to-peer (P2P), or HTTP. The Cisco ASA Botnet Traffic Filter complements existing endpoint security solutions by monitoring network ports for rogue botnet activity and by detecting infected internal endpoints sending command and control traffic back to a host on the Internet. The Botnet Traffic Filter database identifies command and control traffic as well as the domains or hosts receiving the information.
Cisco Security Manager is an enterprise-class security management software application. You can use it to manage security policies on a wide variety of devices.
This paper describes how to use Cisco Security Manager 4.0 to configure Botnet Traffic Filtering on ASA devices running version 8.3 software. Although this paper is specific to this ASA version, you can use these concepts and techniques with any version of ASA software that supports Botnet Traffic Filtering (version 8.2(1)+). Keep in mind that Botnet configuration features can differ between ASA software releases.
This paper uses the following document as a basis for showing how to perform the equivalent configuration using Security Manager: Combating Botnets Using the Cisco ASA Botnet Traffic Filter, http://www.cisco.com/en/US/prod/collateral/vpndevc/ps6032/ps6094/ps6120/white_paper_c11-532091.html.
This paper assumes the following:
• That you have already installed (or upgraded) the appropriate ASA software version on the device and performed basic device configuration. This paper assumes that the ASA is installed and functional in your production network or at least in a test network with realistic connections, that there is a network path between the device and the Cisco Security Manager server, and that you have configured a username and password on the device that Cisco Security Manager can use.
Americas Headquarters:Cisco Systems, Inc., 170 West Tasman Drive, San Jose, CA 95134-1706 USA

Botnet Overview
• That you have obtained and installed the Botnet Traffic Filter license on the ASA along with any other ASA licenses that you require. You must have a special license to use Botnet Traffic Filtering. You cannot install or configure ASA licenses using Cisco Security Manager. Instead, use the Adaptive Security Device Manager (ASDM) or the CLI on the device. For information on ASA licenses, see http://www.cisco.com/en/US/products/ps6120/products_licensing_information_listing.html.
• That you have a basic familiarity with using Cisco Security Manager. This paper does not cover installation or initial configuration of Security Manager. Note that this paper assumes that you are using non-Workflow mode; if you are using Workflow mode, you must explicitly create and manage activities and deployment jobs according to your organization’s policies, which adds a few steps to the procedures.
For more information about the products discussed in this paper, see the following:
• Cisco Security Manager: http://www.cisco.com/go/csmanager.
• ASA devices and software: http://www.cisco.com/go/asa.
• Cisco Security Intelligence Operations Center: http://www.cisco.com/go/sio.
Botnet OverviewA botnet is a collection of autonomous software robots (bots), typically malicious in nature, that operate as a network of compromised computers. An originator, also known as a “bot herder,” typically controls the bots and can launch them at will, using command and control communication between the controller and the bots.
Hackers typically use botnets as a way of gaining access to large distributed resources of computing power. The owner of a botnet determines which users are allowed to access their botnet. It is a common practice to sell access to the botnet.
The following is a typical example of the operation of a botnet:
• Infection—A botnet operator will infect computers by sending out viruses or worms through various infection vectors, such as e-mail or compromised web sites where the malicious application is the bot.
• Control—The bot on the newly infected host will log into a command and control server and await commands. In many cases, the command and control server will be an IRC channel or a web server.
• Execution—A botnet user acquires access to the botnet from the botnet operator. Instructions are sent through the command and control channel to each bot in the botnet to execute actions, such as mass e-mail spam, distributed denial of service (DDoS) attacks, or information theft.
The attack profile of botnets has evolved from spam and DoS attacks to attacking web sites for profit, taking down rival networks, and blackmailing web host owners. These attacks can cost a significant amount of money to the victim.
Because the hosts and controllers in a botnet are operating from captured resources, botnets are dynamic and short-lived, which makes them difficult to defeat. As soon as you close down one botnet, it will show up in a different place with new addresses, operating like a network version of a morphing virus.
Botnets have become an important tool in the arsenal of hackers and other criminals that endeavor to profit and to bring financial ruin to companies and individuals with a presence on the Internet.
For further reading on botnets, see Botnets: The New Threat Landscape White Paper at http://www.cisco.com/en/US/solutions/collateral/ns340/ns394/ns171/ns441/networking_solutions_whitepaper0900aecd8072a537.html.
2Configuring Botnet Traffic Filtering Using Cisco Security Manager 4.0
OL-22644-01
Cisco ASA Botnet Traffic Filter
Cisco ASA Botnet Traffic FilterThis paper focuses on how Cisco Security Intelligence Operations relates to botnet threat identification, its interaction with the Cisco ASA Botnet Traffic Filter, and how to configure the feature using Cisco Security Manager. It is important to realize that a comprehensive security deployment should include Cisco Intrusion Prevention Systems (IPS) with its reputation based Global Correlation service and IPS signatures in conjunction with the security services provided by the ASA security appliance such as Botnet Traffic Filter. Note that you can also use Cisco Security Manager to configure IPS devices and service modules.
The following topics describe the ASA Botnet Traffic Filter in more detail:
• Cisco Security Intelligence Operations, page 3
• Cisco ASA Botnet Traffic Filter Overview, page 3
• Traffic Categorization, page 4
• Dynamic Filter DNS Snooping, page 5
• Example of the Botnet Traffic Filter in Action, page 5
Cisco Security Intelligence OperationsThe Cisco Security Intelligence Operations Center is a security center that provides centralized information and threat signatures issued for all Cisco security technologies, including e-mail filtering, web filtering and reputation, IPS/IDS filtering, and voluntary global threat statistics.
The Cisco Threat Operations Center provides human oversight of Cisco Security Intelligence Operations to ensure speed and accuracy of its threat data, including web and e-mail reputation data, Cisco IPS global correlation data, and botnet database.
Cisco Security Intelligence Operations is the world’s largest e-mail and Web traffic monitoring network. With data on more than 25 percent of the world’s Internet traffic, it provides an unprecedented real-time view into security threats from around the world. Cisco Security Intelligence Operations can be used like a “credit reporting service” for e-mail and web threats, providing comprehensive data that ISPs and companies can use to differentiate legitimate senders from spammers and other attackers, and giving e-mail administrators visibility into who is sending them e-mail.
Cisco ASA Botnet Traffic Filter OverviewCisco ASA 5500 Series Adaptive Security Appliances provide reputation-based control for an IP address or domain name, similar to the control that IronPort SenderBase provides for e-mail and web servers. This has proved to be very successful in combating rogue e-mail and web servers that typically use dynamic or changing IP addresses.
The Cisco ASA Botnet Traffic Filter is integrated into all Cisco ASA appliances that use ASA Software version 8.2(1) or higher, and inspects traffic traversing the appliance to detect rogue traffic in the network. When internal clients are infected with malware and attempt to phone home across the network, the Botnet Traffic Filter alerts the system administrator of this though the regular logging process for intervention. This is an effective way to combat botnets and other malware that shares the same phone-home communications pattern.
3Configuring Botnet Traffic Filtering Using Cisco Security Manager 4.0
OL-22644-01
Cisco ASA Botnet Traffic Filter
The Botnet Traffic Filter monitors all ports and performs a real-time lookup in its database of known botnet IP addresses and domain names. Based on this investigation, the Botnet Traffic Filter will determine if a connection attempt is benign and should be allowed, or if it is a risk and should be tagged for mitigation. If you are using ASA Software version 8.3, you can configure the ASA to automatically drop the traffic.
The ASA Botnet Traffic Filtering process goes through the following general steps:
1. Infected clients try to communicate with a command and control host on the Internet.
2. Cisco Security Intelligence Operations updates the Cisco ASA Botnet Filter database. The ASA looks up the destination and identifies it as a known attack site.
3. Alerts go out to the security teams for prevention, mitigation, and remediation. If Botnet Traffic Filtering is configured to drop the traffic, the ASA also drops the traffic to that destination. Note that dropping the traffic does not clean the infected computer; you must still manually remove the bots from infected machines.
The Cisco ASA Botnet Traffic Filter has three main components:
• Dynamic and Administrator Blacklist Data—The Botnet Traffic Filter uses a database of malicious domain names and IP addresses that is provided by Cisco Security Intelligence Operations. This database is maintained by Cisco Security Intelligence Operations and is downloaded dynamically from an update server. Administrators can also configure their own local blacklists and whitelists.
• Traffic Classification and Reporting—Botnet Traffic Filter traffic classification uses ACLs to define the traffic to be examined for botnets, and the default is to examine all traffic. The dynamic filter compares the source and destination addresses of traffic against the IP addresses that have been discovered for the various lists available (dynamic black, local white, local black), and logs and reports the hits against these lists accordingly. If you configure drop rules, botnet traffic that meets your classification requirements is also dropped.
• Domain Name System (DNS) Snooping—In order to map IP addresses to domain names that are contained in the dynamic database or local lists, the Botnet Traffic Filter uses DNS snooping in conjunction with DNS inspection. Dynamic Filter DNS snooping looks at User Datagram Protocol (UDP) DNS replies and builds a DNS reverse cache (DNSRC), which maps the IP addresses in those replies to the domain names they match. DNS snooping is configured in an inspection rule.
Traffic CategorizationTraffic that passes through the Botnet Traffic Filter is classified into four categories:
• Blacklist—This is traffic to or from an IP address that is considered to be malicious. This IP address can be either an IP address or network entry in the dynamic blacklist or administrator-configured blacklist, or it can be a snooped IP address that was found in a DNS reply for a blacklisted domain.
• Whitelist—This is traffic to or from an IP address that is considered to be good. It is part of the administrator-configured lists.
• Greylist—A greylist IP address has been resolved to one or more blacklist entries as well as one or more unknown entries.
• Unknown or None—An IP address that does not map to a domain in either a blacklist or whitelist. No syslogs or statistics are generated for this traffic.
4Configuring Botnet Traffic Filtering Using Cisco Security Manager 4.0
OL-22644-01
Deployment Guidelines
Once an IP address is found for a blacklisted domain, a rule is added to the dynamic-filter ASP rule table and statistics are kept for the number of times that domain is hit, the client that was accessing it, and the TCP/UDP port that was used to connect. In addition, when a blacklisted IP address is encountered, the device produces log messages that detail the source and destination IP addresses and ports as well as the domain name. A similar process is applied for white-listed fully-qualified domain names (FQDNs).
Using the Botnet Traffic Filter, Cisco ASA administrators can get statistics for the overall number of blacklist, whitelist, and greylist hits for an interface, as well as summary reports for recent activity.
Dynamic Filter DNS SnoopingThe Dynamic Filter DNS snooping feature looks at UDP DNS replies (A and CNAME records only) and builds a DNS reverse cache (DNSRC) that maps the IP addresses in those replies to the domain names they match.
Enable DNS snooping only for the interface that is facing the Internet, because the Botnet Traffic Filter database is aimed at addressing the external threat of botnets. It is also not a good practice to fill up your DNSRC with internal information, which can cause early flushing of external information.
DNSRC housekeeping removes entries from the DNSRC on a regular basis. (The default housekeeping interval is 20 minutes, but it is adjusted shorter as the DNSRC grows.) The amount of time that an entry stays in the DNSRC depends on the time to live (TTL) value in the DNS reply that was snooped.
Example of the Botnet Traffic Filter in ActionThe client attempts to connect to phone-home server “command-control.badguy.ru.”
1. The client issues a DNS query for “command-control.badguy.ru.”
2. The ASA DNS inspection snoops the query and the response to the DNS query and caches it for later use.
3. The client connects to the IP address of “command-control.badguy.ru.”
a. The Botnet Traffic Filter resolves the IP address in the Botnet Traffic Filter DNS cache.
b. The Botnet Traffic Filter looks up the DNS name for the connection in the Botnet Traffic Filter block list.
c. If the peer address is found in the Botnet Traffic Filter block list and it is not in the manual whitelist, then the ASA issues an alert through logging that an illegal connection was attempted. If you also configured a drop rule that applies to the traffic, the traffic to command-control.badguy.ru is blocked.
d. If the peer address is not found, then the connection is allowed to continue.
Deployment GuidelinesThe Cisco ASA appliance with the Botnet Traffic Filter should be deployed at the edge of the enterprise Internet edge, as the botnet database contains information only about external botnets. It is also best to address the external threat as close to the source as possible. This feature is restricted to IPv4 traffic.
The Botnet Traffic Filter is supported in all firewall modes (single and multiple), and in routed and transparent modes.
5Configuring Botnet Traffic Filtering Using Cisco Security Manager 4.0
OL-22644-01
Configuring Botnet Traffic Filtering in Security Manager
The Cisco ASA appliance supports Botnet Traffic Filter in High Availability (HA) mode (Active/Active and Active/Standby). The DNS reverse cache (DNSRC) is not replicated between the ASA HA devices and must therefore be relearned upon a device failover event.
A typical Botnet Traffic Filter deployment will be where the ASA appliance is deployed between the Internet and the corporate networks. The corporate networks can be divided across multiple interfaces and will, from the Botnet Traffic Filter’s point of view, be considered internal networks.
Configuring Botnet Traffic Filtering in Security ManagerThe following is an overview of the steps required to configure Botnet Traffic Filtering using Cisco Security Manager. The cited sections describe the specific procedure or configuration for each step. The steps assume that you are using non-Workflow mode in Security Manager.
Step 1 Add the ASA Device to the Security Manager Inventory, page 6.
Step 2 Enable DNS Lookups on the ASA Device, page 7. This allows the ASA to resolve the address of CSIO’s updater service so that the dynamic filter update client can fetch database updates.
Step 3 Configure Dynamic Database Usage, page 8. This enables the ASA to download the dynamic database and use it when filtering traffic for botnet activity. You can also elect to treat greylisted traffic as blacklisted traffic for drop purposes.
Step 4 Configure Traffic Classification Rules, page 9. This identifies the interface and the traffic that you want to analyze for botnet activity. You can also identify the botnet traffic that the ASA is allowed to drop.
Step 5 Configure Manual White List and Black List (Optional), page 12. The manual white and black lists allow you to augment the dynamic database. If you do not use the dynamic database, the black list defines all of the sites that will be considered objectionable.
Step 6 Configure DNS Snooping on the Outside Interface, page 13. The Botnet Traffic Filter uses DNS snooping to map domain names to IP addresses for analyzing traffic for botnet activity, as explained in Dynamic Filter DNS Snooping, page 5.
Step 7 Configure Syslog (Optional), page 15. You can configure the Security Manager server to be a syslog server for the ASA, which allows you to monitor botnet activity using Security Manager’s Event Viewer.
Step 8 Deploy the Configuration to the ASA, page 16. The configuration on the ASA is not actually changed until you deploy the configuration from Security Manager to the device.
Step 9 (Optional) Create Shared Policies for Botnet Traffic Filter Configurations, page 16. If you have more than one ASA, and the Botnet Traffic Filter configuration should be the same on all of them, you can use Security Manager’s shared policy feature to simplify the configuration of the remaining ASA devices.
Add the ASA Device to the Security Manager InventoryBefore you can use Security Manager to configure a device, you must add it to the Security Manager device inventory.
Tip If you upgraded the ASA Software to version 8.3 on an ASA device that you are currently managing in Security Manager, first delete the device from the inventory. You need to do a fresh policy discovery on these upgraded devices.
6Configuring Botnet Traffic Filtering Using Cisco Security Manager 4.0
OL-22644-01
Configuring Botnet Traffic Filtering in Security Manager
Step 1 Use the Security Manager client to log in with a user account that has sufficient privileges to modify devices and all policies.
Step 2 In Device view, select File > New Device and add the new device to the Security Manager inventory using the New Device wizard:
• For Method, choose Add Device from Network.
• On page 2 of the wizard:
– Enter the hostname or IP address of the ASA device and the display name you want to use in Security Manager (if different from the default).
– For OS Type, select ASA.
– If the device is configured in multiple-context mode (hosting multiple security contexts), select System Context.
– For Discover Device Settings options, select all non-greyed check boxes.
• On page 3, enter the credentials (username and password) that Security Manager can use to access and configure the device.
• On page 4, you can optionally select the device groups in which to add the new device.
Step 3 Click Finish in the New Device wizard. Security Manager contacts the device, converts the discovered configuration into Security Manager policies, and adds it to the inventory.
The Discovery Status window provides a running status of the discovery and any problems encountered. When the process is finished, click Close to close the window.
Tip If you added a multiple-context device, you must select File > Submit to submit changes to the database. Submission is required so that the security contexts appear in the device selector.
Enable DNS Lookups on the ASA DeviceIf you use the dynamic filtering database, you must enable DNS lookup so that the device can resolve the DNS name of the Cisco Security Intelligence Operations Center. Enable lookup on the Internet-facing interface.
Tip If you are using multiple-context mode, you must configure DNS lookup separately for each security context.
Step 1 In Device view, select the device in the device selector.
Step 2 In the Policies selector, select Platform > Device Admin > Server Access > DNS, and configure the following properties in the DNS server policy:
• DNS Server Groups—Click the Add Row (+) button beneath the DNS Server Groups table to specify the DNS servers the device can use. In the Add DNS Server Group dialog box, configure the following:
7Configuring Botnet Traffic Filtering Using Cisco Security Manager 4.0
OL-22644-01
Configuring Botnet Traffic Filtering in Security Manager
– Name—The name of the server group, for example, DNSservers. This name is not directly related to anything configured in the DNS servers, and can be any string that fits your requirements.
– DNS servers—Click the Add (+) button to add the IP addresses of your DNS servers. You can add up to six servers in a single DNS server group. If you add more than one server, use the Up and Down arrow buttons to put the servers in priority order.
– Domain Name—(Optional) The default domain name that should be appended to unqualified names when using these servers, for example, example.com.
• DNS Lookup Interfaces—Enter the names of the interfaces allowed to perform DNS lookups. For Botnet Traffic Filtering, you want to enable DNS lookup on the Internet-facing interface, for example, outside. You can click Select to select the interface from a list.
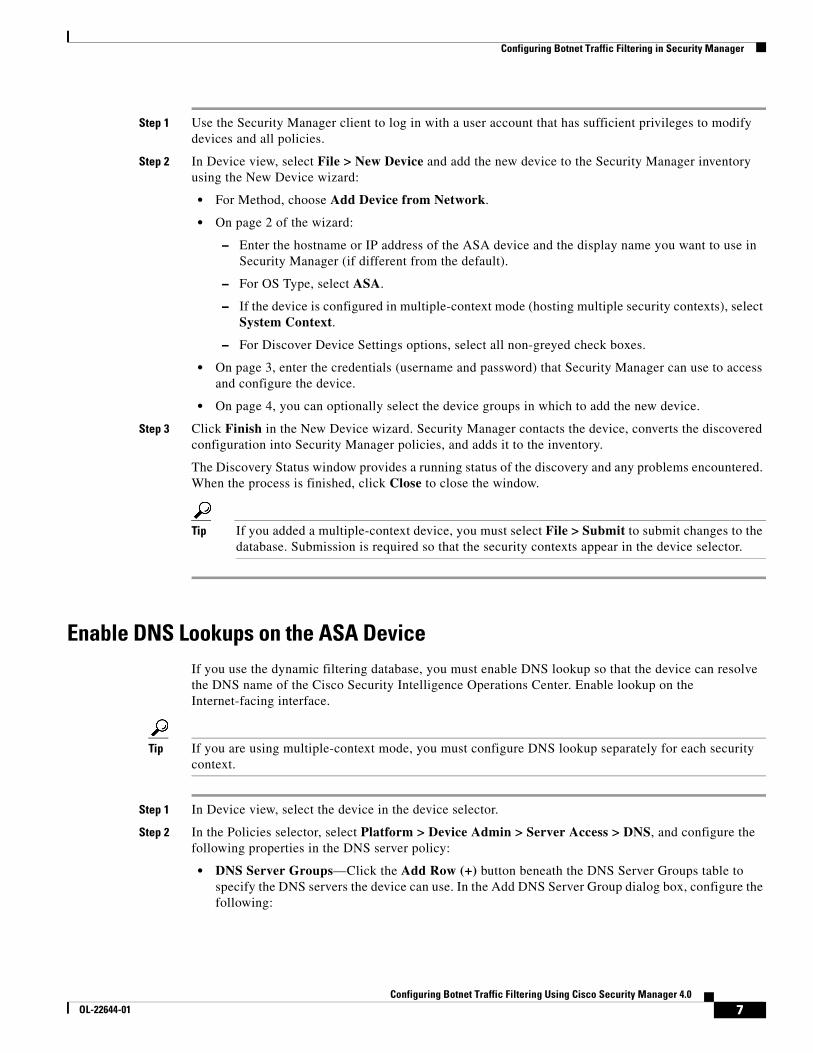
Step 3 Click Save to save the policy. The policy should look similar to the following illustration.
Figure 1 DNS Lookup Configuration for Botnet Traffic Filtering
Configure Dynamic Database UsageIt is actually optional to use the dynamic database, but if you do not use it, you are missing the main advantage of Botnet Traffic Filtering. This database is regularly updated to contain the most recently-known blacklist addresses.
Tip You enable the database download and its use separately; this is advantageous in multiple-context mode, where you download the database once in the system execution space, then enable its use in each of the security contexts in which you want to use it.
8Configuring Botnet Traffic Filtering Using Cisco Security Manager 4.0
OL-22644-01
Configuring Botnet Traffic Filtering in Security Manager
Step 1 In the Policies selector, select Firewall > Botnet Traffic Filter Rules.
Step 2 Select the Dynamic Blacklist Configuration tab if it is not already selected and select from the following options:
• Enable Dynamic Blacklist From Server—This option configures the ASA to download the dynamic database from the Cisco Security Intelligence Operations Center. In multiple-context mode, configure this option on the system execution space (system context).
• Use Dynamic Blacklist—This option configures the ASA to actually use the downloaded database. In multiple-context mode, configure this option on each security context that should use the database.
• Treat Ambiguous traffic as Blacklist—Ambiguous traffic is otherwise known as greylist traffic, as explained in Traffic Categorization, page 4. Select this option if you want to take an aggressive posture towards potential botnet traffic. If you select this option, greylist traffic is dropped if it satisfies your traffic classification drop rules (as configured in Configure Traffic Classification Rules, page 9).
Configure Traffic Classification RulesTraffic classification rules identify the interfaces where you want to enable Botnet Traffic Filtering and the specific traffic that you want to analyze for potential botnet activity. You can also create drop rules to identify the botnet traffic that you want the ASA to automatically drop.
What You Need To Know About Botnet Traffic Classification ACLs
When you configure the enable and drop rules, you have the option of specifying an extended ACL policy object to limit the traffic to which Botnet Traffic Filtering will be applied. If you do not specify an ACL object, filtering is done for all traffic: this is equivalent to specifying an ACL with the single rule permit IP any any.
If you want to specify an ACL so that filtering is performed on less than all traffic, keep the following in mind:
• Permit rules identify the traffic that is subject to Botnet Traffic Filtering. In drop rules, permit entries identify the traffic that the ASA is allowed to drop.
• Deny rules identify the traffic that should not be subject to filtering. The Botnet Traffic Filter ignores traffic that matches deny entries.
• The ACL that you select for drop rules should be a subset of the ACL used in the enable rules for the interface. For traffic to be dropped, there must not only be a permit rule in the drop rule’s ACL, the traffic must also fall under a permit rule in the enable rule’s ACL. This is because the drop rule is not considered until traffic permitted in an enable rule has first been identified as blacklisted.
Step 1 In the Policies selector, select Firewall > Botnet Traffic Filter Rules.
Step 2 Select the Traffic Classification tab.
Step 3 Configure the enable rules, which are shown in the upper table. These rules determine the interface and traffic that will be analyzed for botnet activity. You must configure these rules for any Botnet Traffic Filtering to occur.
9Configuring Botnet Traffic Filtering Using Cisco Security Manager 4.0
OL-22644-01
Configuring Botnet Traffic Filtering in Security Manager
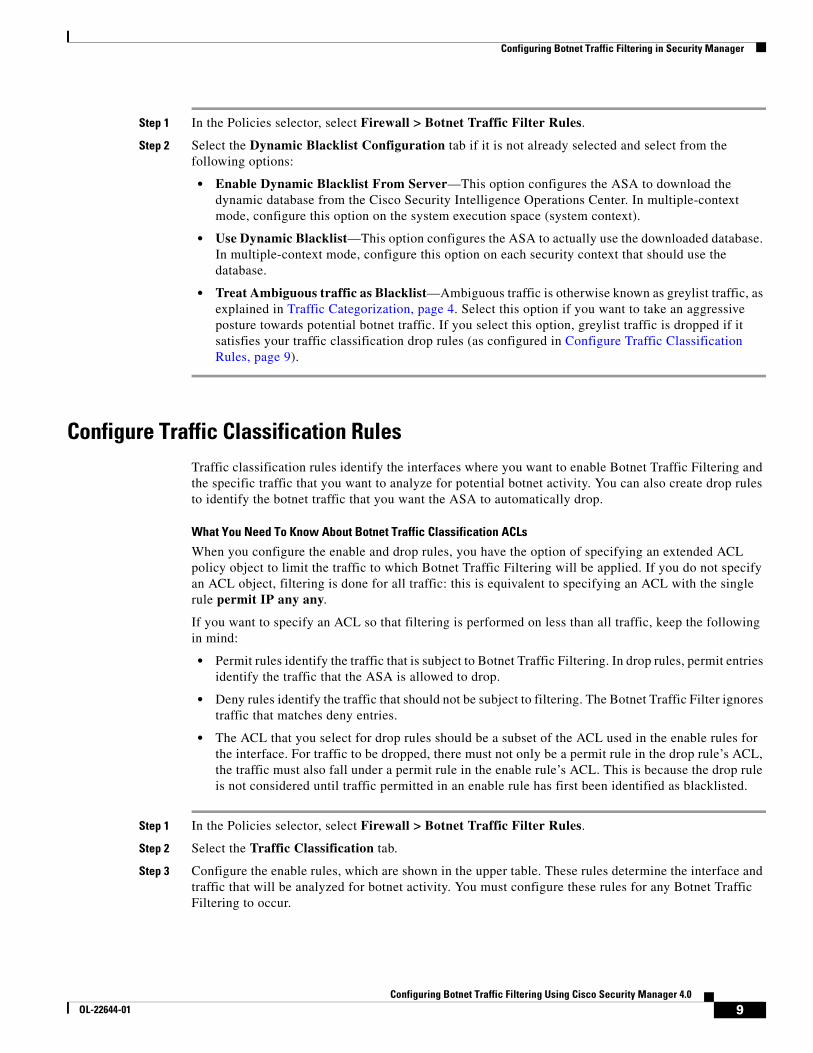
To add an enable rule:
a. Click the Add Row (+) button beneath the Enable Rules table, which opens the BTF Enable Rules Editor dialog box.
b. Enter the name of the interface on which to monitor traffic for botnet activity. Normally, you want to enable the Internet-facing interface only. You can click Select to select the interface, or an interface role object that specifies the interface, from a list.
c. If you want to limit filtering to specific traffic, enter the name of the ACL policy object that identifies the traffic. If you have not yet created the ACL, click Select to open the list of existing ACLs. Then, click the Create (+) button towards the bottom of the dialog box to open the Add Extended Access List dialog box. Click the Help button for information on creating the ACL.
The following figure shows an example enable rule that configures filtering on the outside interface for all traffic.
Figure 2 Traffic Classification Enable Rule
Step 4 If desired, configure drop rules so that the ASA can automatically drop botnet traffic. If you do not configure drop rules, the ASA continues to send syslog notifications, but all botnet traffic is allowed.
To add a drop rule:
a. Click the Add Row (+) button beneath the Drop Rules table, which opens the BTF Drop Rules Editor dialog box.
b. Enter the name of the interface to which the rule applies. There must be a corresponding enable rule for the interface. You can click Select to select the interface, or an interface role object that specifies the interface, from a list.
c. If you want to limit the drop rule to specific traffic, enter the name of the ACL policy object that identifies the traffic, or click Select to select it from a list or to create a new one. The permit and deny rules in the ACL should be a subset of the permit rules in the enable rule’s ACL.
d. Select the threat level of the traffic that should be dropped. Blacklisted traffic has an associated threat level that identifies the potential harm that can occur from botnet traffic to that destination. The default is to drop traffic that has Moderate, High, or Very High threat levels, but you can change this to a more limited or expansive range, or to a specific value.
10Configuring Botnet Traffic Filtering Using Cisco Security Manager 4.0
OL-22644-01
Configuring Botnet Traffic Filtering in Security Manager
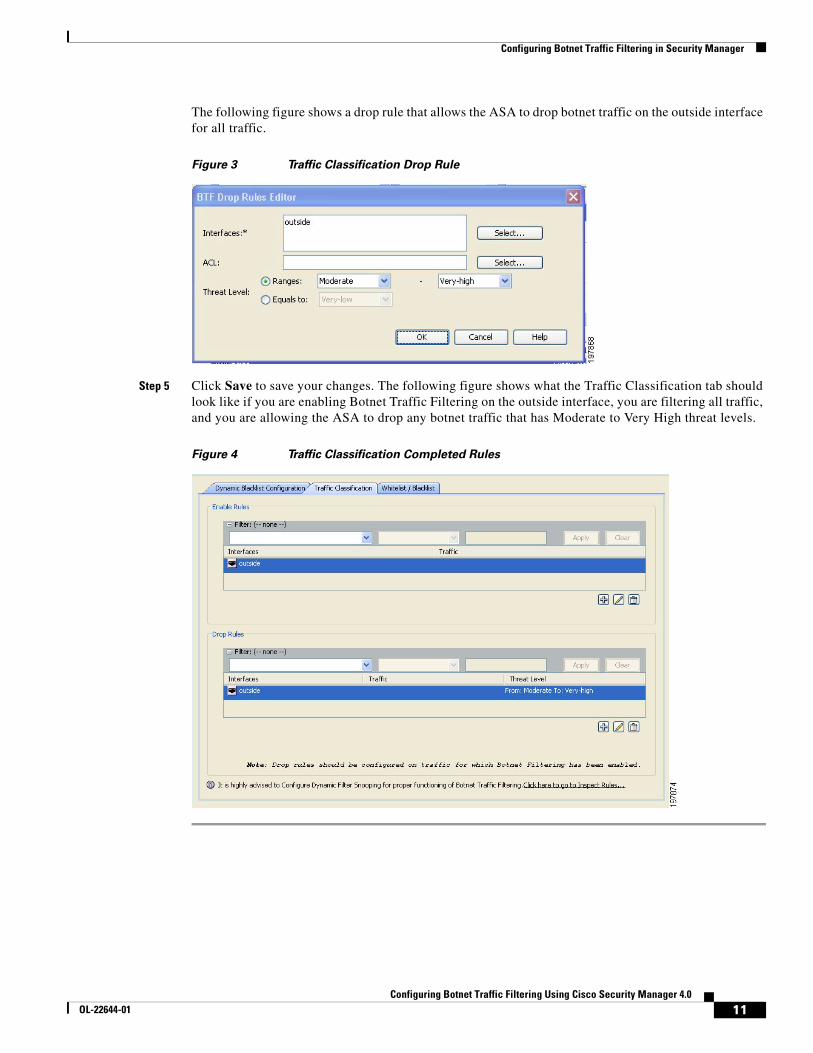
The following figure shows a drop rule that allows the ASA to drop botnet traffic on the outside interface for all traffic.
Figure 3 Traffic Classification Drop Rule
Step 5 Click Save to save your changes. The following figure shows what the Traffic Classification tab should look like if you are enabling Botnet Traffic Filtering on the outside interface, you are filtering all traffic, and you are allowing the ASA to drop any botnet traffic that has Moderate to Very High threat levels.
Figure 4 Traffic Classification Completed Rules
11Configuring Botnet Traffic Filtering Using Cisco Security Manager 4.0
OL-22644-01
Configuring Botnet Traffic Filtering in Security Manager
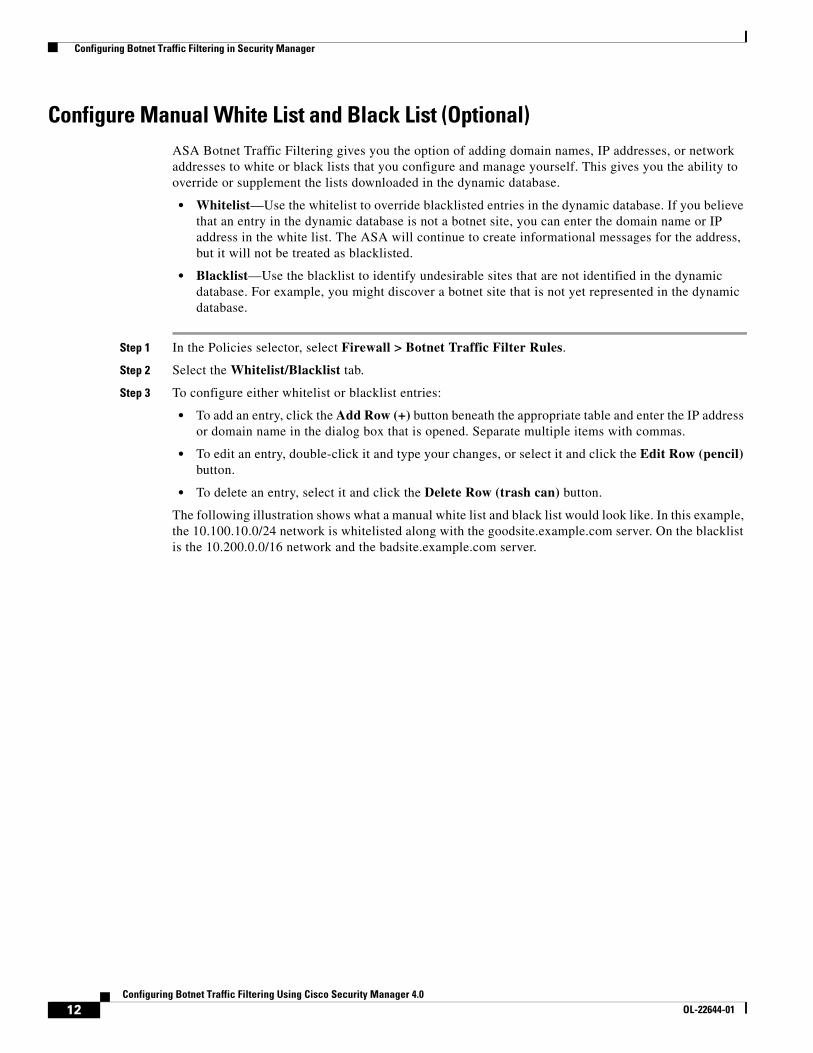
Configure Manual White List and Black List (Optional)ASA Botnet Traffic Filtering gives you the option of adding domain names, IP addresses, or network addresses to white or black lists that you configure and manage yourself. This gives you the ability to override or supplement the lists downloaded in the dynamic database.
• Whitelist—Use the whitelist to override blacklisted entries in the dynamic database. If you believe that an entry in the dynamic database is not a botnet site, you can enter the domain name or IP address in the white list. The ASA will continue to create informational messages for the address, but it will not be treated as blacklisted.
• Blacklist—Use the blacklist to identify undesirable sites that are not identified in the dynamic database. For example, you might discover a botnet site that is not yet represented in the dynamic database.
Step 1 In the Policies selector, select Firewall > Botnet Traffic Filter Rules.
Step 2 Select the Whitelist/Blacklist tab.
Step 3 To configure either whitelist or blacklist entries:
• To add an entry, click the Add Row (+) button beneath the appropriate table and enter the IP address or domain name in the dialog box that is opened. Separate multiple items with commas.
• To edit an entry, double-click it and type your changes, or select it and click the Edit Row (pencil) button.
• To delete an entry, select it and click the Delete Row (trash can) button.
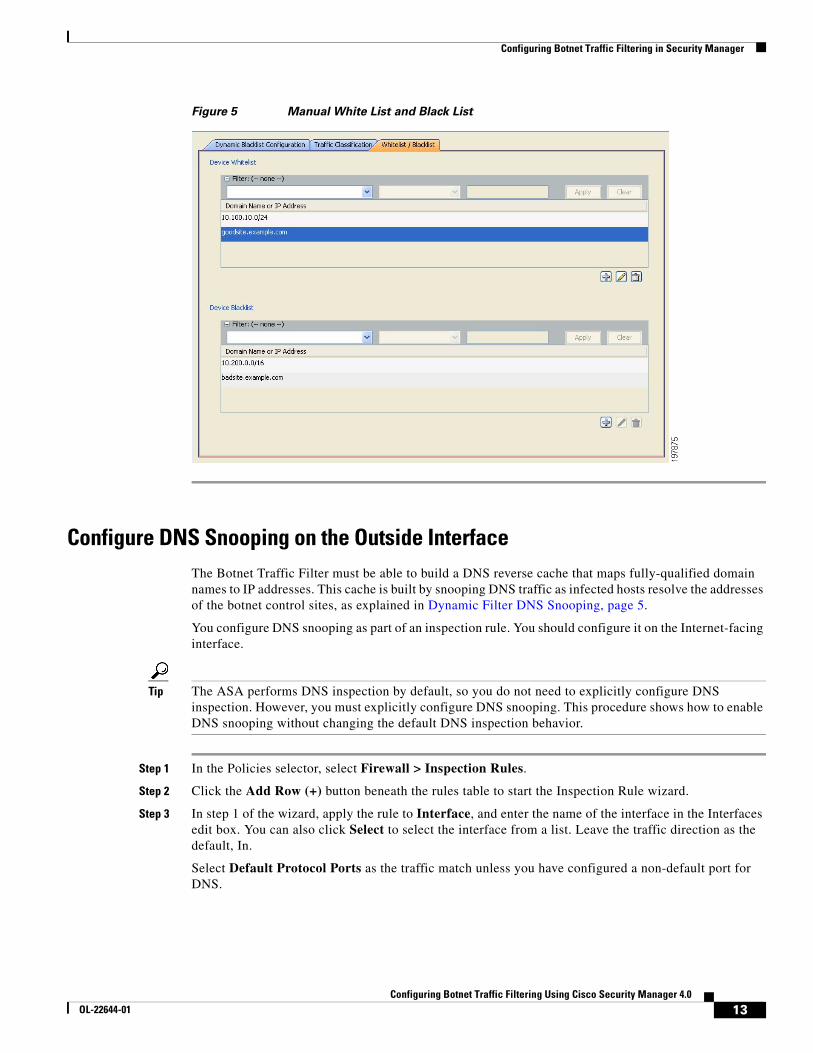
The following illustration shows what a manual white list and black list would look like. In this example, the 10.100.10.0/24 network is whitelisted along with the goodsite.example.com server. On the blacklist is the 10.200.0.0/16 network and the badsite.example.com server.
12Configuring Botnet Traffic Filtering Using Cisco Security Manager 4.0
OL-22644-01
Configuring Botnet Traffic Filtering in Security Manager
Figure 5 Manual White List and Black List
Configure DNS Snooping on the Outside InterfaceThe Botnet Traffic Filter must be able to build a DNS reverse cache that maps fully-qualified domain names to IP addresses. This cache is built by snooping DNS traffic as infected hosts resolve the addresses of the botnet control sites, as explained in Dynamic Filter DNS Snooping, page 5.
You configure DNS snooping as part of an inspection rule. You should configure it on the Internet-facing interface.
Tip The ASA performs DNS inspection by default, so you do not need to explicitly configure DNS inspection. However, you must explicitly configure DNS snooping. This procedure shows how to enable DNS snooping without changing the default DNS inspection behavior.
Step 1 In the Policies selector, select Firewall > Inspection Rules.
Step 2 Click the Add Row (+) button beneath the rules table to start the Inspection Rule wizard.
Step 3 In step 1 of the wizard, apply the rule to Interface, and enter the name of the interface in the Interfaces edit box. You can also click Select to select the interface from a list. Leave the traffic direction as the default, In.
Select Default Protocol Ports as the traffic match unless you have configured a non-default port for DNS.
13Configuring Botnet Traffic Filtering Using Cisco Security Manager 4.0
OL-22644-01

Configuring Botnet Traffic Filtering in Security Manager
The following illustration shows what step 1 should look like if the interface is named outside. Click Next to continue.
Figure 6 DNS Snooping Inspection Rule Step 1
Step 4 In step 2 of the wizard, do the following:
a. Select DNS from the protocols list. Selecting this protocol puts “dns” into the Selected Protocol display box beneath the table and enables the Configure button next to the field.
b. Click Configure to open the Configure DNS dialog box.
c. In the Configure DNS dialog box, select Enable Dynamic Filter Snooping. You can also select a DNS policy map if you want to perform other non-default DNS inspection actions. However, in this example, we will assume you are doing default DNS inspection. Botnet Traffic Filtering requires only the snooping option.
d. Click OK to close the Configure DNS dialog box.
14Configuring Botnet Traffic Filtering Using Cisco Security Manager 4.0
OL-22644-01

Configuring Botnet Traffic Filtering in Security Manager
The following illustration shows the selection of the DNS protocol and the configuration of the snooping attribute.
Figure 7 DNS Snooping Inspection Rule Step 2
Step 5 Click Finish to add the rule to the Inspection Rules policy. The following illustration shows the policy with just the DNS snooping rule.
Figure 8 Completed DNS Snooping Inspection Rule
Step 6 Click Save to save the Inspection Rules policy.
Configure Syslog (Optional)The ASA uses syslog to notify you of botnet activity. You can configure Security Manager as a syslog server and use its Event Viewer to monitor this activity. You can also configure other syslog servers. If you do not configure syslog policies, you can use the syslog facilities of the ASA or of the ASDM used with the device.
Tip This procedure explains how to set up a minimal syslog configuration to use Security Manager as a syslog server. There are other things you can do to fine-tune logging, such as filtering the types of messages generated and setting up e-mail notifications based on event severity. See the Security Manager online help for the various ASA syslog logging policies for detailed information.
15Configuring Botnet Traffic Filtering Using Cisco Security Manager 4.0
OL-22644-01
Configuring Botnet Traffic Filtering in Security Manager
Step 1 (Device view) Select the ASA device, then select Platform > Logging > Syslog > Logging Setup from the Policies selector.
In the policy, select Enable Logging. You can configure other options as needed.
Step 2 Select Platform > Logging > Syslog > Syslog Servers.
Add the Security Manager server’s IP address to the syslog servers table. Configure the server to use the UDP protocol. The default port, 514, is correct unless you configure a different port on the Tools > Security Manager Administration > Event Management page.
Step 3 (Optional, but recommended) You can configure the Platform > Device Admin > Server Access > NTP policy to specify a network time protocol (NTP) server. Using NTP ensures consistent date and time information for easy event correlation. Specify the same NTP server you use for the Security Manager server. If you use different NTP servers, ensure that they are synchronized.
Deploy the Configuration to the ASACompleting the configuration in Security Manager does not change the configuration on the actual ASA device. You must deploy the configuration to update the device. This procedure assumes that you deploy directly to the device and not to a file or to an intermediate server such as AUS or CNS.
Tip The deployment process is very different than this procedure if you are using Workflow mode. In Workflow mode, use the Deployment Manager to create a deployment job, have it approved if you require a separate approver, and then deploy the job.
Step 1 Select File > Submit and Deploy to submit your changes to the database and to start a deployment job. During submission, the device policies are validated. Resolve any errors before deployment. Carefully consider whether you need to resolve warnings.
Step 2 In the Deploy Saved Changes dialog box, select the ASA device. You can select any other devices that you want to deploy to at the same time.
Step 3 Click Deploy to start the job. The Deployment Status window opens to show you the progress of the deployment. Carefully examine the results and any error messages.
Create Shared Policies for Botnet Traffic Filter ConfigurationsSecurity Manager allows you to create shared policies. Shared policies are defined independently of a specific device, and you can assign a single shared policy to multiple devices. By using shared policies, you can update multiple devices at a time simply by editing the shared policy that is assigned to those devices.
The policies you need to configure for Botnet Traffic Filtering are ideal for sharing, because it is highly likely that more than a single ASA can share the same configuration. This is especially true if you use standard naming conventions for interfaces so that every ASA uses the same name for the Internet-facing interface.
16Configuring Botnet Traffic Filtering Using Cisco Security Manager 4.0
OL-22644-01
Monitoring Botnet Activity
Following are the Botnet-related policies that you can most likely share among devices:
• Firewall > Botnet Traffic Filter Rules
• Platform > Device Admin > Server Access > DNS
• Firewall > Inspection Rules, although you might need to make this a special inherited policy that just configures DNS snooping.
• Platform > Logging > Syslog > Logging Setup
• Platform > Logging > Syslog > Syslog Servers
• Platform > Device Admin > Server Access > NTP
You can either create shared policies directly using Policy view, or you can create them from a device’s local policies. If you configured a single ASA to implement Botnet Traffic Filtering, deployed the configuration, and are satisfied that the configuration is working as desired, you can use the following steps to convert the device’s local policies to shared policies so that you can assign them to other devices.
Step 1 In Device view, select the device that has the Botnet Traffic Filtering configuration.
Step 2 For each policy that you want to share:
a. Right-click the policy and select Share Policy. You are prompted to name the policy.
b. Enter an appropriate policy name and click OK.
The policy is converted to a shared policy and assigned to the device.
Step 3 To assign the policy to other devices:
a. Select View > Policy View to go to Policy view.
b. Select the type of policy from the Policy Types selector, then select your specific policy from the Policies selector below it. The shared policy appears in the work area.
c. Click the Assignments tab in the work area. This tab lists all devices to which the policy is assigned.
d. Select the additional devices to which you want to assign the policy in the Available Devices list and click >> to move them to the Assigned Devices list. This action updates the configuration for the selected devices to use the shared policy.
e. Repeat the process for the other shared policies that you created.
Monitoring Botnet ActivityAfter you configure Botnet Traffic Filtering, you want to monitor it and resolve any problems identified in your network. You can use Security Manager and ASDM to monitor Botnet activity, as explained in the following sections:
• Understanding the Syslog Messages That Indicate Actionable Events, page 18
• Monitoring Botnet Using the Security Manager Event Viewer, page 18
• Monitoring Botnet Activity Using the Adaptive Security Device Manager (ASDM), page 20
17Configuring Botnet Traffic Filtering Using Cisco Security Manager 4.0
OL-22644-01
Monitoring Botnet Activity
Understanding the Syslog Messages That Indicate Actionable EventsBotnet Traffic Filter events use syslog message numbers 338xxx. However, some messages are informational and require no action on your part.
When viewing syslogs for botnet events, you should be most concerned with the following message numbers. For information on dealing with messages that indicate blacklisted or whitelisted traffic, see Mitigating Botnet Traffic, page 21. For detailed descriptions of syslog messages, see the Syslog Message document for your ASA software version at http://www.cisco.com/en/US/products/ps6120/products_system_message_guides_list.html.
• 338001 to 338004—Indicate blacklisted traffic that the ASA is logging, but the ASA is not stopping the traffic. These messages require immediate attention if you want to stop botnet activity that is in progress.
• 338005 to 338008—Indicate blacklisted traffic that the ASA is logging and dropping. This indicates that the traffic was covered by a drop rule. Thus, your network is being protected, although you still need to disinfect the victim computer.
• 338201, 338202—Indicate greylisted traffic that the ASA is logging but not dropping. These messages can indicate an active botnet connection that needs to be handled immediately.
• 338203, 338204—Indicate greylisted traffic that the ASA is logging and dropping. Your network is protected from this traffic. However, if the greylisted site is legitimate, the fact that the traffic is being dropped might be a problem that requires immediate attention. You can whitelist the greylisted address if you determine it is legitimate and redeploy the configuration, as described in Configure Manual White List and Black List (Optional), page 12.
• 338305 to 338307, 338310—The ASA could not download the dynamic filter database. Ensure that you configured DNS lookup on the device, and that there is a routable network path to the Cisco Intelligence Security Operations Center. You might need to contact Cisco Technical Support.
• 338309—The Botnet Traffic Filter license is not current, and you cannot download the dynamic database. Purchase and install the appropriate license. The Botnet Traffic Filter license is time-based, so you might have had a valid license that expired.
Monitoring Botnet Using the Security Manager Event ViewerSecurity Manager includes the Event Viewer application, which you can use to monitor syslog events generated by an ASA device. The Event Viewer has a predefined view that shows just botnet events.
Botnet messages are in the informational to debug severity levels and are numbered 338xxx.
Tip This procedure assumes the Event Management subsystem is enabled. If it is not, enable it using the Tools > Security Manager Administration > Event Management page.
Step 1 In the Security Manager client, select Tools > Event Viewer to open the Event Viewer window.
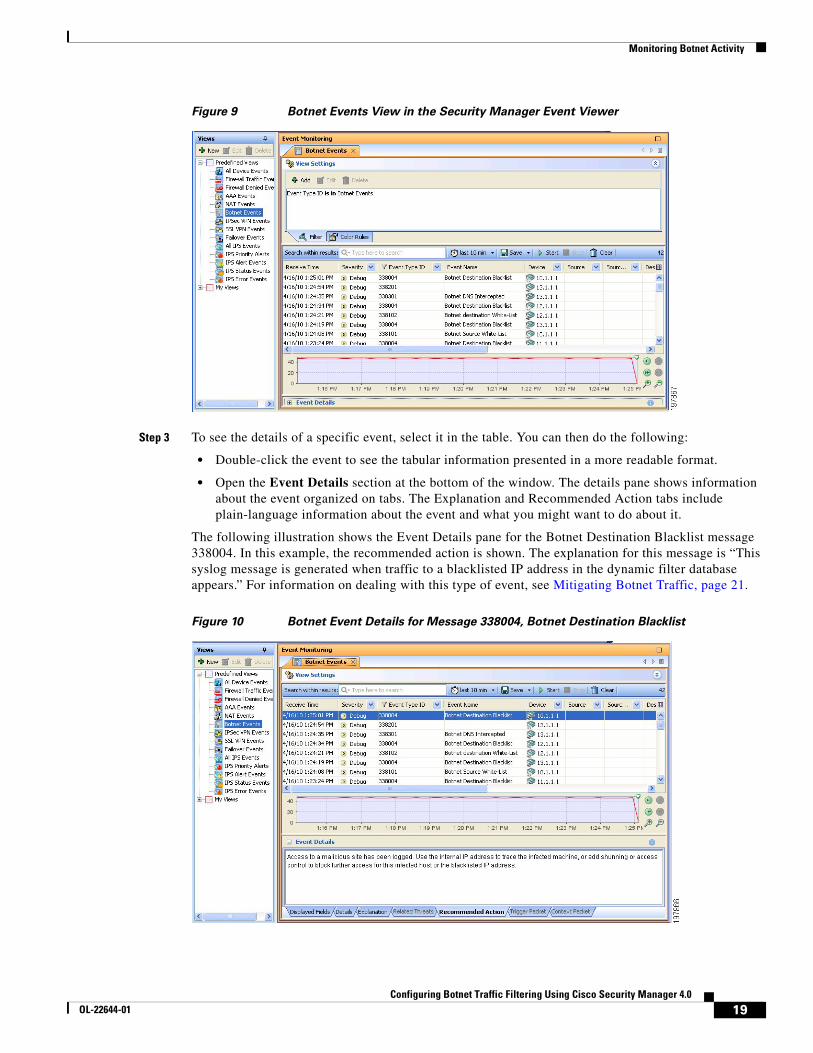
Step 2 Double-click Botnet Events from the list of predefined views in the left pane. You must double-click to activate the view and load it into the right pane. To verify the view has been opened, ensure that the tab name for the view in the right pane says “Botnet Events.” The following illustration shows an example of the botnet events view.
18Configuring Botnet Traffic Filtering Using Cisco Security Manager 4.0
OL-22644-01
Monitoring Botnet Activity
Figure 9 Botnet Events View in the Security Manager Event Viewer
Step 3 To see the details of a specific event, select it in the table. You can then do the following:
• Double-click the event to see the tabular information presented in a more readable format.
• Open the Event Details section at the bottom of the window. The details pane shows information about the event organized on tabs. The Explanation and Recommended Action tabs include plain-language information about the event and what you might want to do about it.
The following illustration shows the Event Details pane for the Botnet Destination Blacklist message 338004. In this example, the recommended action is shown. The explanation for this message is “This syslog message is generated when traffic to a blacklisted IP address in the dynamic filter database appears.” For information on dealing with this type of event, see Mitigating Botnet Traffic, page 21.
Figure 10 Botnet Event Details for Message 338004, Botnet Destination Blacklist
19Configuring Botnet Traffic Filtering Using Cisco Security Manager 4.0
OL-22644-01
Monitoring Botnet Activity
Step 4 To narrow the list of events to those generated by a single ASA, click the drop-down arrow in the Device column and select the desired device from the list. If you want to narrow the list to multiple ASAs, select Custom from the drop-down list and select the desired devices in the dialog box that appears.
You can also narrow the list using filters for any of the other columns. Filtering works the same way for all columns: either select the desired value from the drop-down list, or select Custom to create a more complex column filter.
Monitoring Botnet Activity Using the Adaptive Security Device Manager (ASDM)
Although Security Manager includes event viewing capability, the Adaptive Security Device Manager (ASDM) includes more extensive botnet reporting features. A read-only version of ASDM is installed with the Security Manager client as a device manager, and you can start ASDM from within Security Manager.
Tip You can also install the full ASDM application separately. However, any configuration changes that you perform in ASDM are considered out-of-band changes by Security Manager and are overwritten the next time you deploy configurations from Security Manager. If you ever find a need to make configuration changes using ASDM, be sure to rediscover policies on the device in Security Manager so that Security Manager’s view of the configuration is up-to-date.
Step 1 In Device view, select the ASA device.
Step 2 Select Tools > Device Manager to open an ASDM connection to the ASA. You are warned that you cannot make configuration changes. Click Yes to continue.
Step 3 In ASDM, view Botnet Traffic Filter monitoring information in the following areas:
• Home > Firewall Dashboard includes a Botnet Traffic Filter summary.
• Monitoring > Botnet Traffic Filter > Reports includes charts on the top botnet sites, ports, and infected hosts.
• Monitoring > Logging > Log Buffer shows historical syslog messages.
• Monitoring > Logging > Real-Time Log Viewer shows syslog messages as they are generated.
Tip You can also search the dynamic database on the Configure > Botnet Traffic Filter > Botnet Database page. This page also allows you to manually start a database download or to purge the dynamic database. These actions do not change the device’s configuration and do not require policy rediscovery in Security Manager.
20Configuring Botnet Traffic Filtering Using Cisco Security Manager 4.0
OL-22644-01
Mitigating Botnet Traffic
Mitigating Botnet TrafficBotnet traffic mitigation is a two step process:
1. Stop traffic from your network to the botnet control site.
2. Disinfect the victim computers.
The following procedure explains the process in more detail.
Step 1 You see syslog events that indicate that packets are traveling to or from an objectionable address, typically message numbers 338001-338008 or 338201-3382004. For detailed information about these messages, see Understanding the Syslog Messages That Indicate Actionable Events, page 18.
Tip Messages 338201-3382004 are for greylisted traffic. You might want to first determine if the greylisted traffic is truly objectionable before stopping the traffic.
Step 2 Stop the botnet traffic:
• Messages 338005-338008 and 338203-338204 indicate that the ASA is already dropping the traffic for you. Traffic classification drop rules cover the blacklisted or greylisted addresses. See Configure Traffic Classification Rules, page 9.
• Messages 338001-338004 and 338201-338202 indicate that the ASA is logging the event but not dropping the traffic. The first order of business is to stop this traffic.
You have these options for stopping the botnet traffic if the ASA is not already dropping it because of a drop rule:
• (Preferred method.) Configure a drop rule for the botnet site and redeploy the configuration. See Configure Traffic Classification Rules, page 9.
• (Second best method.) Log into the ASA using an SSH client, enter privileged EXEC mode, and use the shun command to prevent traffic to or from the botnet site. You can also issue this command through ASDM in a CLI window, but you cannot do it from Security Manager. The shun command does not create a permanent rule blocking traffic.
For example, if the botnet site is 10.1.14.14, and the internal infected computer is 10.100.10.10, issue the following commands. The first command blocks all incoming traffic from the botnet command center, the second blocks traffic from the infected computer just to the botnet site.
shun 10.1.14.14
shun 10.100.10.10 10.1.14.14
• (Not recommended.) Although the shun command is preferred, you can also create a permanent rule in the interface’s access control list (ACL) that denies traffic to or from the botnet site. With the device selected in Security Manager, select Firewall > Access Rule, and create two rules: one that denies the botnet site as the source address, with any destination address; one that denies any source address with the botnet site as the destination address. For service, select IP so that all traffic is blocked. You must deploy the configuration for the rule to take effect.
Creating an access rule is not the preferred method because it creates a permanent rule, whereas botnet sites are transient. Using the Botnet Traffic Filter to dynamically block botnet traffic is a better fit for this type of network attack compared to traditional access rules.
Step 3 Shut down network access for the infected computer. For example, find the switch port to which the computer is attached, and shut down the port using the switch’s CLI. There might also be wireless access for the computer, so completely shutting down network access might not be a simple task.
21Configuring Botnet Traffic Filtering Using Cisco Security Manager 4.0
OL-22644-01

Mitigating Botnet Traffic
Step 4 Inform the owner of the victim computer that it is infected and dispatch IT personnel to disinfect the computer. Tools and techniques for disinfecting a computer are outside the scope of this document.
Cisco and the Cisco Logo are trademarks of Cisco Systems, Inc. and/or its affiliates in the U.S. and other countries. A listing of Cisco's trademarks can be found at www.cisco.com/go/trademarks. Third party trademarks mentioned are the property of their respective owners. The use of the word partner does not imply a partnership relationship between Cisco and any other company. (1005R)
Any Internet Protocol (IP) addresses and phone numbers used in this document are not intended to be actual addresses and phone numbers. Any examples, command display output, network topology diagrams, and other figures included in the document are shown for illustrative purposes only. Any use of actual IP addresses or phone numbers in illustrative content is unintentional and coincidental.
© 2010 Cisco Systems, Inc. All rights reserved.
22Configuring Botnet Traffic Filtering Using Cisco Security Manager 4.0
OL-22644-01