cmbt lifesaver
TRANSCRIPT
SUBCOURSE EDITION IS0871 C
COMBAT LIFESAVER COURSE:
STUDENT SELF-STUDY
IS0871 i
ADMINISTRATIVE PROBLEMS Questions of an administrative nature (such as missing pages in the subcourse booklet) should be addressed to your primary instructor (group leader). If you have questions of an administrative nature after you have completed the course, you may write or call the Army Institute for Professional Development (AIPD) at the following:
Address: Army Institute for Professional Development ATTN: ATIC-IPS (Student Services) U.S. Army Training Support Center Newport News, VA 23628-0001
Telephone: DSN 927-3335/3322
Commercial (757) 878-3335/3322 E-mail: [email protected]
CONTENT Questions about the content of this subcourse should be directed to your primary instructor (group leader). If you still have questions or comments concerning course content, write or call the subject matter expert responsible for this edition of the subcourse, Mr. Donald Parsons.
Address: U.S. Army Medical Department Center and School Department of Combat Medic Training ATTN: MCCS-AW 3151 W W White Road Fort Sam Houston, TX 78234-6100
Telephone: DSN 471-5235
Commercial (210) 221-5235
E-mail: [email protected]
CLARIFICATION OF TRAINING LITERATURE TERMINOLOGY When used in this publication, words such as "he," "him," "his," and "men" are intended to include both the masculine and feminine genders unless specifically stated otherwise or when obvious in context. This subcourse is approved for resident and correspondence course instruction. It reflects the current thought of the U.S. Army Medical Department Center and School and conforms to Department of the Army doctrine as closely as currently possible. Development and progress render such doctrine subject to change. The "C" edition of IS0871 is a major revision of the previous "B" edition. Copies of edition “B” should no longer be used. This subcourse may be reproduced locally as needed.
IS0871 ii
COMBAT LIFESAVER COURSE: STUDENT SELF-STUDY
INTERSCHOOL SUBCOURSE 0871
U.S. Army Medical Department Center and School Fort Sam Houston, Texas
GENERAL
Interschool Subcourse 0871, Combat Lifesaver Course: Student Self-Study, contains information needed to pass the written, written performance, and performance examinations for combat lifesaver certification and recertification. All of the tasks contain important, lifesaving information. Terminal objectives for this course are given below. TASK: Tactically manage a casualty. CONDITIONS: Given a casualty in a battlefield environment and a combat lifesaver medical equipment set. STANDARDS: Applied the procedures given in this course so that the mission is not endangered and the risk of additional injury to the casualty is minimized. TASK: Evaluate and treat a casualty. CONDITIONS: Given a combat lifesaver medical equipment set and a casualty with
one or more of the following problems: blocked airway, no respiration, bleeding from an extremity, amputation of an extremity, hypovolemic shock, or open chest wound.
STANDARDS: Performed needed procedures in accordance with the procedures
given in this course and documented the treatment on a U.S. Field Medical Card or Tactical Combat Casualty Care Card, as appropriate.
TASK: Prepare and transmit a request for medical evacuation. CONDITIONS: Given a writing instrument, a MEDEVAC worksheet, needed information, and a transmitting device. STANDARDS: Prepared a MEDEVAC request in correct format and transmitted the request following the rules for proper transmission.
IS0871 iii
TASK: Transport a casualty. CONDITIONS: Given a casualty in need of evacuation, drag equipment (such as a
Dragon Harness or SLICK litter), a SKED litter, a Talon litter, materials for improvising a litter (if used), and assistant(s) (if needed).
STANDARDS: Prepared the SKED litter, Talon litter, improvised litter, or other
equipment (if used) and evacuated the casualty using a drag, manual carry, or litter in accordance with the procedures given in this subcourse.
IS0871 iv
TABLE OF CONTENTS Page
GENERAL .... ...................................................................................................... ii ADMINISTRATIVE INSTRUCTIONS .................................................................. v GRADING AND CERTIFICATION ....................................................................... vi Lesson 1 INTRODUCTION TO THE COMBAT LIFESAVER AND TACTICAL COMBAT CASUALTY CARE ...................................... 1-1 Section I. The Role of the Combat Lifesaver ............................... 1-1 Section II. Tactical Combat Casualty Care ................................... 1-2 Exercises ...................................................................................... 1-9 Lesson 2 CARE UNDER FIRE ...................................................................... 2-1 Exercises ...................................................................................... 2-9 Lesson 3 TACTICAL FIELD CARE ............................................................... 3-1 Exercises ...................................................................................... 3-17 Lesson 4 CONTROLLING BLEEDING .......................................................... 4-1 Section I. Controlling Bleeding Without a Tourniquet ................... 4-1 Section II. Applying a Tourniquet .................................................. 4-10 Exercises ...................................................................................... 4-22 Lesson 5 OPENING AND MANAGING A CASUALTY'S AIRWAY ................ 5-1 Exercises ...................................................................................... 5-10 Lesson 6 TREATING PENETRATING CHEST TRAUMA ............................. 6-1 Section I. Treating an Open Chest Wound .................................. 6-1 Section II. Treating Tension Pneumothorax .................................. 6-6 Exercises ...................................................................................... 6-12 Lesson 7 INITIATING A FIELD MEDICAL CARD OR TCCC CARD ............. 7-1 Section I. U.S. Field Medical Card ............................................... 7-2 Section II. Tactical Combat Casualty Care Card ........................... 7-14 Exercises ....................................................................................... 7-19 Lesson 8 REQUESTING MEDICAL EVACUATION ...................................... 8-1 Exercises ....................................................................................... 8-15 Lesson 9 TACTICAL CASUALTY MOVEMENT ............................................ 9-1 Exercises ....................................................................................... 9-12 Lesson 10 EVACUATING A CASUALTY USING A LITTER ........................... 10-1 Exercises ....................................................................................... 10-12 Appendix A COMBAT LIFESAVER MEDICAL EQUIPMENT SET .................... A-1 Appendix B HAWES CARRY ............................................................................ B-1
IS0871 v
ADMINISTRATIVE INSTRUCTIONS SUBCOURSE CONTENT This subcourse contains ten lessons. Each lesson contains information needed to successfully perform one or more tasks that a combat lifesaver is required to perform. SUPPLEMENTARY REQUIREMENTS Materials Needed. You will be furnished with needed materials at the time you take the examinations for this subcourse. Successful completion of the comprehensive written (multiple-choice) examination, written performance (Tactical Combat Casualty Care Card and MEDEVAC request) examinations, and all performance (hands-on) examinations is required for successful completion of the Combat Lifesaver Course. Supervisory Assistance. Study the information contained in this subcourse on your own before attending classroom instruction. When you take the performance (hands-on) examinations, the evaluator will use checklists similar to those contained in this subcourse. Each written performance examination will require you to complete a form. The comprehensive written examination will consist of multiple-choice items and will be closed-book and proctored. Reference materials other than those provided by the evaluator will not be permitted. References. This subcourse contains all information needed to pass the written, written performance, and performance examinations. No supplementary references are needed. However, references for additional study are given with the lessons. SUGGESTED STUDY PROCEDURES After reading and studying the text assignment of a lesson, complete the lesson exercises at the end of the lesson. If possible, answer the exercises without referring back to the lesson text. After completing the exercises, check your answers with the answer key that follows the lesson exercises. For each exercise answered incorrectly, reread the subcourse material referenced and rework the exercise. If the lesson exercises contain a performance exercise, practice performing the task (if possible) and have someone check your actions against the performance checklist. When you take the actual performance examinations, an instructor will grade your performance using checklists similar to those contained in this subcourse. Keep practicing until you can score a GO on all steps. The use of scenario training that allows the Combat Lifesaver student to perform in his full battle gear for performance testing is encouraged. Complete each lesson before proceeding to the next.
IS0871 vi
GRADING AND CERTIFICATION You must score a minimum of 70 percent on the written (multiple-choice) examination and score a GO on each written performance and performance examination in order to pass this course. A NO-GO on any step of a performance checklist will result in a NO-GO for the entire checklist. The written and written performance examinations will be proctored. You will not be allowed to use the subcourse or notes during the examination. The primary instructor (or a designated assistant) will be responsible for grading the written, written performance, and performance examinations. Please consult your primary instructor or his designated assistant for any questions concerning retaking a failed examination (written, written performance, or performance). An examination may have more than one version. If so, an alternate version may be used for retesting. A student who successfully completes the entire Combat Lifesaver Course (successfully completes all performance and written performance examinations and passes the comprehensive written examination) will receive 40 credit hours from the Army Institute for Professional Development (AIPD), Newport News, Virginia. There is no partial credit. AIPD will send a notice of completion to the primary instructor for each student who successfully completes the entire Combat Lifesaver Course.
IS0871 1-1
LESSON 1
INTRODUCTION TO THE COMBAT LIFESAVER AND TACTICAL COMBAT CASUALTY CARE
TASK Tactically manage a simulated casualty. CONDITIONS Given a written situation concerning tactical combat casualty care and possible responses. STANDARDS Select the correct response based upon instruction given in Subcourse IS0871. REFERENCES STP 21-1-SMCT, Soldier's Manual of Common Tasks: Skill Level 1. FM 4-25.11, First Aid. Prehospital Trauma Life Support Manual, sixth edition. Published by Mosby/Elsevier.
Section I. THE ROLE OF THE COMBAT LIFESAVER 1-1. ARMY BATTLE DOCTRINE The Army battle doctrine was developed for a mobile and widely dispersed battlefield. The doctrine recognizes that battlefield constraints will limit the ability of trained medical personnel, including combat medics (Health Care Specialist, MOS 68W), to provide immediate, far-forward care. Therefore, a plan was developed to provide additional care to injured combat soldiers. The combat lifesaver is part of that plan. 1-2. PURPOSE OF THE COMBAT LIFESAVER a. The combat lifesaver is a bridge between the self-aid/buddy-aid (first aid) training given all soldiers during basic training and the medical training given to the combat medic. The combat lifesaver is a nonmedical soldier who provides lifesaving measures as a secondary mission as his primary (combat) mission allows. The combat lifesaver may also assist the combat medic in providing care and preparing casualties for evacuation when the combat lifesaver has no combat duties to perform.
IS0871 1-2
b. Normally, one member of each squad, crew, or equivalent-sized unit will be trained as a combat lifesaver. c. A major advantage of the combat lifesaver is that he will probably be nearby if a member of his squad or crew is injured. It may take a combat medic several minutes or longer to reach the casualty, especially if there are several other casualties and/or the medic is at another location. The combat lifesaver is trained to provide immediate care that can save a casualty's life, such as stopping severe bleeding and performing needle chest decompression for a casualty with tension pneumothorax. 1-3. COMBAT LIFESAVER'S AID BAG a. The combat lifesaver carries a small aid bag (called a medical equipment set or MES) containing supplies for controlling bleeding, relieving tension pneumothorax, and performing other procedures. A listing of the supplies found in the aid bag at the time this subcourse was developed is given in Appendix A. For current information, check the U.S. Army Medical Materiel Agency (USAMMA) listing at http://www.usamma.army.mil/ on the Internet under DOD Unit Assemblages. b. Some items must be replaced when their expiration date nears. Usually, the combat lifesaver's unit will perform the needed stock rotation. If the combat lifesaver maintains his own bag, he must replenish his supplies in accordance with his unit's standing operating procedure (SOP). c. During combat, the combat lifesaver will need to be resupplied rapidly as his supplies can be quickly depleted. The combat lifesaver can obtain additional supplies from combat medics, from battalion aid stations or other nearby medical treatment facilities, and from ambulances evacuating casualties.
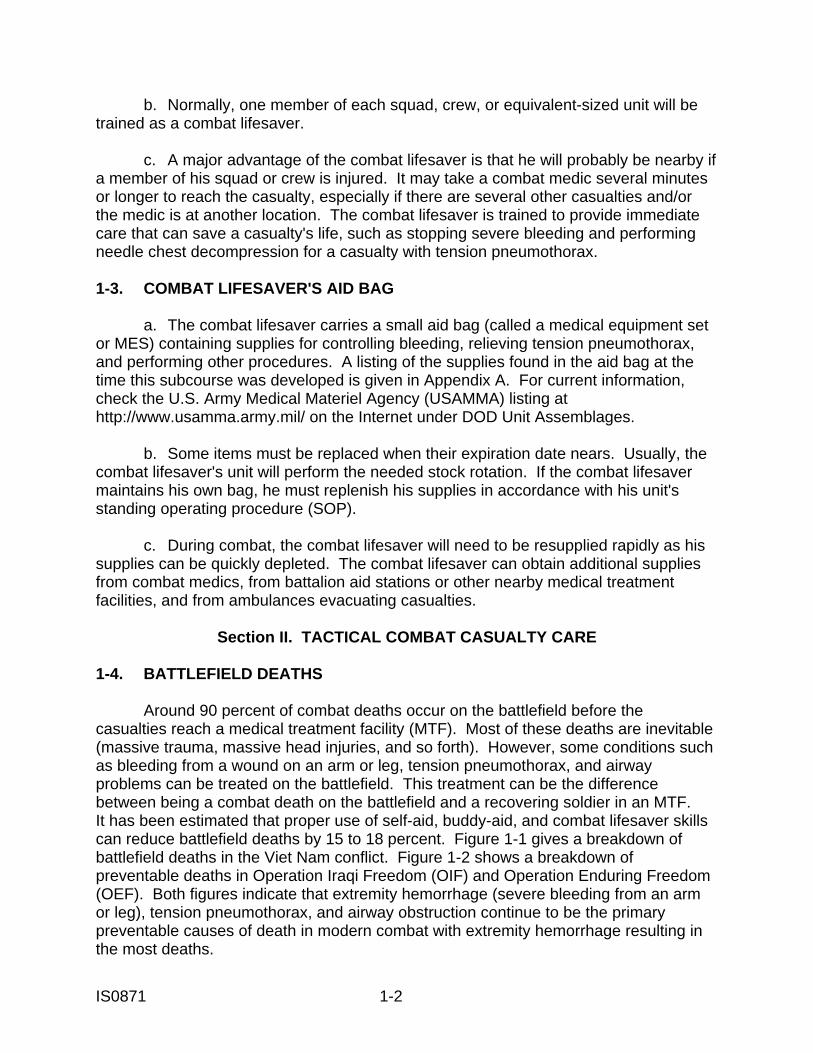
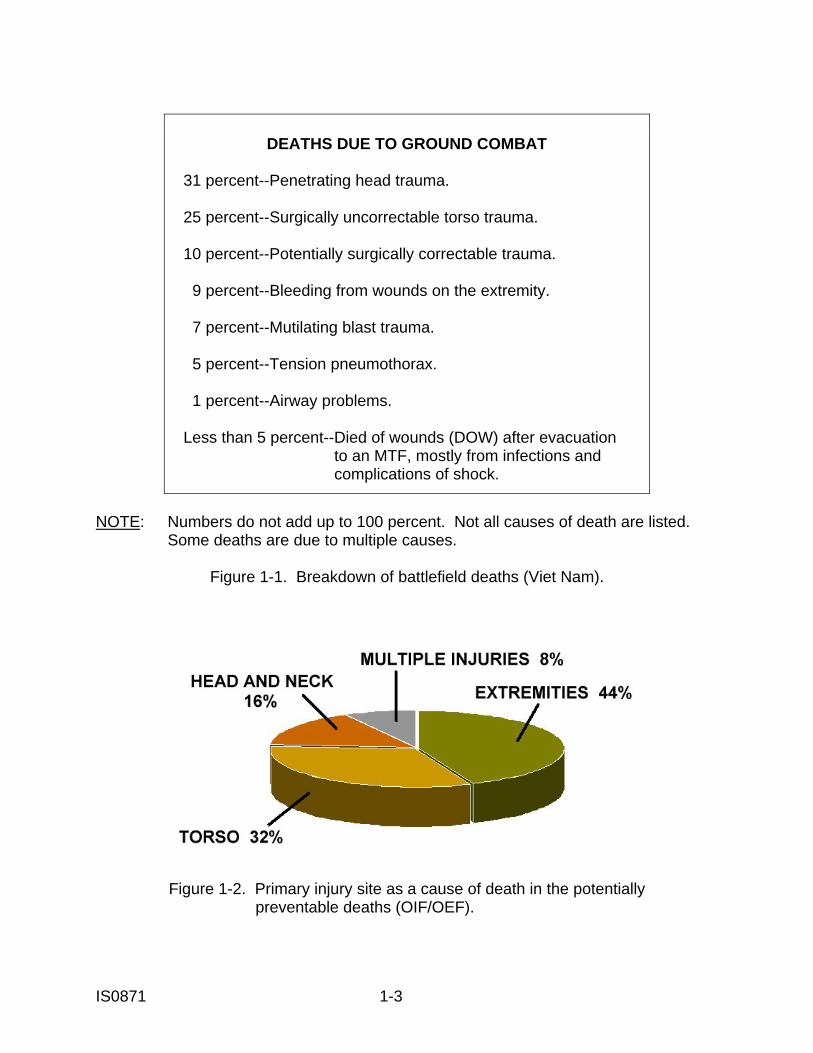
Section II. TACTICAL COMBAT CASUALTY CARE 1-4. BATTLEFIELD DEATHS Around 90 percent of combat deaths occur on the battlefield before the casualties reach a medical treatment facility (MTF). Most of these deaths are inevitable (massive trauma, massive head injuries, and so forth). However, some conditions such as bleeding from a wound on an arm or leg, tension pneumothorax, and airway problems can be treated on the battlefield. This treatment can be the difference between being a combat death on the battlefield and a recovering soldier in an MTF. It has been estimated that proper use of self-aid, buddy-aid, and combat lifesaver skills can reduce battlefield deaths by 15 to 18 percent. Figure 1-1 gives a breakdown of battlefield deaths in the Viet Nam conflict. Figure 1-2 shows a breakdown of preventable deaths in Operation Iraqi Freedom (OIF) and Operation Enduring Freedom (OEF). Both figures indicate that extremity hemorrhage (severe bleeding from an arm or leg), tension pneumothorax, and airway obstruction continue to be the primary preventable causes of death in modern combat with extremity hemorrhage resulting in the most deaths.
IS0871 1-3
DEATHS DUE TO GROUND COMBAT 31 percent--Penetrating head trauma. 25 percent--Surgically uncorrectable torso trauma. 10 percent--Potentially surgically correctable trauma. 9 percent--Bleeding from wounds on the extremity. 7 percent--Mutilating blast trauma. 5 percent--Tension pneumothorax. 1 percent--Airway problems. Less than 5 percent--Died of wounds (DOW) after evacuation to an MTF, mostly from infections and complications of shock.
NOTE: Numbers do not add up to 100 percent. Not all causes of death are listed. Some deaths are due to multiple causes.
Figure 1-1. Breakdown of battlefield deaths (Viet Nam).
Figure 1-2. Primary injury site as a cause of death in the potentially preventable deaths (OIF/OEF).
IS0871 1-4
1-5. PHASES OF TACTICAL COMBAT CASUALTY CARE Tactical combat casualty care (TCCC) can be divided into three phases. The first is care under fire, the second is tactical field care, and the third is tactical evacuation care. a. Care Under Fire. In care under fire, you are under hostile fire and are very limited as to the care you can provide. Treatment consists primarily of using a tourniquet to stop life threatening bleeding from wounds on the extremities and moving the casualty to safety (see Lesson 2).
Remember, in combat, functioning as a combat lifesaver is your secondary mission. Your combat duties remain your primary mission. Your first priority while under fire is to return fire and kill the enemy. You should render care to injured soldiers only when such care does not endanger your primary mission.
b. Tactical Field Care. In tactical field care, you and the casualty are not under effective enemy fire and you are free to provide casualty care to the best of your ability. However, the tactical situation can change and you could find yourself back in a care-under-fire situation. (1) Tactical field care may be rendered by the combat lifesaver after the casualty has been moved to a safe location or when enemy fire has been suppressed (see Lesson 2). (2) Tactical field care also refers to care rendered by the combat lifesaver when the casualty is discovered in a tactical field care situation. That is, the casualty was not in a care-under-fire situation to begin with (see Lesson 3). (3) In tactical field care, available medical equipment and supplies are limited to that carried into the field by the combat lifesaver and individual soldiers. c. Tactical Evacuation Care. In tactical evacuation care, the care is rendered while the casualty is being evacuated to a collection point or medical treatment facility (see Lesson 10). (1) Casualty evacuation (CASEVAC) refers to the movement of casualties using nonmedical vehicles or aircraft. In CASEVAC, the combat lifesaver may travel with the casualty to provide care during transportation. (2) Medical evacuation (MEDEVAC) refers to evacuating casualties using medical ground ambulances or medical air ambulances. Medical evacuation vehicles (ground and air) have medical personnel to care for casualties during evacuation.

IS0871 1-5
1-6. TERMINOLOGY As you go through this subcourse, it will be helpful to know the meaning of certain terms. It is also recommended that you consult a medical dictionary for unfamiliar terms. a. Casualty. The casualty is the soldier who is injured. b. Rescuer. The term rescuer refers to another soldier who is attempting to aid the casualty (provide treatment and/or move the casualty to safety). c. Self-Aid. Self-aid is the care (treatment) that the casualty gives to himself. (Care given by another soldier is buddy-aid. Care given by medical personnel such as a combat medic is medical aid.) d. Medical Treatment Facility. A medical treatment facility (MTF) is a facility established to provide medical and/or dental care. In combat, the battalion aid station (BAS) is a mobile medical treatment facility close to the front lines. e. Collection Point. A collection point is a site to which combat casualties are delivered, usually by nonmedical means (CASEVAC). There, the casualties are transferred to medical vehicles (ground or air ambulances) and transported to an MTF (MEDEVAC). f. Extremity. The term extremity refers to one of the limbs. (1) Upper extremity. Upper extremity refers to the arm (located between the shoulder and the elbow) and the forearm (located between the elbow and the wrist). Often, the term "arm" is used to refer to the arm, forearm, and hand. The terms "upper arm" and "lower arm" are sometimes used to refer to the arm and forearm respectively. (2) Lower extremity. Lower extremity refers to the thigh (located between the hip and the knee) and the leg (located between the knee and the ankle). Often, the term "leg" is used to refer to the thigh, leg, and foot. The terms "upper leg" and "lower leg" are sometimes used to refer to the thigh and leg respectively. g. Hemorrhage. Hemorrhage is another word for bleeding. It usually refers to serious bleeding. h. Dressing. The term "dressing" refers to the material that is placed directly over the wound. The dressing absorbs some of the blood and helps a clot to form. The clot "plugs" the wound to stop the bleeding. The dressing also protects the wound from additional contamination and injury.
IS0871 1-6
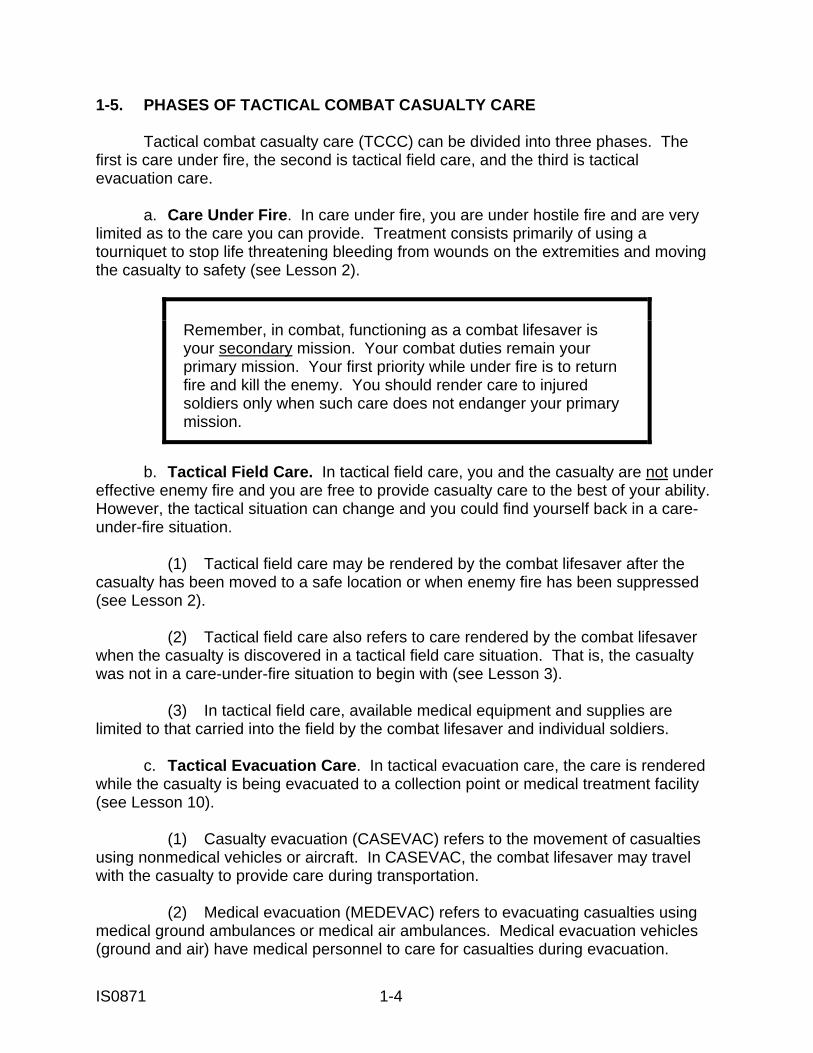
i. Bandage. A bandage is the material used to hold (secure) the dressing in place so the dressing will not slip and destroy the clot that is forming. The ends of the bandage are called the tails. j. Field Dressing. The field dressing consists of a pad of sterile (germ-free) white dressing with a bandage (usually olive drab) already attached to the dressing pad (see figure 1-3). The field dressing is wrapped in paper which is then sealed in a plastic envelope. The field dressing is also called the field first aid dressing and the combat dressing. It is being replaced by the Emergency Bandage, but may still be encountered.
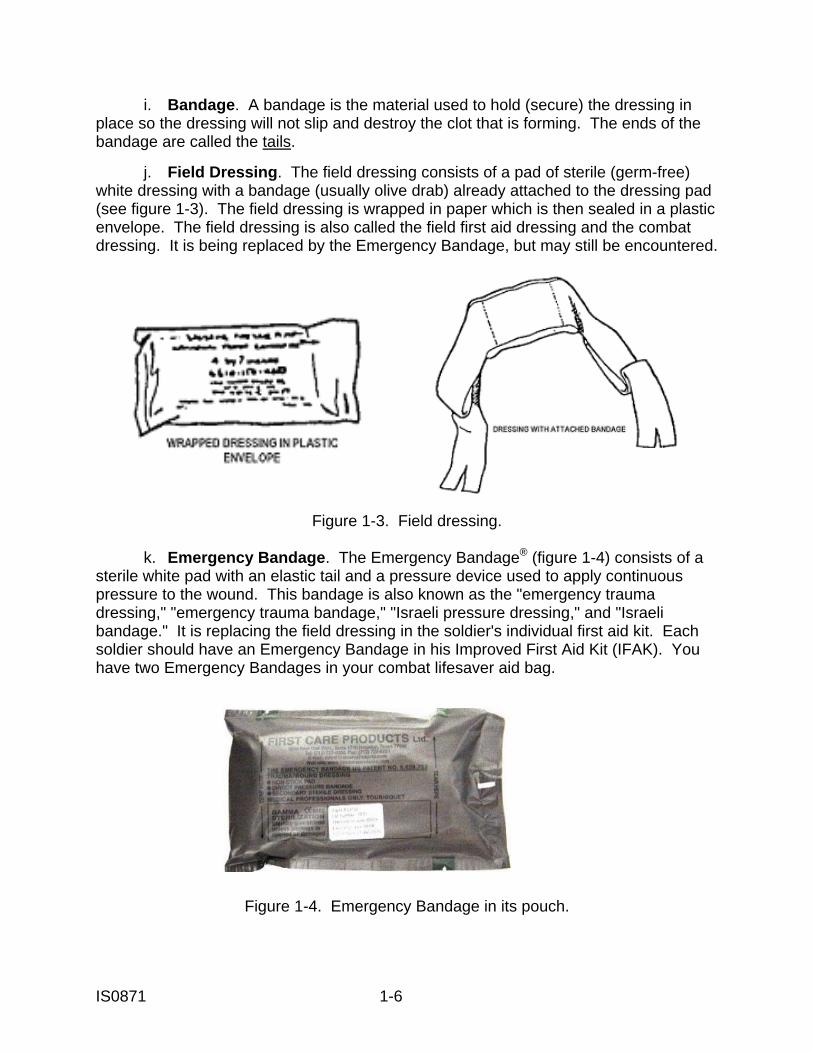
Figure 1-3. Field dressing. k. Emergency Bandage. The Emergency Bandage® (figure 1-4) consists of a sterile white pad with an elastic tail and a pressure device used to apply continuous pressure to the wound. This bandage is also known as the "emergency trauma dressing," "emergency trauma bandage," "Israeli pressure dressing," and "Israeli bandage." It is replacing the field dressing in the soldier's individual first aid kit. Each soldier should have an Emergency Bandage in his Improved First Aid Kit (IFAK). You have two Emergency Bandages in your combat lifesaver aid bag.
Figure 1-4. Emergency Bandage in its pouch.
IS0871 1-7
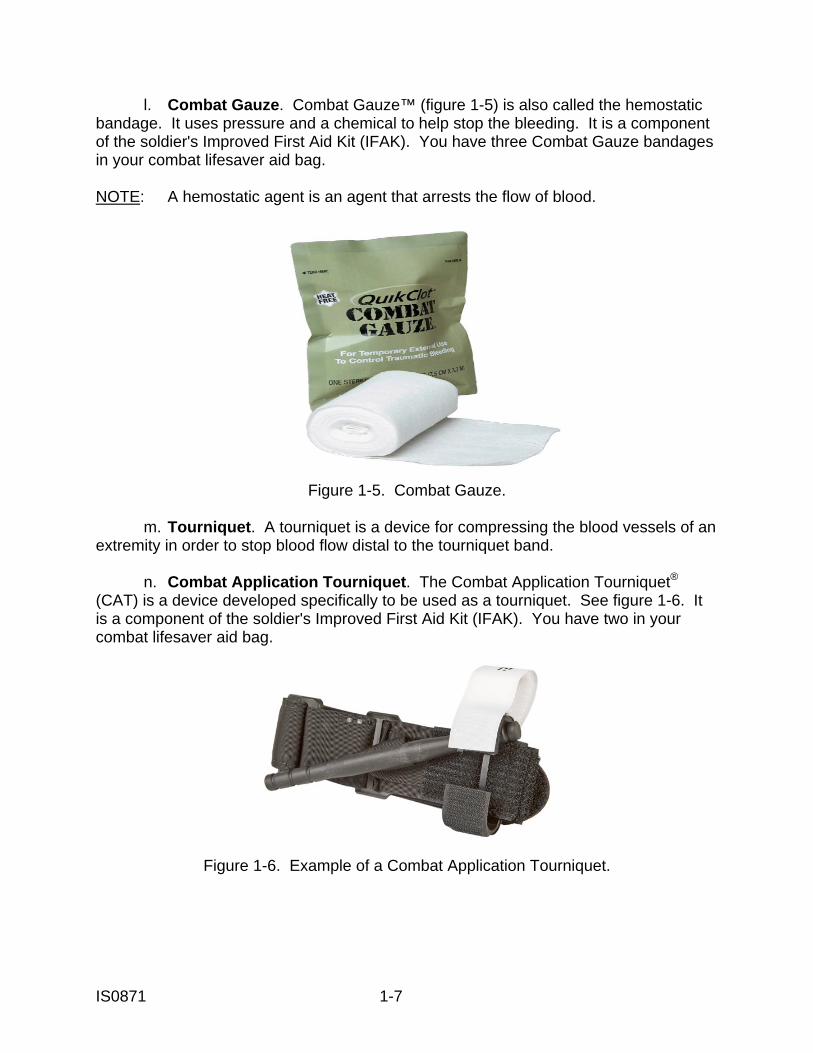
l. Combat Gauze. Combat Gauze™ (figure 1-5) is also called the hemostatic bandage. It uses pressure and a chemical to help stop the bleeding. It is a component of the soldier's Improved First Aid Kit (IFAK). You have three Combat Gauze bandages in your combat lifesaver aid bag. NOTE: A hemostatic agent is an agent that arrests the flow of blood.
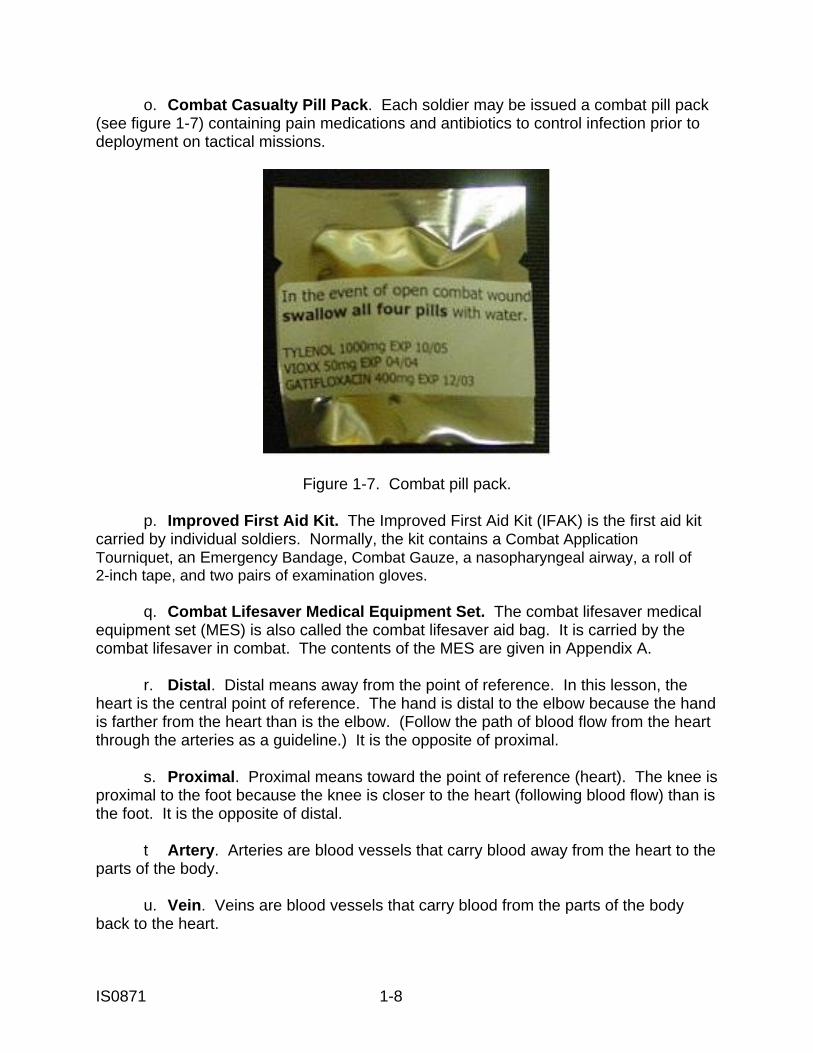
Figure 1-5. Combat Gauze. m. Tourniquet. A tourniquet is a device for compressing the blood vessels of an extremity in order to stop blood flow distal to the tourniquet band. n. Combat Application Tourniquet. The Combat Application Tourniquet®
(CAT) is a device developed specifically to be used as a tourniquet. See figure 1-6. It is a component of the soldier's Improved First Aid Kit (IFAK). You have two in your combat lifesaver aid bag.
Figure 1-6. Example of a Combat Application Tourniquet.
IS0871 1-8
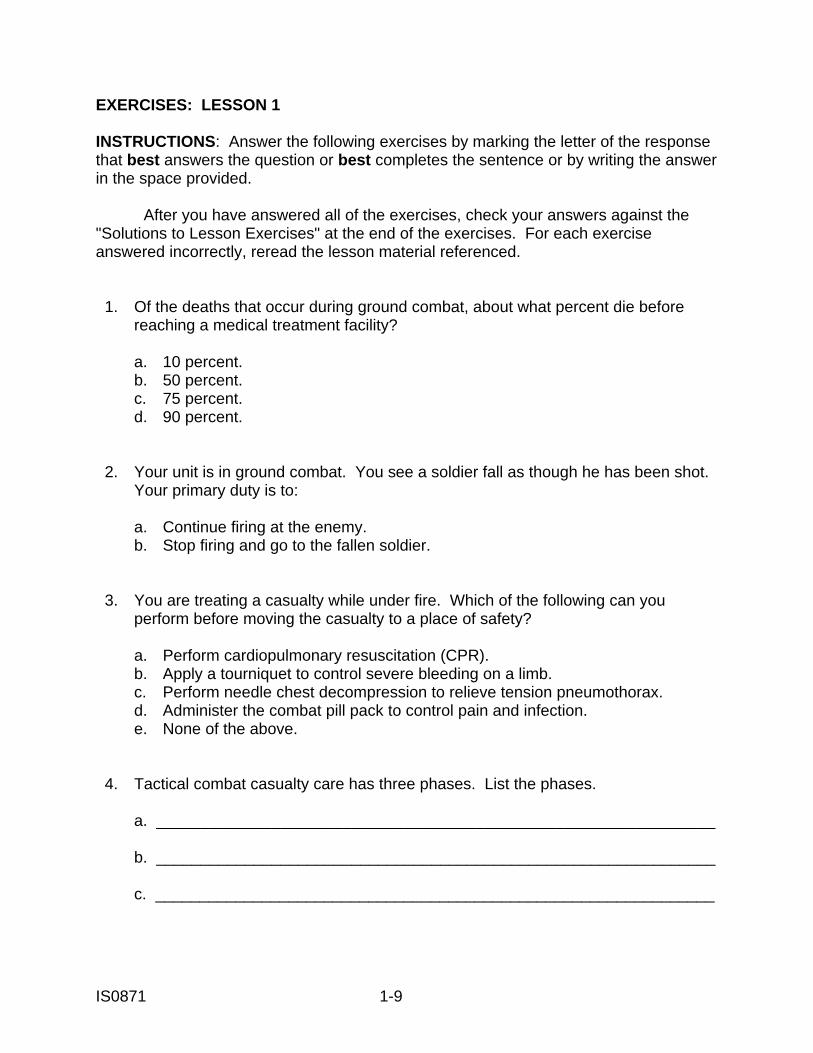
o. Combat Casualty Pill Pack. Each soldier may be issued a combat pill pack (see figure 1-7) containing pain medications and antibiotics to control infection prior to deployment on tactical missions.
Figure 1-7. Combat pill pack. p. Improved First Aid Kit. The Improved First Aid Kit (IFAK) is the first aid kit carried by individual soldiers. Normally, the kit contains a Combat Application Tourniquet, an Emergency Bandage, Combat Gauze, a nasopharyngeal airway, a roll of 2-inch tape, and two pairs of examination gloves. q. Combat Lifesaver Medical Equipment Set. The combat lifesaver medical equipment set (MES) is also called the combat lifesaver aid bag. It is carried by the combat lifesaver in combat. The contents of the MES are given in Appendix A. r. Distal. Distal means away from the point of reference. In this lesson, the heart is the central point of reference. The hand is distal to the elbow because the hand is farther from the heart than is the elbow. (Follow the path of blood flow from the heart through the arteries as a guideline.) It is the opposite of proximal. s. Proximal. Proximal means toward the point of reference (heart). The knee is proximal to the foot because the knee is closer to the heart (following blood flow) than is the foot. It is the opposite of distal. t Artery. Arteries are blood vessels that carry blood away from the heart to the parts of the body. u. Vein. Veins are blood vessels that carry blood from the parts of the body back to the heart.
IS0871 1-9
EXERCISES: LESSON 1 INSTRUCTIONS: Answer the following exercises by marking the letter of the response that best answers the question or best completes the sentence or by writing the answer in the space provided. After you have answered all of the exercises, check your answers against the "Solutions to Lesson Exercises" at the end of the exercises. For each exercise answered incorrectly, reread the lesson material referenced. 1. Of the deaths that occur during ground combat, about what percent die before reaching a medical treatment facility? a. 10 percent. b. 50 percent. c. 75 percent. d. 90 percent. 2. Your unit is in ground combat. You see a soldier fall as though he has been shot. Your primary duty is to: a. Continue firing at the enemy. b. Stop firing and go to the fallen soldier. 3. You are treating a casualty while under fire. Which of the following can you perform before moving the casualty to a place of safety? a. Perform cardiopulmonary resuscitation (CPR). b. Apply a tourniquet to control severe bleeding on a limb. c. Perform needle chest decompression to relieve tension pneumothorax. d. Administer the combat pill pack to control pain and infection. e. None of the above. 4. Tactical combat casualty care has three phases. List the phases. a. _______________________________________________________________ b. _______________________________________________________________ c. _______________________________________________________________
IS0871 1-10
5. A casualty is being transported to a collection point using a nonmedical vehicle. Which of the following terms apply? a. CASEVAC. b. MEDEVAC. 6. What medical term means bleeding, usually severe? _______________________________________________________________ 7. A pad of material placed on the wound to absorb the blood is called the _____________________ while the material used to keep the pad from slipping off the wound is called the _____________________________. 8. The wrist is ____________ to the elbow. The elbow is ____________ to the wrist. a. Distal; proximal. b. Proximal; distal. 9. Is the combat lifesaver considered to be a medical soldier? a. Yes. b. No. 10, What are the three most common medically preventable causes of death on the modern battlefield? _______________________________________________________________ _______________________________________________________________ _______________________________________________________________
IS0871 1-11
11. Of the three preventable causes of death in exercise 10, which results in the most deaths? _______________________________________________________________
Check your answers on the next page.

IS0871 1-12
SOLUTIONS TO EXERCISES: LESSON 1 1. d (para 1-4) 2. a (paras 1-2a, 1-5a box) 3. b (para 1-5a) 4. a. Care under fire. b. Tactical field care. c. Tactical evacuation care. (paras 1-5a, b, c) 5. a (para 1-5c(1)) 6. Hemorrhage (para 1-6g) 7. Dressing; bandage (paras 1-6h, i) 8. a (paras 1-6r, s) 9. b (para 1-2a) 10. Extremity hemorrhage (severe bleeding from an arm or leg). Tension pneumothorax. Airway obstruction. (para 1-4, fig 1-1) 11. Extremity hemorrhage (severe bleeding from an arm or leg). (para 1-4, fig 1-1)

IS0871 2-1
LESSON 2
CARE UNDER FIRE
TASK Tactically manage a simulated casualty in a care under fire situation. CONDITIONS Given a written situation concerning a casualty under combat conditions and possible responses. STANDARDS Select the correct response based upon instruction given in Subcourse IS0871. REFERENCES STP 21-1-SMCT, Soldier's Manual of Common Tasks: Skill Level 1. FM 4-25.11, First Aid. Prehospital Trauma Life Support Manual, sixth edition. Published by Mosby/Elsevier. 2-1. INTRODUCTION Care under fire is the first phase of tactical combat casualty care. In care under fire, you and the casualty are under hostile fire and you are very limited to the care you can provide. In fact, you may not be able to provide any care. Your combat duties remain your primary mission. Your first priority while under fire is to return fire. You should render care to injured soldiers only when such care does not endanger your primary (combat) mission. 2-2. ACTIONS UNDER FIRE When you are under effective hostile fire and see a wounded soldier who is also under enemy fire, you should do the following. a. Take cover and return fire. b. Suppress enemy fire. Reducing enemy fire may be more important to the casualty's survival than any immediate treatment you can provide. c. Try to keep the casualty from sustaining any additional wounds.
IS0871 2-2
d. Direct or expect the casualty to remain engaged as a combatant. e. Try to determine if the casualty is alive. f. If the casualty can function, direct him to move to cover, return fire, and administer self-aid. g. If the soldier has suffered an amputation or has serious bleeding from an extremity, direct him to apply the Combat Application Tourniquet from his Improved First Aid Kit (IFAK) over his uniform and above the wound. h. If the casualty is unable to return fire or move to safety and you cannot assist him, tell the casualty to “play dead.” i. Communicate the situation to your unit leader. 2-3. ACTIONS BEFORE APPROACHING THE CASUALTY If you determine that you can provide assistance to the casualty under enemy fire, take the following actions before approaching a casualty on the battlefield. Remember to protect yourself. a. Scan the area for potential danger. (1) Survey the area for small arms fire. (2) Survey the area for fire or explosive devices. (3) Determine threat for chemical or biological agents. (4) Survey buildings, if any, for structural stability. b. Determine the best route of access to the casualty and the best route of egress. If you need to move the casualty to a safer area, be sure to select an area that provides optimum cover and concealment. Plan your evacuation route prior to exposing yourself to possible hostile fire. c. Request covering fire during movement to and from the casualty's location to reduce the risk to yourself and the casualty. d. Anticipate the type of injuries the casualty may have received and what care will probably be needed. Did the casualty fall from a wall? (If so, the casualty may have broken bones.) Was there an explosion? (If so, the casualty may have blast effects.) Was there small arms fire? (If so, the casualty may have bleeding wounds.)
IS0871 2-3
e. Anticipate how your actions (movement, noise, light, and so forth) may affect the enemy's fire. f. Decide what care you can administer when you reach the casualty and what care will have to wait until you have moved the casualty to a place of safety. 2-4. PROVIDING CARE UNDER FIRE If the casualty cannot move himself to a place of safety and the combat situation allows you to safely assist the casualty, quickly evaluate the casualty, control any life-threatening bleeding from the extremities, and move the casualty and yourself to a safe location. a. Approach the casualty by the safest route. b. Form a general impression as you approach the casualty (extent of injuries, chance of survival, and so forth). c. Upon reaching the casualty, determine his responsiveness (paragraph 2-5 below). d. If the casualty has an amputation of a limb or live-threatening bleeding from a wound on a limb, quickly apply a tourniquet (paragraph 2-6 below and paragraph 4-10 of Lesson 4). e. Move the casualty and yourself to a place of safety where you can perform tactical field care (paragraph 2-7). When moving the casualty, take the casualty's weapon and other mission-essential equipment with you if possible. f. Listed below are some situations in which you should avoid treating the casualty while under fire. (1) Your own life is in imminent danger. (2) There are other soldiers in your area who require treatment more urgently. (3) The casualty does not have vital (life) signs; that is, the casualty is not breathing, does not have a pulse, and is not moving. 2-5. CHECKING THE CASUALTY FOR RESPONSIVENESS NOTE: You may need to wait until you can safely provide tactical field care to fully perform this procedure.
IS0871 2-4
a. Upon reaching the casualty, check the casualty for responsiveness. (1) Ask in a loud, but calm, voice: “Are you okay?” Gently shake or tap the casualty on the shoulder. (2) If the casualty is conscious, ask where it hurts or where his body feels different from usual. This helps to determine the level of consciousness and provides you with information that can be used when treating the casualty. b. Ask the casualty questions to determine his level of consciousness. Ask the casualty questions that require more than a "yes" or "no" answer. Examples of such questions are: "What is your name?", "What is the date?", and "Where are we?" (1) The AVPU scale is used in determining the casualty's level of consciousness. The four levels used in the AVPU scale are given below. (a) A--The casualty is alert (knows who he is, the date, where he is, and such). (b) V--The casualty is not alert, but does responds to verbal (oral) commands. (c) P--The casualty responds to pain, but not to verbal commands. (d) U--The casualty is unresponsive (unconscious). (2) The following are some guidelines to use when assessing the casualty's level of consciousness. (a) A casualty who is yelling at you, telling you where the enemy fire is coming from, or performing similar actions is alert. (b) If the casualty is alert or responds to voice, do not check the casualty's response to pain. (c) To check a casualty’s response to pain, rub his breastbone (sternum) briskly with your knuckle. 2-6. CONTROLLING HEMORRHAGING Quickly check the casualty for potentially live-threatening hemorrhaging (severe arterial bleeding) from an extremity. For example, the shirt sleeve or pant leg may be red from bleeding. If severe bleeding is found, quickly apply a tourniquet high on the injured limb over the uniform and tighten it to stop arterial bleeding (see Section II of Lesson 4). Remember, bleeding from a wound on the extremity is the greatest cause of preventable death on the battlefield (paragraph 1-4).
IS0871 2-5
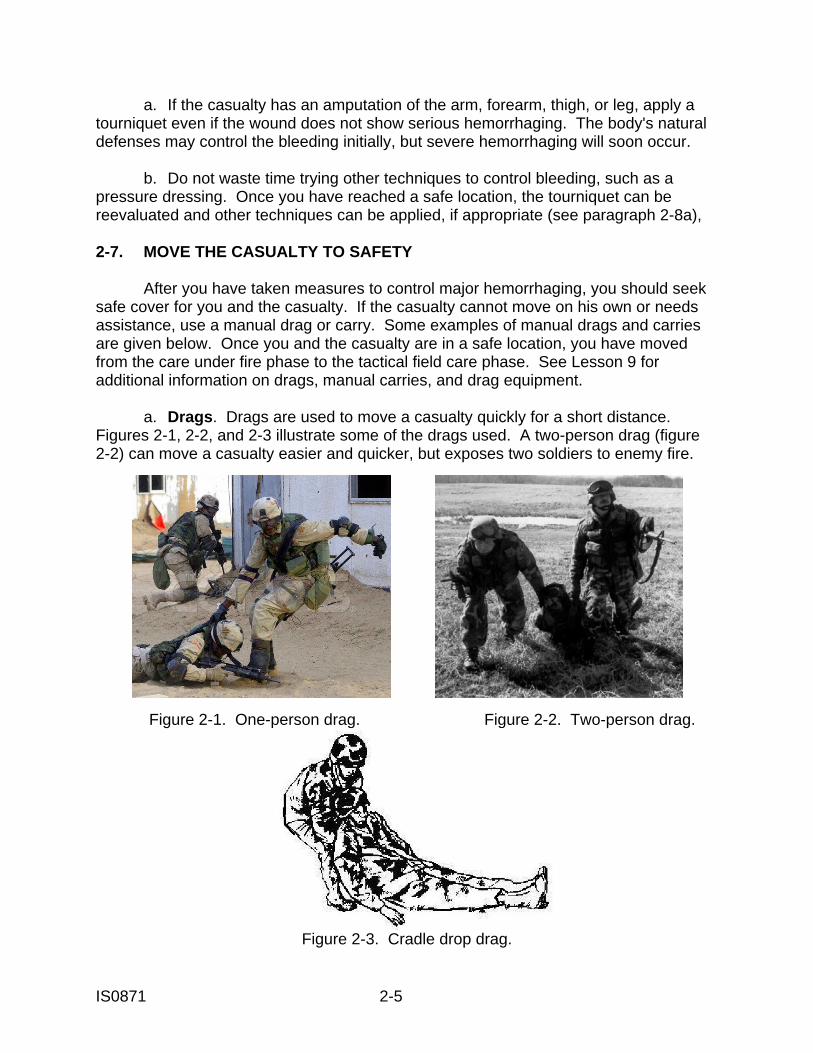
a. If the casualty has an amputation of the arm, forearm, thigh, or leg, apply a tourniquet even if the wound does not show serious hemorrhaging. The body's natural defenses may control the bleeding initially, but severe hemorrhaging will soon occur. b. Do not waste time trying other techniques to control bleeding, such as a pressure dressing. Once you have reached a safe location, the tourniquet can be reevaluated and other techniques can be applied, if appropriate (see paragraph 2-8a), 2-7. MOVE THE CASUALTY TO SAFETY After you have taken measures to control major hemorrhaging, you should seek safe cover for you and the casualty. If the casualty cannot move on his own or needs assistance, use a manual drag or carry. Some examples of manual drags and carries are given below. Once you and the casualty are in a safe location, you have moved from the care under fire phase to the tactical field care phase. See Lesson 9 for additional information on drags, manual carries, and drag equipment. a. Drags. Drags are used to move a casualty quickly for a short distance. Figures 2-1, 2-2, and 2-3 illustrate some of the drags used. A two-person drag (figure 2-2) can move a casualty easier and quicker, but exposes two soldiers to enemy fire.
Figure 2-1. One-person drag. Figure 2-2. Two-person drag.
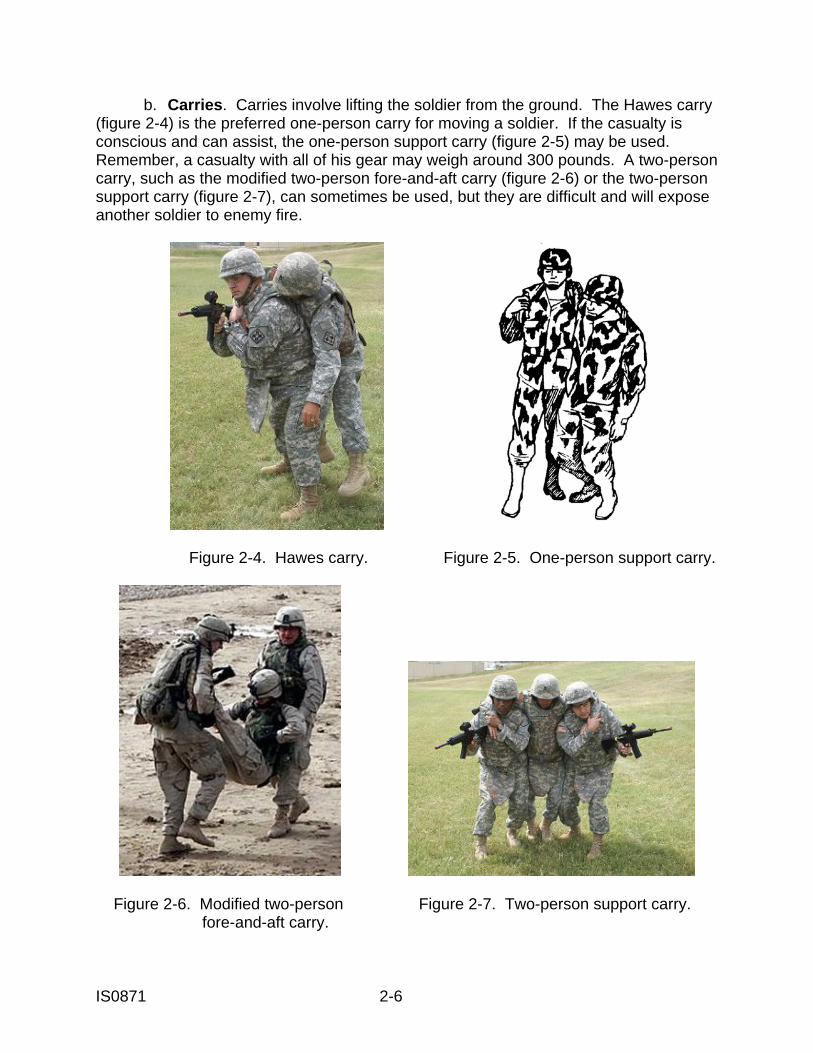
Figure 2-3. Cradle drop drag.
IS0871 2-6
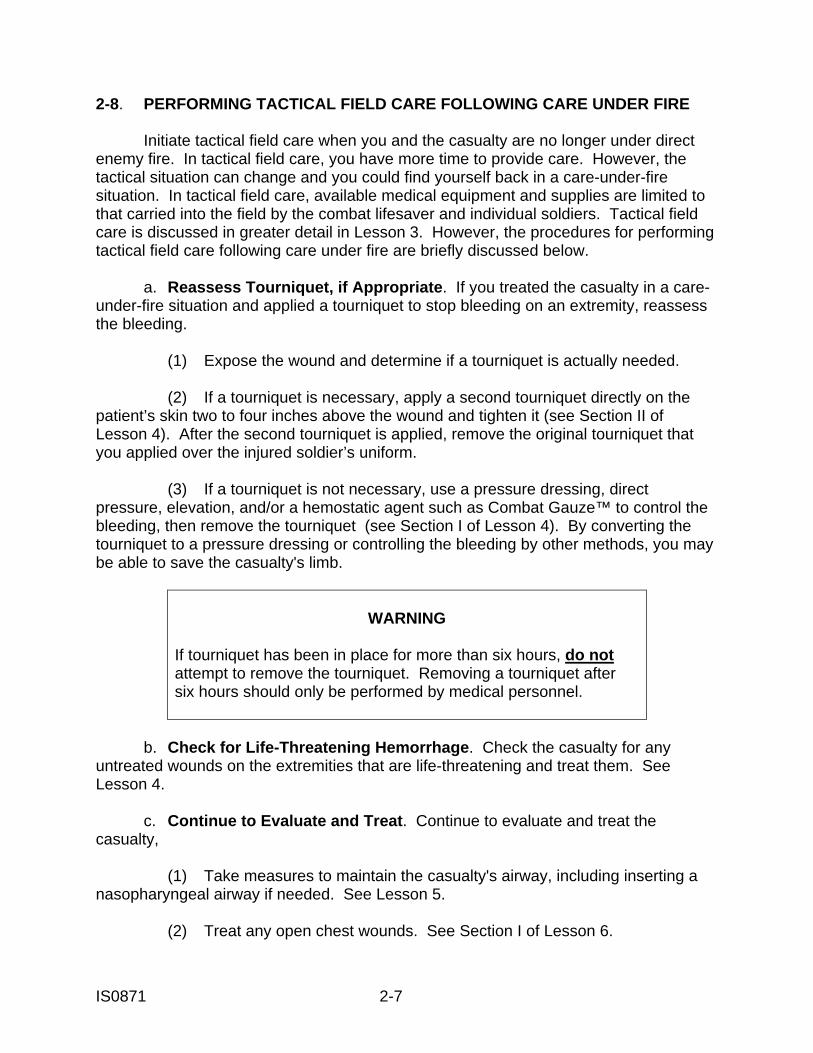
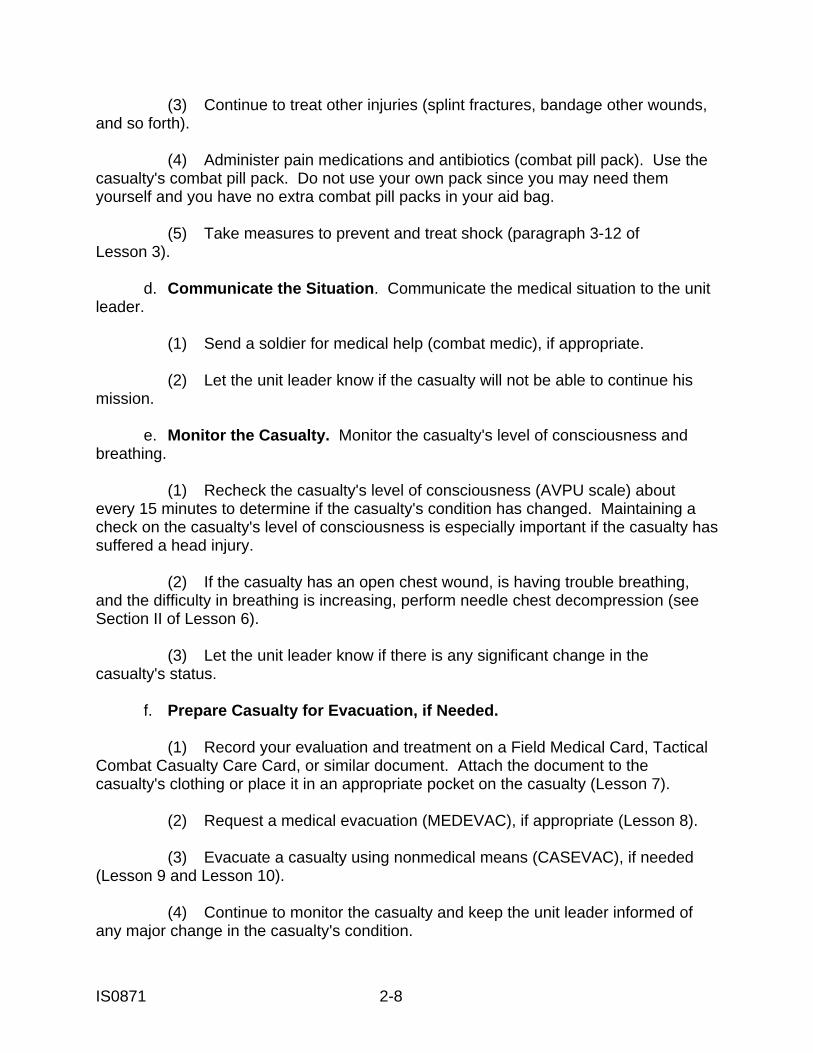
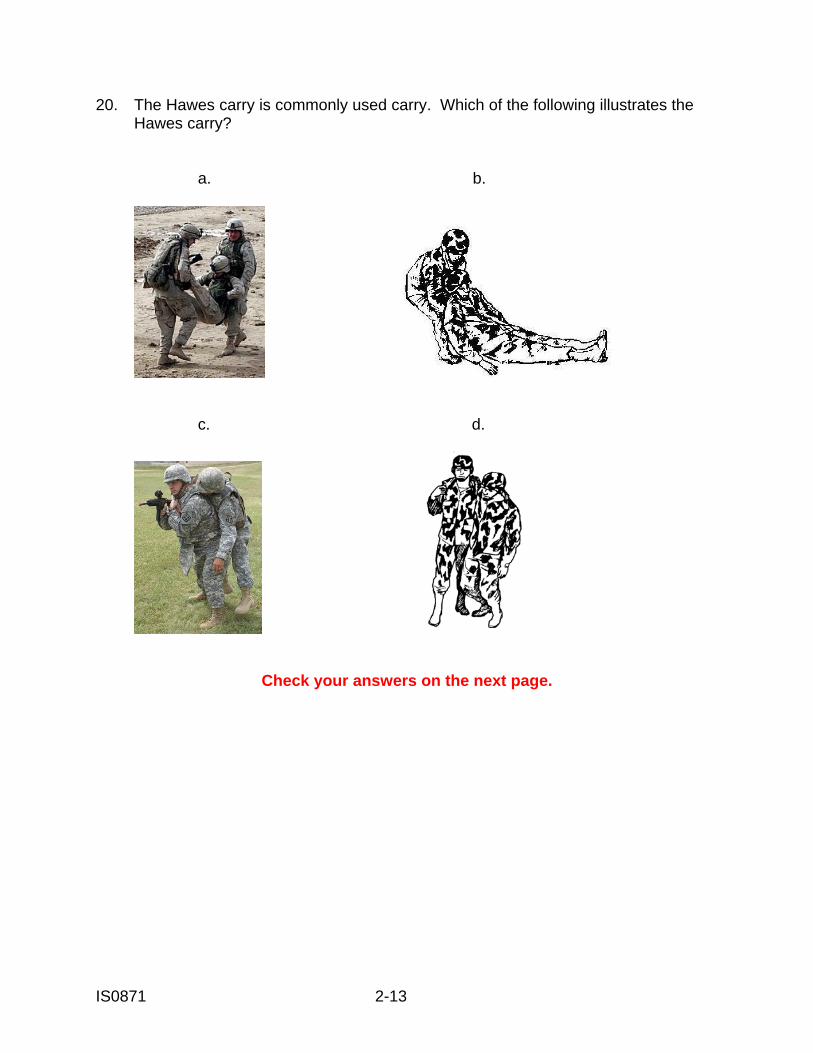
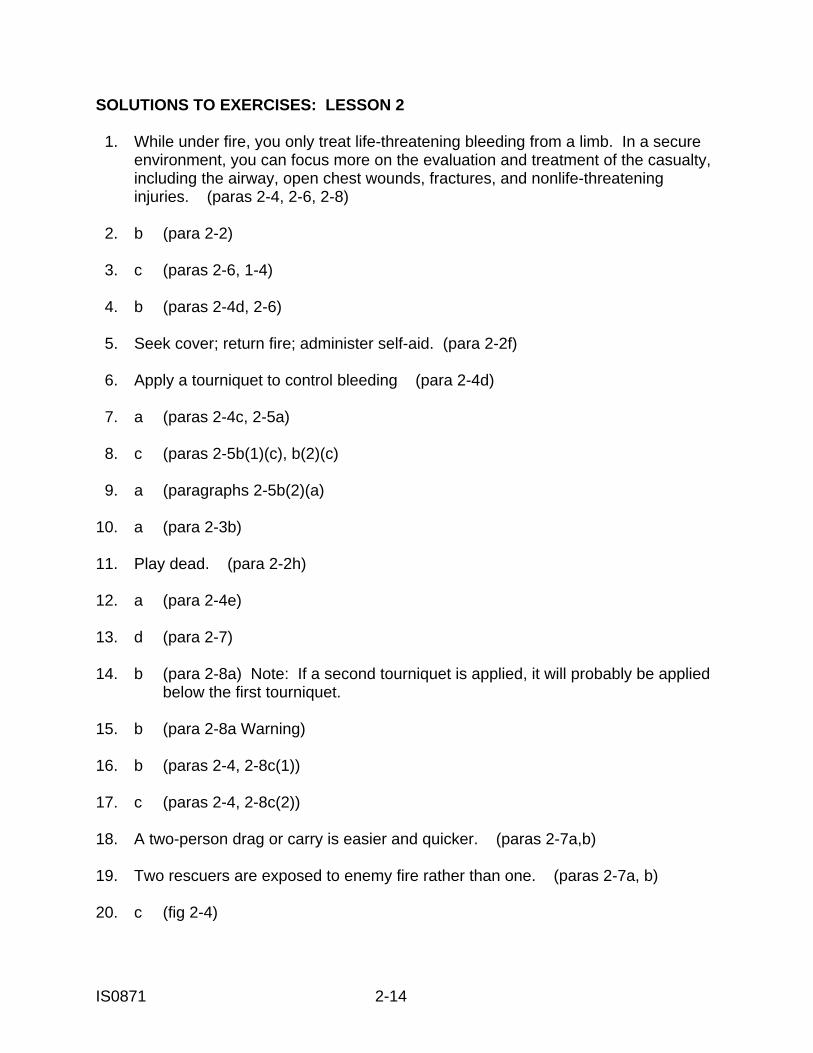
b. Carries. Carries involve lifting the soldier from the ground. The Hawes carry (figure 2-4) is the preferred one-person carry for moving a soldier. If the casualty is conscious and can assist, the one-person support carry (figure 2-5) may be used. Remember, a casualty with all of his gear may weigh around 300 pounds. A two-person carry, such as the modified two-person fore-and-aft carry (figure 2-6) or the two-person support carry (figure 2-7), can sometimes be used, but they are difficult and will expose another soldier to enemy fire.
Figure 2-4. Hawes carry. Figure 2-5. One-person support carry.
Figure 2-6. Modified two-person Figure 2-7. Two-person support carry. fore-and-aft carry.
IS0871 2-7
2-8. PERFORMING TACTICAL FIELD CARE FOLLOWING CARE UNDER FIRE Initiate tactical field care when you and the casualty are no longer under direct enemy fire. In tactical field care, you have more time to provide care. However, the tactical situation can change and you could find yourself back in a care-under-fire situation. In tactical field care, available medical equipment and supplies are limited to that carried into the field by the combat lifesaver and individual soldiers. Tactical field care is discussed in greater detail in Lesson 3. However, the procedures for performing tactical field care following care under fire are briefly discussed below. a. Reassess Tourniquet, if Appropriate. If you treated the casualty in a care-under-fire situation and applied a tourniquet to stop bleeding on an extremity, reassess the bleeding. (1) Expose the wound and determine if a tourniquet is actually needed. (2) If a tourniquet is necessary, apply a second tourniquet directly on the patient’s skin two to four inches above the wound and tighten it (see Section II of Lesson 4). After the second tourniquet is applied, remove the original tourniquet that you applied over the injured soldier’s uniform. (3) If a tourniquet is not necessary, use a pressure dressing, direct pressure, elevation, and/or a hemostatic agent such as Combat Gauze™ to control the bleeding, then remove the tourniquet (see Section I of Lesson 4). By converting the tourniquet to a pressure dressing or controlling the bleeding by other methods, you may be able to save the casualty's limb.
WARNING
If tourniquet has been in place for more than six hours, do not attempt to remove the tourniquet. Removing a tourniquet after six hours should only be performed by medical personnel.
b. Check for Life-Threatening Hemorrhage. Check the casualty for any untreated wounds on the extremities that are life-threatening and treat them. See Lesson 4. c. Continue to Evaluate and Treat. Continue to evaluate and treat the casualty, (1) Take measures to maintain the casualty's airway, including inserting a nasopharyngeal airway if needed. See Lesson 5. (2) Treat any open chest wounds. See Section I of Lesson 6.
IS0871 2-8
(3) Continue to treat other injuries (splint fractures, bandage other wounds, and so forth). (4) Administer pain medications and antibiotics (combat pill pack). Use the casualty's combat pill pack. Do not use your own pack since you may need them yourself and you have no extra combat pill packs in your aid bag. (5) Take measures to prevent and treat shock (paragraph 3-12 of Lesson 3). d. Communicate the Situation. Communicate the medical situation to the unit leader. (1) Send a soldier for medical help (combat medic), if appropriate. (2) Let the unit leader know if the casualty will not be able to continue his mission. e. Monitor the Casualty. Monitor the casualty's level of consciousness and breathing. (1) Recheck the casualty's level of consciousness (AVPU scale) about every 15 minutes to determine if the casualty's condition has changed. Maintaining a check on the casualty's level of consciousness is especially important if the casualty has suffered a head injury. (2) If the casualty has an open chest wound, is having trouble breathing, and the difficulty in breathing is increasing, perform needle chest decompression (see Section II of Lesson 6). (3) Let the unit leader know if there is any significant change in the casualty's status. f. Prepare Casualty for Evacuation, if Needed. (1) Record your evaluation and treatment on a Field Medical Card, Tactical Combat Casualty Care Card, or similar document. Attach the document to the casualty's clothing or place it in an appropriate pocket on the casualty (Lesson 7). (2) Request a medical evacuation (MEDEVAC), if appropriate (Lesson 8). (3) Evacuate a casualty using nonmedical means (CASEVAC), if needed (Lesson 9 and Lesson 10). (4) Continue to monitor the casualty and keep the unit leader informed of any major change in the casualty's condition.
IS0871 2-9
EXERCISES: LESSON 2 INSTRUCTIONS: Answer the following exercises by marking the letter of the response that best answers the question or best completes the sentence or by writing the answer in the space provided. After you have answered all of the exercises, check your answers against the "Solutions to Lesson Exercises" at the end of the exercises. For each exercise answered incorrectly, reread the lesson material referenced. 1. How does evaluation and treatment of a casualty in a care under fire situation differ from secure (tactical field care) situation? ________________________________________________________________ ________________________________________________________________ ________________________________________________________________ ________________________________________________________________ 2. Your unit is in ground combat. You see a soldier fall as though he has been shot. Your primary duty is to: a. Continue firing at the enemy. b. Stop firing and go to the fallen soldier. 3. What type of preventable condition do more soldiers die from during ground combat before reaching a medical treatment facility? a. Tension pneumothorax. b. Blocked airway. c. Bleeding from wounds to the extremities. d. Wound infection. 4. When performing care under fire, which of the following actions can be performed before moving the casualty to a safe location? a. Perform cardiopulmonary resuscitation (CPR). b. Applying a tourniquet to control bleeding. c. Perform needle chest decompression to relieve tension pneumothorax. d. Administer the combat pill pack to control pain and infection.
IS0871 2-10
5. You and another soldier are in the open and separated when you both come under enemy fire. The other soldier is wounded, but is conscious and able to fire his weapon. What should you tell him to do? _____________________________________________________________ 6. You have come under enemy fire. You and another soldier have taken cover together. The other soldier has a severe bleeding wound to his arm. You can administer treatment without endangering the mission or yourself. What treatment should you administer? ______________________________________________________________ 7. You are going to the aid of an injured soldier while under fire. What should be your first action upon reaching the soldier? a. Check the soldier for responsiveness. b. Check the soldier's pulse. c. Check the soldier for breathing. d. Check the soldier for shock. 8. A casualty is lying very still. He does not respond to any of your questions or commands. He does show a reaction when you rub his breastbone briskly with your knuckle. How would you classify the casualty on the AVPU scale? a. A. b. V. c. P. d. U. 9. You are determining the casualty's level of responsiveness. The casualty tells you that he has been shot in his leg and that he is in pain. How would you classify the casualty on the AVPU scale? a. A. b. V. c. P. d. U. e. You cannot classify the casualty until you complete your testing.
IS0871 2-11
10. When should you plan how to move a wounded soldier out of enemy fire? a. Before you leave your place of safety to go to the wounded soldier. b. As soon as you reach the wounded soldier. c. As soon as you have treated the life-threatening conditions. d. As soon as you have treated all of the casualty's injuries. 11 You have been wounded and are still under enemy fire. You are unable to return fire and there is no safe cover nearby. What should you do? ______________________________________________________________ 12. You can move a casualty out of enemy fire and to a safe location. Should you also try to move the casualty's weapon to the safe location? a. Yes. b. No. 13. A casualty has been shot in his left foot, but can still hop on his right leg. Which of the following should you use to move the casualty to safety? a. Cradle drop drag. b. Neck drag. c. Support carry. d. Whichever is the safest for you and the casualty. 14. You applied a tourniquet to a soldier's wounded leg before dragging him to a safe location. What should do about the tourniquet once you and the casualty are safe? a. Nothing. Leave the tourniquet in place. b. Examine the wound to see if it the bleeding can be controlled using other means. c. Place another tourniquet above the first tourniquet and leave both tourniquets in place. d. Place another tourniquet above the first tourniquet and remove the first tourniquet.
IS0871 2-12
15. You applied a tourniquet to a soldier about eight hours ago. The tactical situation now allows the casualty to be evacuated. Should you loosen the tourniquet and try to control the bleeding with a pressure dressing before evacuating the casualty? a. Yes. b. No. 16. Inserting a nasopharyngeal air to maintain the casualty's airway as part of: a. Care under fire. b. Tactical field care. c. Both care under fire and tactical field care. 17. Which of the following is NOT part of care under fire? a. Moving the casualty to safety. b. Checking the casualty's level of consciousness. c. Treating an open chest wound. d. Applying a tourniquet. 18. What is the advantage in using a two-person drag or carry to move a casualty to a safe location while in a care under fire situation? ______________________________________________________________ 19. What is the disadvantage in using a two-person drag or carry to move a casualty to a safe location while in a care under fire situation? ______________________________________________________________
IS0871 2-13
20. The Hawes carry is commonly used carry. Which of the following illustrates the Hawes carry? a. b.
c. d.
Check your answers on the next page.
IS0871 2-14
SOLUTIONS TO EXERCISES: LESSON 2 1. While under fire, you only treat life-threatening bleeding from a limb. In a secure environment, you can focus more on the evaluation and treatment of the casualty, including the airway, open chest wounds, fractures, and nonlife-threatening injuries. (paras 2-4, 2-6, 2-8) 2. b (para 2-2) 3. c (paras 2-6, 1-4) 4. b (paras 2-4d, 2-6) 5. Seek cover; return fire; administer self-aid. (para 2-2f) 6. Apply a tourniquet to control bleeding (para 2-4d) 7. a (paras 2-4c, 2-5a) 8. c (paras 2-5b(1)(c), b(2)(c) 9. a (paragraphs 2-5b(2)(a) 10. a (para 2-3b) 11. Play dead. (para 2-2h) 12. a (para 2-4e) 13. d (para 2-7) 14. b (para 2-8a) Note: If a second tourniquet is applied, it will probably be applied below the first tourniquet. 15. b (para 2-8a Warning) 16. b (paras 2-4, 2-8c(1)) 17. c (paras 2-4, 2-8c(2)) 18. A two-person drag or carry is easier and quicker. (paras 2-7a,b) 19. Two rescuers are exposed to enemy fire rather than one. (paras 2-7a, b) 20. c (fig 2-4)
IS0871 3-1
LESSON 3
TACTICAL FIELD CARE
TASK Tactically manage a simulated casualty. CONDITIONS Given a written situation concerning a casualty in a tactical field care situation and possible responses. STANDARDS Select the correct response based upon instruction given in Subcourse IS0871. REFERENCES STP 21-1-SMCT, Soldier's Manual of Common Tasks: Skill Level 1. FM 4-25.11, First Aid. Prehospital Trauma Life Support Manual, sixth edition. Published by Mosby/Elsevier. 3-1. INTRODUCTION In tactical field care, you and the casualty are not under effective enemy fire and you are free to provide care to the best of your ability. However, medical equipment and supplies are limited to that carried into the field by the combat lifesaver and by individual soldiers. a. Tactical field care covers two situations. (1) In combat, tactical field care may be given by the combat lifesaver after the casualty has been moved to a safe location. However, the tactical situation can change and you could find yourself back in a care-under-fire situation or even told to stop rendering aid and resume your primary combat functions. (2) Tactical field care also refers to care rendered by the combat lifesaver when the casualty is not in a care-under-fire situation to begin with, such as a soldier who falls while trying to climb a wall or cliff or a soldier who is injured by an explosion when no enemy troops are in the area.
IS0871 3-2
b. The first situation was covered in Lesson 2. The second will be covered in this lesson. It is assumed that you locate a casualty while you are not in danger from enemy fire and you can render care to the casualty without endangering your mission. 3-2. INFORM YOUR LEADER When you discover a casualty, communicate the situation to the unit leader as soon as you can. This is done to ensure that the tactical situation allows time to treat the casualty before initiating medical procedures. a. Send a soldier for medical help (combat medic), if appropriate. b. Once you have examined the casualty, let the leader know if the casualty will not be able to continue his mission. c. Once you have treated the casualty, let the unit leader know of any significant change in the casualty's status. 3-3. APPROACH THE CASUALTY a. When approaching the casualty, scan the area for potential hazards. Approach the casualty using a safe route. Keep from becoming a casualty yourself. (1) Survey the area for possible enemy actions, such as small arms fire. (2) Survey the area for fire or explosive devices and for possible chemical or biological agents. (3) Survey any nearby buildings for structural stability. b. As you approach the casualty, form a general impression of the casualty. See if you can anticipate the type of injuries the casualty may have suffered and the type of care you will need to administer. 3-4. CHECK THE CASUALTY FOR RESPONSIVENESS AND LEVEL OF CONSCIOUSNESS When you reach the casualty, check the casualty for responsiveness and determine the casualty's level of consciousness. a. Responsiveness. (1) Upon reaching the casualty, ask in a loud, but calm, voice: “Are you okay?” Gently shake or tap the casualty on the shoulder.
IS0871 3-3
(2) If the casualty is conscious, ask him where it hurts or where his body feels different from usual. This helps to determine the casualty's level of consciousness and provides you with information that can be used when treating the casualty. b. Checking Level of Consciousness. (1) Ask the casualty questions to help determine his level of consciousness. Ask the casualty questions that require more than a "yes" or "no" answer. Examples of such questions are: "What is your name?", "What is the date?" and "Where are we?" (2) If the casualty does not respond, check him for response to pain by rubbing his breastbone (sternum) briskly with your knuckle. c. Determine Level of Consciousness. Determine the casualty's level of consciousness using the AVPU scale discussed below. Changes in the casualty's AVPU rating may indicate changes in his medical condition, especially if the casualty has suffered a head injury. Check the casualty's level of consciousness about every 15 minutes. (1) A--The casualty is alert (knows who he is, the date, where he is, and so forth). (2) V--The casualty is not alert, but does responds to verbal (voice) commands. (3) P--The casualty responds to pain, but not to verbal commands. (4) U--The casualty is unresponsive (unconscious). NOTE: A casualty who is yelling at you, telling you what happened, or performing similar actions is alert. NOTE: If the casualty is alert or responds to voice commands, do not check the casualty's response to pain. 3-5. POSITION THE CASUALTY ON HIS BACK Position the casualty on his back if he is in a prone position. Placing the casualty in a supine position will help you evaluate and treat the casualty. If you turn the casualty, note any injuries that the casualty may have, especially in the chest area. To turn a casualty onto his back, perform the following steps. a. Kneel beside the casualty with your knees near his shoulders. b. Raise the casualty's arm that is nearest to you above the casualty's head.
IS0871 3-4
c. Adjust the casualty’s legs so that they are together and straight or nearly straight. d. Place one of your hands under the back of the casualty's head and neck for support. e. With your free hand, reach across the casualty's back and grasp the casualty's clothing under the arm (far armpit area). f. Pull steadily and evenly toward yourself, keeping the casualty's head and neck in line with his torso. g. Once the casualty is rolled onto his back, place his arms at his sides. NOTE: This method of rolling the casualty is used to minimize further injury to the casualty's spine in case he has suffered an injury to the head, neck, or back. 3-6. CHECK FOR MAJOR BLEEDING OF THE EXTREMITIES Check the casualty for amputation or severe bleeding from the arm, forearm, thigh, or leg. Arterial bleeding from a limb is the leading cause of preventable death on the battlefield. a. Amputation. If the casualty has an amputation of the arm, forearm, thigh, or leg, apply a tourniquet two to four inches above the amputation site. Do not waste time with lesser measures such as a pressure dressing. Apply a tourniquet even if the amputation does not show severe bleeding. The body's natural defenses may be controlling the bleeding temporarily, but the wound will soon result in severe arterial bleeding. CAUTION: DO NOT apply a tourniquet over a joint. The bones of the joint may keep the tourniquet from functioning properly. NOTE: Amputation of a part of a hand or part of a foot can be controlled using a pressure dressing or other measures. NOTE: In a complete amputation, the limb part is completely severed from the rest of the body. In a partial amputation, the limb part is still connected to the rest of the body by skin. Treat a partial amputation as you would a complete amputation. b. Severe Bleeding. Try to control major bleeding on an extremity using an Emergency Bandage from the casualty's first aid kit, direct pressure, elevation, Combat Gauze, or other means. If these methods do not control the bleeding, apply a tourniquet two to four inches above the wound to control the bleeding. Methods for controlling bleeding are presented in Lesson 4.
IS0871 3-5
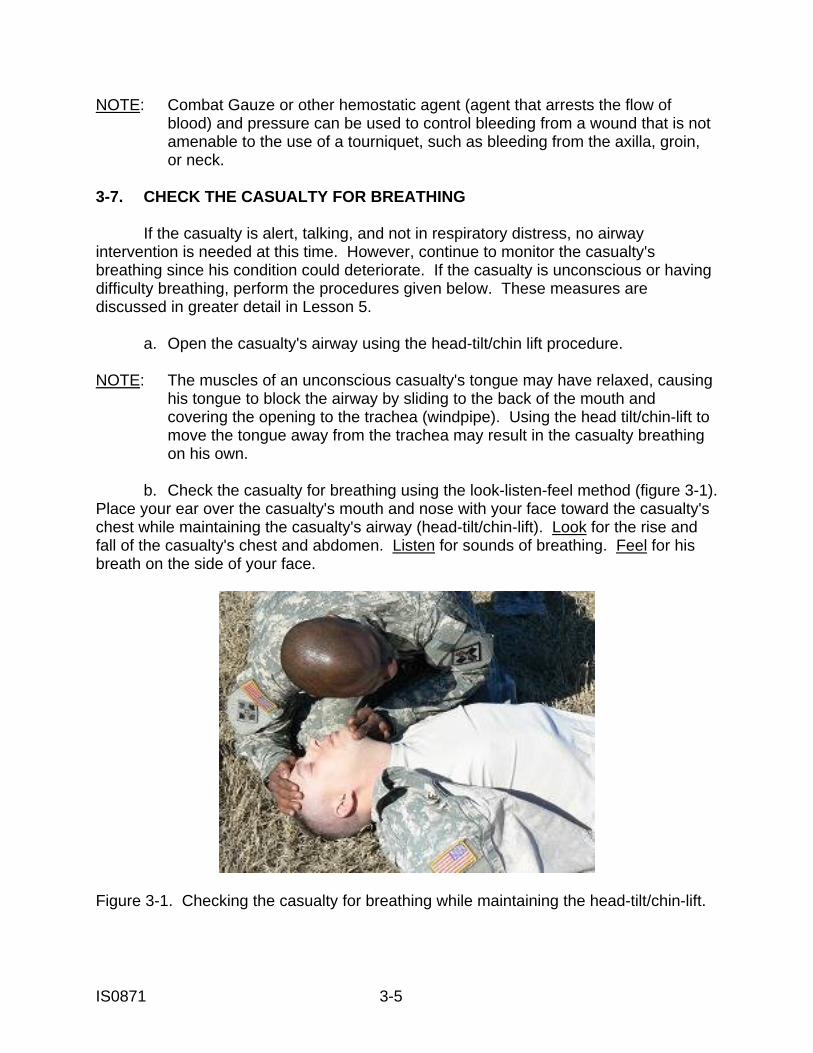
NOTE: Combat Gauze or other hemostatic agent (agent that arrests the flow of blood) and pressure can be used to control bleeding from a wound that is not amenable to the use of a tourniquet, such as bleeding from the axilla, groin, or neck. 3-7. CHECK THE CASUALTY FOR BREATHING If the casualty is alert, talking, and not in respiratory distress, no airway intervention is needed at this time. However, continue to monitor the casualty's breathing since his condition could deteriorate. If the casualty is unconscious or having difficulty breathing, perform the procedures given below. These measures are discussed in greater detail in Lesson 5. a. Open the casualty's airway using the head-tilt/chin lift procedure. NOTE: The muscles of an unconscious casualty's tongue may have relaxed, causing his tongue to block the airway by sliding to the back of the mouth and covering the opening to the trachea (windpipe). Using the head tilt/chin-lift to move the tongue away from the trachea may result in the casualty breathing on his own. b. Check the casualty for breathing using the look-listen-feel method (figure 3-1). Place your ear over the casualty's mouth and nose with your face toward the casualty's chest while maintaining the casualty's airway (head-tilt/chin-lift). Look for the rise and fall of the casualty's chest and abdomen. Listen for sounds of breathing. Feel for his breath on the side of your face.
Figure 3-1. Checking the casualty for breathing while maintaining the head-tilt/chin-lift.
IS0871 3-6
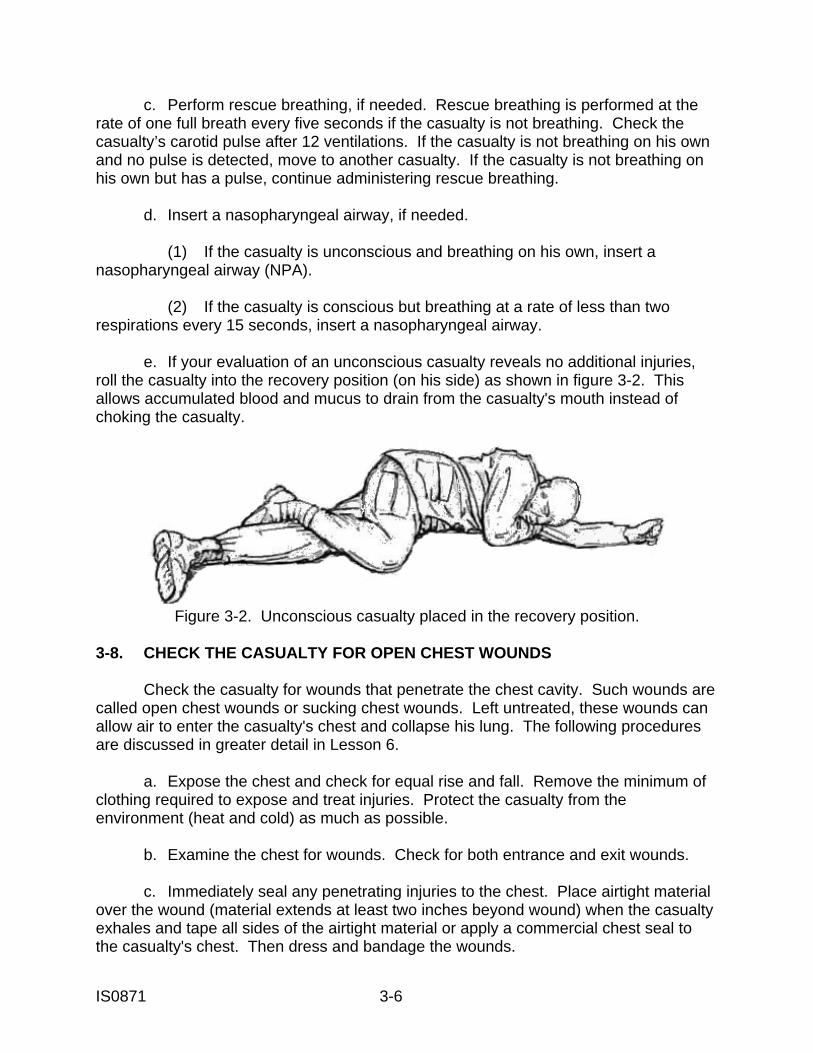
c. Perform rescue breathing, if needed. Rescue breathing is performed at the rate of one full breath every five seconds if the casualty is not breathing. Check the casualty’s carotid pulse after 12 ventilations. If the casualty is not breathing on his own and no pulse is detected, move to another casualty. If the casualty is not breathing on his own but has a pulse, continue administering rescue breathing. d. Insert a nasopharyngeal airway, if needed. (1) If the casualty is unconscious and breathing on his own, insert a nasopharyngeal airway (NPA). (2) If the casualty is conscious but breathing at a rate of less than two respirations every 15 seconds, insert a nasopharyngeal airway. e. If your evaluation of an unconscious casualty reveals no additional injuries, roll the casualty into the recovery position (on his side) as shown in figure 3-2. This allows accumulated blood and mucus to drain from the casualty's mouth instead of choking the casualty.
Figure 3-2. Unconscious casualty placed in the recovery position.
3-8. CHECK THE CASUALTY FOR OPEN CHEST WOUNDS Check the casualty for wounds that penetrate the chest cavity. Such wounds are called open chest wounds or sucking chest wounds. Left untreated, these wounds can allow air to enter the casualty's chest and collapse his lung. The following procedures are discussed in greater detail in Lesson 6. a. Expose the chest and check for equal rise and fall. Remove the minimum of clothing required to expose and treat injuries. Protect the casualty from the environment (heat and cold) as much as possible. b. Examine the chest for wounds. Check for both entrance and exit wounds. c. Immediately seal any penetrating injuries to the chest. Place airtight material over the wound (material extends at least two inches beyond wound) when the casualty exhales and tape all sides of the airtight material or apply a commercial chest seal to the casualty's chest. Then dress and bandage the wounds.
IS0871 3-7
d. After treating a casualty with an open chest wound, allow the casualty to sit up if he has adequate support. If a casualty cannot sit up, place him in the recovery position with his affected (injured) side down. The body pressure acts to "splint" the affected side. 3-9. CHECK FOR OTHER WOUNDS After you have stopped any serious arterial bleeding from the extremities, checked the airway, and sealed any penetrating chest wounds, continue to evaluate and treat the casualty. a. Check the casualty for bleeding. (1) Look for blood-soaked clothes. (2) Look for entry and exit wounds. (3) Place your hands behind the casualty’s neck and pass them upward toward the top of the head. Note whether there is blood or brain tissue on your hands from the casualty’s wounds. (4) Place your hands behind the casualty’s shoulders and pass them downward behind the back, thighs, and legs. Note whether there is blood on your hands from the casualty’s wounds. b. Control bleeding using an Emergency Bandage, Combat Gauze, direct pressure, and/or pressure dressing. (1) If the above methods do not control bleeding from a limb, apply a tourniquet to the extremity. (2) Do not apply a tourniquet except to an extremity. (3) Do not apply a pressure dressing to a head wound. You may apply an Emergency Bandage, but do not tighten it enough to result in a pressure dressing. (4) If a bone is sticking out of the wound, do not attempt to push the bone back under the skin or to straighten the injured limb. Apply the dressing over the bone and the wound.
IS0871 3-8
3-10. CHECK FOR FRACTURED LIMBS a. Check the casualty for fractures (broken bones). Some of the signs and symptoms of a fractured limb are given below. (1) Part of the fractured bone may stick through the skin. (2) The casualty may have pain, tenderness, swelling, and/or bruising at a particular location. The site of the tenderness or bruise is probably the site of the fracture. (3) One arm or leg may appear to be shorter than the other or the limb may be in an abnormal position (looks deformed). (4) The casualty may have difficulty in moving an arm or leg. CAUTION: Do not have the casualty attempt to move the injured arm or leg to test this symptom. Rely upon what the casualty tells you. (5) The casualty has massive injury to an arm or leg. NOTE: Even if the bone is not broken, the pain caused by the wound may be lessened if the arm or leg is splinted after it has been dressed and bandaged. (6) The casualty may have heard a "snapping" sound at the time of the injury. b. Splint any fractured limbs using available materials. If available, a universal malleable splint (SAM splint) may be used to splint an arm, forearm, or lower leg. Two rigid objects (such as straight tree limbs, boards, or tent poles) may be used to splint the fractured limb. Materials such as cravats or strips of cloth can be used to secure the rigid objects and keep the fracture immobilized. c. Applying a splint to a leg. (1) Push the securing materials under natural body curvatures, such as the knees. Then gently move the securing materials up or down the limb until they are in proper position. (2) If possible, place at least two cravats above the fracture site and two below the fracture site (above the upper joint, between the upper joint and the fracture, between the fracture and the lower joint, and below the lower joint). CAUTION: Do not apply a cravat on the suspected fracture site. The pressure caused by the cravat could result in additional injury to the fracture site.
IS0871 3-9
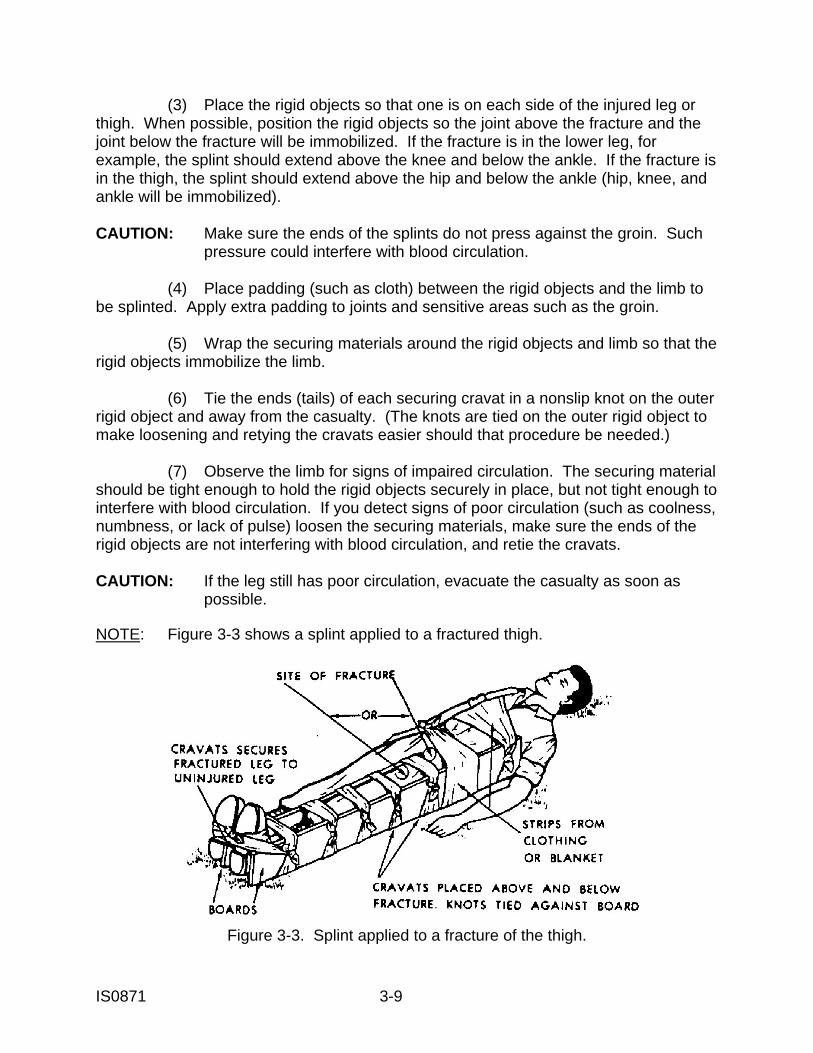
(3) Place the rigid objects so that one is on each side of the injured leg or thigh. When possible, position the rigid objects so the joint above the fracture and the joint below the fracture will be immobilized. If the fracture is in the lower leg, for example, the splint should extend above the knee and below the ankle. If the fracture is in the thigh, the splint should extend above the hip and below the ankle (hip, knee, and ankle will be immobilized). CAUTION: Make sure the ends of the splints do not press against the groin. Such pressure could interfere with blood circulation. (4) Place padding (such as cloth) between the rigid objects and the limb to be splinted. Apply extra padding to joints and sensitive areas such as the groin. (5) Wrap the securing materials around the rigid objects and limb so that the rigid objects immobilize the limb. (6) Tie the ends (tails) of each securing cravat in a nonslip knot on the outer rigid object and away from the casualty. (The knots are tied on the outer rigid object to make loosening and retying the cravats easier should that procedure be needed.) (7) Observe the limb for signs of impaired circulation. The securing material should be tight enough to hold the rigid objects securely in place, but not tight enough to interfere with blood circulation. If you detect signs of poor circulation (such as coolness, numbness, or lack of pulse) loosen the securing materials, make sure the ends of the rigid objects are not interfering with blood circulation, and retie the cravats. CAUTION: If the leg still has poor circulation, evacuate the casualty as soon as possible. NOTE: Figure 3-3 shows a splint applied to a fractured thigh.
Figure 3-3. Splint applied to a fracture of the thigh.
IS0871 3-10
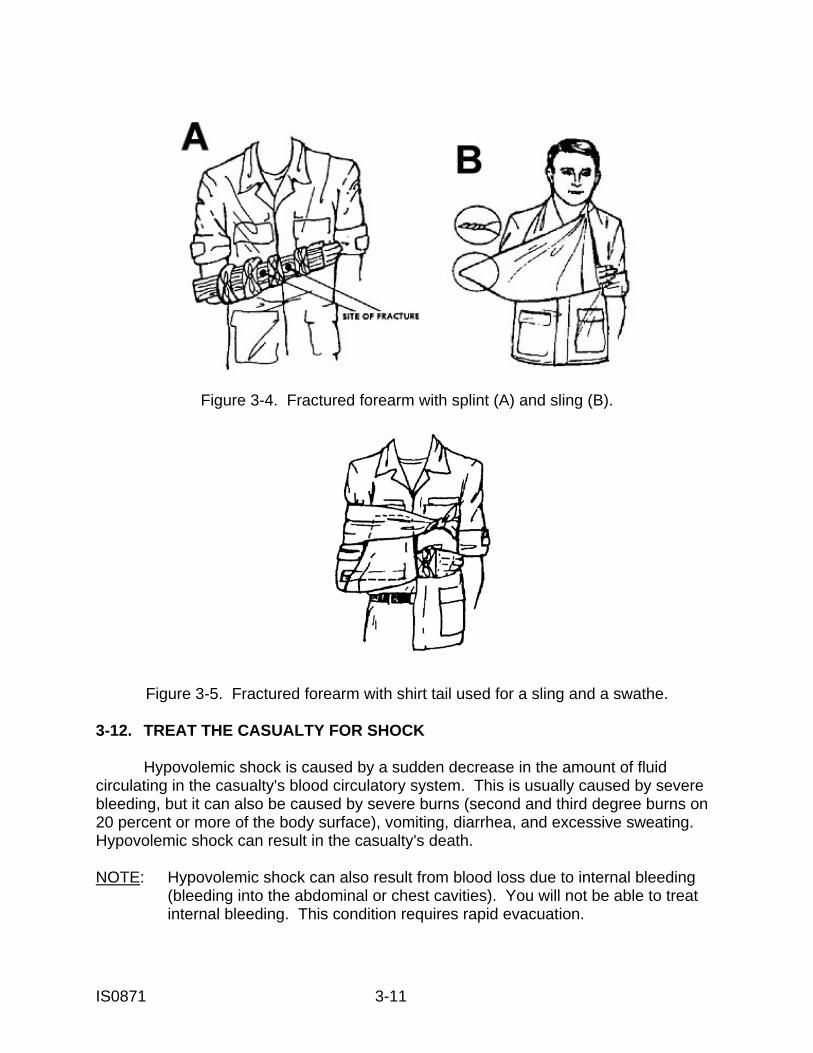
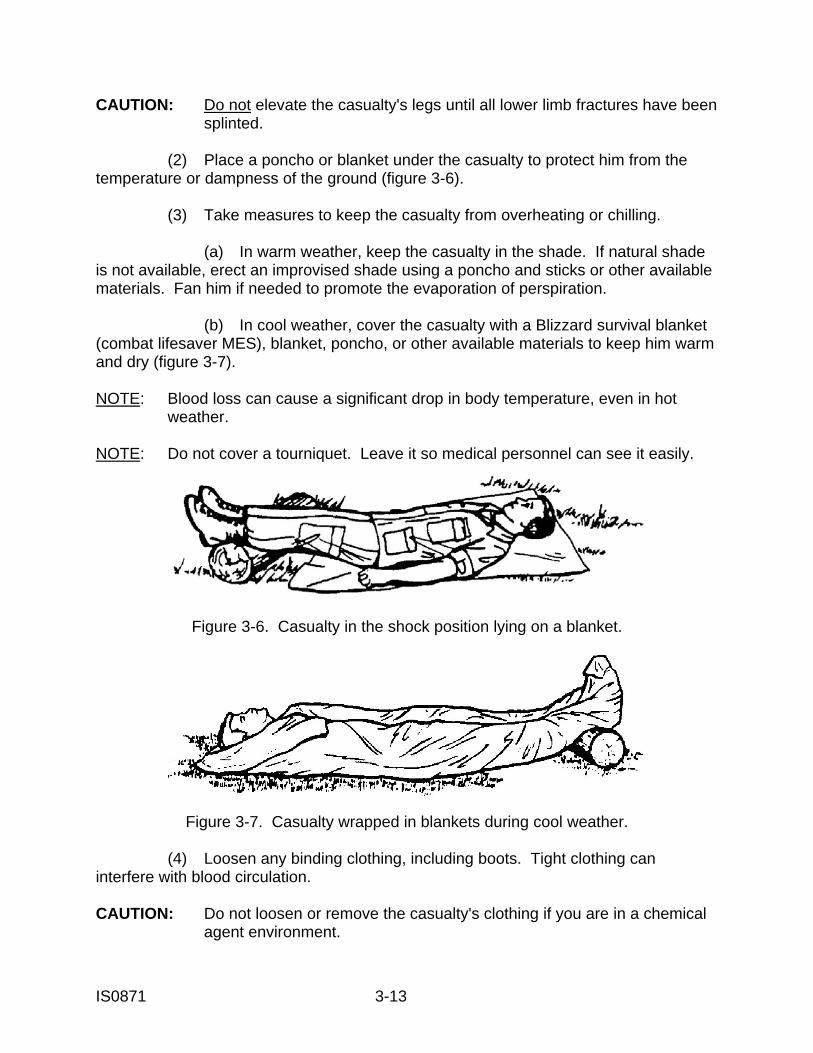
d. Applying a splint to an arm. (1) Place the rigid objects so that one is on each side of the injured arm or forearm. When possible, position the rigid objects so the joint above the fracture and the joint below the fracture will be immobilized. (2) Apply padding between the arm and the splints. (3) Secure the splints with cravats, strips of cloth, or other securing materials. If possible, place two cravats above the fracture site and two below the fracture site. Immobilize the joint above the fracture site and the joint below the fracture site. NOTE: Slings and swathes can be used to immobilize joints. (4) Check for signs of impaired circulation. If you detect signs of poor circulation (such as coolness, numbness, or lack of pulse) loosen the securing materials, make sure the ends of the rigid objects are not interfering with blood circulation (such as pressing on the armpit), and retie the cravats. CAUTION: If the arm or forearm still has poor circulation, evacuate the casualty as soon as possible. (5) If possible, apply a sling to immobilize the forearm. (6) If possible, apply a swathe (material tied around the injured upper arm and the chest) to immobilize the upper arm. If the upper arm is fractured, apply a swathe above the fracture and a swath below the fracture. NOTE: Figure 3-4A shows a forearm with a splint applied. Figure 3-4B shows a sling applied to the fractured arm. Figure 3-5 shows a splinted forearm with the casualty's shirt tail used as a sling (sharp stick stuck through shirt and tail to secure the tail) and a swathe applied. 3-11. ADMINISTER PILL PACK If the casualty has suffered a wound or fracture, administer the casualty's combat pill pack (see figure 1-5). Have the casualty take all four tablets with water from his canteen. The pack contains pain medications and antibiotics to help control infection. Use the casualty's pack, not your own pack. You need your pack in case you are wounded. This pill pack is not part of the combat lifesaver MES.
IS0871 3-11
Figure 3-4. Fractured forearm with splint (A) and sling (B).
Figure 3-5. Fractured forearm with shirt tail used for a sling and a swathe. 3-12. TREAT THE CASUALTY FOR SHOCK Hypovolemic shock is caused by a sudden decrease in the amount of fluid circulating in the casualty's blood circulatory system. This is usually caused by severe bleeding, but it can also be caused by severe burns (second and third degree burns on 20 percent or more of the body surface), vomiting, diarrhea, and excessive sweating. Hypovolemic shock can result in the casualty's death. NOTE: Hypovolemic shock can also result from blood loss due to internal bleeding (bleeding into the abdominal or chest cavities). You will not be able to treat internal bleeding. This condition requires rapid evacuation.

IS0871 3-12
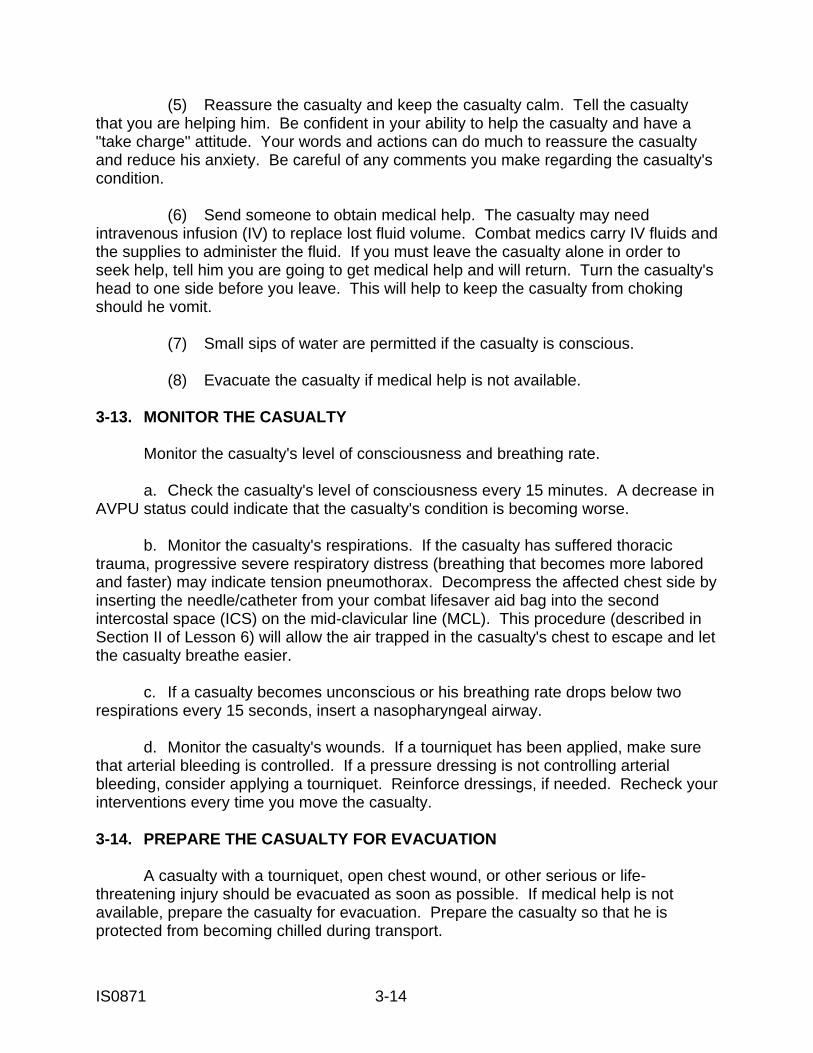
a. Signs and symptoms of shock include the following. (1) Sweaty but cool (clammy) skin, pale skin color, and/or blotchy or bluish skin around the mouth. (2) Nausea. (3) Anxiety (casualty is restless, nervous, or agitated). (4) Decrease in the casualty's level of consciousness (such as mental confusion or unconsciousness). (5) Rapid breathing (increased breathing rate). (6) Unusual thirst. b. Take the following actions to treat shock. NOTE: Do not wait for signs and symptoms of shock to occur. The same measures used to treat shock can be applied to help prevent shock from occurring. (1) If the casualty is conscious, place him in the shock position (on his back with his feet elevated slightly above the level of his heart) (see figure 3-6). This will help his blood circulation. A log, field pack, box, rolled field jacket, or other stable object can be used to elevate his feet. Some exceptions to placing the casualty in the shock position are given below. (a) An unconscious casualty should be placed in the recovery position. If the casualty vomits, quickly perform a finger sweep to clear his airway. (b) A casualty with a suspected spinal fracture or serious head wound should be on his back (feet not elevated). Immobilize his head, neck, and back, if possible. (c) A casualty with an open abdominal wound should be positioned on his back with his knees flexed to reduce stress to the abdomen and reduce the pain. (d) A casualty with an open chest wound should be sitting up with his back to a wall, tree, or other support or in the recovery position with his injured side to the ground. Having the uninjured side up decreases pressure on the uninjured side of the chest and allows the uninjured lung to function easier. (e) A casualty with a minor head wound should be sitting up with his back supported or in the recovery position with his wounded side up.
IS0871 3-13
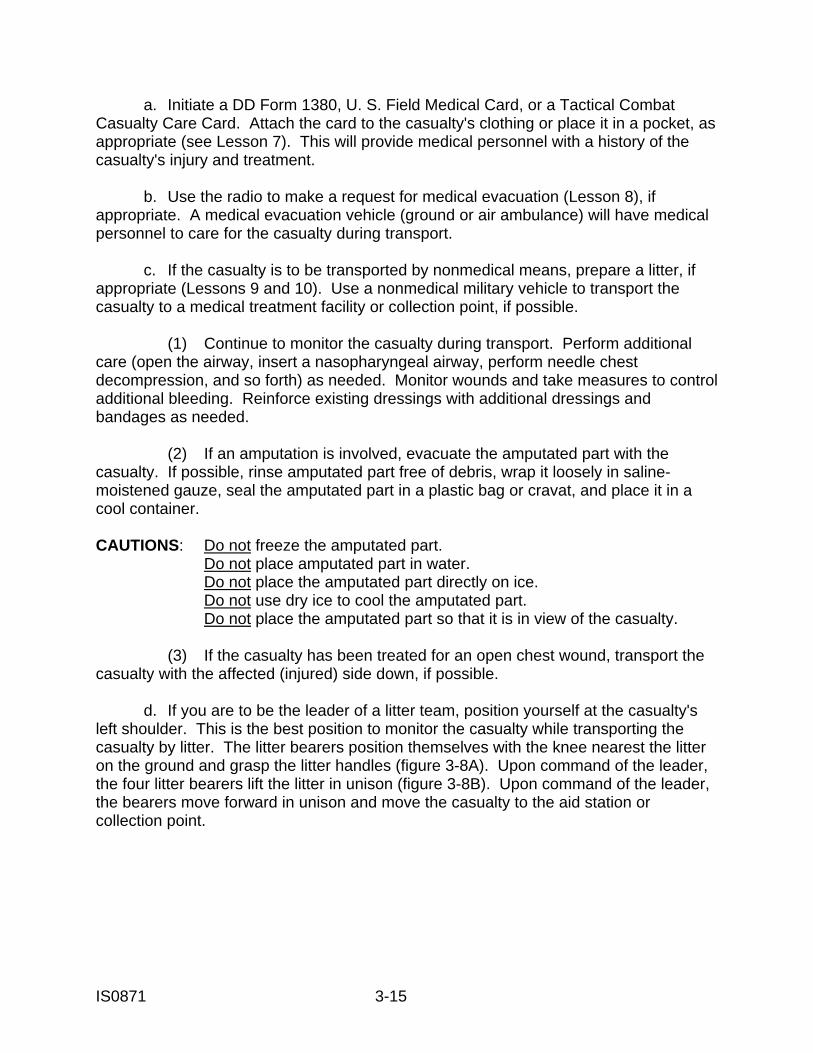
CAUTION: Do not elevate the casualty's legs until all lower limb fractures have been splinted. (2) Place a poncho or blanket under the casualty to protect him from the temperature or dampness of the ground (figure 3-6). (3) Take measures to keep the casualty from overheating or chilling. (a) In warm weather, keep the casualty in the shade. If natural shade is not available, erect an improvised shade using a poncho and sticks or other available materials. Fan him if needed to promote the evaporation of perspiration. (b) In cool weather, cover the casualty with a Blizzard survival blanket (combat lifesaver MES), blanket, poncho, or other available materials to keep him warm and dry (figure 3-7). NOTE: Blood loss can cause a significant drop in body temperature, even in hot weather. NOTE: Do not cover a tourniquet. Leave it so medical personnel can see it easily.
Figure 3-6. Casualty in the shock position lying on a blanket.
Figure 3-7. Casualty wrapped in blankets during cool weather. (4) Loosen any binding clothing, including boots. Tight clothing can interfere with blood circulation. CAUTION: Do not loosen or remove the casualty's clothing if you are in a chemical agent environment.
IS0871 3-14
(5) Reassure the casualty and keep the casualty calm. Tell the casualty that you are helping him. Be confident in your ability to help the casualty and have a "take charge" attitude. Your words and actions can do much to reassure the casualty and reduce his anxiety. Be careful of any comments you make regarding the casualty's condition. (6) Send someone to obtain medical help. The casualty may need intravenous infusion (IV) to replace lost fluid volume. Combat medics carry IV fluids and the supplies to administer the fluid. If you must leave the casualty alone in order to seek help, tell him you are going to get medical help and will return. Turn the casualty's head to one side before you leave. This will help to keep the casualty from choking should he vomit. (7) Small sips of water are permitted if the casualty is conscious. (8) Evacuate the casualty if medical help is not available. 3-13. MONITOR THE CASUALTY Monitor the casualty's level of consciousness and breathing rate. a. Check the casualty's level of consciousness every 15 minutes. A decrease in AVPU status could indicate that the casualty's condition is becoming worse. b. Monitor the casualty's respirations. If the casualty has suffered thoracic trauma, progressive severe respiratory distress (breathing that becomes more labored and faster) may indicate tension pneumothorax. Decompress the affected chest side by inserting the needle/catheter from your combat lifesaver aid bag into the second intercostal space (ICS) on the mid-clavicular line (MCL). This procedure (described in Section II of Lesson 6) will allow the air trapped in the casualty's chest to escape and let the casualty breathe easier. c. If a casualty becomes unconscious or his breathing rate drops below two respirations every 15 seconds, insert a nasopharyngeal airway. d. Monitor the casualty's wounds. If a tourniquet has been applied, make sure that arterial bleeding is controlled. If a pressure dressing is not controlling arterial bleeding, consider applying a tourniquet. Reinforce dressings, if needed. Recheck your interventions every time you move the casualty. 3-14. PREPARE THE CASUALTY FOR EVACUATION A casualty with a tourniquet, open chest wound, or other serious or life-threatening injury should be evacuated as soon as possible. If medical help is not available, prepare the casualty for evacuation. Prepare the casualty so that he is protected from becoming chilled during transport.
IS0871 3-15
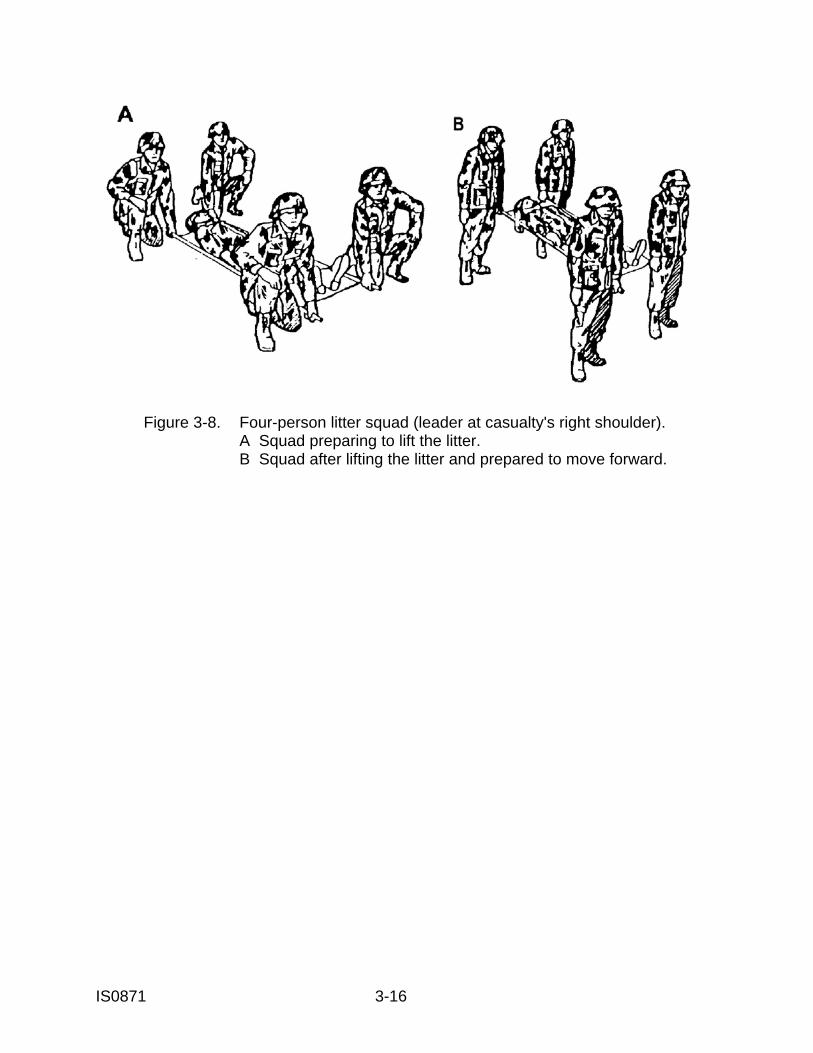
a. Initiate a DD Form 1380, U. S. Field Medical Card, or a Tactical Combat Casualty Care Card. Attach the card to the casualty's clothing or place it in a pocket, as appropriate (see Lesson 7). This will provide medical personnel with a history of the casualty's injury and treatment. b. Use the radio to make a request for medical evacuation (Lesson 8), if appropriate. A medical evacuation vehicle (ground or air ambulance) will have medical personnel to care for the casualty during transport. c. If the casualty is to be transported by nonmedical means, prepare a litter, if appropriate (Lessons 9 and 10). Use a nonmedical military vehicle to transport the casualty to a medical treatment facility or collection point, if possible. (1) Continue to monitor the casualty during transport. Perform additional care (open the airway, insert a nasopharyngeal airway, perform needle chest decompression, and so forth) as needed. Monitor wounds and take measures to control additional bleeding. Reinforce existing dressings with additional dressings and bandages as needed. (2) If an amputation is involved, evacuate the amputated part with the casualty. If possible, rinse amputated part free of debris, wrap it loosely in saline-moistened gauze, seal the amputated part in a plastic bag or cravat, and place it in a cool container. CAUTIONS: Do not freeze the amputated part. Do not place amputated part in water. Do not place the amputated part directly on ice. Do not use dry ice to cool the amputated part. Do not place the amputated part so that it is in view of the casualty. (3) If the casualty has been treated for an open chest wound, transport the casualty with the affected (injured) side down, if possible. d. If you are to be the leader of a litter team, position yourself at the casualty's left shoulder. This is the best position to monitor the casualty while transporting the casualty by litter. The litter bearers position themselves with the knee nearest the litter on the ground and grasp the litter handles (figure 3-8A). Upon command of the leader, the four litter bearers lift the litter in unison (figure 3-8B). Upon command of the leader, the bearers move forward in unison and move the casualty to the aid station or collection point.
IS0871 3-16
Figure 3-8. Four-person litter squad (leader at casualty's right shoulder). A Squad preparing to lift the litter. B Squad after lifting the litter and prepared to move forward.
IS0871 3-17
EXERCISES: LESSON 3 INSTRUCTIONS: Answer the following exercises by marking the letter of the response that best answers the question or best completes the sentence or by writing the answer in the space provided. After you have answered all of the exercises, check your answers against the "Solutions to Lesson Exercises" at the end of the exercises. For each exercise answered incorrectly, reread the lesson material referenced. 1. You are crossing a battlefield after the fighting has stopped and the enemy has retreated. A soldier steps on a land mine and it explodes, giving the soldier a severe wound in his thigh. What type of care will you render the solder? a. Tactical evacuation care. b. Tactical field care. c. Care under fire. 2. A soldier in your squad has been injured. You are in a tactical field care situation. When should you notify your unit leader of the soldier's injury? a. As soon as you can. b. Only after you have performed a full examination of the casualty. c. Only after you have completed your treatment of the casualty. d. Only if the casualty requires evacuation. 3. You see a soldier sitting on the ground. You approach the soldier and ask, “Are you okay?” The soldier responds, "Yeah, but I twisted my ankle when I stepped in a hole." How would you classify this soldier's level of consciousness? a. A. b. V. c. P. d. U. e. Unable to tell without examining his ankle.
IS0871 3-18
4. When evaluating a casualty in a tactical field care setting, what position should the casualty be in? a. On his back (supine). b. On his chest (prone). c. Lying on his injured side. d. Lying on his uninjured side. 5. You are going to turn a casualty from a prone position to a supine position. Which of the following is a correct procedure? a. Use one hand to support the casualty's head and neck. With your free hand, grasp the casualty's clothing under the near arm. Then push steadily and roll away from you and onto his back. b. Use one hand to support the casualty's head and neck. With your free hand, reach across the casualty's back and grasp the casualty's clothing under the arm (far armpit area). Then pull steadily and roll the casualty toward you and onto his back. c. Use one hand to support the casualty's knees. With your free hand, grasp the casualty's clothing under the near arm. Then push steadily and roll away from you and onto his back. d. Use one hand to support the casualty's knees. With your free hand, reach across the casualty's back and grasp the casualty's clothing under the arm (far armpit area). Then pull steadily and roll the casualty toward you and onto his back. 6. You have turned a casualty onto his back. What should you do with his arms? a. Position both arms above his head. b. Position the near arm above his head and the other arm at his side. c. Position the near arm at his side and the far arm above his head. d. Position both arms at his sides. e. Position both forearms on his chest. 7. You are in a tactical field care situation. An unconscious casualty is breathing on his own and appears to have no other injuries. What should you do? _________________________________________________________ _________________________________________________________
IS0871 3-19
8. Which of the following should you treat first if you and the casualty are in a protected area? a. Severe arterial bleeding from a limb. b. Breathing difficulties with a penetrating chest wound. 9. You are in a tactical field care situation. A casualty has a cut on his arm with heavy bleeding. What should you do? a. Apply an Emergency Bandage from your aid bag. b. Apply an Emergency Bandage from the casualty's Improved First Aid Kit. c. Apply a tourniquet. d. Tape an airtight seal over the wound. 10. The look-listen-feel method is used to: a. See if the casualty is in shock. b. Approximate the amount of blood loss. c. Test the casualty's level of consciousness. d. Determine if the casualty is breathing. 11. Why must a penetrating chest wound be sealed? a. To keep air from entering through the wound. b. To keep air from escaping through the wound. c. To control bleeding. 12. The casualty has severe bleeding from a head wound. Should you apply a tourniquet to control the bleeding? a. Yes. b. No. 13. You are treating a soldier with a fractured bone in the forearm. The sharp end of the broken bone has pierced the skin and is sticking out through the wound. Should you attempt to force the bone back into alignment before applying a splint? a. Yes. b. No.
IS0871 3-20
14. You are applying a splint to a casualty's limb. Which of the following is a general rule to follow? a. Apply one cravat above the fracture and one cravat below the fracture. b. Apply two cravats above the fracture and two cravats below the fracture. 15. You are applying a splint to a casualty's limb. Which of the following is a general rule to follow? a. Immobilize the joint above the fracture. b. Immobilize the joint below the fracture. c. Immobilize the joint above the fracture and the joint below the fracture. 16. Which of the following is true concerning a casualty with an injured thigh? a. Apply a splint only if the bone is fractured. b. Apply a splint if the thigh has a massive injury even if the bone is not fractured. 17. What is in the combat pill pack that you and other soldiers may carry in combat? ______________________________________________________________ 18. You are going to administer a combat pill pack to a casualty. You should use: a. The casualty's pack. b. Your personal pack. c. A pack from your aid bag. 19. You have controlled the bleeding from a wound on the casualty's thigh. The casualty lost a good deal of blood. Also, the casualty's skin appears to be pale, cool, and clammy. His is breathing faster than normal and he is acting agitated. The casualty is probably suffering from: a. Blocked airway. b. Cardiac arrest. c. Hypothermia. d. Shock.
IS0871 3-21
20. In most cases, the casualty's legs are placed on a stable object so that his feet are slightly higher than the level of his heart to help control shock. In which of the following circumstances would another position be used? a. The casualty has an open abdominal wound. b. The casualty has an open chest wound. c. Either of the above. 21. You have controlled the bleeding to a casualty with a severe wound to the leg and immobilized the leg. The casualty has been placed on a litter and will be evacuated by air ambulance. What else can you do to help the casualty? a. ______________________________________________________________ b. ______________________________________________________________ c. ______________________________________________________________ 22. You have applied a tourniquet to a casualty. Should you cover the tourniquet with a blanket, poncho, or similar material to protect it from contamination by dirt and dust? a. Yes. b. No. 23. What Department of Defense document is used to record the care given to a casualty in the field? _________________________________________________________ 24. How does evaluation and treatment of a casualty in a tactical field care situation (not under enemy fire) differ from that in a care under fire situation? ________________________________________________________________ ________________________________________________________________ ________________________________________________________________ ________________________________________________________________
IS0871 3-22
25. You are accompanying an unconscious casualty during evacuation. What should you do? a. Monitor the casualty's breathing. b. Monitor bleeding from the casualty's wounds. c. Reinforce dressings, as needed. d. All of the above.
Check your answers on the next page.

IS0871 3-23
SOLUTIONS TO EXERCISES: LESSON 3 1. b (para 3-1a(2) 2 a (para 3-2) 3 a (paras 3-4, 3-4c first Note) 4. a (para 3-5) 5. b (paras 3-5d, e, f) 6. d (para 3-5g) 7. Insert a nasopharyngeal airway Place the casualty in the recovery position (on his side) (paras 3-7d(1), e) 8. a (paras 3-6, 3-7, 3-8) 9. b (para 3-6b) 10. d (para 3-7b) 11. a (para 3-8) 12. b (paras 3-9b(2), (3)) 13. b (para 3-9b(4)) 14. b (para 3-10c(2)) 15. c (para 3-10c(3)) 16. b (para 3-10a(5)Note) 17. Pain medications and antibiotics. (para 3-11) 18. a (para 3-11) 19. d (paras 3-12, 3-12a(1), (3), (5)) 20. c (paras 3-12b(1)(c), (d))

IS0871 3-24
21. (in any order) a. Cover the casualty to keep him from being chilled. b. Reassure the casualty. c. Loosen any binding clothing. (paras 3-12b(3), (4), (5)) 22. b (para 3-12b(3) second Note) 23. DD Form 1380, U.S. Field Medical Card (FMC) (para 3-14a) 24. A tactical field care environment allows you to focus more on the evaluation, treatment, and evacuation of the casualty. While under fire, you are limited only to the treatment of life-threatening bleeding from a limb and movement to safety. (paras 3-1, 2-1, 2-4) 25. d (para 3-14c(1))
IS0871 4-1
LESSON 4
CONTROLLING BLEEDING
TASK Apply an Emergency Bandage, Combat Gauze, manual pressure, pressure dressing, Combat Application Tourniquet, and/or improvised tourniquet, as needed. CONDITIONS Given a simulated casualty with bleeding from a limb and needed supplies. STANDARD Score a GO on the performance checklists. Additional injuries to the casualty are prevented. REFERENCES STP 21-1-SMCT, Soldier's Manual of Common Tasks: Skill Level 1. FM 4-25.11, First Aid.
Section I. CONTROLLING BLEEDING WITHOUT A TOURNIQUET
4-1. GENERAL The leading preventable cause of death on the battlefield is bleeding from an extremity. Bleeding (hemorrhaging) from an extremity can usually be controlled by applying a dressing and bandage, applying manual pressure, elevating the injured limb, and applying a pressure dressing. An Emergency Bandage serves as a dressing and bandage. It can also as a pressure dressing. If the casualty is bleeding from a limb and these methods do not control the bleeding, then a tourniquet must be applied to stop the loss of blood from the limb. a. In an amputation of the arm, forearm, thigh or leg, a tourniquet is applied immediately since the other measures are inadequate to control the bleeding. b. In combat while under enemy fire, a rapidly applied tourniquet is the initial method used to control life-threatening bleeding from a limb. Once you and the casualty are in a safe location, you can reevaluate the tourniquet.
IS0871 4-2
4-2. EXPOSE THE WOUND If possible, expose the wound first by pushing or cutting away loose clothing around the casualty's wound. This will enable you to better view the extent of the injury. Scissors, strap cutter, or a knife can be used to cut clothing. In the care under fire phase, do not take time to expose the wound. CAUTION: Clothing or anything else stuck to the wound should be left alone to avoid further injury. Cut or tear around the stuck material so that the stuck material remains undisturbed. Do not attempt to clean the wound.
WARNING
Do not remove protective clothing in a chemical environment. Apply dressings over the protective clothing.
4-3. CHECK FOR ENTRANCE AND EXIT WOUNDS Before applying the dressing, carefully examine the casualty to determine if there is more than one wound. A missile may have entered at one point and exited at another point. The exit wound is usually larger than the entrance wound. If there is an entrance wound and an exit wound, both wounds need to be dressed and bandaged. CAUTION: If the missile (such as a bullet or shrapnel) lodges in the body (fails to exit), do not attempt to remove the missile or probe the wound. CAUTION: If there is an object extending from (impaled in) the wound, do not remove the object. Apply a dressing around the object and use additional improvised bulky dressings made from the cleanest material available to build up the area around the object. This will stabilize the object and help to prevent further injury. Apply a supporting bandage over the bulky materials to hold them in place. 4-4. EMERGENCY BANDAGE The Emergency Bandage (figures 4-1 and 1-4) can be used on any bleeding wound. It can be used both as a field dressing and as a pressure dressing. Follow the procedures below when applying the Emergency Bandage to a wound on the casualty's extremity. Figure 4-2 shows the Emergency Bandage applied to a forearm. Figure 4-3 shows Emergency Bandages applied to various other wounds.
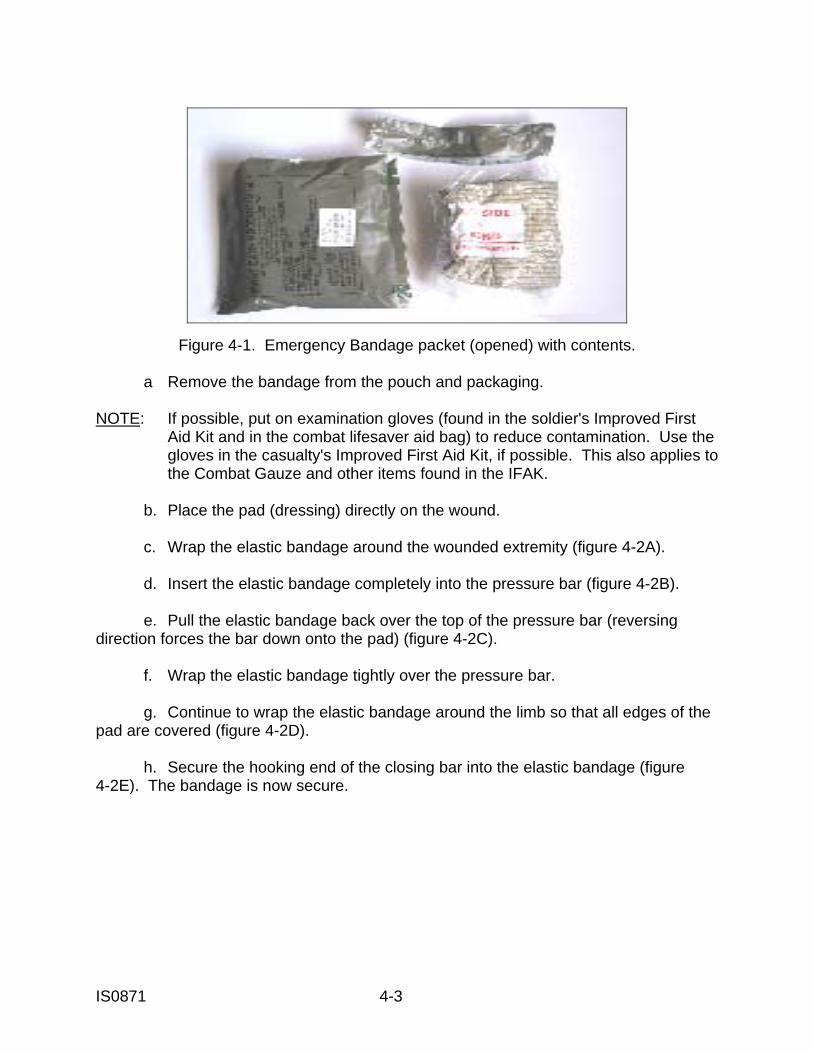
IS0871 4-3
Figure 4-1. Emergency Bandage packet (opened) with contents. a Remove the bandage from the pouch and packaging. NOTE: If possible, put on examination gloves (found in the soldier's Improved First Aid Kit and in the combat lifesaver aid bag) to reduce contamination. Use the gloves in the casualty's Improved First Aid Kit, if possible. This also applies to the Combat Gauze and other items found in the IFAK. b. Place the pad (dressing) directly on the wound. c. Wrap the elastic bandage around the wounded extremity (figure 4-2A). d. Insert the elastic bandage completely into the pressure bar (figure 4-2B). e. Pull the elastic bandage back over the top of the pressure bar (reversing direction forces the bar down onto the pad) (figure 4-2C). f. Wrap the elastic bandage tightly over the pressure bar. g. Continue to wrap the elastic bandage around the limb so that all edges of the pad are covered (figure 4-2D). h. Secure the hooking end of the closing bar into the elastic bandage (figure 4-2E). The bandage is now secure.
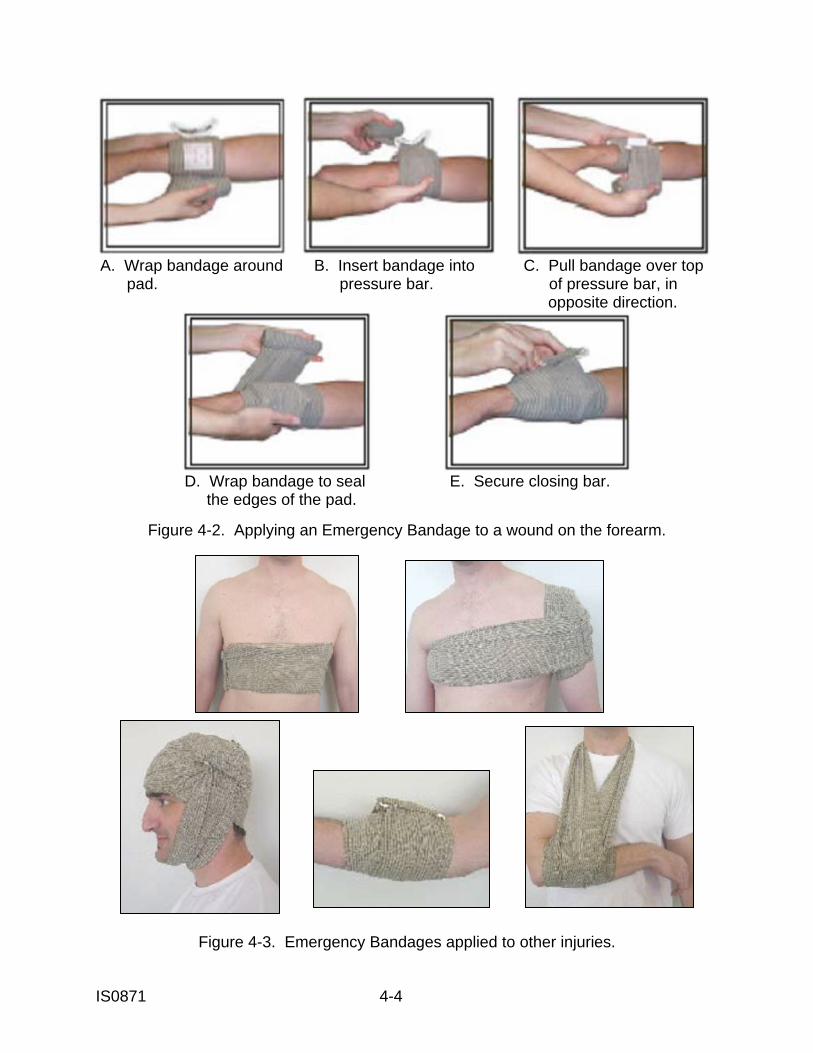
IS0871 4-4
A. Wrap bandage around B. Insert bandage into C. Pull bandage over top pad. pressure bar. of pressure bar, in opposite direction.
D. Wrap bandage to seal E. Secure closing bar. the edges of the pad.
Figure 4-2. Applying an Emergency Bandage to a wound on the forearm.
Figure 4-3. Emergency Bandages applied to other injuries.

IS0871 4-5
4-5. COMBAT GAUZE Combat Gauze (shown previously in figure 1-5 of Lesson 1) is a 3-inch by 4-yard roll of gauze that is impregnated with a hemostatic agent (kaolin). This material is a pro-coagulant and will cause blood to clot when it comes into contact with the blood. This action, along with the pressure of packing it into a bleeding wound and applying manual pressure, causes the wound to stop bleeding. Combat Gauze is used for serious arterial bleeding. Instructions for applying the Combat Gauze are given below. Use the casualty's Combat Gauze first. a. Open the clothing around wound. b. If possible, remove any excess pooled blood from the wound while preserving any clots already formed in the wound. c. Locate the source of most active bleeding. d. Pack the Combat Gauze tightly into wound and directly onto the source of the bleeding. e. More than one Combat Gauze may be required to stem the blood flow. f. Combat Gauze may be repacked or adjusted into the wound to ensure proper placement. g. Quickly apply manual pressure until the bleeding stops. It is recommended that you apply continuous pressure for three minutes. h. Reassess for proper and effective placement. i. Apply a pressure bandage to the wound to secure the Combat Gauze in the wound. 4-6. MANUAL PRESSURE If practical, apply direct pressure over the wound with your hand after you have applied the Emergency Bandage or other dressing. This pressure will help to compress the damaged blood vessels and control the bleeding. Maintain this pressure for 5 to 10 minutes. NOTE: If the casualty is conscious and can follow instructions, you can have him apply the manual pressure himself.

IS0871 4-6
4-7. PRESSURE DRESSING If blood continues to seep from the dressing after you have applied manual pressure, apply a pressure dressing. If an Emergency Bandage has been applied, tighten the bandage to form a pressure dressing. Otherwise, apply an improvised pressure dressing. The following instructions assume that an improvised pressure dressing is being applied after the lower limbs have been elevated to help prevent shock. NOTE: The Emergency Bandage (paragraph 4-4) can be used both as a field dressing and as a pressure dressing. a. Place a wad of padding on top of the dressing and directly over the wound (figure 4-4A). The wad can be made from a folded muslin bandage (cravat) from your aid bag, a rag, material torn from clothing, or other material that can be folded several times. b. Place a cravat over the wad of padding (figure 4-4B) and wrap the cravat tightly around the limb over the dressing (figure 4-4C). (1) The cravat can be made from a muslin bandage from your aid bag or other material torn and folded into a cravat (see figure 4-10 in Section II). Other materials, such as a handkerchief, sock, or strip of cloth torn from a shirt, can also be used. (2) Wire and narrow material, such as a shoestring, should not be used since they are likely to damage blood vessels and nerve tissue. c. Tie the ends of the cravat in a nonslip knot to secure the wad of padding (figure 4-4D). Tie the nonslip knot directly over the wound. The cravat should be tight enough so only the tip of one finger can be inserted under the cravat. Do not tie the cravat so tight that it cuts off blood circulation. The pressure on the wad of dressing helps to restrict the blood vessels and control the bleeding. d. Check the circulation below the pressure dressing. If the skin below the pressure dressing becomes cool to the touch, bluish, or numb, or if the pulse below the pressure dressing is no longer present, the pressure dressing may be too tight. If circulation is impaired, loosen and retie the cravat. If circulation is not restored, evacuate the casualty as soon as possible. NOTE: The pressure dressing can be loosened and retied without disturbing the blood clot forming under the dressing pad.
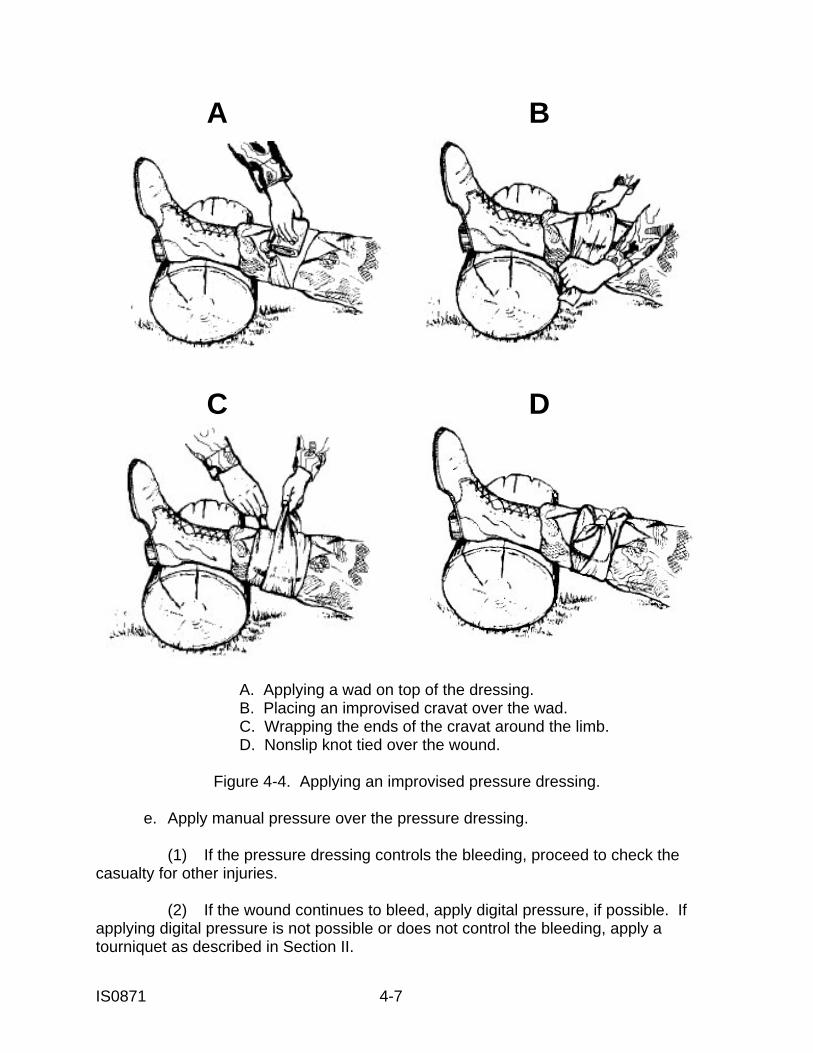
IS0871 4-7
A B
C D
A. Applying a wad on top of the dressing. B. Placing an improvised cravat over the wad. C. Wrapping the ends of the cravat around the limb. D. Nonslip knot tied over the wound.
Figure 4-4. Applying an improvised pressure dressing. e. Apply manual pressure over the pressure dressing. (1) If the pressure dressing controls the bleeding, proceed to check the casualty for other injuries. (2) If the wound continues to bleed, apply digital pressure, if possible. If applying digital pressure is not possible or does not control the bleeding, apply a tourniquet as described in Section II.
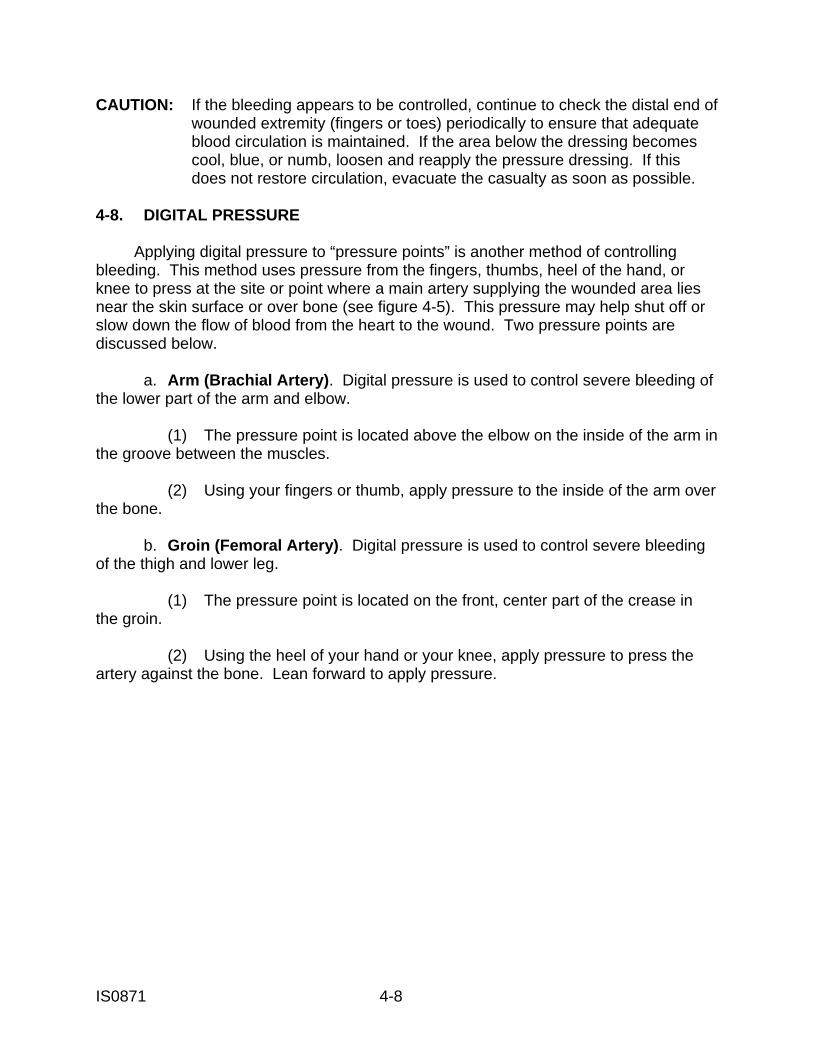
IS0871 4-8
CAUTION: If the bleeding appears to be controlled, continue to check the distal end of wounded extremity (fingers or toes) periodically to ensure that adequate blood circulation is maintained. If the area below the dressing becomes cool, blue, or numb, loosen and reapply the pressure dressing. If this does not restore circulation, evacuate the casualty as soon as possible. 4-8. DIGITAL PRESSURE Applying digital pressure to “pressure points” is another method of controlling bleeding. This method uses pressure from the fingers, thumbs, heel of the hand, or knee to press at the site or point where a main artery supplying the wounded area lies near the skin surface or over bone (see figure 4-5). This pressure may help shut off or slow down the flow of blood from the heart to the wound. Two pressure points are discussed below. a. Arm (Brachial Artery). Digital pressure is used to control severe bleeding of the lower part of the arm and elbow. (1) The pressure point is located above the elbow on the inside of the arm in the groove between the muscles. (2) Using your fingers or thumb, apply pressure to the inside of the arm over the bone. b. Groin (Femoral Artery). Digital pressure is used to control severe bleeding of the thigh and lower leg. (1) The pressure point is located on the front, center part of the crease in the groin. (2) Using the heel of your hand or your knee, apply pressure to press the artery against the bone. Lean forward to apply pressure.
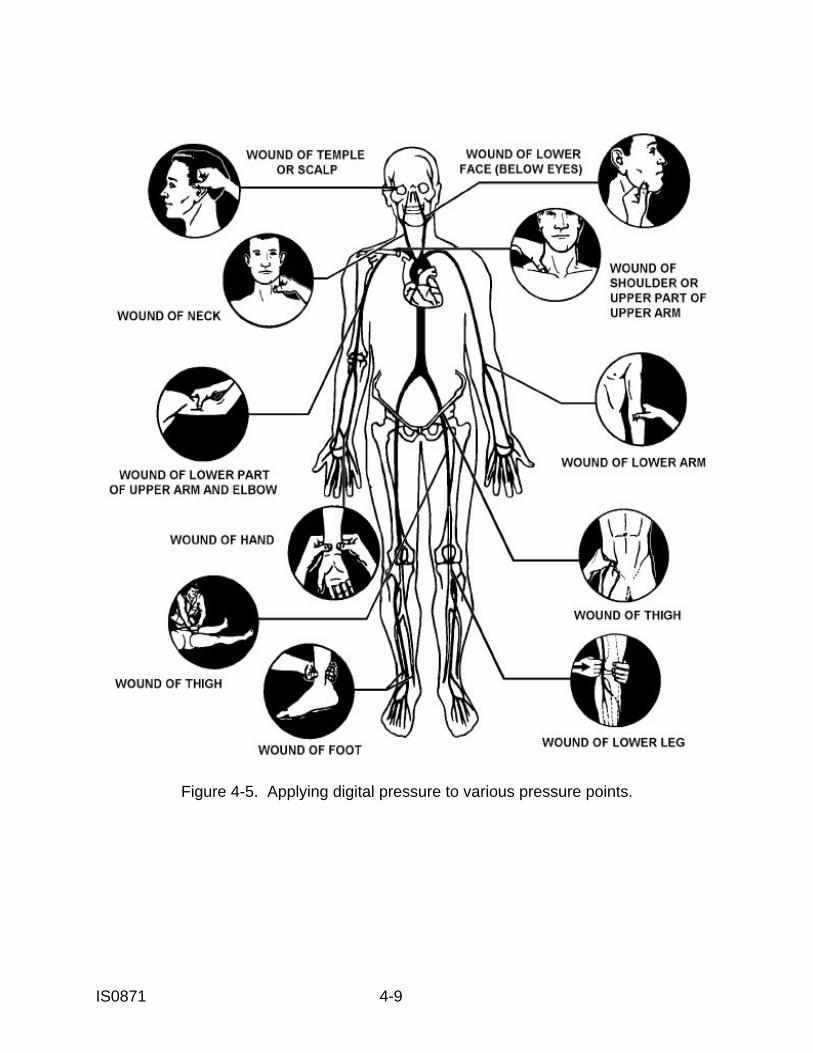
IS0871 4-9
Figure 4-5. Applying digital pressure to various pressure points.

IS0871 4-10
Section II. APPLYING A TOURNIQUET 4-9. DETERMINING IF A TOURNIQUET IS REQUIRED A tourniquet is a constricting band placed around an extremity to stop arterial bleeding by stopping blood circulation to the part of the limb below (distal to) the tourniquet. A tourniquet is only used on an arm, forearm, thigh, or leg when there is a danger of the casualty bleeding to death.
WARNING
A tourniquet is not used for wounds to the head, neck, or trunk (chest and abdominal area).
a. Wound on an Extremity. Bleeding from a major artery of the thigh, lower leg, arm, or forearm and bleeding from multiple arteries may prove to be beyond control by the methods discussed in Section II. If you have applied a pressure dressing and firm hand pressure, but the dressing has become soaked with blood and the wound continues to bleed, apply a tourniquet. NOTE: The tactical situation may not allow the time or safety for conventional methods of controlling the bleeding if you are under fire. The recommended means to control bleeding while under fire is a rapidly applied tourniquet. Tourniquets may be left in place for two hours without major complications.
REMEMBER
If you are unable to control bleeding except with a tourniquet, it is better to sacrifice a limb than to lose a life due to excessive bleeding.
b. Amputation. (1) An amputation may be complete (the limb is completely severed) or partial (the two parts of the limb remain connected by some skin or other tissue). Both require a tourniquet. Both involve bleeding from multiple arteries and are beyond control by the methods discussed in Section II. (2) A person whose has suffered an amputation of the arm, forearm, thigh or leg may not be bleeding severely when first discovered, but a tourniquet should be applied anyway. Lack of bleeding is due to the body’s normal defenses (contraction and spasm of blood vessels) because of the amputation. However, bleeding will start when the blood vessels relax or if the clot is knocked loose while moving the casualty.
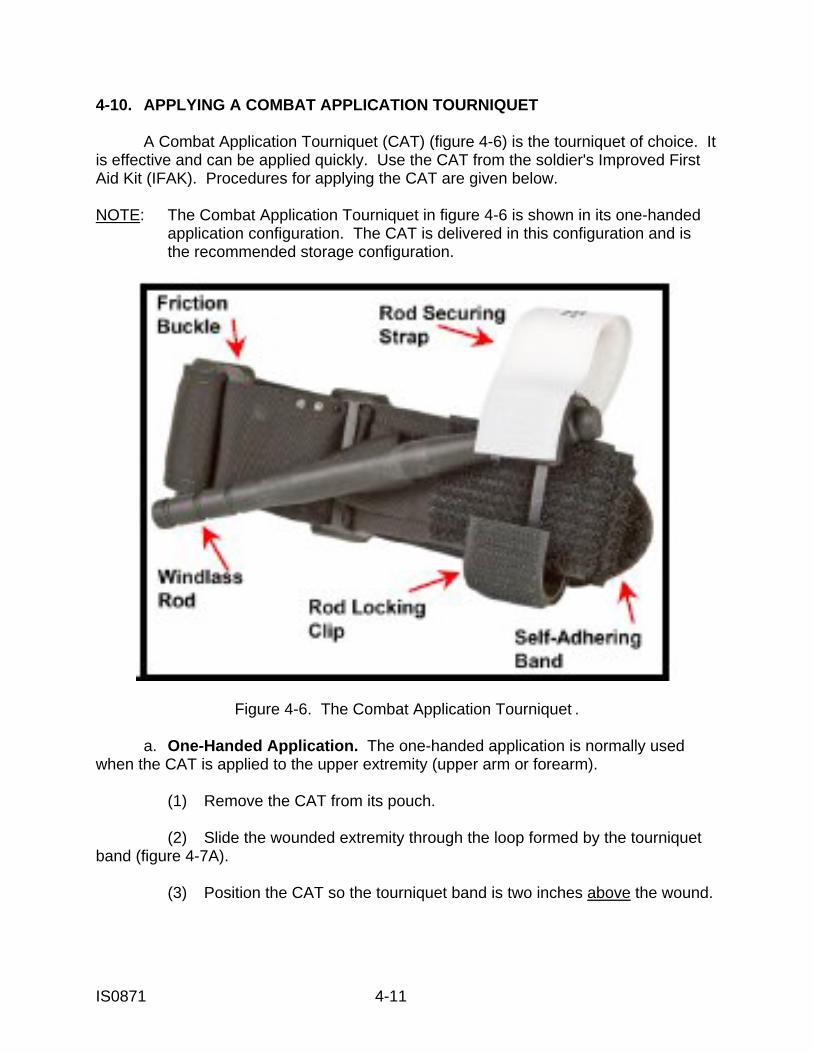
IS0871 4-11
4-10. APPLYING A COMBAT APPLICATION TOURNIQUET A Combat Application Tourniquet (CAT) (figure 4-6) is the tourniquet of choice. It is effective and can be applied quickly. Use the CAT from the soldier's Improved First Aid Kit (IFAK). Procedures for applying the CAT are given below. NOTE: The Combat Application Tourniquet in figure 4-6 is shown in its one-handed application configuration. The CAT is delivered in this configuration and is the recommended storage configuration.
Figure 4-6. The Combat Application Tourniquet . a. One-Handed Application. The one-handed application is normally used when the CAT is applied to the upper extremity (upper arm or forearm). (1) Remove the CAT from its pouch. (2) Slide the wounded extremity through the loop formed by the tourniquet band (figure 4-7A). (3) Position the CAT so the tourniquet band is two inches above the wound.
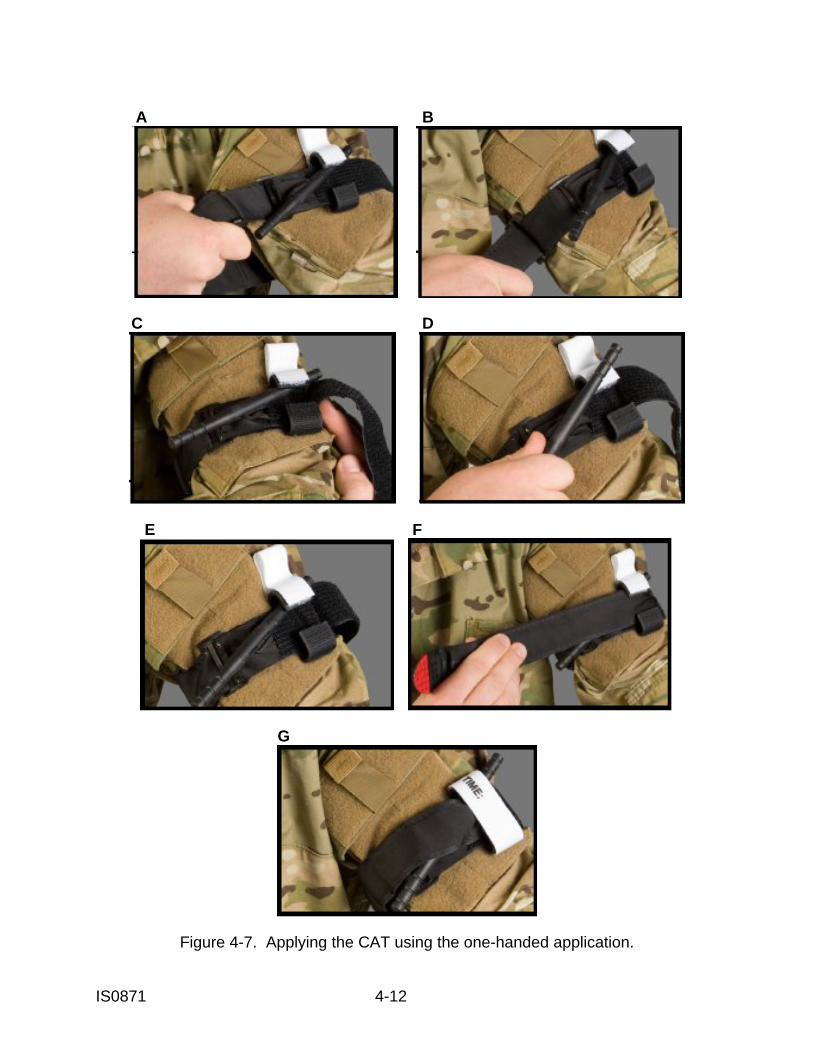
IS0871 4-12
A B
C D
E F
G
Figure 4-7. Applying the CAT using the one-handed application.
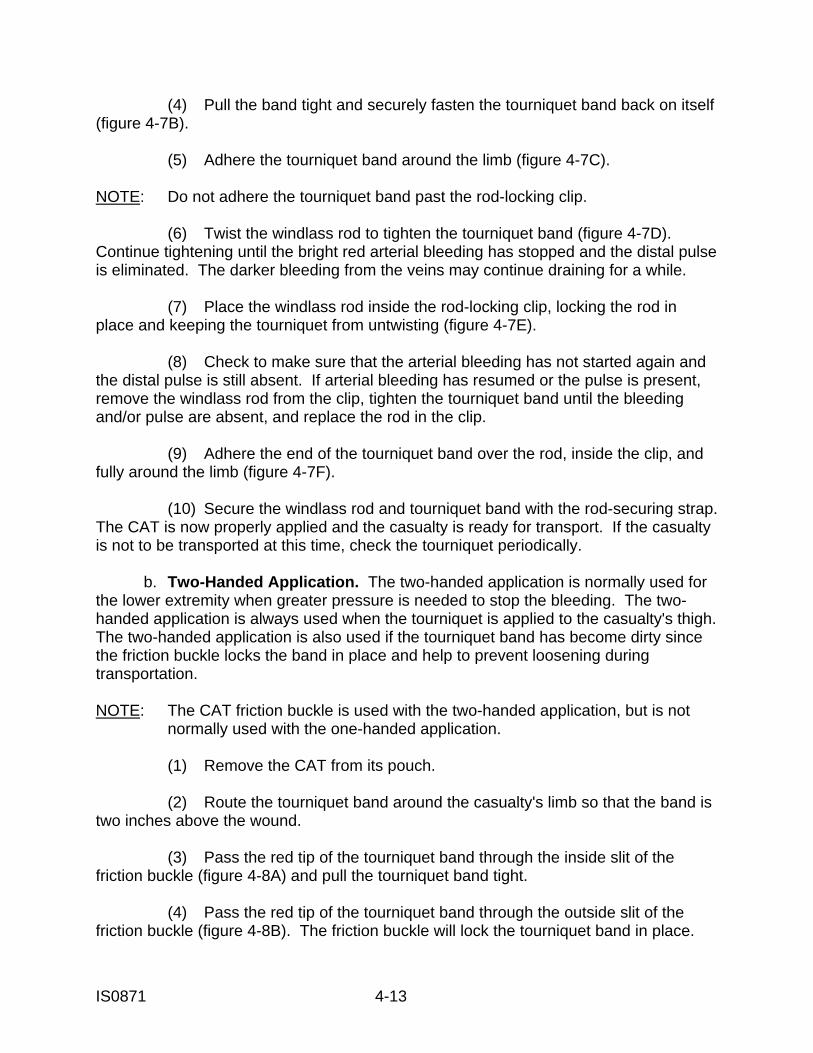
IS0871 4-13
(4) Pull the band tight and securely fasten the tourniquet band back on itself (figure 4-7B). (5) Adhere the tourniquet band around the limb (figure 4-7C). NOTE: Do not adhere the tourniquet band past the rod-locking clip. (6) Twist the windlass rod to tighten the tourniquet band (figure 4-7D). Continue tightening until the bright red arterial bleeding has stopped and the distal pulse is eliminated. The darker bleeding from the veins may continue draining for a while. (7) Place the windlass rod inside the rod-locking clip, locking the rod in place and keeping the tourniquet from untwisting (figure 4-7E). (8) Check to make sure that the arterial bleeding has not started again and the distal pulse is still absent. If arterial bleeding has resumed or the pulse is present, remove the windlass rod from the clip, tighten the tourniquet band until the bleeding and/or pulse are absent, and replace the rod in the clip. (9) Adhere the end of the tourniquet band over the rod, inside the clip, and fully around the limb (figure 4-7F). (10) Secure the windlass rod and tourniquet band with the rod-securing strap. The CAT is now properly applied and the casualty is ready for transport. If the casualty is not to be transported at this time, check the tourniquet periodically. b. Two-Handed Application. The two-handed application is normally used for the lower extremity when greater pressure is needed to stop the bleeding. The two-handed application is always used when the tourniquet is applied to the casualty's thigh. The two-handed application is also used if the tourniquet band has become dirty since the friction buckle locks the band in place and help to prevent loosening during transportation. NOTE: The CAT friction buckle is used with the two-handed application, but is not normally used with the one-handed application. (1) Remove the CAT from its pouch. (2) Route the tourniquet band around the casualty's limb so that the band is two inches above the wound. (3) Pass the red tip of the tourniquet band through the inside slit of the friction buckle (figure 4-8A) and pull the tourniquet band tight. (4) Pass the red tip of the tourniquet band through the outside slit of the friction buckle (figure 4-8B). The friction buckle will lock the tourniquet band in place.
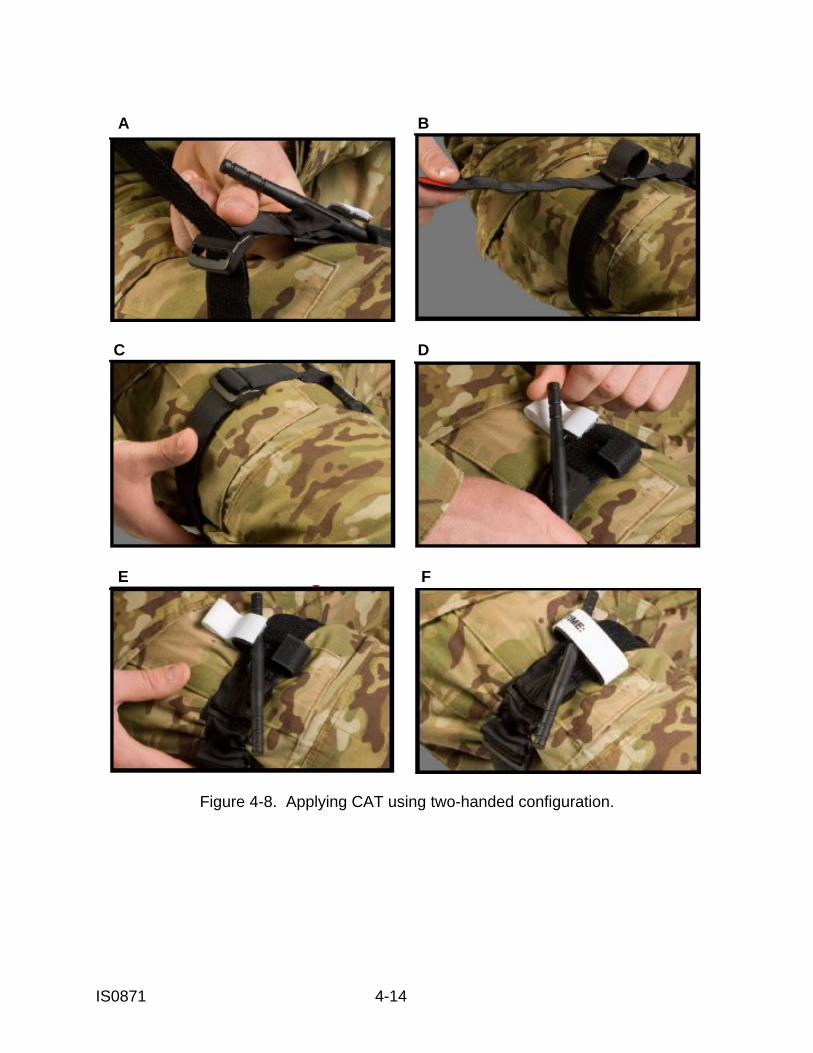
IS0871 4-14
A B
C D
E F
Figure 4-8. Applying CAT using two-handed configuration.
IS0871 4-15
(5) Pull the tourniquet band until it is very tight and securely fasten the tourniquet band back on itself (figure 4-8C). NOTE: When the tourniquet band is pulled tight and secured, no more than three fingers will fit between the tourniquet band and the limb. (6) Twist the windlass rod using both hands to tighten the tourniquet band (figure 4-8D). Continue tightening until the bright red arterial bleeding has stopped and the distal pulse is eliminated. The darker bleeding from the veins may continue for a while. (7) Place the windlass rod inside the rod-locking clip, locking the rod in place and keeping the tourniquet from untwisting (figure 4-8E). (8) Check to make sure that the arterial bleeding has not started again and the distal pulse is still absent. (a) If arterial bleeding has resumed or the pulse is present, apply a second tourniquet proximal to the first tourniquet. (b) If a second tourniquet is applied, reassess to make sure the arterial bleeding is controlled and the distal pulse is absent. Do not remove the first tourniquet. (c) If the second tourniquet does not control the arterial bleeding, transport the casualty as soon as possible. (9) Secure the windlass rod and tourniquet band with the rod-securing strap (figure 4-8F. The CAT is now properly applied and the casualty is ready for transport. If the casualty is not to be transported at this time, check the tourniquet periodically. c. Storing the Combat Application Tourniquet. Follow the following procedures if you need to store an opened Combat Application Tourniquet. (1) Pass the red tip of the tourniquet band through the inside slit in the friction buckle. (2) Pull six inches of the tourniquet band through the slit, fold the tourniquet band back, and adhere the tourniquet band to itself (figure 4-9A). (3) Flatten the loop formed by the tourniquet band, placing the friction buckle in the middle of the flattened tourniquet band (figure 4-9B). (4) Fold the CAT in half so the friction buckle is at one end (figure 4-9C). (5) The CAT is now ready to be placed in your medical equipment set or other container.
IS0871 4-16
A B
C
Figure 4-9. Placing the CAT in the one-handed configuration for storage. 4-11. APPLYING AN IMPROVISED TOURNIQUET In the absence of a specially designed tourniquet such as the CAT, a tourniquet may be made from a strong, pliable material such as gauze, a muslin bandage, or a strip of material torn from clothing. An improvised tourniquet is used with a rigid stick-like object to act as the windlass rod. To minimize skin damage, ensure that the improvised tourniquet is at least two inches wide. a. Gather Materials for Making a Tourniquet. (1) Tourniquet band. You need a band of strong, pliable material that is at least two inches wide when folded and will retain this width after being tightened. A folded muslin bandage (usually called a cravat), a folded handkerchief, or a folded strip of clothing will do. A belt, rope, strap from load bearing equipment (LBE), roller gauze, or a torn sleeve can also be used. Do not use wire or shoestrings as a tourniquet band. A wide tourniquet will protect the tissue beneath the tourniquet when it is tightened. If a very narrow tourniquet is used, the nerves and blood vessels beneath the tourniquet may be seriously damaged.
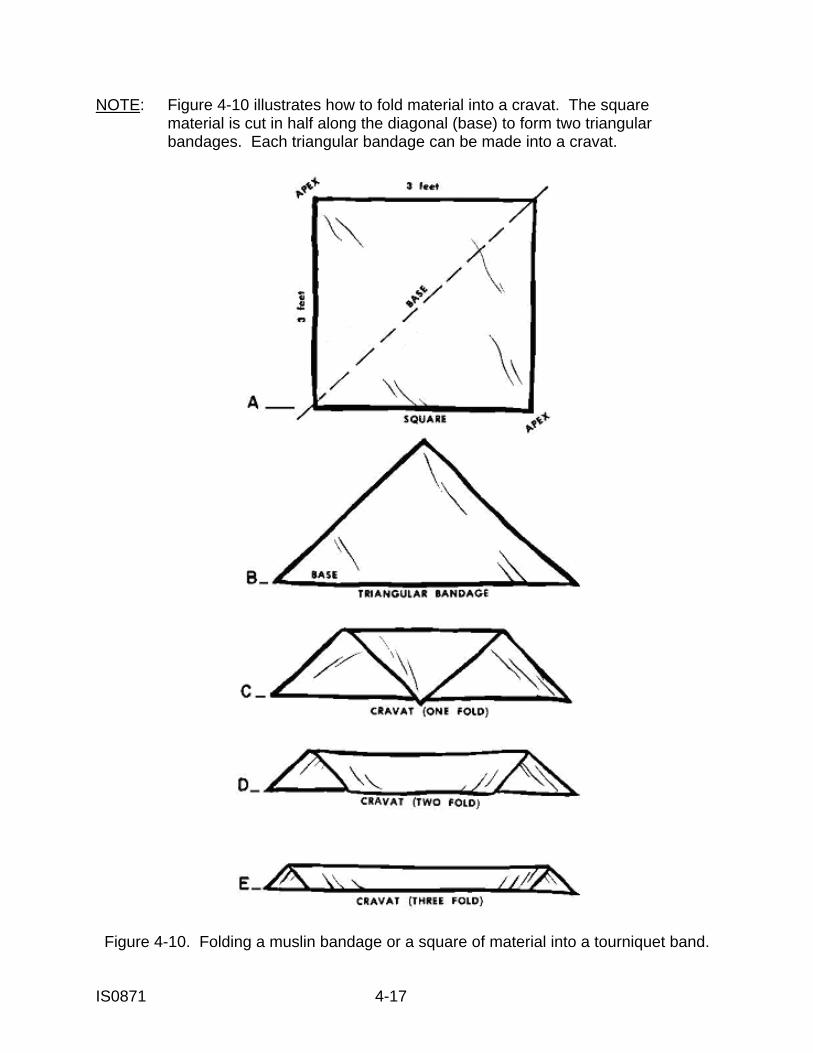
IS0871 4-17
NOTE: Figure 4-10 illustrates how to fold material into a cravat. The square material is cut in half along the diagonal (base) to form two triangular bandages. Each triangular bandage can be made into a cravat.
Figure 4-10. Folding a muslin bandage or a square of material into a tourniquet band.
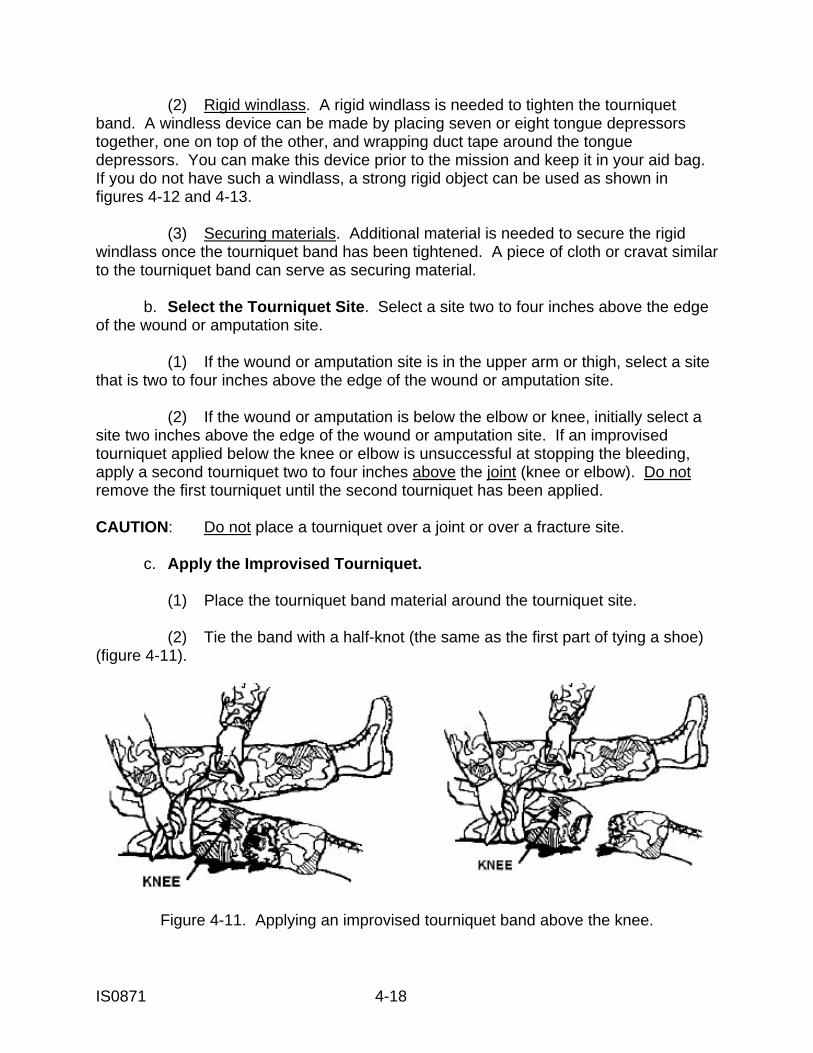
IS0871 4-18
(2) Rigid windlass. A rigid windlass is needed to tighten the tourniquet band. A windless device can be made by placing seven or eight tongue depressors together, one on top of the other, and wrapping duct tape around the tongue depressors. You can make this device prior to the mission and keep it in your aid bag. If you do not have such a windlass, a strong rigid object can be used as shown in figures 4-12 and 4-13. (3) Securing materials. Additional material is needed to secure the rigid windlass once the tourniquet band has been tightened. A piece of cloth or cravat similar to the tourniquet band can serve as securing material. b. Select the Tourniquet Site. Select a site two to four inches above the edge of the wound or amputation site. (1) If the wound or amputation site is in the upper arm or thigh, select a site that is two to four inches above the edge of the wound or amputation site. (2) If the wound or amputation is below the elbow or knee, initially select a site two inches above the edge of the wound or amputation site. If an improvised tourniquet applied below the knee or elbow is unsuccessful at stopping the bleeding, apply a second tourniquet two to four inches above the joint (knee or elbow). Do not remove the first tourniquet until the second tourniquet has been applied. CAUTION: Do not place a tourniquet over a joint or over a fracture site. c. Apply the Improvised Tourniquet. (1) Place the tourniquet band material around the tourniquet site. (2) Tie the band with a half-knot (the same as the first part of tying a shoe) (figure 4-11).
Figure 4-11. Applying an improvised tourniquet band above the knee.
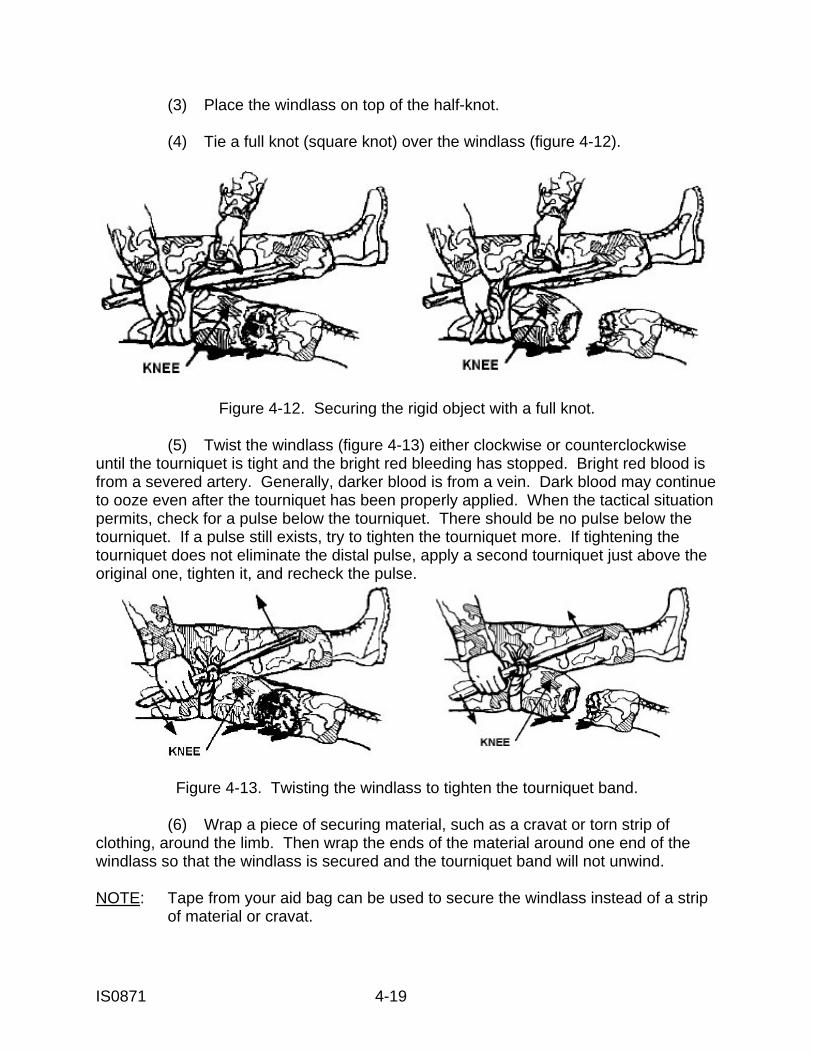
IS0871 4-19
(3) Place the windlass on top of the half-knot. (4) Tie a full knot (square knot) over the windlass (figure 4-12).
Figure 4-12. Securing the rigid object with a full knot. (5) Twist the windlass (figure 4-13) either clockwise or counterclockwise until the tourniquet is tight and the bright red bleeding has stopped. Bright red blood is from a severed artery. Generally, darker blood is from a vein. Dark blood may continue to ooze even after the tourniquet has been properly applied. When the tactical situation permits, check for a pulse below the tourniquet. There should be no pulse below the tourniquet. If a pulse still exists, try to tighten the tourniquet more. If tightening the tourniquet does not eliminate the distal pulse, apply a second tourniquet just above the original one, tighten it, and recheck the pulse.
Figure 4-13. Twisting the windlass to tighten the tourniquet band. (6) Wrap a piece of securing material, such as a cravat or torn strip of clothing, around the limb. Then wrap the ends of the material around one end of the windlass so that the windlass is secured and the tourniquet band will not unwind. NOTE: Tape from your aid bag can be used to secure the windlass instead of a strip of material or cravat.
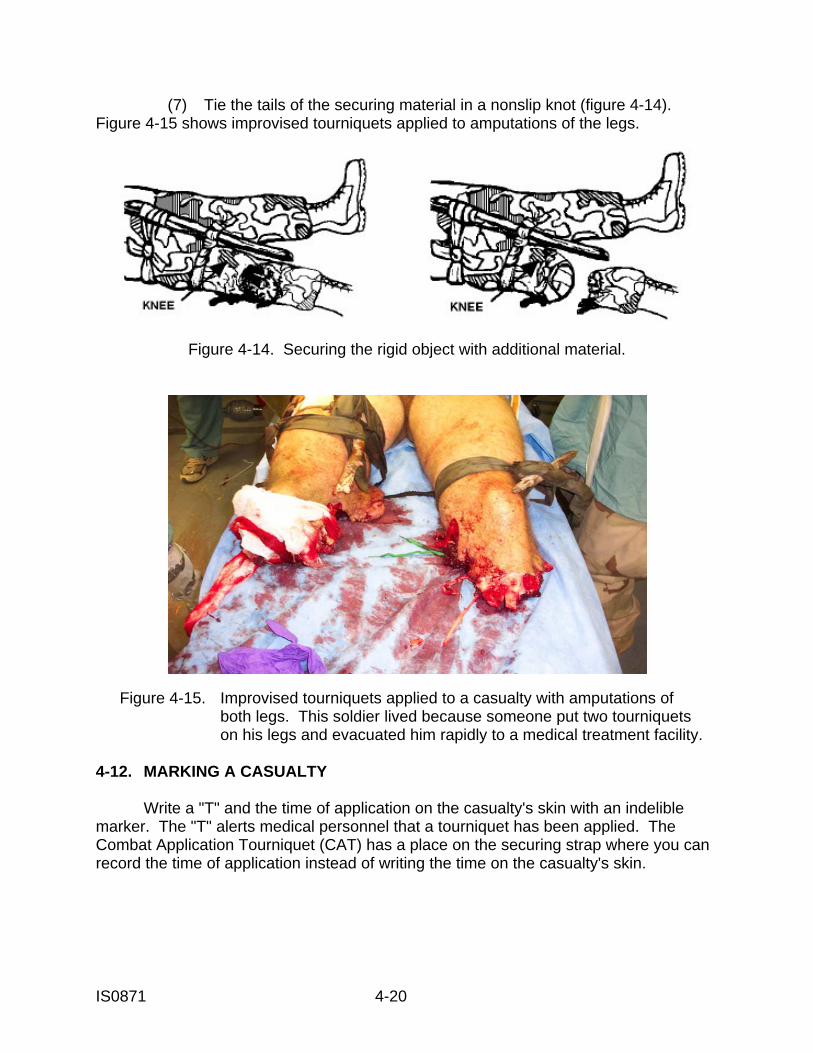
IS0871 4-20
(7) Tie the tails of the securing material in a nonslip knot (figure 4-14). Figure 4-15 shows improvised tourniquets applied to amputations of the legs.
Figure 4-14. Securing the rigid object with additional material.
Figure 4-15. Improvised tourniquets applied to a casualty with amputations of both legs. This soldier lived because someone put two tourniquets on his legs and evacuated him rapidly to a medical treatment facility. 4-12. MARKING A CASUALTY Write a "T" and the time of application on the casualty's skin with an indelible marker. The "T" alerts medical personnel that a tourniquet has been applied. The Combat Application Tourniquet (CAT) has a place on the securing strap where you can record the time of application instead of writing the time on the casualty's skin.
IS0871 4-21
4-13. DRESSING AN AMPUTATION After the tourniquet has been applied to an amputation of the arm or leg, place a dressing made of soft, absorbent material over the end of the stump and secure the dressing with bandages. The dressing will help to prevent additional contamination of the wound. It will also help to protect the wound from additional injury. 4-14. MONITORING A CASUALTY WITH A TOURNIQUET IN PLACE Take measures to ensure that the tourniquet is performing its function. a. When the tactical situation permits, check the casualty for a pulse distal to tourniquet. If a pulse is present, attempt to tighten the tourniquet more or apply another tourniquet side-by-side and proximal (above) to the existing tourniquet. This measure will help to prevent a compartment syndrome or expanding hematoma from threatening the viability of the extremity. b. If a tourniquet applied below the knee or elbow does not control the arterial bleeding, apply another tourniquet two inches above the joint. c. Do not cover the tourniquet. Leave the tourniquet in full view so medical personnel can locate it quickly. d. Any time you move the casualty, recheck the tourniquet to make sure it is still controlling the bleeding.
IS0871 4-22
EXERCISES: LESSON 4 INSTRUCTIONS: Answer the following exercises by marking the letter of the response that best answers the question or best completes the sentence or by writing the answer in the space provided. After you have answered all of the exercises, check your answers against the "Solutions to Lesson Exercises" at the end of the exercises. For each exercise answered incorrectly, reread the lesson material referenced. 1. What is the leading preventable cause of death on the battlefield? _______________________________________________________________ 2. Why should you push away any loose clothing near a casualty's open wound before applying a dressing? a. To allow the wound to get air. b. To provide a sterile work area. c. To see the extent of the wound. d. To apply ointment to the wound. 3. A casualty is bleeding from a leg wound. Part of the trouser material next to the wound is stuck to the wound. You should: a. Cut around the stuck material so as not to pull the material from the wound. b. Gently pull the material away from the wound area. 4. What part of the Emergency Bandage should be applied directly over an open wound? a. The bandage attached to the dressing. b. The dressing pad. c. Either of the above is acceptable.
IS0871 4-23
5. You have just applied a pressure dressing to a wound on the casualty's arm. Under what circumstance would you loosen the cravat? a. The bleeding has stopped. b. The casualty has lost consciousness. c. The casualty complains of thirst. d. There is no pulse in the limb below (distal to) the bandage. 6. You have applied a field dressing to a bleeding wound on the casualty's forearm. What else should you do to help control the bleeding? _____________________________________________ 7. You have applied a field dressing and manual pressure to a wound on the casualty's thigh, but blood is still leaking from the dressing. What should you do now? ______________________________________________ 8. The "wad" of material that is part of an improvised pressure dressing is placed: a. Two to four inches above (proximal to) the original dressing. b. On top of the original dressing and over the wound. c. Two to four inches below (distal to) the original dressing. 9. The portion of the limb below the pressure dressing is cool to the touch and the nail beds on the limb are bluish. The pressure dressing should be ___________________ and ____________________. If the condition does not improve, _____________________ the casualty. 10. You are going to apply digital pressure to help control severe bleeding from an open wound on the thigh. Use _______________________________ to apply pressure to the pressure point at the front, center part of the crease in the groin in order to press the artery against the bone.

IS0871 4-24
11. You are applying an Emergency Bandage to a wound on the limb. Indicate the order in which the following steps are performed by writing the numbers 1 (first) through 7 (last) in the blanks before the steps. ___ Insert the elastic bandage completely into the pressure bar. ___ Place the dressing pad on the wound. ___ Wrap the elastic bandage around the wounded limb. ___ Wrap the elastic bandage tightly over the pressure bar. ___ Secure the hooking end of the closing bar into the elastic bandage. ___ Continue to wrap the elastic bandage around the limb so that all edges of the pad are covered. ___ Pull the elastic bandage back over the top of the pressure bar, forcing the bar down onto the pad. 12. The Combat Gauze bandage is used for: a. Minor bleeding. b. Serious arterial bleeding. c. A complete amputation of an upper arm or thigh in lieu of a tourniquet. 13. After you apply the Combat Gauze bandage to a wound, you should immediately: a. Apply a pressure dressing over the Combat Gauze. b. Apply a tourniquet above the Combat Gauze. c. Apply manual pressure to the Combat Gauze. d. Apply a tourniquet below the Combat Gauze. 14. The Combat Gauze bandage works by: a. A chemical reaction that promotes blood clotting. b. A chemical reaction that helps to heal the damaged blood vessels. c. Causing the blood vessels to expand, thus reducing blood pressure. d. Providing oxygen to the wound.
IS0871 4-25
15. Which of the following is applied with the intent of stopping blood circulation? a. Emergency Bandage. b. Manual pressure. c. Pressure dressing. d. Tourniquet. 16. Both you and the casualty are in a place of safety and you have sufficient time to treat the casualty. In which of the following situations, if any, would you apply a tourniquet without first trying to control the bleeding with a pressure dressing? a. Severe bleeding from a wound on the leg. b. Severe bleeding from a wound on the forearm. c. Amputation of the forearm four inches below the elbow. d. None of the above. 17. When applying the CAT, the friction adaptor buckle is not necessary for proper application to a(n) _____________________ , but it must be used as added protection when using two hands to apply the CAT to a(n) _________________ . 18. Which one of the following would be preferred for an improvised tourniquet band? a. A wire that is 36 inches long. b. A square of cloth (one yard on each side) cut diagonally and folded into a cravat. c. A strong rubber band. d. A bootlace. 19. You are going to apply an improvised tourniquet band made from a muslin bandage. The tourniquet band should be at least _________ wide when folded. a. One-half inch. b. One inch. c. One and a half inches. d. Two inches.
IS0871 4-26
20. You are going to apply a tourniquet to an amputation that is about one inch below the elbow joint. Which of the following is an appropriate site for the tourniquet band? a. Between the wound and the elbow. b. Directly over the elbow. c. A little above the elbow. d. Two inches distal to the shoulder joint. 21. A soldier has just had his forearm amputated slightly above the wrist. The bleeding from the amputation site is not severe. What should you do first? a. Apply an Emergency Bandage to the wound. b. Apply a tourniquet two inches above the amputation site. c. Apply a pressure dressing to the stump. d. Apply a tourniquet two inches above the elbow. 22. Which one of the following statements gives a proper rule for tightening a tourniquet? a. A tourniquet should be loose enough so that you can slip two fingers under the tourniquet band. b. A tourniquet should be loose enough so that you can slip the tip of one finger under the tourniquet band. c. A tourniquet is to be tightened until the bright red bleeding has stopped and the distal pulse is gone; darker blood oozing from the wound can be ignored. d. A tourniquet is to be tightened until both the bright red bleeding and the darker venous bleeding have stopped completely and the distal pulse is gone. 23. Once you have tightened an improvised tourniquet, you must: a. Secure the windlass so that the tourniquet will not unwind. b. Apply an Emergency Bandage over the windlass. c. Remove the windlass and tie the tails in a nonslip knot. 24. The lower part of the casualty's arm has been amputated. You have applied a tourniquet. How is the stump treated? a. The stump is dressed and bandaged. b. The stump is left exposed to facilitate drainage.
IS0871 4-27
25. You have applied an improvised tourniquet to a casualty's left leg. Which one of the following is a proper method of marking the casualty?
a. Write a "T" and the time of application on the casualty's skin. b. Write a "T" and your initials on the dressing over the stump. c. Write "LL" and the time of application on the casualty's skin. d. Write "LL" and the time of application on the dressing over the stump. e. Write your initials on the casualty's chest.
26. If possible, practice performing the following tasks: Apply an Emergency Bandage to an open wound on an extremity. Apply a pressure dressing to an open wound on an extremity. Apply a Combat Application Tourniquet to an arm. Apply a Combat Application Tourniquet to a thigh. Apply an improvised tourniquet to an extremity. It is recommended that you form a team of three -- one playing the role of the combat lifesaver, one playing the casualty, and one performing the evaluation using the performance checklist. If a checklist allows variation (for example, applying a tourniquet to a leg or arm), it is suggested that all of the variations be practiced. Simulate tightening a tourniquet if the "casualty" is an actual person. Do not actually stop arterial blood flow. If an appropriate manikin is available, it can be used as the casualty. If you cannot actually perform the task, perform it mentally. As you describe the steps you would go through, have a person using the checklist evaluate your performance.
Check your answers on the next page.
IS0871 4-28
SOLUTIONS TO EXERCISES: LESSON 4 1. Bleeding (hemorrhaging) from an extremity (limb). (para 4-1) 2. c (para 4-2) 3. a (para 4-2 Caution) 4. b (para 4-4b) 5. d (para 4-7d) 6. Apply manual pressure. (para 4-6) 7. Apply a pressure dressing. (para 4-7) 8. b (para 4-7a) 9. Loosened, retied (or reapplied); evacuate. (para 4-7d) 10. The heel of your hand or your knee. (para 4-8b(2)) 11. The steps of applying the Emergency Bandage are given in correct sequence. 1. Place the dressing pad on the wound. 2. Wrap the elastic bandage around the wounded limb. 3. Insert the elastic bandage completely into the pressure bar. 4. Pull the elastic bandage back over the top of the pressure bar, forcing the bar down onto the pad. 5. Wrap the elastic bandage tightly over the pressure bar. 6. Continue to wrap the elastic bandage around the limb so that all edges of the pad are covered. 7. Secure the hooking end of the closing bar into the elastic bandage. (paras 4-4b through h) 12. b (para 4-5) 13. c (para 4-5g) 14. a (para 4-5) 15. d (para 4-9)
IS0871 4-29
16. c (paras 4-9b(1), (2)) 17. Arm (upper extremity); thigh. (para 4-10a, b, b Note) 18. b (para 4-11a(1), figure 4-10) 19. d (para 4-11a(1)) 20. c (paras 4-10a(2), b(2) ; 4-11b(2), (2) Caution) 21. b (paras 4-9b(1), (2)) 22. c (paras 4-10a(6), b(6); 4-11c(5)) 23. a (paras 4-11c(6), (7)) 24. a (para 4-13) 25. a (para 4-12) 26. See the following checklists.

IS0871 4-30
PERFORMANCE CHECKLIST
APPLY AN EMERGENCY BANDAGE TO AN OPEN WOUND ON AN EXTREMITY
Situation: You have located a casualty (simulated) with severe bleeding from a wound (exposed) on an extremity (wound is marked or indicated on arm, forearm, thigh, or leg). Supplies: Emergency Bandage. GO NO-GO Removes the Emergency Bandage from the pouch. _____ _____ Places the pad (dressing) on the wound. _____ _____ Wraps the elastic bandage around the wounded extremity. _____ _____ Inserts the elastic bandage completely into the pressure bar. _____ _____ Pulls the elastic bandage back over the top of the pressure bar, _____ _____ reversing direction, forcing the bar down onto the pad. Wraps the elastic bandage tightly over the pressure bar. _____ _____ Continues to wrap the elastic bandage around the limb so that all _____ _____ edges of the pad are covered. Secures the hooking end of the closing bar into the elastic bandage. _____ _____ The bandage is tight enough to secure the dressing, but not tight _____ _____ enough to stop distal blood circulation. OVERALL EVALUATION (circle one) GO NO-GO (A no-go on any step gives an overall evaluation of no-go.)
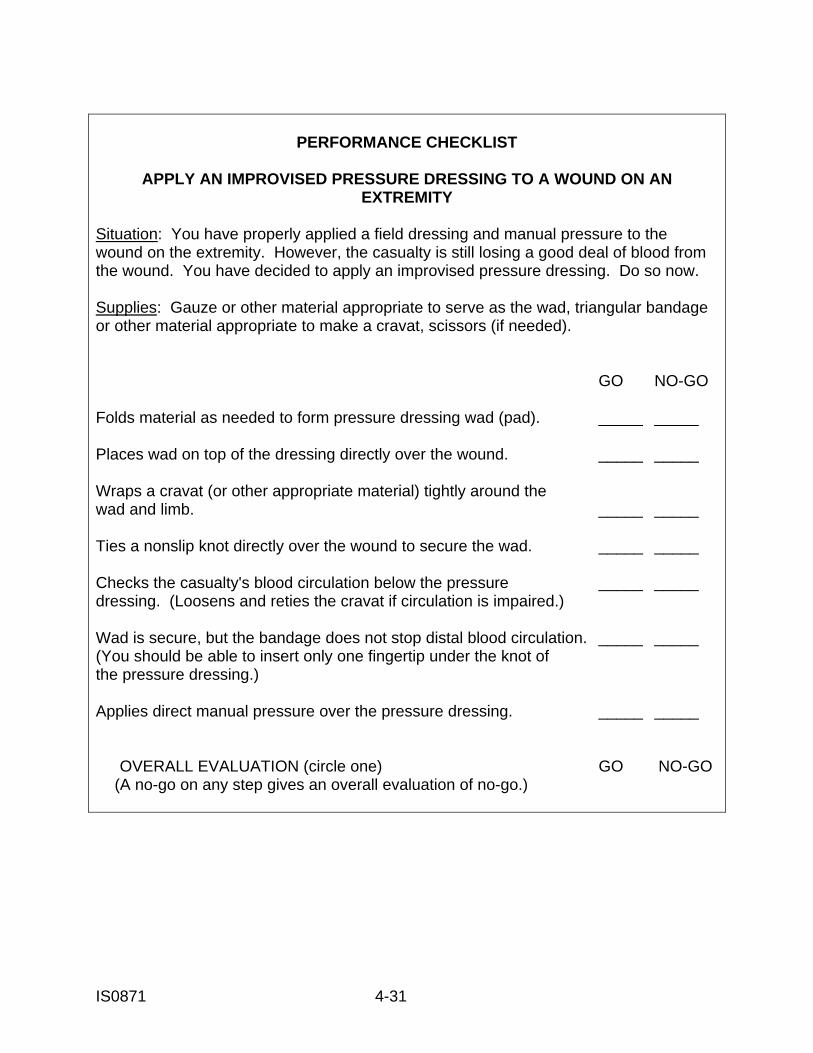
IS0871 4-31
PERFORMANCE CHECKLIST
APPLY AN IMPROVISED PRESSURE DRESSING TO A WOUND ON AN EXTREMITY
Situation: You have properly applied a field dressing and manual pressure to the wound on the extremity. However, the casualty is still losing a good deal of blood from the wound. You have decided to apply an improvised pressure dressing. Do so now. Supplies: Gauze or other material appropriate to serve as the wad, triangular bandage or other material appropriate to make a cravat, scissors (if needed). GO NO-GO Folds material as needed to form pressure dressing wad (pad). _____ _____ Places wad on top of the dressing directly over the wound. _____ _____ Wraps a cravat (or other appropriate material) tightly around the wad and limb. _____ _____ Ties a nonslip knot directly over the wound to secure the wad. _____ _____ Checks the casualty's blood circulation below the pressure _____ _____ dressing. (Loosens and reties the cravat if circulation is impaired.) Wad is secure, but the bandage does not stop distal blood circulation. _____ _____ (You should be able to insert only one fingertip under the knot of the pressure dressing.) Applies direct manual pressure over the pressure dressing. _____ _____ OVERALL EVALUATION (circle one) GO NO-GO (A no-go on any step gives an overall evaluation of no-go.)
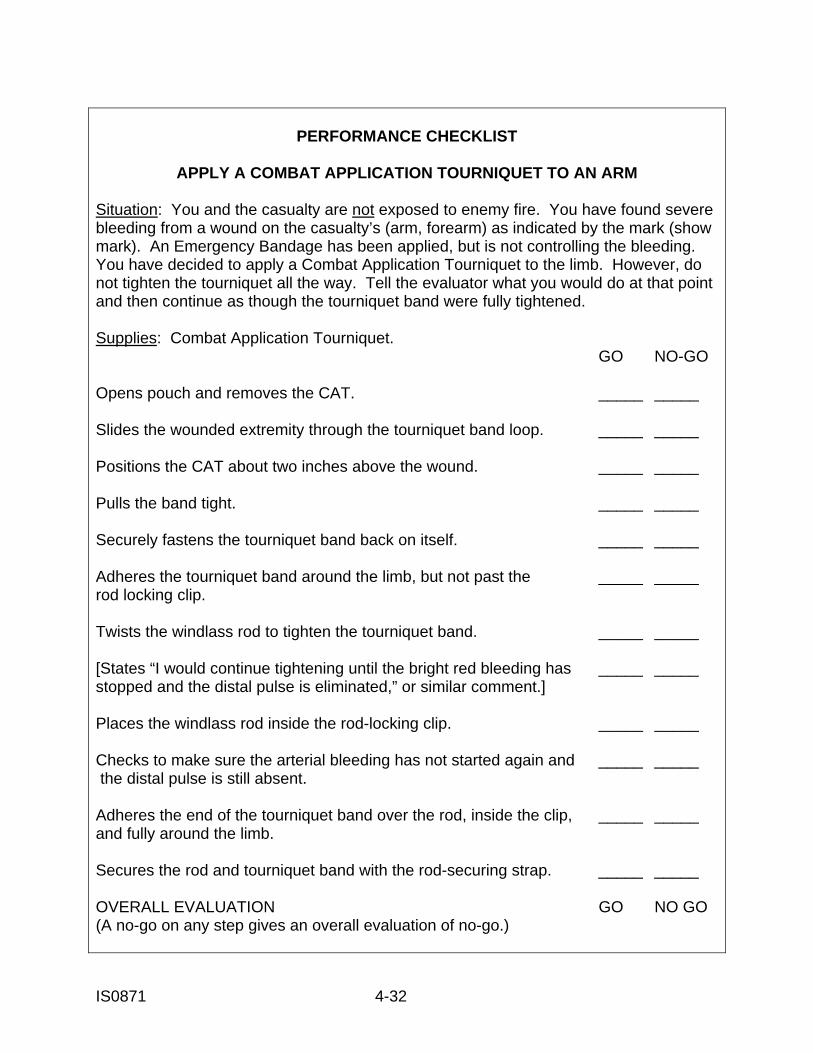
IS0871 4-32
PERFORMANCE CHECKLIST
APPLY A COMBAT APPLICATION TOURNIQUET TO AN ARM
Situation: You and the casualty are not exposed to enemy fire. You have found severe bleeding from a wound on the casualty’s (arm, forearm) as indicated by the mark (show mark). An Emergency Bandage has been applied, but is not controlling the bleeding. You have decided to apply a Combat Application Tourniquet to the limb. However, do not tighten the tourniquet all the way. Tell the evaluator what you would do at that point and then continue as though the tourniquet band were fully tightened. Supplies: Combat Application Tourniquet. GO NO-GO Opens pouch and removes the CAT. _____ _____ Slides the wounded extremity through the tourniquet band loop. _____ _____ Positions the CAT about two inches above the wound. _____ _____ Pulls the band tight. _____ _____ Securely fastens the tourniquet band back on itself. _____ _____ Adheres the tourniquet band around the limb, but not past the _____ _____ rod locking clip. Twists the windlass rod to tighten the tourniquet band. _____ _____ [States “I would continue tightening until the bright red bleeding has _____ _____ stopped and the distal pulse is eliminated,” or similar comment.] Places the windlass rod inside the rod-locking clip. _____ _____ Checks to make sure the arterial bleeding has not started again and _____ _____ the distal pulse is still absent. Adheres the end of the tourniquet band over the rod, inside the clip, _____ _____ and fully around the limb. Secures the rod and tourniquet band with the rod-securing strap. _____ _____ OVERALL EVALUATION GO NO GO (A no-go on any step gives an overall evaluation of no-go.)
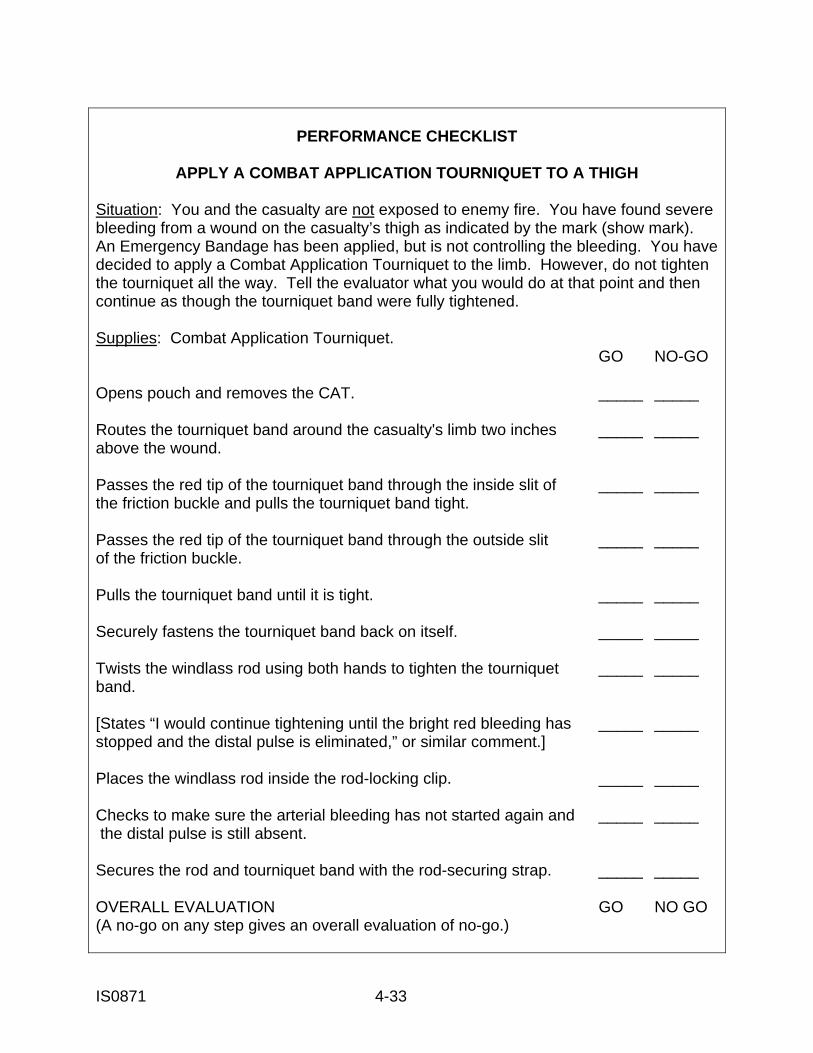
IS0871 4-33
PERFORMANCE CHECKLIST
APPLY A COMBAT APPLICATION TOURNIQUET TO A THIGH Situation: You and the casualty are not exposed to enemy fire. You have found severe bleeding from a wound on the casualty’s thigh as indicated by the mark (show mark). An Emergency Bandage has been applied, but is not controlling the bleeding. You have decided to apply a Combat Application Tourniquet to the limb. However, do not tighten the tourniquet all the way. Tell the evaluator what you would do at that point and then continue as though the tourniquet band were fully tightened. Supplies: Combat Application Tourniquet. GO NO-GO Opens pouch and removes the CAT. _____ _____ Routes the tourniquet band around the casualty's limb two inches _____ _____ above the wound. Passes the red tip of the tourniquet band through the inside slit of _____ _____ the friction buckle and pulls the tourniquet band tight. Passes the red tip of the tourniquet band through the outside slit _____ _____ of the friction buckle. Pulls the tourniquet band until it is tight. _____ _____ Securely fastens the tourniquet band back on itself. _____ _____ Twists the windlass rod using both hands to tighten the tourniquet _____ _____ band. [States “I would continue tightening until the bright red bleeding has _____ _____ stopped and the distal pulse is eliminated,” or similar comment.] Places the windlass rod inside the rod-locking clip. _____ _____ Checks to make sure the arterial bleeding has not started again and _____ _____ the distal pulse is still absent. Secures the rod and tourniquet band with the rod-securing strap. _____ _____ OVERALL EVALUATION GO NO GO (A no-go on any step gives an overall evaluation of no-go.)
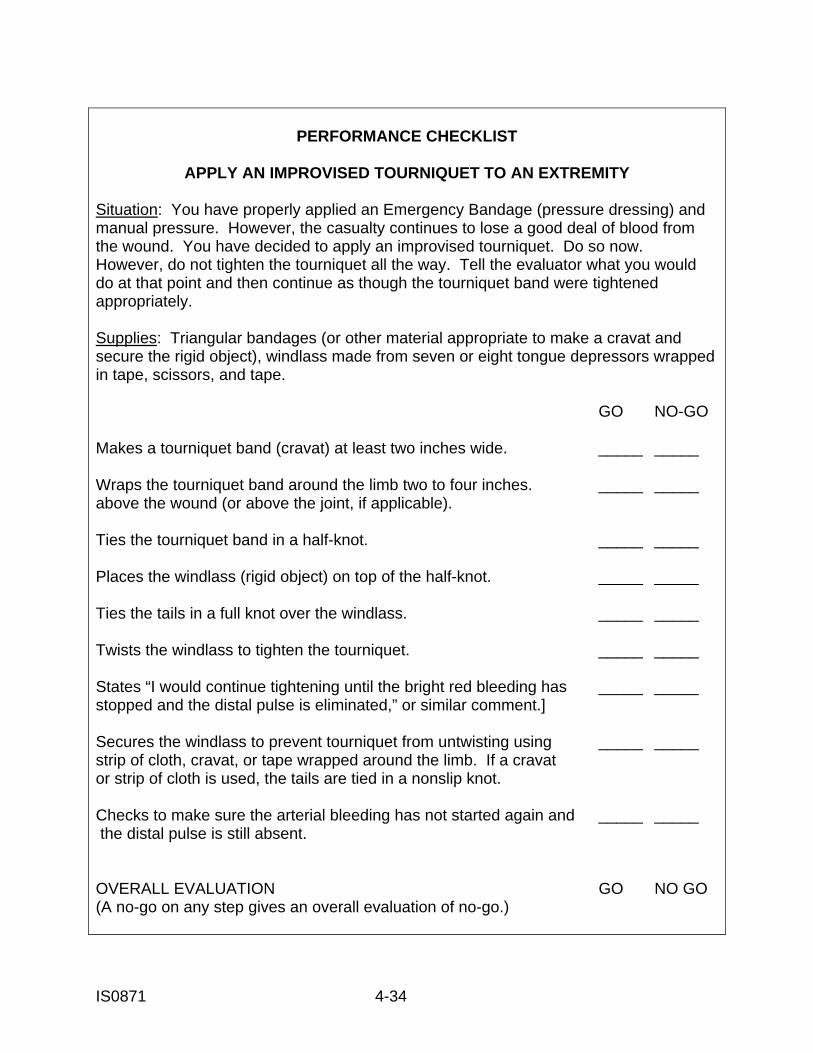
IS0871 4-34
PERFORMANCE CHECKLIST
APPLY AN IMPROVISED TOURNIQUET TO AN EXTREMITY
Situation: You have properly applied an Emergency Bandage (pressure dressing) and manual pressure. However, the casualty continues to lose a good deal of blood from the wound. You have decided to apply an improvised tourniquet. Do so now. However, do not tighten the tourniquet all the way. Tell the evaluator what you would do at that point and then continue as though the tourniquet band were tightened appropriately. Supplies: Triangular bandages (or other material appropriate to make a cravat and secure the rigid object), windlass made from seven or eight tongue depressors wrapped in tape, scissors, and tape. GO NO-GO Makes a tourniquet band (cravat) at least two inches wide. _____ _____ Wraps the tourniquet band around the limb two to four inches. _____ _____ above the wound (or above the joint, if applicable). Ties the tourniquet band in a half-knot. _____ _____ Places the windlass (rigid object) on top of the half-knot. _____ _____ Ties the tails in a full knot over the windlass. _____ _____ Twists the windlass to tighten the tourniquet. _____ _____ States “I would continue tightening until the bright red bleeding has _____ _____ stopped and the distal pulse is eliminated,” or similar comment.] Secures the windlass to prevent tourniquet from untwisting using _____ _____ strip of cloth, cravat, or tape wrapped around the limb. If a cravat or strip of cloth is used, the tails are tied in a nonslip knot. Checks to make sure the arterial bleeding has not started again and _____ _____ the distal pulse is still absent. OVERALL EVALUATION GO NO GO (A no-go on any step gives an overall evaluation of no-go.)
IS0871 5-1
LESSON 5
OPENING AND MANAGING A CASUALTY'S AIRWAY TASK Open and manage the airway of a simulated casualty. CONDITIONS Given a simulated casualty and a combat lifesaver medical equipment set. STANDARDS Score a GO on the performance checklists. Additional injuries to the casualty are prevented. REFERENCES STP 21-1-SMCT, Soldier's Manual of Common Tasks: Skill Level 1. FM 4-25.11, First Aid. Prehospital Trauma Life Support Manual, sixth edition. Published by Mosby/Elsevier. 5-1. MOVE TO SAFETY If a casualty is not breathing, measures to restore respiration (breathing) need to be administered as soon as possible. You must be in a situation in which you and the casualty are not under hostile fire before treating breathing problems. If you are under enemy fire, only administer rescue breathing after you have moved yourself and the casualty to a safe location. This lesson assumes that you have come upon a casualty while you are not under enemy fire and the casualty does not have any life-threatening bleeding from an extremity. 5-2. CHECK THE CASUALTY FOR RESPONSIVENESS a. If the casualty appears to be unconscious, check the casualty for responsiveness. Ask in a loud, but calm, voice, “Are you okay?” Also, gently shake or tap the casualty on the shoulder. If the casualty does not respond, you will need to position the casualty on his back and open his airway. b. Determine the casualty's level of consciousness using the AVPU scale (paragraphs 2-5b and 3-4c).
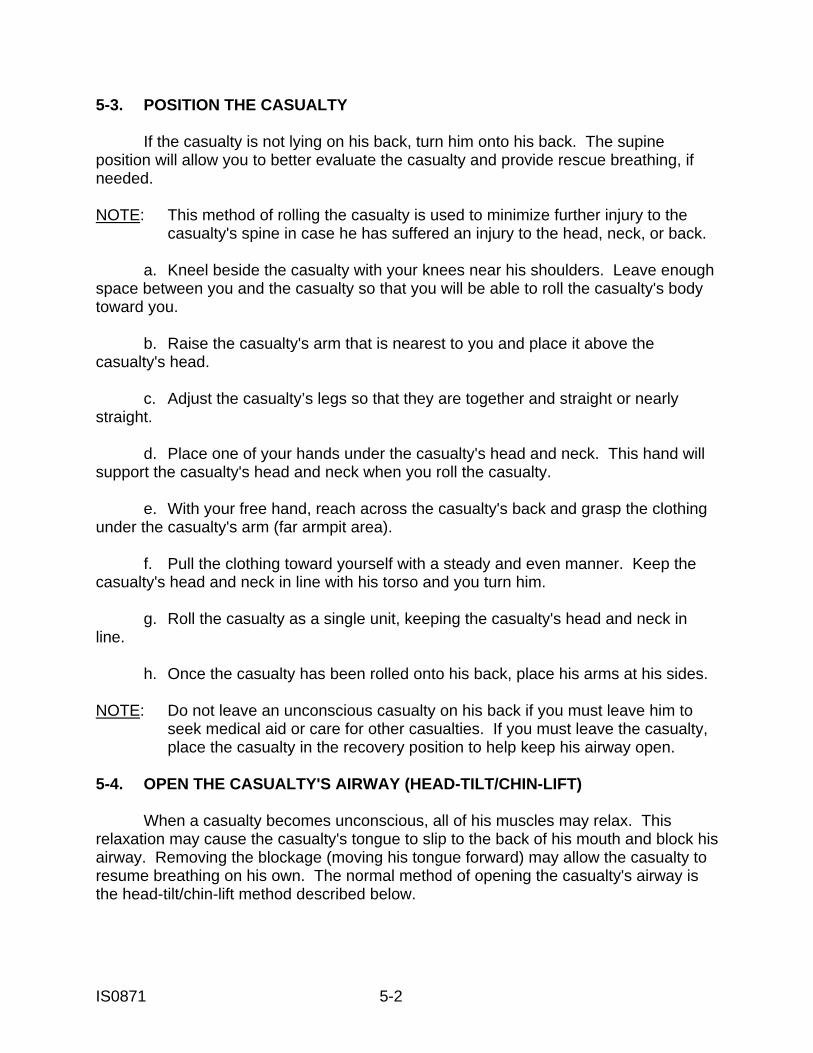
IS0871 5-2
5-3. POSITION THE CASUALTY If the casualty is not lying on his back, turn him onto his back. The supine position will allow you to better evaluate the casualty and provide rescue breathing, if needed. NOTE: This method of rolling the casualty is used to minimize further injury to the casualty's spine in case he has suffered an injury to the head, neck, or back. a. Kneel beside the casualty with your knees near his shoulders. Leave enough space between you and the casualty so that you will be able to roll the casualty's body toward you. b. Raise the casualty's arm that is nearest to you and place it above the casualty's head. c. Adjust the casualty’s legs so that they are together and straight or nearly straight. d. Place one of your hands under the casualty's head and neck. This hand will support the casualty's head and neck when you roll the casualty. e. With your free hand, reach across the casualty's back and grasp the clothing under the casualty's arm (far armpit area). f. Pull the clothing toward yourself with a steady and even manner. Keep the casualty's head and neck in line with his torso and you turn him. g. Roll the casualty as a single unit, keeping the casualty's head and neck in line. h. Once the casualty has been rolled onto his back, place his arms at his sides. NOTE: Do not leave an unconscious casualty on his back if you must leave him to seek medical aid or care for other casualties. If you must leave the casualty, place the casualty in the recovery position to help keep his airway open. 5-4. OPEN THE CASUALTY'S AIRWAY (HEAD-TILT/CHIN-LIFT) When a casualty becomes unconscious, all of his muscles may relax. This relaxation may cause the casualty's tongue to slip to the back of his mouth and block his airway. Removing the blockage (moving his tongue forward) may allow the casualty to resume breathing on his own. The normal method of opening the casualty's airway is the head-tilt/chin-lift method described below.
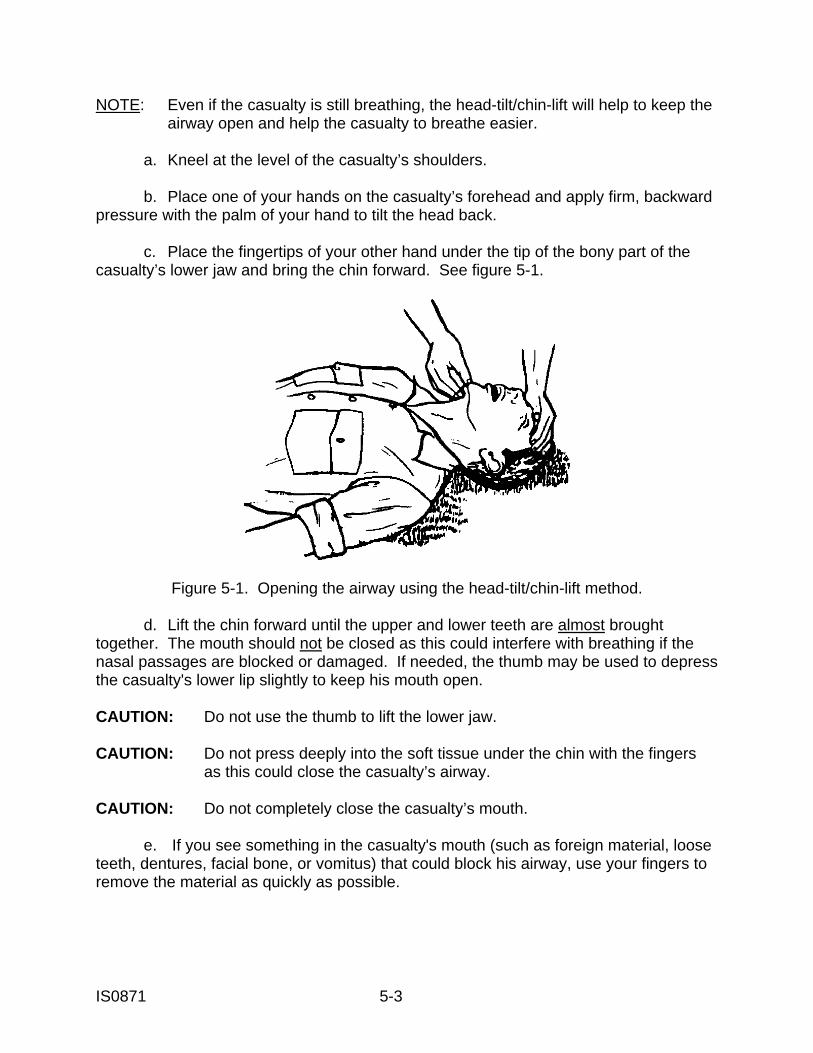
IS0871 5-3
NOTE: Even if the casualty is still breathing, the head-tilt/chin-lift will help to keep the airway open and help the casualty to breathe easier. a. Kneel at the level of the casualty’s shoulders. b. Place one of your hands on the casualty’s forehead and apply firm, backward pressure with the palm of your hand to tilt the head back. c. Place the fingertips of your other hand under the tip of the bony part of the casualty’s lower jaw and bring the chin forward. See figure 5-1.
Figure 5-1. Opening the airway using the head-tilt/chin-lift method. d. Lift the chin forward until the upper and lower teeth are almost brought together. The mouth should not be closed as this could interfere with breathing if the nasal passages are blocked or damaged. If needed, the thumb may be used to depress the casualty's lower lip slightly to keep his mouth open. CAUTION: Do not use the thumb to lift the lower jaw. CAUTION: Do not press deeply into the soft tissue under the chin with the fingers as this could close the casualty’s airway. CAUTION: Do not completely close the casualty’s mouth. e. If you see something in the casualty's mouth (such as foreign material, loose teeth, dentures, facial bone, or vomitus) that could block his airway, use your fingers to remove the material as quickly as possible.
IS0871 5-4
5-5. CHECK THE CASUALTY FOR BREATHING While maintaining the open airway position (head-tilt/chin-lift), place your ear over the casualty’s mouth and nose and look toward the chest and abdomen. Figure 5-2 shows checking for breathing while maintaining the head-tilt/chin-lift.
Figure 5-2. Checking for signs of breathing while maintaining an open airway (head-tilt/chin-lift). a. Look to see if the casualty's chest rises and falls. b. Listen for air escaping during exhalation. c. Feel for the flow of air on the side of your face. 5-6. DETERMINE APPROPRIATE ACTION a. If the casualty is conscious and breathing on his own, count the number of respirations for 15 seconds. If the casualty's respiratory rate is less than two breaths in 15 seconds (one inhalation and one exhalation equals one breath), insert a nasopharyngeal airway (paragraph 5-8) and place the casualty in the recovery position (paragraph 5-9). b. If the casualty is conscious and breathing on his own, but is making snoring or gurgling sounds, insert a nasopharyngeal airway (paragraph 5-8) and place the casualty in the recovery position (paragraph 5-9). c. If the casualty is unconscious, insert a nasopharyngeal airway (paragraph 5-8) and place the casualty in the recovery position (paragraph 5-9). d. If the casualty is not breathing and does not have a penetrating chest wound (see Lesson 6), check for a carotid pulse. (1) If there is no pulse, stop your rescue efforts. (2) If there is a pulse, begin rescue breathing (paragraph 5-7).
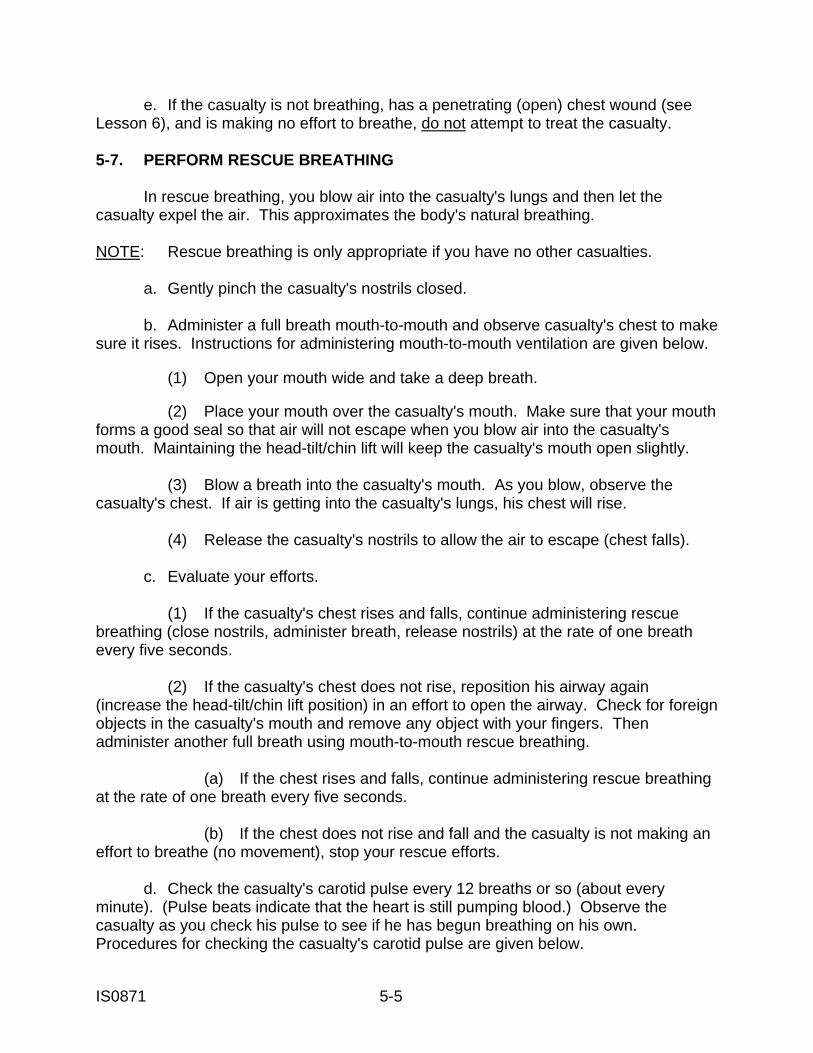
IS0871 5-5
e. If the casualty is not breathing, has a penetrating (open) chest wound (see Lesson 6), and is making no effort to breathe, do not attempt to treat the casualty. 5-7. PERFORM RESCUE BREATHING In rescue breathing, you blow air into the casualty's lungs and then let the casualty expel the air. This approximates the body's natural breathing. NOTE: Rescue breathing is only appropriate if you have no other casualties. a. Gently pinch the casualty's nostrils closed. b. Administer a full breath mouth-to-mouth and observe casualty's chest to make sure it rises. Instructions for administering mouth-to-mouth ventilation are given below. (1) Open your mouth wide and take a deep breath. (2) Place your mouth over the casualty's mouth. Make sure that your mouth forms a good seal so that air will not escape when you blow air into the casualty's mouth. Maintaining the head-tilt/chin lift will keep the casualty's mouth open slightly. (3) Blow a breath into the casualty's mouth. As you blow, observe the casualty's chest. If air is getting into the casualty's lungs, his chest will rise. (4) Release the casualty's nostrils to allow the air to escape (chest falls). c. Evaluate your efforts. (1) If the casualty's chest rises and falls, continue administering rescue breathing (close nostrils, administer breath, release nostrils) at the rate of one breath every five seconds. (2) If the casualty's chest does not rise, reposition his airway again (increase the head-tilt/chin lift position) in an effort to open the airway. Check for foreign objects in the casualty's mouth and remove any object with your fingers. Then administer another full breath using mouth-to-mouth rescue breathing. (a) If the chest rises and falls, continue administering rescue breathing at the rate of one breath every five seconds. (b) If the chest does not rise and fall and the casualty is not making an effort to breathe (no movement), stop your rescue efforts. d. Check the casualty's carotid pulse every 12 breaths or so (about every minute). (Pulse beats indicate that the heart is still pumping blood.) Observe the casualty as you check his pulse to see if he has begun breathing on his own. Procedures for checking the casualty's carotid pulse are given below.
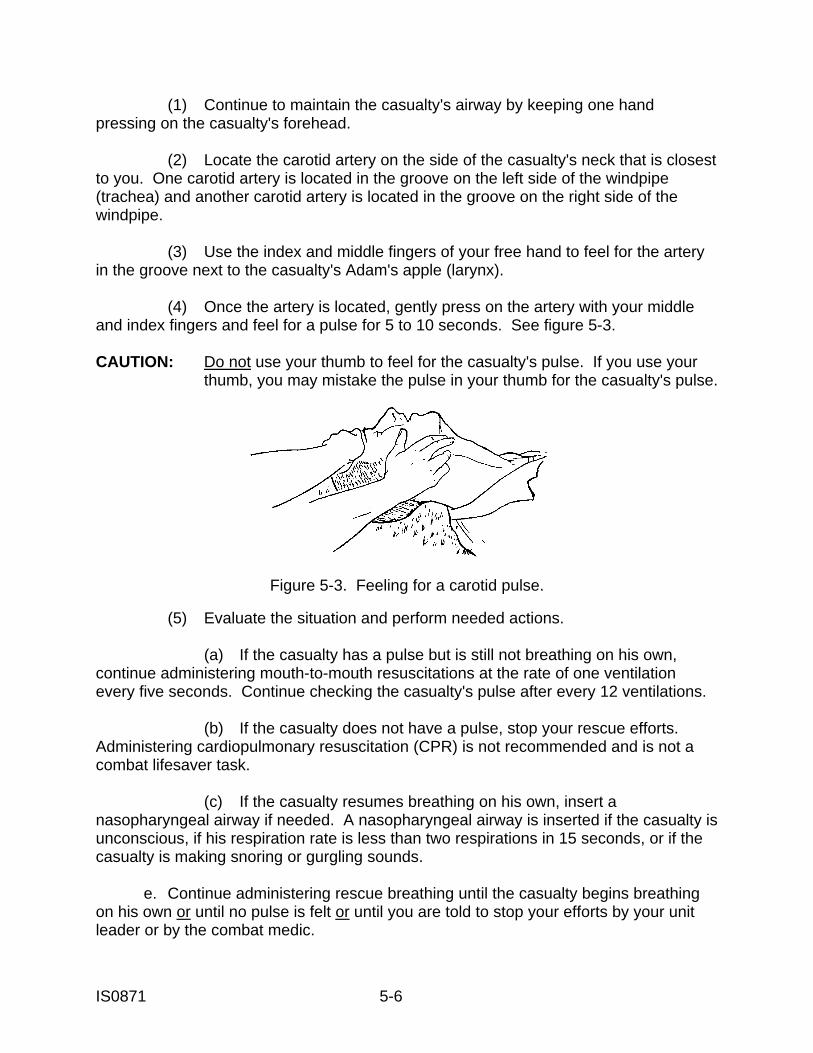
IS0871 5-6
(1) Continue to maintain the casualty's airway by keeping one hand pressing on the casualty's forehead. (2) Locate the carotid artery on the side of the casualty's neck that is closest to you. One carotid artery is located in the groove on the left side of the windpipe (trachea) and another carotid artery is located in the groove on the right side of the windpipe. (3) Use the index and middle fingers of your free hand to feel for the artery in the groove next to the casualty's Adam's apple (larynx). (4) Once the artery is located, gently press on the artery with your middle and index fingers and feel for a pulse for 5 to 10 seconds. See figure 5-3. CAUTION: Do not use your thumb to feel for the casualty's pulse. If you use your thumb, you may mistake the pulse in your thumb for the casualty's pulse.
Figure 5-3. Feeling for a carotid pulse. (5) Evaluate the situation and perform needed actions. (a) If the casualty has a pulse but is still not breathing on his own, continue administering mouth-to-mouth resuscitations at the rate of one ventilation every five seconds. Continue checking the casualty's pulse after every 12 ventilations. (b) If the casualty does not have a pulse, stop your rescue efforts. Administering cardiopulmonary resuscitation (CPR) is not recommended and is not a combat lifesaver task. (c) If the casualty resumes breathing on his own, insert a nasopharyngeal airway if needed. A nasopharyngeal airway is inserted if the casualty is unconscious, if his respiration rate is less than two respirations in 15 seconds, or if the casualty is making snoring or gurgling sounds. e. Continue administering rescue breathing until the casualty begins breathing on his own or until no pulse is felt or until you are told to stop your efforts by your unit leader or by the combat medic.

IS0871 5-7
5-8. INSERT A NASOPHARYNGEAL AIRWAY A nasopharyngeal airway (see figure 5-4) provides an open (patent) airway and helps to keep the tongue from falling to the back of the mouth and blocking the airway.
Figure 5-4. Examples of nasopharyngeal airways. CAUTION: Do not use the nasopharyngeal airway if there is a history of head trauma and the roof of the casualty's mouth is fractured or brain matter is exposed. CAUTION: Do not use the nasopharyngeal airway if there is clear fluid coming from the ears or nose. This may be cerebrospinal fluid (CSF). Cerebrospinal fluid indicates a possible skull fracture. a. Make sure the casualty is positioned on his back with his face up before inserting the airway. b. Lubricate the tube with sterile lubricating jelly or water (figure 5-5).
Figure 5-5. Lubricating the nasopharyngeal airway tube with sterile lubricating jelly.

IS0871 5-8
c. Insert the airway. (1) Expose the opening of the casualty's nostril (figure 5-6). The casualty's right nostril is normally used for the initial attempt.
Figure 5-6. Exposing the opening of the casualty's nostril. (2) Insert the tip of the airway tube into the nostril. (3) Position the tube so that the bevel (pointed end) of the airway faces toward the septum (the partition inside the nose that separates the nostrils). (4) Insert the airway into the nostril and advance it until the flange rests against the nostril (figure 5-7.)
Figure 5-7. Airway inserted with flange resting against the nostril.
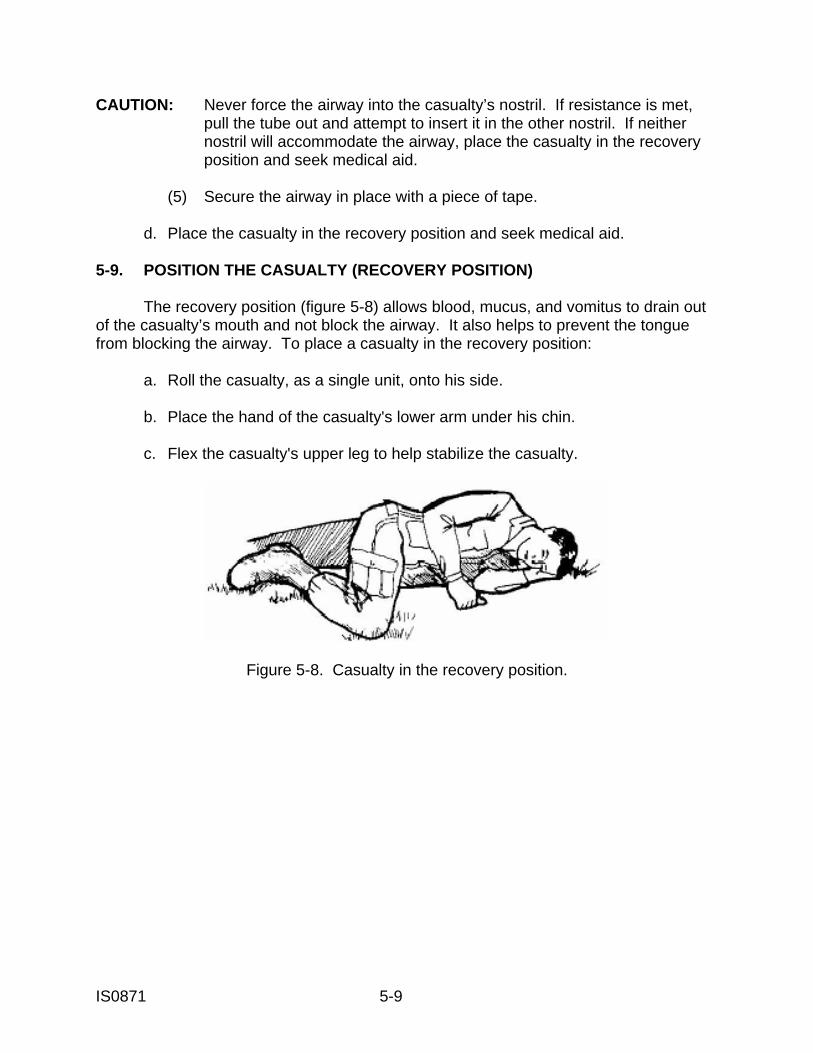
IS0871 5-9
CAUTION: Never force the airway into the casualty’s nostril. If resistance is met, pull the tube out and attempt to insert it in the other nostril. If neither nostril will accommodate the airway, place the casualty in the recovery position and seek medical aid. (5) Secure the airway in place with a piece of tape. d. Place the casualty in the recovery position and seek medical aid. 5-9. POSITION THE CASUALTY (RECOVERY POSITION) The recovery position (figure 5-8) allows blood, mucus, and vomitus to drain out of the casualty’s mouth and not block the airway. It also helps to prevent the tongue from blocking the airway. To place a casualty in the recovery position: a. Roll the casualty, as a single unit, onto his side. b. Place the hand of the casualty's lower arm under his chin. c. Flex the casualty's upper leg to help stabilize the casualty.
Figure 5-8. Casualty in the recovery position.
IS0871 5-10
EXERCISES: LESSON 5 INSTRUCTIONS: Answer the following exercises by marking the letter of the response that best answers the question or best completes the sentence or by writing the answer in the space provided. After you have answered all of the exercises, check your answers against the "Solutions to Lesson Exercises" at the end of the exercises. For each exercise answered incorrectly, reread the lesson material referenced. 1. You find a soldier who appears to be unconscious. You are not in danger of enemy fire. Which of the following should be your first action in rendering aid to the soldier? a. Check his pulse. b. Call out, "Are you okay?" and shake his shoulder. c. Begin inserting a nasopharyngeal airway. d. Open his airway. e. Begin performing mouth-to-mouth resuscitation. 2. You are going to check the casualty to see if he is breathing. How should you position the casualty? a. On his back. b. On his stomach. c. On his right side. d. On his left side. 3. In the head-tilt/chin-lift method of opening a casualty's airway, one hand is used to press on his forehead. How is the thumb on the opposite hand used? a. Lift the casualty's chin by hooking the thumb under the casualty's jaw. b. Hook over the casualty's bottom teeth to ensure a good grip on his chin. c. Press against the casualty's nose to seal off his nostrils. d. Depress the casualty's lower lip, if needed. 4. When performing the head-tilt/chin-lift method of opening a casualty's airway, you __________ allow your fingers to press deeply in the soft tissues under the chin. a. Should. b. Should not.
IS0871 5-11
5. When rolling a casualty, one of your hands is used to support the casualty's head and neck. What should you do with the other hand? a. Reach across the casualty's chest, grab under the casualty's arm, and pull the casualty toward you. b. Place your hand under the casualty's side that is nearest to you and push the casualty away from you. 6. When you check for breathing, you should: a. Watch the casualty's chest to see if it rises and falls. b. Listen for sounds of breathing. c. Feel for any exhaled breath blowing against your face. d. Do all of the above. 7. What are three indicators that a nasopharyngeal airway should be inserted into a casualty who is breathing on his own? a. _______________________________________________________________ b. _______________________________________________________________ c. _______________________________________________________________ 8. What should you do with the nasopharyngeal tube before inserting it into the casualty's nostril? a. Lubricate the outside of the tube with antibacterial ointment. b. Rub the outside of the tube with an iodine solution. c. Pour alcohol through the inside of the tube. d. Lubricate the outside of the tube with water or sterile lubricating jelly. e. None of the above; the tube is inserted as is. 9. Normally, the nasopharyngeal tube is inserted into the casualty's _______ nostril. a. Left. b. Right.
IS0871 5-12
10. You are inserting a nasopharyngeal tube into the casualty's nostril when resistance is met. What should you do? a. Continue inserting the tube. b. Begin twisting the tube so that it slides around the blockage. c. Remove the tube and insert it into the nostril again. d. Remove the tube and insert it into the other nostril. e. Remove the tube and begin cardiopulmonary resuscitation. 11. Upon successfully inserting a nasopharyngeal airway, the flange of the airway should be: a. Inserted as far as possible into the casualty's nostril. b. Against the outer part of the casualty's nostril. c. About half an inch from the outside of the casualty's nostril. d. About an inch from the outside of the casualty's nostril. 12. You have inserted a nasopharyngeal airway. How should you position the casualty? a. On his back. b. On his stomach. c. On his side. 13. If possible, form a group of three. One person plays the role of the casualty, the second plays the role of the combat lifesaver, and the third plays the role of the evaluator (the evaluator uses this lesson as a guide). Practice the following: a. Turning the casualty from his stomach onto his back
b. Performing the head-tilt/chin-lift and checking the casualty for breathing. After the "combat lifesaver" has completed the procedures correctly, switch roles. 14. If you have access to an appropriate manikin and a nasopharyngeal airway, practice inserting the nasopharyngeal airway.
Check your answers on the next page.
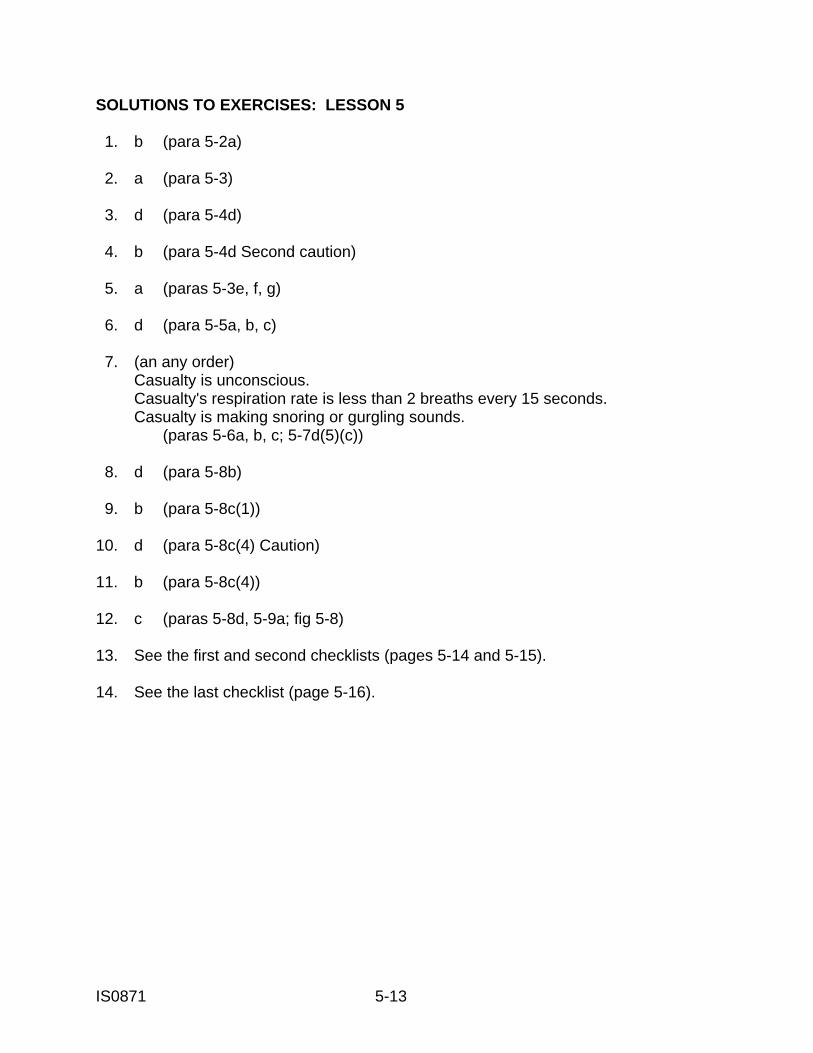
IS0871 5-13
SOLUTIONS TO EXERCISES: LESSON 5 1. b (para 5-2a) 2. a (para 5-3) 3. d (para 5-4d) 4. b (para 5-4d Second caution) 5. a (paras 5-3e, f, g) 6. d (para 5-5a, b, c) 7. (an any order) Casualty is unconscious. Casualty's respiration rate is less than 2 breaths every 15 seconds. Casualty is making snoring or gurgling sounds. (paras 5-6a, b, c; 5-7d(5)(c)) 8. d (para 5-8b) 9. b (para 5-8c(1)) 10. d (para 5-8c(4) Caution) 11. b (para 5-8c(4)) 12. c (paras 5-8d, 5-9a; fig 5-8) 13. See the first and second checklists (pages 5-14 and 5-15). 14. See the last checklist (page 5-16).
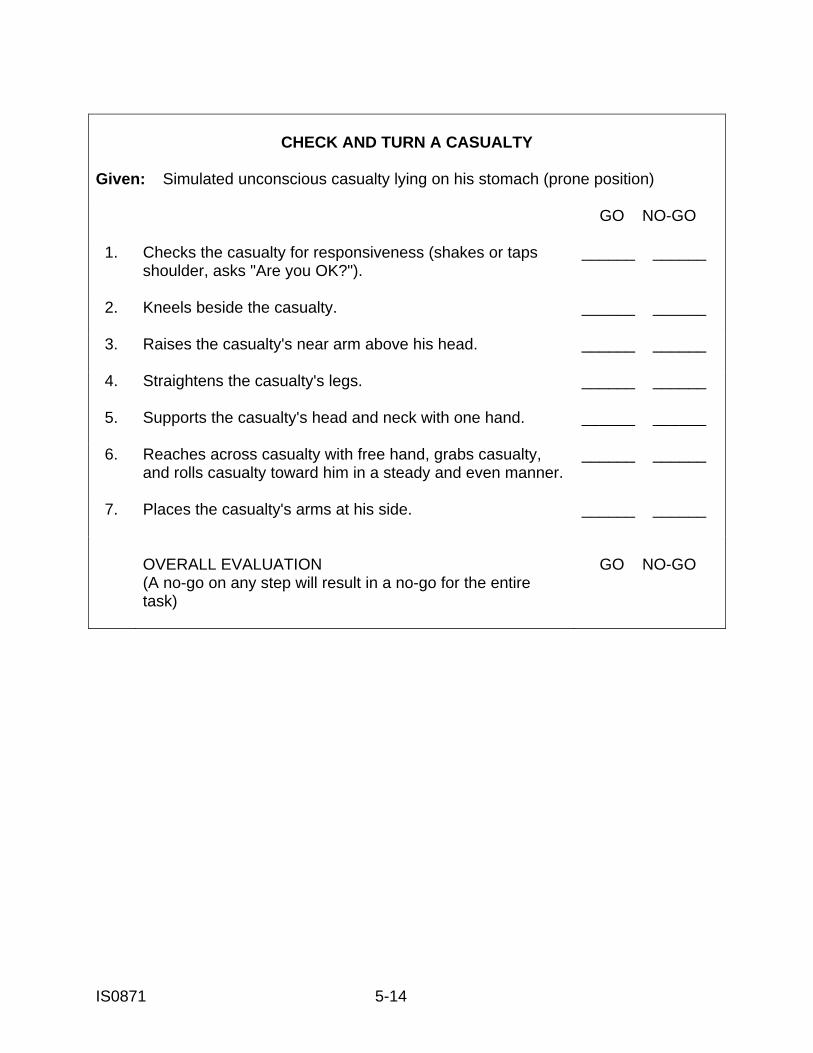
IS0871 5-14
CHECK AND TURN A CASUALTY
Given: Simulated unconscious casualty lying on his stomach (prone position) GO NO-GO
1. Checks the casualty for responsiveness (shakes or taps
shoulder, asks "Are you OK?").
______ ______
2. Kneels beside the casualty.
______ ______
3. Raises the casualty's near arm above his head.
______ ______
4. Straightens the casualty's legs.
______ ______
5. Supports the casualty's head and neck with one hand.
______ ______
6. Reaches across casualty with free hand, grabs casualty, and rolls casualty toward him in a steady and even manner.
______ ______
7. Places the casualty's arms at his side.
______ ______
OVERALL EVALUATION (A no-go on any step will result in a no-go for the entire task)
GO NO-GO

IS0871 5-15
PERFORM THE HEAD-TILT/CHIN-LIFT AND
CHECK CASUALTY FOR BREATHING
Given: Simulated unconscious casualty lying on his back with arms at his sides GO NO-GO
1. Kneels at the casualty's shoulder.
______ ______
2. Places one hand on the casualty's forehead and applies firm pressure with the palm to tilt the head back.
______ ______
3. Places fingertips of other hand under the casualty's chin and lifts the lower jaw forward.
______ ______
4. Pressure from fingers does not interfere with casualty's airway.
______ ______
5. Casualty's upper and lower teeth are almost brought together, but the casualty's mouth is not closed. (The thumb on the hand performing the chin-lift can be used to depress the casualty's lower lip, if needed.)
______ ______
6. Places his ear over the casualty’s mouth and nose and looks toward the casualty's chest and abdomen while maintaining the casualty's airway (head-tilt/chin-lift).
______ ______
7. Checks casualty for breathing (looks for rising/falling chest, listens for sounds of breathing, and feels for air flow).
______ ______
OVERALL EVALUATION
(A no-go on any step will result in a no-go for the entire task)
GO NO-GO
IS0871 5-16
INSERT A NASOPHARYNGEAL AIRWAY
Given: Simulated unconscious casualty lying on his back with arms at his sides Nasopharyngeal airway (from combat lifesaver medical equipment set) Packet of sterile lubricating jelly (from combat lifesaver MES) Tape (from combat lifesaver MES) GO NO-GO
1. Lubricates the tube with sterile lubricating jelly.
______ ______
2. Exposes the opening of the casualty's right nostril.
______ ______
3. Inserts the tip of the airway into the nostril with the bevel toward the septum.
______ ______
4. Advances airway until the flange rests against the nostril.
______ ______
5. Does not force the airway into the nostril. If resistance is met, pulls out the tube and attempts to insert it in the other nostril.
______ ______
6. Secures the airway with tape.
______ ______
7. Places the casualty in the recovery position (on his side with hand under his chin and upper leg flexed to stabilize the casualty).
______ ______
OVERALL EVALUATION (A no-go on any step will result in a no-go for the entire task)
GO NO-GO
IS0871 6-1
LESSON 6
TREATING PENETRATING CHEST TRAUMA TASK Treat a simulated casualty with penetrating chest trauma, including decompressing a tension pneumothorax. CONDITIONS Given a simulated conscious or unconscious casualty and a combat lifesaver medical equipment set. STANDARDS Score a GO on the performance checklists Additional injuries to the casualty are prevented. REFERENCES STP 21-1-SMCT, Soldier's Manual of Common Tasks: Skill Level 1. FM 4-25.11, First Aid.
Section I. TREATING AN OPEN CHEST WOUND 6-1. INTRODUCTION The body has two lungs. Each lung is enclosed in a separate airtight area within the chest. These areas are under negative pressure. If an object punctures the chest wall, air may be allowed to enter the chest. If air enters into one of the formerly airtight areas, the lung within that area begins to collapse. In order for both lungs to collapse, both sides of the chest would have to be punctured. Any degree of collapse, however, interferes with the casualty's ability to breathe and reduces the amount of oxygen available for the body to use. Figure 6-1 shows a normal chest and lungs. Figure 6-2 shows a chest and lungs with a penetrating (open) chest wound that has allowed one of the lungs to collapse. The lung does not collapse immediately, but does so gradually as air enters and remains in the chest cavity.

IS0871 6-2
Figure 6-1. Normal chest cavity and lungs.
NOTE: Air flows into the chest cavity from a penetrating wound, collapsing the lung.
Figure 6-2. Collapsed lung.
6-2. SIGNS AND SYMPTOMS OF AN OPEN CHEST WOUND An open chest wound can be caused by the chest wall being penetrated by a bullet, knife blade, shrapnel, or other object. If you are not sure if the wound has penetrated the chest wall completely, treat the wound as though it were an open chest wound. Some of the signs and symptoms of an open chest wound are given below. a. Sucking or hissing sounds coming from chest wound. (When a casualty with an open chest wound breathes, air goes in and out of the wound. This air sometimes causes a "sucking" sound. Because of this distinct sound, an open chest wound is often called a "sucking chest wound.")
IS0871 6-3
b. Casualty coughing up blood (hemoptysis). c. Frothy blood coming from the chest wound. (The air going in and out of an open chest wound causes bubbles in the blood coming from the wound.) d. Shortness of breath or difficulty in breathing. e. Chest not rising normally when the casualty inhales. (The casualty may have several fractured ribs and the lung may be deflated.) f. Pain in the shoulder or chest area that increases with breathing. g. Bluish tint of lips, inside of mouth, fingertips, and/or nail beds (cyanosis). (This color change is caused by the decreased amount of oxygen in the blood.) h. Signs of shock such as a rapid and weak heartbeat. 6-3. CHECK FOR OPEN CHEST WOUNDS Check for both entry and exit wounds. Open the casualty’s armor and uniform to look for any penetrating wounds. Look for a pool of blood under the casualty's back. Use your hands to feel for wounds. If there is more than one open chest wound, treat the initial wound you find first. 6-4. EXPOSE THE WOUND Expose the area around the open chest wound by removing, cutting, or tearing the clothing covering the wound. If clothing is stuck to the wound, do not try to remove the stuck clothing as this may cause additional pain and injury. Cut or tear around the stuck clothing. Do not try to clean the wound or remove objects from the wound. 6-5. SEAL THE OPEN CHEST WOUND Since air can pass through most dressings and bandages, you must seal the open chest wound with plastic, cellophane, or other nonporous, airtight material to prevent air from entering the chest and collapsing the lung. The wrapper from an Emergency Bandage or a field first aid dressing can be used. The following steps assume that the wrapper from an Emergency Bandage is being used. However, the same general steps can be used with any airtight material. NOTE: If you have a commercially available chest seal in your aid bag (see figure 6-3), you may use it instead of improvised sealing materials described in this lesson. Follow the instructions on the commercial chest seal. NOTE: Put on your gloves.
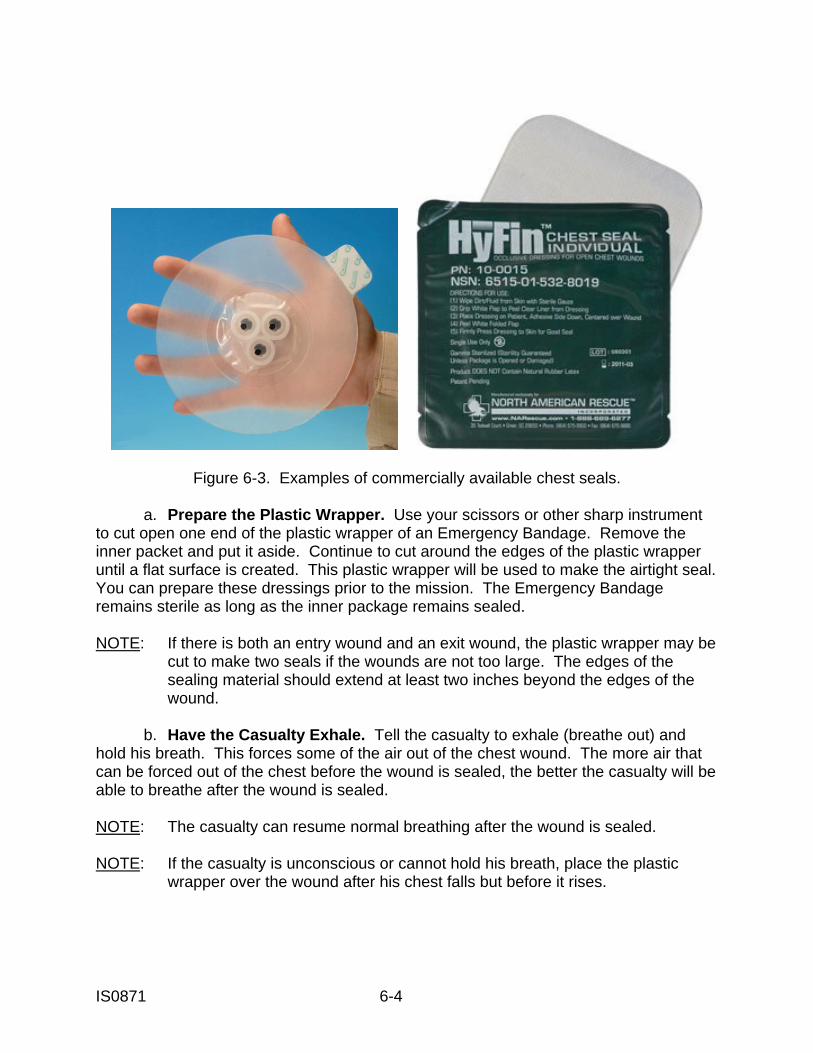
IS0871 6-4
Figure 6-3. Examples of commercially available chest seals. a. Prepare the Plastic Wrapper. Use your scissors or other sharp instrument to cut open one end of the plastic wrapper of an Emergency Bandage. Remove the inner packet and put it aside. Continue to cut around the edges of the plastic wrapper until a flat surface is created. This plastic wrapper will be used to make the airtight seal. You can prepare these dressings prior to the mission. The Emergency Bandage remains sterile as long as the inner package remains sealed. NOTE: If there is both an entry wound and an exit wound, the plastic wrapper may be cut to make two seals if the wounds are not too large. The edges of the sealing material should extend at least two inches beyond the edges of the wound. b. Have the Casualty Exhale. Tell the casualty to exhale (breathe out) and hold his breath. This forces some of the air out of the chest wound. The more air that can be forced out of the chest before the wound is sealed, the better the casualty will be able to breathe after the wound is sealed. NOTE: The casualty can resume normal breathing after the wound is sealed. NOTE: If the casualty is unconscious or cannot hold his breath, place the plastic wrapper over the wound after his chest falls but before it rises.
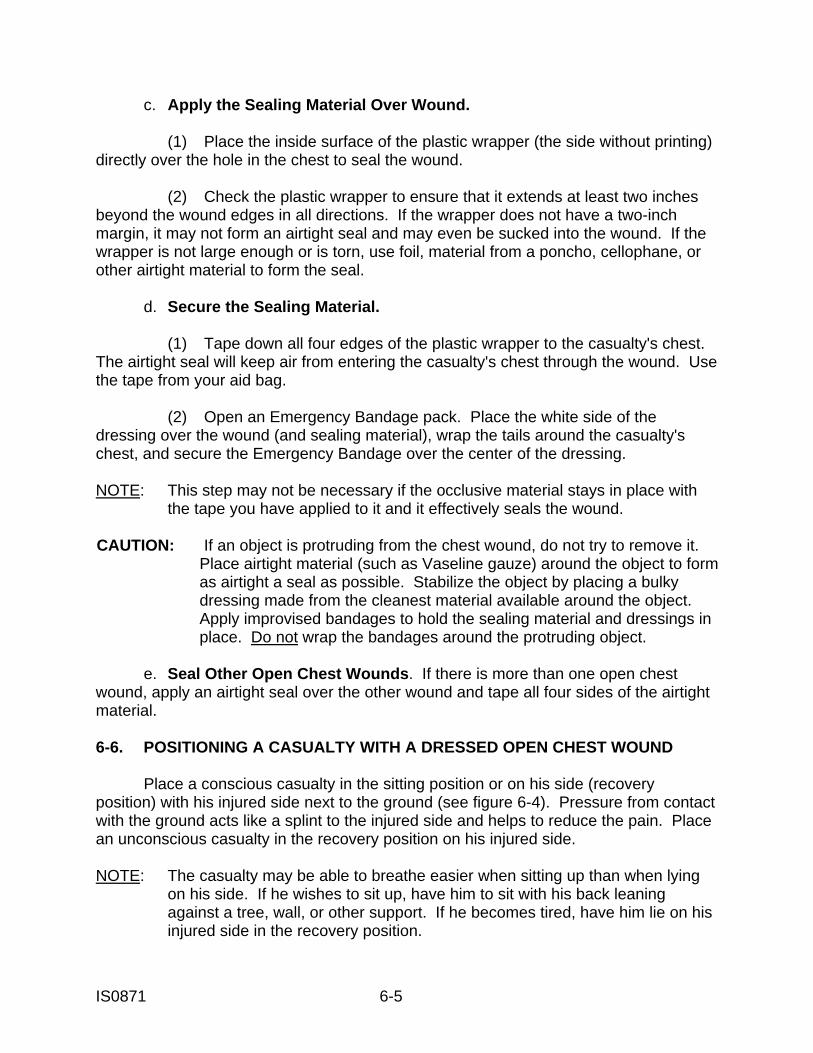
IS0871 6-5
c. Apply the Sealing Material Over Wound. (1) Place the inside surface of the plastic wrapper (the side without printing) directly over the hole in the chest to seal the wound. (2) Check the plastic wrapper to ensure that it extends at least two inches beyond the wound edges in all directions. If the wrapper does not have a two-inch margin, it may not form an airtight seal and may even be sucked into the wound. If the wrapper is not large enough or is torn, use foil, material from a poncho, cellophane, or other airtight material to form the seal. d. Secure the Sealing Material. (1) Tape down all four edges of the plastic wrapper to the casualty's chest. The airtight seal will keep air from entering the casualty's chest through the wound. Use the tape from your aid bag. (2) Open an Emergency Bandage pack. Place the white side of the dressing over the wound (and sealing material), wrap the tails around the casualty's chest, and secure the Emergency Bandage over the center of the dressing. NOTE: This step may not be necessary if the occlusive material stays in place with the tape you have applied to it and it effectively seals the wound. CAUTION: If an object is protruding from the chest wound, do not try to remove it. Place airtight material (such as Vaseline gauze) around the object to form as airtight a seal as possible. Stabilize the object by placing a bulky dressing made from the cleanest material available around the object. Apply improvised bandages to hold the sealing material and dressings in place. Do not wrap the bandages around the protruding object. e. Seal Other Open Chest Wounds. If there is more than one open chest wound, apply an airtight seal over the other wound and tape all four sides of the airtight material. 6-6. POSITIONING A CASUALTY WITH A DRESSED OPEN CHEST WOUND Place a conscious casualty in the sitting position or on his side (recovery position) with his injured side next to the ground (see figure 6-4). Pressure from contact with the ground acts like a splint to the injured side and helps to reduce the pain. Place an unconscious casualty in the recovery position on his injured side. NOTE: The casualty may be able to breathe easier when sitting up than when lying on his side. If he wishes to sit up, have him to sit with his back leaning against a tree, wall, or other support. If he becomes tired, have him lie on his injured side in the recovery position.
IS0871 6-6
Figure 6-4. Casualty with a dressed open chest wound.
NOTE: Evacuate the casualty with his injured side down.
Section II. TREATING TENSION PNEUMOTHORAX
6-7. TENSION PNEUMOTHORAX Tension pneumothorax occurs when there is a buildup of air under pressure in the plural space and the air cannot escape. As the air outside the lung continues to increase, the affected lung continues to collapse. In addition to causing further collapse of the affected lung, the increasing pressure of the trapped air pushes on the mediastinum (the mass of material separating the two plural sacs). This movement of the mediastinum may compress the uninjured lung, major blood vessels, and the heart. You will need to perform a needle chest decompression to relieve the pressure of the tension pneumothorax. 6-8. SIGNS AND SYMPTOMS OF TENSION PNEUMOTHORAX Signs and symptoms of tension pneumothorax include the following. a. Anxiety, agitation, and apprehension. b. Diminished or absent breath sounds. c. Increasing difficulty in breathing (dyspnea) with cyanosis (bluish tint of lips, inside of mouth, fingertips, and/or nail beds). d. Rapid, shallow breathing (tachypnea). e. Distended neck veins. f. Abnormally low blood pressure (hypotension) evidenced by a loss of radial pulse. g. Cool, clammy skin. h. Decreased level of consciousness (AVPU scale).
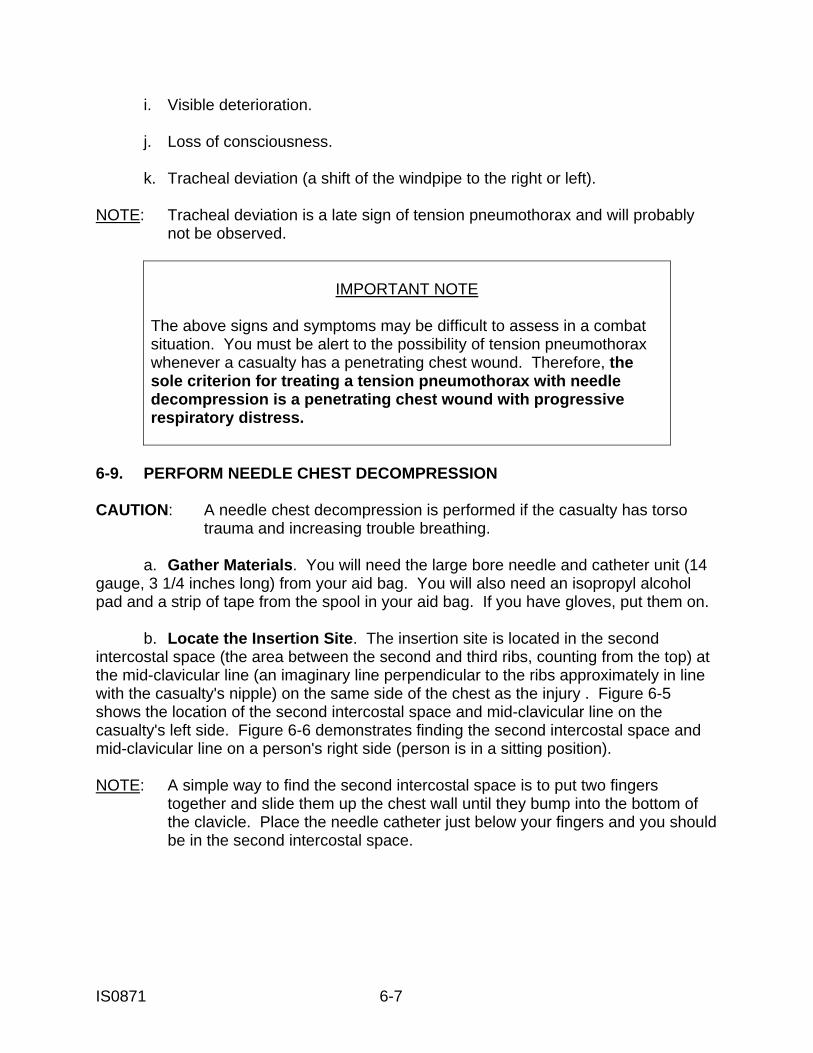
IS0871 6-7
i. Visible deterioration. j. Loss of consciousness. k. Tracheal deviation (a shift of the windpipe to the right or left). NOTE: Tracheal deviation is a late sign of tension pneumothorax and will probably not be observed.
IMPORTANT NOTE
The above signs and symptoms may be difficult to assess in a combat situation. You must be alert to the possibility of tension pneumothorax whenever a casualty has a penetrating chest wound. Therefore, the sole criterion for treating a tension pneumothorax with needle decompression is a penetrating chest wound with progressive respiratory distress.
6-9. PERFORM NEEDLE CHEST DECOMPRESSION CAUTION: A needle chest decompression is performed if the casualty has torso trauma and increasing trouble breathing. a. Gather Materials. You will need the large bore needle and catheter unit (14 gauge, 3 1/4 inches long) from your aid bag. You will also need an isopropyl alcohol pad and a strip of tape from the spool in your aid bag. If you have gloves, put them on. b. Locate the Insertion Site. The insertion site is located in the second intercostal space (the area between the second and third ribs, counting from the top) at the mid-clavicular line (an imaginary line perpendicular to the ribs approximately in line with the casualty's nipple) on the same side of the chest as the injury . Figure 6-5 shows the location of the second intercostal space and mid-clavicular line on the casualty's left side. Figure 6-6 demonstrates finding the second intercostal space and mid-clavicular line on a person's right side (person is in a sitting position). NOTE: A simple way to find the second intercostal space is to put two fingers together and slide them up the chest wall until they bump into the bottom of the clavicle. Place the needle catheter just below your fingers and you should be in the second intercostal space.
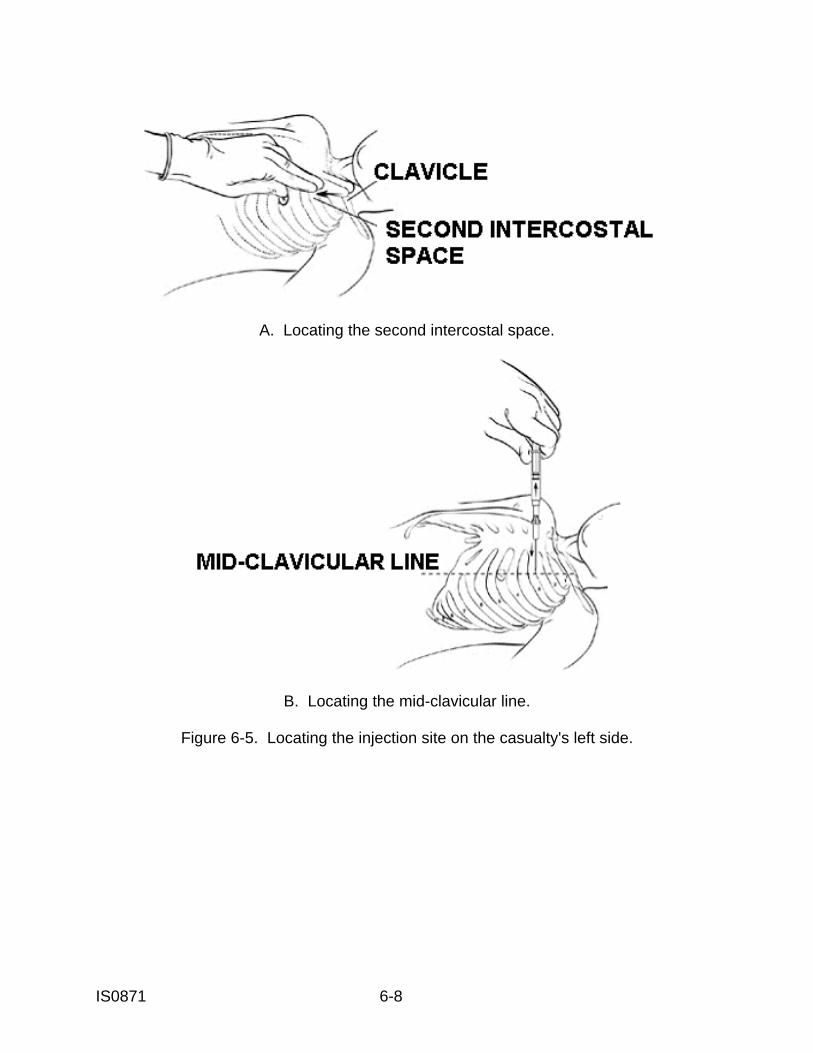
IS0871 6-8
A. Locating the second intercostal space.
B. Locating the mid-clavicular line.
Figure 6-5. Locating the injection site on the casualty's left side.
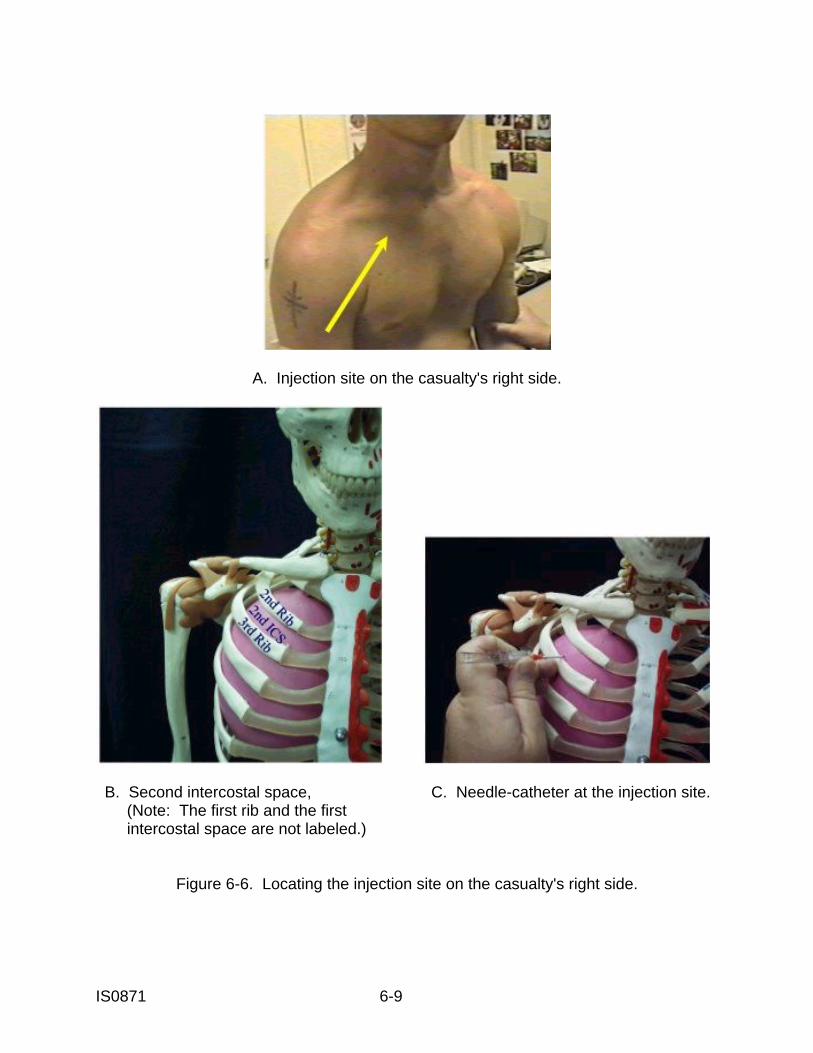
IS0871 6-9
A. Injection site on the casualty's right side.
B. Second intercostal space, C. Needle-catheter at the injection site. (Note: The first rib and the first intercostal space are not labeled.)
Figure 6-6. Locating the injection site on the casualty's right side.
IS0871 6-10
c. Cleanse the Site. Clean the insertion site with an isopropyl alcohol pad from the combat lifesaver aid bag. d. Insert the Needle/Catheter. Firmly insert the needle into the skin slightly above the top of the third rib into the second intercostal space at a 90-degree angle (figures 6-5B and 6-6C). Continue inserting the needle (with its catheter covering) all the way to the hub. You will feel a "pop" as the needle enters the chest cavity. A hiss of escaping air under pressure should be heard. CAUTION: Ensure the needle is not inserted medially to the patient’s nipple or directed towards the patient's heart. CAUTION: Proper positioning of the needle is essential to avoid damaging blood vessels and nerves that run along the bottom of each rib. This is why you insert the needle/catheter just above the third rib rather than at the bottom of the second rib. e. Advance the Need/e/Catheter. Continue advancing the needle/catheter all the way to the hub. f. Withdraw the Needle. Withdraw the needle while holding the catheter in place. The catheter will remain as a means for air trapped in the chest to continue to escape to the atmosphere. NOTE: When you withdraw the needle, place it in a location that is not dangerous to you or the casualty. When you complete the task, safely dispose of the needle (sharps shuttle).
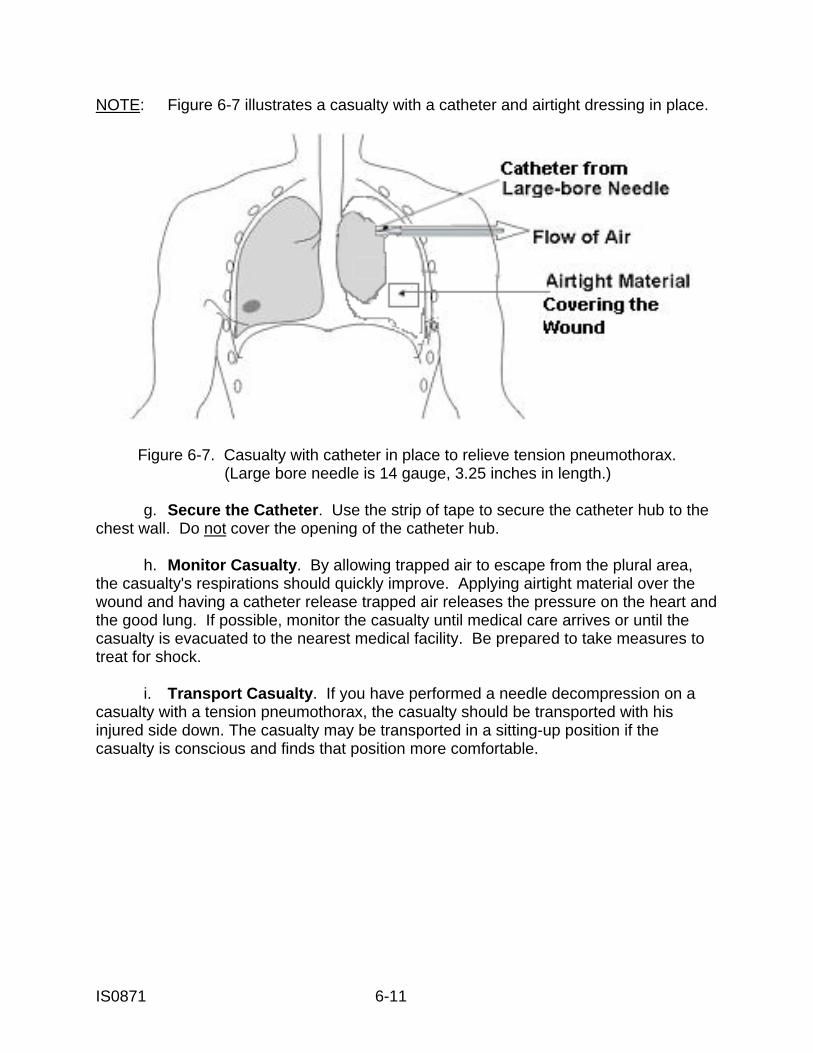
IS0871 6-11
NOTE: Figure 6-7 illustrates a casualty with a catheter and airtight dressing in place.
Figure 6-7. Casualty with catheter in place to relieve tension pneumothorax. (Large bore needle is 14 gauge, 3.25 inches in length.) g. Secure the Catheter. Use the strip of tape to secure the catheter hub to the chest wall. Do not cover the opening of the catheter hub. h. Monitor Casualty. By allowing trapped air to escape from the plural area, the casualty's respirations should quickly improve. Applying airtight material over the wound and having a catheter release trapped air releases the pressure on the heart and the good lung. If possible, monitor the casualty until medical care arrives or until the casualty is evacuated to the nearest medical facility. Be prepared to take measures to treat for shock. i. Transport Casualty. If you have performed a needle decompression on a casualty with a tension pneumothorax, the casualty should be transported with his injured side down. The casualty may be transported in a sitting-up position if the casualty is conscious and finds that position more comfortable.
IS0871 6-12
EXERCISES: LESSON 6 INSTRUCTIONS: Answer the following exercises by marking the letter of the response that best answers the question or best completes the sentence or by writing the answer in the space provided. After you have answered all of the exercises, check your answers against the "Solutions to Lesson Exercises" at the end of the exercises. For each exercise answered incorrectly, reread the lesson material referenced. 1. A soldier has been stabbed in his chest. The blade entered the chest just above his right nipple, penetrated the chest wall, and was withdrawn. Which of the following is most likely to happen? a. His right lung will begin to collapse. b. His left lung will begin to collapse. c. Both of his lungs will begin to collapse. 2. A soldier has suffered a wound to the chest. You are not sure if the chest wall has been penetrated. What should you do? a. Leave the wound exposed until the medic arrives. b. Dress and bandage the wound as you would a cut on the arm. c. Apply airtight material over the wound and tape down three sides of the material, then dress and bandage the wound. d. Apply airtight material over the wound and tape down all four sides of the material, then dress and bandage the wound. 3. An open chest wound is sometimes called another name. What is the name? ______________________________________________________________ 4. List three signs or symptoms other than the sound of air passing through the wound that may indicate the casualty has an open chest wound. ______________________________________________________________ ______________________________________________________________ ______________________________________________________________
IS0871 6-13
5. A soldier has been shot. The bullet passed through the left side of his chest leaving entrance and exit wounds. Which of the following is the preferred method of treatment. a. Apply airtight material over each wound and tape down all four sides of the material for each wound. b. Apply airtight material over each wound, tape down three sides of the material for the wound on the front, and tape down all four sides of the material for the wound on the back. c. Apply airtight material over each wound and tape down three sides of the material for each wound. 6. A casualty has a circular puncture wound to his chest about one inch in diameter. You have airtight material in the following sizes. You want to use the smallest material that fits the size criteria. Which of the following pieces of plastic should you use? a. Square 2 inches by 2 inches. b. Square 4 inches by 4 inches. c. Square 6 inches by 6 inches. d. Square 8 inches by 8 inches. e. Rectangle 8 inches by 12 inches. 7. You have treated a casualty with a chest wound. The casualty does not want to sit up. How should you position the casualty? a. On his back. b. On his front. c. On his side, wounded side up. d. On his side, wounded side down. 8. Tension pneumothorax has developed in a casualty with an open chest wound to his right side. The condition could result in which of the following? a. Collapse of his right lung. b. Compression of his left lung. c. Compression of the heart and blood vessels. d. Responses a and b above. e. Responses a and c above. f. Responses a, b, and c above.
IS0871 6-14
9. A casualty with an open chest wound is showing initial signs of tension pneumothorax. You should: a. Remove the airtight seal over the wound. b. Insert a large bore needle to decompress the plural sac. c. Begin cardiopulmonary resuscitation. 10. Which of the following is a sign or symptom of tension pneumothorax? (More than one response may be correct.) a. Skin becomes warmer and dry. b. The casualty develops progressive respiratory distress. c. You can no longer feel the casualty's pulse at his wrist. d. The casualty's breathing has returned to normal. 11. You are going to insert a needle to relieve tension pneumothorax. You should choose an insertion site that is: a. On the top of the chest and on the injured side. b. On the side of the chest and on the injured side. c. On the top of the chest and on the uninjured side. d. On the side of the chest and on the uninjured side. e. In the middle of the chest over the sternum (breastbone). 12. The insertion site to relieve tension pneumothorax should be: a. Slightly below the second rib. b. Slightly above the third rib. c. Slightly below the third rib. d. Slightly above the fourth rib. e. Slightly below the fourth rib. f. Slightly above the fifth rib. 13. The insertion site to relieve tension pneumothorax is located along the casualty's mid-clavicular line. What else is located on or near this imaginary line? ________________________________________
IS0871 6-15
14. You are inserting a needle to relieve tension pneumothorax. How can you tell when you have penetrated the chest wall and the tip of the needle is now in the plural space? ______________________________________________________________ 15. Once you have penetrated the plural space with a large bore needle/catheter, you should: a. Immediately tape the needle/catheter unit in place. b. Remove the needle/catheter and tape airtight material over the injection site. c. Advance the needle/catheter all the way to the hub, remove the needle while leaving the catheter, and tape the catheter hub to the chest. d. Advance the needle/catheter all the way to the hub, remove the needle while leaving the catheter, and tape airtight material over the injection site. e. Advance the needle/catheter all the way to the hub and tape the needle/catheter hub to the chest. 16. A casualty who has been treated for tension pneumothorax with needle chest decompression is being evacuated on a litter. How should he be positioned? a. On his back. b. On his stomach. c. On his injured side (the side with the catheter). d. On his uninjured side (the side without the catheter). 17. The signs and symptoms of tension pneumothorax may be difficult to assess in a combat situation. Therefore you should perform needle chest decompression if the casualty has a _______________________ wound and has _______________________________________________________________ 18. Using a manikin or another person, practice treating an open chest wound. 19. If an appropriate manikin and appropriate supplies are available, practice performing a needle chest decompression.
Check your answers on the next page.
IS0871 6-16
SOLUTIONS TO EXERCISES: LESSON 6 1. a (para 6-1) 2. d (paras 6-2, 6-5) 3. Sucking chest wound (para 6-2a) 4. Any three of the following Coughing up blood. Bubbles in blood on chest. Breathing problems. Abnormal chest actions. Pain increases when breathing. Cyanosis. Rapid, but weak, pulse (paras 6-2 b through h) 5. a (paras 6-5d(1), e) 6. c (para 6-5c(2)). The wound size is one inch in diameter. Two inches beyond the wound equals 2" + 1" + 2" = 5" diameter. The 6"x6" square is the smallest material to contain a circle with a 5" diameter. 7. d (para 6-6, fig 6-4) 8. f (para 6-7) 9. b (paras 6-7, 6-9) 10. b, c (paras 6-8c, f, g) 11. a (para 6-9b) 12. b (paras 6-9b, d, d second Caution) 13. Nipple (para 6-9b) 14. Feel a "pop." Hear air escaping. (either or both) (para 6-9d) 15. c (paras 6-9d, e, f, g) 16. c (para 6-9i) 17. Open chest (or penetrating chest); progressive respiratory distress (or increasing trouble breathing). (para 6-8 Important Note, 6-9 Caution) 18. See checklist on the following page (page 6-17). 19. See second checklist (page 6-18).

IS0871 6-17
TREAT AN OPEN CHEST WOUND Given: Simulated conscious casualty with wound(s) indicated (pen mark, etc.) Emergence Bandage Scissors (from combat lifesaver MES) Tape (from combat lifesaver MES) Additional airtight material, dressings, bandages, if needed Gloves GO NO-GO
1. Checks casualty for entrance and exit wounds.
______ ______
2. Exposes the wound.
______ ______
3. Prepares airtight material that will extend at least 2 inches beyond the edge of the wound on all sides.
______ ______
4. Puts on gloves (this step may be performed sooner). .
______ ______
5. Has casualty exhale and hold breath. .
______ ______
6. Places airtight material over wound so that airtight material extends at least 2 inches beyond edges of wound.
______ ______
7. Tapes all four sides of the airtight material to the casualty's chest.
______ ______
8. Allows casualty to resume breathing.
______ ______
9. If two open chest wounds are present, repeats steps 2 through 7.
______ ______
10. Applied an Emergency Bandage over the airtight material(s).
______ ______
OVERALL EVALUATION (A no-go on any step will result in a no-go for the entire task)
GO NO-GO
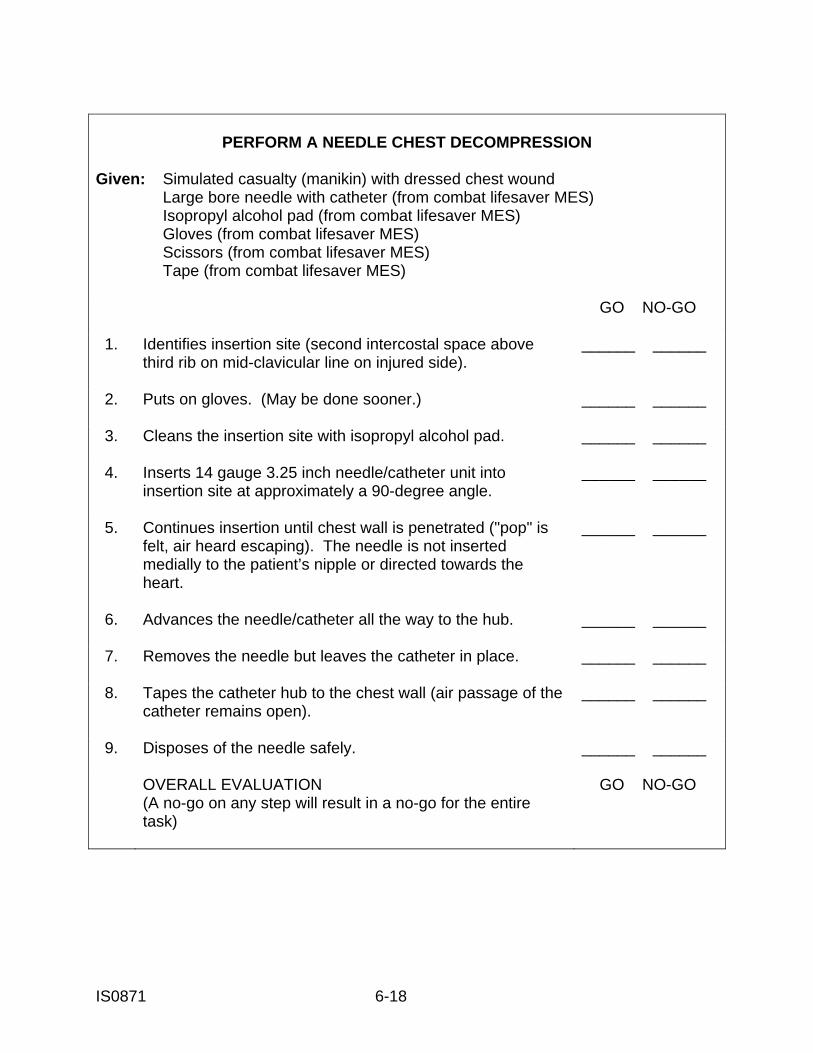
IS0871 6-18
PERFORM A NEEDLE CHEST DECOMPRESSION
Given: Simulated casualty (manikin) with dressed chest wound Large bore needle with catheter (from combat lifesaver MES) Isopropyl alcohol pad (from combat lifesaver MES) Gloves (from combat lifesaver MES) Scissors (from combat lifesaver MES) Tape (from combat lifesaver MES) GO NO-GO
1. Identifies insertion site (second intercostal space above
third rib on mid-clavicular line on injured side).
______ ______
2. Puts on gloves. (May be done sooner.)
______ ______
3. Cleans the insertion site with isopropyl alcohol pad.
______ ______
4. Inserts 14 gauge 3.25 inch needle/catheter unit into insertion site at approximately a 90-degree angle.
______ ______
5. Continues insertion until chest wall is penetrated ("pop" is felt, air heard escaping). The needle is not inserted medially to the patient’s nipple or directed towards the heart.
______ ______
6. Advances the needle/catheter all the way to the hub.
______ ______
7. Removes the needle but leaves the catheter in place.
______ ______
8. Tapes the catheter hub to the chest wall (air passage of the catheter remains open).
______ ______
9. Disposes of the needle safely.
______ ______
OVERALL EVALUATION (A no-go on any step will result in a no-go for the entire task)
GO NO-GO
IS0871 7-1
LESSON 7
INITIATING A FIELD MEDICAL CARD OR TCCC CARD TASK Initiate a DD Form 1380, U.S. Field Medical Card, or a DA Form 7656, Tactical Combat Casualty Care Card. CONDITIONS Given information on a simulated casualty, a DD Form 1380 or a DA Form 7656, and an indelible marker or other writing instrument. STANDARD Enter the required information in the appropriate blocks. Score a GO on the written performance checklist. REFERENCES FM 8-10-6, Medical Evacuation in a Theater of Operations.
SPECIAL NOTE
DD Form 1380, U.S. Field Medical Card, is being replaced by DA Form 7656, Tactical Combat Casualty Care Card. This lesson has two sections. The first section discusses the U.S. Field Medical Card which is currently in use. The second section discusses the Tactical Combat Casualty Care Card that will replace the Field Medical Card.

IS0871 7-2
Section I. U.S. FIELD MEDICAL CARD 7-1. PURPOSE OF THE UNITED STATES FIELD MEDICAL CARD, DD FORM 1380 DD Form 1380, U.S. Field Medical Card, is usually called the Field Medical Card (FMC). A Field Medical Card is prepared on any casualty treated within a theater of operations. The Field Medical Card was designed to be used in forward combat areas by North Atlantic Treaty Organization (NATO) troops; therefore, the printed instructions on the form are in French as well as in English. The Field Medical Card provides medical personnel who treat the casualty during evacuation with essential information about the casualty's injury or disease and the treatment already given. The Field Medical Card, as a record of events, may prevent accidental medication overdose and alert the receiving medical facility to any special care needed for treatment. It provides an accurate record of care already given. The front and the back of the Field Medical Card are illustrated in figures 7-1 and 7-2. Write legibly and concisely when making entries. Use approved abbreviations when possible. If an item is not known, leave it blank. 7-2. FIELD MEDICAL CARD PAD Field Medical Cards are issued in a pad. Each pad contains 10 sets. A set consists of an original card with attached wire, a protective sheet, and a duplicate paper form. The front side of the card has areas for the casualty's identification, a description of the injury or illness, and treatment rendered. 7-3. INITIATING THE FIELD MEDICAL CARD The Field Medical Card is usually initiated by the combat medic. However, the combat lifesaver can initiate the Field Medical Card if no combat medic is available or if the combat medic directs the combat lifesaver to initiate the card. A pad of Field Medical Cards is part of the combat lifesaver medical equipment set. a. Remove Protective Sheet. When initiating the Field Medical Card, remove the protective sheet between the original card and the duplicate (white sheet). The back of the original card is impregnated so that the information written on the front of the card will also appear on the front of the duplicate sheet. b. Enter Primary Information. Complete blocks 1, 3, 4, 9, and 11, if possible. c. Enter Secondary Information. Complete blocks 2, 5, 6, 7, 8, and 10 on the front side of the form, if appropriate, as time permits. Blocks 12, 13, 14, 15, 16, and 17 on the reverse side of the form are normally completed at the medical treatment facility (battalion aid station).
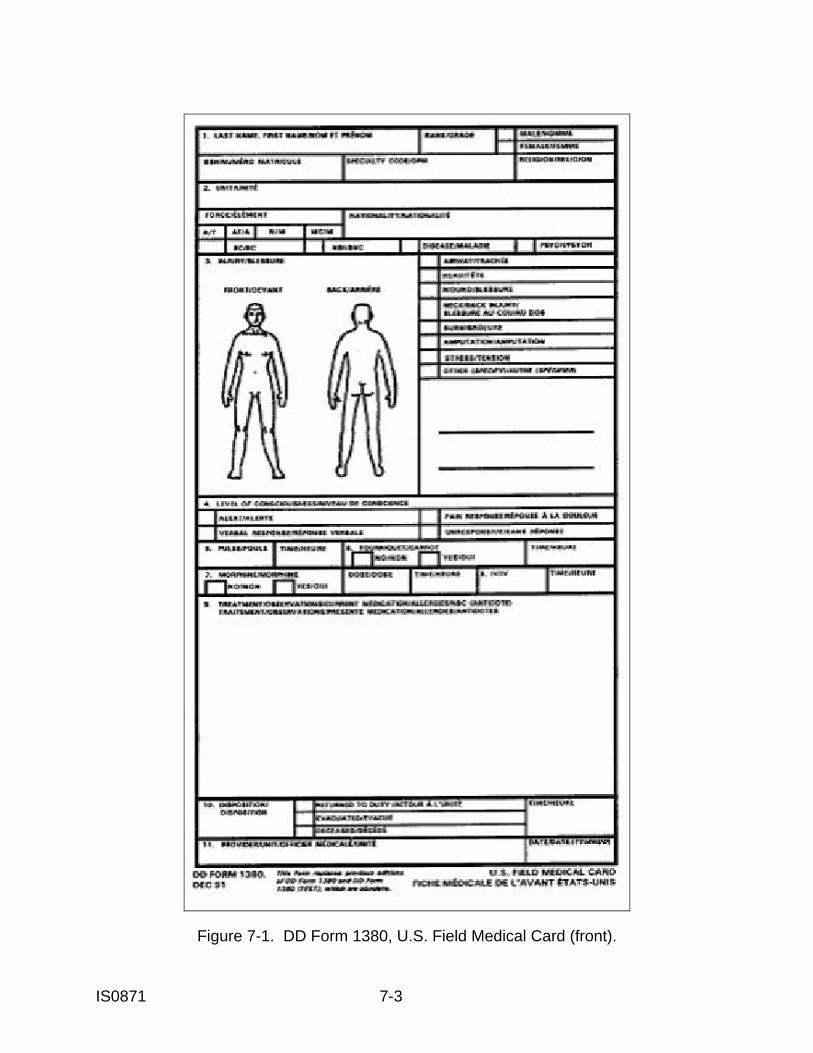
IS0871 7-3
Figure 7-1. DD Form 1380, U.S. Field Medical Card (front).
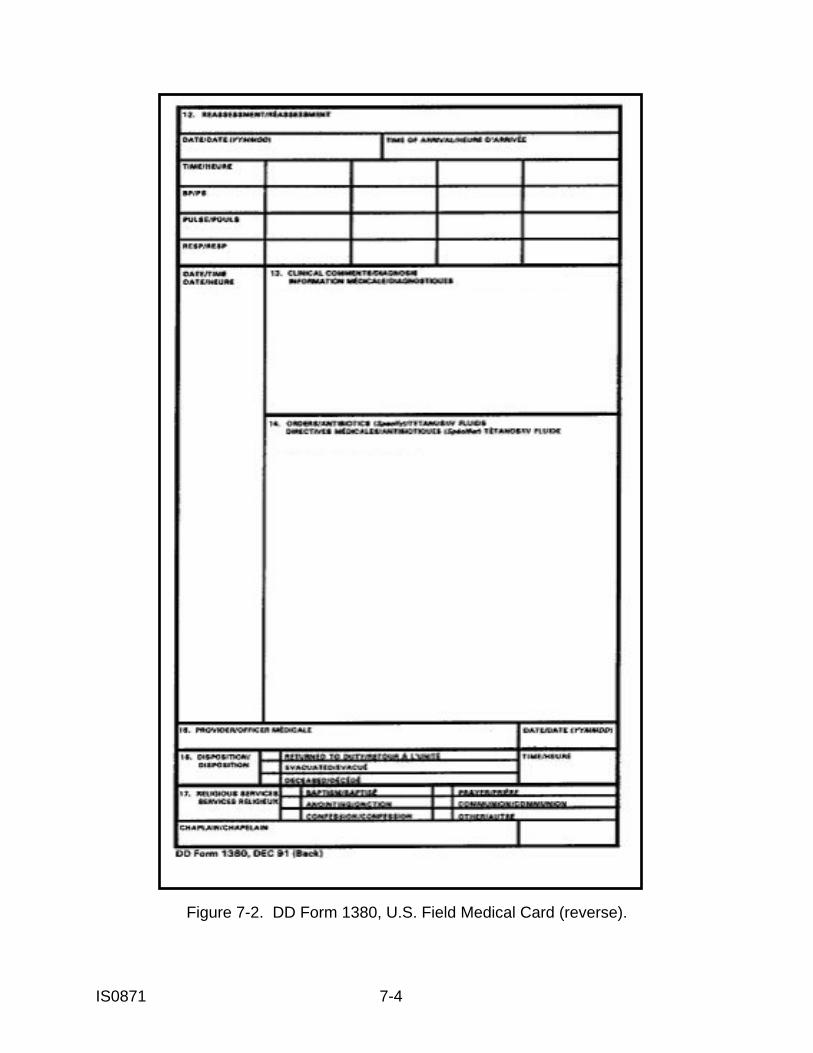
IS0871 7-4
Figure 7-2. DD Form 1380, U.S. Field Medical Card (reverse).
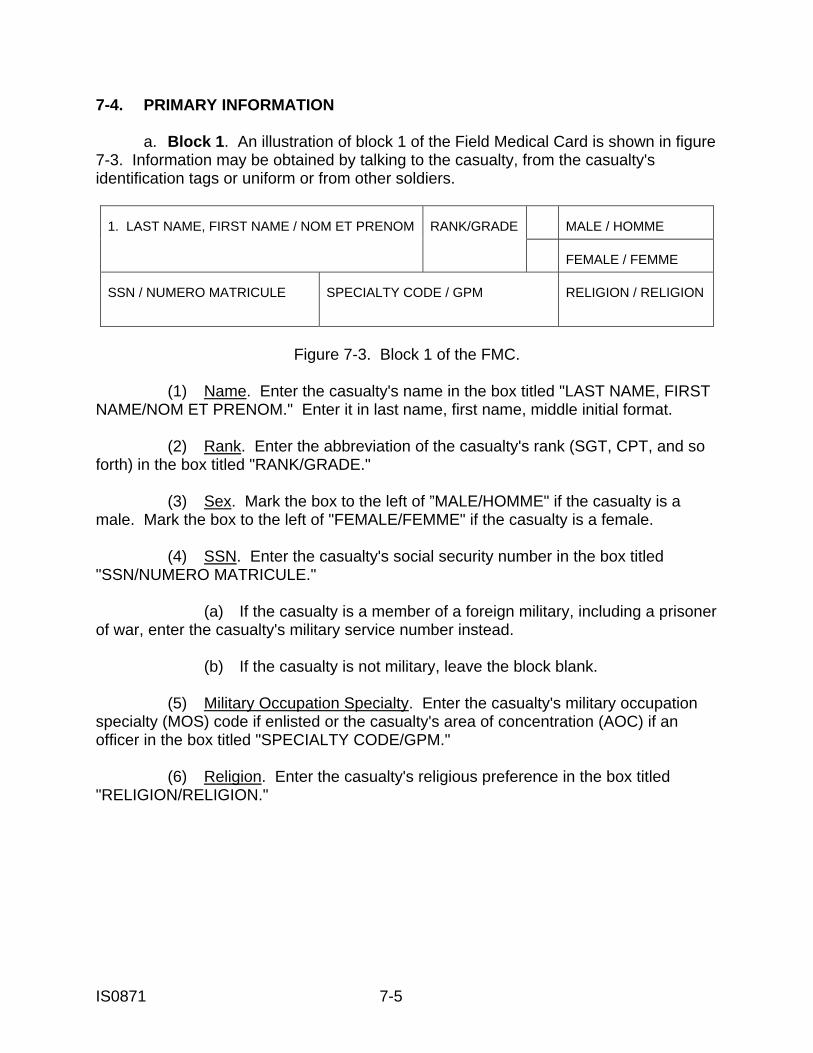
IS0871 7-5
7-4. PRIMARY INFORMATION a. Block 1. An illustration of block 1 of the Field Medical Card is shown in figure 7-3. Information may be obtained by talking to the casualty, from the casualty's identification tags or uniform or from other soldiers.
1. LAST NAME, FIRST NAME / NOM ET PRENOM
RANK/GRADE
MALE / HOMME
FEMALE / FEMME
SSN / NUMERO MATRICULE
SPECIALTY CODE / GPM
RELIGION / RELIGION
Figure 7-3. Block 1 of the FMC.
(1) Name. Enter the casualty's name in the box titled "LAST NAME, FIRST NAME/NOM ET PRENOM." Enter it in last name, first name, middle initial format. (2) Rank. Enter the abbreviation of the casualty's rank (SGT, CPT, and so forth) in the box titled "RANK/GRADE." (3) Sex. Mark the box to the left of ”MALE/HOMME" if the casualty is a male. Mark the box to the left of "FEMALE/FEMME" if the casualty is a female. (4) SSN. Enter the casualty's social security number in the box titled "SSN/NUMERO MATRICULE." (a) If the casualty is a member of a foreign military, including a prisoner of war, enter the casualty's military service number instead. (b) If the casualty is not military, leave the block blank. (5) Military Occupation Specialty. Enter the casualty's military occupation specialty (MOS) code if enlisted or the casualty's area of concentration (AOC) if an officer in the box titled "SPECIALTY CODE/GPM." (6) Religion. Enter the casualty's religious preference in the box titled "RELIGION/RELIGION."
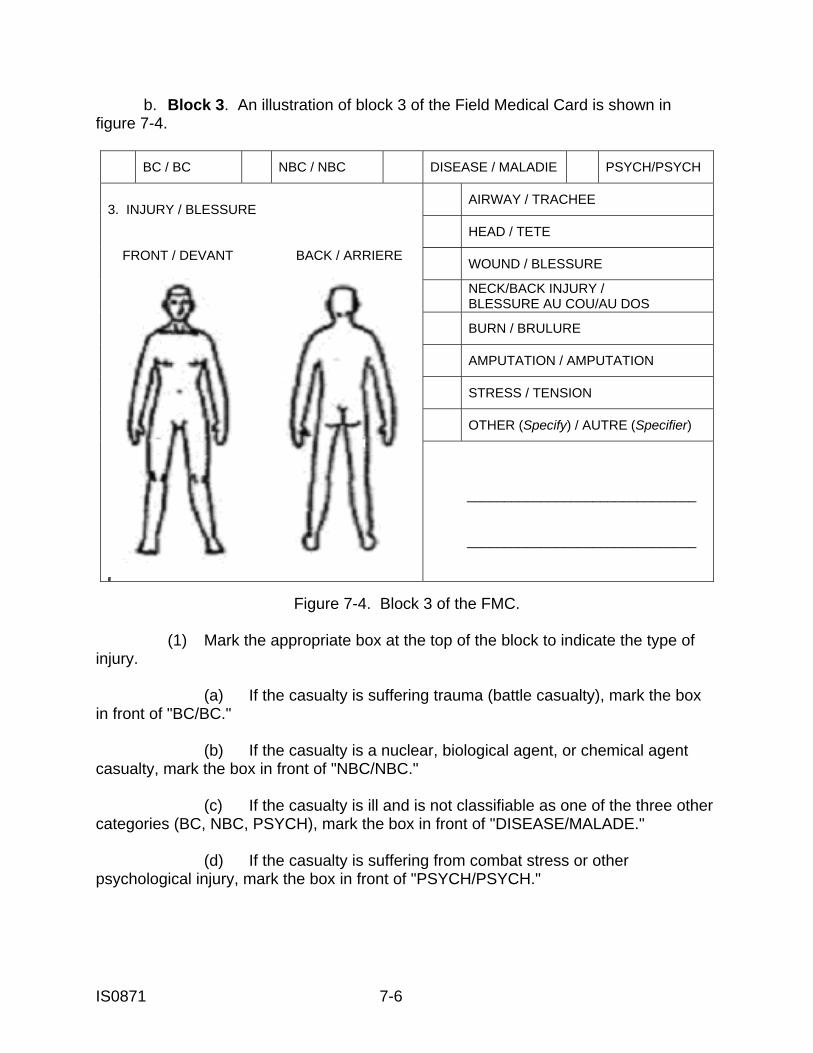
IS0871 7-6
b. Block 3. An illustration of block 3 of the Field Medical Card is shown in figure 7-4.
BC / BC NBC / NBC DISEASE / MALADIE PSYCH/PSYCH
3. INJURY / BLESSURE FRONT / DEVANT BACK / ARRIERE
AIRWAY / TRACHEE
HEAD / TETE
WOUND / BLESSURE
NECK/BACK INJURY / BLESSURE AU COU/AU DOS
BURN / BRULURE
AMPUTATION / AMPUTATION
STRESS / TENSION
OTHER (Specify) / AUTRE (Specifier)
_______________________________ _______________________________
Figure 7-4. Block 3 of the FMC.
(1) Mark the appropriate box at the top of the block to indicate the type of injury. (a) If the casualty is suffering trauma (battle casualty), mark the box in front of "BC/BC." (b) If the casualty is a nuclear, biological agent, or chemical agent casualty, mark the box in front of "NBC/NBC." (c) If the casualty is ill and is not classifiable as one of the three other categories (BC, NBC, PSYCH), mark the box in front of "DISEASE/MALADE." (d) If the casualty is suffering from combat stress or other psychological injury, mark the box in front of "PSYCH/PSYCH."

IS0871 7-7
(2) Use the figures in the left portion of the block to show the location of the casualty's injury or injuries. Note that there are two figures, one for injuries to the front and one for injuries to the back. Be sure that the casualty has been checked for both entrance wounds and exit wounds. An "X" can be used to denote the location of an injury or wound. (3) Mark the appropriate box or boxes on the right to describe the casualty's injury or injuries. If the box for "OTHER" is checked, enter the description in the area below the box. Do not mark the "OTHER" block if the casualty's condition has been covered in one of the other boxes in the column. c. Block 4. Check the appropriate box for level of consciousness. Use the AVPU system described in paragraph 2-5 of Lesson 2 and paragraph 3-4 of Lesson 3. An illustration of block 4 of the Field Medical Card is shown in figure 7-5.
4. LEVEL OF CONCIOUSNESS / NIVEAU DE CONSCIENCE ALERT / ALERTE PAIN RESPONSE / REPONSE A LA DOULER
VERBAL RESPONSE / REPONSE VEBALE UNRESPONSIVE / SANS REPONSE
Figure 7-5. Block 4 of the FMC.
d. Block 9. Enter a brief description of the treatment given in block 9. Use approved abbreviations, if possible. (See paragraph 7-7 for a partial list of approved abbreviations.) If needed, use block 14 on the back of the card for additional space. An illustration of block 9 of the Field Medical Card is shown in figure 7-6.
9. TREATMENT/OBSERVATIONS/CURRENT MEDICATIONS/ALLERGIES/NBC (ANTIDOTE) TRAITEMENT/OBSERVATIONS/PRESENTE MEDICATION/ALLERGIES/ANTIDOTES
Figure 7-6. Block 9 of the FMC.
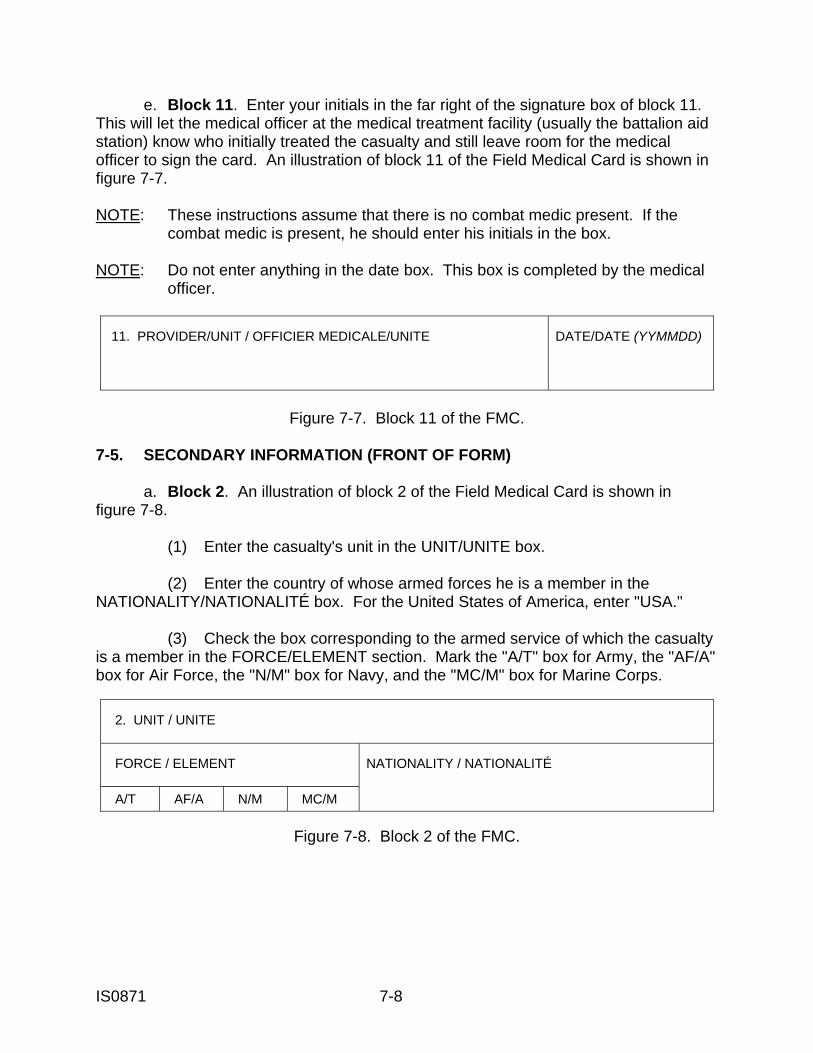
IS0871 7-8
e. Block 11. Enter your initials in the far right of the signature box of block 11. This will let the medical officer at the medical treatment facility (usually the battalion aid station) know who initially treated the casualty and still leave room for the medical officer to sign the card. An illustration of block 11 of the Field Medical Card is shown in figure 7-7. NOTE: These instructions assume that there is no combat medic present. If the combat medic is present, he should enter his initials in the box. NOTE: Do not enter anything in the date box. This box is completed by the medical officer.
11. PROVIDER/UNIT / OFFICIER MEDICALE/UNITE
DATE/DATE (YYMMDD)
Figure 7-7. Block 11 of the FMC.
7-5. SECONDARY INFORMATION (FRONT OF FORM) a. Block 2. An illustration of block 2 of the Field Medical Card is shown in figure 7-8. (1) Enter the casualty's unit in the UNIT/UNITE box. (2) Enter the country of whose armed forces he is a member in the NATIONALITY/NATIONALITÉ box. For the United States of America, enter "USA." (3) Check the box corresponding to the armed service of which the casualty is a member in the FORCE/ELEMENT section. Mark the "A/T" box for Army, the "AF/A" box for Air Force, the "N/M" box for Navy, and the "MC/M" box for Marine Corps.
2. UNIT / UNITE FORCE / ELEMENT
NATIONALITY / NATIONALITÉ
A/T AF/A N/M MC/M
Figure 7-8. Block 2 of the FMC.
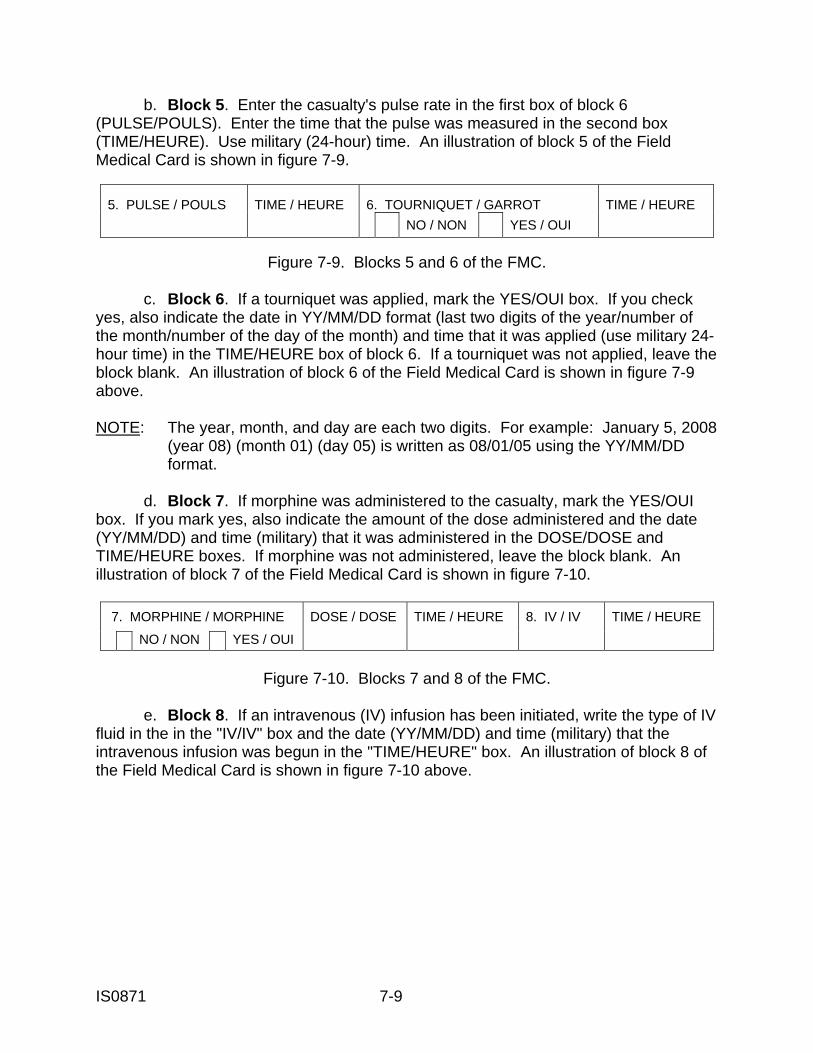
IS0871 7-9
b. Block 5. Enter the casualty's pulse rate in the first box of block 6 (PULSE/POULS). Enter the time that the pulse was measured in the second box (TIME/HEURE). Use military (24-hour) time. An illustration of block 5 of the Field Medical Card is shown in figure 7-9.
5. PULSE / POULS
TIME / HEURE
6. TOURNIQUET / GARROT
TIME / HEURE
NO / NON YES / OUI
Figure 7-9. Blocks 5 and 6 of the FMC. c. Block 6. If a tourniquet was applied, mark the YES/OUI box. If you check yes, also indicate the date in YY/MM/DD format (last two digits of the year/number of the month/number of the day of the month) and time that it was applied (use military 24-hour time) in the TIME/HEURE box of block 6. If a tourniquet was not applied, leave the block blank. An illustration of block 6 of the Field Medical Card is shown in figure 7-9 above. NOTE: The year, month, and day are each two digits. For example: January 5, 2008 (year 08) (month 01) (day 05) is written as 08/01/05 using the YY/MM/DD format. d. Block 7. If morphine was administered to the casualty, mark the YES/OUI box. If you mark yes, also indicate the amount of the dose administered and the date (YY/MM/DD) and time (military) that it was administered in the DOSE/DOSE and TIME/HEURE boxes. If morphine was not administered, leave the block blank. An illustration of block 7 of the Field Medical Card is shown in figure 7-10.
7. MORPHINE / MORPHINE DOSE / DOSE TIME / HEURE 8. IV / IV TIME / HEURE
NO / NON YES / OUI
Figure 7-10. Blocks 7 and 8 of the FMC. e. Block 8. If an intravenous (IV) infusion has been initiated, write the type of IV fluid in the in the "IV/IV" box and the date (YY/MM/DD) and time (military) that the intravenous infusion was begun in the "TIME/HEURE" box. An illustration of block 8 of the Field Medical Card is shown in figure 7-10 above.
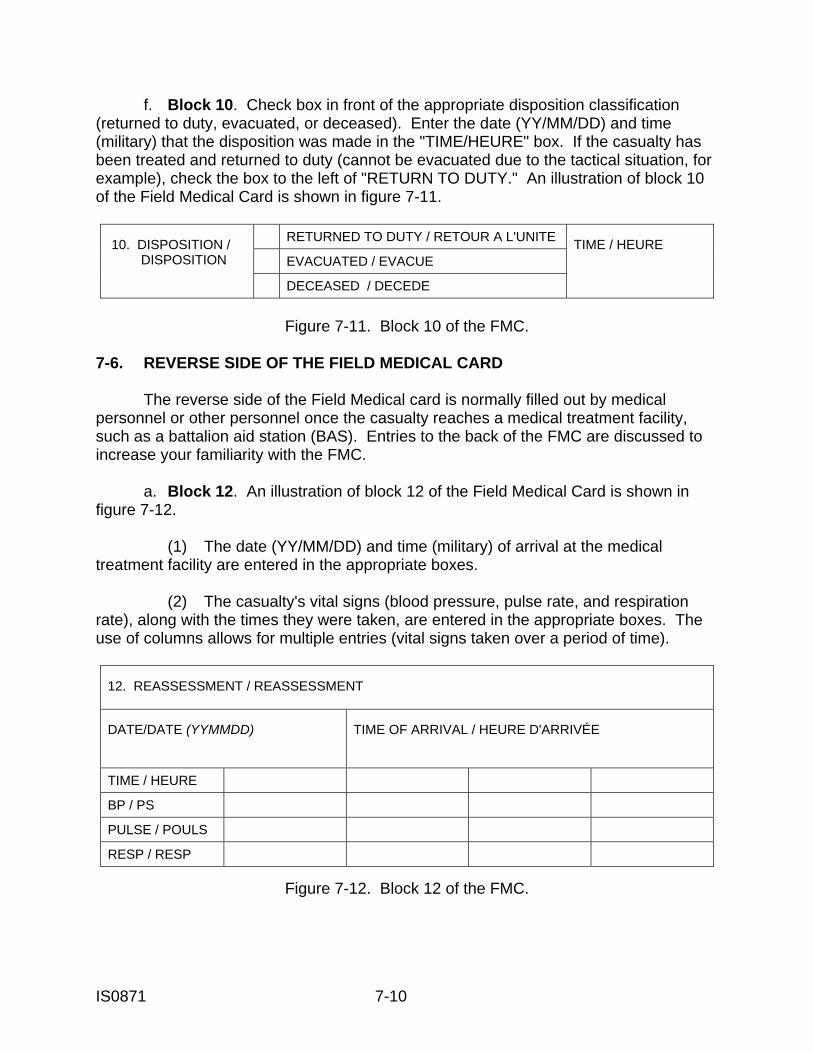
IS0871 7-10
f. Block 10. Check box in front of the appropriate disposition classification (returned to duty, evacuated, or deceased). Enter the date (YY/MM/DD) and time (military) that the disposition was made in the "TIME/HEURE" box. If the casualty has been treated and returned to duty (cannot be evacuated due to the tactical situation, for example), check the box to the left of "RETURN TO DUTY." An illustration of block 10 of the Field Medical Card is shown in figure 7-11.
10. DISPOSITION / DISPOSITION
RETURNED TO DUTY / RETOUR A L'UNITE TIME / HEURE
EVACUATED / EVACUE DECEASED / DECEDE
Figure 7-11. Block 10 of the FMC.
7-6. REVERSE SIDE OF THE FIELD MEDICAL CARD The reverse side of the Field Medical card is normally filled out by medical personnel or other personnel once the casualty reaches a medical treatment facility, such as a battalion aid station (BAS). Entries to the back of the FMC are discussed to increase your familiarity with the FMC. a. Block 12. An illustration of block 12 of the Field Medical Card is shown in figure 7-12. (1) The date (YY/MM/DD) and time (military) of arrival at the medical treatment facility are entered in the appropriate boxes. (2) The casualty's vital signs (blood pressure, pulse rate, and respiration rate), along with the times they were taken, are entered in the appropriate boxes. The use of columns allows for multiple entries (vital signs taken over a period of time).
12. REASSESSMENT / REASSESSMENT DATE/DATE (YYMMDD)
TIME OF ARRIVAL / HEURE D'ARRIVÉE
TIME / HEURE BP / PS PULSE / POULS RESP / RESP
Figure 7-12. Block 12 of the FMC.
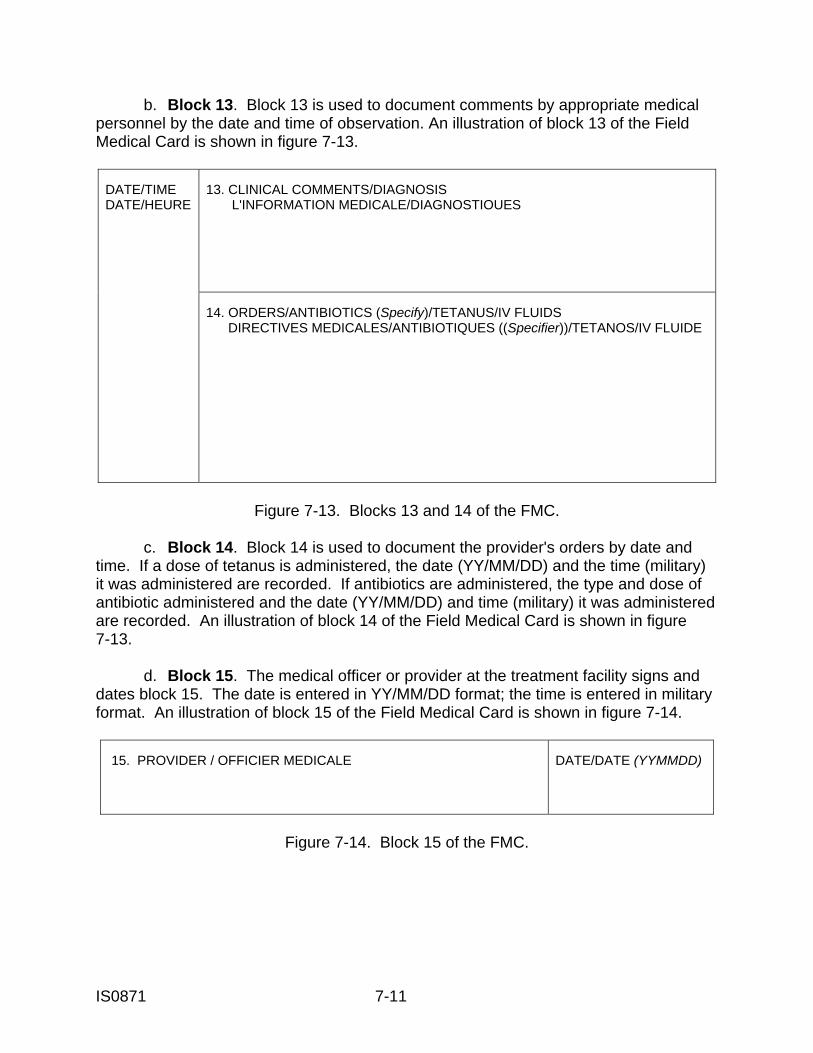
IS0871 7-11
b. Block 13. Block 13 is used to document comments by appropriate medical personnel by the date and time of observation. An illustration of block 13 of the Field Medical Card is shown in figure 7-13.
DATE/TIME DATE/HEURE
13. CLINICAL COMMENTS/DIAGNOSIS L'INFORMATION MEDICALE/DIAGNOSTIOUES 14. ORDERS/ANTIBIOTICS (Specify)/TETANUS/IV FLUIDS DIRECTIVES MEDICALES/ANTIBIOTIQUES ((Specifier))/TETANOS/IV FLUIDE
Figure 7-13. Blocks 13 and 14 of the FMC.
c. Block 14. Block 14 is used to document the provider's orders by date and time. If a dose of tetanus is administered, the date (YY/MM/DD) and the time (military) it was administered are recorded. If antibiotics are administered, the type and dose of antibiotic administered and the date (YY/MM/DD) and time (military) it was administered are recorded. An illustration of block 14 of the Field Medical Card is shown in figure 7-13. d. Block 15. The medical officer or provider at the treatment facility signs and dates block 15. The date is entered in YY/MM/DD format; the time is entered in military format. An illustration of block 15 of the Field Medical Card is shown in figure 7-14.
15. PROVIDER / OFFICIER MEDICALE
DATE/DATE (YYMMDD)
Figure 7-14. Block 15 of the FMC.
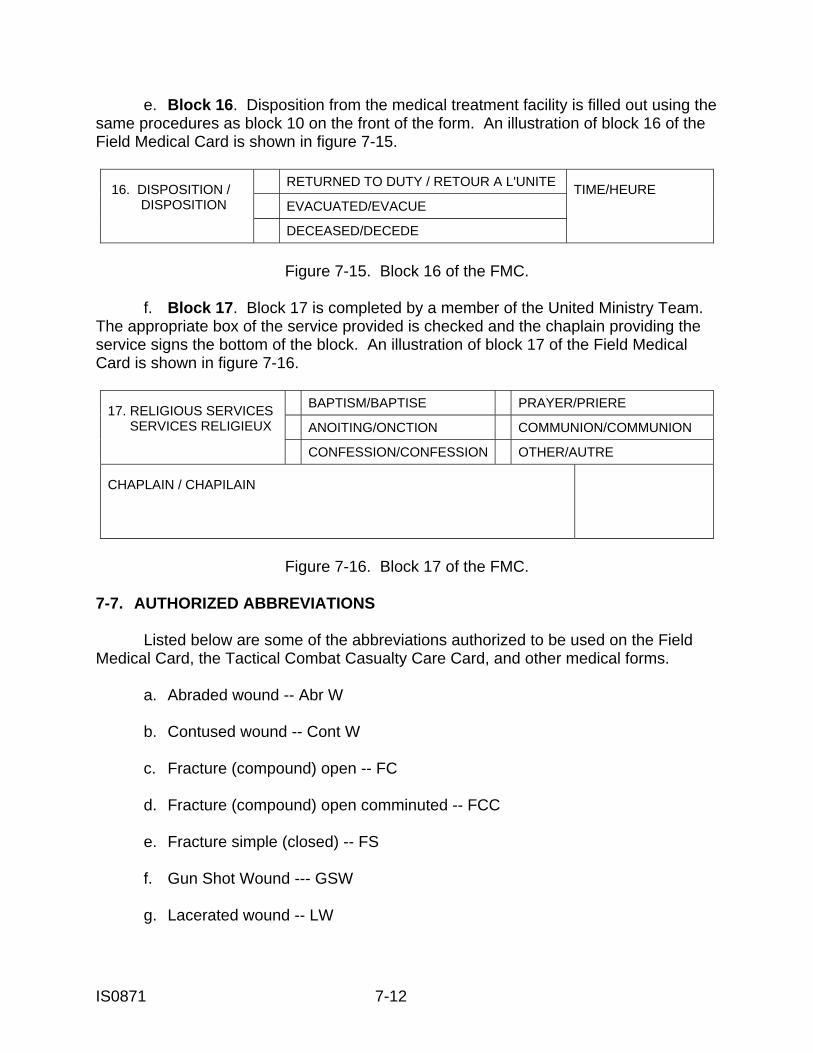
IS0871 7-12
e. Block 16. Disposition from the medical treatment facility is filled out using the same procedures as block 10 on the front of the form. An illustration of block 16 of the Field Medical Card is shown in figure 7-15.
16. DISPOSITION / DISPOSITION
RETURNED TO DUTY / RETOUR A L'UNITE TIME/HEURE
EVACUATED/EVACUE DECEASED/DECEDE
Figure 7-15. Block 16 of the FMC.
f. Block 17. Block 17 is completed by a member of the United Ministry Team. The appropriate box of the service provided is checked and the chaplain providing the service signs the bottom of the block. An illustration of block 17 of the Field Medical Card is shown in figure 7-16.
17. RELIGIOUS SERVICES SERVICES RELIGIEUX
BAPTISM/BAPTISE PRAYER/PRIERE ANOITING/ONCTION COMMUNION/COMMUNION CONFESSION/CONFESSION OTHER/AUTRE
CHAPLAIN / CHAPILAIN
Figure 7-16. Block 17 of the FMC.
7-7. AUTHORIZED ABBREVIATIONS Listed below are some of the abbreviations authorized to be used on the Field Medical Card, the Tactical Combat Casualty Care Card, and other medical forms. a. Abraded wound -- Abr W b. Contused wound -- Cont W c. Fracture (compound) open -- FC d. Fracture (compound) open comminuted -- FCC e. Fracture simple (closed) -- FS f. Gun Shot Wound --- GSW g. Lacerated wound -- LW
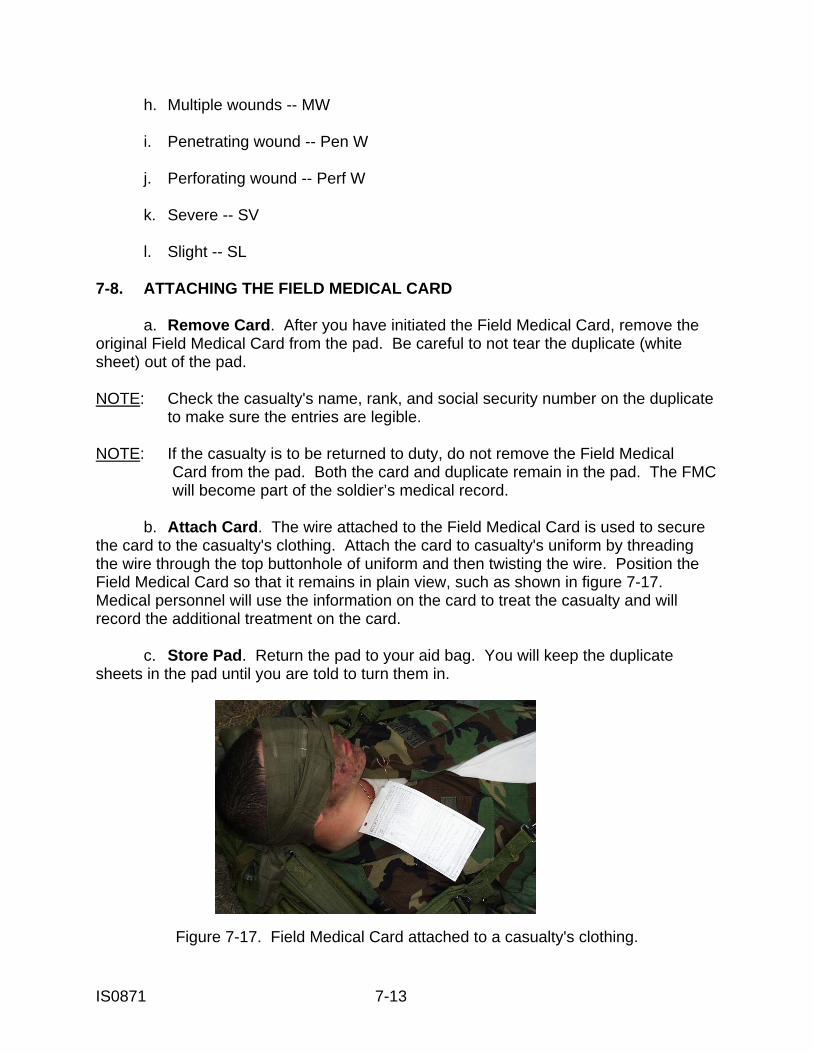
IS0871 7-13
h. Multiple wounds -- MW i. Penetrating wound -- Pen W j. Perforating wound -- Perf W k. Severe -- SV l. Slight -- SL 7-8. ATTACHING THE FIELD MEDICAL CARD a. Remove Card. After you have initiated the Field Medical Card, remove the original Field Medical Card from the pad. Be careful to not tear the duplicate (white sheet) out of the pad. NOTE: Check the casualty's name, rank, and social security number on the duplicate to make sure the entries are legible. NOTE: If the casualty is to be returned to duty, do not remove the Field Medical Card from the pad. Both the card and duplicate remain in the pad. The FMC will become part of the soldier’s medical record. b. Attach Card. The wire attached to the Field Medical Card is used to secure the card to the casualty's clothing. Attach the card to casualty's uniform by threading the wire through the top buttonhole of uniform and then twisting the wire. Position the Field Medical Card so that it remains in plain view, such as shown in figure 7-17. Medical personnel will use the information on the card to treat the casualty and will record the additional treatment on the card. c. Store Pad. Return the pad to your aid bag. You will keep the duplicate sheets in the pad until you are told to turn them in.
Figure 7-17. Field Medical Card attached to a casualty's clothing.
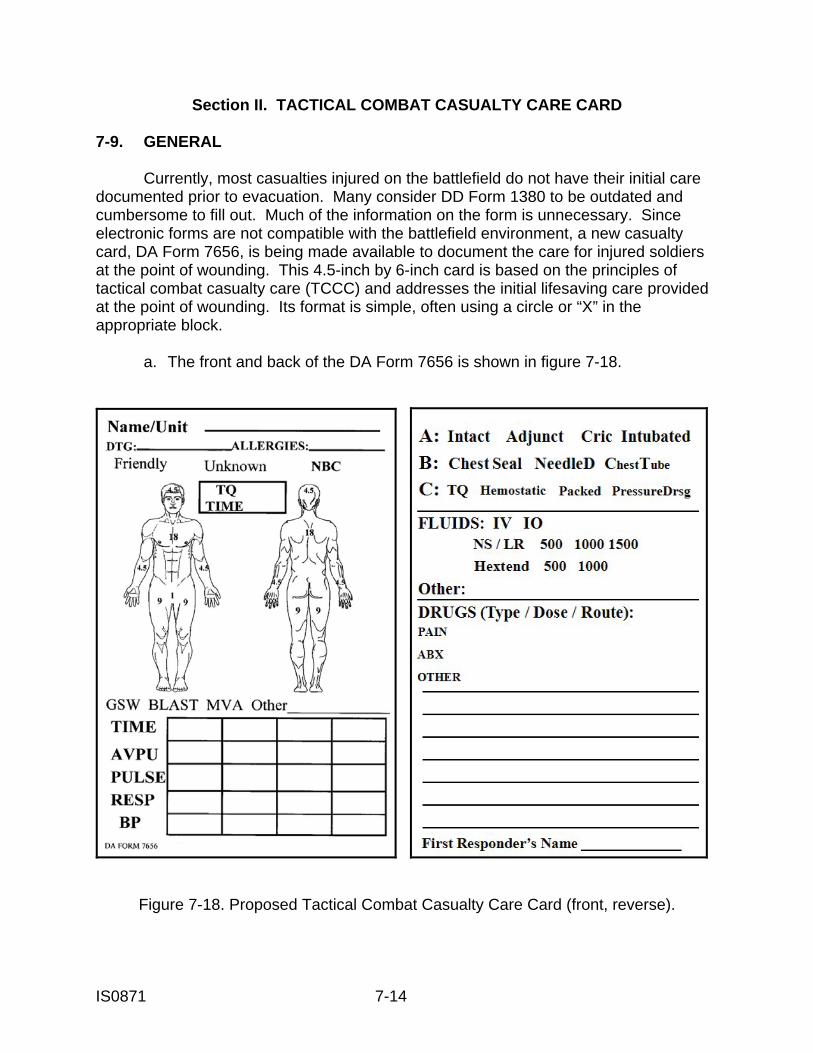
IS0871 7-14
Section II. TACTICAL COMBAT CASUALTY CARE CARD
7-9. GENERAL Currently, most casualties injured on the battlefield do not have their initial care documented prior to evacuation. Many consider DD Form 1380 to be outdated and cumbersome to fill out. Much of the information on the form is unnecessary. Since electronic forms are not compatible with the battlefield environment, a new casualty card, DA Form 7656, is being made available to document the care for injured soldiers at the point of wounding. This 4.5-inch by 6-inch card is based on the principles of tactical combat casualty care (TCCC) and addresses the initial lifesaving care provided at the point of wounding. Its format is simple, often using a circle or “X” in the appropriate block. a. The front and back of the DA Form 7656 is shown in figure 7-18.
Figure 7-18. Proposed Tactical Combat Casualty Care Card (front, reverse).

IS0871 7-15
b. Each soldier will carry his own DA Form 7656 in his personal Improved First Aid Kit (IFAK). The soldier should complete the Name/Unit section and the Allergies section on his card before placing it in his IFAK. c. If possible, use an indelible marker to make entries on the card. Include as much information as you can on the card. 7-10. COMPLETING THE FRONT SIDE a. Casualty’s Name (Name/Unit). The soldier should have entered his last name and first name as a minimum in the “Name/Unit” portion of his card before he placed the card in his IFAK. If the information is not entered, obtain the information from the casualty’s identification tags, casualty’s uniform, from the casualty himself, or from another soldier who knows the casualty and enter the information. b. Allergies. The soldier should have listed any allergic reactions to medications on his card before he placed the card in his IFAK. If the information is not entered, obtain the information from the casualty or from any medical alert identification, if possible. c. Date-Time Group (DGT). Enter the date and military time that you begin treatment of the casualty. For example: 17 May 1530. The year need not be entered. d. Cause of Injury. Circle the cause of injury: friendly, unknown, or NBC (nuclear, biological agent, or chemical agent). e. Type of Injury. Circle the type of injury: gunshot wound (GSW), blast, motor vehicle accident (MVA), or other. If “other” is indicated, enter an explanation in the blank following “Other.” f. Time Tourniquet Applied (TQ Time). If a tourniquet has been applied to the casualty, enter the military time that the tourniquet was applied, such as “1540.” The date and year does not normally need to be entered. g. Location of Wound(s). The card contains two body pictures, one of the casualty’s front and another for the casualty’s back. Place an “X” on the illustration to indicate the place of injury or the wound site. If there is an entrance wound and an exit wound, place one “X” on the front figure and another “X” on the back figure. Place as many X’s as needed. NOTE: The figures contain burn percentages based upon the “rule of nines.” Use these figures in estimating the percentage of body surface burned.
IS0871 7-16
h. Vital Signs. The chart is used to record the casualty’s level of consciousness and vital signs. Note that there are four columns to record four sets of readings. If more readings need to be recorded, use the “OTHER” section on the back of the card. (1) Enter the time (military time, usually without the date and year) in the “Time” box at the top of the left column. (2) Enter the casualty’s level of consciousness using the AVPU system in the “AVPU” box. Enter “A” for alert, “V” for verbal, “P” for pain, or “U” for unresponsive. The AVPU system is discussed in paragraph 2-5. (3) Enter the casualty’s pulse rate (even number showing the casualty’s pulse beats per minute) in the “Pulse” box. (4) Enter the casualty’s respiration rate (complete breaths per minute—even or odd number) in the “Resp” box. (5) Enter the casualty’s blood pressure (if applicable) in the “BP” box. Enter the blood pressure in “systolic/diastolic” format with both numbers being entered as even numbers. 7-11. COMPLETING THE REVERSE SIDE a. Airway Interventions (Line A). Indicate the airway interventions performed (if any) by circling the appropriate term in Line A. (1) If the casualty’s airway is intact and no airway intervention was needed, circle “Intact.” (2) If an airway adjunct (such as a nasopharyngeal airway) has been used, circle “Adjunct” and enter a brief explanation (such as “NPA”) in the “OTHER” section near the bottom of the card. (3) If a cricothyrotomy has been performed, circle “Cric.” (4) If an intubation has been performed (such as an insertion of an endotrachial tube), circle “Intubated” and enter a brief explanation in the “OTHER” section. b. Breathing Interventions (Line B). Indicate any breathing interventions performed by circling the appropriate item in Line B. (1) If a commercial chest seal has been applied to a penetrating chest wound, circle “Chest Seal.”
IS0871 7-17
(2) If a needle chest decompression has been performed, circle “NeedleD.” (3) If a chest tube has been inserted, circle “Chest Tube.” c. Bleeding Control Measures (Line C). Indicate any bleeding control measures that have been performed by circling the appropriate item in Line C. Additional information can be entered in the “OTHER” section near the bottom of the card, if needed. NOTE: More than one item can be circled. (1) If a tourniquet has been applied, circle the “TQ.” Also make sure the time that the tourniquet was applied is entered in the “TQ Time” box on the front of the card. (2) If a hemostatic agent (such as Combat Gauze) has been applied to a wound, circle “Hemostatic.” (3) If material such as plain gauze (not Combat Gauze) has been packed in a wound in order to control bleeding, circle “Packed.” (4) If a pressure dressing has been applied to the wound, circle “Pressure Dx.” d. Fluids Administered. (1) Indicate the method used to administer the fluids. Circle “IV” for intravenous infusion and “IO” for intraosseous (through the bone) infusion. (2) Circle the type of fluid administered. (a) Circle “NS” for normal saline. (b) Circle “LR” for lactated Ringer injection. (c) Circle “Hextend” for Hextend® fluid. (d) If another fluid was administered (such as 5 percent dextrose in water [D5W] or whole blood), enter the fluid type in the “Other” line in the FLUIDS section. (3) Circle the amount of fluid being administered. (a) If NS or LR is administered, circle “500” (500 milliliters), “1000” (1000 milliliters), or 1500 (1500 milliliters) on the “NS/LR” line as appropriate.
IS0871 7-18
(b) If Hextend is administered, circle “500” (500 milliliters) or “1000” (1000 milliliters) as appropriate. (c) If another amount is needed (such as 250 milliliters), enter the amount in the “Other” line of the FLUIDS section. e. Drugs. (1) Enter the type, dose, and route of any medication administered for pain on the “PAIN” line. (2) Enter the type, dose, and route of any antibiotics administered on the “ABX” line. (3) Enter the type, dose, and route of any other medication administered other than antibiotics or pain medication on the “OTHER” line. f. Notes. Enter any pertinent notes or observations in the lines below the “OTHER” line in the DRUGS section. g. Signature. If you are assisting a combat medic, he will sign the card. If you are acting as a combat lifesaver and no combat medic is present, print your name and rank in the “First Responder’s Name” line at the bottom of the card. 7-12. ATTACHING THE CARD You can attach the TCCC card to the casualty or place the card in the upper left sleeve or the left trouser cargo pocket of the casualty’s clothing.
IS0871 7-19
EXERCISES: LESSON 7 INSTRUCTIONS: Answer the following exercises by marking the letter of the response that best answers the question or best completes the sentence or by writing the answer in the space provided. After you have answered all of the exercises, check your answers against the "Solutions to Lesson Exercises" at the end of the exercises. For each exercise answered incorrectly, reread the lesson material referenced. 1. What are the five blocks in which you would make entries (primary information) when initiating a Field Medical Card? ____________________________________________________________ SPECIAL INSTRUCTIONS FOR LESSON EXERCISES 2 THROUGH 12. Match the information (Column I) with the block of the U.S. Field Medical Card (Column II) in which the information is recorded. Items in Column II may be used more than once.
COLUMN I 2. ____ Casualty's name and rank. 3. ____ Description of treatment the casualty received. 4. ____ Combat lifesaver's signature. 5. ____ AVPU notation. 6. ____ Casualty's social security number. 7. ____ Illustration of wound location. 8. ____ Casualty is suffering from combat stress. 9. ____ Combat lifesaver's initials. 10. ____ Casualty's religious preference. 11. ____ Casualty has suffered serious burns. 12. ____ Casualty's MOS or AOC.
COLUMN II a. Block 1. b. Block 3. c. Block 4. d. Block 9. e. Block 11. f. This information is not entered on the FMC.
IS0871 7-20
SPECIAL INSTRUCTIONS FOR LESSON EXERCISES 13 THROUGH 18. Match the information (Column I) with the block of the U.S. Field Medical Card (Column II) in which the information is recorded. Items in Column II may be used more than once.
COLUMN I 13. ____ A tourniquet has been applied. 14. ____ Casualty returned to duty (not evacuated). 15. ____ Casualty is a member of the Canadian armed forces. 16. ____ The combat medic initiated an intravenous infusion. 17. ____ The casualty's pulse rate. 18. ____ The casualty has received a morphine injection.
COLUMN II a. Block 2. b. Block 5. c. Block 6. d. Block 7. e. Block 8. f. Block 10.
19. You are treating a casualty while the casualty is being evacuated (CASEVAC). You have used up the space in Block 9 of the U.S. Field Medical Card, but still need to record additional information. You should: a. Continue your entries in Block 10 of the FMC. b. Continue your entries in Block 14 of the FMC. c. Continue your entries in Block 9 of the duplicate white sheet. d. Stop making entries on the FMC. 20. What should you do before you begin writing on the Field Medical Card? ___________________________________________________________ 21. How many U.S. Field Medical Card sets are in a pad? _______________ 22. What should you do once you complete a U.S. Field Medical Card on a casualty that will be evacuated? ____________________________________________________________ ____________________________________________________________
IS0871 7-21
23. What should you do once you complete a U.S. Field Medical Card on a casualty that is being returned to duty? _______________________________________________________________ 24. What is the correct abbreviation for a penetrating wound? ______________ 25. The titles of the blocks of the Field Medical Card are in two languages. What are the languages? ___________________________________________________ 26. You are filling out a U.S. Field Medical Card on a casualty. The casualty is unconscious and his identification is missing. You can fill out most of Block 1 from your personal knowledge of the casualty, but you do not know his social security number or his religious preference. What should you do? a. Enter your social security number and religious preference in the blocks. b. Enter "Unknown" in the blocks. c. Leave the blocks blank so they can be filled in later. 27. A casualty has received a gunshot wound to the abdomen. You have marked the "Wound" box in Block 3 of the U.S. Field Medical Card. Should you explain the casualty's injury in more detail in the "Other" section of the block? a. Yes. b. No. 28. You are filling out a Tactical Combat Casualty Care Card on a casualty. Which of the following requires an entry on the front of the card and on the reverse side of the card? a. An intravenous infusion is being administered. b. A tourniquet has been applied. c. A drug for pain and an antibiotic has been administered. d. You have taken three sets of vital signs. 29. A soldier should complete the ____________________ and the ___________ sections of a blank Tactical Combat Casualty Care Card before going into combat.
IS0871 7-22
30. What should the soldier do with his Tactical Combat Casualty Care Card after it has been initiated? ______________________________________________________________ 31. You have applied a tourniquet to a casualty and are preparing to evacuate the casualty. The casualty has not been evaluated or treated by a combat medic. What should be entered in the “First Responder’s Name” section of the Tactical Combat Casualty Care Card? a. Your printed name and rank. b. Your written name, followed by “CL.” c. The printed name of your unit’s combat medic. d. Nothing. 32. You have completed a Tactical Combat Casualty Care Card on a casualty and the casualty is being prepared for evacuation. Where should you place the card? (More than one answer may be correct? a. Tie the card to the casualty’s button hole. b. Place the card in the casualty’s pocket in his upper left sleeve. c. Place the card in the casualty’s pocket in his upper right sleeve. d. Place the card in the casualty’s left trouser cargo pocket. e. Place the card in the casualty’s right trouser cargo pocket. f. In the outside pocket of your combat lifesaver aid bag. 33. Practice filling out a U.S. Field Medical Card. Using the simulated U.S. Field Medical Card front on the next page, fill in the information for the following casualty. The date is 25 October 2009. Male soldier suffered severe cut to front of upper right arm due to an explosion. On AVPU scale, casualty rates V (verbal). Emergency Bandage applied to arm at 3:20 p.m. Tourniquet applied to arm at 3:30 p.m. Tactical situation prevents evacuation at this time. The casualty is Corporal (E-4) Joe Robinson, U.S. Army, MOS 13F, Unit (not known), SSN 445-79-2393, Protestant. Your name is Ugeer R. Irving.
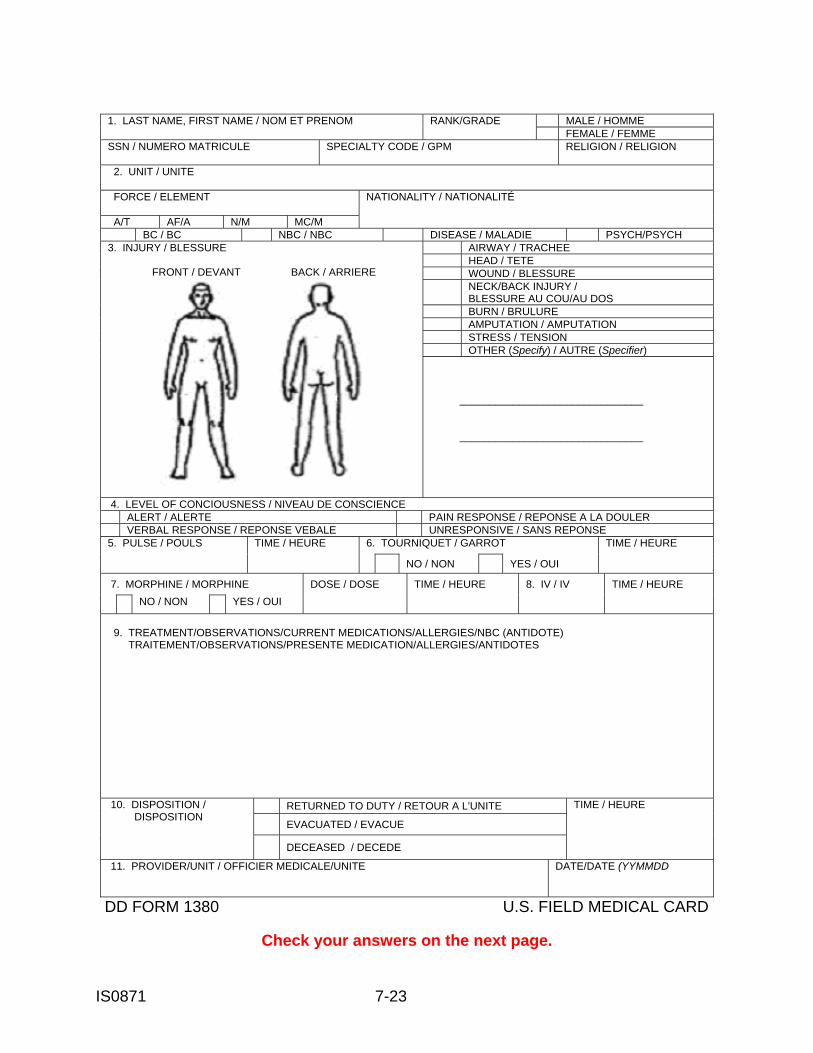
IS0871 7-23
1. LAST NAME, FIRST NAME / NOM ET PRENOM
RANK/GRADE MALE / HOMME FEMALE / FEMME
SSN / NUMERO MATRICULE
SPECIALTY CODE / GPM RELIGION / RELIGION
2. UNIT / UNITE FORCE / ELEMENT
NATIONALITY / NATIONALITÉ
A/T AF/A N/M MC/M BC / BC NBC / NBC DISEASE / MALADIE PSYCH/PSYCH 3. INJURY / BLESSURE FRONT / DEVANT BACK / ARRIERE
AIRWAY / TRACHEE HEAD / TETE WOUND / BLESSURE NECK/BACK INJURY /
BLESSURE AU COU/AU DOS BURN / BRULURE AMPUTATION / AMPUTATION STRESS / TENSION OTHER (Specify) / AUTRE (Specifier) _______________________________ _______________________________
4. LEVEL OF CONCIOUSNESS / NIVEAU DE CONSCIENCE ALERT / ALERTE PAIN RESPONSE / REPONSE A LA DOULER VERBAL RESPONSE / REPONSE VEBALE UNRESPONSIVE / SANS REPONSE 5. PULSE / POULS
TIME / HEURE 6. TOURNIQUET / GARROT TIME / HEURE
NO / NON YES / OUI
7. MORPHINE / MORPHINE DOSE / DOSE TIME / HEURE 8. IV / IV TIME / HEURE NO / NON YES / OUI
9. TREATMENT/OBSERVATIONS/CURRENT MEDICATIONS/ALLERGIES/NBC (ANTIDOTE) TRAITEMENT/OBSERVATIONS/PRESENTE MEDICATION/ALLERGIES/ANTIDOTES 10. DISPOSITION / DISPOSITION
RETURNED TO DUTY / RETOUR A L'UNITE TIME / HEURE EVACUATED / EVACUE DECEASED / DECEDE
11. PROVIDER/UNIT / OFFICIER MEDICALE/UNITE
DATE/DATE (YYMMDD
DD FORM 1380 U.S. FIELD MEDICAL CARD
Check your answers on the next page.

IS0871 7-24
SOLUTIONS TO EXERCISES: LESSON 7 1. Blocks 1, 3, 4, 9, 11 (para 7-3b) 2. a (paras 7-4a(1), (2)) 3. d (para 7-4d) 4. f (para 7-4e) 5. c (para 7-4c) 6. a (para 7-4a(4)) 7. b (para 7-4b(2)) 8. b (para 7-4b(1)(d) 9. e (para 7-4e) 10. a (para 7-4a(6)) 11. b (para 7-4b(3), figure 7-4) 12. a (para 7-4a(5)) 13. c (para 7-5c) 14. f (para 7-5f) 15. a (para 7-5a(2)) 16. e (para 7-5e) 17. b (para 7-5b) 18. d (para 7-5d) 19. b (para 7-4d) 20. Remove the protective sheet between the FMC and the duplicate copy. (para 7-3a) 21. 10 (para 7-2)

IS0871 7-25
22. Remove the FMC and use the attached wire to secure it to the casualty's clothing. (paras 7-8a, b) 23. Leave the FMC in the pad. (para 7-8a Second Note) 24. Pen W. (para 7-7i) 25. English and French. (para 7-1) 26. c (para 7-1) 27. b (para 7-4b(3)) 28. b (paras 7-10f, 7-11c(1)) 29. Name/Unit; Allergies. (paras 7-10a, b) 30. Place it in his IFAC. (paras 7-10a, b) 31. a (para 7-11g) 32 b, d (para 7-12) 33. See the following page. Note that the location of the wound is marked with an "X" in the figure.
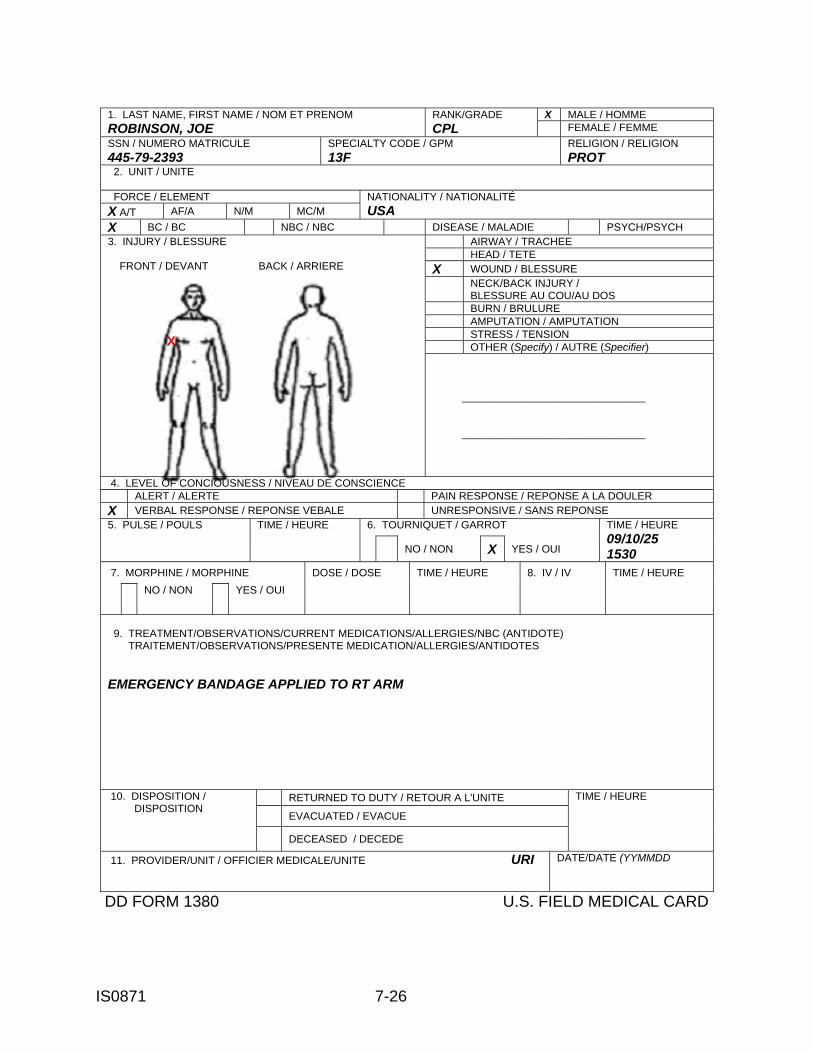
IS0871 7-26
1. LAST NAME, FIRST NAME / NOM ET PRENOM ROBINSON, JOE
RANK/GRADE CPL
X MALE / HOMME FEMALE / FEMME
SSN / NUMERO MATRICULE 445-79-2393
SPECIALTY CODE / GPM 13F
RELIGION / RELIGION PROT
2. UNIT / UNITE FORCE / ELEMENT NATIONALITY / NATIONALITÉ
USA X A/T AF/A N/M MC/M X BC / BC NBC / NBC DISEASE / MALADIE PSYCH/PSYCH 3. INJURY / BLESSURE FRONT / DEVANT BACK / ARRIERE
X
AIRWAY / TRACHEE HEAD / TETE X WOUND / BLESSURE NECK/BACK INJURY /
BLESSURE AU COU/AU DOS BURN / BRULURE AMPUTATION / AMPUTATION STRESS / TENSION OTHER (Specify) / AUTRE (Specifier) _______________________________ _______________________________
4. LEVEL OF CONCIOUSNESS / NIVEAU DE CONSCIENCE ALERT / ALERTE PAIN RESPONSE / REPONSE A LA DOULER X VERBAL RESPONSE / REPONSE VEBALE UNRESPONSIVE / SANS REPONSE 5. PULSE / POULS
TIME / HEURE 6. TOURNIQUET / GARROT TIME / HEURE 09/10/25 1530 NO / NON X YES / OUI
7. MORPHINE / MORPHINE DOSE / DOSE TIME / HEURE 8. IV / IV TIME / HEURE NO / NON YES / OUI
9. TREATMENT/OBSERVATIONS/CURRENT MEDICATIONS/ALLERGIES/NBC (ANTIDOTE) TRAITEMENT/OBSERVATIONS/PRESENTE MEDICATION/ALLERGIES/ANTIDOTES EMERGENCY BANDAGE APPLIED TO RT ARM 10. DISPOSITION / DISPOSITION
RETURNED TO DUTY / RETOUR A L'UNITE TIME / HEURE EVACUATED / EVACUE DECEASED / DECEDE
11. PROVIDER/UNIT / OFFICIER MEDICALE/UNITE URI
DATE/DATE (YYMMDD
DD FORM 1380 U.S. FIELD MEDICAL CARD
IS0871 8-1
LESSON 8
REQUESTING MEDICAL EVACUATION TASK Prepare and transmit a medical evacuation (MEDEVAC) request. CONDITIONS Given information on simulated casualty or casualties, MEDEVAC request guide, a pencil or other writing instrument, paper, and a simulated transmitting device. STANDARD Transmission includes all needed information in the proper sequence. Correct brevity code items are used. Correct radiotelephone procedures (pronunciation, beginning, ending, and so forth) are used. Score a GO on the written performance checklist. REFERENCES FM 8-10-6, Medical Evacuation in a Theater of Operations. 8-1. MEDICAL EVACUATION Medical evacuation (MEDEVAC) is the timely and efficient movement and en route care by medical personnel (combat medics) of the wounded, injured, or ill persons from the battlefield and other locations to medical treatment facilities (MTF). Medical evacuation begins when medical personnel receive the injured or ill soldier. Although the combat lifesaver is not a medical person, he may be the person who initiates the medical evacuation by requesting the casualty be evacuated by ground ambulance or air ambulance. NOTE: Medical evacuation (MEDEVAC) is different from casualty evacuation (CASEVAC). In CASEVAC, nonmedical vehicles (trucks used to haul supplies, vehicles used to transport troops, and so forth) are used to evacuate casualties. In MEDEVAC, medical vehicles (ground ambulances) and medical helicopters (air ambulances) are used. Ground and air ambulances have medical personnel aboard who provide care to the casualties.
IS0871 8-2
8-2. MEDICAL EVACUATION REQUESTS Procedures for requesting medical evacuation support have been standardized. The same format used to request aeromedical evacuation is also used to request ground evacuation. The information contained in the evacuation request helps medical units to determine the correct priority for committing evacuation assets. This helps to control the evacuation flow so that medical resources are not overly strained. 8-3. OVERCLASSIFICATION Overclassification is the tendency to classify a wound or injury as being more severe than it actually is. Overclassification has historically been a problem and is still a problem. Proper casualty classification is needed to ensure that those casualties in greatest need are evacuated first and receive the necessary care required to help ensure their survival. Casualties will be picked up as soon as possible, consistent with available resources and pending missions. 8-4. PREPARING A MEDICAL EVACUATION REQUEST A special nine-line format has been developed to assist in requesting medical evacuation. Rather than stating what type of information is being transmitted, a line number is given. Brevity codes are used to identify specific information being transmitted. Brevity codes allow information to be easily and quickly transmitted. The information is transmitted in sequence (line 1, then line 2, and so forth). The information needed for wartime and peacetime evacuation requests is described in paragraphs 8-5 and 8-6. Lines 1 through 5 must be transmitted before the evacuation mission begins. The remainder should be transmitted at the same time if possible, but can be transmitted to the ground or air ambulance en route. Use Table 8-1 when making notes for transmitting a MEDEVAC request and when actually transmitting the request. 8-5. LINES 1 THROUGH 5 OF THE MEDICAL EVACUATION REQUEST Ambulance personnel need the following information before they begin their mission. a. Line 1: Location of Pickup Site. Using a map, determine the grid coordinates (eight digits) of the site where the air or ground ambulance will pick up the casualty or casualties. This information can often be obtained from your unit leader. This information allows the unit coordinating evacuation to plan the ambulance's route so it can pick up casualties from more than one site, if appropriate.
IS0871 8-3
b. Line 2: Radio Frequency, Call Sign, and Suffix. Your radio frequency, call signal, and suffix can be obtained from the Signal Operating Instruction (SOI) or from the Automated Net Control Device (ANCD) or from the radio supervisor. This information is needed so the evacuation vehicle crew can contact the requesting unit while en route to obtain additional information (for example, to verify marking devices). c. Line 3: Number of Casualties by Precedence. Based upon the actual evaluation of the casualties, determine how many are urgent, how many are urgent surgical, how many are priority, how many are routine, and how many are convenient. This information is used by the unit controlling evacuation to prioritize missions when more than one request is received. Definitions of these categories are given below. (1) Urgent. Urgent means an emergency case that should be evacuated as soon as possible and within a maximum of two hours in order to save live, limb, or eyesight. For example, a soldier who is seriously ill with spinal meningitis or other life-threatening illness may be classified as urgent. (2) Urgent Surgical. Urgent surgical means an emergency case that should be evacuated within two hours to the nearest surgical unit. For example, a soldier with acute appendicitis or a seriously wounded soldier who will probably require a surgical procedure should be classified as urgent surgical. (3) Priority. A soldier, sick or wounded, requiring prompt medical care and who should be evacuated within four hours or the casualty's medical condition could deteriorate to such a degree that he could become an urgent precedence is classified as priority. (4) Routine. A soldier, sick or wounded, requiring evacuation, but whose condition is not expected to deteriorate significantly is classified as routine. The casualty should be evacuated within 24 hours. (5) Convenient. A person who is being medically evacuated for medical convenience rather than necessity is classified as convenient. d. Line 4: Special Equipment Required. Based upon actual evaluation of the casualties, determine what special equipment, if any, will need to be placed aboard the ambulance before it begins the mission. The most common items for an air ambulance are hoist, Stokes litter, and forest penetrator. Another common special equipment requirement is a ventilator. This information is required so the equipment can be placed on board the evacuation vehicle before it leaves the medical treatment facility. e. Line 5: Number of Casualties by Type. Based upon actual evaluation of the casualties, determine the number of casualties that will evacuated on a litter and the number of casualties that are able to be evacuated in a sitting position (ambulatory). This information is needed to configure the vehicle properly to transport the casualties being evacuated.
IS0871 8-4
8-6. LINES 6 THROUGH 9 OF THE MEDICAL EVACUATION REQUEST The following information is transmitted with the information given in paragraph 8-5 if possible, but can be transmitted to the ambulance personnel after they have begin their mission. a. Line 6: Security of Pickup Site. In wartime operations, determine whether proposed pickup site is secure. This information is normally obtained from your unit leader based upon his evaluation of the situation. The information will help the unit controlling evacuation to determine whether assistance (escort) is required to accomplish the mission. The situation is categorized as one of the following: (1) No enemy troops in area. (2) Possibly enemy troops in area; approach with caution. (3) Enemy troops in area; approach with caution. (4) Enemy troops in area; armed escort required. NOTE: In peacetime, line 6 is not used for the security of the pickup site. Instead, line 6 gives the number and type of wound, injury, or illness. For example, two gunshot wounds and one compound fracture. b. Line 7: Method of Marking Pickup Site. Determine how the pickup site is to be marked for identification. This information is usually used when the evacuation is to be by air ambulance. The method is usually determined by your unit leader based upon the military situation and the materials available. Common methods of marking the pickup site are: (1) Panels. (2) Pyrotechnic signal. (3) Smoke signal. (4) Signal person. (5) Strips of fabric or parachute. (6) Tree branches, pieces of wood, or stones placed together. (7) Signal lamp, flashlight, or vehicle lights. (8) Open flame.
IS0871 8-5
NOTE: The information is required to assist the evacuation aircraft crew in identifying the specific location of the pickup site. The color of the panels, smoke, or other markings should not be transmitted until the evacuation vehicle contacts the unit just prior to arrival. For security reasons, the crew of the air ambulance should identify the color of the smoke (for example) and the person on the ground with the casualty should verify that the crew member has seen the correct color of smoke. This helps to prevent the air ambulance from being mislead by colored smoke coming from the enemy. c. Line 8: Casualty Nationality and Status. Based upon information obtained from the casualties, determine which categories of those listed below are represented. The number of casualties in each category does not need to be determined. The information will help the unit coordinating the evacuation identify which facilities should receive casualties and whether guards are needed. The categories are: (1) United States (U.S.) military. (2) U.S. civilian. (3) Military other than U.S. military. (4) Civilian other than U.S. civilian. (5) Enemy prisoner of war (EPW). d. Line 9: Nuclear, Biological, and Chemical Contamination. In wartime operations, determine if chemical contamination, biological contamination, or radiological contamination is present. This information will assist the unit controlling evacuation. If there is no nuclear, biological, or chemical (NBC) contamination, this line is not transmitted. NOTE: In peacetime, line 9 is used to give a description of the terrain (flat, hilly, wooded, open, sloping, and so forth). If possible, include the relationship of the landing area to prominent terrain features (mountain, lake, tower, and so forth). This information can assist the evacuation personnel determine the avenue of approach. This information can be obtained from personnel at the site or by an area survey. 8-7. TRANSMITTING RULES a. During wartime, brevity codes must be used in preparing all medical evacuation requests. Brevity codes should be listed in the Signal Operating Instruction (SOI) or available from the Automated Net Control Device (ANCD). Locally devised brevity codes are not authorized.
IS0871 8-6
b. General rules of radio transmission security are given below. Follow these basic rules to ensure transmission security. These rules are strictly enforced on all military radiotelephone circuits. (1) No transmission will be made unless the proper authority authorizes the transmission. (2) The following practices are specifically forbidden: (a) Violation of radio silence. (b) Unofficial conversation between operators. (c) Transmission on a directed net without permission. (d) Excessive tuning and testing. (e) Transmission of the operator's personal sign or name. (f) Unauthorized use of plain language. (g) Use of other than authorized procedure words (prowords) (see Table 8-2). (h) Unauthorized use of plain language in place of applicable prowords or operating signals. (i) Association of classified call signs and address groups with unclassified call signs. (j) Profane, indecent, or obscene language. c. Call signs are used in radio communications to identify a communications facility, a command, an authority, or a unit. There are two forms of call signs: complete call signs and abbreviated call signs. (1) Complete call signs consist of a letter-number-letter combination and a suffix. They are used when: (a) Entering a net in which you do not normally operate. (b) When so requested by another station in the net. (2) Abbreviated call signs are used at all other times. For example, if A2D28 were the complete call sign, then D28 would be the abbreviated call sign.
IS0871 8-7
(3) If no confusion exists as to which operators are on the radio net, no call signs need be used. d. To avoid confusion and errors during voice transmission, special techniques have been developed for pronouncing letters and numerals. These special techniques resulted in the phonetic alphabet and phonetic numerals (Tables 8-3 and 8-4). NOTE: If there are two syllables, the underlined syllable is emphasized. (1) The phonetic alphabet is used by the operator to spell difficult words and thereby prevent misunderstanding on the part of the receiving operator. (2) The phonetic alphabet is also used for the transmission of messages. For example, the cipher group CMVVX is spoken "CHAR-LEE, MIKE, VICK-TOR, VICK-TOR, ECKS-RAY." (3) Numbers are spoken digit by digit, except that exact multiples of thousands may be spoken as such. For example, 84 is "AIT FOW-ER," 2,500 is "TOO FIFE ZE-RO ZE-RO" and 16,000 is "WUN SIX TOU-SAND." (4) The date-time group is always spoken digit by digit, followed by the time zone indication. For example, 291205Z is "TOO NIN-ER WUN TOO ZE-RO FIFE ZOO-LOO." (5) Map coordinates and call sign suffixes are spoken digit by digit. To keep voice transmission as short and clear as possible, radio operators use procedure words (prowords) to take the place of long sentences. e. Paragraph 8-7c(2) gives an example of a call sign. If this were the call sign of your station, you would identify yourself using prowords and phonetics as follows: "This is al-fah too dell-tah too ait." If abbreviated call signs were being used, you would say, "This is dell-tah too ait." 8-8. TRANSMITTING A MEDICAL EVACUATION REQUEST a. Collect Information. Collect the information that you need before beginning the transmission. b. Begin Transmission. (1) Provide the opening statement: "I HAVE A MEDEVAC REQUEST. OVER." (2) Break for acknowledgement by receiving operator. Wait one to three seconds for acknowledgment. If there is no answer or if contact is interrupted, repeat the statement.
IS0871 8-8
c. Transmit Request. The first five lines of the MEDEVAC request must be transmitted at this time. If possible, the remaining lines should also be transmitted at this time. If the remaining lines cannot be transmitted at this time, they should be transmitted as soon as possible. NOTE: A guide that can be used in making a medical evacuation request is given in Table 8-1. NOTE: Commonly used prowords are given in Table 8-2. (1) Give the line number identifier followed by applicable information. (2) Letters and numbers are to be pronounced according to standard radio procedure (see Tables 8-3 and 8-4). d. End Transmission. After transmitting the request, state "OVER" and wait for acknowledgment of the transmission or request for additional information from the receiving station. e. Monitor Frequency. After the transmission has ended, monitor the frequency given in line 2 of the request. The air or ground ambulance will contact you on this frequency, if needed. f. Prepare Site. Prepare and mark the pickup site as indicated in line 7 of the MEDEVAC request, if needed. NOTE: An example of a MEDEVAC request is given in figure 8-1.
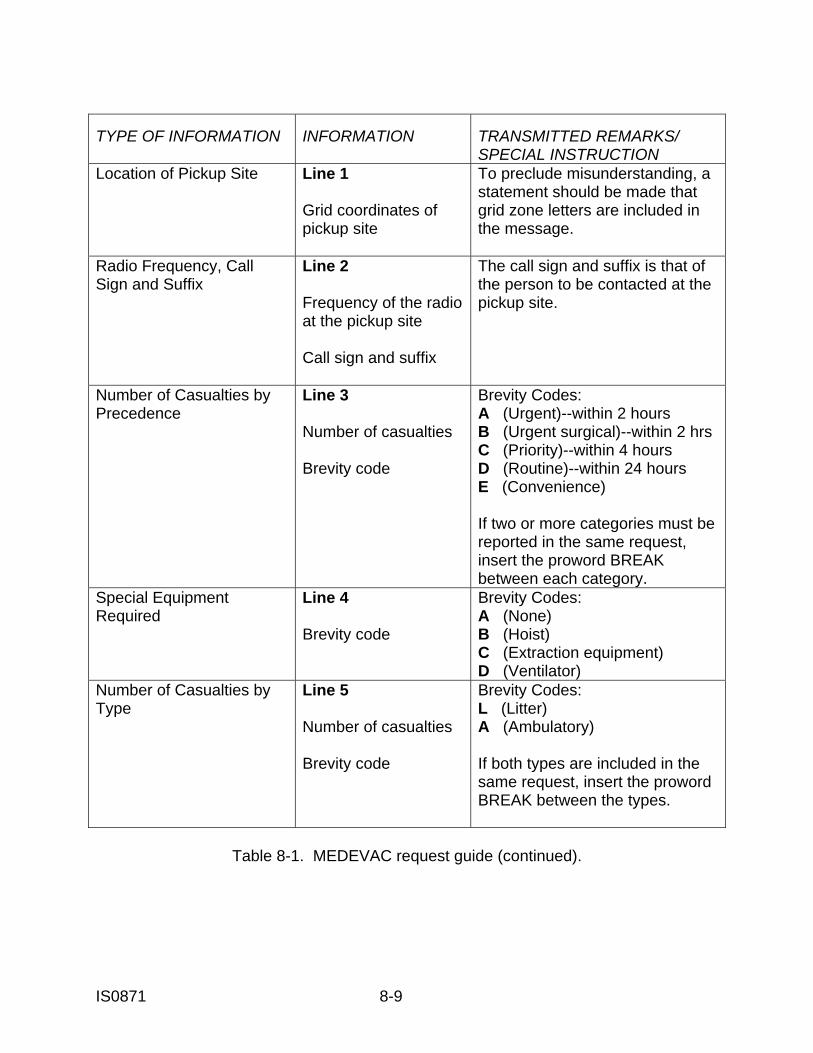
IS0871 8-9
TYPE OF INFORMATION
INFORMATION
TRANSMITTED REMARKS/ SPECIAL INSTRUCTION
Location of Pickup Site Line 1 Grid coordinates of pickup site
To preclude misunderstanding, a statement should be made that grid zone letters are included in the message.
Radio Frequency, Call Sign and Suffix
Line 2 Frequency of the radio at the pickup site Call sign and suffix
The call sign and suffix is that of the person to be contacted at the pickup site.
Number of Casualties by Precedence
Line 3 Number of casualties Brevity code
Brevity Codes: A (Urgent)--within 2 hours B (Urgent surgical)--within 2 hrs C (Priority)--within 4 hours D (Routine)--within 24 hours E (Convenience) If two or more categories must be reported in the same request, insert the proword BREAK between each category.
Special Equipment Required
Line 4 Brevity code
Brevity Codes: A (None) B (Hoist) C (Extraction equipment) D (Ventilator)
Number of Casualties by Type
Line 5 Number of casualties Brevity code
Brevity Codes: L (Litter) A (Ambulatory) If both types are included in the same request, insert the proword BREAK between the types.
Table 8-1. MEDEVAC request guide (continued).
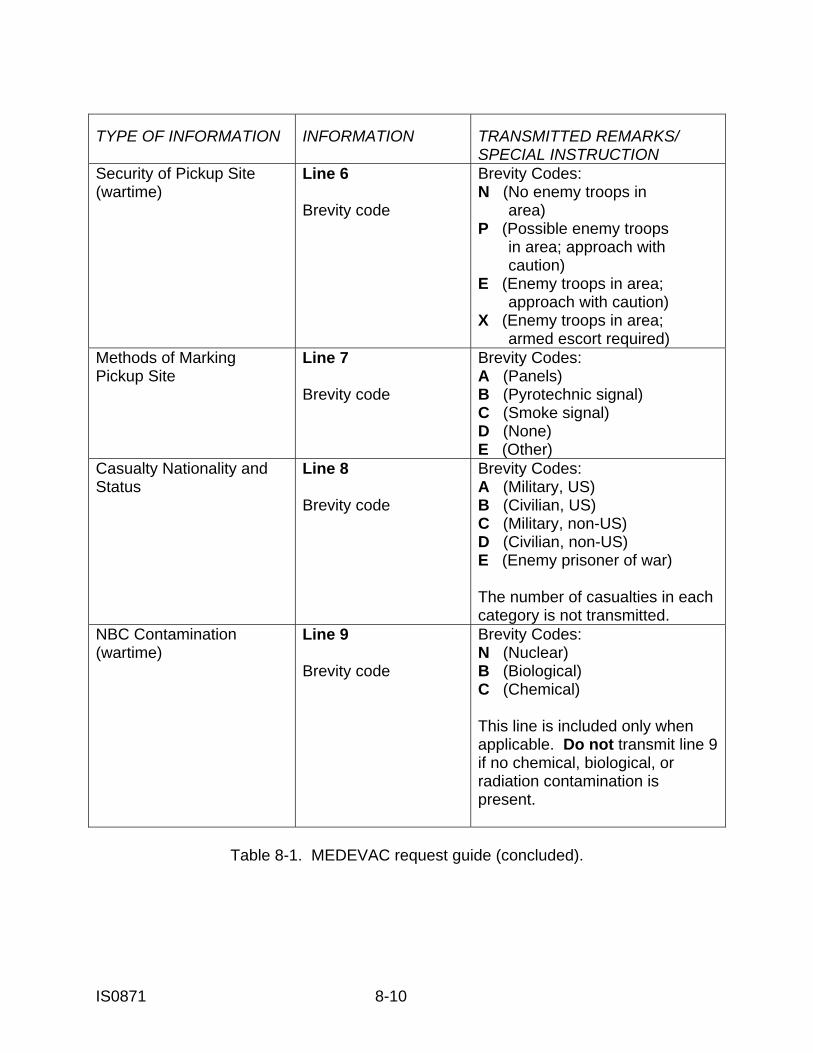
IS0871 8-10
TYPE OF INFORMATION
INFORMATION
TRANSMITTED REMARKS/ SPECIAL INSTRUCTION
Security of Pickup Site (wartime)
Line 6 Brevity code
Brevity Codes: N (No enemy troops in area) P (Possible enemy troops in area; approach with caution) E (Enemy troops in area; approach with caution) X (Enemy troops in area; armed escort required)
Methods of Marking Pickup Site
Line 7 Brevity code
Brevity Codes: A (Panels) B (Pyrotechnic signal) C (Smoke signal) D (None) E (Other)
Casualty Nationality and Status
Line 8 Brevity code
Brevity Codes: A (Military, US) B (Civilian, US) C (Military, non-US) D (Civilian, non-US) E (Enemy prisoner of war) The number of casualties in each category is not transmitted.
NBC Contamination (wartime)
Line 9 Brevity code
Brevity Codes: N (Nuclear) B (Biological) C (Chemical) This line is included only when applicable. Do not transmit line 9 if no chemical, biological, or radiation contamination is present.
Table 8-1. MEDEVAC request guide (concluded).
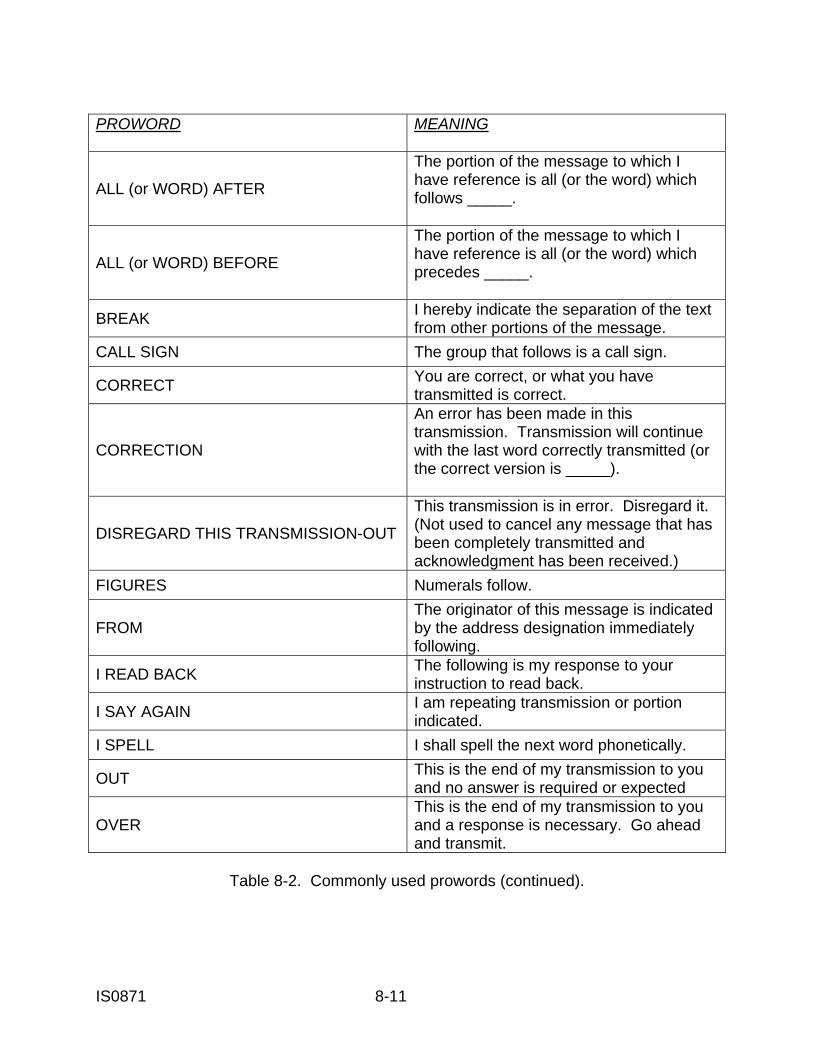
IS0871 8-11
PROWORD
MEANING
ALL (or WORD) AFTER
The portion of the message to which I have reference is all (or the word) which follows _____.
ALL (or WORD) BEFORE
The portion of the message to which I have reference is all (or the word) which precedes _____.
BREAK I hereby indicate the separation of the text from other portions of the message.
CALL SIGN The group that follows is a call sign.
CORRECT You are correct, or what you have transmitted is correct.
CORRECTION
An error has been made in this transmission. Transmission will continue with the last word correctly transmitted (or the correct version is _____).
DISREGARD THIS TRANSMISSION-OUT
This transmission is in error. Disregard it. (Not used to cancel any message that has been completely transmitted and acknowledgment has been received.)
FIGURES Numerals follow.
FROM The originator of this message is indicated by the address designation immediately following.
I READ BACK The following is my response to your instruction to read back.
I SAY AGAIN I am repeating transmission or portion indicated.
I SPELL I shall spell the next word phonetically.
OUT This is the end of my transmission to you and no answer is required or expected
OVER This is the end of my transmission to you and a response is necessary. Go ahead and transmit.
Table 8-2. Commonly used prowords (continued).
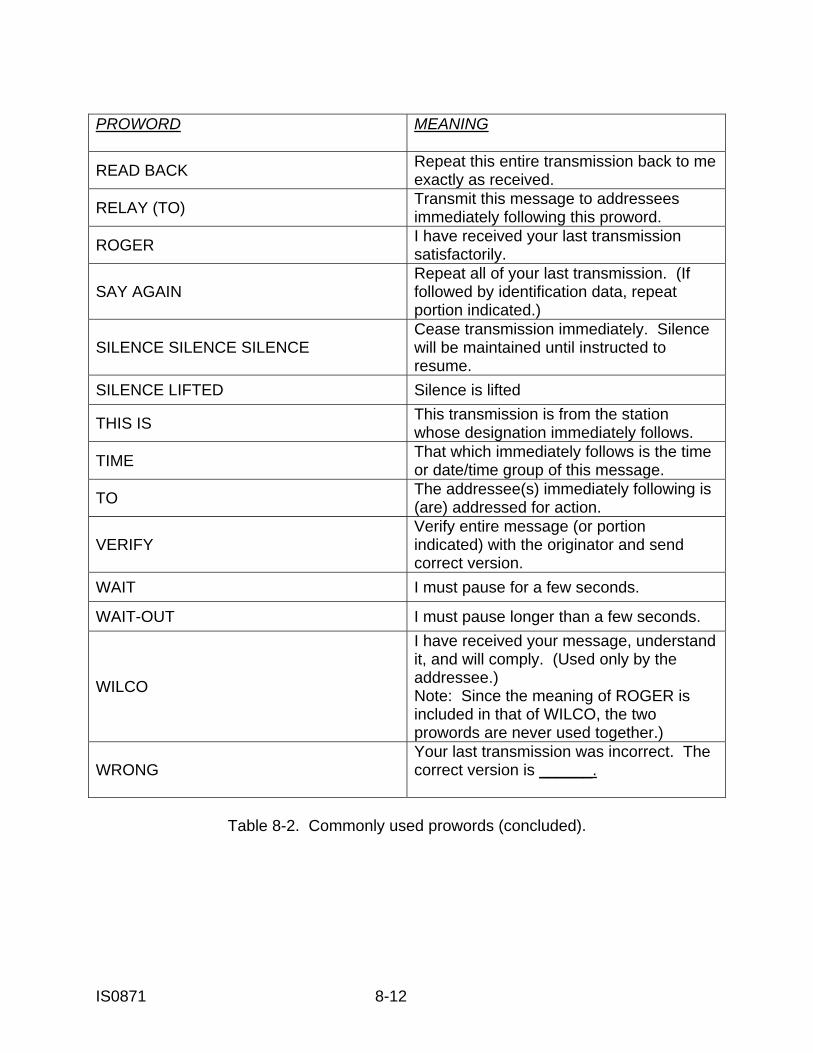
IS0871 8-12
PROWORD
MEANING
READ BACK Repeat this entire transmission back to me exactly as received.
RELAY (TO) Transmit this message to addressees immediately following this proword.
ROGER I have received your last transmission satisfactorily.
SAY AGAIN Repeat all of your last transmission. (If followed by identification data, repeat portion indicated.)
SILENCE SILENCE SILENCE Cease transmission immediately. Silence will be maintained until instructed to resume.
SILENCE LIFTED Silence is lifted
THIS IS This transmission is from the station whose designation immediately follows.
TIME That which immediately follows is the time or date/time group of this message.
TO The addressee(s) immediately following is (are) addressed for action.
VERIFY Verify entire message (or portion indicated) with the originator and send correct version.
WAIT I must pause for a few seconds.
WAIT-OUT I must pause longer than a few seconds.
WILCO
I have received your message, understand it, and will comply. (Used only by the addressee.) Note: Since the meaning of ROGER is included in that of WILCO, the two prowords are never used together.)
WRONG Your last transmission was incorrect. The correct version is ______.
Table 8-2. Commonly used prowords (concluded).
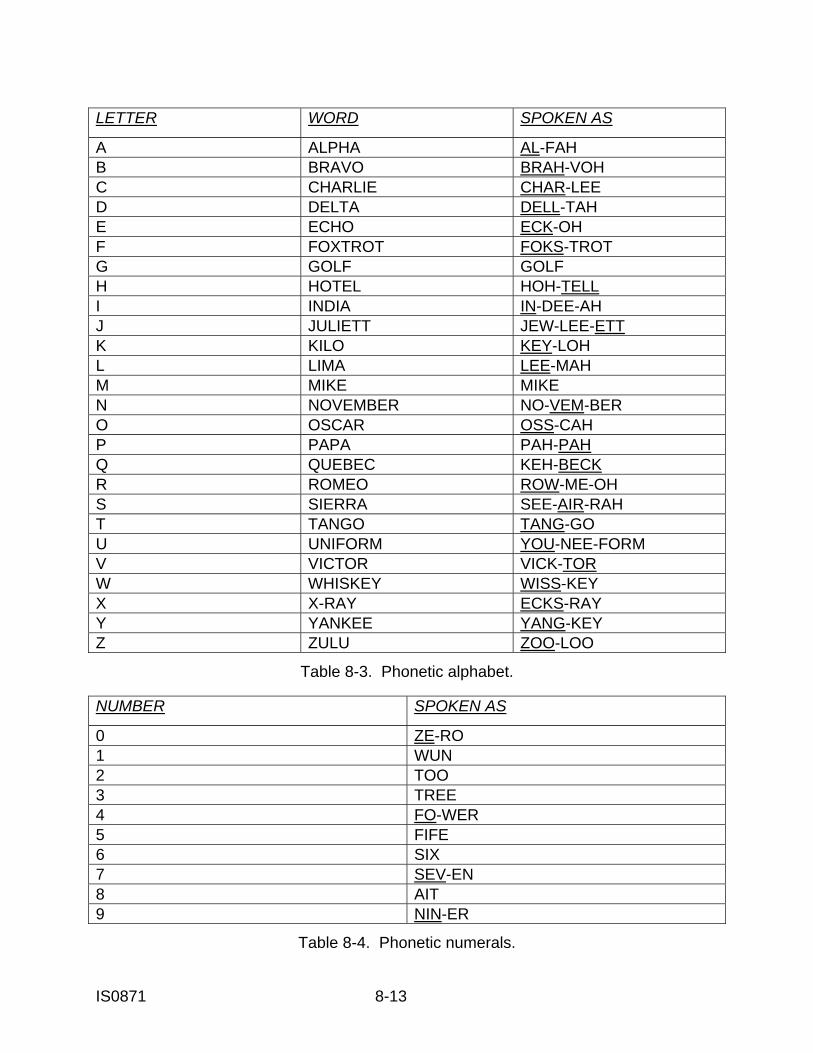
IS0871 8-13
LETTER WORD SPOKEN AS
A ALPHA AL-FAH B BRAVO BRAH-VOH C CHARLIE CHAR-LEE D DELTA DELL-TAH E ECHO ECK-OH F FOXTROT FOKS-TROT G GOLF GOLF H HOTEL HOH-TELL I INDIA IN-DEE-AH J JULIETT JEW-LEE-ETT K KILO KEY-LOH L LIMA LEE-MAH M MIKE MIKE N NOVEMBER NO-VEM-BER O OSCAR OSS-CAH P PAPA PAH-PAH Q QUEBEC KEH-BECK R ROMEO ROW-ME-OH S SIERRA SEE-AIR-RAH T TANGO TANG-GO U UNIFORM YOU-NEE-FORM V VICTOR VICK-TOR W WHISKEY WISS-KEY X X-RAY ECKS-RAY Y YANKEE YANG-KEY Z ZULU ZOO-LOO
Table 8-3. Phonetic alphabet. NUMBER SPOKEN AS
0 ZE-RO 1 WUN 2 TOO 3 TREE 4 FO-WER 5 FIFE 6 SIX 7 SEV-EN 8 AIT 9 NIN-ER
Table 8-4. Phonetic numerals.
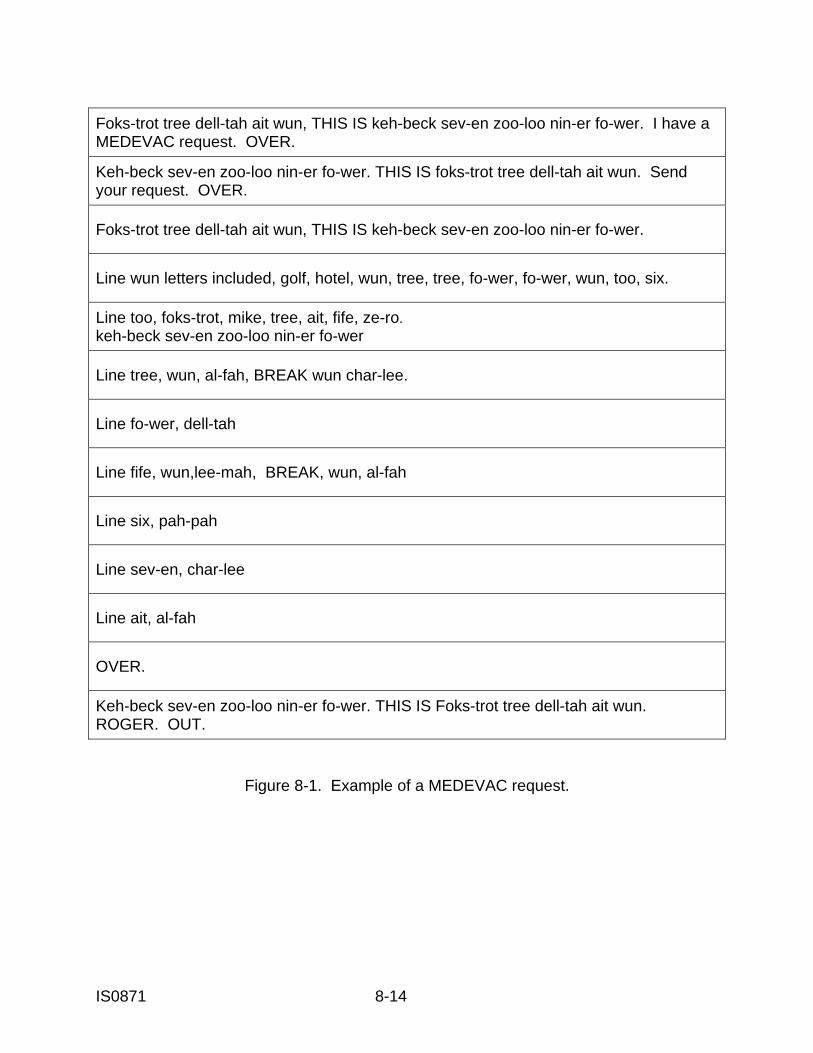
IS0871 8-14
Foks-trot tree dell-tah ait wun, THIS IS keh-beck sev-en zoo-loo nin-er fo-wer. I have a MEDEVAC request. OVER.
Keh-beck sev-en zoo-loo nin-er fo-wer. THIS IS foks-trot tree dell-tah ait wun. Send your request. OVER.
Foks-trot tree dell-tah ait wun, THIS IS keh-beck sev-en zoo-loo nin-er fo-wer.
Line wun letters included, golf, hotel, wun, tree, tree, fo-wer, fo-wer, wun, too, six.
Line too, foks-trot, mike, tree, ait, fife, ze-ro. keh-beck sev-en zoo-loo nin-er fo-wer
Line tree, wun, al-fah, BREAK wun char-lee.
Line fo-wer, dell-tah
Line fife, wun,lee-mah, BREAK, wun, al-fah
Line six, pah-pah
Line sev-en, char-lee
Line ait, al-fah
OVER.
Keh-beck sev-en zoo-loo nin-er fo-wer. THIS IS Foks-trot tree dell-tah ait wun. ROGER. OUT.
Figure 8-1. Example of a MEDEVAC request.

IS0871 8-15
EXERCISES: LESSON 8 INSTRUCTIONS: Answer the following exercises by marking the letter of the response that best answers the question or best completes the sentence or by writing the answer in the space provided. After you have answered all of the exercises, check your answers against the "Solutions to Lesson Exercises" at the end of the exercises. For each exercise answered incorrectly, reread the lesson material referenced. 1. The MEDEVAC request format is used to request evacuation by: a. Air ambulances only. b. Ground ambulances only. c. Both air and ground ambulances. 2. Of the nine lines of information in a wartime evacuation request, the first _____ lines must be transmitted before the ambulance begins its mission. 3. Assume you are calling in a MEDEVAC request using the MEDEVAC wartime guidelines given in this lesson. State what type of information is reported on each line of the request. Line 1. ___________________________________________________________ Line 2. ___________________________________________________________ Line 3. ___________________________________________________________ Line 4. ___________________________________________________________ Line 5. ___________________________________________________________ Line 6. ___________________________________________________________ Line 7. ___________________________________________________________ Line 8. ___________________________________________________________ Line 9____________________________________________________________
IS0871 8-16
4. Of the nine lines of information in a wartime evacuation request, which line is omitted if it is not applicable? ____________________________________________ 5. What has historically been a problem requests for medical evacuation? ________________________________________________________ 6. What proword means you have finished your transmission and a response from the receiving station is needed? ____________________________________________ 7. When is the term "ROGER WILCO" used in making a MEDEVAC request? ______________________________________________________________ 8. A "priority" casualty should be evacuated within: a. 1 hour. b. 2 hours. c. 4 hours. d. 8 hours. e. 24 hours. 9. A "urgent" or "urgent surgical" casualty should be evacuated within: a. 1 hour. b. 2 hours. c. 4 hours. d. 8 hours. e. 24 hours.
IS0871 8-17
10. Casualties are divided into two types (line 5). They are: a. Surgical and nonsurgical. b. Military and civilian. c. Ambulatory and litter. d United States and non-U.S. 11. You are making a MEDEVAC request for a ground ambulance during wartime. The casualty has a broken arm and no other injuries. What should be transmitted for Line 4? a. The word "None." b. The word "Routine." c. The code "A." d. None of the above. The line need not be transmitted.
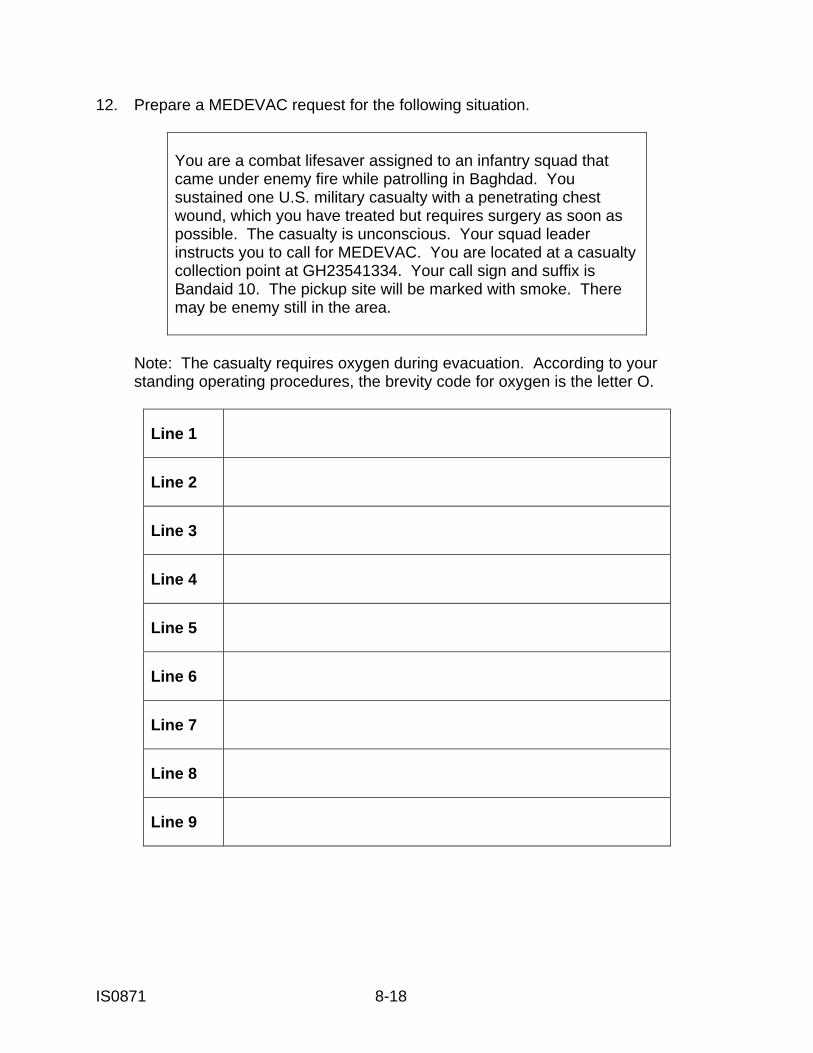
IS0871 8-18
12. Prepare a MEDEVAC request for the following situation.
You are a combat lifesaver assigned to an infantry squad that came under enemy fire while patrolling in Baghdad. You sustained one U.S. military casualty with a penetrating chest wound, which you have treated but requires surgery as soon as possible. The casualty is unconscious. Your squad leader instructs you to call for MEDEVAC. You are located at a casualty collection point at GH23541334. Your call sign and suffix is Bandaid 10. The pickup site will be marked with smoke. There may be enemy still in the area.
Note: The casualty requires oxygen during evacuation. According to your standing operating procedures, the brevity code for oxygen is the letter O.
Line 1
Line 2
Line 3
Line 4
Line 5
Line 6
Line 7
Line 8
Line 9
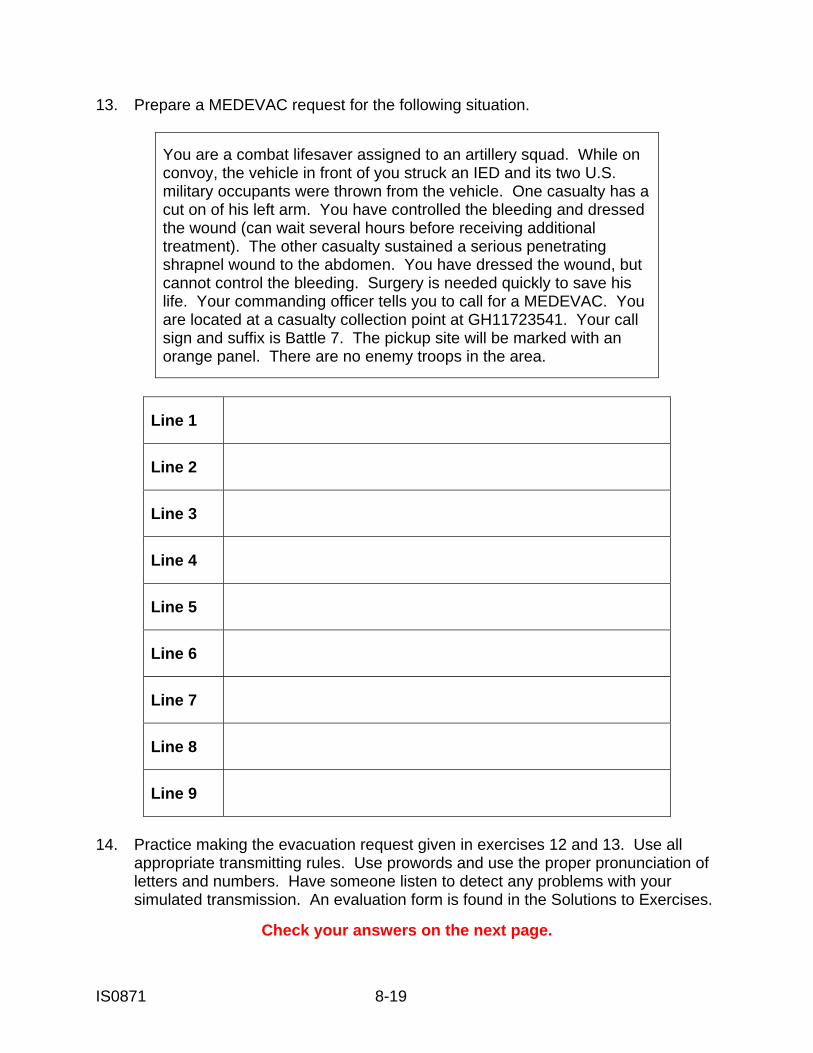
IS0871 8-19
13. Prepare a MEDEVAC request for the following situation.
You are a combat lifesaver assigned to an artillery squad. While on convoy, the vehicle in front of you struck an IED and its two U.S. military occupants were thrown from the vehicle. One casualty has a cut on of his left arm. You have controlled the bleeding and dressed the wound (can wait several hours before receiving additional treatment). The other casualty sustained a serious penetrating shrapnel wound to the abdomen. You have dressed the wound, but cannot control the bleeding. Surgery is needed quickly to save his life. Your commanding officer tells you to call for a MEDEVAC. You are located at a casualty collection point at GH11723541. Your call sign and suffix is Battle 7. The pickup site will be marked with an orange panel. There are no enemy troops in the area.
Line 1
Line 2
Line 3
Line 4
Line 5
Line 6
Line 7
Line 8
Line 9
14. Practice making the evacuation request given in exercises 12 and 13. Use all appropriate transmitting rules. Use prowords and use the proper pronunciation of letters and numbers. Have someone listen to detect any problems with your simulated transmission. An evaluation form is found in the Solutions to Exercises.
Check your answers on the next page.
IS0871 8-20
SOLUTIONS TO EXERCISES: LESSON 8 1. c (para 8-2) 2. Five (para 8-4) 3. Line 1: Location of pickup site. Line 2: Radio frequency, call sign, and suffix. Line 3. Number of casualties by precedence. Line 4. Special equipment requirements. Line 5. Number of casualties by type. Line 6. Security level of the pickup site. Line 7. Method of marking the pickup site. Line 8. Casualty nationality and status. Line 9. NBC contamination. (paragraphs 8-5 and 8-6, Table 8-1) 4. Line 9 (para 8-6d, Table 8-1, figure 8-1) 5. Overclassification. (para 8-3) 6. Over. (Table 8-2) 7. Never. The term should not be used. (Table 8-2, WILCO) 8. c (para 8-5c(3), Table 8-1) 9. b (paras 8-5c(1), (2), Table 8-1) 10. c (para 8-5e, Table 8-1) 11. c (Table 8-1, line 4) 12. See chart (top of page 8-21). 13. See chart (bottom of page 8-21). 14. See checklist (page 8-22).
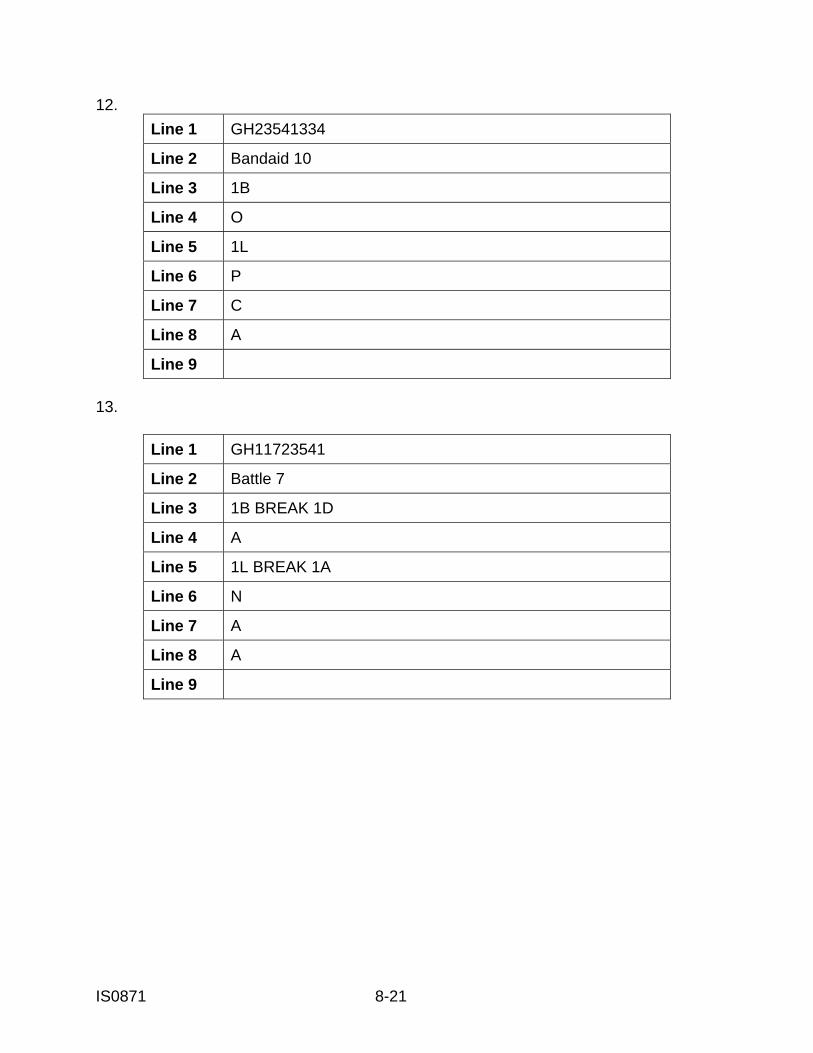
IS0871 8-21
12. Line 1 GH23541334
Line 2 Bandaid 10
Line 3 1B
Line 4 O
Line 5 1L
Line 6 P
Line 7 C
Line 8 A
Line 9 13.
Line 1 GH11723541
Line 2 Battle 7
Line 3 1B BREAK 1D
Line 4 A
Line 5 1L BREAK 1A
Line 6 N
Line 7 A
Line 8 A
Line 9
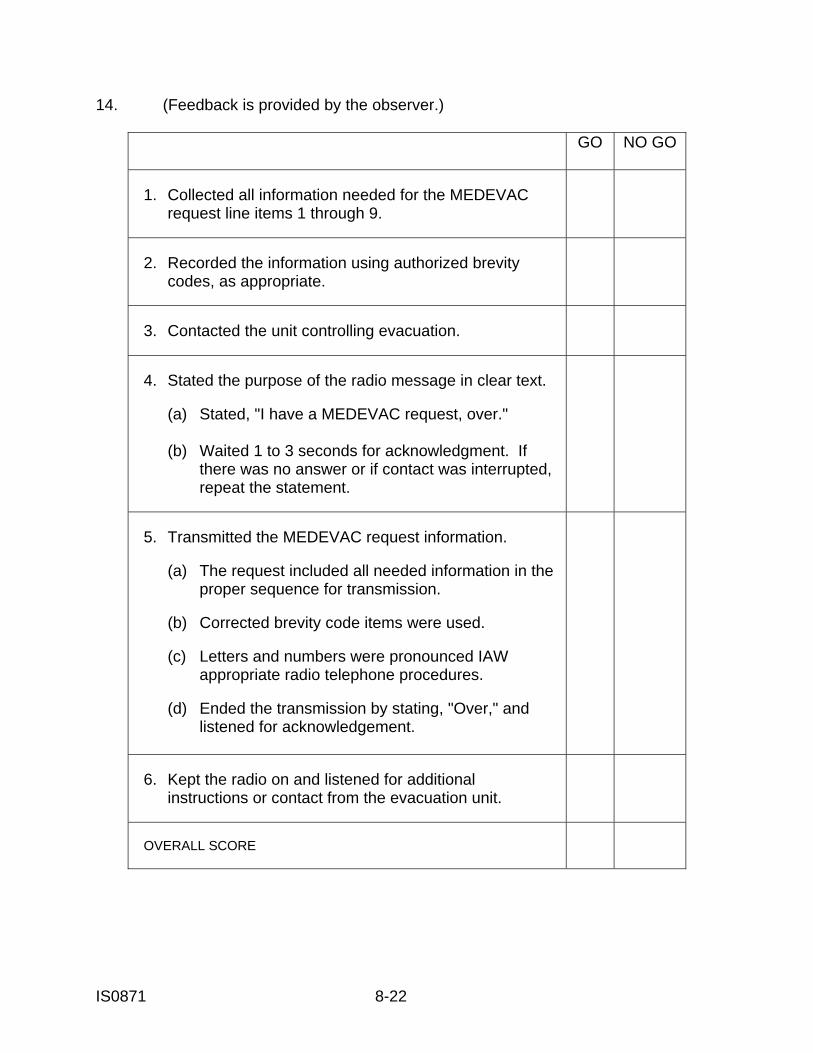
IS0871 8-22
14. (Feedback is provided by the observer.)
GO NO GO
1. Collected all information needed for the MEDEVAC
request line items 1 through 9.
2. Recorded the information using authorized brevity
codes, as appropriate.
3. Contacted the unit controlling evacuation.
4. Stated the purpose of the radio message in clear text. (a) Stated, "I have a MEDEVAC request, over." (b) Waited 1 to 3 seconds for acknowledgment. If
there was no answer or if contact was interrupted, repeat the statement.
5. Transmitted the MEDEVAC request information. (a) The request included all needed information in the
proper sequence for transmission. (b) Corrected brevity code items were used. (c) Letters and numbers were pronounced IAW
appropriate radio telephone procedures. (d) Ended the transmission by stating, "Over," and
listened for acknowledgement.
6. Kept the radio on and listened for additional
instructions or contact from the evacuation unit.
OVERALL SCORE
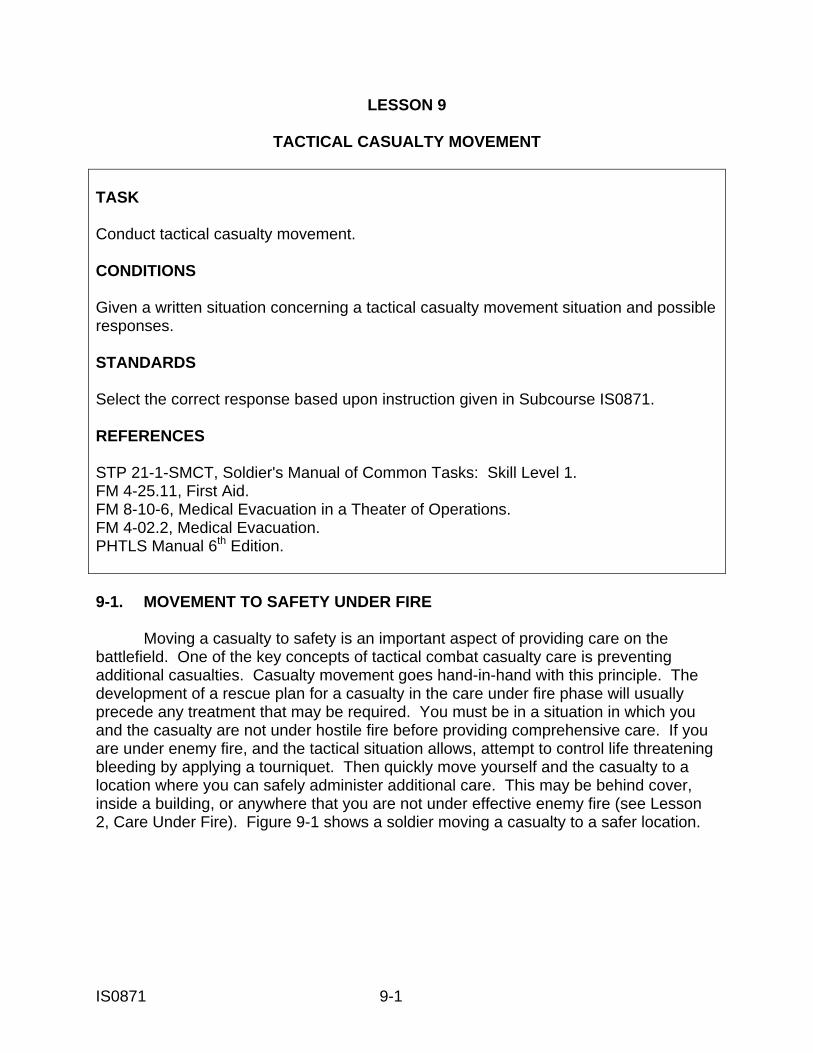
IS0871 9-1
LESSON 9
TACTICAL CASUALTY MOVEMENT TASK Conduct tactical casualty movement. CONDITIONS Given a written situation concerning a tactical casualty movement situation and possible responses. STANDARDS Select the correct response based upon instruction given in Subcourse IS0871. REFERENCES STP 21-1-SMCT, Soldier's Manual of Common Tasks: Skill Level 1. FM 4-25.11, First Aid. FM 8-10-6, Medical Evacuation in a Theater of Operations. FM 4-02.2, Medical Evacuation. PHTLS Manual 6th Edition. 9-1. MOVEMENT TO SAFETY UNDER FIRE Moving a casualty to safety is an important aspect of providing care on the battlefield. One of the key concepts of tactical combat casualty care is preventing additional casualties. Casualty movement goes hand-in-hand with this principle. The development of a rescue plan for a casualty in the care under fire phase will usually precede any treatment that may be required. You must be in a situation in which you and the casualty are not under hostile fire before providing comprehensive care. If you are under enemy fire, and the tactical situation allows, attempt to control life threatening bleeding by applying a tourniquet. Then quickly move yourself and the casualty to a location where you can safely administer additional care. This may be behind cover, inside a building, or anywhere that you are not under effective enemy fire (see Lesson 2, Care Under Fire). Figure 9-1 shows a soldier moving a casualty to a safer location.
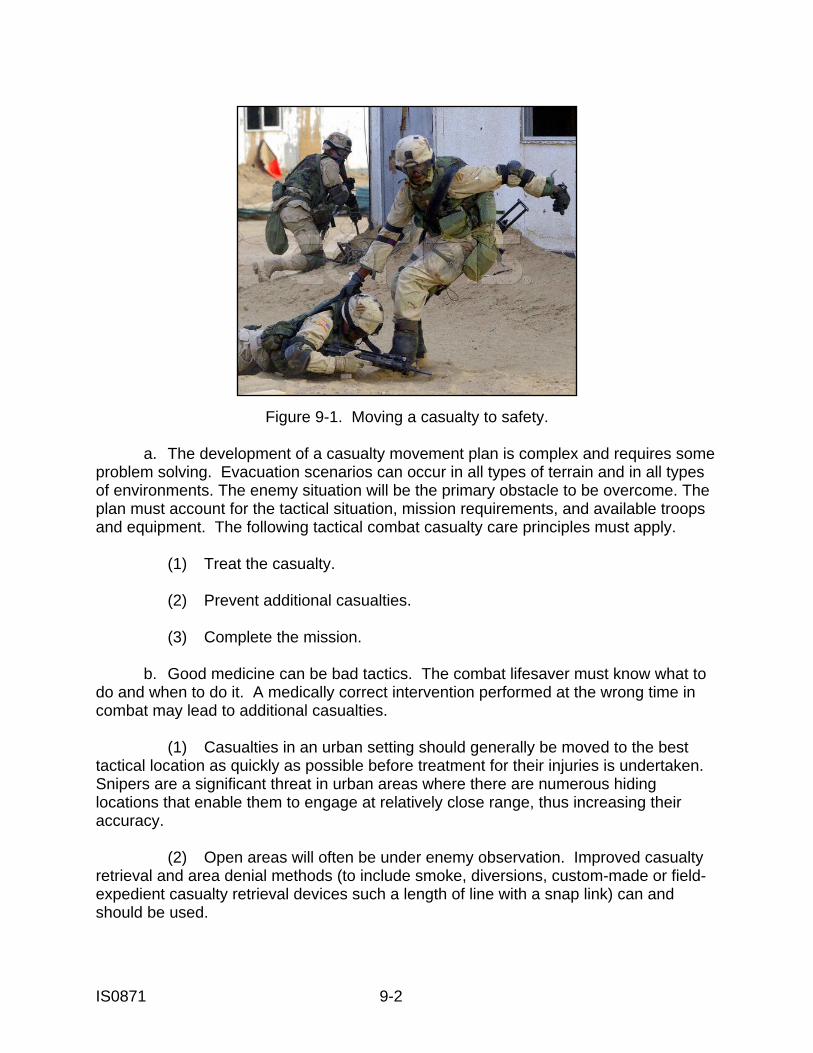
IS0871 9-2
Figure 9-1. Moving a casualty to safety. a. The development of a casualty movement plan is complex and requires some problem solving. Evacuation scenarios can occur in all types of terrain and in all types of environments. The enemy situation will be the primary obstacle to be overcome. The plan must account for the tactical situation, mission requirements, and available troops and equipment. The following tactical combat casualty care principles must apply. (1) Treat the casualty. (2) Prevent additional casualties. (3) Complete the mission. b. Good medicine can be bad tactics. The combat lifesaver must know what to do and when to do it. A medically correct intervention performed at the wrong time in combat may lead to additional casualties. (1) Casualties in an urban setting should generally be moved to the best tactical location as quickly as possible before treatment for their injuries is undertaken. Snipers are a significant threat in urban areas where there are numerous hiding locations that enable them to engage at relatively close range, thus increasing their accuracy. (2) Open areas will often be under enemy observation. Improved casualty retrieval and area denial methods (to include smoke, diversions, custom-made or field-expedient casualty retrieval devices such a length of line with a snap link) can and should be used.

IS0871 9-3
c. Finally, the following questions should be asked. Who is responsible for casualty retrieval? What training and equipment is needed, and how much emphasis is placed on this training? Which techniques are optimal given the mission and terrain? 9-2. MOVEMENT TECHNIQUES a. The modern combatant carries personal protective equipment, weapons system, ammunition, survival gear, water, communications equipment, and miscellaneous other equipment. This gear significantly increases the weight of the average soldier, usually by 50 to 70 pounds. Because of this increased weight, casualty movement becomes a problem. b. There are several different techniques we can utilize to move a casualty. Some are given below. (1) Individual movement techniques. (2) Drags. (3) Manual carries (one-person and two-person). (4) Litter carries. c. Historically, the primary casualty movement techniques utilize one-person and two-person carries. These techniques have proven to be difficult due to the increased weight of the average combatant. What is needed is a new philosophy on how to move casualties injured on the battlefield. 9-3. BASIC PHYSICS When discussing movement of heavy objects (an unconscious casualty), think back to your high school physics class. a. “Every object in a state of uniform motion tends to remain in that state of motion unless an external force is applied to it.” The relationship between an object's mass m, its acceleration a, and the applied force F is F = ma. Acceleration and force are vectors (as indicated by their symbols being displayed in italic font). In this law, the direction of the force vector is the same as the direction of the acceleration vector. b. "For every action, there is an equal and opposite reaction." So what does that actually mean? It means that a heavy object (a fully equipped injured soldier lying on the ground) is difficult to move easily. What is the best technique to accomplish this?
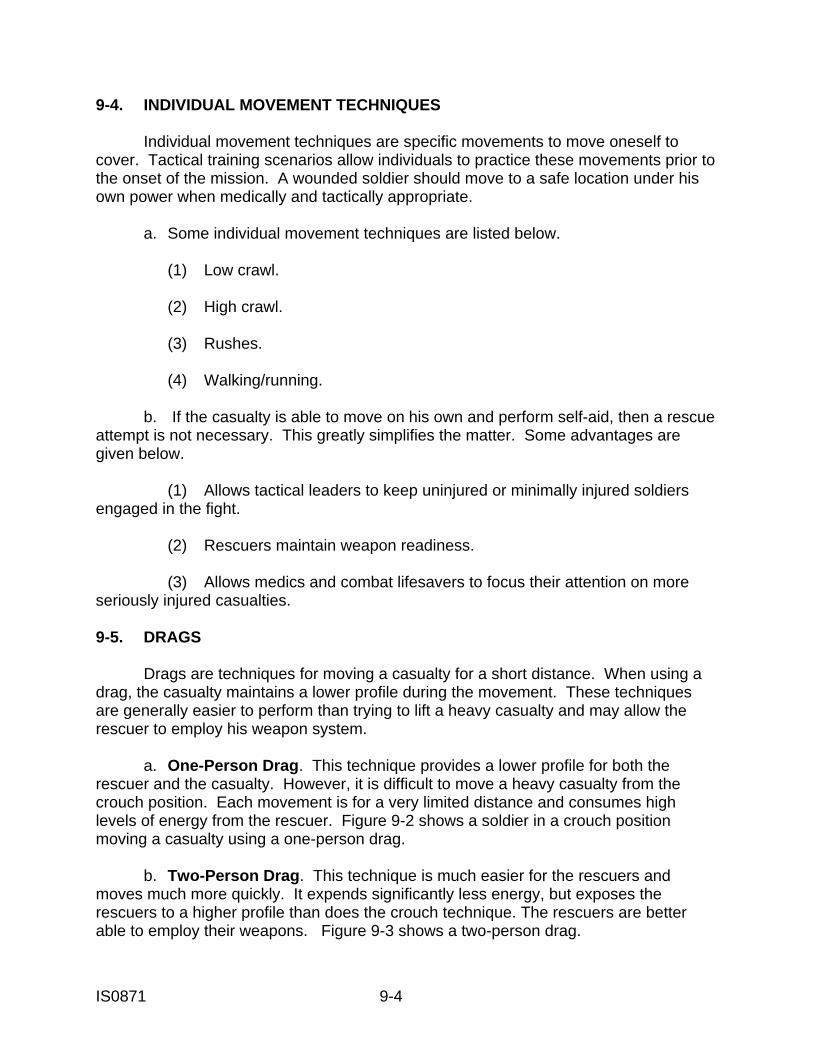
IS0871 9-4
9-4. INDIVIDUAL MOVEMENT TECHNIQUES Individual movement techniques are specific movements to move oneself to cover. Tactical training scenarios allow individuals to practice these movements prior to the onset of the mission. A wounded soldier should move to a safe location under his own power when medically and tactically appropriate. a. Some individual movement techniques are listed below. (1) Low crawl. (2) High crawl. (3) Rushes. (4) Walking/running. b. If the casualty is able to move on his own and perform self-aid, then a rescue attempt is not necessary. This greatly simplifies the matter. Some advantages are given below. (1) Allows tactical leaders to keep uninjured or minimally injured soldiers engaged in the fight. (2) Rescuers maintain weapon readiness. (3) Allows medics and combat lifesavers to focus their attention on more seriously injured casualties. 9-5. DRAGS Drags are techniques for moving a casualty for a short distance. When using a drag, the casualty maintains a lower profile during the movement. These techniques are generally easier to perform than trying to lift a heavy casualty and may allow the rescuer to employ his weapon system. a. One-Person Drag. This technique provides a lower profile for both the rescuer and the casualty. However, it is difficult to move a heavy casualty from the crouch position. Each movement is for a very limited distance and consumes high levels of energy from the rescuer. Figure 9-2 shows a soldier in a crouch position moving a casualty using a one-person drag. b. Two-Person Drag. This technique is much easier for the rescuers and moves much more quickly. It expends significantly less energy, but exposes the rescuers to a higher profile than does the crouch technique. The rescuers are better able to employ their weapons. Figure 9-3 shows a two-person drag.

IS0871 9-5
Figure 9-2. One-person drag (rescuer in crouch position).
Figure 9-3. Two-person drag. c. Disadvantages of Manual Drags. Some disadvantages of drag techniques are given below. (1) They are really only good for short distances. (2) They still require significant strength to drag a fully combat loaded soldier any distance. The rescuer must overcome the laws of physics (friction, inertia, mass) to get movement started. (3) Depending on technique, the rescuer may display a larger profile to the enemy. Bending over to grasp a casualty to drag him may displace the rescuer's body armor and expose more of his torso to small arms fire and fragmentation wounds. (4) There is no optimal place to grip the casualty to begin movement.
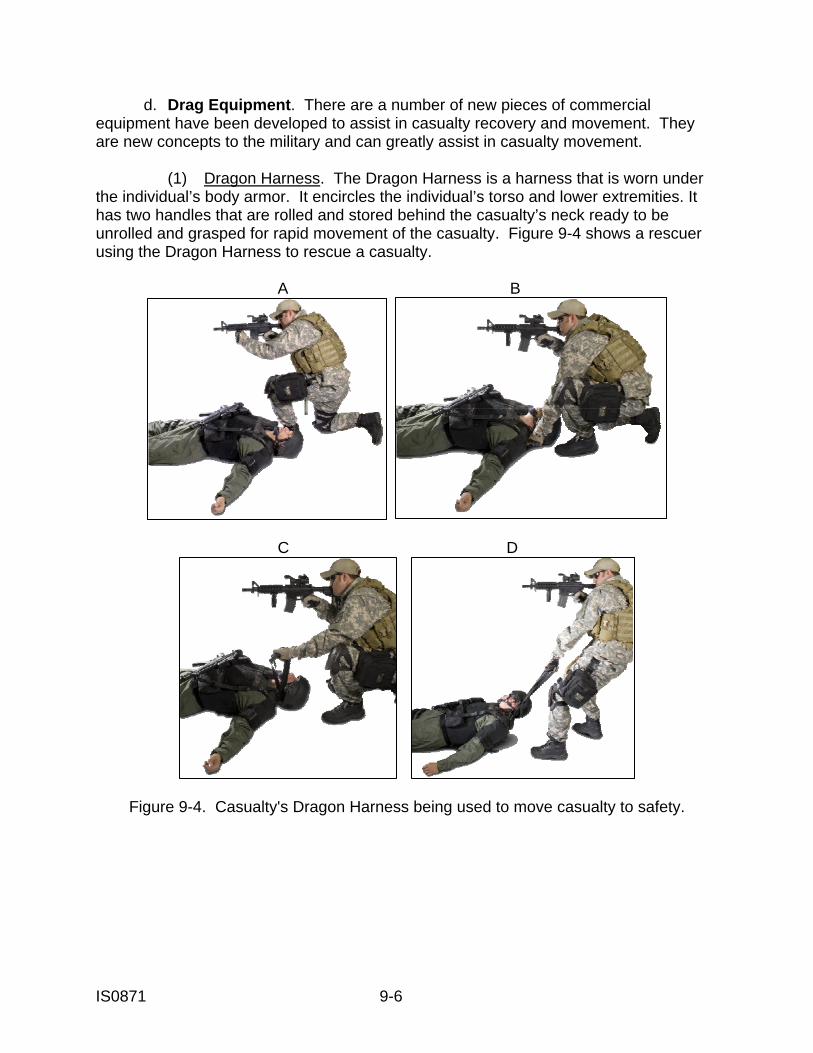
IS0871 9-6
d. Drag Equipment. There are a number of new pieces of commercial equipment have been developed to assist in casualty recovery and movement. They are new concepts to the military and can greatly assist in casualty movement. (1) Dragon Harness. The Dragon Harness is a harness that is worn under the individual’s body armor. It encircles the individual’s torso and lower extremities. It has two handles that are rolled and stored behind the casualty’s neck ready to be unrolled and grasped for rapid movement of the casualty. Figure 9-4 shows a rescuer using the Dragon Harness to rescue a casualty. A B
C D
Figure 9-4. Casualty's Dragon Harness being used to move casualty to safety.
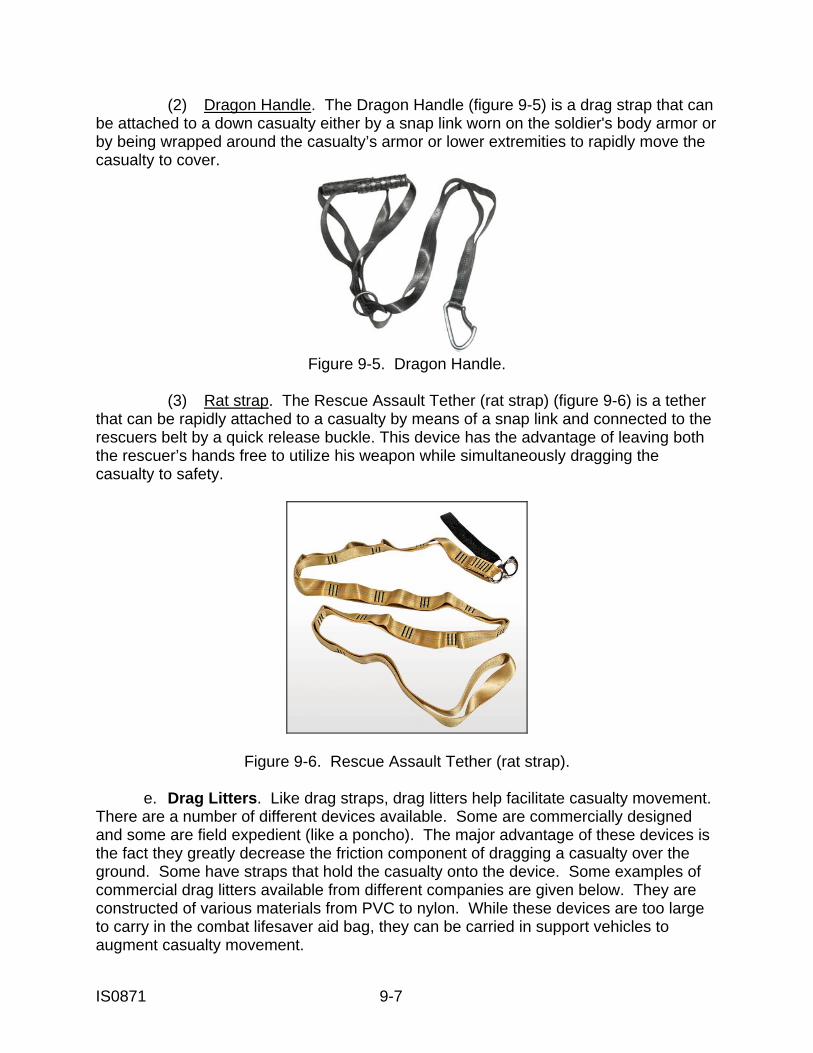
IS0871 9-7
(2) Dragon Handle. The Dragon Handle (figure 9-5) is a drag strap that can be attached to a down casualty either by a snap link worn on the soldier's body armor or by being wrapped around the casualty’s armor or lower extremities to rapidly move the casualty to cover.
Figure 9-5. Dragon Handle.
(3) Rat strap. The Rescue Assault Tether (rat strap) (figure 9-6) is a tether that can be rapidly attached to a casualty by means of a snap link and connected to the rescuers belt by a quick release buckle. This device has the advantage of leaving both the rescuer’s hands free to utilize his weapon while simultaneously dragging the casualty to safety.
Figure 9-6. Rescue Assault Tether (rat strap). e. Drag Litters. Like drag straps, drag litters help facilitate casualty movement. There are a number of different devices available. Some are commercially designed and some are field expedient (like a poncho). The major advantage of these devices is the fact they greatly decrease the friction component of dragging a casualty over the ground. Some have straps that hold the casualty onto the device. Some examples of commercial drag litters available from different companies are given below. They are constructed of various materials from PVC to nylon. While these devices are too large to carry in the combat lifesaver aid bag, they can be carried in support vehicles to augment casualty movement.
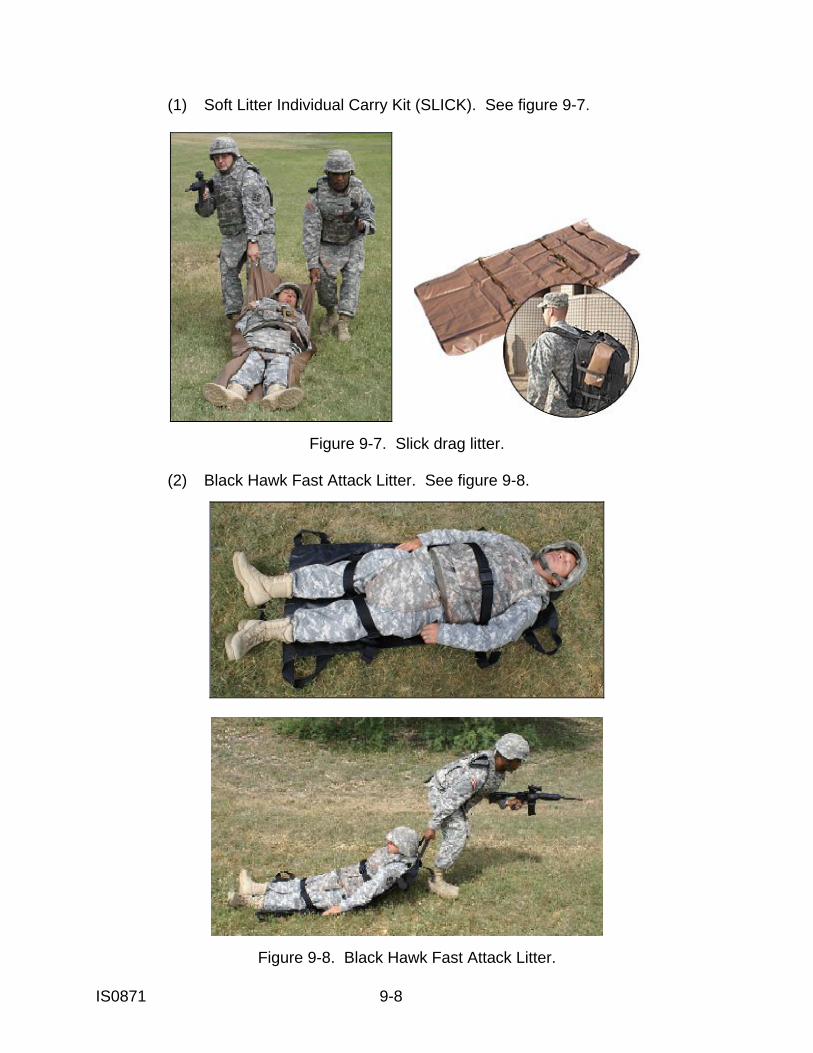
IS0871 9-8
(1) Soft Litter Individual Carry Kit (SLICK). See figure 9-7.
Figure 9-7. Slick drag litter. (2) Black Hawk Fast Attack Litter. See figure 9-8.
Figure 9-8. Black Hawk Fast Attack Litter.
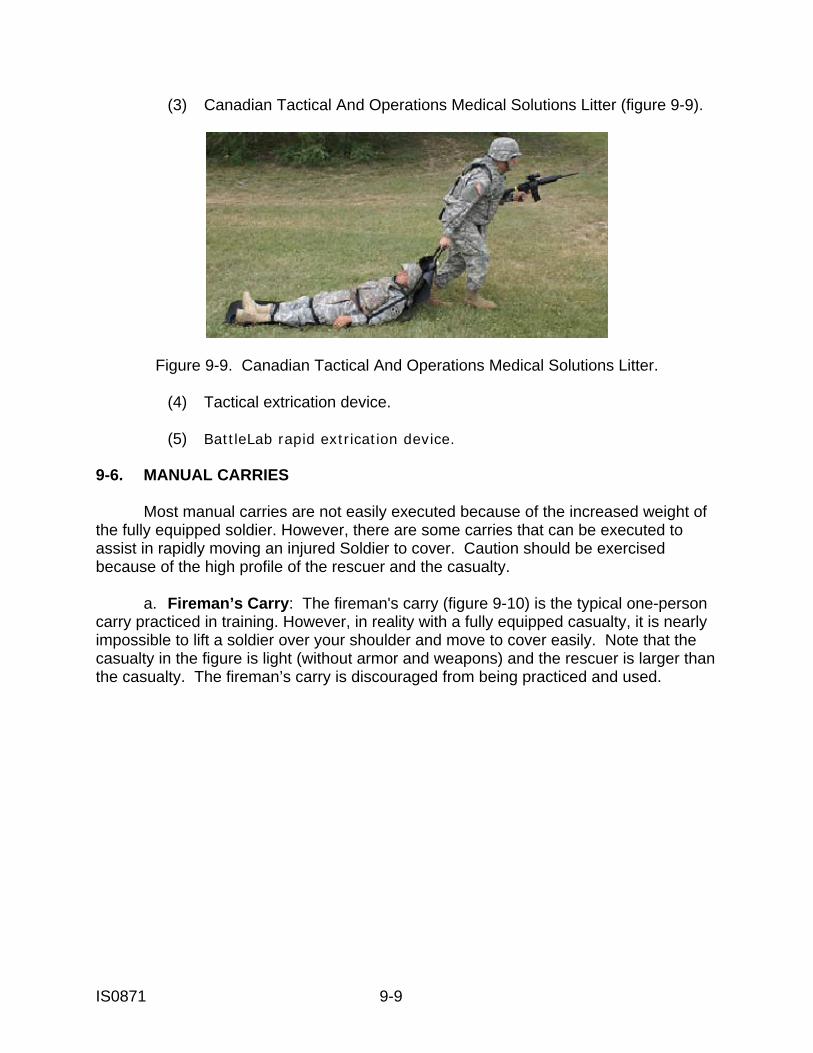
IS0871 9-9
(3) Canadian Tactical And Operations Medical Solutions Litter (figure 9-9).
Figure 9-9. Canadian Tactical And Operations Medical Solutions Litter. (4) Tactical extrication device. (5) BattleLab rapid extrication device. 9-6. MANUAL CARRIES Most manual carries are not easily executed because of the increased weight of the fully equipped soldier. However, there are some carries that can be executed to assist in rapidly moving an injured Soldier to cover. Caution should be exercised because of the high profile of the rescuer and the casualty. a. Fireman’s Carry: The fireman's carry (figure 9-10) is the typical one-person carry practiced in training. However, in reality with a fully equipped casualty, it is nearly impossible to lift a soldier over your shoulder and move to cover easily. Note that the casualty in the figure is light (without armor and weapons) and the rescuer is larger than the casualty. The fireman’s carry is discouraged from being practiced and used.
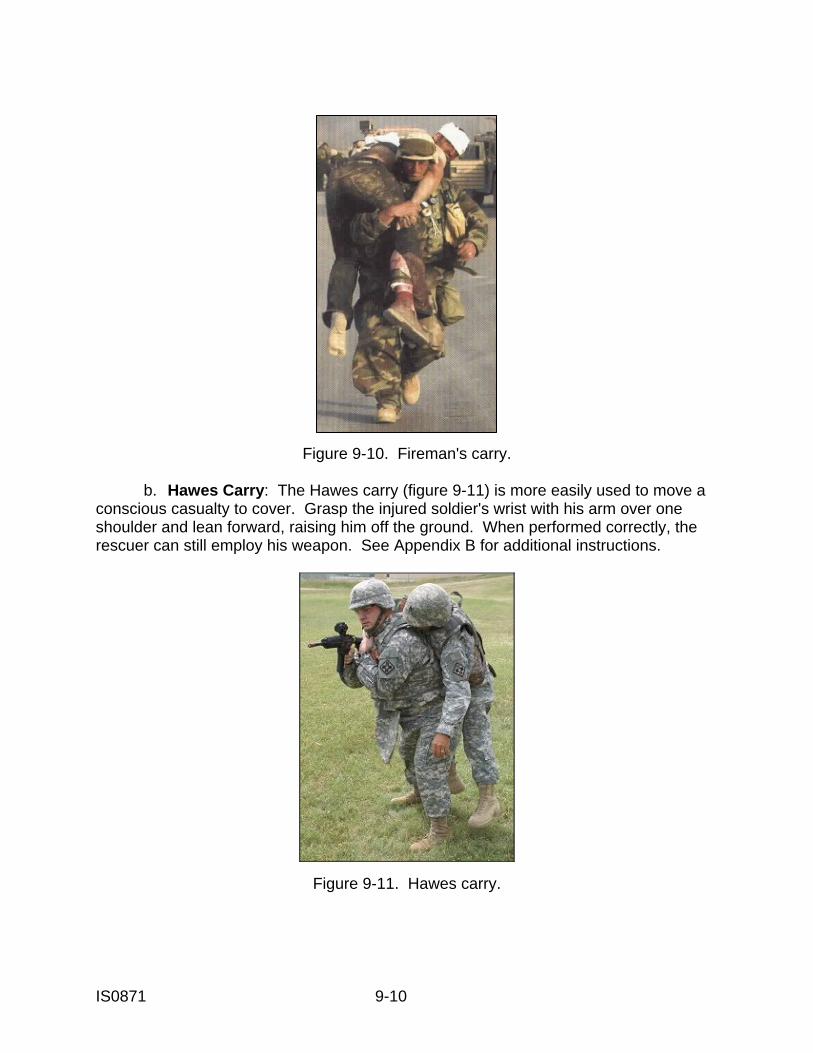
IS0871 9-10
Figure 9-10. Fireman's carry. b. Hawes Carry: The Hawes carry (figure 9-11) is more easily used to move a conscious casualty to cover. Grasp the injured soldier's wrist with his arm over one shoulder and lean forward, raising him off the ground. When performed correctly, the rescuer can still employ his weapon. See Appendix B for additional instructions.
Figure 9-11. Hawes carry.
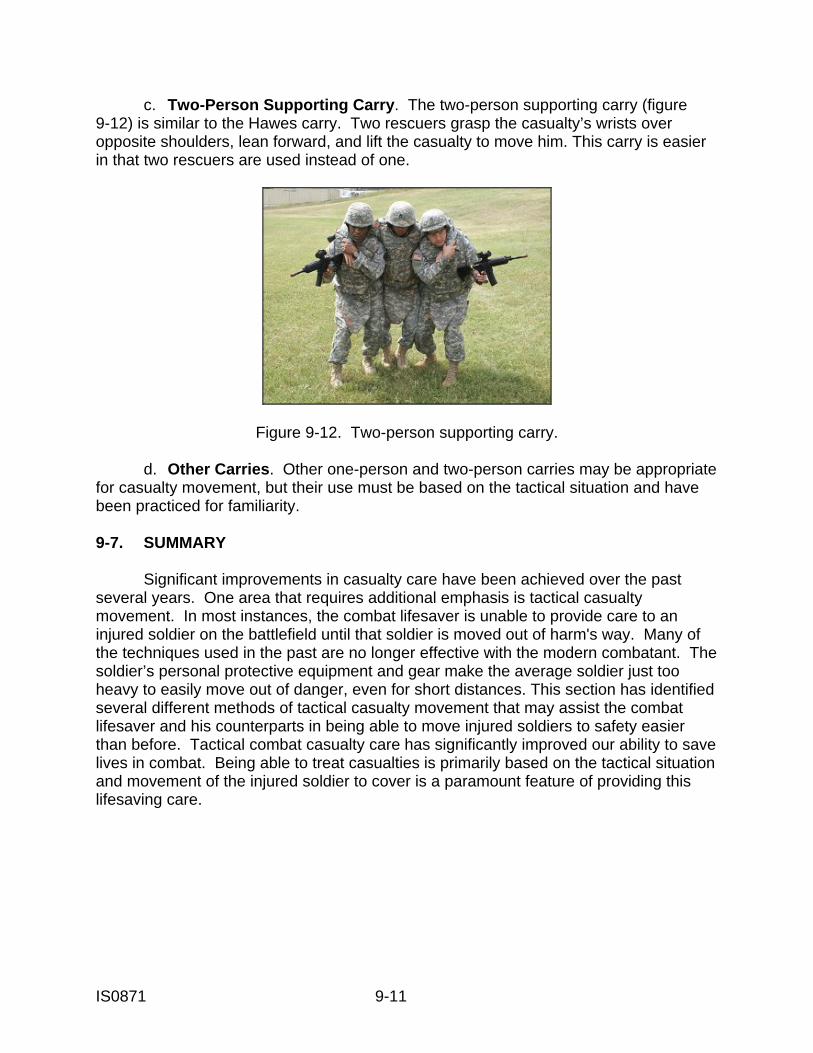
IS0871 9-11
c. Two-Person Supporting Carry. The two-person supporting carry (figure 9-12) is similar to the Hawes carry. Two rescuers grasp the casualty’s wrists over opposite shoulders, lean forward, and lift the casualty to move him. This carry is easier in that two rescuers are used instead of one.
Figure 9-12. Two-person supporting carry. d. Other Carries. Other one-person and two-person carries may be appropriate for casualty movement, but their use must be based on the tactical situation and have been practiced for familiarity. 9-7. SUMMARY Significant improvements in casualty care have been achieved over the past several years. One area that requires additional emphasis is tactical casualty movement. In most instances, the combat lifesaver is unable to provide care to an injured soldier on the battlefield until that soldier is moved out of harm's way. Many of the techniques used in the past are no longer effective with the modern combatant. The soldier’s personal protective equipment and gear make the average soldier just too heavy to easily move out of danger, even for short distances. This section has identified several different methods of tactical casualty movement that may assist the combat lifesaver and his counterparts in being able to move injured soldiers to safety easier than before. Tactical combat casualty care has significantly improved our ability to save lives in combat. Being able to treat casualties is primarily based on the tactical situation and movement of the injured soldier to cover is a paramount feature of providing this lifesaving care.
IS0871 9-12
EXERCISES: LESSON 9 1. A soldier says, "Good medicine is always good tactics." Do you agree and why? _________________________________________________________________ _________________________________________________________________ 2. The fireman's carry is the typical one-person carry practiced in training. However, it is now being discouraged from being used. Why? _________________________________________________________________ _________________________________________________________________ 3. Manual drags are used to move a casualty for a __________ distance. a. Long. b. Moderate. c. Short. 4. How are drag litters superior to drag harnesses? a. _______________________________________________________________ b. _______________________________________________________________ 5. Using another person as the casualty, practice performing the Hawes carry.
IS0871 9-13
SOLUTIONS TO EXERCISES: LESSON 9 1, No. Performing needed treatment at the wrong time can result in both the casualty and the rescuer being killed. (para 9-1b) 2. It is very difficult to lift and move a fully equipped casualty using this carry (paras 9-2c, 9-6a) 3. c (paras 9-5, 9-5c(1)) 4. a. They decrease friction, making it easier to move the casualty. b. They can often be used with two rescuers. (para 9-5e, fig 9-7) 5. See the checklist on the following page.
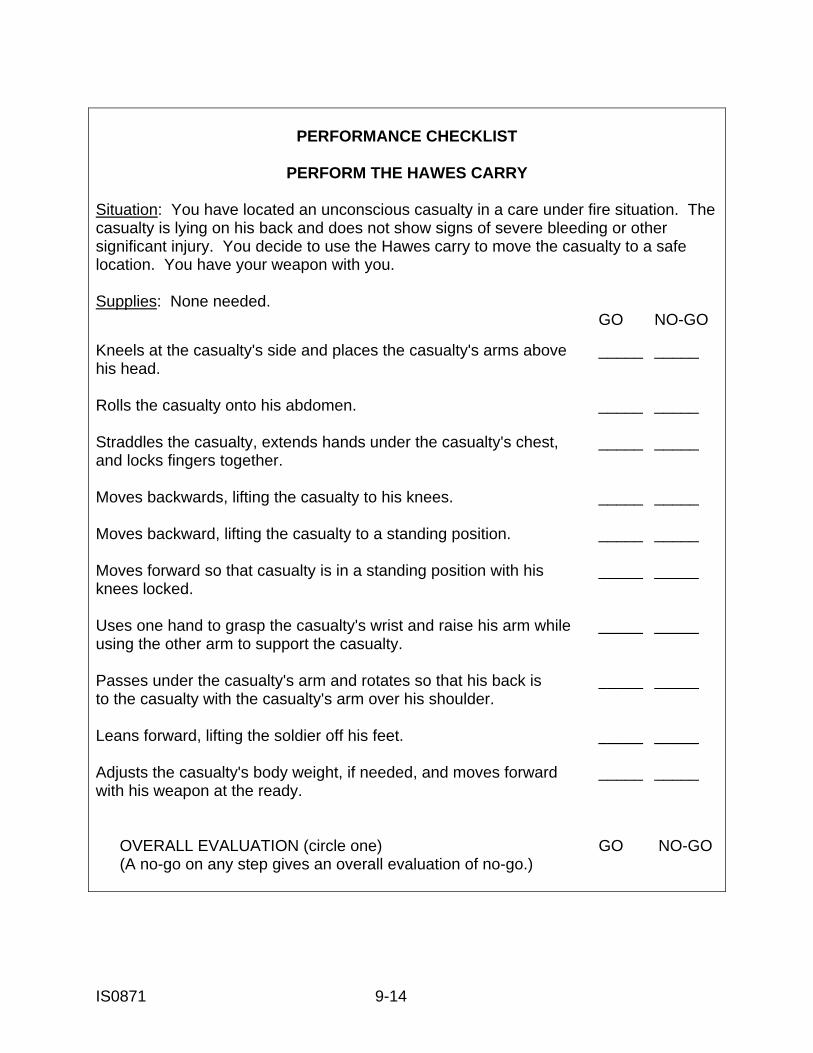
IS0871 9-14
PERFORMANCE CHECKLIST
PERFORM THE HAWES CARRY
Situation: You have located an unconscious casualty in a care under fire situation. The casualty is lying on his back and does not show signs of severe bleeding or other significant injury. You decide to use the Hawes carry to move the casualty to a safe location. You have your weapon with you. Supplies: None needed. GO NO-GO Kneels at the casualty's side and places the casualty's arms above _____ _____ his head. Rolls the casualty onto his abdomen. _____ _____ Straddles the casualty, extends hands under the casualty's chest, _____ _____ and locks fingers together. Moves backwards, lifting the casualty to his knees. _____ _____ Moves backward, lifting the casualty to a standing position. _____ _____ Moves forward so that casualty is in a standing position with his _____ _____ knees locked. Uses one hand to grasp the casualty's wrist and raise his arm while _____ _____ using the other arm to support the casualty. Passes under the casualty's arm and rotates so that his back is _____ _____ to the casualty with the casualty's arm over his shoulder. Leans forward, lifting the soldier off his feet. _____ _____ Adjusts the casualty's body weight, if needed, and moves forward _____ _____ with his weapon at the ready. OVERALL EVALUATION (circle one) GO NO-GO (A no-go on any step gives an overall evaluation of no-go.)
IS0871 10-1
LESSON 10
EVACUATING A CASUALTY USING A LITTER TASK Prepare and use a SKED litter, Talon litter, or improvised litter to evacuate a casualty. CONDITIONS Given a simulated casualty, personnel to act a litter bearers if needed, and either a SKED litter, a Talon litter, or materials to make an improvised litter. STANDARD Score a GO on the performance checklist. Additional injuries to the casualty are prevented. REFERENCES FM 8-10-6, Medical Evacuation in a Theater of Operations. 10-1. EVACUATION Being able to evacuate casualties in a quick and efficient manner will result in saving lives. There are times when a standard medical litter is available for evacuation. However, in many situations, you will use a SKED litter or Talon litter. If neither a standard litter, a SKED litter, nor a Talon litter is available, you can construct an improvised litter from available materials. 10-2. SKED LITTER The SKED® litter (made by SKEDCO, Incorporated) is a compact and lightweight transport system used to evacuate a casualty over land. It can also be used to rescue a casualty in water. A SKED litter is illustrated in figure 10-1. It has four handholds on the sides and a dragline at the head of the litter. a. Prepare the SKED. (1) Remove the SKED litter from its pack and place it on the ground. (2) Unfasten the retainer strap. (3) Step on the foot end of the SKED litter and unroll the SKED completely.
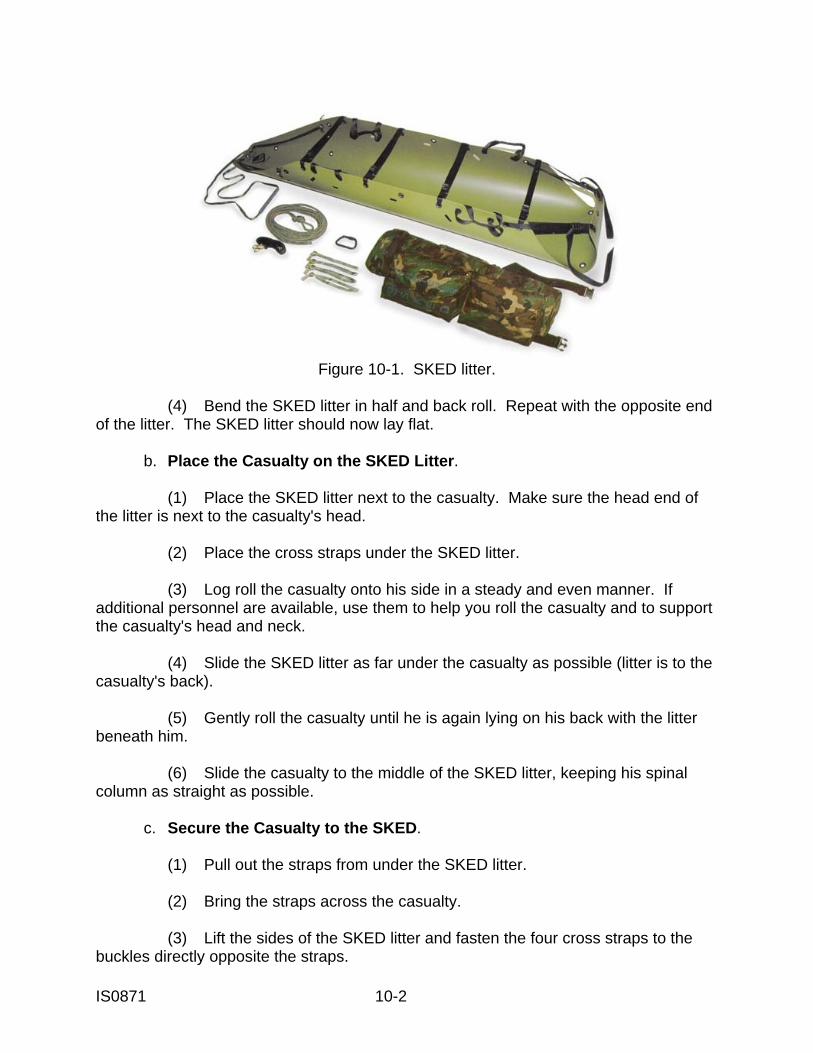
IS0871 10-2
Figure 10-1. SKED litter.
(4) Bend the SKED litter in half and back roll. Repeat with the opposite end of the litter. The SKED litter should now lay flat. b. Place the Casualty on the SKED Litter. (1) Place the SKED litter next to the casualty. Make sure the head end of the litter is next to the casualty's head. (2) Place the cross straps under the SKED litter. (3) Log roll the casualty onto his side in a steady and even manner. If additional personnel are available, use them to help you roll the casualty and to support the casualty's head and neck. (4) Slide the SKED litter as far under the casualty as possible (litter is to the casualty's back). (5) Gently roll the casualty until he is again lying on his back with the litter beneath him. (6) Slide the casualty to the middle of the SKED litter, keeping his spinal column as straight as possible. c. Secure the Casualty to the SKED. (1) Pull out the straps from under the SKED litter. (2) Bring the straps across the casualty. (3) Lift the sides of the SKED litter and fasten the four cross straps to the buckles directly opposite the straps.
IS0871 10-3
(4) Lift the foot portion of the SKED litter. (5) Feed the foot straps over the casualty's lower extremities and through the unused grommets at the foot end of the SKED litter. (6) Fasten the straps to the buckles. (7) Check to make sure the casualty is secured to the SKED litter. d. Transport the Casualty. (1) Ideally, you and three other soldiers will be available to evacuate the casualty. A four-person carry can be used to transport a casualty on a SKED litter quickly and safely to a nearby collection point where he can be transferred to a ground or air ambulance. (a) Each bearer kneels at one of the handles. They should kneel on the knee closest to the litter and face in the same direction, usually so that the casualty's feet are in the direction of travel. The leader of the litter team should position himself at the handle nearest the casualty's right shoulder and direct the other bearers. This position allows the leader to monitor the casualty during the evacuation. (b) Upon command from the leader, the bearers stand up in unison, lifting the casualty. (c) Upon command from the leader, the bearers carry the casualty, adjusting as needed to keep the casualty as level as possible. (2) If only one other soldier is available, position yourself on opposite sides of the litter and face toward the casualty, kneel on one knee, and grab the two near handholds. Upon the command from the leader, both rise in unison, lifting the casualty. (3) If no other person is available, use the dragline at the head of the litter to drag the casualty. 10-3. TALON LITTER The Talon litter (figure 10-2) is a compact quad-folding litter that, when extended, becomes a full-size litter. Its small size allows it to fit into vehicles easier that a conventional litter. It also comes with a carrying case that allows an individual soldier to carry it on his back like a rucksack. This litter is a component of the Warrior Aid and Litter Kit.
IS0871 10-4
a. Preparing the Talon Litter for Use. (1) Stand the Talon litter upright and release the fastening buckles (figure 10-2A). (2) Place the litter on the ground and completely extend with the fabric side up (figure 10-2B). NOTE: Figure 10-2C shows what the hinges closest to you (when holding the handles) will look like when the litter is in the relaxed (unlocked) position. (3) Keeping the litter as straight as possible, grab handles (figure 10-2D) and rotate inward (figure 10-2E) until all of the hinges rotate and lock (figure 10-2F). NOTE: This action is best done using two individuals, one on each end of the litter, executing the rotation step simultaneously. (4) While maintaining the hinges in the locked position, apply firm steady pressure on the pressure bar with your foot (figure 10-2G). Increase the pressure with your foot until the pressure bar locks into place. NOTE: To close and store the litter, perform the steps in reverse order. b. Placing the Casualty on the Talon Litter. (1) Lift or log roll the casualty onto the Talon litter just as you would a conventional litter. (2) Secure the casualty to the litter using the litter straps. The Talon comes with integral litter straps to fasten the casualty to the litter. They are located at the mid-thigh and chest areas. CAUTION: The buckles on the Talon are made of plastic and are easily broken if stepped on.
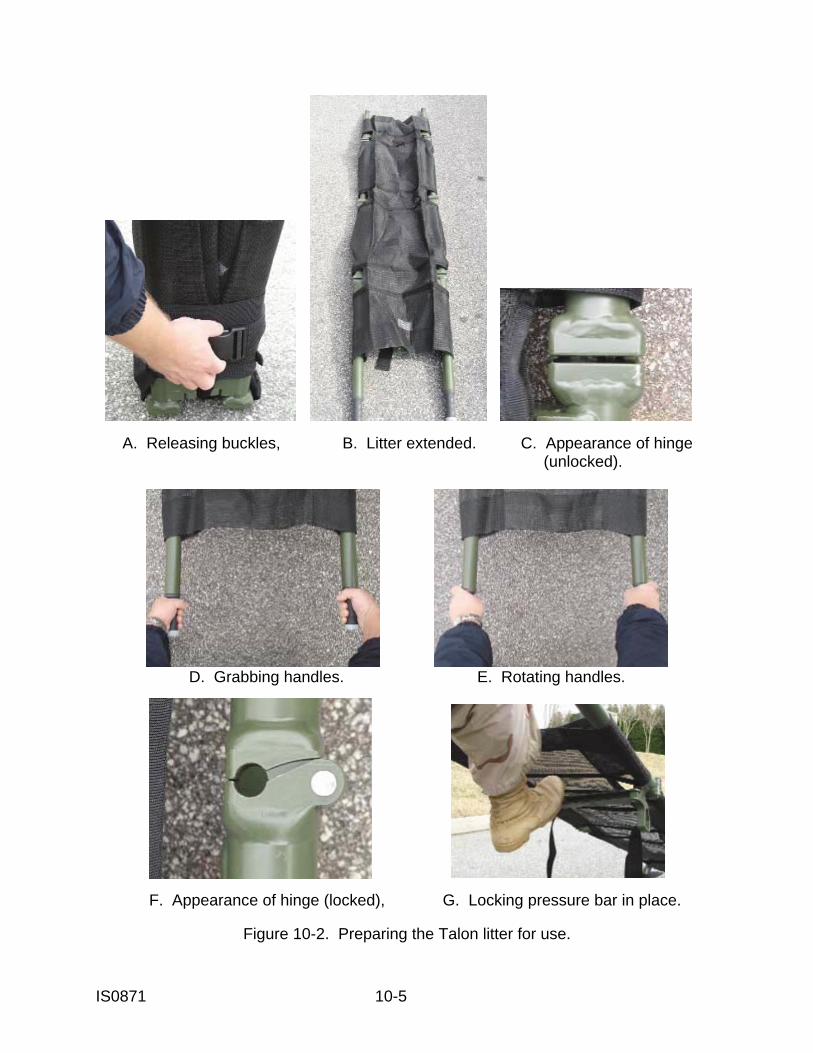
IS0871 10-5
A. Releasing buckles, B. Litter extended. C. Appearance of hinge (unlocked).
D. Grabbing handles. E. Rotating handles.
F. Appearance of hinge (locked), G. Locking pressure bar in place.
Figure 10-2. Preparing the Talon litter for use.
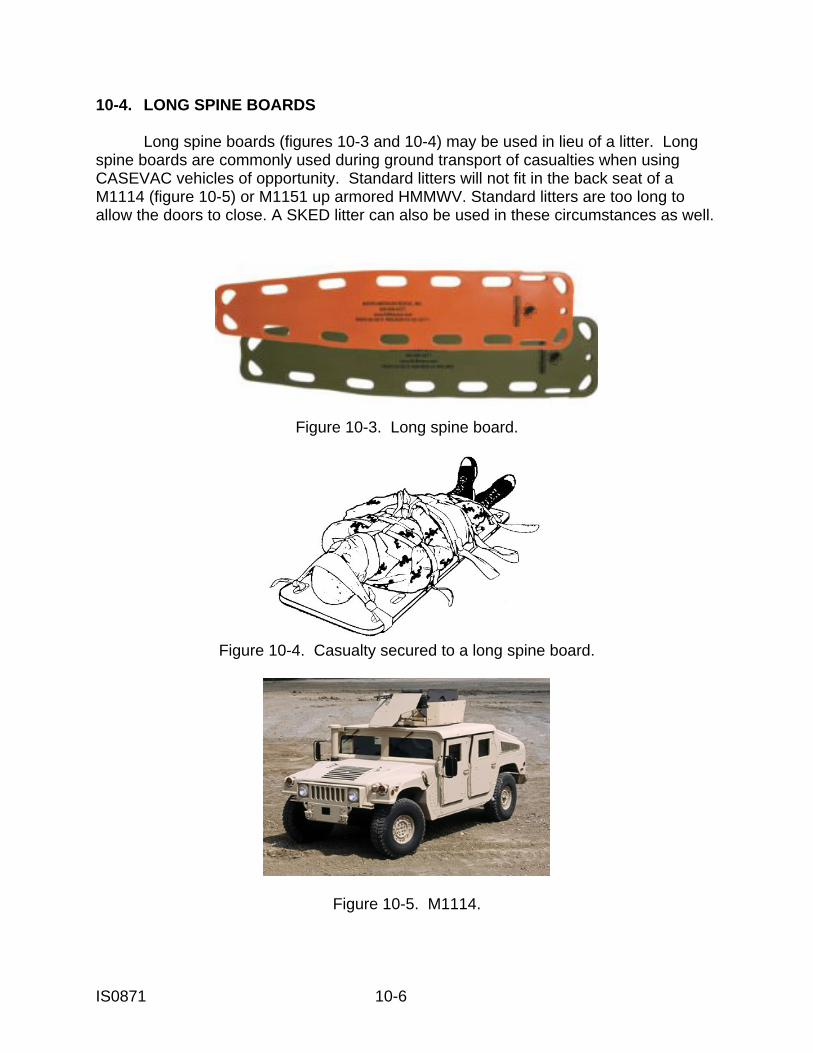
IS0871 10-6
10-4. LONG SPINE BOARDS Long spine boards (figures 10-3 and 10-4) may be used in lieu of a litter. Long spine boards are commonly used during ground transport of casualties when using CASEVAC vehicles of opportunity. Standard litters will not fit in the back seat of a M1114 (figure 10-5) or M1151 up armored HMMWV. Standard litters are too long to allow the doors to close. A SKED litter can also be used in these circumstances as well.
Figure 10-3. Long spine board.
Figure 10-4. Casualty secured to a long spine board.
Figure 10-5. M1114.
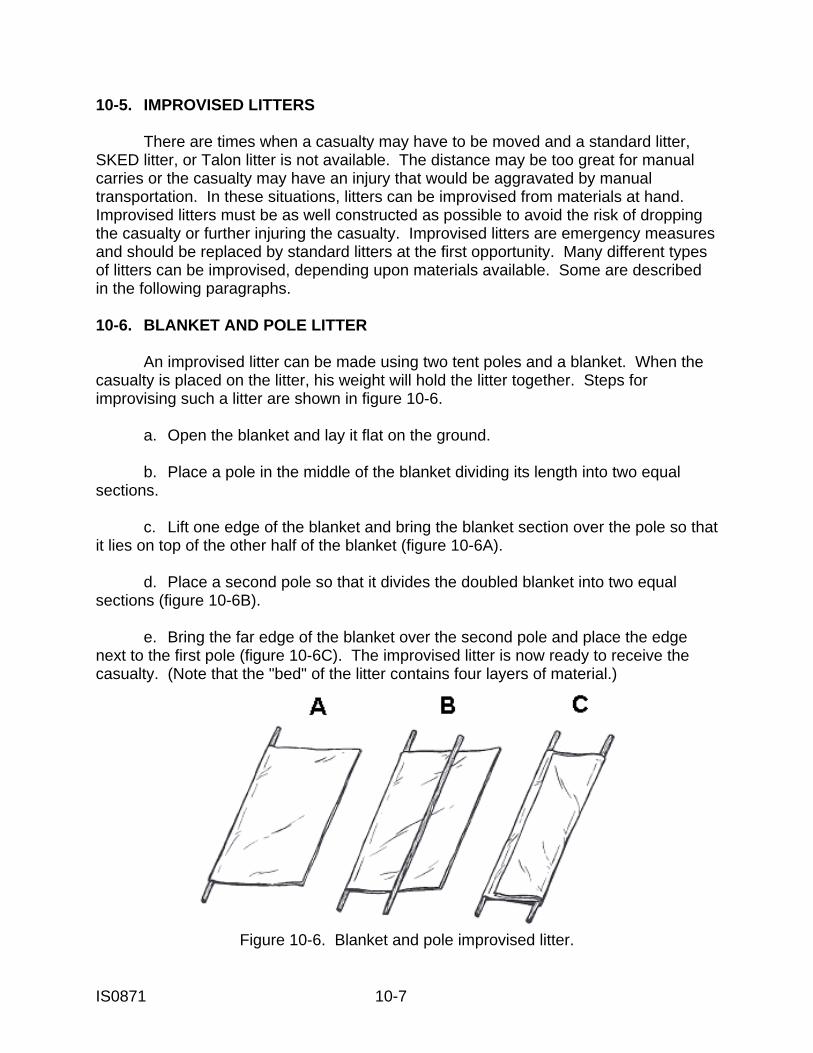
IS0871 10-7
10-5. IMPROVISED LITTERS There are times when a casualty may have to be moved and a standard litter, SKED litter, or Talon litter is not available. The distance may be too great for manual carries or the casualty may have an injury that would be aggravated by manual transportation. In these situations, litters can be improvised from materials at hand. Improvised litters must be as well constructed as possible to avoid the risk of dropping the casualty or further injuring the casualty. Improvised litters are emergency measures and should be replaced by standard litters at the first opportunity. Many different types of litters can be improvised, depending upon materials available. Some are described in the following paragraphs. 10-6. BLANKET AND POLE LITTER An improvised litter can be made using two tent poles and a blanket. When the casualty is placed on the litter, his weight will hold the litter together. Steps for improvising such a litter are shown in figure 10-6. a. Open the blanket and lay it flat on the ground. b. Place a pole in the middle of the blanket dividing its length into two equal sections. c. Lift one edge of the blanket and bring the blanket section over the pole so that it lies on top of the other half of the blanket (figure 10-6A). d. Place a second pole so that it divides the doubled blanket into two equal sections (figure 10-6B). e. Bring the far edge of the blanket over the second pole and place the edge next to the first pole (figure 10-6C). The improvised litter is now ready to receive the casualty. (Note that the "bed" of the litter contains four layers of material.)
Figure 10-6. Blanket and pole improvised litter.
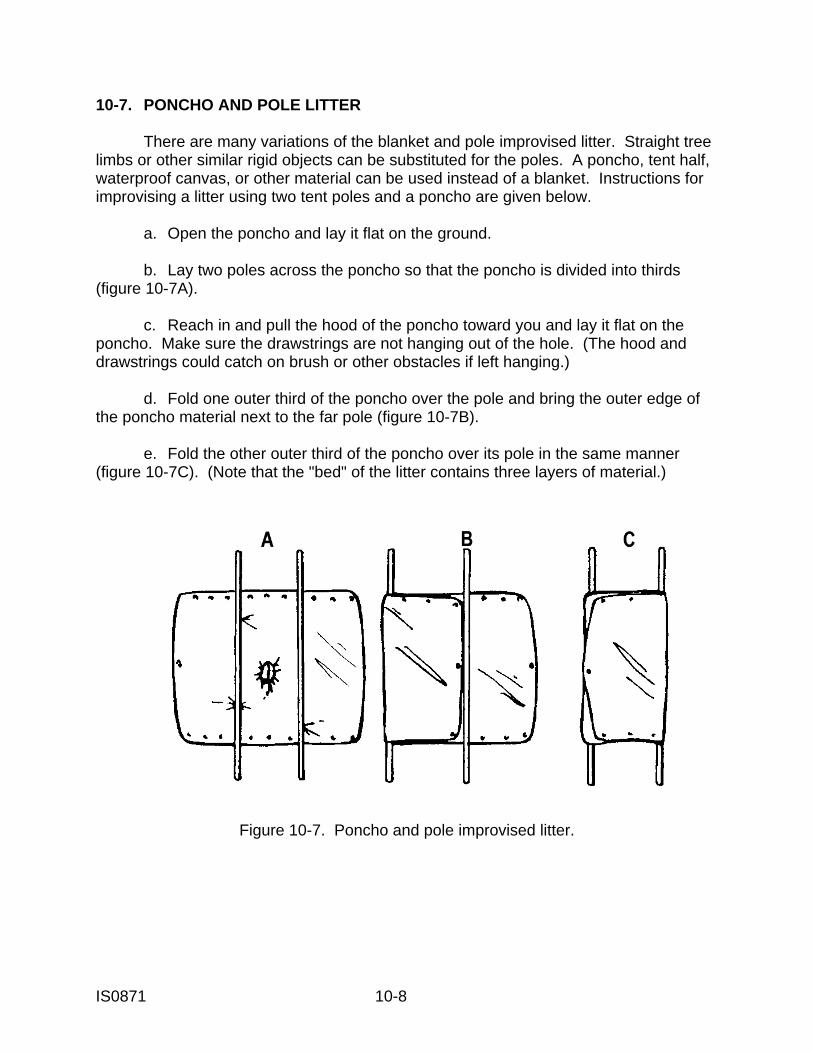
IS0871 10-8
10-7. PONCHO AND POLE LITTER There are many variations of the blanket and pole improvised litter. Straight tree limbs or other similar rigid objects can be substituted for the poles. A poncho, tent half, waterproof canvas, or other material can be used instead of a blanket. Instructions for improvising a litter using two tent poles and a poncho are given below. a. Open the poncho and lay it flat on the ground. b. Lay two poles across the poncho so that the poncho is divided into thirds (figure 10-7A). c. Reach in and pull the hood of the poncho toward you and lay it flat on the poncho. Make sure the drawstrings are not hanging out of the hole. (The hood and drawstrings could catch on brush or other obstacles if left hanging.) d. Fold one outer third of the poncho over the pole and bring the outer edge of the poncho material next to the far pole (figure 10-7B). e. Fold the other outer third of the poncho over its pole in the same manner (figure 10-7C). (Note that the "bed" of the litter contains three layers of material.)
Figure 10-7. Poncho and pole improvised litter.
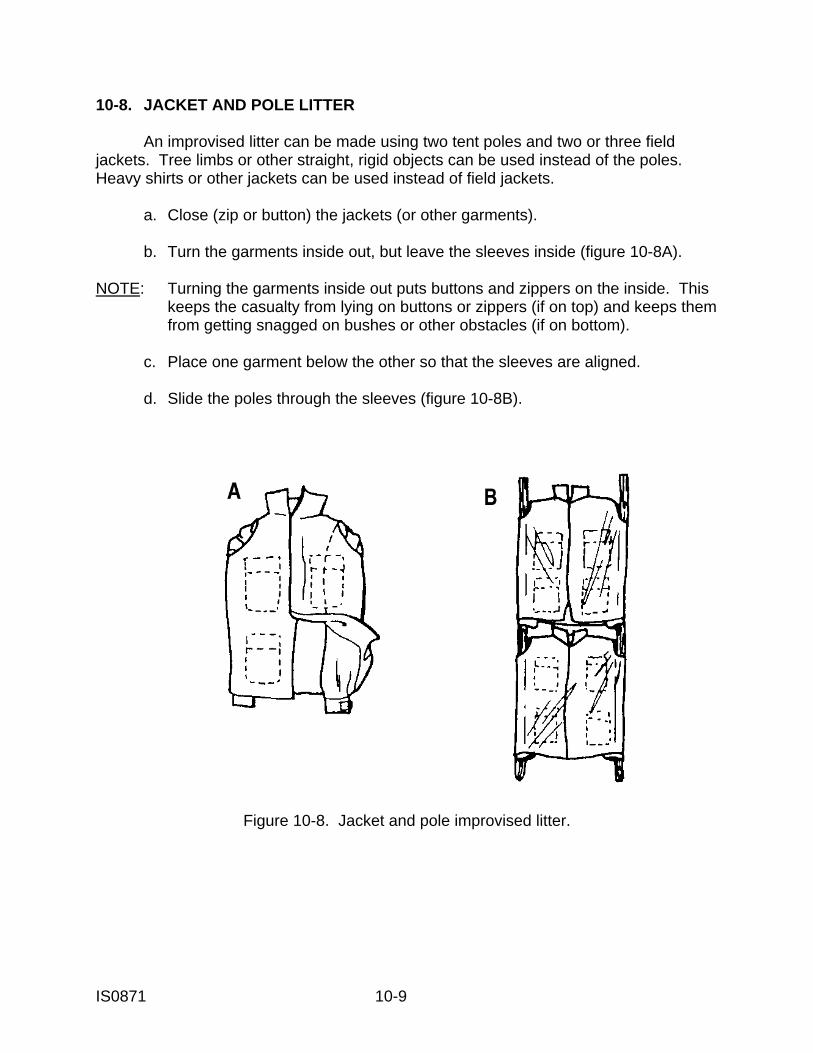
IS0871 10-9
10-8. JACKET AND POLE LITTER An improvised litter can be made using two tent poles and two or three field jackets. Tree limbs or other straight, rigid objects can be used instead of the poles. Heavy shirts or other jackets can be used instead of field jackets. a. Close (zip or button) the jackets (or other garments). b. Turn the garments inside out, but leave the sleeves inside (figure 10-8A). NOTE: Turning the garments inside out puts buttons and zippers on the inside. This keeps the casualty from lying on buttons or zippers (if on top) and keeps them from getting snagged on bushes or other obstacles (if on bottom). c. Place one garment below the other so that the sleeves are aligned. d. Slide the poles through the sleeves (figure 10-8B).
Figure 10-8. Jacket and pole improvised litter.

IS0871 10-10
10-9. SACK AND POLE LITTER An improvised litter can be made using two tent poles or similar rigid objects and two empty heavy fabric sacks, such as potato sacks. A sack and pole improvised litter is shown in figure 10-9. a. Cut holes in the two corners of the closed end of each sack. b. Place the sacks lengthwise so the open ends of the sacks are facing each other. c. Slide the poles or limbs through the holes. d. Overlap the open ends of the sacks about three inches to provide extra strength in the middle of the litter.
Figure 10-9. Sack and pole improvised litter.
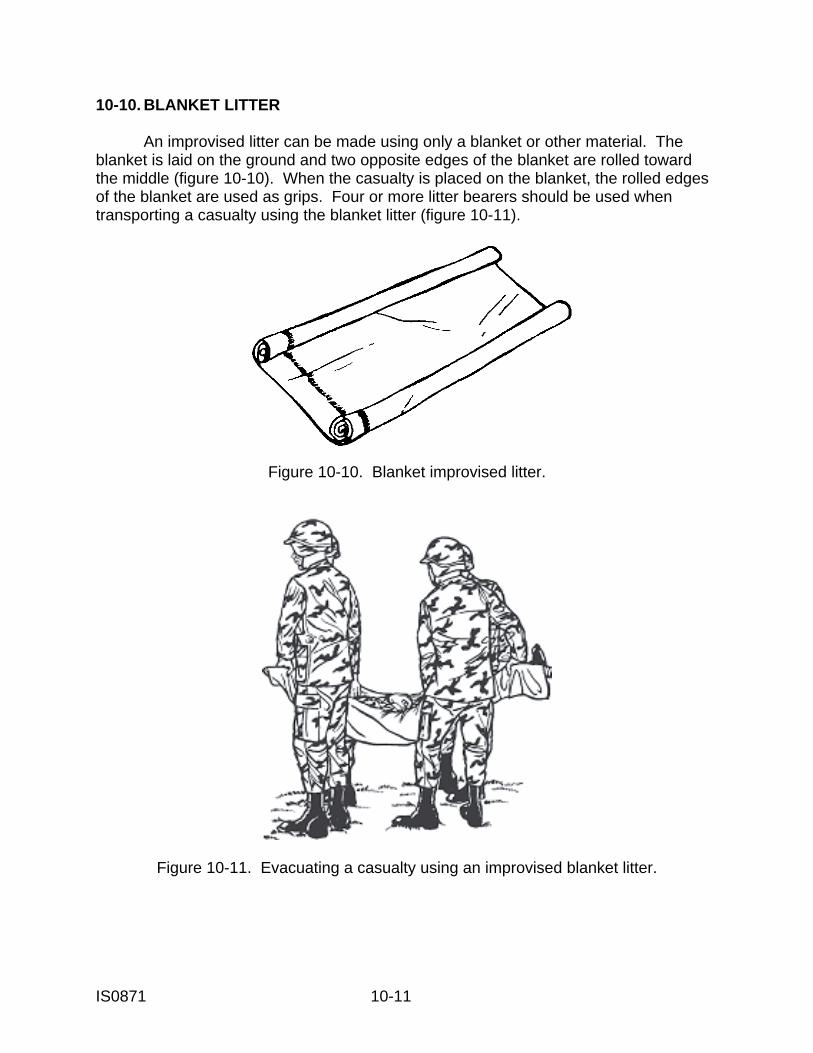
IS0871 10-11
10-10. BLANKET LITTER An improvised litter can be made using only a blanket or other material. The blanket is laid on the ground and two opposite edges of the blanket are rolled toward the middle (figure 10-10). When the casualty is placed on the blanket, the rolled edges of the blanket are used as grips. Four or more litter bearers should be used when transporting a casualty using the blanket litter (figure 10-11).
Figure 10-10. Blanket improvised litter.
Figure 10-11. Evacuating a casualty using an improvised blanket litter.
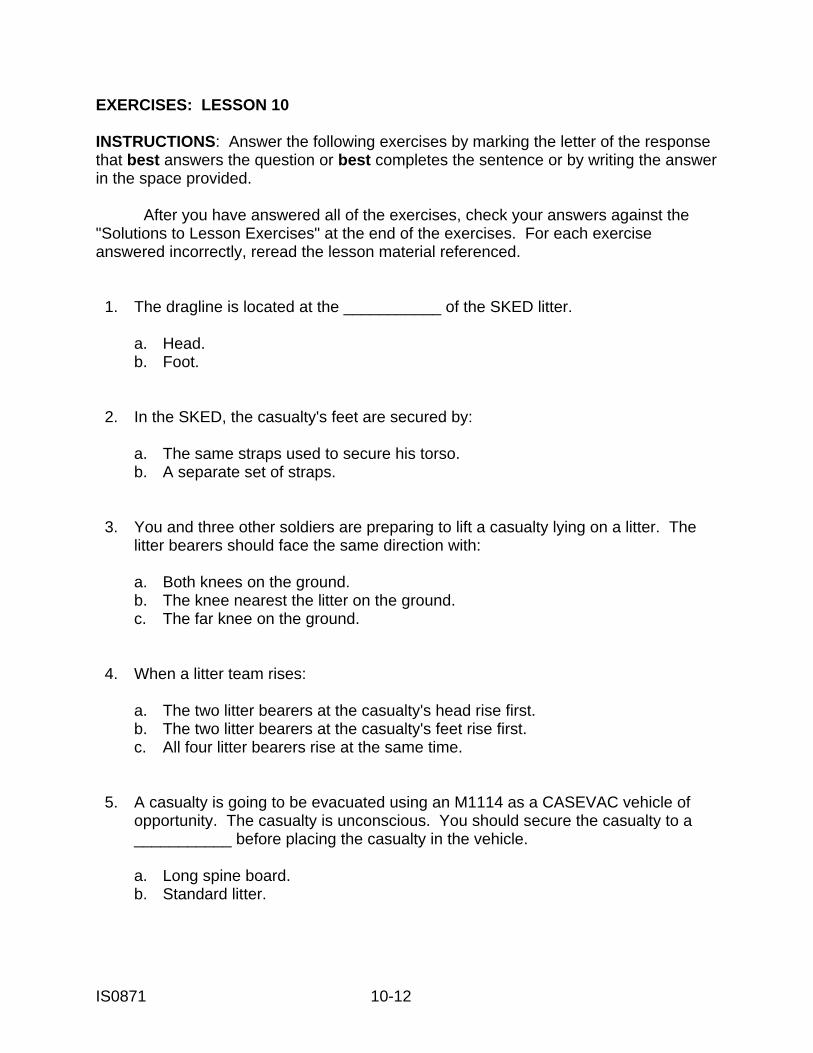
IS0871 10-12
EXERCISES: LESSON 10 INSTRUCTIONS: Answer the following exercises by marking the letter of the response that best answers the question or best completes the sentence or by writing the answer in the space provided. After you have answered all of the exercises, check your answers against the "Solutions to Lesson Exercises" at the end of the exercises. For each exercise answered incorrectly, reread the lesson material referenced. 1. The dragline is located at the ___________ of the SKED litter. a. Head. b. Foot. 2. In the SKED, the casualty's feet are secured by: a. The same straps used to secure his torso. b. A separate set of straps. 3. You and three other soldiers are preparing to lift a casualty lying on a litter. The litter bearers should face the same direction with: a. Both knees on the ground. b. The knee nearest the litter on the ground. c. The far knee on the ground. 4. When a litter team rises: a. The two litter bearers at the casualty's head rise first. b. The two litter bearers at the casualty's feet rise first. c. All four litter bearers rise at the same time. 5. A casualty is going to be evacuated using an M1114 as a CASEVAC vehicle of opportunity. The casualty is unconscious. You should secure the casualty to a ___________ before placing the casualty in the vehicle. a. Long spine board. b. Standard litter.
IS0871 10-13
6. If possible, obtain a SKED litter. Have four people (one to play the role of the casualty, the other to play the roles of the litter bearers) help you practice preparing and using a SKED litter to transport a casualty. 7. If possible, obtain a Talon litter. Have two people (one to play the role of the casualty, the other to play the role of the assistant help you practice preparing and using a Talon litter to transport a casualty. 8. Practice making improvised litters from available materials. If possible, practice preparing the following improvised litters. a. Blanket and pole improvised litter. b. Poncho and pole improvised litter. c. Jacket and pole improvised litter. d. Sack and pole improvised litter.
Check your answers on the next page.
IS0871 10-14
SOLUTIONS TO EXERCISES: LESSON 10 1. a (para 10-2) 2. b (para 10-2c(5)) 3. b (para 10-2d(1)(a)) 4. c (para 10-2d(1)(b)) 5. a (para 10-4) 6. See the following checklist (pages 10-14 and 10-15). 7. See the following checklist (page 10-16). 8. See the following checklists (pages 10-17 through 10-20).
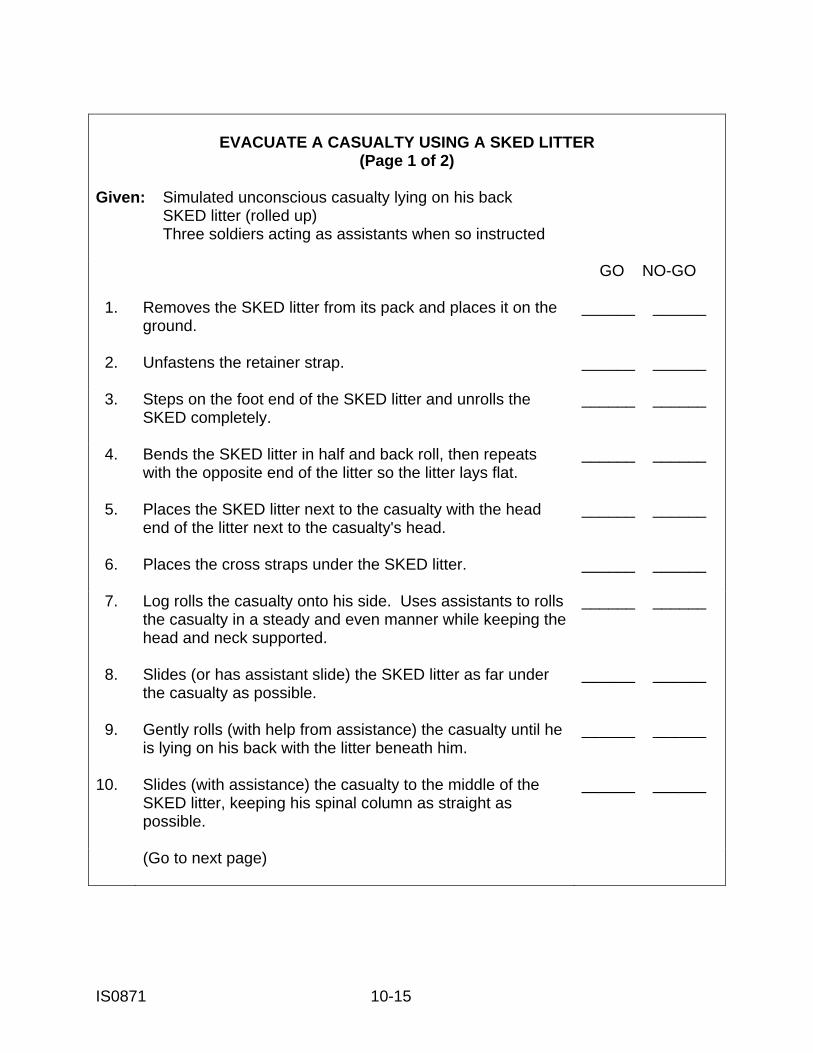
IS0871 10-15
EVACUATE A CASUALTY USING A SKED LITTER (Page 1 of 2)
Given: Simulated unconscious casualty lying on his back SKED litter (rolled up) Three soldiers acting as assistants when so instructed GO NO-GO
1. Removes the SKED litter from its pack and places it on the
ground.
______ ______
2. Unfastens the retainer strap.
______ ______
3. Steps on the foot end of the SKED litter and unrolls the SKED completely.
______ ______
4. Bends the SKED litter in half and back roll, then repeats with the opposite end of the litter so the litter lays flat.
______ ______
5. Places the SKED litter next to the casualty with the head end of the litter next to the casualty's head.
______ ______
6. Places the cross straps under the SKED litter.
______ ______
7. Log rolls the casualty onto his side. Uses assistants to rolls the casualty in a steady and even manner while keeping the head and neck supported.
______ ______
8. Slides (or has assistant slide) the SKED litter as far under the casualty as possible.
______ ______
9. Gently rolls (with help from assistance) the casualty until he is lying on his back with the litter beneath him.
______ ______
10. Slides (with assistance) the casualty to the middle of the SKED litter, keeping his spinal column as straight as possible.
______ ______
(Go to next page)
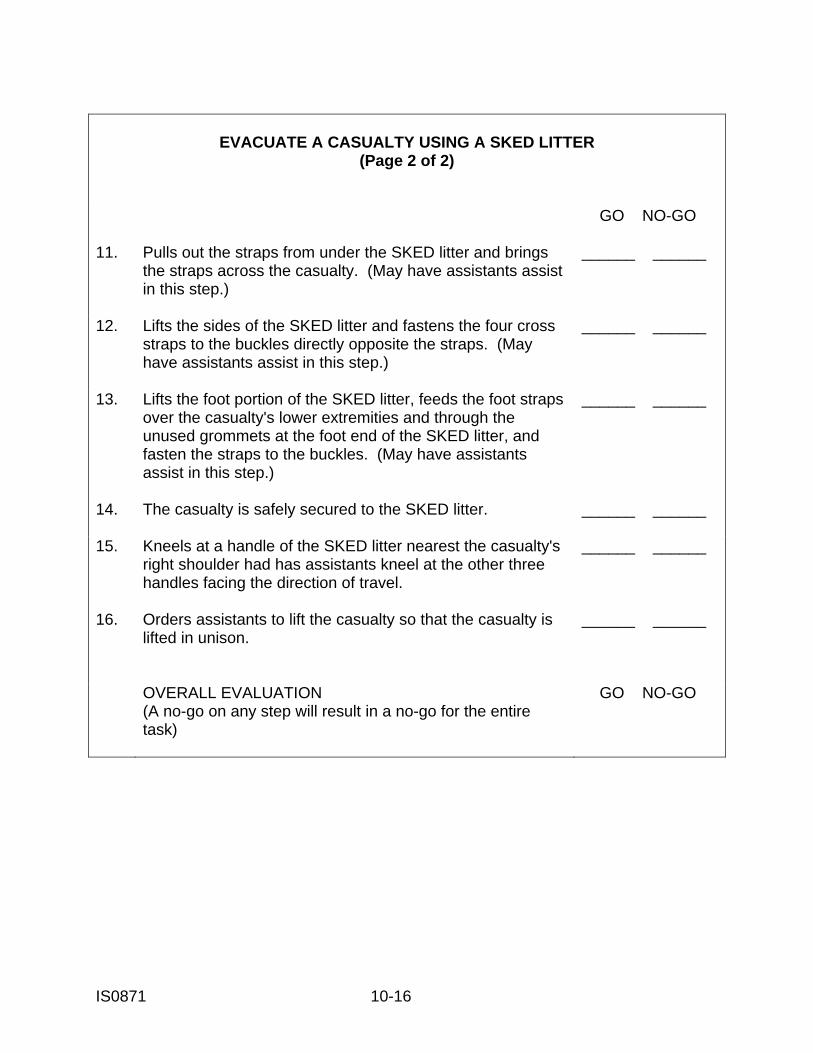
IS0871 10-16
EVACUATE A CASUALTY USING A SKED LITTER (Page 2 of 2)
GO NO-GO
11. Pulls out the straps from under the SKED litter and brings
the straps across the casualty. (May have assistants assist in this step.)
______ ______
12. Lifts the sides of the SKED litter and fastens the four cross straps to the buckles directly opposite the straps. (May have assistants assist in this step.)
______ ______
13. Lifts the foot portion of the SKED litter, feeds the foot straps over the casualty's lower extremities and through the unused grommets at the foot end of the SKED litter, and fasten the straps to the buckles. (May have assistants assist in this step.)
______ ______
14. The casualty is safely secured to the SKED litter.
______ ______
15. Kneels at a handle of the SKED litter nearest the casualty's right shoulder had has assistants kneel at the other three handles facing the direction of travel.
______ ______
16. Orders assistants to lift the casualty so that the casualty is lifted in unison.
______ ______
OVERALL EVALUATION (A no-go on any step will result in a no-go for the entire task)
GO NO-GO
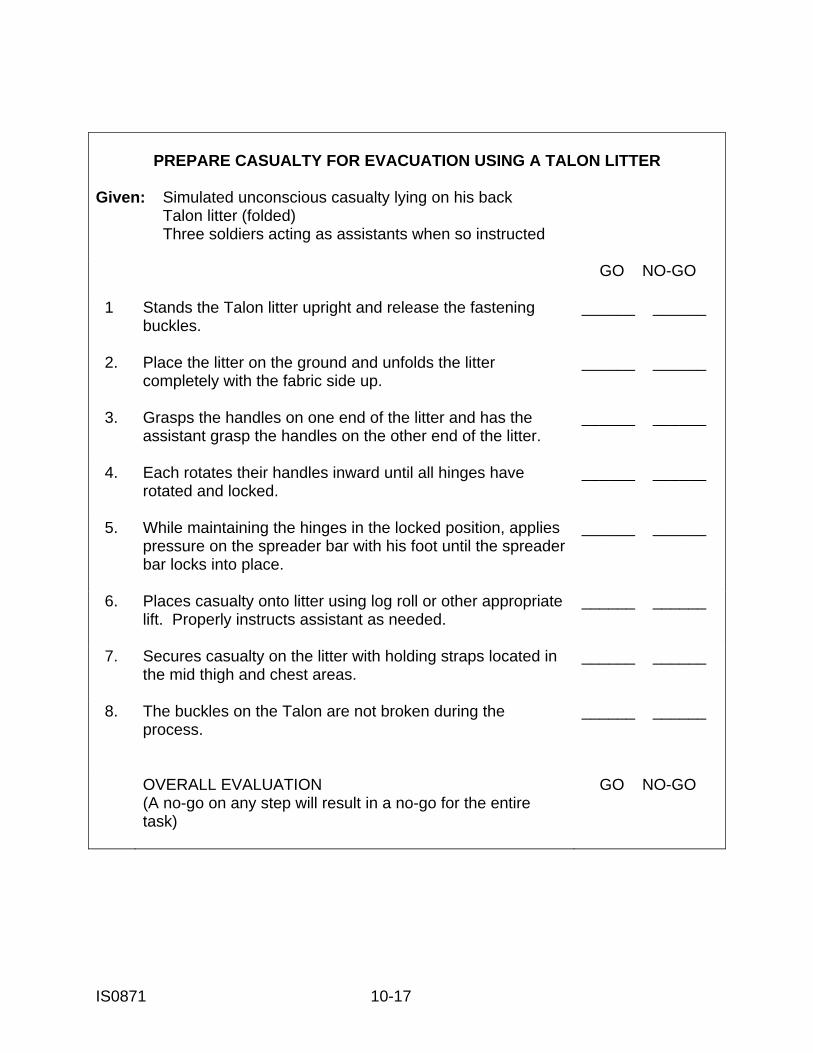
IS0871 10-17
PREPARE CASUALTY FOR EVACUATION USING A TALON LITTER
Given: Simulated unconscious casualty lying on his back Talon litter (folded) Three soldiers acting as assistants when so instructed GO NO-GO
1 Stands the Talon litter upright and release the fastening
buckles.
______ ______
2. Place the litter on the ground and unfolds the litter completely with the fabric side up.
______ ______
3. Grasps the handles on one end of the litter and has the assistant grasp the handles on the other end of the litter.
______ ______
4. Each rotates their handles inward until all hinges have rotated and locked.
______ ______
5. While maintaining the hinges in the locked position, applies pressure on the spreader bar with his foot until the spreader bar locks into place.
______ ______
6. Places casualty onto litter using log roll or other appropriate lift. Properly instructs assistant as needed.
______ ______
7. Secures casualty on the litter with holding straps located in the mid thigh and chest areas.
______ ______
8. The buckles on the Talon are not broken during the process.
______ ______
OVERALL EVALUATION (A no-go on any step will result in a no-go for the entire task)
GO NO-GO
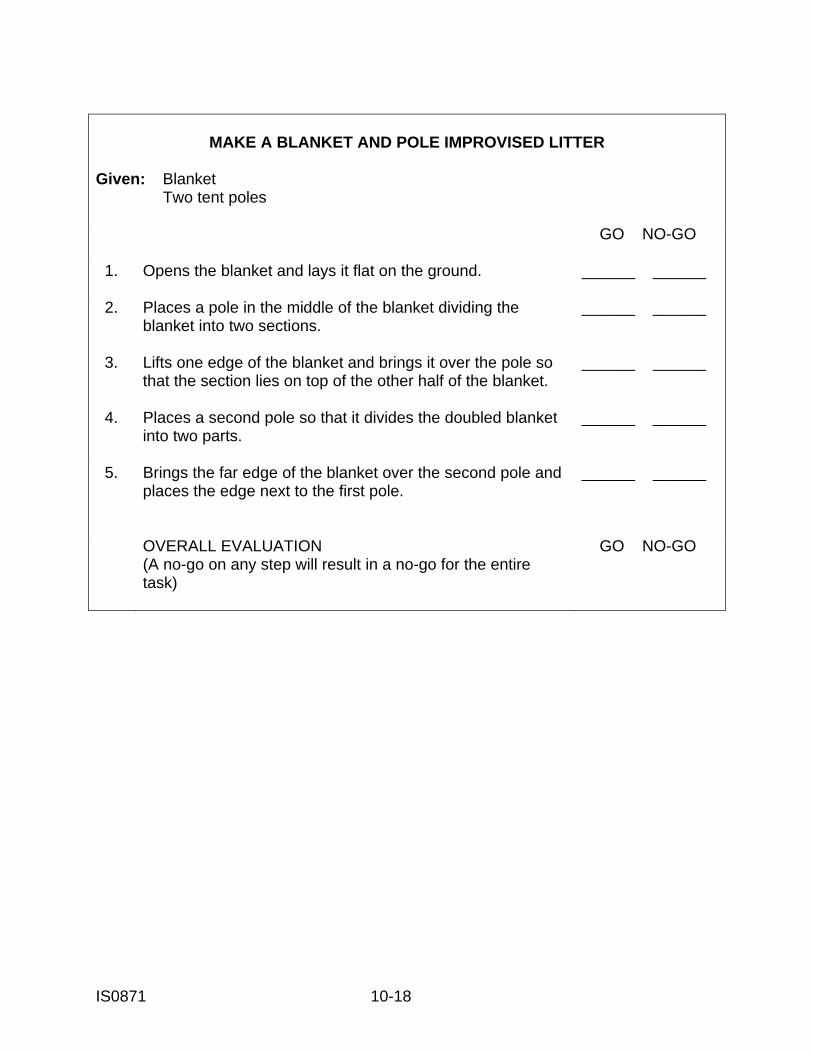
IS0871 10-18
MAKE A BLANKET AND POLE IMPROVISED LITTER
Given: Blanket Two tent poles GO NO-GO
1. Opens the blanket and lays it flat on the ground.
______ ______
2. Places a pole in the middle of the blanket dividing the blanket into two sections.
______ ______
3. Lifts one edge of the blanket and brings it over the pole so that the section lies on top of the other half of the blanket.
______ ______
4. Places a second pole so that it divides the doubled blanket into two parts.
______ ______
5. Brings the far edge of the blanket over the second pole and places the edge next to the first pole.
______ ______
OVERALL EVALUATION (A no-go on any step will result in a no-go for the entire task)
GO NO-GO
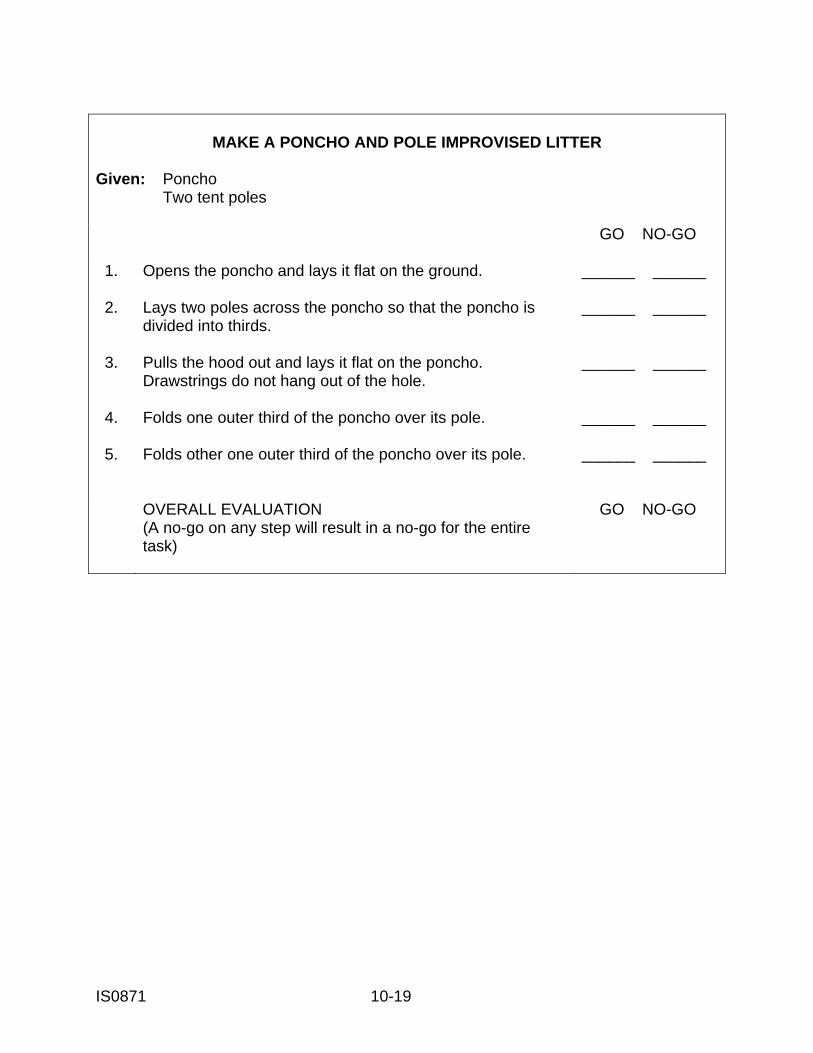
IS0871 10-19
MAKE A PONCHO AND POLE IMPROVISED LITTER
Given: Poncho Two tent poles GO NO-GO
1. Opens the poncho and lays it flat on the ground.
______ ______
2. Lays two poles across the poncho so that the poncho is divided into thirds.
______ ______
3. Pulls the hood out and lays it flat on the poncho. Drawstrings do not hang out of the hole.
______ ______
4. Folds one outer third of the poncho over its pole.
______ ______
5. Folds other one outer third of the poncho over its pole.
______ ______
OVERALL EVALUATION (A no-go on any step will result in a no-go for the entire task)
GO NO-GO
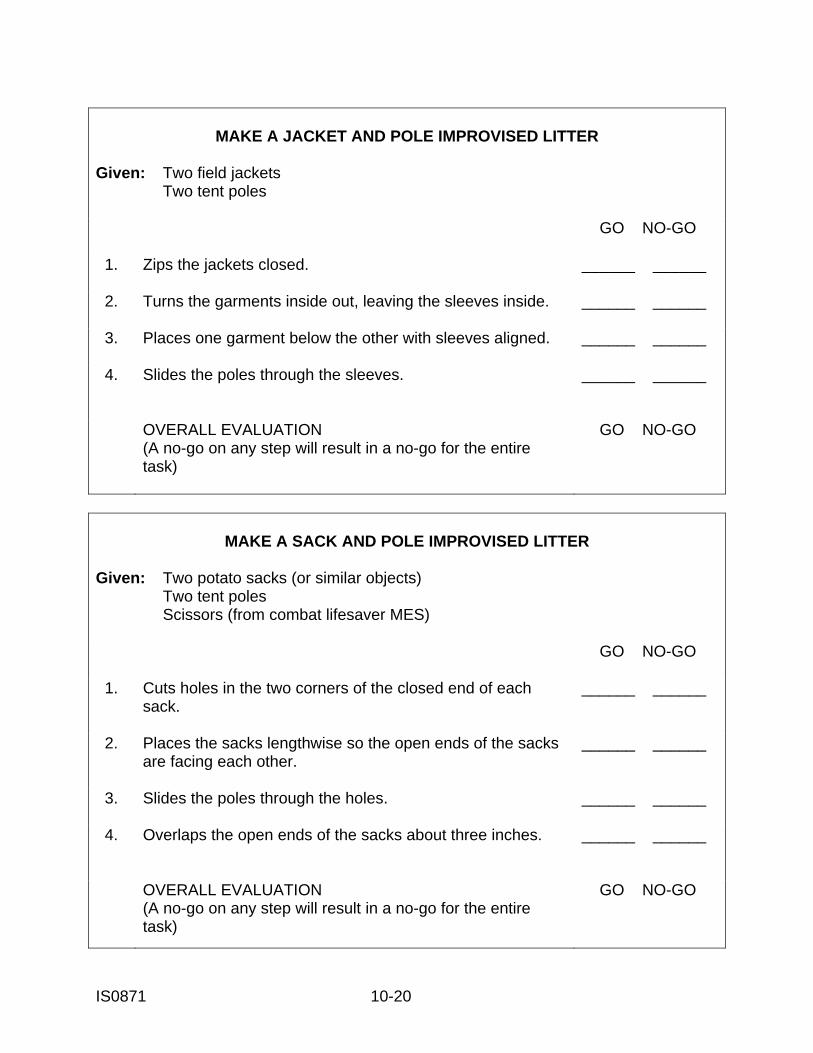
IS0871 10-20
MAKE A JACKET AND POLE IMPROVISED LITTER
Given: Two field jackets Two tent poles GO NO-GO
1. Zips the jackets closed.
______ ______
2. Turns the garments inside out, leaving the sleeves inside.
______ ______
3. Places one garment below the other with sleeves aligned.
______ ______
4. Slides the poles through the sleeves.
______ ______
OVERALL EVALUATION (A no-go on any step will result in a no-go for the entire task)
GO NO-GO
MAKE A SACK AND POLE IMPROVISED LITTER
Given: Two potato sacks (or similar objects) Two tent poles Scissors (from combat lifesaver MES) GO NO-GO
1. Cuts holes in the two corners of the closed end of each
sack.
______ ______
2. Places the sacks lengthwise so the open ends of the sacks are facing each other.
______ ______
3. Slides the poles through the holes.
______ ______
4. Overlaps the open ends of the sacks about three inches.
______ ______
OVERALL EVALUATION (A no-go on any step will result in a no-go for the entire task)
GO NO-GO
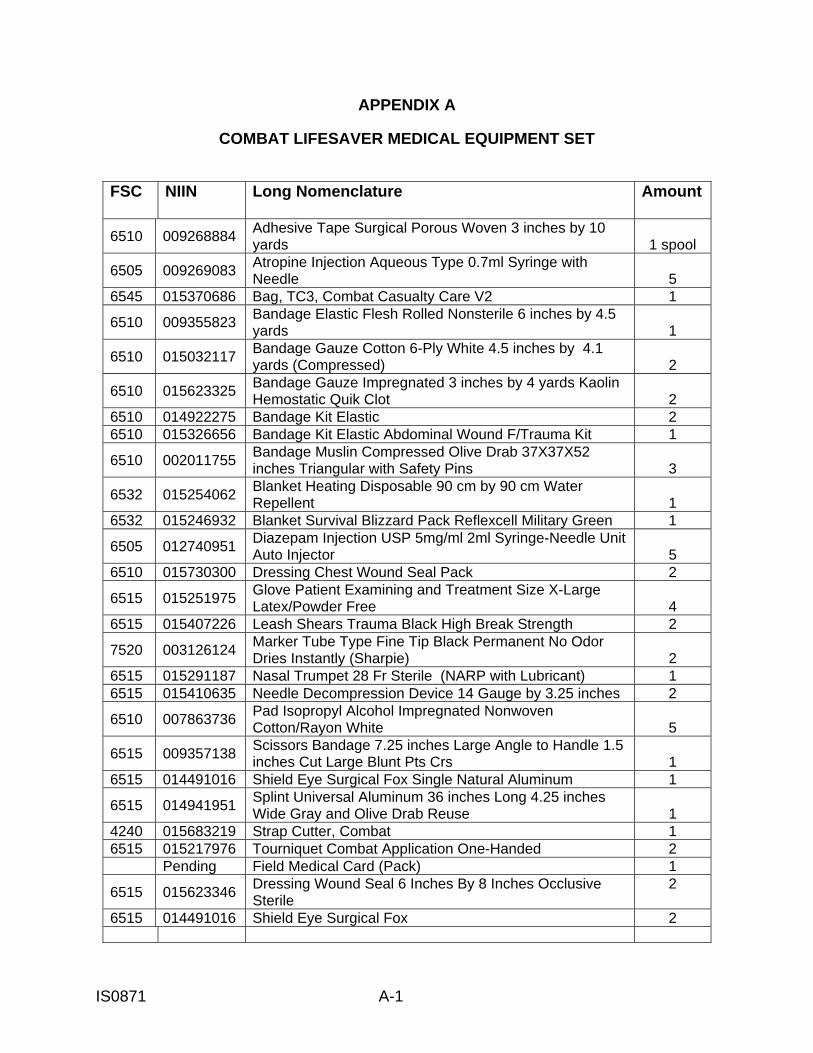
IS0871 A-1
APPENDIX A
COMBAT LIFESAVER MEDICAL EQUIPMENT SET
FSC
NIIN
Long Nomenclature
Amount
6510 009268884 Adhesive Tape Surgical Porous Woven 3 inches by 10 yards 1 spool
6505 009269083 Atropine Injection Aqueous Type 0.7ml Syringe with Needle 5
6545 015370686 Bag, TC3, Combat Casualty Care V2 1
6510 009355823 Bandage Elastic Flesh Rolled Nonsterile 6 inches by 4.5 yards 1
6510 015032117 Bandage Gauze Cotton 6-Ply White 4.5 inches by 4.1 yards (Compressed) 2
6510 015623325 Bandage Gauze Impregnated 3 inches by 4 yards Kaolin Hemostatic Quik Clot 2
6510 014922275 Bandage Kit Elastic 2 6510 015326656 Bandage Kit Elastic Abdominal Wound F/Trauma Kit 1
6510 002011755 Bandage Muslin Compressed Olive Drab 37X37X52 inches Triangular with Safety Pins 3
6532 015254062 Blanket Heating Disposable 90 cm by 90 cm Water Repellent 1
6532 015246932 Blanket Survival Blizzard Pack Reflexcell Military Green 1
6505 012740951 Diazepam Injection USP 5mg/ml 2ml Syringe-Needle Unit Auto Injector 5
6510 015730300 Dressing Chest Wound Seal Pack 2
6515 015251975 Glove Patient Examining and Treatment Size X-Large Latex/Powder Free 4
6515 015407226 Leash Shears Trauma Black High Break Strength 2
7520 003126124 Marker Tube Type Fine Tip Black Permanent No Odor Dries Instantly (Sharpie) 2
6515 015291187 Nasal Trumpet 28 Fr Sterile (NARP with Lubricant) 1 6515 015410635 Needle Decompression Device 14 Gauge by 3.25 inches 2
6510 007863736 Pad Isopropyl Alcohol Impregnated Nonwoven Cotton/Rayon White 5
6515 009357138 Scissors Bandage 7.25 inches Large Angle to Handle 1.5 inches Cut Large Blunt Pts Crs 1
6515 014491016 Shield Eye Surgical Fox Single Natural Aluminum 1
6515 014941951 Splint Universal Aluminum 36 inches Long 4.25 inches Wide Gray and Olive Drab Reuse 1
4240 015683219 Strap Cutter, Combat 1 6515 015217976 Tourniquet Combat Application One-Handed 2 Pending Field Medical Card (Pack) 1
6515 015623346 Dressing Wound Seal 6 Inches By 8 Inches Occlusive Sterile
2
6515 014491016 Shield Eye Surgical Fox 2
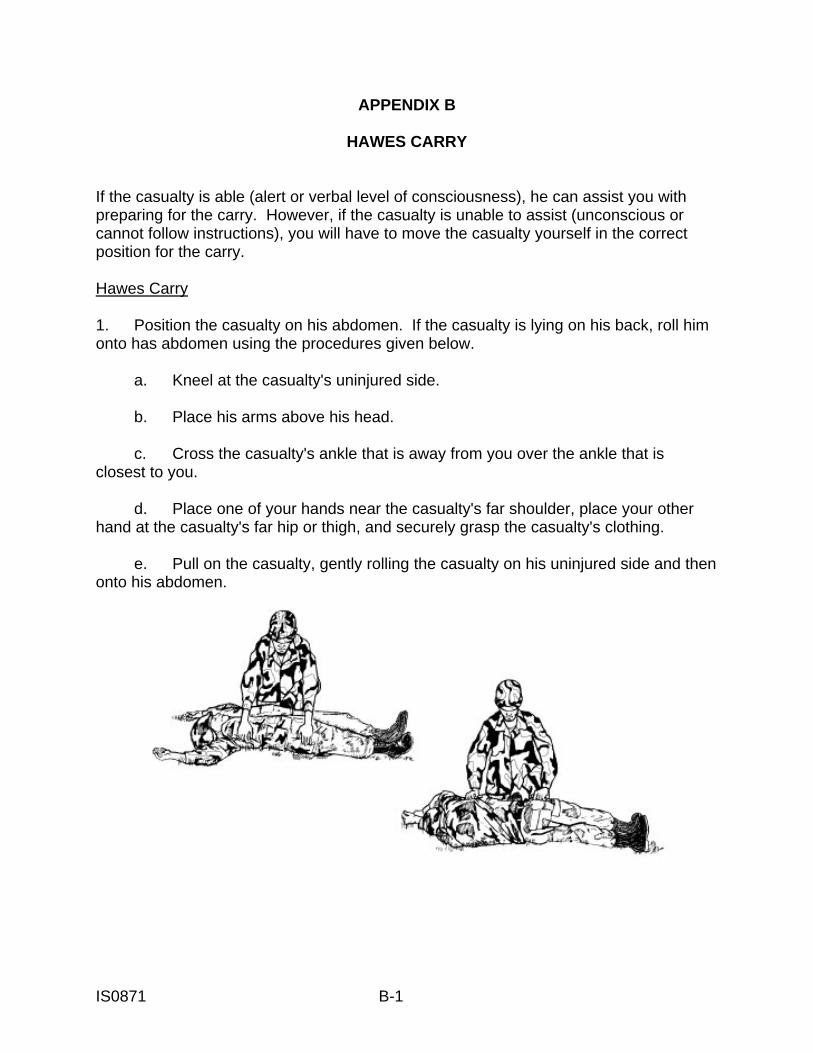
IS0871 B-1
APPENDIX B
HAWES CARRY If the casualty is able (alert or verbal level of consciousness), he can assist you with preparing for the carry. However, if the casualty is unable to assist (unconscious or cannot follow instructions), you will have to move the casualty yourself in the correct position for the carry. Hawes Carry 1. Position the casualty on his abdomen. If the casualty is lying on his back, roll him onto has abdomen using the procedures given below. a. Kneel at the casualty's uninjured side. b. Place his arms above his head. c. Cross the casualty's ankle that is away from you over the ankle that is closest to you. d. Place one of your hands near the casualty's far shoulder, place your other hand at the casualty's far hip or thigh, and securely grasp the casualty's clothing. e. Pull on the casualty, gently rolling the casualty on his uninjured side and then onto his abdomen.
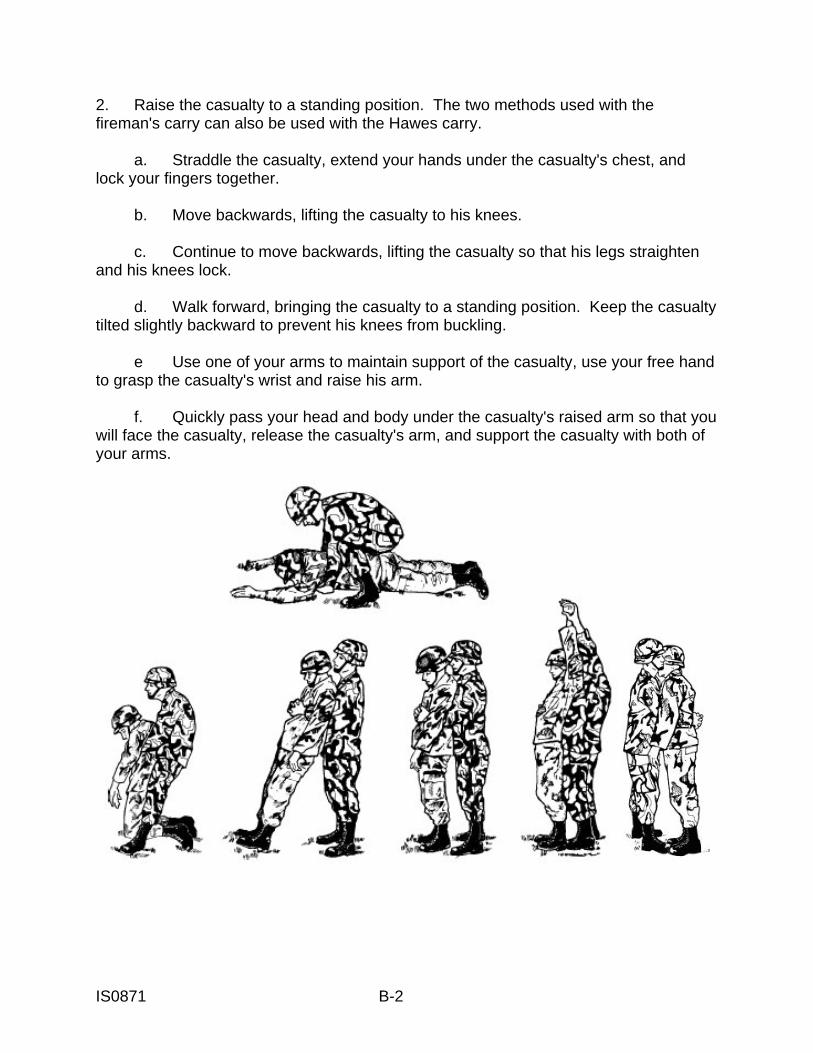
IS0871 B-2
2. Raise the casualty to a standing position. The two methods used with the fireman's carry can also be used with the Hawes carry. a. Straddle the casualty, extend your hands under the casualty's chest, and lock your fingers together. b. Move backwards, lifting the casualty to his knees. c. Continue to move backwards, lifting the casualty so that his legs straighten and his knees lock. d. Walk forward, bringing the casualty to a standing position. Keep the casualty tilted slightly backward to prevent his knees from buckling. e Use one of your arms to maintain support of the casualty, use your free hand to grasp the casualty's wrist and raise his arm. f. Quickly pass your head and body under the casualty's raised arm so that you will face the casualty, release the casualty's arm, and support the casualty with both of your arms.
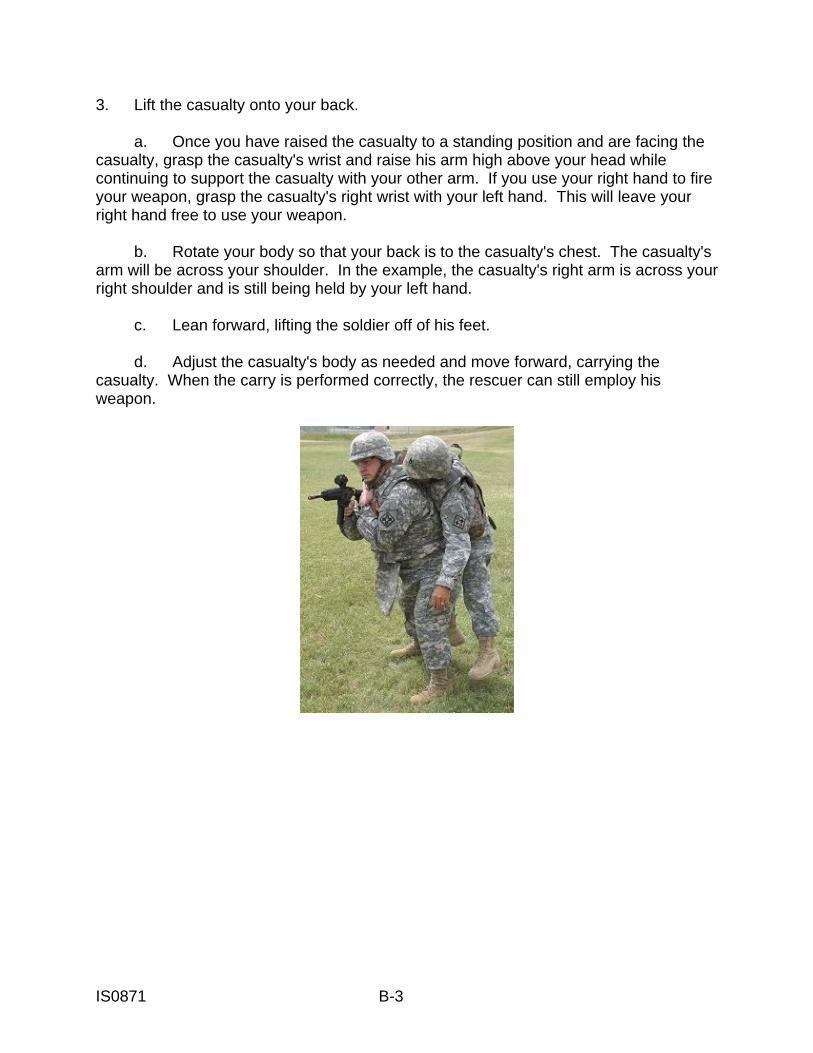
IS0871 B-3
3. Lift the casualty onto your back. a. Once you have raised the casualty to a standing position and are facing the casualty, grasp the casualty's wrist and raise his arm high above your head while continuing to support the casualty with your other arm. If you use your right hand to fire your weapon, grasp the casualty's right wrist with your left hand. This will leave your right hand free to use your weapon. b. Rotate your body so that your back is to the casualty's chest. The casualty's arm will be across your shoulder. In the example, the casualty's right arm is across your right shoulder and is still being held by your left hand. c. Lean forward, lifting the soldier off of his feet. d. Adjust the casualty's body as needed and move forward, carrying the casualty. When the carry is performed correctly, the rescuer can still employ his weapon.