cm deal aggregator documentation - read the docs
TRANSCRIPT
CM Deal Aggregator DocumentationRelease 1.3.0
CMExtension
July 28, 2015

Contents
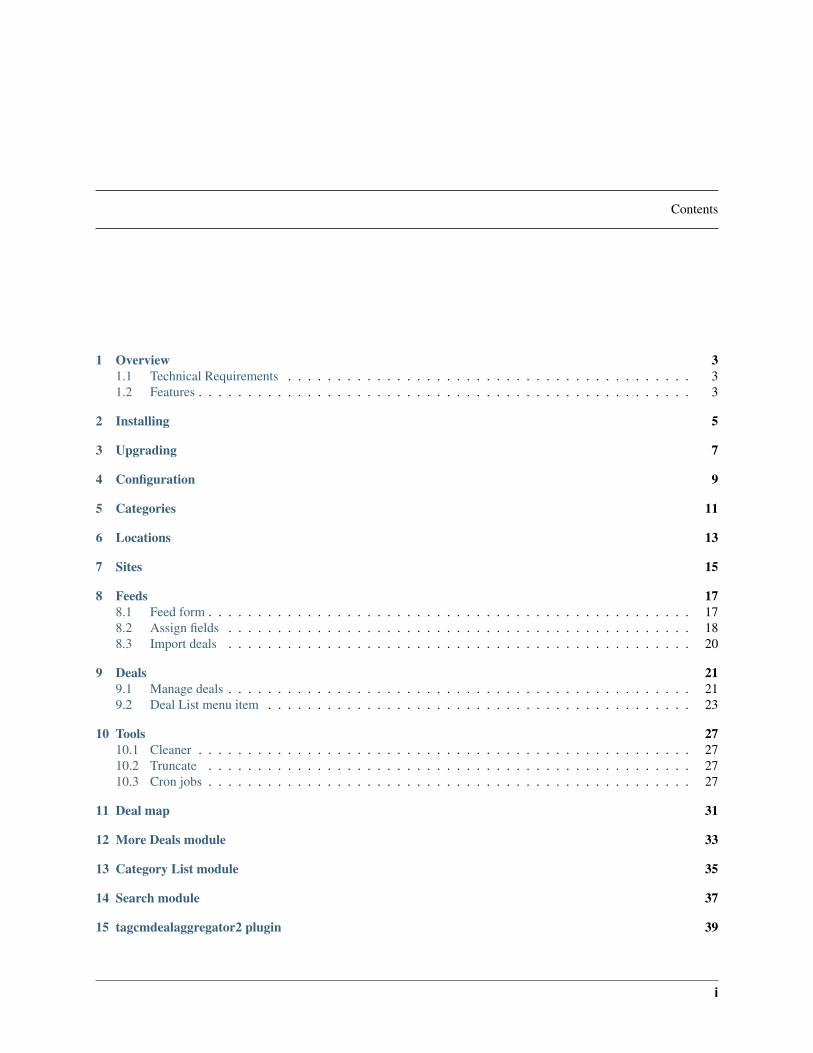
1 Overview 31.1 Technical Requirements . . . . . . . . . . . . . . . . . . . . . . . . . . . . . . . . . . . . . . . . . 31.2 Features . . . . . . . . . . . . . . . . . . . . . . . . . . . . . . . . . . . . . . . . . . . . . . . . . . 3
2 Installing 5
3 Upgrading 7
4 Configuration 9
5 Categories 11
6 Locations 13
7 Sites 15
8 Feeds 178.1 Feed form . . . . . . . . . . . . . . . . . . . . . . . . . . . . . . . . . . . . . . . . . . . . . . . . . 178.2 Assign fields . . . . . . . . . . . . . . . . . . . . . . . . . . . . . . . . . . . . . . . . . . . . . . . 188.3 Import deals . . . . . . . . . . . . . . . . . . . . . . . . . . . . . . . . . . . . . . . . . . . . . . . 20
9 Deals 219.1 Manage deals . . . . . . . . . . . . . . . . . . . . . . . . . . . . . . . . . . . . . . . . . . . . . . . 219.2 Deal List menu item . . . . . . . . . . . . . . . . . . . . . . . . . . . . . . . . . . . . . . . . . . . 23
10 Tools 2710.1 Cleaner . . . . . . . . . . . . . . . . . . . . . . . . . . . . . . . . . . . . . . . . . . . . . . . . . . 2710.2 Truncate . . . . . . . . . . . . . . . . . . . . . . . . . . . . . . . . . . . . . . . . . . . . . . . . . 2710.3 Cron jobs . . . . . . . . . . . . . . . . . . . . . . . . . . . . . . . . . . . . . . . . . . . . . . . . . 27
11 Deal map 31
12 More Deals module 33
13 Category List module 35
14 Search module 37
15 tagcmdealaggregator2 plugin 39
i

16 Translation 43
ii
CM Deal Aggregator Documentation, Release 1.3.0
This documentation gives you instruction how to install and setup CM Deal Aggregator on your Joomla! website.
Contents 1
CM Deal Aggregator Documentation, Release 1.3.0
2 Contents
CHAPTER 1
Overview
CMDealAggregator is a deal aggregator component for Joomla! developed by CMExtension Team.
With CMDealAggregator, your Joomla! website can have a function of a deal feeder – getting deals from social buyingwebsites like Groupon.com or LivingSocial.com, and earn referral credits.
You should have all the following files in the package you downloaded from our website or received from us:
• com_cmdealaggregator.zip: The main component.
• mod_cmdealaggregator_search.zip: The module for searching deals.
• mod_cmdealaggregator_category_list.zip: The module for listing all categories as a menu module.
• mod_cmdealaggregator_more_deas.zip: The module for displaying deals.
• tagcmdealaggregator2: The plugin for daily deal tags for ACYMailing’s tag system.
This documentation only gives you instructions how to use our extensions. This documentation doesn’t mention aboutbasic usages of Joomla!, we consider you’ve already known how to use Joomla!. You can view Joomla! Help (menu“Help” -> “Joomla! Help” in Joomla! Administrator section) or visit Joomla! home page for documentations aboutJoomla!.
1.1 Technical Requirements
• Joomla! 2.5.x or Joomla! 3.x.x: CM Deal Aggregator is NOT compatible with Joomla! 1.x.x. Please checkJoomla!’s Technical Requirements for more information. We recommend to latest release of Joomla! for stabil-ity and security.
• Bootstrap 2: CM Deal Aggregator is NOT compatible with Bootstrap 3. Bootstrap 2 is available by defaultin Joomla! 3.x.x. Bootstrap 2 must be loaded on your site by Joomla! or by your template. You can also loadBootstrap from CM Deal Aggregator itself.
• XML feed: CM Deal Aggregator supports plain XML feeds (.xml) or XML feeds which are compressed intoGZ files (.gz).
1.2 Features
Front-end:
• Deal list page: List all deals on the site, can be filtered by category, location and website.
• Deal detail page: Display information about a specific deal and navigate to the deal’s website.
3
CM Deal Aggregator Documentation, Release 1.3.0
• Deal map page: Browse deal via Google Maps.
• Search for deal by keyword, location, category and website with Search module.
• Share deals via Facebook, Twitter,Google+ and email. Can be disabled in back-end.
• Display deals on any page with More Deals module. Deals can be selected in different ways:
– Featured deals: Only specified deals are displayed.
– Random deals: Deals are selected randomly.
– Popular deals: List the deals which are clicked the most.
– Ending soon deals: List the deals which will be expired soon.
• Import deals with web based cron job.
Back-end:
• Manage categories, locations, websites, XML feeds and deals.
• Import deals from XML feeds with ease right in Joomla! back-end.
• Import deals with server’s cron job.
• Ability to edit deal information after deal is imported.
• Ability to create deal manually.
• Count how many people have clicked to view deals.
• Tools for truncating the tables, deleting the downloaded XML feed files.
4 Chapter 1. Overview

CHAPTER 2
Installing
Log into the Joomla! Administrator section and click on the menu Extensions -> Extension Manager, you will be inInstall submenu. In Upload Package File section, choose the package and click Upload & Install button to install.
There is another alternative way to install. It is Install Directory. To install with this method you need to:
• Create a temporary directory on your server.
• Upload and uncompress the package file in the temporary directory you create above.
• In the Install Directory field specify the server directory where the temporary directory is.
• Click on the Install button and Joomla! will install the contents of the given directory.
5
CM Deal Aggregator Documentation, Release 1.3.0
6 Chapter 2. Installing
CHAPTER 3
Upgrading
To upgrade CM Deal Aggregator, you just simply install the new packages for the component, the modules and theplugin.
CM Deal Aggregator 1.3.0 has many new features and is different to the previous versions. So if you upgrade fromCM Deal Aggregator 1.0.0, 1.1.0 or 1.2.x to 1.3.0, you will need to do some extra steps in the settings. Although thecomponent configures some settings automatically when you upgrade, there are still some settings you need to reviewand configure manually.
• Check the component’s configuration to configure the new options.
• Check your sites’s settings to configure the new options.
• Check the new feeds in 1.3.0 to see if there is any option you need to adjust.
• Assign deal’s fields to XML elements in every feed. This step is required to import new deals after you upgrade.
Some tips on upgrading:
• Never upgrade on your production site. Clone your production site to a test site, do upgrading on your test site,if there is any issue you can contact us for support.
• Always backup your site before upgrading.
• If you customized the source code of our extensions, your changes will be lost because the files will be over-written while upgrading, so make sure you have backups your site or your customized files.
7
CM Deal Aggregator Documentation, Release 1.3.0
8 Chapter 3. Upgrading
CHAPTER 4
Configuration
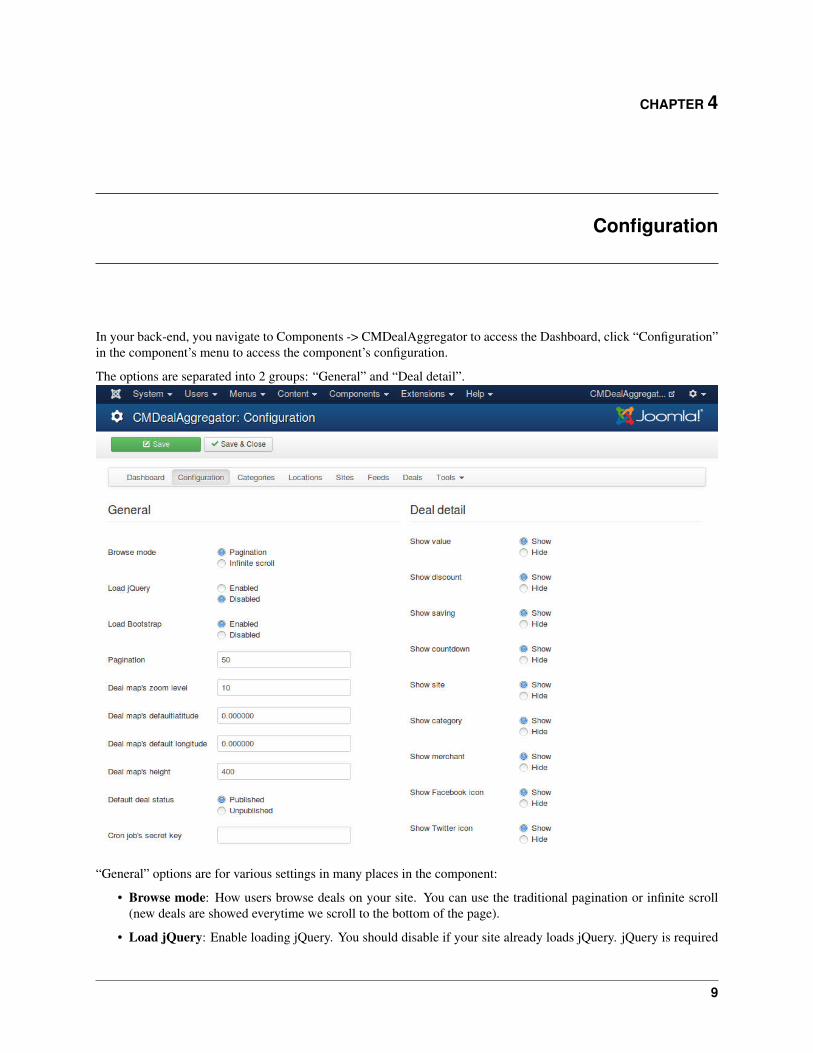
In your back-end, you navigate to Components -> CMDealAggregator to access the Dashboard, click “Configuration”in the component’s menu to access the component’s configuration.
The options are separated into 2 groups: “General” and “Deal detail”.
“General” options are for various settings in many places in the component:
• Browse mode: How users browse deals on your site. You can use the traditional pagination or infinite scroll(new deals are showed everytime we scroll to the bottom of the page).
• Load jQuery: Enable loading jQuery. You should disable if your site already loads jQuery. jQuery is required
9
CM Deal Aggregator Documentation, Release 1.3.0
by Bootstrap.
• Load Bootstrap: Enable loading Bootstrap. You should disable if your site already loads Bootstrap.CMDealAggregator requires Bootstrap 2.x.
• Pagination: The quantity of deals displayed per page for pagination browse mode, or per load for infinite scrollbrowse mode.
• Deal map’s zoom level: The default zoom level of deal map.
• Deal map’s latitude: The latitude of the default location in deal map.
• Deal map’s longitude: The longitude of the default location in deal map.
• Deal map’s width: The width of deal map.
• Deal map’s height: The height of deal map.
• Default deal status: The status of deals after they are imported. You may want them to be unpublished toreview before publishing them.
• Cron job’s secret key: Your custom and secret text for using web based cron job. This secret key is added tothe cron URLs so that only you can run the cron jobs. The secret key must only contain A-Z or underscores (notcase sensitive).
“Deal detail” options are for showing or hiding the information in deal detail page.
10 Chapter 4. Configuration
CHAPTER 5
Categories
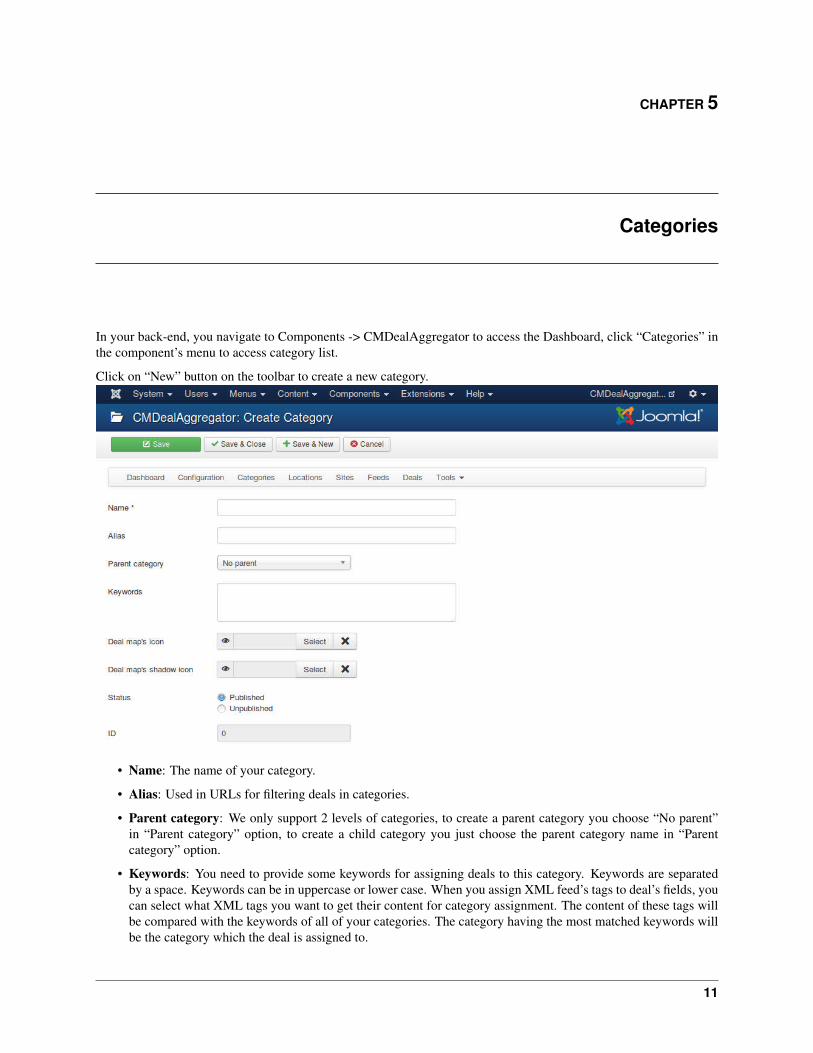
In your back-end, you navigate to Components -> CMDealAggregator to access the Dashboard, click “Categories” inthe component’s menu to access category list.
Click on “New” button on the toolbar to create a new category.
• Name: The name of your category.
• Alias: Used in URLs for filtering deals in categories.
• Parent category: We only support 2 levels of categories, to create a parent category you choose “No parent”in “Parent category” option, to create a child category you just choose the parent category name in “Parentcategory” option.
• Keywords: You need to provide some keywords for assigning deals to this category. Keywords are separatedby a space. Keywords can be in uppercase or lower case. When you assign XML feed’s tags to deal’s fields, youcan select what XML tags you want to get their content for category assignment. The content of these tags willbe compared with the keywords of all of your categories. The category having the most matched keywords willbe the category which the deal is assigned to.
11
CM Deal Aggregator Documentation, Release 1.3.0
• Deal map icon: Custom icon you want to use for deals in a category in deal map.
• Deal map icon: Custom icon you want to use as a shadow for deal map icon. If you don’t what to have shadoweffect, just leave this field empty.
• Status: Category in “Unpublished” status is not visible in front-end.
12 Chapter 5. Categories
CHAPTER 6
Locations
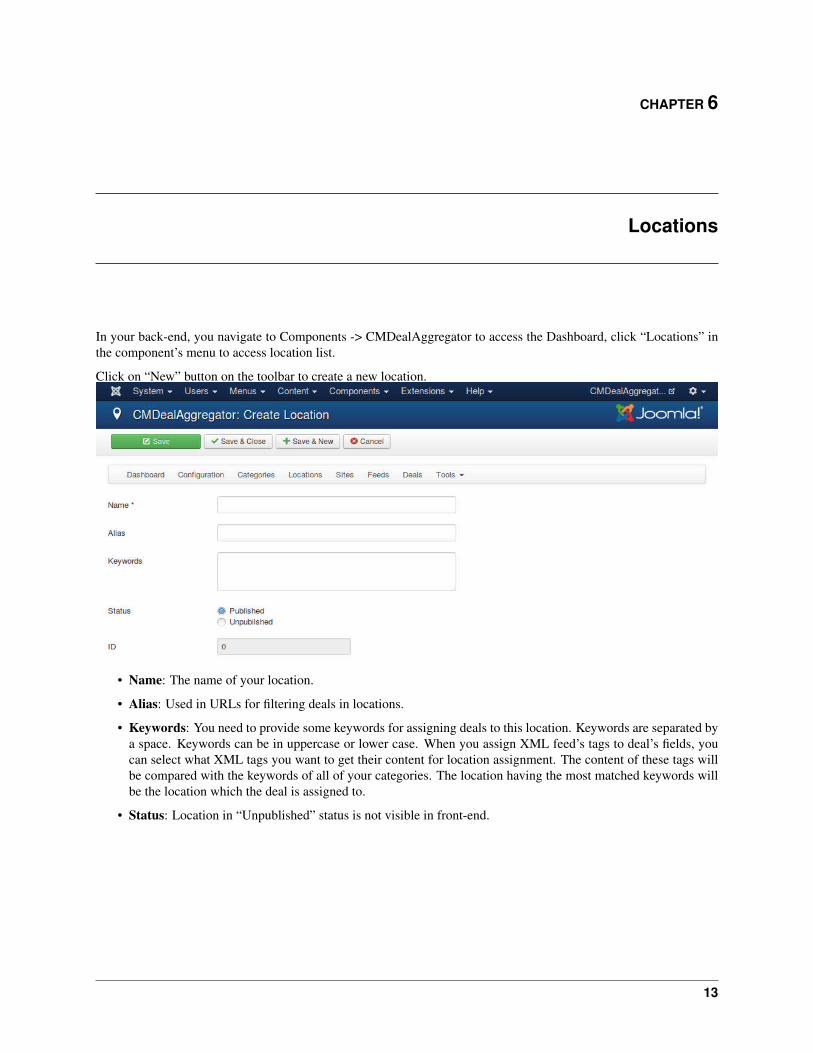
In your back-end, you navigate to Components -> CMDealAggregator to access the Dashboard, click “Locations” inthe component’s menu to access location list.
Click on “New” button on the toolbar to create a new location.
• Name: The name of your location.
• Alias: Used in URLs for filtering deals in locations.
• Keywords: You need to provide some keywords for assigning deals to this location. Keywords are separated bya space. Keywords can be in uppercase or lower case. When you assign XML feed’s tags to deal’s fields, youcan select what XML tags you want to get their content for location assignment. The content of these tags willbe compared with the keywords of all of your categories. The location having the most matched keywords willbe the location which the deal is assigned to.
• Status: Location in “Unpublished” status is not visible in front-end.
13
CM Deal Aggregator Documentation, Release 1.3.0
14 Chapter 6. Locations
CHAPTER 7
Sites
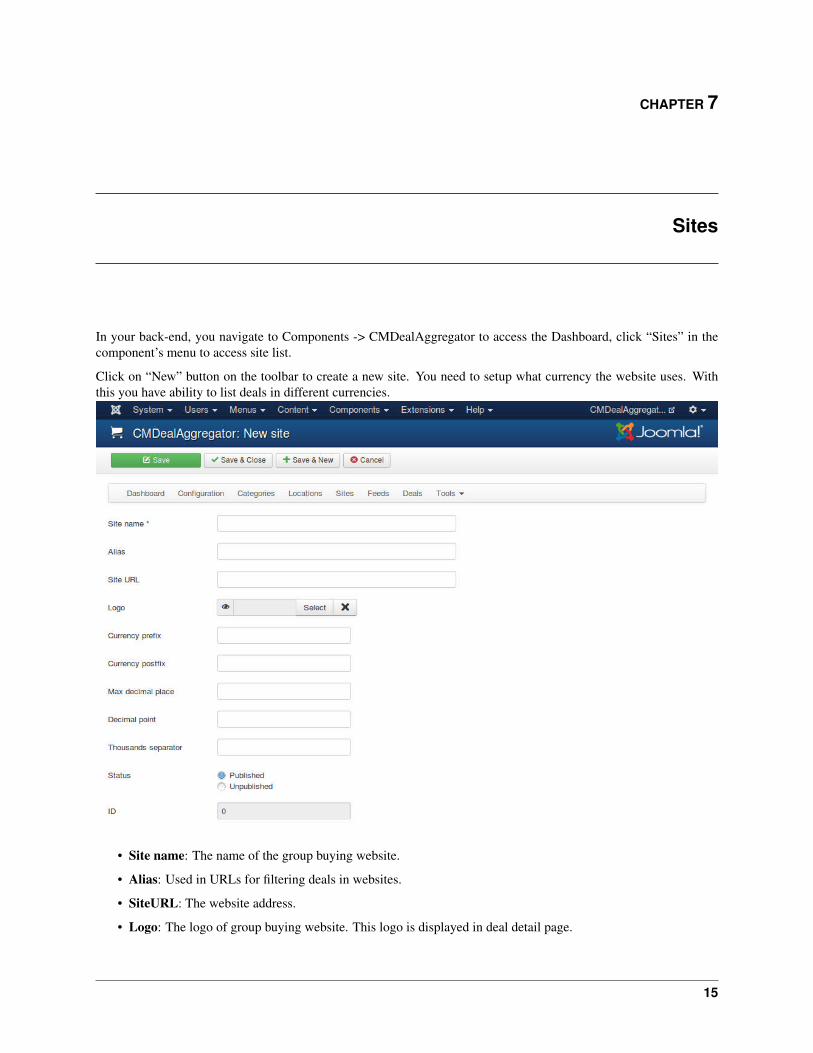
In your back-end, you navigate to Components -> CMDealAggregator to access the Dashboard, click “Sites” in thecomponent’s menu to access site list.
Click on “New” button on the toolbar to create a new site. You need to setup what currency the website uses. Withthis you have ability to list deals in different currencies.
• Site name: The name of the group buying website.
• Alias: Used in URLs for filtering deals in websites.
• SiteURL: The website address.
• Logo: The logo of group buying website. This logo is displayed in deal detail page.
15
CM Deal Aggregator Documentation, Release 1.3.0
• Currency prefix: If your currency sign/code stands before the amount, enter the sign/code in this field. Forexample, you enter ‘$’, the result could look like: $100.
• Currency postfix: If your currency sign/code stands behind the amount, enter the sign/code in this field. Forexample, you enter ‘’, the result could look like: 100.
• Max decimal: The number of decimal points.
• Decimal point: The symbol used to separate the integer part of your currency (a decimal number) from itsfractional part.
• Thousands separator: The symbol used in digit grouping.
• Status: Site in “Unpublished” status is not visible in front-end.
16 Chapter 7. Sites
CHAPTER 8
Feeds
8.1 Feed form
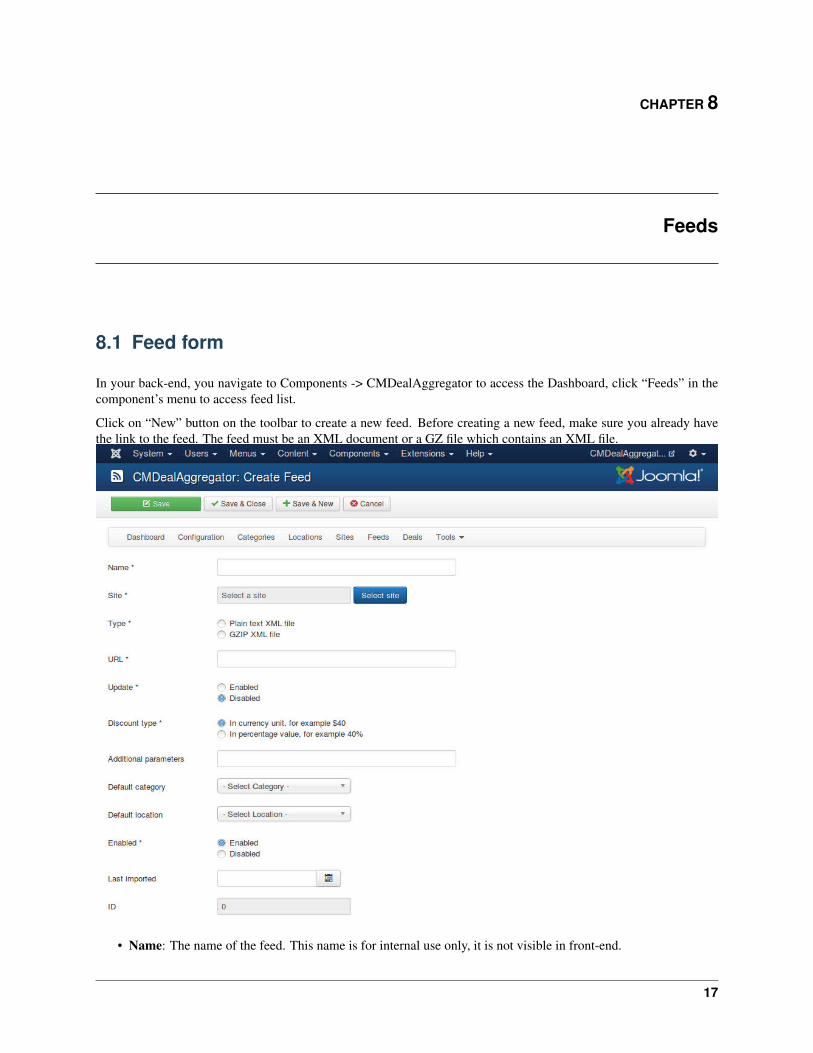
In your back-end, you navigate to Components -> CMDealAggregator to access the Dashboard, click “Feeds” in thecomponent’s menu to access feed list.
Click on “New” button on the toolbar to create a new feed. Before creating a new feed, make sure you already havethe link to the feed. The feed must be an XML document or a GZ file which contains an XML file.
• Name: The name of the feed. This name is for internal use only, it is not visible in front-end.
17
CM Deal Aggregator Documentation, Release 1.3.0
• Site: The group buying site of the deals in the feed.
• Type: The type of the feed file, plain XML file (.xml) or compressed XML file in GZIP format (.gz).
• URL: The URL to the feed.
• Update: If update is enabled, the data of imported deals will be update by the data in the feed, all your customdata will be lost. If update is disabled, only new deals are imported, imported deals are not updated.
• Discount type: The type of discount value which this feed provides. Some feed providers provide discountamount, some provide percentage value.
• Additional parameters: Additional parameters which are appened to the deal URL. You can use thisto add your referral parameters. Parameters are separated by a “&” sign, for example: parame-ter1=value1¶meter2=value2.
• Default category: Select a category if you want to assign new deals to this category when we can’t find anycategory for them.
• Default location: Select a location if you want to assign new deals to this location when we can’t find anylocation for them.
• Enabled: Feed is only imported when it is enabled.
• Last imported: When this feed is imported the last time.
8.2 Assign fields
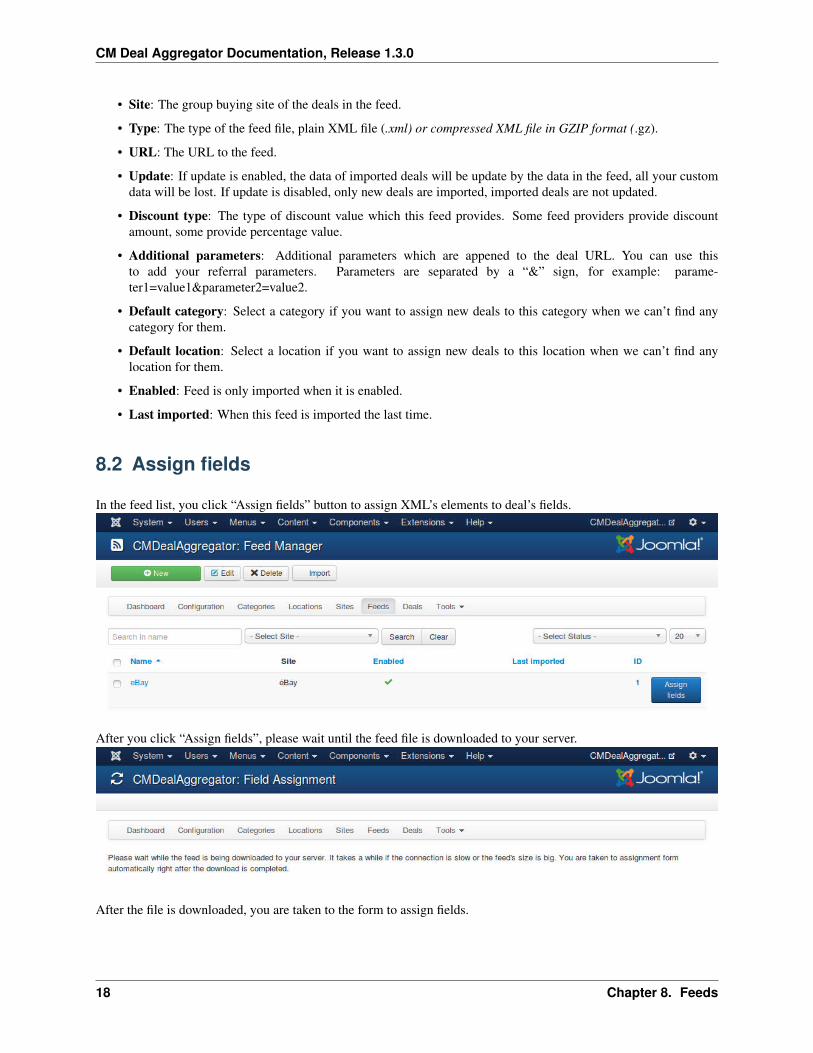
In the feed list, you click “Assign fields” button to assign XML’s elements to deal’s fields.
After you click “Assign fields”, please wait until the feed file is downloaded to your server.
After the file is downloaded, you are taken to the form to assign fields.
18 Chapter 8. Feeds
CM Deal Aggregator Documentation, Release 1.3.0
8.2. Assign fields 19
CM Deal Aggregator Documentation, Release 1.3.0
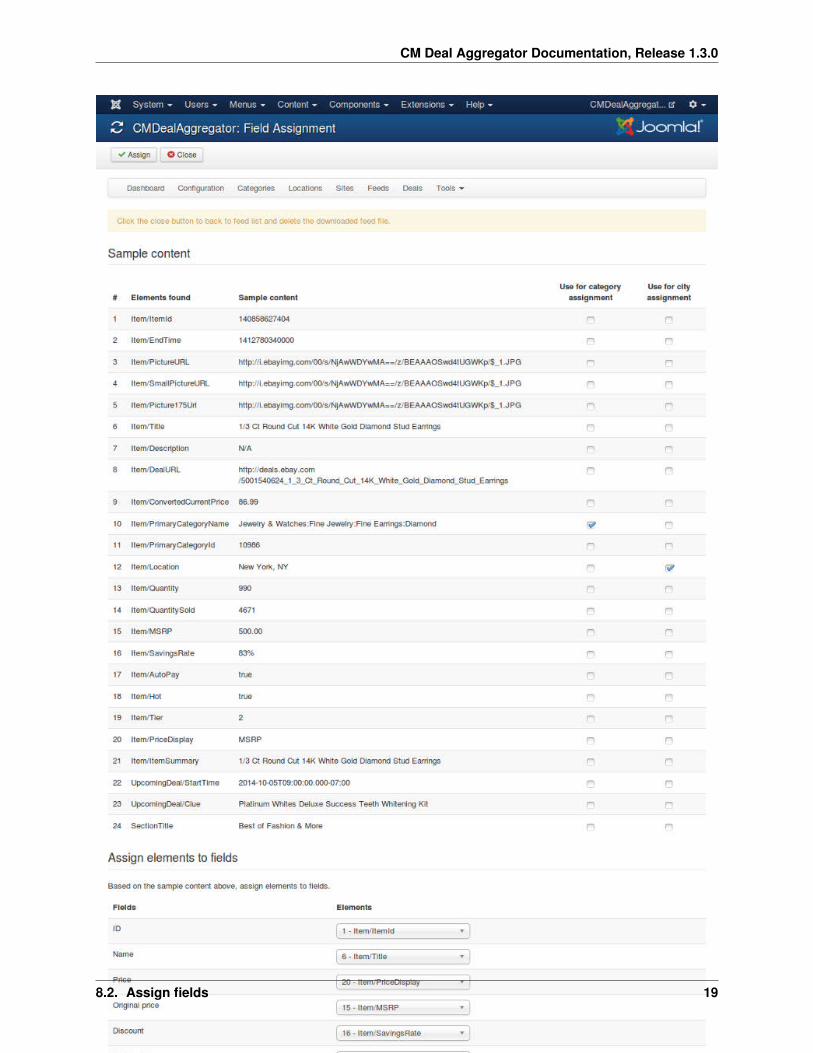
Based on the sample content of the feed’s elements, you assign elements to fields of deal.
Tip: You don’t need to remember the element’s name, you just need to remember the number in the first column ofthe sample content table and find it in the dropdown list. You can type the number to find the element faster if you useJoomla! 3.
To use the content of an element in checking and assigning category and location, you check “Use for categoryassignment” and “Use for city assignment” options in the sample content table.
Click “Assign” button on the toolbar to save, or click “Close” to cancel. After the assignment is saved or canceled, thefeed file is deleted on your server.
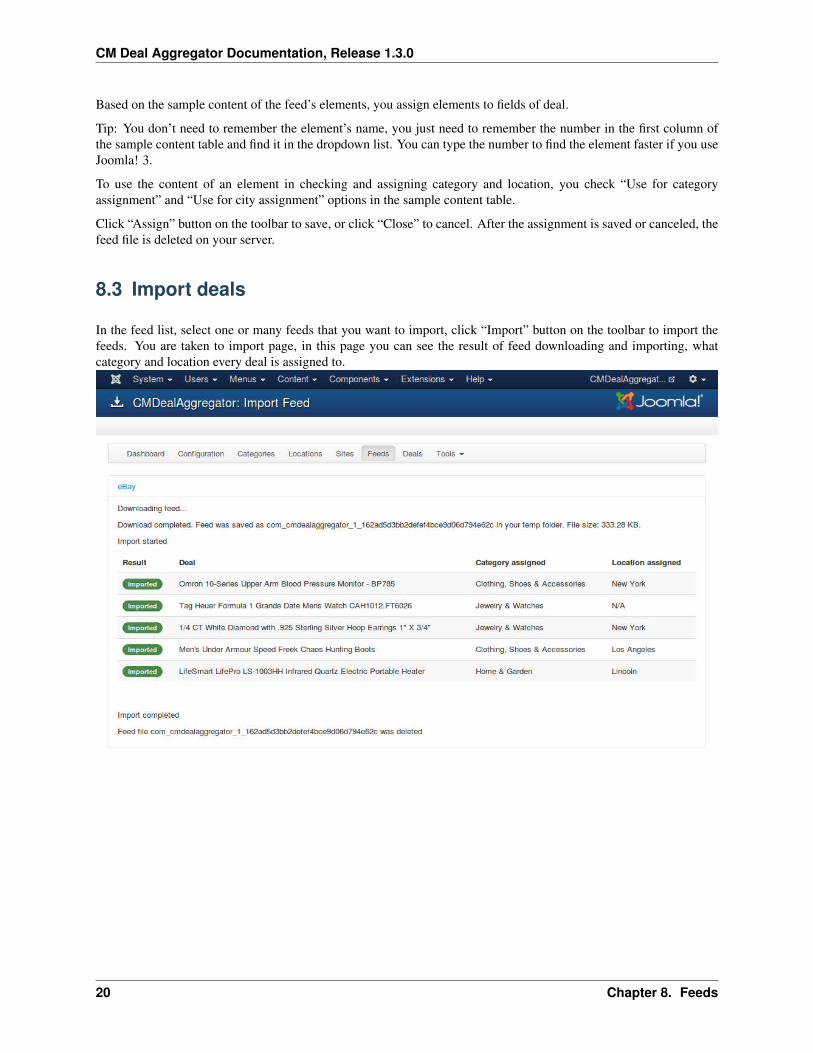
8.3 Import deals
In the feed list, select one or many feeds that you want to import, click “Import” button on the toolbar to import thefeeds. You are taken to import page, in this page you can see the result of feed downloading and importing, whatcategory and location every deal is assigned to.
20 Chapter 8. Feeds

CHAPTER 9
Deals
9.1 Manage deals
To see the list of imported deals, you navigate to Components -> CMDealAggregator -> click “Deals” in the compo-nent’s menu.
You can use the filter tools to filter the deals in the list.
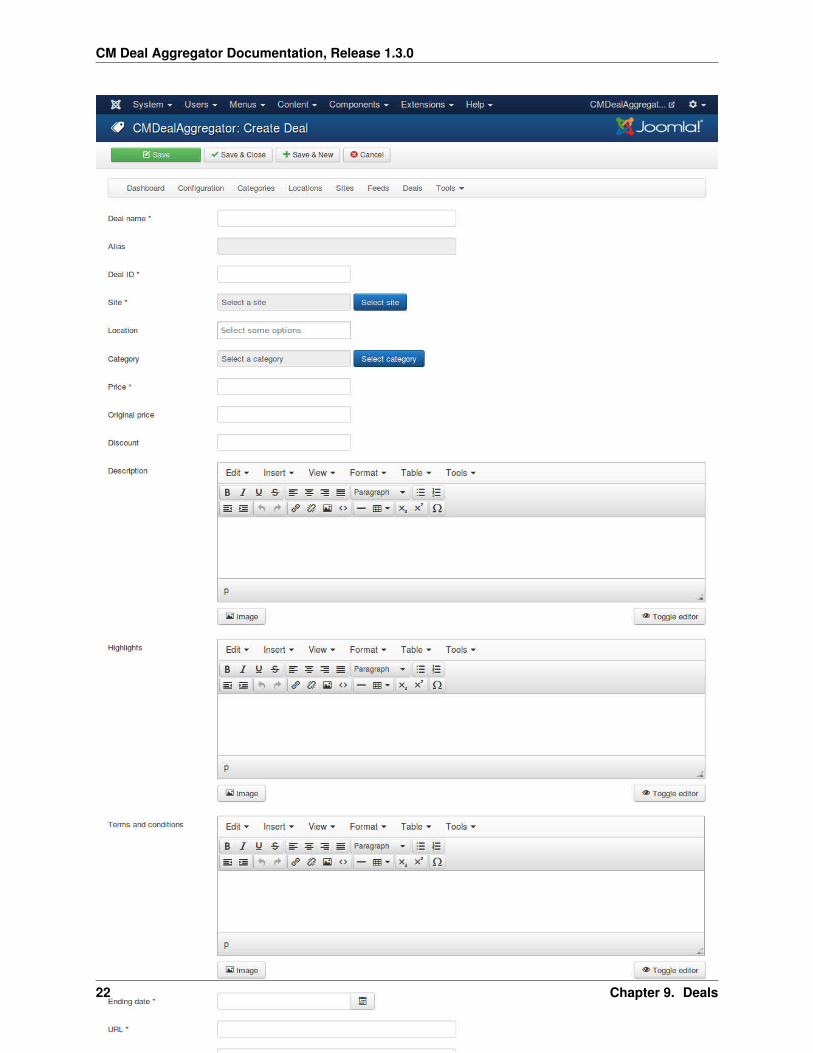
You can click “New” button on the toolbar to create a new deal manually.
21
CM Deal Aggregator Documentation, Release 1.3.0
22 Chapter 9. Deals
CM Deal Aggregator Documentation, Release 1.3.0
• Deal name: The name of the deal.
• Alias: Used in search engine friendly URL.
• Deal ID: The ID of the deal on its group buying site.
• Site: The group buying site which this deal is on.
• Location: The location where the deal is in.
• Category: The category which the deal is in.
• Price: The price of the deal.
• Original price: The original price of the deal.
• Discount: The discount value (in currency unit or percentage).
• Description: The deal’s description.
• Highlights: The deal’s highlights.
• Terms and conditions: The deal’s terms and conditions.
• Ending date: The date the deal expires.
• URL: The link to the deal.
• Latitude: Google Map latitude of the deal’s loation. This info is required in displaying the deal in deal map.
• Longitude: Google Map longitude of the deal’s location. This info is required in displaying the deal in dealmap.
• Merchant name: The name of the merchant who owns the deal.
• Merchant address: The merchant’s address.
• Status: Deal is only published if in published status.
• Added date: The date the deal is added to your system.
• Clicks: How many users click to view the deal.
9.2 Deal List menu item
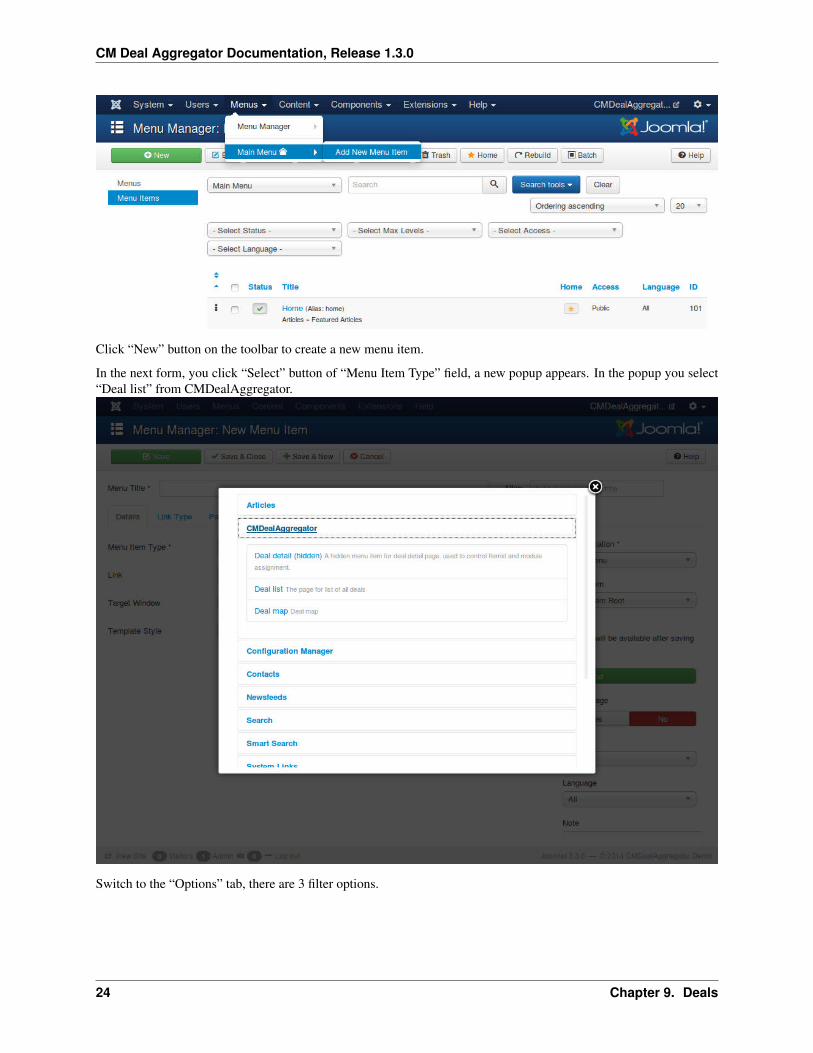
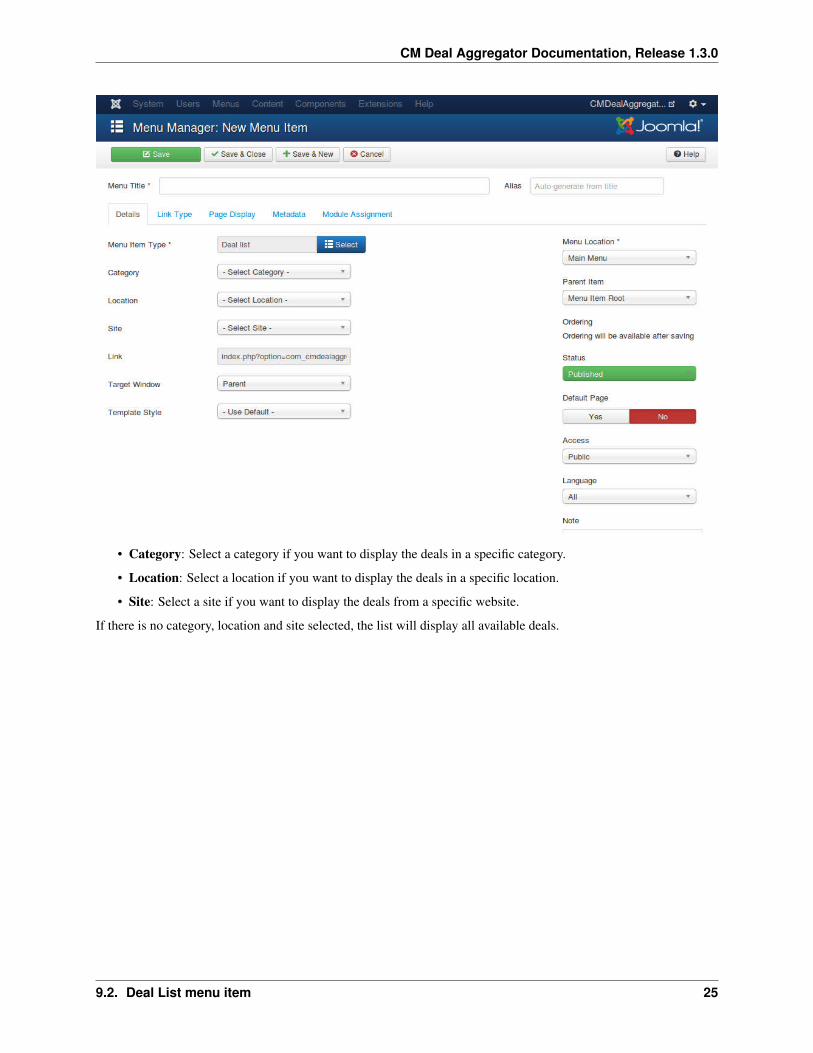
To create a menu item for deal list, in the back-end’s top menu you go to Menu Manager -> select a menu -> AddNew Menu Item, you are taken to the list of the menu items of the selected menu. This list is similar to the screenshotbelow.
9.2. Deal List menu item 23
CM Deal Aggregator Documentation, Release 1.3.0
Click “New” button on the toolbar to create a new menu item.
In the next form, you click “Select” button of “Menu Item Type” field, a new popup appears. In the popup you select“Deal list” from CMDealAggregator.
Switch to the “Options” tab, there are 3 filter options.
24 Chapter 9. Deals
CM Deal Aggregator Documentation, Release 1.3.0
• Category: Select a category if you want to display the deals in a specific category.
• Location: Select a location if you want to display the deals in a specific location.
• Site: Select a site if you want to display the deals from a specific website.
If there is no category, location and site selected, the list will display all available deals.
9.2. Deal List menu item 25
CM Deal Aggregator Documentation, Release 1.3.0
26 Chapter 9. Deals
CHAPTER 10
Tools
In your back-end, go to Components -> CMDealAggregator to access the Dashboard, click “Tools” in the component’smenu and select 1 in 3 tools: Cleaner, Truncate, Cron jobs.
10.1 Cleaner
Cleaner is the tool to delete the orphan feed files in your Joomla! temp folder.
The orphan feed files are the files which are downloaded while assigning fields or importing deals but they are notdeleted after the progress is completed because of some reasons, for example a server’s error occurs, you close thebrowser...
To delete the files, you just need to select them and click “Delete” button on the toolbar.
10.2 Truncate
This tool helps you delete all deals in the table cmda_cmdealaggregator_deals in your database and reset its autoincrement value to 0, the next imported deal’s ID will be back to 1.
The table cmda_cmdealaggregator_deal_location which is used to map deals and locations is also be emptied to deletethe deal-location assignments.
You can use this tool to delete all the deals to import them again.
Note: This action can not be rolled back!
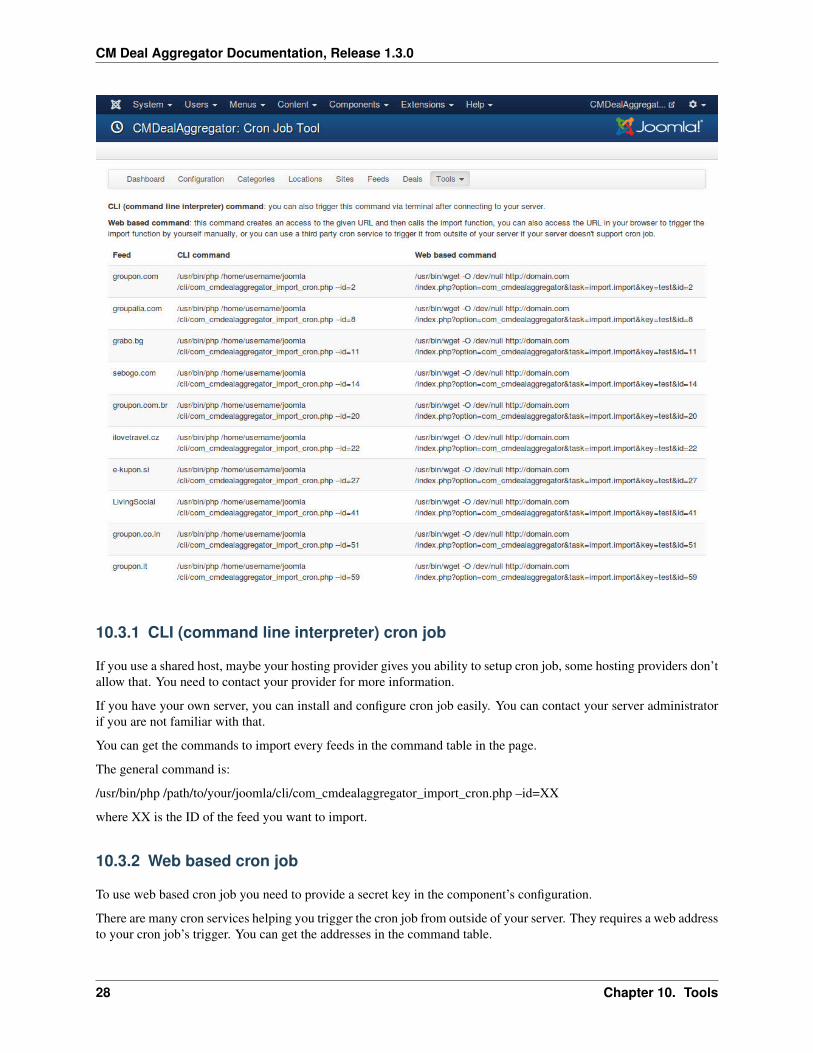
10.3 Cron jobs
Besides importing feeds from Joomla! back-end, you can use your server’s cron job (command line interpreter cronjob) or cron job services (web based cron job). This page give you available commands for you to use with cron jobs.
27
CM Deal Aggregator Documentation, Release 1.3.0
10.3.1 CLI (command line interpreter) cron job
If you use a shared host, maybe your hosting provider gives you ability to setup cron job, some hosting providers don’tallow that. You need to contact your provider for more information.
If you have your own server, you can install and configure cron job easily. You can contact your server administratorif you are not familiar with that.
You can get the commands to import every feeds in the command table in the page.
The general command is:
/usr/bin/php /path/to/your/joomla/cli/com_cmdealaggregator_import_cron.php –id=XX
where XX is the ID of the feed you want to import.
10.3.2 Web based cron job
To use web based cron job you need to provide a secret key in the component’s configuration.
There are many cron services helping you trigger the cron job from outside of your server. They requires a web addressto your cron job’s trigger. You can get the addresses in the command table.
28 Chapter 10. Tools
CM Deal Aggregator Documentation, Release 1.3.0
The general address is:
http://yoursite.com/index.php?option=com_cmdealaggregator&task=import.import&key=XX&id=YY
where XX is your secret key and YY is the ID of your feed.
If your server supports cron job, you can also trigger the web based cron jobs from CLI too. Instead of using
/usr/bin/php /path/to/your/joomla/cli/com_cmdealaggregator_import_cron.php –id=YY
You can use
/usr/bin/wget -O /dev/null http://yoursite.com/index.php?option=com_cmdealaggregator&task=import.import&key=XX&id=YY
where XX is your secret key and YY is the ID of your feed.
10.3. Cron jobs 29

CM Deal Aggregator Documentation, Release 1.3.0
30 Chapter 10. Tools
CHAPTER 11
Deal map
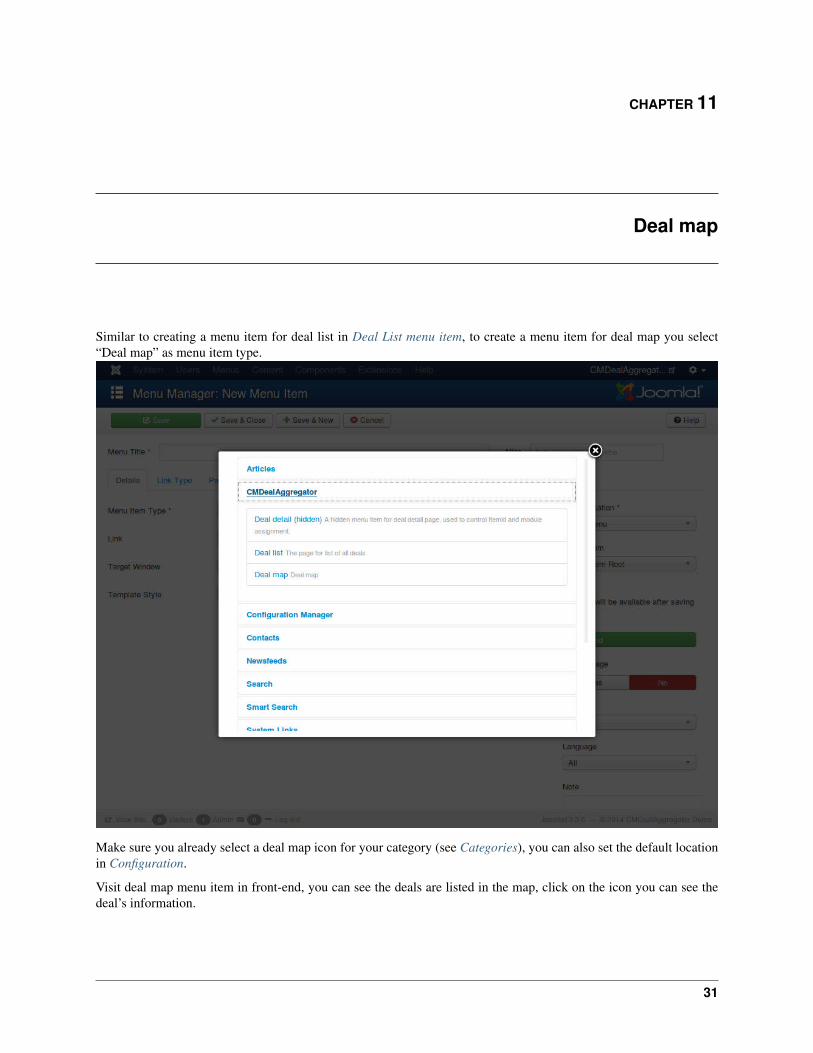
Similar to creating a menu item for deal list in Deal List menu item, to create a menu item for deal map you select“Deal map” as menu item type.
Make sure you already select a deal map icon for your category (see Categories), you can also set the default locationin Configuration.
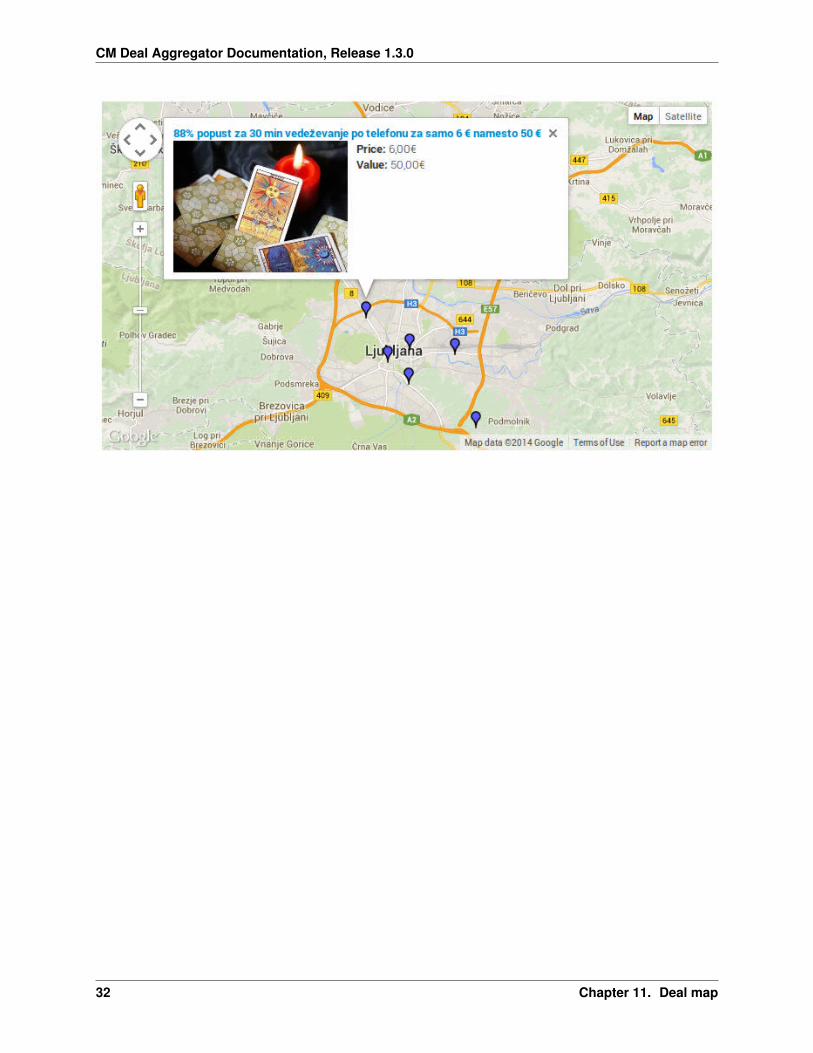
Visit deal map menu item in front-end, you can see the deals are listed in the map, click on the icon you can see thedeal’s information.
31
CM Deal Aggregator Documentation, Release 1.3.0
32 Chapter 11. Deal map
CHAPTER 12
More Deals module
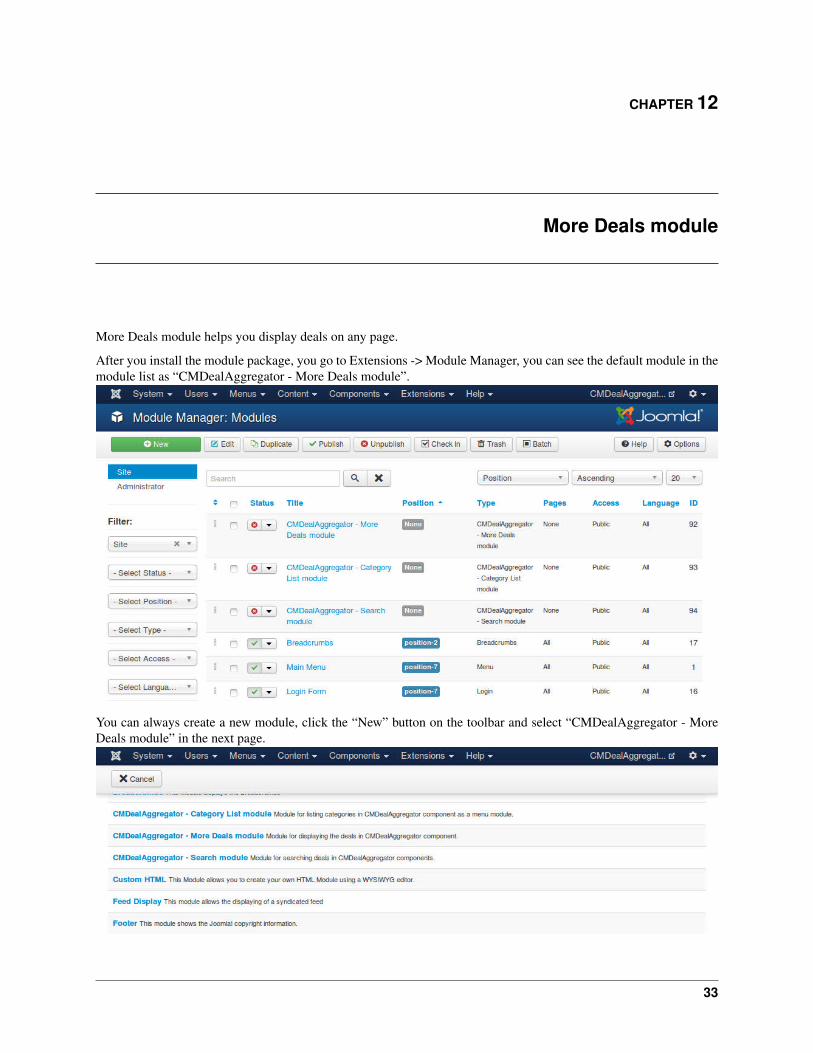
More Deals module helps you display deals on any page.
After you install the module package, you go to Extensions -> Module Manager, you can see the default module in themodule list as “CMDealAggregator - More Deals module”.
You can always create a new module, click the “New” button on the toolbar and select “CMDealAggregator - MoreDeals module” in the next page.
33
CM Deal Aggregator Documentation, Release 1.3.0
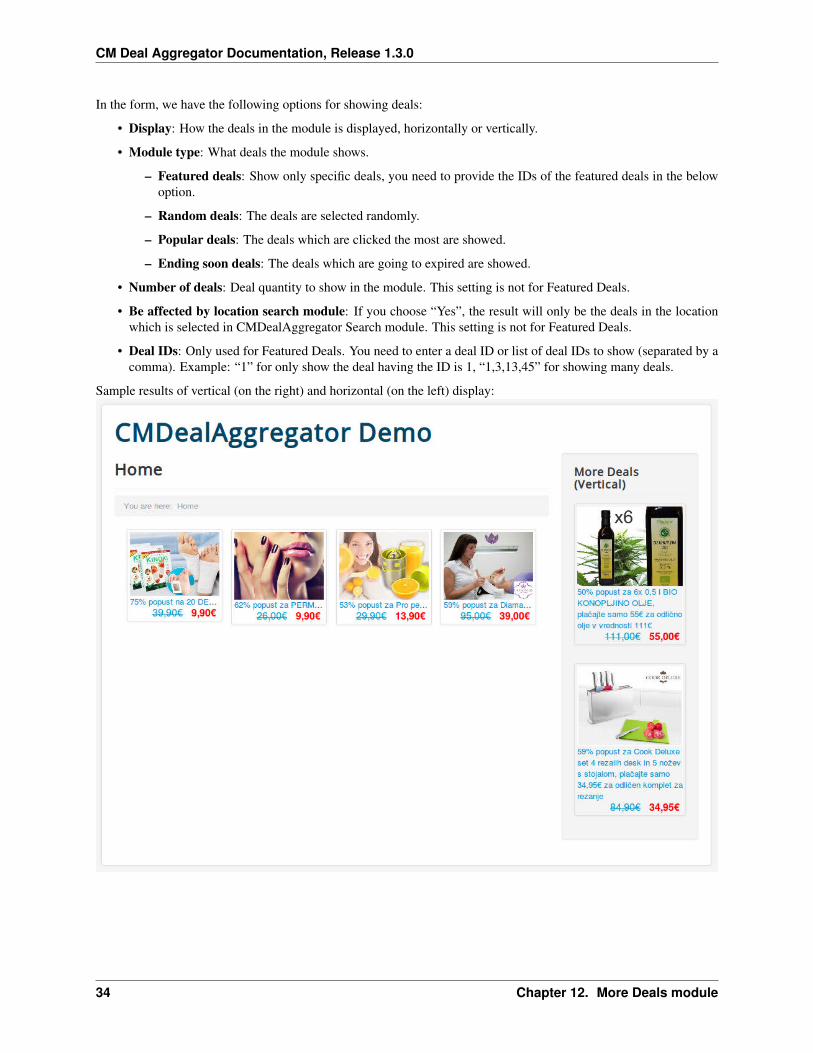
In the form, we have the following options for showing deals:
• Display: How the deals in the module is displayed, horizontally or vertically.
• Module type: What deals the module shows.
– Featured deals: Show only specific deals, you need to provide the IDs of the featured deals in the belowoption.
– Random deals: The deals are selected randomly.
– Popular deals: The deals which are clicked the most are showed.
– Ending soon deals: The deals which are going to expired are showed.
• Number of deals: Deal quantity to show in the module. This setting is not for Featured Deals.
• Be affected by location search module: If you choose “Yes”, the result will only be the deals in the locationwhich is selected in CMDealAggregator Search module. This setting is not for Featured Deals.
• Deal IDs: Only used for Featured Deals. You need to enter a deal ID or list of deal IDs to show (separated by acomma). Example: “1” for only show the deal having the ID is 1, “1,3,13,45” for showing many deals.
Sample results of vertical (on the right) and horizontal (on the left) display:
34 Chapter 12. More Deals module
CHAPTER 13
Category List module
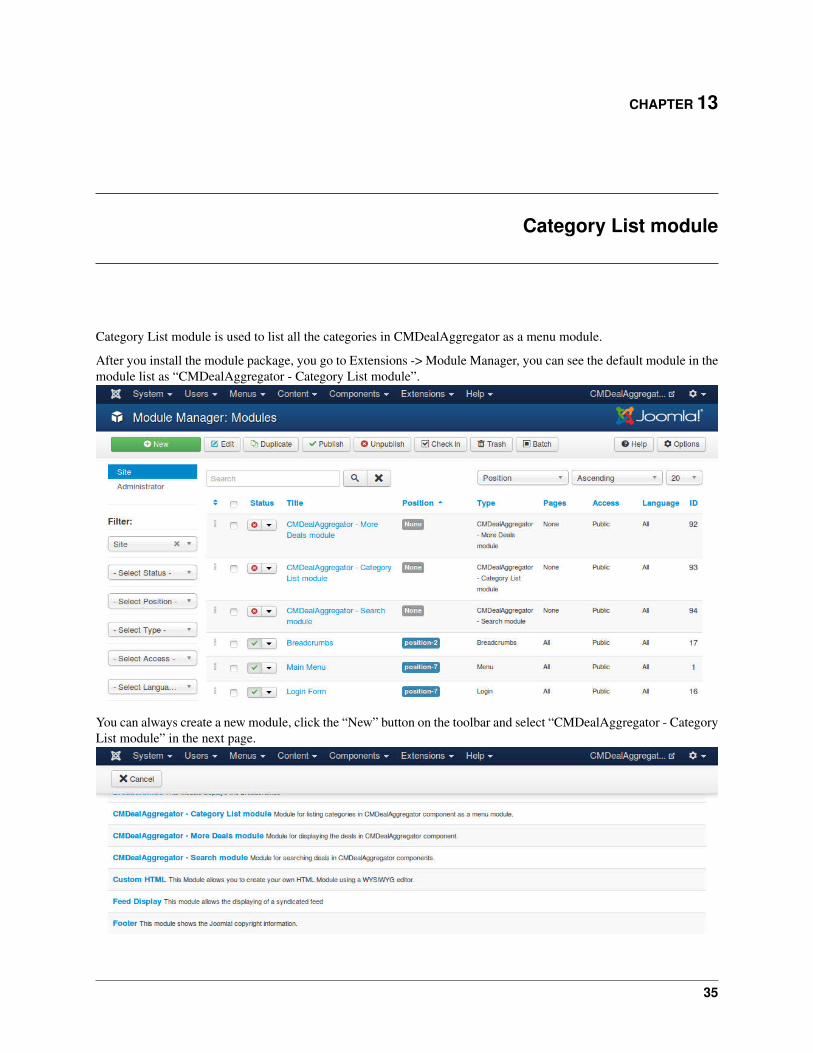
Category List module is used to list all the categories in CMDealAggregator as a menu module.
After you install the module package, you go to Extensions -> Module Manager, you can see the default module in themodule list as “CMDealAggregator - Category List module”.
You can always create a new module, click the “New” button on the toolbar and select “CMDealAggregator - CategoryList module” in the next page.
35
CM Deal Aggregator Documentation, Release 1.3.0
The module doesn’t have any option to configure.
36 Chapter 13. Category List module
CHAPTER 14
Search module
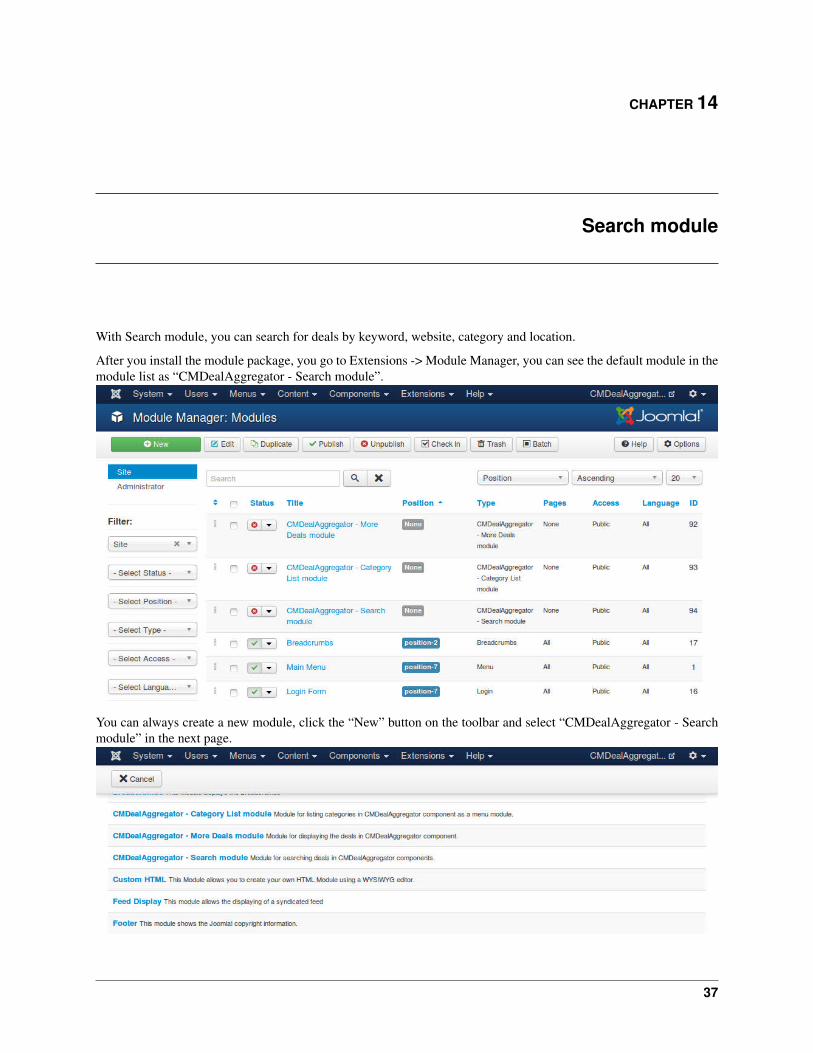
With Search module, you can search for deals by keyword, website, category and location.
After you install the module package, you go to Extensions -> Module Manager, you can see the default module in themodule list as “CMDealAggregator - Search module”.
You can always create a new module, click the “New” button on the toolbar and select “CMDealAggregator - Searchmodule” in the next page.
37

CM Deal Aggregator Documentation, Release 1.3.0
The module doesn’t have any option to configure.
38 Chapter 14. Search module
CHAPTER 15
tagcmdealaggregator2 plugin
If you use ACYMailing component to send newsletter to your website’s subscribers, you can use tagcmdealaggregator2to insert deals into your newsletter, give you ability to send deals to your subscribers via email.
Note:
• In this section we only give instruction on how to use tagcmdealaggregator2 plugin, if you are new to ACYMail-ing, please check their documentation to know how to use ACYMailing.
• This plugin is compatible with all ACYMailing versions (Starter, Essential, Business, Enterprise).
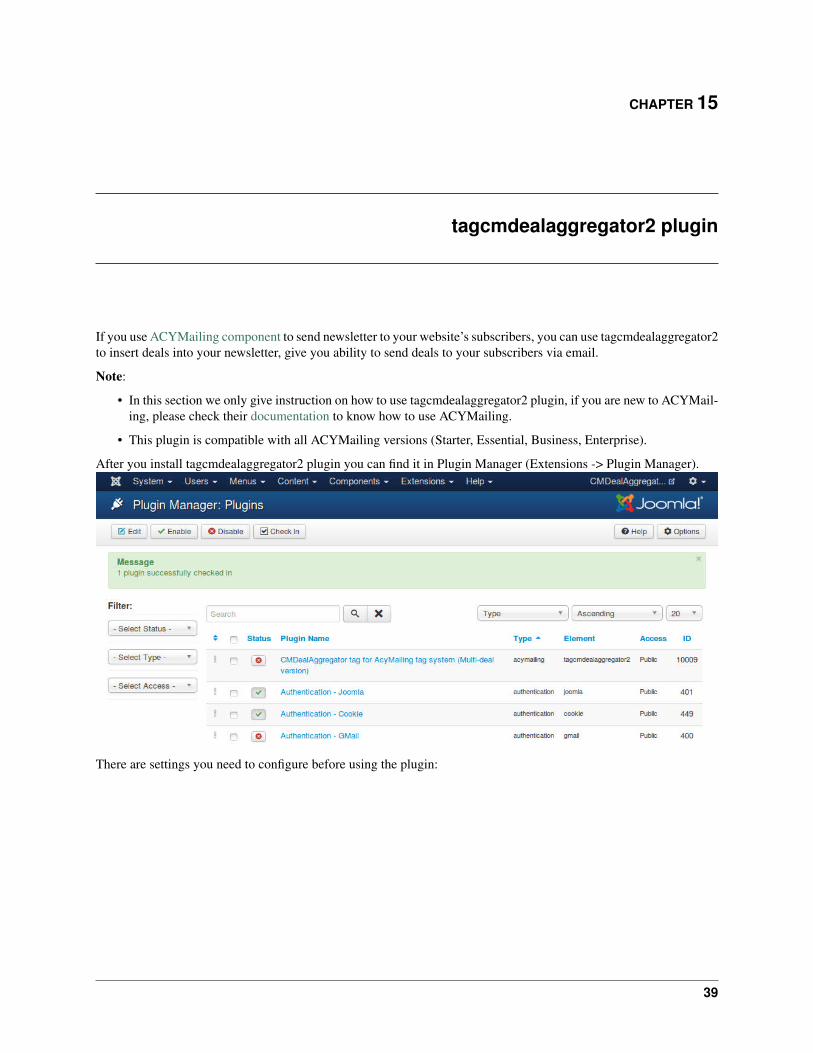
After you install tagcmdealaggregator2 plugin you can find it in Plugin Manager (Extensions -> Plugin Manager).
There are settings you need to configure before using the plugin:
39
CM Deal Aggregator Documentation, Release 1.3.0
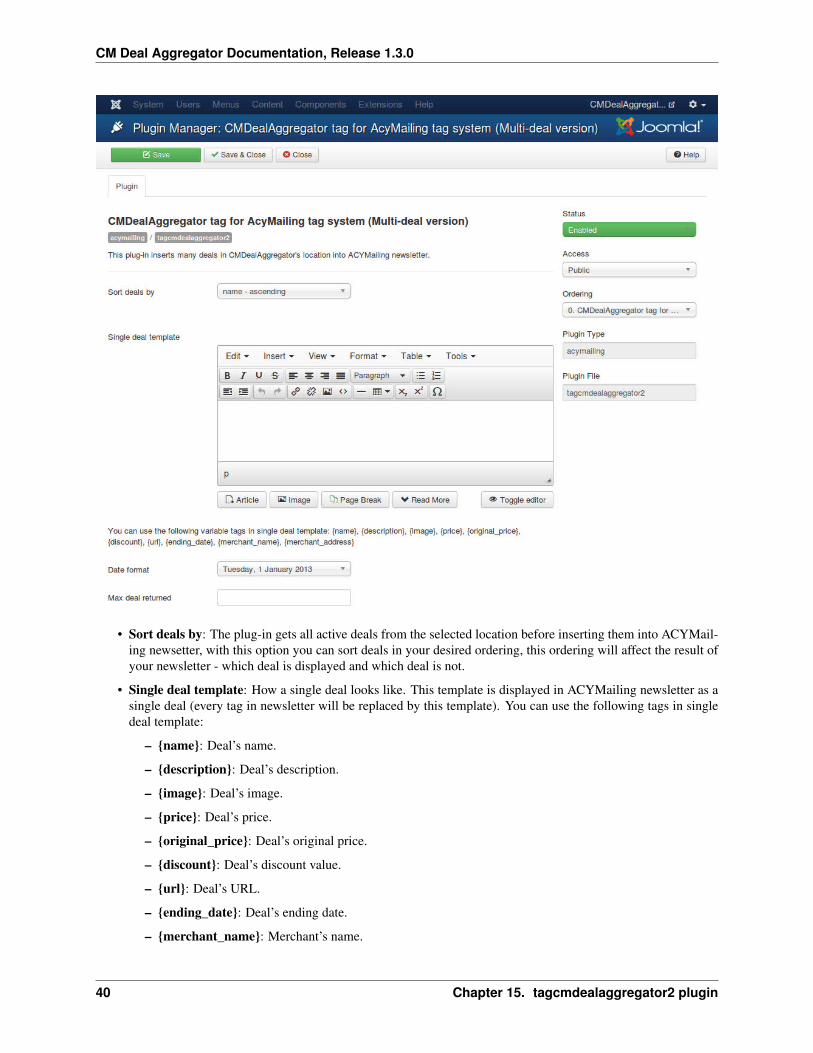
• Sort deals by: The plug-in gets all active deals from the selected location before inserting them into ACYMail-ing newsetter, with this option you can sort deals in your desired ordering, this ordering will affect the result ofyour newsletter - which deal is displayed and which deal is not.
• Single deal template: How a single deal looks like. This template is displayed in ACYMailing newsletter as asingle deal (every tag in newsletter will be replaced by this template). You can use the following tags in singledeal template:
– {name}: Deal’s name.
– {description}: Deal’s description.
– {image}: Deal’s image.
– {price}: Deal’s price.
– {original_price}: Deal’s original price.
– {discount}: Deal’s discount value.
– {url}: Deal’s URL.
– {ending_date}: Deal’s ending date.
– {merchant_name}: Merchant’s name.
40 Chapter 15. tagcmdealaggregator2 plugin
CM Deal Aggregator Documentation, Release 1.3.0
– {merchant_address}: Merchant’s address.
• Date format: Date format which is used for ending date in single deal template.
• Max deal returned: Limit the maximum quantity of returned deals. For example, you enter “10” if you onlywant to display 10 deals in your newsletter.
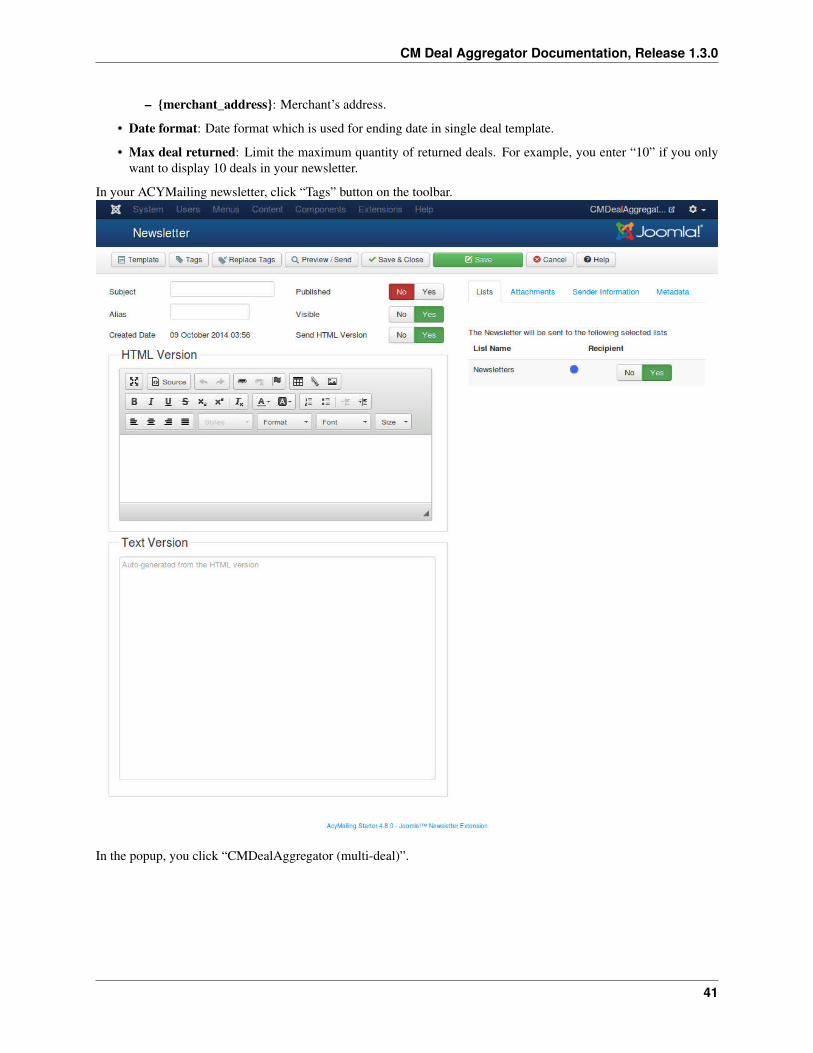
In your ACYMailing newsletter, click “Tags” button on the toolbar.
In the popup, you click “CMDealAggregator (multi-deal)”.
41
CM Deal Aggregator Documentation, Release 1.3.0
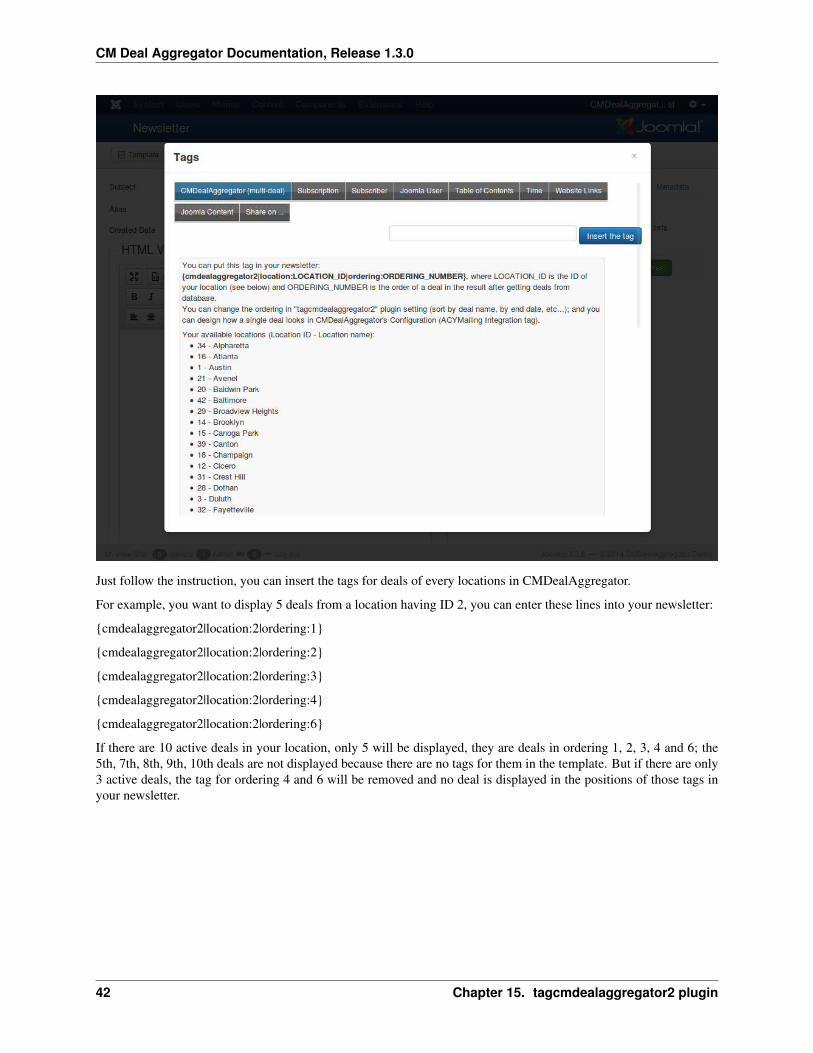
Just follow the instruction, you can insert the tags for deals of every locations in CMDealAggregator.
For example, you want to display 5 deals from a location having ID 2, you can enter these lines into your newsletter:
{cmdealaggregator2|location:2|ordering:1}
{cmdealaggregator2|location:2|ordering:2}
{cmdealaggregator2|location:2|ordering:3}
{cmdealaggregator2|location:2|ordering:4}
{cmdealaggregator2|location:2|ordering:6}
If there are 10 active deals in your location, only 5 will be displayed, they are deals in ordering 1, 2, 3, 4 and 6; the5th, 7th, 8th, 9th, 10th deals are not displayed because there are no tags for them in the template. But if there are only3 active deals, the tag for ordering 4 and 6 will be removed and no deal is displayed in the positions of those tags inyour newsletter.
42 Chapter 15. tagcmdealaggregator2 plugin
CHAPTER 16
Translation
CMDealAggregator comes with English language by default. To translate CMDealAggregator to a different language,please follow the following steps:
Preparation:
1. Download and install the full package of your language. www.joomla.org is a right place to search.
2. Go to “Extensions” → “Language Manager”, you can see your new language is listed. Take a look at “LanguageTag” column, you need to remember the language tag of you new language for next steps.
Translate for back-end:
3. Go to administrator/components/com_cmdealaggregator/language folder, create a new folder with the name isthe tag of your language that you see in step 2.
4. Copy en-GB.com_cmdealaggregator.ini and en-GB.com_cmdealaggregator.sys.ini files in “en-GB” folder intothe new folder you’ve created in step 3 and change “en-GB” in their names to your language tag. Now you canopen these INI files and start translating the string in double quotes to your language.
Translate for front-end:
5. Go to components/com_cmdealaggregator/language folder, create a new folder with the name is your languagetag.
6. Copy en-GB.com_cmdealaggregator.ini in “en-GB” folder into the new folder, change “en-GB” in its name toyour language tag you’ve created in step 5 and then start translating it.
Change default language:
7. Go to Extensions -> Language Manager, in “Installed - Site” submenu you set your new language to your defaultlanguage for front-end. Switch to “Installed - Administrator” submenu, you choose your default language forback-end.
Now your site and our extensions are switched to your new language.
When you translate the INI files, you need to save them in “UTF-8 without BOM” encoding.
43