®cloudlink amazon web services administration … configuring nfs/smb access to ... managing...
TRANSCRIPT

CloudLink®
Amazon Web Services Administration Guide
June 2014

Notice
THIS DOCUMENT CONTAINS CONFIDENTIAL AND TRADE SECRET INFORMATION OF AFORE
SOLUTIONS INC AND ITS RECEIPT OR POSSESSION DOES NOT CONVEY ANY RIGHTS TO
REPRODUCE OR DISCLOSE ITS CONTENTS, OR TO MANUFACTURE, USE, OR SELL
ANYTHING THAT IT MAY DESCRIBE. REPRODUCTION, DISCLOSURE, OR USE IN WHOLE OR IN
PART WITHOUT THE SPECIFIC WRITTEN AUTHORIZATION OF AFORE IS STRICTLY
FORBIDDEN.
The information furnished herein is believed to be accurate and reliable to the best of our knowledge.
However, AFORE Solutions, Inc. assumes no responsibility for its use, or for any infringements of
patents or other rights of third parties resulting from its use.
AFORE Solutions, Inc. reserves the right to, without notice, modify all or part of this document and/or
change product features or specifications and shall not be responsible for any loss, cost, or damage,
including consequential damage, caused by reliance on these materials. If you are in any doubt as to
whether this is the correct version of the manual for a particular release, contact the AFORE Solutions,
Inc.
Trademarks
AFORE Solutions and the AFORE Solutions logo are trademarks of AFORE Solutions Inc. All other
brands or product names mentioned herein are for identification purposed only and may be trademarks
and/or registered trademarks of their respective companies.
© Copyright 2014 All Rights Reserved
AFORE Solutions Inc.
2680 Queensview Drive, Suite 150 Ottawa, Ontario, K2B 8J9, Canada
Tel: (613) 224-5995 Fax: (613) 224-5410
Support Inquiries
(866) 356-4060 [email protected]
General Inquiries [email protected]
Sales Inquiries [email protected]

CloudLink® Amazon Web Services Administration Guide
Software Version 2.2 3 3 Document Version 1.0
© Copyright 2014 AFORE Solutions Inc. All rights reserved.
Table of Contents
1 Introduction ................................................................................................................ 5
1.1 Audience and Purpose .................................................................................................................... 5
1.2 Typographical Conventions ............................................................................................................. 6
1.3 Administration Guide Organization ................................................................................................. 6
2 Getting Started............................................................................................................ 7
2.1 Connecting to CloudLink Center over the Web ............................................................................... 7
2.2 Topology Tree ................................................................................................................................. 8
2.3 Getting Help .................................................................................................................................... 9
2.4 Customizing CloudLink Center Panel Views ................................................................................... 9
2.5 EULA and Ancillary Software ........................................................................................................ 10
2.6 Logging Out from a CloudLink Center Session ............................................................................. 10
3 CloudLink Center ...................................................................................................... 11
3.1 Reviewing and Changing your Deployment Settings .................................................................... 12
3.2 Adding Storage Volumes .............................................................................................................. 13
3.2.1 Adding Volumes to a Split Volume Configuration ............................................................................. 13
3.2.2 Adding Volumes to a Merged Volume Configuration ........................................................................ 16
3.3 Managing User Accounts .............................................................................................................. 19
3.3.1 User Accounts .................................................................................................................................. 19
3.3.2 Verifying Your Access Role for the Current Session ........................................................................ 20
3.3.3 Viewing Current User Accounts ........................................................................................................ 20
3.3.4 Adding User Accounts ...................................................................................................................... 21
3.3.5 Changing Local User Account Passwords ........................................................................................ 22
3.3.6 Configuring an AD Domain for User Accounts.................................................................................. 23
3.4 Assigning Storage Licenses .......................................................................................................... 25
3.5 Managing Secure Storage ............................................................................................................ 26
3.5.1 Local Key Store ................................................................................................................................ 27
3.5.2 Active Directory and RSA DPM Key Store ....................................................................................... 27
3.5.3 Managing Encryption Key Store ....................................................................................................... 28
3.5.4 Managing Secure Storage ................................................................................................................ 32
3.5.5 Configuring NFS/SMB Access to Secure Storage ............................................................................ 34
3.5.6 Configuring iSCSI Access to Secure Storage ................................................................................... 35
3.5.7 Viewing Storage Volumes ................................................................................................................ 38
3.5.8 Changing the Volume Type .............................................................................................................. 39

CloudLink® Amazon Web Services Administration Guide
Software Version 2.2 4 Document Version 1.0
© Copyright 2014 AFORE Solutions Inc. All rights reserved.
3.5.9 Changing a Volume Name ............................................................................................................... 40
3.5.10 Viewing Storage Statistics for a Volume ......................................................................................... 40
3.5.11 Merging Volumes ............................................................................................................................ 42
3.5.12 Splitting Volumes ............................................................................................................................ 43
3.5.13 Changing the Volume Write Mode .................................................................................................. 44
3.5.14 Formatting the Volumes.................................................................................................................. 45
3.6 Accessing Secure Storage ............................................................................................................ 45
3.6.1 Storage Access in an EC2 Environment ........................................................................................... 46
3.6.2 Storage Access in a VPC Environment ............................................................................................ 46
3.7 Configuring CloudLink Center Session Timeout ........................................................................... 47
3.8 Configuring a Domain Name Server ............................................................................................. 48
3.9 Configuring a Network Time Protocol Server ................................................................................ 49
3.10 Generating Performance Reports ................................................................................................. 50
3.11 Logs and Events ............................................................................................................................ 52
3.11.1 Viewing the CloudLink Actions Log ................................................................................................ 53
3.11.2 Viewing the CloudLink Alarms Log ................................................................................................. 54
3.11.3 Viewing the CloudLink Events Log ................................................................................................. 54
3.11.4 Viewing the CloudLink Security Events Log ................................................................................... 55
3.12 Configuring Syslog ........................................................................................................................ 55
3.12.1 Configuring a Syslog Logger .......................................................................................................... 56
3.12.2 Viewing Syslog Output ................................................................................................................... 57
3.13 Configuring SNMP ......................................................................................................................... 57
3.13.1 Viewing SNMP Configuration ......................................................................................................... 58
3.13.2 Creating a New Community String ................................................................................................. 58
3.13.3 Deleting a Community String .......................................................................................................... 59
3.13.4 Viewing SNMP Trap Destinations ................................................................................................... 60
3.13.5 Creating a new SNMP Trap Destination ......................................................................................... 60
3.13.6 Deleting an SNMP Trap Destination ............................................................................................... 61
3.13.7 Downloading CloudLink MIBs ......................................................................................................... 61
Terms and Acronyms ....................................................................................................... 63
Appendix A: Configuring AD for Key Store .................................................................... 65
Appendix B: RSA DPM Configuration ............................................................................. 67
Appendix C: Migrating the Encrypted Storage .............................................................. 68
Appendix D: CloudLink Tabs and Options ..................................................................... 70

CloudLink® Amazon Web Services Administration Guide
Software Version 2.2 5 Document Version 1.0
© Copyright 2014 AFORE Solutions Inc. All rights reserved.
1 Introduction
CloudLink® is a data at rest encryption solution that provides a software defined storage encryption layer on
top of existing storage infrastructures whether deployed in the enterprise data center, private clouds or in
public clouds. Its cloud security management software enables a single data encryption solution for on-
premise enterprise virtualized data centers, hybrid cloud deployments, and public cloud environments such
as Amazon AWS, Microsoft Azure, and VMware-based cloud environments.
AFORE’s CloudLink solution on the AWS Marketplace is a simple to deploy, self-contained AMI that enables
customers to get up and running quickly. You deploy a CloudLink AMI instance from the AWS Marketplace
and Amazon will simply add the CloudLink costs to your AWS bill as a separately identified charge.
There are two CloudLink AMIs: CloudLink 1TB Edition and CloudLink 10TB Edition. CloudLink instances can
be deployed in either Elastic Compute Cloud (EC2) or Virtual Private Cloud (VPC) environments.
You manage deployed CloudLink instances from CloudLink Center, a web-based application residing on the
CloudLink instance.
1.1 Audience and Purpose
This guide is intended for system administrators managing CloudLink deployments in an Amazon Web
Services environment.
It assumes the administrator is experienced with Amazon Elastic Compute Cloud (EC2) services, Virtual
Private Cloud (VPC) services, and IP networking. If you are new to AWS, visit the AWS documentation
webpage for useful getting started guides at http://aws.amazon.com/documentation.
The purpose of this guide is to help you manage your CloudLink instances deployed in an AWS environment.
For information on how to deploy CloudLink instances in an AWS environment, refer to CloudLink Amazon
Web Services Deployment Guide for this release.

CloudLink® Amazon Web Services Administration Guide
Software Version 2.2 6 Document Version 1.0
© Copyright 2014 AFORE Solutions Inc. All rights reserved.
1.2 Typographical Conventions
This guide uses the following typographical conventions.
Convention Used for
Black bold User interface elements such as menus, menu items, tabs, boxes, lists, and buttons. For example:
In the CloudLink window, select the Options tab.
Italic Examples of formats and values. Also used for emphasis. For example:
Use the default user name (secadmin)…
For each CloudLink instance you must…
1.3 Administration Guide Organization
This administration guide consists of the following chapters:
Chapter 1, Introduction, introduces you to CloudLink, the AWS Marketplace, and this document.
Chapter 2, Getting Started, provides information on the CloudLink Center application and how to get
help.
Chapter 3, CloudLink Center, provides instructions how to use CloudLink Center to manage your
CloudLink environment.

CloudLink® Amazon Web Services Administration Guide
Software Version 2.2 7 Document Version 1.0
© Copyright 2014 AFORE Solutions Inc. All rights reserved.
2 Getting Started
Once your CloudLink instances are deployed, you can manage the instances from CloudLink Center. The
getting started topics are as follows:
Connecting to CloudLink Center over the Web
Topology Tree
Getting Help
Customizing CloudLink Center Panel Views
EULA and Ancillary Software
Logging Out from a CloudLink Center Session
2.1 Connecting to CloudLink Center over the Web
You can manage your CloudLink instances from a Web browser with Java Script enabled.
Adobe Flash is required for graphic representation of the storage statistics within CloudLink Center.
NOTE: CloudLink Center uses a self-signed certificate.
To connect to the CloudLink instance over the Web:
1. In your Web browser, type the URL of the CloudLink instance in the format
https:// IpAddress:8443 or https:// fqdn:8443 where IpAddress is the public interface IP and fqdn is
the fully qualified domain name (FQDN).
Whenever you connect to CloudLink Center, the CloudLink Center home page is displayed. For
example:

CloudLink® Amazon Web Services Administration Guide
Software Version 2.2 8 Document Version 1.0
© Copyright 2014 AFORE Solutions Inc. All rights reserved.
You can use the default user name secadmin and the default password AWS instance ID to access the
CloudLink Center. For more information, see CloudLink Center User Account Administration on page 9.
2. Enter a user name and password. After the credentials are validated, the main CloudLink Center
window is displayed. For example:
2.2 Topology Tree
The Topology Tree is an essential part of the CloudLink Center display. At the top of the list in the Topology
Tree is the CloudLink instance to which the CloudLink Center is connected. For example:
.
The Topology Tree shows the following parameters:
CloudLink Name: CloudLink Center’s name for the instance.
IP:
CloudLink Role:
IP address of the instance’s private network interface.
Role the instance plays in CloudLink.
MAC:
Platform:
MAC address of the instance’s private network interface.
The virtualization platform on which the instance is running.
You can change the CloudLink Name by double-clicking in the name field and entering a new text string.

CloudLink® Amazon Web Services Administration Guide
Software Version 2.2 9 Document Version 1.0
© Copyright 2014 AFORE Solutions Inc. All rights reserved.
2.3 Getting Help
The CloudLink documentation is available on the CloudLink page in the AWS Marketplace.
CloudLink Amazon Web Services Deployment Guide
CloudLink Amazon Web Services Administration Guide (this guide)
For an overview of the available tabs and options as viewed from the CloudLink Center user interface,
see Appendix D: CloudLink Tabs and Options on page 70.
For customer support, call AFORE Solutions at (866) 356-4060 or email us at [email protected].
2.4 Customizing CloudLink Center Panel Views
You can define the columns to be displayed in each panel and specify ascending or descending order for the
column rows.
To customize a column:
1. Access a panel, for example the User Accounts panel.
2. To display the dropdown icon, move the mouse pointer over the rightmost area of a column heading
in the panel. For example:
3. Click the icon to display the column options. For example:

CloudLink® Amazon Web Services Administration Guide
Software Version 2.2 10 Document Version 1.0
© Copyright 2014 AFORE Solutions Inc. All rights reserved.
4. From the menu items, you can select Sort Ascending or Sort Descending to set the order of the
column items, and select the columns to display or hide. For example, to display the User name list
in ascending order, select Sort Ascending. To hide the Built-in column, uncheck the Built-in
checkbox. The results are as follows:
5. A triangle appears in the User name column that allows you to resort the column contents by
clicking the column heading.
NOTE: The settings only apply to the current CloudLink Center session.
2.5 EULA and Ancillary Software
The End User License Agreement (EULA) and the list of ancillary software distributed with the AFORE
CloudLink Center software is available under the System tab of the CloudLink Center user interface.
2.6 Logging Out from a CloudLink Center Session
To logout from a CloudLink Center session, click on Welcome at the top corner of the CloudLink Center
main page and select Logout. The session is terminated and the CloudLink Center login page is displayed.

CloudLink® Amazon Web Services Administration Guide
Software Version 2.2 11 Document Version 1.0
© Copyright 2014 AFORE Solutions Inc. All rights reserved.
3 CloudLink Center
After you deployed and configured a CloudLink instance on AWS, it is managed via the CloudLink Center
web application accessible via a HTTPS session.
The default storage configuration for CloudLink is a single merged volume created from all of the EBS
volumes specified during deployment of the CloudLink instance. Hence, ten 1TB EBS volumes defined
during deployment appear as a single 10TB EBS volume in CloudLink Center. You can keep the single
merged encrypted volume configuration or create separate encrypted volumes for the CloudLink instance
depending upon which model best suits your needs. Any data that is written to the EBS volume is encrypted
with AES 256-bit encryption and will have a unique encryption key used to encrypt each EBS volume when
configured in split volume mode or a single encryption key for a merged volume.
CloudLink provides AWS instances with access to their encrypted storage over NFS/SMB or iSCSI remote
disk protocols. A brief description of the different access models is provided below to assist with selecting the
configuration that will work best for the intended application/services:
NFS/SMB network-attached storage (NAS)
This option is appropriate for standard deployments where instances will be
attaching/mapping to an encrypted share.
iSCSI remote disk for a single Windows server
This option is appropriate for servers requiring dedicated, block-level high performance
access to a remote disk.
iSCSI remote disk for a Windows SMB server
This option is appropriate for advanced SMB sharing configurations where Windows
Kerberos authentication and access control is required.
This section covers the following topics:
Reviewing and Changing your Deployment Settings
Adding Storage Volumes
Managing User Accounts
Assigning Storage Licenses
Managing Secure Storage

CloudLink® Amazon Web Services Administration Guide
Software Version 2.2 12 Document Version 1.0
© Copyright 2014 AFORE Solutions Inc. All rights reserved.
Accessing Secure Storage
Configuring CloudLink Center Session Timeout
Configuring a Domain Name Servers
Configuring a Network Time Protocol Server
Generating Performance Reports
Logs and Events
Configuring Syslog
Configuring SNMP
3.1 Reviewing and Changing your Deployment Settings
The CloudLink Amazon Web Services Deployment Guide includes the basic configuration steps to complete
a deployment from CloudLink Center. For reference purposes, the steps are repeated in this section and
include links to the associated reference section of this guide. Use this information to review or change your
deployment settings.
1. Change the default secadmin user account password, see 3.3.5 Changing Local User Account
Passwords on page 22.
2. Assign storage licenses to the storage volume, see 3.4 Assigning Storage Licenses on page 25.
3. Split the volume if desired, see 3.5.12 Splitting Volumes on page 43.
4. Specify the storage type (NFS/SMB or iSCSI), see 3.5.8 Changing the Volume Type on page 39.
5. Set the write mode for the storage volumes, see 3.5.13 Changing the Volume Write Mode on page
44.
6. Format the storage volumes, see 3.5.14 Formatting the Volumes on page 45.
7. Configure access rights to the storage volumes, see 3.5.5 Configuring NFS/SMB Access to Secure
Storage on page 34 and 3.5.6 Configuring iSCSI Access to Secure Storage on page 35.
8. Access a storage volume, see 3.6 Accessing Secure Storage on page 45.

CloudLink® Amazon Web Services Administration Guide
Software Version 2.2 13 Document Version 1.0
© Copyright 2014 AFORE Solutions Inc. All rights reserved.
3.2 Adding Storage Volumes
The CloudLink 10TB Edition instance is capable of supporting up to 10 TB of data in one or more EBS
volumes. A single EBS volume provides the ability to increase the volume size to 10 TB to handle a large
amount of data. In a multi-volume environment, each volume is limited to 1 TB and the maximum aggregated
volume size is limited to 10 TB. Separate volumes allow you to provide a separate key for each volume and
manage the volumes independently. The CloudLink 1TB Edition instance is capable of supporting up to 1 TB
of data in one or more EBS volumes.
The instructions for increasing encrypted storage capacity differs depending upon whether a merged volume
or split volume configuration has been selected, follow the appropriate instructions for your selected
configuration.
Note: CloudLink does not support AWS encrypted EBS volumes in this release.
3.2.1 Adding Volumes to a Split Volume Configuration
From the EC2 console you create new volumes and attach them to the CloudLink instance. You then access
CloudLink Center, perform a volume rescan to detect the newly added EBS volumes, and finally, format the
new volumes to make them accessible.
NOTE: Increasing encrypted storage capacity in a split volume configuration can be performed without affecting
storage access.
To add a storage volume to a CloudLink instance with a split volume configuration:
1. Log on to the AWS Marketplace with your AWS account credentials.
2. Access the EC2 console and select Volumes.
3. Click Create Volume.
4. From the Create Volume dialog, enter the Volume Type, Size, Availability Zone, and optionally
select a Snapshot. For example:

CloudLink® Amazon Web Services Administration Guide
Software Version 2.2 14 Document Version 1.0
© Copyright 2014 AFORE Solutions Inc. All rights reserved.
A snapshot is a backup of an EC2 volume that's stored in S3. You can create a new volume using
data stored in a snapshot by entering the snapshot's ID. You can search for public snapshots by
typing text in the Snapshot field. Descriptions are case-sensitive.
5. Click Yes, Create.
6. Observe the presence of the new volume in the volume list. For example:
7. Right- click the volume in the list and select Attach Volume from the menu.
8. From the Attach Volume dialog, note the volume instance identifier (vol-).
9. From the Instances dropdown list, select a CloudLink instance.
10. Enter a unique volume label in the Device field and click Yes, Attach. For example:
CloudLink® Amazon Web Services Administration Guide
Software Version 2.2 15 Document Version 1.0
© Copyright 2014 AFORE Solutions Inc. All rights reserved.
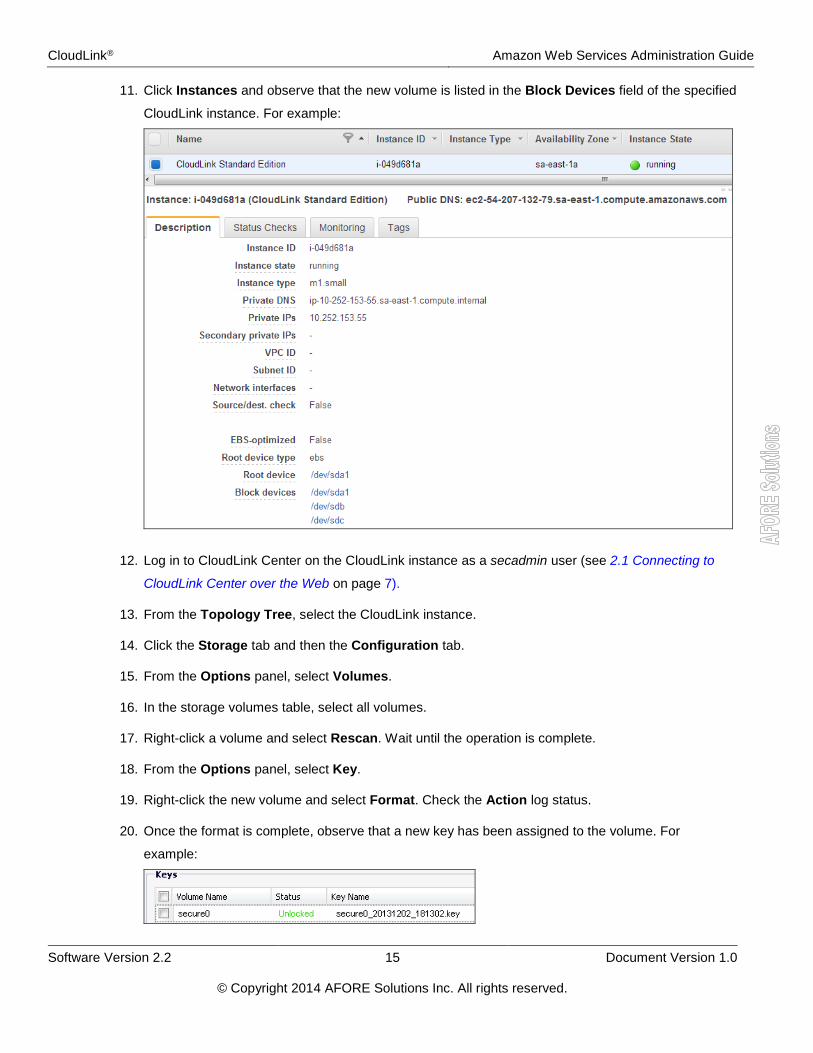
11. Click Instances and observe that the new volume is listed in the Block Devices field of the specified
CloudLink instance. For example:
12. Log in to CloudLink Center on the CloudLink instance as a secadmin user (see 2.1 Connecting to
CloudLink Center over the Web on page 7).
13. From the Topology Tree, select the CloudLink instance.
14. Click the Storage tab and then the Configuration tab.
15. From the Options panel, select Volumes.
16. In the storage volumes table, select all volumes.
17. Right-click a volume and select Rescan. Wait until the operation is complete.
18. From the Options panel, select Key.
19. Right-click the new volume and select Format. Check the Action log status.
20. Once the format is complete, observe that a new key has been assigned to the volume. For
example:

CloudLink® Amazon Web Services Administration Guide
Software Version 2.2 16 Document Version 1.0
© Copyright 2014 AFORE Solutions Inc. All rights reserved.
21. Test read/write access to the new encrypted storage volume (see 3.6 Accessing Secure Storage on
page 45).
22. You should log the CloudLink instance configuration on a worksheet and keep the worksheet in a
safe place. A worksheet template is provided in the CloudLink Amazon Web Services Deployment
Guide.
3.2.2 Adding Volumes to a Merged Volume Configuration
From the EC2 console you create a new volume and attach the new volume to the CloudLink instance. You
then access CloudLink Center and then perform a volume resize and rescan to increase the encrypted
capacity.
NOTE: Increasing encrypted storage capacity in a merged volume configuration should be performed
during system maintenance periods. Storage access is not available during the volume expansion
operation.
To add a storage volume to a CloudLink instance with a merged volume configuration:
1. Log on to the AWS Marketplace with your AWS account credentials.
2. Access the EC2 console and select Volumes.
3. Click Create Volume.
4. From the Create Volume dialog, enter the Volume Type, Size, and Availability Zone. Do not
select Snapshot as this feature is not supported in merged volume configurations. For example:
5. Click Yes, Create.
6. Observe the presence of the new volume in the volume list. For example:

CloudLink® Amazon Web Services Administration Guide
Software Version 2.2 17 Document Version 1.0
© Copyright 2014 AFORE Solutions Inc. All rights reserved.
7. Right- click the volume in the list and select Attach Volume from the menu.
8. From the Attach Volume dialog, note the volume instance identifier (vol-).
9. From the Instances dropdown list, select a CloudLink instance.
10. Enter a unique volume label in the Device field and click Yes, Attach. For example:
11. Click Instances and observe that the new volume is listed in the Block Devices field of the specified
CloudLink instance. For example:

CloudLink® Amazon Web Services Administration Guide
Software Version 2.2 18 Document Version 1.0
© Copyright 2014 AFORE Solutions Inc. All rights reserved.
12. Log in to CloudLink Center on the CloudLink instance as a secadmin user (see 2.1 Connecting to
CloudLink Center over the Web on page 7).
13. From the Topology Tree, select the CloudLink instance.
14. Click the Storage tab and then the Configuration tab.
15. From the Options panel, select Volumes.
16. In the storage volumes table, select all volumes.
17. Right-click a volume and select Rescan. Wait until the operation is complete. Check the Action log
status. When the Rescan operation is complete, the action details contain the message “Resize
required”.
NOTE: The Rescan option will appear only if all disks are selected.
18. In the Volumes panel, right-click a volume and select Resize.
19. In the Confirmation window, click Yes to confirm the storage volume resize action.
20. Wait until the operation is complete. Check the Action log status. When the Resize operation is
complete, the new volume size will be reflected in the volumes table. For example:
21. From the Options panel, select Key.
22. Right-click the new volume and select Format. Check the Action log status.
23. Once the format is complete, observe that a new key has been assigned to the volume. For
example:
24. You should log the CloudLink instance configuration on a worksheet and keep the worksheet in a
safe place. A worksheet template is provided in the CloudLink Amazon Web Services Deployment
Guide.
25. Test read/write access to the encrypted storage volumes (see 3.6 Accessing Secure Storage on
page 45).

CloudLink® Amazon Web Services Administration Guide
Software Version 2.2 19 Document Version 1.0
© Copyright 2014 AFORE Solutions Inc. All rights reserved.
3.3 Managing User Accounts
CloudLink Center defines three user roles: secadmin, admin, and observer. The default user credentials for
CloudLink Center are as follows:
User name: secadmin
Password: AWS instance ID
The secadmin user has full access to all CloudLink Center functionality including user account management.
WARNING: For security purposes, you should change the default secadmin password to prevent
unauthorized access. For more information, see Changing Local User Account Passwords on page 22.
3.3.1 User Accounts
Each person who needs to work with CloudLink must have a user account in CloudLink Center. The access
role of a CloudLink Center user account defines what functions the user is permitted to perform in the
CloudLink system.
You can create two types of CloudLink Center user accounts:
Local accounts: These user accounts exist in and are applicable only to the ClouldLink system.
Domain accounts: Rather than creating users specifically for your CloudLink needs, you can reuse
existing user accounts in your organization’s Microsoft Active Directory (AD) domain and assign
those accounts the appropriate CloudLink Center access role.
NOTE: Before you can add Domain accounts, you must configure an Active Directory (AD) Domain.
For more information, see Configuring an AD Domain for User Accounts on page 23.
User account parameters are as follows:
User Name: Name to identify the user in the system.
Access Role: The access roles are secadmin, admin, and observer.
o The secadmin user has full access to all CloudLink Center functionality, including secure
storage management and key store configuration. This user can create user accounts in
CloudLink Center and change passwords for users. The secadmin user is the only user who
is authorized to see the Security Events log.
o The admin user has full access to all CloudLink Center functionality, except secure storage

CloudLink® Amazon Web Services Administration Guide
Software Version 2.2 20 Document Version 1.0
© Copyright 2014 AFORE Solutions Inc. All rights reserved.
management and key store configuration. The admin user can not see the Security Events
log. This user can change the passwords for admin and observer users.
o The observer user can monitor statistics on the CloudLink Center and view test results.
For information on the available options for each access role, see Appendix D: CloudLink Tabs and
Options on page 70.
User Type: The options are local and domain. If you select domain, the user will be able to reuse
the password from the domain user account to log on to CloudLink Center. If you select local, the
user must enter a password to access CloudLink Center.
3.3.2 Verifying Your Access Role for the Current Session
To verify your access role for the current CloudLink Center session, note the current session user name in
the top right corner of the CloudLink Center window, For example:
Then follow the instructions in section 3.3.3 Viewing Current User Accounts on page 20 and correlate the
current session user name with the user account Access Role in the User Accounts panel. For this
example, user randall has the admin access role as part of a local account.
3.3.3 Viewing Current User Accounts
To view the current user accounts, proceed as follows:
1. From the Topology Tree, select a CloudLink instance.
2. Click the Administration tab.
3. From the Options panel, click User Accounts.

CloudLink® Amazon Web Services Administration Guide
Software Version 2.2 21 Document Version 1.0
© Copyright 2014 AFORE Solutions Inc. All rights reserved.
4. Observe the current user accounts. The Built-in column displays yes for the default user account
secadmin. For example:
3.3.4 Adding User Accounts
To add user accounts, proceed as follows:
1. Log in as a secadmin or admin user (see 2.1 Connecting to CloudLink Center over the Web on page 7).
2. From the Topology Tree, select a CloudLink instance.
3. Click the Administration tab
4. From the Options panel, click User Accounts.
5. From the Add User panel, select a user type from the User Type list (Figure 3-1). See User
Accounts on page 19 for a description of the available user types.
6. Enter a user name. If the user type is domain, enter the exact user name from the domain user
account. If the specified user name is not found in the Active Directory, the system displays an error
message. For information on Active Directory domains, see Configuring an AD Domain for User
Accounts on page 23.
7. From the Access Role list, select a role for the user. See User Accounts on page 19 for a
description of the access roles.
8. For local user types, enter a password for the user. The password must be at least 6 characters
long.
9. Click Add to add a user to the User Accounts panel.
Figure 3-1: Adding user accounts (local and domain)

CloudLink® Amazon Web Services Administration Guide
Software Version 2.2 22 Document Version 1.0
© Copyright 2014 AFORE Solutions Inc. All rights reserved.
3.3.5 Changing Local User Account Passwords
As a secadmin user, you can change the CloudLink Center password of all non-domain users without
entering the current user account password. As an admin user, you must enter the current user password
before changing the password of an admin or observer user. Observer account users cannot change their
passwords.
To change CloudLink Center user passwords:
1. Log in as a secadmin or admin user (see 2.1 Connecting to CloudLink Center over the Web on page 7).
2. From the Topology Tree, select a CloudLink instance.
3. Click the Administration tab.
4. From the Options panel, select User Accounts.
NOTE: When logged in as an admin user, only the admin and observer accounts are visible from the User
Accounts panel.
5. In the User name list, right-click a user account and click Change password (Figure 3-2 and Figure
3-3).
Figure 3-2: Changing a password (secadmin users)

CloudLink® Amazon Web Services Administration Guide
Software Version 2.2 23 Document Version 1.0
© Copyright 2014 AFORE Solutions Inc. All rights reserved.
Figure 3-3: Changing a password (admin users)
6. In the Change password window, type the current password if required and then type and confirm
the new password.
7. Click OK.
3.3.6 Configuring an AD Domain for User Accounts
Rather than creating users specifically for your CloudLink needs, you can reuse existing user accounts in
your organization’s Microsoft Active Directory (AD) domain and assign those accounts the appropriate
CloudLink Center access roles if the AD is accessible from the VPC environment.
To configure an Active Directory domain for user accounts:
1. Log in as a secadmin or admin user (see 2.1 Connecting to CloudLink Center over the Web on page 7).
2. From the Topology Tree, select a CloudLink instance.
3. Click the Administration tab.
4. From the Options panel, click AD Domain.
5. In the Controller Configuration panel, specify the Active Directory parameters:
Host: The Active Directory host IP address (the Active Directory host is
a Windows Server where the Active Directory is configured).
Port: The TCP port number configured on the Active Directory host.
Domain: Domain name configured on the Active Directory host.
User: A user name configured on the Active Directory host.
Password: Password configured for the user.

CloudLink® Amazon Web Services Administration Guide
Software Version 2.2 24 Document Version 1.0
© Copyright 2014 AFORE Solutions Inc. All rights reserved.
6. Click Apply to use the configured Active Directory user names and passwords for CloudLink Center.
For example:
7. The Domain status is Inaccessible in red if the Active Directory host cannot be reached because of
a network problem or incorrectly configured IP, or if there is a problem authenticating the configured
user. While the Active Directory is inaccessible, all domain login attempts are disabled. Check the
Action logs to determine why the domain is inaccessible. For example:
NOTE: If Active Directory is inaccessible, it may take a few seconds to redisplay the AD Domain table.

CloudLink® Amazon Web Services Administration Guide
Software Version 2.2 25 Document Version 1.0
© Copyright 2014 AFORE Solutions Inc. All rights reserved.
3.4 Assigning Storage Licenses
Storage licenses allow control of storage space on CloudLink instances. The storage license variables
include the customer domain, type of storage, platform, the amount of storage, and the active timeframe for
the storage space. The CloudLink AMI includes a pre-packaged perpetual license which needs to be
assigned to the volume before access to CloudLink encrypted storage is possible.
To assign a storage license to a CloudLink instance:
1. Log in as a secadmin or admin user (see 2.1 Connecting to CloudLink Center over the Web on page 7).
2. From the Topology Tree, select a CloudLink instance.
3. Select the Storage tab.
4. From the Options panel, select the License option.
5. From the License Assignment panel, select a storage license from the Available Licenses
dropdown list. Only valid licenses are displayed in the list.
6. Click Assign to assign the storage license.
7. Observe the graph in the License Usage panel. For example:

CloudLink® Amazon Web Services Administration Guide
Software Version 2.2 26 Document Version 1.0
© Copyright 2014 AFORE Solutions Inc. All rights reserved.
3.5 Managing Secure Storage
Each CloudLink instance can provide one or more encrypted EBS volumes. The volumes are encrypted
using a default encryption key. You must change the default encryption key before using the encrypted
storage. CloudLink provides three options to store encryption keys (Key Store):
Local (the default Key Store)
Active Directory
RSA Data Protection Manager (DPM)
This section covers the following topics:
Local Key Store
Active Directory and RSA DPM Key Store
Managing Encryption Key Store
Managing Secure Storage
Configuring NFS/SMB Access to Secure Storage
Configuring iSCSI Access to Secure Storage
Viewing Storage Volumes
Changing the Volume Type
Changing a Volume Name
Viewing Storage Statistics for a Volume
Merging Volumes
Splitting Volumes
Changing the Volume Write Mode
Formatting the Volumes
NOTE: You cannot delete a volume from CloudLink Center.
CloudLink® Amazon Web Services Administration Guide
Software Version 2.2 27 Document Version 1.0
© Copyright 2014 AFORE Solutions Inc. All rights reserved.
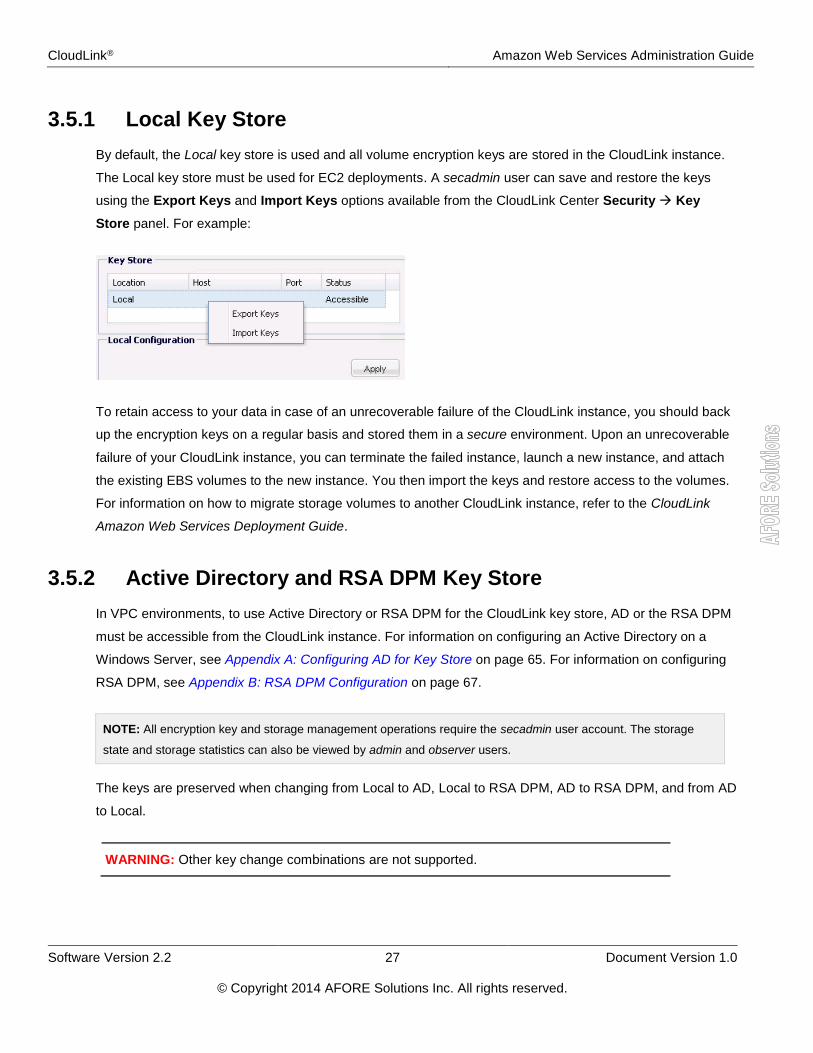
3.5.1 Local Key Store
By default, the Local key store is used and all volume encryption keys are stored in the CloudLink instance.
The Local key store must be used for EC2 deployments. A secadmin user can save and restore the keys
using the Export Keys and Import Keys options available from the CloudLink Center Security Key
Store panel. For example:
To retain access to your data in case of an unrecoverable failure of the CloudLink instance, you should back
up the encryption keys on a regular basis and stored them in a secure environment. Upon an unrecoverable
failure of your CloudLink instance, you can terminate the failed instance, launch a new instance, and attach
the existing EBS volumes to the new instance. You then import the keys and restore access to the volumes.
For information on how to migrate storage volumes to another CloudLink instance, refer to the CloudLink
Amazon Web Services Deployment Guide.
3.5.2 Active Directory and RSA DPM Key Store
In VPC environments, to use Active Directory or RSA DPM for the CloudLink key store, AD or the RSA DPM
must be accessible from the CloudLink instance. For information on configuring an Active Directory on a
Windows Server, see Appendix A: Configuring AD for Key Store on page 65. For information on configuring
RSA DPM, see Appendix B: RSA DPM Configuration on page 67.
NOTE: All encryption key and storage management operations require the secadmin user account. The storage
state and storage statistics can also be viewed by admin and observer users.
The keys are preserved when changing from Local to AD, Local to RSA DPM, AD to RSA DPM, and from AD
to Local.
WARNING: Other key change combinations are not supported.

CloudLink® Amazon Web Services Administration Guide
Software Version 2.2 28 Document Version 1.0
© Copyright 2014 AFORE Solutions Inc. All rights reserved.
3.5.3 Managing Encryption Key Store
Merged volumes are encrypted with a single encryption key. Unique encryption keys are used to encrypt
each volume in a split volume configuration. You can trigger automatic encryption key changes based on a
time interval. For example, if you specify an interval of eight hours, new encryption keys will be generated
and assigned to all storage volumes every eight hours.
The specified interval applies only to those storage volumes that have encryption keys. Changing encryption
keys manually does not affect the schedule for automatically generating and changing encryption keys for
the specified interval. Changing the key store type does not affect the schedule for automatically generating
and changing encryption keys.
This section shows you how to:
Display the current location of the encryption key store.
Configure Active Directory as the CloudLink key store location.
Configure RSA DPM as the CloudLink key store location.
Specify the interval for changing the storage volume encryption keys.
To display the current location of the encryption key store:
1. Log in as a secadmin user (see 2.1 Connecting to CloudLink Center over the Web on page 7).
2. From the Topology Tree, select a CloudLink instance.
3. Click the Security tab and then the Key Store tab. For example:
To configure Active Directory as the CloudLink key store location:
1. Configure Active Directory as outlined in Appendix A: Configuring AD for Key Store on page 65.
2. Log in as a secadmin user (see 2.1 Connecting to CloudLink Center over the Web on page 7).
3. From the Topology Tree, select a CloudLink instance.
4. Click the Security tab and then the Key Store tab.

CloudLink® Amazon Web Services Administration Guide
Software Version 2.2 29 Document Version 1.0
© Copyright 2014 AFORE Solutions Inc. All rights reserved.
5. From the Options panel, click Active Directory.
6. In the Active Directory Configuration panel, specify the Active Directory parameters:
Host: The Active Directory host IP address (the Active Directory host is
a Windows Server where the Active Directory is configured).
Base DN: Base domain name configured on the Active Directory host.
Port: The TCP port number configured on the Active Directory host.
User: A domain user name configured on the Active Directory host. This
user account will be used to search the AD.
Password: Password configured for the user on the Active Directory host.
NOTE: The Base DN, Port, User, and Password parameters are part of the Active Directory configuration
of a Windows Server.
7. Click Apply to use the configured Active Directory for storage of CloudLink encryption keys. For
example:
The Key Store status is Inaccessible in red if the Active Directory host cannot be reached because of a
network problem or incorrectly configured IP, or if there is a problem authenticating the configured user.
Check the Action logs to determine why the key store is inaccessible.
If the storage was unlocked when the AD became inaccessible, it will stay unlocked. If after the AD became
inaccessible, the instance which hosts the storage is restarted, the storage would become locked. The
storage will be unlocked when the AD becomes available.

CloudLink® Amazon Web Services Administration Guide
Software Version 2.2 30 Document Version 1.0
© Copyright 2014 AFORE Solutions Inc. All rights reserved.
NOTE: If Active Directory is inaccessible, it may take a few seconds to redisplay the Key Store tab.
To configure RSA DPM as the CloudLink key store location:
1. Verify that the RSA DPM server is reachable from CloudLink via its private LAN network interface.
The supported RSA DPM versions are 3.2 and 3.5.
2. Verify that the client certificates have been created and uploaded to the RSA DPM server, and that
they are accessible from CloudLink.
3. Log in as a secadmin user (see 2.1 Connecting to CloudLink Center over the Web on page 7).
NOTES:
If a security class for the RSA DPM client is not configured, see Appendix B: RSA DPM
Configuration on page 67.
An instance can only register once with RSA DPM. To re-register an instance, you must either
change the instance hostname or delete instance from the DPM server database.
4. From the Topology Tree, select a CloudLink instance.
5. Click the Security tab and then the Key Store tab.
6. From the Options panel, click RSA DPM.
7. In the RSA DPM Configuration panel, specify the RSA DPM parameters:
Host: The RSA DPM host IP address.
Port: The TCP port number configured on the RSA DPM host (default port
is 443).
Security Class Name: The name of the security class configured on the RSA DPM host for
the RSA DPM client.
Trust Certificate: The RSA DPM server certificate.
Client Certificate: The RSA DPM client certificate.
Password: The password used during the RSA DPM client certificate creation.

CloudLink® Amazon Web Services Administration Guide
Software Version 2.2 31 Document Version 1.0
© Copyright 2014 AFORE Solutions Inc. All rights reserved.
8. Click Apply. For example:
The Key Store status is Inaccessible in red if the RSA DPM host cannot be reached because of a network
problem or incorrectly configured IP, or if there is a problem authenticating the configured user. Check the
Action logs to determine why the key store is inaccessible.
If the storage was unlocked when the host became inaccessible, it will stay unlocked. If after the host
became inaccessible, the instance which hosts the storage is restarted, the storage would become locked.
The storage will be unlocked when the host becomes available.
To specify the interval for changing the storage volume encryption keys:
1. Log in as a secadmin user (see 2.1 Connecting to CloudLink Center over the Web on page 7).
2. From the Topology Tree, select a CloudLink instance.
3. Click the Security tab and then the Key Store tab.
4. From the Options panel, click Schedule.
5. In the Key change interval, hours list, select one of the options (Disabled, 8, 12, 24, or Custom).
Select Custom to specify a customer interval from 1 to 1,000 hours. To disable key changes, select
Disabled.
6. Click Apply.

CloudLink® Amazon Web Services Administration Guide
Software Version 2.2 32 Document Version 1.0
© Copyright 2014 AFORE Solutions Inc. All rights reserved.
3.5.4 Managing Secure Storage
Most storage operations are available only after the storage license is applied to the storage volume.
To view or modify the storage state on the CloudLink instance:
1. Log in as a secadmin user (see 2.1 Connecting to CloudLink Center over the Web on page 7).
2. From the Topology Tree, select a CloudLink instance with storage attached.
3. Click the Storage tab and then the Configuration tab.
4. From the Options panel, click Key.
Two panels are displayed on the right: Key Store and Keys.
The Key Store panel shows the currently used key store location (Local, Active Directory or
RSA DPM) and its status (Accessible or Inaccessible).
The Keys table shows the list of all configured storage volumes, status (Locked or
Unlocked) and the currently used key name for each volume).
The secure storage volume name format depends on what storage mode is in use:
If you opted to have each virtual disk assigned to the CloudLink instance presented as a
separate encrypted volume, the storage volume name will have the following format:
securehostId-targetId
where hostId and targetId refer to the host number and target identifier you selected
when assigning a hard disk. For example, if you selected SCSI (0:1), select the
volume labelled secure0-01. For example:

CloudLink® Amazon Web Services Administration Guide
Software Version 2.2 33 Document Version 1.0
© Copyright 2014 AFORE Solutions Inc. All rights reserved.
If you opted to merge all virtual disks assigned to the CloudLink instance so that they are
presented as a single encrypted volume, the storage volume name will be secure0. For
example:
5. Right-click on the key in the Keys panel to see a list of the available management
commands for the corresponding storage volume. For example:
The commands are as follows:
Command Description
Unlock Opens (unlocks) the encrypted storage volume for use.
Each volume is unlocked independently.
Lock Closes (locks) the storage volume to make it unavailable for use.
Each volume is locked independently.
Format Forces unlocking of the storage volume with a new key, formats the disk, and makes old data unusable.
Formatting a volume has no effect on other volumes.

CloudLink® Amazon Web Services Administration Guide
Software Version 2.2 34 Document Version 1.0
© Copyright 2014 AFORE Solutions Inc. All rights reserved.
Command Description
Change Key Changes a previously generated key. This command can be executed only if the storage volume is unlocked.
For CloudLink instance with multiple volumes, the Change Key operation affects only the selected volume.
The key secures storage access. The key is not used to encrypt the stored data.
You can see the result of each storage operation by viewing the Actions, Events, and Security
Events logs. For more information, see Logs and Events on page 52.
NOTE: Initially, the storage status shown in the CloudLink Center is Unlocked, and the key name is shown
as Undefined, which means that the storage was opened using the default encryption key. Use the Format
operation to generate your own key.
Before using the storage, perform the Format operation, see 3.5.14 Formatting the Volumes on
page 45. As a result of this operation, the storage is formatted and enters the unlocked state with a
new key. The key name is displayed on the Key tab.
WARNING: The Format operation deletes all existing data on the storage volume.
The generated key has a name in the following format:
volumeName_yyyyMMdd_HHmmss.key
where: volumeName - the name of volume yyyyMMdd - key generation date HHmmss - key generation time
For example, secure0-01_20131008_033222.key.
3.5.5 Configuring NFS/SMB Access to Secure Storage
CloudLink provides virtual machines with direct access to their encrypted storage over NFS/SMB and iSCSI.
The CloudLink Access Control List (ACL) must be configured to grant access to all machines connected to
the CloudLink instance. As part of deployment, AWS Security Groups are configured and therefore act as a
virtual firewall to control traffic into the CloudLink instance. For more information on security groups, refer to
the CloudLink Amazon Web Services Deployment Guide.

CloudLink® Amazon Web Services Administration Guide
Software Version 2.2 35 Document Version 1.0
© Copyright 2014 AFORE Solutions Inc. All rights reserved.
To configure the ACL to provide access to the storage for all members:
1. Log in as a secadmin user (see 2.1 Connecting to CloudLink Center over the Web on page 7).
2. From the Topology Tree, select a CloudLink instance.
3. Click the Storage tab then the Configuration tab.
4. In the Options panel, click Access.
5. Select a volume from the Volume Name dropdown list.
6. Click the IP Address dropdown list, and select Any.
NOTES:
You can also configure individual IP addresses or a range of IP addresses for the ACL.
All IP entries in the Access Control List must be deleted before you can select Any.
7. Click Add.
The Access Control List will display the subnet(s) that will be granted access to the secure storage.
Once access to a secure storage has been granted, the storage is made available to those devices over
NFS/SMB that form part of the proper AWS security groups.
For information on how to access the secure storage, see 3.6 Accessing Secure Storage on page 45.
3.5.6 Configuring iSCSI Access to Secure Storage
To access a CloudLink instance secure storage over iSCSI, you must configure CHAP credentials for use in
performing incoming access to the iSCSI target (that is, one-way CHAP authentication).
If you wish to configure mutual CHAP authentication, you can optionally configure CHAP credentials for
performing outgoing access from the CloudLink instance to the iSCSI initiator.
This section shows you how to:
Configure one-way CHAP authentication.
Configure mutual CHAP authentication.
Delete a CHAP credential from the Access Control List (ACL).

CloudLink® Amazon Web Services Administration Guide
Software Version 2.2 36 Document Version 1.0
© Copyright 2014 AFORE Solutions Inc. All rights reserved.
To configure one-way CHAP authentication:
1. Log in as a secadmin user (see 2.1 Connecting to CloudLink Center over the Web on page 7).
2. From the Topology Tree, select a CloudLink instance.
3. Click the Storage tab then the Configuration tab.
4. From the Options panel, click Access.
5. Select the encrypted volume for which you are configuring access from the Volume Name dropdown
list in the Volume panel.
6. If the Access Control List is empty, then there are no credentials configured for accessing the
iSCSI storage and the storage is therefore inaccessible. Set the ACL configuration to Any.
7. Enter a CHAP user name in the User Name field and a corresponding secret in the Secret field. This
user name and secret combination will be used to authenticate the iSCSI initiator.
8. Select Incoming User in the User Type dropdown list and click Add. For example:
NOTES:
You must configure the iSCSI initiator(s) you wish to connect to with one of the Incoming User
credentials specified in the Access Control List.
The iSCSI Qualified Name (IQN) field is not used for this release.

CloudLink® Amazon Web Services Administration Guide
Software Version 2.2 37 Document Version 1.0
© Copyright 2014 AFORE Solutions Inc. All rights reserved.
To configure mutual CHAP authentication:
1. Configure one-way CHAP authentication as described in this section.
2. Enter a CHAP user name in the User Name field and a corresponding secret in the Secret field. This
user name and secret combination will be used to authenticate the CloudLink iSCSI target to the
initiator.
3. Select Outgoing User in the User Type dropdown list and click Add. For example:
NOTES:
You can configure only one Outgoing User credential for each volume.
You must configure the iSCSI initiator(s) you wish to connect to with an Outgoing User
credential specified in the Access Control List for mutual authentication.
The iSCSI Qualified Name (IQN) field is not used for this release.
To delete a CHAP credential from the Access Control List:
1. Log in as a secadmin user (see 2.1 Connecting to CloudLink Center over the Web on page 7).
2. From the Topology Tree, select a CloudLink instance.
3. Click the Storage tab then the Configuration tab.
4. From the Options panel, click Access.

CloudLink® Amazon Web Services Administration Guide
Software Version 2.2 38 Document Version 1.0
© Copyright 2014 AFORE Solutions Inc. All rights reserved.
5. Select the encrypted volume for which you wish to delete CHAP credentials from the Volume Name
dropdown list in the Volume panel.
6. In the Access Control List, right-click the credential you wish to delete and click Delete.
3.5.7 Viewing Storage Volumes
To view secure storage volume information:
1. Log in as a secadmin user (see 2.1 Connecting to CloudLink Center over the Web on page 7).
2. From the Topology Tree, select a CloudLink instance.
3. Click the Storage tab then the Configuration tab.
4. From the Options panel, click Volumes. The Volumes table shows the following parameters for all
existing storage volumes:
Type: The storage type (NFS/SMB or iSCSI).
Location: The storage location in the format: volumeIP /volumeName/mnt.
Device: The name of the storage device (sd# or xvd#, where # is an alphabet character, for
example, sdb or xvdb).
Size: The storage volume size.
Status Represents the write mode for the storage volume: synchronous (sync) or
asynchronous (async).
For example:
If you opted to merge all virtual disks assigned to the CloudLink instance so that they are presented as a
single encrypted volume, a single volume will be displayed in the Volumes table. The Device will be shown
as a range, for example, sdb-sdd, which means that the volume aggregates three disks: sdb, sdc, and sdd.
The displayed Size of the multi-disk volume will represent the sum of all aggregated storage disk sizes.

CloudLink® Amazon Web Services Administration Guide
Software Version 2.2 39 Document Version 1.0
© Copyright 2014 AFORE Solutions Inc. All rights reserved.
3.5.8 Changing the Volume Type
You can change the volume type of a volume from NFS/SMB to iSCSI and from iSCSI to NFS/SMB.
Server Message Block (SMB) shares, also referred to as Common Internet File System (CIFS) shares, are
primarily used in Windows operating systems.
Network File System (NFS) shares are primarily used in Unix and Linux based operating systems. When
working with NFS you mount a remote folder to a local path.
The Internet Small Computer System Interface (iSCSI) provides better performance for raw I/O and is used
for databases/clusters.
The results of a change in volume type are as follows:
All data on the disk is lost.
The storage keys are lost and the ACL configuration is lost.
The storage write mode is set to Sync.
To access a CloudLink instance’s secure storage over iSCSI, you must also configure CHAP credentials for
use in performing incoming access to the instance’s iSCSI target, see Configuring iSCSI Access to Secure
Storage on page 35.
WARNING: Changing a volume type erases all data on the disk.
To change the volume type for a storage volume:
1. Log in as a secadmin user (see 2.1 Connecting to CloudLink Center over the Web on page 7).
2. From the Topology Tree, select a CloudLink instance.
3. Click the Storage tab then the Configuration tab.
4. Click Volumes in the Options panel.
5. Right-click a NFS/SMB volume and select Change volume type to iSCSI or right-click an iSCSI
volume and select Change volume type to NFS/SMB.
6. Observe that the volume type has changed in the Volumes panel.

CloudLink® Amazon Web Services Administration Guide
Software Version 2.2 40 Document Version 1.0
© Copyright 2014 AFORE Solutions Inc. All rights reserved.
NOTES: If the new volume type is iSCSI, you must reactivate the disk from the disk management facility
on the client PC and configure CHAP credentials for use in performing access to the iSCSI target.
3.5.9 Changing a Volume Name
A name change affects only the name as it appears in CloudLink Center. The name change does not change
the path of the storage.
To change the volume name for a storage volume:
1. Log in as a secadmin user (see 2.1 Connecting to CloudLink Center over the Web on page 7).
2. From the Topology Tree, select a CloudLink instance.
3. Click the Storage tab then the Configuration tab.
4. Click Volumes in the Options panel.
5. Right-click a volume and select Rename.
6. Enter a new name for the volume and press the Enter key.
3.5.10 Viewing Storage Statistics for a Volume
You can view storage statistics for each encrypted volume attached to a CloudLink instance.
The following storage statistics are available in CloudLink Center in both graph and table form:
Read/write rate (KBps)
Read/write operations (operations/s)
Read/write latency (ms)
By default, the Statistics graph represents the statistics collected within the last 10 minutes. You can apply
the appropriate time interval to the statistics (5 minutes, 10 minutes, 20 minutes, 30 minutes, or 1 hour). The
statistics are collected every minute.
To see the traffic statistics collected over the last 24 hours, use the CloudLink Performance Report feature.
For more information, see Performance Reports on page 50.

CloudLink® Amazon Web Services Administration Guide
Software Version 2.2 41 Document Version 1.0
© Copyright 2014 AFORE Solutions Inc. All rights reserved.
To view storage statistics:
1. From the Topology Tree, select a CloudLink instance.
2. Click the Storage tab and then the Statistics tab.
3. In the Volume Name dropdown list, select a secure storage volume.
4. Use the Read and Write checkboxes to control whether read and write statistics are displayed. The
graph always displays Total statistics which are a summary of total read and write activity.
The storage rate statistics are displayed. For example:
5. In the Time Interval list, select an interval.
6. To view the read/write rate statistics, click I/O Rate in the Options panel.
7. To view the storage read/write latency statistics, click I/O Latency in the Options panel.
8. To view storage read/write operations statistics, click I/O Operations in the Options panel.
NOTE: No storage statistics are updated when the storage is locked.

CloudLink® Amazon Web Services Administration Guide
Software Version 2.2 42 Document Version 1.0
© Copyright 2014 AFORE Solutions Inc. All rights reserved.
3.5.11 Merging Volumes
By default, CloudLink is configured to merge multiple EBS volumes into a single encrypted volume. If you
previously changed to a split volume configuration and now wish to revert to a merged volume model, you
can merge all volumes of a given volume type into a single encrypted volume. The storage volume name will
be secure0. The Device column will show a range of devices, for example, sdb-sde, to indicate that the
volume aggregates four disks: sdb, sdc, sdd and sde. The displayed Size of the multi-disk volume will
represent the sum of all aggregated storage disks sizes. For example:
WARNING: Merging volumes erases all data on the disk.
The results of a volume merge are as follows:
All data on the disk is lost.
The storage keys are lost and the ACL configuration is lost.
The storage write mode is set to Sync.
To merge all volumes:
1. Log in as a secadmin user (see 2.1 Connecting to CloudLink Center over the Web on page 7).
2. From the Topology Tree, select a CloudLink instance.
3. Click the Storage tab then the Configuration tab.
4. Click Volumes in the Options panel.
5. From the Volumes panel, select all volumes by clicking the Volume Name checkbox.
CloudLink® Amazon Web Services Administration Guide
Software Version 2.2 43 Document Version 1.0
© Copyright 2014 AFORE Solutions Inc. All rights reserved.
6. Right-click a volume and select Merge. Click Yes in the confirmation window.
7. Once the Storage tab reappears, select it to view the results.
3.5.12 Splitting Volumes
You can split the volume of a merged volume into its original volumes. The storage volume names will be
secure0-xx where xx starts at 01. The Device rows will show the original device names, for example, sdb,
sdc, sdd, and sde. The displayed Size of the volumes will show the original disk sizes.
WARNING: Splitting a volume erases all data on the disks.
The results of a volume split are as follows:
All data on the disk is lost.
The storage key for the merged volume is lost and the ACL configuration is lost.
The storage write mode is set to Sync.
To split a volume:
1. Log in as a secadmin user (see 2.1 Connecting to CloudLink Center over the Web on page 7).
2. From the Topology Tree, select a CloudLink instance.
3. Click the Storage tab then the Configuration tab.
4. Click Volumes in the Options panel.
5. From the Volumes panel, right-click the volume and select Split. Click Yes in the confirmation
window.

CloudLink® Amazon Web Services Administration Guide
Software Version 2.2 44 Document Version 1.0
© Copyright 2014 AFORE Solutions Inc. All rights reserved.
6. Once the Storage tab reappears, select it to view the results. For example:
3.5.13 Changing the Volume Write Mode
The default write mode for NFS/SMB and iSCSI storage devices is synchronous. You can change the write
mode to asynchronous for the purpose of reducing data transfer times to storage devices. In the
asynchronous write mode, loss of data can occur under certain network failure scenarios.
NOTE: After changing the write mode for an iSCSI volume, you must reactivate the disk from the disk
management facility on the client PC.
To change the write mode of a volume:
1. Log in as a secadmin or admin user (see 2.1 Connecting to CloudLink Center over the Web on page 7).
2. From the Topology Tree, select a CloudLink instance.
3. Click the Storage tab then the Configuration tab.
4. Click Volumes in the Options panel.
5. From the Volumes panel, right-click a volume and select the appropriate option; Change Write
Mode to async or Change Write Mode to sync.

CloudLink® Amazon Web Services Administration Guide
Software Version 2.2 45 Document Version 1.0
© Copyright 2014 AFORE Solutions Inc. All rights reserved.
3.5.14 Formatting the Volumes
To format a storage volume:
1. Log in as a secadmin or admin user (see 2.1 Connecting to CloudLink Center over the Web on page 7).
2. From the Topology Tree, select a CloudLink instance.
3. Click the Storage tab then the Configuration tab.
4. Click Key in the Options panel.
5. Select one or more volumes and right-click a selected volume.
6. Select Format from the menu.
The format operation formats the volume and encrypts it with a new key, rendering old data unusable. The
generated key has a name in the following format:
volumeName_yyyyMMdd_HHmmss.key
where: volumeName - the name of volume yyyyMMdd - key generation date HHmmss - key generation time
For example, secure0-01_20131008_033222.key
3.6 Accessing Secure Storage
Once access to a CloudLink instance secure storage has been granted to virtual servers, the storage is
made available to those devices over NFS/SMB or iSCSI.
If you opted to have the encrypted storage presented as a merged volume, the storage volume name is
secure0.
It you opted to split the encrypted storage into multiple volumes, the volume name format is as secure0-xx
where xx represents the numerical identifier of the encrypted storage volume. For example, secure0-01 to
secure0-11.

CloudLink® Amazon Web Services Administration Guide
Software Version 2.2 46 Document Version 1.0
© Copyright 2014 AFORE Solutions Inc. All rights reserved.
3.6.1 Storage Access in an EC2 Environment
To access an encrypted secure storage from a Windows machine in an EC2 environment, launch a file
browser from a qualified instance and enter the domain name of the CloudLink instance followed by the
secure storage name. For example, a CloudLink instance with an EIP address of 54.232.178.105, may be
accessed as follows:
\\ec2-54-232-178-105.sa-east-1.compute.amazonaws.com\secure0
To test the storage, you can create a folder on the encrypted storage volume. For example:
To access the same encrypted secure storage from a Linux machine, you would mount the drive as follows:
mount ec2-54-232-178-105.sa-east-1.compute.amazonaws.com:/secure0/
mnt/ folderName
3.6.2 Storage Access in a VPC Environment
To access an encrypted secure storage from a Windows machine in an VPC environment, launch a file
browser from a qualified instance and enter the private IP address of the CloudLink instance followed by the
secure storage name. For a CloudLink instance with a private IP address of 10.0.0.103 with a single volume,
we have the following entry:
\\10.0.0.103\secure0
For external access, you can use the public IP address.
To access the same encrypted secure storage from a Linux machine, you would mount the drive as follows:
mount 10.0.0.103:/secure0/mnt/ folderName

CloudLink® Amazon Web Services Administration Guide
Software Version 2.2 47 Document Version 1.0
© Copyright 2014 AFORE Solutions Inc. All rights reserved.
3.7 Configuring CloudLink Center Session Timeout
CloudLink Center can be configured to close user sessions after a specified period of inactivity. If no
operations are performed by the user for the period specified, the user is logged out and the login page is
displayed. Note that actions such as switching CloudLink Center tabs, which do not affect the CloudLink
system state, will not trigger a reset of the session countdown timer.
To configure the Session Timeout for a CloudLink instance:
1. Log in as a secadmin or admin user (see 2.1 Connecting to CloudLink Center over the Web on page 7).
2. From the Topology Tree, select a CloudLink instance.
3. Click the Administration tab.
4. From the Options panel, click Session Setup.
5. Enter a value in minutes from 0 to 60 for Session timeout. Entering 0 disables the session timeout
feature.
6. Click Apply. For example:

CloudLink® Amazon Web Services Administration Guide
Software Version 2.2 48 Document Version 1.0
© Copyright 2014 AFORE Solutions Inc. All rights reserved.
3.8 Configuring a Domain Name Server
The CloudLink instance may be configured to resolve hostnames using a Domain Name Server (DNS).
This section shows you how to add and delete a DNS from a CloudLink instance.
To add a DNS:
1. Log in as a secadmin or admin user (see 2.1 Connecting to CloudLink Center over the Web on page 7).
2. From the Topology Tree, select a CloudLink instance.
3. Click the Administration tab.
4. Click DNS.
5. Enter the IP address of the DNS in the IP address field.
6. Click Add. For example:
To delete a DNS server:
1. Log in as a secadmin or admin user (see 2.1 Connecting to CloudLink Center over the Web on page 7).
2. From the Topology Tree, select a CloudLink instance.
3. Click the Administration tab.
4. Click DNS.
5. In the DNS Servers list, right-click the DNS you wish to delete.
6. Click Delete.

CloudLink® Amazon Web Services Administration Guide
Software Version 2.2 49 Document Version 1.0
© Copyright 2014 AFORE Solutions Inc. All rights reserved.
3.9 Configuring a Network Time Protocol Server
You can synchronize a CloudLink instance with a time of day obtained from Network Time Protocol (NTP)
servers. By default, CloudLink is configured with four NTP servers.
This section shows you how to add and delete a NTP server.
To add a NTP Server:
1. Log in as a secadmin or admin user (see 2.1 Connecting to CloudLink Center over the Web on page 7).
2. From the Topology Tree, select a CloudLink instance.
3. Click the Administration tab.
4. Click NTP.
5. Enter the IP address or hostname of the NTP server in the NTP Server field.
NOTE: If you are planning to use a hostname for the NTP server, ensure that you have configured at
least one DNS server first. See Configuring a Domain Name Server on page 48.
6. Click Add. For example:
7. To view the current date and time of day used by the CloudLink instance, observe the date and time
displayed in Date and Time panel. For example:
NOTE: License activation is based on the time and date of the CloudLink instance. Ensure that the
servers associated with encrypted storage are synchronized with the time and date of the CloudLink
instance.

CloudLink® Amazon Web Services Administration Guide
Software Version 2.2 50 Document Version 1.0
© Copyright 2014 AFORE Solutions Inc. All rights reserved.
To delete a NTP server:
1. Log in as a secadmin or admin user (see 2.1 Connecting to CloudLink Center over the Web on page 7).
2. From the Topology Tree, select a CloudLink instance.
3. Click the Administration tab.
4. Click NTP.
5. In the NTP Servers list, right-click the NTP server you wish to delete.
6. Click Delete.
3.10 Generating Performance Reports
CloudLink Center lets you generate and save a report containing storage statistics for the last 24 hours.
The report is saved in the Microsoft Excel format (.xls). Report generation is available for the secadmin,
admin, and observer user accounts.
You can generate reports for a particular type of storage statistics or a combination of particular storage
statistic types (Rate, Operations, and Latency).
The name of the generated report has the following format:
volumeName_yyyy-MM-dd_HH-mm-ss.xls
where:
volumeName - name of the CloudLink instance volume
yyyy-MM-dd - report generation date
HH-mm-ss - report generation time
For example:
secure0_2013-11-25-15-45-25.xls
The report includes the volume name and the CloudLink name, for example:
i-99c618c3

CloudLink® Amazon Web Services Administration Guide
Software Version 2.2 51 Document Version 1.0
© Copyright 2014 AFORE Solutions Inc. All rights reserved.
To generate a storage statistics report:
1. From the Topology Tree, click a CloudLink instance.
2. Click the Storage tab and then the Statistics tab.
3. From the Options panel, select Report.
4. In the Export Performance window, select the types of storage statistics to include in the report and
click the Download Report link. For example:
Depending on the download settings of your Web browser, you may be asked to specify the location
to which to save the report. Otherwise, the report will be saved to the default downloads location
specified in the browser settings.
NOTE: Performance reports for Storage Statistics provide values averaged over 20-second periods
whereas the graphs are based on values averaged over 60-second periods.
An excerpt from an example storage statistics report for CloudLink i-99c618c3 and secure volume secure0
follows:
You can access each statistic type by clicking on the appropriate tab at the bottom of the spreadsheet.

CloudLink® Amazon Web Services Administration Guide
Software Version 2.2 52 Document Version 1.0
© Copyright 2014 AFORE Solutions Inc. All rights reserved.
3.11 Logs and Events
CloudLink Center logs provide comprehensive information about all activity associated with the CloudLink
instance. All CloudLink logs have four categories:
Actions
Alarms
Events
Security events
NOTE: CloudLink Center displays only those logs generated over the past six hours. A maximum of 60 log records
is displayed for each log category. However, CloudLink stores all logs for two days for reporting via SNMP. To
configure CloudLink for SNMP, see SNMP Configuration on page 57.
To view all logs, log on to in CloudLink Center as a secadmin user. A CloudLink admin user can view
Actions, Alarms, and Events logs. The CloudLink observer user can view only Alarms and Events logs.
This section covers the following topics:
Viewing the CloudLink Actions Log
Viewing the CloudLink Alarms Log
Viewing the CloudLink Events Log
Viewing the CloudLink Security Events Log

CloudLink® Amazon Web Services Administration Guide
Software Version 2.2 53 Document Version 1.0
© Copyright 2014 AFORE Solutions Inc. All rights reserved.
3.11.1 Viewing the CloudLink Actions Log
To view the CloudLink Actions log, click the actions icon at the bottom of the CloudLink Center window:
Each action record will stay active for 5 minutes and then will be cleared from the panel (fixed time out).
You can use the Show all checkbox to display all Action records, including the timed-out records.
NOTE: The actions icon appears dimmed if the log contains no records and if all the action
records have timed out.
The Actions log window shows the actions associated with particular user actions. For example:
An action record contains the following information:
Name: Action name.
Object: The name of the instance from which the action was performed.
Status: Action status.
User: User who performed the action.
IP: The IP address of the computer where the action was performed.
Started: Action started time stamp.
Completed: Action completed time stamp.
Details: Additional information about the action; for example, why the action failed.

CloudLink® Amazon Web Services Administration Guide
Software Version 2.2 54 Document Version 1.0
© Copyright 2014 AFORE Solutions Inc. All rights reserved.
3.11.2 Viewing the CloudLink Alarms Log
To view the CloudLink Alarms log, click the alarms icon at the bottom of the CloudLink Center window:
NOTE: The alarms icon appears dimmed if the log contains no unacknowledged alarm records.
The Alarms log window records all major and critical severity alarms.
An alarms record contains the following information:
Time: The alarm generation time.
Name: The alarm name.
Object: The name of the instance from which the alarm was generated.
3.11.3 Viewing the CloudLink Events Log
To view the CloudLink Events log, click the events icon at the bottom of the CloudLink Center window:
Each event record will stay active for 5 minutes and then will be cleared from the panel (fixed time out).
You can use the Show all checkbox to show all Events records, including the timed-out records.
NOTE: The events icon appears dimmed if the Events log contains no records and if all the Event
records have timed out.
The Events log window records all moderate and minor severity events.
An events record contains the following information:
Time: The event generation time.
Name: The event name.
Object: The name of the instance where the event was generated.

CloudLink® Amazon Web Services Administration Guide
Software Version 2.2 55 Document Version 1.0
© Copyright 2014 AFORE Solutions Inc. All rights reserved.
3.11.4 Viewing the CloudLink Security Events Log
To view the CloudLink Security Events log, open CloudLink Center using the secadmin user account and
click the security events icon at the bottom of the CloudLink Center window:
Each security event record will stay active for 5 minutes and then will be cleared from the panel (fixed time
out).
You can use the Show all checkbox to show all Security Event records, including the timed-out records.
NOTE: The security events icon appears dimmed if the Security Events log contains no records
and if all the Security Event records have timed out.
The Security Events log window shows all CloudLink security events.
A security event record contains the following information:
Time: The security event generation time.
Action: The action name.
User: User who performed the action.
Object: The name of the instance where the security event was generated.
IP: IP address of the computer where the action was performed.
Permission: Status indicating whether the user is allowed to perform the action.
Details: Additional information about the action.
NOTE: Security events with the Permission of Denied are displayed in red.
3.12 Configuring Syslog
CloudLink Center lets you configure a syslog logger. When the syslog logger is configured, all system log
messages are directed to the configured remote host via UDP Port 514. The log messages still appear in the
CloudLink Center window. The priority levels are as follows:
The info (information) priority level tag is assigned to the event logs.
The notice priority level tag is assigned to the action logs.

CloudLink® Amazon Web Services Administration Guide
Software Version 2.2 56 Document Version 1.0
© Copyright 2014 AFORE Solutions Inc. All rights reserved.
The alert priority level tag is assigned to both the security events logs and alarms.
3.12.1 Configuring a Syslog Logger
To configure a syslog server:
1. Log in as a secadmin or admin user (see 2.1 Connecting to CloudLink Center over the Web on page 7).
2. From the Topology Tree, select a CloudLink instance.
3. Click the Tools tab and then the Monitoring tab.
4. From the Options panel, select Syslog.
5. On the Syslog tab, in the Host box, specify the IP address of the host to which the message logs
will be sent.
6. In the Facility list, select the facility on which the syslog messages are to be logged.
7. Click Apply. For example:
NOTE: By default, the syslog server status is Postponed, which means that logs are not sent out until the
Syslog status is explicitly set to Resume.
8. Right-click a host and select Resume.
9. Observe that the status changes to Accessible.
NOTE: Once syslog is activated with the Resume command, messages will be sent to the configured
Syslog server until the Postpone command is selected.
If communication with the Syslog server fails, the syslog status is set to Inaccessible.

CloudLink® Amazon Web Services Administration Guide
Software Version 2.2 57 Document Version 1.0
© Copyright 2014 AFORE Solutions Inc. All rights reserved.
3.12.2 Viewing Syslog Output
To view the syslog output as stored in the facility:
1. Log in to the host where the system logs are stored.
2. Access the directory where the logs are located.
3. Enter the following command:
$ tail /var/log/syslog
3.13 Configuring SNMP
CloudLink can generate SNMPv2 traps for the logs it records. It also provides MIBs which support get, get-
next, and walk operations for several CloudLink performance monitors.
NOTE: CloudLink stores all logs for two days for reporting via SNMP.
This section covers the following topics:
Viewing SNMP Configuration
Creating a New Community String
Deleting a Community String
Viewing SNMP Trap Destinations
Creating a new SNMP Trap Destination
Deleting an SNMP Trap Destination
Downloading CloudLink MIBs

CloudLink® Amazon Web Services Administration Guide
Software Version 2.2 58 Document Version 1.0
© Copyright 2014 AFORE Solutions Inc. All rights reserved.
3.13.1 Viewing SNMP Configuration
To view CloudLink’s SNMP configuration:
1. Log in as a secadmin or admin user (see 2.1 Connecting to CloudLink Center over the Web on page 7).
2. From the Topology Tree, select a CloudLink instance.
3. Click the Tools tab and then the Monitoring tab.
4. From the Options panel, select SNMP V2. For example:
3.13.2 Creating a New Community String
To create a new community string:
1. Log in as a secadmin or admin user (see 2.1 Connecting to CloudLink Center over the Web on page 7).
2. From the Topology Tree, select a CloudLink instance.
3. Click the Tools tab and then the Monitoring tab.
4. From the Options panel, select SNMP V2.
5. Specify the Community String parameter.

CloudLink® Amazon Web Services Administration Guide
Software Version 2.2 59 Document Version 1.0
© Copyright 2014 AFORE Solutions Inc. All rights reserved.
6. Select the required Access Role from the dropdown list in the Configuration panel.
7. Click Add. For example:
8. To change the receive port number for the SNMP agent, specify the port number and click Apply.
The valid port numbers are 161 (default) and any value from 1024 to 65535.
3.13.3 Deleting a Community String
To delete a community string:
1. Log in as a secadmin or admin user (see 2.1 Connecting to CloudLink Center over the Web on page 7).
2. From the Topology Tree, select a CloudLink instance.
3. Click the Tools tab and then the Monitoring tab.
4. In the Options panel, select SNMP V2.
5. In the SNMP V2 panel, right-click a community and select Delete.
6. In the Confirmation window, click Yes.

CloudLink® Amazon Web Services Administration Guide
Software Version 2.2 60 Document Version 1.0
© Copyright 2014 AFORE Solutions Inc. All rights reserved.
3.13.4 Viewing SNMP Trap Destinations
To view SNMP trap destinations:
1. Log in as a secadmin or admin user (see 2.1 Connecting to CloudLink Center over the Web on page 7).
2. From the Topology Tree, select a CloudLink instance.
3. Click the Tools tab and then the Monitoring tab.
4. In the Options panel, select SNMP Traps. For example:
The Trap Destinations panel shows the configured SNMP trap destinations. The default is no SNMP
trap destinations.
3.13.5 Creating a new SNMP Trap Destination
To create a new SNMP trap destination:
1. Log in as a secadmin or admin user (see 2.1 Connecting to CloudLink Center over the Web on page 7).
2. From the Topology Tree, select a CloudLink instance.
3. Click the Tools tab and then the Monitoring tab.
4. From the Options panel, select SNMP Traps.
5. In the New Trap Destination panel, specify the following parameters:
IP: The trap destination host IP address.
Port: The UDP port used for sending SNMP traps.
Community String: The SNMP community string.

CloudLink® Amazon Web Services Administration Guide
Software Version 2.2 61 Document Version 1.0
© Copyright 2014 AFORE Solutions Inc. All rights reserved.
6. Click Add. For example:
3.13.6 Deleting an SNMP Trap Destination
To delete an SNMP trap destination:
1. Log in as a secadmin or admin user (see 2.1 Connecting to CloudLink Center over the Web on page 7).
2. From the Topology Tree, select a CloudLink instance.
3. Click the Tools tab and then the SNMP tab.
4. From the Options panel, select Trap Destinations.
5. In Trap Destinations panel, right-click a trap destination and click Delete.
6. In the Confirmation window, click Yes.
3.13.7 Downloading CloudLink MIBs
To download the CloudLink MIBs:
1. Log in as a secadmin or admin user (see 2.1 Connecting to CloudLink Center over the Web on page 7).
2. From the Topology Tree, select a CloudLink instance.
3. Click the Tools tab and then the Monitoring tab.
4. From the Options panel, select MIBs.

CloudLink® Amazon Web Services Administration Guide
Software Version 2.2 62 Document Version 1.0
© Copyright 2014 AFORE Solutions Inc. All rights reserved.
5. To download a MIB file, select the file from the MIBs panel, click Download, and select a file location
from the dialog. For example:

CloudLink® Amazon Web Services Administration Guide
Software Version 2.2 63 Document Version 1.0
© Copyright 2014 AFORE Solutions Inc. All rights reserved.
Terms and Acronyms
ACL Access Control List
AD Active Domain
AMI Amazon Machine Image
AWS Amazon Web Services
AWS Marketplace An online store of software and services to build products and run businesses. AWS Marketplace includes databases, application servers, testing tools, monitoring tools, content management, and business intelligence software.
CHAP Challenge-Handshake Authentication Protocol
DNS Domain Name Server
DPM Data Protection Manager
EBS Elastic Block Store
EC2 Elastic Compute Cloud
EULA End User License Agreement
FQDN Fully Qualified Domain Name
GB Gigabyte
HTTP Hypertext Transfer Protocol
HTTPS Hypertext Transfer Protocol Secure
I/O Input/Output
IOPS Input/Output Operations per Second
IP Internet Protocol
iSCSI Internet Small Computer System Interface
IQN iSCSI Qualified Name
ISO International Organization for Standardization
KBps Kilobytes per second
LAN Local Area Network
MAC Media Access Control
MIB Management Information Base
ms Milliseconds
NAS Network-attached Storage
NFS Network File System
NTP Network Time Protocol
SMB Server Message Block
SNMP Simple Network Management Protocol
SSH Secure Shell

CloudLink® Amazon Web Services Administration Guide
Software Version 2.2 64 Document Version 1.0
© Copyright 2014 AFORE Solutions Inc. All rights reserved.
TB Terabyte
TCP Transmission Control Protocol
UDP User Datagram Protocol
URL Uniform Resource Locator
UTC Coordinated Universal Time
vDC Virtual Data Center
VPC Virtual Private Cloud

CloudLink® Amazon Web Services Administration Guide
Software Version 2.2 65 Document Version 1.0
© Copyright 2014 AFORE Solutions Inc. All rights reserved.
Appendix A: Configuring AD for Key Store
To use Active Directory to store CloudLink encryption keys, deploy a Windows Server so that it will be
accessible by the CloudLink Gateway from its private LAN network.
This appendix shows you how to configure the Active Directory for the CloudLink encryption key store on
Windows 2003 or 2008 Server that is configured as a domain controller.
To configure the Active Directory for the CloudLink encryption key store on Windows 2003 or 2008
Server that is configured as a domain controller:
1. Setup Organization unit on Windows Server:
a. On the Windows taskbar, click the Start button, select All Programs -> Administrative Tools,
and select Active Directory Users and Computers.
b. Create an Organization Unit by expanding your domain name, and right-click, highlight New and
click Organizational Unit.
c. Specify a Name (for example, CloudLink_OU).
d. Right-click the Organization Unit (for example, CloudLink_OU), highlight New and select Group.
e. Specify the Group Name (for example, CloudLink_Group).
2. Create a bind user.
a. Select Global and Security.
b. Right-click the Organization Unit (for example, CloudLink_OU), highlight New and select User.
c. Specify the First Name (for example, Cloud), Last Name (for example, Link), login name and
click Next.
d. Specify the Password and click Finish.
e. Right click the Organization Unit (for example, CloudLink_OU) and select Delegate Control.
f. Click Next to follow setup wizard.
g. Click Add and specify the CloudLink group name (for example,. CloudLink_Group) and click OK
and then click Next.
h. Select Create a custom task to delegate and click Next.
i. Select the first bullet: This folder, existing objects in this folder, and creation of new
objects in this folder and select Next.

CloudLink® Amazon Web Services Administration Guide
Software Version 2.2 66 Document Version 1.0
© Copyright 2014 AFORE Solutions Inc. All rights reserved.
j. Select Full Control and click Next.
k. Select Finish.
3. Add the bind user to the security group.
a. Double-click Security Group.
b. Click the Members tab.
c. Click Add.
d. Type the bind user name.
e. Click OK.
4. Record the DN of CloudLink.
a. Click Start button, select Run.
b. Enter cmd and select OK.
c. Enter dsquery OU (Support tool is required) and record the DN (for example,
OU=CloudLink_OU,DC=company,DC=com).
5. Apply domain controller in CloudLink.
a. Log in to CloudLink Center with secadmin user.
b. Select the CloudLink Gateway server in the topology tree .
c. Click on the Security tab.
d. Click on the Key Store tab.
e. Click the Active Directory link in Options.
f. Enter the IP address of the Windows Server for Host.
g. Enter the DN recorded in step 4 (for example, OU=CloudLink_OU,DC=company,DC=com)
for Base DN.
h. Enter User name from step 2c (for example, Fred Smith) for User and select Apply.

CloudLink® Amazon Web Services Administration Guide
Software Version 2.2 67 Document Version 1.0
© Copyright 2014 AFORE Solutions Inc. All rights reserved.
Appendix B: RSA DPM Configuration
To use RSA DPM to store encryption keys, ensure that an RSA DPM server is accessible from the CloudLink
instance via its private LAN network. The supported RSA DPM versions are 3.2 and 3.5. Verify that the client
certificates have been created and uploaded to the RSA DPM server, and that they are accessible from the
CloudLink instance.
To configure the RSA DPM for storage of CloudLink encryption keys:
1. Log on to the RSA Data Protection Manager console.
2. Create an identity that belongs to a particular RSA DPM identity group. For example:
3. Create a security class object with Infinite duration that belongs to the same RSA DPM identity
group. For example:
4. Click Next until Step 5 is displayed, then click Finish.

CloudLink® Amazon Web Services Administration Guide
Software Version 2.2 68 Document Version 1.0
© Copyright 2014 AFORE Solutions Inc. All rights reserved.
Appendix C: Migrating the Encrypted Storage
If there is a situation where the existing CloudLink instance needs to be replaced, either because of a
CloudLink instance failure or the presence of a newer version of CloudLink, you can migrate the encrypted
EBS volumes to a new CloudLink instance.
NOTE: To retain access to the secure storage in the event of an unrecoverable failure of the CloudLink instance, you
must export and securely save all keys before the occurrence of an unrecoverable CloudLink instance failure. The
exported keys will allow you to access the storage volumes from another CloudLink instance. You can also log the
CloudLink instance configuration in a deployment worksheet provided in the CloudLink Amazon Web Services
Deployment Guide.
To migrate the encrypted storage volumes of a CloudLink instance:
1. Backup all data associated with the CloudLink encrypted storage as a precaution.
NOTE: The use of AWS volume Snapshots as a backup mechanism is not supported for merged volumes.
2. If not already done, document the configuration of the EBS volumes attached to the CloudLink
instance. You can use the deployment worksheet template from the CloudLink Amazon Web
Services Deployment Guide to log the configuration of the CloudLink Instance.
3. From the AWS EC2 console, select Volumes and select all data EBS volumes attached to the
CloudLink instance.
NOTES:
For merged volume configurations, the encrypted EBS volumes must be attached as a set, meaning
that for the encrypted data to be accessible, all encrypted EBS volumes must be attached.
For split volume configurations, each encrypted EBS storage volume is treated separately and can
be attached separately.
Sorting the volumes based on the Attachment Information column may facilitate the identification
of the EBS volumes associated with the CloudLink instance.

CloudLink® Amazon Web Services Administration Guide
Software Version 2.2 69 Document Version 1.0
© Copyright 2014 AFORE Solutions Inc. All rights reserved.
In the following example, the CloudLink instance has an 8 GB operating system root volume and
three 30 GB EBS encrypted volumes. Only the three 30 GB EBS encrypted volumes will be moved
to the replacement CloudLink instance.
4. Select all of the EBS encrypted storage volumes associated with the CloudLink instance and record
the Volume ID before detaching the EBS volumes from the original CloudLink instance. For
example:
NOTES:
As mentioned previously, if working with a CloudLink merged volume configuration, the CloudLink
encrypted EBS volumes must be treated as a set of volumes, meaning that all three data volumes in
this example must be attached to the new CloudLink instance for the data to be usable. Attaching
only two of the three CloudLink encrypted EBS volumes would cause all of the encrypted data to be
inaccessible.
For split volume deployments, each CloudLink encrypted EBS volume can be treated as separate
and independent volumes and attached to the new CloudLink instance independently
5. Right-click a selected volume and select Detach Volume. If the detach process fails, use the Force
Detach option.
6. Import the saved keys.
7. Attach the encrypted EBS volumes to the new CloudLink instance.
8. Reboot the CloudLink instance.
9. Test read/write access to the storage volumes.

CloudLink® Amazon Web Services Administration Guide
Software Version 2.2 70 Document Version 1.0
© Copyright 2014 AFORE Solutions Inc. All rights reserved.
Appendix D: CloudLink Tabs and Options
This section provides an overview of the available tabs and options as viewed from the CloudLink Center
user interface. Links to the topics are also included.
CloudLink Role
Tab Sub-tab Options Access Role Help Topic Link
Gateway Administration User Accounts Session Setup DNS NTP AD Domain
admin, secadmin
19 47 48 49
23 and 65
Gateway Map All
Gateway Security Key Store Local Active Directory RSA DPM Schedule
secadmin
26
Gateway Security VPN Certificates Configuration One-time Passcode
Not used
Not available
Gateway Storage Configuration Key Volumes Access License
secadmin
32 38 to 44
34 and 35 25
Gateway Storage Statistics I/O Rate I/O Latency I/O Operations Report
All 40
Gateway System Storage License Version Control Eula Ancillary Software
admin, secadmin
25
Not available 10 10
Gateway Tools Deployment vCloud Director Amazon Cloud Windows Azure
Not used
Not available
Gateway Tools Monitoring Syslog SNMP V2 SNMP Traps MIBs
admin, secadmin
55 57 60 61