ckt-tf1525e kit system · 2019-02-22 · celestion ckt-tf1525e ckt-tf1525e kit system the...
TRANSCRIPT

CELESTION CKT-TF1525e
CKT-TF1525e Kit System
The CKT-TF1525e kit system is a high performance 2-way speaker design suitable forstand mounting. This system comprises the TF1525e 15”(380mm) bass/midrange driverand CDX1-1747 compression driver fitted with the H1-9040 horn. The system offerswide bandwidth, high sensitivity and high output capability and can be used either stand-alone or with a sub-woofer. The 90x40 horn ensures good coverage over a wide area.
ComponentsSystem Bass Driver Compression
DriverHorn Crossover
CKT-TF1525e TF1525e CDX1-1747 H1-9040 CX-TF1525e

CELESTION CKT-TF1525e
CELESTION CKT-TF1525e

CELESTION CKT-TF1525e
Measured Data
On-Axis Frequency Response (2m measurement normalized to 2.83V/1m)

CELESTION CKT-TF1525e
Input Impedance
Horizontal Dispersion: on-axis(red), 30(green), 60deg(yellow)(2m measurements normalized to 2.83V/1m)

CELESTION CKT-TF1525e
Vertical Dispersion: on-axis(red), +10deg(green), -10deg(yellow)(1m measurements normalized to 2.83V)
Directivity: -6dB beamwidth
Frequency/Hz 500 800 1k 2k 5k 8k 10k 15kBeamwidth (deg) 120 104 108 66 74 50 50 30
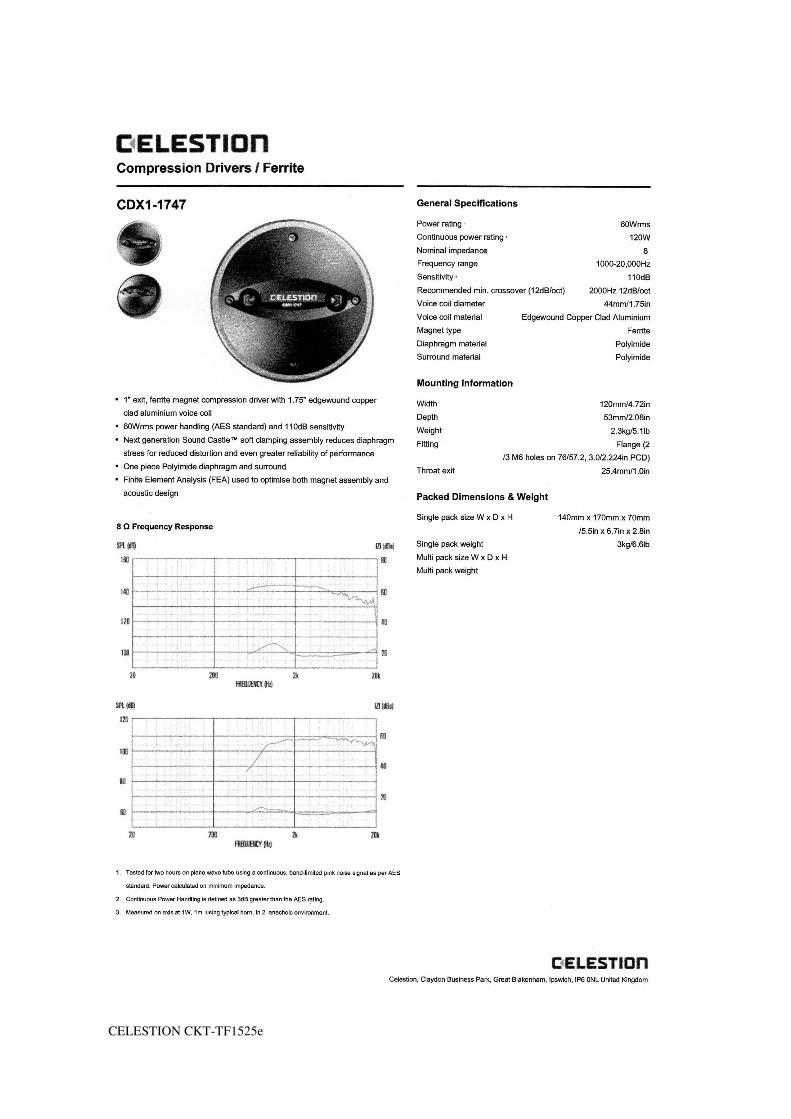
Specifications:
Format: 2-way systemDrivers: TF1525e, CDX1-1747 (H1-9040)Sensitivity: 97.5dB (2.83V)Input Impedance: 8ohms (nominal), 8.2 ohms (minimum)Rated System Power: 450W (EIA), 1800W (peak)LF Extension: 70Hz (-3dB), 50Hz(-10dB)Crossover Frequency: 2.1 kHzMaximum Output Level: 124dB (Continuous), 130dB (Peak)LF Unit Power Rating: 300W (AES)Horn Directivity: 90deg H x 40deg VHigh Pass Filter: 60-70HzInternal Volume: 76LPort Tuning Frequency: 55HzPort Dimensions: 2 x (Diameter 100mm x Length 60mm)Port Options: smaller port: 2 x (95Dx49L) / larger port: 2 x (105Dx72L)Dimensions: 730 x 452 x 342mm (H x W x D)

CELESTION CKT-TF1525e
Crossover Network
The crossover schematic and component listing is shown below, along with a suggestedcomponent layout. The network provides a second order roll off for the bass unit andthird order for the compression driver. This results in a fourth order acoustic crossoverbetween the units.
L1 can be either an air core or iron(solid) cored inductor. For an iron core the saturationcurrent needs to be at least 8A and/or it should have a power rating of at least 250W.The capacitors should be polypropylene types for best performance. If the poly-switch isincluded it should be situated at least 30mm or so away from R1 and L1 to avoid its localambient temperature being raised by those components if and when they get warm.
Inductors should, in general, be positioned with their core axes at right angles and withat least 20mm of physical space between them to avoid magnetic interactions. However,they can be positioned with their axes parallel provided they are at the same height andthere is sufficient separation between them. This separation will depend on the inductorsize, core type and winding geometry but an axis separation of 125mm should preventany significant interactions between typical inductors.
The crossover components can be mounted onto a 6mm wooden board, hard-wired andsecured with hot-melt and then with cable ties fitted through holes drilled through theboard. The board can be screwed onto the inner surface of the cabinet, ideally with 6mmspacers to prevent rattling. Cables should be connected in a way that does not stressthe component lead-out wires, tag panels or terminal strips can be used to connect thelead-wires to the circuit. The cable conductor cross-sectional areas should be at least1.5 square mm.

CELESTION CKT-TF1525e
Crossover Schematic: CX-TF1525e
Suggested crossover component layout (Air core L1)
I/P-/LF-/HF-
HF+
I/P+
LF+ L1
L2L2
L1
L2L2
C3
P1
C1/C2
C4R2
R1
R3
I/P-
I/P+L1
LF O/P +
LF O/P -
HF O/P +
HF O/P -
R2 C3
L2
Component Listing - CX-TF1525e
R1 - 1.0 Ohms / 20WR2 - 12 Ohms / 20WR3 - 100 Ohms / 10WL1 - 1.8 mH / dcr < 0.5 Ohms (Air Core) dcr < 0.25 Ohms (Iron Core)L2 - 0.82 mH / dcr< 0.6 Ohms (Air Core)C1 - 10 uF / 250V / DF<0.1%C2 - 2.2 uH / 250V / DF<0.1%C3 - 1.0 uF / 250V / DF<0.1%C4 - 6.8 uF/ 250V/ DF<0.1%P1 - Polyswitch (optional): 1.35A(H)/ 2.7A(T)
P1
I/P-
I/P+L1
C1
LF O/P +
LF O/P -
HF O/P +
HF O/P -
R2
C2
L2
R1
C4P1
R3

CELESTION CKT-TF1525e
Cabinet Design – Tapered
Construction Notes:All joints should be glued and screwed.T-Nuts and fixing bolts are recommended as a means of fixing the units.Ensure that there are no air leaks in the cabinet apart from the ports – foam gasket stripto be used in the mounting of drivers, stand attachment (top-hat) and terminal panel.Internal cables should be carefully positioned to avoid any rattling.18mm MDF can be used instead of 15mm Birch plywood provided the internal volume ismaintained.
FRONT VIEW
BACK VIEW
BOTTOM VIEW
SECTION A-A'
SECTION B-B'
B B'
A
A'
CKT-TF1525E TAPERED CABINET15MM BIRCH PLYALL DIMS IN MM
PORT HOLE CENTRES
8 HOLES EQUALLYSPACED ON 369 PCD
8 HOLES AS SHOWN
88,5
88,5
34
7,5°
260
148,5148,5
165
40
260
81
307
O352
120 50 120
93383
50
50
416
362
290
700
2 92,5
CELESTION CKT-TF1525e
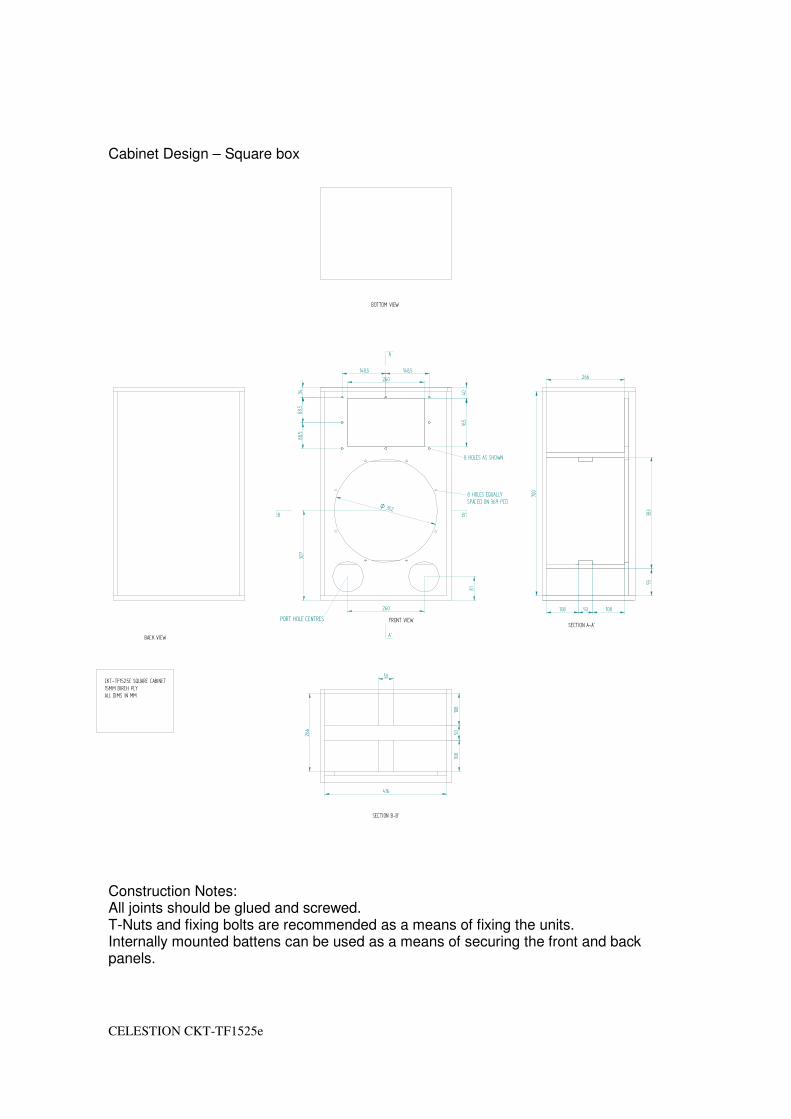
Cabinet Design – Square box
Construction Notes:All joints should be glued and screwed.T-Nuts and fixing bolts are recommended as a means of fixing the units.Internally mounted battens can be used as a means of securing the front and backpanels.
FRONT VIEW
BACK VIEW
BOTTOM VIEW
SECTION A-A'
SECTION B-B'
B B'
A
A'
CKT-TF1525E SQUARE CABINET15MM BIRCH PLYALL DIMS IN MM
8 HOLES EQUALLYSPACED ON 369 PCD
8 HOLES AS SHOWN
88,5
88,5
260
148,5148,5
165
34 40
O 352
307
81
260
PORT HOLE CENTRES
108 50 108
93383
416
108
50108
50
700
266
266
CELESTION CKT-TF1525e
Ensure that there are no air leaks in the cabinet apart from the ports – foam gasket stripto be used in the mounting of drivers, stand attachment (top-hat) and terminal panel.Internal cables should be carefully positioned to avoid any rattling.18mm MDF can be used instead of 15mm Birch plywood provided the internal volume ismaintained.
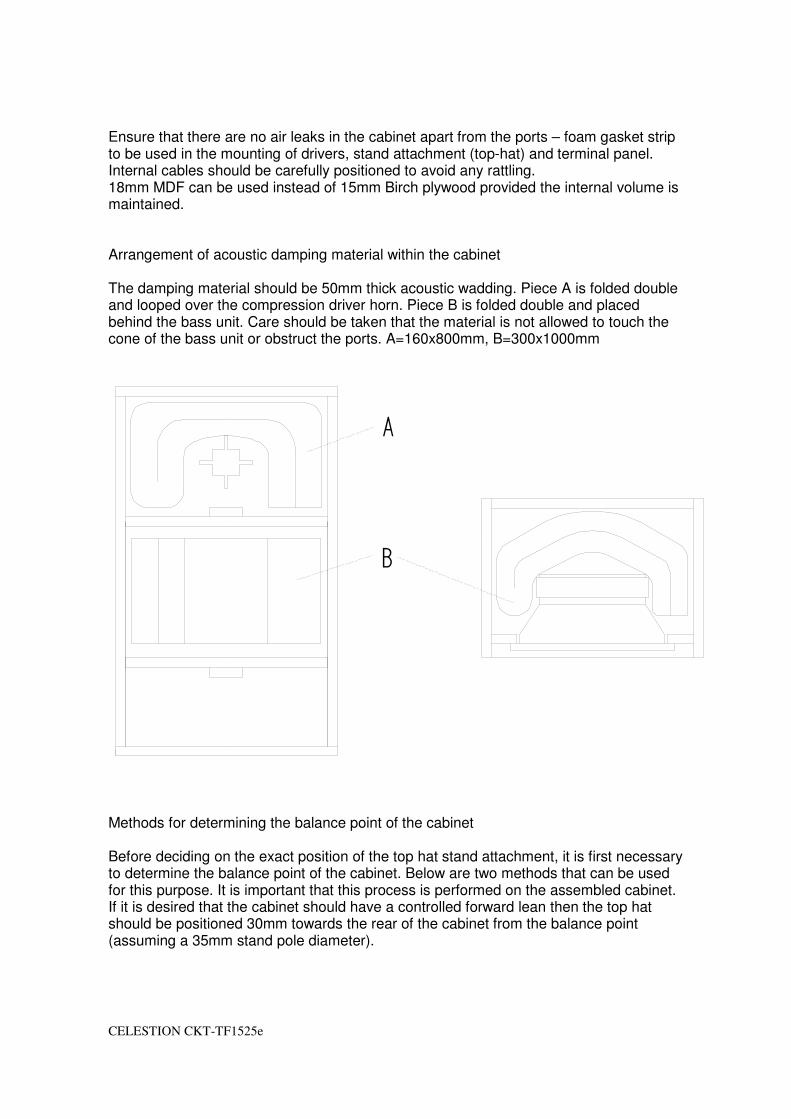
Arrangement of acoustic damping material within the cabinet
The damping material should be 50mm thick acoustic wadding. Piece A is folded doubleand looped over the compression driver horn. Piece B is folded double and placedbehind the bass unit. Care should be taken that the material is not allowed to touch thecone of the bass unit or obstruct the ports. A=160x800mm, B=300x1000mm
Methods for determining the balance point of the cabinet
Before deciding on the exact position of the top hat stand attachment, it is first necessaryto determine the balance point of the cabinet. Below are two methods that can be usedfor this purpose. It is important that this process is performed on the assembled cabinet.If it is desired that the cabinet should have a controlled forward lean then the top hatshould be positioned 30mm towards the rear of the cabinet from the balance point(assuming a 35mm stand pole diameter).
A
B

CELESTION CKT-TF1525e
Method 1:In this method the cabinet is balanced on a wooden strip of 10x10mm cross-sectionwhich runs in the side to side direction. Position markers should be drawn on both sidesof the cabinet to ensure the cabinet is always precisely aligned in the forward direction.Carefully move the cabinet forwards and backwards to determine the front-to-backbalance point. If the cabinet is asymmetrical along its width then this process should berepeated at 90 degrees to determine the left to right balance point.
Method 2:Safety note – this method requires two people, one to support the cabinet and the otherto mark the balance point.The cabinet is carefully placed on top of an inverted top-hat attachment. Move thecabinet relative to the top-hat until the optimum balance point is found. The position ofthe top hat on the bottom of the cabinet can then be marked.
10 x10mm WOOD STRIPFIRMLY FIXED TO WOODENBASE.SIDE VIEW TOP VIEW
POSITION MARKERS ONBOTH SIDES OF CABINET
DETERMINING CABINET BALANCE POINT - METHOD 1
CENTRE-LINE MARK
DETERMINING CABINET BALANCE POINT - METHOD 2
TOP HAT ATTACHMENT
SAFETY NOTE: SECOND PERSON REQUIRED TOSUPPORT CABINET.