civil air patrol’s “fizzy rocket” for use as enrichment ... · concepts as they prepare a...
TRANSCRIPT
Civil Air Patrol’s
“Fizzy Rocket”
For Use As Enrichment After CAP Foam Rocket
by AAS/SW Joint National Project: STEM Outreach
Partners in Aerospace and STEM Education:
Arnold Air Society Civil Air Patrol United States Air Force Air Force Association Silver Wings
Topics: rockets, Newton’s laws of motion, matter (science, math)
Length of Lesson: 45-60 minutes, or as long as is desired, using as much of this lesson as
is needed
Lesson Reference: http://spaceplace.jpl.nasa.gov/en/kids/rocket.shtml
http://www.fmalive.com/_downloads/fizzy20070511.pdf
National Science Standards:
Content Standard B: Physical Science
- Position and motion of objects
Content Standard E: Science and Technology
- Abilities of technological design
- Understanding about science and technology
Objectives:
Students will construct and launch a rocket.
Students will explain and apply Newton’s laws of motion.
Students will identify a solid, liquid, and gas.
Students will demonstrate a chemical reaction.
Background Information:
The lesson, which demonstrates rocketry and Newton’s laws of motion, will take longer
than thirty minutes if each step is followed. If time is an issue, you do NOT need to have
students make the film canister look like a rocket. You may skip step 4 in this lesson plan.
If this is your plan, have the film canisters already filled about 1/3 full of water.
Distribute the prepared film canisters to students along with an effervescent tablet to
use with either the “Fizzy Rocket Data Sheet” or “Fizzy Rocket Experiment Form.”
Materials:
- plastic 35 mm film canisters (keep and reuse over and over)
The film canister must have an internal-sealing lid, like many Fuji and translucent
canisters. The canister MUST have a cap that snaps INSIDE the rim instead of
over the outside of the rim. Photo shops and labs will be happy to save and donate
some for educational purposes; however, these types of canisters are becoming
difficult to find.
They are available for purchase at the following online sites: http://www.teachersource.com/Energy/EnergyConversion/RocketFilmCanisters.aspx http://www.sciencebobstore.com/products.php?product=Bulk-Film-Canisters-for-Rockets http://www.stevespanglerscience.com/product/flying-film-canisters
- effervescent antacid tablet, such as Alka Seltzer
- paper (copy paper or construction paper) - tape
- Fizzy Rocket Data Sheet OR Fizzy Rocket Experiment Form
- scissors
- paper towels
- water
- bucket or pitcher
- eye protection
- index cards (for fins)
NOTE: It is suggested that you allow students to work in pairs or groups of three for
this activity. Determine what is appropriate for the students in your classroom. Also,
determine which Fizzy Rocket data sheet you will use for this activity. (See step 8 below
for more info.)
Consider watching the video available at
http://www.stevespanglerscience.com/product/flying-film-canisters. Unlike examples in
the video, this lesson plan asks the participants to flip the canister upside down after
sealing the lid.
Lesson Presentation:
1. Show a film canister and ask students to record ideas on how to make it fly.
2. Discuss student ideas. Remind students that according to Newton’s third law of
motion, there must be some action to result in a reaction. Also, tell them that
Newton’s first law of motion says that an object at rest will stay at rest unless
there is some force that disrupts its rest. The opposite is also true. An object in
motion will remain in motion unless there is some other force or forces that cause
it to stop its motion. For example, a kickball on the ground stays there resting until
a force causes it to move. Ask students what would cause the kickball to move.
(the force of the moving leg that strikes it) Ask students what force(s) will cause
the kickball to, if it flies up, come back down and stop moving. (gravity and friction,
if they have studied friction) Tell students that they should remember these
concepts as they prepare a film canister to rocket upwards away from Earth.
3. Distribute a canister for each student (or group of students).
4. Distribute materials (paper, scissors, index cards, Fizzy Rocket Template, tape) to
make the canister look like rocket. If time is an issue, you may omit this step.
Open end
Open end
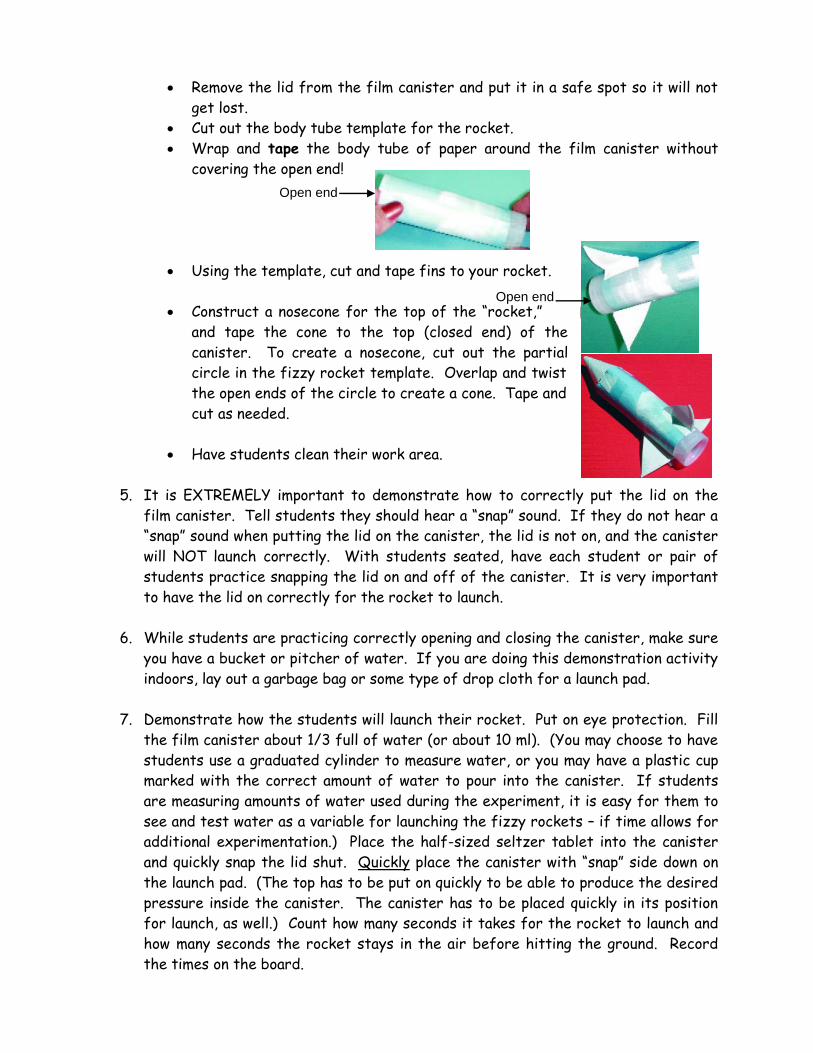
Remove the lid from the film canister and put it in a safe spot so it will not
get lost.
Cut out the body tube template for the rocket.
Wrap and tape the body tube of paper around the film canister without
covering the open end!
Using the template, cut and tape fins to your rocket.
Construct a nosecone for the top of the “rocket,”
and tape the cone to the top (closed end) of the
canister. To create a nosecone, cut out the partial
circle in the fizzy rocket template. Overlap and twist
the open ends of the circle to create a cone. Tape and
cut as needed.
Have students clean their work area.
5. It is EXTREMELY important to demonstrate how to correctly put the lid on the
film canister. Tell students they should hear a “snap” sound. If they do not hear a
“snap” sound when putting the lid on the canister, the lid is not on, and the canister
will NOT launch correctly. With students seated, have each student or pair of
students practice snapping the lid on and off of the canister. It is very important
to have the lid on correctly for the rocket to launch.
6. While students are practicing correctly opening and closing the canister, make sure
you have a bucket or pitcher of water. If you are doing this demonstration activity
indoors, lay out a garbage bag or some type of drop cloth for a launch pad.
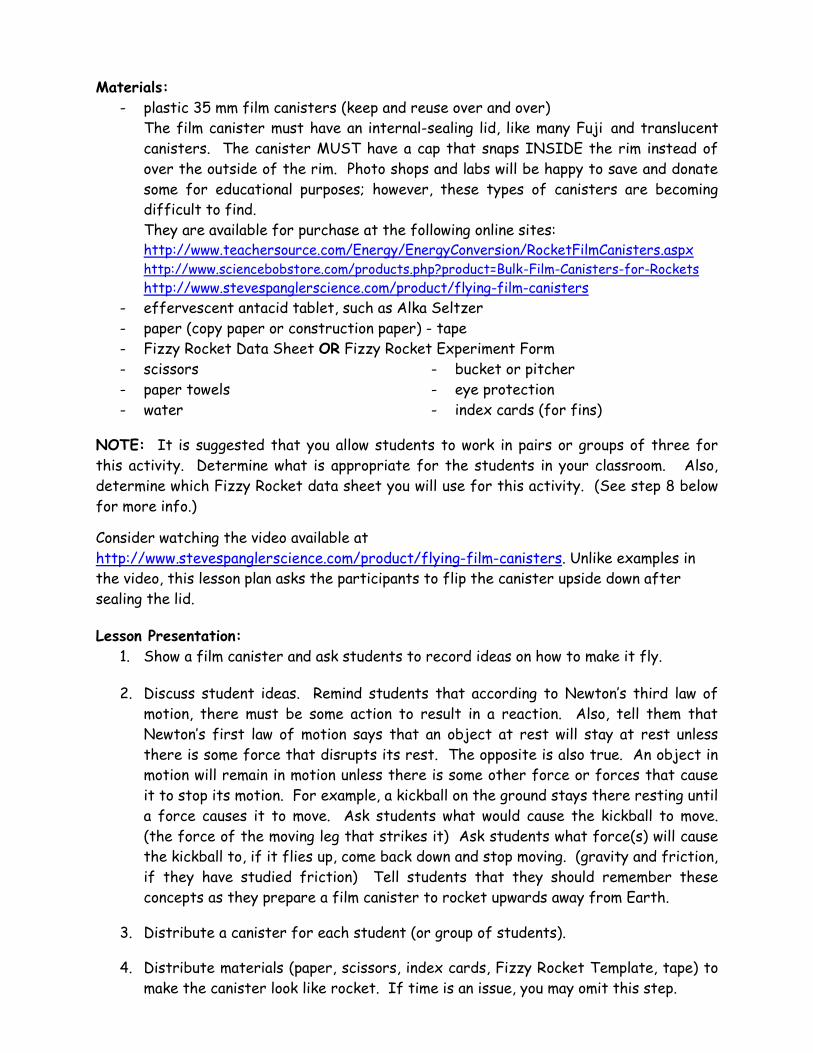
7. Demonstrate how the students will launch their rocket. Put on eye protection. Fill
the film canister about 1/3 full of water (or about 10 ml). (You may choose to have
students use a graduated cylinder to measure water, or you may have a plastic cup
marked with the correct amount of water to pour into the canister. If students
are measuring amounts of water used during the experiment, it is easy for them to
see and test water as a variable for launching the fizzy rockets – if time allows for
additional experimentation.) Place the half-sized seltzer tablet into the canister
and quickly snap the lid shut. Quickly place the canister with “snap” side down on
the launch pad. (The top has to be put on quickly to be able to produce the desired
pressure inside the canister. The canister has to be placed quickly in its position
for launch, as well.) Count how many seconds it takes for the rocket to launch and
how many seconds the rocket stays in the air before hitting the ground. Record
the times on the board.
8. Distribute either the “Fizzy Rocket Launch Data Sheet” or the “Fizzy Rocket
Experiment Form,” depending on which you prefer for your students. Use the
“Fizzy Rocket Experiment Form” if students are using a combination of ¼, ½, and
whole tablets. Go over the directions for the sheet that you have selected for
your class.
9. If not already outside, go outside to launch the students’ rockets. Prior to launch,
if students are in groups of three, they should rotate among the following tasks for
each launch: (1) set up the canister to launch (2) count how many seconds it takes
to launch after the rocket is placed in launch position (3) count how many seconds
the rocket stays in the air before it hits the ground. The students should record
the times on their data sheet.
10. Prior to the first launch, ask a volunteer to explain the steps they will follow to
launch the rockets. (Put on eye goggles. Fill the canister about 1/3 full of water
(or 10 ml). Put the tablet in. Make sure the lid snaps on. Place the canister in
launch position. Count to see how many seconds it takes to launch and how many
seconds it stays in the air. Record the results of both counts.)
11. Distribute the effervescent tablets. Use the water to fill canisters and allow the
students to conduct their launches.
12. Once the students have launched the rockets and completed their information, have
students clean up the area and assemble together in the classroom. If the “Fizzy
Rocket Launch Data Sheet” was used, allow students time to figure out the average
launch and flight times.
13. Discuss how Newton’s three laws of motion were at work in this activity.
Law #1 (Inertia): The rocket is at rest until it lifts off due to a force acting
upon it. That force is the pressure that has built up inside the canister and
escaped.
Law #2 (F=ma): The amount of force created is directly proportional to the
mass and acceleration of the water and gas expelled from the canister.
Law #3 (Action/Reaction): The top is forced off the canister due to the
pressure produced by the fizzy gas. That fizzy gas is actually carbon
dioxide. Ask students if they know what caused that gas to occur. The
carbon dioxide is a result of the chemical reaction that took place when the
fizzy tablet was added to the water. A result of the chemical reaction is
the accumulating pressure due to the buildup of gas inside the canister. The
pressure of the carbon dioxide bubbles builds up so much that it finds the
weakest structural point in the canister through which to escape. The
weakest structural point is the area where the lid snaps onto the canister.
The action of the high pressure escaping out of the canister causes the
opposite reaction of the canister being propelled into the air.
14. Allow students to discuss the results of their data sheet and what they feel they
have learned from the experiment.
Summarization:
Ask students what might account for some differences in the number of seconds to launch
and land. (Some students may have counted faster or slower. Some students may have
had a little bit more or less water in their canister. Some students may have had a little
bit more or less of the effervescent tablet. Part of the tablet may have been protruding
out from the water when the canister was placed in launch position.)
Ask students to identify the liquid in their experiment. (water) Ask students to identify
the solids in the experiment. (canister, tablet) Ask students to explain what created the
gas in their experiment. (a chemical reaction: the tablet reacting in the water produced
gas bubbles) Ask the students to explain what made the rocket canister “explode” and
allow the rocket to launch. (Newton’s Three laws of motion)
A great explanation from http://spaceplace.jpl.nasa.gov/en/kids/rocket.shtml:
When the fizzy tablet is placed in water, many little bubbles of gas escape. The bubbles go up, instead of down, because they weigh less than water. When the bubbles get to the surface of the water, they break open. All that gas that has escaped from the bubbles pushes on the sides of the canister.
When you blow up a balloon, the air makes the balloon stretch bigger and bigger. But the little film canister doesn't stretch and all this gas has to go somewhere!
Eventually, something has to give! So the canister pops its top (which is really its bottom, since it's upside down). All the water and gas rush down and out, pushing the canister up and up, along with the rocket attached to it.
Real rockets work kind of the same way. But instead of using tablets that fizz in water, they use rocket fuel. The action is the gas rushing out of the rocket. The reaction is the rocket taking off in the other direction. In other words, for every action there is an equal and opposite reaction. The rocket goes in the opposite direction from the gas, and the faster the gas leaves the rocket, the faster the rocket gets pushed the other way.
Character Connection: Tell students that the fizzy rocket should remind us of something
we do not want to do in life: “pop-off.” Sometimes, we feel ourselves getting very upset.
It feels like the pressure building up inside that small canister and builds until we want to
explode. We are not rockets. We must find other ways to deal with bad pressure. Have
students name ways they can prevent “popping their lid.” When we find alternative ways to
handle frustration and anger, we gain control in our lives. We become our own directional
fins able to travel steadily through life.
Assessment: leader observation
constructed rocket
data sheet
student answers to class discussion questions
“Fizzy Rocket Reflections” worksheet (optional)
Additional activity ideas to enrich and extend the primary lesson (optional):
Have students complete the “Fizzy Rocket Reflection” worksheet. Answers:
1) water 2) tablet 3) pressure, gas, or chemical reaction 4&5) answers will vary
Bonus: chemical reaction
Find the mean, median, and mode of a list of launch times and flight times.
Experiment with the launch performance of canisters with and without fins and
with and without nosecones. Real rockets have nosecones to reduce drag, and they
have fins to create stability.
Write an expository paragraph explaining how to make a film canister fly.
Conduct the Water Bottle Rocket Launch enrichment activity that follows all Fizzy
Rocket documents.
Help students gain a better understanding and an appreciation for rockets that
deliver payload (e.g., satellite, rover, humans) by having them participate in this
“Rocket to Mars” design challenge.
Room set up: Place three 50 cm circles (Mars – destination) in three separate
places with masking tape on the floor. Place a line of tape (Earth – launch site) 3
meters from each circle. Have extra balloons on hand as students re-launch their
rockets!
Materials per team of 3 students: 1 toilet paper tube, 1 drinking straw, 1 wooden
skewer (with ends cut off or blunted), 1 balloon, 1 ping pong ball
- Additional materials available to all: construction paper, aluminum foil, and a
variety of tape (duct tape, scotch tape, masking tape, etc.)
Instructions:
1. Explain/demonstrate the difficulty of hitting a moving target. Lead into
challenges of launching a spacecraft or satellite from a moving Earth to land on
another moving target, such as the International Space Station (ISS) or Mars.
2. Explain the design challenge to the students: Each team must use the items to
create a rocket that can deliver the ping pong ball (the payload) to Mars
(represented by the circles on the floor) from Earth (tape lines). To make things
easier, the targets are not moving. The teams have 50 minutes to design and
test their vehicles. If they are unsuccessful, they may make modifications and
try again (waiting their turn at one of the 3 stations). The “propulsion system”
for their rocket is the balloon. Each team will slide its straw over the skewer to
create a “launch pad” that can be adjusted to the team’s desired angle of launch
by the person holding the skewer. The straw should be secured to the team’s
rocket design. To succeed, the rocket must land in the circle, not slide into it.
Teams who succeed may make additional modifications to try to reach a target
that is farther away.
Closing: This is a real challenge, and few teams will succeed. Emphasize that the
students were trying to land a rocket and its payload onto a non-moving target.
Mars, Earth, and the International Space Station are all in motion, which means
designing is even more challenging! Students probably came to the realization
that weight was a factor in their launch vehicle. Rockets that were the simplest
(no extra decorations and lightest weight tape) traveled the farthest.
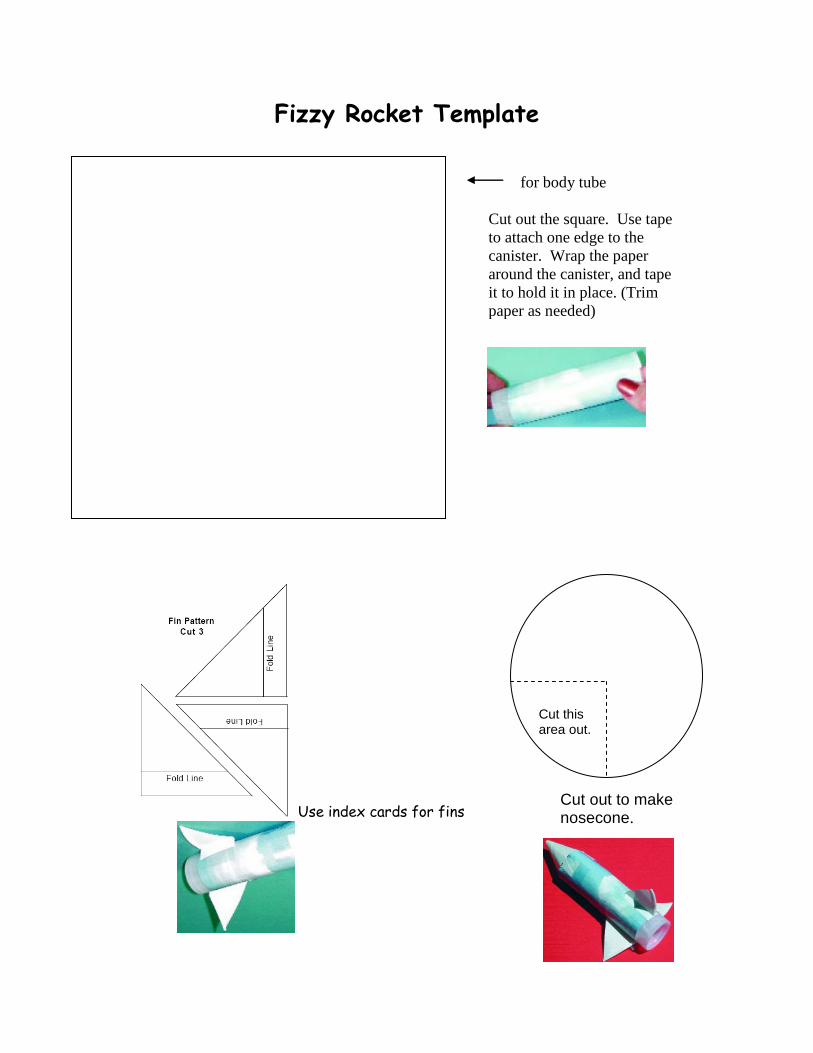
Fizzy Rocket Template
Use index cards for fins
Cut this area out.
for body tube
Cut out the square. Use tape
to attach one edge to the
canister. Wrap the paper
around the canister, and tape
it to hold it in place. (Trim
paper as needed) Cut this area out.
Cut out to make nosecone.
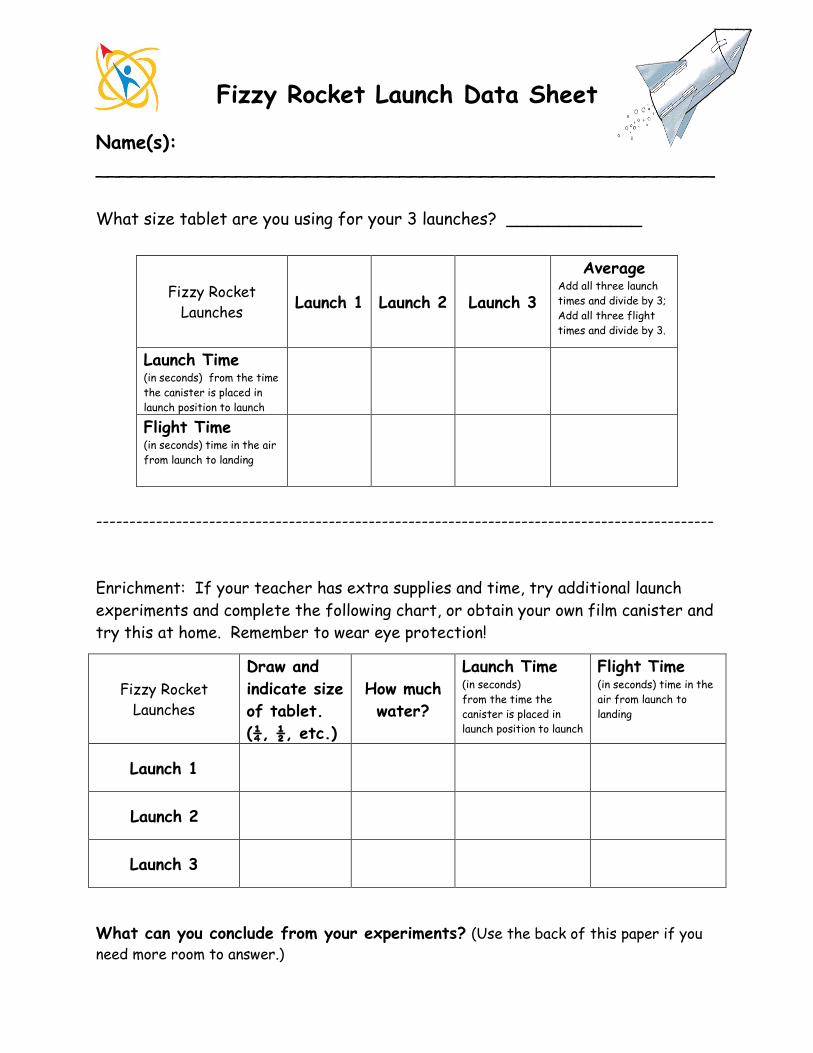
Fizzy Rocket Launch Data Sheet
Name(s):
_____________________________________________________
What size tablet are you using for your 3 launches? _____________
Fizzy Rocket
Launches Launch 1 Launch 2 Launch 3
Average Add all three launch
times and divide by 3;
Add all three flight
times and divide by 3.
Launch Time (in seconds) from the time
the canister is placed in
launch position to launch
Flight Time (in seconds) time in the air
from launch to landing
---------------------------------------------------------------------------------------------
Enrichment: If your teacher has extra supplies and time, try additional launch
experiments and complete the following chart, or obtain your own film canister and
try this at home. Remember to wear eye protection!
Fizzy Rocket
Launches
Draw and
indicate size
of tablet.
(¼, ½, etc.)
How much
water?
Launch Time (in seconds)
from the time the
canister is placed in
launch position to launch
Flight Time (in seconds) time in the
air from launch to
landing
Launch 1
Launch 2
Launch 3
What can you conclude from your experiments? (Use the back of this paper if you
need more room to answer.)
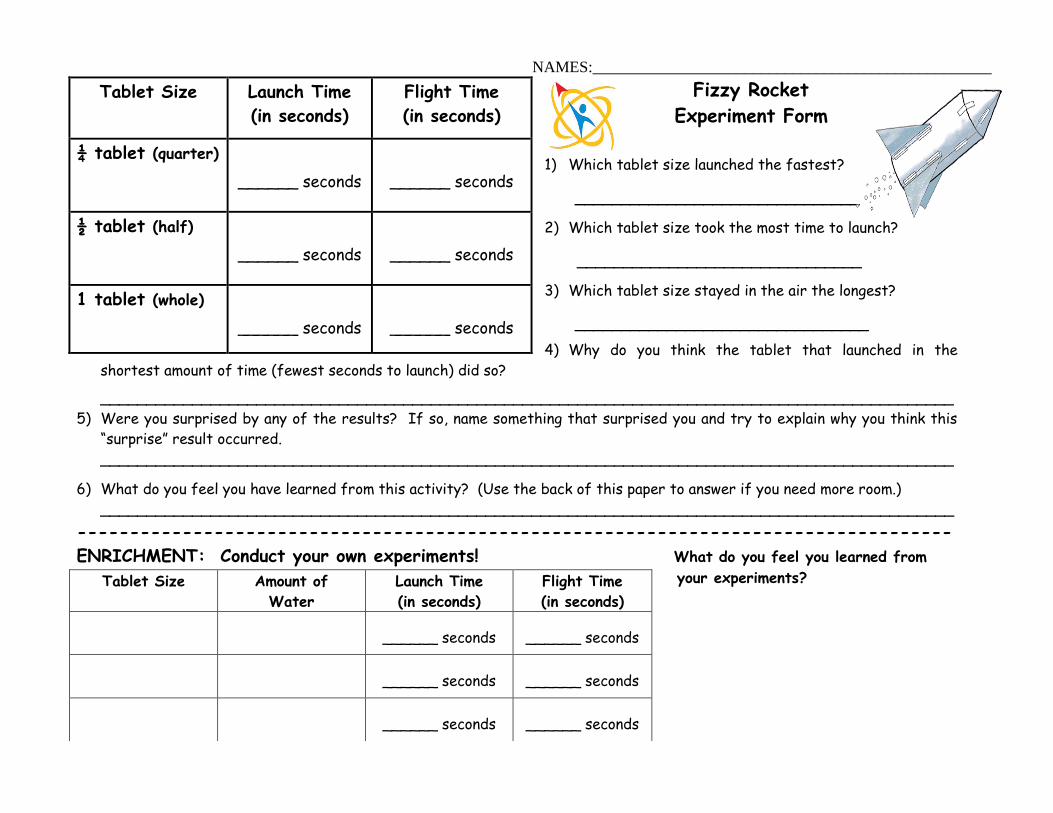
NAMES:__________________________________________________
Fizzy Rocket
Experiment Form
1) Which tablet size launched the fastest?
_______________________________
2) Which tablet size took the most time to launch?
_______________________________
3) Which tablet size stayed in the air the longest?
________________________________
4) Why do you think the tablet that launched in the
shortest amount of time (fewest seconds to launch) did so?
_____________________________________________________________________________________________
5) Were you surprised by any of the results? If so, name something that surprised you and try to explain why you think this
“surprise” result occurred.
_____________________________________________________________________________________________
6) What do you feel you have learned from this activity? (Use the back of this paper to answer if you need more room.)
_____________________________________________________________________________________________
-----------------------------------------------------------------------------------
ENRICHMENT: Conduct your own experiments! What do you feel you learned from
your experiments?
Tablet Size Launch Time
(in seconds)
Flight Time
(in seconds)
¼ tablet (quarter)
______ seconds
______ seconds
½ tablet (half)
______ seconds
______ seconds
1 tablet (whole)
______ seconds
______ seconds
Tablet Size Amount of
Water
Launch Time
(in seconds)
Flight Time
(in seconds)
______ seconds
______ seconds
______ seconds
______ seconds
______ seconds
______ seconds
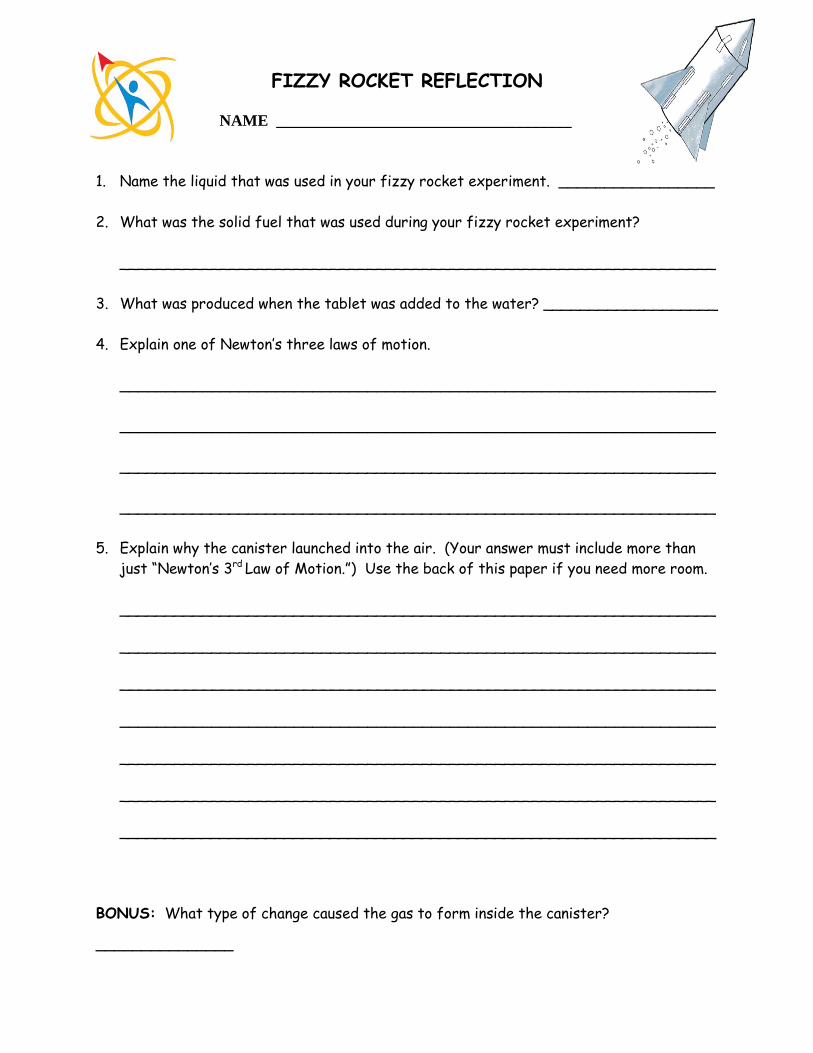
FIZZY ROCKET REFLECTION
NAME _____________________________________
1. Name the liquid that was used in your fizzy rocket experiment. _________________
2. What was the solid fuel that was used during your fizzy rocket experiment?
_________________________________________________________________
3. What was produced when the tablet was added to the water? ___________________
4. Explain one of Newton’s three laws of motion.
_________________________________________________________________
_________________________________________________________________
_________________________________________________________________
_________________________________________________________________
5. Explain why the canister launched into the air. (Your answer must include more than
just “Newton’s 3rd Law of Motion.”) Use the back of this paper if you need more room.
_________________________________________________________________
_________________________________________________________________
_________________________________________________________________
_________________________________________________________________
_________________________________________________________________
_________________________________________________________________
_________________________________________________________________
BONUS: What type of change caused the gas to form inside the canister?
_______________

Rocket Enrichment Activity: Water Bottle Rocket Launching
Materials:
empty 2- liter bottle
cork to insert into bottle opening
bicycle pump and inflator needle
3-4 small dowels, rods, or sticks (with optional wooden base and nails to attach)
cardboard
duct tape
clay or other material(s) for making nose cone (optional)
straw (optional)
colored permanent markers and/or stickers for decorating bottle rocket
bucket of water
eye goggles
1. Get an empty 2-liter plastic bottle.
2. Make 3 or 4 cardboard fins to attach to
the bottom of the bottle to make a bottle
rocket. Use duct tape to attach. (Note:
Ensure that the fins are pointed in the
direction in the photo as the opening of
the bottle will be the bottom of the
rocket.) Students should experiment with
the height of the fins to get the most
stability.
3. Decorate the bottle rocket as desired
with markers or stickers.
4. If desired, add some weight to the top of
the rocket by adding some clay or other
material covered with duct tape to make a
nose cone. Experiment with various top weights and fin positions in order to get
the most accurate center of mass (or center of gravity) to balance the rocket for
best launch control.
5. Insert a cork into the opening of the bottle. (If the cork does not fit well,
microwave the cork no more than 25 seconds to soften it and then put it in the
opening. It will cool quickly and will fit snugly, but will be able to be pulled in and
out of the opening, as needed.)
6. Insert a bicycle pump inflator needle into the center of the cork, ensuring it goes
completely through to allow air to flow through the cork and into the bottle.
7. Attach the bicycle pump hose end to the needle.
8. Make a simple rocket base by using 3 or 4 dowels, sticks, or rods inserted into the
ground or onto a piece of wood. The opening end of the rocket should rest near the
base. OR, as in the photo, use a single rod either inserted into the ground or on a
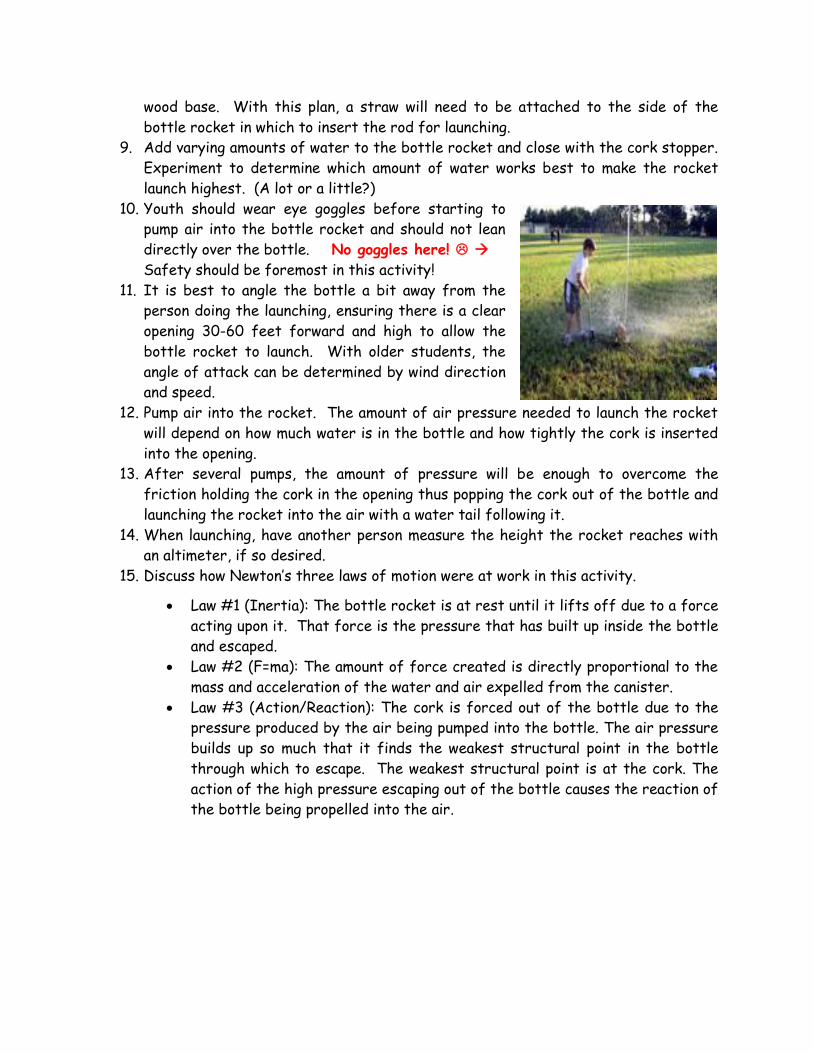
wood base. With this plan, a straw will need to be attached to the side of the
bottle rocket in which to insert the rod for launching.
9. Add varying amounts of water to the bottle rocket and close with the cork stopper.
Experiment to determine which amount of water works best to make the rocket
launch highest. (A lot or a little?)
10. Youth should wear eye goggles before starting to
pump air into the bottle rocket and should not lean
directly over the bottle. No goggles here!
Safety should be foremost in this activity!
11. It is best to angle the bottle a bit away from the
person doing the launching, ensuring there is a clear
opening 30-60 feet forward and high to allow the
bottle rocket to launch. With older students, the
angle of attack can be determined by wind direction
and speed.
12. Pump air into the rocket. The amount of air pressure needed to launch the rocket
will depend on how much water is in the bottle and how tightly the cork is inserted
into the opening.
13. After several pumps, the amount of pressure will be enough to overcome the
friction holding the cork in the opening thus popping the cork out of the bottle and
launching the rocket into the air with a water tail following it.
14. When launching, have another person measure the height the rocket reaches with
an altimeter, if so desired.
15. Discuss how Newton’s three laws of motion were at work in this activity.
Law #1 (Inertia): The bottle rocket is at rest until it lifts off due to a force
acting upon it. That force is the pressure that has built up inside the bottle
and escaped.
Law #2 (F=ma): The amount of force created is directly proportional to the
mass and acceleration of the water and air expelled from the canister.
Law #3 (Action/Reaction): The cork is forced out of the bottle due to the
pressure produced by the air being pumped into the bottle. The air pressure
builds up so much that it finds the weakest structural point in the bottle
through which to escape. The weakest structural point is at the cork. The
action of the high pressure escaping out of the bottle causes the reaction of
the bottle being propelled into the air.