cisco voip phones: configuring single number reach (snr ... phones/cisco... · cisco voip phones:...
TRANSCRIPT

Cisco VoIP Phones: Configuring Single Number Reach (SNR) and
Move to Mobile.
ICIT Technology Training and Advancement ([email protected])
Updated on 7/28/2014

Table of Contents Single Number Reach (SNR) .................................................................................................................................... 3
About Single Number Reach (SNR)...................................................................................................................... 3
Logging into the Cisco Unified Communications Self Care Portal ....................................................................... 3
Personalize Single Number Reach Settings ......................................................................................................... 3
Configuring an Alternate Number .................................................................................................................. 3
Single Number Reach Ring Schedule .............................................................................................................. 5
Adjust Single Number Reach Call Timing ........................................................................................................ 7
Disable Single Number Reach ......................................................................................................................... 9
Move to Mobile (Mobility) .................................................................................................................................... 10
About Move to Mobile ...................................................................................................................................... 10
Personalize Move to Mobile Settings ................................................................................................................ 10
Enable/Disable Move to Mobile ................................................................................................................... 10
Send Call to Mobile Device ........................................................................................................................... 11
Send Mobile Call back to Desk Phone........................................................................................................... 13
Troubleshooting .................................................................................................................................................... 14
2

Single Number Reach (SNR)
About Single Number Reach (SNR) Single Number Reach (SNR) allows users to answer incoming calls to their UWW extension using an alternate phone, such as a mobile phone. When an incoming call rings your primary desk phone, it will also ring an alternate phone number simultaneously. This is a custom, add-on, feature that is not enabled by default and requires an ICIT staff consultation. This document is intended for users that already have SNR enabled. To request access to this feature, please contact the ICIT TSC Helpdesk at 472-4357 or [email protected].
Once ICIT staff has enabled SNR for your extension, please use this guide to modify and customize these settings.
Logging into the Cisco Unified Communications Self Care Portal Single number reach settings are configured using the Cisco Unified Communications Self Care Portal. Please follow the instructions below to log into the Cisco Unified Communications Self Care Portal page.
NOTE: You must be on the UW-Whitewater campus network, or use a VPN connection to connect to the UWW network, to access the link below. For help setting up a VPN connection, please contact the ICIT TSC helpdesk at 472-4357 or [email protected].
Step 1 Using a web browser, go to http://phone.uww.edu. Step 1 Step 2
Enter your Net-ID and password. Click Login to continue. NOTE: Your Net-ID and password is case-sensitive.
Personalize Single Number Reach Settings Single Number Reach settings are configured using the Cisco Unified Communications Self Care Portal. Please follow the instructions below to customize your SNR configuration options.
Configuring an Alternate Number Configure an alternate phone number to ring simultaneously when your primary UWW phone extension rings.
3

Step 1 From the main Cisco Unified Communications Self Care Portal page, click the “Cisco Dual Mode for” phone option and select Edit Single Number Reach.
Step 2 1. Enter your alternate phone number in the
“Phone Number or URI” box. NOTE: Your phone number should include 1, the area code, then the number. Ex. 12622635555.
2. Enter an alternate phone number
description in the “Description” box.
3. Check the “Enable Single Number Reach” checkbox to enable SNR on your phone.
Step 3
Click Save to save your settings.
4

Single Number Reach Ring Schedule Once SNR is configured, you have the ability to set what days and times you would like your alternate phone number to ring. Please follow the instructions below to create your SNR schedule.
Step 1 From the main Cisco Unified Communications Self Care Portal page, click the “Cisco Dual Mode for” phone option and select Edit Single Number Reach.
Step 2 Click the button to Create a schedule for this assignment.
5

Step 3 1. Enter a description for your schedule. 2. Select the “Ring only during specific times”
radial button. 3. Check the boxes of the days you would like to
schedule your alternate number to ring. 4. Set your “start” and “end” time for each day
you would like to schedule your alternate number to ring.
NOTE: Times are in military time format. 5. Set your current time zone.
NOTE: You may need to select “More Choices” multiple times to view all time zone options.
6. Click Save to save your schedule settings.
Step 4 Click Save to return to the main Self Care Portal page.
6

Adjust Single Number Reach Call Timing Step 1
From the main Cisco Unified Communications Self Care Portal page, click the “Cisco Dual Mode for” phone option and select Edit Single Number Reach.
Step 2 Click the Advanced Call Timing link.
NOTE: Normally the Advanced Call Timing settings should remain as default. Only change these settings if you are having trouble answering calls on your desk or alternate phone number once SNR is enabled.
7

Wait before ring: Set the number of seconds your primary desk phone should ring before your alternate phone begins to ring. This allows you to answer the call at your desk before ringing your alternate number. Prevent call from going straight to voicemail: Sets the number of seconds you would like to wait before calls go to voicemail. Stop ringing this phone after: Set the number of seconds to stop ringing your alternate phone to prevent reaching the voicemail on your alternate phone.
Step 3 Once you have changed your Advanced Timing settings, click Save to save your settings.
8

Disable Single Number Reach Follow the instructions below to disable Single Number Reach on your phone.
Step 1 From the main Cisco Unified Communications Self Care Portal page, click the “Cisco Dual Mode for” phone option and select Edit Single Number Reach.
Step 2 Uncheck the box to “Enable Single Number Reach”. Click Save to save your changes. NOTE: To enable Single Number Reach on your phone again, simply check the box “Enable Single Number Reach”. Your previous settings should remain intact.
9
Move to Mobile (Mobility)
About Move to Mobile Once Single Number Reach is enabled on your desk phone, you gain the ability to transfer an active call from your desktop phone to your mobile phone without losing the call. This option appears as a button on your phone called “Mobility”. Move to Mobile is disabled by default until you enable it.
NOTE: On a video enabled phone, you must press the “minimize” or “hide video” soft key to view the “Mobility” soft key, allowing you to transfer your call to a mobile device.
Personalize Move to Mobile Settings NOTE: Pictures may appear slightly different depending on phone model.
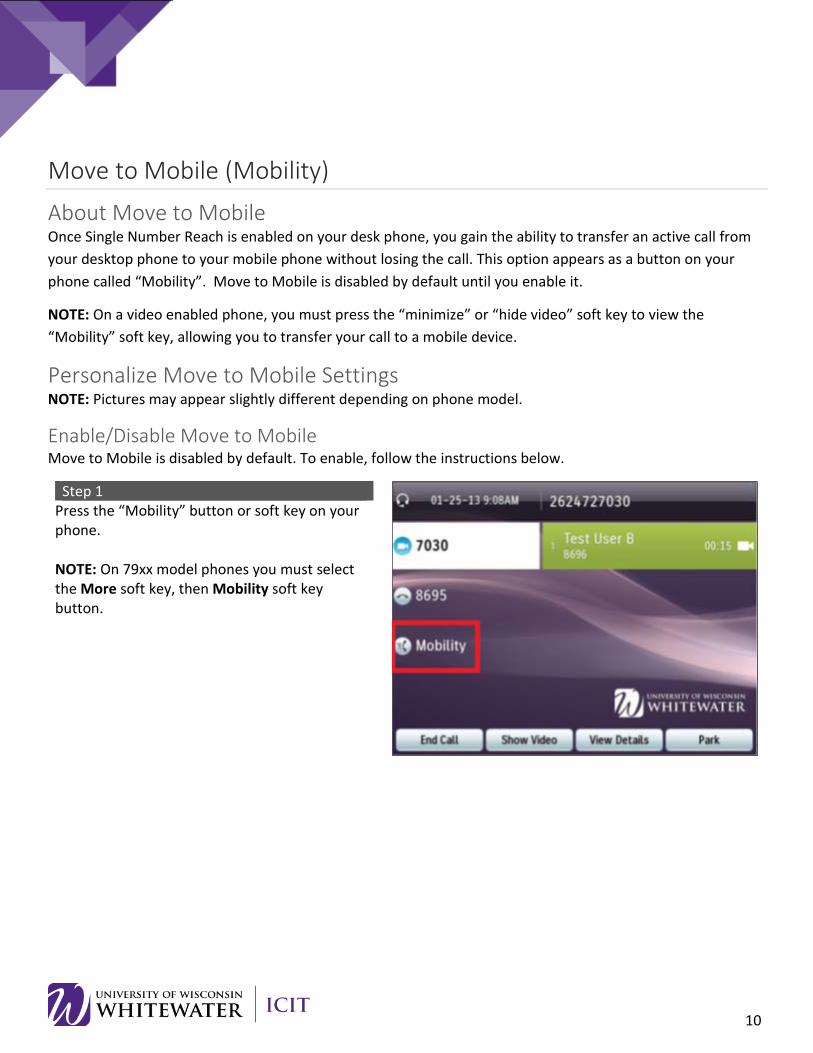
Enable/Disable Move to Mobile Move to Mobile is disabled by default. To enable, follow the instructions below.
Step 1 Press the “Mobility” button or soft key on your phone. NOTE: On 79xx model phones you must select the More soft key, then Mobility soft key button.
10

Step 2 Highlight the “Enable Mobile Connect” option, then press the Select soft key button. NOTE: To disable Move to Mobile, follow step 1 above, then select “Disable Mobile Connect” and press the Select soft key button. NOTE: If mobility is already enabled, you will only see “Disable Mobile Connect” as an option. If you want to keep mobility enabled, press the Exit key to return to the main menu. If you want to disable mobility, press the Select soft key button.
Send Call to Mobile Device To transfer an active phone call from your desk phone to your mobile phone, follow the instructions below.
Step 1 While on an active phone call at your desk phone, press the Mobility soft key on your phone’s display screen. Note: If using a 79xx model phone, you may need to press the More soft key button to display the “Mobility” soft key button.
11

Step 2 Select “Send call to Mobile Phone”, then press the Select soft key button. Step 3
After a few seconds your mobile phone will ring. Answer the call. You may be prompted to press any digit to accept the call. Do so now. The transferred call should now be active on your mobile phone.
Step 4 To end the call, simply hang up the call on your mobile phone. This will place the call on hold at your desk phone. Press the line button, of the held call, to resume the call at your desk phone. If you do not resume the call at your desk phone, the call will automatically end after 5 seconds.
12

Send Mobile Call back to Desk Phone To transfer a mobile connect call from your mobile phone back to your desk phone, please follow the instructions bellow.
NOTE: This option is only available for calls that were previously transferred to a mobile phone using “Send to Mobile”.
Step 1 Verify the line on your phone is illuminated red, indicating that you currently have a call transferred using “Send to Mobile”. NOTE: Your phone may look slightly different from the picture depending on phone model. Continue to next page for remaining steps.
13

Step 2 End the call on your mobile device. The system will automatically put the call on hold at your desk phone. Step 3
Press the line key associated with the call that is on hold. NOTE: Typically a line will flash red if it has a call on hold. The call should now be active on your desk phone. NOTE: If you do not answer the call on hold within 5 seconds the call will end.
Troubleshooting Contact the Technology Support Center Helpdesk at [email protected] or (262) 472-4357.
14