cisco telepresence server on virtual machine 4.1(2.29) installation
TRANSCRIPT
Cisco TelePresenceServer on Virtual Machine
Installation Guide
4.1(2.29)
April 2015
Contents
General information 4About the Cisco TelePresence Server on Virtual Machine 4Licensing 4Co-residency support 4Related documents 4Platform licensing comparison 5
Prerequisites 7Recommended platform 7CPU requirements 8Other requirements 8Specifications-based systemminimum requirements 9Before installing Cisco TelePresence Server on Virtual Machine 9
Installing the TelePresence Server 10(Optional) Configuring initial IP details 10Configuring the VM host 11Deploying OVA to host 11
Configuring the TelePresence Server 15Task 1: Assign an IP address 15Task 2: Log in to the Cisco TelePresence Server on Virtual Machine 15Task 3: Apply license or feature keys 15Task 4: (Optional) Configure DNS settings 16
Configuring the TelePresence Server for administration by TelePresence Conductor 17Task 5: Create an administrator account for TelePresence Conductor 17Task 6: Enable encryption and encrypted SIP (TLS) 18Task 7: Configure SIP settings 19
(Optional) Migrating the TelePresence Server to a new host 20
(Optional) Change the number of vCPUs 21
(Optional) Change the RAM allocation 23
Checking for updates 24Upgrade instructions 24
Security 25Changing the admin account password 25Note about existing privileged account 25Security hardening 25
Troubleshooting and technical support information 26Using the event log to help solve a problem 26Gettingmore help 26Checking VMware compatibility 26VMware checklist 26Analyzing the cause of VMware issues 27Known sources of issues with Cisco TelePresence Server on Virtual Machine 27
Cisco TelePresence Server on VirtualMachine Installation Guide (4.1(2.29)) Page 2 of 30
VM Image Fails to Boot 27Guest console in vSphere 5 fails to run on someMicrosoft platforms 28Raid Controller Synchronization 28TelePresence Server Displays Different Serial Number/MAC address on Reboot 28
Collecting logs from the host 28Restoring default configuration (factory reset) 28
Cisco TelePresence Server on VirtualMachine Installation Guide (4.1(2.29)) Page 3 of 30
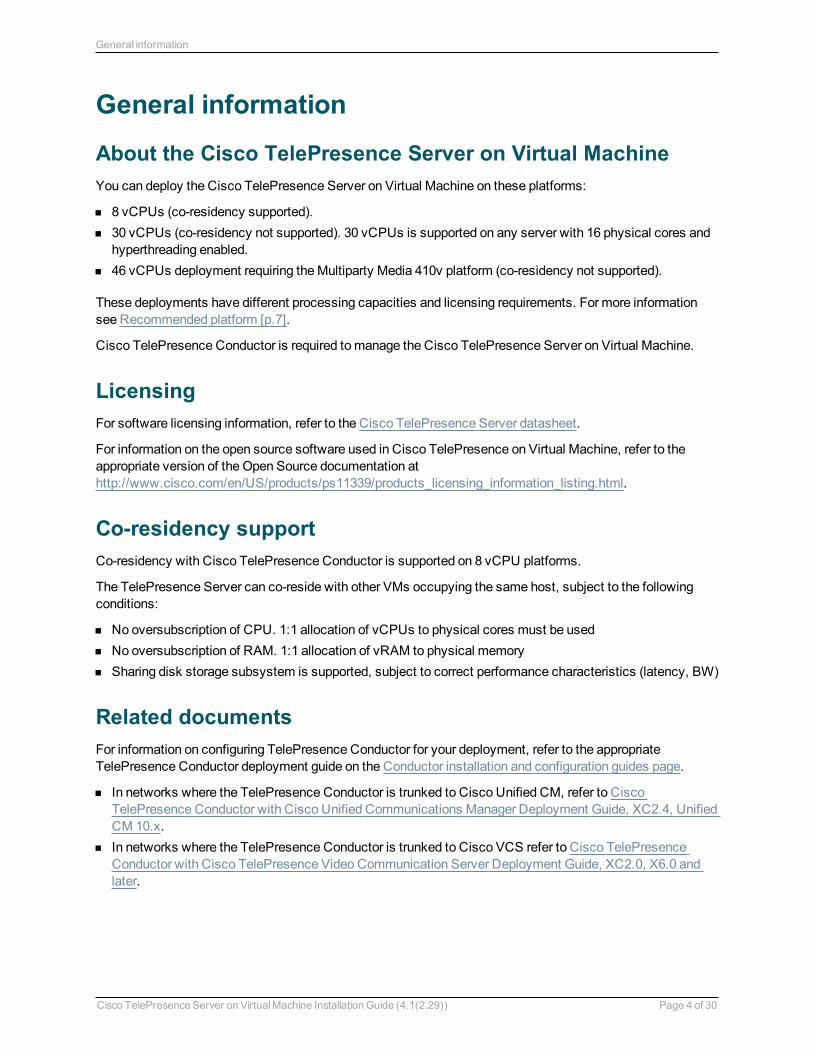
General information
About the Cisco TelePresence Server on Virtual MachineYou can deploy the Cisco TelePresence Server on Virtual Machine on these platforms:
n 8 vCPUs (co-residency supported).n 30 vCPUs (co-residency not supported). 30 vCPUs is supported on any server with 16 physical cores and
hyperthreading enabled.n 46 vCPUs deployment requiring theMultiparty Media 410v platform (co-residency not supported).
These deployments have different processing capacities and licensing requirements. For more informationsee Recommended platform [p.7].
Cisco TelePresence Conductor is required tomanage the Cisco TelePresence Server on Virtual Machine.
LicensingFor software licensing information, refer to the Cisco TelePresence Server datasheet.
For information on the open source software used in Cisco TelePresence on Virtual Machine, refer to theappropriate version of the Open Source documentation athttp://www.cisco.com/en/US/products/ps11339/products_licensing_information_listing.html.
Co-residency supportCo-residency with Cisco TelePresence Conductor is supported on 8 vCPU platforms.
The TelePresence Server can co-reside with other VMs occupying the same host, subject to the followingconditions:
n No oversubscription of CPU. 1:1 allocation of vCPUs to physical cores must be usedn No oversubscription of RAM. 1:1 allocation of vRAM to physical memoryn Sharing disk storage subsystem is supported, subject to correct performance characteristics (latency, BW)
Related documentsFor information on configuring TelePresence Conductor for your deployment, refer to the appropriateTelePresence Conductor deployment guide on the Conductor installation and configuration guides page.
n In networks where the TelePresence Conductor is trunked to Cisco Unified CM, refer to CiscoTelePresence Conductor with Cisco Unified Communications Manager Deployment Guide, XC2.4, UnifiedCM 10.x.
n In networks where the TelePresence Conductor is trunked to Cisco VCS refer to Cisco TelePresenceConductor with Cisco TelePresence Video Communication Server Deployment Guide, XC2.0, X6.0 andlater.
Cisco TelePresence Server on VirtualMachine Installation Guide (4.1(2.29)) Page 4 of 30
General information
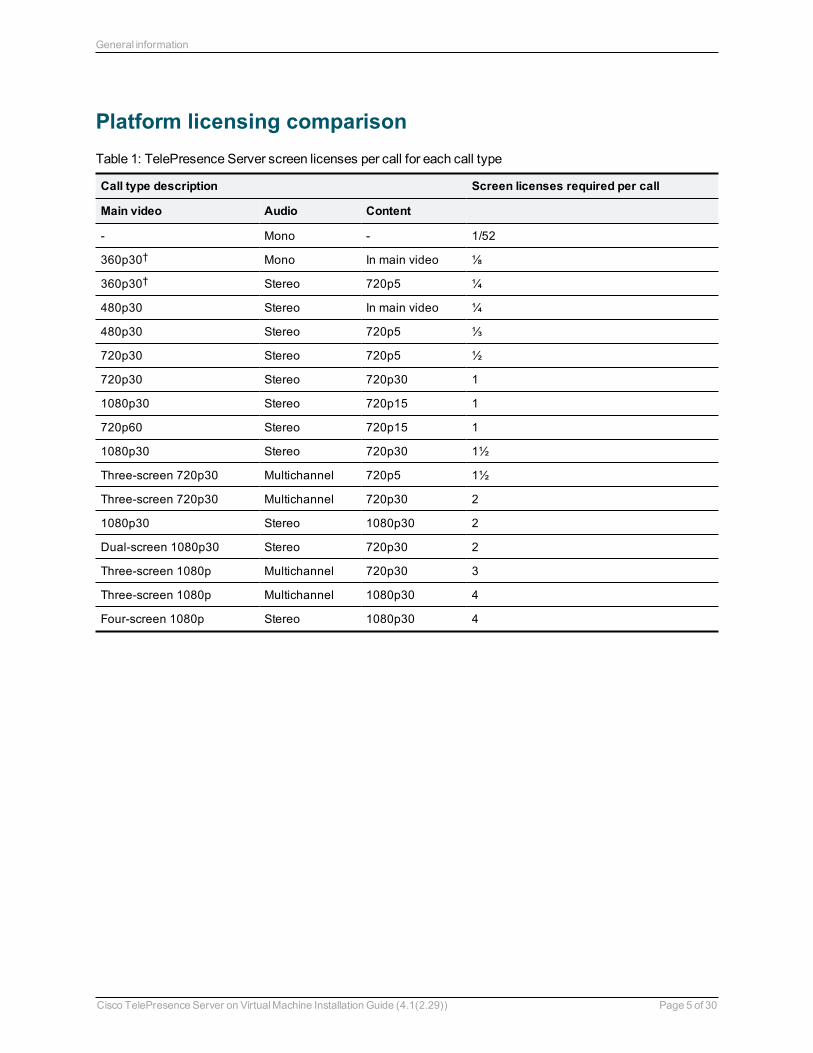
Platform licensing comparison
Call type description Screen licenses required per call
Main video Audio Content
- Mono - 1/52
360p30† Mono In main video ⅛
360p30† Stereo 720p5 ¼
480p30 Stereo In main video ¼
480p30 Stereo 720p5 ⅓
720p30 Stereo 720p5 ½
720p30 Stereo 720p30 1
1080p30 Stereo 720p15 1
720p60 Stereo 720p15 1
1080p30 Stereo 720p30 1½
Three-screen 720p30 Multichannel 720p5 1½
Three-screen 720p30 Multichannel 720p30 2
1080p30 Stereo 1080p30 2
Dual-screen 1080p30 Stereo 720p30 2
Three-screen 1080p Multichannel 720p30 3
Three-screen 1080p Multichannel 1080p30 4
Four-screen 1080p Stereo 1080p30 4
Table 1: TelePresence Server screen licenses per call for each call type
Cisco TelePresence Server on VirtualMachine Installation Guide (4.1(2.29)) Page 5 of 30
General information
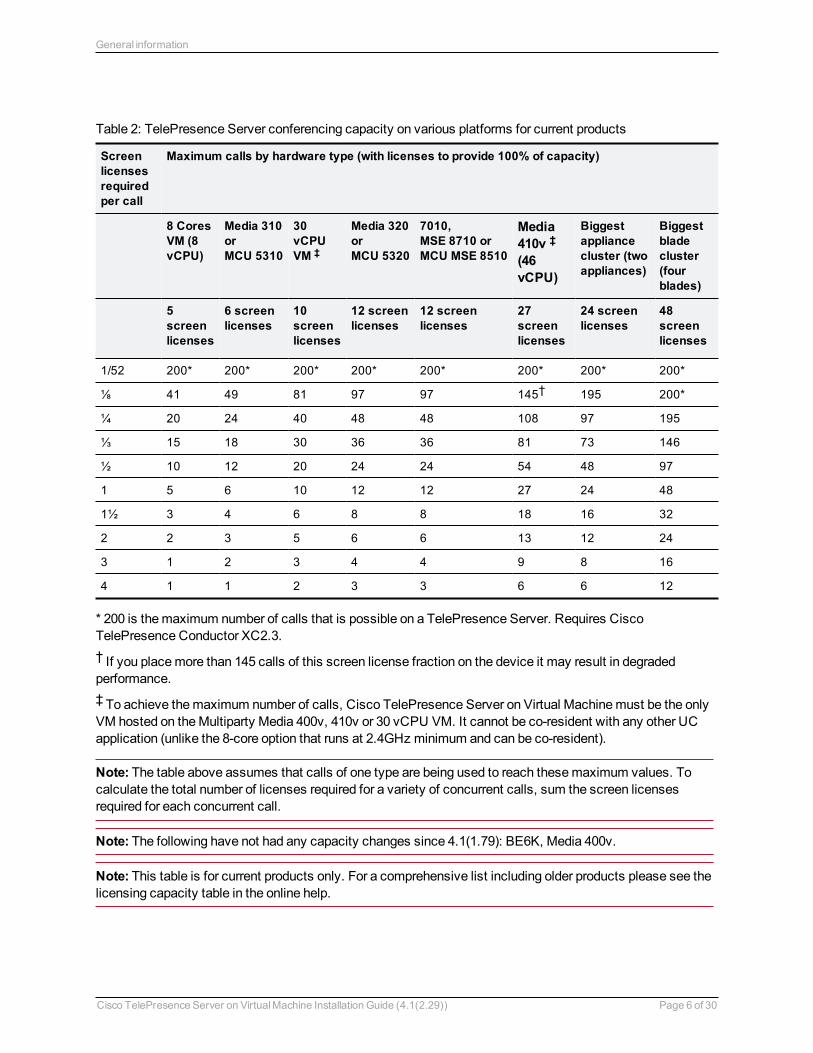
Screenlicensesrequiredper call
Maximum calls by hardware type (with licenses to provide 100% of capacity)
8 CoresVM (8vCPU)
Media 310orMCU 5310
30vCPUVM ‡
Media 320orMCU 5320
7010,MSE 8710 orMCU MSE 8510
Media410v ‡
(46vCPU)
Biggestappliancecluster (twoappliances)
Biggestbladecluster(fourblades)
5screenlicenses
6 screenlicenses
10screenlicenses
12 screenlicenses
12 screenlicenses
27screenlicenses
24 screenlicenses
48screenlicenses
1/52 200* 200* 200* 200* 200* 200* 200* 200*
⅛ 41 49 81 97 97 145† 195 200*
¼ 20 24 40 48 48 108 97 195
⅓ 15 18 30 36 36 81 73 146
½ 10 12 20 24 24 54 48 97
1 5 6 10 12 12 27 24 48
1½ 3 4 6 8 8 18 16 32
2 2 3 5 6 6 13 12 24
3 1 2 3 4 4 9 8 16
4 1 1 2 3 3 6 6 12
Table 2: TelePresence Server conferencing capacity on various platforms for current products
* 200 is themaximum number of calls that is possible on a TelePresence Server. Requires CiscoTelePresence Conductor XC2.3.† If you placemore than 145 calls of this screen license fraction on the device it may result in degradedperformance.‡ To achieve themaximum number of calls, Cisco TelePresence Server on Virtual Machinemust be the onlyVM hosted on theMultiparty Media 400v, 410v or 30 vCPU VM. It cannot be co-resident with any other UCapplication (unlike the 8-core option that runs at 2.4GHz minimum and can be co-resident).
Note: The table above assumes that calls of one type are being used to reach thesemaximum values. Tocalculate the total number of licenses required for a variety of concurrent calls, sum the screen licensesrequired for each concurrent call.
Note: The following have not had any capacity changes since 4.1(1.79): BE6K, Media 400v.
Note: This table is for current products only. For a comprehensive list including older products please see thelicensing capacity table in the online help.
Cisco TelePresence Server on VirtualMachine Installation Guide (4.1(2.29)) Page 6 of 30
General information
Prerequisites
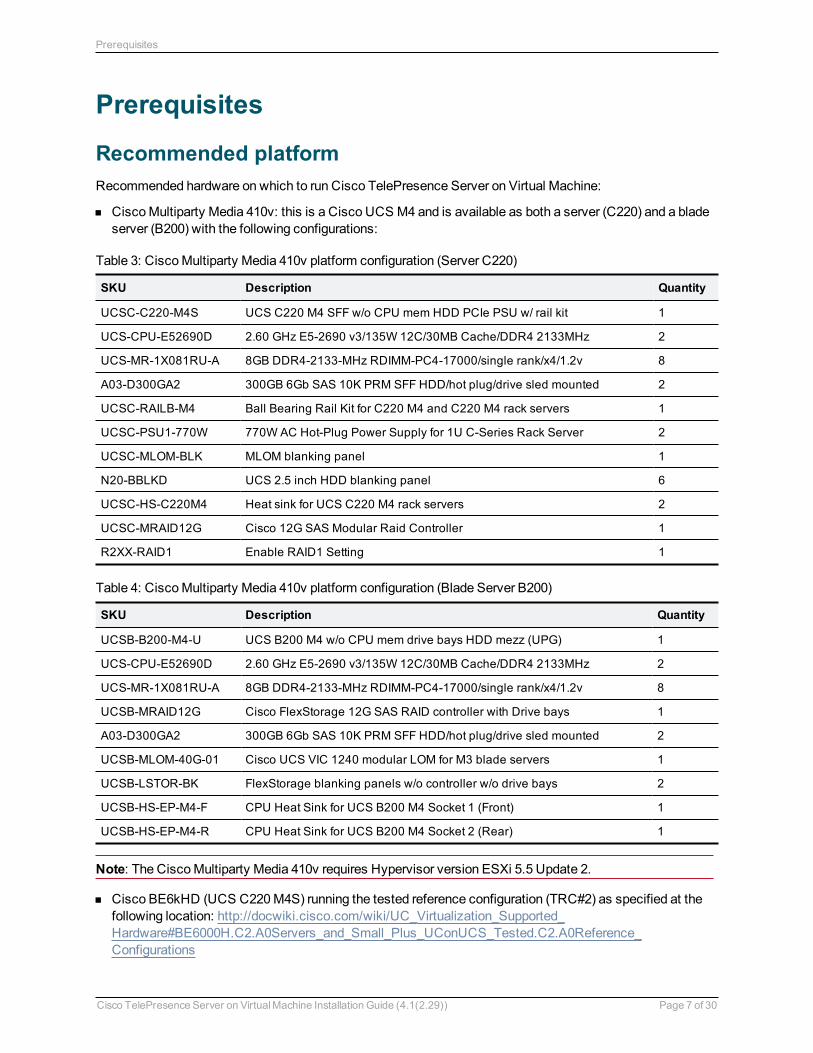
Recommended platformRecommended hardware on which to run Cisco TelePresence Server on Virtual Machine:
n CiscoMultiparty Media 410v: this is a Cisco UCS M4 and is available as both a server (C220) and a bladeserver (B200) with the following configurations:
SKU Description Quantity
UCSC-C220-M4S UCS C220 M4 SFF w/o CPU mem HDD PCIe PSU w/ rail kit 1
UCS-CPU-E52690D 2.60 GHz E5-2690 v3/135W 12C/30MB Cache/DDR4 2133MHz 2
UCS-MR-1X081RU-A 8GB DDR4-2133-MHz RDIMM-PC4-17000/single rank/x4/1.2v 8
A03-D300GA2 300GB 6Gb SAS 10K PRM SFF HDD/hot plug/drive sled mounted 2
UCSC-RAILB-M4 Ball Bearing Rail Kit for C220 M4 and C220 M4 rack servers 1
UCSC-PSU1-770W 770W AC Hot-Plug Power Supply for 1U C-Series Rack Server 2
UCSC-MLOM-BLK MLOM blanking panel 1
N20-BBLKD UCS 2.5 inch HDD blanking panel 6
UCSC-HS-C220M4 Heat sink for UCS C220 M4 rack servers 2
UCSC-MRAID12G Cisco 12G SAS Modular Raid Controller 1
R2XX-RAID1 Enable RAID1 Setting 1
Table 3: CiscoMultiparty Media 410v platform configuration (Server C220)
SKU Description Quantity
UCSB-B200-M4-U UCS B200 M4 w/o CPU mem drive bays HDD mezz (UPG) 1
UCS-CPU-E52690D 2.60 GHz E5-2690 v3/135W 12C/30MB Cache/DDR4 2133MHz 2
UCS-MR-1X081RU-A 8GB DDR4-2133-MHz RDIMM-PC4-17000/single rank/x4/1.2v 8
UCSB-MRAID12G Cisco FlexStorage 12G SAS RAID controller with Drive bays 1
A03-D300GA2 300GB 6Gb SAS 10K PRM SFF HDD/hot plug/drive sled mounted 2
UCSB-MLOM-40G-01 Cisco UCS VIC 1240 modular LOM for M3 blade servers 1
UCSB-LSTOR-BK FlexStorage blanking panels w/o controller w/o drive bays 2
UCSB-HS-EP-M4-F CPU Heat Sink for UCS B200 M4 Socket 1 (Front) 1
UCSB-HS-EP-M4-R CPU Heat Sink for UCS B200 M4 Socket 2 (Rear) 1
Table 4: CiscoMultiparty Media 410v platform configuration (Blade Server B200)
Note: The CiscoMultiparty Media 410v requires Hypervisor version ESXi 5.5 Update 2.
n Cisco BE6kHD (UCS C220M4S) running the tested reference configuration (TRC#2) as specified at thefollowing location: http://docwiki.cisco.com/wiki/UC_Virtualization_Supported_Hardware#BE6000H.C2.A0Servers_and_Small_Plus_UConUCS_Tested.C2.A0Reference_Configurations
Cisco TelePresence Server on VirtualMachine Installation Guide (4.1(2.29)) Page 7 of 30
Prerequisites
n BE7KMD (UCS C240M4S2) running the tested reference configuration (TRC#1) as specified at thefollowing location: http://docwiki.cisco.com/wiki/UC_Virtualization_Supported_Hardware#BE7000M_Servers_and.C2.A0Medium_UConUCS_Tested_Reference.C2.A0Configurations
n BE7KHD (UCS C240M4SX) running the tested reference configuration (TRC#1) as specified at thefollowing location: http://docwiki.cisco.com/wiki/UC_Virtualization_Supported_Hardware#BE7000H.C2.A0Servers_and_Large_UConUCS_Tested.C2.A0Reference_Configurations
CPU requirementsThere are three deployment configurations for Cisco TelePresence Server on Virtual Machine:
n 8 Cores Cisco TelePresence Servern 30 Hyperthread Core Cisco TelePresence Servern 46 Hyperthread Core Cisco TelePresence Server
The number of cores in the first option refers to the number of physical cores required, that is, the 8 Coresoption requires 8 physical CPU cores (preferably with hyperthreading enabled, but not required). TheTelePresence Server on Virtual Machinemust have exclusive access to all the processing capacity providedby these physical cores, even when hyperthreading is enabled.
Note: We recommend that you enable hyperthreading where possible as it gives the TelePresence Server asmall performance advantage. Additionally, the TelePresence Server must have exclusive access to thestated number of physical cores and youmay not share them with other virtual machines.
The 30 Hyperthread Core deployment configuration uses 30 virtual CPUs and can be deployed on serverswith at least 16 physical CPU cores with Hyperthreading enabled. The 46 Hyperthread Core deploymentconfiguration uses 46 virtual CPUs and can be deployed on servers with at least 24 physical CPU cores withHyperthreading enabled. These platforms should be exclusively dedicated for the Cisco TelePresenceServer on Virtual Machine.
Example with 8 physical CPU cores and hyperthreading enabled: Youmay deploy the 8 Cores optionbut not the 30 Hyperthread Core option. In this example, the 8 Cores TelePresence Server is using all 16logical cores and youmay not use any of them for other applications.
Examples with 16 physical CPU cores and hyperthreading enabled:Youmay deploy either the 30Hyperthread Core option or the 8 Cores option. In the 30 Hyperthread Core case, youmay not share theCPU capacity with other applications. In the 8 Cores case, youmust dedicate half the CPU capacity (8physical = 16 logical CPUs) to the TelePresence Server VM, but you can use the other half for other VMs.
Other requirementsn VT is enabled in the BIOS before installing VMware ESXi.n Check theCluster on DieBIOS setting is disabled viaBIOS > Advanced > QPI Configuration >
Cluster on Die.n VMware version is ESXi 5.1 Update 2 or ESXi 5.5 Update 2.n The VM host “Virtual Machine Startup/Shutdown” is configured to “Allow Virtual machines to start and stop
automatically with the system”, and that the TelePresence Server on Virtual Machine has beenmoved tothe Automatic startup section.
n Only one network interface is configured.
Cisco TelePresence Server on VirtualMachine Installation Guide (4.1(2.29)) Page 8 of 30
Prerequisites
Note: The CiscoMultiparty Media 410v requires Hypervisor version ESXi 5.5 Update 2.
Note: We recommendRAID for backing up.
Specifications-based system minimum requirementsIf using a specifications-based system the Cisco TelePresence Server on Virtual Machine supports up to:
n 5 screen licenses with the 8 vCPU version (some older processors such as the E5-2609 are only capableof up to 4 screen licenses)
n 10 screen licenses with the 30 vCPU version
If using a specifications-based system, the requirements are:
n 2 x Intel Xeon processor E5-2600 series with 2.4GHz or faster processor.n At least 12 GB RAM to be dedicated to Cisco TelePresence Server on Virtual Machine. (Minimum of two
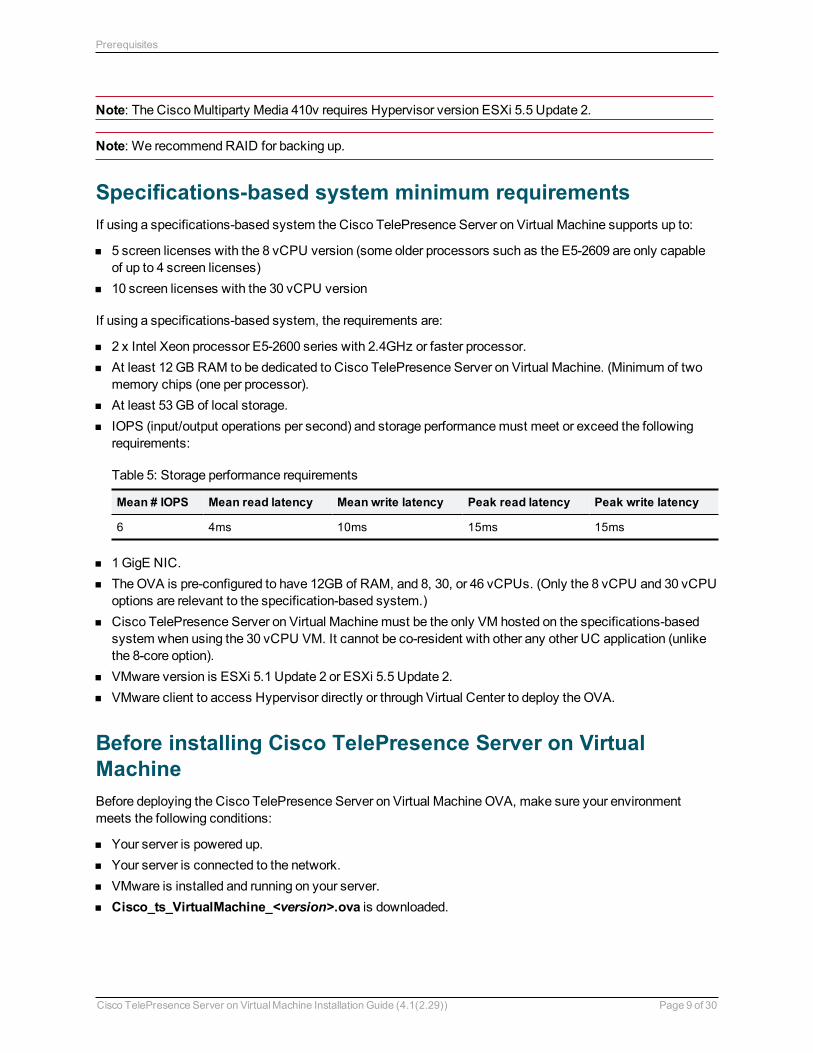
memory chips (one per processor).n At least 53 GB of local storage.n IOPS (input/output operations per second) and storage performancemust meet or exceed the following
requirements:
Mean # IOPS Mean read latency Mean write latency Peak read latency Peak write latency
6 4ms 10ms 15ms 15ms
Table 5: Storage performance requirements
n 1GigE NIC.n TheOVA is pre-configured to have 12GB of RAM, and 8, 30, or 46 vCPUs. (Only the 8 vCPU and 30 vCPU
options are relevant to the specification-based system.)n Cisco TelePresence Server on Virtual Machinemust be the only VM hosted on the specifications-based
system when using the 30 vCPU VM. It cannot be co-resident with other any other UC application (unlikethe 8-core option).
n VMware version is ESXi 5.1 Update 2 or ESXi 5.5 Update 2.n VMware client to access Hypervisor directly or through Virtual Center to deploy the OVA.
Before installing Cisco TelePresence Server on VirtualMachineBefore deploying the Cisco TelePresence Server on Virtual Machine OVA, make sure your environmentmeets the following conditions:
n Your server is powered up.n Your server is connected to the network.n VMware is installed and running on your server.n Cisco_ts_VirtualMachine_<version>.ova is downloaded.
Cisco TelePresence Server on VirtualMachine Installation Guide (4.1(2.29)) Page 9 of 30
Prerequisites
Installing the TelePresence ServerThis process guides you through installing the virtual machine (VM); it assumes that you are using vSphereclient, but you could use vCenter.
(Optional) Configuring initial IP detailsNote: This feature requires ESXi hosts managed via a vCenter Server. For deployments with many CiscoTelePresence Server on Virtual Machines you can use this feature to configure initial IP address details tosave time. See the vTS Software download page to obtain the OVA file that supports this option.
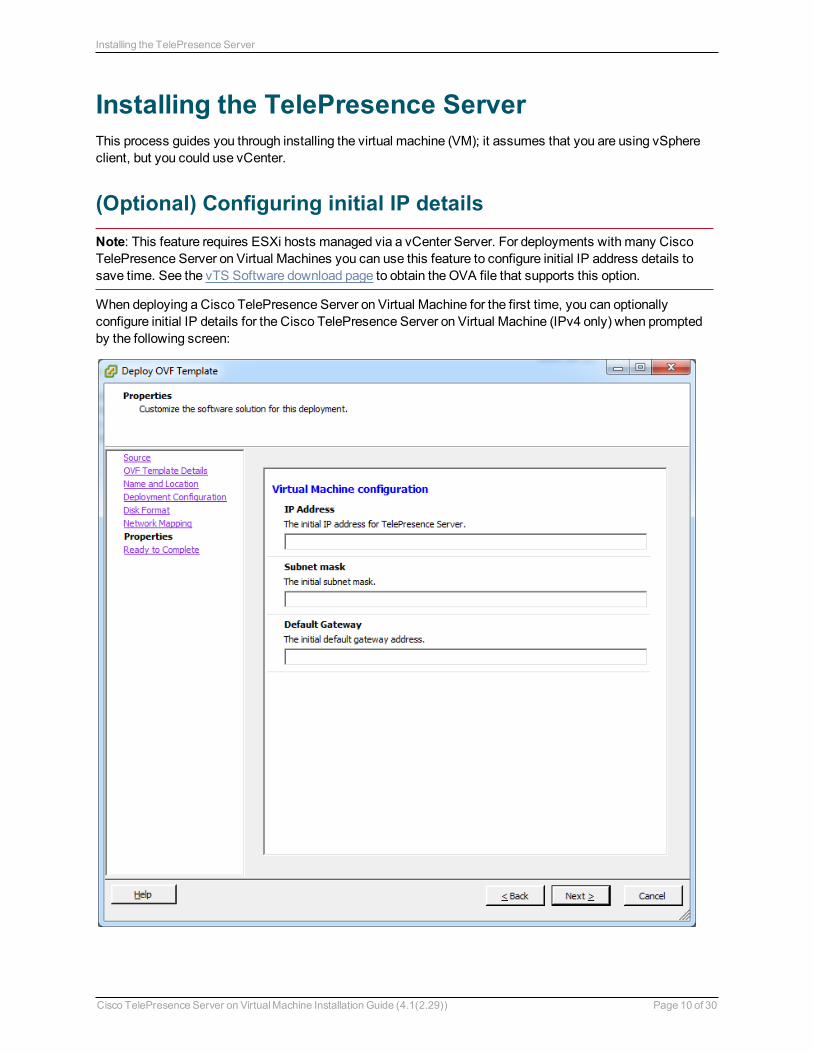
When deploying a Cisco TelePresence Server on Virtual Machine for the first time, you can optionallyconfigure initial IP details for the Cisco TelePresence Server on Virtual Machine (IPv4 only) when promptedby the following screen:
Cisco TelePresence Server on VirtualMachine Installation Guide (4.1(2.29)) Page 10 of 30
Installing the TelePresence Server
These IP details will only be used on the very first boot of the Cisco TelePresence Server on Virtual Machine,and are entirely optional. The Cisco TelePresence Server on Virtual Machine will attempt to configure its IPdetails with these parameters if entered. If left blank or entered incorrectly, you will need to use the console toconfigure network details (see Task 1: Assign an IP address [p.15]).
Configuring the VM hostEnsure that the VM host is configured with a valid NTP server – the sameNTP server that will be specified inCisco TelePresence Server on Virtual Machine.
1. Select the host.2. Go to theConfiguration tab.3. Select Time configuration.4. Select Properties.
If the date and time were red on the previous page, then set the date and timemanually to the currenttime.
5. Click Options.6. Select NTP Settings.7. Click Add.8. Enter the IP address of the NTP server.9. Click OK.10. Select theRestart NTP service to apply changes check box.11. Click OK.12. Click OK.
Deploying OVA to hostThese instructions represent a typical installation; not all of the steps listedmay be necessary, depending onyour deployment environment. The Deploy OVF Template wizard dynamically changes to reflect the hostconfiguration.
Note: The same process is used to deploy the 8 Cores, 30 vCPU or 46 vCPU options, except for theConfiguration option on theDeployment Configuration screen of the wizard (step 7 below).
1. Log in to vSphere to access the ESXi Host.2. Select File > Deploy OVF Template.3. Click Browse, find the location of the .ova file, click Open and then click Next.4. On theOVF Template Details page, click Next.5. If anEnd User License Agreement page appears, read the EULA, click Accept and then click Next.6. On theName and Location page, enter aName for this Cisco TelePresence Server on Virtual Machine
guest, for example "Cisco_ts_VirtualMachine", and select the Inventory Locationwhere the virtualmachine will reside.
Cisco TelePresence Server on VirtualMachine Installation Guide (4.1(2.29)) Page 11 of 30
Installing the TelePresence Server
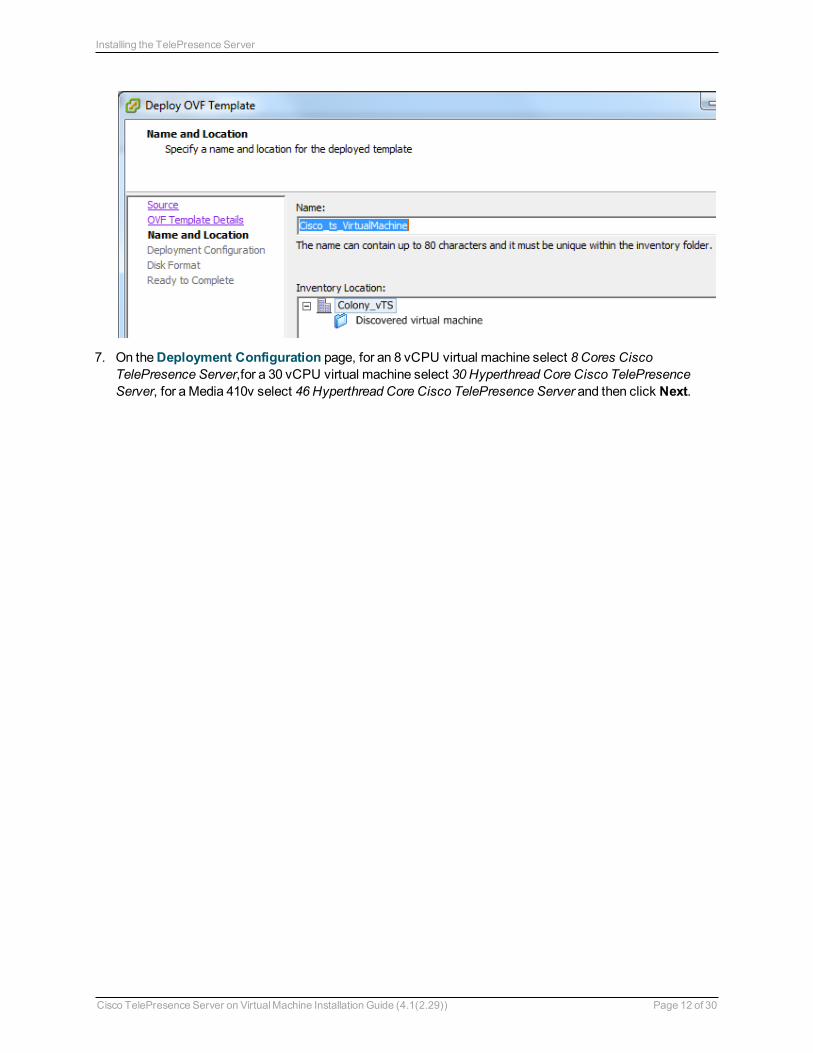
7. On theDeployment Configuration page, for an 8 vCPU virtual machine select 8 Cores CiscoTelePresence Server,for a 30 vCPU virtual machine select 30 Hyperthread Core Cisco TelePresenceServer, for aMedia 410v select 46 Hyperthread Core Cisco TelePresence Server and then click Next.
Cisco TelePresence Server on VirtualMachine Installation Guide (4.1(2.29)) Page 12 of 30
Installing the TelePresence Server

8. On theHost / Cluster page, select which host or cluster will run the deployed virtual machine and clickNext.
9. On theResource Pool page, select the resource pool in which you want to run the deployed virtualmachine and click Next.
10. On theStorage page, select the datastore onto which the TelePresence Server files will be deployed andthen click Next.
11. On theDisk Format page, select Thick Provision Lazy Zeroed and click Next.Thin Provision is not supported as VM performancemay degrade during resizing of a partition.
12. On theNetwork Mapping page, select the network mapping that applies to your infrastructure and thenclick Next (default is VMNetwork).
13. On theReady to Complete page, confirm the deployment settings.14. Select thePower on after deployment check box.
Cisco TelePresence Server on VirtualMachine Installation Guide (4.1(2.29)) Page 13 of 30
Installing the TelePresence Server

15. Click Finish.A progress indicator shows the deployment progress. When it has finished, the TelePresence Server isdeployed as a guest on the VM Host.
Cisco TelePresence Server on VirtualMachine Installation Guide (4.1(2.29)) Page 14 of 30
Installing the TelePresence Server
Configuring the TelePresence Server
Task 1: Assign an IP addressNote: If an IP address was entered during the task (Optional) Configuring initial IP details [p.10], this taskcan be ignored.
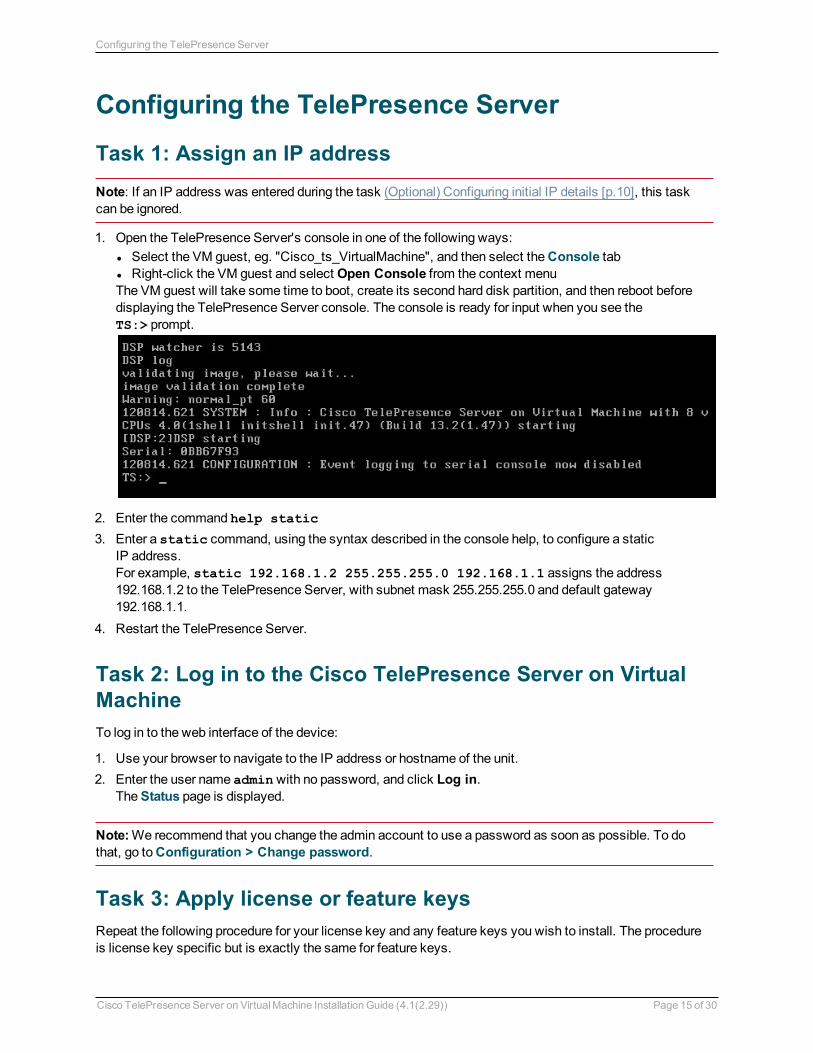
1. Open the TelePresence Server's console in one of the following ways:l Select the VM guest, eg. "Cisco_ts_VirtualMachine", and then select theConsole tabl Right-click the VM guest and select Open Console from the context menuThe VM guest will take some time to boot, create its second hard disk partition, and then reboot beforedisplaying the TelePresence Server console. The console is ready for input when you see theTS:> prompt.
2. Enter the command help static
3. Enter a static command, using the syntax described in the console help, to configure a staticIP address.For example, static 192.168.1.2 255.255.255.0 192.168.1.1 assigns the address192.168.1.2 to the TelePresence Server, with subnet mask 255.255.255.0 and default gateway192.168.1.1.
4. Restart the TelePresence Server.
Task 2: Log in to the Cisco TelePresence Server on VirtualMachineTo log in to the web interface of the device:
1. Use your browser to navigate to the IP address or hostname of the unit.2. Enter the user name admin with no password, and click Log in.
TheStatus page is displayed.
Note:We recommend that you change the admin account to use a password as soon as possible. To dothat, go toConfiguration > Change password.
Task 3: Apply license or feature keysRepeat the following procedure for your license key and any feature keys you wish to install. The procedureis license key specific but is exactly the same for feature keys.
Cisco TelePresence Server on VirtualMachine Installation Guide (4.1(2.29)) Page 15 of 30
Configuring the TelePresence Server
1. Go toConfiguration > Upgrade.2. Locate the Feature management area.3. Type the license key exactly as you received it, including any dashes.4. Click Add key.
The key is verified against the device serial number, and then appears in the "License keys" list in theweb interface.
5. Keep a record of the license key in case you need it again. For example, if you get locked out of thedevice and do not have a configuration backup. (Keys are stored in the configuration.xml file, but the filedoes not contain the names of the keys.)
Task 4: (Optional) Configure DNS settings1. Go toNetwork > DNS.2. Enter aHost name if required.3. Add the details of yourName server(s).4. Click Update DNS configuration.
Cisco TelePresence Server on VirtualMachine Installation Guide (4.1(2.29)) Page 16 of 30
Configuring the TelePresence Server
Configuring the TelePresence Server foradministration by TelePresence Conductor
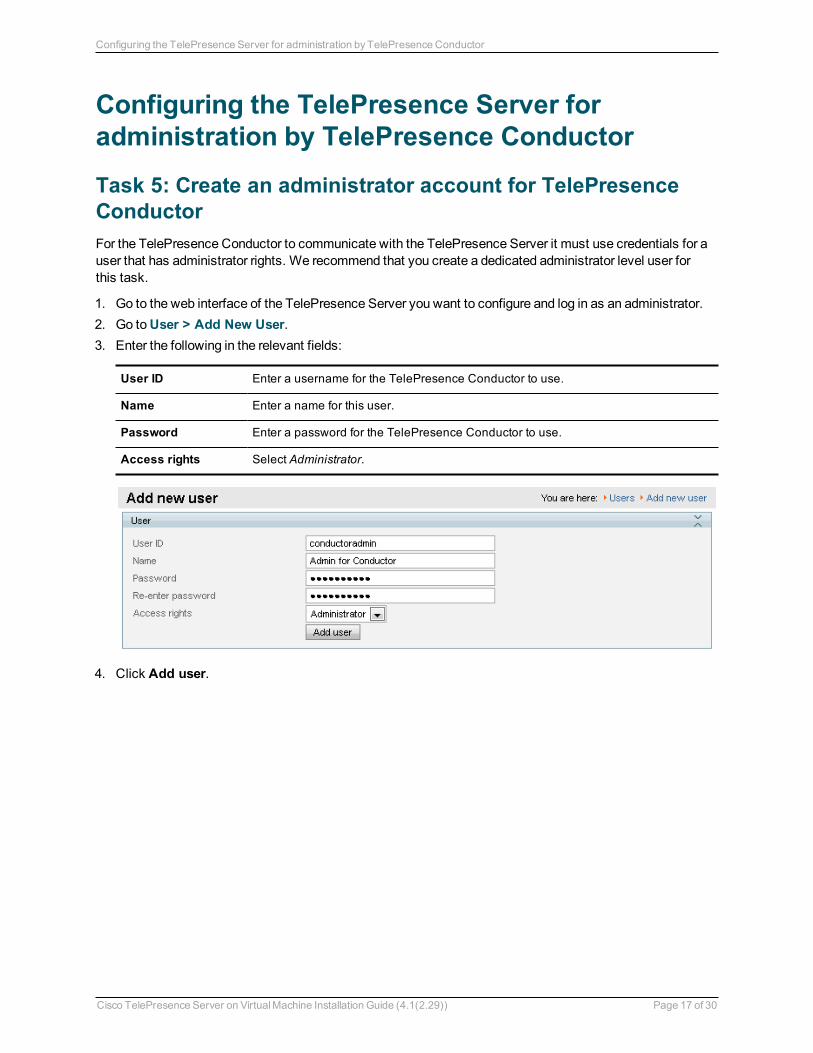
Task 5: Create an administrator account for TelePresenceConductorFor the TelePresence Conductor to communicate with the TelePresence Server it must use credentials for auser that has administrator rights. We recommend that you create a dedicated administrator level user forthis task.
1. Go to the web interface of the TelePresence Server you want to configure and log in as an administrator.2. Go toUser > Add New User.3. Enter the following in the relevant fields:
User ID Enter a username for the TelePresence Conductor to use.
Name Enter a name for this user.
Password Enter a password for the TelePresence Conductor to use.
Access rights Select Administrator.
4. Click Add user.
Cisco TelePresence Server on VirtualMachine Installation Guide (4.1(2.29)) Page 17 of 30
Configuring the TelePresence Server for administration byTelePresence Conductor

Task 6: Enable encryption and encrypted SIP (TLS)To verify that theEncryption key is installed or to install the key, perform the following tasks:
1. Go toConfiguration > Upgrade.2. Go to the Feature management section and verify that theEncryption key is installed. If the key is not
installed, enter the key into theAdd key field and click Add key.
To verify that TLS is enabled on the TelePresence Server:
1. Go toNetwork > Services.2. Ensure that Encrypted SIP (TLS) is checked.3. Ensure that SIP (TCP) andSIP (UDP) are not checked.4. Ensure that HTTPS is enabled on port 443.
5. Click Apply changes.
Cisco TelePresence Server on VirtualMachine Installation Guide (4.1(2.29)) Page 18 of 30
Configuring the TelePresence Server for administration byTelePresence Conductor
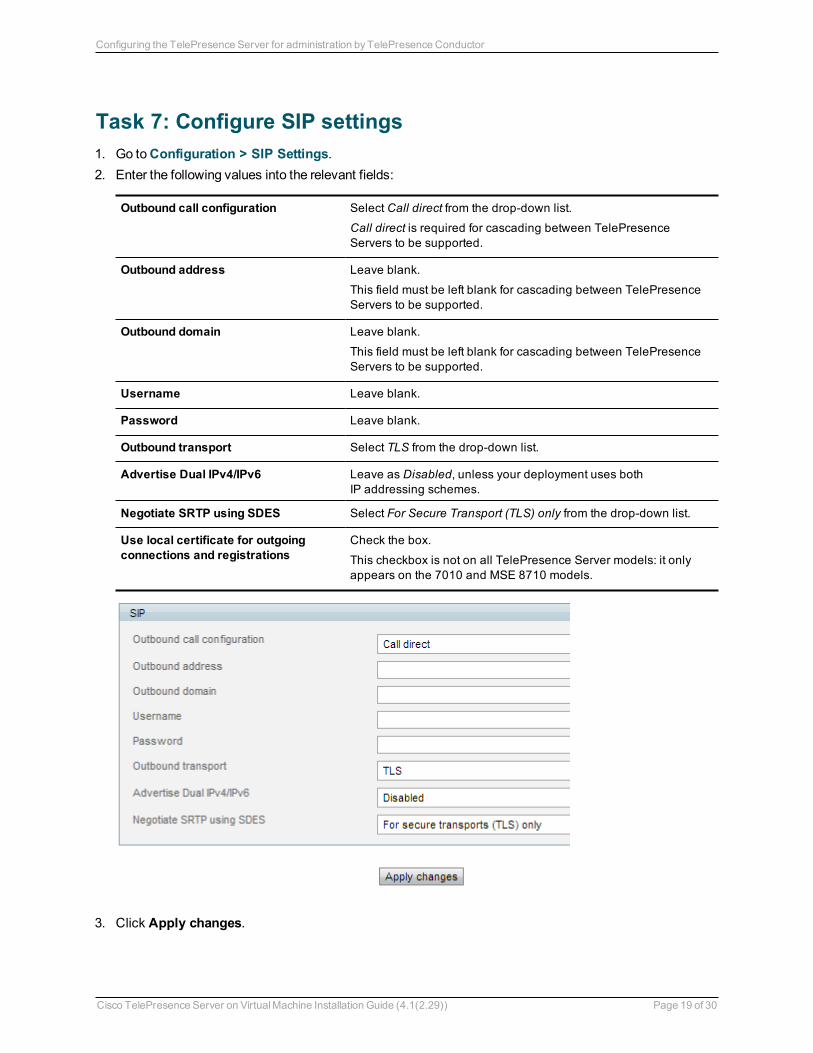
Task 7: Configure SIP settings1. Go toConfiguration > SIP Settings.2. Enter the following values into the relevant fields:
Outbound call configuration Select Call direct from the drop-down list.
Call direct is required for cascading between TelePresenceServers to be supported.
Outbound address Leave blank.
This field must be left blank for cascading between TelePresenceServers to be supported.
Outbound domain Leave blank.
This field must be left blank for cascading between TelePresenceServers to be supported.
Username Leave blank.
Password Leave blank.
Outbound transport Select TLS from the drop-down list.
Advertise Dual IPv4/IPv6 Leave as Disabled, unless your deployment uses bothIP addressing schemes.
Negotiate SRTP using SDES Select For Secure Transport (TLS) only from the drop-down list.
Use local certificate for outgoingconnections and registrations
Check the box.
This checkbox is not on all TelePresence Server models: it onlyappears on the 7010 and MSE 8710 models.
3. Click Apply changes.
Cisco TelePresence Server on VirtualMachine Installation Guide (4.1(2.29)) Page 19 of 30
Configuring the TelePresence Server for administration byTelePresence Conductor
(Optional) Migrating the TelePresence Server to anew hostNote: Youmay wish to carry out this task if you have an 8 coremachine and want to upgrade to aMedia410v. If so, you will need tomove the VM (as explained below) before upgrading the vCPU (see (Optional)Change the number of vCPUs [p.21]). If you need to change thememory size see (Optional) Change theRAM allocation [p.23]. Then add any additional licenses for the additional capacity.
If you need tomove TelePresence Server to a new host youmust perform a host migration via vMotion.
We recommend that a vMotionmove is carried out when the VM is powered off.
Cisco TelePresence Server on VirtualMachine Installation Guide (4.1(2.29)) Page 20 of 30
(Optional) Migrating the TelePresence Server to a new host
(Optional) Change the number of vCPUsNote: Youmay wish to carry out this task if you have an 8 coremachine and want to upgrade to aMedia410v. If so, you will need tomove the VM (see (Optional) Migrating the TelePresence Server to a new host[p.20]) before upgrading the vCPU as explained below. If you need to change thememory size see (Optional)Change the RAM allocation [p.23]. Then add any additional licenses for the additional capacity.
Note: You need to be running VMware hardware version 9 to enable you to assignmore than 32 cores to amachine. If you need to upgrade to Version 9, please see:http://kb.vmware.com/selfservice/microsites/search.do?language=en_US&cmd=displayKC&externalId=1003746 for more information on VMware, version compatibility, andUpgrading the virtual hardware.
1. Open your VMware client and access the ESXi host.2. Right-click the TelePresence Server virtual machine and select Power > Power Off.3. Right-click the TelePresence Server virtual machine and select Edit Settings….4. On theHardware tab, click CPUs.5. From theNumber of cores per socket list, select the required number of virtual CPUs (vCPUs). Ensure
that theNumber of virtual sockets stays at 1.
Cisco TelePresence Server on VirtualMachine Installation Guide (4.1(2.29)) Page 21 of 30
(Optional) Change the number of vCPUs
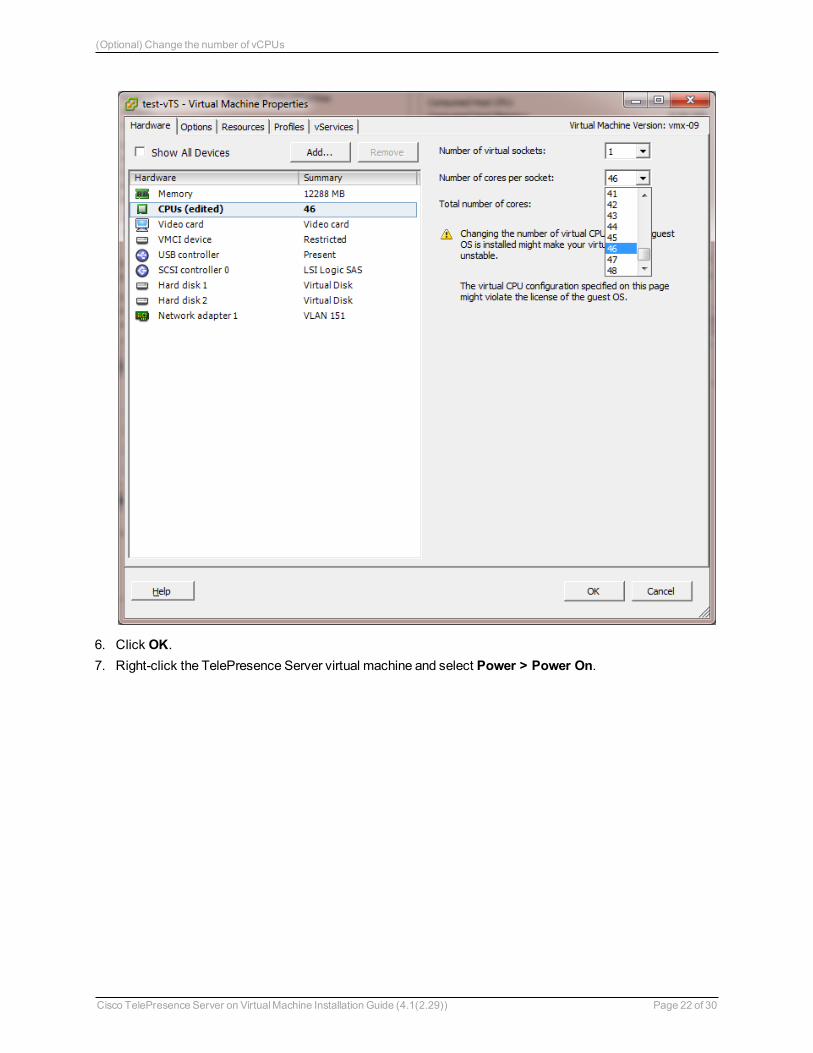
6. Click OK.7. Right-click the TelePresence Server virtual machine and select Power > Power On.
Cisco TelePresence Server on VirtualMachine Installation Guide (4.1(2.29)) Page 22 of 30
(Optional) Change the number of vCPUs
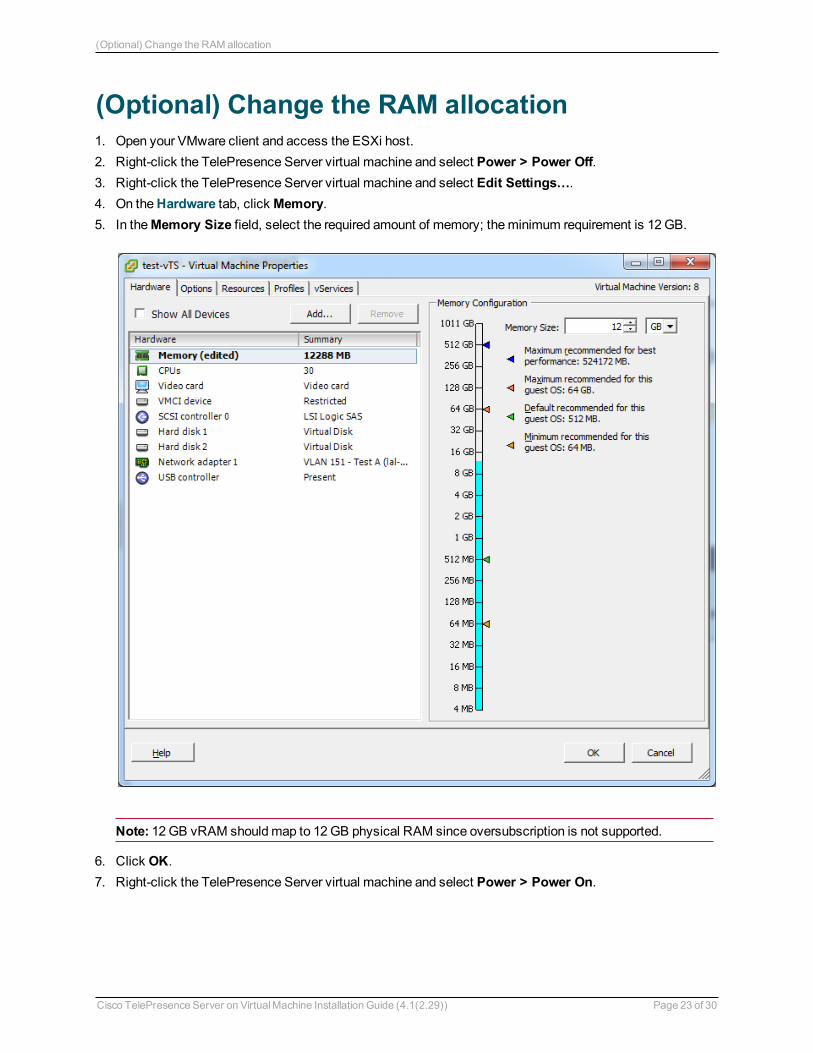
(Optional) Change the RAM allocation1. Open your VMware client and access the ESXi host.2. Right-click the TelePresence Server virtual machine and select Power > Power Off.3. Right-click the TelePresence Server virtual machine and select Edit Settings….4. On theHardware tab, click Memory.5. In theMemory Size field, select the required amount of memory; theminimum requirement is 12GB.
Note: 12GB vRAM shouldmap to 12GB physical RAM since oversubscription is not supported.
6. Click OK.7. Right-click the TelePresence Server virtual machine and select Power > Power On.
Cisco TelePresence Server on VirtualMachine Installation Guide (4.1(2.29)) Page 23 of 30
(Optional) Change the RAM allocation
Checking for updatesIt is a good idea to regularly check for updates to the device's main software image on the Cisco web site.This section describes how to upgrade the device using the web interface.
To check for, and download, updates:
1. Log in to the web interface and go toStatus > Status.2. Make a note of the software version that is currently installed.3. Go to the support section of the web site and check if a more recent release is available.
Note: the upgrade file for Cisco TelePresence Server on Virtual Machine has a .tgz extension, while theoriginal install file has a .ova extension
4. If a more recent release is available, download it and save it locally.
Upgrade instructions1. In a web browser, navigate to the web interface of the device.2. Sign in as an administrator.
The username is admin and there is no password on a new unit.3. Go toConfiguration > Upgrade.4. In theMain software image section, locate theNew image file field. Browse to and select the new
image file.5. Click Upload software image.
The web browser uploads the file to the device, whichmay take a few minutes.
Note:Do not browse away from theUpgrade page, or refresh the page, during the upload process – thiswill cause the upload to fail.
A pop-up window displays to show upload progress. When complete, close themessage. The webbrowser refreshes automatically and displays themessageMain image upload completed.
6. Click Shut down TelePresence Server. This option will now change toConfirm TelePresence Servershutdown. Click to confirm.
7. Click Restart TelePresence Server and upgrade.The unit will reboot and upgrade itself; this can take up to 25minutes.
Note:Youmay be logged out due to inactivity. If this happens, log in again, go toConfiguration >Shutdown and click Restart TelePresence Server and upgrade.
8. Go to theStatus page to verify that your device is using the new version.9. If necessary, restore your configuration; refer to the online help for details.
Cisco TelePresence Server on VirtualMachine Installation Guide (4.1(2.29)) Page 24 of 30
Checking for updates
Security
Changing the admin account passwordTo change the password for the admin account using the web interface:
1. Go toUsers > Users.2. Select admin user.3. Click Change password.4. Enter a new password in thePassword andRe-enter password fields.5. Click Change password.
Note about existing privileged accountCisco TelePresence Server on Virtual Machine releases contain a password-protected privileged shell loginover virtual console. This account can be accessed via vSphere administration console.
Cisco TelePresence Server Software 4.1(1.85) and later have this account disabled by default. PrivilegedShell account password can be changed by contacting Cisco TAC.
Security hardeningInformation on how to deploy and operate VMware products in a securemanner is available from the VMwareSecurity Hardening Guides.
Cisco TelePresence Server on VirtualMachine Installation Guide (4.1(2.29)) Page 25 of 30
Security
Troubleshooting and technical supportinformation
Using the event log to help solve a problemYou can use the event log to produce debugging information to assist technical support in solving anyproblems. Event logging capture filter topics are set by default toErrors, warnings and information. Donot change the capture filter topic level without the guidance of technical support.
Getting more helpIf you experience any problems when configuring or using the TelePresence Server, consult the online helpavailable from the user interface.
If you cannot find the answer you need in the documentation, check the web site athttp://www.cisco.com/cisco/web/support/index.html where you will be able to:
n Make sure that you are running themost up-to-date software.n Get help from the Cisco Technical Support team.
Make sure you have the following information ready before raising a case:
n Identifying information for your product, such as model number, firmware version, and software version(where applicable).
n Your contact email address or telephone number.n A full description of the problem.
To view a list of Cisco TelePresence products that are no longer being sold andmight not be supported, visithttp://www.cisco.com/en/US/products/prod_end_of_life.html and scroll down to the TelePresence section.
Checking VMware compatibilityIf you are using third party hardware for hosting the Cisco TelePresence Server on Virtual Machineapplication, check the hardware compatibility. This can be done using the VMware compatibility guide toolavailable from http://www.vmware.com/resources/compatibility/search.php.
VMware checklist1. Check the accessibility to the VM host server (by ping, physical console access, ssh remote access,
KVM-over-IP console, and so on)2. Check the network connectivity of the VMkernel (by executing the vmkping command using Tech Support
Mode to verify network connectivity from the VMkernel NIC level)3. If you are having problems connecting to the vSphere Client management console, execute the command
/sbin/services.sh from an SSH session to restart the ESXi management agent4. Check the utilization of the VM host server (CPU utilization, memory utilization, disk access speed,
storage access speed, network access status, power utilization, and so on). If any specific applicationcauses high utilization, stop or restart this application to isolate the overall VM host performance level.
Cisco TelePresence Server on VirtualMachine Installation Guide (4.1(2.29)) Page 26 of 30
Troubleshooting and technical support information

Alternatively execute the command esxtop from Tech Support Mode to list all system processes runningon the ESXi host application
5. Check the ESXi server file log (hostd.logs) under the folder /var/log/vmwareThis log contains common error logs such as iSCSI naming error, authentication error, host convertibilityerror, and so on.
6. Verify that there is adequate disk space available on the volume that is storing the database files to ensurecorrect operation of the database. If there is not adequate space available on the physical volume thatstores the database files, free up disk space
7. Validate the authentication to the vCenter Server database. The vCenter Server servicemay not be able toauthenticate with the database in the following circumstances:l There are permission issues with the database when importing from one instance to anotherl The password on the account you are using to authenticate to the database has changed but thepassword in the registry has not changed as well
l The vCenter Server database user is not granted correct permissions
Analyzing the cause of VMware issues
Potentialsource ofissue
Symptoms to look for
Storage Look for the VM store application image stored either on the local drive, SAN or NFS.
VMs often freeze or hang up if the application failed to access the storage.
Possible error messages are:
n vCenter Server does not startn vCenter Server is slow to respondn vCenter Server fails after an indefinite amount of time
Network Any network failure or locking causes a connection failure between the VM and the virtual network.Also, if using NFS or iSCSI, storage may cause application failures because the application cannotaccess the file system.
DNS DNS server failures or communication failures between DNS and the VM server may cause theVMware application or the Cisco TelePresence Server on Virtual Machine application to fail.
vCenterServer
If vCenter is not operating properly, even though the Cisco TelePresence Server on Virtual Machineapplication is still up and running, you may lose connection to the application from the network.
Hostapplication
Check any critical alarms on the VM application for events on the host or application level (check theevent information from vSphere Client).
Table 6: VMware issues and possible root causes
Known sources of issues with Cisco TelePresence Server onVirtual Machine
VM Image Fails to BootIf the VM image fails to boot, check the VT (Virtualization Technology) setting in BIOS. This needs to beenabled for hosting VMs. If it is not set, set it and re-install ESXi then load the .ova file.
Cisco TelePresence Server on VirtualMachine Installation Guide (4.1(2.29)) Page 27 of 30
Troubleshooting and technical support information
Guest console in vSphere 5 fails to run on some Microsoft platformsWhen attempting to open a console screen from vSphere for the VM:
n Error message: “The VMRC console has disconnected...attempting to reconnect.”n Screen remains black
The following operating systems are at risk:
n Windows 7 64 bit – reported on VMware forum (http://communities.vmware.com/thread/333026)n Windows Server 2008 R2 (64-bit)
Raid Controller SynchronizationIf the VMware system is synchronizing its RAID disks, disk performance is seriously degraded. We stronglyrecommend that you do not install Cisco TelePresence Server on Virtual Machine on VM platforms whereRAID disks are in a degraded or synchronizing state.
TelePresence Server Displays Different Serial Number/MAC address onRebootThis situation can occur if multiple network interfaces are configured. Only one network interface issupported.
Collecting logs from the hostIf VMware is causing problems on a Cisco TelePresence Server on Virtual Machine host, we recommendthat you collect logs from the host for analysis:
1. Using the vSphere client (or the vCenter Server managing this ESXi host) connect to the ESXi host onwhich the Cisco TelePresence Server on Virtual Machine is running.
2. Go to File > Export > Export System logs, choose the appropriate ESXi host and go with the defaultsettings.
After you have downloaded the logs analyze them, or have them analyzed to determine the issue.
More information on exporting logs can be found at Collecting diagnostic information for VMware ESX/ESXiusing the vSphere Client (653).
Restoring default configuration (factory reset)Very rarely, it may become necessary to run the reset_config command on a TelePresence Server. Thisresets the configuration of the TelePresence Server to its original default settings.
Note: This command removes the IP address and other network configurations, the installed licenses andthe configured users.
To restore the default configuration:
1. Restart the TelePresence Server.2. Within 30 seconds after reboot, enter reset_config at the console.
Cisco TelePresence Server on VirtualMachine Installation Guide (4.1(2.29)) Page 28 of 30
Troubleshooting and technical support information

The configuration reset is complete.
Cisco TelePresence Server on VirtualMachine Installation Guide (4.1(2.29)) Page 29 of 30
Troubleshooting and technical support information
THE SPECIFICATIONS AND INFORMATION REGARDING THE PRODUCTS IN THIS MANUAL ARESUBJECT TOCHANGEWITHOUT NOTICE. ALL STATEMENTS, INFORMATION, ANDRECOMMENDATIONS IN THIS MANUAL ARE BELIEVED TOBE ACCURATE BUT ARE PRESENTEDWITHOUTWARRANTY OF ANY KIND, EXPRESS OR IMPLIED. USERS MUST TAKE FULLRESPONSIBILITY FOR THEIR APPLICATION OF ANY PRODUCTS.
THE SOFTWARE LICENSE AND LIMITED WARRANTY FOR THE ACCOMPANYINGPRODUCT ARESET FORTH IN THE INFORMATION PACKET THAT SHIPPED WITH THE PRODUCT AND AREINCORPORATED HEREIN BY THIS REFERENCE. IF YOU ARE UNABLE TO LOCATE THESOFTWARE LICENSE OR LIMITED WARRANTY, CONTACT YOUR CISCOREPRESENTATIVE FORA COPY.
The Cisco implementation of TCP header compression is an adaptation of a program developed by theUniversity of California, Berkeley (UCB) as part of UCB's public domain version of the UNIX operatingsystem. All rights reserved. Copyright © 1981, Regents of the University of California.
NOTWITHSTANDINGANY OTHER WARRANTY HEREIN, ALL DOCUMENT FILES AND SOFTWAREOF THESE SUPPLIERS ARE PROVIDED "AS IS" WITH ALL FAULTS. CISCOAND THE ABOVE-NAMED SUPPLIERS DISCLAIM ALLWARRANTIES, EXPRESSED OR IMPLIED, INCLUDING,WITHOUT LIMITATION, THOSE OFMERCHANTABILITY, FITNESS FOR A PARTICULAR PURPOSEAND NONINFRINGEMENT OR ARISING FROM A COURSE OF DEALING, USAGE, OR TRADEPRACTICE.
IN NOEVENT SHALLCISCOOR ITS SUPPLIERS BE LIABLE FOR ANY INDIRECT, SPECIAL,CONSEQUENTIAL, OR INCIDENTALDAMAGES, INCLUDING, WITHOUT LIMITATION, LOSTPROFITS OR LOSS OR DAMAGE TODATA ARISINGOUTOF THE USE OR INABILITY TOUSE THISMANUAL, EVEN IF CISCOOR ITS SUPPLIERS HAVE BEEN ADVISED OF THE POSSIBILITY OFSUCH DAMAGES.
Cisco and the Cisco Logo are trademarks of Cisco Systems, Inc. and/or its affiliates in the U.S. and othercountries. A listing of Cisco's trademarks can be found at www.cisco.com/go/trademarks. Third partytrademarks mentioned are the property of their respective owners. The use of the word partner does not implya partnership relationship between Cisco and any other company. (1005R)
Any Internet Protocol (IP) addresses and phone numbers used in this document are not intended to be actualaddresses and phone numbers. Any examples, command display output, network topology diagrams, andother figures included in the document are shown for illustrative purposes only. Any use of actual IPaddresses or phone numbers in illustrative content is unintentional and coincidental.
© 2015 Cisco Systems, Inc. All rights reserved.
Cisco TelePresence Server on VirtualMachine Installation Guide (4.1(2.29)) Page 30 of 30