cisco prime collaboration deployment administration guide, …€¦ · cisco prime collaboration...
TRANSCRIPT

Cisco Prime Collaboration Deployment Administration Guide, Release11.5(2)First Published: June 21, 2016
Americas HeadquartersCisco Systems, Inc.170 West Tasman DriveSan Jose, CA 95134-1706USAhttp://www.cisco.comTel: 408 526-4000 800 553-NETS (6387)Fax: 408 527-0883

THE SPECIFICATIONS AND INFORMATION REGARDING THE PRODUCTS IN THIS MANUAL ARE SUBJECT TO CHANGE WITHOUT NOTICE. ALL STATEMENTS,INFORMATION, AND RECOMMENDATIONS IN THIS MANUAL ARE BELIEVED TO BE ACCURATE BUT ARE PRESENTED WITHOUT WARRANTY OF ANY KIND,EXPRESS OR IMPLIED. USERS MUST TAKE FULL RESPONSIBILITY FOR THEIR APPLICATION OF ANY PRODUCTS.
THE SOFTWARE LICENSE AND LIMITEDWARRANTY FOR THE ACCOMPANYING PRODUCT ARE SET FORTH IN THE INFORMATION PACKET THAT SHIPPED WITHTHE PRODUCT AND ARE INCORPORATED HEREIN BY THIS REFERENCE. IF YOU ARE UNABLE TO LOCATE THE SOFTWARE LICENSE OR LIMITED WARRANTY,CONTACT YOUR CISCO REPRESENTATIVE FOR A COPY.
The Cisco implementation of TCP header compression is an adaptation of a program developed by the University of California, Berkeley (UCB) as part of UCB's public domain versionof the UNIX operating system. All rights reserved. Copyright © 1981, Regents of the University of California.
NOTWITHSTANDINGANYOTHERWARRANTYHEREIN, ALL DOCUMENT FILES AND SOFTWARE OF THESE SUPPLIERS ARE PROVIDED “AS IS"WITH ALL FAULTS.CISCO AND THE ABOVE-NAMED SUPPLIERS DISCLAIM ALL WARRANTIES, EXPRESSED OR IMPLIED, INCLUDING, WITHOUT LIMITATION, THOSE OFMERCHANTABILITY, FITNESS FORA PARTICULAR PURPOSEANDNONINFRINGEMENTORARISING FROMACOURSEOFDEALING, USAGE, OR TRADE PRACTICE.
IN NO EVENT SHALL CISCO OR ITS SUPPLIERS BE LIABLE FOR ANY INDIRECT, SPECIAL, CONSEQUENTIAL, OR INCIDENTAL DAMAGES, INCLUDING, WITHOUTLIMITATION, LOST PROFITS OR LOSS OR DAMAGE TO DATA ARISING OUT OF THE USE OR INABILITY TO USE THIS MANUAL, EVEN IF CISCO OR ITS SUPPLIERSHAVE BEEN ADVISED OF THE POSSIBILITY OF SUCH DAMAGES.
Any Internet Protocol (IP) addresses and phone numbers used in this document are not intended to be actual addresses and phone numbers. Any examples, command display output, networktopology diagrams, and other figures included in the document are shown for illustrative purposes only. Any use of actual IP addresses or phone numbers in illustrative content is unintentionaland coincidental.
Cisco and the Cisco logo are trademarks or registered trademarks of Cisco and/or its affiliates in the U.S. and other countries. To view a list of Cisco trademarks, go to this URL: http://www.cisco.com/go/trademarks. Third-party trademarks mentioned are the property of their respective owners. The use of the word partner does not imply a partnershiprelationship between Cisco and any other company. (1110R)
© 2016 Cisco Systems, Inc. All rights reserved.
C O N T E N T S
C H A P T E R 1 Introduction 1
Introduction to Cisco Prime Collaboration Deployment 1
C H A P T E R 2 Install Cisco Prime Collaboration Deployment 3
System Requirements for Installation 3
Browser Requirements 4
IP Address Requirements 4
Virtualization Software License Types 4
Frequently Asked Questions About the Installation 5
Preinstallation Tasks 6
Begin Installation 14
Install Cisco Prime Collaboration Deployment 14
Extract the PCD_VAPP.OVA File 14
Install the Virtual Machine 15
Configure Cisco Prime Collaboration Deployment on the Virtual Machine 16
Postinstallation Tasks 18
C H A P T E R 3 Upgrade Cisco Prime Collaboration Deployment 19
Upgrade Cisco Prime Collaboration Deployment Using CLI 19
C H A P T E R 4 Cisco Prime Collaboration Deployment Features 21
Cisco Prime Collaboration Deployment Considerations 21
Network Address Translation Support 22
Configure Cisco Prime Collaboration Deployment Behind the NAT 23
Supported Upgrade and Migration Tasks 23
Upgrade Paths for Export Restricted and Unrestricted Software 27
Supported ESXi Server Versions 27
Cluster Inventory 28
Cisco Prime Collaboration Deployment Administration Guide, Release 11.5(2) iii
Discover a Cluster 28
Modify and View a Cluster 30
Add an ESXi Host Server 31
Create a Migration Cluster 31
Add New Cluster for Fresh Install 33
Task Management 34
Migration Task 35
Before You Begin 35
Create a Migration Task 36
Run a Migration Task 38
Postmigration Tasks for Cisco Unified Communication Manager Nodes in the
Cluster 39
Post Migration Tasks for IM and Presence Service 40
Migration Procedure Flow Charts 41
Simple Migration 42
Pre Release 8.0.1 Unified CM Network Migration 43
Release 8.0.1 And Later Unified CM Network Migration 44
Recovery of Original Cluster 45
Check the Status of the Cluster Manager Service on All Source Nodes 45
Upgrade Task 46
Create an Upgrade Task 46
Reuse Sequence from Previous Task 49
Switch Versions Task 49
Create a Switch Versions Task 49
Server Restart Task 52
Create a Server Restart Task 52
Readdress Task 54
Create a Readdress Task 54
Run a Readdress Task 55
Post Readdress Task 56
Install Task 56
Create an Install Task 56
Add Install Task 57
Run an Install Task 59
Cancel Install Task 60
Cisco Prime Collaboration Deployment Administration Guide, Release 11.5(2)iv
Contents

Post-Install Task 60
Edit and Expand Cluster Support 60
Edit or Delete a New Install Cluster 60
Edit or Delete a Discovered Cluster 61
Monitor Task Status 62
Action Buttons on the Monitoring Page 63
Automatic Refresh 64
Administration Tools 64
Email Notification 64
When Email Is Sent 64
SFTP Datastore 65
Migration or Fresh Install Tasks 65
Upgrade Task 65
Verify or View an ISO Filename 66
Delete ISO or COP Files 66
Remote SFTP Server Support 66
Add Remote SFTP server 67
Associate Nodes to Remote SFTP Server 68
Edit Remote SFTP Server 69
Delete Remote SFTP Server 69
Delete Local SFTP/Datastore ISO files 70
Disk Space Warning Level 70
Configure Disk Space Warning Level 71
C H A P T E R 5 Cisco Prime Collaboration Deployment Administrative Interface Elements 73
Common Administrative Interface Elements 73
Monitoring View Elements 74
Tasks View Elements 78
Upgrade View 78
Switch Versions View 82
Server Restart View 87
Readdress View 92
Install View 98
Migrate View 102
Inventory View Elements 107
Cisco Prime Collaboration Deployment Administration Guide, Release 11.5(2) v
Contents
Clusters 107
ESXi Hosts View 114
SFTP Servers and Datastore 115
Administration View Elements 116
Email Notification View 116
NAT Settings 118
Disk Space Warning Level 119
C H A P T E R 6 Cisco Prime Collaboration Deployment Configuration and Administration 121
Services 121
Limitations and Restrictions 125
C H A P T E R 7 CLI Commands and Disaster Recovery System 127
CLI Commands on Cisco Prime Collaboration Deployment 127
Create a DRS Backup of the Server 129
Important Notes on Backup and Restore 130
Restore a Backup to Cisco Prime Collaboration Deployment 130
C H A P T E R 8 CTL Update 133
More Information 133
Bulk Certificate Management 133
C H A P T E R 9 Best Practices 135
Cluster Discovery 135
Upgrades 136
ESXi Host 136
Migration and Installation Virtual Machines 136
Premigration 136
Check TFTP Directory Disk Usage 137
Delete TFTP Files 137
Postmigration 137
Task Validation 138
Cisco Prime Collaboration Deployment Shutdown 138
Monitoring Tasks 138
Managing Files in the SFTP Datastore 138
Cisco Prime Collaboration Deployment Administration Guide, Release 11.5(2)vi
Contents
Using Cisco Prime Collaboration Deployment with Clustering Over WAN 139
Sequence During Migration 139
Server Readdress 139
Fresh Install Publishers and Subscribers 139
Fresh Install of a Unified CM and IM and Presence Cluster 139
Email Notification 140
Test Email 140
C H A P T E R 1 0 Cisco Prime Collaboration Deployment Troubleshooting 141
Increase Disk Space for Migrations 141
General Troubleshooting Issues 142
Errors Seen in View Log 142
Lock Errors 146
NFS Datastores 146
Pause States on Monitor Page 146
Scheduling 147
Server Connectivity 147
Task Failure Due to Restart 147
Installation Task Failure 148
Upgrade Task Failure 149
Migration Task Failure 151
Switch Version Task Failure 152
Readdress Task Failure 153
Server Restart Task Failure 155
Task Scheduling 156
Task Timeouts 157
Upgrade Migration and Installation 157
Run a New Task When Current Task in Canceling State 158
Rerun Fresh Install Task 158
Rerun Migration Task 159
Version Validity 159
ISO File Does Not Get Loaded Or Not Recognized During Migration 160
Cisco Prime Collaboration Deployment Administration Guide, Release 11.5(2) vii
Contents

Cisco Prime Collaboration Deployment Administration Guide, Release 11.5(2)viii
Contents
C H A P T E R 1Introduction
• Introduction to Cisco Prime Collaboration Deployment, page 1
Introduction to Cisco Prime Collaboration DeploymentCisco Prime Collaboration Deployment is an application that is designed to assist in the management ofUnified Communications (UC) applications. It allows you to perform tasks such as migration of older softwareversions of clusters to new virtual machines, fresh installs, and upgrades on existing clusters.
Cisco Prime Collaboration Deployment has four primary high-level functions:
• Migrate an existing cluster of UC servers to a new cluster (such as MCS 7800 to virtual or virtual tovirtual)
• Perform operations on existing clusters (8.6(1) or later). Examples of these operations include:
◦Upgrade
◦Switch version
◦Restart
• Change IP addresses or hostnames in the cluster on existing Release 10.x clusters.
All the IP addresses that are mentioned in this document applies only for the IPv4 addressformat.
Important
• Fresh install a new Release 10.x or 11.x Unified Communications cluster
Cisco Prime Collaboration Deployment features are only supported by specific software versions. Fordetails on software versions that are compatible with each Cisco Prime Collaboration Deployment feature,see Supported Upgrade and Migration Tasks, on page 23. For details on supported upgrade paths, seeUpgrade Paths for Export Restricted and Unrestricted Software, on page 27.
Note
Cisco Prime Collaboration Deployment Administration Guide, Release 11.5(2) 1

Cisco Prime Collaboration Deployment Administration Guide, Release 11.5(2)2
IntroductionIntroduction to Cisco Prime Collaboration Deployment
C H A P T E R 2Install Cisco Prime Collaboration Deployment
• System Requirements for Installation, page 3
• Browser Requirements, page 4
• IP Address Requirements, page 4
• Virtualization Software License Types, page 4
• Frequently Asked Questions About the Installation, page 5
• Preinstallation Tasks, page 6
• Begin Installation, page 14
• Install Cisco Prime Collaboration Deployment, page 14
• Postinstallation Tasks, page 18
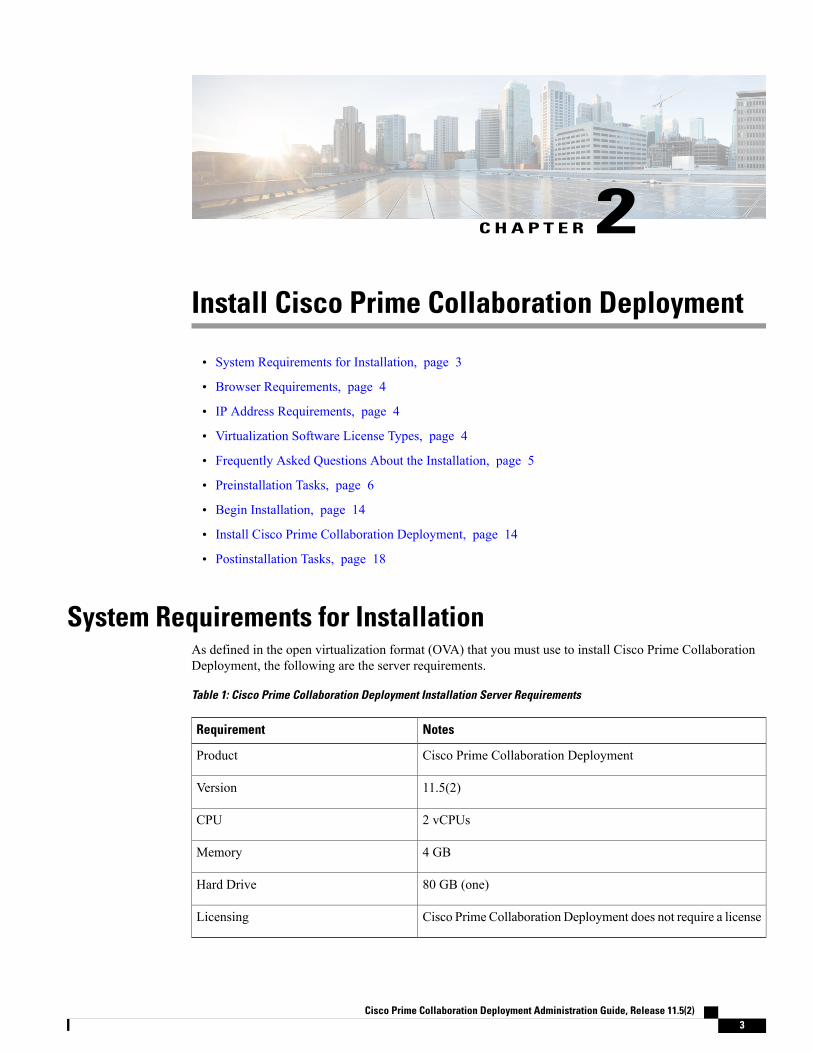
System Requirements for InstallationAs defined in the open virtualization format (OVA) that you must use to install Cisco Prime CollaborationDeployment, the following are the server requirements.
Table 1: Cisco Prime Collaboration Deployment Installation Server Requirements
NotesRequirement
Cisco Prime Collaboration DeploymentProduct
11.5(2)Version
2 vCPUsCPU
4 GBMemory
80 GB (one)Hard Drive
Cisco Prime Collaboration Deployment does not require a licenseLicensing
Cisco Prime Collaboration Deployment Administration Guide, Release 11.5(2) 3
Browser RequirementsCisco Prime Collaboration Deployment provides a GUI interface that you can use to configure and managethe system. You can access the interfaces by using the browsers and operating systems listed here.
Other browsers are not supported.Note
Cisco Prime Collaboration Deployment supports the following operating system browsers:
• Mozilla Firefox 42
• Mozilla Firefox ESR 38.4
• Google Chrome 46
• Microsoft Internet Explorer (IE) 9, 10, 11
• Apple Safari 7
From any user PC in your network, browse to a server that is running Cisco Prime Collaboration Deploymentand log in with administrative privileges.
Simultaneous login to Cisco Prime Collaboration Deployment Administration GUI by more than fiveusers can affect performance. Limit the number of users and administrators that are logged insimultaneously.
Note
Cisco Prime Collaboration Deployment Administration does not support the buttons in your browser. Donot use the browser buttons (for example, the Back button) when you perform configuration tasks.
Note
IP Address RequirementsYou must configure the Cisco Prime Collaboration Deployment server to use static IP addressing to ensurethat the server obtains a fixed IP address.
Virtualization Software License TypesThe VMware vSphere ESXi license is required for the physical server with ESXi that hosts the Cisco PrimeCollaboration Deployment virtual machine in addition to any additional physical servers with ESXI on whichCisco Prime Collaboration Deployment will operate. This includes virtual machines to which Cisco PrimeCollaboration Deployment is migrating, installing, upgrading, or rebooting.
Cisco Prime Collaboration Deployment Administration Guide, Release 11.5(2)4
Install Cisco Prime Collaboration DeploymentBrowser Requirements
Cisco Prime Collaboration Deployment is not compatible with all license types of VMware vSphere ESXi,because some of these licenses do not enable required VMware APIs.
Cisco Business Edition 6000 and Cisco Business Edition 7000 servers are preinstalled with Cisco UCVirtualization Hypervisor. If you plan to use Cisco Prime Collaboration Deployment with applicationVMs on these servers, you must substitute a higher virtualization software feature level.
Note
The following are compatible with Cisco Prime Collaboration Deployment:
• Cisco UC Virtualization Foundation (appears as “Foundation Edition” in vSphere Client)
• Cisco UC Virtualization Hypervisor Plus 6.0 or higher
• VMware vSphere Standard Edition, Enterprise Edition, or Enterprise Plus Edition
• Evaluation mode license (for example, for lab deployments and not production use)
The following are not compatible with Cisco Prime Collaboration Deployment:
• Cisco UC Virtualization Hypervisor (appears as “Hypervisor Edition” in vSphere Client)
• VMware vSphere Hypervisor Edition
Frequently Asked Questions About the InstallationReview this section carefully before you begin the installation.
How much time does the installation require?
The entire Cisco Prime Collaboration Deployment installation process, excluding pre- and postinstallationtasks, takes approximately 30 minutes.
What usernames and passwords do I need to specify?
The system checks your passwords for strength. For guidelines on creating a strong passwords, see “WhatIs a Strong Password?” below.
Note
During the installation, you must specify the following usernames and passwords:
• Administrator account username and password
• Security password
You use the Administrator account username and password to log in to the following areas:
• Cisco Prime Collaboration Deployment GUI interface
• Command line interface
When you choose an administrator account username and password, follow these guidelines:
Cisco Prime Collaboration Deployment Administration Guide, Release 11.5(2) 5
Install Cisco Prime Collaboration DeploymentFrequently Asked Questions About the Installation
• Administrator account username—Must start with an alphabetic character and can contain alphanumericcharacters, hyphens, and underscores.
• Administrator account password—Must be at least six characters long and can contain alphanumericcharacters, hyphens, and underscores.
You can change the administrator account password or add a new administrator account by using the commandline interface. For more information, see the “Command line interface for Cisco Prime CollaborationDeployment” section.For the security password, the password must be at least six characters long and can contain alphanumericcharacters, hyphens, and underscores.
What is a strong password?
The Installation wizard checks to ensure that you enter a strong password. To create a strong password, followthese recommendations:
• Mix uppercase and lowercase letters.
• Mix letters and numbers.
• Include hyphens and underscores.
• Remember that longer passwords are stronger and more secure than shorter ones.
Avoid the following types of passwords:
• Do not use recognizable words, such as proper names and dictionary words, even when combined withnumbers.
• Do not invert recognizable words.
• Do not use word or number patterns, such as aaabbb, qwerty, zyxwvuts, 123321, and so on.
• Do not use recognizable words from other languages.
• Do not use personal information of any kind, including birthdays, postal codes, or names of children orpets.
Can I install other software on the virtual machine?
You cannot install or use unapproved third-party software applications. The system can upload and processonly software that is Cisco approved.
You can use the CLI to perform approved software installations and upgrades.
Preinstallation TasksThe following table contains a list of preinstallation tasks that you must perform to install Cisco PrimeCollaboration Deployment.
Cisco Prime Collaboration Deployment Administration Guide, Release 11.5(2)6
Install Cisco Prime Collaboration DeploymentPreinstallation Tasks
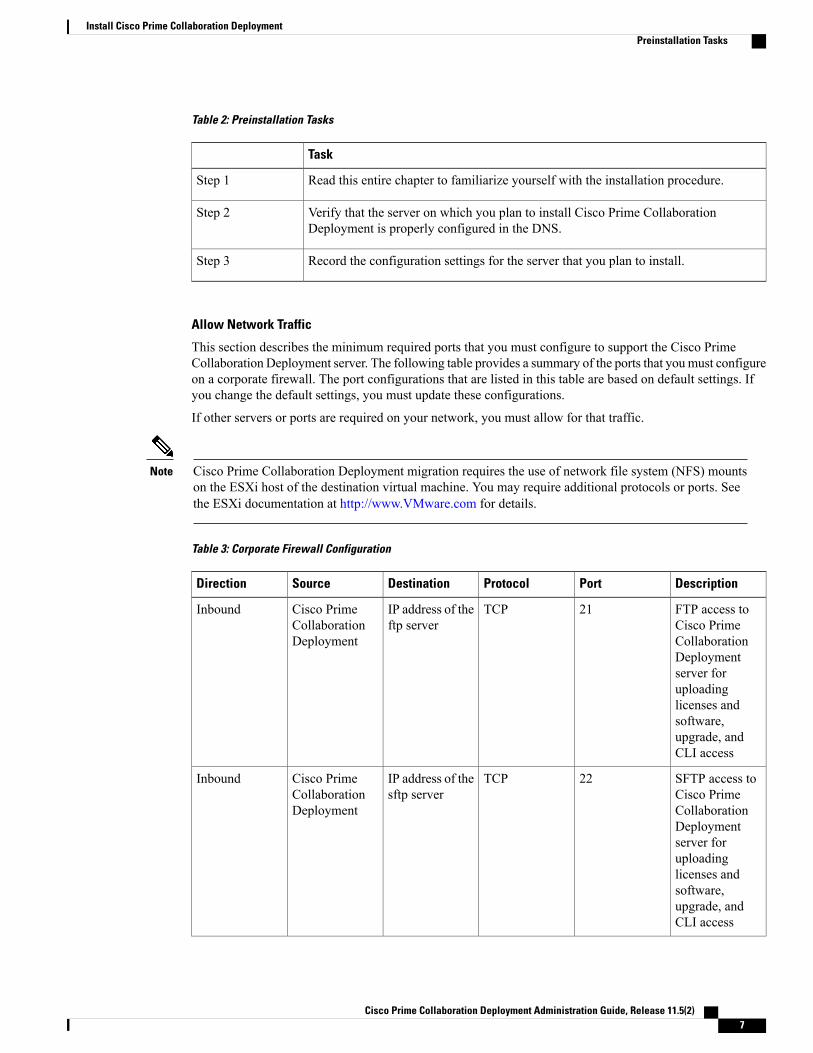
Table 2: Preinstallation Tasks
Task
Read this entire chapter to familiarize yourself with the installation procedure.Step 1
Verify that the server on which you plan to install Cisco Prime CollaborationDeployment is properly configured in the DNS.
Step 2
Record the configuration settings for the server that you plan to install.Step 3
Allow Network Traffic
This section describes the minimum required ports that you must configure to support the Cisco PrimeCollaboration Deployment server. The following table provides a summary of the ports that youmust configureon a corporate firewall. The port configurations that are listed in this table are based on default settings. Ifyou change the default settings, you must update these configurations.
If other servers or ports are required on your network, you must allow for that traffic.
Cisco Prime Collaboration Deployment migration requires the use of network file system (NFS) mountson the ESXi host of the destination virtual machine. You may require additional protocols or ports. Seethe ESXi documentation at http://www.VMware.com for details.
Note
Table 3: Corporate Firewall Configuration
DescriptionPortProtocolDestinationSourceDirection
FTP access toCisco PrimeCollaborationDeploymentserver foruploadinglicenses andsoftware,upgrade, andCLI access
21TCPIP address of theftp server
Cisco PrimeCollaborationDeployment
Inbound
SFTP access toCisco PrimeCollaborationDeploymentserver foruploadinglicenses andsoftware,upgrade, andCLI access
22TCPIP address of thesftp server
Cisco PrimeCollaborationDeployment
Inbound
Cisco Prime Collaboration Deployment Administration Guide, Release 11.5(2) 7
Install Cisco Prime Collaboration DeploymentPreinstallation Tasks
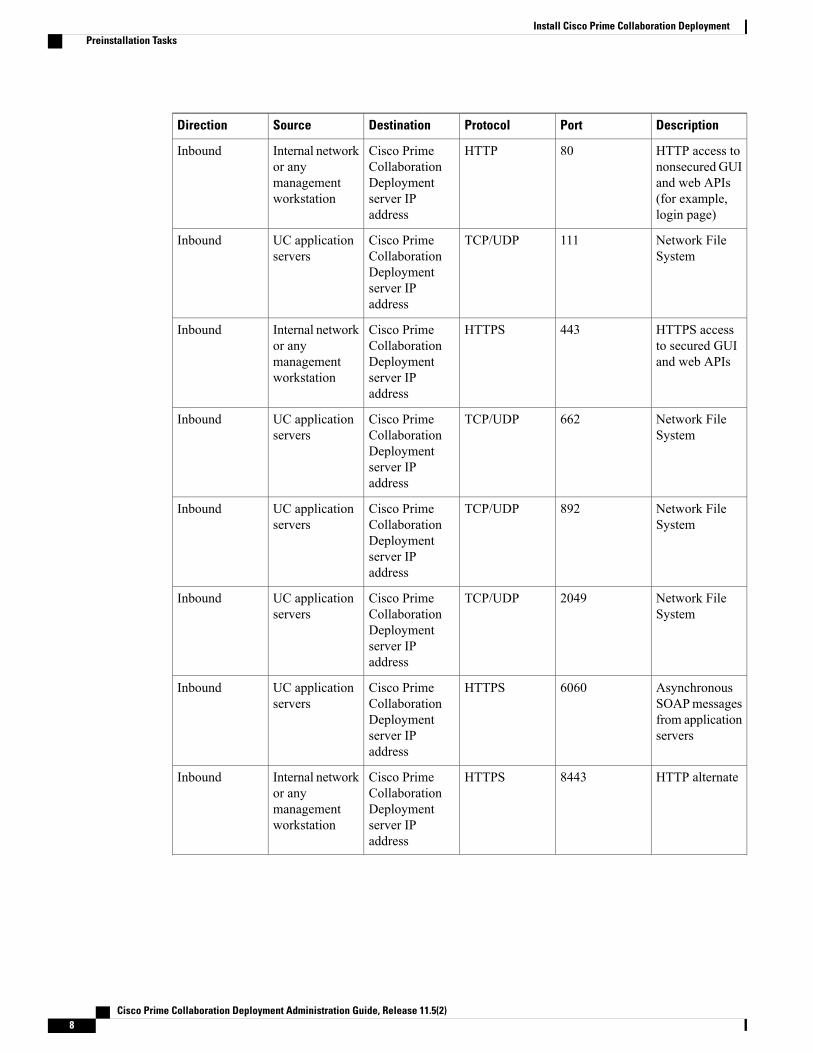
DescriptionPortProtocolDestinationSourceDirection
HTTP access tononsecured GUIand web APIs(for example,login page)
80HTTPCisco PrimeCollaborationDeploymentserver IPaddress
Internal networkor anymanagementworkstation
Inbound
Network FileSystem
111TCP/UDPCisco PrimeCollaborationDeploymentserver IPaddress
UC applicationservers
Inbound
HTTPS accessto secured GUIand web APIs
443HTTPSCisco PrimeCollaborationDeploymentserver IPaddress
Internal networkor anymanagementworkstation
Inbound
Network FileSystem
662TCP/UDPCisco PrimeCollaborationDeploymentserver IPaddress
UC applicationservers
Inbound
Network FileSystem
892TCP/UDPCisco PrimeCollaborationDeploymentserver IPaddress
UC applicationservers
Inbound
Network FileSystem
2049TCP/UDPCisco PrimeCollaborationDeploymentserver IPaddress
UC applicationservers
Inbound
AsynchronousSOAPmessagesfrom applicationservers
6060HTTPSCisco PrimeCollaborationDeploymentserver IPaddress
UC applicationservers
Inbound
HTTP alternate8443HTTPSCisco PrimeCollaborationDeploymentserver IPaddress
Internal networkor anymanagementworkstation
Inbound
Cisco Prime Collaboration Deployment Administration Guide, Release 11.5(2)8
Install Cisco Prime Collaboration DeploymentPreinstallation Tasks
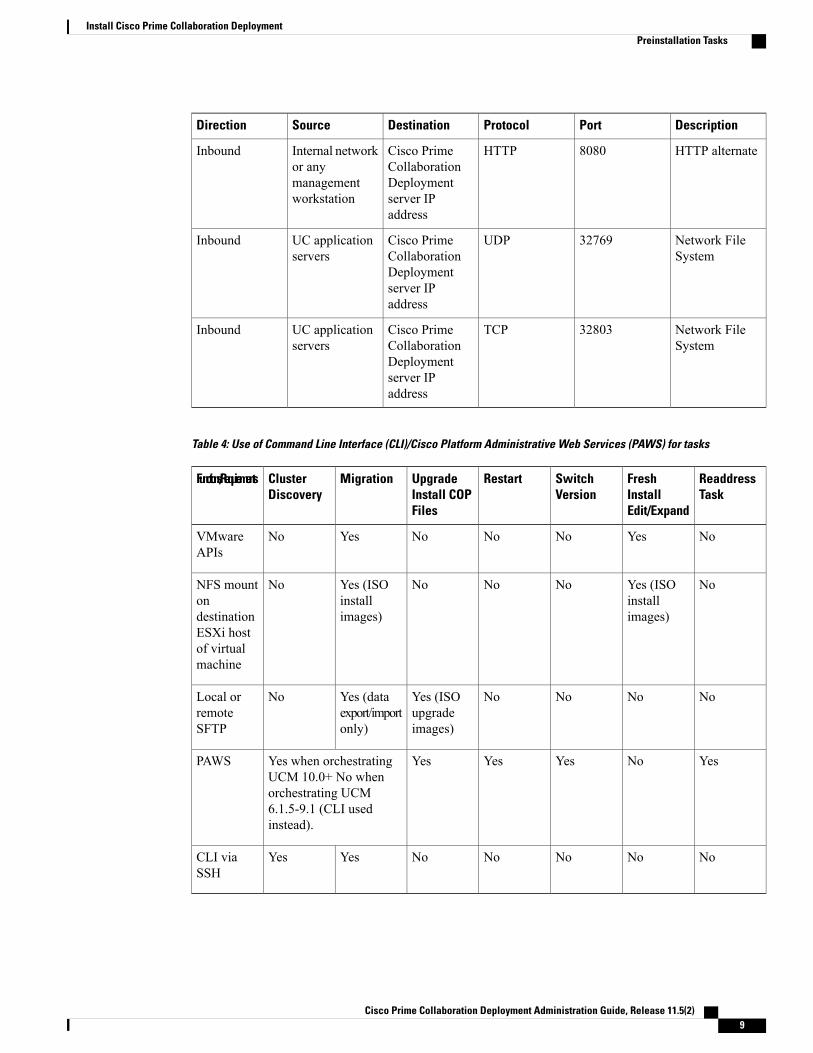
DescriptionPortProtocolDestinationSourceDirection
HTTP alternate8080HTTPCisco PrimeCollaborationDeploymentserver IPaddress
Internal networkor anymanagementworkstation
Inbound
Network FileSystem
32769UDPCisco PrimeCollaborationDeploymentserver IPaddress
UC applicationservers
Inbound
Network FileSystem
32803TCPCisco PrimeCollaborationDeploymentserver IPaddress
UC applicationservers
Inbound
Table 4: Use of Command Line Interface (CLI)/Cisco Platform Administrative Web Services (PAWS) for tasks
ReaddressTask
FreshInstallEdit/Expand
SwitchVersion
RestartUpgradeInstall COPFiles
MigrationClusterDiscovery
Functions/Requirements
NoYesNoNoNoYesNoVMwareAPIs
NoYes (ISOinstallimages)
NoNoNoYes (ISOinstallimages)
NoNFS mountondestinationESXi hostof virtualmachine
NoNoNoNoYes (ISOupgradeimages)
Yes (dataexport/importonly)
NoLocal orremoteSFTP
YesNoYesYesYesYes when orchestratingUCM 10.0+ No whenorchestrating UCM6.1.5-9.1 (CLI usedinstead).
PAWS
NoNoNoNoNoYesYesCLI viaSSH
Cisco Prime Collaboration Deployment Administration Guide, Release 11.5(2) 9
Install Cisco Prime Collaboration DeploymentPreinstallation Tasks
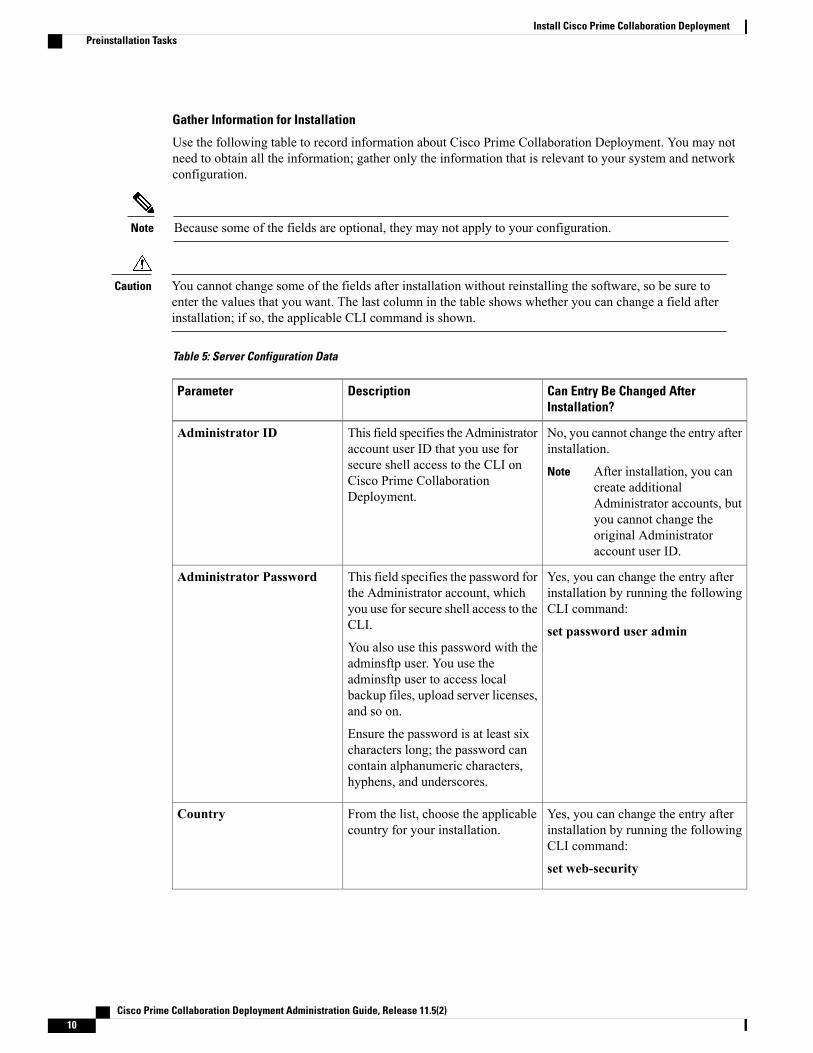
Gather Information for Installation
Use the following table to record information about Cisco Prime Collaboration Deployment. You may notneed to obtain all the information; gather only the information that is relevant to your system and networkconfiguration.
Because some of the fields are optional, they may not apply to your configuration.Note
You cannot change some of the fields after installation without reinstalling the software, so be sure toenter the values that you want. The last column in the table shows whether you can change a field afterinstallation; if so, the applicable CLI command is shown.
Caution
Table 5: Server Configuration Data
Can Entry Be Changed AfterInstallation?
DescriptionParameter
No, you cannot change the entry afterinstallation.
After installation, you cancreate additionalAdministrator accounts, butyou cannot change theoriginal Administratoraccount user ID.
Note
This field specifies the Administratoraccount user ID that you use forsecure shell access to the CLI onCisco Prime CollaborationDeployment.
Administrator ID
Yes, you can change the entry afterinstallation by running the followingCLI command:
set password user admin
This field specifies the password forthe Administrator account, whichyou use for secure shell access to theCLI.
You also use this password with theadminsftp user. You use theadminsftp user to access localbackup files, upload server licenses,and so on.
Ensure the password is at least sixcharacters long; the password cancontain alphanumeric characters,hyphens, and underscores.
Administrator Password
Yes, you can change the entry afterinstallation by running the followingCLI command:
set web-security
From the list, choose the applicablecountry for your installation.
Country
Cisco Prime Collaboration Deployment Administration Guide, Release 11.5(2)10
Install Cisco Prime Collaboration DeploymentPreinstallation Tasks
Can Entry Be Changed AfterInstallation?
DescriptionParameter
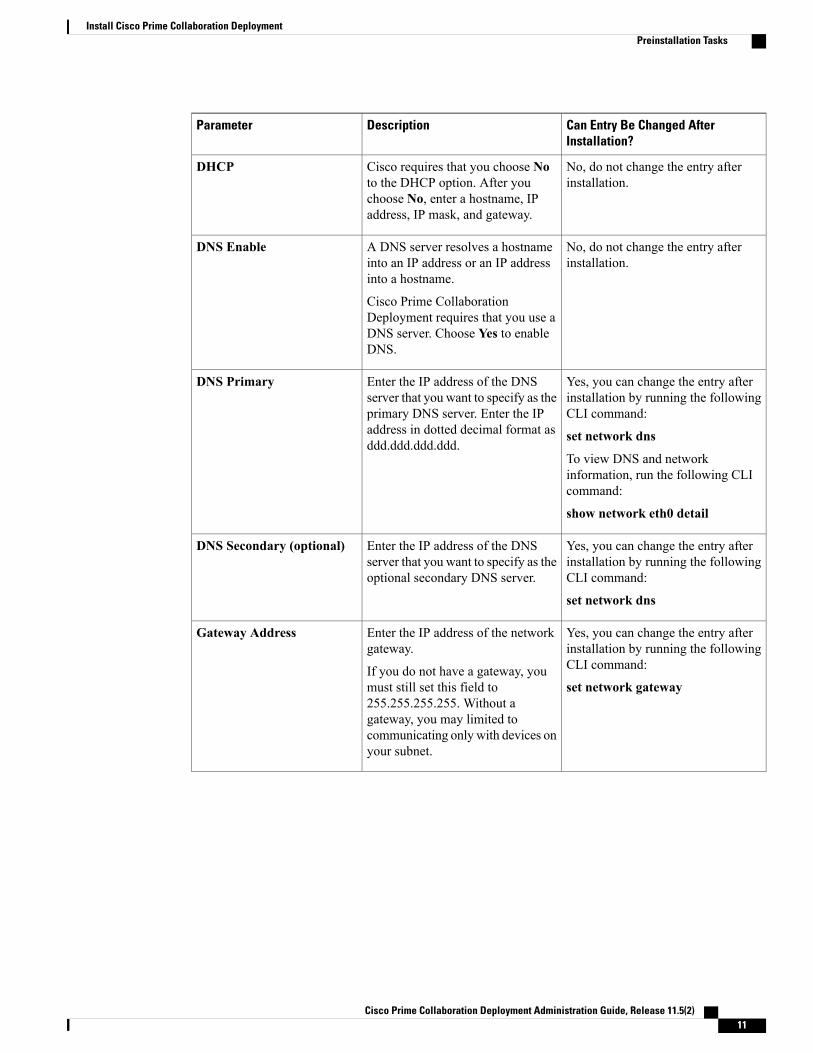
No, do not change the entry afterinstallation.
Cisco requires that you choose Noto the DHCP option. After youchoose No, enter a hostname, IPaddress, IP mask, and gateway.
DHCP
No, do not change the entry afterinstallation.
A DNS server resolves a hostnameinto an IP address or an IP addressinto a hostname.
Cisco Prime CollaborationDeployment requires that you use aDNS server. Choose Yes to enableDNS.
DNS Enable
Yes, you can change the entry afterinstallation by running the followingCLI command:
set network dns
To view DNS and networkinformation, run the following CLIcommand:
show network eth0 detail
Enter the IP address of the DNSserver that you want to specify as theprimary DNS server. Enter the IPaddress in dotted decimal format asddd.ddd.ddd.ddd.
DNS Primary
Yes, you can change the entry afterinstallation by running the followingCLI command:
set network dns
Enter the IP address of the DNSserver that you want to specify as theoptional secondary DNS server.
DNS Secondary (optional)
Yes, you can change the entry afterinstallation by running the followingCLI command:
set network gateway
Enter the IP address of the networkgateway.
If you do not have a gateway, youmust still set this field to255.255.255.255. Without agateway, you may limited tocommunicating only with devices onyour subnet.
Gateway Address
Cisco Prime Collaboration Deployment Administration Guide, Release 11.5(2) 11
Install Cisco Prime Collaboration DeploymentPreinstallation Tasks
Can Entry Be Changed AfterInstallation?
DescriptionParameter
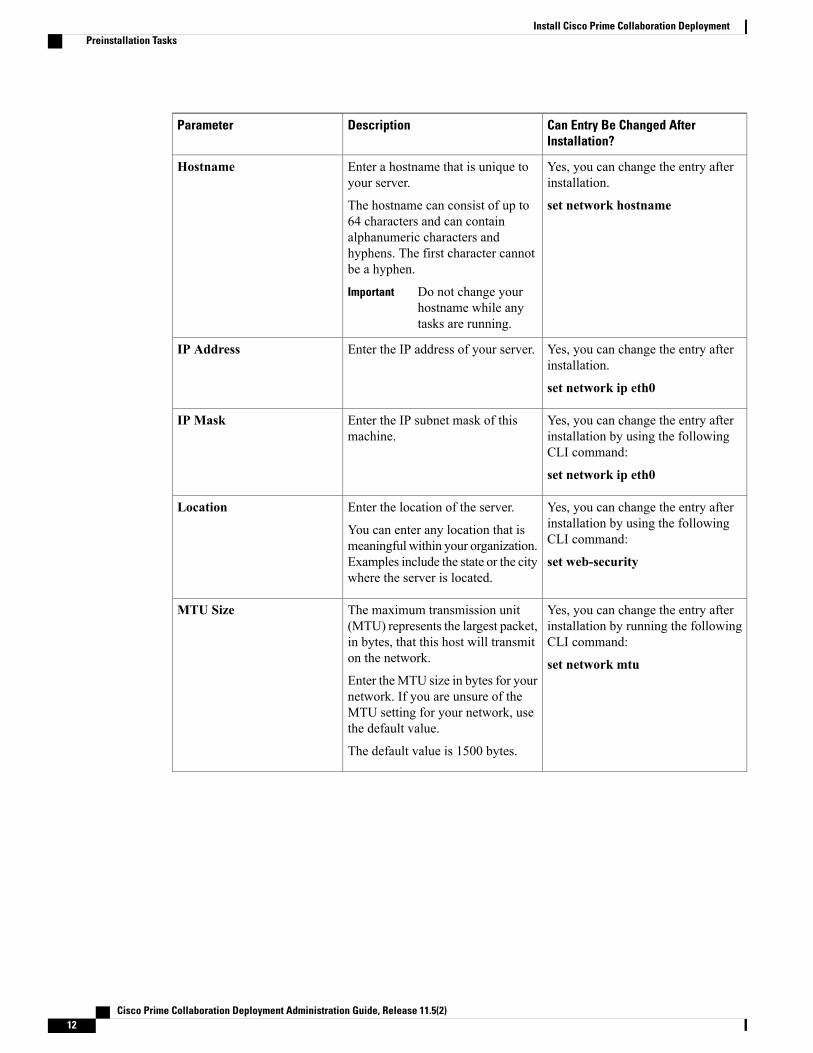
Yes, you can change the entry afterinstallation.
set network hostname
Enter a hostname that is unique toyour server.
The hostname can consist of up to64 characters and can containalphanumeric characters andhyphens. The first character cannotbe a hyphen.
Do not change yourhostname while anytasks are running.
Important
Hostname
Yes, you can change the entry afterinstallation.
set network ip eth0
Enter the IP address of your server.IP Address
Yes, you can change the entry afterinstallation by using the followingCLI command:
set network ip eth0
Enter the IP subnet mask of thismachine.
IP Mask
Yes, you can change the entry afterinstallation by using the followingCLI command:
set web-security
Enter the location of the server.
You can enter any location that ismeaningful within your organization.Examples include the state or the citywhere the server is located.
Location
Yes, you can change the entry afterinstallation by running the followingCLI command:
set network mtu
The maximum transmission unit(MTU) represents the largest packet,in bytes, that this host will transmiton the network.
Enter theMTU size in bytes for yournetwork. If you are unsure of theMTU setting for your network, usethe default value.
The default value is 1500 bytes.
MTU Size
Cisco Prime Collaboration Deployment Administration Guide, Release 11.5(2)12
Install Cisco Prime Collaboration DeploymentPreinstallation Tasks
Can Entry Be Changed AfterInstallation?
DescriptionParameter
Yes, you can change the entry afterinstallation by running the followingCLI command:
utils ntp server
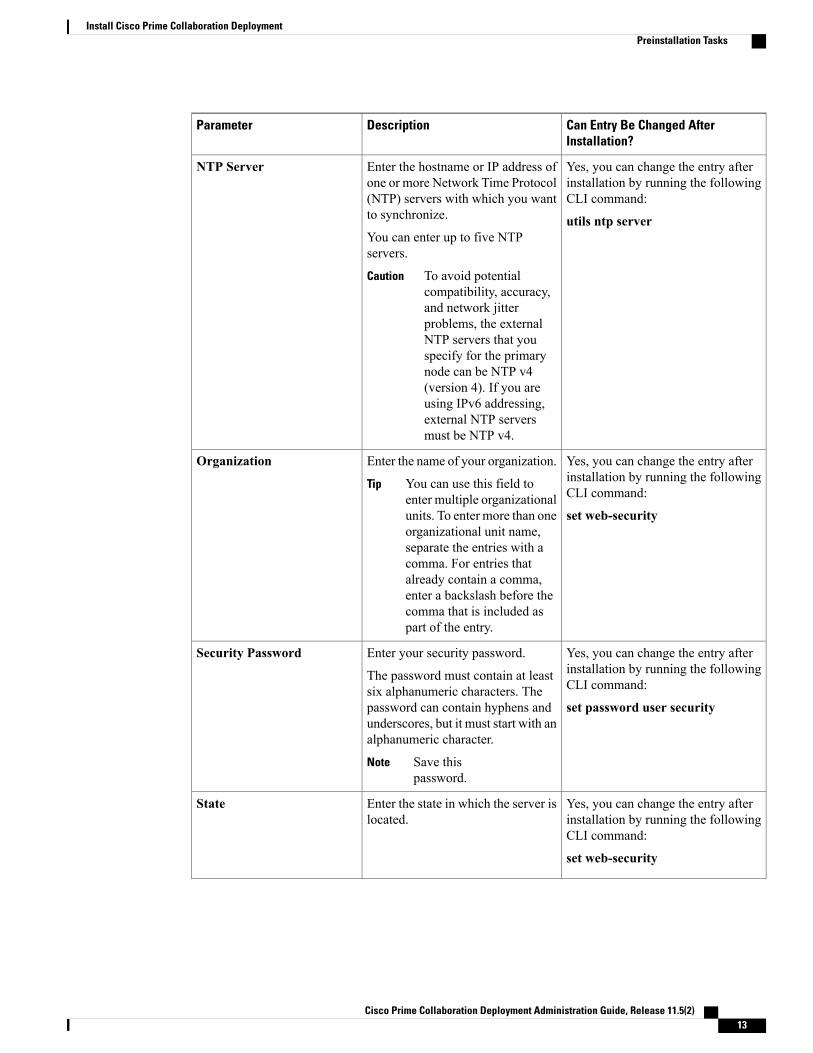
Enter the hostname or IP address ofone or more Network Time Protocol(NTP) servers with which you wantto synchronize.
You can enter up to five NTPservers.
To avoid potentialcompatibility, accuracy,and network jitterproblems, the externalNTP servers that youspecify for the primarynode can be NTP v4(version 4). If you areusing IPv6 addressing,external NTP serversmust be NTP v4.
Caution
NTP Server
Yes, you can change the entry afterinstallation by running the followingCLI command:
set web-security
Enter the name of your organization.
You can use this field toenter multiple organizationalunits. To enter more than oneorganizational unit name,separate the entries with acomma. For entries thatalready contain a comma,enter a backslash before thecomma that is included aspart of the entry.
Tip
Organization
Yes, you can change the entry afterinstallation by running the followingCLI command:
set password user security
Enter your security password.
The password must contain at leastsix alphanumeric characters. Thepassword can contain hyphens andunderscores, but it must start with analphanumeric character.
Save thispassword.
Note
Security Password
Yes, you can change the entry afterinstallation by running the followingCLI command:
set web-security
Enter the state in which the server islocated.
State
Cisco Prime Collaboration Deployment Administration Guide, Release 11.5(2) 13
Install Cisco Prime Collaboration DeploymentPreinstallation Tasks
Can Entry Be Changed AfterInstallation?
DescriptionParameter
Yes, you can change the entry afterinstallation by running the followingCLI command:
set timezone
To view the current time zoneconfiguration, run the following CLIcommand:
show timezone config
This field specifies the local timezone and offset from GreenwichMean Time (GMT).
Choose the time zone that mostclosely matches the location of yourmachine.
Time Zone
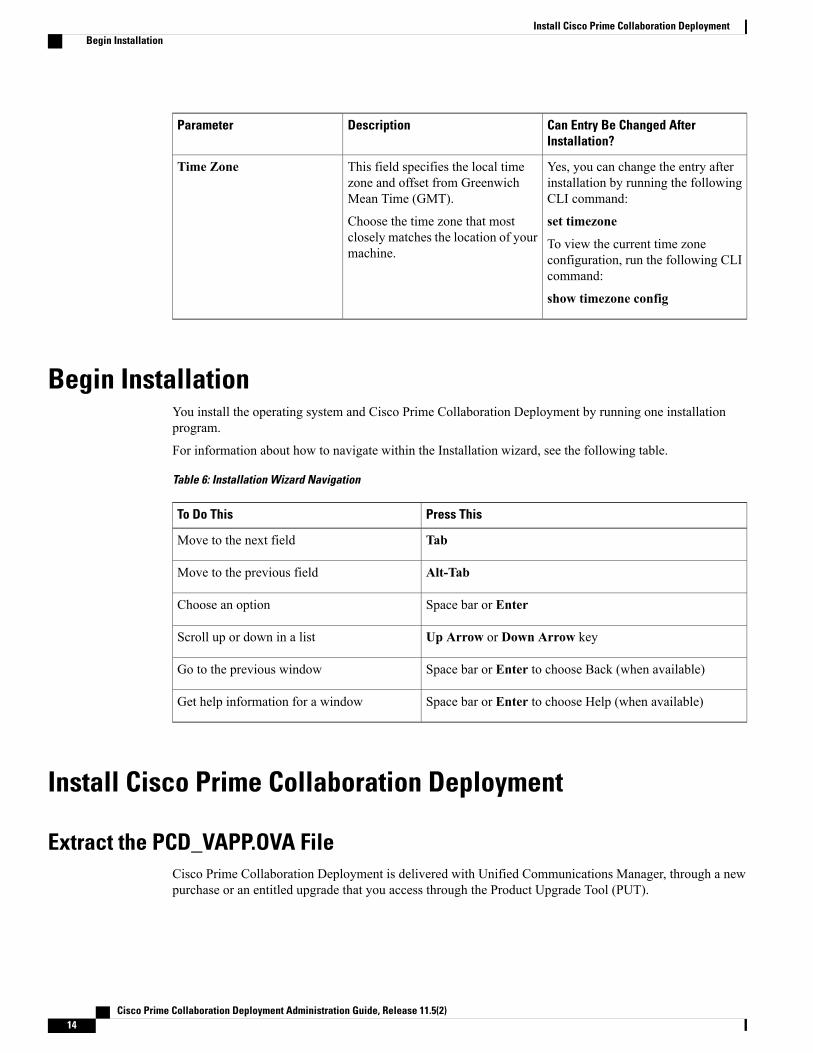
Begin InstallationYou install the operating system and Cisco Prime Collaboration Deployment by running one installationprogram.
For information about how to navigate within the Installation wizard, see the following table.
Table 6: Installation Wizard Navigation
Press ThisTo Do This
TabMove to the next field
Alt-TabMove to the previous field
Space bar or EnterChoose an option
Up Arrow or Down Arrow keyScroll up or down in a list
Space bar or Enter to choose Back (when available)Go to the previous window
Space bar or Enter to choose Help (when available)Get help information for a window
Install Cisco Prime Collaboration Deployment
Extract the PCD_VAPP.OVA FileCisco Prime Collaboration Deployment is delivered with Unified Communications Manager, through a newpurchase or an entitled upgrade that you access through the Product Upgrade Tool (PUT).
Cisco Prime Collaboration Deployment Administration Guide, Release 11.5(2)14
Install Cisco Prime Collaboration DeploymentBegin Installation
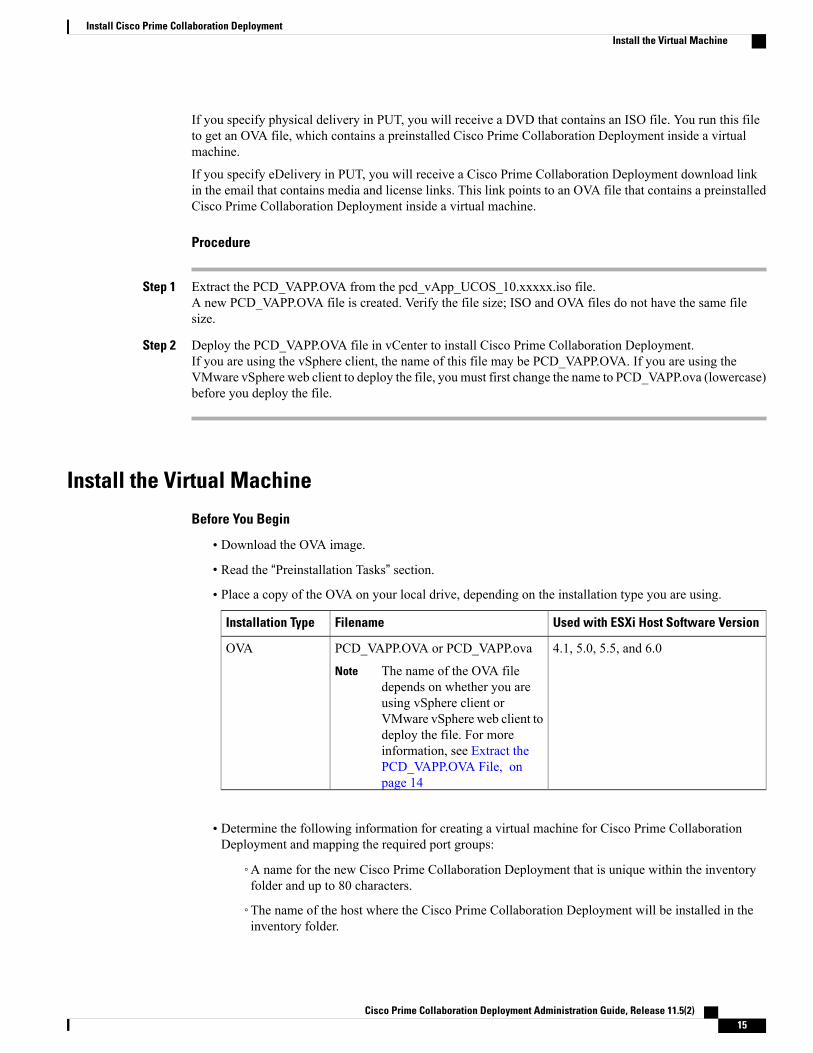
If you specify physical delivery in PUT, you will receive a DVD that contains an ISO file. You run this fileto get an OVA file, which contains a preinstalled Cisco Prime Collaboration Deployment inside a virtualmachine.
If you specify eDelivery in PUT, you will receive a Cisco Prime Collaboration Deployment download linkin the email that contains media and license links. This link points to an OVA file that contains a preinstalledCisco Prime Collaboration Deployment inside a virtual machine.
Procedure
Step 1 Extract the PCD_VAPP.OVA from the pcd_vApp_UCOS_10.xxxxx.iso file.A new PCD_VAPP.OVA file is created. Verify the file size; ISO and OVA files do not have the same filesize.
Step 2 Deploy the PCD_VAPP.OVA file in vCenter to install Cisco Prime Collaboration Deployment.If you are using the vSphere client, the name of this file may be PCD_VAPP.OVA. If you are using theVMware vSphere web client to deploy the file, you must first change the name to PCD_VAPP.ova (lowercase)before you deploy the file.
Install the Virtual Machine
Before You Begin
• Download the OVA image.
• Read the “Preinstallation Tasks” section.
• Place a copy of the OVA on your local drive, depending on the installation type you are using.
Used with ESXi Host Software VersionFilenameInstallation Type
4.1, 5.0, 5.5, and 6.0PCD_VAPP.OVA or PCD_VAPP.ova
The name of the OVA filedepends on whether you areusing vSphere client orVMware vSphere web client todeploy the file. For moreinformation, see Extract thePCD_VAPP.OVA File, onpage 14
Note
OVA
• Determine the following information for creating a virtual machine for Cisco Prime CollaborationDeployment and mapping the required port groups:
◦A name for the new Cisco Prime Collaboration Deployment that is unique within the inventoryfolder and up to 80 characters.
◦The name of the host where the Cisco Prime Collaboration Deployment will be installed in theinventory folder.
Cisco Prime Collaboration Deployment Administration Guide, Release 11.5(2) 15
Install Cisco Prime Collaboration DeploymentInstall the Virtual Machine
◦The name of the datastore in which the VM files will be stored.
◦The names of the network port groups used for the VM.
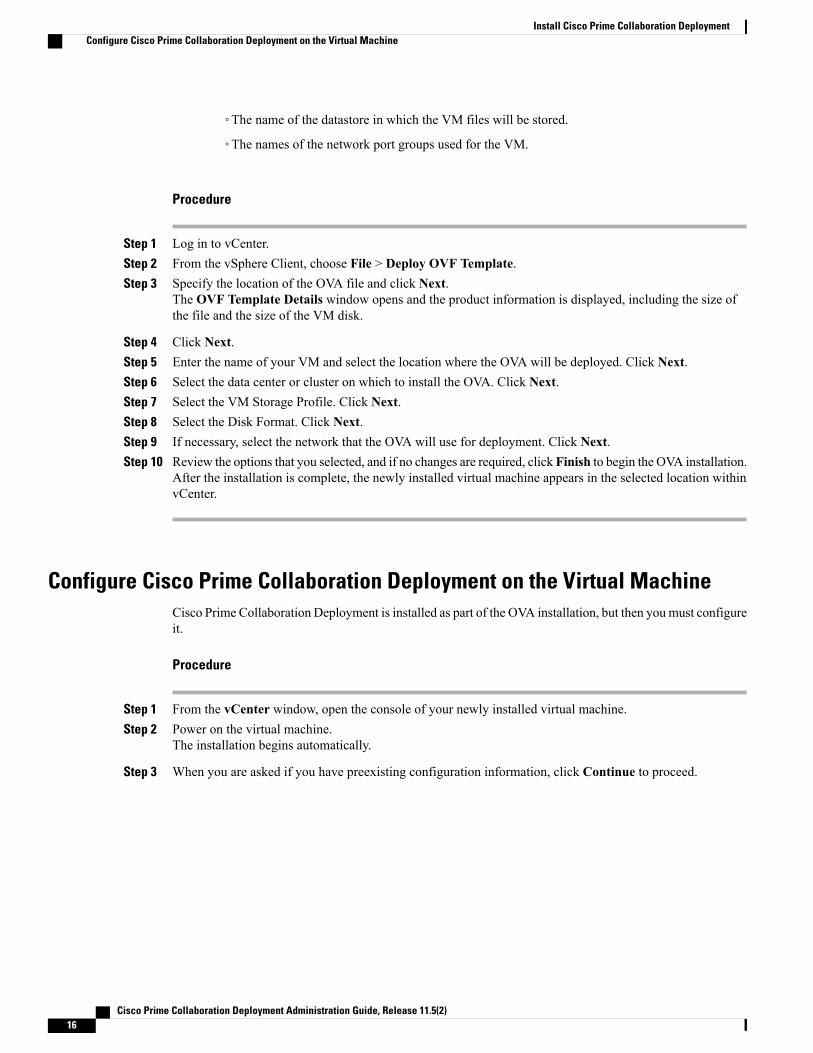
Procedure
Step 1 Log in to vCenter.Step 2 From the vSphere Client, choose File > Deploy OVF Template.Step 3 Specify the location of the OVA file and click Next.
The OVF Template Details window opens and the product information is displayed, including the size ofthe file and the size of the VM disk.
Step 4 Click Next.Step 5 Enter the name of your VM and select the location where the OVA will be deployed. Click Next.Step 6 Select the data center or cluster on which to install the OVA. Click Next.Step 7 Select the VM Storage Profile. Click Next.Step 8 Select the Disk Format. Click Next.Step 9 If necessary, select the network that the OVA will use for deployment. Click Next.Step 10 Review the options that you selected, and if no changes are required, click Finish to begin the OVA installation.
After the installation is complete, the newly installed virtual machine appears in the selected location withinvCenter.
Configure Cisco Prime Collaboration Deployment on the Virtual MachineCisco Prime Collaboration Deployment is installed as part of the OVA installation, but then youmust configureit.
Procedure
Step 1 From the vCenter window, open the console of your newly installed virtual machine.Step 2 Power on the virtual machine.
The installation begins automatically.
Step 3 When you are asked if you have preexisting configuration information, click Continue to proceed.
Cisco Prime Collaboration Deployment Administration Guide, Release 11.5(2)16
Install Cisco Prime Collaboration DeploymentConfigure Cisco Prime Collaboration Deployment on the Virtual Machine

The Platform Installation Wizard screen appears.
Step 4 Click Proceed to continue with the wizard.Step 5 Click Continue at the Basic Install screen.Step 6 In the Timezone Configuration screen, select your time zone and click OK.Step 7 Click Continue at the Auto Negotiation Configuration screen.Step 8 When asked if you want to change the MTU size from the OS default, click No to proceed.Step 9 For network configuration, you can choose to either set up a static network IP address for the node or to use
Dynamic Host Configuration Protocol (DHCP). Static IP addresses are recommended. If you use DHCP, usestatic DHCP.
• If you have a DHCP server that is configured in your network and want to use DHCP, click Yes. Thenetwork restarts, and the Administrator Login Configuration window appears.
• If you want to configure a static IP address for the node, click No. The Static Network Configurationwindow appears.
Step 10 If you chose not to use DHCP, enter your static network configuration values and click OK.The DNS Client Configuration window appears.
Step 11 To enable DNS, clickYes, enter your DNS client information, and click OK.The network restarts by using the new configuration information, and theAdministrator Login Configurationwindow appears.
Step 12 Enter your Administrator username and password.The Administrator username must start with an alphabetic character, be at least six characters long,and can contain alphanumeric characters, hyphens, and underscores. You will need the Administratorusername to log in to Cisco Unified Communications Operating SystemAdministration, the commandline interface, and the Disaster Recovery System.
Note
Step 13 Enter the Certificate Information:
• Organization
• Unit
• Location
• State
• Country
Step 14 Click OK to proceed.Step 15 Enter your Network Time Protocol (NTP) client configuration information. To test this configuration, click
Test.Step 16 Click Proceed to configure the NTP.Step 17 When asked, enter your security password.Step 18 When the platform configuration is complete, click OK to complete the installation. The installation take a
few minutes to complete.
Cisco Prime Collaboration Deployment Administration Guide, Release 11.5(2) 17
Install Cisco Prime Collaboration DeploymentConfigure Cisco Prime Collaboration Deployment on the Virtual Machine
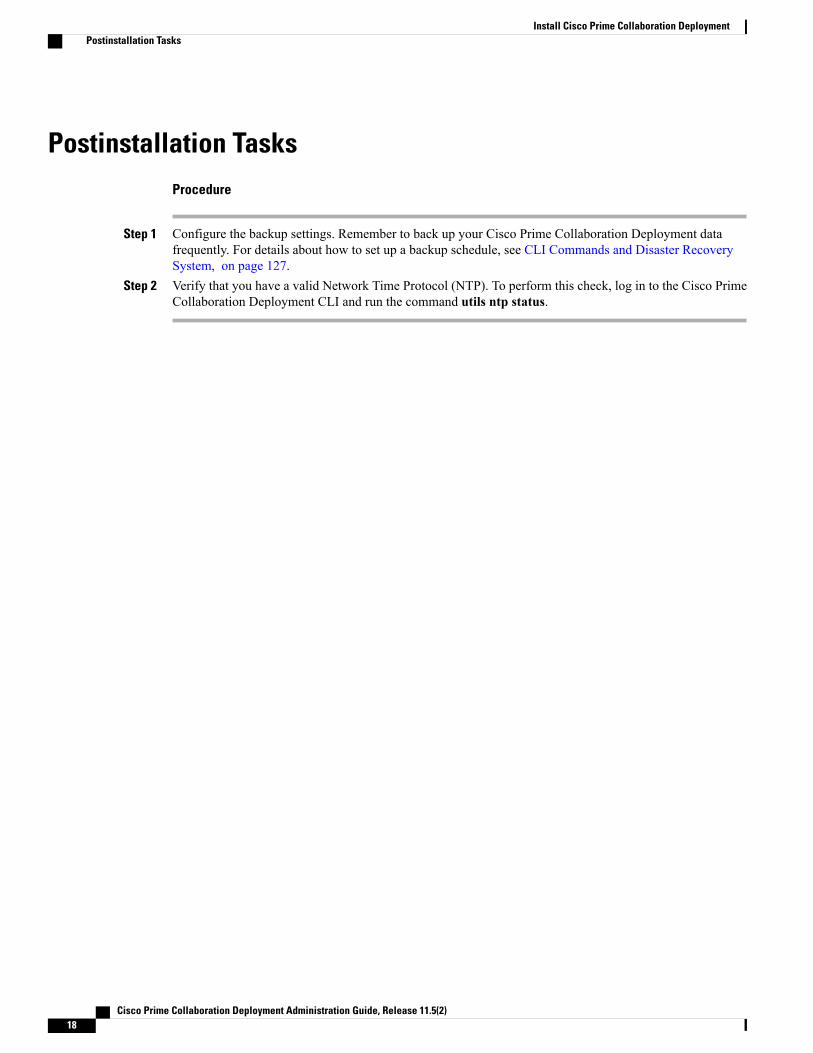
Postinstallation TasksProcedure
Step 1 Configure the backup settings. Remember to back up your Cisco Prime Collaboration Deployment datafrequently. For details about how to set up a backup schedule, see CLI Commands and Disaster RecoverySystem, on page 127.
Step 2 Verify that you have a valid Network Time Protocol (NTP). To perform this check, log in to the Cisco PrimeCollaboration Deployment CLI and run the command utils ntp status.
Cisco Prime Collaboration Deployment Administration Guide, Release 11.5(2)18
Install Cisco Prime Collaboration DeploymentPostinstallation Tasks
C H A P T E R 3Upgrade Cisco Prime Collaboration Deployment
• Upgrade Cisco Prime Collaboration Deployment Using CLI, page 19
Upgrade Cisco Prime Collaboration Deployment Using CLITo upgrade the software version of Cisco Prime Collaboration Deployment, use the utils system upgradeinitiate CLI command. There are four options, depending on where you have placed the new ISO file on anexternal filesystem or on Cisco Prime Collaboration Deployment itself.
Before You Begin
You must place the non-bootable ISO file on a network location or remote drive that is accessible from CiscoPrime Collaboration Deployment.
Procedure
Step 1 If you want to place the ISO on Cisco Prime Collaboration Deployment, upload it to the Cisco PrimeCollaboration Deployment server /upgrade folder by performing the following steps:a) sftp adminsftp@<Cisco Prime Collaboration Deployment IP>b) cd upgradec) put <name of iso file>
If you are using a remote file system, place the ISO file there. Be sure that it can be accessed throughSFTP or FTP.
Note
Step 2 Log on to the CLI interface of the Cisco Prime Collaboration Deployment server, and use the utils systemupgrade initiate CLI command.You will be asked to choose an option, based on where your ISO is located.
Warning: Do not close this window without first canceling the upgrade.
1) Remote Filesystem via SFTP2) Remote Filesystem via FTP3) Local DVD/CD4) Local Upload Directoryq) quit
Cisco Prime Collaboration Deployment Administration Guide, Release 11.5(2) 19
Please select an option (1-4 or "q" ):
Step 3 Perform one of the following steps:
• If the ISO file is in the /upgrade folder of Cisco Prime Collaboration Deployment, choose option 4.
• If the ISO file is on a remote file system, choose option 1 or 2, depending on whether you wish to useSFTP or FTP.
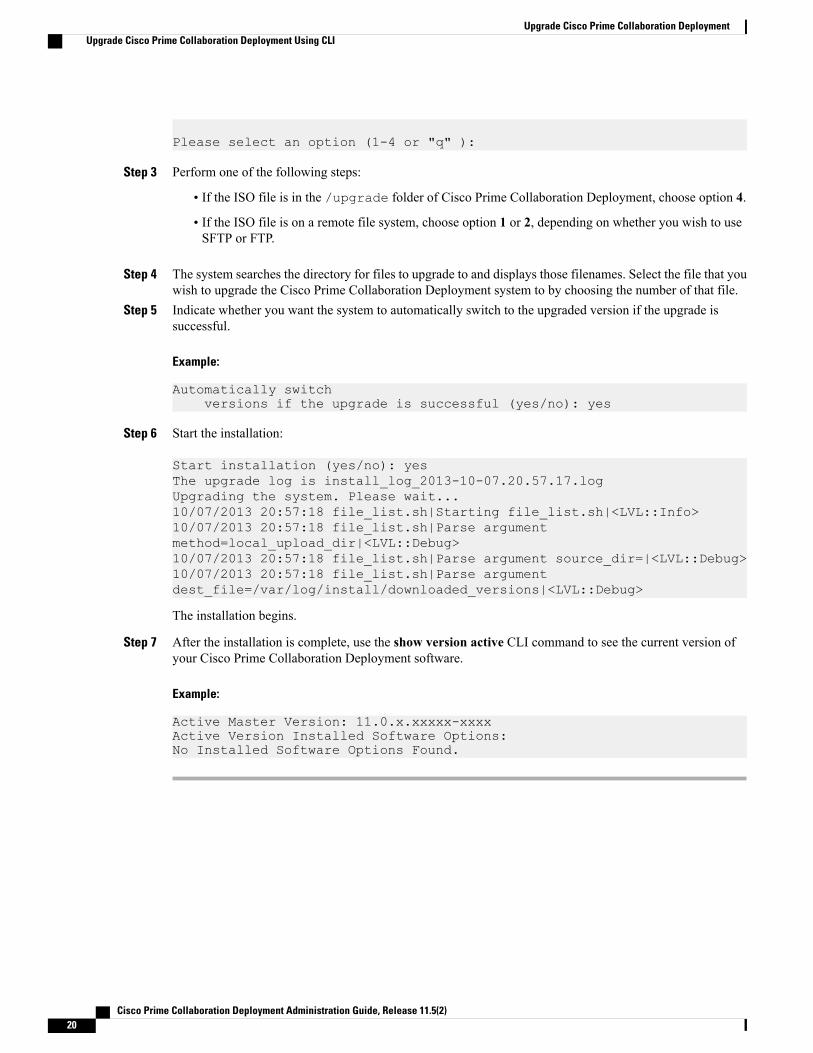
Step 4 The system searches the directory for files to upgrade to and displays those filenames. Select the file that youwish to upgrade the Cisco Prime Collaboration Deployment system to by choosing the number of that file.
Step 5 Indicate whether you want the system to automatically switch to the upgraded version if the upgrade issuccessful.
Example:
Automatically switchversions if the upgrade is successful (yes/no): yes
Step 6 Start the installation:
Start installation (yes/no): yesThe upgrade log is install_log_2013-10-07.20.57.17.logUpgrading the system. Please wait...10/07/2013 20:57:18 file_list.sh|Starting file_list.sh|<LVL::Info>10/07/2013 20:57:18 file_list.sh|Parse argumentmethod=local_upload_dir|<LVL::Debug>10/07/2013 20:57:18 file_list.sh|Parse argument source_dir=|<LVL::Debug>10/07/2013 20:57:18 file_list.sh|Parse argumentdest_file=/var/log/install/downloaded_versions|<LVL::Debug>
The installation begins.
Step 7 After the installation is complete, use the show version active CLI command to see the current version ofyour Cisco Prime Collaboration Deployment software.
Example:
Active Master Version: 11.0.x.xxxxx-xxxxActive Version Installed Software Options:No Installed Software Options Found.
Cisco Prime Collaboration Deployment Administration Guide, Release 11.5(2)20
Upgrade Cisco Prime Collaboration DeploymentUpgrade Cisco Prime Collaboration Deployment Using CLI
C H A P T E R 4Cisco Prime Collaboration Deployment Features
• Cisco Prime Collaboration Deployment Considerations, page 21
• Network Address Translation Support, page 22
• Supported Upgrade and Migration Tasks, page 23
• Upgrade Paths for Export Restricted and Unrestricted Software, page 27
• Supported ESXi Server Versions, page 27
• Cluster Inventory, page 28
• Task Management, page 34
• Administration Tools, page 64
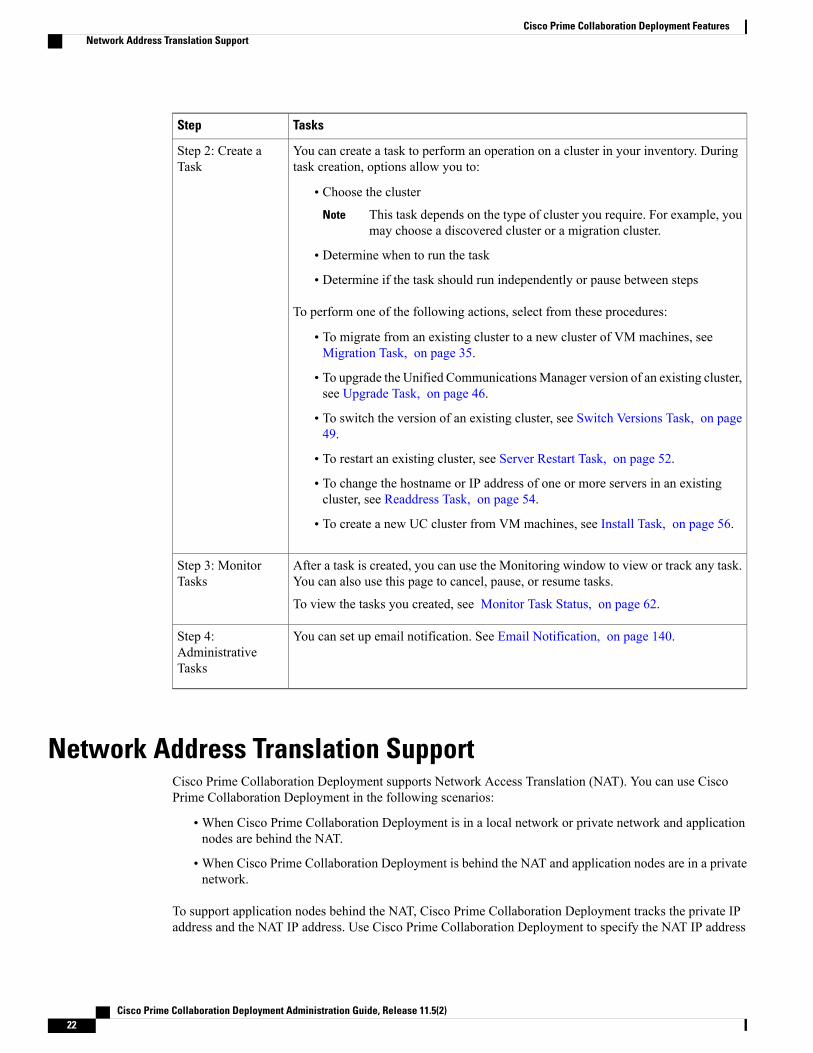
Cisco Prime Collaboration Deployment ConsiderationsCisco Prime Collaboration Deployment allows a user to perform tasks (such as migration or upgrade) onservers that are in the inventory.
TasksStep
To perform any tasks, you must first have clusters in your inventory. To add a UCcluster that is already running UC applications to your inventory, click the open andclose navigation button and choose the Inventory > Clusters > Discovery Clusterfeature.
To migrate an existing cluster to new virtual machines, click the open and closenavigation button and choose Inventory >Clusters >DefineMigration DestinationCluster. (See Migration Task, on page 35.)
To install a new cluster, click the open and close navigation button and choose theInventory > Clusters > Define New UC Cluster feature. (See Install Task, on page56.)
If you are migrating an existing cluster to a new virtual machine cluster, or installinga new cluster, you must first add the ESXi Hosts that contain those virtual machinesto your inventory. To add an ESXi host, click the open and close navigation buttonand choose Inventory > ESXi Hosts. (See Add an ESXi Host Server, on page 31.)
Step 1: InventoryCreation
Cisco Prime Collaboration Deployment Administration Guide, Release 11.5(2) 21
TasksStep
You can create a task to perform an operation on a cluster in your inventory. Duringtask creation, options allow you to:
• Choose the clusterThis task depends on the type of cluster you require. For example, youmay choose a discovered cluster or a migration cluster.
Note
• Determine when to run the task
• Determine if the task should run independently or pause between steps
To perform one of the following actions, select from these procedures:
• To migrate from an existing cluster to a new cluster of VM machines, seeMigration Task, on page 35.
• To upgrade the Unified CommunicationsManager version of an existing cluster,see Upgrade Task, on page 46.
• To switch the version of an existing cluster, see Switch Versions Task, on page49.
• To restart an existing cluster, see Server Restart Task, on page 52.
• To change the hostname or IP address of one or more servers in an existingcluster, see Readdress Task, on page 54.
• To create a new UC cluster from VM machines, see Install Task, on page 56.
Step 2: Create aTask
After a task is created, you can use the Monitoring window to view or track any task.You can also use this page to cancel, pause, or resume tasks.
To view the tasks you created, see Monitor Task Status, on page 62.
Step 3: MonitorTasks
You can set up email notification. See Email Notification, on page 140.Step 4:AdministrativeTasks
Network Address Translation SupportCisco Prime Collaboration Deployment supports Network Access Translation (NAT). You can use CiscoPrime Collaboration Deployment in the following scenarios:
•When Cisco Prime Collaboration Deployment is in a local network or private network and applicationnodes are behind the NAT.
•When Cisco Prime Collaboration Deployment is behind the NAT and application nodes are in a privatenetwork.
To support application nodes behind the NAT, Cisco Prime Collaboration Deployment tracks the private IPaddress and the NAT IP address. Use Cisco Prime Collaboration Deployment to specify the NAT IP address
Cisco Prime Collaboration Deployment Administration Guide, Release 11.5(2)22
Cisco Prime Collaboration Deployment FeaturesNetwork Address Translation Support
for deployment nodes and the application. Cisco Prime Collaboration Deployment uses the NAT IP addressto communicate with the application node. However, when you configure a node using theplatformConfig.xml file, the node uses its private address.
Configure Cisco Prime Collaboration Deployment Behind the NATWhen Cisco Prime Collaboration Deployment is behind the NAT and communicates with an applicationvirtual machine or an ESXi host, the communication occurs using the NAT IP address.
When Cisco Prime Collaboration Deployment is behind the NAT and application nodes are in a privatenetwork, the application nodes communicate with the NAT IP address.
Note
Use the NAT Settings window in the Administration menu to set the NAT IP address for Cisco PrimeCollaboration Deployment. The NAT IP address that you enter on this window does not appear on any windowon the GUI.
Procedure
Step 1 From the Cisco Prime Collaboration Deployment application, click the open and close navigation button andchoose Administration > NAT Settings.The NAT Settings window appears and is prepopulated with the hostname and the private IP address.
Step 2 Enter the NAT IP address in the NAT IP field.Step 3 Click Save.
The NAT IP address is saved as an entry in a configuration file on Cisco Prime Collaboration Deployment.This entry is used when the application nodes try to contact Cisco Prime Collaboration Deployment, then theapplication nodes read the configuration file to get the NAT IP address, and then try to communicate CiscoPrime Collaboration Deployment with that IP address.
Step 4 (Optional) Click Reset.The NAT IP address is reset to the earlier saved NAT IP address.
Supported Upgrade and Migration TasksYou can use Cisco Prime Collaboration Deployment to perform upgrade and migration tasks for UnifiedCommunications applications. The following tables list the upgrade and migration tasks that Cisco PrimeCollaboration Deployment supports for each application.
• Table 7: Supported Tasks for Cisco Unified Communications Manager (including Session ManagementEdition), on page 24
• Table 8: Supported Tasks for Cisco Unified Presence, on page 25
• Table 9: Supported Tasks for the IM and Presence Service, on page 25
• Table 10: Supported Tasks for Cisco Unified Contact Center Express, on page 26
• Table 11: Supported Tasks for Cisco Unity Connection, on page 26
Cisco Prime Collaboration Deployment Administration Guide, Release 11.5(2) 23
Cisco Prime Collaboration Deployment FeaturesConfigure Cisco Prime Collaboration Deployment Behind the NAT
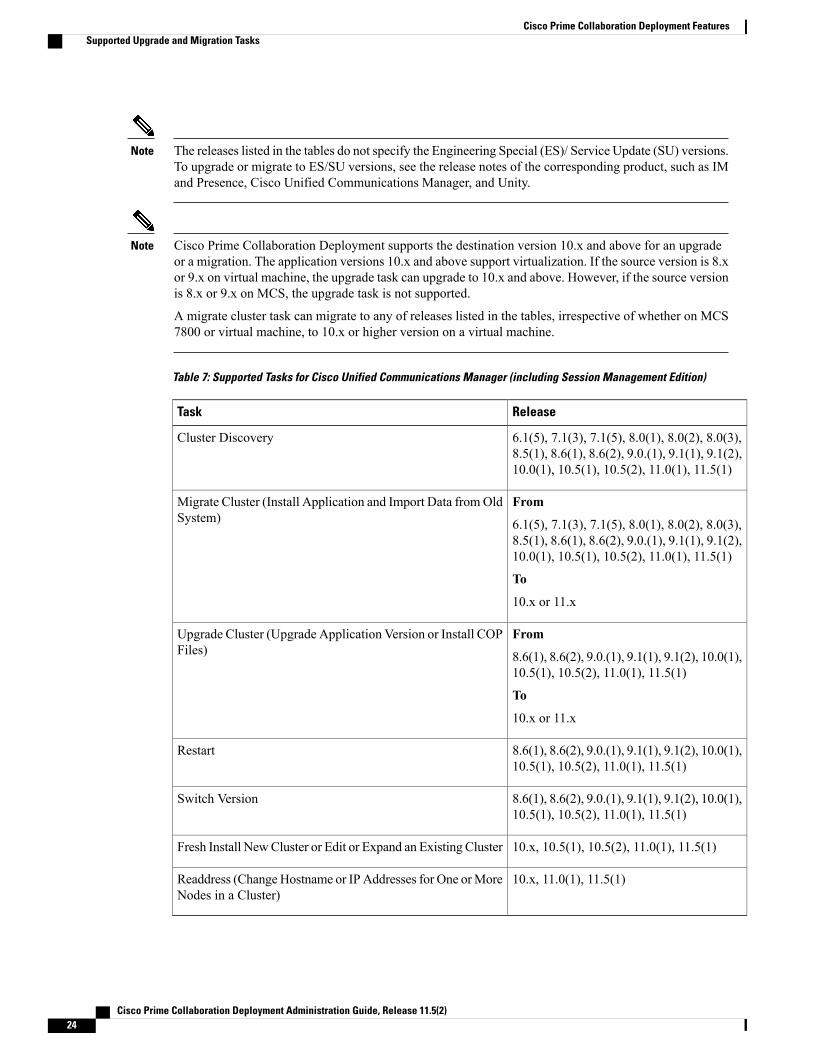
The releases listed in the tables do not specify the Engineering Special (ES)/ Service Update (SU) versions.To upgrade or migrate to ES/SU versions, see the release notes of the corresponding product, such as IMand Presence, Cisco Unified Communications Manager, and Unity.
Note
Cisco Prime Collaboration Deployment supports the destination version 10.x and above for an upgradeor a migration. The application versions 10.x and above support virtualization. If the source version is 8.xor 9.x on virtual machine, the upgrade task can upgrade to 10.x and above. However, if the source versionis 8.x or 9.x on MCS, the upgrade task is not supported.
A migrate cluster task can migrate to any of releases listed in the tables, irrespective of whether on MCS7800 or virtual machine, to 10.x or higher version on a virtual machine.
Note
Table 7: Supported Tasks for Cisco Unified Communications Manager (including Session Management Edition)
ReleaseTask
6.1(5), 7.1(3), 7.1(5), 8.0(1), 8.0(2), 8.0(3),8.5(1), 8.6(1), 8.6(2), 9.0.(1), 9.1(1), 9.1(2),10.0(1), 10.5(1), 10.5(2), 11.0(1), 11.5(1)
Cluster Discovery
From
6.1(5), 7.1(3), 7.1(5), 8.0(1), 8.0(2), 8.0(3),8.5(1), 8.6(1), 8.6(2), 9.0.(1), 9.1(1), 9.1(2),10.0(1), 10.5(1), 10.5(2), 11.0(1), 11.5(1)
To
10.x or 11.x
Migrate Cluster (Install Application and Import Data fromOldSystem)
From
8.6(1), 8.6(2), 9.0.(1), 9.1(1), 9.1(2), 10.0(1),10.5(1), 10.5(2), 11.0(1), 11.5(1)
To
10.x or 11.x
Upgrade Cluster (Upgrade Application Version or Install COPFiles)
8.6(1), 8.6(2), 9.0.(1), 9.1(1), 9.1(2), 10.0(1),10.5(1), 10.5(2), 11.0(1), 11.5(1)
Restart
8.6(1), 8.6(2), 9.0.(1), 9.1(1), 9.1(2), 10.0(1),10.5(1), 10.5(2), 11.0(1), 11.5(1)
Switch Version
10.x, 10.5(1), 10.5(2), 11.0(1), 11.5(1)Fresh Install NewCluster or Edit or Expand an Existing Cluster
10.x, 11.0(1), 11.5(1)Readdress (ChangeHostname or IP Addresses for One orMoreNodes in a Cluster)
Cisco Prime Collaboration Deployment Administration Guide, Release 11.5(2)24
Cisco Prime Collaboration Deployment FeaturesSupported Upgrade and Migration Tasks
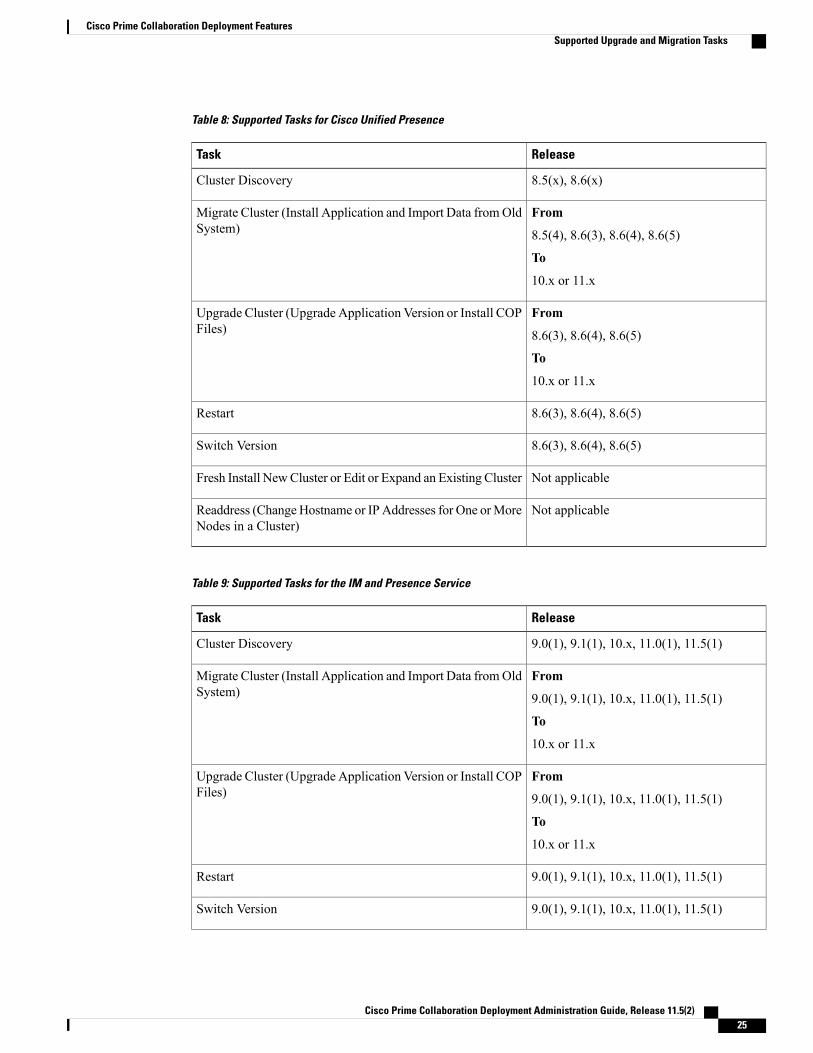
Table 8: Supported Tasks for Cisco Unified Presence
ReleaseTask
8.5(x), 8.6(x)Cluster Discovery
From
8.5(4), 8.6(3), 8.6(4), 8.6(5)
To
10.x or 11.x
Migrate Cluster (Install Application and Import Data fromOldSystem)
From
8.6(3), 8.6(4), 8.6(5)
To
10.x or 11.x
Upgrade Cluster (Upgrade Application Version or Install COPFiles)
8.6(3), 8.6(4), 8.6(5)Restart
8.6(3), 8.6(4), 8.6(5)Switch Version
Not applicableFresh Install NewCluster or Edit or Expand an Existing Cluster
Not applicableReaddress (ChangeHostname or IP Addresses for One orMoreNodes in a Cluster)
Table 9: Supported Tasks for the IM and Presence Service
ReleaseTask
9.0(1), 9.1(1), 10.x, 11.0(1), 11.5(1)Cluster Discovery
From
9.0(1), 9.1(1), 10.x, 11.0(1), 11.5(1)
To
10.x or 11.x
Migrate Cluster (Install Application and Import Data fromOldSystem)
From
9.0(1), 9.1(1), 10.x, 11.0(1), 11.5(1)
To
10.x or 11.x
Upgrade Cluster (Upgrade Application Version or Install COPFiles)
9.0(1), 9.1(1), 10.x, 11.0(1), 11.5(1)Restart
9.0(1), 9.1(1), 10.x, 11.0(1), 11.5(1)Switch Version
Cisco Prime Collaboration Deployment Administration Guide, Release 11.5(2) 25
Cisco Prime Collaboration Deployment FeaturesSupported Upgrade and Migration Tasks

ReleaseTask
10.x, 10.5(1), 10.5(2), 11.0(1), 11.5(1)Fresh Install NewCluster or Edit or Expand an Existing Cluster
Not SupportedReaddress (ChangeHostname or IP Addresses for One orMoreNodes in a Cluster)
Table 10: Supported Tasks for Cisco Unified Contact Center Express
ReleaseTask
8.5(1), 9.0, 9.0(2), and 10.x, 11.xCluster Discovery
Not SupportedMigrate Cluster (Install Application and Import Data fromOldSystem)
From
9.0(2), 10.x, 11.x
To
10.x or 11.x
Upgrade Cluster (Upgrade Application Version or Install COPFiles)
9.0(2), 10.x, 11.xRestart
9.0(2), 10.x, 11.xSwitch Version
10.5(x), 11.xFresh Install NewCluster or Edit or Expand an Existing Cluster
10.5(x), 11.xReaddress (ChangeHostname or IP Addresses for One orMoreNodes in a Cluster)
Table 11: Supported Tasks for Cisco Unity Connection
ReleaseTask
8.6.1, 8.6.2, 9.x, 10.x, 11.xCluster Discovery
Not SupportedMigrate Cluster (Install Application and Import Data fromOldSystem)
From 8.6(x) to 8.6(x)
From 8.6(x) to 9.x
From 9.x to 9.x
From 10.0(1) to 10.x
From 10.x to 11.0
From 11.0 to 11.x
Upgrade Cluster (Upgrade Application Version or Install COPFiles)
Cisco Prime Collaboration Deployment Administration Guide, Release 11.5(2)26
Cisco Prime Collaboration Deployment FeaturesSupported Upgrade and Migration Tasks
ReleaseTask
8.6(1), 8.6(2), 9.x, 10.x, 11.xRestart
8.6(1), 8.6(2), 9.x, 10.x, 11.xSwitch Version
10.5(x), 11.xFresh Install NewCluster or Edit or Expand an Existing Cluster
10.5(x), 11.xReaddress (ChangeHostname or IP Addresses for One orMoreNodes in a Cluster)
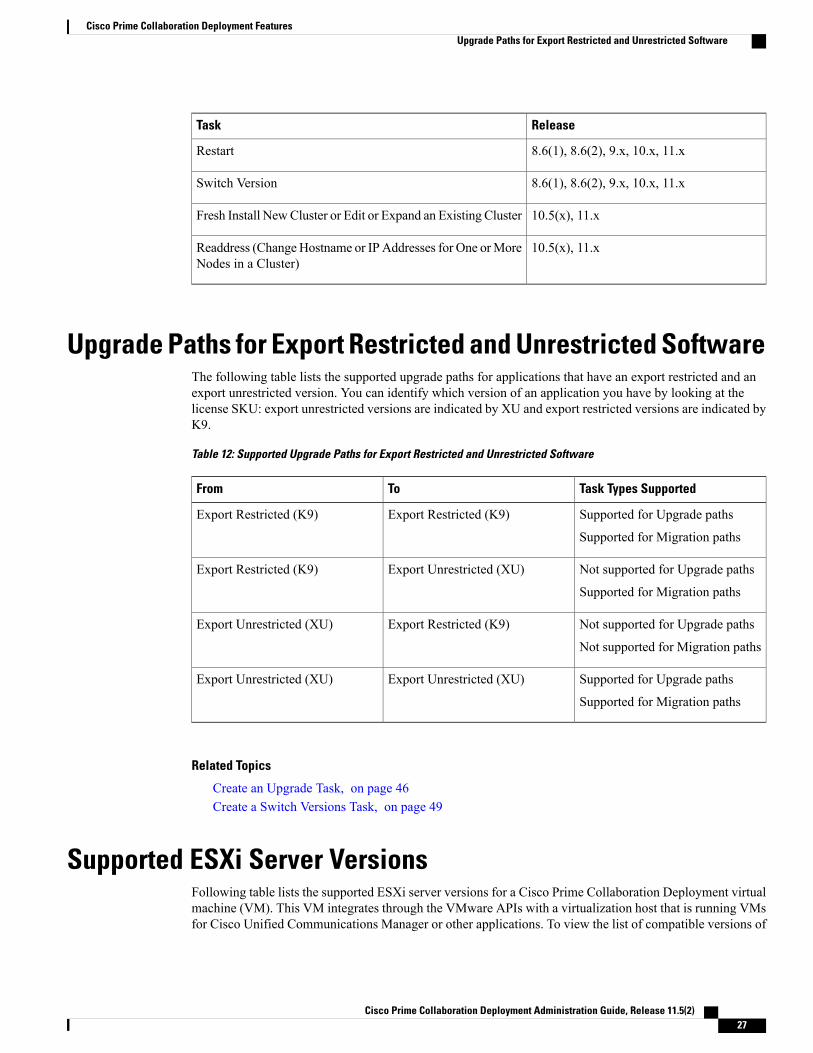
Upgrade Paths for Export Restricted and Unrestricted SoftwareThe following table lists the supported upgrade paths for applications that have an export restricted and anexport unrestricted version. You can identify which version of an application you have by looking at thelicense SKU: export unrestricted versions are indicated by XU and export restricted versions are indicated byK9.
Table 12: Supported Upgrade Paths for Export Restricted and Unrestricted Software
Task Types SupportedToFrom
Supported for Upgrade paths
Supported for Migration paths
Export Restricted (K9)Export Restricted (K9)
Not supported for Upgrade paths
Supported for Migration paths
Export Unrestricted (XU)Export Restricted (K9)
Not supported for Upgrade paths
Not supported for Migration paths
Export Restricted (K9)Export Unrestricted (XU)
Supported for Upgrade paths
Supported for Migration paths
Export Unrestricted (XU)Export Unrestricted (XU)
Related Topics
Create an Upgrade Task, on page 46Create a Switch Versions Task, on page 49
Supported ESXi Server VersionsFollowing table lists the supported ESXi server versions for a Cisco Prime Collaboration Deployment virtualmachine (VM). This VM integrates through the VMware APIs with a virtualization host that is running VMsfor Cisco Unified Communications Manager or other applications. To view the list of compatible versions of
Cisco Prime Collaboration Deployment Administration Guide, Release 11.5(2) 27
Cisco Prime Collaboration Deployment FeaturesUpgrade Paths for Export Restricted and Unrestricted Software
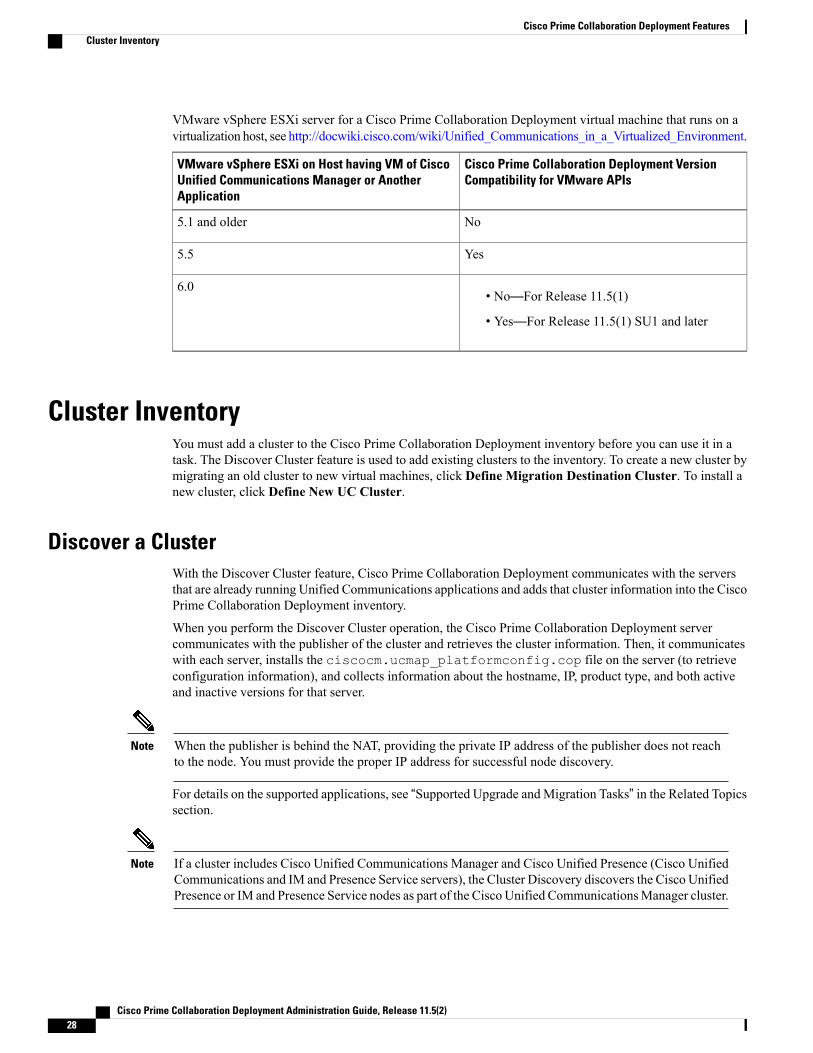
VMware vSphere ESXi server for a Cisco Prime Collaboration Deployment virtual machine that runs on avirtualization host, see http://docwiki.cisco.com/wiki/Unified_Communications_in_a_Virtualized_Environment.
Cisco Prime Collaboration Deployment VersionCompatibility for VMware APIs
VMware vSphere ESXi on Host having VM of CiscoUnified Communications Manager or AnotherApplication
No5.1 and older
Yes5.5
• No—For Release 11.5(1)
• Yes—For Release 11.5(1) SU1 and later
6.0
Cluster InventoryYou must add a cluster to the Cisco Prime Collaboration Deployment inventory before you can use it in atask. The Discover Cluster feature is used to add existing clusters to the inventory. To create a new cluster bymigrating an old cluster to new virtual machines, click Define Migration Destination Cluster. To install anew cluster, click Define New UC Cluster.
Discover a ClusterWith the Discover Cluster feature, Cisco Prime Collaboration Deployment communicates with the serversthat are already running Unified Communications applications and adds that cluster information into the CiscoPrime Collaboration Deployment inventory.
When you perform the Discover Cluster operation, the Cisco Prime Collaboration Deployment servercommunicates with the publisher of the cluster and retrieves the cluster information. Then, it communicateswith each server, installs the ciscocm.ucmap_platformconfig.cop file on the server (to retrieveconfiguration information), and collects information about the hostname, IP, product type, and both activeand inactive versions for that server.
When the publisher is behind the NAT, providing the private IP address of the publisher does not reachto the node. You must provide the proper IP address for successful node discovery.
Note
For details on the supported applications, see “Supported Upgrade andMigration Tasks” in the Related Topicssection.
If a cluster includes Cisco Unified Communications Manager and Cisco Unified Presence (Cisco UnifiedCommunications and IM and Presence Service servers), the Cluster Discovery discovers the Cisco UnifiedPresence or IM and Presence Service nodes as part of the Cisco Unified CommunicationsManager cluster.
Note
Cisco Prime Collaboration Deployment Administration Guide, Release 11.5(2)28
Cisco Prime Collaboration Deployment FeaturesCluster Inventory

Procedure
Step 1 From the Cisco Prime Collaboration Deployment application, click the open and close navigation button andchoose Inventory > Clusters.The Clusters window appears.
Step 2 Click the Discover Cluster button to discover the existing clusters.The Discover Cluster wizard appears.
Step 3 Enter details in the following fields:
• Choose a Nickname for this Cluster
• Hostname/IP Address of Cluster PublisherFor a cluster that has both Unified Communications Manager and IM and Presence Servicenodes, enter the hostname or IP address of the CiscoUnified CommunicationsManager publisher.
Note
• OS Admin Username
• OS Admin Password
• Enable NAT
Step 4 (Optional) Check the Enable NAT check box, and then click Next.During discovery, the ciscocm.ucmap_platformconfig.cop file is installedautomatically on the active partition of all nodes in the cluster. This COP file is used for thecluster discovery process and does not affect Cisco Unified Communications Manager.
Important
When a cluster is behind NAT, the application tries to establish communication with each node usingits private address. So, the nodes are unreachable. A pop-up shows the unreachable nodes.
Note
Cisco Prime Collaboration Deployment generates a list of cluster nodes from the inventory of the publisherserver. The list generation process may take several minutes to complete. After the list is generated, aconfirmation message appears indicating the completion of the cluster discovery process.
Step 5 Click Edit to add NAT IP address, and click OK.The Nat IP address is set for the hostname.
Step 6 Click Resume Discovery to resume the discovery of unreachable nodes.Cisco Prime Collaboration Deployment retries to discover the cluster with the NAT IP address instead of theprivate IP address and to get the cluster details, such as version. The discovery is successful when the clusterdetails appear on the window.
Step 7 Click Next.Step 8 (Optional) Click Assign Functions to assign functions to each of the cluster nodes.
The assignment of functions has no effect on the services that are to be activated. However, thisinformation can be used to determine the default sequence of tasks.
Note
The Assign Functions dialog box appears.Step 9 Click Finish.
The cluster appears in the Clusters window, showing the cluster name, the product and version, the clustertype as Discovered, and the discovery status.
It might take a few minutes to discover a cluster. After the discovery is complete, the informationfor each node in the cluster is listed in the Cluster Inventory window. If you cancel the discoverybefore it is complete, the data is lost and you will have to repeat the discovery procedure.
Note
Cisco Prime Collaboration Deployment Administration Guide, Release 11.5(2) 29
Cisco Prime Collaboration Deployment FeaturesDiscover a Cluster
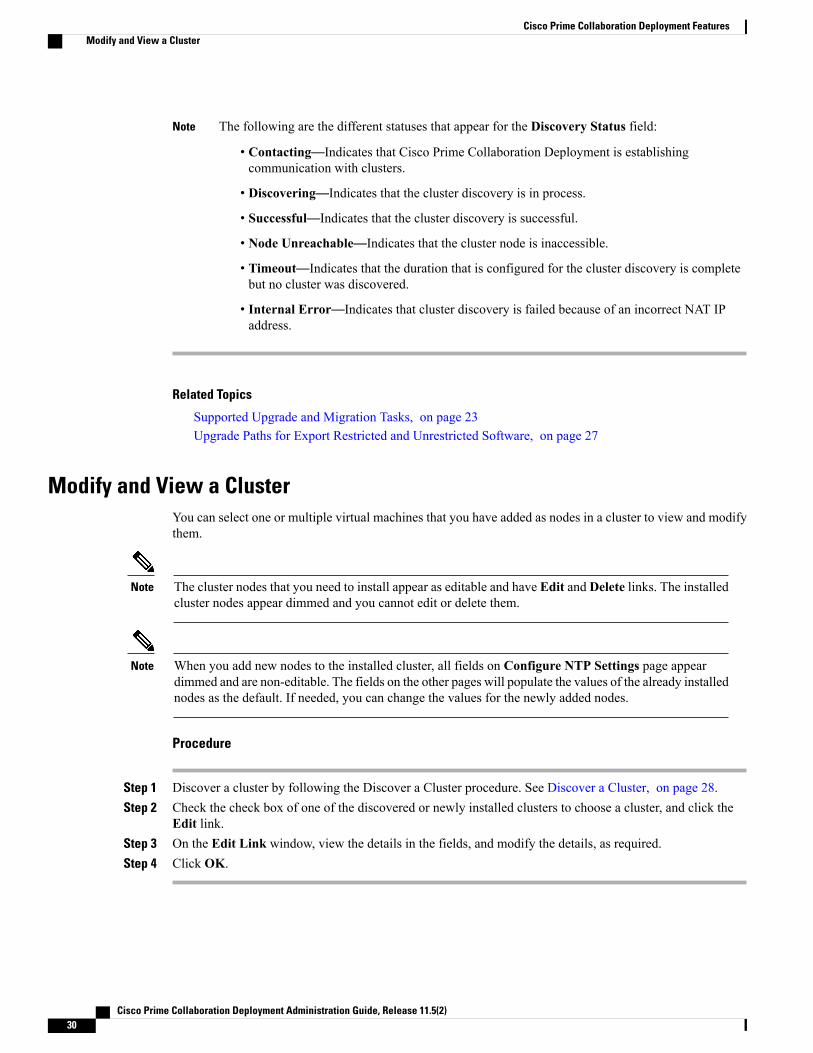
The following are the different statuses that appear for the Discovery Status field:Note
• Contacting—Indicates that Cisco Prime Collaboration Deployment is establishingcommunication with clusters.
• Discovering—Indicates that the cluster discovery is in process.
• Successful—Indicates that the cluster discovery is successful.
• Node Unreachable—Indicates that the cluster node is inaccessible.
• Timeout—Indicates that the duration that is configured for the cluster discovery is completebut no cluster was discovered.
• Internal Error—Indicates that cluster discovery is failed because of an incorrect NAT IPaddress.
Related Topics
Supported Upgrade and Migration Tasks, on page 23Upgrade Paths for Export Restricted and Unrestricted Software, on page 27
Modify and View a ClusterYou can select one or multiple virtual machines that you have added as nodes in a cluster to view and modifythem.
The cluster nodes that you need to install appear as editable and have Edit and Delete links. The installedcluster nodes appear dimmed and you cannot edit or delete them.
Note
When you add new nodes to the installed cluster, all fields on Configure NTP Settings page appeardimmed and are non-editable. The fields on the other pages will populate the values of the already installednodes as the default. If needed, you can change the values for the newly added nodes.
Note
Procedure
Step 1 Discover a cluster by following the Discover a Cluster procedure. See Discover a Cluster, on page 28.Step 2 Check the check box of one of the discovered or newly installed clusters to choose a cluster, and click the
Edit link.Step 3 On the Edit Link window, view the details in the fields, and modify the details, as required.Step 4 Click OK.
Cisco Prime Collaboration Deployment Administration Guide, Release 11.5(2)30
Cisco Prime Collaboration Deployment FeaturesModify and View a Cluster
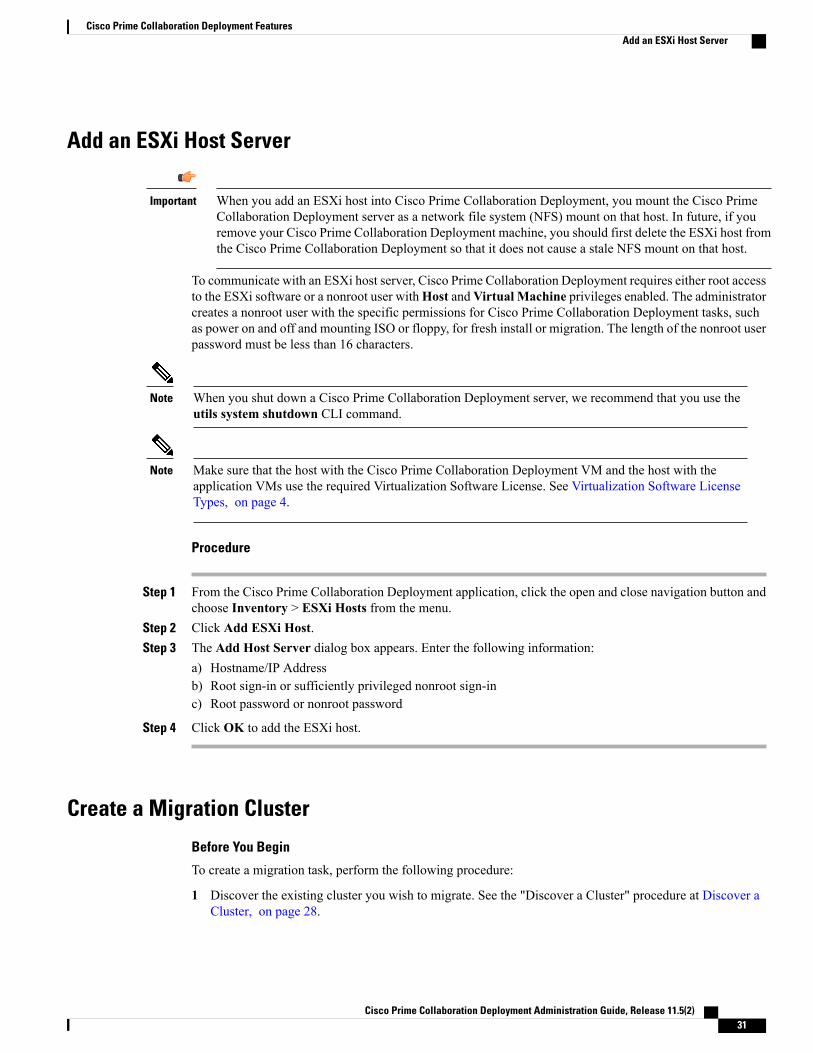
Add an ESXi Host Server
When you add an ESXi host into Cisco Prime Collaboration Deployment, you mount the Cisco PrimeCollaboration Deployment server as a network file system (NFS) mount on that host. In future, if youremove your Cisco Prime Collaboration Deployment machine, you should first delete the ESXi host fromthe Cisco Prime Collaboration Deployment so that it does not cause a stale NFS mount on that host.
Important
To communicate with an ESXi host server, Cisco Prime Collaboration Deployment requires either root accessto the ESXi software or a nonroot user withHost andVirtual Machine privileges enabled. The administratorcreates a nonroot user with the specific permissions for Cisco Prime Collaboration Deployment tasks, suchas power on and off and mounting ISO or floppy, for fresh install or migration. The length of the nonroot userpassword must be less than 16 characters.
When you shut down a Cisco Prime Collaboration Deployment server, we recommend that you use theutils system shutdown CLI command.
Note
Make sure that the host with the Cisco Prime Collaboration Deployment VM and the host with theapplication VMs use the required Virtualization Software License. See Virtualization Software LicenseTypes, on page 4.
Note
Procedure
Step 1 From the Cisco Prime Collaboration Deployment application, click the open and close navigation button andchoose Inventory > ESXi Hosts from the menu.
Step 2 Click Add ESXi Host.Step 3 The Add Host Server dialog box appears. Enter the following information:
a) Hostname/IP Addressb) Root sign-in or sufficiently privileged nonroot sign-inc) Root password or nonroot password
Step 4 Click OK to add the ESXi host.
Create a Migration Cluster
Before You Begin
To create a migration task, perform the following procedure:
1 Discover the existing cluster you wish to migrate. See the "Discover a Cluster" procedure at Discover aCluster, on page 28.
Cisco Prime Collaboration Deployment Administration Guide, Release 11.5(2) 31
Cisco Prime Collaboration Deployment FeaturesAdd an ESXi Host Server
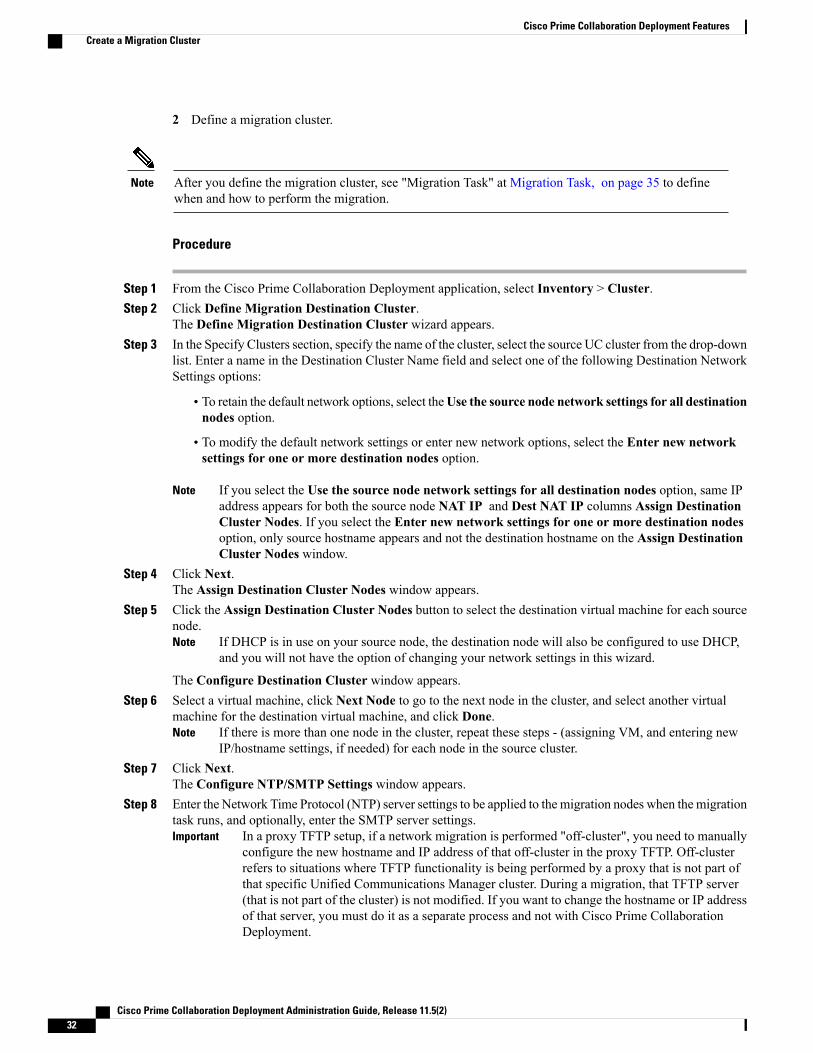
2 Define a migration cluster.
After you define the migration cluster, see "Migration Task" at Migration Task, on page 35 to definewhen and how to perform the migration.
Note
Procedure
Step 1 From the Cisco Prime Collaboration Deployment application, select Inventory > Cluster.Step 2 Click Define Migration Destination Cluster.
The Define Migration Destination Cluster wizard appears.Step 3 In the Specify Clusters section, specify the name of the cluster, select the source UC cluster from the drop-down
list. Enter a name in the Destination Cluster Name field and select one of the following Destination NetworkSettings options:
• To retain the default network options, select theUse the source node network settings for all destinationnodes option.
• To modify the default network settings or enter new network options, select the Enter new networksettings for one or more destination nodes option.
If you select the Use the source node network settings for all destination nodes option, same IPaddress appears for both the source node NAT IP and Dest NAT IP columns Assign DestinationCluster Nodes. If you select the Enter new network settings for one or more destination nodesoption, only source hostname appears and not the destination hostname on the Assign DestinationCluster Nodes window.
Note
Step 4 Click Next.The Assign Destination Cluster Nodes window appears.
Step 5 Click the Assign Destination Cluster Nodes button to select the destination virtual machine for each sourcenode.
If DHCP is in use on your source node, the destination node will also be configured to use DHCP,and you will not have the option of changing your network settings in this wizard.
Note
The Configure Destination Cluster window appears.Step 6 Select a virtual machine, click Next Node to go to the next node in the cluster, and select another virtual
machine for the destination virtual machine, and click Done.If there is more than one node in the cluster, repeat these steps - (assigning VM, and entering newIP/hostname settings, if needed) for each node in the source cluster.
Note
Step 7 Click Next.The Configure NTP/SMTP Settings window appears.
Step 8 Enter the Network Time Protocol (NTP) server settings to be applied to the migration nodes when the migrationtask runs, and optionally, enter the SMTP server settings.
In a proxy TFTP setup, if a network migration is performed "off-cluster", you need to manuallyconfigure the new hostname and IP address of that off-cluster in the proxy TFTP. Off-clusterrefers to situations where TFTP functionality is being performed by a proxy that is not part ofthat specific Unified Communications Manager cluster. During a migration, that TFTP server(that is not part of the cluster) is not modified. If you want to change the hostname or IP addressof that server, you must do it as a separate process and not with Cisco Prime CollaborationDeployment.
Important
Cisco Prime Collaboration Deployment Administration Guide, Release 11.5(2)32
Cisco Prime Collaboration Deployment FeaturesCreate a Migration Cluster
Step 9 Click Next.The Define DNS Settings window appears.
Step 10 To change the DNS setting for a node, select the node or nodes from the table and clickAssign DNS Settings.Enter the primary and secondary DNS, then click OK to apply the changes.
You cannot change the domain name during amigration.
Important
Step 11 Click Finish.The changes are saved and a row is added to the clusters table to reflect the new migration cluster that youhave created.
Add New Cluster for Fresh Install
Procedure
Step 1 From the Cisco Prime Collaboration Deployment application, select Inventory > Clusters.Step 2 Click Define New UC Cluster.
The Define Cluster wizard appears.Step 3 In the Specify Cluster Name section, enter the cluster name, and click Next.
The Add Virtual Machines window appears.Step 4 Click Add Node to add nodes to the cluster.
The Add Node dialog box appears showing the list of the available VMs that are sorted by name and by host.Step 5 On the Add Node window, enter the network settings for the node that you have added, choose the functions
for the node, and choose a VM for this node. Select the VM that you wish to add and then enter the followinginformation in the sections below the VM table:a) In Network section, select either Static IP Address or Use DHCP with reservations. If you select the
Static IP Address option, enter the hostname, IP Address, subnet mask, gateway, and NAT IP. If youselect Use DHCP with reservations option, enter the IP address that you have a reservation for on yourDHCP server (associated with the MAC address for that VM) in addition to the hostname.If you are adding a Cisco Unified Contact Center Express server, do not use DHCP for network settings.
NAT IP is an optional field. In Step 4, if you have selected a node that is behind NAT, enter theIP address in the NAT IP field, else leave this field blank. The value that you enter in this fieldappears in the NAT IP column. If the NAT IP address is associated with a port, you can enterport value which should be in the range of 1 to 65535.
Note
b) From the Products and Functions list box, select a product.c) In the Functions section, check the appropriate function check boxes for your VM.
Note • Check the Publisher check box for at least one node in the cluster that you have defined,for each application type.
• (Optional) Add a note about the functions that you have assigned in the Notes field belowthe Publisher field.
d) Click OK.e) In Virtual Machines section, choose a VM for this node.
Cisco Prime Collaboration Deployment Administration Guide, Release 11.5(2) 33
Cisco Prime Collaboration Deployment FeaturesAdd New Cluster for Fresh Install
Note • Choose a new VM for fresh install clusters and that new VMs must be in turned off state.
• Do not install over an existing running Cisco Unified Communications Manager node. Theinstallation must be a fresh VM that you create with the appropriate OVA for the applicationthat you will install.
Step 6 Click OK.The VM is added and is listed in the Cluster Name table.
Step 7 (Optional) To add more nodes to the cluster, repeat steps 4 through 6.Step 8 Click Next.
The Configure Cluster Wide Settings window appears.Step 9 Enter the OS administration credentials, application credentials, security password, SMTP settings, and
certificate information for this cluster, and click Next.The Configure DNS Settings window appears.
Step 10 (Optional) Add a DNS setting for a node, select the node, and click Assign DNS Settings.The Cisco Unified Contact Center Express application must use DNS.The Configure NTP Settings window appears.
Step 11 Enter IP address of at least one NTP server.Note • It is recommended that you define at least IP addresses of two NTP servers.
• If you are not using DNS, NTP server must be an IP address. If you are using DNS, NTP servercan be an FQDN.
Step 12 Click Next.The Configure NIC Settings window appears.
Step 13 (Optional) Choose the server, and enter an MTU size between 552 and 1500, and click Apply to Selected.Step 14 Click Next.
The Configure Time Zones window appears.Step 15 Select a node, choose the region and time zone from the Region and Time Zones list boxes, and click Apply
to Selected.Step 16 Click Finish.
The new install cluster is listed on the Clusters screen, with a Cluster Type as New Install. The cluster isdefined but is yet to be created. To install the cluster, create an install task. The install task uses the installcluster you have defined, and creates the cluster.
Task ManagementAfter you add your clusters and ESXi hosts to the Cisco Prime Collaboration Development inventory, youcan create tasks to manage your clusters. Each task has the following common features:
• Each task is applied to a single cluster.
• The default sequence for each task (for example, what servers are affected and when) is applied basedon the server functions you defined.
• The sequence of each task can be customized to fit your needs.
• Each task can be scheduled to start immediately or at a later date.
Cisco Prime Collaboration Deployment Administration Guide, Release 11.5(2)34
Cisco Prime Collaboration Deployment FeaturesTask Management

• Tasks can also be created without a specific start time. You can then manually start the task through theMonitoring page at the appropriate time.
Migration, install, and upgrade tasks require you to select one or more Cisco Option Packages (COP) or ISOfiles. You must download these files from Cisco.com and upload them to the Cisco Prime CollaborationDeployment server before you create the task. You can use any SFTP client to upload the files using the"adminsftp" account and the OS Administation password. Upload migration and .iso install files into the/fresh_install directory, and place upgrade .iso files or .cop files to be installed on an existing serverin the /upgrade directory.
Migration and install .iso files must be bootable.Note
Migration Task
Before You BeginTo perform cluster migration, the destination virtual machine must be ready for installation before you createthe migration task. Be sure that the following steps are completed:
1 VMware—Deploy the hardware for the new cluster and install ESXi.
Make sure that the host with the Cisco Prime Collaboration Deployment VM and the host with theapplication VMs use the required Virtualization Software License. See Virtualization Software LicenseTypes, on page 4.
Note
2 ISO file—Download the recommended OVA and ISO images for the target release, and use SFTP to sendthe ISO file to the Cisco Prime Collaboration Deployment server, /fresh_install directory.
3 VMware—Deploy the Cisco-recommended OVA to create the VMs for the destination nodes. Create theappropriate number of target virtual machines on your ESXi hosts (one new virtual machine for eachserver in the existing cluster) using the Cisco OVAs that you downloaded in Step 2. Configure the networksettings on new VMs.
4 Cisco Prime Collaboration Deployment GUI—Add the ESXi Hosts that contain your virtual machinesto the Cisco Prime Collaboration Deployment inventory. For information about adding an ESXi host toCisco Prime Collaboration Deployment, see Add an ESXi Host Server, on page 31.
5 Cisco Prime Collaboration Deployment GUI—Ensure that you performed a cluster discovery for theexisting cluster (source cluster) so that it appears in the Cluster Inventory. For information about clusterdiscovery, see Discover a Cluster, on page 28.
6 Cisco Prime Collaboration Deployment GUI—Create the migration cluster (click the open and closenavigation button and choose Inventory > Clusters) to define the mapping between MCS source nodesand target virtual machines.
When the migration cluster is created, you must indicate whether all destination nodes will maintain thesame hostname or IP address, or whether some of these addresses will change.
Important
Cisco Prime Collaboration Deployment Administration Guide, Release 11.5(2) 35
Cisco Prime Collaboration Deployment FeaturesMigration Task
• Using the source node settings for all destination nodes option is called a simple migration. See themigration flow chart for more information.
• Entering new network settings for one or more destination nodes is called a network migration. Seethe migration flow chart for more information.
7 Cisco Prime Collaboration Deployment GUI—Setup Email Notification (Optional)
• Click the open and close navigation button and choose Administration > Email Notification.
•When email notification is set up, the Cisco Prime Collaboration Deployment server emails the errorconditions that may occur during the migration task.
8 Cisco Prime Collaboration Deployment GUI—Create the migration task.9 Install the ciscocm.migrate_export_10_0_1.sh_v1.1.cop.sgn cop file on both IM and
Presence publisher and subscriber nodes.
Special Considerations
• If you are migrating a cluster that is security enabled, see CTL Update, on page 133 for specialinstructions. If you are performing a migration with network migration (where one or more hostnamesor IP addresses change between the source and destination nodes), update the IP addresses or hostnamesof destination nodes in your DNS server before you begin the migration task.
• You can specify a different NAT address for source and destination, so that the source is not abruptlyshut down. If you want to perform a simple migration but need to specify different Network AddressTranslation (NAT) entries for source and destination, you must select “Network Migration” and providethe same details for source and destination (all hostnames and IP addresses).
Create a Migration TaskFollow these steps to create or edit a new migration task to simultaneously upgrade and migrate a cluster tonew virtual machines.
Note the supported restricted and unrestricted paths. See “Supported Upgrade and Migration Tasks” and“Upgrade Paths for Export Restricted and Unrestricted Software” in the Related Topics section.
Procedure
Step 1 Click the open and close navigation button and choose Task >Migrate.Step 2 Click the Add Migration Task. The Add Migration Task wizard appears.Step 3 From the Source UC Cluster drop-down list, select the cluster on which the nodes to be migrated from are
located.Step 4 From the Destination Cluster drop-down list, select the destination cluster or migration map. The migration
maps are associated with the source cluster you have selected. Click Next.Step 5 In the Choose Migration Files section, choose the ISO file you wish to install on the destination cluster by
clicking Browse. The Choose a Migration File window opens. Select the ISO file from the list and clickOK.
Cisco Prime Collaboration Deployment Administration Guide, Release 11.5(2)36
Cisco Prime Collaboration Deployment FeaturesMigration Task
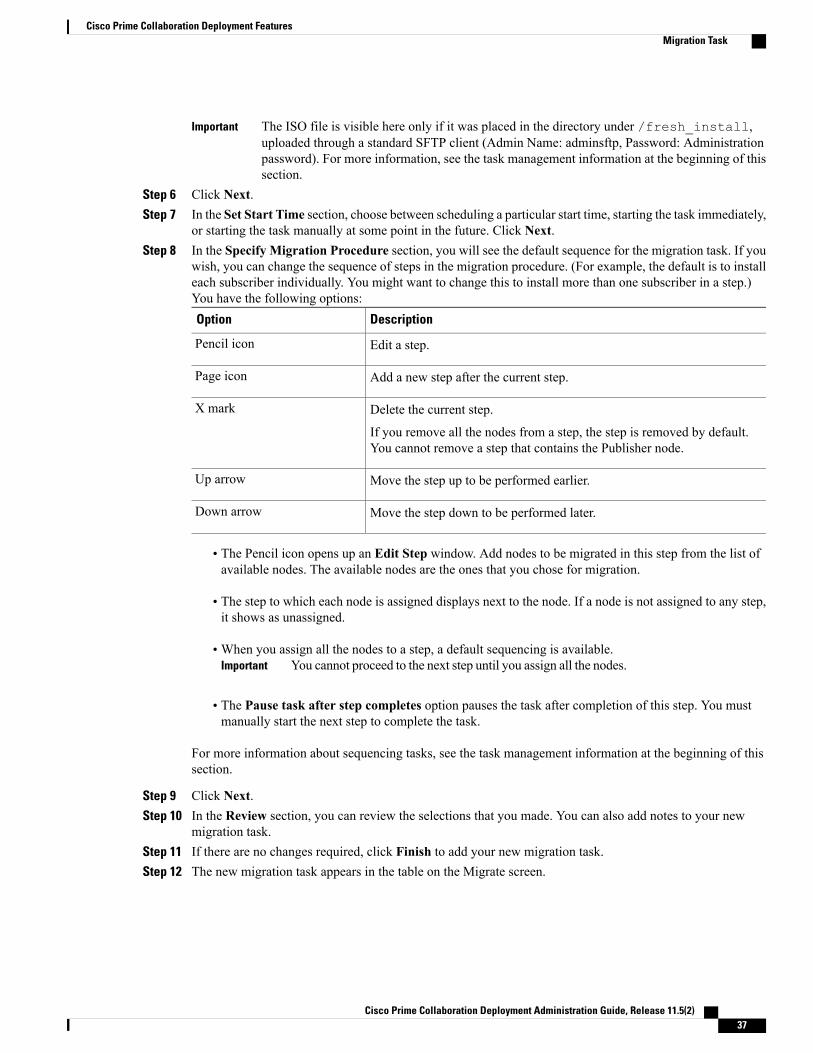
The ISO file is visible here only if it was placed in the directory under /fresh_install,uploaded through a standard SFTP client (Admin Name: adminsftp, Password: Administrationpassword). For more information, see the task management information at the beginning of thissection.
Important
Step 6 Click Next.Step 7 In the Set Start Time section, choose between scheduling a particular start time, starting the task immediately,
or starting the task manually at some point in the future. Click Next.Step 8 In the Specify Migration Procedure section, you will see the default sequence for the migration task. If you
wish, you can change the sequence of steps in the migration procedure. (For example, the default is to installeach subscriber individually. You might want to change this to install more than one subscriber in a step.)You have the following options:
DescriptionOption
Edit a step.Pencil icon
Add a new step after the current step.Page icon
Delete the current step.
If you remove all the nodes from a step, the step is removed by default.You cannot remove a step that contains the Publisher node.
X mark
Move the step up to be performed earlier.Up arrow
Move the step down to be performed later.Down arrow
• The Pencil icon opens up an Edit Step window. Add nodes to be migrated in this step from the list ofavailable nodes. The available nodes are the ones that you chose for migration.
• The step to which each node is assigned displays next to the node. If a node is not assigned to any step,it shows as unassigned.
•When you assign all the nodes to a step, a default sequencing is available.You cannot proceed to the next step until you assign all the nodes.Important
• The Pause task after step completes option pauses the task after completion of this step. You mustmanually start the next step to complete the task.
For more information about sequencing tasks, see the task management information at the beginning of thissection.
Step 9 Click Next.Step 10 In the Review section, you can review the selections that you made. You can also add notes to your new
migration task.Step 11 If there are no changes required, click Finish to add your new migration task.Step 12 The new migration task appears in the table on the Migrate screen.
Cisco Prime Collaboration Deployment Administration Guide, Release 11.5(2) 37
Cisco Prime Collaboration Deployment FeaturesMigration Task
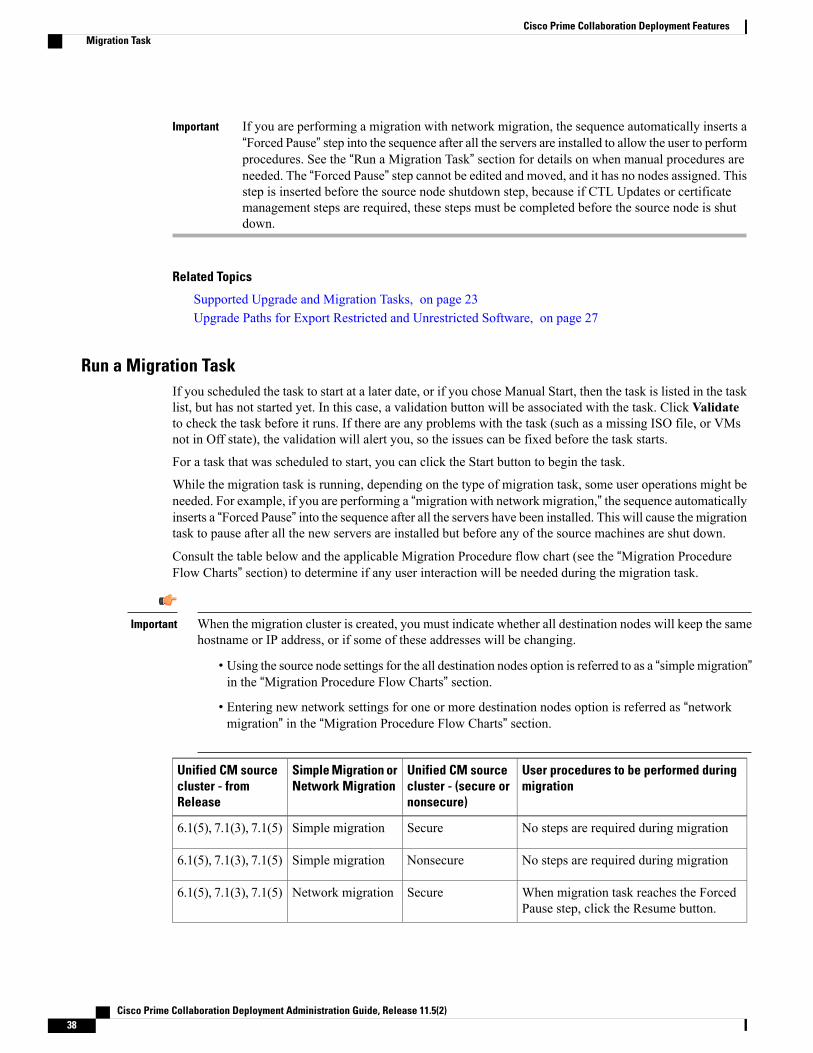
If you are performing a migration with network migration, the sequence automatically inserts a“Forced Pause” step into the sequence after all the servers are installed to allow the user to performprocedures. See the “Run a Migration Task” section for details on when manual procedures areneeded. The “Forced Pause” step cannot be edited and moved, and it has no nodes assigned. Thisstep is inserted before the source node shutdown step, because if CTL Updates or certificatemanagement steps are required, these steps must be completed before the source node is shutdown.
Important
Related Topics
Supported Upgrade and Migration Tasks, on page 23Upgrade Paths for Export Restricted and Unrestricted Software, on page 27
Run a Migration TaskIf you scheduled the task to start at a later date, or if you chose Manual Start, then the task is listed in the tasklist, but has not started yet. In this case, a validation button will be associated with the task. Click Validateto check the task before it runs. If there are any problems with the task (such as a missing ISO file, or VMsnot in Off state), the validation will alert you, so the issues can be fixed before the task starts.
For a task that was scheduled to start, you can click the Start button to begin the task.
While the migration task is running, depending on the type of migration task, some user operations might beneeded. For example, if you are performing a “migration with network migration,” the sequence automaticallyinserts a “Forced Pause” into the sequence after all the servers have been installed. This will cause the migrationtask to pause after all the new servers are installed but before any of the source machines are shut down.
Consult the table below and the applicable Migration Procedure flow chart (see the “Migration ProcedureFlow Charts” section) to determine if any user interaction will be needed during the migration task.
When the migration cluster is created, you must indicate whether all destination nodes will keep the samehostname or IP address, or if some of these addresses will be changing.
Important
• Using the source node settings for the all destination nodes option is referred to as a “simple migration”in the “Migration Procedure Flow Charts” section.
• Entering new network settings for one or more destination nodes option is referred as “networkmigration” in the “Migration Procedure Flow Charts” section.
User procedures to be performed duringmigration
Unified CM sourcecluster - (secure ornonsecure)
Simple Migration orNetwork Migration
Unified CM sourcecluster - fromRelease
No steps are required during migrationSecureSimple migration6.1(5), 7.1(3), 7.1(5)
No steps are required during migrationNonsecureSimple migration6.1(5), 7.1(3), 7.1(5)
When migration task reaches the ForcedPause step, click the Resume button.
SecureNetwork migration6.1(5), 7.1(3), 7.1(5)
Cisco Prime Collaboration Deployment Administration Guide, Release 11.5(2)38
Cisco Prime Collaboration Deployment FeaturesMigration Task
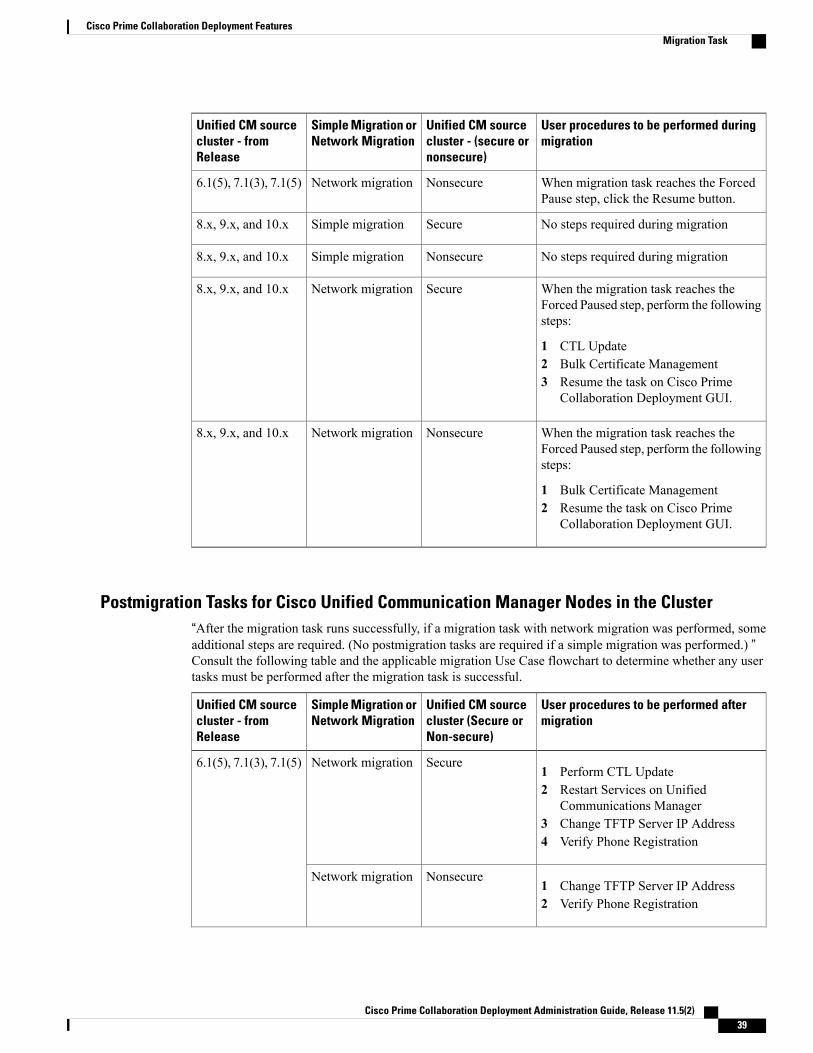
User procedures to be performed duringmigration
Unified CM sourcecluster - (secure ornonsecure)
Simple Migration orNetwork Migration
Unified CM sourcecluster - fromRelease
When migration task reaches the ForcedPause step, click the Resume button.
NonsecureNetwork migration6.1(5), 7.1(3), 7.1(5)
No steps required during migrationSecureSimple migration8.x, 9.x, and 10.x
No steps required during migrationNonsecureSimple migration8.x, 9.x, and 10.x
When the migration task reaches theForced Paused step, perform the followingsteps:
1 CTL Update2 Bulk Certificate Management3 Resume the task on Cisco Prime
Collaboration Deployment GUI.
SecureNetwork migration8.x, 9.x, and 10.x
When the migration task reaches theForced Paused step, perform the followingsteps:
1 Bulk Certificate Management2 Resume the task on Cisco Prime
Collaboration Deployment GUI.
NonsecureNetwork migration8.x, 9.x, and 10.x
Postmigration Tasks for Cisco Unified Communication Manager Nodes in the Cluster“After the migration task runs successfully, if a migration task with network migration was performed, someadditional steps are required. (No postmigration tasks are required if a simple migration was performed.) ”Consult the following table and the applicable migration Use Case flowchart to determine whether any usertasks must be performed after the migration task is successful.
User procedures to be performed aftermigration
Unified CM sourcecluster (Secure orNon-secure)
Simple Migration orNetwork Migration
Unified CM sourcecluster - fromRelease
1 Perform CTL Update2 Restart Services on Unified
Communications Manager3 Change TFTP Server IP Address4 Verify Phone Registration
SecureNetwork migration6.1(5), 7.1(3), 7.1(5)
1 Change TFTP Server IP Address2 Verify Phone Registration
NonsecureNetwork migration
Cisco Prime Collaboration Deployment Administration Guide, Release 11.5(2) 39
Cisco Prime Collaboration Deployment FeaturesMigration Task
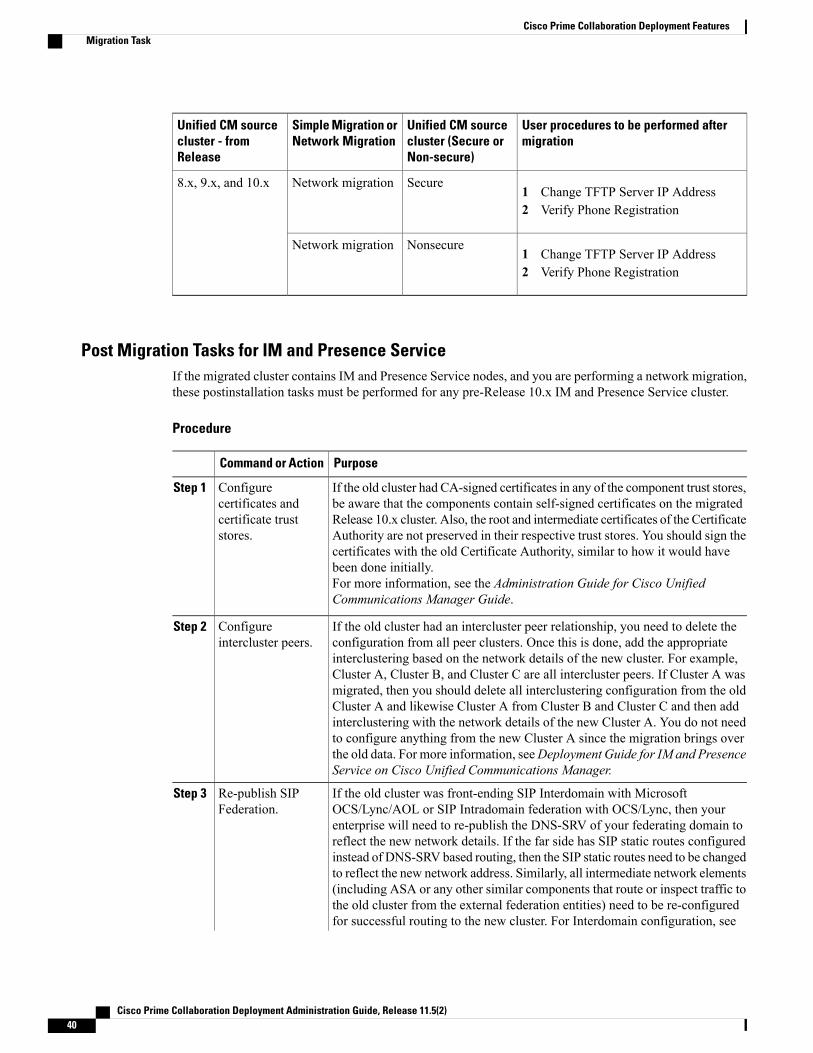
User procedures to be performed aftermigration
Unified CM sourcecluster (Secure orNon-secure)
Simple Migration orNetwork Migration
Unified CM sourcecluster - fromRelease
1 Change TFTP Server IP Address2 Verify Phone Registration
SecureNetwork migration8.x, 9.x, and 10.x
1 Change TFTP Server IP Address2 Verify Phone Registration
NonsecureNetwork migration
Post Migration Tasks for IM and Presence ServiceIf the migrated cluster contains IM and Presence Service nodes, and you are performing a network migration,these postinstallation tasks must be performed for any pre-Release 10.x IM and Presence Service cluster.
Procedure
PurposeCommand or Action
If the old cluster had CA-signed certificates in any of the component trust stores,be aware that the components contain self-signed certificates on the migrated
Configurecertificates and
Step 1
Release 10.x cluster. Also, the root and intermediate certificates of the Certificatecertificate truststores. Authority are not preserved in their respective trust stores. You should sign the
certificates with the old Certificate Authority, similar to how it would havebeen done initially.For more information, see the Administration Guide for Cisco UnifiedCommunications Manager Guide.
If the old cluster had an intercluster peer relationship, you need to delete theconfiguration from all peer clusters. Once this is done, add the appropriate
Configureintercluster peers.
Step 2
interclustering based on the network details of the new cluster. For example,Cluster A, Cluster B, and Cluster C are all intercluster peers. If Cluster A wasmigrated, then you should delete all interclustering configuration from the oldCluster A and likewise Cluster A from Cluster B and Cluster C and then addinterclustering with the network details of the new Cluster A. You do not needto configure anything from the new Cluster A since the migration brings overthe old data. For more information, seeDeployment Guide for IM and PresenceService on Cisco Unified Communications Manager.
If the old cluster was front-ending SIP Interdomain with MicrosoftOCS/Lync/AOL or SIP Intradomain federation with OCS/Lync, then your
Re-publish SIPFederation.
Step 3
enterprise will need to re-publish the DNS-SRV of your federating domain toreflect the new network details. If the far side has SIP static routes configuredinstead of DNS-SRV based routing, then the SIP static routes need to be changedto reflect the new network address. Similarly, all intermediate network elements(including ASA or any other similar components that route or inspect traffic tothe old cluster from the external federation entities) need to be re-configuredfor successful routing to the new cluster. For Interdomain configuration, see
Cisco Prime Collaboration Deployment Administration Guide, Release 11.5(2)40
Cisco Prime Collaboration Deployment FeaturesMigration Task
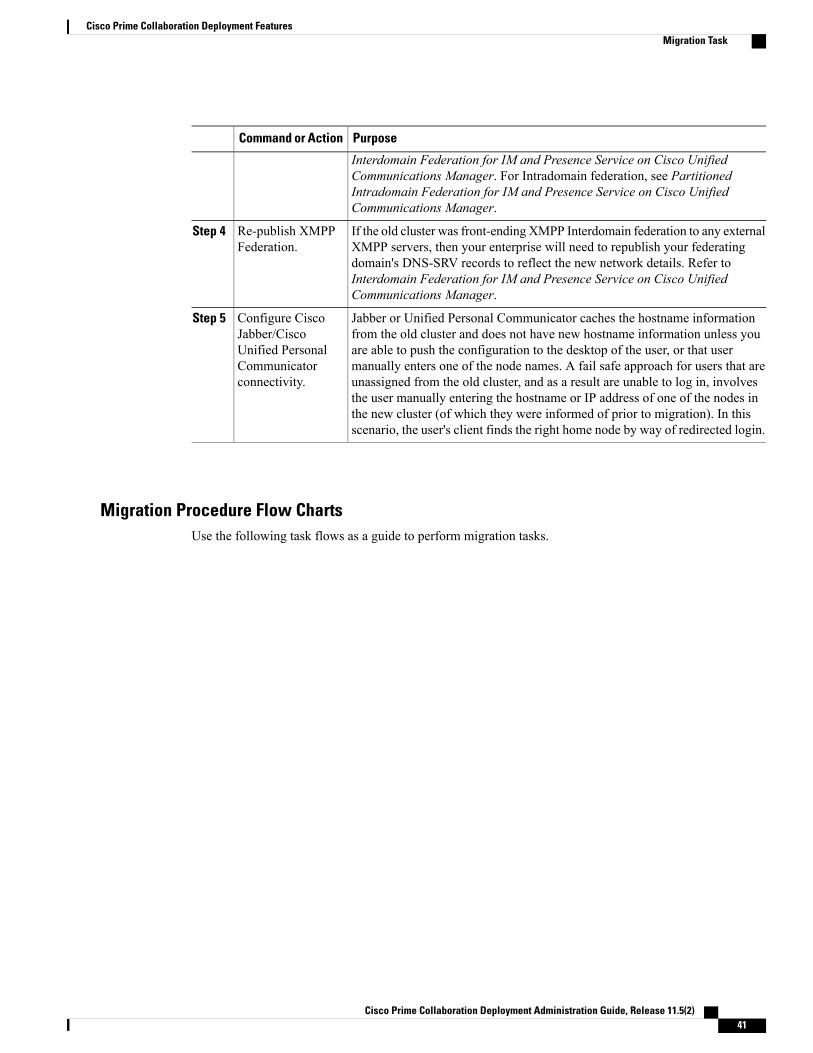
PurposeCommand or Action
Interdomain Federation for IM and Presence Service on Cisco UnifiedCommunications Manager. For Intradomain federation, see PartitionedIntradomain Federation for IM and Presence Service on Cisco UnifiedCommunications Manager.
If the old cluster was front-ending XMPP Interdomain federation to any externalXMPP servers, then your enterprise will need to republish your federating
Re-publish XMPPFederation.
Step 4
domain's DNS-SRV records to reflect the new network details. Refer toInterdomain Federation for IM and Presence Service on Cisco UnifiedCommunications Manager.
Jabber or Unified Personal Communicator caches the hostname informationfrom the old cluster and does not have new hostname information unless you
Configure CiscoJabber/Cisco
Step 5
are able to push the configuration to the desktop of the user, or that userUnified Personalmanually enters one of the node names. A fail safe approach for users that areCommunicator
connectivity. unassigned from the old cluster, and as a result are unable to log in, involvesthe user manually entering the hostname or IP address of one of the nodes inthe new cluster (of which they were informed of prior to migration). In thisscenario, the user's client finds the right home node by way of redirected login.
Migration Procedure Flow ChartsUse the following task flows as a guide to perform migration tasks.
Cisco Prime Collaboration Deployment Administration Guide, Release 11.5(2) 41
Cisco Prime Collaboration Deployment FeaturesMigration Task
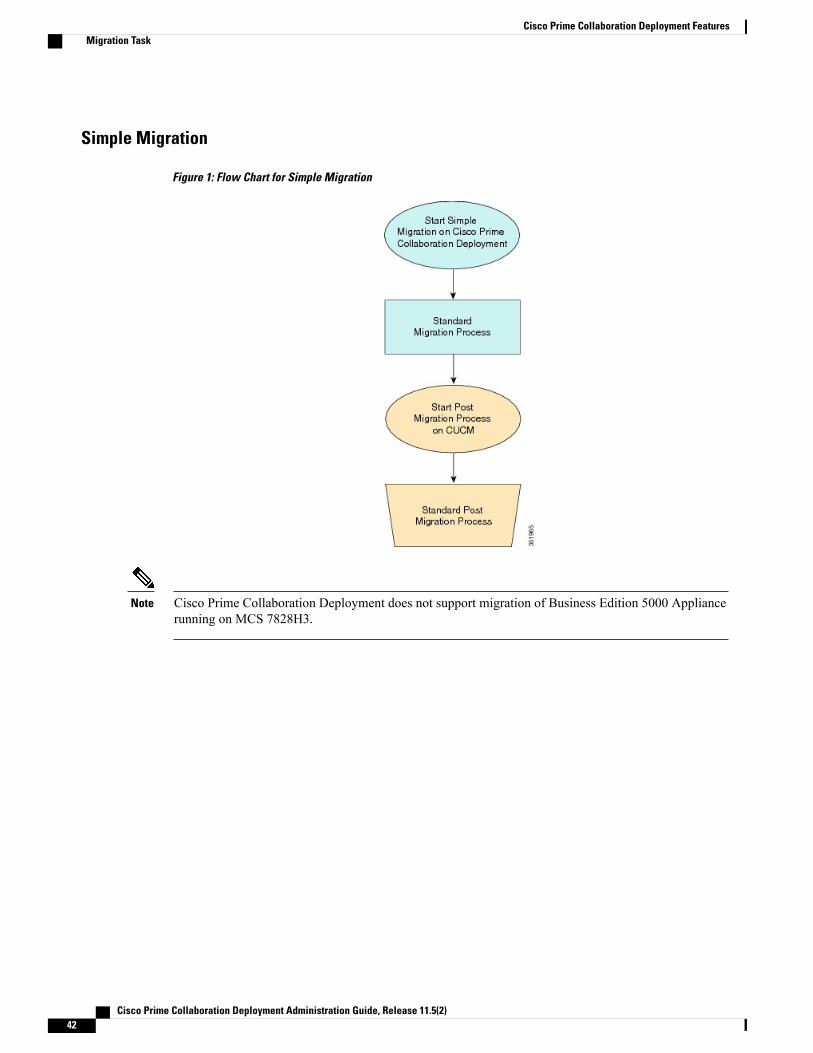
Simple Migration
Figure 1: Flow Chart for Simple Migration
Cisco Prime Collaboration Deployment does not support migration of Business Edition 5000 Appliancerunning on MCS 7828H3.
Note
Cisco Prime Collaboration Deployment Administration Guide, Release 11.5(2)42
Cisco Prime Collaboration Deployment FeaturesMigration Task
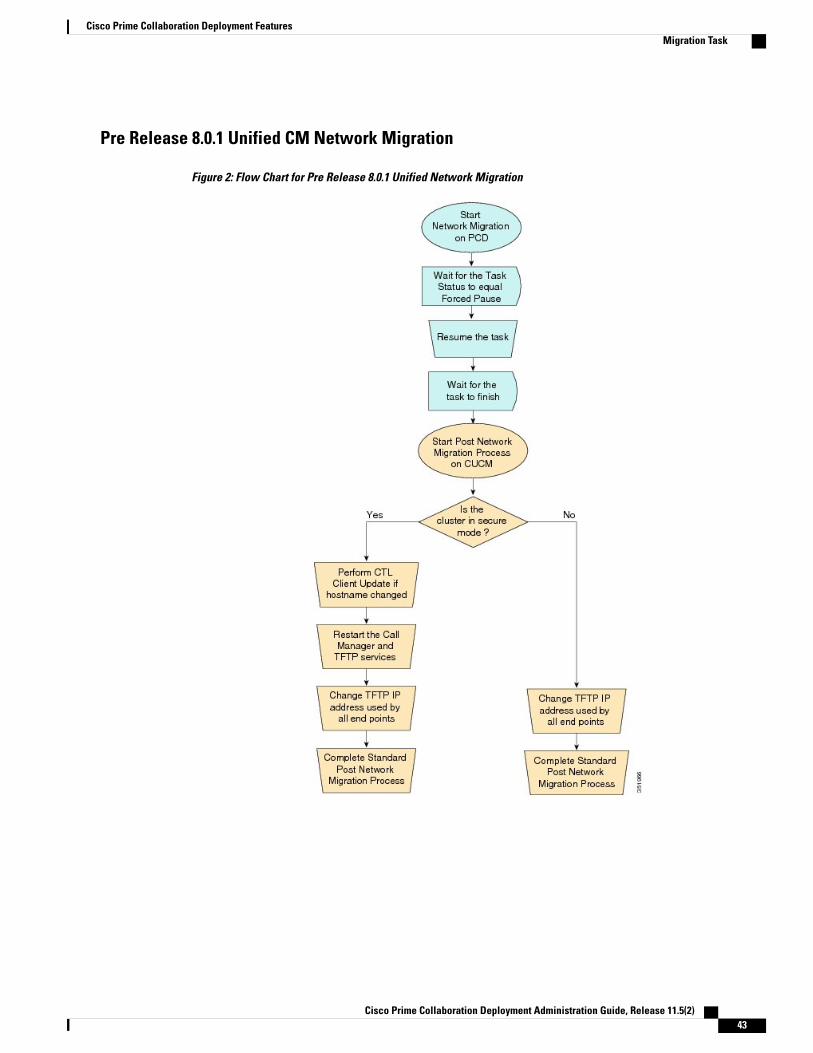
Pre Release 8.0.1 Unified CM Network Migration
Figure 2: Flow Chart for Pre Release 8.0.1 Unified Network Migration
Cisco Prime Collaboration Deployment Administration Guide, Release 11.5(2) 43
Cisco Prime Collaboration Deployment FeaturesMigration Task
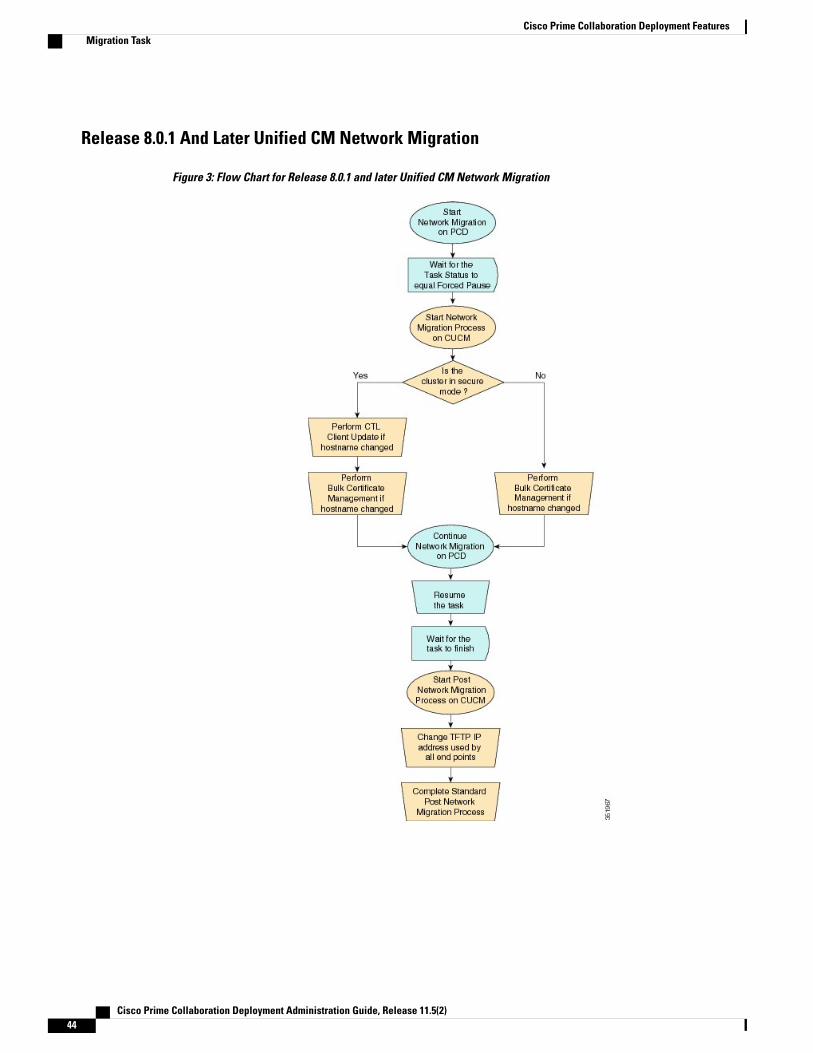
Release 8.0.1 And Later Unified CM Network Migration
Figure 3: Flow Chart for Release 8.0.1 and later Unified CM Network Migration
Cisco Prime Collaboration Deployment Administration Guide, Release 11.5(2)44
Cisco Prime Collaboration Deployment FeaturesMigration Task
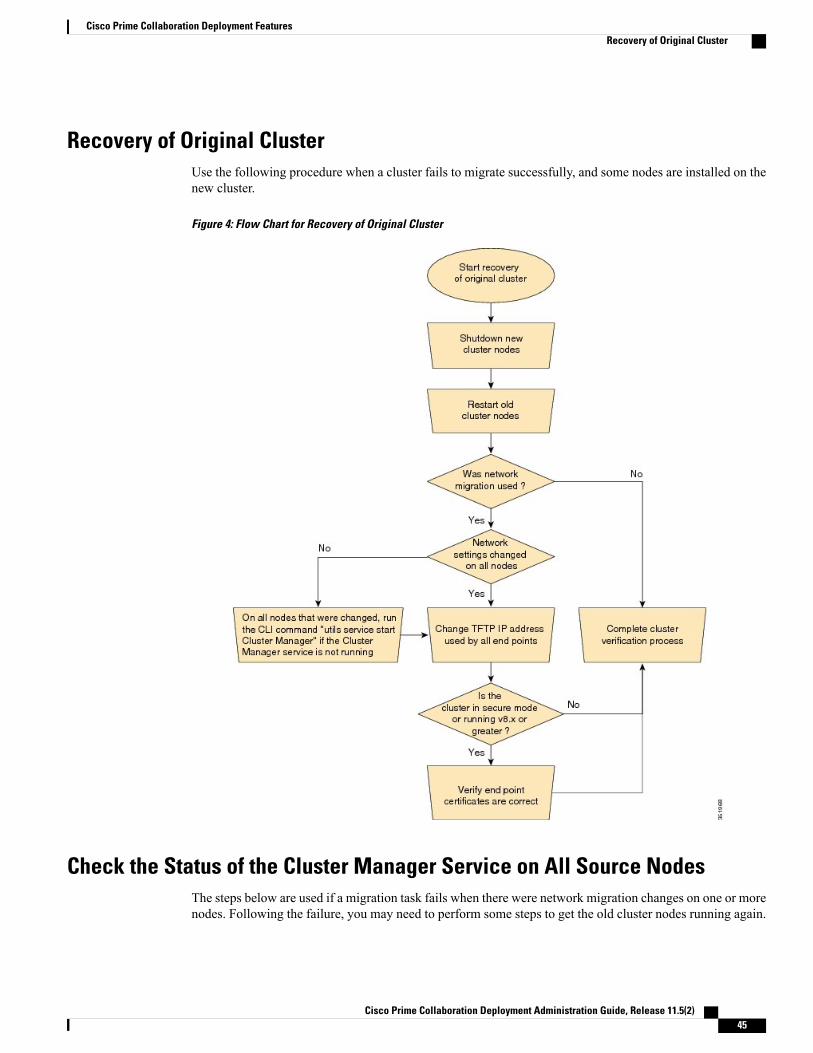
Recovery of Original ClusterUse the following procedure when a cluster fails to migrate successfully, and some nodes are installed on thenew cluster.
Figure 4: Flow Chart for Recovery of Original Cluster
Check the Status of the Cluster Manager Service on All Source NodesThe steps below are used if a migration task fails when there were network migration changes on one or morenodes. Following the failure, you may need to perform some steps to get the old cluster nodes running again.
Cisco Prime Collaboration Deployment Administration Guide, Release 11.5(2) 45
Cisco Prime Collaboration Deployment FeaturesRecovery of Original Cluster
See the flow chart above for all steps to be followed. Below are detailed steps for running the CLI commandto restart cluster manager on old nodes.
Perform the following steps manually on all subscriber nodes that were supposed to have network changes(for example, hostname, IP address, or both) after all old cluster nodes are up and running.
Use cases that may require the restart of Cluster manager on source nodes are:
Use Case 1
No hostname and no IP address change on Publisher, host name change on Subscriber
The user is required to check Cluster Manager service on source Subscriber
Use Case 2
No hostname and no IP address change on Publisher, IP address change on Subscriber
The user is required to check Cluster Manager service on source Subscriber
Use Case 3
No hostname and no IP address change on Publisher, hostname and IP address change on Subscriber
The user is required to check Cluster Manager service on source Subscriber
Use Case 4
No hostname change on Publisher, IP address change on Publisher, no hostname and no IP Subscriber
The user is required to check Cluster Manager service on source Publisher
Procedure
Step 1 Enter the following CLI command at the command prompt: utils service list. The following output appears:
Requesting service status, please wait...System SSH [STARTED]Cluster Manager [STOPPED]
Step 2 If Cluster Manager Service status is STOPPED, type the following command to start the service on the oldsubscriber node:utils service start Cluster Manager
Upgrade Task
Create an Upgrade TaskUse the upgrade task to perform software version upgrades on a cluster. You can also use an upgrade task toinstall .cop files on all or a subset of servers in a cluster.
To know which applications and releases are supported for upgrade tasks, see “Supported Upgrade andMigration Tasks” and “Upgrade Paths for Export Restricted and Unrestricted Software” in the Related Topicssection.
Cisco Prime Collaboration Deployment Administration Guide, Release 11.5(2)46
Cisco Prime Collaboration Deployment FeaturesUpgrade Task
Cisco Prime Collaboration Deployment uses the standard upgrade process, and therefore the standardvalidation rules will be applied. For more information, see the application-specific documentation.
Note
Use the Add Upgrade Task wizard to create and edit upgrade tasks.
To create or edit a new upgrade task to automatically run on one or more clusters at scheduled times, followthese steps.
Before You Begin
1 Note the supported restricted and unrestricted paths. See “Supported Upgrade and Migration Tasks” and“Upgrade Paths for Export Restricted and Unrestricted Software” in the Related Topics section.
2 Perform a cluster discovery for the cluster that you wish to upgrade, so it appears in the Cluster Inventory.See Discover a Cluster, on page 28.
3 Download the ISO files you wish to upgrade to, and use SFTP to send this file to Cisco Prime CollaborationDeployment in the upgrade folder. If you are using the upgrade task to install a .cop file, upload the .copfile to the /upgrade folder using an SFTP client.
4 For the application servers in the cluster to be upgraded, ensure that the Platform Administrative WebService is active on that server.
Procedure
Step 1 Click the open and close navigation button and choose Task > Upgrade from the main menu.Step 2 Click Add Upgrade Task.Step 3 From the Cluster drop-down list, select the cluster on which the nodes to be upgraded are located.Step 4 From the Products drop-down list, select the products to be upgraded.Step 5 Select the nodes that are part of the upgrade from the list of nodes.Step 6 Click Next.
The Next button is dimmed if no nodes areselected.
Note
Step 7 Click the respective Browse buttons to select the upgrade files from the file server.The option to select upgrade files is available only for the selected product types and applicationsthat are currently supported in the cluster.
Note
Step 8 Select a valid upgrade file or files.Click the Show drop-down list to see all the available upgrade files on the file server.Note
To create an upgrade task, while selecting ISO files, ensure that the ISO files are common across allthe required SFTP servers which are associated to cluster nodes. If the ISO files are not common toall the required SFTP servers which are associated to cluster nodes, the valid files do not appear eventhough they are valid for upgrade. To view all the ISO files, from the Show drop-down list, chooseAll.
Note
Step 9 Click Choose File.Step 10 Click Next.
The Next button is dimmed if no valid upgrade files areselected.
Note
Cisco Prime Collaboration Deployment Administration Guide, Release 11.5(2) 47
Cisco Prime Collaboration Deployment FeaturesUpgrade Task
Step 11 Select the date and time when you want the upgrade task to begin. You have the following options to scheduleupgrades:
• Select Schedule for a specific time to enter the date and time when you want the upgrade task to start.Any start time that you set is based on the time zone of the Cisco Prime Collaboration Deploymentserver as denoted by the time zone that is displayed with this option.
If you schedule a task for a few minutes in the future, but do not save it until that scheduledtime passes, then the task will start automatically.
Note
• Select Start task manually to keep the task in a manual start.If you choose to start the task manually, a task is created, but will not start until you click theStart task button on the Monitoring page, or the Start task link on the task page.
Note
• Select Start task immediately upon completion of this wizard to start the task immediately after youclick Finish.
• If you want the system to automatically switch to the new version, choose the option Upgrade Optionto Automatically Switch to New Version after Successful Upgrade. Otherwise, the server, or servers,will be upgraded but remain on the current version of software. In that case, the user can schedule aswitch version task to switch over to the upgraded version of software.
Step 12 Click Next.Step 13 Specify the sequence of steps to complete the task. You have the following options:
DescriptionOption
Edit a step.Pencil icon
Add a new step after the current step.Page icon
Delete the current step.
If you remove all the nodes from a step, the step is removed by default.You cannot remove a step that contains the Publisher node.
X mark
Move the step up to be performed earlier.Up arrow
Move the step down to be performed later.Down arrow
• The Pencil icon opens up an Edit Step window. Add nodes to be upgraded in this step from the list ofavailable nodes. The available nodes are the ones that you chose for an upgrade.
• The step to which each node is assigned displays next to the node. If a node is not assigned to any step,it shows as unassigned.
•When you assign all the nodes to a step, a default sequencing is available.You cannot proceed to next step until you assign all thenodes.
Important
Cisco Prime Collaboration Deployment Administration Guide, Release 11.5(2)48
Cisco Prime Collaboration Deployment FeaturesUpgrade Task
• The Pause task after step completes option pauses the task after completion of this step. You mustmanually start the next step to complete the task.
Step 14 Click OK.Step 15 Click Next.
TheNext button remains enabled, which allows the user to click to be informed of any configurationerrors.
Note
Step 16 See theReview section to verify the details of the task you created. You can add notes for the task if required.The notes are saved with the task and are visible if the task is edited before completion.
Step 17 Click Finish to schedule the task.
Related Topics
Supported Upgrade and Migration Tasks, on page 23Upgrade Paths for Export Restricted and Unrestricted Software, on page 27
Reuse Sequence from Previous TaskThe Reuse Sequence from Previous Task feature uses a previously defined task sequence in the task you arecurrently creating. This feature is useful for upgrade, restart, switch version, migration, and readdress tasks.It allows you to reuse a previously configured task sequence as opposed to having to rescript the sequencefrom scratch.
During task creation, the task wizard progresses to the sequence pane where a user can configure the orderingand pause characteristics. If there is a task in the system of similar type, the sequence from that task is presentedas the default sequence.
In this case, a check box labeledUse Last Configured Run Sequence is visible just above the sequence table.You can check the check box to use the sequence from the previous task or leave the check box uncheckedto use the default sequence that the system generates.
To be considered a task of similar type, the selected cluster, task type, and nodes in the task must matchexactly. If multiple tasks meet the similar type criteria, the most recently created task is used and its sequenceis presented as the default to the user.
In the case of an upgrade task, there is an additional requirement. The type of installation must be either ISObased or COP based. The COP and ISO installations can be performed with different sequencing.
Switch Versions Task
Create a Switch Versions TaskUse the switch versions task to automatically switch one or more nodes in a cluster to the upgraded or inactiveversion.
Use the Switch Versions Task wizard to create and edit switch versions tasks.
Cisco Prime Collaboration Deployment Administration Guide, Release 11.5(2) 49
Cisco Prime Collaboration Deployment FeaturesReuse Sequence from Previous Task
To know which applications and releases are supported for upgrade tasks, see “Supported Upgrade andMigration Tasks” and “Upgrade Paths for Export Restricted and Unrestricted Software” in the Related Topicssection.
To create or edit a switch versions task to automatically switch one or more nodes in a cluster to the upgradedor inactive version at scheduled times, follow this procedure.
The Automatic Switch version option is not available on clusters which contain Unity Connection nodes.For clusters with Cisco Unity Connection, create an upgrade task and then create a switch version task toswitch to the new version. You can create the switch version task after the upgrade task runs successfully.
Note
Before You Begin
1 Perform a cluster discovery for the cluster on which you want to switch versions, so that the cluster appearsin the Cluster inventory. See Discover a Cluster, on page 28. If you previously used Cisco PrimeCollaboration Deployment to upgrade or migrate a cluster, the cluster should already be in the inventory.
2 For each application server in the cluster, ensure that the Platform Administrative Web Service is activeon that server.
Procedure
Step 1 Click the open and close navigation button and choose Tasks > Switch Versions from the main menu.Step 2 Click Add Switch Versions Task.Step 3 From the Cluster drop-down list, select the cluster on which you want to switch the versions.Step 4 Select the version to which you want all the nodes to be switched.
If there is more than one product, you can select the applicable versions of all the different products.You also can choose to switch the version for one product and to not switch the version for anotherproduct.
Note
Step 5 Click Next.Step 6 Select the date and time when you want the switch versions task to begin. You have the following options to
schedule switch versions task:
• Select Schedule for a specific time to enter the date and time when you want the switch versions taskto start. Any start time that you set is based on the time zone of the Cisco Prime Collaboration Deploymentserver as denoted by the time zone that is displayed with this option.
If you schedule a task for a few minutes in the future, but do not save it until that scheduledtime passes, then the task will start automatically.
Note
• Select Start task manually to keep the task in a manual start.
• Select Start task immediately upon completion of this wizard to start the task immediately afer youclick Finish.
You can also start the task from theMonitoring page.Note
Cisco Prime Collaboration Deployment Administration Guide, Release 11.5(2)50
Cisco Prime Collaboration Deployment FeaturesSwitch Versions Task
• If you want the server to automatically switch to the new version, check the check box next toAutomatically switch to new version after successful upgrade.
Step 7 Click Next.Step 8 Specify the sequence of steps to complete the task. You have the following options:
DescriptionOption
Edit a step.Pencil icon
Add a new step after the current step.Page icon
Delete the current step.
If you remove all the nodes from a step, the step is removed by default.You cannot remove a step that contains the Publisher node.
X mark
Move the step up to be performed earlier.Up arrow
Move the step down to be performed later.Down arrow
• The Pencil icon opens up an Edit Step window. Add the nodes on which the versions must be switchedin this step from the list of available nodes. The available nodes are the ones that you chose for the switchversions task.
• The step to which each node is assigned displays next to the node. If a node is not assigned to any step,it shows as unassigned.
•When you assign all the nodes to a step, a default sequencing is available.You cannot proceed to next step until you assign all thenodes.
Important
• The Pause task after step completes option pauses the task after completion of this step. You mustmanually start the next step to complete the task.
Step 9 Click OK.Step 10 Click Next.
TheNext button remains enabled, which allows the user to click to be informed of any configurationerrors.
Note
Step 11 Use the Review section to verify the details of the task that you created. You can add notes for the task ifrequired. The notes are saved with the task and are visible if the task is edited before completion.
Step 12 Click Finish to schedule the task.
Related Topics
Supported Upgrade and Migration Tasks, on page 23Upgrade Paths for Export Restricted and Unrestricted Software, on page 27
Cisco Prime Collaboration Deployment Administration Guide, Release 11.5(2) 51
Cisco Prime Collaboration Deployment FeaturesSwitch Versions Task
Server Restart TaskTo know which applications and releases are supported for upgrade tasks, see “Supported Upgrade andMigration Tasks” and “Upgrade Paths for Export Restricted and Unrestricted Software” in the Related Topicssection.
Related Topics
Supported Upgrade and Migration Tasks, on page 23Upgrade Paths for Export Restricted and Unrestricted Software, on page 27
Create a Server Restart TaskUse the Restart Task wizard to create and edit restart tasks.
To create or edit a restart task to automatically restart one or more nodes in a cluster at scheduled times, followthis procedure.
Before You Begin
1 Perform a cluster discovery for the cluster you wish to restart, so that it appears in the Cluster inventory.See Discover a Cluster, on page 28.
2 For each application server in the cluster, ensure that the Platform Administrative Web Service is activeon that server.
Procedure
Step 1 Click the open and close navigation button and choose Task > Server Restart from the main menu.Step 2 Click Add Server Restart Task.
The Add Restart Task wizard appears.Step 3 From the Clusters drop-down list, select the cluster on which you want to restart the nodes.Step 4 From the table, select the nodes to be restarted. If you do not select any nodes, you cannot continue.Step 5 Click Next.Step 6 Select the date and time when you want the server restart task to begin. You have the following options to
schedule restart tasks:
• Select Schedule for a specific time to enter the date and time when you want the restart task to start.Any start time that you set is based on the time zone of the Cisco Prime Collaboration Deploymentserver.
If you schedule a task for a few minutes in the future, but do not save it until that scheduledtime passes, then the task will start automatically.
Note
• Select Start the task manually to keep the task in a manual start.
• Select Start task immediately upon completion of the wizard to start the task immediately after youclick Finish.
Cisco Prime Collaboration Deployment Administration Guide, Release 11.5(2)52
Cisco Prime Collaboration Deployment FeaturesServer Restart Task
You can also start the task from theMonitoring page.Note
Step 7 Click Next.Step 8 Specify the sequence of steps to complete the task. You have the following options:
DescriptionOption
Edit a step.Pencil icon
Add a new step after the current step.Page icon
Delete the current step.
If you remove all the nodes from a step, the step is removed by default.You cannot remove a step that contains the Publisher node.
X mark
Move the step up to be prepared earlier.Up arrow
Move the step down to be prepared later.Down arrow
• The Pencil icon opens up an Edit Step window. In this step, add nodes to be restarted from the list ofavailable nodes. The available nodes are the ones that you chose for a restart.
• The step to which each node is assigned appears next to the node. If a node is not assigned to any step,that node shows as unassigned.
•When you assign all the nodes to a step, a default sequencing is available.You cannot proceed to the next step until you assign all the nodes.Important
• The Pause task after step completes option pauses the task after completion of this step. You mustmanually start the next step to complete the task.
Step 9 Click OK.Step 10 Click Next.
TheNext button remains enabled, which allows the user to click to be informed of any configurationerrors.
Note
Step 11 See theReview section to verify the details of the task you created. You can add notes for the task if required.The notes are saved with the task and are visible if the task is edited before completion.
Step 12 Click Finish to schedule the task.
Cisco Prime Collaboration Deployment Administration Guide, Release 11.5(2) 53
Cisco Prime Collaboration Deployment FeaturesServer Restart Task
Readdress Task
Create a Readdress TaskUse the readdress task change the hostname or IP address for one or more nodes in a cluster. To use thereaddress feature, the servers must be Release 10.0 or later.
Note the difference between a hostname and a fully qualified domain name (FQDN) The network-level DNSdefault domain name of the node is combined with the hostname to form the FQDN for the node. For example,a node with hostname “cucm-server” and domain “example.com” has an FQDN of “imp-server.example.com.”
Cisco Prime Collaboration Deployment does not support changing the FQDN, only hostnames.Note
Use the Readdress Task wizard to create and edit readdress tasks.
Before You Begin
If you have not already done so, perform a cluster discovery for the cluster you wish to readdress, so that itappears in the Cluster inventory. See Discover a Cluster, on page 28.
Procedure
Step 1 Click the open and close navigation button and choose Task > Readdress from the main menu.Step 2 Click Add Readdress Task.Step 3 From the Cluster drop-down list, select the cluster on which you want to change the address of the nodes.
Click View Nodes to view the Cluster nodes.Step 4 Click Next.Step 5 Click Edit next to a node to enter an alternate Hostname, IP Address, Subnet Mask or Gateway.
If DHCP is configured for a cluster, you cannot edit using the readdresstask.
Note
Step 6 Click OK.Step 7 Click Next.
When you click Next, Cisco Prime Collaboration Deployment performs a validation testautomatically. If the test on a cluster fails, the error message describes the failed test. You cancontinue to create the tasks, but you must resolve the errors described or the task will fail.
Important
Step 8 Select the date and time when you want the readdress task to begin. You have the following options to schedulereaddress tasks:
• Select Schedule for a specific time to enter the date and time when you want the readdress task to start.Any start time that you set is based on the time zone of the Cisco Prime Collaboration Deploymentserver as denoted by the time zone that is displayed with this option.
If you schedule a task for a few minutes in the future, but do not save it until that scheduledtime passes, then the task will start automatically.
Note
• Select Start task manually to keep the task in a manual start.
Cisco Prime Collaboration Deployment Administration Guide, Release 11.5(2)54
Cisco Prime Collaboration Deployment FeaturesReaddress Task
• Select Start task immediately upon completion of wizard to start the task immediately afer you clickFinish.
You can also start the task from theMonitoring page.Note
Step 9 Click Next.Step 10 Specify the sequence of steps to complete the task. You have the following options here:
DescriptionOption
Edit a step.Pencil icon
Add a new step after the current step.Page icon
Move the step up to be executed earlier.Up arrow
Move the step down to be executed later.Down arrow
• The Pencil icon opens up an Edit Step window. Add nodes to be readdressed in this step from the listof available nodes. The available nodes are the ones that you chose for a readdress.
IM and Presence Service nodes do not have an Edit button, since readdress is not supportedon Cisco Prime Collaboration Deployment for IM and Presence Service servers.
Note
• The step to which each node is assigned displays next to the node. If a node is not assigned to any step,it shows as unassigned.
•When you assign all the nodes to a step, there will be a default sequencing available.You cannot proceed to next step until you assign all the nodes that were selected for thistask.
Important
• Cisco Prime Collaboration Deployment automatically inserts a Forced Pause after each sequence stepin a Readdress task.
• For a readdress task, only one node can be assigned to each step. Multiple nodes cannot be combinedand assigned in a single step.
Step 11 Click OK.Step 12 Click Next.
TheNext button remains enabled, which allows the user to click to be informed of any configurationerrors.
Note
Step 13 See theReview section to verify the details of the task you created. You can add notes for the task if required.The notes are saved with the task and are visible if the task is edited before completion.
Step 14 Click Finish to schedule the task.
Run a Readdress TaskIf you scheduled the task to start at a later date, or if you chose Manual Start, then the task will be listed inthe task list but will not start yet.
For a task that was scheduled for manual start, click the Start button that is associated with this task to beginthe task.
Cisco Prime Collaboration Deployment Administration Guide, Release 11.5(2) 55
Cisco Prime Collaboration Deployment FeaturesReaddress Task
While the readdress task is running, if there is more than one server to be readdressed in the task, some useroperations are needed. The readdress task sequence automatically inserts a Forced Pause into the sequenceafter the address of a server is changed.
This allows the user to perform any manual steps (for example, changes in DNS) and to check that the phonesassociated with the server successfully registered, and the system is successfully replicating, before Resumingthe readdress task.
For more information, see Administration Guide for Cisco Unified Communications Manager.
Before You Begin
Before running a readdress task, you may need to perform certain steps (for example, updating entries onthe DNS server).
It is very important that you read Administration Guide for Cisco Unified Communications Managerbefore you run the readdress task.
Important
Post Readdress TaskWhen you determine that the server successfully changed the address, go to the Cisco Prime CollaborationDeployment GUI and click Resume to resume the task.
The Cisco Prime CollaborationDeployment server proceeds to the next server in the sequence to be readdressed.Repeat the steps of waiting for the forced pause, checking the server state, and resuming the task, when theserver readdress is verified.
Install TaskUse this task to fresh install a cluster containing Unified CommunicationsManager or IM and Presence Serviceservers. You cannot use this task to add a new server to an existing cluster.
Create an Install Task
Before You Begin
1 VMware—Deploy the hardware for the new cluster and install ESXi
Make sure that the host with the Cisco Prime Collaboration Deployment VM and the host with theapplication VMs use the required Virtualization Software License. See Virtualization Software LicenseTypes, on page 4.
Note
2 ISO files—Download the necessary OVA and ISO images for target release, and use SFTP transfer theISO files to the /fresh_install directory of Cisco Prime Collaboration Deployment.
The ISO file must be bootable.Note
Cisco Prime Collaboration Deployment Administration Guide, Release 11.5(2)56
Cisco Prime Collaboration Deployment FeaturesInstall Task
Do not edit the file name of the bootable ISO that is being used for a PCD task.Note
3 VMware—Deploy Cisco-recommended OVA to create the VMs for the nodes to be installed. Create theappropriate number of target virtual machines on your ESXi hosts (one new virtual machine for eachserver to be installed in the cluster) using the Cisco OVAs that you downloaded in Step 2. Configure thenetwork settings on new VMs.
4 Cisco Prime Collaboration Deployment GUI—Add the ESXi Hosts that contain your virtual machines tothe Cisco Prime Collaboration Deployment inventory. For information about adding and ESXi host toCisco Prime Collaboration Deployment, see Add an ESXi Host Server, on page 31.
5 Cisco Prime Collaboration Deployment GUI—Define the new installation cluster (click the open and closenavigation button and choose Inventory >Clusters) to define the nodes to be installed, and their associatedvirtual machines. (See Add New Cluster for Fresh Install, on page 33.)
6 Cisco Prime Collaboration Deployment GUI—Setup Email Notification (Optional)
• Click the open and close navigation button and choose Administration > Email Notification.
•When email notification is set up, the Cisco Prime Collaboration Deployment server emails the errorconditions that may occur during the migration task.
7 Cisco Prime Collaboration Deployment GUI—Create the Install task.8 Be sure to enter the IP addresses or hostnames of the cluster nodes to be installed into your DNS server
before you create the install task.
Add Install TaskFollow this procedure to automatically install one or more nodes in a cluster at scheduled times.
Procedure
Step 1 Click the open and close navigation button and choose Task > Install from the main menu.Step 2 Click Add Install Task.
If you have no Install tasks, a Cluster Installation popup window appears with the prerequisites torun the wizard. Click Close to close the popup window.
Note
Step 3 From the Installation Cluster drop-down list, select the cluster on which the nodes to be installation arelocated.
Step 4 Click Next.Step 5 Click the respective Browse buttons to select the Unified Communications Manager Installation file and the
Cisco Unified Presence Installation file from the server.The ISO file is visible here only if it was placed in the directory under /fresh_install, uploadedthrough a standard SFTP client (Admin Name: adminsftp, Password: Administration password). Formore information, see the task management information at the beginning of this section.
Note
By default, only files that can be installed on the selected nodes are displayed. The option to selectinstall files is available only for the selected product types and applications that are currently supportedin the cluster.
Note
Cisco Prime Collaboration Deployment Administration Guide, Release 11.5(2) 57
Cisco Prime Collaboration Deployment FeaturesInstall Task
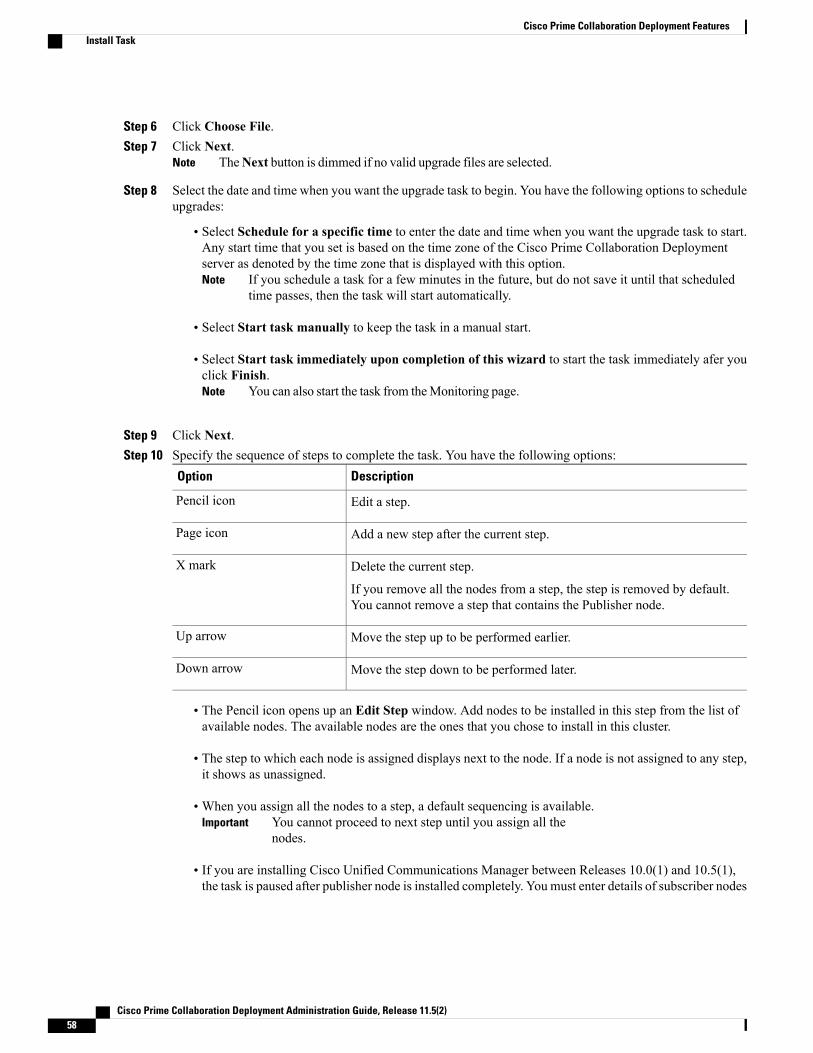
Step 6 Click Choose File.Step 7 Click Next.
TheNext button is dimmed if no valid upgrade files are selected.Note
Step 8 Select the date and time when you want the upgrade task to begin. You have the following options to scheduleupgrades:
• Select Schedule for a specific time to enter the date and time when you want the upgrade task to start.Any start time that you set is based on the time zone of the Cisco Prime Collaboration Deploymentserver as denoted by the time zone that is displayed with this option.
If you schedule a task for a few minutes in the future, but do not save it until that scheduledtime passes, then the task will start automatically.
Note
• Select Start task manually to keep the task in a manual start.
• Select Start task immediately upon completion of this wizard to start the task immediately afer youclick Finish.
You can also start the task from theMonitoring page.Note
Step 9 Click Next.Step 10 Specify the sequence of steps to complete the task. You have the following options:
DescriptionOption
Edit a step.Pencil icon
Add a new step after the current step.Page icon
Delete the current step.
If you remove all the nodes from a step, the step is removed by default.You cannot remove a step that contains the Publisher node.
X mark
Move the step up to be performed earlier.Up arrow
Move the step down to be performed later.Down arrow
• The Pencil icon opens up an Edit Step window. Add nodes to be installed in this step from the list ofavailable nodes. The available nodes are the ones that you chose to install in this cluster.
• The step to which each node is assigned displays next to the node. If a node is not assigned to any step,it shows as unassigned.
•When you assign all the nodes to a step, a default sequencing is available.You cannot proceed to next step until you assign all thenodes.
Important
• If you are installing Cisco Unified Communications Manager between Releases 10.0(1) and 10.5(1),the task is paused after publisher node is installed completely. You must enter details of subscriber nodes
Cisco Prime Collaboration Deployment Administration Guide, Release 11.5(2)58
Cisco Prime Collaboration Deployment FeaturesInstall Task
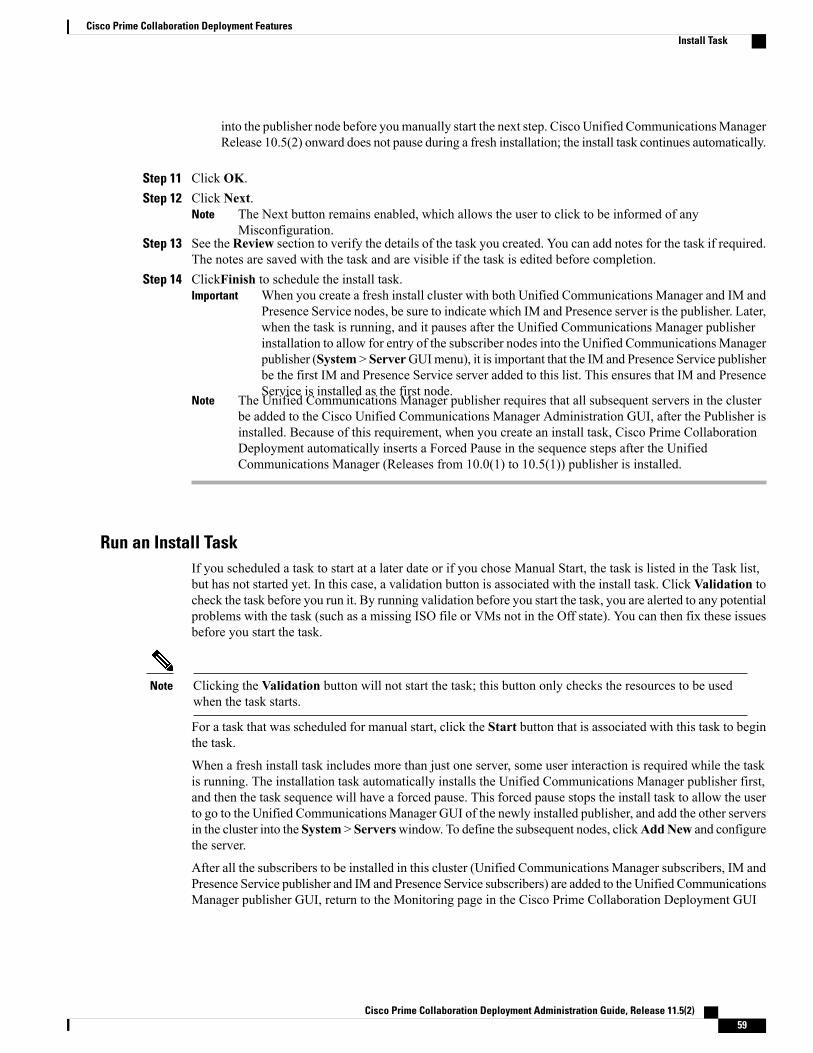
into the publisher node before youmanually start the next step. Cisco Unified CommunicationsManagerRelease 10.5(2) onward does not pause during a fresh installation; the install task continues automatically.
Step 11 Click OK.Step 12 Click Next.
The Next button remains enabled, which allows the user to click to be informed of anyMisconfiguration.
Note
Step 13 See theReview section to verify the details of the task you created. You can add notes for the task if required.The notes are saved with the task and are visible if the task is edited before completion.
Step 14 ClickFinish to schedule the install task.When you create a fresh install cluster with both Unified Communications Manager and IM andPresence Service nodes, be sure to indicate which IM and Presence server is the publisher. Later,when the task is running, and it pauses after the Unified Communications Manager publisherinstallation to allow for entry of the subscriber nodes into the Unified CommunicationsManagerpublisher (System > ServerGUImenu), it is important that the IM and Presence Service publisherbe the first IM and Presence Service server added to this list. This ensures that IM and PresenceService is installed as the first node.
Important
The Unified Communications Manager publisher requires that all subsequent servers in the clusterbe added to the Cisco Unified Communications Manager Administration GUI, after the Publisher isinstalled. Because of this requirement, when you create an install task, Cisco Prime CollaborationDeployment automatically inserts a Forced Pause in the sequence steps after the UnifiedCommunications Manager (Releases from 10.0(1) to 10.5(1)) publisher is installed.
Note
Run an Install TaskIf you scheduled a task to start at a later date or if you chose Manual Start, the task is listed in the Task list,but has not started yet. In this case, a validation button is associated with the install task. Click Validation tocheck the task before you run it. By running validation before you start the task, you are alerted to any potentialproblems with the task (such as a missing ISO file or VMs not in the Off state). You can then fix these issuesbefore you start the task.
Clicking the Validation button will not start the task; this button only checks the resources to be usedwhen the task starts.
Note
For a task that was scheduled for manual start, click the Start button that is associated with this task to beginthe task.
When a fresh install task includes more than just one server, some user interaction is required while the taskis running. The installation task automatically installs the Unified Communications Manager publisher first,and then the task sequence will have a forced pause. This forced pause stops the install task to allow the userto go to the Unified CommunicationsManager GUI of the newly installed publisher, and add the other serversin the cluster into the System > Serverswindow. To define the subsequent nodes, clickAddNew and configurethe server.
After all the subscribers to be installed in this cluster (Unified Communications Manager subscribers, IM andPresence Service publisher and IM and Presence Service subscribers) are added to the Unified CommunicationsManager publisher GUI, return to the Monitoring page in the Cisco Prime Collaboration Deployment GUI
Cisco Prime Collaboration Deployment Administration Guide, Release 11.5(2) 59
Cisco Prime Collaboration Deployment FeaturesInstall Task
and click the Resume button for the install task to resume. The install task continues and installs the UnifiedCommunications Manager or IM and Presence Service software on the subsequent server (or servers).
Cancel Install TaskUse this procedure to cancel a fresh install task or an existing installation in a migration task.
Procedure
Step 1 From the Cisco Prime Collaboration Deployment application, click the open and close navigation button andchoose Task > Install from the main menu.The existing install tasks appear in the Task List section.
Step 2 Select an existing install task and click Cancel.If you cancel the currently running install task, you will have to delete the virtual machine and thenrecreate it.
Note
The virtual machine of the selected install task turns off and the task status is displayed as Canceled.
Post-Install TaskAfter the install task, no further actions are required. The new cluster is ready for use.
Edit and Expand Cluster SupportIf you deployed a Cisco Unified Communications Manager cluster, the Edit and Expand Cluster supportfeature in Cisco Prime Collaboration Deployment eliminates migration issues and barriers. You can performthe following actions:
• Add IM and Presence Service to an existing Unified Communications Manager cluster.
• Add new nodes to the existing cluster—for example, add subscriber nodes.
• Select nodes from a cluster to perform installation.
This feature works with only a previously installed 10.x or later system and uses the Fresh Install Task to addthe nodes.
After you add and install new nodes to an existing cluster, if you later perform the Discovery task, theentire cluster with the new nodes is discovered.
Note
Edit or Delete a New Install ClusterEdit or delete an added new node that has not yet been installed. A node that has not been installed appearsactive.
Cisco Prime Collaboration Deployment Administration Guide, Release 11.5(2)60
Cisco Prime Collaboration Deployment FeaturesEdit and Expand Cluster Support
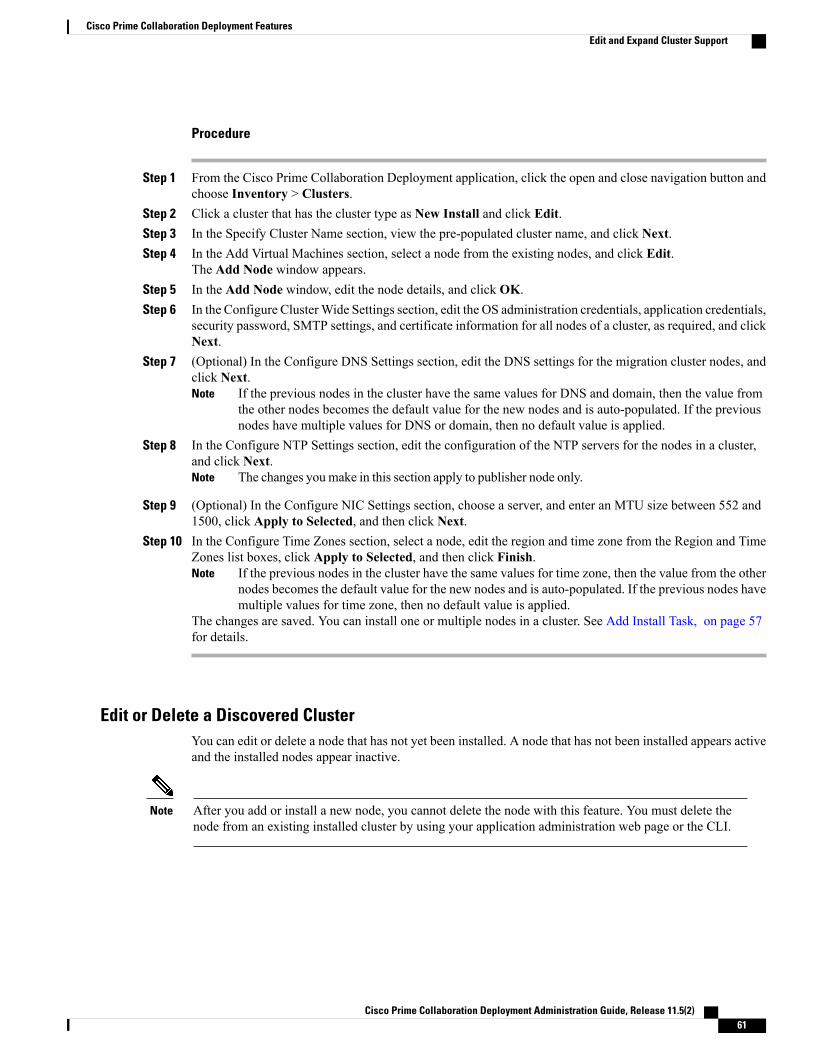
Procedure
Step 1 From the Cisco Prime Collaboration Deployment application, click the open and close navigation button andchoose Inventory > Clusters.
Step 2 Click a cluster that has the cluster type as New Install and click Edit.Step 3 In the Specify Cluster Name section, view the pre-populated cluster name, and click Next.Step 4 In the Add Virtual Machines section, select a node from the existing nodes, and click Edit.
The Add Node window appears.Step 5 In the Add Node window, edit the node details, and click OK.Step 6 In the Configure ClusterWide Settings section, edit the OS administration credentials, application credentials,
security password, SMTP settings, and certificate information for all nodes of a cluster, as required, and clickNext.
Step 7 (Optional) In the Configure DNS Settings section, edit the DNS settings for the migration cluster nodes, andclick Next.
If the previous nodes in the cluster have the same values for DNS and domain, then the value fromthe other nodes becomes the default value for the new nodes and is auto-populated. If the previousnodes have multiple values for DNS or domain, then no default value is applied.
Note
Step 8 In the Configure NTP Settings section, edit the configuration of the NTP servers for the nodes in a cluster,and click Next.
The changes youmake in this section apply to publisher node only.Note
Step 9 (Optional) In the Configure NIC Settings section, choose a server, and enter an MTU size between 552 and1500, click Apply to Selected, and then click Next.
Step 10 In the Configure Time Zones section, select a node, edit the region and time zone from the Region and TimeZones list boxes, click Apply to Selected, and then click Finish.
If the previous nodes in the cluster have the same values for time zone, then the value from the othernodes becomes the default value for the new nodes and is auto-populated. If the previous nodes havemultiple values for time zone, then no default value is applied.
Note
The changes are saved. You can install one or multiple nodes in a cluster. See Add Install Task, on page 57for details.
Edit or Delete a Discovered ClusterYou can edit or delete a node that has not yet been installed. A node that has not been installed appears activeand the installed nodes appear inactive.
After you add or install a new node, you cannot delete the node with this feature. You must delete thenode from an existing installed cluster by using your application administration web page or the CLI.
Note
Cisco Prime Collaboration Deployment Administration Guide, Release 11.5(2) 61
Cisco Prime Collaboration Deployment FeaturesEdit and Expand Cluster Support
Procedure
Step 1 From the Cisco Prime Collaboration Deployment application, click the open and close navigation button andchoose Inventory > Clusters.
Step 2 From the Cisco Prime Collaboration Deployment application, select Inventory > Clusters.Step 3 Click a cluster that has the cluster type as Discovered and click Edit.Step 4 In the Specify Cluster Name section, enter the cluster name, and click Next.
If the discovered cluster is already installed, the cluster name is non-editable.Note
Step 5 In the Add Virtual Machines section, select a node from the existing nodes that has not been installed, andclick Edit.The Add Node window appears.
Step 6 In theAddNodewindow, edit the node details, and clickOK, and then clickNext in the Add Virtual Machinessection.
If you add a new node to an existing cluster, the new nodes cannot use the Publisher functionNote
Step 7 In the Configure ClusterWide Settings section, view the OS administration credentials, application credentials,security password, SMTP settings, and certificate information for all nodes of a cluster and click Next.
The fields in this section are editable only if the cluster type isNew Install.Note
Step 8 (Optional) In the Configure DNS Settings section, edit the DNS settings for the migration cluster nodes, andclick Next.
If the previous nodes in the cluster have the same values for DNS and domain, then the value fromthe other nodes becomes the default value for the new nodes. If the previous nodes have multiplevalues for DNS or domain, then no default value is applied.
Note
Step 9 In the Configure NTP Settings section, view the configuration of the NTP servers for the nodes in a cluster,and click Next.
The fields in this section arenon-editable.
Note
Step 10 (Optional) In the Configure NIC Settings section, edit the server details for the uninstalled nodes, enter anMTU size between 552 and 1500, and then click Next.
Step 11 In the Configure Time Zones section, select a node, edit the region and time zone from the Region and TimeZones list boxes, click Apply to Selected, and then click Finish.
If the previous nodes in the cluster have the same values for time zone, then the value from the othernodes becomes the default value for the new nodes. If the previous nodes have multiple values fortime zone, then no default value is applied.
Note
The changes are saved. You can install one or multiple nodes in a cluster. See Add Install Task, on page 57for details.
Monitor Task StatusUse the Monitoring page to view the status of tasks in Cisco Prime Collaboration Deployment.
Cisco Prime Collaboration Deployment Administration Guide, Release 11.5(2)62
Cisco Prime Collaboration Deployment FeaturesMonitor Task Status
For a description of the information that is available through the Monitoring page, see Monitoring ViewElements, on page 74.
Note
Procedure
Step 1 Click theMonitoring link on the main menu to view the Monitoring page.Step 2 The column on the left side of the Monitoring page lists each task and an icon that shows its current status.
Also shown is the type of task (Migrate, Upgrade, Install, and so on), and the cluster nickname for the task.The task start time is also shown. Click the task in this left column to view the detailed data for that task inthe panel on the right.
Step 3 The upper right section of the page provides the following data:
• Status
• Start time
• Task data (for example: cluster nickname and ISO name)
Click View Log to see the detailed log messages for the task. If you see any errors or warnings in this log,refer to the Troubleshooting section more information.
In the upper right are buttons that you use to perform various operations on the task. For example, if the taskis paused, click the Resume button to resume the task.
A button will appear if it is valid for the current state of the task. For example, after a task is finished, it willnot have a Cancel button, but instead will have a Delete button (if you wish to remove the data for the task).
Step 4 The bottom right section of the page provides detailed steps for the task, along with the status for that step.Click on the triangle that corresponds to a step to expand the step description.Each step also has a View Log link, to show the log messages for that step.
The Monitoring page refreshes automatically every 3 minutes. To deactivate automatic refresh, clickthe Disable button.
Note
Action Buttons on the Monitoring Page• Start—This button appears if a task is created with the “Start Task Manually” option. The task startsafter you click the Start button.
• Cancel—Cancel the task. This button appears when a task is in the scheduled or running state. If thetask has already started, this button does not undo any steps that are already complete, but it will stopthe task as soon as possible.
• Delete—Delete the task from the system. This removes the task and all its history.
• Resume—This button appears when a task is in a paused state. It allows the user to resume the task atthe next step.
• Retry—This button appears when the task is in a “Paused due to error” state. Clicking this button retriesthe last step of the task that failed because of an error.
Cisco Prime Collaboration Deployment Administration Guide, Release 11.5(2) 63
Cisco Prime Collaboration Deployment FeaturesMonitor Task Status
Automatic RefreshThe Monitoring page refreshes automatically every 3 minutes. To deactivate automatic refresh, click theDisable button in the top left corner of the Monitoring page.
Administration Tools
Email NotificationThe Email Notification feature sends email notifications to you that contain details about certain task events.You can choose whether the system sends emails for all standard task events (such as when task is scheduled,started, successful, paused, failed and canceled), or for only task errors. Emails are sent for all types of tasks:cluster discovery, upgrade, migration, switch version, restart, fresh install, and readdress.
When Email Is SentIf you choose to receive email notifications in Standard mode, an email message is sent when a task entersany of the following states:
• Scheduled
• Failed to Schedule
• Started
• Successful
• Failed
• Canceled
• Canceling
• Failed to Cancel
• Paused on Error
• Paused
• Paused – Required
If you choose to receive email notifications in Error only mode, an email message is sent when the taskenters the following states:
• Failed to Schedule
• Failed
• Failed to Cancel
• Paused on Error
Cisco Prime Collaboration Deployment Administration Guide, Release 11.5(2)64
Cisco Prime Collaboration Deployment FeaturesAdministration Tools
SFTP DatastoreThe Cisco Prime Collaboration Deployment server serves as a local SSH File Transfer Protocol or SecureFile Transfer Protocol (SFTP) server that is used to store the ISO and COP files to be used by upgrade, freshinstall, and migrate tasks.
These procedures describe how to place files on the Cisco Prime Collaboration Deployment server usingLinux. You can push a file from a Linux machine for SFTP client.
Note
Migration or Fresh Install TasksFollow this procedure to send the ISO file to the Cisco Prime Collaboration Deployment server using theadminsftp account and Cisco Prime Collaboration Deployment GUI (or CLI password with any SFTP client).
Procedure
Step 1 From a Linux shell, type sftp adminsftp@<Cisco Prime Collaboration Deployment server> and thenprovide the password (the same in both the CLI and GUI).
Step 2 Change the directory to the fresh_install directory.
Example:From a Linux shell, type cd fresh_install and press Return.
Step 3 Upload the ISO file.
Example:Type put UCSInstall_UCOS_10.0.x.xxx.sgn.iso.
Upgrade TaskFollow this procedure to use SFTP to upload ISO or COP files that will be used for upgrade tasks on the CiscoPrime Collaboration Deployment server.
Procedure
Step 1 From a Linux shell, type sftp adminsftp@<Cisco Prime Collaboration Deployment server> and thenprovide the password (the same in both the CLI and GUI).
Step 2 Change the directory to the upgrade directory.
Example:
Cisco Prime Collaboration Deployment Administration Guide, Release 11.5(2) 65
Cisco Prime Collaboration Deployment FeaturesSFTP Datastore
From a Linux shell, type cd upgrade and press Return.
Step 3 Upload the ISO file or COP file.
Example:Type put UCSInstall_UCOS_10.0.x.xxx.sgn.iso.
Verify or View an ISO Filename
Procedure
Step 1 From the Cisco Prime Collaboration Deployment application, click the open and close navigation button andchoose Inventory > SFTP Servers and Datastore.
Step 2 On this page, you can view and manage files that are stored on the SFTP datastore of this Cisco PrimeCollaboration Deployment server.It displays the filename of the ISO and COP files that are stored on the server, and where they are located inthe directory (for example: fresh_install or upgrade).
Delete ISO or COP FilesUse the following procedure to delete ISO or COP files on a Cisco Prime Collaboration Deployment SFTPserver using the Cisco Prime Collaboration Deployment GUI.
Procedure
Step 1 Log in to Cisco Prime Collaboration Deployment.Step 2 From the Cisco Prime Collaboration Deployment application, click the open and close navigation button and
choose Inventory > SFTP Servers and Datastore.Step 3 Check the check box next to the ISO or COP file.Step 4 Click Delete.
We recommend that you periodically delete ISO or COP files that are no longer needed to savespace, especially before upgrading the Cisco Prime Collaboration Deployment server software.
Important
Remote SFTP Server SupportThe remote SFTP server support feature leverages Cisco Prime Collaboration Deployment for upgrades. Useof this feature avoids the issues that are caused by large application image files streamed over WAN that areonly supported by Cisco Prime Collaboration Deployment 11.0(1) and later.
Cisco Prime Collaboration Deployment Administration Guide, Release 11.5(2)66
Cisco Prime Collaboration Deployment FeaturesRemote SFTP Server Support
Examples of where this feature is useful are listed as follows:
• Geographically distributed deployments, such as multi-site distributed IP Telephony with multipleclusters at separate sites from the Cisco Prime Collaboration Deployment virtual machine.
• Clustering overWAN (CoW), where the application virtual machines are at different sites than the CiscoPrime Collaboration Deployment virtual machine.
• Deployments where Cisco Prime Collaboration Deployment is in central data center; however CiscoUnified Communications Manager clusters are remote over the WAN.
These SFTP servers used for the upgrade of Cisco Unified Communications Manager are same as the SFTPservers that are used for the upgrade of Cisco Unified Communications Manager. Following is the list of thesupported SFTP servers that are used for the upgrade:
• Open SSH
• Cygwin
• Titan
The remote SFTP server support is available for upgrade task only and no other task types, including themigration task.
Note
Add Remote SFTP server
Procedure
Step 1 From the Cisco Prime Collaboration Deployment application, click the open and close navigation button andchoose Inventory > SFTP Servers and Datastore.The SFTP Servers/Datastore table on this window shows the PCD details by default.
Step 2 From the SFTP Servers/Datastore table, click Add Server.The Add SFTP Server window appears.
Step 3 In theAddress and access credentials section, enter values in the IP / Host Name,Username, and Passwordfields.
Step 4 In the Path to Datastore Directory on Server section, click a Add Directory button to add a value in theDirectory field.
For an upgrade, ensure that a directory includes .iso datastorefiles.
Note
Step 5 (Optional) In the Additional Information section, enter description in the Description field.Step 6 Click Add.
Cisco Prime Collaboration Deployment Administration Guide, Release 11.5(2) 67
Cisco Prime Collaboration Deployment FeaturesRemote SFTP Server Support
If the SFTP server is not added, you get any of the following error messages:Note
• Connection Timeout—Indicates that the connection to SFTP server failed due to timeout.
• Login Failure—Indicates that the login to the SFTP server failed.
• Directory Not Found—Indicates that the directory that you selected is not found on the SFTPserver.
• Directory Already Entered—Indicates that the directory that you selected already exists inthe list of directories. You can view the list of available directories by clicking theAddDirectorybutton.
• Directory Already Exists—Indicates that the directory that you entered already exists in thelist of the SFTP servers.
•Mandatory Fields Missed—Indicates that you did not enter values in the mandatory fields.
•Mentioned Server Could Not Be Located—Indicates that the server that you entered is notconfigured with DNS. This error message appears if you enter host name instead of IP address.
The SFTP Servers/Datastore table shows the remote SFTP server that you added. The SFTP/DatastoreFiles table shows the list of files from the remote SFTP server and fromCisco Prime CollaborationDeployment.In addition, the existing Cisco Prime Collaboration Deployment server is added automatically and the filesin the upgrade and fresh_install folders in the Cisco Prime Collaboration Deployment server appearby default in the SFTP/Datastore Files table.
Associate Nodes to Remote SFTP Server
Before You Begin
• Add an SFTP server.
• Ensure that the cluster node you choose to associate to an SFTP server is not in the Scheduled,Running,orWait_for_manual_start states.
Procedure
Step 1 From the Cisco Prime Collaboration Deployment application, click the open and close navigation button andchoose Inventory > Clusters.The Clusters window appears.
Step 2 Click Discover Cluster button to search for the existing clusters. To discover a cluster, see the Discover aCluster, on page 28 procedure.
Step 3 From the available cluster nodes in the Cluster Nodes table, click Edit for a cluster node.The Edit Node window appears.
Step 4 From the SFTP Server drop-down list, choose an SFTP server.By default, this field shows the localhost option as the SFTP Server.
Step 5 Click OK.
Cisco Prime Collaboration Deployment Administration Guide, Release 11.5(2)68
Cisco Prime Collaboration Deployment FeaturesRemote SFTP Server Support
The SFTP server is associated with the cluster node that you selected and the details appear in the SFTPServer column of the Cluster Nodes table.
Edit Remote SFTP ServerFor the existing remote SFTP server, you can edit the details, such as username, password, or description.You can also add multiple directories to the remote SFTP server while editing other field values.
Before You Begin
• Ensure that a cluser node is not associated with remote SFTP server directory that you choose to edit.
• Ensure that no upgrade task is associated with the SFTP server.
Procedure
Step 1 From the Cisco Prime Collaboration Deployment application, click the open and close navigation button andchoose Inventory > SFTP Servers and Datastore.The SFTP Servers/Datastore table on this window shows the PCD details by default.
Step 2 From the available SFTP servers in the SFTP Servers/Datastore table, click Edit for an SFTP server.The Edit SFTP Server window appears.
Step 3 Edit the values for the fields in theAddress and access credentials, Path to Datastore Directory on Server,and Additional Information sections.In Path to Datastore Directory on Server section, by clicking the Add Directory button, you can edit anexisting directory and also add multiple directories.
Step 4 Click Save.
Delete Remote SFTP ServerYou can delete one or multiple remote SFTP servers that are available in the Cisco Prime CollaborationDeployment application. However, you cannot delete any datastore.
Before You Begin
• Ensure that no upgrade task is associated and running with the cluster node that uses the SFTP serverthat you choose to delete.
• Disassociate the cluster nodes from the SFTP server that you choose to delete.
You can disassociate a cluster node even if no upgrade task is associated and runningwith the cluster node that uses the SFTP server that you selected to delete.
Note
• Ensure to change the node association of the SFTP server, which you choose to delete, fromremote/external SFTP server to the localhost SFTP server.
Cisco Prime Collaboration Deployment Administration Guide, Release 11.5(2) 69
Cisco Prime Collaboration Deployment FeaturesRemote SFTP Server Support
If you do not change the node association from remote/external SFTP server tothe localhost SFTP server, the association of cluster nodes changes to thelocalhost SFTP server from the remote SFTP server and the remote SFTP serverthat you selected is deleted.
Note
Procedure
Step 1 From the Cisco Prime Collaboration Deployment application, click the open and close navigation button andchoose Inventory > SFTP Servers and Datastore.The SFTP Servers/Datastore table on this window shows the PCD details by default.
Step 2 From the available SFTP servers in the SFTP Servers/Datastore table, check the check box of one or multipleremote SFTP servers that you want to delete.
Step 3 Click Delete.
Delete Local SFTP/Datastore ISO filesYou can delete ISO and COP files from the SFTP server running locally in the Cisco Prime CollaborationDeployment virtual machine. However, you cannot delete ISO files from the remote SFTP server.
Before You Begin
Ensure that the SFTP and datastore ISO files that you choose to delete are not associated with the upgrade inthese states—Scheduled, Running, orWait_for_manual_start.
Procedure
Step 1 From the Cisco Prime Collaboration Deployment application, click the open and close navigation button andchoose Inventory > SFTP Servers and Datastore.The SFTP Servers/Datastore table on this window shows the PCD details by default.
Step 2 From the available SFTP and datastore files in the SFTP/Datastore Files table, check the check box of oneor multiple remote SFTP and datastore files that you want to delete.
You cannot delete remote SFTPfiles.
Note
Step 3 Click Delete.
Disk Space Warning LevelUse this feature to view and configure a disk space warning level for tasks through the Disk Space WarningLevel Configuration window. When the available disk space value drops below the value that you assign asthe warning level disk space, the system warns you that it is running out of disk space to perform tasks.
Cisco Prime Collaboration Deployment Administration Guide, Release 11.5(2)70
Cisco Prime Collaboration Deployment FeaturesDisk Space Warning Level
Configure Disk Space Warning LevelUse this procedure to configure the available disk space threshold where the systemwarns you that it is runningout of disk space to perform tasks.
Disk space warning level is applicable and is validated for migration and install tasks. This level is alsovalidated each time you log in to Cisco Prime Collaboration Deployment.
Note
Procedure
Step 1 From the Cisco Prime Collaboration Deployment application, click the open and close navigation button andchoose Administration > Disk Space Warning Level.The Disk Space Warning Level window appears showing the total disk space and the available disk space.
Step 2 View the total disk space and the available disk space in the Total Disk Space (GB) and Available DiskSpace (GB) fields.
Step 3 Enter the value that you want to assign for theWarning Level Disk Space (GB) field.You can click the information link to check if the space value you entered is available for use on the server.
Step 4 Click Save.Step 5 (Optional) Click Reset.
The page is reset with the default values.
Cisco Prime Collaboration Deployment Administration Guide, Release 11.5(2) 71
Cisco Prime Collaboration Deployment FeaturesDisk Space Warning Level

Cisco Prime Collaboration Deployment Administration Guide, Release 11.5(2)72
Cisco Prime Collaboration Deployment FeaturesDisk Space Warning Level
C H A P T E R 5Cisco Prime Collaboration DeploymentAdministrative Interface Elements
• Common Administrative Interface Elements, page 73
• Monitoring View Elements, page 74
• Tasks View Elements, page 78
• Inventory View Elements, page 107
• Administration View Elements, page 116
Common Administrative Interface ElementsThe following elements are common to all views in the Cisco Prime Collaboration Deployment administrationinterface.
DescriptionSetting
Provides you access to navigate to menus, which appear in a vertical pane.Click this button view and hide the menus.
Open and close navigationbutton
Displays the search text box to allow search in the application. It also displaysthe options Cisco Prime Collaboration Deployment as index.
To view the search option, click the open and close navigationbutton.
Note
Search and Indexing
Provides the version of the Cisco Prime Collaboration Deployment. Thissetting also includes copyright and trademark information.
About
Exits from the server.Logout
Provides context-sensitive help information.Help
Provides information about the current page that you are viewing.Information ("i" button)
Cisco Prime Collaboration Deployment Administration Guide, Release 11.5(2) 73
DescriptionSetting
Provides information about getting started to perform system-level tasks onthe server.
Getting Started (flag button)
Monitoring View ElementsAfter a task is scheduled, you can monitor, and control the tasks by using the Monitoring page.
DescriptionSetting
A list of all the tasks contained in Cisco Prime Collaboration Deployment.This list can include any of the following tasks:
• Scheduled
• Canceled
• Started
• Paused
• Paused due to Error
• Successful
• Failed
• Upgrade Tasks
• Switch Version Tasks
• Server Restart Tasks
• Readdress Tasks
• Install Tasks
• Migrate Tasks
Click one of the tasks in the Task Queue to open the details for that task inthe right top panel.
Task Queue
Cisco Prime Collaboration Deployment Administration Guide, Release 11.5(2)74
Cisco Prime Collaboration Deployment Administrative Interface ElementsMonitoring View Elements

DescriptionSetting
Task status
Cisco Prime Collaboration Deployment Administration Guide, Release 11.5(2) 75
Cisco Prime Collaboration Deployment Administrative Interface ElementsMonitoring View Elements
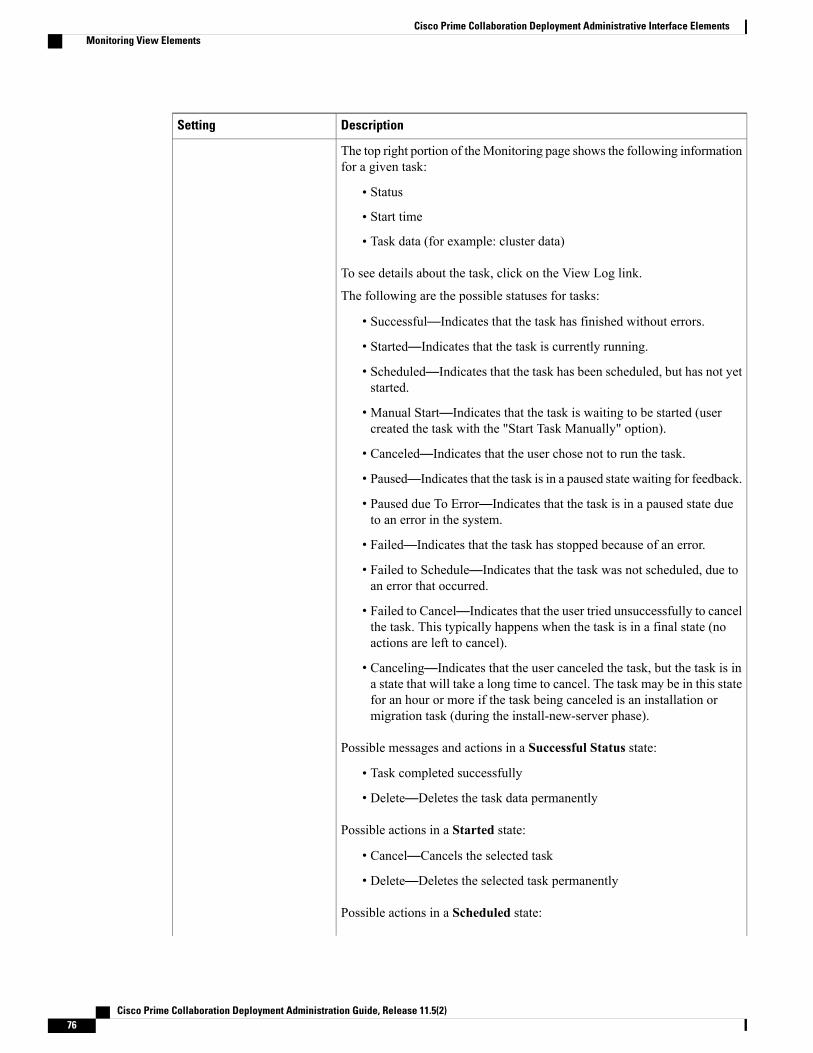
DescriptionSetting
The top right portion of theMonitoring page shows the following informationfor a given task:
• Status
• Start time
• Task data (for example: cluster data)
To see details about the task, click on the View Log link.
The following are the possible statuses for tasks:
• Successful—Indicates that the task has finished without errors.
• Started—Indicates that the task is currently running.
• Scheduled—Indicates that the task has been scheduled, but has not yetstarted.
• Manual Start—Indicates that the task is waiting to be started (usercreated the task with the "Start Task Manually" option).
• Canceled—Indicates that the user chose not to run the task.
• Paused—Indicates that the task is in a paused state waiting for feedback.
• Paused due To Error—Indicates that the task is in a paused state dueto an error in the system.
• Failed—Indicates that the task has stopped because of an error.
• Failed to Schedule—Indicates that the task was not scheduled, due toan error that occurred.
• Failed to Cancel—Indicates that the user tried unsuccessfully to cancelthe task. This typically happens when the task is in a final state (noactions are left to cancel).
• Canceling—Indicates that the user canceled the task, but the task is ina state that will take a long time to cancel. The task may be in this statefor an hour or more if the task being canceled is an installation ormigration task (during the install-new-server phase).
Possible messages and actions in a Successful Status state:
• Task completed successfully
• Delete—Deletes the task data permanently
Possible actions in a Started state:
• Cancel—Cancels the selected task
• Delete—Deletes the selected task permanently
Possible actions in a Scheduled state:
Cisco Prime Collaboration Deployment Administration Guide, Release 11.5(2)76
Cisco Prime Collaboration Deployment Administrative Interface ElementsMonitoring View Elements
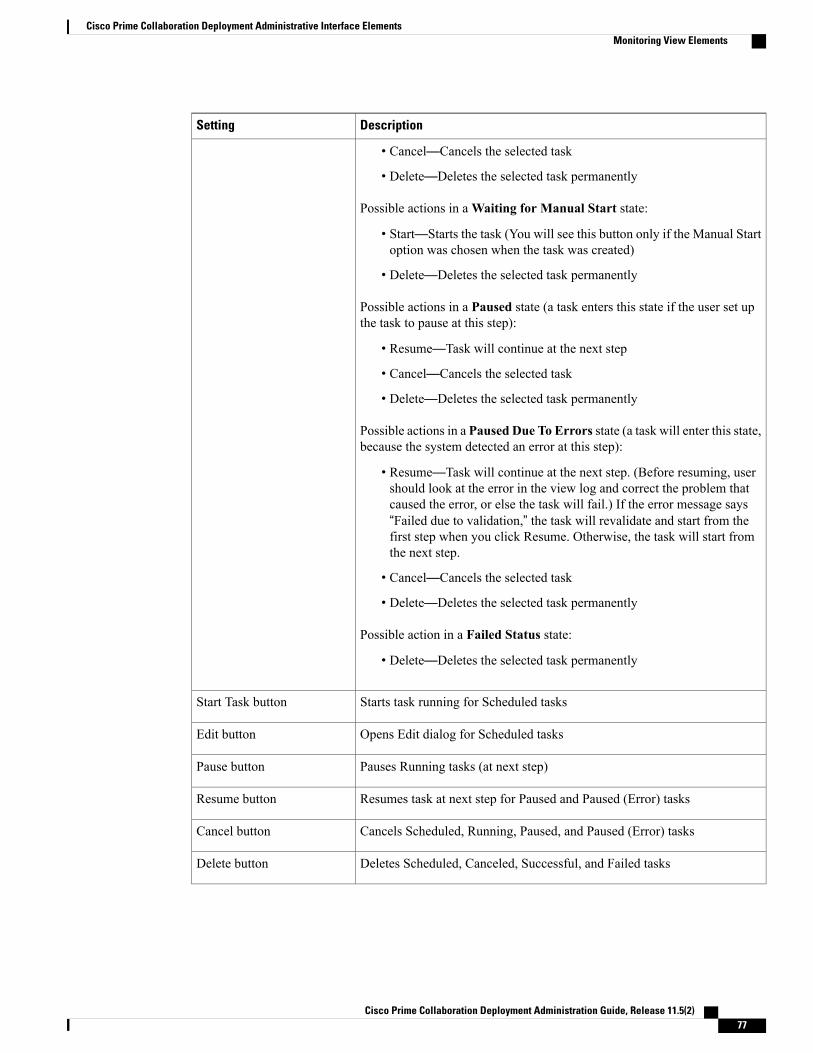
DescriptionSetting
• Cancel—Cancels the selected task
• Delete—Deletes the selected task permanently
Possible actions in aWaiting for Manual Start state:
• Start—Starts the task (You will see this button only if the Manual Startoption was chosen when the task was created)
• Delete—Deletes the selected task permanently
Possible actions in a Paused state (a task enters this state if the user set upthe task to pause at this step):
• Resume—Task will continue at the next step
• Cancel—Cancels the selected task
• Delete—Deletes the selected task permanently
Possible actions in a Paused Due To Errors state (a task will enter this state,because the system detected an error at this step):
• Resume—Task will continue at the next step. (Before resuming, usershould look at the error in the view log and correct the problem thatcaused the error, or else the task will fail.) If the error message says“Failed due to validation,” the task will revalidate and start from thefirst step when you click Resume. Otherwise, the task will start fromthe next step.
• Cancel—Cancels the selected task
• Delete—Deletes the selected task permanently
Possible action in a Failed Status state:
• Delete—Deletes the selected task permanently
Starts task running for Scheduled tasksStart Task button
Opens Edit dialog for Scheduled tasksEdit button
Pauses Running tasks (at next step)Pause button
Resumes task at next step for Paused and Paused (Error) tasksResume button
Cancels Scheduled, Running, Paused, and Paused (Error) tasksCancel button
Deletes Scheduled, Canceled, Successful, and Failed tasksDelete button
Cisco Prime Collaboration Deployment Administration Guide, Release 11.5(2) 77
Cisco Prime Collaboration Deployment Administrative Interface ElementsMonitoring View Elements
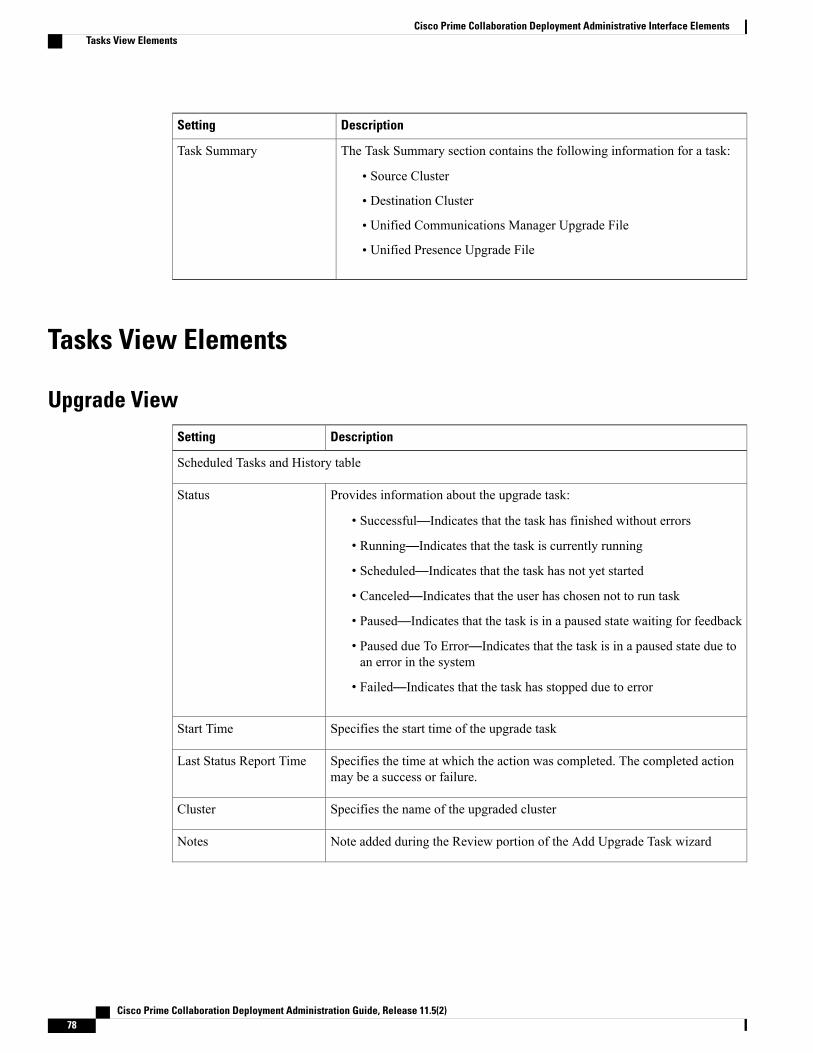
DescriptionSetting
The Task Summary section contains the following information for a task:
• Source Cluster
• Destination Cluster
• Unified Communications Manager Upgrade File
• Unified Presence Upgrade File
Task Summary
Tasks View Elements
Upgrade ViewDescriptionSetting
Scheduled Tasks and History table
Provides information about the upgrade task:
• Successful—Indicates that the task has finished without errors
• Running—Indicates that the task is currently running
• Scheduled—Indicates that the task has not yet started
• Canceled—Indicates that the user has chosen not to run task
• Paused—Indicates that the task is in a paused state waiting for feedback
• Paused due To Error—Indicates that the task is in a paused state due toan error in the system
• Failed—Indicates that the task has stopped due to error
Status
Specifies the start time of the upgrade taskStart Time
Specifies the time at which the action was completed. The completed actionmay be a success or failure.
Last Status Report Time
Specifies the name of the upgraded clusterCluster
Note added during the Review portion of the Add Upgrade Task wizardNotes
Cisco Prime Collaboration Deployment Administration Guide, Release 11.5(2)78
Cisco Prime Collaboration Deployment Administrative Interface ElementsTasks View Elements

DescriptionSetting
Actions
Cisco Prime Collaboration Deployment Administration Guide, Release 11.5(2) 79
Cisco Prime Collaboration Deployment Administrative Interface ElementsUpgrade View

DescriptionSetting
Allows you to perform the following for a particular upgrade task
Depending on the state of the task, only some of these actions may beallowed (for example, an upgrade task that is completed cannot becanceled).
Note
• Scheduled status:
◦Run Validation Test—Runs a validation test to ensure that all nodesare available and the iso to be used for upgrade is present.
◦Edit—Shows the Edit Upgrade Task window. Allows you to editthe selected task
◦Cancel Task—Cancels the selected task
◦Delete—Deletes the selected task permanently
• Canceled status:
◦Delete—Deletes the selected task permanently
• Started status:
◦Cancel Task—Cancels the selected task
• Paused status:
◦Resume—Use this button to restart task at the next step.
◦View Details—Navigates to the monitoring page showing all thetasks available
◦Start Task—Start task is present if the task is started manually. Timeis not selected for this action.
Start Task is applicable only if you select Start taskmanually option in the Set Start Time panel.
Note
When you select the task manually, the resume option isunavailable in the monitoring page.
◦Cancel Task—Cancels the selected task
• Paused due to Error:
◦Retry—This causes the task to restart and retry the last failed taskaction.
◦Resume—This causes the task to start at the next step (after thefailed step).
◦View Details—Navigates to the monitoring page showing all thetasks available
◦Cancel Task—Cancels the selected task
Cisco Prime Collaboration Deployment Administration Guide, Release 11.5(2)80
Cisco Prime Collaboration Deployment Administrative Interface ElementsUpgrade View
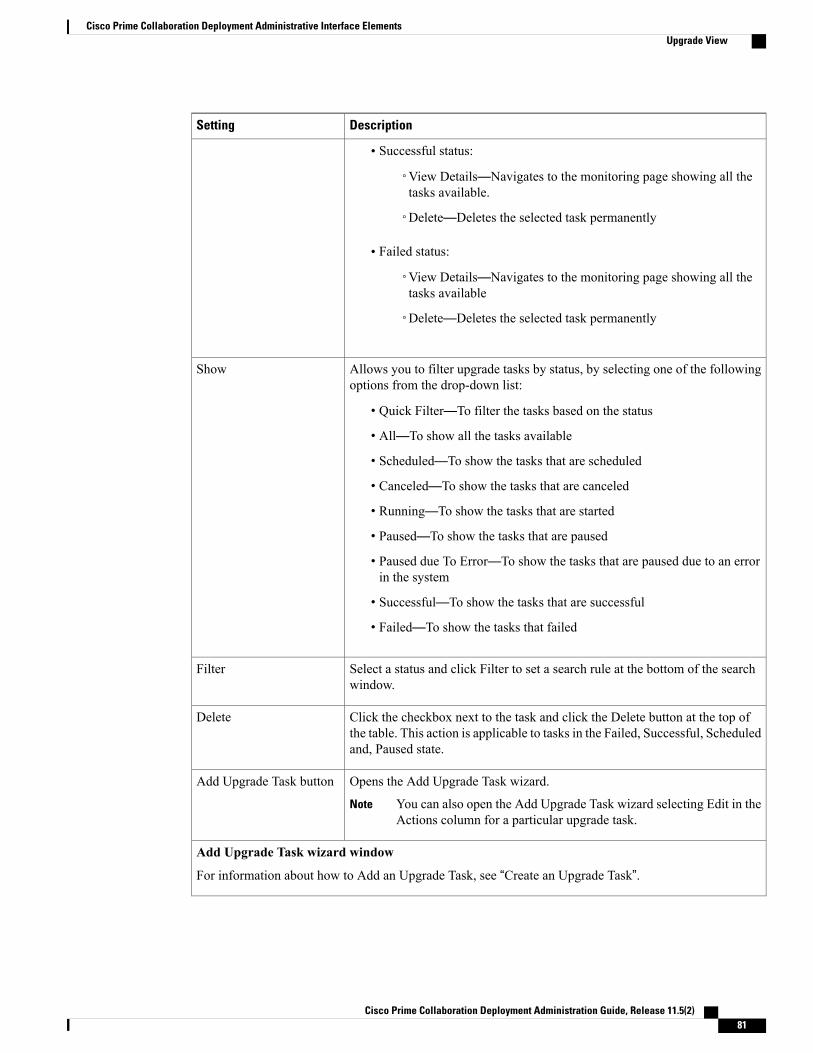
DescriptionSetting
Successful status:•
◦View Details—Navigates to the monitoring page showing all thetasks available.
◦Delete—Deletes the selected task permanently
• Failed status:
◦View Details—Navigates to the monitoring page showing all thetasks available
◦Delete—Deletes the selected task permanently
Allows you to filter upgrade tasks by status, by selecting one of the followingoptions from the drop-down list:
• Quick Filter—To filter the tasks based on the status
• All—To show all the tasks available
• Scheduled—To show the tasks that are scheduled
• Canceled—To show the tasks that are canceled
• Running—To show the tasks that are started
• Paused—To show the tasks that are paused
• Paused due To Error—To show the tasks that are paused due to an errorin the system
• Successful—To show the tasks that are successful
• Failed—To show the tasks that failed
Show
Select a status and click Filter to set a search rule at the bottom of the searchwindow.
Filter
Click the checkbox next to the task and click the Delete button at the top ofthe table. This action is applicable to tasks in the Failed, Successful, Scheduledand, Paused state.
Delete
Opens the Add Upgrade Task wizard.
You can also open the Add Upgrade Task wizard selecting Edit in theActions column for a particular upgrade task.
Note
Add Upgrade Task button
Add Upgrade Task wizard window
For information about how to Add an Upgrade Task, see “Create an Upgrade Task”.
Cisco Prime Collaboration Deployment Administration Guide, Release 11.5(2) 81
Cisco Prime Collaboration Deployment Administrative Interface ElementsUpgrade View
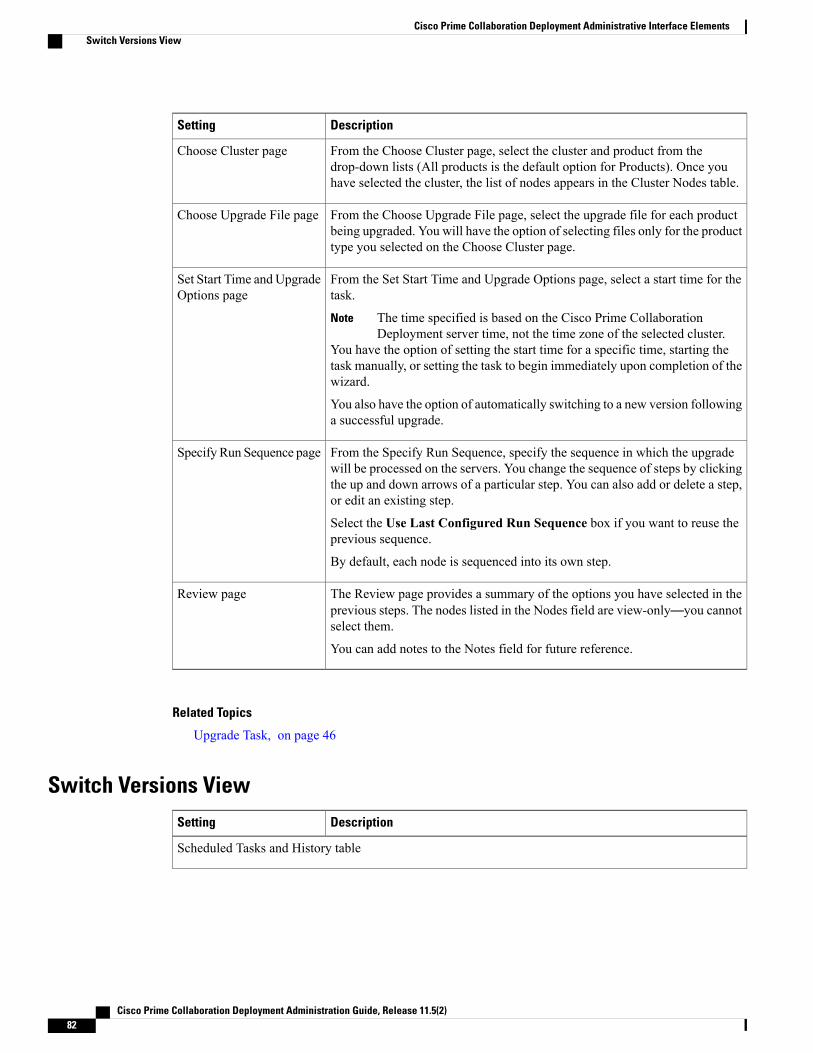
DescriptionSetting
From the Choose Cluster page, select the cluster and product from thedrop-down lists (All products is the default option for Products). Once youhave selected the cluster, the list of nodes appears in the Cluster Nodes table.
Choose Cluster page
From the Choose Upgrade File page, select the upgrade file for each productbeing upgraded. You will have the option of selecting files only for the producttype you selected on the Choose Cluster page.
Choose Upgrade File page
From the Set Start Time and Upgrade Options page, select a start time for thetask.
The time specified is based on the Cisco Prime CollaborationDeployment server time, not the time zone of the selected cluster.
Note
You have the option of setting the start time for a specific time, starting thetask manually, or setting the task to begin immediately upon completion of thewizard.
You also have the option of automatically switching to a new version followinga successful upgrade.
Set Start Time and UpgradeOptions page
From the Specify Run Sequence, specify the sequence in which the upgradewill be processed on the servers. You change the sequence of steps by clickingthe up and down arrows of a particular step. You can also add or delete a step,or edit an existing step.
Select the Use Last Configured Run Sequence box if you want to reuse theprevious sequence.
By default, each node is sequenced into its own step.
Specify Run Sequence page
The Review page provides a summary of the options you have selected in theprevious steps. The nodes listed in the Nodes field are view-only—you cannotselect them.
You can add notes to the Notes field for future reference.
Review page
Related Topics
Upgrade Task, on page 46
Switch Versions ViewDescriptionSetting
Scheduled Tasks and History table
Cisco Prime Collaboration Deployment Administration Guide, Release 11.5(2)82
Cisco Prime Collaboration Deployment Administrative Interface ElementsSwitch Versions View
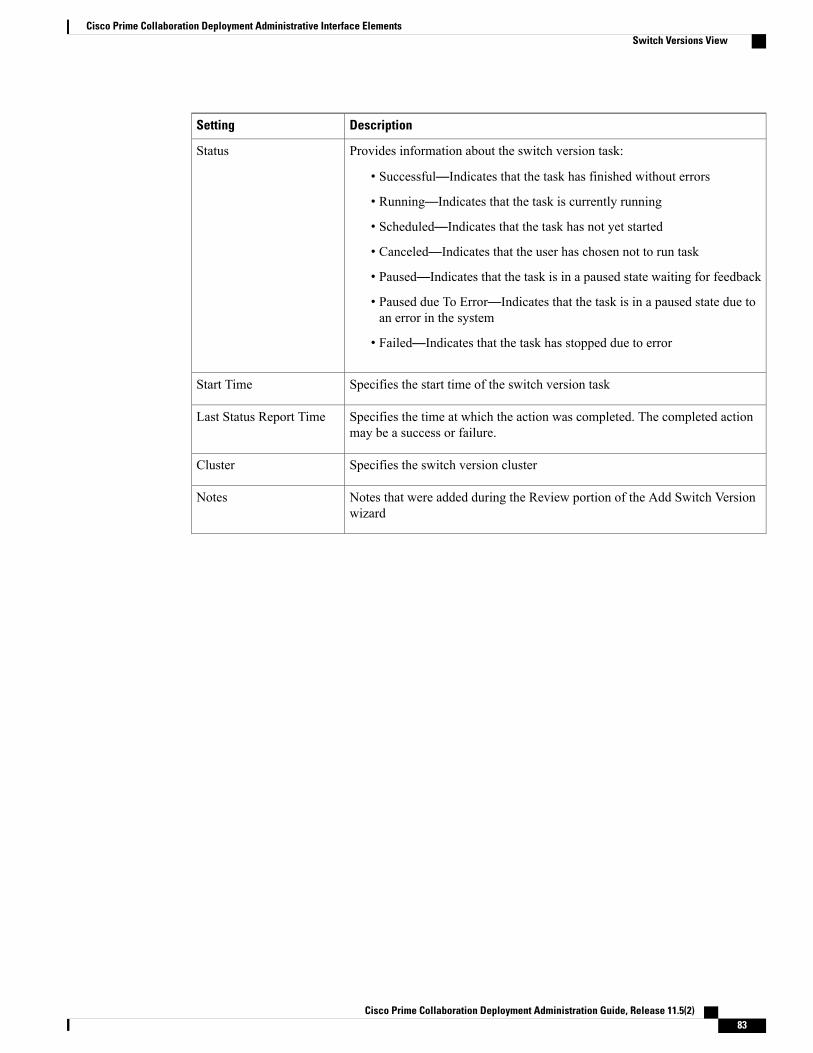
DescriptionSetting
Provides information about the switch version task:
• Successful—Indicates that the task has finished without errors
• Running—Indicates that the task is currently running
• Scheduled—Indicates that the task has not yet started
• Canceled—Indicates that the user has chosen not to run task
• Paused—Indicates that the task is in a paused state waiting for feedback
• Paused due To Error—Indicates that the task is in a paused state due toan error in the system
• Failed—Indicates that the task has stopped due to error
Status
Specifies the start time of the switch version taskStart Time
Specifies the time at which the action was completed. The completed actionmay be a success or failure.
Last Status Report Time
Specifies the switch version clusterCluster
Notes that were added during the Review portion of the Add Switch Versionwizard
Notes
Cisco Prime Collaboration Deployment Administration Guide, Release 11.5(2) 83
Cisco Prime Collaboration Deployment Administrative Interface ElementsSwitch Versions View
DescriptionSetting
Actions
Cisco Prime Collaboration Deployment Administration Guide, Release 11.5(2)84
Cisco Prime Collaboration Deployment Administrative Interface ElementsSwitch Versions View
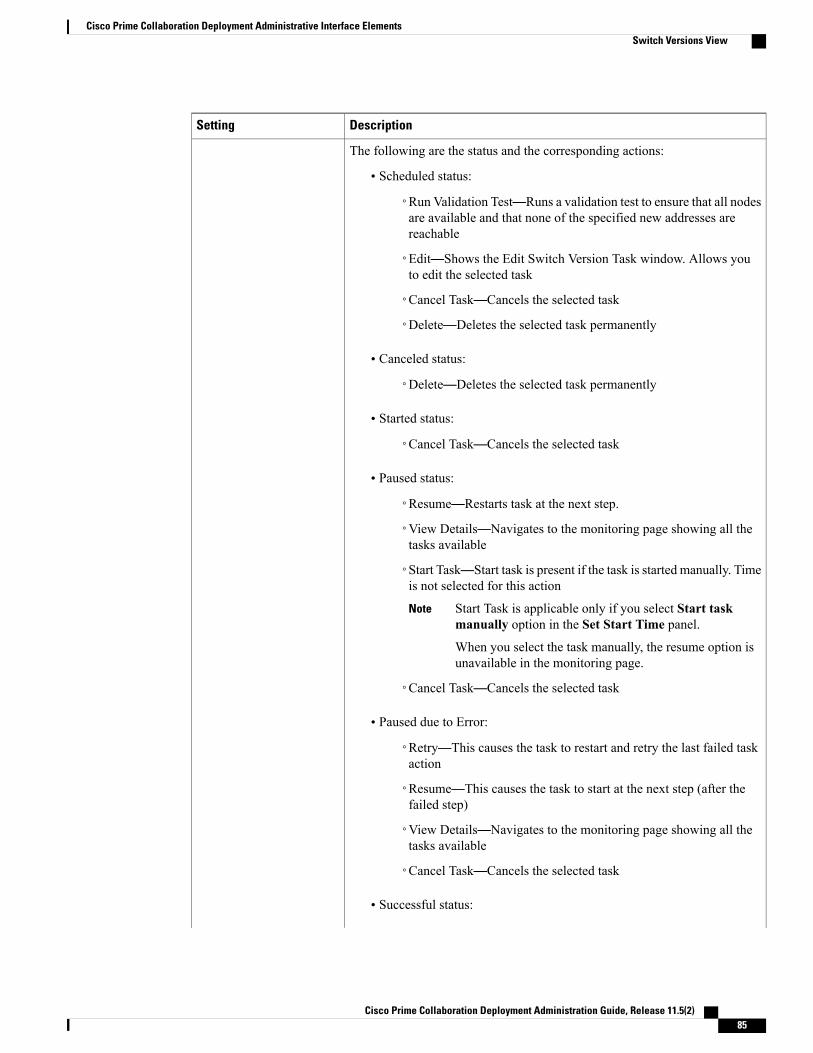
DescriptionSetting
The following are the status and the corresponding actions:
• Scheduled status:
◦Run Validation Test—Runs a validation test to ensure that all nodesare available and that none of the specified new addresses arereachable
◦Edit—Shows the Edit Switch Version Task window. Allows youto edit the selected task
◦Cancel Task—Cancels the selected task
◦Delete—Deletes the selected task permanently
• Canceled status:
◦Delete—Deletes the selected task permanently
• Started status:
◦Cancel Task—Cancels the selected task
• Paused status:
◦Resume—Restarts task at the next step.
◦View Details—Navigates to the monitoring page showing all thetasks available
◦Start Task—Start task is present if the task is started manually. Timeis not selected for this action
Start Task is applicable only if you select Start taskmanually option in the Set Start Time panel.
Note
When you select the task manually, the resume option isunavailable in the monitoring page.
◦Cancel Task—Cancels the selected task
• Paused due to Error:
◦Retry—This causes the task to restart and retry the last failed taskaction
◦Resume—This causes the task to start at the next step (after thefailed step)
◦View Details—Navigates to the monitoring page showing all thetasks available
◦Cancel Task—Cancels the selected task
• Successful status:
Cisco Prime Collaboration Deployment Administration Guide, Release 11.5(2) 85
Cisco Prime Collaboration Deployment Administrative Interface ElementsSwitch Versions View
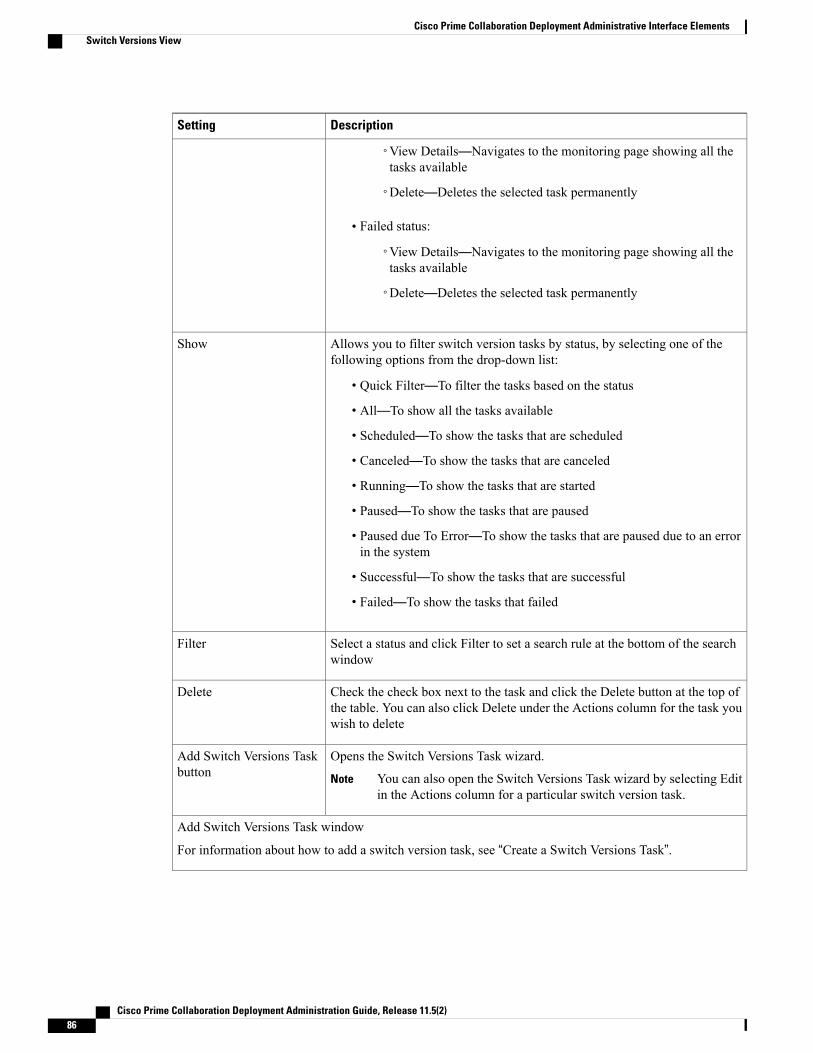
DescriptionSetting
◦View Details—Navigates to the monitoring page showing all thetasks available
◦Delete—Deletes the selected task permanently
• Failed status:
◦View Details—Navigates to the monitoring page showing all thetasks available
◦Delete—Deletes the selected task permanently
Allows you to filter switch version tasks by status, by selecting one of thefollowing options from the drop-down list:
• Quick Filter—To filter the tasks based on the status
• All—To show all the tasks available
• Scheduled—To show the tasks that are scheduled
• Canceled—To show the tasks that are canceled
• Running—To show the tasks that are started
• Paused—To show the tasks that are paused
• Paused due To Error—To show the tasks that are paused due to an errorin the system
• Successful—To show the tasks that are successful
• Failed—To show the tasks that failed
Show
Select a status and click Filter to set a search rule at the bottom of the searchwindow
Filter
Check the check box next to the task and click the Delete button at the top ofthe table. You can also click Delete under the Actions column for the task youwish to delete
Delete
Opens the Switch Versions Task wizard.
You can also open the Switch Versions Task wizard by selecting Editin the Actions column for a particular switch version task.
Note
Add Switch Versions Taskbutton
Add Switch Versions Task window
For information about how to add a switch version task, see “Create a Switch Versions Task”.
Cisco Prime Collaboration Deployment Administration Guide, Release 11.5(2)86
Cisco Prime Collaboration Deployment Administrative Interface ElementsSwitch Versions View
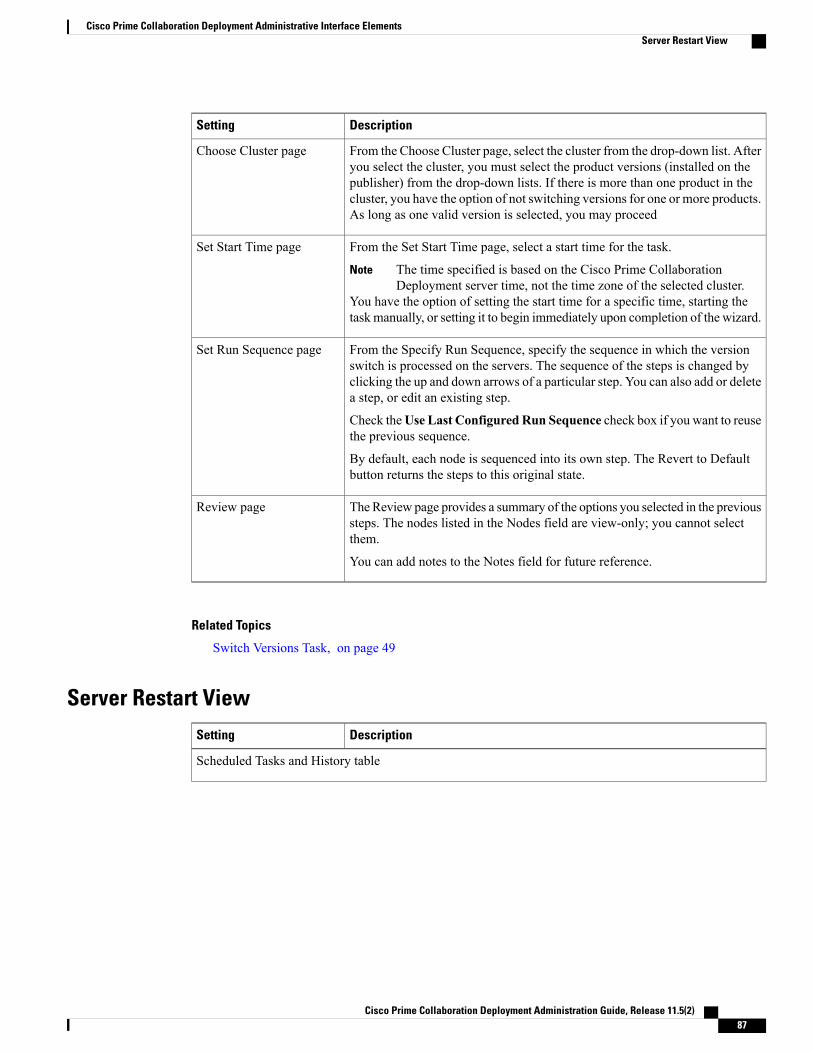
DescriptionSetting
From the Choose Cluster page, select the cluster from the drop-down list. Afteryou select the cluster, you must select the product versions (installed on thepublisher) from the drop-down lists. If there is more than one product in thecluster, you have the option of not switching versions for one or more products.As long as one valid version is selected, you may proceed
Choose Cluster page
From the Set Start Time page, select a start time for the task.
The time specified is based on the Cisco Prime CollaborationDeployment server time, not the time zone of the selected cluster.
Note
You have the option of setting the start time for a specific time, starting thetask manually, or setting it to begin immediately upon completion of the wizard.
Set Start Time page
From the Specify Run Sequence, specify the sequence in which the versionswitch is processed on the servers. The sequence of the steps is changed byclicking the up and down arrows of a particular step. You can also add or deletea step, or edit an existing step.
Check theUse Last Configured Run Sequence check box if you want to reusethe previous sequence.
By default, each node is sequenced into its own step. The Revert to Defaultbutton returns the steps to this original state.
Set Run Sequence page
The Review page provides a summary of the options you selected in the previoussteps. The nodes listed in the Nodes field are view-only; you cannot selectthem.
You can add notes to the Notes field for future reference.
Review page
Related Topics
Switch Versions Task, on page 49
Server Restart ViewDescriptionSetting
Scheduled Tasks and History table
Cisco Prime Collaboration Deployment Administration Guide, Release 11.5(2) 87
Cisco Prime Collaboration Deployment Administrative Interface ElementsServer Restart View
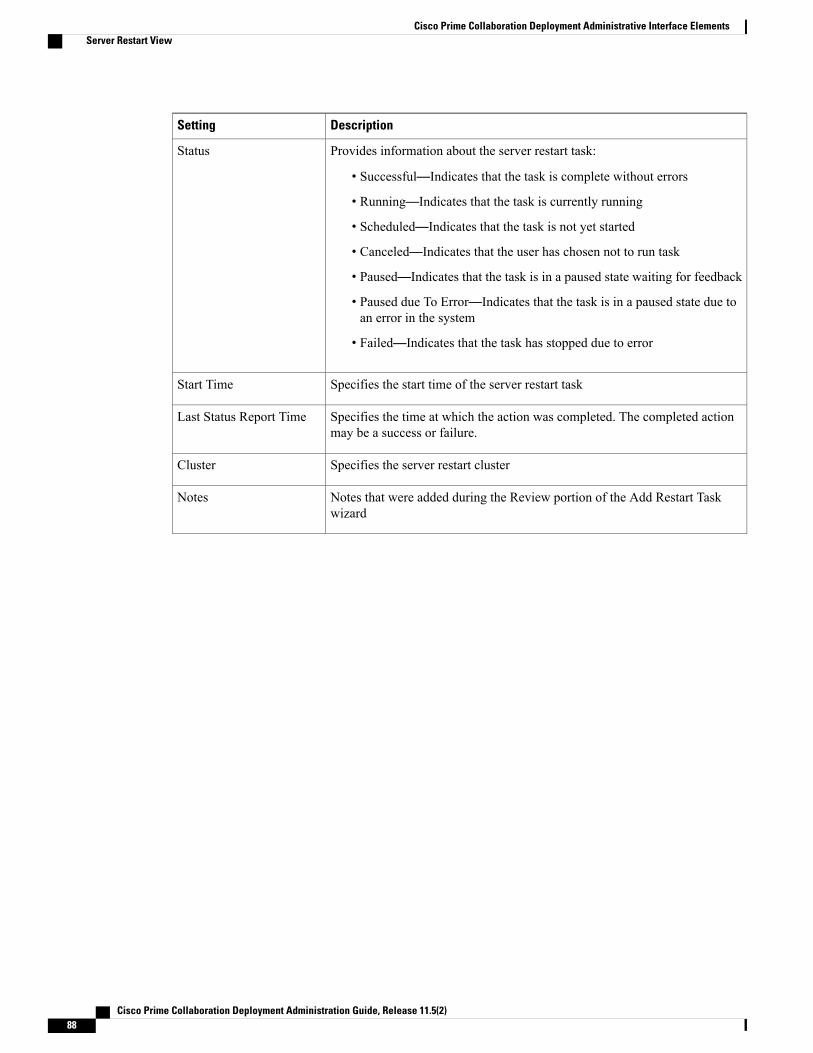
DescriptionSetting
Provides information about the server restart task:
• Successful—Indicates that the task is complete without errors
• Running—Indicates that the task is currently running
• Scheduled—Indicates that the task is not yet started
• Canceled—Indicates that the user has chosen not to run task
• Paused—Indicates that the task is in a paused state waiting for feedback
• Paused due To Error—Indicates that the task is in a paused state due toan error in the system
• Failed—Indicates that the task has stopped due to error
Status
Specifies the start time of the server restart taskStart Time
Specifies the time at which the action was completed. The completed actionmay be a success or failure.
Last Status Report Time
Specifies the server restart clusterCluster
Notes that were added during the Review portion of the Add Restart Taskwizard
Notes
Cisco Prime Collaboration Deployment Administration Guide, Release 11.5(2)88
Cisco Prime Collaboration Deployment Administrative Interface ElementsServer Restart View

DescriptionSetting
Actions
Cisco Prime Collaboration Deployment Administration Guide, Release 11.5(2) 89
Cisco Prime Collaboration Deployment Administrative Interface ElementsServer Restart View
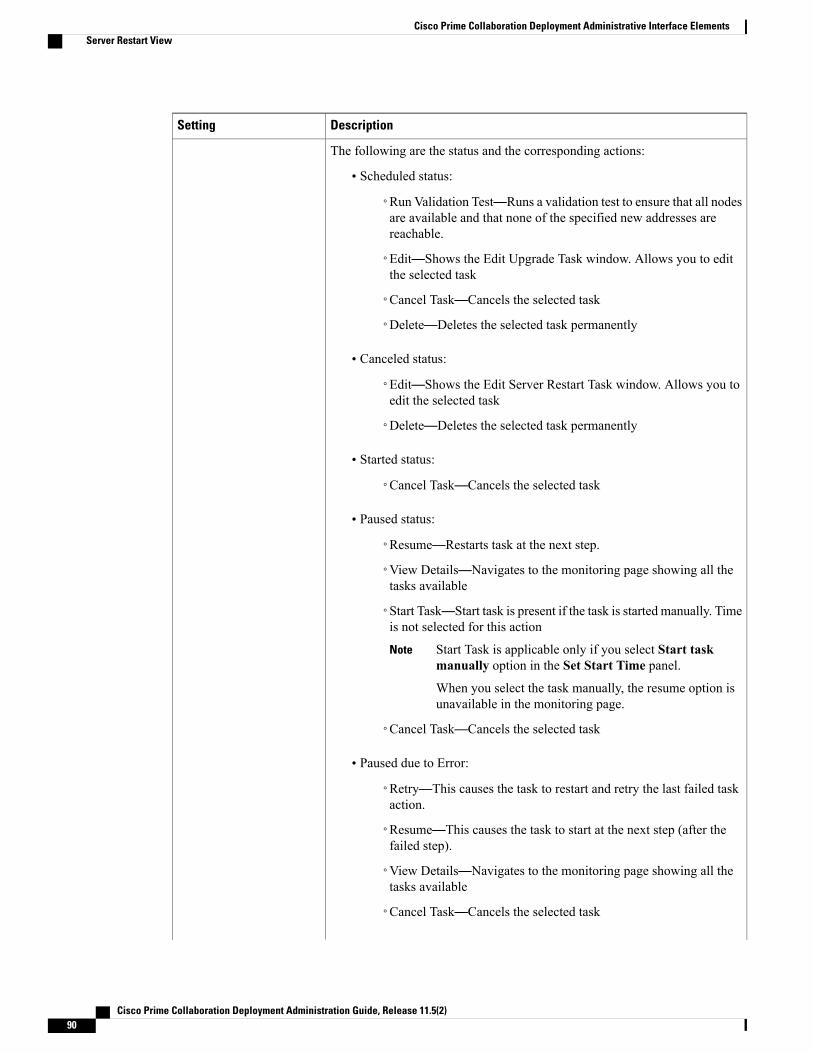
DescriptionSetting
The following are the status and the corresponding actions:
• Scheduled status:
◦Run Validation Test—Runs a validation test to ensure that all nodesare available and that none of the specified new addresses arereachable.
◦Edit—Shows the Edit Upgrade Task window. Allows you to editthe selected task
◦Cancel Task—Cancels the selected task
◦Delete—Deletes the selected task permanently
• Canceled status:
◦Edit—Shows the Edit Server Restart Task window. Allows you toedit the selected task
◦Delete—Deletes the selected task permanently
• Started status:
◦Cancel Task—Cancels the selected task
• Paused status:
◦Resume—Restarts task at the next step.
◦View Details—Navigates to the monitoring page showing all thetasks available
◦Start Task—Start task is present if the task is started manually. Timeis not selected for this action
Start Task is applicable only if you select Start taskmanually option in the Set Start Time panel.
Note
When you select the task manually, the resume option isunavailable in the monitoring page.
◦Cancel Task—Cancels the selected task
• Paused due to Error:
◦Retry—This causes the task to restart and retry the last failed taskaction.
◦Resume—This causes the task to start at the next step (after thefailed step).
◦View Details—Navigates to the monitoring page showing all thetasks available
◦Cancel Task—Cancels the selected task
Cisco Prime Collaboration Deployment Administration Guide, Release 11.5(2)90
Cisco Prime Collaboration Deployment Administrative Interface ElementsServer Restart View

DescriptionSetting
Successful status:•
◦View Details—Navigates to the monitoring page showing all thetasks available.
◦Delete—Deletes the selected task permanently
• Failed status:
◦View Details—Navigates to the monitoring page showing all thetasks available
◦Delete—Deletes the selected task permanently
Allows you to filter restart tasks by status, by selecting one of the followingoptions from the drop-down list:
• Quick Filter—To filter the tasks based on the status
• All—To show all the tasks available
• Scheduled—To show the tasks that are scheduled
• Canceled—To show the tasks that are canceled
• Running—To show the tasks that are started
• Paused—To show the tasks that are paused
• Paused due To Error—Indicates that the task is in a paused state due toan error in the system
• Successful—To show the tasks that are successful
• Failed—To show the tasks that failed
Show
Select a status and click Filter to set a search rule at the bottom of the searchwindow.
Filter
Click the checkbox next to the task and click the Delete button at the top ofthe table. You can also click Delete under the Actions column for the task youwish to delete.
Delete
Opens the Add Server Restart Task wizard.
You can also open the Add Server Restart Task wizard by selectingEdit in the Actions column for a particular server restart task.
Note
Add Server Restart Taskbutton
Add Server Restart Task window
For information about how to add a server restart task, see “Create a Restart Task”.
Cisco Prime Collaboration Deployment Administration Guide, Release 11.5(2) 91
Cisco Prime Collaboration Deployment Administrative Interface ElementsServer Restart View
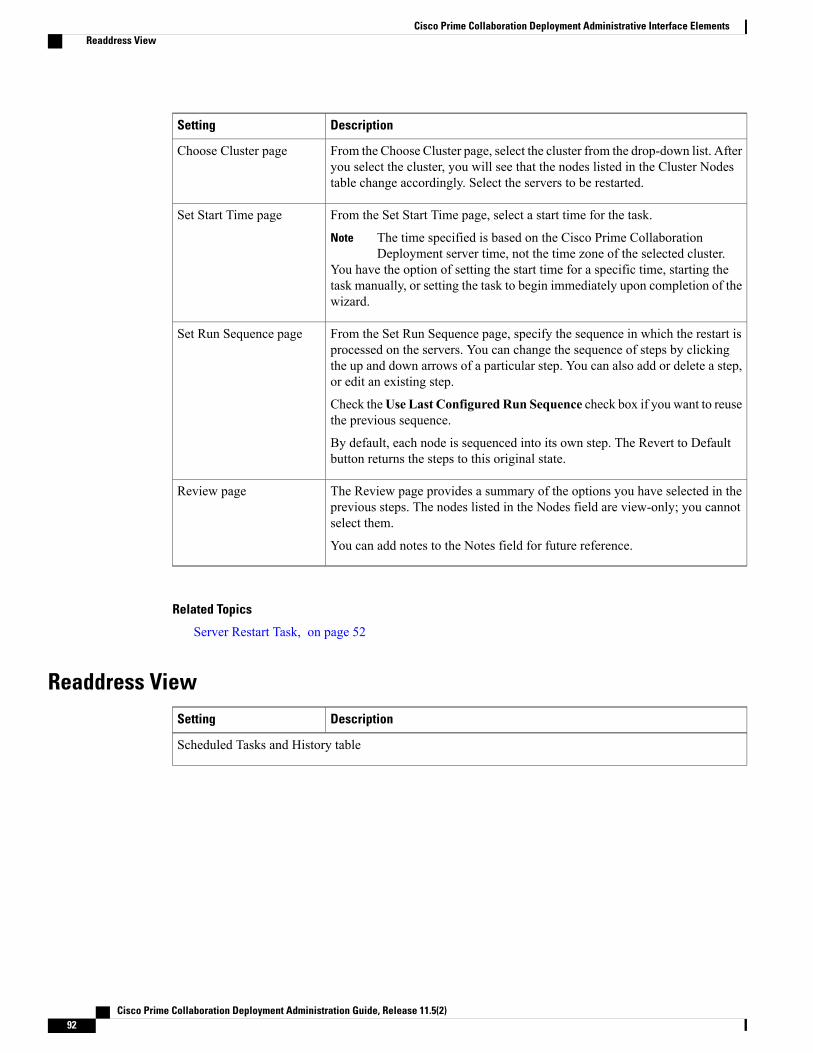
DescriptionSetting
From the Choose Cluster page, select the cluster from the drop-down list. Afteryou select the cluster, you will see that the nodes listed in the Cluster Nodestable change accordingly. Select the servers to be restarted.
Choose Cluster page
From the Set Start Time page, select a start time for the task.
The time specified is based on the Cisco Prime CollaborationDeployment server time, not the time zone of the selected cluster.
Note
You have the option of setting the start time for a specific time, starting thetask manually, or setting the task to begin immediately upon completion of thewizard.
Set Start Time page
From the Set Run Sequence page, specify the sequence in which the restart isprocessed on the servers. You can change the sequence of steps by clickingthe up and down arrows of a particular step. You can also add or delete a step,or edit an existing step.
Check theUse Last Configured Run Sequence check box if you want to reusethe previous sequence.
By default, each node is sequenced into its own step. The Revert to Defaultbutton returns the steps to this original state.
Set Run Sequence page
The Review page provides a summary of the options you have selected in theprevious steps. The nodes listed in the Nodes field are view-only; you cannotselect them.
You can add notes to the Notes field for future reference.
Review page
Related Topics
Server Restart Task, on page 52
Readdress ViewDescriptionSetting
Scheduled Tasks and History table
Cisco Prime Collaboration Deployment Administration Guide, Release 11.5(2)92
Cisco Prime Collaboration Deployment Administrative Interface ElementsReaddress View
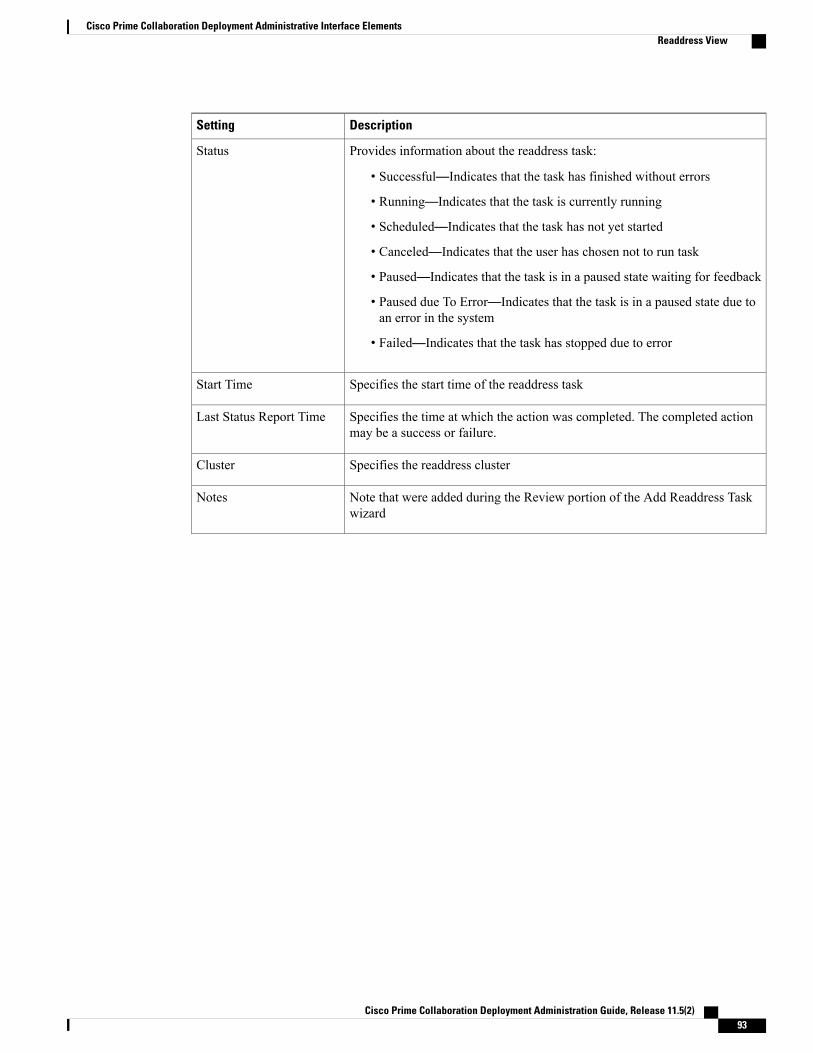
DescriptionSetting
Provides information about the readdress task:
• Successful—Indicates that the task has finished without errors
• Running—Indicates that the task is currently running
• Scheduled—Indicates that the task has not yet started
• Canceled—Indicates that the user has chosen not to run task
• Paused—Indicates that the task is in a paused state waiting for feedback
• Paused due To Error—Indicates that the task is in a paused state due toan error in the system
• Failed—Indicates that the task has stopped due to error
Status
Specifies the start time of the readdress taskStart Time
Specifies the time at which the action was completed. The completed actionmay be a success or failure.
Last Status Report Time
Specifies the readdress clusterCluster
Note that were added during the Review portion of the Add Readdress Taskwizard
Notes
Cisco Prime Collaboration Deployment Administration Guide, Release 11.5(2) 93
Cisco Prime Collaboration Deployment Administrative Interface ElementsReaddress View
DescriptionSetting
Actions
Cisco Prime Collaboration Deployment Administration Guide, Release 11.5(2)94
Cisco Prime Collaboration Deployment Administrative Interface ElementsReaddress View
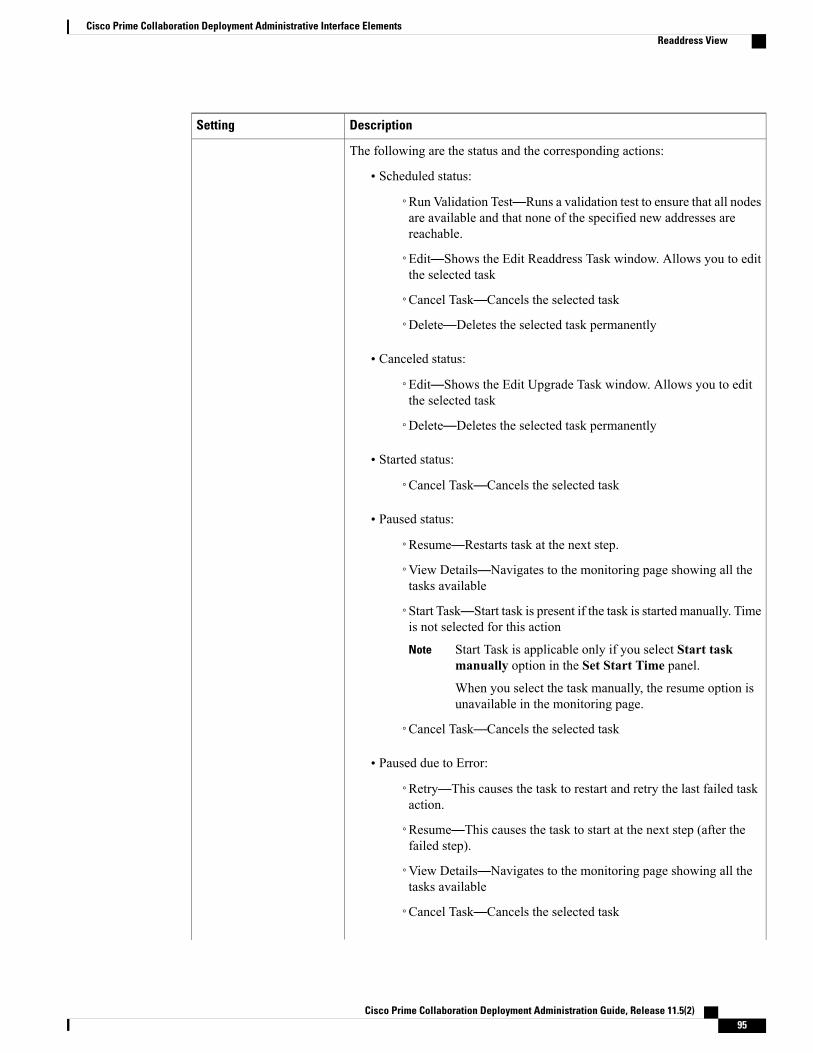
DescriptionSetting
The following are the status and the corresponding actions:
• Scheduled status:
◦Run Validation Test—Runs a validation test to ensure that all nodesare available and that none of the specified new addresses arereachable.
◦Edit—Shows the Edit Readdress Task window. Allows you to editthe selected task
◦Cancel Task—Cancels the selected task
◦Delete—Deletes the selected task permanently
• Canceled status:
◦Edit—Shows the Edit Upgrade Task window. Allows you to editthe selected task
◦Delete—Deletes the selected task permanently
• Started status:
◦Cancel Task—Cancels the selected task
• Paused status:
◦Resume—Restarts task at the next step.
◦View Details—Navigates to the monitoring page showing all thetasks available
◦Start Task—Start task is present if the task is started manually. Timeis not selected for this action
Start Task is applicable only if you select Start taskmanually option in the Set Start Time panel.
Note
When you select the task manually, the resume option isunavailable in the monitoring page.
◦Cancel Task—Cancels the selected task
• Paused due to Error:
◦Retry—This causes the task to restart and retry the last failed taskaction.
◦Resume—This causes the task to start at the next step (after thefailed step).
◦View Details—Navigates to the monitoring page showing all thetasks available
◦Cancel Task—Cancels the selected task
Cisco Prime Collaboration Deployment Administration Guide, Release 11.5(2) 95
Cisco Prime Collaboration Deployment Administrative Interface ElementsReaddress View
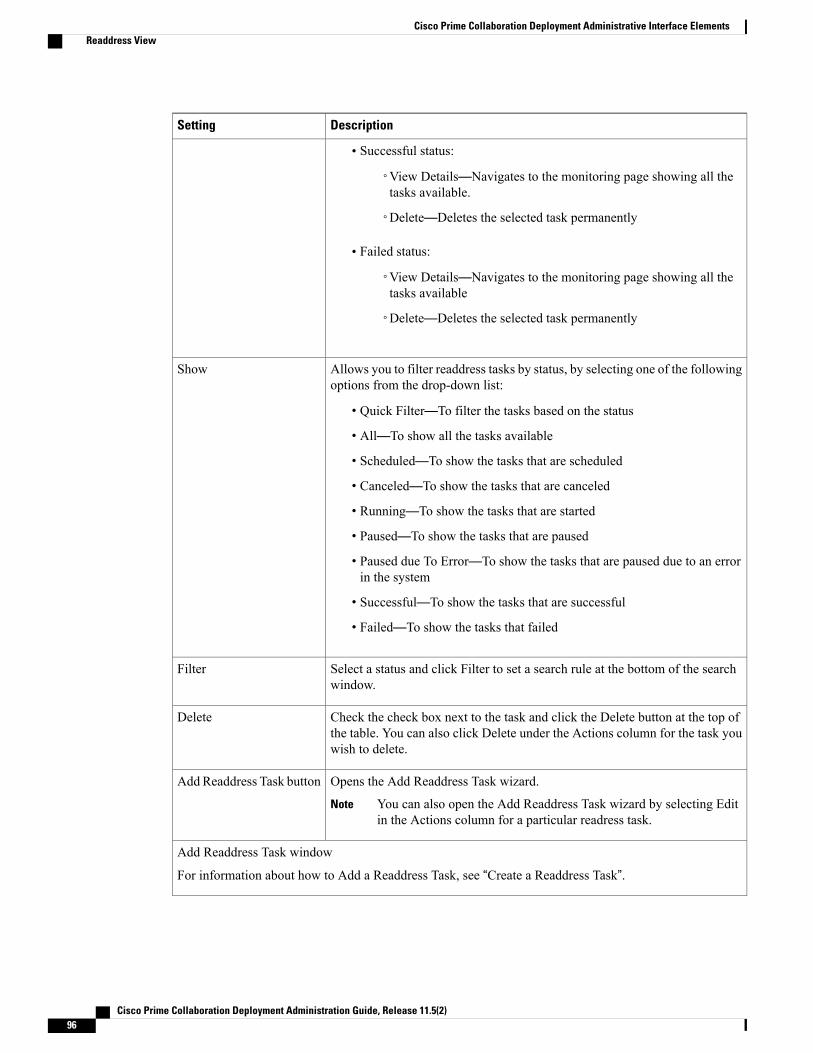
DescriptionSetting
Successful status:•
◦View Details—Navigates to the monitoring page showing all thetasks available.
◦Delete—Deletes the selected task permanently
• Failed status:
◦View Details—Navigates to the monitoring page showing all thetasks available
◦Delete—Deletes the selected task permanently
Allows you to filter readdress tasks by status, by selecting one of the followingoptions from the drop-down list:
• Quick Filter—To filter the tasks based on the status
• All—To show all the tasks available
• Scheduled—To show the tasks that are scheduled
• Canceled—To show the tasks that are canceled
• Running—To show the tasks that are started
• Paused—To show the tasks that are paused
• Paused due To Error—To show the tasks that are paused due to an errorin the system
• Successful—To show the tasks that are successful
• Failed—To show the tasks that failed
Show
Select a status and click Filter to set a search rule at the bottom of the searchwindow.
Filter
Check the check box next to the task and click the Delete button at the top ofthe table. You can also click Delete under the Actions column for the task youwish to delete.
Delete
Opens the Add Readdress Task wizard.
You can also open the Add Readdress Task wizard by selecting Editin the Actions column for a particular readress task.
Note
AddReaddress Task button
Add Readdress Task window
For information about how to Add a Readdress Task, see “Create a Readdress Task”.
Cisco Prime Collaboration Deployment Administration Guide, Release 11.5(2)96
Cisco Prime Collaboration Deployment Administrative Interface ElementsReaddress View
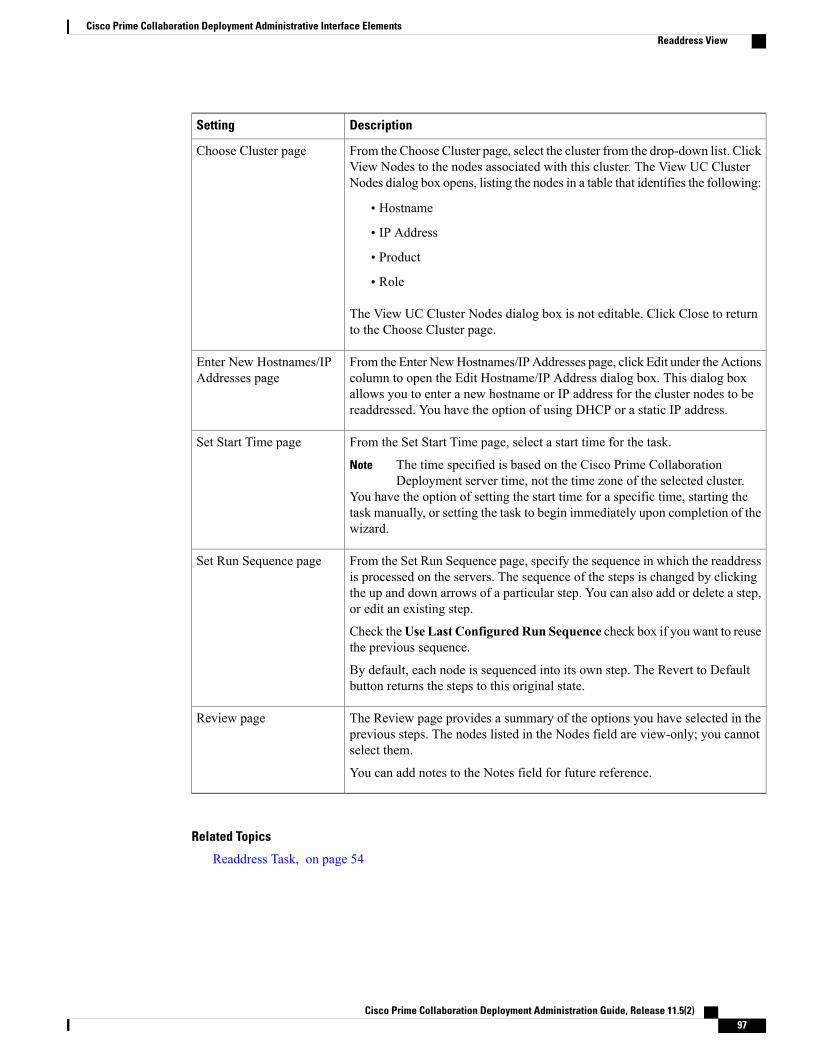
DescriptionSetting
From the Choose Cluster page, select the cluster from the drop-down list. ClickView Nodes to the nodes associated with this cluster. The View UC ClusterNodes dialog box opens, listing the nodes in a table that identifies the following:
• Hostname
• IP Address
• Product
• Role
The View UC Cluster Nodes dialog box is not editable. Click Close to returnto the Choose Cluster page.
Choose Cluster page
From the Enter NewHostnames/IPAddresses page, click Edit under the Actionscolumn to open the Edit Hostname/IP Address dialog box. This dialog boxallows you to enter a new hostname or IP address for the cluster nodes to bereaddressed. You have the option of using DHCP or a static IP address.
Enter New Hostnames/IPAddresses page
From the Set Start Time page, select a start time for the task.
The time specified is based on the Cisco Prime CollaborationDeployment server time, not the time zone of the selected cluster.
Note
You have the option of setting the start time for a specific time, starting thetask manually, or setting the task to begin immediately upon completion of thewizard.
Set Start Time page
From the Set Run Sequence page, specify the sequence in which the readdressis processed on the servers. The sequence of the steps is changed by clickingthe up and down arrows of a particular step. You can also add or delete a step,or edit an existing step.
Check theUse Last Configured Run Sequence check box if you want to reusethe previous sequence.
By default, each node is sequenced into its own step. The Revert to Defaultbutton returns the steps to this original state.
Set Run Sequence page
The Review page provides a summary of the options you have selected in theprevious steps. The nodes listed in the Nodes field are view-only; you cannotselect them.
You can add notes to the Notes field for future reference.
Review page
Related Topics
Readdress Task, on page 54
Cisco Prime Collaboration Deployment Administration Guide, Release 11.5(2) 97
Cisco Prime Collaboration Deployment Administrative Interface ElementsReaddress View
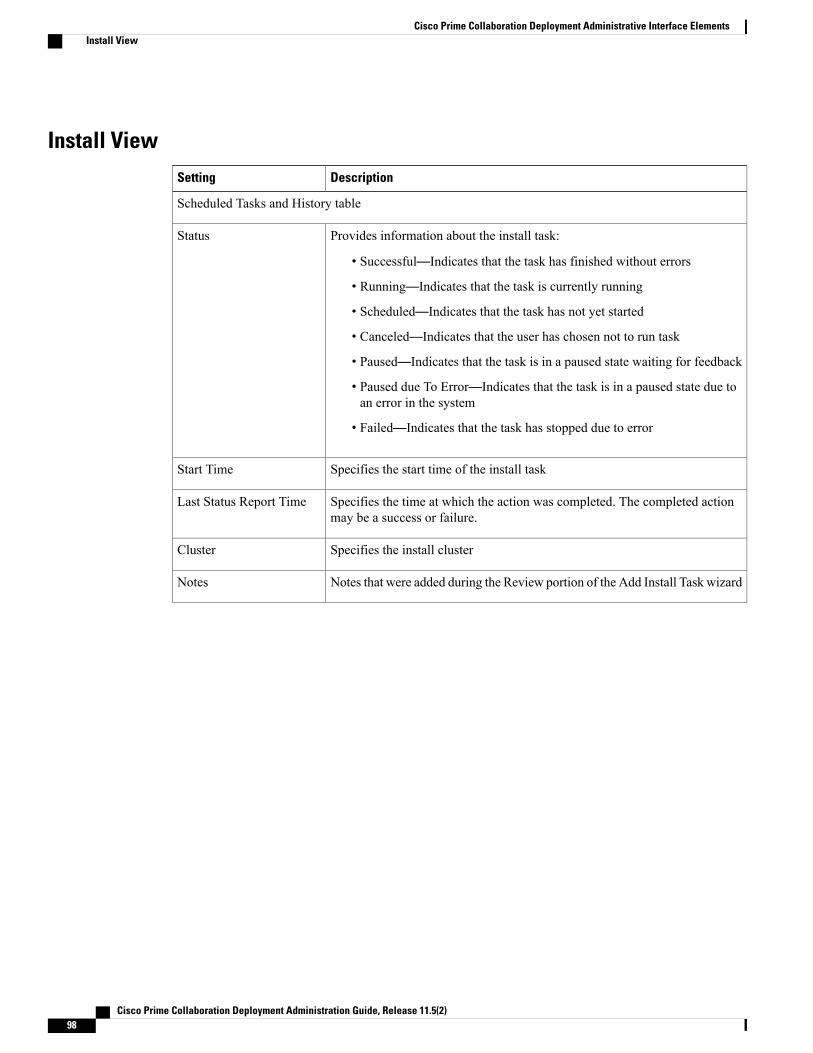
Install ViewDescriptionSetting
Scheduled Tasks and History table
Provides information about the install task:
• Successful—Indicates that the task has finished without errors
• Running—Indicates that the task is currently running
• Scheduled—Indicates that the task has not yet started
• Canceled—Indicates that the user has chosen not to run task
• Paused—Indicates that the task is in a paused state waiting for feedback
• Paused due To Error—Indicates that the task is in a paused state due toan error in the system
• Failed—Indicates that the task has stopped due to error
Status
Specifies the start time of the install taskStart Time
Specifies the time at which the action was completed. The completed actionmay be a success or failure.
Last Status Report Time
Specifies the install clusterCluster
Notes that were added during the Review portion of the Add Install Task wizardNotes
Cisco Prime Collaboration Deployment Administration Guide, Release 11.5(2)98
Cisco Prime Collaboration Deployment Administrative Interface ElementsInstall View

DescriptionSetting
Actions
Cisco Prime Collaboration Deployment Administration Guide, Release 11.5(2) 99
Cisco Prime Collaboration Deployment Administrative Interface ElementsInstall View
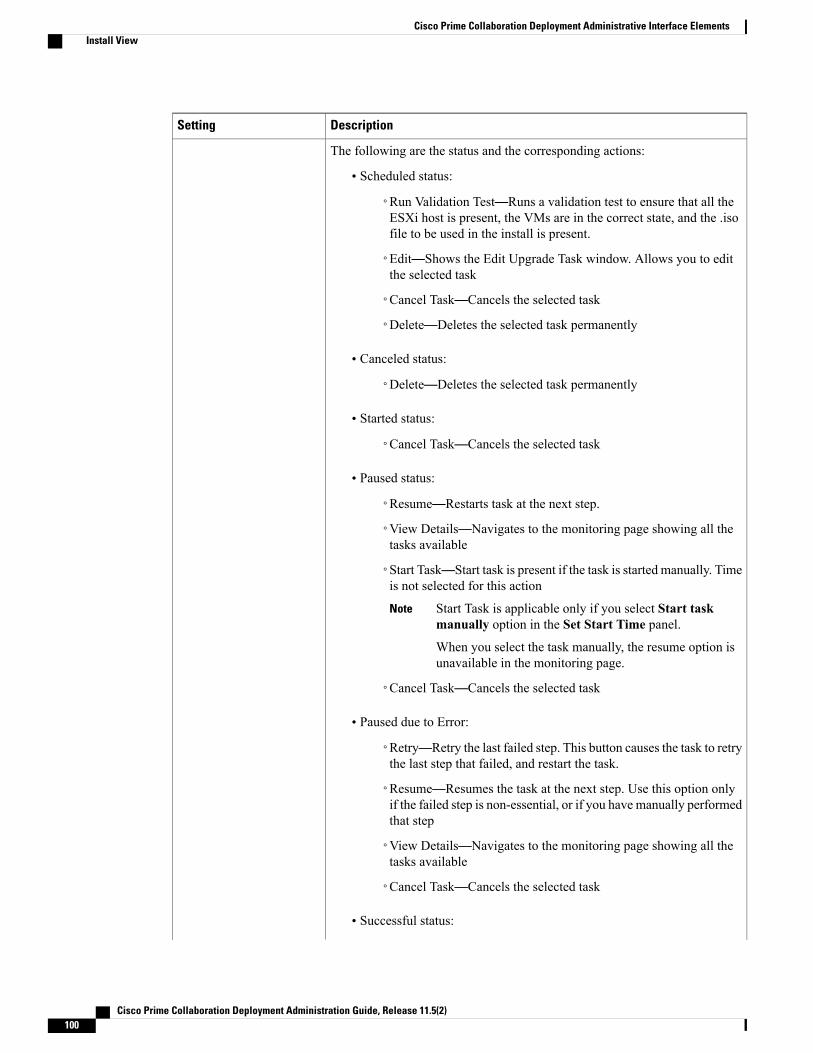
DescriptionSetting
The following are the status and the corresponding actions:
• Scheduled status:
◦Run Validation Test—Runs a validation test to ensure that all theESXi host is present, the VMs are in the correct state, and the .isofile to be used in the install is present.
◦Edit—Shows the Edit Upgrade Task window. Allows you to editthe selected task
◦Cancel Task—Cancels the selected task
◦Delete—Deletes the selected task permanently
• Canceled status:
◦Delete—Deletes the selected task permanently
• Started status:
◦Cancel Task—Cancels the selected task
• Paused status:
◦Resume—Restarts task at the next step.
◦View Details—Navigates to the monitoring page showing all thetasks available
◦Start Task—Start task is present if the task is started manually. Timeis not selected for this action
Start Task is applicable only if you select Start taskmanually option in the Set Start Time panel.
Note
When you select the task manually, the resume option isunavailable in the monitoring page.
◦Cancel Task—Cancels the selected task
• Paused due to Error:
◦Retry—Retry the last failed step. This button causes the task to retrythe last step that failed, and restart the task.
◦Resume—Resumes the task at the next step. Use this option onlyif the failed step is non-essential, or if you have manually performedthat step
◦View Details—Navigates to the monitoring page showing all thetasks available
◦Cancel Task—Cancels the selected task
• Successful status:
Cisco Prime Collaboration Deployment Administration Guide, Release 11.5(2)100
Cisco Prime Collaboration Deployment Administrative Interface ElementsInstall View
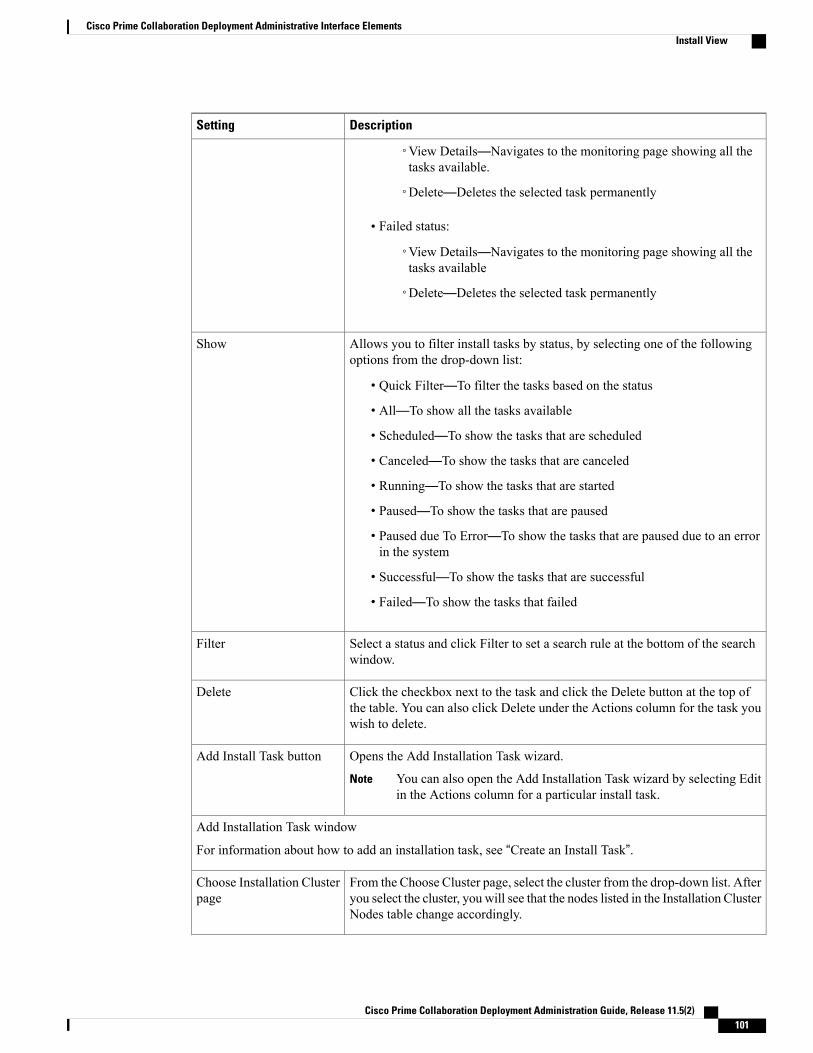
DescriptionSetting
◦View Details—Navigates to the monitoring page showing all thetasks available.
◦Delete—Deletes the selected task permanently
• Failed status:
◦View Details—Navigates to the monitoring page showing all thetasks available
◦Delete—Deletes the selected task permanently
Allows you to filter install tasks by status, by selecting one of the followingoptions from the drop-down list:
• Quick Filter—To filter the tasks based on the status
• All—To show all the tasks available
• Scheduled—To show the tasks that are scheduled
• Canceled—To show the tasks that are canceled
• Running—To show the tasks that are started
• Paused—To show the tasks that are paused
• Paused due To Error—To show the tasks that are paused due to an errorin the system
• Successful—To show the tasks that are successful
• Failed—To show the tasks that failed
Show
Select a status and click Filter to set a search rule at the bottom of the searchwindow.
Filter
Click the checkbox next to the task and click the Delete button at the top ofthe table. You can also click Delete under the Actions column for the task youwish to delete.
Delete
Opens the Add Installation Task wizard.
You can also open the Add Installation Task wizard by selecting Editin the Actions column for a particular install task.
Note
Add Install Task button
Add Installation Task window
For information about how to add an installation task, see “Create an Install Task”.
From the Choose Cluster page, select the cluster from the drop-down list. Afteryou select the cluster, you will see that the nodes listed in the Installation ClusterNodes table change accordingly.
Choose Installation Clusterpage
Cisco Prime Collaboration Deployment Administration Guide, Release 11.5(2) 101
Cisco Prime Collaboration Deployment Administrative Interface ElementsInstall View
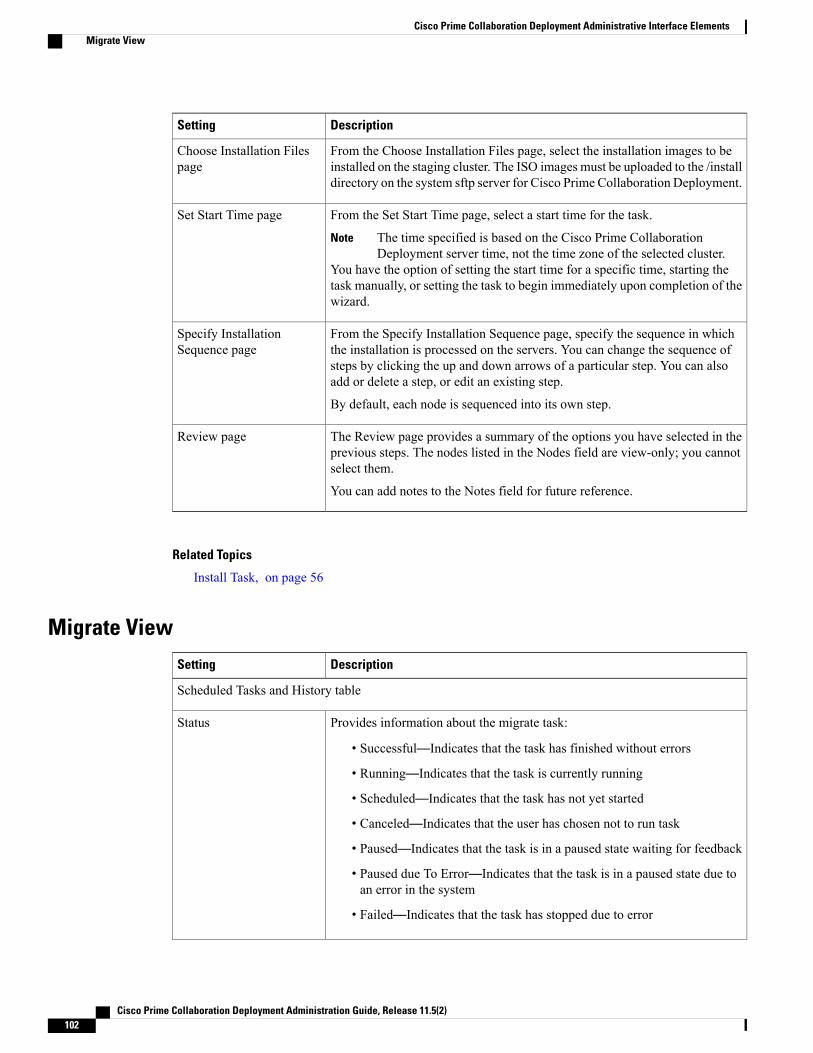
DescriptionSetting
From the Choose Installation Files page, select the installation images to beinstalled on the staging cluster. The ISO images must be uploaded to the /installdirectory on the system sftp server for Cisco Prime Collaboration Deployment.
Choose Installation Filespage
From the Set Start Time page, select a start time for the task.
The time specified is based on the Cisco Prime CollaborationDeployment server time, not the time zone of the selected cluster.
Note
You have the option of setting the start time for a specific time, starting thetask manually, or setting the task to begin immediately upon completion of thewizard.
Set Start Time page
From the Specify Installation Sequence page, specify the sequence in whichthe installation is processed on the servers. You can change the sequence ofsteps by clicking the up and down arrows of a particular step. You can alsoadd or delete a step, or edit an existing step.
By default, each node is sequenced into its own step.
Specify InstallationSequence page
The Review page provides a summary of the options you have selected in theprevious steps. The nodes listed in the Nodes field are view-only; you cannotselect them.
You can add notes to the Notes field for future reference.
Review page
Related Topics
Install Task, on page 56
Migrate ViewDescriptionSetting
Scheduled Tasks and History table
Provides information about the migrate task:
• Successful—Indicates that the task has finished without errors
• Running—Indicates that the task is currently running
• Scheduled—Indicates that the task has not yet started
• Canceled—Indicates that the user has chosen not to run task
• Paused—Indicates that the task is in a paused state waiting for feedback
• Paused due To Error—Indicates that the task is in a paused state due toan error in the system
• Failed—Indicates that the task has stopped due to error
Status
Cisco Prime Collaboration Deployment Administration Guide, Release 11.5(2)102
Cisco Prime Collaboration Deployment Administrative Interface ElementsMigrate View
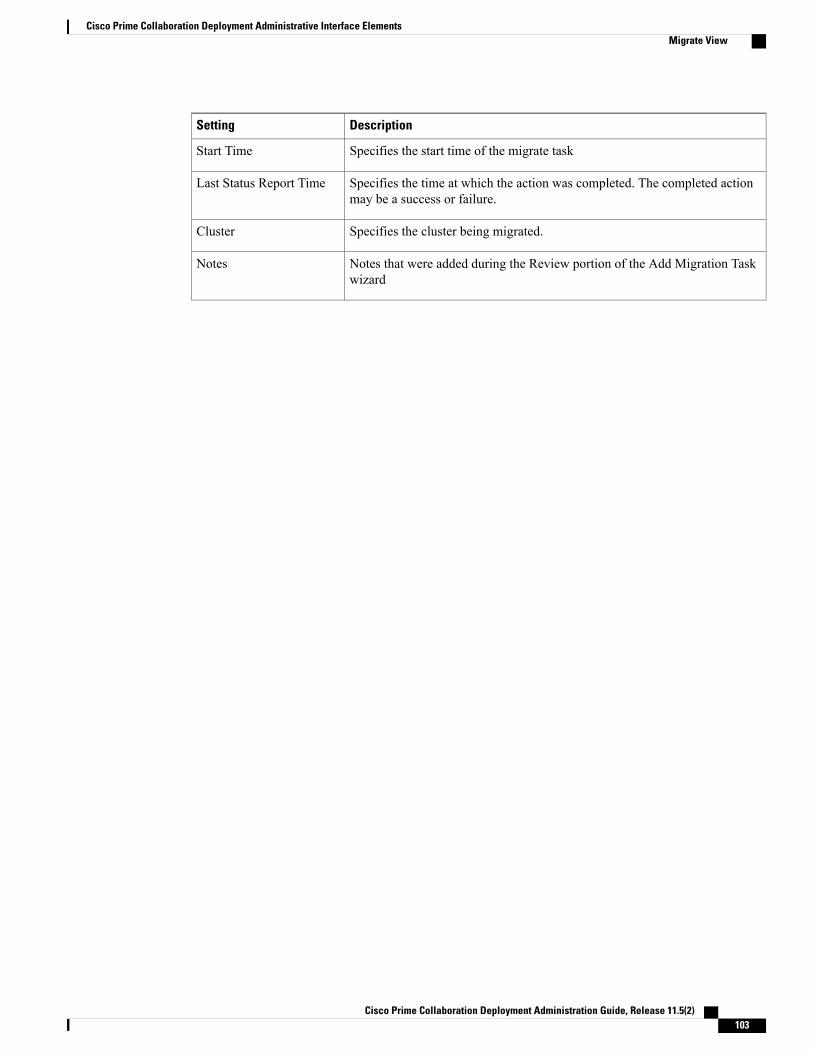
DescriptionSetting
Specifies the start time of the migrate taskStart Time
Specifies the time at which the action was completed. The completed actionmay be a success or failure.
Last Status Report Time
Specifies the cluster being migrated.Cluster
Notes that were added during the Review portion of the Add Migration Taskwizard
Notes
Cisco Prime Collaboration Deployment Administration Guide, Release 11.5(2) 103
Cisco Prime Collaboration Deployment Administrative Interface ElementsMigrate View
DescriptionSetting
Actions
Cisco Prime Collaboration Deployment Administration Guide, Release 11.5(2)104
Cisco Prime Collaboration Deployment Administrative Interface ElementsMigrate View
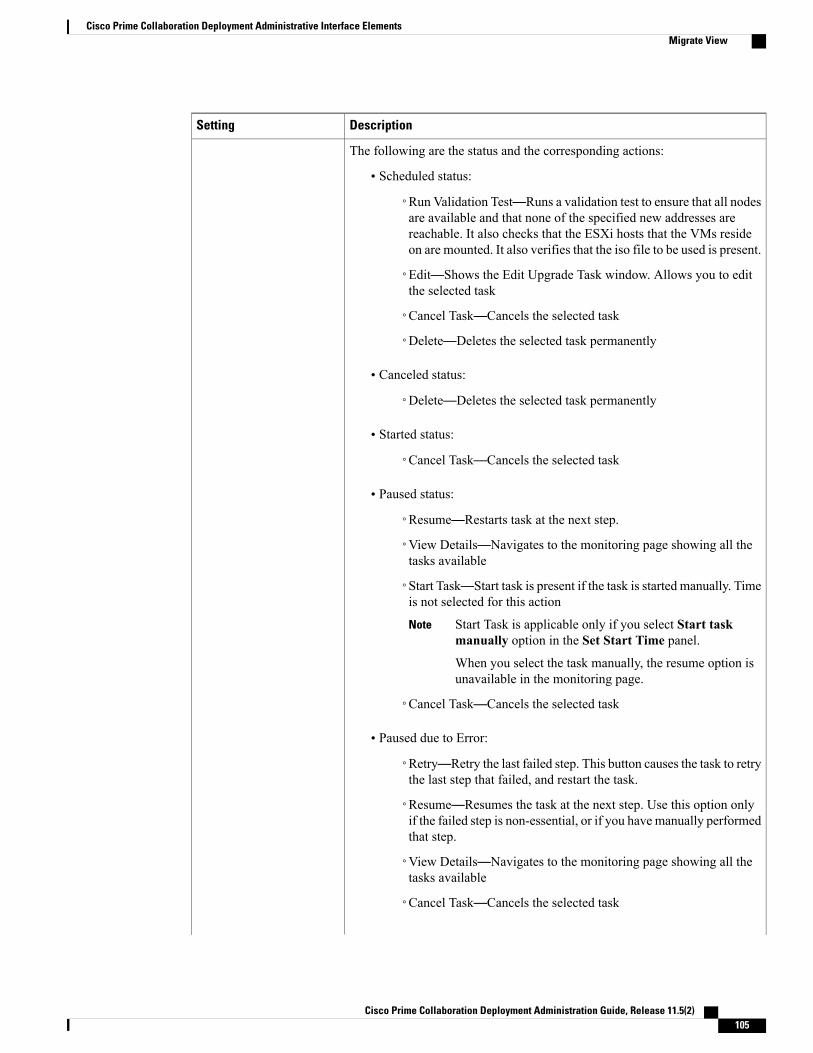
DescriptionSetting
The following are the status and the corresponding actions:
• Scheduled status:
◦Run Validation Test—Runs a validation test to ensure that all nodesare available and that none of the specified new addresses arereachable. It also checks that the ESXi hosts that the VMs resideon are mounted. It also verifies that the iso file to be used is present.
◦Edit—Shows the Edit Upgrade Task window. Allows you to editthe selected task
◦Cancel Task—Cancels the selected task
◦Delete—Deletes the selected task permanently
• Canceled status:
◦Delete—Deletes the selected task permanently
• Started status:
◦Cancel Task—Cancels the selected task
• Paused status:
◦Resume—Restarts task at the next step.
◦View Details—Navigates to the monitoring page showing all thetasks available
◦Start Task—Start task is present if the task is started manually. Timeis not selected for this action
Start Task is applicable only if you select Start taskmanually option in the Set Start Time panel.
Note
When you select the task manually, the resume option isunavailable in the monitoring page.
◦Cancel Task—Cancels the selected task
• Paused due to Error:
◦Retry—Retry the last failed step. This button causes the task to retrythe last step that failed, and restart the task.
◦Resume—Resumes the task at the next step. Use this option onlyif the failed step is non-essential, or if you have manually performedthat step.
◦View Details—Navigates to the monitoring page showing all thetasks available
◦Cancel Task—Cancels the selected task
Cisco Prime Collaboration Deployment Administration Guide, Release 11.5(2) 105
Cisco Prime Collaboration Deployment Administrative Interface ElementsMigrate View
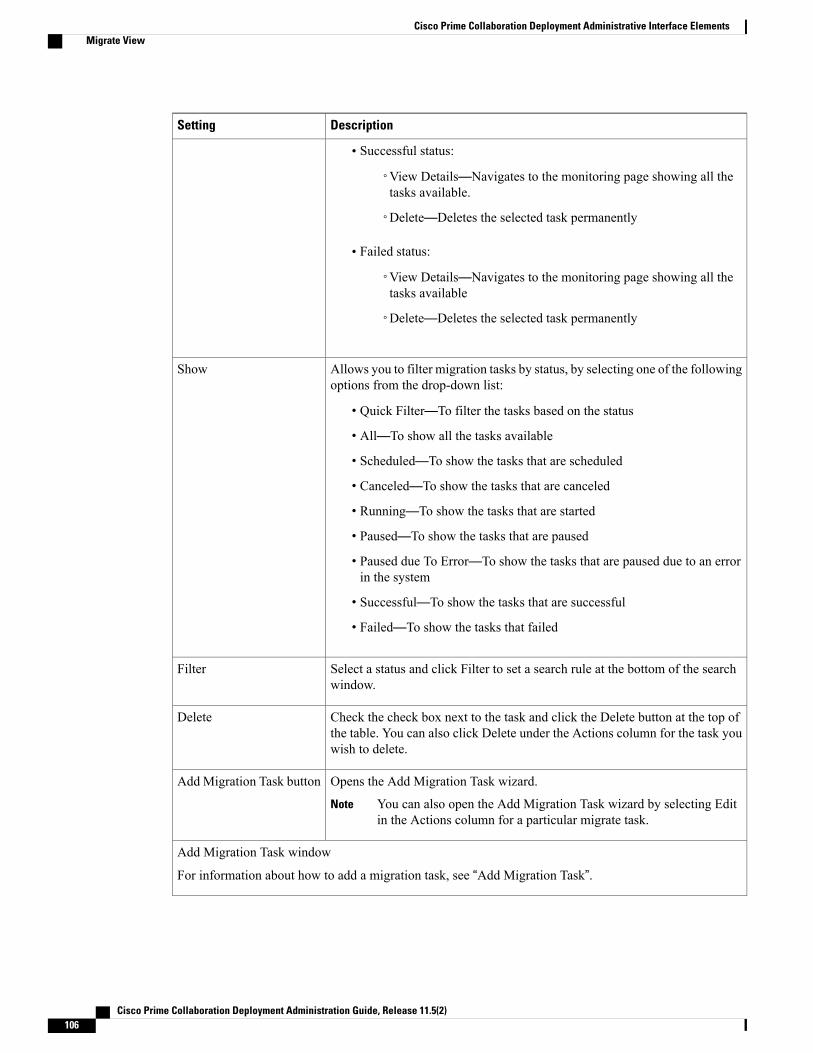
DescriptionSetting
Successful status:•
◦View Details—Navigates to the monitoring page showing all thetasks available.
◦Delete—Deletes the selected task permanently
• Failed status:
◦View Details—Navigates to the monitoring page showing all thetasks available
◦Delete—Deletes the selected task permanently
Allows you to filter migration tasks by status, by selecting one of the followingoptions from the drop-down list:
• Quick Filter—To filter the tasks based on the status
• All—To show all the tasks available
• Scheduled—To show the tasks that are scheduled
• Canceled—To show the tasks that are canceled
• Running—To show the tasks that are started
• Paused—To show the tasks that are paused
• Paused due To Error—To show the tasks that are paused due to an errorin the system
• Successful—To show the tasks that are successful
• Failed—To show the tasks that failed
Show
Select a status and click Filter to set a search rule at the bottom of the searchwindow.
Filter
Check the check box next to the task and click the Delete button at the top ofthe table. You can also click Delete under the Actions column for the task youwish to delete.
Delete
Opens the Add Migration Task wizard.
You can also open the Add Migration Task wizard by selecting Editin the Actions column for a particular migrate task.
Note
AddMigration Task button
Add Migration Task window
For information about how to add a migration task, see “Add Migration Task”.
Cisco Prime Collaboration Deployment Administration Guide, Release 11.5(2)106
Cisco Prime Collaboration Deployment Administrative Interface ElementsMigrate View

DescriptionSetting
From the Choose Source and Destination Clusters page, select the source UCcluster from the drop-down list. After you select the source cluster, you selectthe destination cluster from the drop-down list and the nodes from the NodeMapping from Source to Destination Cluster table.
Choose Source andDestination Clusters page
From the Choose Upgrade File page, select the upgrade file for each productbeing upgraded. You will only have the option of selecting files for the producttype you selected on the Choose Cluster page.
Choose Upgrade Files page
From the Set Start Time page, select a start time for the task.
The time specified is based on the Cisco Prime CollaborationDeployment server time, not the time zone of the selected cluster.
Note
You have the option of setting the start time for a specific time, starting thetask manually, or setting the task to begin immediately upon completion of thewizard.
Set Start Time page
From the Specify Migration Procedure page, specify the sequence in whichthe migration is processed on the servers. You can change the sequence of thestepsby clicking the up and down arrows of a particular step. You can also addor delete a step, or edit an existing step.
By default, each node is sequenced into its own step. The Revert to Defaultbutton returns the steps to this original state.
Specify MigrationProcedure page
The Review page provides a summary of the options you have selected in theprevious steps. The nodes listed in the Nodes field are view-only; you cannotselect them.
You can add notes to the Notes field for future reference.
Review page
Related Topics
Migration Task, on page 35
Inventory View Elements
ClustersDescriptionSetting
Clusters table
Shows the available clustersCluster Name
Shows the product for which the cluster is added along with its versionProduct and Version
Cisco Prime Collaboration Deployment Administration Guide, Release 11.5(2) 107
Cisco Prime Collaboration Deployment Administrative Interface ElementsInventory View Elements
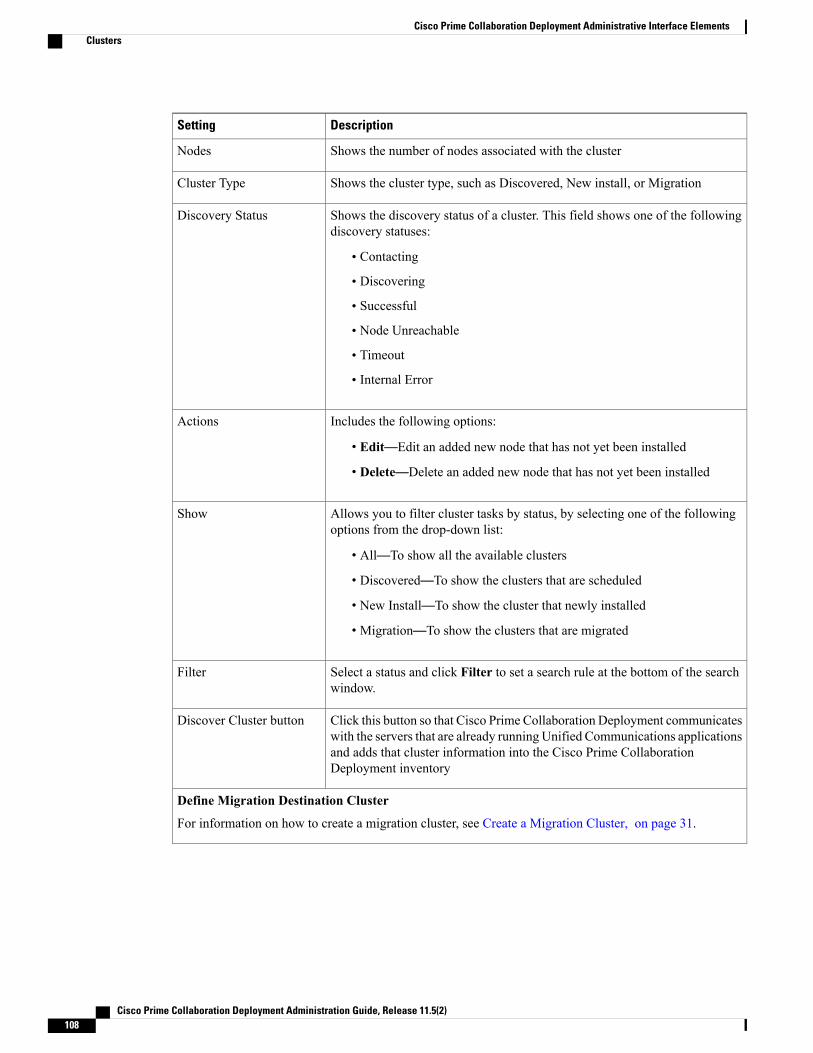
DescriptionSetting
Shows the number of nodes associated with the clusterNodes
Shows the cluster type, such as Discovered, New install, or MigrationCluster Type
Shows the discovery status of a cluster. This field shows one of the followingdiscovery statuses:
• Contacting
• Discovering
• Successful
• Node Unreachable
• Timeout
• Internal Error
Discovery Status
Includes the following options:
• Edit—Edit an added new node that has not yet been installed
• Delete—Delete an added new node that has not yet been installed
Actions
Allows you to filter cluster tasks by status, by selecting one of the followingoptions from the drop-down list:
• All—To show all the available clusters
• Discovered—To show the clusters that are scheduled
• New Install—To show the cluster that newly installed
• Migration—To show the clusters that are migrated
Show
Select a status and click Filter to set a search rule at the bottom of the searchwindow.
Filter
Click this button so that Cisco Prime Collaboration Deployment communicateswith the servers that are already running Unified Communications applicationsand adds that cluster information into the Cisco Prime CollaborationDeployment inventory
Discover Cluster button
Define Migration Destination Cluster
For information on how to create a migration cluster, see Create a Migration Cluster, on page 31.
Cisco Prime Collaboration Deployment Administration Guide, Release 11.5(2)108
Cisco Prime Collaboration Deployment Administrative Interface ElementsClusters
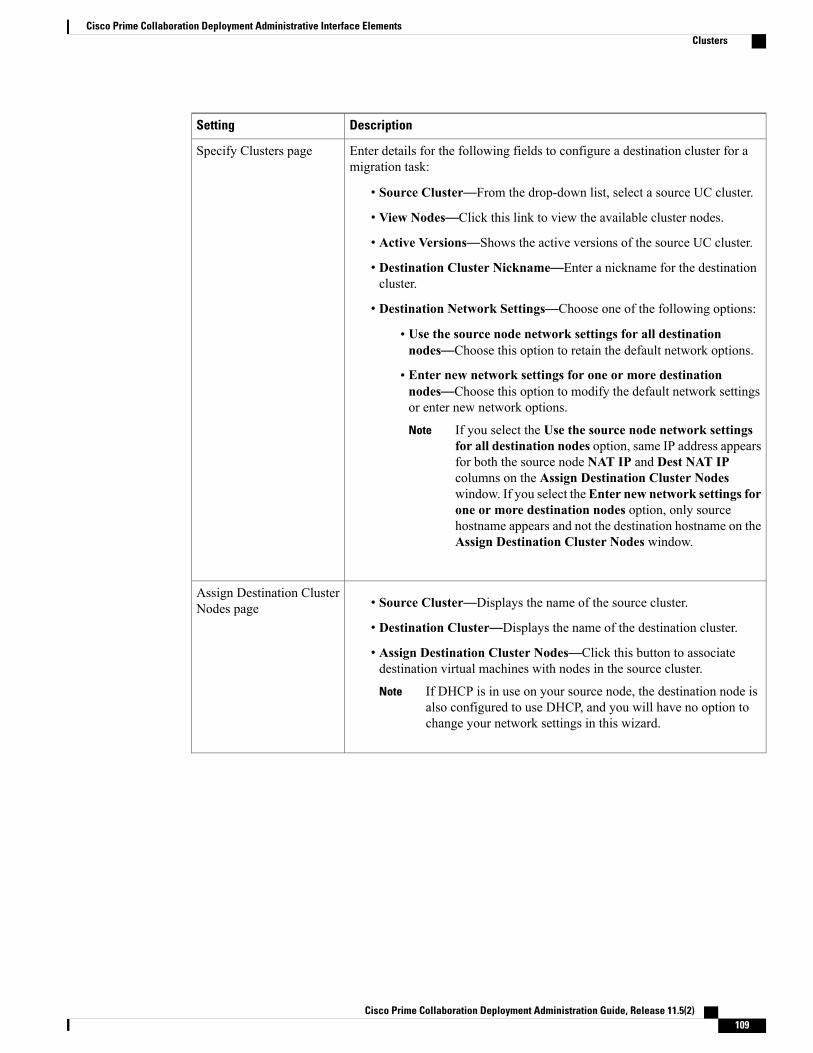
DescriptionSetting
Enter details for the following fields to configure a destination cluster for amigration task:
• Source Cluster—From the drop-down list, select a source UC cluster.
• View Nodes—Click this link to view the available cluster nodes.
• Active Versions—Shows the active versions of the source UC cluster.
• Destination Cluster Nickname—Enter a nickname for the destinationcluster.
• Destination Network Settings—Choose one of the following options:
• Use the source node network settings for all destinationnodes—Choose this option to retain the default network options.
• Enter new network settings for one or more destinationnodes—Choose this option to modify the default network settingsor enter new network options.
If you select the Use the source node network settingsfor all destination nodes option, same IP address appearsfor both the source node NAT IP and Dest NAT IPcolumns on the Assign Destination Cluster Nodeswindow. If you select theEnter new network settings forone or more destination nodes option, only sourcehostname appears and not the destination hostname on theAssign Destination Cluster Nodes window.
Note
Specify Clusters page
• Source Cluster—Displays the name of the source cluster.
• Destination Cluster—Displays the name of the destination cluster.
• Assign Destination Cluster Nodes—Click this button to associatedestination virtual machines with nodes in the source cluster.
If DHCP is in use on your source node, the destination node isalso configured to use DHCP, and you will have no option tochange your network settings in this wizard.
Note
Assign Destination ClusterNodes page
Cisco Prime Collaboration Deployment Administration Guide, Release 11.5(2) 109
Cisco Prime Collaboration Deployment Administrative Interface ElementsClusters

DescriptionSetting
Enter details for the following sections to configure NTP and SMTP to themigration nodes when the migration task is run:
Network Time Protocol (NTP) Configurationwindow—Enter IP address ofat least one of the following fields:
• NTP Server 1
• NTP Server 2
• NTP Server 3
• NTP Server 4
• NTP Server 5
(Optional) Simple Mail Transfer Protocol (SMTP) Configuration window
• SMTP Server—Enter IP address of the SMTP server.
Configure NTP/SMTPSettings
(Optional) From the available hosts added along with the functions, check anode to configure DNS setting for the migration cluster nodes and clickAssignDNS Settings
Define DNS Settings
Discover Cluster window
For information on how to Discover a Cluster, see Discover a Cluster, on page 28.
Enter details in the following fields:
• Choose a Nickname for this Cluster—Enter a nick name for the cluster.
• Hostname/IPAddress of Cluster Publisher—Enter either the host nameor the IP address for the publisher node of the cluster.
• OS Admin Username—Enter the OS administrator user name.
• OS Admin Password—Enter the password for the OS administrator.
• Enable NAT—Check this check box to enable NAT for the cluster.
When you check the Enable NAT check box, the NAT IPcolumn appears on the Cluster Discovery Progress page.
Note
Cluster Access page
Cisco Prime Collaboration Deployment Administration Guide, Release 11.5(2)110
Cisco Prime Collaboration Deployment Administrative Interface ElementsClusters
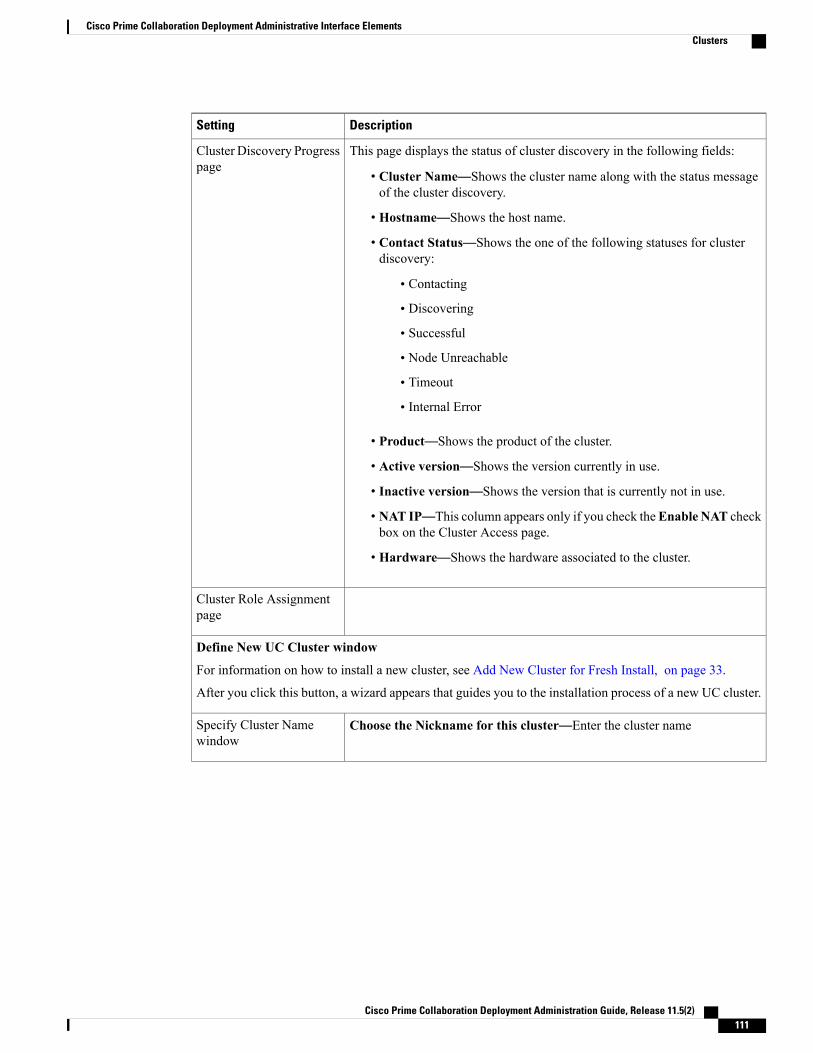
DescriptionSetting
This page displays the status of cluster discovery in the following fields:
• Cluster Name—Shows the cluster name along with the status messageof the cluster discovery.
• Hostname—Shows the host name.
• Contact Status—Shows the one of the following statuses for clusterdiscovery:
• Contacting
• Discovering
• Successful
• Node Unreachable
• Timeout
• Internal Error
• Product—Shows the product of the cluster.
• Active version—Shows the version currently in use.
• Inactive version—Shows the version that is currently not in use.
• NAT IP—This column appears only if you check theEnable NAT checkbox on the Cluster Access page.
• Hardware—Shows the hardware associated to the cluster.
Cluster Discovery Progresspage
Cluster Role Assignmentpage
Define New UC Cluster window
For information on how to install a new cluster, see Add New Cluster for Fresh Install, on page 33.
After you click this button, a wizard appears that guides you to the installation process of a new UC cluster.
Choose the Nickname for this cluster—Enter the cluster nameSpecify Cluster Namewindow
Cisco Prime Collaboration Deployment Administration Guide, Release 11.5(2) 111
Cisco Prime Collaboration Deployment Administrative Interface ElementsClusters
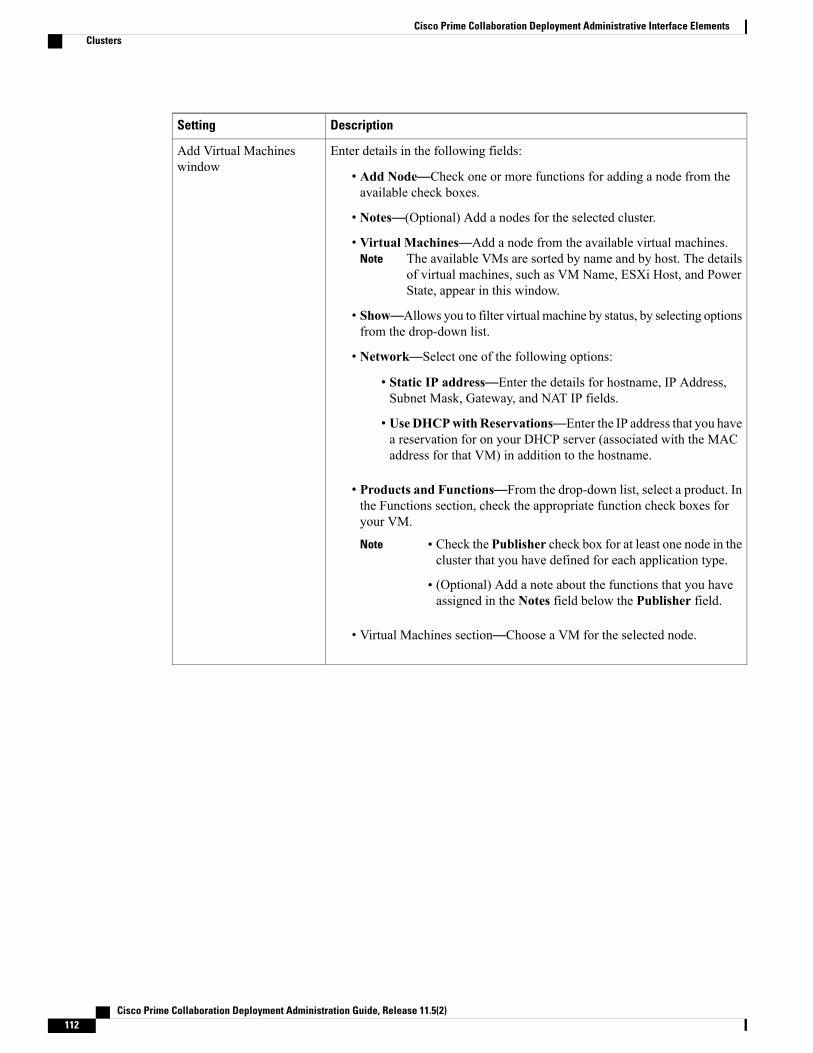
DescriptionSetting
Enter details in the following fields:
• Add Node—Check one or more functions for adding a node from theavailable check boxes.
• Notes—(Optional) Add a nodes for the selected cluster.
• Virtual Machines—Add a node from the available virtual machines.The available VMs are sorted by name and by host. The detailsof virtual machines, such as VM Name, ESXi Host, and PowerState, appear in this window.
Note
• Show—Allows you to filter virtual machine by status, by selecting optionsfrom the drop-down list.
• Network—Select one of the following options:
• Static IP address—Enter the details for hostname, IP Address,Subnet Mask, Gateway, and NAT IP fields.
• UseDHCPwithReservations—Enter the IP address that you havea reservation for on your DHCP server (associated with the MACaddress for that VM) in addition to the hostname.
• Products and Functions—From the drop-down list, select a product. Inthe Functions section, check the appropriate function check boxes foryour VM.
Note • Check the Publisher check box for at least one node in thecluster that you have defined for each application type.
• (Optional) Add a note about the functions that you haveassigned in the Notes field below the Publisher field.
• Virtual Machines section—Choose a VM for the selected node.
Add Virtual Machineswindow
Cisco Prime Collaboration Deployment Administration Guide, Release 11.5(2)112
Cisco Prime Collaboration Deployment Administrative Interface ElementsClusters
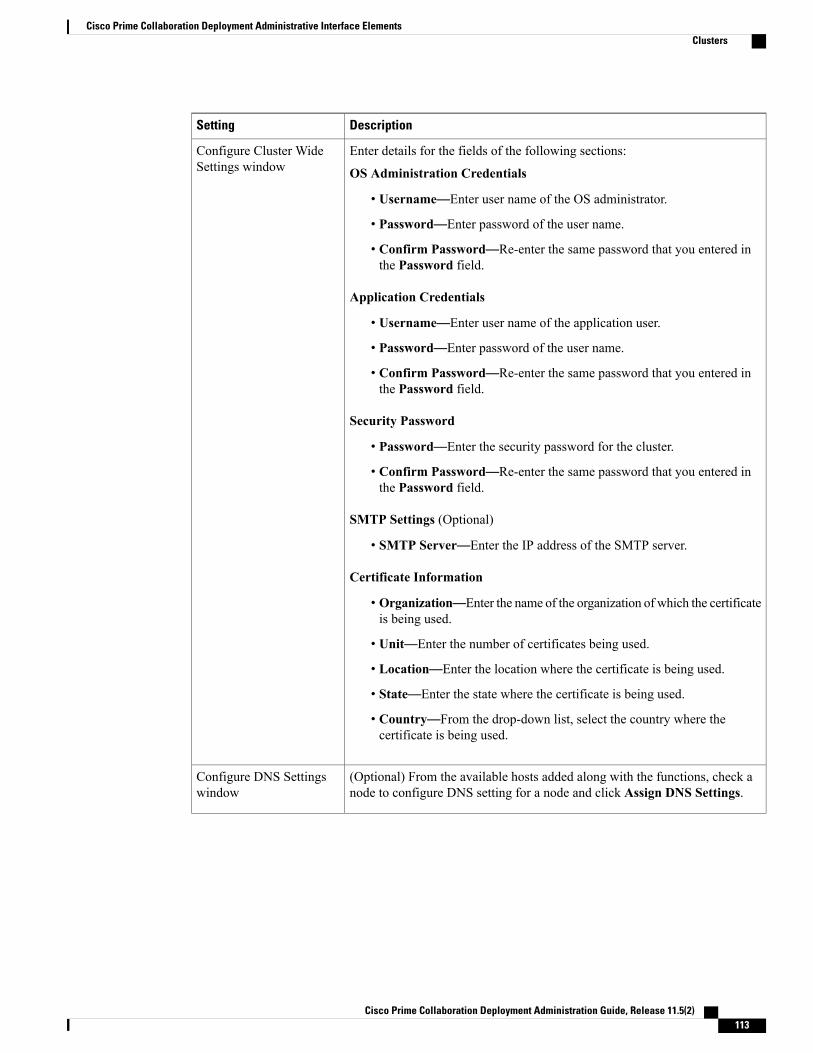
DescriptionSetting
Enter details for the fields of the following sections:
OS Administration Credentials
• Username—Enter user name of the OS administrator.
• Password—Enter password of the user name.
• Confirm Password—Re-enter the same password that you entered inthe Password field.
Application Credentials
• Username—Enter user name of the application user.
• Password—Enter password of the user name.
• Confirm Password—Re-enter the same password that you entered inthe Password field.
Security Password
• Password—Enter the security password for the cluster.
• Confirm Password—Re-enter the same password that you entered inthe Password field.
SMTP Settings (Optional)
• SMTP Server—Enter the IP address of the SMTP server.
Certificate Information
• Organization—Enter the name of the organization of which the certificateis being used.
• Unit—Enter the number of certificates being used.
• Location—Enter the location where the certificate is being used.
• State—Enter the state where the certificate is being used.
• Country—From the drop-down list, select the country where thecertificate is being used.
Configure Cluster WideSettings window
(Optional) From the available hosts added along with the functions, check anode to configure DNS setting for a node and click Assign DNS Settings.
Configure DNS Settingswindow
Cisco Prime Collaboration Deployment Administration Guide, Release 11.5(2) 113
Cisco Prime Collaboration Deployment Administrative Interface ElementsClusters
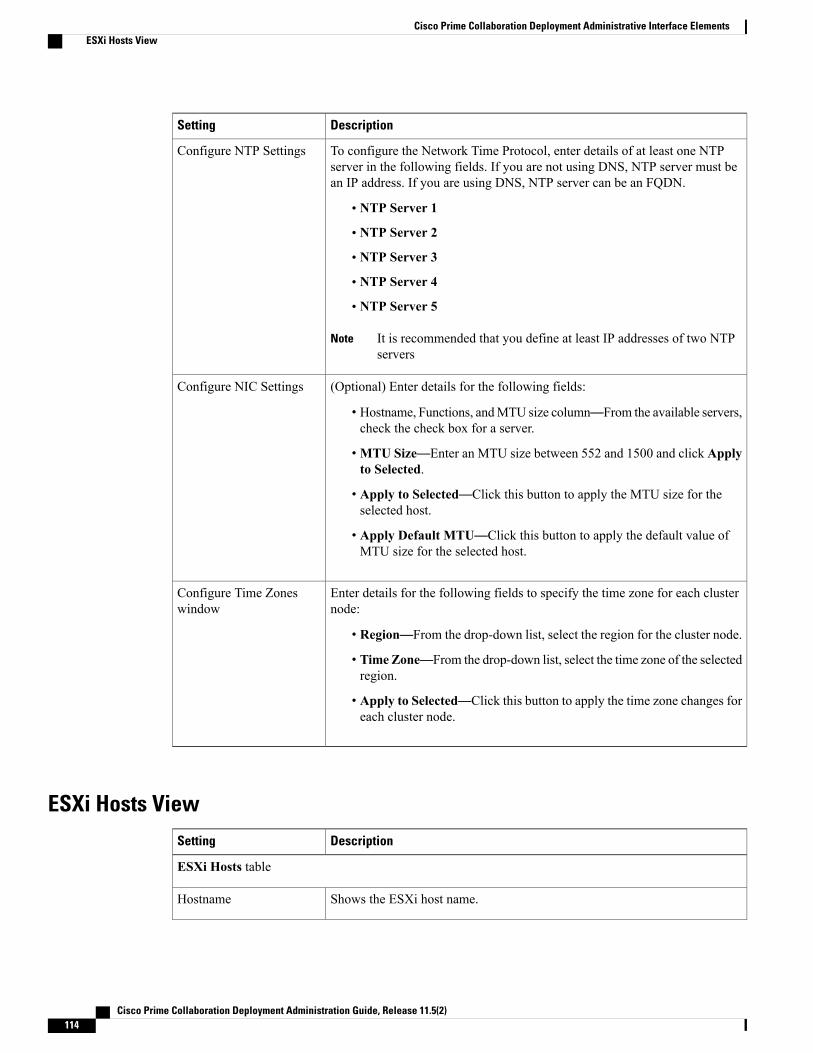
DescriptionSetting
To configure the Network Time Protocol, enter details of at least one NTPserver in the following fields. If you are not using DNS, NTP server must bean IP address. If you are using DNS, NTP server can be an FQDN.
• NTP Server 1
• NTP Server 2
• NTP Server 3
• NTP Server 4
• NTP Server 5
It is recommended that you define at least IP addresses of two NTPservers
Note
Configure NTP Settings
(Optional) Enter details for the following fields:
• Hostname, Functions, andMTU size column—From the available servers,check the check box for a server.
•MTU Size—Enter an MTU size between 552 and 1500 and click Applyto Selected.
• Apply to Selected—Click this button to apply the MTU size for theselected host.
• Apply Default MTU—Click this button to apply the default value ofMTU size for the selected host.
Configure NIC Settings
Enter details for the following fields to specify the time zone for each clusternode:
• Region—From the drop-down list, select the region for the cluster node.
• Time Zone—From the drop-down list, select the time zone of the selectedregion.
• Apply to Selected—Click this button to apply the time zone changes foreach cluster node.
Configure Time Zoneswindow
ESXi Hosts ViewDescriptionSetting
ESXi Hosts table
Shows the ESXi host name.Hostname
Cisco Prime Collaboration Deployment Administration Guide, Release 11.5(2)114
Cisco Prime Collaboration Deployment Administrative Interface ElementsESXi Hosts View
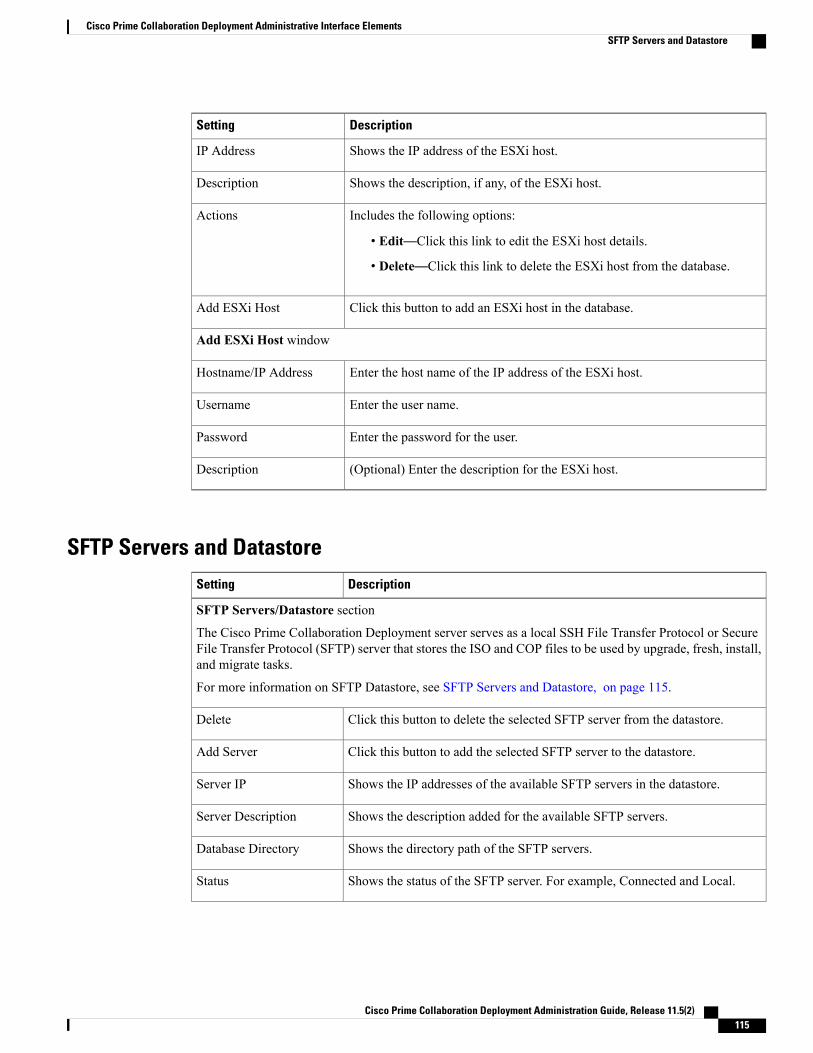
DescriptionSetting
Shows the IP address of the ESXi host.IP Address
Shows the description, if any, of the ESXi host.Description
Includes the following options:
• Edit—Click this link to edit the ESXi host details.
• Delete—Click this link to delete the ESXi host from the database.
Actions
Click this button to add an ESXi host in the database.Add ESXi Host
Add ESXi Host window
Enter the host name of the IP address of the ESXi host.Hostname/IP Address
Enter the user name.Username
Enter the password for the user.Password
(Optional) Enter the description for the ESXi host.Description
SFTP Servers and DatastoreDescriptionSetting
SFTP Servers/Datastore section
The Cisco Prime Collaboration Deployment server serves as a local SSH File Transfer Protocol or SecureFile Transfer Protocol (SFTP) server that stores the ISO and COP files to be used by upgrade, fresh, install,and migrate tasks.
For more information on SFTP Datastore, see SFTP Servers and Datastore, on page 115.
Click this button to delete the selected SFTP server from the datastore.Delete
Click this button to add the selected SFTP server to the datastore.Add Server
Shows the IP addresses of the available SFTP servers in the datastore.Server IP
Shows the description added for the available SFTP servers.Server Description
Shows the directory path of the SFTP servers.Database Directory
Shows the status of the SFTP server. For example, Connected and Local.Status
Cisco Prime Collaboration Deployment Administration Guide, Release 11.5(2) 115
Cisco Prime Collaboration Deployment Administrative Interface ElementsSFTP Servers and Datastore
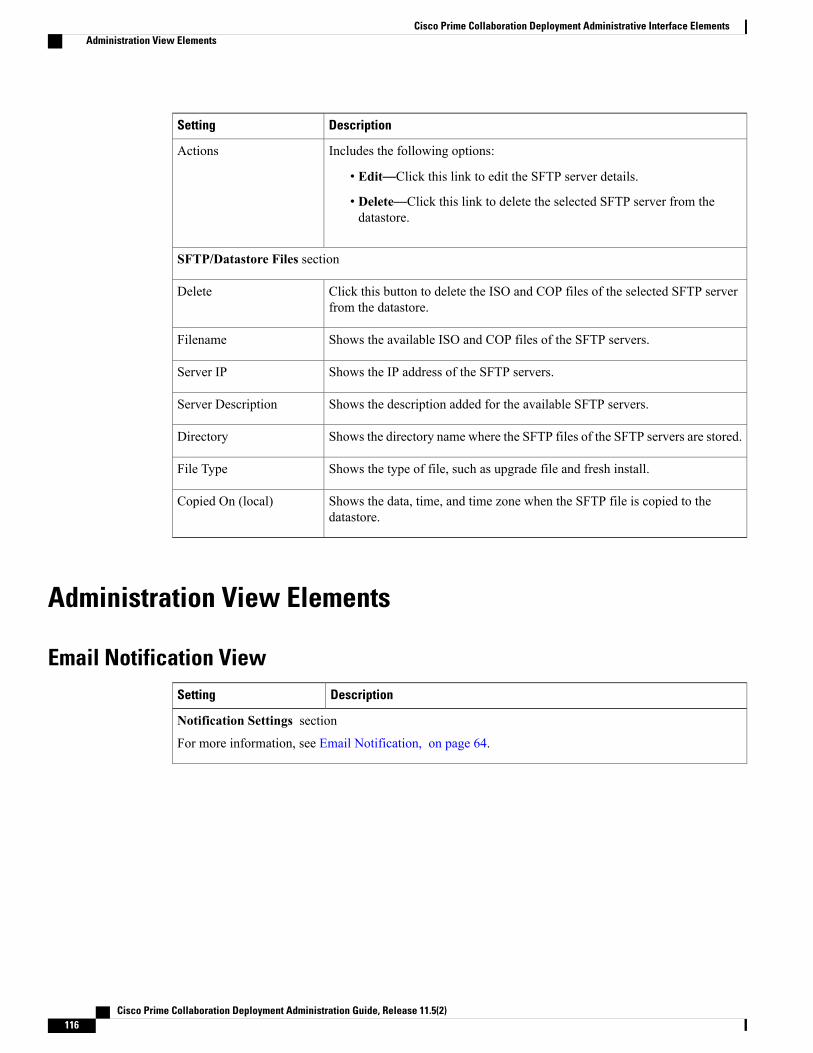
DescriptionSetting
Includes the following options:
• Edit—Click this link to edit the SFTP server details.
• Delete—Click this link to delete the selected SFTP server from thedatastore.
Actions
SFTP/Datastore Files section
Click this button to delete the ISO and COP files of the selected SFTP serverfrom the datastore.
Delete
Shows the available ISO and COP files of the SFTP servers.Filename
Shows the IP address of the SFTP servers.Server IP
Shows the description added for the available SFTP servers.Server Description
Shows the directory name where the SFTP files of the SFTP servers are stored.Directory
Shows the type of file, such as upgrade file and fresh install.File Type
Shows the data, time, and time zone when the SFTP file is copied to thedatastore.
Copied On (local)
Administration View Elements
Email Notification ViewDescriptionSetting
Notification Settings section
For more information, see Email Notification, on page 64.
Cisco Prime Collaboration Deployment Administration Guide, Release 11.5(2)116
Cisco Prime Collaboration Deployment Administrative Interface ElementsAdministration View Elements
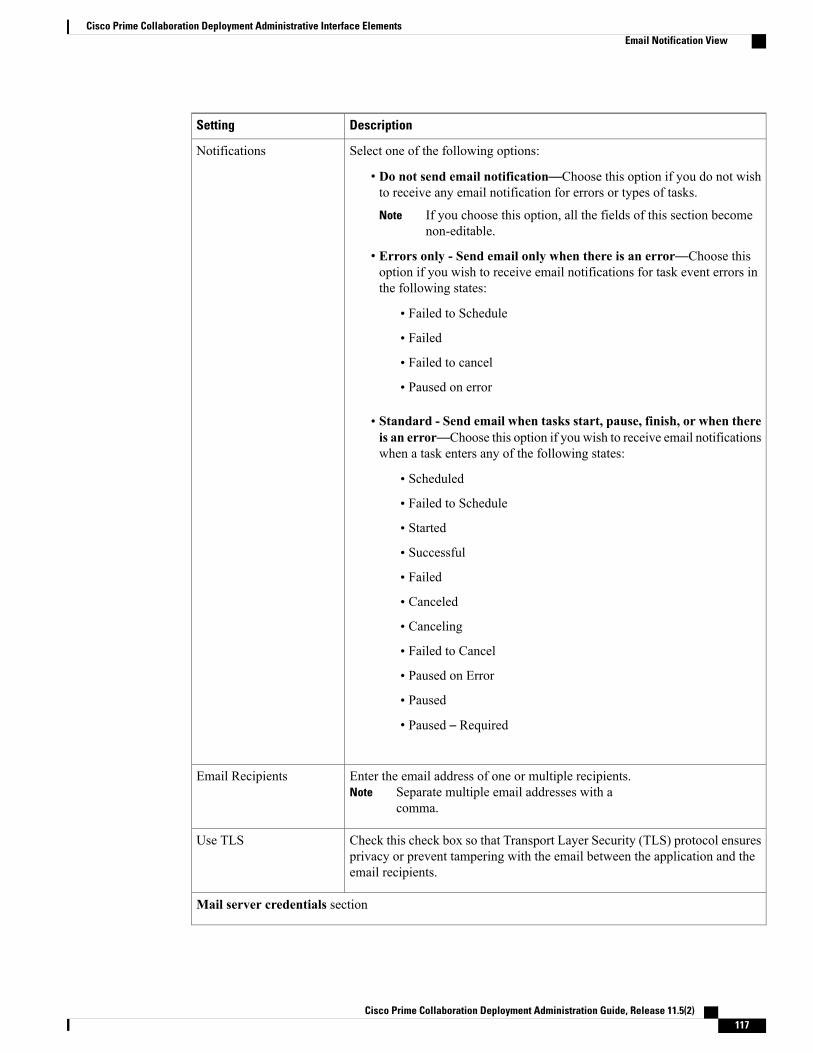
DescriptionSetting
Select one of the following options:
• Do not send email notification—Choose this option if you do not wishto receive any email notification for errors or types of tasks.
If you choose this option, all the fields of this section becomenon-editable.
Note
• Errors only - Send email only when there is an error—Choose thisoption if you wish to receive email notifications for task event errors inthe following states:
• Failed to Schedule
• Failed
• Failed to cancel
• Paused on error
• Standard - Send email when tasks start, pause, finish, or when thereis an error—Choose this option if you wish to receive email notificationswhen a task enters any of the following states:
• Scheduled
• Failed to Schedule
• Started
• Successful
• Failed
• Canceled
• Canceling
• Failed to Cancel
• Paused on Error
• Paused
• Paused – Required
Notifications
Enter the email address of one or multiple recipients.Separate multiple email addresses with acomma.
NoteEmail Recipients
Check this check box so that Transport Layer Security (TLS) protocol ensuresprivacy or prevent tampering with the email between the application and theemail recipients.
Use TLS
Mail server credentials section
Cisco Prime Collaboration Deployment Administration Guide, Release 11.5(2) 117
Cisco Prime Collaboration Deployment Administrative Interface ElementsEmail Notification View
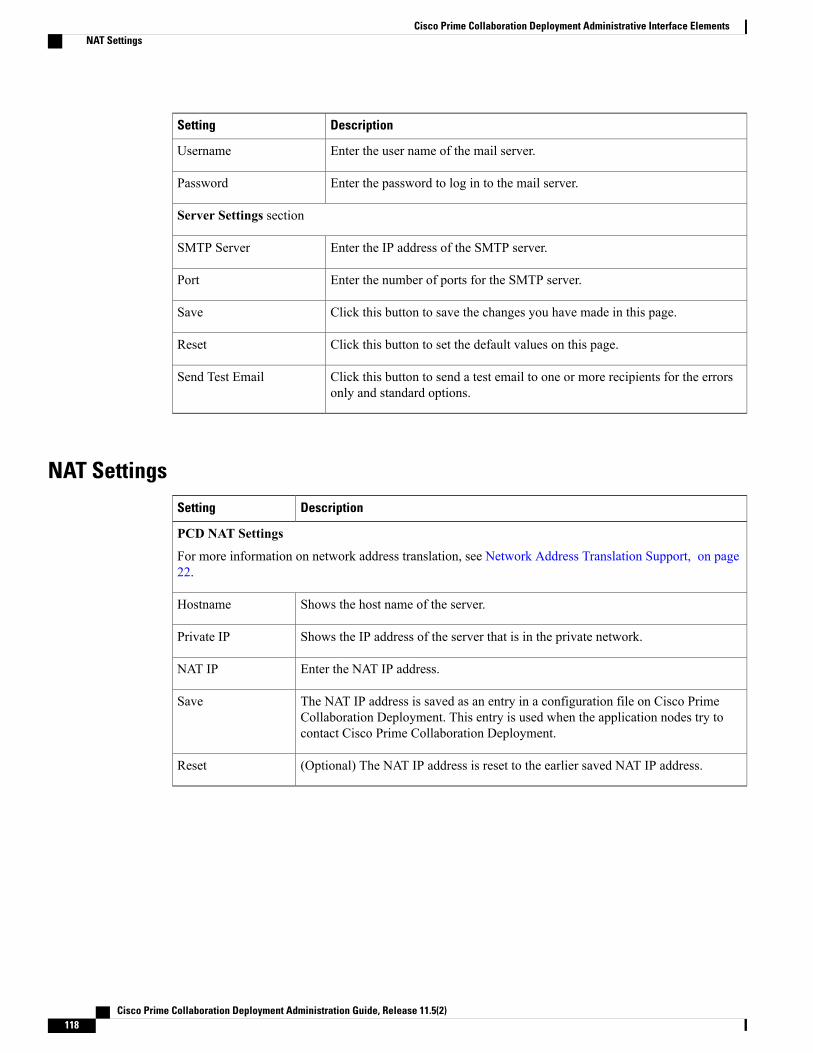
DescriptionSetting
Enter the user name of the mail server.Username
Enter the password to log in to the mail server.Password
Server Settings section
Enter the IP address of the SMTP server.SMTP Server
Enter the number of ports for the SMTP server.Port
Click this button to save the changes you have made in this page.Save
Click this button to set the default values on this page.Reset
Click this button to send a test email to one or more recipients for the errorsonly and standard options.
Send Test Email
NAT SettingsDescriptionSetting
PCD NAT Settings
For more information on network address translation, see Network Address Translation Support, on page22.
Shows the host name of the server.Hostname
Shows the IP address of the server that is in the private network.Private IP
Enter the NAT IP address.NAT IP
The NAT IP address is saved as an entry in a configuration file on Cisco PrimeCollaboration Deployment. This entry is used when the application nodes try tocontact Cisco Prime Collaboration Deployment.
Save
(Optional) The NAT IP address is reset to the earlier saved NAT IP address.Reset
Cisco Prime Collaboration Deployment Administration Guide, Release 11.5(2)118
Cisco Prime Collaboration Deployment Administrative Interface ElementsNAT Settings
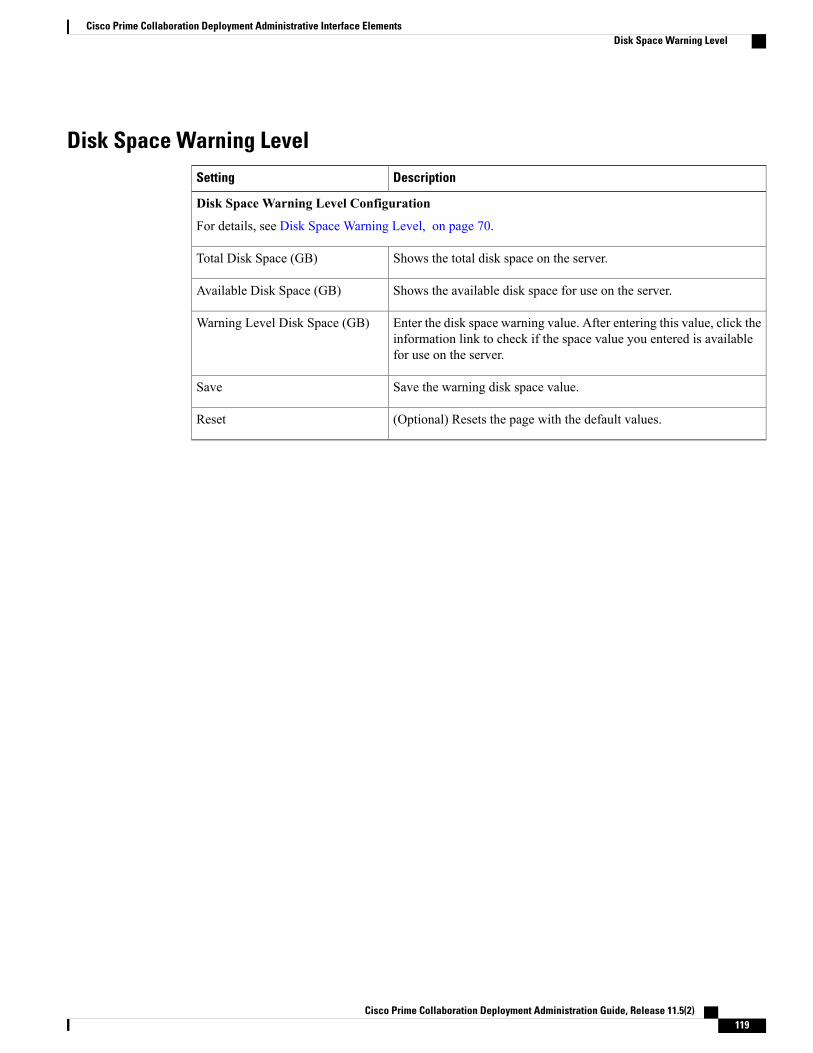
Disk Space Warning LevelDescriptionSetting
Disk Space Warning Level Configuration
For details, see Disk Space Warning Level, on page 70.
Shows the total disk space on the server.Total Disk Space (GB)
Shows the available disk space for use on the server.Available Disk Space (GB)
Enter the disk space warning value. After entering this value, click theinformation link to check if the space value you entered is availablefor use on the server.
Warning Level Disk Space (GB)
Save the warning disk space value.Save
(Optional) Resets the page with the default values.Reset
Cisco Prime Collaboration Deployment Administration Guide, Release 11.5(2) 119
Cisco Prime Collaboration Deployment Administrative Interface ElementsDisk Space Warning Level

Cisco Prime Collaboration Deployment Administration Guide, Release 11.5(2)120
Cisco Prime Collaboration Deployment Administrative Interface ElementsDisk Space Warning Level
C H A P T E R 6Cisco Prime Collaboration DeploymentConfiguration and Administration
• Services, page 121
• Limitations and Restrictions, page 125
ServicesAfter the installation of the Cisco Prime Collaboration Deployment platform, most services start automatically.You can configure services by setting service parameters for each service. If necessary, for example, fortroubleshooting purposes, you may need to stop, start, or restart a service. You can perform these tasks byusing the CLI on the Cisco Prime Collaboration Deployment platform.
Cisco Prime Collaboration Deployment Service
This service supports the Cisco Prime Collaboration Deployment application interface. This service must beactive for the Cisco Prime Collaboration Deployment application to work correctly. It is active by default.
Performance and Monitoring Services
Cisco Log Partition Monitoring Tool
The Cisco Log Partition Monitoring Tool service supports the Log Partition Monitoring feature, whichmonitors the disk usage of the log partition on the Cisco Prime Collaboration Deployment platform byusing configured thresholds and a polling interval.
Cisco RIS Data Collector
The Real-Time Information Server (RIS) maintains real-time information, such as critical alarmsgenerated.
Cisco AMC Service
The Alert Manager and Collector (AMC) service allows you to retrieve real-time information that existson the server.
Cisco Prime Collaboration Deployment Administration Guide, Release 11.5(2) 121
Cisco Audit Event Service
The Cisco Audit Event Service monitors and logs any configuration change to the Cisco PrimeCollaboration Deployment platform by a user or as a result of the user action.
SOAP-Log Collection APIs Service
The Cisco SOAP-Log Collection APIs service allows you to collect log files and to schedule collectionof log files on a remote SFTP server. Examples of log files that you can collect include syslog, coredump files, Cisco application trace files.
SOAP-Performance Monitoring APIs Service
The Cisco SOAP-Performance Monitoring APIs service allows you to use performance monitoringcounters for various applications through SOAPAPIs; for example, you canmonitor memory informationper service and CPU usage.
Backup and Restore Services
Cisco DRF Master
The Cisco Disaster Recovery Framework (DRF)Master Agent service supports the DRFMaster Agent,which works with the CLI to schedule backups, perform restorations, view dependencies, check statusof jobs, and cancel jobs, if necessary. The Cisco DRF Master Agent also provides the storage mediumfor the backup and restoration process.
Cisco DRF Local
The Cisco DRF Local service supports the Cisco DRF Local Agent, which performs the work for theDRFMaster Agent. Components register with the Cisco DRF Local Agent to use the disaster recoveryframework. The Cisco DRF Local Agent runs commands that it receives from the Cisco DRF MasterAgent. Cisco DRF Local Agent sends the status, logs, and command results to the Cisco DRF MasterAgent.
SFTP
Cisco Prime Collaboration Deployment runs a Secure File Transfer Protocol (SFTP) server locally.
System Services
CDP
Cisco Delivery Protocol (CDP) advertises the voice application to other network managementapplications, so the network management application can perform network management tasks for thevoice application.
Cisco Trace Collection Servlet
The Cisco Trace Collection Servlet, along with the Cisco Trace Collection Service, supports tracecollection and allows users to view traces. If you stop this service, you cannot collect or view traceson the Cisco Prime Collaboration Deployment platform.
For SysLog Viewer and trace and log collection, the Cisco Trace Collection Servlet and the Cisco TraceCollection Service must run on the server.
Cisco Prime Collaboration Deployment Administration Guide, Release 11.5(2)122
Cisco Prime Collaboration Deployment Configuration and AdministrationServices
Cisco Trace Collection Service
The Cisco Trace Collection Service, along with the Cisco Trace Collection Servlet, supports tracecollection and allows users to view traces. If you stop this service, you cannot collect or view traceson the Cisco Prime Collaboration Deployment platform.
For SysLog Viewer and trace and log collection, the Cisco Trace Collection Servlet and the Cisco TraceCollection Service must run on the server.
If necessary, to reduce the initialization time, we recommend that you restartthe Cisco Trace Collection Service before restarting the Cisco Trace CollectionServlet.
Tip
Platform Services
Cisco Tomcat
The Cisco Tomcat service supports the web server.
Cisco Tomcat Stats Servlet
The Cisco Tomcat Stats servlet collects the Tomcat statistics.
Platform Administrative Web Service
The Platform Administrative Web service is a SOAP API that can be activated on Cisco UnifiedCommunications Manager, Cisco Unified Presence, IM and Presence Service, Cisco Unified ContactCenter Express, or Cisco Unity Connection systems, to allow the Cisco Prime Collaboration Deploymentserver to upgrade the system.
SNMP Master Agent
This service, which acts as the agent protocol engine, provides authentication, authorization, accesscontrol, and privacy functions that relate to Simple Network Management Protocol (SNMP) requests.
After you complete SNMP configuration in the CLI, youmust restart the SNMPMaster Agent service.
Tip
MIB2 Agent
The Management Information Base (MIB2) Agent service provides SNMP access to variables, whichare defined in RFC 1213, that read and write variables; for example, system and interfaces.
Host Resources Agent
This service provides SNMP access to host information, such as storage resources, process tables, andinstalled software base. This service implements the HOST-RESOURCES-MIB.
System Application Agent
This service provides SNMP access to the applications that are installed and running on the system.This service implements the SYSAPPL-MIB.
Cisco Prime Collaboration Deployment Administration Guide, Release 11.5(2) 123
Cisco Prime Collaboration Deployment Configuration and AdministrationServices
Cisco CDP Agent
This service uses the Cisco Discovery Protocol to provide SNMP access to network connectivityinformation on the Cisco Prime Collaboration Deployment platform. This service implements theCISCO-CDP-MIB.
Cisco Syslog Agent
This service supports gathering of syslog messages that various components generate. This serviceimplements the CISCO-SYSLOG-MIB.
Cisco Certificate Expiry Monitor
This service periodically checks the expiration status of certificates that the system generates and sendsnotification when a certificate gets close to its expiration date.
Working with Services
To start, stop, activate, or restart services or to configure service parameters for services on the Cisco PrimeCollaboration Deployment platform, you must use the CLI. You can start, stop, activate, or refresh only oneservice at a time.
When a service is stopping, you cannot start it until after the service is stopped. Also, when a service isstarting, you cannot stop it until after the service is started.
Note
The following services are activated by default after you install the Cisco Prime Collaboration Deploymentplatform.
• Cisco AMC Service
• Cisco Audit Event Service
• Cisco CDP
• Cisco CDP Agent
• Cisco Certificate Expiry Monitor
• Cisco DRF Local
• Cisco DRF Master
• Cisco Log Partition Monitoring Tool
• Cisco Platform Manager Service
• Cisco RIS Data Collector
• Cisco Syslog Agent
• Cisco Tomcat
• Cisco Tomcat Stats Servlet
• Cisco Trace Collection Servlet
• Host Resources Agent
Cisco Prime Collaboration Deployment Administration Guide, Release 11.5(2)124
Cisco Prime Collaboration Deployment Configuration and AdministrationServices
• MIB2 Agent
• SNMP Master Agent
• System Application Agent
The following services are stopped by default after you install the Cisco Prime Collaboration Deploymentplatform.
• Cisco Trace Collection Service
• SOAP-Log Collection APIs
• SOAP-Performance Monitoring APIs
Some changes to service parameters may cause system failure. We recommend that you do not make anychanges to service parameters unless you fully understand the feature that you are changing or unless theCisco Technical Assistance Center (TAC) specifies the changes.
Caution
The following table shows the commands that you need to work with services on the Cisco Prime CollaborationDeployment platform.
Table 13: Service CLI Commands
CommandTask
utils service listDisplay a list of services and service status
utils service activateActivate a service
utils service stop servicenameStop a service
utils service start servicenameStart a service
utils service restart servicenameRestart a service
Limitations and Restrictions• Cisco Prime Collaboration Deployment is not a diagnostic tool. An error message appears on the tasklist page if a task fails; however, you should use your usual set of tools and procedures to diagnose andcorrect the problem.
• The SOAP services do not replace the existing OS Administration and CLI upgrade processes. You canstill upgrade your servers by using the application GUIs or CLI commands. Cisco Prime CollaborationDeployment is another way to upgrade, restart, or switch versions on the application servers.
• No localization is available for Cisco Prime Collaboration Deployment. The localization is available inEnglish only (including time and date formats).
Cisco Prime Collaboration Deployment Administration Guide, Release 11.5(2) 125
Cisco Prime Collaboration Deployment Configuration and AdministrationLimitations and Restrictions

Cisco Prime Collaboration Deployment Administration Guide, Release 11.5(2)126
Cisco Prime Collaboration Deployment Configuration and AdministrationLimitations and Restrictions

C H A P T E R 7CLI Commands and Disaster Recovery System
• CLI Commands on Cisco Prime Collaboration Deployment, page 127
CLI Commands on Cisco Prime Collaboration DeploymentThemain functions of Cisco Prime Collaboration Deployment (such as creating migration, upgrade, and othertasks) are supported through the Cisco Prime Collaboration Deployment GUI interface. You can use the GUIinterface to create a specific task and schedule the time to perform the task. The GUI interface also reportsthe status of tasks.
For other operations, such as upgrading the software on the Cisco Prime Collaboration Deployment serverand performing a DRS backup, use the Cisco Prime Collaboration Deployment CLI, which is similar to theCLI on Cisco Unified Communications Manager Release 10.x.
Use the CLI on Cisco Prime Collaboration Deployment to perform the following tasks:
• View or get log files
• Administer a DRS backup device, and perform a data backup or restore
• Upgrade the Cisco Prime Collaboration Deployment software
• Change the hostname, IP address, or password on the Cisco Prime Collaboration Deployment
• Perform diagnostic commands on the Cisco Prime Collaboration Deployment system
The most common CLI operations and commands are for viewing logs and performing DRS backups.
Getting Cisco Prime Collaboration Deployment Logs
When you troubleshoot problems on the Cisco Prime Collaboration Deployment server, it is often necessaryto view the main application log.
CLI command: file get activelog tomcat/logs/ucmap/log4j/*
The Cisco Prime Collaboration Deployment main application log contains the following information:
• Representational state transfer (REST) requests from the browser
• Simple Object Access Protocol (SOAP) requests to UC servers
• Database requests
Cisco Prime Collaboration Deployment Administration Guide, Release 11.5(2) 127

• Scheduler events (scheduled, started, failed, and so on)
• Specific job events (tasks, task actions, and nodes)
• Exceptions and errors
DRS on Cisco Prime Collaboration Deployment
The Disaster Recovery System (DRS) can be administered and invoked from the Cisco Prime CollaborationDeployment CLI. DRS allows you to perform user-invoked data backups of the data on your Cisco PrimeCollaboration Deployment (the server clusters you have discovered, and scheduled and completed tasks). Youcan also choose to set up regularly scheduled automatic backups. The DRS feature has the following functions:
• CLI commands for performing backup and restore tasks
• The ability to schedule backups ahead of time, or run backups manually immediately
• The ability to archive backups to a remote SFTP server
DRS restores its own settings (backup device settings and schedule settings) as part of the platform backupand restore.
While you restore your data, the hostname, server IP address, and Cisco Prime Collaboration Deploymentsoftware version on the machine to which you are restoring the data must be the same as they were on theserver on which you performed the backup.
Important
DRS CLI Commands
Below is a list of the CLI commands that you can use to configure and perform backup and restore operationsthrough DRS.
• utils disaster_recovery status <operation> (An example of operation is Backup or Restore).
• utils disaster_recovery device list
• utils disaster_recovery device add
• utils disaster_recovery device delete
• utils disaster_recovery schedule add
• utils disaster_recovery schedule delete
• utils disaster_recovery schedule enable
• utils disaster_recovery schedule disable
• utils disaster_recovery schedule list
• utils disaster_recovery backup—Starts a manual backup by using the features that are configured inthe DRS interface.
• utils disaster_recovery restore—Starts a restore, and requires parameters for backup location, filename,and features to restore.
• utils disaster_recovery show_backupfiles—Shows existing backup files.
• utils disaster_recovery cancel_backup
Cisco Prime Collaboration Deployment Administration Guide, Release 11.5(2)128
CLI Commands and Disaster Recovery SystemCLI Commands on Cisco Prime Collaboration Deployment
• utils disaster_recovery show_registration
• utils disaster_recovery show_registration SERVER—Shows the features that you need to back up.For example, if you want to back up Cisco Prime Collaboration Deployment, choose PCD from thefeature list.
For more information, see the DRS documentation for Cisco Unified Communications Manager, at http://www.cisco.com/c/en/us/support/unified-communications/unified-communications-manager-callmanager/products-maintenance-guides-list.html.
Create a DRS Backup of the Server
Before You Begin
If you are using a location on your network to back up your Cisco Prime Collaboration Deployment, ensurethe following points:
1 You must have access to an SFTP server to configure a network storage location. The Disaster Recoverysystem supports only SFTP servers that are configured with an IPv4 address or hostname/FQDN.
2 The account that you use to access the SFTP server must have write permission for the selected path.
You can also back up your Cisco Prime Collaboration Deployment to a local disk; however, this method isnot recommended, because of the amount of space that is required on the Cisco PrimeCollaborationDeploymentdisk to store the backup files.
Procedure
Step 1 Add the backup device.Run the following command: utils disaster_recovery device add network
Example:utils disaster_recovery device add network device1 /backupdir/pcdbk 10.94.155.76 adminname 2
Step 2 To verify that the device was set up correctly, run the following CLI command: disaster_recovery devicelist.
Step 3 Run a backup using the following command:utils disaster_recovery backup network PCD device_name where device_name is the name of the backupdevice that was defined in Step 1.
Example:utils disaster_recovery backup network PCD device1
Step 4 Check the status of the backup using the following CLI command:utils disaster_recovery status backup.Use this command to see the status of your backup. The backup iscomplete when Percentage Complete is 100, and all components show “SUCCESS.”
Cisco Prime Collaboration Deployment Administration Guide, Release 11.5(2) 129
CLI Commands and Disaster Recovery SystemCreate a DRS Backup of the Server
Important Notes on Backup and Restore
When you restore your Cisco Prime Collaboration Deployment data, ensure that the Cisco PrimeCollaboration Deployment software version that is installed on your server matches the version of thebackup file that you want to restore.
Note
When you perform a DRS restore operation to migrate data to a new server, you must assign the newserver the identical IP address and hostname that the old server used. Additionally, if DNS was configuredwhen the backup was taken, then the same DNS configuration must be present before you perform arestore operation.
Note
We recommend that you perform a fresh installation of Cisco Prime Collaboration Deployment on yourvirtual machine before you restore the data.
Note
Restore a Backup to Cisco Prime Collaboration Deployment
This procedure is optional.Note
Procedure
Step 1 Because a fresh install of the VM is recommended before the restore, you will need to add a backup device,so the system can retrieve the files from there. Configure the backup device by using the utils disaster_recoverydevice add network command.
Example:utils disaster_recovery device add network device1 /backupdir/pcdbk 10.94.155.76 adminname 2Specify the device from which you want to restore a backup file.
Step 2 List the backup files by using the following CLI command: utils disaster_recovery show_backupfiles
Example:admin: utils disaster_recovery show_backupfiles device1The show_backupfiles command shows which backups are available to be restored. Backups are named bydate and the time the backup was performed.
Step 3 Start the restore operation by running the following CLI command: utils disaster_recovery restore network
Example:admin:utils disaster_recovery restore network b7k-vmb031 2013-10-30-15-40-54 device1When you are prompted to enter the features to restore, enter PCD.Enter the comma separated features you wish to restore. Valid features for server B7K-VMB031 are PCD:PCD.
Cisco Prime Collaboration Deployment Administration Guide, Release 11.5(2)130
CLI Commands and Disaster Recovery SystemImportant Notes on Backup and Restore
Step 4 Check the status of the restore by using the following CLI command: utils disaster_recovery status restore.While the restore process is running, you can check the status of the current restore job.
Do not administer any data on the Cisco Prime Collaboration Deployment server until the command showsas one hundred percent complete. This can take several minutes, depending on the amount of data that is beingrestored.
What to Do Next
After you restore your data, perform a system restart on the Cisco Prime Collaboration Deployment server toinitialize the database.
The Cisco Prime Collaboration Deployment server will lose contact with ESXi hosts during the reinstallation.You may have to add ESXi hosts back into Cisco Prime Collaboration Deployment after a restore operation.
Cisco Prime Collaboration Deployment Administration Guide, Release 11.5(2) 131
CLI Commands and Disaster Recovery SystemRestore a Backup to Cisco Prime Collaboration Deployment

Cisco Prime Collaboration Deployment Administration Guide, Release 11.5(2)132
CLI Commands and Disaster Recovery SystemRestore a Backup to Cisco Prime Collaboration Deployment
C H A P T E R 8CTL Update
• More Information, page 133
• Bulk Certificate Management, page 133
More InformationFor information about performing a CTL update, see the “Security Basics” section in the Cisco UnifiedCommunications Manager Security Guide: http://www.cisco.com/c/en/us/support/unified-communications/unified-communications-manager-callmanager/products-maintenance-guides-list.html
Bulk Certificate ManagementBulk certificate management must be performed manually on both source nodes and destination nodes. Thesource nodes and destination nodes must be up and running at this point. Phones are registered with the sourcenodes.
Cisco Prime Collaboration Deployment Administration Guide, Release 11.5(2) 133
Procedure
Step 1 On the Destination Cluster Publisher, navigate to Cisco Unified Operating SystemAdministration and chooseSecurity > Bulk Certificate Management.
Step 2 Define the Central Secure File Transfer Protocol (SFTP) server IP address, port, user, password, and directory.Step 3 Use the Export button to export all Trivial File Transfer Protocol (TFTP) certificates from the destination
cluster to the central SFTP server.Step 4 On the Source Cluster Publisher, navigate to Cisco Unified Operating SystemAdministration. Select Security
> Bulk Certificate Management.Step 5 Define the Central SFTP server with same parameters that you used in Step 2.Step 6 Click Export to export all TFTP certificates from source cluster to the central SFTP server.Step 7 Click Consolidate to consolidate all the TFTP certificates on the central SFTP server. You can perform this
step on either the source or destination cluster, using the Bulk Certificate Management interface.Step 8 On the Source cluster, click Bulk Certificate Import to import the TFTP certificates from the central SFTP
server.Step 9 On the Destination cluster, click Bulk Certificate Import to import the TFTP certificates from the central
SFTP server.Step 10 Use Dynamic Host Configuration Protocol (DHCP) option 150 to point the phones to the new destination
cluster TFTP server.Upon reset or power cycle, the phones will download the new destination cluster ITL file and attempt toauthenticate the new Initial Trust List (ITL) file signature with the certificates in the existing ITL file.
No certificate in the existing ITL file can be used to authenticate the signature, so the phone requests thesigner's certificate from the old Trust Verification Service (TVS) server on the source cluster.
The phone sends this request to the source cluster TVS service on TCP port 2445.
The bulk certificate exchange in Steps 1 through 9 provides the TVS service in the source cluster with theTFTP certificate on the destination cluster that signed the new ITL file.
TVS returns the certificate to the phone, which allows the phone to authenticate the signature and replace theold ITL file with the newly downloaded ITL file.
The phone can now download and authenticate the signed configuration files from the new destination cluster.
Cisco Prime Collaboration Deployment Administration Guide, Release 11.5(2)134
CTL UpdateBulk Certificate Management

C H A P T E R 9Best Practices
• Cluster Discovery, page 135
• Upgrades, page 136
• ESXi Host, page 136
• Migration and Installation Virtual Machines, page 136
• Premigration, page 136
• Postmigration, page 137
• Task Validation, page 138
• Cisco Prime Collaboration Deployment Shutdown, page 138
• Monitoring Tasks, page 138
• Managing Files in the SFTP Datastore, page 138
• Using Cisco Prime Collaboration Deployment with Clustering Over WAN , page 139
• Sequence During Migration, page 139
• Server Readdress, page 139
• Fresh Install Publishers and Subscribers, page 139
• Fresh Install of a Unified CM and IM and Presence Cluster , page 139
• Email Notification, page 140
• Test Email, page 140
Cluster DiscoveryDuring cluster discovery, a small Cisco Options Package (COP) file is installed on the servers that are beingdiscovered. For this reason, ensure that before you initiate a discovery, no upgrades or COP file installationsare in progress on the servers in the cluster that you want to discover.
Cisco Prime Collaboration Deployment Administration Guide, Release 11.5(2) 135
UpgradesWhen you initiate an upgrade of an application server (Cisco Unified Communications Manager, IM andPresence Service, Cisco Unified Contact Center Express, or Cisco Unity Connection) from the Cisco PrimeCollaboration Deployment Upgrade task, the upgrade works in the same manner as upgrades that are initiatedby the Unified Communications application GUI or CLI. As a result, we recommend that you follow the samepreupgrade procedures and postupgrade verifications as you would directly from the application server GUI.
ESXi HostEnsure that the virtual machines that you use for migrations or fresh installations reside on an ESXi host thatwas entered into the Cisco Prime Collaboration Deployment system. That ESXi host should not allowDisasterRecovery System (DRS) or vSphere vMotion.
Migration and Installation Virtual MachinesAlways create virtual machines (VMs) for new clusters using the appropriate Open Virtualization Format(OVA) for the unified communications application that you will install. Do not use an existing VM as adestination VM for migration (use a newly-created VM). After a failed migration, if Cisco Prime CollaborationDeployment had started to install the newVM, you must delete this VM and create a new one using the properOVA.
If you have to configure a VMware in various ESXi host servers, ensure that you enter a unique name forESXi host servers and avoid using the default name from OVA.
Note
PremigrationSource Cluster
•We recommend that you run a full backup by using Disaster Recovery System (DRS) on the cluster.
•We recommend that you check the size of the TFTP folder on the TFTP server. If a number of firmwareendpoint COP files was installed on the TFTP server, and if the size of the TFTP directory on the TFTPserver is larger than 2.5 GB, we strongly recommend that you delete any large unused firmware files inthe /usr/local/cm/tftp directory.
The following procedures describe how to check TFTP space usage, and if necessary, how to remove TFTPfiles on the TFTP server (source node) before you perform a migration using Cisco Prime CollaborationDeployment.
Cisco Prime Collaboration Deployment Administration Guide, Release 11.5(2)136
Best PracticesUpgrades
Check TFTP Directory Disk Usage
Procedure
Step 1 Log in using the CLI.Step 2 Enter the following command: admin:show diskusage tftpStep 3 Check the disk usage output for the following line: /usr/local/cm/tftp/. (Disk-usage information appears at
the end of the output.)Step 4 Check the size of the /usr/local/cm/tftp directory.
We recommend recommended that the size not exceed 2.5 GB. If it does, reduce the size by deletingsome files (see procedure below). Before you delete those files, copy them to another server as abackup in case you need them in the future.
Note
Delete TFTP Files
Procedure
Step 1 Log in to the Cisco Unified Operating System Administration GUI on the TFTP server.Step 2 Navigate to Software Upgrades and select TFTP File Management.Step 3 Click Find to see a list of TFTP files.Step 4 Check the check box of the TFTP file that you want to delete.
To delete multiple files, check multiple check boxes.
Step 5 Click Delete Selected.Step 6 After you delete the files, check the disk usage again using the above procedure.
What to Do Next
If the cluster has more than one TFTP server, perform these procedures on every TFTP server.Note
PostmigrationFollow these postmigration best practices:
• Check endpoints
Cisco Prime Collaboration Deployment Administration Guide, Release 11.5(2) 137
Best PracticesCheck TFTP Directory Disk Usage
• Check database replication, for example:
admin:show perf query class "Number of Replicates Created and State ofReplication" ==>query class :
- Perf class (Number of Replicates Created and State of Replication)has instances and values:
ReplicateCount -> Number of Replicates Created = 676
ReplicateCount -> Replicate_State = 2
The following list shows the possible values for Replicate_State:
• 0—Replication Not Started. Either no subscribers exist, or the Database Layer Monitor service is notrunning and has not been running since the subscriber was installed.
• 1—Replicates were created, but their count is incorrect.
• 2—Replication is good.
• 3—Replication is bad in the cluster.
• 4—Replication setup did not succeed.
Task ValidationIf a task is scheduled to start manually or start at a later time, the Validate button appears and you can runvalidation on the task manually. We recommend that you run the validation on a task before the start (youcan run the validation anytime before the start), to identify problems such as missing virtual machines,communication issues, or missing ISO files. When the validation is run, a popup window opens with a list ofvalidation problems. If no problems are found, the following message appears: “All validation tests passed.”
Cisco Prime Collaboration Deployment ShutdownFor best results, to shut down the Cisco Prime Collaboration Deployment server, use the command utils servershutdown. Failure to do so can result in Network File System (NFS) mount issues on the ESXi hosts.
Monitoring TasksUse the Monitoring GUI page to view the status of your tasks. Click the task in the left column, and the taskdetails appear on the right. Each step in the task (export, install, and so on) appears in the Task Status tablebelow the details section. Click the arrow next to any step to see additional details for that step. Some stepsmay have several task actions within them. Scroll down to see all the actions and their status.
Managing Files in the SFTP DatastoreThe SFTP datastore page shows the ISO and COP files that were transferred to the Cisco Prime CollaborationDeployment server through SFTP. To place a file on the Cisco Prime Collaboration Deployment server, for
Cisco Prime Collaboration Deployment Administration Guide, Release 11.5(2)138
Best PracticesTask Validation
use in a migration, install or upgrade task, use an SFTP client and log in as adminsftp (use the administratorpassword as your password).
When you connect to the Cisco Prime Collaboration Deployment server, upload ISO files to be used by amigration or install task into the /fresh_install folder. Upload COP files to the /upgrade folder.
After a task is complete, if the ISO is not needed for another task, we recommend that you delete the ISO filefrom the SFTP datastore to conserve space on your Cisco Prime Collaboration Deployment server. If thereare too many ISO files in the SFTP datastore when the Cisco Prime Collaboration Deployment is upgradedor a DRS backup is restored, the Cisco Prime Collaboration Deployment server may run out of space.
Using Cisco Prime Collaboration Deployment with ClusteringOver WAN
A minimum bandwidth of 100 Mbps is recommended if the Cisco Prime Collaboration Deployment serverand other Unified Communications application nodes are communicating over a WAN.
Sequence During MigrationWhen you create a migration task, the default sequence is presented, which has one server in each install step.You can use the editing tools in the sequence screen to place more than one server in a step. For best results,include no more than six servers in any one step.
Server ReaddressWith the Server Readdress feature, the system inserts a forced pause after each server readdress. Verify thatthe server was successfully changed and that the phones reregistered before you continue to the next readdressstep.
Fresh Install Publishers and SubscribersWhen a fresh install task (new UC cluster) includes more than one server, the Cisco Prime CollaborationDeployment system automatically installs the Unified Communications Manager publisher first, and theninserts a forced pause following the publisher installation. During the pause, you can go to the UnifiedCommunications Manager GUI of the newly installed publisher and add the other cluster servers into theSystem > Servers GUI. After all the subscribers to be installed in this cluster (Unified CommunicationsManager subscribers, IM and Presence publishers and subscribers) are added to the Unified CommunicationsManager publisher GUI, the user can click theResume button on the Cisco Prime Collaboration DeploymentMonitoring page to resume the fresh install task.
Fresh Install of a Unified CM and IM and Presence ClusterWhen you create a fresh install with both Unified Communications Manager and IM and Presence Servicenodes, you must indicate which IM and Presence Service server is the publisher. After the UnifiedCommunications Manager publisher install, the task pauses. This pause allows the subscriber install nodes to
Cisco Prime Collaboration Deployment Administration Guide, Release 11.5(2) 139
Best PracticesUsing Cisco Prime Collaboration Deployment with Clustering Over WAN

enter into the Unified CommunicationsManager Publisher (System > ServerGUI page). The IM and PresenceService publisher must be the first IM and Presence server that is added to this list. This step ensures that theIM and Presence Service publisher is installed as the first node.
Email NotificationIf a task encounters an error, the task is paused to wait for user intervention. Also, some tasks pauseautomatically in the task sequence to allow for manual interaction. We recommend that you set up emailnotification (Standard option) before you run any tasks in order to be notified of pauses or errors that mayrequire your attention when the task runs.
Test EmailWhen setting up email notification, click the Send Test email button to verify that the Cisco PrimeCollaboration Deployment mail system can send email to your mail server. Check that the test email wasreceived. Perform this test before you run tasks.
Cisco Prime Collaboration Deployment Administration Guide, Release 11.5(2)140
Best PracticesEmail Notification
C H A P T E R 10Cisco Prime Collaboration DeploymentTroubleshooting
• Increase Disk Space for Migrations, page 141
• General Troubleshooting Issues, page 142
• Errors Seen in View Log, page 142
• Lock Errors, page 146
• NFS Datastores, page 146
• Pause States on Monitor Page, page 146
• Scheduling, page 147
• Server Connectivity, page 147
• Task Failure Due to Restart, page 147
• Task Scheduling, page 156
• Task Timeouts, page 157
• Upgrade Migration and Installation, page 157
• Run a New Task When Current Task in Canceling State, page 158
• Version Validity, page 159
• ISO File Does Not Get Loaded Or Not Recognized During Migration, page 160
Increase Disk Space for MigrationsIf one Cisco Prime Collaboration Deployment server is used to migrate a large number of UnifiedCommunications Manager servers concurrently, the Cisco Prime Collaboration Deployment disk can run lowon space, and this can cause migration tasks to fail. If you plan to use a Cisco Prime Collaboration Deploymentsystem to migrate several servers concurrently, you can use this procedure to increase the disk size.
Cisco Prime Collaboration Deployment Administration Guide, Release 11.5(2) 141
Procedure
Step 1 Shut down the Cisco Prime Collaboration Deployment server by logging in to the Cisco Prime CollaborationDeployment CLI and entering the utils system shutdown command.
Step 2 After the Cisco Prime Collaboration Deployment server shuts down, go to ESXi host and increase the disksize for the virtual machine on which the Cisco Prime Collaboration Deployment server resides.
Step 3 Restart the Cisco Prime Collaboration Deployment server.Step 4 To view how much disk space is available on the Cisco Prime Collaboration Deployment server, run the CLI
command show status on the Cisco Prime Collaboration Deployment server.
General Troubleshooting IssuesView Step-By-Step Log of Events
Use theViewLog buttons on theMonitoring dashboard to see a step-by-step log of Cisco Prime CollaborationDeployment events.
Access Cisco Prime Collaboration Deployment Logs
Obtain additional details by accessing Cisco Prime Collaboration Deployment logs using CLI commands.For example:
file get activelog tomcat/logs/ucmap/log4j/*
Check For Problems Before You Start a Task
Use the Validate button to check for problems before starting a task. When the validation process identifiesproblems, click the View Log button to see more detail.
Node Information Mismatches
Some mismatches between node information that is stored in Cisco Prime Collaboration Deployment and theactual node can be fixed automatically (for example, active versions). Other information will require arediscovery to correct the problem.
Verify Communication Between Servers
Use the network capture CLI command to verify communication between servers (for example, to confirmthat packets are being sent to and received by the correct ports).
Errors Seen in View LogThe View Log button on the Monitoring dashboard can be used to see a step by step log of Cisco PrimeCollaboration Deployment events during the task. When viewing the log, there may be events or errors thatare shown. Some of the more common errors, and possible actions to correct those errors, are shown below:
Cisco Prime Collaboration Deployment Administration Guide, Release 11.5(2)142
Cisco Prime Collaboration Deployment TroubleshootingGeneral Troubleshooting Issues
Node Connection and Contact Issues
Error messages:
• “The network diagnostic service indicates node {0} has a network issue. The network settings cannotbe changed until the network issue is resolved.”
• “The node could not be located.”
• “The node could not be contacted. ”
Possible actions to correct node connection and contact issues:
• Check the network settings and firewall settings for the indicated node and ensure that the Cisco PrimeCollaboration Deployment server can communicate with the node.
• Check to see if the node is powered off, if the node name is misspelled, or if the node is inaccessible.
Other Connection Issues
Error message:
• “The switch version status could not be determined. Please manually verify that the switch versioncompleted.”
Possible actions to correct issues:
During a switch version task, if the server does not respond in a fixed amount of time, this message mayappear even if the task is successful. you see this error, log in to the CLI for the server that is not respondingand run the show version active command to see if the switch version was successful. For example, a switchversion on a Cisco Unified Contact Center Express server can take more than 60 minutes.
Node Response
Error messages:
• “The node did not respond within the expected time frame.”
• “The upgrade service for node {0} did not send back the expected response. This is assumed to be afailure. However, this can also happen when network connectivity is temporarily lost. Please manuallyverify the upgrade status on node {0} before proceeding.”
Possible actions to correct issues:
These messages are usually seen during a task (install, upgrade, and so on), when the new node does notcontact the Cisco Prime Collaboration Deployment server within a specified amount of time. For an upgrade,this time is 8 hours, so when one of these error messages appear, it may indicate that the task failed. However,these error messages can also indicate that there were network issues during the upgrade (or install) thatprevented the server from contacting Cisco Prime Collaboration Deployment. For this reason, you see one ofthese messages, log in to the server that is not responding (using the CLI) and run the show version activecommand to see if the upgrade was successful.
Unable to Mount Datastore
Error message:
• “Unable to mount datastore xxx_NFS on ESXi host <hostname>. ”
Cisco Prime Collaboration Deployment Administration Guide, Release 11.5(2) 143
Cisco Prime Collaboration Deployment TroubleshootingErrors Seen in View Log

Possible actions to correct the issue:
This error occurs when your Network File System (NFS) Datastore has an issue. Datastore issues can occurwhen Cisco Prime Collaboration Deployment is shut down unexpectedly. When this error occurs, check theESXi host and unmount the old NFS mount. Then delete and add back the ESXi host to Cisco PrimeCollaboration Deployment.
Unable to Add ESXi Host to Inventory
Possible cause:
This error may be caused by a networking issue with the vSwitch on the ESXi host.
Possible actions to correct the issue:
• Ping the host and verify connectivity by entering the following CLI command: utils network pinghostname.
• Verify that the license for the ESXi host is valid. A demo license is not supported.
• Be aware that you need root access to the ESXi host. Use the root username and password when addingESXi host credentials.
• Be aware that if you are using network address translation (NAT), Cisco Prime Collaboration Deploymentand all nodes in the clusters must be behind the same NAT to ensure successful communication betweenCisco Prime Collaboration and the nodes.
Unable to Power On Virtual Machine
Error message:
• “Unable to power on the VM named xxx on ESXi host xxxxxxx. ”
Possible actions to correct issue:
Check the ESXi host that the VM resides on. From the Tasks and Events tab, check the time stamp for whenCisco Prime Collaboration Deployment tried to power on the VM. Determine whether too many VMs arealready on that host. If that is the case, you may need to power off a VM that is not being used for this cluster.
The Power State of a Virtual Machine
Error message:
• “The power state of VM xxxxx in ESXi host XX.XX.X.XX needs to be OFF. The task is now paused.”
Possible actions to correct issue:
VMs that are to be used in a destination cluster for a migration task, or for a new cluster installation, must bein the OFF state. If you receive this error message, check the named VM. If it is not off, power it off. Then,retry or resume the task.
Username and/or Password Not Valid
Error message:
• “ The username and/or password is not valid.”
Possible actions to correct the issue:
Cisco Prime Collaboration Deployment Administration Guide, Release 11.5(2)144
Cisco Prime Collaboration Deployment TroubleshootingErrors Seen in View Log
Correct the administrator name and password for this server in the cluster page. You can then rediscover thisnode.
Platform Administrative Web Services (PAWS)
Error messages:
• “The Platform Administrative Web Services (PAWS) is not available.”
• “ Unable to access node {0} via the Platform Administrative Web Services (PAWS) interface.”
Possible actions to correct issues:
Ensure that the server is reachable, and that the PAWS service is active on the node. When you use CiscoPrime Collaboration Deployment to perform an upgrade, switch version, or restart task on an applicationserver (for example, to upgrade a Unified Communications Manager server), the Platform AdministrativeWeb Service on the application must be active. Otherwise, the Cisco Prime Collaboration Deployment servercannot communicate with the Unified Communications Manager application server.
{0} VMs Named {1} Were Located on ESXi Host {2}
Error message:
• “ {0} VMs named {1} were located on ESXi host {2}.”
Possible actions to correct issue:
Check that the virtual machine named still exists on the ESXi host. Sometimes VMs are moved to anotherESXi host, and if this is the case, the ESXi host that holds the VM must be added into the Cisco PrimeCollaboration Deployment server.
Power State of VM {0} in ESXi Host {1} Needs to Be OFF
Error message:
• “The power state of VM {0} in ESXi host {1} needs to be OFF.”
Possible actions to correct the issue:
In order for Cisco Prime Collaboration Deployment to be installed on or migrate to a VM, the power state ofthe target VMs must be OFF.
CLI Command Timed Out
Error message:
• “CLI command timed out for node {0}.”
Possible actions to correct issue:
Check for networking, connection, or password issues with the node. Also check to see if another operationwas in progress (for example, a COP file install) during the time that the command timed out.
Task Paused Due to Validation Issues
Error message:
• “ Task paused due to validation issues”
Cisco Prime Collaboration Deployment Administration Guide, Release 11.5(2) 145
Cisco Prime Collaboration Deployment TroubleshootingErrors Seen in View Log
Possible actions to correct the issue:
Before it runs a task, the Cisco Prime Collaboration Deployment server will run validation checks to ensurethat VMs to be used are available, that the ISO file can be found, and so on. This message indicates that oneor more of the validation checks failed. See the log file for more information about which validations failed.
Lock ErrorsMost products allow only one change at a time (for example, you cannot modify Network Time Protocolsettings while an upgrade is in progress). If a request is made while the node is locked, then a lock messagewith the following information is displayed:
• The name of the resource that was locked
• The ID of the process that locked the resource
• The hostname of the node
You can typically wait a few minutes and try again. For more details, use the node CLI to identify the exactprocess based on the provided process ID and hostname.
NFS DatastoresExceptions and Other NFS-Related Issues
Review the Cisco Prime Collaboration Deployment logs for any exceptions or other NFS-related issues.
Use VMware vSphere
Use VMware vSphere to verify that NFS datastores are available.
Unmount and Remount All Current Datastores
When you restart it, Cisco Tomcat unmounts all current datastores and attempts to remount them.
Pause States on Monitor PageTask Is Waiting for Manual Intervention
Certain tasks, such as migration or readdress, pause at a point that human intervention may be required. Inthose tasks, the Cisco Prime Collaboration Deployment system inserts a Forced Pause. When the task reachesthis point, the task is paused and a message appears on the Monitoring page. Perform manual steps as needed,and then click the Resume button when you are ready to resume the task.
Task Paused Due to Validation Issues
When this message is displayed, click the View log link to view more detail on which validations failed.
Cisco Prime Collaboration Deployment Administration Guide, Release 11.5(2)146
Cisco Prime Collaboration Deployment TroubleshootingLock Errors
Task Paused Due to Task Action Failures
When this message is displayed, click the View log link to view more detail on which tasks failed.
SchedulingVerify Scheduled Date
If a task was scheduled but did not start, verify the scheduled date.
Validation Tests
When a task starts, Prime Collaboration Deployment runs a series of validation tests. A validation failurepauses the task.
Determine Why a Task Has Been Paused
Use the View Log button to see why a task is paused (for example, validation failure, a requested or requiredpause, one or more nodes failed on a partiular step, and so on).
Canceled Tasks
Some steps cannot be canceled after they are started (for example, restarting a server).If you cancel the task,it remains in the Canceling state until the step is finished.
Server ConnectivityVerify Connectivity
Use the utils network ping and traceroute CLI commands to verify connectivity.
Verify Forward and Reverse DNS Lookups
Use the utils network host CLI command to verify forward and reverse DNS lookups.
Platform Administrative Web Services
Ensure that Platform Administrative Web Services are activated on nodes that are being upgraded, restarted,and switch versioned.
Verify That Ports Are Open
Verify that the ports listed in the Port Usage guide are open (for example, verify that the NFS and SOAPcall-back ports are not being blocked by other network devices).
Task Failure Due to RestartThe success or failure of each of the following tasks depends on the Prime Collaboration Deployment serverbeing able to get a response from every server in the cluster during the task. If connectivity to the servers is
Cisco Prime Collaboration Deployment Administration Guide, Release 11.5(2) 147
Cisco Prime Collaboration Deployment TroubleshootingScheduling
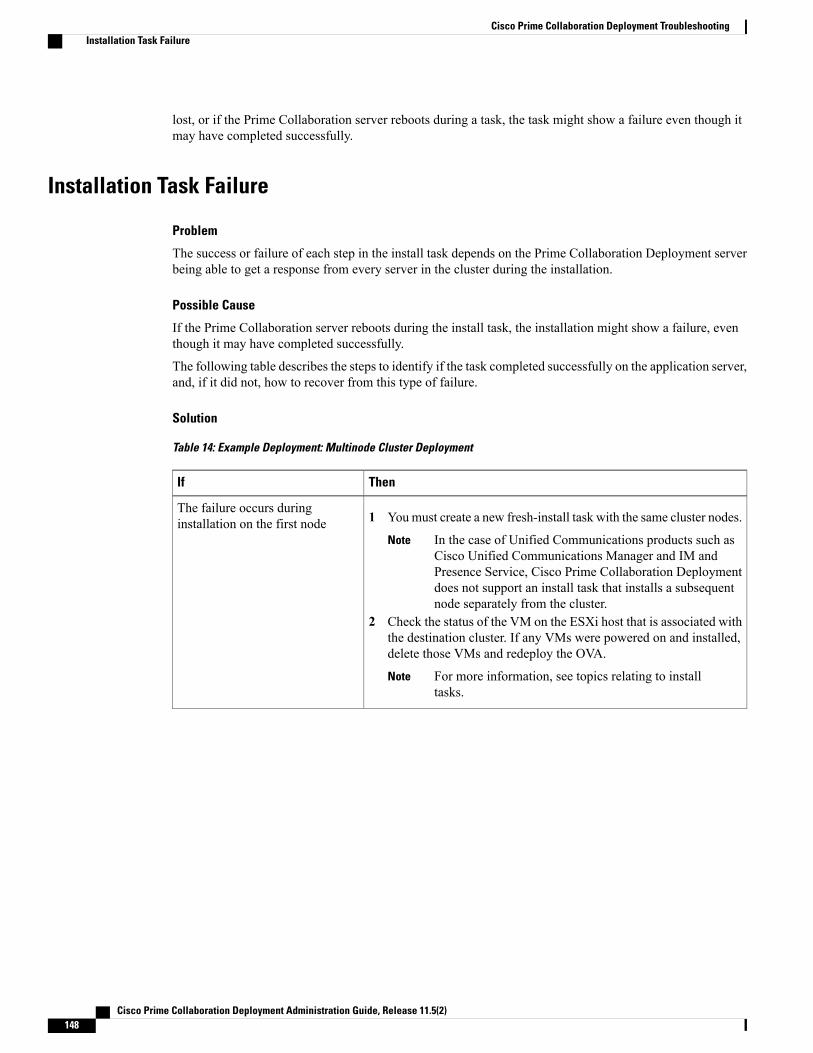
lost, or if the Prime Collaboration server reboots during a task, the task might show a failure even though itmay have completed successfully.
Installation Task Failure
Problem
The success or failure of each step in the install task depends on the Prime Collaboration Deployment serverbeing able to get a response from every server in the cluster during the installation.
Possible Cause
If the Prime Collaboration server reboots during the install task, the installation might show a failure, eventhough it may have completed successfully.
The following table describes the steps to identify if the task completed successfully on the application server,and, if it did not, how to recover from this type of failure.
Solution
Table 14: Example Deployment: Multinode Cluster Deployment
ThenIf
1 Youmust create a new fresh-install task with the same cluster nodes.
In the case of Unified Communications products such asCisco Unified Communications Manager and IM andPresence Service, Cisco Prime Collaboration Deploymentdoes not support an install task that installs a subsequentnode separately from the cluster.
Note
2 Check the status of the VM on the ESXi host that is associated withthe destination cluster. If any VMs were powered on and installed,delete those VMs and redeploy the OVA.
For more information, see topics relating to installtasks.
Note
The failure occurs duringinstallation on the first node
Cisco Prime Collaboration Deployment Administration Guide, Release 11.5(2)148
Cisco Prime Collaboration Deployment TroubleshootingInstallation Task Failure
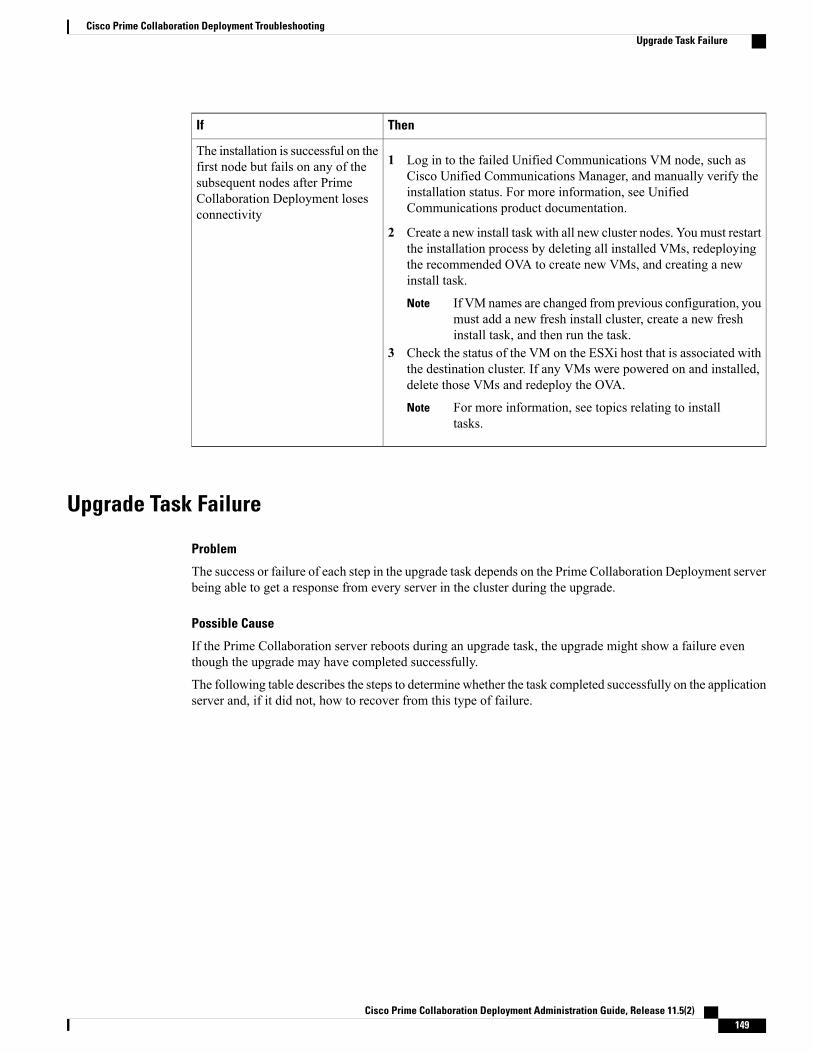
ThenIf
1 Log in to the failed Unified Communications VM node, such asCisco Unified Communications Manager, and manually verify theinstallation status. For more information, see UnifiedCommunications product documentation.
2 Create a new install task with all new cluster nodes. You must restartthe installation process by deleting all installed VMs, redeployingthe recommended OVA to create new VMs, and creating a newinstall task.
If VM names are changed from previous configuration, youmust add a new fresh install cluster, create a new freshinstall task, and then run the task.
Note
3 Check the status of the VM on the ESXi host that is associated withthe destination cluster. If any VMs were powered on and installed,delete those VMs and redeploy the OVA.
For more information, see topics relating to installtasks.
Note
The installation is successful on thefirst node but fails on any of thesubsequent nodes after PrimeCollaboration Deployment losesconnectivity
Upgrade Task Failure
Problem
The success or failure of each step in the upgrade task depends on the Prime Collaboration Deployment serverbeing able to get a response from every server in the cluster during the upgrade.
Possible Cause
If the Prime Collaboration server reboots during an upgrade task, the upgrade might show a failure eventhough the upgrade may have completed successfully.
The following table describes the steps to determine whether the task completed successfully on the applicationserver and, if it did not, how to recover from this type of failure.
Cisco Prime Collaboration Deployment Administration Guide, Release 11.5(2) 149
Cisco Prime Collaboration Deployment TroubleshootingUpgrade Task Failure
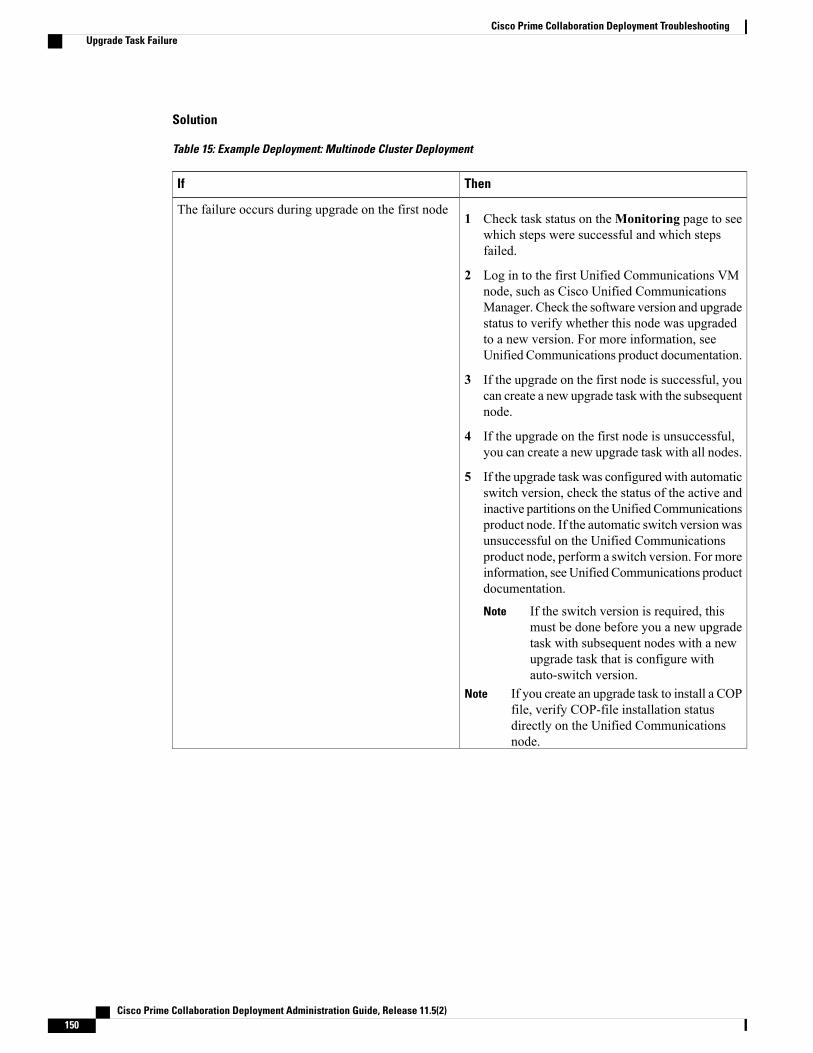
Solution
Table 15: Example Deployment: Multinode Cluster Deployment
ThenIf
1 Check task status on theMonitoring page to seewhich steps were successful and which stepsfailed.
2 Log in to the first Unified Communications VMnode, such as Cisco Unified CommunicationsManager. Check the software version and upgradestatus to verify whether this node was upgradedto a new version. For more information, seeUnified Communications product documentation.
3 If the upgrade on the first node is successful, youcan create a new upgrade task with the subsequentnode.
4 If the upgrade on the first node is unsuccessful,you can create a new upgrade task with all nodes.
5 If the upgrade task was configured with automaticswitch version, check the status of the active andinactive partitions on theUnified Communicationsproduct node. If the automatic switch version wasunsuccessful on the Unified Communicationsproduct node, perform a switch version. For moreinformation, see Unified Communications productdocumentation.
If the switch version is required, thismust be done before you a new upgradetask with subsequent nodes with a newupgrade task that is configure withauto-switch version.
Note
If you create an upgrade task to install a COPfile, verify COP-file installation statusdirectly on the Unified Communicationsnode.
Note
The failure occurs during upgrade on the first node
Cisco Prime Collaboration Deployment Administration Guide, Release 11.5(2)150
Cisco Prime Collaboration Deployment TroubleshootingUpgrade Task Failure
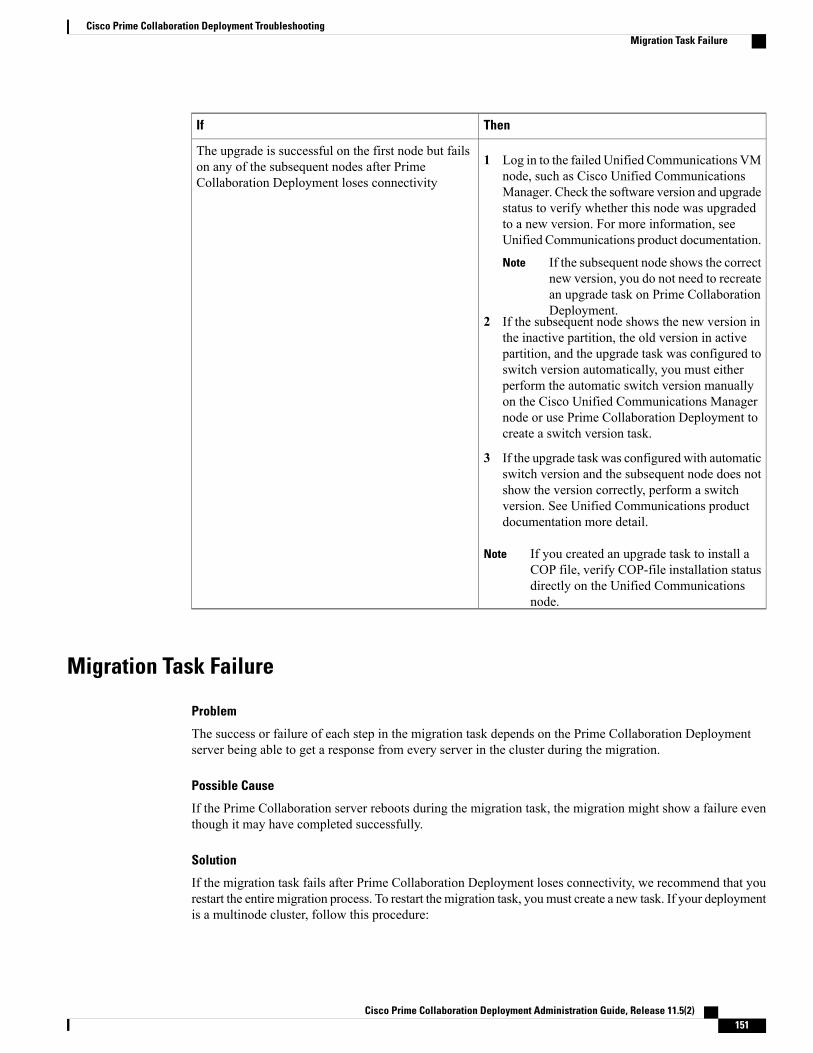
ThenIf
1 Log in to the failed Unified Communications VMnode, such as Cisco Unified CommunicationsManager. Check the software version and upgradestatus to verify whether this node was upgradedto a new version. For more information, seeUnified Communications product documentation.
If the subsequent node shows the correctnew version, you do not need to recreatean upgrade task on Prime CollaborationDeployment.
Note
2 If the subsequent node shows the new version inthe inactive partition, the old version in activepartition, and the upgrade task was configured toswitch version automatically, you must eitherperform the automatic switch version manuallyon the Cisco Unified Communications Managernode or use Prime Collaboration Deployment tocreate a switch version task.
3 If the upgrade task was configured with automaticswitch version and the subsequent node does notshow the version correctly, perform a switchversion. See Unified Communications productdocumentation more detail.
If you created an upgrade task to install aCOP file, verify COP-file installation statusdirectly on the Unified Communicationsnode.
Note
The upgrade is successful on the first node but failson any of the subsequent nodes after PrimeCollaboration Deployment loses connectivity
Migration Task Failure
Problem
The success or failure of each step in the migration task depends on the Prime Collaboration Deploymentserver being able to get a response from every server in the cluster during the migration.
Possible Cause
If the Prime Collaboration server reboots during the migration task, the migration might show a failure eventhough it may have completed successfully.
Solution
If the migration task fails after Prime Collaboration Deployment loses connectivity, we recommend that yourestart the entire migration process. To restart the migration task, youmust create a new task. If your deploymentis a multinode cluster, follow this procedure:
Cisco Prime Collaboration Deployment Administration Guide, Release 11.5(2) 151
Cisco Prime Collaboration Deployment TroubleshootingMigration Task Failure

1 Check the task status on theMonitoring page to find out which steps were successful and which stepsfailed.
2 If the source node was shut down, you must power on the node manually.
Repeat this step for all source nodes that were shut down.Note
3 Delete the failed migration task.
4 Delete the destination migration cluster that is associated with the failed migration task.
You do not need to delete the source cluster.Note
5 Check the status of the VM on the ESXi host that is associated with the destination cluster. If any VMswere powered on and installed, delete those VMs and redeploy the OVA.
For more information, see topics relating to migration tasks.Note
Switch Version Task Failure
Problem
The success or failure of each step in the switch version task depends on the Prime Collaboration Deploymentserver being able to get a response from every server in the cluster during the switch version.
Possible Cause
If the Prime Collaboration server reboots during the switch version task, the switch version might show afailure even though the switch version may have completed successfully.
The following table describes the steps to determine whether the task completed successfully on the applicationserver, and, if it did not, how to recover from this type of failure.
Cisco Prime Collaboration Deployment Administration Guide, Release 11.5(2)152
Cisco Prime Collaboration Deployment TroubleshootingSwitch Version Task Failure
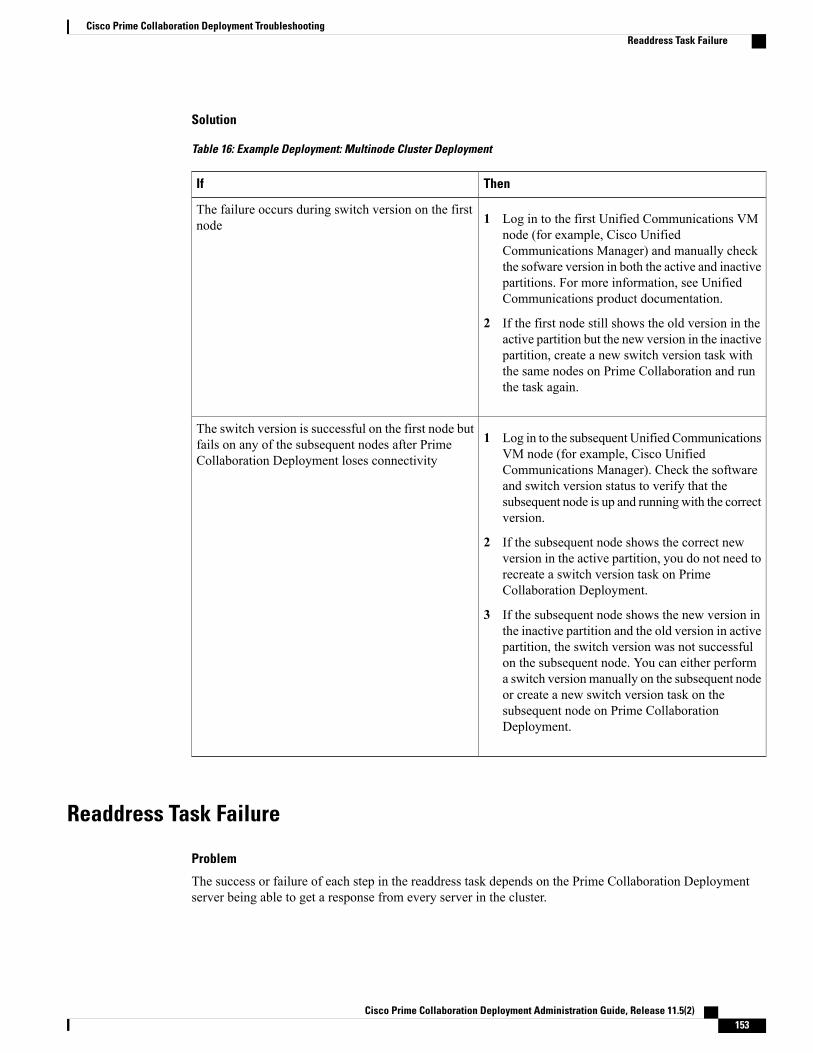
Solution
Table 16: Example Deployment: Multinode Cluster Deployment
ThenIf
1 Log in to the first Unified Communications VMnode (for example, Cisco UnifiedCommunications Manager) and manually checkthe sofware version in both the active and inactivepartitions. For more information, see UnifiedCommunications product documentation.
2 If the first node still shows the old version in theactive partition but the new version in the inactivepartition, create a new switch version task withthe same nodes on Prime Collaboration and runthe task again.
The failure occurs during switch version on the firstnode
1 Log in to the subsequent Unified CommunicationsVM node (for example, Cisco UnifiedCommunications Manager). Check the softwareand switch version status to verify that thesubsequent node is up and runningwith the correctversion.
2 If the subsequent node shows the correct newversion in the active partition, you do not need torecreate a switch version task on PrimeCollaboration Deployment.
3 If the subsequent node shows the new version inthe inactive partition and the old version in activepartition, the switch version was not successfulon the subsequent node. You can either performa switch version manually on the subsequent nodeor create a new switch version task on thesubsequent node on Prime CollaborationDeployment.
The switch version is successful on the first node butfails on any of the subsequent nodes after PrimeCollaboration Deployment loses connectivity
Readdress Task Failure
Problem
The success or failure of each step in the readdress task depends on the Prime Collaboration Deploymentserver being able to get a response from every server in the cluster.
Cisco Prime Collaboration Deployment Administration Guide, Release 11.5(2) 153
Cisco Prime Collaboration Deployment TroubleshootingReaddress Task Failure
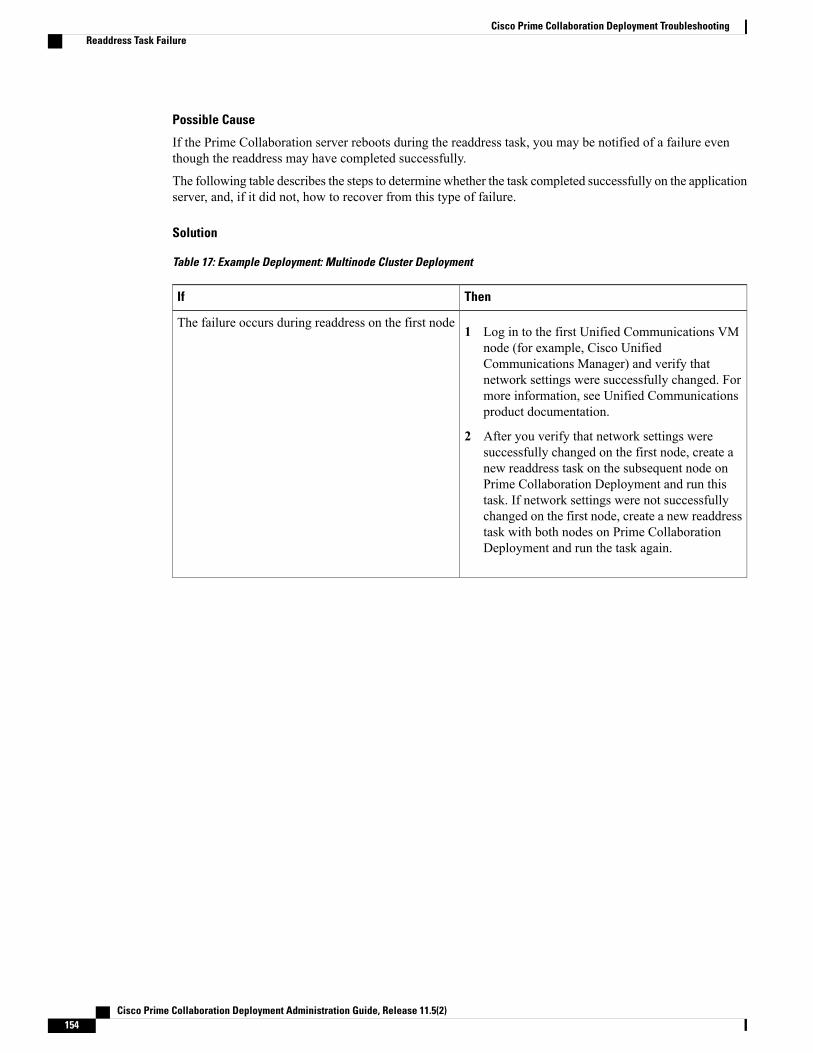
Possible Cause
If the Prime Collaboration server reboots during the readdress task, you may be notified of a failure eventhough the readdress may have completed successfully.
The following table describes the steps to determine whether the task completed successfully on the applicationserver, and, if it did not, how to recover from this type of failure.
Solution
Table 17: Example Deployment: Multinode Cluster Deployment
ThenIf
1 Log in to the first Unified Communications VMnode (for example, Cisco UnifiedCommunications Manager) and verify thatnetwork settings were successfully changed. Formore information, see Unified Communicationsproduct documentation.
2 After you verify that network settings weresuccessfully changed on the first node, create anew readdress task on the subsequent node onPrime Collaboration Deployment and run thistask. If network settings were not successfullychanged on the first node, create a new readdresstask with both nodes on Prime CollaborationDeployment and run the task again.
The failure occurs during readdress on the first node
Cisco Prime Collaboration Deployment Administration Guide, Release 11.5(2)154
Cisco Prime Collaboration Deployment TroubleshootingReaddress Task Failure
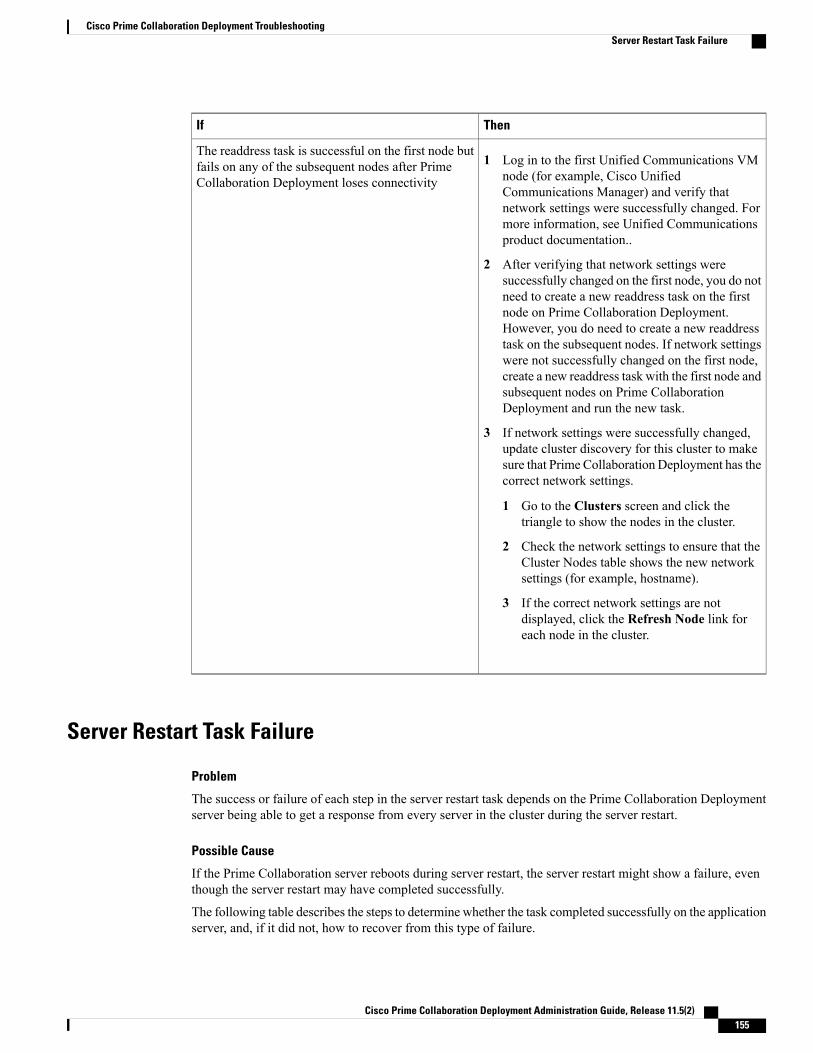
ThenIf
1 Log in to the first Unified Communications VMnode (for example, Cisco UnifiedCommunications Manager) and verify thatnetwork settings were successfully changed. Formore information, see Unified Communicationsproduct documentation..
2 After verifying that network settings weresuccessfully changed on the first node, you do notneed to create a new readdress task on the firstnode on Prime Collaboration Deployment.However, you do need to create a new readdresstask on the subsequent nodes. If network settingswere not successfully changed on the first node,create a new readdress task with the first node andsubsequent nodes on Prime CollaborationDeployment and run the new task.
3 If network settings were successfully changed,update cluster discovery for this cluster to makesure that Prime Collaboration Deployment has thecorrect network settings.
1 Go to the Clusters screen and click thetriangle to show the nodes in the cluster.
2 Check the network settings to ensure that theCluster Nodes table shows the new networksettings (for example, hostname).
3 If the correct network settings are notdisplayed, click the Refresh Node link foreach node in the cluster.
The readdress task is successful on the first node butfails on any of the subsequent nodes after PrimeCollaboration Deployment loses connectivity
Server Restart Task Failure
Problem
The success or failure of each step in the server restart task depends on the Prime Collaboration Deploymentserver being able to get a response from every server in the cluster during the server restart.
Possible Cause
If the Prime Collaboration server reboots during server restart, the server restart might show a failure, eventhough the server restart may have completed successfully.
The following table describes the steps to determine whether the task completed successfully on the applicationserver, and, if it did not, how to recover from this type of failure.
Cisco Prime Collaboration Deployment Administration Guide, Release 11.5(2) 155
Cisco Prime Collaboration Deployment TroubleshootingServer Restart Task Failure
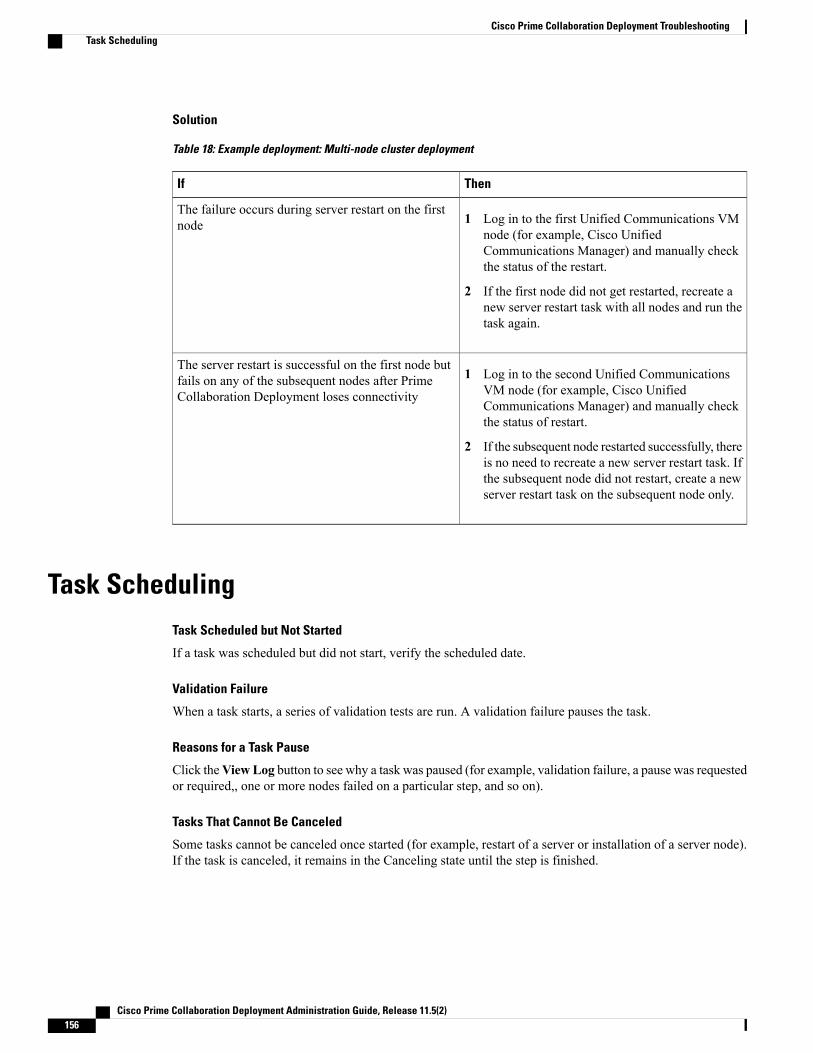
Solution
Table 18: Example deployment: Multi-node cluster deployment
ThenIf
1 Log in to the first Unified Communications VMnode (for example, Cisco UnifiedCommunications Manager) and manually checkthe status of the restart.
2 If the first node did not get restarted, recreate anew server restart task with all nodes and run thetask again.
The failure occurs during server restart on the firstnode
1 Log in to the second Unified CommunicationsVM node (for example, Cisco UnifiedCommunications Manager) and manually checkthe status of restart.
2 If the subsequent node restarted successfully, thereis no need to recreate a new server restart task. Ifthe subsequent node did not restart, create a newserver restart task on the subsequent node only.
The server restart is successful on the first node butfails on any of the subsequent nodes after PrimeCollaboration Deployment loses connectivity
Task SchedulingTask Scheduled but Not Started
If a task was scheduled but did not start, verify the scheduled date.
Validation Failure
When a task starts, a series of validation tests are run. A validation failure pauses the task.
Reasons for a Task Pause
Click theViewLog button to see why a task was paused (for example, validation failure, a pause was requestedor required,, one or more nodes failed on a particular step, and so on).
Tasks That Cannot Be Canceled
Some tasks cannot be canceled once started (for example, restart of a server or installation of a server node).If the task is canceled, it remains in the Canceling state until the step is finished.
Cisco Prime Collaboration Deployment Administration Guide, Release 11.5(2)156
Cisco Prime Collaboration Deployment TroubleshootingTask Scheduling
Task TimeoutsManually Verify Results
All Cisco Prime Collaboration Deployment tasks have built-in timeouts ranging from 30 minutes to 10 hours,depending on the type of task and product. If Cisco Prime Collaboration Deployment does not receive theexpected results within that time frame, Cisco Prime Collaboration Deployment signals an error, even if theactual process succeeded. Users must manually verify the results and ignore any false negatives.
Readdress Times Out
During readdress, if a VLAN change is required, Cisco Prime Collaboration Deployment does not receiveupdates for the nodes. As a result, the readdress eventually times out even though the actual readdress processsucceeded.
Resource Issues Slowing Down the Nodes
Use VMware vSphere to verify that no resource issues are slowing down the nodes. Disk, CPU, and memoryissues can cause slower than normal logins, which can cause connectivity timeout issues during clusterdiscovery.
Network Congestion
Because large files are sent across the network during upgrades, installations, and migrations, networkcongestion can cause tasks to take longer than usual.
Upgrade Migration and InstallationVirtual Machine Does Not Boot
If a VM does not boot using the mounted install ISO during migration or installation, verify the VM bootorder in the Basic Input/Output System (BIOS). We recommend that only freshly created VMs that use theofficial Cisco Open Virtualization Format (OVF) files.
VM Cannot Be Located
If a VM cannot be located, make sure vMotion is turned off.
Upgrade File List Is Blank
If the list of ISO files for upgrade is blank, the reason might be that one or more servers in the cluster you areupgrading have an existing upgrade that is stuck. The file list shows as blank because the UnifiedCommunicationsManager-side upgrade process was stuck. Therefore, no files are valid, because no upgradescan be done. If you attempt an upgrade from the application server CLI, youmay see the message “The resourcelock platform.api.network.address is currently locked.”To resolve this problem, reboot your Unified Communications Manager server.
Cisco Prime Collaboration Deployment Administration Guide, Release 11.5(2) 157
Cisco Prime Collaboration Deployment TroubleshootingTask Timeouts

Upgrade ISO or COP File Is Not Displayed in the Task Wizard
If an upgrade ISO or COP file is not displayed in the task wizard, verify that the file was uploaded into thecorrect directory on the Prime Collaboration Deployment Server. To confirm the location of the file, clickopen and close navigation button and choose the Inventory > SFTP Servers and Datastore menu option.The directory that is in use is usually listed at the top of the task wizard.
Upgrade ISO File Must Be Valid for All Nodes
An upgrade ISO file must be valid for all nodes in the task in order to be listed in the wizard. If the upgradeISO file is not listed, verify that the task contains the publisher or that the publisher was already upgraded.
Release 10.x and Older Products
Most Release 10.x and older products report only generic upgrade and installation failure messages. Usersmust access the failed node directly and diagnose the problem by using traditional tools and processes thatare specific to that product (for example, use the Unified Real-Time Monitoring Tool or the CLI to viewupgrade logs).
Run a New Task When Current Task in Canceling State
Rerun Fresh Install TaskThe following procedure provides the high-level steps for rerunning a new task when the current task is inthe process of being canceled. For more detailed information, see topics relating to task management.
Procedure
Step 1 View the task log to verify the status of the most recent task.a) If the VM is powered on and the fresh install task is still in progress, power off the VM, delete it, and
redeploy the OVA to create a new VM. You can use the same name for the new VM.b) If the VM is powered off and the fresh install was not started on the VM, leave the VM powered off.
Step 2 Check the cluster to verify if any nodes in the cluster were updated with the active version and discoverystatus.
• If any nodes were updated with the new version or discovery status, create a new cluster with a newname, including the same VMs and installation settings.
• If any nodes in the cluster were not updated, reuse the cluster when recreating a fresh install task.
Step 3 Create and run a new install task.
Cisco Prime Collaboration Deployment Administration Guide, Release 11.5(2)158
Cisco Prime Collaboration Deployment TroubleshootingRun a New Task When Current Task in Canceling State
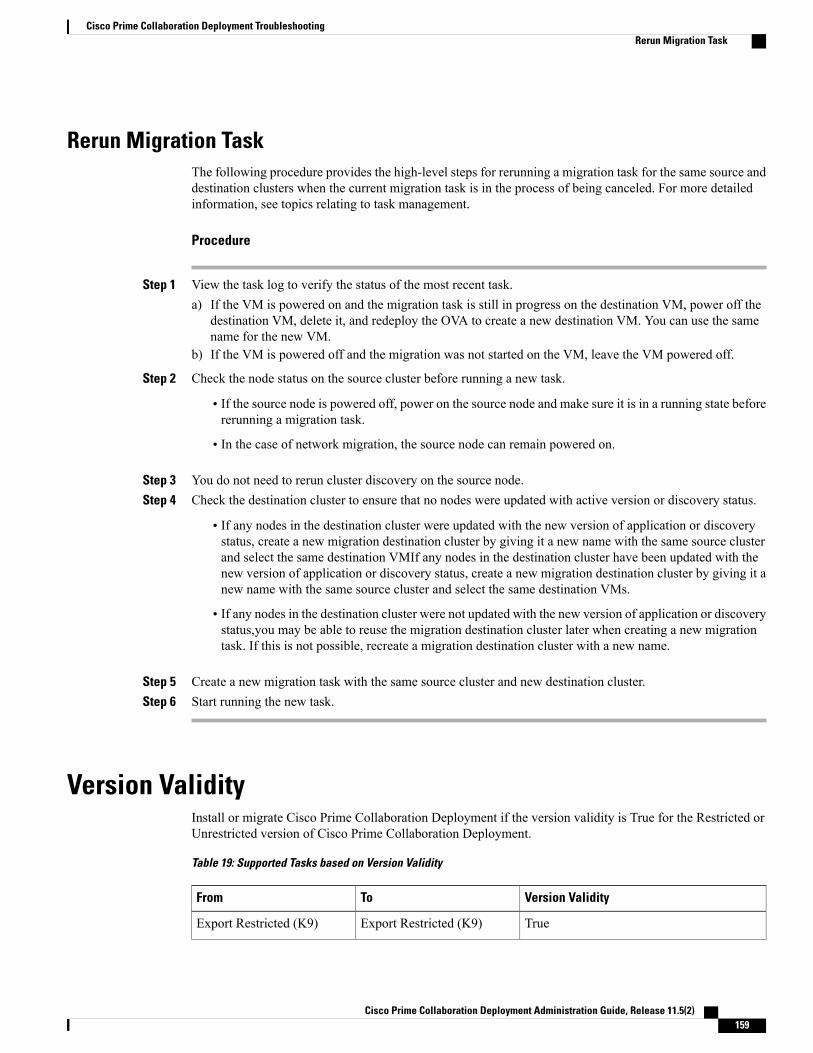
Rerun Migration TaskThe following procedure provides the high-level steps for rerunning a migration task for the same source anddestination clusters when the current migration task is in the process of being canceled. For more detailedinformation, see topics relating to task management.
Procedure
Step 1 View the task log to verify the status of the most recent task.a) If the VM is powered on and the migration task is still in progress on the destination VM, power off the
destination VM, delete it, and redeploy the OVA to create a new destination VM. You can use the samename for the new VM.
b) If the VM is powered off and the migration was not started on the VM, leave the VM powered off.
Step 2 Check the node status on the source cluster before running a new task.
• If the source node is powered off, power on the source node and make sure it is in a running state beforererunning a migration task.
• In the case of network migration, the source node can remain powered on.
Step 3 You do not need to rerun cluster discovery on the source node.Step 4 Check the destination cluster to ensure that no nodes were updated with active version or discovery status.
• If any nodes in the destination cluster were updated with the new version of application or discoverystatus, create a new migration destination cluster by giving it a new name with the same source clusterand select the same destination VMIf any nodes in the destination cluster have been updated with thenew version of application or discovery status, create a new migration destination cluster by giving it anew name with the same source cluster and select the same destination VMs.
• If any nodes in the destination cluster were not updated with the new version of application or discoverystatus,you may be able to reuse the migration destination cluster later when creating a new migrationtask. If this is not possible, recreate a migration destination cluster with a new name.
Step 5 Create a new migration task with the same source cluster and new destination cluster.Step 6 Start running the new task.
Version ValidityInstall or migrate Cisco Prime Collaboration Deployment if the version validity is True for the Restricted orUnrestricted version of Cisco Prime Collaboration Deployment.
Table 19: Supported Tasks based on Version Validity
Version ValidityToFrom
TrueExport Restricted (K9)Export Restricted (K9)
Cisco Prime Collaboration Deployment Administration Guide, Release 11.5(2) 159
Cisco Prime Collaboration Deployment TroubleshootingRerun Migration Task
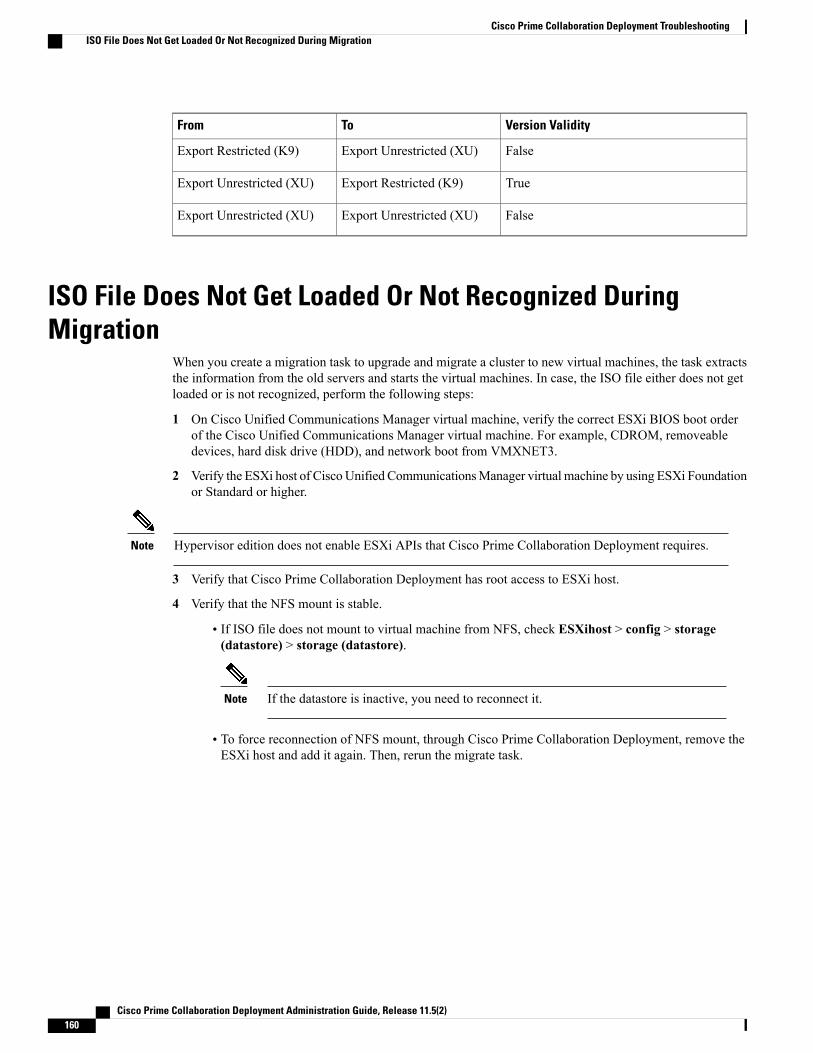
Version ValidityToFrom
FalseExport Unrestricted (XU)Export Restricted (K9)
TrueExport Restricted (K9)Export Unrestricted (XU)
FalseExport Unrestricted (XU)Export Unrestricted (XU)
ISO File Does Not Get Loaded Or Not Recognized DuringMigration
When you create a migration task to upgrade and migrate a cluster to new virtual machines, the task extractsthe information from the old servers and starts the virtual machines. In case, the ISO file either does not getloaded or is not recognized, perform the following steps:
1 On Cisco Unified Communications Manager virtual machine, verify the correct ESXi BIOS boot orderof the Cisco Unified Communications Manager virtual machine. For example, CDROM, removeabledevices, hard disk drive (HDD), and network boot from VMXNET3.
2 Verify the ESXi host of CiscoUnified CommunicationsManager virtual machine by using ESXi Foundationor Standard or higher.
Hypervisor edition does not enable ESXi APIs that Cisco Prime Collaboration Deployment requires.Note
3 Verify that Cisco Prime Collaboration Deployment has root access to ESXi host.
4 Verify that the NFS mount is stable.
• If ISO file does not mount to virtual machine from NFS, check ESXihost > config > storage(datastore) > storage (datastore).
If the datastore is inactive, you need to reconnect it.Note
• To force reconnection of NFS mount, through Cisco Prime Collaboration Deployment, remove theESXi host and add it again. Then, rerun the migrate task.
Cisco Prime Collaboration Deployment Administration Guide, Release 11.5(2)160
Cisco Prime Collaboration Deployment TroubleshootingISO File Does Not Get Loaded Or Not Recognized During Migration