cisco - configuring ipsec between pix and cisco vpn … - configuring ipsec between... ·...
TRANSCRIPT
Cisco − Configuring IPSec Between PIX and Cisco VPN Client Using Smartcard Certificates
Table of ContentsConfiguring IPSec Between PIX and Cisco VPN Client Using Smartcard Certificates..............................1
Introduction..............................................................................................................................................1Components Used.......................................................................................................................1 Network Diagram......................................................................................................................2
Enrolling and Configuring the PIX..........................................................................................................2Enrolling Cisco VPN Client Certificates.................................................................................................4
Step−by−Step Instructions..........................................................................................................4Configuring the Cisco VPN Client to Use the Certificate for Connection to the PIX...........................10
Step−by−Step Instructions........................................................................................................10Installing eToken Smartcard Drivers.....................................................................................................13
Step−by−Step Instructions........................................................................................................13Verifying the Results.............................................................................................................................15Tools Information..................................................................................................................................17 Related Information..............................................................................................................................17
Cisco − Configuring IPSec Between PIX and Cisco VPN Client Using Smartcard Certificates
i
Configuring IPSec Between PIX and Cisco VPNClient Using Smartcard Certificates
Introduction
Components UsedNetwork DiagramEnrolling and Configuring the PIXEnrolling Cisco VPN Client Certificates
Step−by−Step InstructionsConfiguring the Cisco VPN Client to Use the Certificate for Connection to the PIX
Step−by−Step InstructionsInstalling eToken Smartcard Drivers
Step−by−Step InstructionsVerifying the ResultsTools InformationRelated Information
Introduction
This document demonstrates how to configure an IPSec VPN tunnel between a PIX Firewall and a Cisco VPNClient 3.x. The configuration example in this document also highlights the certification authority (CA)enrollment procedure for both the Cisco IOS® router and the Cisco VPN Client, as well as the use of aSmartcard as a certificate storage.
Below is the required information for configuring the features that are described in this document.
Note: To find additional information on the commands used in this document, use the IOS Command Lookuptool. A link to this tool can be found in the Tools Information section of this document.
Components Used
This document was developed and tested using the software and hardware versions below.
Cisco PIX Firewall running software version 6.2(1).•
Cisco VPN Client 3.5.1C on a PC running Windows 2000.•
A Microsoft Windows 2000 CA server is used in this document as the CA server.•
Certificates on the Client are stored using Aladdin e−Token Smartcard.•
The information presented in this document was created from devices in a specific lab environment. All of thedevices used in this document started with a cleared (default) configuration. If you are working in a livenetwork, be sure that you understand the potential impact of any command before using it.
Cisco − Configuring IPSec Between PIX and Cisco VPN Client Using Smartcard Certificates
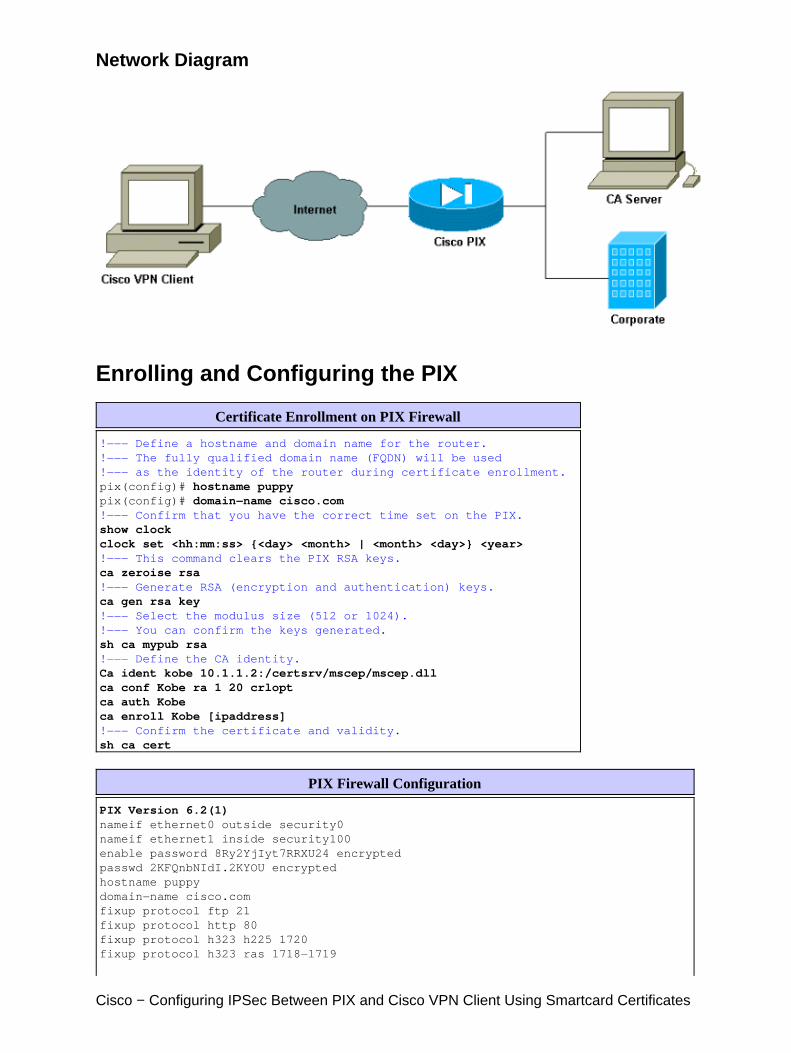
Network Diagram
Enrolling and Configuring the PIX
Certificate Enrollment on PIX Firewall
!−−− Define a hostname and domain name for the router. !−−− The fully qualified domain name (FQDN) will be used !−−− as the identity of the router during certificate enrollment. pix(config)# hostname puppy pix(config)# domain−name cisco.com!−−− Confirm that you have the correct time set on the PIX. show clock clock set <hh:mm:ss> {<day> <month> | <month> <day>} <year> !−−− This command clears the PIX RSA keys. ca zeroise rsa!−−− Generate RSA (encryption and authentication) keys. ca gen rsa key !−−− Select the modulus size (512 or 1024). !−−− You can confirm the keys generated.sh ca mypub rsa !−−− Define the CA identity.Ca ident kobe 10.1.1.2:/certsrv/mscep/mscep.dll ca conf Kobe ra 1 20 crlopt ca auth Kobe ca enroll Kobe [ipaddress]!−−− Confirm the certificate and validity. sh ca cert
PIX Firewall Configuration
PIX Version 6.2(1)nameif ethernet0 outside security0 nameif ethernet1 inside security100 enable password 8Ry2YjIyt7RRXU24 encrypted passwd 2KFQnbNIdI.2KYOU encrypted hostname puppy domain−name cisco.com fixup protocol ftp 21 fixup protocol http 80 fixup protocol h323 h225 1720 fixup protocol h323 ras 1718−1719
Cisco − Configuring IPSec Between PIX and Cisco VPN Client Using Smartcard Certificates
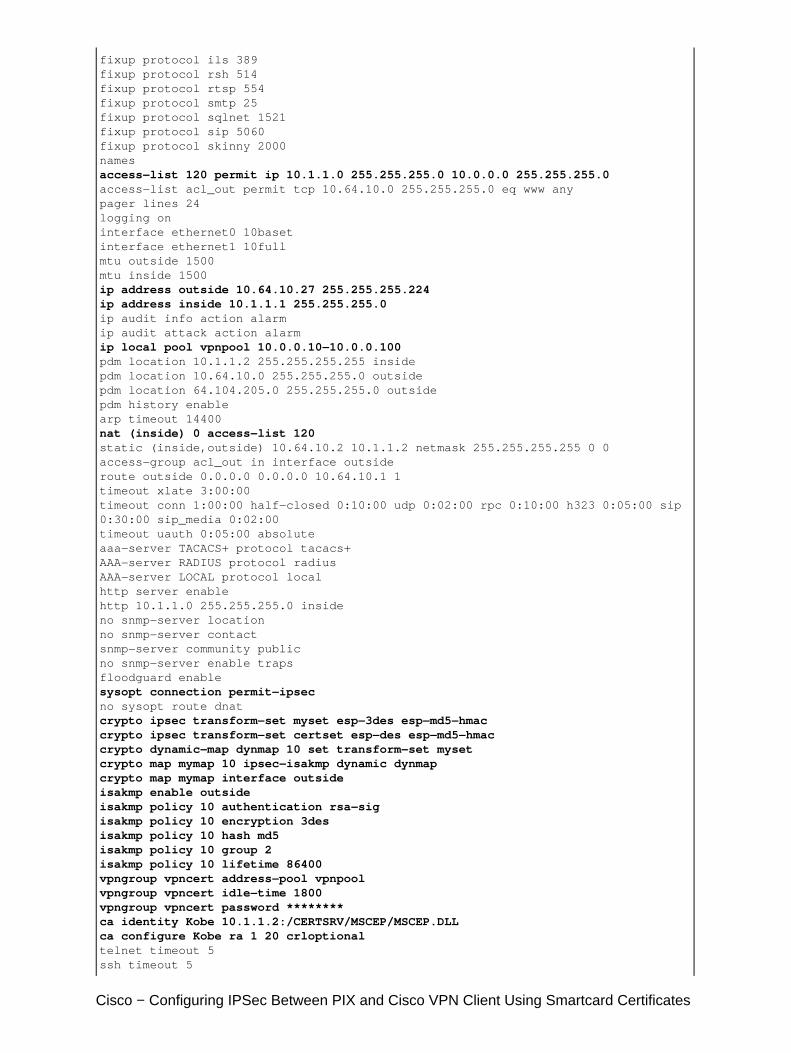
fixup protocol ils 389 fixup protocol rsh 514 fixup protocol rtsp 554 fixup protocol smtp 25 fixup protocol sqlnet 1521 fixup protocol sip 5060 fixup protocol skinny 2000 names access−list 120 permit ip 10.1.1.0 255.255.255.0 10.0.0.0 255.255.255.0 access−list acl_out permit tcp 10.64.10.0 255.255.255.0 eq www any pager lines 24 logging on interface ethernet0 10baset interface ethernet1 10full mtu outside 1500 mtu inside 1500 ip address outside 10.64.10.27 255.255.255.224ip address inside 10.1.1.1 255.255.255.0ip audit info action alarm ip audit attack action alarm ip local pool vpnpool 10.0.0.10−10.0.0.100 pdm location 10.1.1.2 255.255.255.255 inside pdm location 10.64.10.0 255.255.255.0 outside pdm location 64.104.205.0 255.255.255.0 outside pdm history enable arp timeout 14400 nat (inside) 0 access−list 120static (inside,outside) 10.64.10.2 10.1.1.2 netmask 255.255.255.255 0 0 access−group acl_out in interface outside route outside 0.0.0.0 0.0.0.0 10.64.10.1 1 timeout xlate 3:00:00 timeout conn 1:00:00 half−closed 0:10:00 udp 0:02:00 rpc 0:10:00 h323 0:05:00 sip 0:30:00 sip_media 0:02:00 timeout uauth 0:05:00 absolute aaa−server TACACS+ protocol tacacs+ AAA−server RADIUS protocol radius AAA−server LOCAL protocol local http server enable http 10.1.1.0 255.255.255.0 inside no snmp−server location no snmp−server contact snmp−server community public no snmp−server enable traps floodguard enable sysopt connection permit−ipsecno sysopt route dnat crypto ipsec transform−set myset esp−3des esp−md5−hmac crypto ipsec transform−set certset esp−des esp−md5−hmac crypto dynamic−map dynmap 10 set transform−set mysetcrypto map mymap 10 ipsec−isakmp dynamic dynmapcrypto map mymap interface outsideisakmp enable outsideisakmp policy 10 authentication rsa−sigisakmp policy 10 encryption 3desisakmp policy 10 hash md5isakmp policy 10 group 2isakmp policy 10 lifetime 86400vpngroup vpncert address−pool vpnpoolvpngroup vpncert idle−time 1800vpngroup vpncert password ********ca identity Kobe 10.1.1.2:/CERTSRV/MSCEP/MSCEP.DLL ca configure Kobe ra 1 20 crloptionaltelnet timeout 5 ssh timeout 5
Cisco − Configuring IPSec Between PIX and Cisco VPN Client Using Smartcard Certificates
terminal width 80 Cryptochecksum:56b426c59dec5e35fd9caa6ca0dc5ec7 : end [OK] puppy(config)#
Enrolling Cisco VPN Client Certificates
Remember to install all the necessary drivers and utilities that come with the Smartcard device on the PC to beused with the Cisco VPN Client.
The following steps demonstrate the procedures used to enroll the Cisco VPN Client for MS certificates. Thecertificate is stored on the e−Token Smartcard store.
Step−by−Step Instructions
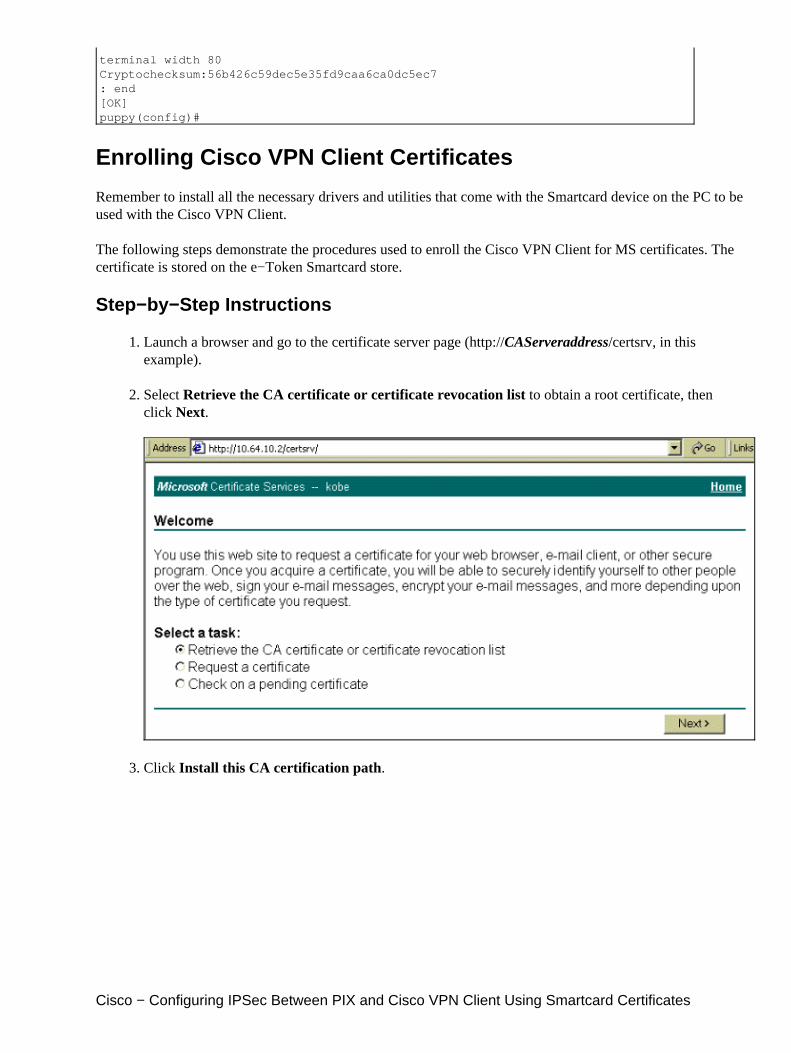
Launch a browser and go to the certificate server page (http://CAServeraddress/certsrv, in thisexample).
1.
Select Retrieve the CA certificate or certificate revocation list to obtain a root certificate, thenclick Next.
2.
Click Install this CA certification path.3.
Cisco − Configuring IPSec Between PIX and Cisco VPN Client Using Smartcard Certificates
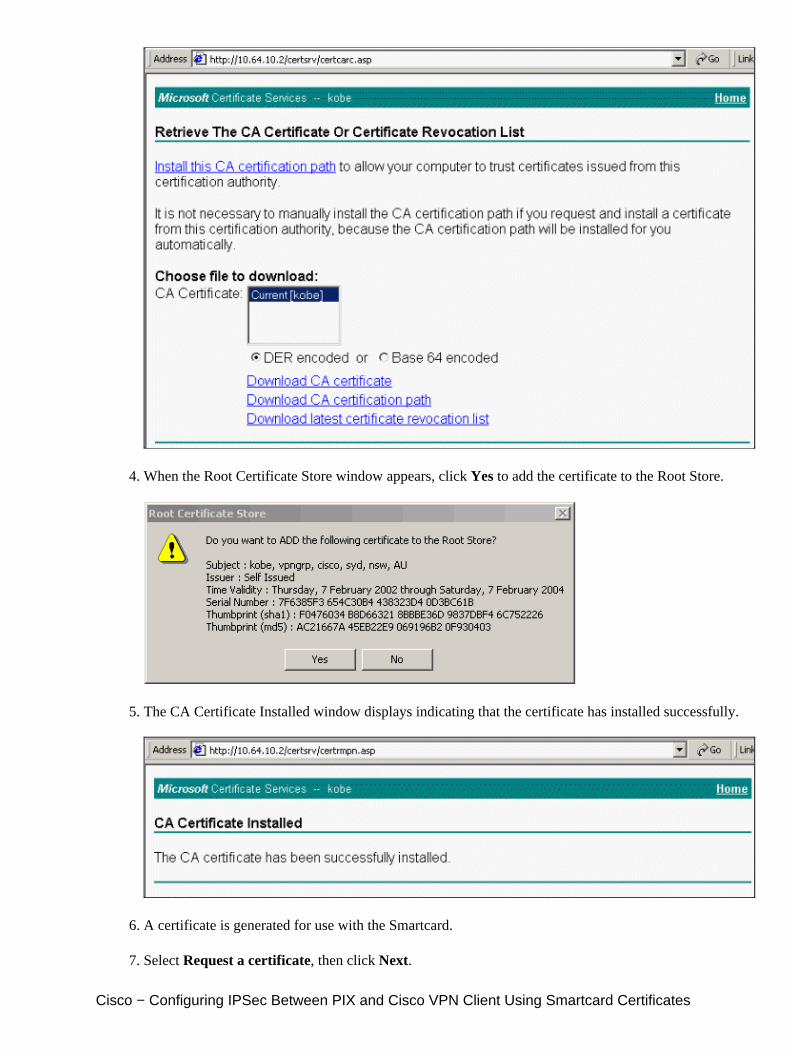
When the Root Certificate Store window appears, click Yes to add the certificate to the Root Store.4.
The CA Certificate Installed window displays indicating that the certificate has installed successfully.5.
A certificate is generated for use with the Smartcard.6.
Select Request a certificate, then click Next.7.
Cisco − Configuring IPSec Between PIX and Cisco VPN Client Using Smartcard Certificates
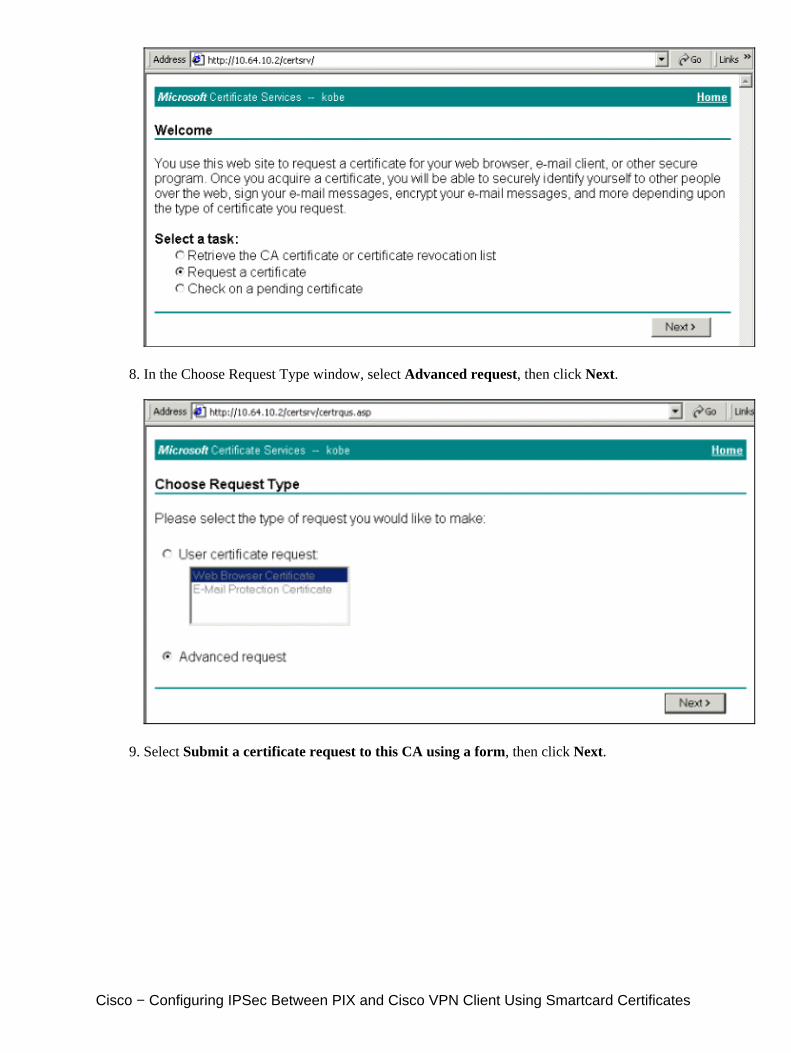
In the Choose Request Type window, select Advanced request, then click Next.8.
Select Submit a certificate request to this CA using a form, then click Next.9.
Cisco − Configuring IPSec Between PIX and Cisco VPN Client Using Smartcard Certificates

Fill in all the items on the Advanced Certificate Request form. Be sure that the department ororganizational unit (OU) corresponds to the VPN Client group name, as configured in the PIXvpngroup name. Select the correct Certificate Service Provider (CSP) appropriate for your setup.
10.
Cisco − Configuring IPSec Between PIX and Cisco VPN Client Using Smartcard Certificates
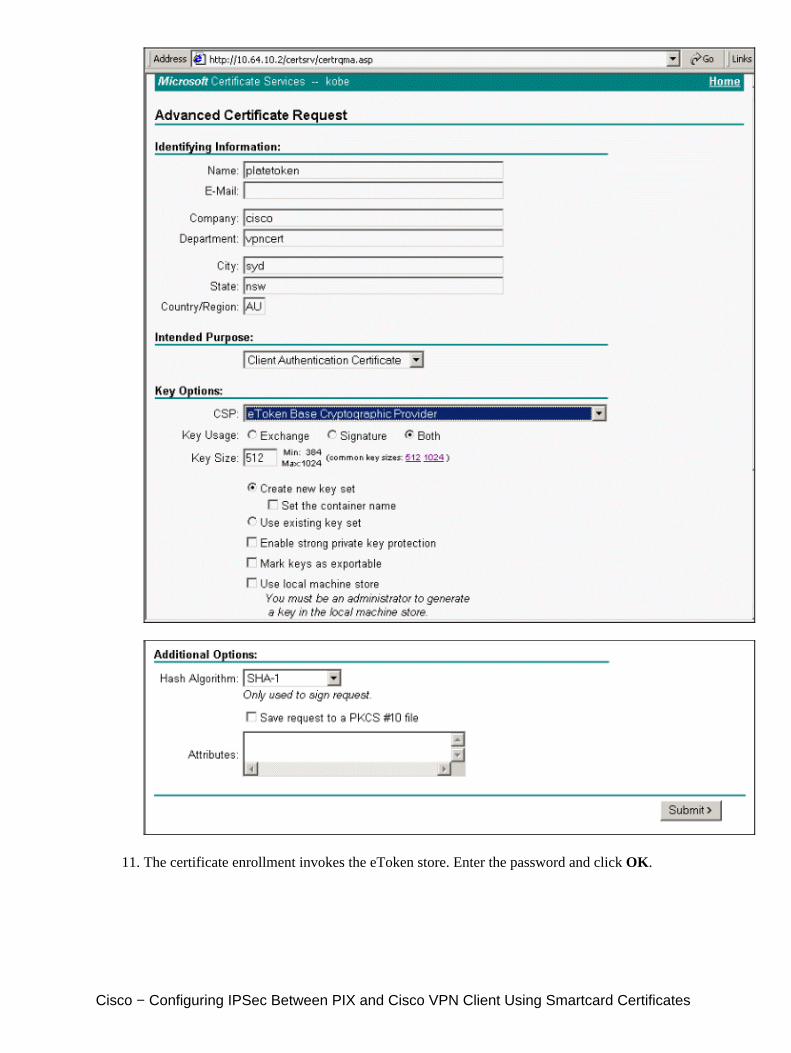
The certificate enrollment invokes the eToken store. Enter the password and click OK.11.
Cisco − Configuring IPSec Between PIX and Cisco VPN Client Using Smartcard Certificates
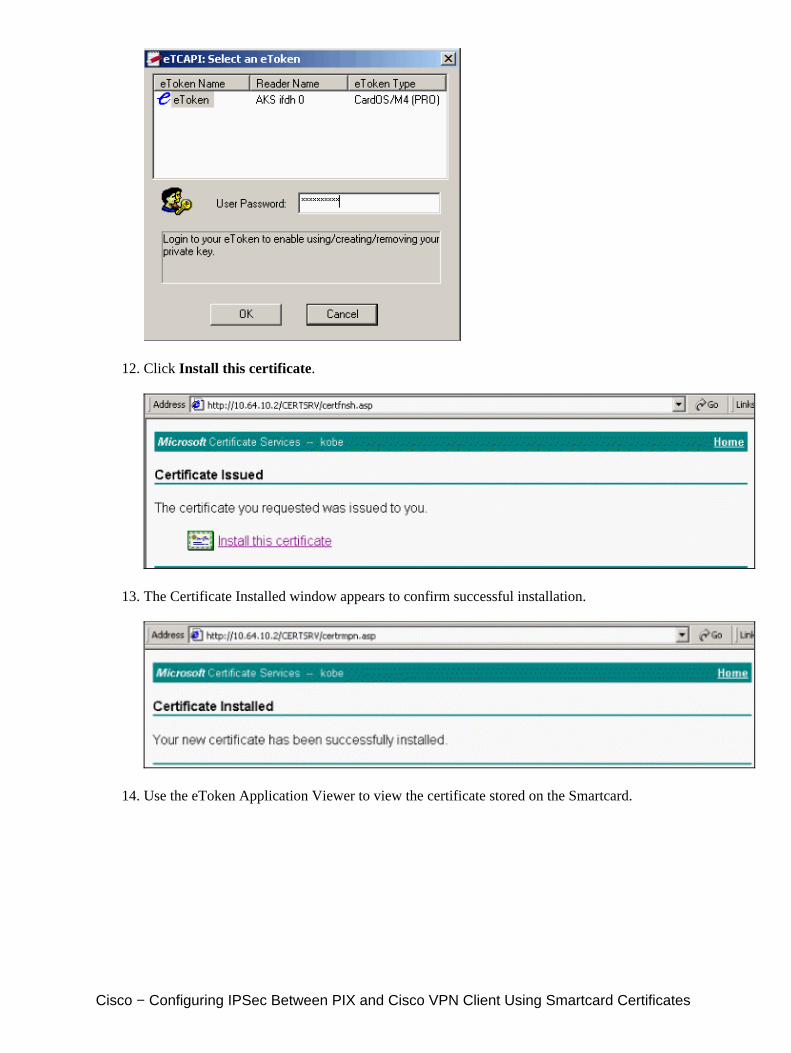
Click Install this certificate.12.
The Certificate Installed window appears to confirm successful installation.13.
Use the eToken Application Viewer to view the certificate stored on the Smartcard.14.
Cisco − Configuring IPSec Between PIX and Cisco VPN Client Using Smartcard Certificates
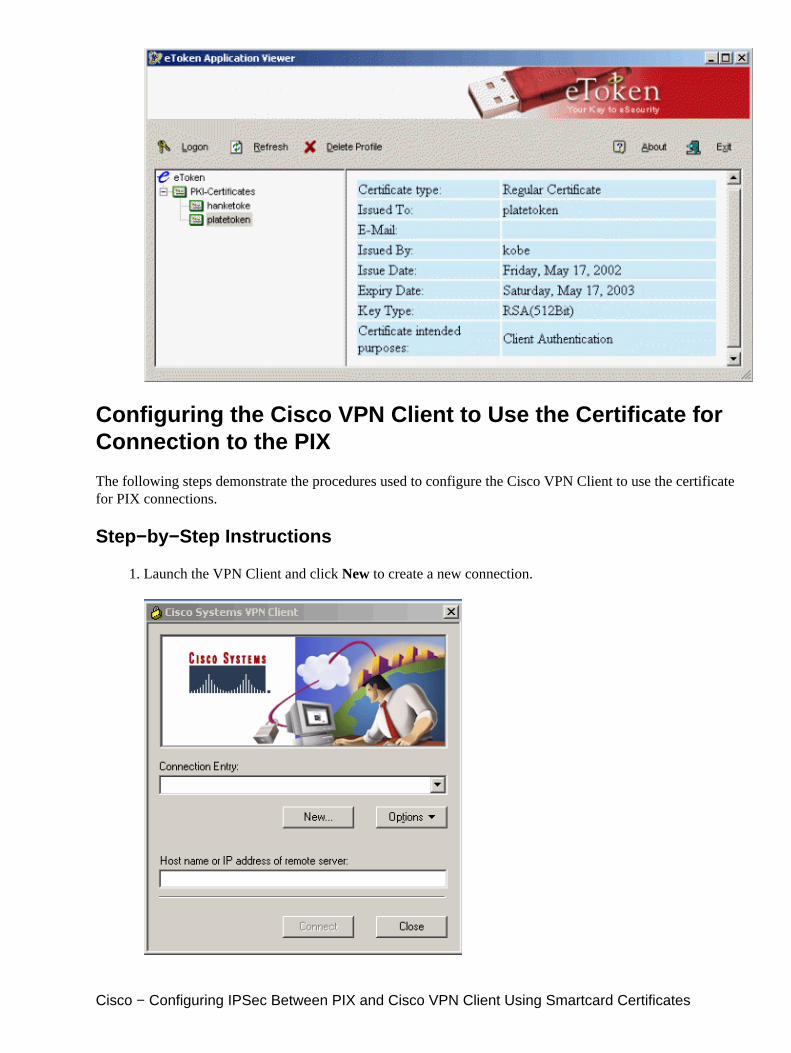
Configuring the Cisco VPN Client to Use the Certificate forConnection to the PIX
The following steps demonstrate the procedures used to configure the Cisco VPN Client to use the certificatefor PIX connections.
Step−by−Step Instructions
Launch the VPN Client and click New to create a new connection.1.
Cisco − Configuring IPSec Between PIX and Cisco VPN Client Using Smartcard Certificates
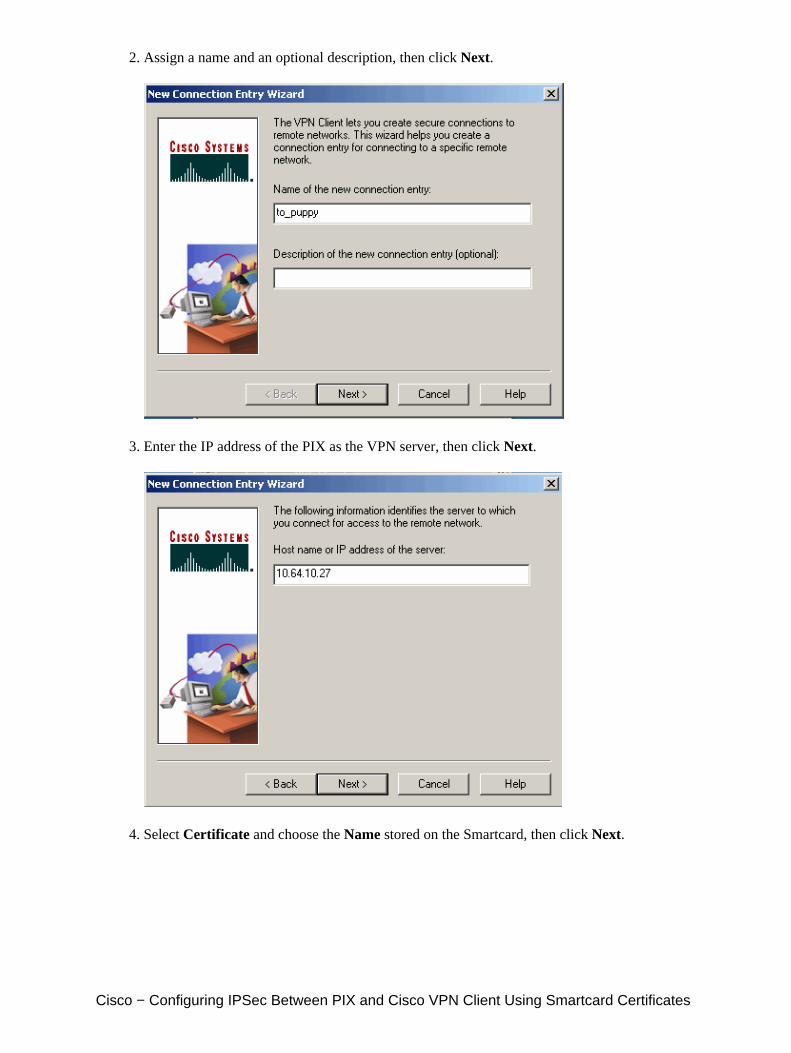
Assign a name and an optional description, then click Next.2.
Enter the IP address of the PIX as the VPN server, then click Next.3.
Select Certificate and choose the Name stored on the Smartcard, then click Next.4.
Cisco − Configuring IPSec Between PIX and Cisco VPN Client Using Smartcard Certificates

Click Finish to save the configured entry.5.
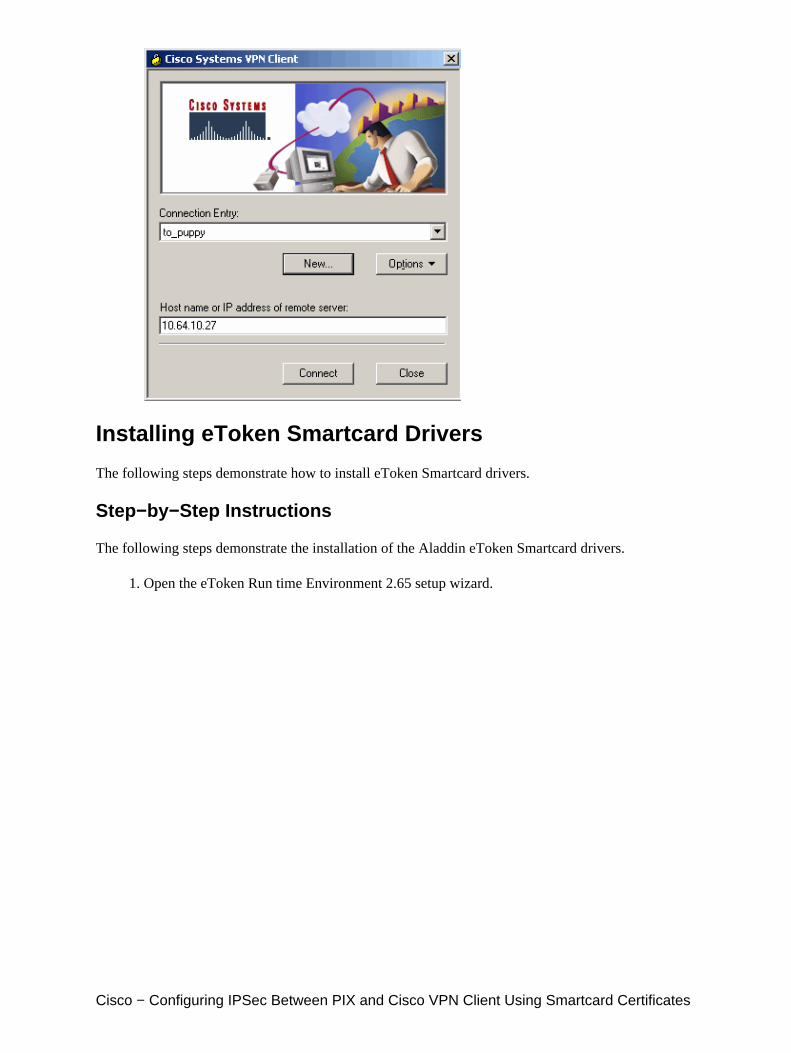
To start the VPN Client connection to the PIX, select the desired Connection Entry and clickConnect.
6.
Cisco − Configuring IPSec Between PIX and Cisco VPN Client Using Smartcard Certificates
Installing eToken Smartcard Drivers
The following steps demonstrate how to install eToken Smartcard drivers.
Step−by−Step Instructions
The following steps demonstrate the installation of the Aladdin eToken Smartcard drivers.
Open the eToken Run time Environment 2.65 setup wizard.1.
Cisco − Configuring IPSec Between PIX and Cisco VPN Client Using Smartcard Certificates
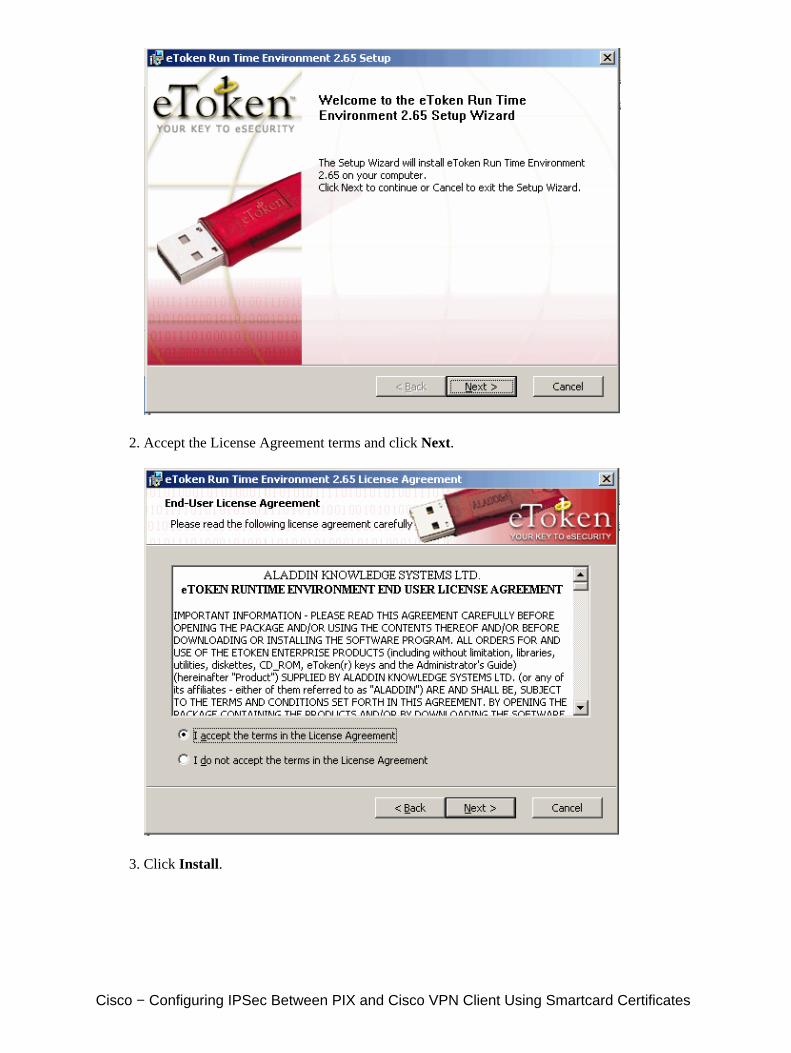
Accept the License Agreement terms and click Next.2.
Click Install.3.
Cisco − Configuring IPSec Between PIX and Cisco VPN Client Using Smartcard Certificates
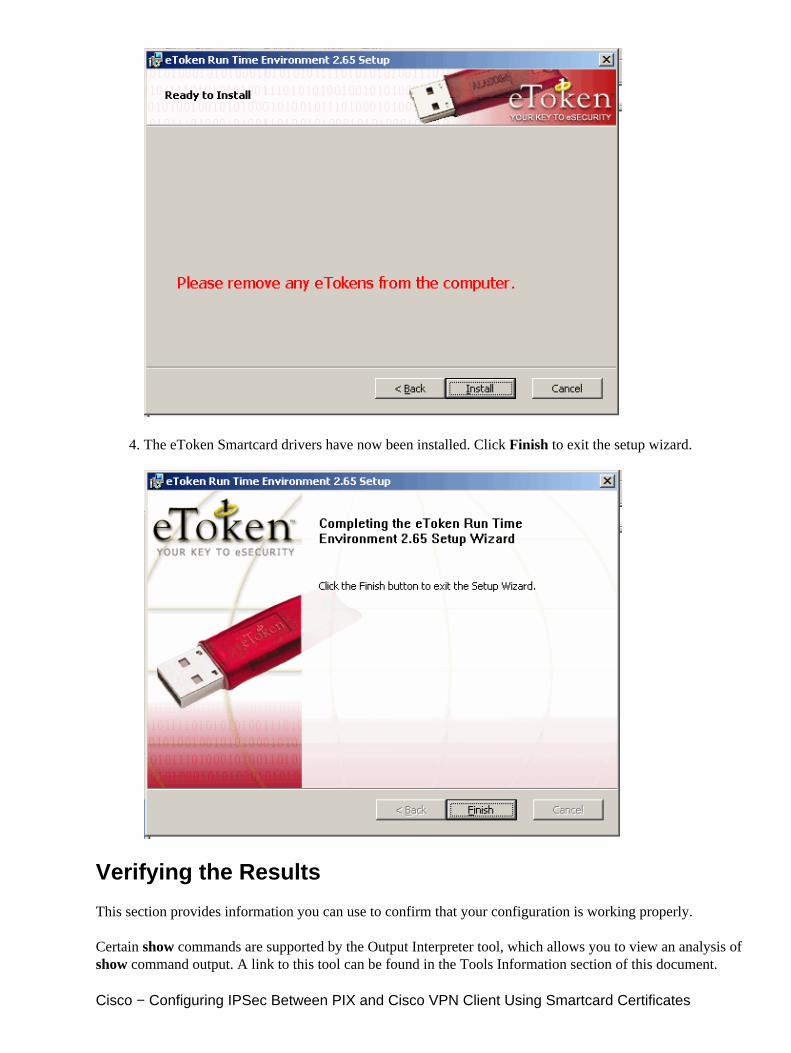
The eToken Smartcard drivers have now been installed. Click Finish to exit the setup wizard.4.
Verifying the Results
This section provides information you can use to confirm that your configuration is working properly.
Certain show commands are supported by the Output Interpreter tool, which allows you to view an analysis ofshow command output. A link to this tool can be found in the Tools Information section of this document.
Cisco − Configuring IPSec Between PIX and Cisco VPN Client Using Smartcard Certificates
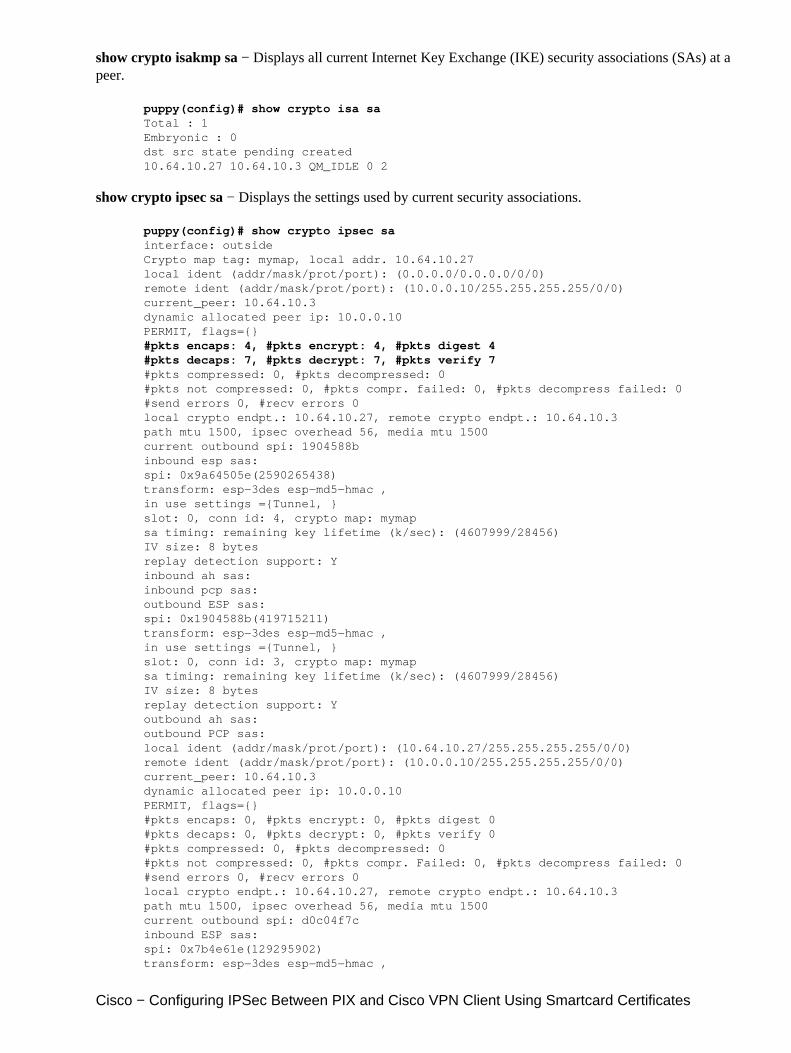
show crypto isakmp sa − Displays all current Internet Key Exchange (IKE) security associations (SAs) at apeer.
puppy(config)# show crypto isa saTotal : 1 Embryonic : 0 dst src state pending created 10.64.10.27 10.64.10.3 QM_IDLE 0 2
show crypto ipsec sa − Displays the settings used by current security associations.
puppy(config)# show crypto ipsec sainterface: outside Crypto map tag: mymap, local addr. 10.64.10.27 local ident (addr/mask/prot/port): (0.0.0.0/0.0.0.0/0/0) remote ident (addr/mask/prot/port): (10.0.0.10/255.255.255.255/0/0) current_peer: 10.64.10.3 dynamic allocated peer ip: 10.0.0.10 PERMIT, flags={} #pkts encaps: 4, #pkts encrypt: 4, #pkts digest 4 #pkts decaps: 7, #pkts decrypt: 7, #pkts verify 7 #pkts compressed: 0, #pkts decompressed: 0 #pkts not compressed: 0, #pkts compr. failed: 0, #pkts decompress failed: 0 #send errors 0, #recv errors 0 local crypto endpt.: 10.64.10.27, remote crypto endpt.: 10.64.10.3 path mtu 1500, ipsec overhead 56, media mtu 1500 current outbound spi: 1904588b inbound esp sas: spi: 0x9a64505e(2590265438) transform: esp−3des esp−md5−hmac , in use settings ={Tunnel, } slot: 0, conn id: 4, crypto map: mymap sa timing: remaining key lifetime (k/sec): (4607999/28456) IV size: 8 bytes replay detection support: Y inbound ah sas: inbound pcp sas: outbound ESP sas: spi: 0x1904588b(419715211) transform: esp−3des esp−md5−hmac , in use settings ={Tunnel, } slot: 0, conn id: 3, crypto map: mymap sa timing: remaining key lifetime (k/sec): (4607999/28456) IV size: 8 bytes replay detection support: Y outbound ah sas: outbound PCP sas: local ident (addr/mask/prot/port): (10.64.10.27/255.255.255.255/0/0) remote ident (addr/mask/prot/port): (10.0.0.10/255.255.255.255/0/0) current_peer: 10.64.10.3 dynamic allocated peer ip: 10.0.0.10 PERMIT, flags={} #pkts encaps: 0, #pkts encrypt: 0, #pkts digest 0 #pkts decaps: 0, #pkts decrypt: 0, #pkts verify 0 #pkts compressed: 0, #pkts decompressed: 0 #pkts not compressed: 0, #pkts compr. Failed: 0, #pkts decompress failed: 0 #send errors 0, #recv errors 0 local crypto endpt.: 10.64.10.27, remote crypto endpt.: 10.64.10.3 path mtu 1500, ipsec overhead 56, media mtu 1500 current outbound spi: d0c04f7c inbound ESP sas: spi: 0x7b4e61e(129295902) transform: esp−3des esp−md5−hmac ,
Cisco − Configuring IPSec Between PIX and Cisco VPN Client Using Smartcard Certificates
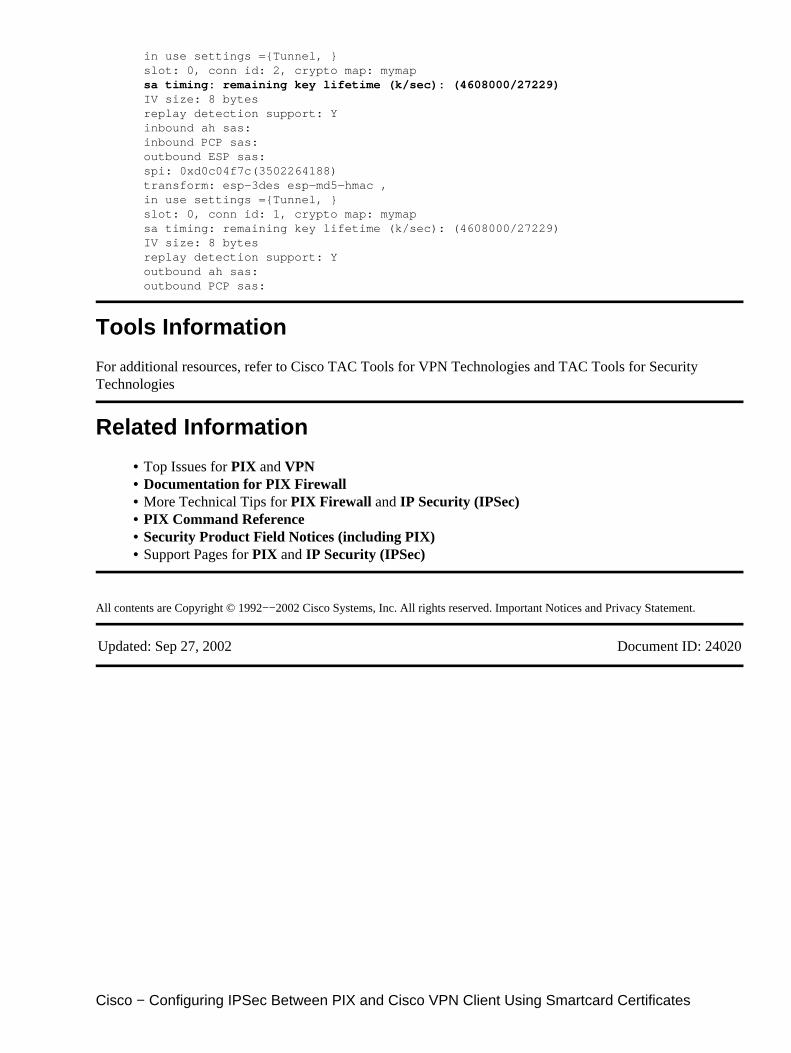
in use settings ={Tunnel, } slot: 0, conn id: 2, crypto map: mymap sa timing: remaining key lifetime (k/sec): (4608000/27229)IV size: 8 bytes replay detection support: Y inbound ah sas: inbound PCP sas: outbound ESP sas: spi: 0xd0c04f7c(3502264188) transform: esp−3des esp−md5−hmac , in use settings ={Tunnel, } slot: 0, conn id: 1, crypto map: mymap sa timing: remaining key lifetime (k/sec): (4608000/27229) IV size: 8 bytes replay detection support: Y outbound ah sas: outbound PCP sas:
Tools Information
For additional resources, refer to Cisco TAC Tools for VPN Technologies and TAC Tools for SecurityTechnologies
Related Information
Top Issues for PIX and VPN• Documentation for PIX Firewall• More Technical Tips for PIX Firewall and IP Security (IPSec)• PIX Command Reference• Security Product Field Notices (including PIX)• Support Pages for PIX and IP Security (IPSec)•
All contents are Copyright © 1992−−2002 Cisco Systems, Inc. All rights reserved. Important Notices and Privacy Statement.
Updated: Sep 27, 2002 Document ID: 24020
Cisco − Configuring IPSec Between PIX and Cisco VPN Client Using Smartcard Certificates