chess the endgame ebook ad pdf
DESCRIPTION
This may be the best book you will ever get on the endgame. All the basics in an easy to read format!TRANSCRIPT

A Paul Wiseman Ebook.
Chess: The Endgame
by Paul Wiseman
ISBN: 978-1-4653-0989-1
Modestly priced at £2.99, this easy-to-read masterpiece is a must for all club players. Speed up your endgame play
to beat the clock and your opponent!
Purchase from:
www.xlibrispublishing.co.uk
Select: Browse by Subject > Games > Chess

Chess: The Endgame
Published for Paul Wisemanby
Xlibris
Copyright 2012 Paul Wiseman
1st Edition, License Notes This ebook is licensed for your personal enjoyment only. This ebook may not be re-sold or given away to other people. If you would like to share this book with another person, then please purchase an additional copy for each recipient. If you’re reading this book and did not purchase it, or it was not purchased for your use only, then please purchase your own copy. Thank you for respecting the hard work of this author.

BACK TO TITLE PAGES
Table of ContentsBack to Top
# Chess Notation
#Chapter 1: King and Pawn Endings Promotion Square Races 1.1 The Opposition Vertical Opposition Horizontal Opposition Diagonal Opposition Oblique Opposition Distant Opposition 1.2 #The Opposition in Action The Trébuchet (1) The Trébuchet (2) Pawn Promotion 3(a) Pawn Promotion 3(b) Pawn Promotion 3(c) Multiple Pawns 4(a) Multiple Pawns 4(b) Multiple Pawns 4(c) Triangulation 5(a) Triangulation 5(b) Triangulation 5(c) Summary: Opposition and Triangulation 1.3 #Pawn Ending Technique Pawn Ending Technique (1 to 16) The 50 Move Rule (and 3-fold repetition rule)

Back to Top
Chapter 2: Rook and Pawn Endings 2.1#Winning Methods The Lucena Win (1497) The Ersatz Lucena Win 2.2 # Defending against the Lucena Short side defence - advanced pawn Short side defence - less advanced pawn The king is cut off along 2 or more files The king is cut off along a rank The king is cut off along a file The Rule of Seven (A) The Rule of Seven (B) 2.3 # Defensive Methods Philidor's Draw (1777) Short side defence Short side defence examples (A) Short side defence examples (B) Short side defence examples (C) Back-rank defence (A) Back-rank defence (B) Attacking Rook in front of pawn Rook in front of pawn - Vančura position Attacking King in front of pawn The Frontal defence 2.4# Rooks and Pawns Rook & Pawn v. Rook Problem Rooks & Pawns Problem Wing Play Nothing Fancy! 2.5 Rook versus minor piece games#

Back to Top
Chapter 3: Bishop and pawn Endings Wrong Colour B Mate with two Bs The Finesse
3.1 Same Colour Bishops and Pawn (1) Same Colour Bs and P(2) Same Colour Bs and P(3) Same Colour Bs and P(4) Same Colour Bs and P(5)
3.2# Opposite Colour Bishops Opposite Colour Bs versus P Opposite Colour Bs v. two Ps Isolated pawns (a) Isolated pawns (b) Isolated pawns (c) Wrong Rook Pawn (d) Connected Pawns (e) Connected Pawns (f)
Chapter 4: Knight and Pawn v Knight Endings N and P versus N (1) (2) and (3)
Chapter 5: Bishop & Knight Endings Mate with B& N The Good N v. A Bad B N and P versus B(1) and (2) B and P versus N(1) and (2)

Back to Top
# Chapter 6: Queen and pawn Endings Queen versus a pawn on the 6th rank Exceptions (1) Exceptions (2)
6.1 Queen versus a pawn on the 7th rank Central pawn or N pawn (1) Central pawn or N pawn (2) Rook pawn (1) Rook pawn (2) Bishop pawn (1) Bishop pawn (2) Bishop pawn (3) Stalemate Example (1) Stalemate Example (2) Stalemate Test 6.2 Queen + pawn v Queen Ending (1) Queen + pawn v. Queen Ending (2)
Bibliography About_the_Author
About Chess The Endgame

Back to Top
#Chess Notation
When setting the board a white square is always bottom right (and top left). The Black R (Rook or Castle), in the diagram, is standing on a7, the White N on c3 and the White B is on f5.
!""""""""#ç + + + +%æT + + + %å + + + +%ä+ + +b+ %ã + + + +%â+ N + + %á + + + +%à+ + + + %/èéêëìíîï)
Files = a to hRanks = 1 to 8
Squares = Rank & File coordinates (e.g. a1 = bottom-left square)

Back to Top
Chess Notation Each square on a chess board has a name indicated by its coordinate – combinations of letters and numbers. Every piece has a symbol. K=King; Q=Queen; R=Rook; B=Bishop; N=Knight. There is no symbol for a pawn. To show a piece move, the symbol and the square it’s moving to is indicated. For example, Rh7 means a R moves to the h7 square; Ne4 means the N moves to e4. To show a pawn move, you just name the square the pawn is going to; e.g. d5 means the pawn goes to that square. En passant is shown by "e.p." Captures are shown with an “x”. Thus Qxg5 means a Q captures on g5 – especially if it is a pawn. (This ebook's notation indicates the name of the piece being taken so it is easier to visualize; e.g. QxB=Queen takes Bishop). Kside castling is shown by 0-0 and Qside castling is shown by 0-0-0. The symbol “+” means check and “++” means double check (i.e. two pieces threaten a king). Discovered check is indicated by the abbreviation “dis.ch.”
! = good move. ? = poor move.

Back to Top
Chapter 1: King and Pawn EndingsPromotion Square Races
Count the moves for the pawn to promote, then make an imaginary square from that number. Place opposing Ks on the long sides outside the square.
See diagram.
!""""""""#ç L + + +%æ+l+ + + %å L + + +%ä+l+ +p+ %ã LlLlL +%â+ + + + %á + + + +%à+ + + + %/èéêëìíîï)
Clearly, the White pawn will promote if it moves first. If a K enters the square first, however, it will stop (or take) the pawn. With both sides having a pawn, the game need not be so straight forward.

Back to Top
The Opposition (1)1. Vertical Opposition
With one square between the Ks, whoever has the move must give way. The other side thus has the opposition. However, because of the pawn, White maintains the opposition and eventually promotes.
!""""""""#ç + + + +%æ+ + + + %å + + L +%ä+ + + + %ã + + K +%â+ + + + %á + + P +%à+ + + + %/èéêëìíîï)
e.g. 1.f3 Ke6 2.Kg5 Kf7 3.Kf5 (retaining opposition) Kg7 4.Ke6 Kf8 5.f4 Ke8 6.f5
Kf8 7.Kf6 Ke8 8.Kg7 and wins.

Back to Top
The Opposition (2)1. Horizontal Opposition2. Diagonal Opposition
!""""""""#ç + + + +%æ+ + + +l%åk+l+ + +%ä+ + +kP %ã P + + +%â+ + + + %á + + + +%à+ + + + %/èéêëìíîï)
Left: White wins easily: 1.b5+ Kc7 2.Ka7 Kc8 3.6 and the pawn promotes.
Right: 1.Kf6 Kh8 2.Kf7 easing the pawn’s way to g8. (If 1.Kg8 then 2.Kg6 thus seizing the opposition and next 3.Kf7 or K7 depending on Black’ s next move).

Back to Top
The Opposition (3)Oblique Opposition
Black to move draws by: .K7(five squares away, taking oblique opposition) 2.Kd2 Kd6
3.Kd3 Kd5 and thus Black denies White the opposition.
!""""""""#ç + +l+ +%æ+ + + + %å + + + +%ä+ + + + %ã + + + +%â+ + + + %á + +p+ +%à+ + K + %/èéêëìíîï)
White to move plays: 1.Kd2 (5 squares away - taking oblique opposition) 1..Kd8 2.Kd3 Kd7
3.Ke4 Ke6 4.e3 reaching the vertical opposition position and wins.

Back to Top
The Opposition (4)Distant Opposition
White, to move, is up one pawn but Black uses distant opposition to save the game?
!""""""""#ç + + + +%æ+ + + + %å + + + +%ä+ +l+o+ %ã + + P +%â+ +kP + %á + + + +%à+ + + + %/èéêëìíîï)
E.g. 1.Kc2 Kc6 2.Kd2 Kd6 taking the “distant opposition” (with three [i.e. odd no.] squares between Ks) and White is
not able to progress and promote a pawn.

Back to Top
The Opposition in Action (1)The Trébuchet (1)
Not technically classed as an example of opposition but included here because, like opposition generally, whoever has the move must lose out.
(A pawn and the game in this case).Either side to move first.
!""""""""#ç + + + +%æ+ + + + %å + + + +%ä+ Ko+ + %ã + Pl+ +%â+ + + + %á + + + +%à+ + + + %/èéêëìíîï)In this particular position (the trébuchet),
both players are also in zugzwang. (Zugzwang = whoever has the move will weaken their position). See the next page.

Back to Top
The Opposition in Action (2)The Trébuchet (2)
!""""""""#ç +l+ + +%æ+ + + + %å +o+ + +%ä+ + + + %ã +p+ K +%â+ + + + %á + + + +%à+ + + + %/èéêëìíîï)
White wins by: 1.c5 Kb7 2.Ke5 Ka63.Ke6 Ka5 4.Kd7 Kb5 5.Kd6 - activating the trébuchet. 1-0.
White may also win with: 1.c5 Kd8 2.Kf5 Ke7 3.Ke5 (seizing the Vertical Opposition) Kd7 4.Kf6 Kd1 5.Ke6 Kc7 6.Ke7 Kc8 7.Kd6 Kb7 8.Kd7 Kb8 9.Kxc6 1-0.
Note the relevance of the Opposition in these manoeuvres!

Back to Top
The Opposition in Action (3)Pawn Promotion (a)
Left: The ideal position. White will win whoever has the move. i.e.1..Ka8 2.Kc7 or 1.Ka6 or Kc6 and the pawn promotes.
!""""""""#ç L + + L%æ+ + + + %å K + + K%ä+p+ + +p%ã + + + +%â+ + + + %á + + + +%à+ + + + %/èéêëìíîï)
Right: Black can stop a pawn on the a or h files, if he controls the promotion
square, whoever has the move.

Back to Top
The Opposition in Action (3)Pawn Promotion (b)
Is Black (to move) lost?
!""""""""#ç + + + +%æ+ + L + %å + +p+ +%ä+ +k+ + %ã + + + +%â+ + + + %á + + + +%à+ + + + %/èéêëìíîï)
Black must go straight back to save the game. The pawn cannot now progress to the 8th rank.
e.g. 1..Ke8 2.Kd6 Kd8 3.e7+ Ke8!
The Rule is that, with the pawn on the 6th rankand the opposing K on the 7th rank in front of the pawn, the game is drawn whoever has the move.

Back to Top
The Opposition in Action (3)Pawn Promotion (c)
Here, the vital f7 square is denied to the Black K and White wins by taking the Opposition.
!""""""""#ç + + + +%æ+ +l+ + %å + + P +%ä+ + + + %ã +k+ + +%â+ + + + %á + + + +%à+ + + + %/èéêëìíîï)
For example: 1.Kd5 Kd8 2.Kd6 Ke83.Ke6 Kf8 4.f7
1-0.
Back to Top
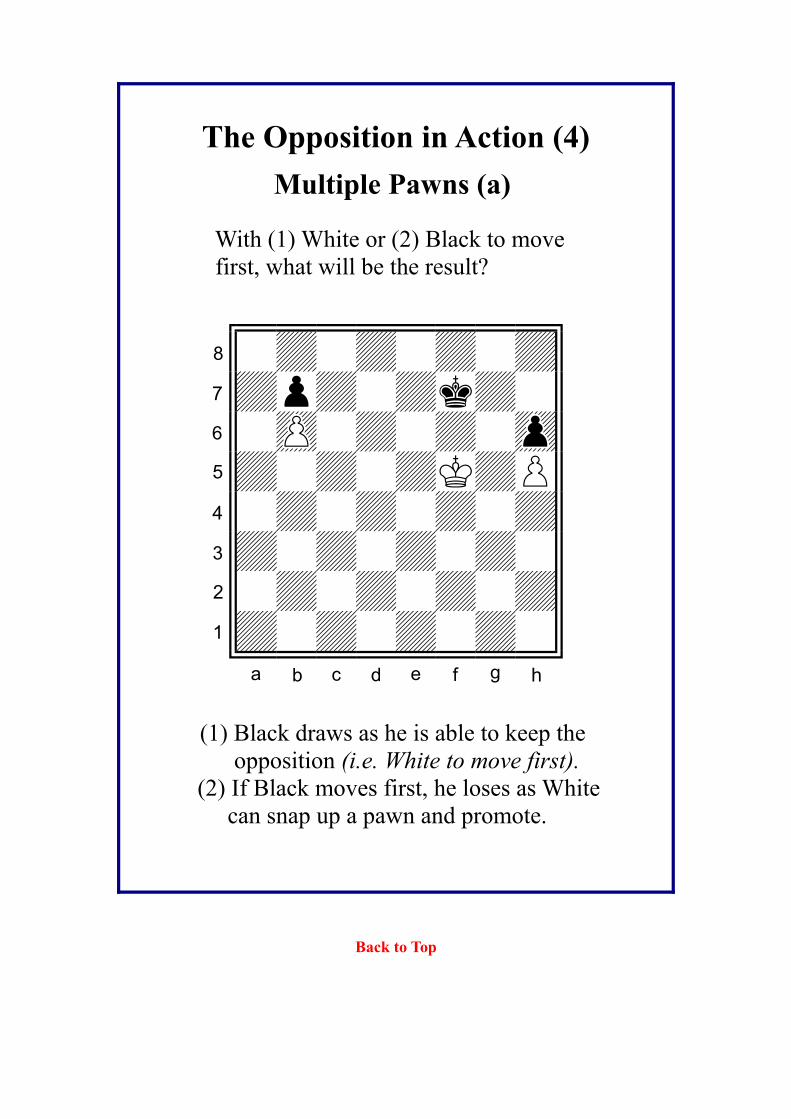
The Opposition in Action (4)Multiple Pawns (a)
With (1) White or (2) Black to move first, what will be the result?
!""""""""#ç + + + +%æ+o+ +l+ %å P + + O%ä+ + +k+p%ã + + + +%â+ + + + %á + + + +%à+ + + + %/èéêëìíîï)(1) Black draws as he is able to keep the opposition (i.e. White to move first).
(2) If Black moves first, he loses as White can snap up a pawn and promote.

Back to Top
The Opposition in Action (4)Multiple Pawns (b)
Black draws by keeping the Opposition (diagonal or direct). White to move wins.
!""""""""#ç + + + +%æ+ + + + %å + + + +%ä+ + L + %ãpO + + +%â+p+ +k+ %á + + + +%à+ + + + %/èéêëìíîï)
1.Ke3 Kd5 2.Kd3 Kc5 3.Ke4 Kc64.Kd4 1-0.

Back to Top
The Opposition in Action (4)Multiple Pawns (c)
1.Kf4 K72.Kf5(a) K7 3.KgKe 4.c4 Ke 5.K(b) K 6.K(c) 1-0.
!""""""""#ç + + + +%æ+ + + + %åo+o+ Ol+%äP P + + %ã + + +p+%â+ P + K %á + + + +%à+ + + + %/èéêëìíîï)
Blackburne v. Teichmann, Berlin 1897
(a) taking opposition (b) again taking opposition (c) Black resigned as all is lost. (If 1.Kf4 Kg7 then 2.Kf5 Kf7 3.c4 taking the opposition Ke7 4.Kg6 Ke & Black takes back opposition! 5.Kh6Kd7 (best?) 6.Kh7and Black must give way!)
Proof that pawn endings need careful handling!

Back to Top
The Opposition in Action (5)Triangulation (a)
Triangulation is a technique for losing a move so that the same position is reached but with the other player now on the move. Essentially, the manoeuvre is used to gain the Opposition with a view to promoting a pawn.
!""""""""#ç + + L +%æ+ + + + %å + + P O%ä+ + K +o%ã + + + P%â+ + + + %á + + + +%à+ + + + %/èéêëìíîï)
White wins by triangulating: e.g. 1.Kf4 K82.K Kf8 3.Ke5 (forcing vertical or diagonal
Opposition)and now Black has only losing moves.

Back to Top
The Opposition in Action (5)Triangulation (b)
The White K is behind his c pawn. (In front of a pawn is the ideal position).
How can White promote the pawn?
!""""""""#ç +l+ + +%æ+ + + + %åo+p+ + +%äP +k+ + %ã + + + +%â+ + + + %á + + + +%à+ + + + %/èéêëìíîï)
By triangulation. i.e. 1.Kc4 Kb8 2.Kd4 Kc8 3.Kd5 and the c pawn cannot now be stopped.

Back to Top
The Opposition in Action (5)Triangulation (c)
The K is behind the d pawn - not ideal! What can White do?
!""""""""#ç + + + +%æ+ + + + %å + + + +%ä+ + + + %ã +oPl+ +%â+ P + + %á + K + +%à+ + + + %/èéêëìíîï)
White wins whoever has the move. E.g.1..Kf42.Kc2 going round via the a file or triangulatingby 1.Kd1 Kd52.Ke2Ke43.Kd2and Black
must give way.
(Black’s K dares not enter the 3rd rank as the d pawn promotes).

SummaryOpposition and Triangulation
All is not lost if you are a pawn down in the ending as there are several saving techniques you can try such as ensuring that the opposing pawn is on the a or h file, and your K controls the promotion square, as shown earlier.
However, sound knowledge of the above techniques are essential for anyone who wishes to become a formidable player. Even so, be assured that even very good players often find the winning moves hard to see. Indeed, endgame technique may well be the most difficult of arts in chess.
The following section involves pawns v. pawns endings. Knowledge of Opposition and Triangulation, and other endgame skills, will enable you to understand and “see” the possibilities in similar positions over-the- board.

Read More and Buy This Paul Wiseman Ebook.
Chess: The Endgame
by Paul Wiseman
ISBN: 978-1-4653-0989-1
Modestly priced at £2.99, this easy-to-read masterpiece is a must for all club players. Speed up your endgame play
to beat the clock and your opponent!
Purchase from:
www.xlibrispublishing.co.uk
Select: Browse by Subject > Games > Chess
A

About the AuthorPaul Wiseman was born and raised in Walsall, Staffordshire. After working in the printing industry he entered Edinburgh University as a mature student, gaining an MA honours degree in Social Anthropology. After graduating, he moved to Dulwich and worked in Education and for the Home Office. A keen chess player since boyhood, he played for the Metropolitan Chess Club of London and was a member of a team that won a national title in 1985. Although now retired, he still plays chess for his local club in Brixham, Devon.

TRUE OR FALSE?
NEWSFLASH!
ELEPHANT EATS AUTHOR The great chess author and libertine, Paul Wiseman, has, reportedly, been eaten by Jumbo the Performing Elephant during his visit to Inner Mongolia. Local witnesses were shocked as Jumbo had never eaten a whole human before. Happily, to date, Jumbo has had no adverse after effects to the feast. As many chess players are aware, Paul is famous for inventing the Alzheimer (What was my last move?) Attack and the Kamikaze Attack. Sadly, many of his most brilliant losses are unavailable as he never remembered where he put the score sheets! Equally, with soccer, Paul was famous for his idiosyncratic football refereeing. He would give yellow cards for spitting on the pitch and a red card for clearing one’s nostrils without benefit of a tissue. Admirers of Paul's works are now entreated to purchase his ebooks so that his relatives can afford to bring his remains back to Devon for proper internment.
Also by Paul WisemanChess Essentials
www.xlibrispublishing.co.uk
HOW TO WIN AT SOCCER Amazon