checker 200 series reference - cognex · checker 200 series products and accessories checker 201...
TRANSCRIPT

COGNEX®
Checker® 200 SeriesReference
Checker 200 Series Products and AccessoriesDimensions and FeaturesGetting StartedWorking Distance and Field of ViewAdjusting FocusChanging LensesMounting CheckerChecker User InterfaceChecker Part TriggersPart Finding SensorInspection SensorsLadder LogicLadder Logic ExamplesJob ControlExternal RetrainRun Time DisplayRun Time RecordingFilmstrip ControlInput/Output WiringSpecificationsPrecautions
CO
GN
EX
Check
er
24 VDC
ENCODER PHB−
INPUT 7
INPUT 6
INPUT 5
INPUT 4
INPUT 3
INPUT 2
INPUT 1
TRIGGER
COMM OK
CH
ECKER
MODULE OK
OUT 7
OUT 6
OUT 5
OUT 4
OUT 3
OUT 2
HS OUT 1
HS OUT 0
I/O COMMON
−
+
ENCODER PHB+
ENCODER PHA−
ENCODER PHA+
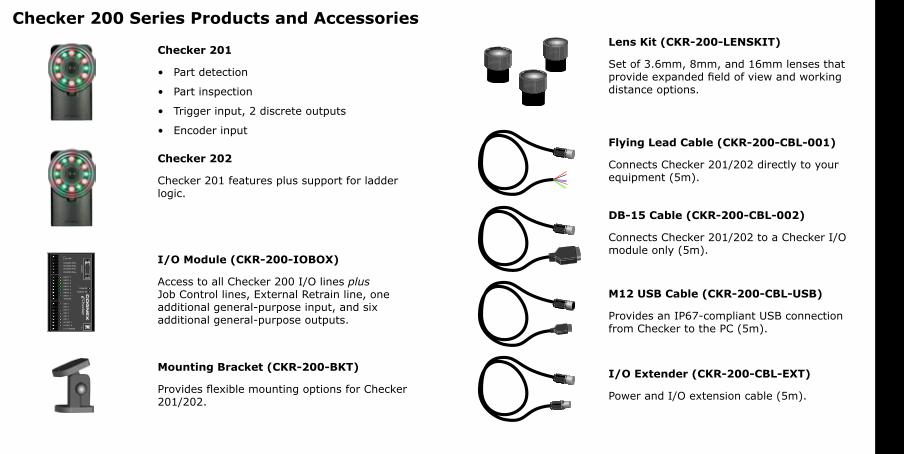
Checker 200 Series Products and Accessories
Checker 201
Part detection
Part inspection
Trigger input, 2 discrete outputs
Encoder input
•
•
•
•
Checker 202
Checker 201 features plus support for ladder logic.
I/O Module (CKR-200-IOBOX)
Access to all Checker 200 I/O lines plus Job Control lines, External Retrain line, one additional general-purpose input, and six additional general-purpose outputs.
Flying Lead Cable (CKR-200-CBL-001)
Connects Checker 201/202 directly to your equipment (5m).
Mounting Bracket (CKR-200-BKT)
Provides flexible mounting options for Checker 201/202.
Lens Kit (CKR-200-LENSKIT)
Set of 3.6mm, 8mm, and 16mm lenses that provide expanded field of view and working distance options.
DB-15 Cable (CKR-200-CBL-002)
Connects Checker 201/202 to a Checker I/O module only (5m).
M12 USB Cable (CKR-200-CBL-USB)
Provides an IP67-compliant USB connection from Checker to the PC (5m).
I/O Extender (CKR-200-CBL-EXT)
Power and I/O extension cable (5m).
1
67 (2.64)
22 (0.87)
39 (1.54)
60 (2.36)
41 (1.61)
mm (in)27.5+0.5
(1.08+0.02)
1
2
34
6
7
5
2
8
1
Dim
en
sion
s an
d F
eatu
res
Dimensions and Features
1 Mounting holes (M4 x 4 mm)
2 Focus lock (M3, use 2.5 mm hex key)
3 Lens cover/focus ring
4 Status LED (GREEN):
On: Run mode
Slow blink: Setup Mode
Fast blink: Internal error
•
•
•
5 Part detect LED (RED)
6 USB connector with M12 plug
7 USB connector cover (cover or IP67 USB cable must be used for IP67 protection)
8 Power and I/O connector with M12 plug

32
2 3
4
1
Gettin
g S
tarte
d
Minimum PC System Requirements
Microsoft® Windows® 2000™ SP4, Windows XP™, or Windows Vista™
128 MB RAM
USB 1.1 (2.0 recommended for best performance)
1024 x 768 (96 DPI) or 1280 x 1024 (120 DPI) display
Step 1: Install Checker User Interface Software
Insert CD-ROM
If installer does not start automatically, double-click setup.exe
Follow installer prompts
Step 2: Connect Checker Sensor
Connect Checker to 24 VDC power (see Input/Output Wiring for connection details)
Connect cable shield to earth ground. (If using I/O Module, connect ground screw to earth ground.)
Connect USB cable to PC
Step 3: Verify Connections
Checker’s green status LED should blink and the illumination LEDs should be on.
•
•
•
•
1.
2.
3.
1.
2.
3.
Getting StartedStep 4: Verify Operation
Start the Checker User Interface software (select Cognex->Checker 200 Series->Checker from the Windows Start menu), then perform the steps listed below to verify that Checker is functioning properly.
1 Click on Get Connected.
2 Select your Checker in the Checkers list.
3 Click Connect.
4 Verify that Checker is displaying an image.

54
40
10
20
30
40
5020 3010 5
4
1211104 93 82 71 6
8
9
3
7
2
6
1
5
3.6 mm
5.8 mm
8 mm
16 mm
3.6 mm
5.8 mm
8 mm
16 mm
40
10
20
30
40
5020 3010 5
4
1211104 93 82 71 6
8
9
3
7
2
6
1
5
3.6 mm
5.8 mm
8 mm
16 mm
3.6 mm
5.8 mm
8 mm
16 mm6
3
4
1 2
5
Wo
rkin
g D
istan
ce a
nd
Fie
ld o
f Vie
wWorking Distance and Field of View Adjusting FocusThe distance from Checker’s lens cover to your part is the working distance; the field of view is what Checker can see at that distance. As the working distance increases, so does the size of the field of view.
These charts show the field of view provided by the standard 5.8mm lens at various working distances, as well as the fields of view provided by the 3.6mm, 8mm, and 16mm lenses included in the optional Checker Lens Kit (CKR-200-LENSKIT).
Adjust focus using the clear ring on Checker. Using the supplied 2.5 mm hex key, you can lock the focus adjustment by tightening the focus lock.
The lens cover both seals the front of Checker and lets you adjust the lens focus.
4 Lens is threaded into Checker housing.
5 Large O-ring seals lens cover to Checker housing.
6 Small O-ring rotates lens when lens cover is rotated.
1 Closer
2 More distant
3 Focus lock
Working Distance (cm)
Working Distance (in)Fi
eld o
f Vie
w (
cm)
Fiel
d o
f Vie
w (
in)

76
x5
2
3
1
3
4
1 2C
han
gin
g L
en
ses
Changing Lenses
1 Unscrew lens cover. Lens is secured to lens cover by small internal O-ring.
2 When lens is fully released, remove cover with lens in place.
3 Remove lens from lens cover. Take care not to lose O-ring that secures lens to lens cover.
1 Screw lens into Checker at least five full rotations.
2 Make sure both outer and inner O-rings are seated in place on the lens cover.
3 Firmly and evenly press the lens cover onto Checker until it snaps into place.
4 Screw in the lens cover to bring Checker into focus.
To remove the Checker lens, follow the steps listed below.
Note: Failure to follow these instructions can cause damage to your Checker.
To install the Checker lens, follow the steps listed below.
Note: Failure to follow these instructions can cause damage to your Checker.
98
A
B
B
A
C
C
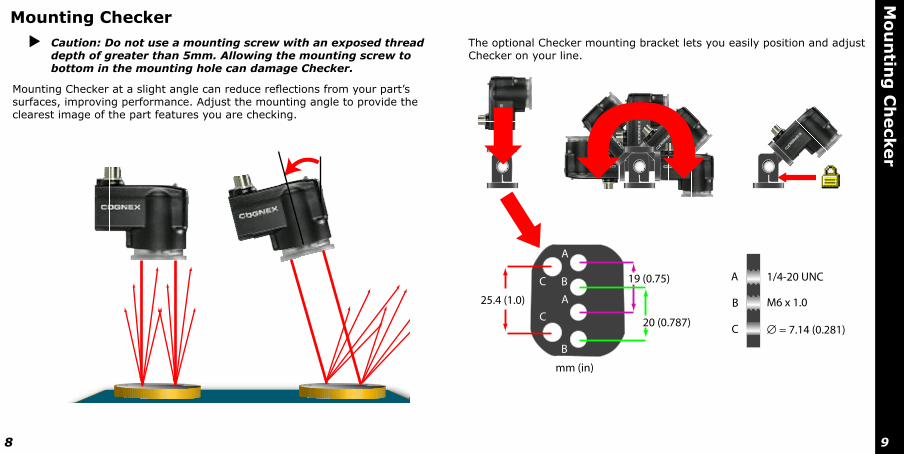
1/4-20 UNC
M6 x 1.0
7.14 (0.281)20 (0.787)
19 (0.75)
25.4 (1.0)
A
B
C
mm (in)
Mo
un
ting
Ch
eck
er
Mounting CheckerCaution: Do not use a mounting screw with an exposed thread depth of greater than 5mm. Allowing the mounting screw to bottom in the mounting hole can damage Checker.
Mounting Checker at a slight angle can reduce reflections from your part’s surfaces, improving performance. Adjust the mounting angle to provide the clearest image of the part features you are checking.
The optional Checker mounting bracket lets you easily position and adjust Checker on your line.
1110
3
2
1
4 5
6 7
8
Ch
eck
er U
ser In
terfa
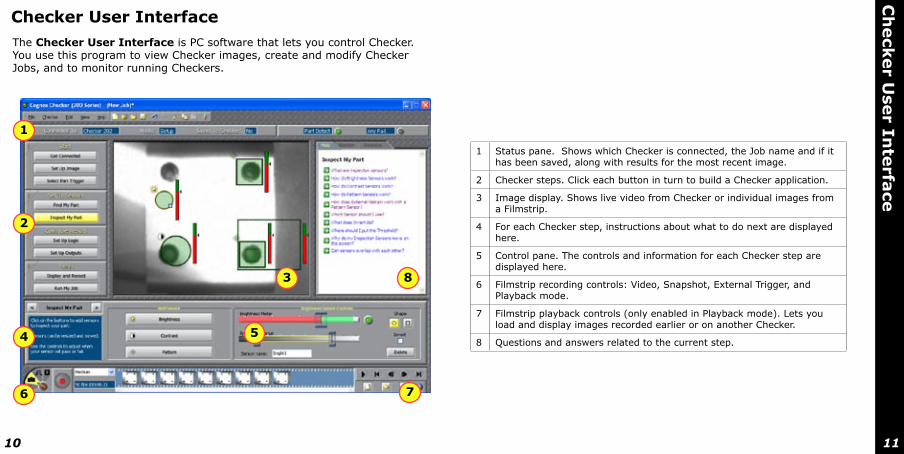
ceChecker User Interface
1 Status pane. Shows which Checker is connected, the Job name and if it has been saved, along with results for the most recent image.
2 Checker steps. Click each button in turn to build a Checker application.
3 Image display. Shows live video from Checker or individual images from a Filmstrip.
4 For each Checker step, instructions about what to do next are displayed here.
5 Control pane. The controls and information for each Checker step are displayed here.
6 Filmstrip recording controls: Video, Snapshot, External Trigger, and Playback mode.
7 Filmstrip playback controls (only enabled in Playback mode). Lets you load and display images recorded earlier or on another Checker.
8 Questions and answers related to the current step.
The Checker User Interface is PC software that lets you control Checker. You use this program to view Checker images, create and modify Checker Jobs, and to monitor running Checkers.
APEX APEX
1 2 3
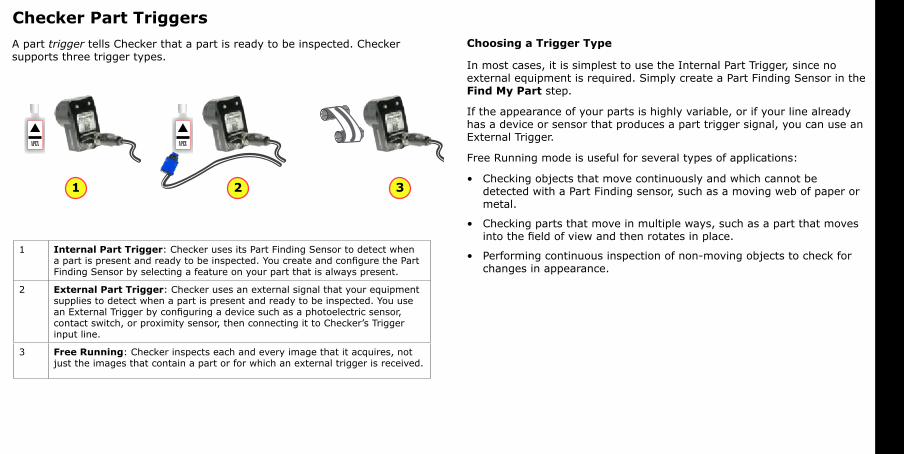
Checker Part Triggers
1 Internal Part Trigger: Checker uses its Part Finding Sensor to detect when a part is present and ready to be inspected. You create and configure the Part Finding Sensor by selecting a feature on your part that is always present.
2 External Part Trigger: Checker uses an external signal that your equipment supplies to detect when a part is present and ready to be inspected. You use an External Trigger by configuring a device such as a photoelectric sensor, contact switch, or proximity sensor, then connecting it to Checker’s Trigger input line.
3 Free Running: Checker inspects each and every image that it acquires, not just the images that contain a part or for which an external trigger is received.
A part trigger tells Checker that a part is ready to be inspected. Checker supports three trigger types.
Choosing a Trigger Type
In most cases, it is simplest to use the Internal Part Trigger, since no external equipment is required. Simply create a Part Finding Sensor in the Find My Part step.
If the appearance of your parts is highly variable, or if your line already has a device or sensor that produces a part trigger signal, you can use an External Trigger.
Free Running mode is useful for several types of applications:
Checking objects that move continuously and which cannot be detected with a Part Finding sensor, such as a moving web of paper or metal.
Checking parts that move in multiple ways, such as a part that moves into the field of view and then rotates in place.
Performing continuous inspection of non-moving objects to check for changes in appearance.
•
•
•
1
2
Part Finding SensorPart Finding Sensors and Trigger Types
Part Finding Sensors are used differently for different trigger types.
With an Internal Trigger, a Part Finding Sensor is required. The Part Finding Sensor tells Checker that a part is present.
With an External Trigger, a Part Finding Sensor is optional. If you do not use a Part Finding Sensor, then the inspection sensors will run in fixed positions. If you use a Part Finding Sensor, then both the Part Finding Sensor and the External Trigger must indicate a part before Checker will check it.
In Free Running mode, a Part Finding Sensor is optional. If you do not use a Part Finding Sensor, then the inspection sensors will run in fixed positions. If you use a Part Finding Sensor, then the Part Finding Sensor must detect a part in an image before Checker will check it.
In all cases, if a Part Finding Sensor is used, then Checker uses the part’s detected location to position the inspection sensors.
Modifying a Part Finding Sensor
You can change the location where Checker looks for the part by simply moving the Part Finding Sensor search region.
To change what a Part Finding Sensor looks for, you must either
Create a new Part Finding Sensor in Setup mode.
Use the External Retrain feature in Setup mode or Run mode.
•
•
•
•
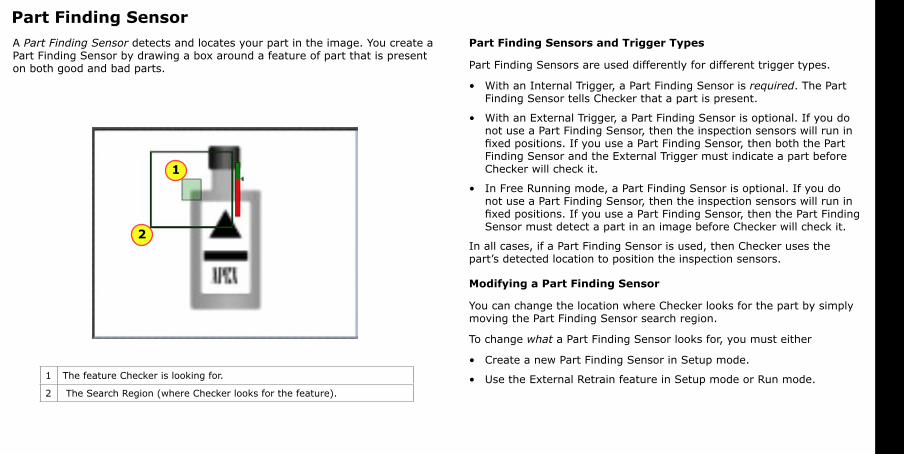
•1 The feature Checker is looking for.
2 The Search Region (where Checker looks for the feature).
A Part Finding Sensor detects and locates your part in the image. You create a Part Finding Sensor by drawing a box around a feature of part that is present on both good and bad parts.
1
2
3
1
2
Inspection SensorsSensor Threshold
The sensor threshold slider sets the level below which a sensor fails and above which a sensor passes. In many cases, the default value works well. If you adjust the slider, set it so that it is mid-way between the level for good parts and bad parts.
If you check Invert, the Sensor passes with levels below the threshold and fails with levels above the threshold.
Modifying a Sensor
To change the location of a sensor, click and drag on the sensor border. To resize a sensor, click and drag on the handle on the sensor border. Checker automatically re-trains a Pattern sensor whenever you move or resize it.
Advanced Sensor Tuning
Brightness and Contrast Sensors have controls that let you tune the sensors to maximize the reported difference between good and bad parts.
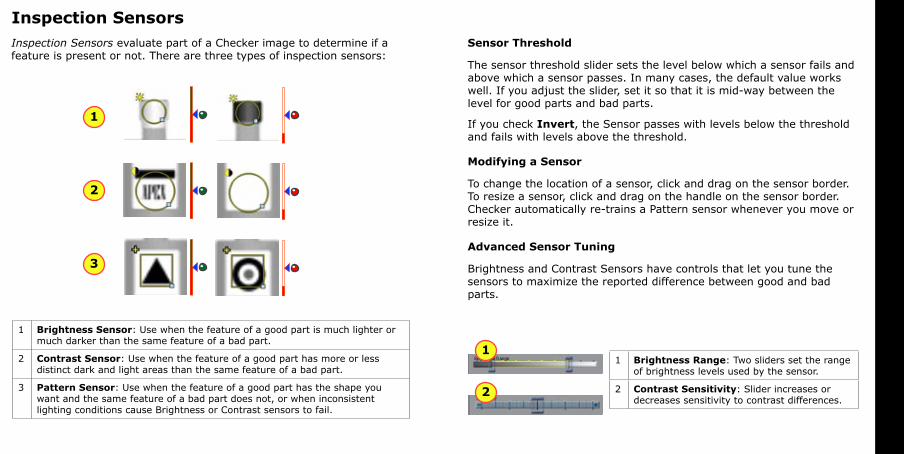
1 Brightness Sensor: Use when the feature of a good part is much lighter or much darker than the same feature of a bad part.
2 Contrast Sensor: Use when the feature of a good part has more or less distinct dark and light areas than the same feature of a bad part.
3 Pattern Sensor: Use when the feature of a good part has the shape you want and the same feature of a bad part does not, or when inconsistent lighting conditions cause Brightness or Contrast sensors to fail.
Inspection Sensors evaluate part of a Checker image to determine if a feature is present or not. There are three types of inspection sensors:
1 Brightness Range: Two sliders set the range of brightness levels used by the sensor.
2 Contrast Sensitivity: Slider increases or decreases sensitivity to contrast differences.
1
1 2
3 4
5
2
3
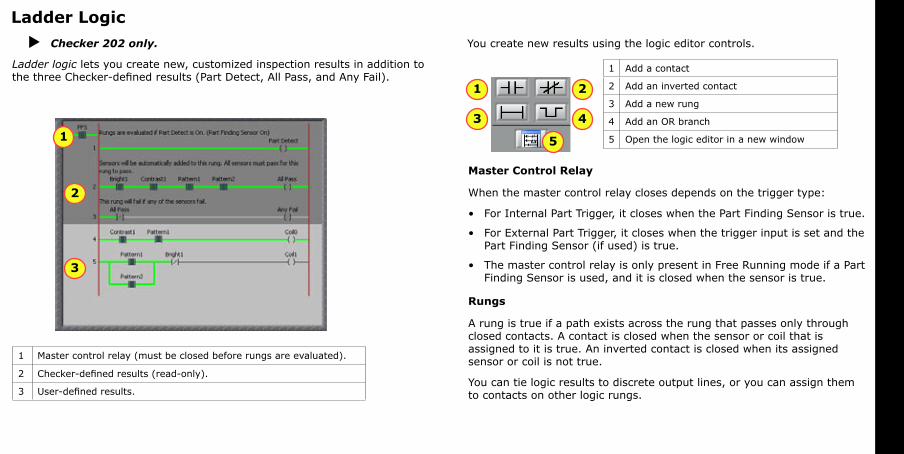
Ladder Logic
1 Master control relay (must be closed before rungs are evaluated).
2 Checker-defined results (read-only).
3 User-defined results.
You create new results using the logic editor controls.
1 Add a contact
2 Add an inverted contact
3 Add a new rung
4 Add an OR branch
5 Open the logic editor in a new window
Checker 202 only.
Ladder logic lets you create new, customized inspection results in addition to the three Checker-defined results (Part Detect, All Pass, and Any Fail).
Master Control Relay
When the master control relay closes depends on the trigger type:
For Internal Part Trigger, it closes when the Part Finding Sensor is true.
For External Part Trigger, it closes when the trigger input is set and the Part Finding Sensor (if used) is true.
The master control relay is only present in Free Running mode if a Part Finding Sensor is used, and it is closed when the sensor is true.
Rungs
A rung is true if a path exists across the rung that passes only through closed contacts. A contact is closed when the sensor or coil that is assigned to it is true. An inverted contact is closed when its assigned sensor or coil is not true.
You can tie logic results to discrete output lines, or you can assign them to contacts on other logic rungs.
•
•
•
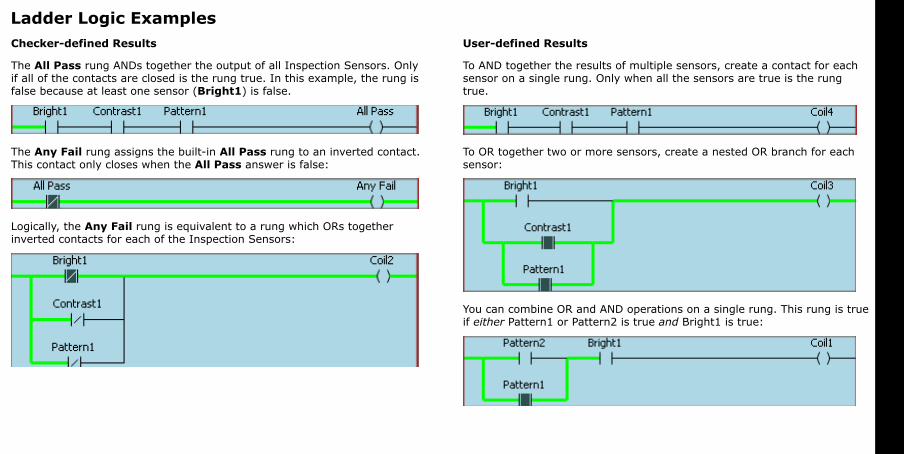
Ladder Logic ExamplesChecker-defined Results
The All Pass rung ANDs together the output of all Inspection Sensors. Only if all of the contacts are closed is the rung true. In this example, the rung is false because at least one sensor (Bright1) is false.
The Any Fail rung assigns the built-in All Pass rung to an inverted contact. This contact only closes when the All Pass answer is false:
Logically, the Any Fail rung is equivalent to a rung which ORs together inverted contacts for each of the Inspection Sensors:
User-defined Results
To AND together the results of multiple sensors, create a contact for each sensor on a single rung. Only when all the sensors are true is the rung true.
To OR together two or more sensors, create a nested OR branch for each sensor:
You can combine OR and AND operations on a single rung. This rung is true if either Pattern1 or Pattern2 is true and Bright1 is true:
CO
GN
EX
Check
er
24 VDC
ENCODER PHB−
INPUT 7
INPUT 6
INPUT 5
INPUT 4
INPUT 3
INPUT 2
INPUT 1
TRIGGER
COMM OK
CH
ECKER
MODULE OK
OUT 7
OUT 6
OUT 5
OUT 4
OUT 3
OUT 2
HS OUT 1
HS OUT 0
I/O COMMON
−
+
ENCODER PHB+
ENCODER PHA−
ENCODER PHA+
CO
GN
EX
Check
er
24 VDC
ENCODER PHB−
INPUT 7
INPUT 6
INPUT 5
INPUT 4
INPUT 3
INPUT 2
INPUT 1
TRIGGER
COMM OK
CH
ECKER
MODULE OK
OUT 7
OUT 6
OUT 5
OUT 4
OUT 3
OUT 2
HS OUT 1
HS OUT 0
I/O COMMON
−
+
ENCODER PHB+
ENCODER PHA−
ENCODER PHA+
24 VDC +– 24 VDC +–
1 2
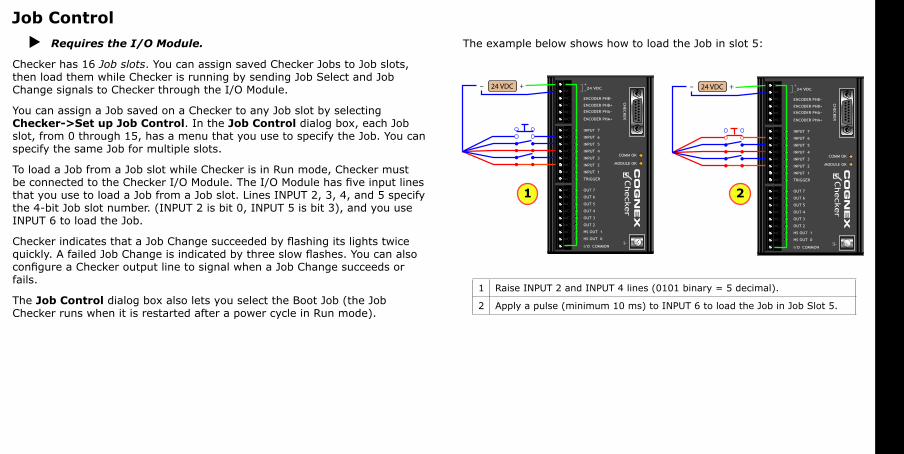
Job ControlRequires the I/O Module.
Checker has 16 Job slots. You can assign saved Checker Jobs to Job slots, then load them while Checker is running by sending Job Select and Job Change signals to Checker through the I/O Module.
You can assign a Job saved on a Checker to any Job slot by selecting Checker->Set up Job Control. In the Job Control dialog box, each Job slot, from 0 through 15, has a menu that you use to specify the Job. You can specify the same Job for multiple slots.
To load a Job from a Job slot while Checker is in Run mode, Checker must be connected to the Checker I/O Module. The I/O Module has five input lines that you use to load a Job from a Job slot. Lines INPUT 2, 3, 4, and 5 specify the 4-bit Job slot number. (INPUT 2 is bit 0, INPUT 5 is bit 3), and you use INPUT 6 to load the Job.
Checker indicates that a Job Change succeeded by flashing its lights twice quickly. A failed Job Change is indicated by three slow flashes. You can also configure a Checker output line to signal when a Job Change succeeds or fails.
The Job Control dialog box also lets you select the Boot Job (the Job Checker runs when it is restarted after a power cycle in Run mode).
1 Raise INPUT 2 and INPUT 4 lines (0101 binary = 5 decimal).
2 Apply a pulse (minimum 10 ms) to INPUT 6 to load the Job in Job Slot 5.
The example below shows how to load the Job in slot 5:
CO
GN
EX
Check
er
24 VDC
ENCODER PHB−
INPUT 7
INPUT 6
INPUT 5
INPUT 4
INPUT 3
INPUT 2
INPUT 1
TRIGGER
COMM OK
CH
ECKER
MODULE OK
OUT 7
OUT 6
OUT 5
OUT 4
OUT 3
OUT 2
HS OUT 1
HS OUT 0
I/O COMMON
−
+
ENCODER PHB+
ENCODER PHA−
ENCODER PHA+
24 VDC +–
1
23
4
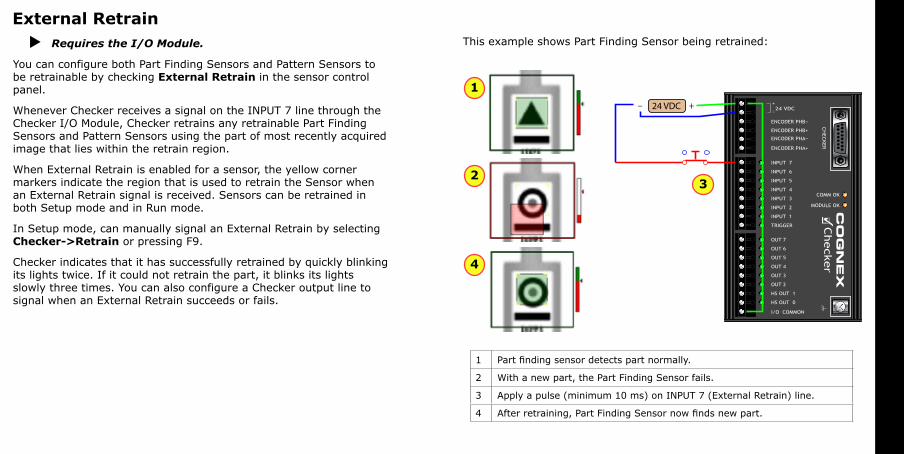
External RetrainRequires the I/O Module.
You can configure both Part Finding Sensors and Pattern Sensors to be retrainable by checking External Retrain in the sensor control panel.
Whenever Checker receives a signal on the INPUT 7 line through the Checker I/O Module, Checker retrains any retrainable Part Finding Sensors and Pattern Sensors using the part of most recently acquired image that lies within the retrain region.
When External Retrain is enabled for a sensor, the yellow corner markers indicate the region that is used to retrain the Sensor when an External Retrain signal is received. Sensors can be retrained in both Setup mode and in Run mode.
In Setup mode, can manually signal an External Retrain by selecting Checker->Retrain or pressing F9.
Checker indicates that it has successfully retrained by quickly blinking its lights twice. If it could not retrain the part, it blinks its lights slowly three times. You can also configure a Checker output line to signal when an External Retrain succeeds or fails.
1 Part finding sensor detects part normally.
2 With a new part, the Part Finding Sensor fails.
3 Apply a pulse (minimum 10 ms) on INPUT 7 (External Retrain) line.
4 After retraining, Part Finding Sensor now finds new part.
This example shows Part Finding Sensor being retrained:

Run Time DisplayRun Time Display lets you control what images, if any, are displayed by Checker in Run mode.
The Display: menu lets you pick which images to display in Run mode. You can choose from among any of the current Checker results, including those that you define with ladder logic. When Checker sees an image that makes the result true, it displays it.
The Freeze On: menu lets you control when the display is frozen (no longer updated with new images). Whenever Checker sees an image that makes the Freeze On: result true, Checker stops updating the Run-Time Display until you click Live.
Checker indicates that the Run-Time Display is frozen in two ways:
The Frozen button is highlighted.
The display itself includes the words Display Frozen.
To restart live display, click on the Live button.
•
•
Run Time Recording
Run Time Recording lets Checker record and save specific images while it is running, even when not connected to a PC. You can choose from among any of the current Checker results, including those that you define with the ladder logic.
When Checker sees an image that makes the specified result true, it records it. The next time you connect to Checker with the PC and enter Setup mode, the images are automatically copied to the Filmstrip.
Checker has space for about 150 saved images. If you select Most Recent in the Type: menu, then when the image storage space is full, the oldest images are discarded when new images arrive.
If you select Most Marginal, then the images which came closest to not making the selected answer true are saved. For example, if you specify the All Pass answer, then the images with the sensors that came closest to failing are saved.
12
3 4
5 6
7 8
9
10
11 12
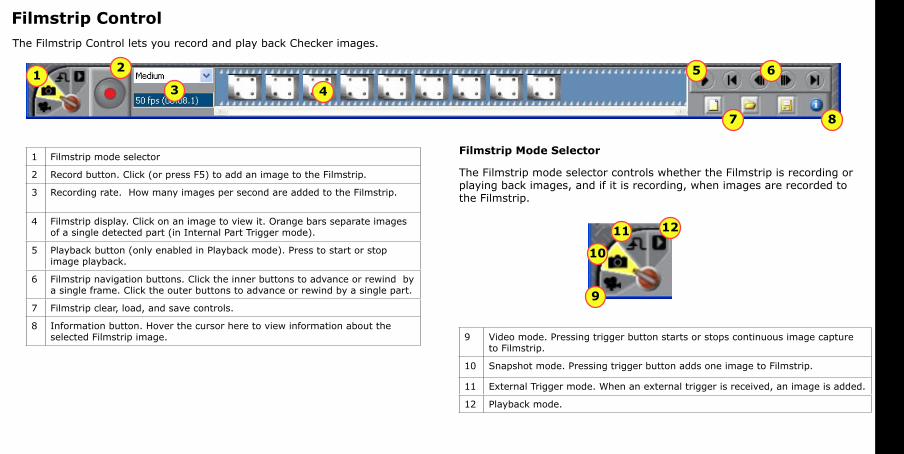
1 Filmstrip mode selector
2 Record button. Click (or press F5) to add an image to the Filmstrip.
3 Recording rate. How many images per second are added to the Filmstrip.
4 Filmstrip display. Click on an image to view it. Orange bars separate images of a single detected part (in Internal Part Trigger mode).
5 Playback button (only enabled in Playback mode). Press to start or stop image playback.
6 Filmstrip navigation buttons. Click the inner buttons to advance or rewind by a single frame. Click the outer buttons to advance or rewind by a single part.
7 Filmstrip clear, load, and save controls.
8 Information button. Hover the cursor here to view information about the selected Filmstrip image.
Filmstrip Control
9 Video mode. Pressing trigger button starts or stops continuous image capture to Filmstrip.
10 Snapshot mode. Pressing trigger button adds one image to Filmstrip.
11 External Trigger mode. When an external trigger is received, an image is added.
12 Playback mode.
The Filmstrip Control lets you record and play back Checker images.
Filmstrip Mode Selector
The Filmstrip mode selector controls whether the Filmstrip is recording or playing back images, and if it is recording, when images are recorded to the Filmstrip.

1312
24 VDC+
–
24 VDC+
–
24 VDC+
–
+ 24 VDC –
+ 24 VDC –
012345
COM
DC OUT
012345
COM
DC IN
+ 24 VDC –
1
2
3
4
1
2
3
4
5
1
2
3
4
5
Inp
ut/
Ou
tpu
t Wirin
gLead Color Signal
RED 24 VDC +
BLACK 24 VDC –
WHITE/VIOLET ENCODER PHB –
VIOLET ENCODER PHB +
WHITE/BROWN ENCODER PHA –
BROWN ENCODER PHA +
ORANGE TRIGGER
GREY OUTPUT 1
BLUE OUTPUT 0
GREEN I/O COMMON
YELLOW RESERVED
WHITE/YELLOW RESERVED
Input/Output WiringChecker leads are color-coded as shown in this table.
All input and output devices must either source or sink current. To have Checker source current, attach DC+ (RED) to I/O COMMON (GREEN). To have Checker sink current, connect DC- (BLACK) to I/O COMMON (GREEN).
Power
Trigger
Output
Typical Wiring Configurations (Checker sinks current)
Signal a PLC with Checker (Checker sources current)
DC+ (RED)
DC– (BLACK)
TRIGGER (ORANGE)
I/O COMMON (GREEN)
OUTPUT 1 (GREY)
OUTPUT 0 (BLUE)
I/O COMMON (GREEN)
Trigger Checker from a Sensor (Checker sources current)
Control stack light with Checker (Checker sinks current)
1 TRIGGER (ORANGE)
2 24 VDC+ (RED)
3 I/O COMMON (GREEN)
4 24 VDC– (BLACK)
1 OUTPUT 1 (GREY)
2 OUTPUT 0 (BLUE)
3 24 VDC+ (RED)
4 I/O COMMON (GREEN)
5 24 VDC– (BLACK)
1 OUTPUT 1 (GREY)
2 OUTPUT 0 (BLUE)
3 24 VDC+ (RED)
4 I/O COMMON (GREEN)
5 24 VDC– (BLACK)
1514
CO
GN
EX
Check
er
24 VDC
ENCODER PHB−
INPUT 7
INPUT 6
INPUT 5
INPUT 4
INPUT 3
INPUT 2
INPUT 1
TRIGGER
COMM OK
CH
ECKER
MODULE OK
OUT 7
OUT 6
OUT 5
OUT 4
OUT 3
OUT 2
HS OUT 1
HS OUT 0
I/O COMMON
−
+
ENCODER PHB+
ENCODER PHA−
ENCODER PHA+
5-24 VDC
5-24 VDC
++
–
A+
A–
–
B+
B–
+
–
A+
B+V–
4.7 KΩ
4.7 KΩ
V+
+ 24 VDC –
V– V+A+
A–
B+
B– 12
34
56
I/O
Mo
du
le a
nd
En
cod
er W
iring
24 VDC power
Encoder inputs
Job Slot select (0-15)INPUT 5: bit 3INPUT 4: bit 2INPUT 3: bit 1INPUT 2: bit 0
External Retrain
General-purpose input
Trigger input
General-purpose output lines
(Minimum pulse width = 4 ms)
High-speed output lines
I/O Common
I/O
Module
Only
I/O
Module
Only
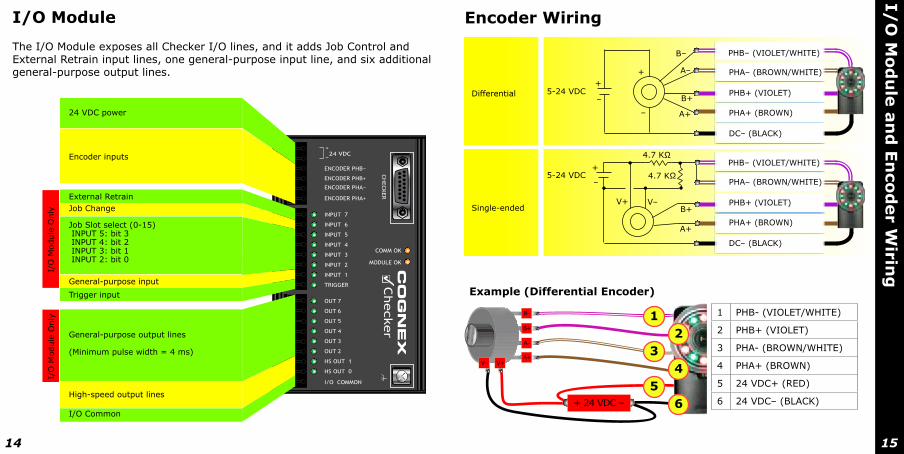
The I/O Module exposes all Checker I/O lines, and it adds Job Control and External Retrain input lines, one general-purpose input line, and six additional general-purpose output lines.
I/O Module Encoder Wiring
Differential
Single-ended
Example (Differential Encoder)
PHB– (VIOLET/WHITE)
PHA– (BROWN/WHITE)
PHB+ (VIOLET)
PHA+ (BROWN)
DC– (BLACK)
PHB– (VIOLET/WHITE)
PHA– (BROWN/WHITE)
PHB+ (VIOLET)
PHA+ (BROWN)
DC– (BLACK)
1 PHB- (VIOLET/WHITE)
2 PHB+ (VIOLET)
3 PHA- (BROWN/WHITE)
4 PHA+ (BROWN)
5 24 VDC+ (RED)
6 24 VDC– (BLACK)
Job Change

1716
Sp
ecifi
catio
ns a
nd
Pre
cau
tion
sCable 24AWG, 5 m, M12 connector (power and I/O)
Power require-ments
Voltage: +24 VDC (22-26 VDC)Current: 250 mA max (500 mA max with I/O Module)
Discrete Inputs
Input ON: > 10 VDC (> 6 mA)Input OFF: < 2 VDC (< 1.5 mA)Protection: Opto-isolated, polarity-independentNote: All input and output devices must be current source or current sink.
Discrete Outputs
Output: Solid state switchRating: 100 mA, 24 VDC MaxMax voltage drop: 3.5 VDC @ 100 mAMax load: 100 mAProtection: Opto-isolated, protected from short circuit, overcurrent, and reverse polarity.Note: All input and output devices must be current source or current sink.
Encoder Inputs
Type: Open collector or differential 5-24 VDCON/OFF: 50% nominalLoad: 50% encoder maximum. Inputs: Leading pulse on PHB produces positive encoder count.
24V power fuse
500 mA, 60 V rated resettable fuse that will recover after an overload is removed. Protects against over voltage and reverse wiring.
Output fuse 200 mA, 30 V rated resettable fuse that will recover after an overload is removed. Protects each output from over current.
Weight 3.5 oz. (100g)
Environmental limits
Operating temperature: 32° to 122°F (0° to 50°C)Storage temperature: -22° to 176°F (-30° to 80°C)Operating humidity: 0% - 90% non-condensingMaximum operating altitude: 4000 metersProtection: IP67Pollution degree: 2
Shock 80Gs for 5ms on each axis (per IEC 68-2-2)
Vibration 10Gs (10-500Hz) at 100 M/sec2 / 15mm for 2 hours in each axis (per IEC 68-2-6)
Certification
RoHS
Specifications PrecautionsObserve these precautions when installing Checker to reduce the risk of injury or equipment damage:
Do not use Checker in applications where an incorrect or absent output signal could cause human injury.
Checker is intended for indoor use only.
Do not attempt to adjust Checker’s focus when moving parts and/or equipment are present.
Use a listed power supply with an output rated 24 VDC, at least 250 mA, and marked Class 2, Limited Power Source (LPS). Any other voltage creates a risk of fire or shock and can damage Checker.
Connect the cable shield (or ground screw, if using the I/O module) to earth ground.
An IP67-compliant plug or cable must be fitted to the USB connector for Checker to meet the IP67 protection standard.
Do not install Checker in locations that expose it to environmental hazards such as excessive heat, humidity, impact, vibration, corrosive substances, flammable substances, or static electricity.
To reduce the risk of damage or malfunction, route all cables and wires away from high-voltage power sources.
Make sure that the mounting screws do not bottom in the mounting holes; using too long a mounting screw can damage Checker.
Do not attempt to modify Checker. Modifications will void the warranty.NOTE: This equipment has been tested and found to comply with the limits for a Class A digital device, pursuant to Part 15 of the FCC Rules. These limits are designed to provide reasonable protection against harmful interference when the equipment is operated in a commercial environment. This equipment generates, uses, and can radiate radio frequency energy and, if not installed and used in accordance with the instruction manual, may cause harmful interference to radio communications. Operation of this equipment in a residential area is likely to cause harmful interference in which case the user will be required to correct the interference at his own expense.
Copyright © 2007 Cognex Corporation All Rights Reserved. This document may not be copied in whole or in part, nor transferred to any other media or language, without the written permission of Cognex Corporation. The hardware and portions of the software described in this document may be covered by one or more of the U.S. patents listed on the Cognex web site http://www.cognex.com/patents.asp. Other U.S. and foreign patents are pending. Cognex, the Cognex logo, Checker, and the Checker logo are trademarks, or registered trademarks, of Cognex Corporation.
•
•
•
•
•
•
•
•
•
•