chapter 2: nate’s three finger piano method · 2 chapter nate’s three finger piano method...
TRANSCRIPT

Chapter
2 N A T E ’ S T H R E E F I N G E R P I A N O M E T H O D
Chapter 2: Nate’s Three Finger Piano Method How to quickly find any chord.
his is the basic system on which the more advanced improvising and “real-time” arranging of songs while reading will hinge. You can probably pick this up in about half-an-hour. It will then take a few months to master. You can think of it a lot like typing. You want to practice until you can do it
instinctually. When a touch typist uses the keyboard, they don’t have to think about how a word is spelled. It just pours from his/her fingers. Likewise, with this system, you should just know where the chords are after a few months of practice. After that, when you want to be creative, you can change the voicings in an infinite number of ways to put your own unique stamp on the music.
T
The Quick Method to finding any Chord
Steps 1-2: Finding the Starting Position At first, you will want to find the Root of the chord in octaves, and the fourth above the higher root. This will be the starting position for Nate’s Three Finger Method.
Step 3: Finding the Quality from the Starting Position Depending on the quality of the chord (M, m, 7, or dim7), you will move the top two notes to the left to find the final chord.
Note: Nate’s Three Finger Piano Method is an instructional method, sort of like memorizing “Every good boy does fine” to memorize the note names on the musical staff. It is a mnemonic trick. Just as a skilled musician doesn’t need to think of the lines of the staff, you will want to use to system to quickly memorize the chords until you can do them subconsciously, like when you type an e-mail. This should take between one to six weeks, depending on how studious and/or previously-schooled in music you are.
14
N A T E ’ S T H R E E F I N G E R P I A N O M E T H O D
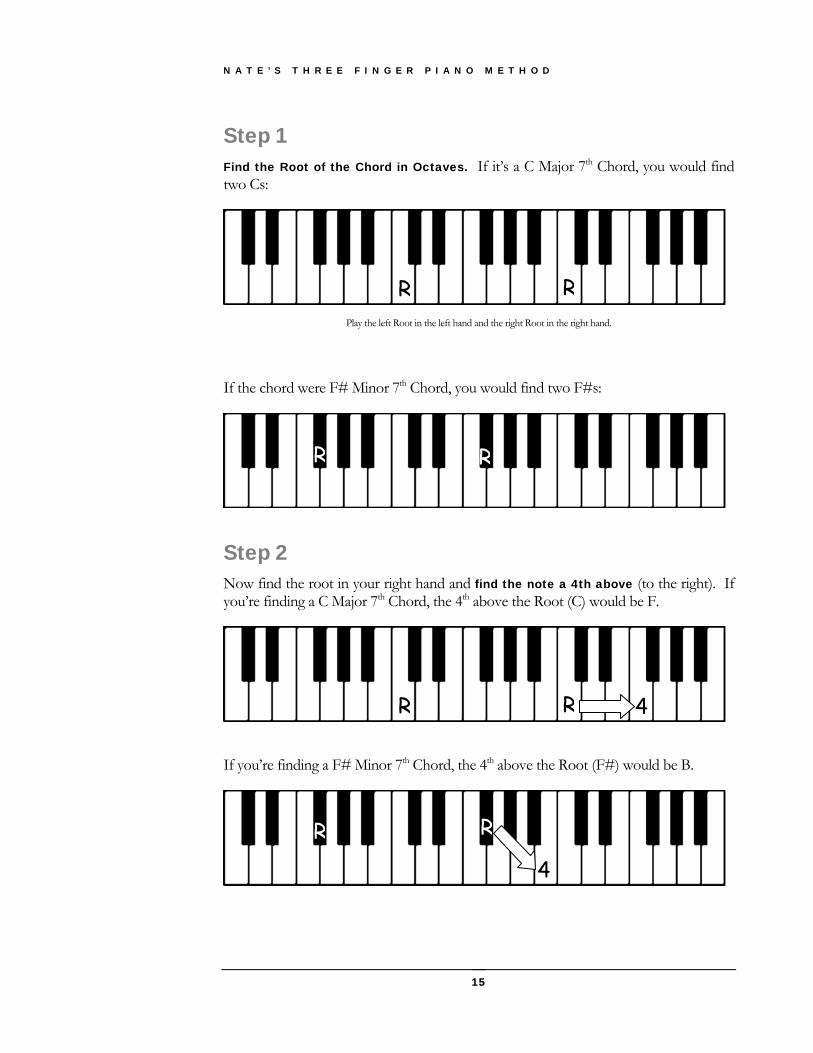
Step 1 Find the Root of the Chord in Octaves. If it’s a C Major 7th Chord, you would find two Cs:
R
Play the left
If the chord were F# Minor
Step 2 Now find the root in your ryou’re finding a C Major 7th C
If you’re finding a F# Minor
Root in the left hand and the right Root in
7th Chord, you would find tw
ight hand and find the notehord, the 4th above the Roo
R
7th Chord, the 4th above the
4
15
R
the right hand.
o F#s:
a 4th above (to the right). If t (C) would be F.
RR
RRoot (F#) w
4
ould be B.
R
R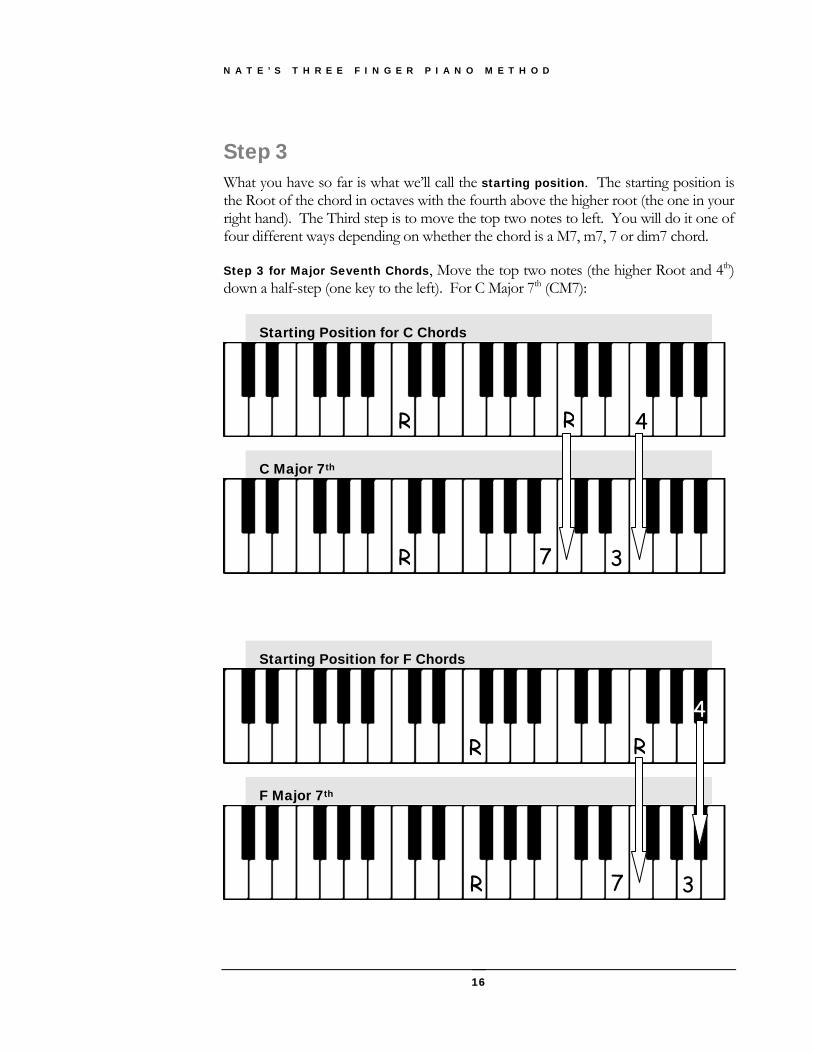
N A T E ’ S T H R E E F I N G E R P I A N O M E T H O D
Step 3 What you have so far is what we’ll call the starting position. The starting position is the Root of the chord in octaves with the fourth above the higher root (the one in your right hand). The Third step is to move the top two notes to left. You will do it one of four different ways depending on whether the chord is a M7, m7, 7 or dim7 chord.
Step 3 for Major Seventh Chords, Move the top two notes (the higher Root and 4th) down a half-step (one key to the left). For C Major 7th (CM7):
Starting Position for C Chords
C Major 7th
R
Starting Position fo
F Major 7th
R
r F Chords
R
R
16
R
3
4
7
4 R
7 3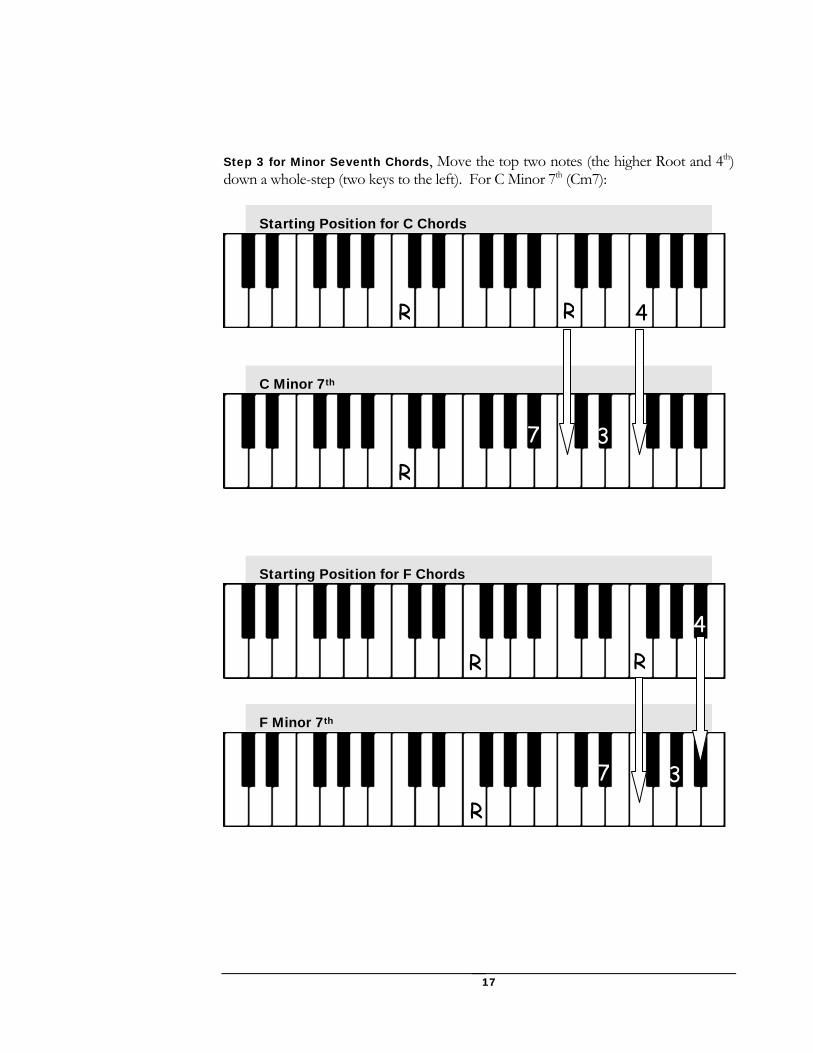
Step 3 for Minor Seventh Chords, Move the top two notes (the higher Root and 4th) down a whole-step (two keys to the left). For C Minor 7th (Cm7):
Starting Position for C Chords
R
C Minor 7th
Starting Position fo
F Minor 7th
7
R
r F Chords
R
R
17
R
3
7
4
4
R3
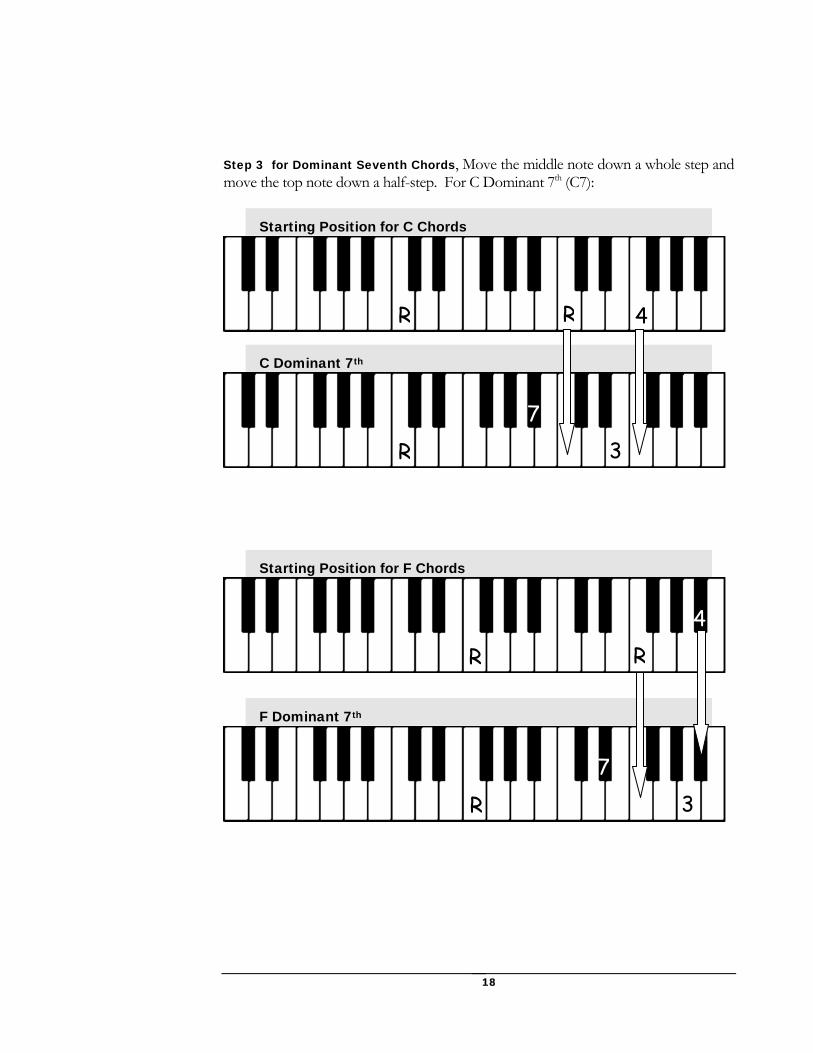
Step 3 for Dominant Seventh Chords, Move the middle note down a whole step and move the top note down a half-step. For C Dominant 7th (C7):
Starting Position for C Chords
C Dominant 7th
Starting Position fo
F Dominant 7th
R
7
R
r F Chords
R
R
18
R
3
7
4
4
R3
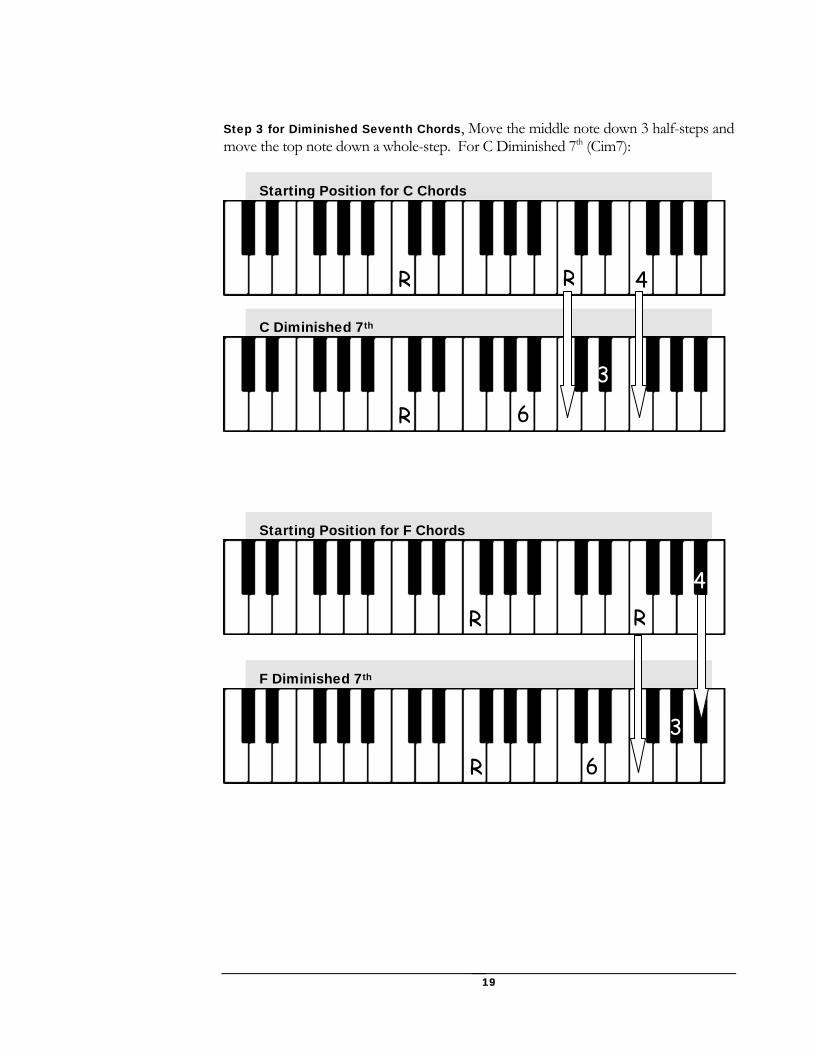
Step 3 for Diminished Seventh Chords, Move the middle note down 3 half-steps and move the top note down a whole-step. For C Diminished 7th (Cim7):
Starting Position for C Chords
C Diminished 7th
RR 4
3
6R
Starting Position for F Chords
F Diminished 7th
4 RR
3
6R
19
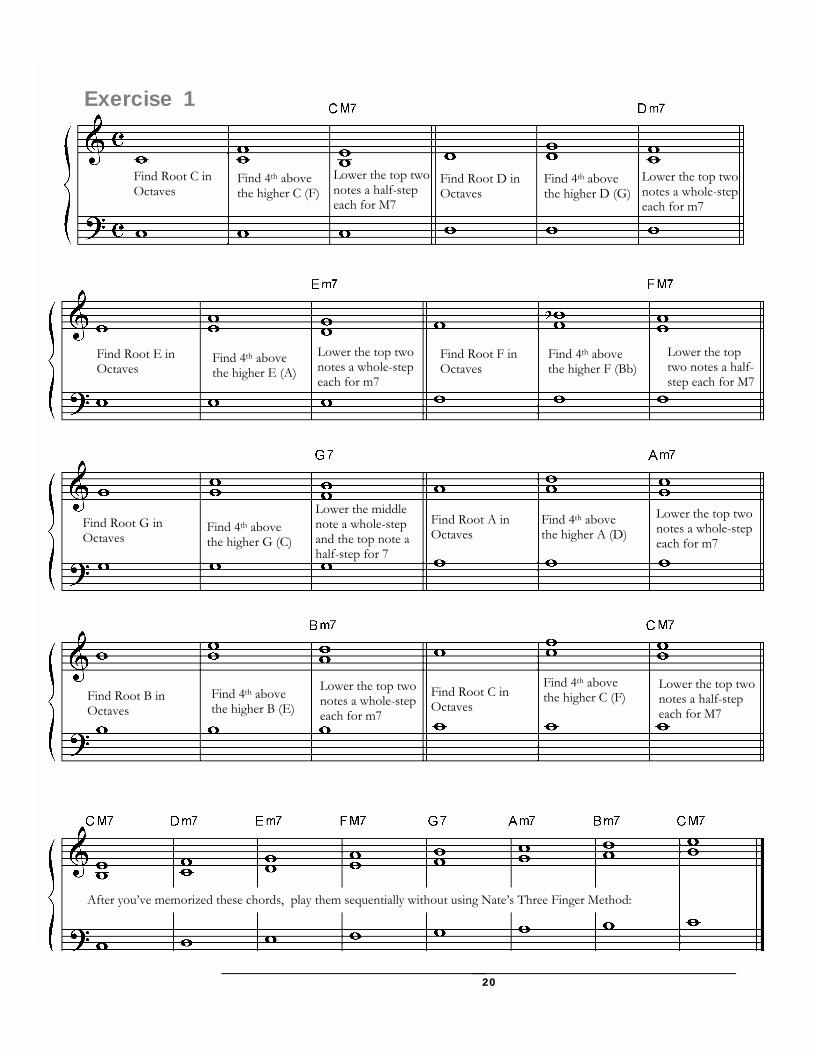
After you’ve memorized these chords, play them sequentially without using Nate’s Three Finger Method:
Lower the middle note a whole-step and the top note a half-step for 7
Find 4th above the higher G (C)
Find Root G in Octaves
Lower the top two notes a whole-step each for m7
Find 4th above the higher A (D)
Find Root A in Octaves
Lower the top two notes a half-step each for M7
Find 4th above the higher C (F) Find Root C in
Octaves Lower the top two notes a whole-step each for m7
Find 4th above the higher B (E)
Find Root B in Octaves
Lower the top two notes a whole-step each for m7
Find 4th above the higher E (A)
Find Root E in Octaves
Lower the top two notes a whole-step each for m7
Find 4th above the higher D (G)
Find Root D in Octaves
Lower the top two notes a half-step each for M7
Find 4th above the higher F (Bb)
Find Root F in Octaves
Lower the top two notes a half-step each for M7
Find 4th above the higher C (F)
Find Root C in Octaves
Exercise 1
20

Exercise 2
\\\\\\
21

What if it’s Not a 7th Chord? If the chord is a simple major or minor chord, the middle note will not be a 7th, but either the root or the 5th – it’s up to you.
Easy option: Leave the middle note on the root: Step 3 for Minor Chords (no 7th), Move the top note down a whole-step:
Starting Position fo C Chords
R R
C Minor
4
Step 3 for Major Chords (no
Starting Position fo
C Major
R
7th), Move the
C Chords
R
R
R
top note down a h
R
R
22
r
3
alf-ste
3
p:
r
4
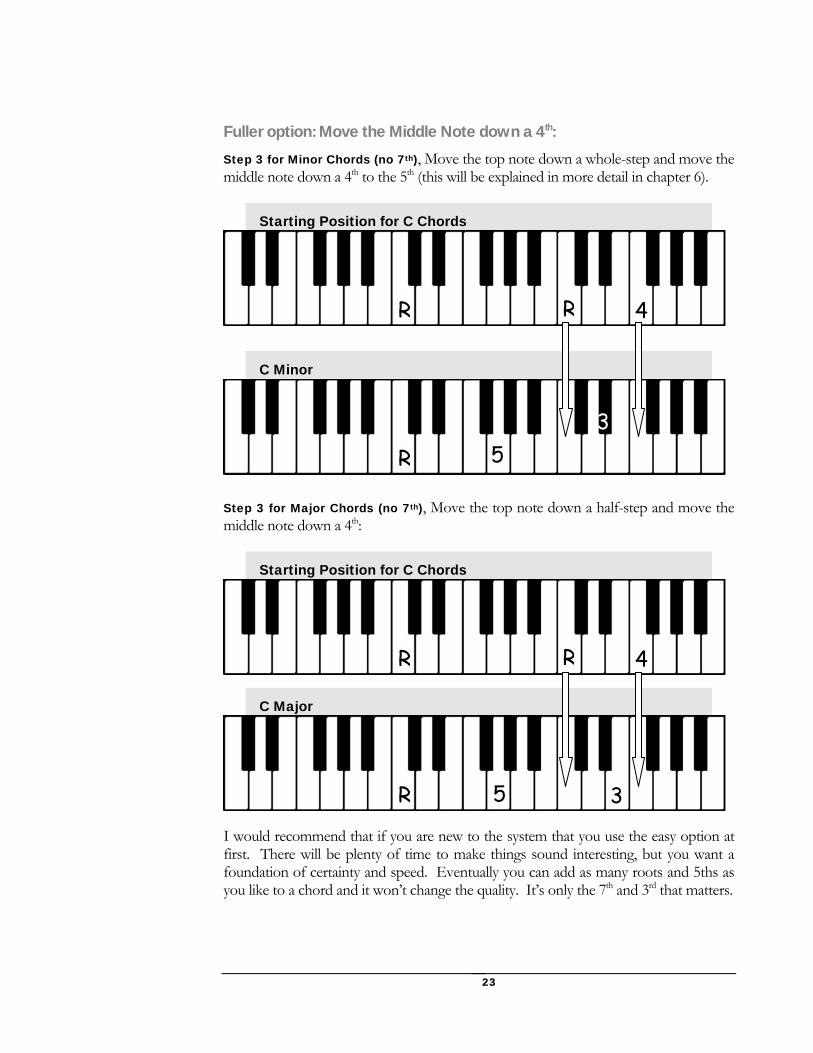
Fuller option: Move the Middle Note down a 4th: Step 3 for Minor Chords (no 7th), Move the top note down a whole-step and move the middle note down a 4th to the 5th (this will be explained in more detail in chapter 6).
Starting Position for C Chords
RR
C Minor
4
3 5R
Step 3 for Major Chords (no 7th), Move the top note down a half-step and move the middle note down a 4th:
Starting Position for C Chords
RR
C Major
4
5R 3
I would recommend that if you are to the m that you use the easy option at first. There will be plenty of time ake thin ound interesting, but you want a foundation of certainty and speed. ntually y an add as many roots and 5ths as you like to a chord and it won’t cha the qualit ’s only the 7th and 3rd that matters.
new to m Evenge
23
systegs s
ou cy. It

M3m7 R
m3 m7 R
M3 M7 R
M3 5th
R
M3 5th R
M3 m7 R
3 3 M3m3 5th R
m3 m7 R
m3 R R
M3 M7 R
M3R R
M3R R
M3 M7 R
M3 R R
Exercise 3
Mm R
m3m7 R
24
37
R R
M
MR M3R
M3m7 R
M7 R
m7 R
R
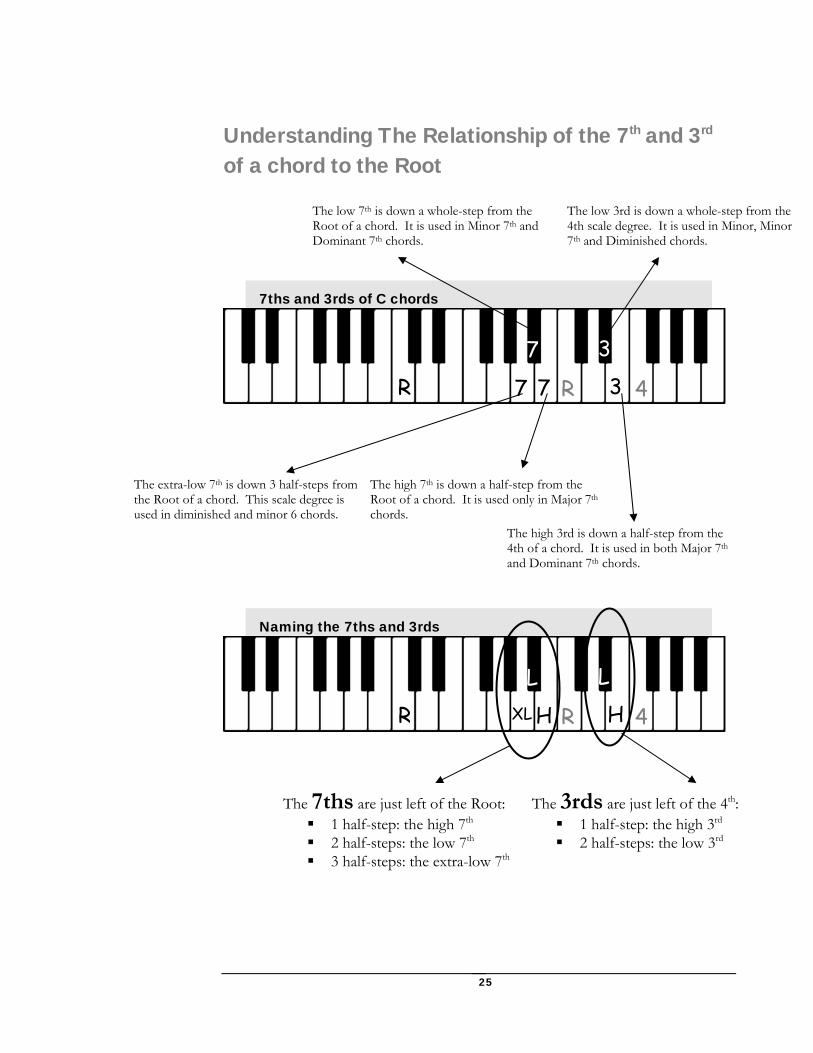
Understanding The Relationship of the 7th and 3rd of a chord to the Root
The low 7th is down a whole-step from the Root of a chord. It is used in Minor 7th and Dominant 7th chords.
The low 3rd is down a whole-step from the 4th scale degree. It is used in Minor, Minor 7th and Diminished chords.
7ths and 3rds of C chords
The extra-low 7th is down 3 half-steps from the Root of a chord. This scale degree is used in diminished and minor 6 chords.
TheRoocho
Naming the 7ths an
The 7ths are ju
1 half-step 2 half-step 3 half-step
7
R 7 7
high 7th is down a half-step fromt of a chord. It is used only in Mrds.
The high4th of a cand Dom
d 3rds
L
H XL R
st left of the Root: : the high 7th s: the low 7th s: the extra-low 7th
The
25
3
3 R
the ajor 7th
3rd is down ahord. It is useinant 7th chor
H
L
R
3rds are 1 half-s 2 half-s
4
half-step from the d in both Major 7th
ds.
4
just left of the 4th: tep: the high 3rd teps: the low 3rd
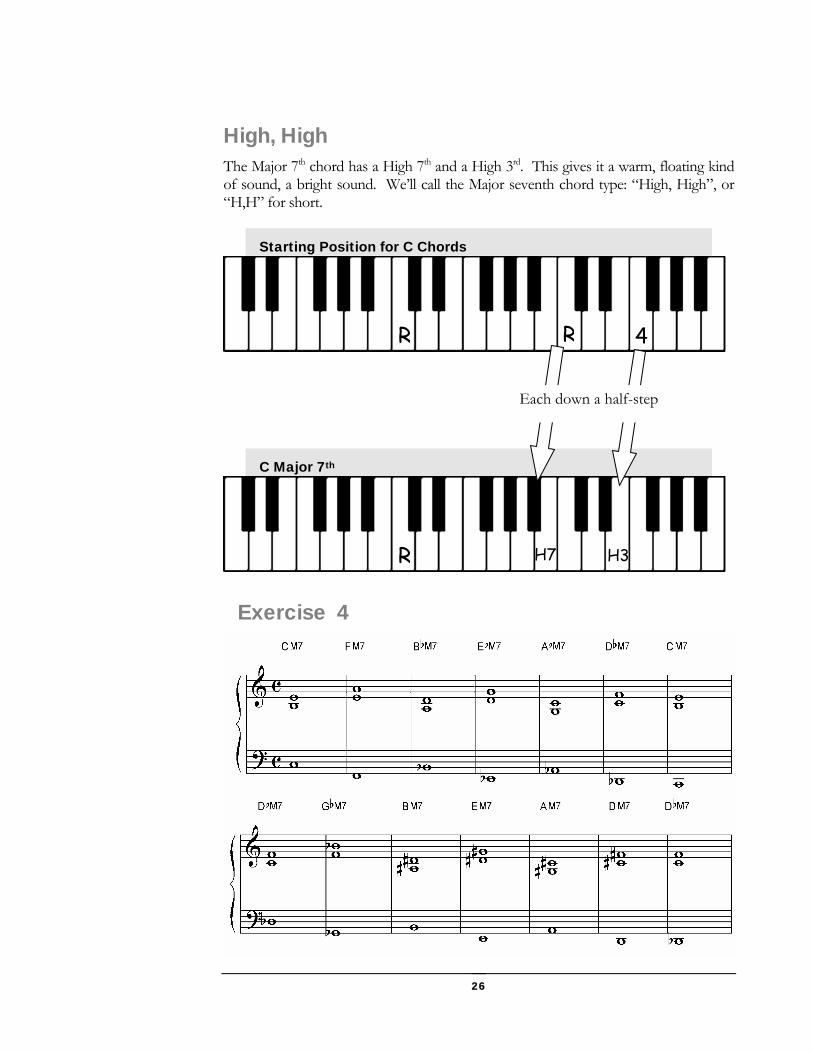
High, High The Major 7th chord has a High 7th and a High 3rd. This gives it a warm, floating kind of sound, a bright sound. We’ll call the Major seventh chord type: “High, High”, or “H,H” for short.
Starting Position for C Chords
C Major 7th
R
Exercise 4
Each
R H7
26
R
down a half
H3
4
-step
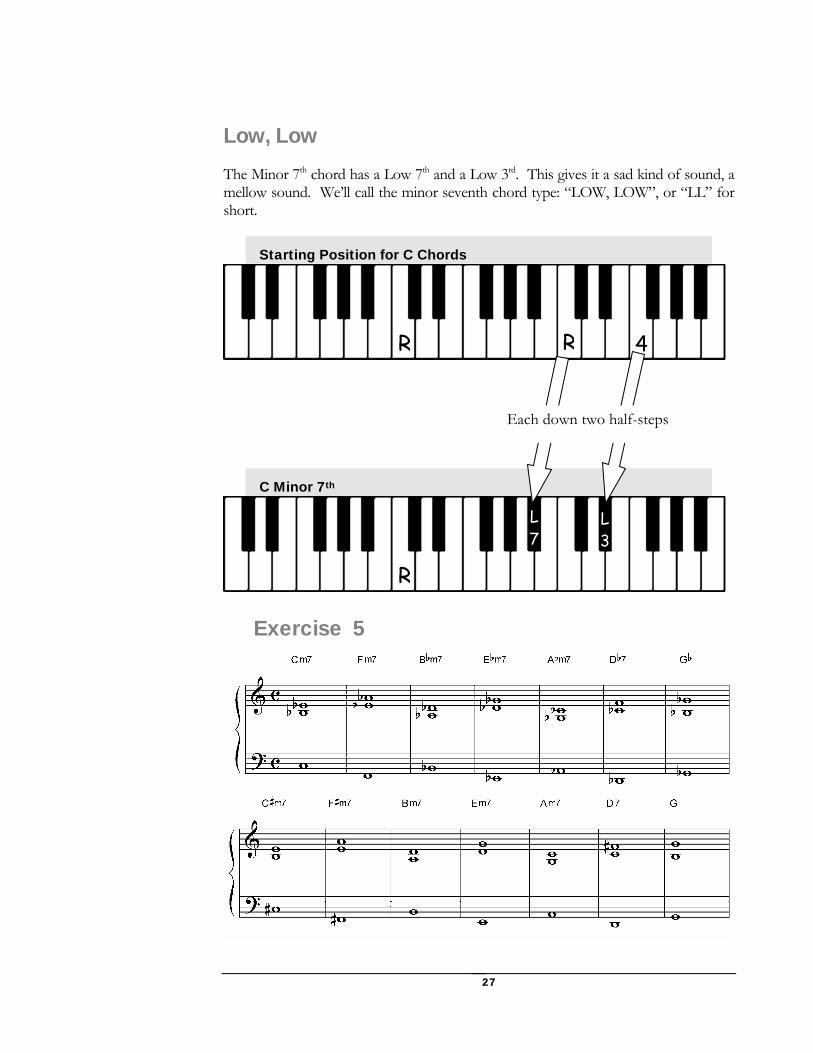
Low, LowThe Minor 7th chord has a Low 7th and a Low 3rd. This gives it a sad kind of sound, a mellow sound. We’ll call the minor seventh chord type: “LOW, LOW”, or “LL” for short.
Starting Position for C Chords
C Minor 7th
R
Exercise 5
L 7
R
27
R
L 3
4
Each down two half-steps
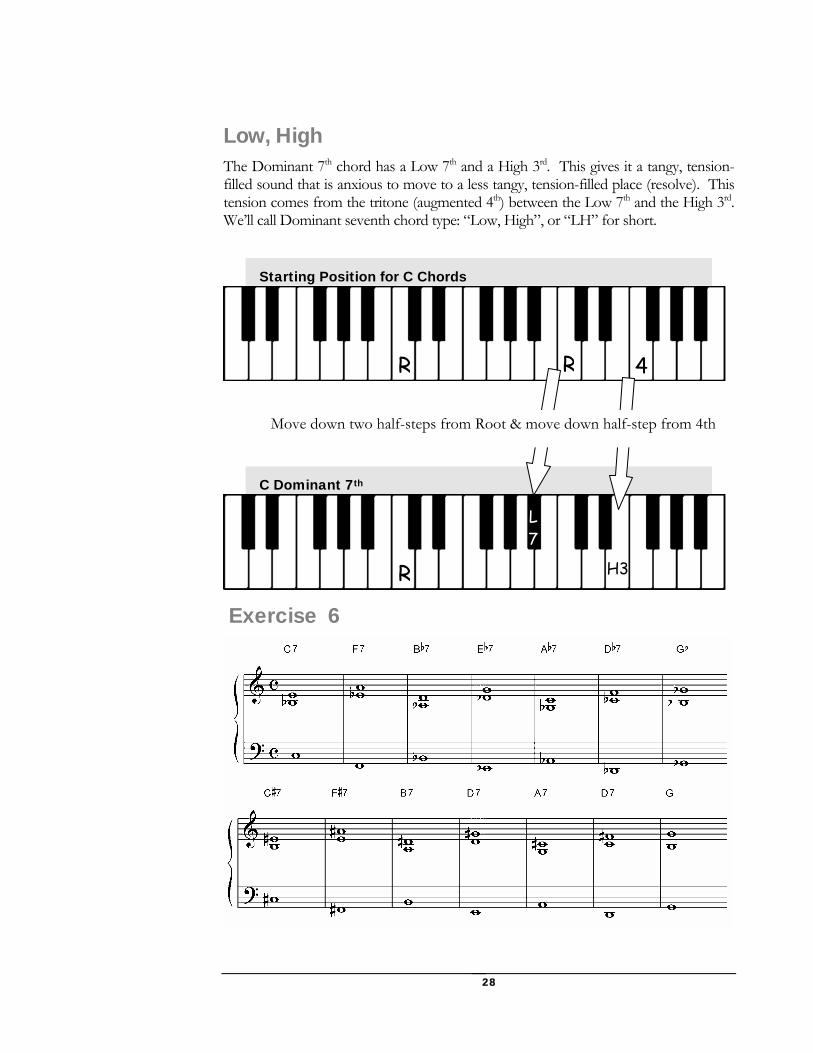
Low, High The Dominant 7th chord has a Low 7th and a High 3rd. This gives it a tangy, tension-filled sound that is anxious to move to a less tangy, tension-filled place (resolve). This tension comes from the tritone (augmented 4th) between the Low 7th and the High 3rd. We’ll call Dominant seventh chord type: “Low, High”, or “LH” for short.
Starting Position for C Chords
C Dominant 7th
Move down two ha
Exercise 6
R
lf-steps from Root & mov
L 7
R
28
R
e down half
H3
4
-step from 4th
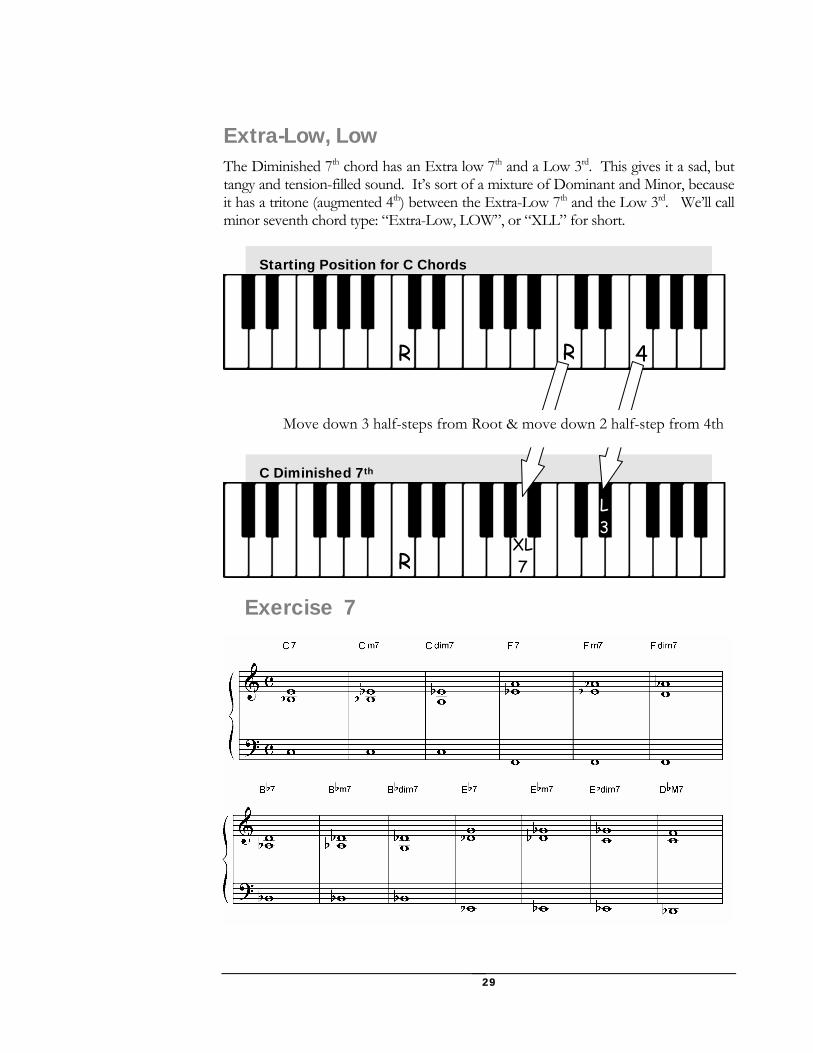
Extra-Low, Low The Diminished 7th chord has an Extra low 7th and a Low 3rd. This gives it a sad, but tangy and tension-filled sound. It’s sort of a mixture of Dominant and Minor, because it has a tritone (augmented 4th) between the Extra-Low 7th and the Low 3rd. We’ll call minor seventh chord type: “Extra-Low, LOW”, or “XLL” for short.
Starting Position for C Chords
C Dimini
R R 4
Move
Exercis
shed 7th
R
down 3 half-steps from R
e 7
XL
oo ve
29
L3
down 2 half-step from 4th
t & mo
7
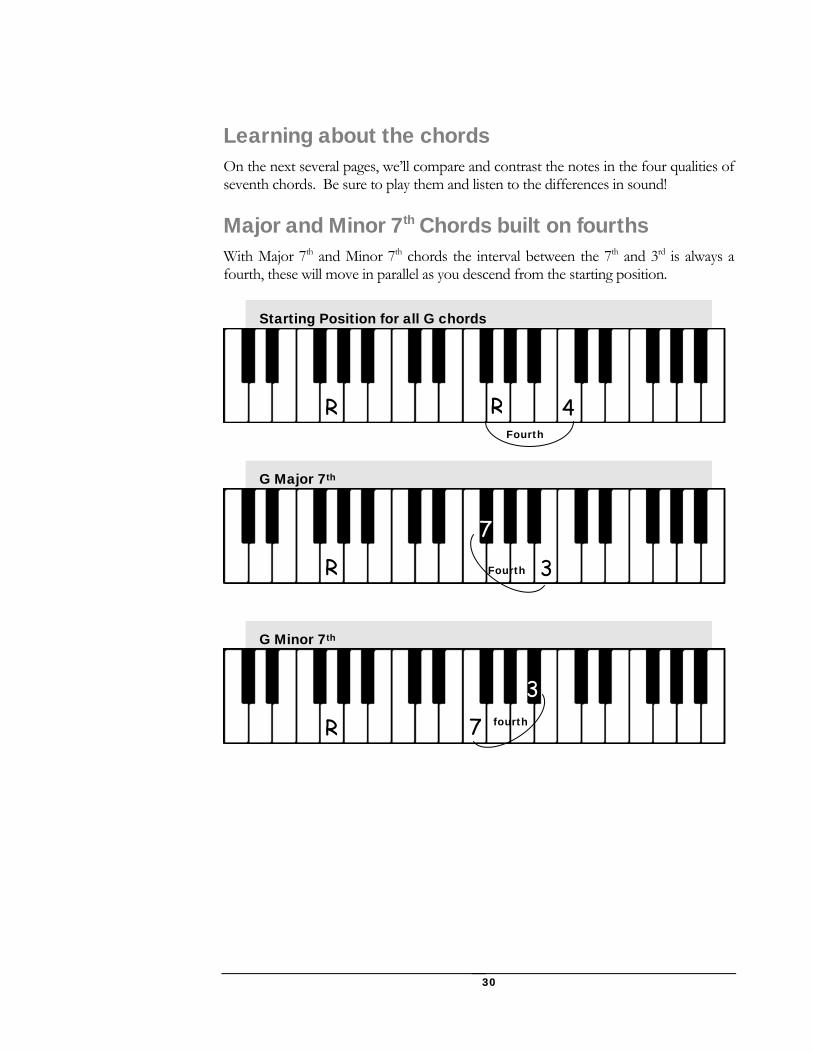
Learning about the chords On the next several pages, we’ll compare and contrast the notes in the four qualities of seventh chords. Be sure to play them and listen to the differences in sound!
Major and Minor 7th Chords built on fourths With Major 7th and Minor 7th chords the interval between the 7th and 3rd is always a fourth, these will move in parallel as you descend from the starting position.
Starting Position for all G chords
G Major
G Minor
7th
7th
R
R
R
R
7
73
fourth
Fourth
Fou
30
4
rth
3
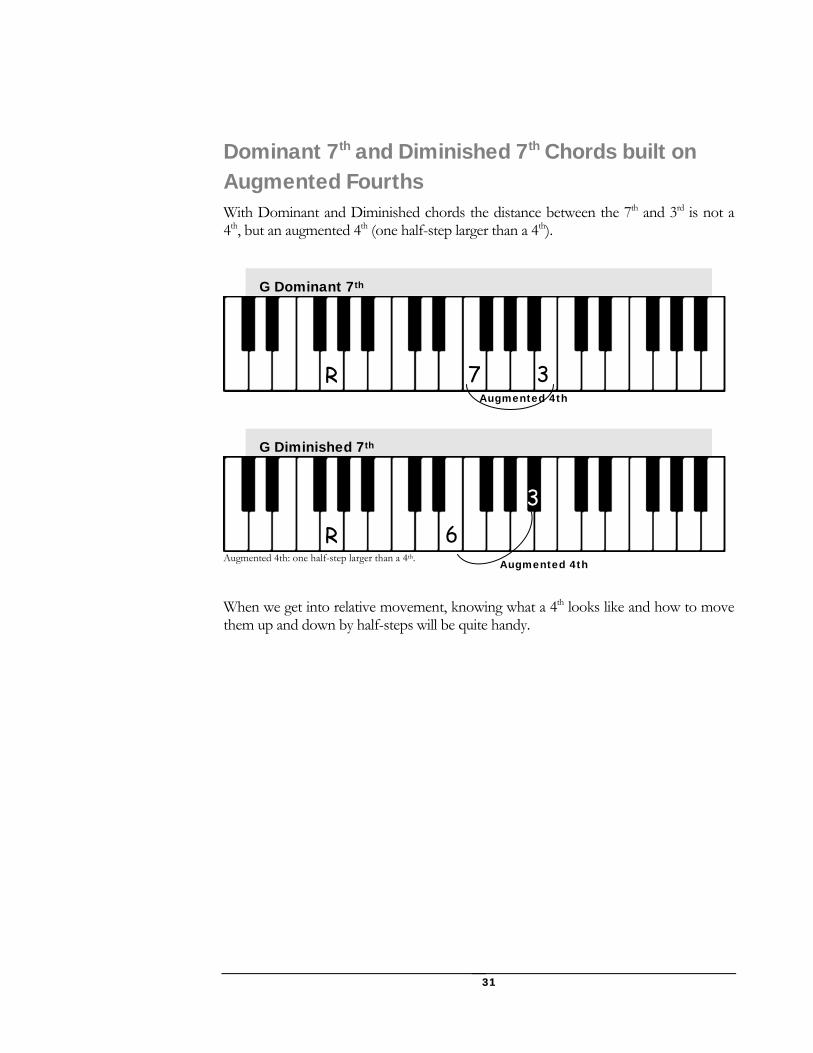
Dominant 7th and Diminished 7th Chords built on Augmented Fourths With Dominant and Diminished chords the distance between the 7th and 3rd is not a 4th, but an augmented 4th (one half-step larger than a 4th).
G Dominant 7th
7 3 R
G Dimin
Augmented 4th: one h
When we get inthem up and do
h
ished 7th
63
R
alf-step larger than a 4th.to relative movement, known by half-steps will be qu
Augmented 4t
ugmented 4th
wi
A
ing what a 4th looks like and how to move te handy.
31

More facts to help you lear
Major 7ths and Dominant 7ths ShareUntil you get to chapter 4, the 3rd will ALWA
G Dominant 7th
R L A
G Major 7th
HH
R.
Minor 7ths and Diminished 7ths Shar
G Minor 7th
G Diminished 7th
L
XL
R
R
3
n the system:
the High 3rd
YS be the top note!
H
ugm ted 4thH
4thrd
e t2
en
he Low 3
L
4th
L
. Augmented 4th
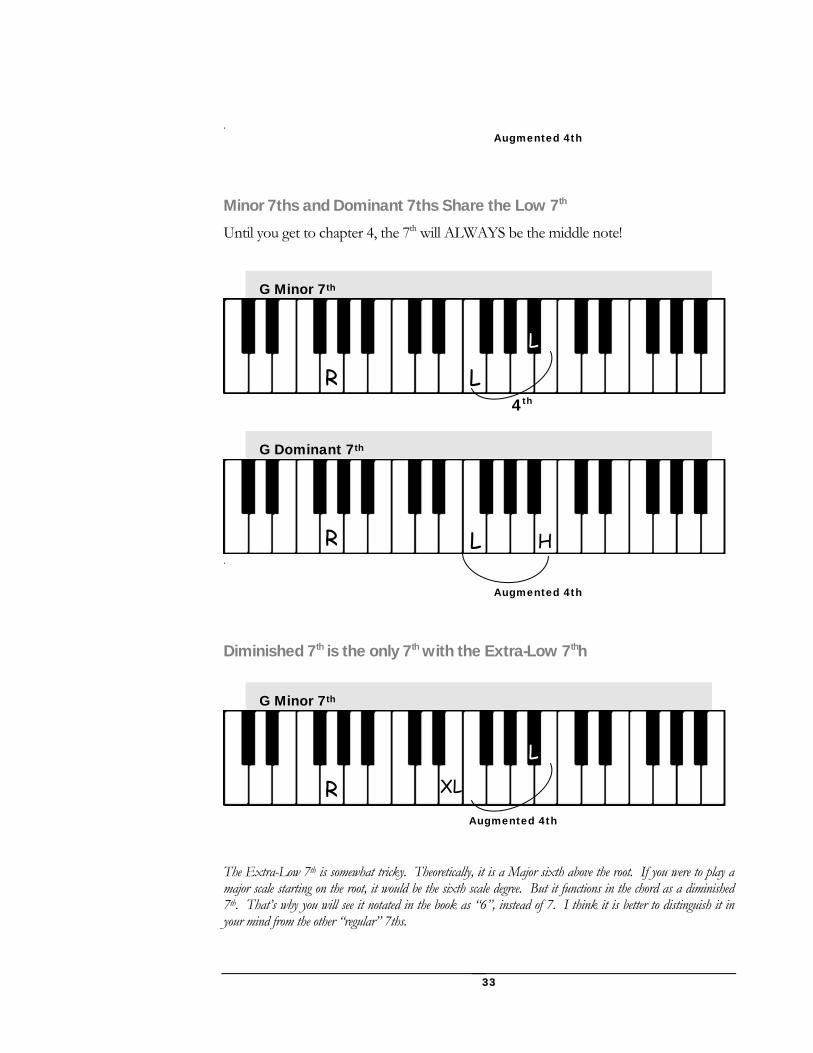
Minor 7ths and Dominant 7ths Share the Low 7th
Until you get to chapter 4, the 7th will ALWAYS be the middle note!
G Minor 7th
L
R
G Dominant 7th
R.
Diminished 7th is the only 7t
G Minor 7th
R
The Extra-Low 7th is somewhat tricky. major scale starting on the root, it would b7th. That’s why you will see it notated inyour mind from the other “regular” 7ths.
L4th
L H
Augmente
h with the Extra-Low
L
Augmented 4th
XL
Theoretically, it is a Major sixe the sixth scale degree. But
the book as “6”, instead of 7
33
d 4th
7thh
th above the rooit functions in th. I think it is
t. e
bet
If you were to play a chord as a diminished ter to distinguish it in
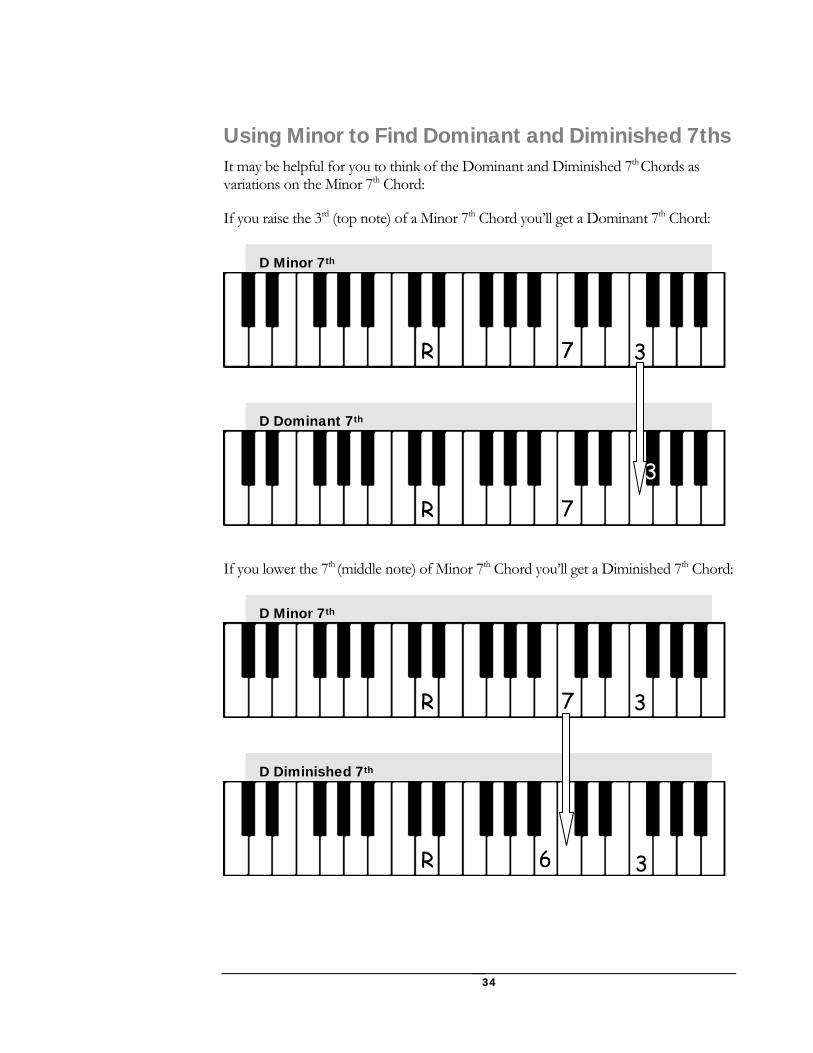
Using Minor to Find Dominant and Diminished 7ths It may be helpful for you to think of the Dominant and Diminished 7th Chords as variations on the Minor 7th Chord:
If you raise the 3rd (top note) of a Minor 7th Chord you’ll get a Dominant 7th Chord:
D Minor 7th
7R
D Dominant 7th
3
3 7R
If you lower the 7th (middle note) of Minor 7th Chord you’ll get a Diminished 7th Chord:
D Minor 7th
D Diminished 7th
7 R 3
6R 3
34
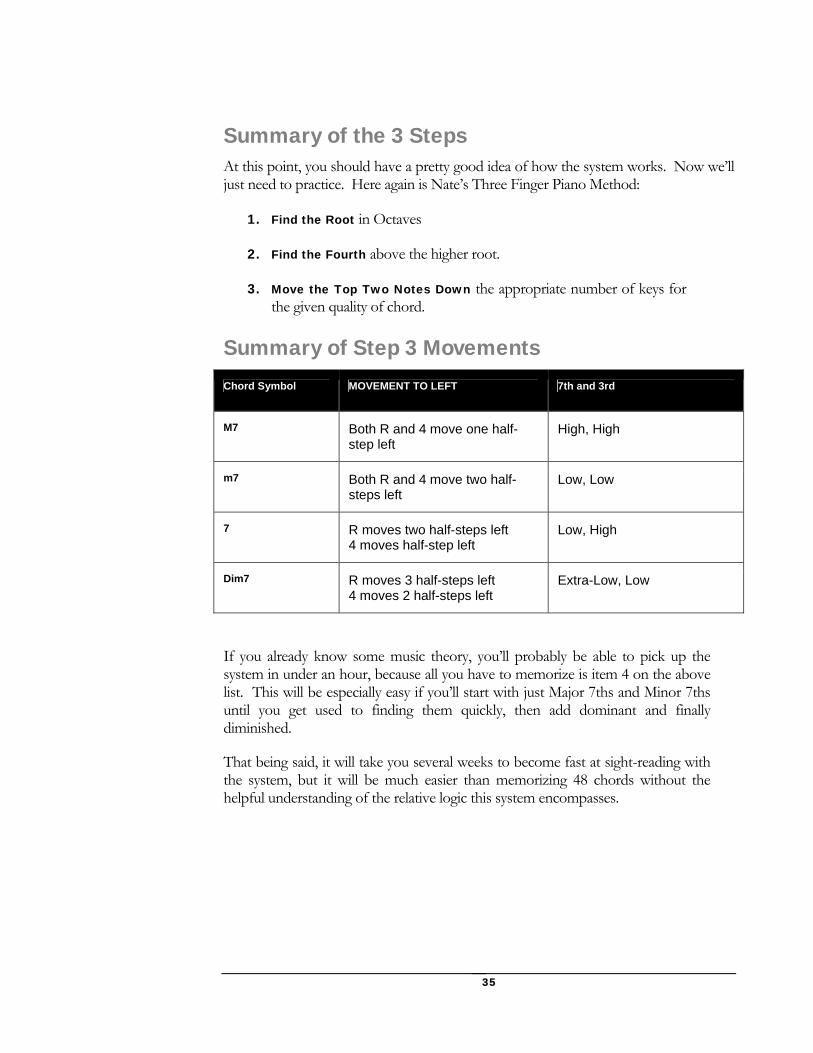
Summary of the 3 Steps At this point, you should have a pretty good idea of how the system works. Now we’ll just need to practice. Here again is Nate’s Three Finger Piano Method:
1. Find the Root in Octaves
2. Find the Fourth above the higher root.
3. Move the Top Two Notes Down the appropriate number of keys for the given quality of chord.
Summary of Step 3 Movements Chord Symbol MOVEMENT TO LEFT 7th and 3rd
M7 Both R and 4 move one half-step left
High, High
m7 Both R and 4 move two half-steps left
Low, Low
7 R moves two half-steps left 4 moves half-step left
Low, High
Dim7 R moves 3 half-steps left 4 moves 2 half-steps left
Extra-Low, Low
If you already know some music theory, you’ll probably be able to pick up the system in under an hour, because all you have to memorize is item 4 on the above list. This will be especially easy if you’ll start with just Major 7ths and Minor 7ths until you get used to finding them quickly, then add dominant and finally diminished.
That being said, it will take you several weeks to become fast at sight-reading with the system, but it will be much easier than memorizing 48 chords without the helpful understanding of the relative logic this system encompasses.
35