chap8: midi menu - makemusic · midi menu 8-1 toc toc index index ... to an external “slave”...
TRANSCRIPT

MIDI Menu 8-1
OC
OC
ndex
Index
ext hapter
reviouhapter
ext hapter
reviouhapter
n
ource, ou
s also
T
T
I
NC
PC
NC
PC
Chapter 8: MIDI Menu
MIDI MenuHow to get thereThe MIDI Menu is one of Finale’s unchanging menus.
What it doesThis menu contains items specific to your MIDI setup and usage.
• MIDI Setup. Choose this command to display the MIDI Setup dialog box, where you camake a number of settings concerning your MIDI interface setup. See MIDI SETUP DIALOG BOX.
• MIDI Thru. If you prefer to use one keyboard as a controller and another as the sound schoose this command to specify your MIDI Thru preferences. MIDI Thru must be on if ywish to hear notes from one device as your entering them on another. See MIDI T HRU DIALOG BOX.
• Import MIDI File Options. Choose this command to display the Import MIDI File Optiondialog box. This dialog box lets you set specific options for importing MIDI files. You can see this dialog box when importing a MIDI File. See IMPORT MIDI FILE OPTIONS DIALOG BOX.
MIDI Menu 8-2
OC
OC
ndex
Index
ext hapter
reviouhapter
ext hapter
reviouhapter
s n
r syn-ee
ing See
set y in t er.
ls el.
ne’s com- Note
ack
d river.
T
T
I
NC
PC
NC
PC
• Export MIDI File Options. Choose this command to display the Export MIDI File Optiondialog box. This dialog box lets you set specific options for exporting MIDI files. You caalso see this dialog when exporting a MIDI File. See EXPORT MIDI FILE OPTIONS DIALOG BOX.
• Send MIDI Value. When you choose this command, the Send MIDI Value dialog box appears. Using the options in this dialog box, you can send any kind of MIDI data to youthesizers immediately: a patch change, a “pedal up” command, a “note off” command. SSEND MIDI V ALUE DIALOG BOX.
• Send MIDI Sync. Choose this option when you want to Finale to transmit MIDI Sync (durplayback) to an external “slave” device such as a drum machine or external sequencer.MIDI SYNC for more information.
• MicNotator. Choose this command to display the MicNotator dialog box, where you canup options for the MicNotator feature. With MicNotator, Finale converts the pitch you plaa microphone into a MIDI note when you use Speedy Entry or HyperScribe. If the 16-biMIDI driver is selected, MicNotator will be unavailable because it requires the 32-bit drivSee MICNOTATOR DIALOG BOX.
• Tablature MIDI Channels. Choose this command to display the Tablature MIDI Channedialog box, where you can assign each string of a MIDI guitar to a different MIDI channSee MIDI CHANNELS FOR TABLATURE DIALOG BOX.
• All Notes Off. From time to time, you may encounter MIDI lock, a rare situation in which a synthesizer sounds as if its keys are “stuck,” and it plays continuously as though someostill pressing them. To send the MIDI signal that tells it to “release the keys,” choose thismand; after a moment, the synthesizer will be silent. Technically, this command sends aOff command to all notes on all channels.
• Start Playback • Stop Playback. These menu items provide keyboard access to the PlaybControls to start or stop the playback of a file.
• 16-bit MIDI Driver • 32-bit MIDI Driver. If your soundcard requires it, choose the 16-bitMIDI Driver. The 16-bit option will not appear on NT-derived systems. Most users shoulchoose the 32-bit MIDI Driver. Please note, the MicNotator feature requires the 32-bit d
MIDI Setup dialog box 8-3
OC
OC
ndex
Index
ext hapter
reviouhapter
ext hapter
reviouhapter
face
IDI r
or a
T
T
I
NC
PC
NC
PC
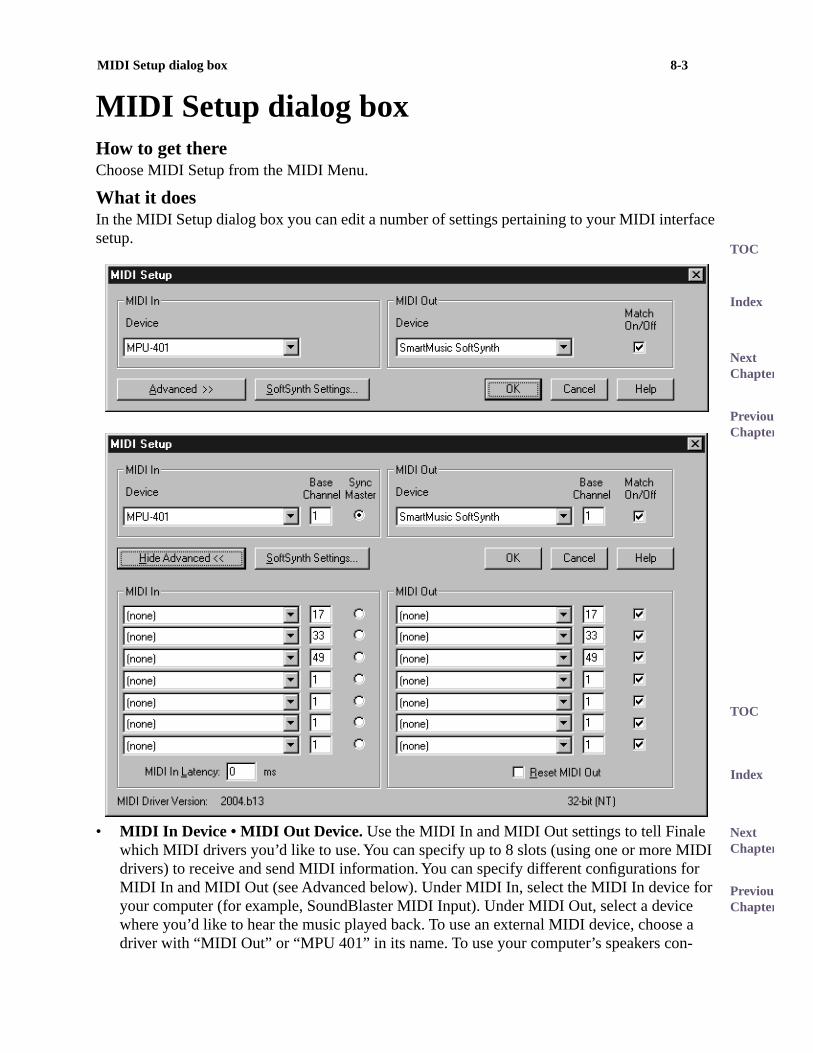
MIDI Setup dialog boxHow to get thereChoose MIDI Setup from the MIDI Menu.
What it doesIn the MIDI Setup dialog box you can edit a number of settings pertaining to your MIDI intersetup.
• MIDI In Device • MIDI Out Device. Use the MIDI In and MIDI Out settings to tell Finale which MIDI drivers you’d like to use. You can specify up to 8 slots (using one or more Mdrivers) to receive and send MIDI information. You can specify different configurations foMIDI In and MIDI Out (see Advanced below). Under MIDI In, select the MIDI In device fyour computer (for example, SoundBlaster MIDI Input). Under MIDI Out, select a devicewhere you’d like to hear the music played back. To use an external MIDI device, choosedriver with “MIDI Out” or “MPU 401” in its name. To use your computer’s speakers con-
MIDI Setup dialog box 8-4
OC
OC
ndex
Index
ext hapter
reviouhapter
ext hapter
reviouhapter
, ion puters sn’t oft-
s of tch’ ple, in a mes-contin- two or on/off
new layer D. Play he C check p-
.
nges in e File
ion is ows
, set nager. only prob-
els
T
T
I
NC
PC
NC
PC
nected to your soundcard, choose a driver with “Synth” or “Synthesizer” in it. By defaultFinale uses “SoftSynth,” which is Finale’s own General MIDI Sound Font. Since this optdoes not use your sound card’s synthesizer, playback will sound the same on other comas long as SoftSynth is selected for the MIDI Out device (and the “Synthgms.sf2” file habeen replaced by a different Sound Font in the Finale/Component files folder). Select SSynth Settings to fine tune Sound Font playback. See SOFTSYNTH DIALOG BOX.
• Match On/Off. This check box controls how Finale handles simultaneous MIDI messagethe same pitch on the same channel. When this box is checked, Finale attempts to ‘maeach simultaneous note on message with a corresponding note off message. For exammeasure containing a whole note on middle C and a half note on middle C, the note offsage at the conclusion of the half note applies only to the half note and the whole note ues for the full duration. If the MIDI output device supports matching on/offs, this optionshould be checked so that note off messages do not interrupt playback of the longer of more unisons on the same channel. If the MIDI device does not support matching note messages, this option should be unchecked.
Tip: To test if your MIDI output device supports matching note on/off messages, open adefault document. Enter a whole note middle C in the first measure in layer 1. Switch to2, and then in the same measure, enter a half note on middle C and then a half note on the measure back. If the whole note C gets cut off with the half note C (you can’t hear tagainst the D), the MIDI device does not support matching, but Finale thinks it does - unMatch On/Off. If the whole note C continues to play over the barline, the MIDI device suports matching, but Finale thinks it doesn’t - check Match On/Off. If you can hear the C against the D, and they both cut off at the same time, Finale is setup correctly.
• Advanced. Click the Advanced button to expand the dialog box for more than one device
• SoftSynth Settings. Click this button to open the SOFTSYNTH DIALOG BOX where you can select the software synthesizer you want to use for output, and change the volume. Chathis dialog box apply to audio files created using the Save As Audio File feature under thMenu.
Note: SoftSynth requires DirectX 5.0 or higher. DirectX is Windows® technology that enables higher performance in graphics and sound. DirectX 5.0, or a newer DirectX versincluded with Windows 98 and newer Windows versions. However, if you are using WindNT4, you may need to install a DirectX update. You can download DirectX updates fromMicrosoft’s Web site free of charge.
Note Also: If you experience erratic playback while using SoftSynth (such as incorrect rhythms), and are using a machine with a dual processors or hyper threading capabilityFinale to run on a single CPU. To do this, press Ctrl-Alt-Delete and then select Task MaChoose the Processes tab, right click “Finale.exe” and choose Set Affinity. Then, ensureone CPU is selected. Click OK, close out of the Task Manager, and the erratic playbacklem should be resolved.
• Base Channel. You can specify the initial MIDI channel number for each MIDI driver selected. This number indicates the first of 16 channels. Finale supports 64 MIDI channthrough different MIDI drivers.

SoftSynth dialog box 8-5
OC
OC
ndex
Index
ext hapter
reviouhapter
ext hapter
reviouhapter
e ified als. If r com-se” n-
en IDI
a- m-
s and reated
T
T
I
NC
PC
NC
PC
• Sync Master. Click in this column if you want Finale to transmit MIDI Sync signals any timit plays back your score through the corresponding MIDI driver and MIDI channels (specby the Base Channel for that driver). Only one device at a time can send MIDI Sync signyou have connected your computer to an external sequencer, drum machine, or anotheputer that has been configured to interpret this kind of MIDI message, it will wait in “paumode until Finale begins playback, at which point the two will play together in perfect sychronization.
• Reset MIDI Out. This option sends a “Key off” message to all notes, on all channels whthe port is made inactive. This check box should only be unchecked (disabled) if your Mdevice(s) are responding with a “MIDI Buffer Overflow” or “MIDI Communication Error” when receiving such a command.
• MIDI In Latency. Enter a value in this text box to delay Finale’s translation of MIDI informtion for entry in HyperScribe. The MIDI latency value compensates for the short delay itsometimes takes for MIDI information to travel from an external MIDI device into the coputer.
• OK • Cancel. Click OK to confirm, or Cancel to discard, the changes you’ve made to theMIDI settings in this dialog box and return to the score.
SoftSynth dialog boxHow to get thereFrom the MIDI Menu, choose MIDI Setup, and then select SoftSynth Settings.
What it doesHere, select the software synthesizer you want to use for output, adjust the volume controloutput level. Changes in this dialog box apply to standard playback as well as audio files cusing the Save As Audio File feature under the File Menu.

MIDI Thru dialog box 8-6
OC
OC
ndex
Index
ext hapter
reviouhapter
ext hapter
reviouhapter
e
y- here File
f
set-
the MIDI rn on
ale. MIDI tly to
T
T
I
NC
PC
NC
PC
• Output Level. Adjust this slider to control the output volume. This setting will also changthe output volume for Wave in your systems’s volume controls.
• Output Source. This drop-down menu displays each device available for Sound Font plaback. Choose the sound driver you want to use for Sound Font playback. Your selectionalso applies to standard playback, as well as audio files generated with Save As Audio feature. See AUDIO FILES.
• Microsoft® Volume Controls: Output • Input. These buttons open the Volume Controls oyour Windows operating system.
• OK • Cancel. Click OK (or press enter) to confirm, or Cancel to discard, your SoftSynth tings and return to the score.
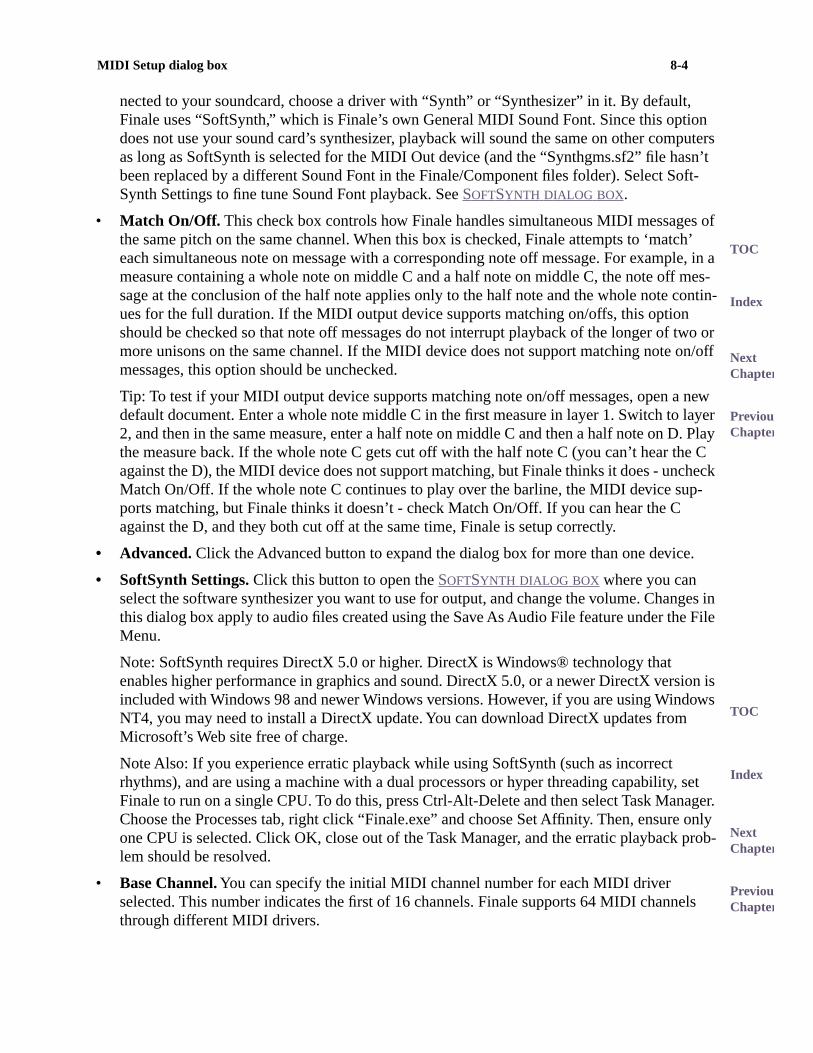
MIDI Thru dialog boxHow to get thereChoose MIDI Thru from the MIDI Menu. The MIDI Thru dialog box appears.
What it doesMIDI Thru is the MIDI configuration whereby you play the pitches on a controller keyboard,MIDI signal travels to your computer, and the computer in turn sends the signal to a secondkeyboard—the one that actually produces the sound. If you have such a setup, you must tuMIDI Thru to tell Finale to pass incoming MIDI signals along to the next MIDI device.
Use the MIDI Thru dialog box to choose how you want MIDI Thru to work when you use FinThe choices are to turn MIDI Thru off, map all channels to a single fixed channel, use SmartThru (for recording with HyperScribe or editing with Speedy Entry), map each channel direc
MIDI Thru dialog box 8-7
OC
OC
ndex
Index
ext hapter
reviouhapter
ext hapter
reviouhapter
ap
d to.
ile ooks oming ing le
ing the e
h text
to ted a
T
T
I
NC
PC
NC
PC
the channel that is being played, or use an editable table of channels where you explicitly meach incoming channel to the outgoing channel you specify.
• Off. Click this option if you don’t want to use MIDI Thru at all. When selected, no routingtakes place.
• Fixed Channel. Click this option if you want to route all incoming channels to the single channel you specify. Enter the number of the channel that you want all channels mappe
• Smart. Click this option if you want to hear the channel and patch assigned to a staff whyou’re recording with HyperScribe or editing with Speedy Entry. When selected, Finale lat the Instrument List to see what instrument sound is set for the staff, and routes all incsignals to the channel defined for that instrument. Note, however, that if you’re just playyour MIDI device and not recording with HyperScribe or editing with Speedy Entry, Finacontinues to use the last active “smart” channel (i.e., the last edited staff’s channel).
• Direct. Click this option if you want Finale to map the outgoing channels directly to the incoming channels that are being played. (This is the same as choosing Table and leavMIDI Thru Table at its default mapping, in which the outgoing channel is the same as thincoming channel.)
• Table • Edit. Click this option if you want to map incoming channels to different outgoingchannels on a channel-by-channel basis. Click Edit to display the MIDI T HRU TABLE DIALOG BOX where you can remap each incoming channel by entering a channel number in eacbox.
• OK • Cancel. Click OK (or press enter) to confirm the MIDI Thru setting, or click Cancel discard any changes you’ve made to the dialog box and return to the score. If you selecMIDI Thru mode, MIDI Thru will be checked in the MIDI Menu. If you selected Off, MIDIThru will not be checked, indicating that no MIDI Thru mode is in use.

MIDI Thru Table dialog box 8-8
OC
OC
ndex
Index
ext hapter
reviouhapter
ext hapter
reviouhapter
IDI key-als n-
nter
.
ru dia-
T
T
I
NC
PC
NC
PC
MIDI Thru Table dialog boxHow to get thereChoose MIDI Thru from the MIDI Menu. Click Table, then click Edit.
What it doesMidi Thru is the MIDI configuration whereby you play the pitches on a MIDI controller, the Msignal travels to your computer, and the computer in turn sends the signal to another MIDI board—the one that actually produces the sound. In this dialog box, you can route the signcoming from your MIDI controller to other MIDI channels, giving you control over which chanels are received by your sound module.
• 1—64. The fixed number on the left indicates the channel of the incoming MIDI signal. Einto the text box the number of the desired output channel for producing the sound. Thedefault setting for each input and output channel is one-to-one.
• Reset. Click this button to restore all settings to the original one-to-one channel mapping
• OK • Cancel. Click OK (or press enter) to confirm the MIDI Thru Table settings, or click Cancel to discard any changes you’ve made to the dialog box and return to the MIDI Thlog box.
Import MIDI File Options dialog box 8-9
OC
OC
ndex
Index
ext hapter
reviouhapter
ext hapter
reviouhapter
ou-
he real-e sig-nfor-
slated r that
alog gura-
T
T
I
NC
PC
NC
PC
Import MIDI File Options dialog boxHow to get thereChoose Import MIDI File Options from the MIDI Menu. The Import MIDI File Options dialogbox appears.
Or,
Choose Open from the File Menu and click MIDI File (from the File Type drop-down list). Dble-click the name of the MIDI file you want to transcribe.
What it doesWhen you tell Finale to “open” a MIDI file, you’re essentially telling it to transcribe the file. Toptions in this dialog box are very similar to those you encounter when you’re transcribing time performances in a Finale document—quantization and split point options, key and timnature settings, and commands to “capture” MIDI data (such as pedaling and key velocity imation).
You also use this dialog box to tell Finale how you want the tracks of the sequencer file traninto Finale staves. For example, you can specify that each track simply become one staff, othe contents of each MIDI channel become one staff. However, you can also enter other diboxes from within this one, where you can specify much more elaborate track-to-staff confitions.
Follow your sequencer’s instructions for creating a standard MIDI file.
Import MIDI File Options dialog box 8-10
OC
OC
ndex
Index
ext hapter
reviouhapter
ext hapter
reviouhapter
of , based at it ves
I key low either lef
T
T
I
NC
PC
NC
PC
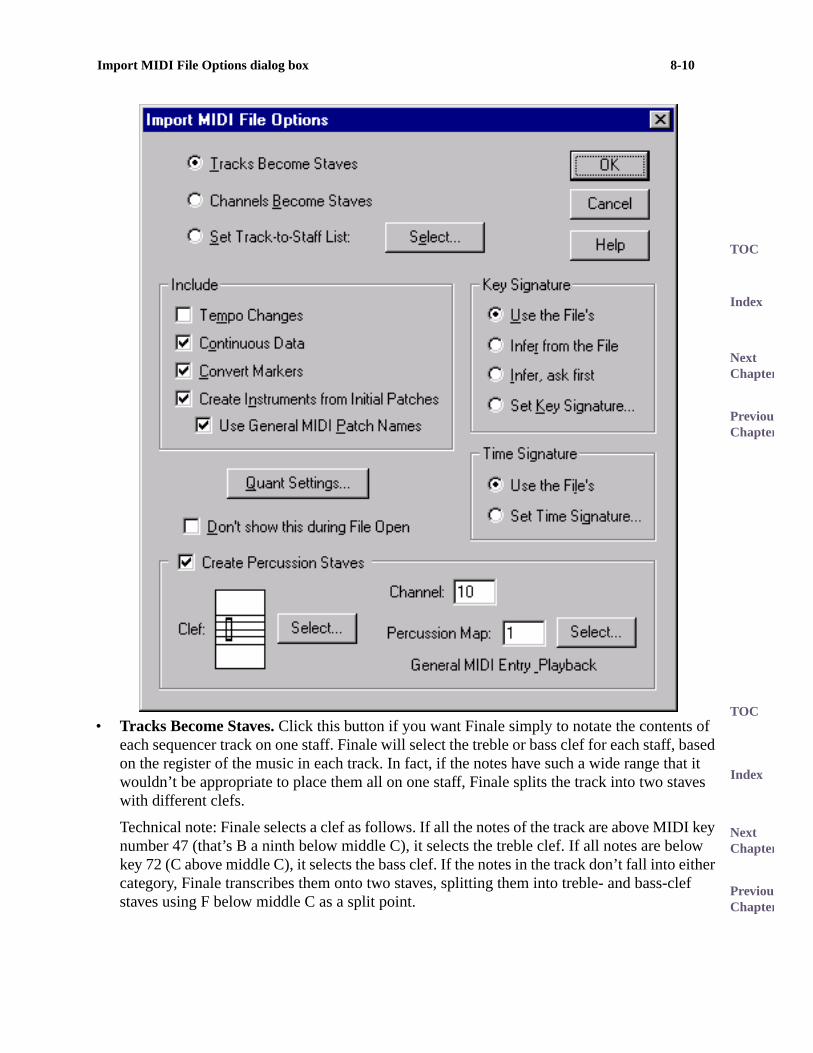
• Tracks Become Staves. Click this button if you want Finale simply to notate the contents each sequencer track on one staff. Finale will select the treble or bass clef for each staffon the register of the music in each track. In fact, if the notes have such a wide range thwouldn’t be appropriate to place them all on one staff, Finale splits the track into two stawith different clefs.
Technical note: Finale selects a clef as follows. If all the notes of the track are above MIDnumber 47 (that’s B a ninth below middle C), it selects the treble clef. If all notes are bekey 72 (C above middle C), it selects the bass clef. If the notes in the track don’t fall into category, Finale transcribes them onto two staves, splitting them into treble- and bass-cstaves using F below middle C as a split point.

Import MIDI File Options dialog box 8-11
OC
OC
ndex
Index
ext hapter
reviouhapter
ext hapter
reviouhapter
l Finale
l ber of en re
IDI
n s you
e ze the ou
into
e nfirm the onfirm
he
-hat
ou
T
T
I
NC
PC
NC
PC
• Channels Become Staves. Click this button if you want the contents of each MIDI channe(regardless of its track assignments) transcribed onto a single Finale staff. Once again,attempts to make intelligent decisions regarding the selection of a clef for each staff.
• Set Track-to-Staff List; Select. If you click this button, Finale will display the Track/ChanneMapping for Staves dialog box when you open a MIDI file, where you can specify a numof track, MIDI channel, and staff configurations. You can specify the top-to-bottom orderthe resulting Finale staves, as well as staff transpositions, clefs, and the distance betwestaves in the resultant Finale document. The Select button is only displayed when you aimporting a file and do not have Don’t show this during File Open selected. If you have selected Set Track-to-Staff List and Don’t show this during File Open while in the MIDI Menu, the Track/Channel Mapping to Staves dialog box will appear when you open a Mfile instead of the Import MIDI File Options dialog box. See TRACK/CHANNEL MAPPING TO STAVES DIALOG BOX for full details.
• Key Signature: Use the File’s. Click this button if you want Finale to notate the transcriptiowith the key signature specified by the MIDI file (if it was created by a sequencer that letspecify one).
• Key Signature: Infer from the File. Click this button if you want Finale to attempt to deducthe correct key signature by examining the notes in the sequencer file. Finale will analymusic, measure by measure, placing key changes where it considers them necessary. Ywon’t see the results of Finale’s intelligent guesses until it’s finished transcribing the filestandard notation.
• Key Signature: Infer, ask me first. Click this button if you want Finale to attempt to deducthe correct key signature by examining the notes in the sequencer file, but to let you coits guesses. When you click the OK button to begin the transcription, Finale will display key signature dialog box at each measure in which it detects a key change, letting you cor cancel its decision.
• Key Signature: Set Key Signature. Click this button if you simply want to tell Finale what key the file is in. Finale displays the Key Signature dialog box, where you can scroll to tcorrect key signature and click OK.
• Time Signature: Use the File’s. Click this button if you want Finale to notate the transcription with the time signature specified by the MIDI file (if it was created by a sequencer tlets you specify one).
• Time Signature: Set the Time Signature. Click this button if you simply want to tell Finalewhat time signature the file is in. Finale displays the Time Signature dialog box, where ycan set the correct time signature and click OK. (See TIME SIGNATURE DIALOG BOX if you need help in setting the time signature.)

Import MIDI File Options dialog box 8-12
OC
OC
ndex
Index
ext hapter
reviouhapter
ext hapter
reviouhapter
yback ntinuous hen
play es for
acce-
nd so
rted
ou r to
from nnel n Map note-
percus-
in s port
to-ap-
t, ht, d by
T
T
I
NC
PC
NC
PC
• Tempo Changes • Continuous Data • Convert Markers. These options tell Finale to remember the precise “feel” of the original sequence, and to keep this data handy for plaonce it’s been transcribed. (These are the same as Save Tempo Changes, and Save CoData checkboxes in the Transcription window.) If you don’t choose these options, then wyou play back the transcribed music from the score, Finale will simply play the “sheet music”—the notated version, which will be rhythmically precise but expressionless and “square”—instead of an exact re-creation of the original sequence. (Important note: To back your music with these captured nuances, be sure you’ve selected all four data typplayback (see PLAYBACK OPTIONS DIALOG BOX).
Tempo Changes information describes changes in the actual tempo, such as ritards andlerandi.
Continuous Data is controller data (MIDI signals generated by pedals, patch changes, aon) and wheels (like the pitch wheel).
Convert Markers defaults to on. Click it if you do not want the sequencer markers conveto Finale bookmarks
• Create Instruments from Initial Patches • Use General MIDI Patch Names. Use these set-tings to import patch information into Finale’s instrument list.
• Quant Settings. Click this button to display the Quantization Settings dialog box where ycan set more options regarding the type of quantization, smallest allowed value, whethecapture Key Velocities and Note Duration, etc. See QUANTIZATION SETTINGS DIALOG BOX.
• Create Percussion Staves: Channel • Clef • Percussion Map [Appears when opening MIDI files only]. Check this box to have Finale create and configure percussion staves the MIDI file. Enter the playback channel in the Channel text box. Finale will suggest cha10, the default percussion channel for General MIDI. Next to Clef, Finale will display theselected clef for percussion staves. Click Select to choose a different clef. The Percussiotext box indicates which Percussion Map will be used to adjust the display of percussionheads, placement and alternate playback. Click the Select button to choose a different sion map. See PERCUSSION.
• Don’t show this during File Open. Select this option if you wish to use the current settingsthe Import MIDI File options next time you import a MIDI file. The Import MIDI File Optiondialog box will not be displayed when you import a MIDI file, only when Import MIDI FileOptions is selected from the MIDI Menu. Deselect this checkbox to again display the ImMIDI File Options dialog box when importing MIDI files. If you have selected Set Track-Staff List and Don’t show this during File Open, Finale will display the Track/Channel Mping to Staves dialog box without first going through the Import MIDI File Options dialogbox. See TRACK/CHANNEL MAPPING TO STAVES DIALOG BOX.
• OK • Cancel. Click OK (or press enter) to proceed with the transcription. After a momenFinale displays the transcribed score. If you discover that your settings weren’t quite rigyou can close the new Finale document and try again—the original MIDI file is unaffecteFinale’s transcription efforts. Click Cancel if you decide not to transcribe the MIDI file.
Track/Channel Mapping to Staves dialog box 8-13
OC
OC
ndex
Index
ext hapter
reviouhapter
ext hapter
reviouhapter
ou-g -Staff
taves m your
ify a order n staves
ch me as rt MIDI an e click
T
T
I
NC
PC
NC
PC
Track/Channel Mapping to Staves dialog boxHow to get thereChoose Open from the File Menu, and select MIDI File from the File Type drop-down list. Dble-click the name of a MIDI file you want transcribed. In the Import MIDI File Options dialobox, click the Set Track-to-Staff List radio button. If you have already selected Set Track-toList and Don’t show this during File Open, Finale will display the Track/Channel Mapping toStaves dialog box without first going through the Import MIDI File Options dialog box.
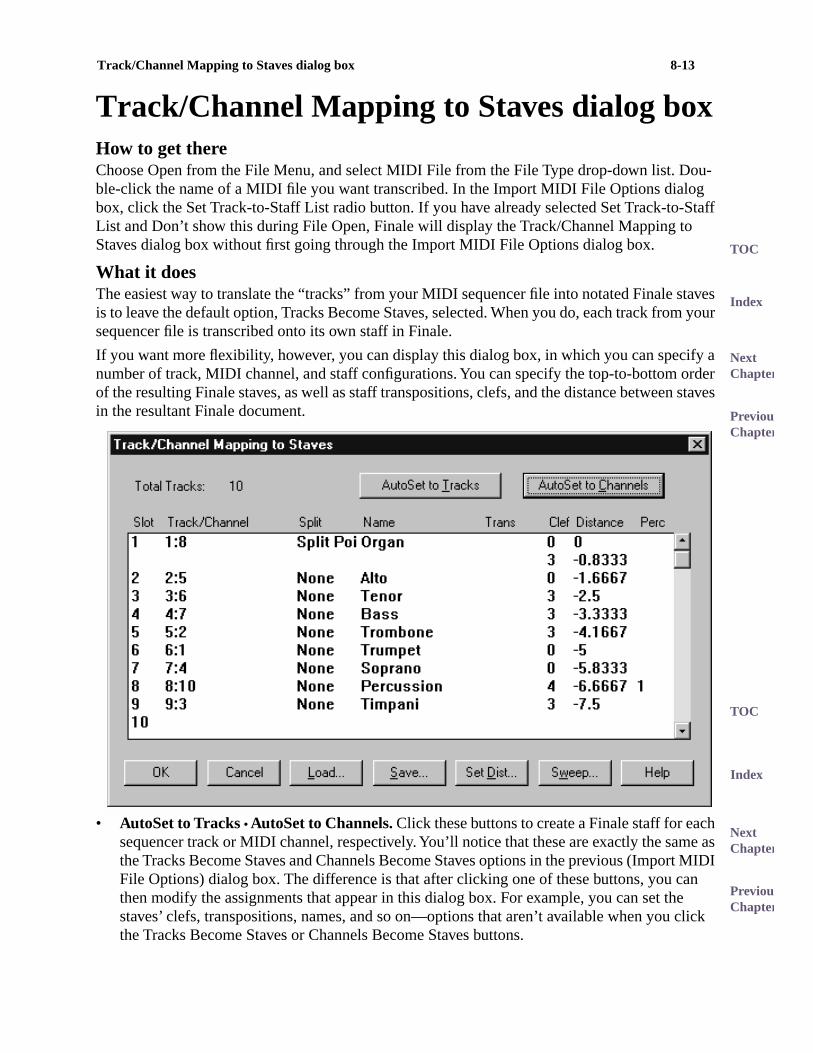
What it doesThe easiest way to translate the “tracks” from your MIDI sequencer file into notated Finale sis to leave the default option, Tracks Become Staves, selected. When you do, each track frosequencer file is transcribed onto its own staff in Finale.
If you want more flexibility, however, you can display this dialog box, in which you can specnumber of track, MIDI channel, and staff configurations. You can specify the top-to-bottom of the resulting Finale staves, as well as staff transpositions, clefs, and the distance betweein the resultant Finale document.
• AutoSet to Tracks • AutoSet to Channels. Click these buttons to create a Finale staff for easequencer track or MIDI channel, respectively. You’ll notice that these are exactly the sathe Tracks Become Staves and Channels Become Staves options in the previous (ImpoFile Options) dialog box. The difference is that after clicking one of these buttons, you cthen modify the assignments that appear in this dialog box. For example, you can set thstaves’ clefs, transpositions, names, and so on—options that aren’t available when you the Tracks Become Staves or Channels Become Staves buttons.
Track/Channel Mapping to Staves dialog box 8-14
OC
OC
ndex
Index
ext hapter
reviouhapter
ext hapter
reviouhapter
l col-
the ified am-trans-rough of the e dis-
ioned nnel s
s (like rder
e you y
el
ify a ce
. text
Finale .
to
T
T
I
NC
PC
NC
PC
• Track/Channel • Split • Name • Trans • Clef • Distance • Perc. The largest part of this dialogbox is devoted to this display, which is a scrolling list of 128 staves. In the Track/Channeumn, you see the name of each track and the MIDI channel to which it was assigned inoriginal sequencer file. In the Split column, Finale displays the split option, if you’ve specone (for example, you might want the track split into two staves—for a piano part, for exple). The Name column displays the staff name; Trans is the transposition, if any (for a posing instrument such as a trumpet or clarinet); Clef indicates the clef, by number (0 th17); and Distance indicates the distance between the top line of the staff and the top lineone above it.The Perc column indicates which Percussion Map will be used to adjust thplay of percussion noteheads, placement and alternate playback.
Each row of information represents one Finale staff. To specify all of the variables mentabove, click anywhere in a row (but define the rows from top to bottom). The Track/ChaMapping dialog box appears, where you can split the sequencer track you clicked into amany as eight Finale staves. You can base this split on MIDI channel, the range of notethe Split Point and Hand Width options in the Transcription Mode), or the top-to-bottom oof notes in each chord (like the Explode Music command in the Mass Edit Menu).
See TRACK/CHANNEL MAPPING DIALOG BOX for more information.
• Load • Save. Once you’ve created a mapping setup, you needn’t re-create it the next timwant to transcribe a similarly configured MIDI file. Instead, after creating the mapping bworking through this dialog box, click Save; Finale asks you to title this “TrackMap file.”
Later, if you want to transcribe the same MIDI file—or a similarly configured one—click Load. Double-click the TrackMap File’s title in the list box that appears; the Track/ChannMapping dialog box fills itself out automatically.
• Set Dist. Click this button to display the Set Distances dialog box, in which you can specuniform distance between staves in the resultant Finale document, as well as the distanbetween the top staff and the top page margin. See SET DISTANCES DIALOG BOX for details.
• Sweep. This button lets you find out which MIDI channels were assigned to a given trackClick the button; the Sweep For Channels Present In A Track dialog box appears. In thebox, enter the number of the track you want scanned, then click Sweep. In the display, places an X below each MIDI channel number on which you recorded data in this trackFinale displays this information for each of four data types; see SWEEP FOR CHANNELS DIA-
LOG BOX.
• OK • Cancel. Click OK (or press enter) to confirm your track-to-staff mapping and returnthe Import MIDI File Options dialog box. Click Cancel to return to the Transcribe MIDI Channel dialog box without changing the track-to-staff mapping.

Set Distances dialog box 8-15
OC
OC
ndex
Index
ext hapter
reviouhapter
ext hapter
reviouhapter
ou-g ired
nt that e top the
line use
the
line ive staff
n to d in ialog
ou-log
T
T
I
NC
PC
NC
PC
Set Distances dialog boxHow to get thereChoose Open from the File Menu, and select MIDI File from the File Type drop-down list. Dble-click the name of a MIDI file you want transcribed. In the Import MIDI File Options dialobox, click the Set Track-to-Staff List radio button. Define track-to-staff mappings for the destracks by clicking each row of information (see TRACK/CHANNEL MAPPING DIALOG BOX). When you’re finished, click Set Dist.
What it doesIn this dialog box, you can specify a uniform distance between staves in the Finale documeresults from your MIDI file transcription, as well as the distance between the top staff and thpage margin. Note that you can override these settings on a staff-by-staff basis by clicking staff name and changing the Distance number in the Track/Channel Mapping dialog box.
• Distance to Top Staff. The number in this text box specifies the distance between the topof the first staff and the top of the window in Scroll View (the default is –.28 inches, becait’s being measured down from the top of the window). You can think of this distance asdistance between systems.
• Distance Between Staves. The number in this text box specifies the distance from the top of one staff to the top line of the next. The default is –.83 inches, because each successis placed below the previous one in the system.
• OK • Cancel. Click OK (or press enter) to confirm your staff placement settings and returthe Track/Channel Mapping to Staves dialog box. Your distance settings will be reflectethe Distances column. Click Cancel to return to the Track/Channel Mapping to Staves dbox without specifying a uniform distance between staves and systems.
Sweep For Channels dialog boxHow to get thereChoose Open from the File Menu, and select MIDI File from the File Type drop-down list. Dble-click the name of a MIDI file you want to transcribe. In the Import MIDI File Options diabox, click the Set Track-to-Staff List radio button. Click Sweep.
Track/Channel Mapping dialog box 8-16
OC
OC
ndex
Index
ext hapter
reviouhapter
ext hapter
reviouhapter
ou’re
in
n-
el ocess ork-
ou-g dia-
T
T
I
NC
PC
NC
PC
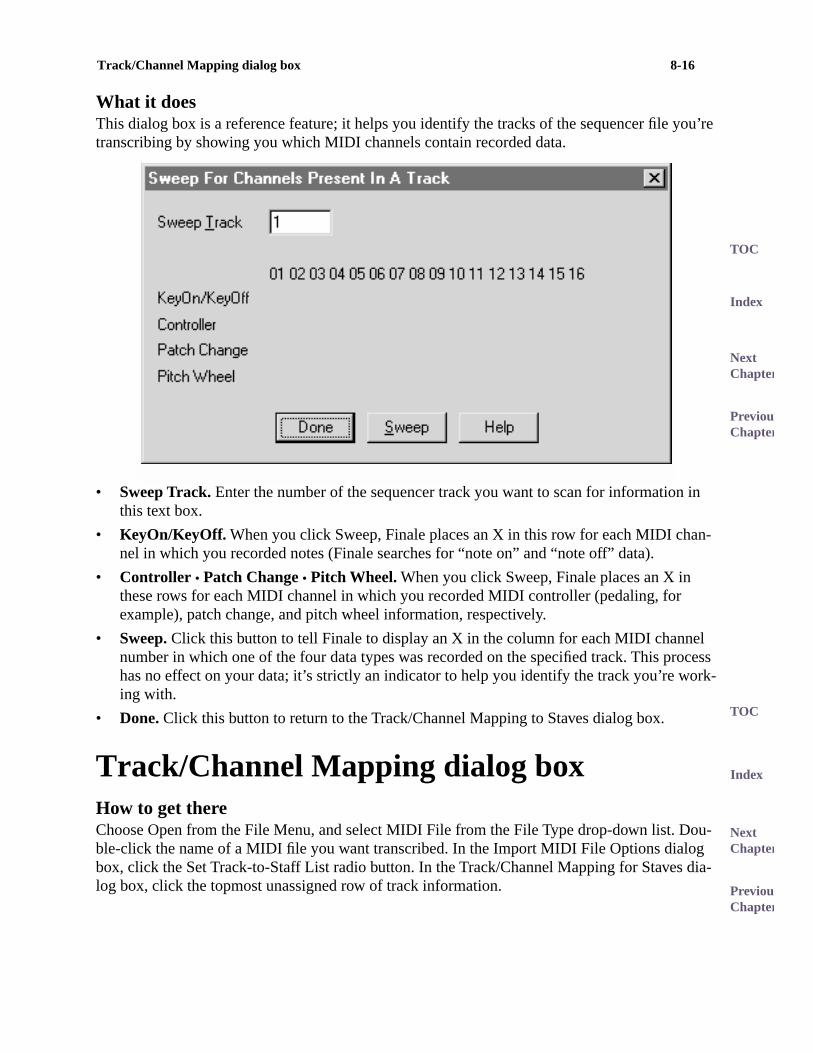
What it doesThis dialog box is a reference feature; it helps you identify the tracks of the sequencer file ytranscribing by showing you which MIDI channels contain recorded data.
• Sweep Track. Enter the number of the sequencer track you want to scan for informationthis text box.
• KeyOn/KeyOff. When you click Sweep, Finale places an X in this row for each MIDI chanel in which you recorded notes (Finale searches for “note on” and “note off” data).
• Controller • Patch Change • Pitch Wheel. When you click Sweep, Finale places an X in these rows for each MIDI channel in which you recorded MIDI controller (pedaling, for example), patch change, and pitch wheel information, respectively.
• Sweep. Click this button to tell Finale to display an X in the column for each MIDI channnumber in which one of the four data types was recorded on the specified track. This prhas no effect on your data; it’s strictly an indicator to help you identify the track you’re wing with.
• Done. Click this button to return to the Track/Channel Mapping to Staves dialog box.
Track/Channel Mapping dialog boxHow to get thereChoose Open from the File Menu, and select MIDI File from the File Type drop-down list. Dble-click the name of a MIDI file you want transcribed. In the Import MIDI File Options dialobox, click the Set Track-to-Staff List radio button. In the Track/Channel Mapping for Staveslog box, click the topmost unassigned row of track information.
Track/Channel Mapping dialog box 8-17
OC
OC
ndex
Index
ext hapter
reviouhapter
ext hapter
reviouhapter
racks
k. You e sev-
track- as if hest
h tehead,
T
T
I
NC
PC
NC
PC
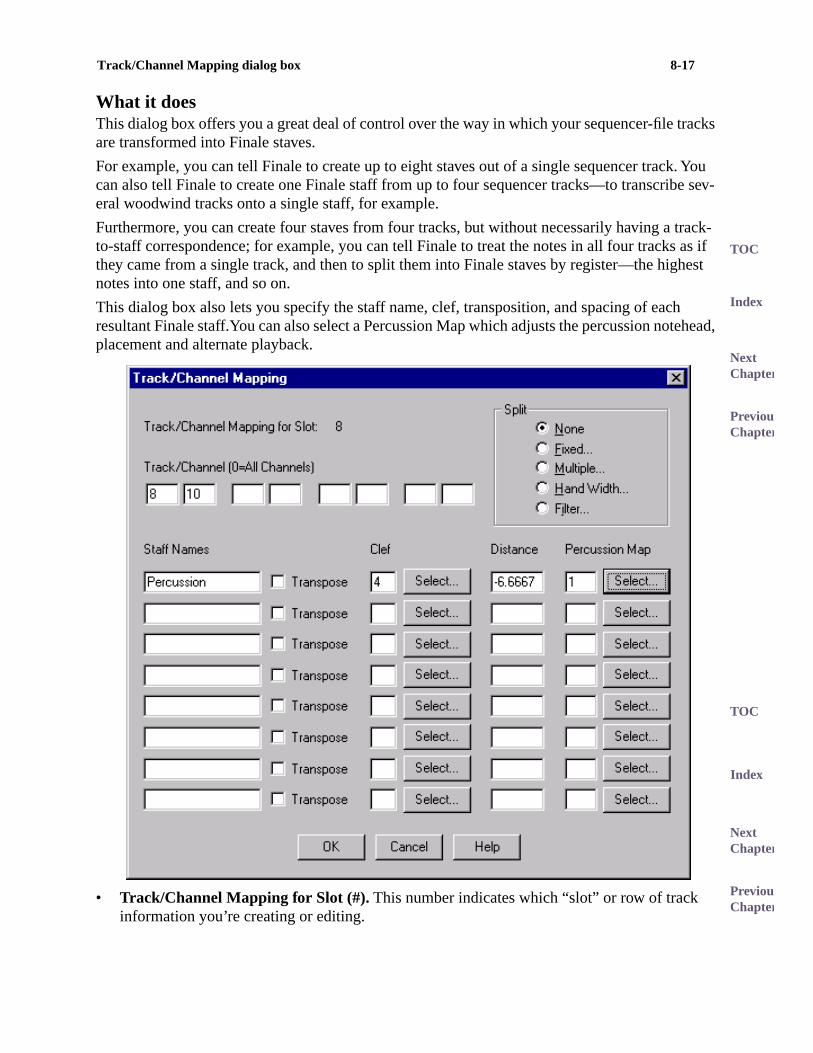
What it doesThis dialog box offers you a great deal of control over the way in which your sequencer-file tare transformed into Finale staves.
For example, you can tell Finale to create up to eight staves out of a single sequencer traccan also tell Finale to create one Finale staff from up to four sequencer tracks—to transcriberal woodwind tracks onto a single staff, for example.
Furthermore, you can create four staves from four tracks, but without necessarily having a to-staff correspondence; for example, you can tell Finale to treat the notes in all four tracksthey came from a single track, and then to split them into Finale staves by register—the hignotes into one staff, and so on.
This dialog box also lets you specify the staff name, clef, transposition, and spacing of eacresultant Finale staff.You can also select a Percussion Map which adjusts the percussion noplacement and alternate playback.
• Track/Channel Mapping for Slot (#). This number indicates which “slot” or row of track information you’re creating or editing.
Track/Channel Mapping dialog box 8-18
OC
OC
ndex
Index
ext hapter
reviouhapter
ext hapter
reviouhapter
ecify rack
el on’t
Enter n-
nel es for
ain, on the
e track one of ou’ve y reg-
in pair four as the mbers num-.
e” is ter; in string
ss rder.
T
T
I
NC
PC
NC
PC
• Track/Channel. There are four pairs of text boxes at the top of the screen, letting you spthe track number (and, within that track, the MIDI channel number) of each sequencer twhose music you want included in the staves you’re about to create.
To create a single staff from a single track, enter the track’s number and the MIDI channfrom which it was recorded in one pair of the Track/Channel boxes. Note: You normally dhave to enter anything in the MIDI Channel text box (the second text box of each pair). a MIDI channel value only if you want to specify that a single MIDI channel’s data be trascribed from a track containing music recorded from several MIDI channels.
Next, enter a staff name, transposition, clef, and so on. Of the Split options, leave Noneselected—otherwise, you’ll transcribe the selected track onto more than one staff.
To create a single staff from multiple sequencer tracks, enter up to four track/MIDI channumber pairings in the text boxes. (Note again that you can leave the MIDI Channel boxblank—or enter zero—if each track was only recorded from a single channel, or if it’s OKFinale to notate the contents of all channels in the track onto one Finale staff.) Once agenter a staff name, and leave the None radio button selected—or, if you want to include resultant staff only the notes within certain pitch ranges, click Filter (see below).
To create several staves from either a single sequencer track or several tracks, enter thand channel numbers in the text boxes, as before. This time, however, you must specifythe Split options (see below). As far as Finale is concerned, the music on all the tracks yspecified in the text boxes are part of a single “source” track, which you can then split, bister, into as many as eight staves.
• Split: None. If this radio button is selected, Finale will place the music from all the tracksyou’ve specified in a single staff, instead of splitting it into separate staves.
• Fixed. When you click this radio button, Finale displays a special Split Point dialog box,which you can specify up to four split points for the music in the specified tracks. In eachof text boxes, you enter a low and a high key number; in this way, you can specify up toregisters, each of which will be notated on its own staff (in the same top-to-bottom order text box pairs) in the resultant Finale document. (Middle C is key number 60, and the nuincrease sequentially as you move up the keyboard. But you don’t have to type in thesebers; you can enter them simply by clicking the Listen button and then playing the notesFinale will enter their key numbers in the text boxes automatically. See FIXED SPLIT DIALOG BOX for a more complete discussion.)
• Multiple. Click this button to display the Multiple Splits dialog box, where you can “explodall the music on the specified tracks onto as many as eight staves. The advantage of thmethod is that notes are “separated out” in order from top to bottom, instead of by regisother words, this would be a more appropriate way to separate single musical lines—forparts, for example—into individual staves.
This dialog box works in much the same way as the Explode Music command in the MaEdit Menu, letting you specify the number of resultant staves as well as the Overload OFor a more complete discussion, see MULTIPLE SPLITS DIALOG BOX.
Track/Channel Mapping dialog box 8-19
OC
OC
ndex
Index
ext hapter
reviouhapter
ext hapter
reviouhapter
s litting ands split ich
ou ged
.
dia-t, for Staff
h-
as the hic of
staff aves n to the hich
’ve log
f g box.
T
T
I
NC
PC
NC
PC
• Hand Width. Click this radio button to display the Hand Width Split dialog box, which letyou transcribe the contents of the sequencer tracks you’ve specified onto two staves, spthe notes by tracking the positions of your hands on the keyboard. Finale follows your has they move up and down the keyboard, eliminating the need to specify a single, fixedpoint—provided there’s always enough distance between the hands for Finale to tell whhand is which. For a more detailed discussion of this dialog box, see HAND WIDTH SPLIT DIA-
LOG BOX.
• Filter. Click this radio button to display the Filter Channels dialog box. With this option, ycan specify certain ranges of notes from each of several tracks that you want to be meronto a single Finale staff. See FILTER CHANNELS DIALOG BOX for more information.
• Staff Names. In these text boxes, enter staff names for the Finale staves you’re creating
• Transpose. Click the appropriate Transpose checkbox to display the Staff Transpositionslog box, in which you can specify an instrumental transposition (for a trumpet or clarineexample). This is the same dialog box that appears when you click Transposition in theAttributes dialog box; see STAFF TRANSPOSITIONS DIALOG BOX for a complete description of the options.
• Clef • Select. This text box identifies, by number, the staff’s starting clef. Finale offers eigteen standard clefs, numbered 0 through 17; for a table of these clefs, see CLEFS.
Enter the number in each Clef text box corresponding to the clef you want to designatestarting clef for the resultant Finale staff. You can also click Select to choose from a grapeach available clef.
• Distance. The number in this text box specifies the distance, between the top line of theyou’re defining and the top of the Finale window (in Scroll View). It’s a negative number,because this staff appears below the top of the window. Note that if you want all your stevenly spaced, you don’t have to enter numbers in these boxes; instead, when you returTrack/Channel Mapping to Staves dialog box, click Set Dist. A dialog box appears, in wyou can enter a global staff distance measurement. (See SET DISTANCES DIALOG BOX.)
• Percussion Map • Select. The number in this text box specifies which Percussion Map youselected for this staff. Click the Select button to open the Percussion Map Selection diabox, where you can select from any Percussion Maps available in the default file. See PERCUS-
SION.
• OK • Cancel. Click OK (or press enter) to confirm, or Cancel to discard, the track-to-stafconfigurations you’ve created. You return to the Track/Channel Mapping to Staves dialo

Fixed Split dialog box 8-20
OC
OC
ndex
Index
ext hapter
reviouhapter
ext hapter
reviouhapter
ou-g dia-es at el
k (or notes flute’s n. You ce.
ou ers
the t, then
tically.
T
T
I
NC
PC
NC
PC
Fixed Split dialog boxHow to get thereChoose Open from the File Menu, and select MIDI File from the File Type drop-down list. Dble-click the name of a MIDI file you want transcribed. In the Import MIDI File Options dialobox, click the Set Track-To-Staff List radio button. In the Track/Channel Mapping to Staveslog box, click the top unassigned row of track/channel mapping information. In the text boxthe top of the Track/Channel Mapping dialog box, enter the track numbers and MIDI channnumbers of the “tracks” you want to split. Click Fixed.
What it doesIn this dialog box, you can specify up to four split points for the music in the sequencer tractracks) you’ve specified for transcription. In each pair of text boxes, you specify a range of you want to appear in a separate staff. You could, for example, include only the notes in theregister to place in one staff; only the notes in the bass’s register to put in another, and so ocan even specify overlapping split ranges so that some notes are transcribed more than on
• Key Range: Low • High. In each pair of Low/High text boxes, enter a low and a high keynumber, where middle C is key number 60, and the numbers increase sequentially as ymove from left to right on the keyboard. The notes to which these synthesizer key numbrefer—and all notes in between—will be split into their own staff.
Note that you don’t have to calculate the key numbers and type them in manually. ClickListen button (see below) beside each pair of text boxes, and play each note—the lowesthe highest note in the range; Finale enters their key numbers in the text boxes automa
Multiple Splits dialog box 8-21
OC
OC
ndex
Index
ext hapter
reviouhapter
ext hapter
reviouhapter
arate of text
al. MIDI
ber in
nd ou’ll
ou-g dia-
m lets ividual sical
g are
his taff; the
T
T
I
NC
PC
NC
PC
You can split the notes of the track (or tracks) you’ve indicated into as many as four sepstaves this way. These staves will appear in the same top-to-bottom order as these pairsboxes.
• Listen. When you click this button, Finale goes into “listen” mode, waiting for a MIDI sign(A message to this effect appears on the screen.) Simply play the desired pitch on yourdevice; Finale enters the appropriate key number in the active text boxes.
• Split into __ Staves. After indicating all the desired ranges of notes in the text boxes (seeabove), tell Finale how many resultant staves you want by entering the appropriate numthe Split text box (1 to 4).
• OK • Cancel. Click OK (or press enter) to confirm your split points, or Cancel to discard them, areturn to the Track/Channel Mapping dialog box. In the Split column for the row you clicked, ysee Fixed (if you clicked OK) or None (if you clicked Cancel).
Multiple Splits dialog boxHow to get thereChoose Open from the File Menu, and select MIDI File from the File Type drop-down list. Dble-click the name of a MIDI file you want transcribed. In the Import MIDI File Options dialobox, click the Set Track-to-Staff List radio button. In the Track/Channel Mapping for Staveslog box, click the top unassigned row of track information. Click Multiple.
What it doesThis dialog box works much the same as the Explode Music dialog box in the Finale prograitself, but you use it when you’re transcribing a standard MIDI sequencer file. In essence, ityou strip a chordal passage (from the combined sequencer tracks you’ve specified) into indsingle-line melodies on separate staves. This is a good technique for separating single mulines—for string parts, for example—into individual staves.
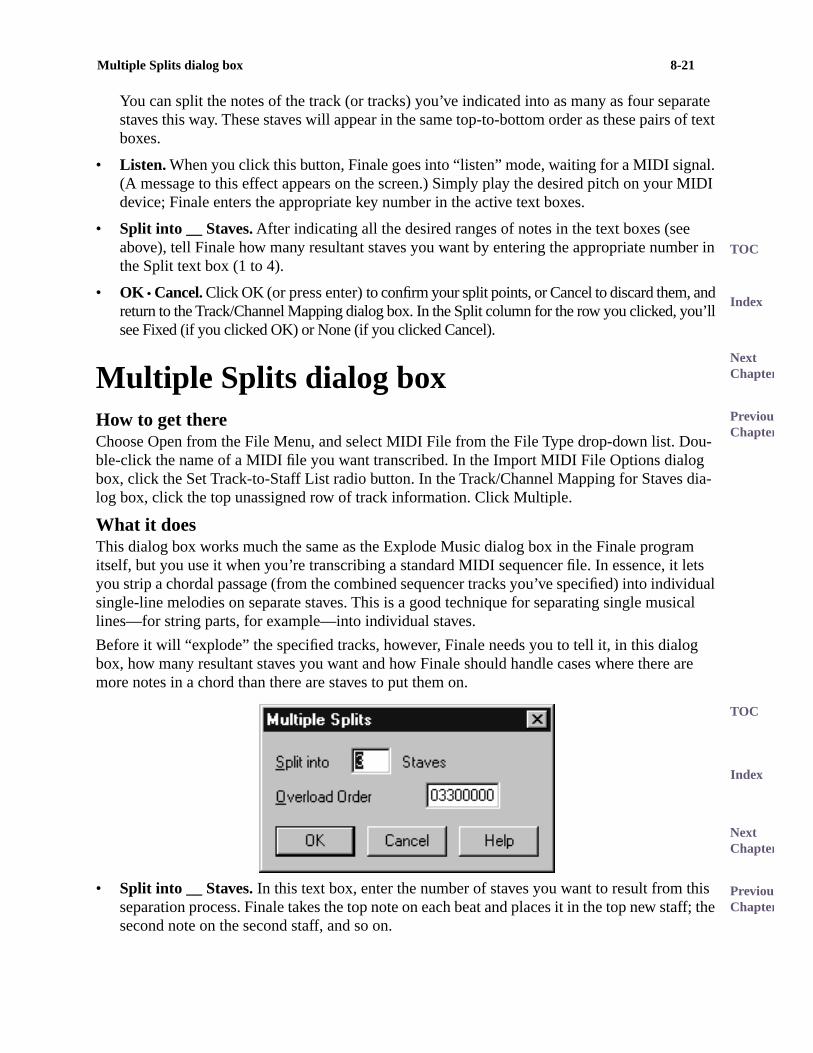
Before it will “explode” the specified tracks, however, Finale needs you to tell it, in this dialobox, how many resultant staves you want and how Finale should handle cases where theremore notes in a chord than there are staves to put them on.
• Split into __ Staves. In this text box, enter the number of staves you want to result from tseparation process. Finale takes the top note on each beat and places it in the top new ssecond note on the second staff, and so on.
Hand Width Split dialog box 8-22
OC
OC
ndex
Index
ext hapter
reviouhapter
ext hapter
reviouhapter
the k into tra two s by
” it ff, and how-d) on
t, it col-
ou-g the
to two enter in eft- as oint—and is
T
T
I
NC
PC
NC
PC
• Overload Order. The Overload Order is the order in which “extra” notes are assigned toresultant staves. For example, if you’re splitting the music from a chordal sequencer tracthree staves, and one of the chords contains five notes, where should Finale put the exnotes? You indicate the order in which you want extra notes distributed among the staveentering a series of staff numbers in this text box.
If, in this example, you entered 12345678 in this text box, Finale would distribute “extranotes from the original five-note chord sequentially among the resultant staves. That is,would notate the top two notes on the first exploded staff, the next two on the second stathe fifth (bottom) note on the third exploded staff. If the Overload Order was 11111111, ever, Finale would place all the “extra” notes (the top three of the original five-note chorthe top exploded staff; the remaining staves would receive one note apiece.
• OK • Cancel. Click OK (or press enter) to confirm your split setup, or Cancel to discard iand return to the Track/Channel Mapping dialog box, where None will appear in the Splumn for the row you clicked.
Hand Width Split dialog boxHow to get thereChoose Open from the File Menu, and select MIDI File from the File Type drop-down list. Dble-click the name of a MIDI file you want transcribed. In the Import MIDI File Options dialobox, click Set Track-to-Staff List. In the Track/Channel Mapping for Staves dialog box, clickfirst row of information you haven’t yet filled in. Click Hand Width.
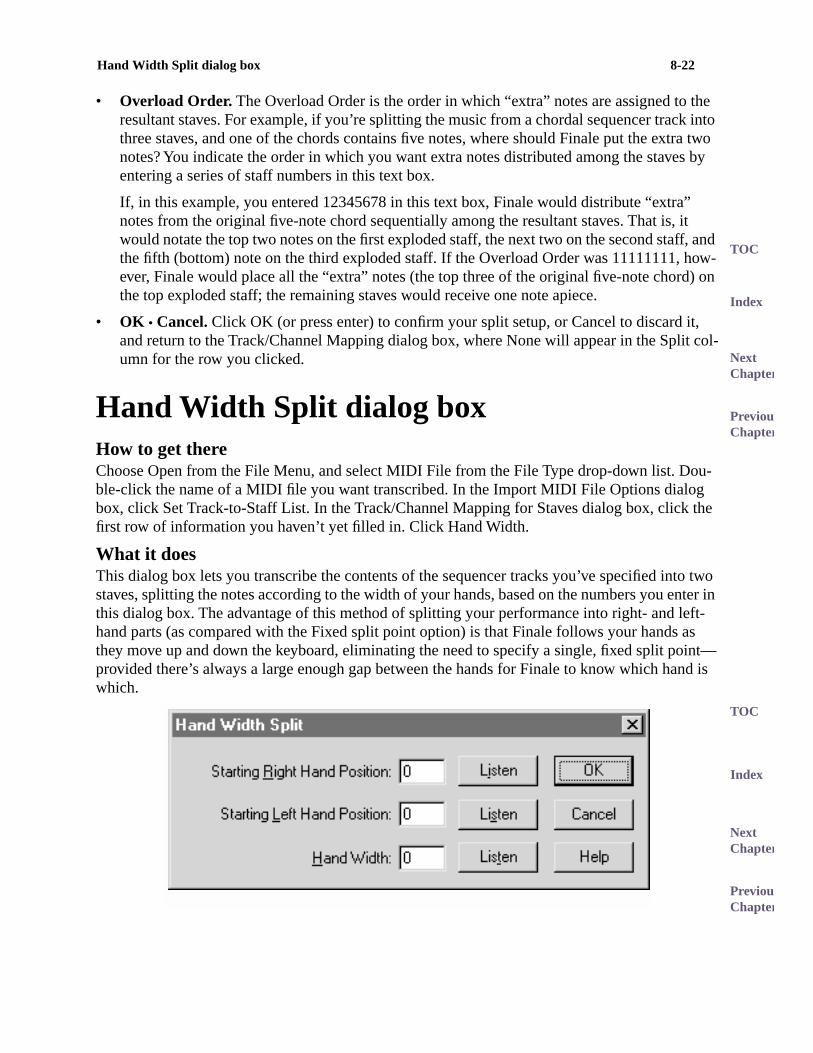
What it doesThis dialog box lets you transcribe the contents of the sequencer tracks you’ve specified instaves, splitting the notes according to the width of your hands, based on the numbers you this dialog box. The advantage of this method of splitting your performance into right- and lhand parts (as compared with the Fixed split point option) is that Finale follows your handsthey move up and down the keyboard, eliminating the need to specify a single, fixed split pprovided there’s always a large enough gap between the hands for Finale to know which hwhich.

Filter Channels dialog box 8-23
OC
OC
ndex
Index
ext hapter
reviouhapter
ext hapter
reviouhapter
tran-ey
n but- box
and isten
idth
s
ou-g ialog log s to be
hich up to encer
into
ur n has ext
T
T
I
NC
PC
NC
PC
• Starting Right Hand Position • Starting Left Hand Position • Listen. These text boxes let you tell Finale where your right and left hands are at the beginning of the track(s) to be scribed. The numbers are synthesizer key numbers (middle C is key number 60), and thspecify the starting position of your leftmost finger of each hand.
Instead of calculating key numbers and entering them in these boxes, just click the Listeton, then play the note or chord that begins the left-hand (or right-hand) part of the trackyou’re transcribing. Finale automatically enters the key number into the appropriate text(in which you’ve clicked the cursor).
• Hand Width: • Listen. In this text box, enter the widest interval, in half steps, that either hplayed during your performance. Instead of calculating the number of half steps, click Lto MIDI, and play the widest interval. The checkbox is no longer selected, and the Hand Wtext box displays the width of the interval.
• OK • Cancel. Click OK (or press enter) to confirm, or Cancel to discard, the hand width settingyou’ve just made. You return to the Track/Channel Mapping dialog box.
Filter Channels dialog boxHow to get thereChoose Open from the File Menu, and select MIDI File from the File Type drop-down list. Dble-click the name of a MIDI file you want transcribed. In the Import MIDI File Options dialobox, click the Set Track-to-Staff List radio button. In the Track/Channel Mapping to Staves dbox, click the topmost unassigned row of track information; the Track/Channel Mapping diabox appears. Enter the numbers of the tracks from which you want to select ranges of notetranscribed in the text boxes at the top of the window; click Filter.
What it doesThe Track/Channel Mapping dialog box offers you a great deal of control over the way in wyour sequencer-file tracks are transformed into Finale staves. You can tell Finale to create eight staves out of a single sequencer track, to create one Finale staff from up to four sequtracks, and so on.
You can think of the Filter split option as the inverse of the Fixed, Multiple, and other split options. Where these other functions serve to split the notes on the tracks you’ve specifiedseparate staves, the Filter function lets you combine selected notes from several different sequencer tracks onto a single Finale staff.
In the Filter Channels dialog box, you specify the ranges of the notes from each of up to fotracks you want Finale to transcribe onto a single staff. Note, however, that the Filter functiono meaning if you haven’t specified at least one track by entering its number in one of the tboxes at the top of the Track/Channel Mapping dialog box. If you click Filter without havingspecified a track, Finale will display an alert message.
Export MIDI File Options dialog box 8-24
OC
OC
ndex
Index
ext hapter
reviouhapter
ext hapter
reviouhapter
nd box.
igh track/cribe tion.
key-e will te, you
west, tomati-
ns
rop-
ox
T
T
I
NC
PC
NC
PC
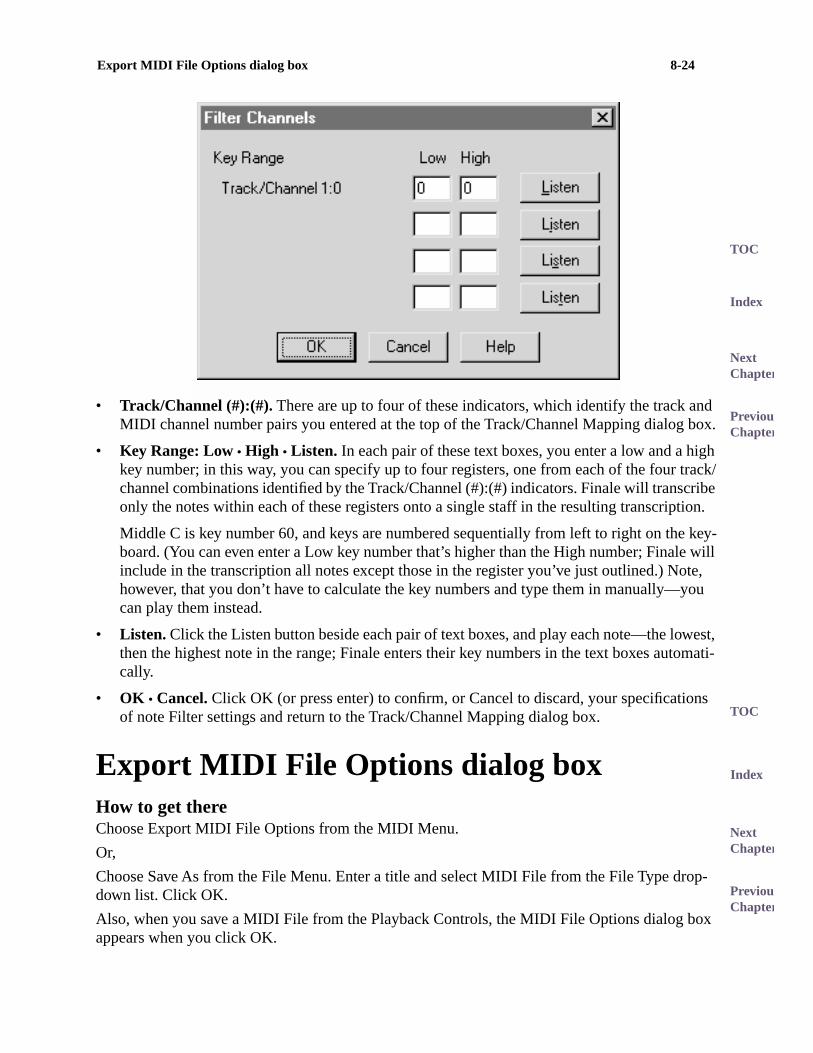
• Track/Channel (#):(#). There are up to four of these indicators, which identify the track aMIDI channel number pairs you entered at the top of the Track/Channel Mapping dialog
• Key Range: Low • High • Listen. In each pair of these text boxes, you enter a low and a hkey number; in this way, you can specify up to four registers, one from each of the four channel combinations identified by the Track/Channel (#):(#) indicators. Finale will transonly the notes within each of these registers onto a single staff in the resulting transcrip
Middle C is key number 60, and keys are numbered sequentially from left to right on theboard. (You can even enter a Low key number that’s higher than the High number; Finalinclude in the transcription all notes except those in the register you’ve just outlined.) Nohowever, that you don’t have to calculate the key numbers and type them in manually—can play them instead.
• Listen. Click the Listen button beside each pair of text boxes, and play each note—the lothen the highest note in the range; Finale enters their key numbers in the text boxes aucally.
• OK • Cancel. Click OK (or press enter) to confirm, or Cancel to discard, your specificatioof note Filter settings and return to the Track/Channel Mapping dialog box.
Export MIDI File Options dialog boxHow to get thereChoose Export MIDI File Options from the MIDI Menu.
Or,
Choose Save As from the File Menu. Enter a title and select MIDI File from the File Type ddown list. Click OK.
Also, when you save a MIDI File from the Playback Controls, the MIDI File Options dialog bappears when you click OK.
Export MIDI File Options dialog box 8-25
OC
OC
ndex
Index
ext hapter
reviouhapter
ext hapter
reviouhapter
I file, ost of
ers
te a
—u-hords, you’ve iple
erent , for ry ele-
t a ndi, le
to
T
T
I
NC
PC
NC
PC
What it doesYou can save any document into several formats. This file format, known as a standard MIDenables your document to be shared with other music programs (primarily sequencers), mwhich can read this kind of file.
In this dialog box, Finale asks you which kind of MIDI file you want to create; most sequenccan read any of these formats.
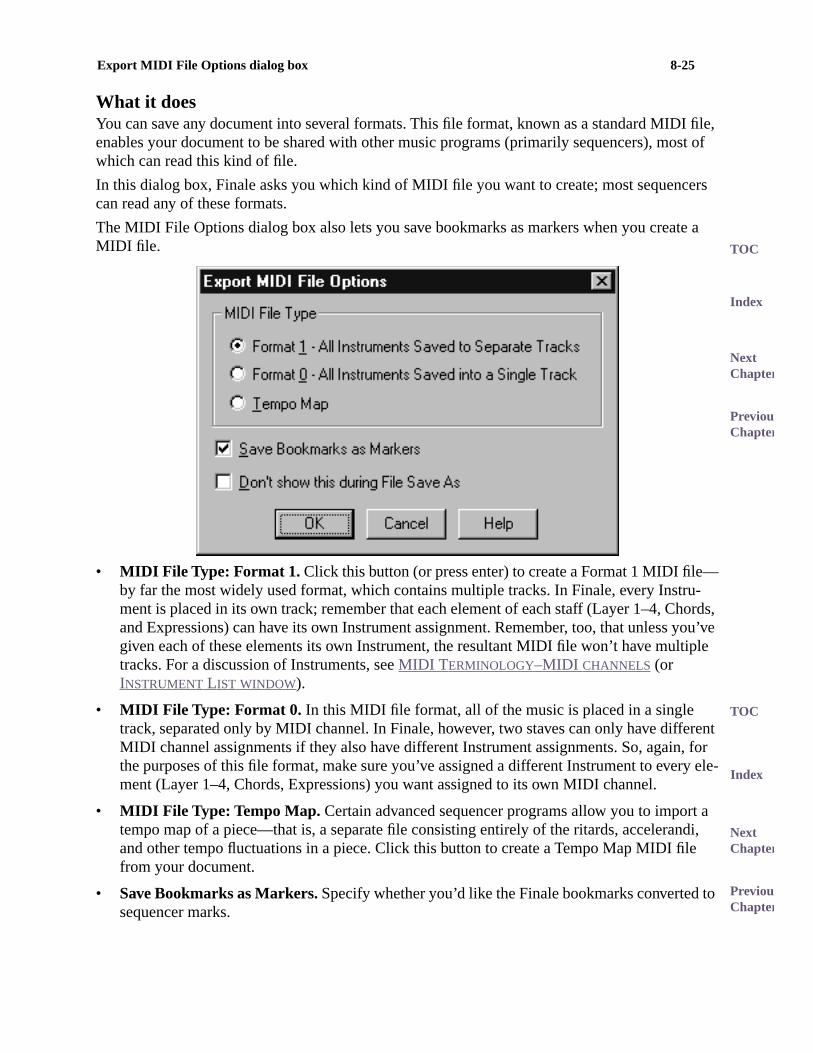
The MIDI File Options dialog box also lets you save bookmarks as markers when you creaMIDI file.
• MIDI File Type: Format 1. Click this button (or press enter) to create a Format 1 MIDI fileby far the most widely used format, which contains multiple tracks. In Finale, every Instrment is placed in its own track; remember that each element of each staff (Layer 1–4, Cand Expressions) can have its own Instrument assignment. Remember, too, that unlessgiven each of these elements its own Instrument, the resultant MIDI file won’t have multtracks. For a discussion of Instruments, see MIDI T ERMINOLOGY–MIDI CHANNELS (or INSTRUMENT LIST WINDOW).
• MIDI File Type: Format 0. In this MIDI file format, all of the music is placed in a single track, separated only by MIDI channel. In Finale, however, two staves can only have diffMIDI channel assignments if they also have different Instrument assignments. So, againthe purposes of this file format, make sure you’ve assigned a different Instrument to evement (Layer 1–4, Chords, Expressions) you want assigned to its own MIDI channel.
• MIDI File Type: Tempo Map. Certain advanced sequencer programs allow you to importempo map of a piece—that is, a separate file consisting entirely of the ritards, acceleraand other tempo fluctuations in a piece. Click this button to create a Tempo Map MIDI fifrom your document.
• Save Bookmarks as Markers. Specify whether you’d like the Finale bookmarks convertedsequencer marks.
Send MIDI Value dialog box 8-26
OC
OC
ndex
Index
ext hapter
reviouhapter
ext hapter
reviouhapter
gs I ort lay
ut
your (the
or of
t values ller, Con-
T
T
I
NC
PC
NC
PC
• Don’t show this during File Save As. Select this option if you wish to use the current settinin the Export MIDI File options next time you save a MIDI file in Finale. The Export MIDFile Options dialog box will not be displayed when you save a MIIDI file, only when ExpMIDI File Options is selected from the MIDI Menu. Deselect this checkbox to again dispthe Export MIDI File Options dialog box when saving MIDI files.
• OK • Cancel. Click OK (or press enter) to confirm, or Cancel to return to the score withocreating a MIDI file.
Send MIDI Value dialog boxHow to get thereChoose Send MIDI Value from the MIDI Menu.
What it doesThis dialog box simply provides a convenient way to transmit any MIDI message directly toMIDI device. You might send a “note off” message on all channels in the event of MIDI locksame function as the All Notes Off command–see MIDI MENU); you might use it to change the patch setting of one of your keyboards; or you could reset a MIDI keyboard’s sustain pedalpitch wheel that’s become “stuck” in the down position, for example. The permissible rangevalues in any of the text boxes is zero to 127.
To send bank and program changes immediately, enter the program change and bank selecinto the Send MIDI Value dialog box. Sending controller data is simple. To choose a controclick Controller, then choose the name of the controller, such as 64:Sustain Pedal, from thetroller drop down list.

Send MIDI Value dialog box 8-27
OC
OC
ndex
Index
ext hapter
reviouhapter
ext hapter
reviouhapter
IDI orts). l
right city key
T
T
I
NC
PC
NC
PC
• All MIDI Channels • Only MIDI Channel ___. With these controls, you specify the MIDI channel on which you want Finale to transmit the specified MIDI data. If you select All MChannels, Finale transmits the specified data on all sixteen MIDI channels (from both pIf you select Only MIDI Channel ___, Finale only transmits the data on the MIDI channewhose number you enter in the text box.
• Key Off • Key On. Click one of these buttons if you want Finale to transmit a Key Off (“release the key”) or Key On (“play the key”) message to the key whose number you’veentered in the first text box. (MIDI key numbers increase sequentially as you move to theon the keyboard; middle C is key number 60.) In the second text box, enter the key velovalue with which you want the note struck (or released, for synthesizers that respond tooff velocity data).
MIDI Sync 8-28
OC
OC
ndex
Index
ext hapter
reviouhapter
ext hapter
reviouhapter
t the ant
DI
r you ank ent you ill be
e text
xt t text oxes
log
that rovid- data;
back long lock
iption yback box. k file;
encer
com- MIDI will
T
T
I
NC
PC
NC
PC
• Controller. Click this button and place the controller number in the first text box (or selecdesired controller from the drop-down list). In the second text box, enter the value you wsent for the controller whose number you’ve entered in the first text box. For a list of MIcontrollers and their numbers, see the APPENDIX–MORE ON MIDI .
• Patch. Click this button to make a Patch change. From the drop down list choose whethewant to make a simple program change, or a bank and program change; then use the BSelect and Program Change text boxes to make the changes. Or just select the instrumdesire from the General MIDI drop down list and the Bank Select and Program Change wset for you automatically. See PATCHES for a detailed description of how patch information works.
• Pitch Wheel • Channel Pressure. Click one of these buttons if you want Finale to transmitthe pitch wheel or channel pressure (monophonic aftertouch) value you’ve specified in thbox.
• Other. If you’re very familiar with the MIDI protocol, you can use this button and set of teboxes to transmit other kinds of MIDI data—system exclusive data, for example. The firsbox contains the highest portion of the status byte. The contents of the remaining text bdepend upon that status byte. See APPENDIX for a discussion of status bytes.
• Done • Send. Click Send to transmit the data you’ve specified. Click Done to exit the diabox.
MIDI SyncMIDI Sync signals, often referred to as Song Pointer data, consist of a stream of MIDI dataallows two sequencers or computers to perfectly synchronize their playback or recording (ping both are equipped to interpret this data). Finale can both transmit and receive MIDI Syncin other words, you can either use Finale to drive external sequencers so that they all play together, or you can record new music in Finale (or listen to a playback of a Finale score) awith the tempo track of a sequencer that’s sending MIDI Sync data. Finale supports MIDI csignals but does not support SMPTE, MIDI Time Code, or MIDI Machine Control.
To transmit MIDI Sync data while playing back a Finale scoreFinale sends MIDI Sync (Song Pointer data) when you’re playing back music in the Transcrwindow, or when you’re using the Playback Controls (and Pre-Scan Music or Play using Plafile is selected). In either case, Send MIDI Sync must be selected in the MIDI Setup dialog (Finale only responds to Song Pointer data when playing back a disk file—that is, a playbacsee PLAYBACK .)
Follow these instructions if you want Finale to be the “master” device and an external sequto be the “slave” (in other words, Finale is providing the synchronization signal).
• Choose Send MIDI Sync from the MIDI Menu.From now on, Finale will transmit MIDI Sync (Song Pointer data) any time it plays back your score. If you have connected yourputer to an external sequencer (or another computer) configured to interpret this kind ofmessage, it will wait in “pause” mode until Finale begins to play, at which point the two play in synchronization.

MIDI Sync 8-29
OC
OC
ndex
Index
ext hapter
reviouhapter
ext hapter
reviouhapter
cer to nal).
.
will or
tion rack
sig-
ran-
s.
n find
. If as been e
by an
T
T
I
NC
PC
NC
PC
To receive MIDI Sync data while playing back a Finale scoreFollow these instructions if you want Finale to be the “slave” device and an external sequenbe the “master” (in other words, the external sequencer is providing the synchronization sigFinale supports MIDI clock signals but does not support SMPTE, MIDI Time Code, or MIDIMachine Control.
• From the Window Menu, choose Playback Controls. Playback Controls appears.
• Click the Playback Settings button. The Playback Settings dialog box appears, offering additional controls.
• Click Playback Options. You can also click on the Options menu, then Playback OptionsThe Playback Options dialog box appears.
• Select Wait for MIDI Sync, and then click OK. Make sure your Play Mode in the Play-back Controls is set to Non-Scrolling (Pre-Scan Music). Finale now waits for a MIDI Sync signal from the external sequencer. Once the external sequencer begins to play, Finaleautomatically “sync up” to it, playing precisely together with it, even if you jump forward backward in the external sequence.
• Click Play. Finale will pre-scan the music and then wait for the MIDI Sync data from theother MIDI device before playing the music.
To transmit MIDI Sync data while recording in the Transcription ModeYou can transmit MIDI Sync signals during either recording or playing back in the TranscripTool. You might want to set up this configuration if, for example, you want to record a new twith a drum machine as accompaniment. Using this technique, Finale will “drive” the drum machine as you record new music in the Transcription window. Finale supports MIDI clock nals but does not support SMPTE, MIDI Time Code, or MIDI Machine Control.
• Click the HyperScribe Tool g select Transcription Mode and click a measure. The
measure you click will be the first measure of the resultant transcription. You enter the Tscription window.
• Choose Click Output from the Time Tag Menu. The Click Output Type dialog box appear
• Click Send MIDI Sync. Click OK (or press enter).
• Enter Time Tags in the usual way. You can record Time Tags either by tapping a key or pedal, or by telling Finale to enter them automatically (using the Set To text box). You cafull instructions for the first method of entering Time Tags under TRANSCRIBING A SEQUENCE, and for the second method under METRONOME MARKINGS.
• Under the words Time Tag, click Play. Proceed with your playback or recording as usualFinale will transmit MIDI Sync (song pointer data) instead of providing an audible click. you have connected the computer to an external sequencer (or another computer) that hconfigured to interpret this kind of MIDI message, it will wait in “pause” mode until Finalbegins play, at which point the two will play in synchronization.
To use the MIDI Sync signal to provide the “tap” in HyperScribeNormally, when you’re transcribing music in HyperScribe, you tap a key or pedal to provideFinale with a tempo reference. If you’re using HyperScribe to transcribe music being played
MicNotator dialog box 8-30
OC
OC
ndex
Index
ext hapter
reviouhapter
ext hapter
reviouhapter
ransmit-IDI
re in
s the ic
n
e
nale r
per-ls, see
T
T
I
NC
PC
NC
PC
external sequencer, however, the sequencer can provide the tempo reference by itself by tting MIDI Sync signals. Finale supports MIDI clock signals but does not support SMPTE, MTime Code, or MIDI Machine Control.
• Click the HyperScribe Tool g. The HyperScribe Menu appears.
• From the Beat Source submenu of the HyperScribe Menu, choose External MIDI Sync.Proceed with the usual HyperScribe preparations, concluding by clicking the first measuwhich you want the transcription to appear. Finale will wait in pause mode until it receiveMIDI Sync signal, at which point it will automatically “sync up” to it, transcribing the musas it goes. No tapping is needed.
To transmit Song Pointer data during playback• Choose MIDI Setup from the MIDI Menu. The MIDI Setup dialog box appears.
• Select Send MIDI Sync. Click OK (or press enter). You may also choose Click Output fromthe Time Tag Menu, and select Send MIDI Sync; Finale will now transmit this informatioinstead of an audible click.
MicNotator dialog boxHow to get thereFrom the MIDI Menu, choose MicNotator. If the MicNotator is unavailable in the menu, maksure the 32-bit MIDI driver is selected.
What it doesThis dialog box allows you to set up options for the MicNotator feature. With MicNotator, Ficonverts the pitch you play in a microphone into a MIDI note when you use Speedy Entry oHyperScribe. Check the Enable box to use the MicNotator feature in Speedy Entry and HyScribe. You should use the levels meter to fine-tune your microphone input. For more detaiMICNOTATOR.

MicNotator dialog box 8-31
OC
OC
ndex
Index
ext hapter
reviouhapter
ext hapter
reviouhapter
rded
r to . If the
.
set-
T
T
I
NC
PC
NC
PC
• Enable MicNotator. Check this box to use the MicNotator feature to convert pitches recothrough the microphone to MIDI notes that Finale can transcribe into notation in SpeedyEntry or HyperScribe.
• Levels: Mic Level • Input Meter. When you play into the microphone, you’ll see colored bars in the Input Meter, indicating how loud Finale heard you. Adjust the Mic Level slidechange your microphone input levels so that your loudest note doesn’t hit the red levelslevels are too “hot,” the distortion will impair MicNotator’s pitch recognition.
• Recording Options: Channel. Specify your input channel.
• Mic Options: Mic Source • Mic Thru Speaker. Select an input source from drop-down listCheck the Mic Thru box to have the microphone play through your speaker.
• Microsoft® Volume Controls: Output • Input. These button open the Volume Controls ofyour Windows operating system.
• OK • Cancel. Click OK (or press enter) to confirm, or Cancel to discard, your MicNotatortings and return to the score.

Tablature MIDI Channels dialog box 8-32
OC
OC
ndex
Index
ext hapter
reviouhapter
ext hapter
reviouhapter
n-to a
-
t to d r,
T
T
I
NC
PC
NC
PC
Tablature MIDI Channels dialog boxHow to get thereFrom the MIDI Menu, choose Tablature MIDI Channels.
What it doesWhile using a MIDI guitar for entry, each string will use an independent MIDI channel for trascription into the score. This allows Finale to transcribe the correct string while recording intablature staff with HyperScribe.
• Map MIDI Channels To Tablature Staff Strings. Check this box to use independent channels for each string in a Tablature Staff.
• Listen for String #. Click in the text box under the channel column of the string you wanassign. Then, click the Listen For String button. Play the string on the MIDI guitar to senFinale the MIDI channel information. To configure the channels used by your MIDI guitarefer to the instructions that came with the guitar to MIDI interface.

Tablature MIDI Channels dialog box 8-33
OC
OC
ndex
Index
ext hapter
reviouhapter
ext hapter
reviouhapter
set-
der-even cer,
the ch
e han
in
nels nts) sed on range,
k Set ou
ce
ile’s).
T
T
I
NC
PC
NC
PC
• OK • Cancel. Click OK (or press enter) to confirm, or Cancel to discard, your MicNotatortings and return to the score.
MIDI filesFinale both imports and exports standard MIDI files. A MIDI file has a format that can be unstood by music programs from different companies, including most sequencer programs—on other computer brands. If you prefer to compose by improvising in your favorite sequenyou could save your piece as a standard MIDI file and let Finale notate it for you.
When you save a MIDI file, Finale saves the instrument name (from the Instrument List) astrack name. When you open a MIDI file, Finale uses the track name as the staff name (whiappears in the Staff Attributes dialog box).
To import a MIDI fileTo create the MIDI file, follow your sequencer’s instructions. There’s no need to quantize thsequence; however, you’ll probably find Finale’s quantization powers to be more effective tyour sequencer’s.
• Choose Open from the File Menu. The Open dialog box appears. The file types are listedthe drop-down list at the bottom of the window.
• Click MIDI File. The names of any available MIDI files appear in the list box.
• Double-click the desired document name. The Import MIDI File Options dialog box appears, listing various transcription options.
• Specify the way in which you want the MIDI file extracted onto Finale staves. If you click Tracks Become Staves, each sequencer track becomes a Finale staff. If you click ChanBecome Staves, the contents of each MIDI channel (regardless of their track assignmebecome a Finale staff. In either case, Finale will choose a clef for each resultant staff bathe range of notes in the track. (If it discovers that the notes in a track have a very wide it will automatically notate its contents on two staves. See IMPORT MIDI FILE OPTIONS DIA-
LOG BOX for details.) For even greater control over the track and channel extraction, clicTrack-to-Staff List; the Track/Channel Mapping to Staves dialog box appears, in which ycan specify extremely sophisticated track and channel splitting.
• Click Quant Settings. The Quantization Settings dialog box appears.
• Click the icon representing your smallest note value.
• Choose your quantization type. See QUANTIZATION SETTINGS DIALOG BOX for more details.
• Click More Settings. The More Quantization Settings dialog box appears.
• Select the quantization settings you desire. You can select options for grace notes and voi2, as well as retain key velocities and note durations. See MORE QUANTIZATION SETTINGS DIALOG BOX for details.
• Choose Key and Time Signature options. Most MIDI files contain key and time signature information already, so you usually won’t have to change the default selection (Use the F
Audio Files 8-34
OC
OC
ndex
Index
ext hapter
reviouhapter
ext hapter
reviouhapter
-our
is- try r ation
I ctor,
ay-
ols t you
rack. result-
g lly
or-mat 1 s you
ressed ener-le uses .sf2.” I ale/
T
T
I
NC
PC
NC
PC
• If you’ll want to hear the sequence played back with its original tempo fluctuations and continuous data (controllers and wheels) data, make sure Tempo Changes and Continuous Data are selected. These options capture some of the MIDI performance data from ysequence. For a more complete description of performance data, see Installation & Tutorials.
• Click OK (or press enter). Finale transcribes the MIDI File into standard notation. If you dcover that your settings weren’t quite right, you can close the new Finale document andagain—the original MIDI file is unaffected by Finale’s transcription efforts. Or, for smallesectional changes, use the Retranscribe function in the Mass Edit Tool. For more informabout the elements of the Import MIDI File Options dialog box, see IMPORT MIDI FILE OPTIONS DIALOG BOX and RETRANSCRIPTION.
To export a MIDI file of the entire document• Prepare your Finale file. Keep in mind that any playback data will be retained in the MID
file. This includes tempo changes (for those sequencers that support a tempo, or condutrack), dynamics, pitch wheel data, MIDI channel assignments, in addition to Human Plback settings configured in the PLAYBACK SETTINGS DIALOG BOX. Be sure to specify other important playback options in the Playback Options dialog box (choose Playback Contrfrom the Window Menu; click the expand arrow; click Playback Options). Remember thaare exporting a MIDI file, text and layout will not be retained in this format.
• Make sure that you have assigned Instruments correctly (one for each resultant sequencer track). When Finale creates a MIDI sequencer file, it places the music you’veassigned to each Instrument in the Instrument List dialog box in a separate sequencer tTherefore, make sure the Instrument configuration is set up the same way you want theant tracks set up. See MIDI T ERMINOLOGY–MIDI CHANNELS for further instructions.
• Choose Save As from the File Menu. The Save As dialog box appears.
• From the List Files of Type: drop down list choose MIDI File, and enter a title in the text box. Note, too, that you don’t have to click anything if you add the suffix “.MID” (includinthe period) at the end of the title, as in “Overture.MID”; if you do this, Finale automaticasaves your document as a MIDI file.
• Click Save (or press enter). Finale now asks which type of MIDI file you want to create: Fmat 1 (multiple tracks), Format 0 (a single, multichannel track), or just a tempo map. Foris by far the most common format. Also, choose whether you want to save any bookmarkcreated in Finale as sequencer marks in your MIDI file.
• Select a MIDI file format by clicking the appropriate button.
Audio FilesYou can save a Finale document as a standard Wave file (for burning to a CD), or in a compWave audio file format (for storing on your computer or transfer over the Internet). Finale gates the audio file based on the MIDI performance of the Finale document. For sound, Finaa General MIDI sound font installed to the Finale/Component Files folder named “synthgmsThis file contains the sounds used to ‘record’ the audio file. To use a different General MIDsound font, rename any General MIDI sound font file “synthgms.sf2,” and save it to the Fin
Sound Fonts 8-35
OC
OC
ndex
Index
ext hapter
reviouhapter
ext hapter
reviouhapter
u
ctions
ce, NT:
e same I
e the
nd
ressed
to
und d by
nu, ss of
les Gen-ound
er for card or spe-
T
T
I
NC
PC
NC
PC
Component Files folder. If you want to save Finale’s default sound font, rename it before yocopy the new sound font to the Finale/Component Files folder.
Note: To burn audio files to a CD, save as an uncompressed Wave file, and then follow instruincluded with your CD burning software to organize the files into tracks and burn them to arecordable CD.
To save an audio file from Finale• Review playback. The audio file created by Finale is generated from the MIDI performan
so changes to the document’s MIDI data will apply to the generated audio file. IMPORTAHuman Playback settings apply to saved audio files, so all generated Wave file sound thas the document played from Finale. To use MIDI data added deliberately (with the MIDTool for example), set Human Playback to None in the PLAYBACK SETTINGS DIALOG BOX. To edit Finale’s MIDI performance manually (instead of using Human Playback), you can usMIDI or Expression Tool. See MIDI T OOL and EXPRESSIONS.
• From the MIDI Menu, choose MIDI Setup, and then select SoftSynth Settings. The Soft-Synth dialog box appears. In this dialog box, choose the device you want to use for SouFont output, as well as the output volume. See SOFTSYNTH DIALOG BOX for details.
• From the File Menu, choose Save Special, and then Save As Audio File. The SAVE AS AUDIO FILE DIALOG BOX appears. Here, you can choose to generate a standard, or compWave file, and make additional settings, such as the sample rate.
• Choose the destination folder and click Save. Finale generates the audio file and saves itthe specified folder.
Sound FontsSound fonts are basically a collection of audio samples that have been transformed by a sofont editor into MIDI instruments. Sound fonts can be loaded into your sound card and useMIDI programs such as Finale for playback. (Note: A sound font-compatible sound card is required to use any Sound Font for playback). A general MIDI sound font “synthgms.sf2” isincluded with Finale 2004. To use this Sound Font for playback in Finale, from the MIDI Mechoose MIDI Setup. Then, for the MIDI Out device, choose SmartMusic SoftSynth. Regardlethe device chosen in the MIDI Setup dialog box, Finale’s Sound Font is used for all Audio fi(.WAV) and SmartMusic Accompaniment files (.SMP) saved from Finale. (To use a differenteral MIDI Sound Font for Wave or SMP files saved from Finale, rename any General MIDI SFont file “synthgms.sf2,” and save it to the Finale/Component Files folder.)
You can load Finale’s Sound Font “synthgms.sf2” into your sound card’s Sound Font managuse with other MIDI playback programs. The procedure for doing so depends on the soundyou are using and the accompanying software. Consult your sound card’s documentation fcific instructions for loading a new sound font.
MicNotatorFor best results with MicNotator, follow these basic guidelines:

MicNotator 8-36
OC
OC
ndex
Index
ext hapter
reviouhapter
ext hapter
reviouhapter
a not
e. So up-
he
t er-
read-ace-
T
T
I
NC
PC
NC
PC
The purpose of MicNotator is to allow users to input notes via a wind instrument instead ofMIDI keyboard. This version of MicNotator is not designed for use with a vocalist (i.e., doesaccommodate wide vibrato, glissandi, etc.). When using MicNotator, keep in mind that the desired result is to notate and print the music as you want it, not to record your performancthink of it more like a typewriter and less like a tape recorder. NOTE: MicNotator does not sport Windows NT 4.0 or earlier.
Setting up MicNotator• Plug the microphone into your computer. Make sure it is plugged into the Mic In port,
not Line In.
• From the MIDI Menu, choose MicNotator. Or, click the MicNotator icon on the MIDI Menu Toolbar. The MicNotator Dialog box appears. If MicNotator is unavailable in the menu, make sure 32-bit MIDI driver is selected in the MIDI Menu. MicNotator requires t32-bit MIDI driver.
• Place a checkmark on Enable MicNotator.
• Under Mic Level, use the slider to control the microphone input level. THE MIC LEVEL IS VERY IMPORTANT TO SUCCESSFUL NOTE ENTRY WITH MIC NOTATOR. For besresults, use the small clip-on Finale microphone available from MakeMusic! Customer Svice at 1.800.843.2066.To set the mic level, follow these steps:
• Place the microphone as follows:
• Play your instrument and watch the level lights.
• Move the slider next to the level light up or down to obtain the correct input level. The lights should be green most of the time; red is too high, blue is too low. Occasional red ings are acceptable. To ensure accurate pitch detection, follow the guidelines for mic plment and mic level above.
Instrument Placement
Flute, Piccolo left side of shirt collar
Bassoon, Oboe, English Horn shirt above the stomach
Clarinet, Soprano Sax shirt above the stomach
Alto and Bass Clarinet music stand
Alto, Tenor and Baritone Sax neck strap
All brass outside of bell
MicNotator 8-37
OC
OC
ndex
Index
ext hapter
reviouhapter
ext hapter
reviouhapter
o s
ext oon as
and
d tyle, dura-
al ation tion
ve bet-dy note
More m 20
lick
T
T
I
NC
PC
NC
PC
Using MicNotator with Speedy Entry
Before you begin, make sure you’ve set up the MicNotator for your instrument. See SETTING UP MICNOTATOR. You’ll need to use the Hands-Free MIDI method (unless you can play one-handed). For more details, see SPEEDY ENTRY.
• Click the Speedy Entry Tool a, and click a measure. The editing frame appears.
• Press caps lock; then press the number key on the computer keyboard corresponding tthe value you want to enter. In other words, you’re now telling Finale what the note valueare going to be before you specify the pitches.
The number you press appears in the lower-left corner of the editing frame.
• Play the notes on your instrument. Each note you play appears in the score; if Jump to NMeasure is checked in the Speedy Menu, the editing frame advances automatically as syou fill each measure. It’s safe to outplay Finale, too; it will remember up to 500 notes (continue to notate them as fast as your computer allows).
Using MicNotator with HyperScribeBefore you begin, make sure you’ve set up the MicNotator for your instrument. See SETTING UP MICNOTATOR. For more details about HyperScribe, see RECORDING WITH HYPERSCRIBE.
MicNotator will notate what you play, so your performance should reflect the desired printeresults, rather than the desired sound. For instance, if you play eighth notes in a staccato sthey may come out as sixteenth notes rather than eighth notes. So you should play the fulltion of all notes. Also, you will experience better results if you input notes at a slow tempo.
Follow the basic guidelines for quantization that you would use with MIDI input. As a generrule, you should quantize to the smallest duration that you will play (i.e., if your smallest duris an eighth, quantize to the eighth note rather than the sixteenth). The No Tuplets quantizasetting produces the best results. Even if you have triplets in your performance, you will hater results using the No Tuplets setting and then editing the triplet measures (using the speetool).
If you encounter small rhythmic errors when entering sixteenth note passages, click on theSettings in the Quantization Settings dialog box and change the Very Short Notes value froEDUs to 0 EDUs.
• From the Options Menu, choose Quantization Settings. The Quantization Settings dialog box appears.
• Click on the More Settings button. The More Quantization Settings dialog box appears.• Under Very Short Notes, click in the Remove Notes Smaller text box and enter 20.• Choose Remove Grace Notes.• Under Options, ensure Include Voice Two and Allow Dotted Rests are unchecked.• Click OK. You return to the Quantization Settings dialog box. Adjust the settings, then c
OK. See QUANTIZATION SETTINGS DIALOG BOX for more information.
• Click the HyperScribe Tool g. The HyperScribe Menu appears.
• From the HyperScribe Menu, choose Beat Source, then Playback and/or Click. The Play-back and/or Click dialog box appears. (See PLAYBACK AND/OR CLICK DIALOG BOX) If you’d rather provide the tap or tempo yourself, see TAP SOURCE DIALOG BOX.

MicNotator 8-38
OC
OC
ndex
Index
ext hapter
reviouhapter
ext hapter
reviouhapter
e in
None me- ur-
andard edal; log
ry,
e you
gain.
tes
t
T
T
I
NC
PC
NC
PC
• Click the note duration you would like to use for your beat. Type in the number of EDUs for any duration that is not available from the palette.
• If you know what tempo you want to record at, enter the tempo into the Tempo text box. If you prefer to have Finale calculate the tempo for you, click Listen, then tap your mousthe dialog box at the desired tempo. Finale will enter the tempo you play.
• Choose a start signal from the Start Signal for Recording drop-down list. Finale will delay starting the countoff measures and recording until it receives a start signal. Choose(Record Immediately) if you don’t want to use a signal to start recording—Finale will imdiately start recording (after playing the countoff if one was specified); choose Any MIDIData for Finale to start recording upon receiving any MIDI signal that’s played; choose Crent Metronome Sound to use the same MIDI signal as the metronome click; choose StSustain Pedal or Nonstandard Sustain Pedal to signal the start by depressing the foot pchoose Other to define an alternate MIDI signal as the start signal in the MIDI Event diabox (see MIDI EVENT DIALOG BOX).
• Deselect Play Staves While Recording or make sure MicNotator is set to a unique inputchannel. See MICNOTATOR DIALOG BOX.
• Click on Click and Countoff to set up your click and countoff options. For details, see PLAYBACK – CLICK AND COUNTOFF.
• Click OK. You return to the score.
• From the HyperScribe Menu, choose Record into One Staff. MicNotator only supports single pitch instruments.
• To start recording, click the measure in which you want Finale to begin recording. SignalFinale to start (if you selected a start signal). Click a measure. Or, choose Playback Con-trols from the Window Menu, if it isn’t already selected. Change the measure if necessathen click Record in the Playback Controls.
Note: If you click a measure to start recording, Finale will start recording into the measurclicked, not the measure displayed in the Playback Controls.
• When you’re finished, if you are providing the beat, give one extra tap. The extra tap is required to fill out the beat, for the benefit of Finale’s quantization feature.
• Click anywhere on the screen to stop recording. If the quantization or split point settings weren’t quite right, change them; then click the first measure and try the performance aHyperScribe will overwrite whatever music is already on the staff.
Note you can also adjust Finale’s MIDI In Latency setting for improved recognition. If notend to appear behind the beat during a recording session, do the following.
• From the MIDI Menu, choose MIDI Setup, and then click the Advanced button.
• For MIDI In Latency, enter “50” and click OK. Try recording. You may need to experimenwith different values until you find the amount of MIDI latency that works best.