ccrecord professional trunk recording - poltys pro trunk...6 overview ccrecord trunk recording...
TRANSCRIPT

CCRecord Professional
Trunk Recording
Application Notes
Poltys, Inc.
3300 N. Main Street, Suite D, Anderson, SC 29621-4128
+1 (864) 642-6103
www.poltys.com
© 2017 Poltys, Inc. All rights reserved.
The information contained in this manual is based on information available at the time of publication and is subject to change without notice. Accuracy and completeness are not warranted or guaranteed.
No part of this manual may be reproduced or transmitted in any form or by any means, including electronic medium or machine-readable form, without the express written permission of Poltys, Inc. Brand or product names are trademarks of their respective owners.
March 2017

Contents
OVERVIEW .................................................................................................................................. 5 INTRODUCTION ............................................................................................................................. 5 TARGET CUSTOMERS ....................................................................................................................... 5 KEY FEATURES .............................................................................................................................. 5 BENEFITS .................................................................................................................................... 6
INSTALLING SYNWAY VOICE BOARDS ........................................................................................ 7 INTRODUCTION ............................................................................................................................. 7 SYNWAY BOARDS SUPPORTED ............................................................................................................ 7 DRIVER INSTALLATION .................................................................................................................... 7
Getting Ready ........................................................................................................................ 7 New Installation ..................................................................................................................... 9 Upgrade/Reinstallation .......................................................................................................... 13 Add/Replace Board or Change Slot ......................................................................................... 13
SYNWAY VOICE BOARDS CONFIGURATION ........................................................................................... 14 DTP Boards.......................................................................................................................... 14 Non-DTP Boards ................................................................................................................... 18
USING TRUNK RECORDING ....................................................................................................... 23 CONFIGURATION .......................................................................................................................... 23 SYSTEM REQUIREMENTS ................................................................................................................ 23 VOICE RECORDING FORMAT ............................................................................................................ 25 PREREQUISITES ........................................................................................................................... 25 TRUNK RECORDING SETTINGS ......................................................................................................... 26
Software Licensing ............................................................................................................... 26 Backup Procedure ................................................................................................................. 27 Record Settings .................................................................................................................... 28 Recording User Restrictions ................................................................................................... 36 Recorded Conversations Playback for CCView .......................................................................... 40 Recorded Conversations Playback for CCView 2012 .................................................................. 43 Recorded Conversations Export for CCView .............................................................................. 44 Start/ Stop the CCServer Service ........................................................................................... 45
PRODUCT SUPPORT ................................................................................................................... 50

4 Contents
CCRecord Pro Trunk Recording Application Notes Poltys, Inc.
- Blank Page -

Overview
Introduction
CCRecord Pro is a powerful end-user call management tool that provides:
Non-intrusive voice recording
Historical voice streams management and playback
Call signaling and voice archiving
Playback via default Windows Media Player
The recorded conversations are useful in improving call quality, Customer relationship management,
Agent training, and evaluation or to preserve important information & questions from Customers. Each
recorded conversation is saved in a .wav format and playable by your computers default media player.
NOTE:
CCRecord Pro can be integrated with CCView product.
The voice recording use cases include transfer CO to CO and multi-party conference scenarios.
Target Customers
The CCRecord Pro program is ideal for:
Government Institutions
Insurance and financial services
Call Centers and Customer Services
Attorney Offices
Law Enforcement Force
Medical Centers
Key Features
Real-time conversations recording
Easy saving and playing
Scalable from 4 to 120 analog channels and 8 to 120 digital channels per server
Digital and analog station-side recording
Supervisor right to record specific extensions
Manual/ Automatic Recording
6 Overview
CCRecord Trunk Recording Application Notes Poltys, Inc.
Custom selection of the type of calls to be recorded: CO ACD, CO Non ACD, CO Outgoing and
Intercom
Stamp recording with caller ID, ANI and Agent information
CO/Intercom Call Log comprehensive information for recorded calls: Date, Time, Customer Name,
Caller ID and so on
Export Voice Records
No time limit for recording
Variable number of simultaneously recorded calls with the number of installed tapping boards
Expandable anytime by adding extra tapping boards
Compatible with Panasonic KX-TDA/TDE/NCP/ NS IP-PBX systems
Benefits
Increase Customer confidence, maximizing productivity and dramatically improving employee
performance
Improve call quality control through Agent answering time, customer hold time and lost calls
number
Help evaluate and analyze agent-customer interactions
Accurate record of what was said, by whom and when. It avoids the need for repetition or speaking
slowly
Focus and improve customer service level and information management, offering reliable data
necessary to refine call-handling processes
Perfect aid to Agent training
Minimize technology expenditure
Installing Synway Voice Boards
Introduction
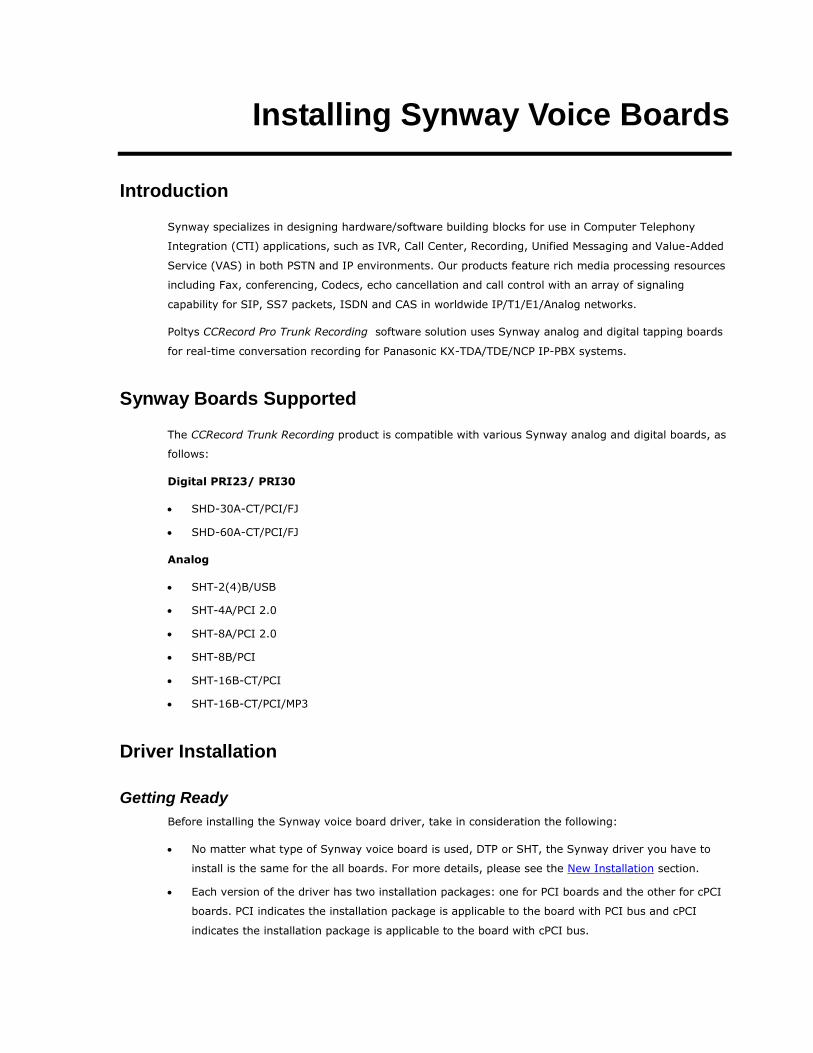
Synway specializes in designing hardware/software building blocks for use in Computer Telephony
Integration (CTI) applications, such as IVR, Call Center, Recording, Unified Messaging and Value-Added
Service (VAS) in both PSTN and IP environments. Our products feature rich media processing resources
including Fax, conferencing, Codecs, echo cancellation and call control with an array of signaling
capability for SIP, SS7 packets, ISDN and CAS in worldwide IP/T1/E1/Analog networks.
Poltys CCRecord Pro Trunk Recording software solution uses Synway analog and digital tapping boards
for real-time conversation recording for Panasonic KX-TDA/TDE/NCP IP-PBX systems.
Synway Boards Supported
The CCRecord Trunk Recording product is compatible with various Synway analog and digital boards, as
follows:
Digital PRI23/ PRI30
SHD-30A-CT/PCI/FJ
SHD-60A-CT/PCI/FJ
Analog
SHT-2(4)B/USB
SHT-4A/PCI 2.0
SHT-8A/PCI 2.0
SHT-8B/PCI
SHT-16B-CT/PCI
SHT-16B-CT/PCI/MP3
Driver Installation
Getting Ready
Before installing the Synway voice board driver, take in consideration the following:
No matter what type of Synway voice board is used, DTP or SHT, the Synway driver you have to
install is the same for the all boards. For more details, please see the New Installation section.
Each version of the driver has two installation packages: one for PCI boards and the other for cPCI
boards. PCI indicates the installation package is applicable to the board with PCI bus and cPCI
indicates the installation package is applicable to the board with cPCI bus.
8 Installing Synway Voice Boards
CCRecord Trunk Recording Application Notes Poltys, Inc.
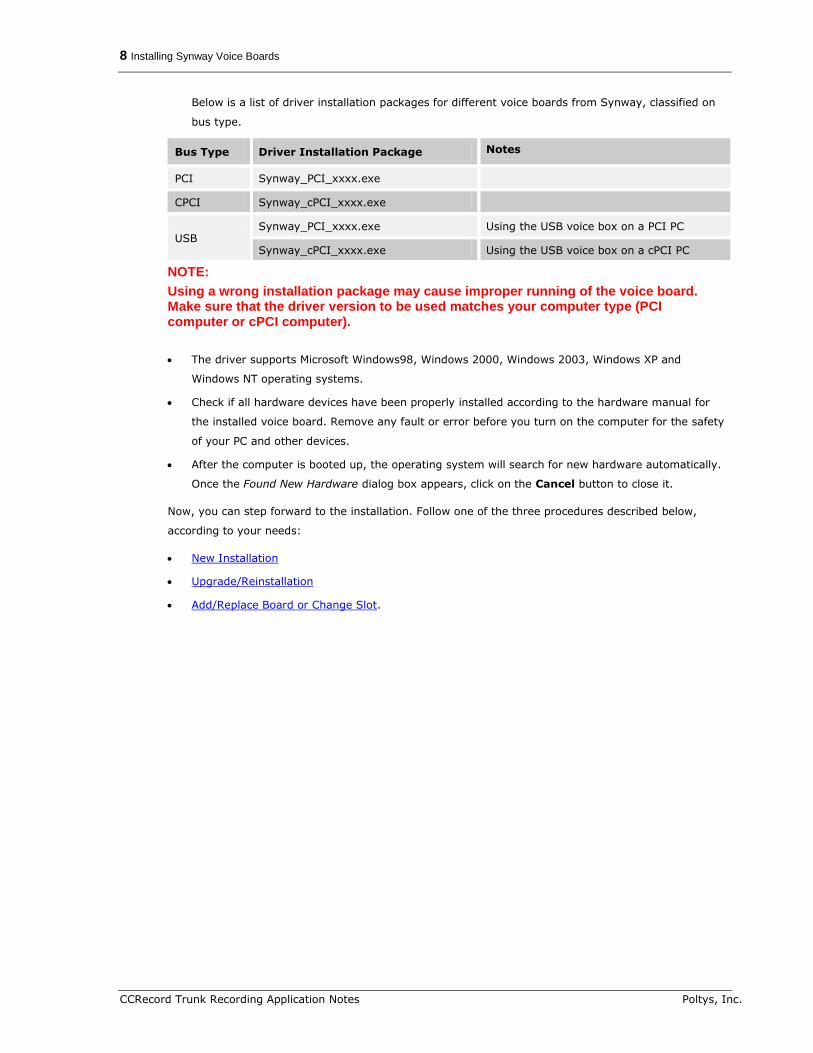
Below is a list of driver installation packages for different voice boards from Synway, classified on
bus type.
Bus Type Driver Installation Package Notes
PCI Synway_PCI_xxxx.exe
CPCI Synway_cPCI_xxxx.exe
USB Synway_PCI_xxxx.exe Using the USB voice box on a PCI PC
Synway_cPCI_xxxx.exe Using the USB voice box on a cPCI PC
NOTE:
Using a wrong installation package may cause improper running of the voice board. Make sure that the driver version to be used matches your computer type (PCI computer or cPCI computer).
The driver supports Microsoft Windows98, Windows 2000, Windows 2003, Windows XP and
Windows NT operating systems.
Check if all hardware devices have been properly installed according to the hardware manual for
the installed voice board. Remove any fault or error before you turn on the computer for the safety
of your PC and other devices.
After the computer is booted up, the operating system will search for new hardware automatically.
Once the Found New Hardware dialog box appears, click on the Cancel button to close it.
Now, you can step forward to the installation. Follow one of the three procedures described below,
according to your needs:
New Installation
Upgrade/Reinstallation
Add/Replace Board or Change Slot.

Installing Synway Voice Boards 9
Poltys, Inc. CCRecord Trunk Recording Application Notes
New Installation
You will now install for the first time the SynCTI driver in your system. Please follow the procedure
below in order for Synway Analog Voice Board to be installed:
1. Double-click on the Synway_PCI_xxxx.exe from the board’s CD in order for the installation to
begin. Wait for the WinRar self-extracting archive to finish the extracting process
2. The Choose Setup Language window is displayed. Choose the language and click on the OK button
10 Installing Synway Voice Boards
CCRecord Trunk Recording Application Notes Poltys, Inc.
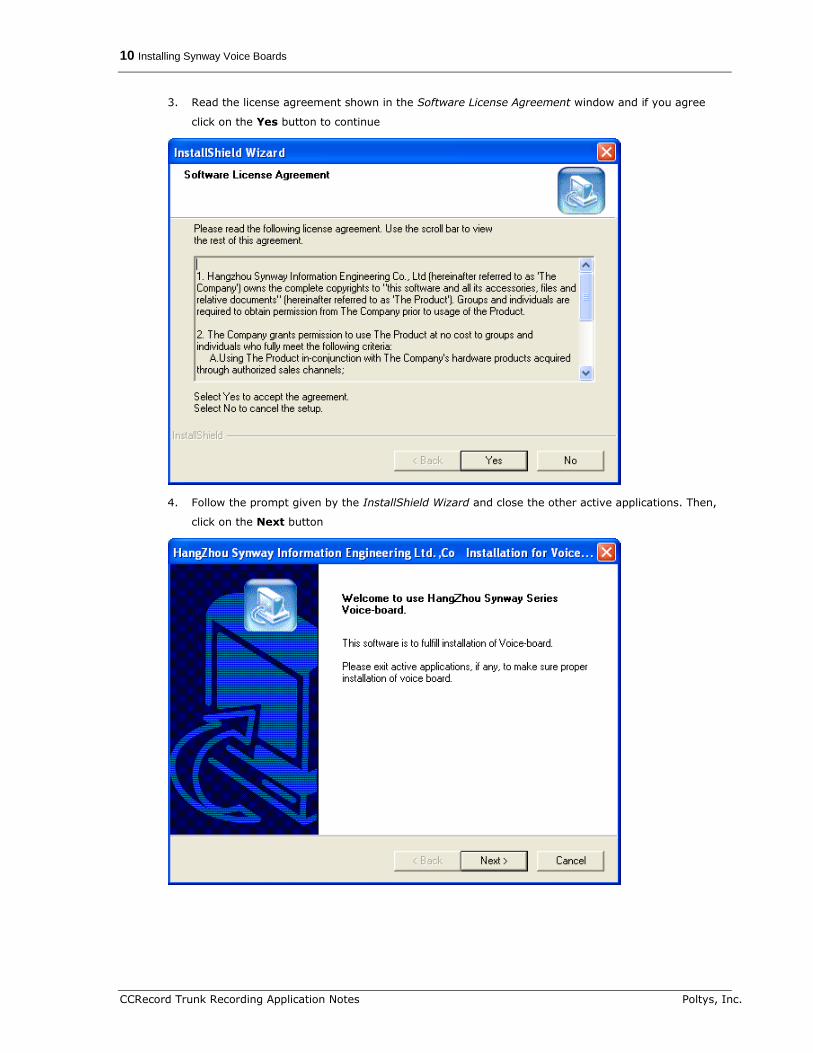
3. Read the license agreement shown in the Software License Agreement window and if you agree
click on the Yes button to continue
4. Follow the prompt given by the InstallShield Wizard and close the other active applications. Then,
click on the Next button

Installing Synway Voice Boards 11
Poltys, Inc. CCRecord Trunk Recording Application Notes
5. Choose the installation files location and click on the Next button
6. If the folder you have selected doesn’t exist, confirm the new created folder and click on the Yes
button
7. If it is necessary for you to install the API header and the library files, click on the Yes button
12 Installing Synway Voice Boards
CCRecord Trunk Recording Application Notes Poltys, Inc.
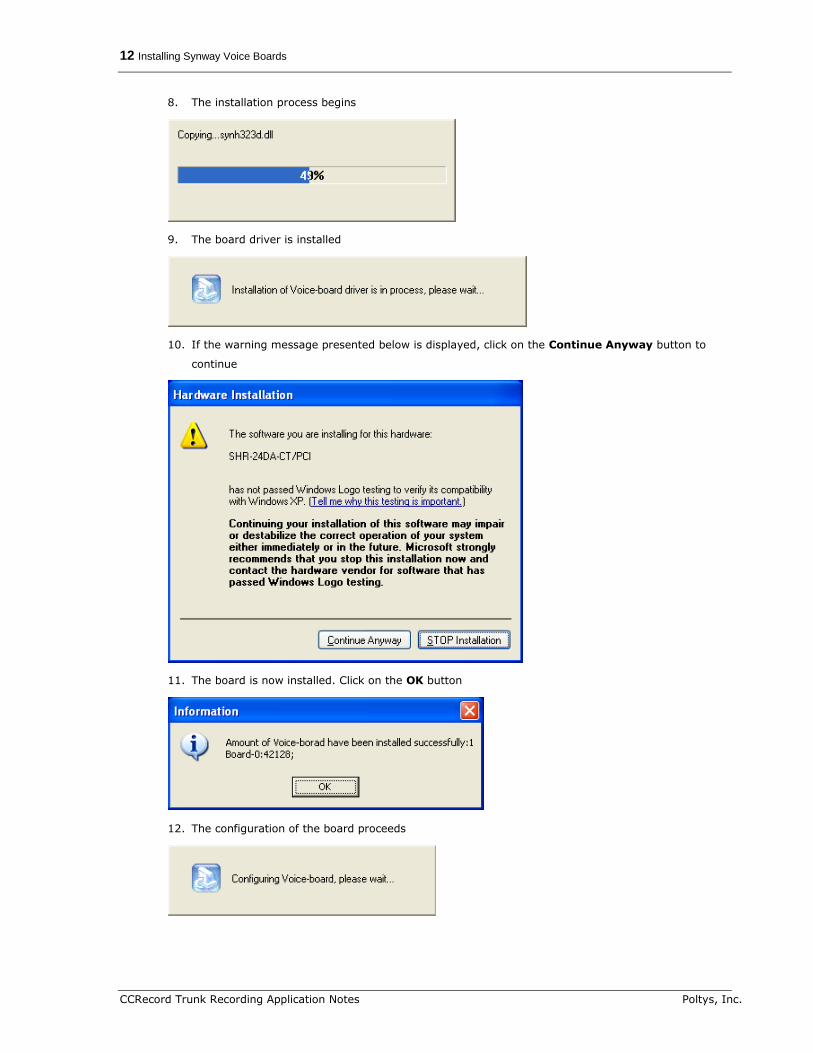
8. The installation process begins
9. The board driver is installed
10. If the warning message presented below is displayed, click on the Continue Anyway button to
continue
11. The board is now installed. Click on the OK button
12. The configuration of the board proceeds
Installing Synway Voice Boards 13
Poltys, Inc. CCRecord Trunk Recording Application Notes
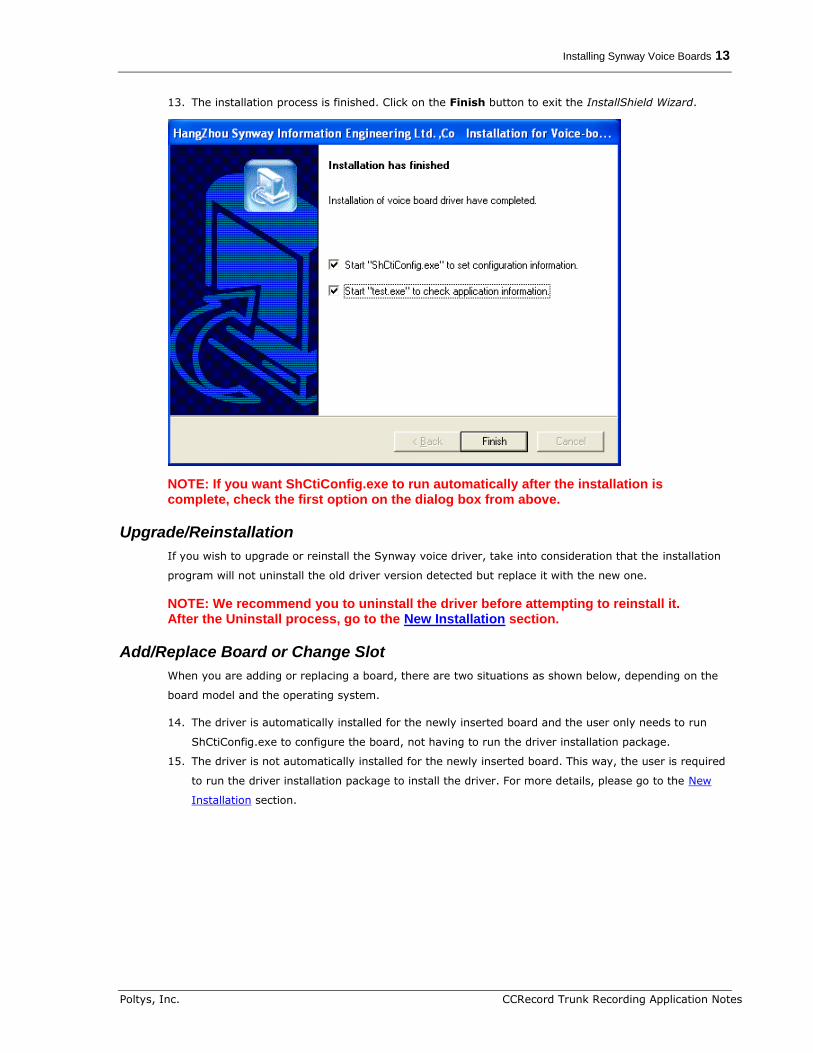
13. The installation process is finished. Click on the Finish button to exit the InstallShield Wizard.
NOTE: If you want ShCtiConfig.exe to run automatically after the installation is complete, check the first option on the dialog box from above.
Upgrade/Reinstallation
If you wish to upgrade or reinstall the Synway voice driver, take into consideration that the installation
program will not uninstall the old driver version detected but replace it with the new one.
NOTE: We recommend you to uninstall the driver before attempting to reinstall it. After the Uninstall process, go to the New Installation section.
Add/Replace Board or Change Slot
When you are adding or replacing a board, there are two situations as shown below, depending on the
board model and the operating system.
14. The driver is automatically installed for the newly inserted board and the user only needs to run
ShCtiConfig.exe to configure the board, not having to run the driver installation package.
15. The driver is not automatically installed for the newly inserted board. This way, the user is required
to run the driver installation package to install the driver. For more details, please go to the New
Installation section.

14 Installing Synway Voice Boards
CCRecord Trunk Recording Application Notes Poltys, Inc.
Synway Voice Boards Configuration
For each mentioned Synway voice board, different settings must be done in order for the CCRecord Pro
Trunk Recording to properly function.
Mainly, the settings reside in configuring the A-law/U-law properties for your board. According to your
location, two options are available:
A-Law Recording – Europe CODEC format – assign the value 6 when required
U-Law Recording – US CODEC format - assign the value 7 when required
In the next sections, you can find the appropriated settings for your Synway voice board.
DTP Boards
The CCRecord Pro Trunk Recording supported DTP boards are the SHD boards. In order to make the
proper A-law/U-law settings for your SHD board, follow the steps presented below:
1. Open ShCtiConfig application. The ShCtiConfig.exe window is displayed:

Installing Synway Voice Boards 15
Poltys, Inc. CCRecord Trunk Recording Application Notes
2. Double-click the digital board from the Board Setting list. The Modify Board window is displayed:
3. Modify the Playing format and the Recording format according to the A-law/U-law CODEC
format utilized. The following operations are required:
Inside the Modify Board window, click the Record and play button from the Advanced Setting
section and the Record and Play Setting window is displayed like below:
Edit the Playing format and the Recording format values according to the A-law/U-law CODEC
format utilized.
Click OK and return to the Modify Board window.

16 Installing Synway Voice Boards
CCRecord Trunk Recording Application Notes Poltys, Inc.
4. Edit the Default Voice Format. The following operations are required:
Inside the Modify Board window, click the Others button.
Inside the Others Setting window, check the Default Voice Format value according to the A-
law/U-law CODEC format utilized.
Press OK to save the setting.
5. Edit the PCM Information. The following operations are required:
Inside the Modify Board window, click the PCM button.
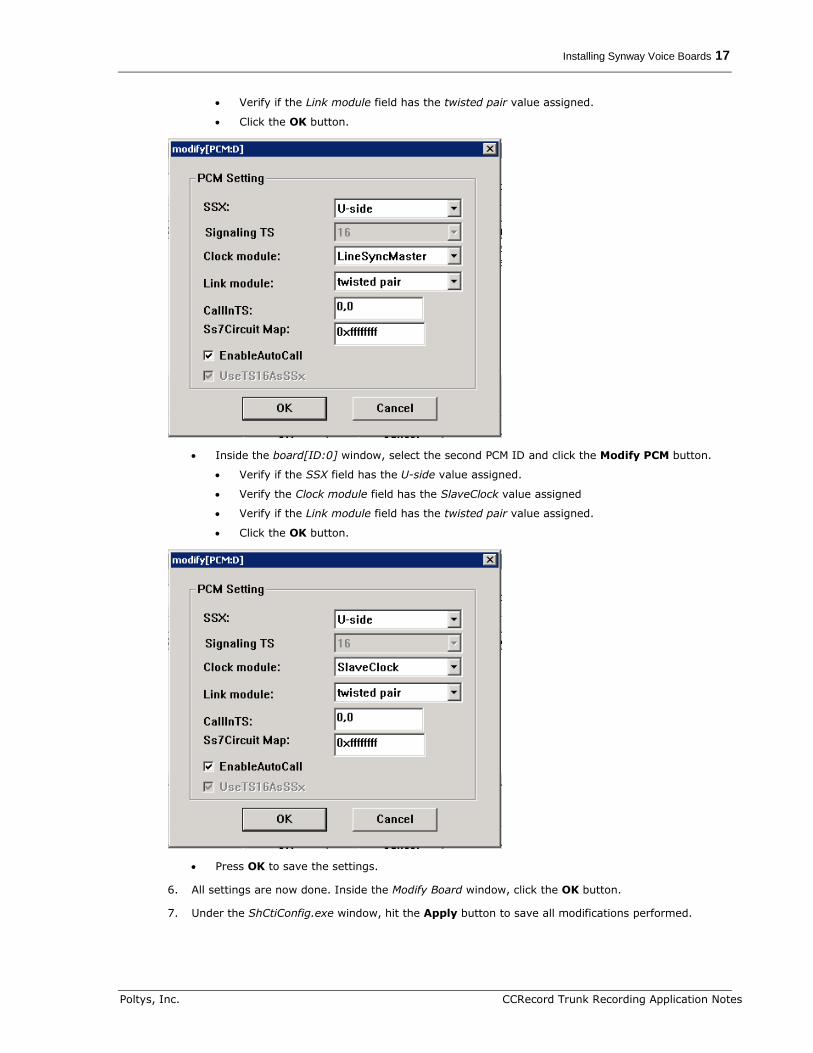
Inside the board[ID:0] window, select the first PCM ID and click the Modify PCM button.
Verify if the SSX field has the U-side value assigned.
Verify the Clock module field has the LineSyncMaster value assigned
Installing Synway Voice Boards 17
Poltys, Inc. CCRecord Trunk Recording Application Notes
Verify if the Link module field has the twisted pair value assigned.
Click the OK button.
Inside the board[ID:0] window, select the second PCM ID and click the Modify PCM button.
Verify if the SSX field has the U-side value assigned.
Verify the Clock module field has the SlaveClock value assigned
Verify if the Link module field has the twisted pair value assigned.
Click the OK button.
Press OK to save the settings.
6. All settings are now done. Inside the Modify Board window, click the OK button.
7. Under the ShCtiConfig.exe window, hit the Apply button to save all modifications performed.
18 Installing Synway Voice Boards
CCRecord Trunk Recording Application Notes Poltys, Inc.
NOTE: If you are using more than one Synway DTP voice board with the CCRecord Pro Trunk Recording apply the settings presented above to all Synway DTP voice boards in use.
Non-DTP Boards
The CCRecord Pro Trunk Recording Synway supported non-DTP boards are the SHT boards. Please find
more information on how each board is configured in the following sections.
Setting the SHT Board
Please find more information on how to make the proper A-law/U-law settings for your SHT board in the
following section:
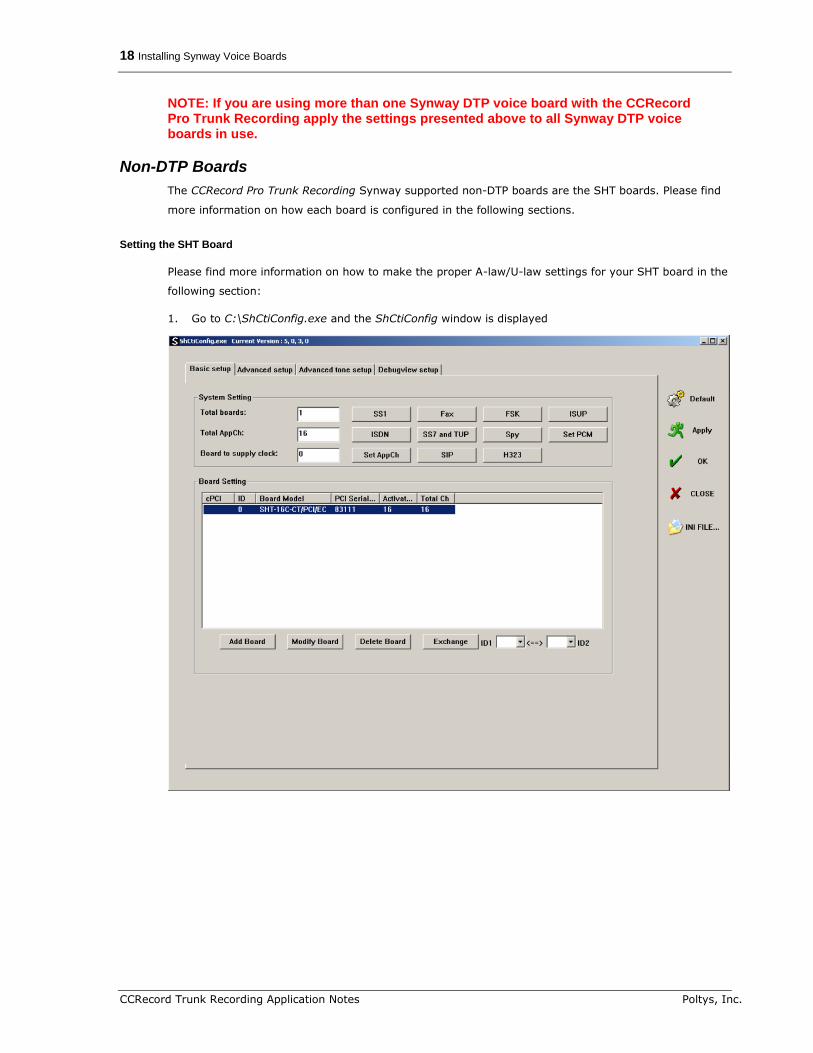
1. Go to C:\ShCtiConfig.exe and the ShCtiConfig window is displayed
Installing Synway Voice Boards 19
Poltys, Inc. CCRecord Trunk Recording Application Notes
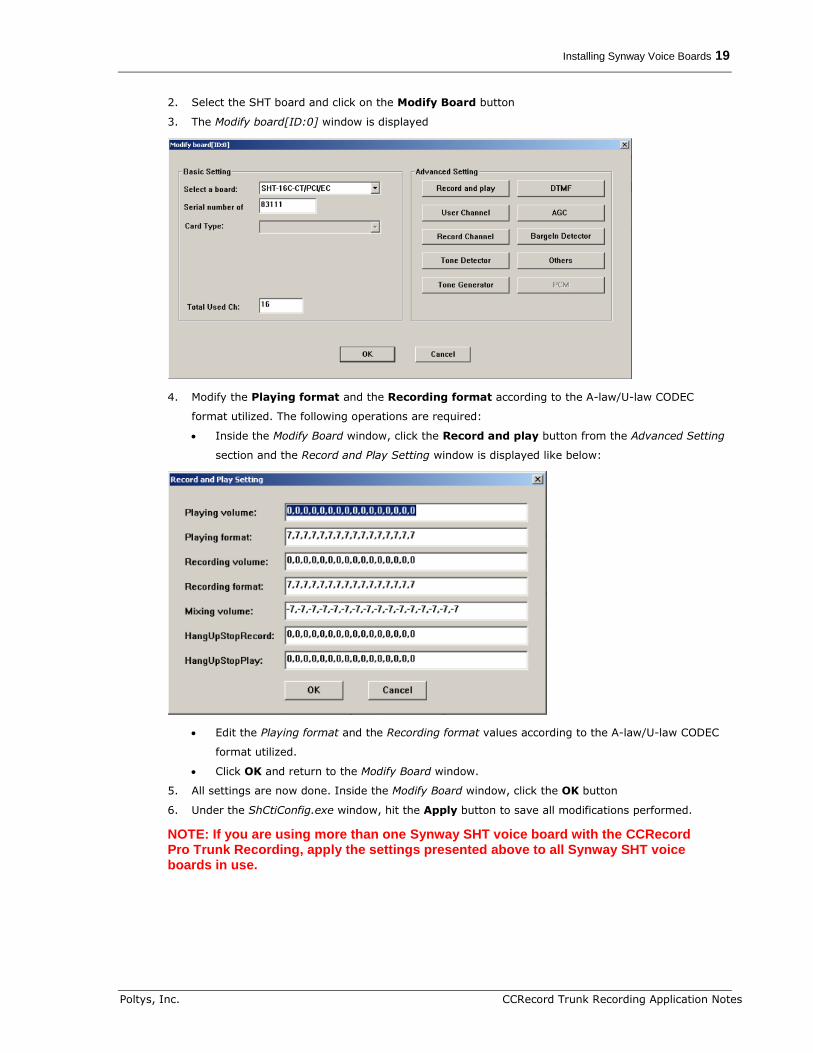
2. Select the SHT board and click on the Modify Board button
3. The Modify board[ID:0] window is displayed
4. Modify the Playing format and the Recording format according to the A-law/U-law CODEC
format utilized. The following operations are required:
Inside the Modify Board window, click the Record and play button from the Advanced Setting
section and the Record and Play Setting window is displayed like below:
Edit the Playing format and the Recording format values according to the A-law/U-law CODEC
format utilized.
Click OK and return to the Modify Board window.
5. All settings are now done. Inside the Modify Board window, click the OK button
6. Under the ShCtiConfig.exe window, hit the Apply button to save all modifications performed.
NOTE: If you are using more than one Synway SHT voice board with the CCRecord Pro Trunk Recording, apply the settings presented above to all Synway SHT voice boards in use.
20 Installing Synway Voice Boards
CCRecord Trunk Recording Application Notes Poltys, Inc.
Setting the DST Board
In order to make the proper A-law/U-law settings for your DST board, follow the steps presented below:
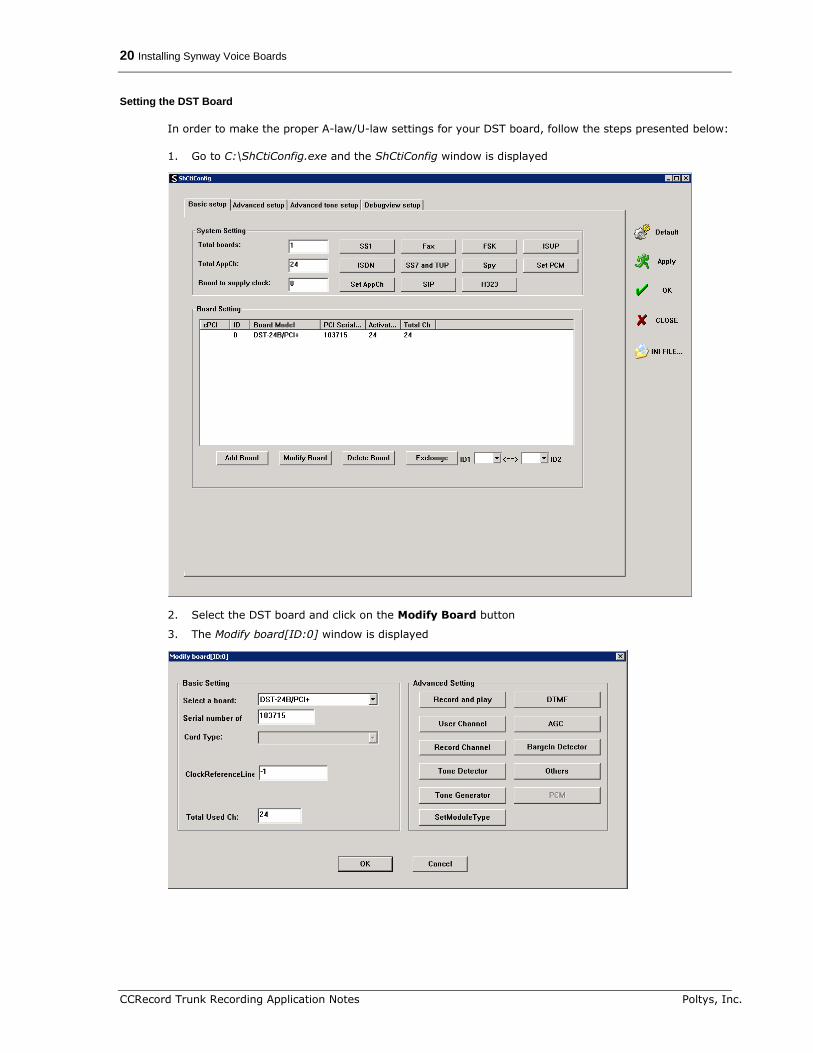
1. Go to C:\ShCtiConfig.exe and the ShCtiConfig window is displayed
2. Select the DST board and click on the Modify Board button
3. The Modify board[ID:0] window is displayed

Installing Synway Voice Boards 21
Poltys, Inc. CCRecord Trunk Recording Application Notes
4. Modify the Playing format and the Recording format according to the A-law/U-law CODEC
format utilized. The following operations are required:
Inside the Modify Board window, click the Record and play button from the Advanced Setting
section and the Record and Play Setting window is displayed like below:
Edit the Playing format and the Recording format values according to the A-law/U-law CODEC
format utilized.
Click OK and return to the Modify Board window.
5. Edit the Module Type according to the A-law/U-law CODEC format utilized. The following
operations are required:
Inside the Modify Board window, click the SetModule Type button from the Advanced Setting
section
A note is displayed to detail the procedure
22 Installing Synway Voice Boards
CCRecord Trunk Recording Application Notes Poltys, Inc.
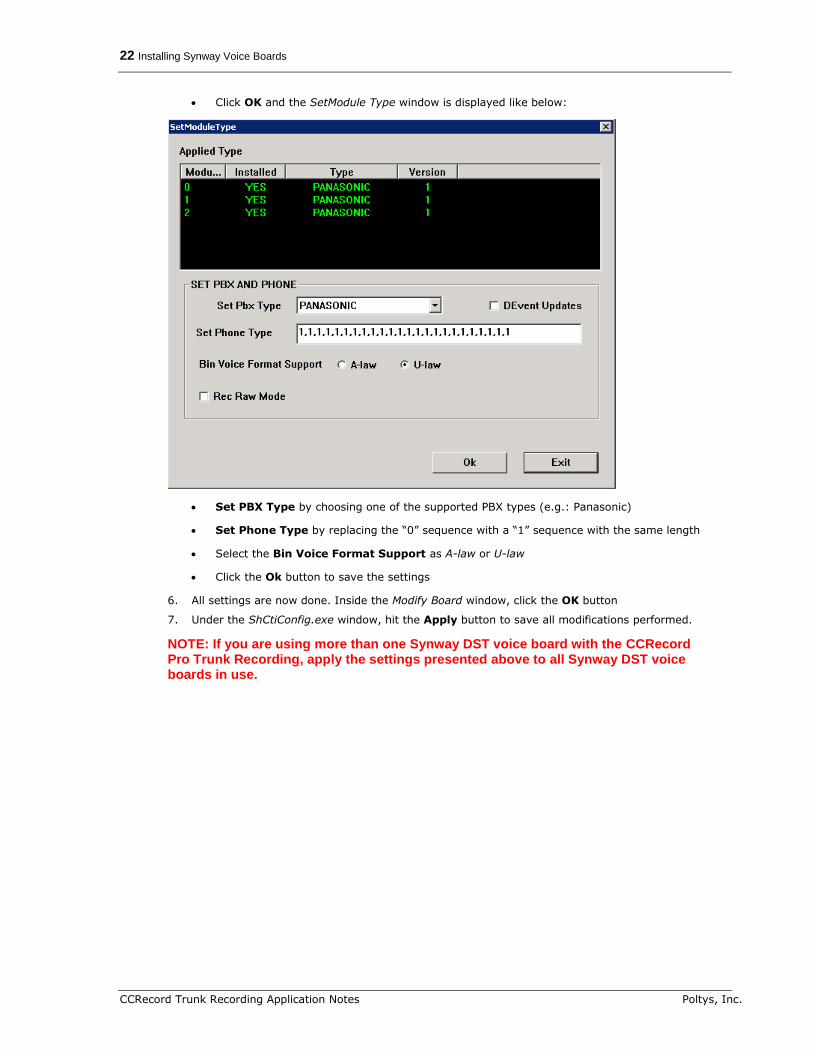
Click OK and the SetModule Type window is displayed like below:
Set PBX Type by choosing one of the supported PBX types (e.g.: Panasonic)
Set Phone Type by replacing the “0” sequence with a “1” sequence with the same length
Select the Bin Voice Format Support as A-law or U-law
Click the Ok button to save the settings
6. All settings are now done. Inside the Modify Board window, click the OK button
7. Under the ShCtiConfig.exe window, hit the Apply button to save all modifications performed.
NOTE: If you are using more than one Synway DST voice board with the CCRecord Pro Trunk Recording, apply the settings presented above to all Synway DST voice boards in use.
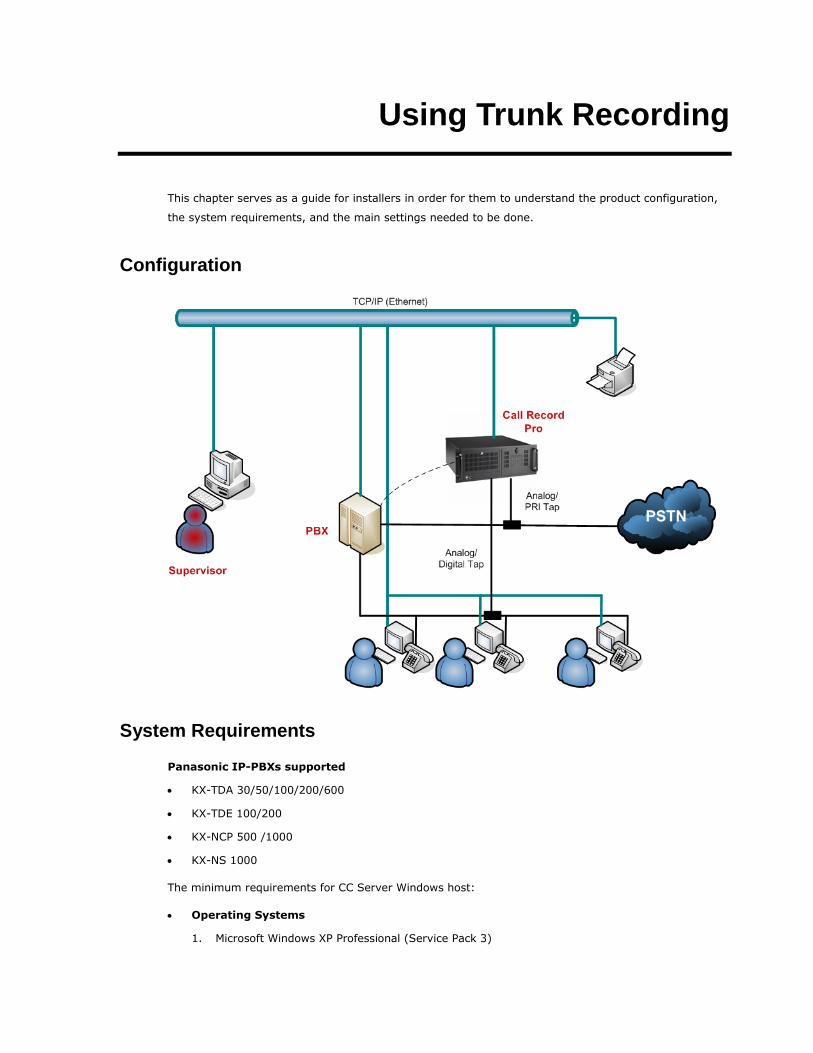
Using Trunk Recording
This chapter serves as a guide for installers in order for them to understand the product configuration,
the system requirements, and the main settings needed to be done.
Configuration
System Requirements
Panasonic IP-PBXs supported
KX-TDA 30/50/100/200/600
KX-TDE 100/200
KX-NCP 500 /1000
KX-NS 1000
The minimum requirements for CC Server Windows host:
Operating Systems
1. Microsoft Windows XP Professional (Service Pack 3)
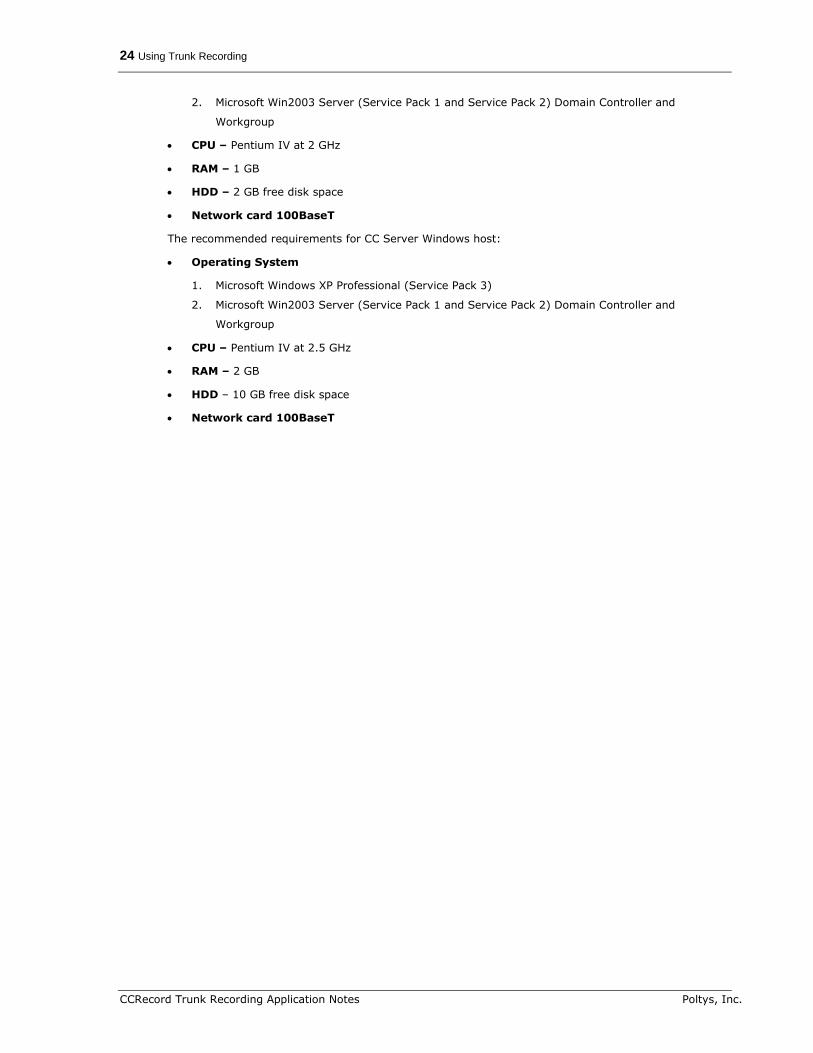
24 Using Trunk Recording
CCRecord Trunk Recording Application Notes Poltys, Inc.
2. Microsoft Win2003 Server (Service Pack 1 and Service Pack 2) Domain Controller and
Workgroup
CPU – Pentium IV at 2 GHz
RAM – 1 GB
HDD – 2 GB free disk space
Network card 100BaseT
The recommended requirements for CC Server Windows host:
Operating System
1. Microsoft Windows XP Professional (Service Pack 3)
2. Microsoft Win2003 Server (Service Pack 1 and Service Pack 2) Domain Controller and
Workgroup
CPU – Pentium IV at 2.5 GHz
RAM – 2 GB
HDD – 10 GB free disk space
Network card 100BaseT

Using Trunk Recording 25
Poltys, Inc. CCRecord Trunk Recording Application Notes
Voice Recording Format
The recorded calls are saved in a wav format and are playable through Winamp or Windows Media
Player 9 (or higher) applications installed on the host computer.
The wav files CCRecord Pro works with hold the following properties:
Bit Rate – 64 kbps
Audio Sample Size – 8 bit
Channel – 1 (mono)
Audio sample rate – 8 kHz
Audio format – CCITT A-Law/U-Law
NOTE: The disk space required for one minute of recording is 480 KB; if 36 hours of conversation are recorded, 1 GB space is required.
Prerequisites
The following prerequisites are mandatory before creating the configuring and using the CCRecord Pro
Trunk Recording software solution:
1. Stop the CCServer Service if it is already installed and running. Refer to Start/ Stop the CCServer
Service section for details.
2. Physically install the Synway Board in the local PC
3. Install the Synway Board driver
4. Configure the Synway Board driver settings according to Synway board type
DTP Boards
Non-DTP Boards
SHT Boards
DST Boards
5. Install the Poltys software (if not installed already)
NOTE: For more information, please refer to the CCServer Getting Started Manual.
6. The CCRecord Pro uses the Synway driver .ini files in order to proper function. Follow the path
<install dir>\ShCti and copy all the .ini files from that location to the <install dir>\CC Server folder.
7. Perform the actions described in the Trunk Recording Settings section.
8. Start the CCServer Service. Refer to Start/ Stop the CCServer Service section for details.
26 Using Trunk Recording
CCRecord Trunk Recording Application Notes Poltys, Inc.
Trunk Recording Settings
NOTES:
The Trunk Recording Settings are available only with the CCRecord Pro Trunk Recording solution.
Before making the following settings, please make sure the Synway Board and the Synway Board driver are already installed and configured on the local PC.
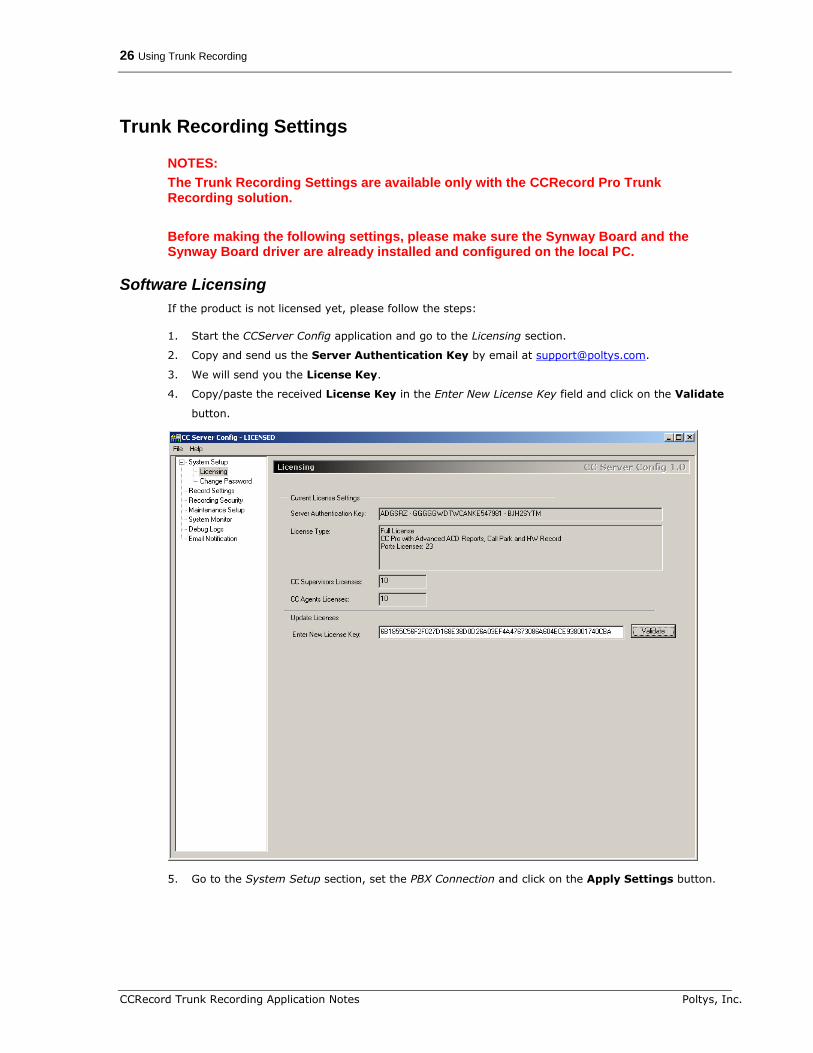
Software Licensing
If the product is not licensed yet, please follow the steps:
1. Start the CCServer Config application and go to the Licensing section.
2. Copy and send us the Server Authentication Key by email at [email protected].
3. We will send you the License Key.
4. Copy/paste the received License Key in the Enter New License Key field and click on the Validate
button.
5. Go to the System Setup section, set the PBX Connection and click on the Apply Settings button.

Using Trunk Recording 27
Poltys, Inc. CCRecord Trunk Recording Application Notes
6. Click the Restart button in order for the CCServer to start. When the server is connected, all the
lights turn green.
Backup Procedure
We recommend a periodically Backup Database operation to protect all the information stored in the
system.
Inside the System Setup section from the CCServer application, click on the Backup Database button
in order to create duplicates for the current CCDatabase and also for the voice recordings existing in the
system.
If necessary, you can restore the CCDatabase including the voice recordings any time by overwriting
them with the previous backup files.
NOTE: The location for the backup files is
C:\Program Files\G3 Nova Communications\CC Server\Backup. Here, you can find the backup database, the Intercom Call Log voice records in the IntVoiceRecords folder and the CO Call Log voice records in the VoiceRecords folder.
28 Using Trunk Recording
CCRecord Trunk Recording Application Notes Poltys, Inc.
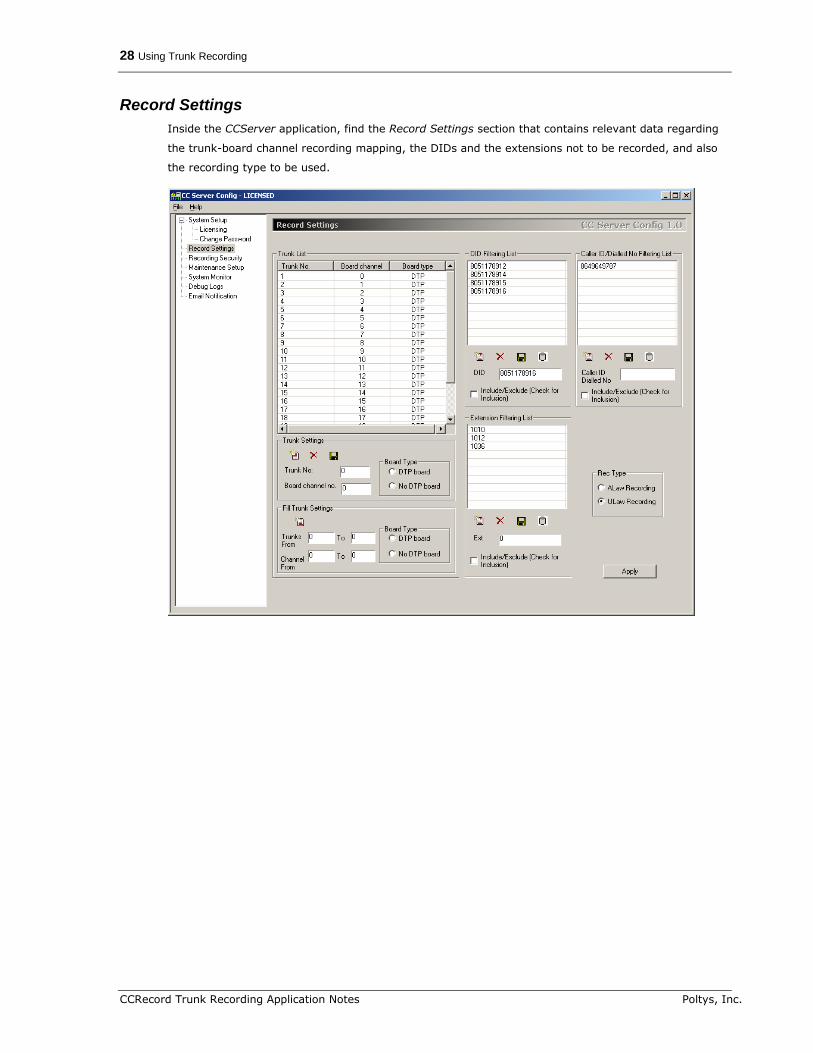
Record Settings
Inside the CCServer application, find the Record Settings section that contains relevant data regarding
the trunk-board channel recording mapping, the DIDs and the extensions not to be recorded, and also
the recording type to be used.

Using Trunk Recording 29
Poltys, Inc. CCRecord Trunk Recording Application Notes
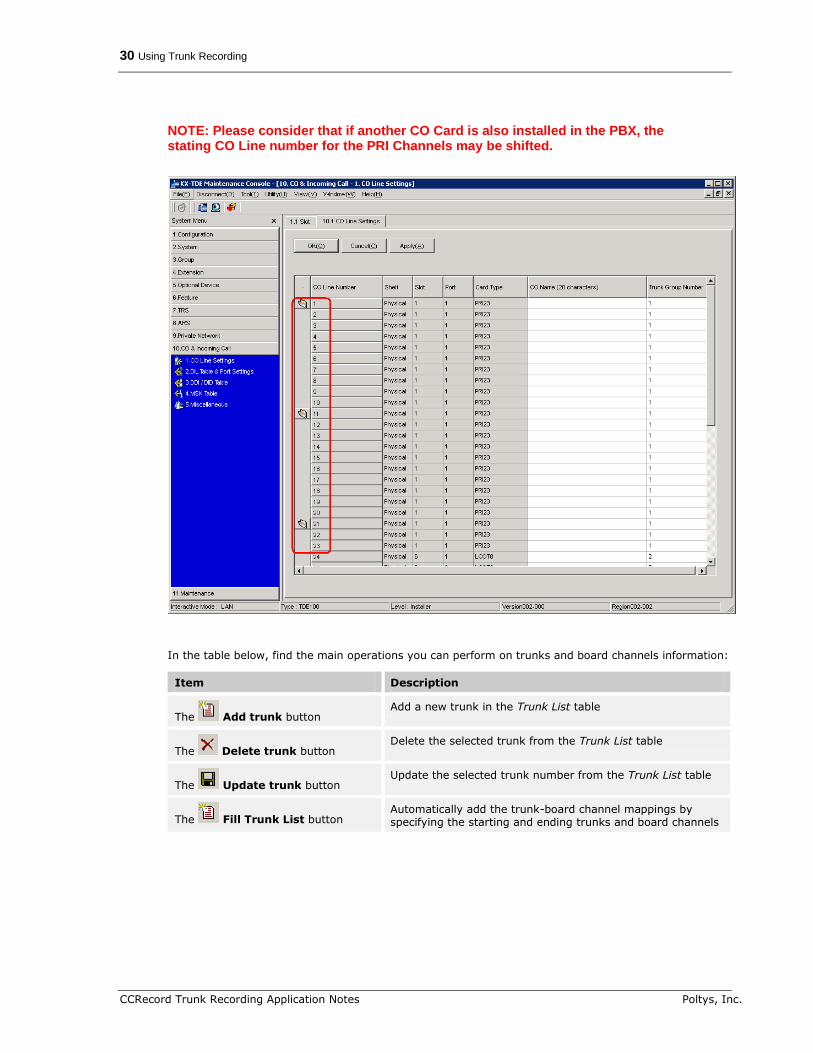
Trunk List
NOTE: When all settings are performed inside the Record Settings window, please remember to save the changes on server. Find more information inside the Saving Changes on Server section.
The Trunk List section contains all configured trunk-board channel mappings for a specific board type
and allows you to manually and/or automatically add, to delete and/or to update the trunk-board
channel mappings.
In the example below, the trunks 1-23 are mapped according to the DTP board channels 0-22:
30 Using Trunk Recording
CCRecord Trunk Recording Application Notes Poltys, Inc.
NOTE: Please consider that if another CO Card is also installed in the PBX, the stating CO Line number for the PRI Channels may be shifted.
In the table below, find the main operations you can perform on trunks and board channels information:
Item Description
The Add trunk button Add a new trunk in the Trunk List table
The Delete trunk button Delete the selected trunk from the Trunk List table
The Update trunk button Update the selected trunk number from the Trunk List table
The Fill Trunk List button Automatically add the trunk-board channel mappings by specifying the starting and ending trunks and board channels
Using Trunk Recording 31
Poltys, Inc. CCRecord Trunk Recording Application Notes
To manually add a new trunk:
1. Inside the Trunk Settings section, populate the following fields:
Trunk No. – the number of the trunk to be added in the list
Board Channel no. – the number of board channel to be mapped with the prior mentioned
trunk number
Channel offset – the channel offset, representing the total number of channels corresponding
to the previous Synway Boards used and that are not part of the DPT series
DTP board series – the board you are using corresponds to a DTP series
No DTP series – the board you are using does NOT correspond to a DTP series
2. Click the Add trunk button and the new trunk-board channel mapping is added in the Trunk
List table.
To delete an existing trunk:
1. Select the trunk you want to delete from the Trunk List table
2. Inside the Trunk Settings section, click the Delete trunk button and the selected trunk-board
channel mapping is deleted from the Trunk List table.
To update an existing trunk:
1. Select the trunk you want to update from the Trunk List table
2. Inside the Trunk Settings section, modify any information from the fields:
Trunk No. – the number of the trunk
Board Channel no. – the number of board channel to be mapped with the prior mentioned
trunk number
Channel offset – the channel offset, representing the total number of channels corresponding
to the previous Synway Boards used and that are not part of the DPT series
DTP board series – the board you are using corresponds to a DTP series
No DTP series – the board you are using does NOT correspond to a DTP series
3. After finishing the modifications, click the Update trunk button and the selected trunk-board
channel mapping is updated inside the Trunk List table.
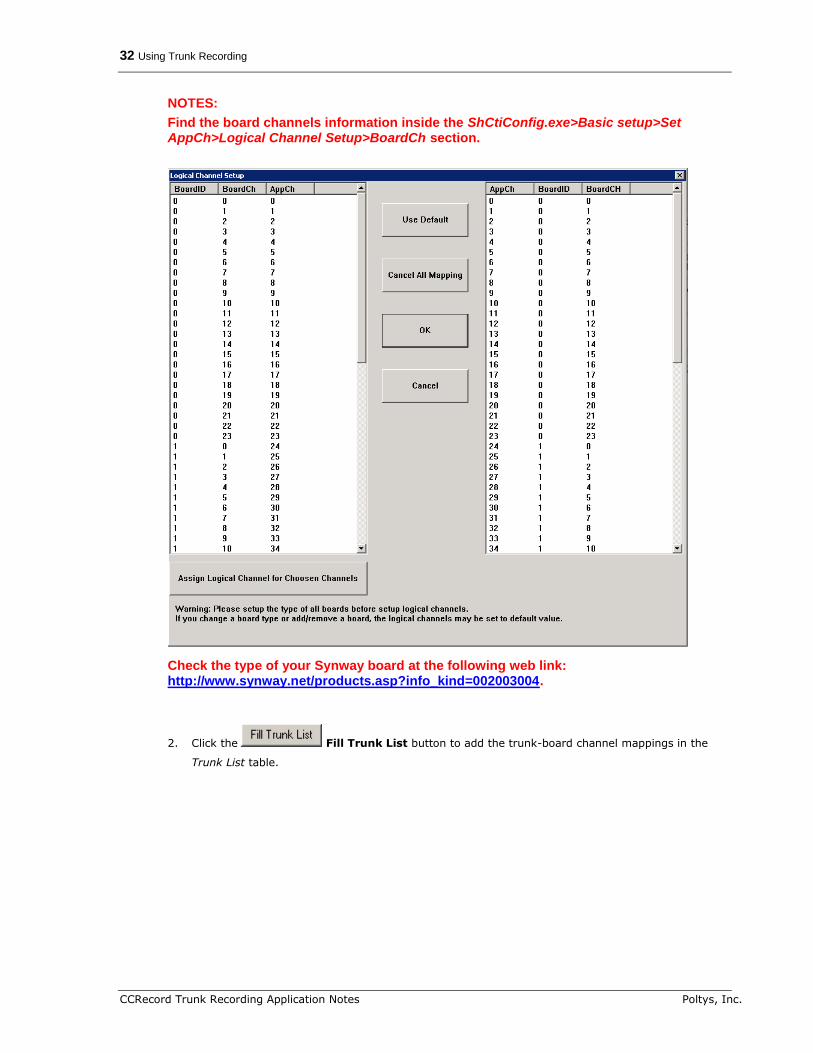
To automatically add trunk-board channel mappings inside the Trunk List table, you can use the
Fill Trunk Settings section by following the procedure described below:
1. Populate the following fields with the appropriate information:
Trunks From/To – the number of the first/last trunk
Channels From/To – the number of the first/last board channel
DTP board series – the board you are using correspond to a DTP series
No DTP series – the board you are using does NOT correspond to a DTP series
32 Using Trunk Recording
CCRecord Trunk Recording Application Notes Poltys, Inc.
NOTES:
Find the board channels information inside the ShCtiConfig.exe>Basic setup>Set AppCh>Logical Channel Setup>BoardCh section.
Check the type of your Synway board at the following web link: http://www.synway.net/products.asp?info_kind=002003004.
2. Click the Fill Trunk List button to add the trunk-board channel mappings in the
Trunk List table.
Using Trunk Recording 33
Poltys, Inc. CCRecord Trunk Recording Application Notes
Filtering Rules for Recording Operation
NOTE: When all settings are performed inside the Record Settings window, please remember to save the changes on server. Find more information inside the Saving Changes on Server section.
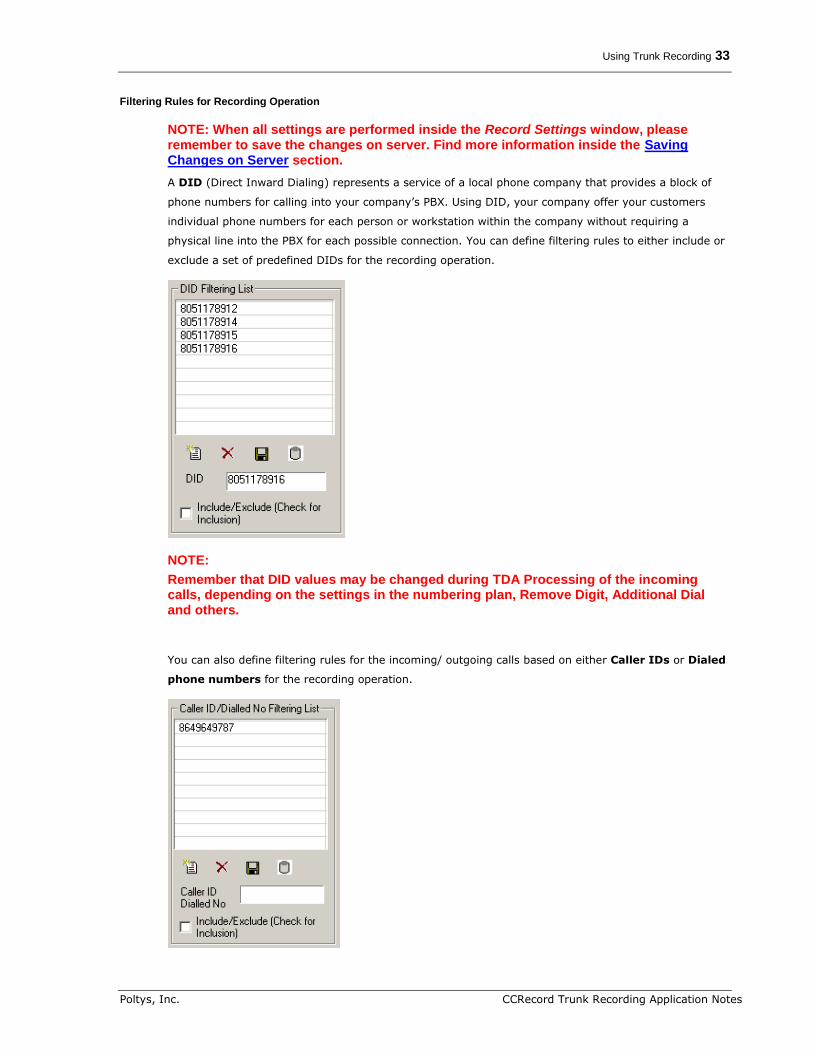
A DID (Direct Inward Dialing) represents a service of a local phone company that provides a block of
phone numbers for calling into your company’s PBX. Using DID, your company offer your customers
individual phone numbers for each person or workstation within the company without requiring a
physical line into the PBX for each possible connection. You can define filtering rules to either include or
exclude a set of predefined DIDs for the recording operation.
NOTE:
Remember that DID values may be changed during TDA Processing of the incoming calls, depending on the settings in the numbering plan, Remove Digit, Additional Dial and others.
You can also define filtering rules for the incoming/ outgoing calls based on either Caller IDs or Dialed
phone numbers for the recording operation.

34 Using Trunk Recording
CCRecord Trunk Recording Application Notes Poltys, Inc.
Each Agent from your Call Center uses a PBX extension and a telephone set. You can define filtering
rules to either include or exclude a set of predefined extensions for the recording operation.
You can toggle anytime any of the Include/Exclude options for the lists above in order to customize
the recording rules according to your needs, as follows:
Include/Exclude option is selected – None of the DID/ Caller ID or Dialed No/ Extension are
recorded except of the items in the corresponding list
Include/Exclude option is not selected – All of the DID/ Caller ID or Dialed No/ Extension are
recorded except of the items in the corresponding list
In the table below, you can see the main operations you can perform on DID/Caller ID or Dialed
extension restriction information:
Item Description
The Add DID/Caller ID or Dialed
No/ Extension button
Add a new filtering rule in the corresponding list based on DID/Caller ID or Dialed No/Extension.
The Delete DID/Caller ID or
Dialed No/ Extension button
Delete the selected rule from the corresponding list.
The Update DID/Caller ID or
Dialed No/ Extension button
Update the rule in the corresponding list.
The Import DID/Caller ID or
Dialed No/ Extension button
Import a set of predefined items provided in a text file. The items imported are appended to the existing list.
To add a new filtering rule:
1. Type the DID/Caller ID or Dialed No/ Extension to be added in the corresponding list
2. Click Add button to add the new item

Using Trunk Recording 35
Poltys, Inc. CCRecord Trunk Recording Application Notes
To delete a filtering rule:
1. Select the DID/Caller ID or Dialed No/ Extension to be removed from the corresponding list
2. Click Delete button to remove the selected item
To update an existing filtering rule:
1. Select the DID/Caller ID or Dialed No/ Extension to be updated in the corresponding list
2. Modify the number from the corresponding field
3. Click the Update button to update the number in the corresponding list.
To import items from predefined text files:
1. Click Import button to add new items from text files
2. Browse for the text file and click on Open button
Recording Type
NOTE: When all settings are performed inside the Record Settings window, please remember to save the changes on server. Find more information inside the Saving Changes on Server section.
Inside the Recording Type section, choose the type of PRI23 recording you prefer:
ALaw Recording – Europe CODEC format
ULaw Recording – US CODEC format
To set a recording type, choose the Rec Type between ALaw Recording and ULaw Recording options.
Saving Changes on Server
To save changes on server when all settings are performed inside the Record Settings window:
1. Click the Apply button to save the changes on the server

36 Using Trunk Recording
CCRecord Trunk Recording Application Notes Poltys, Inc.
2. A warning message is displayed informing you to restart the CCServer in order for the modifications
to be saved:
3. Click the OK button to accept the warning message
4. After all modifications are performed, restart the CCServer application by going to the System
Setup pane and clicking the Restart button.
5. The CCServer is reconnected within a few moments.
Recording User Restrictions
Inside the CCServer application, find the Recording Security section that allows you to add, delete
and/or update the users’ rights to access the recorded conversations from the CCSupervisor>CO Call
Log and Intercom Call Log sections.
A user, referred within this section as User, represents a CCSupervisor user. The user access rights
refer to listening and exporting actions. For example, with the appropriated user rights, you can listen
Using Trunk Recording 37
Poltys, Inc. CCRecord Trunk Recording Application Notes
to a recorded call by trunk – the entire recorded call - and by extension – the segment of the recorded
call handled by a specific extension.
A DID (Direct Inward Dialing) represents a service of a local phone company that provides a block of
phone numbers for calling into your company’s PBX. Using DID, your company offer your customers
individual phone numbers for each person or workstation within the company without requiring a
physical line into the PBX for each possible connection. A DID restriction, referred within this section
as DID, represents a DID that is not recorded.
Each Agent from your Call Center uses a PBX extension and a telephone set. An extension
restriction, referred within this section as Extension, represents an extension that is not recorded.
For each user, you can assign a password, and various DID and Extension restrictions. Multiple users
can be defined, as needed.
NOTE: If no user is defined inside the Recording Security section, no recorded calls can be accessed by the CCSupervisor under the CCSupervisor>CO Call Log and the Intercom Call Log sections.
Users List
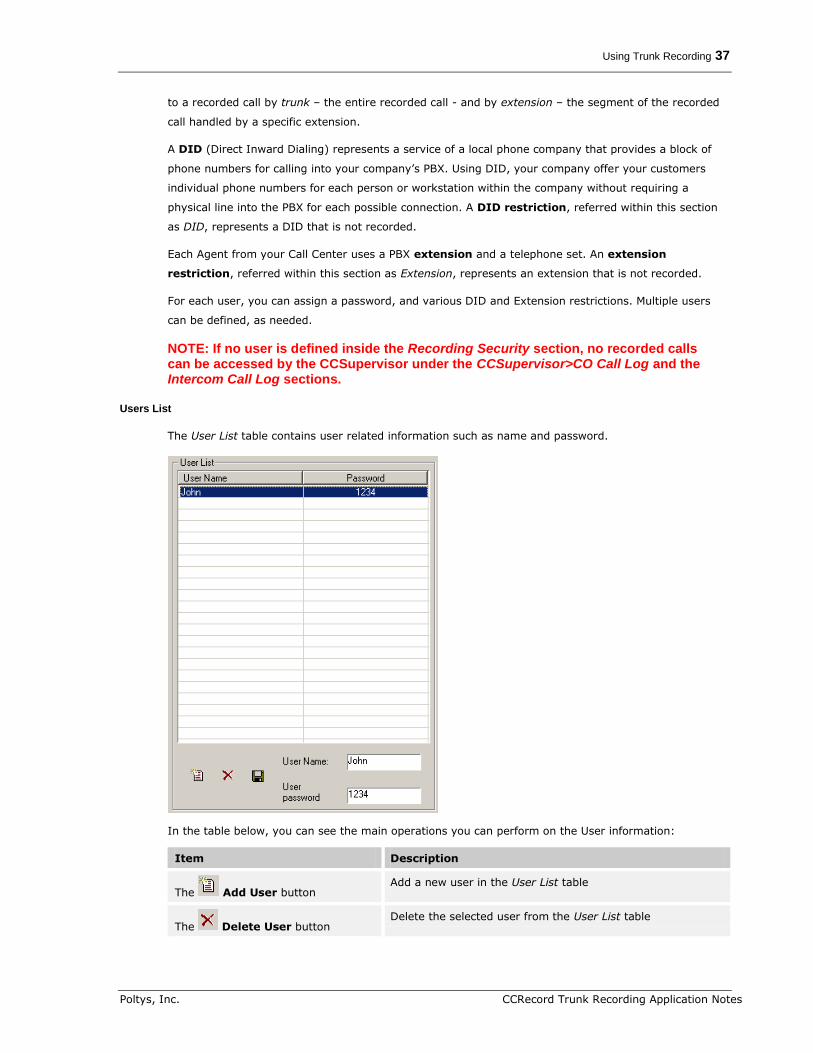
The User List table contains user related information such as name and password.
In the table below, you can see the main operations you can perform on the User information:
Item Description
The Add User button Add a new user in the User List table
The Delete User button Delete the selected user from the User List table
38 Using Trunk Recording
CCRecord Trunk Recording Application Notes Poltys, Inc.
Item Description
The Update User button Update the selected user information by modifying the name and/or password
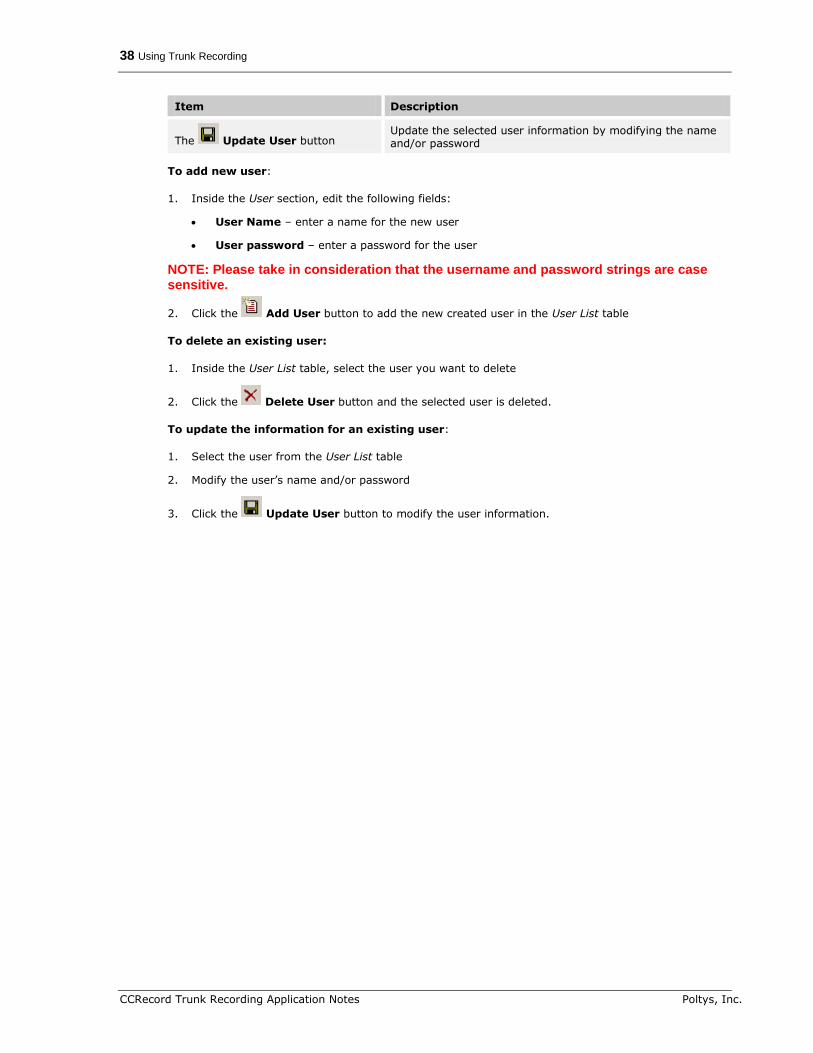
To add new user:
1. Inside the User section, edit the following fields:
User Name – enter a name for the new user
User password – enter a password for the user
NOTE: Please take in consideration that the username and password strings are case sensitive.
2. Click the Add User button to add the new created user in the User List table
To delete an existing user:
1. Inside the User List table, select the user you want to delete
2. Click the Delete User button and the selected user is deleted.
To update the information for an existing user:
1. Select the user from the User List table
2. Modify the user’s name and/or password
3. Click the Update User button to modify the user information.
Using Trunk Recording 39
Poltys, Inc. CCRecord Trunk Recording Application Notes
User Restrictions
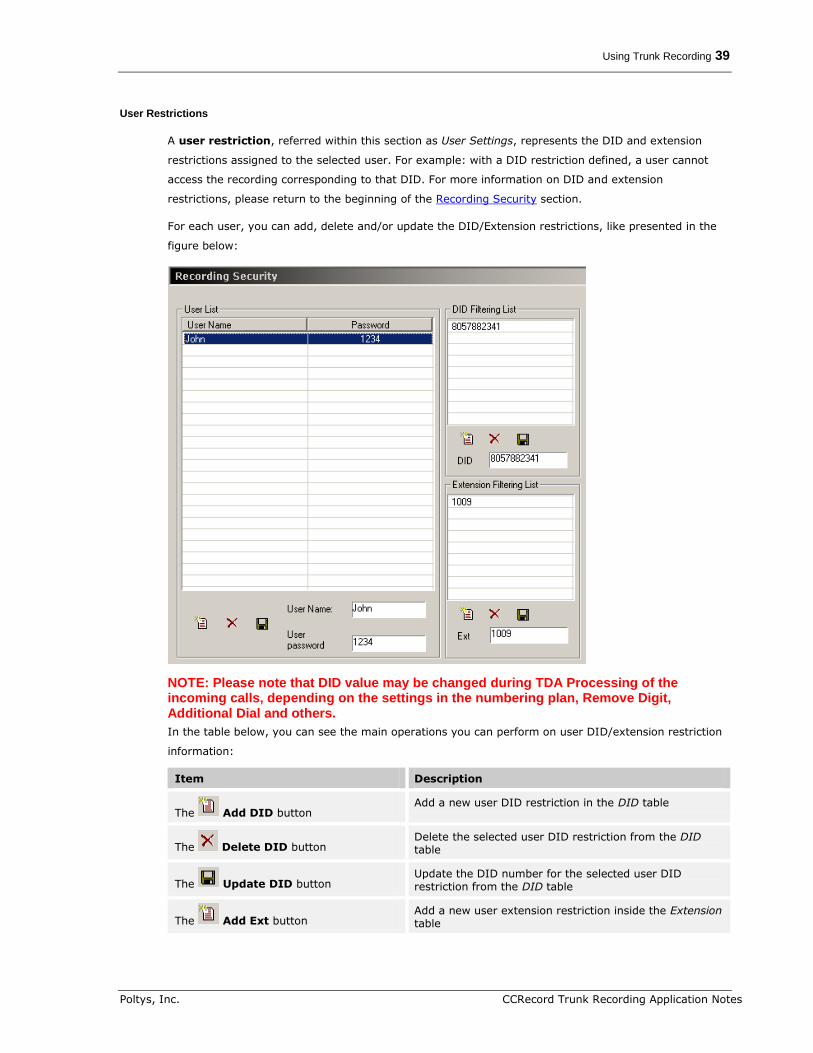
A user restriction, referred within this section as User Settings, represents the DID and extension
restrictions assigned to the selected user. For example: with a DID restriction defined, a user cannot
access the recording corresponding to that DID. For more information on DID and extension
restrictions, please return to the beginning of the Recording Security section.
For each user, you can add, delete and/or update the DID/Extension restrictions, like presented in the
figure below:
NOTE: Please note that DID value may be changed during TDA Processing of the incoming calls, depending on the settings in the numbering plan, Remove Digit, Additional Dial and others.
In the table below, you can see the main operations you can perform on user DID/extension restriction
information:
Item Description
The Add DID button Add a new user DID restriction in the DID table
The Delete DID button Delete the selected user DID restriction from the DID table
The Update DID button Update the DID number for the selected user DID restriction from the DID table
The Add Ext button Add a new user extension restriction inside the Extension table
40 Using Trunk Recording
CCRecord Trunk Recording Application Notes Poltys, Inc.
Item Description
The Delete Ext button Delete the selected user extension restriction from the Extension table
The Update Ext button Update the extension number for the selected user extension restriction inside the Extension table
To create a new user DID/Extension restriction for a user:
1. Inside the User List table, select the user you want to create a restriction for
2. Type the DID/extension not to be accessed by the selected user inside the DID/Ext field
3. Click the Add DID / Extension button to add the user DID/extension restriction in the
DID/Extension list.
To delete an existing DID/Extension restriction for a user:
1. Inside the User List table, select the user you want to delete a restriction from
2. Select the DID/extension restriction to be deleted
3. Click the Delete DID / Extension button to delete the user DID/extension restriction inside
the DID/Extension list.
To update an existing DID/Extension restriction for a user:
1. Inside the User List table, select the user you want to update the restriction for
2. Select the DID/extension restriction to be modified
3. Change the number for the DID/extension inside the DID/Ext field
4. Click the Update DID/ Extension button to update the user DID/extension restriction inside
the DID/Extension list.
Recorded Conversations Playback for CCView
Using the CCSupervisor application, you can listen to all recorded calls, including the internal calls, and
also export the records to your chosen location.
To listen to the recorded conversations, Winamp or Windows Media Player 9 (or higher) must be
installed in the host computer.
Using Trunk Recording 41
Poltys, Inc. CCRecord Trunk Recording Application Notes
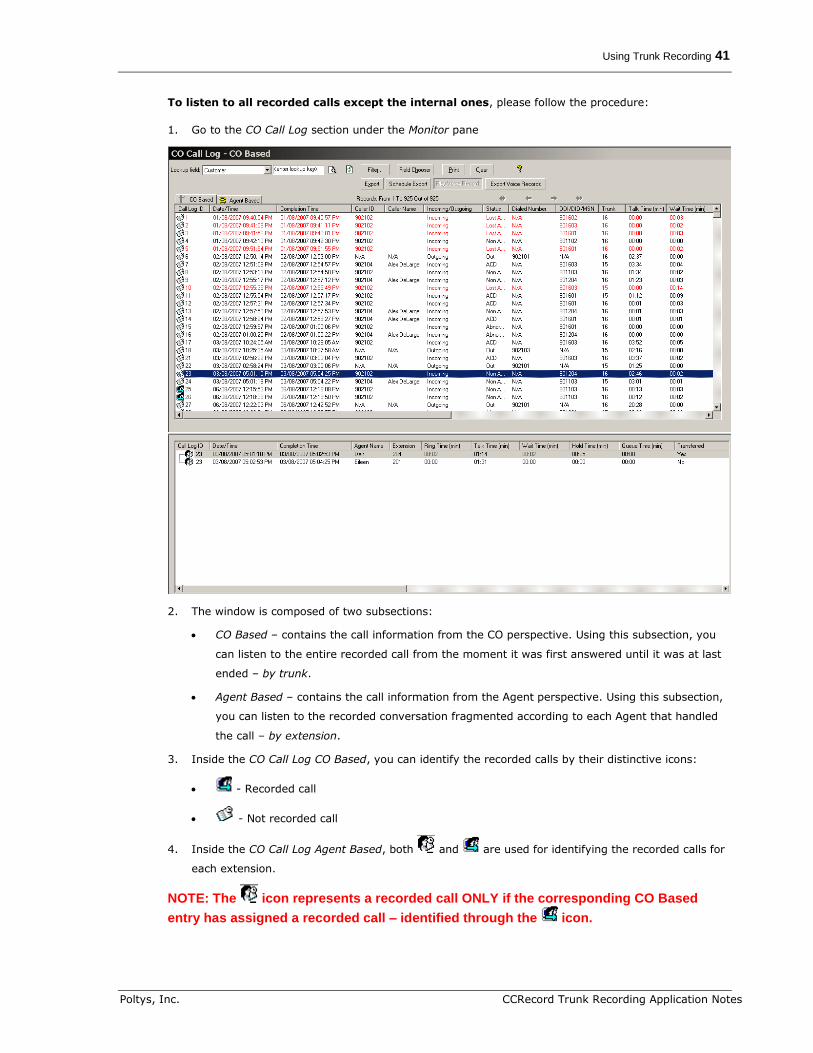
To listen to all recorded calls except the internal ones, please follow the procedure:
1. Go to the CO Call Log section under the Monitor pane
2. The window is composed of two subsections:
CO Based – contains the call information from the CO perspective. Using this subsection, you
can listen to the entire recorded call from the moment it was first answered until it was at last
ended – by trunk.
Agent Based – contains the call information from the Agent perspective. Using this subsection,
you can listen to the recorded conversation fragmented according to each Agent that handled
the call – by extension.
3. Inside the CO Call Log CO Based, you can identify the recorded calls by their distinctive icons:
- Recorded call
- Not recorded call
4. Inside the CO Call Log Agent Based, both and are used for identifying the recorded calls for
each extension.
NOTE: The icon represents a recorded call ONLY if the corresponding CO Based
entry has assigned a recorded call – identified through the icon.
42 Using Trunk Recording
CCRecord Trunk Recording Application Notes Poltys, Inc.
5. Select a call from the CO Call Log CO Based or Agent Based and click the Play Voice Record
button to listen to the recorded conversation.
6. The Record Security window is displayed:
7. Enter your user credentials – the username and the password – in the corresponding fields and
click the OK button.
NOTE: For more information on Record Security, please refer to the Recording User Restrictions section.
8. If needed, check the Remember user name and password option to save to credentials for later
use.
9. The default media player starts playing the recorded conversation.
To listen to the internal recorded calls, please follow the procedure:
1. Go to the Intercom Call Log section under the Monitor pane
2. You can identify the recorded calls by their distinctive icons:
- Recorded call
- Not recorded call
3. Select a call from the Intercom Call Log and click the Play Voice Record button to listen to the
recorded conversation.
Using Trunk Recording 43
Poltys, Inc. CCRecord Trunk Recording Application Notes
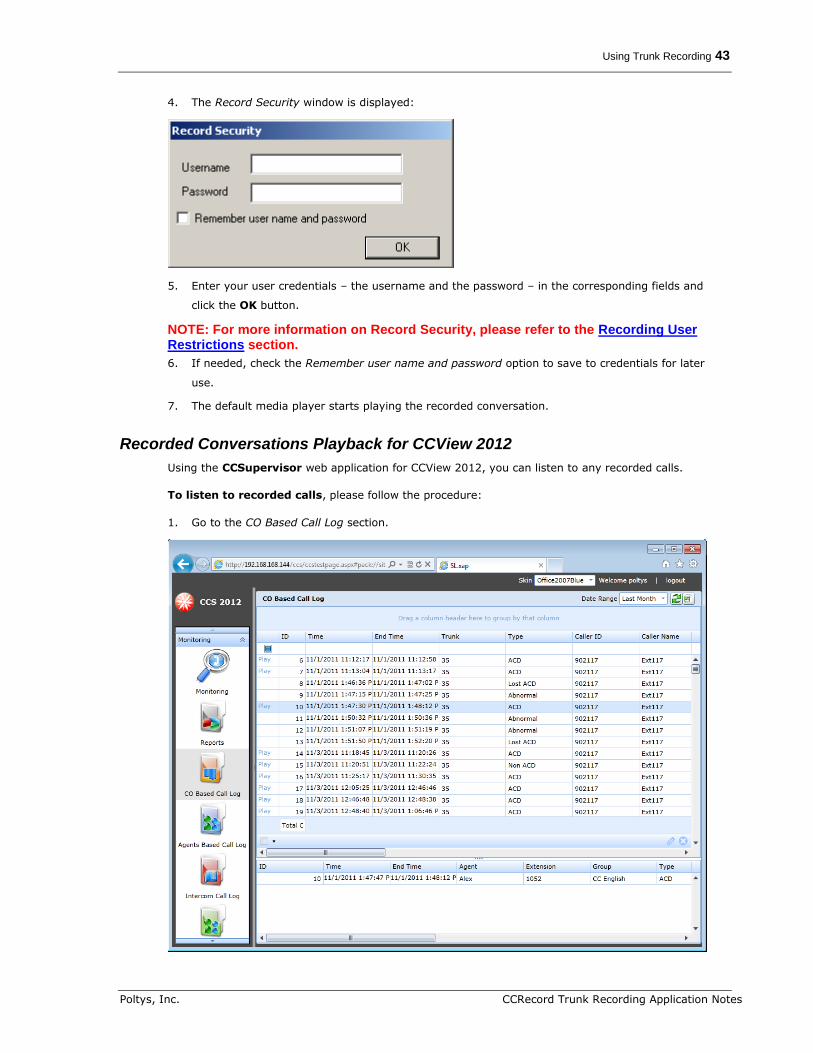
4. The Record Security window is displayed:
5. Enter your user credentials – the username and the password – in the corresponding fields and
click the OK button.
NOTE: For more information on Record Security, please refer to the Recording User Restrictions section.
6. If needed, check the Remember user name and password option to save to credentials for later
use.
7. The default media player starts playing the recorded conversation.
Recorded Conversations Playback for CCView 2012
Using the CCSupervisor web application for CCView 2012, you can listen to any recorded calls.
To listen to recorded calls, please follow the procedure:
1. Go to the CO Based Call Log section.

44 Using Trunk Recording
CCRecord Trunk Recording Application Notes Poltys, Inc.
2. Inside the CO Based Call Log, you can identify the recorded calls by their distinctive marker Play in
the related column.
3. For playback the conversation, click on the hyperlink Play of the corresponding item in list. A new
web page is displayed containing links to the recorded wave files.
4. Click on the wave of your choice. The default media player starts playing the recorded
conversation.
Recorded Conversations Export for CCView
In both CCSupervisor sections, CO Call Log and Intercom Call Log, you have the option to Export Voice
Records using the button with the same name:
1. Select one or more recorded calls to be exported.
NOTE: Please remember that multiple records selection is supported only inside the CO Call Log Agent Based and Intercom Call Log sections.
2. Click on the Export Voice Records button.
3. The Record Security window is displayed:
4. Enter you user credentials – the username and the password – in the corresponding fields and click
the OK button.
NOTE: For more information on Record Security, please refer to the Recording User Restrictions section.
5. If needed, check the Remember user name and password option to save to credentials for later
use.
Using Trunk Recording 45
Poltys, Inc. CCRecord Trunk Recording Application Notes
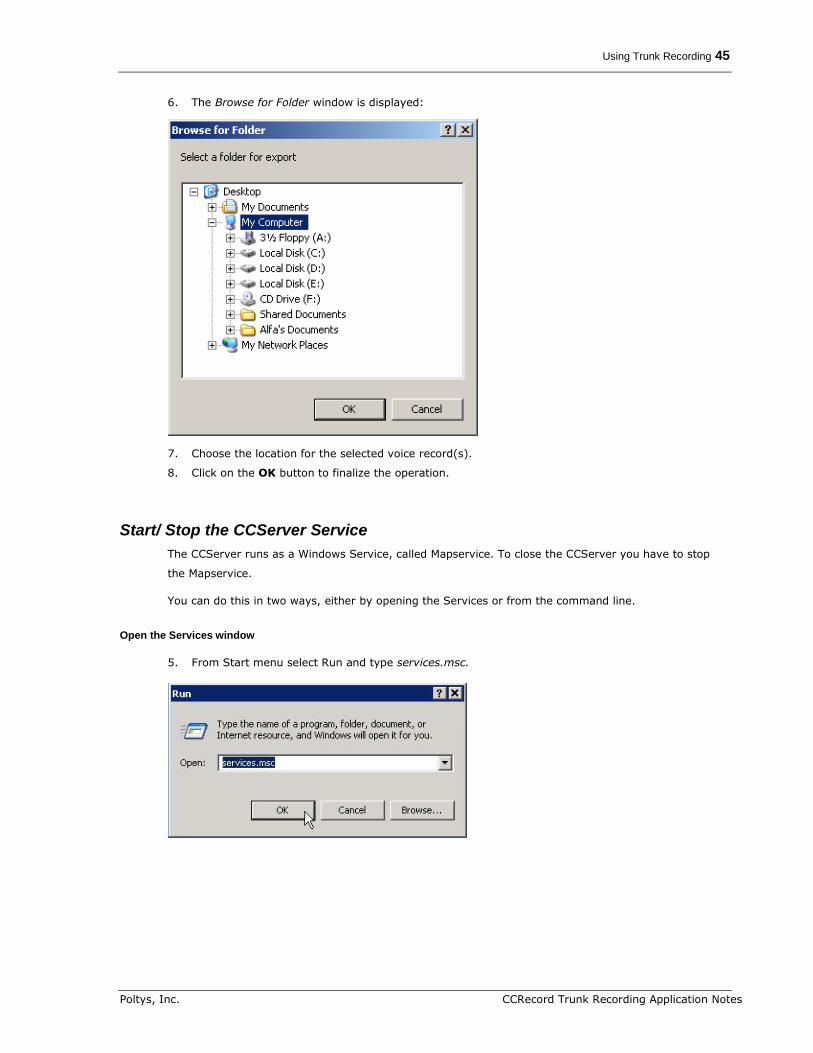
6. The Browse for Folder window is displayed:
7. Choose the location for the selected voice record(s).
8. Click on the OK button to finalize the operation.
Start/ Stop the CCServer Service
The CCServer runs as a Windows Service, called Mapservice. To close the CCServer you have to stop
the Mapservice.
You can do this in two ways, either by opening the Services or from the command line.
Open the Services window
5. From Start menu select Run and type services.msc.
46 Using Trunk Recording
CCRecord Trunk Recording Application Notes Poltys, Inc.
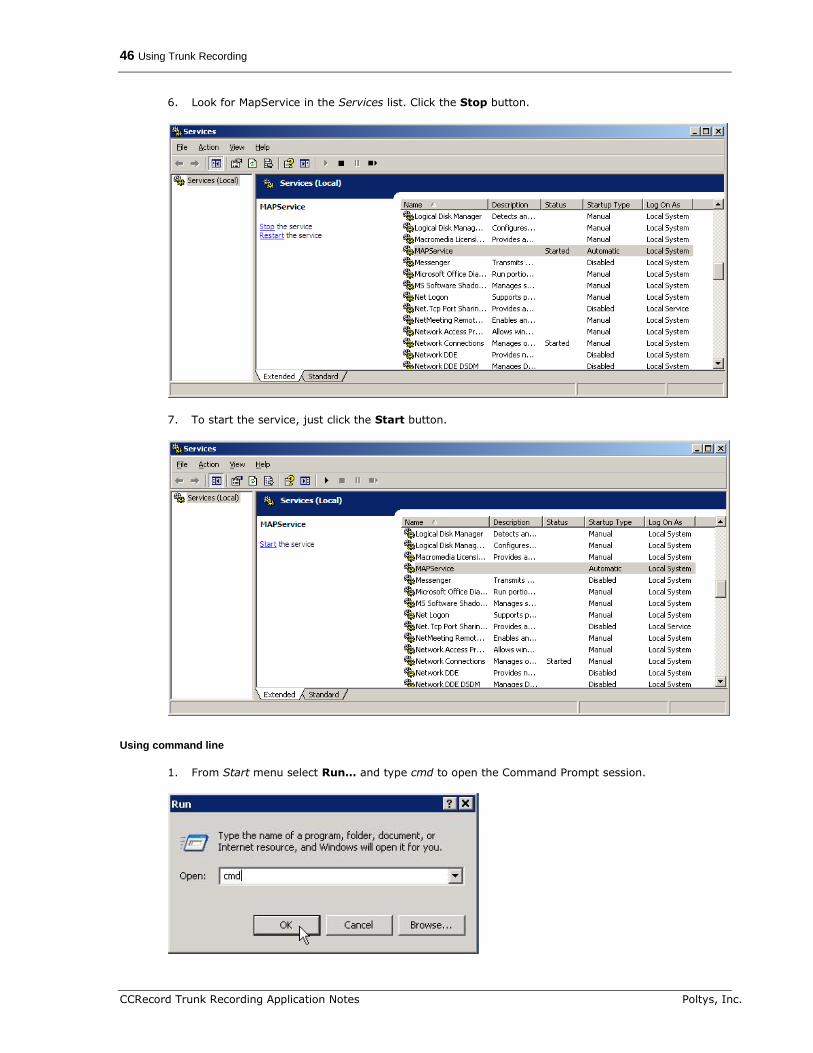
6. Look for MapService in the Services list. Click the Stop button.
7. To start the service, just click the Start button.
Using command line
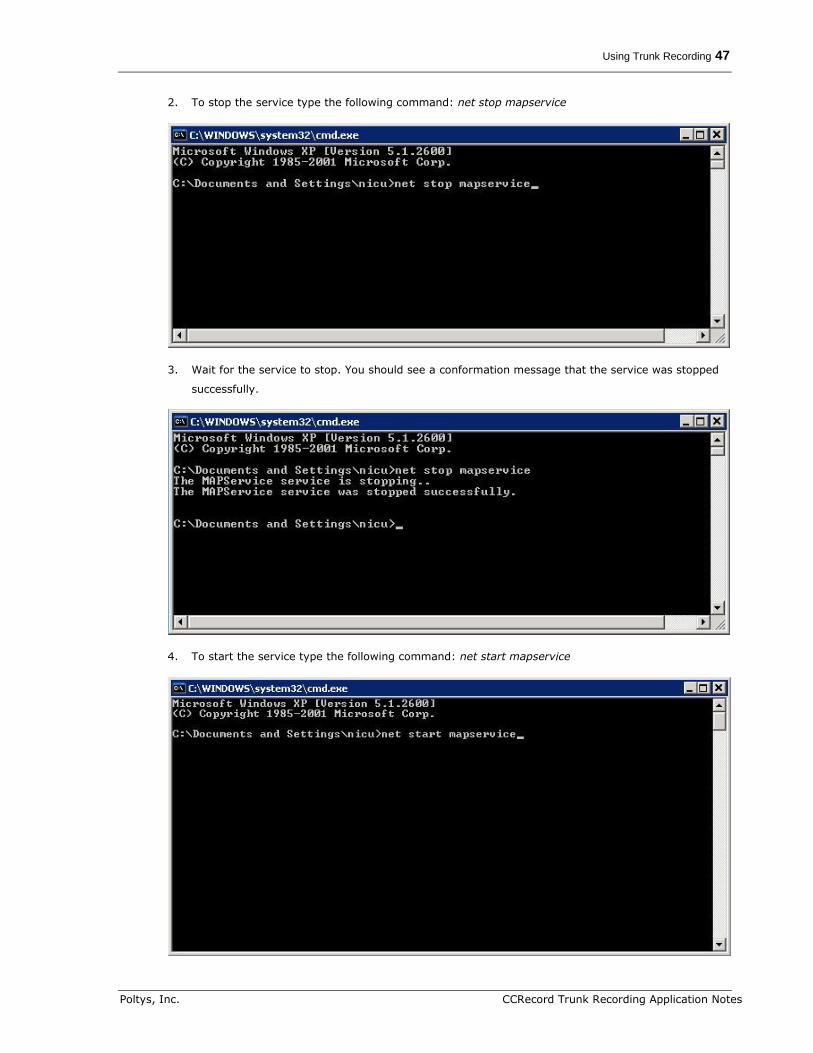
1. From Start menu select Run… and type cmd to open the Command Prompt session.
Using Trunk Recording 47
Poltys, Inc. CCRecord Trunk Recording Application Notes
2. To stop the service type the following command: net stop mapservice
3. Wait for the service to stop. You should see a conformation message that the service was stopped
successfully.
4. To start the service type the following command: net start mapservice
48 Using Trunk Recording
CCRecord Trunk Recording Application Notes Poltys, Inc.
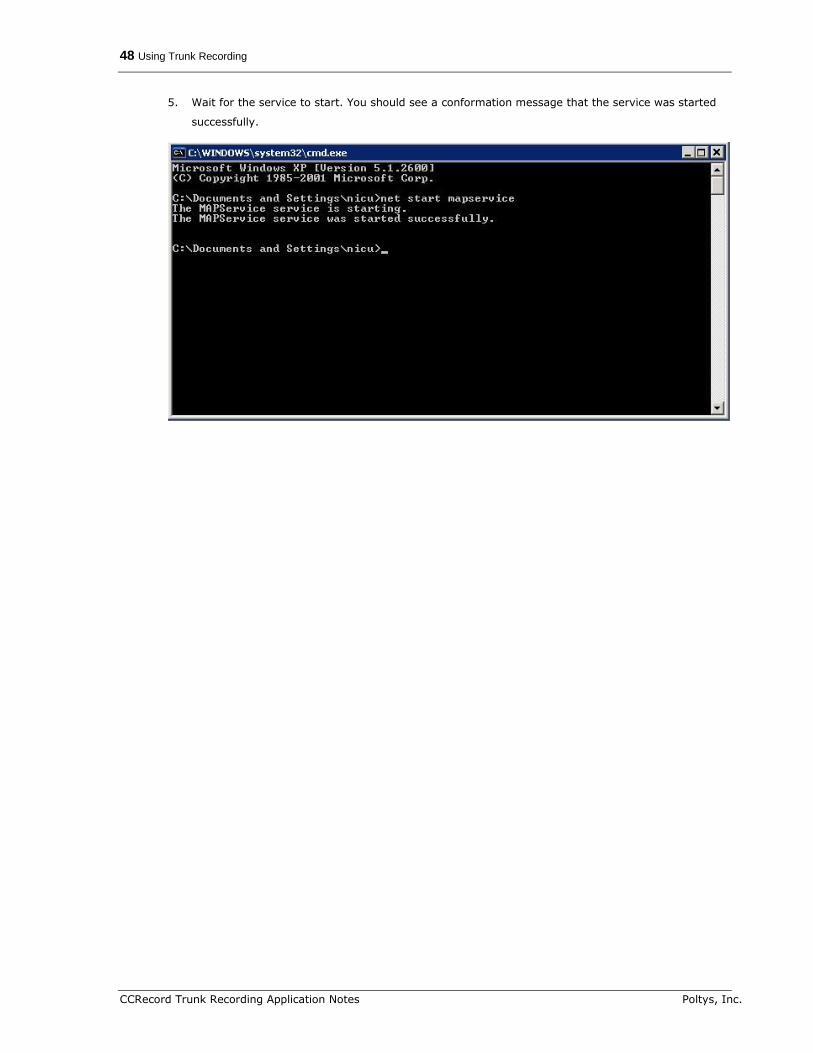
5. Wait for the service to start. You should see a conformation message that the service was started
successfully.

Using Trunk Recording 49
Poltys, Inc. CCRecord Trunk Recording Application Notes
- Blank Page -

Product Support
Poltys tech support engineers are always available to answer your questions at:
US Phone number: +1 864 642 6103
Email: [email protected]