canon eos rebel t2i top cover replacement › pdf › ifixit › guide_15005… · see that thing...
TRANSCRIPT

Canon EOS Rebel T2i Top Cover ReplacementReplacing the top piece of a Canon T2i (550D). In my case, I had a broken hot-shoe, but as most
controls on this camera are built into the same part, this repair guide will solve many repairs.Requires removing front, back and top panels.
Written By: Jeff Ballweg
Canon EOS Rebel T2i Top Cover Replacement Draft: 2013-10-15Guide ID: 15005 -
This document was generated on 2019-09-17 11:56:05 PM (MST).
© iFixit — CC BY-NC-SA www.iFixit.com Page 1 of 15

INTRODUCTION
The knobs, switches, buttons, flash and other components are part of a single assembly fromCanon. Canon do not generally sell parts directly to consumers, and suggest you send your camerato them for repairs.
This guide will show you how to remove the top, front and back panels of your camera, so you canaccess and replace many of the external components that may have become worn or broken.
TOOLS:8" Needle Nose Plier (1)Tweezers (1)iFixit Opening Tools (1)Phillips #1 Screwdriver (1)
Canon EOS Rebel T2i Top Cover Replacement Draft: 2013-10-15Guide ID: 15005 -
This document was generated on 2019-09-17 11:56:05 PM (MST).
© iFixit — CC BY-NC-SA www.iFixit.com Page 2 of 15

Step 1 — Top Cover
As you can see here, we've got a damaged hot shoe on this T2i (550D). A little bit of searching oneBay has yielded the part we need to replace. It's an entire assembly of the top cover.
You'll need the following:
Plastic opening tool
Small Screwdrivers
Pliers (or surgical clamps :D)
Tweezers
Pen and paper
Get the camera ready by removing the neck strap, battery, lens and SD card.
Canon EOS Rebel T2i Top Cover Replacement Draft: 2013-10-15Guide ID: 15005 -
This document was generated on 2019-09-17 11:56:05 PM (MST).
© iFixit — CC BY-NC-SA www.iFixit.com Page 3 of 15

Step 2
Remove the two top screws from under where the strap attaches to the camera body.
Remove screws from bottom of camera. Note that these can be quite tight. Use one hand to holdthe screwdriver down, and another to turn the pliers, or clamp.
Note down the location of each screw. They are not all the same size or threading.
Canon EOS Rebel T2i Top Cover Replacement Draft: 2013-10-15Guide ID: 15005 -
This document was generated on 2019-09-17 11:56:05 PM (MST).
© iFixit — CC BY-NC-SA www.iFixit.com Page 4 of 15

Step 3
Remove two screws from the right side of the camera, next to the CF card.
Remove one screw from the right side of the camera. Leave those under the rubber door for later,we just want to do the one outside for now.
Remove the eyepiece, and the two screws beneath it.
Remove the two black screws on the front of the camera, just above the lens mount.
Remove the screw in the centre of the viewfinder focus knob. It will come out with the knobattached.
If you've got them all, you will have removed 10 screws from the upper body, and 7 from thebottom.
Canon EOS Rebel T2i Top Cover Replacement Draft: 2013-10-15Guide ID: 15005 -
This document was generated on 2019-09-17 11:56:05 PM (MST).
© iFixit — CC BY-NC-SA www.iFixit.com Page 5 of 15

Step 4
Pry open the bottom of the camera with the opening tool or screwdriver. The front panel shouldcome forward, but must be lifted (pried) over the tripod mounting. It may help to slide a smallscrewdriver under the panel via the battery door.
Once you've slipped the front cover's base over the tripod mount, gently pull it away from thecamera body.
Do not remove the screws on the metal lens mount ring. Doing so may cause issues with auto-focus.
See that thing that looks like an AA battery? That is actually a very large capacitor to charge theflash to high voltage. Do not go near it with any metal object. Do not touch the two leads at thebottom. It can give you a very serious shock, even without the battery installed!
Canon EOS Rebel T2i Top Cover Replacement Draft: 2013-10-15Guide ID: 15005 -
This document was generated on 2019-09-17 11:56:05 PM (MST).
© iFixit — CC BY-NC-SA www.iFixit.com Page 6 of 15

Step 5
Remove the last two screws holding the back of the camera onto the body by removing them fromunder the connections door on the left side.
Remove the connection plate and rubber door and set aside.
Gently pull the back of the camera away from the body.
Do not detach the cables. In the case of this guide, we only need to access the connection for thetop cover.
Canon EOS Rebel T2i Top Cover Replacement Draft: 2013-10-15Guide ID: 15005 -
This document was generated on 2019-09-17 11:56:05 PM (MST).
© iFixit — CC BY-NC-SA www.iFixit.com Page 7 of 15

Step 6
Locate the ribbon connector connecting the main circuit board to the top cover, near "zoom in"button, under where your right thumb would sit while using the camera.
Carefully and gently pry the connector lose with the blade of a plastic opening tool.
Locate the microphone connection, and disconnect it. It is to the left of the sensor on the circuitboard.
Canon EOS Rebel T2i Top Cover Replacement Draft: 2013-10-15Guide ID: 15005 -
This document was generated on 2019-09-17 11:56:05 PM (MST).
© iFixit — CC BY-NC-SA www.iFixit.com Page 8 of 15

Step 7
On the front of the camera, disconnect the red and yellow wires from the circuit board. If you havea plastic tweezers, simply pull them away from their connectors.
The top cover is now free. Gently pull it away from the body, and replace it with the new one. Besure that the cables are running to the correct side of the body. Red and rellow to the front; ribbonand tiny black and red microphone cable to the back.
See that thing that looks like an AA battery? That is actually a very large capacitor to charge theflash to high voltage. Do not go near it with any metal object. Do not touch the two leads at thebottom. It can give you a very serious shock, even without the battery installed!
Canon EOS Rebel T2i Top Cover Replacement Draft: 2013-10-15Guide ID: 15005 -
This document was generated on 2019-09-17 11:56:05 PM (MST).
© iFixit — CC BY-NC-SA www.iFixit.com Page 9 of 15

Step 8
As you seat the cover, note that there are 5 cables dangling from the new part.
A pair of wires with a red connector and dark wire.
A pair of wires with a yellow connector, one yellow, one white.
A tiny red and black wire with a white connector.
A gold ribbon cable with flat square connector.
In my case, I did not notice the black wire until I removed it. I believe it is the ground wire for hotshoe devices. It slots into a tiny space on the top of the camera, in front of the circuit board.
Bend the wire to match the old one, as mine was straight and difficult to manage.
Use a tweezers to slide the wire into the white connector slot on the board.
Canon EOS Rebel T2i Top Cover Replacement Draft: 2013-10-15Guide ID: 15005 -
This document was generated on 2019-09-17 11:56:05 PM (MST).
© iFixit — CC BY-NC-SA www.iFixit.com Page 10 of 15

Step 9
Reattach the ribbon cable to the connector on the main circuit board.
Reattach the red and black microphone cable to the board.
Step 10
Gently place the back onto thecamera as you removed it. Squeezedown gently but firmly until top coverand back are in place and screwholes are aligned.
Canon EOS Rebel T2i Top Cover Replacement Draft: 2013-10-15Guide ID: 15005 -
This document was generated on 2019-09-17 11:56:05 PM (MST).
© iFixit — CC BY-NC-SA www.iFixit.com Page 11 of 15

Step 11
Reattach the red and yellowconnectors on the front of thecamera. Be sure to route the cablesso they cannot interfere with thefront cover when replaced.
Step 12
Put the rubber connection door onto the connector plate and set them in place.
Replace both screws to attach the plate.
Canon EOS Rebel T2i Top Cover Replacement Draft: 2013-10-15Guide ID: 15005 -
This document was generated on 2019-09-17 11:56:05 PM (MST).
© iFixit — CC BY-NC-SA www.iFixit.com Page 12 of 15

Step 13
Replace front cover of camera.
Be sure that all components are aligned, such as infrared receiver and AF assist lamp.
Canon EOS Rebel T2i Top Cover Replacement Draft: 2013-10-15Guide ID: 15005 -
This document was generated on 2019-09-17 11:56:05 PM (MST).
© iFixit — CC BY-NC-SA www.iFixit.com Page 13 of 15
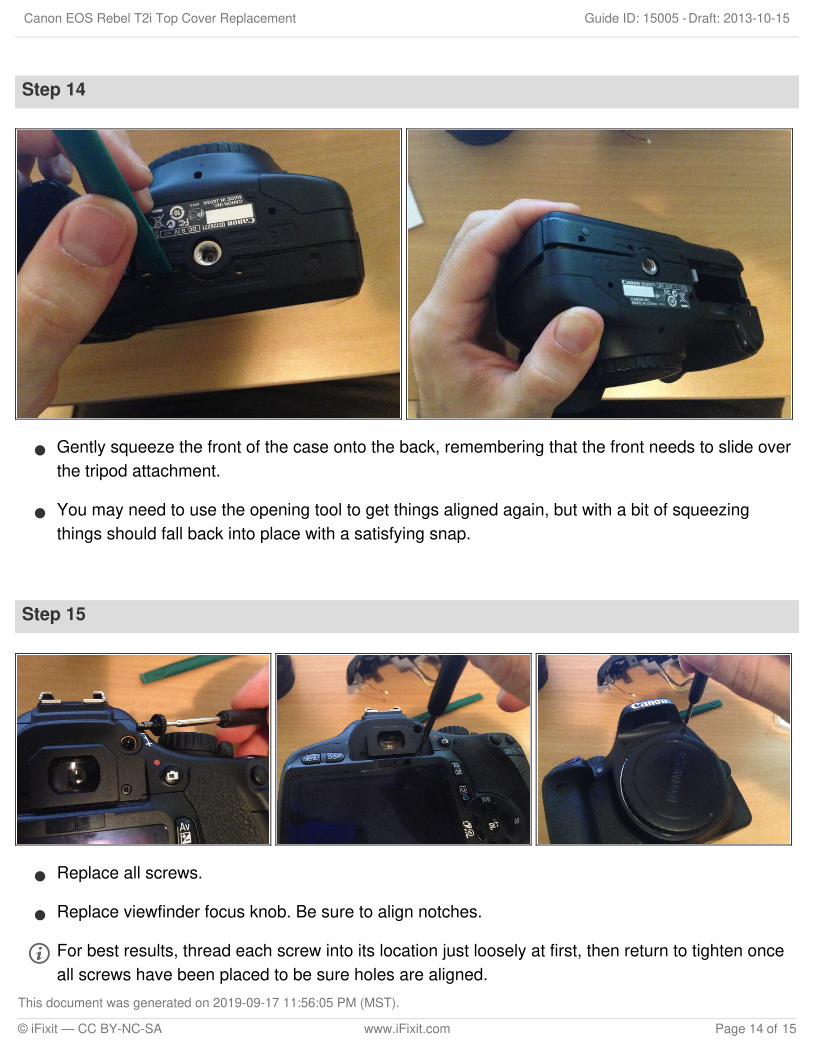
Step 14
Gently squeeze the front of the case onto the back, remembering that the front needs to slide overthe tripod attachment.
You may need to use the opening tool to get things aligned again, but with a bit of squeezingthings should fall back into place with a satisfying snap.
Step 15
Replace all screws.
Replace viewfinder focus knob. Be sure to align notches.
For best results, thread each screw into its location just loosely at first, then return to tighten onceall screws have been placed to be sure holes are aligned.
Canon EOS Rebel T2i Top Cover Replacement Draft: 2013-10-15Guide ID: 15005 -
This document was generated on 2019-09-17 11:56:05 PM (MST).
© iFixit — CC BY-NC-SA www.iFixit.com Page 14 of 15

To reassemble your device, follow these instructions in reverse order.
Step 16
Replace eyepiece, battery and lens.
Test camera.
You're done!
Canon EOS Rebel T2i Top Cover Replacement Draft: 2013-10-15Guide ID: 15005 -
This document was generated on 2019-09-17 11:56:05 PM (MST).
© iFixit — CC BY-NC-SA www.iFixit.com Page 15 of 15