canon dslr the ultimate photographer's guide
DESCRIPTION
ÂTRANSCRIPT


Canon DSLR
Digital Photography Workflow
Prelims-K52040.indd iPrelims-K52040.indd i 8/9/07 3:48:18 PM8/9/07 3:48:18 PM

The Digital Workfl ow series from Focal Press
The Digital Workfl ow series off ers clear, highly illustrated, in-depth, practical guides to each part of the digital workfl ow process. They help photographers and digital image makers to work faster, work smarter, and create great images. The focus is on what the working photographer and digital image maker actually need to know to get the job done.
This series is answering readers’ calls to create books that off er clear, no-nonsense advice, with lots of explanatory images, but don’t stint on explaining why a certain approach is suggested. The authors in this series – all professional photographers and image makers – look at the context in which you are working – whether you are a wedding photographer shooting 1000s of jpegs a week or a fi ne artist working on a single Raw fi le.
The huge explosion in the amount of tools available to photographers and digital image makers – as new cameras and software arrives on the market – has made choosing and using equipment an exciting, but risk-fi lled venture. The Digital Workfl ow series helps you fi nd a path through digital workfl ow, tailored just for you.
Series editor: Richard Earney
Richard Earney is an award-winning Graphic Designer for Print and Web Design and Coding. He is a beta tester for Adobe Photoshop, a consultant for Photoshop Lightroom, on the Apple Developers program and is an expert on Digital Workfl ow. He has been a keen photographer for over 30 years and is a Licentiate of the Royal Photographic Society. He can be found at http://www.method-photo.co.uk
Forthcoming titles in the series
Mac OSX for Photographers
File Management for Photographers
Prelims-K52040.indd iiPrelims-K52040.indd ii 8/9/07 3:48:20 PM8/9/07 3:48:20 PM

Digital Photography Workflow
CANON DSLRThe Ultimate Photographer’s Guide
Christopher Grey
Amsterdam • Boston • Heidelberg • London • New York
Oxford • Paris • San Diego • San Francisco • Singapore
Sydney • Tokyo
Focal Press is an imprint of Elsevier
Prelims-K52040.indd iiiPrelims-K52040.indd iii 8/9/07 3:48:20 PM8/9/07 3:48:20 PM

Focal Press is an imprint of ElsevierLinacre House, Jordan Hill, Oxford OX2 8DP, UK30 Corporate Drive, Suite 400, Burlington, MA 01803, USA
First published 2008
Copyright © 2008, Christopher Grey. Published by Elsevier Ltd. All rights reserved
The right of Christopher Grey to be identifi ed as the author of this work has been asserted in accordance with the Copyright, Designs and Patents Act 1988
No part of this publication may be reproduced, stored in a retrieval system or transmitted in any form or by any means electronic, mechanical, photocopying, recording or otherwise without the prior written permission of the publisher
Permissions may be sought directly from Elsevier’s Science & Technology Rights Department in Oxford, UK; phone: (�44) (0) 1865 843830; fax: (�44) (0) 1865 853333; e-mail: [email protected]. Alternatively you can submit your request online by visiting the Elsevier web site at http://elsevier.com/locate/permissions, and selecting Obtaining permission to use Elsevier material
NoticeNo responsibility is assumed by the publisher for any injury and/or damage to persons or property as a matter of products liability, negligence or otherwise, or from any use or operation of any methods, products, instructions or ideas contained in the material herein. Because of rapid advances in the medical sciences, in particular, independent verifi cation of diagnoses and drug dosages should be made
British Library Cataloguing in Publication DataGrey, ChristopherCanon DSLR: the ultimate photographer’s guide. – (Digitalphotography workfl ow)1. Canon digital camerasI. Title771.3�3
Library of Congress Number: 2007933397
ISBN: 978-0-240-52040-7
For information on all Focal Press publicationsvisit our website at www.focalpress.com
Typeset by Charon Tec Ltd (A Macmillan Company), Chennai, Indiawww.charontec.com
Printed and bound in Canada
07 08 09 10 11 11 10 9 8 7 6 5 4 3 2 1
Prelims-K52040.indd ivPrelims-K52040.indd iv 8/9/07 3:48:21 PM8/9/07 3:48:21 PM

v
Introduction .............................................................................. vii
Acknowledgments ..................................................................... ix
Chapter 1 The Basics .................................................................. 3
Aperture and Depth of Field ...................................................................3
Shutter Speed ..............................................................................................7
Reciprocity ................................................................................................. 10
Resolution and Compression .............................................................. 14
Quick Start .................................................................................................. 17
Chapter 2 Workfl ow ................................................................. 23
Successful Workfl ow ............................................................................... 23
Paul Gero .................................................................................................... 31
Chapter 3 The Cameras ........................................................... 39
Digital Rebel XTi ....................................................................................... 39
EOS 30D ...................................................................................................... 42
EOS 5D ......................................................................................................... 45
EOS 1D Mark II N, 1Ds Mark II .............................................................. 47
The Incredible Canon 1D Mark III ....................................................... 50
Chapter 4 Common Ground .................................................... 65
Wise and Thoughtful Features ............................................................ 65
Rod Evans .................................................................................................... 94
Chapter 5 The Zones ..............................................................101
Basic Zone ................................................................................................101
The Creative Zone .................................................................................114
David Bicho ...............................................................................................120
Chapter 6 Focus, Exposure, and Style ..................................127
Working with External Light Meters ...............................................127
Picture Styles ...........................................................................................132
Color Temperature ................................................................................148
Perfect Focus and Exposure ...............................................................151
Paul Hartley ..............................................................................................175
CONTENTS
Prelims-K52040.indd vPrelims-K52040.indd v 8/9/07 3:48:22 PM8/9/07 3:48:22 PM

vi
Contents
Chapter 7 The Glass ...............................................................183
Lenses ........................................................................................................183
Chapter 8 Flash ......................................................................205
Watt? Me Worry? ....................................................................................205
Chapter 9 Digital Photo Professional ...................................239
Maximizing the Digital Negative .....................................................239
Chapter 10 Canon Gallery .....................................................265
Canon Around the World ....................................................................265
Index ........................................................................................287
Prelims-K52040.indd viPrelims-K52040.indd vi 8/9/07 3:48:23 PM8/9/07 3:48:23 PM

vii
Welcome. The fact that you’re reading this book means you’ve
either just bought a Canon camera and want more information
than the instruction book can give you (no surprise there) or that
you’re thinking of getting into the system and want to know more
about it.
As a professional photographer with a couple of million frames
under his belt, my decision to give up another manufacturer’s
system for Canon was not one that was undertaken lightly. Well,
actually, it was. I tried Canon’s D30 some years ago and knew I was
holding my future in my hands. I put my name in the hopper for
a D60, moved from there to the 1Ds, and have been progressing
ever since.
I’ve never regretted that decision.
In my opinion, Canon made a quantum leap for photography,
both mechanically but more importantly, philosophically,
producing the best, most intuitive, and easiest to use equipment
ever. That said, no digital equipment is “easy.” Yes, you can make a
nice image (pretty much right out of the box, but also right down
the middle of the road) in Full Auto or Program, but what’s the
point if you don’t understand the subtleties?
If you haven’t done so already, you’re about to make a major
fi nancial investment in your photographic future. Canon’s gear is
the best this planet has ever seen – that’s my opinion, but it’s the
opinion of a professional who makes his living from photography,
and also someone who’s made a substantial investment in his
equipment. I want, and need, the very best, and I demand a lot
from it.
Let me help you get the most out of yours.
Christopher Grey
INTRODUCTION
Prelims-K52040.indd viiPrelims-K52040.indd vii 8/9/07 3:48:23 PM8/9/07 3:48:23 PM

This page intentionally left blank

ix
Many, many people volunteered their time and talent to make
this project a reality, and I wish to thank each and every one of
them. I spent many hours interviewing a very selected group of
photographers with amazing talents and a fi rm grasp on their
business niche. These shooters were very forthcoming about
their history, workfl ow, even the professional “secrets” that have
contributed to their success. I thanked each of them personally,
but this is the place to formally thank David Bicho, Rod Evans, Paul
Gero, Paul Hartley, and Gerry Kopelow for being so open with me
about their professional lives.
One nice benefi t of a project like this is that I got to work with
some extremely nice people who were willing to put up with
me checking my notes and making abrupt changes in the
middle of the shoot or making numerous wardrobe changes
to accommodate the shoot schedule. The list is long, but each
should know that their contribution was worth every minute of
their time. A big Thank You to Miki Adachi, Kimberly Anderson
(makeup artist), Denise Armstead, Tristy Auger, Sandra Avelli
(makeup artist), Lola Bel Aire, Tiffi ny Carlson, Mike Dorfman,
Stephanie Fellner, Bill Foster, Marc Foster, Gerry Girouard, Tammy
Goldsworthy, Molly Grace, Elizabeth Grey, Jennifer Haldeman,
Grace Harrod, Arika Inugami, Jennifer Lauren, Jessica Madson,
Hayley Malone, Devonair Mathis, Kurt Melancon, Zoran Mojsilov,
Julie Nielson, Jeremy Norred, Ingrid Nurse, Juris Plesums, Jennifer
Rocha, Sahata, Katie, Lilly, Joe and Nora Thomey, Alissa Tousignant,
Reuben Van Hemert, Liliane Vangay, Pistol Vegas, Keith Williams,
and Justin Zitzer. I couldn’t have done this without you.
Canon extended its cooperation for this project, for which I thank
Joe DeLora and Brian Matsumoto for their personal help. Beyond
that, I wish to give my deepest thanks to Elizabeth Pratt, a Canon
Professional Market Representative who was also my Technical
Editor for this book. If you’ve ever had the pleasure of meeting
Elizabeth, you’ve met not only a warm and charming woman,
you’ve met one of the most knowledgeable Canon reps ever. To
my delight, she’s become a great friend, and I couldn’t have done
this without her, either.
A fi nal note from the Pit of Doom: Thank you, Susan!
ACKNOWLEDGMENTS
Prelims-K52040.indd ixPrelims-K52040.indd ix 8/9/07 3:48:23 PM8/9/07 3:48:23 PM

Ch01-K52040.indd 2Ch01-K52040.indd 2 8/9/07 3:50:48 PM8/9/07 3:50:48 PM
3
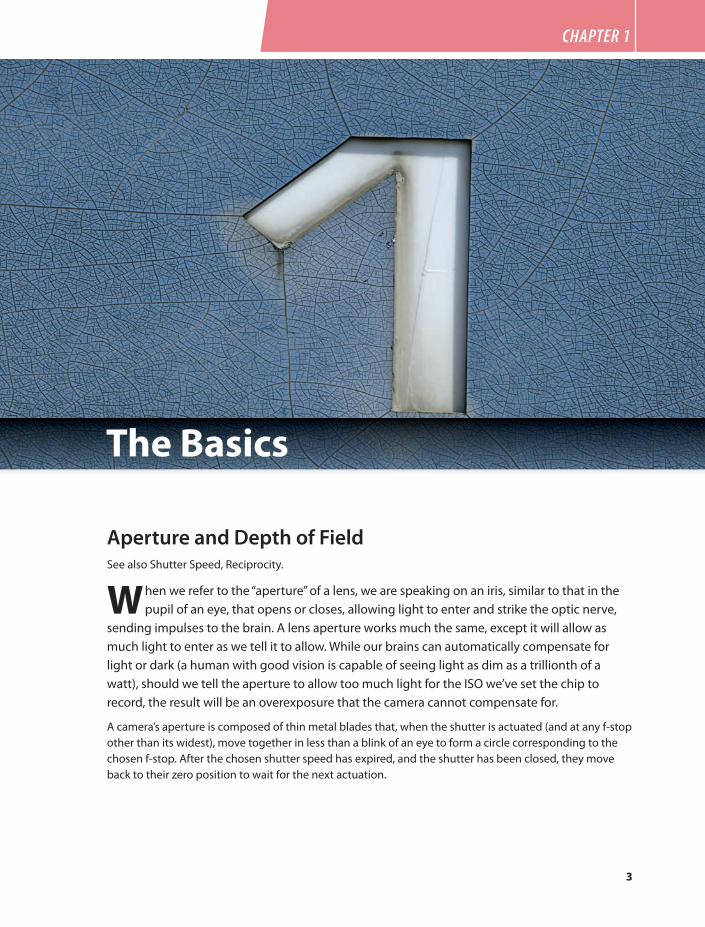
CHAPTER 1
The Basics
Aperture and Depth of FieldSee also Shutter Speed, Reciprocity.
When we refer to the “aperture” of a lens, we are speaking on an iris, similar to that in the
pupil of an eye, that opens or closes, allowing light to enter and strike the optic nerve,
sending impulses to the brain. A lens aperture works much the same, except it will allow as
much light to enter as we tell it to allow. While our brains can automatically compensate for
light or dark (a human with good vision is capable of seeing light as dim as a trillionth of a
watt), should we tell the aperture to allow too much light for the ISO we’ve set the chip to
record, the result will be an overexposure that the camera cannot compensate for.
A camera’s aperture is composed of thin metal blades that, when the shutter is actuated (and at any f-stop
other than its widest), move together in less than a blink of an eye to form a circle corresponding to the
chosen f-stop. After the chosen shutter speed has expired, and the shutter has been closed, they move
back to their zero position to wait for the next actuation.
Ch01-K52040.indd 3Ch01-K52040.indd 3 8/9/07 3:50:58 PM8/9/07 3:50:58 PM

4
Canon DSLR: The Ultimate Photographer’s Guide
Unlike older irises, which were assembled by hand, Canon’s are created
and assembled robotically, in a super-clean, in-house environment,
assuring a quality of design, construction, and control.
Throughout this book, you’ll see references to “opening up” or “stopping
down” your lens. When a lens is opened up, the iris is enlarged, allowing
more light to strike the sensor. But, as with so many mysteries of life, things
work in reverse; opening up a lens means changing its value to a smaller
number. Lenses are rated at their maximum, or fastest, f-stop, thus a lens
with a maximum aperture of f1.2 is faster (will gather more light at its
maximum aperture) than a lens with a maximum aperture of f2.8. When we
shoot “wide open” it means we’re shooting at the lens’ maximum aperture.
When we stop down a lens, the result is that less light will strike the sensor,
because we change the f-stop to a smaller number. f22, for example, allows
less light to reach the sensor than f16 because the circle is smaller.
Mathematically, when the aperture is “opened up” one full stop, the
amount of light reaching the chip is doubled. For example, changing the
aperture from f11 to f8 will double the amount of light falling on the chip
and result in a one stop overexposure, assuming that f11 would provide a
correct exposure.
When the aperture is “stopped down” one full stop the amount of light
reaching the chip is cut in half. For example, changing the aperture from
f11 to f16, assuming that f11 would provide a correct exposure, will result
in an image underexposed by one stop (FIGS 1.1–1.3).
FIG 1.1 1/200 second, f8. Image is 1 stop
overexposed
Ch01-K52040.indd 4Ch01-K52040.indd 4 8/9/07 3:51:03 PM8/9/07 3:51:03 PM

5
The Basics
FIG 1.2 1/200 second, f11. Image is
correctly exposed
FIG 1.3 1/200 second, f16. Image is 1 stop
underexposed
Ch01-K52040.indd 5Ch01-K52040.indd 5 8/9/07 3:51:04 PM8/9/07 3:51:04 PM

6
Canon DSLR: The Ultimate Photographer’s Guide
FIG 1.5 At f2.8, the shutter speed is high enough to freeze any movement, and the background is so soft
that the subject stands out nicely
FIG 1.4 At f22 the background is too confusing to make sense out of this close up, while a slight breeze was
enough to blur the subject
The area in front of and in back of the point of focus that appears sharp
to our eyes is the image’s depth of fi eld. Stopping down the lens will
increase this area of apparent sharp focus while opening up the lens
will diminish it. The closer you are to your subject, and with an opened
aperture, the less depth of fi eld. This is useful to isolate a subject against
an otherwise cluttered or distracting background (FIGS 1.4 and 1.5).
Ch01-K52040.indd 6Ch01-K52040.indd 6 8/9/07 3:51:06 PM8/9/07 3:51:06 PM

7
The Basics
Shutter SpeedSee also Aperture, Depth of Field, and Reciprocity.
The amount of time a shutter remains open to allow light to strike the
camera’s sensor is the camera’s “shutter speed.” A shorter time duration
(aka “faster”) means more action can be stopped, or frozen. Conversely,
slower shutter speeds (a.k.a. “longer”) allows action to blur. Under many
circumstances, longer shutter speeds will necessitate smaller apertures,
increasing depth of fi eld (FIGS 1.6 and 1.7).
FIG 1.6 A very fast shutter speed of
1/1000th second (at f6.3) was fast enough
to freeze the rapidly moving water
FIG 1.7 With the help of neutral density
fi lters, a shutter speed of 6/10th second (at
f22) was slow enough to gracefully blur the
roiling water
Ch01-K52040.indd 7Ch01-K52040.indd 7 8/9/07 3:51:08 PM8/9/07 3:51:08 PM

8
Canon DSLR: The Ultimate Photographer’s Guide
When a shutter speed actuation is made slower (by the shutter’s
equivalent of a full stop), the amount of time that light plays on
the chip is doubled. Changing the shutter speed in such a manner
without correspondingly adjusting the aperture will result in an image
overexposed by one stop.
When a shutter speed actuation is made faster (by the shutter’s
equivalent of a full stop), the amount of time that light plays on the
chip is halved. Changing the shutter speed in this manner without a
corresponding change in f-stop will yield an image underexposed by one
stop (FIGS 1.8–1.10).
Canon cameras off er a range of shutter speeds from 30 seconds to
1/4000th of a second (on the Rebel) to a maximum of 1/8000 (on other
models). All cameras have provision for Bulb exposures, where the shutter
stays open as long as it’s depressed. Custom Function (C.Fn) 6 (on most
cameras) permits you to choose intermittent shutter speed increments in
½ stops (camera default is 1/3 stop increments).
FIG 1.8 One stop overexposed
Ch01-K52040.indd 8Ch01-K52040.indd 8 8/9/07 3:51:11 PM8/9/07 3:51:11 PM

9
The Basics
FIG 1.10 One stop underexposed
FIG 1.9 Correct exposure
Ch01-K52040.indd 9Ch01-K52040.indd 9 8/9/07 3:51:12 PM8/9/07 3:51:12 PM

10
Canon DSLR: The Ultimate Photographer’s Guide
ReciprocityReciprocity is the rule that states that if, beginning with the correct
shutter/aperture combination to yield a perfect exposure, the shutter
speed is adjusted in one direction (faster, for example) and the aperture
is adjusted correspondingly in the opposite direction (opened up, for this
example), the exposure will be the same.
Let’s say a correct exposure for an image is 1/125 at f8. Charting all
equivalent shutter speed/f-stop combinations would look like this:
1/15 1/30 1/60 1/125 1/250 1/500 1/1000
f22 f16 f11 f8 f5.6 f4 f2.8
Each combination would yield the same correct exposure. What would
change would be the amount of blur in a moving subject (or moving
photographer) as the shutter speeds got longer, or the amount of depth
of fi eld in the image as the aperture became progressively smaller.
Note that this is a constant rule only when the light source itself is
constant. Sunlight and most available light is “constant” in that it
doesn’t change over the course of the exposure. Fluorescent lights
are not considered “constant” because they fl icker on and off 60 times
per second. Studio strobes and on camera fl ash units are not constant
sources of light because they fi re and expire somewhere between the
time the shutter actually opens and closes, so the amount of light they
produce may be fi gured into the equation (like fi ll fl ash) and used to
advantage to either supplement existing light or overpower it.
Back in the days of fi lm, most of us were trained to think in terms of whole
stops and half-stops. In other words, I might have told my assistant to “get
me 11 and a half” if I wanted a little more light. Canon’s EF Series of lenses,
designed for the EOS camera family, easily work in thirds of stops, much
more accurate for the touchy digital environment. Similarly, digital cameras
have added additional shutter speeds to refl ect the additional aperture
settings. An expanded version of the reciprocity scale looks like this:
Shutter speed 1/15 1/20 1/25 1/30 1/40 1/50 1/60 1/80 1/100
Aperture f22 f20 f18 f16 f14 f13 f11 f10 f9
Shutter speed 1/125 1/160 1/200 1/250 1/320 1/400 1/500 1/640 1/800 1/1000
Aperture f8 f7.1 f6.3 f5.6 f5 f4.5 f4 f3.5 f3.2 f2.8
Should you decide to set your camera to work in half-stop
increments, here’s how the reciprocity scale would work for the same
Ch01-K52040.indd 10Ch01-K52040.indd 10 8/9/07 3:51:15 PM8/9/07 3:51:15 PM

11
The Basics
Shutter speed 1/15 1/20 1/30 1/45 1/60 1/90 1/125 1/180 1/250 1/350 1/500 1/750 1/1000
Aperture f22 f19 f16 f13 f11 f9.5 f8 f6.7 f5.6 f4.5 f4 f3.5 f2.8
FIG 1.11 1/800, f2.8
FIG 1.12 1/400, f4
These are not complete scales, of course. There are lenses with a
maximum aperture greater than f2.8 and there are lenses that stop down
below f22, but the principle remains the same and can easily be charted
for whatever lenses you may own.
Notice, as you look through these images, how depth of fi eld increases as
apertures get smaller (FIGS 1.11–1.17).
1/125 at f8 exposure:
Ch01-K52040.indd 11Ch01-K52040.indd 11 8/9/07 3:51:15 PM8/9/07 3:51:15 PM

12
Canon DSLR: The Ultimate Photographer’s Guide
FIG 1.13 1/200, f5.6
FIG 1.14 1/100, f8
FIG 1.15 1/50, f11
Ch01-K52040.indd 12Ch01-K52040.indd 12 8/9/07 3:51:18 PM8/9/07 3:51:18 PM

13
The Basics
FIG 1.16 1/25, f16
FIG 1.17 1/13, f22
Ch01-K52040.indd 13Ch01-K52040.indd 13 8/9/07 3:51:22 PM8/9/07 3:51:22 PM

14
Canon DSLR: The Ultimate Photographer’s Guide
Resolution and CompressionThe reproduction quality of any image is ultimately tied to the number of
pixels that comprise that image. Pixels, shorthand for “picture elements,”
are present in the millions in all of Canon’s cameras, even their amateur
snapshot cameras, as it takes a million pixels to equal 1 megapixel. Thus,
a 16 megapixel sensor contains 16 million picture elements, and each
element, electrically charged to receive and process information from
the light that strikes it, becomes 1/16,000,000th of the fi nal image. The
number of pixels that make up an image is the resolution of the image.
Logic would dictate that, the more pixels in an image, the more
information (and the higher degree of enlargement) in that image. That’s
true, but only to a degree.
Image quality is also dependent on the size of the chip that receives the
image. A 10 megapixel CMOS sensor in a Rebel, for example, is smaller in
physical size than a 10 megapixel sensor in a 1D Mark III. Larger sensors
mean larger pixels, which equates to better light gathering capability and
cleaner images, so even though the Rebel has the same number of pixels,
images from the larger sensor will appear to be sharper, with less noise
and more latitude for enlargement (FIG 1.18).
FIG 1.18 Comparative sizes and
conversion factors of CMOS sensors
Ch01-K52040.indd 14Ch01-K52040.indd 14 8/9/07 3:51:24 PM8/9/07 3:51:24 PM

15
The Basics
After chip size and resolution, the degree of image compression factors
into the quality of the fi nal reproduction. When you look at the resolution
settings in the menu of a Canon prosumer camera or Digital Rebel, you
will see Large (L), Medium (M), and Small (S) jpeg, plus RAW by itself and
a RAW combination that will take a RAW fi le plus a Large, Medium, or
Small jpeg at the same time. The 1D Mark III even has a Small RAW (sRAW)
choice.
The Large jpeg setting will use all of the pixels on the sensor to create the
image, while the Medium setting uses fewer pixels and the Small jpeg
choice creates an even lower resolution image. You also have a choice
of how that jpeg fi le is compressed. Compression doesn’t aff ect the
number of pixels used to make up the image, but how that information is
remembered and stored.
Here’s one way to visualize what jpeg compression does. Let’s say we’ve
chosen to shoot Large resolution jpegs. When an image is compressed into
a jpeg, the processor looks at pixels and their neighbors. If a neighboring
pixel is only slightly diff erent than the inspected pixel, the neighbor
is remembered by the processor as the same color. If the degree of
compression is low, pixels that may be only slightly diff erent than their
neighbors are remembered by the processor as being diff erent and the
result is a Large fi le. If the degree of compression is high, as many pixels as
possible are lumped together as the same color, tossing out some detailed
information in the name of saving space. The result of high compression is
a fi le that takes up less room on your hard drive or your memory card but
may not have the same smooth colors and gradations as a less compressed
fi le. The resolution (or number of pixels) of the fi le is still the same whether
you choose a Large jpeg with low compression or with high compression.
You see, the jpeg fi le format, as convenient as it is, is what’s known
as a “lossy” format. The subtle color variation that was there before
compression between some of the pixels is gone forever. The same thing
happens when the image is recompressed in a program like Photoshop.
After a certain number of compressions/decompressions, the image
develops “artifacts,” areas of color that look chunky because the pixels
are not transitioning color or tone correctly. Artifacts are most likely to
form around areas of sharp focus against a plain background, such as this
chain against a bright sky. Once they form there’s nothing that can be
done about them, but they’re much less likely to be visible in Large fi les
with low compression (FIGS 1.19 and 1.20).
Does this mean that jpegs are a bad format? Not at all. Jpegs are a fi ne
format, suitable for almost everything, provided you understand their
operation and limitations. Working with jpegs can be a viable part of your
workfl ow, actually saving you lots of time.
Ch01-K52040.indd 15Ch01-K52040.indd 15 8/9/07 3:51:25 PM8/9/07 3:51:25 PM

16
Canon DSLR: The Ultimate Photographer’s Guide
FIG 1.19 This Small fi le, high compression jpeg was only
opened once
Personally, I believe you should always shoot at a level higher than you’ll
need. If you are just going to shoot snapshots, with maybe an occasional
8 � 10, I’d recommend you shoot Large (Normal). The number of images
you can fi t onto a card is double that of Large (High) fi les yet will yield
high quality prints. With an 8 megapixel camera, that works out to over
500 shots on a 1 gigabyte card.
Pros should always shoot Large (High) or RAW to get the most out the fi les.
On the other hand, should you want the versatility of RAW but need a
quick reference for an image catalog, you might want to shoot RAW �
Small (Normal). It will be easy to use the Small jpegs in Canon’s Image
Browser or other programs such as iView Media or iPhoto. Use the
catalog of jpegs for reference, then process the images you like from the
RAW fi les. If you’re worried about losing important data to artifacts (you
shouldn’t be) process those images as Tiff s, a lossless format.
The important thing to understand is how compression aff ects your
picture quality. As always, I suggest you test your equipment to
determine what makes you happy. Large or not so large, Canon’s CMOS
sensor technology allows for exceptionally clean data.
FIG 1.20 This Small fi le, high compression jpeg required more
than a dozen cycles before artifacts became problematic
Storage cards are cheap. If you’re shooting
something important, like a vacation, be
sure to have enough cards to cover the trip.
If you take a laptop with you, and your
machine is capable of burning CDs or DVDs,
it’s good insurance to burn your fi les to
duplicate discs. Save one with your luggage
and mail the other to your home or offi ce. If
your laptop, camera, or luggage is stolen or
lost you’ll still have your pictures.
In other words, don’t re-format your
storage cards until you’re sure your images
are safely backed up.
Yeah, I know. Paranoia is my middle name.
Ch01-K52040.indd 16Ch01-K52040.indd 16 8/9/07 3:51:26 PM8/9/07 3:51:26 PM

17
The Basics
Quick StartOkay, so you’ve got your new camera and lens, and you’re champing
at the bit to take a picture. Now, I’m the last guy on Earth who’ll tell
you not to read the instruction manual; today’s cameras have so many
sophisticated controls and systems that you’ll actually be doing yourself
a disfavor if you decide to rely only on what you know about fi lm camera
operation. Still, I remember my own excitement when I opened the box
of my fi rst Canon DSLR, the D60, and how anxious I was to “lock and load”
so I won’t yell at you if you just can’t wait.
So, for those of you who just can’t wait, here are ten simple steps to get
your fi rst pictures:
1. Insert the battery. Canon batteries are shipped with a slight charge,
which may be enough to get you going, but you should charge the
battery to a full charge fi rst. Battery style and type varies between some
models, and you need to consult your manual for the proper procedure
to maintain the battery in peak performance. Some batteries, like the
NP-E3 nickel metal hydride (NiMH), should be charged, refreshed, and
recharged several times before actual camera use. This procedure,
known as “shaping” or “forming,” imprints a kind of behavior pattern on
the battery, allowing it to perform as it was designed and at its best.
When you insert a battery into an EOS-1 camera body, you’ll feel a
slight resistance as you push the battery into the chamber and use
the thumb-turn lock to latch it into place. Canon EOS-1 pro bodies
have been sealed against mild inclement weather and dust. The
resistance you feel is the rubber gasket seal that protects the battery
compartment from the elements (FIG 1.21).
Battery Life and Health
Rechargeable batteries will deteriorate
over time. After periods of continuous use,
they are unable to deliver a full charge,
which means that the maximum number
of images you may have been used to will
decline. For the consumer and prosumer
cameras, the batteries are small and
relatively inexpensive. Replacing a battery
doesn’t mean you have to recycle the old
one, it just means you have a backup. If
you’re a casual shooter, it may be years
before you notice the loss of power, and
you may never have to replace the battery
before you replace the camera.
Pro shooters, especially those who work
on location and away from AC power
should buy at least one backup battery
immediately. Many of the cameras at
the high end of Canon’s camera list, the
machines use NiMH batteries, which are
also prone to loss of power due to overuse.
NiMH chargers come with a “Refresh”
button that should be used before the
camera is put into use and periodically
thereafter. Selecting Refresh will drain the
battery to zero charge before charging back
to 100%, which guarantees the battery
will perform its very best (FIG 1.22).
Canon’s newest battery, the LP-E4
(lithium-ion) type, is an improvement
found on the Mark III. Weighing about
a half pound less than its NP-E3 (NiMH)
counterpart, it delivers roughly twice the
shooting power without the same need
for the “shaping” or “forming” that NiMH
batteries require for best performance. It’s
a signifi cant benefi t, and signals continued
changes as Canon rotates improvements
through its product line.
FIG 1.21
Ch01-K52040.indd 17Ch01-K52040.indd 17 8/9/07 3:51:28 PM8/9/07 3:51:28 PM

18
Canon DSLR: The Ultimate Photographer’s Guide
2. Attach the lens. Align the large red dot on the lens with the red
dot on the lens mount of the camera body. Insert the lens and turn
clockwise until the lens locks into place (about 1/8th of a full turn).
If you have an EF-S lens, specifi cally designed for the recent digital
cameras with the APS-C size sensor, you will align the white
square on the lens with the white square on the lens mount
(FIGS 1.23 and 1.24).
FIG 1.22
FIG 1.23
Ch01-K52040.indd 18Ch01-K52040.indd 18 8/9/07 3:51:29 PM8/9/07 3:51:29 PM

19
The Basics
3. Set the Focus Mode switch on the lens to AF (Auto Focus) (FIG 1.25).
4. Insert a Compact Flash (CF) or Secure Digital (SD) card. Most Canon
cameras only accept the CF card format, although a few will accept
one of each. In that case, each card can be used separately or set up
for one card to write Raw fi les while the other writes jpegs (FIG 1.26).
5. Turn the camera’s power switch on (FIG 1.27).
6. Take a moment and Format your CF or SD card(s). Formatting prepares
the card for use in the camera, and you’ll risk image loss or corruption
if you just pop it in and start shooting. See “Common Ground” on
page 65 for more information.
FIG 1.24
FIG 1.25
Ch01-K52040.indd 19Ch01-K52040.indd 19 8/9/07 3:51:31 PM8/9/07 3:51:31 PM

20
Canon DSLR: The Ultimate Photographer’s Guide
7. Set the Mode Dial to Full Auto (in the Basic Zone) or Program (in the
Creative Zone). Doing so will allow the camera to automatically make
all choices and decisions regarding focus point, exposure, and white
balance.
8. Frame your image by moving into or out of the frame, or by using a
zoom lens to get closer or further away. Depress the shutter halfway
down to engage the AF mechanism (FIGS 1.28 and 1.29).
9. Depress the shutter button the rest of the way to take the picture.
10. Review the image on the camera’s LCD screen. Although it’s not
accurate enough for critical assessment, the camera’s LCD screen
will tell you if you’re “in the ballpark” regarding composition and
exposure. The image has also been written to the CF or SD card, just
waiting for you to download and print (FIG 1.30).
FIG 1.26
FIG 1.27
After just a few days with your gear
you’ll realize that Canon’s processors are
the best in the business, and even those
images made under Full Auto or Program
will almost always be printable without
additional work in image manipulation
software like Photoshop. Once you realize
this, you’ll be able to resist the urge to
“chimp” your shots, automatically looking
at the LCD to check it after each shot.
“Chimping” is a term, meant only in fun, for
digital novices (and pros, too!) who look
down at the LCD after each shot and then
say “Oooh! Oooh!” as the screen lights up.
Ch01-K52040.indd 20Ch01-K52040.indd 20 8/9/07 3:51:33 PM8/9/07 3:51:33 PM

21
The Basics
FIG 1.28
FIG 1.29
FIG 1.30
Ch01-K52040.indd 21Ch01-K52040.indd 21 8/9/07 3:51:35 PM8/9/07 3:51:35 PM

Ch02-K52040.indd 22Ch02-K52040.indd 22 8/9/07 6:40:59 PM8/9/07 6:40:59 PM

23
CHAPTER 2
Workfl ow
Successful Workfl ow
There are monthly articles in almost every photography-related magazine, lectures given
by experts in or near your fair city several times a year, and a never-ending stream of tips,
ideas or just plain hearsay from store clerks and friends regarding just exactly what proper
workfl ow is and how to accomplish it. For all the discussion, it’s a very diffi cult subject to pin
down because of one simple truth: workfl ow is a little diff erent for everyone.
Beginning here, we’ll take a hard look at workfl ow and how understanding the Canon system
can lead you to make the right workfl ow choices to maximize your production time and
minimize any necessary post-production. The idea is to get from Point A (the shoot) to Point B
(completion and delivery) with a great product and the least expenditure of time.
Proper workfl ow begins at the camera, and there are some choices you need to make before
you take your fi rst picture.
Ch02-K52040.indd 23Ch02-K52040.indd 23 8/9/07 6:41:16 PM8/9/07 6:41:16 PM

24
Canon DSLR: The Ultimate Photographer’s Guide
Color Space: Adobe RGB vs. sRGB
Prior to beginning a job, it’s necessary to think of the end result. Will the
images be published on a mechanical press, like this book, or will they be
printed through a desktop printer or by a commercial lab? The end result
may dictate your choice of Color Space.
Adobe RGB (1998), is an industry standard and off ers a very wide range
of reproducible colors and shades, the “gamut” of that color space, and
is similar to the reproduction range of fi lm stock. When an image is
prepared for mechanical reproduction, such as this book, each image is
separated into its complimentary opposites; red becomes cyan, green
becomes magenta, and blue becomes yellow. This reproduction color
space, called CMYK (cyan, magenta, yellow, and “key” or black) represents
the smallest gamut, allowing for the proper reproduction of roughly
one-half of the colors present in a full-gamut RGB image. See “Common
Ground” on page 65 for more information (FIG 2.1).
It stands to reason that in order to get the maximum reproduction quality
from an image that one would need to start with the color space that
would present the largest selection of colors and shades, which is Adobe
RGB. But, is that true?
The sRGB color space is smaller than its Adobe RGB counterpart, allowing
for reproduction of approximately 4/5 of the maximum reproducible
gamut. Many people incorrectly see RGB as a fl awed color space, and
Adobe RGB represents that largest color
gamut that is selectable for in-camera jpeg
processing. However, DPP off ers the option
of processing the RAW fi le into “Wide
Gamut RGB” (a larger color space than
Adobe RGB) among others such as “Color
Match RGB” and “Apple RGB.” Some folks
teach that when processing a RAW fi le in
Adobe Camera RAW it should be processed
into “ProPhoto RGB” since the RAW fi les
color gamut actually exceeds Adobe RGB.
This is overkill for the vast majority of
photographers and, unless you understand,
need, and have a practical reason for using
one of them, my opinion is that these
gamuts, while useful, are not necessary.
For this book, we’ll deal only with the two
most commonly used color spaces, Adobe
RGB and sRGB.
FIG 2.1 Here’s another graph representing the comparative size of the three primary color spaces. Adobe
RGB (1998) is the largest, followed by sRGB and CMYK
Ch02-K52040.indd 24Ch02-K52040.indd 24 8/9/07 6:41:22 PM8/9/07 6:41:22 PM

25
Workflow
shoot everything, including weddings and portraits, as Adobe RGB
imagery, assuming that more colors are better than fewer and that their
pictures will always look better when made in Adobe RGB.
In actuality, the vast majority of devices for printing or viewing any
image are native sRGB machines. With a few notable and very high-end
exceptions, all commercial lab printers are sRGB, the Internet is sRGB, and
so are computer monitors whether they are CRT or LCD devices (again,
with few, very high-end, exceptions).
The sRGB color space is completely acceptable as a starting point for any
image meant for printing by a lab or desktop machine. While some colors
might change slightly to conform to the sRGB space, those changes are
generally not noticed.
When you look at the Color Space options available on Canon gear you’ll
see that Canon gives you a choice of sRGB or Adobe RGB. Adobe RGB
is a generic, encompassing, color space that’s meant to be tweaked by
image manipulation software such as Photoshop or by a pre-press service
that will optimize the images for conversion to CMYK. Does this mean
you can’t shoot a portrait in Adobe RGB? Of course it doesn’t, but it does
mean that you should convert those images to the sRGB profi le before
sending them to your lab or to the Internet, extra steps that will add to
your workfl ow.
Shooting RAW
Another shooting option is to shoot RAW. Unlike the .jpg fi le format,
in which the camera makes the processing decisions based on the
parameters you set, a RAW fi le is the equivalent of a digital negative, and
you decide, via Canon’s Digital Photo Professional software (supplied
with the camera with free updates available online) how you want the
photo to look. You can correct the exposure over about a two stop range,
up or down, adjusting for exposure errors, until you get a correct image.
You can also change color temperature, make contrast and sharpness
adjustments, even batch process a whole folder’s worth of images.
In a way, it’s like shooting color transparency fi lm, with its very tight
tolerances, but having exposure latitude closer to color negative fi lm.
The downside is that you can spend a signifi cant amount of time
processing these fi les. One or two at a time, of course, is minimal. It’s
when you shoot a major event, like a wedding with its requisite hundreds
of shots, or a day’s worth of graduate portraits, that you’ll feel the time
constraints of processing RAW fi les.
Personally, I have nothing against the RAW format. In fact, I think it’s
a digital gift. The problem I do have with it, and with those folks who
Use the Adobe RGB Color Space
when creating images for mechanical
reproduction. Catalogs, magazines,
and brochures are some examples of
mechanically reproduced material that use
images created as Adobe RGB and then
converted to CMYK. Be aware that you will
not be able to see the full range of RGB
color on your computer monitor.
Use an appropriate sRGB Color Space when
creating images that will be reproduced
by a pro lab or 1-hour print shop, or for
images you will print on a desktop printer.
Also, sRGB is the preferred color space for
the Internet – Adobe RGB images look fl at
when posted.
Ch02-K52040.indd 25Ch02-K52040.indd 25 8/9/07 6:41:23 PM8/9/07 6:41:23 PM

26
Canon DSLR: The Ultimate Photographer’s Guide
propose it as the only way to work, is that there are better ways
to spend your time than sitting in front of your screen, opening, and
tweaking fi les that should not need so much of your attention
(FIGS 2.2 and 2.3).
FIG 2.2 When exposure is tightly controlled, jpegs may be all you need to produce great work. This jpeg is
just as the camera made it, and has not been adjusted
FIG 2.3 There are few discernible diff erences between the jpeg and this RAW fi le, both of which were
opened “as is”
Ch02-K52040.indd 26Ch02-K52040.indd 26 8/9/07 6:41:24 PM8/9/07 6:41:24 PM

27
Workflow
In terms of workfl ow (and this is only my opinion and based on my own
clients and workfl ow), I think RAW should be used judiciously. If you are
a photographer who may only shoot a minimal number of frames per
day, a landscape or architectural photographer perhaps, then RAW is a
great option for you, as it will allow you the greatest amount of control
over your work.
For those of you who have a more production-intensive schedule, here
is a solution that could save hours of post-production off of every day of
your professional lives.
Canon allows you several compression ratios for your images (explained
elsewhere) and also allows you to shoot RAW and .jpg at the same time.
Now, RAW fi les do take up a fair amount of space on the storage cards,
and you may have to buy more cards or download more frequently to
shoot both formats, but if you want the convenience of shooting jpegs
and the fl exibility of RAW, shooting both RAW and high jpeg is the
best bet.
On prosumer EOS bodies, and on the Rebel, fi nd and select Quality from
the Menu. Select RAW�L. You’re good to go (FIG 2.4).
Current EOS-1 bodies, 1Ds Mark II, 1D Mark II N, use the Image Size
Selection Button (the new Mark III uses the Function button), found on
the bottom of the camera’s back, along with the Quick Control Dial. The
selection is indicated on the camera’s rear LCD.
Note that on earlier models, such as the 1Ds, RAW�Jpeg had to be
selected in the Menu, along with the desired jpeg quality, in order to
obtain both formats. After the Menu selection, use the Quality button
and the Quick Control Dial to fi nd RAW. Both fi les will be created.
FIG 2.4
Ch02-K52040.indd 27Ch02-K52040.indd 27 8/9/07 6:41:26 PM8/9/07 6:41:26 PM

28
Canon DSLR: The Ultimate Photographer’s Guide
When your download is complete, open DPP and compare the two fi les
side by side. If you’ve really messed up you use the RAW fi les, fi x and
process them, and create a fi le of perfect images. If the .jpg fi les are
perfect (which should always be a goal), ignore the RAW fi les, make the
proofs, and take the orders. Additional tweaking to get a perfect image
will be minimal, and can be accomplished when client-selected fi les are
made ready for printing (FIG 2.5).
File Accessibility
The question of how to easily access and store fi les is frequently raised,
and is another situation that should be studied by each photographer,
then implemented according to individual needs.
Regardless of how you access your fi les, keeping your primary computer’s
hard drive full of fi les you might work on is not the best solution. Some
say that computers function best when they are about half-full, and
I have no logical argument against that. Using de-fragmenting software
assures that the information that comprises your images is stored in as
linear a position as possible, which means the search arm of your hard
drive won’t have to skip all over the drive’s surface to reconstruct an
image. Also, if you’ve got free space, you’ll never have to worry about
having enough room to download a big job.
FIG 2.5 As this screengrab indicates, there is no reason to spend extra time processing RAW fi les
Ch02-K52040.indd 28Ch02-K52040.indd 28 8/9/07 6:41:28 PM8/9/07 6:41:28 PM

29
Workflow
The important thing to know, especially if you’ve never experienced it, is
that all devices will fail, sooner or later. It’s inevitable; a fact of life, and a
problem that you must address if you want to keep your images for any
reason.
My own workfl ow solution works like this: After a shoot, I’ll download the
fi les and immediately make a CD or DVD of those fi les (what can I say, I’m
paranoid) which goes into a physical fi le reserved for original data.
I try to shoot as much work as possible in low compression (high quality)
jpeg mode, to avoid additional time processing RAW fi les, and I routinely
shoot those jpegs for commercial, stock, or portrait work. With the tight
control that I exercise over my lighting and exposure, whether with my
Canon’s features or through hand-held light meters, my exposures are
terrifi c (and my clients never complain).
If my shoot is deadlined and I will have the fi le on my machine for a short
time, I’ll keep it there and do whatever work I need to do on the fi les my
client orders, saving my retouched images as separate fi les, designated
by “v.2” after the camera-given or batch-renamed fi le name. Once the
work is complete I’ll burn another disc and fi le both discs together in an
archive fi le. Once the second disc has been verifi ed I can trash the fi le off
the hard drive.
If my shoot is one I’ll have to work on for a while, such as a large group of
stock photographs, I’ll make the fi rst disc for insurance and keep the data
on an external hard drive where I can work on it as time allows. Finished
fi les are renamed to refl ect the subject matter and are additionally copied
to a special fi le I call “Saved Work #--,” which I back up on another drive
and which is burned to two separate DVDs when the fi le is large enough.
These discs are cataloged so I have quick reference to what I’ve fi nished
and which “Saved Work” disc it’s on. Because this is important work, the
second disc is kept in a safe place away from my offi ce.
Being able to save more than one copy of an image is a tremendous step
above fi lm negatives. Copy negatives were never as good as originals,
and if the originals were lost or damaged they could never be re-shot.
Still, CD and DVD discs do fail sometimes, and the extra copy is an
additional measure of insurance. Please be aware that there is great
debate over the longevity of CDs and DVDs. The life expectancy of a
standard CD or DVD is somewhat dicey unless it’s kept in ideal conditions.
Some say that the Gold CDs and DVDs make all the diff erence. A quote
from the Delkin Devices website regarding their “Archival Gold” CD would
indicate: “CD-R’s are known to deteriorate quickly due to Earth’s common
elements: ultraviolet light, heat, and humidity. Using N.I.S.T.’s (National
Institute of Standards and Technology) accelerated aging process to test
Ch02-K52040.indd 29Ch02-K52040.indd 29 8/9/07 6:41:31 PM8/9/07 6:41:31 PM

30
Canon DSLR: The Ultimate Photographer’s Guide
the longevity of CD-R media, the Archival Gold CD-R’s have been shown
to safely store your images for more than 300 years.”
If you feel your work warrants long-term storage, which is to say, longer
life than that of a negative, you owe it to yourself to investigate storage
methods and make the best decision for your work. “Diamonds Are
Forever,” Ian Fleming wrote. Most digital media, as it’s currently defi ned,
is not.
Want more info? Type this link into your browser to check out an optical
media longevity study from the Library of Congress: http://www.itl.nist.
gov/iad/894.05/docs/Public%20SP%20500263%20November%202005.pdf.
I wrote earlier that workfl ow is slightly diff erent for everyone, and I think
there are many important stories to tell. I’ve interviewed a few high-test
Canon shooters and was given insight into their workfl ow habits, which
I’d like to pass on to you. Read each interview to see how others do their
jobs, then take what you like and apply it to your own situation.
Ch02-K52040.indd 30Ch02-K52040.indd 30 8/9/07 6:41:31 PM8/9/07 6:41:31 PM

31
Workflow
Paul Gero“It was surprisingly diffi cult for me to fully embrace digital. I had such
a familiarity for fi lm; there’s nostalgia there, but there’re some advantages,
like dynamic range. I’ve always liked to think I’m willing to change, but
making the total switch to digital was one of the toughest things I’ve
ever done. Younger photographers, who come in without a history in fi lm,
well, I think it’s easier for them because they have no nostalgia to overcome.”
Paul Gero started shooting with fi lm at age 12. He saw his fi rst prints
materialize in the developer tray and fell in love with the process. He
learned what his equipment could do by shooting as much as he could
aff ord, knowing that photography was his calling.
While attending college, it took Gero 3 years of persistent interviewing to
land a job as an intern at the Chicago Tribune, going full time after just
6 months. He began his professional career as a photojournalist
thoroughly immersed in the medium of fi lm. “I tried to do everything
‘right’, ” he says. “While the more seasoned guys would soup their fi lm
in hot chemistry, and be dry-to-dry in around six minutes, I’d be in the
darkroom going the D-76 route, developing for the recommended period
of time at the recommended temperature. I’ve always felt I was recording
legacies, not mere assignments.”
For a number of reasons, newspapers were on the rise in the 1980s,
and, as Gero says, “I was livin’ the dream, baby!” Indeed, while under
the employ of the Tribune, Gero covered the second administration of
Reagan, the confl ict in Haiti, and Kennedy weddings.
Even though the majority of Tribune photographers shot a diff erent
brand, Gero felt totally at ease with his Canon T90s, working them hard
every day, whether on call or shooting for pleasure.
After he left the Tribune, Gero spent the next 18 months as a contract
shooter with Sygma, the photojournalism stock photography
powerhouse, settling into a stint in Washington, DC. “I was basically
working on my own,” he said. “I missed the ‘group collective’ feel of
a newspaper. I also realized that being on call 24/7 was no longer that
appealing. I wanted my own life.”
Gero accepted a job off er from the Arizona Republic, landing in Phoenix
on a day that was so hot planes were actually grounded because of
the heat danger to the tires, and spent the next several years on a wide
variety of assignments. “It was the most fun I ever had,” he recalled.
“Among other things, I covered the start of both Charles Barkley’s and
Michael Jordan’s pro basketball careers; it was a terrifi c place to be!”
Ch02-K52040.indd 31Ch02-K52040.indd 31 8/9/07 6:41:31 PM8/9/07 6:41:31 PM

32
Canon DSLR: The Ultimate Photographer’s Guide
FIG 2.6 This image was made at a private
home in the San Fernando Valley, on
the tennis courts. The lighting behind
drew me to this angle and I positioned
myself to place the subjects in front of the
background. Using a 70–200 2.8 IS lens at
2.8 at 1/8th of a second (handheld – this
is the reason the IS is so fantastic) I used
a bit of fi ll fl ash – a 550EX with a Stofen
Omni-bounce aimed directly at the
bride – to fi ll the foreground
Branching out, Gero began shooting weddings on the side, mostly for
friends. Because it was terra incognita to him, Paul says his fi rst eff orts
were “very posed, highly technical, but without much feeling.”
During his parent’s 50th anniversary party, Gero had the chance to
compare their commissioned wedding album against a second album
that had been shot by a friend of his mother’s, who’d shot with a Leica
in available light. “The shot’s from the hired photographer were a lot like
mine; technically excellent, no life. That’s when it struck me that we don’t
shoot photos for now, we shoot them for the grandkids, for years from
now. Wedding photography is the beginning of a family’s visual history.”
For Paul, shooting weddings brought back the euphoric feelings he’d
had when he fi rst started as a photojournalist. “I realized I’d been missing
what I’d gotten into photography for, to see life as it happened naturally
and to record those moments.”
Paul shoots fi ne portraiture and quality architectural interiors, too, but
weddings are what fl oats his boat. “I can’t wait for ’em,” he says. “It’s such
a loaded situation, good stuff ’s gotta happen!”
When it does, he’s ready. Paul wears two 5D cameras at a time, one with
a 24–70 zoom, the other with a 70–200 (or fast primes like the 35 mm f1.4
and the 85 mm f1.8), and shoots everything in RAW because he likes the
fl exibility for color temperature adjustments more than exposure. “I like
to work in reverse, and let the ISO I need be dictated by the f-stop I want
to use and the shutter speed I need to get it,” he says. “Being exposure-
consistent is much more critical than anything else; shooting RAW makes
that easy” (FIGS 2.6–2.11).
Ch02-K52040.indd 32Ch02-K52040.indd 32 8/9/07 6:41:32 PM8/9/07 6:41:32 PM
33
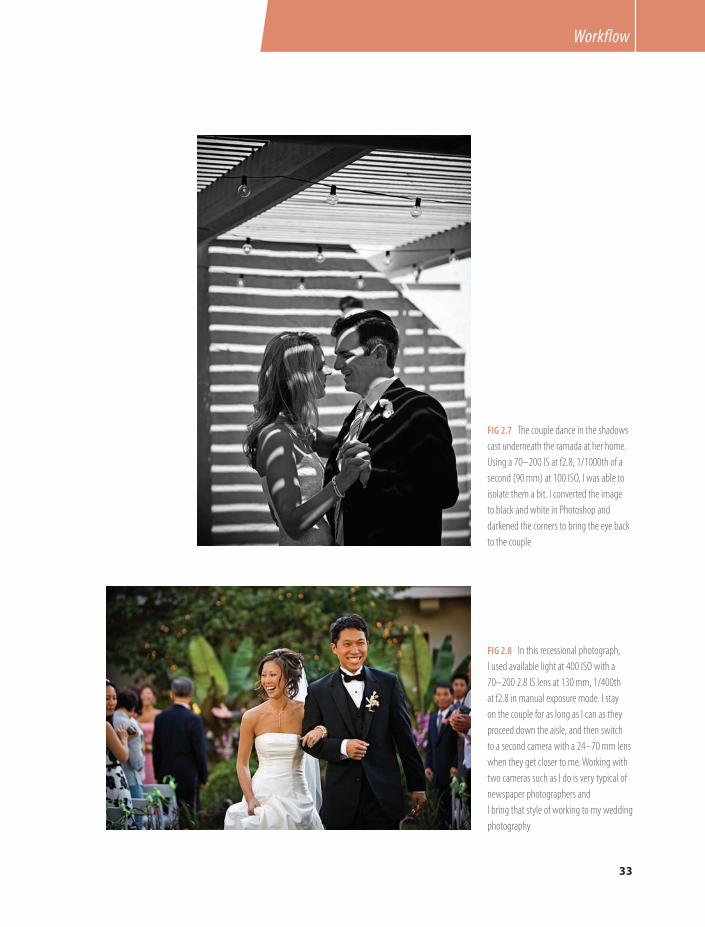
Workflow
FIG 2.8 In this recessional photograph,
I used available light at 400 ISO with a
70–200 2.8 IS lens at 130 mm, 1/400th
at f2.8 in manual exposure mode. I stay
on the couple for as long as I can as they
proceed down the aisle, and then switch
to a second camera with a 24–70 mm lens
when they get closer to me. Working with
two cameras such as I do is very typical of
newspaper photographers and
I bring that style of working to my wedding
photography
FIG 2.7 The couple dance in the shadows
cast underneath the ramada at her home.
Using a 70–200 IS at f2.8, 1/1000th of a
second (90 mm) at 100 ISO, I was able to
isolate them a bit. I converted the image
to black and white in Photoshop and
darkened the corners to bring the eye back
to the couple
Ch02-K52040.indd 33Ch02-K52040.indd 33 8/9/07 6:41:33 PM8/9/07 6:41:33 PM

34
Canon DSLR: The Ultimate Photographer’s Guide
FIG 2.10 I kept watching the cake
throughout the afternoon and evening,
periodically stopping by to photograph
it. But I suspected that the optimum time
would be about 20–30 minutes after
sunset, so I made sure to come back when
the sky was dark blue, and the lanterns
lit. It paid off . This image was made with
a 50 mm f1.4 lens at 1/30th at f1.6 at 400
ISO, handheld
FIG 2.9 During the speeches, I kept a close
watch on the couple using a 70–200 2.8
lens (1/320th at f2.8, 200 ISO, 200 mm).
This is a tricky scene because you have to
watch your metering carefully. The bright
values in the background can cause many
meters to underexpose the foreground so
you have to be aware that may happen
Ch02-K52040.indd 34Ch02-K52040.indd 34 8/9/07 6:41:35 PM8/9/07 6:41:35 PM

35
Workflow
FIG 2.11 Phil tosses the garter at his wedding in London. Using a 16–35 f2.8 lens at 400 ISO and 1/15th
at f2.8 with a Canon D60 camera, I knew I had basically one shot at this image (because of the speed of the
camera). The slow shutter speed helped render the available light in the scene and the slightly movement
and blur during the shot helps give the image some vibrancy
Note: This image was actually shot as a medium fi ne jpeg and the original fi le is approximately 8
megapixels when opened in photoshop, though I have taken it up to fi t on a spread that is 20 � 15 and it
looks amazing (rezzing up in 10% increments). The reason I shot as a medium fi ne jpeg is that at the time
(2002) Compact Flash cards were still very expensive and I would often shoot in jpeg mode to conserve
card space. Now, card costs are dramatically lower, RAW processing software incredibly good, and computer
processing speeds are much faster.
He also shoots the majority of his frames in Auto White Balance. “Back
when I shot color transparency fi lm, exposure was very tight, yet I never
let the lack of a critical light meter reading stop me from making an
image. I’ve always been a ‘seat of my pants’ shooter, and, to be honest, I
hate making Custom White Balance adjustments when I’m moving from
situation to situation. I’d rather wait until I edit to gang up the similars
and fi x them all at one time, which is another advantage to shooting
RAW.”
Editing presents its own problems, since Gero will shoot up to 3500
frames at a wedding, which makes his back-end work quite extensive.
“I make four backups before I edit anything,” he says. “I have a rack of
three Lexar Professional CompactFlash Readers which can download
simultaneously through Photo Mechanic, a software program that was
originally developed for newspaper photographers. Everything is loaded
into a working hard drive as well as a backup hard drive. Then, before
I do anything else, I’ll burn duplicate DVDs of all the fi les.” After the edit is
Ch02-K52040.indd 35Ch02-K52040.indd 35 8/9/07 6:41:37 PM8/9/07 6:41:37 PM

36
Canon DSLR: The Ultimate Photographer’s Guide
complete, he processes the chosen images in Photoshop Bridge. Catalogs
of available images are made with IView Media Pro.
“As I envision my workfl ow,” he says, “there is no one piece of current
software that I can use for everything. I need one program to download,
one to process, and one to catalog.”
For lighting on location, Paul is a true minimalist. “If I didn’t have to use
fl ash, I wouldn’t,” he says. “I prefer to keep a low profi le.” He goes on, “I’m
just trying to maintain a documentary look, and I don’t want to announce
my presence in a room by setting up multiple lights and making white
balance adjustments.”
For a guy who primarily uses one Canon 580EX on-camera fl ash, Gero is
still able to create an impressively wide range of looks by bouncing or
tilting the fl ash. Unless the fl ash is bounced off a ceiling or wall, it’s most
often fi tted with a StoFen Omni Bounce, with many eff ects achieved by
varying the camera’s ISO speed and the output power of the fl ash. He
knows the newer sensors produce less noise at higher speeds than their
predecessors, and he exploits that benefi t whenever possible. Most of his
shots are made at f2.8 or faster, allowing him to retain about 35% of the
scene’s ambient light. “I like a splash of tungsten for depth and warmth,”
he says, noting that he will frequently bounce light off a wall rather than
a ceiling but that he always considers the angle of the bounce. “Whatever
light I choose has to fl atter my subject or it’s useless.”
When using fl ash, Paul sets the camera’s drive for One-Shot AF, which
emits an infrared beam to lock focus. He’ll use the AI Servo function
FIG. 2.12 Paul Gero at work, teaching
his popular wedding photography class at
ShootSmarter University, Aurora, IL
Ch02-K52040.indd 36Ch02-K52040.indd 36 8/9/07 6:41:39 PM8/9/07 6:41:39 PM

37
Workflow
whenever there is enough light, to track focus between shots, although
not when he’s using fl ash.
Custom Function 4.1, back-button focus, is “My bread and butter, because
I can tap for focus, lock it, and recompose on the fl y either in AI Servo or
One Shot AF.”
In addition to being an extremely busy wedding photographer, the
author of a terrifi c book, Digital Wedding Photography, Paul Gero is also
a sought-after workshop instructor (just Google him to see what he’s up
to). Should you have the chance to catch his “One Light Wonder” class,
you’ll get fi rst-hand instruction on how to make your Canon on-camera
fl ash sing like an Italian soprano (http://www.paulfgero.com) (FIG 2.12).
Ch02-K52040.indd 37Ch02-K52040.indd 37 8/9/07 6:41:41 PM8/9/07 6:41:41 PM

Ch03-K52040.indd 38Ch03-K52040.indd 38 8/9/07 3:56:30 PM8/9/07 3:56:30 PM

39
CHAPTER 3
The Cameras
Digital Rebel XTi
The Digital Rebel XTi is a great, entry level DSLR, for anyone who is curious about the
benefi ts of working with an SLR, anyone who wishes to make the jump from a non-SLR,
such as a Canon Powershot, or anyone looking for the ultimate snapshot machine. This is the
fi nest consumer-end camera Canon makes, probably the best made by any manufacturer, but it
is the fi rst in the lineup and should be considered a basic tool (FIG 3.1).
The XTi features both Basic and Creative Zones on the Mode Dial, a built-in, pop up, fl ash and a 10.1
megapixel CMOS sensor. Even with the 1.6 conversion factor of the smaller sensor, it’s quite sharp, and
with clean and accurate color that’s easy to judge (although not critically) on its 1.8 inch LCD monitor.
One major physical diff erence between the XTi and other Canon DSLRs is the lack of a Quick Control Dial
on the XTi. Instead, the Rebel uses four Cross-Keys which toggle between selected images but also control
ISO, White Balance selection, Metering Modes (there is no Spot meter mode on the Rebel), and the One
Shot, AI Focus and AI Servo Auto Focus (AF) Modes (FIG 3.2).
Ch03-K52040.indd 39Ch03-K52040.indd 39 8/9/07 3:56:42 PM8/9/07 3:56:42 PM

40
Canon DSLR: The Ultimate Photographer’s Guide
Even with its designation as a consumer camera, make no mistake about
this machine’s EOS title. You will get the benefi t of simultaneous RAW and
jpeg fi le capture, Picture Styles, electronically controlled shutter speeds
from 30–1/4000 second, and an ISO range of 100–1600. Additionally, you
can use any of the EF or EF-S lenses on this machine.
I really enjoy shooting this camera, and
I have to say that I’m more impressed
with it than I thought I would be. As a
professional, I’m used to high-end gear
and all the performance that comes
with it. Even so, this lightweight DSLR
is a wonderful machine for the money,
especially when shooting RAW, Large jpeg,
or both at the same time. I like to have
this camera nearby, for everyday family
or friend events, just because it’s so easy
to use and so predictably brilliant (FIGS
3.3–3.5).
Take this as only my advice, but I think
that if you’re embarking on a professional
career, or a fi lm-based pro looking to get
into digital photography, the Rebel may
not be a camera for you simply because
it looks like a consumer machine. I know
I might sound arrogant, but I’m talking
image here, and image, the look that you
present to your clients as you work a job, is
as important to your success as the pictures
you produce for them to buy. In straight-
talking other words, buy equipment that
accents your professional image, not gear
that a bride’s uncle is likely to bring to the
event (or that your client may own).
FIG 3.1
FIG 3.2
Ch03-K52040.indd 40Ch03-K52040.indd 40 8/9/07 3:56:46 PM8/9/07 3:56:46 PM

41
The Cameras
FIG 3.3
FIG 3.4
FIG 3.5
Ch03-K52040.indd 41Ch03-K52040.indd 41 8/9/07 3:56:48 PM8/9/07 3:56:48 PM

42
Canon DSLR: The Ultimate Photographer’s Guide
EOS 30DWith its nice mix of consumer and professional features, the EOS 30D, the
fi rst of Canon’s two prosumer models, is worthy of any photographer’s
gadget bag. Canon has never rested on its laurels, and refi nes, tweaks,
and modifi es each new addition to its catalog (FIG 3.6).
The 30D features an 8.2 megapixel CMOS sensor, the Digic II processor
(faster than its predecessor), and access to the full line of EF and EF-S
lenses. This “Digital Trinity” carries through every EOS camera, assuring
you of continuity when you change models or add a second camera.
The built-in pop up fl ash and Mode Dial (with both Basic and Creative
Modes) are the most prominent carryovers from the consumer Rebel, but
beyond those the 30D is a very sophisticated machine. Canon added the
3.5% Spot to the light meter menu, along with a 9 point AF mechanism.
The fi ve Picture Styles are also included, as is simultaneous RAW and jpeg
image capture.
The shutter, rated for 100,000 actuations, will fi re in bursts of 3 or 5 frames
per second (FIGS 3.7–3.9).
An addition to the 30D is the Multi-Controller, located above and to the
left of the Quick Control Dial. The Multi-Controller is an eight key device
that you can use to select an AF point, change white balance or scroll
around a magnifi ed image, checking focus and lighting on the brilliant
2.5 inch LCD. It’s a very useful tool (FIG 3.10).
FIG 3.6
Ch03-K52040.indd 42Ch03-K52040.indd 42 8/9/07 3:56:53 PM8/9/07 3:56:53 PM

43
The Cameras
FIG 3.7 FIG 3.8
FIG 3.9
Ch03-K52040.indd 43Ch03-K52040.indd 43 8/9/07 3:56:57 PM8/9/07 3:56:57 PM

44
Canon DSLR: The Ultimate Photographer’s Guide
Many emerging professional photographers opt to start at this end of the
scale, and usually for fi nancial reasons. If this describes you, rest assured
that your money was well spent, as this is the fi nest camera you can buy
for the price.
FIG 3.10
Ch03-K52040.indd 44Ch03-K52040.indd 44 8/9/07 3:57:00 PM8/9/07 3:57:00 PM

45
The Cameras
EOS 5DThe EOS 5D is one of my favorite cameras of the entire line (FIG 3.11).
Paul Gero (interviewed elsewhere in this
book) said that after shooting fi lm and
prime (non-zoom) lenses for so many
years, he developed an instinct for how far
from his subject he would need to be to get
the shot, and that the instinct extended to
every lens in his bag.
It wasn’t until after he switched to digital
that he began to seriously work with zoom
lenses, although he still uses his favorite
primes. One thing he’s never been willing
to give up is the full frame sensor, which is
why he works his wedding magic with two
5Ds at a time, each with a diff erent lens
FIG 3.11
FIG 3.12
It costs a bit more than the 30D, but if you can aff ord it, I think this is
the camera to start with. First of all, this unit features a full frame,
24 � 36 mm, 12.8 megapixel CMOS sensor, which means no conversion
factor. Your lenses will give you exactly what they were designed for.
As this prosumer model is one step below the professional cameras, you
can expect to see less of the consumer infl uence. For example, the pop
up fl ash is gone, and the Basic Zone has been eliminated from the Mode
Dial. The Creative Zone remains, of course, with one wonderful addition,
the Camera Setting selection (FIG 3.12).
Ch03-K52040.indd 45Ch03-K52040.indd 45 8/9/07 3:57:02 PM8/9/07 3:57:02 PM

46
Canon DSLR: The Ultimate Photographer’s Guide
Canon’s made it possible for you to record your favorite shooting settings
and get back to them just by turning the Mode Dial to the “C”.
It’s easy. After you get the AF mode, Metering, ISO, white balance (and
many more items), where you want them, activate the Menu and fi nd
Register Camera Settings in the Tools submenu. Press the Set button and
a new screen will appear. Rotate the Quick Control Dial to OK, and press
the Set button again. That’s it.
In addition to shooting settings, you can register many Menu settings
at the same time, 16 of them, in fact, plus any active Custom Functions.
If you’re a studio shooter with a preferred setup of, say, ISO 400, 6500 K
Color Temperature, top center single AF Point, sRGB color space and
Standard Picture Style, you can go out and shoot any other combination
you wish, but get your preferred settings back anytime. I know you can
easily see the usefulness of this feature (FIG 3.13).
FIG 3.13
The best part? Even if you’re set to C, you can make changes to any of the
covered settings. If you fi nd you like the new selection better, just register
it as you did before, through the Menu.
Ch03-K52040.indd 46Ch03-K52040.indd 46 8/9/07 3:57:04 PM8/9/07 3:57:04 PM

47
The Cameras
EOS 1D Mark II N, 1Ds Mark IIIt’s quite obvious that the 1D Mark II N has been replaced by the
Mark III. Yet, the Mark II N is an exceptional machine, and one that held
the frame-rate record until the introduction of the Mark III. At the time
of this writing, the Mark II N is a very popular machine, is still listed
in Canon’s product line, and deserves at least a few lines in this
book (FIG 3.14).
FIG 3.14
Photojournalists fi nd the 8.5 frame per second rate (up to 48 full
resolution jpegs in one continuous burst) enormously useful when
covering, well, anything that moves. It’s also the camera of choice for
many wedding and event photographers, who carry a Mark II N to
capture subtleties of expression, and with more frames to choose from,
than any other camera could catch. For those moments that don’t require
the full 8.5 frames per second burst, photographers have second choice,
a 3 frames per second rate. This machine also sports an 8.2 megapixel
CMOS sensor and the Digic II processor, which explains the exceptional
image quality and processing speed (FIGS 3.15–3.17).
As the fi rst in the professional EOS-1 line, the Mark II N’s magnesium alloy
body is weather sealed, to allow working in mildly inclement weather or
under dusty conditions. With a shutter that’s designed for approximately
200,000 actuations before service (it’s only a guideline, Canons of every
model have performed fl awlessly well beyond the manufacturer’s
expectations) it’s a terrifi c machine. The 2.5 inch LCD doesn’t hurt, either
(FIG 3.18).
Ch03-K52040.indd 47Ch03-K52040.indd 47 8/9/07 3:57:05 PM8/9/07 3:57:05 PM

48
Canon DSLR: The Ultimate Photographer’s Guide
FIG 3.16 Although these frames
appear to be the same, a fast burst
rate assures a great deal of subtlety
FIG 3.17 Although these frames
appear to be the same, a fast burst
rate assures a great deal of subtlety
FIG 3.15 Although these frames
appear to be the same, a fast burst rate
assures a great deal of subtlety
Ch03-K52040.indd 48Ch03-K52040.indd 48 8/9/07 3:57:06 PM8/9/07 3:57:06 PM

49
The Cameras
Just because a particular model is
discontinued doesn’t make it worthless.
There are many shooters out there who
need, or always want to have, the newest
gear. Consequently, whenever Canon
introduces a new model, the online auction
sites, list sites (such as Craigslists.com), and
camera stores see many cameras put up for
sale. If you can’t aff ord a new machine, take
advantage of new model introduction and
spend time looking for used gear. Do your
homework and investigate carefully, as
these are mostly “as is” sales, but you may
be able to acquire exactly what you want
at a really sweet price. Be patient. The best
deals usually come several months after a
new model has been introduced.
FIG 3.19
The Mark II N’s big brother, the 1Ds Mark II features a very impressive full
frame, 16.7 megapixel CMOS sensor, large enough to threaten the realm
of medium format digital cameras, but with versatility that only comes
with a full line of lenses and accessories.
This is the camera for commercial shooters who desire easy, intuitive
operation and impressive high quality, wrapped in an attractive
and durable package. This is also the camera for Canon portrait
photographers who want the largest fi le possible, for the most
enlargement opportunities (FIG 3.19).
FIG 3.18
Ch03-K52040.indd 49Ch03-K52040.indd 49 8/9/07 3:57:09 PM8/9/07 3:57:09 PM

50
Canon DSLR: The Ultimate Photographer’s Guide
The Incredible Canon 1D Mark IIIFor months before the offi cial announcement of what the public had
dubbed the Mark III, rumors fl ew through Internet photography sites at
unbelievable speed. Whenever anyone even thought they had a clue, the
photography world lined up to read about it (FIG 3.20).
FIG 3.20
Canon did, indeed, introduce the 1D Mark III. What Canon had so cleverly
hidden from the rumor mill (and who could blame them?) was that they
were not just introducing another model, they had actually reinvented
the concept of a digital SLR and what it should do for the person who
holds it. Since introducing its fi rst DSLR, the EOS DCS 3, a Canon/Kodak
hybrid released in 1995, Canon has noted every complaint, bitch,
rant, compliment, praise and suggestion, waiting for the time when
technology could produce the greatest camera of its kind.
Does this mean that photographic technology has reached the end
of the road? Of course not. Technology moves by leaps and bounds,
traditionally doubling in speed and benefi ts every 18 months (Moore’s
Law), so you can expect that Canon is already working on goodies that
will blow your doors off again, and in the very near future. But, as far as
the Mark III is concerned, Canon has produced a machine that does more,
and does it faster, than any other camera out there (at the time of this
writing).
To do this camera justice, and to provide practical advice for every
feature, would require an entire book by itself, and, unfortunately, time
and space will not allow me to do that. So let’s take a look at some of
my favorite features of the Mark III, and how you might apply them to
your work.
Ch03-K52040.indd 50Ch03-K52040.indd 50 8/9/07 3:57:12 PM8/9/07 3:57:12 PM

51
The Cameras
You’ll notice, as soon as you power up the machine, that the LCD
indicates automatic sensor cleaning is taking place. Originally introduced
on the Rebel XTi, this short burst of ultrasonic vibration cleans the sensor
of small dust particles. While it’s possible to acquire a chunk of something
on the sensor that the cleaner can’t remove, almost all of the dust
problems we’ve learned to live with have been eliminated (FIG 3.21).
FIG 3.21
If you want to shoot tethered but don’t like wires (I know I don’t), the
addition of a WFT-E2A dedicated Wireless File Transmitter lets you send
images via three choices of wireless transfer methods, PTP, HTTP, and
FTP, to a computer over a LAN. With FTP, studio photographers can send
frames to the studio’s lounge area (keeping unnecessary personnel out of
the shooting area); event photographers, working with an assistant, can
transfer fi les to be chosen for immediate printing.
Those of you who’ve worked social events know the bottom-line value of
having prints ready for purchase within minutes of making the image.
The Wireless File Transmitter mounts on the camera’s side and can also
immediately upload to a website, using the HTTP version of the WFT-E2A.
When using it, an assistant (in the next room or on another continent)
could remotely browse the camera’s memory card via any standard web
browser and transfer only desirable fi les. This is a secure operation, by
the way, as it requires knowledge of the camera’s IP address as well as
a password.
The PTP function can also be used to control the camera remotely! You
can change settings, focus, and shoot from your computer using EOS
Utility, free software that comes with the camera.
Let’s move on to the Big Buzz.
Ch03-K52040.indd 51Ch03-K52040.indd 51 8/9/07 3:57:13 PM8/9/07 3:57:13 PM

52
Canon DSLR: The Ultimate Photographer’s Guide
FIG 3.22 FIG 3.23
It’s true! The Mark III will shoot bursts of images at 10 frames per second
onto its new 10.1 megabyte sensor and, depending on the write speed
of the fl ashcard or SD card you’re using, it will maintain that burst rate
until the card is full. Canon promises 110 frames, but tests with a very fast
card like the SanDisk Extreme III indicate the camera will write more than
120 continuous frames in a single burst before the buff er fi lls and forces
the camera to take a breath. This sequence represents a full second of
the shoot; notice how smoothly the action fl ows from frame to frame, so
close to real-time animation (FIGS 3.22–3.31).
Recently, SanDisk announced its new Extreme IV cards, with the fastest
write speed on the planet (at least for now) of 40 megabytes per second. I
haven’t seen any data from Canon as yet, but at such a speed you should
be able to get well in excess of 120 frames in one burst.
For sports photographers, a burst rate of 10 frames per second is a
blessing that means the peak of action will not be missed; an entire
gymnastics exercise, many from start to fi nish, can be covered in one
burst. For wedding and event photographers, it means fewer missed
opportunities. Imagine being able to isolate the one split second that
defi nes an intimate moment, along with frames immediately in front of
and behind that image.
Ch03-K52040.indd 52Ch03-K52040.indd 52 8/9/07 3:57:14 PM8/9/07 3:57:14 PM

53
The Cameras
FIG 3.26 FIG 3.27
FIG 3.24 FIG 3.25
Ch03-K52040.indd 53Ch03-K52040.indd 53 8/9/07 3:57:17 PM8/9/07 3:57:17 PM

54
Canon DSLR: The Ultimate Photographer’s Guide
FIG 3.30 FIG 3.31
FIG 3.29FIG 3.28
Ch03-K52040.indd 54Ch03-K52040.indd 54 8/9/07 3:57:21 PM8/9/07 3:57:21 PM

55
The Cameras
Unlike the 30D and 5D, traditional cameras of wedding and event
photographers, the Mark III is weather sealed, so should you have to follow
a bride and groom out the church into a spring rain, you can do so without
fear of ruining your camera (check the manual for full details). It’s a safe
bet that friends of the couple will not hold their umbrellas over you.
Speaking of wedding photographs, the Mark III addressed the problem
of blown out highlights in high contrast situations by extending the
dynamic range, the number of tones that can be correctly produced,
through a Custom Function, C.FnII:3, Highlight Tone Priority (FIG 3.32).
FIG 3.32
When you use it the lowest available ISO will be 200. The ISO designation
on the display will change to read 2oo, indicating that Highlight Tone
Priority is in use. Event photographers, who do not always have the
luxury of testing exposure prior to shooting the “money” shot, have had
many problems balancing the bleached and blued whites of a wedding
dress against the light-absorbing blacks of tuxedoed groomsmen.
Highlight Tone Priority very eff ectively addresses this problem, as well
as the problem of white-on-white tones. Obviously, this Function can be
useful for any subject matter that would be improved by an expanded
dynamic range (FIG 3.33).
Pixels, and the borders around them, have been redesigned to be much
more effi cient. The borders, incredibly tiny photodiodes that separate
pixels, now deliver the light more effi ciently to the chip, lessening noise
and allowing for an extended ISO range. The camera defaults to an ISO
range of 100–3200. In the digital realm, ISO 1600 was previously noisy,
because, up to now, signal amplifi cation at each pixel site presented
noise control issues. The ID Mark III carries the next generation of Canon’s
on-chip noise removal circuit, and the redesigned chip and new noise
circuit, working together, are responsible for the amazing reduction in
noise. Using an additional Custom Function, C.FnI:3, will extend the ISO
range to 50 at the low end and an amazing 6400 on the high end.
Ch03-K52040.indd 55Ch03-K52040.indd 55 8/9/07 3:57:25 PM8/9/07 3:57:25 PM

56
Canon DSLR: The Ultimate Photographer’s Guide
Canon’s instruction manual says that images made at ISO 6400 are
“acceptable”. I say they are astounding, especially when using C.FnII:2,
High ISO Speed Noise Reduction, to suppress noise! Like most of you
who read the hype, I was immediately intrigued by Canon’s claim, and
had to try it myself. I bounced an incandescent spotlight into a large
umbrella and shot a series of portraits with the 85 mm f1.2 lens. I set the
Mark III to Aperture Priority (at f1.2) so the camera would see the scene
exactly the same way, regardless of the change in ISO. You can judge for
yourself, but the results absolutely knocked me over, especially when
looking at a 30 � 40 enlargement of the ISO 6400 image! (FIGS 3.34–3.41)
The previous set you looked at were all jpegs, straight out of the camera
and without any adjustments. When the series was shot, I made the
images in both RAW and jpeg, which gave me the opportunity, through
DPP, to go to the original RAW fi le and change it to a Monochrome. Again,
FIG 3.33
Ch03-K52040.indd 56Ch03-K52040.indd 56 8/9/07 3:57:26 PM8/9/07 3:57:26 PM

57
The Cameras
FIG 3.34 ISO 50 FIG 3.35 ISO 100
FIG 3.36 ISO 200 FIG 3.37 ISO 400
Ch03-K52040.indd 57Ch03-K52040.indd 57 8/9/07 3:57:27 PM8/9/07 3:57:27 PM

58
Canon DSLR: The Ultimate Photographer’s Guide
FIG 3.38 ISO 800 FIG 3.39 ISO 1600
FIG 3.40 ISO 3200 FIG 3.41 ISO 6400
Ch03-K52040.indd 58Ch03-K52040.indd 58 8/9/07 3:57:30 PM8/9/07 3:57:30 PM
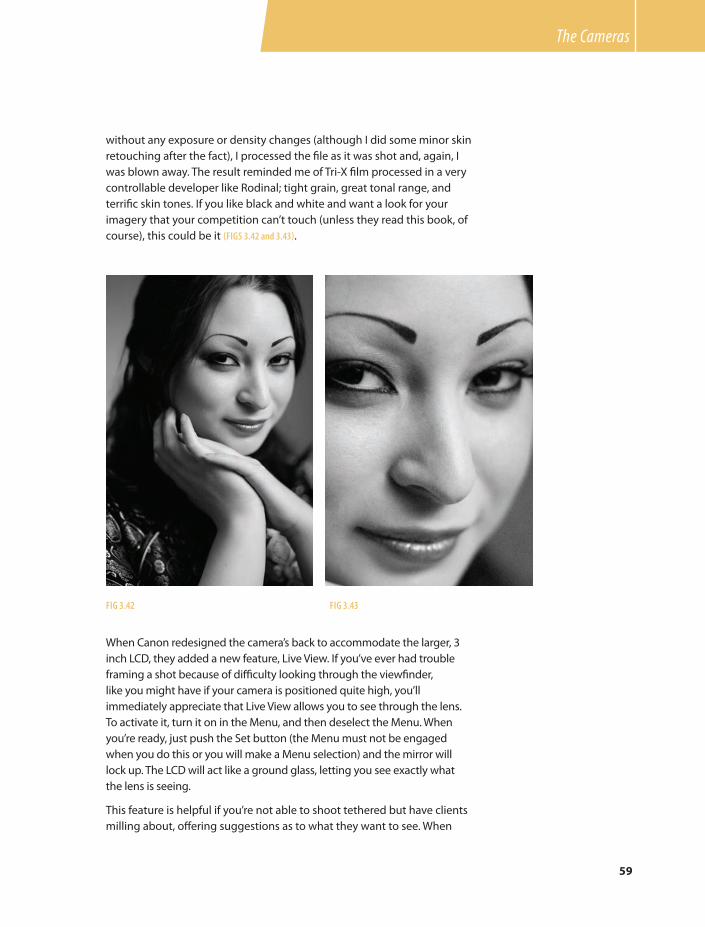
59
The Cameras
without any exposure or density changes (although I did some minor skin
retouching after the fact), I processed the fi le as it was shot and, again, I
was blown away. The result reminded me of Tri-X fi lm processed in a very
controllable developer like Rodinal; tight grain, great tonal range, and
terrifi c skin tones. If you like black and white and want a look for your
imagery that your competition can’t touch (unless they read this book, of
course), this could be it (FIGS 3.42 and 3.43).
When Canon redesigned the camera’s back to accommodate the larger, 3
inch LCD, they added a new feature, Live View. If you’ve ever had trouble
framing a shot because of diffi culty looking through the viewfi nder,
like you might have if your camera is positioned quite high, you’ll
immediately appreciate that Live View allows you to see through the lens.
To activate it, turn it on in the Menu, and then deselect the Menu. When
you’re ready, just push the Set button (the Menu must not be engaged
when you do this or you will make a Menu selection) and the mirror will
lock up. The LCD will act like a ground glass, letting you see exactly what
the lens is seeing.
This feature is helpful if you’re not able to shoot tethered but have clients
milling about, off ering suggestions as to what they want to see. When
FIG 3.42 FIG 3.43
Ch03-K52040.indd 59Ch03-K52040.indd 59 8/9/07 3:57:36 PM8/9/07 3:57:36 PM

60
Canon DSLR: The Ultimate Photographer’s Guide
Painting with light is back! In the early
days of photography, and when faced
with a cavernous interior that couldn’t be
easily lit, photographers would set the
shutter to Bulb, and lock it open while
they creatively “painted” the area with one
light, wafting it like a brush across the
planes of the image. The results were often
spectacular. With the advent of smaller
lights, many photographic artists chose
to paint smaller subjects with fl ashlights,
hand-held strobes, or custom lights. The
inherent noise problems with earlier digital
cameras made light painting very diffi cult,
as the exposures were too long to create
clean images.
This image was made with a
(approximately) 3-minute exposure at ISO
100 by moving a small fl ashlight across
the fi eld of view. Although this is a long
exposure, in digital terms, the Mark III
produced an image that’s entirely free of
noticeable noise at 100% magnifi cation
(FIG 3.44).FIG 3.44
FIG 3.45
you’re ready to shoot you can either push the Set button to drop the
mirror or just push the shutter button, which will close Live View before
taking the picture (FIG 3.45).
Ch03-K52040.indd 60Ch03-K52040.indd 60 8/9/07 3:57:39 PM8/9/07 3:57:39 PM

61
The Cameras
Pre-visualizing a crop, in-camera, can be a source of frustration, especially
if you’d like to shoot square. You could get a custom screen from Canon
or other source, but they can be pricey. Canon addressed this problem in
the Mark III via C.FnIV:14, Add Aspect Ratio Information. When you select
a preset aspect ratio, bars appear in the Playback image on the LCD,
indicating immediately whether you’re framing correctly. If you use Live
View, the bars appear on the LCD as you look through the lens, for more
immediate adjustments and, although they won’t appear in a fi nished
image, of course, the bars will be seen, and can be moved around (or
ignored), when the image is opened in DPP (FIGS 3.46 and 3.47).
FIG 3.46 The image as seen
FIG 3.47 As seen on the LCD
Ch03-K52040.indd 61Ch03-K52040.indd 61 8/9/07 3:57:41 PM8/9/07 3:57:41 PM

62
Canon DSLR: The Ultimate Photographer’s Guide
There are 57 Custom Functions for the Mark III. To make it easier for you
to quickly fi nd what you need, Canon separated them into four groups
and placed each relevant Custom Function in the correct folder within
the redesigned Menu. As you can imagine, logical placement of these
Functions will make your life a lot easier (FIG 3.48).
Also new to the Menu, the My Menu window displays Functions that you
choose to add to the menu such as registered Custom White Balances,
Dust Delete Data, a quick jump to Highlight Tone Priority, the invaluable
Battery Info window, another quick jump to Format, and your registered
personal Menu Settings. Just knowing that I could access this information
so quickly rapidly increased my confi dence level in the short time I had to
work with the machine (FIG 3.49).
From the 19 high-precision, cross-type AF points to the precise Battery
Info window (FIGS 3.50 and 3.51), the Mark III should be considered the fi rst
of a new breed of camera and a new approach to digital photography.
FIG 3.48
FIG 3.49
Ch03-K52040.indd 62Ch03-K52040.indd 62 8/9/07 3:57:45 PM8/9/07 3:57:45 PM

63
The Cameras
FIG 3.50
You could also consider the Mark III a “crossover” camera, with features
that appeal to photographers of most every discipline, and you can bet
that every new Canon being designed today will incorporate features and
technologies introduced by the Mark III.
FIG 3.51
Ch03-K52040.indd 63Ch03-K52040.indd 63 8/9/07 3:57:47 PM8/9/07 3:57:47 PM

Ch04-K52040.indd 64Ch04-K52040.indd 64 8/9/07 6:43:31 PM8/9/07 6:43:31 PM

65
CHAPTER 4
Common Ground
Wise and Thoughtful Features
A ll Canon cameras share some common features, giving the system a cohesiveness that any
great camera line must have, especially when it’s the leader of the pack. Although some of
the controls may look diff erent, or be placed in other locations, anyone who’s enjoyed one EOS
machine can become totally familiar with another EOS model in just a few minutes.
Power Switch
All prosumer and professional Canon cameras have a two-stepped power switch (the Rebel does not). To
power the camera up, raise the toggle to either the fi rst or second position. On prosumer EOS bodies, the
fi rst position is a general “on” switch with the Quick Control Dial disabled. The second on position will allow
you to make exposure setting adjustments. Because the Quick Control Dial is so close to where you may
have your thumb when shooting, it’s possible to nudge the dial inadvertently. When shooting in Program,
Aperture Priority or Shutter Priority, this adjusts your exposure compensation. In Manual, this dial controls
aperture. With the dial turned on, it would be possible to throw off the exposure without realizing it, so it’s
a good idea to keep the power switch in the fi rst position until you want to make adjustments (FIG 4.1).
Ch04-K52040.indd 65Ch04-K52040.indd 65 8/9/07 6:43:45 PM8/9/07 6:43:45 PM

66
Canon DSLR: The Ultimate Photographer’s Guide
On most EOS-1 bodies, the second power switch only powers the audible
signal. On the EOS-1 bodies prior to the 1D Mark III, there is an additional
switch, the Quick Control Dial Switch, located in 11 o’clock position just
above and to the left of the Quick Control Dial. You may make exposure
and vertical focus point adjustments only when this switch is active,
however even when turned off , the Quick Control Dial will work for
scrolling through the menu or moving around within an enlarged image
you are reviewing (FIG 4.2).
FIG 4.1
FIG 4.2
Ch04-K52040.indd 66Ch04-K52040.indd 66 8/9/07 6:43:49 PM8/9/07 6:43:49 PM

67
Common Ground
The Main Dial
The Main Dial is located just behind the shutter button on the camera-
right side. You will use this wheel to change Focus Points, make Exposure
Compensation adjustments, change ISO, and to control many more
functions (FIG 4.3).
EOS-1 bodies have an extra Main Dial (with its own on/off switch), along
with an additional FEL button and shutter release, located under the
camera’s right side grip. Called the Vertical Grip Dial, this extra dial allows
the photographer to control everything while holding the camera in a
vertical position. If you’ve never had a camera with this feature it may
take a little getting used to, but once you do you’ll wonder how you ever
got by without it (FIG 4.4).
Quick Control Dial
Found on the back of every EOS prosumer model and EOS-1 camera,
the Quick Control Dial works in conjunction with a great many of the
camera’s settings (the Rebel uses a set of Cross-Keys). You will use it to
dial through the many Menu items, select AF (Auto Focus) points, make
exposure adjustments, or just to check images on the LCD screen.
The Quick Control Dial is also used to change focus points. On the 1Ds
Mark II, for example, the only way to move your focus point up and down
(without employing a Custom Function) is to have the QC dial turned on
(FIG 4.5).
FIG 4.3
Ch04-K52040.indd 67Ch04-K52040.indd 67 8/9/07 6:43:51 PM8/9/07 6:43:51 PM

68
Canon DSLR: The Ultimate Photographer’s Guide
Please note that, on EOS prosumer bodies, you will not be able to use the
Quick Control Dial to make exposure changes unless the power switch is
set to the second position (FIG 4.6).
FIG 4.4
FIG 4.5
Ch04-K52040.indd 68Ch04-K52040.indd 68 8/9/07 6:43:52 PM8/9/07 6:43:52 PM

69
Common Ground
Shutter Release Button
When holding the camera as if to take a picture, the Shutter Button will
be easy to reach with your right index fi nger (FIG 4.7).
The Shutter Button is a two-stepped switch. Push it halfway down and
it will activate and set auto focus (AF) and auto exposure metering
FIG 4.6
FIG 4.7
Ch04-K52040.indd 69Ch04-K52040.indd 69 8/9/07 6:43:54 PM8/9/07 6:43:54 PM

70
Canon DSLR: The Ultimate Photographer’s Guide
(AE) for every Zone except Manual. In Manual Mode, you can use the
Quick Control Dial and the Main Control Dial to move shutter speed
and aperture until the Exposure Level Indicator is centered or otherwise
where you want it to be. If you’re using a lens with Image Stabilization, it
is also activated by a half-press of the shutter button.
With prosumer EOS bodies, the Exposure Level Indicator is found on the
bottom of the viewfi nder; with EOS-1 bodies it’s found on the right side
of the viewfi nder.
After pressing the Shutter Button halfway, it will remain active for a few
seconds, after which you’ll have to press it again to reactivate it.
Pressing the Shutter Button all the way will take the picture.
Should you be checking the Menu or reviewing images, you can return to
shooting almost immediately just by pushing the Shutter Button to the
halfway position.
Menu
A source of wonder for some photographers, and a source of confusion
for others, the Menu can look daunting. Don’t let it bother you. My
suggestion is to open it, dive in, and play with it. You won’t wreck the
camera, and if you mess something up and don’t know how to fi x it, you
can always return to Canon’s default settings and start from scratch.
Each camera model’s Menu is divided by topic and each topic is
delineated by an icon. As Canon’s models move up the scale, from
consumer to prosumer to professional, the number of menu items
naturally increases, although the icons are consistent (FIG 4.8).
The number of Menu options varies from model to model, from 17 on
the current Rebel XTi to 57 on the new Mark III, but here are some that
are common to all models, with explanations of what they do and some
practical advice on how to make them work for you.
Quality
Canon cameras provide a number of options for image type from RAW,
with the most data and fl exibility of all fi le types that the camera’s sensor
can provide, to Large (L), Medium (M), and Small (S) jpegs. Each fi le
size will provide high quality images. The diff erence is in the degree of
enlargement a given fi le will withstand before artifacts and pixelization
become noticeable.
Large jpegs deliver a full size fi le, so if you have a 10 megapixel sensor
you will see a 30 mb fi le (10 mb for each channel of red, green, and blue)
when it’s opened in software like Photoshop.
FIG 4.8
Ch04-K52040.indd 70Ch04-K52040.indd 70 8/9/07 6:43:57 PM8/9/07 6:43:57 PM

71
Common Ground
Medium jpegs will produce fi les about one-half the size, or about 15 mb
for a 10 megapixel sensor. Basically, the camera ignores about half the
data. This reduction in resolution will not be noticeable if the print size
does not exceed the capabilities of the fi le.
Small jpegs will be roughly one-fourth the size of a full fi le, in this case
about 7.5 mb. While you have less opportunity for enlargement, the
lower resolution of the fi le will not be appreciably noticed as long as you
understand, and work within, its limitations.
Based on the job at hand, it will be up to you to determine the most
effi cient resolution choice for your work. High-ticket jobs like commercial,
advertising, portraiture, or weddings will generally demand RAW or Large
jpeg fi les. Depending on your camera’s sensor size and resolution, images
meant for snapshot prints, even 5 � 7s, will look great when shot as
Medium jpegs; Small is fi ne for web use, possibly even for 3 � 5s or 4 � 6s.
Canon cameras off er the opportunity to shoot both RAW and jpeg fi les at
the same time. All models allow at least RAW � Large (aka High) jpeg and
RAW � Small jpeg. Newer models also provide RAW � Medium as well
as slightly more compressed versions of Large and Small jpegs. With the
addition of the new, 2.5 megapixel Small RAW (sRAW) fi le available on the
Mark III, the total number of quality options is a staggering 14 diff erent
ways to save your fi les (FIG 4.9).
Whether you’re going to make large prints
yourself or send the fi les off to a lab, it’s
probably best to not resize them beyond
what you can do when converting a Raw
fi le. Photoshop’s interpolation software,
while adequate, is only a small portion
of the entire program and shouldn’t be
expected to do an A� job.
Labs use RIP software, programs designed
specifi cally to interpolate imagery, that are
much more accurate than what’s generally
available to us. True, we can purchase RIP
software from third-party manufacturers,
which we should if our equipment is going
to do the work, but it’s expensive. I think
the expense is justifi ed if the burden is
on us, otherwise, let the lab resize them
(be sure to ask your lab how they will
interpolate your image, of course).
Auto Exposure Bracketing
If you primarily work in jpeg, Auto Exposure Bracketing (AEB) is a great
little tool, easy to implement, that will help you get even more out of your
images. There are many instances in a photographer’s career when “just
a little more” or “just a little less” would have made the diff erence
between a great image and an outstanding one, but there was no
opportunity to download to a calibrated computer to judge the fi nal
image. And, although one could certainly shoot RAW and adjust an image
FIG 4.9
Ch04-K52040.indd 71Ch04-K52040.indd 71 8/9/07 6:43:57 PM8/9/07 6:43:57 PM

72
Canon DSLR: The Ultimate Photographer’s Guide
in manipulation software later, that does require more work. Even though
it might take only a few minutes, time is money.
When you engage this feature, the camera will set itself to shoot a
bracketed series of three exposures, in one-third stop increments, up to
three full f-stops under and over the target exposure. This feature works
in every Creative Zone mode except Bulb and is perfect for adding a bit of
subtlety to your work.
With EOS-1 bodies, push the Mode and AF buttons at the same time. The
top LCD panel will change from its usual inclusive display to a minimalist
view showing only Exposure Compensation, 0.0, and an icon that
represents a bracketed exposure (FIG 4.10).
Use the Quick Control Dial to select the amount of diff erence between
exposures (FIG 4.11).
FIG 4.10
FIG 4.11 This LCD indicates a two-stop
spread between the three exposures
Ch04-K52040.indd 72Ch04-K52040.indd 72 8/9/07 6:43:58 PM8/9/07 6:43:58 PM

73
Common Ground
The AEB feature is just as easy to use with prosumer EOS bodies. Just fi nd
the item in the Menu, select it, and use the Quick Control Dial to set the
amount of exposure bracket you wish. Push the shutter three times to
record the exposure bracket (FIGS 4.12 and 4.13).
Once your picture is composed, click the shutter three times. The fi rst
exposure will be what you’ve determined to be “on the mark,” the next
will be the underexposed frame, followed by the frame that’s brighter
than the mark (FIGS 4.14–4.16).
FIG 4.12 FIG 4.13
FIG 4.14 FIG 4.15
Ch04-K52040.indd 73Ch04-K52040.indd 73 8/9/07 6:44:00 PM8/9/07 6:44:00 PM

74
Canon DSLR: The Ultimate Photographer’s Guide
Shooting Tip
Use your camera’s Drive function and set
the motor drive to either the high or low
setting. Just depress the shutter button and
fi re away. The camera will not shoot more
than three frames.
Most cameras will allow as many additional series as you wish, and AEB
will remain active until you either dial the exposure spread back to zero
or turn the machine off . You can change the sequence of shots and
whether or not AEB stays active after a series by engaging a Custom
Function. Refer to your manual to determine which Custom Function
allows this on your camera.
White Balance
From the Rebel to the Mark III, all Canons have a menu of preset white
balances. Meant to be used “on the fl y” when walking into a scene or
under rapidly changing conditions (such as dark clouds moving across
sunny blue skies), they are based on predetermined color temperature
numbers and will, in a general way, neutralize colors found in the
situations they were built for.
Canon has placed eight of these white balance presets into each of its
cameras. Let’s see how each will interpret the white balance of a typical
daylight scene.
AWB (Auto White Balance) will look at any scene as it’s being shot and
attempt to neutralize the color it sees from 3000–7000 K. It’s largely
successful, but can be skewed (see Custom White Balance below).
FIG 4.16
Ch04-K52040.indd 74Ch04-K52040.indd 74 8/9/07 6:44:03 PM8/9/07 6:44:03 PM
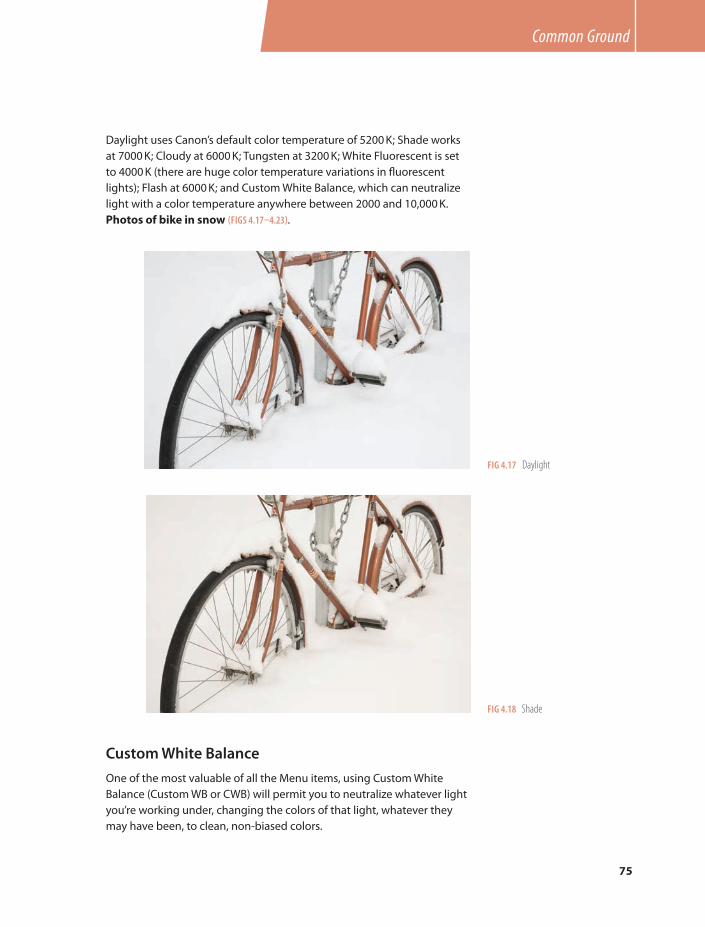
75
Common Ground
Daylight uses Canon’s default color temperature of 5200 K; Shade works
at 7000 K; Cloudy at 6000 K; Tungsten at 3200 K; White Fluorescent is set
to 4000 K (there are huge color temperature variations in fl uorescent
lights); Flash at 6000 K; and Custom White Balance, which can neutralize
light with a color temperature anywhere between 2000 and 10,000 K.
Photos of bike in snow (FIGS 4.17–4.23).
FIG 4.17 Daylight
FIG 4.18 Shade
Custom White Balance
One of the most valuable of all the Menu items, using Custom White
Balance (Custom WB or CWB) will permit you to neutralize whatever light
you’re working under, changing the colors of that light, whatever they
may have been, to clean, non-biased colors.
Ch04-K52040.indd 75Ch04-K52040.indd 75 8/9/07 6:44:04 PM8/9/07 6:44:04 PM

76
Canon DSLR: The Ultimate Photographer’s Guide
FIG 4.21 White Fluorescent
FIG 4.19 Cloudy
FIG 4.20 Tungsten
Ch04-K52040.indd 76Ch04-K52040.indd 76 8/9/07 6:44:05 PM8/9/07 6:44:05 PM

77
Common Ground
FIG 4.22 Flash
FIG 4.23 Custom White Balance
Light is not a constant color, except to our eyes and brain. Humans have
the cerebral ability to white balance on the fl y, interpreting whatever
color we see to be neutral, based on our ability to see something we
know to be a certain color (white, for instance) and balancing all other
colors against that reference. The CWB function of the camera does
exactly the same thing, except that the camera can leave us with
a physical record, a print, of a situation that has been neutrally balanced.
There are a number of generic white balance settings already in play
on every Canon DSLR (explained elsewhere), but they are not nearly as
precise as a measured, custom, white balance.
To do this eff ectively you will need to meter and photograph a neutral
gray or white card under the light conditions within the frame. If you’re
Ch04-K52040.indd 77Ch04-K52040.indd 77 8/9/07 6:44:08 PM8/9/07 6:44:08 PM

78
Canon DSLR: The Ultimate Photographer’s Guide
working under studio strobes, you will need to use a calibrated fl ash
meter to accurately measure the strength of the light. Either way, it’s
important to purchase a neutral target. Typewriter paper, tablecloths,
bridal gowns, or other objects contain chemicals or bluing agents that
make them look neutral, but they will not white balance properly because
of that chemistry. A commercially available 18% gray target will produce
the most accurate white balance.
Check your instruction manual to know how much of the frame you will
have to fi ll to get a correct measurement. I think you should err on the
FIG 4.24 Auto White Balance sees the red
background more than the subject and
attempts to neutralize the two blocks of
color, which it cannot do
Although Auto White Balance will do an
acceptable job, it is possible that dominant
colors in the frame can skew it to produce
an off -color image. It’s the most important
argument for using CWB whenever
possible (FIGS 4.24 and 4.25).
Ch04-K52040.indd 78Ch04-K52040.indd 78 8/9/07 6:44:10 PM8/9/07 6:44:10 PM

79
Common Ground
side of caution and fi ll as much of the frame as you can. It’s not necessary
for the image to be in focus, although a target like this BalanceSmarter
(www.BalanceSmarter.com) with its printed lines, is helpful because you
won’t have to disable AF to make the shot (FIG 4.26).
In the Shooting menu choose Custom WB (FIG 4.27).
You will be asked to select an image, but the camera always defaults
selection to the last image made. If you’re happy with that image, press
Select (or Set, depending on your model) (FIG 4.28).
FIG 4.25 CWB doesn’t care what colors are
in the scene, only the color temperature of
the light that falls into it
Ch04-K52040.indd 79Ch04-K52040.indd 79 8/9/07 6:44:12 PM8/9/07 6:44:12 PM

80
Canon DSLR: The Ultimate Photographer’s Guide
On current EOS bodies, if your White Balance icon is not set to Custom,
you will be told to set it accordingly. Push the WB/AF button and scroll to
the CWB icon. Custom White Balance has been set.
EOS-1 bodies will ask you if you want to “Use this white tone?”
Use the Select button and the Quick Control Dial to choose “OK” (FIG 4.29).
Push the WB (White Balance) button and use the Quick Control Dial to
select the CWB icon (FIG 4.30).
FIG 4.26
FIG 4.27 FIG 4.28
Ch04-K52040.indd 80Ch04-K52040.indd 80 8/9/07 6:44:14 PM8/9/07 6:44:14 PM

81
Common Ground
FIG 4.31 If you were to shoot some images under daylight, and then
move into a fl uorescent light environment, the shot you’d make of the
daylight-balanced gray target would look off -color
FIG 4.32 A new image of the target shows that bad color has been
neutralized
It won’t matter if the picture you make
of the gray or white card has an off -color
cast. Telling the camera that you want it to
neutralize that tone will eff ectively change
the color balance of any additional image.
You can prove it by shooting another image
of the target, but with the data from the
fi rst image used for Custom White Balance.
The new shot will show a color neutral
target (FIGS 4.31 and 4.32).
Telling the camera that you want to use this
balance is eff ectively telling the camera to
neutralize the color it sees after you select
the CWB icon.
FIG 4.29
FIG 4.30
White Balance Shift/Bracket
Similar to Auto Exposure Bracketing, White Balance Shift/Bracket can
produce from one to three color variations from a single exposure. It’s an
interesting feature because you don’t need to shoot a bracket set, which
means that if you routinely like your images a little warmer or cooler,
or a little more yellow or green, you can set the screen where you wish.
From the moment the feature is engaged, all of your images will exhibit
the color change, regardless of which white balance mode you are in,
including Custom White Balance.
To access this feature, open the Menu and select WB Shift/Bracket.
Entering that screen will get you what is, essentially a color chart that you
can navigate through to select either a Blue/Amber or Magenta/Green
bias (FIG 4.33).
Ch04-K52040.indd 81Ch04-K52040.indd 81 8/9/07 6:44:17 PM8/9/07 6:44:17 PM

82
Canon DSLR: The Ultimate Photographer’s Guide
FIG 4.33 FIG 4.34
FIG 4.35 FIG 4.36
On the 30D, 5D and Mark III, you’ll use either the Main Dial or the Quick
Control Dial (the Rebel doesn’t have a Quick Control Dial) to select the
number of bracketed images. Use the Multi-Controller to position the
bias where you want it (FIG 4.34).
Note that the 1Ds Mark II and 1D Mark II N access this feature diff erently.
Just check the manual for directions.
Remember, if you don’t want multiple exposures, leave BKT at �0
(FIGS 4.35–4.37).
Ch04-K52040.indd 82Ch04-K52040.indd 82 8/9/07 6:44:19 PM8/9/07 6:44:19 PM

83
Common Ground
Color Space/Color Matrix
Color Space determines the number of colors that will be recorded (the
“gamut”) when a picture is taken. Adobe RGB (1998) is a wide gamut,
recording a very large range of colors. Photographers who photograph
for mechanical reproduction on a press (books, catalogs, brochures)
should use the Adobe RGB color space so that, when those colors
are converted to the very small CMYK reproduction gamut the most
information possible will be retained.
For almost all other uses, weddings, portraits, snapshots and the like, the
smaller gamut sRGB is all you need. Some have decried the sRGB color
space as inadequate, which I don’t believe to be true for a number of
reasons. For instance, all labs use sRGB printers almost exclusively. From
the 1-hour photo kiosk at the mall to the large machines at your pro
lab, the sRGB color space is what the machines prefer (only a very few
printers, are able to make use of Adobe RGB color space). In fact, your lab
may add charges to your bill should you provide them with RGB fi les that
they will have to convert.
FIG 4.37
Ch04-K52040.indd 83Ch04-K52040.indd 83 8/9/07 6:44:22 PM8/9/07 6:44:22 PM

84
Canon DSLR: The Ultimate Photographer’s Guide
Additionally, the Internet is an sRGB environment and doesn’t treat
Adobe RGB images kindly. Putting an Adobe RGB image on the web will
fl atten some colors and make it look, well, bad.
Finally, your computer monitor, either CRT or LCD, is an sRGB device and,
as such, is incapable of seeing all the colors in the Adobe RGB space. At
the moment, there are very few monitors that even claim to be Adobe
RGB compatible, fewer still that can live up to the claim (FIG 4.38).
EOS bodies off er your choice of Adobe RGB or sRGB but also off er a
second system, Picture Styles (described elsewhere) to change the visual
characteristics of the fi nal image.
Early EOS-1 bodies off er fi ve diff erent designations, similar to Picture
Styles but using older logarithms, found under Color Matrix. Four of the
fi ve are sRGB color spaces, engineered to render images that mimic a
number of classic fi lm emulsions. Newer EOS bodies, currently the Rebel
XTi, 30D, 5D and 1D Mark III, off er the aforementioned Picture Styles.
Protect
With this feature, you can protect any image from normal erasure. This
would be useful should you fi nd yourself running out of card space in
the middle of a shoot. All photographers tend to go overboard when
shooting digital because there are no processing costs associated with
FIG 4.38 This three dimensional representation of three traditional color spaces clearly shows the size of
the Adobe RGB space (the largest envelope of color), sRGB (the graphed space), and CMYK, representing
mechanically reproduced color
Ch04-K52040.indd 84Ch04-K52040.indd 84 8/9/07 6:44:23 PM8/9/07 6:44:23 PM

85
Common Ground
each image, and usually erase images during the post-shoot edit. When
you use the Protect feature you can edit in the fi eld, save your best
images, and gain important memory space.
On the Rebel and the prosumer cameras, fi nd Protect in the Playback
portion of the Menu, then use the Set button to select it. Images stored
on the memory card will appear on the LCD screen, beginning with the
last image made. As you scroll through the images, push the Set button
for each image you wish to protect. You’ll see a small icon, a skeleton key,
appear on the image, indicating that the image is locked (push the Set
button a second time to unlock the image and void the protection)
(FIG 4.39).
Protecting an image is faster with the EOS-1 cameras. On the back of the
camera, at the top of the row of buttons on the left side (bottom center
on the 1D Mark III), is the Protect/Sound Recording button. As you scroll
through the images simply push this button when you see an image
you wish to protect. It won’t matter if you scroll through the images
individually or in groups of four or nine, the skeleton key icon will appear
on each image you select (FIG 4.40).
Erasing Images
On the bottom of “Button Row,” found on the left side of any Rebel or
prosumer camera’s back, the noble trashcan patiently waits for you to use
FIG 4.39
Ch04-K52040.indd 85Ch04-K52040.indd 85 8/9/07 6:44:28 PM8/9/07 6:44:28 PM

86
Canon DSLR: The Ultimate Photographer’s Guide
it. Scroll through the images on the memory card. When you see one you
don’t want, just push the button. The rear LCD will display three boxes:
Cancel, Erase, and All. Use the Quick Control Dial to erase just the selected
image (Erase), or to erase every non-protected image on the card (All).
You can change your mind by selecting Cancel, or just by pushing the
shutter button halfway down (FIG 4.41).
Format
In the Menu of every Canon DSLR is a function always designated as
Format. Selecting Format will do two things: (1) It will completely erase all
data, including any protected images, from the CF (Compact Flash) card,
FIG 4.40
FIG 4.41
Ch04-K52040.indd 86Ch04-K52040.indd 86 8/9/07 6:44:29 PM8/9/07 6:44:29 PM

87
Common Ground
or the SD (Secure Data) card. (2) It will change a card that has been used
in another camera for use in the camera you have in your hand (FIG 4.42).
Note that Formatting in camera simply deletes the fi le directory structure
and allows that images on the card to be overwritten. In most cases, the
images can still be rescued after an accidental format as long as the card
is not overwritten.
Let’s look at each in turn.
First, think of a clean CF or SD card as a straight line. When you take two
(or more) consecutive pictures on a clean card the camera writes them
in sequence, one after another, using as much space on the card as is
necessary for a comfortable fi t. When the straight line is exhausted, the
card says, “Whoa, Cowboy!” (your display may say “CARD FULL”), and
won’t allow you to take any more pictures until you swap out the card for
a fresh one.
Let’s assume that, instead of swapping out the card, you choose to go
back through the fi les and eliminate those that are clearly inferior by
using the Erase function. Unlike a motored hard drive, which will put bits
and pieces of a fi le wherever there is a little room, your camera’s card can
only write in a straight line, which means it will place smaller images into
whatever larger slots are available or truncate (cut off ) larger fi les which
it cannot fi t into an existing slot. Aside from fi les being truncated, a big
enough problem by itself, placing smaller fi les into larger spaces means
that some memory space, those little bits and pieces, will not be used.
When that happens, there’s no way to realize the full memory potential of
the card, and you won’t be able to get all the images you should.
In practical terms, what does this mean? Simply put, you should re-format
each card between uses to maximize its potential. Although you can use
the Erase function in the fi eld when you fi nd yourself without enough
card space, just erasing individual images, even selecting Erase All, will
ultimately hamper the performance of the card.
FIG 4.42
Ch04-K52040.indd 87Ch04-K52040.indd 87 8/9/07 6:44:31 PM8/9/07 6:44:31 PM

88
Canon DSLR: The Ultimate Photographer’s Guide
ISO Speed
ISO is a number that indicates the chip’s sensitivity to, and is based on
formulas presented by the International Organization of Standards (who
couldn’t get their initials right, but at least did a good job fi guring out
exposure). Based on a set series of tests, an exposure under a controlled
light source at a given shutter/aperture combination will yield a perfect
exposure. When the ISO is increased, the same perfect exposure will be
attained at a predictable (and constant) shutter/aperture combination.
Generally speaking, setting your camera to a higher ISO will allow faster
shutter speeds under dimmer light, while lower ISO means slower
shutters to record the same exposure.
I say generally, because with any ISO, you can manipulate the shutter/
aperture combination for creative eff ects (FIGS 4.43 and 4.44).
You can set your camera’s sensor to record a wider range of ISO speeds
than were ever available to fi lm shooters, even those who manipulated
Reciprocity and ISO
In a stable environment, you can use ISO
changes to get closer to a “perfect” image.
For example, let’s say you’re shooting an
event with an ambient light level that
gives you 1/30th of a second at f2.8,
with the camera set to ISO 100, and that
combination is not enough to stop the
action. Increasing the ISO to 200 (one
stop in value) will permit a shutter speed
of 1/60th of a second at f2.8. Doubling
the ISO again, to 400, will allow a shutter
speed of 1/125th of a second at f2.8 (FIGS
4.45 and 4.46).
Conversely, if you’d like more depth of fi eld
instead, changing the ISO to 200 will give
you 1/30th of a second at f4; increasing
to ISO 400 will give you f5.6 (FIGS 4.47
and 4.48). (See “Reciprocity” for a more
in-depth explanation.)
FIG 4.43 A 25th of a second is close
to the hand-held shutter speed limit
without an IS lens. At f2.8 and ISO 100 the
scene was still a little too dark for a good
representation
FIG 4.44 Boosting the ISO to 200 is the
equivalent of opening the lens one more
stop, but without the requisite loss of depth
of fi eld
Ch04-K52040.indd 88Ch04-K52040.indd 88 8/9/07 6:44:32 PM8/9/07 6:44:32 PM

89
Common Ground
FIG 4.45 The proper ISO 100 exposure was
1/60 second at f8, not quite fast enough to
freeze motion in the fl ag
FIG 4.46 Boosting the ISO to 400 (2 stops)
let me shoot the same f8, but now at 1/250
second
FIG 4.48 Increasing the ISO to 400 allowed f5.6 at 1/15th. Notice how much
more “complete” the image appears
FIG 4.47 This marble statue, photographed under a table lamp, required 1/15
second at f2.8. There is almost no depth of fi eld at that aperture
Ch04-K52040.indd 89Ch04-K52040.indd 89 8/9/07 6:44:33 PM8/9/07 6:44:33 PM

90
Canon DSLR: The Ultimate Photographer’s Guide
fi lm stock by “pushing” or “holding” the exposure in processing, and with
incredible precision. Just as you can adjust shutter and aperture values by
thirds of stops, so can you adjust ISO.
All Canons begin their default ISO range at ISO 100, with most capping
out at ISO 1600 (the Mark III default caps at ISO 3200 but is expandable
to ISO 6400!). Except for the Rebel, the ISO on all Canon models may be
expanded. Using the correct Custom Function will expand the ISO range
to 3200 for most cameras.
ISO expansion works the other way, too, lowering the minimum ISO to 50.
This is the solution for when your shot will look better with less depth of
fi eld or more blur. Please note that, although the rule of thumb is always
to shoot at the lowest ISO possible for maximum image quality, using
ISO 50 will actually decrease the dynamic range of the image. This is why
Canon puts 50 outside of the normal range and accessible only via a
Custom Function. The highest ISO setting, 3200 on most and 6400 on the
Mark III is noisier than Canon generally considers acceptable. This is why
these ISO settings are not included in the regular selections.
Highlight Alert
It’s not totally accurate, but if you are close to overexposure you’ll see
small portions of your image blink in the LCD. Canon’s overexposure
threshold is relatively low, and any minor blinking areas should not be
a huge source of alarm. When you see major portions of your displayed
image blinking black to white you might want to reevaluate your
exposure strategy. Test your own equipment to determine limits you fi nd
acceptable, then dial in appropriate Exposure Compensation or adjust
your external light meter, if necessary.
Sensor Cleaning
It doesn’t matter that you take great pains to mount and dismount lenses
properly, or that your particular camera may have a weather seal, sooner
or later you will get dust on the sensor, and of a size large enough to
leave a shadow of itself on an image. When that happens, the sensor
must be carefully cleaned or the spot will probably stay forever.
Most dust is unnoticeable, especially at apertures larger than f22 and
against patterned backgrounds. Here’s what to do to fi nd out if your
sensor is dirty.
First, set your camera’s aperture to its maximum aperture (at least f22)
and the shooting Mode to Aperture Priority. You’ll want the smallest
aperture to provide enough depth of fi eld so even small spots will cast
a discernible shadow.
Ch04-K52040.indd 90Ch04-K52040.indd 90 8/9/07 6:44:36 PM8/9/07 6:44:36 PM

91
Common Ground
Take a picture of any clean, white background, such as a sheet of typing
paper. Because you’re using the camera’s meter on a pure white fi eld,
you may have to add Exposure Compensation to get a clean, but not
overexposed, white. Make sure the background is evenly lit. It won’t
matter if the image is in focus or not.
Download your image and open it in DPP or Photoshop. Enlarge it to
100% or 200%, scroll through it to look for crud. My test indicated some
small chunks of crud in the frame (FIG 4.49).
Canon recommends only one method of cleaning the sensor, rapidly
squeezing fresh air from an air bladder onto the sensor while holding the
camera upside down. Under no circumstances should you use canned air.
While the air may be clean, the propellant itself may spray out and land
on the sensor, drying immediately and seriously degrading image quality.
Using non-recommended methods may, in fact, void the warranty.
In a clean, relatively dust-free environment, hold the camera upside down
and remove the lens or body cap. If removing a lens, place a cap on the
mount before proceeding. This will keep airborne dust from landing on
the mount or the rear element of the lens. Continue to hold the camera
upside down, so loose particles will fall to the fl oor. Blow any dust off the
mirror and the interior assembly (FIG 4.50).
Find and select Sensor Cleaning in the Menu (FIG 4.51).
Your EOS-1 camera may want assurances that you’ll do the procedure
correctly. Assure it that you mean it no harm and select OK. Prosumer
bodies will tell you what to do when you’re done (FIGS 4.52 and 4.53).
With EOS-1 bodies, push the shutter button all the way down. Doing
so will lock the mirror to the top of the viewfi nder. With the prosumer
bodies, the mirror will fl ip up and lock a second or two after you choose
the Sensor Cleaning menu item.
Every sensor will eventually pick up some
dust, even if you’ve treated your camera
like a member of your own family (hmm,
maybe that’s a bad analogy), so don’t call
Canon to complain. It’s rare to make this
test and not fi nd some dust. The reality
is that the vast majority of it will never
be seen on your images, even at f22,
because image details will very eff ectively
camoufl age those tiny spots.
FIG 4.49
Ch04-K52040.indd 91Ch04-K52040.indd 91 8/9/07 6:44:37 PM8/9/07 6:44:37 PM

92
Canon DSLR: The Ultimate Photographer’s Guide
Use the bladder to blow off the sensor, taking care not to touch the
surface of the chip with the end of the bladder. Be sure to blow air onto
the corners of the sensor as well as across the center. Dust likes to hide
out in the corners (FIG 4.54).
When you’re fi nished, and while still holding the camera upside down,
replace the lens or body cap. Turn off the power, returning the mirror to
its ready position (FIG 4.55).
FIG 4.50
FIG 4.51
FIG 4.52 Pro EOS-1 screen
FIG 4.53 Prosumer EOS screen
Ch04-K52040.indd 92Ch04-K52040.indd 92 8/9/07 6:44:37 PM8/9/07 6:44:37 PM

93
Common Ground
As of this writing, both the Rebel XTi and the 1D Mark III feature
automatic sensor cleaning which eliminates most of the need for manual
sensor cleaning.
LCD Brightness
Canon allows you to adjust the brightness of the LCD screen to suit your
environment. If you’re working in a studio, for example, the brightest
setting may be too bright to provide an adequate estimation of the
image quality, and you may think it necessary to adjust the exposure.
Working outside, you’ll probably want to boost the level as high as
possible. Checking an LCD image outdoors is diffi cult, especially in bright
sun, so you’ll want all the help you can get. Both EOS body styles use
a slider to select brightness with this Function, although they don’t have
the same design (FIG 4.56).
FIG 4.54
FIG 4.55
FIG 4.56
Ch04-K52040.indd 93Ch04-K52040.indd 93 8/9/07 6:44:40 PM8/9/07 6:44:40 PM

94
Canon DSLR: The Ultimate Photographer’s Guide
Rod EvansWalking into Rod Evans’ studio reception room in Sioux Falls, South Dakota,
is a bit like walking into an art gallery. Huge (4’ � 6’ inch and larger) prints
are hung on sandblasted brick walls over plush sofas and chairs. Large
windows, with carefully restored woodwork, illuminate the room with
east and north light. Occupying the fi rst fl oor corner of a building built in
1897 (which he purchased a number of years ago), Evans’ studio is a well
thought out mix of tasteful elegance and digital convenience.
The beautiful, massive, prints look a lot more like paintings than
traditional photographs, and that’s intentional. They represent the high
end of Evans’ considerable talent, and have been worked in Photoshop
and Painter, sometimes painted by hand, until he’s satisfi ed he’s created
an heirloom. Says Evans, “I believe the uniqueness you bring to your work
is what people are looking for, so I think the more unique you can be
with posing and design, and all the technical info you have will make you
better as a creator. Whatever artistic vision you bring to the table will help
you survive this market.”
Rod Evans draws visual inspiration from one of the great masters of
painting, John Singer Sargent. “I’m very passionate about his work,” he
says, “which gives me passion for my own. I think the more passion you
have, as an artist in any media, can’t help but make you better. I’m not
trying to copy him, I’m trying to be inspired by his work and creativity.”
“He had the same challenges that we, as photographers have; pleasing
your client and pleasing yourself as an artist. There’s a balance you have
to create” (FIG 4.57).
FIG 4.57 Hans and Sanna
Evans created this dramatic portrait as a
wedding present for the subjects, master
portrait painters Sanna Tomac and Hans-
Peter Szameit. He built a special stand for
Tomac to lie on so she could arch her back
and drape her hair over her husband’s
shoulders. Lighting was one 5 � 7 Larson
softbox from camera left. Evans mounted
a Canon EF 100 mm f2.0 on a Hasselblad
H1 fi tted with a DCS Proback 645. ISO
100 at F8
Ch04-K52040.indd 94Ch04-K52040.indd 94 8/9/07 6:44:42 PM8/9/07 6:44:42 PM

95
Common Ground
Evans’ photography career started as a fl uke. “I had a real job (as a sales
trainer for Citibank), and someone asked me to shoot their wedding. I
said yes, then realized what a huge mistake I’d made. I bought books,
a camera, lights, because I knew a huge responsibility this was.” He
obviously did a good job. “One thing led to the next, and I booked a
few more. Pretty soon I had more business than … well, I had to make a
decision of one job over the other, and I was completely enamored with
photography.”
These days, Evans is strictly a portrait shooter, having left the wedding
business behind years ago. “We’ve been fortunate in our market, a city
of about 150,000 people which is growing rapidly,” he says. “I’m able to
work Tuesday to Friday, 9 to 5, and just shoot children and families. The
children and family markets are very big right now, segments of the
business that are actually growing” (FIG 4.58).
FIG 4.58 Chloe
To create a true work of art for this client’s
home, Evans departed from his tried and
true formula of placing the subject 8–10
feet from the background and, instead, had
her stand right in front of the tapestry. After
some exposures, Chloe tired of standing
and crouched down to rest. Evans shot,
and knew he had the image he wanted.
Because the fi le was large, Evans split it
into nine segments and painted each one
individually, primarily using Photoshop’s
Smudge tool. The incredible number of
brush strokes in this image required over
60 hours of work, and was worth every
minute of it. Lit by one 5 � 7 Larson
softbox, 70–200 mm f2.8 at f11, ISO 100
Ch04-K52040.indd 95Ch04-K52040.indd 95 8/9/07 6:44:50 PM8/9/07 6:44:50 PM
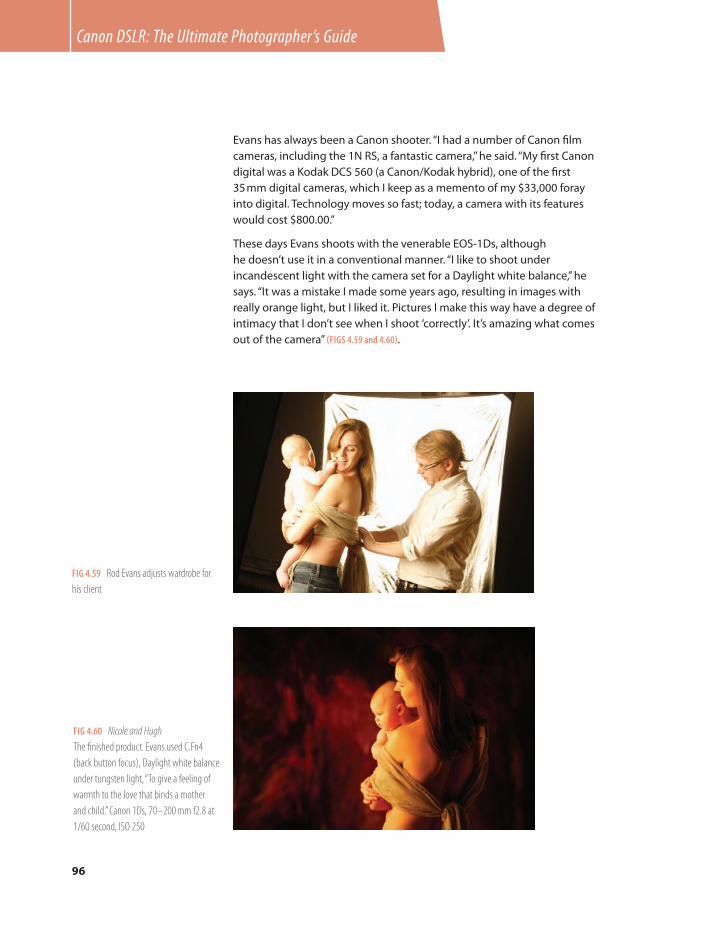
96
Canon DSLR: The Ultimate Photographer’s Guide
Evans has always been a Canon shooter. “I had a number of Canon fi lm
cameras, including the 1N RS, a fantastic camera,” he said. “My fi rst Canon
digital was a Kodak DCS 560 (a Canon/Kodak hybrid), one of the fi rst
35mm digital cameras, which I keep as a memento of my $33,000 foray
into digital. Technology moves so fast; today, a camera with its features
would cost $800.00.”
These days Evans shoots with the venerable EOS-1Ds, although
he doesn’t use it in a conventional manner. “I like to shoot under
incandescent light with the camera set for a Daylight white balance,” he
says. “It was a mistake I made some years ago, resulting in images with
really orange light, but I liked it. Pictures I make this way have a degree of
intimacy that I don’t see when I shoot ‘correctly’. It’s amazing what comes
out of the camera” (FIGS 4.59 and 4.60).
FIG 4.59 Rod Evans adjusts wardrobe for
his client
FIG 4.60 Nicole and Hugh
The fi nished product. Evans used C.Fn4
(back button focus), Daylight white balance
under tungsten light, “To give a feeling of
warmth to the love that binds a mother
and child.” Canon 1Ds, 70–200 mm f2.8 at
1/60 second, ISO 250
Ch04-K52040.indd 96Ch04-K52040.indd 96 8/9/07 6:44:53 PM8/9/07 6:44:53 PM
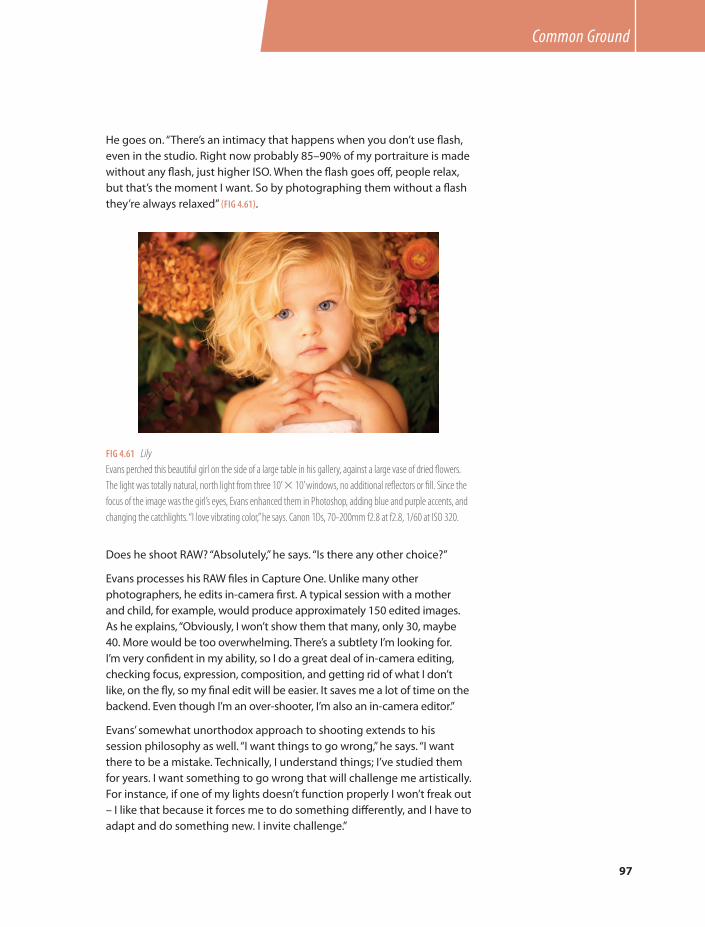
97
Common Ground
He goes on. “There’s an intimacy that happens when you don’t use fl ash,
even in the studio. Right now probably 85–90% of my portraiture is made
without any fl ash, just higher ISO. When the fl ash goes off , people relax,
but that’s the moment I want. So by photographing them without a fl ash
they’re always relaxed” (FIG 4.61).
Does he shoot RAW? “Absolutely,” he says. “Is there any other choice?”
Evans processes his RAW fi les in Capture One. Unlike many other
photographers, he edits in-camera fi rst. A typical session with a mother
and child, for example, would produce approximately 150 edited images.
As he explains, “Obviously, I won’t show them that many, only 30, maybe
40. More would be too overwhelming. There’s a subtlety I’m looking for.
I’m very confi dent in my ability, so I do a great deal of in-camera editing,
checking focus, expression, composition, and getting rid of what I don’t
like, on the fl y, so my fi nal edit will be easier. It saves me a lot of time on the
backend. Even though I’m an over-shooter, I’m also an in-camera editor.”
Evans’ somewhat unorthodox approach to shooting extends to his
session philosophy as well. “I want things to go wrong,” he says. “I want
there to be a mistake. Technically, I understand things; I’ve studied them
for years. I want something to go wrong that will challenge me artistically.
For instance, if one of my lights doesn’t function properly I won’t freak out
– I like that because it forces me to do something diff erently, and I have to
adapt and do something new. I invite challenge.”
FIG 4.61 Lily
Evans perched this beautiful girl on the side of a large table in his gallery, against a large vase of dried fl owers.
The light was totally natural, north light from three 10’ � 10’ windows, no additional refl ectors or fi ll. Since the
focus of the image was the girl’s eyes, Evans enhanced them in Photoshop, adding blue and purple accents, and
changing the catchlights. “I love vibrating color,” he says. Canon 1Ds, 70-200mm f2.8 at f2.8, 1/60 at ISO 320.
Ch04-K52040.indd 97Ch04-K52040.indd 97 8/9/07 6:44:57 PM8/9/07 6:44:57 PM
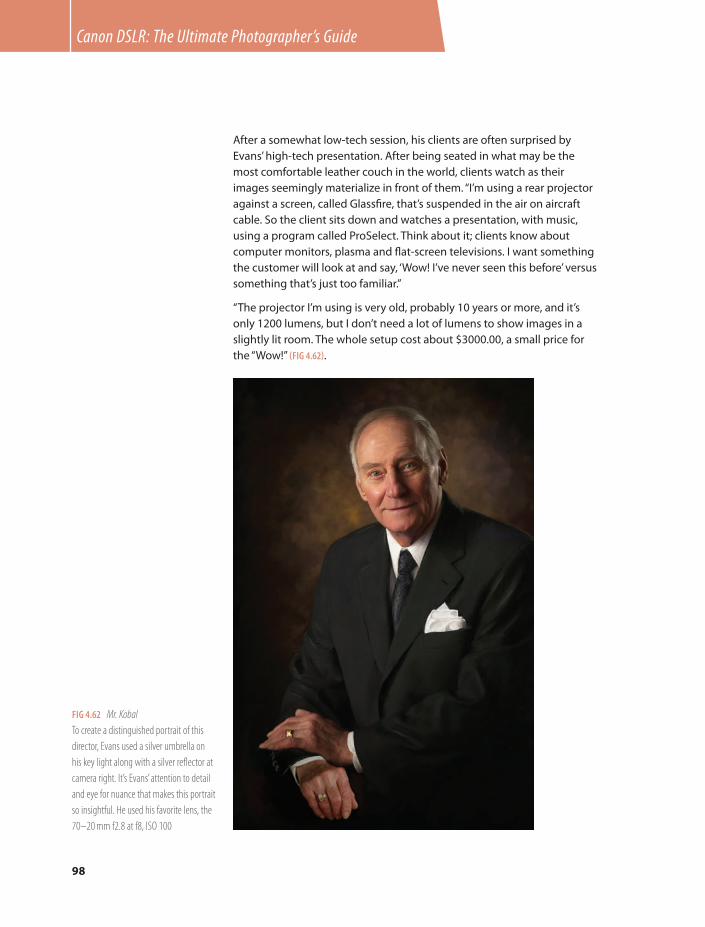
98
Canon DSLR: The Ultimate Photographer’s Guide
After a somewhat low-tech session, his clients are often surprised by
Evans’ high-tech presentation. After being seated in what may be the
most comfortable leather couch in the world, clients watch as their
images seemingly materialize in front of them. “I’m using a rear projector
against a screen, called Glassfi re, that’s suspended in the air on aircraft
cable. So the client sits down and watches a presentation, with music,
using a program called ProSelect. Think about it; clients know about
computer monitors, plasma and fl at-screen televisions. I want something
the customer will look at and say, ‘Wow! I’ve never seen this before’ versus
something that’s just too familiar.”
“The projector I’m using is very old, probably 10 years or more, and it’s
only 1200 lumens, but I don’t need a lot of lumens to show images in a
slightly lit room. The whole setup cost about $3000.00, a small price for
the “Wow!” (FIG 4.62).
FIG 4.62 Mr. Kobal
To create a distinguished portrait of this
director, Evans used a silver umbrella on
his key light along with a silver refl ector at
camera right. It’s Evans’ attention to detail
and eye for nuance that makes this portrait
so insightful. He used his favorite lens, the
70–20 mm f2.8 at f8, ISO 100
Ch04-K52040.indd 98Ch04-K52040.indd 98 8/9/07 6:44:59 PM8/9/07 6:44:59 PM

99
Common Ground
Even though it’s taken him years to build up his market, he’s not afraid of
competition, and freely off ers advice to new photographers.
“First, if you’re new, you need to learn everything you can learn about this
business, so that you can freely create because you have the technical
expertise and knowledge. That foundation is so incredibly important.”
“Secondly, you have to fi nd out who you are creatively and artistically, so
you know what makes you diff erent from your competition. What angle,
what direction, what artistic vision, do you have. Find out what makes
you excited, takes your breath away and stops you in your tracks. Study
it, understand it, learn as much as you can about it, then apply it to your
own work. As you learn you’ll get even more excited and fascinated about
that subject. Your enthusiasm will only grow.”
See more of Rod’s work at http://www.evansimages.com.
Ch04-K52040.indd 99Ch04-K52040.indd 99 8/9/07 6:45:18 PM8/9/07 6:45:18 PM

Ch05-K52040.indd 100Ch05-K52040.indd 100 8/10/07 12:37:58 PM8/10/07 12:37:58 PM

101
CHAPTER 5
The Zones
Basic Zone
For certain prosumer cameras, like the 30D, Canon off ers two options for creative
controls. Dubbed the Basic Zone and the Creative Zone, they are meant to be utilized
by photographers of varying skill levels to produce great photographs. The Basic Zone, for
example, uses icons to indicate automated imaging modes while the Creative Zone requires
a deeper knowledge of how things work in a camera.
None of the Basic Zone modes allow changes in white balance, exposure compensation, or exposure
beyond what the camera’s internal light meter says is correct. Instead, each mode is preset to what a
photographer would typically choose for a specifi c type of image, like a portrait or a landscape. However,
if the camera is not able to achieve this eff ect and still get a good exposure, it will simply attempt a
well-exposed image.
The Basic Zone modes do allow for creative cheating. For instance, each mode will allow the lens to
focus over its entire range, which means that you could focus on a close object even though you’re in
Landscape mode. The information that’s most critical to your choice of mode is the relationship between
the shutter speed and aperture that each mode provides by default.
Ch05-K52040.indd 101Ch05-K52040.indd 101 8/10/07 12:38:14 PM8/10/07 12:38:14 PM

102
Canon DSLR: The Ultimate Photographer’s Guide
Full Automatic
The fi rst function, as you might guess, is Full Automatic. Although this
function will achieve good results, the photographer allows the camera
to make every decision regarding how the picture will be taken and it’s
not possible to use any function, custom or otherwise, to change the
image (you are allowed to turn off the “beep”). If you’re using your camera
for basic snapshots, Full Auto may be all you need, but the results will be
an average look at the scene you’re photographing. You’ll also be missing
about 95% of your camera’s capabilities! (FIG 5.1)
Even though Full Auto does not take
advantage of the camera’s technology,
it beats trying to manually set up for a
fl eeting moment.
I heard a piece of advice (wish I could
remember from whom) that actually
makes a lot of sense: Always put the
camera away with it set to Full Auto or
Program. If you happen to come across
a “fl eeting moment” you’ll be ready to
go as fast as the camera can turn on and
charge up. Certain family moments fall into
this category as well as more impromptu
activities, like witnessing a bank robbery.
If you have time after fi rst recording the
action you can reset the camera for more
creative control.
FIG 5.1
One downside to Full Auto is that the fl ash may pop up and fi re if the
camera thinks there is not enough light for a good exposure.
One potential benefi t of Full Auto is that the auto focus is set to AI
Focus, enabling the camera to switch back and forth between One Shot
mode (for stationary subjects) and AI Servo mode (to track moving subjects)
based on whether it sees your subject as moving or standing still.
Portrait
The Portrait mode of your camera provides a quick and easy way to make
images of your subject (you’re not just limited to people) with a soft
background because it automatically attempts to set the lens to
its widest aperture, for the least amount of depth of fi eld. Reciprocally,
Ch05-K52040.indd 102Ch05-K52040.indd 102 8/10/07 12:38:19 PM8/10/07 12:38:19 PM

103
The Zones
the large aperture (greatest amount of light reaching the sensor)
means the camera will choose the fastest shutter speed possible
(shortest amount of time necessary to make a proper exposure) so any
problems associated with camera shake are minimized or non-existent
(FIG 5.2).
In Portrait mode, the camera defaults to a multiple exposure drive. Like a
motor drive on a fi lm camera, the camera will fi re continuously as long as
the shutter is depressed, until either the card or the buff er is full. It’s
often advantageous to shoot multiple frames of a subject because
expressions can be subtle and nuanced. Portrait mode allows you to do
that, if you wish.
The soft background one gets when shooting wide open can be
accentuated by replacing the current lens with a longer telephoto. Also,
the closer you are to the subject, or by using a longer focal length, the
softer the background will be (FIGS 5.3–5.5).
Landscape
Landscape mode is meant for normal or wide perspective shots of distant
horizons. Cameras set in this mode will default to an aperture somewhere
in the middle of the lens’ range, giving you some depth of fi eld (it’s not
usually necessary to shoot landscapes for maximum depth of fi eld)
(FIG 5.6).
FIG 5.2
Ch05-K52040.indd 103Ch05-K52040.indd 103 8/10/07 12:38:20 PM8/10/07 12:38:20 PM

104
Canon DSLR: The Ultimate Photographer’s Guide
FIG 5.3 At 70 mm, the background does
not intrude into the picture
FIG 5.4 At 100 mm, the background
softens more and visually increases in size
Ch05-K52040.indd 104Ch05-K52040.indd 104 8/10/07 12:38:21 PM8/10/07 12:38:21 PM

105
The Zones
FIG 5.5 At 200 mm, the background is extremely soft and delicate, and the subject exhibits a dimensionality
unlike the other images. Note that I backed up with each focal length change to maintain the same
composition.
FIG 5.6
Ch05-K52040.indd 105Ch05-K52040.indd 105 8/10/07 12:38:23 PM8/10/07 12:38:23 PM

106
Canon DSLR: The Ultimate Photographer’s Guide
The light meter will default to its Evaluative setting, which means that the
camera will meter the entire scene, but give emphasis to the area where
the camera has chosen to focus. Should you decide you want to lock your
focus and recompose, hold the shutter button halfway down, then re-
frame and shoot. Landscape mode may be used for interiors, too (FIG 5.7).
Please note that exposure information will not lock or store in the
camera’s memory unless the shutter button remains half-pressed. Also,
critical focus is almost never possible in any of the Basic Zone modes
because the camera is always set to automatic focus point selection. The
camera will choose what it wants to focus on; you don’t get to select a
focus point to use. Yes, you can focus/meter lock and recompose when in
Landscape mode, but which focus point or points the camera decides to
use is out of your control.
Close-up
When using the Close-up mode, you’ll notice the camera will tend to choose
an aperture that’s not quite wide open, like it does in Portrait (FIG 5.8). The
closer you are to your subject, the less depth of fi eld you have, even in
manual mode at small apertures. The camera wants to give you just a
little depth of fi eld to help showcase your subject with more than just
pinpoint focus. At the same time, maintaining a fast shutter speed will
help eliminate camera shake that’s more obvious when shooting fi ne
detail (FIG 5.9).
Should you fi nd you enjoy close-up (macro) photography, and many
people do, take a look at Canon’s line of macro lenses. The EF 50 mm f2.5
Compact Macro is an inexpensive yet impressive lens to begin with, and
will open up a whole new world for you (FIG 5.10).
FIG 5.7
Ch05-K52040.indd 106Ch05-K52040.indd 106 8/10/07 12:38:26 PM8/10/07 12:38:26 PM

107
The Zones
Sports
Got action? Whatever high-speed activity you’re shooting, the Sports
mode will do a great job of stopping it (FIG 5.11).
FIG 5.9
FIG 5.10
FIG 5.8
Ch05-K52040.indd 107Ch05-K52040.indd 107 8/10/07 12:38:27 PM8/10/07 12:38:27 PM
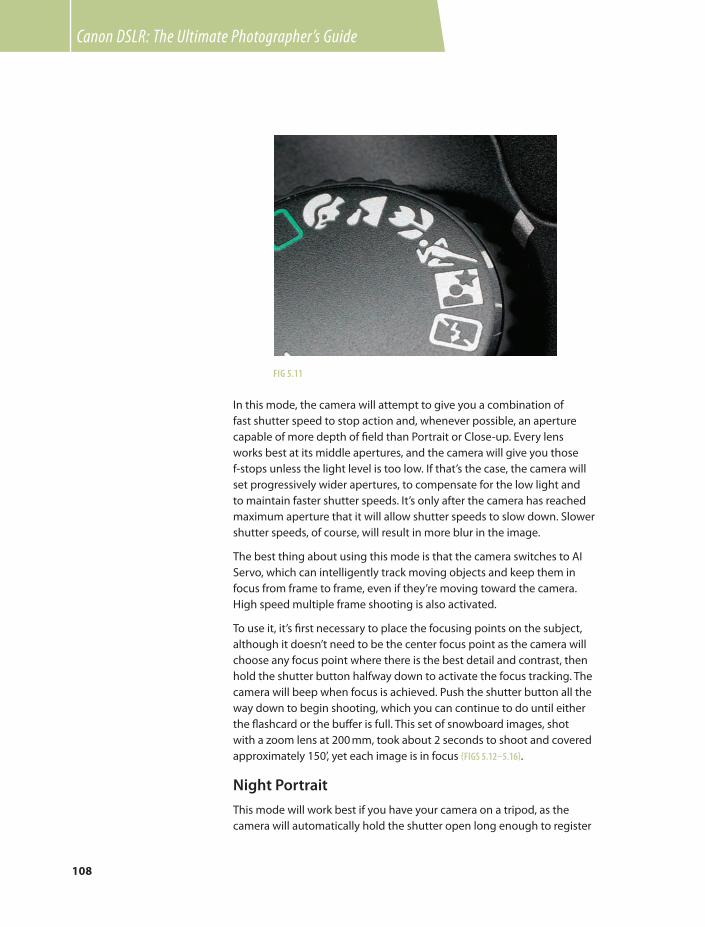
108
Canon DSLR: The Ultimate Photographer’s Guide
In this mode, the camera will attempt to give you a combination of
fast shutter speed to stop action and, whenever possible, an aperture
capable of more depth of fi eld than Portrait or Close-up. Every lens
works best at its middle apertures, and the camera will give you those
f-stops unless the light level is too low. If that’s the case, the camera will
set progressively wider apertures, to compensate for the low light and
to maintain faster shutter speeds. It’s only after the camera has reached
maximum aperture that it will allow shutter speeds to slow down. Slower
shutter speeds, of course, will result in more blur in the image.
The best thing about using this mode is that the camera switches to AI
Servo, which can intelligently track moving objects and keep them in
focus from frame to frame, even if they’re moving toward the camera.
High speed multiple frame shooting is also activated.
To use it, it’s fi rst necessary to place the focusing points on the subject,
although it doesn’t need to be the center focus point as the camera will
choose any focus point where there is the best detail and contrast, then
hold the shutter button halfway down to activate the focus tracking. The
camera will beep when focus is achieved. Push the shutter button all the
way down to begin shooting, which you can continue to do until either
the fl ashcard or the buff er is full. This set of snowboard images, shot
with a zoom lens at 200 mm, took about 2 seconds to shoot and covered
approximately 150’, yet each image is in focus (FIGS 5.12–5.16).
Night Portrait
This mode will work best if you have your camera on a tripod, as the
camera will automatically hold the shutter open long enough to register
FIG 5.11
Ch05-K52040.indd 108Ch05-K52040.indd 108 8/10/07 12:38:29 PM8/10/07 12:38:29 PM

109
The Zones
FIG 5.12
FIG 5.13
FIG 5.14
I wanted to use a sequence shot on snow to
illustrate two points:
1. Remember that Basic modes do not
allow any exposure compensation.
It doesn’t matter if you’re dealing with a
fi lm or digital camera; every in-camera
light meter can be fooled by a scene
that’s overly light or dark. The default
meter mode, Evaluative, is designed
to provide averages for whatever
scene it looks at. When it sees a frame
fi lled with light tones it tells the
camera that it needs a lesser exposure
than it actually does. The result is
underexposure. If the meter read a
frame that was mostly dark the result
would be the opposite, overexposure,
which would result in an overly bright
image.
2. These images were shot as high
resolution jpegs, not as Raw fi les. Still,
the RGB Image Adjustment’s Tone
Curve Adjustment in DPP was more
than enough to change the image
from a failure to a success (FIGS 5.17
and 5.18).
Ch05-K52040.indd 109Ch05-K52040.indd 109 8/10/07 12:38:31 PM8/10/07 12:38:31 PM

110
Canon DSLR: The Ultimate Photographer’s Guide
FIG 5.15
FIG 5.16
FIG 5.17 As shot
Ch05-K52040.indd 110Ch05-K52040.indd 110 8/10/07 12:38:34 PM8/10/07 12:38:34 PM

111
The Zones
background light behind your subject. It works in tandem with fl ash,
either the built-in camera fl ash or an accessory unit, and the amount
of time the shutter will stay open depends, not on the fl ash, but the
brightness of the background light (FIG 5.19).
Flash shots typically show a properly exposed subject but a very dark
background because the fl ash loses intensity as it travels away from the
subject. Night Portrait mode works equally well for inside portraits as
well, for any subject, in fact, where you’d like some background detail.
It’s a good idea to ask your subject to hold still after the fl ash fi res and
until you hear the shutter close (FIG 5.20).
FIG 5.18 After adjustment in DPP
FIG 5.19 Night Portrait
Ch05-K52040.indd 111Ch05-K52040.indd 111 8/10/07 12:38:37 PM8/10/07 12:38:37 PM

112
Canon DSLR: The Ultimate Photographer’s Guide
Flash Off
This mode will disable the camera’s command to fi re the built-in fl ash
or any accessory fl ash plugged into the fl ash shoe. The camera will
attempt to give you a combination of shutter speed and aperture that
will properly expose the frame but still provide some depth of fi eld.
Under lower light, the shutter must stay open longer and the possibility
of camera shake exists. Based on the focal length of the lens you have on
the camera, the shutter speed indicator light, visible inside the viewfi nder
along the bottom of the viewfi nder window or on the exterior LCD panel,
will blink to indicate potential camera shake (FIG 5.21).
FIG 5.20
FIG 5.21 Flash Off
This mode is particularly useful if you need to photograph a building
interior and do not want the distraction or infl uence of a fl ash. Also, the
Auto Focus function will default to AI Focus to enable the camera to
switch back and forth between One Shot and AI Servo automatically. This
mode is identical to Full Auto (the Green mode) with the exception that
the fl ash will never pop up (FIG 5.22).
Ch05-K52040.indd 112Ch05-K52040.indd 112 8/10/07 12:38:38 PM8/10/07 12:38:38 PM

113
The Zones
FIG 5.22
Ch05-K52040.indd 113Ch05-K52040.indd 113 8/10/07 12:38:40 PM8/10/07 12:38:40 PM

114
Canon DSLR: The Ultimate Photographer’s Guide
FIG 5.23
The Creative ZoneWithin the prosumer line of cameras, the Creative Zone is separate set of
functions that may be found on the other half of the Mode dial. On the
EOS-1 bodies, the professional line, the Creative Zone is all you get. The
Creative Zone off ers a huge opportunity for aperture and shutter speed
options as well as the use of many of the personal or fi ne-tuning options
like Custom Functions or Exposure Compensation.
Program AE
Like its Basic Zone brother, Full Automatic, Program AE (Auto Exposure) is a
general purpose shooting mode and will set shutter speed and aperture in
exactly the same way. Still, it off ers quite a number of options that Full Auto
does not, but here a just a few of the most important (FIG 5.23).
You can change the White Balance from Auto White Balance to any of the
presets or to a Custom White Balance (always a good idea). Even Color
Temperature, a way to dial in a color temperature of choice, is available
to you.
If your subjects are too light or dark, you may dial in some Exposure
Compensation. This is often necessary when photographing a dark
subject against a light background or vice versa.
The RAW fi le format is available when using Program AE.
All Picture Styles are available (if your camera supports them).
Ch05-K52040.indd 114Ch05-K52040.indd 114 8/10/07 12:38:41 PM8/10/07 12:38:41 PM

115
The Zones
FIG 5.24
Tv Shutter Speed Priority AE
Tv (Time value), allows you to choose the shutter speed best suited to
your creative needs while the camera chooses the correct reciprocal
f-stop. This mode is a valuable tool when photographing moving objects
because you can easily change the amount of motion blur in your fi nal
image, from none at all to as much as you want (FIG 5.24).
Note that if you see the aperture light blinking in the viewfi nder or on the
LCD display, you will not get a correct exposure (FIGS 5.25 and 5.26).
FIG 5.25 Even at 70 miles per hour, 1/1000th second is not fast enough to
stop all movement in the wheels, although the truck almost looks parked
at fi rst glance
FIG 5.26 Panning the camera at 1/8th second (with additional
neutral density fi ltration) produces a beautiful blur and sense of great
speed
Shooting Tip
On many of its digital SLRs, Canon allows
you to extend the ISO range, via a Custom
Function, to a speed as low as ISO 50.
This is still not slow enough to allow
extraordinary blur of fast moving objects in
bright daylight. You may need to purchase
and use neutral density (ND) fi lters,
available in a wide variety of densities, to
get the amount of blur you want.
Specialty fi lters like ND are expensive. I
always recommend buying fi lters larger
than your largest lens diameter (to avoid
potential vignetting issues if you stack two
or three together) and using step-up or
step-down rings so your one set of fi lters
will fi t all of your lenses.
I think it’s a good idea to buy a variety of
ND fi lters, perhaps a �2, �3, and �4
stop set. You can stack them together to
get up to �9 stops. More than three fi lters
in front of the lens and you’ll run the risk
of focus aberrations. Performing a Custom
White Balance whenever you add ND is
also a good idea.
Ch05-K52040.indd 115Ch05-K52040.indd 115 8/10/07 12:38:42 PM8/10/07 12:38:42 PM

116
Canon DSLR: The Ultimate Photographer’s Guide
Av Aperture Priority AE
If depth of fi eld, or the lack of it, is more important than stopping motion
you may wish to use the Av (Aperture value) mode. You may wish to
shoot a number of close-up images, like portraits (which makes this
similar to the Basic Portrait mode) or to the lens’ hyperfocal distance.
However you apply it, simply set the camera’s aperture to the desired size
and fi re away. The camera will set the reciprocal shutter speed. Unless you
see the shutter speed number blinking in either the viewfi nder or on the
LCD you will get a good exposure (FIG 5.27).
Since you can use any of the light meter and auto focus matrices with
any Creative Zone mode I’d recommend that you experiment with each.
After a little practice you’ll have a good idea of what works best for your
personal style.
Personally, Aperture Priority is my favorite mode if I’m just walking
around, looking for things to photograph, and just want to snap away.
I don’t usually like great depth of fi eld, so the faster shutter speeds I get
with a large aperture, and Canon’s rapid ultrasonic motors and image
stabilizers, means I can shoot quickly and with confi dence under a very
wide variety of lighting conditions (FIGS 5.28–5.30).
Manual
Ah, Manual. Manual is probably my favorite mode in the Creative Zone,
and for a number of reasons. First of all, using it forces me to think about
what I’m doing and what I want to see when I’m done. If I’m on location
FIG 5.27
Ch05-K52040.indd 116Ch05-K52040.indd 116 8/10/07 12:38:45 PM8/10/07 12:38:45 PM

117
The Zones
FIG 5.29
for a commercial client I know I can bend the camera to my will and
deliver exactly what the art director wants to get. And, of course, working
in Manual is indispensable in the studio, where everything must be
tightly controlled to be successful (and where semi-automatic modes are
almost impossible to work with) (FIG 5.31).
An accessory light meter may be necessary when working in Manual
under available light although you can see light levels measured in
the viewfi nder, a somewhat tedious method. The camera does not set
anything, so you’ll have to make shutter and aperture adjustments
manually. If your studio is equipped with electronic fl ash, you will need a
separate light meter able to measure strobes as well as ambient light.
Some of the Canon line will strobe-sync to shutter speeds as fast as
1/250th of a second. This is often useful if you’re balancing strobe light
to bright ambient light, so you should be sure to read your camera’s
instruction manual to fi nd the maximum shutter speed you can use to
sync your studio, built-in, or accessory fl ash units. The faster it syncs, the
FIG 5.28
FIG 5.30
Ch05-K52040.indd 117Ch05-K52040.indd 117 8/10/07 12:38:46 PM8/10/07 12:38:46 PM
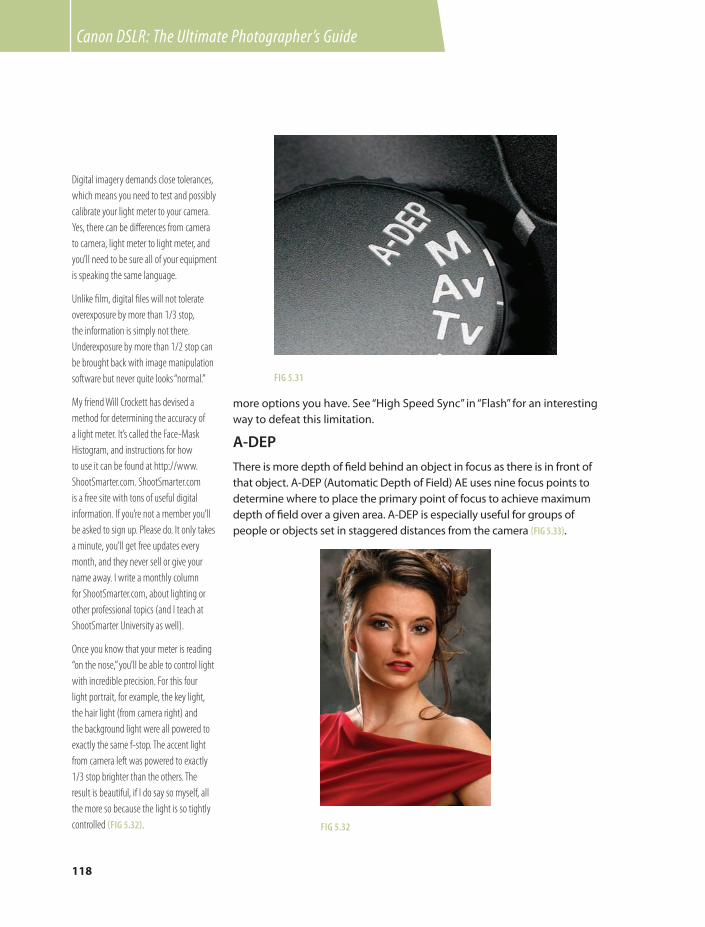
118
Canon DSLR: The Ultimate Photographer’s Guide
more options you have. See “High Speed Sync” in “Flash” for an interesting
way to defeat this limitation.
A-DEP
There is more depth of fi eld behind an object in focus as there is in front of
that object. A-DEP (Automatic Depth of Field) AE uses nine focus points to
determine where to place the primary point of focus to achieve maximum
depth of fi eld over a given area. A-DEP is especially useful for groups of
people or objects set in staggered distances from the camera (FIG 5.33).
FIG 5.31
FIG 5.32
Digital imagery demands close tolerances,
which means you need to test and possibly
calibrate your light meter to your camera.
Yes, there can be diff erences from camera
to camera, light meter to light meter, and
you’ll need to be sure all of your equipment
is speaking the same language.
Unlike fi lm, digital fi les will not tolerate
overexposure by more than 1/3 stop,
the information is simply not there.
Underexposure by more than 1/2 stop can
be brought back with image manipulation
software but never quite looks “normal.”
My friend Will Crockett has devised a
method for determining the accuracy of
a light meter. It’s called the Face-Mask
Histogram, and instructions for how
to use it can be found at http://www.
ShootSmarter.com. ShootSmarter.com
is a free site with tons of useful digital
information. If you’re not a member you’ll
be asked to sign up. Please do. It only takes
a minute, you’ll get free updates every
month, and they never sell or give your
name away. I write a monthly column
for ShootSmarter.com, about lighting or
other professional topics (and I teach at
ShootSmarter University as well).
Once you know that your meter is reading
“on the nose,” you’ll be able to control light
with incredible precision. For this four
light portrait, for example, the key light,
the hair light (from camera right) and
the background light were all powered to
exactly the same f-stop. The accent light
from camera left was powered to exactly
1/3 stop brighter than the others. The
result is beautiful, if I do say so myself, all
the more so because the light is so tightly
controlled (FIG 5.32).
Ch05-K52040.indd 118Ch05-K52040.indd 118 8/10/07 12:38:50 PM8/10/07 12:38:50 PM

119
The Zones
FIG 5.33
To use it, simply turn the dial to the A-DEP icon and compose your picture.
A-DEP will analyze the data from the focus points and set an aperture ade-
quate to get depth of fi eld over the group along with its corresponding
shutter speed. You can see the camera’s selection in the information bar
along the bottom of the viewfi nder or in the LCD display on top of the body.
If you see a blinking shutter speed, either 30 or 8000, it means the subject
is either too light or too dark. If the aperture number blinks, it means that
proper depth of fi eld could not be attained. Canon recommends either
moving further away from the subjects or changing to a wider-angle
(shorter focal length) lens. Also, A-DEP will not work if the lens is set to
Manual Focus.
It’s possible that, with low light subjects, the camera will set a shutter
speed that requires a tripod to avoid camera shake (FIG 5.34).
FIG 5.34
Ch05-K52040.indd 119Ch05-K52040.indd 119 8/10/07 12:38:52 PM8/10/07 12:38:52 PM
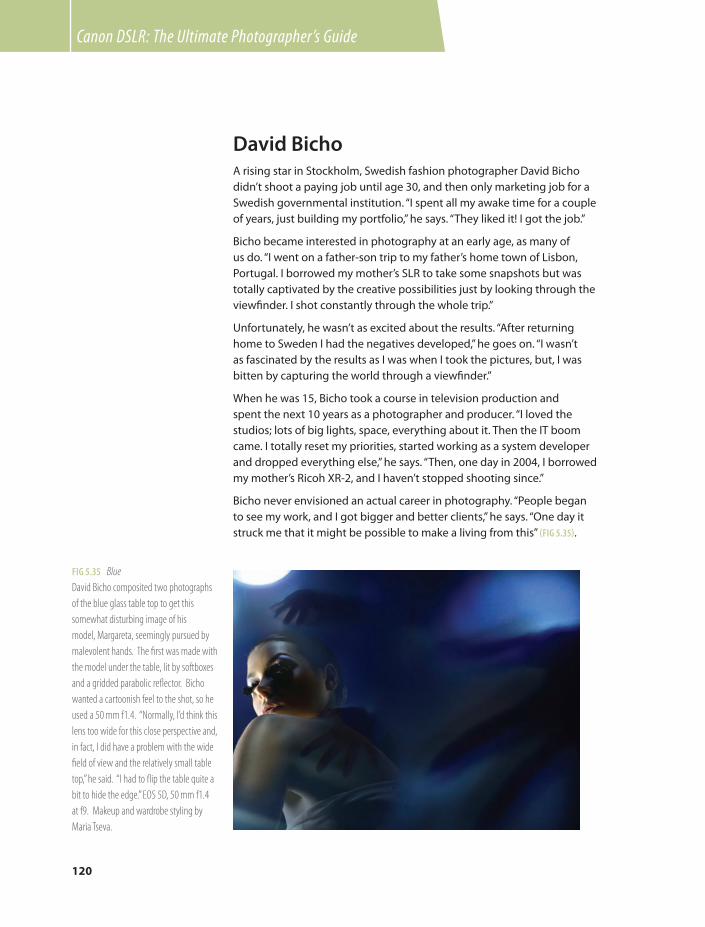
120
Canon DSLR: The Ultimate Photographer’s Guide
David BichoA rising star in Stockholm, Swedish fashion photographer David Bicho
didn’t shoot a paying job until age 30, and then only marketing job for a
Swedish governmental institution. “I spent all my awake time for a couple
of years, just building my portfolio,” he says. “They liked it! I got the job.”
Bicho became interested in photography at an early age, as many of
us do. “I went on a father-son trip to my father’s home town of Lisbon,
Portugal. I borrowed my mother’s SLR to take some snapshots but was
totally captivated by the creative possibilities just by looking through the
viewfi nder. I shot constantly through the whole trip.”
Unfortunately, he wasn’t as excited about the results. “After returning
home to Sweden I had the negatives developed,” he goes on. “I wasn’t
as fascinated by the results as I was when I took the pictures, but, I was
bitten by capturing the world through a viewfi nder.”
When he was 15, Bicho took a course in television production and
spent the next 10 years as a photographer and producer. “I loved the
studios; lots of big lights, space, everything about it. Then the IT boom
came. I totally reset my priorities, started working as a system developer
and dropped everything else,” he says. “Then, one day in 2004, I borrowed
my mother’s Ricoh XR-2, and I haven’t stopped shooting since.”
Bicho never envisioned an actual career in photography. “People began
to see my work, and I got bigger and better clients,” he says. “One day it
struck me that it might be possible to make a living from this” (FIG 5.35).
FIG 5.35 Blue
David Bicho composited two photographs
of the blue glass table top to get this
somewhat disturbing image of his
model, Margareta, seemingly pursued by
malevolent hands. The fi rst was made with
the model under the table, lit by softboxes
and a gridded parabolic refl ector. Bicho
wanted a cartoonish feel to the shot, so he
used a 50 mm f1.4. “Normally, I’d think this
lens too wide for this close perspective and,
in fact, I did have a problem with the wide
fi eld of view and the relatively small table
top,” he said. “I had to fl ip the table quite a
bit to hide the edge.” EOS 5D, 50 mm f1.4
at f9. Makeup and wardrobe styling by
Maria Tseva.
Ch05-K52040.indd 120Ch05-K52040.indd 120 8/10/07 12:38:53 PM8/10/07 12:38:53 PM

121
The Zones
FIG 5.36 Sunset
This image was made for a makeup artist’s portfolio and Bicho wanted to create the look of a sunset on a
vacation beach. He set up a fl ash with a small refl ector directly behind a large diff usion panel. Because part
of the fl ash is pointed directly at the camera, fl are is formed, giving the impression of very bright light. A
second light from above gently kisses her chin as it bounces off a refl ector panel below. The underlight is
typical of a beach refl ection. Photographers live to deceive you. This image was created entirely in studio, of
course. The hat, which is quite believable as a beach hat was actually made of thick felt. It’s the shape and
the model’s pose that make it work. EOS 5D, 135 f2 at f14
At the moment, Bicho still maintains a part-time job at a web bureau
in Stockholm, just to be sure the family’s bills are taken care of. “My
photography is standing for the bigger part of the total family income,
but I’m still investing a lot in gear and equipment,” he says. “Measured in
time, my photography is more than a full-time job.”
In terms of fashion, Bicho is “fascinated by trends as phenomenon. In
fashion photography there are fashion trends to follow but also esthetic
and technical trends that are very inspiring.” He goes on, “I love the fact
that behind good fashion photography (to my taste) is a total control of
details. I’m a control freak, so fashion suits me perfectly, but I also want
to select makeup artists and wardrobe stylists who have something to
contribute to the shoot. When I do this, everyone in the studio is also
inspired.”
David Bicho’s equipment list is surprisingly minimal, given the look
of his results. He shoots with a Canon 5D, with battery grip, and just a
few lenses, the 35 mm f1.4L, 50 mm f1.4, 135 mm f2L primes and the
16–35 mm f2.8L and 70-200 f2.8L IS zooms. Along with three BX400 and
two BX100 Elinchrom monolights, softbox and umbrella modifi ers, Bicho
is able to produce some compelling imagery (FIG 5.36).
Ch05-K52040.indd 121Ch05-K52040.indd 121 8/10/07 12:38:55 PM8/10/07 12:38:55 PM

122
Canon DSLR: The Ultimate Photographer’s Guide
And how does he deal with his images?
“I always shoot RAW,” he says. “The only advantage in shooting jpeg is that
I wouldn’t have to change the memory card after a day’s shooting.
I see a RAW fi le as the beginning of an art work. The base material.
I want as many possibilities for post-processing as possible. I am, of
course, always striving to nail the shot in camera, but I couldn’t live with
the feeling that I’m locked into that tight (jpeg) corner.”
He continues, “I’m a RAW fi le converter freak. I spent a lot of time testing
all the RAW converters out there and I don’t have any one favorite. Each
one has its strengths, so I use them for diff erent purposes.”
“For example, Lightroom is my choice when a lot of images need to be
fi xed with no time for Photoshopping. The Hue/Saturation/Lightness tool
is incredible, as is the Split Toning feature. If there’s any drawback to LR
it’s that it doesn’t support two monitors, but the fact that Lightroom will
create and upload my web albums makes up for it. That feature is a life
quality enhancer since I can go to sleep while it’s working.”
“When I shoot tethered I work with Capture One Pro. It’s stable and
renders RAW fi les beautifully. I also use Raw Shooter, the old RAW
converter from Pixmantec that’s been discontinued for some time. It
was never made for Mac’s OS X but runs wonderfully with the Windows
emulator Parallels. Raw Shooter has a magic way of making colors look
analog, and it makes great black and white conversions, too.”
Archiving is a big issue for Bicho. He’s tried virtually every application out
there but hasn’t found any one that suits his workfl ow, especially since
he uses a number of RAW converters and diff erent computers. As he puts
it, “My archiving structure is a simple fi le structure with all RAW fi les in
date order on a lot of hard drives. I also have a Project structure, based
on client names, scattered over other hard drives. I would call my archive
total chaos.”
Bicho also shoots lifestyle stock photography. “I tried to join (a stock
agency) with some personal fashion projects but was rejected because
of ‘poor lighting’. They sent me to a link that explained I couldn’t light
straight into the camera because this would cause fl are. They were so
cute and considerate.”
Like every good photographer, Bicho continues to evolve. “There is so
much to learn in so many diff erent areas is one thing,” he says. “But the
absurd fact that one puts so much energy, time, and eff ort to control a
hundredth of a second fascinates me” (FIGS 5.37–5.39).
To see more work, visit David’s site, http://www.bicho.se .
Ch05-K52040.indd 122Ch05-K52040.indd 122 8/10/07 12:38:57 PM8/10/07 12:38:57 PM
123
The Zones
FIG 5.37 No legs at all
Some people can’t wait to shoot. Bicho made this image of his makeup artist, Hanna-Cecelia, while waiting
for his hairstylist to fi nish with the “real” model. He lit the shot with a large beauty bowl from the right front
and a softbox from behind and to the left. “Yes,” he says. “I removed the legs in Photoshop.” Canon EOS 5D,
85 mm f1.2 at f10
Ch05-K52040.indd 123Ch05-K52040.indd 123 8/10/07 12:38:57 PM8/10/07 12:38:57 PM

124
Canon DSLR: The Ultimate Photographer’s Guide
FIG 5.38 Big Red Feathers
“My beautiful model, Margareta, has perfect, fl awless skin and unnaturally bright whites in her eyes,
perfect proportions … it’s like she’s gone through Photoshop in real life.” Bicho accented her features using
a very feathered (angled away) softbox on the left and a black foamcore card on the right to deepen the
shadows. An additional silver refl ector was placed below the model’s chest. Makeup by Maria Tseva, EOS 5D,
135 mm f2.0 at f10
Ch05-K52040.indd 124Ch05-K52040.indd 124 8/10/07 12:39:02 PM8/10/07 12:39:02 PM

125
The Zones
FIG 5.39 Without Trousers
Working with a colleague, Martin Botvidsson, the two created this evocative image using only one light, a studio strobe with a 40 � 40 gridded softbox from
above and an angled refl ector card from below. EOS 5D, 50 mm f1.2 at f6.3
Ch05-K52040.indd 125Ch05-K52040.indd 125 8/10/07 12:39:05 PM8/10/07 12:39:05 PM

Ch06-K52040.indd 126Ch06-K52040.indd 126 8/10/07 12:39:57 PM8/10/07 12:39:57 PM

127
CHAPTER 6
Focus, Exposure, and Style
Working With External Light Meters
Today’s external digital light meters are miracles for photographers. All of the good ones are
able to read in increments of 1/10 of an f-stop and, when they’re properly calibrated to your
equipment, will yield exposures that are impressively exact.
Canon’s internal light meters are terrifi c, too, and you may never come up against a situation where
they will not perform admirably. Still, for studio photographers working with either Canon Speedlites
in manual mode, or larger studio strobes, in-camera meters just won’t cut it – they simply aren’t
designed to measure non-constant light sources. Don’t think you can use the camera’s LCD as a light
meter, either. It’s just not accurate enough to give you more than a general idea of how close you are to
perfection.
That said, external meters can be confusing. The extra numbers representing the decimal confuse many, and
some largely ignore them. This can create exposure problems, especially with overexposure greater than
1/3 of a stop, so you must take those extra numbers seriously. For example, if you take a reading and you see
something like this (FIG 6.1), it most defi nitely does not mean f11 alone. Rather, the meter is indicating your
exposure is f11 plus 2/3 (7/10) of a stop more. To simply set the camera to f11 would mean an overexposure
of 2/3 stop, too great to salvage with any software, unless you’ve shot RAW (which adds to your workfl ow
time) (FIG 6.2).
Ch06-K52040.indd 127Ch06-K52040.indd 127 8/10/07 12:40:08 PM8/10/07 12:40:08 PM

128
Canon DSLR: The Ultimate Photographer’s Guide
To make matters even more confusing, it’s not the same old f8, f11, f16 on
the camera anymore. There’s a batch of new numbers in between those
whole f-stops that are equally confusing. Those numbers, the numeric
FIG 6.1
FIG 6.2 When an image is overexposed
by more than 1/3 stop (f11) there is no
way to bring highlight densities back to a
“normal” range.
Ch06-K52040.indd 128Ch06-K52040.indd 128 8/10/07 12:40:12 PM8/10/07 12:40:12 PM
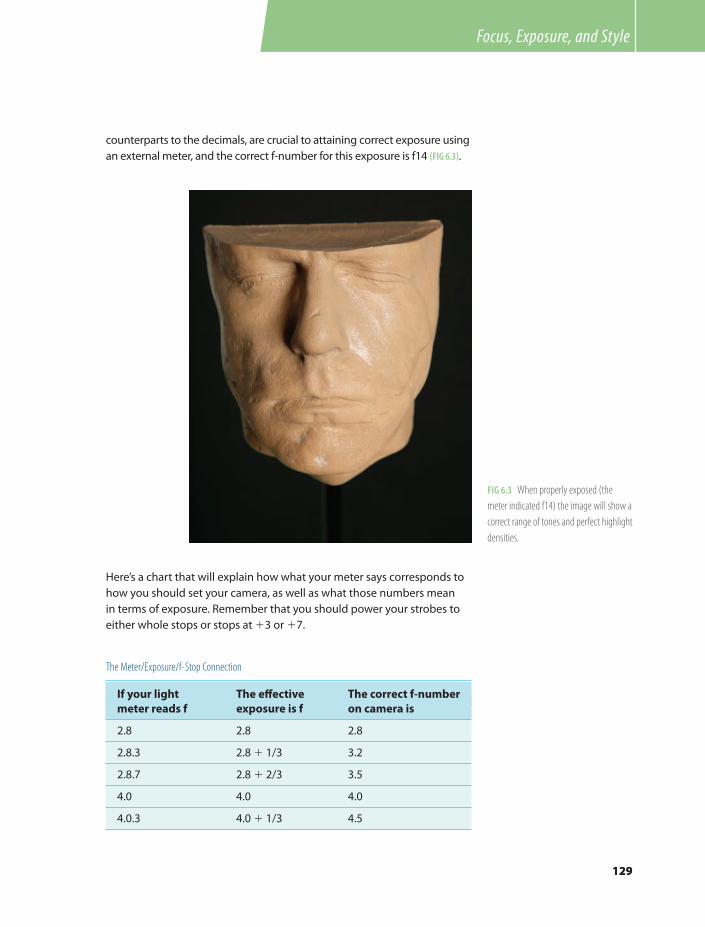
129129
Focus, Exposure and StyleFocus, Exposure, and Style
If your light The eff ective The correct f-number
meter reads f exposure is f on camera is
2.8 2.8 2.8
2.8.3 2.8 � 1/3 3.2
2.8.7 2.8 � 2/3 3.5
4.0 4.0 4.0
4.0.3 4.0 � 1/3 4.5
The Meter/Exposure/f-Stop Connection
counterparts to the decimals, are crucial to attaining correct exposure using
an external meter, and the correct f-number for this exposure is f14 (FIG 6.3).
FIG 6.3 When properly exposed (the
meter indicated f14) the image will show a
correct range of tones and perfect highlight
densities.
Here’s a chart that will explain how what your meter says corresponds to
how you should set your camera, as well as what those numbers mean
in terms of exposure. Remember that you should power your strobes to
either whole stops or stops at �3 or �7.
Ch06-K52040.indd 129Ch06-K52040.indd 129 8/10/07 12:40:14 PM8/10/07 12:40:14 PM

130
Canon DSLR: The Ultimate Photographer’s Guide
For those of you who may wish to work in ½ stop increments, here’s a
chart that explains the concept in those terms.
If your light The eff ective The correct f-number
meter reads f exposure is f on camera is
4.0.7 4.0 � 2/3 5.0
5.6 5.6 5.6
5.6.3 5.6 � 1/3 6.3
5.6.7 5.6 � 2/3 7.1
8.0 8.0 8.0
8.03 8 � 1/3 9
8.0.7 8 � 2/3 10
11 11 11
11.3 11 � 1/3 13
11.7 11 � 2/3 14
16 16 16
16.3 16 � 1/3 18
16.7 16 � 2/3 20
22 22 22
22.3 22 � 1/3 25
22.7 22 � 2/3 29
32 32 32
If your light The eff ective The correct f-number
meter reads f exposure is f on camera is
2.8 2.8 2.8
2.8.5 2.8 � 1/2 3.5
4 4 4
4.5 4 � 1/2 4.5
5.6 5.6 5.6
5.6.5 5.6 � 1/2 6.7
8 8 8
8.5 8 � 1/2 9.5
Ch06-K52040.indd 130Ch06-K52040.indd 130 8/10/07 12:40:15 PM8/10/07 12:40:15 PM

131
Focus, Exposure, and Style
If your light The eff ective The correct f-number
meter reads f exposure is f on camera is
11 11 11
11.5 11 � 1/2 13
16 16 16
16.5 16 � 1/2 19
22 22 22
Ch06-K52040.indd 131Ch06-K52040.indd 131 8/10/07 12:40:16 PM8/10/07 12:40:16 PM

132
Canon DSLR: The Ultimate Photographer’s Guide
Picture StylesOne of the fi rst big gripes about digital was that it didn’t look like fi lm.
True enough, and for a number of reasons. Even early digital cameras
could produce images that were neutral in tone while fi lm manufacturers
were creating emulsions that looked anything but neutral. Kodak’s Portra
color negative fi lm, for example, was soft and not overly saturated, while
Fuji’s Velvia transparency stock was more red-rich and very saturated.
Another frustration was digital’s inability to easily make high quality black
and white images and prints that looked like their darkroom-generated
counterparts.
With the release of the 20D, Canon introduced a new control, Processing
Parameters. Three preset selections which controlled saturation, contrast,
sharpness, and color tone (a shift between yellow and red) allowed the
photographer to create photographs with diff erent looks, as well as
black and white images. Additional presets were available which could
be programmed a photographer’s particular taste or situation. Note that
with Parameters, each fi le was always processed with the same basic
neutral algorithm, which could be modifi ed by adding or subtracting
contrast, saturation, sharpness, or color tone.
Canon upgraded the function by creating a series of unique algorithms,
introduced with the 5D and 30D models, and calling them Picture Styles. In
addition to each algorithm producing a diff erent look, the upgrade allows
variations within each Picture Style, called Detailed Settings. These settings
allow for changes in Sharpness, Contrast, Saturation, and Color Tone for
each of the Styles, giving photographers even more image control.
There are six native Picture Styles: Standard, Portrait, Landscape, Neutral,
Faithful, and Monochrome. I would strongly encourage you to test these
extensively, so they might be used to complement your work.
Standard
For general work, Standard is hard to beat (FIG 6.4). Colors are true but
slightly exaggerated, with a crisp quality imparted by a built-in sharpness
increase. Since I like a little punch in my imagery this is my favorite,
everyday, Picture Style (FIGS 6.5 and 6.6).
Portrait
The Portrait algorithm was built for skin tones, producing a look similar to
fi ne color negative fi lm (FIG 6.7). Final prints are not quite as sharp as other
Styles (fi ne portraiture should never be too sharp), and skin tones can be
modifi ed by changing the Color Tone feature (FIGS 6.8 and 6.9).
Ch06-K52040.indd 132Ch06-K52040.indd 132 8/10/07 12:40:16 PM8/10/07 12:40:16 PM

133
Focus, Exposure, and Style
FIG 6.5
FIG 6.4
FIG 6.6
FIG 6.7
FIG 6.9FIG 6.8
Ch06-K52040.indd 133Ch06-K52040.indd 133 8/10/07 12:40:16 PM8/10/07 12:40:16 PM

134
Canon DSLR: The Ultimate Photographer’s Guide
Landscape
Outdoor photographers will appreciate the increased blue and green
recognition of the Landscape Style (FIG 6.10). While this Style is not
recommended for general portraiture it can certainly be used to produce
some interesting eff ects (FIGS 6.11 and 6.12).
Neutral
Designed to produce color that is not exaggerated in any way. Files
produced in the Neutral setting will generally need to undergo some
post-processing adjustments (FIG 6.13). By the way, if you are working
with a pre-Picture Styles camera, all of your images are produced
using the Neutral algorithm, unless Parameters are applied (FIGS 6.14
and 6.15).
FIG 6.11
FIG 6.10
FIG 6.12
Ch06-K52040.indd 134Ch06-K52040.indd 134 8/10/07 12:40:20 PM8/10/07 12:40:20 PM

135
Focus, Exposure, and Style
Faithful
Faithful is based strictly on math and not on the personal tastes of the
engineers who design the processing algorithms (FIG 6.16). Its algorithm
refl ects color as interpreted colorimetrically, faithful to the numbers that
defi ne each particular color or shade of that color (FIGS 6.17 and 6.18).
FIG 6.14
Monochrome
Monochrome, another new algorithm, redefi nes Canon’s traditional Black
and White Parameter setting to create totally neutral RGB or sRGB images
FIG 6.16
FIG 6.13
FIG 6.15
Ch06-K52040.indd 135Ch06-K52040.indd 135 8/10/07 12:40:22 PM8/10/07 12:40:22 PM

136
Canon DSLR: The Ultimate Photographer’s Guide
FIG 6.17
FIG 6.18
that are full of visual information and rival those produced in a darkroom
(FIG 6.19).
Monochrome images made under jpeg compression cannot be returned
to their color state with any image processing software but images shot
Raw can be converted to any Picture Style (FIGS 6.20 and 6.21).
As I mentioned earlier, Sharpness, Contrast, Saturation, and Color Tone
are variable beyond the basic default settings of each of the Picture
Styles. For this demonstration I selected the Neutral Picture Style and
shot a variation at each end of the scale (FIGS 6.23–6.49).
User Defi ned
With this interface, Canon gives you the
option of creating and registering three
Picture Styles with your choice of Detailed
Settings. For example, you could select the
Portrait Picture Style, set the Sharpness to
3 and Contrast to �2, leaving the Color
Tone alone. Once set in the camera, this
would become User Defi ned setting 1,
available to you anytime you wished to use
it (FIG 6.22) .
FIG 6.19
Ch06-K52040.indd 136Ch06-K52040.indd 136 8/10/07 12:40:25 PM8/10/07 12:40:25 PM

137
Focus, Exposure, and Style
FIG 6.20FIG 6.21
FIG 6.22
Ch06-K52040.indd 137Ch06-K52040.indd 137 8/10/07 12:40:27 PM8/10/07 12:40:27 PM

138
Canon DSLR: The Ultimate Photographer’s Guide
FIG 6.24
FIG 6.25
FIG 6.23 Zero Sharpness applied in camera
Ch06-K52040.indd 138Ch06-K52040.indd 138 8/10/07 12:40:30 PM8/10/07 12:40:30 PM

139
Focus, Exposure, and Style
FIG 6.26 Same fi les with a Sharpness factor of �3FIG 6.27
FIG 6.28
Ch06-K52040.indd 139Ch06-K52040.indd 139 8/10/07 12:40:32 PM8/10/07 12:40:32 PM

140
Canon DSLR: The Ultimate Photographer’s Guide
FIG 6.29 An applied Sharpness factor of �7FIG 6.30
FIG 6.31
Ch06-K52040.indd 140Ch06-K52040.indd 140 8/10/07 12:40:35 PM8/10/07 12:40:35 PM

141
Focus, Exposure, and Style
FIG 6.32 Neutral Picture Style with Contrast set to –4 FIG 6.33
FIG 6.34
Ch06-K52040.indd 141Ch06-K52040.indd 141 8/10/07 12:40:39 PM8/10/07 12:40:39 PM

142
Canon DSLR: The Ultimate Photographer’s Guide
FIG 6.35 Neutral Picture Style with Contrast set to �4FIG 6.36
FIG 6.37
Ch06-K52040.indd 142Ch06-K52040.indd 142 8/10/07 12:40:41 PM8/10/07 12:40:41 PM

143
Focus, Exposure, and Style
FIG 6.38 Color Saturation set, in camera, to –4FIG 6.39
FIG 6.40
Ch06-K52040.indd 143Ch06-K52040.indd 143 8/10/07 12:40:44 PM8/10/07 12:40:44 PM

144
Canon DSLR: The Ultimate Photographer’s Guide
FIG 6.41 Color Saturation set, in camera, to �4FIG 6.42
FIG 6.43
Ch06-K52040.indd 144Ch06-K52040.indd 144 8/10/07 12:40:47 PM8/10/07 12:40:47 PM

145
Focus, Exposure, and Style
FIG 6.44 Moving the Color Tone slider to the left will skew colors
toward red
FIG 6.46
FIG 6.45
Ch06-K52040.indd 145Ch06-K52040.indd 145 8/10/07 12:40:50 PM8/10/07 12:40:50 PM

146
Canon DSLR: The Ultimate Photographer’s Guide
FIG 6.47 Moving the Color Tone slider to the right will
skew colors toward yellow FIG 6.48
FIG 6.49
Ch06-K52040.indd 146Ch06-K52040.indd 146 8/10/07 12:40:53 PM8/10/07 12:40:53 PM

147
Focus, Exposure, and Style
I used a 30D for this demo, and the interface for this function varies
slightly between body styles, so your set up screens may look diff erent.
Check your camera’s manual to understand what’s possible and how it’s
confi gured. I’d suggest you then run a test like I did to understand the
diff erences and subtleties you can achieve with your equipment.
Want more? The Canon website has three more Picture Styles available
for download: Nostalgia, Twilight, and Clear. You can download these
Picture Styles to Digital Photo Professional to be applied to RAW fi les
after shooting. Or you can connect your camera to your computer and
add the selections to the camera menu. These new Picture Styles can be
downloaded at http://www.cusa.canon.com/content/picturestyle/fi le/
index.html.
Ch06-K52040.indd 147Ch06-K52040.indd 147 8/10/07 12:40:56 PM8/10/07 12:40:56 PM

148
Canon DSLR: The Ultimate Photographer’s Guide
Color TemperatureWhen a perfect white balance is not desired, Canon off ers an interesting
option. One of the White Balance modes is Color Temperature,
designated in the white balance list (on the camera’s LCD), by the letter
K (for Kelvin). You will fi nd this function on prosumer and professional
cameras, but not on the Rebel.
We know, of course, that diff erent types of light have diff ering color
temperatures, measured in degrees Kelvin. Canon cameras, like those
of other manufacturers, will take a photograph of a neutral item like
a gray card or collapsible gray target and negate any odd color, rendering
any subsequent images neutral in color. Sometimes that’s just not good
enough. Many photographers routinely alter color temperature to add to
the mood of the images or to just to add some zip. Color Temperature is
one more tool that you can use to set your work apart from that of other
less informed or less creative shooters.
Canon uses 5200 K as its default daylight color temperature. When
the camera is balanced for daylight, but you’re shooting in color
temperatures lower than 5200 K, your images will be rendered warmer,
with more red and yellow; higher numbers will add more blue and cyan
and look cooler. Custom White Balance will neutralize any tested light
and add appropriate correction to bring the light to this temperature, but
Color Temperature tells the camera that whatever light you’re shooting in
is a particular color temperature, from 2800 to 10,000 K, and will interpret
any light to that selection.
It works like this: If you want a warmer look to your images, tell the
camera that the light you’re working with is cooler than it actually is. The
camera will add warm color to counteract what it thinks is cool light,
resulting in a warmer shot. The reverse is true if you want a cooler color;
just tell the camera that the light is warmer than it actually is and the
camera will add blue. The fi nal image will have a cooler feel.
Prosumer and professional cameras access Color Temperature diff erently,
but it’s quite easy. Just check your instruction manual for the correct
method for your camera.
The use of Color Temperature is practical for a number of circumstances.
Color infl uences and describes our emotions. If we’re having a bad day we
might say we’re “blue”, if we see something exciting we might describe it
as “hot” (FIGS 6.50–6.54).
If you know your studio strobes are consistent in color output, setting
a higher or lower color temperature will give your images a look that may
become a brand “signature” for your work.
Ch06-K52040.indd 148Ch06-K52040.indd 148 8/10/07 12:40:57 PM8/10/07 12:40:57 PM
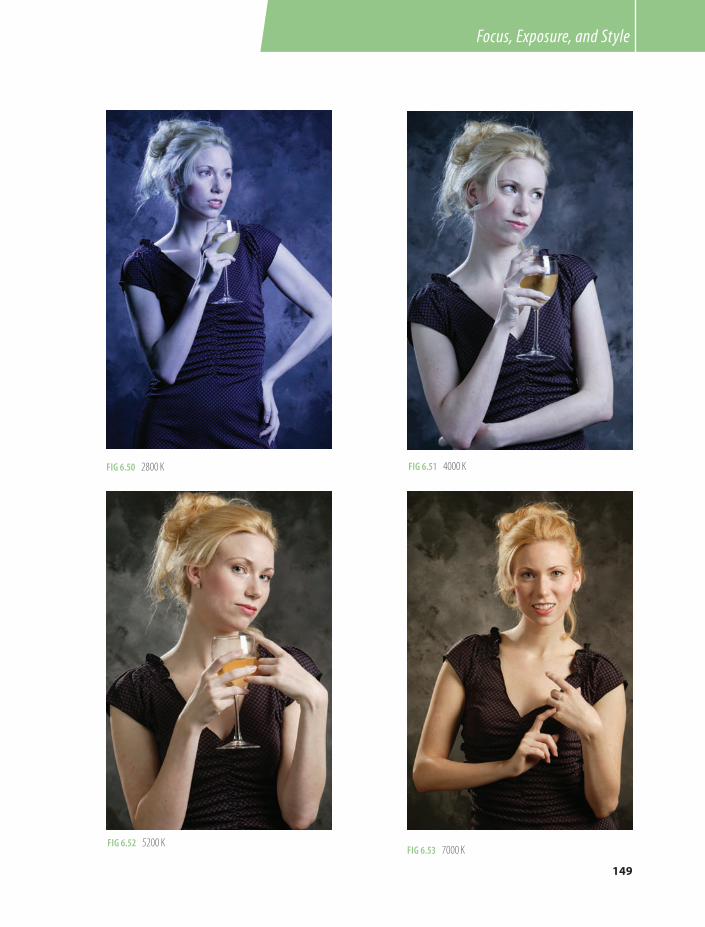
149
Focus, Exposure, and Style
FIG 6.50 2800 K FIG 6.51 4000 K
FIG 6.52 5200 KFIG 6.53 7000 K
Ch06-K52040.indd 149Ch06-K52040.indd 149 8/10/07 12:40:57 PM8/10/07 12:40:57 PM

150
Canon DSLR: The Ultimate Photographer’s Guide
Sometimes just adding a slight correction will produce a look that’s more
consistent with how we think a subject should look. For this example
I set the Color Temperature to 4800 K, slightly warmer than my strobes.
Because the camera added blue, the slightly cooler result of the key
light, coupled with the gelled accent lights, gives this image a genuine
nightclub appearance (FIG 6.55).
By the way, if you’re familiar with hand-held color meters, you can use
Color Temperature to dial in a correct temperature, too.
FIG 6.54 10,000 K FIG 6.55
Ch06-K52040.indd 150Ch06-K52040.indd 150 8/10/07 12:41:01 PM8/10/07 12:41:01 PM
151
Focus, Exposure, and Style
Perfect Focus and ExposureIf you were to defi ne the two most important and determining factors
to the success of your imagery (aside from your personal creativity, of
course), the ability to automatically place the critical point of focus would
have to equal that of perfect exposure. Failure to accomplish either could
be the kiss of death to what would have been a great idea.
Camera Metering
All Canon DSLRs are capable of metering exposure, via TTL (Through The
Lens) full aperture metering, three or four diff erent ways, each of which
is accessed though the Metering Mode button. Note that none of the
Rebels have spot metering, nor do any of the cameras that preceded the
30D: the 20D, 10D, D60 or D30. Whether you select Evaluative, Partial,
Spot, or Center-Weighted Averaging, you’ll get a very accurate exposure
for any “average” scene. Note that while you will be able to see the
information in the viewfi nder, and set the camera accordingly, none of
the metering functions will work automatically in Manual mode. All Basic
Zones default to Evaluative Metering.
Understanding, in visual terms, what each mode might do for you is
crucial to your development as a digital photographer. After all, what’s
the use of buying this beautiful technology if you never use anything but
Program or Full Auto?
Evaluative Metering is the most general purpose metering system,
and is the default mode for all of the Basic Zone settings. It is a very
sophisticated system based on 35 zones of varying selectivity, with the
most important zones located around the active focus point. It will do
a great job 90% of the time, but is most useful when you understand that,
although it can be fooled, there are ways to outsmart it.
When the AF (Auto Focus) Point selector is set to Automatic selection,
and the camera is allowed to look at the scene and determine where
focus should be set (usually by the closest objects in the scene), the
aperture will be set based on the infl uence of those objects (FIGS 6.56 and
6.57).
Perhaps a more practical way to use Evaluative Metering would be to
set the AF Point selector to an area more in keeping with your
compositional goals. If your primary points of interest is on the bottom,
selecting one of the lower AF Points would allow you to lock focus and
exposure for that object at the same time by placing the AF Point on
your subject and pressing the shutter release halfway down. Once focus
Ch06-K52040.indd 151Ch06-K52040.indd 151 8/10/07 12:41:03 PM8/10/07 12:41:03 PM

152
Canon DSLR: The Ultimate Photographer’s Guide
FIG 6.56 A dark center surrounded by bright edges is perfect for the Evaluative meter because it
will read and average both, resulting in a perfect exposure.
FIG 6.57
Ch06-K52040.indd 152Ch06-K52040.indd 152 8/10/07 12:41:04 PM8/10/07 12:41:04 PM

153
Focus, Exposure, and Style
and metering have been set, continue to depress the shutter release and
recompose the image if necessary. You may fi re when ready (FIGS 6.58 and
6.59).
If your scene features a subject darker than the background you may get
successful results by selecting Partial Metering. The area measured by the
meter is about 9% of the total frame, in the center. Essentially an oversize
spot meter, Partial Metering can be utilized when a dark subject needs to
be balanced against a brighter one or vice versa.
If you wish to change the composition of the image after metering for the
important information, you will have to engage the AE (Auto Exposure)
Lock before moving the camera because the Partial Metering does
FIG 6.58 When the Evaluative meter point is centered, the darker portion of
this image will be read
FIG 6.59 Placing the AE point on the subject and holding the shutter allows
for easy recomposition
Ch06-K52040.indd 153Ch06-K52040.indd 153 8/10/07 12:41:06 PM8/10/07 12:41:06 PM

154
Canon DSLR: The Ultimate Photographer’s Guide
not correlate with focus points for exposure evaluation. Be aware that
Focus Points are not actually used for metering (in any metering mode)
although their selection will indicate to the metering system where to
place its importance (FIGS 6.60 and 6.61).
To meter an even tighter area, many Canon cameras can use Spot
Metering. Using about 3% of the frame, dead center, this function allows
for critical exposure evaluation when shooting a diffi cult subject, a white
object on a dark background, perhaps, or vice versa. Proper use of the
Spot function can mean the diff erence between the success or failure of
some images which may be so bright or dark as to overly infl uence the
meter (FIGS 6.62 and 6.63).
FIG 6.60
FIG 6.61
Ch06-K52040.indd 154Ch06-K52040.indd 154 8/10/07 12:41:08 PM8/10/07 12:41:08 PM

155
Focus, Exposure, and Style
FIG 6.63 Over or under exposure can result from the improper position of the Spot meter. In this case the
meter read her dress, not her face
FIG 6.62
Ch06-K52040.indd 155Ch06-K52040.indd 155 8/10/07 12:41:12 PM8/10/07 12:41:12 PM

156
Canon DSLR: The Ultimate Photographer’s Guide
EOS-1 style bodies give the user the opportunity to link their spot meter
to one of 11 chosen focusing point (19 on the Mark III) via a Custom
Function for precise spot metering even with an off -center subject.
Consult your camera’s instruction manual to fi nd the correct C.Fn if you
wish to use this feature (FIGS 6.64 and 6.65).
FIG 6.64 The Spot meter was linked to the center focus point
FIG 6.65 The Spot meter was linked to the left focus point
The fourth method is the Center-Weighted Averaging Meter, which takes
the majority of its reading from approximately 25% of the frame, from the
center, then averages that portion against what it reads from the rest of the
frame. This function is valuable when you are photographing an object or
group that is more important than the surroundings but not signifi cantly
brighter or darker than those surroundings (FIGS 6.66 and 6.67).
Ch06-K52040.indd 156Ch06-K52040.indd 156 8/10/07 12:41:14 PM8/10/07 12:41:14 PM
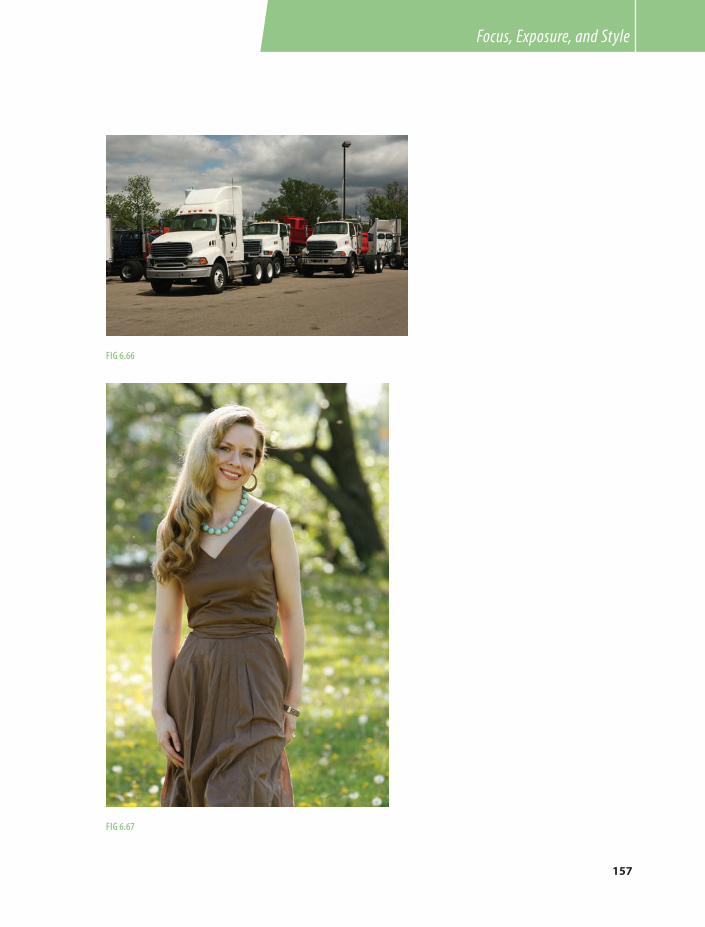
157
Focus, Exposure, and Style
FIG 6.66
FIG 6.67
Ch06-K52040.indd 157Ch06-K52040.indd 157 8/10/07 12:41:16 PM8/10/07 12:41:16 PM

158
Canon DSLR: The Ultimate Photographer’s Guide
When you look at a potential photo op, the fi rst thing you see is
usually the most important element. You’ve trained your eye to see the
important details and to tell you how to compose the image. Let’s see
how Canon can help you capture that vision, beginning with some of the
options you have for focusing (and I want to qualify “some of the options”
because, while we’ll look at specifi c controls and Custom Functions, you
can create personalized control combinations that you can tailor to your
special shooting needs).
Please note that Custom Functions may not carry the same reference
number between cameras. Refer to your camera’s instruction manual for
specifi cs.
Automatic Focus Point Selection
AUTO FOCUS
Manufacturers have created and implemented many versions of AF
over the years, but none have been as successful as Canon, mostly
because, unlike other companies, Canon designs their entire system
in house. Refi ned during the 35 mm EOS era, Canon has incorporated
new algorithms and new chip technology to realize an AF system of
unparalleled performance.
Working in conjunction with the super fast Digic processor, Image
Stabilization (in some lenses), Ultrasonic Motors and the latest in CMOS
imaging sensor upgrades, Canon’s AF mechanics are something for them
to be proud of, and for you to exploit as just one more tool to make your
professional life easier.
To be eff ective, any AF system must know where to look. Canon’s system
uses a combination of high-precision cross-type sensors along with
a network of single-line assist sensors within the frame for a truly accurate
focusing mechanism. Using Canon’s AF technology and certain Custom
Functions allow you to tailor your focusing habits to your camera, your
application, and, ultimately, to the success of your images, at least as far
as critical focus is concerned.
Diff erent cameras make diff erent uses of the cross-type and single-line
sensors. The Rebel XTi, 20D, 30D, and 5D have one high-precision cross-
type sensor and eight single-line sensors. The EOS-1D series bodies
(up to, but not including, the Mark III) have 7 high-precision cross-type
sensors and 38 single-line sensors. The new EOS-1D Mark III has 19 high-
precision cross-type sensors and 26 invisible single-line “assist” sensors.
The single-line assist sensors are not selectable on the 1D Mark III, but
they are on all of the other cameras mentioned above.
Ch06-K52040.indd 158Ch06-K52040.indd 158 8/10/07 12:41:18 PM8/10/07 12:41:18 PM
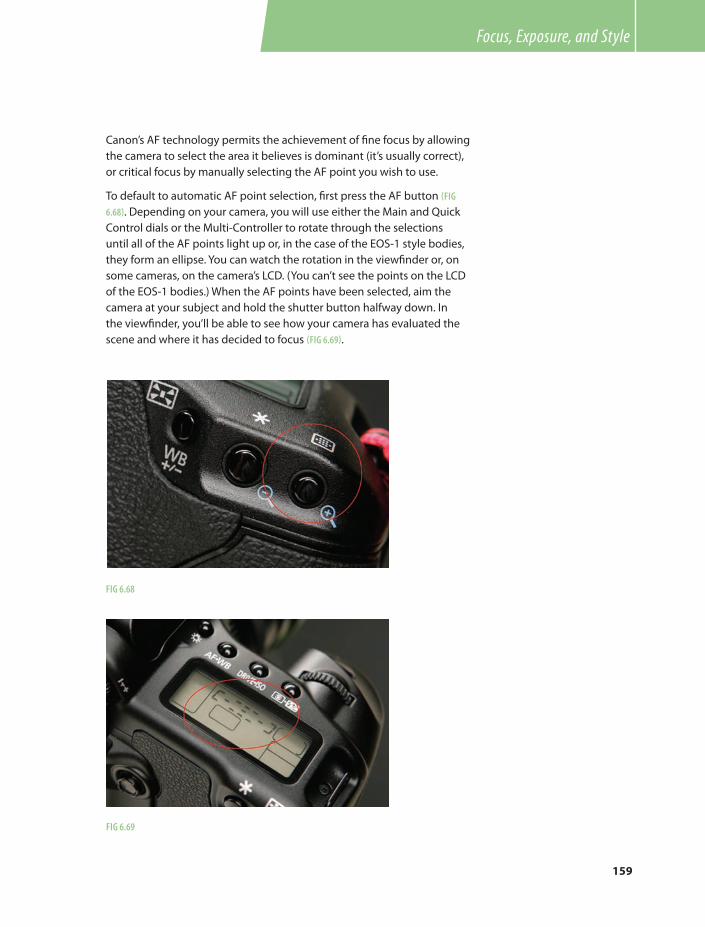
159
Focus, Exposure, and Style
Canon’s AF technology permits the achievement of fi ne focus by allowing
the camera to select the area it believes is dominant (it’s usually correct),
or critical focus by manually selecting the AF point you wish to use.
To default to automatic AF point selection, fi rst press the AF button (FIG
6.68). Depending on your camera, you will use either the Main and Quick
Control dials or the Multi-Controller to rotate through the selections
until all of the AF points light up or, in the case of the EOS-1 style bodies,
they form an ellipse. You can watch the rotation in the viewfi nder or, on
some cameras, on the camera’s LCD. (You can’t see the points on the LCD
of the EOS-1 bodies.) When the AF points have been selected, aim the
camera at your subject and hold the shutter button halfway down. In
the viewfi nder, you’ll be able to see how your camera has evaluated the
scene and where it has decided to focus (FIG 6.69).
FIG 6.68
FIG 6.69
Ch06-K52040.indd 159Ch06-K52040.indd 159 8/10/07 12:41:19 PM8/10/07 12:41:19 PM

160
Canon DSLR: The Ultimate Photographer’s Guide
Should you decide you don’t like the AF points the camera chose, or if
the area you wish to be sharp is outside the ellipse, you may move the
camera to a better position, push the shutter button halfway to achieve
focus, then recompose the image without releasing the shutter button
(FIGS 6.70 and 6.71).
FIG 6.70
Some situations may require shot-to-shot focus in a particular area;
perhaps a series of portraits in which the subject’s face is too far off center
to eff ectively utilize the entire focusing matrix. In this circumstance you
can simply use the AF button to select a focus point that’s appropriate to
your composition.
AUTO FOCUS MODES
In order to use any Auto Focus Mode the Focus Mode switch of the lens
must be set to AF. You cannot switch between modes if the camera is set
to Full Auto, although you can switch between One Shot, AI Servo, and AI
Focus when in Program Mode. You can also change your focus points or
use Automatic Focus Point selection (AFPS), which you cannot do when
you’re in Full Auto or using any Basic Zone.
Ch06-K52040.indd 160Ch06-K52040.indd 160 8/10/07 12:41:20 PM8/10/07 12:41:20 PM

161
Focus, Exposure, and Style
FIG 6.71
Of the AF modes available on Canon gear, One-Shot AF is suitable for
any subject standing still. With AFPS, the AF point which the camera
uses to determine focus will fl ash briefl y in the viewfi nder, giving you an
opportunity to judge whether or not the critical focus area was selected.
A Focus Confi rmation light will be displayed in the viewfi nder.
If focus cannot be achieved, the Focus Confi rmation light will blink
rapidly. This can sometimes happen even if you’re working within the
focusing limits of the lens. Areas of fl at or minimal detail, like a blank
wall, or refl ective surfaces like mirrors or windows may send the AF
mechanism into what I like to call a “sub-electronic dilemma,” racking the
lens through a complete focusing cycle that fi nds nothing to lock onto.
With One-Shot AF and Evaluative Metering, and with Aperture Priority
or Shutter Priority selected, the aperture or shutter speed are set at the
same time that focus is achieved and will be locked as long as the shutter
button is depressed halfway. This allows you to recompose the shot, if
necessary, without changing the light meter reading, a useful tool if you’d
like to zoom in on an important detail, meter it, then zoom out for the
actual exposure (FIGS 6.72–6.74).
Ch06-K52040.indd 161Ch06-K52040.indd 161 8/10/07 12:41:22 PM8/10/07 12:41:22 PM

162
Canon DSLR: The Ultimate Photographer’s Guide
FIG 6.72 1. Compose FIG 6.73 2. Meter
FIG 6.74 3. Recompose and shoot
Ch06-K52040.indd 162Ch06-K52040.indd 162 8/10/07 12:41:30 PM8/10/07 12:41:30 PM

163
Focus, Exposure, and Style
AI Servo AF
By now, there’s no question that Canon’s Auto Focus is blazing fast and
deadly accurate. It’s always been one of Canon’s better features, and as
such is always under improvement. It seems that each new model works
faster (and under progressively lower light levels, too). That’s as it should
be, of course, given not only the cost of the gear, but also what we expect
of it. After all, if a manufacturer gives us such a feature we should feel
obligated to try to defeat it.
Six months prior to this writing we acquired a new dog, a Golden
Retriever puppy my daughter named Romeo because of his bedroom
eyes. By the time this book is published I’m hoping Romeo will settle
down, get a job, and pay me back for the chew job he did on my favorite
loafers. In the meantime, he’s become a very social animal and loves to
play with his brethren at every opportunity.
At one of his weekly outings at an off -leash dog park, and armed with
a Canon 70–200 mm f2.8L IS zoom, I was able to track him almost
eff ortlessly as he played with a new buddy using the AI (for Artifi cial
Intelligence) Servo AF mode. The AI Servo is designed for subjects that
move unpredictably so they will stay in focus regardless of how they
move within the frame. You might say it keeps track of the subject for you,
a feature that was perfect for this demonstration, since the last things
on earth to travel in a straight line are two dogs at play. They dodge and
weave faster than the most skilled human boxer, and so quickly that the
human eye cannot see the details of the game, only the blur of the fun. To
make this test more diffi cult, I used Aperture Priority and set it at f2.8 to
get the fastest shutter speed and the least depth of fi eld.
After selecting AI Servo from the Auto Focus options button, start by
holding the shutter button halfway down to get the fi rst focus point on
your subject, then simply continue to hold the shutter button in the same
position, halfway down, for all the exposures in your series. If you let up
on the shutter button, you will have to achieve a starting AF point before
the AI Servo will kick in again. Note that neither focus confi rmation lights
nor beepers will be visible or audible in this mode (FIGS 6.75–6.79).
Ch06-K52040.indd 163Ch06-K52040.indd 163 8/10/07 12:41:33 PM8/10/07 12:41:33 PM

164
Canon DSLR: The Ultimate Photographer’s Guide
FIG 6.75
FIG 6.76
FIG 6.77
Ch06-K52040.indd 164Ch06-K52040.indd 164 8/10/07 12:41:33 PM8/10/07 12:41:33 PM
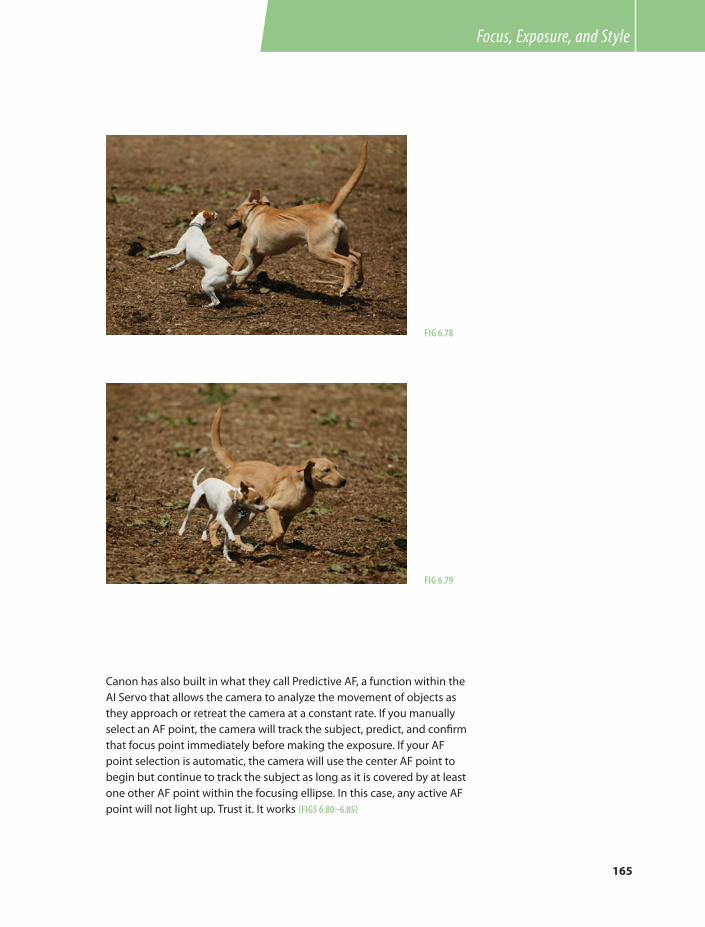
165
Focus, Exposure, and Style
FIG 6.78
FIG 6.79
Canon has also built in what they call Predictive AF, a function within the
AI Servo that allows the camera to analyze the movement of objects as
they approach or retreat the camera at a constant rate. If you manually
select an AF point, the camera will track the subject, predict, and confi rm
that focus point immediately before making the exposure. If your AF
point selection is automatic, the camera will use the center AF point to
begin but continue to track the subject as long as it is covered by at least
one other AF point within the focusing ellipse. In this case, any active AF
point will not light up. Trust it. It works (FIGS 6.80–6.85)
Ch06-K52040.indd 165Ch06-K52040.indd 165 8/10/07 12:41:36 PM8/10/07 12:41:36 PM

166
Canon DSLR: The Ultimate Photographer’s Guide
FIG 6.81
FIG 6.82
FIG 6.80
Ch06-K52040.indd 166Ch06-K52040.indd 166 8/10/07 12:41:39 PM8/10/07 12:41:39 PM

167
Focus, Exposure, and Style
FIG 6.84
FIG 6.85
FIG 6.83
Ch06-K52040.indd 167Ch06-K52040.indd 167 8/10/07 12:41:41 PM8/10/07 12:41:41 PM

168
Canon DSLR: The Ultimate Photographer’s Guide
FIG 6.86 FIG 6.87
FIG 6.88 FIG 6.89
Ch06-K52040.indd 168Ch06-K52040.indd 168 8/10/07 12:41:44 PM8/10/07 12:41:44 PM

169
Focus, Exposure, and Style
AI Focus
AI Focus is a nifty little feature that combines the best of One-Shot Focus
and AI Servo.
When AI Focus is selected, you can shoot as you would with subjects
that are not moving, or moving minimally, essentially One-Shot focusing.
Should the subject begin to move with more energy, the camera will
automatically shift into AI Servo mode, tracking and predicting the next
point of focus. This feature works just as well if the photographer moves
toward the subject.
Using AI Focus does not require you to hold the shutter button halfway
down during the sequence, it will re-acquire focus frame-to-frame, much
more rapidly than if you were using One-Shot Focus (FIGS 6.86–6.90).
At fi rst glance, it would appear that AI Focus is the way to go. After all, an
AF program that will track both moving and non-moving subjects should
be pretty cool, right? If there is a problem with AI Focus it would be that
the camera has to make some complicated decisions in an extremely
short period of time. I’m here to tell you, at least for this technological
moment, that doing so is a tough job. Personally, I’ve seen this function
FIG 6.90
Ch06-K52040.indd 169Ch06-K52040.indd 169 8/10/07 12:41:48 PM8/10/07 12:41:48 PM

170
Canon DSLR: The Ultimate Photographer’s Guide
succeed and fail, for a number of reasons, not the least of which was that
both the subject and I were moving. AI Focus can sometimes mistake
a slow-moving subject for a stationary one or, since it has a decision to
make, it can miss a fast-moving subject.
Test this for yourself. I’m sure that, with just a little practice, you’ll know a
whole lot more about how Canon’s AF system works.
REGISTERING AN AF POINT
EOS-1 bodies allow you to register specifi c AF points, via a Custom
Function. Using the C.Fn in conjunction with the Assist button enables
you to toggle between focusing options. You may wish to have all
focus points active as Plan A but only one when Plan B is needed. This
technique will switch focus points eff ortlessly and without removing your
eye from the viewfi nder.
Any AF mechanism can be fooled for a short time by a number of
variables. As always, I suggest you try each feature to determine how it
works best with your style of shooting.
I’ve noticed in lower light situations, such as when a subject is lit by a
relatively dim softbox in a studio, and when using the shutter button
to focus, it will take a bit longer for the lens to achieve focus. There is a
Custom Function (C.Fn), “Shutter Button/AE Lock Button,” that uses the
AE Lock Button (also known as Thumb Focus, Rear Button Focus or FEL
Focus) to act as the AF activator. EOS-1 bodies feature an additional FEL
button on the Vertical Grip (FIG 6.91).
FIG 6.91
Ch06-K52040.indd 170Ch06-K52040.indd 170 8/10/07 12:41:49 PM8/10/07 12:41:49 PM

171
Focus, Exposure, and Style
Wedding, sports photographers, and photojournalists love this feature,
because they can focus, and change focus, using a thumb. When a thumb
is used to make the exposure it means that focus can be achieved, held,
or changed without waiting for the shutter button to fi nd it. If focus is
made in this manner, the actual exposure will be made faster than if the
shutter button AF mechanism had to be activated before making the
exposure. Also, when AI Servo is engaged, focus is continuous, as is the
ability of the shutter button to shoot, which means you could change the
plane of focus during a burst or suspend AI Servo while waiting for your
subject to clear a visual obstacle, re-acquiring focus when you can and
starting a new sequence.
It may take a little practice, but once your thumb and forefi nger learn to
work together you’ll appreciate the fractions of seconds this technique
adds to your timing skills.
As with most Custom Functions, there is more than one way to use it.
Option 2 is terrifi c for sports photographers or anyone who may
pre-focus on a spot and wait for the action to get there. Option 2 will start
the AF function on the shutter button but let the photographer suspend
that command by pressing the AE Lock (Rear Button) eff ectively locking
focus on the predetermined point. I think you will fi nd this option is most
useful when exposure is set manually, as subjects entering the frame may
skew the exposure value when either Av or Tv is set.
When Option 3 and Rear Button Focus is selected, and you’re using Av
or Tv for exposure, there is no AE Lock, so if you’re following a moving
subject through changing light conditions the camera will adjust
automatically to the changing light (FIGS 6.92–6.96).
FIG 6.92
Ch06-K52040.indd 171Ch06-K52040.indd 171 8/10/07 12:41:50 PM8/10/07 12:41:50 PM
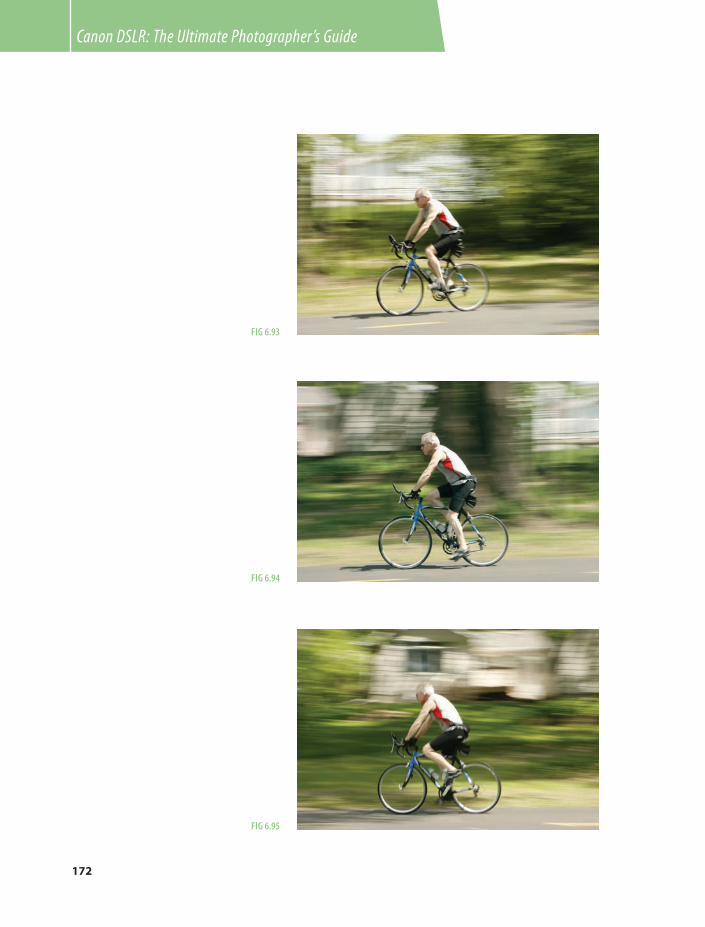
172
Canon DSLR: The Ultimate Photographer’s Guide
FIG 6.94
FIG 6.95
FIG 6.93
Ch06-K52040.indd 172Ch06-K52040.indd 172 8/10/07 12:41:51 PM8/10/07 12:41:51 PM

173
Focus, Exposure, and Style
Manual Focus Point Selection (MFPS)
You may fi nd it helpful to select a focus point manually. This is a useful
function if you have many shots where the primary focus point will fall
in a specifi c area, such as with a series of head and shoulder portraits. In
such a case, you will not want the focus point to be infl uenced by body
parts or props; you’ll want to keep primary focus on the face. Whether
you’re shooting vertically or horizontally, you can select the proper focus
point by pushing the AF button and selecting the correct focus point
using the dials or (on some cameras) the Multi-Controller. As long as
your primary focus area falls under this focus point your subject will be in
focus (FIG 6.97).
FIG 6.96
FIG 6.97
Ch06-K52040.indd 173Ch06-K52040.indd 173 8/10/07 12:41:54 PM8/10/07 12:41:54 PM

174
Canon DSLR: The Ultimate Photographer’s Guide
EOS-1 pro cameras incorporate a number of Custom Functions that deal
specifi cally with focusing issues, including my favorite, “AF Point Selection
Method.” This function allows me to reduce the number of focusing
points and tie the Spot Meter and Flash Exposure Lock to any of those
focus points. This is extremely useful if my primary point of interest is off -
center and has a diff erent exposure level than the rest of the image.
Almost all Custom Functions and Personal Functions will work together,
which means that photographers can create sets of Functions that favor
a particular shooting style or type of shoot. For example, events such
as weddings or parties lean heavily on grab-shot photojournalism, with
few pictures actually posed. Using the One-Shot AF Mode, with focus
achieved by using the shutter button, a photographer might wish to
create and apply some or all of the following Custom Functions. I refer
to these Functions by title because the numbers may vary from camera to
camera; check your instruction manual.
AF Point Selection Method, Option 2. Lets the Quick Control Dial take the
job of the AF Point Selection Button, which may allow you to make focus
point selections faster.
Number AF Points/Spot Metering, Option 3. This Function limits the number
of AF points to 8 around the ellipse plus the center AF point. By limiting
the number of AF points focus may be achieved a bit faster.
AF Point Activation Area, Option 1. If you are shooting in a situation with
low contrast, this Function will expand the AF activation area, making it
easier for the camera to fi nd focus.
Once you have found a favorite set of Custom Functions, you can register
and save that set for use anytime. Personal Function (00) will store up to
three sets of Custom Functions, which means you can store your favorites
for the diff erent subject matter you may shoot on a regular basis without
having to remember exactly what they are.
Ch06-K52040.indd 174Ch06-K52040.indd 174 8/10/07 12:41:56 PM8/10/07 12:41:56 PM

175
Focus, Exposure, and Style
Paul HartleyWith his runner’s physique, boyish looks and self-deprecating attitude,
one would not necessarily think of Paul Hartley as a driving force in
photography. The pun is intended, for Hartley’s forte is the world of heavy
trucks and long distance transportation and, as both a writer and location
photographer of that world, he is rapidly becoming a master of his niche.
His articles and photographs have appeared in almost every magazine
devoted to the trade as well as the house organs and annual calendars
of manufacturers such as Detroit Diesel, Kenworth, International, and
Peterbilt. Additionally, Hartley’s work regularly appears internationally in
such magazines as Australia’s Truckin’ Life.
Although he always had an interest in photography, Hartley began his
career, not surprisingly, as a trucker. At age 19 he was a “Beanbagger,”
a nickname applied to drivers who haul grain. At age 21 he bought his
fi rst truck and went interstate, and, at 23, an even bigger truck to make
regular runs from the Midwest to the West Coast.
In 1978, while awaiting $6000 worth of repairs to his vehicle, Hartley
called his bank and said, “Send money. I’m going camera shopping.”
He bought a new Canon A1 and a generic zoom lens. “I started my
photography career right there,” he said. “I photographed trucks, trailers,
drivers, landscapes; anything that caught my eye. I wasn’t all that good at
it, you understand, but it was a great learning experience.”
At fi rst, Hartley says, “I had second thoughts about my Canon purchase.
I liked my equipment, but I wasn’t enthusiastic because I’d been reading
about so many other photographers shooting a diff erent brand. I felt
I was missing out on something, but I didn’t know what it was. At some
point I realized that my feelings were a result of advertising, not of
quality, and when Canon went digital I knew I was in the right place.”
Sliding into a soft Southern accent (that belies his Minnesota roots and
which seems to be reserved for truckers and commercial airline pilots),
Hartley says, “I woke up one day and thought ‘I’m gonna get me a
college education. There’s more to life than just hangin’ on to a steering
wheel.”
Hartley enrolled in Journalism at Mankato (MN) State University. One
of the requirements was a photography class taught by John Cross.
“He was the best editorial photographer I’ve ever met,” said Hartley. “He
had a way of sizing up a composition as he prepared to shoot it, and
never overlooked even minor changes of camera angle. Whether the
scene demanded a bird’s eye or mouse eye view, he would fi nd the best
Paul Hartley’s Travel Kit
You may have some trouble believing this!
This man travels heavy. When he’s working
with a 16 ton rig that may be on location
for only a few hours Hartley knows he
has to be ready for anything. While he’s
not opposed to hopping a fl ight when
time demands it he usually prefers
driving himself and all of his gear to the
location. He’s tapped himself into a vast
network of fl eets and schedules, articles
and photographs, and art directors or art
buyers, so when he knows in advance
where he’ll be he notifi es as many of them
as possible. Consequently, he’s frequently
asked to leave a day or two early or late,
in order to complete another assignment
within driving distance of his primary
location.
If it’s absolutely necessary to fl y to a
location, Hartley will pull what he feels will
be the minimum gear to get the job done.
Even then, Paul’s idea of minimum always
generates extra profi ts for the airline.
Standard gear
Camera Bag
EOS 1D Mark II
EOS 5D
EF 16-35 F2.8 USM
EF 24-70 F2.8 USM
EF 70-200 F2.8 USM
EF 300 F4 IS USM
Speedlite 550EX Flash
Speedlite 580EX Flash
Quantum Battery 1� with charger
Cables
Sekonic L-358 light meters (2)
Ch06-K52040.indd 175Ch06-K52040.indd 175 8/10/07 12:41:56 PM8/10/07 12:41:56 PM

176
Canon DSLR: The Ultimate Photographer’s Guide
point of view and exploit it. Everything he taught me has proved to be
extremely valuable.” Obviously true, as Hartley went on part-time staff at
the Mankato Free Press and then onto staff positions at other newspapers,
climbing the ladder until landing a staff writer position at Overdrive
magazine.
“I’d always done the shooting for my stories,” said Hartley. “Once
I realized that the art director not only liked my work but found it
technically competent I started to freelance on the side, contacting other
publications and working as both writer and photographer. I was wearing
more than one hat again, but, fortunately, I’m as passionate about my
photography as I am about my writing.”
Hartley carries two Canon DSLRs, a 5D and a 1D Mark II. He shoots
the vast majority of the heavy equipment images with the 5D to take
advantage of the larger fi le size. “Editors appreciate those extra pixels,” he
says. “Some of their product, like calendars, can be large, so bigger fi les
are defi nitely better” (FIGS 6.98 and 6.99).
FIG 6.98 “This was one of the easiest shoots I’ve ever had,” says Hartley. “It was 7:00pm with beautiful, warm
light, the truck was spotless and the curve of the driveway was perfect.” It’s hard to believe that this truck,
“often confused with a milk hauler,” was actually carrying sewage, which it does 5 days a week. Hartley made
the image with his 5D and 35–105 mm f2.8 zoom, set at 70 mm
“The Mark II is perfect for press events,” he goes on. “I like to shoot in bursts
of three to fi ve shots, just to get a perfect expression. Sometimes I’ll put my
70–200 mm telephoto on the Mark II and the 24–70 mm wide angle on the
5D, and carry both. I’m pretty much ready for anything” (FIGS 6.100 and 6.101).
“I only use fl ash if conditions demand it, and then only with second
curtain sync, Custom Function 15, in case I want an interesting blur,”
he says. “I’ll custom white balance to the room, of course, and I’ll make
Camera-battery chargers (2)
Spare camera batteries (for both bodies)
Spare 1- & 2-gig fl ash cards (4)
77 mm polarizing fi lter
Lens cleaning cloth
Operator manuals for cameras
Camera Support
Benbo 1 tripod w/Foba ball head
Hakuba HG-6240C carbon tripod w/Foba
ball head
Bogen 3249 monopod w/Foba ball head
Small Tripod Bag
Manfrotto 3333 11-foot light stands (4)
Avenger 36” baby light stands (2)
Large Tripod Bag
Manfrotto 3353 6-foot light stands (2)
Avenger A635B 12-foot light stands (4)
Lightform Bag
Chimera Super Pro 57X72 softbox
Chimera Super Pro 36X48 softbox
Chimera Super Pro 24X32 softbox
Chimera Super Pro 16X22 softbox
Multiple refl ective and shoot-through
parabolics
Avenger D520B boom arm
Photofl ex Litediscs (5, various sizes and
colors)
Speed rings (4)
Main Toolbox
Various hand tools
Tape measure
Ch06-K52040.indd 176Ch06-K52040.indd 176 8/10/07 12:41:56 PM8/10/07 12:41:56 PM

177
Focus, Exposure, and Style
FIG 6.99 For a calendar shoot in Wheeling, West Virginia, Hartley had almost no time to get his shot. “The
rig belonged to an owner-operator, not a fl eet, and he had, as they say, a load for the road. ”Working with
a small window of opportunity, Paul found an abandoned steel mill nearby, and had the driver move his
truck into position. “I usually like low angles, but the Art Director said ‘don’t forget your Little Giant,’ so I took
that as a hint that maybe I’d been sending in too many low-angled shots,” said Paul. “The Little Giant is a 10’
foldable step ladder that I don’t use often but am always happy to have with me.” Hartley used his Canon 5D
and 35–105 mm f2.8 zoom lens. “Fortunately for me, the sky that day off ered some high thin overcast, which
helped soften the light slightly. I wanted a somewhat bolder view, but not too whacked out, so I went with
40 mm of lens length”
FIG 6.100 “Shortly before this scene was photographed, I’d directed the driver to a diff erent setting in a
vacant lot. As he was driving toward that location, his right front wheel fell into a sinkhole, dropping the truck
onto its bumper. The guy was wholeheartedly displeased in the project at that moment, but he cooled down
after a while – especially after International promised to give him a new bumper and light bar. If you look
carefully, you can see that the bumper is not quite straight.” Hartley later repaired a number of broken lights in
Photoshop. The dark, brooding, clouds and the angle of the raised “tipper” trailer make for a very interesting
image, and the apparent mass of the truck was visually increased by using a 16–35 mm f2.8 lens
Spare batteries (AA and AAA)
Battery chargers (Quantum and Lumedyne)
Thin gloves (for shooting in cold weather)
FedEx envelopes and pre-printed air bills
Gel sheets (many fl avors)
Power strip
“Cheater” plugs for two-prong electrical
outlets
Gaff er tape
Duct tape
Strapping tape
Binoculars
Ear protection (handy at auto races)
Blank CDs and DVDs
Stroboframe
Manfrotto 2900 Super Clamp
Manfrotto Magic Arm
Manfrotto 482 mini tripod
Small Toolbox
Canon EF 25 extension tube
Canon EF 2X extension tube
Walkie-Talkies (6)
Lee fi lters and holder
Assorted connectors
Lumedyne 486 power pack w/3 025
batteries
Operator manuals for all equipment
Cleaning Toolbox
Various detergents and cleaners
Scrub brushes
Towels (paper and cloth)
Ch06-K52040.indd 177Ch06-K52040.indd 177 8/10/07 12:41:58 PM8/10/07 12:41:58 PM

178
Canon DSLR: The Ultimate Photographer’s Guide
certain to leave that shot on the card. If the color temperature changes,
perhaps as the bulbs warm up, I’m able to neutralize any changes after
the shots are downloaded.”
Paul Hartley’s production workfl ow is relatively simple and effi cient. Since
the vast majority of what he shoots is meant for publication his cameras
default to the RGB color space, and he shoots everything RAW. He’s found
DPP, Canon’s proprietary conversion software, to be especially valuable for
batch conversions to the 16-bit Tiff fi les he prefers. “It takes up a lot of real
estate, but it’s worth the time,” he says. “I just like the power, the control over
the image, that I have at 16 bits. When I’m happy with the way my fi rst image
looks on my calibrated monitor, I’ll apply the recipe and let the machine
convert the batch to 8-bit, which is what my clients ultimately want.”
“I’ve off ered clients the RAW fi les,” he continues. “Some art directors, in
their own minds, are gods in the world of RAW conversion, but no one’s
ever taken me up on that. They just say ‘you convert, I’ll interpret’ or, ‘just
send us a good picture’.”
“Once things look good to me, I’ll burn to CD or DVD, package it for FedEx
delivery and send it out the door and away it goes, along with my invoice.
Color management of my RGB fi les is very important, and my gear is all
calibrated to give me the most accurate color I can get, but my images are
going to an art director who’s probably using a monitor that’s calibrated
to a specifi c color space and need (author’s note: such as a custom CMYK
FIG 6.101 The location looks European, but Hartley found this beautiful arch at the entrance to the grounds
of a private school in Faribault, Minnesota. “I’d originally hoped to capture the coach in the classic three-
quarters pose, but the windows provided a little too much refl ection to suit my tastes, so we repositioned it
behind the arch and shot it almost fl at-on. Normally that angle doesn’t work at all, but the addition of the
arch made for a very pleasing photograph. ” To frame the shot and compress the background, Hartley used his
70–200 mm f2.8 zoom “stretched out all the way”
100-foot garden hose
50-foot garden hose
Spray nozzles
Lights
Elinchrom EL-1000 (3)
Elinchrom Style RX 600 (1)
Elinchrom EL-500 (1)
Elinchrom EL-250 (3)
Elinchrom Ranger RX Speed AS kit
Quantum QFlash
Computer Equipment
17-inch Mac Powerbook
17-inch Apple Display
External keyboard
250-gig LaCie portable drives (2)
500-gig LaCie portable drive
Other
Yamaha EF3000ise generator (3000-watt)
10-foot Little Giant stepladder
4-foot stepladder
8 � 12-foot aluminum lighting frames
with removable fabric panels (2)
20-lb sandbags (6)
Empty sandbags (1 case)
Mover’s pads (6)
Handcarts (3)
Halogen work lamps (2)
20-ton hydraulic jack
Traffi c cones (6)
Fluorescent orange safety vests (2)
Ch06-K52040.indd 178Ch06-K52040.indd 178 8/10/07 12:41:59 PM8/10/07 12:41:59 PM

179
Focus, Exposure, and Style
space for publication on a specifi ed paper. See ‘Workfl ow’ for more
information). He or she is going to adjust my RGB fi les to suit those needs.”
Hartley also licenses his images as stock photography (he shoots
specifi cally for stock as well). In addition to archiving every job he shoots
on CD or DVD, Hartley keeps a more easily accessible copy on portable
LaCie hard drives that reside in his offi ce or pack in his traveling gear,
currently over a terabyte of storage, allowing his images to be available
to him or to potential clients no matter where he might be. As you can
imagine, it could be diffi cult to quickly fi nd a particular image, and clients
can be very picky, so Hartley devised an ingenious system that enables
him to rapidly search his fi les by numbers rather than keywords.
It works like this: Let’s say a client is looking for a Peterbilt truck hauling
a fl atbed trailer on a rural highway in the rain. A keyword search for
“12.6.4.4.”, Hartley’s codes for Peterbilt, fl atbed trailer, rural highway, and
rain would locate several examples. An additional three or four digit
fi le number would follow, indicating exactly which images would be
submitted to the client.
Even though his professional roots are in trucking, Hartley fi nds many
similarities between photography and his former life. “I think some
people like trucking because of its unpredictability,” he explains. “In a lot
of ways it’s just like photography. Personally, I thrive in an environment
that’s ever changing. I just want my voice to come through with every
piece I create” (http://www.addmedia.com) (FIGS 6.102 and 6.103).
FIG 6.102 Who says a photographer’s life is a glamorous life? While on his way to an assignment in Texas,
Paul drove into a blizzard in Missouri. Not to let that deter him, he pulled off the road to shoot some stock of
trucks in bad weather. “I was standing on the roadway about two minutes when this I heard this plow scraping
its way toward me. I crouched down and shot a number of frames. This one is the last, captured seconds before
I was pelted with snow.” As a matter of quality, Hartley prefers to shoot at ISO 100, but bumped the speed up
to 200 because that allowed him to shoot at 1/250th of a second at f6.3 with his 24–70 zoom
Heavy-duty extension cords (3 totaling
200 feet)
Multiple water pails
Cannondale mountain bike
Ch06-K52040.indd 179Ch06-K52040.indd 179 8/10/07 12:42:00 PM8/10/07 12:42:00 PM

180
Canon DSLR: The Ultimate Photographer’s Guide
FIG 6.103 Paul Hartley on location at a cement company in Minnesota
Ch06-K52040.indd 180Ch06-K52040.indd 180 8/10/07 12:42:01 PM8/10/07 12:42:01 PM

This page intentionally left blank

Ch07-K52040.indd 182Ch07-K52040.indd 182 8/10/07 12:42:53 PM8/10/07 12:42:53 PM

183
CHAPTER 7
The Glass
LensesSo much glass, so little time.
I s it possible there is one photographer out there using a complete set of Canon lenses?
I doubt it (although I have been wrong, on rare occasions). Lenses, to me, are like shirts, and
while I have shirts for a wide range of social events, I don’t own every shirt available, just those
that fi t my lifestyle.
Canon makes so many diff erent lenses that it’s possible for photographers of every skill level to
purchase what’s necessary to get their jobs done well while keeping an eye on cost vs. benefi ts. A studio
photographer specializing in portraiture may desire a 400 mm f2.8 telephoto, for example, but the lens
will not represent the most intelligent choice for portrait glass.
In the late 1980s, Canon began replacing its award winning FD Lens Series with even better glass, now
designated as EF. This new Series incorporates next-generation design specs, and was developed with the
entire camera line in mind. Each lens starts with an ideal, large diameter mount, which permits perfect
communication between the camera and the lens’ auto focus (AF) actuators and the electromagnetically
driven precision diaphragm, to control the iris. Canon’s Ultrasonic Motor (USM) was originally meant only
for the L Series lenses but is now found on almost all of the EF Series.
Ch07-K52040.indd 183Ch07-K52040.indd 183 8/10/07 12:43:01 PM8/10/07 12:43:01 PM

184
Canon DSLR: The Ultimate Photographer’s Guide
Here’s the real beauty of the EF Series: Every EF lens made since the debut
of the EOS cameras in 1987 is fully operational on any EOS camera, fi lm or
digital. Canon recognizes and appreciates your investment!
Canon’s EF L Series is the high ground for glass, with aspherical
elements (to control distortion), a minimum of one fl uorite element
(to control secondary chromatic aberration), and UD (Ultra-low
Dispersion) or Super-UD elements. Amazingly, Canon developed its own
technology, right down to a successful method for creating artifi cial
fl uorite.
Shine a light into an L Series lens and you’ll see a spectrum of
colors. This is Canon’s Super Spectra Coating, a system by which
individual lens elements are coated with diff erent substances to,
among other things, reduce fl are and ghosting (from internal refl ections),
assure consistent color balance, absorb ultraviolet and prevent
white from shifting to yellow. “Wow!” is the only word that sums up
what Canon has been able to do, and the lens’ performance lives up
to it.
Depending on which camera you have, you may have to deal with a
“conversion factor,” the diff erence between the focal length of the lens
and how your camera’s sensor sees that focal length.
Lenses are designed to eff ectively cover a full 36 � 36 mm circle,
so full size CMOS sensors, as you’ll currently fi nd on the 5D and IDs
Mark II (and earlier on the 1Ds) can take advantage of the full focal length
of any compatible lens. All other Canons have smaller sensors, which
require a conversion factor to determine a focal length as those cameras
see it.
The Rebel XTi and the 30D have the smallest chip size of any of
the DSLRs, and a conversion factor of 1.6. The 1D Mark II, Mark II N
and Mark III have conversion factors of 1.3. When you multiply a focal
length by the conversion factor, that number will give you the focal
length of that lens as your camera sees it. Thus, a 100 mm lens on
a 5D or 1Ds Mark II will have the angle of view of a 160 mm lens on a
Rebel or a 30D, or a 130 mm lens on a 1D Mark II, Mark II N or Mark III
(FIG 7.1).
Ch07-K52040.indd 184Ch07-K52040.indd 184 8/10/07 12:43:05 PM8/10/07 12:43:05 PM
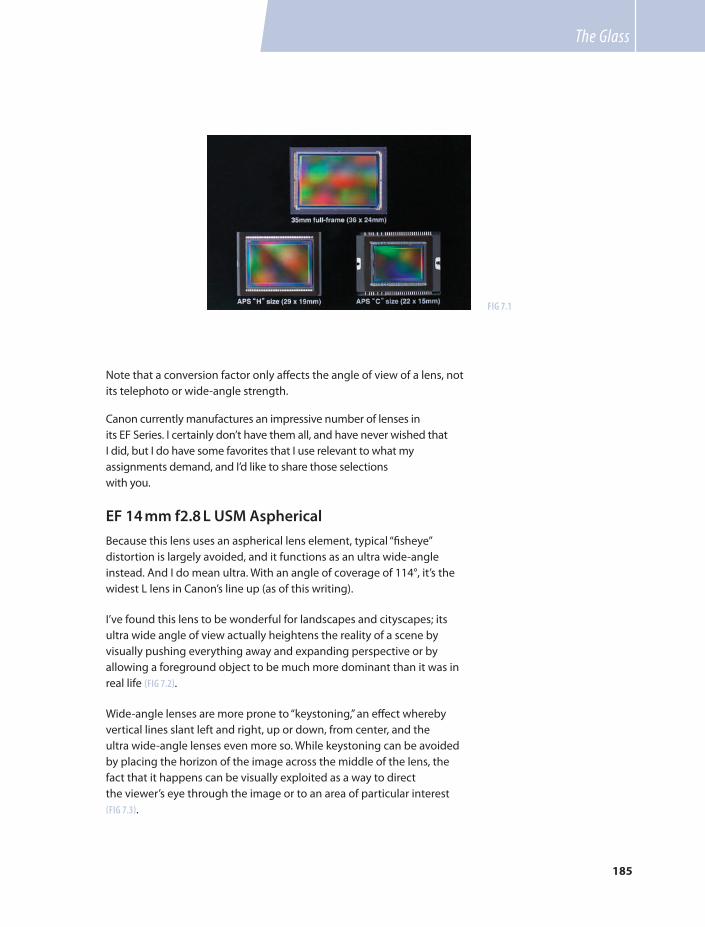
185
The Glass
Note that a conversion factor only aff ects the angle of view of a lens, not
its telephoto or wide-angle strength.
Canon currently manufactures an impressive number of lenses in
its EF Series. I certainly don’t have them all, and have never wished that
I did, but I do have some favorites that I use relevant to what my
assignments demand, and I’d like to share those selections
with you.
EF 14 mm f2.8 L USM Aspherical
Because this lens uses an aspherical lens element, typical “fi sheye”
distortion is largely avoided, and it functions as an ultra wide-angle
instead. And I do mean ultra. With an angle of coverage of 114°, it’s the
widest L lens in Canon’s line up (as of this writing).
I’ve found this lens to be wonderful for landscapes and cityscapes; its
ultra wide angle of view actually heightens the reality of a scene by
visually pushing everything away and expanding perspective or by
allowing a foreground object to be much more dominant than it was in
real life (FIG 7.2).
Wide-angle lenses are more prone to “keystoning,” an eff ect whereby
vertical lines slant left and right, up or down, from center, and the
ultra wide-angle lenses even more so. While keystoning can be avoided
by placing the horizon of the image across the middle of the lens, the
fact that it happens can be visually exploited as a way to direct
the viewer’s eye through the image or to an area of particular interest
(FIG 7.3).
FIG 7.1
Ch07-K52040.indd 185Ch07-K52040.indd 185 8/10/07 12:43:05 PM8/10/07 12:43:05 PM

186
Canon DSLR: The Ultimate Photographer’s Guide
One thing that I’ve always enjoyed about the 14 mm is that the image
is so wide it’s possible to crop it to a long, narrow aspect ratio, which
gives the impression of a panoramic image without stitching together
individual images or when a tripod is not available to correctly line up
those individual frames. Cropping also allows you to move the centered
horizon up or down to a more compositionally friendly location (FIG 7.4).
EF 15 mm f2.8 Fisheye
This is one of the most fun lenses Canon has ever built. Aside from
its impressive 180° angle of view (measured diagonally across a
24 � 36 mm, 35 mm size sensor), the inherent ability of this lens to distort
FIG 7.2
FIG 7.3
FIG 7.4
Ch07-K52040.indd 186Ch07-K52040.indd 186 8/10/07 12:43:06 PM8/10/07 12:43:06 PM

187
The Glass
both foreground and background creates images that are uniquely
interesting. A viewer simply has to look at them, if for no other reason
than to try to fi gure them out (FIG 7.5).
Wide-angle lenses are capable of more depth of fi eld than normal
perspective or telephoto lenses. Thus, at small apertures, it’s possible to
get what appears to be sharp focus from the closest working distance
(0.2 m/0.7 ft in this case) almost to infi nity (FIG 7.6).
As with any lens, but certainly true of wide angles, distortion is minimized
when the horizon is framed at the center (FIG 7.7).
85 mm f1.2
This lens is a photojournalist’s dream. Super fast and dead-on sharp,
its slight telephoto focal length adds charm to the images through a
slightly foreshortened perspective. This is a perfect, grab-shot lens for
FIG 7.5
FIG 7.6
Ch07-K52040.indd 187Ch07-K52040.indd 187 8/10/07 12:43:09 PM8/10/07 12:43:09 PM

188
Canon DSLR: The Ultimate Photographer’s Guide
location work, and, even though its huge front element (72 mm) adds
extra weight, is the lens of choice for many wedding and documentary
photographers on the prowl for the perfect moment (FIG 7.8).
With a maximum aperture of f1.2, not only is this lens able to function
under very low light levels, depth of fi eld at f1.2 is virtually non-existent.
FIG 7.7
FIG 7.8
Ch07-K52040.indd 188Ch07-K52040.indd 188 8/10/07 12:43:11 PM8/10/07 12:43:11 PM

189
The Glass
This lens makes it easy to isolate an in-focus subject within an out of
focus fi eld, both in the foreground and background (FIG 7.9).
Current trends in creative food photography lean toward small areas of
sharp focus with rapid fall off to blur, a beautiful and evocative trick. The
majority of contemporary cookbooks have been photographed this way,
and I’ve even seen upscale restaurant menus shot with this style. Many of
these images are made on sheet fi lm, with the view camera’s lens tilted
in such a way as to limit depth of fi eld, and many are manipulated in
Photoshop (see my book, Photoshop Eff ects for Portrait Photographers for
an easy way to do this). Although the look may not be quite the same,
this lens makes that eff ect an easy one to achieve (FIG 7.10).
FIG 7.9
FIG 7.10
Ch07-K52040.indd 189Ch07-K52040.indd 189 8/10/07 12:43:14 PM8/10/07 12:43:14 PM

190
Canon DSLR: The Ultimate Photographer’s Guide
At 85 mm, this lens is terrifi c for portraits. The slight perspective
compression that I spoke of earlier, coupled with a mid-range f-stop of 5.6
or 8 will hold focus over the planes of the face but begin falling off to a
nice blur at the ears and shoulders (FIG 7.11).
50 mm f2.5 Compact Macro
Here’s an entry-level macro lens that will perform beautifully as it
opens up the world of close-up imagery for you. Capable of one half
life-size magnifi cation and 1:1 ratio with the Lifesize Converter EF, this
inexpensive and lightweight little lens also functions as a lens of normal
perspective that you could use for everyday snapshot photography.
This lens is best for inanimate objects, as you have to move in pretty close
to get a tight image, a position some creatures feel uncomfortable with.
Still, it can work well with people. Many medical and legal operations
and investigators use this lens for everyday documentation of injuries or
evidence (FIG 7.12).
There’s a buzzword fl oating around,
bokeh, which refers to the quality of the
out of focus areas in any image where
such is deliberately introduced or used as
a compositional element. I understand
it came from the Japanese, boke, but I’d
never heard it until recently and it isn’t in
my American dictionary. I just wanted to
pass it along, so that if a member of the
photographic intelligencia drops the word
into polite conversation, as in “Hey! Nice
bokeh!” you won’t take it personally.
FIG 7.11
Ch07-K52040.indd 190Ch07-K52040.indd 190 8/10/07 12:43:16 PM8/10/07 12:43:16 PM

191
The Glass
Please note that the 50 mm f/2.5 Compact Macro is the only true fl at fi eld
lens in Canon’s lineup. If you do a lot of work on a copystand this is a lens
you really need.
100 mm f2.8 macro
Like macro? Take a step-up and check out the 100 mm f2.8. Yes, it’s
substantially heavier than the 50 mm, but it’s still inexpensive (for what
it does) and also makes a great portrait lens. The Twin Light macro light
system and the Ring Flash are built to fi t this lens (see Flash).
This lens also delivers true 1:1 magnifi cation, but the extra 50 mm this
lens’ focal length allows you to get in really close from further away,
perfect if you like close-up images with a great deal of background blur.
At smaller apertures, this lens will keep enough background detail so
your subject matter will be tied to it.
By the way, this lens also features full-time manual focus, which means
you can make fi ne adjustments at any time (very useful when doing
macro work), while maintaining AF capabilities (FIG 7.13).
FIG 7.12
FIG 7.13
Ch07-K52040.indd 191Ch07-K52040.indd 191 8/10/07 12:43:18 PM8/10/07 12:43:18 PM

192
Canon DSLR: The Ultimate Photographer’s Guide
If macro photography becomes a driving force in your life, be sure to
check out Canon’s MP-E 65 mm f2.8 Macro Photo lens. This lens will set
you back a few extra dollars, but with magnifi cation up to 5� life size it
might be something you’ll have to have.
TS-E 90 mm f2.8 Tilt/Shift
Acting much like a view camera, Tilt/Shift (T/S) lenses correct image
distortion and control depth of fi eld by moving the axis of the lens.
Canon makes three focal lengths of T/S lenses, 24, 45, and 90 mm
and, although all are manual focus, each will do the same job, it’s the
applications that are diff erent.
The 24 mm, for example, is extremely useful for architectural photo-
graphers, as the keystoning eff ect one typically sees when rooms or
buildings are photographed can be controlled, with vertical lines drawn
back into parallel with the edges of the image frame. Additionally, depth
of fi eld can be increased by properly tilting the lens into the frame.
A fair portion of my work is editorial and usually involves people. When
I am called upon to photograph buildings I’m typically granted a certain
amount of artistic license to interpret what I see. For that reason I prefer
the 90 mm, as it can be used to photograph details in what the eye
perceives as a normal perspective (FIG 7.14), as well as to alter details of
other subjects by narrowing the point of focus (FIG 7.15).
FIG 7.14
Ch07-K52040.indd 192Ch07-K52040.indd 192 8/10/07 12:43:19 PM8/10/07 12:43:19 PM

193
The Glass
FIG 7.15
EF 70–200 mm f2.8L USM
It’s long, heavy and expensive, and it’s my favorite lens of all time. The
quality of this glass is second to none, and I’ve found it invaluable for just
about every subject I like to photograph.
The old rule of thumb for hand-held telephotos was that the focal length
of the lens was equivalent to the maximum shutter speed one should
use to get a critically sharp image. So, if this lens was being used at its
max focal length, a cautious photographer wouldn’t use a shutter speed
slower than 1/200th of a second because of potential camera shake.
That’s a seriously limiting rule, and one I like to break.
The 70–200 incorporates Canon’s most advanced Image Stabilization
technology, which lets me break that rule because it will anticipate
(based on my movements), and compensate for, up to three shutter
speeds’ worth of camera movement.
Shooting Tip
Here’s an eff ective and very inexpensive
way to get a few more shutter speeds’ use
out of this or any other lens.
Any hardware store should have 1/4 �
20 “O” bolts in stock. Buy one and screw
it into the tripod socket on the bottom of
the lens (or the camera, if the lens doesn’t
have a socket).
From a pet supply store, buy a nylon dog
leash, about a foot longer than your height.
Clip the leash onto the bolt, then stand
on it to put upward pressure against the
lens. This extra stabilization will buy you at
least two more shutter speeds (depending
on your caff eine intake for the day) (FIGS
7.16–7.18).
Ch07-K52040.indd 193Ch07-K52040.indd 193 8/10/07 12:43:20 PM8/10/07 12:43:20 PM

194
Canon DSLR: The Ultimate Photographer’s Guide
I’ve found many uses for this lens. At a maximum aperture of f2.8, it’s fast
enough in the studio to shoot using only modeling lights or the ambient
incandescent light around the seating area. This image started as a total
grab shot, when during a break in a portrait shoot my couple began
nuzzling each other. Since the thrust of the shoot was to show their
FIG 7.17
FIG 7.18
FIG 7.16
Ch07-K52040.indd 194Ch07-K52040.indd 194 8/10/07 12:43:22 PM8/10/07 12:43:22 PM
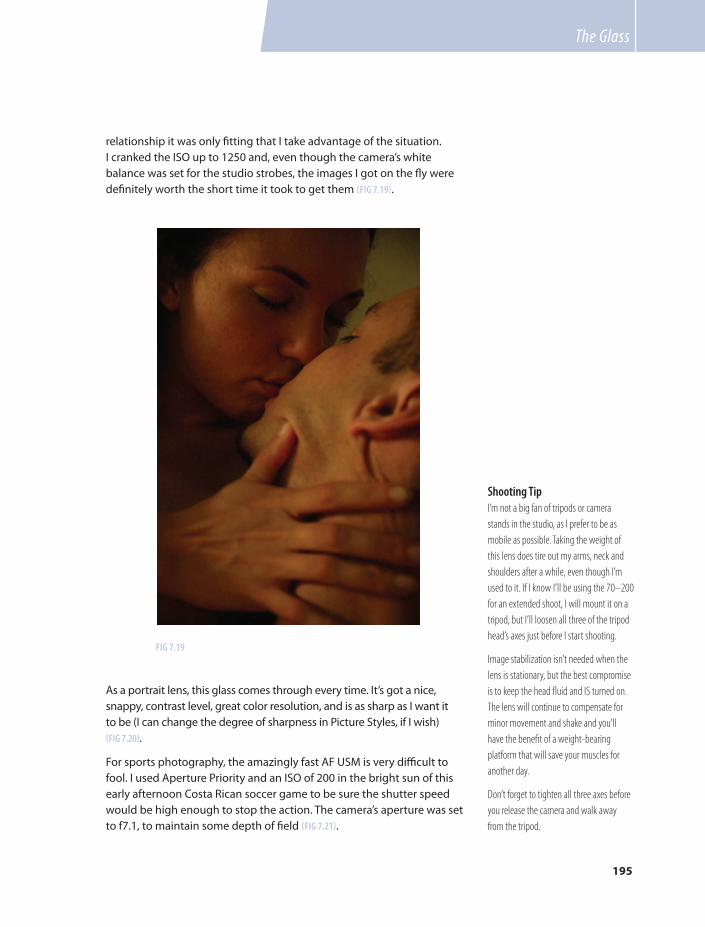
195
The Glass
relationship it was only fi tting that I take advantage of the situation.
I cranked the ISO up to 1250 and, even though the camera’s white
balance was set for the studio strobes, the images I got on the fl y were
defi nitely worth the short time it took to get them (FIG 7.19).
As a portrait lens, this glass comes through every time. It’s got a nice,
snappy, contrast level, great color resolution, and is as sharp as I want it
to be (I can change the degree of sharpness in Picture Styles, if I wish)
(FIG 7.20).
For sports photography, the amazingly fast AF USM is very diffi cult to
fool. I used Aperture Priority and an ISO of 200 in the bright sun of this
early afternoon Costa Rican soccer game to be sure the shutter speed
would be high enough to stop the action. The camera’s aperture was set
to f7.1, to maintain some depth of fi eld (FIG 7.21).
FIG 7.19
Shooting Tip
I’m not a big fan of tripods or camera
stands in the studio, as I prefer to be as
mobile as possible. Taking the weight of
this lens does tire out my arms, neck and
shoulders after a while, even though I’m
used to it. If I know I’ll be using the 70–200
for an extended shoot, I will mount it on a
tripod, but I’ll loosen all three of the tripod
head’s axes just before I start shooting.
Image stabilization isn’t needed when the
lens is stationary, but the best compromise
is to keep the head fl uid and IS turned on.
The lens will continue to compensate for
minor movement and shake and you’ll
have the benefi t of a weight-bearing
platform that will save your muscles for
another day.
Don’t forget to tighten all three axes before
you release the camera and walk away
from the tripod.
Ch07-K52040.indd 195Ch07-K52040.indd 195 8/10/07 12:43:23 PM8/10/07 12:43:23 PM

196
Canon DSLR: The Ultimate Photographer’s Guide
EF 24–70 mm f2.8 USM
Another favorite, the 24–70 is an indispensable tool for wedding and
event photographers or anyone who likes to rack from wide to normal
FIG 7.20
FIG 7.21
Ch07-K52040.indd 196Ch07-K52040.indd 196 8/10/07 12:43:25 PM8/10/07 12:43:25 PM

197
The Glass
in split seconds. I know many photographers who carry two cameras,
with the 70–200 on the second body, switching whenever the situation
warrants a change in focal length. It takes getting used to, but once you
do you’re covered from wide angle to telephoto.
This is my favorite, everyday lens. I use it professionally, of course, as it
does a terrifi c job on people and environmental images, two subjects I
shoot regularly for clients, as well as many self-assignments for stock
(FIGS 7.22 and 7.23).
At 70 mm, it’s a useful portrait lens,
although just barely. If you have to move
in tight to get a good head and shoulder
composition, for example, you may see
distortion caused by the short subject-to-
camera distance. Noses will look larger and
ears will look smaller. I’m not saying you
shouldn’t use it, just be mindful of short
focal length pitfalls for classic portraiture.
EF 400 mm f2.8L IS USM
Weighing almost 12 pounds (5.37 kg), this lens is a beast, and not one to
just casually toss into your gadget bag for vacation photos at the beach,
but it’s so cool it’s worth lugging around when photography is your living.
Sports and wildlife photographers love this lens. At f2.8 it gathers just about
every photon out there, which makes it a terrifi c choice for games at night
or gazelles at dawn. Those of us who shoot stock photography are always
FIG 7.22
FIG 7.23
Ch07-K52040.indd 197Ch07-K52040.indd 197 8/10/07 12:43:27 PM8/10/07 12:43:27 PM

198
Canon DSLR: The Ultimate Photographer’s Guide
looking for ways to separate our work from the rest of the pack, so a lens
like this can actually justify its expense (hey, that’s what I told my wife).
I’ve used this lens in a number of situations where glass of a shorter focal
length would have produced a much more “normal” looking image. When
I’m working with this lens, “normal“ is the last thing I’m going to get, or
want. This compressed scene began almost 600’ away from me (FIG 7.24).
FIG 7.24
One of my photographic loves is heavy transport machinery; trucks,
trains, and planes, anything with mass. This lens can compress so much
perspective that massive objects look even bigger. I like that. Many
photographers who shoot big stuff like to work with wide angle, as do
I, sometimes, although I am extremely pleased with the look of strong
telephoto (FIG 7.25).
For this particular series of stock shots, I wanted even stronger telephoto
compression than I was getting with the 400. The easy solution was to use
the Canon Extender EF 2� II, eff ectively doubling the focal length of the
lens to 800 mm. It cost me two stops, so my available largest aperture was
Ch07-K52040.indd 198Ch07-K52040.indd 198 8/10/07 12:43:29 PM8/10/07 12:43:29 PM

199
The Glass
FIG 7.27FIG 7.26
FIG 7.25
f5.6, but Canon doesn’t make an 800 mm. In the fi rst of these two shots,
made at least half a mile (1.75 km) from my location, notice how eff ectively
Canon’s Super Spectra Coating suppressed internal element refl ections
from the sun, not an easy task with such a bright source (FIGS 7.26 and 7.27).
Ch07-K52040.indd 199Ch07-K52040.indd 199 8/10/07 12:43:31 PM8/10/07 12:43:31 PM
200
Canon DSLR: The Ultimate Photographer’s Guide
You can take a trip through a Canon lens catalog and surely fi nd
gear that will do whatever you wish it to do. As an avowed generalist,
I’m lucky in that I can fi nd something I like to shoot with just about
any lens Canon makes. I realize that you may have diff erent aspirations.
I’m OK with that. I just want to assure you that whatever you need, Canon
makes.
If you’re looking for a starter “kit“ of lenses that will creatively realize the
vast majority of your ideas, let me suggest the following:
● EF 16–35 mm f2.8L II USM. I don’t have one. The 14 mm Aspherical and
15 mm Fisheye do nice things for me (and may be for you), but this lens
is an easy and relatively inexpensive way to get into ultra wide angle.
● As a lower cost alternative, the EF 17–40 mm f/4L USM is a terrifi c lens
and about half the price of the 16–35 mm f2.8.
● EF 24–70 mm f2.8 USM. With its close focusing abilities, this lens is an
excellent day-to-day lens and will do beautiful things for you.
● EF 70–200 mm f2.8L USM. I don’t have a bad word to say about this
lens – it’s incredible, right out of the box.
● Canon has built several lenses that one could consider “sleepers” in that
they’re great pieces of glass for less money than you’d think you’d have
to pay. Do yourself a favor and check them out.
● One of my favorites, the aforementioned 100 mm f2.8 macro absolutely
falls into this category.
● The EF 85 mm f/1.8 is an awesome lens. I consider it a very viable
alternative to the EF 85 mm f/1.2 for folks who can’t spare the cash.
This lens is generally around $340 instead of $1789 (at the time of this
writing) for the 85 mm f/1.2! It’s lighter, faster to focus (since it doesn’t
have the giant elements to move around) and is optically quite pleasing.
I also think that the EF 28 mm f/1.8 is a great value at around $400. It is
quick to focus, nice and sharp at the edges and a great way to get into
a fast lens at a low price. For the Digital Rebel/30D shooter, its eff ective
focal length is 44.8, which could be a nice all-purpose lens (and pretty
close to 50 mm with a full frame sensor).
EF-S Lenses
In 2003, beginning with the Digital Rebel, Canon debuted a new series of
lenses, designated EF-S, with a new mount that was designed for cameras
with the APS-C sensor and its 1.6 conversion factor. Although earlier
models, specifi cally the D30, D60, and 10D, have APS-C sensors, these
lenses will not fi t those cameras because the lens mount is too deep. The
Rebel, 20D and 30D sport mirror assemblies that move the mirror back as
it moves up. If you could mount an EF-S lens on a 10D, for example, the
Ch07-K52040.indd 200Ch07-K52040.indd 200 8/10/07 12:43:33 PM8/10/07 12:43:33 PM

201
The Glass
mirror would smack into the lens mount with the very fi rst exposure. That
would be bad (FIG 7.28).
FIG 7.28 EF-S lenses feature deeper
mount that will only fi t a select number of
Canon cameras.
The lenses were designed to be lighter, smaller and less expensive, which
they can be because the camera sensors are smaller and the circle of light
is correspondingly small. There is nothing to be gained by a circle of light
that’s larger than the sensor, a fact Canon took into account.
There are currently fi ve lenses in this series.
EF-S 17–55 mm f2.8 IS USM
This is the most expensive of the series, currently almost $1200.00. What
makes it interesting is that is comprised of the requisite number of exotic
elements (fl uorite, aspherical elements, etc.) as to qualify it for L-Series
inclusion. (It can’t be a L lens because it doesn’t fi t all the cameras.)
For everything that it packs into its 4.4�, 22.8 oz. weight (110.6 mm, 645 g),
it’s a great piece of glass. The conversion factor eff ectively makes it a
27–88 mm zoom.
EF-S 10–22 mm f3.5–4.5 USM
Ultra wide-angle coverage, aspherical elements to control distortion, and
focus as close as 9.5 inch makes this lens a great choice for the Rebel,
20D or 30D. The conversion factor means you’d have a 16–35 mm, one of
the most popular choices for wide-angle lenses. Full-time manual focus
means you can tweak focus anytime, even when using AF.
EF-S 17–85 mm f4–5.6 IS USM
The equivalent of a 28–135 mm on a full frame camera, this lens also
features Canon’s Image Stabilization, allowing you to shoot under lower
light conditions than you normally would be able to use.
Ch07-K52040.indd 201Ch07-K52040.indd 201 8/10/07 12:43:34 PM8/10/07 12:43:34 PM

202
Canon DSLR: The Ultimate Photographer’s Guide
This strikes me as a useful lens for event photographers who shoot with
fl ash. I think the f5.6 maximum aperture (at 85 mm) would be limiting
without fl ash, but the price is certainly attractive, currently about $515,
and you’re certainly not limited to just fl ash work (FIG 7.29).
FIG 7.30
FIG 7.29
EF-S 18–55 mm f3.5–5.6 USM
The standard “kit“ lens that Canon lets you purchase for next to nothing
when you buy a Rebel or 30D. Many photographers have indicated they
feel the lens must be pretty bad or Canon wouldn’t sell them so cheaply.
They couldn’t be further from the truth.
Ch07-K52040.indd 202Ch07-K52040.indd 202 8/10/07 12:43:35 PM8/10/07 12:43:35 PM
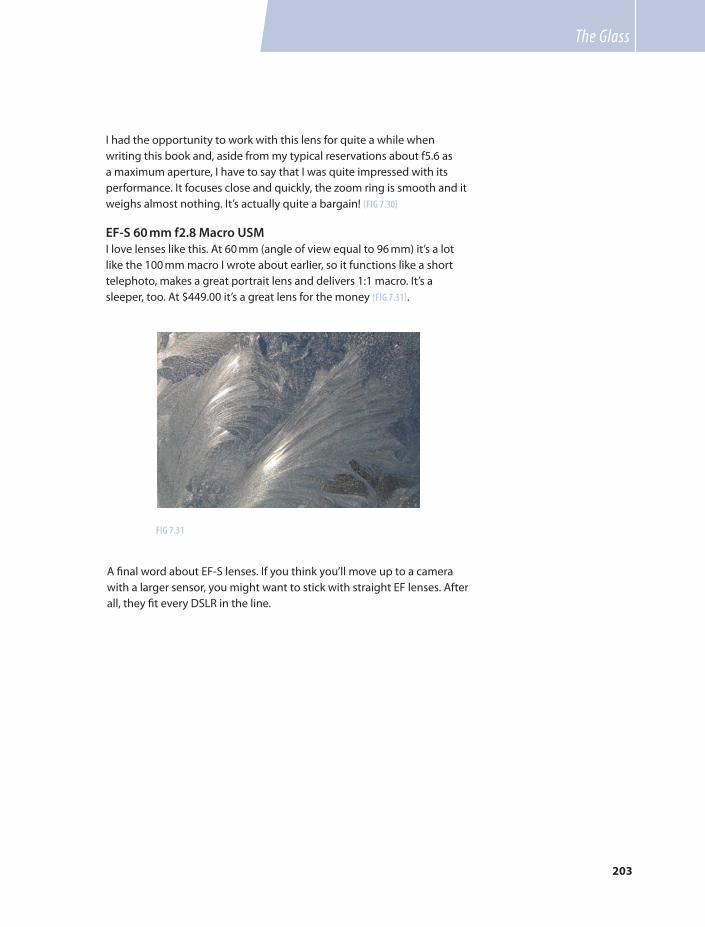
203
The Glass
I had the opportunity to work with this lens for quite a while when
writing this book and, aside from my typical reservations about f5.6 as
a maximum aperture, I have to say that I was quite impressed with its
performance. It focuses close and quickly, the zoom ring is smooth and it
weighs almost nothing. It’s actually quite a bargain! (FIG 7.30)
EF-S 60 mm f2.8 Macro USM
I love lenses like this. At 60 mm (angle of view equal to 96 mm) it’s a lot
like the 100 mm macro I wrote about earlier, so it functions like a short
telephoto, makes a great portrait lens and delivers 1:1 macro. It’s a
sleeper, too. At $449.00 it’s a great lens for the money (FIG 7.31).
A fi nal word about EF-S lenses. If you think you’ll move up to a camera
with a larger sensor, you might want to stick with straight EF lenses. After
all, they fi t every DSLR in the line.
FIG 7.31
Ch07-K52040.indd 203Ch07-K52040.indd 203 8/10/07 12:43:36 PM8/10/07 12:43:36 PM

Ch08-K52040.indd 204Ch08-K52040.indd 204 8/10/07 3:17:29 PM8/10/07 3:17:29 PM

205
CHAPTER 8
Flash
Watt? Me Worry?
Whether you’ll use a built-in fl ash (found on the Rebel and 30D) or an accessory Speedlite,
Canon has paid a great deal of attention to how that equipment interacts with their
cameras. In the earlier days of Canon’s digital photography, early Rebels, D30, D60, 10D, and 20D
models, even the 1Ds, there were signifi cant problems with E-TTL, Canon’s through-the-lens fl ash
metering system, that garnered less than rave reviews from many photographers. The problem
was that the output power of the fl ash was tied to the fi nal position of the focus point, so that
if you focused, held the shutter halfway down and recomposed the image, the fl ash would fi re
based on where that focus point ended up. If the focus point came to rest on a white wall, for
example, the exposure could be seriously skewed (although the wall would look great).
Canon’s newer cameras, beginning with the EOS-1D Mark II, employ a newer fl ash metering algorithm
called E-TTL II which provides more stable fl ash exposure than the previous E-TTL. The fl ash metering is
still infl uenced by the location of the focus point at the time of exposure but not nearly as much so as with
the older E-TTL bodies. E-TTL II will also take into account the focusing distance information that it gets
from most, but not all, Canon lenses. While not perfect, it is certainly an improvement over E-TTL.
Ch08-K52040.indd 205Ch08-K52040.indd 205 8/10/07 3:17:38 PM8/10/07 3:17:38 PM

206
Canon DSLR: The Ultimate Photographer’s Guide
Shooting Tip
Should you be working with one of the
early E-TTL cameras, getting good images
is not impossible, it just requires that you
pay close attention to where the focus
point falls at the time of exposure or, if you
choose to focus and recompose, that you
add one more step with a feature called
Flash Exposure Lock (FEL).
Using either the on-camera fl ash or
an accessory Speedlite, fi nd the most
important part of the image, the portion
you wish to focus on. Push the shutter
button halfway to lock focus. Find the FEL
(* on the prosumer bodies and near the
shutter button on the EOS-1 cameras)
button and push it. The FEL button will fi re
a small fl ash at the subject, and will record
its strength and distance data when it’s
bounced back into the camera’s memory.
Note that you cannot use back-button
focus with FEL on consumer and prosumer
bodies (FIG 8.1).
EOS-1 pro cameras have a dedicated FEL
button, located just to the left of the shutter
release. It’s used exactly the same way,
except that you can still use back-button
focus (FIG 8.2).
You now have 6 seconds to recompose and
shoot the image, with the FEL-targeted
area nicely exposed. While this feature
is helpful for earlier cameras, it’s just as
valuable as a tool for critical fl ash exposure
on newer machines.
Built-In Flash
Working with the built-in on-camera fl ash is terrifi c for snapshots,
although, in my opinion, it should not be used for paying jobs because its
tube is small and produces a hard, specular source that accents skin shine
and shows hard shadows. Pictures made with built-in fl ash will also look
like everyone else’s shots, so if you’re a wedding photographer trying to
establish a visual identity, using this feature might not be the best idea.
The fl ash is placed close to the lens, and pops up vertically just above
the lens axis. While this guarantees even light over its eff ective working
area, the look of the images will actually be quite fl at. Further, if you turn
the camera to its vertical position, the resulting shadows will fall straight
across that axis and look quite unattractive.
That said, the built-in fl ash can be very eff ective as fi ll fl ash, a little
something to brighten up a shot without overpowering it.
FIG 8.1
FIG 8.2
Ch08-K52040.indd 206Ch08-K52040.indd 206 8/10/07 3:17:42 PM8/10/07 3:17:42 PM
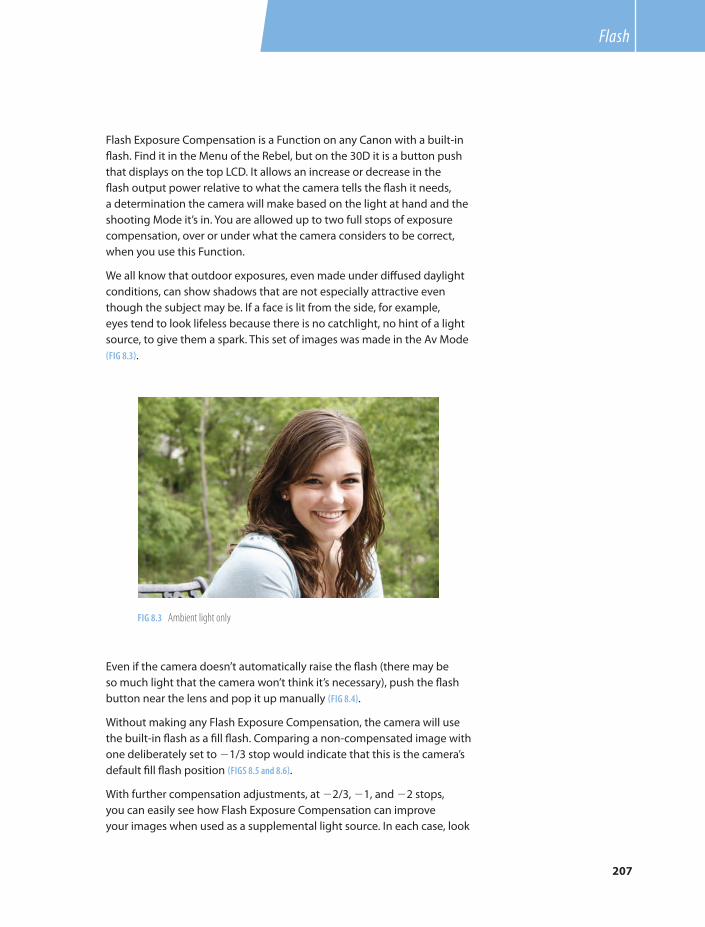
207
Flash
Flash Exposure Compensation is a Function on any Canon with a built-in
fl ash. Find it in the Menu of the Rebel, but on the 30D it is a button push
that displays on the top LCD. It allows an increase or decrease in the
fl ash output power relative to what the camera tells the fl ash it needs,
a determination the camera will make based on the light at hand and the
shooting Mode it’s in. You are allowed up to two full stops of exposure
compensation, over or under what the camera considers to be correct,
when you use this Function.
We all know that outdoor exposures, even made under diff used daylight
conditions, can show shadows that are not especially attractive even
though the subject may be. If a face is lit from the side, for example,
eyes tend to look lifeless because there is no catchlight, no hint of a light
source, to give them a spark. This set of images was made in the Av Mode
(FIG 8.3).
Even if the camera doesn’t automatically raise the fl ash (there may be
so much light that the camera won’t think it’s necessary), push the fl ash
button near the lens and pop it up manually (FIG 8.4).
Without making any Flash Exposure Compensation, the camera will use
the built-in fl ash as a fi ll fl ash. Comparing a non-compensated image with
one deliberately set to �1/3 stop would indicate that this is the camera’s
default fi ll fl ash position (FIGS 8.5 and 8.6).
With further compensation adjustments, at �2/3, �1, and �2 stops,
you can easily see how Flash Exposure Compensation can improve
your images when used as a supplemental light source. In each case, look
FIG 8.3 Ambient light only
Ch08-K52040.indd 207Ch08-K52040.indd 207 8/10/07 3:17:44 PM8/10/07 3:17:44 PM

208
Canon DSLR: The Ultimate Photographer’s Guide
at how much life the catchlights in the eyes add to the shots
(FIGS 8.7–8.9).
When working with built-in fl ash indoors, there are a couple of things for
you to consider that will improve the quality of your images.
Virtually any setting that has light falling in it can be photographed. It’s
the quality of the light that determines the fi nal beauty of the shot.
FIG 8.5 Fill fl ash, no adjustment FIG 8.6 Fill �1/3
FIG 8.4
Ch08-K52040.indd 208Ch08-K52040.indd 208 8/10/07 3:17:45 PM8/10/07 3:17:45 PM

209
Flash
This image, made in the Av Mode, takes advantage of the light coming
into the room through this family’s large front room window. It’s a nice
image, but looks a little fl at because the source (the window) is so broad
and the subject is not infl uenced by any direct light (FIG 8.10).
FIG 8.7 Fill �2/3 FIG 8.8 Fill �1 stop
FIG 8.9 Fill �2 stops
FIG 8.10 Ambient light only
Ch08-K52040.indd 209Ch08-K52040.indd 209 8/10/07 3:17:47 PM8/10/07 3:17:47 PM

210
Canon DSLR: The Ultimate Photographer’s Guide
Use a shooting Mode that will take ambient light into account. If you
use Manual, be sure to set a shutter speed and aperture that will include
enough ambient detail to show the background. A shutter speed that’s
too short or an aperture that’s too small will not allow enough ambient
light to register, resulting in dark backgrounds with minimal or no
detail. Even though the exposure from the fl ash will be terrifi c, the lack
of ambient detail will result in “tonal merger,” a part of the image where
dark areas of the subject like hair or clothing are so dark they become
indistinguishable against the background. Photos made with tonal
merger lack the three-dimensional quality that makes for a better shot
(FIG 8.11).
You’ll get better results working in a mode that supports ambient light
exposures. On the Basic side of the dial, Portrait, even Night Portrait,
will produce great results because the exposure will be made for both
ambient and fl ash. On the Creative side, Av, Tv, even ADep (on the Rebel
and 30D) will produce nicely lit, dimensional results that balance ambient
light to the fl ash (FIG 8.12).
FIG 8.11 Camera in Manual mode
FIG 8.12
Ch08-K52040.indd 210Ch08-K52040.indd 210 8/10/07 3:17:49 PM8/10/07 3:17:49 PM

211
Flash
Accessory Flash
At the time of this writing, Canon’s fl agship accessory strobe is the 580EX-II
Speedlite, a beautiful, slim, relatively lightweight product that can do
wonderful things either by itself or linked with many additional units (I’ve
heard of as many as 36!). Unlike the earlier 580EX, the EX-II adds “Auto” to
its Mode list, along with E-TTL and Manual, a feature many photographers
feel will bring the Speedlite line back into the race as a full-featured unit
capable of delivering what the photographic community says it wants.
E-TTL Mode fi res a small fl ash immediately before fi ring the main burst.
The purpose is for the unit to get a read on the amount of light bouncing
back from the measuring point and shorten or lengthen the second fl ash
duration accordingly. Auto Mode fi res one shot at essentially full power,
reads the bounce, and turns the strobe off when the correct amount of light
has hit the sensor. Many photographers feel Auto to be more accurate than
E-TTL.
No matter how you cut it, any 580 is considered a small unit. While it’s
capable of a strong burst at full power it doesn’t typically work that way
in E-TTL, where recycle speed is important (FIG 8.13).
FIG 8.13
I’ll go out on a limb here, at least a little bit, to say that there is no
accessory fl ash out there that will deliver perfect shots, every time and
Ch08-K52040.indd 211Ch08-K52040.indd 211 8/10/07 3:17:51 PM8/10/07 3:17:51 PM

212
Canon DSLR: The Ultimate Photographer’s Guide
right out of the box unless you understand and use Manual mode. Back in
the days when we shot weddings, events, and portraits on fi lm we could
mess up quite a bit with our “automatic” fl ash units, and our labs would
bail us out by adjusting exposure at the enlarger. Those days are over.
Today, if we mess up, we’re on the hook to fi x it and sometimes that’s
hard to do, even with Photoshop.
I’ve found a few tricks, over the years, to get more consistent results from
my Canon fl ash in E-TTL. Naturally, I’ll share. Some of these tricks have
minimal basis in fact, they’re only based on my experience, but they seem
to work nicely and improve my shot-to-shot success ratio.
My most important tip is that E-TTL seems to work better with an ISO
higher than 100. When I fi re up my fl ash unit I’ll set my camera’s ISO to at
least 400. I think this helps because the unit doesn’t have to push out as
much light as it does at my preferred ISO of 100, and can light the scene
more effi ciently.
The units have a built-in power adjustment that you can use to increase
or decrease the output power relative to what the camera thinks it wants.
This is just like the Flash Exposure Compensation Function dialed in on
the camera with built-in fl ash, except that the adjustments are made on
the fl ash unit itself. I’ve found that, working with the 30D and 5D, I like
an overall increase of �1/3 on the strobe to give me more consistently
perfect exposures although I can easily work with what the camera gives
me if I forget to do that.
I’ve also found that zoom lenses are defi nitely the way to go when using
accessory fl ash.
At 7 to 10 feet, the fl ash is working at its best. The distance from the
subject is not so far that the fl ash has to work overtime but far enough so
that the spread of light is even and consistent. My preferred lens in this
circumstance is the 24–70 mm f2.8 zoom, because I can let the lens do the
work of moving in or out of the frame.
It’s also a good idea to use a maximum aperture of f5.6 (larger is better)
whenever possible.
Even when you’ve got your E-TTL fl ash nailed, you’re still dealing with a
small, specular, light source. Better results are obtained when you use
a third-party diff user to broaden and soften the light source. There are
many of these devices on the market, and I certainly haven’t tried all of
them, but there are some characteristics that each exhibit: Any of them
will spread the light, creating a larger, softer, source, and each will cut the
effi ciency of the source, the power of the strobe’s output, by at least one
full stop.
Ch08-K52040.indd 212Ch08-K52040.indd 212 8/10/07 3:17:52 PM8/10/07 3:17:52 PM

213
Flash
The two that I use the most are the LumiQuest MidiBouncer (aka the
Baseball Glove), www.lumiquest.com, which I attach with the provided
Velcro strips, and my new favorite, the Ultimate Light Box System, a
beautiful mini-softbox that’s engineered to fi t snugly right over the fl ash
head and that can be easily modifi ed for a softer or more specular light
because it’s a modular system. www.harbordigitaldesign.com (FIG 8.14).
If you want the most controllable results from your Speedlites, you
must learn and note their power output in Manual mode. When you
know what the true output is, and at what f-stop, a whole new world of
controlled imagery is literally at your fi ngertips.
If you don’t have an external fl ash meter, you will need to borrow or
rent one to make this test, and you’ll need to calibrate it to your camera
fi rst. Since there may be discrepancies between your camera and the
meter, you’ll need to photograph a gray target fi rst. You’ll also require the
services of a friend to hold the meter as you fi re the fl ash.
Make this test at ISO 100.
Set the EX fl ash unit to Manual, which will give you consistent shot-to-shot
power (make sure the unit is fully recharged befo re fi ring). You will also
FIG 8.14
Ch08-K52040.indd 213Ch08-K52040.indd 213 8/10/07 3:17:52 PM8/10/07 3:17:52 PM

214
Canon DSLR: The Ultimate Photographer’s Guide
need to set the Zoom control to 50 mm for the test, and be sure to select
50 mm whenever you use this technique for an actual shoot or do another
test at other focal lengths. Dialing a diff erent zoom focal length will change
the power output of the light (FIG 8.16).
Using full power, 1/1 as noted on the back of the unit, fi nd the correct
distance from the target (and as close to it as possible, so you can fi ll the
frame with gray) that will give you a meter reading in a whole stop or whole
stop plus 0.3 or 0.7 (see External Meters). Take a picture of the gray target.
Push the Display button on the camera, and dial in the image with
the Histogram. A properly metered and exposed image will show the
primary pixel spike dead center. A spike to the left indicates that your
FIG 8.15
FIG 8.16
Shooting Tip
A look that I really like is when a fl ash fi ll is
not noticeable but looks like it was part of
the ambient. In other words, the fi ll is so soft
as to be unrecognizable as fi ll fl ash, except,
perhaps, in the catchlights in the eyes.
Try this with your favorite third-party
modifi er. From a working distance of not
more than 10 feet, and with your modifi er in
place and your camera set to Av Mode, dial
the E-TTL power to �11/3 stops. Be sure to
use an aperture that will not require a high
power discharge from the fl ash unit. The
result may be inconsistent and take too long
to recycle. I think you’ll fi nd that the strobe
fi lls in the shadows just enough to make the
image truly believable and much prettier
than it would have been without the fi ll. This
image was made with the ULB (FIG 8.15).
Ch08-K52040.indd 214Ch08-K52040.indd 214 8/10/07 3:17:53 PM8/10/07 3:17:53 PM

215
Flash
meter is giving you underexposure, while a spike to the right indicates
overexposure. Adjust your light meter (see the manual) so that the
reading it gives you will produce a centered histogram (FIG 8.17).
Use a tape measure and measure out one-foot increments, over a length
of 20 feet. Starting at the 20’ mark, and with your friend aiming the light
meter at the camera from the other end, fi re a full power fl ash at the
meter. Note the f-stop the meter gives you. You may have to move a little
closer, but the object is to get to the fi rst available whole f-stop. Make
note of that distance.
Move forward, test fi ring as you go and making note of where the whole
f-stops are found. When you’re done, you’ll have a power map that will
give you consistent results, shot after shot, over that 20’ range.
You’ll also have a map that can be used to extrapolate f-stops for every
Manual power setting on the fl ash, from 1/1 to 1/64.
Every time you cut the power ratio in Manual, you’ll drop the exposure
value by one stop. So, if you’re at 5’ and getting f22 at full power, changing
the ratio to 1/2 will give you f16, 1/4 will give you f11, and so on, all the way
down to 1/64 which will give you a perfect f2.8. The 580 powers down to
1/128, for those of you with f2.0 capabilities (FIGS 8.18–8.20).
FIG 8.18 1/1 equals f22 FIG 8.19 1/8 equals f8
FIG 8.17
Ch08-K52040.indd 215Ch08-K52040.indd 215 8/10/07 3:17:55 PM8/10/07 3:17:55 PM

216
Canon DSLR: The Ultimate Photographer’s Guide
This is a rock-solid technique that works in any indoor situation. Of
course, once you know how much light your favorite modifi er eats, you’ll
have a map for that, as well.
You can use fl ash outdoors, and in Manual, too, although there are some
considerations that will aff ect the quality of your images.
When shooting outdoors, E-TTL and Auto will both take ambient light
(sunlight) into account, more so than indoors when the fl ash is the
dominant source. Manual does not. It can’t make allowances for ambient
light because its output is consistent, so you have to make allowances
for it.
The eff ects of light are cumulative. Adding light to light creates brighter
light, which must be dealt with at the camera by selecting a smaller
aperture. For example, if you’re outside in bright sun, and the sun is
falling on the subject (with its usual bad shadows), you may want to
fi ll those shadows as much as possible. Should you select the correct
distance/power output to give you a fl ash strength of f16, you will have
to add one stop less of exposure at the camera to f22, which will give you
the perfect exposure you require (FIGS 8.21–8.23).
FIG 8.20 1/64 equals f2.8
FIG 8.22 Manual fl ash power equals f16. Image is one stop
overexposed
FIG 8.21 Exposure from sun is f16
Ch08-K52040.indd 216Ch08-K52040.indd 216 8/10/07 3:17:56 PM8/10/07 3:17:56 PM

217
Flash
Fill fl ash strength to ambient Exposure adjustment New aperture/result
�2 stops �1/10 stop f16 (image is 1/10 over)
�1 2/3 stops �2/10 stop f18 (image is 1/10 under)
�1 1/3 s tops �4/10 stop f18 (image is 1/10 over)
�1 stop �1/2 stop f20 (image is 2/10 under)
�2/3 stop �6/10 stop f20 (image is 1/10 under)
�1/3 stop �2/3 stop f20 (perfect exposure)
Same as constant �1 stop f22 (perfect exposure)
When you use Manual fl ash as fi ll, you need to consider how much of the
ambient light you wish to be dominant and then make the appropriate
exposure adjustment. Note that some adjustments will not produce
a whole f-stop or a perfect third. In those cases I’ve noted the closest
f-stop that will yield an exposure good enough for proofs, without
manipulation. This example uses f16 as its base, but the formula can be
extrapolated against any ambient light level.
Assume the sun is a constant at f16.
FIG 8.23 Adding one stop at the camera,
to f22, equals perfect exposure
Canon’s Speedlites have many other features, all designed to help you
make better pictures.
FEB (Flash Exposure Bracketing) let’s you take three fl ash shots in a row at
three diff erent strengths. You can symmetrically vary the power in 1/3 stop
increments up to a plus/minus of three whole stops. The camera will have
to wait for the fl ash to recycle, of course, but if you jump the gun and fi re
the camera before the fl ash is ready you won’t have to reset the bracket.
The fl ash will hold the setting until a successful discharge can be made and,
if you have dialed in a basic E-TTL exposure correction, the fl ash will add or
Ch08-K52040.indd 217Ch08-K52040.indd 217 8/10/07 3:17:58 PM8/10/07 3:17:58 PM

218
Canon DSLR: The Ultimate Photographer’s Guide
subtract that correction automatically. You will have to reselect FEB each
time you wish to make a new bracket series (FIG 8.24).
Sometimes, working outside in bright sunlight can pose a signifi cant
challenge to photographers hoping to use fi ll fl ash along with large
apertures. On a typical sunny day, ISO 100 would require 1/1600 second
at f4, well beyond the camera’s maximum fl ash sync speed.
Speedlites off er High-Speed Sync (FP Flash), which lets you use fl ash at any
shutter speed, up to the maximum 1/8000 second. To access it, select the
high-speed option from the back of the fl ash. An icon next to the
E-TTL designation will appear in the LCD panel. Note that as shutter
speeds increase in speed the working distance of the strobe decreases.
There is a distance scale on the bottom of the LCD showing you the
eff ective range, but only for an unmodifi ed strobe. If you’d like to use a
diff user to soften the light, your best bet might be to use the camera in Av
Mode and make adjustments via Flash Exposure Compensation (FIG 8.25).
Of course, there are many other uses for High-Speed Sync (FIG 8.26).
Toggling the same button that controls High-Speed Sync will access
Second-Curtain Sync, a cool tool that fi res the fl ash at the end of the
exposure rather than the outset. If you wish to intentionally create a
motion blur, fl ash at the end of a long exposure will freeze time at the
end of the blur. The images will have a more realistic look to them. For the
FIG 8.24
FIG 8.25
Ch08-K52040.indd 218Ch08-K52040.indd 218 8/10/07 3:17:58 PM8/10/07 3:17:58 PM

219
Flash
most realistic look, be sure all the lights have, or have been gelled to, the
same color temperature.
Multi Stroboscopic Flash
Multi Stroboscopic Flash is yet another option for the creative
photographer. Using this Mode gets you a multiple, rapid burst of strobe
fi res that will freeze movement in multiple positions. Use the images for
analysis, like a golf swing, or just for drama or fun.
Working with Second-Curtain Sync in the
studio poses an interesting problem. Even
though Canon cameras have a Custom
Function called Shutter Curtain Sync, it
only works with Canon Speedlites that do
not have that feature built into them. It
will only fi re studio strobes (or non-Canon
accessory fl ash units) at the start of the
exposure.
Obviously, the thing to do is to use the
Speedlite to fi re the Slave function of the
studio strobes. I realized quickly that
I couldn’t use the E-TTL mode, as it fi res
a pre-fl ash that was strong enough to
activate the slave. The studio strobes went
off before the shutter (the shots were
a little dark). The solution was to set the
Speedlite to Manual at its lowest power,
1/128, and turn it so it was aimed behind
me, at the slave on the studio pack
(FIG 8.27).FIG 8.27
FIG 8.26
Ch08-K52040.indd 219Ch08-K52040.indd 219 8/10/07 3:17:59 PM8/10/07 3:17:59 PM

220
Canon DSLR: The Ultimate Photographer’s Guide
This feature is just slightly more diffi cult to use than other Modes, but it’s
not that tough. You’ll need to determine the correct exposure strength
of one fl ash, in Manual mode, that falls on your subject. Use an external
meter or photograph a gray card, adjusting either the fl ash to subject
distance or the strength of the fl ash, until you get a perfect, centered,
histogram. Make note of the correct power setting.
Now, press the Mode button until Multi is displayed on the LCD. Dial in
the same power setting.
For moving subjects that will not signifi cantly overlap, decide how many
times the fl ash should fi re, and use the Dial button to fi nd the burst
number (it will blink when selected) and the Dial to select the number
of fl ashes that will comprise the burst. Note that fi nding a lower power
setting at the start of the process will allow for more fl ashes now.
The Hz setting will determine the speed of the burst. Higher Hz numbers
mean shorter times between fl ashes but will also require more power,
which is another reason to use a lower power setting if possible (FIG 8.28).
To fi nd the correct shutter speed for your image, divide the number of
fl ashes by the Hz rate. In this case the number of fl ashes is 4, as is the Hz
rate (4/4 � 1). The shutter speed needs to be at least one full second long
(FIG 8.29).
FIG 8.28
FIG 8.29
Ch08-K52040.indd 220Ch08-K52040.indd 220 8/10/07 3:18:01 PM8/10/07 3:18:01 PM

221
Flash
Speedlites in Studio or Location
Speedlites can talk to each other and, like humans, can set each
other off .
You can connect a network of Speedlites together for a basic portrait
light setup or to provide accent and background lights for a wedding or
other such event. Although Speedlites are small, specular sources, they
are, like all auxiliary lighting, tools to boost your creativity and realize
your vision. It’s simply a matter of how you work with them, and how you
get them to do what you want.
The 550EX and 580 Speedlites have a switch on the bottom, just above
the shoe mount, that will assign the role of Master or Slave, but the 580EX
II Master/Slave selection happens in the Speedlite’s Menu. The unit on
the camera is always the Master, and with it, you can control every other
Slave unit. Now, there are some caveats. Because the Slave units must
“see” the camera unit, you are limited to a spread of 40º, left and right of
the lens axis. You will also need to tilt or swing each fl ash so the infrared
signal window (the red window on the front of the unit) is facing the
Master. This 80º total is the limit of the infrared signal transmitted by
the Master. Working with multiple Speedlites outside, according to
Canon, gives you a maximum working outdoor distance of about 26’,
indoors, almost 50’. These are average results, and yours may vary, so test
any setup before you put your money on it.
You can program Flash Exposure Compensation, High-Speed Sync,
Stroboscopic Flash, or any other feature of the Speedlite (with the
exception of Second-Curtain Sync) into the Master, but understand that
the same settings will be applied to each of the slaves. For many images
this is totally acceptable. Wedding and event photographers will often set
several slaves on clamp mounts in multiple locations in a reception hall, to
illuminate backgrounds or add hair lights to create depth and dimension
to their images. Should you decide to make a change to the Master, such as
adding or subtracting 1/3 stop of exposure value, the change will be made
symmetrically to every Slave unit, although they can be ratioed separately
against each other.
I’m not a fan of on-camera fl ash as a key (main) light, although I’ll admit
I’ve seen some beautiful shots made in that manner. I much prefer to
have my key light off -camera, set to camera right or camera left, just to
give my subject dimension by throwing a nice shadow. When I do have
the Master on-camera, I prefer to use a modifi er. The key light for this
shot of R&B singer, Sahata, was modifi ed with the Ultimate Light Box. The
slaves, slightly behind and to the sides of her at camera right and camera
left, were gelled with orange (FIG 8.30).
Shooting Tip
The little stand, the foot, that is provided
with the 580EX II is best used when the
strobe can be placed on a fl at, level surface
such as a fl oor or shelf. If you want to place
the unit on a stand, and have the ability
to change its angle, check out the R 4130
Umbrella Stand Adapter from Norman
(www.photo-control.com). It’s inexpensive
and you can thread an umbrella through
it, turning your Canon fl ash into a much
broader, softer, source.
If you fi nd yourself in a pinch and need
to position another fl ash at an angle, just
screw the foot onto your tripod and use
its controls to angle the fl ash where you
need it.
Ch08-K52040.indd 221Ch08-K52040.indd 221 8/10/07 3:18:02 PM8/10/07 3:18:02 PM

222
Canon DSLR: The Ultimate Photographer’s Guide
Canon allows you the option of prohibiting the Master unit from fi ring,
even though it will still send out a signal fl ash to alert the other units.
Being able to disable the Master is an extremely valuable feature because
it frees you from the fl at-light look that’s so common to on-camera fl ash
images made without modifi ers.
We all like to break the rules, and the most important rule with wireless
is that the units must see each other. One of my favorite lighting
arrangements is to place a large softbox behind a sheet of white
Plexiglas. I meter it by retracting the dome of the my external fl ash
meter and placing it fl at against the Plexi from the camera side, take the
reading, then set the camera �2/3 over that reading. For example, if the
meter read f11, I’d open the lens’ aperture to f9. The result is an almost
total silhouette (with just a little wrap-around light), against a clean,
white background.
Recently, I had to set this up in an area where I could not use my studio
fl ash. This presented a problem because the Plexiglas would not allow
the infrared signal from the on-camera unit to pass through it to the
Slave. While I could have slaved the rear unit to the Master, I didn’t want
any extra light to fall on my subject. The solution was to place the fl ash on
a stand and aim it at a window to the side of the set. Since I could see the
FIG 8.30
Ch08-K52040.indd 222Ch08-K52040.indd 222 8/10/07 3:18:02 PM8/10/07 3:18:02 PM

223
Flash
Slave unit’s refl ection in the window, I knew the signal would be received
(a mirror on a stand would work just as well). I connected the Master to
the camera with a Canon Off -Camera Shoe Flash Cord 2, disabled the
fl ash of the Master unit, and made this image (FIGS 8.31 and 8.32).
For studio or location, a nifty trick to increase the apparent size of the
light is to place a translucent diff usion screen close to the subject and
place the fl ash a few feet behind it. When the screen lights up from the
fl ash it will act as a softbox and become a softer, broader source. It’s best,
in my opinion, to set the fl ash on Manual and meter with an external
device. For this image the Master was disabled, with only the Slave fi ring.
An additional bounce panel was placed at camera left (FIG 8.33).
FIG 8.31
FIG 8.32
Ch08-K52040.indd 223Ch08-K52040.indd 223 8/10/07 3:18:03 PM8/10/07 3:18:03 PM

224
Canon DSLR: The Ultimate Photographer’s Guide
Specialty Strobes
MACRO TWIN LITE
Canon makes two special accessory fl ashes, the Macro Twin Lite and the
Ring Lite. Each is mounted on the lens and meant to be a close-to-the-lens
source. While they are similar to the pop up fl ashes of the Rebel and 30D,
the Twin Lite is a two light source that can be controlled while the Ring Lite
is a continuous circle of light around the lens. Both have applications for
anyone who wishes to expand his or her visual vocabulary.
Should you be one of the many shooters looking for an edge over your
competition or just someone looking for a cool and unusual accessory,
check out Canon’s Macro Twin Lite MT-24EX (FIG 8.34).
FIG 8.33 Even a single Speedlite can
produce exceptional images when properly
modifi ed.
FIG 8.34
Ch08-K52040.indd 224Ch08-K52040.indd 224 8/10/07 3:18:04 PM8/10/07 3:18:04 PM

225
Flash
The fi rst thing you’ll notice, of course, are the dual strobe heads, designated
A and B. Mounted on a ring that is, in turn, mounted on the lens barrel, both
heads can be moved in tandem around the lens or moved independently
by pushing a small release button to any other position. Additionally, each
head swivels on its’ own mount, allowing you to place head A at an angle
of 45° to the lens while positioning head B at, perhaps, 75°. Being able to
move the two heads separately allows a great deal of control. Think of one
head as the key light, the most important of the two, and the other as fi ll
light. You may wish to use a hard angle for the key and a lesser angle for the
fi ll, which will produce a lighting scenario impossible to achieve with other
macro fl ashes such as ring lights.
In E-TTL, each head can be ratioed against the other, allowing even
more control of key (head A) to fi ll (head B), up to three stops in either
direction. Note that, on the back of the unit, the ratio is marked as A:B
(FIG 8.35). This cannot be changed, which is why the ratio scale runs from
8:1 (A being three stops brighter than B, and B is the correct f-stop
according to E-TTL) to 1:8 (B now being three stops brighter than A,
according to the E-TTL computations). Since the two lights are so close
together, the actual diff erence will be a blend of the two lights although
one will be truly brighter than the other (FIGS 8.36 and 8.37).
FIG 8.35
FIG 8.37 An 1:8 ratio.
FIG 8.36 An 8:1 ratio.
Ch08-K52040.indd 225Ch08-K52040.indd 225 8/10/07 3:18:05 PM8/10/07 3:18:05 PM

226
Canon DSLR: The Ultimate Photographer’s Guide
Light Source: Light Source Ratios
Ratios are always determined against
values of 2, with the key light noted as a
constant, expressed as the numeral 1. The
key light is always regarded as the correct
exposure for the image area we wish to
be perfect, with all other lights ratioed
against it.
Each f-stop increase of light (changing the
aperture to a smaller number, or, “opening
up”) doubles the amount of light reaching
the chip while each f-stop decrease of light
(changing the aperture to a larger number,
or, “stopping down”) cuts the amount of
light reaching the chip in half.
When a secondary light is brighter than that
of the key, the secondary value is expressed
to the left of the numeral 1, indicating its
stronger relationship to the correct exposure.
Conversely, an exposure with a light powered
less than that of the key is expressed to the
right of the numeral 1.
Exposure ratios, either right or left of 1, are
numerically expressed like this:
Exposure Ratio
Correct 1
�0.5 1:1.5
�1 1:2
�1.5 1:3
�2 1:4
�2.5 1:6
�3 1:8
In Manual mode, the ratio of the two heads is symmetrical and
cannot be modifi ed although the actual power output of the unit can
be changed. In other words, the strength of the two heads is the
same regardless of the strength of the pulse of light they emit. The
default full power output designation is 1/1. Push the Sel/Set
button and the � and � keys to select 1/2, 1/4, 1/8, 1/16, 1/32, or
1/64; each number represents a reduction of power by one full f-stop
(FIG 8.38).
What does this mean in practical terms? This is valuable knowledge if
you don’t want to rely on E-TTL in a potentially “iff y” situation like a bright
subject against a dark background. By testing your fl ash in Manual mode
with a calibrated fl ash meter you will know exactly how much light it
pumps out at a given distance and be able to set the camera’s aperture
accordingly. Perfect fi ll fl ash can be guaranteed, shot after shot, but it will
take some work on your end to determine the limits of the gear and how
those limits apply to your work.
Relatively strong for a macro light, with a guide number of 78 (in feet,
24 in meters), this innovative fl ash does a terrifi c job lighting a wide
variety of subjects and works well in both E-TTL and Manual modes. In
some situations, it’s even strong enough to overpower the strength
of the sun when a subject is fully backlit and close to the camera, a
feature that allows you a great deal of versatility within the
FIG 8.38
Ch08-K52040.indd 226Ch08-K52040.indd 226 8/10/07 3:18:07 PM8/10/07 3:18:07 PM

227
Flash
For a fi ll light that’s less than the key:
You can easily extrapolate additional ratios
and f-stop values from these numbers.
Exposure Ratio
Correct 1
�0.5 1.5:1
�1 2:1
�1.5 3:1
�2 4:1
�2.5 6:1
�3 8:1
realm of your work. Since I got mine, I’ve used it for a wide variety of
images.
In the studio environment, the Canon Twin Lite makes a terrifi c key
light for snappy, on the fl y, headshots whether you use it with other
Speedlites, using the built-in infrared triggering device, or simply to set
off studio packs. My Twin Lite was set to a 1:4 ratio, with the upper fl ash
being dominant. Notice how nicely the lower strobe fi lls in the small
shadow under the chin (FIGS 8.39).
Foliage in deep shadow can be easily photographed in relief with the
Twin Lite. This image, made in E-TTL at f5 in Manual mode and with
a 100 mm Macro, shows just enough depth of fi eld to give the viewer a
strong impression of shape and form (FIG 8.40).
I was able to overpower the strength of the sun by setting my aperture to
f32 and letting the E-TTL function of the Twin Lite throw more light at the
subject than the ambient light would ever show. Be aware that proper
eye protection is necessary when making images when full sunlight can
shine directly into your focusing eye. An optic nerve is a terrible thing to
waste (FIG 8.41).
FIG 8.39
Ch08-K52040.indd 227Ch08-K52040.indd 227 8/10/07 3:18:08 PM8/10/07 3:18:08 PM

228
Canon DSLR: The Ultimate Photographer’s Guide
I’ve worked with or watched a number of medical photographers who
photograph their patients, and the vast majority have used ring lights.
In my opinion, a Twin Lite will produce a better light for photographing
injuries because the two lights can be separated and ratioed against each
other, to show the dimensional planes of physical injuries (FIG 8.42).
FIG 8.40
FIG 8.41
Ch08-K52040.indd 228Ch08-K52040.indd 228 8/10/07 3:18:09 PM8/10/07 3:18:09 PM

229
Flash
“Incredibly rare, this small rubber bust of Jar-Jar Binks, George Lucas’ most
endearing Star Wars character, is, without question, the most desirable
collectible of all time. No reserve!”
Should you be one of the many who sell goods via online auction
services, an accessory such as the Twin Lite will give your goods so much
life they might look, well, desirable (FIG 8.43).
RING LITE
Canon’s Ring Light, MR-14EX, like the Twin Light, is built to fi t onto
the 58 mm front of the 100 mm Macro, but you can buy step-down
and step-up rings so that the fl ashes can be mounted on lenses with
fi lter diameters other than 58 mm. Because it can act like a continuous
fl ashtube around the lens, it can produce a beautiful, virtually shadow-
free light onto any subject. However, the strobe tube is not a single piece,
rather two semi-circular tubes that can be proportioned against each
other to create a key:fi ll ratio.
FIG 8.42
FIG 8.43
Ch08-K52040.indd 229Ch08-K52040.indd 229 8/10/07 3:18:11 PM8/10/07 3:18:11 PM

230
Canon DSLR: The Ultimate Photographer’s Guide
Even though it wraps around the lens, the light it throws is not shadow-
free. Instead, a small shadow is formed, symmetrically, around the entire
periphery of the subject. The width of this shadow is controlled by the
distance of the subject to the background, which many photographers
exploit as a compositional element. There are examples in virtually
every fashion magazine, every month, of ring light photography
(FIGS 8.44 and 8.45).
FIG 8.44 FIG 8.45
Ch08-K52040.indd 230Ch08-K52040.indd 230 8/10/07 3:18:12 PM8/10/07 3:18:12 PM

231
Flash
Canon’s Ring Light, while certainly usable as a fashion light, is also
extremely useful as a macro light. Insurance documentarians and
collectors use it routinely, as it adequately represents the planes of
important artifacts well enough to establish monetary value. The light is
fl at, but modeled enough so it sees cosmetic damage easily (FIG 8.46).
FIG 8.46
Most of Canon’s Speedlites will work together as a wireless unit, which
means you could set up a portrait shot using a Ring Light as the key, a
Twin Light to accent the hair, and a head-modifi ed, standard fl ash for the
background, controlling all of them from a Master fl ash on camera that
you’ve told not to fi re.
There is so much more to Canon’s Speedlite system than fi rst meets
the eye. Yes, the gear is more expensive than that from a third-party
manufacturer, but the other stuff can’t do as much or talk to the camera,
like native equipment can. I’d suggest, that if you have doubts about
what a Canon fl ash can do for you and your camera, you rent or borrow
one for a weekend. Make sure you have the instruction manual. Play,
and don’t be afraid to mess up. Working with fl ash is not a trouble-free
experience, but I know that when you’re done you’ll be a True Believer.
Ch08-K52040.indd 231Ch08-K52040.indd 231 8/10/07 3:18:14 PM8/10/07 3:18:14 PM

232
Canon DSLR: The Ultimate Photographer’s Guide
Gerry Kopelow
I caught up with Canada’s Gerry Kopelow shortly before he was
scheduled to leave for a hectic 10 days of teaching and lecturing in the
States. A noted architectural photographer and author, Kopelow’s insight
and expertise is in great demand, especially by Canon, who often asks his
help on the fl oor at events where architecture and photography come
together. At 57, Kopelow is at the top of his game, and always willing to
help those coming up the ranks.
Gerry began his career in eighth grade, with the help of a teacher who
had an avid interest in photography. Within a few months “I guess I got
good,” he says. “I saw a call for submissions from the Still Photography
Branch of the National Film Board of Canada (the government’s public
relations arm) and sent in some of my images, which were immediately
accepted. I was 14 years old.”
The National Film Board of Canada took a liking to young Kopelow and his
style of photography. “They were great for me,” he recalls. “For several years
after that initial connection, I would take a train to the NFB Head Offi ce in
Ottawa during school holidays to sell them images.” At $50.00 per image,
and in his teens, Kopelow began making good money from his work.
He became a street photographer, in the style of Henri Cartier-Bresson,
but “I peaked early,” he says. “I married young, had children young, and
couldn’t make a living doing what I had been doing, so I started shooting
commercial jobs.”
It wasn’t long after that when Kopelow’s work caught the eyes of an
architectural engineering fi rm seeking to produce a brochure about their
projects. “I was asked to photograph one key building in each Provincial
capital, ten buildings spread across Canada. It never occurred to me
to question it, but they wanted me to shoot two buildings per day. I
would fl y into a city, be met by someone at the airport and driven to the
location, shoot the picture and be driven back to the airport. It sounds
awful, but it was a charmed project. Every situation was perfect, with
great light and a point of view that I was quickly able to fi nd. I remember
thinking, ‘This is easy. I should do more of this.’ ”
Kopelow used the fi nished brochure as a promotional piece, which got
him hired by major architectural fi rms in his home city, Winnipeg as well as
other cities across the country. Canada was going through a boom period
and fi ne architectural photography was in demand by every competitive
fi rm. Just when things were going well, the government closed a tax law
loophole that encouraged investment and the entire architectural market,
and Kopelow’s source of revenue, dried up virtually overnight.
Gerry Kopelow’s Gear
1D Mark II
5D (as backup)
14 mm
17–40 mm f4
24–105 mm
70–300 mm DO
85 mm f1.8
24 mm TSC
Polarizer big enough for all lenses
Lens shades
Modifi ed Gitzo tripod
Ch08-K52040.indd 232Ch08-K52040.indd 232 8/10/07 3:18:15 PM8/10/07 3:18:15 PM

233
Flash
Kopelow went back to commercial shooting while the architectural
market slowly rebounded. His work is largely architectural again.
When the digital revolution hit, Kopelow did not jump ship immediately.
He continued to shoot with view cameras and medium format
equipment, scanning his fi lm on a high-end scanner in order to deliver
the digital fi les his clients requested. He’d made a list of things he wanted
in a digital camera and vowed to not purchase one until the list was met.
His primary requirement was a full frame sensor, and the Canon 1Ds was
the fi rst camera to make the grade. “The fi rst Raw fi le I made was superior
to fi les coming off my scanner,” he recalls. “I sold all my fi lm camera and
darkroom gear immediately.”
These days Kopelow shoots a 1Ds Mark II, with a 5D for backup. “Canon is
defi nitely superior,” he notes, “and photography is way more fun. I can do
better work – one order of magnitude better – that I could with my 4 � 5.
Any future improvements will just make my life that much smoother.”
Kopelow’s shooting workfl ow changes with his clients. For example, he
will often shoot tethered to his computer so his clients can see what he
sees. “It’s a fantastic tool because the clients become involved in fi ne-
tuning the shot. When they can see the images they’ll know when the
shot is what they want. (Shooting tethered) slows the process but that
doesn’t bother me.”
Even if clients can see the fi nal composition on the tethered screen,
they still have to rely on the photographer for the fi nal vision. Kopelow
shoots a very wide exposure bracket, nine or ten full f-stops, to get all
the detail in every area. Unlike High Dynamic Range processing, which
merges a number of exposures together by itself, Kopelow prefers a more
basic method. “I’ve taught myself a number of creative ways to cut and
paste. I’ll start with a baseline pick, a shot with great midtones and detail,
then build the image from there. HDR gives you great tonal range but
not always fi ne detail, especially at severely over-exposed edges. If I’m
working on the road, I can do the Photoshop work while I’m watching a
movie in my hotel room. A typical image takes 45–60 minutes, and I build
that into my cost.”
For backup, Kopelow replaced the single drive that came in his Mac
laptop with dual hard drives and RAID software that immediately places
his shots on both drives. “I feel pretty safe on the road,” he says.
It’s a diff erent story at home, where he built his own RAID array using Mac
G4 logic boards bought on eBay and assembled in third-party towers,
networked together. “The main drawback to digital is storage,” he says,
“but I have over ten terabytes of it. I don’t use any optical storage, it’s too
Ch08-K52040.indd 233Ch08-K52040.indd 233 8/10/07 3:18:15 PM8/10/07 3:18:15 PM

234
Canon DSLR: The Ultimate Photographer’s Guide
FIG 8.48 Kopelow used his Photoshop
skills to blend several bracketed exposures
of this sculpture inside the Museum of
Anthropology at the University of British
Columbia in Vancouver. His client was the
architect, Arthur Erickson. 1Ds Mark II,
24–105 mm zoom (at 42 mm)
slow. I’ve duplicated all my Raw fi les, and I’m sure I’ll have to deal with them
someday . . .”
Kopelow travels as light as possible. “I feel obligated, as a pro, to carry
some lighting with me, so I’ll often bring a small Profoto kit. Otherwise,
everything I bring fi ts in the overhead compartment on an aircraft.” In
addition to his lens selection (see below), Kopelow has a few special
tricks. “The right-angle fi nder attachment is valuable, as I’m frequently
backed up to a wall.” Obviously handy in the workshop, he adds,
“I mounted a tripod head on a vice grip, which works great if I need to
mount a camera to a door or shelf, and I’ve customized my lens shades so
I won’t ever see any vignetting.”
In between a busy schedule of shooting and speaking, Gerry Kopelow is
also the author of several books on architectural photography and other
subjects (FIGS 8.47–8.51). His latest, Architectural Photography the Digital Way
has just been released by Princeton Architectural Press. See more of his
work at http://www.GerryKopelow.com.
FIG 8.47 “Shooting digitally at night is
much easier than shooting fi lm,” Kopelow
says. “Colors are more predictable and
accurate, and the illuminated LCD and
histogram make fi nding the right exposure
that much quicker.” Kopelow used his 1Ds
Mark II with a 17–40 mm Canon zoom
to make this image for AB Architects of
Vancouver
Ch08-K52040.indd 234Ch08-K52040.indd 234 8/10/07 3:18:15 PM8/10/07 3:18:15 PM

235
Flash
FIG 8.49 On assignment for Loewen Windows, used only available light to make this image of a beautiful San Diego, California, living room. “This is a good
example of how an extreme range of exposure brackets can be combined in Photoshop to make a natural looking, extremely wide tonal range image.” 1Ds
Mark II, 17–40 mm zoom
Ch08-K52040.indd 235Ch08-K52040.indd 235 8/10/07 3:18:16 PM8/10/07 3:18:16 PM

236
Canon DSLR: The Ultimate Photographer’s Guide
FIG 8.50 It’s always best to correct perspective in camera. For this detail image from the new National
Archives of Canada, Kopelow used his 24 mm TSE lens. As he explains, “Image focus was manipulated for
eff ect with the tilt function of the lens, perspective was controlled by dialing in suffi cient vertical rise”
Ch08-K52040.indd 236Ch08-K52040.indd 236 8/10/07 3:18:18 PM8/10/07 3:18:18 PM
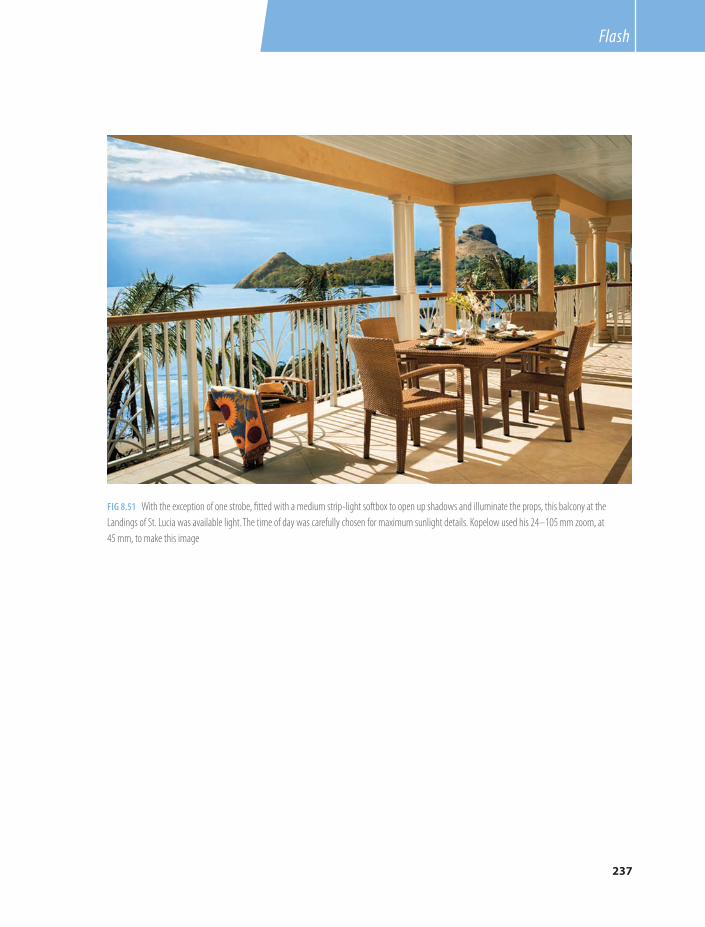
237
Flash
FIG 8.51 With the exception of one strobe, fi tted with a medium strip-light softbox to open up shadows and illuminate the props, this balcony at the
Landings of St. Lucia was available light. The time of day was carefully chosen for maximum sunlight details. Kopelow used his 24–105 mm zoom, at
45 mm, to make this image
Ch08-K52040.indd 237Ch08-K52040.indd 237 8/10/07 3:18:21 PM8/10/07 3:18:21 PM

Ch09-K52040.indd 238Ch09-K52040.indd 238 8/10/07 1:53:04 PM8/10/07 1:53:04 PM
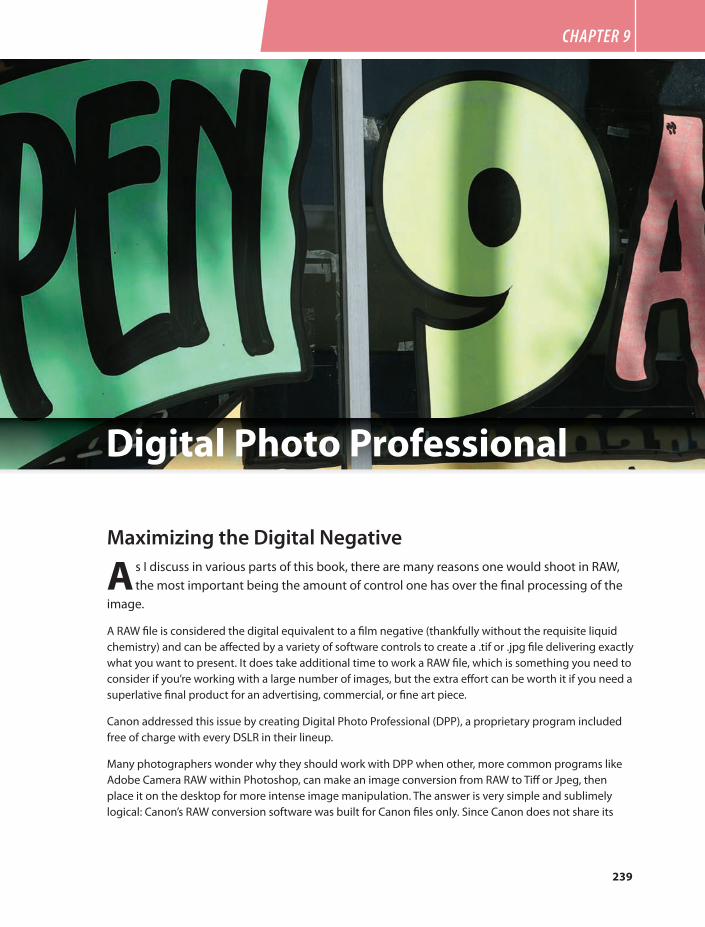
239
CHAPTER 9
Digital Photo Professional
Maximizing the Digital Negative
A s I discuss in various parts of this book, there are many reasons one would shoot in RAW,
the most important being the amount of control one has over the fi nal processing of the
image.
A RAW fi le is considered the digital equivalent to a fi lm negative (thankfully without the requisite liquid
chemistry) and can be aff ected by a variety of software controls to create a .tif or .jpg fi le delivering exactly
what you want to present. It does take additional time to work a RAW fi le, which is something you need to
consider if you’re working with a large number of images, but the extra eff ort can be worth it if you need a
superlative fi nal product for an advertising, commercial, or fi ne art piece.
Canon addressed this issue by creating Digital Photo Professional (DPP), a proprietary program included
free of charge with every DSLR in their lineup.
Many photographers wonder why they should work with DPP when other, more common programs like
Adobe Camera RAW within Photoshop, can make an image conversion from RAW to Tiff or Jpeg, then
place it on the desktop for more intense image manipulation. The answer is very simple and sublimely
logical: Canon’s RAW conversion software was built for Canon fi les only. Since Canon does not share its
Ch09-K52040.indd 239Ch09-K52040.indd 239 8/10/07 1:53:12 PM8/10/07 1:53:12 PM

240
Canon DSLR: The Ultimate Photographer’s Guide
architecture with other manufacturers, they can only create programs
that generically do the job. Consequently, those other manufacturers,
whose goal is to create generic translators that work with any RAW code,
cannot incorporate the subtleties and nuances available to the engineers
at Canon. Let me show you what I mean.
Both programs, Photoshop and DPP, can make a conversion from a RAW
fi le without making any other changes beyond what the conversion
software “sees” when the fi le is selected. Smart photographers, who
take the time to calibrate their light meters to their camera equipment,
use the correct White Balance settings or who take the time to test
the automated settings (such as Av or Tv) and make any necessary
exposure adjustments via Exposure Compensation, can produce fi les
that are as close to perfect as possible. These fi les may require no
further manipulation other than conversion from RAW to Tiff or Jpeg,
which makes it important that the conversion software refl ects those
calibrations. Note that if you make adjustments to the image in the
camera by changing the amount of sharpness or other such parameters,
this information will not be seen by software other than DPP.
Consider these “straight” conversions, made without any exposure or
color changes, just as the RAW fi le was captured by the camera and
interpreted by the software (FIGS 9.1 and 9.2).
Of course, color and exposure can also be adjusted in other programs,
but why would you want to take that extra time?
Another, very signifi cant, benefi t from working with Canon’s DPP
software is the reduction of noise in a processed image.
Noise is a natural by-product of signal amplifi cation, how the camera
defi nes ISO, a term that originally defi ned how sensitive fi lm was to light.
Camera manufacturers have programmed their sensors to mimic that
same scale, so that, at ISO 100 an exposure of 1/100th of a second under
bright sun at f16 on fi lm (the Sweet Sixteen rule) will yield the same
results with digital media. If a fi lm photographer needed the same f-stop
and shutter speed under less bright circumstances it was a simple matter
to change to a fi lm with a higher ISO, but that’s not an option for digital
photographers.
With fi lm, higher ISO speed fi lm meant a more pronounced grain structure,
grain being the size of the individual light sensitive silver-based “chunks”
adhered to the fi lm base. Faster fi lms generally meant larger grain.
Digital cameras compensate by amplifying the signal that reaches the
sensor chip, and the result is quite dissimilar. The higher the camera’s ISO,
Ch09-K52040.indd 240Ch09-K52040.indd 240 8/10/07 1:53:17 PM8/10/07 1:53:17 PM

241
Digital Photo Professional
the more noise it produces. The diff erence is that grain (or the deliberate
use of it) had a certain charm that frequently added to the look of the
image. Noise is an amplifi cation of the RGB signal, which shows up as RGB
artifacts and is not usually considered “charming” at all.
Because Canon’s DPP software was built for its own chips it has built-in
noise reduction, engineered only for itself, that generic RAW converters
simply cannot target. Noise typically is most prominent in darker tones or
shadows and should be noticeable even in small reproductions like these
(FIGS 9.3 and 9.4).
DPP uses two windows for its operation. The Main window acts like a
browser; you point it to the folder you wish to view, select it, and all of
that folder’s contents show up in rows of thumbnails (FIG 9.5).
Select one, some, or all of the images, then select Edit Image window
from the button menu at the top. Doing so will call up a second window,
the Edit window, and your selected images will appear in a vertical row
on the left. The fi rst image from the selected group will appear large in
the main portion of the Edit Window. You’ll note this image will look fuzzy
for a few seconds, as DPP renders the fi le.
A RAW fi le itself is never changed, no
matter how you change the screen image.
When you see a RAW image on your screen
you’re looking at an image infl uenced only
by the conditions under which it was shot
and the manipulations that you make in
the conversion software. When you like
it, tell the machine to Convert and Save
and a new fi le will be created as a Tiff or
Jpeg (your choice). The original RAW fi le
information can be revisited any time, and
remains intact until removed or deleted.
FIG 9.1 Conversion made in DPP FIG 9.2 Conversion made in Photoshop CS3
Ch09-K52040.indd 241Ch09-K52040.indd 241 8/10/07 1:53:17 PM8/10/07 1:53:17 PM

242
Canon DSLR: The Ultimate Photographer’s Guide
Now that you’re initially familiar with the two windows, let’s back up for a
moment. DPP magic can happen in either window, and I want to focus on
the Main window before we proceed.
With the Main window open, click the Folders button (FIG 9.6) to hide the
drive menu on the left and maximize the rows of thumbnails. Dragging
on the expansion tab at the lower right corner will expand the screen
even further, as long as you have room on your monitor (FIG 9.7).
Select All will highlight every image in the folder; Clear All will de-select
them (FIG 9.8).
FIG 9.3 DPP conversion at 100% FIG 9.4 Photoshop CS3 conversion at 100%
FIG 9.5
Ch09-K52040.indd 242Ch09-K52040.indd 242 8/10/07 1:53:19 PM8/10/07 1:53:19 PM

243
Digital Photo Professional
You can select each image individually and rank them in order of
importance (fi rst, second, third) by clicking the Check1, Check2, or
Check3 buttons (FIG 9.9).
Obviously, the Clear Check button will clear any previously checked fi les
(FIG 9.10).
Rotate Left and Rotate Right will turn the selection in 90˚ increments
(FIG 9.11).
FIG 9.6
FIG 9.8
FIG 9.7
Ch09-K52040.indd 243Ch09-K52040.indd 243 8/10/07 1:53:21 PM8/10/07 1:53:21 PM

244
Canon DSLR: The Ultimate Photographer’s Guide
Up to now, you could apply any of the controls to either fi le format your
camera is capable of creating, RAW or .jpg. The last four buttons are
reserved for RAW images only (FIG 9.12).
Selecting the White Balance button will call up the White Balance
Adjustment window. In this window you can change the White Balance
of the actual shot settings to any white balance setting available in
the camera. Should you accidentally shoot a batch of images under
Tungsten light (but the camera’s white balance was set to Daylight), the
entire batch can be changed by simply using this tool and selecting the
appropriate White Balance (FIG 9.13).
Take the White Balance further by selecting the Tune button, which calls
up a color wheel. Drag the center mark anywhere in the wheel to get
eff ects from sublime to outrageous (FIG 9.14).
FIG 9.9
FIG 9.10
FIG 9.11
FIG 9.12
Ch09-K52040.indd 244Ch09-K52040.indd 244 8/10/07 1:53:25 PM8/10/07 1:53:25 PM
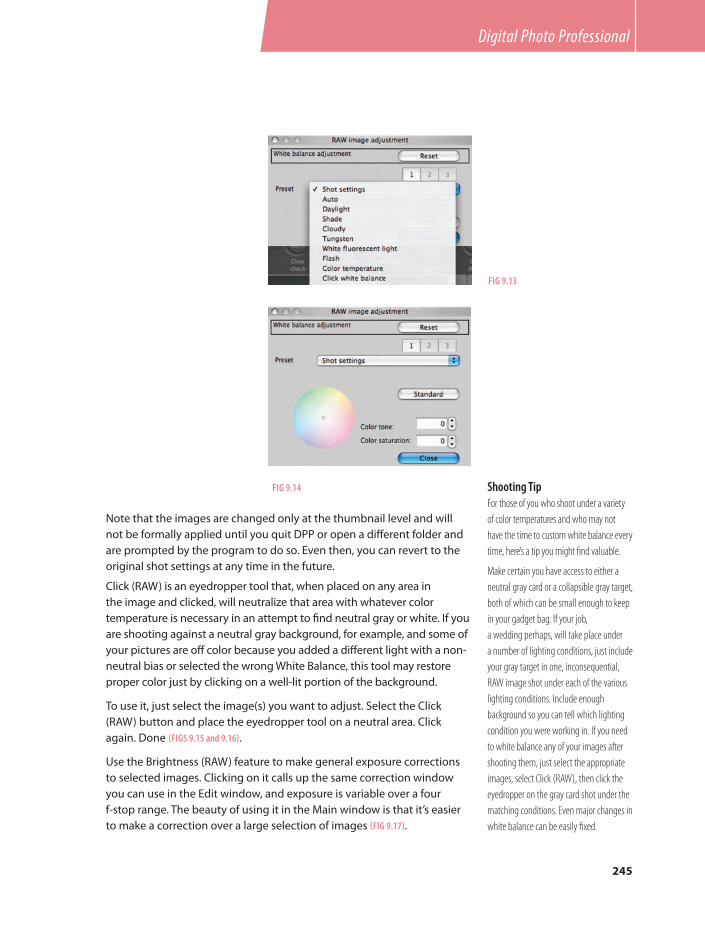
245
Digital Photo Professional
Note that the images are changed only at the thumbnail level and will
not be formally applied until you quit DPP or open a diff erent folder and
are prompted by the program to do so. Even then, you can revert to the
original shot settings at any time in the future.
Click (RAW) is an eyedropper tool that, when placed on any area in
the image and clicked, will neutralize that area with whatever color
temperature is necessary in an attempt to fi nd neutral gray or white. If you
are shooting against a neutral gray background, for example, and some of
your pictures are off color because you added a diff erent light with a non-
neutral bias or selected the wrong White Balance, this tool may restore
proper color just by clicking on a well-lit portion of the background.
To use it, just select the image(s) you want to adjust. Select the Click
(RAW) button and place the eyedropper tool on a neutral area. Click
again. Done (FIGS 9.15 and 9.16).
Use the Brightness (RAW) feature to make general exposure corrections
to selected images. Clicking on it calls up the same correction window
you can use in the Edit window, and exposure is variable over a four
f-stop range. The beauty of using it in the Main window is that it’s easier
to make a correction over a large selection of images (FIG 9.17).
FIG 9.13
FIG 9.14 Shooting Tip
For those of you who shoot under a variety
of color temperatures and who may not
have the time to custom white balance every
time, here’s a tip you might fi nd valuable.
Make certain you have access to either a
neutral gray card or a collapsible gray target,
both of which can be small enough to keep
in your gadget bag. If your job,
a wedding perhaps, will take place under
a number of lighting conditions, just include
your gray target in one, inconsequential,
RAW image shot under each of the various
lighting conditions. Include enough
background so you can tell which lighting
condition you were working in. If you need
to white balance any of your images after
shooting them, just select the appropriate
images, select Click (RAW), then click the
eyedropper on the gray card shot under the
matching conditions. Even major changes in
white balance can be easily fi xed.
Ch09-K52040.indd 245Ch09-K52040.indd 245 8/10/07 1:53:26 PM8/10/07 1:53:26 PM

246
Canon DSLR: The Ultimate Photographer’s Guide
If you’re happy with what you’ve done to your images in the Main
window, select Batch Process to convert them into real Tiff s or Jpegs.
You’ll see a new window appear, the Batch Settings window, where you’ll
make decisions as to where the processed images will go, what kind of
fi le (16 bit Tiff , 8 bit Tiff or Jpeg) they’ll become. Additionally, DPP can
resize images up or down from their original fi le sizes. This is especially
valuable if your client needs a high quality fi le for a larger than normal
use, a two page magazine spread for example (FIG 9.18).
The Edit Window
By default, the Edit window opens with Thumbnails and Tools selected, so
that you’ll see the fi rst several of your selected images along the left and
the Image Adjustment toolbox at the right. Should you choose to edit
individual images, this window alone will probably accomplish 90% of
your goals with DPP, so that’s where we’ll begin (FIG 9.19).
FIG 9.15 Before FIG 9.16 After
FIG 9.17
Ch09-K52040.indd 246Ch09-K52040.indd 246 8/10/07 1:53:27 PM8/10/07 1:53:27 PM

247
Digital Photo Professional
You’ll notice two bars at the top of the window: RAW Image Adjustment
and RGB Image Adjustment. The majority of adjustments will be made on
the RAW side, although there are some very interesting tricks to be found
in the RGB window.
RAW Image Adjustment
The fi rst image in my queue is a little underexposed on my model’s face.
I’d been working with a parabolic refl ector fi tted with a grid spot,
FIG 9.18
FIG 9.19
Ch09-K52040.indd 247Ch09-K52040.indd 247 8/10/07 1:53:29 PM8/10/07 1:53:29 PM

248
Canon DSLR: The Ultimate Photographer’s Guide
a honeycomb-like device that fi ts into the refl ector and allows light to
be reshaped for a spotlight eff ect. The grid spot narrows the light beam
so that the intensity of the light falls off dramatically at its edges, and my
model had moved slightly off her mark. Using the Brightness adjustment
(the same control that you’d see in the Main window) allows me to
quickly change the exposure value. Note that because the background
was lit by another light, and is therefore constant, it will change along
with the exposure on the woman. Those of you profi cient in Photoshop
or other image editing software know that you can create two images
from this RAW fi le; one with a normal background and one with the
adjusted background, then blend the two together for an almost perfect
match (FIGS 9.20 and 9.21).
DPP off ers adjustments over a four f-stop
range, which means you should be able to
salvage an image that was over exposed
by up to two full f-stops, a feat that’s not
possible with any software if your original
shots were jpegs only, because digital
exposure is the most fussy on the high
end. With jpegs, an overexposure of only
�1/3 stop will damage the image and
the loss of data will not allow detail to be
brought back. It can’t be “burned in” like
overexposed detail in traditional negatives
because it simply doesn’t exist. Shooting
RAW is a partial solution to over and under
exposure issues but will take more of your
post-production time. Use it wisely.
The White Balance adjustment will also call up a box similar to that found
in the Main window, with one notable exception. You can retain up to
three personal white balance settings to be used now or later, as you
wish. They can be altered at any time.
Setting a personal white balance is very easy. Simply select the White
Balance setting you’d like to use by choosing from the dropdown list (or
using the slider under Custom White Balance) (FIG 9.22).
In the Register window, select Custom 1, 2, or 3, then click OK. Your color
temperature selection is available anytime until it’s changed (FIG 9.23).
FIG 9.20 Before
Ch09-K52040.indd 248Ch09-K52040.indd 248 8/10/07 1:53:33 PM8/10/07 1:53:33 PM

249
Digital Photo Professional
Although color temperatures can’t be set at the White Balance window
in the Main window, those set in the Edit window will be available in the
Main window after they have been registered.
I’m sure you can see the importance of a control like this. Many wedding
photographers shoot everything in RAW format, preferring to take the
time to fi ne-tune each image before processing and printing. Many of
those images are made with on-camera fl ash and sometimes look a little
fl at. Adding a little extra warmth by changing the color temperature to
5600–6000 K might be benefi cial to the fi nal product.
FIG 9.21 After
FIG 9.22
FIG 9.23
Ch09-K52040.indd 249Ch09-K52040.indd 249 8/10/07 1:53:34 PM8/10/07 1:53:34 PM

250
Canon DSLR: The Ultimate Photographer’s Guide
Beauty and glamour photographers frequently want an even greater
level of warmth in their images, perhaps all the way up to 10,000 K.
Although, as demonstrated elsewhere, you can set the Color Temperature
in the camera, shooting RAW will guarantee that you can dial in any
color temperature you desire while holding the original shoot data in a
protected fi le (FIGS 9.24 and 9.25).
FIG 9.24 8000 K FIG 9.25 10,000 K
If you like the concept of changing an image’s color temperature and
want to apply it to existing, non-RAW, images, I’ve outlined a simple yet
very versatile Photoshop formula in my book Photoshop Eff ects for Portrait
Photographers, also from Focal Press.
PICTURE STYLES
You can, of course, set any Picture Style you wish in the camera. If you
shoot jpegs, and you want a look that’s diff erent from what you typically
shoot that’s what you’ll have to do, of course. The beauty of RAW and the
Edit window is that you have access to all of the Picture Styles, so you can
toggle between them to see what looks best, without locking yourself in
to a camera-processed style (FIG 9.26).
Ch09-K52040.indd 250Ch09-K52040.indd 250 8/10/07 1:53:36 PM8/10/07 1:53:36 PM

251
Digital Photo Professional
Picture Styles are like processing fi lms from diff erent manufacturers in the
same chemistry; they all slightly vary in color and look. Whether you use
Photoshop for fi nal tweaks or not, the ability to rapidly but consistently
alter the Picture Style gives you unprecedented creative freedom over
the look of your image. See “Picture Styles” for more information and
comparison images.
ADJUSTING DYNAMIC RANGE
What appears to be a traditional histogram is actually a Dynamic Range
adjuster. The image in the Edit window originally showed a dynamic
range of �9.0 to �3.6. These numbers can be changed by moving the
shadow slider (on the left) and the highlight slider (on the right) toward
the middle. Moving either slider eliminates some of the shades of light or
dark that comprise the image, making transitions from white (no detail)
to highlight detail, or black to shadow detail, shorter than what was
shot. Although you might wonder why you would ever want to shorten
the dynamic range this tool is quite practical; if you’re shooting for a
critical application and you know the maximum dynamic range of that
application is, say, �8.4 to 2.0, you can make those changes as well as
necessary Brightness adjustments to get the best possible representation
of your image in a shorter dynamic range. If this is not done it’s possible
that the image will be tonally clipped when it’s reproduced (FIG 9.27).
Just below the Dynamic Range window is a nameless graduated slider that
you can use to raise or lower the contrast of the image as it appears after
you move the sliders or by itself, without any DR adjustment. It’s extremely
useful for fi ne-tuning an image with a shortened dynamic range (FIG 9.28).
FIG 9.26
Ch09-K52040.indd 251Ch09-K52040.indd 251 8/10/07 1:53:38 PM8/10/07 1:53:38 PM

252
Canon DSLR: The Ultimate Photographer’s Guide
FIG 9.27
FIG 9.28
Checking the Linear box to the right of the contrast slider will fl atten the
curve and seems to show an average of represented pixels within the
image, actually adjusting the Linear Tone Curve. This is a tool generally
used by very advanced users to create their own custom profi les. You’ve
been warned (FIG 9.29).
Below the Dynamic Range graph are two more sliders that are important
to any of the Picture Styles; Color Tone and Color Saturation.
Ch09-K52040.indd 252Ch09-K52040.indd 252 8/10/07 1:53:39 PM8/10/07 1:53:39 PM

253
Digital Photo Professional
For truly neutral results on either self-
printed or lab-generated prints, there are a
few things you should know. Many inkjet
printers will not print a neutral black and
white print even if you send them a neutral
fi le. The standard inks are not designed to
do that and results will typically show a
slight magenta or green cast. If your printer
allows true black and white, you may fi rst
have to fl ush the ink delivery system and
change cartridges, a somewhat expensive
routine because of wasted ink. Some new
printers, like Canon’s imagePROGRAF line,
can produce beautiful neutral images
without skipping a beat (or changing a
cartridge). Check and test your equipment
before starting a money job.
Color Tone will skew the overall color of your image in either of two
directions. Slide to the left, and the tone takes on more red. Move it to the
right and the image gains yellow. This is a useful tool if you need to add
to or mellow out colors in a general way.
Color Saturation, like its Photoshop counterpart, will either saturate or
desaturate the color strength of your image.
Black and white is back! I mentioned elsewhere that Canon’s
Monochrome Picture Style is absolutely outstanding, and it truly is,
producing neutral tones of great depth and full of visual information,
with natural highlights and terrifi c shadow detail. DPP uses almost
identical algorithm as the Picture Styles function in the newer cameras,
with a few additional features.
When you select Monochrome, you’ll notice changes to the secondary
control sliders. The Color Tone and Color Saturation sliders respectively
change to Filter Eff ect and Toning eff ect (FIG 9.30).
FIG 9.29
FIG 9.30
Ch09-K52040.indd 253Ch09-K52040.indd 253 8/10/07 1:53:42 PM8/10/07 1:53:42 PM
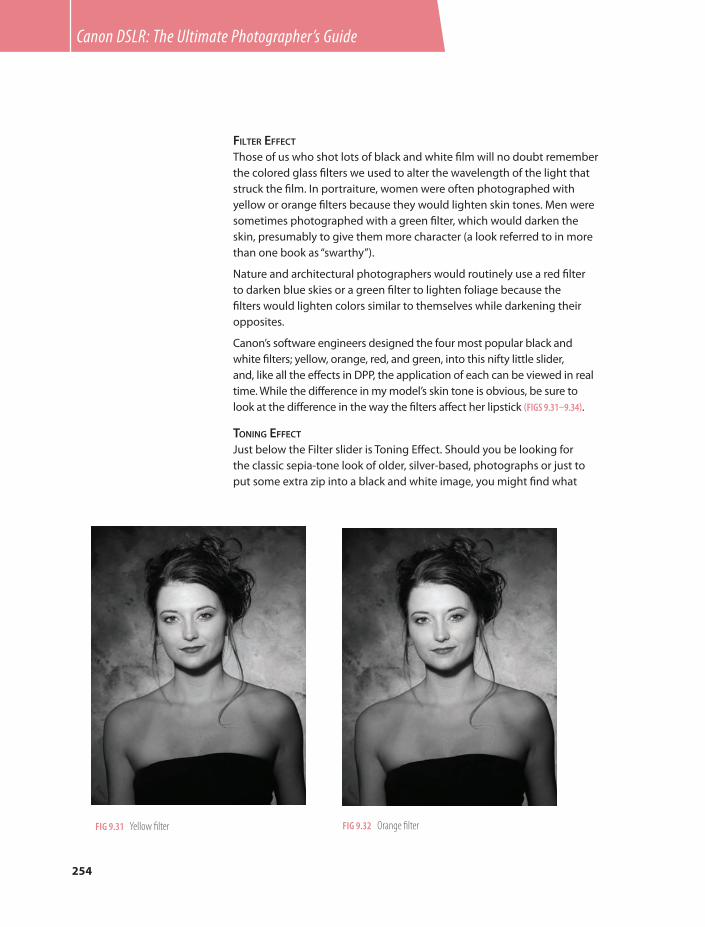
254
Canon DSLR: The Ultimate Photographer’s Guide
FIG 9.31 Yellow fi lter FIG 9.32 Orange fi lter
FILTER EFFECT
Those of us who shot lots of black and white fi lm will no doubt remember
the colored glass fi lters we used to alter the wavelength of the light that
struck the fi lm. In portraiture, women were often photographed with
yellow or orange fi lters because they would lighten skin tones. Men were
sometimes photographed with a green fi lter, which would darken the
skin, presumably to give them more character (a look referred to in more
than one book as “swarthy”).
Nature and architectural photographers would routinely use a red fi lter
to darken blue skies or a green fi lter to lighten foliage because the
fi lters would lighten colors similar to themselves while darkening their
opposites.
Canon’s software engineers designed the four most popular black and
white fi lters; yellow, orange, red, and green, into this nifty little slider,
and, like all the eff ects in DPP, the application of each can be viewed in real
time. While the diff erence in my model’s skin tone is obvious, be sure to
look at the diff erence in the way the fi lters aff ect her lipstick (FIGS 9.31–9.34).
TONING EFFECT
Just below the Filter slider is Toning Eff ect. Should you be looking for
the classic sepia-tone look of older, silver-based, photographs or just to
put some extra zip into a black and white image, you might fi nd what
Ch09-K52040.indd 254Ch09-K52040.indd 254 8/10/07 1:53:43 PM8/10/07 1:53:43 PM
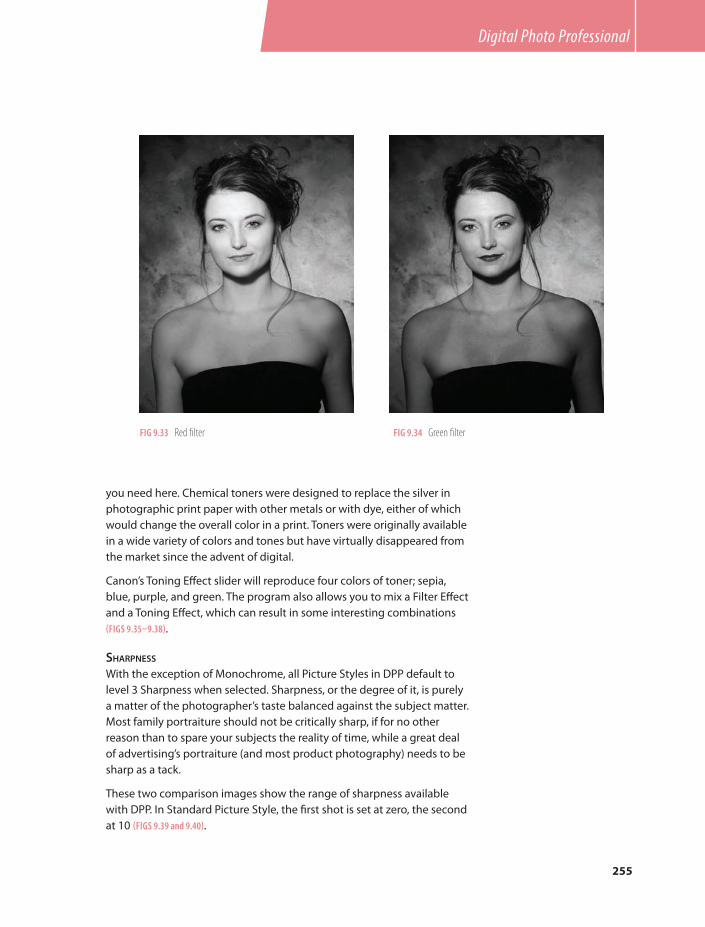
255
Digital Photo Professional
FIG 9.34 Green fi lterFIG 9.33 Red fi lter
you need here. Chemical toners were designed to replace the silver in
photographic print paper with other metals or with dye, either of which
would change the overall color in a print. Toners were originally available
in a wide variety of colors and tones but have virtually disappeared from
the market since the advent of digital.
Canon’s Toning Eff ect slider will reproduce four colors of toner; sepia,
blue, purple, and green. The program also allows you to mix a Filter Eff ect
and a Toning Eff ect, which can result in some interesting combinations
(FIGS 9.35–9.38).
SHARPNESS
With the exception of Monochrome, all Picture Styles in DPP default to
level 3 Sharpness when selected. Sharpness, or the degree of it, is purely
a matter of the photographer’s taste balanced against the subject matter.
Most family portraiture should not be critically sharp, if for no other
reason than to spare your subjects the reality of time, while a great deal
of advertising’s portraiture (and most product photography) needs to be
sharp as a tack.
These two comparison images show the range of sharpness available
with DPP. In Standard Picture Style, the fi rst shot is set at zero, the second
at 10 (FIGS 9.39 and 9.40).
Ch09-K52040.indd 255Ch09-K52040.indd 255 8/10/07 1:53:44 PM8/10/07 1:53:44 PM

256
Canon DSLR: The Ultimate Photographer’s Guide
FIG 9.35 Sepia tone FIG 9.36 Blue tone
FIG 9.37 Purple tone FIG 9.38 Green tone
Ch09-K52040.indd 256Ch09-K52040.indd 256 8/10/07 1:53:46 PM8/10/07 1:53:46 PM

257
Digital Photo Professional
RGB Image Adjustment
You can continue to fi ne-tune your image by selecting the RGB Image
Adjustment button, found at the top of the Tool window. Here you’ll
fi nd what looks like a traditional histogram. While it shares some of the
functions of a histogram, it’s actually a Tone Curve Adjustment and, as
such, combines the best of Photoshop’s Levels and Curves with some
additional features (FIG 9.41).
As with Photoshop’s Curves, you create a break point by clicking and
dragging certain portions of the graph line, changing the tones, contrast
and brilliance of the image. For general corrections, Canon recommends
the following basic curves (FIGS 9.42–9.45).
At the top of the chart, you’ll see eight boxes; RGB (changeable to
Luminance in Preferences), R, G, B, plus four others. Selecting any of
the RGB channels allows you to make a Tone Curve correction to just
that channel. So, while Luminance mode allows us to make general
corrections over the full RGB spectrum, Luminance, along with changes
made to the individual Red, Green, or Blue channels, provides more than
selective retouching, individual RGB tweaks provide even more creative
opportunities. You can place up to eight break points on each of the four
lines (FIG 9.46).
FIG 9.40 Sharpness level 10FIG 9.39 Sharpness zero
Ch09-K52040.indd 257Ch09-K52040.indd 257 8/10/07 1:53:50 PM8/10/07 1:53:50 PM

258
Canon DSLR: The Ultimate Photographer’s Guide
FIG 9.41
If you want to take the easy way out, you can allow DPP to make tone
curve decisions for you. DPP will make corrections based on image
analysis and create a new tone curve that refl ects that analysis. Simply
click the fi rst of the next four buttons, Tone Curve Assist – Standard
(FIG 9.47), and DPP will do the work for you (FIG 9.48).
FIG 9.42 Brighter medium tones
Ch09-K52040.indd 258Ch09-K52040.indd 258 8/10/07 1:53:52 PM8/10/07 1:53:52 PM

259
Digital Photo Professional
FIG 9.43 Darker medium tones
FIG 9.44 For harder tones
FIG 9.45 For softer tones
If you’re working with a more diffi cult image, move your cursor over to
the next button, Tone Curve Assist – High (FIG 9.49). This button allows a
major assist that may be able to rescue a severely under exposed image
but, like the Standard Assist button, it’s a quick fi x only. You’ll get much
better results if you take the time to attack each problem within your
image; exposure, color, and white balance, separately (FIG 9.50).
If you’ve made some previous corrections, color balance or exposure,
perhaps, and then made a mistake with the Tone Curve Adjustment, you
Ch09-K52040.indd 259Ch09-K52040.indd 259 8/10/07 1:53:53 PM8/10/07 1:53:53 PM

260
Canon DSLR: The Ultimate Photographer’s Guide
FIG 9.49
FIG 9.51
FIG 9.47
FIG 9.48
FIG 9.50
FIG 9.46
can either select Reset or just click on the third button (FIG 9.51). Selecting
either will void the tone curve adjustment and return it to default.
Finally, just in case you missed this before, Canon’s placed another white
balance eyedropper (FIG 9.52) right where you need it. Click on a white or
gray portion of the image to neutralize the image.
Because most of the items in the drop down menus are duplicated as
buttons or selections in the Tool palette I was able to do everything I’ve
shown you so far without using any of those menus. There are a few very
Ch09-K52040.indd 260Ch09-K52040.indd 260 8/10/07 1:53:55 PM8/10/07 1:53:55 PM

261
Digital Photo Professional
exciting and innovative items hiding in menuland, however, and we need
to take a look at them.
RECIPES
You may have noticed some commands in the File and Edit menus that
sound a little strange. There are, in fact, seven commands that cryptically
reference “recipe.” Well, DPP keeps a running tab on all the changes that are
made to an image until it’s fi nished and converted to a Tiff of jpeg. The fi nal
version of all changes made to an image can be saved and, like a recipe,
applied to another image to make a new one that’s just as tasty as the fi rst.
It took several minutes to get this particular eff ect, and I often reset a
control because I didn’t like what I saw. I radically changed the dynamic
range, exposure, contrast, individual RGB channels as well as the entire
RGB tone curve. Before converting it to a .tif, I selected EditSave Recipe
in File, named it, selected a location for it (I created a Recipe Folder), and
clicked Save. That’s it. Now I can apply this recipe to any photo I wish, now
or in the future (FIG 9.53).
FIG 9.52
FIG 9.53
Ch09-K52040.indd 261Ch09-K52040.indd 261 8/10/07 1:53:58 PM8/10/07 1:53:58 PM

262
Canon DSLR: The Ultimate Photographer’s Guide
Working with Jpegs and Tiff s
Although DPP was developed as a high-end
tool for RAW fi le conversion, it functions
quite well, but with limitations, as an
editing and image enhancing program for
.jpg and .tif fi les as well. You can only use
the RGB Image Adjustment window and
palette, but you can make changes to one
image, then apply it to others via a recipe.
Like working with RAW fi le data, changes
made to Tiff s or Jpegs are only made when
selected images are processed. The original
image data remains intact.
They may make adjustments to the
following items:
Brightness
Click White Balance
Contrast
Color Tone
Color Saturation
Sharpness
Dynamic Range
Automatic Adjustment
Tone Curve
To use the recipe (or any other that’s been saved in the created Recipe
folder), fi rst select a new photo in the Edit window or in another RAW
fi le folder. Go to EditRead and Paste Recipe from File …, and select the
proper fi le and recipe. Go back to EditPaste Recipe to Selected Image.
The entire conversion process, which perfectly matched the fi rst image,
took less than ten seconds. Note: Any color diff erences between these
two images is because this image is a screengrab (FIG 9.54).
FIG 9.54
DPP can also trim your images on the fl y, to any aspect ratio you wish,
by using the Trimming tool found under the Tools menu. Calling up that
tool will send your selected image to a new window, where you’ll see the
Aspect Ratio palette. You can choose from a number of presets or select
Custom and simply type in the dimensions you need. If you want to crop
without a ratio, just select Free and crop as you wish (FIG 9.55).
Unless you return to the last saved settings or revert to the image’s shot
settings, DPP will produce a trimmed fi le each time you process that
fi le from now on. You can easily tell if the image has been trimmed by
looking for the Trim icon in the Main or Edit window. You’ll fi nd it in the
upper right corner of the thumbnail (FIG 9.56).
Ch09-K52040.indd 262Ch09-K52040.indd 262 8/10/07 1:54:00 PM8/10/07 1:54:00 PM
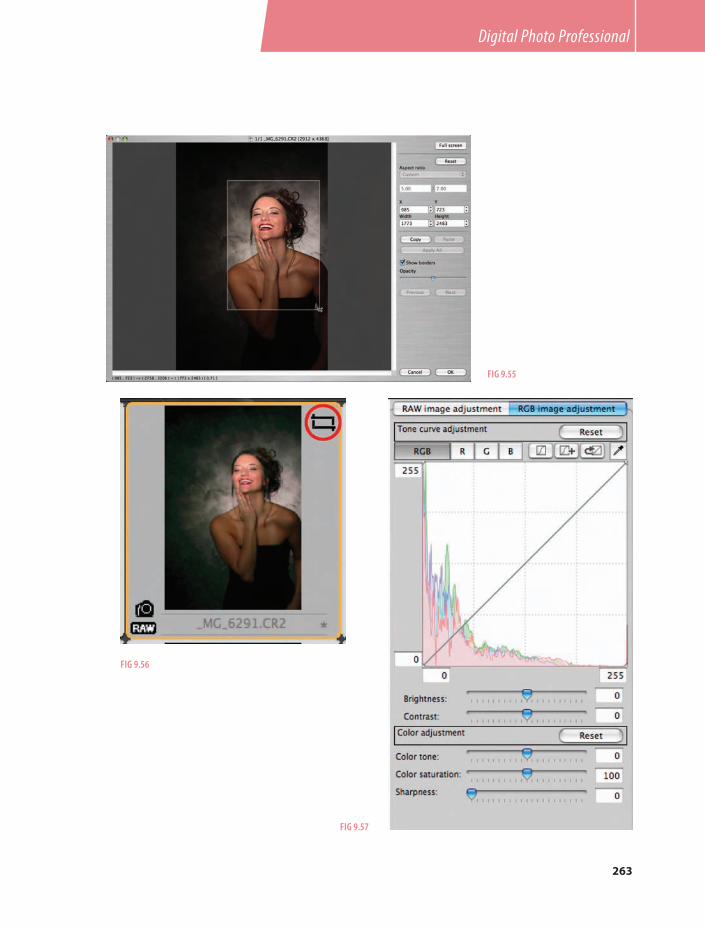
263
Digital Photo Professional
FIG 9.55
FIG 9.56
FIG 9.57
Ch09-K52040.indd 263Ch09-K52040.indd 263 8/10/07 1:54:01 PM8/10/07 1:54:01 PM

Ch10-K52040.indd 264Ch10-K52040.indd 264 8/10/07 12:47:39 PM8/10/07 12:47:39 PM

CHAPTER 10
Canon Gallery
Canon Around the World
Take a look at what peers and colleagues can do with their Canon gear, and make note of
their tricks and tips for your own work.
With all the wonderful gear at their disposal, it’s no wonder that Canon shooters of every level produce
consistently remarkable images. From casual snapshots to photojournalism to commissioned advertising,
Canon delivers the goods.
There is an acronym, WYSIWYG (“Whizzy-wig), “What You See Is What You Get,” that was the Holy Grail for
digital imagers. In the early years of digital, and even today with some camera systems, WYSIWYG is still a
mirage on the horizon. But not for Canon. Now you can capture what you see, faithfully, or go beyond it if
you wish.
Take a look at some marvellous images, made by enthusiastic Canon photographers from around the
world.
Ch10-K52040.indd 265Ch10-K52040.indd 265 8/10/07 12:47:54 PM8/10/07 12:47:54 PM

266
Canon DSLR: The Ultimate Photographer’s Guide
David Brownell
SNOW RAINBOW
Shot with a Canon 10D, 20–35 mm f2.8 lens at 20 mm, this rare snow
rainbow, caused by the refraction of ice crystals against the sun, was
made, coincidentally, at Canon Mountain in Franconia, New Hampshire.
David’s exposure, 1/1000 at f8, about one stop less than a textbook
daylight exposure, accounts for the saturated colors. The camera’s preset
Daylight color temperature accents the extra ultraviolet light present in a
snow scene (FIG 10.1).
David Scarbrough
KINDERGARTEN TEACHER MARY SCARBROUGH
David had only the 15 min of “snack time” to get his shot. He bounced
two fl ash units off the ceiling with the STE-1 remote trigger, along with
Rear Curtain Sync to fi re the fl ashes at the end of the ½-second exposure,
mixing ambient and fl ash about 50/50. His lens was the EF-S 10–22,
at 11 mm, on his 20D (FIG 10.2).
FIG 10.1
FIG 10.2
Ch10-K52040.indd 266Ch10-K52040.indd 266 8/10/07 12:48:01 PM8/10/07 12:48:01 PM

267
Canon Gallery
Craig Wolf
HUMMINGBIRD
According to Craig Wolf, the low noise of his Digital Rebel and the high
shutter speeds were what made this shot a success. He’d made a few,
quick shots but realized, after reviewing the images, that the shutter
speed was too slow to stop the bird’s wings. He reset the ISO to 400,
which gave him 1/2000 second at f5.6, enough to stop most of the wings’
action (www.craigwolf.com) (FIG 10.3).
Jim Byron
MARVIN
Jim sparked up his ID Mark II and three studio lights (key, key accent,
shadow kicker) and a refl ector, all set up in advance of his subject’s arrival,
to create this evocative image. ISO 100, zoom lens at 125 mm, 1/125 at
f22 (FIG 10.4).
FIG 10.3
FIG 10.4
Ch10-K52040.indd 267Ch10-K52040.indd 267 8/10/07 12:48:03 PM8/10/07 12:48:03 PM

268
Canon DSLR: The Ultimate Photographer’s Guide
Kristen Farmer
ALEX
As Kristen explains, “We shot this image at the very end of a full day’s
shoot. The only lighting issue we had was timing the exact moment of
a quickly falling sun. We only had moments before it went down too far.
We sprayed Alex’s hair with a water bottle and used available light and a
gold refl ector to light her.”
Kristen used a 70–200 mm f2.8 zoom on her 1D Mark II, 160 mm, ISO 100,
1/320 at f2.8 (www.greysonhill.com) (FIG 10.5).
FIG 10.5
Ch10-K52040.indd 268Ch10-K52040.indd 268 8/10/07 12:48:04 PM8/10/07 12:48:04 PM

269
Canon Gallery
Allen Birnbach
UNTITLED
It’s never a dull moment for commercial photographers. This stunning
image, as Allen explains it, is “Part of an ad campaign ‘Live the High
Defi nition Life’ for DTS, the movie sound company. Shot with three
cameras consecutively (when one hit the buff er, we went to the next)
to create images for print and motion graphics applications. Shot on
an outdoor cyclorama so we could shoot at the maximum frames
per second. Over 3000 images were created in one day to complete
the project requirements.” Canon 1DsMkII, 40 mm, ISO 400
(www.allenbirnbach.com) (FIG 10.6).
FIG 10.6
Ch10-K52040.indd 269Ch10-K52040.indd 269 8/10/07 12:48:07 PM8/10/07 12:48:07 PM

270
Canon DSLR: The Ultimate Photographer’s Guide
David Sutton
UNTITLED
The fi rst thing David Sutton did when he got his 1Ds Mark II was to pop
out the focusing screen and score a square onto it with an Xacto knife.
After years of shooting with Hasselblad, the square format was tied to his
visual identity. “The Mark II gives me so much information that I literally
throw a third of it away. We off er clients prints up to 30 � 30 and never
have a problem. Digital capture saved us almost a week of turnaround
time, too.” Canon 1Ds Mark II, zoom lens at 28 mm (www.suttonstudios.
com) (FIG 10.7).
FIG 10.7
Ch10-K52040.indd 270Ch10-K52040.indd 270 8/10/07 12:48:08 PM8/10/07 12:48:08 PM

271
Canon Gallery
Kreta Chandler
DAHLIA
During an Island vacation, Kreta Chandler wandered into a little fl ower
shop just as the owner’s stock was being replenished. One of the buckets
of dahlias was placed on the edge of a shaft of sunlight, and Kreta asked
permission to photograph it. She used the Standard Picture Style to
slightly increase the saturation. “It’s my fi rst DSLR,” she said. “I love it, but
I still have a lot to learn about it.” Looks like she’s doing OK. Canon 5D.
ISO 400, 1/30 at f2.8 (FIG 10.8).
FIG 10.8
FIG 10.9
Kiet Thai
LEGONG DANCE
This photo was taken during an evening performance of a traditional
“Legong” dance in Ubud, Bali. The dancers were illuminated by bright
theater lights and, although there was a lot of light, Thai had to use ISO
1600 to get a shutter speed high enough to freeze some motion. He
explains, “The movements of the dancers were quick and about half of the
images I took were blurred. Thankfully this one came out wonderfully!”
Canon Digital Rebel Xt, 18–55 mm kit lens at 55 mm, 1/40 at f5.6 (FIG 10.9).
Ch10-K52040.indd 271Ch10-K52040.indd 271 8/10/07 12:48:10 PM8/10/07 12:48:10 PM

272
Canon DSLR: The Ultimate Photographer’s Guide
David Shirk
NATIONAL THEATER TAIPEI
There’s do doubt Canon shooters are ingenious! David Shirk saw this
beautiful refl ection in a street puddle after a rainstorm but knew using
a tripod would raise his camera too high to get the refl ection and the
building in the frame. He nested his camera into the crook of his umbrella,
just out of the puddle, and used his favorite Custom Function, Mirror
Lockup, along with the self-timer to prevent camera shake when the
shutter fi red. Canon 20D, 18–55 mm kit lens at 18 mm, ISO 200,
30-second exposure at f22 (www.unpluggedphotography.com) (FIG 10.10).
FIG 10.10
Ch10-K52040.indd 272Ch10-K52040.indd 272 8/10/07 12:48:12 PM8/10/07 12:48:12 PM

273
Canon Gallery
Scott Tokar
HOME RUN
Magician Scott Tokar used his Canon 20D and 580 EX fl ash to work a
little magic into this shot of this young lad’s home run. His combination
of twilight, the fi eld lights, and his fl ash (set to Second-Curtain Sync) got
him a perfect exposure along with a speed trail that followed the ball
after it was struck. Canon 20D, ISO 800, 1/60 at f4.5 (FIG 10.11).
FIG 10.11
Ch10-K52040.indd 273Ch10-K52040.indd 273 8/10/07 12:48:13 PM8/10/07 12:48:13 PM

274
Canon DSLR: The Ultimate Photographer’s Guide
Joseph Tichenor
UNTITLED
On location for a transportation advertising agency, and waiting for a
particular vehicle, Joey Tichenor killed time by panning his camera with
traffi c that crossed his vantage point. Note that the refl ective signs were
frozen in time when the fl ash fi red, but that everything else maintains
a motion blur. Canon 1Ds, 16–35 mm zoom at 17 mm, 1/3 second at f14
(www.jtichenorphotography.com) (FIG 10.12).
FIG 10.12
Ch10-K52040.indd 274Ch10-K52040.indd 274 8/10/07 12:48:16 PM8/10/07 12:48:16 PM

275
Canon Gallery
Larry Brownstein
HOLLYWOOD BOULEVARD 108
Larry Brownstein juxtaposed this street performer with a movie poster
to make this somewhat unsettling image. The sun had just set behind
the buildings, so Larry opened his lens to its maximum aperture, f1.2,
so he could continue to shoot with a low ISO. The poster was only a foot
or two behind the harmonica player, but the lack of depth of fi eld lends
to the eerie feel. Canon 5D, 85 mm f1.2 L, ISO 160, 1/200 at f1.2 (www.
larrybrownstein.com) (FIG 10.13).
FIG 10.13
Ch10-K52040.indd 275Ch10-K52040.indd 275 8/10/07 12:48:18 PM8/10/07 12:48:18 PM

276
Canon DSLR: The Ultimate Photographer’s Guide
Rizwan Farooqui
ASHA BHOSLE
From Hollywood to Bollywood. Riz Farooqui made this portrait of
Bollywood playback singer (over 925 movies!), and Grammy Award
nominee, Asha Bhosle using two 580 EX units. Farooqui’s key light was on
a light stand to camera right and aimed into an umbrella. His second unit,
on camera, was modifi ed with a LightSphere. 1D Mark II N, 70–200 mm
f2.8 zoom at 185 mm, ISO 400 at f5 (FIG 10.14).
FIG 10.14
Ch10-K52040.indd 276Ch10-K52040.indd 276 8/10/07 12:48:20 PM8/10/07 12:48:20 PM

277
Canon Gallery
Russ Pullen
UNTITLED
London wedding photographer Russ Pullen was sheltered under a bridge
with the bride and groom, waiting out a small rain shower. When the sun
broke through, lighting the Tower Bridge, Pullen grabbed the couple
and brought them out for a shot. Their location was in open shade, so he
used fl ash fi ll to put a little “pop” in the light. 1D Mark II, 24–70 mm f2.8
zoom at 40 mm, 550 EX fl ash, ISO 400, 1/1000 at f7.1 (www.russpullen.
com) (FIG 10.15).
FIG 10.15
Ch10-K52040.indd 277Ch10-K52040.indd 277 8/10/07 12:48:22 PM8/10/07 12:48:22 PM

278
Canon DSLR: The Ultimate Photographer’s Guide
Scott Galloway
INTERIOR
Scott Galloway blended a number of exposures together to create this
beautiful interior. “The multiple exposures were taken perfectly level with
special care not to bump or move the camera,” he said. “F/18 was used
for all fi ve exposures at 1/15th, 1/10th, 1/5th, 1/3rd, 1/2. Only three of the
exposures were used to make the fi nal image. The 1/15th was used for
the sky and ceiling, the 1/3rd was used for the stairs and most of the fl oor
and interior, and one other was used for the wall lights.” Canon 5D, 24 mm
Tilt/Shift lens, ISO 100, f18 (FIG 10.16).
FIG 10.16
Ch10-K52040.indd 278Ch10-K52040.indd 278 8/10/07 12:48:24 PM8/10/07 12:48:24 PM

279279
Canon Gallery
Jeff Morgan
STONE ARCH BRIDGE
Jeff Morgan used his 24 mm Tilt/Shift lens to correct perspective as he
looked down on a landmark bridge. Working with 50% overlap, and
Auto Exposure Bracket to produce a series of exposures, Morgan stitched
together this beautiful High Dynamic Range (HDR) image.
“The highlights in the image come from the –2 stop image; the midtones
from the correct exposure; and the shadows from the �2 stop image. It is
important to keep the f/stop constant and bracket with the shutter speed
so the DOF does not change. To make the images register correctly you
need to take all the bracketed images in the same position fi rst before
moving the camera. The camera’s auto-bracket function works well for
this. The middle, or correct, exposure was 4 seconds at f/8.0. I then moved
the camera to have a 50% overlap and took the next set of three images
and so on,” said Morgan. Canon 5D (FIG 10.17).
FIG 10.17
Ch10-K52040.indd 279Ch10-K52040.indd 279 8/10/07 12:48:26 PM8/10/07 12:48:26 PM

280
Canon DSLR: The Ultimate Photographer’s Guide
Rick Haithcox
BARNEY BARNWELL
Dallas, North Carolina, photographer Rick Haithcox took great pains to
make his image of “local personality and ex-moonshiner” Barney Barnwell
look like an eff ortless grab shot. Rick notes, “The early afternoon sun
fi ltered by pine trees came from camera left. A white refl ector was placed
to camera right. Black gobo’s were placed to keep any hard light off the
background door and porch wall. Camera was placed on a tripod and
settings were 60th at 5.6 and a Canon cable release switch was used
to keep the camera steady. The mirror lock up feature was also used to
eliminate any vibrations (Custom Function 12). The color balance was
set to manual and was 4600 K, but this image was determined to be best
converted to B&W.” (FIG 10.18).
FIG 10.18
Ch10-K52040.indd 280Ch10-K52040.indd 280 8/10/07 12:48:27 PM8/10/07 12:48:27 PM

281
Canon Gallery
Cris Mitchell
HOLLYWOOD PORTRAIT
Cris Mitchell, photographer and owner of www.ProPhotoResource.com
made this portrait in the style of the old Hollywood masters, George Hurrell
and C.S. Bull, using studio strobes equipped with refl ectors and grid spots.
Mitchell’s key light was an 18� Beauty Bowl fi tted with a 25° grid. The
contrasty light, with its deep shadows, contributes greatly to the period
look of this image. Canon 20D, 24–70 mm lens at 40 mm, ISO 100, f5.6
(FIG 10.19).
FIG 10.19
Ch10-K52040.indd 281Ch10-K52040.indd 281 8/10/07 12:48:29 PM8/10/07 12:48:29 PM

282
Canon DSLR: The Ultimate Photographer’s Guide
Jorge Fernandez
THE OLD RADIO MAN
He may be just starting in photography, but he’s doing everything
correctly. After doing a Custom White Balance, and using only the two
60 watt lamps in the room, Jorge Fernandez crouched between a table
and sofa and made this evocative image of radio legend Tom Hennesey,
who keeps in touch with his friends by cassette tape “broadcasts.” Canon
20D, 24–70 mm zoom at 59 mm, ISO 800, 1/80 at f2.8 (FIG 10.20).
FIG 10.20
Ch10-K52040.indd 282Ch10-K52040.indd 282 8/10/07 12:48:31 PM8/10/07 12:48:31 PM

283
Canon Gallery
FIG 10.21
Jeff Carsten
SUZY THE WONDERPUPPY
For all her speed and determination, Suzy was no match for Jeff
Carsten’s 20D, even in Program Mode. Carsten’s 100–400 mm zoom,
at 300 mm, gave him the angle of view of a 480 mm lens, allowing for
the camera’s 1.6 conversion factor, and AI Servo focus tracked the pup
eff ortlessly as Carsten held the trigger down. ISO 400, 1/800 at f9
(www.southernlightphoto.com) (FIG 10.21).
Ch10-K52040.indd 283Ch10-K52040.indd 283 8/10/07 12:48:32 PM8/10/07 12:48:32 PM

This page intentionally left blank

285
Canon Gallery
EGP:
Thanks for saving it.
Ch10-K52040.indd 285Ch10-K52040.indd 285 8/10/07 12:48:34 PM8/10/07 12:48:34 PM

This page intentionally left blank

287
50 mm f2.5 Compact Macro 190–19185 mm f1.2 187–190100 mm f2.8 macro 191–192
A
Accent light 118Accessory fl ash 211–219
Macro Twin Lite 224–229
Ring Lite 229–231
Accessory light meter 117A-DEP (Automatic Depth of Field) 118–119Adobe RGB color space 24, 83
vs. sRGB 24–25
AF Point selector 151AI Servo AF 102, 108, 112, 163–167
Predictive AF 165
Aperture, depth of fi eld 3–6Aperture Priority 56, 65, 116, 161, 163Archival Gold CD-R 29–30Artifi cial Intelligence (AI) Focus 163–165Aspect Ratio 61, 262Auto Exposure (AE) Lock 153, 170, 171Auto Exposure Bracketing (AEB) 71–74Auto Focus (AF) Mode 67, 160–161
AI Focus 169–170
AI Servo AF 163–167
One-Shot 161
Auto White Balance (AWB) 35, 74, 78Automatic Focus Point Selection (AFPS) 158
AF Mode 160–170
Auto Focus (AF) 158–160
Register specifi c AF points 170–173
Av Aperture Priority AE 116
B
Background light 118BalanceSmarter 79Basic Zone 101
Close-up mode 106–107
Flash Off mode 112–113
Full Automatic 102
Landscape mode 103–106
Night Portrait mode 108, 111–112
Portrait mode 102, 103
Sport mode 107–108
Battery Info window 62–63Bicho, David 120–125Birnbach, Allen 269Bokeh 190Brownell, David 266Brownstein, Larry 275Built-in fl ash 206–210Bulb 8, 60, 72Burst rate 52–54Byron, Jim 267
C
Camera metering 151–158Center-Weighted Averaging Meter 156–157
Evaluative Metering 151
Partial Metering 153–154
Spot Metering 154–155
Camera Setting selection 45Camera stands, See TripodsCameras
Digital Rebel XTi 39
EOS 1D Mark II N 47–49
EOS 1D Mark III 50–63
EOS 5D 45–46
EOS 30D 42–44
Canon galleryAlex 268
Asha Bhosle 276
Barney Barnwell 280
Dahlia 271
Hollywood Boulevard 108 275
Hollywood portrait 281
Home run 273
Hummingbird 267
Interior 278
INDEX
Index-K52040.indd 287Index-K52040.indd 287 8/10/07 5:46:26 PM8/10/07 5:46:26 PM

288
Index
Canon gallery (Contd.)Kindergarten teacher Mary Scarbrough 266
Legong dance 271
Marvin 267
National Theater Taipei 272
The Old Radio Man 282
Snow Rainbow 266
Stone Arch Bridge 279
Suzy the Wonderpuppy 283
Carsten, Jeff 283Center-Weighted Averaging Meter 156–157Chandler, Kreta 271Chimping 20Close-up mode 106–107Cloudy 75, 76CMYK 24Color Saturation 143, 144, 253Color Space 24–25, 83–84
Adobe RGB 83
Picture Styles 84
sRGB 83
Color Temperature 75, 114, 148–150, 250Color Tone 132, 145, 146, 253Compact Flash (CF) 19Compression 14–16Conversion factor 184–185Correct exposure 4, 9, 10, 129, 220, 226Creative Zone 45, 72, 114
A-DEP (Automatic Depth of Field) 118–119
Av Aperture Priority AE 116
Manual mode 116–118
Program AE 114
Tv Shutter Speed Priority AE 115
Cropping 186, 262Custom Function (C.Fn) 8, 158, 170, 174Custom White Balance (CWB) 75, 77, 79, 80, 148
D
Daylight 75, 148Depth of fi eld 6
See also A-DEP
Detailed Settings 132Digital Photo Professional (DPP) 239
Batch Process 246
Brightness 245
Click 245
Edit window 241, 246–247
Main window 241, 242
Noise reduction 241
and Photoshop conversion, comparison 240,
241
RAW Image Adjustment 247–257
RGB Image Adjustment 257–263
White Balance 244, 245
Digital Trinity 42Drive function 74Dynamic Range (DR) 233, 251–253
Color Saturation 253
Color Tone 253
E
Edit window 241, 246–247, 250, 251, 262EF 14 mm f2.8 L USM aspherical 185–186EF 15 mm f2.8 Fisheye 186–187EF 24–70 mm f2.8 USM 196–197EF 70–200 mm f2.8L USM 193–196EF 400 mm f2.8L IS USM 197–200EF-S lenses 200–203
EF-S 10–22 mm f3.5–4.5 USM 201
EF-S 17–55 mm f2.8 IS USM 201
EF-S 17–85 mm f4–5.6 IS USM 201–202
EF-S 18–55 mm f3.5–5.6 USM 202–203
EF-S 60 mm f2.8 Macro USM 203
EOS 1D Mark II 47–49EOS 1D Mark III 50–63
Aperture Priority 56–58
Aspect Ratio 61
Battery Info window 62–63
Borders 55
Burst rate 52–54
Custom Functions 62
Highlight Tone Priority 55
Live View 59–60
Pixels 55
Sensor cleaning 51
Weather sealed 55
Wireless File Transmitter 51
EOS 5D 45–46EOS 30D 42–44
Digital Trinity 42
Multi-Controller 42
Erasing images 85–86
Index-K52040.indd 288Index-K52040.indd 288 8/10/07 5:46:27 PM8/10/07 5:46:27 PM

289
Index
E-TTL 205, 211, 225, 227Tricks to use 212–219
Evaluative Metering 106, 109, 151Evans, Rod 94–99Exposure Compensation 114Exposure Level Indicator 70External light meter 127–131
F
Face-Mask Histogram 118Farmer, Kristen 268Farooqui, Rizwan 276Features 65
Auto Exposure Bracketing 71–74
Color Space/Color Matrix 83–84
Custom White Balance 75, 77–82
Erasing images 85–86
Format 86–87
Highlight alert 90
ISO speed 87–90
LCD brightness 93
Main Dial 67
Menu 70
Power switch 65–66
Protect 84–85
Quality 70–71
Quick Control Dial 67–68
Sensor cleaning 90–93
Shutter button 69–70
White Balance 74–75
Fernandez, Jorge 282File accessibility 28–30Fill fl ash 206, 207, 214Filter Effect 254Flash 75, 77, 205
Accessory fl ash 211–219
Built-in 206–210
Macro Twin Lite 224
Multi Stroboscopic Flash 219–220
Ring Lite 229–231
Speedlites 221–224
Flash Exposure Bracketing (FEB) 217–218Flash Exposure Compensation 207, 212, 218Flash Exposure Lock (FEL) 170, 206
See also AE Lock
Flash meter 78, 222
Flash Off mode 112–113Flash shots 111Fluorescent light 10Focus Confi rmation light 161Focus Points 106, 118, 154Format 19, 86–87FTP 51Full Automatic 102, 160Full-time manual focus 191, 201
G
Gallery, See Canon galleryGalloway, Scott 278Gero, Paul 31–37Glassfi re 98Gray target 78, 148, 213
H
Hair light 118, 221Haithcox, Rick 280Hartley, Paul 175–180
Education 175
First photography 175
Production workfl ow 178
Stock photography 179
Travel kit 175–179
Writer 176
High-Speed Sync 218, 221High-ticket jobs 71Highlight alert 90Highlight Tone Priority 55, 62HTTP 51
I
Image quality 14, 47, 70, 90, 91, 93Image Stabilization 70, 158, 193, 195, 201Internal light meter 101, 127ISO Speed 36, 56, 88–90, 240iView Media Pro 16, 36
J
jpeg 15, 262
K
Kelvin 148Key light 118, 150, 221, 225, 227
Index-K52040.indd 289Index-K52040.indd 289 8/10/07 5:46:28 PM8/10/07 5:46:28 PM

290
Index
Keystoning 185, 192Kopelow, Gerry 232–237
Photographic tricks 232, 234
Tool kit 234
Workfl ow 233
L
L Series 184, 201Landscape mode 103–106, 134Large jpeg 15, 70, 71LCD brightness 93Lenses 183
50 mm f2.5 Compact macro 190–191
85 mm f1.2 187–190
100 mm f2.8 macro 191–192
EF 14 mm f2.8 L USM aspherical 185–186
EF 15 mm f2.8 Fisheye 186–187
EF 24–70 mm f2.8 USM 196–197
EF 70–200 mm f2.8L USM 193–196
EF-S lenses 200–203
TS-E 90 mm f2.8 Tilt/Shift 192–193
Light meter 106, 117, 118Light source 127, 226Linear Tone Curve 252Live View 59–60LP-E4 batteries 17LumiQuest MidiBouncer 213
M
Macro Twin Lite 224–229Main Dial 67Manual Focus Point Selection (MFPS)
173–174Manual Mode 70, 116–118, 151, 210, 226Master unit 222, 223Medium jpeg 15, 71Menu 70Meter/exposure/f-stop connection 129–131Mitchell, Cris 281Mode Dial 45Monochrome 135, 253
Filter Eff ect 254
Sharpness 255
Toning Eff ect 254–255
Morgan, Jeff 279
Multi Stroboscopic Flash 219–220Multi-Controller 42, 159, 173
N
Neutral density (ND) fi lters 7, 115Neutral Picture Style 136
Color Saturation 143, 144
Color Tone 145, 146
Contrast 141, 142
Sharpness factor 139, 140
Zero Sharpness 138
Night Portrait mode 108, 111NP-E3 (NiMH) batteries 17
O
Off-color cast 81One-Shot AF 102, 161, 174One stop overexposed 4, 8, 216One stop underexposed 4, 8, 9Opening up, of lens 4
P
Partial Metering 153–154Perfect Focus and Exposure 151
Automatic Focus Point Selection 158–173
Camera metering 151–158
Manual Focus Point Selection (MFPS)
173–174
Personal Function 174Picture elements, See PixelPicture Styles 42, 132, 250–251
Faithful 135, 136
Landscape 134
Monochrome 135, 136
Neutral 134, 135
Portrait 132, 133
Standard 132, 133
User Defi ned 136, 137
Pixel 14, 55Portrait mode 102–103, 111Power switch 65–66Prime lens 45Processing Parameters 132Program AE 114Protect 84–85
Index-K52040.indd 290Index-K52040.indd 290 8/10/07 5:46:28 PM8/10/07 5:46:28 PM

291
Index
PTP 51Pullen, Russ 277
Q
Quick Control Dial 27, 39, 46, 65, 66, 67–68, 72, 73, 80, 86
Quick start 17–21
R
RAW fi les 15, 16, 24, 27, 56, 114, 239, 241RAW Image Adjustment 247–257
Dynamic Range 251–253
Picture Styles 250–251
Rear Button Focus, See AE LockRebel XTi 39
Quick Control Dial 39
Rechargeable batteries 17Reciprocity 10–13
and ISO 88
Resolution 14–16, 71RGB Image Adjustment 257–263
Recipes 261–263
Ring Lite 224, 229–231RIP software 71Rock-solid technique 216
S
SanDisk Extreme III 52“Saved Work” disc 29Scarbrough, David 266Second-Curtain Sync 218, 219Secure Digital (SD) 19Sensor Cleaning 90–93Shade 75Sharpness 132, 255, 257Shirk, David 272Shooting RAW 25–28, 32, 35, 248, 250ShootSmarter.com 118Shot-to-shot focus 160Shutter/aperture combinations 88Shutter Button 69–70Shutter Curtain Sync 219Shutter Priority, See Aperture PriorityShutter speed 7–9, 119, 210
Fast 8, 88, 106, 108
Slow 8, 35, 108
Slave unit 219, 221, 223Small jpeg 15, 16, 71Speedlite 211, 213, 217, 218, 221–224, 231Sport mode 107–108Spot Metering 154–156sRGB color space 83
vs. Adobe RGB 24–25
Stopping down, of lens 4, 6Storage cards 16, 27Studio strobes 10, 148, 219Sub-electronic dilemma 161Sunlight 10, 218, 227, 271Super Spectra Coating 184, 199Sutton, David 270
T
Thai, Kiet 271Through The Lens (TTL) 151Thumb Focus, See AE Lock buttonTichenor, Joseph 274Tiff 262Tokar, Scott 273Tonal merger 210Tone Curve Adjustment 109, 257, 259, 260Toning Effect 254–255, 256Tripods 108, 119, 195TS-E 90 mm f2.8 Tilt/Shift 192, 193Tungsten 36, 75, 76, 244Tv Shutter Speed Priority AE 115
U
Ultimate Light Box System 213, 221Ultrasonic Motor (USM) 116, 158, 183Umbrella Stand Adapter 221User Defi ned interface 136, 137
V
Vertical Grip Dial 67, 67, 170
W
White Balance 74–75, 244, 248Auto White Balance (AWB) 74
Cloudy 75, 76
Custom White Balance (CWB) 75, 77
Index-K52040.indd 291Index-K52040.indd 291 8/10/07 5:46:28 PM8/10/07 5:46:28 PM

292
Index
White Balance (Contd.) Daylight 75
Flash 75, 77
Shade 75
Tungsten 75, 76
White Fluorescent 75, 76
White Balance Shift/Bracket 81–83
White Fluorescent 75, 76Wireless File Transmitter 51Wolf, Craig 267Workfl ow 23–37
Color Space 24–25
Z
Zoom lens 45
Index-K52040.indd 292Index-K52040.indd 292 8/10/07 5:46:29 PM8/10/07 5:46:29 PM