ca mediation manager and ca mediation manager for infrastructure management mediation manager 2 2...
TRANSCRIPT
Administration Guide CA Mediation Manager Release 2.2.3 / CA Mediation Manager
for Infrastructure Management 2.0, Release 2.2.3
CA Mediation Manager and CA Mediation Manager for Infrastructure Management

This Documentation, which includes embedded help systems and electronically distributed materials, (hereinafter referred to as the “Documentation”) is for your informational purposes only and is subject to change or withdrawal by CA at any time.
This Documentation may not be copied, transferred, reproduced, disclosed, modified or duplicated, in whole or in part, without the prior written consent of CA. This Documentation is confidential and proprietary information of CA and may not be disclosed by you or used for any purpose other than as may be permitted in (i) a separate agreement between you and CA governing your use of the CA software to which the Documentation relates; or (ii) a separate confidentiality agreement between you and CA.
Notwithstanding the foregoing, if you are a licensed user of the software product(s) addressed in the Documentation, you may print or otherwise make available a reasonable number of copies of the Documentation for internal use by you and your employees in connection with that software, provided that all CA copyright notices and legends are affixed to each reproduced copy.
The right to print or otherwise make available copies of the Documentation is limited to the period during which the applicable license for such software remains in full force and effect. Should the license terminate for any reason, it is your responsibility to certify in writing to CA that all copies and partial copies of the Documentation have been returned to CA or destroyed.
TO THE EXTENT PERMITTED BY APPLICABLE LAW, CA PROVIDES THIS DOCUMENTATION “AS IS” WITHOUT WARRANTY OF ANY KIND, INCLUDING WITHOUT LIMITATION, ANY IMPLIED WARRANTIES OF MERCHANTABILITY, FITNESS FOR A PARTICULAR PURPOSE, OR NONINFRINGEMENT. IN NO EVENT WILL CA BE LIABLE TO YOU OR ANY THIRD PARTY FOR ANY LOSS OR DAMAGE, DIRECT OR INDIRECT, FROM THE USE OF THIS DOCUMENTATION, INCLUDING WITHOUT LIMITATION, LOST PROFITS, LOST INVESTMENT, BUSINESS INTERRUPTION, GOODWILL, OR LOST DATA, EVEN IF CA IS EXPRESSLY ADVISED IN ADVANCE OF THE POSSIBILITY OF SUCH LOSS OR DAMAGE.
The use of any software product referenced in the Documentation is governed by the applicable license agreement and such license agreement is not modified in any way by the terms of this notice.
The manufacturer of this Documentation is CA.
Provided with “Restricted Rights.” Use, duplication or disclosure by the United States Government is subject to the restrictions set forth in FAR Sections 12.212, 52.227-14, and 52.227-19(c)(1) - (2) and DFARS Section 252.227-7014(b)(3), as applicable, or their successors.
Copyright © 2013 CA. All rights reserved. All trademarks, trade names, service marks, and logos referenced herein belong to their respective companies.
CA Technologies Product References
This document references the following CA Technologies products:
■ CA Mediation Manager
■ CA Mediation Manager for Infrastructure Management 2.0
Contact CA Technologies
Contact CA Support
For your convenience, CA Technologies provides one site where you can access the information that you need for your Home Office, Small Business, and Enterprise CA Technologies products. At http://ca.com/support, you can access the following resources:
■ Online and telephone contact information for technical assistance and customer services
■ Information about user communities and forums
■ Product and documentation downloads
■ CA Support policies and guidelines
■ Other helpful resources appropriate for your product
Providing Feedback About Product Documentation
If you have comments or questions about CA Technologies product documentation, you can send a message to [email protected].
To provide feedback about CA Technologies product documentation, complete our short customer survey which is available on the CA Support website at http://ca.com/docs.

Contents 5
Contents
Chapter 1: Introduction 7
Architecture ................................................................................................................................................................. 8
Chapter 2: Overview 9
Component Overview .................................................................................................................................................. 9
Main Components ........................................................................................................................................................ 9
MultiController...................................................................................................................................................... 9
LocalController .................................................................................................................................................... 10
Web ..................................................................................................................................................................... 11
Subcomponents ......................................................................................................................................................... 16
Engine .................................................................................................................................................................. 16
Presenter ............................................................................................................................................................. 16
Other Components ..................................................................................................................................................... 16
Generic Executor ................................................................................................................................................. 16
Delivery Service ................................................................................................................................................... 17
Chapter 3: Install, Uninstall, and Upgrade CA Mediation Manager 19
System Requirements ................................................................................................................................................ 19
Installation and Upgrade ............................................................................................................................................ 19
Starting and Stopping Services ................................................................................................................................... 20
UNIX .................................................................................................................................................................... 20
Windows ............................................................................................................................................................. 21
Chapter 4: Component Configuration 23
Generic Executor Configuration ................................................................................................................................. 24
How the Generic Executor Works ....................................................................................................................... 25
Generic Executor Configuration Options ............................................................................................................ 27
Generic Executor Startup Sequence ................................................................................................................... 28
Add Another Generic Executor (UNIX) ................................................................................................................ 28
MultiController Configuration .................................................................................................................................... 29
MultiController Configuration Options ............................................................................................................... 32
Start and Stop the MultiController Manually...................................................................................................... 34
LocalController Configuration .................................................................................................................................... 35
LocalController Configuration Options ............................................................................................................... 37
Start and Stop the LocalController Manually ...................................................................................................... 41
6 Administration Guide
Engine and Presenter Configuration ................................................................................................................... 41
Failover Operation ..................................................................................................................................................... 41
MultiController Failure ............................................................................................................................................... 41
MultiController Communication ......................................................................................................................... 42
Primary MultiController Failure .......................................................................................................................... 43
MultiController Proxy Capability ......................................................................................................................... 43
LocalController Failure ........................................................................................................................................ 44
Subcomponent Failure ........................................................................................................................................ 44
High Availability Configuration ................................................................................................................................... 44
Configure the Primary MultiController ............................................................................................................... 45
Configure the Secondary MultiController ........................................................................................................... 45
Configure the LocalController ............................................................................................................................. 45
Log Files Configuration ............................................................................................................................................... 46
logging.properties File - Examples by Component .............................................................................................. 47
Configuring Log File Cleanup ............................................................................................................................... 48
Chapter 5: Using EMS Profiles for CA Mediation Manager for Infrastructure Management 2.0, Release 2.2.3 53
EMS Integration Profiles ............................................................................................................................................. 53
Add EMS Integration Profiles .............................................................................................................................. 53
Start EMS Discovery Manually ............................................................................................................................ 55
View EMS Discovery Results ............................................................................................................................... 56
Start or Stop EMS Discovery Services ................................................................................................................. 56
Add Event Rules.......................................................................................................................................................... 57

Chapter 1: Introduction 7
Chapter 1: Introduction
This guide provides information about the architecture, installation, prerequisites, and requirements for installing CA Mediation Manager.
Note: The information in this chapter applies only to CA Mediation Manager.
This section contains the following topics:
Architecture (see page 8)
Architecture
8 Administration Guide
Architecture
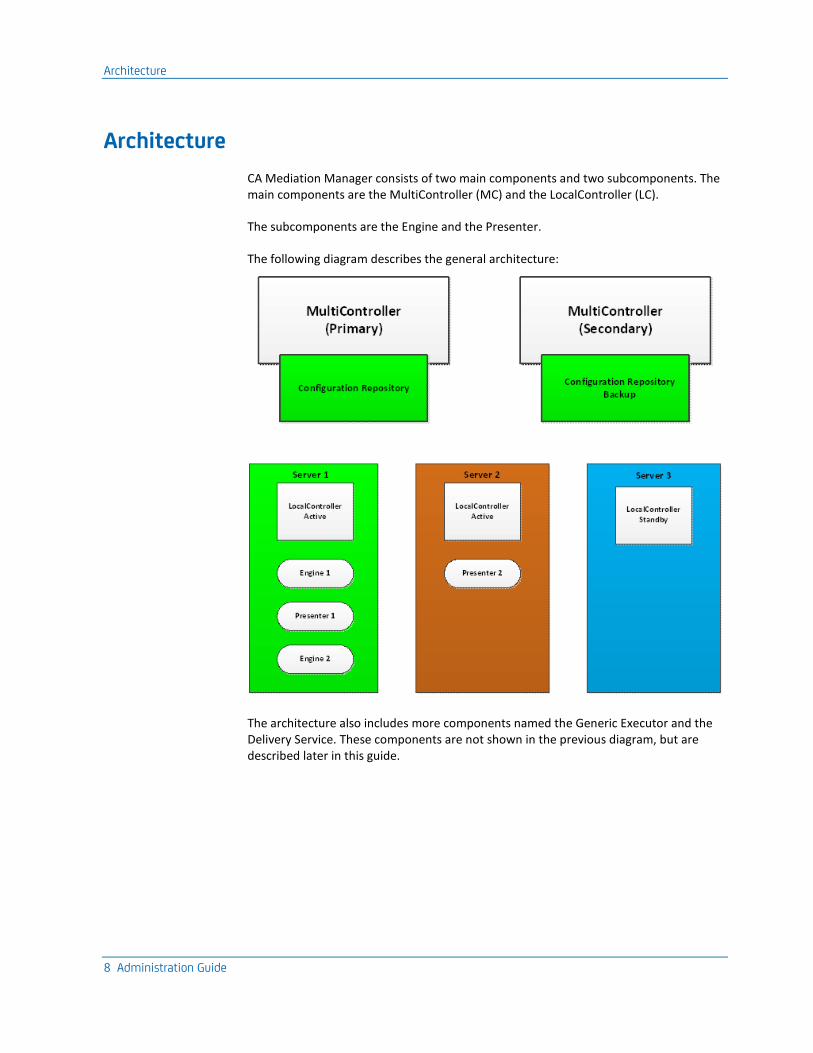
CA Mediation Manager consists of two main components and two subcomponents. The main components are the MultiController (MC) and the LocalController (LC).
The subcomponents are the Engine and the Presenter.
The following diagram describes the general architecture:
The architecture also includes more components named the Generic Executor and the Delivery Service. These components are not shown in the previous diagram, but are described later in this guide.
Chapter 2: Overview 9
Chapter 2: Overview
Note: The information in this chapter applies only to CA Mediation Manager.
This section contains the following topics:
Component Overview (see page 9) Main Components (see page 9) Subcomponents (see page 16) Other Components (see page 16)
Component Overview
The CA Mediation Manager installer installs the MultiController, LocalController, and the web components.
The CA Mediation Manager installer also installs the following components:
■ Delivery Service (part of the LocalController)
■ Generic Executor
The subcomponents, Engine and Presenter, are installed when you install a device pack.
Note: For more installation details for your specific device pack, see the Device Pack Guide in the DpConfig folder in CAMM_HOME, the directory where CA Mediation Manager is installed.
Main Components
CA Mediation Manager has three main components: MultiController, LocalController, and Web.
MultiController
You can deploy up to two MultiControllers, primary and secondary, in a cluster. Deploy at least one MultiController per cluster. A MultiController performs the following actions in your cluster environment:
■ Monitors heartbeat messages from LocalController components on remote servers.
■ Acts as the centralized licensing server for the cluster.
■ Stores centralized configuration files for components in the cluster.
Main Components
10 Administration Guide
LocalController
Install one LocalController on each physical server in the cluster where a subcomponent (Engine or Presenter) resides. A LocalController performs the following actions:
■ Provides the communication mechanism for subcomponents installed on the server.
■ Monitors heartbeat messages for subcomponents on the local server and automatically restarts subcomponents if they fail.
■ Uses a delivery service to process output from the Engine. This service delivers XML documents in a compressed and encrypted format to a local or remote Presenter.
Main Components
Chapter 2: Overview 11
Web
The web component lets you centrally manage the device pack deployment using its web-based interface. The interface displays the following information:
■ Status of the running Device packs.
■ Status of the LocalControllers on which the device packs are installed.
■ Status of the primary and secondary MultiController.
CA Mediation Manager installs two web servers:
■ Primary web server
■ Secondary web server
The primary web server is installed during the primary MultiController installation and a secondary web server is installed during the secondary MultiController installation.
■ To access the primary web server, launch the CA Mediation Manager Web UI:
http://<PrimaryMCMachineIP>:<web-port>/tim-web/index.htm
Where <web-port> is the port number configured during the CA Mediation Manager installation and <PrimaryMCMachineIP> is the IP address or hostname of the primary MultiController system.
If the primary MultiController is not responding, the secondary MultiController automatically starts the secondary web server.
If the primary MultiController starts responding, the secondary MultiController stops the secondary web server.
■ To access the secondary web server, launch the CA Mediation Manager Web UI:
http://<SecondaryMCMachineIP>:<web-port>/tim-web/index.htm
Where <web-port> is the port number configured during the CA Mediation Manager installation and <SecondaryMCMachineIP> is the IP address or hostname of the secondary MultiController system.
The subsequent sections describe the web component options.
Main Components
12 Administration Guide
Default Options
The following information describes the default options in the Management tab of CA Mediation Manager:
Install or Remove
Installs or removes the device packs from the existing repository. The default path used during the installation is $CAMM_HOME/MC/repository/device packs. If you used a different path during the installation, browse and select your device pack path.
Upgrade
Upgrades the version of the device pack.
Advanced Options
The following information describes the advanced options.
Statistics
Provides the following options to collect and understand statistics:
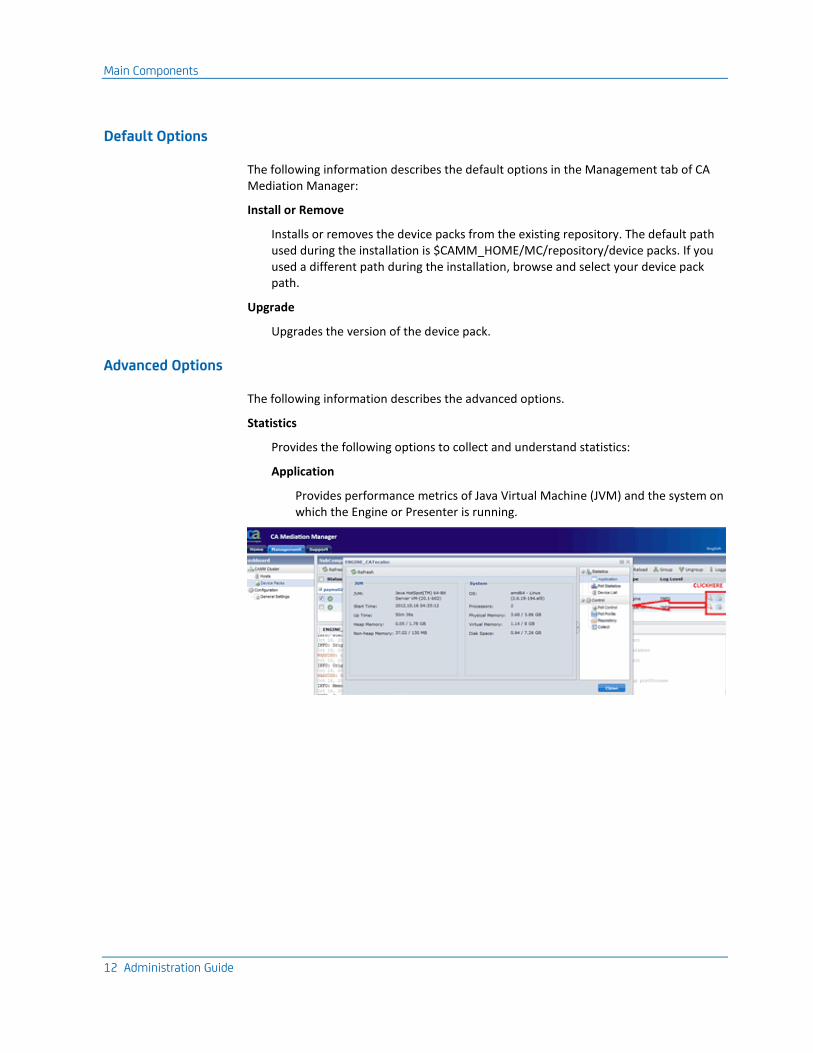
Application
Provides performance metrics of Java Virtual Machine (JVM) and the system on which the Engine or Presenter is running.
Main Components
Chapter 2: Overview 13
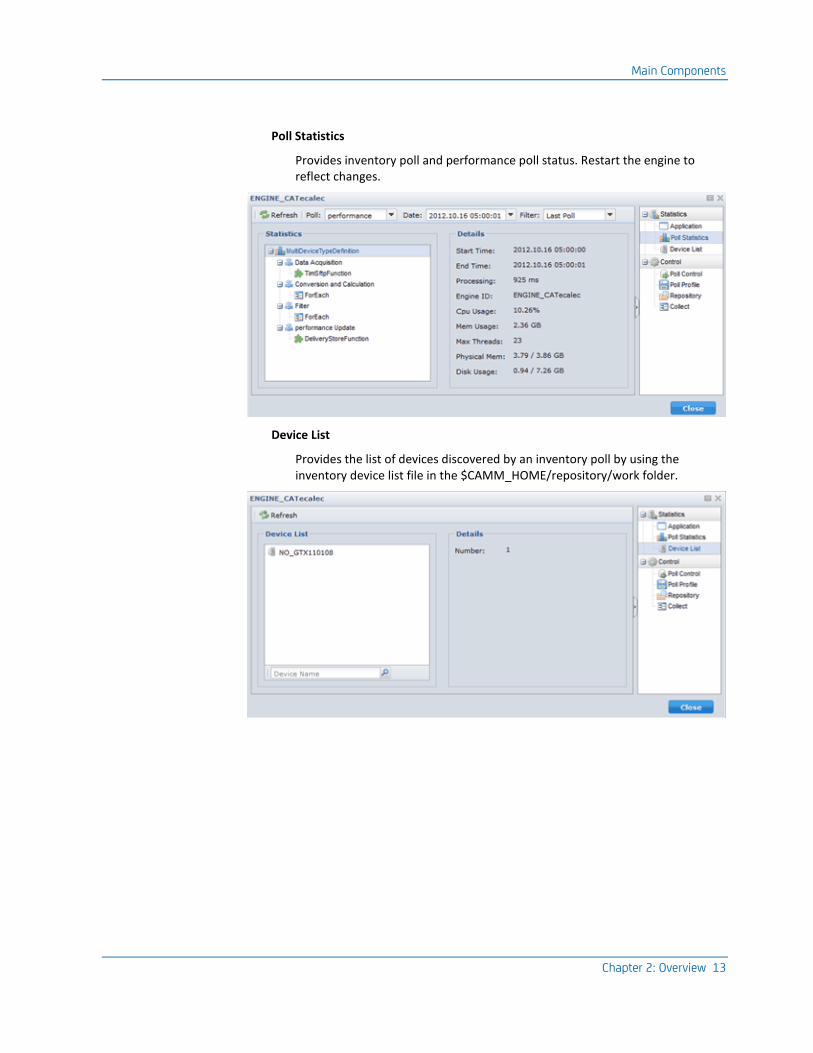
Poll Statistics
Provides inventory poll and performance poll status. Restart the engine to reflect changes.
Device List
Provides the list of devices discovered by an inventory poll by using the inventory device list file in the $CAMM_HOME/repository/work folder.
Main Components
14 Administration Guide
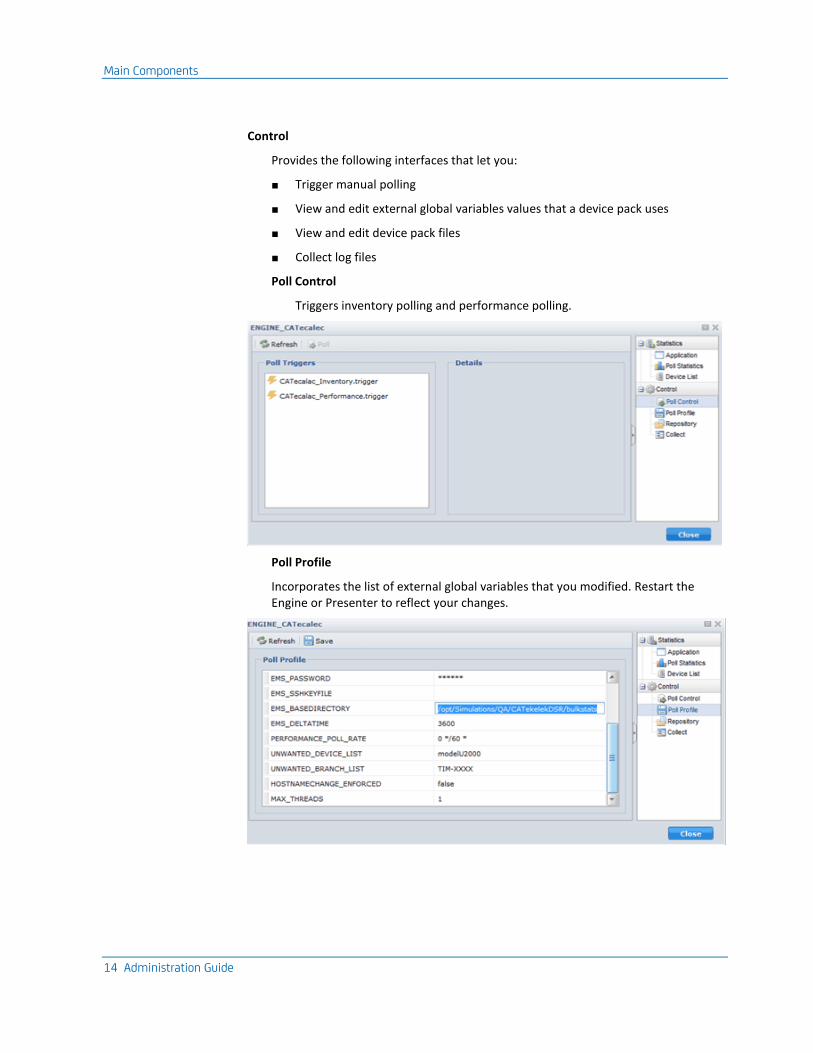
Control
Provides the following interfaces that let you:
■ Trigger manual polling
■ View and edit external global variables values that a device pack uses
■ View and edit device pack files
■ Collect log files
Poll Control
Triggers inventory polling and performance polling.
Poll Profile
Incorporates the list of external global variables that you modified. Restart the Engine or Presenter to reflect your changes.
Main Components
Chapter 2: Overview 15
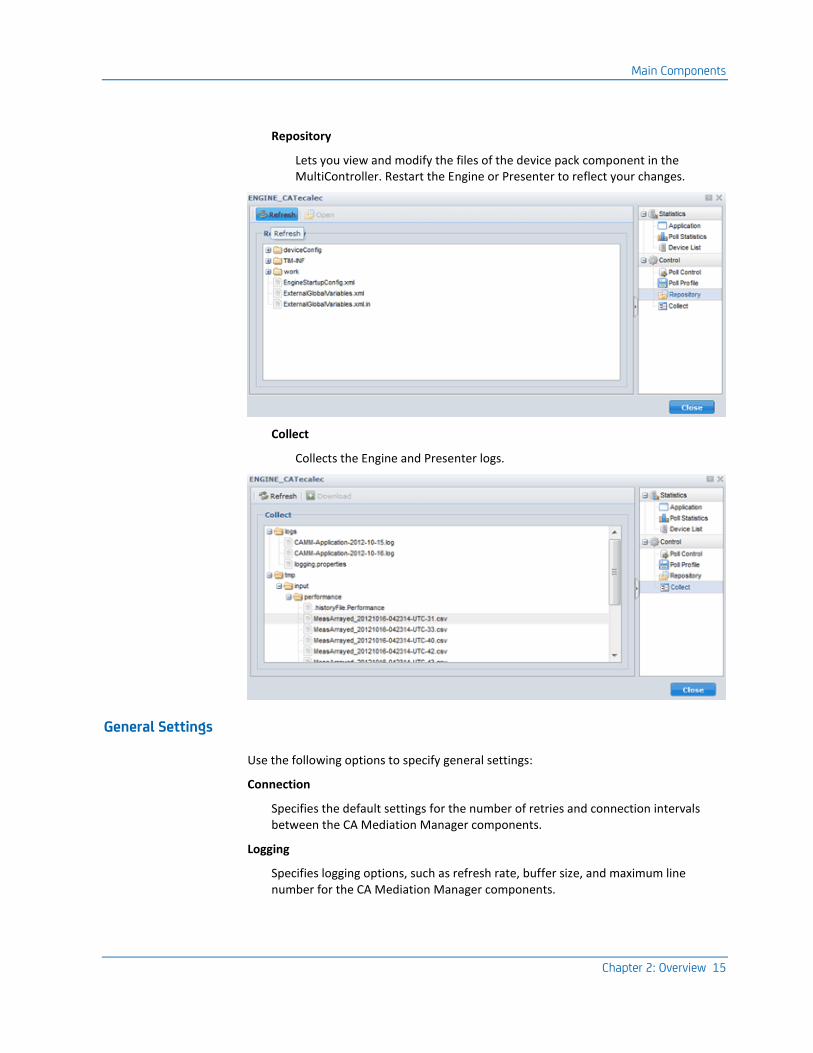
Repository
Lets you view and modify the files of the device pack component in the MultiController. Restart the Engine or Presenter to reflect your changes.
Collect
Collects the Engine and Presenter logs.
General Settings
Use the following options to specify general settings:
Connection
Specifies the default settings for the number of retries and connection intervals between the CA Mediation Manager components.
Logging
Specifies logging options, such as refresh rate, buffer size, and maximum line number for the CA Mediation Manager components.
Subcomponents
16 Administration Guide
Subcomponents
There are two subcomponents in CA Mediation Manager: Engine and Presenter.
Engine
The Engine is the main, threaded polling engine in CA Mediation Manager. You can deploy the Engine in the active or standby mode. The Engine performs the following actions:
■ Gathers information from devices using XML, CSV, Telnet, SSH, and so on, and processes the data to a CA Mediation Manager-standard XML document.
■ Deploys the CA Mediation Manager-standard XML document to the queue for processing by the Delivery Service.
Presenter
The Presenter is a threaded presentation engine that performs the following actions:
■ Receives the CA Mediation Manager-standard XML document from the Engine.
■ Formats the data to the required output format, such as CSV, XML, SNMP, and DDI.
Other Components
The Generic Executor and Delivery Service are the two other components of CA Mediation Manager. The Generic Executor starts the other components. The Delivery Service sends the XML file output to the Presenter.
Generic Executor
All components in a cluster share a common set of functions for communication and execution. The Generic Executor starts the Engine and Presenter subcomponents and cleans the temporary and log files.
The Generic Executor starts at system startup and listens on a specific TCP port. To start a component like the MultiController, the CA Mediation Manager Control Utility, cammCtrl, sends a MultiController XML configuration file to the Generic Executor. When the Generic Executor receives this data, it identifies and starts the MultiController component using the information in the configuration file.
Other Components
Chapter 2: Overview 17
Delivery Service
When an Engine finishes its poll cycle, it generates one or more CA Mediation Manager-standard XML documents in the queue directory. The Delivery Service monitors the queue directory independently and distributes the data to one or more local or remote Presenters.
If a local or remote Presenter is unavailable, the Delivery Service does not process the queue until the local or remote Presenter becomes available.

Chapter 3: Install, Uninstall, and Upgrade CA Mediation Manager 19
Chapter 3: Install, Uninstall, and Upgrade CA Mediation Manager
Note: The information in this chapter applies only to CA Mediation Manager.
This section contains the following topics:
System Requirements (see page 19) Installation and Upgrade (see page 19) Starting and Stopping Services (see page 20)
System Requirements
CA Mediation Manager requires the Java Runtime Environment (JRE) version 1.7 or later.
The following table describes the minimum hardware requirements for each supported operating system:
Operating System
Architecture CPU Memory Disk
Solaris 9 or 10
SPARC (64-bit) 1 x 1.4 GHz 4 GB 18 GB
Linux x86 (64-bit) 1 x 2 GHz 4 GB 18 GB
Windows 2003
x86 (64-bit) 1 x 2 GHz 4 GB 18 GB
Windows 2008
x86 (64-bit) 1 x 2 GHz 4 GB 18 GB
Note: Maintain consistency between the JRE and the operating system architecture. For example, on 64-bit operating systems, the JRE you use to install and run CA Mediation Manager must also be 64-bit. CA Technologies recommends using the latest version of JRE, which you can obtain from the Java download site.
Installation and Upgrade
To install and upgrade CA Mediation Manager and device packs, see the CA Mediation Manager Installation Guide.
Starting and Stopping Services
20 Administration Guide
Starting and Stopping Services
The following information describes starting and stopping services in CA Mediation Manager for UNIX and Windows.
UNIX
You can execute the startall or stopall script or the init.camm script to start or stop CA Mediation Manager. The init.camm script is in the Tools directory in the CAMM Home directory.
Execute the following init.camm.install script, as root or sudo so, to start or stop CA Mediation Manager automatically at the system startup or shut down:
shell# tools/init.camm.install
Execute the following init.camm.uninstall script to remove the setting that automatically starts or stops CA Mediation Manager:
shell# tools/init.camm.uninstall
Starting and Stopping Services
Chapter 3: Install, Uninstall, and Upgrade CA Mediation Manager 21
Windows
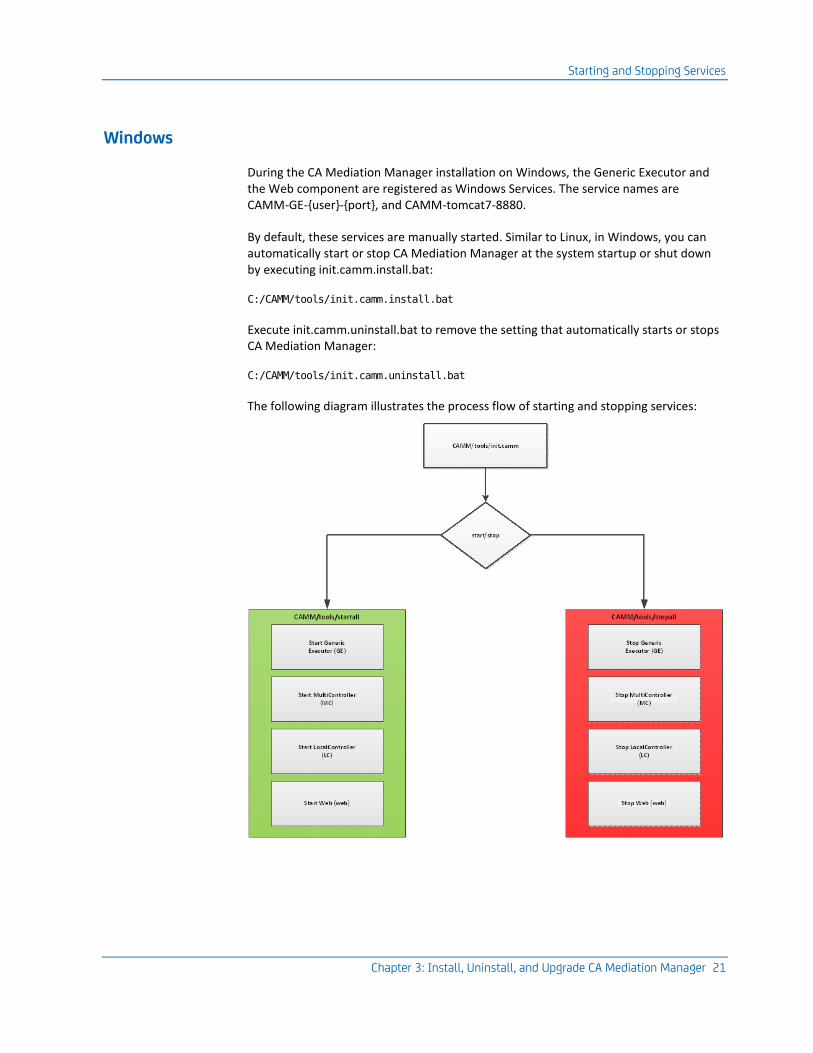
During the CA Mediation Manager installation on Windows, the Generic Executor and the Web component are registered as Windows Services. The service names are CAMM-GE-{user}-{port}, and CAMM-tomcat7-8880.
By default, these services are manually started. Similar to Linux, in Windows, you can automatically start or stop CA Mediation Manager at the system startup or shut down by executing init.camm.install.bat:
C:/CAMM/tools/init.camm.install.bat
Execute init.camm.uninstall.bat to remove the setting that automatically starts or stops CA Mediation Manager:
C:/CAMM/tools/init.camm.uninstall.bat
The following diagram illustrates the process flow of starting and stopping services:

Chapter 4: Component Configuration 23
Chapter 4: Component Configuration
The following sections describe how to configure the components in CA Mediation Manager:
Note: The information in this chapter applies only to CA Mediation Manager.
This section contains the following topics:
Generic Executor Configuration (see page 24) MultiController Configuration (see page 29) LocalController Configuration (see page 35) Failover Operation (see page 41) MultiController Failure (see page 41) High Availability Configuration (see page 44) Log Files Configuration (see page 46)
Generic Executor Configuration
24 Administration Guide
Generic Executor Configuration
The Generic Executor typically requires no configuration after the initial installation. Only one Generic Executor is required per server unless you require the components to run with different user IDs.
The Generic Executor configuration is installed in the Generic Executor directory, named GE_<userid>, in the CAMM HOME directory. The <userid> is the user name that you specified during the installation.
The Generic Executor directory contains a file named LocalConfig-ge.xml.
When the Generic Executor assumes the role of a component, it executes using the same user ID configured in the LocalConfig-ge.xml.
Example of a LocalConfig-ge.xml file for UNIX
<?xml version="1.0" encoding="UTF-8"?>
<AppDaemon>
<Names>
</Names>
<Paths>
<Path name="tim.base">/opt/CA/CAMM</Path>
<Path name="appHome">${tim.base}/GE_camm</Path>
<Path name="configBase">${appHome}/tmp</Path>
</Paths>
<Binding>
CA Portal29560</Port>
<UserId>camm</UserId>
</Binding>
</AppDaemon>
Example of a LocalConfig-ge.xml file for Windows
For a Windows user, the primary Generic Executor configuration file is slightly different:
<?xml version="1.0" encoding="UTF-8"?>
<AppDaemon>
<Names>
</Names>
<Paths>
<Path name="tim.base">/opt/CA/CAMM</Path>
<Path name="appHome">${tim.base}/GE_camm</Path>
<Path name="configBase">${appHome}/tmp</Path>
</Paths>
<Binding>
CA Portal29560</Port>
<UserId>camm</UserId>
</Binding>
<CompanyItems>
Generic Executor Configuration
Chapter 4: Component Configuration 25
<Item>
<Name>MC</Name>
<Config>${tim.base}/MC/LocalConfig-mc.xml</Config>
CA Portal29599</Port>
</Item>
<Item>
<Name>LC</Name>
<Config>${tim.base}/LC/LocalConfig-lc.xml</Config>
CA Portal29598</Port>
</Item>
</CompanyItems>
</AppDaemon>
The <CompanyItems> section added to the Generic Executor configuration file defines the locations and service ports for MultiController and LocalController. With <CompanyItems> defined, the Generic Executor checks these items every one minute and if they are not running, the Generic Executor starts them automatically. This configuration enables the MultiController and the LocalController to start without external intervention.
The <CompanyItems> feature is disabled after installation by default. You can execute the camm.init.install command to enable it.
Note: Only the primary Generic Executor requires the <CompanyItems> section. Other Generic Executors must not contain this section.
How the Generic Executor Works
The Generic Executor is a reusable entity and is the foundation of CA Mediation Manager components. When a server starts, it is mandatory that at least one Generic Executor component exists and is started.
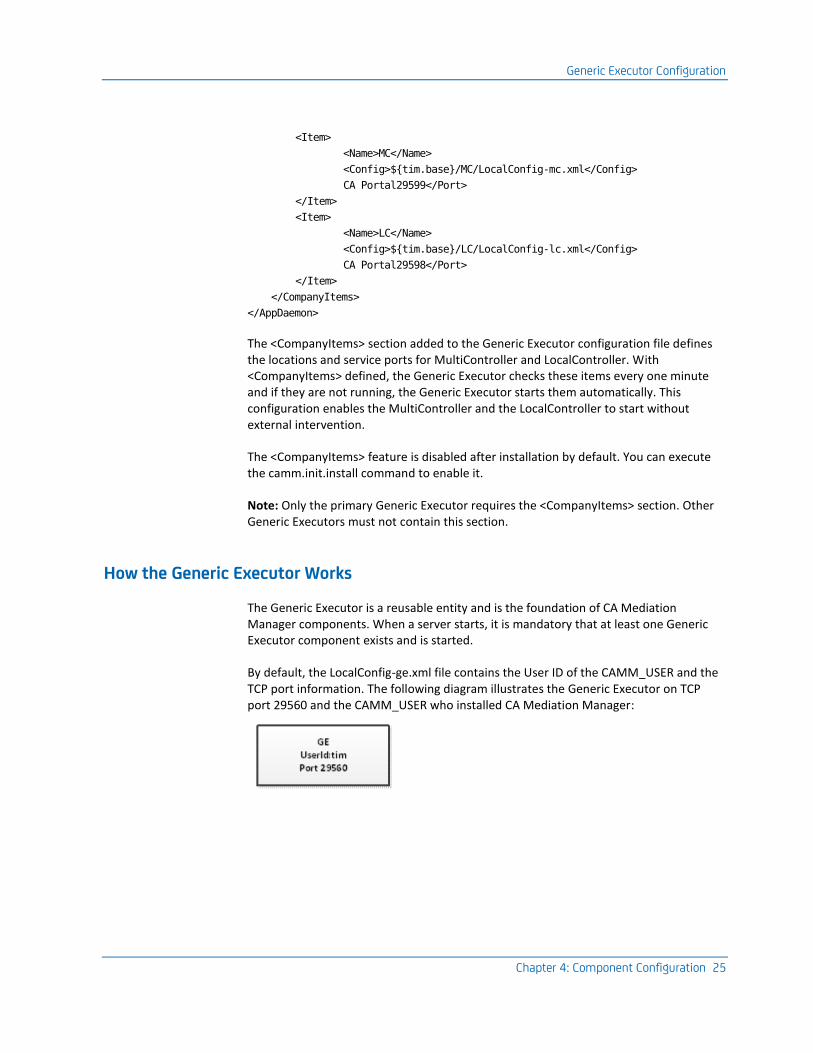
By default, the LocalConfig-ge.xml file contains the User ID of the CAMM_USER and the TCP port information. The following diagram illustrates the Generic Executor on TCP port 29560 and the CAMM_USER who installed CA Mediation Manager:
Generic Executor Configuration
26 Administration Guide
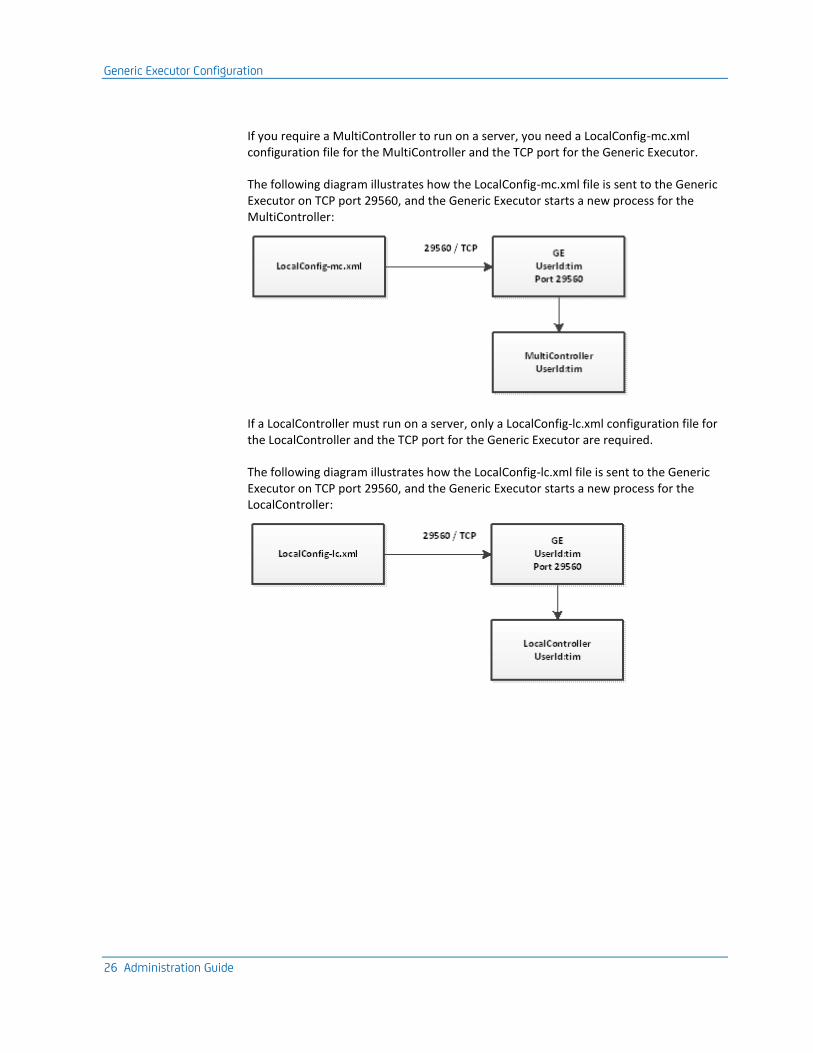
If you require a MultiController to run on a server, you need a LocalConfig-mc.xml configuration file for the MultiController and the TCP port for the Generic Executor.
The following diagram illustrates how the LocalConfig-mc.xml file is sent to the Generic Executor on TCP port 29560, and the Generic Executor starts a new process for the MultiController:
If a LocalController must run on a server, only a LocalConfig-lc.xml configuration file for the LocalController and the TCP port for the Generic Executor are required.
The following diagram illustrates how the LocalConfig-lc.xml file is sent to the Generic Executor on TCP port 29560, and the Generic Executor starts a new process for the LocalController:
Generic Executor Configuration
Chapter 4: Component Configuration 27
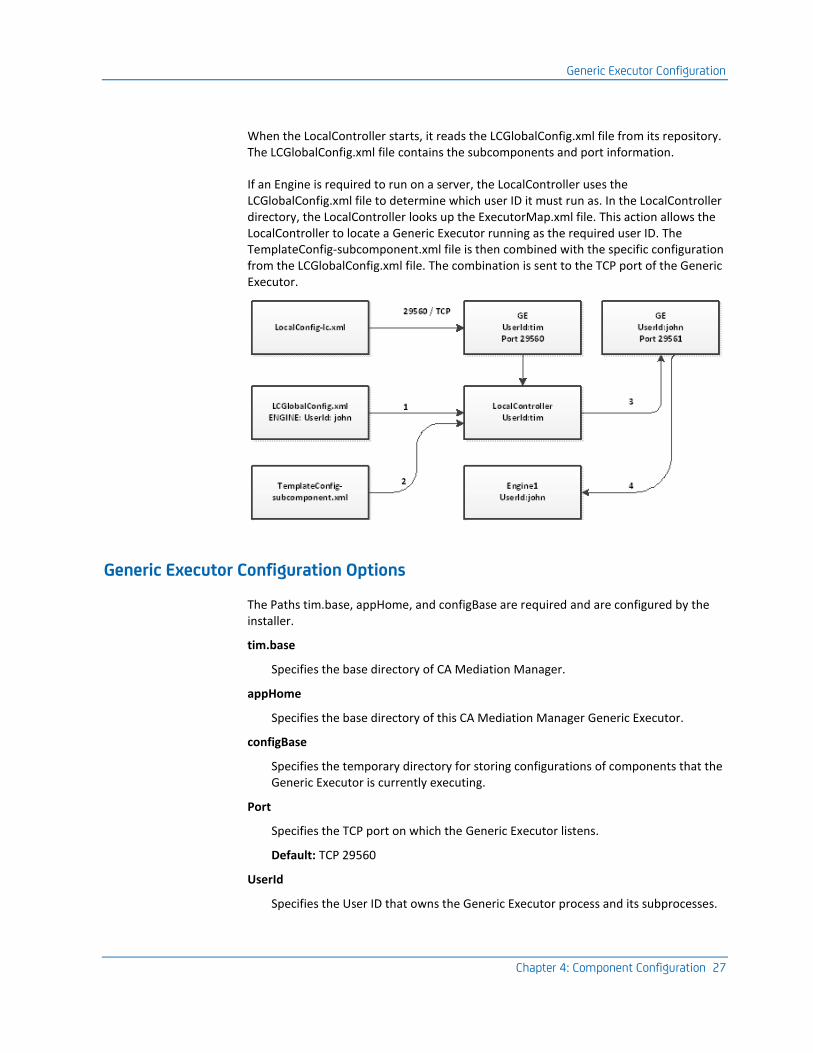
When the LocalController starts, it reads the LCGlobalConfig.xml file from its repository. The LCGlobalConfig.xml file contains the subcomponents and port information.
If an Engine is required to run on a server, the LocalController uses the LCGlobalConfig.xml file to determine which user ID it must run as. In the LocalController directory, the LocalController looks up the ExecutorMap.xml file. This action allows the LocalController to locate a Generic Executor running as the required user ID. The TemplateConfig-subcomponent.xml file is then combined with the specific configuration from the LCGlobalConfig.xml file. The combination is sent to the TCP port of the Generic Executor.
Generic Executor Configuration Options
The Paths tim.base, appHome, and configBase are required and are configured by the installer.
tim.base
Specifies the base directory of CA Mediation Manager.
appHome
Specifies the base directory of this CA Mediation Manager Generic Executor.
configBase
Specifies the temporary directory for storing configurations of components that the Generic Executor is currently executing.
Port
Specifies the TCP port on which the Generic Executor listens.
Default: TCP 29560
UserId
Specifies the User ID that owns the Generic Executor process and its subprocesses.
Generic Executor Configuration
28 Administration Guide
Generic Executor Startup Sequence
You can manually start the Generic Executor process (or service on Windows) using the startall or startall.bat script. However, if camm.init.install is executed, the Generic Executor starts automatically on system startup.
Add Another Generic Executor (UNIX)
Add another Generic Executor if you require a component to execute as a different User ID.
Follow these steps:
1. Add a new user to the LocalController that requires the additional user ID. The new user must be a member of the same group that owns the CAMM_HOME directory.
Note: Repeat this procedure for any standby LocalControllers.
2. Log in as the new user.
3. Execute the following command to add the new Generic Executor:
shell# /opt/CA/CAMM/tools/camm.ge.install
The additional Generic Executor is added.
Note: A configuration file in the LocalController directory named ExecutorMap.xml is modified to provide a map between the required User ID and the TCP port.
When the Engine subcomponent is started, the LocalController references the User ID provided in the LCGobalConfig for that component. If the User ID is not the default User ID, the ExecutorMap is referenced and the TCP port for the alternative Generic Executor starts the subcomponent.
This reference is useful when the Engine uses user or host-based RSA key authentication to SFTP or SCP the information.
MultiController Configuration
Chapter 4: Component Configuration 29
MultiController Configuration
The MultiController is the most essential part of the cluster. It contains the centralized license file and maintains a heartbeat with the components in the cluster.
The configuration for LocalControllers, Engines, and Presenters in the cluster are also located in the repository of the MultiController.
The MultiController listens for heartbeat operations from cluster members on TCP port number 29599.
During the GUI installation, you can configure only the mandatory options required to install a basic MultiController. However, you can manually edit the MC or LocalConfig-mc.xml file.
Sample LocalConfig-mc.xml file (basic configuration)
<?xml version="1.0" encoding="UTF-8"?>
<LocalConfig>
<Description>Configuration for Multi Controller</Description>
<Names>
<Name name="mainClass">com.torokina.tim.mc.Main</Name>
<Name name="appName">CAMM-Multi-Controller</Name>
<Name name="appShortName">MC</Name>
<Name name="primaryMcAddress">127.0.0.1</Name>
<Name name="secondaryMcAddress"></Name>
<Name name="primaryMcPort">29599</Name>
<Name name="secondaryMcPort">-1</Name><
<Name name="myMode">primary</Name>
<Name name="myAddress">127.0.0.1</Name>
<Name name="mcPort">29599</Name>
<Name name="otherMcAddress"></Name>
<Name name="otherMcPort">-1</Name>
<Name name="heartbeatFrequency">15</Name>
<Name name="heartbeatTimeout">180</Name>
<Name name="repositoryFrequency">15</Name>
</Names>
<Paths>
<Path name="license">${tim.base}/license.lic</Path>
</Paths>
<LocalConfig>
Sample LocalConfig-mc.xml file (hidden logging and cleanups configuration)
<Logging>
<LogLevel>INFO</LogLevel>
<LogDirectory>${logbase}</LogDirectory>
<ObjectLogging>
<ObjectToLog>
<ObjectName>com.torokina.tim.config</ObjectName>
<ObjectLogLevel>TRACE</ObjectLogLevel>
MultiController Configuration
30 Administration Guide
</ObjectToLog>
</ObjectLogging>
</Logging>
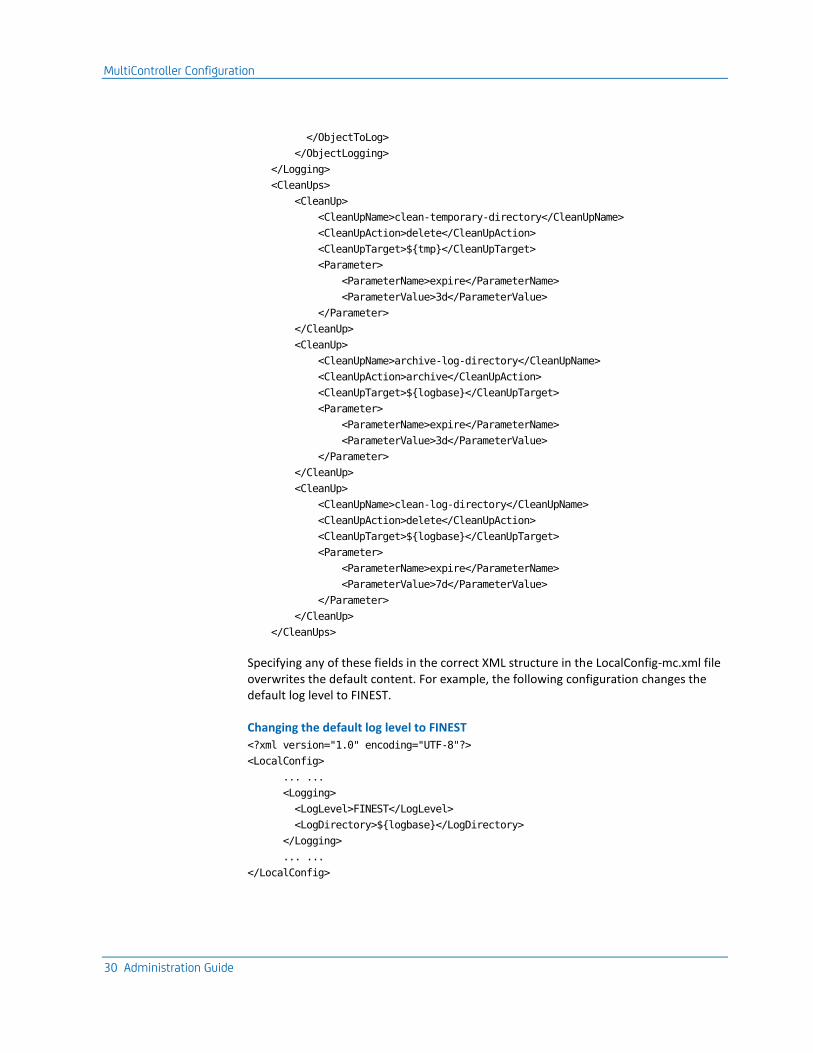
<CleanUps>
<CleanUp>
<CleanUpName>clean-temporary-directory</CleanUpName>
<CleanUpAction>delete</CleanUpAction>
<CleanUpTarget>${tmp}</CleanUpTarget>
<Parameter>
<ParameterName>expire</ParameterName>
<ParameterValue>3d</ParameterValue>
</Parameter>
</CleanUp>
<CleanUp>
<CleanUpName>archive-log-directory</CleanUpName>
<CleanUpAction>archive</CleanUpAction>
<CleanUpTarget>${logbase}</CleanUpTarget>
<Parameter>
<ParameterName>expire</ParameterName>
<ParameterValue>3d</ParameterValue>
</Parameter>
</CleanUp>
<CleanUp>
<CleanUpName>clean-log-directory</CleanUpName>
<CleanUpAction>delete</CleanUpAction>
<CleanUpTarget>${logbase}</CleanUpTarget>
<Parameter>
<ParameterName>expire</ParameterName>
<ParameterValue>7d</ParameterValue>
</Parameter>
</CleanUp>
</CleanUps>
Specifying any of these fields in the correct XML structure in the LocalConfig-mc.xml file overwrites the default content. For example, the following configuration changes the default log level to FINEST.
Changing the default log level to FINEST
<?xml version="1.0" encoding="UTF-8"?>
<LocalConfig>
... ...
<Logging>
<LogLevel>FINEST</LogLevel>
<LogDirectory>${logbase}</LogDirectory>
</Logging>
... ...
</LocalConfig>
MultiController Configuration
Chapter 4: Component Configuration 31
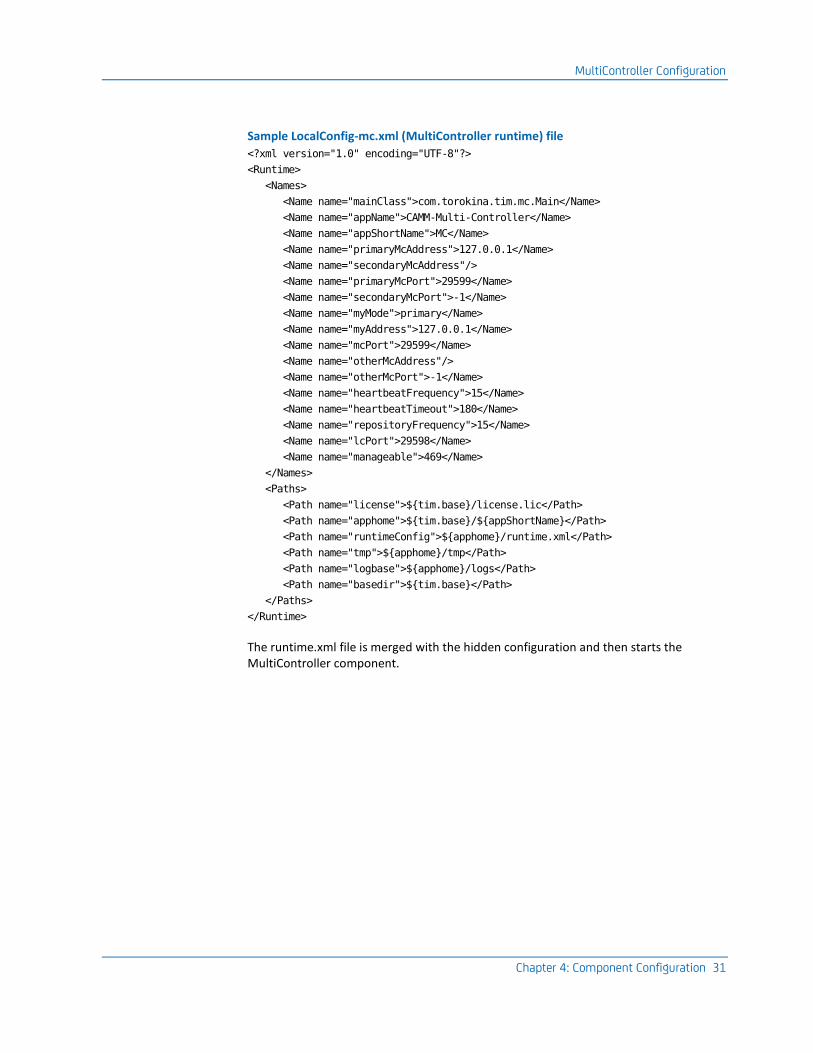
Sample LocalConfig-mc.xml (MultiController runtime) file
<?xml version="1.0" encoding="UTF-8"?>
<Runtime>
<Names>
<Name name="mainClass">com.torokina.tim.mc.Main</Name>
<Name name="appName">CAMM-Multi-Controller</Name>
<Name name="appShortName">MC</Name>
<Name name="primaryMcAddress">127.0.0.1</Name>
<Name name="secondaryMcAddress"/>
<Name name="primaryMcPort">29599</Name>
<Name name="secondaryMcPort">-1</Name>
<Name name="myMode">primary</Name>
<Name name="myAddress">127.0.0.1</Name>
<Name name="mcPort">29599</Name>
<Name name="otherMcAddress"/>
<Name name="otherMcPort">-1</Name>
<Name name="heartbeatFrequency">15</Name>
<Name name="heartbeatTimeout">180</Name>
<Name name="repositoryFrequency">15</Name>
<Name name="lcPort">29598</Name>
<Name name="manageable">469</Name>
</Names>
<Paths>
<Path name="license">${tim.base}/license.lic</Path>
<Path name="apphome">${tim.base}/${appShortName}</Path>
<Path name="runtimeConfig">${apphome}/runtime.xml</Path>
<Path name="tmp">${apphome}/tmp</Path>
<Path name="logbase">${apphome}/logs</Path>
<Path name="basedir">${tim.base}</Path>
</Paths>
</Runtime>
The runtime.xml file is merged with the hidden configuration and then starts the MultiController component.
MultiController Configuration
32 Administration Guide
MultiController Configuration Options
The following information describes the options that you can use to configure the MultiController.
Path
Lets you specify the path information for the following items:
basedir
Specifies the CA Mediation Manager base directory.
apphome
Specifies the CA Mediation Manager MultiController application home directory.
tmp
Specifies the CA Mediation Manager MultiController temporary files directory.
logbase
Specifies the CA Mediation Manager MultiController log directory.
runtimeConfig
Specifies the CA Mediation Manager MultiController runtime XML configuration provided by the Generic Executor.
Java
Lets you specify options for using Java.
CommandPath
Specifies the full path to the Java executer that the Generic Executor calls to start the MultiController.
ClassPath/JarBase
Lets you create a list with one or more entries to add to ClassPath.
Options
Specifies the command line options parsed to Java.
Environment
Specifies the environment variables that execute the MultiController component.
MainClass/Class
Specifies the main Java class to execute.
MainClass/Args
Specifies the arguments parsed to the Java class.
MultiController Configuration
Chapter 4: Component Configuration 33
Runtime
Lets you specify runtime options.
Binding/BindAddress
Specifies the IP address to which the MultiController component binds.
Value: Use IP address 0.0.0.0 for all MultiController components. For two or more IP addresses use a comma-separated list.
The MultiController binds to TCP port 29599.
Binding/MyAddress
Specifies the IP address that the MultiController uses to identify itself.
Note: The IP address must be a valid IP address on this host.
MultiControllerConfig/Mode
Specifies the operating mode of the MultiController.
Value: Specify either Primary or Secondary.
MultiControllerConfig/MCAddresses/Other
Specifies the IP address of the other MultiControllers in the cluster.
MultiControllerConfig/Heartbeat/ParameterName == frequency
Specifies the frequency of heartbeat messages sent to other MultiControllers.
MultiControllerConfig/Heartbeat/ParameterName == timeout
Specifies the period that this MultiController waits for heart beats from the LocalController components. If the MultiController does not receive a heartbeat from a LocalController for 180 seconds, the MultiController triggers a failover to the first available LocalController.
Logging
Lets you specify logging options.
LogLevel
Specifies the logging level in the output log files.
Value: Specify DEBUG, TRACE, INFO, WARNING, or ERROR.
LogDirectory
Specifies the logging level in the output log files.
Value: Specify DEBUG, TRACE, INFO, WARNING, or ERROR.
ObjectLogging/ObjectToLog/ObjectName
Specifies the Java class name on which to enable logging.
ObjectLogging/ObjectToLog/ObjectLogLevel
Specifies the logging level for a Java class.
MultiController Configuration
34 Administration Guide
Cleanup
Lets you specify cleanup options.
CleanUpName
Specifies the descriptive name of the cleanup.
CleanUpAction
Specifies the cleanup action.
Value: Specify Delete or Archive.
CleanupTarget
Specifies the directory to clean up.
Value: Can specify using a CA Mediation Manager variable such as ${camm.variable}.
Parameter/ParameterName – Parameter/ParameterValue
Specifies a parameter to expire and its expiration time in the format of <n><unit>. For example:
10d = 10 days
10h = 10 hours
10m = 10 minutes
Start and Stop the MultiController Manually
The init.camm script automatically starts the MultiController process. You can use the cammCtrl utility to manually stop or start the MultiController component independently.
Follow these steps:
1. Log in as the CAMM_USER and go to the CAMM home directory.
2. Execute the following command to start the MultiController:
/opt/CA/CAMM# tools/startall -c mc
3. Execute the following command to stop the MultiController:
/opt/CA/CAMM # tools/stopall –c mc
LocalController Configuration
Chapter 4: Component Configuration 35
LocalController Configuration
The LocalController is an essential service that is installed on each server in the cluster.
The LocalController performs the following key functions:
■ Facilitates communication between subcomponents running on the local server and the remote MultiControllers.
■ Monitors the performance and availability of Engines and Presenters and restarts any failed components.
■ Listens for heartbeat operations from cluster members. By default, the LocalController listens on port 29598 or TCP.
■ Sends heartbeat information to the MultiControllers.
■ Starts, stops, and restarts local Engines and Presenters.
During the GUI installation, you can configure only the mandatory options that are required to install a basic LocalController. However, you may manually edit the LC or LocalConfig-lc.xml file.
Sample LocalConfig-lc.xml file (basic configuration)
<LocalConfig>
<Names>
<Name name="mainClass">com.torokina.tim.lc.Main</Name>
<Name name="primaryMcAddress">127.0.0.1</Name>
<Name name="secondaryMcAddress"></Name>
<Name name="primaryMcPort">29599</Name>
<Name name="secondaryMcPort">-1</Name>
<Name name="myAddress">127.0.0.1</Name>
<Name name="appName">CAMM-Local-Controller</Name>
<Name name="appShortName">LC</Name>
<Name name="lcPort">29598</Name>
<Name name="heartbeatFrequency">15</Name>
<Name name="heartbeatTimeout">180</Name>
</Names>
<Paths>
<Path name="dsLocalConfig">${basedir}/DS/LocalConfig-ds.xml</Path>
</Paths>
</LocalConfig>
Sample LocalConfig-lc.xml file (hidden logging and cleanups configuration)
<Logging>
<LogLevel>INFO</LogLevel>
<LogDirectory>${logbase}</LogDirectory>
<ObjectLogging>
<ObjectToLog>
<ObjectName>com.torokina.tim.config</ObjectName>
<ObjectLogLevel>TRACE</ObjectLogLevel>
LocalController Configuration
36 Administration Guide
</ObjectToLog>
</ObjectLogging>
</Logging>
<CleanUps>
<CleanUp>
<CleanUpName>clean-temporary-directory</CleanUpName>
<CleanUpAction>delete</CleanUpAction>
<CleanUpTarget>${tmp}</CleanUpTarget>
<Parameter>
<ParameterName>expire</ParameterName>
<ParameterValue>3d</ParameterValue>
</Parameter>
</CleanUp>
<CleanUp>
<CleanUpName>archive-log-directory</CleanUpName>
<CleanUpAction>archive</CleanUpAction>
<CleanUpTarget>${logbase}</CleanUpTarget>
<Parameter>
<ParameterName>expire</ParameterName>
<ParameterValue>3d</ParameterValue>
</Parameter>
</CleanUp>
<CleanUp>
<CleanUpName>clean-log-directory</CleanUpName>
<CleanUpAction>delete</CleanUpAction>
<CleanUpTarget>${logbase}</CleanUpTarget>
<Parameter>
<ParameterName>expire</ParameterName>
<ParameterValue>7d</ParameterValue>
</Parameter>
</CleanUp>
</CleanUps>
Sample LocalConfig-lc.xml file (LocalController runtime)
<?xml version="1.0" encoding="UTF-8"?>
<Runtime>
<Names>
<Name name="mainClass">com.torokina.tim.lc.Main</Name>
<Name name="primaryMcAddress">127.0.0.1</Name>
<Name name="secondaryMcAddress"/>
<Name name="primaryMcPort">29599</Name>
<Name name="secondaryMcPort">-1</Name>
<Name name="myAddress">127.0.0.1</Name>
<Name name="appName">CAMM-Local-Controller</Name>
<Name name="appShortName">LC</Name>
<Name name="lcPort">29598</Name>
<Name name="heartbeatFrequency">15</Name>
<Name name="heartbeatTimeout">180</Name>
<Name name="mcPort">29599</Name>
LocalController Configuration
Chapter 4: Component Configuration 37
<Name name="manageable">996</Name>
</Names>
<Paths>
<Path name="dsLocalConfig">${basedir}/DS/LocalConfig-ds.xml</Path>
<Path name="apphome">${tim.base}/${appShortName}</Path>
<Path name="runtimeConfig">${apphome}/runtime.xml</Path>
<Path name="tmp">${apphome}/tmp</Path>
<Path name="logbase">${apphome}/logs</Path>
<Path name="basedir">${tim.base}</Path>
</Paths>
</Runtime>
LocalController Configuration Options
The following information describes the options that you can use to configure the LocalController.
Path
Lets you specify the path information for the following items:
basedir
Specifies the CA Mediation Manager base directory.
apphome
Specifies the CA Mediation Manager LocalController application home directory.
tmp
Specifies the CA Mediation Manager LocalController temporary files directory.
logbase
Specifies the CA Mediation Manager LocalController log directory.
runtimeConfig
Specifies the CA Mediation Manager LocalController runtime XML configuration file provided by the Generic Executor.
LocalController Configuration
38 Administration Guide
Java
Lets you specify options for using Java.
CommandPath
Specifies the full path to the Java executer that the Generic Executor calls to start the LocalController.
ClassPath/JarBase
Lets you create a list with one or more entries to add to ClassPath.
Options
Specifies the command line options parsed to Java.
Environment
Specifies the environment variables that execute the MultiController component.
MainClass/Class
Specifies the main Java class to execute.
MainClass/Args
Specifies the arguments parsed to the Java class.
LocalController Configuration
Chapter 4: Component Configuration 39
Runtime
Lets you specify runtime options.
Binding/BindAddress
Specifies the IP address to which the LocalController component binds.
Value: Use IP address 0.0.0.0 for all LocalController components. For two or more IP addresses use a comma-separated list.
Binding/MyAddress
Specifies the IP address that the LocalController uses to identify itself.
Note: This IP address must be a valid IP address on this host.
Binding/BindPort
Specifies the IP address that the LocalController uses to identify itself.
Note: This IP address must be a valid IP address on this host. By default, the LocalController binds to TCP port 29598.
LocalControllerConfig/Mode
Specifies the operating mode of the LocalController.
Value: Specify either Active or Standby.
LocalControllerConfig/MCAddresses/Primary
Specifies the IP address of the primary MultiController in the cluster.
LocalControllerConfig/MCAddresses/Secondary
Specifies the IP address of the secondary MultiController in the cluster.
LocalControllerConfig/Heartbeat/ParameterName == frequency
Specifies the frequency of the heartbeat messages sent to the MultiController.
LocalControllerConfig/Heartbeat/ParameterName == timeout
Specifies how long this LocalController waits for heart beats from subcomponents (Engines and Presenters). If the LocalController does not receive a heartbeat from a subcomponent for 180 seconds, the LocalController restarts.
LocalController Configuration
40 Administration Guide
Logging
Lets you specify logging options.
LogLevel
Specifies the logging level in the output log files.
Value: Specify DEBUG, TRACE, INFO, WARNING, or ERROR.
LogDirectory
Specifies the logging level in the output log files.
Value: Specify DEBUG, TRACE, INFO, WARNING, or ERROR.
ObjectLogging/ObjectToLog/ObjectName
Specifies the Java class name on which to enable logging.
ObjectLogging/ObjectToLog/ObjectLogLevel
Specifies the logging level for a Java class.
Cleanup
Lets you specify cleanup options.
CleanUpName
Specifies the descriptive name of the cleanup.
CleanUpAction
Specifies the cleanup action.
Value: Specify Delete or Archive.
CleanupTarget
Specifies the directory to clean up.
Value: Can specify using a CA Mediation Manager variable such as ${camm.variable}.
Parameter/ParameterName – Parameter/ParameterValue
Specifies a parameter to expire and its expiration time in the format of <n><unit>. For example:
10d = 10 days
10h = 10 hours
10m = 10 minutes
Failover Operation
Chapter 4: Component Configuration 41
Start and Stop the LocalController Manually
The init.camm script automatically starts the LocalController process. You can use the cammCtrl utility to manually stop or start the LocalController component independently.
Follow these steps:
1. Log in as the CAMM_USER and go to the CAMM home directory.
2. Execute the following command to start the LocalController:
/opt/CA/CAMM# tools/startall –c lc
3. Execute the following command to stop the LocalController:
/opt/CA/CAMM # tools/stopall –c lc
Engine and Presenter Configuration
The installation and configuration of the Engine and the Presenter is achieved using the Device Pack installation program provided with each device pack.
Failover Operation
A MultiController operates in one of two modes: Primary or Secondary.
The MultiController has three main communication functions:
■ Heartbeat
■ Name service lookup
■ Repository synchronization
MultiController Failure
The following information describes how CA Mediation Manager manages MultiController failure.
MultiController Failure
42 Administration Guide
MultiController Communication
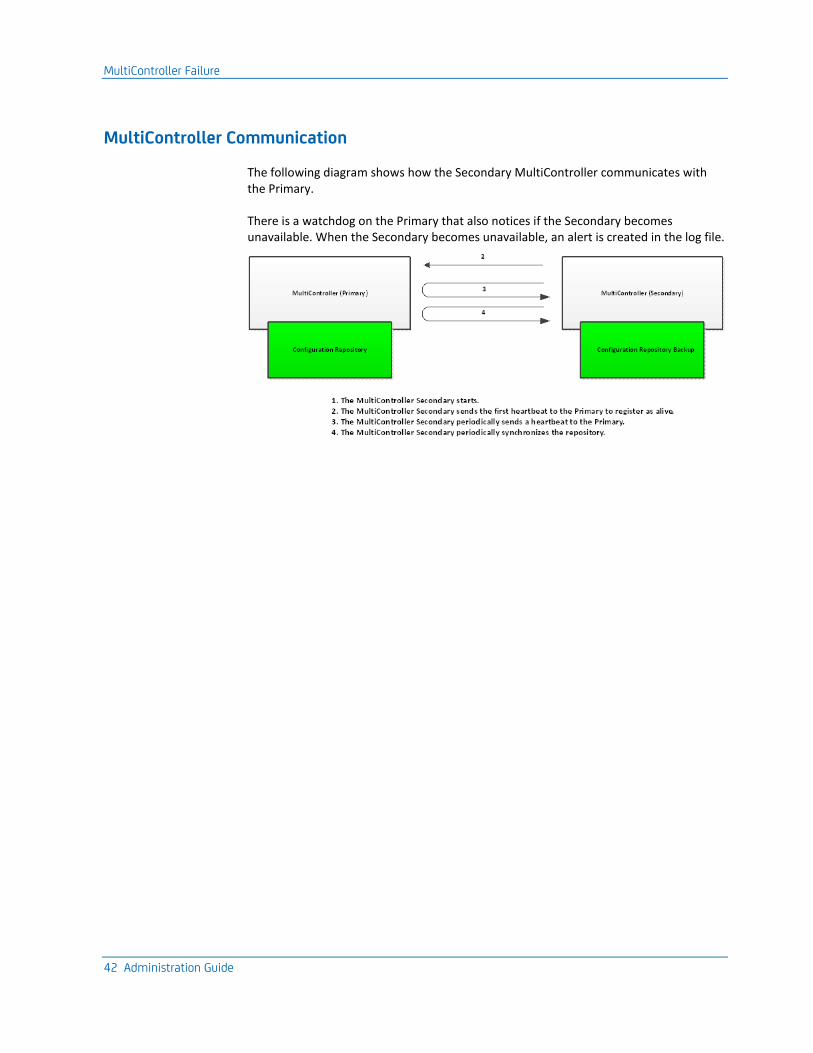
The following diagram shows how the Secondary MultiController communicates with the Primary.
There is a watchdog on the Primary that also notices if the Secondary becomes unavailable. When the Secondary becomes unavailable, an alert is created in the log file.
MultiController Failure
Chapter 4: Component Configuration 43
Primary MultiController Failure
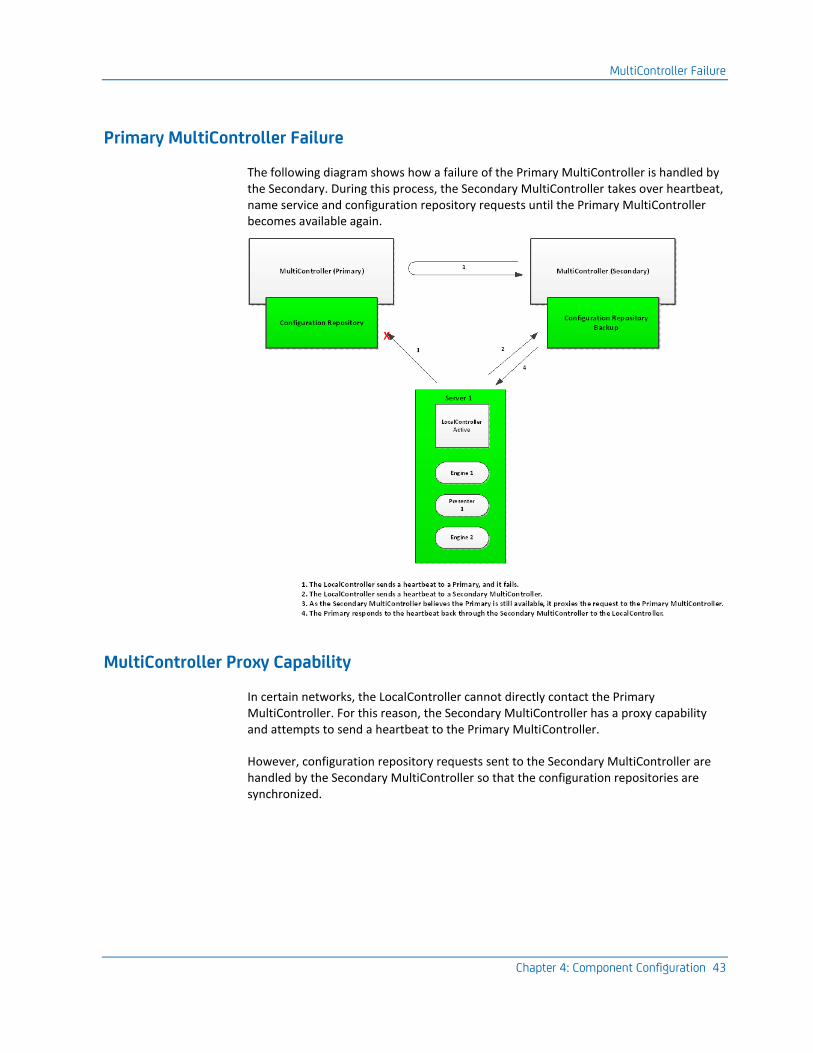
The following diagram shows how a failure of the Primary MultiController is handled by the Secondary. During this process, the Secondary MultiController takes over heartbeat, name service and configuration repository requests until the Primary MultiController becomes available again.
MultiController Proxy Capability
In certain networks, the LocalController cannot directly contact the Primary MultiController. For this reason, the Secondary MultiController has a proxy capability and attempts to send a heartbeat to the Primary MultiController.
However, configuration repository requests sent to the Secondary MultiController are handled by the Secondary MultiController so that the configuration repositories are synchronized.
High Availability Configuration
44 Administration Guide
LocalController Failure
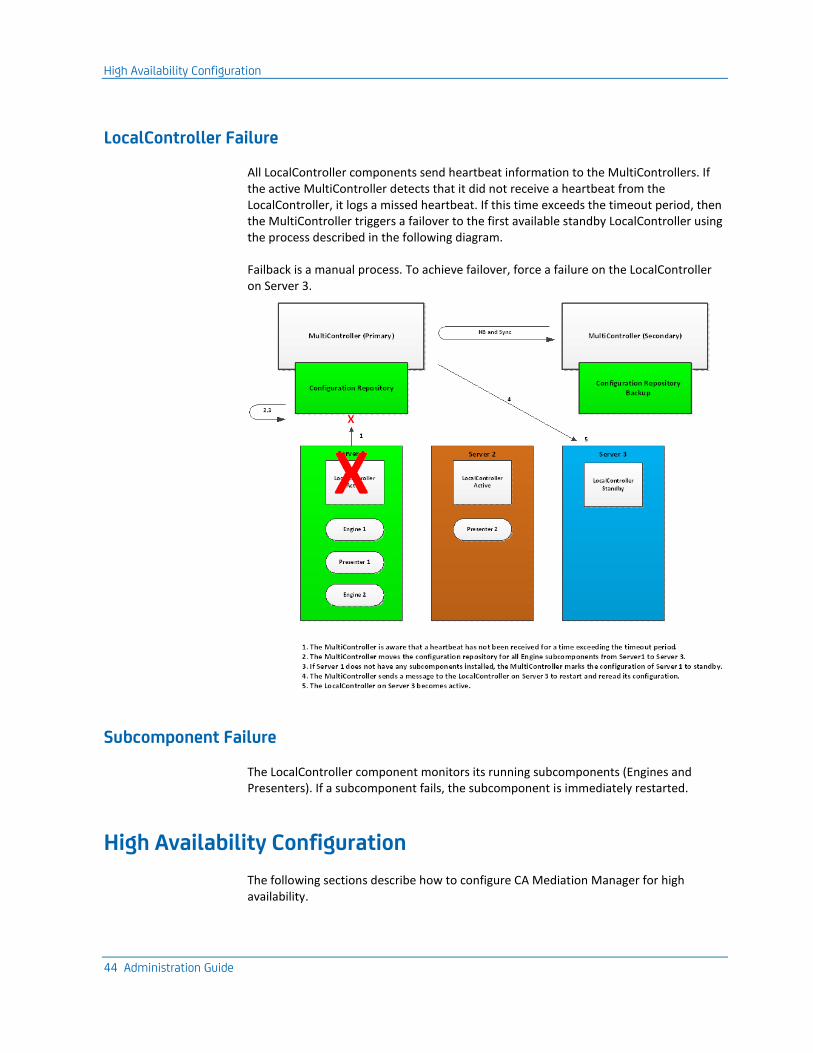
All LocalController components send heartbeat information to the MultiControllers. If the active MultiController detects that it did not receive a heartbeat from the LocalController, it logs a missed heartbeat. If this time exceeds the timeout period, then the MultiController triggers a failover to the first available standby LocalController using the process described in the following diagram.
Failback is a manual process. To achieve failover, force a failure on the LocalController on Server 3.
Subcomponent Failure
The LocalController component monitors its running subcomponents (Engines and Presenters). If a subcomponent fails, the subcomponent is immediately restarted.
High Availability Configuration
The following sections describe how to configure CA Mediation Manager for high availability.
High Availability Configuration
Chapter 4: Component Configuration 45
Configure the Primary MultiController
During the primary MultiController installation, configure the primary MultiController for high availability.
Follow these steps:
1. In the MultiController Configuration panel, select the Will the other MC exist in the Cluster check box.
2. Provide the primary MultiController IP address and click Next.
3. In the Other MultiController Configuration panel, provide the IP address of the secondary MultiController.
4. Click Next and complete the installation.
Configure the Secondary MultiController
During the secondary MultiController installation, configure the secondary MultiController for high availability.
Follow these steps:
1. In the MultiController Configuration panel, select Secondary from the MultiController dropdown.
2. Provide the secondary MultiController IP address.
3. Select the Will the other MC exist in the Cluster check box and click Next.
4. In the Other MultiController Configuration panel, provide the IP address of the primary MultiController.
5. Click Next and complete the installation.
Configure the LocalController
During the LocalController installation, configure the LocalController for high availability.
Follow these steps:
1. In the LocalController Configuration panel, provide the IP address for both the primary MultiController and the secondary MultiController.
2. Click Next and complete the installation.
3. Repeat these steps for each LocalController installation.
Log Files Configuration
46 Administration Guide
Log Files Configuration
The following sections describe how to configure log files in CA Mediation Manager.
Configure the logging properties for all the CA Mediation Manager components using the logging.properties file, which is created in the default log directory when the component is started. The logging.properties file is preconfigured to generate log files in the default log directory. However, you can edit the logging.properties file to redirect the log files in to another directory. Once the logging.properties file is modified, restart the component to load the modified logging properties. All logs (application logs and STD-ERROR/STD-OUTPUT logs) are generated in the directory that is specified in the logging.properties file.
Log Files Configuration
Chapter 4: Component Configuration 47
logging.properties File - Examples by Component
The following examples describe the different logging.properties files:
MultiController example logging.properties file
com.torokina.common.logging.apache.FileHandler.directory=/opt/CA/C
AMM/MC/logs
handlers=com.torokina.common.logging.apache.FileHandler
com.torokina.common.logging.apache.FileHandler.level=INFO
.level=INFO
com.torokina.common.logging.apache.FileHandler.prefix=CAMM-Multi-C
ontroller-
LocalController example logging.properties file
com.torokina.common.logging.apache.FileHandler.directory=/opt/CA/C
AMM/LC/logs
handlers=com.torokina.common.logging.apache.FileHandler
com.torokina.common.logging.apache.FileHandler.level=INFO
.level=INFO
com.torokina.common.logging.apache.FileHandler.prefix=CAMM-Local-C
ontroller-
Delivery System example logging.properties file
com.torokina.common.logging.apache.FileHandler.directory=/opt/CA/C
AMM/DS/logs
handlers=com.torokina.common.logging.apache.FileHandler
com.torokina.common.logging.apache.FileHandler.level=INFO
.level=INFO
com.torokina.common.logging.apache.FileHandler.prefix=CAMM-Deliver
y-System-
ENGINE_CAMM example logging.properties file
com.torokina.common.logging.apache.FileHandler.directory=/opt/CA/C
AMM/COMPONENTS/ENGINE_CAMM/logs
handlers=com.torokina.common.logging.apache.FileHandler
com.torokina.common.logging.apache.FileHandler.level=INFO
Log Files Configuration
48 Administration Guide
.level=INFO
com.torokina.common.logging.apache.FileHandler.prefix=CAMM-ENGINE_
CAMM-
Generic Executor example logging.properties file
By default the Generic Executor does not create a logging.properties file in its log directory. All logs are generated in the ~GE/logs directory. The following example shows how you can create the logging.properties file in the logs directory to redirect the Generic Executor logs (non-Windows platforms only):
#Properties for Logger
#Tue May 07 04:08:45 EDT 2013
com.torokina.common.logging.apache.FileHandler.directory=/opt/CA/C
AMM/GE/logs
handlers=com.torokina.common.logging.apache.FileHandler
com.torokina.common.logging.apache.FileHandler.level=INFO
.level=INFO
com.torokina.common.logging.apache.FileHandler.prefix=CAMM-Generic
-Executor-
Configuring Log File Cleanup
By default the cleanup action for each component is configured to run on the logbase directory. If the log files are redirected to another directory, modify the cleanup configuration for successful Archive or Delete actions.
Define cleanup actions in the LocalConfig xml-element in the configuration files. For all CAMM components, define the cleanup actions in the respective configuration files:
■ MultiController: LocalConfig-mc.xml
■ LocalController: LocalConfig-lc.xml
■ Delivery Service: LocalConfig-ds.xml
■ Subcomponents (ENGINE or PRESENTER): TemplateConfig-subcomponent.xml
Note: You can find the TemplateConfig-subcomponent.xml file in the <camm.base>/LC directory.
Log Files Configuration
Chapter 4: Component Configuration 49
The following examples describe two sample cleanup configurations.
Example: Cleanup configuration file (Delete action) for the Delivery Service component
<LocalConfig>
<Description>Configuration for Delivery Module</Description>
…
…
<CleanUps>
<!-- SAMPLE DELETE ACTION -->
<CleanUp>
<CleanUpName>Delete</CleanUpName>
<CleanUpAction>delete</CleanUpAction>
<CleanUpTarget>${apphome}/.local</CleanUpTarget> <!--
Directory Name -->
<Parameter>
<ParameterName>expire</ParameterName>
<ParameterValue>7d</ParameterValue> <!--
1y0m3d1h -->
</Parameter>
<Parameter>
<ParameterName>includeDir</ParameterName>
<ParameterValue>true</ParameterValue><!-- true/false -->
</Parameter>
<Parameter>
<ParameterName>recursive</ParameterName>
<ParameterValue>true</ParameterValue><!-- true/false -->
</Parameter>

Log Files Configuration
50 Administration Guide
<Parameter>
<ParameterName>match</ParameterName>
<ParameterValue>^[\d]+\.xml$</ParameterValue>
<!-- Regular Pattern -->
</Parameter>
</CleanUp>
Log Files Configuration
Chapter 4: Component Configuration 51
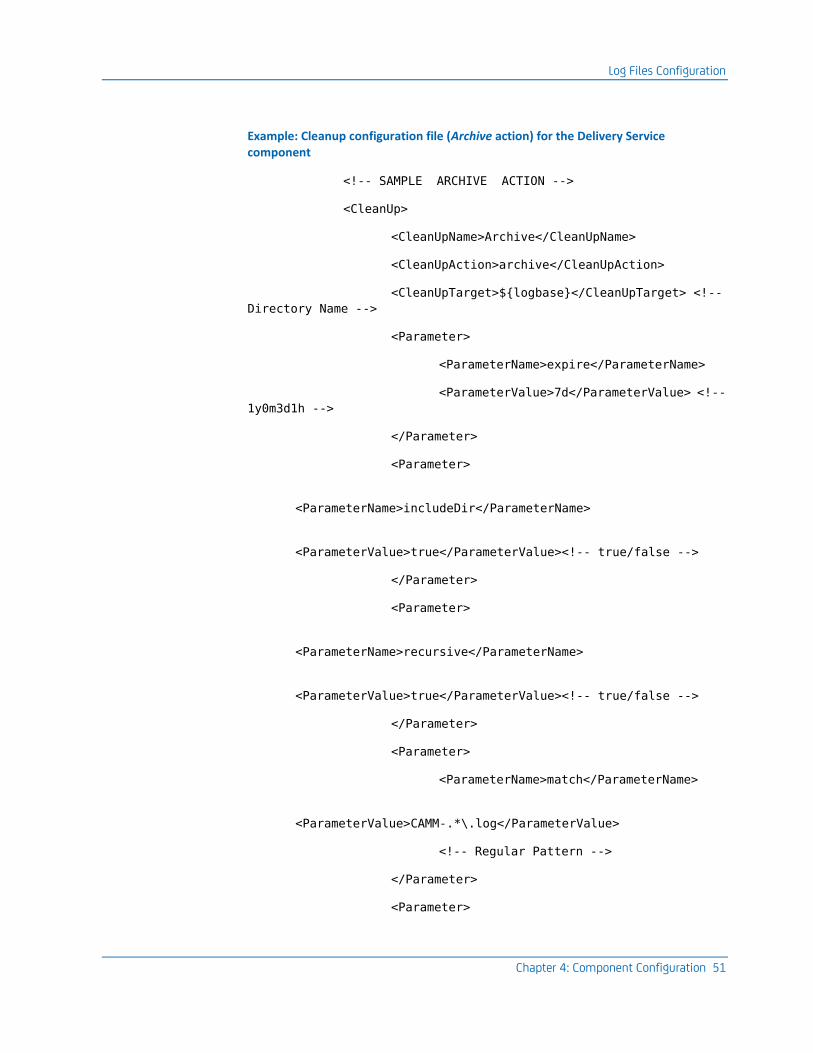
Example: Cleanup configuration file (Archive action) for the Delivery Service component
<!-- SAMPLE ARCHIVE ACTION -->
<CleanUp>
<CleanUpName>Archive</CleanUpName>
<CleanUpAction>archive</CleanUpAction>
<CleanUpTarget>${logbase}</CleanUpTarget> <!--
Directory Name -->
<Parameter>
<ParameterName>expire</ParameterName>
<ParameterValue>7d</ParameterValue> <!--
1y0m3d1h -->
</Parameter>
<Parameter>
<ParameterName>includeDir</ParameterName>
<ParameterValue>true</ParameterValue><!-- true/false -->
</Parameter>
<Parameter>
<ParameterName>recursive</ParameterName>
<ParameterValue>true</ParameterValue><!-- true/false -->
</Parameter>
<Parameter>
<ParameterName>match</ParameterName>
<ParameterValue>CAMM-.*\.log</ParameterValue>
<!-- Regular Pattern -->
</Parameter>
<Parameter>
Log Files Configuration
52 Administration Guide
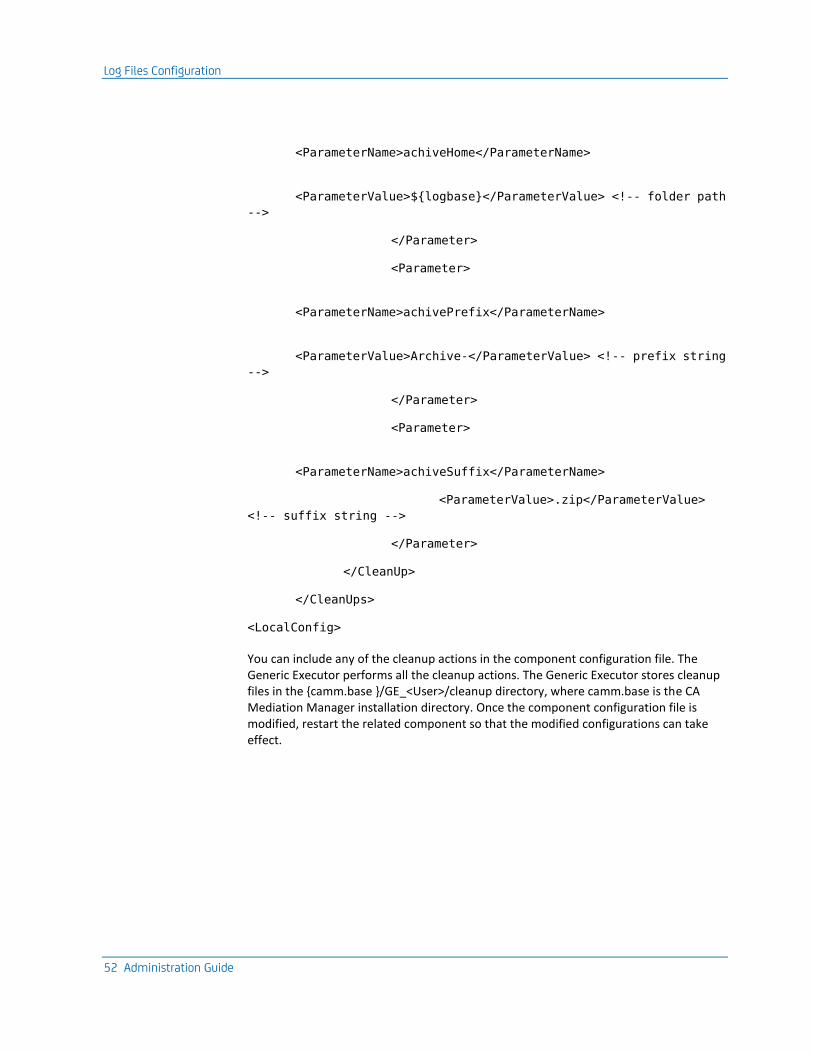
<ParameterName>achiveHome</ParameterName>
<ParameterValue>${logbase}</ParameterValue> <!-- folder path
-->
</Parameter>
<Parameter>
<ParameterName>achivePrefix</ParameterName>
<ParameterValue>Archive-</ParameterValue> <!-- prefix string
-->
</Parameter>
<Parameter>
<ParameterName>achiveSuffix</ParameterName>
<ParameterValue>.zip</ParameterValue>
<!-- suffix string -->
</Parameter>
</CleanUp>
</CleanUps>
<LocalConfig>
You can include any of the cleanup actions in the component configuration file. The Generic Executor performs all the cleanup actions. The Generic Executor stores cleanup files in the {camm.base }/GE_<User>/cleanup directory, where camm.base is the CA Mediation Manager installation directory. Once the component configuration file is modified, restart the related component so that the modified configurations can take effect.
Chapter 5: Using EMS Profiles for CA Mediation Manager for Infrastructure Management 2.0, Release 2.2.3 53
Chapter 5: Using EMS Profiles for CA Mediation Manager for Infrastructure Management 2.0, Release 2.2.3
Note: The information in this chapter applies only to CA Mediation Manager for Infrastructure Management 2.0.
This section contains the following topics:
EMS Integration Profiles (see page 53) Add Event Rules (see page 57)
EMS Integration Profiles
EMS integration profiles specify how EMS inventory discovery operates in your Data Aggregator environment.
With EMS integration profiles, you specify the status, data collector, device pack, EMS IP, and Backup EMS IP. Specify one IP domain for each EMS integration profile you create. The IP domain that you specify is for the target EMS server, which manages multiple devices (typically 1,000 devices at a time). Data Aggregator processes the inventory data from the EMS server constantly and all at once. (With SNMP or ICMP, polling is done device-by-device.)
Note:
■ After you install the device pack, the EMS Integration Profiles option becomes visible in the user interface.
■ Do not add the same EMS integration profile more than once for same Data Collector.
Add EMS Integration Profiles
You can create EMS integration profiles to specify how EMS inventory discovery operates in your Data Aggregator environment.
Note: You must be logged in as an administrator to perform this task.
EMS Integration Profiles
54 Administration Guide
Creating EMS integration profiles without first setting the scope to a tenant puts the profile in the global space, accessible by all tenants. Running a discovery using a profile in the global space lets anyone see the discovery results, whether they set the scope to a tenant.
Therefore, set the scope to a tenant before you create an EMS integration profile to make that profile accessible only to a specific tenant. After you set the scope to a tenant, the tenant indicator appears at the top right of the page. You can then manually synchronize the tenant with CA Infrastructure Management, or wait for the automatic synchronization to occur. You cannot create the EMS integration profile until the tenant is synchronized with Data Aggregator.
Note: For more information about setting the scope to a tenant and synchronizing a tenant, see the CA Performance Center Administrator Guide.
Follow these steps:
1. Select Admin, Data Source Settings, and click a Data Aggregator data source in the CA Performance Center user interface.
2. Click EMS Integration Profiles from the Monitoring Configuration menu.
The EMS Integration Profiles page opens, displaying a list of available discovery profiles.
3. Click New.
The Add EMS Discovery Profile dialog opens.
4. Enter the required information in the fields. The configuration fields that display depend on the device pack you select. Each device pack has unique global variables that you configure.
Note: For information about unique global variables for each product, see the CA Support site.
5. Click Save.
The EMS integration profile is created.
The inventory discovery does not run automatically when you click Save and the Enabled option is selected. The inventory discovery only runs when one of the following conditions is met:
■ The inventory poll schedule is reached.
■ The EMS integration profile is manually started.
More Information:
View EMS Discovery Results (see page 56) Start EMS Discovery Manually (see page 55)
EMS Integration Profiles
Chapter 5: Using EMS Profiles for CA Mediation Manager for Infrastructure Management 2.0, Release 2.2.3 55
Start EMS Discovery Manually
EMS Integration Profiles discover devices and their components in your network. You can manually start an EMS Integration profile to begin discovery.
Note: Alternatively, you can wait until the inventory poll schedule is reached for discovery to begin automatically.
Follow these steps:
1. Select Admin, Data Source Settings, and click a Data Aggregator data source in the CA Performance Center user interface.
2. Click EMS Integration Profiles from the Monitoring Configuration menu.
The EMS Integration Profiles page opens, displaying a list of available discovery profiles.
3. Select one or more EMS integration profiles that you want to run a discovery on, and click Start.
Note: You can only run a discovery on an EMS integration profile that has a status of 'READY'.
A confirmation dialog opens.
4. Click Yes.
The Discovery starts. The Status column for the selected Discovery profiles indicates 'Started'.
A confirmation dialog opens.
5. Click OK.
Devices and all of their associated interfaces are discovered and polling begins. You are returned to the EMS Integration Profiles page.
If discovery hangs for more than 10 minutes, Data Aggregator stops it. Data Aggregator considers a discovery to be hanging when no new devices are discovered within 10 minutes and the state for the selected discovery profiles have not changed within 10 minutes. An audit event is generated on the discovery instance item. If no devices were discovered successfully, the Status column for the selected discovery profiles indicates 'FAILURE'. If at least one device but not all devices were discovered successfully, the Status column indicates 'PARTIAL_FAILURE'.
The discovered devices and components can take up to 5 minutes to synchronize with CA Performance Center. When the synchronization is complete, the discovered devices and components appear in the Inventory tab in CA Performance Center.
More Information:
View EMS Discovery Results (see page 56)
EMS Integration Profiles
56 Administration Guide
View EMS Discovery Results
You can view a summary of the number of all manageable EMS devices that were discovered.
Follow these steps:
1. Select Admin, Data Source Settings, and click a Data Aggregator data source in the CA Performance Center user interface.
2. Click EMS Integration Profiles from the Monitoring Configuration menu.
The EMS Integration Profiles page opens, displaying a list of available discovery profiles.
3. Select an EMS integration profile instance for which you want to view discovery results, and click History.
The EMS History results display as follows:
■ The Device table shows the monitored devices and time of creation for each.
■ The Element table shows the monitored interfaces and time of creation for each.
Start or Stop EMS Discovery Services
"Start" services are used for discovery on EMS servers to review the inventory continuously. Although discovery can be scheduled, you can manually start, stop, or restart services on demand. For example, you can restart discovery after an EMS server has been down and brought back up, or after upgrading a device pack installation.
Stopping a service deletes any inactive data poll but waits for any active data polling to complete without any interruption. No EMS files are deleted. This action also disables any new polling from occurring as long as it is in the stopped state. The service remains in the stopped state until you start it again.
Restarting Data Collector has no effect on the status of any EMS integration profile.
Note: You must be logged in as an administrator to perform this task.
Follow these steps:
1. Select Admin, Data Source Settings, and click a Data Aggregator data source in the CA Performance Center user interface.
2. Click EMS Integration Profiles from the Monitoring Configuration menu.
The EMS Integration Profiles page opens, displaying a list of available discovery profiles.
Add Event Rules
Chapter 5: Using EMS Profiles for CA Mediation Manager for Infrastructure Management 2.0, Release 2.2.3 57
3. Select a profile, and click Start or Stop.
A confirmation dialog opens.
4. Click Yes to confirm the action.
The service starts or stops, depending on your choice. This service remains in the started or stopped state until you change it manually.
Add Event Rules
Event rules can be added using the Data Aggregator monitoring profiles dialog.
Note: For more information, see the Data Aggregator Administrator Guide or online help.