by marcus van bavel, bsee dvfilm
TRANSCRIPT
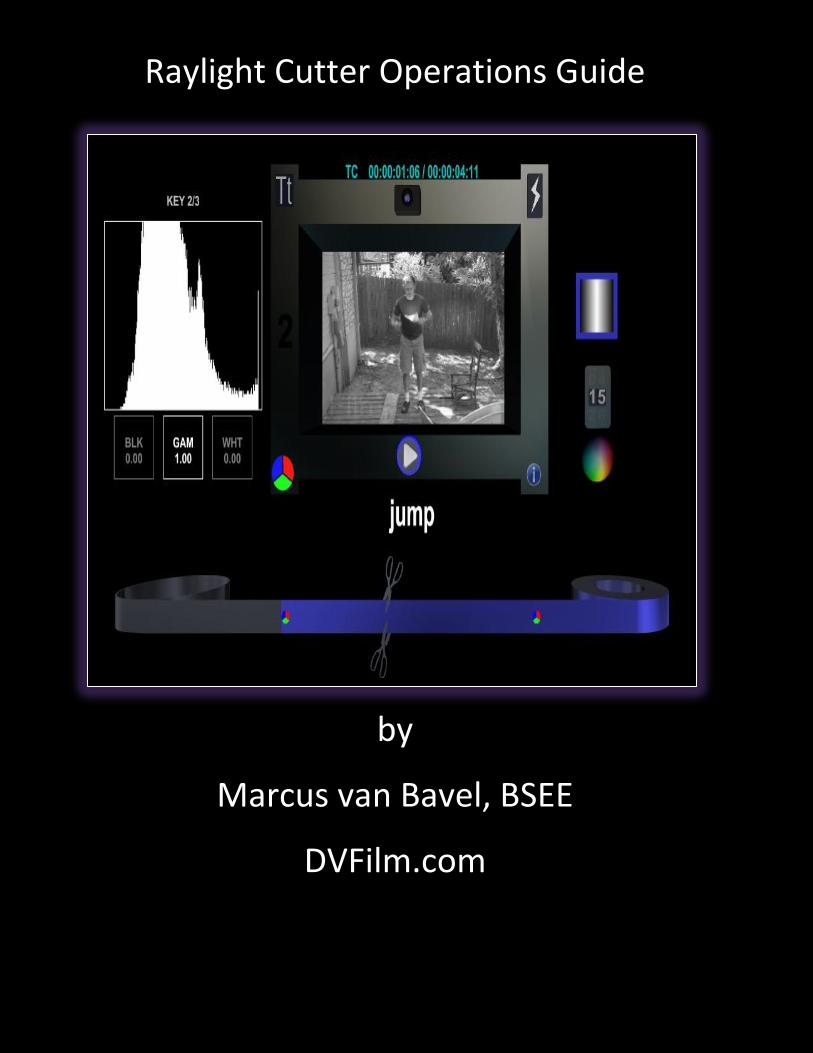
Raylight Cutter Operations Guide
by
Marcus van Bavel, BSEE
DVFilm.com
A series of videos on YouTube exist to guide the user through installation and setup of Raylight Cutter. They can be found at dvfilm.com/help and click on Tutorials, or by searching YouTube for “Raylight Cutter”. Here is a direct link: youtube.com/user/dvfilmsupport
Installation When you purchase the program, a download link is emailed to you. Download the file and double-click on it to run the installer. Helper Apps The installer will guide you through the installation process. Several helper programs are used with Raylight Cutter. These are all free programs available on the Internet. The installers are included with Raylight Cutter for your convenience. Some of these helper programs may not be required. The best procedure is to select all of them, then later, remove the ones that are not used, with Windows Control Panel, or on OSX by deleting the application icon from the Applications folder. Only the first one (Microsoft Visual C Runtime) is absolutely required, for Windows only. Also if you have previously installed Raylight Cutter, you can skip all of them. For a detailed explanation of the helper files and what they are used for, see dvfilm.com/cutter/helpers Activation (Purchased Version Only) Skip this section if you are running the demo version. When the installer is finished, you will be prompted for your serial number, email address and activation code. If you do not know your serial number, you can request it by pressing Request Serial Number (the computer must be connected to the Internet for this step). The serial number is emailed to you. If you need your activation code, click Request Activation. The activation number will be filled in assuming the email address and serial number are correct (this also requires the computer to be online). If your computer is off the Internet, there is another activation method that involves using your smart phone. To use that, point your phone’s web browser to dvfilm.com/mobile, click Help and then Activate Software. A full explanation of offline activation, including a video tutorial, can be found at dvfilm.com/help under “Serials and Activation”.
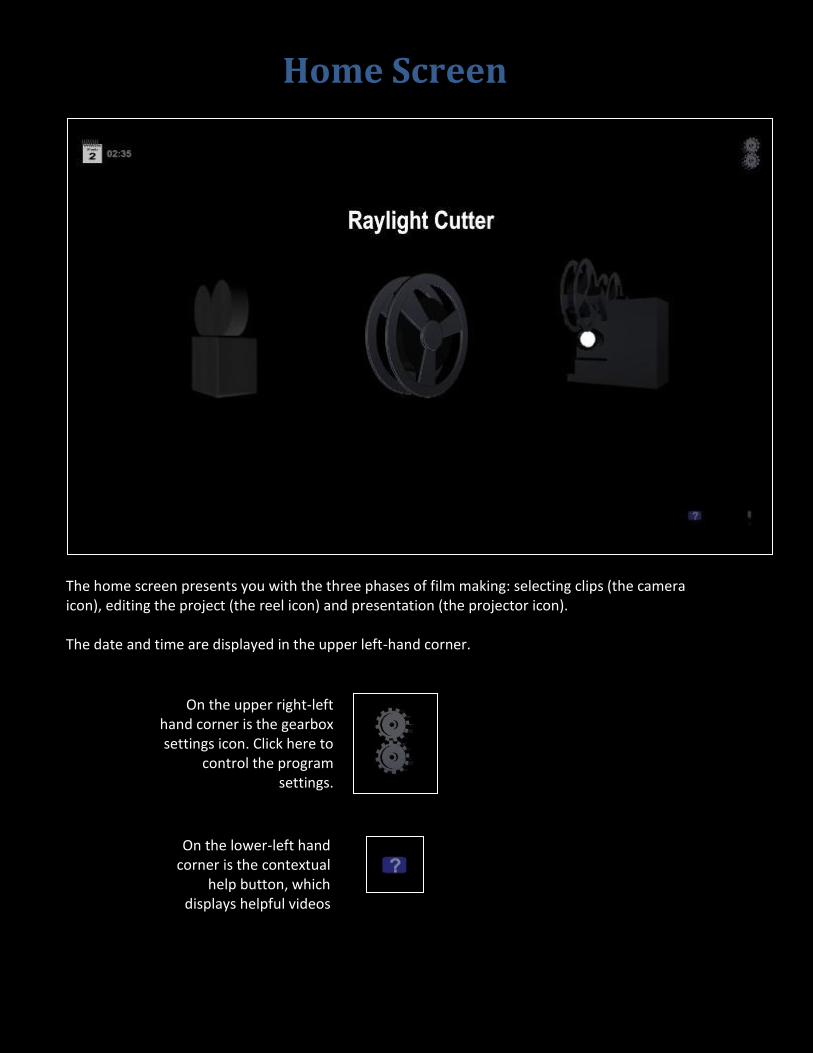
Home Screen
The home screen presents you with the three phases of film making: selecting clips (the camera icon), editing the project (the reel icon) and presentation (the projector icon). The date and time are displayed in the upper left-hand corner.
On the lower-left hand corner is the contextual
help button, which displays helpful videos
or text about the functions on that particular screen.
On the upper right-left hand corner is the gearbox settings icon. Click here to
control the program settings.
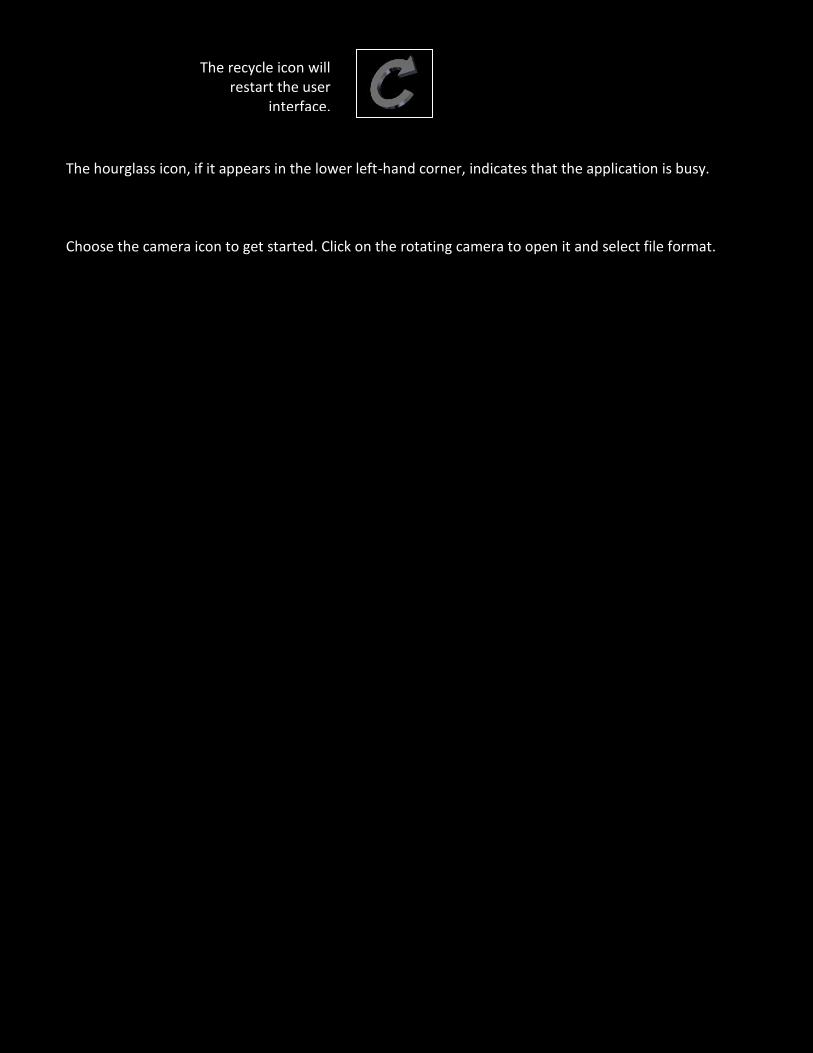
The hourglass icon, if it appears in the lower left-hand corner, indicates that the application is busy. Choose the camera icon to get started. Click on the rotating camera to open it and select file format.
The recycle icon will restart the user
interface.
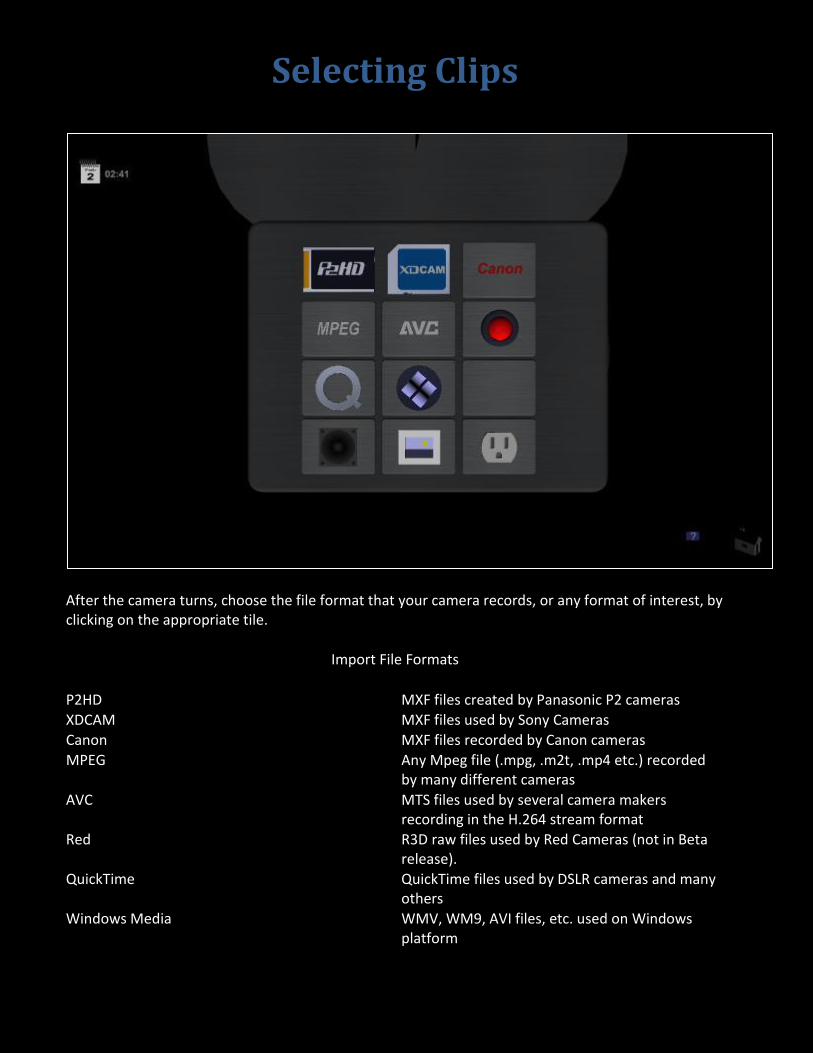
Selecting Clips
After the camera turns, choose the file format that your camera records, or any format of interest, by clicking on the appropriate tile.
Import File Formats
P2HD MXF files created by Panasonic P2 cameras
XDCAM MXF files used by Sony Cameras
Canon MXF files recorded by Canon cameras
MPEG Any Mpeg file (.mpg, .m2t, .mp4 etc.) recorded by many different cameras
AVC MTS files used by several camera makers recording in the H.264 stream format
Red R3D raw files used by Red Cameras (not in Beta release).
QuickTime QuickTime files used by DSLR cameras and many others
Windows Media WMV, WM9, AVI files, etc. used on Windows platform
Import File Formats (cont)
RAW A variety of Raw formats from electronic cinema cameras (not in Beta release).
Audio AIFF, WAV, and MP3 files usually exported from other programs
Stills JPG, TIFF, BMP, PNG, DPX files and frame sequences usually exported from other programs
Plugin Any file format supported by DirectShow or a Raylight Cutter 3rd-party plugin.
Raylight Cutter will then search your hard drives for clips of that format. It searches by file extension. The areas searched are:
1. Your system drive Media folder (usually C:\Media). On OSX this is the system drive, Media folder. This folder is created by Raylight Cutter on installation and it puts a couple of sample files in a Samples subfolder. Except for this folder and the user’s home folder (including the desktop) the rest of the system drive is not searched. 2. Any other connected hard drive, starting in the root folder. Up to 6 levels of subfolders are searched. This subfolder limit can be changed, see “Customizing Raylight Cutter”. 3. The user’s home folder (Documents, Videos, Desktop, etc) is searched. 4. If you don’t want a folder searched, rename the folder with a minus sign in front of the folder name. If you have folders on the root of your system drive and want them searched, move them to C:\Media. 5. The search can take a long time, but it is done only once for each type of file that you work with, and then Raylight Cutter remembers where they are. If you add folders of media files to your system, you can use the refresh icon to redo the search and find those folders.
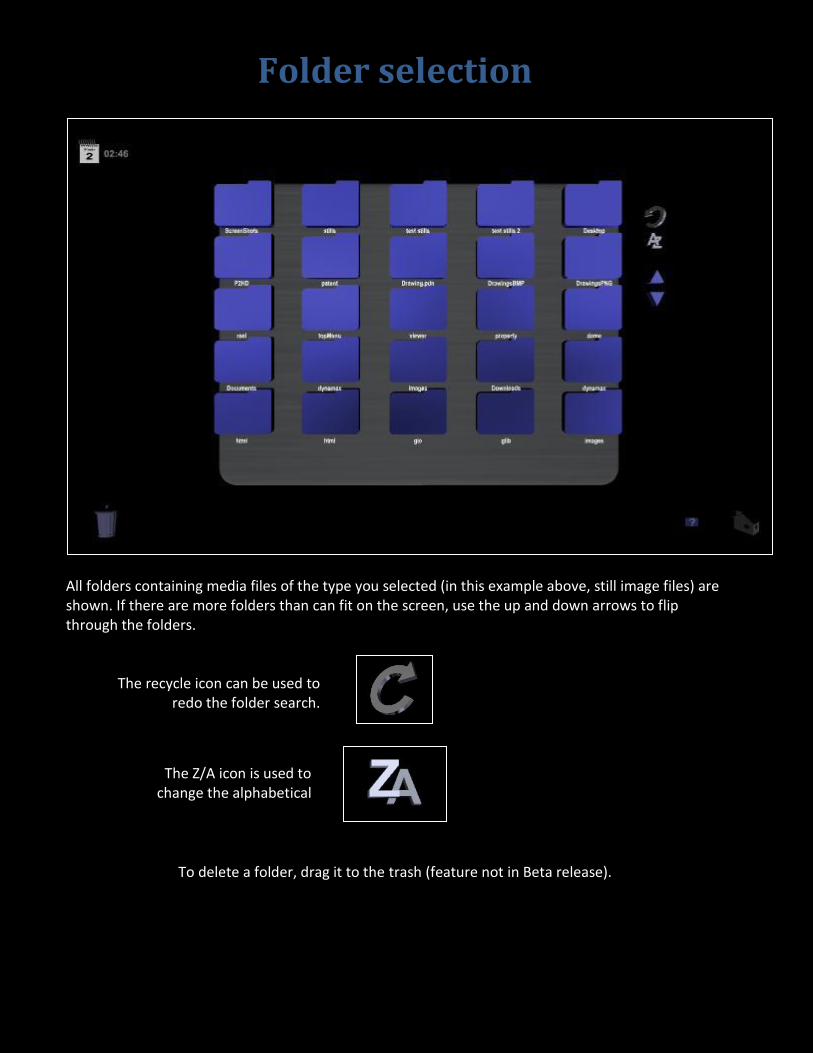
Folder selection
All folders containing media files of the type you selected (in this example above, still image files) are shown. If there are more folders than can fit on the screen, use the up and down arrows to flip through the folders.
To delete a folder, drag it to the trash (feature not in Beta release).
The Z/A icon is used to change the alphabetical
order of the folders
The recycle icon can be used to redo the folder search.
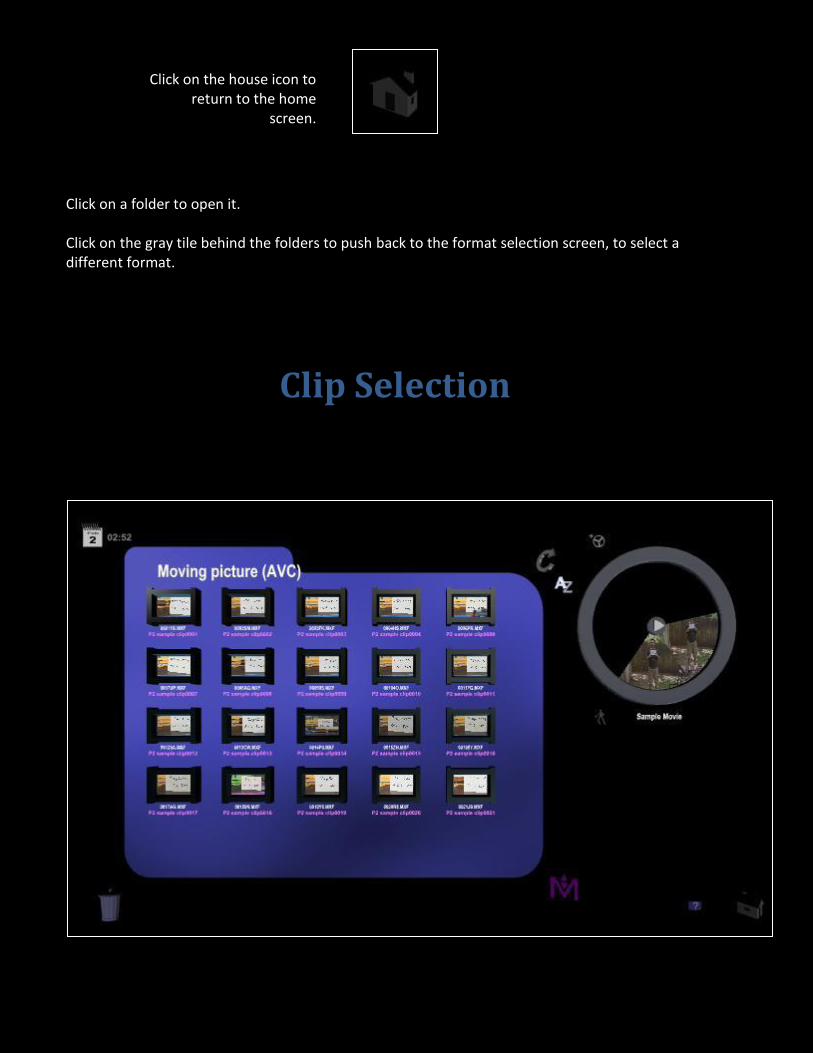
Click on a folder to open it. Click on the gray tile behind the folders to push back to the format selection screen, to select a different format.
Clip Selection
Click on the house icon to return to the home
screen.
When the folder is open, all the clips of the selected format (in this case, P2 MXF files) in that folder are shown. Beneath each clip is the file name in white, and the metadata user clip name in violet. The metadata category can be changed by clicking on the metadata icon (the violet “M”). Clips can be alphabetized by file name or metadata. Typical metadata includes starting timecode, date, format, location, scene and take number, camera person’s name, etc. Drag a clip to the trash to delete it. Drag a clip into the project (the reel-shaped piechart) to add it to the project. Drag the clip into the background (black area) to create a floating clip. The clip will remain floating there until you put it somewhere, or remove it by dragging it into the trash. Click on a clip to select it and open the viewer.
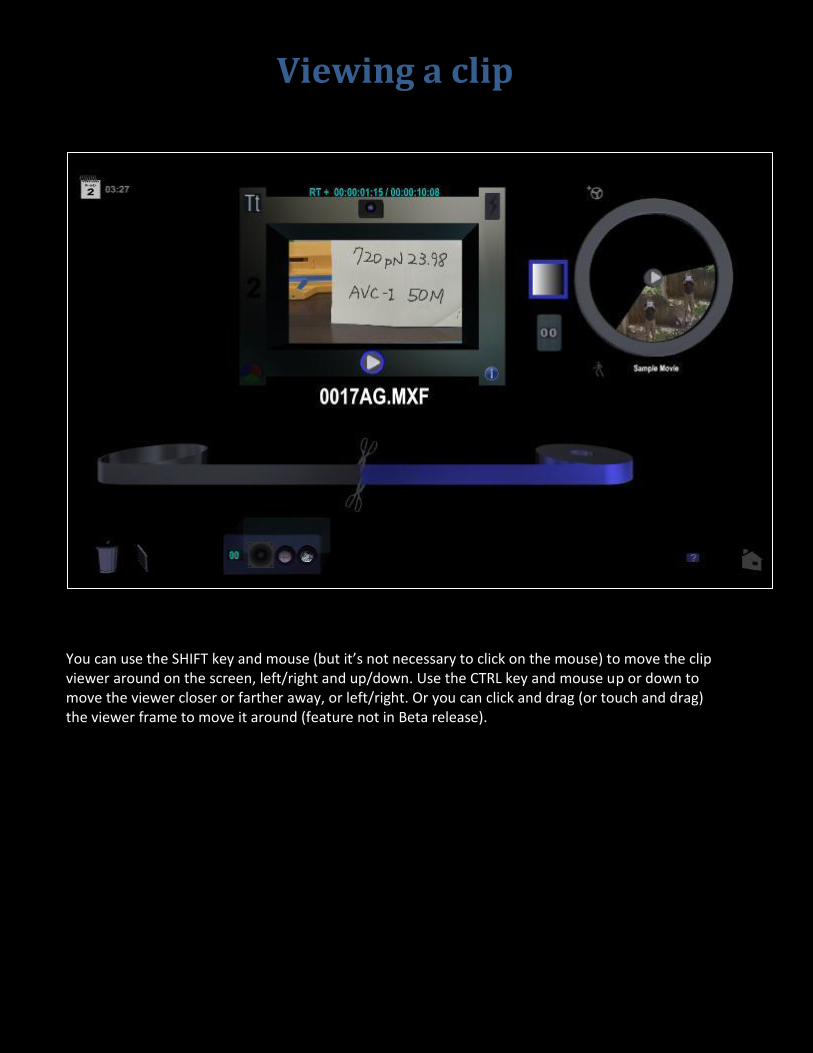
Viewing a clip
You can use the SHIFT key and mouse (but it’s not necessary to click on the mouse) to move the clip viewer around on the screen, left/right and up/down. Use the CTRL key and mouse up or down to move the viewer closer or farther away, or left/right. Or you can click and drag (or touch and drag) the viewer frame to move it around (feature not in Beta release).
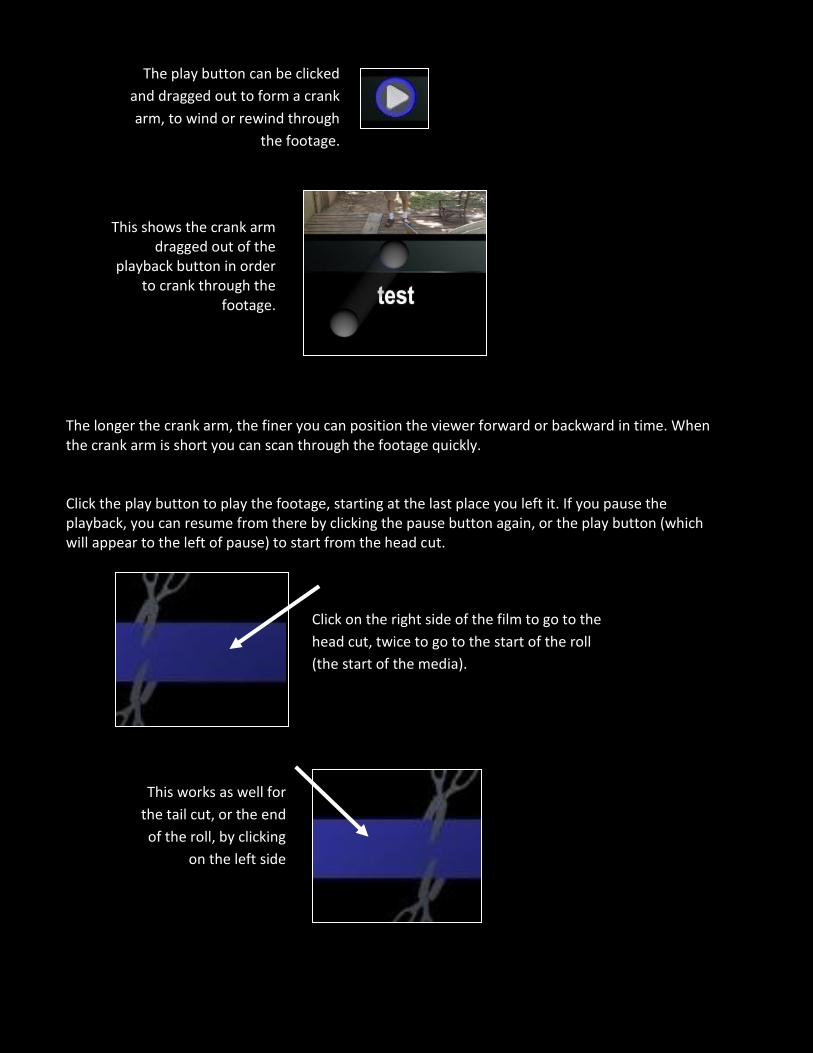
The longer the crank arm, the finer you can position the viewer forward or backward in time. When the crank arm is short you can scan through the footage quickly. Click the play button to play the footage, starting at the last place you left it. If you pause the playback, you can resume from there by clicking the pause button again, or the play button (which will appear to the left of pause) to start from the head cut.
The play button can be clicked
and dragged out to form a crank
arm, to wind or rewind through
the footage.
This shows the crank arm dragged out of the
playback button in order to crank through the
footage.
Click on the right side of the film to go to the
head cut, twice to go to the start of the roll
(the start of the media).
This works as well for
the tail cut, or the end
of the roll, by clicking
on the left side
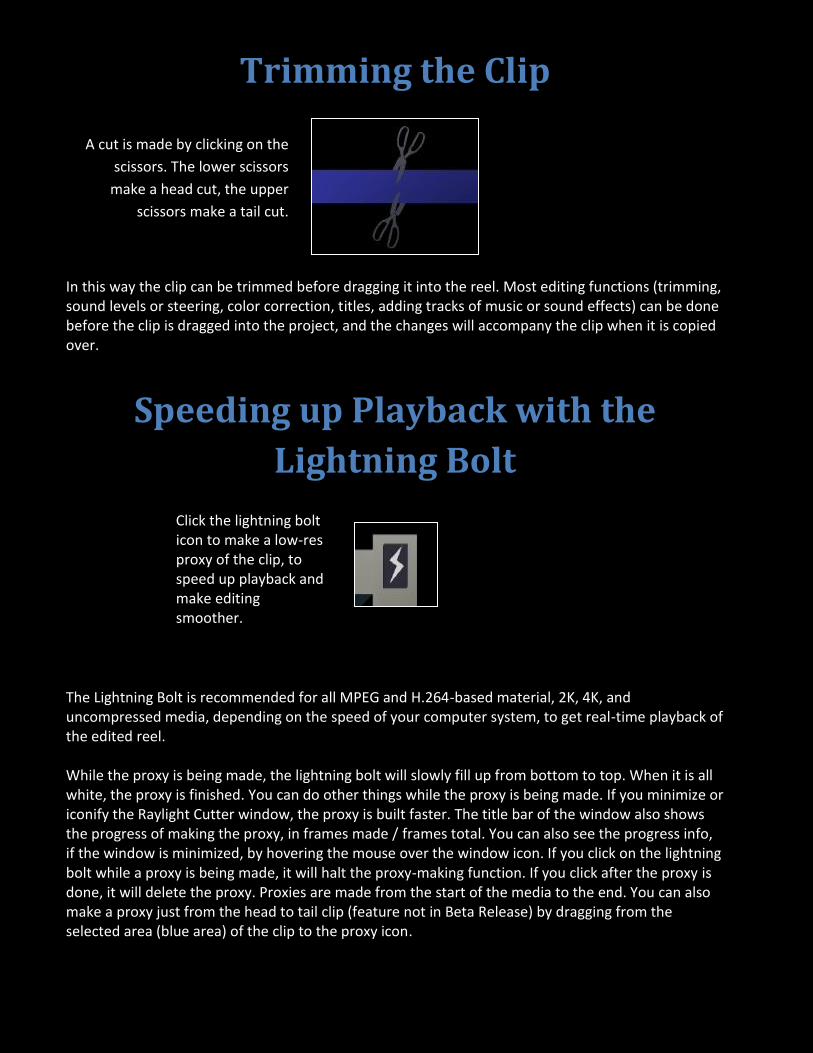
Trimming the Clip
In this way the clip can be trimmed before dragging it into the reel. Most editing functions (trimming, sound levels or steering, color correction, titles, adding tracks of music or sound effects) can be done before the clip is dragged into the project, and the changes will accompany the clip when it is copied over.
Speeding up Playback with the
Lightning Bolt
The Lightning Bolt is recommended for all MPEG and H.264-based material, 2K, 4K, and uncompressed media, depending on the speed of your computer system, to get real-time playback of the edited reel. While the proxy is being made, the lightning bolt will slowly fill up from bottom to top. When it is all white, the proxy is finished. You can do other things while the proxy is being made. If you minimize or iconify the Raylight Cutter window, the proxy is built faster. The title bar of the window also shows the progress of making the proxy, in frames made / frames total. You can also see the progress info, if the window is minimized, by hovering the mouse over the window icon. If you click on the lightning bolt while a proxy is being made, it will halt the proxy-making function. If you click after the proxy is done, it will delete the proxy. Proxies are made from the start of the media to the end. You can also make a proxy just from the head to tail clip (feature not in Beta Release) by dragging from the selected area (blue area) of the clip to the proxy icon.
Click the lightning bolt icon to make a low-res proxy of the clip, to speed up playback and make editing smoother.
A cut is made by clicking on the
scissors. The lower scissors
make a head cut, the upper
scissors make a tail cut.

The low-res proxy will not affect the quality of your finished movie, it just makes editing faster and easier. To control the quality and resolution of the proxy, see “Customizing Raylight Cutter” page xxx.
Snapshot or Thumbnail
Add Title
Press the return key to go to the second line. Click outside the viewer to stop adding text to the title. It’s possible to control the position, size, color, transparency, scrolling, and font of the title. Click the title icon (“Tt”) to open the title controls. You can also create a title or any superimposed image in an external paint or photo-retouching program. When you drag a clip to the project, the title will go with it. If you need multiple titles over one shot, this is usually done with a subreel (of superimposed clips). See Titles for more detail.
You can change the thumbnail of the clip by cranking the viewer to a typical frame of the clip and then click on the
still camera icon at the top of the frame. The still image of the clip is
visible in the miniature clip view, and in the reel, if the clip is in the reel.
You can add a title to the clip by dragging the title icon to the screen. Click on the title
icon to change the color and position of the title.
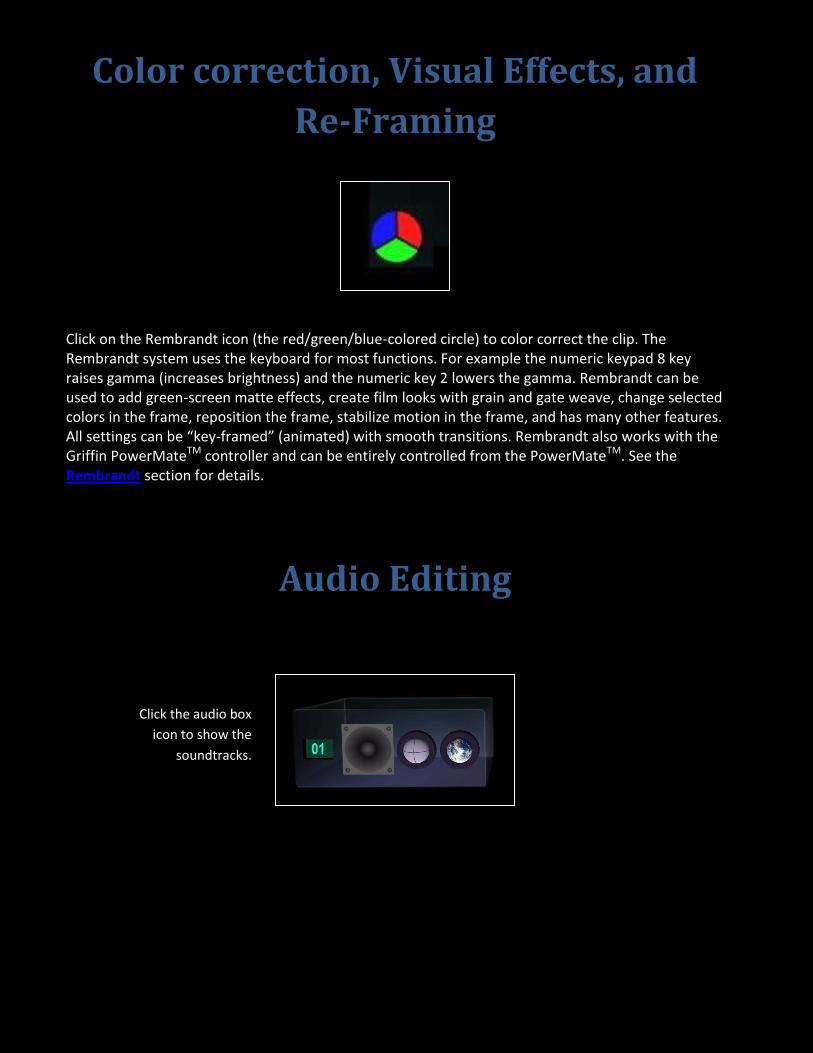
Color correction, Visual Effects, and
Re-Framing
Click on the Rembrandt icon (the red/green/blue-colored circle) to color correct the clip. The Rembrandt system uses the keyboard for most functions. For example the numeric keypad 8 key raises gamma (increases brightness) and the numeric key 2 lowers the gamma. Rembrandt can be used to add green-screen matte effects, create film looks with grain and gate weave, change selected colors in the frame, reposition the frame, stabilize motion in the frame, and has many other features. All settings can be “key-framed” (animated) with smooth transitions. Rembrandt also works with the Griffin PowerMateTM controller and can be entirely controlled from the PowerMateTM. See the Rembrandt section for details.
Audio Editing
Click the audio box
icon to show the
soundtracks.
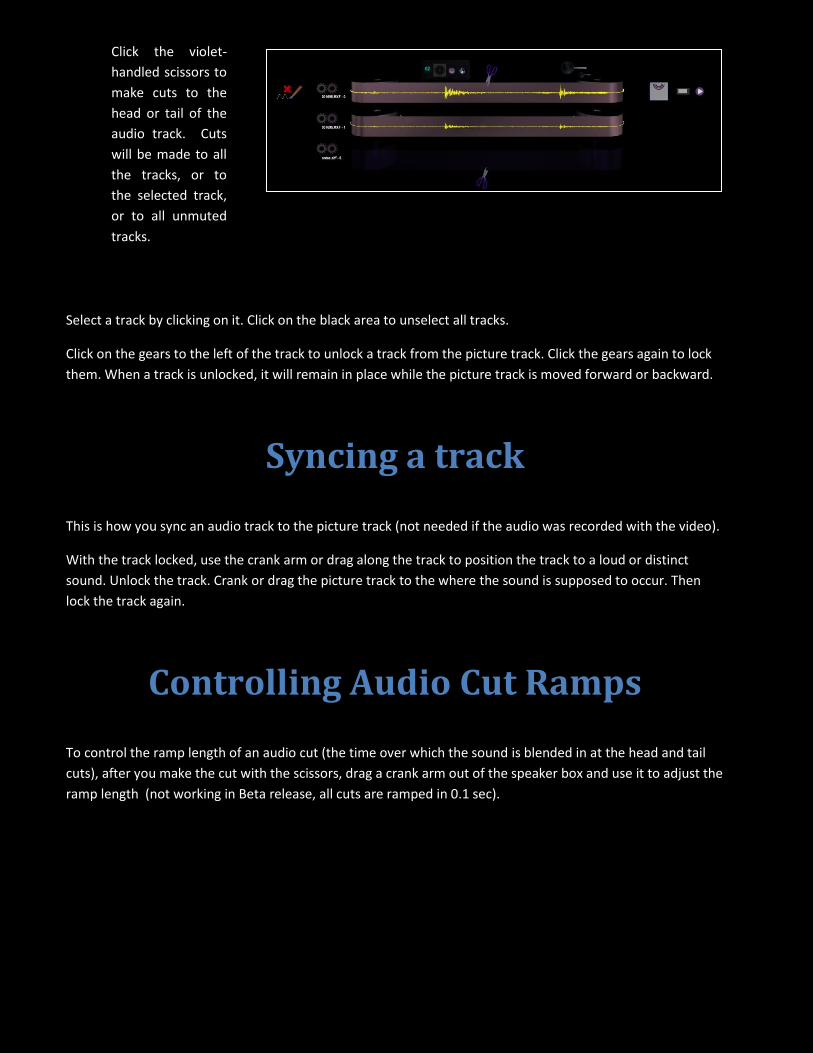
Select a track by clicking on it. Click on the black area to unselect all tracks.
Click on the gears to the left of the track to unlock a track from the picture track. Click the gears again to lock
them. When a track is unlocked, it will remain in place while the picture track is moved forward or backward.
Syncing a track
This is how you sync an audio track to the picture track (not needed if the audio was recorded with the video).
With the track locked, use the crank arm or drag along the track to position the track to a loud or distinct
sound. Unlock the track. Crank or drag the picture track to the where the sound is supposed to occur. Then
lock the track again.
Controlling Audio Cut Ramps
To control the ramp length of an audio cut (the time over which the sound is blended in at the head and tail
cuts), after you make the cut with the scissors, drag a crank arm out of the speaker box and use it to adjust the
ramp length (not working in Beta release, all cuts are ramped in 0.1 sec).
Click the violet-
handled scissors to
make cuts to the
head or tail of the
audio track. Cuts
will be made to all
the tracks, or to
the selected track,
or to all unmuted
tracks.

Changing audio levels
A volume change can be made to the entire track by dragging a crank arm out of the global audio icon (looks
like the Earth) and turning it. The audio waveform turns cold (more blue) for lower volume and hot (yellow)
for higher volume. Peaks will be highlighted in red if the volume is too hot. When playing back a track, the
audio peak meters will highlight red and stay red if the track is over-modulated. Crank the track to the loud
parts and reduce the volume to avoid distortion. Cutter also has a feature which will automatically limit or
soft-limit the volume before the tracks starts peaking (not in Beta release).
Changing volume over a small patch
Move the track so the sound you want to change is centered. A crank arm can be dragged out of the local
volume control (crosshair icon) to change a small part of the track. Turn the arm to raise or lower the volume,
drag the crank arm out to enlarge the region around the center of the track. The two-digit counter shows how
many places in the track you have done this. Drag black into the audio box to clear any volume changes.
Audio Surround Steering
Click on a corner of the cube to direct the sound to a corner. Click the top, bottom or side edges to center it
front, back or side. Click the middle to direct the sound to the subwoofer or to mute it.
The screening room will open and allow you to fine adjust the steering between the speakers.
Select the track and
click on the steering
cube to change the
steering.
For more precise control
click on the screening room
icon to the right of the
cube.

The Screening Room
Click and drag along the walls or the floor of the room to move the audio location. Click and drag the arrows to
re-orient the room. Use the play button to preview the track (only the track you selected will play). Click the
“X” to close the steering room.
Audio Effects
Audio Effects built in to Cutter include reverb, equalization, limiting (compression), pitch change, and noise
reduction. The audio effect is selected by clicking on the speaker icon in the audio box (this feature is not
provided in the Beta Release).
External Audio Editing
Audio tracks can be edited
with an external audio editor
by clicking the paintbrush
icon to the left of the
selected track. Click on the
red “X” to delete the track.
If you click the paintbrush a copy of the track will be made and then opened with the default audio editor. If
Audacity is the default editor, after making changes the track must be exported back to the copy. The file is
located in the Cutter subfolder with the original source clip.
Other editing programs may be used such as Goldwave, Sound ForgeTM, ProToolsTM, etc. See “Customizing
Raylight Cutter.”
Key-frame Volume changes or steering
The Rembrandt controls can be used to key-frame any volume, effect, or steering changes. See the
Rembrandt section for more details. (In the Beta release, only volume changes can be key-framed).
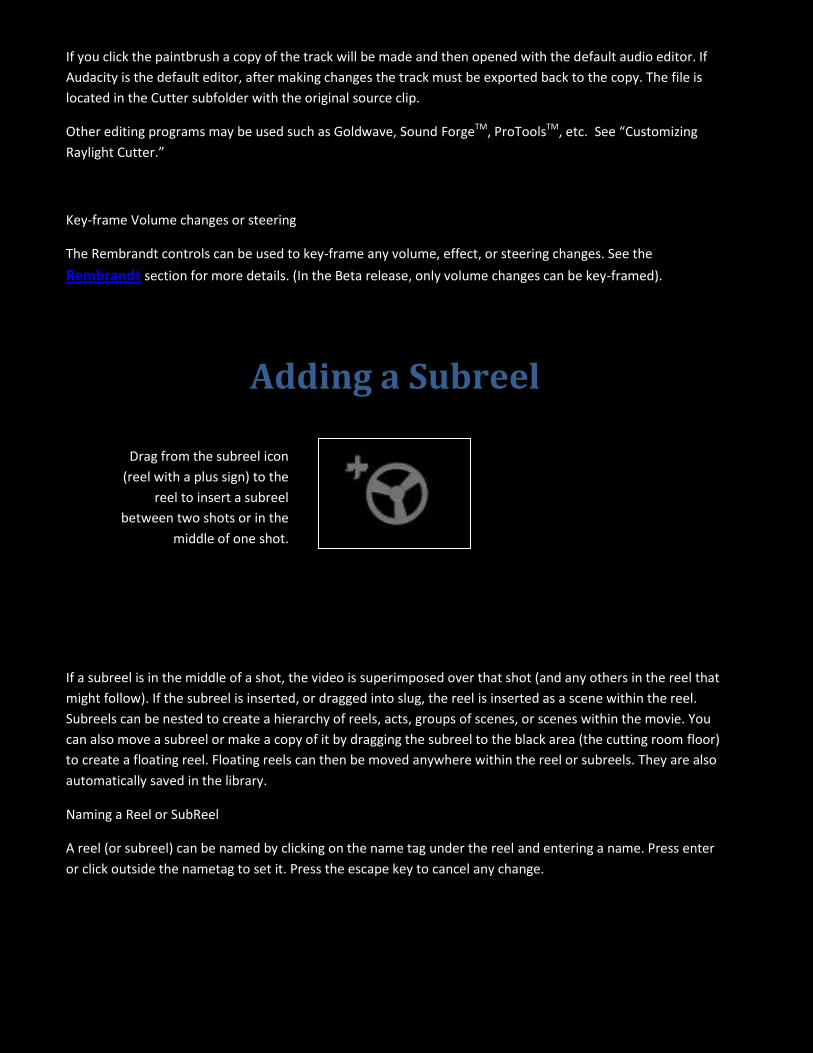
Adding a Subreel
If a subreel is in the middle of a shot, the video is superimposed over that shot (and any others in the reel that
might follow). If the subreel is inserted, or dragged into slug, the reel is inserted as a scene within the reel.
Subreels can be nested to create a hierarchy of reels, acts, groups of scenes, or scenes within the movie. You
can also move a subreel or make a copy of it by dragging the subreel to the black area (the cutting room floor)
to create a floating reel. Floating reels can then be moved anywhere within the reel or subreels. They are also
automatically saved in the library.
Naming a Reel or SubReel
A reel (or subreel) can be named by clicking on the name tag under the reel and entering a name. Press enter
or click outside the nametag to set it. Press the escape key to cancel any change.
Drag from the subreel icon
(reel with a plus sign) to the
reel to insert a subreel
between two shots or in the
middle of one shot.
Adding Slug or Blank Footage
Drag from black to add slug to a reel. Slug is black video that can have titles or added audio tracks. The
Rembrandt controls can be used to create colored or semi-transparent slug. The head and tail cuts can be
used to change the length of the slug.
Using the Library and Navigating
through a Project
A new, empty project can be started by dragging the edge of the reel to the trash can. The existing project will
be saved before the reel is cleared out. Reels are saved automatically as you edit them, so there is no need to
save a reel. However you can force Cutter to save a reel by clicking the hard drive icon in the lower right
corner.
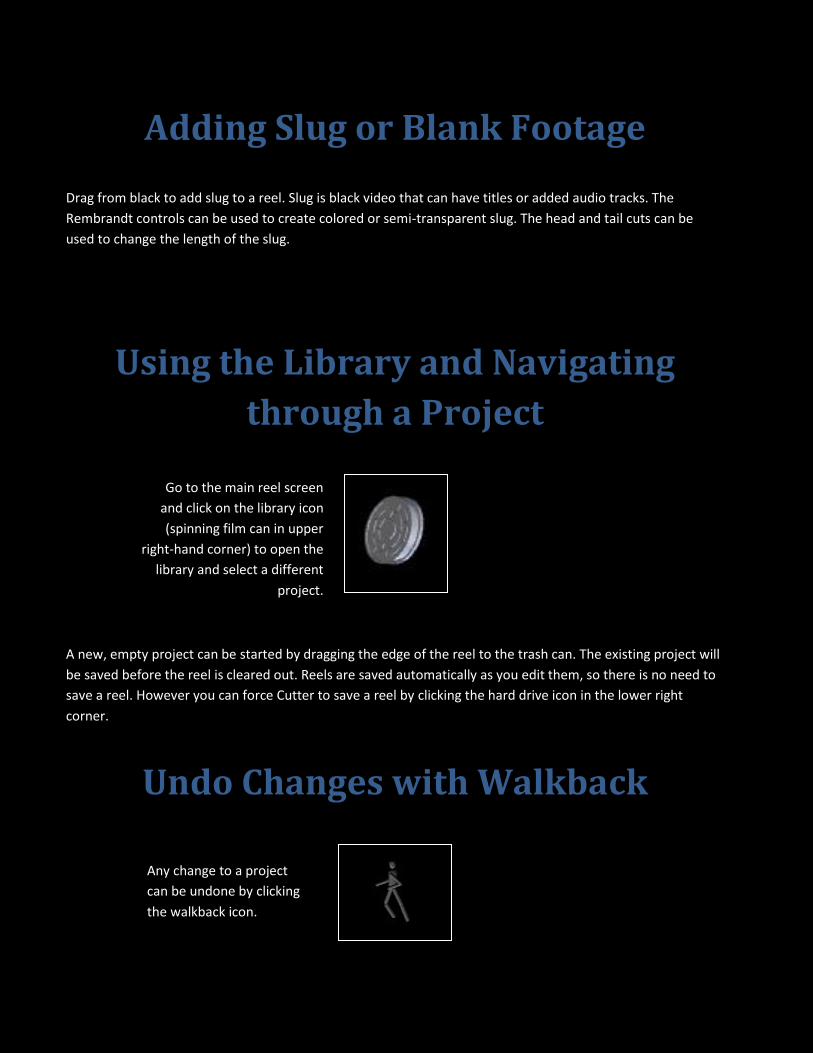
Undo Changes with Walkback
Go to the main reel screen
and click on the library icon
(spinning film can in upper
right-hand corner) to open the
library and select a different
project.
Any change to a project
can be undone by clicking
the walkback icon.

If you made a series of mistakes and want to backtrack the project to an earlier date, you can also copy the
backup from the undo folder in the Documents/RaylightCutter/FilmVault folder (or on the Mac, the
/Users/Shared/RaylightCutter/FilmVault folder) to the FilmVault folder. The backup files are named by project,
date, and time of the backup.
Packaging a Project
A project can be packaged by clicking on the package icon in the library screen. Select the folder, and then
Cutter will copy the project file and the associated media into to that folder. The references in the project file
are relative to the root folder of the package. So the folder can then be moved or copied to any location, or
onto another computer, or to a backup drive. (This feature is not working in the Beta release).
Adding and Editing Transitions
A video transition can be selected by clicking on the border between two shots in the reel. The border will be
highlighted in violet, and the transition cube will rotate to the appropriate transition. If the cube remains grey,
the default transition (a hard cut, by default) is used.
You can clink at the top of bottom edge of the digits to change the length, or at the top or bottom edge of the
counter to change the length by 4 frames up or down. You can also drag a crank handle off the counter and set
an arbitrary length. The main 4 built-in transitions are dissolve, flash frame, wipe, and clock wipe. You can also
select one of 100 additional transitions by dragging a crank handle off of the cube (feature not working in Beta
release).
To change the
transition, click on
the cube or the
counter icon below it.
The counter controls
the length of the
transition.
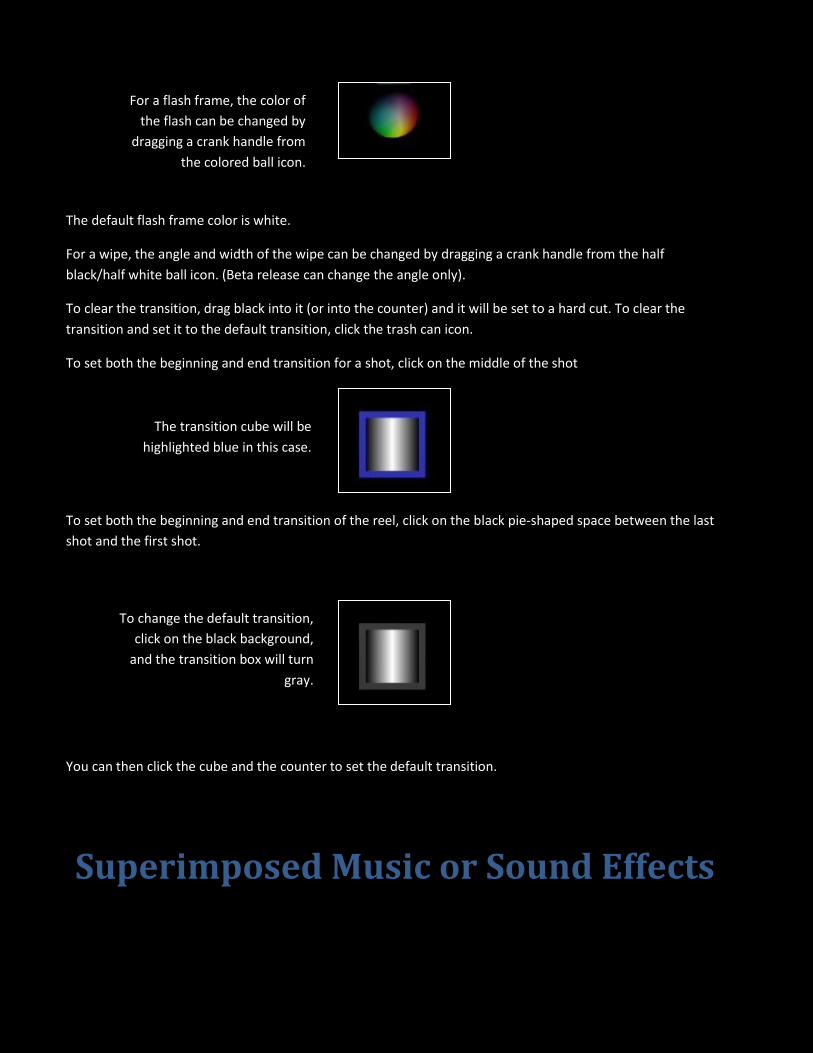
The default flash frame color is white.
For a wipe, the angle and width of the wipe can be changed by dragging a crank handle from the half
black/half white ball icon. (Beta release can change the angle only).
To clear the transition, drag black into it (or into the counter) and it will be set to a hard cut. To clear the
transition and set it to the default transition, click the trash can icon.
To set both the beginning and end transition for a shot, click on the middle of the shot
To set both the beginning and end transition of the reel, click on the black pie-shaped space between the last
shot and the first shot.
You can then click the cube and the counter to set the default transition.
Superimposed Music or Sound Effects
For a flash frame, the color of
the flash can be changed by
dragging a crank handle from
the colored ball icon.
The transition cube will be
highlighted blue in this case.
To change the default transition,
click on the black background,
and the transition box will turn
gray.
Details to be written. Superimposed music or sound effect tracks can be made by dragging audio tracks from a folder or audio files or from the clip viewer to a clip in the reel. The sync gear controls and scissors can be used to synchronize and trim the sound effects or music.
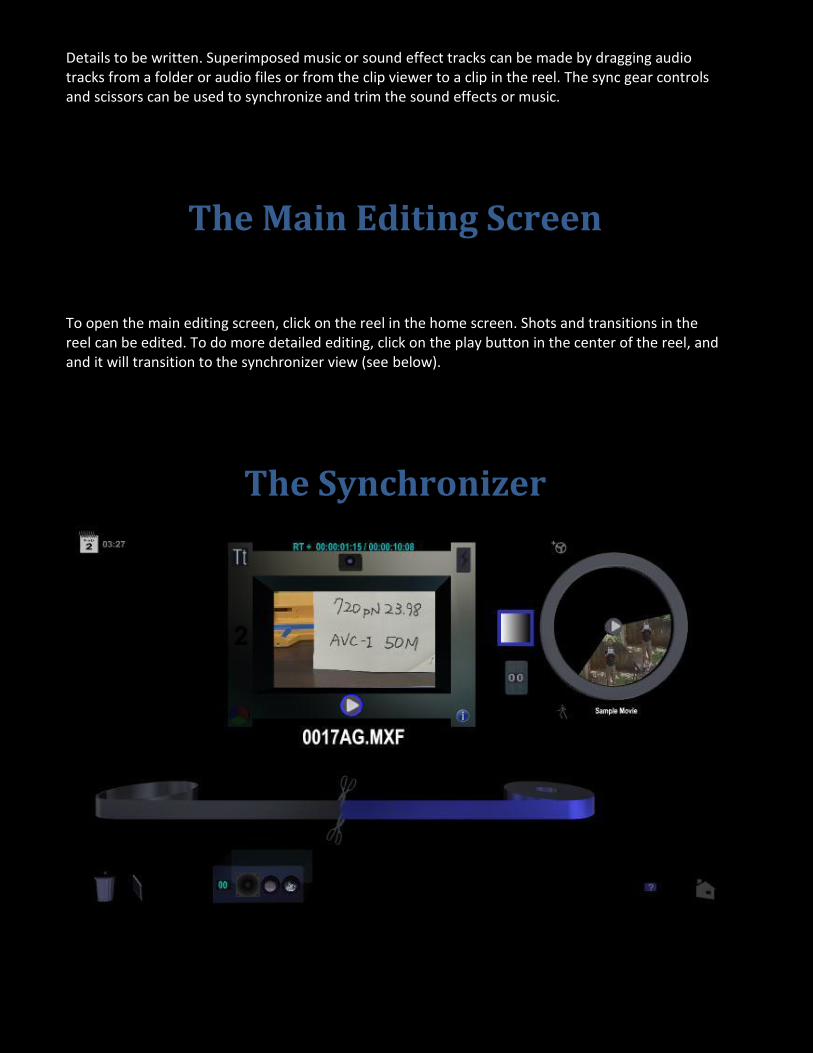
The Main Editing Screen
To open the main editing screen, click on the reel in the home screen. Shots and transitions in the reel can be edited. To do more detailed editing, click on the play button in the center of the reel, and and it will transition to the synchronizer view (see below).
The Synchronizer
In the synchronizer, clicking on a shot in the reel will open the shot in the clip viewer. Clicking on the audio
box will also show the soundtracks. The viewer will also show any sound tracks from other clips in the reel
that overlap this shot. Those reference tracks will be shown with darker, transparent color.
If the clip is in a superimposed subreel, scrubbing the picture track with the crank arm or by dragging the
mouse along the film strip will show the selected clip superimposed over the parent clip. Hoever playing the
clip by using the play button on the viewer will show only the clip.
To change the opacity (or transparency) of a superimposed clip, turn on the Rembrandt control and set the
clip level with the “L” key.
If you have slug in the superimposed reel, the slug can be made completely transparent by setting the level to
-1.0.
50% transparency is equivalent to a level of -.5.
Synchronizing the superimposed track is accomplished by using the blue gear box controls to the left of the
picture roll. These are also called the slip gears. To use them, first scrub or crank the selected clip to the sync
point. Release the slip gear. Then use the crank arm to position the underlying layer (from the parent clip) to
the sync point of the parent clip. Then lock the tracks together. Using the blue slip gears will ensure that the
audio tracks will remain locked to the selected clip when it is slipped.
(Example to illustrate this function to be written).
Editing Multi-Camera Shoots
Drag a subreel into the first shot (camera “A”) of a main reel. Open the subreel by clicking on it. Drag a second shot (Camera “B”) into the subreel. The A/B control in the synchronizer screen can then be used to switch back and forth between A and B cameras, either during live playback, or after scrubbing to an edit point. “C” camera clips can be added as a subreel to the “Camera B” subreel, etc. When you click on the “A/B” control, the default transition is used to transition between the shots. The edit point becomes the middle of the transition. Transitions can also be changed after the cut has been made (see Editing Transitions). More details to be added.
Project Settings
These settings are default frame size, frame rate, etc. for exporting movies and also affect conversions if you have a mix of formats in your project. You can skip this step and change the settings later if you desire. They’re not important until you export video, or start to work with sound mixing. See below.
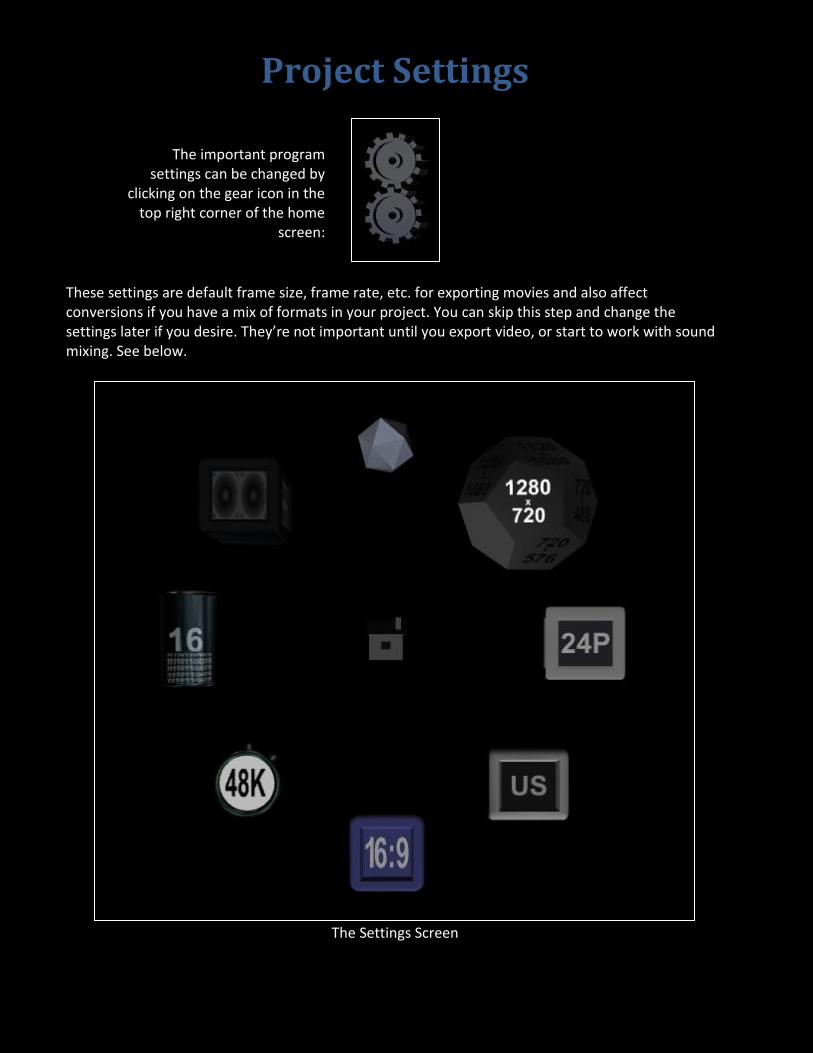
The Settings Screen
The important program settings can be changed by
clicking on the gear icon in the top right corner of the home
screen:
The settings are: Frame size – set the default frame size when exporting. Click on the top half of the polyhedron to increase the frame size, the bottom half to decrease it. Frame rate – set the project frame rate (the default frame rate when playing or exporting) Frame system – select US or EU (European) frame rate system. US rates are divided by 1.001 for compatibility with NTSC and digital video systems (for example 29.97 instead of 30 frames/sec). EU rates are exactly as shown. Frame Aspect Ratio – select 16:9 or 4:3 Audio Rate – select 48 KHz, 44.1 KHz or 96 KHz as the default export rate Audio Bits – select 16 or 24 bits/sample as the default export format. If a format will only work with 16 bits/sample this setting is ignored. Audio Channels – select no audio (no speakers), mono audio (one speaker), stereo (2 speakers), or surround (6 speakers) Graphics mode – click the icosahedron to change the graphics mode to non-textured or wireframe
How to Organize Large Projects
To be written
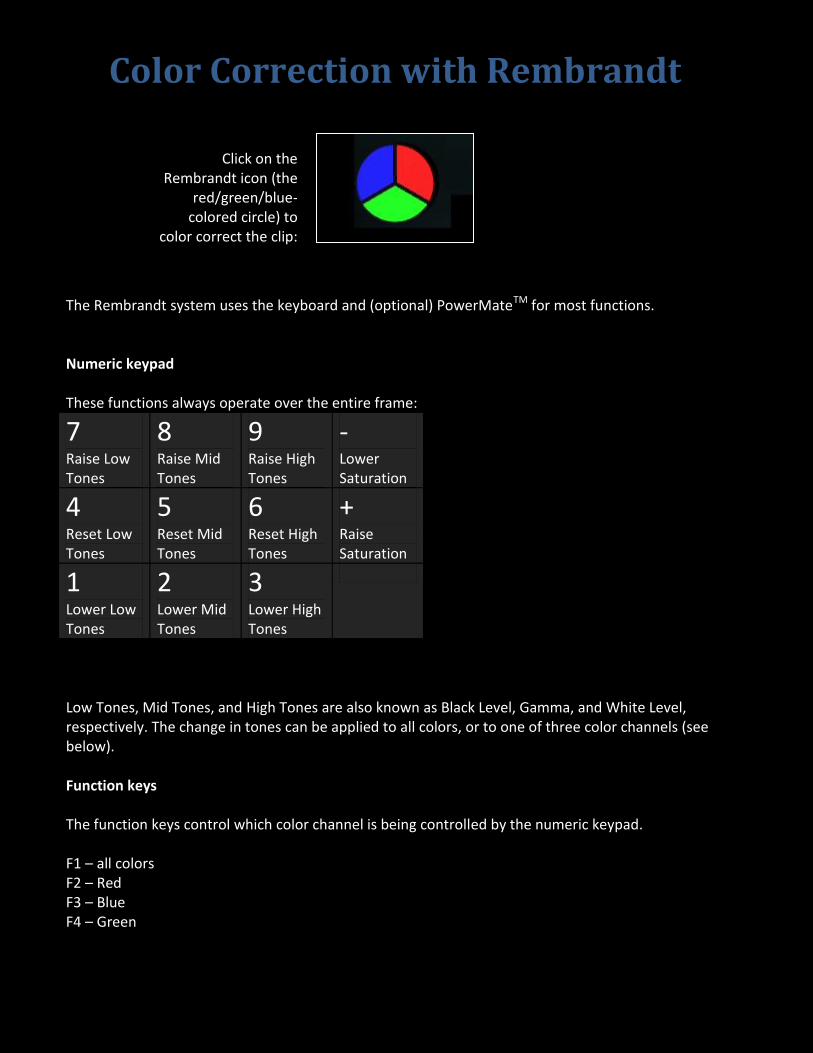
Color Correction with Rembrandt
The Rembrandt system uses the keyboard and (optional) PowerMateTM for most functions. Numeric keypad These functions always operate over the entire frame:
7 Raise Low Tones
8 Raise Mid Tones
9 Raise High Tones
- Lower Saturation
4 Reset Low Tones
5 Reset Mid Tones
6 Reset High Tones
+ Raise Saturation
1 Lower Low Tones
2 Lower Mid Tones
3 Lower High Tones
Low Tones, Mid Tones, and High Tones are also known as Black Level, Gamma, and White Level, respectively. The change in tones can be applied to all colors, or to one of three color channels (see below). Function keys The function keys control which color channel is being controlled by the numeric keypad. F1 – all colors F2 – Red F3 – Blue F4 – Green
Click on the Rembrandt icon (the
red/green/blue-colored circle) to
color correct the clip:
The histogram is drawn in white, red, green or blue depending on the mode (see below). Special keys: P – Pick color – click on the color in the frame to select it, use P or p to control the range of colors selected. For negative pick values, the picked area is reversed (selected color is excluded from change). The following controls operate only on the picked region (or the entire frame if no color is picked). Use the Shift key to raise the setting, no shift key to lower the setting. Use the control key to accelerate the amount that you are adjusting B – brightness C – contrast L – level (or opacity) N – noise (add or remove grain or noise to the image) H - hue S - saturation F – focus (blur or sharpen) A green screen effect is accomplished by adding a subreel to the background footage, putting the foreground shot into a superimposed subreel, picking the green color of the screen, setting the opacity of the screen to zero (level of -1.0). Sometimes you must also use the green saturation control (“-“ saturation key on the numeric keypad when in green mode) to de-saturate the green to make the green fringe around the foreground player less noticeable. The analogous procedure can be used for blue screen composites. Some tips on effective green screen work: 1) provide lots of separation between the players and the green screen 2) use a slightly magenta backlight on the players. 3) avoid green clothing. Repositioning These controls operate on the entire frame: T – tilt Z – zoom Arrow keys – reposition left/right, up/down J – jitter (add random motion) or stabilize image (stabilizer not in Beta release)
Scrubbing Page Up/Page Down – next frame, previous frame Control Page Up, Control Page Down – next key-frame
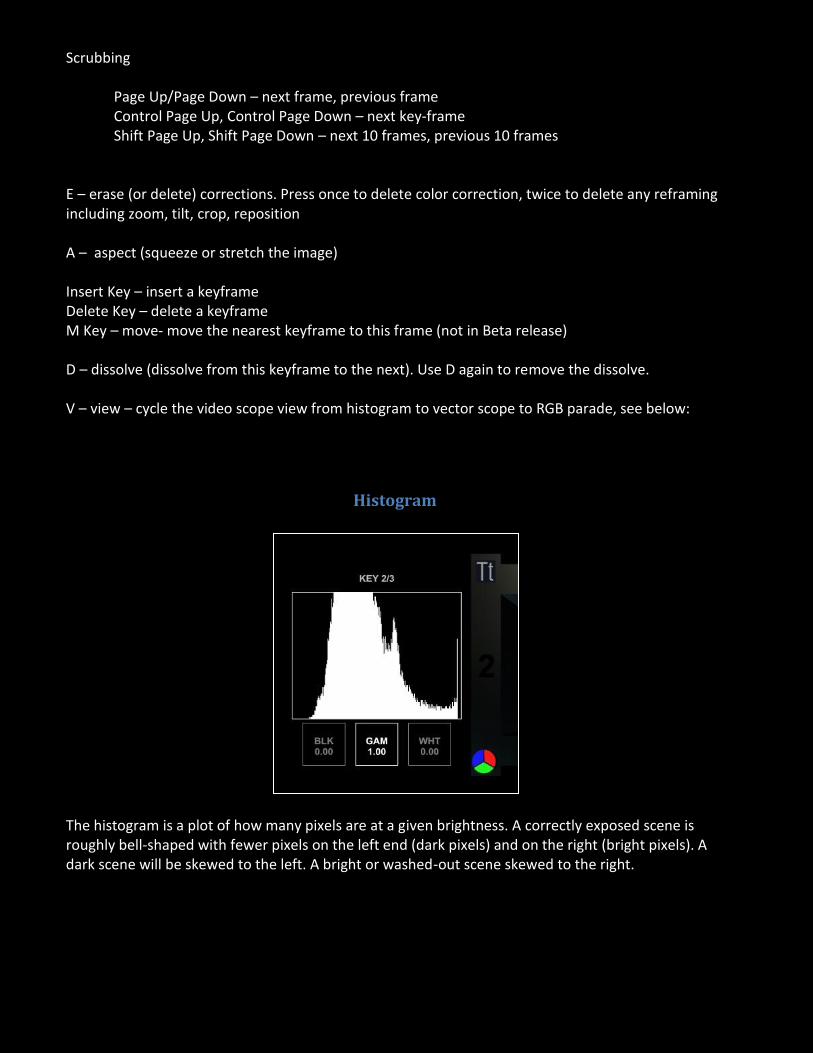
Shift Page Up, Shift Page Down – next 10 frames, previous 10 frames E – erase (or delete) corrections. Press once to delete color correction, twice to delete any reframing including zoom, tilt, crop, reposition A – aspect (squeeze or stretch the image) Insert Key – insert a keyframe Delete Key – delete a keyframe M Key – move- move the nearest keyframe to this frame (not in Beta release) D – dissolve (dissolve from this keyframe to the next). Use D again to remove the dissolve. V – view – cycle the video scope view from histogram to vector scope to RGB parade, see below:
Histogram
The histogram is a plot of how many pixels are at a given brightness. A correctly exposed scene is roughly bell-shaped with fewer pixels on the left end (dark pixels) and on the right (bright pixels). A dark scene will be skewed to the left. A bright or washed-out scene skewed to the right.

Vector Scope
The vector scope shows a plot of color phase and amplitude and is useful mainly to broadcast professionals. The six colored pie-shaped areas are where the chromatic values should be when displaying standard SMPTE color bars. To adjust the chromaticity you can use the Rembrandt Hue (H) and Saturation (S) controls.
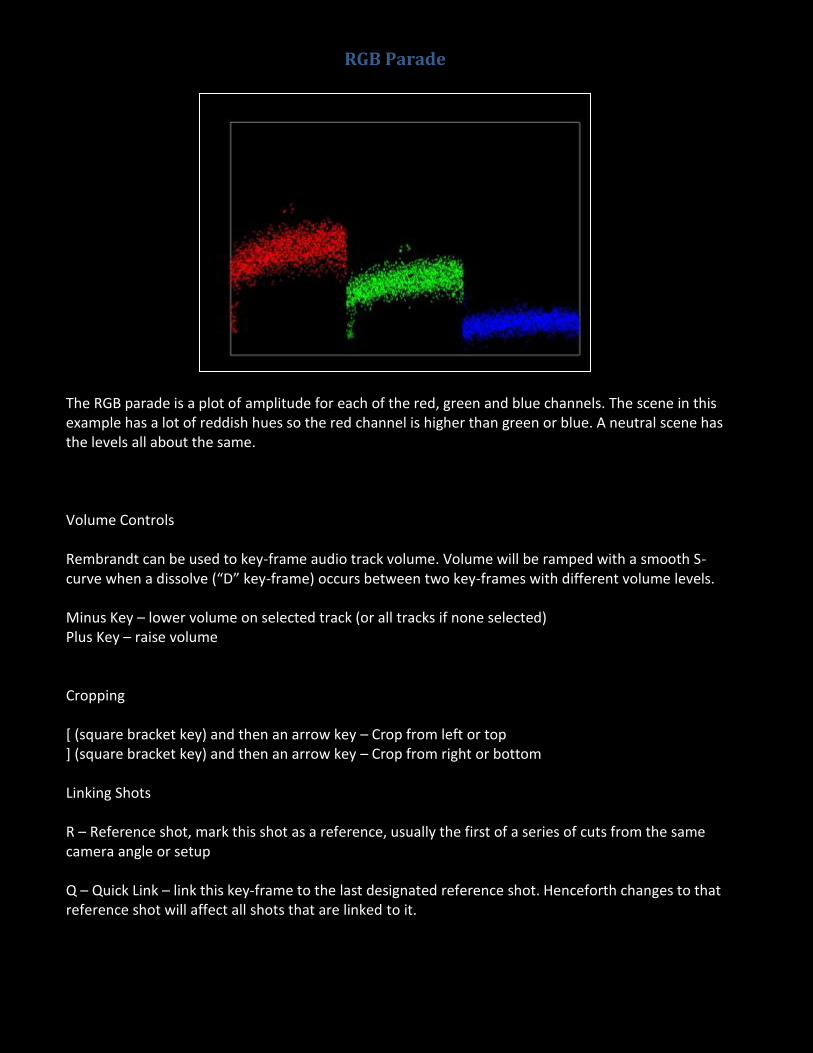
RGB Parade
The RGB parade is a plot of amplitude for each of the red, green and blue channels. The scene in this example has a lot of reddish hues so the red channel is higher than green or blue. A neutral scene has the levels all about the same. Volume Controls Rembrandt can be used to key-frame audio track volume. Volume will be ramped with a smooth S-curve when a dissolve (“D” key-frame) occurs between two key-frames with different volume levels. Minus Key – lower volume on selected track (or all tracks if none selected) Plus Key – raise volume Cropping [ (square bracket key) and then an arrow key – Crop from left or top ] (square bracket key) and then an arrow key – Crop from right or bottom Linking Shots R – Reference shot, mark this shot as a reference, usually the first of a series of cuts from the same camera angle or setup Q – Quick Link – link this key-frame to the last designated reference shot. Henceforth changes to that reference shot will affect all shots that are linked to it.
Comparing shots Snapshots – Use these function keys to make a snapshot, use the shift key to view the snapshot. This is used to compare color correction between two shots. F5 – snapshot one F6 – two F7 – three F8 - four Miscellaneous Esc key – hold down to view the frame without color correction Hold down Esc key and press a special key to reset that effect ~ (tilde key) – cancel any special mode and clear the state of the PowerMate Superimposed (multi-camera) editing These controls are used to control a superimposed shot: 1 – One key – Make the shot fully transparent (if it is superimposed with another shot) and add a key-frame 2 – Two key – Make the shot fully opaque (Level = 1.0) and add a key-frame (note: the A/B control can also be used to do multi-camera editing, and automatically inserts a default transition), see section on A/B editing.
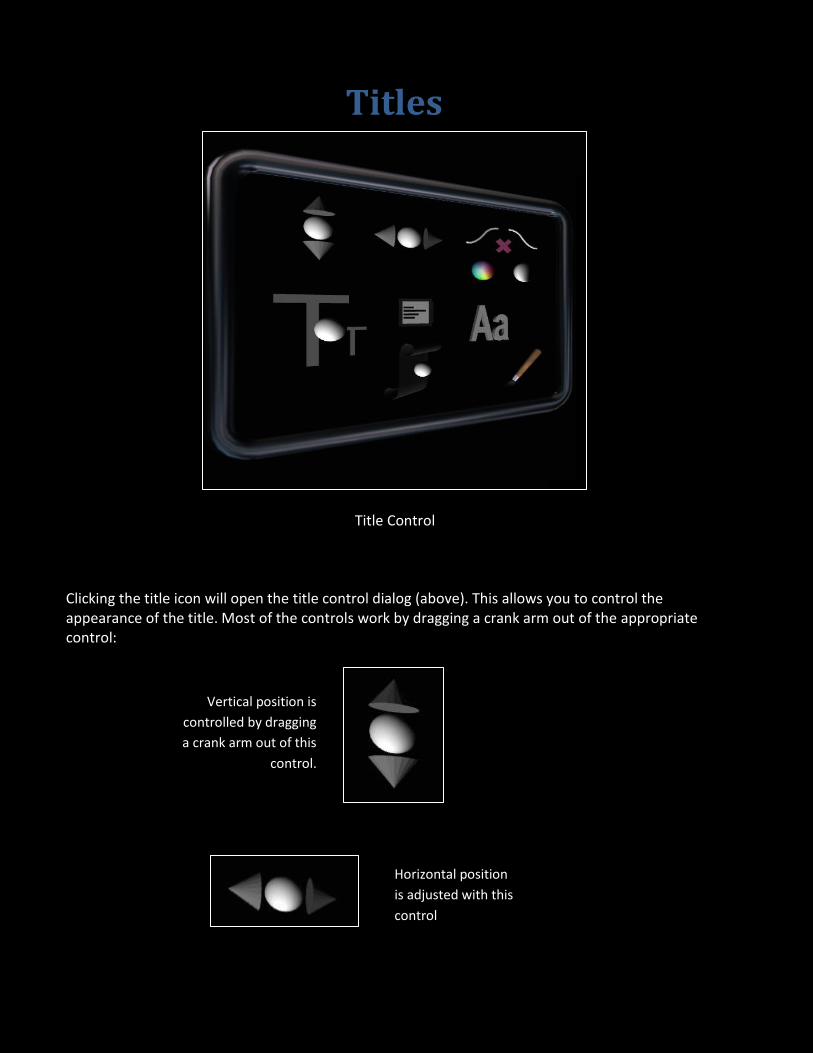
Titles
Title Control
Clicking the title icon will open the title control dialog (above). This allows you to control the appearance of the title. Most of the controls work by dragging a crank arm out of the appropriate control:
Vertical position is
controlled by dragging
a crank arm out of this
control.
Horizontal position
is adjusted with this
control
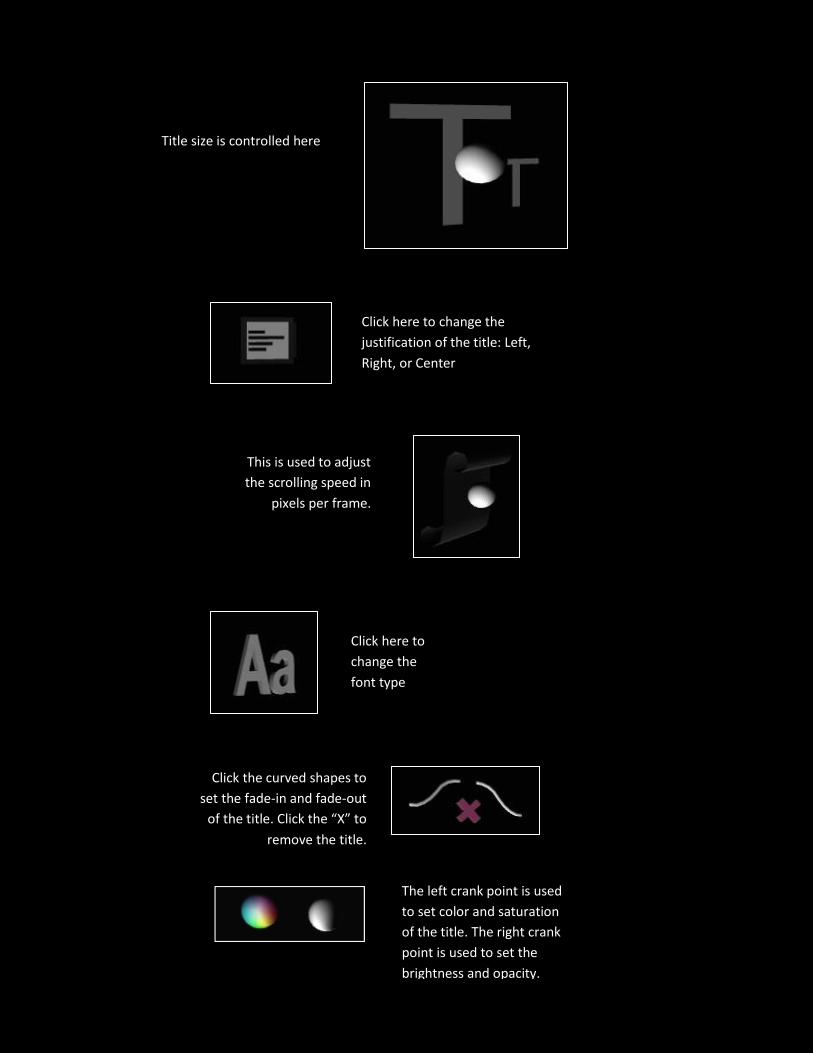
Title size is controlled here
Click here to change the
justification of the title: Left,
Right, or Center
This is used to adjust
the scrolling speed in
pixels per frame.
Click here to
change the
font type
Click the curved shapes to
set the fade-in and fade-out
of the title. Click the “X” to
remove the title.
The left crank point is used
to set color and saturation
of the title. The right crank
point is used to set the
brightness and opacity.
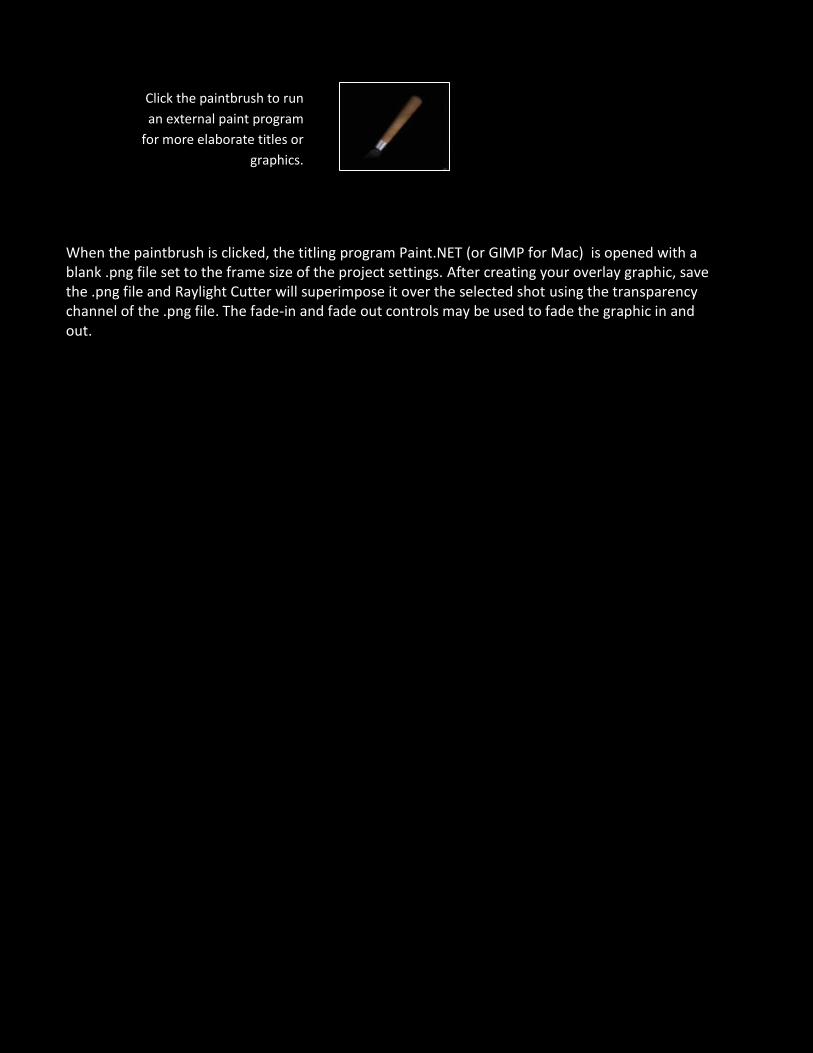
When the paintbrush is clicked, the titling program Paint.NET (or GIMP for Mac) is opened with a blank .png file set to the frame size of the project settings. After creating your overlay graphic, save the .png file and Raylight Cutter will superimpose it over the selected shot using the transparency channel of the .png file. The fade-in and fade out controls may be used to fade the graphic in and out.
Click the paintbrush to run
an external paint program
for more elaborate titles or
graphics.
Exporting and Preparing your Project
for Presentation
to be written
DVD and BluRay
DCP (Digital Cinema)
Streaming
Image File Sequences
Audio Files
Archive Formats
