board-for-board construction
TRANSCRIPT
G!.* 5!
fwt
1
t f.* " !.r";:+
don't have visible interiors but stillneed a board-for-board exterior.
I recently decided to finally build amodel of Jim Law's house. I first met
Jim Law back in the late 1960's. Jimbegan working for the YosemiteLumber Company around 1919 andeventually became a foreman on the
Board-for-board constructionA better way to use this time-honored technique/Jack Burgess
have been a devotee of scratch-building with styrene for over 30years. My rule is that if I'm scratch-
building a model of a painted proto-type, whether a building or a freightcar, I build it from styrene. I have a fewbuildings on my Yosemite ValleyRailroad layout that duplicate unpaint-ed structures, and these have beenscratchbuilt from wood. Such buildingsare always built board-for-board,rather than using scribed wood siding.If a building will have a visible interiorit features fully built-up walls completewith studs and sills. However, a sim-pler approach can work for models that
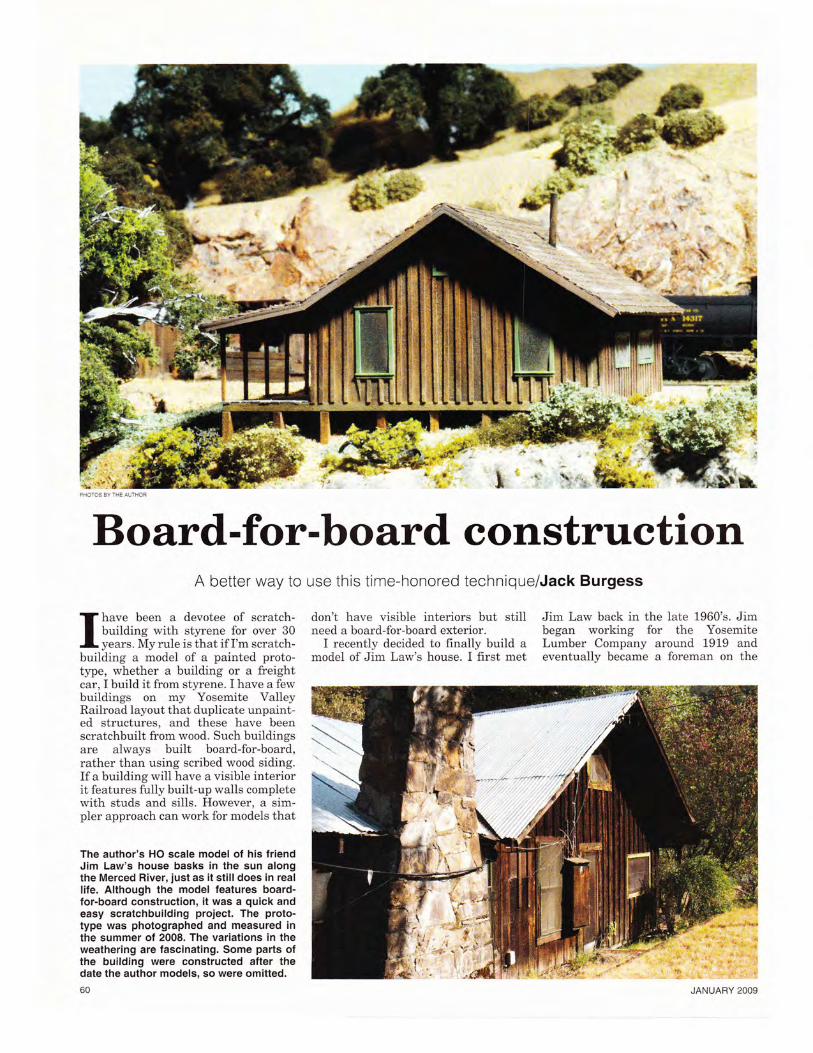
The author's HO scale model of his lriendJim Law's house basks in the sun alongthe Merced River, just as it still does in reallife. Although the model features board-for-board construction, it was a quick andeasy scratchbuilding proiect. The proto-type was photographed and measured inthe summer of 2008. The variations in theweathering are fascinating. Some parts ofthe building were constructed after thedate the author models, so were omitted.60 JANUARY 2OO9
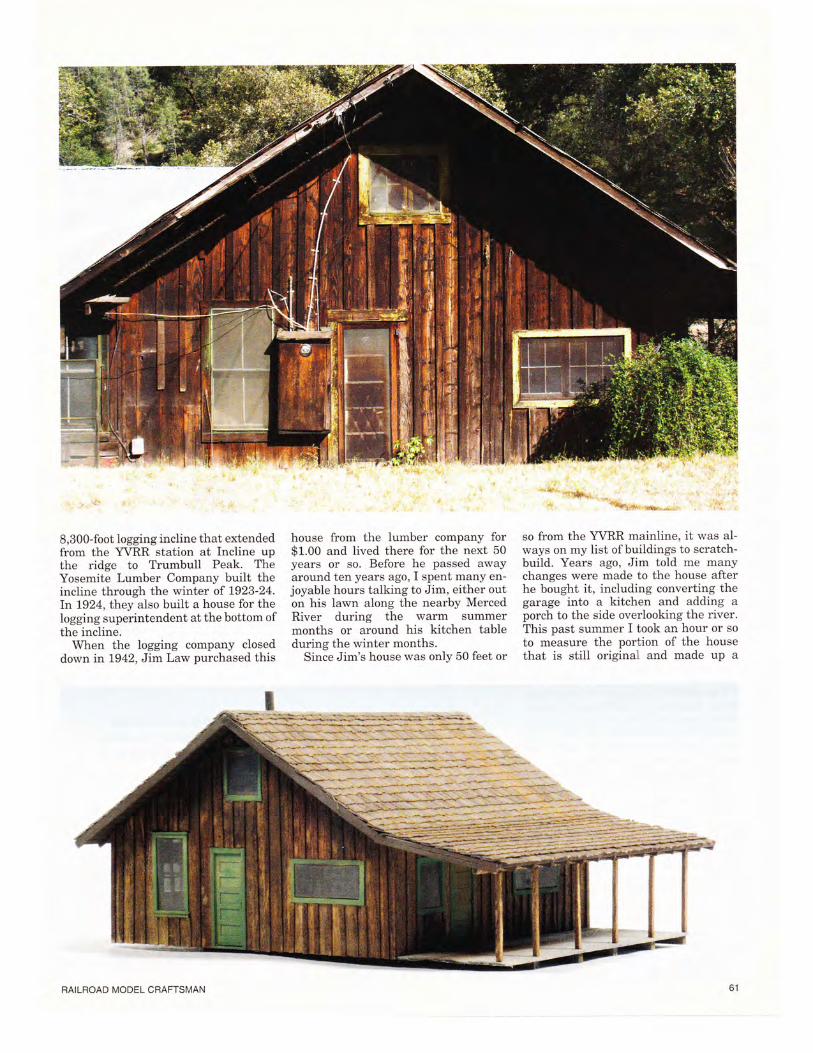
8,300-foot logging incline that extendedfrom the YVRR station at Incline upthe ridge to Trumbull Peak. TheYosemite Lumber Company built theincline through the winter of 7923-24.In 7924, they also built a house for thelogging superintendent at the bottom ofthe incline.
When the logging company closeddown in 1942, Jim Law purchased this
house from the lumber company for$1.00 and lived there for the next 50years or so. Before he passed awayaround ten years ago, I spent many en-joyable hours talking to Jim, either outon his lawn along the nearby MercedRiver during the warm summermonths or around his kitchen tableduring the winter months.
Since Jim's house was only 50 feet or
,. *&B,r.r! ..*..-_ . .t,,
so from the YVRR mainline, it was al-ways on my list of buildings to scratch-build. Years ago, Jim told me manychanges were made to the house afterhe bought it, including converting thegarage into a kitchen and adding aporch to the side overlooking the river.This past summer I took an hour or so
to measure the portion of the housethat is still original and made up a
RAILBOAD MODEL CBAFTSMAN
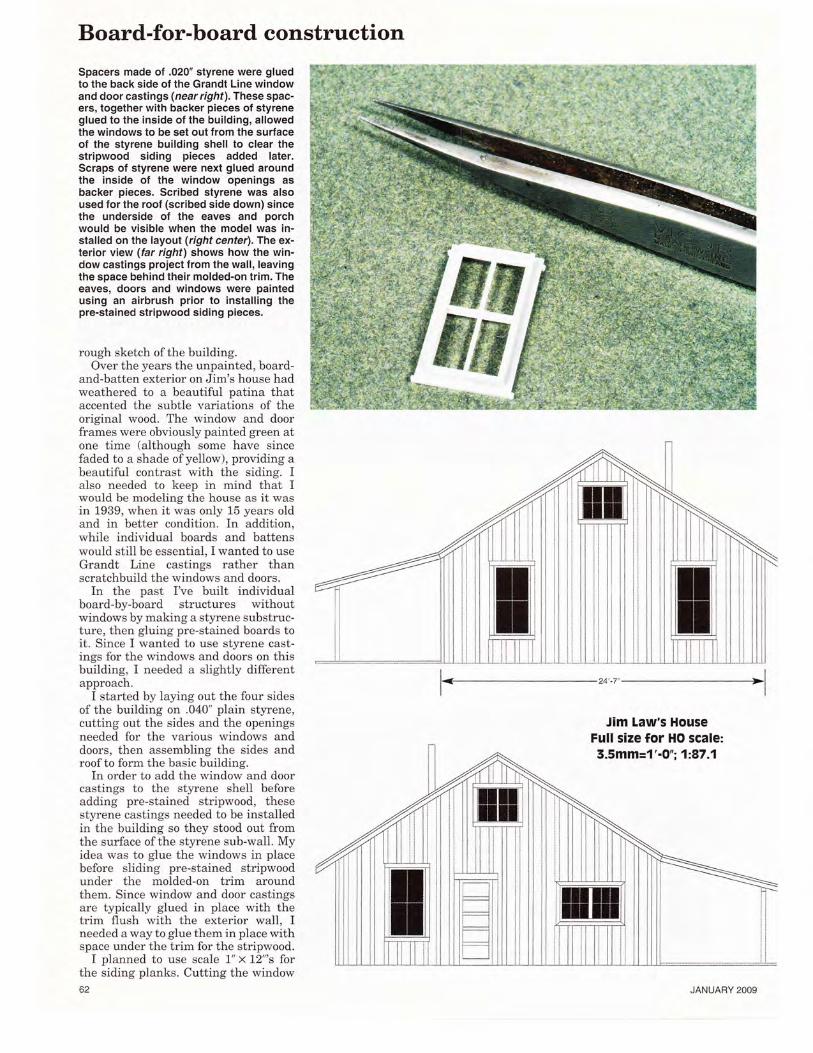
Board-for-board constructionSpacers made of .020" styrene were gluedto the back side of the Grandt Line windowand door castings (near right). These spac-ers, together with backer pieces of styreneglued to the inside of the building, allowedthe windows to be set out from the surfaceof the styrene building shell to clear thestripwood siding pieces added later.Scraps of styrene were next glued aroundthe inside of the window openings asbacker pieces. Scribed styrene was alsoused for the roof (scribed side down) sincethe underside of the eaves and porchwould be visible when the model was in-stalled on the layout (right center). The ex-terior view (far right) shows how the win-dow castings project from the wall, leavingthe space behind their molded-on trim. Theeaves, doors and windows were paintedusing an airbrush prior to installing thepre-stained stripwood siding pieces.
rough sketch ofthe building.Over the years the unpainted, board-
and-batten exterior on Jim's house hadweathered to a beautiful patina thataccented the subtle variations of theoriginal wood. The window and doorframes were obviously painted green atone time (although some have sincefaded to a shade of yellow), providing abeautiful contrast with the siding. Ialso needed to keep in mind that Iwould be modeling the house as it wasin 1939, when it was only 15 years oldand in better condition. In addition,while individual boards and battenswould still be essential, I wanted to useGrandt Line castings rather thanscratchbuild the windows and doors.
In the past I've built individualboard-by-board structures withoutwindows by making a styrene substruc-ture, then gluing pre-stained boards toit. Since I wanted to use styrene cast-ings for the windows and doors on thisbuilding, I needed a slightly differentapproach.
I started by laying out the four sidesof the building on .040" plain styrene,cutting out the sides and the openingsneeded for the various windows anddoors, then assembling the sides androofto form the basic building.
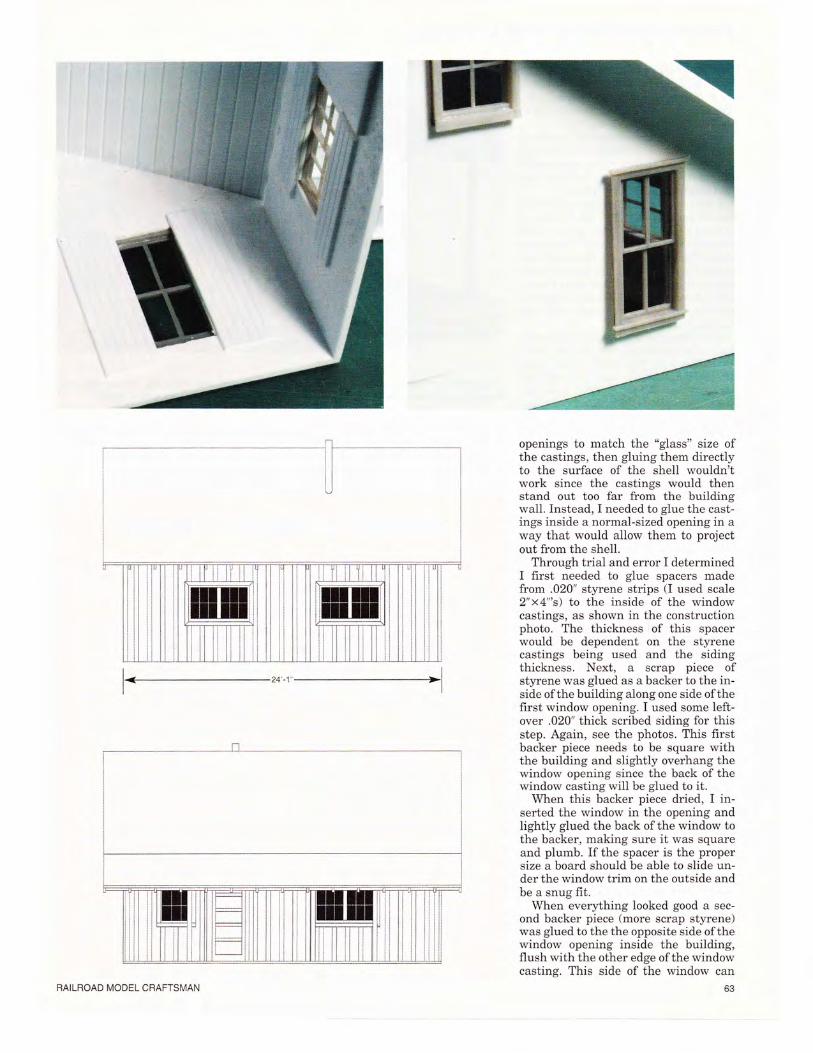
In order to add the window and doorcastings to the styrene shell beforeadding pre-stained stripwood, thesestyrene castings needed to be installedin the building so they stood out fromthe surface of the styrene sub-wall. Myidea was to glue the windows in placebefore sliding pre-stained stripwoodunder the molded-on trim aroundthem. Since window and door castingsare typically glued in place with thetrim flush with the exterior wall, Ineeded a way to glue them in place withspace under the trim for the stripwood.
I planned to use scale 1" x 12"'s forthe siding planks. Cutting the window62
Jim Law',s HouseFull size for HO scale:3.5mm=1'-0';1:87.1
rffiBffiI
JANUABY 2OO9
l-ro-,'-l
openings to match the "glass" size ofthe castings, then gluing them directlyto the surface of the shell wouldn'twork since the castings would thenstand out too far from the buildingwall. Instead, I needed to glue the cast-ings inside a normal-sized opening in away that would allow them to projectout from the shell.
Through trial and error I determinedI frrst needed to glue spacers madefrom .020" styrene strips (I used scale2"x4"'s) to the inside of the windowcastings, as shown in the constructionphoto. The thickness of this spacerwould be dependent on the styrenecastings being used and the sidingthickness. Next, a scrap piece ofstyrene was glued as a backer to the in-side ofthe building along one side ofthefirst window opening. I used some left-over .020" thick scribed siding for thisstep. Again, see the photos. This firstbacker piece needs to be square withthe building and slightly overhang thewindow opening since the back of thewindow casting will be glued to it.
When this backer piece dried, I in-serted the window in the opening andlightly glued the back of the window tothe backer, making sure it was squareand plumb. If the spacer is the propersize a board should be able to slide un-der the window trim on the outside andbe a snug frt.
When everything looked good a sec-ond backer piece (more scrap styrene)was glued to the the opposite side of thewindow opening inside the building,flush with the other edge of the windowcasting. This side of the windo* .11
bJRAILROAD MODEL CRAFTSMAN
Board-for-board constructionnow be glued in place, completing theprocess. Keep in mind that all this ismore diffrcult to describe than execute.The construction photos should help tounderstand the simple steps.
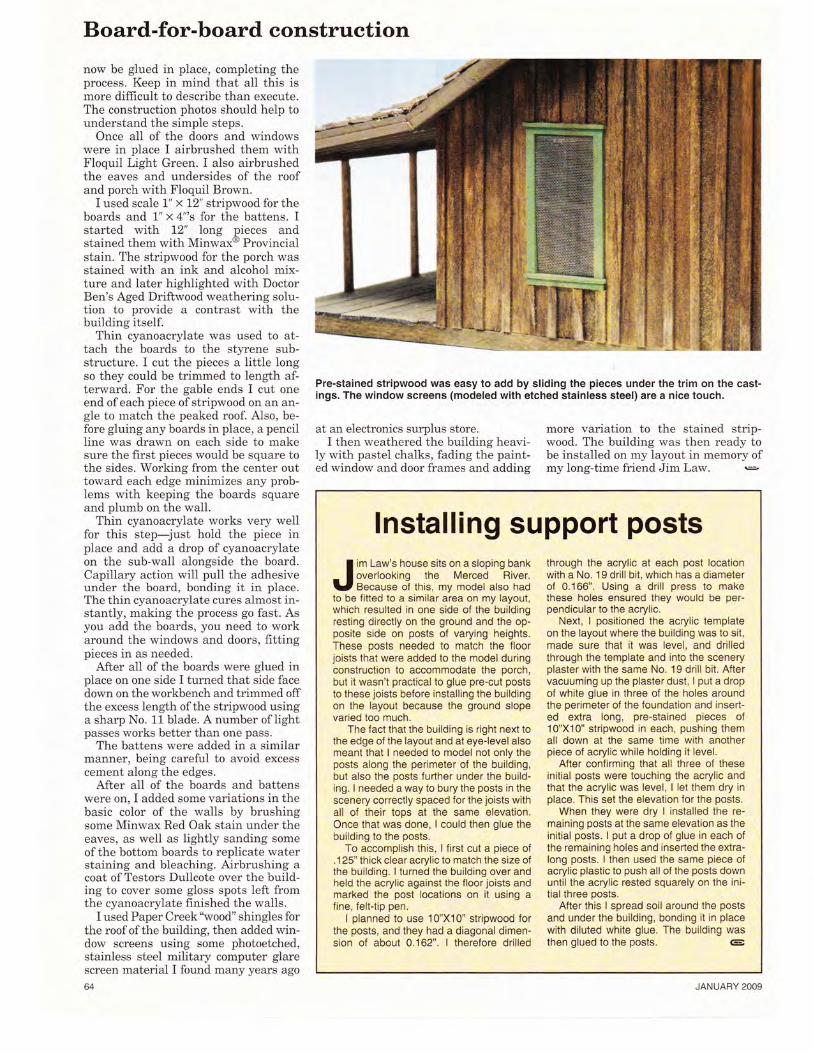
Once a]l of the doors and windowswere in place I airbrushed them withFloquil Light Green. I also airbrushedthe eaves and undersides of the roofand porch with Floquil Brown.
I used scale L" x L2" stripwood for theboards and 1" x 4"'s for the battens. Istarted with 12" long pieces andstained them with Minwax@ Provincialstain. The stripwood for the porch wasstained with an ink and alcohol mix-ture and later highlighted with DoctorBen's Aged Driftwood weathering solu-tion to provide a contrast with thebuilding itself.
Thin cyanoacrylate was used to at-tach the boards to the styrene sub-structure. I cut the pieces a little longso they could be trimmed to length af-terward. For the gable ends I cut oneend ofeach piece ofstripwood on an an-gle to match the peaked roof. Also, be-fore gluing any boards in place, a pencilline was drawn on each side to makesure the first pieces would be square tothe sides. Working from the center outtoward each edge minimizes any prob-lems with keeping the boards squareand plumb on the waII.
Thin cyanoacrylate works very wellfor this step-just hold the piece inplace and add a drop of cyanoacrylateon the sub-wall alongside the board.Capillary action will pull the adhesiveunder the board, bonding it in place.The thin cyanoacrylate cures almost in-stantly, making the process go fast. Asyou add the boards, you need to workaround the windows and doors, frttingpieces in as needed.
After all of the boards were glued inplace on one side I turned that side facedown on the workbench and trimmed offthe excess length ofthe stripwood usinga sharp No. 11 blade. A number of lightpasses works better than one pass.
The battens were added in a similarmanner, being careful to avoid excesscement along the edges.
After all of the boards and battenswere on, I added some variations in thebasic color of the walls by brushingsome Minwax Red Oak stain under theeaves, as well as lightly sanding someofthe bottom boards to replicate waterstaining and bleaching. Airbrushing acoat ofTestors Dullcote over the build-ing to cover some gloss spots left fromthe cyanoacrylate finished the walls.
I used Paper Creek'\n ood" shingles forthe roof of the building, then added win-dow screens using some photoetched,stainless steel military computer glarescreen material I found many years ago
64
at an electronics surplus store.I then weathered the building heavi-
ly with pastel chalks, fading the paint-ed window and door frames and adding
more variation to the stained strip-wood. The building was then ready tobe installed on my layout in memory ofmy long-time friend Jim Law.
Pre-stained stripwood was easy to add by sliding the pieces under the trim on the cast-ings. The window screens (modeled with etched stainless steel) are a nice touch.
lnstalling support postsim Law's house sits on a sloping bankoverlooking the Merced River.Because of this, my model also had
to be fitted to a similar area on my layout,which resulted in one side of the buildingresting directly on the ground and the op-posite side on posts of varying heights.These posts needed to match the floorjoists that were added to the model duringconstruction to accommodate the porch,but it wasn't practical to glue pre-cut poststo these joists before installing the buildingon the layout because the ground slopevaried too much.
The tact that the building is right next tothe edge of the layout and at eye-level alsomeant that I needed to model not only theposts along the perimeter of the building,but also the posts further under the build-ing. I needed a way to bury the posts in thescenery correctly spaced lor the loists withall ol their tops at the same elevation.Once that was done, I could then glue thebuilding to the posts.
To accomplish this, I first cul a piece of.125" thick clear acrylic to match the size ofthe building. I turned the building over andheld the acrylic against the floor joists andmarked the post locations on it using afine, felt-tip pen.
I planned to use 10"X10" stripwood forthe posts, and they had a diagonal dimen-sion of aboui 0.162". I therefore drilled
through the acrylic at each post locationwith a No. 19 drill bit, which has a diameterof 0.166". Using a drill press to makethese holes ensured they would be per-pendicular to the acrylic.
Next, I positioned the acrylic templateon the layout where the building was to sit,made sure that it was level, and drilledthrough the template and into the sceneryplaster with the same No. 19 drill bit. Aftervacuuming up the plaster dust, I put a dropof white glue in three of the holes aroundthe perimeter of the foundation and insert-ed extra long, pre-stained pieces of10"X10" stripwood in each, pushing themall down at the same time with anotherpiece ol acrylic while holding it level.
After confirming that all three o{ theseinitial posts were touching the acrylic andthat the acrylic was level, I let them dry inplace. This set the elevation for the posts.
When they were dry I installed the re-maining posts at the same elevation as theinitial posts. I put a drop of glue in each ofthe remaining holes and inserted the extra-long posts. I then used the same piece ofacrylic plastic to push all of the posts downuntil the acrylic rested squarely on the ini-tial three posts.
After this I spread soil around the postsand under the building, bonding it in placewith diluted white glue. The building wasthen glued to the posts. e
JANUARY 2OO9