bluegriffon - floss manualsarchive.flossmanuals.net/_booki/bluegriffon/bluegriffon.pdf ·...
TRANSCRIPT

BLUEGRIFFON
Published : 2011-10-12 License : None
1

INTRODUCTION1. INTRODUCTION
2
1. INTRODUCTION
A griffon vulture is a large scavenger bird. But what is BlueGriffon?
BlueGriffon is an Open Source Web editing application that allows WYSIWYG (What You See IsWhat You Get) editing and creation of web pages. It is a successor to the NvU editor, which isno longer maintained. BlueGriffon also includes support for new features in HTML5, which havebeen defined since the time when NvU and some other similar editors were developed. TheBlueGriffon website is http://bluegriffon.org/ and it is released under the Mozilla Public LicenseVersion 1.1.
Since it is not as complicated as similar commercial applications, BlueGriffon may be easier tolearn how to use. More importantly, it generates good clean HTML code.
About this tutorial
All the examples in this tutorial are based on running BlueGriffon under the Linux operatingsystem. Fortunately, BlueGriffon operates with a very similar interface regardless of thesystem under which system it runs. All the examples given will be equally applicable to OS Xand Windows. In the event that there is a difference, separate instructions for each operatingsystem will be provided.
This tutorial is written for someone who has little or no previous experience creating webpages or working with HTML code, and is looking for a tool to quickly and easily get contentready to put on the web. It should also be useful to anyone who is used to other WYSIWYGweb editing applications, and is looking to see what BlueGriffon has on offer. You will not needany knowledge of HTML to create a web page using this tutorial.
This tutorial will cover:
How to construct a simple websiteHow to enter text and imagesHow links workUsing styles to easily control the look and feel of your pageUsing Cascading Style Sheets to easily manage the use of styles
By the time you complete this tutorial, you should be able to create your own complete andfunctional web page. You should also be able to use styles to customise the look and feel ofyour site without affecting the content of the pages.
However, it is beyond the scope of this tutorial to cover the details of getting your sitepublished on the web or the inner workings of HTML code. So this tutorial makes a couple ofassumptions about its readers:
You are familiar with the basics of your operating system (BlueGriffon works on OS X,Linux, and Windows) and you know how to install applications on your computer.You are familiar with the basics of resizing and manipulating images using a programsimilar to the GIMP.You have a hosting solution for your site, and have all the information needed to get thepages you create posted on the web.
The last assumption is not strictly required to use BlueGriffon or create web pages in general,but will be necessary if you want others to be able to see your site.
3
GETTING STARTED2. CONTENTS OF A SIMPLE WEBSITE3. CREATING TEXT ON A WEB PAGE4. ADDING AN IMAGE TO A PAGE5. USING LINKS
4
2. CONTENTS OF A SIMPLE WEBSITE
At the most basic level a website is nothing more than a set of files written in a specific waythat can be interpreted (or parsed, in web lingo) by a web browser. In order for all browsers tointerpret the files the web pages must be written in a consistent manner. This consistency ofform is HTML, or HyperText Mark-up Language. Because HTML is nothing more than a text filewritten in a specific format, all that is needed to write web pages is a text editor. Creatingpages this way requires knowledge of the HTML format, and while HTML is not all that hard tolearn, most people prefer a more visual way of designing pages. Applications such asBlueGriffon allow people to make functional websites by creating the mark-up language foryou, based on the information you provide as you create the content.
The design of BlueGriffon makes the experience of web page design very similar to using aword processor. While this makes learning the software easier for most, there are a few trapsthat lurk in the shadows of this kind of approach. The Hypertext part of HTML is what makeslinking possible in web pages, and understanding how links work is crucial before successfullycreating a website. I'll give you a brief introduction here, but I recommend further reading formore detail of how all this works.
The tutorial is about to lead you through the steps of creating one small and simple web pageusing BlueGriffon. If you have not already done so:
visit the BlueGriffon website to download and install this application, orfind the BlueGriffon application in the repository of your Linux distribution and install itusing your favorite package manager.
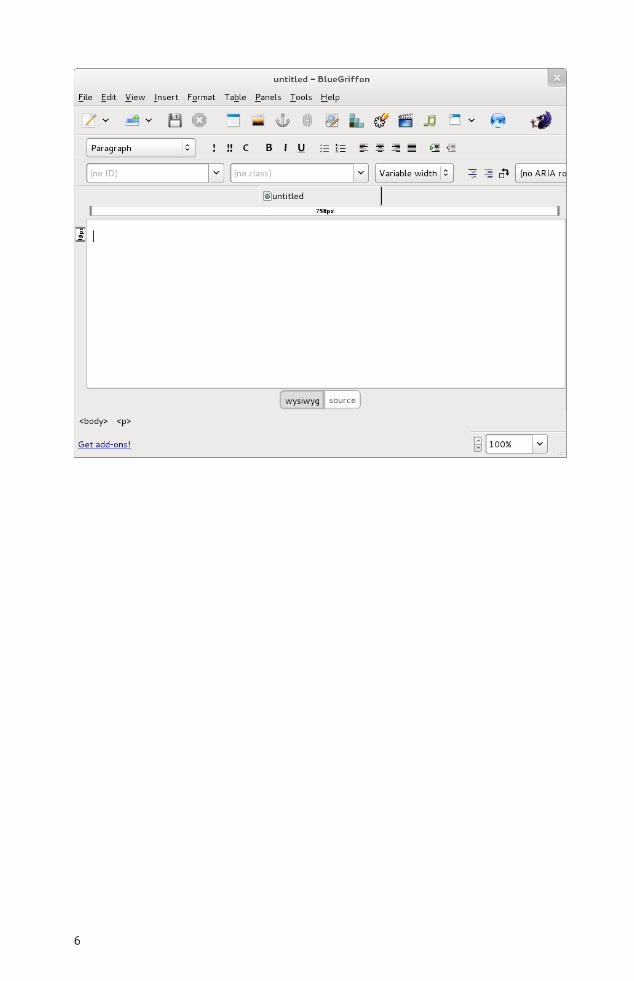
When you first open BlueGriffon, whether by e.g.:
Activities, Applications, BlueGriffon [via Gnome 3 on Linux],Launcher [on OS X], orStart, Programs, All Programs [on Windows]
you will be presented with a screen that resembles:
5
6

3. CREATING TEXT ON A WEB PAGE
7
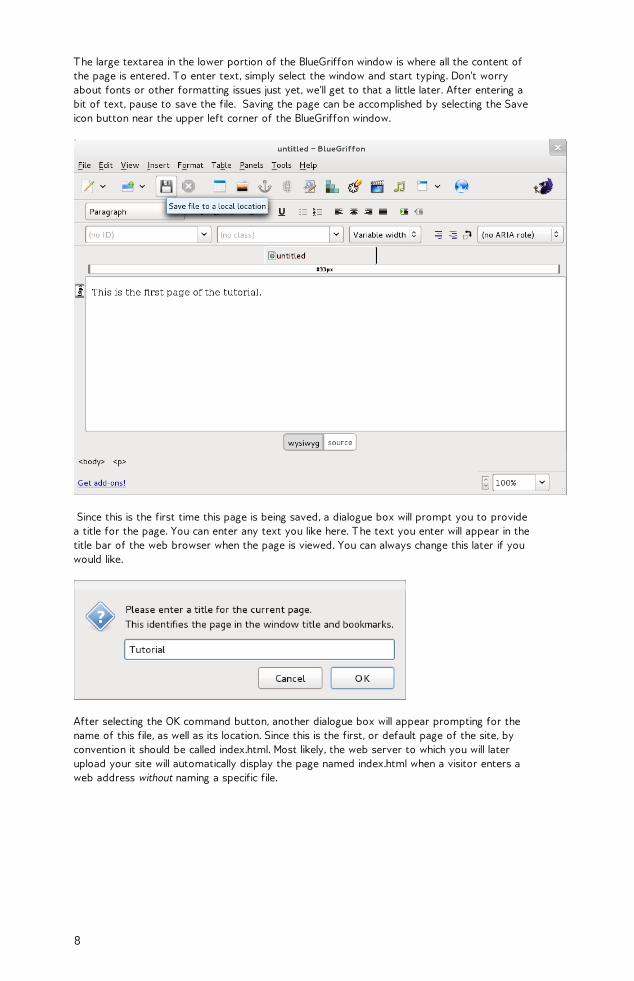
The large textarea in the lower portion of the BlueGriffon window is where all the content ofthe page is entered. To enter text, simply select the window and start typing. Don't worryabout fonts or other formatting issues just yet, we'll get to that a little later. After entering abit of text, pause to save the file. Saving the page can be accomplished by selecting the Saveicon button near the upper left corner of the BlueGriffon window.
Since this is the first time this page is being saved, a dialogue box will prompt you to providea title for the page. You can enter any text you like here. The text you enter will appear in thetitle bar of the web browser when the page is viewed. You can always change this later if youwould like.
After selecting the OK command button, another dialogue box will appear prompting for thename of this file, as well as its location. Since this is the first, or default page of the site, byconvention it should be called index.html. Most likely, the web server to which you will laterupload your site will automatically display the page named index.html when a visitor enters aweb address without naming a specific file.
8
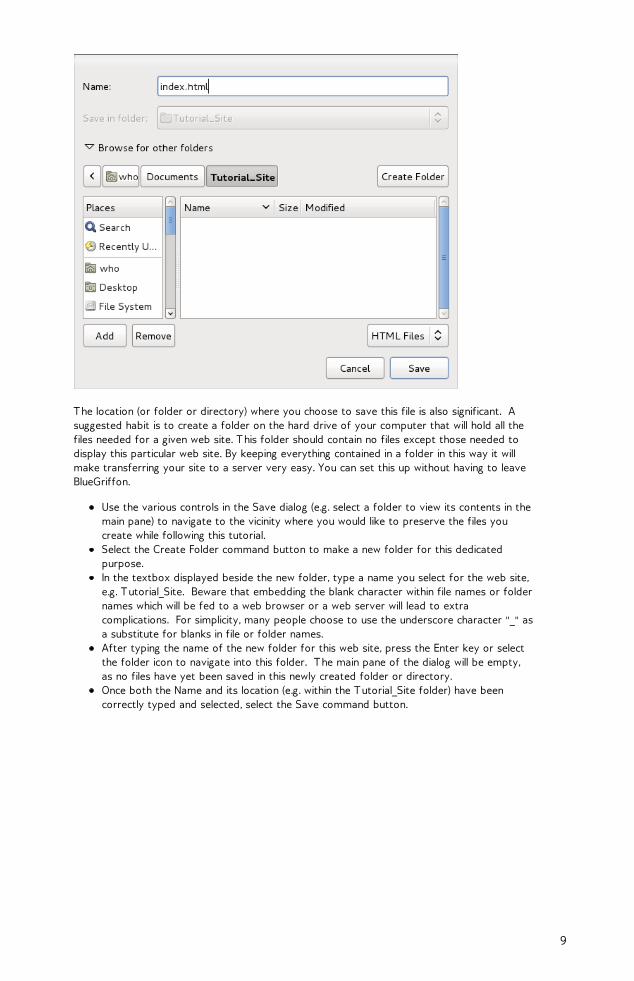
The location (or folder or directory) where you choose to save this file is also significant. Asuggested habit is to create a folder on the hard drive of your computer that will hold all thefiles needed for a given web site. This folder should contain no files except those needed todisplay this particular web site. By keeping everything contained in a folder in this way it willmake transferring your site to a server very easy. You can set this up without having to leaveBlueGriffon.
Use the various controls in the Save dialog (e.g. select a folder to view its contents in themain pane) to navigate to the vicinity where you would like to preserve the files youcreate while following this tutorial.Select the Create Folder command button to make a new folder for this dedicatedpurpose.In the textbox displayed beside the new folder, type a name you select for the web site,e.g. Tutorial_Site. Beware that embedding the blank character within file names or foldernames which will be fed to a web browser or a web server will lead to extracomplications. For simplicity, many people choose to use the underscore character "_" asa substitute for blanks in file or folder names.After typing the name of the new folder for this web site, press the Enter key or selectthe folder icon to navigate into this folder. The main pane of the dialog will be empty,as no files have yet been saved in this newly created folder or directory.Once both the Name and its location (e.g. within the Tutorial_Site folder) have beencorrectly typed and selected, select the Save command button.
9
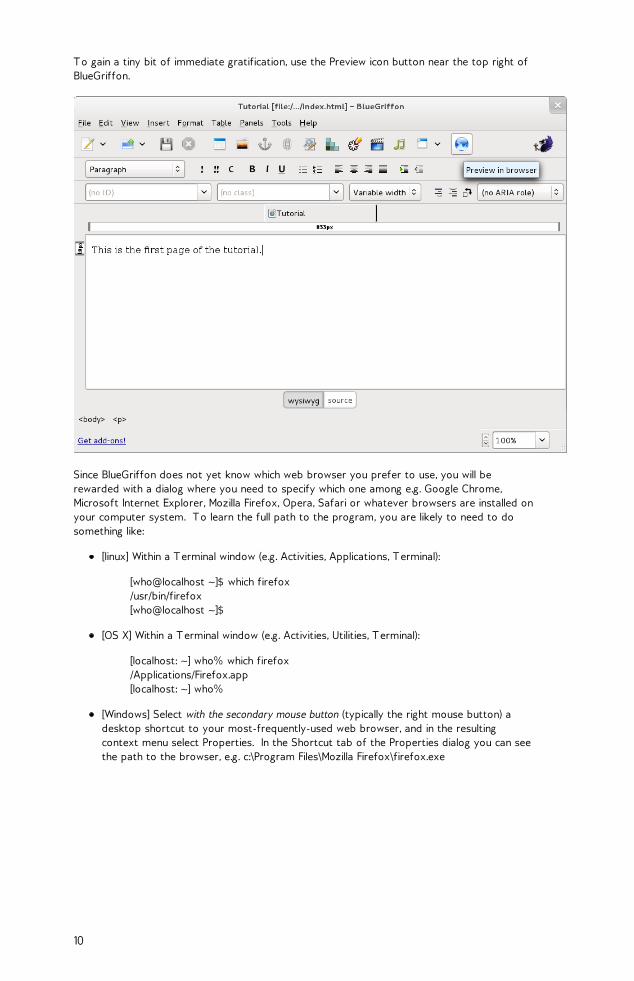
To gain a tiny bit of immediate gratification, use the Preview icon button near the top right ofBlueGriffon.
Since BlueGriffon does not yet know which web browser you prefer to use, you will berewarded with a dialog where you need to specify which one among e.g. Google Chrome,Microsoft Internet Explorer, Mozilla Firefox, Opera, Safari or whatever browsers are installed onyour computer system. To learn the full path to the program, you are likely to need to dosomething like:
[linux] Within a Terminal window (e.g. Activities, Applications, Terminal):
[who@localhost ~]$ which firefox/usr/bin/firefox[who@localhost ~]$
[OS X] Within a Terminal window (e.g. Activities, Utilities, Terminal):
[localhost: ~] who% which firefox/Applications/Firefox.app[localhost: ~] who%
[Windows] Select with the secondary mouse button (typically the right mouse button) adesktop shortcut to your most-frequently-used web browser, and in the resultingcontext menu select Properties. In the Shortcut tab of the Properties dialog you can seethe path to the browser, e.g. c:\Program Files\Mozilla Firefox\firefox.exe
10
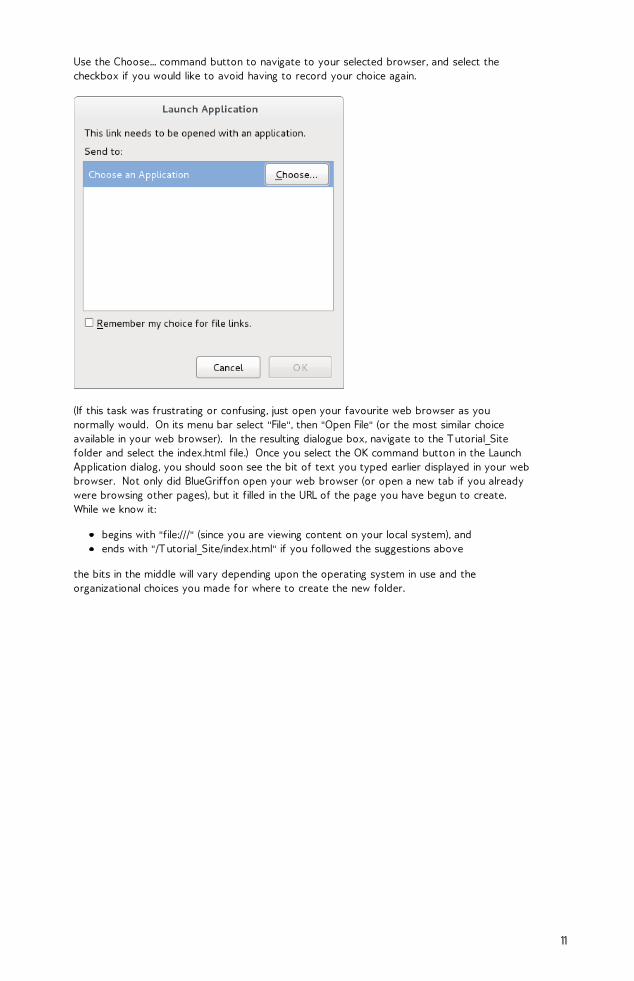
Use the Choose... command button to navigate to your selected browser, and select thecheckbox if you would like to avoid having to record your choice again.
(If this task was frustrating or confusing, just open your favourite web browser as younormally would. On its menu bar select "File", then "Open File" (or the most similar choiceavailable in your web browser). In the resulting dialogue box, navigate to the Tutorial_Sitefolder and select the index.html file.) Once you select the OK command button in the LaunchApplication dialog, you should soon see the bit of text you typed earlier displayed in your webbrowser. Not only did BlueGriffon open your web browser (or open a new tab if you alreadywere browsing other pages), but it filled in the URL of the page you have begun to create. While we know it:
begins with "file:///" (since you are viewing content on your local system), andends with "/Tutorial_Site/index.html" if you followed the suggestions above
the bits in the middle will vary depending upon the operating system in use and theorganizational choices you made for where to create the new folder.
11
4. ADDING AN IMAGE TO A PAGE
Most web pages have at least some visual (non-textual) content, so let's begin to see howBlueGriffon can be used to place an image on the page. Just as there are benefits to groupingall files for a website within one folder, there are benefits to having a nested folder dedicatedfor the purpose of containing all images used on the website. As you'll soon see keepingthings categorized in this way will make expansion and revision of the site relatively painless.
Do you already have a digital image saved in your computer's storage system that you wouldlike to add to the tiny web page we are constructing? Is it an appropriate size for viewing onthe web? Keep in mind that large files take longer to download than small files do. Further,there is seldom any advantage in sending more pixels to a web browser than it can display onyour screen (e.g. an 8 megapixel image will be scaled to a small fraction of its native size inorder to be fully displayed on a 1280 x 1024 pixel screen or monitor). If you have a suitableimage, make a copy of that image and save it in a new folder named "images" within the"Tutorial_Site" folder.
12
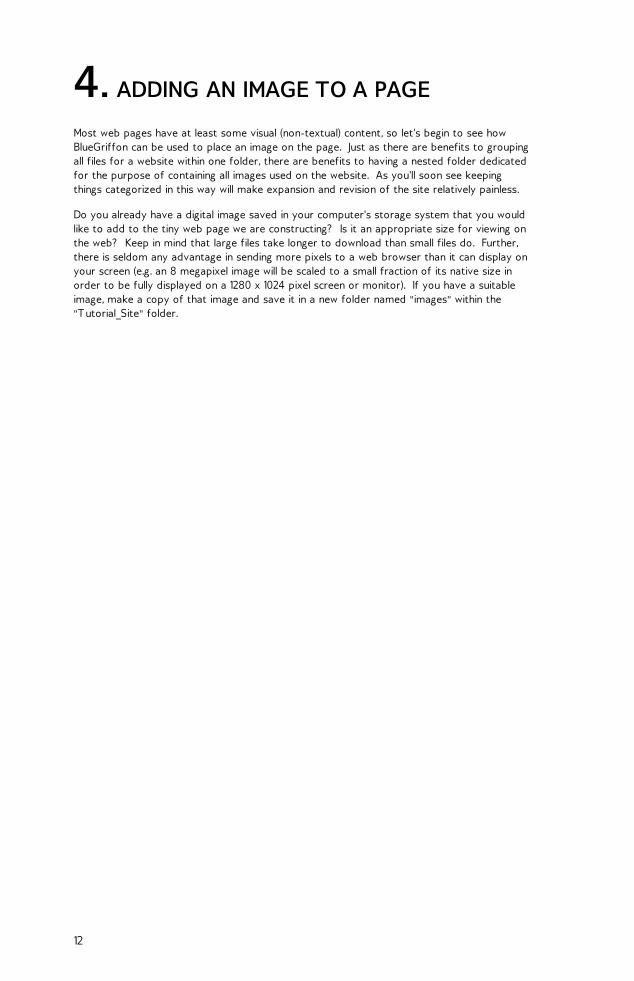
Alternatively, you may choose to copy the image displayed immediately below on this page.
You could use your image editing program (e.g. the GNU Image Manipulation Program) tocreate a new image from taking a screenshot of the area of the image above. But you willprobably find it simpler and quicker from within your web browser to select the image withthe secondary mouse button, then select "Save Image As..." from the resulting context menu. Remember to create a new folder named "images" within the "Tutorial_Site" folder, and thensave cheese.jpg within the images folder.
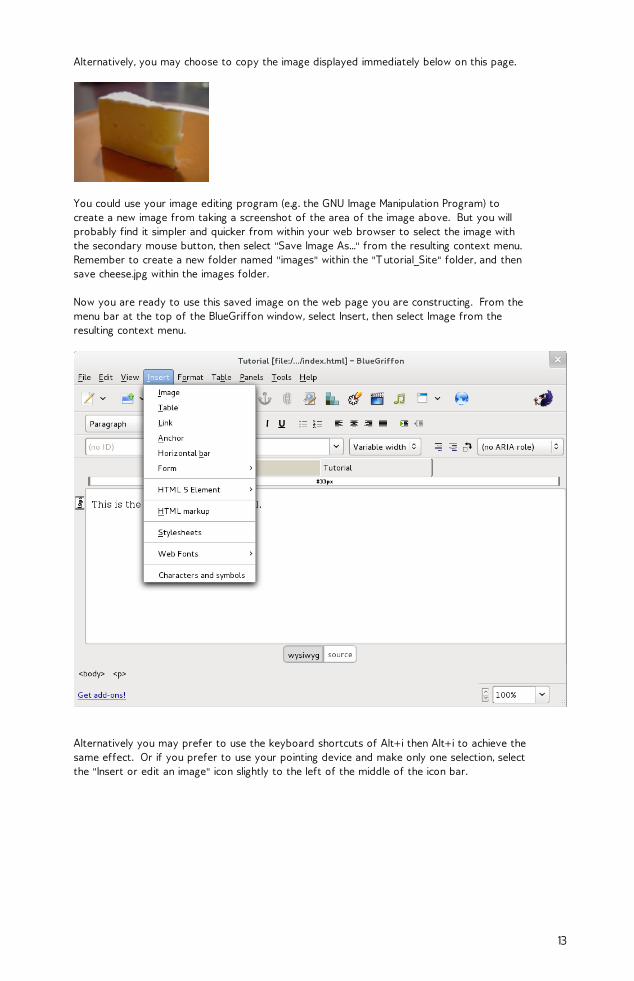
Now you are ready to use this saved image on the web page you are constructing. From themenu bar at the top of the BlueGriffon window, select Insert, then select Image from theresulting context menu.
Alternatively you may prefer to use the keyboard shortcuts of Alt+i then Alt+i to achieve thesame effect. Or if you prefer to use your pointing device and make only one selection, selectthe "Insert or edit an image" icon slightly to the left of the middle of the icon bar.
13
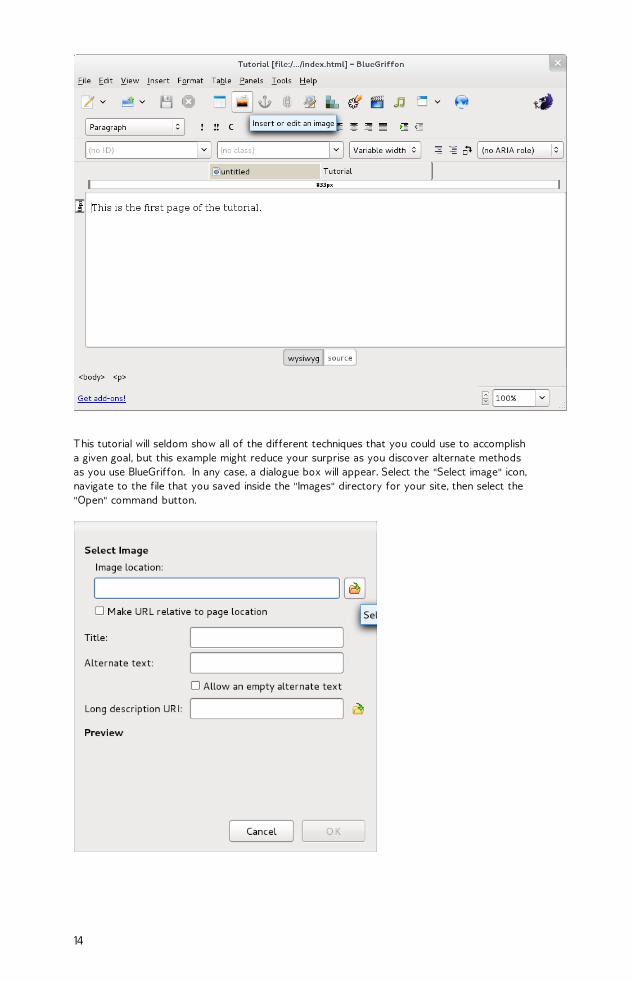
This tutorial will seldom show all of the different techniques that you could use to accomplisha given goal, but this example might reduce your surprise as you discover alternate methodsas you use BlueGriffon. In any case, a dialogue box will appear. Select the "Select image" icon,navigate to the file that you saved inside the "Images" directory for your site, then select the"Open" command button.
14

Back in the "Select Image" dialog you will notice that your choice has automatically filled in thepath to your selected image, and selected the checkbox "Make URL relative to page location". You may also notice that the "OK" command button is not yet available. BlueGriffon isencouraging you to supply some useful information in the "Alternate text:" textbox. Thesewords will be:
used for those who use a screen reader program to hear what is on your web page,displayed to you when you are proofreading your website and somehow failed to uploadthis image file to its correct location, andother possibly infrequent but useful occasions.
Once you select the OK button, the Image should appear within your web page. Were yousurprised by where the image was displayed? There is:
no need to delete the image,no need to more carefully select the cursor position, andno need to insert it again.
15
Remember, BlueGriffon is a WYSIWYG editor, so just drag and drop the image to the locationbefore / within / after the text where you would like for it to appear.
Now would be a good time to save the page with the image inserted. Merely select "File" onthe menu bar, then select "Save", or as before by selecting the "Save" icon button near theupper left corner of the BlueGriffon window. In either case, you will notice this is completedpromptly (without you having to supply a Name and T itle, etc. as you did the first time).
If you left the preview of your page open in your web browser, just return to that tab orwindow and Reload or Refresh the page to view the changed contents. Otherwise, you canselect the "Preview" icon in BlueGriffon again.
If you have insatiable curiousity for trying to understand the inner workings of things, oralready know some HTML, you may wish to select the "source" command button at thebottom center of the BlueGriffon window. This will reveal the instructions for the browser onwhere to find the image file, etc. that BlueGriffon has constructed for you. Yes, you couldchoose to alter the content of or the markup for the page in this view, but it may beinfrequently or even never that this would be an attractive option for you. Selecting theadjacent "wysiwyg" command button will revert to the more familiar view of your web page.
As you may have noticed if you peeked at the HTML source for this page, the technique thatis used to tell a web browser where to find an image file is by using a URL (an acronym forUniversal Resource Locater). Forming links via URLs can be used for other purposes, and thatis the fundamental innovation which makes presenting information on the web so productiveand attractive. Next we will learn more about these hyperlinks.
16
5. USING LINKS
First, there needs to be another page to link to. To make another page in your site, just selectthe "Create a new page" icon in the upper left corner of the BlueGriffon window. (Or use Alt+fthen Alt+n to accomplish the same goal.) A new blank page will appear in a new tab. For nowjust enter some new text in the page, select the "Save file to a local location" icon, give thepage a title, and save the page in the Tutorial_Site directory. These are the same steps thatwere used to save the first page. This time when it comes time to name the HTML file, youneed to name it something other than index.html, as filenames must be unique within adirectory. Remember to avoid spaces in the file name. In the example, the file for the secondpage is called second_page.html (Note the underscore).
Note that the first page is still displayed in its own tab. Select the tab for the first page, editit to add and then select some text that will serve as a link to the second page. (Text isselected by clicking and dragging the mouse, in much the same way you would in a wordprocessor.) Links can be associated with words, sentences, paragraphs, individual letters oreven spaces. This example will just use one word as a link. Highlight (select) the word that willcontain the link, then click on the "Insert or edit a link" icon near the top center of theBlueGriffon window. (If you prefer keyboard shortcuts, you have probably already discoveredAlt+i followed by Alt+l. To reduce the irritation of those who prefer to use their pointingdevice, we will not include more parenthetical clues such as this one.)
17
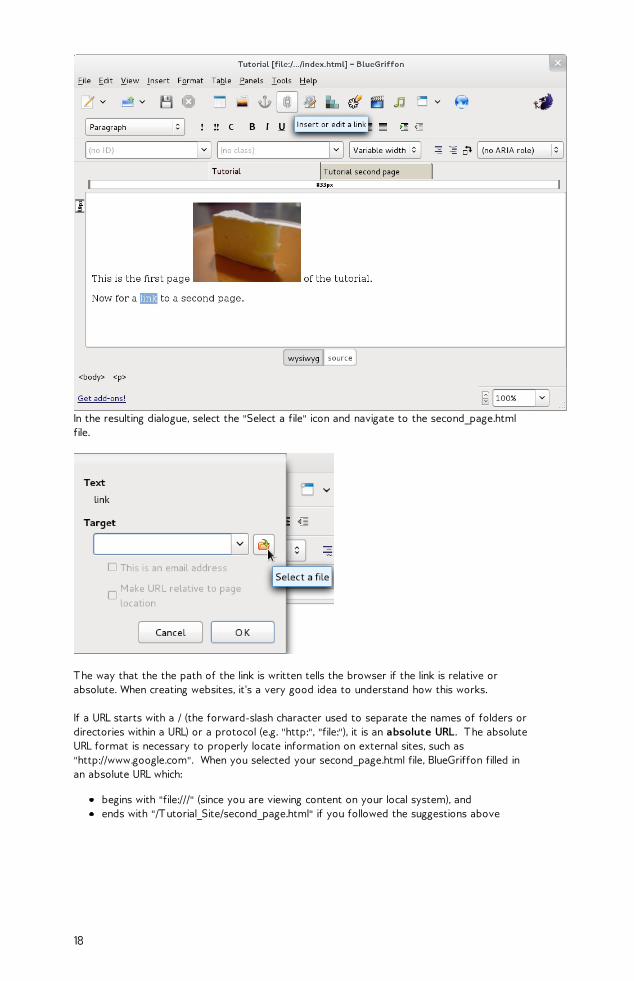
In the resulting dialogue, select the "Select a file" icon and navigate to the second_page.htmlfile.
The way that the the path of the link is written tells the browser if the link is relative orabsolute. When creating websites, it's a very good idea to understand how this works.
If a URL starts with a / (the forward-slash character used to separate the names of folders ordirectories within a URL) or a protocol (e.g. "http:", "file:"), it is an absolute URL. The absoluteURL format is necessary to properly locate information on external sites, such as"http://www.google.com". When you selected your second_page.html file, BlueGriffon filled inan absolute URL which:
begins with "file:///" (since you are viewing content on your local system), andends with "/Tutorial_Site/second_page.html" if you followed the suggestions above
18
but the bits in the middle will vary depending upon the operating system in use and theorganizational choices you made when you created this web folder. There is a seriousdrawback to using an absolute URL here, however. If at a later time you decide to move thelocation of your site to a different web address or change the location of a directory within asite, you would have go back and change all the links in the site to point to the new location.Web pages can easily have tens to hundreds of links, so having to change all of them each timea directory is moved would make managing a web site very unpleasant and error-prone.
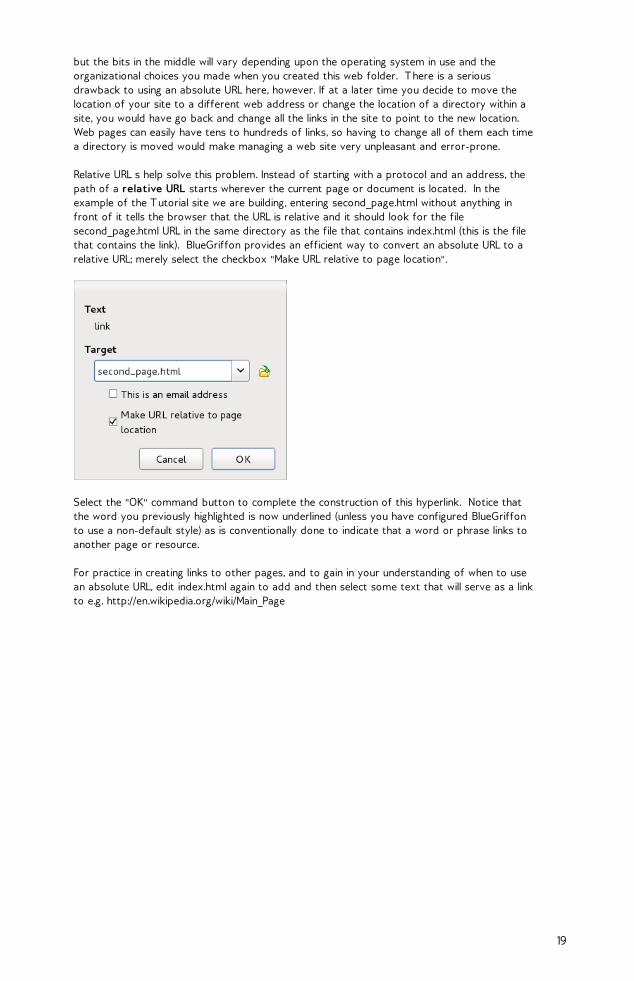
Relative URL s help solve this problem. Instead of starting with a protocol and an address, thepath of a relative URL starts wherever the current page or document is located. In theexample of the Tutorial site we are building, entering second_page.html without anything infront of it tells the browser that the URL is relative and it should look for the filesecond_page.html URL in the same directory as the file that contains index.html (this is the filethat contains the link). BlueGriffon provides an efficient way to convert an absolute URL to arelative URL; merely select the checkbox "Make URL relative to page location".
Select the "OK" command button to complete the construction of this hyperlink. Notice thatthe word you previously highlighted is now underlined (unless you have configured BlueGriffonto use a non-default style) as is conventionally done to indicate that a word or phrase links toanother page or resource.
For practice in creating links to other pages, and to gain in your understanding of when to usean absolute URL, edit index.html again to add and then select some text that will serve as a linkto e.g. http://en.wikipedia.org/wiki/Main_Page
19
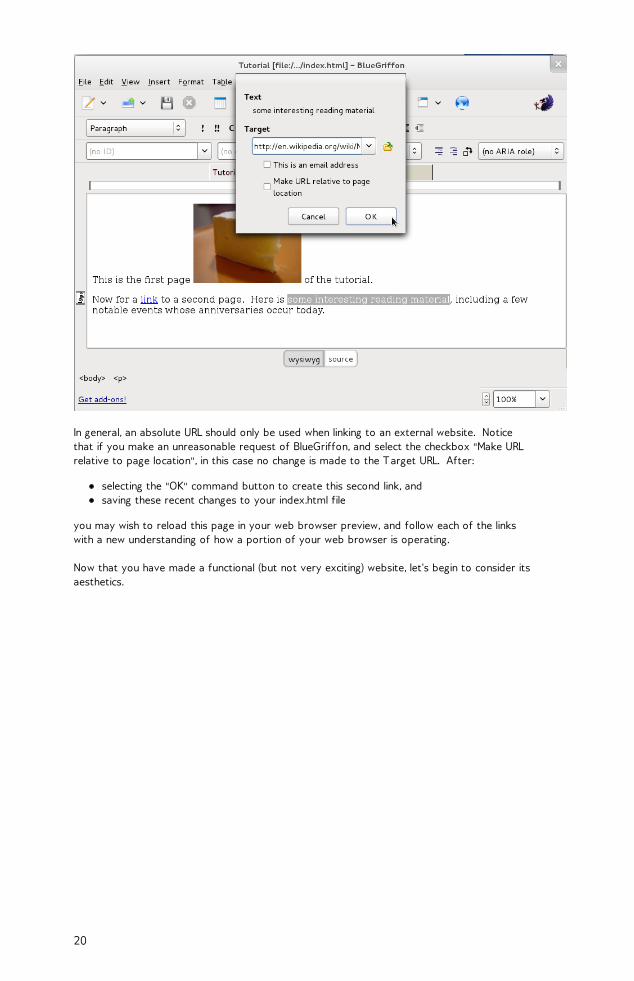
In general, an absolute URL should only be used when linking to an external website. Noticethat if you make an unreasonable request of BlueGriffon, and select the checkbox "Make URLrelative to page location", in this case no change is made to the Target URL. After:
selecting the "OK" command button to create this second link, andsaving these recent changes to your index.html file
you may wish to reload this page in your web browser preview, and follow each of the linkswith a new understanding of how a portion of your web browser is operating.
Now that you have made a functional (but not very exciting) website, let's begin to consider itsaesthetics.
20
STYLES6. INLINE STYLES7. USING EMBEDDED STYLES8. EXTERNAL CASCADING STYLE SHEETS9. ALTERNATE STYLE SHEETS
21

6. INLINE STYLES
HTML is well suited to setting up links to different pages, images and locations on the net. Itwas not designed for telling a browser how that information should be presented in minutedetail. In the first decade or less of the use of HTML, some web designers attempted to finetune the layout, spacing, and other aspects of the appearance of a web page by using variousHTML tags. Some of these tags were implemented in only one or a few browsers, and sometags which were recognized and implemented by multiple web browsers were rendered indifferent ways by each browser. Even if someone invested in the extra work of havingmultiple sets of browser-specific tags which were conditionally included in a file, some webpages were not displayed gracefully, attractively, or as intended in some browsers.
The solution to this problem was to create a standard for specifying the presentation ofHTML that would be the same in all browsers. This standard is called CSS, or Cascading StyleSheets. It is certainly beyond the scope of this tutorial to explain the intricacies of how thisworks. Fortunately BlueGriffon does a lot of this work for you. All you really need to know atthis point is that HTML handles the content of the site (text, links, images, etc.) and stylesdetermine how that content should be presented. CSS may be used to control the visualappearance of your web page both on screen and on paper (should a user choose to printsome of your content), as well as in other media. So, content first, then worry about how itlooks. This approach has two distinct advantages. First, there is a much greater chance of yoursite looking the same no matter which browser it is viewed on. Second, if you decide that youwant to change the look of your site, all that is required is changing the style associated withthe site's content, without having to re-do the whole site from scratch.
USING INLINE STYLES
You may wonder why the word cascading is used in Cascading Style Sheets. CSS provides fora hierarchy of sources of style information:
default rules (initial values) from the web browser (or user agent)rules in author's style sheetrules in user's style sheet!important rules in author's style sheet!important rules in user's style sheet
22
Rules found in sources at the bottom of this list override rules found earlier in the hierarchy. This allows e.g. a user with a slight visual impairment to ensure that all text is rendered in alarger font size, even if the author of a website thought it would be cute to use a tiny font s ize. But if a user does not create or have their own style sheet, then the author's preference for asmaller font s ize will overrule the default font size which the browser would have used.
For the large majority of the time while you are working through this tutorial, you will be in therole of creating rules in the author's style sheet. For simplicity, we will assume that you havenot already constructed your own over-riding user's style sheet. If you do not know what auser's style sheet is or where it might be stored, you may skip reading the remainder of thissentence; if you have constructed your own user's style sheet, it may be less confusing for youto disable it for the duration of this tutorial.
Another aspect of the cascading process is the spatial order of appearance. The web browser(or user agent) will honor the most recent CSS rule which it has encountered as it scans orreads the web page when it renders a given element. This allows one to describe uniquedecorative elements with the same mechanism that is used to describe the overall uniformlook and feel within a entire document or website.
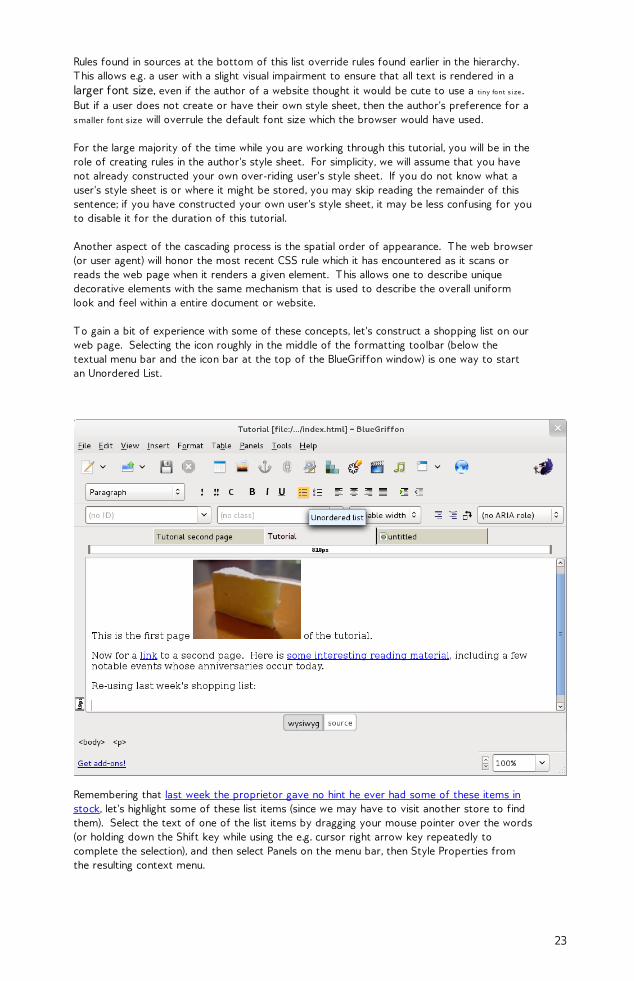
To gain a bit of experience with some of these concepts, let's construct a shopping list on ourweb page. Selecting the icon roughly in the middle of the formatting toolbar (below thetextual menu bar and the icon bar at the top of the BlueGriffon window) is one way to startan Unordered List.
Remembering that last week the proprietor gave no hint he ever had some of these items instock, let's highlight some of these list items (since we may have to visit another store to findthem). Select the text of one of the list items by dragging your mouse pointer over the words(or holding down the Shift key while using the e.g. cursor right arrow key repeatedly tocomplete the selection), and then select Panels on the menu bar, then Style Properties fromthe resulting context menu.
23
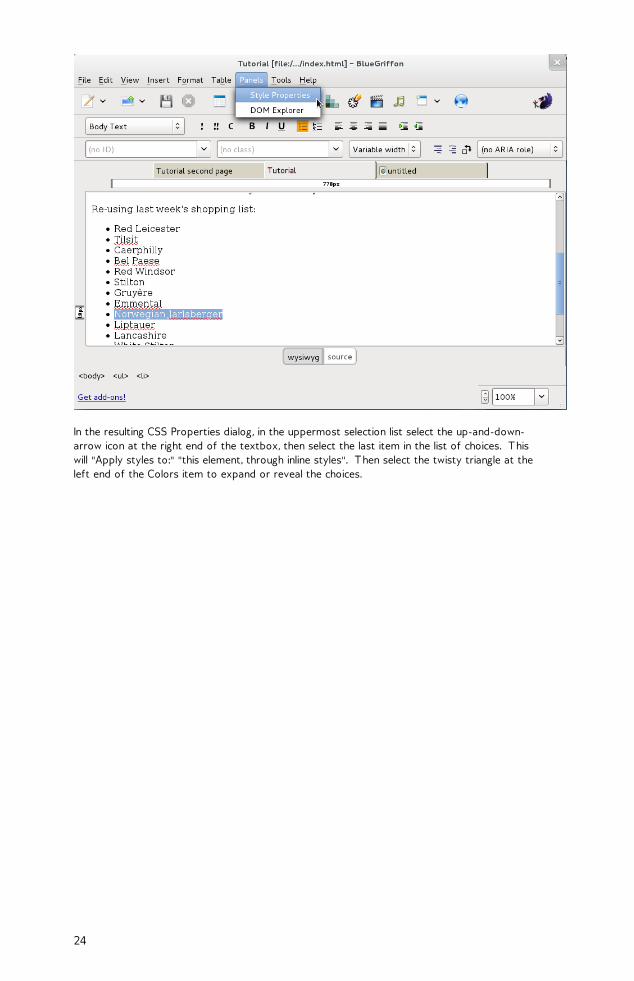
In the resulting CSS Properties dialog, in the uppermost selection list select the up-and-down-arrow icon at the right end of the textbox, then select the last item in the list of choices. Thiswill "Apply styles to:" "this element, through inline styles". Then select the twisty triangle at theleft end of the Colors item to expand or reveal the choices.
24
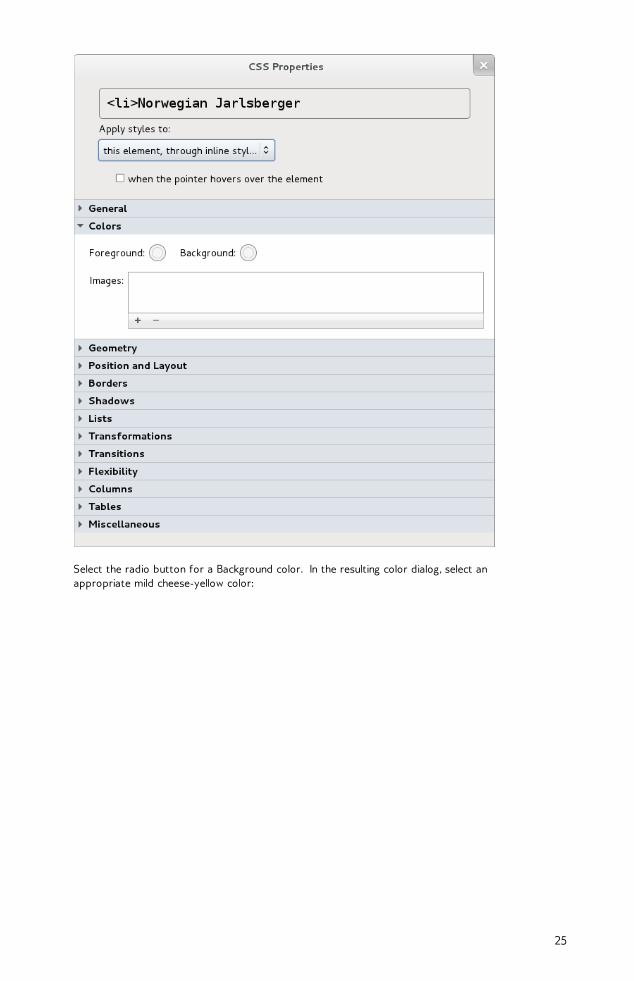
Select the radio button for a Background color. In the resulting color dialog, select anappropriate mild cheese-yellow color:
25
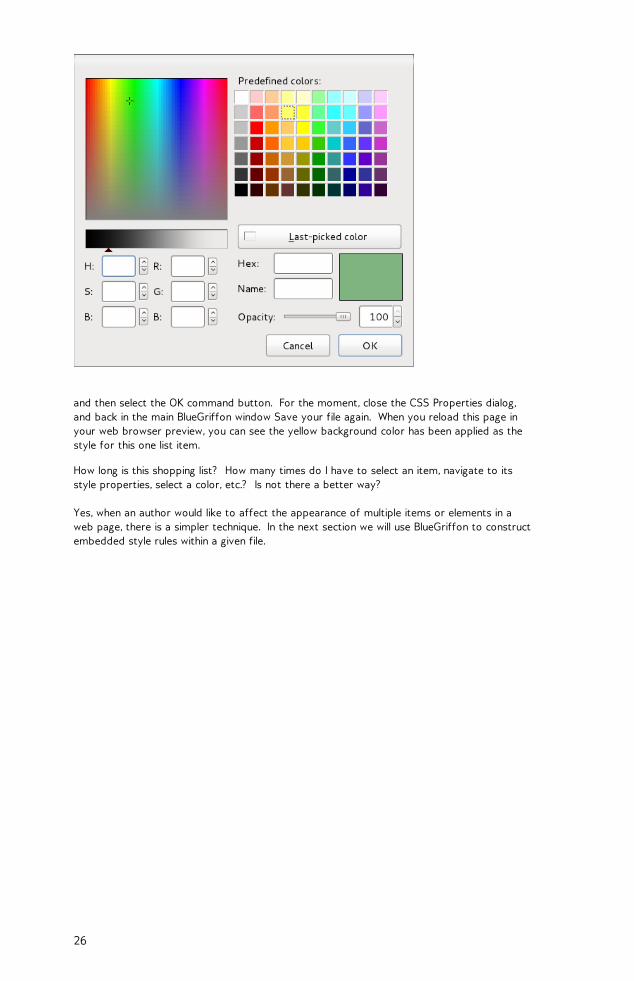
and then select the OK command button. For the moment, close the CSS Properties dialog,and back in the main BlueGriffon window Save your file again. When you reload this page inyour web browser preview, you can see the yellow background color has been applied as thestyle for this one list item.
How long is this shopping list? How many times do I have to select an item, navigate to itsstyle properties, select a color, etc.? Is not there a better way?
Yes, when an author would like to affect the appearance of multiple items or elements in aweb page, there is a simpler technique. In the next section we will use BlueGriffon to constructembedded style rules within a given file.
26

7. USING EMBEDDED STYLES
In this section, we continue to construct and embellish our shopping list of cheeses in the fileindex.html.
Select the text for another list item, and reopen the CSS Properties dialog (via Panels, StyleProperties as before, or via Alt+p then Alt+s, or by selecting the "Set CSS styles" icon slightlyto the right of the middle of the icon bar), but this time change the selection to "Apply stylesto:" "all elements of same type...". Select a slightly cheesier orange-yellow hue this time, andthen select the OK command button.
In the "wysiwyg" view of the main BlueGriffon window (or in the web browser preview, afteryou Save the file again, and reload the view in the browser), you can see the background colorfor all of the list items except one has been changed. This illustrates one aspect of thehierarchical overrides in CSS; an inline style which you apply to a given element (e.g. list item)takes precedence over an embedded style which is applied to all elements of that type (e.g. alllist items within a given file).
Ah, but our goal had been to only highlight the items on the list which we feared might notever be available at this particular cheese shop, rather than every list item. CSS includes apowerful concept of selectors, which we can utilize if we supply a class for the items we wouldlike to style similarly. It is wise to use class names which convey meaning, or the significance ofthe distinction. So, for example, rather than naming our class "cheese-yellow-orange" we willname it "no" (since that was the simple response to our inquiry about this item last week). Then for example, if on next week's edition of our shopping list we begin to loose all hope offinding these items locally, we could change the background color for all items of class "no" tobe gray. (We could even change their "Visibility" to be "hidden".) Such changes would leavemore confusion in their wake if the class name simply echoed an initial description of how todisplay the element (e.g. "cheese-yellow-orange") rather than gave a semantic hint.
How do you prepare to use selectors in your style? You need to supply a class name forsome elements. Select a list item, and in the class textbox type in the class name, "no".
27
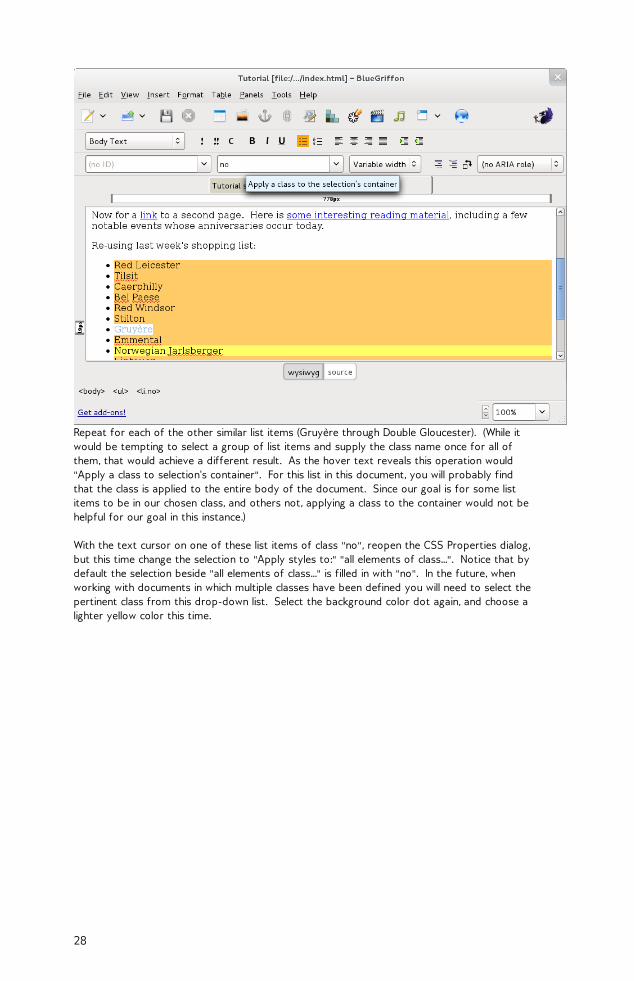
Repeat for each of the other similar list items (Gruyère through Double Gloucester). (While itwould be tempting to select a group of list items and supply the class name once for all ofthem, that would achieve a different result. As the hover text reveals this operation would"Apply a class to selection's container". For this list in this document, you will probably findthat the class is applied to the entire body of the document. Since our goal is for some listitems to be in our chosen class, and others not, applying a class to the container would not behelpful for our goal in this instance.)
With the text cursor on one of these list items of class "no", reopen the CSS Properties dialog,but this time change the selection to "Apply styles to:" "all elements of class...". Notice that bydefault the selection beside "all elements of class..." is filled in with "no". In the future, whenworking with documents in which multiple classes have been defined you will need to select thepertinent class from this drop-down list. Select the background color dot again, and choose alighter yellow color this time.
28
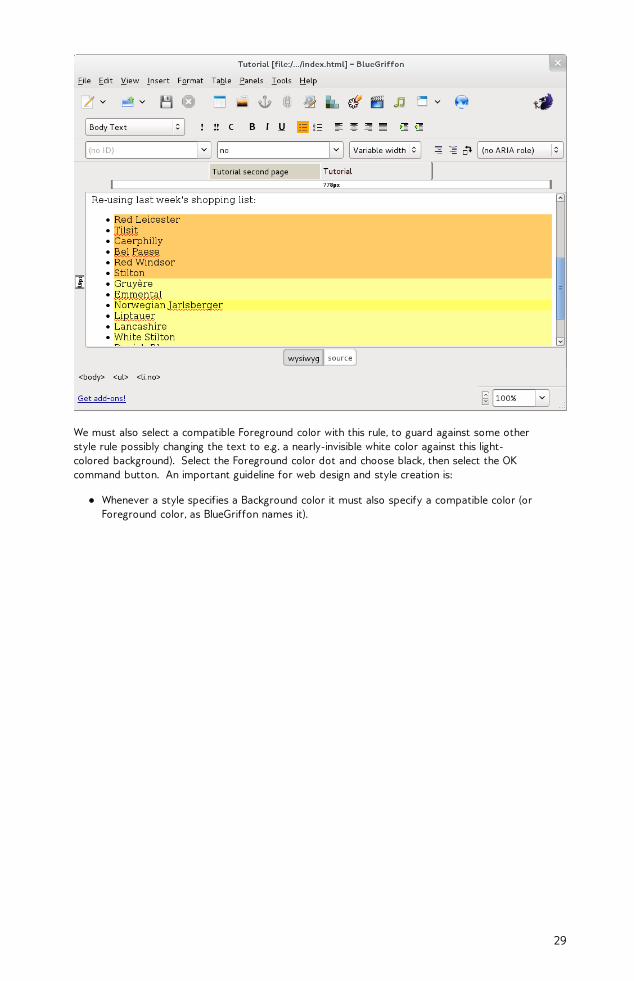
We must also select a compatible Foreground color with this rule, to guard against some otherstyle rule possibly changing the text to e.g. a nearly-invisible white color against this light-colored background). Select the Foreground color dot and choose black, then select the OKcommand button. An important guideline for web design and style creation is:
Whenever a style specifies a Background color it must also specify a compatible color (orForeground color, as BlueGriffon names it).
29
In the BlueGriffon window (or in the web browser preview window, after Saving the file andreloading the tab or page within browser) you will observe three different background colorsfor the various list items. This illustrates another aspect of the hierarchical overrides in CSS; an embedded style rule which has more specificity (e.g. it applies to items only with class="no")takes precedence over an embedded style which is applied to all elements (e.g. all list itemswithin a given file). This tutorial will not illustrate each of the techniques for determiningprecedence, and therefore the displayed or rendered style, when multiple style rules match agiven item. But there is a well-defined priority for predicting the deterministic outcome,regardless of which web browser is interpreting the style rules (in the absence ofimplementation errors within the browser).
Now you might want to get rid of the undesirable darker highlighting of the list items which arenot of class "no". Merely move your text cursor to be within one of those list items (RedLeicester through Stilton), and in the CSS Properties dialog (with the default selection of "Applystyles to:" "all elements of same type..."), select the Colors, Background dot yet again. Thistime select the upper left choice (white), then select the OK command button. Note thatBlueGriffon shows your previous highlighting of list items of class "no" still persists.
These exercises have demonstrated some of the flexibility and power of using CSS to controlthe appearance of your web page.
Using BlueGriffon to construct a stand-alone web page (i.e. an HTML file that you would like tosend as an email attachment) with inline style information or embedded style rules would bequite appropriate. The advantage is that all information (for both the content and the style) isinseparably contained in one file.
However, if you are using BlueGriffon to construct a web site, or even just a small portion of aweb site, using only inline styling or embedded style rules would be counterproductive. Thenext section will reveal why, and show the better alternative.
30

8. EXTERNAL CASCADING STYLE SHEETS
Maybe you are unsure that you like the default font choice that each browser would use torender your web page. You can select a cheesier font by Edit, Select All, and thenexpanding the General item in the CSS Properties dialogue.
31
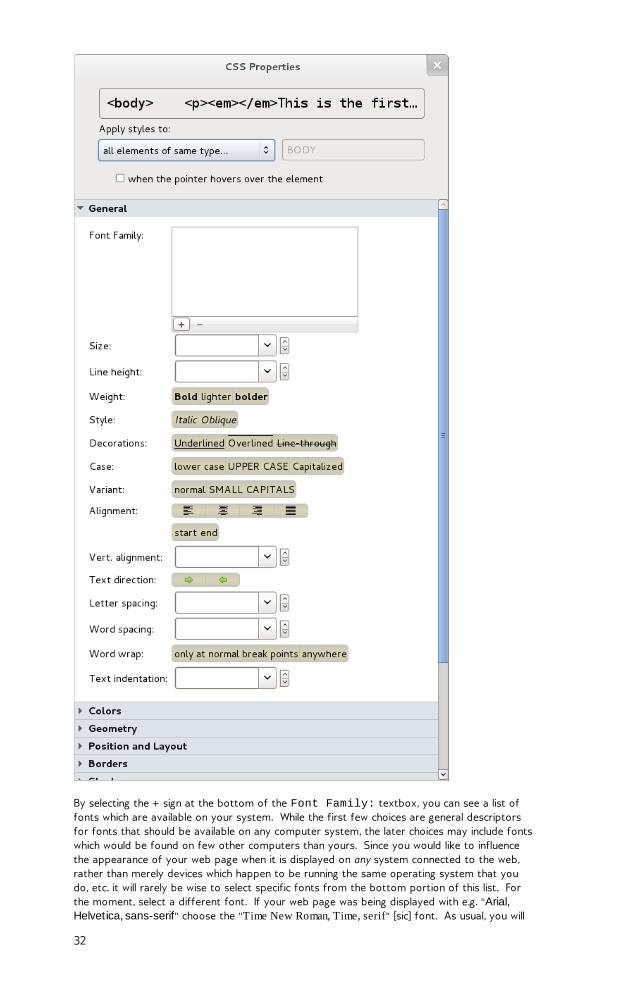
By selecting the + sign at the bottom of the Font Family: textbox, you can see a list offonts which are available on your system. While the first few choices are general descriptorsfor fonts that should be available on any computer system, the later choices may include fontswhich would be found on few other computers than yours. Since you would like to influencethe appearance of your web page when it is displayed on any system connected to the web,rather than merely devices which happen to be running the same operating system that youdo, etc. it will rarely be wise to select specific fonts from the bottom portion of this list. Forthe moment, select a different font. If your web page was being displayed with e.g. "Arial,Helvet ica, sans-serif" choose the "Time New Roman, Time, serif" [sic] font. As usual, you will
32
notice that this change is effective immediately in the BlueGriffon window, even before youclose the CSS Properties dialog.
Remember that much earlier in this tutorial you created another page? You may even stillhave it open in another tab within your BlueGriffon window. Select it to view it once more. While its content is still quite brief, you will notice that it is still rendered with the default font,rather than the one you just selected for the main page. Rather than creating a group of webpages which resemble a ransom note, with different fonts, etc. would not it be nice to makestyle changes in one place which affect all of the pages?
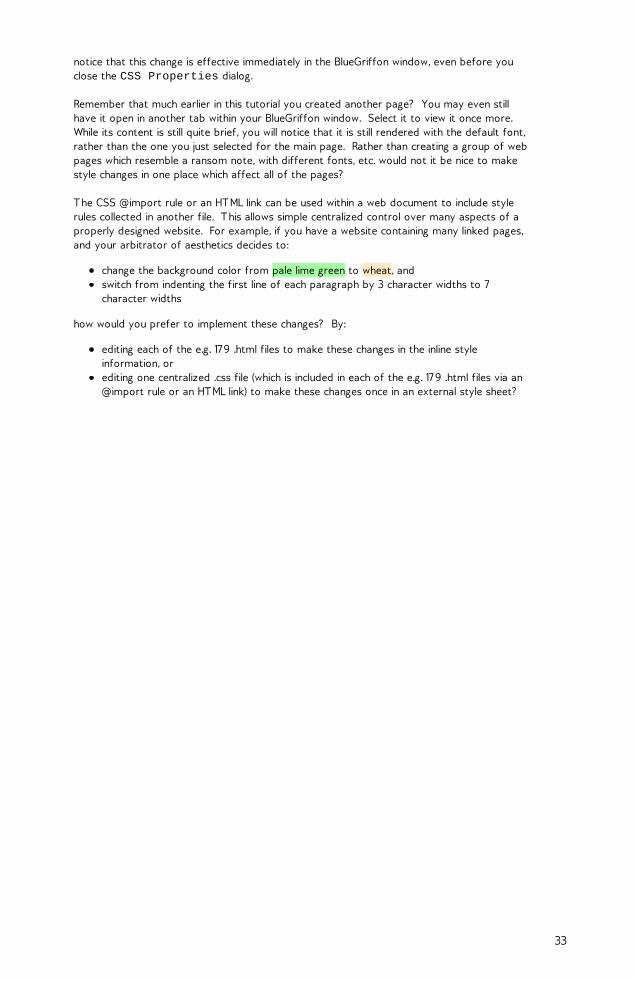
The CSS @import rule or an HTML link can be used within a web document to include stylerules collected in another file. This allows simple centralized control over many aspects of aproperly designed website. For example, if you have a website containing many linked pages,and your arbitrator of aesthetics decides to:
change the background color from pale lime green to wheat, andswitch from indenting the first line of each paragraph by 3 character widths to 7character widths
how would you prefer to implement these changes? By:
editing each of the e.g. 179 .html files to make these changes in the inline styleinformation, orediting one centralized .css file (which is included in each of the e.g. 179 .html files via an@import rule or an HTML link) to make these changes once in an external style sheet?
33
I thought so.
As usual, BlueGriffon spares you having to learn the details of how to write a CSS @importrule or a HTML link statement. (Although, as usual, once you have used BlueGriffon to createe.g. an external style sheet, you can use the source command button at the bottom centerof the BlueGriffon window to peek at the link it constructed for you, etc.)
[ The early releases of BlueGriffon do not include the ability to automatically export thecurrent style rules to a new external style sheet, so we include a few extra manual steps here. From a 2011-07-20 forum posting (which was once visible here), there is a hint that someBlueGriffon release newer than 1.1 may include this ability to export. ]
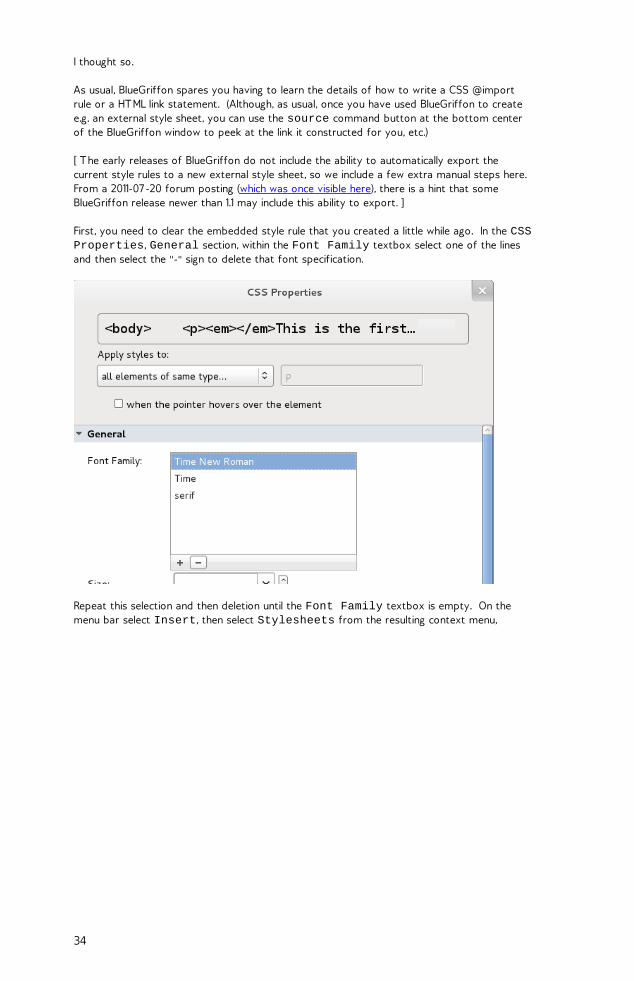
First, you need to clear the embedded style rule that you created a little while ago. In the CSSProperties, General section, within the Font Family textbox select one of the linesand then select the "-" sign to delete that font specification.
Repeat this selection and then deletion until the Font Family textbox is empty. On themenu bar select Insert, then select Stylesheets from the resulting context menu,
34
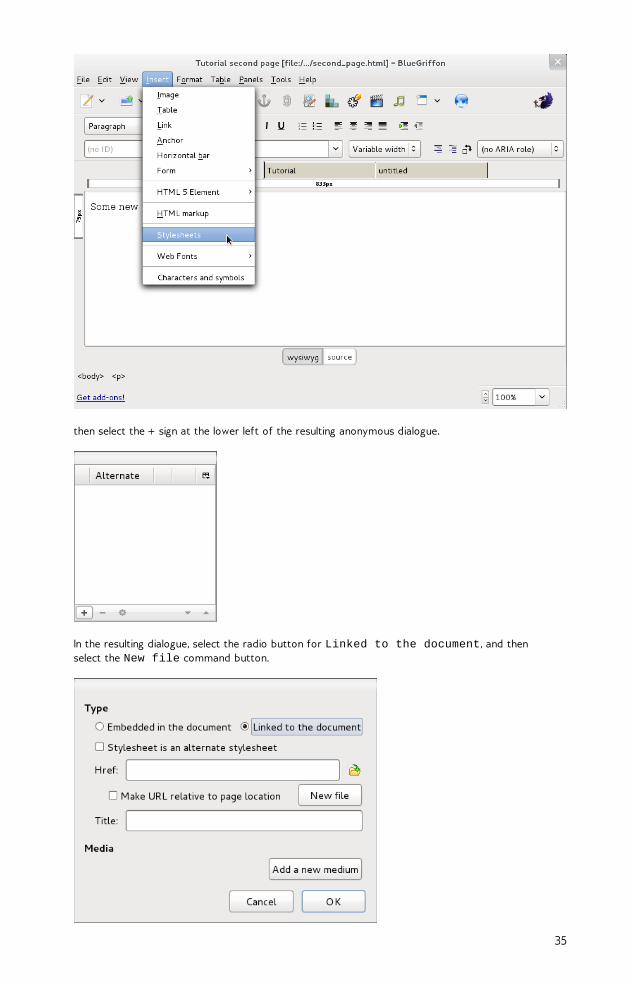
then select the + sign at the lower left of the resulting anonymous dialogue.
In the resulting dialogue, select the radio button for Linked to the document, and thenselect the New file command button.
35
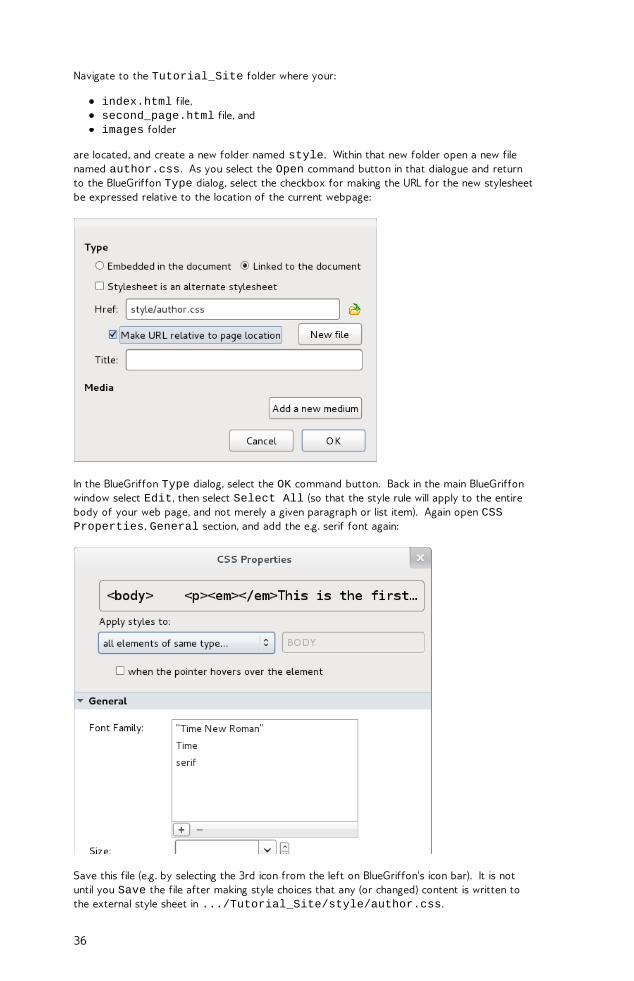
Navigate to the Tutorial_Site folder where your:
index.html file,second_page.html file, andimages folder
are located, and create a new folder named style. Within that new folder open a new filenamed author.css. As you select the Open command button in that dialogue and returnto the BlueGriffon Type dialog, select the checkbox for making the URL for the new stylesheetbe expressed relative to the location of the current webpage:
In the BlueGriffon Type dialog, select the OK command button. Back in the main BlueGriffonwindow select Edit, then select Select All (so that the style rule will apply to the entirebody of your web page, and not merely a given paragraph or list item). Again open CSSProperties, General section, and add the e.g. serif font again:
Save this file (e.g. by selecting the 3rd icon from the left on BlueGriffon's icon bar). It is notuntil you Save the file after making style choices that any (or changed) content is written tothe external style sheet in .../Tutorial_Site/style/author.css.
36
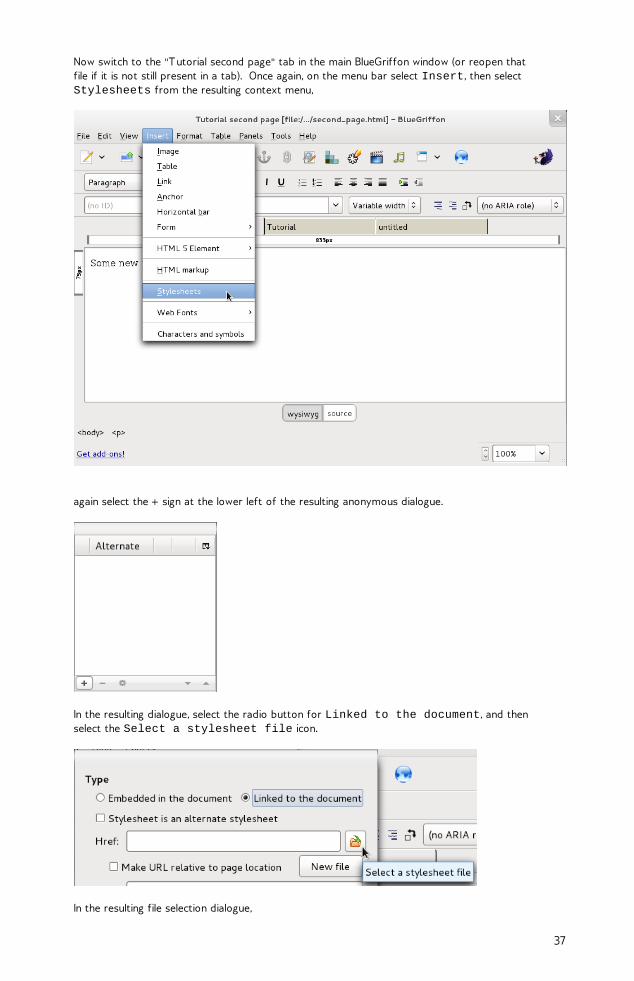
Now switch to the "Tutorial second page" tab in the main BlueGriffon window (or reopen thatfile if it is not still present in a tab). Once again, on the menu bar select Insert, then selectStylesheets from the resulting context menu,
again select the + sign at the lower left of the resulting anonymous dialogue.
In the resulting dialogue, select the radio button for Linked to the document, and thenselect the Select a stylesheet file icon.
In the resulting file selection dialogue,
37
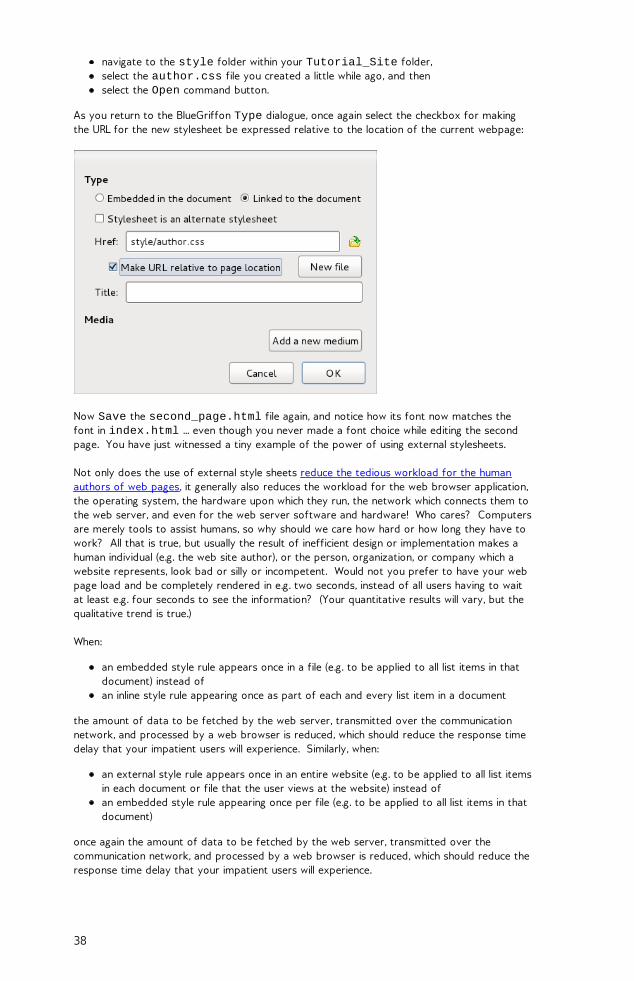
navigate to the style folder within your Tutorial_Site folder,select the author.css file you created a little while ago, and thenselect the Open command button.
As you return to the BlueGriffon Type dialogue, once again select the checkbox for makingthe URL for the new stylesheet be expressed relative to the location of the current webpage:
Now Save the second_page.html file again, and notice how its font now matches thefont in index.html ... even though you never made a font choice while editing the secondpage. You have just witnessed a tiny example of the power of using external stylesheets.
Not only does the use of external style sheets reduce the tedious workload for the humanauthors of web pages, it generally also reduces the workload for the web browser application,the operating system, the hardware upon which they run, the network which connects them tothe web server, and even for the web server software and hardware! Who cares? Computersare merely tools to assist humans, so why should we care how hard or how long they have towork? All that is true, but usually the result of inefficient design or implementation makes ahuman individual (e.g. the web site author), or the person, organization, or company which awebsite represents, look bad or silly or incompetent. Would not you prefer to have your webpage load and be completely rendered in e.g. two seconds, instead of all users having to waitat least e.g. four seconds to see the information? (Your quantitative results will vary, but thequalitative trend is true.)
When:
an embedded style rule appears once in a file (e.g. to be applied to all list items in thatdocument) instead ofan inline style rule appearing once as part of each and every list item in a document
the amount of data to be fetched by the web server, transmitted over the communicationnetwork, and processed by a web browser is reduced, which should reduce the response timedelay that your impatient users will experience. Similarly, when:
an external style rule appears once in an entire website (e.g. to be applied to all list itemsin each document or file that the user views at the website) instead ofan embedded style rule appearing once per file (e.g. to be applied to all list items in thatdocument)
once again the amount of data to be fetched by the web server, transmitted over thecommunication network, and processed by a web browser is reduced, which should reduce theresponse time delay that your impatient users will experience.
38

9. ALTERNATE STYLE SHEETS
You can also supply an external style sheet which is available as an option to be selected bythe visitors who view your web page. Once again, on the menu bar select Insert, then selectStylesheets from the resulting context menu,
again select the + sign at the lower left of the resulting anonymous dialogue.
In the resulting dialogue:
select the radio button for Linked to the document,select the checkbox to designate this stylesheet as an alternate stylesheet,supply a Title for the stylesheet:
39
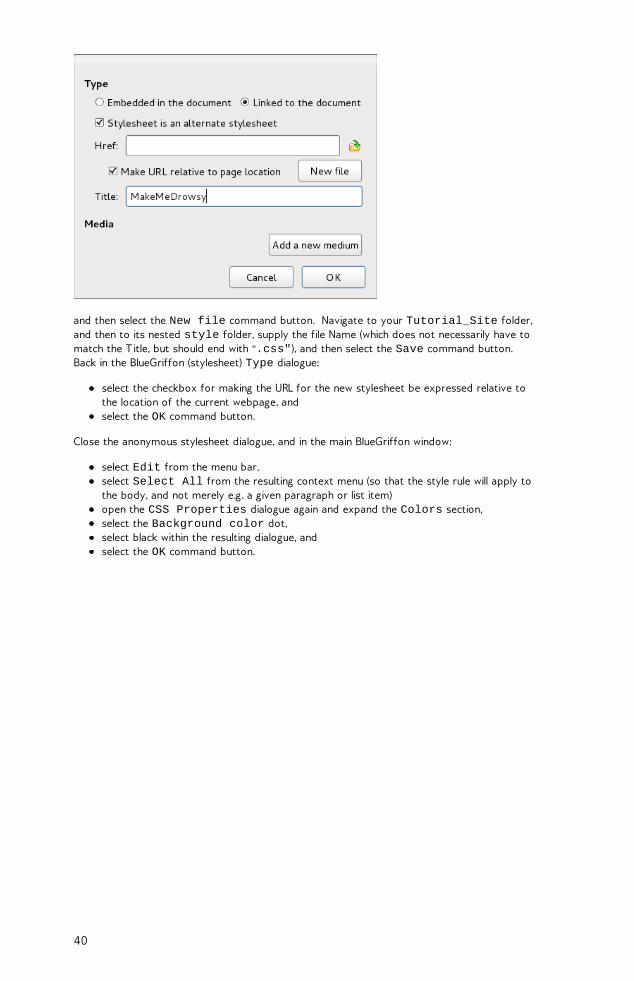
and then select the New file command button. Navigate to your Tutorial_Site folder,and then to its nested style folder, supply the file Name (which does not necessarily have tomatch the T itle, but should end with ".css"), and then select the Save command button. Back in the BlueGriffon (stylesheet) Type dialogue:
select the checkbox for making the URL for the new stylesheet be expressed relative tothe location of the current webpage, andselect the OK command button.
Close the anonymous stylesheet dialogue, and in the main BlueGriffon window:
select Edit from the menu bar,select Select All from the resulting context menu (so that the style rule will apply tothe body, and not merely e.g. a given paragraph or list item)open the CSS Properties dialogue again and expand the Colors section,select the Background color dot,select black within the resulting dialogue, andselect the OK command button.
40
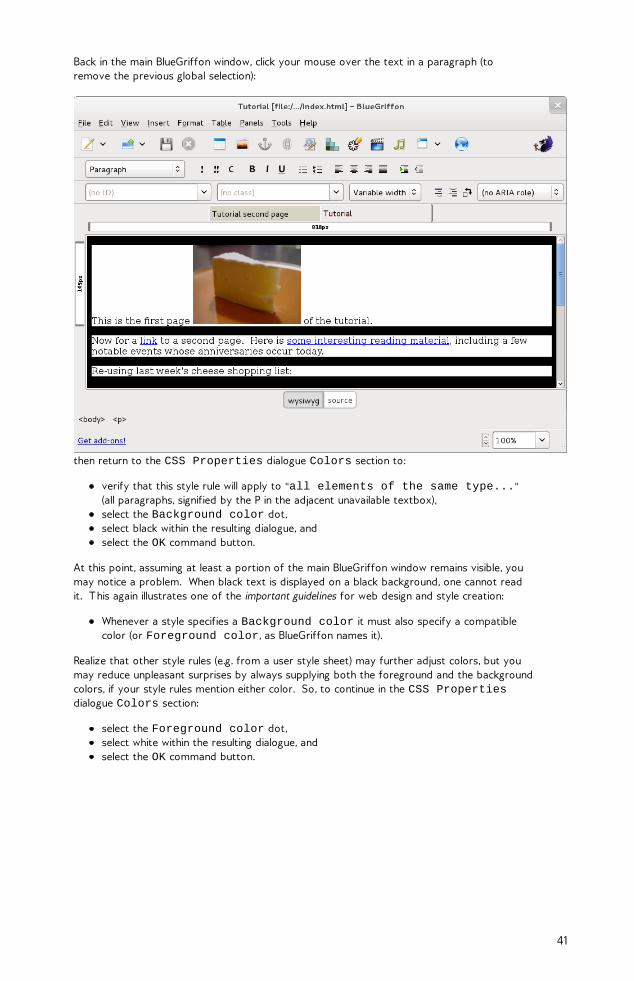
Back in the main BlueGriffon window, click your mouse over the text in a paragraph (toremove the previous global selection):
then return to the CSS Properties dialogue Colors section to:
verify that this style rule will apply to "all elements of the same type..."(all paragraphs, signified by the P in the adjacent unavailable textbox),select the Background color dot,select black within the resulting dialogue, andselect the OK command button.
At this point, assuming at least a portion of the main BlueGriffon window remains visible, youmay notice a problem. When black text is displayed on a black background, one cannot readit. This again illustrates one of the important guidelines for web design and style creation:
Whenever a style specifies a Background color it must also specify a compatiblecolor (or Foreground color, as BlueGriffon names it).
Realize that other style rules (e.g. from a user style sheet) may further adjust colors, but youmay reduce unpleasant surprises by always supplying both the foreground and the backgroundcolors, if your style rules mention either color. So, to continue in the CSS Propertiesdialogue Colors section:
select the Foreground color dot,select white within the resulting dialogue, andselect the OK command button.
41
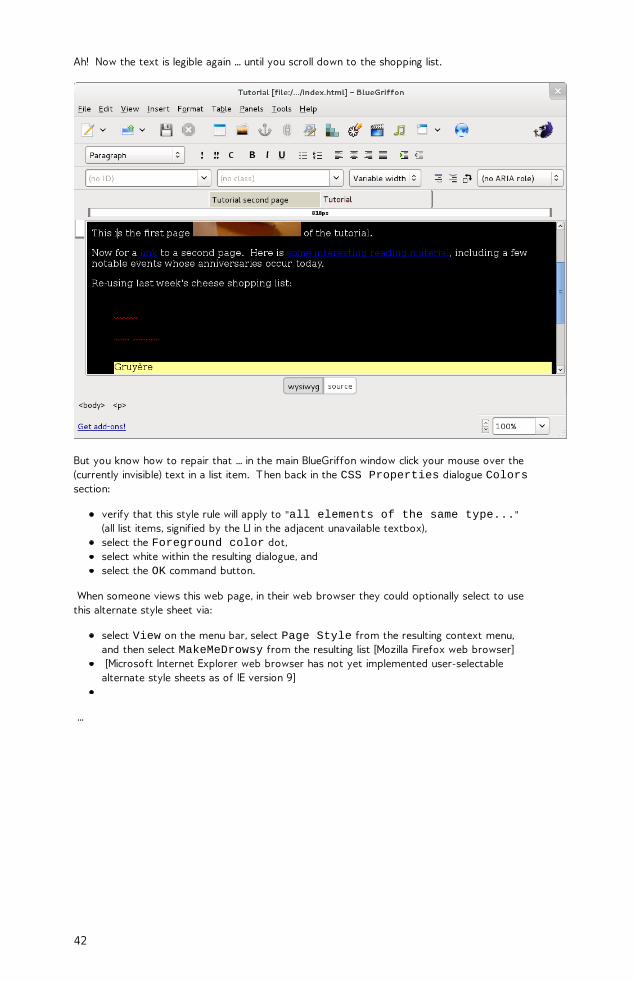
Ah! Now the text is legible again ... until you scroll down to the shopping list.
But you know how to repair that ... in the main BlueGriffon window click your mouse over the(currently invisible) text in a list item. Then back in the CSS Properties dialogue Colorssection:
verify that this style rule will apply to "all elements of the same type..."(all list items, signified by the LI in the adjacent unavailable textbox),select the Foreground color dot,select white within the resulting dialogue, andselect the OK command button.
When someone views this web page, in their web browser they could optionally select to usethis alternate style sheet via:
select View on the menu bar, select Page Style from the resulting context menu,and then select MakeMeDrowsy from the resulting list [Mozilla Firefox web browser] [Microsoft Internet Explorer web browser has not yet implemented user-selectablealternate style sheets as of IE version 9]
...
42

APPENDIX10. CREDITS
43
10. CREDITS
LICENSE
All chapters copyright of the authors (see below). Unless otherwise stated all chapters in thismanual licensed with GNU General Public License version 2
This documentation is free documentation; you can redistribute it and/or modify it under theterms of the GNU General Public License as published by the Free Software Foundation; eitherversion 2 of the License, or (at your option) any later version.
This documentation is distributed in the hope that it will be useful, but WITHOUT ANYWARRANTY; without even the implied warranty of MERCHANTABILITY or FITNESS FOR APART ICULAR PURPOSE. See the GNU General Public License for more details.
You should have received a copy of the GNU General Public License along with thisdocumentation; if not, write to the Free Software Foundation, Inc., 51 Franklin Street, Fifth Floor,Boston, MA 02110-1301, USA.
AUTHORS
This manual originally forged for NvU, a predecessor of BlueGriffon, at Your Machines :http://www.yourmachines.org/ . Check out Your Machines for other very interesting and wellwritten manuals! Many thanks for to Simon Yuill for porting the manual from Your Machinesand agreeing to re-licensing it under the GPL.
Introduction © Ben Dembroski 2006, 2007 Modifications: adam hyde 2007 , 2008 Andrew Lowenthal 2008 Fred Clausen 2008 Gustav Delius 2009 Thomas Middleton 2008 Nelson Strother 2011
Contents of a Simple Website © Ben Dembroski 2007 Modifications: adam hyde 2007 , 2008 Andrew Lowenthal 2008 Rene Snel 2008 Thomas Middleton 2008 Nelson Strother 2011
Creating Text on a Web Page © Ben Dembroski 2007 Modifications: adam hyde 2007 , 2008 Andrew Lowenthal 2008 Thomas Middleton 2008 Nelson Strother 2011
44
Adding an Image to a Page © Ben Dembroski 2007 Modifications: adam hyde 2007 , 2008 Andrew Lowenthal 2008 Thomas Middleton 2008 Nelson Strother 2011
Using Links © Ben Dembroski 2007 Modifications: adam hyde 2007 , 2008 Thomas Middleton 2008 Nelson Strother 2011
Using Inline Styles to Control the Appearance of a Page © Nelson Strother 2011
Using Embedded Styles to Control the Appearance of a Page © Nelson Strother 2011
Using External Cascading Style Sheets to Control the Appearance of a Set of Pages © Nelson Strother 2011
Providing an Alternate Style Sheet for the User to Choose © Nelson Strother 2011
Credits © adam hyde 2006, 2007 , 2008 Modifications: Nelson Strother 2011
Free manuals for free software
GENERAL PUBLIC LICENSE
Version 2, June 1991
Copyright (C) 1989, 1991 Free Software Foundation, Inc. 51 Franklin Street, Fifth Floor, Boston, MA 02110-1301, USA
Everyone is permitted to copy and distribute verbatim copies of this license document, but changing it is not allowed.
Preamble
45
The licenses for most software are designed to take away your freedom to share and changeit. By contrast, the GNU General Public License is intended to guarantee your freedom to shareand change free software--to make sure the software is free for all its users. This GeneralPublic License applies to most of the Free Software Foundation's software and to any otherprogram whose authors commit to using it. (Some other Free Software Foundation software iscovered by the GNU Lesser General Public License instead.) You can apply it to your programs,too.
When we speak of free software, we are referring to freedom, not price. Our General PublicLicenses are designed to make sure that you have the freedom to distribute copies of freesoftware (and charge for this service if you wish), that you receive source code or can get it ifyou want it, that you can change the software or use pieces of it in new free programs; andthat you know you can do these things.
To protect your rights, we need to make restrictions that forbid anyone to deny you theserights or to ask you to surrender the rights. These restrictions translate to certainresponsibilities for you if you distribute copies of the software, or if you modify it.
For example, if you distribute copies of such a program, whether gratis or for a fee, you mustgive the recipients all the rights that you have. You must make sure that they, too, receive orcan get the source code. And you must show them these terms so they know their rights.
We protect your rights with two steps: (1) copyright the software, and (2) offer you this licensewhich gives you legal permission to copy, distribute and/or modify the software.
Also, for each author's protection and ours, we want to make certain that everyoneunderstands that there is no warranty for this free software. If the software is modified bysomeone else and passed on, we want its recipients to know that what they have is not theoriginal, so that any problems introduced by others will not reflect on the original authors'reputations.
Finally, any free program is threatened constantly by software patents. We wish to avoid thedanger that redistributors of a free program will individually obtain patent licenses, in effectmaking the program proprietary. To prevent this, we have made it clear that any patent mustbe licensed for everyone's free use or not licensed at all.
The precise terms and conditions for copying, distribution and modification follow.
TERMS AND CONDITIONS FOR COPYING, DISTRIBUTION AND MODIFICATION
0. This License applies to any program or other work which contains a notice placed by thecopyright holder saying it may be distributed under the terms of this General Public License.The "Program", below, refers to any such program or work, and a "work based on theProgram" means either the Program or any derivative work under copyright law: that is to say,a work containing the Program or a portion of it, either verbatim or with modifications and/ortranslated into another language. (Hereinafter, translation is included without limitation in theterm "modification".) Each licensee is addressed as "you".
Activities other than copying, distribution and modification are not covered by this License;they are outside its scope. The act of running the Program is not restricted, and the outputfrom the Program is covered only if its contents constitute a work based on the Program(independent of having been made by running the Program). Whether that is true depends onwhat the Program does.
1. You may copy and distribute verbatim copies of the Program's source code as you receiveit, in any medium, provided that you conspicuously and appropriately publish on each copy anappropriate copyright notice and disclaimer of warranty; keep intact all the notices that referto this License and to the absence of any warranty; and give any other recipients of theProgram a copy of this License along with the Program.
You may charge a fee for the physical act of transferring a copy, and you may at your optionoffer warranty protection in exchange for a fee.
46
2. You may modify your copy or copies of the Program or any portion of it, thus forming awork based on the Program, and copy and distribute such modifications or work under theterms of Section 1 above, provided that you also meet all of these conditions:
a) You must cause the modified files to carry prominent notices stating that youchanged the files and the date of any change.
b) You must cause any work that you distribute or publish, that in whole or in partcontains or is derived from the Program or any part thereof, to be licensed as a wholeat no charge to all third parties under the terms of this License.
c) If the modified program normally reads commands interactively when run, you mustcause it, when started running for such interactive use in the most ordinary way, to printor display an announcement including an appropriate copyright notice and a notice thatthere is no warranty (or else, saying that you provide a warranty) and that users mayredistribute the program under these conditions, and telling the user how to view a copyof this License. (Exception: if the Program itself is interactive but does not normally printsuch an announcement, your work based on the Program is not required to print anannouncement.)
These requirements apply to the modified work as a whole. If identifiable sections of thatwork are not derived from the Program, and can be reasonably considered independent andseparate works in themselves, then this License, and its terms, do not apply to those sectionswhen you distribute them as separate works. But when you distribute the same sections aspart of a whole which is a work based on the Program, the distribution of the whole must beon the terms of this License, whose permissions for other licensees extend to the entire whole,and thus to each and every part regardless of who wrote it.
Thus, it is not the intent of this section to claim rights or contest your rights to work writtenentirely by you; rather, the intent is to exercise the right to control the distribution ofderivative or collective works based on the Program.
In addition, mere aggregation of another work not based on the Program with the Program (orwith a work based on the Program) on a volume of a storage or distribution medium does notbring the other work under the scope of this License.
3. You may copy and distribute the Program (or a work based on it, under Section 2) in objectcode or executable form under the terms of Sections 1 and 2 above provided that you also doone of the following:
a) Accompany it with the complete corresponding machine-readable source code, whichmust be distributed under the terms of Sections 1 and 2 above on a medium customarilyused for software interchange; or,
b) Accompany it with a written offer, valid for at least three years, to give any thirdparty, for a charge no more than your cost of physically performing source distribution,a complete machine-readable copy of the corresponding source code, to be distributedunder the terms of Sections 1 and 2 above on a medium customarily used for softwareinterchange; or,
c) Accompany it with the information you received as to the offer to distributecorresponding source code. (This alternative is allowed only for noncommercialdistribution and only if you received the program in object code or executable form withsuch an offer, in accord with Subsection b above.)
47
The source code for a work means the preferred form of the work for making modificationsto it. For an executable work, complete source code means all the source code for all modulesit contains, plus any associated interface definition files, plus the scripts used to controlcompilation and installation of the executable. However, as a special exception, the sourcecode distributed need not include anything that is normally distributed (in either source orbinary form) with the major components (compiler, kernel, and so on) of the operating systemon which the executable runs, unless that component itself accompanies the executable.
If distribution of executable or object code is made by offering access to copy from adesignated place, then offering equivalent access to copy the source code from the sameplace counts as distribution of the source code, even though third parties are not compelled tocopy the source along with the object code.
4. You may not copy, modify, sublicense, or distribute the Program except as expresslyprovided under this License. Any attempt otherwise to copy, modify, sublicense or distributethe Program is void, and will automatically terminate your rights under this License. However,parties who have received copies, or rights, from you under this License will not have theirlicenses terminated so long as such parties remain in full compliance.
5. You are not required to accept this License, since you have not signed it. However, nothingelse grants you permission to modify or distribute the Program or its derivative works. Theseactions are prohibited by law if you do not accept this License. Therefore, by modifying ordistributing the Program (or any work based on the Program), you indicate your acceptance ofthis License to do so, and all its terms and conditions for copying, distributing or modifying theProgram or works based on it.
6. Each time you redistribute the Program (or any work based on the Program), the recipientautomatically receives a license from the original licensor to copy, distribute or modify theProgram subject to these terms and conditions. You may not impose any further restrictionson the recipients' exercise of the rights granted herein. You are not responsible for enforcingcompliance by third parties to this License.
7. If, as a consequence of a court judgment or allegation of patent infringement or for anyother reason (not limited to patent issues), conditions are imposed on you (whether by courtorder, agreement or otherwise) that contradict the conditions of this License, they do notexcuse you from the conditions of this License. If you cannot distribute so as to satisfysimultaneously your obligations under this License and any other pertinent obligations, then asa consequence you may not distribute the Program at all. For example, if a patent licensewould not permit royalty-free redistribution of the Program by all those who receive copiesdirectly or indirectly through you, then the only way you could satisfy both it and this Licensewould be to refrain entirely from distribution of the Program.
If any portion of this section is held invalid or unenforceable under any particular circumstance,the balance of the section is intended to apply and the section as a whole is intended to applyin other circumstances.
It is not the purpose of this section to induce you to infringe any patents or other propertyright claims or to contest validity of any such claims; this section has the sole purpose ofprotecting the integrity of the free software distribution system, which is implemented bypublic license practices. Many people have made generous contributions to the wide range ofsoftware distributed through that system in reliance on consistent application of that system;it is up to the author/donor to decide if he or she is willing to distribute software through anyother system and a licensee cannot impose that choice.
This section is intended to make thoroughly clear what is believed to be a consequence of therest of this License.
8. If the distribution and/or use of the Program is restricted in certain countries either bypatents or by copyrighted interfaces, the original copyright holder who places the Programunder this License may add an explicit geographical distribution limitation excluding thosecountries, so that distribution is permitted only in or among countries not thus excluded. Insuch case, this License incorporates the limitation as if written in the body of this License.
48
9. The Free Software Foundation may publish revised and/or new versions of the GeneralPublic License from time to time. Such new versions will be similar in spirit to the presentversion, but may differ in detail to address new problems or concerns.
Each version is given a distinguishing version number. If the Program specifies a version numberof this License which applies to it and "any later version", you have the option of following theterms and conditions either of that version or of any later version published by the FreeSoftware Foundation. If the Program does not specify a version number of this License, youmay choose any version ever published by the Free Software Foundation.
10. If you wish to incorporate parts of the Program into other free programs whosedistribution conditions are different, write to the author to ask for permission. For softwarewhich is copyrighted by the Free Software Foundation, write to the Free Software Foundation;we sometimes make exceptions for this. Our decision will be guided by the two goals ofpreserving the free status of all derivatives of our free software and of promoting the sharingand reuse of software generally.
NO WARRANTY
11. BECAUSE THE PROGRAM IS LICENSED FREE OF CHARGE, THERE IS NO WARRANTY FOR THEPROGRAM, TO THE EXTENT PERMITTED BY APPLICABLE LAW. EXCEPT WHEN OTHERWISESTATED IN WRIT ING THE COPYRIGHT HOLDERS AND/OR OTHER PART IES PROVIDE THEPROGRAM "AS IS" WITHOUT WARRANTY OF ANY KIND, EITHER EXPRESSED OR IMPLIED,INCLUDING, BUT NOT LIMITED TO, THE IMPLIED WARRANT IES OF MERCHANTABILITY ANDFITNESS FOR A PART ICULAR PURPOSE. THE ENT IRE RISK AS TO THE QUALITY ANDPERFORMANCE OF THE PROGRAM IS WITH YOU. SHOULD THE PROGRAM PROVE DEFECT IVE,YOU ASSUME THE COST OF ALL NECESSARY SERVICING, REPAIR OR CORRECT ION.
12. IN NO EVENT UNLESS REQUIRED BY APPLICABLE LAW OR AGREED TO IN WRIT ING WILL ANYCOPYRIGHT HOLDER, OR ANY OTHER PARTY WHO MAY MODIFY AND/OR REDISTRIBUTE THEPROGRAM AS PERMITTED ABOVE, BE LIABLE TO YOU FOR DAMAGES, INCLUDING ANYGENERAL, SPECIAL, INCIDENTAL OR CONSEQUENT IAL DAMAGES ARISING OUT OF THE USE ORINABILITY TO USE THE PROGRAM (INCLUDING BUT NOT LIMITED TO LOSS OF DATA OR DATABEING RENDERED INACCURATE OR LOSSES SUSTAINED BY YOU OR THIRD PART IES OR AFAILURE OF THE PROGRAM TO OPERATE WITH ANY OTHER PROGRAMS), EVEN IF SUCHHOLDER OR OTHER PARTY HAS BEEN ADVISED OF THE POSSIBILITY OF SUCH DAMAGES.
END OF TERMS AND CONDITIONS
49