bioscreen user manual 2.1.11 2015-06-10
TRANSCRIPT

User's Manual
Bioscreen C
Oy Growth Curves Ab Ltd 2015
Version 2.1.11


Table of Contents 1. Inspection and Installation of the Bioscreen C Syst em 2 2. System Description 3
2.1 Overview 4 2.2 Bioscreen C Reader 4 2.3 Software 5
3. Operation 6
3.1 Pre-Start Checklist 6 3.2 Planning an Experiment 6 3.3 Running an Experiment 7 3.4 Data Handling 10
4. Guide to Anaerobic Experiments 10 5. Guide to Manual Pipetting 11 6. Maintenance 12
6.1 Maintenance Steps & Frequency 12 6.2 Cleaning 12 6.3 Checking the Heat Transfer Fluid Level 13 6.4 Replacing the Fuses 13 6.5 Replacing the Lamp 14
7. Troubleshooting Guide 16
7.1 Optical Problems 16 7.2 Temperature Problems 17 7.3 Operational Problems 18
8. About Bioscreen 19
8.1 Product History 19 8.2 Unique Features of Bioscreen C 19 8.3 Applications 20
9. Technical Specifications 22
9.1 General Specifications 22 9.2 Safety Specifications 22 9.3 Photometric System 23 9.4 Incubator 23 9.5 Honeycomb 2 Microplates 23 9.6 PC Requirements 24 9.7 EU Directive on Waste (WEEE) 24
10. User Replaceable Parts 24 11. Appendix Warranty Statement 12. Appendix
Bioscreen C Service Request Bioscreen C Certificate of decontamination

Bioscreen C Microbiology Reader User's Manual _______________________________________________________________________________________________
_______________________________________________________________________________________________
1
Thank you for choosing the Bioscreen C system.
We hope this system fulfills your expectations. If you should have any questions or problems, pleas e don’t hesitate to contact your
local Bioscreen C distributor.
Have a nice time with your versatile Bioscreen C!
Figure 1 The components of the Bioscreen C instrume nt.
Measurement compartment
Incubator compartment: 2 Honeycomb Microplates, sample tray
Heat transfer fluid window Thermo module
Lamp and filter wheel compartment
Main cover
Bioscreen keyboard for built-in service tests Bioscreen display

Bioscreen C Microbiology Reader User's Manual _______________________________________________________________________________________________
_______________________________________________________________________________________________
2
1. INSPECTION AND INSTALLATION OF THE BIOSCREEN C SYSTEM
It is very important to read these instructions carefully and to follow them in the presented order (from 1 to 11). Wrong order might cause problems with the installation or the use of the Bioscreen C system.
1. Check the parcel for visual damage If there is damage on the parcel (holes, dents etc.), make a notification to the air waybill BEFORE accepting the shipment. This will help with the insurance claim in case the content is damaged. Unless this notification has been made, there is no possibility to claim insurance for a faulty Bioscreen C instrument! 2. Open the parcel, check for visual damage One indication of possible damage is that the green measurement lid has jumped off from its place. This indicates that the parcel has had some rough treatment on the way but it doesn’t necessarily mean that the Bioscreen C is damaged. 3. Check the content of the package The list of contents (Packing list) is placed on top of the instrument. Save the carton and the foam corners for possible transportation or service of the Bioscreen C in the future. 4. Check the lamp (A & D in Figure 2) Check that the lamp is intact and properly in its place. 5. Install the filter wheel
The filter wheel is in its own black container inside the Supplement pack. Avoid touching the filter lenses. Fingerprints on the lenses diminish the amount of light passing through to the detector. Install the wheel with the serial number on the wheel pointing towards the front of the Bioscreen C instrument. The connection is magnetic, it will automatically pull the wheel into the right position (A in Figure 2). 6. Open the sample area cover (B & C in Figure 2) Take the notification leaflet out from the sample area and make sure that all Bioscreen C users are informed about the risk of a damaged detector lens with an improperly placed incubator cover. Check that the incubator cover is placed properly on its hinges and that the cover is locked in its place. White arrows on the incubator cover point to the hinges (see the notification leaflet for more information). 7. Install the driver for the USB-adapter The USB-adapter and the CD are found in Accessory pack. Install the driver from the CD BEFORE connecting the USB-adapter to the PC. 8. Connect the cables to the Bioscreen C and to the PC
Before turning the Bioscreen C on ALWAYS remember to check that the incubator cover is in its right position. Improper placing of the cover can cause serious damage to the instrument which is NOT covered by warranty! Always close the lids before starting an experiment, as placing fingers etc. inside a running instrument can cause serous physical injury.

Bioscreen C Microbiology Reader User's Manual _______________________________________________________________________________________________
_______________________________________________________________________________________________
3
9. Turn on the Bioscreen C 10. Install the BioScreener software from the CD in cluded 11. Run a short test measurement Run a short test measurement with the BioScreener software to verify that your Bioscreen C system is working properly. More details on how to run an experiment with BioScreener software can be found from software’s internal help section. Details on how to insert the microplates etc. are found in section “3.3 Running an experiment” in this User’s Manual.
Figure 2 Positioning of the filter wheel, the halog en lamp and the incubator cover.

Bioscreen C Microbiology Reader User's Manual _______________________________________________________________________________________________
_______________________________________________________________________________________________
4
2. SYSTEM DESCRIPTION
2.1 Overview The Bioscreen C Microbiology Reader is a fully automated system developed to perform a wide range of microbiology experiments. The system consists of:
• Bioscreen C reader • BioScreener software • Honeycomb microplates (consumables) • PC (not provided by Growth Curves Ltd.)
All microorganisms (bacteria, mold, yeast, etc.) increase the turbidity of liquid growth medium when growing and multiplying in it. Bioscreen C monitors this growth by measuring the turbidity of the medium in the wells of a microplate. These measurements are done kinetically, and recorded as optical density (OD) measurements. All functions are controlled by BioScreener software according to the parameters entered by the user. OD values are recorded automatically by the software. Bioscreen C is an open system: the user can decide what is studied in the the wells. Any microorganism, broth or chemical can be pipetted into the wells for monitoring growth kinetically and automatically. Most of the conventional test tube tests where the turbidity or color change occurs can be run with the "mini-tubes" in a Honeycomb microplate with Bioscreen C. For vertical light photometry, all visible light wavelengths can be used. The eight standard filters provided in the filter wheel of Bioscreen C are: 405, 420, 450, 492, 540, 580, 600 nm and a wide band (420-580 nm) filter. Filters with special wavelengths are available by request.
2.2 Bioscreen C Reader The reader includes three interrelated systems: mechanical transport, incubator and optical system (for the elements, see Figure 1). These three systems work in a coordinated way to provide automated heating/cooling, sample indexing and OD readings. 2.2.1 Mechanical transport The incubator tray assembly holds the Honeycomb microplates. The assembly shuttles from the microplate loading section into the measurement compartment, where light is passed through each well of the microplate and the detector makes the OD readings. 2.2.2 Incubator
The incubator consists of the incubator tray (fixed, non-removable), the incubator cover (on hinges) and a temperature control system. After filling the microplate with experimental materials, the incubator cover is placed manually on top of the incubator tray and properly closed. During the incubation and measuring, the incubator cover remains in place.
The temperature control system maintains the incubation temperature set by the program. Ethylene glycol and water mixture (1:1) is used as a heat transfer liquid. The liquid circulates continuously in the incubator tray to keep the temperature stable and at a selected value. The temperature is continuously monitored and saved by the software. 2.2.3 Optical system The changes in turbidity or color in the culture medium, due to the growth of microorganisms, is measured kinetically with a vertical photometer. A halogen lamp produces light which then passes through the chopper wheel. The light path is turned 90 degrees by a mirror. Then the light passes through the filter wheel. The interference filters are selected with the PC software. Filtered light moves through an optical fiber to the lens assembly in the measurement compartment, below the Honeycomb microplates. The light passes through the bottom of each well and

Bioscreen C Microbiology Reader User's Manual _______________________________________________________________________________________________
_______________________________________________________________________________________________
5
results are collected by the detector. The detector is on a retractable arm which moves into the right places above the plate. The measuring device is moved along the Y-axis while the incubator tray with the microplate is moved along the X-axis. This enables rapid measurement of all wells in the microplate.
Figure 3 The optical system.
2.3 Software The BioScreener® software is designed to run Bioscreen C experiments. BioScreener SW is a combination of the proven functions of the previous softwares used with Bioscreen C. BioScreener stores all settings and results from the experiment in a .bsm file. Results can be exported to common data files such as xls or csv for graph generation and analysis with another software of your choice. Please remember to save the data on a local hard dr ive, do not use network disks. You can always transfer the measurement files to a network disk after the experiment is completed. This way your experiment won’t be interrupted by possible network errors.
2.4 Honeycomb ® Microplates Bioscreen C uses unique 10x10-well Honeycomb microplates with lids. These plates are especially designed to give unmatched temperature distribution between the samples and also to minimize evaporation of the sample liquids. The instrument can handle one or two 100-well Honeycomb microplates at a time. Each well of the microplate can be considered as an individual test vessel. Thus monitoring the microbiological growth in 200 experiments can be performed simultaneously in a single run. Honeycomb microplates are sterilized by gamma radiation, packed in individual bags and sold in boxes of
Halogen lamp
Chopper wheel
UV-mirror
Filter wheel
Optical fiber
Lens
Detector
2 Honeycomb microplates with covers (200 samples)

Bioscreen C Microbiology Reader User's Manual _______________________________________________________________________________________________
_______________________________________________________________________________________________
6
100 microplates each. Honeycomb multiwell microplate technology positions 100 wells in a similar footprint as a 96-well microplate. The microplate was designed to assure the best temperature distribution across the microplate, as well as to eliminate evaporation and condensation, common problems with conventional 96-well microplates. The unique incubator of Bioscreen C has liquid circulation which is cabable of cooling the samples below the ambient temperature and ensures constant temperature to all wells. This is essential for developing high quality growth curves.
3. OPERATION
3.1 Pre-Start Checklist
• Check that the filter wheel is clean. • Check that there are no spills inside the instrument. • Check that there is enough heat transfer fluid. • Check that the desired incubating temperature is not more than 6 °C below ambient. • Check that the cables are connected properly.
3.2 Planning an Experiment 3.2.1 Sample number The instrument can handle one or two Honeycomb microplates at a time. There are 100 wells per microplate, hence the total amount of samples can be 1-200 in a single run. 3.2.2 Sample volume Growth medium to be used in an experiment must be in a liquid form. The maximum sample + growth medium volume per well is 400 µl. Excess filling can cause flooding during shaking. There is no recommended minimum volume, but with very small volumes evaporation can cause problems to the experiment. When choosing the sample volume, consider also possible behaviour of the sample during its incubation and the entire experiment. If the microorganisms in the sample are supposed to create gas, make sure that you don’t fill the wells too much. Flooding of the wells can cause damage to the parts underneath the incubator tray. 3.2.3 Incubating temperature The incubation temperature selection ranges from 1 to 60 °C in steps of 0.1 °C. The maximum temperature of 60 °C is reached when the incubator cover is 60 °C and the incubator tray holding the samples has reached 59 °C. Bioscreen C can reach 6 °C below and 30 °C above ambient temperature (see Figure 4). If lower temperatures are desired, the whole Bioscreen C must be placed in a cooled room.

Bioscreen C Microbiology Reader User's Manual _______________________________________________________________________________________________
_______________________________________________________________________________________________
7
Example 1. At ambient temperature 10 °C the incubating temperature can be set at 4 - 40 °C. Example 2. At ambient temperature 20 °C the incubating temperature can be set at 14 - 50 °C. Example 3. At ambient temperature 30 °C the incubating temperature can be set at 24 - 60 °C. Figure 4 Range of incubating temperatures that can be selected at different ambient temperatures. 3.2.4 Filters Up to 3 of the eight filters on the filter wheel can be chosen to be used in a single measurement. The wavelengths of the standard filters are 405-600 nm. The wideband filter (420-580 nm) is less sensitive to color changes than the other filters so the results are not affected so much by change of color of growth medium. 3.2.5 Shaking BioScreener software has various shaking protocols. It also includes parameters from previous Bioscreen C softwares (eg. EZExperiment SW and BioLink SW), which can be used by selecting appropriate compatibility mode from BioScreener’s Additional options menu.
3.3 Running an Experiment Switch ON the Bioscreen C and your PC. Open the the cover of the incubator compartment (see. Figure 1). Remove the black incubator cover by first pulling gently the spring catch (with the text “OPEN”) towards you. Then lift the incubator cover by pushing it back and up. 3.3.1 Inserting the Honeycomb microplates Insert the Honeycomb microplates into the incubator tray. Plate number one belongs to the left side and plate number two to the right side of the tray. Make sure that the small cut-off corner of the plate is in the left front
60 °C
50 °C
40 °C
30 °C
20 °C
10 °C
0 °C
10 °C 0 °C 20 °C 30 °C 40 °C 50 °C
Ambient temperature
Range of available incubation temperatures at ambient temperature of 25 °C.
Temperature
70 °C
25 °C

Bioscreen C Microbiology Reader User's Manual _______________________________________________________________________________________________
_______________________________________________________________________________________________
8
of the tray. Put the incubator cover back carefully, making sure that the hinges fit through the slots in the back of the cover. Close the lock on the front side: snap the front of the cover into the catch. See Figures 5 & 6.
Figure 5 Inserting the incubator cover properly to the hinges.

Bioscreen C Microbiology Reader User's Manual _______________________________________________________________________________________________
_______________________________________________________________________________________________
9
Figure 6 Checking the seam of the parts. 3.3.2 Starting the experiment Start the BioScreener software by clicking on the BioScreener icon on your PC and enter the measurement parameters of your choice. Please refer to the software’s internal instructions. 3.3.3 Opening the cover during the experiment During the measurements all instrument covers must be closed. Open covers can interrupt the test, produce wrong results or result in personal physical injury. If necessary, the cover of the incubator compartment can be opened between the measurement cycles. Press Pause in the BioScreener software’s Settings window. Make sure that the Bioscreen has come to a full stop and it is safe to open the cover. New samples can be added or samples for other studies can be taken. Continue the measurement by pressing the Continue button in the software.
When the incubator cover is opened, condensation may occur onto the microplate lid. If this occurs, adjust the time between the measurements so that the heating of the incubator cover has time to evaporate the condensation before the next measurement.
3.3.4 Cleaning the instrument When the experiment is completed, remove the microplates. Clean the inside of the incubator tray and the cover with ethanol-moistened tissues. A white powder-like substance can occur because of the movements of the microplate in the incubator tray, especially if the shaking function is regularly used.

Bioscreen C Microbiology Reader User's Manual _______________________________________________________________________________________________
_______________________________________________________________________________________________
10
3.4 Data Handling The BioScreener software handles the OD measurements and stores the data on a computer hard drive. OD data and well details are stored and this data can be exported to another software of your choice. This approach lets the user handle Bioscreen C data (curve drawing etc.) using any DOS, OS/2 or Windows graphical, scientific or statistical software.
All use of BioScreener software is done entirely at the users own risk. Growth Curves Ltd. assumes no liability for any problems the user of the software might encounter, including but not limited to any loss of data, samples or any of the similar. Growth Curves Ltd. assumes no liability for software developed by other companies. Any and all claims relating to software shall be addressed to the licensor or developer.
4. Guide to Anaerobic Experiments Experiments with anaerobic bacteria can be done with Bioscreen C by using different methods. Strict anaerobes:
1. Samples are pipetted into wells of Honeycomb microplate in an anaerobic environment. The two "ears" of the Honeycomb microplate are cut off and the microplate is hermetically sealed with appropriate glue or tape.
An indicator liquid or paper is placed into one well for confirming the existence of anaerobiosis. If O2
leaks, the colour of the indicator liquid or paper changes. The hermetically closed Honeycomb microplate is put into the Bioscreen C and a normal experiment with shaking, incubating and measurement is carried out.
2. The whole Bioscreen C can be placed in an anaerobic cabinet.
Facultative anaerobes (e.g. lactobacilli and bifido bacteria):
1. Oil layer technique can be used. The oil diminishes the dissolving of O2 from air into the sample.
2. Redox medium (including chemicals which react with O2) can be used with previously described techniques or separately.

Bioscreen C Microbiology Reader User's Manual _______________________________________________________________________________________________
_______________________________________________________________________________________________
11
5. Guide to Manual Pipetting Instruction for use: Keep this paper under the Honeycomb microplate during sample pipetting. The well numbers are seen through the wells of the microplate. Microplate number 1. Microplate number 2.
1
2
3
4
5
6
7
8
9
10
11
12
13
14
15
16
17
18
19
20
21
22
23
24
25
26
27
28
29
30
31
32
33
34
35
36
37
38
39
40
41
42
43
44
45
46
47
48
49
50
51
52
53
54
55
56
57
58
59
60
61
62
63
64
65
66
67
68
69
70
71
72
73
74
75
76
77
78
79
80
81
82
83
84
85
86
87
88
89
90
91
92
93
94
95
96
97
98
99
100
101
102
103
104
105
106
107
108
109
110
111
112
113
114
115
116
117
118
119
120
121
122
123
124
125
126
127
128
129
130
131
132
133
134
135
136
137
138
139
140
141
142
143
144
145
146
147
148
149
150
151
152
153
154
155
156
157
158
159
160
161
162
163
164
165
166
167
168
169
170
171
172
173
174
175
176
177
178
179
180
181
182
183
184
185
186
187
188
189
190
191
192
193
194
195
196
197
198
199
200
Bioscreen C Microbiology Reader User's Manual _______________________________________________________________________________________________
_______________________________________________________________________________________________
12
6. MAINTENANCE
6.1 Maintenance Steps & Frequency During normal operation we recommend you to perform the following maintenance procedures:
• Clean the lenses Weekly / more often if necessary • Clean the filter wheel Weekly • Replace the fuses As needed • Replace the lamp As needed • Add the heat transfer fluid As needed / Check before each measurement • Decontamination Before service call
(Please see Appendix A)
6.2 Cleaning
Bioscreen C can be used with substances containing or producing hazardous compounds. Remember to clean the contaminated parts properly after use to avoid health risks. This is particularly important when Bioscreen C is sent out of the laboratory or if a service visit is needed. Your service representative will ask you to provide a written certificate of decontamination.
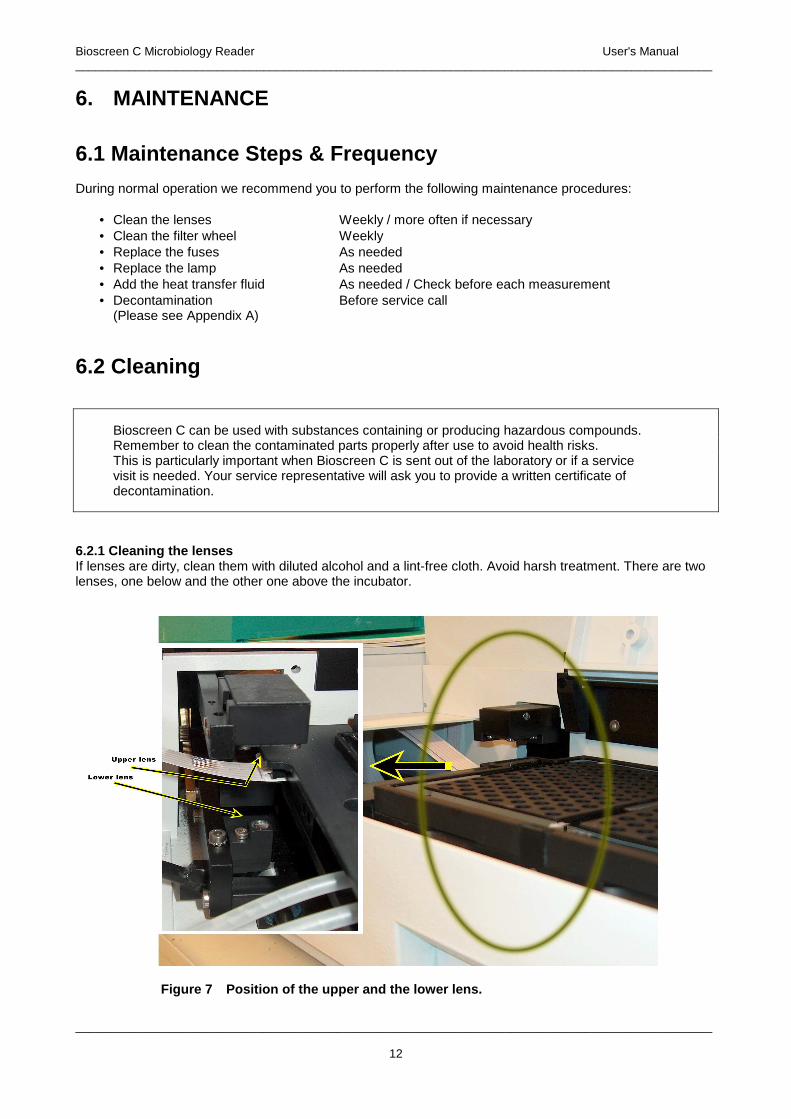
6.2.1 Cleaning the lenses If lenses are dirty, clean them with diluted alcohol and a lint-free cloth. Avoid harsh treatment. There are two lenses, one below and the other one above the incubator.
Figure 7 Position of the upper and the lower lens.

Bioscreen C Microbiology Reader User's Manual _______________________________________________________________________________________________
_______________________________________________________________________________________________
13
6.2.2 Cleaning the outer surface All surfaces of the instrument can be cleaned with a moist, soft cloth and mild detergent. Make sure that liquids don’t enter the instrument. 6.2.3 Cleaning the filter wheel Check the filter wheel once a week and clean it if necessary:
• Turn the power off. • Open the cover of the lamp cabinet. • Lift the filter wheel up. Avoid touching the filter surfaces. • Clean the filter surfaces with a lens paper. If necessary, use diluted purified alcohol. • Put the filter wheel back so that the toothed edge is facing backwards. The magnets will draw the
wheel into the correct position. Do not force it to the right place, try to turn it around instead. • Close the cover.
6.2.4 Cleaning the incubator tray Clean the incubator tray with a soft cloth and alcohol. Don’t immerse the incubator tray cover in cleaning solution.
6.3 Checking the Heat Transfer Fluid Level Check the level of the heat transfer fluid at the window of the incubator at the front of the instrument regularly. With the Bioscreen C turned ON, the green lamp in the tank window lets you see the level of the heat transfer fluid. The fluid level should be above the minimum level marked with �. The heat transfer fluid tank is full when you receive your Bioscreen C, but remember to check the fluid level on a regular basis. Don’t operate the Bioscreen C if the fluid level is too low, this can seriously damage the instrument. The heat transfer fluid bottle is located inside the Accessory pack included with your system. To add more fluid, do the following:
• Switch the Bioscreen C ON. • Unscrew the plug on the heat transfer fluid tank. • With a pipette, take up a few milliliters of heat transfer fluid and dispense it through the hole from which
you removed the plug. Keep dispensing until the level in the fluid window is well above the minimum. • Screw back the plug. • Press MODE - 21 - ENTER on your Bioscreen C instrument keypad. The heat transfer fluid pump
starts a continuous circulation of the heat transfer fluid. Let it run for 15-30 seconds. If there is a lot of air in the tubes, unscrew the plug slightly to let the air out.
• Press RESET on the keypad. • Check the fluid level. If it is still too low, repeat the previous procedure. • Press RESET on the keypad.
The heat transfer fluid contains ethylene glycol, which is harmful if swallowed. Keep the bottle clearly labeled and wash your hands after the use of the fluid.

Bioscreen C Microbiology Reader User's Manual _______________________________________________________________________________________________
_______________________________________________________________________________________________
14
6.4 Replacing the Fuses
• Switch the power off. • Disconnect the power cord from the mains. • The fuses are on the back of the Bioscreen C in the power cord block. The fuse holder can be
removed after the power cord is detached from the block. The fuse holder is attached with two small clips which are released by pressing them towards each other.
• Change the blown fuses to new ones and put the fuse holder back into the power cord block. • Connect the instrument to the mains and switch it on.
Replace the blown fuses only with fuses with the same rating shown on the serial plate of the instrument. Failure to do this may cause instrument damage and/or personal injury.
6.5 Replacing the Lamp
CAUTION: THE LAMP MAY BE VERY HOT! Do not touch it with bare hands or let it cool down before changing.
• Switch the power off. • Open the cover of the lamp compartment (see Figure 1). • Loosen the two screws of the lamp connector with the screw driver included with your system. Lift the
lamp holder upwards and remove the lamp. • Make sure that your new lamp is sold and pre-tested by Growth Curves Ltd. (see Figure 10). • Install the new lamp so that the red dot points upwards . Do not bend the lamp pins. Do not touch the
reflective surface of the bulb. • Place the lamp connector to the lamp pins and tighten the screws. Check that the lamp is correctly
positioned. • Close the cover and switch the Bioscreen C on.
Figure 8 Replacing the lamp. Figure 9 Positioni ng the lamp.

Bioscreen C Microbiology Reader User's Manual _______________________________________________________________________________________________
_______________________________________________________________________________________________
15
Figure 10 Lamps tested, approved and marked by Gr owth Curves Ltd.
There are some brands of lamps that will not give enough light for the wavelength range that the Bioscreen C operates. Only lamps that are sold and pre-tested by Growth Curves Ltd. are guaranteed to operate properly. Pre-tested lamps are marked with a red dot. Use only these certified lamps in order to avoid the F1-b2 / “too little light” error!

Bioscreen C Microbiology Reader User's Manual _______________________________________________________________________________________________
_______________________________________________________________________________________________
16
7. TROUBLESHOOTING GUIDE
7.1 Optical problems
Problem Filter error (FE)
Cause
A filter is missing.
Solution
Be sure that the filter wheel is properly installed.
Problem Blank error (F1 - B2)
Cause
Insufficient light to the amplifier: 1) The lamp is burned out, near the end of its lifespan or the lamp is of the wrong model. 2) The detector lens is scratched. 3) The filters and / or lenses are dirty.
Solution 1) Change the lamp to a pre-tested and approved lamp marked with red dot. 2) Check the detector lens for scratches. 3) Clean the filters and lenses.
Note Sometimes old lamps can cause problems. They are lit, but the amount of ultraviolet light is not sufficient for the measurement. This can cause false assumption that the lamp is OK when it is not.
Problem Blank error (F1 - B3)
Cause
Too much light is reaching the detector: 1) The filter wheel is missing. 2) The cover is open.
Solution 1) Check that the filter wheel is properly installed. 2) Close the covers.
Problem Abnormal growth curves
Cause
1) Sediment accumulates to the bottom of the sample wells and it moves randomly when the carriage moves. 2) The cover has been opened during the measurement and this has elevated the measurement values. 3) Ambient temperature is too high or too low to keep the programmed incubation temperature.

Bioscreen C Microbiology Reader User's Manual _______________________________________________________________________________________________
_______________________________________________________________________________________________
17
Solution
1) Use shaking before each measurement to keep the sample suspension homogenous. Try different shaking options for the best result. 2) Do not open the cover during the measurement. 3) Place the instrument into a room or cabinet of higher or lower temperature.
Problem Elevated readings which lower gradually to normal after a few minutes.
Cause
The vapors from the sample have condensed onto the microplate lid. This happens when measurement temperature is lowered during the measurement, or when the run has been aborted and started again, or when the incubator cover has been removed during the measurement.
Solution Make the measurement start from lower temperatures and measure the warmest last. If reverse temperature measurements are needed, give the instrument enough time to stabilize at the desired temperature before measurement. If condensation occurs while the experiment has been aborted, warm up the instrument and samples as usually is done at the start of the experiment.
Problem Absorbance values oscillate randomly. Stati c noise is very high.
Cause
The incubator tray is loose in its carriage. The locking screws are loose and the incubator is not firmly secured in its place.
Solution If the carriage locking screws are loose, tighten them firmly (but not too tight).
Note With very old instruments this behavior can be caused by external electromagnetic interferences. Newer instruments have protective coating on the chassis to prevent against electromagnetic (EMP) disturbances. If the problem arises after the instrument has been relocated (or other changes have been made in the operational environment), this is the probable cause. Try to solve the problem by using the instrument in another location, or use better regulated power outlets (reserved for computer use only).

Bioscreen C Microbiology Reader User's Manual _______________________________________________________________________________________________
_______________________________________________________________________________________________
18
7.2 Temperature problems
Problem Desired temperature is not reached.
Cause
1) Desired temperature is out of operational range. 2) The ambient temperature is too low or too high. 3) Heat transfer fluid level is too low.
Solution 1) See Chapter “3.2.3 Incubating temperature” for correct operational range. 2) Place the instrument in a room or cabinet of higher or lower temperature. 3) Add some heat transfer fluid to the tank (See Chapter “6.3 Checking the Heat Transfer fluid Level”).
7.3 Operational problems
Problem The instrument does not work.
Cause
1) Power cord is not connected properly. 2) Primary fuses are blown.
Solution 1) Connect the power cord properly from both ends. 2) Replace the primary fuses. See Chapter “6.4 Replacing the Fuses”.
Problem No connection between the computer and Bios creen C.
Cause
1) Bioscreen C is not turned ON. 2) Serial cable is not connected. 3) Serial port of Bioscreen C is shut. 4) Incorrect COM-port setting. 5) Incorrect serial cable.
Solution 1) Turn Bioscreen C ON. 2) Connect the serial cable properly from both ends. 3) Press RESET on Bioscreen C keypad. 4) Check the COM Port settings from the BioScreener’s Additional Options menu. 5) Use the cable supplied with Bioscreen C.
Note Bioscreen C is delivered with a standard serial cable and USB-adapter.

Bioscreen C Microbiology Reader User's Manual _______________________________________________________________________________________________
_______________________________________________________________________________________________
19
Problem Totally wrong readings periodically during a long experiment.
Cause
Computer power saving features interfere with serial port communication.
Solution Turn off all power saving features from your computer. Please consult with your IT department if necessary.
Problem Motor runs the incubator against an obstacl e which causes noise.
Cause
The incubator tray cover is not placed properly over the hinges. The cover crashes against the optical detector assembly.
Solution Place the cover properly over the hinges. Wiggle it to be sure it’s in place (See figures 5 & 6). Check for damage on the upper lens (in the detector assembly). If the lens has been damaged, it must be replaced.
Problem Carriage movement is normal but noisy.
Cause
The incubator tray cover is not placed properly over the hinges. The cover crashes with the detector assembly.
Solution Place the cover properly over the hinges. Wiggle it to be sure it’s in place (See figures 5 & 6). Check for damages on the upper lens (in the detector assembly). If the lens has been damaged, it must be replaced.

Bioscreen C Microbiology Reader User's Manual _______________________________________________________________________________________________
_______________________________________________________________________________________________
20
8. ABOUT BIOSCREEN C
8.1 Product History Bioscreen C was developed by Labsystems Oy, a Finnish company heavily involved in biotechnology and laboratory instrumentation. They have manufactured over 16 000 ELISA readers and over 1 million Finnpipettes. About 20 years ago, they saw a need for a new generation of instruments designed specifically for microbiology. This led them to develop Bioscreen C – a fully automated growth curve reader that gives results in less than a day. After Labsystems Oy was acquired by Thermo Electron, the strategic decision was made to sell off the Bioscreen C line to a newly-formed company, Oy Growth Curves Ab Ltd. (Helsinki, Finland). Oy Growth Curves Ab Ltd. now manufactures the Bioscreen C instrument for distribution throughout the world.
8.2 Unique Features of Bioscreen C • No condensation and minimized evaporation of the sa mples
The patented technology assures that there will be no liquid condensation underneath the microplate cover, which can mask true results. The cover also maximizes the possibility for long term testing and minimizes sample evaporation, which can distort results. Bioscreen C is the only reader that keeps the cover on during the entire experiment.
• Tight temperature range for reliable results
Temperature range is from 1 to 60 °C, with temperature variation held within +/- 0.1 °C. Conventional microplate readers can not keep these tolerances, and hence provide less reliable results.
• Choice of optical measurements
The user can choose of seven wavelengths or a wide-band filter for turbidity measurements.
• 200 results at a time Conventional readers read a 96 well microplate in one run, but Bioscreen C can measure 200 results at a time.
• Unique versatility and reliability
Other readers are not designed for microbiology work, or for long-term use with an incubating time of up to 1600 hours. Bioscreen C has proven its versatility for a wide range of applications in over 500 sites worldwide, with some units in use for over 20 years.
8.3 Applications Bioscreen C can measure growth of any organism that will increase the turbidity of the growth medium when growing and multiplying in it. In addition to monitoring the growth of microorganisms (bacteria, yeast, mold, etc.), the growth of fungi, algae, phage and suspended cell cultures can be monitored by Bioscreen C. Some examples of applications for the system include: microbiology research, development of new antibiotics, antibiotic susceptibility tests, protein expression, development of new preservatives, optimization of fermentation processes, development of waste treatment processes, bioassays, kinetic MIC, QC of foods, cell culturing, growth medium development, tests to study effects of pH, temperature, chemicals or other parameters on microorganisms etc. and many others. Even anaerobic bacteria can be grown in Bioscreen C. This can be done by sealing the cover of the microplate and using an oxygen-free gas, alternatively the oil layer technique can be used (see chapter “4. Guide to anaerobic experiments” ). One can also monitor bacteriophage growth (dropping growth curves), amoebae (Limulus) growth and other processes where the turbidity changes in any way.

Bioscreen C Microbiology Reader User's Manual _______________________________________________________________________________________________
_______________________________________________________________________________________________
21
To get a closer view of the research area you are interested in, please make a search at Google Scholar. Use a search phrase: “Bioscreen C” and then add the specific area you are interested in, for example “algae”. Most likely you will get a convincing list of public studies done in the field of your interest. A user can dispense any micro-organism with any broth and chemical to the microplates to monitor kinetically the growth of the culture i.e. the development of turbidity or color in 200 wells at a time. Most tests that are run in test tubes with broth can be run automatically by Bioscreen C. Examples of Applications:
• To follow the differences of growth of 200 cultures simultaneously.
• To measure the total count of microorganisms of food samples.
• Microbiological assays for measuring the amount of vitamins, amino acids, antibiotics, disinfectants, toxicants, biostimulators, growth retardants, or other chemicals.
• To develop the production of microbiological protein from organic waste.
• To develop new antimicrobial/antifungal agents.
• To develop microbiological preservatives. • To develop microbiological single-cell-protein (SCP) production processes.
• To product enzymes, proteins, fatty acids or other substances.
• To develop wastewater treatment biofilm and activated sludge processes.
• To find optimal conditions for biodegradation of pollutants.
• To study microbiological processes at different temperatures.
• To determine minimal inhibitory concentration (MIC) of antimicrobials.
• To determine the lethal dose (LD) of antibiotics or other compounds.
• To develop microorganisms with wanted characteristics.
• To measure the toxicity and potential mutagenicity of different compounds.
• To study the metabolic processes of microorganisms and cells.
• To study microbiological processes in production of yogurt, beer, wine or foods.
• To measure the combined effect of various parameters (e.g. pH, temperature, water activity, salt
concentration, chemicals) on pure and mixed cultures.
• To study the growth kinetics of bacteriophage (dropping growth curves).
• To develop selective or broad range growth media for microorganisms or cells.
• To develop bio energy applications.
• LAL tests (Limulus amoebocyte lysate gel assay) for endotoxin assay.
• Mathematic modeling of microorganism, phage or cell growth with the help of MS Excel or similar softwares.

Bioscreen C Microbiology Reader User's Manual _______________________________________________________________________________________________
_______________________________________________________________________________________________
22
9. TECHNICAL SPECIFICATIONS
9.1 General Specifications Nominal voltages: 100/240 VAC 50/60 Hz 110/220 VAC 50/60 Hz Operating voltage range: 10% of nominal 90-130 VAC (100/110 VAC) 180-260 VAC (220/240 VAC) Power consumption: 1.6 A 100, 110 VAC 0.8 A 220, 240 VAC Weight: 22 kg Dimensions (WxDxH): 62 cm x 38 cm x 23 cm Primary fuses: T 4A/250V IEC 127/III at 100/110 V T 2A/250V IEC 127/III at 220/240 V Transportation and storage temperature: -25 – +50 °C Operating temperature: +5 – +40 ° C
9.2 Safety Specifications Bioscreen C fulfills the following requirements: IEC 1010-1 including Amendments 1 and 2 The safety specifications are met also under the following environmental conditions in addition or in excess to those stated in the operating conditions: Altitude: up to 2000 m Temperature: +5 °C – +40 °C Humidity: max. 85% at normal room temperature Mains supply fluctuations: ±10% Installation category (over voltage category): II according to IEC 664-1 (Note 1) Pollution degree: 2 according to IEC 664-1 (Note 2) “WEEE” EU Directive (2002/96/EC) NOTE 1 Installation category (over-voltage category) defines the level of transient over-voltage, which the
instrument is designed to withstand safely. It depends on the nature of the electricity supply and its over-voltage protection means. For example in CAT II which is the category used for instruments in installations supplied from supply comparable to public mains such as hospital and research laboratories and most industrial laboratories the expected transient over-voltage is 2500 V for a 230 V supply and 1500 V for a 120 V supply.
NOTE 2 Pollution degree describes the amount of conductive pollution present in the operating
environment. Pollution degree 2 assumes that normally only non-conductive pollution such as dust occurs with the exception of occasional conductivity caused by condensation.

Bioscreen C Microbiology Reader User's Manual _______________________________________________________________________________________________
_______________________________________________________________________________________________
23
Both of these affect the dimensioning of the electrical insulation within the instrument.
9.3 Photometric System Linear range: 0.0-2.0A max.dev. < 2% Noise: max. 0.002A at 0.0A Drift max: 0.003A Resolution: 0.001A Warm-up time: 30 min Optics: Fiber optics with filter Light source: Quartz-Halogen lamp 8V/50W, average lifetime 4000 hours Filters: 8 filters: 405, 420, 450, 492, 540, 580, 600 nm, and wide band filter 420-580 nm Half band width: 3-10 nm Detector: Silicon photocell
9.4 Incubator Microplate type: Honeycomb 2 microplate, 100 wells per plate Capacity: 1-2 microplates Incubating temperature: 1.0 - 60.0 °C, selectable with steps of 0.1 °C. Depends on
ambient temperature (see fig. 4). Bioscreen can go 6 °C below or 30 °C above ambient temperature (max. 60 °C).
Temperature uniformity: ± 0.1 °C Heating time from 20 °C to 30 °C: 30 min Heat transfer fluid: Mixture of ethylene glycol and water 1:1
9.5 Honeycomb 2 Microplates Capacity: 100 wells per one Honeycomb microplate.
Use 1 or 2 microplates per experiment. Maximum volume: 400 µl / Honeycomb microplate well Material: Polystyrene Sterilizing method: Gamma radiation Note: Honeycomb 2 microplates are single use consumables. They are not autoclavable.

Bioscreen C Microbiology Reader User's Manual _______________________________________________________________________________________________
_______________________________________________________________________________________________
24
9.6 PC Requirements PC Operating BioScreener software can be used in Windows XP, Vista or 7.
9.7 European Union Directive on Waste Electrical an d Electronic Equipment (WEEE) This symbol applies to European countries only and indicates that the equipment carrying this mark must NOT be thrown into trash and must be collected separately and properly recycled under local regulations.

Bioscreen C Microbiology Reader User's Manual _______________________________________________________________________________________________
_______________________________________________________________________________________________
25
10. User Replaceable Parts
User Replaceable Parts 240 5590 Filter wheel with 405, 420, 450, 492, 540, 580, 600 and WB (420-580) nm filters 240 0620 Halogen lamp 8V 50W – use ONLY lamps that are pre-tested by Growth Curves Ltd 121 0051 Fuse 2A slow, 10 pcs 121 0091 Fuse 4A slow, 10 pcs Consumables 950 2550 Sterile Honeycomb 2 microplate with a cover, 100 pcs PC Software 510 1500 BioScreener, versatile software for Bioscreen C Manual 150 6090 Bioscreen C User’s Manual

11. Appendix
The products of Growth Curves Ltd. are fully guaranteed against defective parts and materials including defects caused by poor workmanship for a period of one year from the date of the purchase. Growth Curves Ltd. will repair or replace defective parts or materials during the term of warranty at no extra charge for materials and labor, provided that the products were used and maintained according to Growth Curves Ltd’s instructions. The warranty is invalid if the products have been misused or abused. Opening or tampering the product is misuse, and will void warranty. For warranty to be effective, the product must have been purchased either directly from Growth Curves Ltd. or from an authorized Bioscreen C distributor. The guarantee is not transferable to a third party without prior written approval from Growth Curves Ltd. The guarantee is subject to the following exclusions:
• Any defects caused by normal wear and tear. • Defects caused by fire, lightning, flood, earthquake, explosion, sabotage, war, riot
or any other occurrence of the character listed above. • Refurbished products, which are subject to different warranty conditions.
THIS WARRANTY IS IN LIEU OF ALL OTHER EXPRESSED OR IMPLIED WARRANTIES, INCLUDING BUT NOT LIMITED TO ANY IMPLIED WARRANTIES OF MERCHANTABILITY OR FITNESS FOR A PARTICULAR PURPOSE.
Disclaimer: The seller is not liable for any losses or damage arising out of or in connection with the use of the product or indirect damages.
WARRANTY STATEMENT
Warranty

12. Appendix
Bioscreen C Service Request
Serial Number: ___________________________________________
Owner (Company): ___________________________________________
Contact Person: ___________________________________________
Contact Phone: ___________________________________________
Contact Fax: ___________________________________________
Contact E-mail: ___________________________________________
Date: ___________________________________________
Include this document with the instrument packaging.
1. Instrument is sent for � Maintenance/Service � Repair � Warranty Repair � Other (specify) ________________________________
2. Specify and describe the problem / maintenance request
3. Preferred type of contact for questions (number 1, 2, 3 – in the order of preference).
Please add the contact information as well!
Phone FAX e-mail
4. Specify the return address for serviced/repaired instrument
Signature _____________________________ Date _______________________

Instructions for Service Request and Decontamination
Dear customer, please follow this operating procedure to ensure the safety of our employees and expedite the return/repair of the equipment.
• Please fill in the Service Request completely and include it with the instrument. Describe the problem in detail. Please use separate appendix, if necessary.
• Fill in the Decontamination declaration form. Have the person responsible for verifying decontamination sign and date the Certificate of Decontamination AND the Safety/shipping label.
• Attach Safety/shipping label to the exterior of the packaging. • Take note and follow shipping laws and regulations.
In case an instrument is not decontaminated and/or the decontamination declaration form is not filled in and/or the Shipping/safety label is not attached to
the packaging exactly as specified, the shipment will be refused and result in immediate return of the unit at the customer’s expense.
Failure to properly document or label shipped units will result in
the immediate return of the unit at the customer’s expense!
Safety/shipping label
Fill out and sign the Safety/Shipping Label below. Cut out and affix it to the exterior (outside) of the shipping carton.
TO: Growth Curves Ltd
Telekatu 12
20360 Turku
FINLAND
Safety/Shipping Label
Samples used in product:
Decontamination performed
by: Signature
Name Date
This label must be affixed to the exterior of the packaging!
PACKAGES WITHOUT SAFETY/SHIPPING LABEL WILL BE REFUSED!

Responsibilities It is the responsibility of the Bioscreen user to
1. Remove all substances which are dangerous for human health from the instrument so that the instrument is safe for human to handle.
2. Choose the appropriate decontamination method depending on what substances (liquids) the instrument has been exposed to.
Why the instrument has to be cleaned?
• The product must be shipped under corresponding regulations. • Safety of the service personnel must be secured.
Decontamination areas The most important areas to be cleaned are the incubator and the sample compartment. Clean the incubator thoroughly (some white residue from the Honeycomb plates which is difficult to clean can remain on the corners after the cleaning). If there has been spillage of any harmful substances, take the incubator tray up and clean also underneath of the incubator. The incubator tray is attached with two hexagonal screws on both ends of the tray (large one on the left side and smaller one on the right side). The carriage can be manually moved to the left in order to clean the bottom part of the sample compartment.

Bioscreen C Certificate of Decontamination
Serial Number: ___________________________________________
Owner (Company): ___________________________________________
Contact Person: ___________________________________________
Contact Phone: ___________________________________________
Contact Fax: ___________________________________________
Contact E-mail: ___________________________________________
Date: ___________________________________________
Include this document with the instrument packaging. Decontamination Information: Materials used in unit: � Carcinogen � Chemical Hazard � Bacteria � Virus � Fungus � Toxic Substance � Pathogen � Radioactive � Non Hazardous Substance � Other (specify) _________________________________________________ Decontamination Procedure Used: ___________________________________________ If pathogen or radioactive, please check all that a pplies: � HIV � Hepatitis B � Retro Virus � Alpha � Beta � Gamma � S35 Isotope � P33 Isotope � P32 Isotope This unit is certified as having been reviewed by a competent member of our organization and found to have been totally decontaminated off all chemical, biological and/or radioactive materials PRIOR to packaging for shipment. By signing this form I acknowledge that I have read and understood my responsibilities. I have also read and understood that I have to attach Safety/shipment label to the exterior of the packaging in order to extradite the expenses for shipment refusal and returning. _______________________________________________________________________________________________ (Printed Name of Company Representative) (Title) _______________________________________________________________________________________ (Signature) (Date) Signature of Radiation Safety Officer is also requi red when the unit has been used with radioactive materials. Unit is certified by me to be free of Radioactive Contamination. _______________________________________________________________________________________ (Printed Name) (Signature) (Date)

This page is reserved for your notes:


This User’s Manual covers the use, specifications and maintenance of Bioscreen C Microbiology Reader.
Information in this User´s Manual is subjected to change without prior notice.
Web databases on Bioscreen C:
www.bioscreen.fi
www.growthcurvesusa.com
Oy Growth Curves Ab Ltd
www.bioscreen.fi Vuorimiehenkatu 13 A 2, 00140 Helsinki, Finland
Phone: +358-9-687 46 300