bios update instructions for intel® desktop boards update...before updating the bios on the intel®...
TRANSCRIPT
*Other names and brands may be claimed as the property of others.
BIOS Update Readme
BIOS Update Instructions for Intel® Desktop Boards
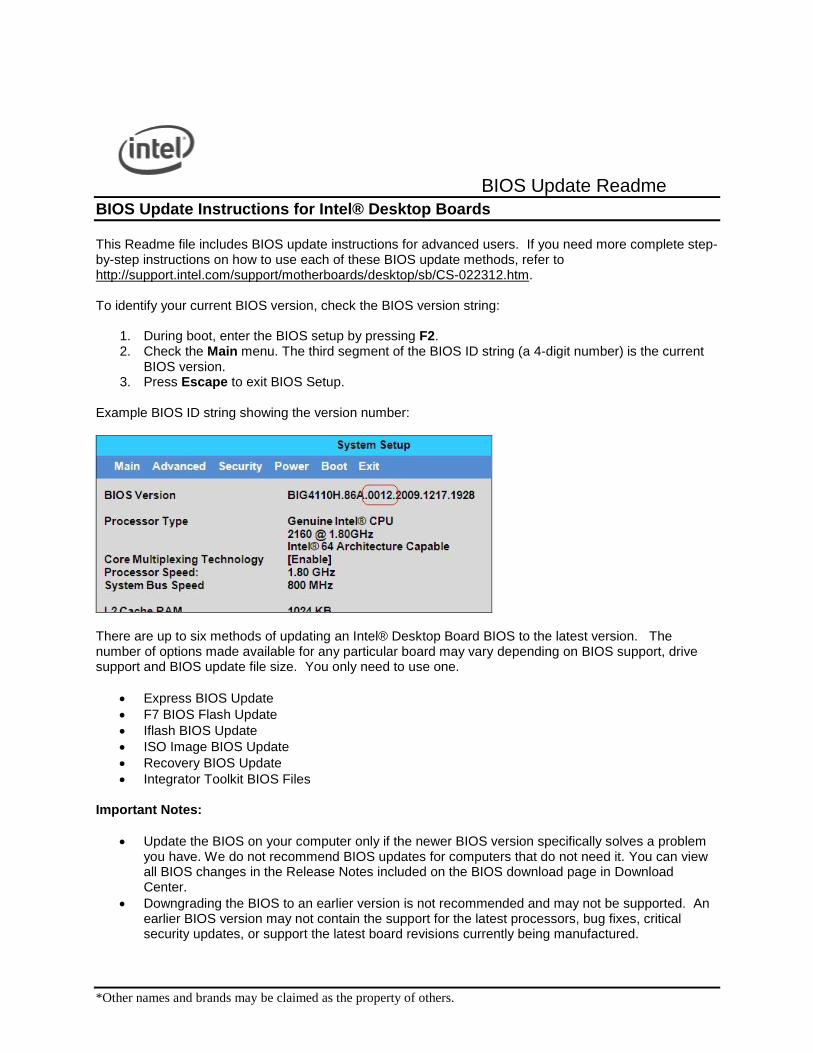
This Readme file includes BIOS update instructions for advanced users. If you need more complete step-by-step instructions on how to use each of these BIOS update methods, refer to http://support.intel.com/support/motherboards/desktop/sb/CS-022312.htm. To identify your current BIOS version, check the BIOS version string:
1. During boot, enter the BIOS setup by pressing F2. 2. Check the Main menu. The third segment of the BIOS ID string (a 4-digit number) is the current
BIOS version. 3. Press Escape to exit BIOS Setup.
Example BIOS ID string showing the version number:
There are up to six methods of updating an Intel® Desktop Board BIOS to the latest version. The number of options made available for any particular board may vary depending on BIOS support, drive support and BIOS update file size. You only need to use one.
Express BIOS Update
F7 BIOS Flash Update
Iflash BIOS Update
ISO Image BIOS Update
Recovery BIOS Update
Integrator Toolkit BIOS Files Important Notes:
Update the BIOS on your computer only if the newer BIOS version specifically solves a problem you have. We do not recommend BIOS updates for computers that do not need it. You can view all BIOS changes in the Release Notes included on the BIOS download page in Download Center.
Downgrading the BIOS to an earlier version is not recommended and may not be supported. An earlier BIOS version may not contain the support for the latest processors, bug fixes, critical security updates, or support the latest board revisions currently being manufactured.

*Other names and brands may be claimed as the property of others.
Before initiating a BIOS update, be sure to read and precisely follow the instructions included in this document. You may wish to print the instructions for easy reference.
If a BIOS update process is interrupted, your computer may not function properly. We recommend the process be done in an environment with a steady power supply (preferably with UPS).
Before updating the BIOS on the Intel® Desktop Board, manually record all BIOS settings that have been changed (from default) so they can be restored after completing the BIOS update.
Instructions for Express BIOS Updates With the Intel Express BIOS Update utility you can update the BIOS while in the Windows environment. The BIOS file is included in an automated update utility that combines the functionality of the Intel® Flash Memory Update Utility and the ease-of use of Windows-based installation wizards.
1. Save the Express BIOS update file to a temporary directory on the target PC. 2. Double-click the *.EXE file to run the Express BIOS update.
CAUTION!!! DO NOT POWER DOWN YOUR SYSTEM before the update is complete. This update will take up to 3 minutes.
Instructions for F7 BIOS Flash Update The F7 BIOS Flash Update is available on Intel® Desktop Boards beginning in 2009. To see if your board supports this feature, in BIOS Setup, check the Advanced > Boot Configuration menu for the setting Display F7 to Update BIOS. 1. Download and save the Recovery BIOS (.BIO) file to a temporary directory. 2. Copy the .BIO to a USB thumb drive. 3. Plug the thumb drive into a USB port of the target computer. 4. Shut down the target computer. 5. Enable the F7 prompt display:
a. Power the computer on. b. Enter the BIOS Setup by pressing F2 during boot. c. Go to the Advanced > Boot Configuration menu. d. Enable Display F7 to Update BIOS e. Press F10 to save and exit.
6. During boot, when the F7 prompt is displayed, press F7 to enter the BIOS Flash Update tool. 7. Select the USB thumb drive and press Enter. 8. Select the .BIO file and press Enter 9. Confirm you want to update the BIOS by pressing Enter. 10. Wait 2-5 minutes for the update to complete. 11. Remove the thumb drive. 12. Restart the computer.
Instructions for iFlash BIOS Updates With the Iflash BIOS update utility you can update the BIOS from a floppy disk, bootable CD-ROM, bootable USB flash drive or other bootable USB media. (Information on how to create a bootable USB device or CD is listed at the end of this document.) CAUTION!!! DO NOT POWER DOWN YOUR SYSTEM before the update is complete. This update will take up to 3 minutes.
*Other names and brands may be claimed as the property of others.
iFlash Update with Floppy Disk You can use this method if the iFlash files are small enough to fit on a floppy disk and the desktop board includes floppy drive support. You will need a blank floppy diskette.
1. Save the iFlash BIOS update file to a temporary directory. 2. Double-click the *.EXE to extract necessary files. 3. Double-click the RUN.BAT file to create a bootable floppy disk with the necessary BIOS update
files. 4. Boot the target PC with the floppy disk in the floppy drive to automatically launch the iFlash BIOS
update process. iFlash Update with Bootable USB Device You can use this method if the iFlash files are too large to fit on a floppy disk or if the desktop board does not include floppy drive support. You will need a bootable USB device, such as a USB thumb drive or USB external hard drive. (Information on how to create a bootable USB device is listed at the end of this document.)
1. Save the iFlash BIOS update file to a temporary directory. 2. Double-click the *.EXE to extract necessary files. 3. Copy the .BIO file and IFLASH.EXE (or IFLASH2.EXE, depending on your board model) to the
bootable USB device. 4. Configure the BIOS of the target system to boot to the USB device:
a. Press F2 during boot to enter BIOS Setup. b. Go to the Boot menu. c. Enable USB Boot. d. Save by pressing F10 and exit the BIOS Setup.
5. Boot the target PC with the USB device connected. 6. At the prompt, type IFLASH /PF XXX.BIO, where XXX.BIO is the filename of the .BIO file (or
IFLASH2 /PF XXX.BIO, depending on the version of iFlash you have) to launch the iFlash BIOS update process. Follow all prompts.
iFlash Update with Bootable CD-ROM Use this method if the iFlash files are too large to fit on a floppy disk or if the desktop board does not include floppy drive support. You will need a bootable CD-ROM. (Information on how to create a bootable CD is listed at the end of this document.)
1. Save the iFlash BIOS update file to a temporary directory. 2. Double-click the *.EXE to extract necessary files. 3. Copy the .BIO file and IFLASH.EXE (or IFLASH2.EXE, depending on your board model) to the
bootable CD. 4. Configure the BIOS of the target system to boot to the CD-ROM drive:
a. Press F2 during boot to enter BIOS Setup.
b. Go to the Boot menu.
c. In Boot Device Priority, set the CD-ROM drive to be the first boot device.
d. Save by pressing F10 and exit the BIOS Setup. 5. Boot the target PC with the CD in the drive. 6. At the prompt, type IFLASH /PF XXX.BIO, where XXX.BIO is the filename of the .BIO file (or
IFLASH2 /PF XXX.BIO, depending on the version of iFlash you have) to launch the iFlash BIOS update process. Follow all prompts.
Instructions for ISO Image BIOS Updates The ISO Image BIOS Update allows for the update of an Intel® Desktop Board BIOS to the latest production release regardless of the operating system installed on the computer's hard drive and without the need to remove the BIOS configuration jumper. It requires a blank CD-R, a read/writeable CD drive,
*Other names and brands may be claimed as the property of others.
and software capable of uncompressing and writing the ISO image to CD. The image uses ISOLINUX* bootloader and automatically launches a script to upgrade the board’s BIOS via the Iflash utility. Instructions to upgrade the BIOS using the ISO image:
1. Download the ISO image file. 2. Using software capable of uncompressing and writing an ISO image to CD, burn the data to a
blank CD. Note: Copying the ISO image file to CD will not work; the completed CD should contain multiple files and a directory.
3. Insert the CD that was created from the ISO image in the previous step into the CDROM drive of the computer to be upgraded and boot the system.
4. Press the ENTER key when presented with the "Press ENTER to continue booting from CD-ROM" prompt (system will boot from hard drive if no key is pressed within 15 seconds).
5. Press any key at the "Welcome to the Intel Desktop Board BIOS Upgrade CD-ROM" page to confirm the BIOS upgrade operation.
6. Wait for the BIOS upgrade process to complete. CAUTION!!! DO NOT POWER DOWN YOUR SYSTEM before the update is complete. This may take up to 5 minutes. Note: Source code for the open source software used is available at Intel's Download Center at http://aiedownload.intel.com/df-support/9730/eng/FDOEMCD.source.zip.
Instructions for Recovery BIOS Updates In the unlikely event that a BIOS update is interrupted, it is possible the BIOS may be left in an unusable state. The recovery process requires the chassis to be opened to move the onboard BIOS Configuration Jumper. WARNING: This process is intended to be performed by a trained technician. Recovery with Bootable USB Thumb Drive Use this method if the recovery file (*.BIO) is too large to fit on a floppy disk or if the desktop board does not include floppy drive support.
1. Copy the recovery file (*.bio) to a bootable USB thumb drive. 2. Place the thumb drive in a USB port of the target system. 3. Shut down the system and unplug AC power. 4. Open the chassis and remove the BIOS Configuration Jumper. See the Technical Product
Specification for details including the location of this jumper. 5. Power the system on. 6. Wait 2-5 minutes for the update to complete. 7. System will either turn off when the recovery process is completed or it will prompt you to turn off
the system. 8. Remove the thumb drive from the USB port. 9. Replace the BIOS Configuration Jumper. 10. Restart system.
Recovery with CD-ROM Use this method if the recovery file (*.BIO) is too large to fit on a floppy disk or if the desktop board does not include floppy drive support.
1. Copy the recovery file (*.bio) to a CD. 2. Place the CD in the CD-ROM drive of the target system. 3. Shut down the system and unplug AC power. 4. Open the chassis and remove the BIOS Configuration Jumper. See the Technical Product
Specification for details including the location of this jumper.
*Other names and brands may be claimed as the property of others.
5. Power the system on. 6. Wait 2-5 minutes for the update to complete. 7. System will either turn off when the recovery process is completed or it will prompt you to turn off
the system. 8. Replace the BIOS Configuration Jumper. 9. Restart system.
Recovery with Floppy Disk Use this method if the recovery file (*.BIO) is small enough to fit on a floppy disk (smaller than 1.44MB) and the desktop board includes floppy drive support. Note: The floppy disk does NOT need to be bootable; however, it must be formatted.
1. Copy the recovery file (*.bio) to a formatted floppy disk. 2. Place the disk in the floppy drive (drive A) of the target system. 3. Shut down the system and unplug AC power. 4. Open the chassis and remove the BIOS Configuration Jumper. See the Technical Product
Specification for details including the location of this jumper. 5. Power the system on. 6. Wait 2-5 minutes for the update to complete. When the floppy drive LED is lit, the system is
copying the recovery code into the FLASH device. 7. System will either turn off when the recovery process is completed or it will prompt you to turn off
the system. 8. Remove floppy disk from drive A: 9. Replace the BIOS Configuration Jumper. 10. Restart system.
NOTE: If the error message "CMOS/GPNV Checksum Bad…Press F1 to Run SETUP" appears during boot after the update, press [F1] to go into the "BIOS Setup Utility", press [F9] to load setup defaults, and then press [F10] to save and exit.
Instructions for Integrator Toolkit BIOS Files With the Iflash BIOS Update / Integrator Toolkit BIOS Files you can update the BIOS from a bootable CD-ROM, bootable USB flash drive or other bootable USB media. This download also provides the necessary files for Intel® Integrator Toolkit. CAUTION!!! DO NOT POWER DOWN YOUR SYSTEM before the update is complete. This update will take up to 3 minutes. iFlash Update with CD-ROM or USB Device Use this method if the files are too large to fit on a floppy disk or if the desktop board does not include floppy drive support. You will need a CD or a USB device, such as a USB thumb drive or USB external hard drive.
7. Download and save the Integrator Toolkit BIOS Files to a temporary directory. 8. Double-click the *.EXE to extract necessary files. 9. Copy the .BIO file and IFLASH2.EXE to a CD-ROM or USB device. 10. Boot the target PC to DOS. 11. At the appropriate directory prompt for the CD-ROM drive or USB drive, type
IFLASH2 /pf XXX.BIO /rb (where XXX.BIO is the filename of the .BIO file) to launch the iFlash BIOS update process.
Note: The Integrator Toolkit BIOS Files download also provides the *.ITK file necessary for use with the Intel® Integrator Toolkit.
*Other names and brands may be claimed as the property of others.
Creating a Bootable USB Device Making a USB flash device into a bootable drive is not as simple as creating bootable floppy disks. Please refer to the documentation provided by the manufacturer of your USB device for information on how to create a bootable USB device. Additionally, you may refer to any of the following websites for tips on creating bootable USB devices. Intel is unable to assist with the creation of bootable devices.
Make your Thumb Drive Bootable at http://www.pcmag.com/article2/0,1895,1846793,00.asp
How to Boot from a USB Device at http://www.weethet.nl/english/hardware_bootfromusbstick.php You can also search for additional resources on the web for creating bootable USB devices. Search on “How to create bootable USB drives”. Creating a Bootable CD Creating a bootable CD is not as simple as creating bootable floppy disks. Refer to any of the following websites for tips on creating bootable CDs. Intel is unable to assist with the creation of bootable devices.
Bart’s Way to Create Bootable CD-ROMs at http://www.nu2.nu/bootcd/
How to Create a Bootable CD-ROM at http://www.hardwaresecrets.com/article/75
How to Create Bootable CDs at http://www.techsupportalert.com/search/t1214.pdf You can also search for additional resources on the web for creating bootable CDs. Search on “How to create a bootable CD”.
LEGAL INFORMATION
Information in this document is provided in connection with Intel Products and for the purpose of supporting Intel developed server/desktop boards and systems. No license, express or implied, by estoppel or otherwise, to any intellectual property rights is granted by this document. Except as provided in Intel's Terms and Conditions of Sale for such products, Intel assumes no liability whatsoever, and Intel disclaims any express or implied warranty, relating to sale and/or use of Intel products including liability or warranties relating to fitness for a particular purpose, merchantability, or infringement of any patent, copyright or other intellectual property right. Intel Corporation may have patents or pending patent applications, trademarks, copyrights, or other intellectual property rights that relate to the presented subject matter. The furnishing of documents and other materials and information does not provide any license, express or implied, by estoppel or otherwise, to any such patents, trademarks, copyrights, or other intellectual property rights. Intel products are not intended for use in medical, life saving, or life sustaining applications. Intel may make changes to specifications and product descriptions at any time, without notice. Intel is a registered trademark of Intel Corporation. Copyright (c) 2010 Intel Corporation.