binder clip catapult - rock creek elementary science...
TRANSCRIPT
Project #22 Page 1/15
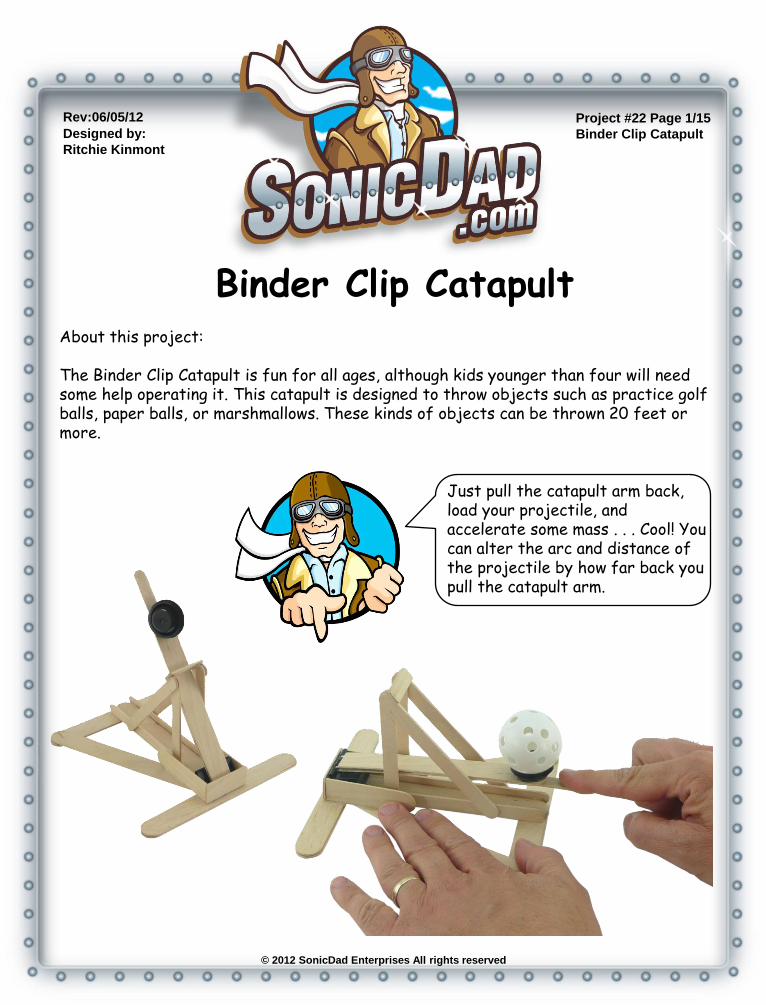
Binder Clip Catapult
Binder Clip Catapult
Designed by:
Ritchie Kinmont
About this project: The Binder Clip Catapult is fun for all ages, although kids younger than four will need some help operating it. This catapult is designed to throw objects such as practice golf balls, paper balls, or marshmallows. These kinds of objects can be thrown 20 feet or more.
Just pull the catapult arm back, load your projectile, and accelerate some mass . . . Cool! You can alter the arc and distance of the projectile by how far back you pull the catapult arm.
© 2012 SonicDad Enterprises All rights reserved
Rev:06/05/12
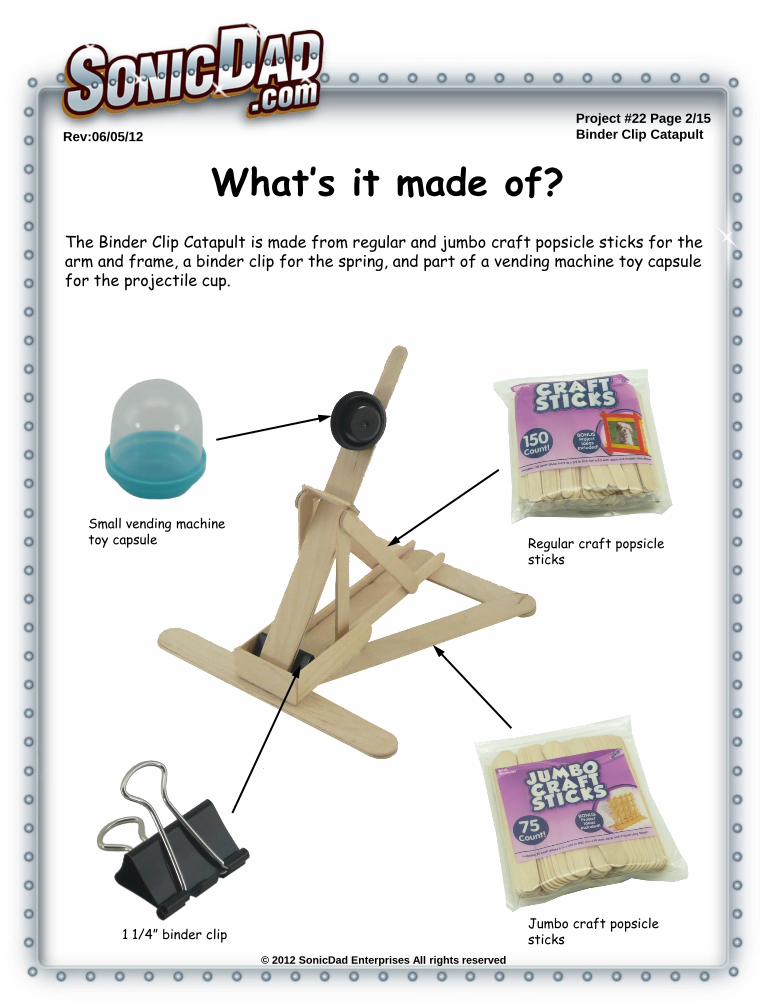
What’s it made of?
The Binder Clip Catapult is made from regular and jumbo craft popsicle sticks for the arm and frame, a binder clip for the spring, and part of a vending machine toy capsule for the projectile cup.
Rev:06/05/12
Project #22 Page 2/15
Binder Clip Catapult
Small vending machine toy capsule
© 2012 SonicDad Enterprises All rights reserved
Regular craft popsicle sticks
1 1/4” binder clip Jumbo craft popsicle sticks
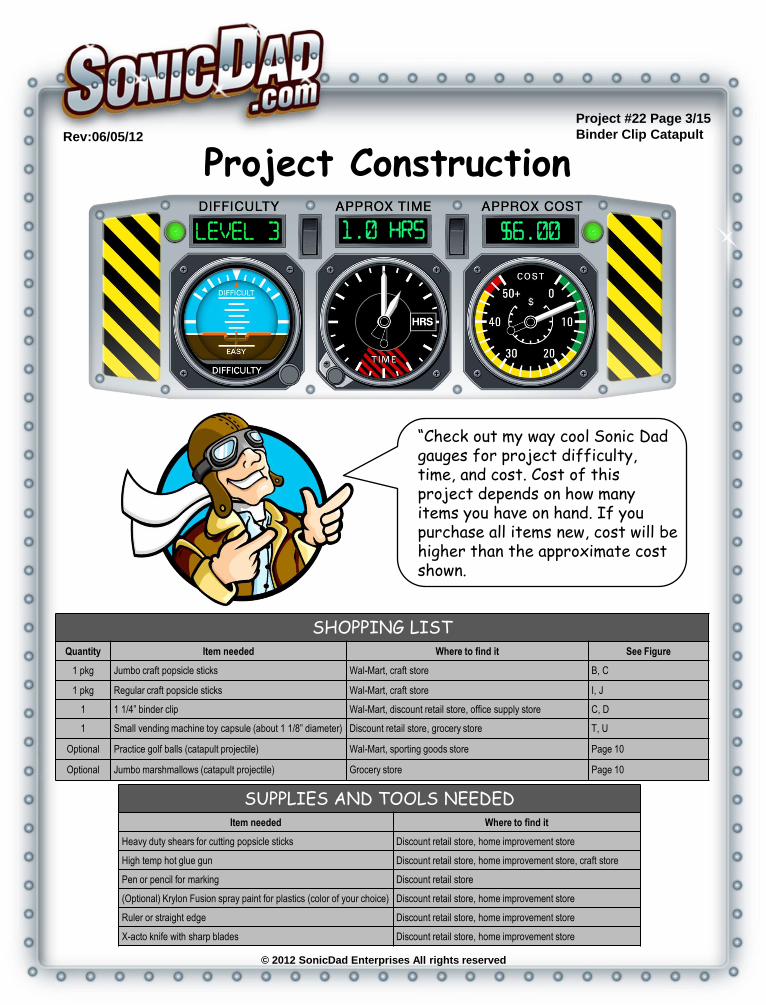
Project Construction
“Check out my way cool Sonic Dad gauges for project difficulty, time, and cost. Cost of this project depends on how many items you have on hand. If you purchase all items new, cost will be higher than the approximate cost shown.
LEVEL 3 $6.00 1.0 HRS
SHOPPING LIST Quantity Item needed Where to find it See Figure
1 pkg Jumbo craft popsicle sticks Wal-Mart, craft store B, C
1 pkg Regular craft popsicle sticks Wal-Mart, craft store I, J
1 1 1/4” binder clip Wal-Mart, discount retail store, office supply store C, D
1 Small vending machine toy capsule (about 1 1/8” diameter) Discount retail store, grocery store T, U
Optional Practice golf balls (catapult projectile) Wal-Mart, sporting goods store Page 10
Optional Jumbo marshmallows (catapult projectile) Grocery store Page 10
SUPPLIES AND TOOLS NEEDED Item needed Where to find it
Heavy duty shears for cutting popsicle sticks Discount retail store, home improvement store
High temp hot glue gun Discount retail store, home improvement store, craft store
Pen or pencil for marking Discount retail store
(Optional) Krylon Fusion spray paint for plastics (color of your choice) Discount retail store, home improvement store
Ruler or straight edge Discount retail store, home improvement store
X-acto knife with sharp blades Discount retail store, home improvement store
© 2012 SonicDad Enterprises All rights reserved
Project #22 Page 3/15
Binder Clip Catapult Rev:06/05/12
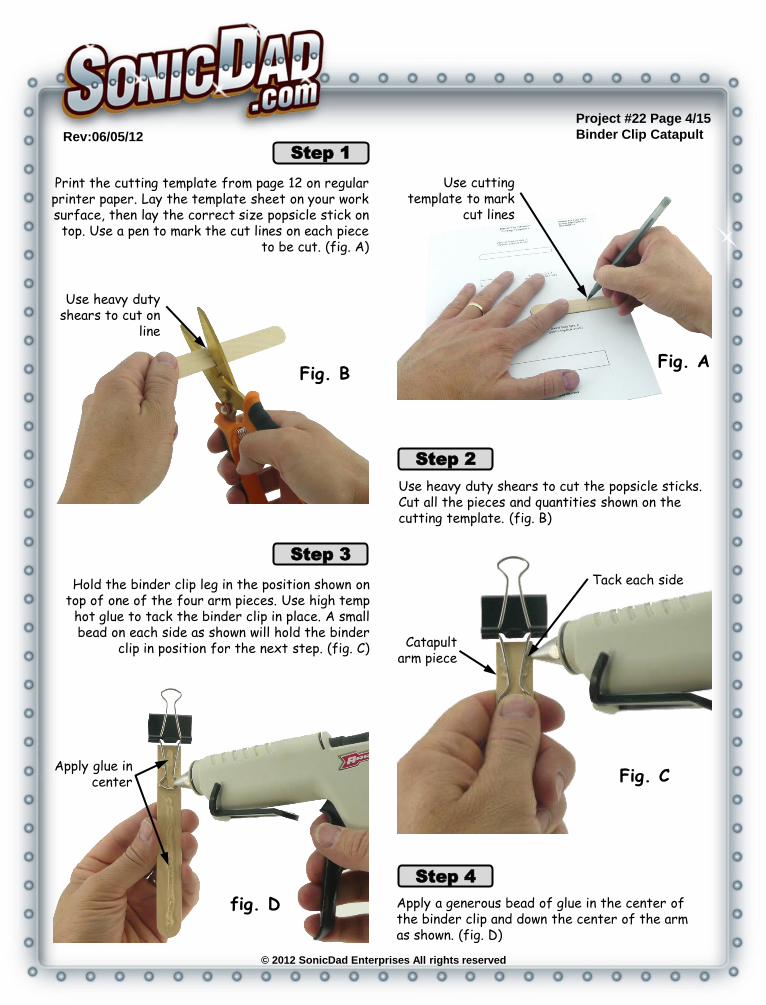
Print the cutting template from page 12 on regular printer paper. Lay the template sheet on your work surface, then lay the correct size popsicle stick on top. Use a pen to mark the cut lines on each piece
to be cut. (fig. A)
Step 1
Apply a generous bead of glue in the center of the binder clip and down the center of the arm as shown. (fig. D)
Step 4
Use heavy duty shears to cut the popsicle sticks. Cut all the pieces and quantities shown on the cutting template. (fig. B)
Step 2
fig. D
Hold the binder clip leg in the position shown on
top of one of the four arm pieces. Use high temp hot glue to tack the binder clip in place. A small bead on each side as shown will hold the binder
clip in position for the next step. (fig. C)
Step 3
© 2012 SonicDad Enterprises All rights reserved
Fig. A
Use cutting
template to mark cut lines
Fig. B
Use heavy duty
shears to cut on line
Fig. C
Tack each side
Apply glue in center
Catapult arm piece
Project #22 Page 4/15
Binder Clip Catapult Rev:06/05/12
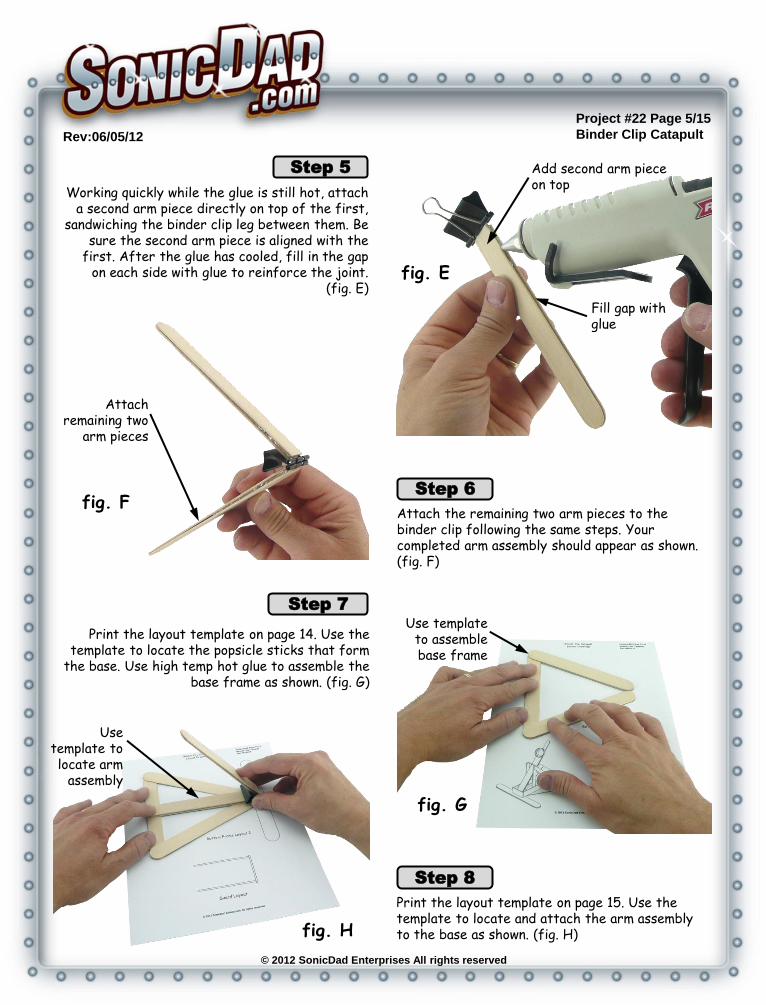
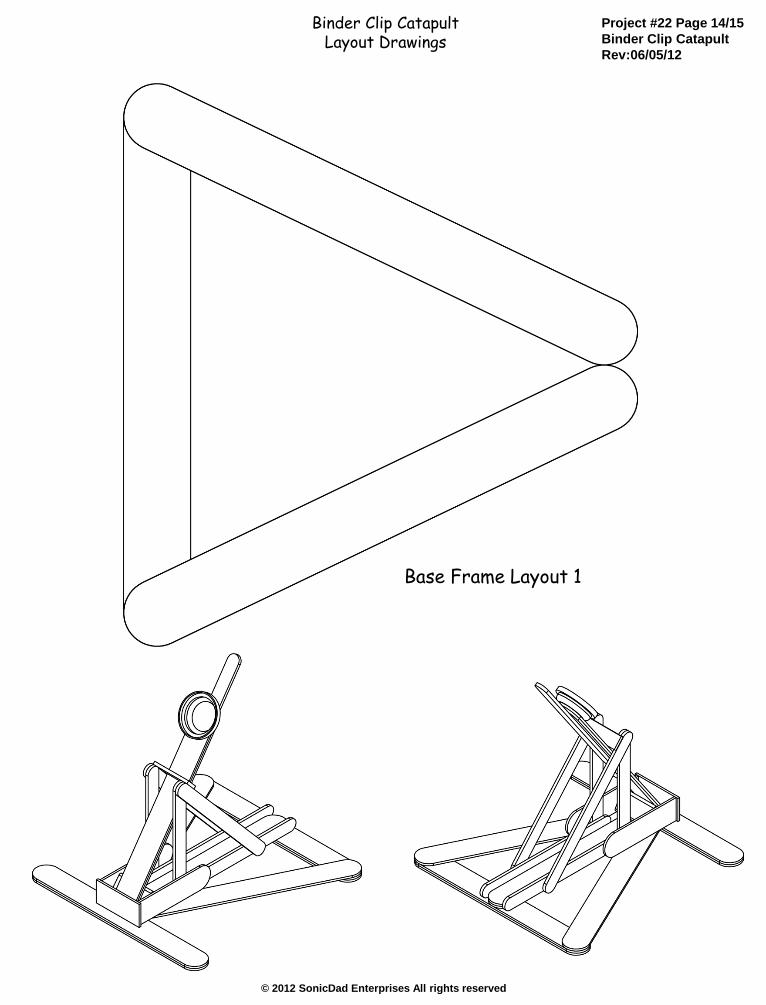
Print the layout template on page 14. Use the
template to locate the popsicle sticks that form the base. Use high temp hot glue to assemble the
base frame as shown. (fig. G)
Step 7
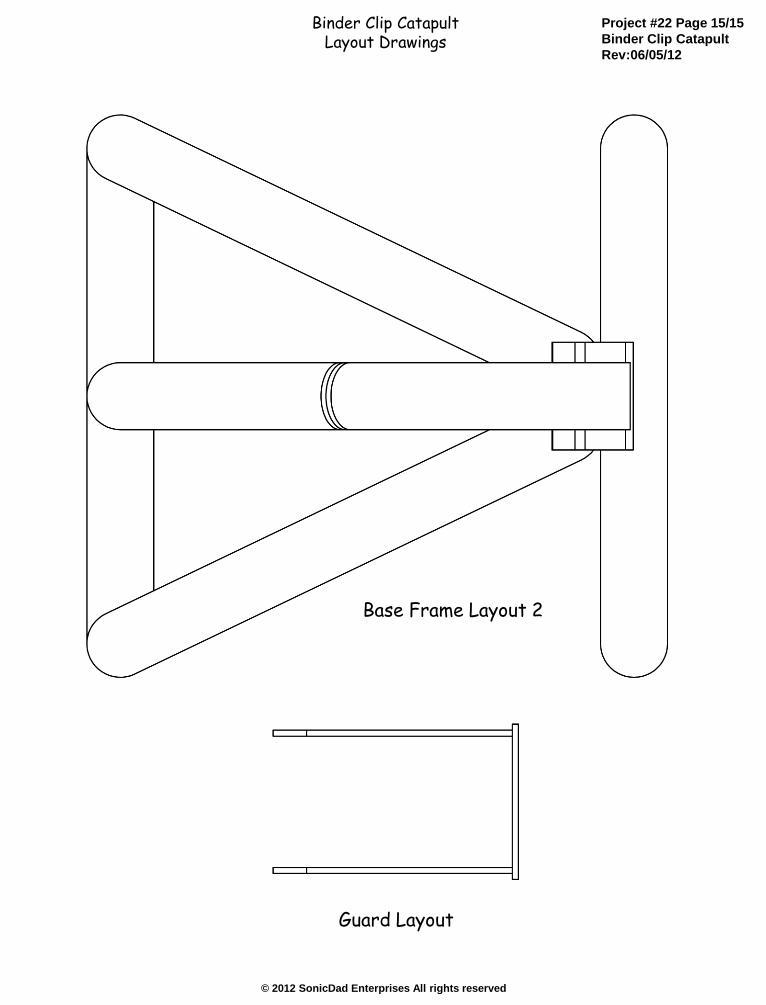
Print the layout template on page 15. Use the template to locate and attach the arm assembly to the base as shown. (fig. H)
Step 8
Working quickly while the glue is still hot, attach
a second arm piece directly on top of the first, sandwiching the binder clip leg between them. Be
sure the second arm piece is aligned with the first. After the glue has cooled, fill in the gap
on each side with glue to reinforce the joint. (fig. E)
Step 5
© 2012 SonicDad Enterprises All rights reserved
Attach the remaining two arm pieces to the binder clip following the same steps. Your completed arm assembly should appear as shown. (fig. F)
Step 6
fig. F
Attach
remaining two arm pieces
Fill gap with glue
Add second arm piece on top
fig. E
fig. G
Use template
to assemble base frame
fig. H
Use
template to locate arm
assembly
Project #22 Page 5/15
Binder Clip Catapult Rev:06/05/12
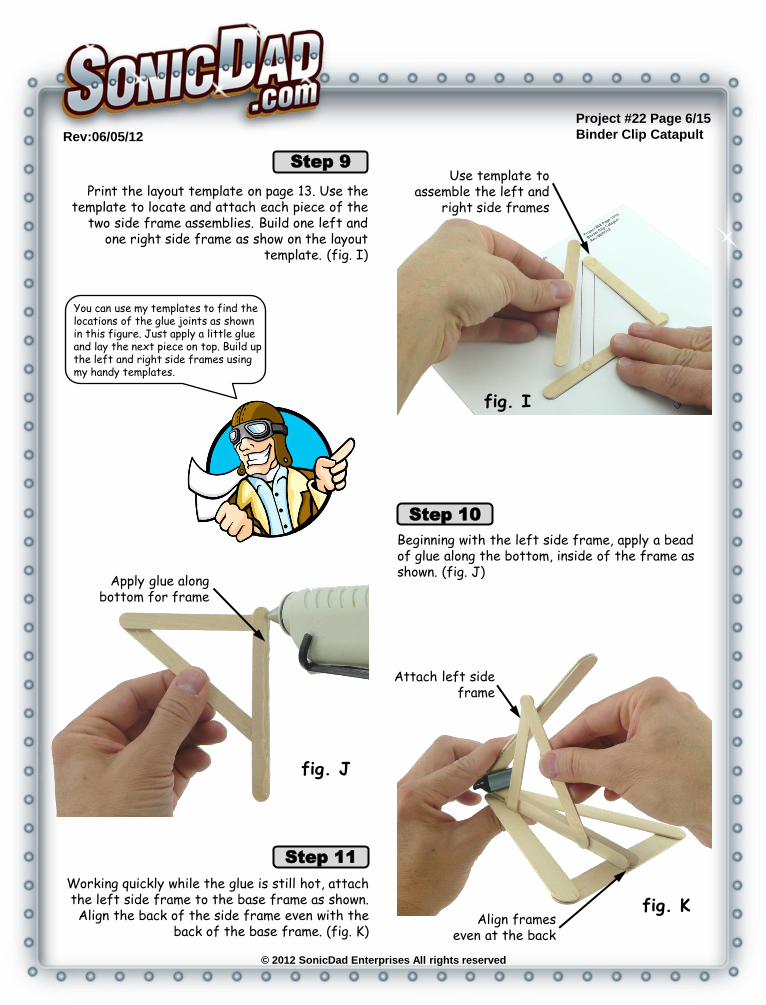
Beginning with the left side frame, apply a bead of glue along the bottom, inside of the frame as shown. (fig. J)
Step 10
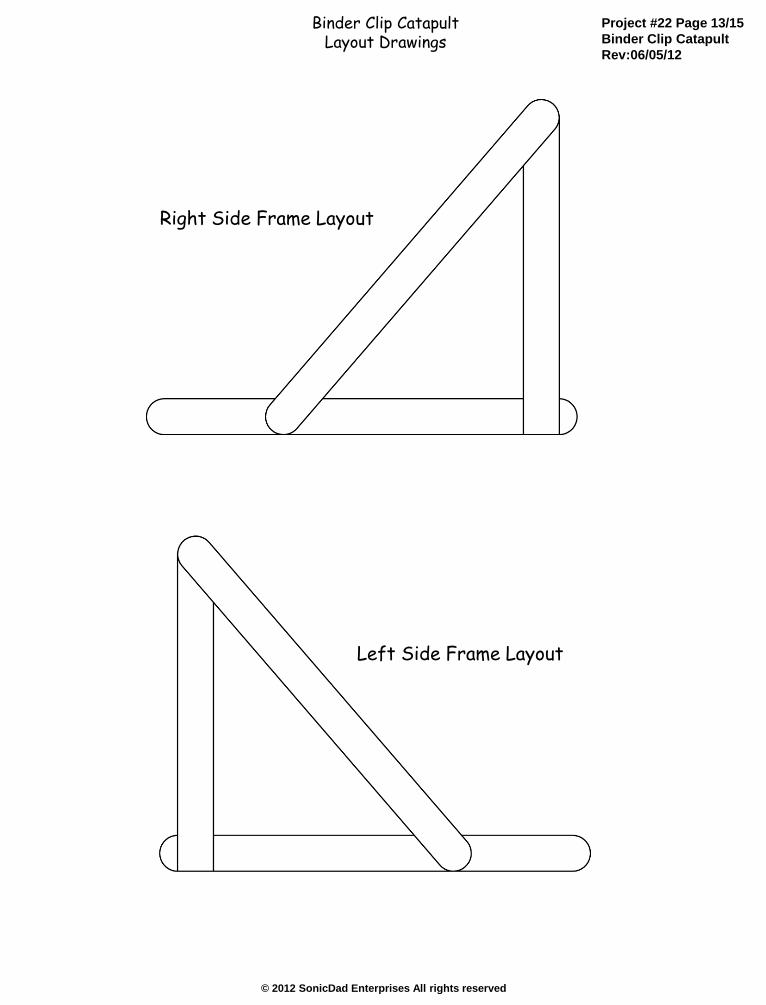
Print the layout template on page 13. Use the
template to locate and attach each piece of the two side frame assemblies. Build one left and
one right side frame as show on the layout template. (fig. I)
Step 9
Working quickly while the glue is still hot, attach the left side frame to the base frame as shown. Align the back of the side frame even with the
back of the base frame. (fig. K)
Step 11
You can use my templates to find the locations of the glue joints as shown in this figure. Just apply a little glue and lay the next piece on top. Build up the left and right side frames using my handy templates.
© 2012 SonicDad Enterprises All rights reserved
fig. I
Use template to
assemble the left and right side frames
fig. J
Apply glue along
bottom for frame
Attach left side
frame
fig. K Align frames
even at the back
Project #22 Page 6/15
Binder Clip Catapult Rev:06/05/12
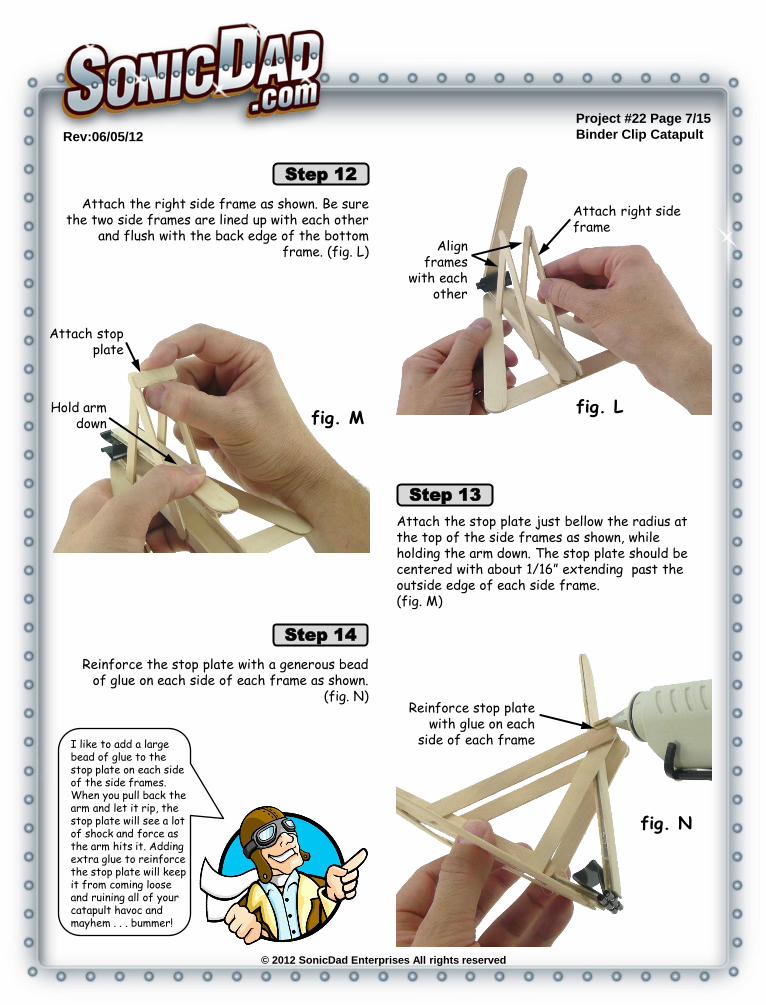
Attach the right side frame as shown. Be sure
the two side frames are lined up with each other and flush with the back edge of the bottom
frame. (fig. L)
Step 12
Attach the stop plate just bellow the radius at the top of the side frames as shown, while holding the arm down. The stop plate should be centered with about 1/16” extending past the outside edge of each side frame. (fig. M)
Step 13
Reinforce the stop plate with a generous bead
of glue on each side of each frame as shown. (fig. N)
Step 14
© 2012 SonicDad Enterprises All rights reserved
fig. M
Attach stop
plate
Hold arm
down
fig. N
Reinforce stop plate
with glue on each side of each frame
fig. L
Attach right side frame
Align frames
with each other
I like to add a large bead of glue to the stop plate on each side of the side frames. When you pull back the arm and let it rip, the stop plate will see a lot of shock and force as the arm hits it. Adding extra glue to reinforce the stop plate will keep it from coming loose and ruining all of your catapult havoc and mayhem . . . bummer!
Project #22 Page 7/15
Binder Clip Catapult Rev:06/05/12
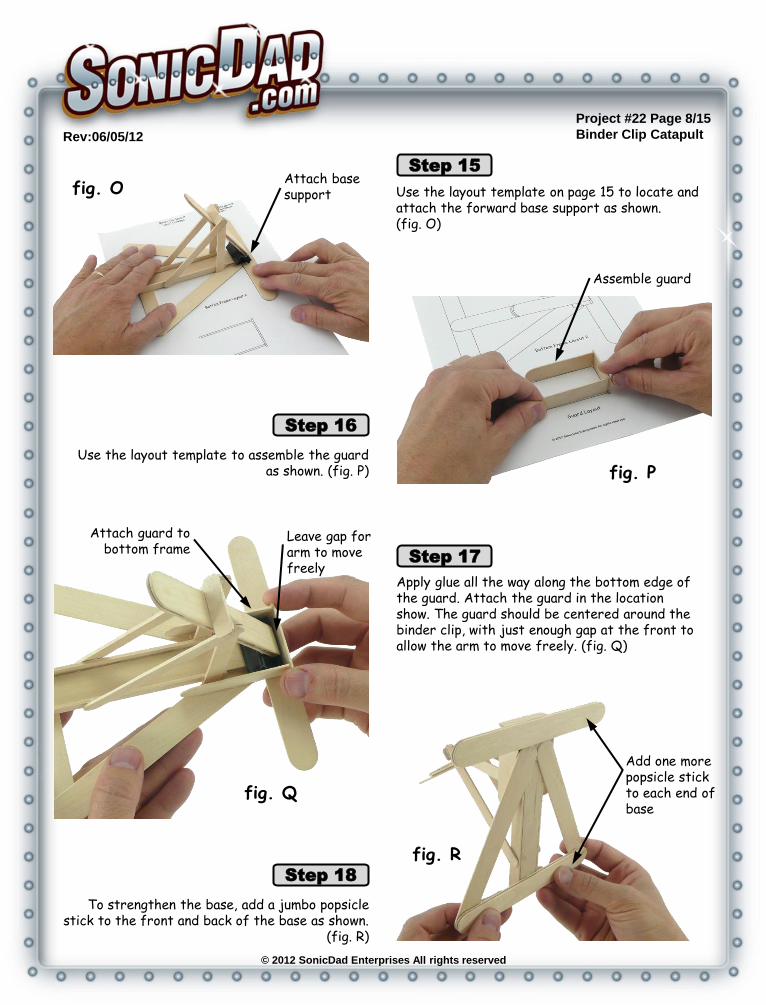
Apply glue all the way along the bottom edge of the guard. Attach the guard in the location show. The guard should be centered around the binder clip, with just enough gap at the front to allow the arm to move freely. (fig. Q)
Step 17
To strengthen the base, add a jumbo popsicle
stick to the front and back of the base as shown. (fig. R)
Step 18
Use the layout template on page 15 to locate and attach the forward base support as shown. (fig. O)
Step 15
Use the layout template to assemble the guard
as shown. (fig. P)
Step 16
© 2012 SonicDad Enterprises All rights reserved
fig. O
Attach base support
Assemble guard
fig. P
Attach guard to
bottom frame
fig. Q
Leave gap for arm to move freely
fig. R
Add one more popsicle stick to each end of base
Project #22 Page 8/15
Binder Clip Catapult Rev:06/05/12
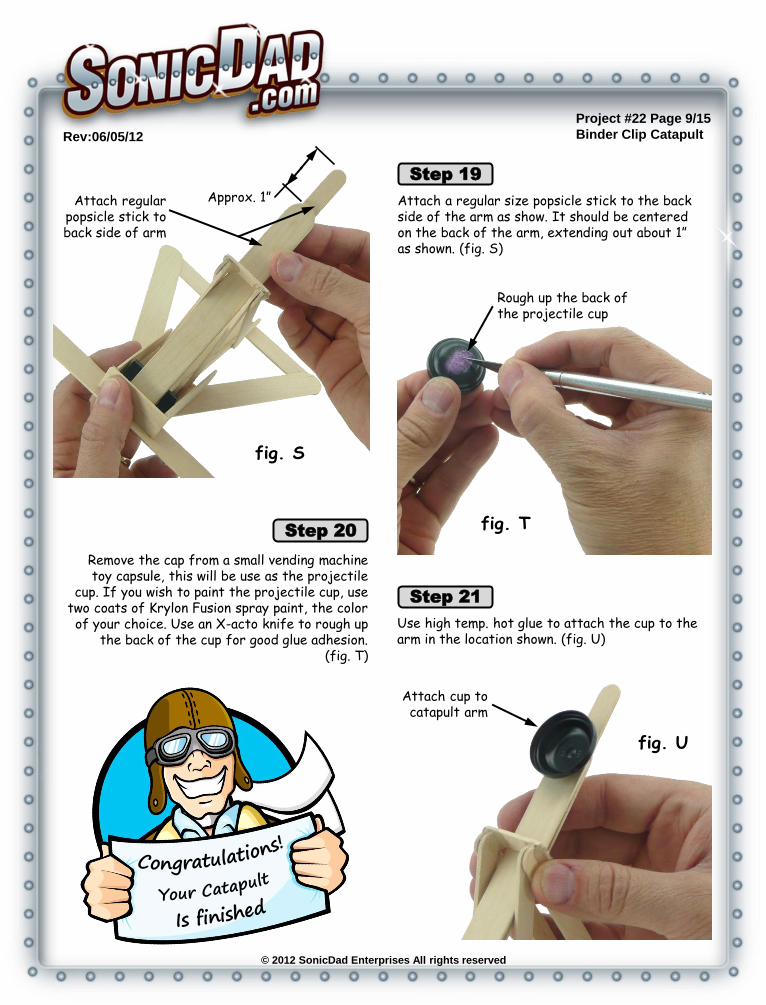
Remove the cap from a small vending machine toy capsule, this will be use as the projectile
cup. If you wish to paint the projectile cup, use two coats of Krylon Fusion spray paint, the color of your choice. Use an X-acto knife to rough up
the back of the cup for good glue adhesion. (fig. T)
Step 20
Attach a regular size popsicle stick to the back side of the arm as show. It should be centered on the back of the arm, extending out about 1” as shown. (fig. S)
Step 19
© 2012 SonicDad Enterprises All rights reserved
Use high temp. hot glue to attach the cup to the arm in the location shown. (fig. U)
Step 21
fig. U
Attach cup to catapult arm
fig. S
Attach regular
popsicle stick to back side of arm
Approx. 1”
fig. T
Rough up the back of the projectile cup
Project #22 Page 9/15
Binder Clip Catapult Rev:06/05/12
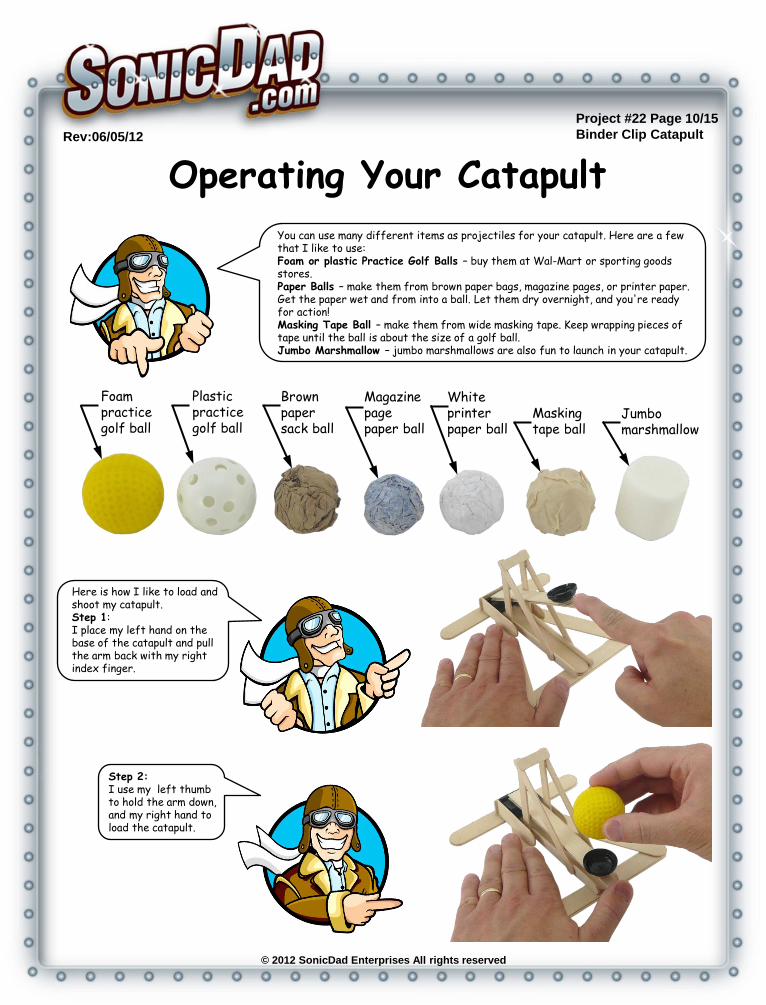
Operating Your Catapult
Here is how I like to load and shoot my catapult. Step 1: I place my left hand on the base of the catapult and pull the arm back with my right index finger.
You can use many different items as projectiles for your catapult. Here are a few that I like to use: Foam or plastic Practice Golf Balls – buy them at Wal-Mart or sporting goods stores. Paper Balls – make them from brown paper bags, magazine pages, or printer paper. Get the paper wet and from into a ball. Let them dry overnight, and you're ready for action! Masking Tape Ball – make them from wide masking tape. Keep wrapping pieces of tape until the ball is about the size of a golf ball. Jumbo Marshmallow – jumbo marshmallows are also fun to launch in your catapult.
© 2012 SonicDad Enterprises All rights reserved
Foam practice golf ball
Plastic practice golf ball
Brown paper sack ball
Magazine page paper ball
White printer paper ball
Masking tape ball
Jumbo marshmallow
Step 2: I use my left thumb to hold the arm down, and my right hand to load the catapult.
Project #22 Page 10/15
Binder Clip Catapult Rev:06/05/12
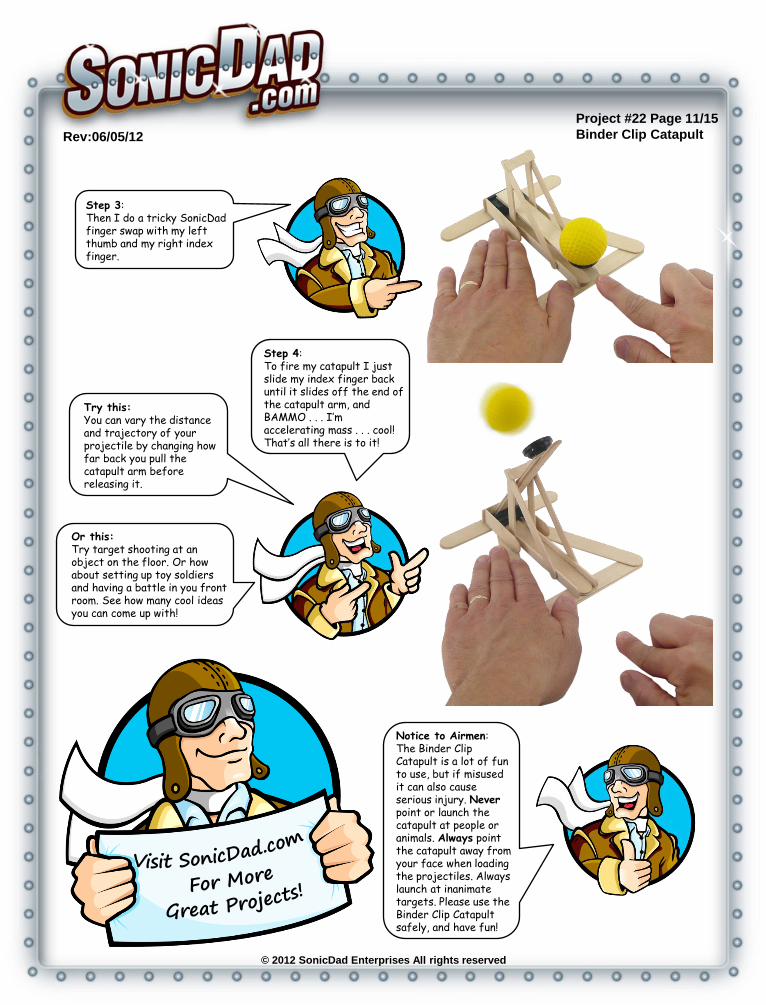
Step 4: To fire my catapult I just slide my index finger back until it slides off the end of the catapult arm, and BAMMO . . . I’m accelerating mass . . . cool! That’s all there is to it!
© 2012 SonicDad Enterprises All rights reserved
Notice to Airmen: The Binder Clip Catapult is a lot of fun to use, but if misused it can also cause serious injury. Never point or launch the catapult at people or animals. Always point the catapult away from your face when loading the projectiles. Always launch at inanimate targets. Please use the Binder Clip Catapult safely, and have fun!
Step 3: Then I do a tricky SonicDad finger swap with my left thumb and my right index finger.
Or this: Try target shooting at an object on the floor. Or how about setting up toy soldiers and having a battle in you front room. See how many cool ideas you can come up with!
Try this: You can vary the distance and trajectory of your projectile by changing how far back you pull the catapult arm before releasing it.
Project #22 Page 11/15
Binder Clip Catapult Rev:06/05/12
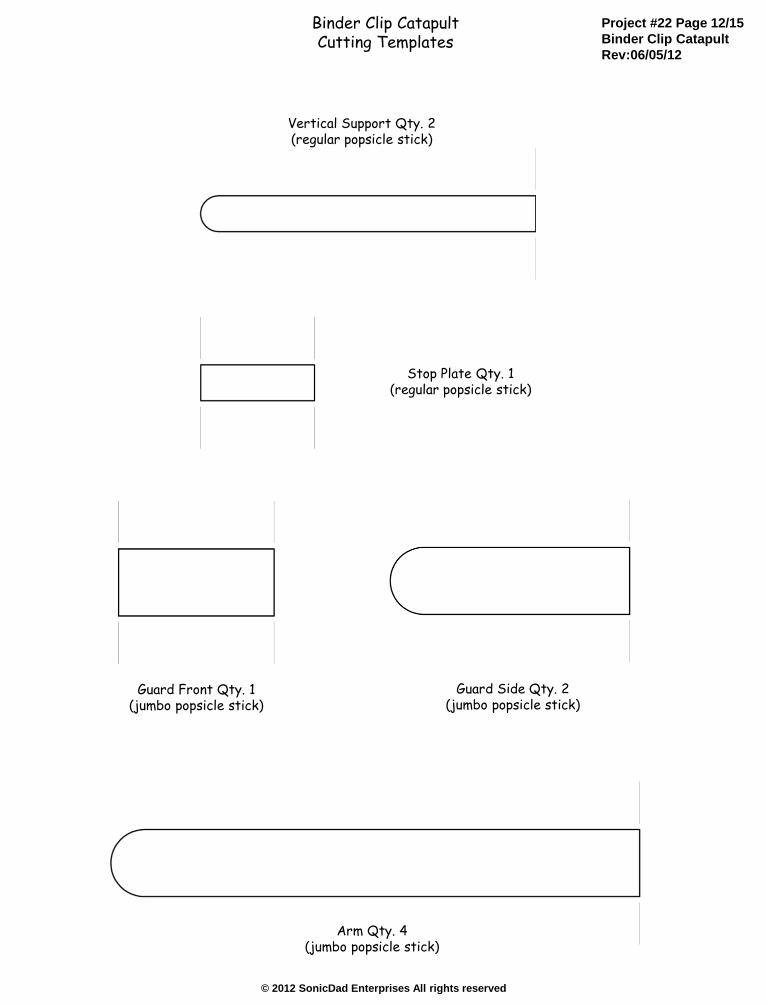
Binder Clip Catapult Cutting Templates
© 2012 SonicDad Enterprises All rights reserved
Vertical Support Qty. 2 (regular popsicle stick)
Project #22 Page 12/15
Binder Clip Catapult
Rev:06/05/12
Stop Plate Qty. 1 (regular popsicle stick)
Guard Front Qty. 1 (jumbo popsicle stick)
Guard Side Qty. 2 (jumbo popsicle stick)
Arm Qty. 4 (jumbo popsicle stick)
© 2012 SonicDad Enterprises All rights reserved
Right Side Frame Layout
Binder Clip Catapult Layout Drawings
Project #22 Page 13/15
Binder Clip Catapult
Rev:06/05/12
Left Side Frame Layout
© 2012 SonicDad Enterprises All rights reserved
Binder Clip Catapult Layout Drawings
Project #22 Page 14/15
Binder Clip Catapult
Rev:06/05/12
Base Frame Layout 1
© 2012 SonicDad Enterprises All rights reserved
Binder Clip Catapult Layout Drawings
Project #22 Page 15/15
Binder Clip Catapult
Rev:06/05/12
Base Frame Layout 2
Guard Layout