best practices - trend micro worry-free business security services · 2012-10-02 · worry-free™...
TRANSCRIPT

SM
B T
ec
hn
ica
l P
rod
uc
t M
ark
eti
ng
TREND MICRO
Worry-Free Business Security
Services v5.0
Best Practices Guide
Trend Micro, Inc.
10101 N. De Anza Blvd.
Cupertino, CA 95014
T 800.228.5651 / 408.257.1500
F 408.257.2003
www.trendmicro.com
Worry-Free™ Business Security Services 5.0 – Best Practices Guide V1.0
2
Trend Micro Incorporated reserves the right to make changes to this document and to the products
described herein without notice. Before installing and using the software, please review the
readme file and the latest version of the applicable user documentation.
Trend Micro, the Trend Micro t-ball logo, and Worry-Free are trademarks or registered trademarks
of Trend Micro, Incorporated. All other product or company names may be trademarks or
registered trademarks of their owners.
Copyright © 2012 Trend Micro Incorporated, Volume Technical Product Marketing. All rights
reserved.
Trend Micro™ Worry-Free™ Business Security Services – Best Practices Guide provides best
practice guidelines to resellers and customers deploying Worry-Free Business Security Services.
Detailed information about how to use specific features in the software is available in the Online
Help and in the Trend Micro™ Worry-Free™ Business Security Services User’s Guide.
At Trend Micro, we are always seeking to improve our documentation. If you have questions,
comments, or suggestions about this or any Trend Micro documents, please contact us at
[email protected]. You can also evaluate this document on the following Web site:
www.trendmicro.com/download/documentation/rating.asp
DOCUMENT PROFILE:
Product: Trend Micro™ Worry-Free™ Business Security Services 5.0
Document Title: Worry-Free™ Business Security Services v5.0 – Best Practices Guide v1.0
Document Filename: BP - WFBS-SVC 5.0 - v1.0.docx
Document Release Date: September, 2012
Team: SMB Technical Product Marketing

Worry-Free™ Business Security Services 5.0 – Best Practices Guide V1.0
3
Contents
Preface ............................................................................................................................... 5
Chapter 1: Introduction .................................................................................................... 6 What is Worry-Free Business Security Services? ............................................................................ 6 What’s New in Worry-Free Business Security Services? ................................................................ 6 Features and Benefits ....................................................................................................................... 8
Chapter 2: Product Registration .................................................................................... 10 Logon Information ......................................................................................................................... 10
Chapter 3: Initial Configuration ..................................................................................... 12 Default Configuration..................................................................................................................... 12 Installer Management ..................................................................................................................... 13 Deploying via Active Directory ..................................................................................................... 13 Package URL.................................................................................................................................. 18
Chapter 4: Installation .................................................................................................... 19 Worry-Free Business Security Services Agent System Requirements ........................................... 19
Requirements for Trend Micro Mobile Security (TMMS), the Android Agent ......................... 20 Uninstall Existing AV Product ....................................................................................................... 21 Ports................................................................................................................................................ 22
Chapter 5: Management Console .................................................................................. 23 Agent Reporting Time .................................................................................................................... 23 Day-to-Day Management ............................................................................................................... 23
SBS 2011 Dashboard Widget ..................................................................................................... 23 Live Status .................................................................................................................................. 23 System Status ............................................................................................................................. 24 License Status ............................................................................................................................. 25 Agents Installed .......................................................................................................................... 25 Customize Columns ................................................................................................................... 26 Scans Tab ................................................................................................................................... 26 Reports Tab ................................................................................................................................ 28 Log Query .................................................................................................................................. 29 Notifications ............................................................................................................................... 29 IM Content Filtering ................................................................................................................... 29 Approved and Blocked Lists ...................................................................................................... 30
Chapter 6: The Client Console ....................................................................................... 32 Accessing the WFBS-SVC – Client/Server Security Agent Console ............................................. 32 Component Update ......................................................................................................................... 32 Personal Firewall ............................................................................................................................ 33

Worry-Free™ Business Security Services 5.0 – Best Practices Guide V1.0
4
Chapter 7 – Worry-Free Remote Manager Integration ................................................ 34 Creating a Customer and WFBS-SVC Service in WFRM ............................................................. 34
Chapter 8: Password Management ............................................................................... 39 Recovering a Lost WFBS-SVC Console Password........................................................................ 39 Setting an Uninstall and Unload Agent Password .......................................................................... 39
Chapter 9: Performance Tuning .................................................................................... 41 Active and Normal Agents ............................................................................................................. 41
Manually Setting the Active Agent ............................................................................................ 41 Account Recommendations/Limit .................................................................................................. 42 Update Bandwidth .......................................................................................................................... 43
Appendix .......................................................................................................................... 44 License Management Portal ........................................................................................................... 44
Introduction ................................................................................................................................ 44 Creating Customer Accounts ...................................................................................................... 44 Service Plans .............................................................................................................................. 52 License Pool ............................................................................................................................... 53 Editing Your Account Information ............................................................................................ 53
About Trend Micro .......................................................................................................... 54

Worry-Free™ Business Security Services 5.0 – Best Practices Guide V1.0
5
Preface
Welcome to the Trend Micro Worry-Free Business Security Services - Best Practices Guide. This
document is designed to help resellers and customers develop a set of best practices for deploying
and managing Worry-Free Business Security Services.
The document is also designed to be used in conjunction with the following guides:
Trend Micro Worry-Free Business Security Services - User’s Guide
Trend Micro Worry-Free Business Security Services - Reviewer’s Guide
–SMB Technical Product Marketing

Worry-Free™ Business Security Services 5.0 – Best Practices Guide V1.0
6
Chapter 1: Introduction
What is Worry-Free Business Security Services? Trend Micro™ Worry-Free™ Business Security Services (WFBS-SVC) is an in-the-cloud
security service for small business. It works with on-premise Client/Server Security Agents
(CSAs) to help small businesses automatically detect, monitor, and prevent Web, Virus, and
Spyware threats on file servers, PCs, notebooks, Mac, and Android devices. No on-premise server
is required to host the service, saving maintenance and hardware costs. Trend Micro security
experts host the WFBS-SVC Server in the Trend Micro Data Center and update the service for
you.
WFBS-SVC provides a centralized Web management console, readily available through your
browser, which allows you to view dashboard Live Status information for threats, security
incidents, system updates, and your license across all managed clients. It also allows you to
manage clients by groups; execute manual and scheduled scans; create reports and store them in
PDF format; and administer the system for multiple PCs and notebooks. Used in conjunction with
Worry-Free Remote Manager, you can also manage multiple customers. Altogether, WFBS-SVC
is
Safer: It protects multiple PCs/notebooks located in or out of the office with a single
antivirus, anti-spyware business solution.
Smarter: It stops viruses and other threats without users having to configure settings or
maintain updates.
Simpler: You can centrally manage and check the status of protected clients anywhere
(no server required).
What’s New in Worry-Free Business Security Services?
Table 1. What’s New in Worry-Free Business Security Services 5.0
Worry-Free Business Security Services 5.0
Support for Windows, Mac, and Mobile
This version of WFBS-SVC now manages Macs and Android devices to provide increased security at work (or at home).
Flexible Device Management
With custom tags, you can use email addresses, employee IDs, or any other unique combinations to speed up your workflow.
Improved User Experience Features that require a lot of parameters in the background have been simplified on the console. The Common Tasks on Live Status gives you quick access to commonly used tasks.
Enhanced Flows We’ve changed a few flows to reduce the steps taken to complete a task. For example, you can now add a device and the device to a group with ease.
Refreshed Look and Feel We have refreshed the interface that makes it easier for you to use WFBS-SVC.

Worry-Free™ Business Security Services 5.0 – Best Practices Guide V1.0
7
Table 2. What’s New in Worry-Free Business Security Service 3.6
Worry-Free Business Security Services 3.6
Management Enhanced Scalability Each Worry-Free Business Security account now supports 10,000 computers.
Efficient License Management
The new license enhancements empower business owners and IT teams to merge multiple licenses or accounts into a single account. Also, additional licenses keys increase the overall seat count.
Search Feature This version includes a new search feature and an improved sort feature that assist in quickly finding specific clients. This version also includes a notification system that sends additional and useful information to recipients.
Improved Dashboard and Reporting
With customizable alert triggers and templates, administrators can choose the information they'd like to see.
New Email Tokens and Customizable Subjects for Email Notifications
Support for tokens in email notifications allows for more descriptive notifications and customizable subject lines.
Table 3. What’s New in Worry-Free Business Security Services 3.5 SP3
Worry-Free Business Security Services 3.5 SP3
Security Features
Blocked list for URL Filtering
Blocked list in URL Filtering allows users to designate specific URLs to block.
Wildcards allowed in Blocked and Allowed Lists for URL Filtering
Improved rule creation. URLs can use an asterisk (*) as a wildcard.
Add-in for SBS 2011 Essentials
The add-in tool allows administrators to access the WFBS-SVC console directly from a Small Business Server (SBS) Essentials 2011 Dashboard.
Support for Microsoft Internet Explorer 9
WFBS-SVC 3.6 supports the latest Microsoft browser.
Table 4. What’s New in Worry-Free Business Security Services 3.5
Worry-Free Business Security Services 3.5
Security Features
URL Filtering Category-based URL filtering allows you to ensure only safe and productive sites are visited by employees at times you deem appropriate.
Approved List for Web Reputation and URL Filtering
Approved List in allows users to designate specific URLs that will not be blocked by URL Filtering or Web Reputation.
URL Filtering Logs URL filtering information is now available in the logs.
Password-Protected Configurable access and password-protected client uninstall ensure employees can’t tamper with

Worry-Free™ Business Security Services 5.0 – Best Practices Guide V1.0
8
Global Agent Uninstall protection levels.
Table 5. What's New in Worry-Free Business Security Services 3.0
Worry-Free Business Security Services 3.0
Security Features
Smart Protection Network (SPN) Integration
WFBS-SVC incorporates the cloud-based Web and File Reputation of the SPN, which tracks the credibility of Websites and the reputation of files; as well as Smart Feedback, which gathers threat intelligence from Trend Micro’s global community of customers, partners, and sensors (agents). The result is automatic, real-time protection.
Smart Scan Trend Micro has moved the bulk of antimalware signatures to the cloud. During a Smart Scan on a client computer, files are checked against these signatures, lightening the burden on the client.
Behavior Monitoring Behavior Monitoring module in WFBS-SVC is provided by a user-configurable module that protects the client computer from unapproved changes to the system, including bots and other malware.
Protection from USB Autorun Threats
WFBS-SVC protects you against autorun executables that can install malware on your system when you insert a drive.
Management Live Status Enhancements
Live Status now provides collapsible panels, context-sensitive awareness, and configurable notifications, for an easier-to-use monitoring experience.
Integration with Worry-Free Remote Manager (WFRM)
Integration with WFRM lets resllers monitor multiple WFBS-S/A, Hosted Email Security, and WFBS-SVC customers and companies from one easy-to-use Web-based console.
Performance and Support
Variable Scanning Based on CPU Consumption
CPU consumption can now be adjusted to Low, Medium, and High settings, which pauses a scan when CPU usage exceeds the designated threshold.
Windows 7 Support As of version 3.0, WFBS-SVC supports the latest edition of Windows.
Features and Benefits As a member of the Trend Micro Worry-Free Business Security Family, Worry-Free Business
Security Services provides a number of key benefits to small business users. Designed to be the
simplest to deploy among the family, users can be up and running and protected in a matter of
minutes.
Table 6 - WFBS Hosted Features and Benefits
Features WFBS Services
WFBS Standard
WFBS Advanced
Server Required

Worry-Free™ Business Security Services 5.0 – Best Practices Guide V1.0
9
Web Management Console
Client Console and Agent Updates
Smart Scan
File Reputation
Web Reputation
Antivirus, Anti-spyware, Anti-rootkits, Anti-bots,
Firewall
Anti-phishing
POP3 Anti-spam
TrendSecure
Instant Messaging Content Filtering
Damage Cleanup Services
Reports
Behavior Monitoring
Managed by Worry-Free Remote Manager (in-the-cloud)
Intuit QuickBooks Protection
URL Filtering
Location Awareness
Mac Support
Support for Android Mobile Devices
Email Message Content Filtering
IMAP Anti-spam
Attachment Blocking
Email Reputation (IP Addresses), Exchange 2007
Support, bundled with Trend Micro Hosted Email
Security (Inbound Filtering) (aka InterScan Messaging
Hosted Security)

Worry-Free™ Business Security Services 5.0 – Best Practices Guide V1.0
10
Chapter 2: Product Registration
Logon Information Though logging onto Worry-Free Business Security Services (WFBS-SVC) is a simple process,
you should keep several things in mind to get the best results:
To provide better performance, WFBS-SVC data centers are situated in four regions around the
world. When registering for a trial account or purchasing the product, select the appropriate region
where the WFBS-SVC clients will be installed. This will enable the WFBS-SVC agents to update
signature files from nearby update servers. It will also provide better Web Console performance.
To register for a Trial version of Worry-Free Business Security Services in specific regions, click
the appropriate link below:
NABU: http://forms.trendmicro.com/services/index.php?dom=us&productID=WFSBWXE3X
APAC:
http://forms.trendmicro.com/services/index.php?dom=apac&productID=WFSBWXE3X
AU: http://forms.trendmicro.com/services/index.php?dom=au&productID=WFSBWXE3X
UK: http://uk.trendmicro.com/uk/products/sb/worry-free-business-security-
services/download/index.php
DE: http://de.trendmicro.com/de/products/sb/worry-free-business-security-
services/download/
FR: http://fr.trendmicro.com/fr/products/sb/worry-free-business-security-
services/download/index.php
IT: http://it.trendmicro.com/it/products/sb/worry-free-business-security-
services/download/index.php
ES: http://es.trendmicro.com/es/products/sb/worry-free-business-security-
services/download/index.php
EMEA: http://emea.trendmicro.com/emea/products/sb/worry-free-business-security-
services/download/index.php

Worry-Free™ Business Security Services 5.0 – Best Practices Guide V1.0
11
Figure 1 - WFBS Services Main Page
Upon successful registration, Trend Micro will send your WFBS-SVC account information to
your email address. Take time to read the Reviewer’s Guide or User’s Guide for an overview
of the functions in WFBS-SVC.
Alternately, a trial account may have been set up for you by a Trend Micro partner. If this is
the case, WFBS-SVC can be accessed through the License Management Portal.
Figure 2 - Licensing Management Platform page

Worry-Free™ Business Security Services 5.0 – Best Practices Guide V1.0
12
Chapter 3: Initial Configuration
Default Configuration The Devices tab in the main menu allows you to deploy clients with predefined settings. By
default, there are two computer groups – the Server and the Device groups. Since newly installed
clients will use these groups’ settings after installation, it is a good idea to configure the settings of
these groups according to your company’s security requirements. (You can also add additional
groups to cluster specific settings.) Consider the following before deploying clients.
The default scanning method is set for Smart Scan. Smart Scan reduces the need for clients to
download virus definitions. It also consumes less client memory than Conventional Scan, so you
can use the Smart Scan Method for computers with less memory. Consider setting Conventional
Scan for server/clients that won’t be able to connect to the Internet for a long time.
The default Antivirus and Anti-spyware settings are recommended. If you have applications that
you trust that use data files that you know won’t host malicious code, it is a good idea to put them
in the Exclusions configuration screen. These could be databases, multimedia files, or other files
that can introduce scanning delays.
Figure 3 - Exclusions Settings
By default, mapped drives are not scanned. Do not enable mapped drive-scanning on clients with
persistent static mappings to server shares as this will lead to multiple scanning jobs.
Server and Device groups have different Web Reputation settings. It is advisable to keep the
default Web Reputation configurations for maximum security.

Worry-Free™ Business Security Services 5.0 – Best Practices Guide V1.0
13
We encourage enabling Behavior Monitoring to prevent malicious system changes. This adds
a layer of security, since Behavior Monitoring does not depend upon virus definitions, but
rather blocks application behavior that violates certain rules.
Plan groups accordingly. You may want to have more granular settings by creating multiple
groups, or simplify settings by using the default Server and Device groups. Note that the
more groups you create, the more administrative overhead you will incur.
New groups appear alphabetically below the default groups, with Server groups appearing at
the top of the tree. Aside from planning for the group’s configuration settings, also consider
their names as they appear in the tree. Groups can be renamed.
Figure 4 – New Group Names are listed alphabetically
Installer Management The package management feature of previous releases was simplified for this release. There is
now only a single installation package bound to a WFBS-SVC account. The installation
process is triggered by a downloader, which downloads the package for installation. You must
use this installer on systems that you want to report to your WFBS-SVC account.
Deploying via Active Directory The WFBS-SVC has an MSI package which can be deployed using Active Directory. You
can follow the following procedure if your environment has an Active Directory domain. The
following procedure was tested on an SBS 2003 server.
1. Open the WFBS-SVC Console.
2. Navigate to the Devices tab, and then click Add Devices.
3. Click the expansion box for Download the Installer Package. The screen shows the 2
installation packages.
4. Select the package used for Conventional Installation by clicking the Download button at
the top of the panel.

Worry-Free™ Business Security Services 5.0 – Best Practices Guide V1.0
14
Figure 5 - MSI Download Link
5. The downloaded MSI package should be placed on a file server accessible to the
computers you want to install with WFBS-SVC.
6. Create a shared folder on your SBS server or any available file server and make sure that
the UNC path is accessible from the computers you are installing with WFBS-SVC.
7. At minimum, give the “Domain Computers” and the “Domain Users” security group
Read permissions to the share.
8. WFBS-SVC is also bundled with a VBS script which can be used to deploy the
application during logon. Locate the example script by clicking the Administration tab
and selecting Tools.
9. In the Administrative Tools panel, download the file WFBS-SVC Example Deployment
Script.vbs.
Figure 6 - Deployment Script Sample
10. Edit the sample script using Notepad, such that the installer path points to the UNC path
of the MSI installer you created earlier. To do this, edit the line of the script that reads
pathOfWFBSHInstaller=”HostedAgent.MSI” and replace the text between the double
quotes with the path to your MSI file. Example \\MySBSServer\ClientApps\WFBS-
SVC_Agent_Installer.msi. Then save the updated file.

Worry-Free™ Business Security Services 5.0 – Best Practices Guide V1.0
15
11. Open Active Directory > Users and Computers and select the OU for the computers
you want to deploy with WFBS-SVC. If you don’t have an OU for Computer accounts,
create a new one and move the computer accounts from the default “Computers” folder to
the newly created OU.
Figure 7 - Computer Account OU
12. Right click the OU for the computer accounts (in this example – the Computer Clients
OU), then click Properties | Group Policy | Open. This opens the Group Policy
Management console.
13. Right click the Computer Clients OU again, then click Create and Link GPO here.
Figure 8 - Create GPO Menu Item
14. Give the GPO a name, and then click OK.

Worry-Free™ Business Security Services 5.0 – Best Practices Guide V1.0
16
15. In the Scope tab of the GPO, make sure the “Domain Computers” Group is included in
the Security Filtering section.
16. Select the newly created GPO and then click Edit. The Group Policy Object Editor
appears.
17. Under Computer Configuration, click Windows Settings | Scripts (Startup/Shutdown),
then double click Startup.
18. Click Show Files to open the folder where the Startup Script should be copied.
19. Copy the VBS script you edited earlier into this directory.
Figure 9 - Specify Script Location
20. Click Add then browse to the location of the script from the previous step.
21. Leave the Script Parameters blank and click OK. The close the GPO Editor.
Figure 10 - Add Script Dialog Box

Worry-Free™ Business Security Services 5.0 – Best Practices Guide V1.0
17
22. The WFBS-SVC CSA agent will be automatically installed when a user logs in the
computer.

Worry-Free™ Business Security Services 5.0 – Best Practices Guide V1.0
18
Package URL You can use the email template below to deploy the WFBS-SVC agent via email. The body of
it is generated whenever you use the Copy Text or Use My Default Email buttons in the
Web Installation panel when you add computers.
Dear Sir/Madam,
Click the URL to install the Trend Micro Client/Server Security Agent. The installer will guide
you through the installation.
Client/Server Security Agent Download URL: http://wfbs-svc-nabu.trendmicro.com/wfbs-
svc/download/en/view/agent?type=installer&id=riby2cWbWVxx3yRa6yMnEM0C6xKgi0lyhZ24b8Qx&lang=en
Regards,
Administrator

Worry-Free™ Business Security Services 5.0 – Best Practices Guide V1.0
19
Chapter 4: Installation
Worry-Free Business Security Services Agent System Requirements
The WFBS-SVC Agent supports the following operating systems:
Table 7 - System Requirements

Worry-Free™ Business Security Services 5.0 – Best Practices Guide V1.0
20
Item Minimum Specifications
Operating System Series or Family Supported Service Packs or Releases
Windows XP SP3
Windows Server 2003 R2 (with Storage Server 2003)
SP1 or SP2
Windows Server 2003 (with Storage Server 2003)
SP1 or SP2
Windows SBS 2003 R2 SP1 or SP2
Windows SBS 2003 SP1 or SP2
Windows Vista SP1 or SP2
Windows Home Server No service pack
Windows Server 2008 R2 None or SP1
Windows Server 2008 SP1 or SP2
Windows SBS 2008 SP1 or SP2
Windows 2008 Foundation SP1 or SP2
Windows Essential Business Server (EBS) 2008
SP1 or SP2
Windows 7 None or SP1
Windows SBS 2011 No service pack
Windows 8 (RTM) No service pack
Windows Server 2012 (RTM) No service pack
Note: All major editions and 64-bit versions of these operating systems are supported unless noted otherwise.
Mac OS X v10.5.7 (Leopard) or later
Mac OS X v10.6 (Snow Leopard ) or later
Mac OS X v10.7 (Lion) or later
Mac OS X v10.8 (Mountain Lion)
Web browser (for Web-based setup)
Internet Explorer 7.0, 8.0, 9.0, 10.0 (32 and 64 bit)
Firefox 10.0, 12.0, 13.0, 14.0
Display 256-color display or higher with resolutions of 800x600 or higher
Requirements for Trend Micro Mobile Security (TMMS), the Android Agent
- Android 2.2 (Froyo) or later
- Android 2.3 (Gingerbread) or later
- Android 3.0 (Honeycomb) or later
- Android 4.0 (Ice Cream Sandwich) or later

Worry-Free™ Business Security Services 5.0 – Best Practices Guide V1.0
21
Uninstall Existing AV Product Though the WFBS-SVC installation package can uninstall 3
rd party antivirus products, it’s
best to manually uninstall existing AV products by running their uninstall programs.
After doing so, reboot the computer before installing the WFBS-SVC agent.

Worry-Free™ Business Security Services 5.0 – Best Practices Guide V1.0
22
Ports If you installed WFBS-SVC agents on multiple segments separated by firewalls, you need to
open the following ports. The following ports are automatically exempted from the WFBS-
SVC firewall policy.
Table 8 - WFBS Hosted Ports
Service Port Protocol
Agent Download 61116 TCP
Agent Broadcast 61117 UDP
Agent Discover 61118 UDP
Agent Broadcast 61119 UDP
Pattern Update 80 TCP

Worry-Free™ Business Security Services 5.0 – Best Practices Guide V1.0
23
Chapter 5: Management Console
Agent Reporting Time Agent reporting time has been greatly improved on this version. Agents appear in the
management console almost instantaneously after a successful installation. Configuration
changes on the management console also take only a few minutes to propagate to the client.
Day-to-Day Management
SBS 2011 Dashboard Widget Starting WFBS-SVC 3.5 SP3 (released April 30, 2011), a widget can be installed on the
Windows Small Business Sever 2011 Dashboard. The widget links to the WFBS-SVC
management console. This add-on can be downloaded from the Administration | Tools section
of the WFBS-SVC console.
Figure 11 - SBS 2011 Essentials Dashboard for WFBS-SVC
Live Status The Live Status Tab provides an overview of the security posture of all the WFBS-SVC
agents. The Threat Status panel summarizes the Outbreak Defense, Antivirus, Anti-spyware,
Web Reputation, URL Filtering, Behavior Monitoring, and Network Virus status of your
agents.

Worry-Free™ Business Security Services 5.0 – Best Practices Guide V1.0
24
Figure 12 - Threat Status Panel
A red icon means that you need to perform an action to prevent further risk in your network.
Once the appropriate action has been completed, (for example, doing a manual scan or
manually deleting an infected file), click Reset Counter to clear the threat log and restore the
icon to green status.
Figure 13 - Reset Counter
System Status The System Status section provides a summary of the virus update deployment of your
organization. By clicking the number link generated for the Outdated computers (Component
Status), you can update the computers in a few clicks.
Figure 14 - System Status Section

Worry-Free™ Business Security Services 5.0 – Best Practices Guide V1.0
25
License Status If the License Status section turns yellow or red, it means that you need to consider adding
licenses for your clients.
WFBS-SVC back end servers provides a 20% seat allowance. This means that if you have 10
licenses, you can still add 2 agents above your license limit. Adding more agents would fail.
We recommend adding licenses when you have 80% license usage if you are still in the
process of deploying the products.
A yellow License Status means that the seat license usage is greater than 100%.
A red License Status means that the seat license usage is greater than 110%.
If you go over the license limit the following will be imposed to your WFBS-SVC account:
1. If a new user clicks the agent installation link, the agent will still be installed.
2. However, these newly installed agents won’t be allowed to report to the management
console. Since the agents will not report to the console, you cannot configure any client-
side settings.
3. The agents will not receive any updates.
Figure 15 - License Section
Agents Installed You can view all the agents you have installed in the Devices section (previous versions show
it in the License screen). This is also where you set configuration settings for each of your
security groups.

Worry-Free™ Business Security Services 5.0 – Best Practices Guide V1.0
26
Figure 16 - Devices Tab
Customize Columns By default, the Web management console displays all the column fields for a group in the
Group Information Table. Using the Customize Columns dropdown menu (shown below in
the Command menu), you can limit the columns to display the most useful information using
the checkboxes.
Figure 17 - Customize Columns
We recommend displaying the following:
IP Address
Online/Offline State
Program/Virus Pattern/Virus Engine Version
Virus/Spyware/Spam Detected
Scans Tab The Scans tab allows you to configure Manual and Scheduled Scans. Note that you can also
do an on-demand scan from the Devices tab by selecting a group and clicking on More >
Scan Now.

Worry-Free™ Business Security Services 5.0 – Best Practices Guide V1.0
27
Figure 18 - Scans Tab

Worry-Free™ Business Security Services 5.0 – Best Practices Guide V1.0
28
Reports Tab The Reports tab allows you to configure one-time and scheduled reports. You can specify an
email address where the report will be sent after it has been generated. Reports are also stored
on the in-the-cloud WFBS-SVC Server.
Figure 19. New Report
The generated report contains the following information:
1. Virus Summary
2. Top 5 Devices (excluding Servers) with Virus Detections
3. Top 5 Servers with Virus Detections
4. Spyware/Grayware Summary
5. Top 5 Devices (excluding Servers) with Spyware/Grayware Detections
6. Top 5 Servers with Spyware/Grayware Detections
7. Top 10 Devices Violating Web Threat Protection Policies
8. Top 5 URL Category Policies Violated
9. Top 10 Devices Violating URL Category Policies
10. Top 5 Programs Violating Behavior Monitoring Policies
11. Top 10 Devices Violating Behavior Monitoring Policies
12. Top 10 Network Viruses Detected
13. Top 10 Devices Attacked by Network Viruses

Worry-Free™ Business Security Services 5.0 – Best Practices Guide V1.0
29
The reports are generated in PDF format. Disable any popup blockers, since the PDF report is
opened in a new window.
Generate a report at least once a month to keep a history of the security status of your
protected network.
Log Query Each WFBS-SVC agent (CSA) sends logs at predefined intervals. You can query
management and desktop/server logs from the Reports menu. The logs can be exported to
CSV format.
Figure 20 - Virus/Malware Logs
Logs are kept for 15 days in the WFBS-SVC agent computers. Adjust this according to your
log retention requirement.
Notifications WFBS-SVC now includes a robust notification system. This system can send event
notifications at certain thresholds. Notification settings are globally applied so you may need
to fine-tune the settings at certain times. WFBS-SVC can notify individuals from 17 types of
events.
IM Content Filtering WFBS-SVC can filter words and phrases from the following popular IM applications.
1. America Online® Instant Messenger (AIM) 6 (builds released after March 2008 are not
supported)
2. ICQ® 6 (builds released after March 2008 are not supported)
3. MSN™ Messenger 7.5, 8.1, 9.0
4. Windows Messenger Live™ 8.1, 8.5
Worry-Free™ Business Security Services 5.0 – Best Practices Guide V1.0
30
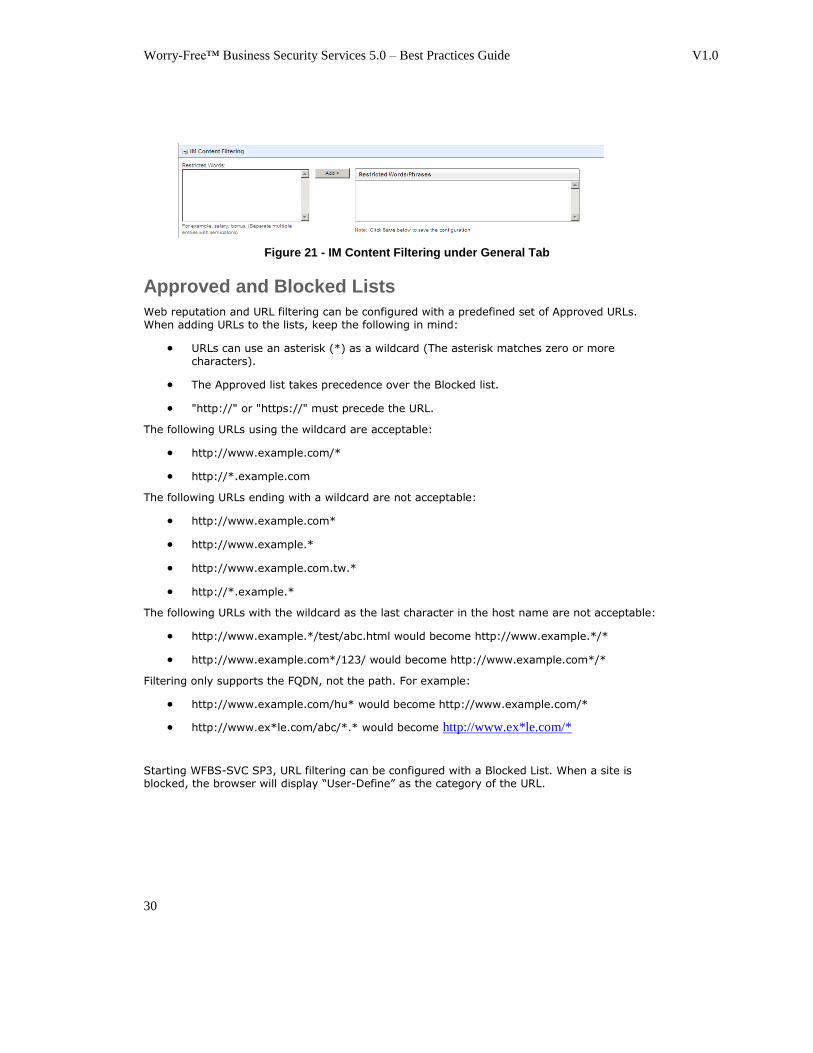
Figure 21 - IM Content Filtering under General Tab
Approved and Blocked Lists
Web reputation and URL filtering can be configured with a predefined set of Approved URLs. When adding URLs to the lists, keep the following in mind:
URLs can use an asterisk (*) as a wildcard (The asterisk matches zero or more
characters).
The Approved list takes precedence over the Blocked list.
"http://" or "https://" must precede the URL.
The following URLs using the wildcard are acceptable:
http://www.example.com/*
http://*.example.com
The following URLs ending with a wildcard are not acceptable:
http://www.example.com*
http://www.example.*
http://www.example.com.tw.*
http://*.example.*
The following URLs with the wildcard as the last character in the host name are not acceptable:
http://www.example.*/test/abc.html would become http://www.example.*/*
http://www.example.com*/123/ would become http://www.example.com*/*
Filtering only supports the FQDN, not the path. For example:
http://www.example.com/hu* would become http://www.example.com/*
http://www.ex*le.com/abc/*.* would become http://www.ex*le.com/*
Starting WFBS-SVC SP3, URL filtering can be configured with a Blocked List. When a site is blocked, the browser will display “User-Define” as the category of the URL.

Worry-Free™ Business Security Services 5.0 – Best Practices Guide V1.0
31
Figure 22 – URL Filtering Block List

Worry-Free™ Business Security Services 5.0 – Best Practices Guide V1.0
32
Chapter 6: The Client Console
Accessing the WFBS-SVC – Client/Server Security Agent Console
The Worry-Free Business Security Hosted (WFBS-SVC) – Client/Server Security Agent
(CSA) Console can be accessed by double-clicking the system tray icon on the client. This
opens the Agent console, allowing you to see the number of files scanned and the last detected
files. You can also access the CSA console in the Trend Micro Client Security Agent Program
group created during the installation.
Component Update If you encounter problems with the product, especially virus detection issues, it’s a good
practice to check the version of all installed components and compare it with the latest
components listed at http://www.trendmicro.com/download/pattern.asp. The WBFS-SVC
Active Agent automatically downloads the latest components available. However, beta
signature files (virus definitions not yet available to Trend Micro’s update server) can be
installed manually.
Figure 23 – Version Information

Worry-Free™ Business Security Services 5.0 – Best Practices Guide V1.0
33
Personal Firewall WFBS-SVC comes with a personal firewall and a default set of policies. On a new installation
of WFBS-SVC 3.6, the firewall is turned off by default. To tune the policies according to
your requirements, you can configure the rules by opening the CSA console, selecting the
Security Protection tab and selecting the Firewall drop-down menu. The status of the
personal firewall can also be changed by right-clicking the system tray icon. We recommend
enabling the firewall component when you are using a public Internet connection.
Figure 24 – CSA Firewall Configuration

Worry-Free™ Business Security Services 5.0 – Best Practices Guide V1.0
34
Chapter 7 – Worry-Free Remote Manager Integration
Worry-Free Remote Manager (WFRM) installation integration allows resellers to easily get
up and running with WFRM, to monitor multiple WFBS-S/A, Hosted Email Security (aka
InterScan Messaging Hosted Security), and WFBS-SVC customers and companies from one
easy-to-use Web-based console. WFBS-SVC 3.5 is supported for Worry-Free Remote
Manager 2.5 and above
.
Figure 25 - Worry-Free Remote Manager Dashboard
Creating a Customer and WFBS-SVC Service in WFRM
If you are a reseller and want to have access to your customer WFBS-SVC installation, you
need to create customer and service entries in your WFRM account for the customer. The
process is illustrated in the following WFRM screenshots.
1. In the WFRM Console, select the Customers tab to open the Customers Network Tree.

Worry-Free™ Business Security Services 5.0 – Best Practices Guide V1.0
35
Figure 26. Customers
2. In the Customers Network Tree menu, click the Add button to create a customer. The
wizard walks you through the customer creation process.
Figure 27 - Create a customer
3. Select the customer name in the Network tree and in the Purchased Product/Service
panel on the right, click Add to add a service entry for WFBS-SVC for that customer.
Remember that WFBS-SVC 3.5 is only supported on WFRM v2.5 and above.
Worry-Free™ Business Security Services 5.0 – Best Practices Guide V1.0
36
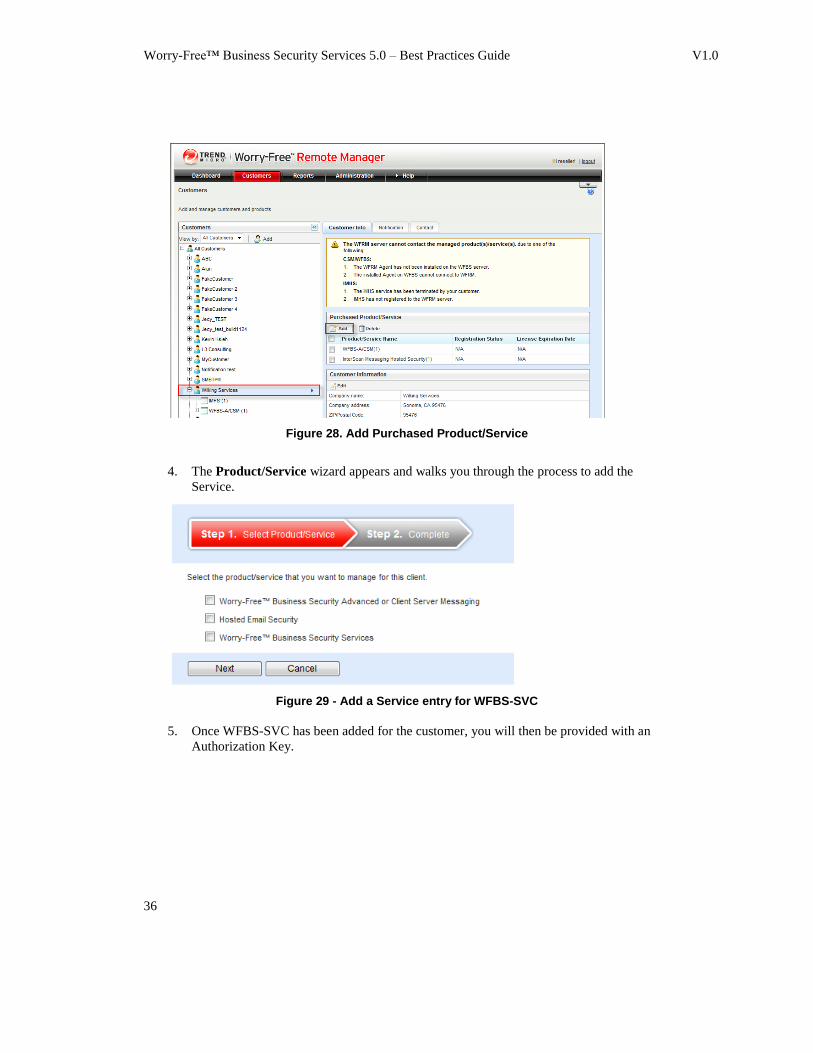
Figure 28. Add Purchased Product/Service
4. The Product/Service wizard appears and walks you through the process to add the
Service.
Figure 29 - Add a Service entry for WFBS-SVC
5. Once WFBS-SVC has been added for the customer, you will then be provided with an
Authorization Key.

Worry-Free™ Business Security Services 5.0 – Best Practices Guide V1.0
37
Figure 30 - WFRM AK generated for WFBS-SVC
6. Provide this Authorization Key to your customer, who will in turn enter the key into the
WFBS-SVC Console.
7. The customer inputs the Authorization Key in the delegation field on the Administration
>Worry-Free Remote Manager page.
Figure 31 - Using the WFRM AK for Remote Manager Delegation
8. After a successful delegation, the reseller will be able to access the customer’s WFBS-
SVC account. The following WFBS-SVC features will be available from the WFRM
Console:
SSO
Sync
Live Status
Threat Management

Worry-Free™ Business Security Services 5.0 – Best Practices Guide V1.0
38
Figure 32 - Worry-Free Remote Manager > WFBS-SVC Features

Worry-Free™ Business Security Services 5.0 – Best Practices Guide V1.0
39
Chapter 8: Password Management
Recovering a Lost WFBS-SVC Console Password 1. If you forget your WFBS-SVC Console password, visit the following link:
https://olr.trendmicro.com/registration/us/en-us/forget_pwd.aspx
Figure 33. New Password Request
2. Input the appropriate information and click Submit. Instructions will be sent to the email
account on how to reset the password.
Setting an Uninstall and Unload Agent Password Starting WFBS-SVC 3.5, administrators can set an Uninstall and Unload password. These
two passwords can be different and are set individually under the Administration > Global
Settings tab. By default, no password is required to uninstall or unload the agent.
Figure 34. Agent Uninstallation and Unload Passwords

Worry-Free™ Business Security Services 5.0 – Best Practices Guide V1.0
40
On some occasions, you may need to uninstall a client security agent that was installed with a
different account. In this case, if you don’t know the password and you need to uninstall the
agent perform the procedure at the following link:
http://esupport.trendmicro.com/5/Bypassing-the-uninstallation-password-of-a-ClientServer-
Security-Agent.aspx

Worry-Free™ Business Security Services 5.0 – Best Practices Guide V1.0
41
Chapter 9: Performance Tuning
Active and Normal Agents After installation, an agent can be elected to be the Active Agent. The Active Agent serves as
the contact window between the WFBS-SVC server and all WFBS-SVC Agents in a
company. It is responsible for distributing updates and pattern files to other WFBS-SVC
agents
The Active Agent periodically checks the WFBS-SVC server for component and pattern file
updates. If there are updates, the Active Agent downloads the update and notifies Inactive
Agents about the update. Some agents then download the update from the Active Agent. After
these inactive agents are updated, they then proceed to update other agents that need to be
updated. This prevents excessive utilization of the Active Agent's system resources.
The Active Agent election algorithm ensures there is always one Active Agent. If the
computer hosting the current Active Agent becomes unavailable, all other WFBS-SVC agents
immediately elect a new Active Agent.
Each agent connects to a channel. A channel is created for each of the following computer
groups:
OS architecture: an x64 and an x86 machine will be in a different channel.
Hotfix ability: In the CSA group configuration, specifically on Client Privileges |
Update Settings, clients with the ability to deploy agent and hotfix upgrades will belong
to one channel, while clients with this setting disabled will below to another channel.
For each of these channels, there are 4 conditions checked in deciding which computer
becomes an Active Agent. These are:
1. Online/Offline status: Online has higher priority.
2. Program Version: Higher version has higher priority.
3. Priority: There are 3 priorities - high, medium, and low.
4. IP address: The higher IP, the higher the priority.
Each agent broadcasts its own information and each agent sequentially compares these 4
conditions.
Manually Setting the Active Agent On some occasions, you may want to manually set the Active Agent role to a particular
machine. This could be a machine that is always on or a machine with higher hardware
specifications.
To manually set a computer as the Active Agent:
The computer needs to belong to a group with hotfix deployment enabled. Ensure that the
“Disable agent upgrade and hotfix deployment” is unchecked.
1. Open Registry Editor on the computer you want to be the Active Agent.

Worry-Free™ Business Security Services 5.0 – Best Practices Guide V1.0
42
2. Set the following registry entry to 0.
\HKEY_LOCAL_MACHINE\SOFTWARE\Wow6432Node\TrendMicro\PC-
cillinNTCorp\CurrentVersion\HostedAgent\Priority
(0=High, 1=Medium, 2=Low)
3. Restart the “Trend Micro Client/Server Security Agent” service.
You can verify which machine is the Active Agent by running the support tool –
WhoIsAA.exe. The tool can be requested from SMB Technical Support or from SMB
Technical Product Marketing.
Figure 35 - WhoIsAA utility
We recommend setting the Active Agent to a computer/server that has a gigabit LAN
connection. This will considerably increase the amount of clients that can concurrently pull
updates.
Account Recommendations/Limit We recommend the following account limits:
Limit the number of computers per group when possible as a best practice since it can
introduce delay in viewing the client tree.
Limit the number of groups to what’s really needed by the organization. The more groups
you create, the more management overhead will come with it.
Use IE7/IE8 or Firefox in opening the management console, especially if viewing client
trees with a large number of users. IE6 will introduce delays in showing the client tree.

Worry-Free™ Business Security Services 5.0 – Best Practices Guide V1.0
43
Update Bandwidth Active Agents conserve Internet bandwidth by propagating program and definition updates to
other WFBS-SVC agents instead of each agent downloading via the Internet. In the table below, a
worst case scenario is simulated by deploying a 75MB pattern file to all the agents. The pattern
deployment time is estimated below on this scenario.
Table 9 - Full Pattern Deployment Time – Active Agent to WFBS-SVC Agents
75MB Full Pattern Download In
Minutes (Active Agent to CSA
Agents)
100
Agents
200
Agents
400
Agents
600
Agents
1000
Agents
100Mbps @ 80% Utilization 13.1 min. 26.2 min. 52.4 min. 78.6 min.
131.1
min.
1Gbps @ 80@ Utilization 1.3 min. 2.6 min. 5.2 min. 7.9 min. 13.1 min.
After installation, all agents will download incremental updates and not full updates. Below is the
estimated time for different number of agents. Note that this example is for a 1MB incremental
pattern. Typically after installation, only incremental updates needs to be downloaded, so this is
the usual update time after installation.
Table 10 - Incremental Pattern Deployment Time – Active Agent to WFBS-SVC Agents
1MB Incremental Pattern
Download In Minutes (Active
Agent to CSA Agents)
100
Agents
200
Agents
400
Agents
600
Agents
1000
Agents
100Mbps @ 80% Utilization 0.17 min. 0.35 min. 0.70 min. 1.05 min. 1.75 min.
1Gbps @ 80@ Utilization 0.02 min. 0.03 min. 0.07 min. 0.10 min. 0.17 min.
With the current limit of 10 WFBS-SVC agents per Active Agent, a 1000 Agent network can have
up to 100 Active Agents. To estimate the amount of bandwidth an update can incur, below is a
table summarizing the update time for various Internet connection bandwidth. As stated
previously, the 75MB download size is a worst case scenario while the usual update size is
500Kb-1MB for incremental updates.
Table 11 - Full/Incremental Update Time for an Active Agent
Number
of
Agents
Number
of
Active
Agents
Internet
Bandwidth
(80%
Utilization)
Time for AAs to download pattern in
minutes
Full Pattern
(75MB) Incremental (1MB)
10 1 768Kbps 17.07 0.23
10 1 1.5Mbps 8.74 0.12
250 25 3.0Mbps 109.23 1.46
250 25 6.0Mbps 54.61 0.73
500 50 8.0Mbps 81.92 1.09
1000 100 8.0Mbps 163.84 2.18

Worry-Free™ Business Security Services 5.0 – Best Practices Guide V1.0
44
Appendix
License Management Portal
Introduction The License Management Portal (LMP) enables service providers, partners, and resellers to
manage and issue licenses for Trend Micro products with ease. It allows them to manage
customer account information, manage service plans and seat distribution, generate
registration keys, and process requests for licenses for customers.
Features of the License Management Portal:
Customer Account and Entitlement Management
Product License and Service Plan
Account Administration
Service Dashboard for Customers
The Licensing Management Platform can be used by partners, such as resellers and managed
service providers (MSPs). This document will serve as a guide to the Licensing Management
Platform for resellers.
Creating Customer Accounts A customer is the end user who purchases products or services from a partner or reseller. As
a reseller, these are end-users who will be protected by Worry Free Business Security
Services. Resellers can set up customers in the License Management Portal after the
customers purchase the service, or they can be set up as trial services.
To add a new customer in the License Management Portal:
1. Login to the License Management Portal using the URL supplied to you. The Customers
page is the landing page when the reseller logs on to the LMP. You can also arrive at this
page by clicking on Users > Customers.

Worry-Free™ Business Security Services 5.0 – Best Practices Guide V1.0
45
Figure 36 - Customers Dashboard
2. Click on the Add Customer icon.
Figure 37 - Add Customer Icon
3. The Add Customer page now appears. Fill in the Account information and Company
Information. Also enter the email address of the person who will manage this account. A
password will be generated and sent in an email notification to the recipient after the
account is created.
Figure 38 - Customer Fields

Worry-Free™ Business Security Services 5.0 – Best Practices Guide V1.0
46
Note: When creating a new customer, choose a suitable account name since this will
be the username used to login to the service. Also enter the email address of a
person managing this account since an automated email will be sent with logon
credentials after the account is created.
4. You will be given the option to Assign Service Plan or Skip to Complete. If you are set
to add the license information now, click on Assign Service Plan. You can also Skip to
Complete and Assign a Service Plan at a later time.
5. If you click on Assign a Service Plan, enter the service plan, license start date, and
number of seats. Then click on Add Service Plan.
Figure 39 - Assign Service Plan
6. After adding a service plan, or if you have skipped to complete, you will see the
Customer Profile page which gives a summary of the customer account, including the
customer’s logon URL and username and password. A notification with this information
will also be sent to the email address entered.

Worry-Free™ Business Security Services 5.0 – Best Practices Guide V1.0
47
Figure 40 - Customer Profile Page
Batch Customer Account Creation
If there are several customers that need to be created, a CSV file can be uploaded with a list of
customer information, thus saving time in entering customer information one entry at a time.
To add multiple customers at a time using batch customer creation:
1. Click on Users > Customers from the navigation bar. Then click on the Add Multiple
Customers icon.
Figure 41 - Add multiple customers
2. The Batch Account Creation page appears. Click on the XLS icon to download a copy
of the template to your local machine. It will be downloaded as a Microsoft Excel file.

Worry-Free™ Business Security Services 5.0 – Best Practices Guide V1.0
48
Figure 42 - Batch Account Creation page
3. Open up the saved XLS file, and start to fill in the fields with the information available
about each customer. If there is unknown information, the other fields can be modified at
a later time. If a duplicate account name or company name is entered, the system will
detect this and identify it as a duplicate. After filling in the fields, click on Save as CSV
file which is a macro built in to the XLS file. It will save the file as a CSV file onto the
same location where the XLS file is saved.
Figure 43 - Sample batch account creation CSV file
Note: You will be given an opportunity to review the information entered before it is
processed in the system. You will be able to view duplicates, entries with
missing information, and incorrect entries.
4. When ready to upload, return to the Batch Account Creation page and upload the saved
CSV file. You will be given a summary of the fields entered.

Worry-Free™ Business Security Services 5.0 – Best Practices Guide V1.0
49
Figure 44 - Batch account creation summary
The system will validate the data that has been entered and display the corresponding
status icon for each row. The system can identify duplicates based on Account ID and
Company. Only the top 100 rows of the CSV file will be entered.
If there is anything that needs to be modified or corrected, corrections can be made to the
XLS file and re-uploaded as a CSV file.
5. When ready to proceed with the creation of accounts, click on Generate. This will begin
the account creation process and send automated email notifications to the specified
email address of the account.
Figure 45 - Generate batch account creation
After clicking Generate, a confirmation window will be displayed indicating that the
accounts will be created and the quantity of accounts being created.

Worry-Free™ Business Security Services 5.0 – Best Practices Guide V1.0
50
Note: Clicking on Create Account will then proceed to send email notifications to the
account recipients.
Figure 46 - Create account confirmation
6. After the accounts are generated, a summary page will be shown displaying the Import
Status of the batch account creation.
Figure 47 - Batch account creation summary
7. To take note of any errors during the process, there is an option to export these errors into
a file to serve as a reference in amending the entries. The Export Errors button will
generate an XLS file that will list the entries that failed to get imported, and the reason
for the failure.

Worry-Free™ Business Security Services 5.0 – Best Practices Guide V1.0
51
Figure 48 - Export errors feature
Modifying a Customer Account
You can change all customer account information except for the account name.
To modify a customer account:
1. Click Users > Computers on the navigation bar.
2. Click the customer account to modify
3. Click the Modify icon on the customer profile.
4. Make the desired changes.
5. Click Modify.
Enabling and Disabling Accounts
The Licensing Management Platform gives you the ability to enable and disable customer
accounts. Customer accounts are enabled by default.
To enable or disable a customer account:
1. Click Users > Customers on the navigation bar.
2. Click the customer account that you want to enable or disable.
3. Click the Modify icon on the customer profile.
4. Click the Enable/Disable icon, next to the account name at the top of the table.
5. Click Modify.
Note: Customer Accounts cannot be deleted at this time and will remain visible on the
Customer Dashboard. Use the disable feature to remove functionality of the Customer
Accounts if needed.

Worry-Free™ Business Security Services 5.0 – Best Practices Guide V1.0
52
Helping Customers Reset Their Password
Customers who want to reset their passwords can click on the Forget your password? link on the
logon page. As an alternate option, the reseller can initiate the reset password process which will
send an automated email to the customer to reset their password.
To send a reset password notification to the customer:
1. Click Users > Customers on the navigation bar.
2. Click the customer account to reset the password.
3. Click the Reset Password icon.
Figure 49 -- Reset password notification
Service Plans A service plan is a customized plan that contains a certain type of Trend Micro product with
various license terms and conditions. A service plan consists of the following fields:
Product or Service
Version Type (Trial or Full)
Activation Policy
Datacenter
License Period
Auto-Renewal
To view the existing service plans that are available, click on Plans and Licenses > Service
Plans. This will show the list of Service Plans available to the reseller.

Worry-Free™ Business Security Services 5.0 – Best Practices Guide V1.0
53
Figure 50 - Service Plans
License Pool Each Trend Micro product or service comes with a license that is valid for a specified period
of time. A license pool is the number of product licenses that a reseller can deploy currently.
Different licensing options, including the activation policy, depend on the type of Trend
Micro product or solution you are working with. With Worry Free Business Security
Services, the service can be activated through the product console and does not require an
activation code or registration key.
Figure 51 - License Pool summary page
The Minimum Licenses field allows you to input a value of minimum licenses to have
available before an alert is displayed that the licenses remaining are less than the minimum.
Editing Your Account Information
To view and edit your account information:
1. Click Administration > Account Information on the navigation bar.
2. Click the Modify icon.
3. Make the desired changes.
4. Click Modify.

Worry-Free™ Business Security Services 5.0 – Best Practices Guide V1.0
54
About Trend Micro Trend Micro, Incorporated is a global leader in network antivirus and Internet content security
software and services, focused on helping customers prevent and minimize the impact of
network viruses and mixed-threat attacks through its award-winning Trend Micro Enterprise
Protection Strategy. Trend Micro has worldwide operations and trades stock on the Tokyo
Stock Exchange and NASDAQ. You can reach Trend Micro at www.trendmicro.com.
Copyright © 2011 by Trend Micro Incorporated. All rights reserved. No part of this
publication may be reproduced, photocopied, stored on a retrieval system, or transmitted
without the prior written consent of Trend Micro Incorporated. Trend Micro, the t-ball logo,
and Worry-Free are trademarks or registered trademarks of Trend Micro Incorporated. All
other company and/or product names may be trademarks or registered trademarks of their
owners. Information contained in this document is subject to change without notice.