beaweblogic portal - oracle · beaweblogic portal ® portal development guide version 10.2 revised:...
TRANSCRIPT

BEAWebLogic Portal®
Portal Development Guide
Version 10.2Revised: February 2008

BEA WebLogic Portal Portal Development Guide iii
Contents
1. Introduction to PortalsWhat is a Portal? . . . . . . . . . . . . . . . . . . . . . . . . . . . . . . . . . . . . . . . . . . . . . . . . . . . . . . . . 1-1
What is the Portal Framework? . . . . . . . . . . . . . . . . . . . . . . . . . . . . . . . . . . . . . . . . . . . . . 1-3
Portal Development and the Portal Life Cycle . . . . . . . . . . . . . . . . . . . . . . . . . . . . . . . . . 1-3
Architecture . . . . . . . . . . . . . . . . . . . . . . . . . . . . . . . . . . . . . . . . . . . . . . . . . . . . . . . . 1-4
Development . . . . . . . . . . . . . . . . . . . . . . . . . . . . . . . . . . . . . . . . . . . . . . . . . . . . . . . . 1-4
Staging . . . . . . . . . . . . . . . . . . . . . . . . . . . . . . . . . . . . . . . . . . . . . . . . . . . . . . . . . . . . 1-5
Production. . . . . . . . . . . . . . . . . . . . . . . . . . . . . . . . . . . . . . . . . . . . . . . . . . . . . . . . . . 1-5
Getting Started . . . . . . . . . . . . . . . . . . . . . . . . . . . . . . . . . . . . . . . . . . . . . . . . . . . . . . . . . . 1-6
Prerequisites . . . . . . . . . . . . . . . . . . . . . . . . . . . . . . . . . . . . . . . . . . . . . . . . . . . . . . . . 1-6
Related Guides . . . . . . . . . . . . . . . . . . . . . . . . . . . . . . . . . . . . . . . . . . . . . . . . . . . . . . 1-6
Part I. Architecture
2. Planning Your PortalProduction Operations (Propagation and Deployment) . . . . . . . . . . . . . . . . . . . . . . . . . . . 2-2
Portal Development in a Distributed Portal Team . . . . . . . . . . . . . . . . . . . . . . . . . . . . . . . 2-2
Federated Portals . . . . . . . . . . . . . . . . . . . . . . . . . . . . . . . . . . . . . . . . . . . . . . . . . . . . . . . . 2-3
Security . . . . . . . . . . . . . . . . . . . . . . . . . . . . . . . . . . . . . . . . . . . . . . . . . . . . . . . . . . . . . . . 2-3
Content Management . . . . . . . . . . . . . . . . . . . . . . . . . . . . . . . . . . . . . . . . . . . . . . . . . . . . . 2-4
Interaction Management . . . . . . . . . . . . . . . . . . . . . . . . . . . . . . . . . . . . . . . . . . . . . . . . . . 2-4
Performance . . . . . . . . . . . . . . . . . . . . . . . . . . . . . . . . . . . . . . . . . . . . . . . . . . . . . . . . . . . . 2-5
Portals and Mobile Devices . . . . . . . . . . . . . . . . . . . . . . . . . . . . . . . . . . . . . . . . . . . . . . . . 2-5
iv BEA WebLogic Portal Portal Development Guide
Part II. Development
3. Understanding Portal DevelopmentPortal Components . . . . . . . . . . . . . . . . . . . . . . . . . . . . . . . . . . . . . . . . . . . . . . . . . . . . . . 3-1
Portal Component Hierarchy. . . . . . . . . . . . . . . . . . . . . . . . . . . . . . . . . . . . . . . . . . . . . . . 3-3
Portal Development Environment in WorkSpace Studio . . . . . . . . . . . . . . . . . . . . . . . . . 3-5
WebLogic Portal and Shared J2EE Libraries . . . . . . . . . . . . . . . . . . . . . . . . . . . . . . . . . . 3-8
File-Based Portals and Streaming Portals . . . . . . . . . . . . . . . . . . . . . . . . . . . . . . . . . . . . . 3-9
Java Controls in Portals. . . . . . . . . . . . . . . . . . . . . . . . . . . . . . . . . . . . . . . . . . . . . . . . . . 3-10
JSP Tags in Portals . . . . . . . . . . . . . . . . . . . . . . . . . . . . . . . . . . . . . . . . . . . . . . . . . . . . . 3-11
Asynchronous Rendering . . . . . . . . . . . . . . . . . . . . . . . . . . . . . . . . . . . . . . . . . . . . . . . . 3-12
Backing Files. . . . . . . . . . . . . . . . . . . . . . . . . . . . . . . . . . . . . . . . . . . . . . . . . . . . . . . . . . 3-12
How Backing Files are Executed . . . . . . . . . . . . . . . . . . . . . . . . . . . . . . . . . . . . . . . 3-13
Thread Safety and Backing Files . . . . . . . . . . . . . . . . . . . . . . . . . . . . . . . . . . . . . . . 3-14
Scoping and Backing Files. . . . . . . . . . . . . . . . . . . . . . . . . . . . . . . . . . . . . . . . . . . . 3-14
Using the Session to Pass Data Between Life Cycle Methods . . . . . . . . . . . . . . . . 3-15
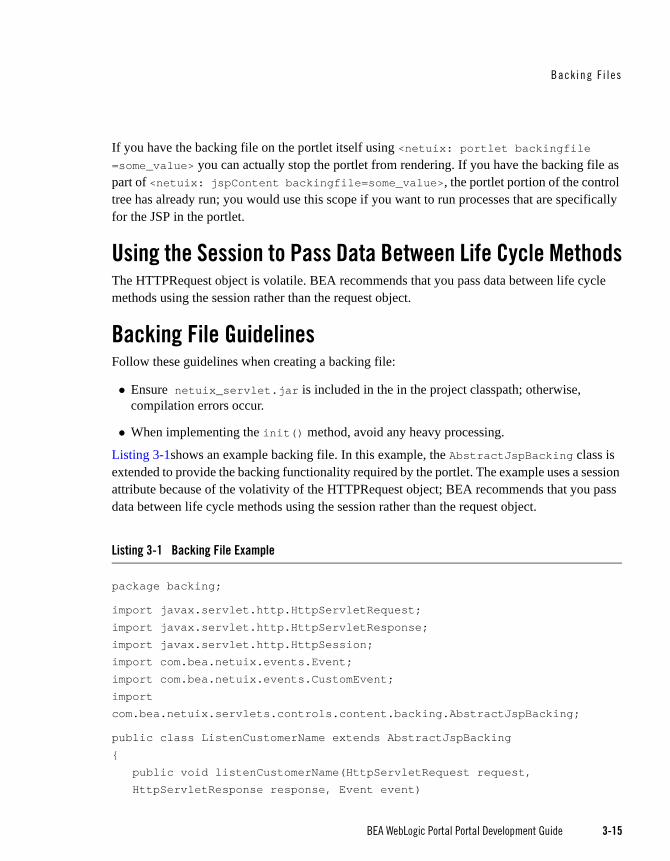
Backing File Guidelines. . . . . . . . . . . . . . . . . . . . . . . . . . . . . . . . . . . . . . . . . . . . . . 3-15
Page Flows in Portals . . . . . . . . . . . . . . . . . . . . . . . . . . . . . . . . . . . . . . . . . . . . . . . . . . . 3-17
State/Session Management . . . . . . . . . . . . . . . . . . . . . . . . . . . . . . . . . . . . . . . . . . . . . . . 3-17
HTTP Session Sharing . . . . . . . . . . . . . . . . . . . . . . . . . . . . . . . . . . . . . . . . . . . . . . . . . . 3-18
4. Setting up Your Portal Development EnvironmentRoadmap for Environment Setup Tasks . . . . . . . . . . . . . . . . . . . . . . . . . . . . . . . . . . . . . . 4-2
Portal Perspective . . . . . . . . . . . . . . . . . . . . . . . . . . . . . . . . . . . . . . . . . . . . . . . . . . . . . . . 4-5
WebLogic Domain Configuration Wizard . . . . . . . . . . . . . . . . . . . . . . . . . . . . . . . . . . . . 4-5
Portal EAR Project Wizard . . . . . . . . . . . . . . . . . . . . . . . . . . . . . . . . . . . . . . . . . . . . . . . . 4-7
New Portal EAR Project – Select Project Facets Dialog . . . . . . . . . . . . . . . . . . . . . . 4-8
Add and Remove Projects Dialog . . . . . . . . . . . . . . . . . . . . . . . . . . . . . . . . . . . . . . . . . . . 4-9
BEA WebLogic Portal Portal Development Guide v
Portal Web Project Wizard . . . . . . . . . . . . . . . . . . . . . . . . . . . . . . . . . . . . . . . . . . . . . . . 4-11
New Portal Web Project – Portal Web Project . . . . . . . . . . . . . . . . . . . . . . . . . . . . . 4-11
New Portal Web Project – Select Project Facets dialog . . . . . . . . . . . . . . . . . . . . . . 4-13
New Portal Web Project - Web Module Dialog . . . . . . . . . . . . . . . . . . . . . . . . . . . . 4-15
New Portal Web Project - WebLogic Web Module Dialog . . . . . . . . . . . . . . . . . . . 4-16
Portal Datasync Project Wizard. . . . . . . . . . . . . . . . . . . . . . . . . . . . . . . . . . . . . . . . . . . . 4-17
Create New Datasync Project – EAR Projects . . . . . . . . . . . . . . . . . . . . . . . . . . . . . 4-20
Associating Web and Datasync Projects with EAR Projects . . . . . . . . . . . . . . . . . . . . . 4-22
Associating an Web Project with an EAR Project . . . . . . . . . . . . . . . . . . . . . . . . . . 4-23
Associating an Datasync Project with an EAR Project . . . . . . . . . . . . . . . . . . . . . . 4-23
Using the Merged Projects View. . . . . . . . . . . . . . . . . . . . . . . . . . . . . . . . . . . . . . . . . . . 4-23
Opening the Merged Projects View . . . . . . . . . . . . . . . . . . . . . . . . . . . . . . . . . . . . . 4-23
Working with the Merged Projects View . . . . . . . . . . . . . . . . . . . . . . . . . . . . . . . . . 4-24
Running a Project on the Server . . . . . . . . . . . . . . . . . . . . . . . . . . . . . . . . . . . . . . . . . . . 4-24
Stopping the Server . . . . . . . . . . . . . . . . . . . . . . . . . . . . . . . . . . . . . . . . . . . . . . . . . . . . . 4-25
Customizing a Perspective. . . . . . . . . . . . . . . . . . . . . . . . . . . . . . . . . . . . . . . . . . . . . . . . 4-26
Setting WebLogic Portal Preferences in WorkSpace Studio. . . . . . . . . . . . . . . . . . . . . . 4-26
Preferences in the WebLogic Portal Section . . . . . . . . . . . . . . . . . . . . . . . . . . . . . . 4-26
WebLogic Portal Preferences in the General Section. . . . . . . . . . . . . . . . . . . . . . . . 4-27
5. Integrating Applications into WebLogic PortalIntegrating an Existing Web Application into WorkSpace Studio . . . . . . . . . . . . . . . . . . 5-2
Integrating Struts Applications . . . . . . . . . . . . . . . . . . . . . . . . . . . . . . . . . . . . . . . . . . . . . 5-6
Preparing Your Struts Application for Integration . . . . . . . . . . . . . . . . . . . . . . . . . . . 5-7
Integration Steps . . . . . . . . . . . . . . . . . . . . . . . . . . . . . . . . . . . . . . . . . . . . . . . . . . . . . 5-9
Best Practices and Development Issues . . . . . . . . . . . . . . . . . . . . . . . . . . . . . . . . . . 5-10
Integrating Java Server Faces . . . . . . . . . . . . . . . . . . . . . . . . . . . . . . . . . . . . . . . . . . . . . 5-11
JSF and the namingContainer JSP Tag. . . . . . . . . . . . . . . . . . . . . . . . . . . . . . . . . . . 5-11

vi BEA WebLogic Portal Portal Development Guide
Integrating Page Flows . . . . . . . . . . . . . . . . . . . . . . . . . . . . . . . . . . . . . . . . . . . . . . . . . . 5-12
Adding Facets to an Existing Project . . . . . . . . . . . . . . . . . . . . . . . . . . . . . . . . . . . . . . . 5-12
Other Methods of Integrating an External Web Application into a Portal . . . . . . . . . . . 5-14
6. User Interface Development with Look And Feel FeaturesLook And Feel Framework Overview . . . . . . . . . . . . . . . . . . . . . . . . . . . . . . . . . . . . . . . 6-2
Working with Look And Feel Files. . . . . . . . . . . . . . . . . . . . . . . . . . . . . . . . . . . . . . . . . . 6-3
Defining a Look And Feel for a Desktop. . . . . . . . . . . . . . . . . . . . . . . . . . . . . . . . . . 6-4
Customizing Look and Feels. . . . . . . . . . . . . . . . . . . . . . . . . . . . . . . . . . . . . . . . . . . . . . . 6-4
Combining Skins and Skeletons in a New Look And Feel . . . . . . . . . . . . . . . . . . . . 6-6
Defining Titlebar Buttons and Window Icons . . . . . . . . . . . . . . . . . . . . . . . . . . . . . . 6-7
Modifying CSS Files . . . . . . . . . . . . . . . . . . . . . . . . . . . . . . . . . . . . . . . . . . . . . . . . . 6-8
Working with Genes and Chromosomes . . . . . . . . . . . . . . . . . . . . . . . . . . . . . . . . . . 6-9
Creating a New Look and Feel . . . . . . . . . . . . . . . . . . . . . . . . . . . . . . . . . . . . . . . . . . . . 6-12
Working with Skins . . . . . . . . . . . . . . . . . . . . . . . . . . . . . . . . . . . . . . . . . . . . . . . . . 6-14
Working with Skeletons . . . . . . . . . . . . . . . . . . . . . . . . . . . . . . . . . . . . . . . . . . . . . . 6-19
Working with Themes. . . . . . . . . . . . . . . . . . . . . . . . . . . . . . . . . . . . . . . . . . . . . . . . . . . 6-22
Using Themes with Microsoft Internet Explorer . . . . . . . . . . . . . . . . . . . . . . . . . . . 6-24
Developing a Theme . . . . . . . . . . . . . . . . . . . . . . . . . . . . . . . . . . . . . . . . . . . . . . . . 6-24
Using Look And Feels From Previous Portal Releases . . . . . . . . . . . . . . . . . . . . . . . . . 6-25
Troubleshooting Look And Feels . . . . . . . . . . . . . . . . . . . . . . . . . . . . . . . . . . . . . . . . . . 6-26
The Look And Feel Editor . . . . . . . . . . . . . . . . . . . . . . . . . . . . . . . . . . . . . . . . . . . . . . . 6-26
Overview . . . . . . . . . . . . . . . . . . . . . . . . . . . . . . . . . . . . . . . . . . . . . . . . . . . . . . . . . 6-26
The Look and Feel Editor Window . . . . . . . . . . . . . . . . . . . . . . . . . . . . . . . . . . . . . 6-27
. . . . . . . . . . . . . . . . . . . . . . . . . . . . . . . . . . . . . . . . . . . . . . . . . . . . . . . . . . . . . . . . . 6-28
Opening the Look And Feel Editor . . . . . . . . . . . . . . . . . . . . . . . . . . . . . . . . . . . . . 6-28
. . . . . . . . . . . . . . . . . . . . . . . . . . . . . . . . . . . . . . . . . . . . . . . . . . . . . . . . . . . . . . . . . 6-30
Style Hierarchy Tab . . . . . . . . . . . . . . . . . . . . . . . . . . . . . . . . . . . . . . . . . . . . . . . . . 6-30
BEA WebLogic Portal Portal Development Guide vii
Style Description Panel . . . . . . . . . . . . . . . . . . . . . . . . . . . . . . . . . . . . . . . . . . . . . . 6-31
View Area. . . . . . . . . . . . . . . . . . . . . . . . . . . . . . . . . . . . . . . . . . . . . . . . . . . . . . . . . 6-34
Outline View. . . . . . . . . . . . . . . . . . . . . . . . . . . . . . . . . . . . . . . . . . . . . . . . . . . . . . . 6-34
Properties View . . . . . . . . . . . . . . . . . . . . . . . . . . . . . . . . . . . . . . . . . . . . . . . . . . . . 6-35
Tips for Using the Look and Feel Editor . . . . . . . . . . . . . . . . . . . . . . . . . . . . . . . . . 6-35
Look And Feel API . . . . . . . . . . . . . . . . . . . . . . . . . . . . . . . . . . . . . . . . . . . . . . . . . . . . . 6-37
Working with Shells . . . . . . . . . . . . . . . . . . . . . . . . . . . . . . . . . . . . . . . . . . . . . . . . . . . . 6-37
Creating a New Shell . . . . . . . . . . . . . . . . . . . . . . . . . . . . . . . . . . . . . . . . . . . . . . . . 6-38
Modifying a Shell . . . . . . . . . . . . . . . . . . . . . . . . . . . . . . . . . . . . . . . . . . . . . . . . . . . 6-38
Applying a Shell to a Portal Desktop . . . . . . . . . . . . . . . . . . . . . . . . . . . . . . . . . . . . 6-38
Placing Portlets in a Header or Footer . . . . . . . . . . . . . . . . . . . . . . . . . . . . . . . . . . . 6-39
Working with Layouts . . . . . . . . . . . . . . . . . . . . . . . . . . . . . . . . . . . . . . . . . . . . . . . . . . . 6-39
Creating a Standard Layout . . . . . . . . . . . . . . . . . . . . . . . . . . . . . . . . . . . . . . . . . . . 6-40
Creating a Custom Layout . . . . . . . . . . . . . . . . . . . . . . . . . . . . . . . . . . . . . . . . . . . . 6-42
Working with Navigation Menus . . . . . . . . . . . . . . . . . . . . . . . . . . . . . . . . . . . . . . . . . . 6-46
Building User Interfaces to Address Accessibility Guidelines . . . . . . . . . . . . . . . . . . . . 6-47
Accessibility Checkpoints . . . . . . . . . . . . . . . . . . . . . . . . . . . . . . . . . . . . . . . . . . . . 6-48
W3C Web Content Accessibility Guidelines . . . . . . . . . . . . . . . . . . . . . . . . . . . . . . 6-49
Government Regulations and Standards . . . . . . . . . . . . . . . . . . . . . . . . . . . . . . . . . 6-49
Accessibility Evaluation and Testing Tools . . . . . . . . . . . . . . . . . . . . . . . . . . . . . . . 6-50
7. Developing Portals Using WorkSpace StudioCreating a Portal . . . . . . . . . . . . . . . . . . . . . . . . . . . . . . . . . . . . . . . . . . . . . . . . . . . . . . . . 7-2
Add a Page or Book to Your Portal . . . . . . . . . . . . . . . . . . . . . . . . . . . . . . . . . . . . . . 7-5
Creating a Standalone Book or Page . . . . . . . . . . . . . . . . . . . . . . . . . . . . . . . . . . . . . 7-6
Extracting an Existing Page or Book to Re-Use . . . . . . . . . . . . . . . . . . . . . . . . . . . . 7-9
Adding a Book or Page Reference (Content) . . . . . . . . . . . . . . . . . . . . . . . . . . . . . . . 7-9
Rearranging Books and Pages . . . . . . . . . . . . . . . . . . . . . . . . . . . . . . . . . . . . . . . . . 7-10

viii BEA WebLogic Portal Portal Development Guide
Setting Portal Component Properties . . . . . . . . . . . . . . . . . . . . . . . . . . . . . . . . . . . . . . . 7-10
Editing Portal Properties . . . . . . . . . . . . . . . . . . . . . . . . . . . . . . . . . . . . . . . . . . . . . 7-11
Tips for Using the Properties View . . . . . . . . . . . . . . . . . . . . . . . . . . . . . . . . . . . . . 7-12
Copying J2EE Library Files into a Project . . . . . . . . . . . . . . . . . . . . . . . . . . . . . . . . . . . 7-25
Viewing Files that Override Shared J2EE Library Files . . . . . . . . . . . . . . . . . . . . . 7-26
Custom Controls in Page Flows . . . . . . . . . . . . . . . . . . . . . . . . . . . . . . . . . . . . . . . . . . . 7-27
Adding a Portal Control to a Page Flow . . . . . . . . . . . . . . . . . . . . . . . . . . . . . . . . . 7-27
Adding an Action to the Page Flow . . . . . . . . . . . . . . . . . . . . . . . . . . . . . . . . . . . . . 7-28
Portal Control Security. . . . . . . . . . . . . . . . . . . . . . . . . . . . . . . . . . . . . . . . . . . . . . . 7-29
Deploy and View a Portal . . . . . . . . . . . . . . . . . . . . . . . . . . . . . . . . . . . . . . . . . . . . . . . . 7-29
Working with URLs . . . . . . . . . . . . . . . . . . . . . . . . . . . . . . . . . . . . . . . . . . . . . . . . . . . . 7-31
Creating URLs to Portal Resources . . . . . . . . . . . . . . . . . . . . . . . . . . . . . . . . . . . . . 7-31
URL Compression . . . . . . . . . . . . . . . . . . . . . . . . . . . . . . . . . . . . . . . . . . . . . . . . . . 7-33
URL Troubleshooting . . . . . . . . . . . . . . . . . . . . . . . . . . . . . . . . . . . . . . . . . . . . . . . 7-36
Ampersand Entities in Portal URLs. . . . . . . . . . . . . . . . . . . . . . . . . . . . . . . . . . . . . 7-36
Optional Look And Feel URL Templates . . . . . . . . . . . . . . . . . . . . . . . . . . . . . . . . 7-37
Working with Encoding in HTTP Responses . . . . . . . . . . . . . . . . . . . . . . . . . . . . . . . . . 7-38
Cache Management in WorkSpace Studio . . . . . . . . . . . . . . . . . . . . . . . . . . . . . . . . . . . 7-39
Changing Cache Settings in WorkSpace Studio . . . . . . . . . . . . . . . . . . . . . . . . . . . 7-39
Improving WebLogic Server Administration Console Performance on a Managed Server. . 7-41
Behavior of the “Return to Default Page” Attribute . . . . . . . . . . . . . . . . . . . . . . . . . . . . 7-41
Adding Commerce Services to an Existing Portal Web Project . . . . . . . . . . . . . . . . . . . 7-43
Customizing Problem Validation Settings . . . . . . . . . . . . . . . . . . . . . . . . . . . . . . . . . . . 7-45
Enabling/Disabling WebLogic Portal Validation . . . . . . . . . . . . . . . . . . . . . . . . . . . 7-45
Customizing WebLogic Portal Validation Mappings. . . . . . . . . . . . . . . . . . . . . . . . 7-48
Enabling Placeable Movement . . . . . . . . . . . . . . . . . . . . . . . . . . . . . . . . . . . . . . . . . . . . 7-49
Configuring the Portal in WorkSpace Studio. . . . . . . . . . . . . . . . . . . . . . . . . . . . . . 7-50
BEA WebLogic Portal Portal Development Guide ix
Setting Up a Desktop in the Administration Console . . . . . . . . . . . . . . . . . . . . . . . 7-51
Testing Placeable Movement . . . . . . . . . . . . . . . . . . . . . . . . . . . . . . . . . . . . . . . . . . 7-52
Enabling Placeable Movement for an Existing Desktop . . . . . . . . . . . . . . . . . . . . . 7-53
Limitations . . . . . . . . . . . . . . . . . . . . . . . . . . . . . . . . . . . . . . . . . . . . . . . . . . . . . . . . 7-53
Localizing Titles for File-Based Books, Pages, and Portlets. . . . . . . . . . . . . . . . . . . . . . 7-54
8. Enabling Visitor ToolsWhat Are Visitor Tools? . . . . . . . . . . . . . . . . . . . . . . . . . . . . . . . . . . . . . . . . . . . . . . . . . . 8-1
Enabling Visitor Tools. . . . . . . . . . . . . . . . . . . . . . . . . . . . . . . . . . . . . . . . . . . . . . . . . . . . 8-2
Verifying the Portal Visitor Tools Facet . . . . . . . . . . . . . . . . . . . . . . . . . . . . . . . . . . . 8-3
Enabling Visitor Tools for a Desktop . . . . . . . . . . . . . . . . . . . . . . . . . . . . . . . . . . . . . 8-4
9. Creating Portals for Multiple Device TypesEnabling Multichannel Features in a Portal Web Application . . . . . . . . . . . . . . . . . . . . . 9-1
Roadmap for Multichannel Processing . . . . . . . . . . . . . . . . . . . . . . . . . . . . . . . . . . . . . . . 9-3
Developing Portals for Use in a Multichannel Environment. . . . . . . . . . . . . . . . . . . . . . . 9-4
Manage Portlet Client Classifications . . . . . . . . . . . . . . . . . . . . . . . . . . . . . . . . . . . . 9-4
Use the Client Attribute in JSP Tags . . . . . . . . . . . . . . . . . . . . . . . . . . . . . . . . . . . . . 9-6
Develop Appropriate Look And Feels . . . . . . . . . . . . . . . . . . . . . . . . . . . . . . . . . . . . 9-7
Interaction Management Development . . . . . . . . . . . . . . . . . . . . . . . . . . . . . . . . . . . 9-7
10.Designing Portals for Optimal PerformanceAsynchronous Desktop Rendering . . . . . . . . . . . . . . . . . . . . . . . . . . . . . . . . . . . . . . . . . 10-1
Choosing the Method of Asynchronous Rendering . . . . . . . . . . . . . . . . . . . . . . . . . 10-2
Configuring Asynchronous Desktop Rendering . . . . . . . . . . . . . . . . . . . . . . . . . . . 10-2
Control Tree Design . . . . . . . . . . . . . . . . . . . . . . . . . . . . . . . . . . . . . . . . . . . . . . . . . . . . 10-3
How the Control Tree Works . . . . . . . . . . . . . . . . . . . . . . . . . . . . . . . . . . . . . . . . . . 10-3
How the Control Tree Affects Performance. . . . . . . . . . . . . . . . . . . . . . . . . . . . . . . 10-4
Using Multiple Desktops . . . . . . . . . . . . . . . . . . . . . . . . . . . . . . . . . . . . . . . . . . . . . . . . . 10-5
x BEA WebLogic Portal Portal Development Guide
Why This is a Good Idea . . . . . . . . . . . . . . . . . . . . . . . . . . . . . . . . . . . . . . . . . . . . . 10-6
Design Decisions for Using Multiple Desktops. . . . . . . . . . . . . . . . . . . . . . . . . . . . 10-8
Optimizing the Control Tree . . . . . . . . . . . . . . . . . . . . . . . . . . . . . . . . . . . . . . . . . . . . . . 10-9
Enabling Control Tree Optimization . . . . . . . . . . . . . . . . . . . . . . . . . . . . . . . . . . . . 10-9
How Tree Optimization Works . . . . . . . . . . . . . . . . . . . . . . . . . . . . . . . . . . . . . . . 10-13
Multi Level Menus and Control Tree Optimization . . . . . . . . . . . . . . . . . . . . . . . 10-14
Limitations to Using Tree Optimization . . . . . . . . . . . . . . . . . . . . . . . . . . . . . . . . 10-15
Disabling Tree Optimization . . . . . . . . . . . . . . . . . . . . . . . . . . . . . . . . . . . . . . . . . 10-17
Other Ways to Improve Performance . . . . . . . . . . . . . . . . . . . . . . . . . . . . . . . . . . . . . . 10-17
Use Entitlements Judiciously . . . . . . . . . . . . . . . . . . . . . . . . . . . . . . . . . . . . . . . . . 10-18
Limit User Customizations . . . . . . . . . . . . . . . . . . . . . . . . . . . . . . . . . . . . . . . . . . 10-19
Optimize Page Flow Session Footprint . . . . . . . . . . . . . . . . . . . . . . . . . . . . . . . . . 10-19
Use File-Based Portals for Simple Applications . . . . . . . . . . . . . . . . . . . . . . . . . . 10-20
Create a Production Domain in Development . . . . . . . . . . . . . . . . . . . . . . . . . . . . 10-21
Optimize Portlet Performance . . . . . . . . . . . . . . . . . . . . . . . . . . . . . . . . . . . . . . . . 10-22
11.Obtaining Debug InformationIntroduction . . . . . . . . . . . . . . . . . . . . . . . . . . . . . . . . . . . . . . . . . . . . . . . . . . . . . . . . . . . 11-1
Configuring and Enabling Debug . . . . . . . . . . . . . . . . . . . . . . . . . . . . . . . . . . . . . . . . . . 11-1
Using Debug in Your WLP Code. . . . . . . . . . . . . . . . . . . . . . . . . . . . . . . . . . . . . . . 11-2
Turning Debug Output On and Off . . . . . . . . . . . . . . . . . . . . . . . . . . . . . . . . . . . . . 11-3
Package-Level Debugging . . . . . . . . . . . . . . . . . . . . . . . . . . . . . . . . . . . . . . . . . . . . 11-4
Directing Output to a File . . . . . . . . . . . . . . . . . . . . . . . . . . . . . . . . . . . . . . . . . . . . 11-5
Reloading Debug Properties . . . . . . . . . . . . . . . . . . . . . . . . . . . . . . . . . . . . . . . . . . 11-5
Example debug.properties File . . . . . . . . . . . . . . . . . . . . . . . . . . . . . . . . . . . . . . . . 11-6
Public WLP Class Debug Reference. . . . . . . . . . . . . . . . . . . . . . . . . . . . . . . . . . . . . . . . 11-8
WLP Framework Classes with Debug Support . . . . . . . . . . . . . . . . . . . . . . . . . . . . 11-8
WLP Core Services Classes with Debug Support . . . . . . . . . . . . . . . . . . . . . . . . . 11-12
BEA WebLogic Portal Portal Development Guide xi
WLP Virtual Content Repository Classes with Debug Support . . . . . . . . . . . . . . . 11-15
WLP Administration Console Classes with Debug Support . . . . . . . . . . . . . . . . . 11-17
Part III. Staging
12.Managing Portal DesktopsAdministration Console Overview . . . . . . . . . . . . . . . . . . . . . . . . . . . . . . . . . . . . . . . . . 12-2
Administration Console Library of Resources . . . . . . . . . . . . . . . . . . . . . . . . . . . . . . . . 12-3
Starting and Logging In to the Administration Console . . . . . . . . . . . . . . . . . . . . . . . . . 12-4
Opening the Administration Console . . . . . . . . . . . . . . . . . . . . . . . . . . . . . . . . . . . . 12-4
Logging In to the Administration Console. . . . . . . . . . . . . . . . . . . . . . . . . . . . . . . . 12-5
Overview of Library Administration . . . . . . . . . . . . . . . . . . . . . . . . . . . . . . . . . . . . . . . . 12-7
Overview of Portal Administration . . . . . . . . . . . . . . . . . . . . . . . . . . . . . . . . . . . . . . . . . 12-8
Portal Management . . . . . . . . . . . . . . . . . . . . . . . . . . . . . . . . . . . . . . . . . . . . . . . . . . . . . 12-9
Overview of the Library . . . . . . . . . . . . . . . . . . . . . . . . . . . . . . . . . . . . . . . . . . . . . . . . . 12-9
Desktop Templates . . . . . . . . . . . . . . . . . . . . . . . . . . . . . . . . . . . . . . . . . . . . . . . . . . . . . 12-9
Creating a Desktop Template . . . . . . . . . . . . . . . . . . . . . . . . . . . . . . . . . . . . . . . . . . 12-9
Communities . . . . . . . . . . . . . . . . . . . . . . . . . . . . . . . . . . . . . . . . . . . . . . . . . . . . . . . . . 12-12
Portal Resources . . . . . . . . . . . . . . . . . . . . . . . . . . . . . . . . . . . . . . . . . . . . . . . . . . . . . . 12-12
Updating Portal Resources . . . . . . . . . . . . . . . . . . . . . . . . . . . . . . . . . . . . . . . . . . . 12-12
Viewing Resources for a Portal Web Application (Update WebApp) . . . . . . . . . . 12-14
Deleting a Portal Resource . . . . . . . . . . . . . . . . . . . . . . . . . . . . . . . . . . . . . . . . . . . 12-14
Localizing a Portal Resource . . . . . . . . . . . . . . . . . . . . . . . . . . . . . . . . . . . . . . . . . 12-15
Portals . . . . . . . . . . . . . . . . . . . . . . . . . . . . . . . . . . . . . . . . . . . . . . . . . . . . . . . . . . . . . . 12-16
Creating a Portal . . . . . . . . . . . . . . . . . . . . . . . . . . . . . . . . . . . . . . . . . . . . . . . . . . . 12-16
Modifying Portal Properties . . . . . . . . . . . . . . . . . . . . . . . . . . . . . . . . . . . . . . . . . . 12-18
Desktops . . . . . . . . . . . . . . . . . . . . . . . . . . . . . . . . . . . . . . . . . . . . . . . . . . . . . . . . . . . . 12-19
Creating a Desktop . . . . . . . . . . . . . . . . . . . . . . . . . . . . . . . . . . . . . . . . . . . . . . . . . 12-20
xii BEA WebLogic Portal Portal Development Guide
Modifying Desktop Properties . . . . . . . . . . . . . . . . . . . . . . . . . . . . . . . . . . . . . . . . 12-25
Books. . . . . . . . . . . . . . . . . . . . . . . . . . . . . . . . . . . . . . . . . . . . . . . . . . . . . . . . . . . . . . . 12-27
Creating a Book . . . . . . . . . . . . . . . . . . . . . . . . . . . . . . . . . . . . . . . . . . . . . . . . . . . 12-27
Managing Book Content . . . . . . . . . . . . . . . . . . . . . . . . . . . . . . . . . . . . . . . . . . . . 12-28
Modifying Library Book Properties and Contents. . . . . . . . . . . . . . . . . . . . . . . . . 12-29
Modifying Desktop Book Properties . . . . . . . . . . . . . . . . . . . . . . . . . . . . . . . . . . . 12-30
Pages . . . . . . . . . . . . . . . . . . . . . . . . . . . . . . . . . . . . . . . . . . . . . . . . . . . . . . . . . . . . . . . 12-31
Creating a New Page . . . . . . . . . . . . . . . . . . . . . . . . . . . . . . . . . . . . . . . . . . . . . . . 12-31
Managing Page Content . . . . . . . . . . . . . . . . . . . . . . . . . . . . . . . . . . . . . . . . . . . . . 12-33
Modifying Library Page Properties . . . . . . . . . . . . . . . . . . . . . . . . . . . . . . . . . . . . 12-35
Modifying Desktop Page Properties . . . . . . . . . . . . . . . . . . . . . . . . . . . . . . . . . . . 12-36
Moving a Page or Book to Another Location on the Desktop. . . . . . . . . . . . . . . . 12-37
Portlets. . . . . . . . . . . . . . . . . . . . . . . . . . . . . . . . . . . . . . . . . . . . . . . . . . . . . . . . . . . . . . 12-37
Copying a Portlet in the Library . . . . . . . . . . . . . . . . . . . . . . . . . . . . . . . . . . . . . . 12-37
Deleting a Portlet . . . . . . . . . . . . . . . . . . . . . . . . . . . . . . . . . . . . . . . . . . . . . . . . . . 12-38
Modifying Library Portlet Properties. . . . . . . . . . . . . . . . . . . . . . . . . . . . . . . . . . . 12-38
Modifying Desktop Portlet Properties . . . . . . . . . . . . . . . . . . . . . . . . . . . . . . . . . . 12-40
Portlet Preferences. . . . . . . . . . . . . . . . . . . . . . . . . . . . . . . . . . . . . . . . . . . . . . . . . . . . . 12-41
Creating a Portlet Preference . . . . . . . . . . . . . . . . . . . . . . . . . . . . . . . . . . . . . . . . . 12-41
Editing a Portlet Preference . . . . . . . . . . . . . . . . . . . . . . . . . . . . . . . . . . . . . . . . . . 12-43
Portlet Categories . . . . . . . . . . . . . . . . . . . . . . . . . . . . . . . . . . . . . . . . . . . . . . . . . . . . . 12-44
Creating a Portlet Category . . . . . . . . . . . . . . . . . . . . . . . . . . . . . . . . . . . . . . . . . . 12-44
Adding Portlets to a Portlet Category . . . . . . . . . . . . . . . . . . . . . . . . . . . . . . . . . . 12-44
Modifying Portlet Category Properties . . . . . . . . . . . . . . . . . . . . . . . . . . . . . . . . . 12-45
Look And Feels . . . . . . . . . . . . . . . . . . . . . . . . . . . . . . . . . . . . . . . . . . . . . . . . . . . . . . . 12-46
Modifying Look And Feel Properties . . . . . . . . . . . . . . . . . . . . . . . . . . . . . . . . . . 12-46
Shells . . . . . . . . . . . . . . . . . . . . . . . . . . . . . . . . . . . . . . . . . . . . . . . . . . . . . . . . . . . . . . . 12-47
Modifying Shell Properties . . . . . . . . . . . . . . . . . . . . . . . . . . . . . . . . . . . . . . . . . . 12-47
BEA WebLogic Portal Portal Development Guide xiii
Themes. . . . . . . . . . . . . . . . . . . . . . . . . . . . . . . . . . . . . . . . . . . . . . . . . . . . . . . . . . . . . . 12-47
Modifying Theme Properties . . . . . . . . . . . . . . . . . . . . . . . . . . . . . . . . . . . . . . . . . 12-48
Menus (Navigation) . . . . . . . . . . . . . . . . . . . . . . . . . . . . . . . . . . . . . . . . . . . . . . . . . . . . 12-48
Modifying Menu Properties . . . . . . . . . . . . . . . . . . . . . . . . . . . . . . . . . . . . . . . . . . 12-49
Layouts . . . . . . . . . . . . . . . . . . . . . . . . . . . . . . . . . . . . . . . . . . . . . . . . . . . . . . . . . . . . . 12-50
Modifying Layout Properties . . . . . . . . . . . . . . . . . . . . . . . . . . . . . . . . . . . . . . . . . 12-50
12.Deploying Portals to ProductionShared J2EE Libraries . . . . . . . . . . . . . . . . . . . . . . . . . . . . . . . . . . . . . . . . . . . . . . . . . . . 12-1
Shared J2EE Library References in config.xml . . . . . . . . . . . . . . . . . . . . . . . . . . . . 12-2
Overriding Shared J2EE Library Settings in the web.xml File . . . . . . . . . . . . . . . . 12-6
Part IV. Production
13.Managing Portals in ProductionPushing Changes from the Library into Production . . . . . . . . . . . . . . . . . . . . . . . . . . . . 13-1
Transferring Changes from Production Back to Development . . . . . . . . . . . . . . . . . . . . 13-2
A. Facet-to-Library Reference TablesWebLogic Portal Facet-to-Library Reference Tables . . . . . . . . . . . . . . . . . . . . . . . . . . . .A-1

xiv BEA WebLogic Portal Portal Development Guide

BEA WebLogic Portal Portal Development Guide 1-1
C H A P T E R 1
Introduction to Portals
This chapter introduces BEA WebLogic Portal® concepts and describes how the content of this guide relates to the portal life cycle.
This chapter contains the following sections:
What is a Portal?
What is the Portal Framework?
Portal Development and the Portal Life Cycle
Getting Started
What is a Portal?A portal represents a web site that provides a single point of access to applications and information.
From an end user perspective, a portal is a web site with pages that are organized by tabs or some other form of navigation. Each page contains a nesting of sub-pages, or one or more portlets—individual windows that display anything from static HTML content to complex web services. A page can contain multiple portlets, giving users access to different information and tools in a single place. Users can also customize their view of a portal by adding their own pages, adding portlets of their choosing, and changing the Look And Feel of the interface.
Technically speaking, a portal is a container of resources and functionality that can be made available to end users. These portal views, which are called desktops in WebLogic Portal, provide
I n t roduct ion to Po r ta ls
1-2 BEA WebLogic Portal Portal Development Guide
the uniform resource location (URL) that users access. A portal presents diverse content and applications to users through a consistent, unified web-based interface. Portal administrators and users can customize portals, and content can be presented based on user preferences or rule-based personalization. Each portal is associated with a web application that contains all of the resources required to run portals on the web.
Portals provide the following benefits to the user:
Aggregation – The user can go to a single place for all content and applications.
Customization – The preferences for a user determine how the portal looks and feels.
Personalization – The user can obtain content that is specific to their interests and needs.
Organization – The user can arrange the content and applications to make better sense of the information.
Integration – The user can work with multiple applications and content sources in a unified fashion.
Portals typically include the following features and benefits:
Search – Enterprise and web-based search facilities
Content Management – Creation, management, and delivery of content
Content Repurposing – Including content from multiple disparate data sources
Portals optionally include the following features and benefits:
– Workflow – Business process management
– Single Sign-On – Allows users to log on once for all applications within the portal
WebLogic Portal supports development of portals through WorkSpace Studio, which is a client-based tool. You can also develop portals without WorkSpace Studio through coding in any tool of choice such as JBuilder, vi or Emacs. Portals can be written in Java or JSP, and can include JavaScript for client-side operations. Although you can create portals outside of WorkSpace Studio, to realize the full development-time productivity gains afforded to the WebLogic Portal customer, use WorkSpace Studio as the portal and portlet development platform.
After you create the parts of a portal using WorkSpace Studio, you assemble it into a desktop using the WebLogic Portal Administration Console. From an administrative standpoint, a portal is a container that defines a portal application. When you create a new portal using the Administration Console, you are really creating an empty portal to hold different versions of the portal (desktops) that can be targeted to specific users. A portal can contain one or more desktops,
What i s the Por ta l F ramework?
BEA WebLogic Portal Portal Development Guide 1-3
or views, of a portal. It is the desktops to which you add the portal resources and navigation such as books, pages, and portlets that make a dynamic portal.
Each portal is associated with a web application that contains all of the resources required to run portals on the web.
What is the Portal Framework?The portal framework is the portion of WebLogic Portal that is responsible for the rendering and customization of the portal.
The portal framework turns a portal that you develop in WorkSpace Studio into the HTML page that desktop visitors see in a browser. When you are familiar with the portal framework tools provided in WebLogic Portal, you can look at a rendered portal in a browser and understand which pieces of the underlying framework you need to modify to obtain the results you want.
Portal Development and the Portal Life CycleThe creation and management of a portal flows through a portal life cycle. The portal life cycle contains four phases:
Architecture
Development
Staging
Production
The tasks described in this guide are organized according to the portal life cycle, which includes best practices and sequences for creating and updating portals. For more information about the portal life cycle, refer to the BEA WebLogic Portal Overview. Figure 1-1 shows a sampling of tasks that occur at each phase.

I n t roduct ion to Po r ta ls
1-4 BEA WebLogic Portal Portal Development Guide
Figure 1-1 Portals and the Four Phases of the Portal Life Cycle
ArchitectureDuring the architecture phase, you design and plan the configuration of your portal. For example, you can create a detailed specification outlining the requirements for your portal, the specific portlets you require, where those portlets will be hosted, and how they will communicate and interact with one another. You might also consider the deployment strategy for your portal. Security is another consideration for the portal architect.
This chapter describes tasks within the Architecture phase:
Chapter 2, “Planning Your Portal”
DevelopmentDevelopers use WorkSpace Studio to create portals, portlets, pages, and books. During development, you can implement data transfer and interportlet communication strategies and consider the security of the components.
In the development stage, careful attention to best practices is crucial. Wherever possible, this guide includes descriptions and instructions for adhering to these best practices.
The chapters describing tasks within the Development phase include:
Production – Roll out your portals to a production environment, making changes as needed
Staging – Use the WebLogic Portal Administration Console to create and configure desktops
Development – Use WorkSpace Studio to create portals, portlets, pages, and books
Architecture – Determine the basic configuration of the portal
Po r ta l Deve lopment and the Por ta l L i fe Cyc le
BEA WebLogic Portal Portal Development Guide 1-5
Chapter 3, “Understanding Portal Development”
Chapter 4, “Setting up Your Portal Development Environment”
Chapter 5, “Integrating Applications into WebLogic Portal”
Chapter 6, “User Interface Development with Look And Feel Features”
Chapter 7, “Developing Portals Using WorkSpace Studio”
Chapter 9, “Creating Portals for Multiple Device Types”
Chapter 8, “Enabling Visitor Tools”
Chapter 10, “Designing Portals for Optimal Performance”
StagingBEA recommends that you deploy your portal to a staging environment where it can be assembled and tested before going live. In the staging environment, you use the WebLogic Portal Administration Console to assemble and configure desktops. You also test your portal in a staging environment before propagating it to a live production system. In the testing aspect of the staging phase, there is tight iteration between staging and development until the application is ready to be released.
The chapters describing tasks within the Staging phase include:
Chapter 12, “Managing Portal Desktops”
Chapter 12, “Deploying Portals to Production”
ProductionA production portal is live and available to end users. A portal in production can be modified by administrators using the WebLogic Portal Administration Console and by users using Visitor Tools. For instance, an administrator might add additional portlets to a portal or reconfigure the contents of a portal.
The chapter describing tasks within the Production phase is:
Chapter 13, “Managing Portals in Production”
I n t roduct ion to Po r ta ls
1-6 BEA WebLogic Portal Portal Development Guide
Getting StartedThis section describes the basic prerequisites to using this guide and lists guides containing related information and topics.
PrerequisitesIn general, this guide assumes that you have performed the following prerequisite tasks before you attempt to use this guide to develop portlets:
Review the Related Guides and become familiar with the basic operation of the tools used to create portals, portlets, and desktops,
Review the WorkSpace Studio tutorials and documentation to become familiar with the Eclipse-based development environment and the recommended project hierarchy.
Complete the tutorial Getting Started with WebLogic Portal.
Related GuidesBEA recommends that you review the following guides:
BEA WebLogic Portal Overview
BEA WebLogic Portal Portlet Development Guide
Whenever possible, this guide includes cross references to material in related guides.
BEA WebLogic Portal Portal Development Guide
Part I Architecture
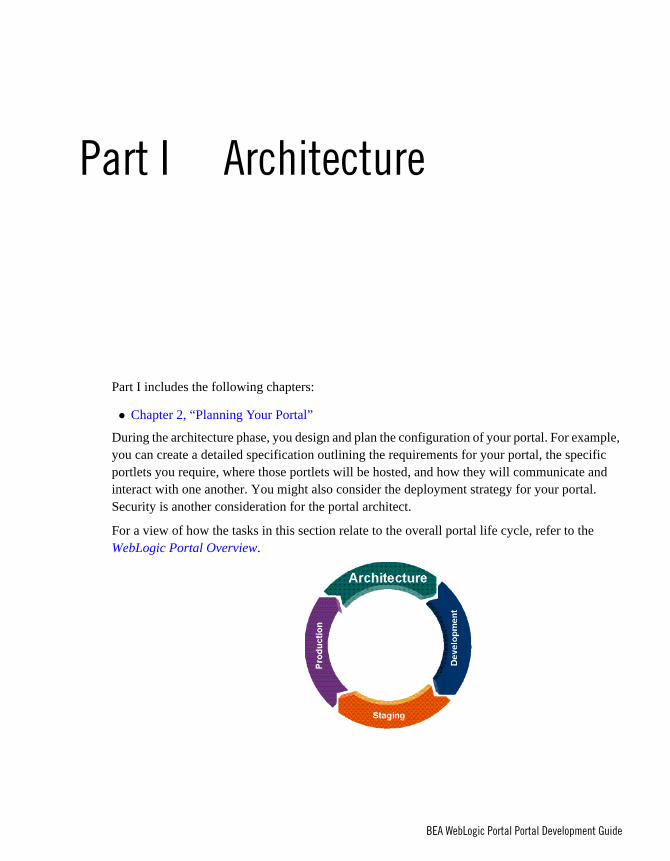
Part I includes the following chapters:
Chapter 2, “Planning Your Portal”
During the architecture phase, you design and plan the configuration of your portal. For example, you can create a detailed specification outlining the requirements for your portal, the specific portlets you require, where those portlets will be hosted, and how they will communicate and interact with one another. You might also consider the deployment strategy for your portal. Security is another consideration for the portal architect.
For a view of how the tasks in this section relate to the overall portal life cycle, refer to the WebLogic Portal Overview.

2-2 BEA WebLogic Portal Portal Development Guide
BEA WebLogic Portal Portal Development Guide 2-1
C H A P T E R 2
Planning Your Portal
Proper planning is essential to portal development. While bypassing planning and moving straight to development might reap short-term benefits in development speed, your projects may suffer from confusion and inconsistency, have poor scalability and performance, and require more time to manage.
The planning and design tasks that mark the architecture phase occur at multiple levels: the domain and enterprise application, the web application, and the individual WebLogic Portal feature areas.
Global inter-portal planning information is provided in the BEA WebLogic Portal Overview, which summarizes the types of issues to consider in the architecture phase at all levels. The various WebLogic Portal feature guides describe planning issues in detail for each feature area.
This chapter includes the following sections:
Production Operations (Propagation and Deployment)
Portal Development in a Distributed Portal Team
Federated Portals
Security
Content Management
Interaction Management
Performance
Planning Your Po r ta l
2-2 BEA WebLogic Portal Portal Development Guide
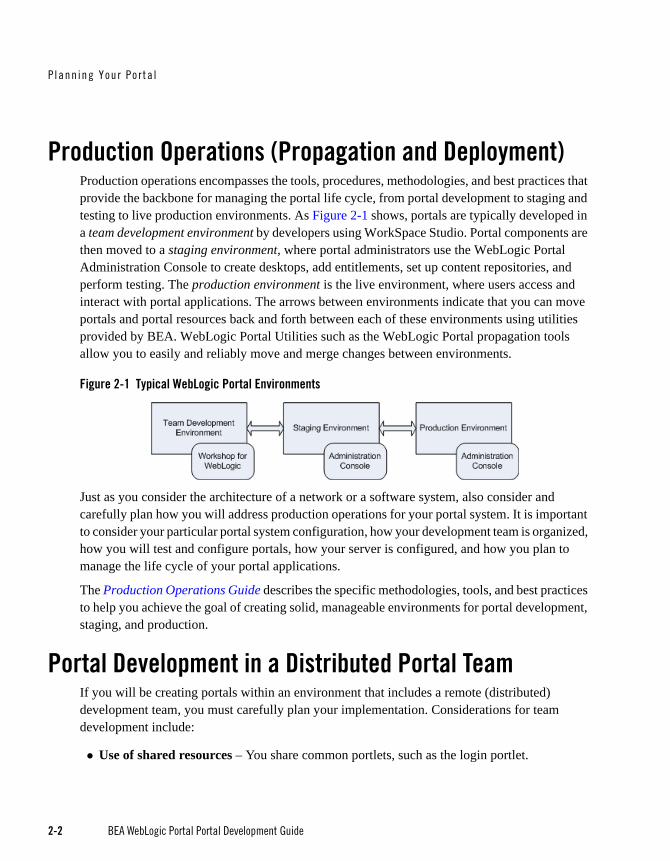
Production Operations (Propagation and Deployment)Production operations encompasses the tools, procedures, methodologies, and best practices that provide the backbone for managing the portal life cycle, from portal development to staging and testing to live production environments. As Figure 2-1 shows, portals are typically developed in a team development environment by developers using WorkSpace Studio. Portal components are then moved to a staging environment, where portal administrators use the WebLogic Portal Administration Console to create desktops, add entitlements, set up content repositories, and perform testing. The production environment is the live environment, where users access and interact with portal applications. The arrows between environments indicate that you can move portals and portal resources back and forth between each of these environments using utilities provided by BEA. WebLogic Portal Utilities such as the WebLogic Portal propagation tools allow you to easily and reliably move and merge changes between environments.
Figure 2-1 Typical WebLogic Portal Environments
Just as you consider the architecture of a network or a software system, also consider and carefully plan how you will address production operations for your portal system. It is important to consider your particular portal system configuration, how your development team is organized, how you will test and configure portals, how your server is configured, and how you plan to manage the life cycle of your portal applications.
The Production Operations Guide describes the specific methodologies, tools, and best practices to help you achieve the goal of creating solid, manageable environments for portal development, staging, and production.
Portal Development in a Distributed Portal TeamIf you will be creating portals within an environment that includes a remote (distributed) development team, you must carefully plan your implementation. Considerations for team development include:
Use of shared resources – You share common portlets, such as the login portlet.
Federated Po r ta ls
BEA WebLogic Portal Portal Development Guide 2-3
Sharing a common domain – Several techniques exist for sharing a common domain among team members with different BEA home directories.
Integrating remotely developed portlets into the portal – Settings that are common to the portal application must match across the entire development project.
Team development of a WebLogic Portal web site revolves around well-designed source control and a correctly configured shared domain for development. For detailed instructions on setting up your development environment, refer to the Team Development chapter of the Production Operations Guide.
Federated PortalsA federated portal is a portal that includes remotely distributed resources, such as remote portlets. These remote resources are collected and brought together at runtime to a portal application called a consumer, which presents the federated portal to end users.
To implement a federated portal environment, you need to make decisions about how to organize your applications. For example, rather than bundling all of a portal’s portlets into a single application, you can deploy portlets in separate web applications running on remote systems while the federated portal consumes them using WSRP. Because the federated portal is decoupled from its portlets, you do not need to redeploy the portal every time a portlet changes. For most WebLogic Portal projects, this decoupling represents an immediate and significant savings in time and money. You also might find it useful in some situations to federate a portal within the same server.
The Federated Portals Guide provides detailed instructions on how to set up a federated portal environment.
Security You can control access to portlet resources for two categories of users:
Portal visitors – You control access to portal resources using visitor entitlements. Visitor access is determined based on visitor entitlement roles.
Portal administrators – You control portal resource management capabilities using delegated administration. Administrative access is determined based on delegated administration roles.
During the Architecture phase, you plan how to organize security policies and roles, and how that fits into your overall security strategy. For an overall look at managing security for your portal

Planning Your Po r ta l
2-4 BEA WebLogic Portal Portal Development Guide
environment, refer to the Security Guide. Recommendations for security in WSRP-enabled environments are contained in the Federated Portals Guide.
Content Management WebLogic Portal’s content management system allows you to store content, track its progress, and incorporate content in your portal applications. It provides an easy integration between creating content and delivering that content to your users. Content creators can use WebLogic Portal’s repositories to create content and portal developers use the content API and JSP tools to deliver content to portal visitors.
You can use either a BEA repository or a third-party repository with your portal. Some third-party content management vendors have built integrations (Content Service Provider Implementations or SPIs) that allow you to connect third-party repositories to the Virtual Content Repository. If you are using a third-party repository from a vender that has not written an implementation for WebLogic Portal's Virtual Content Repository, you can write your own using BEA's Service Provider Interface (SPI).
For detailed information on managing the content for your portal, refer to the Content Management Guide.
Interaction ManagementYou use WebLogic Portal’s Interaction Management features to control and enhance portal visitor interactions with your portal application. You can set up personalized content that is targeted to specific users or audiences. You can guide users through a process (such as signing up for employee benefits or shopping online) that takes them to different locations based on their personal preferences or characteristics. You can even record the path users take through your portal to gauge the effectiveness of the portal, its design, or your process flows.
Developing Interaction Management features involves several interdependent tasks. For example, if you want to target users with personalized content in an ad campaign, you have to add content to BEA's Virtual Content Repository, create placeholders that display the content, set up properties (such as user profile or session properties) that are used to define the conditions under which users will be targeted with campaign content, and finally, create the campaign.
For detailed instructions, refer to the Interaction Management Guide.

Per fo rmance
BEA WebLogic Portal Portal Development Guide 2-5
PerformanceTry to plan for good performance within your portal architecture to minimize the fine-tuning that is required in a production environment. Many performance issues can be resolved and significant performance improvement can be realized by making just a few critical design decisions.
Here are some examples of performance optimizations that you can plan into your overall portal strategy:
Enable control tree optimization.
Use entitlements judiciously; too many can impact performance. Avoid the temptation of granting a different role to every user. Instead, use WebLogic Portal’s personalization capabilities to focus the user experience.
If your portal is small or relies only on static resources, you might experience some performance boost by using a file-based portal rather than a streaming portal.
If you are using page flows in your portal, ensure their session footprint is optimized to deliver the best performance.
Plan performance optimizations before you begin developing your portal so that you can implement any prerequisites that are required. For detailed instructions on developing a high-performance portal, refer to Chapter 10, “Designing Portals for Optimal Performance.” For overall WebLogic Portal performance recommendations that you can implement in a production environment, refer to the Performance Tuning Guide, which will be available in a future documentation release.
Portals and Mobile Devices WebLogic Portal can provide specific portal views based on device and browser detection, allowing a single portal application to serve content to diverse browsers and devices. The portal’s campaign and personalization features can also detect device types, directing users to device- or channel-specific business processes and content (or restrict access). Device specific content operates in tandem with the portal user interface to provide device-specific views of applications.
For instructions on how to implement your portal for use on mobile devices, refer to Chapter 9, “Creating Portals for Multiple Device Types.”

Planning Your Po r ta l
2-6 BEA WebLogic Portal Portal Development Guide
BEA WebLogic Portal Portal Development Guide
Part II Development
Part II includes the following chapters:
Chapter 3, “Understanding Portal Development”
Chapter 4, “Setting up Your Portal Development Environment”
Chapter 5, “Integrating Applications into WebLogic Portal”
Chapter 6, “User Interface Development with Look And Feel Features”
Chapter 7, “Developing Portals Using WorkSpace Studio”
Chapter 8, “Enabling Visitor Tools”
Chapter 9, “Creating Portals for Multiple Device Types”
Chapter 10, “Designing Portals for Optimal Performance”
Developers use WorkSpace Studio to create portals, portlets, pages, and books. During development, you can implement data transfer and interportlet communication strategies and consider the security of the components.
In the development stage, careful attention to best practices is crucial. Wherever possible, this guide includes descriptions and instructions for adhering to these best practices.
For a view of how the tasks in this section relate to the overall portal life cycle, refer to the WebLogic Portal Overview.

3-2 BEA WebLogic Portal Portal Development Guide
BEA WebLogic Portal Portal Development Guide 3-1
C H A P T E R 3
Understanding Portal Development
This chapter provides conceptual and reference information that you might find useful as you begin to develop portals.
This chapter contains the following sections:
Portal Components
Portal Component Hierarchy
Portal Development Environment in WorkSpace Studio
WebLogic Portal and Shared J2EE Libraries
File-Based Portals and Streaming Portals
Java Controls in Portals
JSP Tags in Portals
Page Flows in Portals
State/Session Management
HTTP Session Sharing
Portal ComponentsWhen you use WorkSpace Studio to develop a portal, the portal definition exists as a single XML file. WorkSpace Studio creates the XML file automatically as you build a portal using the editor.
Unders tand ing Por ta l Deve l opment
3-2 BEA WebLogic Portal Portal Development Guide
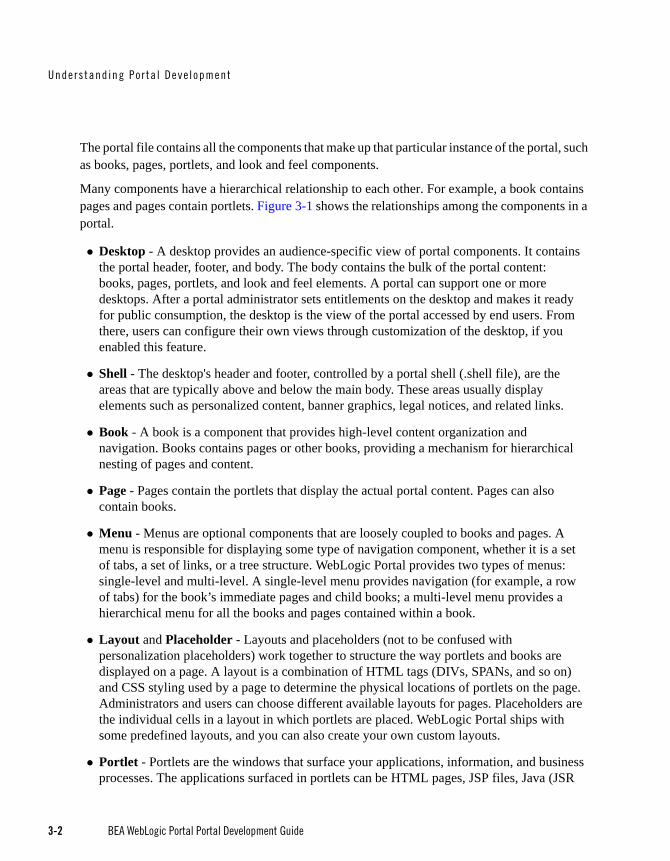
The portal file contains all the components that make up that particular instance of the portal, such as books, pages, portlets, and look and feel components.
Many components have a hierarchical relationship to each other. For example, a book contains pages and pages contain portlets. Figure 3-1 shows the relationships among the components in a portal.
Desktop - A desktop provides an audience-specific view of portal components. It contains the portal header, footer, and body. The body contains the bulk of the portal content: books, pages, portlets, and look and feel elements. A portal can support one or more desktops. After a portal administrator sets entitlements on the desktop and makes it ready for public consumption, the desktop is the view of the portal accessed by end users. From there, users can configure their own views through customization of the desktop, if you enabled this feature.
Shell - The desktop's header and footer, controlled by a portal shell (.shell file), are the areas that are typically above and below the main body. These areas usually display elements such as personalized content, banner graphics, legal notices, and related links.
Book - A book is a component that provides high-level content organization and navigation. Books contains pages or other books, providing a mechanism for hierarchical nesting of pages and content.
Page - Pages contain the portlets that display the actual portal content. Pages can also contain books.
Menu - Menus are optional components that are loosely coupled to books and pages. A menu is responsible for displaying some type of navigation component, whether it is a set of tabs, a set of links, or a tree structure. WebLogic Portal provides two types of menus: single-level and multi-level. A single-level menu provides navigation (for example, a row of tabs) for the book’s immediate pages and child books; a multi-level menu provides a hierarchical menu for all the books and pages contained within a book.
Layout and Placeholder - Layouts and placeholders (not to be confused with personalization placeholders) work together to structure the way portlets and books are displayed on a page. A layout is a combination of HTML tags (DIVs, SPANs, and so on) and CSS styling used by a page to determine the physical locations of portlets on the page. Administrators and users can choose different available layouts for pages. Placeholders are the individual cells in a layout in which portlets are placed. WebLogic Portal ships with some predefined layouts, and you can also create your own custom layouts.
Portlet - Portlets are the windows that surface your applications, information, and business processes. The applications surfaced in portlets can be HTML pages, JSP files, Java (JSR
Por ta l Component H ie ra rchy
BEA WebLogic Portal Portal Development Guide 3-3
168) applications, page flows, and so on. For detailed information about developing portlets for WebLogic Portal, refer to the Portlet Development Guide.
Portal Component HierarchyWhether you are building portal resources and templates in WorkSpace Studio or creating and administering portals with the WebLogic Portal Administration Console, you work with individual components that are then unified by the portal framework.
Figure 3-1 illustrates the flexibility and extensibility of the WebLogic Portal architecture. In the figure, the indicator (0...1) means 0 or 1, (1...n) means one or more, and (0...n) means zero or more. For example, a portal can contain one or more desktops. For resources that occur only once, like look and feel and Shell, you can still develop multiple versions even though only one at a time is allowed.

Unders tand ing Por ta l Deve l opment
3-4 BEA WebLogic Portal Portal Development Guide
Figure 3-1 Portal Component Hierarchy
Por ta l Deve lopment Env i ronment in WorkSpace S tud io
BEA WebLogic Portal Portal Development Guide 3-5
Portal Development Environment in WorkSpace StudioBEA WorkSpace Studio is implemented as a plug-in to the Eclipse Platform, specifically including the Eclipse Workbench, Java Development Tools (JDT), a customized version of the Web Tools Platform Project (WTP), and a WorkSpace Studio-specific plug-in. Specific instructions on using the Workspace Studio are available in the BEA Workshop Product Family documentation. WebLogic Portal provides additional features that facilitate portal and portlet development.
Before continuing, familiarize yourself with the features of Workspace Studio by reviewing the tutorial “Getting Started with BEA WorkSpace Studio,” which is available in the help under BEA Workshop User’s Guide or on e-docs.
Tip: If you edit or add files to your project outside of WorkSpace Studio, you must refresh your project to avoid possible compile errors. For example, if a Jar file is added to your project after you synchronize to a source control repository, you must perform a refresh. To refresh, right-click the new or updated file and select Refresh. WorkSpace Studio then performs the necessary build or update operations to process the changes. WorkSpace Studio has an auto-refresh feature. Because this feature can be time consuming, it is disabled by default. Refer to the WorkSpace Studio Help for information on auto-refresh.
When you set up your portal development environment as described in Chapter 4, “Setting up Your Portal Development Environment,” your application generally consists of the components shown in figure Figure 3-2:
Unders tand ing Por ta l Deve l opment
3-6 BEA WebLogic Portal Portal Development Guide
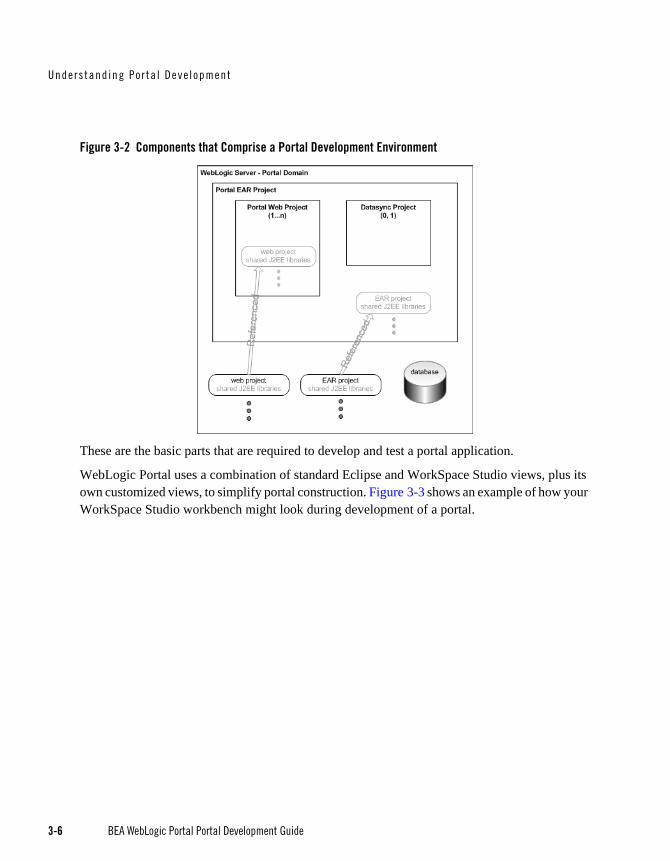
Figure 3-2 Components that Comprise a Portal Development Environment
These are the basic parts that are required to develop and test a portal application.
WebLogic Portal uses a combination of standard Eclipse and WorkSpace Studio views, plus its own customized views, to simplify portal construction. Figure 3-3 shows an example of how your WorkSpace Studio workbench might look during development of a portal.
Por ta l Deve lopment Env i ronment in WorkSpace S tud io
BEA WebLogic Portal Portal Development Guide 3-7
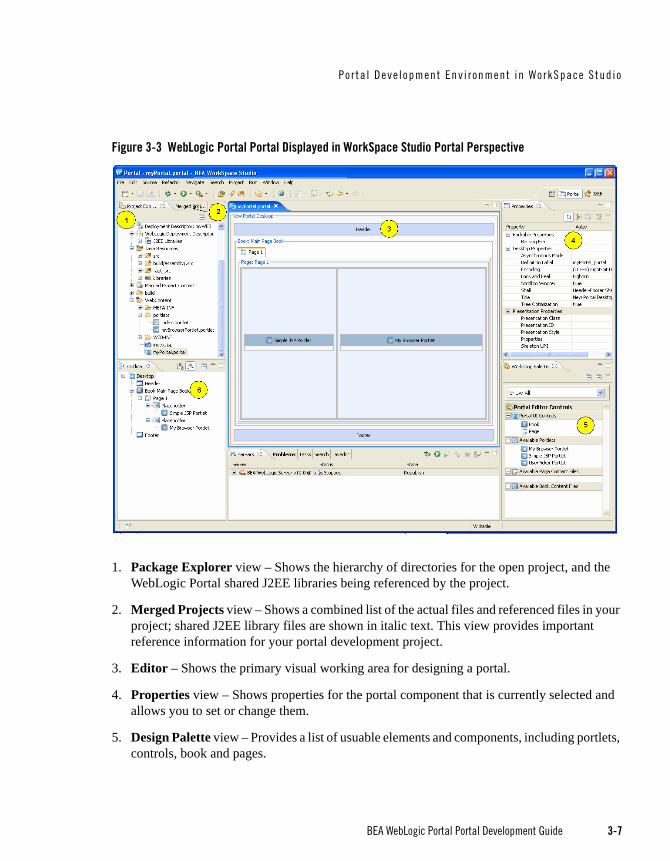
Figure 3-3 WebLogic Portal Portal Displayed in WorkSpace Studio Portal Perspective
1. Package Explorer view – Shows the hierarchy of directories for the open project, and the WebLogic Portal shared J2EE libraries being referenced by the project.
2. Merged Projects view – Shows a combined list of the actual files and referenced files in your project; shared J2EE library files are shown in italic text. This view provides important reference information for your portal development project.
3. Editor – Shows the primary visual working area for designing a portal.
4. Properties view – Shows properties for the portal component that is currently selected and allows you to set or change them.
5. Design Palette view – Provides a list of usuable elements and components, including portlets, controls, book and pages.
Unders tand ing Por ta l Deve l opment
3-8 BEA WebLogic Portal Portal Development Guide
Note: The Design Palette changed with the latest version of WebLogic Portal. If you prefer to use the previous palette, you can set your WorkSpace Studio preferences. Select Window > Preferences > WebLogic Portal > Appearance > Palette View > Show classic palette view.
6. Outline view – Shows the components of the portlet interface in a hierarchical structure. To see an example using the Outline view with style sheet development, refer to Chapter 6, “User Interface Development with Look And Feel Features.”
You also use the Propagation perspective and Page Flow perspective during development. For more information about the Propagation perspective, refer to the Production Operations Guide. For more information about the Page Flow perspective, refer to the WorkSpace Studio help.
WebLogic Portal and Shared J2EE LibrariesShared J2EE libraries (also referred to as library modules) let you deploy and use a single set of resources rather than having to duplicate those resources in every EAR project and portal web project. BEA recommends that you use shared J2EE libraries because of their significant advantages in source control, file sharing, and patch application. WebLogic Portal supports only configurations that implement shared J2EE libraries. For detailed information about shared J2EE libraries, refer to “Creating Shared J2EE Libraries and Optional Packages” in the WebLogic Server documentation.
As illustrated in Figure 3-2, your EAR projects and web projects contain references to shared J2EE libraries that are actually stored at a domain level, and you can use those modules as if they were packaged as part of the referencing application itself.
You can override a resource in a J2EE library by copying it from the library into your portal web project and then customizing it. For example, if you want the default look and feel to look different in a particular portal web project, you can copy the default look and feel from the library into the portal web project and make your modifications.
When you copy a resource, WebLogic Portal puts that resource into the “matching” location within your portal web project. When you deploy the project, WebLogic Server sees the copied resource and uses that instance instead of the resource in the library.
WARNING: If you copy J2EE library resources into your project, keep in mind that with future updates to the WebLogic Portal product, you might have to perform manual steps in order to incorporate product changes that affect those resources. With any future patch installations, WebLogic Portal supports only configurations that do not have copied J2EE library resources in the project.
F i l e -Based Po r ta l s and St reaming Po r ta ls
BEA WebLogic Portal Portal Development Guide 3-9
For information on how to copy J2EE library resources into a project, refer to “Copying J2EE Library Files into a Project” on page 7-25. For more information about how shared J2EE libraries affect portal deployment, refer to Chapter 12, “Deploying Portals to Production.”
File-Based Portals and Streaming Portals The .portal file you create in WorkSpace Studio is a template. In this template you create books, pages and portlets and define defaults for them. When you view the .portal file with your browser the portal is rendered in “single file mode,” meaning that you are viewing the portal from your file system as opposed to a database. The .portal file's XML is parsed and the rendered portal is returned to the browser. The creation and use of a .portal is intended for development purposes, but you can access a .portal file in production. Because there is no database involved you cannot take advantage of features such as user customization or entitlements.
Once you have created a .portal file you can use it to create desktops for a production environment, using the WebLogic Portal Administration Console.
A desktop is a particular view of a portal that visitors access. A portal can be made up of multiple desktops, making the portal a container for desktops. A desktop contains all the portlets, content, shells, layouts, and look and feel elements necessary to create individual user views of a portal.
When you create a desktop based on the .portal file in the WebLogic Portal Administration Console, the .portal and its resources are placed into the database. The settings in the .portal file, such as the look and feel, serve as defaults to the desktop. Once a new desktop is created from a .portal template, the desktop is decoupled from the template, and modifications to the .portal file do not affect the desktop, and vice versa. For example, when you change a desktop's look and feel in the WebLogic Portal Administration Console, the change is made only to the desktop, not to the original .portal file. When you view a desktop with a browser it is rendered in “streaming mode” (from the database). Now that a database is involved, desktop customizations can be saved and delegated administration and entitlements can be set on portal resources.
System performance is not significantly different between streamed portals and file-based portals. The advantages of each portal type depend more on how many portlets you plan to produce, the functionality you want to provide portal end users, and how you want to manage your portal.
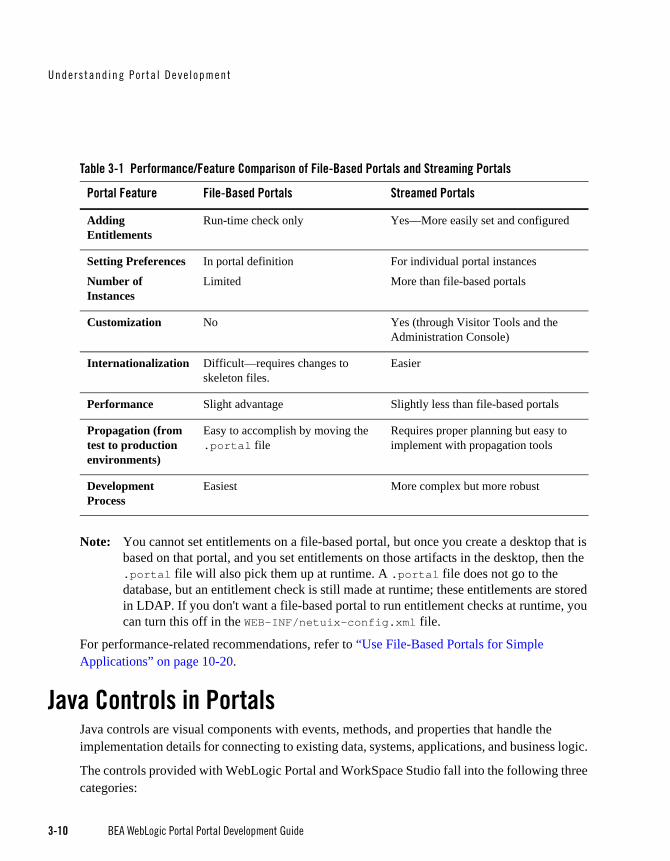
Table 3-1 compares streamed and file-based portals in more detail:
Unders tand ing Por ta l Deve l opment
3-10 BEA WebLogic Portal Portal Development Guide
Note: You cannot set entitlements on a file-based portal, but once you create a desktop that is based on that portal, and you set entitlements on those artifacts in the desktop, then the .portal file will also pick them up at runtime. A .portal file does not go to the database, but an entitlement check is still made at runtime; these entitlements are stored in LDAP. If you don't want a file-based portal to run entitlement checks at runtime, you can turn this off in the WEB-INF/netuix-config.xml file.
For performance-related recommendations, refer to “Use File-Based Portals for Simple Applications” on page 10-20.
Java Controls in PortalsJava controls are visual components with events, methods, and properties that handle the implementation details for connecting to existing data, systems, applications, and business logic.
The controls provided with WebLogic Portal and WorkSpace Studio fall into the following three categories:
Table 3-1 Performance/Feature Comparison of File-Based Portals and Streaming Portals
Portal Feature File-Based Portals Streamed Portals
Adding Entitlements
Run-time check only Yes—More easily set and configured
Setting Preferences
Number of Instances
In portal definition
Limited
For individual portal instances
More than file-based portals
Customization No Yes (through Visitor Tools and the Administration Console)
Internationalization Difficult—requires changes to skeleton files.
Easier
Performance Slight advantage Slightly less than file-based portals
Propagation (from test to production environments)
Easy to accomplish by moving the .portal file
Requires proper planning but easy to implement with propagation tools
Development Process
Easiest More complex but more robust
JSP Tags in Po r ta ls
BEA WebLogic Portal Portal Development Guide 3-11
System controls, which are provided by BEA WorkSpace Studio to give easy access to application resources, like databases and EJBs.
Custom Java controls, which could mean controls that the customer writes himself, or it can mean custom Java controls that WebLogic Portal or WorkSpace Studio provides.
Portal framework controls, otherwise known as the “netuix user interface controls;” examples of these include portlets, desktops, books, pages, and so on.
A large set of Java controls is included with WebLogic Portal. In addition, you can create your own custom Java controls to encapsulate your business logic.
The custom Java controls provided within WebLogic Portal are development objects with a defined runtime interface and configurable properties that are used to render portal HTML at runtime. WebLogic Portal’s custom controls empower you to manipulate portal runtime behavior dynamically based on any available information the developer wishes to exploit. Upon each request, the control tree is created, and you have an opportunity to manipulate the behavior of each control in the tree, at the desktop, menu, page, or portlet level. WebLogic Portal’s custom controls are abstracted by “contexts” in the WebLogic Portal architecture. These contexts give you a well-defined set of APIs that can be used to achieve virtually any runtime behavior that you desire.
WebLogic Portal’s custom controls for portlets are governed by a well-defined life cycle. This life cycle provides plug-in points for desired control manipulation. For example, you might wish to dynamically set the “hidden” property to “true” for a portlet during the init() life cycle stage, to prevent the portlet from rendering.
WebLogic Portal’s custom controls for portals interoperate with page flow controls. The control architecture interoperates with the page flow control architecture, empowering you to define sophisticated interactions between page flow applications surfaced in portlets, and more general portal windowing management. The integration between WebLogic Portal’s custom controls and page flows is surfaced in WorkSpace Studio workbench tools such as property sheets so that you do not need to write code to “hook up” page flows and portlets.
For information about how to access controls when developing a portal, refer to “Custom Controls in Page Flows” on page 7-27. For technical information about the controls and actions provided with WebLogic Portal, refer to the Javadoc.
JSP Tags in PortalsWebLogic Portal provides JSP tags that you can use within JSPs. Portlets can use JSPs as their content nodes, enabling reuse and facilitating personalization and other programmatic

Unders tand ing Por ta l Deve l opment
3-12 BEA WebLogic Portal Portal Development Guide
functionality. You can create JSPs with WorkSpace Studio to provide a structure for other elements to be added to a portlet.
To view the JSP tags available as you develop a portal, select Window > Show View > JSP Design Palette.
For information about the classes associated with WebLogic Portal’s JSP tags, see the Jsp Tag Javadoc.
Asynchronous RenderingYou can choose to have your portal rendered asynchronously. When you set this property, each component of your portal renders when its life cycle is complete, instead of waiting for the entire page or book to be ready for display. You can set this property on a portal (see “Setting Portal Component Properties” on page 7-10) or on a per portlet basis (see the Portlet Development Guide).
Backing FilesA common means of influencing portal behavior within the portal framework control life cycle is to use a backing file. A backing file is a Java class that can contain methods corresponding to life cycle stages, such as init() and preRender(). A portal’s backing context, an abstraction of the portal framework control itself, can be used to query and alter the portlet’s characteristics. For example, in the init() life cycle method, a request parameter might be evaluated, and depending on the parameter’s value, the portlet backing context can be used to specify whether the portlet is visible or hidden. For more information about backing contexts, see Chapter 10, “Designing Portals for Optimal Performance.”
Backing files can be attached to portals either by using WorkSpace Studio or coding them directly into the XML file for the particular framework control.
Backing files are simple Java classes that implement the com.bea.netuix.servlets.controls.content.backing.JspBacking interface or extend the com.bea.netuix.servlets.controls.content.backing.AbstractJspBacking interface abstract class. The methods on the interface mimic the controls life cycle methods (refer to “How Backing Files are Executed” on page 3-13) and are invoked at the same time the controls life cycle methods are invoked.
The following portal controls support backing files:
Desktops

Back ing F i l es
BEA WebLogic Portal Portal Development Guide 3-13
Books
Pages
Portlets
JspContent controls
The interportlet communication example in the Portlet Development Guide uses backing files.
This section contains the following topics:
How Backing Files are Executed
Thread Safety and Backing Files
Backing File Guidelines
Adding a Backing File Using WorkSpace Studio
How Backing Files are ExecutedAll backing files are executed before and after the JSP is called. In its life cycle, each backing file calls these methods:
init()
handlePostBackData()
preRender()
dispose()
Figure 3-4 illustrates the life cycle of a backing file.
Figure 3-4 Backing File Life Cycle
On every request, the following sequence occurs:
Unders tand ing Por ta l Deve l opment
3-14 BEA WebLogic Portal Portal Development Guide
Note: In the following steps, the methods are called unless items on inactive pages have been “optimized away” if tree optimization is enabled. For example, if tree optimization is enabled and items on an inactive page are not included on the resulting partial control tree, then the method is not called.
1. All init() methods are called on all backing files in depth-first order (that is, in the order they appear in the tree). This method is called whether or not the control (the portal, page, book, or desktop) is on an active page.
2. If the _nfpb parameter is set to true, all handlePostbackData() methods are called.
– If the _nfpb parameter is set to true in the request parameter of any called handlePostbackData() methods, raiseChangeEvents() is called. This method causes events to fire, which is necessary if the backing file tries to make any state or mode changes.
Tip: You can use the method AbstractJspBacking.isRequestTargeted(request) to determine if a request is for a particular portlet.
– If the backing file’s handlePostbackData() method returns true, the raiseChangeEvents() method is called.
3. All preRender() methods are called for all portal framework controls on an active (visible) page.
4. The JSPs are called and rendered on the active page.
5. The dispose() method is called on each backing file.
Thread Safety and Backing FilesA new instance of a backing file is created per request, so you do not have to worry about thread safety issues. New Java VMs are specially tuned for short-lived objects, so this is not the performance issue it was in the past. Also, JspContent controls support a special type of backing file that allows you to specify whether or not the backing file is thread safe. If this value is set to true, only one instance of the backing file is created and shared across all requests.
Scoping and Backing FilesYou can cause different behaviors with backing files by varying their scope. For example, a backing file used at a framework control scope has a different behavior than one used at a JSP content scope.
Back ing F i l es
BEA WebLogic Portal Portal Development Guide 3-15
If you have the backing file on the portlet itself using <netuix: portlet backingfile =some_value> you can actually stop the portlet from rendering. If you have the backing file as part of <netuix: jspContent backingfile=some_value>, the portlet portion of the control tree has already run; you would use this scope if you want to run processes that are specifically for the JSP in the portlet.
Using the Session to Pass Data Between Life Cycle MethodsThe HTTPRequest object is volatile. BEA recommends that you pass data between life cycle methods using the session rather than the request object.
Backing File GuidelinesFollow these guidelines when creating a backing file:
Ensure netuix_servlet.jar is included in the in the project classpath; otherwise, compilation errors occur.
When implementing the init() method, avoid any heavy processing.
Listing 3-1shows an example backing file. In this example, the AbstractJspBacking class is extended to provide the backing functionality required by the portlet. The example uses a session attribute because of the volativity of the HTTPRequest object; BEA recommends that you pass data between life cycle methods using the session rather than the request object.
Listing 3-1 Backing File Example
package backing;
import javax.servlet.http.HttpServletRequest;
import javax.servlet.http.HttpServletResponse;
import javax.servlet.http.HttpSession;
import com.bea.netuix.events.Event;
import com.bea.netuix.events.CustomEvent;
import
com.bea.netuix.servlets.controls.content.backing.AbstractJspBacking;
public class ListenCustomerName extends AbstractJspBacking
{
public void listenCustomerName(HttpServletRequest request,
HttpServletResponse response, Event event)
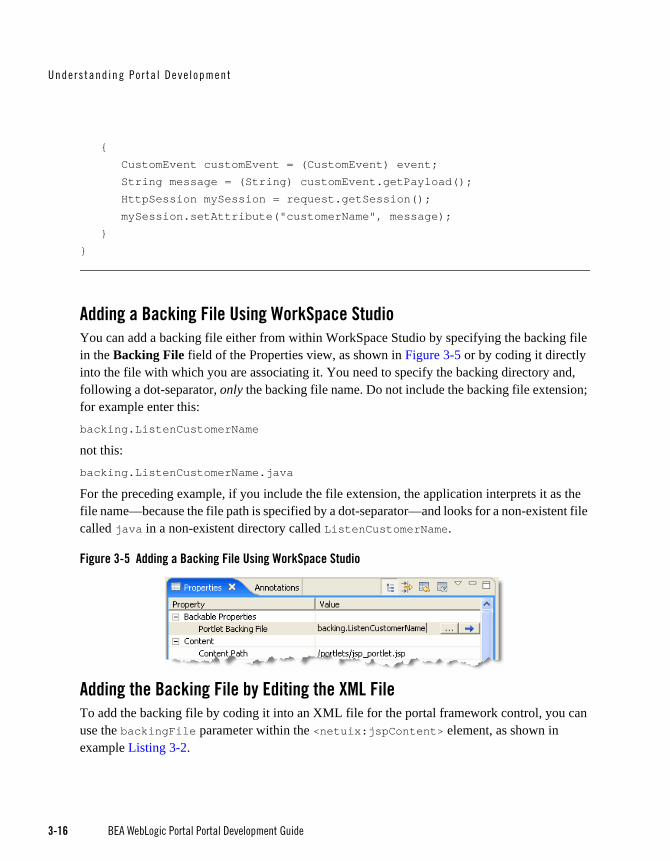
Unders tand ing Por ta l Deve l opment
3-16 BEA WebLogic Portal Portal Development Guide
{
CustomEvent customEvent = (CustomEvent) event;
String message = (String) customEvent.getPayload();
HttpSession mySession = request.getSession();
mySession.setAttribute("customerName", message);
}
}
Adding a Backing File Using WorkSpace StudioYou can add a backing file either from within WorkSpace Studio by specifying the backing file in the Backing File field of the Properties view, as shown in Figure 3-5 or by coding it directly into the file with which you are associating it. You need to specify the backing directory and, following a dot-separator, only the backing file name. Do not include the backing file extension; for example enter this:backing.ListenCustomerName
not this:backing.ListenCustomerName.java
For the preceding example, if you include the file extension, the application interprets it as the file name—because the file path is specified by a dot-separator—and looks for a non-existent file called java in a non-existent directory called ListenCustomerName.
Figure 3-5 Adding a Backing File Using WorkSpace Studio
Adding the Backing File by Editing the XML File To add the backing file by coding it into an XML file for the portal framework control, you can use the backingFile parameter within the <netuix:jspContent> element, as shown in example Listing 3-2.
Page F lows in Po r ta ls
BEA WebLogic Portal Portal Development Guide 3-17
Listing 3-2 Adding a Backing File to a .portlet File
<netuix:content>
<netuix:jspContent
backingFile="portletToPortlet.pageFlowSelectionDisplayOnly.menu.
backing.MenuBacking"
contentUri="/portletToPortlet/pageFlowSelectionDisplayOnly/menu/
menu.jsp"/>
</netuix:content>
Page Flows in Portals Java Page Flow is a feature set built on a Struts-based web application programming model. Java Page Flow leverages the power and extensibility of Struts while also eliminating the difficulties and challenges of building Struts-based applications. Java Page Flow features include runtime support for the web application programming model and tools that enable developers to quickly and easily build applications based upon the model.
Basically, a page flow is a directory of web application files that work together to implement a user interface feature. For example, a page flow could implement a web application’s user registration wizard feature.
You can manage state, data and navigation flow between pages using Java Page Flow (JPF) files. Page flows use the same programming model as other WorkSpace Studio applications, include one-click generation of Java Controls, and offer a standard Struts framework plug-in. JPFs also offer “WYSIWYG” development with a two-way JSP/HTML editor. JPFs can bind to data, web services using controls & data binding tags, drag and drop controls and data to create forms and data-bound web pages.
If you have a page flow, you can easily generate a page flow portlet to encapsulate it. For detailed instructions on this process, refer to the Portlet Development Guide.
For information on creating page flows using WorkSpace Studio, refer to the BEA Workshop User’s Guide or on e-docs.
State/Session ManagementWebLogic Portal provides multiple mechanisms for managing state, including the HTTP Session, HTTP Request and Sessions. WebLogic Portal’s Java Page Flow also provides flexible, powerful

Unders tand ing Por ta l Deve l opment
3-18 BEA WebLogic Portal Portal Development Guide
state management capabilities within a Struts-based framework. Page flow state management bridges the chasm between request and session state management. For many projects the request lifetime is too short and the session lifetime too long and heavy to meet the needs of the application. With page flow, state lifetime lasts only as long as necessary.
HTTP Session SharingShared HTTP sessions is an Oracle WebLogic Server feature that is not supported by WebLogic Portal. For example, using <wls:sharing-enabled>true</wls:sharing-enabled> in weblogic.xml is not supported for WebLogic Portal. Because of the way in which WLP session attributes are scoped, using this shared session feature with WebLogic Portal results in errors and unexpected behavior.
BEA WebLogic Portal Portal Development Guide 4-1
C H A P T E R 4
Setting up Your Portal Development Environment
Use this chapter as you prepare your WorkSpace Studio environment for portal development. This chapter describes the Portal EAR Project Wizard, Portal Web Project Wizard, Datasync Project Wizard, the Add/Remove a Project dialog, and a subset of the WebLogic Domain Configuration Wizard. This chapter also describes some features in the WorkSpace Studio interface that you might find useful as you use it to develop portals.
For a step by step example of how to perform the tasks related to each wizard, see the Getting Started with WebLogic Portal tutorials.
Tip: You can find detailed information about how these setup tasks are related to the deployment of your project in the Production Operations Guide.
This chapter contains the following sections:
Roadmap for Environment Setup Tasks
Portal Perspective
WebLogic Domain Configuration Wizard
Portal EAR Project Wizard
Add and Remove Projects Dialog
Portal Web Project Wizard
Portal Datasync Project Wizard

Se t t ing up Your Po r ta l Deve lopment Env i ronment
4-2 BEA WebLogic Portal Portal Development Guide
Associating Web and Datasync Projects with EAR Projects
Using the Merged Projects View
Running a Project on the Server
Stopping the Server
Customizing a Perspective
Setting WebLogic Portal Preferences in WorkSpace Studio
Roadmap for Environment Setup TasksThe required environment setup options vary depending on whether you want to develop a “conventional portal,” a collaboration portal, or a “development-free” GroupSpace application. Table 4-1 describes the basic tasks that you should perform in each case:
Table 4-1 Task Roadmap According to Development Goals
If you want to... Then in this task... Select these options...
Develop a “conventional” portal application that does not involve collaboration or GroupSpace
WebLogic Configuration Wizard
In Select Domain Source, select the Weblogic Portal check box. Do not select GroupSpace Framework or GroupSpace Application.
Portal EAR Project Wizard Default WebLogic Portal facets.
Portal Web Project Wizard Default WebLogic Portal facets.
Note: You should not include GroupSpace in a conventional portal application. For more information, refer to the GroupSpace Guide.
Copying J2EE library files into your project (for instructions, refer to “Copying J2EE Library Files into a Project” on page 7-25)
As needed; no specific J2EE libraries required.
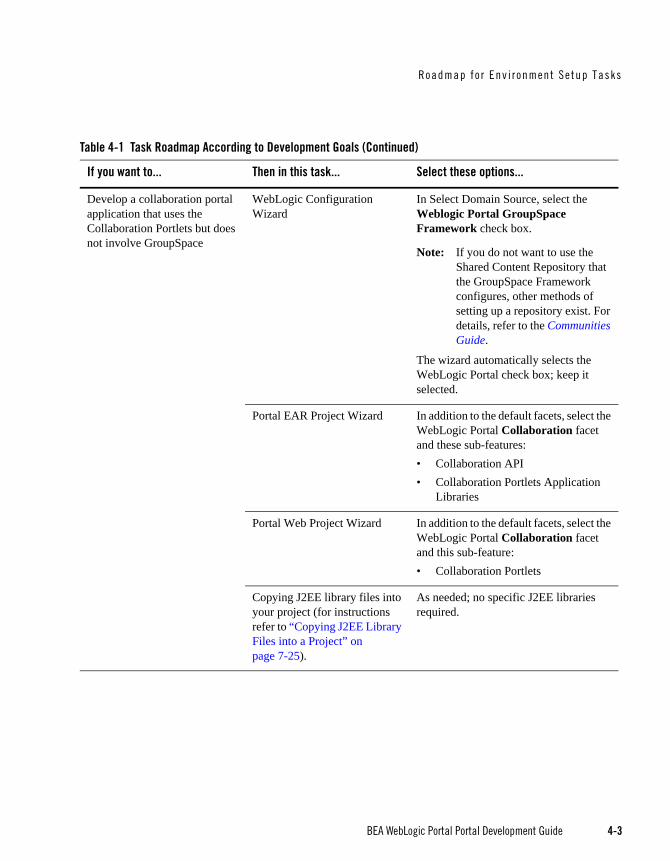
Roadmap fo r Env i ronment Se tup Tasks
BEA WebLogic Portal Portal Development Guide 4-3
Develop a collaboration portal application that uses the Collaboration Portlets but does not involve GroupSpace
WebLogic Configuration Wizard
In Select Domain Source, select the Weblogic Portal GroupSpace Framework check box.
Note: If you do not want to use the Shared Content Repository that the GroupSpace Framework configures, other methods of setting up a repository exist. For details, refer to the Communities Guide.
The wizard automatically selects the WebLogic Portal check box; keep it selected.
Portal EAR Project Wizard In addition to the default facets, select the WebLogic Portal Collaboration facet and these sub-features: • Collaboration API• Collaboration Portlets Application
Libraries
Portal Web Project Wizard In addition to the default facets, select the WebLogic Portal Collaboration facet and this sub-feature: • Collaboration Portlets
Copying J2EE library files into your project (for instructions refer to “Copying J2EE Library Files into a Project” on page 7-25).
As needed; no specific J2EE libraries required.
Table 4-1 Task Roadmap According to Development Goals (Continued)
If you want to... Then in this task... Select these options...
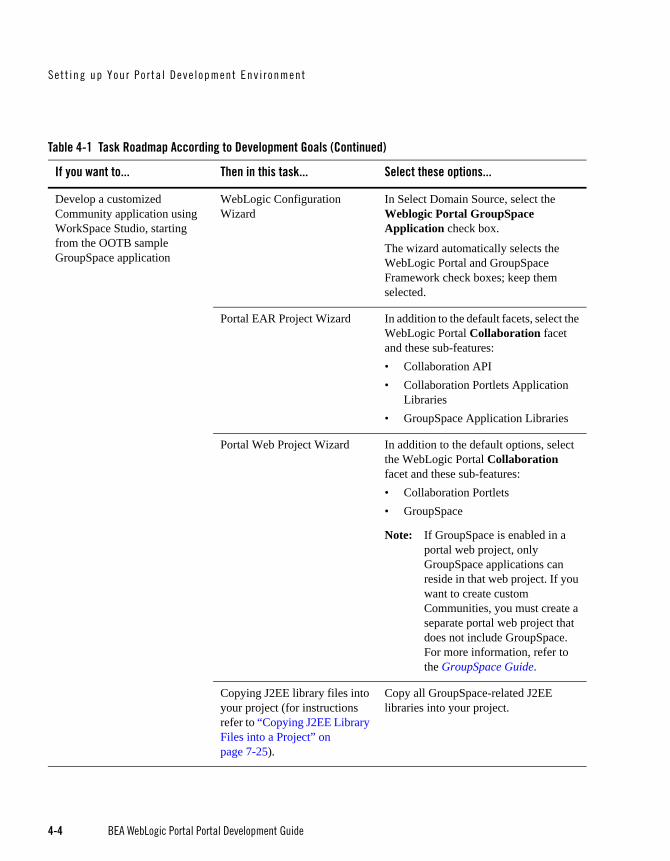
Se t t ing up Your Po r ta l Deve lopment Env i ronment
4-4 BEA WebLogic Portal Portal Development Guide
Develop a customized Community application using WorkSpace Studio, starting from the OOTB sample GroupSpace application
WebLogic Configuration Wizard
In Select Domain Source, select the Weblogic Portal GroupSpace Application check box.
The wizard automatically selects the WebLogic Portal and GroupSpace Framework check boxes; keep them selected.
Portal EAR Project Wizard In addition to the default facets, select the WebLogic Portal Collaboration facet and these sub-features: • Collaboration API• Collaboration Portlets Application
Libraries• GroupSpace Application Libraries
Portal Web Project Wizard In addition to the default options, select the WebLogic Portal Collaboration facet and these sub-features: • Collaboration Portlets• GroupSpace
Note: If GroupSpace is enabled in a portal web project, only GroupSpace applications can reside in that web project. If you want to create custom Communities, you must create a separate portal web project that does not include GroupSpace. For more information, refer to the GroupSpace Guide.
Copying J2EE library files into your project (for instructions refer to “Copying J2EE Library Files into a Project” on page 7-25).
Copy all GroupSpace-related J2EE libraries into your project.
Table 4-1 Task Roadmap According to Development Goals (Continued)
If you want to... Then in this task... Select these options...
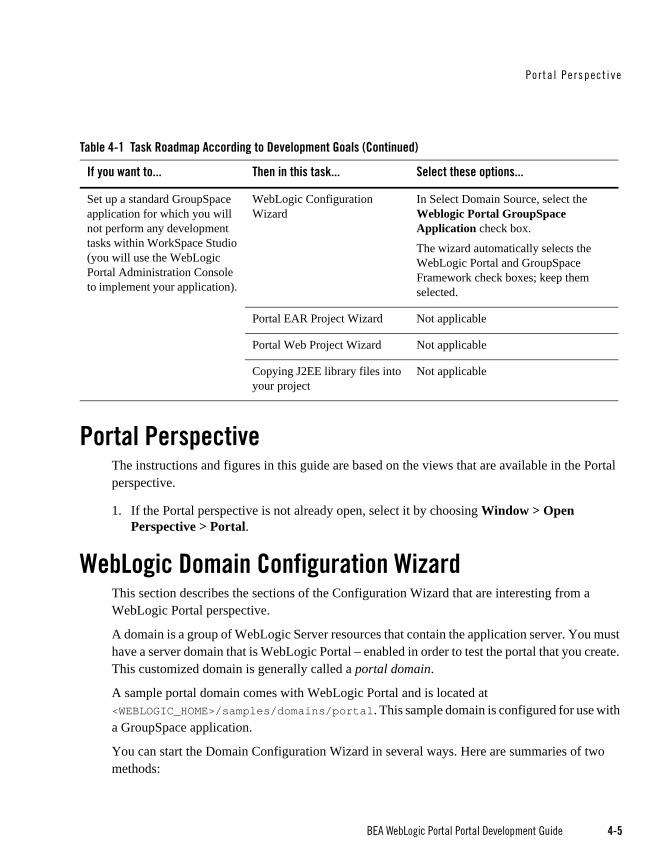
Po r ta l Pe rspec t i ve
BEA WebLogic Portal Portal Development Guide 4-5
Portal PerspectiveThe instructions and figures in this guide are based on the views that are available in the Portal perspective.
1. If the Portal perspective is not already open, select it by choosing Window > Open Perspective > Portal.
WebLogic Domain Configuration WizardThis section describes the sections of the Configuration Wizard that are interesting from a WebLogic Portal perspective.
A domain is a group of WebLogic Server resources that contain the application server. You must have a server domain that is WebLogic Portal – enabled in order to test the portal that you create. This customized domain is generally called a portal domain.
A sample portal domain comes with WebLogic Portal and is located at <WEBLOGIC_HOME>/samples/domains/portal. This sample domain is configured for use with a GroupSpace application.
You can start the Domain Configuration Wizard in several ways. Here are summaries of two methods:
Set up a standard GroupSpace application for which you will not perform any development tasks within WorkSpace Studio (you will use the WebLogic Portal Administration Console to implement your application).
WebLogic Configuration Wizard
In Select Domain Source, select the Weblogic Portal GroupSpace Application check box.
The wizard automatically selects the WebLogic Portal and GroupSpace Framework check boxes; keep them selected.
Portal EAR Project Wizard Not applicable
Portal Web Project Wizard Not applicable
Copying J2EE library files into your project
Not applicable
Table 4-1 Task Roadmap According to Development Goals (Continued)
If you want to... Then in this task... Select these options...
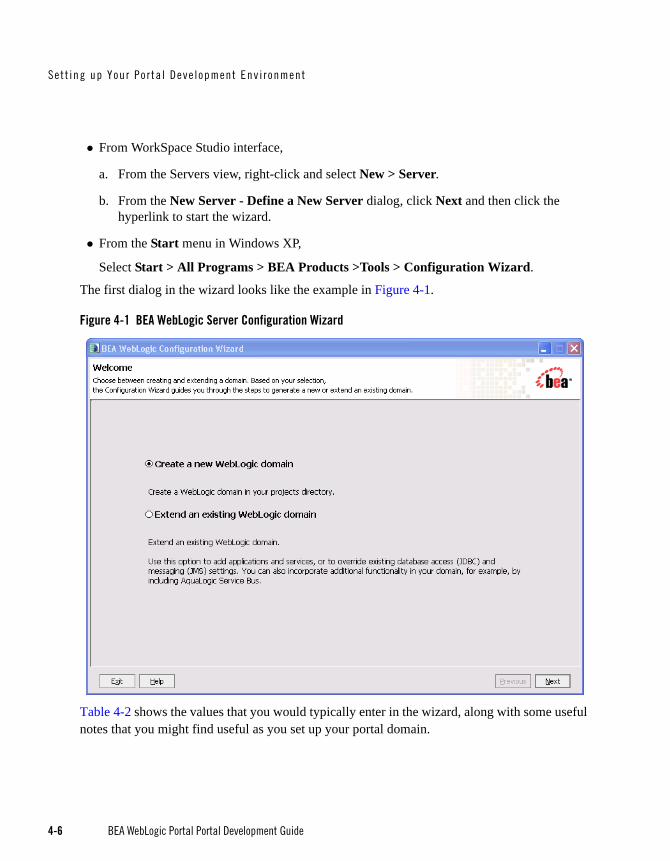
Se t t ing up Your Po r ta l Deve lopment Env i ronment
4-6 BEA WebLogic Portal Portal Development Guide
From WorkSpace Studio interface,
a. From the Servers view, right-click and select New > Server.
b. From the New Server - Define a New Server dialog, click Next and then click the hyperlink to start the wizard.
From the Start menu in Windows XP,
Select Start > All Programs > BEA Products >Tools > Configuration Wizard.
The first dialog in the wizard looks like the example in Figure 4-1.
Figure 4-1 BEA WebLogic Server Configuration Wizard
Table 4-2 shows the values that you would typically enter in the wizard, along with some useful notes that you might find useful as you set up your portal domain.
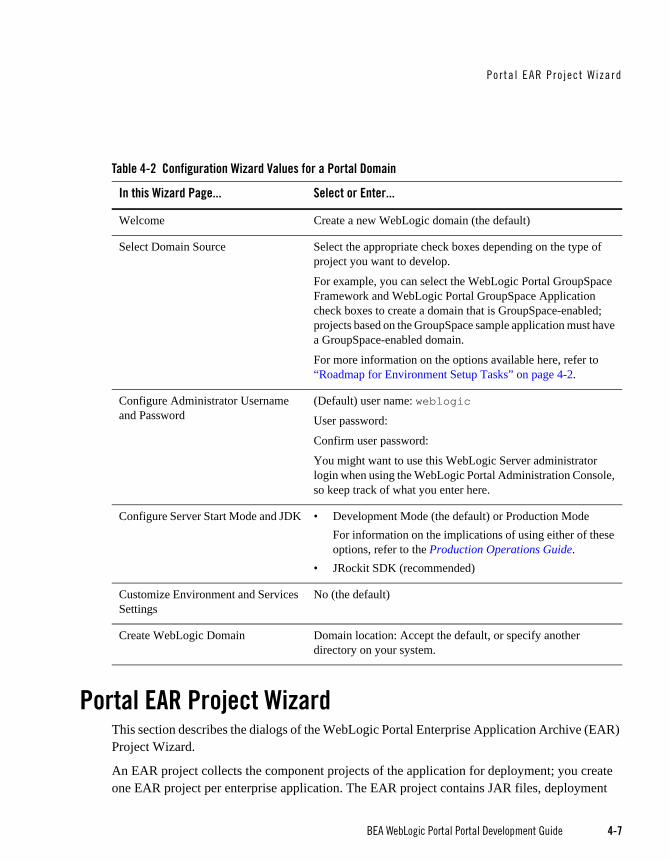
Por ta l EAR Pro jec t Wi za rd
BEA WebLogic Portal Portal Development Guide 4-7
Portal EAR Project WizardThis section describes the dialogs of the WebLogic Portal Enterprise Application Archive (EAR) Project Wizard.
An EAR project collects the component projects of the application for deployment; you create one EAR project per enterprise application. The EAR project contains JAR files, deployment
Table 4-2 Configuration Wizard Values for a Portal Domain
In this Wizard Page... Select or Enter...
Welcome Create a new WebLogic domain (the default)
Select Domain Source Select the appropriate check boxes depending on the type of project you want to develop.
For example, you can select the WebLogic Portal GroupSpace Framework and WebLogic Portal GroupSpace Application check boxes to create a domain that is GroupSpace-enabled; projects based on the GroupSpace sample application must have a GroupSpace-enabled domain.
For more information on the options available here, refer to “Roadmap for Environment Setup Tasks” on page 4-2.
Configure Administrator Username and Password
(Default) user name: weblogic
User password:
Confirm user password:
You might want to use this WebLogic Server administrator login when using the WebLogic Portal Administration Console, so keep track of what you enter here.
Configure Server Start Mode and JDK • Development Mode (the default) or Production ModeFor information on the implications of using either of these options, refer to the Production Operations Guide.
• JRockit SDK (recommended)
Customize Environment and Services Settings
No (the default)
Create WebLogic Domain Domain location: Accept the default, or specify another directory on your system.

Se t t ing up Your Po r ta l Deve lopment Env i ronment
4-8 BEA WebLogic Portal Portal Development Guide
descriptors, build files, and auto-generated files. For more information about EAR projects and their relationship to the other projects in WorkSpace Studio, refer to the “Web Applications” topic in the BEA Workshop User’s Guide.
The Portal EAR Project is an EAR project that is customized for WebLogic Portal. EAR projects appear as siblings to the other projects in a workspace but functionally, they link together projects and do not contain any of the content of your web application.
To start the Portal EAR Project Wizard, perform these steps:
1. From the File menu, select New > Portal EAR Project. The New Portal EAR Project dialog displays. When you enter a name for your project and click Next, the Select Project Facets dialog displays.
New Portal EAR Project – Select Project Facets DialogFigure 4-2 shows an example of the New Portal Web Project – Select Project Facets dialog.
Figure 4-2 New Portal EAR Project – Select Project Facets Dialog
Table 4-3 describes each WebLogic Portal–related field of the Select Project Facets dialog. The selections that you make here cause WebLogic Portal to create files that you can use as you create
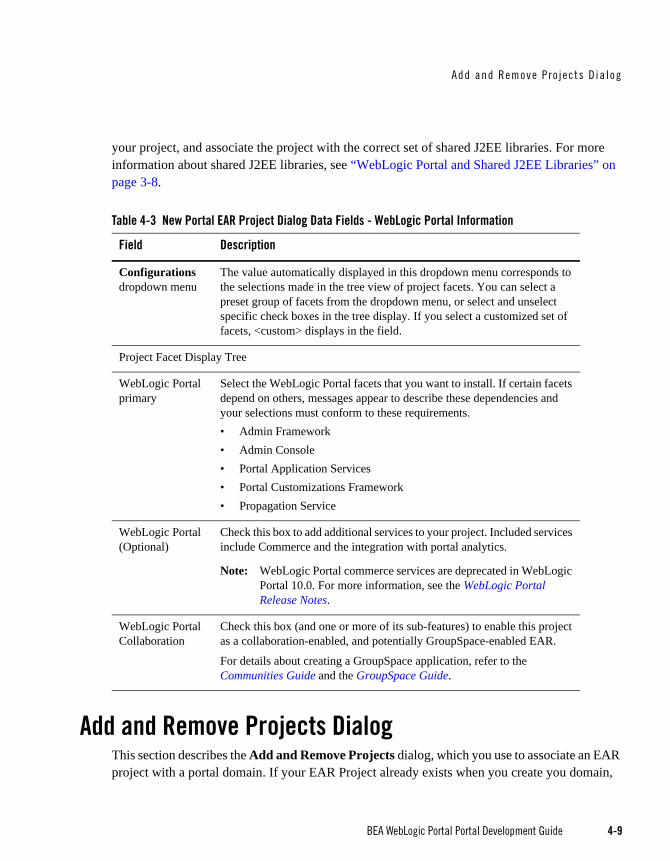
Add and Remove P ro j ec ts D ia log
BEA WebLogic Portal Portal Development Guide 4-9
your project, and associate the project with the correct set of shared J2EE libraries. For more information about shared J2EE libraries, see “WebLogic Portal and Shared J2EE Libraries” on page 3-8.
Add and Remove Projects DialogThis section describes the Add and Remove Projects dialog, which you use to associate an EAR project with a portal domain. If your EAR Project already exists when you create you domain,
Table 4-3 New Portal EAR Project Dialog Data Fields - WebLogic Portal Information
Field Description
Configurations dropdown menu
The value automatically displayed in this dropdown menu corresponds to the selections made in the tree view of project facets. You can select a preset group of facets from the dropdown menu, or select and unselect specific check boxes in the tree display. If you select a customized set of facets, <custom> displays in the field.
Project Facet Display Tree
WebLogic Portal primary
Select the WebLogic Portal facets that you want to install. If certain facets depend on others, messages appear to describe these dependencies and your selections must conform to these requirements. • Admin Framework• Admin Console• Portal Application Services• Portal Customizations Framework• Propagation Service
WebLogic Portal (Optional)
Check this box to add additional services to your project. Included services include Commerce and the integration with portal analytics.
Note: WebLogic Portal commerce services are deprecated in WebLogic Portal 10.0. For more information, see the WebLogic Portal Release Notes.
WebLogic Portal Collaboration
Check this box (and one or more of its sub-features) to enable this project as a collaboration-enabled, and potentially GroupSpace-enabled EAR.
For details about creating a GroupSpace application, refer to the Communities Guide and the GroupSpace Guide.

Se t t ing up Your Po r ta l Deve lopment Env i ronment
4-10 BEA WebLogic Portal Portal Development Guide
you can make this association when you create the server domain. If not, you can do it later using the steps outlined in this section.
To associate the Portal EAR Project with the server, perform these steps:
1. In the Servers view, right-click BEA WebLogic Server v10.0, then select Add and Remove Projects.
The Add and Remove Projects dialog displays, as shown in Figure 4-3.
Figure 4-3 Add and Remove Projects Dialog
2. Click to select the desired EAR project in the Available projects column and then click Add.
The project is added to the Configured projects column on the right.
3. Click Finish.

Po r ta l Web Pro jec t Wi za rd
BEA WebLogic Portal Portal Development Guide 4-11
The Portal EAR Project is now associated with the server. To verify this, in the Servers view you can expand the server node to view the server’s associated projects. The myPortalEAR project should be shown as a subordinate node.
Portal Web Project WizardYou use the Portal Web Project Wizard to create the web project that contains portal files. When you create a Portal Web Project, WebLogic Portal creates a set of shared J2EE libraries and files that you can use as you create your portal.
To start the wizard, perform these steps:
1. Select File > New > Portal Web Project.
The New Portal Web Project dialog displays.
New Portal Web Project – Portal Web Project Figure 4-4 shows an example of the New Portal Web Project dialog.

Se t t ing up Your Po r ta l Deve lopment Env i ronment
4-12 BEA WebLogic Portal Portal Development Guide
Figure 4-4 New Portal Web Project Dialog
Table 4-4 describes each field of the New Portal Web Project – Portal Web Project dialog.
Table 4-4 New Portal Web Project Dialog Data Fields
Field Description
Project name The name of the portal web project.
Project contents area -
Use default check box and file browser
You can use the content area that WebLogic Portal creates by default, or point to another directory where your project contents are stored.
Target Runtime The runtime (server) to which you will deploy.
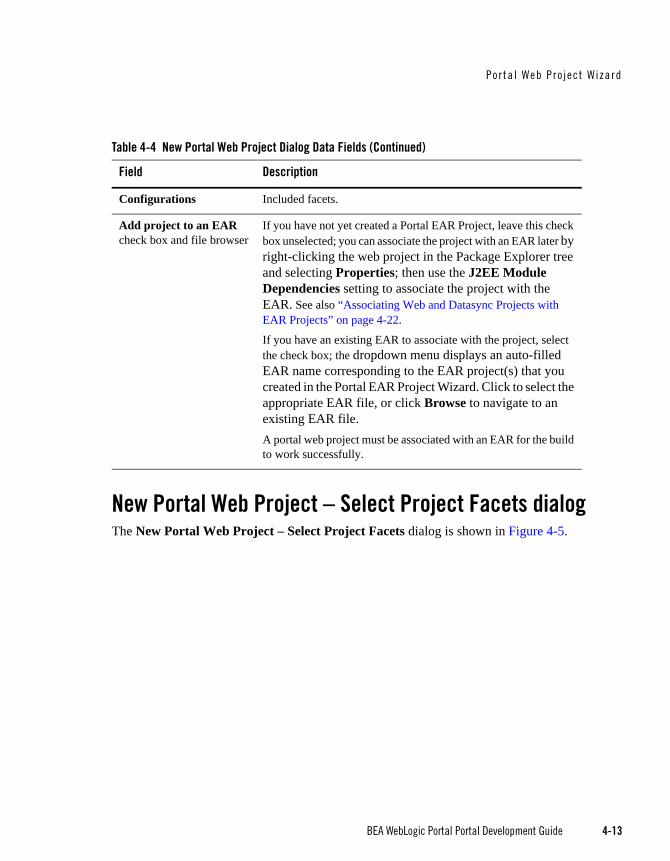
Po r ta l Web Pro jec t Wi za rd
BEA WebLogic Portal Portal Development Guide 4-13
New Portal Web Project – Select Project Facets dialog The New Portal Web Project – Select Project Facets dialog is shown in Figure 4-5.
Configurations Included facets.
Add project to an EAR check box and file browser
If you have not yet created a Portal EAR Project, leave this check box unselected; you can associate the project with an EAR later by right-clicking the web project in the Package Explorer tree and selecting Properties; then use the J2EE Module Dependencies setting to associate the project with the EAR. See also “Associating Web and Datasync Projects with EAR Projects” on page 4-22.
If you have an existing EAR to associate with the project, select the check box; the dropdown menu displays an auto-filled EAR name corresponding to the EAR project(s) that you created in the Portal EAR Project Wizard. Click to select the appropriate EAR file, or click Browse to navigate to an existing EAR file. A portal web project must be associated with an EAR for the build to work successfully.
Table 4-4 New Portal Web Project Dialog Data Fields (Continued)
Field Description
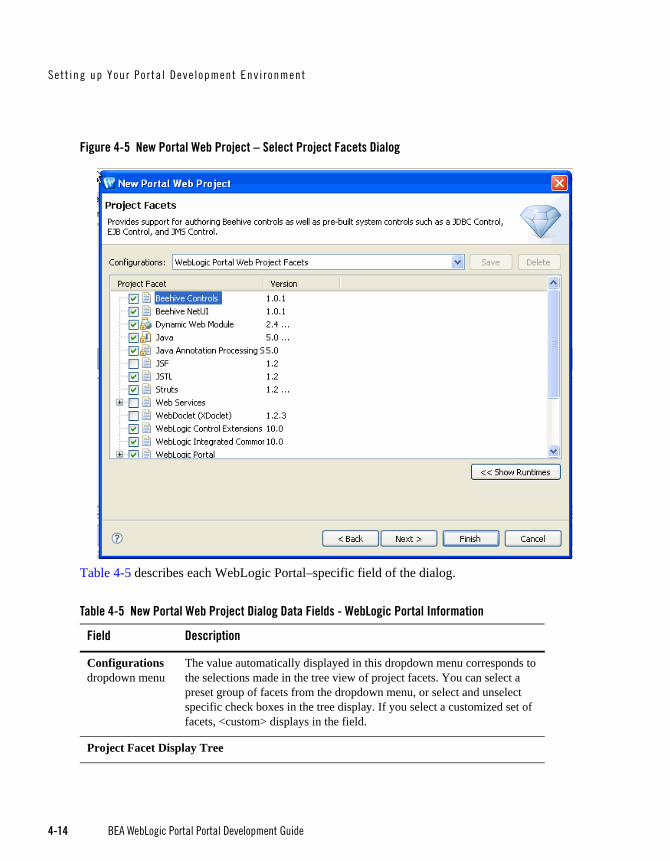
Se t t ing up Your Po r ta l Deve lopment Env i ronment
4-14 BEA WebLogic Portal Portal Development Guide
Figure 4-5 New Portal Web Project – Select Project Facets Dialog
Table 4-5 describes each WebLogic Portal–specific field of the dialog.
Table 4-5 New Portal Web Project Dialog Data Fields - WebLogic Portal Information
Field Description
Configurations dropdown menu
The value automatically displayed in this dropdown menu corresponds to the selections made in the tree view of project facets. You can select a preset group of facets from the dropdown menu, or select and unselect specific check boxes in the tree display. If you select a customized set of facets, <custom> displays in the field.
Project Facet Display Tree
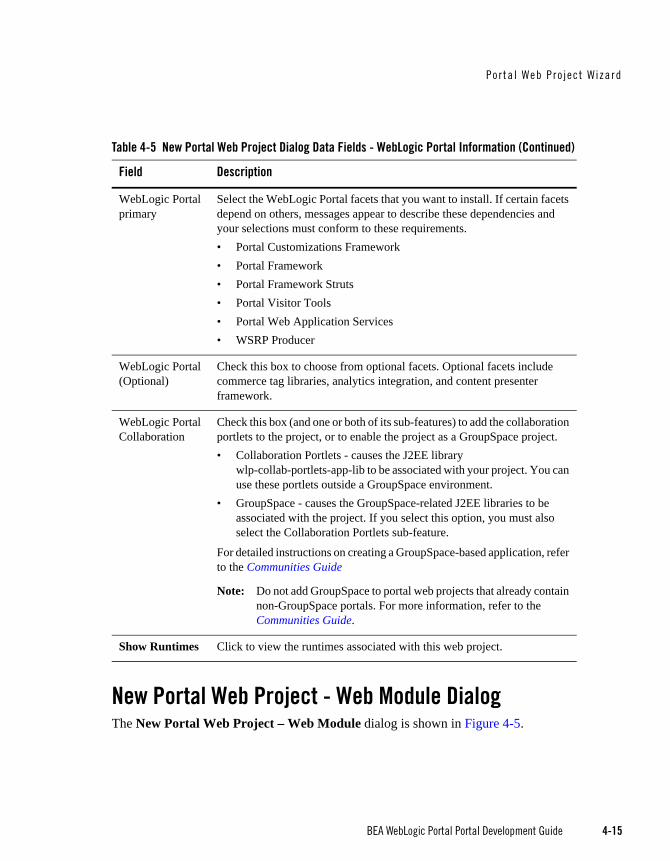
Po r ta l Web Pro jec t Wi za rd
BEA WebLogic Portal Portal Development Guide 4-15
New Portal Web Project - Web Module DialogThe New Portal Web Project – Web Module dialog is shown in Figure 4-5.
WebLogic Portal primary
Select the WebLogic Portal facets that you want to install. If certain facets depend on others, messages appear to describe these dependencies and your selections must conform to these requirements. • Portal Customizations Framework• Portal Framework• Portal Framework Struts• Portal Visitor Tools• Portal Web Application Services• WSRP Producer
WebLogic Portal (Optional)
Check this box to choose from optional facets. Optional facets include commerce tag libraries, analytics integration, and content presenter framework.
WebLogic Portal Collaboration
Check this box (and one or both of its sub-features) to add the collaboration portlets to the project, or to enable the project as a GroupSpace project.• Collaboration Portlets - causes the J2EE library
wlp-collab-portlets-app-lib to be associated with your project. You can use these portlets outside a GroupSpace environment.
• GroupSpace - causes the GroupSpace-related J2EE libraries to be associated with the project. If you select this option, you must also select the Collaboration Portlets sub-feature.
For detailed instructions on creating a GroupSpace-based application, refer to the Communities Guide
Note: Do not add GroupSpace to portal web projects that already contain non-GroupSpace portals. For more information, refer to the Communities Guide.
Show Runtimes Click to view the runtimes associated with this web project.
Table 4-5 New Portal Web Project Dialog Data Fields - WebLogic Portal Information (Continued)
Field Description

Se t t ing up Your Po r ta l Deve lopment Env i ronment
4-16 BEA WebLogic Portal Portal Development Guide
Figure 4-6 New Portal Web Project – Web Module dialog
Table 4-6 describes each field of the dialog.
New Portal Web Project - WebLogic Web Module DialogThe New Portal Web Project – WebLogic Web Module dialog is shown in Figure 4-7.
Table 4-6 New Portal Web Project – Web Module Data Fields
Field Description
Context Root The context root of the web application.
Content Directory The default web content directory name WebContent is automatically displayed; you can change it if you wish.
As a best practice, you should locate your portal file(s) and other portal resources in a web content directory that is subordinate to the web project directory.
Java Source Directory
The default Java source directory name src is automatically displayed; you can change it if you wish.
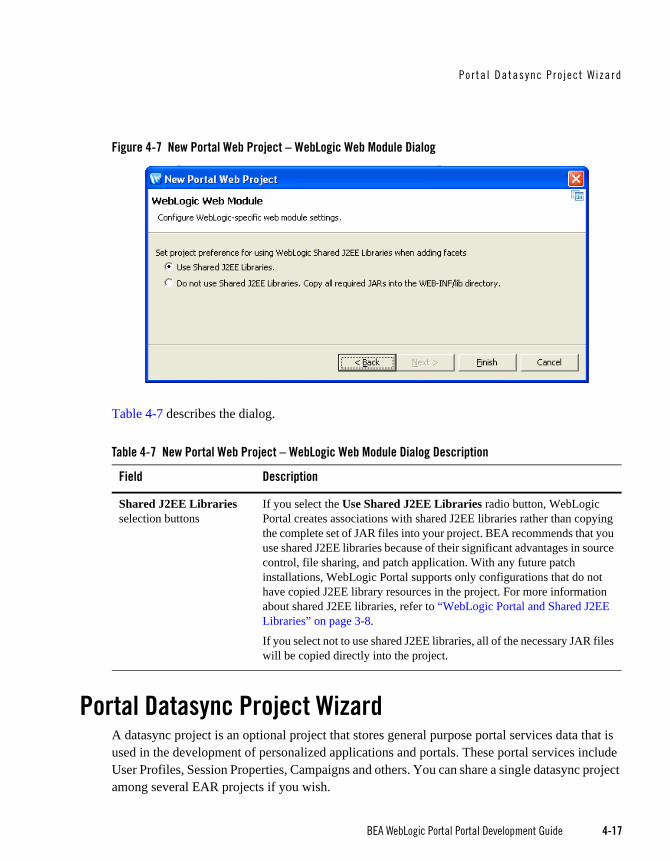
Po r ta l Datasync Pro jec t Wi za rd
BEA WebLogic Portal Portal Development Guide 4-17
Figure 4-7 New Portal Web Project – WebLogic Web Module Dialog
Table 4-7 describes the dialog.
Portal Datasync Project WizardA datasync project is an optional project that stores general purpose portal services data that is used in the development of personalized applications and portals. These portal services include User Profiles, Session Properties, Campaigns and others. You can share a single datasync project among several EAR projects if you wish.
Table 4-7 New Portal Web Project – WebLogic Web Module Dialog Description
Field Description
Shared J2EE Libraries selection buttons
If you select the Use Shared J2EE Libraries radio button, WebLogic Portal creates associations with shared J2EE libraries rather than copying the complete set of JAR files into your project. BEA recommends that you use shared J2EE libraries because of their significant advantages in source control, file sharing, and patch application. With any future patch installations, WebLogic Portal supports only configurations that do not have copied J2EE library resources in the project. For more information about shared J2EE libraries, refer to “WebLogic Portal and Shared J2EE Libraries” on page 3-8.
If you select not to use shared J2EE libraries, all of the necessary JAR files will be copied directly into the project.

Se t t ing up Your Po r ta l Deve lopment Env i ronment
4-18 BEA WebLogic Portal Portal Development Guide
To create the datasync project, perform these steps:
1. Select File > New > Datasync Project. The Create New Datasync Project dialog displays as shown in Figure 4-8.
Figure 4-8 Create New Datasync Project Dialog
Table 4-8 describes each field of the dialog. When you click Next, the EAR Projects dialog displays.

Po r ta l Datasync Pro jec t Wi za rd
BEA WebLogic Portal Portal Development Guide 4-19
Table 4-8 New Datasync Project Data Fields
Field Description
Project name The name that you want to assign to this datasync web project.
Location The default web content directory name WebContent is automatically displayed; you can change it if you wish.
You must locate your portal file(s) and other portal resources in a web content directory that is subordinate to the web project directory.
Datasync source folder The local default Java source directory name src is automatically displayed; you can change it if you wish.
Create default project directories
If checked, a default datasync folder structure is created automatically (for an example, see Figure 4-10). If unchecked, no directory structure is created.
Note: Some datasync components must be placed in a specific folder structure, although most do not. For instance, User Segment and Content Selector components must be placed in specific subfolders of the datasync folder (/segments/GlobalClassifications and /contentselectors/GlobalContentSelectors respectively). You can ask the IDE to warn you if you try to put a datasync file in an improper directory. To enable this warning, select Window > Preferences > WebLogic Portal > Dataysnc. In the Properties dialog, select Show warning on opening files in wrong folder. The warning message also tells you the required folder name.
Default: checked.

Se t t ing up Your Po r ta l Deve lopment Env i ronment
4-20 BEA WebLogic Portal Portal Development Guide
Create New Datasync Project – EAR ProjectsThe Create New Datasync Project – EAR Projects dialog is shown in Figure 4-9.
Create default project files If checked, the wizard creates default project files for events, requests, and user profiles.
Default: checked.
Add Project to an EAR Check this box and pick an EAR from the drop-down menu. The drop-down lists all EARs in the current works space. The datasync project will be associated with the selected EAR. When the selected EAR is deployed, the datasync project is deployed with it.
If you create a datasync project without associating it with an EAR, you can do this step later by right-clicking the datasync project in the Package Explorer tree and selecting Properties; then expand the Datasync node in the tree and select EAR Projects to associate the project with the EAR. See also “Associating Web and Datasync Projects with EAR Projects” on page 4-22.
Table 4-8 New Datasync Project Data Fields (Continued)
Field Description
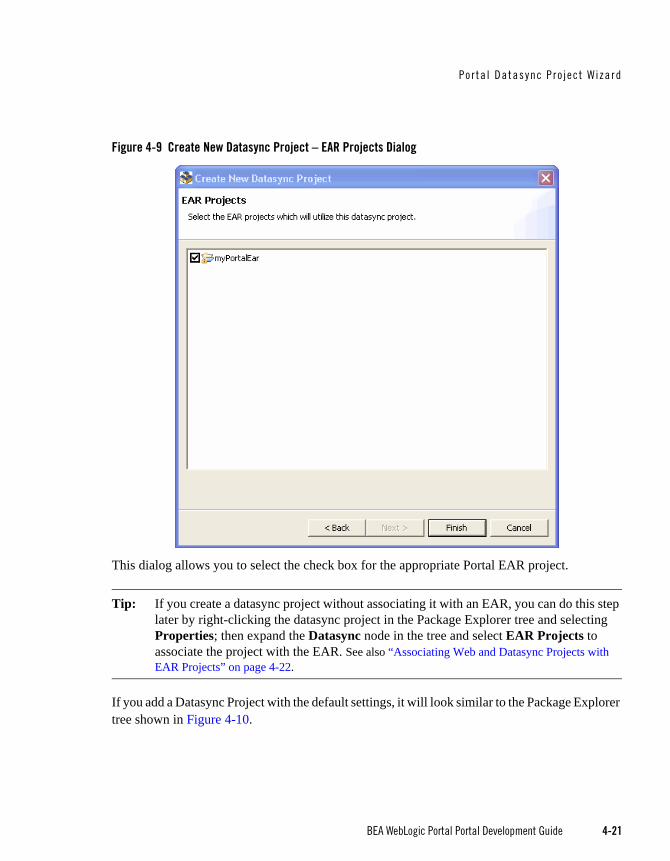
Po r ta l Datasync Pro jec t Wi za rd
BEA WebLogic Portal Portal Development Guide 4-21
Figure 4-9 Create New Datasync Project – EAR Projects Dialog
This dialog allows you to select the check box for the appropriate Portal EAR project.
Tip: If you create a datasync project without associating it with an EAR, you can do this step later by right-clicking the datasync project in the Package Explorer tree and selecting Properties; then expand the Datasync node in the tree and select EAR Projects to associate the project with the EAR. See also “Associating Web and Datasync Projects with EAR Projects” on page 4-22.
If you add a Datasync Project with the default settings, it will look similar to the Package Explorer tree shown in Figure 4-10.
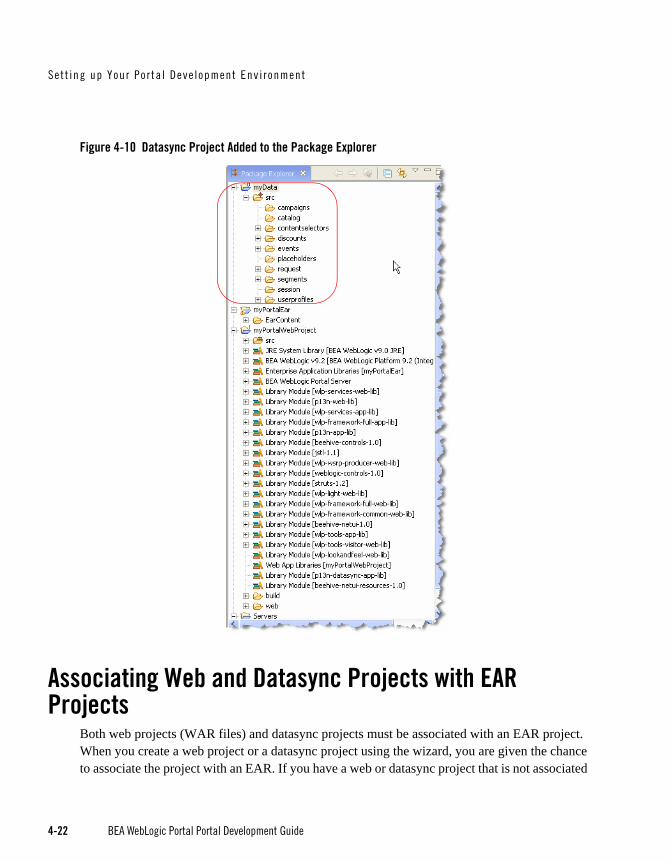
Se t t ing up Your Po r ta l Deve lopment Env i ronment
4-22 BEA WebLogic Portal Portal Development Guide
Figure 4-10 Datasync Project Added to the Package Explorer
Associating Web and Datasync Projects with EAR Projects
Both web projects (WAR files) and datasync projects must be associated with an EAR project. When you create a web project or a datasync project using the wizard, you are given the chance to associate the project with an EAR. If you have a web or datasync project that is not associated

Using the Merged Pro jec ts V i ew
BEA WebLogic Portal Portal Development Guide 4-23
with an EAR or if you want to change the association, you can perform the association at any time by following the steps in this section.
Associating an Web Project with an EAR ProjectYou can associate a web project (WAR file) with an EAR by right-clicking the web project in the Package Explorer tree and selecting Properties; then use the J2EE Module Dependencies setting to associate the project with the EAR.
Note: The correct procedure is to use the J2EE Module Dependencies setting to perform this association. You may notice that the Project References dialog appears to let you associate web projects with EAR and datasync projects; however, this dialog is an Eclipse feature that is not used by WLP.
Associating an Datasync Project with an EAR ProjectYou can associate a datasync project with an EAR project by right-clicking the datasync project in the Package Explorer tree and selecting Properties; then expand the Datasync node in the tree and select EAR Projects to associate the project with the EAR.
Note: The correct procedure is to use the Datasync > EAR Projects setting to perform this association. You may notice that the Project References dialog appears to let you associate datasync projects with EAR and web projects; however, this dialog is an Eclipse feature that is not used by WLP.
Using the Merged Projects ViewThe WebLogic Portal Merged Projects View is included by default in the Portal Perspective. This view shows a combined list of the files in your project, including the associated shared J2EE libraries. This view provides important reference information for your portal development project.
This section includes these topics:
Opening the Merged Projects View
Working with the Merged Projects View
Opening the Merged Projects ViewIf you are not using the Portal Perspective, you should open the Merged Projects view in the workbench. To do so, select Window > Show View > Merged Projects.
Se t t ing up Your Po r ta l Deve lopment Env i ronment
4-24 BEA WebLogic Portal Portal Development Guide
Working with the Merged Projects ViewThis section explains some of the benefits of the Merged Projects view.
You will see in the Merged Projects view that some items are italicized. The italicized items represent entities that are stored in J2EE shared libraries. All entities that are stored on your file system, such as the portal file you created, are shown in regular type.
You can copy certain files from the J2EE shared library in which they are stored to your file system. To do this, right-click the file in the Merged Projects view and select Copy to Project. This feature copies the file from the shared library to the appropriate place in your project folder. Another function, Copy to Workspace lets you choose where to copy the file.
Not all files can be copied using this feature. For instance, .jar and .class files cannot be copied. Typically, property files, XML files, and similar editable files can be copied. In addition, it is possible to create a J2EE Shared Library that specifically excludes some files from being copied. For more information on J2EE Shared Libraries, see the Production Operations Guide.
Caution: If you use the Merged Projects view to copy a J2EE library resource into your project, keep in mind that with future updates to the WebLogic Portal product, you might have to perform manual steps in order to incorporate product changes that affect those projects.
You can view the J2EE library information for a file displayed in the Merged Projects view, including the shared J2EE library name and version. To do this, right-click the file and select Properties.
Running a Project on the ServerYou can use either of two options for running and viewing the results of your project development; the selection you make depends on the changes you have made in your project and whether or not your server is already started.
The following list describes each option available from the context menu in the Project Explorer view:
Run as > Run on Server - starts the server if not already started and, only if needed, performs a full publish/republish of the application; then it opens a web browser. You must use this selection if you have changed a backing class, page flow, EJB, descriptor, Java file, control, or web service.

Stopp ing the Serve r
BEA WebLogic Portal Portal Development Guide 4-25
Tip: You can customize the browser setting so that an external browser displays the application; to do this, select Window > Preferences > General > Web Browser and select the appropriate external browser application.
Refresh button in a currently displayed browser view- refreshes the current display based on changes made in the currently selected portal, but does not start the server; this option takes no action if you stopped the server at some point after displaying the initial browser. This selection requires that you previously performed an initial Run on Server process. You can use this option if your changes were limited to JSPs, HTML, .portal files, or .portlet files.
Stopping the ServerTo stop a running WLP server, do one of the following:
In WorkSpace Studio, right-click the server in the Servers view and select Stop.
Use the shutdown script that is provided with the server domain. For detailed information, see the WebLogic Server documentation topic Shutting Down Instances of WebLogic Server on e-docs.
Occasionally during development, you might need to stop the WLP server manually (for example, by pressing Control-C in the server’s command window). If this happens, a number of WLP server processes may continue to run and need to be stopped manually. This list of processes includes:
java (for the WebLogic Server process)
java (for the PointBase database, if you are using it)
agentstore
AutonomyDiSH
AutonomyIDOLServer
BEACMRepoFetch
category
community
console

Se t t ing up Your Po r ta l Deve lopment Env i ronment
4-26 BEA WebLogic Portal Portal Development Guide
content
FileSystemFetch
HTTPFetch
Customizing a PerspectiveOptionally, you can create a personally customized combination of views, so that you can easily return to it any time.
To save the current workbench layout as a perspective, select Window > Save Perspective As, enter a name for your customized perspective in the Name field, and click OK. Your new perspective is added to the list, in the Other category.
You can also set this perspective as the default perspective for WorkSpace Studio, using the Window > Preferences options. For more information, refer to your Eclipse documentation.
Setting WebLogic Portal Preferences in WorkSpace Studio
You can set preferences for the behavior of the various editors and features of WebLogic Portal. The following sections describe how to access WebLogic Portal-specific settings within WorkSpace Studio.
Preferences in the WebLogic Portal Section1. Select Window > Preferences and then select WebLogic Portal in the tree display.
2. Click the WebLogic Portal node to see settings that are specific to WebLogic Portal.
A dialog similar to the example in Figure 4-11 displays:

Set t ing WebLog ic Po r ta l P re fe rences in WorkSpace S tud io
BEA WebLogic Portal Portal Development Guide 4-27
Figure 4-11 WebLogic Portal Product Preferences
3. Expand the desired section in the dialog to set options for that editor.
WebLogic Portal Preferences in the General Section1. Select Window > Preferences.
2. Expand the General node in the tree display.
3. WebLogic Portal settings are available in both the Appearance > Colors and Fonts and the Appearance > Label Decorations sections.
For example, if you select Appearance > Colors and Fonts, and then select WebLogic Portal > Propagation Tool, a dialog similar to the example in Figure 4-12 displays:
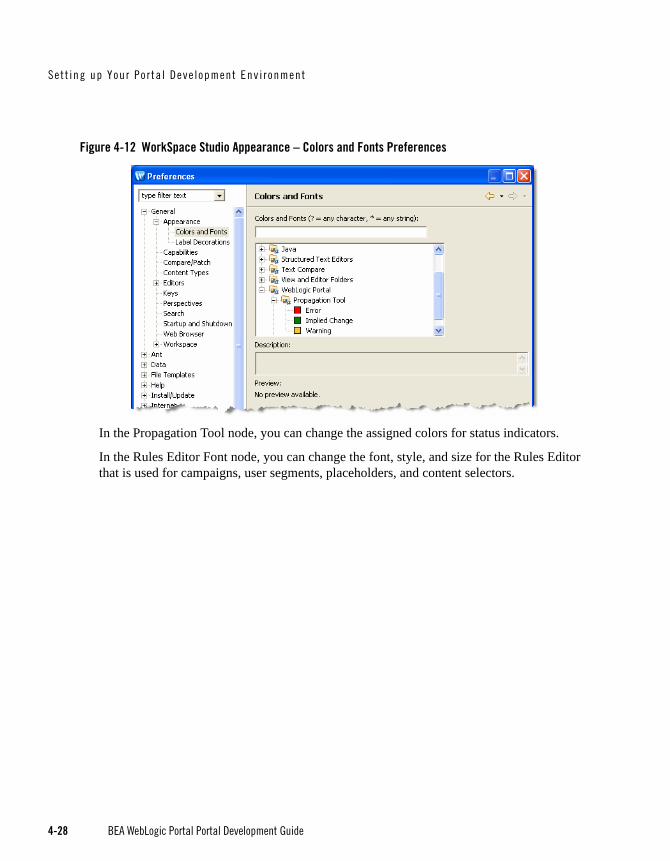
Se t t ing up Your Po r ta l Deve lopment Env i ronment
4-28 BEA WebLogic Portal Portal Development Guide
Figure 4-12 WorkSpace Studio Appearance – Colors and Fonts Preferences
In the Propagation Tool node, you can change the assigned colors for status indicators.
In the Rules Editor Font node, you can change the font, style, and size for the Rules Editor that is used for campaigns, user segments, placeholders, and content selectors.

BEA WebLogic Portal Portal Development Guide 5-1
C H A P T E R 5
Integrating Applications into WebLogic Portal
You can use the instructions presented in this chapter to add WebLogic Portal functionality to existing applications. For example, you can:
Integrate WebLogic Portal into an existing WorkSpace Studio web application.
You can easily transform an existing WorkSpace Studio web application into a Portal web project by installing the necessary WebLogic Portal–specific facets into it. Then you can give the web application a portal user interface, add personalization and campaign functionality, and take advantage of WebLogic Portal's content and user management services.
Add more facets into an existing WebLogic Portal application.
You might originally have selected not to install Commerce Taglibs in your portal project; you can add that feature later if desired.
Note: Do not add GroupSpace to portal web projects that already contain non-GroupSpace portals. For more information, refer to the Communities Guide.
Incorporate pieces of existing applications into a portal, using portlets.
Regardless of how the application is surfaced, it will maintain the full functionality intended in its design.
This chapter contains the following sections:
Integrating an Existing Web Application into WorkSpace Studio
Integrating Struts Applications

In tegrat ing App l icat ions in to WebLog ic Po r ta l
5-2 BEA WebLogic Portal Portal Development Guide
Integrating Java Server Faces
Integrating Page Flows
Adding Facets to an Existing Project
Other Methods of Integrating an External Web Application into a Portal
Integrating an Existing Web Application into WorkSpace Studio
Integrating a web application into a WebLogic Portal environment involves the following steps:
Adding WebLogic Portal project facets into the EAR project.
Adding WebLogic Portal project facets into the web application project.
Adding a Datasync project (if you want to use the general service portal services data such as user profiles, user segments, request properties, session properties, and so on).
Associating your EAR project with a WebLogic Portal-enabled server.
Note: These instructions assume that you have an existing web application that conforms to the requirements of the WorkSpace Studio environment, and includes an EAR Project and a WorkSpace Studio Web Project.
To integrate an existing web application into WorkSpace Studio and add WebLogic Portal functionality, follow these steps:
1. In the Package Explorer view, right-click the EAR Project and choose Properties.
2. Select Project Facets in the tree that is displayed in the left pane of the dialog.
The project facets associated with this EAR project display in the table, as shown in Figure 5-1.
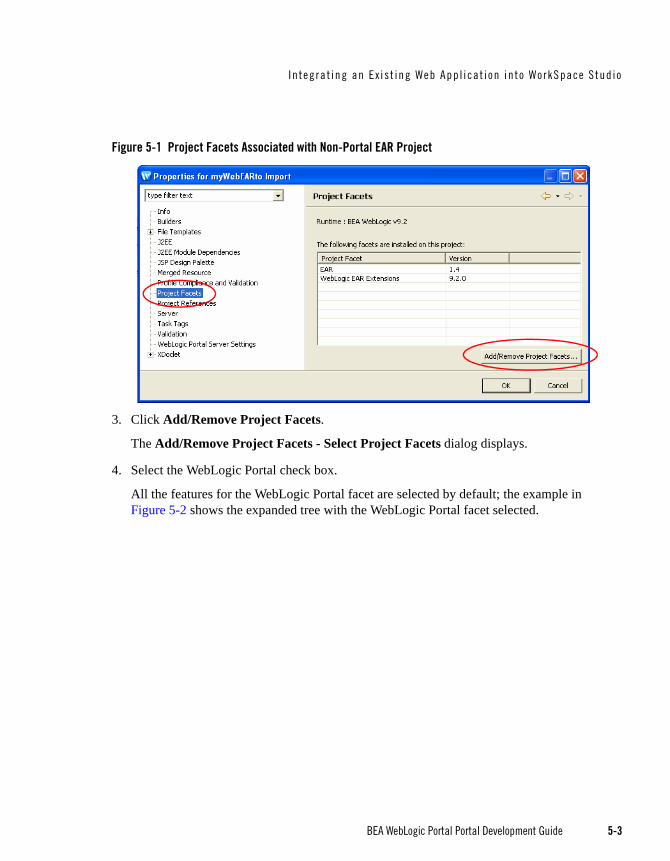
I n tegra t ing an Ex i s t ing Web Appl i cat ion in to WorkSpace S tud io
BEA WebLogic Portal Portal Development Guide 5-3
Figure 5-1 Project Facets Associated with Non-Portal EAR Project
3. Click Add/Remove Project Facets.
The Add/Remove Project Facets - Select Project Facets dialog displays.
4. Select the WebLogic Portal check box.
All the features for the WebLogic Portal facet are selected by default; the example in Figure 5-2 shows the expanded tree with the WebLogic Portal facet selected.
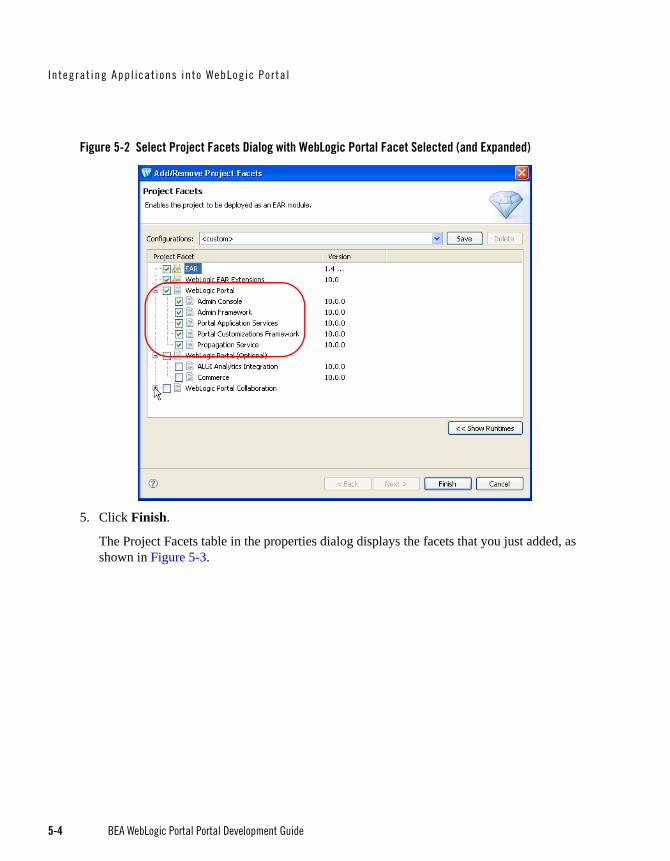
In tegrat ing App l icat ions in to WebLog ic Po r ta l
5-4 BEA WebLogic Portal Portal Development Guide
Figure 5-2 Select Project Facets Dialog with WebLogic Portal Facet Selected (and Expanded)
5. Click Finish.
The Project Facets table in the properties dialog displays the facets that you just added, as shown in Figure 5-3.
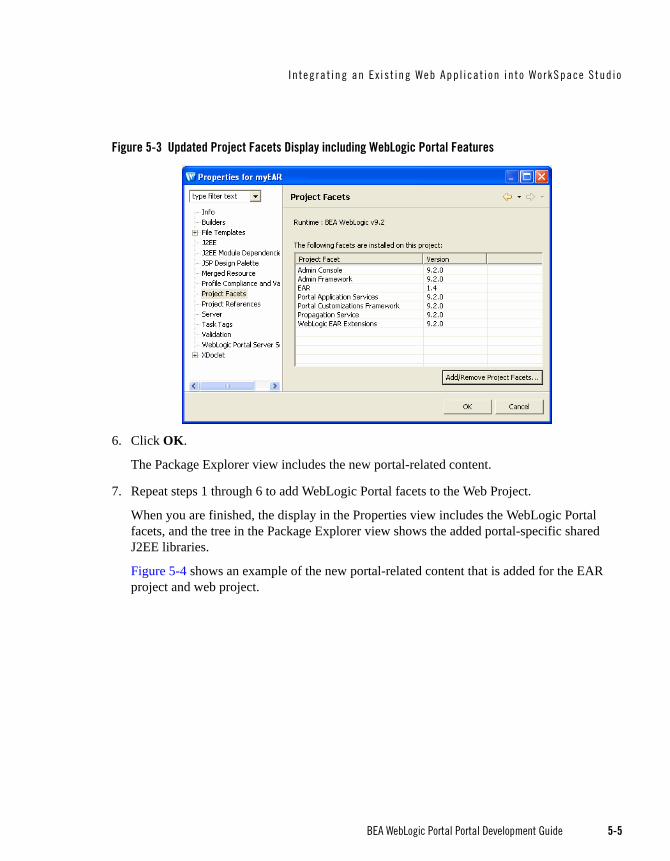
I n tegra t ing an Ex i s t ing Web Appl i cat ion in to WorkSpace S tud io
BEA WebLogic Portal Portal Development Guide 5-5
Figure 5-3 Updated Project Facets Display including WebLogic Portal Features
6. Click OK.
The Package Explorer view includes the new portal-related content.
7. Repeat steps 1 through 6 to add WebLogic Portal facets to the Web Project.
When you are finished, the display in the Properties view includes the WebLogic Portal facets, and the tree in the Package Explorer view shows the added portal-specific shared J2EE libraries.
Figure 5-4 shows an example of the new portal-related content that is added for the EAR project and web project.
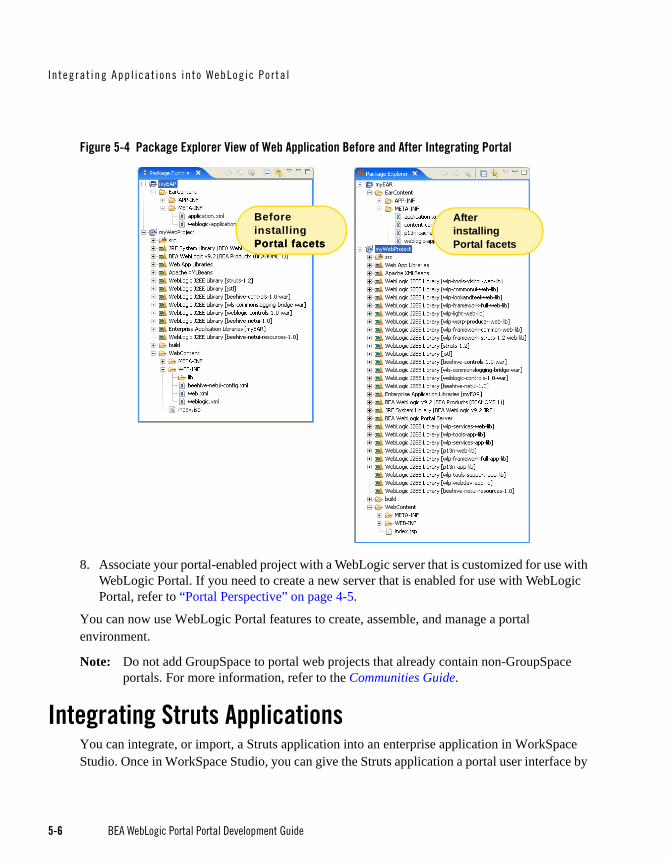
In tegrat ing App l icat ions in to WebLog ic Po r ta l
5-6 BEA WebLogic Portal Portal Development Guide
Figure 5-4 Package Explorer View of Web Application Before and After Integrating Portal
8. Associate your portal-enabled project with a WebLogic server that is customized for use with WebLogic Portal. If you need to create a new server that is enabled for use with WebLogic Portal, refer to “Portal Perspective” on page 4-5.
You can now use WebLogic Portal features to create, assemble, and manage a portal environment.
Note: Do not add GroupSpace to portal web projects that already contain non-GroupSpace portals. For more information, refer to the Communities Guide.
Integrating Struts ApplicationsYou can integrate, or import, a Struts application into an enterprise application in WorkSpace Studio. Once in WorkSpace Studio, you can give the Struts application a portal user interface by
Before installing Portal facets
After installing Portal facetsPortal facets
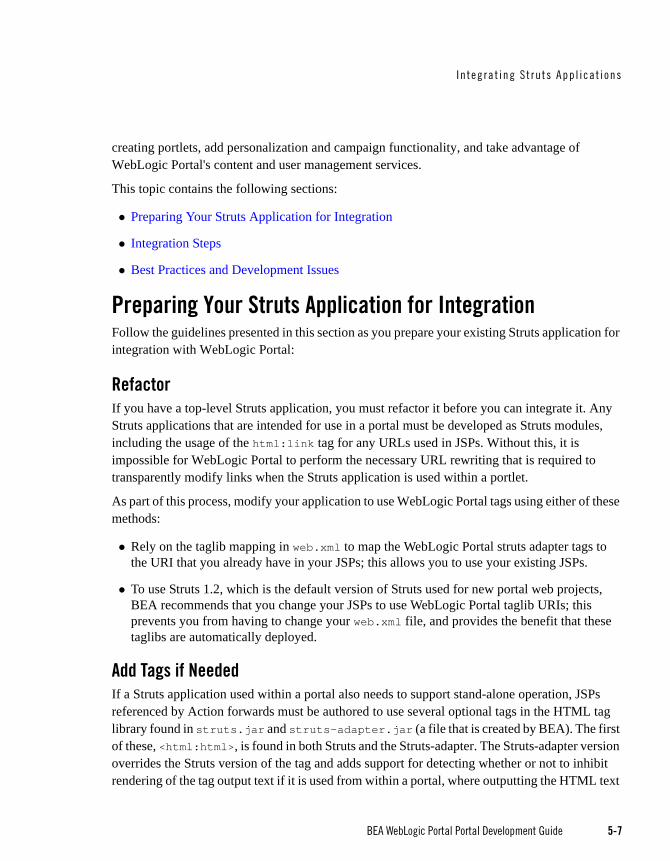
I n teg ra t ing St ruts App l i cat i ons
BEA WebLogic Portal Portal Development Guide 5-7
creating portlets, add personalization and campaign functionality, and take advantage of WebLogic Portal's content and user management services.
This topic contains the following sections:
Preparing Your Struts Application for Integration
Integration Steps
Best Practices and Development Issues
Preparing Your Struts Application for IntegrationFollow the guidelines presented in this section as you prepare your existing Struts application for integration with WebLogic Portal:
RefactorIf you have a top-level Struts application, you must refactor it before you can integrate it. Any Struts applications that are intended for use in a portal must be developed as Struts modules, including the usage of the html:link tag for any URLs used in JSPs. Without this, it is impossible for WebLogic Portal to perform the necessary URL rewriting that is required to transparently modify links when the Struts application is used within a portlet.
As part of this process, modify your application to use WebLogic Portal tags using either of these methods:
Rely on the taglib mapping in web.xml to map the WebLogic Portal struts adapter tags to the URI that you already have in your JSPs; this allows you to use your existing JSPs.
To use Struts 1.2, which is the default version of Struts used for new portal web projects, BEA recommends that you change your JSPs to use WebLogic Portal taglib URIs; this prevents you from having to change your web.xml file, and provides the benefit that these taglibs are automatically deployed.
Add Tags if NeededIf a Struts application used within a portal also needs to support stand-alone operation, JSPs referenced by Action forwards must be authored to use several optional tags in the HTML tag library found in struts.jar and struts-adapter.jar (a file that is created by BEA). The first of these, <html:html>, is found in both Struts and the Struts-adapter. The Struts-adapter version overrides the Struts version of the tag and adds support for detecting whether or not to inhibit rendering of the tag output text if it is used from within a portal, where outputting the HTML text
In tegrat ing App l icat ions in to WebLog ic Po r ta l
5-8 BEA WebLogic Portal Portal Development Guide
would result in non-well-formed HTML. Two additional tags are provided in the Struts-adapter version of the HTML tag library; use them in JSPs that also need to be used standalone: <html:head> and <html:body>. These two tags have the same portal-aware rendering behavior as the <html:html> tag.
Override Certain Behaviors of a RequestProcessorSome Struts applications use a custom RequestProcessor. WebLogic Portal Struts integration requires that you override certain behaviors of a RequestProcessor. The class com.bea.struts.adapter.action.AdapterRequestProcessor, located in struts-adapter.jar, provides this standard behavior and must be used in all Struts applications used within a portal. Any custom RequestProcessors must either extend this class or use a utility class to perform the same required operation that this RequestProcessor performs. When extending this class, overrides of doForward() must call the superclass doForward() and also must not attempt to write to the response. Custom RequestProcessors that do not extend AdapterRequestProcessor must call com.bea.struts.adapter.action.AdapterRequestProcessorUtil.forwardUsingRequ
est() to perform any forwarding operations. (This method replaces an actual RequestDispatcher forward request with an operation that captures the forward URI for later use in including the URI into the portal output.)
Refactor any Existing Custom Action Servlet If a Struts application depends on the use of a custom Action servlet, it must be refactored to use a custom RequestProcessor instead, as outlined above, and as recommended by the Struts implementation. Since the page flow functionality in WebLogic Portal uses a custom Action servlet, and since there can be only one Action servlet in a portal web project, portal Struts integration requires that the Action servlet not be customized. For more information on refactoring an Action servlet customization into a RequestProcessor customization, see the Struts documentation at http://jakarta.apache.org/struts/.
Remove the <html:link> Tag The StrutsContent control supports module switching using Action forwards. If the Action forward returned by an invoked Action results in a content URI that resides in another module, the current module is switched to the corresponding new module, and all further requests to the Struts portlet containing the control are performed using the new module. Perform module switching using only Action forwards, not by using the <html:link> tag to directly link to a JSP in another module; doing so might prevent the portal and Struts frameworks from correctly setting up and selecting the module.
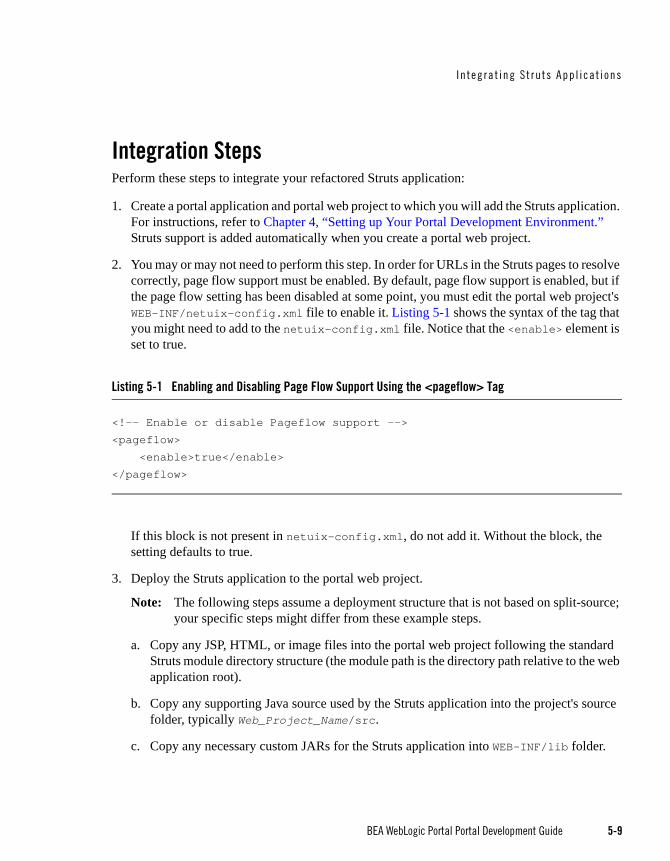
I n teg ra t ing St ruts App l i cat i ons
BEA WebLogic Portal Portal Development Guide 5-9
Integration StepsPerform these steps to integrate your refactored Struts application:
1. Create a portal application and portal web project to which you will add the Struts application. For instructions, refer to Chapter 4, “Setting up Your Portal Development Environment.” Struts support is added automatically when you create a portal web project.
2. You may or may not need to perform this step. In order for URLs in the Struts pages to resolve correctly, page flow support must be enabled. By default, page flow support is enabled, but if the page flow setting has been disabled at some point, you must edit the portal web project's WEB-INF/netuix-config.xml file to enable it. Listing 5-1 shows the syntax of the tag that you might need to add to the netuix-config.xml file. Notice that the <enable> element is set to true.
Listing 5-1 Enabling and Disabling Page Flow Support Using the <pageflow> Tag
<!-- Enable or disable Pageflow support -->
<pageflow>
<enable>true</enable>
</pageflow>
If this block is not present in netuix-config.xml, do not add it. Without the block, the setting defaults to true.
3. Deploy the Struts application to the portal web project.
Note: The following steps assume a deployment structure that is not based on split-source; your specific steps might differ from these example steps.
a. Copy any JSP, HTML, or image files into the portal web project following the standard Struts module directory structure (the module path is the directory path relative to the web application root).
b. Copy any supporting Java source used by the Struts application into the project's source folder, typically Web_Project_Name/src.
c. Copy any necessary custom JARs for the Struts application into WEB-INF/lib folder.
In tegrat ing App l icat ions in to WebLog ic Po r ta l
5-10 BEA WebLogic Portal Portal Development Guide
d. Copy the Struts application module's struts-config.xml or module configuration file into WEB-INF, but rename it struts-auto-config-<module-path>.xml, where <module-path> is the module path to the Struts application relative to the web application root, with all instances of '/' or '\' changed to '-'.
For example, if the module path is /struts/my/module, then rename struts-config.xml to struts-auto-config-struts-my-module.xml. Naming the module configuration file in this manner enables the PageFlowActionServlet used as the Action Servlet to automatically register the module without explicitly registering it with an init-param in web.xml. If you don't want to take advantage of this functionality, you can rename struts-config.xml arbitrarily, but you must manually register the module in web.xml as usual for a Struts 1.1 or 1.2 (Beehive) module.
e. In the module configuration file, add the following line to configure the RequestProcessor that is required for portal integration:
<controller processorClass="com.bea.struts.adapter.action .AdapterRequestProcessor"/>
(unless the Struts application requires a custom RequestProcessor).
4. Create a portlet that contains a StrutsContent control that specifies the module and the default action for the Struts application. For instructions, refer to the Portlet Development Guide.
5. Add the new portlet to the portal. For instructions, refer to the Portlet Development Guide.
Best Practices and Development IssuesUse the following guidelines for integrating Struts applications in portals:
It is highly recommended that you fully develop and test a Struts application before attempting to host it within a portal. This helps to separate the complexities of developing a working Struts application from the additional issues involved in putting the Struts application into a portlet.
If you encounter stack traces or messages in the Struts application portlet showing that an action cannot be found, ensure that the module is correctly configured, named correctly, and registered in web.xml. This can be tested by running the Struts application stand-alone.
If you encounter resource not found exceptions or class not found exceptions for dependent classes:
In tegrat ing Java Serve r Faces
BEA WebLogic Portal Portal Development Guide 5-11
– Make sure that all dependent Java source exists in WEB-INF/src, and that it has successfully been built into the corresponding class files in WEB-INF/classes.
– If more than one message-resource element is specified in the Struts configuration file for the module, any module files that reference a non-default message bundle must append the module path to the bundle key. For example, if the bundle key is alternate, and the module is /my/module, any users of the bundle must fully qualify it as alternate/my/module.
If following action links in a Struts portlet results in full-screen, stand-alone Struts pages, make sure that struts-adapter JSP tag libraries are in the project's WEB-INF/lib directory and that they are registered in web.xml.
If the “No ActionResult returned for action” error is returned when the action attribute of an html:form element contains a query parameter, use a hidden html:text input field.
Integrating Java Server FacesGenerally the integration process for JSF is simple, requiring only that you follow the instructions accompanying the distribution of JSF that you are using. The portal-specific tasks for incorporating a JSF application into WebLogic Portal are:
Create a .portlet file with a facesContent control.
Insert the namingContainer JSP tag as an immediate child of the JSF view tag.
This step is optional but BEA highly recommends it. For more information about this tag, refer to “JSF and the namingContainer JSP Tag” on page 5-11.
The following section contains more information about the namingContainer JSP tag.
JSF and the namingContainer JSP TagThe purpose of the namingContainer JSP tag is to ensure generation of unique IDs on a page. Currently the JSF architecture does not provide an explicit hooking mechanism to override default component ID generation. JSF uses a hierarchical namespace for components on a page, and JSF automatically generates unique IDs for the components on a page; however, because JSF is not “aware” of the portal, it might generate non-unique component IDs on a page. For simple forms you would not likely experience this problem, but if you use JavaScript on a page and non-unique IDs are generated, the Javascript might target the wrong component.
For more detail on the implementation of JSF in WebLogic Portal, refer to the Javadoc for the package com.bea.portlet.adapter.faces.

In tegrat ing App l icat ions in to WebLog ic Po r ta l
5-12 BEA WebLogic Portal Portal Development Guide
Integrating Page FlowsIf you have an existing non-portal application with page flows, you can integrate those page flows into a portal by installing the WebLogic Portal-related facets using the steps described in “Integrating an Existing Web Application into WorkSpace Studio” on page 5-2; then you surface those page flows using portlets. You can also build new page flows within the portal web project before creating page flow portlets.
For instructions on creating a page flow, refer to the documentation for WorkSpace Studio. For instructions on creating page flow portlets, refer to the “Building Portlets” chapter in the Portlet Development Guide.
In order for URLs in the page flows to resolve correctly, page flow support must be enabled. By default, page flow support is enabled, but if the page flow setting has been disabled at some point, you must edit the portal web project's WEB-INF/netuix-config.xml file to enable it. Listing 5-2 shows the syntax of the tag that you might need to add to the netuix-config.xml file. Notice that the <enable> element is set to true.
Listing 5-2 Syntax of the <pageflow> Tag to Enable Page Flow Support
<!-- Enable or disable Page Flow support -->
<pageflow>
<enable>true</enable>
</pageflow>
If this block is not present in netuix-config.xml, do not add it. Without the block, the setting defaults to true.
Adding Facets to an Existing ProjectYou can add a project facet to your EAR project or portal web project at any time. For example, in your portal web project you might originally have selected not to install the facet that enables visitor tools, but you might decide later that you want to use this feature.
Note: Do not add GroupSpace facets to portal web projects that already contain non-GroupSpace portals. For more information, refer to the Communities Guide.
To add a facet to an existing EAR project or portal web project, follow these steps:
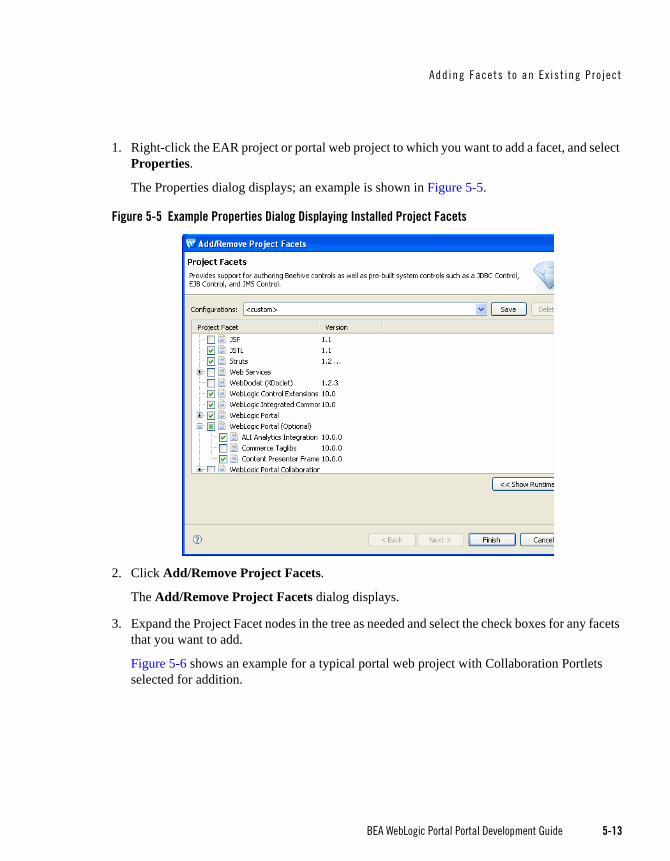
Add ing Facets to an Ex is t ing P ro jec t
BEA WebLogic Portal Portal Development Guide 5-13
1. Right-click the EAR project or portal web project to which you want to add a facet, and select Properties.
The Properties dialog displays; an example is shown in Figure 5-5.
Figure 5-5 Example Properties Dialog Displaying Installed Project Facets
2. Click Add/Remove Project Facets.
The Add/Remove Project Facets dialog displays.
3. Expand the Project Facet nodes in the tree as needed and select the check boxes for any facets that you want to add.
Figure 5-6 shows an example for a typical portal web project with Collaboration Portlets selected for addition.
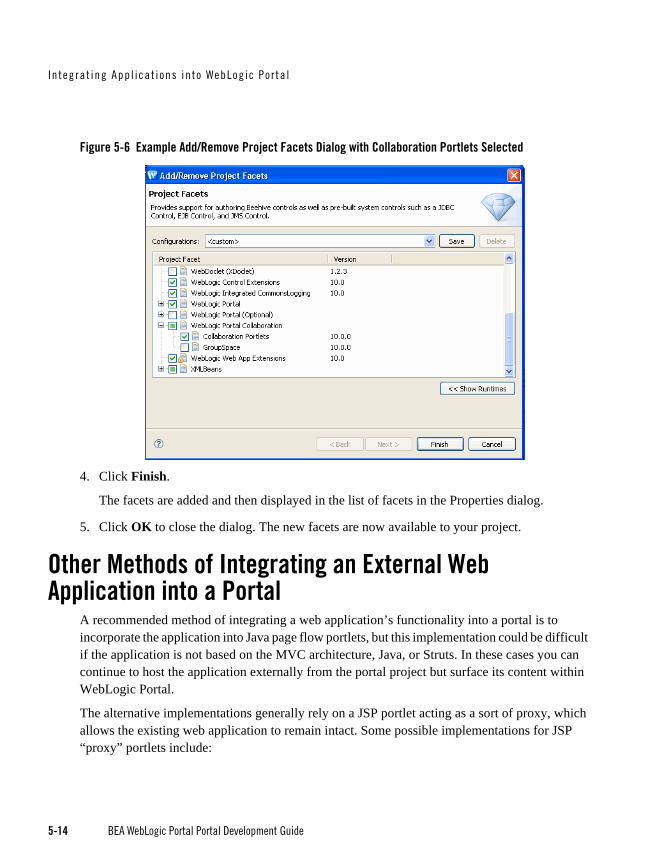
In tegrat ing App l icat ions in to WebLog ic Po r ta l
5-14 BEA WebLogic Portal Portal Development Guide
Figure 5-6 Example Add/Remove Project Facets Dialog with Collaboration Portlets Selected
4. Click Finish.
The facets are added and then displayed in the list of facets in the Properties dialog.
5. Click OK to close the dialog. The new facets are now available to your project.
Other Methods of Integrating an External Web Application into a Portal
A recommended method of integrating a web application’s functionality into a portal is to incorporate the application into Java page flow portlets, but this implementation could be difficult if the application is not based on the MVC architecture, Java, or Struts. In these cases you can continue to host the application externally from the portal project but surface its content within WebLogic Portal.
The alternative implementations generally rely on a JSP portlet acting as a sort of proxy, which allows the existing web application to remain intact. Some possible implementations for JSP “proxy” portlets include:

Othe r Methods o f In tegrat ing an Ex te rna l Web Appl ica t i on in to a Por ta l
BEA WebLogic Portal Portal Development Guide 5-15
Creating a JSP portlet that is identical to the home page of the web application, but altering each link to use JavaScript that pops up a new browser window. This allows you to leverage the existing application while providing a way to interact with the portal.
Using an IFRAME in the portlet to contain the web application. The internal frame acts as an embedded browser window that the user interacts with independently of the parent browser.
Using a third-party screen scraping product such as Kapow within the portlet.
Web Services for Remote Portlets (WSRP) provides another alternative implementation, but this implementation requires the legacy server to support SOAP and WSDL, and works best with existing applications designed using MVC.
WebLogic Portal supplies a utility JSP tag called uriContent that you can use to retrieve an HTTP response document from a given URI. The browser portlet uses the uriContent tag (Content URL) to surface an external web application in a portal, using a portlet. For more information about the browser portlet, refer to the Portlet Development Guide.

In tegrat ing App l icat ions in to WebLog ic Po r ta l
5-16 BEA WebLogic Portal Portal Development Guide
BEA WebLogic Portal Portal Development Guide 6-1
C H A P T E R 6
User Interface Development with Look And Feel Features
This chapter describes how to use the portal framework to develop the overall appearance and behavior of the portal you develop in WorkSpace Studio. You will be able to look at a rendered portal in a browser and understand which pieces of the underlying framework that you need to modify to obtain the results you want. In addition, the look and feel editor is discussed. The look and feel editor lets you interactively modify the text styles used by a portal.
This chapter includes the following sections:
Look And Feel Framework Overview
Working with Look And Feel Files
Customizing Look and Feels
Creating a New Look and Feel
Working with Themes
Using Look And Feels From Previous Portal Releases
Troubleshooting Look And Feels
The Look And Feel Editor
Look And Feel API
Working with Shells
Working with Layouts
User In te r face Deve lopment w i th Look And Fee l Features
6-2 BEA WebLogic Portal Portal Development Guide
Working with Navigation Menus
Building User Interfaces to Address Accessibility Guidelines
Look And Feel Framework OverviewA look and feel file determines the appearance of your portal application, from the placement and behavior of elements on a portal page to the colors used in the portlet title bars.
By using the portal rendering framework, developers can modify and create new look and feel files that portal administrators can apply to individual portal desktops. If visitor tools are enabled, end users can then access different look and feels to change the appearance of their own portal instance.
WebLogic Portal includes robust examples and templates to use when creating the user interface for your portal in WorkSpace Studio.
As with other portal resources (J2EE libraries and so on), you must copy framework resources to your web project before you can modify them. However, in many cases, customizing the user interface for your portal involves modifying a single file or creating a new file to reference rather than modifying an entire set of framework resources.
As a best practice, you should only keep the resources in your project that you need to modify. This allows you to more easily upgrade to newer versions of WebLogic Portal. When you upgrade, all predefined portal resources from J2EE library modules to look and feel files are overwritten.
Table 6-1 lists the key elements involved in the look and feel framework:
Table 6-1 Elements of a Look And Feel
Framework File What it does:
*.laf (look and feel File) This file is an XML file that includes references to a specific skin and skeleton XML file. The *.laf file is what is used to change the appearance of your portal.
skin.xml The skin.xml file is the file where most customizations take place. It contains references to the CSS files, images and JavaScript code that you use in your look and feel.
skeleton.xml The skeleton.xml file provides references to the specific JSPs files that render your portal. The JSPs referenced in the skeleton.xml file dictate the rendering of desktops, menus, and so on.
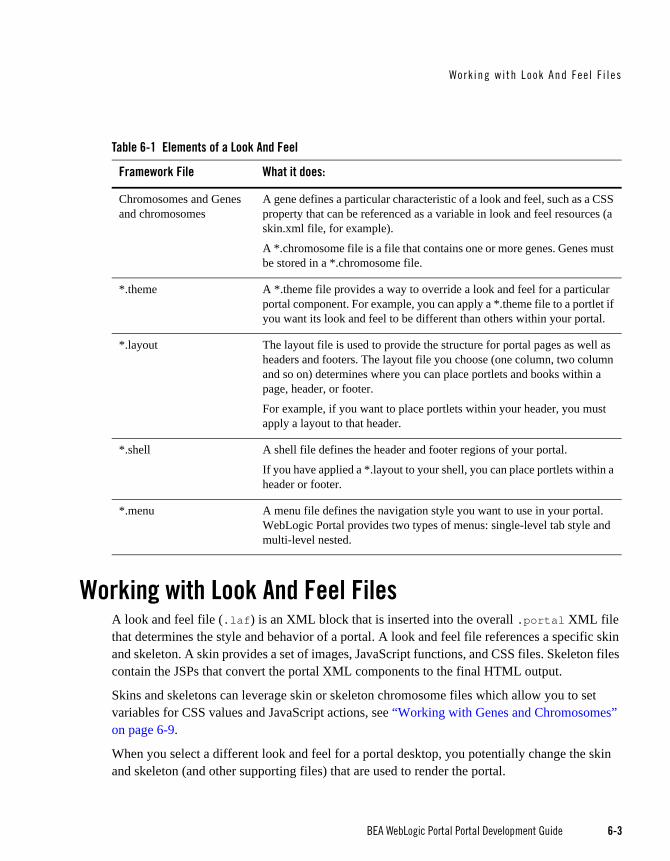
Work ing w i th Look And Fee l F i l es
BEA WebLogic Portal Portal Development Guide 6-3
Working with Look And Feel FilesA look and feel file (.laf) is an XML block that is inserted into the overall .portal XML file that determines the style and behavior of a portal. A look and feel file references a specific skin and skeleton. A skin provides a set of images, JavaScript functions, and CSS files. Skeleton files contain the JSPs that convert the portal XML components to the final HTML output.
Skins and skeletons can leverage skin or skeleton chromosome files which allow you to set variables for CSS values and JavaScript actions, see “Working with Genes and Chromosomes” on page 6-9.
When you select a different look and feel for a portal desktop, you potentially change the skin and skeleton (and other supporting files) that are used to render the portal.
Chromosomes and Genes and chromosomes
A gene defines a particular characteristic of a look and feel, such as a CSS property that can be referenced as a variable in look and feel resources (a skin.xml file, for example).
A *.chromosome file is a file that contains one or more genes. Genes must be stored in a *.chromosome file.
*.theme A *.theme file provides a way to override a look and feel for a particular portal component. For example, you can apply a *.theme file to a portlet if you want its look and feel to be different than others within your portal.
*.layout The layout file is used to provide the structure for portal pages as well as headers and footers. The layout file you choose (one column, two column and so on) determines where you can place portlets and books within a page, header, or footer.
For example, if you want to place portlets within your header, you must apply a layout to that header.
*.shell A shell file defines the header and footer regions of your portal.
If you have applied a *.layout to your shell, you can place portlets within a header or footer.
*.menu A menu file defines the navigation style you want to use in your portal. WebLogic Portal provides two types of menus: single-level tab style and multi-level nested.
Table 6-1 Elements of a Look And Feel
Framework File What it does:

User In te r face Deve lopment w i th Look And Fee l Features
6-4 BEA WebLogic Portal Portal Development Guide
You assign a look and feel to a portal desktop by defining a desktop property. You can also allow portal visitors to choose a look and feel by enabling visitor tools and providing different look and feels from which they can choose.
For more information about visitor tools, see Chapter 8, “Enabling Visitor Tools.”
Note: For GroupSpace applications, you can find information on modifying the default look and feel or creating a new look and feel in the GroupSpace Guide.
This section includes the following topics:
Defining a Look And Feel for a Desktop
Defining a Look And Feel for a DesktopYou assign an existing look and feel (*.laf) to your desktop in WorkSpace Studio. As you develop or customize your portal’s look and feel, this is a helpful way to view your changes.
To assign a look and feel to a desktop using WorkSpace Studio:
1. Navigate to the location of the portal whose properties you want to edit, and double-click the .portal file to open it in the editor.
2. Click the border of the desktop to display its properties in the Properties view.
3. Navigate to the Properties view and choose a look and feel from the look and feel property down-down list for that desktop’s properties.
4. Optionally, to view recent, saved changes to your look and feel, click Reload.
5. To see how the look and feel you have selected affects your portal, navigate to your *.portal file, right-click and select Run As > Run on Server.
Customizing Look and FeelsWebLogic Portal provides several default look and feel files that you can use in your applications. Often it is easier to customize one of these existing look and feels to suit your needs, rather than develop your own. For example, you can customize a look and feel by editing associated CSS files or by using genes and chromosomes to create color or JavaScript variables. For more information about genes, “Working with Genes and Chromosomes” on page 6-9.

Customiz ing Look and Fee ls
BEA WebLogic Portal Portal Development Guide 6-5
Tip: When choosing a look and feel to customize, use ONLY skins or skeletons prefaced with the name “bighorn”. Other templates are available for legacy versions of WebLogic Portal and do not support new look and feel features such as genes and chromosomes.
Using an existing, predefined look and feel ensures that you always have the necessary look and feel files necessary for properly rendering your portals. Table 6-2 lists the look and feels that are included to use as starting points.
Note: The bighorn-xhtml skeleton does not enforce XHTML compliance for portal content. Non-compliant portlets in portals using this skeleton will cause rendering errors. For example, the Groupspace portal application is not XHTML compliant.
This section describes ways to customize an existing look and feel. You can use one of these suggested methods independently or use them together.
If you want to create a new look and feel, see “Creating a New Look and Feel” on page 6-12.
The following topics are covered in this section:
Combining Skins and Skeletons in a New Look And Feel
Defining Titlebar Buttons and Window Icons
Modifying CSS Files
Working with Genes and Chromosomes
Table 6-2 Predefined Look And Feels
Skeleton Skin Skeleton Chromosomes
Skin Chromosomes
bighorn bighorn bighorn No No
bighorn-xhtml bighorn-xhtml bighorn No No
bighorn-genes bighorn bighorn-genes No default.chromosome
bighorn-water bighorn bighorn-genes No water.chromosome
bighorn-fire bighorn bighorn-genes No fire.chromosome
bighorn-template bighorn bighorn No No

User In te r face Deve lopment w i th Look And Fee l Features
6-6 BEA WebLogic Portal Portal Development Guide
Combining Skins and Skeletons in a New Look And FeelYou can create a custom look and feel file that is based on different combinations of predefined skin and skeleton files. For example, if you require an XHTML skeleton and would also like to use genes in your skin file, you can combine those respective files into a new look and feel file.
To create a new look and feel file based on predefined skin and skeleton files, do the following:
1. In Navigator view, right-click your portal web project and choose New > Look And Feel. A wizard guides you through the rest of the process.
2. After you name your new look and feel, you see the window shown in Figure 6-2.
Figure 6-1 Creating a Look And Feel
3. In the Skin field, use the ellipsis icon to navigate to the skin you would like to use and select the skin.xml file.
4. In the Skeleton field, use the ellipsis icon to navigate to the skeleton you would like to use and select the skeleton directory.
Note: To select a skin, you must select a skin.xml file. To select a skeleton, you must only select the skeleton directory.
5. Click Finish.
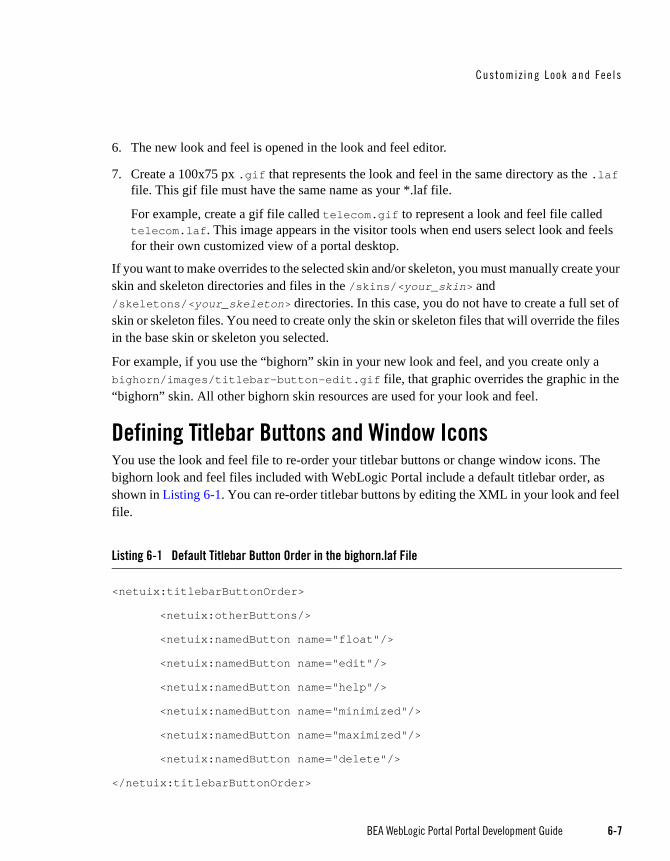
Customiz ing Look and Fee ls
BEA WebLogic Portal Portal Development Guide 6-7
6. The new look and feel is opened in the look and feel editor.
7. Create a 100x75 px .gif that represents the look and feel in the same directory as the .laf file. This gif file must have the same name as your *.laf file.
For example, create a gif file called telecom.gif to represent a look and feel file called telecom.laf. This image appears in the visitor tools when end users select look and feels for their own customized view of a portal desktop.
If you want to make overrides to the selected skin and/or skeleton, you must manually create your skin and skeleton directories and files in the /skins/<your_skin> and /skeletons/<your_skeleton> directories. In this case, you do not have to create a full set of skin or skeleton files. You need to create only the skin or skeleton files that will override the files in the base skin or skeleton you selected.
For example, if you use the “bighorn” skin in your new look and feel, and you create only a bighorn/images/titlebar-button-edit.gif file, that graphic overrides the graphic in the “bighorn” skin. All other bighorn skin resources are used for your look and feel.
Defining Titlebar Buttons and Window IconsYou use the look and feel file to re-order your titlebar buttons or change window icons. The bighorn look and feel files included with WebLogic Portal include a default titlebar order, as shown in Listing 6-1. You can re-order titlebar buttons by editing the XML in your look and feel file.
Listing 6-1 Default Titlebar Button Order in the bighorn.laf File
<netuix:titlebarButtonOrder>
<netuix:otherButtons/>
<netuix:namedButton name="float"/>
<netuix:namedButton name="edit"/>
<netuix:namedButton name="help"/>
<netuix:namedButton name="minimized"/>
<netuix:namedButton name="maximized"/>
<netuix:namedButton name="delete"/>
</netuix:titlebarButtonOrder>
User In te r face Deve lopment w i th Look And Fee l Features
6-8 BEA WebLogic Portal Portal Development Guide
Modifying CSS FilesCSS files are used by skin.xml files to define your HTML rendering, and to define colors, border styles, images, and so on.
By modifying CSS files, you can change many aspects of your look and feel file. Each skin.xml file uses multiple CSS files to define various aspects of the skin. In addition, you can create custom CSS files to override existing CSS files or add new attributes.
Each skin.xml file included with WebLogic Portal includes a reference to a custom.css file that is reserved for your customizations. This CSS file is a placeholder for any CSS changes you want to make to the skin.xml file you wish to use.
More commonly, you will want to add custom CSS styles. The easiest way to do this is to add your customizations to the custom.css file included in your skin.xml file.
The following example shows you how to use the custom.css file that is included in the bighorn look and feel file’s respective skin directory. This custom.css is already referenced in the bighorn skin.xml file.
Tip: You can use steps similar to these to modify any specific look and feel resource. For example, if you want to modify images that are referenced by a skin.xml file, you can copy the image to your project, modify it and save it with the same name. This method allows you to perform minor customizations without modifying entire look and feel files and their resources.
To customize the bighorn skin.xml using the custom.css file:
1. Using the Merged Projects view, navigate to /yourWebProject/framework/skins/bighorn/css/custom.css.
2. Right-click on the custom.css file and select Copy to Project.
3. In the Project Explorer, navigate to /yourWebProject/framework/skins/bighorn/css/custom.css.
4. Right-click the custom.css file and choose open it with the editor of your choice.
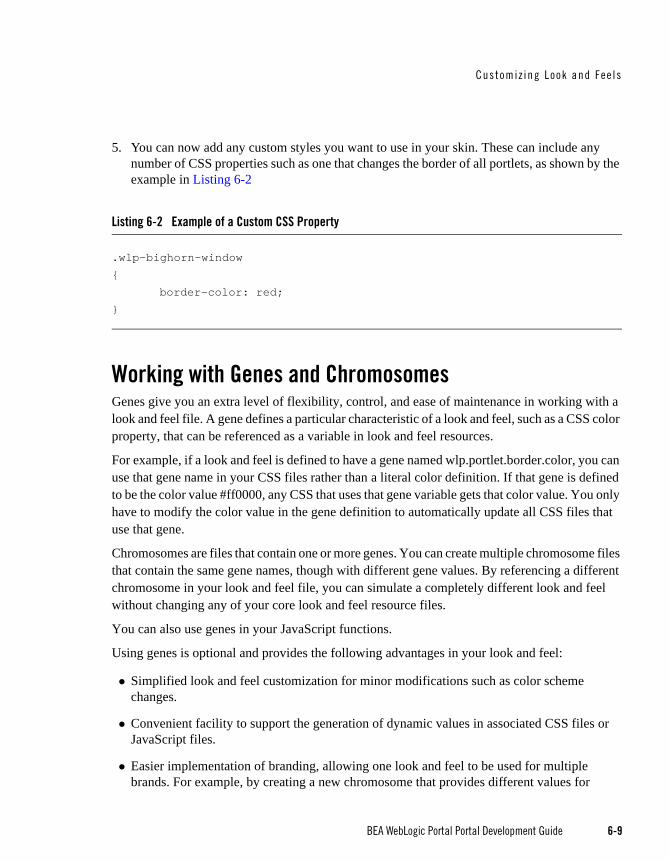
Customiz ing Look and Fee ls
BEA WebLogic Portal Portal Development Guide 6-9
5. You can now add any custom styles you want to use in your skin. These can include any number of CSS properties such as one that changes the border of all portlets, as shown by the example in Listing 6-2
Listing 6-2 Example of a Custom CSS Property
.wlp-bighorn-window
{
border-color: red;
}
Working with Genes and ChromosomesGenes give you an extra level of flexibility, control, and ease of maintenance in working with a look and feel file. A gene defines a particular characteristic of a look and feel, such as a CSS color property, that can be referenced as a variable in look and feel resources.
For example, if a look and feel is defined to have a gene named wlp.portlet.border.color, you can use that gene name in your CSS files rather than a literal color definition. If that gene is defined to be the color value #ff0000, any CSS that uses that gene variable gets that color value. You only have to modify the color value in the gene definition to automatically update all CSS files that use that gene.
Chromosomes are files that contain one or more genes. You can create multiple chromosome files that contain the same gene names, though with different gene values. By referencing a different chromosome in your look and feel file, you can simulate a completely different look and feel without changing any of your core look and feel resource files.
You can also use genes in your JavaScript functions.
Using genes is optional and provides the following advantages in your look and feel:
Simplified look and feel customization for minor modifications such as color scheme changes.
Convenient facility to support the generation of dynamic values in associated CSS files or JavaScript files.
Easier implementation of branding, allowing one look and feel to be used for multiple brands. For example, by creating a new chromosome that provides different values for

User In te r face Deve lopment w i th Look And Fee l Features
6-10 BEA WebLogic Portal Portal Development Guide
genes that are used in the look and feel, you can reference that new chromosome in the look and feel file and provide different appearance and behavior for the existing look and feel.
Global parameterization capabilities. For example, genes can be used to share a set of global properties to toggle the rendering of certain portal-wide features.
Important: In order to use genes, you must configure the CSS and JavaScript entries in your skin.xml to be inlined in the HTML rather than referenced, as described in “Working with Skins” on page 6-14.
Following is an example that highlights one of the primary benefits of genes.
Gene ExampleIn a .chromosome file, you could define a gene called “bodyColor” and assign it a value of “red,” like this:
<gene name=”bodyColor”>
<value>#FF0000</value>
</gene>
In your CSS file, you could use bodyColor as a variable:
body
{
border:1px solid ${bodyColor};
};
When the page is rendered in a browser, the inlined style definition becomes:
body
{
border:1px solid #FF0000;
};
When you use this gene in your CSS files, you only need to modify the gene value itself to cascade the change throughout all configured CSS files rather than changing the value manually in each CSS file.
Customiz ing Look and Fee ls
BEA WebLogic Portal Portal Development Guide 6-11
Creating a Chromosome and GenesEach skin and theme that uses genes must have its own unique chromosome files, even if they are duplicates of each other. Chromosome files are stored in the same directory as the respective skin.xml and skeleton.xml.
The default.chromosome file is intended to contain the complete set of genes for a particular skin.xml file. By using the default.chromosome file, you can keep all your genes in one place. When you need to override a particular gene, you can provide an additional .chromosome file. If the look and feel framework does not find a gene in the chromosome you specify in the .laf file, it looks for it in the default.chromosome file.
Note: As a best practice, you should use a one-to-one representation of genes to CSS property values.
To create and use genes:
1. Create a new *.chromosome file.
a. Select File > New > Other.
b. In the New dialog, open the XML folder and select XML. The New XML File wizard opens.
c. Choose Create XML From XML Schema File and click Next.
d. Enter a name for the XML file in the XML File Name dialog and click Next.
e. In the Select XML Schema File dialog, choose Select XML Catalog Entry and in the Key column select laf-genes-1_0_0.xsd as the schema. Click Next.
f. In the Select Root Element dialog, click Finish..
g. Rename the generated file's extension from .xml to .chromosome.
2. Add genes to the chromosome, using the structure shown in “Gene Example” on page 6-10.
Note: Gene values can contain references to other genes.
3. In your skin or theme CSS files, replace the appropriate hard-coded style values with the related gene names, using the ${geneName} syntax.
4. In your skin.xml or *.theme files, make sure you reference your CSS or JavaScript files so that they appear inline in the final HTML output, as described in “Working with Skins” on page 6-14.
User In te r face Deve lopment w i th Look And Fee l Features
6-12 BEA WebLogic Portal Portal Development Guide
5. If you want to create multiple versions of chromosomes that provide identically named genes with different values, copy the default.chromosome, give it a new filename (such as holiday.chromosome). Delete all but the genes in that file you want to override, and provide different values for those genes. Copy the new .chromosome file to any skin or skeleton directories for which it will be used.
6. Open your look and feel file in the XML editor, and add specific the .chromosome file you want to use for the look and feel by adding one or both of the following attributes to the <netuix:lookAndFeel> element:
<netuix:lookAndFeel skinChromosome=”holiday” skeletonChromosome=”holiday”
The look and feel framework does not check to see if a gene you reference is defined in a chromosome. If the framework cannot find a gene, it prints the gene variable in the HTML output.
Using the Look And Feel Editor with GenesThe look and feel editor HTML preview does not display CSS values that are represented by gene variables. Any CSS rules that use genes are dropped from your HTML preview. If you want to preview a portal’s look and feel that use genes, you can do so by right-clicking .portal file and selecting Run On Server.
Creating a New Look and Feel If you want to do extensive redesign of either the skeleton aspects of your portal (placeholders, layout, and so on) or skin elements (color, borders, buttons and so on), you can create a new look and feel file based on a skin and skeleton templates included with WebLogic Portal.
Tip: WebLogic Portal recommends using the bighorn-template look and feel to create any new look and feel files. It supports genes and provides a complete set of look and feel files that take advantage of the features of the latest version of WebLogic Portal.
You can copy all of the resources associated with a specific skin and skeleton and modify most or all of them to suit your needs. This option should be used only if you need to do extensive modifications that cannot be accomplished with CSS files or genes.
WARNING: When creating new a new look and feel file, use skins or skeletons prefaced with the name “bighorn”. Other templates are available for legacy versions of
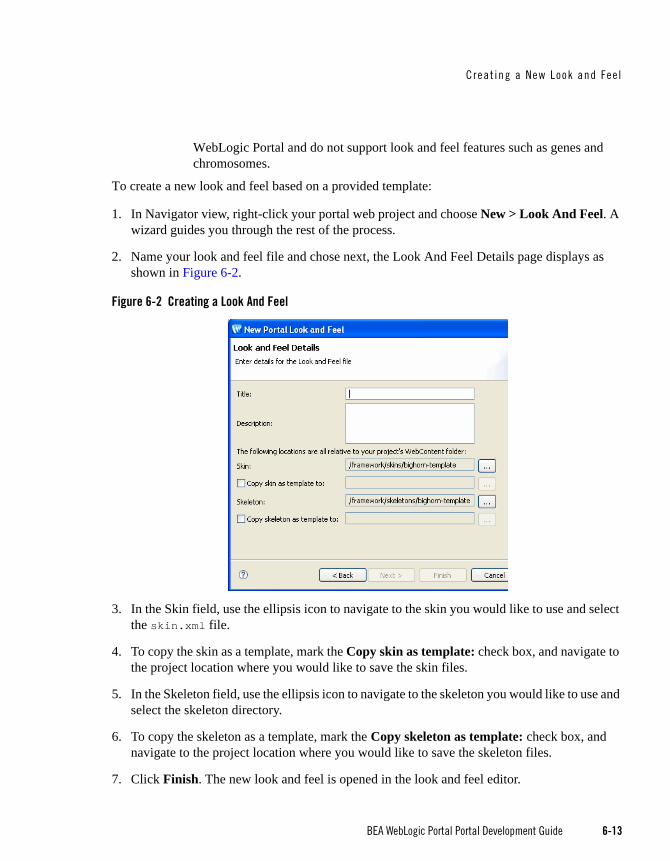
Creat ing a New Look and Fee l
BEA WebLogic Portal Portal Development Guide 6-13
WebLogic Portal and do not support look and feel features such as genes and chromosomes.
To create a new look and feel based on a provided template:
1. In Navigator view, right-click your portal web project and choose New > Look And Feel. A wizard guides you through the rest of the process.
2. Name your look and feel file and chose next, the Look And Feel Details page displays as shown in Figure 6-2.
Figure 6-2 Creating a Look And Feel
3. In the Skin field, use the ellipsis icon to navigate to the skin you would like to use and select the skin.xml file.
4. To copy the skin as a template, mark the Copy skin as template: check box, and navigate to the project location where you would like to save the skin files.
5. In the Skeleton field, use the ellipsis icon to navigate to the skeleton you would like to use and select the skeleton directory.
6. To copy the skeleton as a template, mark the Copy skeleton as template: check box, and navigate to the project location where you would like to save the skeleton files.
7. Click Finish. The new look and feel is opened in the look and feel editor.
User In te r face Deve lopment w i th Look And Fee l Features
6-14 BEA WebLogic Portal Portal Development Guide
8. Create a 100x75 px .gif that represents the look and feel in the same directory as the *.laf file.This image appears in the visitor tools when end users select look and feels for their own customized view of a portal desktop and must have the same name as your *.laf file, but with a *.gif extension.
For example, create a gif file called telecom.gif to represent a look and feel file called telecom.laf. This image appears in the visitor tools when end users select look and feels for their own customized view of a portal desktop.
The following sections provide guidance on working with your new look and feel.
Working with Skins
Working with Skeletons
Note: See “The Look And Feel Editor” on page 6-26 for information about using the look and feel editor.
Working with SkinsSkins are collections of images, cascading style sheets (CSS), and JavaScript files that allow changes to be made to the look and feel of a portal without modifying the portal components directly. References to images and styles are made in the skin rather than being hard coded into the portal definition.
Skins, combined with skeletons, make up a portal desktop's look and feel.
Each skin has its own /images, /css, and /js (JavaScript) subdirectories that contain its skin resources. Create and store your look and feel images, CSS files, and JavaScript files in these directories. You can also store global look and feel resources in a common location outside of a skin’s root directory. A skin knows which resources to use based on its skin.xml file, stored in the skin’s root directory. The skin.xml tells the skin which paths to look in to find image, CSS, and JavaScript files that the look and feel uses.
Use the following guidelines when configuring a skin.xml file:
The <target-skeleton> section specifies the skeleton to use if no skeleton is specified in the look and feel file.
The <images> section lets you set the paths the skin should use to find images. For example:
<skin><images> <search-path>
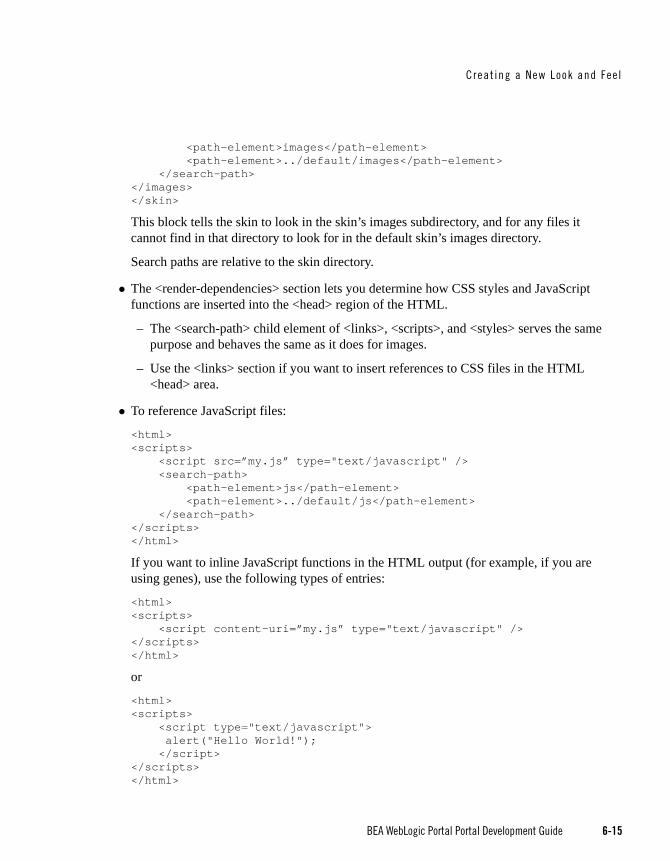
Creat ing a New Look and Fee l
BEA WebLogic Portal Portal Development Guide 6-15
<path-element>images</path-element> <path-element>../default/images</path-element> </search-path></images></skin>
This block tells the skin to look in the skin’s images subdirectory, and for any files it cannot find in that directory to look for in the default skin’s images directory.
Search paths are relative to the skin directory.
The <render-dependencies> section lets you determine how CSS styles and JavaScript functions are inserted into the <head> region of the HTML.
– The <search-path> child element of <links>, <scripts>, and <styles> serves the same purpose and behaves the same as it does for images.
– Use the <links> section if you want to insert references to CSS files in the HTML <head> area.
To reference JavaScript files:
<html><scripts> <script src=”my.js” type="text/javascript" /> <search-path> <path-element>js</path-element> <path-element>../default/js</path-element> </search-path></scripts></html>
If you want to inline JavaScript functions in the HTML output (for example, if you are using genes), use the following types of entries:
<html><scripts> <script content-uri=”my.js” type="text/javascript" /></scripts></html>
or
<html><scripts> <script type="text/javascript"> alert("Hello World!"); </script></scripts></html>
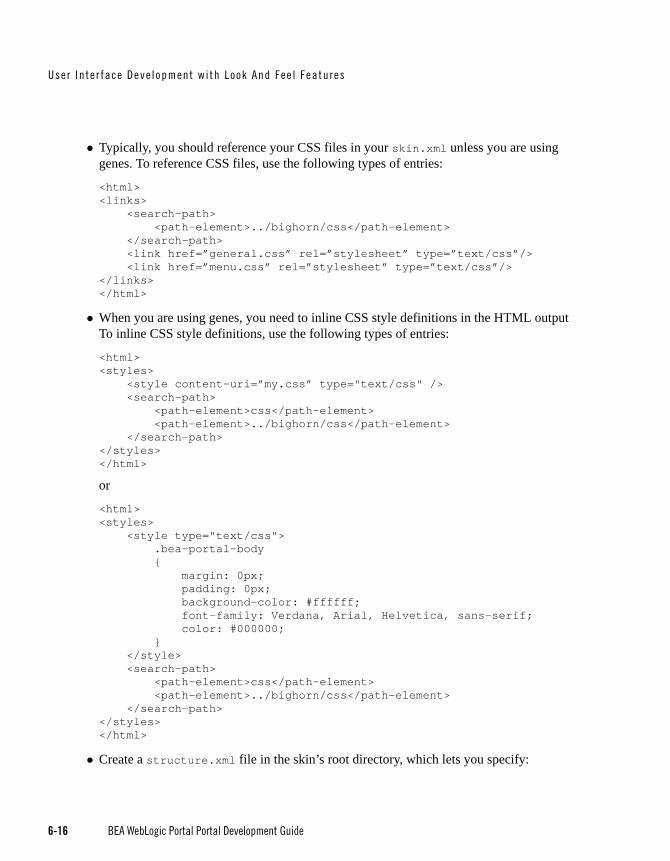
User In te r face Deve lopment w i th Look And Fee l Features
6-16 BEA WebLogic Portal Portal Development Guide
Typically, you should reference your CSS files in your skin.xml unless you are using genes. To reference CSS files, use the following types of entries:
<html><links> <search-path> <path-element>../bighorn/css</path-element> </search-path> <link href=”general.css” rel=”stylesheet” type=”text/css”/> <link href=”menu.css” rel=”stylesheet” type=”text/css”/></links></html>
When you are using genes, you need to inline CSS style definitions in the HTML output To inline CSS style definitions, use the following types of entries:
<html><styles> <style content-uri=”my.css” type="text/css" /> <search-path> <path-element>css</path-element> <path-element>../bighorn/css</path-element> </search-path></styles></html>
or
<html><styles> <style type="text/css"> .bea-portal-body { margin: 0px; padding: 0px; background-color: #ffffff; font-family: Verdana, Arial, Helvetica, sans-serif; color: #000000; } </style> <search-path> <path-element>css</path-element> <path-element>../bighorn/css</path-element> </search-path></styles></html>
Create a structure.xml file in the skin’s root directory, which lets you specify:

Creat ing a New Look and Fee l
BEA WebLogic Portal Portal Development Guide 6-17
– The paths to any themes that correspond to the skin. You can also set paths to look and feel files that you want to use as themes, assuming you have created a .theme file that corresponds to that look and feel.
– The paths to any resources that correspond to different device classification.
– Any localization subdirectories.
Following is a sample structure.xml file:
<?xml version="1.0" encoding="UTF-8"?>
<structure xmlns="http://www.bea.com/servers/portal/framework/laf/1.0.0" xmlns:xsi="http://www.w3.org/2001/XMLSchema-instance" xsi:schemaLocation="http://www.bea.com/servers/portal/framework/laf/1.0.0 laf-structure-1_0_0.xsd"> <specializations> <localizations> <localization locale="ja"/> </localizations> <classifications path="classifications"> <classification name="nokia"/> <classification name="mozilla"/> </classifications> </specializations> <themes> <theme name="red_theme" path="../../redtheme"/> <theme name="holiday" path="holiday"/> </themes></structure>
Best PracticesCreate a structure.xml file in each skin directory. Using this file gives you flexibility in the location of the themes and classification look and feel files, and supports look and feel localization.
For best performance, reference your CSS and JavaScript files rather than inlining them in the HTML.
If you are using genes (see “Working with Themes” on page 6-22), you must inline the CSS styles and JavaScript functions that use genes.
Note: Skeletons hard code the names of look and feel resources, such as CSS style names, JavaScript functions, and image names. If you rename resources from their default names, you must also modify those names throughout your skeleton JSPs.

User In te r face Deve lopment w i th Look And Fee l Features
6-18 BEA WebLogic Portal Portal Development Guide
Considerations for Microsoft Internet ExplorerEach predefined look and feel includes a specialization directory that includes resources (including a separate skin.xml) that are used for Microsoft Internet Explorer. Considerations for Internet Explorer includes specific Javascript for menus, for example.
If you create your own look and feel or make extensive skin modifications, you may require additional browser-specific additions for Internet Explorer. As a best practice, use the existing MSIE classification skin.xml to include these additions.
In addition, if you add new skin resources, you will need to add them to both your look and feel skin.xml and the skin.xml within the MSIE directory. For example, if you add a new CSS file you need to add a link to the new CSS file in both the skin.xml file in the /markup/skins/ directory and the skin.xml file in the /markup/skins/msie/ directory, as illustrated in Figure 6-3.
Figure 6-3 Location of MSIE Specialization Directory
Note: The MSIE specialization directory takes advantage of client-classifications to track different resources. For more information about client-classifications, see “Creating Portals for Multiple Device Types” on page 9-1.
When adding new resources to a skin.xml file, such as new CSS files, be sure to modify both the skin.xml and the /msie/skin.xml file if you need the changes to appear in Microsoft Internet Explorer.
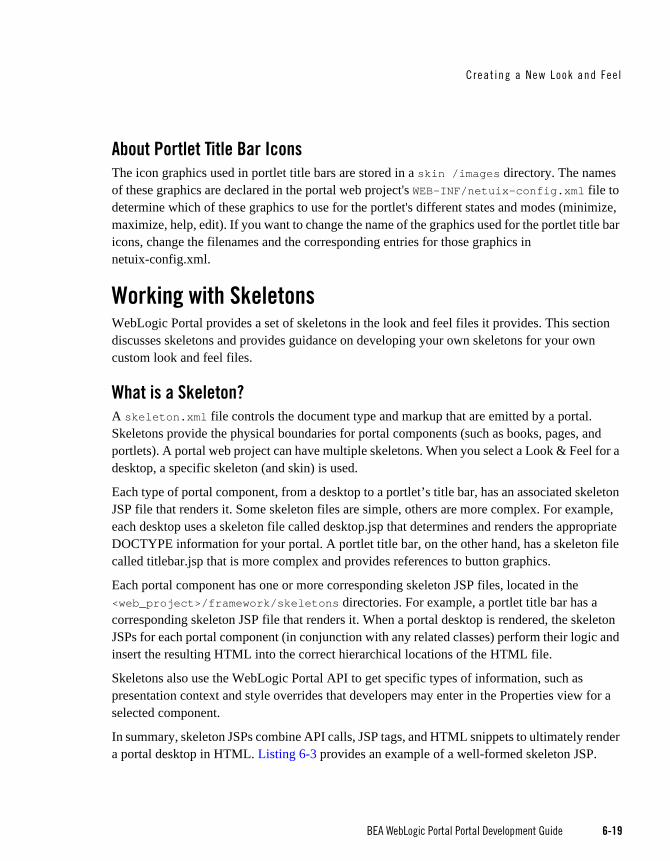
Creat ing a New Look and Fee l
BEA WebLogic Portal Portal Development Guide 6-19
About Portlet Title Bar IconsThe icon graphics used in portlet title bars are stored in a skin /images directory. The names of these graphics are declared in the portal web project's WEB-INF/netuix-config.xml file to determine which of these graphics to use for the portlet's different states and modes (minimize, maximize, help, edit). If you want to change the name of the graphics used for the portlet title bar icons, change the filenames and the corresponding entries for those graphics in netuix-config.xml.
Working with SkeletonsWebLogic Portal provides a set of skeletons in the look and feel files it provides. This section discusses skeletons and provides guidance on developing your own skeletons for your own custom look and feel files.
What is a Skeleton?A skeleton.xml file controls the document type and markup that are emitted by a portal. Skeletons provide the physical boundaries for portal components (such as books, pages, and portlets). A portal web project can have multiple skeletons. When you select a Look & Feel for a desktop, a specific skeleton (and skin) is used.
Each type of portal component, from a desktop to a portlet’s title bar, has an associated skeleton JSP file that renders it. Some skeleton files are simple, others are more complex. For example, each desktop uses a skeleton file called desktop.jsp that determines and renders the appropriate DOCTYPE information for your portal. A portlet title bar, on the other hand, has a skeleton file called titlebar.jsp that is more complex and provides references to button graphics.
Each portal component has one or more corresponding skeleton JSP files, located in the <web_project>/framework/skeletons directories. For example, a portlet title bar has a corresponding skeleton JSP file that renders it. When a portal desktop is rendered, the skeleton JSPs for each portal component (in conjunction with any related classes) perform their logic and insert the resulting HTML into the correct hierarchical locations of the HTML file.
Skeletons also use the WebLogic Portal API to get specific types of information, such as presentation context and style overrides that developers may enter in the Properties view for a selected component.
In summary, skeleton JSPs combine API calls, JSP tags, and HTML snippets to ultimately render a portal desktop in HTML. Listing 6-3 provides an example of a well-formed skeleton JSP.
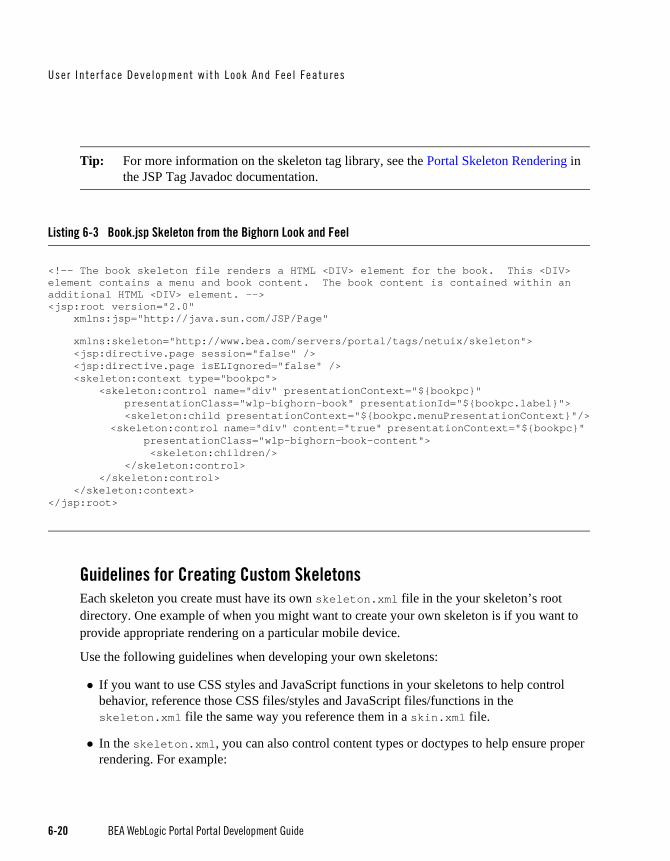
User In te r face Deve lopment w i th Look And Fee l Features
6-20 BEA WebLogic Portal Portal Development Guide
Tip: For more information on the skeleton tag library, see the Portal Skeleton Rendering in the JSP Tag Javadoc documentation.
Listing 6-3 Book.jsp Skeleton from the Bighorn Look and Feel
<!-- The book skeleton file renders a HTML <DIV> element for the book. This <DIV> element contains a menu and book content. The book content is contained within an additional HTML <DIV> element. --><jsp:root version="2.0" xmlns:jsp="http://java.sun.com/JSP/Page"
xmlns:skeleton="http://www.bea.com/servers/portal/tags/netuix/skeleton"> <jsp:directive.page session="false" /> <jsp:directive.page isELIgnored="false" /> <skeleton:context type="bookpc"> <skeleton:control name="div" presentationContext="${bookpc}" presentationClass="wlp-bighorn-book" presentationId="${bookpc.label}"> <skeleton:child presentationContext="${bookpc.menuPresentationContext}"/> <skeleton:control name="div" content="true" presentationContext="${bookpc}"
presentationClass="wlp-bighorn-book-content"> <skeleton:children/> </skeleton:control> </skeleton:control> </skeleton:context></jsp:root>
Guidelines for Creating Custom SkeletonsEach skeleton you create must have its own skeleton.xml file in the your skeleton’s root directory. One example of when you might want to create your own skeleton is if you want to provide appropriate rendering on a particular mobile device.
Use the following guidelines when developing your own skeletons:
If you want to use CSS styles and JavaScript functions in your skeletons to help control behavior, reference those CSS files/styles and JavaScript files/functions in the skeleton.xml file the same way you reference them in a skin.xml file.
In the skeleton.xml, you can also control content types or doctypes to help ensure proper rendering. For example:

Creat ing a New Look and Fee l
BEA WebLogic Portal Portal Development Guide 6-21
<skeleton><render-format> <preset>HTML_4_01_TRANSITIONAL</preset></render-format></skeleton>
The <preset> elements allows values for XHTML_1_0_STRICT, XHTML_1_0_TRANSITIONAL, HTML_4_01_STRICT, HTML_4_01_TRANSITIONAL, HTML_4_01_STRICT_NO_SYSTEM_ID, HTML_4_01_TRANSITIONAL_NO_SYSTEM_ID, HTML_3_2, and NONE.
– You can define your own <custom-htmlType> or <custom-xhtmlType>, using <doctype-public-id> and <doctype-system-id> child elements. In addition, the <custom-xhtmlType> element provides <namespace-uri> and <schema-system-id> child elements.
– You can provide content type overrides for individual types of devices, such as mobile devices, using:
<content-type-overrides> <override classification=”nokia” content-type=”application/xhtml+xml” /></content-type-overrides>
where classification is the name of a device type defined in WEB-INF/client-classifications.xml; and content-type can also use the value “text/html”.
Keep in mind that JSPs are rendered literally. That is, if there are blank lines in the JSP, there will be blank lines in the HTML. At times you may need to sacrifice JSP readability for quality HTML output.
Create a structure.xml file in the skeleton directory, as described in “Working with Skins” on page 6-14. This file lets you reference skeleton themes, skeleton resources for different types of devices (classifications), and localized skeleton subdirectories.
Enabling XHTML in a PortalTo render a portal that is XHTML compliant, you must set the portal to emit XHTML and you must develop your portlets using a framework that supports XHTML. Note that by default, portals support HTML 4.01 Transitional.
To enable a portal for XHTML compliance, you need to do one of the following.
Set the skeleton render format to XHTML_1_0_STRICT, XHTML_1_0_TRANSITIONAL or HTML_4_01_STRICT. See “Guidelines for Creating Custom Skeletons” on page 6-20.
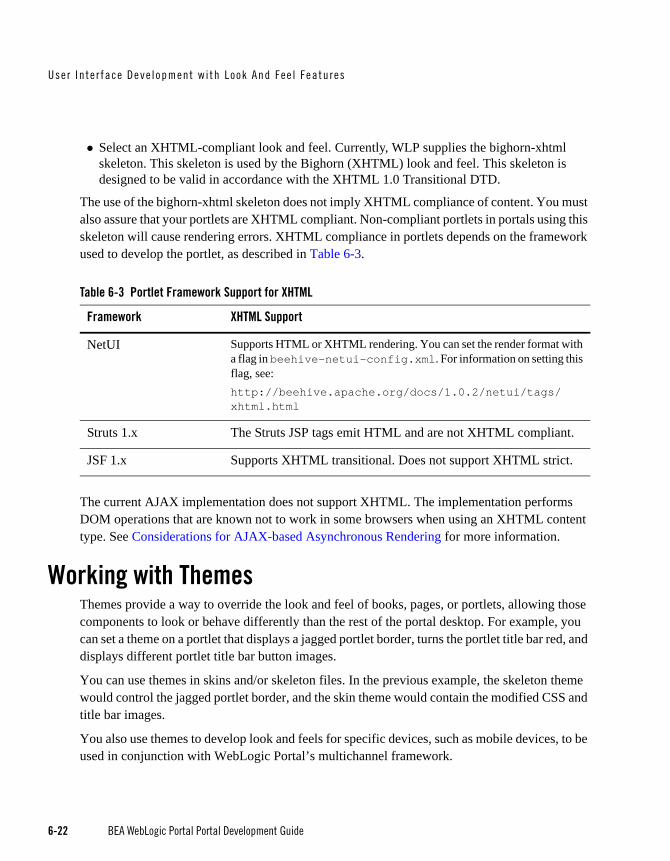
User In te r face Deve lopment w i th Look And Fee l Features
6-22 BEA WebLogic Portal Portal Development Guide
Select an XHTML-compliant look and feel. Currently, WLP supplies the bighorn-xhtml skeleton. This skeleton is used by the Bighorn (XHTML) look and feel. This skeleton is designed to be valid in accordance with the XHTML 1.0 Transitional DTD.
The use of the bighorn-xhtml skeleton does not imply XHTML compliance of content. You must also assure that your portlets are XHTML compliant. Non-compliant portlets in portals using this skeleton will cause rendering errors. XHTML compliance in portlets depends on the framework used to develop the portlet, as described in Table 6-3.
The current AJAX implementation does not support XHTML. The implementation performs DOM operations that are known not to work in some browsers when using an XHTML content type. See Considerations for AJAX-based Asynchronous Rendering for more information.
Working with ThemesThemes provide a way to override the look and feel of books, pages, or portlets, allowing those components to look or behave differently than the rest of the portal desktop. For example, you can set a theme on a portlet that displays a jagged portlet border, turns the portlet title bar red, and displays different portlet title bar button images.
You can use themes in skins and/or skeleton files. In the previous example, the skeleton theme would control the jagged portlet border, and the skin theme would contain the modified CSS and title bar images.
You also use themes to develop look and feels for specific devices, such as mobile devices, to be used in conjunction with WebLogic Portal’s multichannel framework.
Table 6-3 Portlet Framework Support for XHTML
Framework XHTML Support
NetUI Supports HTML or XHTML rendering. You can set the render format with a flag in beehive-netui-config.xml. For information on setting this flag, see: http://beehive.apache.org/docs/1.0.2/netui/tags/xhtml.html
Struts 1.x The Struts JSP tags emit HTML and are not XHTML compliant.
JSF 1.x Supports XHTML transitional. Does not support XHTML strict.

Work ing w i th Themes
BEA WebLogic Portal Portal Development Guide 6-23
Themes are made up of the same types of resources as regular skins and skeletons. The themes typically provide only the files necessary to override the overall look and feel, though full look and feels can also be used as themes. Themes can also be used as look and feels.
Themes are made up of the following resources:
The .theme file is a simple XML file that provides the name of a theme, and ensures that theme name appears in drop-down menus for selection by developers, portal administrators, or end users.
Theme resources include supporting files such as *.gif files or *.css files. The example in Figure 6-4 depicts the “alert” theme which is a subdirectory of the “default” skin, which in turn contains its own look and feel resources. If the alert theme is selected for a book, page, or portlet, the portal framework looks in the structure.xml file in the look and feel’s /skin or /skeleton directories for theme locations. If no structure.xml file is present, the framework looks for /alert skin and skeleton subdirectories under whichever look and feel is being used. If found, the files in the /alert subdirectory take precedence over or are used in addition to the files used in the parent look and feel.
For example, if the alert theme provides a titlebar.jsp skeleton file, the portal framework uses that skeleton file instead of the parent skeleton’s titlebar.jsp file.
Figure 6-4 shows the types of resources included in a theme:
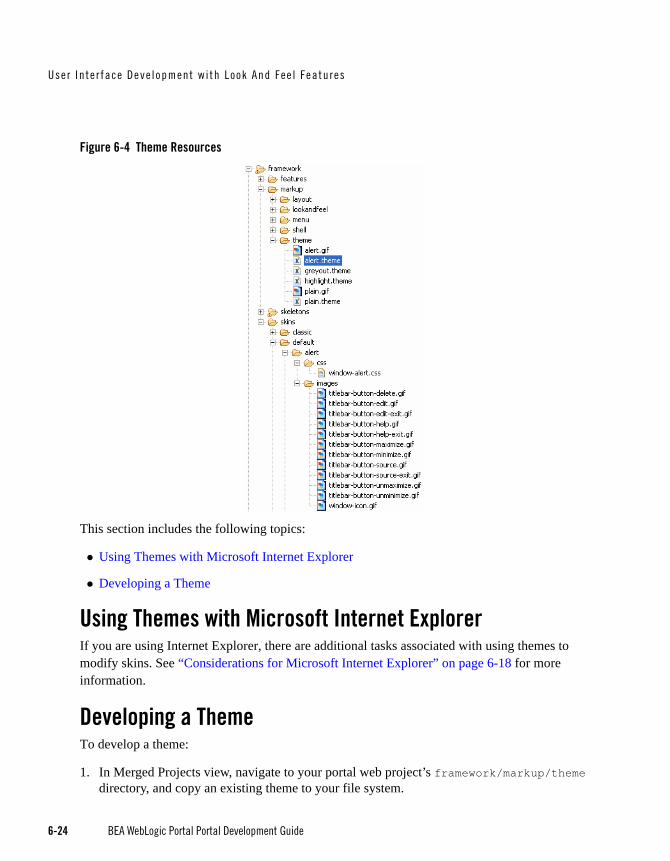
User In te r face Deve lopment w i th Look And Fee l Features
6-24 BEA WebLogic Portal Portal Development Guide
Figure 6-4 Theme Resources
This section includes the following topics:
Using Themes with Microsoft Internet Explorer
Developing a Theme
Using Themes with Microsoft Internet ExplorerIf you are using Internet Explorer, there are additional tasks associated with using themes to modify skins. See “Considerations for Microsoft Internet Explorer” on page 6-18 for more information.
Developing a ThemeTo develop a theme:
1. In Merged Projects view, navigate to your portal web project’s framework/markup/theme directory, and copy an existing theme to your file system.
Using Look And Fee ls F rom Prev i ous Po r ta l Re leases
BEA WebLogic Portal Portal Development Guide 6-25
2. Open the copied theme, and modify the name, title, description, and markupName. Each theme must have a unique markupName.
3. Save the file with a new filename.
4. Create a 100x75 px .gif that represents the theme in the same directory as the .theme file and have the same name.This gif file must have the same name as your *.theme file.
For example, create a gif file called telecom.gif to represent a *.theme file called telecom.theme. This image appears in the visitor tools when end users select themes for their own customized view of a portal desktop.
5. Create the theme directory (using the same, case-sensitive name as the theme markupName) and subdirectories. You can create the theme resources anywhere in the portal web project, where it can be used by any look and feel. Create any unique resources that the theme will use, or duplicate and modify any resources you want to override in the parent skin or skeleton.
6. For any skin or skeleton, be sure to create a structure.xml file that specifies the path to the current theme, as described in “Working with Skins” on page 6-14.
You can also create a structure.xml in the theme directory if you also plan to use the theme as a full look and feel.
If you do not use the structure.xml file in your look and feel /skin and /skeleton directories, store your themes as subdirectories of those skins and skeletons.
Note: If you create any unique resources, be sure to reference them either in the parent skin or skeleton, or in the theme skin or skeleton.
After you create a theme, you can select it in the Properties view for any selected book, page, or portlet.
Using Look And Feels From Previous Portal ReleasesYou can use look and feels created in previous WebLogic Portal releases by importing them into your portal web project (into the proper directories).
If you have look and feel files from WebLogic Portal 8.1 and want to use genes, you will need to upgrade your look and feel files. To upgrade a previous look and feel, open the .laf file in WorkSpace Studio from your portal web project. You are prompted to create the skin.xml and skeleton.xml files. After creating these new files, you are ready to use the new WebLogic Portal look and feel features.
Note: In WebLogic Portal 8.1, skin.properties files could also contain settings for themes. In WebLogic Portal 9.2 and higher, themes are stand-alone look and feels that use their own
User In te r face Deve lopment w i th Look And Fee l Features
6-26 BEA WebLogic Portal Portal Development Guide
skin.xml files. If your WebLogic 8.1 skin.properties files contain theme details that you want to reuse, you must manually add those theme settings to your theme’s skin.xml files.
Troubleshooting Look And FeelsTo troubleshoot or fine tune a look and feel, use the following guidance:
Use the Look And Feel editor to determine which CSS properties you need to modify. See “The Look And Feel Editor” on page 6-26 for details.
When viewing a portal desktop in a browser, view the HTML source to help determine where a problem is occurring and where it needs to be fixed, in a skin or skeleton.
– If the problem is a CSS-related issue, use the HTML source to locate the CSS style that needs to be modified.
– If the problem is a structural issue, use the HTML source to help pinpoint which shell resource or skeleton JSP needs to be modified.
The Look And Feel EditorThis section describes the Look and Feel Editor and includes these topics:
Overview
The Look and Feel Editor Window
Opening the Look And Feel Editor
Style Hierarchy Tab
Style Description Panel
View Area
Outline View
Properties View
Tips for Using the Look and Feel Editor
Overview The look and feel editor lets you interactively edit the text styles used by portal text elements. Technically, the editor modifies Cascading Style Sheet (CSS) files that are referenced by a

The Look And Fee l Ed i to r
BEA WebLogic Portal Portal Development Guide 6-27
portal’s skin.xml file. For example, using the look and feel editor, you can change the size of a heading, the color of a list element, or the padding around a table cell for a portal.
The look and feel editor also lets you change the properties of a portal’s look and feel file (.laf file), such as the skin and skeleton files that it references.
In addition, the editor shows you, at a glance:
The CSS cascade for a portal
The properties assigned to a selected CSS style
The inherited properties of a selected CSS style
The elements of the portal’s skin.xml file
The Look and Feel Editor Window With the look and feel editor, you can experiment with a portal’s look and feel and see the results immediately. The look and feel editor lets you interactively edit the text styles used by a portal. Using the look and feel editor, you can select text in a portal and modify the text’s characteristics, such as font size, color, padding, and so on. The changes you make are immediately reflected in the editor’s view area.
Tip: See “Tips for Using the Look and Feel Editor” on page 6-35.
Remember that a portal’s skin helps to define the overall look and feel of a portal. The portal’s skin.xml file specifies one or more CSS files used by the skin. A portal’s HTML text can reference these CSS files and use their style definitions. If you modify the font size for a particular text style, the look and feel editor changes the style’s definition inside a CSS file. The change is then immediately reflected in the HTML displayed in the editor’s view area.
The following figure shows the parts of the look and feel editor. This section discusses each of these parts in detail.
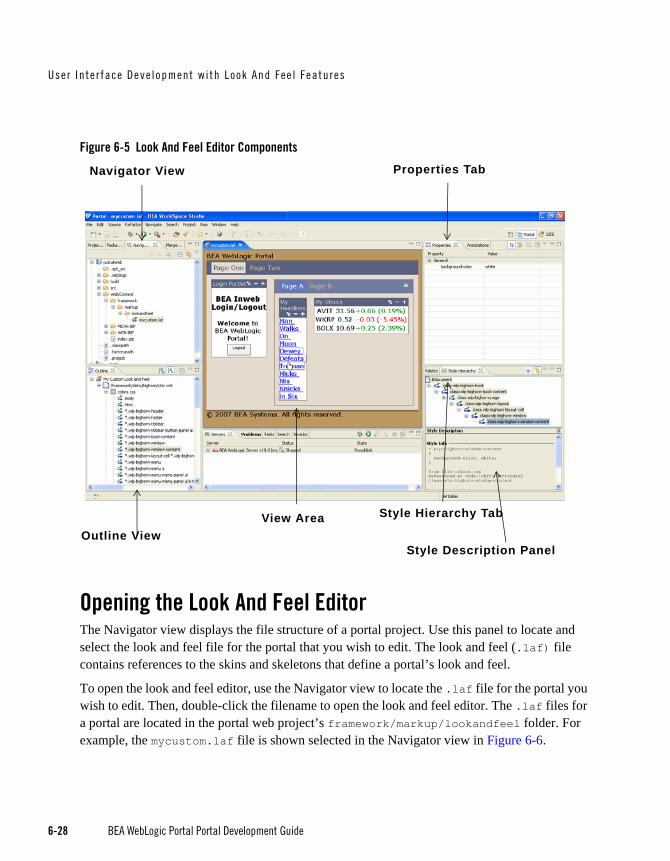
User In te r face Deve lopment w i th Look And Fee l Features
6-28 BEA WebLogic Portal Portal Development Guide
Figure 6-5 Look And Feel Editor Components
Opening the Look And Feel EditorThe Navigator view displays the file structure of a portal project. Use this panel to locate and select the look and feel file for the portal that you wish to edit. The look and feel (.laf) file contains references to the skins and skeletons that define a portal’s look and feel.
To open the look and feel editor, use the Navigator view to locate the .laf file for the portal you wish to edit. Then, double-click the filename to open the look and feel editor. The .laf files for a portal are located in the portal web project’s framework/markup/lookandfeel folder. For example, the mycustom.laf file is shown selected in the Navigator view in Figure 6-6.
Navigator View
Outline View
Style Hierarchy Tab
Style Description Panel
Properties Tab
View Area

The Look And Fee l Ed i to r
BEA WebLogic Portal Portal Development Guide 6-29
Figure 6-6 Selected Look And Feel File
Tip: Use the menu function Edit > Look and Feel to quickly change the format of the preview HTML rendered by the Look and Feel Editor. None of these settings are saved when the Look and Feel editor is closed. Table 6-4 describes the Look and Feel menu options.
Table 6-4 Look and Feel Menu Functions
Menu Function Description
Render Alternate Text Changes the preview HTML being rendered with the open look and feel to an alternate view.
Render Bighorn Text Changes the preview HTML being rendered with the open look amd feel to the Bighorn view.
Render Default Text Changes the preview HTML being rendered with the open look and feel to the default view.
Note: Because skins generally only work with certain skeletons, these first three options attempt to support the look and feel editing with look and feels based on either the WLP 8.1x default/classic/text look and feel (for the Default and Alternative text options) or the new Bighorn look and feel. WorkSpace Studio tries to detect if the look and feel being edited is based on Bighorn or the others and use the appropriate preview HTML.

User In te r face Deve lopment w i th Look And Fee l Features
6-30 BEA WebLogic Portal Portal Development Guide
Style Hierarchy TabThe Style Hierarchy tab shows the CSS cascade for the selected style. The cascade is a hierarchy of CSS styles, defined by the HTML document structure. It is useful to see the cascade, because it can help you to locate and appropriately handle inherited style properties. In Figure 6-7, note that the style wlp-bighorn-window-content is below wlp-bighorn-window in the hierarchy. This means that wlp-window-content can inherit properties from wlp-bighorn-window, and, potentially, from all other style classes higher up the hierarchy. For more information on inheritance, see “CSS Inheritance” on page 6-32. When you select a style in the Style Hierarchy view, its style definitions and inherited style properties appear in the Style Description window, described in “Style Description Panel” on page 6-31.
Figure 6-7 Selected CSS Style
The Link Style Hierarchy Selection with HTML Preview Selection button, shown in Figure 6-7, lets you control whether or not the Style Hierarchy view changes to reflect what is selected in the Look & Feel Editor view. When this button is toggled on, the Style Hierarchy view
Render Custom Text... Changes the preview HTML being rendered with the open look and feel to custom HTML text that you can enter directly in a dialog.
Render Custom URL... Lets you enter a URL or file for the preview HTML. Use this option to preview the look and feel with your own portal that is running on a server.
Table 6-4 Look and Feel Menu Functions
Menu Function Description
Link Style Hierarchy Selectionwith HTML Preview SelectionButton

The Look And Fee l Ed i to r
BEA WebLogic Portal Portal Development Guide 6-31
updates its display to show the style hierarchy corresponding to the styles of the selected HTML element in the editor. If this button is toggled off, the Style Hierarchy view does not update when you click in the Look & Feel Editor. This button is toggled on by default. In a typical use case, you can select an element in the editor and then toggle this button off to “lock” the Style Hierarchy view. Then, you can click around in the editor to compare the “locked” Style Hierarchy to other selected elements in the editor.
Style Description PanelThe Style Description panel lets you see at a glance the selected style’s properties and its inherited style properties. The Style Info section, shown in Figure 6-8, comes directly from the CSS file in which the style is defined. The Inherited Styles list, also shown, is constructed directly from the document structure of the HTML text that is currently opened in the look and feel editor. The Inherited Styles list shows the style properties and their values that are inherited from styles higher up in the document hierarchy. For instance, you can see that wlp-bighorn-window-content inherits the background color property from the wlp-bighorn-book-content style.
Figure 6-8 Window Shows Inherited Styles
To understand the value of the Inherited Styles list, it helps to have a basic understanding of HTML and CSS.
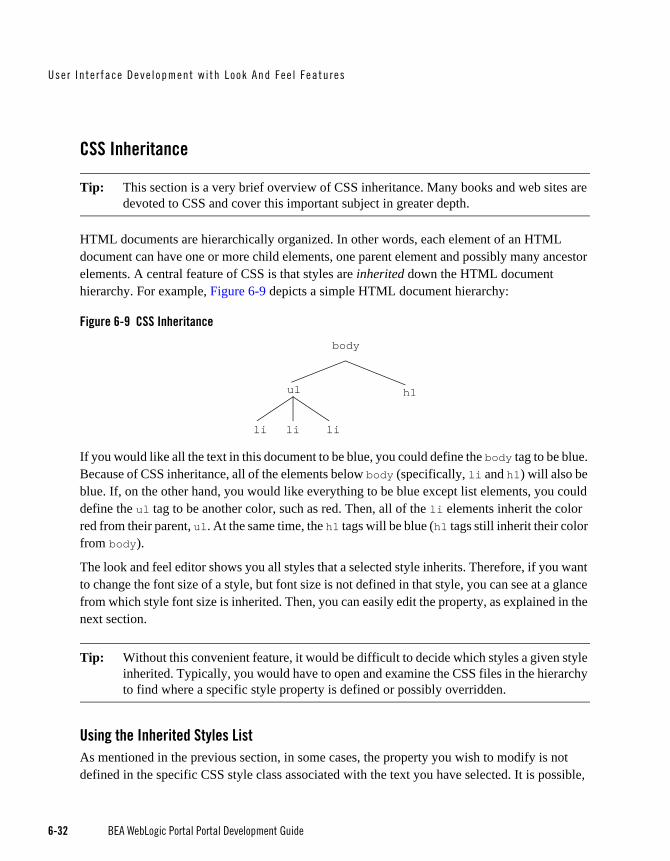
User In te r face Deve lopment w i th Look And Fee l Features
6-32 BEA WebLogic Portal Portal Development Guide
CSS Inheritance
Tip: This section is a very brief overview of CSS inheritance. Many books and web sites are devoted to CSS and cover this important subject in greater depth.
HTML documents are hierarchically organized. In other words, each element of an HTML document can have one or more child elements, one parent element and possibly many ancestor elements. A central feature of CSS is that styles are inherited down the HTML document hierarchy. For example, Figure 6-9 depicts a simple HTML document hierarchy:
Figure 6-9 CSS Inheritance
If you would like all the text in this document to be blue, you could define the body tag to be blue. Because of CSS inheritance, all of the elements below body (specifically, li and h1) will also be blue. If, on the other hand, you would like everything to be blue except list elements, you could define the ul tag to be another color, such as red. Then, all of the li elements inherit the color red from their parent, ul. At the same time, the h1 tags will be blue (h1 tags still inherit their color from body).
The look and feel editor shows you all styles that a selected style inherits. Therefore, if you want to change the font size of a style, but font size is not defined in that style, you can see at a glance from which style font size is inherited. Then, you can easily edit the property, as explained in the next section.
Tip: Without this convenient feature, it would be difficult to decide which styles a given style inherited. Typically, you would have to open and examine the CSS files in the hierarchy to find where a specific style property is defined or possibly overridden.
Using the Inherited Styles ListAs mentioned in the previous section, in some cases, the property you wish to modify is not defined in the specific CSS style class associated with the text you have selected. It is possible,
body
ul
li li li
h1
The Look And Fee l Ed i to r
BEA WebLogic Portal Portal Development Guide 6-33
for instance, to select a heading in the look and feel editor, but find that font size is not a property of that heading's style. In this case, the property you wish to change might be an inherited property.
The look and feel editor displays and lets you edit any inherited property for a given style. For example, suppose you wish to change the font size of some text. After selecting the style you wish to edit (for example, by clicking the text in the View Area), you then notice that font-size is not a property of that text's CSS style. Next you look at the Inherited Styles list, and you discover a style higher up in the cascade in which font-size is defined.
At this point, you must decide whether you want to edit the font-size property where it is currently defined (higher up in the cascade) or add the property directly to the style of the text you wish to modify. Of course, if you modify a property up the cascade, you might inadvertently change the properties of other text that inherits the same property. It is up to you to make this decision. If you change it directly in the selected style, then the inherited property is overridden, and only that style (and any styles down the hierarchy) receive the new property value (unless it is once again overridden).
Tip: To add or modify a property in an inherited style, double-click the style name in the Inherited Styles list. Then, use the CSS Style Wizard to make your changes.
HTML documents are hierarchically organized. In other words, each element of an HTML document can have one or more child elements, one parent element and possibly many ancestor elements. A central feature of CSS is that styles are inherited down the HTML document hierarchy. For example, the following tree diagram depicts a simple HTML document hierarchy:
If you would like all the text in this document to be blue, you could define the body tag to be blue. Because of CSS inheritance, all of the elements below body (specifically, li and h1) will also be blue. If, on the other hand, you would like everything to be blue except list elements, you could define the ul tag to be another color, such as red. Then, all of the li elements will inherit the color red from their parent, ul. At the same time, the h1 tags will be blue (h1 tags still inherit their color from body).
The look and feel editor shows you all styles that a selected style inherits. Therefore, if you want to change the font size of a style, but font size is not defined in that style, you can see at a glance from which style font size is inherited. Then, you can easily edit the property, as explained in the next section.

User In te r face Deve lopment w i th Look And Fee l Features
6-34 BEA WebLogic Portal Portal Development Guide
View Area The View area displays the HTML that uses the CSS styles you wish to edit. When you start the look and feel editor, a default HTML page is displayed, showing a representative sample of text elements.
Note: Remember that you start the look and feel editor by opening a look and feel (.laf) file. The HTML file that is shown in the View Area must reference the same CSS files that the .laf file references in its skin. If you load the default HTML page into the editor, this connection is automatically established. However, if you load HTML from a portal into the editor, you must be sure the portal references the same .laf file as the editor.
Outline ViewThe Outline view shows a representation of the files that are referenced by the portal’s skin.xml file. In this panel you can edit properties of:
The look and feel (.laf) file for the portal
The style properties located in each of the CSS (.css) files referenced by the portal’s skin
Figure 6-10 shows a portion of the Document Structure panel. In this figure, the css/portlet.css file is expanded to reveal the styles defined in it. You can double-click a style to add or modify its properties. You can also single-click a .css file, style name, or style property to display and edit values in the Properties view.
Figure 6-10 Double-click a style to modify its properties

The Look And Fee l Ed i to r
BEA WebLogic Portal Portal Development Guide 6-35
In addition to using this panel to access CSS styles, you can also access and edit the properties of the look and feel file associated with a portal, as shown in Figure 6-11. You can change any of these properties, including picking new skin and skeleton files. Note that the look and feel file node occurs at the top of the document structure.
Figure 6-11 Look and Feel file in the Outline View
Properties ViewThe Properties view lets you interactively modify values of the selected CSS style or look and feel file. To display properties in the Properties view, you can do one of the following:
Click on a text element in the HTML file in the View Area.
Click a CSS style or the look and feel filename in the Outline view.
Click on a CSS filename in the Outline view, then expand the CSS file in the Properties view to edit the properties.
Tips for Using the Look and Feel Editor This section discusses these useful features of the Look and Feel Editor:
The Link Style Hiearchy Selection with HTML Preview Selection button
The Mouse-Over Button
Using the Link Style Hiearchy Selection with HTML Preview Selection ButtonThe Link Style Hierarchy Selection with HTML Preview Selection button, shown in Figure 6-7, lets you control whether or not the Style Hierarchy view changes to reflect what is
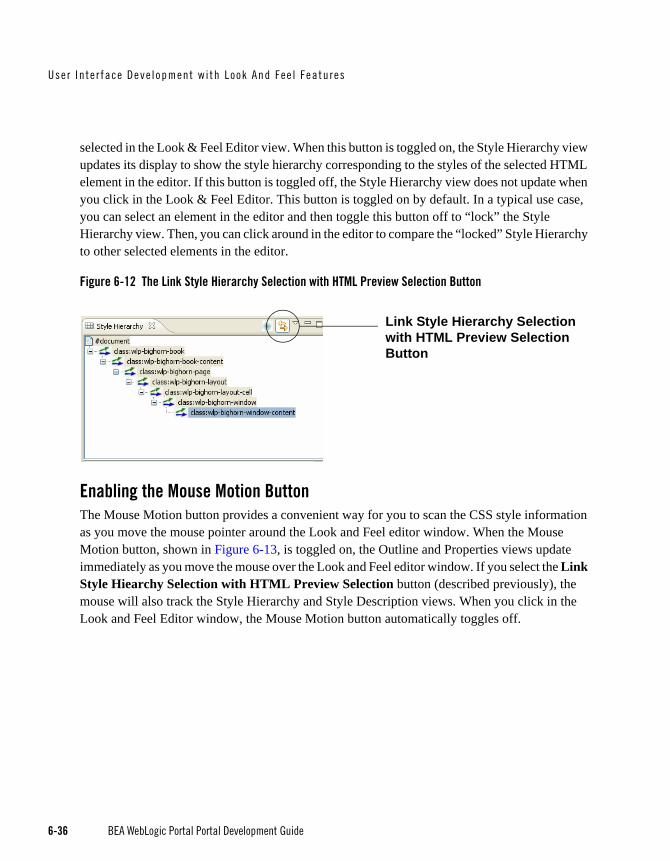
User In te r face Deve lopment w i th Look And Fee l Features
6-36 BEA WebLogic Portal Portal Development Guide
selected in the Look & Feel Editor view. When this button is toggled on, the Style Hierarchy view updates its display to show the style hierarchy corresponding to the styles of the selected HTML element in the editor. If this button is toggled off, the Style Hierarchy view does not update when you click in the Look & Feel Editor. This button is toggled on by default. In a typical use case, you can select an element in the editor and then toggle this button off to “lock” the Style Hierarchy view. Then, you can click around in the editor to compare the “locked” Style Hierarchy to other selected elements in the editor.
Figure 6-12 The Link Style Hierarchy Selection with HTML Preview Selection Button
Enabling the Mouse Motion ButtonThe Mouse Motion button provides a convenient way for you to scan the CSS style information as you move the mouse pointer around the Look and Feel editor window. When the Mouse Motion button, shown in Figure 6-13, is toggled on, the Outline and Properties views update immediately as you move the mouse over the Look and Feel editor window. If you select the Link Style Hiearchy Selection with HTML Preview Selection button (described previously), the mouse will also track the Style Hierarchy and Style Description views. When you click in the Look and Feel Editor window, the Mouse Motion button automatically toggles off.
Link Style Hierarchy Selectionwith HTML Preview SelectionButton

Look And Fee l AP I
BEA WebLogic Portal Portal Development Guide 6-37
Figure 6-13 Mouse Motion Button
Look And Feel APIThe following packages, documented in Javadoc, let you perform many programmatic operations on look and feels:
com.bea.netuix.laf
com.bea.netuix.laf.genes
com.bea.netuix.laf.genes.mutators
Working with ShellsShells define the header and footer regions of a portal. You can include portlets, JSPs, and HTML files in a shell to define the content displayed in the header or footer. You can create a new shell or modify existing shells.
Note: Shells created with previous versions cannot be modified using the shell editor. You must continue to use an XML editor to modify previously created shells.
This section includes the following topics:
Creating a New Shell
Modifying a Shell
Applying a Shell to a Portal Desktop
Placing Portlets in a Header or Footer
Mouse Motion Button
User In te r face Deve lopment w i th Look And Fee l Features
6-38 BEA WebLogic Portal Portal Development Guide
Creating a New ShellTo create a new shell:
1. In Merged Projects view, copy an existing shell from your portal web project’s framework/markup/shells directory to your file system.
Note: If GroupSpace is enabled in your portal web project, you can also copy communityFiles/shell/communityHeaderFooter.shell.
2. In the Project Explorer, right-click the shell and select Open With > Shell Editor.
3. Within the Outline view, click the shell to view its properties in the Properties view.
4. In the Shell Properties view, modify the title and the description properties.
5. Save the new shell.
Modifying a ShellYou can modify the properties of shell, as well as header and footer properties. One of the most common shell modifications is to add a layout to a header or footer. When you add a layout to a header or footer, you can place portlets within the header or footer, respectively.
To modify a shell:
1. In the Merged Projects view, right-click the shell and select Open With > Shell Editor.
2. In the Shell Editor, click the element you want to modify such as the header or footer.
3. In the Properties view, modify the properties that you want to change. For example, choose a Layout Type to use.
4. Save your changes
Applying a Shell to a Portal DesktopIf you want to change the shell that is used by your portal desktop, you must update the Shell property for your portal. For more information about updating portal properties, see “Editing Portal Properties” on page 7-11.
If you have modified or assigned a new shell to your portal desktop, you must reload the shell to ensure your changes are saved.
To reload a shell:

Work ing w i th Layouts
BEA WebLogic Portal Portal Development Guide 6-39
1. Update the shell property using the Properties view.
2. Click the Reload button next to the Shell property drop-down list.
Placing Portlets in a Header or FooterTo place portlets in a header or footer, you must first associate a layout with the respective header or footer.
You may notice that portlets in a header or footer do not display a delete button, even if the portlet specifies that it should have one. When you put a layout inside of a header or footer, the placeholders inside the layout are considered to be “locked.” This means that users can’t move or delete the contents of the placeholders. Therefore, even if a portlet in a header or footer specifies that it is supposed to have a delete button, the delete button will not render.
Working with LayoutsLayouts, used by portal pages as well as headers and footers, provide structure that determines where you can place portlets and books within a page. Layouts can be implemented using HTML tables or CSS-based approaches.
WebLogic Portal provides a set of predefined layouts you can use in your portals, available for selection in the Properties view when you select a page in the portal editor. For more information about page properties, see “Page Properties” on page 7-22.
In addition to using the predefined layouts that WebLogic Portal provides, you can create custom layouts A layout includes the following files:
An XML file with a .layout extension - This file maps to a skeleton JSP that renders the final layout in HTML.
An HTML file with a .html.txt extension - Used to simulate the layout in the portal editor and WebLogic Portal Administration Console.
This section describes the following layout tasks:
Creating a Standard Layout
Creating a Custom Layout
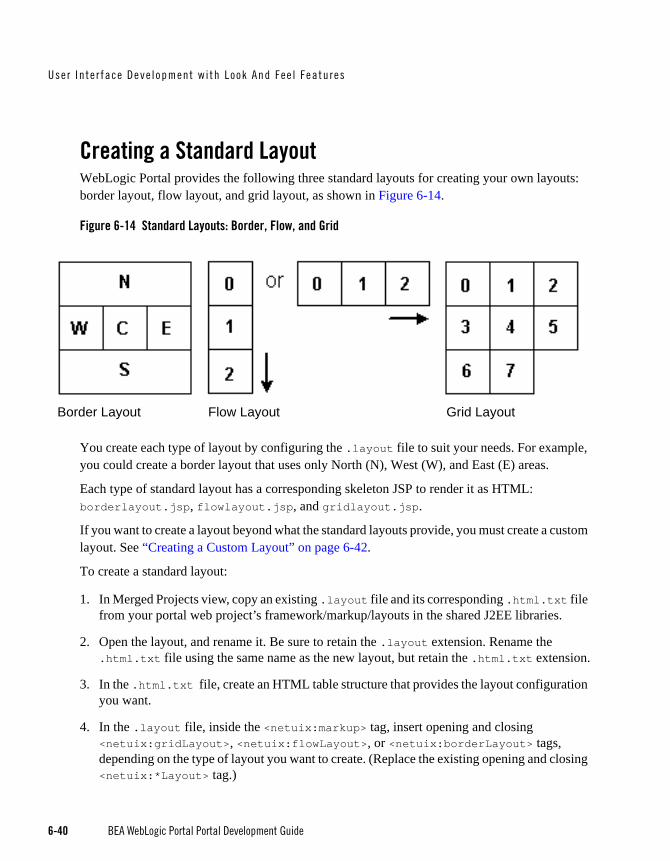
User In te r face Deve lopment w i th Look And Fee l Features
6-40 BEA WebLogic Portal Portal Development Guide
Creating a Standard LayoutWebLogic Portal provides the following three standard layouts for creating your own layouts: border layout, flow layout, and grid layout, as shown in Figure 6-14.
Figure 6-14 Standard Layouts: Border, Flow, and Grid
You create each type of layout by configuring the .layout file to suit your needs. For example, you could create a border layout that uses only North (N), West (W), and East (E) areas.
Each type of standard layout has a corresponding skeleton JSP to render it as HTML: borderlayout.jsp, flowlayout.jsp, and gridlayout.jsp.
If you want to create a layout beyond what the standard layouts provide, you must create a custom layout. See “Creating a Custom Layout” on page 6-42.
To create a standard layout:
1. In Merged Projects view, copy an existing .layout file and its corresponding .html.txt file from your portal web project’s framework/markup/layouts in the shared J2EE libraries.
2. Open the layout, and rename it. Be sure to retain the .layout extension. Rename the .html.txt file using the same name as the new layout, but retain the .html.txt extension.
3. In the .html.txt file, create an HTML table structure that provides the layout configuration you want.
4. In the .layout file, inside the <netuix:markup> tag, insert opening and closing <netuix:gridLayout>, <netuix:flowLayout>, or <netuix:borderLayout> tags, depending on the type of layout you want to create. (Replace the existing opening and closing <netuix:*Layout> tag.)
Border Layout Flow Layout Grid Layout

Work ing w i th Layouts
BEA WebLogic Portal Portal Development Guide 6-41
5. Inside the opening <netuix:*Layout> tag, add (or modify) the following attributes, as shown in Table 6-5.
For example, if you are modifying a copy of the fourcolumn.layout to create a border layout, replace the columns attribute with the layoutStrategy attribute and change its value.
6. Inside the <netuix:*Layout> tag, add opening <netuix:placeholder> and closing </netuix:placeholder> tags for each placeholder you want in the layout.
If you are creating a border layout, use no more than five placeholders.
Table 6-5 Layout Attributes
Title Provides the name for selecting the layout in a drop-down menu.
Description Provides a description for the selected layout.
Border layout attributes layoutStrategy – Enter order or title.
If you enter order, the placeholders are ordered according to the value you put in the <netuix:placeholder> tag (covered in the following steps). For example:
<netuix:placeholder>North</netuix:placeholder> makes the placeholder the north placeholder.
If you enter title, the placeholders are ordered according to the <netuix:placeholder> title attribute value. For example:
<netuix:placeholder title=“south” ...></netuix:placeholder> makes the placeholder the south placeholder.
Flow layout attributes orientation – Enter vertical or horizontal to determine the direction in which the placeholders are positioned.
Grid layout attributes columns – Determines the number of columns in the layout. The number of rows are determined automatically. Do not use the rows attribute if you use the columns attribute.
rows – Determines the number of rows in the layout. The number of columns is determined automatically. Do not use the columns attribute if you use the rows attribute.
htmlLayoutUri Provides the path (relative to the project) to the .html.txt file you created. For example, /framework/markup/layout/yourNewLayout.html.txt.
markupName The markupName must be unique among the other layouts.
User In te r face Deve lopment w i th Look And Fee l Features
6-42 BEA WebLogic Portal Portal Development Guide
7. In the opening <netuix:placeholder> tag of each placeholder, add the following attributes:
title – Enter a title for the placeholder. If you are using a border layout with the layoutStrategy attribute set to title, enter north, south, east, west, or center for the title to determine which position of the placeholder in the border layout.
description – Enter a description for the placeholder.
flow – Optional. If you want to control whether the books and portlets are automatically positioned vertically or horizontally when they are added to a layout, enter true.
usingFlow – Optional. If you set the flow attribute to true, enter vertical or horizontal for this attribute value. This value determines whether books and portlets are positioned on top of each other in the placeholder (vertical) or side by side (horizontal).
width – Optional. Set a width for the placeholder.
markupType – Required. Enter Placeholder.
markupName – Required. Used as an ID for the placeholder. Each placeholder must have a unique markupName across all layouts.
8. If you are creating a border layout and the layoutStrategy attribute is set to order, enter North, South, East, West, or Center as the content between the opening and closing <netuix:placeholder> tag to determine each placeholder's position in the layout. For example, <netuix:placeholder>North</netuix:placeholder> makes a placeholder the north placeholder.
9. Save the layout file.
10. Create a 100x75 px .gif that represents the layout in the same directory as the .layout file and have the same name, but with a *.gif extension. This image appears in the visitor tools when end users select layouts for their own customized view of a portal desktop.
You can now use the layout in your portals, by selecting a page in the portal editor and selecting the layout in the Properties view.
Creating a Custom LayoutIf none of WebLogic Portal’s standard layouts suit your needs, you can create a custom layout. When creating a custom layout you need to create three things:
The Layout File
The html.txt File
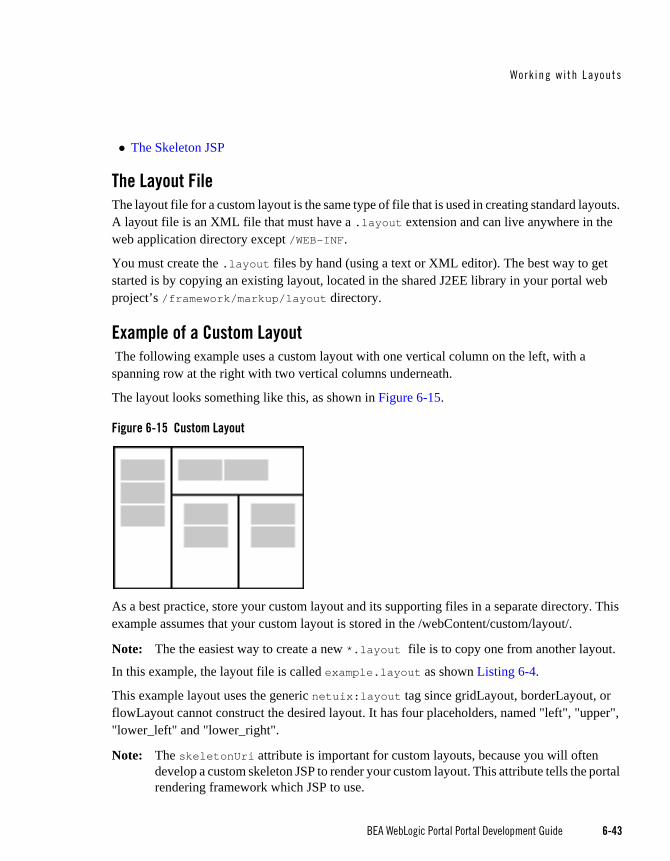
Work ing w i th Layouts
BEA WebLogic Portal Portal Development Guide 6-43
The Skeleton JSP
The Layout FileThe layout file for a custom layout is the same type of file that is used in creating standard layouts. A layout file is an XML file that must have a .layout extension and can live anywhere in the web application directory except /WEB-INF.
You must create the .layout files by hand (using a text or XML editor). The best way to get started is by copying an existing layout, located in the shared J2EE library in your portal web project’s /framework/markup/layout directory.
Example of a Custom Layout The following example uses a custom layout with one vertical column on the left, with a spanning row at the right with two vertical columns underneath.
The layout looks something like this, as shown in Figure 6-15.
Figure 6-15 Custom Layout
As a best practice, store your custom layout and its supporting files in a separate directory. This example assumes that your custom layout is stored in the /webContent/custom/layout/.
Note: The the easiest way to create a new *.layout file is to copy one from another layout.
In this example, the layout file is called example.layout as shown Listing 6-4.
This example layout uses the generic netuix:layout tag since gridLayout, borderLayout, or flowLayout cannot construct the desired layout. It has four placeholders, named "left", "upper", "lower_left" and "lower_right".
Note: The skeletonUri attribute is important for custom layouts, because you will often develop a custom skeleton JSP to render your custom layout. This attribute tells the portal rendering framework which JSP to use.

User In te r face Deve lopment w i th Look And Fee l Features
6-44 BEA WebLogic Portal Portal Development Guide
Listing 6-4 Sample Code for the example.layout File
<?xml version="1.0" encoding="UTF-8"?><netuix:markupDefinition xmlns:netuix="http://www.bea.com/servers/netuix/xsd/controls/netuix/1.0.0"xmlns:xsi="http://www.w3.org/2001/XMLSchema-instance" xsi:schemaLocation="http://www.bea.com/servers/netuix/xsd/controls/netuix/1.0.0 markup-netuix-1_0_0.xsd">
<netuix:locale language="en"/> <netuix:markup> <netuix:layout markupType="Layout" markupName="exampleLayout" title="Example Custom Layout" description="Example with Left, Upper, Lower Left and Lower Right placeholders" skeletonUri="/custom/layout/examplelayout.jsp" htmlLayoutUri="/custom/layout/example.html.txt" iconUri="/framework/markup/layout/example.gif" thumbnailUri="/framework/markup/layout/example.gif" type="example"> <netuix:placeholder markupType="Placeholder" markupName="exampleLayout_left" title="left" usingFlow="false" description="Left Side placeholder" width="30%"> </netuix:placeholder> <netuix:placeholder markupType="Placeholder" markupName="exampleLayout_upper" title="upper" usingFlow="true" flow="horizontal" description="Upper placeholder with horizontal flow" width="70%"> </netuix:placeholder> <netuix:placeholder markupType="Placeholder" markupName="exampleLayout_lowerLeft" title="lower_left" usingFlow="false" description="Lower Left placeholder (below Upper)" width="35%"> </netuix:placeholder> <netuix:placeholder markupType="Placeholder" markupName="exampleLayout_lowerRight" title="lower_right" usingFlow="false" description="Lower Right placeholder (below Upper)" width="35%"> </netuix:placeholder> </netuix:layout> </netuix:markup></netuix:markupDefinition>
The Skeleton JSPThis example requires a custom skeleton to do the rendering (as specified by the skeletonUri attribute). You must create this JSP, copying it to any look and feels in which the layout is to be used. As with the layout file, the easiest way to create a custom layout JSP is to copy an existing one.
Listing 6-5 displays what the custom skeleton JSP (/framework/markup/layout/examplelayout.jsp) looks like:
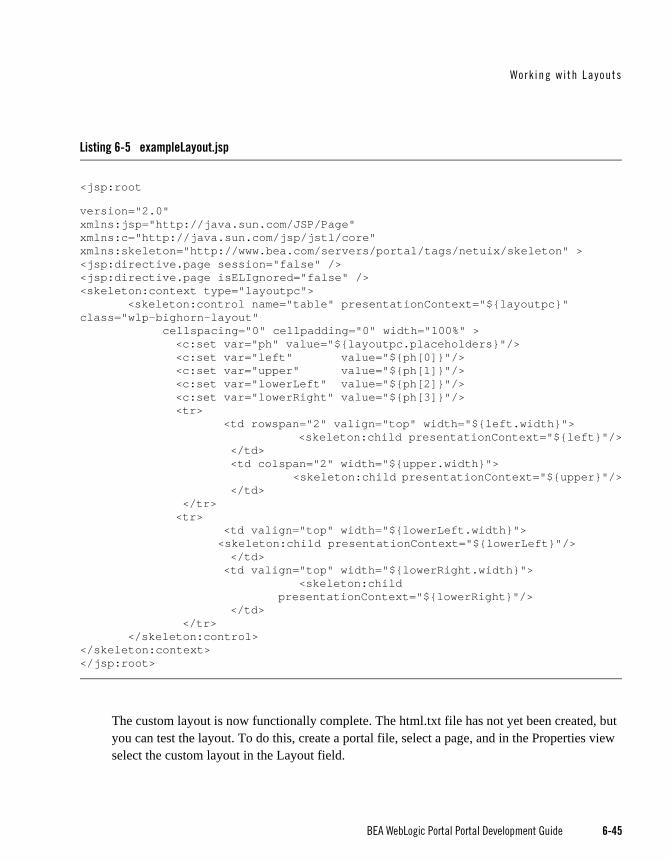
Work ing w i th Layouts
BEA WebLogic Portal Portal Development Guide 6-45
Listing 6-5 exampleLayout.jsp
<jsp:root
version="2.0"xmlns:jsp="http://java.sun.com/JSP/Page"xmlns:c="http://java.sun.com/jsp/jstl/core"xmlns:skeleton="http://www.bea.com/servers/portal/tags/netuix/skeleton" ><jsp:directive.page session="false" /><jsp:directive.page isELIgnored="false" /><skeleton:context type="layoutpc">
<skeleton:control name="table" presentationContext="${layoutpc}" class="wlp-bighorn-layout" cellspacing="0" cellpadding="0" width="100%" >
<c:set var="ph" value="${layoutpc.placeholders}"/><c:set var="left" value="${ph[0]}"/><c:set var="upper" value="${ph[1]}"/><c:set var="lowerLeft" value="${ph[2]}"/><c:set var="lowerRight" value="${ph[3]}"/><tr>
<td rowspan="2" valign="top" width="${left.width}"> <skeleton:child presentationContext="${left}"/>
</td> <td colspan="2" width="${upper.width}">
<skeleton:child presentationContext="${upper}"/> </td>
</tr><tr>
<td valign="top" width="${lowerLeft.width}"> <skeleton:child presentationContext="${lowerLeft}"/>
</td> <td valign="top" width="${lowerRight.width}">
<skeleton:child presentationContext="${lowerRight}"/>
</td> </tr>
</skeleton:control></skeleton:context></jsp:root>
The custom layout is now functionally complete. The html.txt file has not yet been created, but you can test the layout. To do this, create a portal file, select a page, and in the Properties view select the custom layout in the Layout field.

User In te r face Deve lopment w i th Look And Fee l Features
6-46 BEA WebLogic Portal Portal Development Guide
Note: If you change your .layout file after you have used it in the .portal file, you need to reload the changed layout. To reload a layout, update the layout property using the Properties view. Then click Reload. then click Reload (next to the layout property drop-down list).
The html.txt FileThe .html.txt is an HTML snippet used by WorkSpace Studio to give a visual representation of what the layout looks like, so the developer or administrator can place the portlets in the correct placeholders.
In this example, the custom.html.txt file is /framework/markup/layout/example.html.txt and should look something like the example shown in Listing 6-6:
Listing 6-6 Sample example.html.txt Code
<table class="portalLayout" id="thePortalLayout" width="100%" height="100%"><tr>
<td class="placeholderTD" valign="top" rowspan="2" width="30%"><placeholder number="0"/>
</td><td class="placeholderTD" valign="top" colspan="2" width="70%">
<placeholder number="1"/></td>
</tr><tr>
<td class="placeholderTD" valign="top" width="35%"><placeholder number="2"/>
</td><td class="placeholderTD" valign="top" width="35%">
<placeholder number="3"/></td>
</tr></table>
Working with Navigation MenusMenus determine the navigation style used for your portal pages. WebLogic Portal provides two types of menus: single-level for single rows of tabs and multi-level for nested, drop-down style page navigation.
Bui ld ing User In te r faces to Address Access ib i l i t y Gu ide l ines
BEA WebLogic Portal Portal Development Guide 6-47
Single Level Menu - Provides visible layering of book and page links. Any sub-books and pages appear in rows below the main book navigation.
Multi Level Menu - Provides a single row of tab-like links for the books and pages at the level you apply the Multi Level Menu. Any sub-books and pages appear in a drop-down list for selection. The Multi Level Menu implements JavaScript functionality contained in the skins.
If you want navigation menu behavior other than what is provided with the default menus, modify the singlelevelmenu.jsp or multilevelmenu.jsp skeletons in your look and feel /skeletons directory by copying those files from the shared J2EE library to your file system and making the desired modifications. If you are modifying the multi-level menu behavior, you may also need to modify the skin’s menu.js file located in your skin’s /js subdirectory.
Using Images for Page TabsTo use images on page tabs (Rollover Image, Selected Image, Unselected Image in the Properties view for a selected book), enter a path to the images that is relative to the look and feel’s image search paths specific in the skin.xml file.
For example, if you skin.xml image search path is <path-element>images</path-element>, and your menu images are stored in your skin’s /images directory, enter the name of the image file in the Properties view. If your menu images are stored in an /images subdirectory of your portal web project, enter a path to the graphic like this: ../../../../images/my_rollover.gif.
Building User Interfaces to Address Accessibility Guidelines
Many organizations are required to provide web sites that meet industry or government standards for supporting people with special needs. And even if you do not have specific requirements, it is just good business to design your site to serve the needs of a diverse audience.
WebLogic Portal provides a flexible architecture that supports the design, development, and management of accessible portals and applications, for example, the ability to target specific user interfaces based on user preferences or browser and request attributes.
To learn more about building user interfaces with WebLogic Portal, see “Working with Look And Feel Files” on page 6-3.
This section contains information on the following subjects:

User In te r face Deve lopment w i th Look And Fee l Features
6-48 BEA WebLogic Portal Portal Development Guide
Accessibility Checkpoints
W3C Web Content Accessibility Guidelines
Government Regulations and Standards
Accessibility Evaluation and Testing Tools
Accessibility CheckpointsWhen you develop web sites, you can use the following general guidelines to facilitate accessibility. For a complete list, refer to the industry or government regulation relevant for your implementation.
Text Tags – Provide a text equivalent for every non-text element (for example, using “alt”, “longdesc”, or in element content).
Multimedia Presentations – Synchronize equivalent alternatives for any multimedia presentation.
Color – Design web pages so that all information conveyed with color is also available without color. (for example, from context or markup.)
Readability (style sheets) – Organize documents so they are readable without requiring an associated style sheet.
Server-Side Image Maps – Provide redundant text links for each active region of a server-side image map.
Client-Side Image Maps – Provide client-side image maps instead of server-side image maps except where the regions cannot be defined with an available geometric shape.
Data Table (simple row and column headers) – Identify row and column headers for data tables
Data Tables (multiple levels of row and column headers) – Use markup associate data cells and header cells for data tables that have two or more logical levels of row or column headers.
Frames – Entitle frames with text that facilitates frame identification and navigation.
Flicker Rate – Design pages to avoid causing the screen to flicker with a frequency greater than 2 Hz and lower than 55 Hz.

Bui ld ing User In te r faces to Address Access ib i l i t y Gu ide l ines
BEA WebLogic Portal Portal Development Guide 6-49
Text-Only Alternative – Provide a text-only page, with equivalent information or functionality, to make a web site comply with the provisions of this section when compliance cannot be accomplished in any other way. You must remember to update the content of the text-only page whenever the primary page changes.
Scripts – When pages use scripting languages to display content, or to create interface elements, you must identify the information provided by the script with functional text that can be read by assistive technology.
Applets and Plug-ins – When a web page requires that an applet, plug-in or other application be present on the client system to interpret page content, you must provide a link in the page to a plug-in or applet that complies with Section 508 §1194.21(a) through (l).
Electronic Forms – When electronic forms are designed to be completed online, you must create the form to allow people using assistive technology to access the information, field elements, and functionality required for completion and submission of the form, including all directions and cues.
Navigation Links – Provide a method that permits users to skip repetitive navigation links.
Time Delays – When a timed response is required, you must alert users and give them sufficient time to indicate more time is required.
W3C Web Content Accessibility Guidelineshttp://www.w3.org/WAI/w3c.htm - Checklist of Checkpoints for Web Content Accessibility Guidelines 1.0
http://www.w3.org/TR/WCAG10/full-checklist.html
Government Regulations and StandardsTable 6-6 lists some government regulation resources.
Table 6-6 Resources for Government Standards
Country Resource
United States http://www.section508.gov
Canada http://www.tbs-sct.gc.ca/clf-nsi/inter/inter-01-tb_e.asp
United Kingdom http://www.web-access.org.uk

User In te r face Deve lopment w i th Look And Fee l Features
6-50 BEA WebLogic Portal Portal Development Guide
Accessibility Evaluation and Testing ToolsThese tools allow you to validate web page code. They do not repair your code, but they do provide reports on what does and does not need to be fixed, as relating to HTML 4.0, W3C, Section 508 and general accessibility issues.
W3C Web Accessibility InitiativeW3C Web Accessibility Initiative's Web Tools Page - Evaluation, Repair, and Transformation Tools for Web Content Accessibility: http://www.w3.org/WAI/ER/existingtools.html
W3C HTML Validator - The W3C HTML Validation Service checks HTML documents for conformance to W3C HTML and XHTML recommendations and other HTML standards: http://validator.w3.org/
CSS Validator - If you are using Cascading Style Sheets (CSS), then use the CSS Validator: http://jigsaw.w3.org/css-validator/
For more information, visit the W3C's Evaluation & Repairs Tools page: http://www.w3.org/TR/2000/WD-AERT-20000426
Lynx ViewerThe Lynx Viewer generates an HTML page that indicates how much of the content of your page would be available to Lynx, which is a text-only browser. In addition to showing how useful a site would be for a visually-impaired person, it is also a good indicator for anyone with older technology, see http://www.delorie.com/web/lynxview.html.
BEA WebLogic Portal Portal Development Guide 7-1
C H A P T E R 7
Developing Portals Using WorkSpace Studio
Before you perform the tasks described in this chapter, make sure you have already performed the setup steps described in Chapter 4, “Setting up Your Portal Development Environment.” Also keep in mind that you must have the framework for your portal in place, including look and feel elements, any required CSS files, and so on, before you start building your portal.
This chapter includes the following sections:
Creating a Portal
Setting Portal Component Properties
Copying J2EE Library Files into a Project
Custom Controls in Page Flows
Deploy and View a Portal
Working with URLs
Working with Encoding in HTTP Responses
Cache Management in WorkSpace Studio
Improving WebLogic Server Administration Console Performance on a Managed Server
Behavior of the “Return to Default Page” Attribute
Adding Commerce Services to an Existing Portal Web Project
Customizing Problem Validation Settings
Deve lop ing Por ta ls Us ing WorkSpace S tud io
7-2 BEA WebLogic Portal Portal Development Guide
Enabling Placeable Movement
Localizing Titles for File-Based Books, Pages, and Portlets
Creating a PortalWhen you create a portal, WebLogic Portal creates a portal file—an XML file with a .portal file extension. The .portal file is the central defining file of a portal, with references to all the major components of the portal: the desktops, books, pages, portlets, and so on.
This section includes the following topics:
Add a Page or Book to Your Portal
Creating a Standalone Book or Page
Extracting an Existing Page or Book to Re-Use
Rearranging Books and Pages
To create a portal and its accompanying .portal file, perform these steps:
1. If the Portal perspective is not already open, select it by choosing Window > Open Perspective > Portal.
2. Navigate to the web content directory of your Portal Web Project (by default it is named WebContent); right-click and then select New > Portal.
The New Portal dialog displays, as shown in Figure 7-1.
Because you started this wizard by right-clicking the web content directory, the parent folder field automatically displays that directory name.
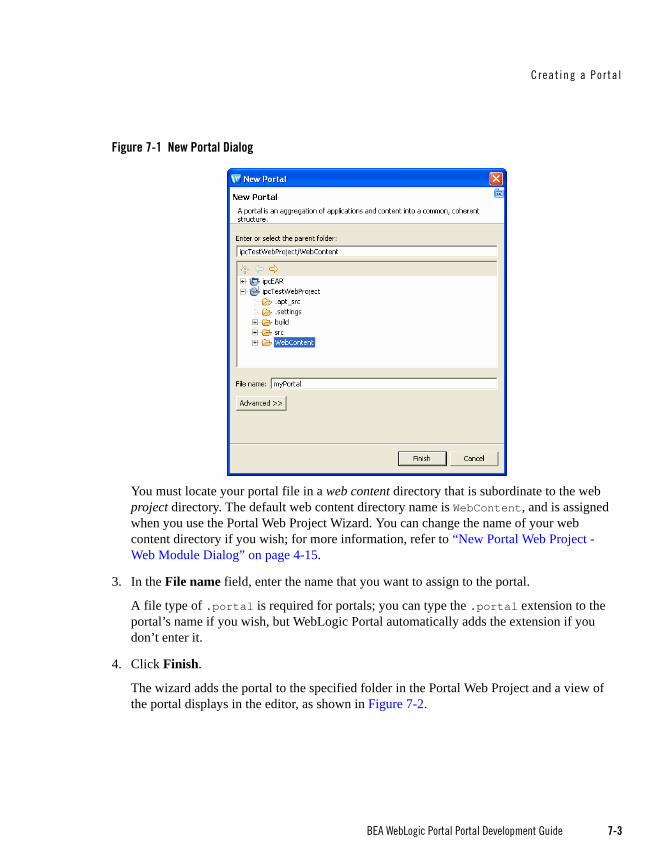
Creat ing a Po r ta l
BEA WebLogic Portal Portal Development Guide 7-3
Figure 7-1 New Portal Dialog
You must locate your portal file in a web content directory that is subordinate to the web project directory. The default web content directory name is WebContent, and is assigned when you use the Portal Web Project Wizard. You can change the name of your web content directory if you wish; for more information, refer to “New Portal Web Project - Web Module Dialog” on page 4-15.
3. In the File name field, enter the name that you want to assign to the portal.
A file type of .portal is required for portals; you can type the .portal extension to the portal’s name if you wish, but WebLogic Portal automatically adds the extension if you don’t enter it.
4. Click Finish.
The wizard adds the portal to the specified folder in the Portal Web Project and a view of the portal displays in the editor, as shown in Figure 7-2.

Deve lop ing Por ta ls Us ing WorkSpace S tud io
7-4 BEA WebLogic Portal Portal Development Guide
Figure 7-2 Portal Displayed in WorkSpace Studio
The created portal includes a desktop, header, footer, book, and page. A desktop is a user-specific view of the portal content. A portal can support many desktops. A single portal might support an employee-specific desktop, a customer-specific desktop, and others, where each desktop exposes different kinds of content to different sets of users. Any part of a portal can be included or excluded from a desktop, including a book, a page, a specific application, or an individual link.
Desktops can also define the look and feel attributes of a portal. Desktops can be associated with a particular skin that defines the color scheme, fonts, and images used. Desktops also contain a header and footer—you can place images, text, or any web content in these areas to give consistency to the look and feel of a desktop.
Typically, you use WorkSpace Studio to develop a portal and its key components; then you use the WebLogic Portal Administration Console to create specific desktops using the portal as a template. For information about creating desktops in the next phase of development, refer to “Managing Portal Desktops” on page 12-1.
You use books to organize your content and navigation in a hierarchical manner. Books can contain other books or pages. In a browser, a book is rendered as a set of tabs or links. Each portal

Creat ing a Po r ta l
BEA WebLogic Portal Portal Development Guide 7-5
contains a main book called, by default, “Main Page Book.” A page consists of a set of columns and/or windows that organize the actual content of your portal. You navigate to a page by clicking on an individual tab or a link. You can create books and pages using either WorkSpace Studio or the WebLogic Portal Administration Console.
Add a Page or Book to Your PortalThis section describes how to add a second page to the portal’s main book. When the portal is rendered in a browser, the two pages will appear as two clickable tabs. You can add a new page using a few different methods; this description describes a drag and drop method.
Note: The procedure for adding a book to a portal is almost identical to the procedure for adding a page. Rather than include both procedures here, we explain how to add a page and, where appropriate, highlight any differences between the two tasks.
To add a page to a portal, perform these steps:
1. From the Design Palette, drag and drop the Page icon to the location where you want to add it. Figure 7-3 shows the result when you add a new page to the right of the default portal page.
Tip: If you do not see the Palette view, select Window > Show View > Design Palette.
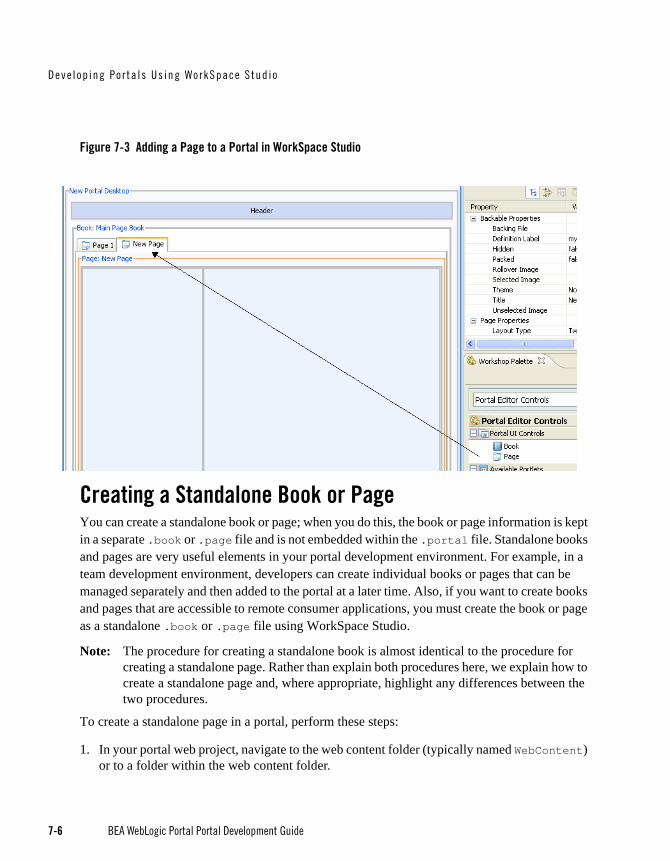
Deve lop ing Por ta ls Us ing WorkSpace S tud io
7-6 BEA WebLogic Portal Portal Development Guide
Figure 7-3 Adding a Page to a Portal in WorkSpace Studio
Creating a Standalone Book or PageYou can create a standalone book or page; when you do this, the book or page information is kept in a separate .book or .page file and is not embedded within the .portal file. Standalone books and pages are very useful elements in your portal development environment. For example, in a team development environment, developers can create individual books or pages that can be managed separately and then added to the portal at a later time. Also, if you want to create books and pages that are accessible to remote consumer applications, you must create the book or page as a standalone .book or .page file using WorkSpace Studio.
Note: The procedure for creating a standalone book is almost identical to the procedure for creating a standalone page. Rather than explain both procedures here, we explain how to create a standalone page and, where appropriate, highlight any differences between the two procedures.
To create a standalone page in a portal, perform these steps:
1. In your portal web project, navigate to the web content folder (typically named WebContent) or to a folder within the web content folder.

Creat ing a Po r ta l
BEA WebLogic Portal Portal Development Guide 7-7
You must locate books and pages in a web content directory or sub-directory that is subordinate to the web project directory. The default web content directory name is WebContent, and is assigned when you use the Portal Web Project Wizard. You can change the name of your web content directory if you wish; for more information, refer to “New Portal Web Project - Web Module Dialog” on page 4-15.
2. Select File > New > Other.
3. In the New – Select a Wizard dialog, open the WebLogic Portal folder, select Page, and click Next.
In the New Page dialog, note that the parent folder auto-fills the path from which you started the wizard.
4. Enter a name for the new page; an example is shown in Figure 7-4.
A file type of .page is required for standalone pages (or .book for standalone books); you can type the .page extension if you wish, but WebLogic Portal automatically adds the extension if you don’t enter it.
Figure 7-4 New Page Dialog
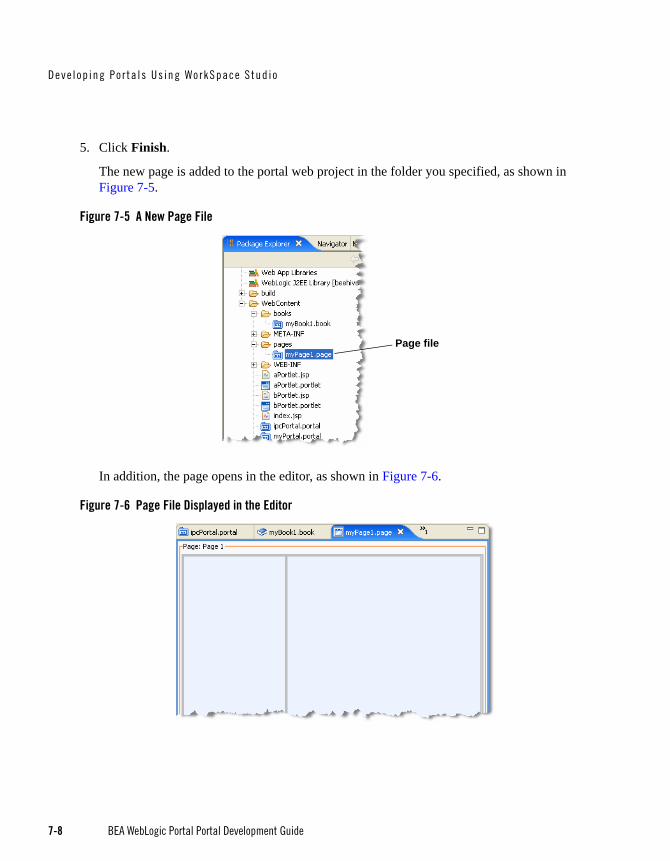
Deve lop ing Por ta ls Us ing WorkSpace S tud io
7-8 BEA WebLogic Portal Portal Development Guide
5. Click Finish.
The new page is added to the portal web project in the folder you specified, as shown in Figure 7-5.
Figure 7-5 A New Page File
In addition, the page opens in the editor, as shown in Figure 7-6.
Figure 7-6 Page File Displayed in the Editor
Page file

Creat ing a Po r ta l
BEA WebLogic Portal Portal Development Guide 7-9
Extracting an Existing Page or Book to Re-Use You can extract an existing page and then re-use it in other portal applications within your web project. When you extract an existing page, all of its contents are extracted as well (portlets and so on).
To extract an existing page or book:
1. Highlight the book or page you want to extract.
2. Right-click and select Extract Page/Book to New File....
3. In the Save As dialog, navigate to the folder where you want to save the book or page. Be sure the location is in the same web project as the portal from which you are extracting.
Adding a Book or Page Reference (Content)Use this selection to add a reference to an existing book or page, into a book or page in your portal.
Adding a Book or Page Reference from the Portal Editor To add a book or page reference from the Portal Editor:
1. Highlight the portal element to which you want to add a book or page reference.
An orange border appears around a selected element.
2. Right-click and select Insert > New Book Content or Insert > New Page Content.
The Choose a Book dialog or Choose a Page dialog displays, as appropriate; all .book/.page files for the web project are listed.
Note: The Insert menu option appears only when this selection is valid, depending on the selected portal element.
3. Select the desired .book or .page file, then click OK.
The WorkSpace Studio window updates, adding a Book (or Page) Content node in the Outline view and displaying the content properties in the Properties view.
Adding a Book or Page Reference Using the Outline View To add a book or page reference from the Outline View:

Deve lop ing Por ta ls Us ing WorkSpace S tud io
7-10 BEA WebLogic Portal Portal Development Guide
1. Right-click the element to which you want to add book or page content and select Insert > New Book Content or Insert > New Page Content.
The Choose a Book dialog or Choose a Page dialog displays, as appropriate; all .book/.page files for the web project are listed.
Note: The Insert menu option appears only when this selection is valid, depending on the selected portal element.
2. Select the desired .book or .page file, then click OK.
The WorkSpace Studio window updates, adding a Book (or Page) Content node in the Outline view and displaying the content properties in the Properties view.
Rearranging Books and PagesYou can change the order of books and pages. For example, if the main page book contains a page and a book in the following order:
Home Page | My Book
you can change the order to:
My Book | Home Page
To change the order of books and pages, right-click the book or page that you want to move in the Outline view, and choose Move Up or Move Down. The book or page moves up or down in the Outline view, and the horizontal reordering occurs in the portal editor.
Rearranging books and pages does not rearrange them in any portal desktops that you already created with the WebLogic Portal Administration Console. For instructions on rearranging those books and pages, refer to Chapter 12, “Managing Portal Desktops.”
Setting Portal Component PropertiesPortal properties are named attributes of the portal that uniquely identify it and define its characteristics. Some properties—such as title and definition label—are required; many optional properties allow you to enable specific functions for the portal such as presentation properties, rollover images, and control tree optimization. The specific properties that you use for a portal vary depending on your expected use for that portal.
Each portal component includes a set of properties that are used to configure its behavior. For example, you can configure desktop properties that determine which look and feel the desktop uses, as well as the type of encoding used at runtime.
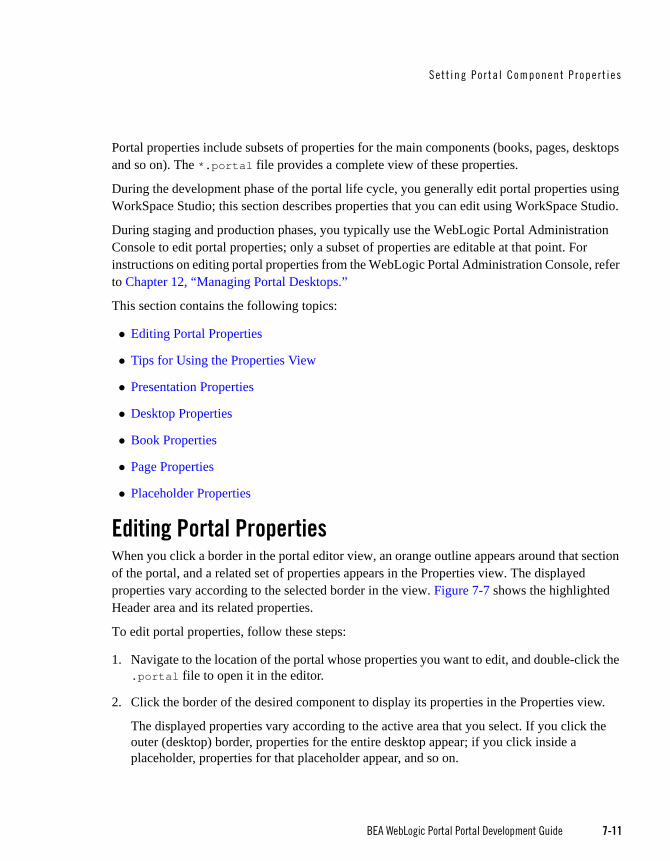
Set t ing Por ta l Component P roper t i es
BEA WebLogic Portal Portal Development Guide 7-11
Portal properties include subsets of properties for the main components (books, pages, desktops and so on). The *.portal file provides a complete view of these properties.
During the development phase of the portal life cycle, you generally edit portal properties using WorkSpace Studio; this section describes properties that you can edit using WorkSpace Studio.
During staging and production phases, you typically use the WebLogic Portal Administration Console to edit portal properties; only a subset of properties are editable at that point. For instructions on editing portal properties from the WebLogic Portal Administration Console, refer to Chapter 12, “Managing Portal Desktops.”
This section contains the following topics:
Editing Portal Properties
Tips for Using the Properties View
Presentation Properties
Desktop Properties
Book Properties
Page Properties
Placeholder Properties
Editing Portal PropertiesWhen you click a border in the portal editor view, an orange outline appears around that section of the portal, and a related set of properties appears in the Properties view. The displayed properties vary according to the selected border in the view. Figure 7-7 shows the highlighted Header area and its related properties.
To edit portal properties, follow these steps:
1. Navigate to the location of the portal whose properties you want to edit, and double-click the .portal file to open it in the editor.
2. Click the border of the desired component to display its properties in the Properties view.
The displayed properties vary according to the active area that you select. If you click the outer (desktop) border, properties for the entire desktop appear; if you click inside a placeholder, properties for that placeholder appear, and so on.
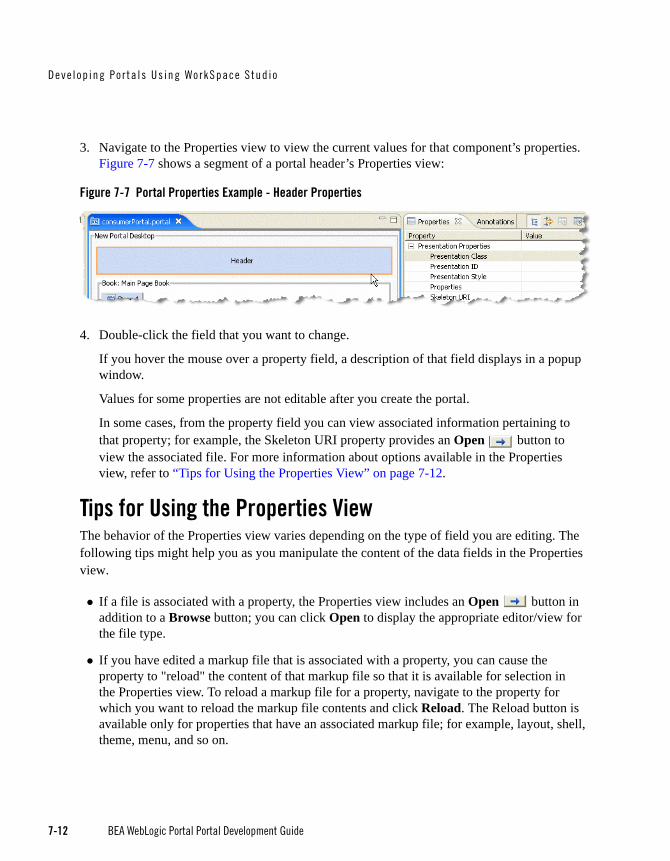
Deve lop ing Por ta ls Us ing WorkSpace S tud io
7-12 BEA WebLogic Portal Portal Development Guide
3. Navigate to the Properties view to view the current values for that component’s properties. Figure 7-7 shows a segment of a portal header’s Properties view:
Figure 7-7 Portal Properties Example - Header Properties
4. Double-click the field that you want to change.
If you hover the mouse over a property field, a description of that field displays in a popup window.
Values for some properties are not editable after you create the portal.
In some cases, from the property field you can view associated information pertaining to that property; for example, the Skeleton URI property provides an Open button to view the associated file. For more information about options available in the Properties view, refer to “Tips for Using the Properties View” on page 7-12.
Tips for Using the Properties ViewThe behavior of the Properties view varies depending on the type of field you are editing. The following tips might help you as you manipulate the content of the data fields in the Properties view.
If a file is associated with a property, the Properties view includes an Open button in addition to a Browse button; you can click Open to display the appropriate editor/view for the file type.
If you have edited a markup file that is associated with a property, you can cause the property to "reload" the content of that markup file so that it is available for selection in the Properties view. To reload a markup file for a property, navigate to the property for which you want to reload the markup file contents and click Reload. The Reload button is available only for properties that have an associated markup file; for example, layout, shell, theme, menu, and so on.
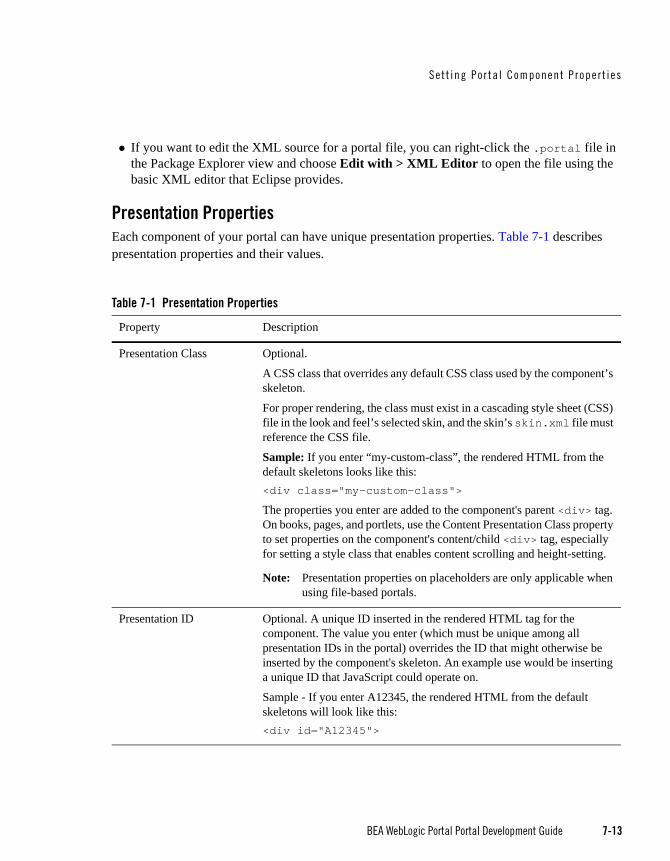
Set t ing Por ta l Component P roper t i es
BEA WebLogic Portal Portal Development Guide 7-13
If you want to edit the XML source for a portal file, you can right-click the .portal file in the Package Explorer view and choose Edit with > XML Editor to open the file using the basic XML editor that Eclipse provides.
Presentation PropertiesEach component of your portal can have unique presentation properties. Table 7-1 describes presentation properties and their values.
Table 7-1 Presentation Properties
Property Description
Presentation Class Optional.
A CSS class that overrides any default CSS class used by the component’s skeleton.
For proper rendering, the class must exist in a cascading style sheet (CSS) file in the look and feel’s selected skin, and the skin’s skin.xml file must reference the CSS file.
Sample: If you enter “my-custom-class”, the rendered HTML from the default skeletons looks like this:<div class="my-custom-class">
The properties you enter are added to the component's parent <div> tag. On books, pages, and portlets, use the Content Presentation Class property to set properties on the component's content/child <div> tag, especially for setting a style class that enables content scrolling and height-setting.
Note: Presentation properties on placeholders are only applicable when using file-based portals.
Presentation ID Optional. A unique ID inserted in the rendered HTML tag for the component. The value you enter (which must be unique among all presentation IDs in the portal) overrides the ID that might otherwise be inserted by the component's skeleton. An example use would be inserting a unique ID that JavaScript could operate on.
Sample - If you enter A12345, the rendered HTML from the default skeletons will look like this:<div id="A12345">

Deve lop ing Por ta ls Us ing WorkSpace S tud io
7-14 BEA WebLogic Portal Portal Development Guide
Desktop PropertiesDesktop properties allow you to determine how your portal desktop will behave. You can assign a backing file to your desktop as well as look and feel properties such as shell, title, and the look and feel you want the desktop to use. Table 7-2 describes desktop properties and their values
Presentation Style HTML style attribute to insert for the portal component. This attribute is equivalent to a style sheet class attribute and overrides any attributes in the style sheet class. Separate multiple entries with a semicolon.
Sample: If you enter {background-color: #fff} for a portlet title bar, the rendered HTML from the default skeletons looks like this:<div class="bea-portal-window-titlebar" style="{background-color: #fff}">**
and the portlet title bar will have a white background. The background-color attribute you entered overrides the background-color attribute in the bea-portal-window-titlebar class.
The properties you enter are added to the component's parent <div> tag. On books, pages, and portlets, use the Content Presentation Style property to set properties on the component's content/child <div> tag, especially for setting content scrolling and height.
Note: Presentation properties on placeholders are only applicable when using file-based portals.
Properties A semicolon-separated list of name-value pairs to associate with the object. This data can be utilized by the skeletons to affect rendering.
Note: Presentation properties on placeholders are only applicable when using file-based portals.
Skeleton URI The path (relative to the project) to a skeleton JSP that is used to render the portal component. This JSP overrides the skeleton JSP that would otherwise be used by the selected look and feel for the desktop. For example, enter /framework/myskeletons/mytitlebar.jsp.
Note: Presentation properties on placeholders are only applicable when using file-based portals.
Table 7-1 Presentation Properties
Property Description
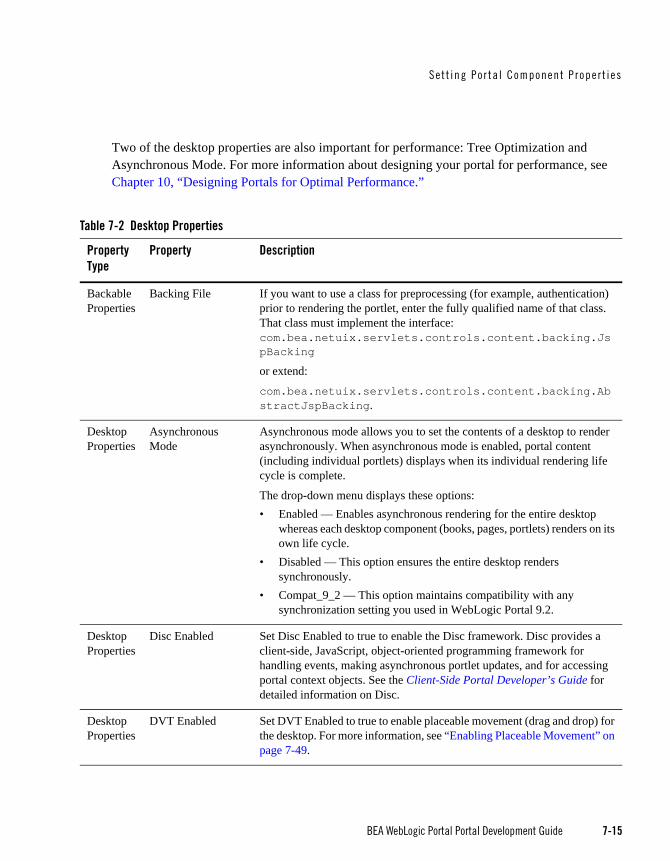
Set t ing Por ta l Component P roper t i es
BEA WebLogic Portal Portal Development Guide 7-15
Two of the desktop properties are also important for performance: Tree Optimization and Asynchronous Mode. For more information about designing your portal for performance, see Chapter 10, “Designing Portals for Optimal Performance.”
Table 7-2 Desktop Properties
Property Type
Property Description
Backable Properties
Backing File If you want to use a class for preprocessing (for example, authentication) prior to rendering the portlet, enter the fully qualified name of that class. That class must implement the interface: com.bea.netuix.servlets.controls.content.backing.JspBacking
or extend:com.bea.netuix.servlets.controls.content.backing.AbstractJspBacking.
Desktop Properties
Asynchronous Mode
Asynchronous mode allows you to set the contents of a desktop to render asynchronously. When asynchronous mode is enabled, portal content (including individual portlets) displays when its individual rendering life cycle is complete.
The drop-down menu displays these options:• Enabled — Enables asynchronous rendering for the entire desktop
whereas each desktop component (books, pages, portlets) renders on its own life cycle.
• Disabled — This option ensures the entire desktop renders synchronously.
• Compat_9_2 — This option maintains compatibility with any synchronization setting you used in WebLogic Portal 9.2.
Desktop Properties
Disc Enabled Set Disc Enabled to true to enable the Disc framework. Disc provides a client-side, JavaScript, object-oriented programming framework for handling events, making asynchronous portlet updates, and for accessing portal context objects. See the Client-Side Portal Developer’s Guide for detailed information on Disc.
Desktop Properties
DVT Enabled Set DVT Enabled to true to enable placeable movement (drag and drop) for the desktop. For more information, see “Enabling Placeable Movement” on page 7-49.
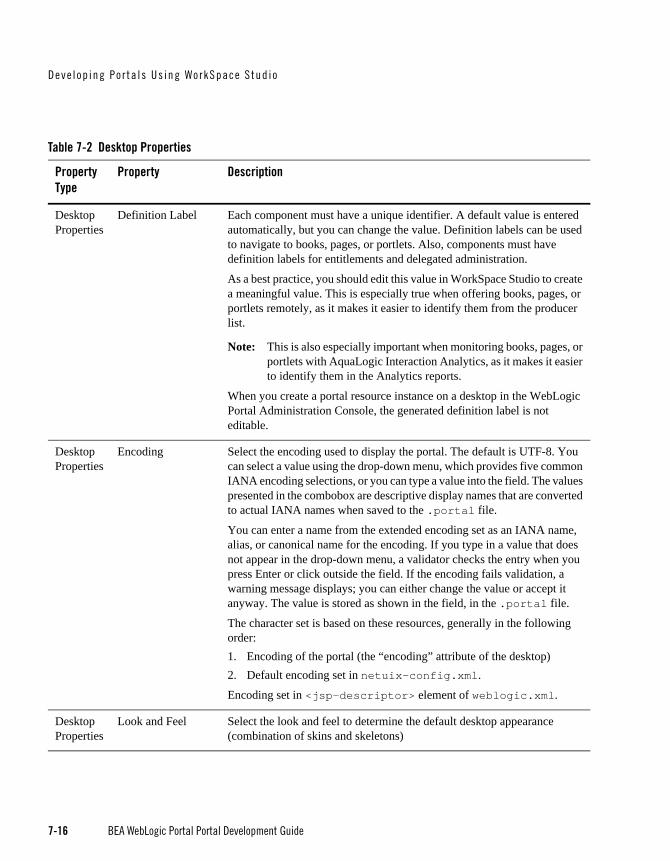
Deve lop ing Por ta ls Us ing WorkSpace S tud io
7-16 BEA WebLogic Portal Portal Development Guide
Desktop Properties
Definition Label Each component must have a unique identifier. A default value is entered automatically, but you can change the value. Definition labels can be used to navigate to books, pages, or portlets. Also, components must have definition labels for entitlements and delegated administration.
As a best practice, you should edit this value in WorkSpace Studio to create a meaningful value. This is especially true when offering books, pages, or portlets remotely, as it makes it easier to identify them from the producer list.
Note: This is also especially important when monitoring books, pages, or portlets with AquaLogic Interaction Analytics, as it makes it easier to identify them in the Analytics reports.
When you create a portal resource instance on a desktop in the WebLogic Portal Administration Console, the generated definition label is not editable.
Desktop Properties
Encoding Select the encoding used to display the portal. The default is UTF-8. You can select a value using the drop-down menu, which provides five common IANA encoding selections, or you can type a value into the field. The values presented in the combobox are descriptive display names that are converted to actual IANA names when saved to the .portal file.
You can enter a name from the extended encoding set as an IANA name, alias, or canonical name for the encoding. If you type in a value that does not appear in the drop-down menu, a validator checks the entry when you press Enter or click outside the field. If the encoding fails validation, a warning message displays; you can either change the value or accept it anyway. The value is stored as shown in the field, in the .portal file.
The character set is based on these resources, generally in the following order:1. Encoding of the portal (the “encoding” attribute of the desktop)2. Default encoding set in netuix-config.xml.
Encoding set in <jsp-descriptor> element of weblogic.xml.
Desktop Properties
Look and Feel Select the look and feel to determine the default desktop appearance (combination of skins and skeletons)
Table 7-2 Desktop Properties
Property Type
Property Description
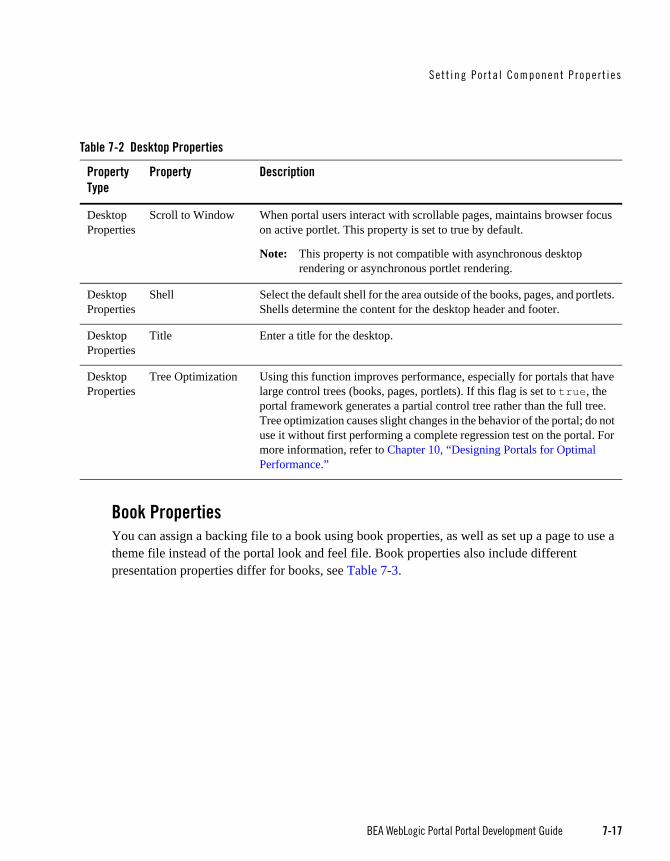
Set t ing Por ta l Component P roper t i es
BEA WebLogic Portal Portal Development Guide 7-17
Book PropertiesYou can assign a backing file to a book using book properties, as well as set up a page to use a theme file instead of the portal look and feel file. Book properties also include different presentation properties differ for books, see Table 7-3.
Desktop Properties
Scroll to Window When portal users interact with scrollable pages, maintains browser focus on active portlet. This property is set to true by default.
Note: This property is not compatible with asynchronous desktop rendering or asynchronous portlet rendering.
Desktop Properties
Shell Select the default shell for the area outside of the books, pages, and portlets. Shells determine the content for the desktop header and footer.
Desktop Properties
Title Enter a title for the desktop.
Desktop Properties
Tree Optimization Using this function improves performance, especially for portals that have large control trees (books, pages, portlets). If this flag is set to true, the portal framework generates a partial control tree rather than the full tree. Tree optimization causes slight changes in the behavior of the portal; do not use it without first performing a complete regression test on the portal. For more information, refer to Chapter 10, “Designing Portals for Optimal Performance.”
Table 7-2 Desktop Properties
Property Type
Property Description

Deve lop ing Por ta ls Us ing WorkSpace S tud io
7-18 BEA WebLogic Portal Portal Development Guide
Table 7-3 Book Properties
Property Type Property Definition
Backable Properties
Backing File If you want to use a class for preprocessing (for example, authentication) prior to rendering the portlet, enter the fully qualified name of that class. That class must implement the interface com.bea.netuix.servlets.controls.content.backing.JspBacking or extend com.bea.netuix.servlets.controls.content.backing.AbstractJspBacking.
Definition Label Each component must have a unique identifier. A default value is entered automatically, but you can change the value. Definition labels can be used to navigate to books, pages, or portlets. Also, components must have definition labels for entitlements and delegated administration.
As a best practice, you should edit this value in WorkSpace Studio to create a meaningful value. This is especially true when offering books, pages, or portlets remotely, as it makes it easier to identify them from the producer list.
Note: This is also especially important when monitoring books, pages, or portlets with AquaLogic Interatction Analytics, as it makes it easier to identify them in the Analytics reports.
When you create a portal resource instance on a desktop in the WebLogic Portal Administration Console, the generated definition label is not editable.
About .book and .page definition labels: Avoid including multiple occurrences of the same .book or .page file (with the same definition label) within a portal. For example, if you use nested embeds of the same .book or .page file within a portal, then rendering problems will occur due to the existence of duplicated definition labels.
Hidden Optional.
Hides the navigation tab for the portal component to prevent direct access. For pages or books, you can provide access with a link (to the definition label) or by using a backing file.
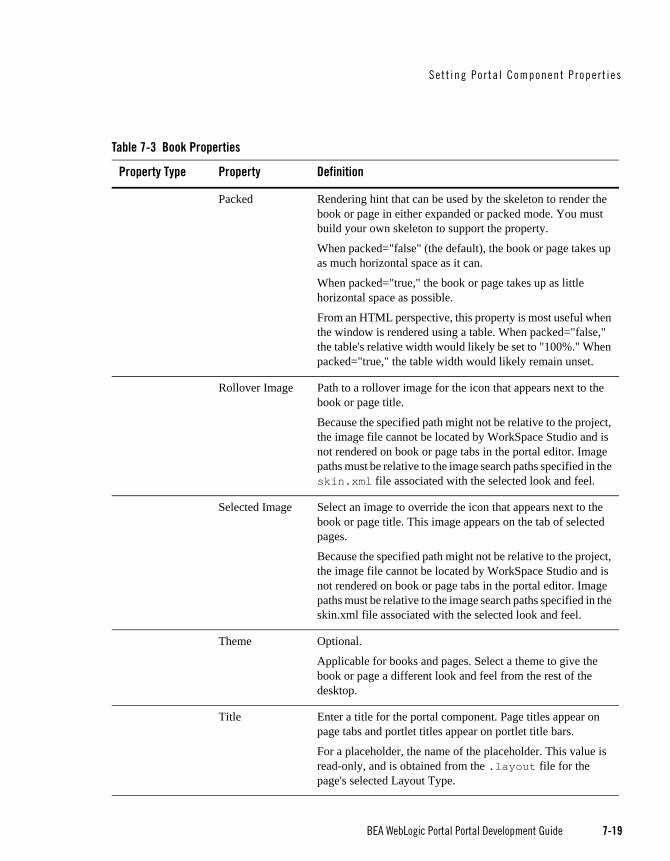
Set t ing Por ta l Component P roper t i es
BEA WebLogic Portal Portal Development Guide 7-19
Packed Rendering hint that can be used by the skeleton to render the book or page in either expanded or packed mode. You must build your own skeleton to support the property.
When packed="false" (the default), the book or page takes up as much horizontal space as it can.
When packed="true," the book or page takes up as little horizontal space as possible.
From an HTML perspective, this property is most useful when the window is rendered using a table. When packed="false," the table's relative width would likely be set to "100%." When packed="true," the table width would likely remain unset.
Rollover Image Path to a rollover image for the icon that appears next to the book or page title.
Because the specified path might not be relative to the project, the image file cannot be located by WorkSpace Studio and is not rendered on book or page tabs in the portal editor. Image paths must be relative to the image search paths specified in the skin.xml file associated with the selected look and feel.
Selected Image Select an image to override the icon that appears next to the book or page title. This image appears on the tab of selected pages.
Because the specified path might not be relative to the project, the image file cannot be located by WorkSpace Studio and is not rendered on book or page tabs in the portal editor. Image paths must be relative to the image search paths specified in the skin.xml file associated with the selected look and feel.
Theme Optional.
Applicable for books and pages. Select a theme to give the book or page a different look and feel from the rest of the desktop.
Title Enter a title for the portal component. Page titles appear on page tabs and portlet titles appear on portlet title bars.
For a placeholder, the name of the placeholder. This value is read-only, and is obtained from the .layout file for the page's selected Layout Type.
Table 7-3 Book Properties
Property Type Property Definition
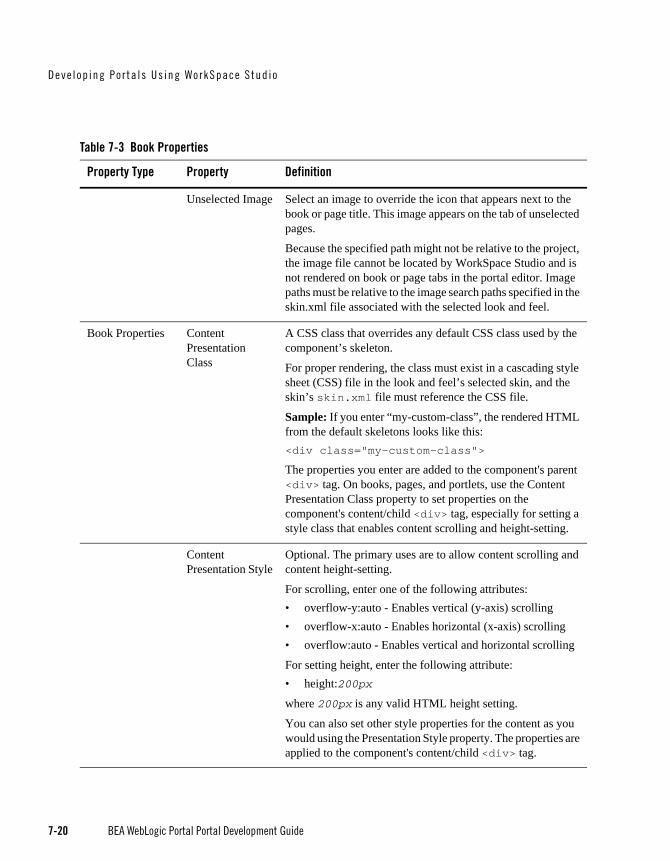
Deve lop ing Por ta ls Us ing WorkSpace S tud io
7-20 BEA WebLogic Portal Portal Development Guide
Unselected Image Select an image to override the icon that appears next to the book or page title. This image appears on the tab of unselected pages.
Because the specified path might not be relative to the project, the image file cannot be located by WorkSpace Studio and is not rendered on book or page tabs in the portal editor. Image paths must be relative to the image search paths specified in the skin.xml file associated with the selected look and feel.
Book Properties Content Presentation Class
A CSS class that overrides any default CSS class used by the component’s skeleton.
For proper rendering, the class must exist in a cascading style sheet (CSS) file in the look and feel’s selected skin, and the skin’s skin.xml file must reference the CSS file.
Sample: If you enter “my-custom-class”, the rendered HTML from the default skeletons looks like this:<div class="my-custom-class">
The properties you enter are added to the component's parent <div> tag. On books, pages, and portlets, use the Content Presentation Class property to set properties on the component's content/child <div> tag, especially for setting a style class that enables content scrolling and height-setting.
Content Presentation Style
Optional. The primary uses are to allow content scrolling and content height-setting.
For scrolling, enter one of the following attributes:• overflow-y:auto - Enables vertical (y-axis) scrolling • overflow-x:auto - Enables horizontal (x-axis) scrolling • overflow:auto - Enables vertical and horizontal scrolling
For setting height, enter the following attribute:• height:200px
where 200px is any valid HTML height setting.
You can also set other style properties for the content as you would using the Presentation Style property. The properties are applied to the component's content/child <div> tag.
Table 7-3 Book Properties
Property Type Property Definition

Set t ing Por ta l Component P roper t i es
BEA WebLogic Portal Portal Development Guide 7-21
Default Page • Required.• Select the page that appears by default when the desktop is
accessed. The list is populated with Definition Labels of all pages in the portal.
Editable A dropdown menu displays these selections:• Not Editable• Edit in Menu• Edit in Titlebar
If you have visitor tools enabled so that users can modify book properties, setting Editable to "Edit in Title Bar" or "Edit in Menu" puts a visitor tool link in that location.
"Edit in Menu" is available only if you select a menu type for the Navigation property. When you select "Edit in Title Bar" or "Edit in Menu," a group of Mode Properties appears in the Property Editor.
Navigation Select the default type of menu to use for navigation among books and pages. The dropdown menu displays these selections:• Single Level Menu – Provides a single row of tabs for the
book's immediate pages and child books.• Multi Level Menu – Recursively provides a hierarchical
menu for all the books and pages contained within a book. This menu does not stop at the first set of children. It continues down the tree. If the parent book uses a multi-level menu, then the child books should not use a menu as the multi-level menu will cover them. For performance considerations associated with multi-level menus, refer to Chapter 10, “Designing Portals for Optimal Performance.”
• No Navigation
Table 7-3 Book Properties
Property Type Property Definition

Deve lop ing Por ta ls Us ing WorkSpace S tud io
7-22 BEA WebLogic Portal Portal Development Guide
Page PropertiesPage properties allow you to configure properties for individual pages in your portal. The layout property determines how many placeholders the page has and their locations. Table 7-4 lists each page property.
Orientation Hint to the skeleton to position the navigation menu on the top, bottom, left, or right side of the book. You must build your own skeleton to support this property. Following are the numbers used in the .portal file for each orientation value: top=0, left=1, right=2, bottom=3.
Return to Default Page
Determines the page displayed when a book is selected.
When Return to Default Page="false" (the default), the last page that was active in a book is displayed when the book is selected.
When Return to Default Page="true," the page selected in the Default Page property is always displayed when a book is selected.
Table 7-3 Book Properties
Property Type Property Definition

Set t ing Por ta l Component P roper t i es
BEA WebLogic Portal Portal Development Guide 7-23
Table 7-4 Page Properties
Property Type Property Definition
Backable Properties
Backing File If you want to use a class for preprocessing (for example, authentication) prior to rendering the portlet, enter the fully qualified name of that class. That class must implement the interface:com.bea.netuix.servlets.controls.content.backing.JspBacking
or extend:com.bea.netuix.servlets.controls.content.backing.AbstractJspBacking.
Definition Label Each component must have a unique identifier. A default value is entered automatically, but you can change the value. Definition labels can be used to navigate to books, pages, or portlets. Also, components must have definition labels for entitlements and delegated administration.
As a best practice, you should edit this value in WorkSpace Studio to create a meaningful value. This is especially true when offering books, pages, or portlets remotely, as it makes it easier to identify them from the producer list.
Note: This is also especially important when monitoring books, pages, or portlets with AquaLogic Interaction Analytics, as it makes it easier to identify them in the Analytics reports.
When you create a portal resource instance on a desktop in the WebLogic Portal Administration Console, the generated definition label is not editable.
About .book and .page definition labels: Avoid including multiple occurrences of the same .book or .page file (with the same definition label) within a portal. For example, if you use nested embeds of the same .book or .page file within a portal, then rendering problems will occur due to the existence of duplicated definition labels.
Hidden Hides the navigation tab for the portal component to prevent direct access. For pages or books, you can provide access with a link (to the definition label) or by using a backing file.

Deve lop ing Por ta ls Us ing WorkSpace S tud io
7-24 BEA WebLogic Portal Portal Development Guide
Placeholder PropertiesPlaceholders are named sections within a page layout. By editing placeholder properties, you can modify a placeholder text flow, width, and so on. For more information about layouts, see “Working with Layouts” on page 6-39.
Table 7-5 lists placeholder properties.
Packed Rendering hint that can be used by the skeleton to render the book or page in either expanded or packed mode. You must build your own skeleton to support the property.
When packed="false" (the default), the book or page takes up as much horizontal space as it can.
When packed="true," the book or page takes up as little horizontal space as possible.
From an HTML perspective, this property is most useful when the window is rendered using a table. When packed="false," the table's relative width would likely be set to "100%." When packed="true," the table width would likely remain unset.
Page Properties Layout Type Select the page layout style for positioning books and portlets in placeholders on a page. A dropdown menu provides the following selections:• Two Column Layout• Three Column Layout• Single Column Layout• Four Column Layout
For more information about layouts, see “Working with Layouts” on page 6-39
Table 7-4 Page Properties
Property Type Property Definition
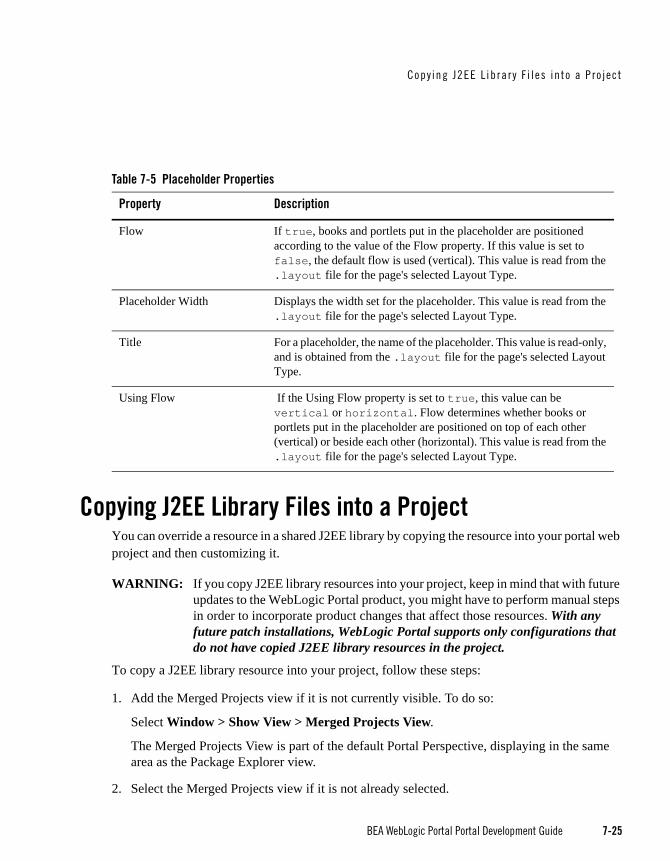
Copy ing J2EE L ib rar y F i l es in to a P ro jec t
BEA WebLogic Portal Portal Development Guide 7-25
Copying J2EE Library Files into a ProjectYou can override a resource in a shared J2EE library by copying the resource into your portal web project and then customizing it.
WARNING: If you copy J2EE library resources into your project, keep in mind that with future updates to the WebLogic Portal product, you might have to perform manual steps in order to incorporate product changes that affect those resources. With any future patch installations, WebLogic Portal supports only configurations that do not have copied J2EE library resources in the project.
To copy a J2EE library resource into your project, follow these steps:
1. Add the Merged Projects view if it is not currently visible. To do so:
Select Window > Show View > Merged Projects View.
The Merged Projects View is part of the default Portal Perspective, displaying in the same area as the Package Explorer view.
2. Select the Merged Projects view if it is not already selected.
Table 7-5 Placeholder Properties
Property Description
Flow If true, books and portlets put in the placeholder are positioned according to the value of the Flow property. If this value is set to false, the default flow is used (vertical). This value is read from the .layout file for the page's selected Layout Type.
Placeholder Width Displays the width set for the placeholder. This value is read from the .layout file for the page's selected Layout Type.
Title For a placeholder, the name of the placeholder. This value is read-only, and is obtained from the .layout file for the page's selected Layout Type.
Using Flow If the Using Flow property is set to true, this value can be vertical or horizontal. Flow determines whether books or portlets put in the placeholder are positioned on top of each other (vertical) or beside each other (horizontal). This value is read from the .layout file for the page's selected Layout Type.

Deve lop ing Por ta ls Us ing WorkSpace S tud io
7-26 BEA WebLogic Portal Portal Development Guide
Italicized items in the Merged Projects View represent entities that are stored in shared J2EE libraries. All entities that are stored on your filesystem, such as any portal files that you create, are shown in regular type.
3. Expand the display tree to view the resource that you want to copy to the project.
You can copy a single file, set of files, or an entire folder, to your project.
4. Right-click the resource(s) that you want to copy, and select Copy To Project.
The resources are copied to the web content folder of your project, and reflect the hierarchy of their location in the J2EE library.
Note: You can view a Properties dialog for a file in the Merged Projects View by right-clicking the file and selecting Properties. The dialog shows the J2EE library information for the file, including the J2EE library name and version.
Viewing Files that Override Shared J2EE Library FilesYou can view local file overrides of J2EE library files in either of these ways:
In the Merged Projects view in WorkSpace Studio, files that you copied to the project are shown in plain (non-italic) text.
Optionally, you can choose to superimpose a small marker icon on file icons in the display tree to indicate that a local file in your portal web project is overriding a file of the same name and path that exists in one of your shared J2EE libraries.
The icon indicating J2EE library overrides is turned off by default, due to the processing time involved in updating the information, and the fact that using it causes the WebLogic Portal plugins to always load at startup.
To activate the library override marker icons, follow these steps:
a. Navigate to Window > Preferences > General > Appearance > Label Decorations.
b. Check the box labeled WebLogic Library Module File Override.
c. Click Apply and then click OK.
A small arrow displays in the icon for files that were copied from the J2EE library to the project.
Custom Cont ro ls in Page F lows
BEA WebLogic Portal Portal Development Guide 7-27
Custom Controls in Page FlowsWebLogic Portal provides custom Java controls—collections of actions (Java methods) that you can drag and drop into your page flows—to make development easier and more automated. You can add actions in a graphical interface and configure the actions with the WorkSpace Studio editor, insulating you from working directly with Java code (although you can still work directly with the code in Source View). Even if you want to work directly with code, working initially with the graphical interface automates code entry and makes it more syntax error free.
For example, the custom controls provided with WebLogic Portal provide built-in forms on some methods. If you want an action that creates a user, you can use the createUser method in the User Provider control. If you add the createUser method into the control's action area, the control provides a CreateUserForm bean that can be added to a JSP and linked to the action automatically.
For information about creating page flows using WorkSpace Studio, refer to the BEA Workshop User’s Guide. For more information about the specific controls provided with WebLogic Portal, refer to the Javadoc.
The following sections provide more information about using controls provided by WebLogic Portal in page flows:
Adding a Portal Control to a Page Flow
Adding an Action to the Page Flow
Portal Control Security
Adding a Portal Control to a Page FlowTo add a control to a page flow:
1. Open an existing page flow (.jpf file) or create a new page flow.
For information about creating page flows using WorkSpace Studio, refer to the BEA Workshop User’s Guide.
2. If you are not already using the Page Flow Perspective, WorkSpace Studio asks if you want to switch to it. Do so.
3. Right-click in the source view for the page flow and select Insert > Control, as shown in Figure 7-8.
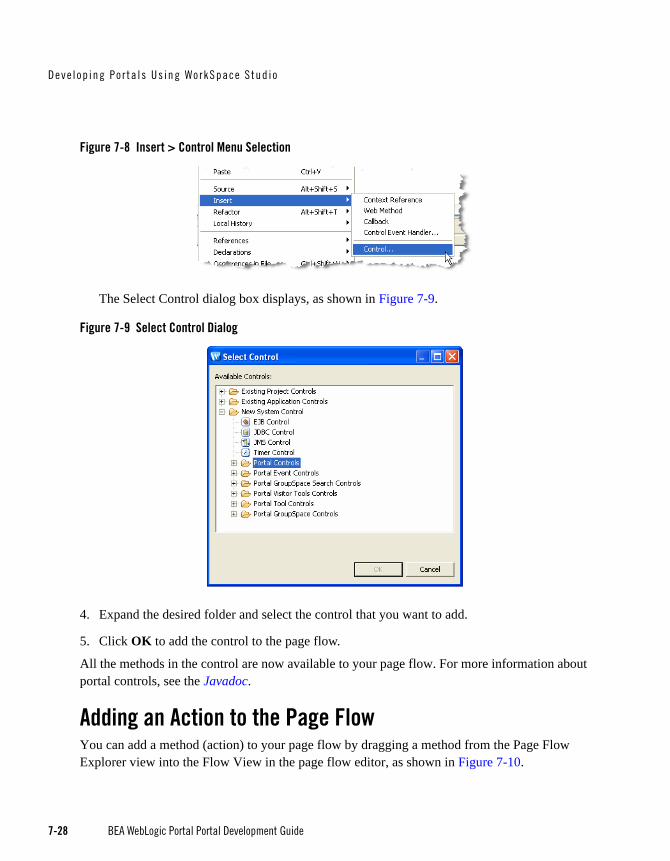
Deve lop ing Por ta ls Us ing WorkSpace S tud io
7-28 BEA WebLogic Portal Portal Development Guide
Figure 7-8 Insert > Control Menu Selection
The Select Control dialog box displays, as shown in Figure 7-9.
Figure 7-9 Select Control Dialog
4. Expand the desired folder and select the control that you want to add.
5. Click OK to add the control to the page flow.
All the methods in the control are now available to your page flow. For more information about portal controls, see the Javadoc.
Adding an Action to the Page FlowYou can add a method (action) to your page flow by dragging a method from the Page Flow Explorer view into the Flow View in the page flow editor, as shown in Figure 7-10.
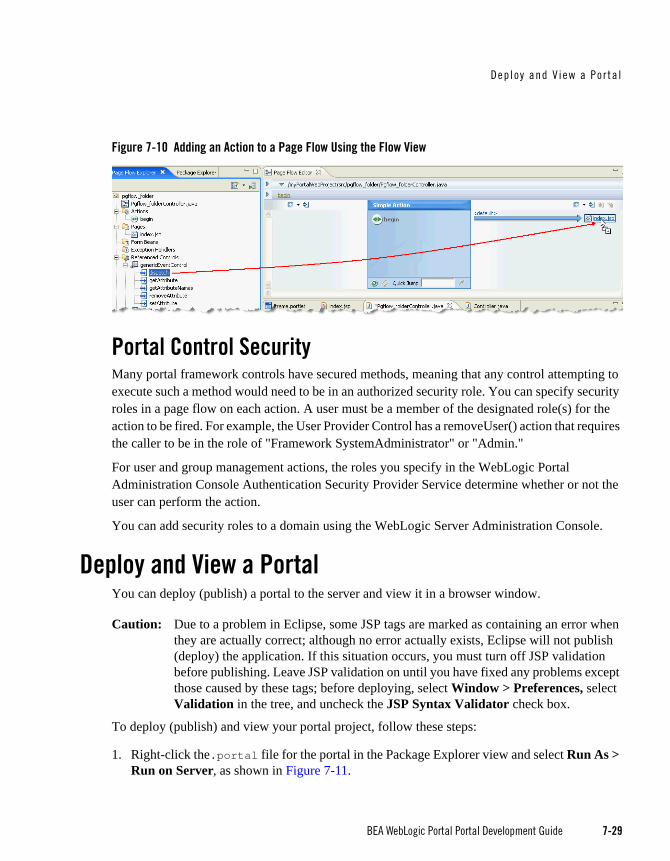
Deploy and V i ew a Po r ta l
BEA WebLogic Portal Portal Development Guide 7-29
Figure 7-10 Adding an Action to a Page Flow Using the Flow View
Portal Control SecurityMany portal framework controls have secured methods, meaning that any control attempting to execute such a method would need to be in an authorized security role. You can specify security roles in a page flow on each action. A user must be a member of the designated role(s) for the action to be fired. For example, the User Provider Control has a removeUser() action that requires the caller to be in the role of "Framework SystemAdministrator" or "Admin."
For user and group management actions, the roles you specify in the WebLogic Portal Administration Console Authentication Security Provider Service determine whether or not the user can perform the action.
You can add security roles to a domain using the WebLogic Server Administration Console.
Deploy and View a Portal You can deploy (publish) a portal to the server and view it in a browser window.
Caution: Due to a problem in Eclipse, some JSP tags are marked as containing an error when they are actually correct; although no error actually exists, Eclipse will not publish (deploy) the application. If this situation occurs, you must turn off JSP validation before publishing. Leave JSP validation on until you have fixed any problems except those caused by these tags; before deploying, select Window > Preferences, select Validation in the tree, and uncheck the JSP Syntax Validator check box.
To deploy (publish) and view your portal project, follow these steps:
1. Right-click the.portal file for the portal in the Package Explorer view and select Run As > Run on Server, as shown in Figure 7-11.
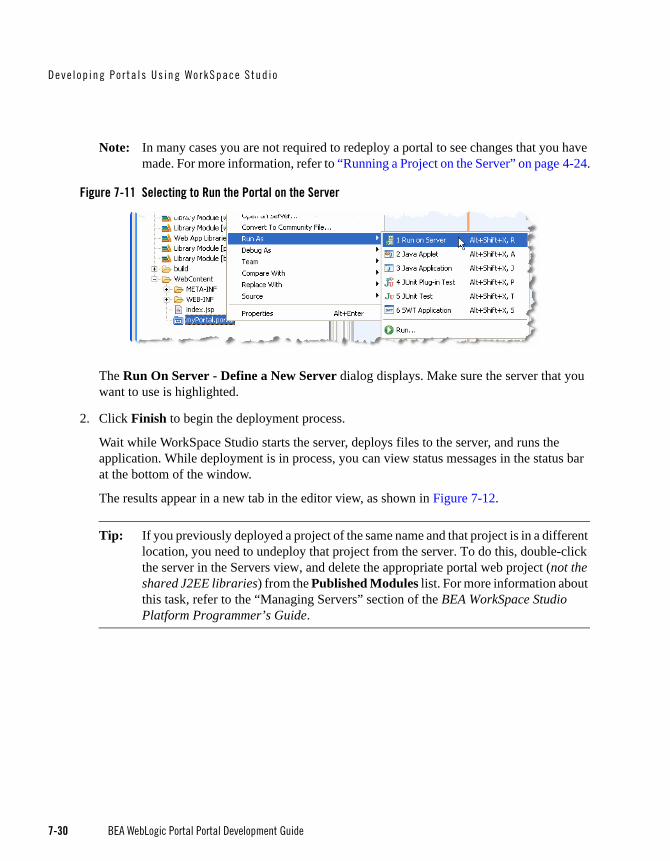
Deve lop ing Por ta ls Us ing WorkSpace S tud io
7-30 BEA WebLogic Portal Portal Development Guide
Note: In many cases you are not required to redeploy a portal to see changes that you have made. For more information, refer to “Running a Project on the Server” on page 4-24.
Figure 7-11 Selecting to Run the Portal on the Server
The Run On Server - Define a New Server dialog displays. Make sure the server that you want to use is highlighted.
2. Click Finish to begin the deployment process.
Wait while WorkSpace Studio starts the server, deploys files to the server, and runs the application. While deployment is in process, you can view status messages in the status bar at the bottom of the window.
The results appear in a new tab in the editor view, as shown in Figure 7-12.
Tip: If you previously deployed a project of the same name and that project is in a different location, you need to undeploy that project from the server. To do this, double-click the server in the Servers view, and delete the appropriate portal web project (not the shared J2EE libraries) from the Published Modules list. For more information about this task, refer to the “Managing Servers” section of the BEA WorkSpace Studio Platform Programmer’s Guide.
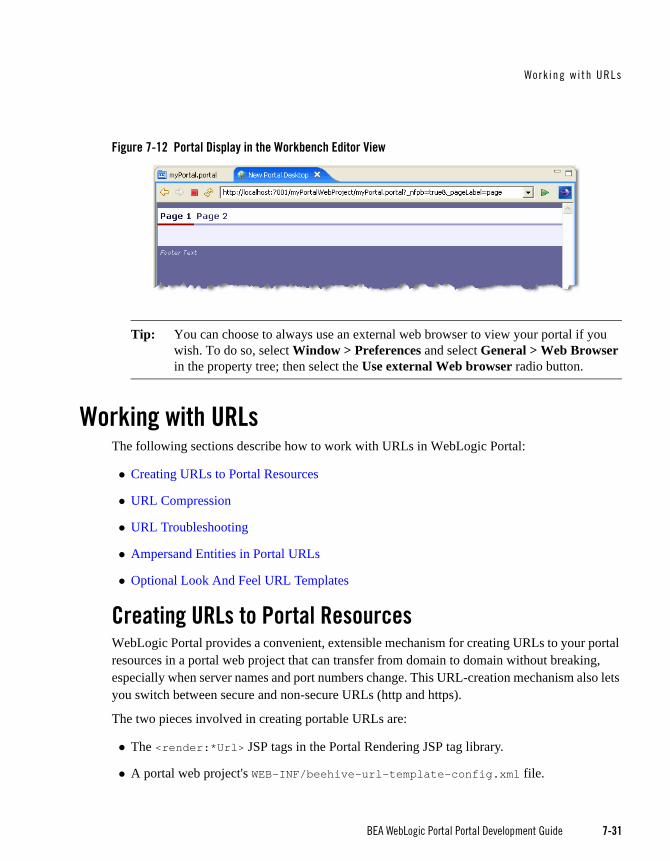
Work ing w i th URLs
BEA WebLogic Portal Portal Development Guide 7-31
Figure 7-12 Portal Display in the Workbench Editor View
Tip: You can choose to always use an external web browser to view your portal if you wish. To do so, select Window > Preferences and select General > Web Browser in the property tree; then select the Use external Web browser radio button.
Working with URLsThe following sections describe how to work with URLs in WebLogic Portal:
Creating URLs to Portal Resources
URL Compression
URL Troubleshooting
Ampersand Entities in Portal URLs
Optional Look And Feel URL Templates
Creating URLs to Portal ResourcesWebLogic Portal provides a convenient, extensible mechanism for creating URLs to your portal resources in a portal web project that can transfer from domain to domain without breaking, especially when server names and port numbers change. This URL-creation mechanism also lets you switch between secure and non-secure URLs (http and https).
The two pieces involved in creating portable URLs are:
The <render:*Url> JSP tags in the Portal Rendering JSP tag library.
A portal web project's WEB-INF/beehive-url-template-config.xml file.
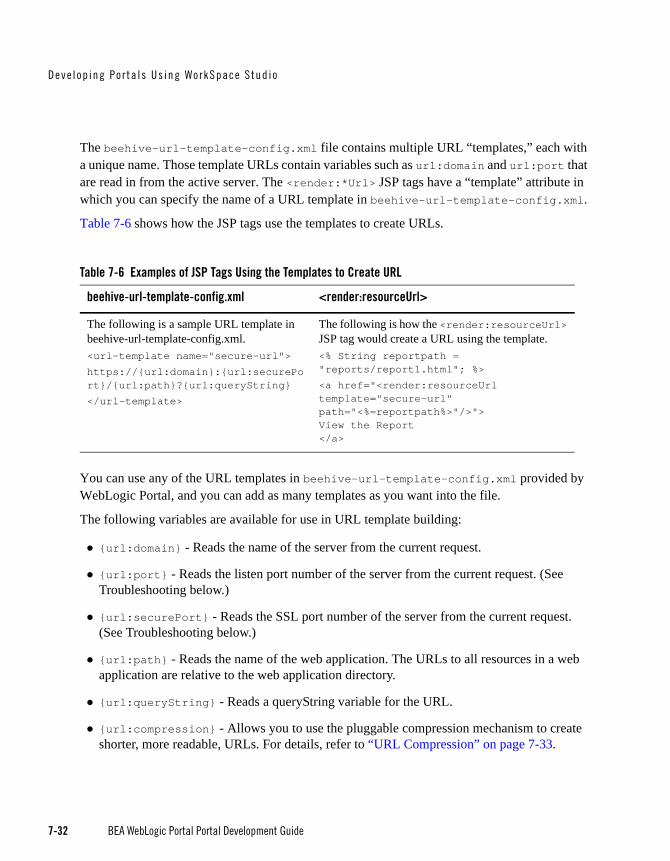
Deve lop ing Por ta ls Us ing WorkSpace S tud io
7-32 BEA WebLogic Portal Portal Development Guide
The beehive-url-template-config.xml file contains multiple URL “templates,” each with a unique name. Those template URLs contain variables such as url:domain and url:port that are read in from the active server. The <render:*Url> JSP tags have a “template” attribute in which you can specify the name of a URL template in beehive-url-template-config.xml.
Table 7-6 shows how the JSP tags use the templates to create URLs.
You can use any of the URL templates in beehive-url-template-config.xml provided by WebLogic Portal, and you can add as many templates as you want into the file.
The following variables are available for use in URL template building:
{url:domain} - Reads the name of the server from the current request.
{url:port} - Reads the listen port number of the server from the current request. (See Troubleshooting below.)
{url:securePort} - Reads the SSL port number of the server from the current request. (See Troubleshooting below.)
{url:path} - Reads the name of the web application. The URLs to all resources in a web application are relative to the web application directory.
{url:queryString} - Reads a queryString variable for the URL.
{url:compression} - Allows you to use the pluggable compression mechanism to create shorter, more readable, URLs. For details, refer to “URL Compression” on page 7-33.
Table 7-6 Examples of JSP Tags Using the Templates to Create URL
beehive-url-template-config.xml <render:resourceUrl>
The following is a sample URL template in beehive-url-template-config.xml.<url-template name="secure-url">
https://{url:domain}:{url:securePort}/{url:path}?{url:queryString}
</url-template>
The following is how the <render:resourceUrl> JSP tag would create a URL using the template.<% String reportpath = "reports/report1.html"; %>
<a href="<render:resourceUrl template="secure-url" path="<%=reportpath%>"/>">View the Report</a>
Work ing w i th URLs
BEA WebLogic Portal Portal Development Guide 7-33
URL CompressionURL strings can take up a large percentage of the response HTML. WebLogic Portal’s URL compression mechanism provides a pluggable means of creating shorter URLs. For example:
Before implementing URL compression, a URL would look like this:http://abc.com/webapp/portletEvents/activatePage/activatePage.portal?_nfpb=true&_windowLabel=pfTPC_source_1&pfTPC_source_1_actionOverride=%2FportletEvents%2FactivatePage%2FtoPage1
After implementing URL compression, a URL would look like this:http://abc.com/wlp.c?__c=7f6
WebLogic Portal implements URL compression by mapping strings to the database. You set up URL compression using a web application-level setting; processing is invoked through the GenericURL class.
The default algorithm uses two of the p13n caches for the mapping - wlp.urlCompression.compressed and wlp.urlCompression.expanded - which are located in p13n-cache-config.xml in the framework-full-app library module.
Implementing URL CompressionTo configure a webapp to use url compression, follow these steps:
1. Define the compression servlet in web.xml; for example<servlet>
<servlet-name>UrlCompressionServlet</servlet-name><servlet-class>com.bea.portlet.compression.UrlCompressionServlet</servlet-class><init-param>
<param-name>defaultPage</param-name> <param-value>/index.jsp</param-value>
</init-param><init-param>
<param-name>errorPage</param-name><param-value>/errors/error.jsp</param-value>
</init-param><load-on-startup>1</load-on-startup>
</servlet>
2. Map the compression pattern; for example:<servlet-mapping>
<servlet-name>UrlCompressionServlet</servlet-name>
Deve lop ing Por ta ls Us ing WorkSpace S tud io
7-34 BEA WebLogic Portal Portal Development Guide
<url-pattern>wlp.c</url-pattern></servlet-mapping>
3. Add the token {url:compression} to the templates for which you want to apply compression.
URL Compression Special ConsiderationsThe following sections describe some special considerations to keep in mind as you implement URL compression.
URL Compression and AJAXURL compression interferes with some of the AJAX-specific mechanisms for page refreshes that are associated with asynchronous portlet rendering. Because of this, URL compression must be disabled whenever asynchronous content rendering is disabled to force page refreshes. WebLogic Portal disables URL compression automatically except when file upload forms are used; in this situation, you must explicitly disable it. For instructions, refer to the Portlet Development Guide.
A successful implementation of URL compression depends on portal developers following best practices and using supported URL tags and classes to generate URLs.
URL Compression and Off-Site URLsAn off-site URL is a URL to a resource that is not hosted in the web application of the code generating the URL. In a web application that has compression enabled, you must specify a URL template with compression disabled when using GenericURL, its subtypes, or the corresponding JSP tags to generate off-site URLs.
Use the following code fragment as a guide:
GenericURL redirectURL = GenericURL.createGenericURL(request, response);
redirectURL.setDomain("www.yahoo.com"); redirectURL.setPort(80);
redirectURL.setPath("/compressedUrl/index.html");
redirectURL.setTemplate("no_compression_template");
where "no_compression_template" is the name of a URL template that excludes the {url:compression} pseudo-token.
URL Compression and Frequently-Accessed DataWhen reference freqently-accessed URLs in your code, it is a best practice to turn off URL compression. When URL compression is enabled, a new database entry is created each time the URL is accessed. For frequently accessed URLs, this could could create performance issues.
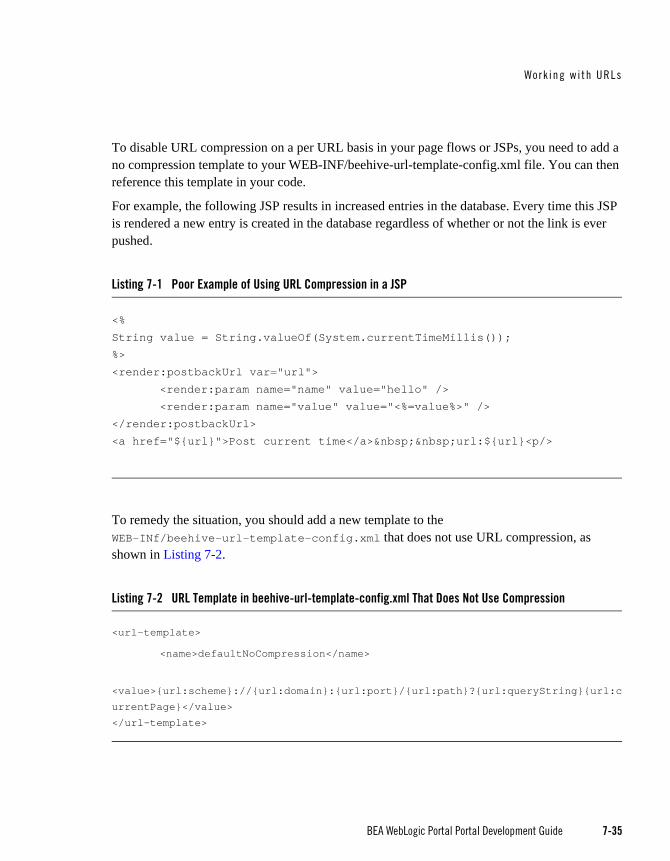
Work ing w i th URLs
BEA WebLogic Portal Portal Development Guide 7-35
To disable URL compression on a per URL basis in your page flows or JSPs, you need to add a no compression template to your WEB-INF/beehive-url-template-config.xml file. You can then reference this template in your code.
For example, the following JSP results in increased entries in the database. Every time this JSP is rendered a new entry is created in the database regardless of whether or not the link is ever pushed.
Listing 7-1 Poor Example of Using URL Compression in a JSP
<%
String value = String.valueOf(System.currentTimeMillis());
%>
<render:postbackUrl var="url">
<render:param name="name" value="hello" />
<render:param name="value" value="<%=value%>" />
</render:postbackUrl>
<a href="${url}">Post current time</a> url:${url}<p/>
To remedy the situation, you should add a new template to the WEB-INf/beehive-url-template-config.xml that does not use URL compression, as shown in Listing 7-2.
Listing 7-2 URL Template in beehive-url-template-config.xml That Does Not Use Compression
<url-template>
<name>defaultNoCompression</name>
<value>{url:scheme}://{url:domain}:{url:port}/{url:path}?{url:queryString}{url:c
urrentPage}</value>
</url-template>
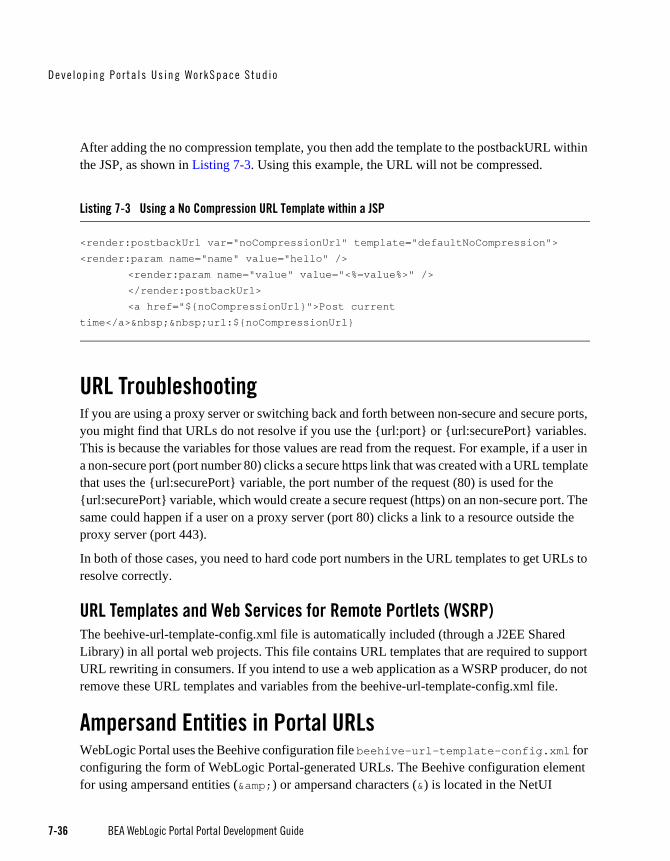
Deve lop ing Por ta ls Us ing WorkSpace S tud io
7-36 BEA WebLogic Portal Portal Development Guide
After adding the no compression template, you then add the template to the postbackURL within the JSP, as shown in Listing 7-3. Using this example, the URL will not be compressed.
Listing 7-3 Using a No Compression URL Template within a JSP
<render:postbackUrl var="noCompressionUrl" template="defaultNoCompression">
<render:param name="name" value="hello" />
<render:param name="value" value="<%=value%>" />
</render:postbackUrl>
<a href="${noCompressionUrl}">Post current
time</a> url:${noCompressionUrl}
URL Troubleshooting If you are using a proxy server or switching back and forth between non-secure and secure ports, you might find that URLs do not resolve if you use the {url:port} or {url:securePort} variables. This is because the variables for those values are read from the request. For example, if a user in a non-secure port (port number 80) clicks a secure https link that was created with a URL template that uses the {url:securePort} variable, the port number of the request (80) is used for the {url:securePort} variable, which would create a secure request (https) on an non-secure port. The same could happen if a user on a proxy server (port 80) clicks a link to a resource outside the proxy server (port 443).
In both of those cases, you need to hard code port numbers in the URL templates to get URLs to resolve correctly.
URL Templates and Web Services for Remote Portlets (WSRP)The beehive-url-template-config.xml file is automatically included (through a J2EE Shared Library) in all portal web projects. This file contains URL templates that are required to support URL rewriting in consumers. If you intend to use a web application as a WSRP producer, do not remove these URL templates and variables from the beehive-url-template-config.xml file.
Ampersand Entities in Portal URLsWebLogic Portal uses the Beehive configuration file beehive-url-template-config.xml for configuring the form of WebLogic Portal-generated URLs. The Beehive configuration element for using ampersand entities (&) or ampersand characters (&) is located in the NetUI
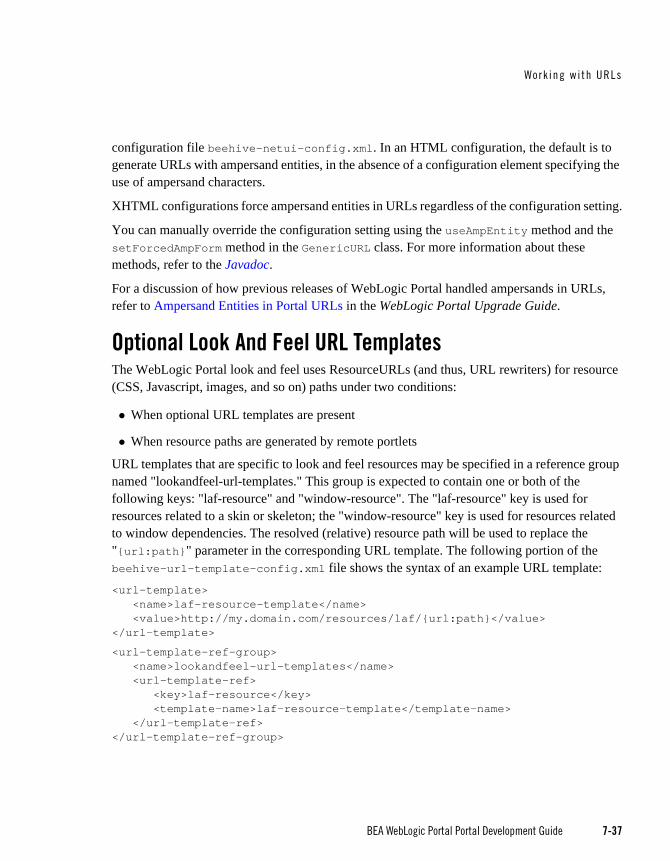
Work ing w i th URLs
BEA WebLogic Portal Portal Development Guide 7-37
configuration file beehive-netui-config.xml. In an HTML configuration, the default is to generate URLs with ampersand entities, in the absence of a configuration element specifying the use of ampersand characters.
XHTML configurations force ampersand entities in URLs regardless of the configuration setting.
You can manually override the configuration setting using the useAmpEntity method and the setForcedAmpForm method in the GenericURL class. For more information about these methods, refer to the Javadoc.
For a discussion of how previous releases of WebLogic Portal handled ampersands in URLs, refer to Ampersand Entities in Portal URLs in the WebLogic Portal Upgrade Guide.
Optional Look And Feel URL TemplatesThe WebLogic Portal look and feel uses ResourceURLs (and thus, URL rewriters) for resource (CSS, Javascript, images, and so on) paths under two conditions:
When optional URL templates are present
When resource paths are generated by remote portlets
URL templates that are specific to look and feel resources may be specified in a reference group named "lookandfeel-url-templates." This group is expected to contain one or both of the following keys: "laf-resource" and "window-resource". The "laf-resource" key is used for resources related to a skin or skeleton; the "window-resource" key is used for resources related to window dependencies. The resolved (relative) resource path will be used to replace the "{url:path}" parameter in the corresponding URL template. The following portion of the beehive-url-template-config.xml file shows the syntax of an example URL template:<url-template>
<name>laf-resource-template</name><value>http://my.domain.com/resources/laf/{url:path}</value>
</url-template>
<url-template-ref-group><name>lookandfeel-url-templates</name><url-template-ref>
<key>laf-resource</key><template-name>laf-resource-template</template-name>
</url-template-ref></url-template-ref-group>

Deve lop ing Por ta ls Us ing WorkSpace S tud io
7-38 BEA WebLogic Portal Portal Development Guide
In the absence of the look and feel URL templates, look and feel resource paths will remain relative, with one exception: when generated within the context of a remote portlet, such paths will use the standard "resource" URL template.
The optional LookAndFeel URL templates can be used to "offload" resources to a different server. However, such resources MUST be copied (not moved) and be resolvable using URLs with the same relative resource path as the Portal Web Application (for example, .../framework/skins/bighorn/css/book.css). Look and feel path resolution continues to rely on local file system access to resources.
The GetSkinPath tag in the render taglib will not be influenced by the optional look and feel URL templates. Paths produced by this tag will be relative in all cases.
Working with Encoding in HTTP Responses This section describes how the encoding is set on the HTTP response.
WebLogic Portal uses the following method of setting encoding based on the information in the .portal file:
1. Examine the netuix:desktop element for an encoding attribute and use that value if present.
2. If the first check is not applicable, examine the .portal file for the directive.page element. Note that this mechanism is deprecated. If that element is present, pick up the encoding from an attribute there.
3. Examine netuix-config.xml for a <defaultEncoding> element, and use the encoding attribute there.
4. If the previous check is not applicable, fall back to the <encoding> element in the <jsp-descriptor> section of the weblogic.xml file. For more information on <jsp-descriptor> element, see weblogic.xml Deployment Descriptor Elements on e-docs.
This implementation differs from that of previous versions of WebLogic Portal. For more information, refer to the “Functional Changes” appendix of the Upgrade Guide.
The following examples show how to use the encoding settings.
<netuix:desktop ... encoding="UTF-8" /> in your .portal file
or
<defaultEncoding encoding="UTF-8" /> in your netuix-config.xml file

Cache Management in WorkSpace S tud io
BEA WebLogic Portal Portal Development Guide 7-39
Cache Management in WorkSpace StudioIf configured properly, caches can vastly reduce the time needed to retrieve frequently used data. You can use WorkSpace Studio to change settings for the current running instance of existing caches, or to flush caches. When you configure a cache, you modify its parameters to change its behavior or capacity. For example, you can set up a cache to hold only the most recent 200 entries and set the amount of time (in milliseconds) to remain in the cache. You can also flush a cache so that all new requests for information come from the database.
You cannot add a new cache using the WorkSpace Studio user interface. However, you can add a cache by manually editing the META-INF/p13n-content-config.xml cache configuration file in the in the content directory (named EarContent by default) of the EAR project. You can also copy a cache file from the Merged Project view into your project if desired.
The cache changes that you make using WorkSpace Studio are not persisted and will be lost the next time you publish the application or restart the server. To make persistent changes, use the WebLogic Portal Administration Console.
Caches are read-only and cluster-aware.
Changing Cache Settings in WorkSpace Studio Note: Before you can perform the steps in this section, your server must be running.
To change cache settings in WorkSpace Studio:
1. Select Run > Portal Cache Manager.
The Portal Cache Manager dialog displays, including a list of the current “live” caches. The caches displayed in this dialog comprise a superset of the caches that you can display in the Administration Console; the list in the Portal Cache Manager dialog includes the configured caches as well as caches that are triggered dynamically based on the processes that you are using in your portal.
2. Select a cache to change its settings.
Use the table below as a guide to the settings that you can change:
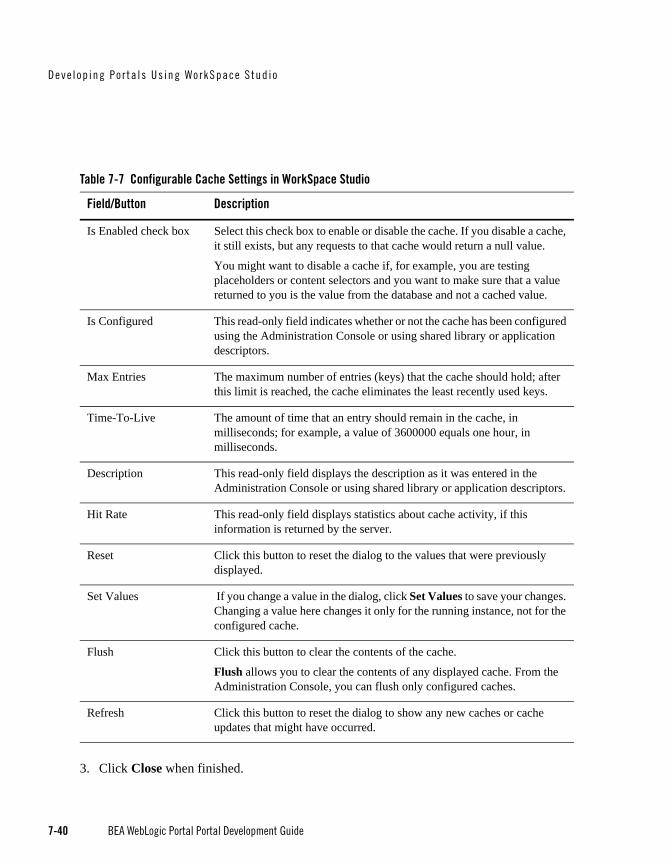
Deve lop ing Por ta ls Us ing WorkSpace S tud io
7-40 BEA WebLogic Portal Portal Development Guide
3. Click Close when finished.
Table 7-7 Configurable Cache Settings in WorkSpace Studio
Field/Button Description
Is Enabled check box Select this check box to enable or disable the cache. If you disable a cache, it still exists, but any requests to that cache would return a null value.
You might want to disable a cache if, for example, you are testing placeholders or content selectors and you want to make sure that a value returned to you is the value from the database and not a cached value.
Is Configured This read-only field indicates whether or not the cache has been configured using the Administration Console or using shared library or application descriptors.
Max Entries The maximum number of entries (keys) that the cache should hold; after this limit is reached, the cache eliminates the least recently used keys.
Time-To-Live The amount of time that an entry should remain in the cache, in milliseconds; for example, a value of 3600000 equals one hour, in milliseconds.
Description This read-only field displays the description as it was entered in the Administration Console or using shared library or application descriptors.
Hit Rate This read-only field displays statistics about cache activity, if this information is returned by the server.
Reset Click this button to reset the dialog to the values that were previously displayed.
Set Values If you change a value in the dialog, click Set Values to save your changes. Changing a value here changes it only for the running instance, not for the configured cache.
Flush Click this button to clear the contents of the cache.
Flush allows you to clear the contents of any displayed cache. From the Administration Console, you can flush only configured caches.
Refresh Click this button to reset the dialog to show any new caches or cache updates that might have occurred.
Improv ing WebLog ic Serve r Admin is t rat ion Conso le Per fo rmance on a Managed Server
BEA WebLogic Portal Portal Development Guide 7-41
For detailed descriptions of each cache, refer to the documentation for the specific feature that is related to that cache. For example, personalization-related caches are described in the Interaction Management Guide.
Improving WebLogic Server Administration Console Performance on a Managed Server
If you are running your portal application on a Managed Server, you can improve the performance of the WebLogic Server Administration Console by using the <context-param> parameter in the web.xml file, as shown in this example:
<context-param>
<param-name>portalFileDirectory</param-name>
<param-value>/</param-value>
</context-param>
This parameter takes advantage of an optimized call that returns EAR content information. Without this parameter, the call recursively searches for .portal files. If you use this parameter, you must place all of the .portal files in the same directory under the portal web application. Use the <param-value> to specify the directory. In the example above, all .portal files reside in the web application’s root directory (/).
Behavior of the “Return to Default Page” AttributeWhen a Book's 'Return To Default Page' attribute is set to true, the portal should display the Book's default page when the book is the target of a navigation URL. The behavior might not be what you expect. The purpose of this section is to clarify the behavior.
This section addresses the nesting of books where the immediate children of the Main Book are books and the return to default only applies when moving between books, not within books. Here is a simple portal hierarchy where each page has a portlet that contains a URL to Book2.
Main Book - Book 2 is the default book for the main book
Book 2 - Return To Default = true with default page = Page 2
Page 2
Page 3
Book 3
Page 4
Deve lop ing Por ta ls Us ing WorkSpace S tud io
7-42 BEA WebLogic Portal Portal Development Guide
Page 5
When the above portal is rendered, Book 2 and Page 2 are displayed.
1. The user clicks on Page 3, moving off of the default page
2. The user clicks on Book 3 (which results in Page 4 being displayed and moving into a different book).
3. The user clicks on the URL for Book 2 and Page 2 is displayed
This works as expected as Page 2 is the default for Book 2 and the last active page in Book2 was Page 3.
When the above portal is rendered, Book 2 and Page 2 are displayed.
1. The user clicks on Page 3, moving off of the default page
2. The user clicks on the URL for Book2 and Page 3 is displayed
The reason for this is because Page 3 is within the same book and therefore, the return to default is not applied.
In the following hierarchy where pages are the children of the main book, the Return to Default feature does not apply.
Main Book - Page 1 is the default page for the main book
Page 1
Book 2 - Return To Default = true with default page = Page 2
Page 2
Page 3
Page 6
Book 3
Page 4
Page 5
Using the above hierarchy, the user is returned to the last active page in Book 2.

Add ing Commerce Se rv ices to an Ex is t ing Por ta l Web P ro jec t
BEA WebLogic Portal Portal Development Guide 7-43
Adding Commerce Services to an Existing Portal Web Project
If you created a portal EAR project or portal web project without adding commerce-related features, you can enable them later by adding the commerce-related facets to your project.
Note: The commerce API and library modules are deprecated with WebLogic Portal 10.0. The API is replaced by BEA Commerce Services, which is available as a separate product from WebLogic Portal.
The J2EE shared libraries directly associated with commerce functionality are listed in Table 7-8:
To add commerce functionality to your portal application, follow these steps:
1. Add the Commerce facet to your portal EAR project by following the instructions in “Adding Facets to an Existing Project” on page 5-12.
The commerce facet is shown in Figure 7-13:
Table 7-8 J2EE Shared Libraries That Include Commerce Features
wlp-commerce-app-lib Provides overall commerce support.
wlp-commerce-tools-support-app-lib Provides WorkSpace Studio (workbench) support for commerce (catalog).
wlp-commerce-web-lib Provides JSP tag libraries.

Deve lop ing Por ta ls Us ing WorkSpace S tud io
7-44 BEA WebLogic Portal Portal Development Guide
Figure 7-13 Commerce Facet in the Portal EAR Project Wizard
2. Add the Commerce facet to your portal web project by following the instructions in “Adding Facets to an Existing Project” on page 5-12.
The commerce facet is shown in Figure 7-14:
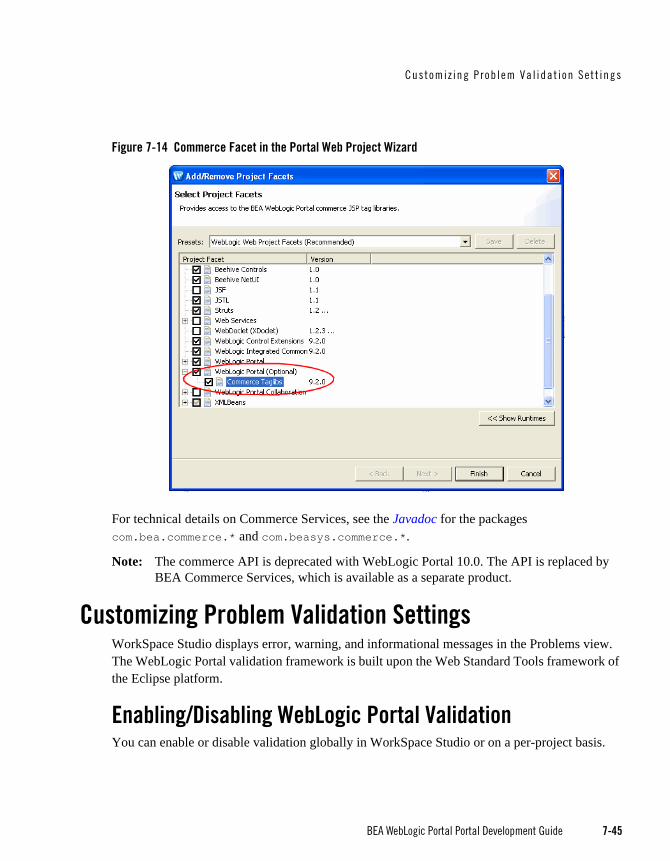
Customiz ing P rob lem Va l ida t ion Set t ings
BEA WebLogic Portal Portal Development Guide 7-45
Figure 7-14 Commerce Facet in the Portal Web Project Wizard
For technical details on Commerce Services, see the Javadoc for the packages com.bea.commerce.* and com.beasys.commerce.*.
Note: The commerce API is deprecated with WebLogic Portal 10.0. The API is replaced by BEA Commerce Services, which is available as a separate product.
Customizing Problem Validation SettingsWorkSpace Studio displays error, warning, and informational messages in the Problems view. The WebLogic Portal validation framework is built upon the Web Standard Tools framework of the Eclipse platform.
Enabling/Disabling WebLogic Portal ValidationYou can enable or disable validation globally in WorkSpace Studio or on a per-project basis.
Deve lop ing Por ta ls Us ing WorkSpace S tud io
7-46 BEA WebLogic Portal Portal Development Guide
Enabling/Disabling Validation GloballyTo enable or disable validation for all projects in a workspace, do the following:
1. Select Window > Preferences.
2. In the Preferences dialog, select Validation.
3. In the Validation dialog, the validation WebLogic Portal Validator and WebLogic Portal XML Validator are selected by default. You can disable either of these settings by deselecting the corresponding check box. Select the Manual check box to perform validation during manual builds, and select the Build check box to perform validation during automatic builds.
– WebLogic Portal Validator – Enables all WebLogic Portal validation except XML schema checking.
– WebLogic Portal XML Validator – Enables only schema checking for WebLogic Portal files.
The Validation dialog is shown in Figure 7-15.
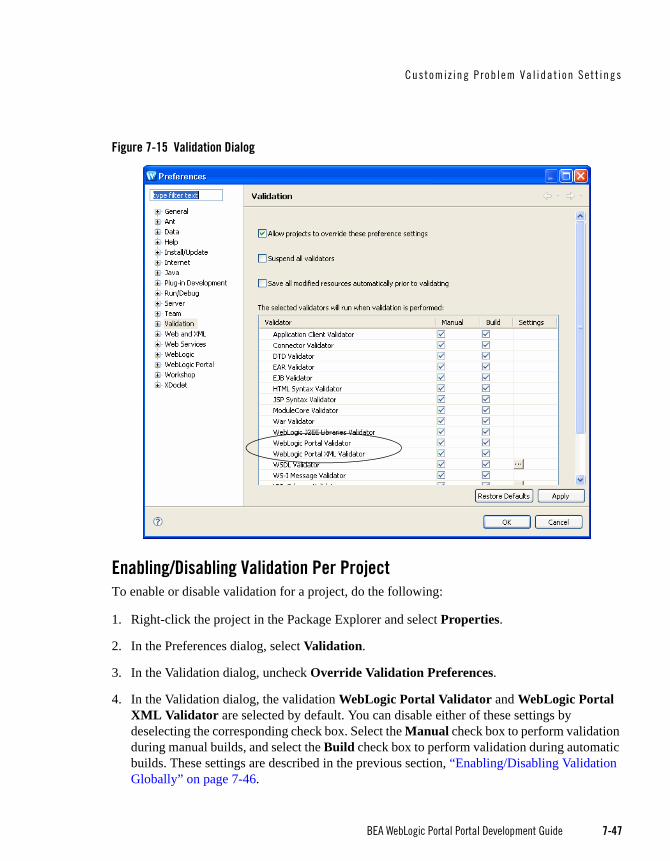
Customiz ing P rob lem Va l ida t ion Set t ings
BEA WebLogic Portal Portal Development Guide 7-47
Figure 7-15 Validation Dialog
Enabling/Disabling Validation Per ProjectTo enable or disable validation for a project, do the following:
1. Right-click the project in the Package Explorer and select Properties.
2. In the Preferences dialog, select Validation.
3. In the Validation dialog, uncheck Override Validation Preferences.
4. In the Validation dialog, the validation WebLogic Portal Validator and WebLogic Portal XML Validator are selected by default. You can disable either of these settings by deselecting the corresponding check box. Select the Manual check box to perform validation during manual builds, and select the Build check box to perform validation during automatic builds. These settings are described in the previous section, “Enabling/Disabling Validation Globally” on page 7-46.
Deve lop ing Por ta ls Us ing WorkSpace S tud io
7-48 BEA WebLogic Portal Portal Development Guide
Customizing WebLogic Portal Validation MappingsYou can the way the severity of errors, warnings, and informational messages are mapped and reported in WorkSpace Studio. This section explains how to customize validation mappings globally and per project.
The main areas of portal code that are checked by the WebLogic Portal validation framework include the following:
Portlet, book, and page definition labels
Book, page, and portlet references in portlets
Portlet event validity
Markup file references and duplicate labels
Project relationships (a portal web application must be deployed in portal EAR, for example)
OverviewOrdinarily, when errors occur in a project, WorkSpace Studio prevents you from deploying your application. In some cases, you might want to ignore such problems and deploy the application anyway. Or, you might have a policy whereby warnings are not allowed in a deployed application. In these cases, you can choose to flag the warnings as errors to prevent deployment. Although you cannot enable or disable specific problem-related messages, you can modify way the severity of types of problems are mapped and reported.
Customizing Validation GloballyTo customize validation for all projects in your workspace, do the following:
1. Select Window > Preferences.
2. In the Preferences dialog, select Validation > WebLogic Portal Verification Settings.
3. In the WebLogic Portal Verification Settings dialog, you can modify how the following kinds of problems are reported:
– Serious problems should be flagged as – Lets you change the severity assigned to problems that would normally be reported as an error.
– Potential problems should be flagged as – Lets you change the severity assigned to problems that would normally be reported as an warning.
Enab l ing P laceab le Movement
BEA WebLogic Portal Portal Development Guide 7-49
– Simple alerts should be flagged as – Lets you change the severity assigned to problems that would normally be reported as an information message.
Tip: Select the Verify related files on incremental builds check box to allow related files to be validated when an incremental build is performed. This feature is useful if you happen to copy a portal resource, such as a book within a portal web application. You will see validation errors related to duplicate definition labels reported on both the original and duplicate file. If you change the duplicate definition labels, only the changed file is validated on incremental builds: the validation errors remain for the original file. If you select Verify related files on incremental builds, both the newly changed and original file are validated and the validation errors on the original file are cleared.
Customizing Validation Per ProjectTo customize validation for all projects for specific projects, do the following:
1. Right-click the project in the Package Explorer and select Properties.
2. In the Preferences dialog, select Validation > WebLogic Portal Verification Settings.
3. In the WebLogic Portal Verification Settings dialog, uncheck Override Validation Preferences.
4. In the WebLogic Portal Verification Settings dialog, you can modify how the following kinds of problems are reported. See the previous section, “Customizing Validation Globally” on page 7-48.
Note: Project-level settings take precedence over global settings.
Enabling Placeable Movement You can enable a portal so that users can drag and drop individual portlets or books (placeables) on a page. This feature, called placeable movement, provides a convenient way for users to customize the location of content on their portal desktop.
Tip: Placeable movement relies on the WLP REST API, which enables clients to dynamically retrieve, modify, and update portal data. See the Client Development Guide for more information about the REST API.
Enabling placeable movement is a two-step process:
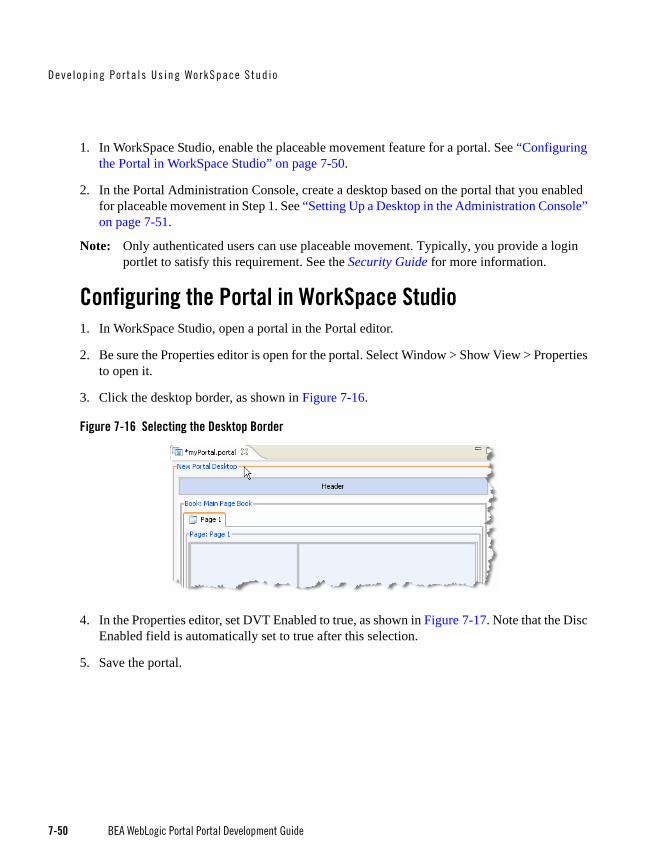
Deve lop ing Por ta ls Us ing WorkSpace S tud io
7-50 BEA WebLogic Portal Portal Development Guide
1. In WorkSpace Studio, enable the placeable movement feature for a portal. See “Configuring the Portal in WorkSpace Studio” on page 7-50.
2. In the Portal Administration Console, create a desktop based on the portal that you enabled for placeable movement in Step 1. See “Setting Up a Desktop in the Administration Console” on page 7-51.
Note: Only authenticated users can use placeable movement. Typically, you provide a login portlet to satisfy this requirement. See the Security Guide for more information.
Configuring the Portal in WorkSpace Studio1. In WorkSpace Studio, open a portal in the Portal editor.
2. Be sure the Properties editor is open for the portal. Select Window > Show View > Properties to open it.
3. Click the desktop border, as shown in Figure 7-16.
Figure 7-16 Selecting the Desktop Border
4. In the Properties editor, set DVT Enabled to true, as shown in Figure 7-17. Note that the Disc Enabled field is automatically set to true after this selection.
5. Save the portal.
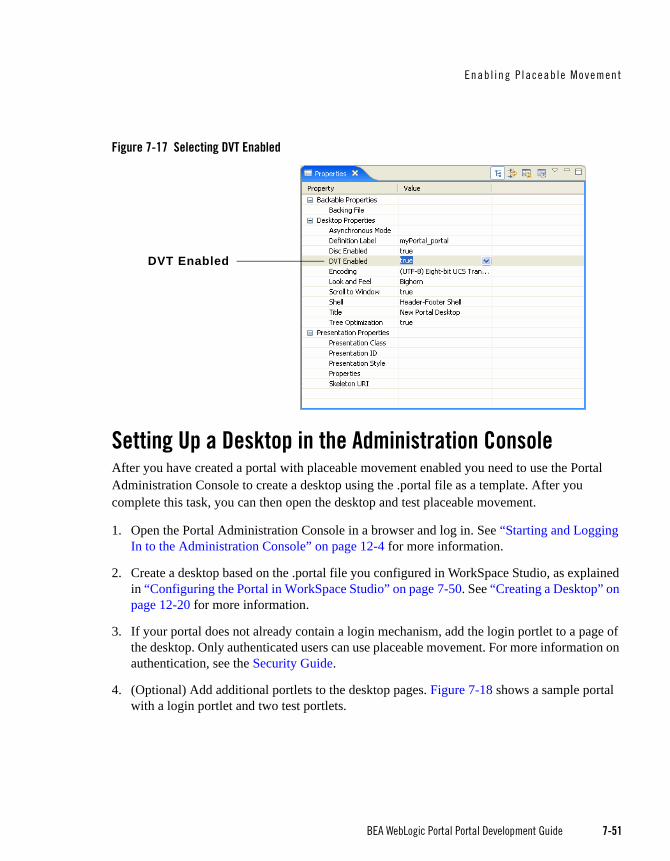
Enab l ing P laceab le Movement
BEA WebLogic Portal Portal Development Guide 7-51
Figure 7-17 Selecting DVT Enabled
Setting Up a Desktop in the Administration ConsoleAfter you have created a portal with placeable movement enabled you need to use the Portal Administration Console to create a desktop using the .portal file as a template. After you complete this task, you can then open the desktop and test placeable movement.
1. Open the Portal Administration Console in a browser and log in. See “Starting and Logging In to the Administration Console” on page 12-4 for more information.
2. Create a desktop based on the .portal file you configured in WorkSpace Studio, as explained in “Configuring the Portal in WorkSpace Studio” on page 7-50. See “Creating a Desktop” on page 12-20 for more information.
3. If your portal does not already contain a login mechanism, add the login portlet to a page of the desktop. Only authenticated users can use placeable movement. For more information on authentication, see the Security Guide.
4. (Optional) Add additional portlets to the desktop pages. Figure 7-18 shows a sample portal with a login portlet and two test portlets.
DVT Enabled
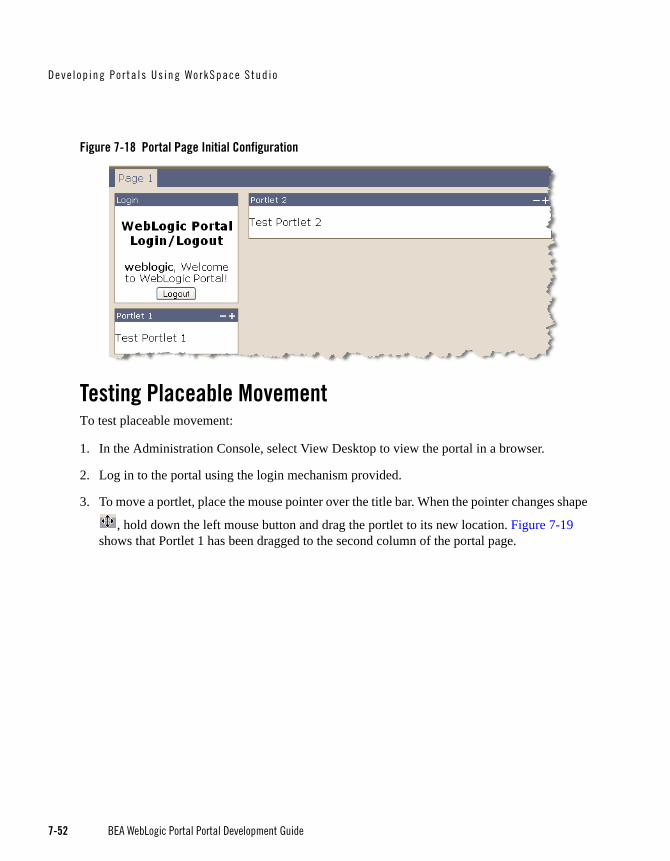
Deve lop ing Por ta ls Us ing WorkSpace S tud io
7-52 BEA WebLogic Portal Portal Development Guide
Figure 7-18 Portal Page Initial Configuration
Testing Placeable Movement To test placeable movement:
1. In the Administration Console, select View Desktop to view the portal in a browser.
2. Log in to the portal using the login mechanism provided.
3. To move a portlet, place the mouse pointer over the title bar. When the pointer changes shape
, hold down the left mouse button and drag the portlet to its new location. Figure 7-19 shows that Portlet 1 has been dragged to the second column of the portal page.
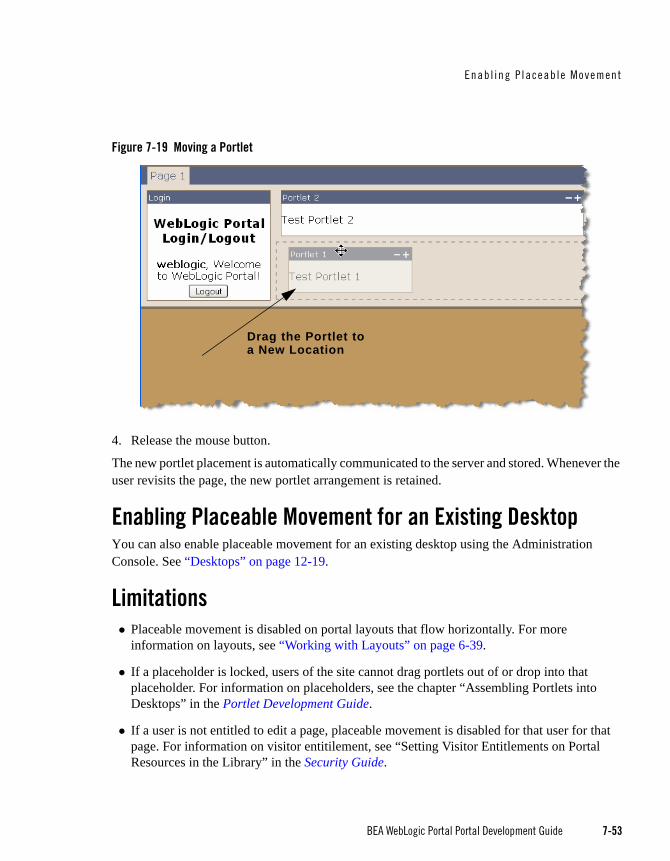
Enab l ing P laceab le Movement
BEA WebLogic Portal Portal Development Guide 7-53
Figure 7-19 Moving a Portlet
4. Release the mouse button.
The new portlet placement is automatically communicated to the server and stored. Whenever the user revisits the page, the new portlet arrangement is retained.
Enabling Placeable Movement for an Existing DesktopYou can also enable placeable movement for an existing desktop using the Administration Console. See “Desktops” on page 12-19.
Limitations Placeable movement is disabled on portal layouts that flow horizontally. For more information on layouts, see “Working with Layouts” on page 6-39.
If a placeholder is locked, users of the site cannot drag portlets out of or drop into that placeholder. For information on placeholders, see the chapter “Assembling Portlets into Desktops” in the Portlet Development Guide.
If a user is not entitled to edit a page, placeable movement is disabled for that user for that page. For information on visitor entitilement, see “Setting Visitor Entitlements on Portal Resources in the Library” in the Security Guide.
Drag the Portlet to a New Location
Deve lop ing Por ta ls Us ing WorkSpace S tud io
7-54 BEA WebLogic Portal Portal Development Guide
Localizing Titles for File-Based Books, Pages, and Portlets
You can localize the title of a file-based book, page, or portlet by specifying a localized resource bundle in the .portlet, .page, or .book file. For instance, to localize the title of a page, modify the .page file as follows:
1. Specify values for the titleKey and localizationBundle attributes. Note that the titleKey attribute value will be substituted for the title attribute for the specified locale. The localizationBundle value identifies the resource bundle.
For example, assume that you have the a resource bundle myresources/PageBundle, where the directory that contains myresources is in the Java CLASSPATH for the web application:<netuix:pagedefinitionLabel="page2"...title="Default Title: Will Not Display When Localized Text Is Substituted" titleKey="page2.title.key"localizationBundle="myresources.PageBundle"...
2. Create a resource bundle properties file with the locale-specific extension. For example:myresources/PageBundle_<locale>.propertieswhere <locale>
where <locale> is the language code, for example, PageBundle_fr.properties for a French translation.
3. Add the correct key/value pairs to the properties file, such as page2.title.key=This is my Localized Title.
Follow the same procedure to localize portlets and books.
Note: This procedure is only used for localizing the title attribute of file-based (non-streaming) portal resources. To localize a portlet in a portal desktop that is managed by the Administration Console (sometimes called a “streaming portal”), see “Localizing a Portal Resource” on page 12-15.

BEA WebLogic Portal Portal Development Guide 8-1
C H A P T E R 8
Enabling Visitor Tools
Visitor Tools allow individual portal users to customize the makeup and appearance of their portal desktop to create a more personalized portal experience. This chapter explains how to enable Visitor Tools.
This chapter includes these topics:
What Are Visitor Tools?
Enabling Visitor Tools
What Are Visitor Tools? When enabled, Visitor Tools add features to portal desktops that allow portal visitors to modify the content and appearance of their desktops, books, and pages.
Changes made by a user through Visitor Tools are saved in the database and persist each time the user logs in to the portal. Visitor Tools provide a small subset of features that are available in the Portal Administration Console, such as changing the portal look & feel, adding and removing portlets, books, and pages, and others features.
Visitor Tools provide a Customize menu that portal visitors can use to access the customize their portal desktop; for example, the GroupSpace sample application’s Customize menu contains a drop-down menu of links (the three menu items are Page Contents, Colors, and Pages). Figure 8-1 shows the Customize menu (circled in red).

Enab l ing V is i t o r Too ls
8-2 BEA WebLogic Portal Portal Development Guide
Tip: The GroupSpace Guide explains the Visitor Tools features from an end user’s perspective; if you want to create a customized user guide for your portal visitors, you can consider using that content as a starting point.
Figure 8-1 GroupSpace Desktop Showing the Customize Menu (Visitor Tools)
Tip: A “Communities” menu is also provided for use in the context of a community-enabled application; for more information, refer to the Communities Guide.
Enabling Visitor Tools Enabling Visitor Tools is a two-step process. First, you need to verify in WorkSpace Studio that the proper facet is installed in the portal web project that contains the portal you wish to enable. Second, you need to create a properly configured desktop in the WebLogic Portal Administration Console based on the enabled .portal file.
This section includes these topics:
Verifying the Portal Visitor Tools Facet
Enabling Visitor Tools for a Desktop
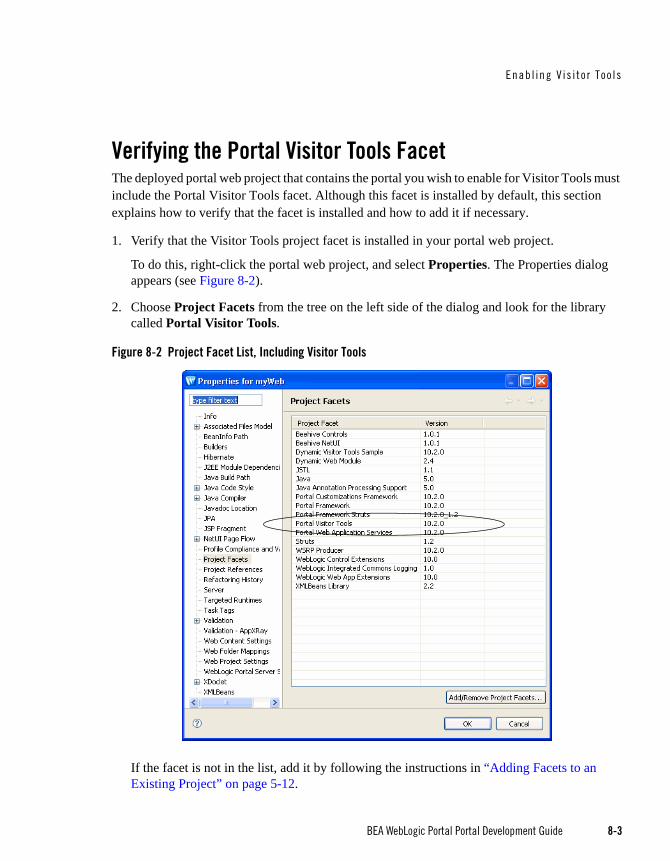
Enab l ing V is i t o r Too ls
BEA WebLogic Portal Portal Development Guide 8-3
Verifying the Portal Visitor Tools FacetThe deployed portal web project that contains the portal you wish to enable for Visitor Tools must include the Portal Visitor Tools facet. Although this facet is installed by default, this section explains how to verify that the facet is installed and how to add it if necessary.
1. Verify that the Visitor Tools project facet is installed in your portal web project.
To do this, right-click the portal web project, and select Properties. The Properties dialog appears (see Figure 8-2).
2. Choose Project Facets from the tree on the left side of the dialog and look for the library called Portal Visitor Tools.
Figure 8-2 Project Facet List, Including Visitor Tools
If the facet is not in the list, add it by following the instructions in “Adding Facets to an Existing Project” on page 5-12.
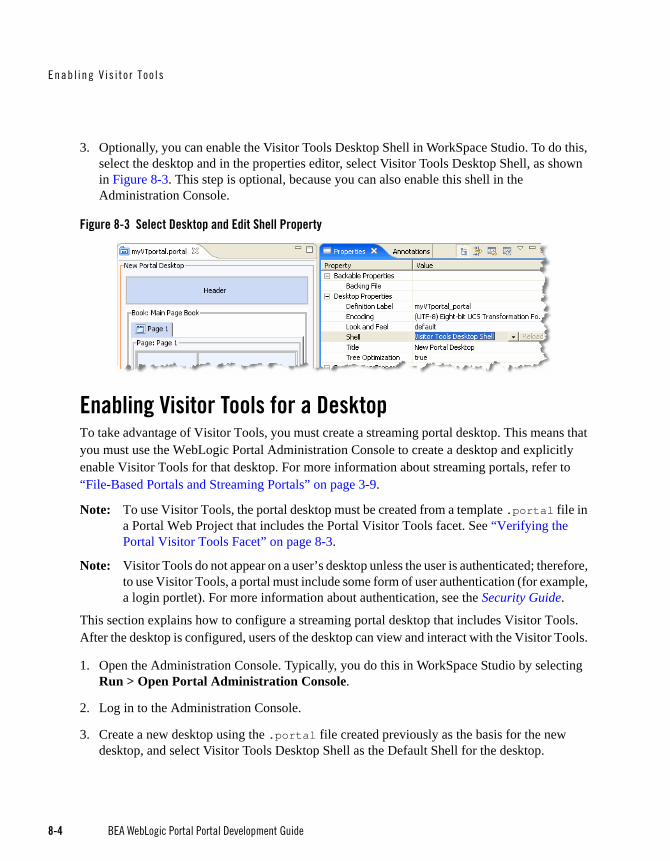
Enab l ing V is i t o r Too ls
8-4 BEA WebLogic Portal Portal Development Guide
3. Optionally, you can enable the Visitor Tools Desktop Shell in WorkSpace Studio. To do this, select the desktop and in the properties editor, select Visitor Tools Desktop Shell, as shown in Figure 8-3. This step is optional, because you can also enable this shell in the Administration Console.
Figure 8-3 Select Desktop and Edit Shell Property
Enabling Visitor Tools for a Desktop To take advantage of Visitor Tools, you must create a streaming portal desktop. This means that you must use the WebLogic Portal Administration Console to create a desktop and explicitly enable Visitor Tools for that desktop. For more information about streaming portals, refer to “File-Based Portals and Streaming Portals” on page 3-9.
Note: To use Visitor Tools, the portal desktop must be created from a template .portal file in a Portal Web Project that includes the Portal Visitor Tools facet. See “Verifying the Portal Visitor Tools Facet” on page 8-3.
Note: Visitor Tools do not appear on a user’s desktop unless the user is authenticated; therefore, to use Visitor Tools, a portal must include some form of user authentication (for example, a login portlet). For more information about authentication, see the Security Guide.
This section explains how to configure a streaming portal desktop that includes Visitor Tools. After the desktop is configured, users of the desktop can view and interact with the Visitor Tools.
1. Open the Administration Console. Typically, you do this in WorkSpace Studio by selecting Run > Open Portal Administration Console.
2. Log in to the Administration Console.
3. Create a new desktop using the .portal file created previously as the basis for the new desktop, and select Visitor Tools Desktop Shell as the Default Shell for the desktop.

Enab l ing V is i t o r Too ls
BEA WebLogic Portal Portal Development Guide 8-5
Tip: For detailed instructions on creating a desktop, refer to “Creating a Desktop” on page 12-20.
To confirm that visitor tools are enabled:
1. From the Administration Console Portal Resources tree, select the new desktop, go to the Details tab, and click View Desktop.
2. When the desktop displays, log in and access the Visitor Tools using the Visitor Tools Customize menu, as shown in Figure 8-4.
Figure 8-4 Visitor Tools Menu Enabled
Tip: The GroupSpace Guide explains the Visitor Tools features from an end user’s perspective; if you want to create a customized user guide for your portal visitors, you can consider using that content as a starting point.
Visitor Tools Menu
Enab l ing V is i t o r Too ls
8-6 BEA WebLogic Portal Portal Development Guide
BEA WebLogic Portal Portal Development Guide 9-1
C H A P T E R 9
Creating Portals for Multiple Device Types
Many types of web-enabled mobile devices can access your portals. Each type has unique requirements for the content that it can display.
With the multichannel framework provided in WebLogic Portal, you can extend your portals to include support for different mobile devices. This flexible framework lets you create a single portal that serves content to multiple web-capable devices seamlessly and simultaneously. You can also serve different content to different browsers, such as Mozilla Firefox, Netscape, and Internet Explorer.
When a device accesses a portal, the portal detects the device type and automatically serves the content you created for it within the assigned Look And Feel.
This chapter contains the following sections:
Enabling Multichannel Features in a Portal Web Application
Roadmap for Multichannel Processing
Developing Portals for Use in a Multichannel Environment
Enabling Multichannel Features in a Portal Web Application
When a device (whether a PC or a handheld) accesses a portal, it sends information about itself to the portal in the HTTP header, including the type of browser being used and the type of device. This combination of information defines a client, which is equivalent to the model of a device.
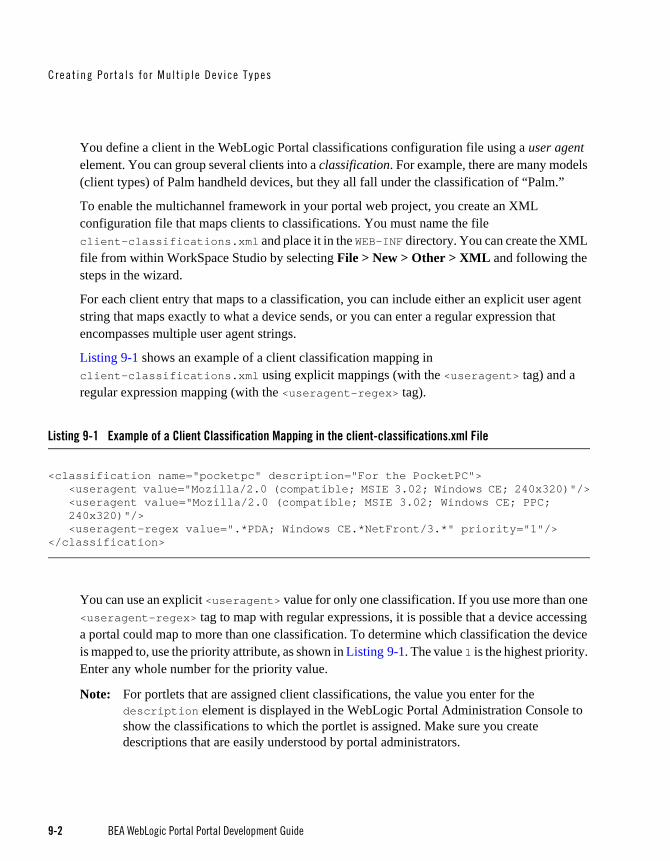
Creat ing Por ta ls fo r Mul t ip le Dev i ce T ypes
9-2 BEA WebLogic Portal Portal Development Guide
You define a client in the WebLogic Portal classifications configuration file using a user agent element. You can group several clients into a classification. For example, there are many models (client types) of Palm handheld devices, but they all fall under the classification of “Palm.”
To enable the multichannel framework in your portal web project, you create an XML configuration file that maps clients to classifications. You must name the file client-classifications.xml and place it in the WEB-INF directory. You can create the XML file from within WorkSpace Studio by selecting File > New > Other > XML and following the steps in the wizard.
For each client entry that maps to a classification, you can include either an explicit user agent string that maps exactly to what a device sends, or you can enter a regular expression that encompasses multiple user agent strings.
Listing 9-1 shows an example of a client classification mapping in client-classifications.xml using explicit mappings (with the <useragent> tag) and a regular expression mapping (with the <useragent-regex> tag).
Listing 9-1 Example of a Client Classification Mapping in the client-classifications.xml File
<classification name="pocketpc" description="For the PocketPC"><useragent value="Mozilla/2.0 (compatible; MSIE 3.02; Windows CE; 240x320)"/><useragent value="Mozilla/2.0 (compatible; MSIE 3.02; Windows CE; PPC;240x320)"/><useragent-regex value=".*PDA; Windows CE.*NetFront/3.*" priority="1"/>
</classification>
You can use an explicit <useragent> value for only one classification. If you use more than one <useragent-regex> tag to map with regular expressions, it is possible that a device accessing a portal could map to more than one classification. To determine which classification the device is mapped to, use the priority attribute, as shown in Listing 9-1. The value 1 is the highest priority. Enter any whole number for the priority value.
Note: For portlets that are assigned client classifications, the value you enter for the description element is displayed in the WebLogic Portal Administration Console to show the classifications to which the portlet is assigned. Make sure you create descriptions that are easily understood by portal administrators.
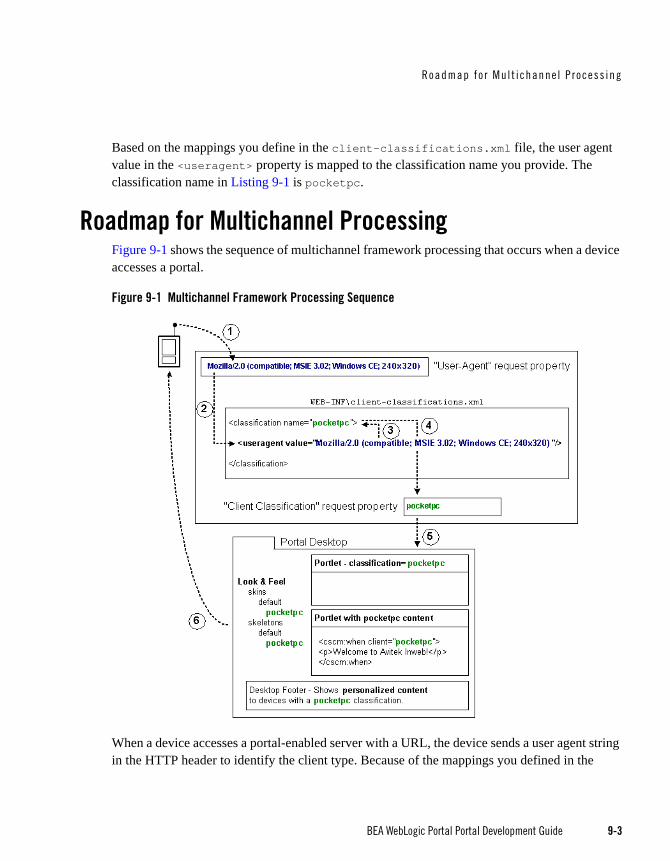
Roadmap fo r Mul t i channe l P rocess ing
BEA WebLogic Portal Portal Development Guide 9-3
Based on the mappings you define in the client-classifications.xml file, the user agent value in the <useragent> property is mapped to the classification name you provide. The classification name in Listing 9-1 is pocketpc.
Roadmap for Multichannel ProcessingFigure 9-1 shows the sequence of multichannel framework processing that occurs when a device accesses a portal.
Figure 9-1 Multichannel Framework Processing Sequence
When a device accesses a portal-enabled server with a URL, the device sends a user agent string in the HTTP header to identify the client type. Because of the mappings you defined in the

Creat ing Por ta ls fo r Mul t ip le Dev i ce T ypes
9-4 BEA WebLogic Portal Portal Development Guide
client-classification.xml file, the user agent string stored in the <useragent> property is mapped to the classification name you provided. As shown in Figure 9-1, the name is pocketpc.
The user agent request property is automatically included with any portal application that you create in WorkSpace Studio. You can view this property by opening the following file in your WorkSpace Studio workspace:Portal_Web_Project\Data_Dir\src\request\DefaultRequestPropertySet.req
The portal uses that client classification name stored in the DefaultRequestPropertySet.req file throughout the portal framework to identify the content and presentation tailored to the device.
Based on the mapping you set up to match user agent strings in the HTTP request to classification names, the portal sends device-specific content and presentation to the different devices that access the portal.
Developing Portals for Use in a Multichannel Environment
The following sections describe how to use the portal framework to create device-specific content and presentation.
Manage Portlet Client ClassificationsWhen you create a portlet, you can assign the portlet to be used by different devices (client classifications). With the portlet open in the editor, go to the Properties view and perform the following steps:
1. Click the ellipsis button in the Client Classifications field, as shown in Figure 9-2.
Figure 9-2 Portlet Properties View Showing the Client Classifications Property
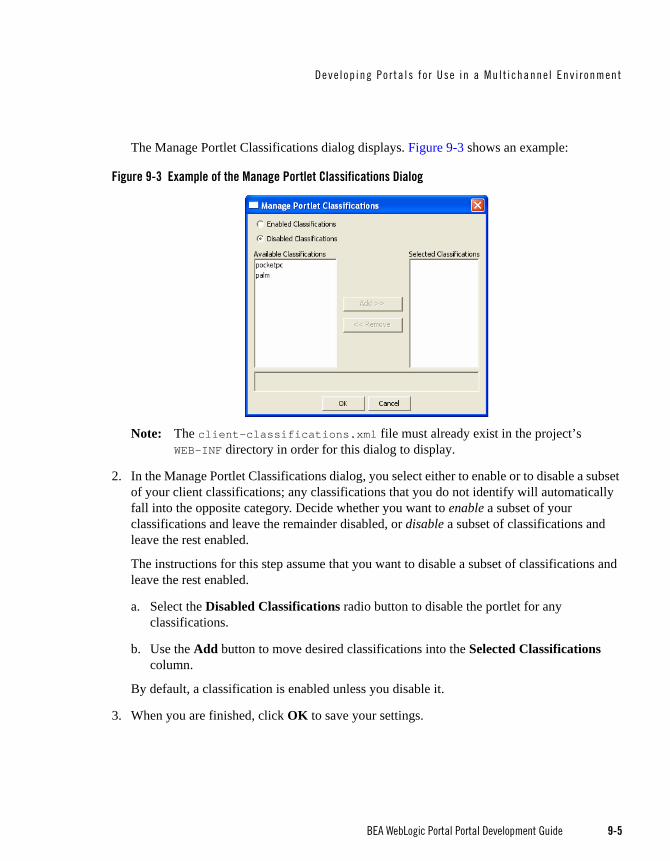
Deve lop ing Po r ta l s fo r Use in a Mu l t i channe l Env i ronment
BEA WebLogic Portal Portal Development Guide 9-5
The Manage Portlet Classifications dialog displays. Figure 9-3 shows an example:
Figure 9-3 Example of the Manage Portlet Classifications Dialog
Note: The client-classifications.xml file must already exist in the project’s WEB-INF directory in order for this dialog to display.
2. In the Manage Portlet Classifications dialog, you select either to enable or to disable a subset of your client classifications; any classifications that you do not identify will automatically fall into the opposite category. Decide whether you want to enable a subset of your classifications and leave the remainder disabled, or disable a subset of classifications and leave the rest enabled.
The instructions for this step assume that you want to disable a subset of classifications and leave the rest enabled.
a. Select the Disabled Classifications radio button to disable the portlet for any classifications.
b. Use the Add button to move desired classifications into the Selected Classifications column.
By default, a classification is enabled unless you disable it.
3. When you are finished, click OK to save your settings.

Creat ing Por ta ls fo r Mul t ip le Dev i ce T ypes
9-6 BEA WebLogic Portal Portal Development Guide
Use the Client Attribute in JSP Tags WebLogic Portal includes JSP tags for creating device-specific inline content in JSPs. Only the content that meets the device criteria defined by the JSP tag is delivered to the device.
The relevant JSP tags have a required client attribute for mapping the JSP content to classifications. For the client value in the JSP tag, you must use the exact value that you used for the name in the client-classifications.xml file.
Listing 9-2 shows some possible uses of the client tag.
Listing 9-2 Example JSP File Showing Possible Uses of the Client Tag
<%@ taglib uri="http://www.bea.com/servers/portal/tags/client/cscm" prefix="client" %><%@ taglib uri="http://www.bea.com/servers/portal/tags/netuix/render" prefix="render" %>
This is a sample of manipulating content using the client-classification tag library.<p/><client:default>
<img style="padding: 10;" align="Bottom" src="<render:jspUri/>images /sunset-big.gif"/>
</client:default>
Different versions of the same image will be selected based on the client classification. For the "default" client, a large image will appear. For the "palm" and "pocketpc", a smaller version of the image will be used. For the "nokia" classification, a greyscale image will be used (purely as an example).
<p/><client:when client="palm,pocketpc"><img src="<render:jspUri/>images /sunset-small.gif"/><p/></client:when><client:when client="nokia"><img src="<render:jspUri/>images /sunset-small-greyscale.gif"/><p/></client:when>
Image placement is also altered slightly for the different classifications.
<client:when-not client="palm,nokia"><p/>This additional content is also included if the client is not a "nokia" or "palm" classification. <p/></client:when-not>
Deve lop ing Po r ta l s fo r Use in a Mu l t i channe l Env i ronment
BEA WebLogic Portal Portal Development Guide 9-7
Develop Appropriate Look And FeelsThe Look And Feels (skins and skeletons) provided with WebLogic Portal include support for a few mobile devices (Nokia, Palm, and Pocket PC).
You can develop your own skins and skeletons to support different devices. When a Look And Feel is selected for a desktop, the portal framework reads the client classification property in the DefaultRequestPropertySet.req file and uses the Look And Feel logic to find skin and skeleton directories matching the name of the client classification.
Any portal web project that you create includes a default set of multichannel Look And Feels located in skin and skeleton subdirectories (\framework\skins\default and \framework\skeletons\default).
For instructions on creating skins and skeletons for Look And Feels, refer to “User Interface Development with Look And Feel Features” on page 6-1.
Interaction Management Development Using the client classification name stored in the DefaultRequestPropertySet.req file, you can build and trigger personalization and campaigns for devices based on that property value.
For information on developing personalization and campaigns, refer to the Interaction Management Guide.

Creat ing Por ta ls fo r Mul t ip le Dev i ce T ypes
9-8 BEA WebLogic Portal Portal Development Guide
BEA WebLogic Portal Portal Development Guide 10-1
C H A P T E R 10
Designing Portals for Optimal Performance
The process of optimizing your portal for the best possible performance spans all phases of development. You should continually monitor performance and make appropriate adjustments.
This chapter describes performance optimizations that you can incorporate as you develop your portal.
For information about fine-tuning your portal application after it has been deployed, please refer to the Performance Tuning Guide. For information about capacity planning, see the Capacity Planning Guide.
Note: The Performance Tuning Guide and the Capacity Planning Guide are typically available online three months after the release of a particular version of WebLogic Portal.
This chapter contains the following sections:
Asynchronous Desktop Rendering
Using Multiple Desktops
Optimizing the Control Tree
Asynchronous Desktop Rendering Asynchronous rendering improves overall portal performance by allowing the contents of portlets to render independently of one another.
WebLogic Portal supports two methods of asynchronous rendering: portlet-specific and desktop. With portlet-specific asynchronous rendering, you can choose which portlets will render
Des ign ing Po r ta ls f o r Opt imal Pe r fo rmance
10-2 BEA WebLogic Portal Portal Development Guide
asynchronously. With asynchronous desktop rendering, all portlets within a portal desktop render asynchronously.
This section discusses asynchronous desktop rendering primarily. For detailed information on portlet-specific asynchronous rendering, see the chapter “Optimizing Portlet Performance” in the Portlet Development Guide.
This section includes these topics:
Choosing the Method of Asynchronous Rendering
Configuring Asynchronous Desktop Rendering
Choosing the Method of Asynchronous RenderingBoth portlet-specific and desktop asynchronous rendering improve overall portal performance. Because only the portlets that have changed are updated (refreshed), users experience quicker overall response times. In addition to improving portal response times, asynchronous rendering decreases server load.
Consider choosing asynchronous desktop rendering if:
You want to use interportlet communication in your asynchronously rendered desktop. Interportlet communication is not supported for portlet-specific asynchronous rendering.
You need to have programmatic access to the full portal control tree. For example, with asynchronous desktop rendering enabled, portlets can take advantage of backing context objects such as PageBackingContext. These objects cannot be used by portlets configured for portlet-specific asynchronous rendering.
Consider choosing portlet-specific asynchronous rendering if:
You only need to enable asynchronous rendering on a single portlet. For example, if a specific portlet requires a long processing time, you might not want to hold up the entire portal.
Configuring Asynchronous Desktop Rendering You can configure asynchronous desktop rendering in WorkSpace Studio and in the WebLogic Portal Administration Console. In both cases, you can choose one of three options:
Enable – Enables asynchronous desktop rendering for the entire portal desktop. This mode disables any portlet-specific asynchronous rendering settings that may exist in the desktop.

Cont ro l T ree Des ign
BEA WebLogic Portal Portal Development Guide 10-3
Disable – Disables asynchronous rendering for the entire portal desktop. This mode disables asynchronous rendering for all portlets, including ones that have portlet-specific asynchronous rendering enabled.
Compatibility Mode – Enables portlet-specific asynchronous rendering to function, but disables asynchronous desktop rendering.
Asynchronous desktop rendering in WorkSpace Studio is set with the portal property called Asynchronous Mode. See “Editing Portal Properties” on page 7-11 for details.
In the Administration Console, you can set asynchronous desktop rendering for specific desktops in the Advanced Properties section of the Desktop Details window. See “Modifying Desktop Properties” on page 12-25 for details.
Control Tree DesignOne of the most important variables that affects portal performance is portal framework controls. The more portal framework controls (pages, portlets, buttons, and so on) you have, the larger your control tree.
How the Control Tree WorksWhen a portal is instantiated, it generates a taxonomy, or hierarchy of portal resources, such as desktops, books, pages, and portlets. Each resource is represented as a node on the control tree, as shown in Figure 10-1.
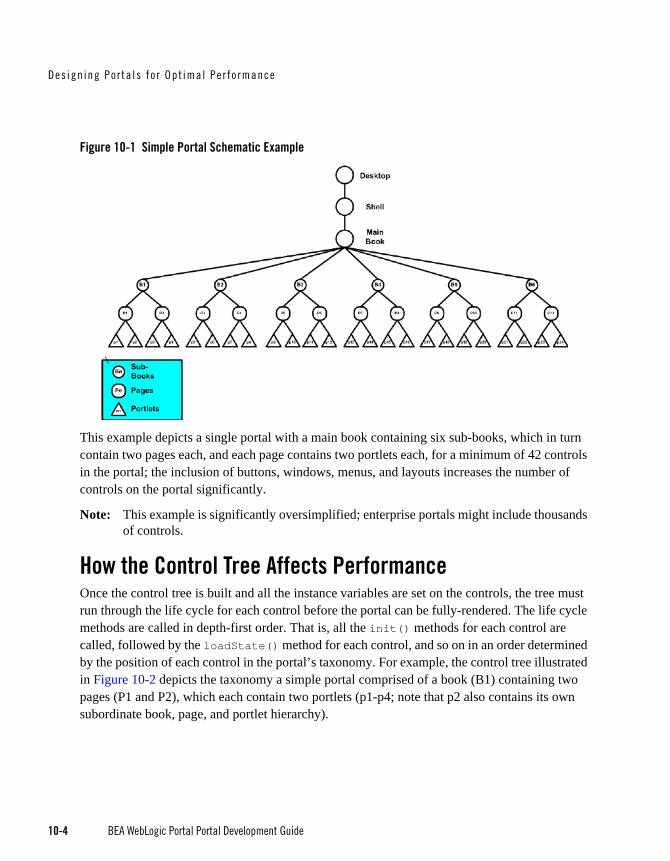
Des ign ing Po r ta ls f o r Opt imal Pe r fo rmance
10-4 BEA WebLogic Portal Portal Development Guide
Figure 10-1 Simple Portal Schematic Example
This example depicts a single portal with a main book containing six sub-books, which in turn contain two pages each, and each page contains two portlets each, for a minimum of 42 controls in the portal; the inclusion of buttons, windows, menus, and layouts increases the number of controls on the portal significantly.
Note: This example is significantly oversimplified; enterprise portals might include thousands of controls.
How the Control Tree Affects PerformanceOnce the control tree is built and all the instance variables are set on the controls, the tree must run through the life cycle for each control before the portal can be fully-rendered. The life cycle methods are called in depth-first order. That is, all the init() methods for each control are called, followed by the loadState() method for each control, and so on in an order determined by the position of each control in the portal’s taxonomy. For example, the control tree illustrated in Figure 10-2 depicts the taxonomy a simple portal comprised of a book (B1) containing two pages (P1 and P2), which each contain two portlets (p1-p4; note that p2 also contains its own subordinate book, page, and portlet hierarchy).
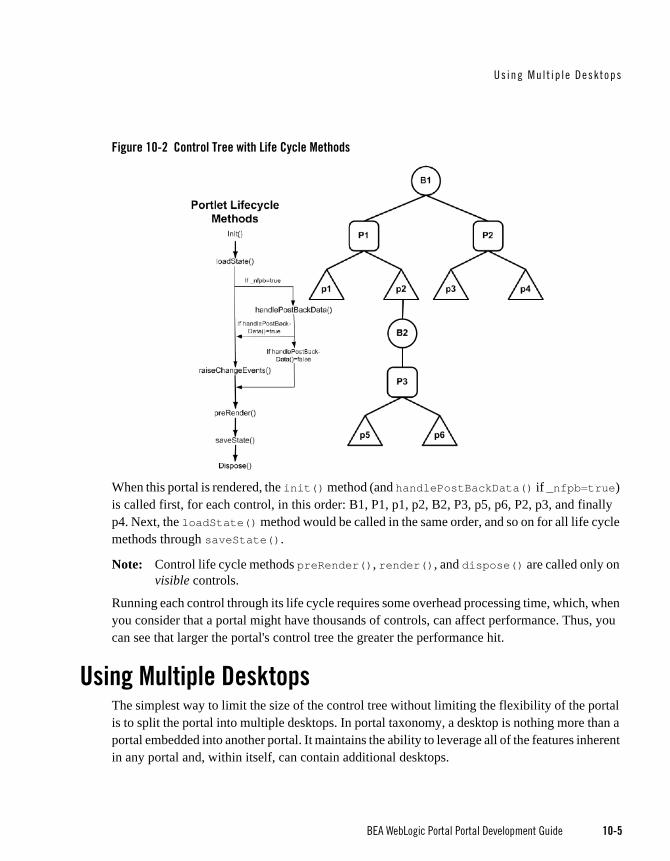
Us ing Mul t ip le Desktops
BEA WebLogic Portal Portal Development Guide 10-5
Figure 10-2 Control Tree with Life Cycle Methods
When this portal is rendered, the init() method (and handlePostBackData() if _nfpb=true) is called first, for each control, in this order: B1, P1, p1, p2, B2, P3, p5, p6, P2, p3, and finally p4. Next, the loadState() method would be called in the same order, and so on for all life cycle methods through saveState().
Note: Control life cycle methods preRender(), render(), and dispose() are called only on visible controls.
Running each control through its life cycle requires some overhead processing time, which, when you consider that a portal might have thousands of controls, can affect performance. Thus, you can see that larger the portal's control tree the greater the performance hit.
Using Multiple DesktopsThe simplest way to limit the size of the control tree without limiting the flexibility of the portal is to split the portal into multiple desktops. In portal taxonomy, a desktop is nothing more than a portal embedded into another portal. It maintains the ability to leverage all of the features inherent in any portal and, within itself, can contain additional desktops.
Des ign ing Po r ta ls f o r Opt imal Pe r fo rmance
10-6 BEA WebLogic Portal Portal Development Guide
Why This is a Good IdeaWhen you split a complex portal into multiple desktops, you spread the controls among those desktops. Since the control tree is scoped to the individual portal and since a desktop behaves much like a portal, each desktop has its own tree and the controls on that tree are built only when that desktop is opened. Thus, by splitting a complex portal with a large control tree into multiple desktops, you reduce the number of controls on the tree to just that number necessary for the active desktop. As you might guess, this reduces the amount of time required to render the portal as a single desktop and increase portal performance.
When a portal is rendered, about 15% of the processing time is dedicated to constructing the control tree, 70% to running the life cycle methods, and 15% in garbage collection (clearing dead objects from the heap, thus releasing that space for new objects). While construction and garbage collection are always performed, running the life cycle methods is necessary only for visible controls (that is, those on the exposed desktop). This results in considerable overhead savings and improved system performance.
For example, the sample control tree depicted in Figure 10-1 shows a single portal with 42 controls. Were we to split this portal up into multiple desktops, as in Figure 10-3, while we would increase the number of control trees in the entire portal, each tree would be nearly two thirds smaller, and thus be processed in roughly two-thirds the time, significantly reducing the time required to render the portal.

Us ing Mul t ip le Desktops
BEA WebLogic Portal Portal Development Guide 10-7
Figure 10-3 Simple Portal Split into Multiple Desktops
Figure 10-4 shows how the example in Figure 10-3 might be rendered once opened.
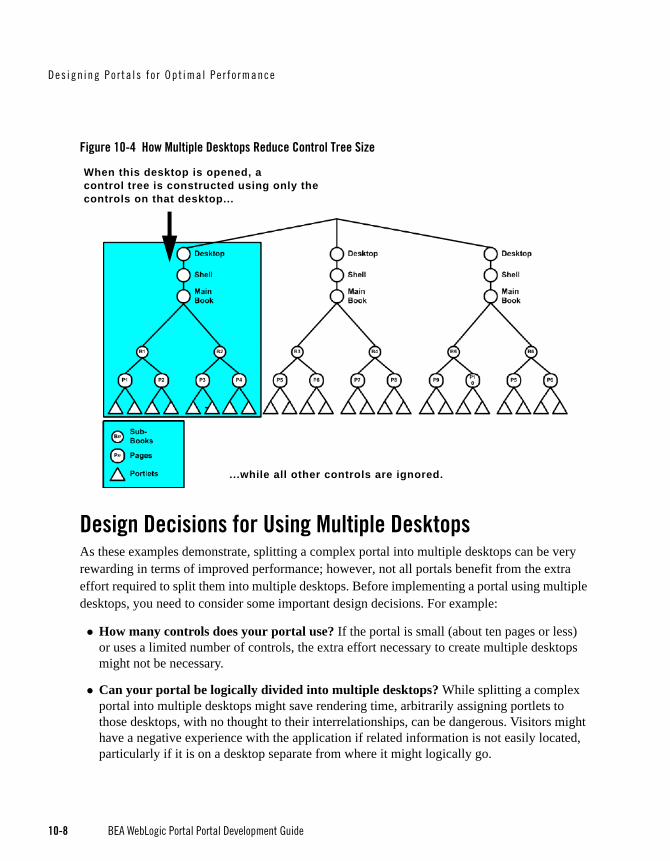
Des ign ing Po r ta ls f o r Opt imal Pe r fo rmance
10-8 BEA WebLogic Portal Portal Development Guide
Figure 10-4 How Multiple Desktops Reduce Control Tree Size
Design Decisions for Using Multiple DesktopsAs these examples demonstrate, splitting a complex portal into multiple desktops can be very rewarding in terms of improved performance; however, not all portals benefit from the extra effort required to split them into multiple desktops. Before implementing a portal using multiple desktops, you need to consider some important design decisions. For example:
How many controls does your portal use? If the portal is small (about ten pages or less) or uses a limited number of controls, the extra effort necessary to create multiple desktops might not be necessary.
Can your portal be logically divided into multiple desktops? While splitting a complex portal into multiple desktops might save rendering time, arbitrarily assigning portlets to those desktops, with no thought to their interrelationships, can be dangerous. Visitors might have a negative experience with the application if related information is not easily located, particularly if it is on a desktop separate from where it might logically go.
When this desktop is opened, a control tree is constructed using only the controls on that desktop...
...while all other controls are ignored.
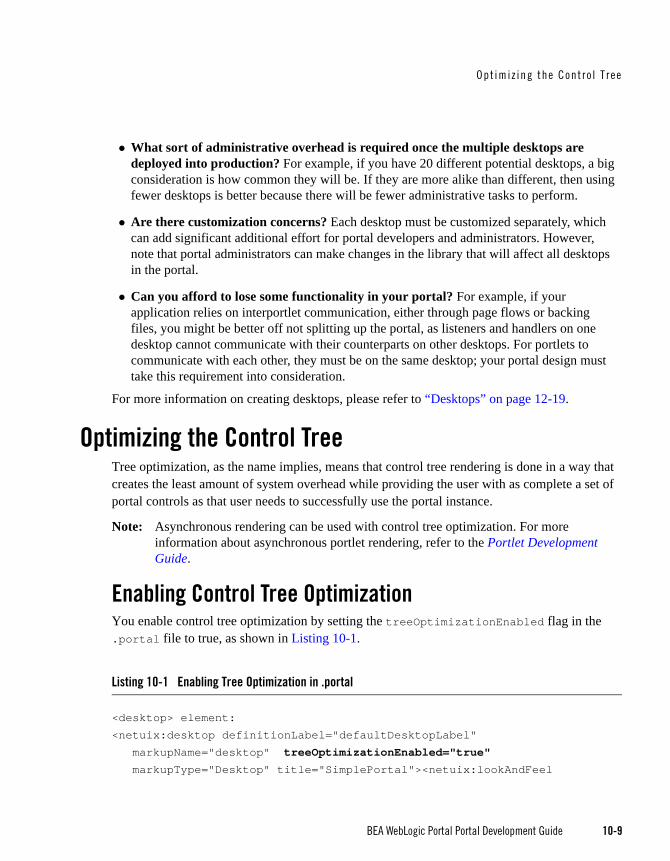
Opt imiz ing the Cont ro l T ree
BEA WebLogic Portal Portal Development Guide 10-9
What sort of administrative overhead is required once the multiple desktops are deployed into production? For example, if you have 20 different potential desktops, a big consideration is how common they will be. If they are more alike than different, then using fewer desktops is better because there will be fewer administrative tasks to perform.
Are there customization concerns? Each desktop must be customized separately, which can add significant additional effort for portal developers and administrators. However, note that portal administrators can make changes in the library that will affect all desktops in the portal.
Can you afford to lose some functionality in your portal? For example, if your application relies on interportlet communication, either through page flows or backing files, you might be better off not splitting up the portal, as listeners and handlers on one desktop cannot communicate with their counterparts on other desktops. For portlets to communicate with each other, they must be on the same desktop; your portal design must take this requirement into consideration.
For more information on creating desktops, please refer to “Desktops” on page 12-19.
Optimizing the Control TreeTree optimization, as the name implies, means that control tree rendering is done in a way that creates the least amount of system overhead while providing the user with as complete a set of portal controls as that user needs to successfully use the portal instance.
Note: Asynchronous rendering can be used with control tree optimization. For more information about asynchronous portlet rendering, refer to the Portlet Development Guide.
Enabling Control Tree OptimizationYou enable control tree optimization by setting the treeOptimizationEnabled flag in the .portal file to true, as shown in Listing 10-1.
Listing 10-1 Enabling Tree Optimization in .portal
<desktop> element:
<netuix:desktop definitionLabel="defaultDesktopLabel"
markupName="desktop" treeOptimizationEnabled="true"
markupType="Desktop" title="SimplePortal"><netuix:lookAndFeel
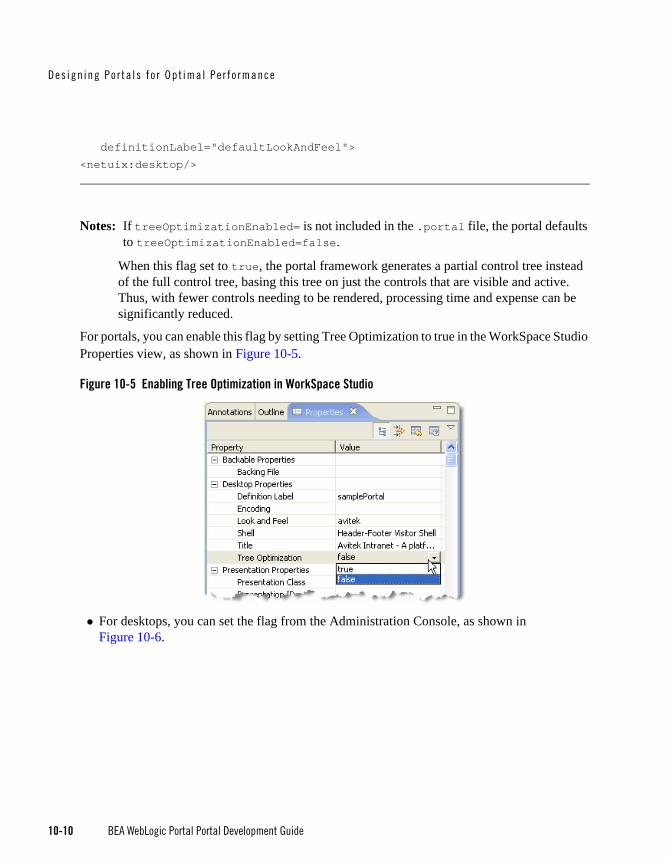
Des ign ing Po r ta ls f o r Opt imal Pe r fo rmance
10-10 BEA WebLogic Portal Portal Development Guide
definitionLabel="defaultLookAndFeel">
<netuix:desktop/>
Notes: If treeOptimizationEnabled= is not included in the .portal file, the portal defaults to treeOptimizationEnabled=false.
When this flag set to true, the portal framework generates a partial control tree instead of the full control tree, basing this tree on just the controls that are visible and active. Thus, with fewer controls needing to be rendered, processing time and expense can be significantly reduced.
For portals, you can enable this flag by setting Tree Optimization to true in the WorkSpace Studio Properties view, as shown in Figure 10-5.
Figure 10-5 Enabling Tree Optimization in WorkSpace Studio
For desktops, you can set the flag from the Administration Console, as shown in Figure 10-6.
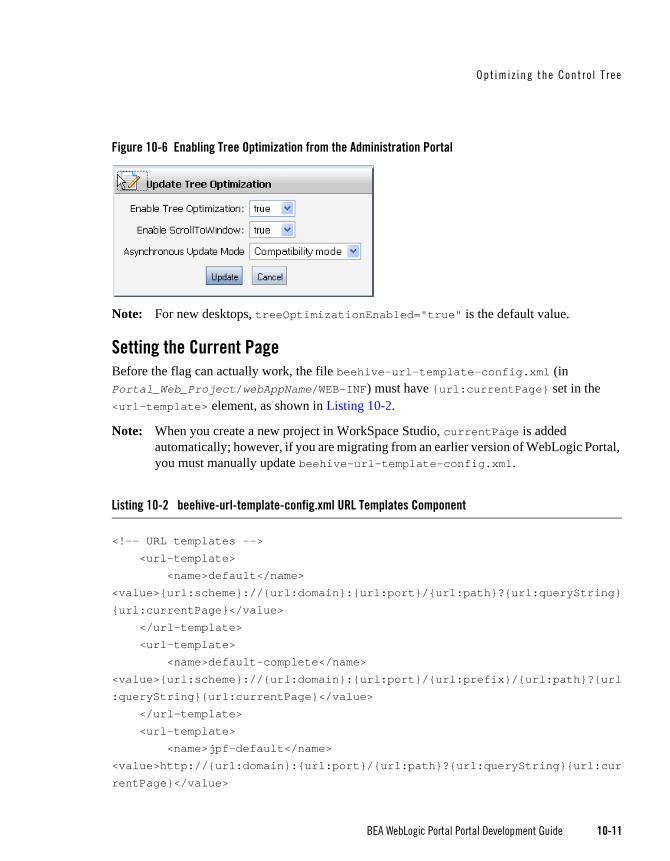
Opt imiz ing the Cont ro l T ree
BEA WebLogic Portal Portal Development Guide 10-11
Figure 10-6 Enabling Tree Optimization from the Administration Portal
Note: For new desktops, treeOptimizationEnabled="true" is the default value.
Setting the Current PageBefore the flag can actually work, the file beehive-url-template-config.xml (in Portal_Web_Project/webAppName/WEB-INF) must have {url:currentPage} set in the <url-template> element, as shown in Listing 10-2.
Note: When you create a new project in WorkSpace Studio, currentPage is added automatically; however, if you are migrating from an earlier version of WebLogic Portal, you must manually update beehive-url-template-config.xml.
Listing 10-2 beehive-url-template-config.xml URL Templates Component
<!-- URL templates -->
<url-template>
<name>default</name>
<value>{url:scheme}://{url:domain}:{url:port}/{url:path}?{url:queryString}
{url:currentPage}</value>
</url-template>
<url-template>
<name>default-complete</name>
<value>{url:scheme}://{url:domain}:{url:port}/{url:prefix}/{url:path}?{url
:queryString}{url:currentPage}</value>
</url-template>
<url-template>
<name>jpf-default</name>
<value>http://{url:domain}:{url:port}/{url:path}?{url:queryString}{url:cur
rentPage}</value>

Des ign ing Po r ta ls f o r Opt imal Pe r fo rmance
10-12 BEA WebLogic Portal Portal Development Guide
</url-template>
<url-template>
<name>jpf-action</name>
<value>http://{url:domain}:{url:port}/{url:path}?{url:queryString}{url:cur
rentPage}</value>
</url-template>
<url-template>
<name>jpf-secure-action</name>
<value>https://{url:domain}:{url:securePort}/{url:path}?{url:queryString}{
url:currentPage}</value>
</url-template>
<url-template>
<name>jpf-resource</name>
<value>http://{url:domain}:{url:port}/{url:path}?{url:queryString}{url:cur
rentPage}</value>
</url-template>
<url-template>
<name>jpf-secure-resource</name>
<value>https://{url:domain}:{url:securePort}/{url:path}?{url:queryString}{
url:currentPage}</value>
</url-template>
<url-template-ref-group>
<name>default-url-templates</name>
<url-template-ref>
<key>action</key>
<template-name>jpf-action</template-name>
</url-template-ref>
<url-template-ref>
<key>secure-action</key>
<template-name>jpf-secure-action</template-name>
</url-template-ref>
<url-template-ref>
<key>resource</key>
<template-name>jpf-resource</template-name>
</url-template-ref>
<url-template-ref>
<key>secure-resource</key>

Opt imiz ing the Cont ro l T ree
BEA WebLogic Portal Portal Development Guide 10-13
<template-name>jpf-secure-resource</template-name>
</url-template-ref>
</url-template-ref-group>
How Tree Optimization WorksWhen the portal servlet receives a request (that is, a mouse-click) it reads the cache to determine if a control tree factory exists. If one doesn’t, it calls controlTreeFactoryBuilder, passing it the XML from the .portal file. This class returns a control tree factory to the servlet, which passes the request to the CreateUIControlTree class.
Assuming _pageLabel and treeOptimizationEnabled="true", CreateUIControlTreeFactory calls the PartialUIControlTreeCreator() method, which returns a control tree comprised of just the control identified by the page label and the set of active page and book labels; this is a partial control tree.
For example, if tree optimizations were enabled for the portal depicted in Figure 10-4, when you submit a request (that is, a mouse click), only the active controls would be rendered, as illustrated in Figure 10-7.
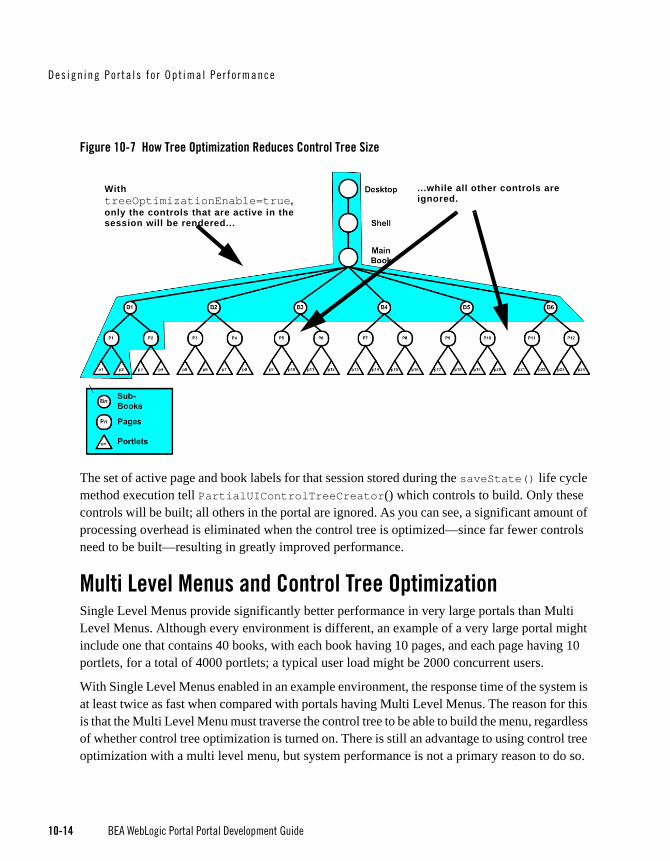
Des ign ing Po r ta ls f o r Opt imal Pe r fo rmance
10-14 BEA WebLogic Portal Portal Development Guide
Figure 10-7 How Tree Optimization Reduces Control Tree Size
The set of active page and book labels for that session stored during the saveState() life cycle method execution tell PartialUIControlTreeCreator() which controls to build. Only these controls will be built; all others in the portal are ignored. As you can see, a significant amount of processing overhead is eliminated when the control tree is optimized—since far fewer controls need to be built—resulting in greatly improved performance.
Multi Level Menus and Control Tree OptimizationSingle Level Menus provide significantly better performance in very large portals than Multi Level Menus. Although every environment is different, an example of a very large portal might include one that contains 40 books, with each book having 10 pages, and each page having 10 portlets, for a total of 4000 portlets; a typical user load might be 2000 concurrent users.
With Single Level Menus enabled in an example environment, the response time of the system is at least twice as fast when compared with portals having Multi Level Menus. The reason for this is that the Multi Level Menu must traverse the control tree to be able to build the menu, regardless of whether control tree optimization is turned on. There is still an advantage to using control tree optimization with a multi level menu, but system performance is not a primary reason to do so.
With treeOptimizationEnable=true, only the controls that are active in the session will be rendered...
...while all other controls are ignored.
Opt imiz ing the Cont ro l T ree
BEA WebLogic Portal Portal Development Guide 10-15
Limitations to Using Tree OptimizationIf you are creating complex portals that require a large number of controls, tree optimization is the easiest way to ensure optimal portal performance. Controls that aren’t active in the current portal instance aren’t built, saving considerable time and overhead. Nonetheless, you need to be aware that tree optimization slightly changes a portal’s behavior and some portal implementations will not have substantial benefit; for example:
When optimization is disabled, the backing file lifecycle methods init() and handlePostBackData() are called for both visible and non-visible controls; when tree optimization is enabled these lifecycle methods are called only for visible controls.
If your portal uses backing files on any of their controls, some backing context APIs are limited in their functionality.
On DesktopBackingContext, BookBackingContext, and PageBackingContext, the following methods return null if they are trying to access a page, book, or portlet that is not in the partial tree– public BookBackingContext getBookBackingContextRecursive(String definitionLabel)
– public PageBackingContext getPageBackingContextRecursive(String definitionLabel)
– public PortletBackingContext getPortletBackingContextRecursive(String instanceLabel)
– public PortletBackingContext[] getPortletsBackingContextRecursive(String definitionLabel)
You might experience the same behavior—or lack thereof—on DesktopPresentationContext, BookPresentationContext, and PagePresentationContext with the presentation versions of these methods:– public BookPresentationContext getBookPresentationContextRecursive(String definitionLabel)
– public PagePresentationContext getPagePresentationContextRecursive(String definitionLabel)
– public PortletPresentationContext getPortletPresentationContextRecursive(String instanceLabel)
– public PortletPresentationContext[] getPortletsPresentationContextRecursive(String definitionLabel)
If your portal uses multi-level menus you need to decide if the benefit of multi-level menus outweigh any performance hit.
Des ign ing Po r ta ls f o r Opt imal Pe r fo rmance
10-16 BEA WebLogic Portal Portal Development Guide
If the menu is on an active book, every control accessible from that menu must be created before the portal is completely rendered, thus more overhead and a greater performance hit. On the other hand, because a multi-level menu results in the creation of a skeletal control tree, it can reduce the number of request cycles required to navigate to your desired destination, reducing the total overhead required to accomplish a navigation.
Overall, single-level menus provide significantly better performance in very large portals than multi-level menus. Although every environment is different, an example of a very large portal might include one that contains 40 books, with each book having 10 pages, and each page having 10 portlets, for a total of 4000 portlets; with a typical user load of 2000 concurrent users. With single-level menus enabled in an example environment, the response time of the system is at least twice as fast when compared with the same portal using multi-level menus.
If your portal uses Programmatic Page Change Events called from a backing file and the page to which the change is being directed is not within the partial control tree, it does not exist in the instance and the page change will not occur.
You can work around this problem by doing one of the following (this is the preferred order):
a. Use a link to perform the page change.
b. Use the new declarative interportlet communications model.
c. Implement a redirect from within the backing file.
d. Set _nfto=”false” in the invoking link. This causes the full control tree to be created for that single request.
e. Turn off tree optimization altogether on the portal.
If your portal uses “cookie” or “url” state locations, the partial control tree will not work.
If your portal uses non-visible portlets, the onDeactivation portlet events for non-visible portlets might not work with portal tree optimization turned on.
When the “tree optimization” flag in a .portal file is turned on, not all non-visible portlets for a given request are processed. (A non-visible portlet is one that lives on a page that is not displayed for the given request.) This can be a problem if you are trying to catch an onDeactivation event for a portlet—once the portlet has been deactivated, it is no longer visible, and so the system doesn't process it to fire its deactivation event. The recommended workaround is to set tree optimization to false for the portal in question. However, there is a trick you can play if you need the tree optimization. For each portlet that you want to catch deactivation events for, define a dummy event handler (for example,
Othe r Ways to Improve Per fo rmance
BEA WebLogic Portal Portal Development Guide 10-17
create a custom event handler with event = "[some nonsense string]" and set the property “Only If Displayed” to false. This forces the system to process the portlet whether visible or not.
Mindful of these conditions, never set treeOptimizationEnabled to true without first doing a complete regression test on the portal. If any of the above-listed problems occur, you might want to rethink your portal design or disable tree optimization completely.
Disabling Tree OptimizationAs discussed above, although control tree optimization can benefit almost any portal, behavioral limitations might require that you disable it. When you disable optimization, the portal creates a full control tree upon every request. Be aware that this could significantly impede the performance of very large portal. You need to decide whether the anticipated performance hit is offset by the improvement in functionality.
To disable tree optimization, do one of the following:
Set treeOptimizationEnabled= “false” in the .portal file or on the desktop.
Include nfto=”false” in the request parameter of just that instance for which you want to disable tree optimization. The parameter needs to be added to URL programmatically as the URLs are generated using framework classes GenericURL and PostbackURL; for more information on these classes, see the WebLogic Portal Javadoc.
The following code shows one way to adding this parameter:
PostbackURL url = PostbackURL.createPostbackURL(request, response);
url.addParameter(GenericURL.TRE_OPTIMIZATION_PARAM, "false");
Use one of the tags in the render tag libraries.
Delete the _pageLabel parameter from the request.
Other Ways to Improve PerformanceIn addition to managing the taxonomy of your portal through effective use of the control tree, WebLogic Portal offers other ways to improve performance. These solutions can all be used in concert with multiple desktops and control tree optimization, ensuring superior portal performance. This section describes the most effective performance-enhancing solutions available with WebLogic Portal.
Des ign ing Po r ta ls f o r Opt imal Pe r fo rmance
10-18 BEA WebLogic Portal Portal Development Guide
Use Entitlements Judiciously Entitlements determine who can access the resources in a portal application and what they can do with those resources. This access is based on the role assigned to an application visitor, allowing for flexible management of the resources. For example, if you have an Employee Review portlet, you can assign the “Managers” visitor entitlement role you created to that portlet, letting only logged in users who belong in that role view the portlet.
Users visiting an application are assigned roles based on an expression that can include their name, the group that they are in, the time of day, or characteristics from their profile. For example, the “gold member” role could be assigned to a user because they are part of the frequent flyer program and have flown more than 50,000 miles in the previous year. This role is dynamically assigned to the user when they log into the site.
How Entitlements Affect PerformanceTo ensure optimal portal performance, use entitlements judiciously. Too many entitlements can significantly impact performance. This happens because the entitlement engine is called during the render phase of an operation and is required to check system overhead and rules. Because this checking represents additional system overhead, if it is required too often on a portal, performance degrades. In addition, the entitlements engine is also responsible for managing administrative tasks, which increases that overhead, again causing degrading performance.
By default, entitlements are stored in the database as opposed to LDAP. Nonetheless, always be aware that too many entitlements can impede performance.
Recommendations for Using EntitlementsHere are some simple recommendation for using entitlements judiciously:
Avoid the temptation to create a role for every node on an organizational chart. In large organizations, granting entitlements would then become a serious burden on the system. If you want to focus the user experience to a more granular level than that provided by the role assigned a user, consider employing the personalization capabilities available with WebLogic Portal.
Disable entitlements if a portal is not using any security policies. If a portal is using security policies enable it and set the value for the <control-resource-cache-size=nn> attribute to equal the number of desktops + number of books + number of pages + number of portlets + number of buttons (max, min, help, edit) used in a portal. Use the default value if you are concerned about available memory.
Othe r Ways to Improve Per fo rmance
BEA WebLogic Portal Portal Development Guide 10-19
Limit your entitlement request to only one resource at a time. Bundling a larger number of resources (portlets, pages, books) with one entitlement request can cause an unwanted performance hit.
If your portal uses more than 5000 entitlements, customize the cache settings for WebLogic Entitlements Engine. For details, see the Performance Tuning Guide, which will be available in a future documentation release.
Limit User Customizations BEA recommends that you allow portal visitors to modify only one page or a small set of pages, and require that administrators control the remainder of pages.
When users customize a page, they obtain their own instance of that page. All other pages that have not been customized point back to the original library instance. When an administrator makes a change to a page, that change must iterate for each user who customized the page. If many users customized that page, propagating the change might take a long time because of the required database processing.
Optimize Page Flow Session FootprintIf your portal uses page flows portlets in a replicated clustering environment, you might experience a performance issue because the request attributes you add to these portlets might be persisted to the session as a component of a page flow portlet’s state. As more request attributes are added, the session grows, often to sizes that can severely restrict performance.
Page flow portlets are hosted within the Portal framework by the Scoped Servlet environment. This environment effectively acts as a servlet container, but its behavior causes the request attributes to be scoped to the session within a container class used to persist page flow state. This can be particularly unwelcome in clustered environments, when large amounts of data—including these page flow portlet request attributes—might be replicated across the cluster.
WebLogic Portal provides the Request Attribute Persistence (requestAttrPersistence) property for page flow portlets. This property is included in the .portlet file and can be set using the Properties view in WorkSpace Studio.
The Request Attribute Persistence property has these values:
session: this is the existing behavior (this is the default). All existing page flow portlets should not require changes by default.
transient-session: places a non-serializable wrapper class around a persisted page flow state object into the session. These portlets work just as the existing portlets, except in

Des ign ing Po r ta ls f o r Opt imal Pe r fo rmance
10-20 BEA WebLogic Portal Portal Development Guide
failover cases, where the persisted request attributes disappear on the failed-over-to server. In these cases you must write the forward JSPs to gracefully handle this contingency by, at minimum, not expecting any particular request attribute to be populated and, ideally, by having a mechanism to either repopulate the request attributes automatically or present the user with a link to re-run the last action to repopulate the request attributes. For non-failover cases, request attributes are persisted, providing a performance advantage for non-postback portlets identical to default session persistence portlets. While session memory is still consumed in this case, there will be no additional cluster replication costs for the persisted request attributes.
none: performs no persistence operation. Since these portlets never have request attributes available on refresh requests, you must write the forward JSPs to assume the request attributes will not be available. This option is helpful when you want to remove completely the framework-induced session memory loading for persisted request attributes.
To set the request attribute persistence attribute for a page flow portlet, open the Request Attribute Persistence drop-down under the Page Flow Content group in the Properties view and select the desired value, as shown in Figure 10-8.
Figure 10-8 Selecting Request Attribute Persistence Attribute
Use File-Based Portals for Simple ApplicationsPortals come in two flavors: file-based and streaming. As the name implies, a file-based portal—also called a “light portal”—obtains all of its resources from the user’s file system. Streaming portals, on the other hand, derive their resources from one or more databases.
A key difference between the two implementations is in the method you use to create and manage multiple portlet instances. Using a streamed portal, managed using the WebLogic Portal Administration Console, you can manage a single instance of a portlet while reusing it in many

Othe r Ways to Improve Per fo rmance
BEA WebLogic Portal Portal Development Guide 10-21
places; you can also easily create a large number of portlet instances and configure each one differently. Using a file-based portal you need to create individual source portlets within .portal files.
Streaming portals also provide you with the management capabilities of the Administration Console. For example, if you want to disable a portlet, you can do this task easily from the Administration Console; otherwise, you must directly access the production servers to change .portal files. The Administration Console also provides management functionality for book and page contents, and the ability to user visitor entitlements and delegated administration on different instances of resources.
Why Use a File-based Portal?For simple, static portals, deriving resources from the file system can result in improved performance and bring these benefits:
Source code control is easily manageable.
Propagation to other environments is easy.
They are easy to create in WorkSpace Studio.
Limitations to Using File-based PortalsWhile file-based portals might show some performance improvement over streaming portals, their functionality is limited; for example, because no database is involved, you cannot take advantage of things such as user customization or entitlements. Other features that are missing from a file-based portal include:
Delegated Administration
Visitor Tools
Preferences at the portal instance level and at the definition level.
Moreover, in the majority of cases, the performance improvement gained by using a file-based portal is not so significant as to outweigh these limitations.
Create a Production Domain in DevelopmentWhile this tip doesn’t directly improve performance at runtime, it nonetheless allows you to see how your application will perform before you propagate it to production. By creating a production domain in development, you can simulate and then evaluate how the portal will
Des ign ing Po r ta ls f o r Opt imal Pe r fo rmance
10-22 BEA WebLogic Portal Portal Development Guide
perform in production. You can then make the necessary adjustments before actually deploying the portal. If problems occur or performance is not optimal, you can rectify these situations before the end user ever sees them.
To create a production domain, you must update the startup script settings by setting the WLS_PRODUCTION_MODE= flag to true and setting to false these flags:
iterativeDevFlag
debugFlag
testConsoleFlag
logErrorsToConsoleFlag
pontbaseFlag
verboseLoggingFlag
Additionally, you must set default values for the threadcount and the JDBCConnectionPool sizes. If you are threading portlets (that is, using forkable=true) ensure that you configure a portalRenderQueue and portalPreRenderQueue in your config.xml file so that the forked portlets use their own thread pools and not the WebLogic thread pool. The following code sample describes how to set the thread count appropriately:
<ExecuteQueue Name="default" ThreadCount="15"/>
<ExecuteQueue Name="portalRenderQueue" ThreadCount="5"/>
Optimize Portlet PerformanceYou can optimize the performance of the portlets in your portal in several ways, including the following:
Editing performance-related portlet properties to optimize performance
Caching portlets
Using remote portlets
Pre-rendering and rendering portlets in parallel
Rendering portlet content asynchronously
Using backing files
You can find more detail on each of these alternatives in the Portlet Development Guide.
Oracle WebLogic Portal Portal Development Guide 11-1
C H A P T E R 11
Obtaining Debug Information
This chapter explains how to obtain debug information from public WLP classes and add debugging calls to your own code. This chapter includes the following sections:
Introduction
Configuring and Enabling Debug
Public WLP Class Debug Reference
For details on how to use Oracle Enterprise Pack for Eclipse to debug your web application project, see "Deploying or Debugging the Application" in Oracle Fusion Middleware Quick Start Guide for Oracle WebLogic Portal.
IntroductionThe class com.bea.p13n.util.debug.Debug is used throughout WLP classes to print information that can be useful in debugging. You can use the Debug class in your own code. By default, debugging is turned off. For information on turning debug output on and off, see “Turning Debug Output On and Off” on page 11-3.
Configuring and Enabling Debug The com.bea.p13n.util.debug.Debug class provides methods for printing and information messages from WLP code. This section explains how to use Debug in your own code and to turn Debug output on and off. This section includes these topics:

Obta in ing Debug In fo rmat ion
11-2 Oracle WebLogic Portal Portal Development Guide
Using Debug in Your WLP Code
Turning Debug Output On and Off
Package-Level Debugging
Directing Output to a File
Reloading Debug Properties
Example debug.properties File
Using Debug in Your WLP CodeUse the com.bea.p13n.util.debug.Debug class to add debugging information calls to your WLP code. The Debug class lets you:
Turn debugging on and off without recompiling code.
Enable debugging output for a single class or entire package.
Discover where debugging messages are coming from.
Listing 11-1 illustrates the basic pattern for using Debug in your classes. For detailed information on Debug methods, refer to the Javadoc (Oracle Fusion Middleware Java API Reference for Oracle WebLogic Portal).
Listing 11-1 Using Debug in a Class
package com.bea.example;
import com.bea.p13n.util.debug.Debug;
class MyClass
{
// Instance of debug object for debugging (if turned on)
// Using this pattern makes it easy to know the debug "switch"
// for any class
private static final Debug debug = Debug.getInstance( MyClass.class );
MyClass()
{
// debug class creation event
debug.here()
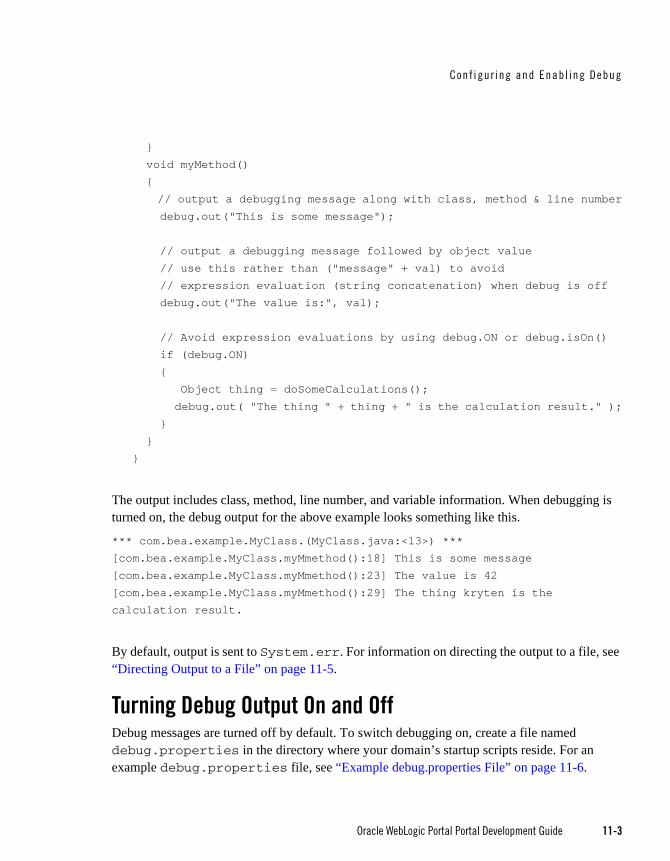
Conf igu r ing and Enab l ing Debug
Oracle WebLogic Portal Portal Development Guide 11-3
}
void myMethod()
{
// output a debugging message along with class, method & line number
debug.out("This is some message");
// output a debugging message followed by object value
// use this rather than ("message" + val) to avoid
// expression evaluation (string concatenation) when debug is off
debug.out("The value is:", val);
// Avoid expression evaluations by using debug.ON or debug.isOn()
if (debug.ON)
{
Object thing = doSomeCalculations();
debug.out( "The thing " + thing + " is the calculation result." );
}
}
}
The output includes class, method, line number, and variable information. When debugging is turned on, the debug output for the above example looks something like this.
*** com.bea.example.MyClass.(MyClass.java:<13>) ***
[com.bea.example.MyClass.myMmethod():18] This is some message
[com.bea.example.MyClass.myMmethod():23] The value is 42
[com.bea.example.MyClass.myMmethod():29] The thing kryten is the
calculation result.
By default, output is sent to System.err. For information on directing the output to a file, see “Directing Output to a File” on page 11-5.
Turning Debug Output On and OffDebug messages are turned off by default. To switch debugging on, create a file named debug.properties in the directory where your domain’s startup scripts reside. For an example debug.properties file, see “Example debug.properties File” on page 11-6.
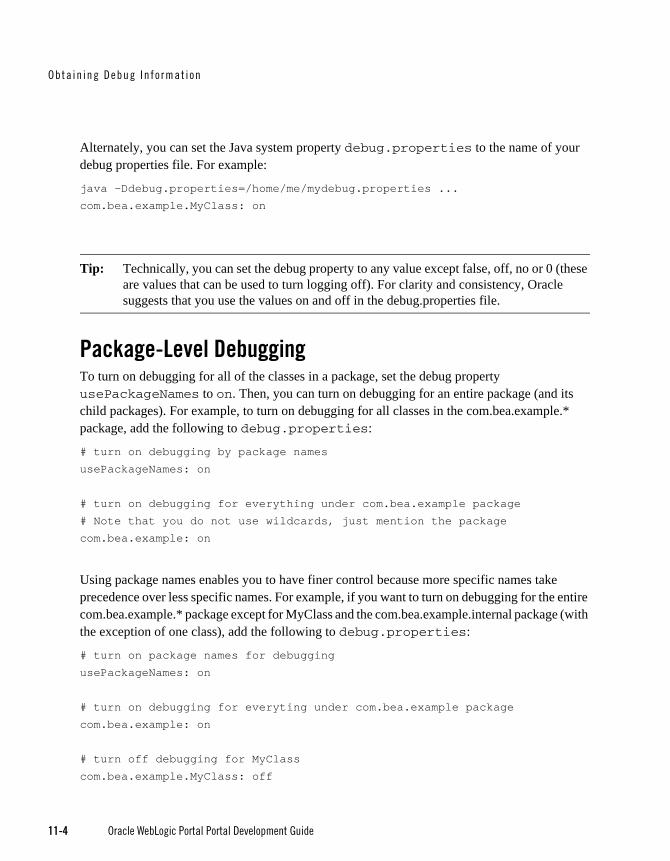
Obta in ing Debug In fo rmat ion
11-4 Oracle WebLogic Portal Portal Development Guide
Alternately, you can set the Java system property debug.properties to the name of your debug properties file. For example:
java -Ddebug.properties=/home/me/mydebug.properties ...
com.bea.example.MyClass: on
Tip: Technically, you can set the debug property to any value except false, off, no or 0 (these are values that can be used to turn logging off). For clarity and consistency, Oracle suggests that you use the values on and off in the debug.properties file.
Package-Level DebuggingTo turn on debugging for all of the classes in a package, set the debug property usePackageNames to on. Then, you can turn on debugging for an entire package (and its child packages). For example, to turn on debugging for all classes in the com.bea.example.* package, add the following to debug.properties:
# turn on debugging by package names
usePackageNames: on
# turn on debugging for everything under com.bea.example package
# Note that you do not use wildcards, just mention the package
com.bea.example: on
Using package names enables you to have finer control because more specific names take precedence over less specific names. For example, if you want to turn on debugging for the entire com.bea.example.* package except for MyClass and the com.bea.example.internal package (with the exception of one class), add the following to debug.properties:
# turn on package names for debugging
usePackageNames: on
# turn on debugging for everyting under com.bea.example package
com.bea.example: on
# turn off debugging for MyClass
com.bea.example.MyClass: off
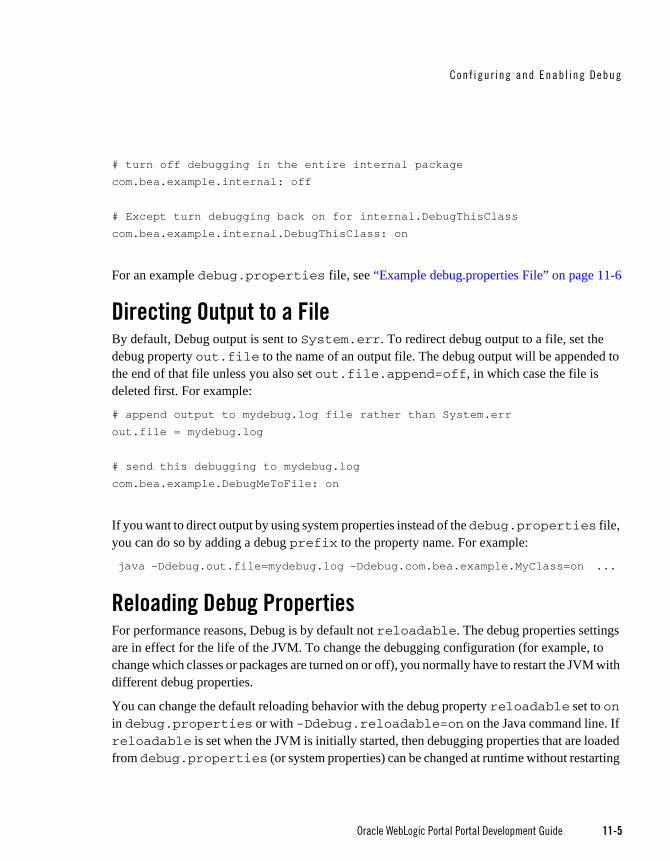
Conf igu r ing and Enab l ing Debug
Oracle WebLogic Portal Portal Development Guide 11-5
# turn off debugging in the entire internal package
com.bea.example.internal: off
# Except turn debugging back on for internal.DebugThisClass
com.bea.example.internal.DebugThisClass: on
For an example debug.properties file, see “Example debug.properties File” on page 11-6
Directing Output to a FileBy default, Debug output is sent to System.err. To redirect debug output to a file, set the debug property out.file to the name of an output file. The debug output will be appended to the end of that file unless you also set out.file.append=off, in which case the file is deleted first. For example:
# append output to mydebug.log file rather than System.err
out.file = mydebug.log
# send this debugging to mydebug.log
com.bea.example.DebugMeToFile: on
If you want to direct output by using system properties instead of the debug.properties file, you can do so by adding a debug prefix to the property name. For example:
java -Ddebug.out.file=mydebug.log -Ddebug.com.bea.example.MyClass=on ...
Reloading Debug PropertiesFor performance reasons, Debug is by default not reloadable. The debug properties settings are in effect for the life of the JVM. To change the debugging configuration (for example, to change which classes or packages are turned on or off), you normally have to restart the JVM with different debug properties.
You can change the default reloading behavior with the debug property reloadable set to on in debug.properties or with -Ddebug.reloadable=on on the Java command line. If reloadable is set when the JVM is initially started, then debugging properties that are loaded from debug.properties (or system properties) can be changed at runtime without restarting
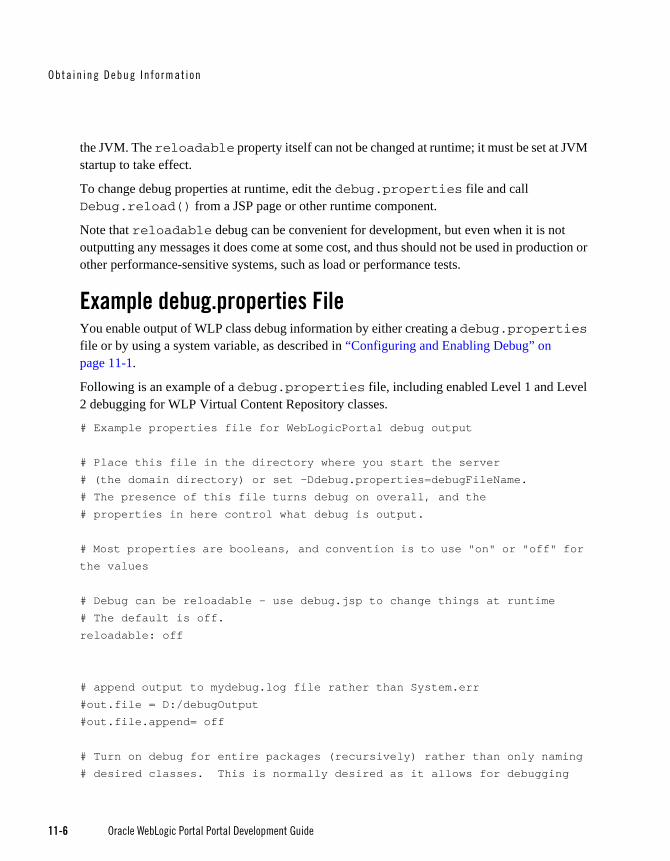
Obta in ing Debug In fo rmat ion
11-6 Oracle WebLogic Portal Portal Development Guide
the JVM. The reloadable property itself can not be changed at runtime; it must be set at JVM startup to take effect.
To change debug properties at runtime, edit the debug.properties file and call Debug.reload() from a JSP page or other runtime component.
Note that reloadable debug can be convenient for development, but even when it is not outputting any messages it does come at some cost, and thus should not be used in production or other performance-sensitive systems, such as load or performance tests.
Example debug.properties FileYou enable output of WLP class debug information by either creating a debug.properties file or by using a system variable, as described in “Configuring and Enabling Debug” on page 11-1.
Following is an example of a debug.properties file, including enabled Level 1 and Level 2 debugging for WLP Virtual Content Repository classes.
# Example properties file for WebLogicPortal debug output
# Place this file in the directory where you start the server
# (the domain directory) or set -Ddebug.properties=debugFileName.
# The presence of this file turns debug on overall, and the
# properties in here control what debug is output.
# Most properties are booleans, and convention is to use "on" or "off" for
the values
# Debug can be reloadable - use debug.jsp to change things at runtime
# The default is off.
reloadable: off
# append output to mydebug.log file rather than System.err
#out.file = D:/debugOutput
#out.file.append= off
# Turn on debug for entire packages (recursively) rather than only naming
# desired classes. This is normally desired as it allows for debugging

Conf igu r ing and Enab l ing Debug
Oracle WebLogic Portal Portal Development Guide 11-7
# whole sets of things, without having to name individual classes
# The default is off.
usePackageNames: off
# Example debug configurations
# Debugging for an individual class
#com.bea.netuix.servlets.manager.PortalServlet: on
com.bea.content.federated.internal.CapabilityManagerImpl: on
com.bea.content.federated.internal.NodeManagerImpl: on
com.bea.content.federated.internal.SearchManagerImpl: on
com.bea.content.federated.internal.TypeManagerImpl: on
com.bea.content.federated.internal.VersionManagerImpl: on
com.bea.content.federated.internal.VirtualRepositoryManagerImpl: on
com.bea.content.federated.internal.WorkflowManagerImpl: on
com.bea.content.federated.internal.delegate.NodeLogic: on
com.bea.content.federated.internal.delegate.ObjectClassLogic: on
com.bea.content.federated.internal.delegate.RepositoryLogic: on
com.bea.content.federated.internal.delegate.SearchLogic: on
com.bea.content.federated.internal.delegate.VersionLogic: on
com.bea.content.federated.internal.delegate.WorkflowLogic: on
spi.com.bea.content.federated.internal.filter.logging.NOPSLoggingFilter:
on
spi.com.bea.content.federated.internal.filter.logging.OCOPSLoggingFilter:
on
spi.com.bea.content.federated.internal.filter.logging.RCOPSLoggingFilter:
on
spi.com.bea.content.federated.internal.filter.logging.SOPSLoggingFilter:
on
spi.com.bea.content.federated.internal.filter.logging.WOPSLoggingFilter:
on
# Debug an entire package
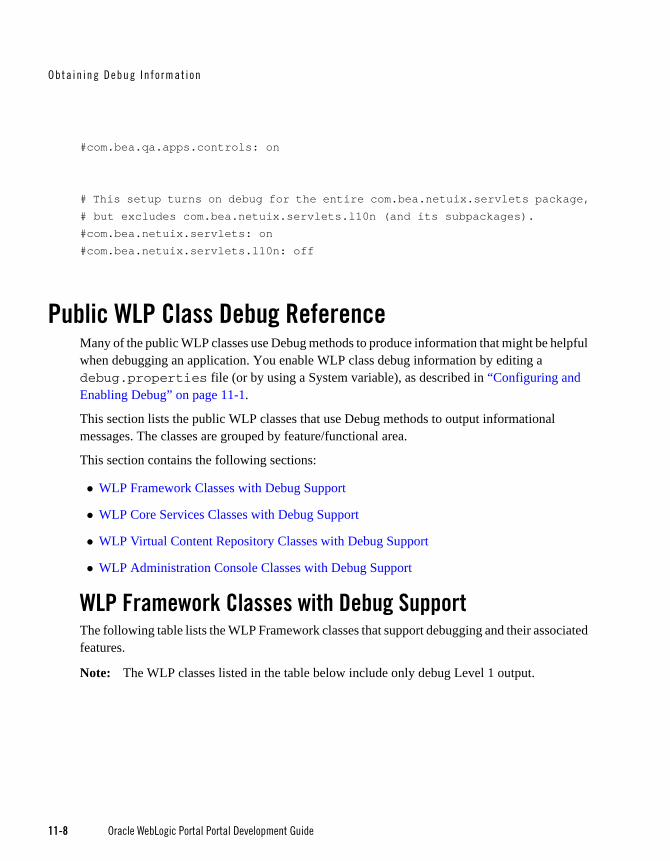
Obta in ing Debug In fo rmat ion
11-8 Oracle WebLogic Portal Portal Development Guide
#com.bea.qa.apps.controls: on
# This setup turns on debug for the entire com.bea.netuix.servlets package,
# but excludes com.bea.netuix.servlets.l10n (and its subpackages).
#com.bea.netuix.servlets: on
#com.bea.netuix.servlets.l10n: off
Public WLP Class Debug ReferenceMany of the public WLP classes use Debug methods to produce information that might be helpful when debugging an application. You enable WLP class debug information by editing a debug.properties file (or by using a System variable), as described in “Configuring and Enabling Debug” on page 11-1.
This section lists the public WLP classes that use Debug methods to output informational messages. The classes are grouped by feature/functional area.
This section contains the following sections:
WLP Framework Classes with Debug Support
WLP Core Services Classes with Debug Support
WLP Virtual Content Repository Classes with Debug Support
WLP Administration Console Classes with Debug Support
WLP Framework Classes with Debug Support The following table lists the WLP Framework classes that support debugging and their associated features.
Note: The WLP classes listed in the table below include only debug Level 1 output.

Publ i c WLP C lass Debug Refe rence
Oracle WebLogic Portal Portal Development Guide 11-9
Table 11-1 WLP Framework Classes That Support Debug
Feature Class
WSRP - Transport com.bea.wsrp.bind.markup
WSRP - URL Rewriting • com.bea.wsrp.producer.adapter• com.bea.wsrp.producer.adapter.context
Portlet Containers - Beehive • com.bea.portlet.adapter.scopedcontent • com.bea.netuix.servlets.controls.content.PageFlowContent
Portlet Containers - Struts • com.bea.struts.adapter • com.bea.netuix.servlets.controls.content.StrutsContent
Portlet Containers - JSF • com.bea.portlet.adapter.faces • com.bea.netuix.servlets.controls.content.FacesContent
Portlet Containers - JSP com.bea.netuix.servlets.controls.content.JspContent
Portlet Containers - Clipper • com.bea.netuix.servlets.controls.content.JspContent • com.bea.netuix.clipper.ClipperBacking • com.bea.netuix.clipper.Clipper
Portlet Containers - Browser Note: There is no debug for the Portlet Containers - Browser feature. However, the control is rendered using a DirectFeature with the name ASYNC_CONTENT_FEATURE = "portleturicontent". You can add debug statements to framework/features/portleturicontent.jspx to troubleshoot this feature.
Portlet Containers - Java (168/286)
com.bea.portlet.container
Framework - Caching • com.bea.netuix.nf.ControlTreeWalker • com.bea.netuix.nf.container.jsp.BufferedJspContext
Framework - Threading • com.bea.netuix.nf.ControlTreeWalker • com.bea.netuix.nf.container.jsp.BufferedJspContext • com.bea.netuix.nf.concurrency
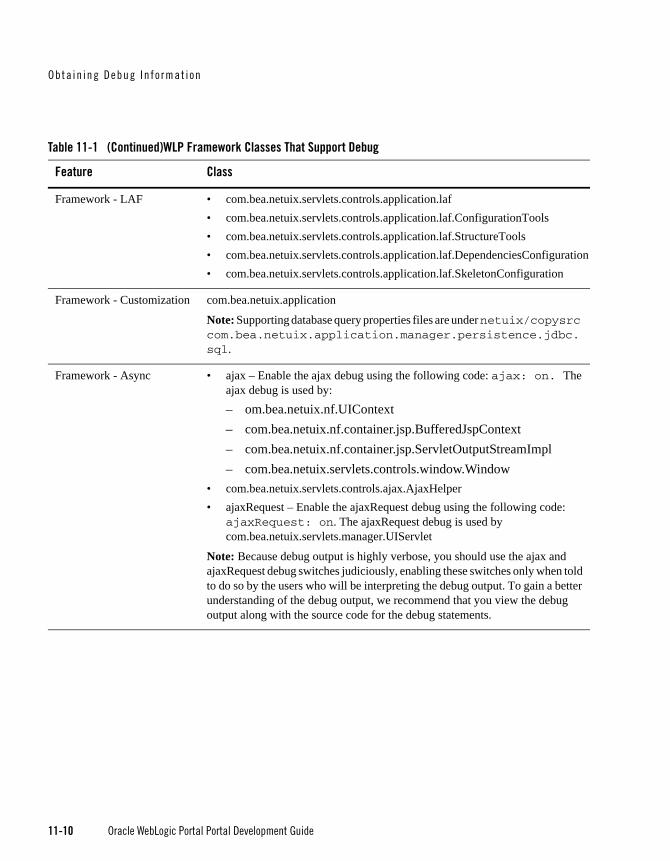
Obta in ing Debug In fo rmat ion
11-10 Oracle WebLogic Portal Portal Development Guide
Framework - LAF • com.bea.netuix.servlets.controls.application.laf • com.bea.netuix.servlets.controls.application.laf.ConfigurationTools• com.bea.netuix.servlets.controls.application.laf.StructureTools • com.bea.netuix.servlets.controls.application.laf.DependenciesConfiguration • com.bea.netuix.servlets.controls.application.laf.SkeletonConfiguration
Framework - Customization com.bea.netuix.application
Note: Supporting database query properties files are under netuix/copysrc com.bea.netuix.application.manager.persistence.jdbc.sql.
Framework - Async • ajax – Enable the ajax debug using the following code: ajax: on. The ajax debug is used by: – om.bea.netuix.nf.UIContext – com.bea.netuix.nf.container.jsp.BufferedJspContext – com.bea.netuix.nf.container.jsp.ServletOutputStreamImpl – com.bea.netuix.servlets.controls.window.Window
• com.bea.netuix.servlets.controls.ajax.AjaxHelper • ajaxRequest – Enable the ajaxRequest debug using the following code:
ajaxRequest: on. The ajaxRequest debug is used by com.bea.netuix.servlets.manager.UIServlet
Note: Because debug output is highly verbose, you should use the ajax and ajaxRequest debug switches judiciously, enabling these switches only when told to do so by the users who will be interpreting the debug output. To gain a better understanding of the debug output, we recommend that you view the debug output along with the source code for the debug statements.
Table 11-1 (Continued)WLP Framework Classes That Support Debug
Feature Class
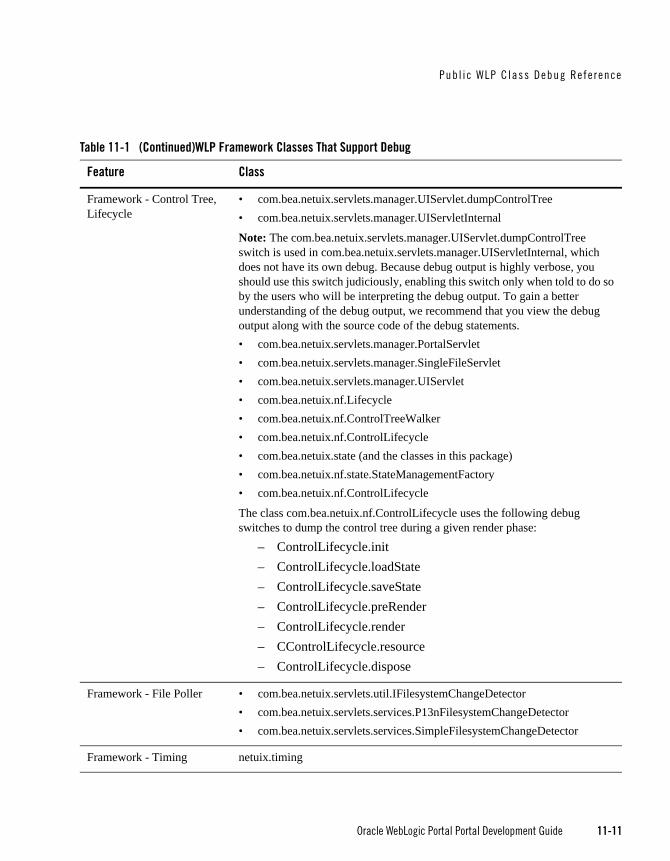
Publ i c WLP C lass Debug Refe rence
Oracle WebLogic Portal Portal Development Guide 11-11
Framework - Control Tree, Lifecycle
• com.bea.netuix.servlets.manager.UIServlet.dumpControlTree • com.bea.netuix.servlets.manager.UIServletInternal
Note: The com.bea.netuix.servlets.manager.UIServlet.dumpControlTree switch is used in com.bea.netuix.servlets.manager.UIServletInternal, which does not have its own debug. Because debug output is highly verbose, you should use this switch judiciously, enabling this switch only when told to do so by the users who will be interpreting the debug output. To gain a better understanding of the debug output, we recommend that you view the debug output along with the source code of the debug statements.• com.bea.netuix.servlets.manager.PortalServlet • com.bea.netuix.servlets.manager.SingleFileServlet • com.bea.netuix.servlets.manager.UIServlet • com.bea.netuix.nf.Lifecycle• com.bea.netuix.nf.ControlTreeWalker • com.bea.netuix.nf.ControlLifecycle • com.bea.netuix.state (and the classes in this package) • com.bea.netuix.nf.state.StateManagementFactory • com.bea.netuix.nf.ControlLifecycle
The class com.bea.netuix.nf.ControlLifecycle uses the following debug switches to dump the control tree during a given render phase:
– ControlLifecycle.init – ControlLifecycle.loadState – ControlLifecycle.saveState – ControlLifecycle.preRender – ControlLifecycle.render– CControlLifecycle.resource – ControlLifecycle.dispose
Framework - File Poller • com.bea.netuix.servlets.util.IFilesystemChangeDetector • com.bea.netuix.servlets.services.P13nFilesystemChangeDetector • com.bea.netuix.servlets.services.SimpleFilesystemChangeDetector
Framework - Timing netuix.timing
Table 11-1 (Continued)WLP Framework Classes That Support Debug
Feature Class
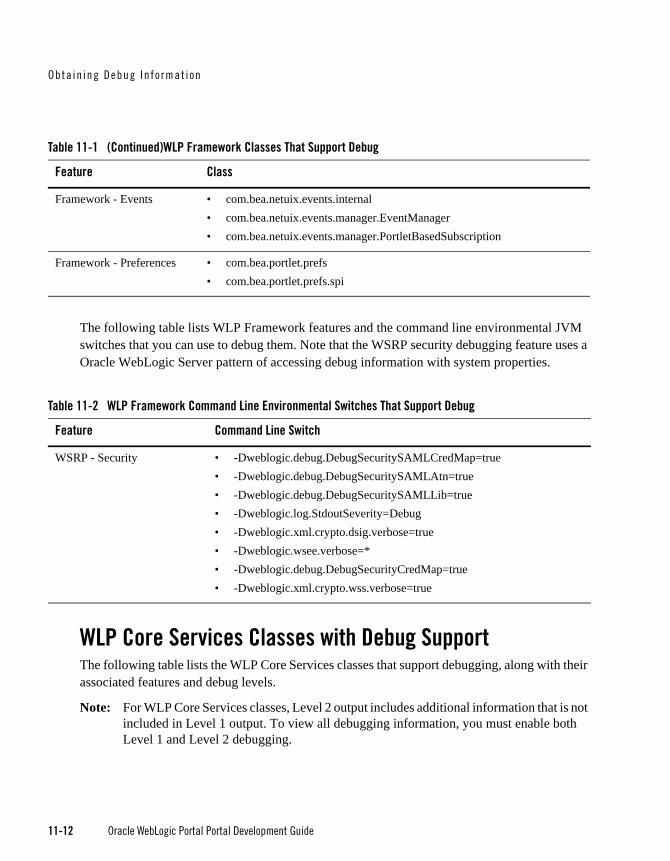
Obta in ing Debug In fo rmat ion
11-12 Oracle WebLogic Portal Portal Development Guide
The following table lists WLP Framework features and the command line environmental JVM switches that you can use to debug them. Note that the WSRP security debugging feature uses a Oracle WebLogic Server pattern of accessing debug information with system properties.
WLP Core Services Classes with Debug SupportThe following table lists the WLP Core Services classes that support debugging, along with their associated features and debug levels.
Note: For WLP Core Services classes, Level 2 output includes additional information that is not included in Level 1 output. To view all debugging information, you must enable both Level 1 and Level 2 debugging.
Framework - Events • com.bea.netuix.events.internal • com.bea.netuix.events.manager.EventManager • com.bea.netuix.events.manager.PortletBasedSubscription
Framework - Preferences • com.bea.portlet.prefs • com.bea.portlet.prefs.spi
Table 11-1 (Continued)WLP Framework Classes That Support Debug
Feature Class
Table 11-2 WLP Framework Command Line Environmental Switches That Support Debug
Feature Command Line Switch
WSRP - Security • -Dweblogic.debug.DebugSecuritySAMLCredMap=true• -Dweblogic.debug.DebugSecuritySAMLAtn=true • -Dweblogic.debug.DebugSecuritySAMLLib=true• -Dweblogic.log.StdoutSeverity=Debug• -Dweblogic.xml.crypto.dsig.verbose=true• -Dweblogic.wsee.verbose=*• -Dweblogic.debug.DebugSecurityCredMap=true• -Dweblogic.xml.crypto.wss.verbose=true

Publ i c WLP C lass Debug Refe rence
Oracle WebLogic Portal Portal Development Guide 11-13
Table 11-3 WLP Core Services Classes That Support Debug
Feature Level 1 Level 2
Cache • com.bea.p13n.cache.CacheFactory • com.bea.p13n.cache.CacheManager
• com.bea.p13n.cache.CacheImpl• com.bea.p13n.cache.CacheImpl.Asynchronou
sReloadRequest
Entitlements • com.bea.p13n.entitlements.management.RolePolicyManager
For the com.bea.p13n.entitlements.management.RolePolicyManager class, you can use the PolicyPredLocation to enable more detailed debug output. For example: PolicyPredLocation.com.bea.p13n.entitlements.management.RolePolicyManager.
• com.bea.p13n.entitlements.management.RolePolicyManager
• com.bea.p13n.delegation.management.DelegationPolicyManager
• com.bea.p13n.entitlements.management.SecurityPolicyManager
• com.bea.p13n.delegation.management.DelegationRoleManager
• com.bea.p13n.entitlements.Authorization
For the com.bea.p13n.entitlements.Authorization class, you can use the following prefixes to choose the type of debug output:
– Unprotected– Protected– PolicyTaxonomy– AnonDebug
For example: Unprotected.com.bea.p13n.entitlements.Authorization • com.bea.p13n.delegation.DelegationService• com.bea.p13n.entitlements.management.inter
nal.RDBMSRolePolicyManager
You can use the following prefixes to choose the type of debug output:
– PolicyPredLocation– PolicyCreateLocation
• com.bea.p13n.entitlements.management.internal.RDBMSSecurityPolicyManager
You can use the following prefixes to choose the type of debug output:
– PolicyPredLocation– PolicyCreateLocation
Rules Expression
N/A • com.bea.p13n.expression.internal.EvaluatorImpl
• com.bea.p13n.expression.internal.ExecutorImpl
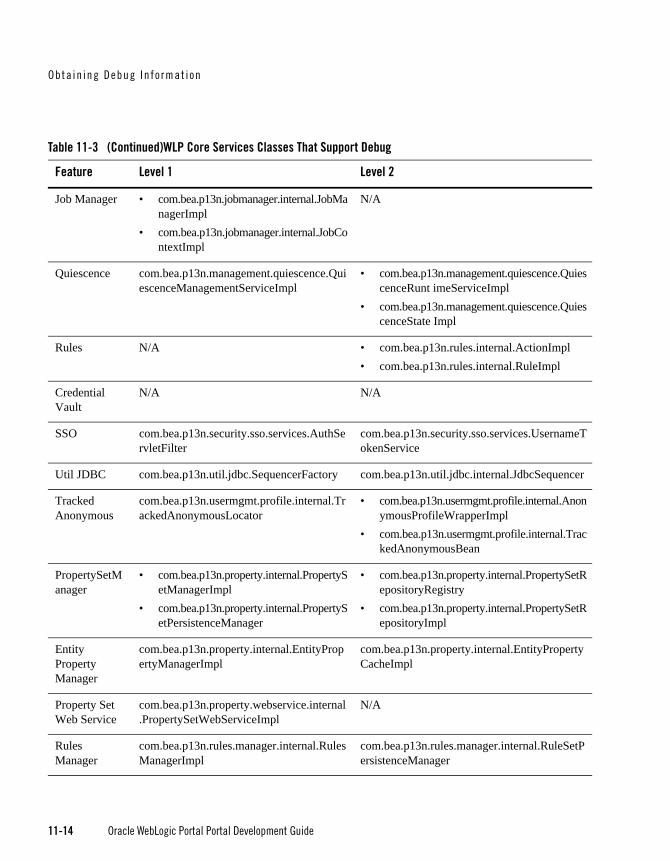
Obta in ing Debug In fo rmat ion
11-14 Oracle WebLogic Portal Portal Development Guide
Job Manager • com.bea.p13n.jobmanager.internal.JobManagerImpl
• com.bea.p13n.jobmanager.internal.JobContextImpl
N/A
Quiescence com.bea.p13n.management.quiescence.QuiescenceManagementServiceImpl
• com.bea.p13n.management.quiescence.QuiescenceRunt imeServiceImpl
• com.bea.p13n.management.quiescence.QuiescenceState Impl
Rules N/A • com.bea.p13n.rules.internal.ActionImpl• com.bea.p13n.rules.internal.RuleImpl
Credential Vault
N/A N/A
SSO com.bea.p13n.security.sso.services.AuthServletFilter
com.bea.p13n.security.sso.services.UsernameTokenService
Util JDBC com.bea.p13n.util.jdbc.SequencerFactory com.bea.p13n.util.jdbc.internal.JdbcSequencer
Tracked Anonymous
com.bea.p13n.usermgmt.profile.internal.TrackedAnonymousLocator
• com.bea.p13n.usermgmt.profile.internal.AnonymousProfileWrapperImpl
• com.bea.p13n.usermgmt.profile.internal.TrackedAnonymousBean
PropertySetManager
• com.bea.p13n.property.internal.PropertySetManagerImpl
• com.bea.p13n.property.internal.PropertySetPersistenceManager
• com.bea.p13n.property.internal.PropertySetRepositoryRegistry
• com.bea.p13n.property.internal.PropertySetRepositoryImpl
Entity Property Manager
com.bea.p13n.property.internal.EntityPropertyManagerImpl
com.bea.p13n.property.internal.EntityPropertyCacheImpl
Property Set Web Service
com.bea.p13n.property.webservice.internal.PropertySetWebServiceImpl
N/A
Rules Manager
com.bea.p13n.rules.manager.internal.RulesManagerImpl
com.bea.p13n.rules.manager.internal.RuleSetPersistenceManager
Table 11-3 (Continued)WLP Core Services Classes That Support Debug
Feature Level 1 Level 2
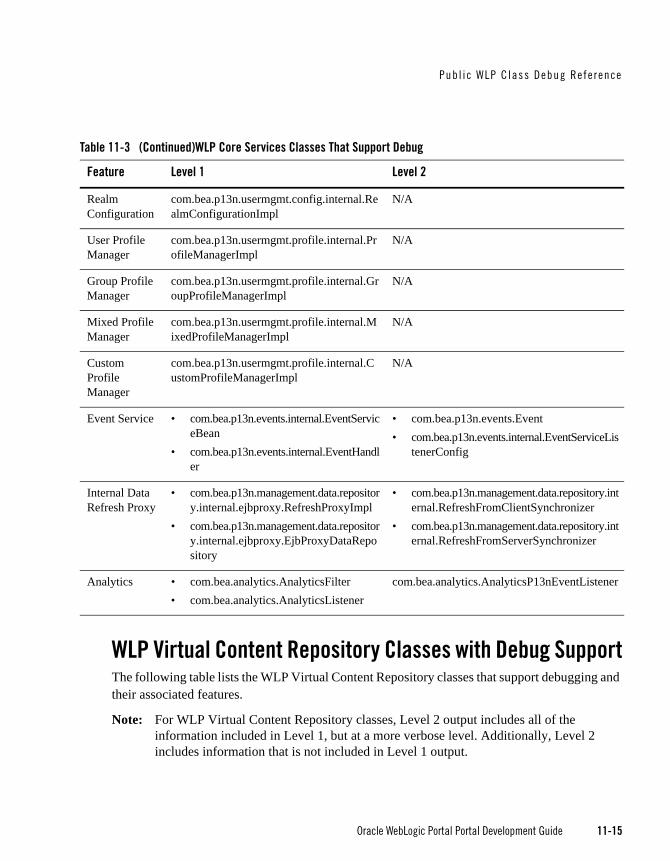
Publ i c WLP C lass Debug Refe rence
Oracle WebLogic Portal Portal Development Guide 11-15
WLP Virtual Content Repository Classes with Debug SupportThe following table lists the WLP Virtual Content Repository classes that support debugging and their associated features.
Note: For WLP Virtual Content Repository classes, Level 2 output includes all of the information included in Level 1, but at a more verbose level. Additionally, Level 2 includes information that is not included in Level 1 output.
Realm Configuration
com.bea.p13n.usermgmt.config.internal.RealmConfigurationImpl
N/A
User Profile Manager
com.bea.p13n.usermgmt.profile.internal.ProfileManagerImpl
N/A
Group Profile Manager
com.bea.p13n.usermgmt.profile.internal.GroupProfileManagerImpl
N/A
Mixed Profile Manager
com.bea.p13n.usermgmt.profile.internal.MixedProfileManagerImpl
N/A
Custom Profile Manager
com.bea.p13n.usermgmt.profile.internal.CustomProfileManagerImpl
N/A
Event Service • com.bea.p13n.events.internal.EventServiceBean
• com.bea.p13n.events.internal.EventHandler
• com.bea.p13n.events.Event• com.bea.p13n.events.internal.EventServiceLis
tenerConfig
Internal Data Refresh Proxy
• com.bea.p13n.management.data.repository.internal.ejbproxy.RefreshProxyImpl
• com.bea.p13n.management.data.repository.internal.ejbproxy.EjbProxyDataRepository
• com.bea.p13n.management.data.repository.internal.RefreshFromClientSynchronizer
• com.bea.p13n.management.data.repository.internal.RefreshFromServerSynchronizer
Analytics • com.bea.analytics.AnalyticsFilter• com.bea.analytics.AnalyticsListener
com.bea.analytics.AnalyticsP13nEventListener
Table 11-3 (Continued)WLP Core Services Classes That Support Debug
Feature Level 1 Level 2

Obta in ing Debug In fo rmat ion
11-16 Oracle WebLogic Portal Portal Development Guide
Table 11-4 WLP Virtual Content Repository Classes That Support Debug
Feature or Component
Level 1 Level 2
Repository Capabilities
com.bea.content.federated.internal.CapabilityManagerImpl
N/A
Node Activities
com.bea.content.federated.internal.NodeManagerImpl
N/A
Search Activities
com.bea.content.federated.internal.SearchManagerImpl
N/A
Type Management Activities
com.bea.content.federated.internal.TypeManagerImpl
N/A
Versioning Activities
com.bea.content.federated.internal.VersionManagerImpl
N/A
Repository Management Activities
com.bea.content.federated.internal.VirtualRepositoryManagerImpl
N/A
Workflow Activities
com.bea.content.federated.internal.WorkflowManagerImpl
N/A
Node activities com.bea.content.federated.internal.delegate.NodeLogic
N/A
Type Management Activities
com.bea.content.federated.internal.delegate.ObjectClassLogic
N/A
Repository Management Activities
com.bea.content.federated.internal.delegate.RepositoryLogic
N/A
Search activities
com.bea.content.federated.internal.delegate.SearchLogic
N/A
Versioning Activities
com.bea.content.federated.internal.delegate.VersionLogic
N/A
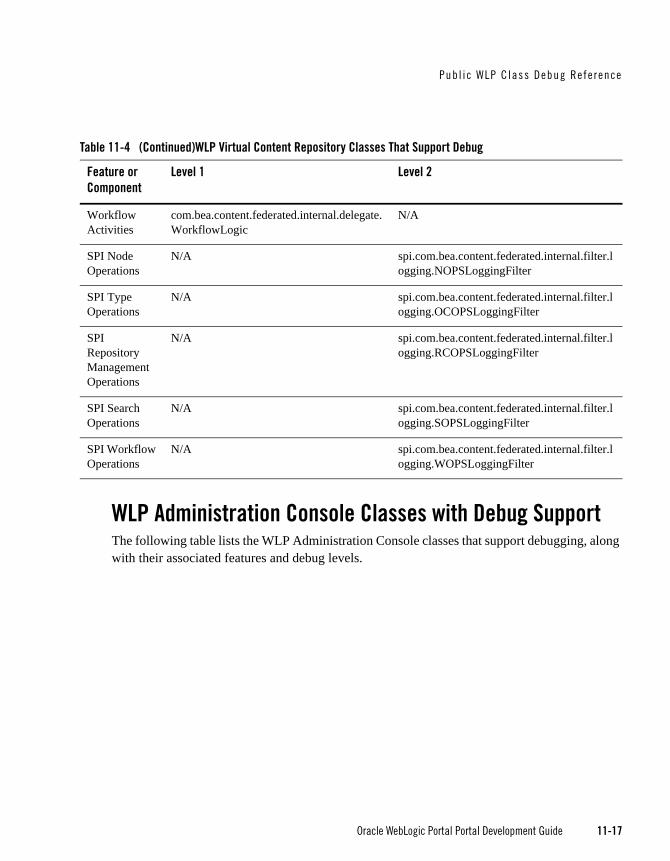
Publ i c WLP C lass Debug Refe rence
Oracle WebLogic Portal Portal Development Guide 11-17
WLP Administration Console Classes with Debug SupportThe following table lists the WLP Administration Console classes that support debugging, along with their associated features and debug levels.
Workflow Activities
com.bea.content.federated.internal.delegate.WorkflowLogic
N/A
SPI Node Operations
N/A spi.com.bea.content.federated.internal.filter.logging.NOPSLoggingFilter
SPI Type Operations
N/A spi.com.bea.content.federated.internal.filter.logging.OCOPSLoggingFilter
SPI Repository Management Operations
N/A spi.com.bea.content.federated.internal.filter.logging.RCOPSLoggingFilter
SPI Search Operations
N/A spi.com.bea.content.federated.internal.filter.logging.SOPSLoggingFilter
SPI Workflow Operations
N/A spi.com.bea.content.federated.internal.filter.logging.WOPSLoggingFilter
Table 11-4 (Continued)WLP Virtual Content Repository Classes That Support Debug
Feature or Component
Level 1 Level 2

Obta in ing Debug In fo rmat ion
11-18 Oracle WebLogic Portal Portal Development Guide
Table 11-5 WLP Administration Console Classes That Support Debug
Feature Level 1 Level 2
General Navigation, Menus, and Componentization
• com.bea.jsptools.common.EditorBookBacking
• com.bea.jsptools.common.ToolsFrameworkUtilities
• com.bea.jsptools.common.ToolsMenuTag• com.bea.jsptools.patterns.list.PagedResult
ServiceTag• com.bea.jsptools.patterns.tree.TreeBuilder• com.bea.jsptools.patterns.xmlhttp.PagedR
esultSearchHandler• com.bea.jsptools.patterns.xmlhttp.Session
AttributeHandler• com.bea.jsptools.util.GenerateResourceLi
nkTag• com.bea.jsptools.util.ToolsResourceLink
• com.bea.jsptools.common.PatDesktopBacking
• com.bea.jsptools.content.helpers.SharedActions
• com.bea.jsptools.laf.SkinImageService• com.bea.jsptools.patterns.item.ItemServi
ce• com.bea.jsptools.patterns.xmlhttp.TextB
oxValidationHandler• com.bea.jsptools.util.PagedResultUtility• com.bea.portal.tools.patterns.ajax.servlet
.XMLHttpRequestServlet• com.bea.portal.tools.resource.ResourceI
DBuilderCache• global.internal.PageFlowHelper• util.tree.TreeController
Help N/A • com.bea.jsptools.patterns.help.HelpLinkTag
• com.bea.jsptools.patterns.help.HelpService
• com.bea.jsptools.patterns.help.HelpTag
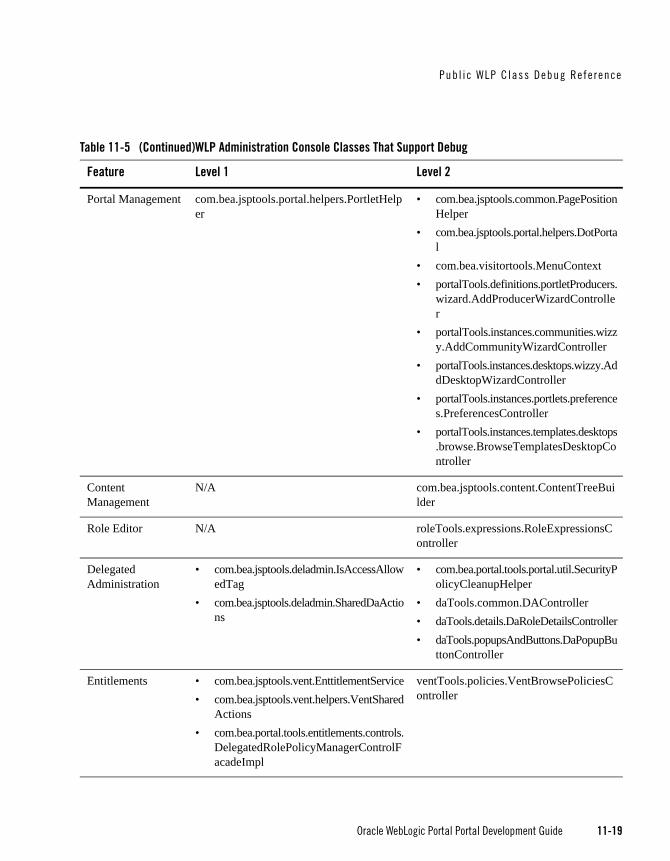
Publ i c WLP C lass Debug Refe rence
Oracle WebLogic Portal Portal Development Guide 11-19
Portal Management com.bea.jsptools.portal.helpers.PortletHelper
• com.bea.jsptools.common.PagePositionHelper
• com.bea.jsptools.portal.helpers.DotPortal
• com.bea.visitortools.MenuContext• portalTools.definitions.portletProducers.
wizard.AddProducerWizardController
• portalTools.instances.communities.wizzy.AddCommunityWizardController
• portalTools.instances.desktops.wizzy.AddDesktopWizardController
• portalTools.instances.portlets.preferences.PreferencesController
• portalTools.instances.templates.desktops.browse.BrowseTemplatesDesktopController
Content Management
N/A com.bea.jsptools.content.ContentTreeBuilder
Role Editor N/A roleTools.expressions.RoleExpressionsController
Delegated Administration
• com.bea.jsptools.deladmin.IsAccessAllowedTag
• com.bea.jsptools.deladmin.SharedDaActions
• com.bea.portal.tools.portal.util.SecurityPolicyCleanupHelper
• daTools.common.DAController• daTools.details.DaRoleDetailsController• daTools.popupsAndButtons.DaPopupBu
ttonController
Entitlements • com.bea.jsptools.vent.EnttitlementService• com.bea.jsptools.vent.helpers.VentShared
Actions• com.bea.portal.tools.entitlements.controls.
DelegatedRolePolicyManagerControlFacadeImpl
ventTools.policies.VentBrowsePoliciesController
Table 11-5 (Continued)WLP Administration Console Classes That Support Debug
Feature Level 1 Level 2

Obta in ing Debug In fo rmat ion
11-20 Oracle WebLogic Portal Portal Development Guide
User/Group Management
• com.bea.jsptools.usermgmt.AtnProviderListTag
• com.bea.jsptools.usermgmt.GroupDescriptionTag
• com.bea.jsptools.usermgmt.UserDescriptionTag
• com.bea.jsptools.usermgmt.helpers.GroupHelper
• com.bea.jsptools.usermgmt.helpers.SharedActions
• com.bea.jsptools.usermgmt.UGMTreeBacking
• com.bea.jsptools.usermgmt.validation.NRNWGroupNameValidator
• com.bea.jsptools.usermgmt.validation.NRNWUserNameValidator
• ugmTools.nrnwTree.NrnwTreeController
Table 11-5 (Continued)WLP Administration Console Classes That Support Debug
Feature Level 1 Level 2
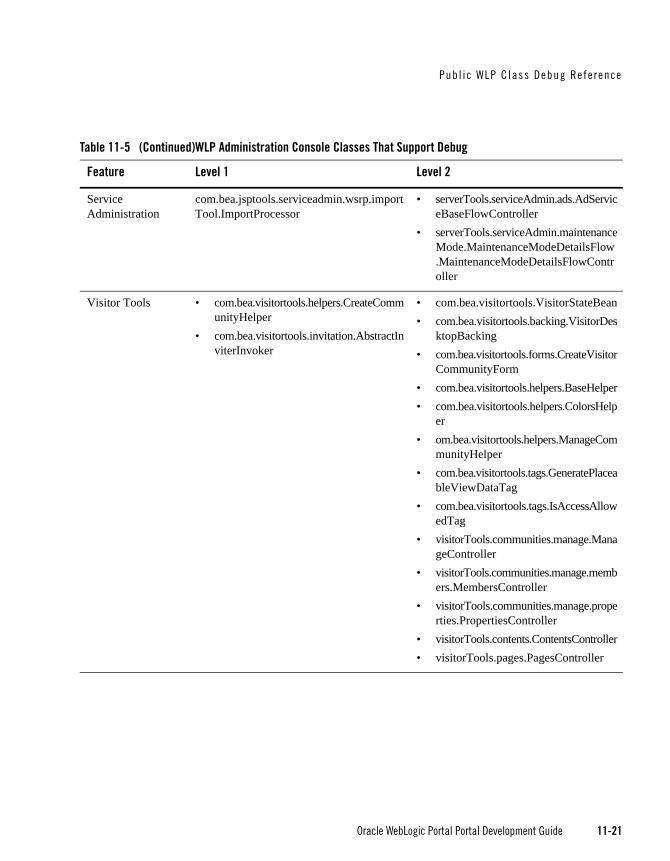
Publ i c WLP C lass Debug Refe rence
Oracle WebLogic Portal Portal Development Guide 11-21
Service Administration
com.bea.jsptools.serviceadmin.wsrp.importTool.ImportProcessor
• serverTools.serviceAdmin.ads.AdServiceBaseFlowController
• serverTools.serviceAdmin.maintenanceMode.MaintenanceModeDetailsFlow.MaintenanceModeDetailsFlowController
Visitor Tools • com.bea.visitortools.helpers.CreateCommunityHelper
• com.bea.visitortools.invitation.AbstractInviterInvoker
• com.bea.visitortools.VisitorStateBean• com.bea.visitortools.backing.VisitorDes
ktopBacking• com.bea.visitortools.forms.CreateVisitor
CommunityForm• com.bea.visitortools.helpers.BaseHelper• com.bea.visitortools.helpers.ColorsHelp
er• om.bea.visitortools.helpers.ManageCom
munityHelper• com.bea.visitortools.tags.GeneratePlacea
bleViewDataTag• com.bea.visitortools.tags.IsAccessAllow
edTag• visitorTools.communities.manage.Mana
geController• visitorTools.communities.manage.memb
ers.MembersController• visitorTools.communities.manage.prope
rties.PropertiesController• visitorTools.contents.ContentsController• visitorTools.pages.PagesController
Table 11-5 (Continued)WLP Administration Console Classes That Support Debug
Feature Level 1 Level 2

Obta in ing Debug In fo rmat ion
11-22 Oracle WebLogic Portal Portal Development Guide
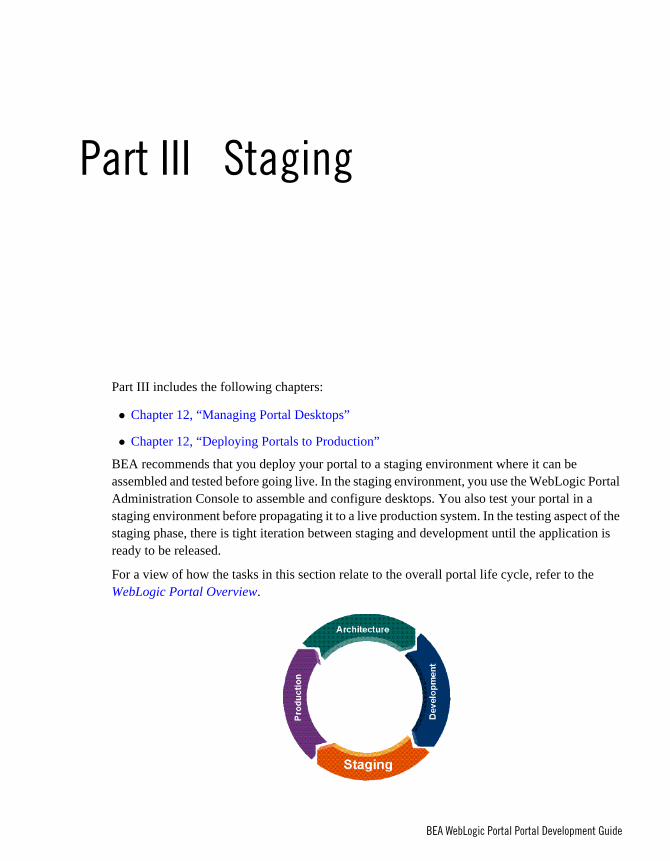
BEA WebLogic Portal Portal Development Guide
Part III Staging
Part III includes the following chapters:
Chapter 12, “Managing Portal Desktops”
Chapter 12, “Deploying Portals to Production”
BEA recommends that you deploy your portal to a staging environment where it can be assembled and tested before going live. In the staging environment, you use the WebLogic Portal Administration Console to assemble and configure desktops. You also test your portal in a staging environment before propagating it to a live production system. In the testing aspect of the staging phase, there is tight iteration between staging and development until the application is ready to be released.
For a view of how the tasks in this section relate to the overall portal life cycle, refer to the WebLogic Portal Overview.

12-2 BEA WebLogic Portal Portal Development Guide
BEA WebLogic Portal Portal Development Guide 12-1
C H A P T E R 12
Managing Portal Desktops
You perform the tasks described in this chapter to prepare your portal application for public consumption.
From an administrative standpoint, a portal is a container that defines a portal application. When you create a new portal in the administration portal, you are really creating an empty portal to hold different versions of the portal (desktops) that can be targeted to specific users. A portal can contain one or more desktops, or views, of a portal. It is the desktops to which you add the portal resources and navigation such as books, pages, and portlets that make a dynamic portal.
After you assemble the desktops, you can test the application as a whole, and then deploy it to the production environment when it is ready for public access. For detailed instructions on how to progress through the stages of portal development and deployment, refer to the Production Operations Guide.
The primary tool used in this chapter is the WebLogic Portal Administration Console.
This chapter contains the following sections:
Administration Console Overview
Administration Console Library of Resources
Starting and Logging In to the Administration Console
Overview of Library Administration
Overview of Portal Administration
Portal Management
Managing Po r ta l Desk tops
12-2 BEA WebLogic Portal Portal Development Guide
Overview of the Library
Desktops
Desktop Templates
Communities
Portal Resources
Books
Pages
Portlets
Portlet Preferences
Portlet Categories
Look And Feels
Shells
Themes
Menus (Navigation)
Layouts
Administration Console OverviewThe WebLogic Portal Administration Console is the tool that portal administrators use to not only control the behavior, content, and appearance of portals, but to perform many traditional system administration activities such as user management and security management.
The WebLogic Portal Administration Console is organized according to the following categories of tasks:
Portal Management – Portals, desktops, books, pages, portlets, and other portal resources.
This guide and the Portlet Development Guide provide details about Portal Management tasks.
User, Groups, & Roles – User and group management, security provider configuration, Delegated Administration, and Visitor Entitlements.
Admin is t ra t ion Conso le L ib rary o f Resources
BEA WebLogic Portal Portal Development Guide 12-3
The User Management Guide and Security Guide provides detailed information about the tasks in this category.
Configuration Settings – Server settings for Cache Management, Server Maintenance Mode, Personalization, Security, Unified User Profiles, and WSRP.
This guide, Security Guide, Federated Portals Guide, Interaction Management Guide, and User Management Guide provide detailed information about the tasks in this category.
Interaction Management – Campaigns, placeholders, user segments, and content selectors.
The Interaction Management Guide provides detailed information about the tasks in this category.
Content Management – Content and repositories.
The Content Management Guide provides detailed information about the tasks in this category.
Administration Console Library of ResourcesWhen you create a new desktop using the Administration Console, you can use an existing portal template. Using a template means that you take the portal resources for your desktop directly from a .portal file that was created in WorkSpace Studio. (The .portal file is also called the primary instance.) When you create a desktop, the portal assets are removed from the .portal file, placed in a database, and surfaced in both the Library and desktop trees of the Administration Console. Taking the assets from a new desktop instance and placing them in the Library is called disassembling.
At this point, the assets (books, pages, and so on) in the Library (Library instances) are hierarchically related to their corresponding desktop instances. A change to a Library resource, such as a name change, is automatically inherited by the corresponding desktop asset. On the other hand, a change to the desktop asset is not reflected back up the hierarchy.
Note: Changes made to assets are never “reverse inherited” up the hierarchy. A change to a desktop asset is never inherited by its corresponding Library instance. Likewise, a change to a Visitor instance is never inherited by a desktop or Library instance.
New books and pages that you create in a desktop are not disassembled—they are considered to be private to that desktop.

Managing Po r ta l Desk tops
12-4 BEA WebLogic Portal Portal Development Guide
Plan your implementation to make the best use of this WebLogic Portal functionality. Refer to the Production Operations Guide for more details about disassembling and decoupling of resources in the Administration Console.
Starting and Logging In to the Administration Console
Opening the Administration ConsoleBefore you can begin using the WebLogic Portal Administration Console, the server must be running. Depending on the state of your WorkSpace Studio workbench, you might need to start the server before opening the Administration Console.
Follow these steps:
1. Start WorkSpace Studio and open a workspace:
2. In the Servers view, click the server to select it.
3. Click Start in the Servers view toolbar.
Wait while WorkSpace Studio starts the server. This process might take some time, depending on the speed of your system. When the process completes, the Status column in the Servers view displays Started and the square Stop the Server button becomes active.
4. In the Package Explorer view, select the .portal file for the portal you want to manage with the Administration Console.
5. From the main menu, select Run > Open Portal Administration Console, as shown in the example in Figure 12-1.
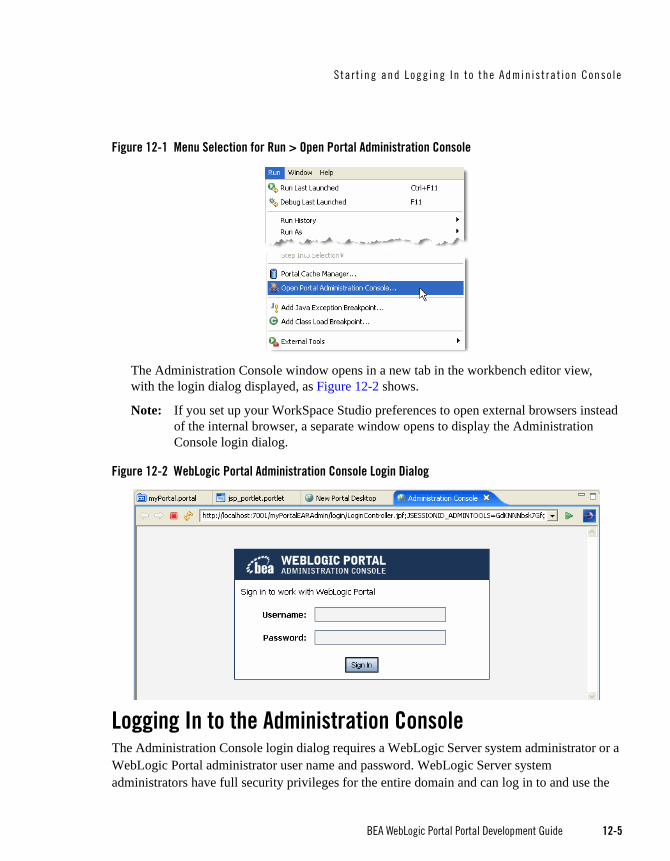
Sta r t ing and Logg ing In to the Admin is t rat ion Conso le
BEA WebLogic Portal Portal Development Guide 12-5
Figure 12-1 Menu Selection for Run > Open Portal Administration Console
The Administration Console window opens in a new tab in the workbench editor view, with the login dialog displayed, as Figure 12-2 shows.
Note: If you set up your WorkSpace Studio preferences to open external browsers instead of the internal browser, a separate window opens to display the Administration Console login dialog.
Figure 12-2 WebLogic Portal Administration Console Login Dialog
Logging In to the Administration ConsoleThe Administration Console login dialog requires a WebLogic Server system administrator or a WebLogic Portal administrator user name and password. WebLogic Server system administrators have full security privileges for the entire domain and can log in to and use the

Managing Po r ta l Desk tops
12-6 BEA WebLogic Portal Portal Development Guide
WebLogic Server Administration Console tools. WebLogic Portal administrators have full security privileges for a Portal Web Project, which can include multiple portals.
Table 12-1 shows the default system administrator user names and passwords:
To log in to the WebLogic Portal Administration Console:
1. Type the appropriate user name and password into the dialog and click Sign In.
The main menu of the Administration Console displays.
2. To get a better view of the console and its functions, click Maximize in the editor view toolbar. Your display should look like the example in Figure 12-3.
Note: If you set up your WorkSpace Studio preferences to open external browsers instead of the internal browser, you do not need to perform this step.
Table 12-1 Default User Names and Passwords for the WebLogic Portal Administration Console
User Name Password Description
portaladmin portaladmin Administrator for the portal domain
weblogic weblogic WebLogic Server system administrator with full privileges in the domain
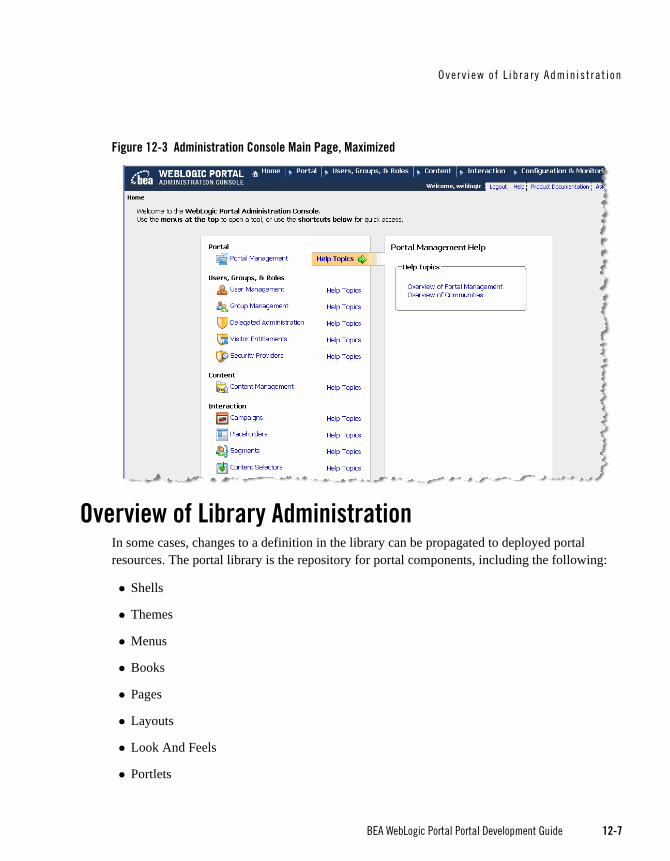
Overv iew o f L ib ra ry Admin is t rat ion
BEA WebLogic Portal Portal Development Guide 12-7
Figure 12-3 Administration Console Main Page, Maximized
Overview of Library AdministrationIn some cases, changes to a definition in the library can be propagated to deployed portal resources. The portal library is the repository for portal components, including the following:
Shells
Themes
Menus
Books
Pages
Layouts
Look And Feels
Portlets
Managing Po r ta l Desk tops
12-8 BEA WebLogic Portal Portal Development Guide
Portlet Categories
Portlet Producers
As the Library Administrator, you can modify the definitions in the Resource library. These modifications are global in scope and carry with them a higher degree of administration responsibility. When you create new portal instances of portal resources and put them in the Portal Library, they have the following characteristics:
Your resource show up in the Portal Library so that portal administrators can create instances of them to use as templates.
Your resource can be localized.
Your resource can be entitled at the enterprise application level. This means that when these resources are entitled, they are entitled for every instance.
Visitors can add these resources to their personal views of a portal using the Visitor Tools because they can choose them from the Library.
If an administrator or visitor deletes this resource from a portal, the resource can easily be retrieved from the Library.
Overview of Portal AdministrationPortal administrators work with portal resources to assemble portals and entitle parts of the portal to end users and other administrators. A portal represents a Web site that can be one of many within an Enterprise Application. Each portal can support multiple desktops using shared components. The administration of the portals, desktops, and components can be delegated to the distinct administrators who have the correct Delegated Administration privileges.
You can assemble your portal using portal resources that exist in the Portal Library, or in some cases you can create your own resources. If you create portal resources outside of the Portal library, you are creating “one-off” versions that have the following restrictions:
Your resource do not show up in the Portal Library
Your resource cannot have entitlements that are scoped to the enterprise applications. You can entitle your resource to your Desktop level.
Visitors are not able to add these resources to their personal views of a portal using the Visitor Tools because they are not available in the Library.
Po r ta l Management
BEA WebLogic Portal Portal Development Guide 12-9
If you delete this resource, it is permanently deleted since no version of it exists in the Library.
Portal Management Portal administrators work with portal resources to assemble portals and entitle parts of the portal to end users and other administrators. A portal represents a web site that can be one of many within an enterprise application. Each portal can support multiple desktops using shared components. You can delegate the administration of the portals, desktops, and components to administrators who have the appropriate Delegated Administration privileges.
Overview of the LibraryThe portal library is the repository for portal components. The definitions in the library are used as templates for portal administrators to create and assemble portals and desktops for end users. In order to have access to the library, you must have delegated administration rights to its resources.
Desktop TemplatesA desktop template is a pre-defined set of portal resources that you can use to quickly build a desktop.
Creating a Desktop TemplateYou can create a desktop template in either of these ways: select available resources in the Library and provide additional desktop properties, or select an existing .portal file on which to base the template.
To create a desktop template:
1. In the Portal Resources tree, select Portals and navigate to the portal for which you want to create the desktop.
2. Navigate to Templates > Desktop Templates.
3. In the Browse tab, click Create Desktop Template. The Create Desktop Template wizard displays.
4. Complete the first page of the wizard by selecting how you want to create a desktop template:

Managing Po r ta l Desk tops
12-10 BEA WebLogic Portal Portal Development Guide
– Select resources in the Library: You can choose the primary book, shell, and Look And Feel for your desktop from available resources and provide additional desktop properties.
– Select a .portal file: You can select from a list of .portal files in the current web application, and provide additional desktop properties.
5. Click Next. The information you need to enter on the remaining pages of the wizard vary according to the selection you made in the first page. Use the following table as a guide.
Select resources in the Library
1. You can either search for an existing book or create a new one. To use an existing book, you can search for a primary book by entering a search string and clicking Search, or display all books by clicking Show All. If you choose to create a new book, enter a Book Name (required), and a Description and Menu option if desired.
2. Enter additional template properties, including Title, Description, and Desktop Template Resources. If you want to add this template to the Library, select the check box.
3. Click Create Template, or review the summary of properties by clicking Review Properties and then click Create Template.
4. Click Finish.
Select a .portal file 1. Either search for a .portal file by entering a search string and clicking Search, or display all .portal files by clicking Show All.
2. Select a .portal file in the list. 3. Click Next. 4. Enter the desired desktop properties, including Title,
Description, and Desktop Template Resources. If you want to add this template to the Library, select the check box.
5. Click Create Template, or review the summary of properties by clicking Review Properties and then click Create Template.
6. Click Finish.

Desktop Templates
BEA WebLogic Portal Portal Development Guide 12-11
Modifying Desktop Template PropertiesYou can modify some desktop template properties from the Details tab. You can also edit the title, description, and locale information from the Title & Description tab, as described below.
To modify desktop template properties, perform these steps:
1. In the Portal Resources tree, expand the Library node or the Portals node and select a desktop template.
2. If you are starting this task from the Library node, click Edit this Template.
3. From the Details tab, select the type of property that you want to change. Use the table below as a guide.
Title and Description
Change title and description of the template in the current locale
1. Click Title & Description. 2. Click the locale (for example, en) in the Locale cell; the Add a
Localized Title & Description dialog displays. 3. Enter a new Title and/or Description. 4. Click Update.
Add a localized title for the portlet
1. Click Title & Description. 2. Click Add Localized Title; the Add a Localized Title & Description
dialog appears. 3. Enter a Language and Country identifier, Variant if applicable, Title,
and a Description for the localized title. 4. Click Create.
Edit Appearance 1. Click Edit Appearance; the Update Desktop dialog displays. 2. In the Default Shell drop-down menu, select a shell. 3. In the Look and Feel drop-down menu, select a Look And Feel. 4. In the Primary Book drop-down menu, select a book as the primary
book for the template. 5. Click Update.
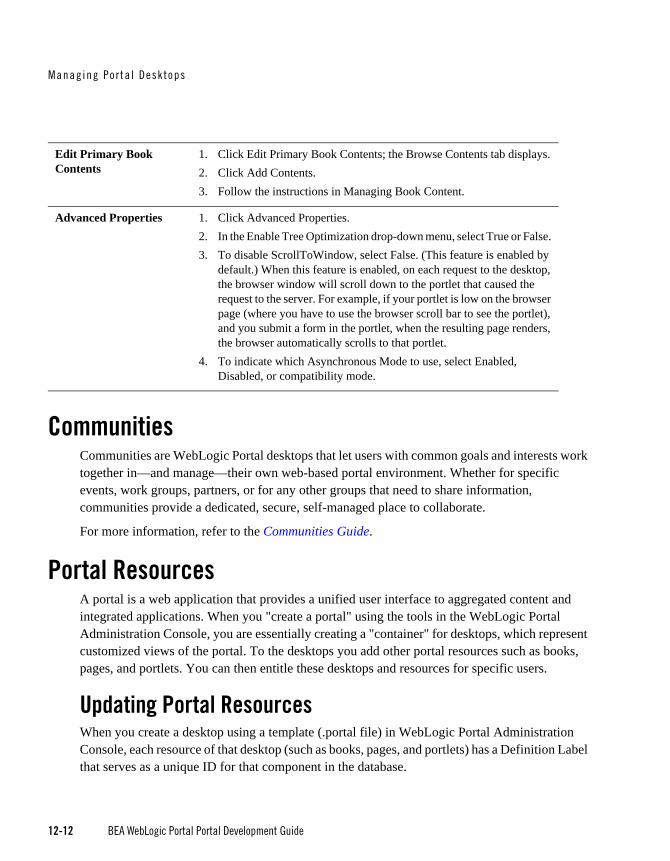
Managing Po r ta l Desk tops
12-12 BEA WebLogic Portal Portal Development Guide
CommunitiesCommunities are WebLogic Portal desktops that let users with common goals and interests work together in—and manage—their own web-based portal environment. Whether for specific events, work groups, partners, or for any other groups that need to share information, communities provide a dedicated, secure, self-managed place to collaborate.
For more information, refer to the Communities Guide.
Portal ResourcesA portal is a web application that provides a unified user interface to aggregated content and integrated applications. When you "create a portal" using the tools in the WebLogic Portal Administration Console, you are essentially creating a "container" for desktops, which represent customized views of the portal. To the desktops you add other portal resources such as books, pages, and portlets. You can then entitle these desktops and resources for specific users.
Updating Portal Resources When you create a desktop using a template (.portal file) in WebLogic Portal Administration Console, each resource of that desktop (such as books, pages, and portlets) has a Definition Label that serves as a unique ID for that component in the database.
Edit Primary Book Contents
1. Click Edit Primary Book Contents; the Browse Contents tab displays. 2. Click Add Contents. 3. Follow the instructions in Managing Book Content.
Advanced Properties 1. Click Advanced Properties. 2. In the Enable Tree Optimization drop-down menu, select True or False. 3. To disable ScrollToWindow, select False. (This feature is enabled by
default.) When this feature is enabled, on each request to the desktop, the browser window will scroll down to the portlet that caused the request to the server. For example, if your portlet is low on the browser page (where you have to use the browser scroll bar to see the portlet), and you submit a form in the portlet, when the resulting page renders, the browser automatically scrolls to that portlet.
4. To indicate which Asynchronous Mode to use, select Enabled, Disabled, or compatibility mode.

Por ta l Resources
BEA WebLogic Portal Portal Development Guide 12-13
If you create a new desktop using a template that contains portal resources with Definition Labels that are identical to resources already stored in the database, a dialog similar to the following displays:
Figure 12-4 Update Portal Resources Dialog
Use the following information for guidance in updating portal resources when you receive this warning:
Table 12-2 Updating Portal Resources- Conflict Resolution Options
Option Description
Don't replace Ignores the resources in the template and leaves the database version of the resources intact, including any user customizations that have been made.
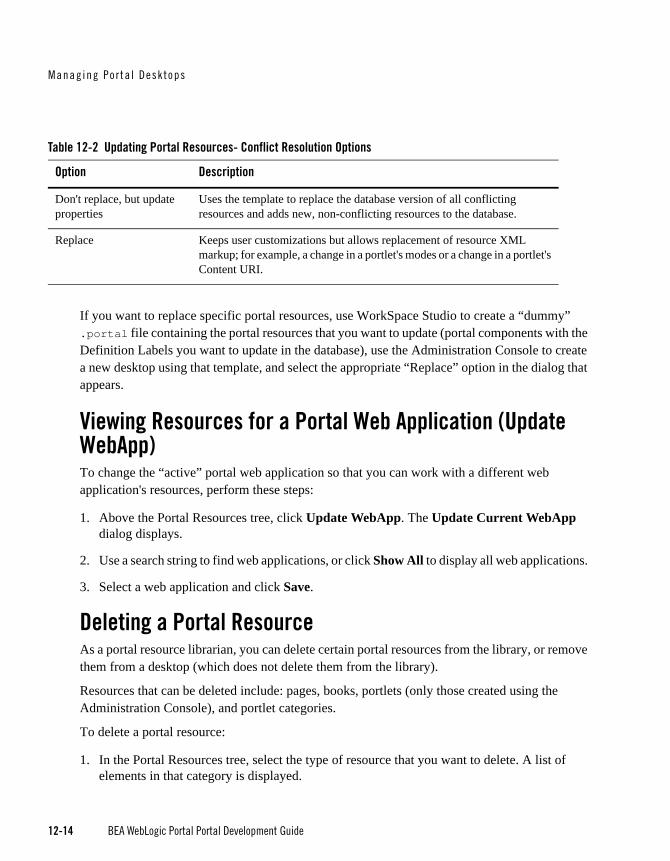
Managing Po r ta l Desk tops
12-14 BEA WebLogic Portal Portal Development Guide
If you want to replace specific portal resources, use WorkSpace Studio to create a “dummy” .portal file containing the portal resources that you want to update (portal components with the Definition Labels you want to update in the database), use the Administration Console to create a new desktop using that template, and select the appropriate “Replace” option in the dialog that appears.
Viewing Resources for a Portal Web Application (Update WebApp) To change the “active” portal web application so that you can work with a different web application's resources, perform these steps:
1. Above the Portal Resources tree, click Update WebApp. The Update Current WebApp dialog displays.
2. Use a search string to find web applications, or click Show All to display all web applications.
3. Select a web application and click Save.
Deleting a Portal ResourceAs a portal resource librarian, you can delete certain portal resources from the library, or remove them from a desktop (which does not delete them from the library).
Resources that can be deleted include: pages, books, portlets (only those created using the Administration Console), and portlet categories.
To delete a portal resource:
1. In the Portal Resources tree, select the type of resource that you want to delete. A list of elements in that category is displayed.
Don't replace, but update properties
Uses the template to replace the database version of all conflicting resources and adds new, non-conflicting resources to the database.
Replace Keeps user customizations but allows replacement of resource XML markup; for example, a change in a portlet's modes or a change in a portlet's Content URI.
Table 12-2 Updating Portal Resources- Conflict Resolution Options
Option Description

Por ta l Resources
BEA WebLogic Portal Portal Development Guide 12-15
2. To delete an element from the library, select the check box for any elements that you want to delete, and click Delete. The items are deleted and removed from the list.
If you try to delete an element from the library that is being used within a desktop, a warning dialog displays. You can choose either to delete the element and any referencing instances, or cancel the deletion task.
3. To delete an element from a desktop, select the check box for any elements that you want to delete, and click Remove. The items are removed from the list.
Localizing a Portal ResourceYou use the WebLogic Portal Administration Console to localize individual portal resources so that they render in different languages. When you assign a language to a portal resource, you assign the preferred language to the name of that resource. Resources localized in the portal library will be propagated through the portals in which they are used.
If the end user's browser supports the selected language, the portal resource is rendered in that language. If the end user's browser does not support that language, the system works through a list of available languages until it finds one that is supported in both your portal and the end user's browser.
Perform these steps:
1. In the Portal Resources tree, expand the Library node to find the resource that you want to localize; for example:
– Theme
– Book
– Page
– Layout
– Look And Feel
– Portlet
2. Select the Title & Description tab for the resource.
3. Click Add Localized Title.
4. Complete the data entry fields for the Language, Title, and other fields as applicable.
5. Click Create.
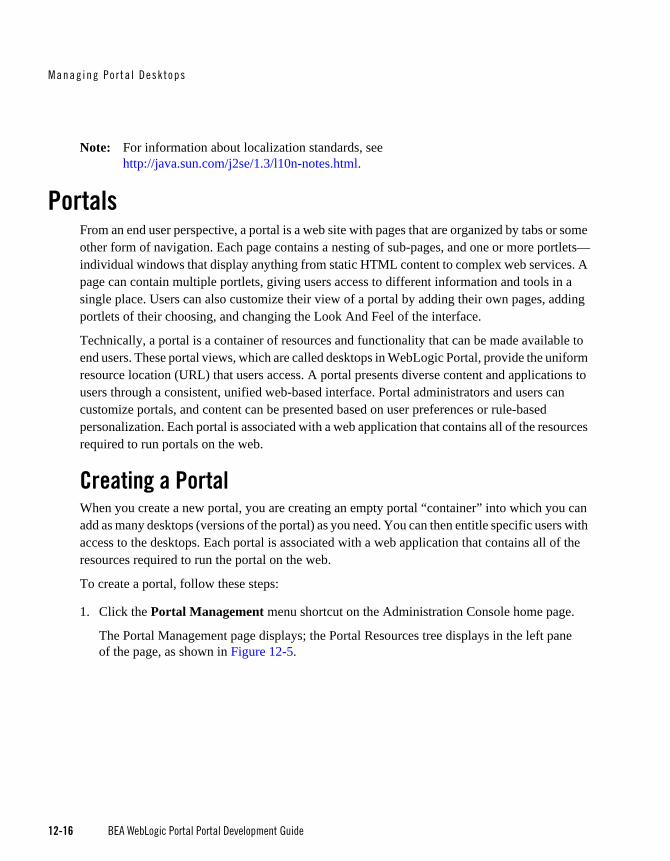
Managing Po r ta l Desk tops
12-16 BEA WebLogic Portal Portal Development Guide
Note: For information about localization standards, see http://java.sun.com/j2se/1.3/l10n-notes.html.
PortalsFrom an end user perspective, a portal is a web site with pages that are organized by tabs or some other form of navigation. Each page contains a nesting of sub-pages, and one or more portlets—individual windows that display anything from static HTML content to complex web services. A page can contain multiple portlets, giving users access to different information and tools in a single place. Users can also customize their view of a portal by adding their own pages, adding portlets of their choosing, and changing the Look And Feel of the interface.
Technically, a portal is a container of resources and functionality that can be made available to end users. These portal views, which are called desktops in WebLogic Portal, provide the uniform resource location (URL) that users access. A portal presents diverse content and applications to users through a consistent, unified web-based interface. Portal administrators and users can customize portals, and content can be presented based on user preferences or rule-based personalization. Each portal is associated with a web application that contains all of the resources required to run portals on the web.
Creating a PortalWhen you create a new portal, you are creating an empty portal “container” into which you can add as many desktops (versions of the portal) as you need. You can then entitle specific users with access to the desktops. Each portal is associated with a web application that contains all of the resources required to run the portal on the web.
To create a portal, follow these steps:
1. Click the Portal Management menu shortcut on the Administration Console home page.
The Portal Management page displays; the Portal Resources tree displays in the left pane of the page, as shown in Figure 12-5.
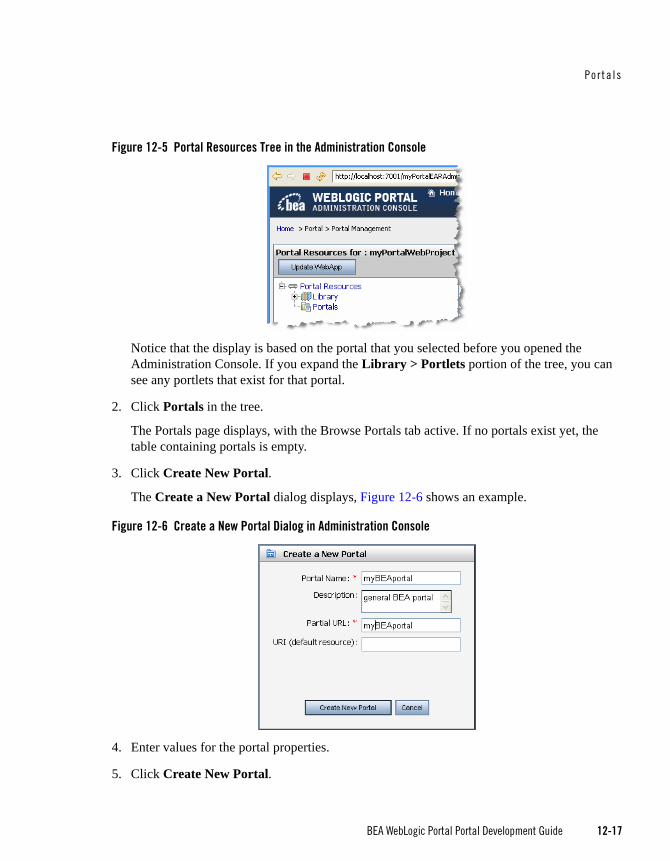
Po r ta ls
BEA WebLogic Portal Portal Development Guide 12-17
Figure 12-5 Portal Resources Tree in the Administration Console
Notice that the display is based on the portal that you selected before you opened the Administration Console. If you expand the Library > Portlets portion of the tree, you can see any portlets that exist for that portal.
2. Click Portals in the tree.
The Portals page displays, with the Browse Portals tab active. If no portals exist yet, the table containing portals is empty.
3. Click Create New Portal.
The Create a New Portal dialog displays, Figure 12-6 shows an example.
Figure 12-6 Create a New Portal Dialog in Administration Console
4. Enter values for the portal properties.
5. Click Create New Portal.

Managing Po r ta l Desk tops
12-18 BEA WebLogic Portal Portal Development Guide
When the Portals page displays again, the Browse Portals table includes the portal you created, and the Portal Resources tree includes the new portal.
6. You can click the portal name in the Browse Portals table to view the details for this portal.
The Portals page displays, with the Browse Desktops tab active. Because no desktops exist yet, the table containing desktops is empty.
You can now add desktops to your portal.
Modifying Portal PropertiesYou can modify some portal properties from the Details tab. You can also edit the title, description, and locale information from the Title & Description tab, as described below.
To modify portal properties:
1. In the Portal Resources tree, expand the Portals node and select a portal.
2. From the Details tab, select the type of property that you want to change. Use the table below as a guide.
Table 12-3 Modifying Portal Properties in the Administration Console
Option Description
Change title and description of the portal in the current locale
1. Click Title & Description. 2. Click the locale (for example, en) in the Locale cell; the Add a
Localized Title & Description dialog displays. 3. Enter a new Title and/or Description. 4. Click Update.
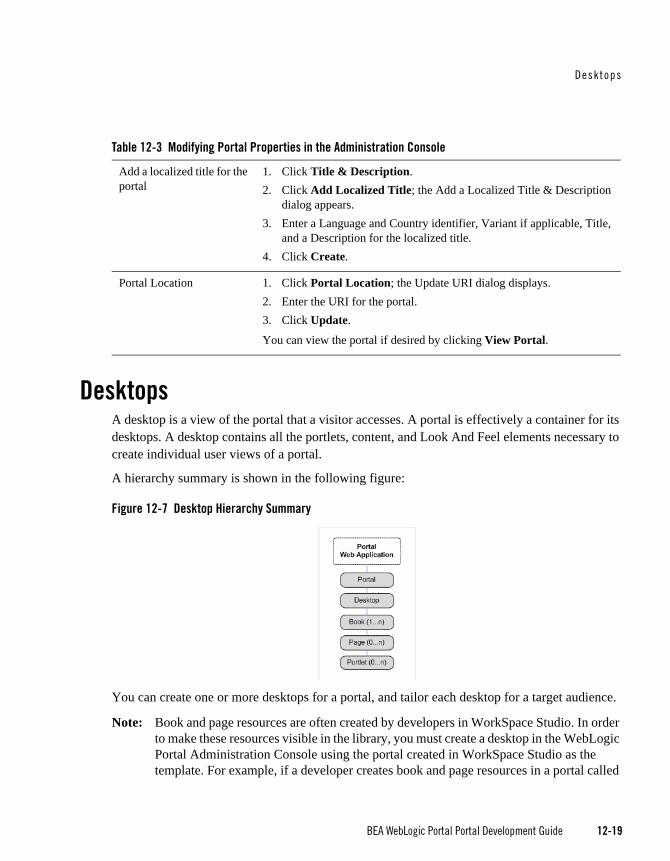
Desktops
BEA WebLogic Portal Portal Development Guide 12-19
Desktops A desktop is a view of the portal that a visitor accesses. A portal is effectively a container for its desktops. A desktop contains all the portlets, content, and Look And Feel elements necessary to create individual user views of a portal.
A hierarchy summary is shown in the following figure:
Figure 12-7 Desktop Hierarchy Summary
You can create one or more desktops for a portal, and tailor each desktop for a target audience.
Note: Book and page resources are often created by developers in WorkSpace Studio. In order to make these resources visible in the library, you must create a desktop in the WebLogic Portal Administration Console using the portal created in WorkSpace Studio as the template. For example, if a developer creates book and page resources in a portal called
Add a localized title for the portal
1. Click Title & Description. 2. Click Add Localized Title; the Add a Localized Title & Description
dialog appears. 3. Enter a Language and Country identifier, Variant if applicable, Title,
and a Description for the localized title. 4. Click Create.
Portal Location 1. Click Portal Location; the Update URI dialog displays. 2. Enter the URI for the portal. 3. Click Update.
You can view the portal if desired by clicking View Portal.
Table 12-3 Modifying Portal Properties in the Administration Console
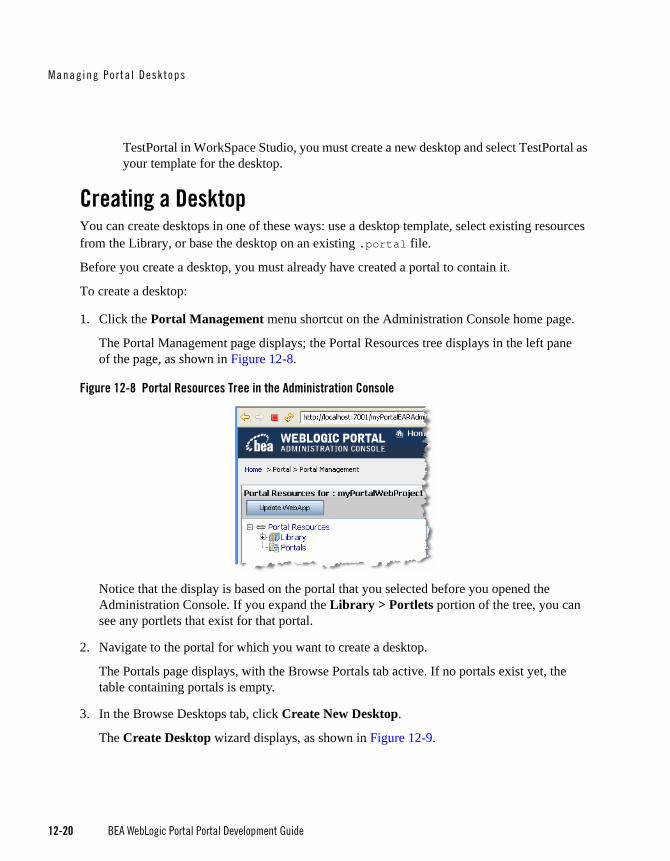
Managing Po r ta l Desk tops
12-20 BEA WebLogic Portal Portal Development Guide
TestPortal in WorkSpace Studio, you must create a new desktop and select TestPortal as your template for the desktop.
Creating a DesktopYou can create desktops in one of these ways: use a desktop template, select existing resources from the Library, or base the desktop on an existing .portal file.
Before you create a desktop, you must already have created a portal to contain it.
To create a desktop:
1. Click the Portal Management menu shortcut on the Administration Console home page.
The Portal Management page displays; the Portal Resources tree displays in the left pane of the page, as shown in Figure 12-8.
Figure 12-8 Portal Resources Tree in the Administration Console
Notice that the display is based on the portal that you selected before you opened the Administration Console. If you expand the Library > Portlets portion of the tree, you can see any portlets that exist for that portal.
2. Navigate to the portal for which you want to create a desktop.
The Portals page displays, with the Browse Portals tab active. If no portals exist yet, the table containing portals is empty.
3. In the Browse Desktops tab, click Create New Desktop.
The Create Desktop wizard displays, as shown in Figure 12-9.
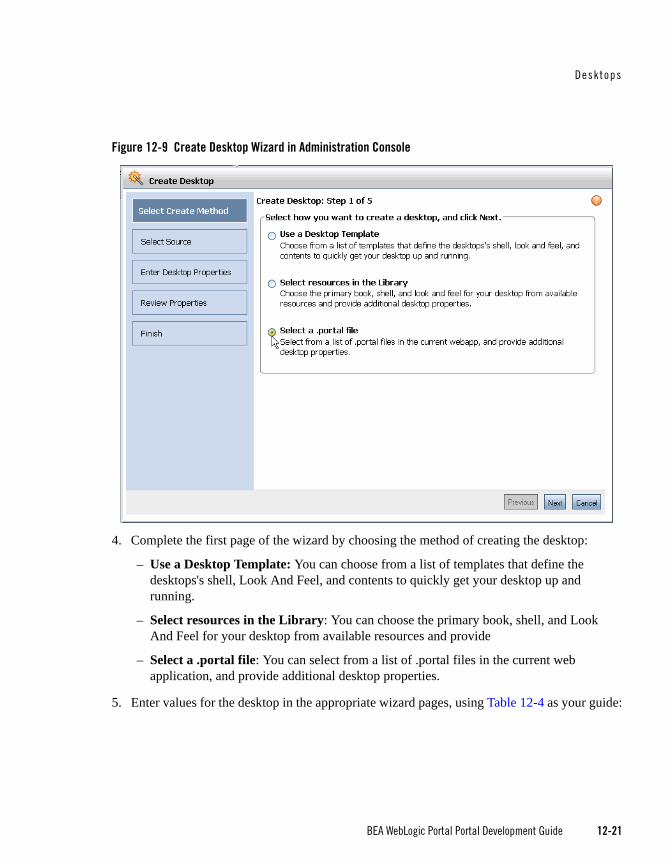
Desktops
BEA WebLogic Portal Portal Development Guide 12-21
Figure 12-9 Create Desktop Wizard in Administration Console
4. Complete the first page of the wizard by choosing the method of creating the desktop:
– Use a Desktop Template: You can choose from a list of templates that define the desktops's shell, Look And Feel, and contents to quickly get your desktop up and running.
– Select resources in the Library: You can choose the primary book, shell, and Look And Feel for your desktop from available resources and provide
– Select a .portal file: You can select from a list of .portal files in the current web application, and provide additional desktop properties.
5. Enter values for the desktop in the appropriate wizard pages, using Table 12-4 as your guide:
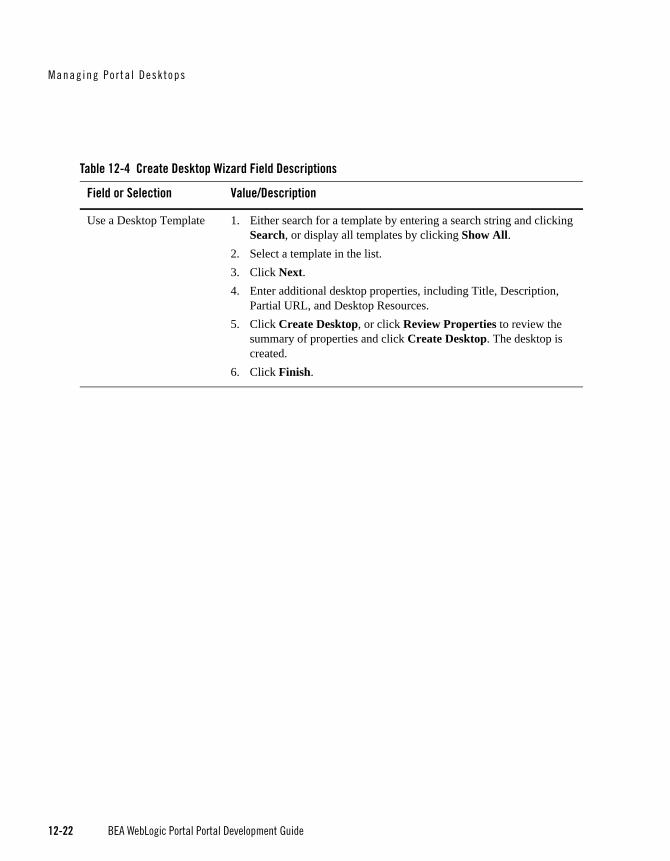
Managing Po r ta l Desk tops
12-22 BEA WebLogic Portal Portal Development Guide
Table 12-4 Create Desktop Wizard Field Descriptions
Field or Selection Value/Description
Use a Desktop Template 1. Either search for a template by entering a search string and clicking Search, or display all templates by clicking Show All.
2. Select a template in the list. 3. Click Next. 4. Enter additional desktop properties, including Title, Description,
Partial URL, and Desktop Resources. 5. Click Create Desktop, or click Review Properties to review the
summary of properties and click Create Desktop. The desktop is created.
6. Click Finish.
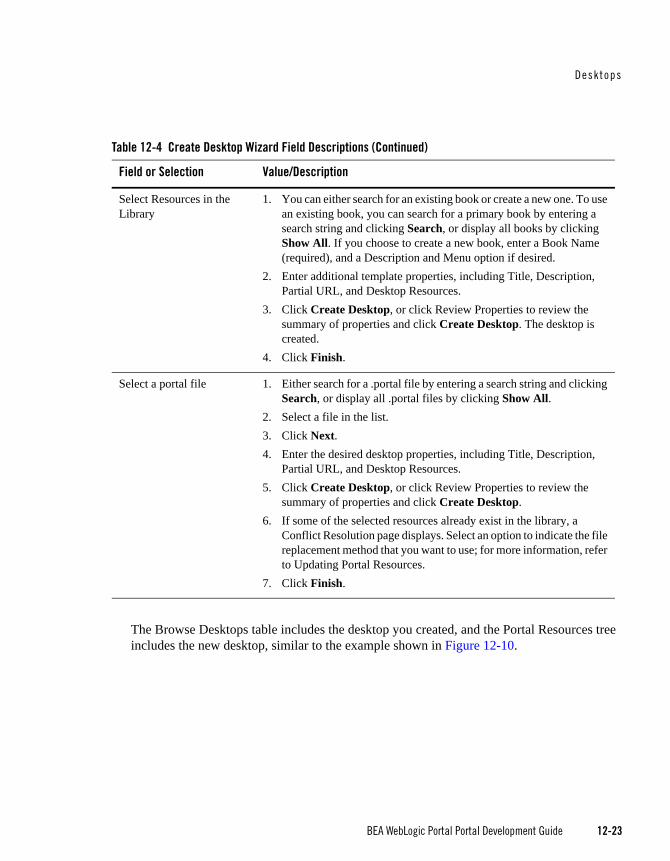
Desktops
BEA WebLogic Portal Portal Development Guide 12-23
The Browse Desktops table includes the desktop you created, and the Portal Resources tree includes the new desktop, similar to the example shown in Figure 12-10.
Select Resources in the Library
1. You can either search for an existing book or create a new one. To use an existing book, you can search for a primary book by entering a search string and clicking Search, or display all books by clicking Show All. If you choose to create a new book, enter a Book Name (required), and a Description and Menu option if desired.
2. Enter additional template properties, including Title, Description, Partial URL, and Desktop Resources.
3. Click Create Desktop, or click Review Properties to review the summary of properties and click Create Desktop. The desktop is created.
4. Click Finish.
Select a portal file 1. Either search for a .portal file by entering a search string and clicking Search, or display all .portal files by clicking Show All.
2. Select a file in the list. 3. Click Next. 4. Enter the desired desktop properties, including Title, Description,
Partial URL, and Desktop Resources. 5. Click Create Desktop, or click Review Properties to review the
summary of properties and click Create Desktop. 6. If some of the selected resources already exist in the library, a
Conflict Resolution page displays. Select an option to indicate the file replacement method that you want to use; for more information, refer to Updating Portal Resources.
7. Click Finish.
Table 12-4 Create Desktop Wizard Field Descriptions (Continued)
Field or Selection Value/Description
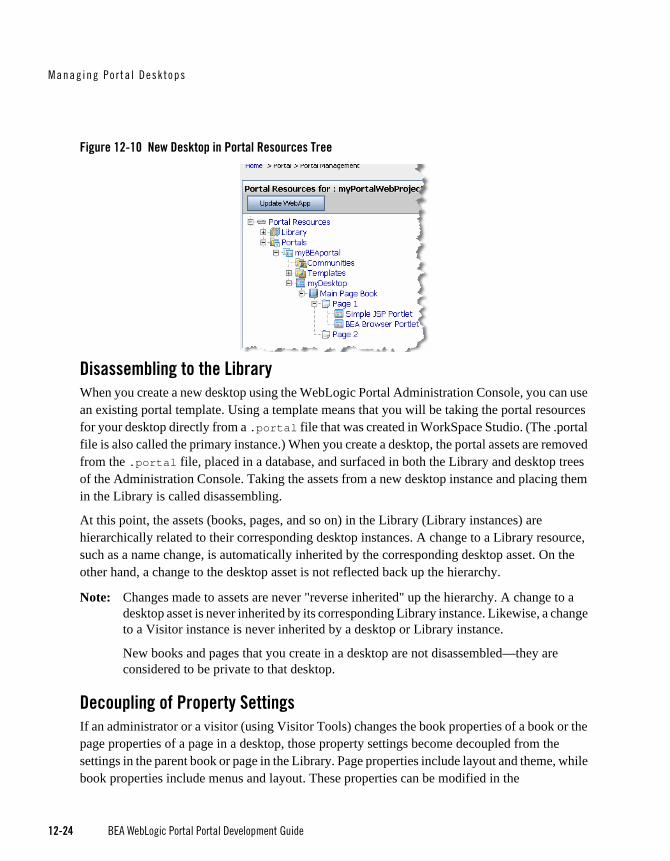
Managing Po r ta l Desk tops
12-24 BEA WebLogic Portal Portal Development Guide
Figure 12-10 New Desktop in Portal Resources Tree
Disassembling to the LibraryWhen you create a new desktop using the WebLogic Portal Administration Console, you can use an existing portal template. Using a template means that you will be taking the portal resources for your desktop directly from a .portal file that was created in WorkSpace Studio. (The .portal file is also called the primary instance.) When you create a desktop, the portal assets are removed from the .portal file, placed in a database, and surfaced in both the Library and desktop trees of the Administration Console. Taking the assets from a new desktop instance and placing them in the Library is called disassembling.
At this point, the assets (books, pages, and so on) in the Library (Library instances) are hierarchically related to their corresponding desktop instances. A change to a Library resource, such as a name change, is automatically inherited by the corresponding desktop asset. On the other hand, a change to the desktop asset is not reflected back up the hierarchy.
Note: Changes made to assets are never "reverse inherited" up the hierarchy. A change to a desktop asset is never inherited by its corresponding Library instance. Likewise, a change to a Visitor instance is never inherited by a desktop or Library instance.
New books and pages that you create in a desktop are not disassembled—they are considered to be private to that desktop.
Decoupling of Property SettingsIf an administrator or a visitor (using Visitor Tools) changes the book properties of a book or the page properties of a page in a desktop, those property settings become decoupled from the settings in the parent book or page in the Library. Page properties include layout and theme, while book properties include menus and layout. These properties can be modified in the

Desktops
BEA WebLogic Portal Portal Development Guide 12-25
Administration Console. When a portal is propagated, any assets that are decoupled in the source application will remain decoupled in the destination.
Modifying Desktop Properties To modify the properties of a desktop, perform these steps:
1. In the Portal Resources tree, select Portals and navigate to a desktop.
2. In the Details tab, you can choose to edit properties in each section. Use the following table as a guide.
Title and Description
Change title and description of the portlet in the current locale
1. Click Title & Description. 2. Click the locale (for example, en) in the Locale cell; the
Add a Localized Title & Description dialog displays. 3. Enter a new Title and/or Description. 4. Click Update.
Add a localized title for the portlet
1. Click Title & Description. 2. Click Add Localized Title; the Add a Localized Title &
Description dialog appears. 3. Enter a Language and Country identifier, Variant if
applicable, Title, and a Description for the localized title. 4. Click Create.
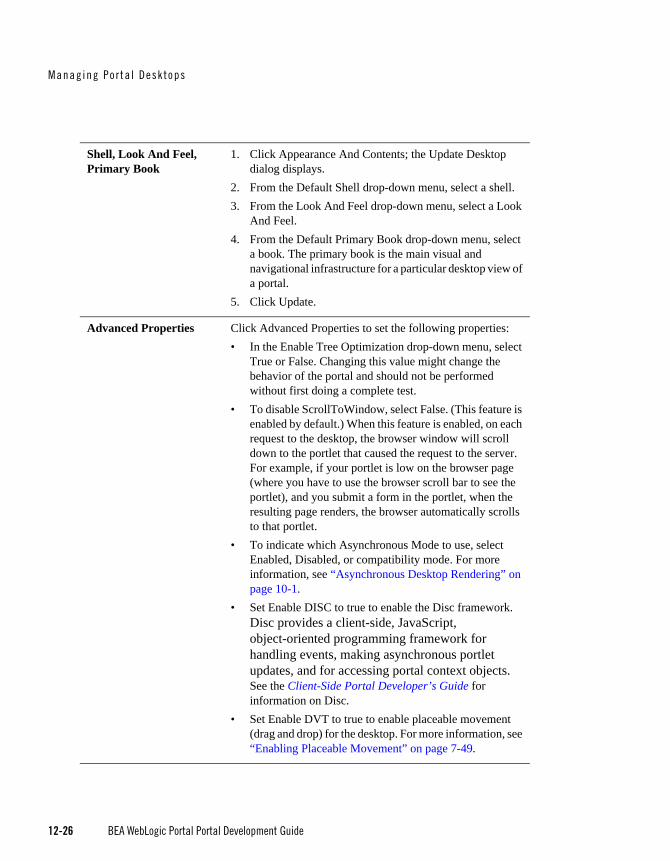
Managing Po r ta l Desk tops
12-26 BEA WebLogic Portal Portal Development Guide
Shell, Look And Feel, Primary Book
1. Click Appearance And Contents; the Update Desktop dialog displays.
2. From the Default Shell drop-down menu, select a shell. 3. From the Look And Feel drop-down menu, select a Look
And Feel. 4. From the Default Primary Book drop-down menu, select
a book. The primary book is the main visual and navigational infrastructure for a particular desktop view of a portal.
5. Click Update.
Advanced Properties Click Advanced Properties to set the following properties: • In the Enable Tree Optimization drop-down menu, select
True or False. Changing this value might change the behavior of the portal and should not be performed without first doing a complete test.
• To disable ScrollToWindow, select False. (This feature is enabled by default.) When this feature is enabled, on each request to the desktop, the browser window will scroll down to the portlet that caused the request to the server. For example, if your portlet is low on the browser page (where you have to use the browser scroll bar to see the portlet), and you submit a form in the portlet, when the resulting page renders, the browser automatically scrolls to that portlet.
• To indicate which Asynchronous Mode to use, select Enabled, Disabled, or compatibility mode. For more information, see “Asynchronous Desktop Rendering” on page 10-1.
• Set Enable DISC to true to enable the Disc framework. Disc provides a client-side, JavaScript, object-oriented programming framework for handling events, making asynchronous portlet updates, and for accessing portal context objects. See the Client-Side Portal Developer’s Guide for information on Disc.
• Set Enable DVT to true to enable placeable movement (drag and drop) for the desktop. For more information, see “Enabling Placeable Movement” on page 7-49.
Books
BEA WebLogic Portal Portal Development Guide 12-27
3. To verify your changes in a browser, click View Desktop.
BooksA book is a portal component that provides high-level content organization and navigation. Books contain pages or other books, providing a mechanism for hierarchical nesting of pages and content.
Creating a BookIf you have Library Administration privileges, you can create a new book in the portal Library that can be used as a component in multiple portals. If you have Portal Administrator privileges, you can create books to use in customized portals, but these books are not reusable (and are not listed in the portal Library).
To create a book in the portal Library, perform these steps:
1. In the Portal Resources tree, expand the Library folder and select Books. The Browse Books tab displays.
2. Click Create New Book. The Create New Book dialog displays.
3. Enter a title, description, menu, and theme for the book.
Note: The Multi Level Menu is a pull-down menu, and the Single Level Menu is a tabbed menu.
4. Click Create Book.
To create a book on an individual desktop, perform these steps:
1. In the Portal Resources tree, expand the Portals node and select the book or page where you want to create a book.
2. Click the appropriate tab depending on whether you are working on a page or a book, as follows:
– For pages, click the Edit Contents tab
– For books, click the Browse Contents tab.
3. Click Add New Book. The Create New Book dialog displays.
4. Enter a title, description, menu, and theme for the book.
5. Click Create.
Managing Po r ta l Desk tops
12-28 BEA WebLogic Portal Portal Development Guide
The book is added for the desktop but will not be added to the Library.
Managing Book ContentThe contents of a book include pages and books. You can view the books and pages that are already on your book, and add and remove pages and books to construct your book.
Adding Portal Elements to a Book Library: To add a content to a book, perform these steps:
1. In the Portal Resource tree, expand the Library node and navigate to a book. The Details tab displays.
2. Click Add & Sort Contents. The Add Books and Pages dialog displays.
3. Display the books or pages that you want to choose from, using the Search area if needed.
4. Choose the elements that you want to add by selecting the desired check boxes, and click Add.
5. When finished, click Save.
Desktop: To add a content to a book, perform these steps:
1. In the Portal Resource tree, expand the Portals node and navigate to a book. The Details tab displays.
2. Click Browse Contents. In the Browse Book Contents section, you can choose to add existing elements using the Add & Sort Content button, or create a new page/book using the Add New Page button or Add New Book button.
3. If you want to create a new book and add it to this book, click Add New Book; the Create New Book dialog displays. Fill in the fields of this dialog as described in “Creating a Book” on page 12-27.
4. If you want to create a new page and add it to this book, click Add New Page; the Create New Page dialog displays. Fill in the fields of this dialog as described in “Creating a New Page” on page 12-31.
5. If you want to add an existing book or page to the book, click Add Contents; search for existing books or pages if needed, then select the elements that you want, and click Add. When finished, click Save.
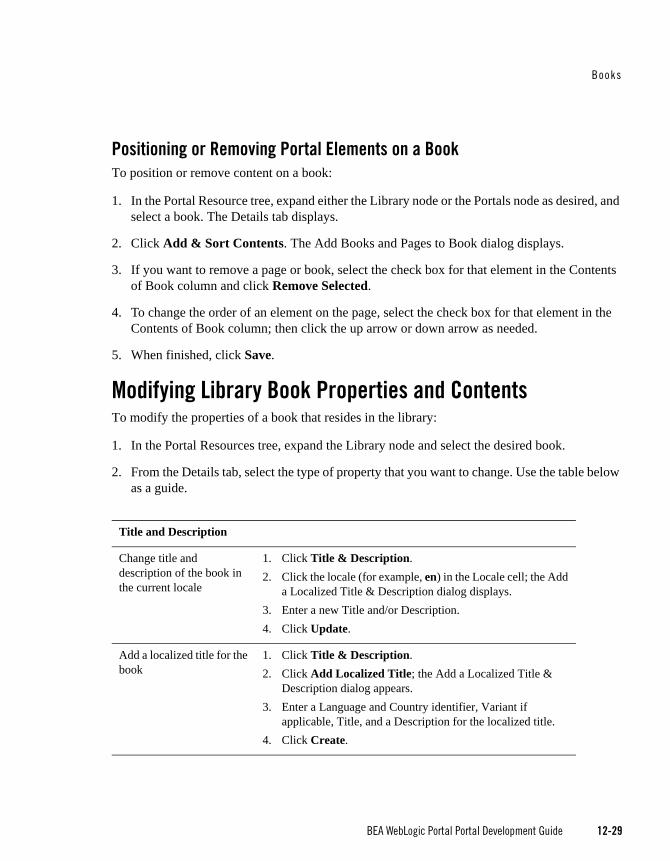
Books
BEA WebLogic Portal Portal Development Guide 12-29
Positioning or Removing Portal Elements on a Book To position or remove content on a book:
1. In the Portal Resource tree, expand either the Library node or the Portals node as desired, and select a book. The Details tab displays.
2. Click Add & Sort Contents. The Add Books and Pages to Book dialog displays.
3. If you want to remove a page or book, select the check box for that element in the Contents of Book column and click Remove Selected.
4. To change the order of an element on the page, select the check box for that element in the Contents of Book column; then click the up arrow or down arrow as needed.
5. When finished, click Save.
Modifying Library Book Properties and ContentsTo modify the properties of a book that resides in the library:
1. In the Portal Resources tree, expand the Library node and select the desired book.
2. From the Details tab, select the type of property that you want to change. Use the table below as a guide.
Title and Description
Change title and description of the book in the current locale
1. Click Title & Description. 2. Click the locale (for example, en) in the Locale cell; the Add
a Localized Title & Description dialog displays. 3. Enter a new Title and/or Description. 4. Click Update.
Add a localized title for the book
1. Click Title & Description. 2. Click Add Localized Title; the Add a Localized Title &
Description dialog appears. 3. Enter a Language and Country identifier, Variant if
applicable, Title, and a Description for the localized title. 4. Click Create.

Managing Po r ta l Desk tops
12-30 BEA WebLogic Portal Portal Development Guide
Modifying Desktop Book PropertiesTo modify the properties of a book that resides on a desktop, perform these steps:
1. In the Portal Resources tree, expand the Portals node and select the desired book.
2. From the Details tab, select the type of property that you want to change. Use the table below as a guide.
Book Contents 1. Click Book Contents; the Browse Contents tab displays. 2. Select books and pages to add, following the instructions in
“Managing Book Content” on page 12-28.
Appearance 1. Click Appearance; the Edit Appearance dialog displays. 2. From the Menu drop-down menu, select a Menu. 3. From the Theme drop-down menu, select a Theme. 4. Select Hidden to hide the navigation tab for the book to
prevent direct access. 5. Click Update.
Title and Description You must edit these values within the Library resource tree. Expand the Library node, select the book that you want to edit, and follow the instructions in “Modifying Library Book Properties and Contents” on page 12-29.
Book Contents 1. Click Book Contents; the Browse Contents tab displays. 2. Click Add Contents. 3. Select books and pages to add, following the instructions in
“Managing Book Content” on page 12-28.
Menu and Theme 1. Click Appearance; the Edit Appearance dialog displays. 2. From the Menu drop-down menu, select a Menu. 3. From the Theme drop-down menu, select a Theme. 4. Click Update.
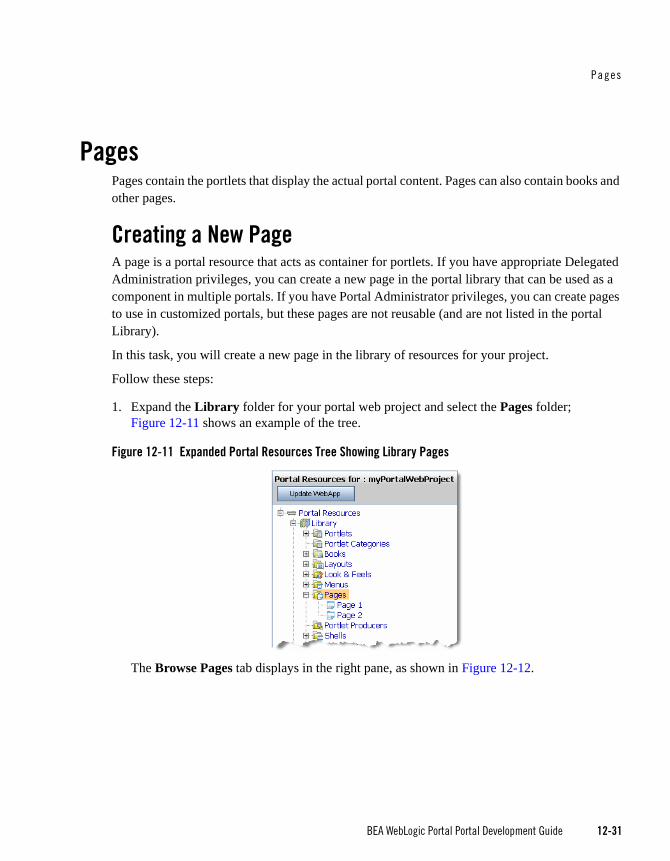
Pages
BEA WebLogic Portal Portal Development Guide 12-31
PagesPages contain the portlets that display the actual portal content. Pages can also contain books and other pages.
Creating a New PageA page is a portal resource that acts as container for portlets. If you have appropriate Delegated Administration privileges, you can create a new page in the portal library that can be used as a component in multiple portals. If you have Portal Administrator privileges, you can create pages to use in customized portals, but these pages are not reusable (and are not listed in the portal Library).
In this task, you will create a new page in the library of resources for your project.
Follow these steps:
1. Expand the Library folder for your portal web project and select the Pages folder; Figure 12-11 shows an example of the tree.
Figure 12-11 Expanded Portal Resources Tree Showing Library Pages
The Browse Pages tab displays in the right pane, as shown in Figure 12-12.

Managing Po r ta l Desk tops
12-32 BEA WebLogic Portal Portal Development Guide
Figure 12-12 Browse Pages Tab
2. Click Create New Page.
The Create New Page dialog displays, as shown in Figure 12-13.
Figure 12-13 Create New Page Dialog in Administration Console
3. Enter a title, description, layout, and theme for the page.
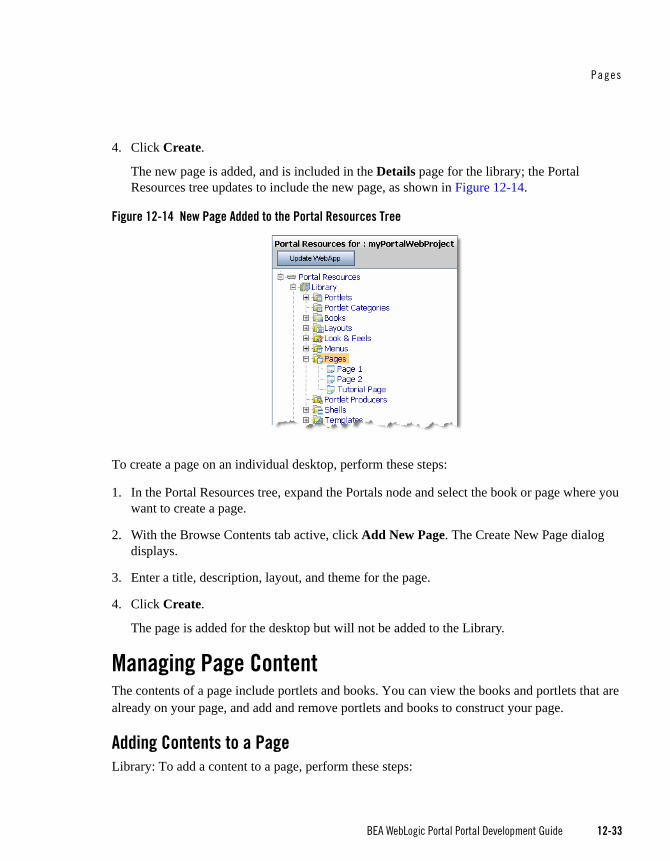
Pages
BEA WebLogic Portal Portal Development Guide 12-33
4. Click Create.
The new page is added, and is included in the Details page for the library; the Portal Resources tree updates to include the new page, as shown in Figure 12-14.
Figure 12-14 New Page Added to the Portal Resources Tree
To create a page on an individual desktop, perform these steps:
1. In the Portal Resources tree, expand the Portals node and select the book or page where you want to create a page.
2. With the Browse Contents tab active, click Add New Page. The Create New Page dialog displays.
3. Enter a title, description, layout, and theme for the page.
4. Click Create.
The page is added for the desktop but will not be added to the Library.
Managing Page ContentThe contents of a page include portlets and books. You can view the books and portlets that are already on your page, and add and remove portlets and books to construct your page.
Adding Contents to a Page Library: To add a content to a page, perform these steps:

Managing Po r ta l Desk tops
12-34 BEA WebLogic Portal Portal Development Guide
1. In the Portal Resource tree, expand the Library node and navigate to a page. The Details tab displays.
2. Click Page Contents. The Edit Contents tab displays.
3. Click Add Contents in the respective placeholder. The Add Books and Portlets to Placeholder dialog displays.
4. Display the portlets or books that you want to choose from, using the Search area if needed.
5. Choose the content that you want to add by selecting the desired check boxes, and click Add.
6. When finished, click Save.
Desktop: To add content to a page:
1. In the Portal Resource tree, expand the Portals node and navigate to a page. The Details tab displays.
2. Click Page Contents. The Edit Contents tab displays. In the Edit Contents tab, you can choose to add existing content using the Add Contents button, or create a new book using the Add New Book button.
a. If you want to create a new book and add it to this page, click Add New Book for the respective placeholder; the Create New Book dialog displays. Fill in the fields of this dialog as described in “Creating a Book” on page 12-27.
b. If you want to add an existing book or portlet to the book, click Add Contents for the respective placeholder; search for existing books or portlets if needed, then select the elements that you want, and click Add.
3. When finished, click Save.
Positioning Elements on a PageThe page layout is the grid structure of a page that holds placeholders for portlets on the page. You can select a layout for your portlets/books, and drag and drop portlets or books between the placeholders to customize the layout of each page.
Perform these steps:
1. In the Portal Resource tree, expand either the Library node or the Portals node as applicable, and select a page. The Details tab displays.
2. Click Page Contents. The Edit Contents tab displays.

Pages
BEA WebLogic Portal Portal Development Guide 12-35
3. If you want to change to a different layout, select a layout in the Layout drop-down menu.
4. Select the method that you want to use to position the elements on the page by selecting an option in the Position Elements area. The default is Drag & Drop.
5. Move portlets or books between placeholder columns.
6. If you want to prevent users from moving or deleting elements from a placeholder, select the Lock Placeholder check box.
7. When finished, click Save Changes.
Modifying Library Page Properties To modify the properties of a page that resides in the library, perform these steps:
1. Expand the Library node in the Portal Resources tree and navigate to a page.
2. From the Details tab, select the type of property that you want to change. Use the table below as a guide.
Title and Description
Change title and description of the page in the current locale
1. Click Title & Description. 2. Click the locale (for example, en) in the Locale cell; the Add
a Localized Title & Description dialog displays. 3. Enter a new Title and/or Description. 4. Click Update.
Add a localized title for the page
1. Click Title & Description. 2. Click Add Localized Title; the Add a Localized Title &
Description dialog appears. 3. Enter a Language and Country identifier, Variant if
applicable, Title, and a Description for the localized title. 4. Click Create.

Managing Po r ta l Desk tops
12-36 BEA WebLogic Portal Portal Development Guide
Modifying Desktop Page PropertiesTo modify the properties of a page that resides on a desktop, perform these steps:
1. Expand the Portals node in the Portal Resources tree and navigate to a page.
2. From the Details tab, select the type of property that you want to change. Use the table below as a guide.
Page Contents 1. Click Page Contents; the Edit Contents tab displays. 2. To add books or portlets, click Add Contents. To move
content, select a positioning option by clicking one of the Position Elements radio buttons, then move elements as desired. Follow the instructions in “Managing Page Content” on page 12-33.
Appearance 1. Click Appearance; the Edit Appearance dialog displays. 2. From the Layout drop-down menu, select a Layout. 3. From the Theme drop-down menu, select a Theme. 4. Select Hidden to hide the navigation tab for the page to
prevent direct access. 5. Click Update.
Title and Description You must edit these values within the Library resource tree. Expand the Library node, select the page that you want to edit, and follow the instructions in “Modifying Library Page Properties” on page 12-35.
Page Contents 1. Click Page Contents; the Edit Contents tab displays. 2. To add books or portlets, click Add Contents. To move content,
select a positioning option by clicking one of the Position Elements radio buttons, then move elements as desired. Follow the instructions in “Managing Page Content” on page 12-33.
Layout and Theme 1. Click Appearance; the Edit Appearance dialog displays. 2. From the Layout drop-down menu, select a Layout. 3. From the Theme drop-down menu, select a Theme. 4. Click Update.
Por t l e ts
BEA WebLogic Portal Portal Development Guide 12-37
Moving a Page or Book to Another Location on the DesktopWithin a desktop, you can move a book or page to a different location within the desktop; for example, you can move page1 from book1 to book2 within a single desktop. You must have "can manage" privileges on both the source and destination location for the resource. You can perform this task for any book or page, except the main book.
Note: You cannot change the inheritance structure of a resource when you move it; for example, if a book's parent is another book, you may move it only underneath another book - not to a page. If the parent is a page, you can only move the resource under another page.
Perform these steps:
1. In the Portal Resource tree, expand the Portals node as desired, and select the book or page that you want to move.
2. Click Move. The Move dialog displays, instructing you to select the node in the Portal resources tree where you want to place the element.
3. Click OK.
4. In the Portal Resources tree, click the book or page under which you want to paste the element that you selected in step 2.
5. Click Paste. The Paste confirmation dialog displays.
6. Click OK.
PortletsPortlets are the visible components that act as the interface to applications and content. They are the actual components with which a user interacts in a portal. Portlets can be arranged in pages to provide users access to multiple applications within a single page.
Portlets also support application-to-application communication and can be used to provide users access to composite applications - a single portlet interface that combines data and tasks from multiple sources.
Copying a Portlet in the LibraryYou can use this feature of the WebLogic Portal Administration Console to duplicate an existing portlet and use it as a template for a "new" portlet.
Managing Po r ta l Desk tops
12-38 BEA WebLogic Portal Portal Development Guide
Perform these steps:
1. Expand the Library node in the Portal Resources tree and navigate to the portlet that you want to copy.
2. Click Copy Portlet. The Copy Portlet dialog displays.
3. Enter a title and description for the copied portlet.
4. Click OK. The portlet is added at the bottom of the portlet list.
You can now customize the copied portlet by modifying its properties and preferences.
Deleting a PortletYou can delete portlets from the Administration Console only if they were created there; for example, if you used the Copy Portlet feature to duplicate the portlet. Portlets created in WorkSpace Studio cannot be deleted using the Administration Console.
Perform these steps:
1. Expand the Library node in the Portal Resources tree and navigate to the portlet that you want to delete.
2. Click Delete Portlet.
Modifying Library Portlet PropertiesPortlet properties include all of the features and elements that make up the portlet. As a portal administrator, you can modify some of these properties from the Details tab. You can also edit the title, description, and locale information from the Title & Description tab, as described below.
To modify the properties of a portlet that resides in the library, perform these steps:
1. Expand the Library node in the Portal Resources tree and navigate to the portlet that you want to modify.
2. From the Details tab, select the type of property that you want to change. Use the table below for guidance.

Por t l e ts
BEA WebLogic Portal Portal Development Guide 12-39
Title and Description
Change title and description of the portlet in the current locale
1. Click Title & Description. 2. Click the locale (for example, en) in the Locale cell; the Add a
Localized Title & Description dialog displays. 3. Enter a new Title and/or Description. 4. Click Update.
Add a localized title for the portlet
1. Click Title & Description. 2. Click Add Localized Title; the Add a Localized Title &
Description dialog appears. 3. Enter a Language and Country identifier, Variant if applicable,
Title, and a Description for the localized title. 4. Click Create.
Portlet Preferences Refer to “Creating a Portlet Preference” on page 12-41 and “Editing a Portlet Preference” on page 12-43.
Portlet Theme 1. Click Appearance; the Edit Appearance dialog displays. 2. From the drop-down menu, select a Theme. 3. Click Update.
Render caching and timeout
1. Click Advanced Properties. 2. In the Render Caching Enabled drop-down menu, select True or
False. 3. If you selected True, enter a cache expiration value in the Cache
Expiration field. 4. Click Update.
Run Portlet in a Separate Thread
This option is only available if the portlet was marked as Forkable during the development stage. If you select True, the portlet will be processed in a separate thread (forked). If False, the portlet will not be forked.
See the Portlet Development Guide for detailed information on portet forking.
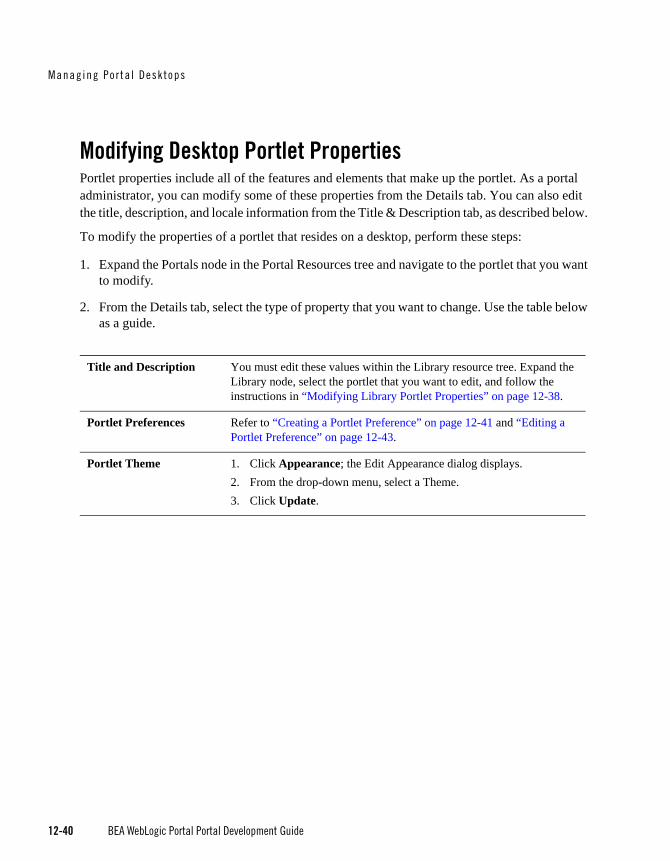
Managing Po r ta l Desk tops
12-40 BEA WebLogic Portal Portal Development Guide
Modifying Desktop Portlet PropertiesPortlet properties include all of the features and elements that make up the portlet. As a portal administrator, you can modify some of these properties from the Details tab. You can also edit the title, description, and locale information from the Title & Description tab, as described below.
To modify the properties of a portlet that resides on a desktop, perform these steps:
1. Expand the Portals node in the Portal Resources tree and navigate to the portlet that you want to modify.
2. From the Details tab, select the type of property that you want to change. Use the table below as a guide.
Title and Description You must edit these values within the Library resource tree. Expand the Library node, select the portlet that you want to edit, and follow the instructions in “Modifying Library Portlet Properties” on page 12-38.
Portlet Preferences Refer to “Creating a Portlet Preference” on page 12-41 and “Editing a Portlet Preference” on page 12-43.
Portlet Theme 1. Click Appearance; the Edit Appearance dialog displays. 2. From the drop-down menu, select a Theme. 3. Click Update.
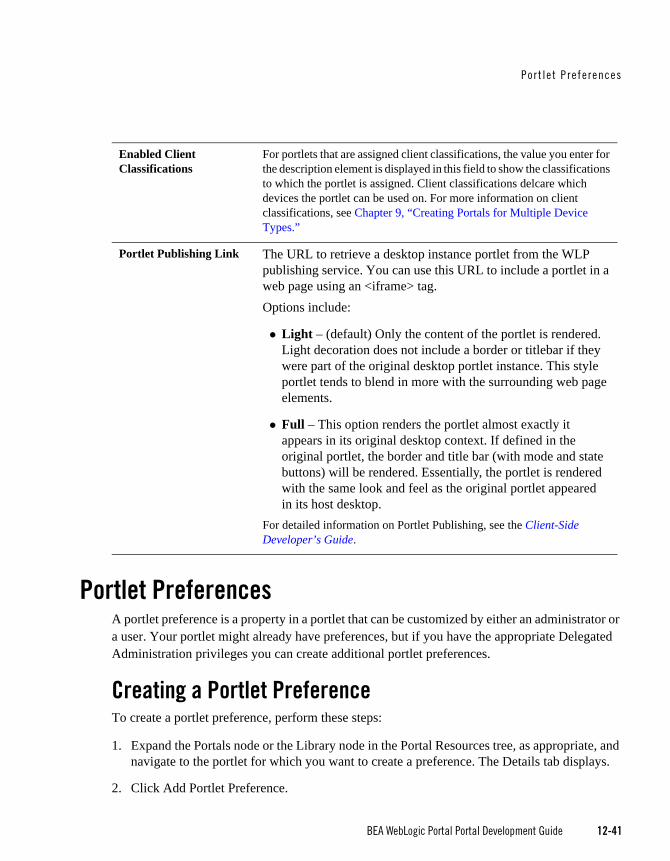
Por t le t P re fe rences
BEA WebLogic Portal Portal Development Guide 12-41
Portlet PreferencesA portlet preference is a property in a portlet that can be customized by either an administrator or a user. Your portlet might already have preferences, but if you have the appropriate Delegated Administration privileges you can create additional portlet preferences.
Creating a Portlet Preference To create a portlet preference, perform these steps:
1. Expand the Portals node or the Library node in the Portal Resources tree, as appropriate, and navigate to the portlet for which you want to create a preference. The Details tab displays.
2. Click Add Portlet Preference.
Enabled Client Classifications
For portlets that are assigned client classifications, the value you enter for the description element is displayed in this field to show the classifications to which the portlet is assigned. Client classifications delcare which devices the portlet can be used on. For more information on client classifications, see Chapter 9, “Creating Portals for Multiple Device Types.”
Portlet Publishing Link The URL to retrieve a desktop instance portlet from the WLP publishing service. You can use this URL to include a portlet in a web page using an <iframe> tag. Options include:
Light – (default) Only the content of the portlet is rendered. Light decoration does not include a border or titlebar if they were part of the original desktop portlet instance. This style portlet tends to blend in more with the surrounding web page elements.
Full – This option renders the portlet almost exactly it appears in its original desktop context. If defined in the original portlet, the border and title bar (with mode and state buttons) will be rendered. Essentially, the portlet is rendered with the same look and feel as the original portlet appeared in its host desktop.
For detailed information on Portlet Publishing, see the Client-Side Developer’s Guide.
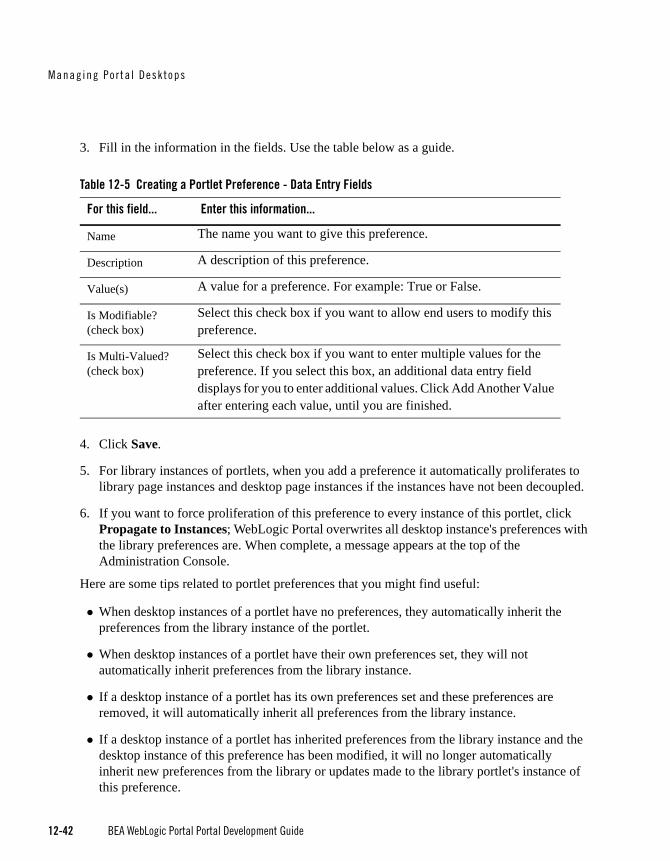
Managing Po r ta l Desk tops
12-42 BEA WebLogic Portal Portal Development Guide
3. Fill in the information in the fields. Use the table below as a guide.
4. Click Save.
5. For library instances of portlets, when you add a preference it automatically proliferates to library page instances and desktop page instances if the instances have not been decoupled.
6. If you want to force proliferation of this preference to every instance of this portlet, click Propagate to Instances; WebLogic Portal overwrites all desktop instance's preferences with the library preferences are. When complete, a message appears at the top of the Administration Console.
Here are some tips related to portlet preferences that you might find useful:
When desktop instances of a portlet have no preferences, they automatically inherit the preferences from the library instance of the portlet.
When desktop instances of a portlet have their own preferences set, they will not automatically inherit preferences from the library instance.
If a desktop instance of a portlet has its own preferences set and these preferences are removed, it will automatically inherit all preferences from the library instance.
If a desktop instance of a portlet has inherited preferences from the library instance and the desktop instance of this preference has been modified, it will no longer automatically inherit new preferences from the library or updates made to the library portlet's instance of this preference.
Table 12-5 Creating a Portlet Preference - Data Entry Fields
For this field... Enter this information...
Name The name you want to give this preference.
Description A description of this preference.
Value(s) A value for a preference. For example: True or False.
Is Modifiable? (check box)
Select this check box if you want to allow end users to modify this preference.
Is Multi-Valued? (check box)
Select this check box if you want to enter multiple values for the preference. If you select this box, an additional data entry field displays for you to enter additional values. Click Add Another Value after entering each value, until you are finished.

Por t le t P re fe rences
BEA WebLogic Portal Portal Development Guide 12-43
If a desktop instance of a portlet has inherited the preferences from the library instance and no desktop instance specific preferences have been set, and the inherited preferences have not been modified in the desktop instance, the desktop instance will inherit all updates to the library preferences.
Editing a Portlet Preference If you have the appropriate Delegated Administration rights, you can edit a portlet's preferences to change the way a portlet behaves.
To edit a portlet preference:
1. Expand the Portals node or the Library node in the Portal Resources tree, as appropriate, and navigate to the portlet for which you want to edit a preference. The Details tab displays.
2. Click Portlet Preferences.
3. Select the portlet preference by clicking its name in the Name column.
4. Edit the information in the fields. Use the table below as a guide.
5. Click Save.
6. For library instances of portlets, when you edit a preference it automatically proliferates to library page instances and desktop page instances if the instances have not been decoupled. If
Table 12-6 Editing a Portlet Preference - Data Entry Fields
For this field... Enter this information...
Name The name you want to give this preference.
Description A description of this preference.
Value(s) A value for a preference.
Is Modifiable? (check box)
Select this check box if you want to allow end users to modify this preference.
Is Multi-Valued? (check box)
Select this check box if you want to enter multiple values for the preference. If you select this box, an additional data entry field displays for you to enter additional values. Click Add Another Value after entering each value, until you are finished.

Managing Po r ta l Desk tops
12-44 BEA WebLogic Portal Portal Development Guide
you want to force proliferation of this change to every instance of this portlet, click Propagate to Instances. When complete, a message appears at the top of the Administration Console.
Portlet CategoriesThis section explains how to create and edit portlet categories. Portlet categories provide for the classification of portlets, which is useful when organizing a large collection of portlets into meaningful groupings. The portlet categories are similar to other hierarchical structures in that parent “folders” can contain child folders and/or portlets. You must first create a portlet category, and then you can manage portlets by adding them to a category or moving them between categories.
Creating a Portlet CategoryTo create a portlet category:
1. In the Portal Resources tree, expand the Library folder and select Portlet Categories. The Browse Category tab displays.
2. Click Create New Category.
3. Type a title and description for the new category in the pop-up window.
4. Click Create.
Adding Portlets to a Portlet CategoryTo add portlets into a category:
1. Expand the Library node in the Portal Resources tree and navigate to a portlet category. The Summary tab displays.
2. Click Portlets In Category.
3. Click Add Portlets.
4. In the Available Portlets area, select the portlets that you want to add, and click Add to list them in the Selected Portlets area.
5. Click Save.
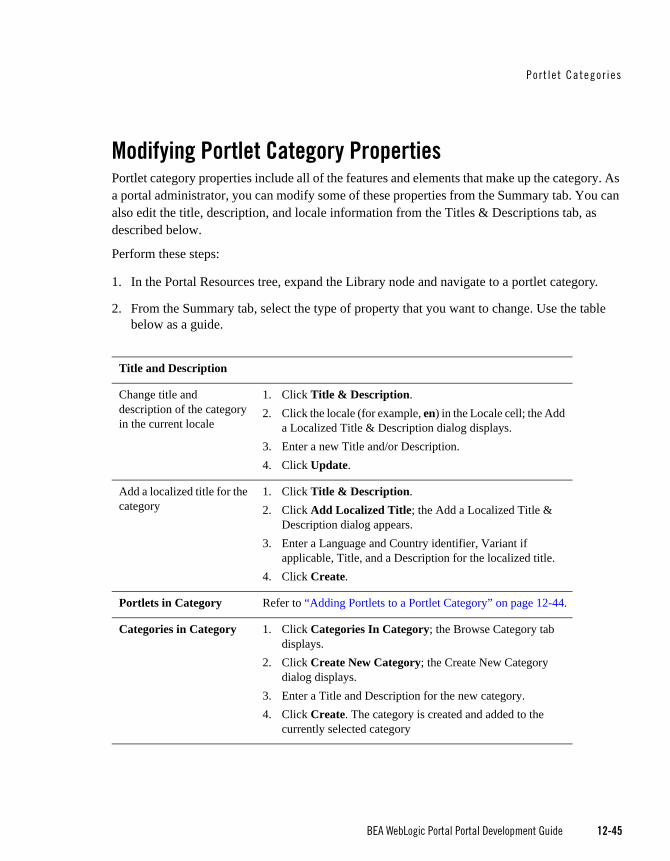
Por t le t Catego r i es
BEA WebLogic Portal Portal Development Guide 12-45
Modifying Portlet Category PropertiesPortlet category properties include all of the features and elements that make up the category. As a portal administrator, you can modify some of these properties from the Summary tab. You can also edit the title, description, and locale information from the Titles & Descriptions tab, as described below.
Perform these steps:
1. In the Portal Resources tree, expand the Library node and navigate to a portlet category.
2. From the Summary tab, select the type of property that you want to change. Use the table below as a guide.
Title and Description
Change title and description of the category in the current locale
1. Click Title & Description. 2. Click the locale (for example, en) in the Locale cell; the Add
a Localized Title & Description dialog displays. 3. Enter a new Title and/or Description. 4. Click Update.
Add a localized title for the category
1. Click Title & Description. 2. Click Add Localized Title; the Add a Localized Title &
Description dialog appears. 3. Enter a Language and Country identifier, Variant if
applicable, Title, and a Description for the localized title. 4. Click Create.
Portlets in Category Refer to “Adding Portlets to a Portlet Category” on page 12-44.
Categories in Category 1. Click Categories In Category; the Browse Category tab displays.
2. Click Create New Category; the Create New Category dialog displays.
3. Enter a Title and Description for the new category. 4. Click Create. The category is created and added to the
currently selected category

Managing Po r ta l Desk tops
12-46 BEA WebLogic Portal Portal Development Guide
Look And FeelsThe physical appearance of a portal is determined by the look and feel selected for the portal desktop. Look and feels are a combination of skins, themes, and skeletons that control the structure, portlet title bar graphics, JavaScript behavior, and HTML styles in your portal desktops.
Developers use WorkSpace Studio to assemble skeletons, skins, and other elements to create Look And Feels. A look and feel is a portal resource that you "apply" to a portal desktop using the WebLogic Portal Administration Console.
You can change the look and feel of an entire desktop or of individual components in the desktop by editing that element’s properties:
Modifying Look And Feel PropertiesLook and feels are created using WorkSpace Studio. You can modify some look and feel properties using the WebLogic Portal Administration Console.
To modify a look and feel property:
1. In the Portal Resources tree, select Library and navigate to a look and feel. The Details tab displays, showing the current information for the look and feel.
2. Click Title & Description.
3. You can either update the title and description for the current locale, or add a new localized title for the Look And Feel. Use the table below as a guide:
Change title and description of the Look And Feel in the current locale
1. Click the locale (for example, en) in the Locale cell; the Add a Localized Title & Description dialog displays.
2. Enter a new Title and/or Description. 3. Click Update.
Add a localized title for the Look And Feel
1. Click Add Localized Title; the Add a Localized Title & Description dialog appears.
2. Enter a Language and Country identifier, Variant if applicable, Title, and a Description for the localized title.
3. Click Create.

She l l s
BEA WebLogic Portal Portal Development Guide 12-47
ShellsA desktop's header and footer, controlled by a portal shell, are the areas that are typically above and below the main body. These areas usually display such things as personalized content, banner graphics, legal notices, and related links. When a portal is accessed by a user, each of the components in the shell are rendered to form the frame that contains the books, pages, and portlets.
Shells are created using WorkSpace Studio. You can modify some shell properties using the WebLogic Portal Administration Console.
Modifying Shell PropertiesYou can modify the title, description, and locale information for shells.
To modify shell properties:
1. In the Portal Resources tree, expand the Library node and navigate to the desired shell.
2. Click Title & Description.
3. You can either update the title and description for the current locale, or add a new localized title for the shell. Use the table below as a guide:
ThemesThemes allow you to customize specific portal resources such as books, pages, or portlets. Developers create themes using WorkSpace Studio; for example, a skin theme is a subset of
Change title and description of the shell in the current locale
1. Click the locale (for example, en) in the Locale cell; the Add a Localized Title & Description dialog displays.
2. Enter a new Title and/or Description. 3. Click Update.
Add a localized title for the shell 1. Click Add Localized Title; the Add a Localized Title & Description dialog appears.
2. Enter a Language and Country identifier, Variant if applicable, Title, and a Description for the localized title.
3. Click Create.

Managing Po r ta l Desk tops
12-48 BEA WebLogic Portal Portal Development Guide
graphics, CSS styles, and/or JavaScript behaviors that you can use on books, pages, and portlets to give them a different look from the rest of the portal desktop.
For more information, refer to Chapter 6, “User Interface Development with Look And Feel Features.”
You can select from predefined themes as you design portal desktops.
Modifying Theme PropertiesThemes are created using WorkSpace Studio. You can modify a subset of theme properties using the WebLogic Portal Administration Console.
Perform these steps:
1. In the Portal Resources tree, expand the Library node and navigate to the desired theme.
2. Click Title & Description.
3. You can either update the title and description for the current locale, or add a new localized title for the theme. Use the table below as a guide:
Menus (Navigation)Menus are optional components that are loosely coupled to books and pages. A menu provides a navigation component, whether it is a set of tabs, a set of links, or a tree structure. WebLogic Portal provides the following types of menus:
Single Level Menu - Provides a single row of tabs for navigation among books and pages.
Change title and description of the theme in the current locale
1. Click the locale (for example, en) in the Locale cell; the Add a Localized Title & Description dialog displays.
2. Enter a new Title and/or Description. 3. Click Update.
Add a localized title for the theme
1. Click Add Localized Title; the Add a Localized Title & Description dialog appears.
2. Enter a Language and Country identifier, Variant if applicable, Title, and a Description for the localized title.
3. Click Create.

Menus (Nav igat i on)
BEA WebLogic Portal Portal Development Guide 12-49
Multi Level Menu - Provides multiple levels of nested tabs for navigating among books and pages. Sub-books and pages are accessed through a cascading drop-down menu. Drop-down functionality occurs when books are added directly to books rather than to placeholders on pages.
No Navigation - Suppresses the sub-book and pages tabs in the book. This option is useful, for example, if you use the Targeted Menu Portlet or the Left Navigation Shell for book navigation.
If you created your own navigation menus by copying and modifying the default menus, they are also available for selection when you are editing @@@.
Modifying Menu PropertiesA menu's properties are all of the features and elements that make up the menu. As a portal administrator, you can modify some of these properties.
Perform these steps:
1. In the Portal Resources tree, select Library and navigate to a menu. The Details tab displays, showing the current information for the menu.
2. Click Title & Description.
3. You can either update the title and description for the current locale, or add a new localized title for the menu. Use the table below as a guide:
Change title and description of the menu in the current locale
1. Click the locale (for example, en) in the Locale cell; the Add a Localized Title & Description dialog displays.
2. Enter a new Title and/or Description. 3. Click Update.
Add a localized title for the menu 1. Click Add Localized Title; the Add a Localized Title & Description dialog appears.
2. Enter a Language and Country identifier, Variant if applicable, Title, and a Description for the localized title.
3. Click Create.
Managing Po r ta l Desk tops
12-50 BEA WebLogic Portal Portal Development Guide
LayoutsLayouts are used to control the positions of the components in your portal, providing placeholders (in a table structure) for a page in which books, pages, and portlets can be placed. Different layouts display books and portlets on a page in different areas. For example, a layout that uses three table cells provides three placeholders in which portlets can be placed.
You cannot add a layout using the WebLogic Portal Administration Console. Layouts are created using WorkSpace Studio. However, you can modify some layout properties and add localized titles and descriptions for your layouts using the Administration Console.
Modifying Layout PropertiesLayouts are created using WorkSpace Studio. You can modify some layout properties using the WebLogic Portal Administration Console.
Perform these steps:
1. In the Portal Resources tree, select Library and navigate to a layout. The Details tab displays, showing the current information for the layout.
2. Click Title & Description.
3. You can either update the title and description for the current locale, or add a new localized title for the layout. Use the table below as a guide:
Change title and description of the layout in the current locale
1. Click the locale (for example, en) in the Locale cell; the Add a Localized Title & Description dialog displays.
2. Enter a new Title and/or Description. 3. Click Update.
Add a localized title for the layout
1. Click Add Localized Title; the Add a Localized Title & Description dialog appears.
2. Enter a Language and Country identifier, Variant if applicable, Title, and a Description for the localized title.
3. Click Create.

BEA WebLogic Portal Portal Development Guide 12-1
C H A P T E R 12
Deploying Portals to Production
Propagation refers to the process of moving the database and LDAP contents of one portal domain environment to another. BEA provides tools to help with portal propagation. These tools not only move database assets and LDAP information, but they also report differences and potential conflicts between the source and the target environments. You can define policies to automatically resolve conflicts, or an administrator can view a list of differences and decide the appropriate actions to take on a case-by-case basis.
Propagation tools are described in detail in the Production Operations Guide. The Production Operations Guide also helps you through the process of planning a strategy for propagation and provides detailed information on best practices.
This chapter contains information you might find useful as you are propagating (deploying) your portal from the staging environment to the production environment, when it is ready for public access.
The primary tools used in this chapter are the WebLogic Portal propagation tools (to move database and LDAP data between staging, development, and production), WebLogic Server application deployment tools, and any external content or security providers you are using.
Shared J2EE Libraries The following sections provide more information about J2EE libraries and their behavior during portal deployment. For detailed instructions on how to work with J2EE libraries during deployment, refer to the Production Operations Guide.

Deploy ing Por ta ls to P roduc t i on
12-2 BEA WebLogic Portal Portal Development Guide
Shared J2EE Library References in config.xmlFigure 12-1 highlights the separation between your application code and shared J2EE libraries. The config.xml file resides in the domain, and it specifies the relationships between the web application and the J2EE libraries. Listing 12-1 shows an example <library> element from the config.xml file in a WebLogic Portal domain. As you can see, the library file is an EAR file located in the WebLogic installation area. This library is available to applications deployed on the target server.
Listing 12-1 J2EE Library Referenced in config.xml File
<library>
<name>p13n-app-lib#[email protected]</name>
<target>AdminServer</target>
<source-path>D:/bea/weblogic92/common/deployable-libraries/
p13n-app-lib.ear
</source-path>
<deployment-order>1</deployment-order>
<security-dd-model>DDOnly</security-dd-model>
</library>
When the application is deployed, these relationships provide a plan by which the application and J2EE library code are merged into a single enterprise application.

Shared J2EE L ib ra r i es
BEA WebLogic Portal Portal Development Guide 12-3
Figure 12-1 Application Referencing a Shared J2EE Library
Tip: You can create a deployment plan to configure what gets mapped at runtime when the files merge. Deployment plans are described in the Production Operations Guide.
J2EE libraries can be:
Included by reference
Perhaps the most important thing to know about shared J2EE libraries is that they are included in your application by reference. Within your WebLogic Portal application is a configuration file that references all of the J2EE libraries that your application requires. When you deploy your application, the library files are automatically located and included with your application.
Independently versioned
Another important thing to know about J2EE libraries is that they are independently versioned. This means that each J2EE library includes within it a descriptor file that lists the module’s version number. At deploy time, these descriptors are located, read, and merged automatically, ensuring that your application retrieves the correct version of each J2EE library that it requires.
Shared across multiple applications
A set of shared J2EE libraries is installed when you create a WebLogic Portal domain. This set of J2EE libraries is used by all applications running in that domain.
Deploy ing Por ta ls to P roduc t i on
12-4 BEA WebLogic Portal Portal Development Guide
Separately deployed
Because J2EE libraries are separately deployed, applications can be upgraded easily by replacing a single J2EE library.
An application can include multiple J2EE libraries, assigning each a deployment order, which determines which version of a given file takes precedence if the same file is contained in multiple libraries. (Files contained in the referencing application always take precedence over library files.) Conceptually, J2EE libraries can be viewed as effectively overlaying (or more precisely, under-laying) the application in which they are included.
J2EE libraries can be employed at either the enterprise or web application level. They use the same file and directory structure as the applications in which they are included—the files contained in a J2EE library are effectively merged into the referencing application at deploy-time.
After deployment, the merged application functions as a standard J2EE application. As a consequence, the deployment information for assets in a library must be merged into the descriptors for the referencing application either prior to (or as part of) the deployment process.
Anatomy of a Shared J2EE LibraryA J2EE library is a collection of libraries, resources, and configuration files packaged in an EAR or WAR file. EAR-based J2EE libraries are enterprise application scoped, while WAR-based modules are web application scoped.
Figure 12-2 shows an exploded J2EE library. The J2EE library’s name is p13n-app-lib.
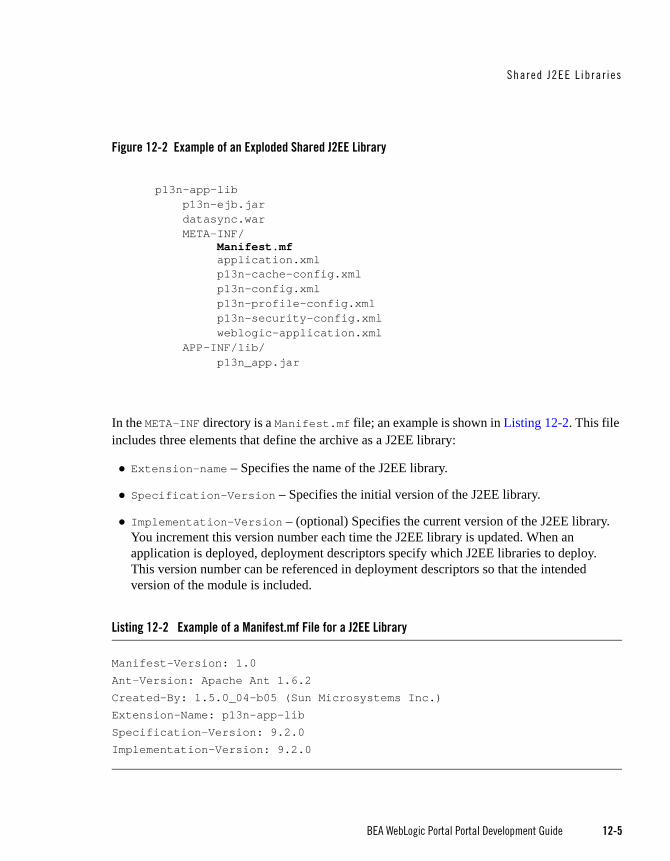
Shared J2EE L ib ra r i es
BEA WebLogic Portal Portal Development Guide 12-5
Figure 12-2 Example of an Exploded Shared J2EE Library
In the META-INF directory is a Manifest.mf file; an example is shown in Listing 12-2. This file includes three elements that define the archive as a J2EE library:
Extension-name – Specifies the name of the J2EE library.
Specification-Version – Specifies the initial version of the J2EE library.
Implementation-Version – (optional) Specifies the current version of the J2EE library. You increment this version number each time the J2EE library is updated. When an application is deployed, deployment descriptors specify which J2EE libraries to deploy. This version number can be referenced in deployment descriptors so that the intended version of the module is included.
Listing 12-2 Example of a Manifest.mf File for a J2EE Library
Manifest-Version: 1.0
Ant-Version: Apache Ant 1.6.2
Created-By: 1.5.0_04-b05 (Sun Microsystems Inc.)
Extension-Name: p13n-app-lib
Specification-Version: 9.2.0
Implementation-Version: 9.2.0
p13n-app-libp13n-ejb.jardatasync.warMETA-INF/
p13n-cache-config.xmlp13n-config.xmlp13n-profile-config.xmlp13n-security-config.xmlweblogic-application.xml
APP-INF/lib/p13n_app.jar
Manifest.mfapplication.xml
Deploy ing Por ta ls to P roduc t i on
12-6 BEA WebLogic Portal Portal Development Guide
Overriding Shared J2EE Library Settings in the web.xml File At runtime, the web.xml files in all the shared J2EE libraries are merged, along with the web.xml file in your portal web project. The content of your WEB-INF/web.xml file overrides anything in the shared J2EE libraries, so if you want to change particular settings, you can do it there.
There are many other files for which file contents are merged; these can be overridden in the same way. These files include not only WEB-INF/web.xml but also WEB-INF/weblogic.xml and any files mentioned in weblogic-extension.xml from either the users' application or the shared libraries.
Servlet filters and servlets deployed in the shared libraries' web.xml files can be disabled if desired by deploying the null servlet filter (com.bea.p13n.servlets.NullFilter) or 404 servlet (com.bea.p13n.servlets.SendErrorServlet) in their place. For more information, refer to the Javadoc.
Servlet Mapping Overrides The web.xml servlet mappings provided by WebLogic Portal reside in J2EE libraries. For example, the showPropertyServlet is defined in <WEBLOGIC_HOME>/cm/lib/modules/content-management-web-lib.war
If you want to add to or modify these servlet mappings, you can add your mappings or provide mapping overrides in your portal web project's file-based web.xml file located in the following path:PortalWebProject/WebContent/WEB-INF/web.xml
For example, if you want to call the ShowPropertyServlet when /ShowPropertyServlet/* is used in a URL, add the following entry to your file system web.xml file:<servlet-mapping>
<servlet-name>ShowPropertyServlet</servlet-name>
<url-pattern>/ShowBinaryServlet/*</url-pattern>
</servlet-mapping>
BEA WebLogic Portal Portal Development Guide
Part IV Production
Part IV includes the following chapter:
Chapter 13, “Managing Portals in Production”
In the production phase of the portal life cycle, your portal is live. In this phase, you can use the WebLogic Portal Administration Console to perform some management functions, such as adding portlets.
For a view of how the tasks in this section relate to the overall portal life cycle, refer to the WebLogic Portal Overview.
.

12-2 BEA WebLogic Portal Portal Development Guide
BEA WebLogic Portal Portal Development Guide 13-1
C H A P T E R 13
Managing Portals in Production
A production portal is live and available to end users. A portal in production can be modified by administrators using the WebLogic Portal Administration Console and by users using Visitor Tools. For instance, an administrator might add additional portlets to a portal or reconfigure the contents of a portal.
During the life cycle of a WebLogic Portal application, it moves back and forth between development, staging, and production environments. This chapter contains information about managing portals that are on a production system.
This chapter contains the following sections:
Pushing Changes from the Library into Production
Transferring Changes from Production Back to Development
Pushing Changes from the Library into ProductionProliferation refers to the process by which changes made to the Library instance of a portal asset on the WebLogic Portal Administration Console are pushed into user-customized instances of that asset. For example, if a portal administrator deletes a portlet from a desktop, that change must be reflected into user-customized instances of that desktop. Before you propagate a portal, consider the way in which proliferation is configured for your portal.
If your desktops include a large number of user customizations, we recommend that you change the Portal Resources Proliferation of Updates Configuration setting to either Asynchronous or Off. This change reduces the amount of time required to complete the propagation.

Managing Po r ta l s in P roduct ion
13-2 BEA WebLogic Portal Portal Development Guide
You can do this in the WebLogic Portal Administration Console under Configuration Settings and Analytics > Service Administration > Portal Resources > Portal Resources Proliferation of Updates Configuration. The proliferation settings include Asynchronous, Synchronous, or Off.
For more information on proliferation and propagation, refer to the Production Operations Guide. For database setup requirements related to using the Asynchronous proliferation setting, refer to the Database Administration Guide.
Transferring Changes from Production Back to Development
WebLogic Portal utilities such as the propagation tools and the Export/Import Utility allow you to reliably move and merge changes between environments. The Export/Import Utility allows a full round-trip development life cycle, where you can easily move portals from a production environment back to your WorkSpace Studio development environment.
For instructions on using the propagation tools and Export/Import Utility, refer to the Production Operations Guide.
BEA WebLogic Portal Portal Development Guide A-1
A P P E N D I X A
Facet-to-Library Reference Tables
This appendix contains reference tables that show the relationships between WebLogic Portal facets and Shared J2EE libraries.
WebLogic Portal Facet-to-Library Reference TablesRefer to the following tables to view the relationships between WebLogic Portal facets and their associated Shared J2EE Libraries:
Figure A-1, “WebLogic Portal Application Facets and Associated J2EE Libraries,” on page A-2
Figure A-2, “WebLogic Portal Web Application Facets and Associated J2EE Libraries,” on page A-3
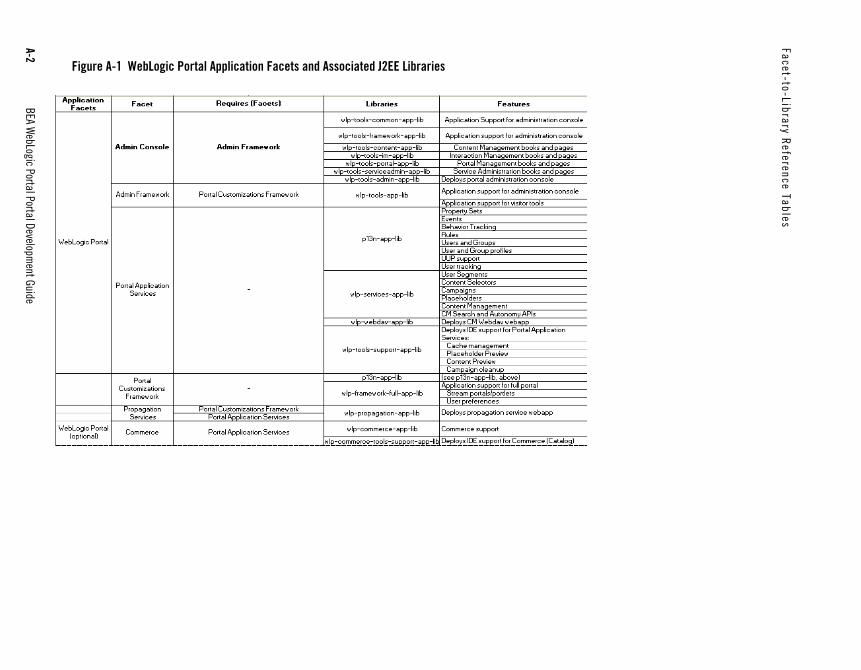
Facet-to-Library Reference Tables
A-2BEA W
ebLogic Portal Portal Development Guide
Figure A-1 WebLogic Portal Application Facets and Associated J2EE Libraries

WebLogic Portal Facet-to-Library R
eference Tables
BEA WebLogic Portal Portal Developm
ent GuideA-3
FigureA-2 WebLogic Portal Web Application Facets and Associated J2EE Libraries
Facet- to -L ib rary Re fe rence Tab les
A-4 BEA WebLogic Portal Portal Development Guide