basic audio editing -...
TRANSCRIPT
157
Basic AudioEditing
8B
asic Au
dio Editin
g
For most of the history of recorded audio,
editing involved a razor blade, a cutting
block, and some tape. Editing individual
tracks was difficult or impossible, and one
bad edit with that razor blade could mean
redoing the entire song from scratch.
Editing digital audio is a completely differ-
ent story. Cubase stores audio files on a hard
drive, and the visible audio waveforms in
the Project window that we call events and
parts are actually just pointers to those
audio files. This means that any part of any
file can play back at any point in a project—
there is complete freedom to rearrange and
modify the parts of a project. Cubase SX 2
is a world-class audio editing platform.
The techniques that you’ll learn in this chap-
ter and in Chapter 9 are accomplished by
using advanced editing tools right in the
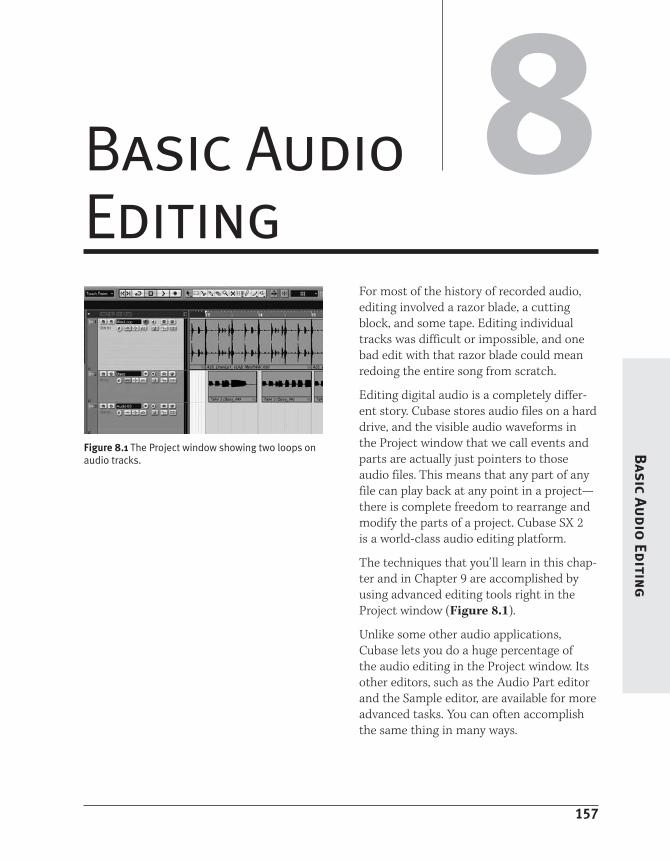
Project window (Figure 8.1).
Unlike some other audio applications,
Cubase lets you do a huge percentage of
the audio editing in the Project window. Its
other editors, such as the Audio Part editor
and the Sample editor, are available for more
advanced tasks. You can often accomplish
the same thing in many ways.
Figure 8.1 The Project window showing two loops onaudio tracks.
Contextual menus are a powerful part of
Cubase. You open a contextual menu by right-
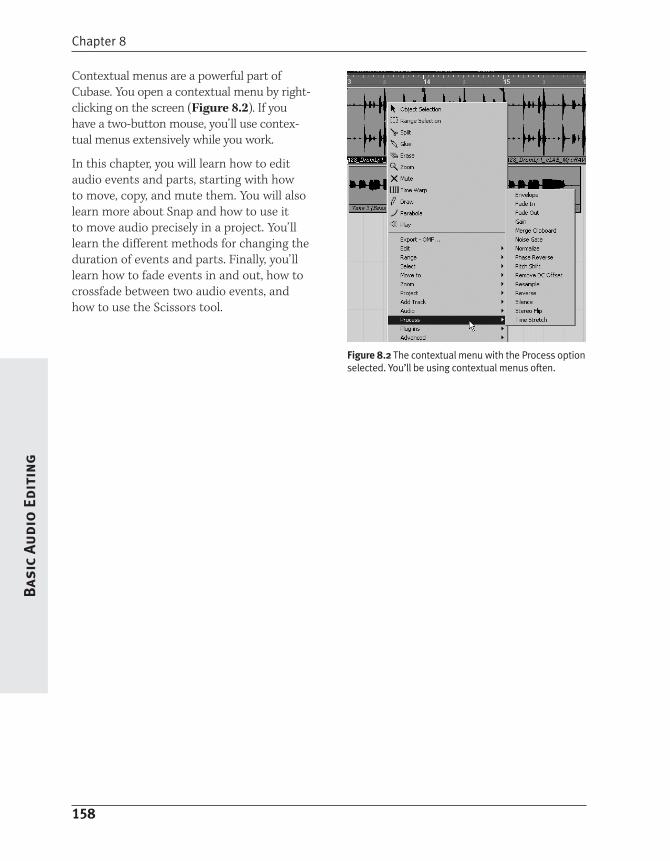
clicking on the screen (Figure 8.2). If you
have a two-button mouse, you’ll use contex-
tual menus extensively while you work.
In this chapter, you will learn how to edit
audio events and parts, starting with how
to move, copy, and mute them. You will also
learn more about Snap and how to use it
to move audio precisely in a project. You’ll
learn the different methods for changing the
duration of events and parts. Finally, you’ll
learn how to fade events in and out, how to
crossfade between two audio events, and
how to use the Scissors tool.
158
Chapter 8B
asic
Au
dio
Edi
tin
g
Figure 8.2 The contextual menu with the Process optionselected. You’ll be using contextual menus often.
159
Basic Audio EditingB
asic Au
dio Editin
g
What’s the Difference Between an Event and a Part?
The differences between audio events and parts can be confusing even for expert Cubase
users. If you record an instrument in Cubase, you’ve created an audio event in the Project
window—the thing with a waveform that you can click, move, edit, and modify. For some
projects, you may use nothing but events for your audio. Some events may be as long as the
full song, and other events may be loops or single, short snippets of sound.
Parts are used mainly for two purposes. First, you may want to create a part when you have a
group of events that you want to use together as a single entity. For instance, if the vocal line
in a song is great but the last note is wrong, you can find another place where the singer hit
that note right, snip it out, and then align the two events so the good note replaces that bad
note in the first event. This leaves you using two events to play back a single line. To make
your work easier, you can combine these events into a single part, so you can move and
process the events as a single entity.
The second main use of parts is in creating comps. Comps are explained later in this chapter,
but in general, comping involves using bits of numerous events to achieve a better take.
One reason that parts and events may seem confusing is that different audio programs work
with audio in quite different ways. For example, in previous versions of Cubase, all audio
events had to be in an audio part. This is no longer true in SX; events can be played, edited,
and processed directly in the Project window. If you are learning Cubase after using another
audio application or an earlier version of Cubase, you may want to take some time to be sure
you understand the differences between parts and events.
The final tricky part of distinguishing between parts and events is that in the Project win-
dow, audio parts and audio events look very similar. One easy way to tell the difference is to
click something to select it. If you see the blue handles (which are used to change volume
and fade), you’ve clicked an event. If you don’t see them, then you have a part on your hands.
Don’t fret if the distinction between parts and events seems a bit arcane at first. Parts and
events both follow logical rules, and after you’ve tried a few of the examples in this chapter,
you’ll understand intuitively which is which and when to use one or the other.
Converting Events to PartsWhen you start editing audio in Cubase, it
might be hard at first to see the difference
between events and parts. Both can be used
in the Project window, and both can be
edited directly in the Project window.
However, some of what is described in this
chapter relates only to audio events, some
is useful only with audio parts, and some
works with both events and parts.
Audio event: An audio event is a reference
to an audio file that has been recorded or
imported into Cubase. It is not the audio file
itself, but an indication to Cubase to play an
audio file (or a part of an audio file) at a par-
ticular time in a project.
Audio part: An audio part is a container
that can hold one or more audio events.
Audio parts are used to more easily manage
one or more events in the Project window. If
it is convenient to deal with a group of events
as a single entity, it’s usually best to create a
single part that holds all of the events.
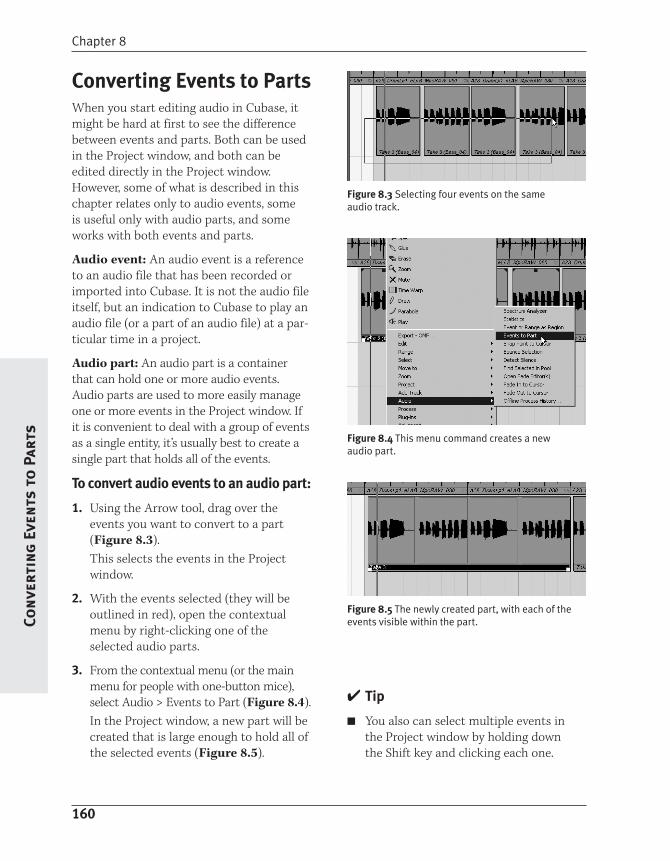
To convert audio events to an audio part:
1. Using the Arrow tool, drag over the
events you want to convert to a part
(Figure 8.3).
This selects the events in the Project
window.
2. With the events selected (they will be
outlined in red), open the contextual
menu by right-clicking one of the
selected audio parts.
3. From the contextual menu (or the main
menu for people with one-button mice),
select Audio > Events to Part (Figure 8.4).
In the Project window, a new part will be
created that is large enough to hold all of
the selected events (Figure 8.5).
160
Chapter 8Co
nve
rtin
g E
ven
ts t
o P
arts
Figure 8.3 Selecting four events on the sameaudio track.
Figure 8.4 This menu command creates a newaudio part.
Figure 8.5 The newly created part, with each of theevents visible within the part.
✔ Tip
■ You also can select multiple events in
the Project window by holding down
the Shift key and clicking each one.
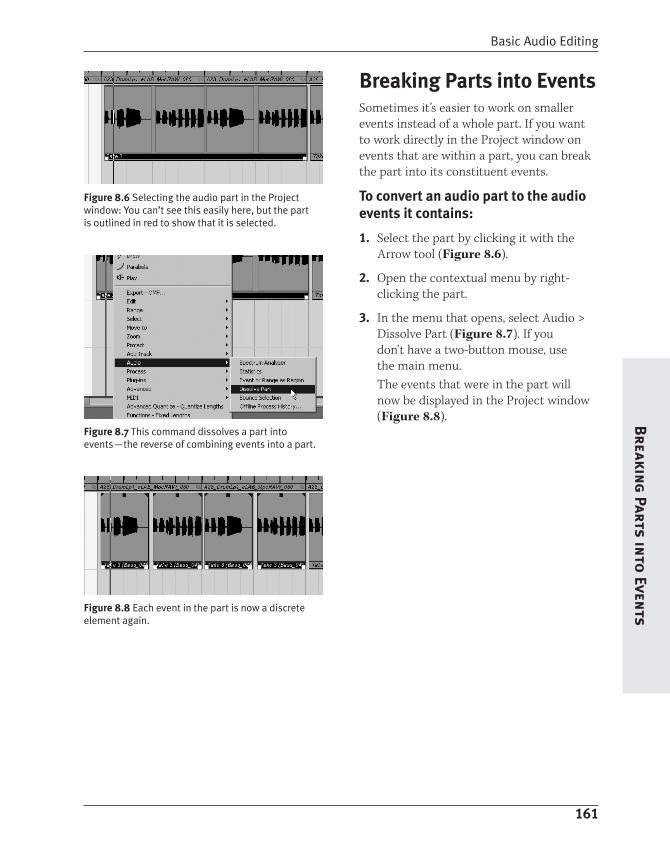
Breaking Parts into EventsSometimes it’s easier to work on smaller
events instead of a whole part. If you want
to work directly in the Project window on
events that are within a part, you can break
the part into its constituent events.
To convert an audio part to the audio
events it contains:
1. Select the part by clicking it with the
Arrow tool (Figure 8.6).
2. Open the contextual menu by right-
clicking the part.
3. In the menu that opens, select Audio >
Dissolve Part (Figure 8.7). If you
don’t have a two-button mouse, use
the main menu.
The events that were in the part will
now be displayed in the Project window
(Figure 8.8).
161
Basic Audio EditingB
reaking
Parts into
Events
Figure 8.6 Selecting the audio part in the Projectwindow: You can’t see this easily here, but the partis outlined in red to show that it is selected.
Figure 8.7 This command dissolves a part intoevents—the reverse of combining events into a part.
Figure 8.8 Each event in the part is now a discreteelement again.
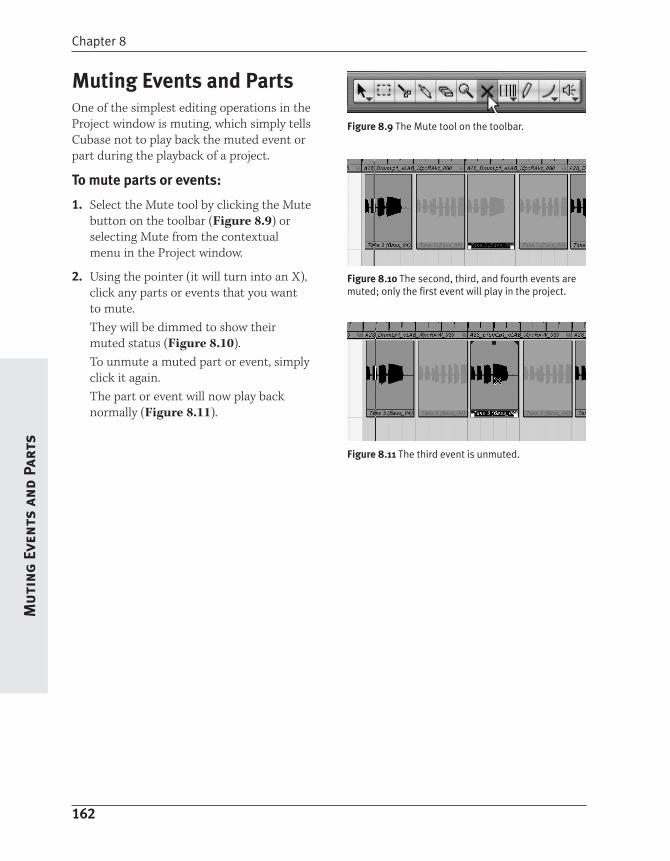
Muting Events and PartsOne of the simplest editing operations in the
Project window is muting, which simply tells
Cubase not to play back the muted event or
part during the playback of a project.
To mute parts or events:
1. Select the Mute tool by clicking the Mute
button on the toolbar (Figure 8.9) or
selecting Mute from the contextual
menu in the Project window.
2. Using the pointer (it will turn into an X),
click any parts or events that you want
to mute.
They will be dimmed to show their
muted status (Figure 8.10).
To unmute a muted part or event, simply
click it again.
The part or event will now play back
normally (Figure 8.11).
162
Chapter 8M
uti
ng
Eve
nts
an
d Pa
rts
Figure 8.9 The Mute tool on the toolbar.
Figure 8.10 The second, third, and fourth events aremuted; only the first event will play in the project.
Figure 8.11 The third event is unmuted.
Moving Parts and EventsUsing SnapYou can move any part or event in Cubase to
another place in a project simply by dragging
it to a new location. If Snap is turned off,
parts and events can be moved anywhere,
without relation to a beat or grid. When
Snap is turned on, parts and events are
moved according to the grid created by the
Snap settings. In the following task, you will
move an event a quarter note at a time to
change its place in a beat, but keep in mind
that parts are moved exactly the same way.
To move an event using snap:
1. Turn on Snap by clicking the Snap
button on the toolbar.
2. From the Snap Settings menu, select
Use Quantize (Figure 8.12).
3. From the Quantize menu, select 1/4 Note.
The snap settings will look like those in
Figure 8.13.
4. Drag the audio event, which is now con-
strained to movements of 1/4 note
(Figure 8.14).
✔ Tips
■ Many people turn Snap on and off con-
stantly. If you are one of those people, you
should know that the J key on your com-
puter keyboard is the default shortcut
key for Snap; using it will save you a lot
of mouse trips to the toolbar and back.
■ Notice the numerical display in Figure
8.14. It shows the current location of the
event (4.3.1) and its song position relative
to its position before it was moved (+0.2).
You can use this information to keep track
of the movement of parts and events.
163
Basic Audio EditingM
ovin
g Parts an
d Events U
sing
Sn
ap
Figure 8.12 The UseQuantize setting enablesmore Snap options.
Figure 8.13 With these settings, Snap will constrainmovements to quarter notes.
Figure 8.14 The beginning of this event moves along aquarter note grid.
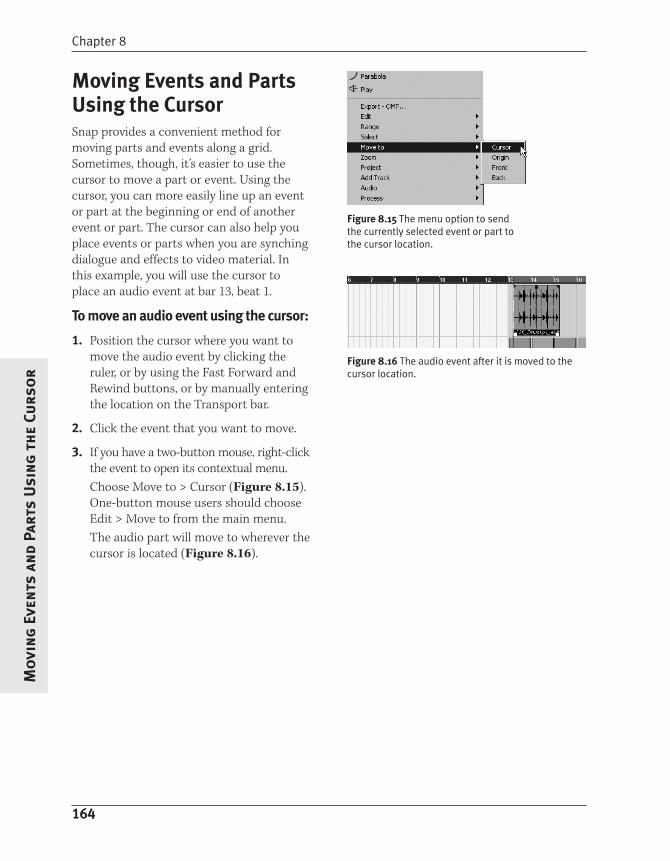
Moving Events and PartsUsing the CursorSnap provides a convenient method for
moving parts and events along a grid.
Sometimes, though, it’s easier to use the
cursor to move a part or event. Using the
cursor, you can more easily line up an event
or part at the beginning or end of another
event or part. The cursor can also help you
place events or parts when you are synching
dialogue and effects to video material. In
this example, you will use the cursor to
place an audio event at bar 13, beat 1.
To move an audio event using the cursor:
1. Position the cursor where you want to
move the audio event by clicking the
ruler, or by using the Fast Forward and
Rewind buttons, or by manually entering
the location on the Transport bar.
2. Click the event that you want to move.
3. If you have a two-button mouse, right-click
the event to open its contextual menu.
Choose Move to > Cursor (Figure 8.15).
One-button mouse users should choose
Edit > Move to from the main menu.
The audio part will move to wherever the
cursor is located (Figure 8.16).
164
Chapter 8M
ovi
ng
Even
ts a
nd
Part
s U
sin
g th
e Cu
rso
r
Figure 8.15 The menu option to sendthe currently selected event or part tothe cursor location.
Figure 8.16 The audio event after it is moved to thecursor location.
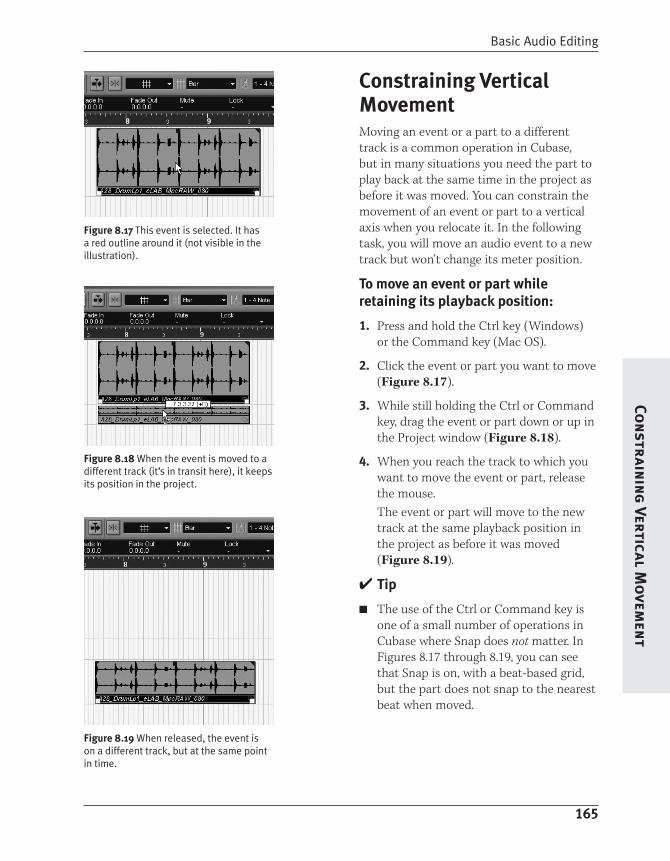
Constraining VerticalMovementMoving an event or a part to a different
track is a common operation in Cubase,
but in many situations you need the part to
play back at the same time in the project as
before it was moved. You can constrain the
movement of an event or part to a vertical
axis when you relocate it. In the following
task, you will move an audio event to a new
track but won’t change its meter position.
To move an event or part while
retaining its playback position:
1. Press and hold the Ctrl key (Windows)
or the Command key (Mac OS).
2. Click the event or part you want to move
(Figure 8.17).
3. While still holding the Ctrl or Command
key, drag the event or part down or up in
the Project window (Figure 8.18).
4. When you reach the track to which you
want to move the event or part, release
the mouse.
The event or part will move to the new
track at the same playback position in
the project as before it was moved
(Figure 8.19).
✔ Tip
■ The use of the Ctrl or Command key is
one of a small number of operations in
Cubase where Snap does not matter. In
Figures 8.17 through 8.19, you can see
that Snap is on, with a beat-based grid,
but the part does not snap to the nearest
beat when moved.
165
Basic Audio EditingCo
nstrain
ing
Vertical Mo
vemen
t
Figure 8.17 This event is selected. It has a red outline around it (not visible in theillustration).
Figure 8.18 When the event is moved to adifferent track (it’s in transit here), it keepsits position in the project.
Figure 8.19 When released, the event ison a different track, but at the same pointin time.
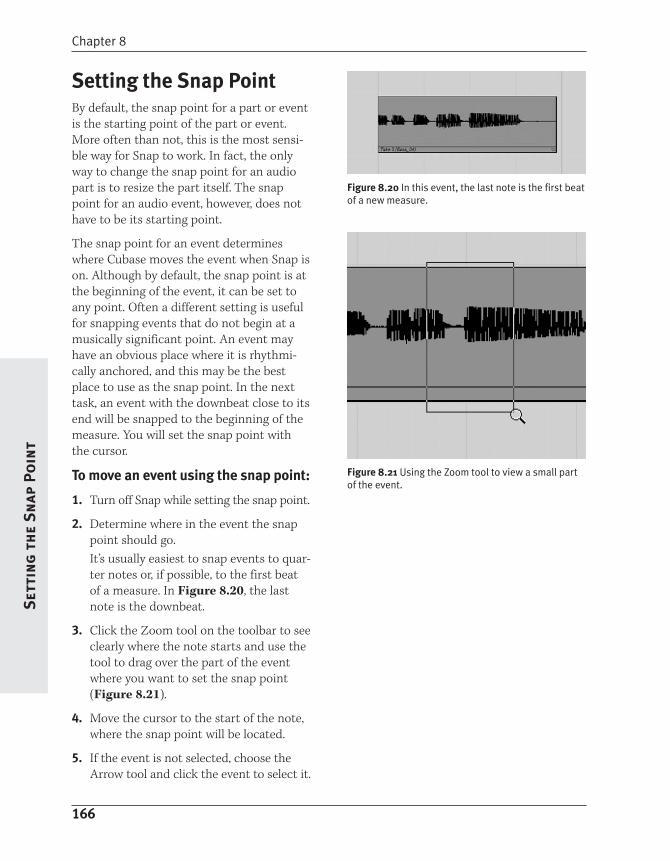
Setting the Snap PointBy default, the snap point for a part or event
is the starting point of the part or event.
More often than not, this is the most sensi-
ble way for Snap to work. In fact, the only
way to change the snap point for an audio
part is to resize the part itself. The snap
point for an audio event, however, does not
have to be its starting point.
The snap point for an event determines
where Cubase moves the event when Snap is
on. Although by default, the snap point is at
the beginning of the event, it can be set to
any point. Often a different setting is useful
for snapping events that do not begin at a
musically significant point. An event may
have an obvious place where it is rhythmi-
cally anchored, and this may be the best
place to use as the snap point. In the next
task, an event with the downbeat close to its
end will be snapped to the beginning of the
measure. You will set the snap point with
the cursor.
To move an event using the snap point:
1. Turn off Snap while setting the snap point.
2. Determine where in the event the snap
point should go.
It’s usually easiest to snap events to quar-
ter notes or, if possible, to the first beat
of a measure. In Figure 8.20, the last
note is the downbeat.
3. Click the Zoom tool on the toolbar to see
clearly where the note starts and use the
tool to drag over the part of the event
where you want to set the snap point
(Figure 8.21).
4. Move the cursor to the start of the note,
where the snap point will be located.
5. If the event is not selected, choose the
Arrow tool and click the event to select it.
166
Chapter 8S
etti
ng
th
e S
nap
Po
int
Figure 8.20 In this event, the last note is the first beatof a new measure.
Figure 8.21 Using the Zoom tool to view a small partof the event.
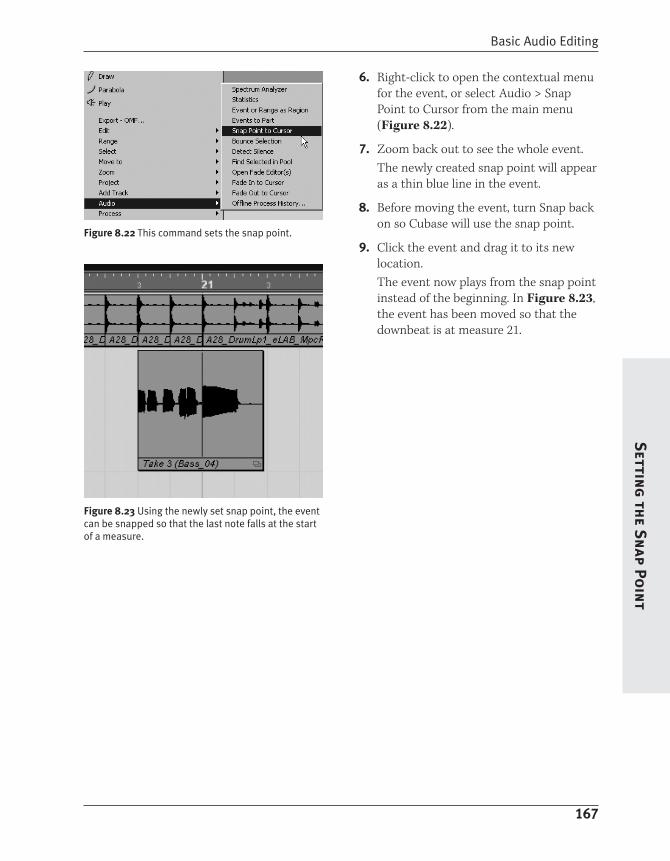
6. Right-click to open the contextual menu
for the event, or select Audio > Snap
Point to Cursor from the main menu
(Figure 8.22).
7. Zoom back out to see the whole event.
The newly created snap point will appear
as a thin blue line in the event.
8. Before moving the event, turn Snap back
on so Cubase will use the snap point.
9. Click the event and drag it to its new
location.
The event now plays from the snap point
instead of the beginning. In Figure 8.23,
the event has been moved so that the
downbeat is at measure 21.
167
Basic Audio EditingS
etting
the S
nap P
oin
t
Figure 8.22 This command sets the snap point.
Figure 8.23 Using the newly set snap point, the eventcan be snapped so that the last note falls at the startof a measure.
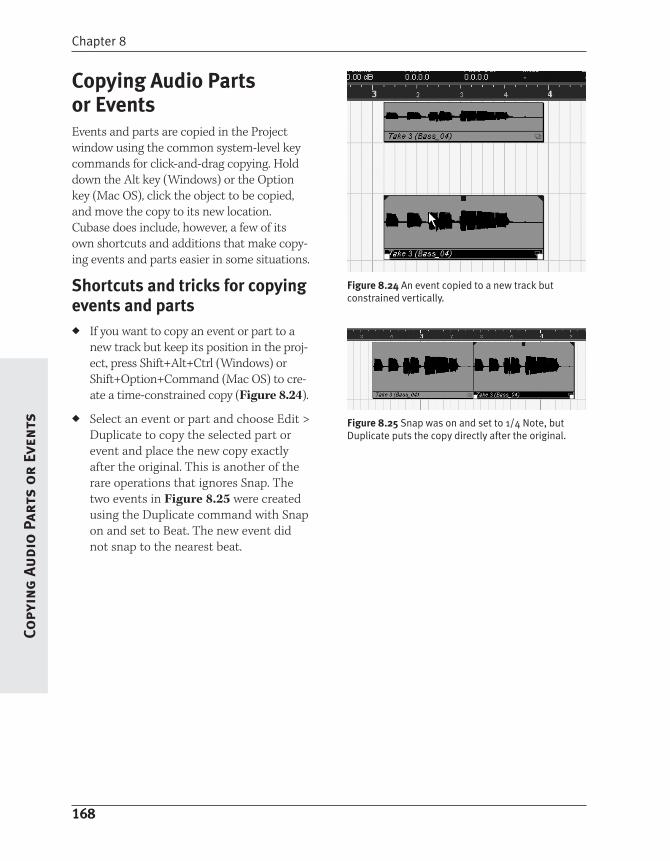
Copying Audio Parts or EventsEvents and parts are copied in the Project
window using the common system-level key
commands for click-and-drag copying. Hold
down the Alt key (Windows) or the Option
key (Mac OS), click the object to be copied,
and move the copy to its new location.
Cubase does include, however, a few of its
own shortcuts and additions that make copy-
ing events and parts easier in some situations.
Shortcuts and tricks for copyingevents and parts
◆ If you want to copy an event or part to a
new track but keep its position in the proj-
ect, press Shift+Alt+Ctrl (Windows) or
Shift+Option+Command (Mac OS) to cre-
ate a time-constrained copy (Figure 8.24).
◆ Select an event or part and choose Edit >
Duplicate to copy the selected part or
event and place the new copy exactly
after the original. This is another of the
rare operations that ignores Snap. The
two events in Figure 8.25 were created
using the Duplicate command with Snap
on and set to Beat. The new event did
not snap to the nearest beat.
168
Chapter 8Co
pyin
g A
udi
o P
arts
or
Even
ts
Figure 8.24 An event copied to a new track butconstrained vertically.
Figure 8.25 Snap was on and set to 1/4 Note, butDuplicate puts the copy directly after the original.
Creating a Fade-InAll music and sound production uses effects
called fades. A fade-in takes a sound from a
lower level and raises it in volume so that it
can be heard. A fade-out takes a sound that
is playing and decreases its volume until it
is not heard. Most people notice fades only
when a full mix is faded out at the end of a
song on, say, a CD, but parts are faded in
and out of mixes constantly.
Cubase has many ways to create fades. One
very graphical way to create fades is to use
the mouse in the Project window to fade
individual events in and out. Only events
can be faded in this way. If you need to fade
a part, you probably should do that when
you are mixing the project.
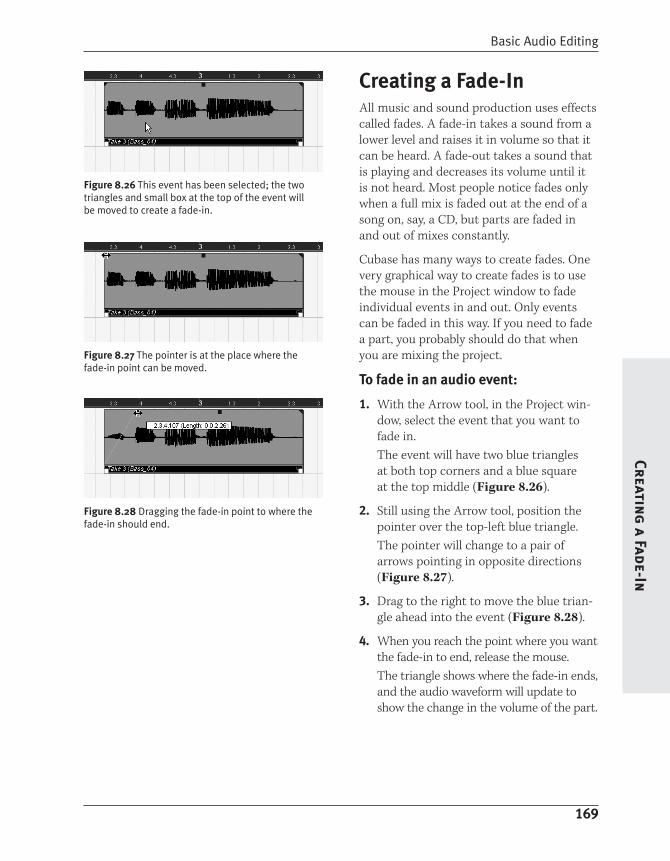
To fade in an audio event:
1. With the Arrow tool, in the Project win-
dow, select the event that you want to
fade in.
The event will have two blue triangles
at both top corners and a blue square
at the top middle (Figure 8.26).
2. Still using the Arrow tool, position the
pointer over the top-left blue triangle.
The pointer will change to a pair of
arrows pointing in opposite directions
(Figure 8.27).
3. Drag to the right to move the blue trian-
gle ahead into the event (Figure 8.28).
4. When you reach the point where you want
the fade-in to end, release the mouse.
The triangle shows where the fade-in ends,
and the audio waveform will update to
show the change in the volume of the part.
169
Basic Audio EditingCreatin
g a Fade-In
Figure 8.26 This event has been selected; the twotriangles and small box at the top of the event willbe moved to create a fade-in.
Figure 8.27 The pointer is at the place where thefade-in point can be moved.
Figure 8.28 Dragging the fade-in point to where thefade-in should end.
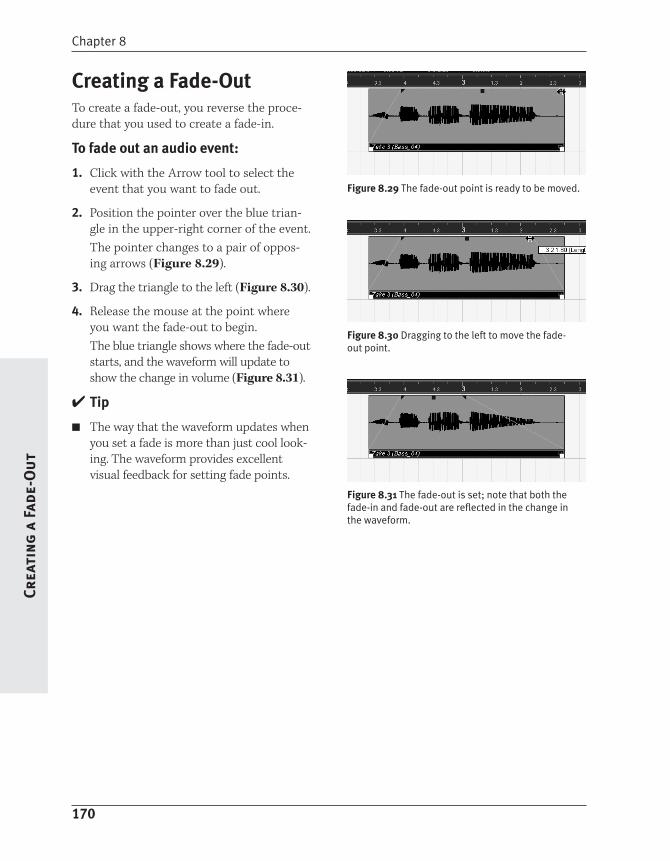
Creating a Fade-OutTo create a fade-out, you reverse the proce-
dure that you used to create a fade-in.
To fade out an audio event:
1. Click with the Arrow tool to select the
event that you want to fade out.
2. Position the pointer over the blue trian-
gle in the upper-right corner of the event.
The pointer changes to a pair of oppos-
ing arrows (Figure 8.29).
3. Drag the triangle to the left (Figure 8.30).
4. Release the mouse at the point where
you want the fade-out to begin.
The blue triangle shows where the fade-out
starts, and the waveform will update to
show the change in volume (Figure 8.31).
✔ Tip
■ The way that the waveform updates when
you set a fade is more than just cool look-
ing. The waveform provides excellent
visual feedback for setting fade points.
170
Chapter 8Cr
eati
ng
a F
ade-
Ou
t
Figure 8.29 The fade-out point is ready to be moved.
Figure 8.30 Dragging to the left to move the fade-out point.
Figure 8.31 The fade-out is set; note that both thefade-in and fade-out are reflected in the change inthe waveform.
Editing FadesCubase uses a simple linear fade by default.
This default is the rough equivalent of turn-
ing a volume knob for the event at precisely
the same speed throughout the fade.
Although this default fade quite often does
the job, Cubase does not restrict fades to
this linear shape. Fades can be almost infi-
nitely edited by using the Fade editors.
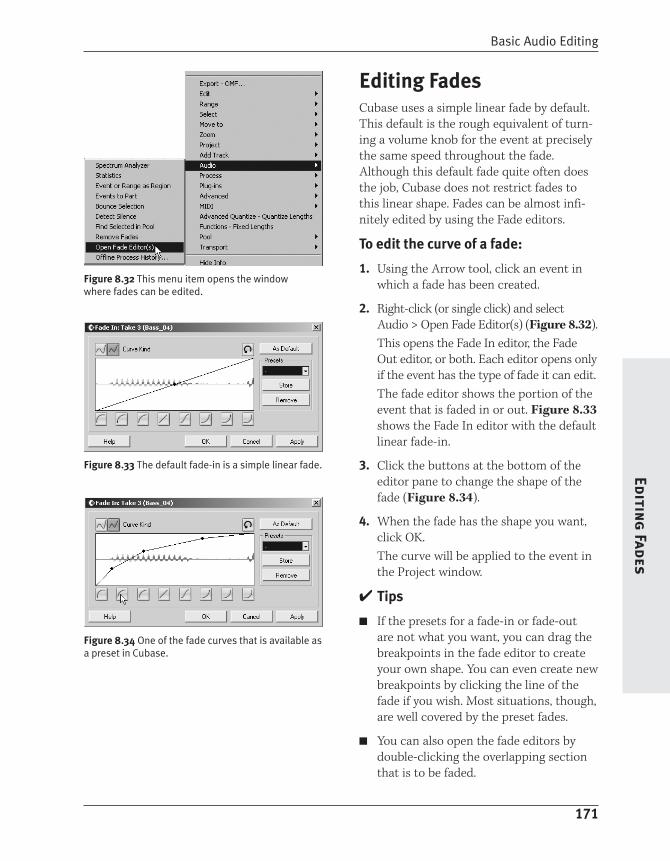
To edit the curve of a fade:
1. Using the Arrow tool, click an event in
which a fade has been created.
2. Right-click (or single click) and select
Audio > Open Fade Editor(s) (Figure 8.32).
This opens the Fade In editor, the Fade
Out editor, or both. Each editor opens only
if the event has the type of fade it can edit.
The fade editor shows the portion of the
event that is faded in or out. Figure 8.33
shows the Fade In editor with the default
linear fade-in.
3. Click the buttons at the bottom of the
editor pane to change the shape of the
fade (Figure 8.34).
4. When the fade has the shape you want,
click OK.
The curve will be applied to the event in
the Project window.
✔ Tips
■ If the presets for a fade-in or fade-out
are not what you want, you can drag the
breakpoints in the fade editor to create
your own shape. You can even create new
breakpoints by clicking the line of the
fade if you wish. Most situations, though,
are well covered by the preset fades.
■ You can also open the fade editors by
double-clicking the overlapping section
that is to be faded.
171
Basic Audio EditingEditin
g Fades
Figure 8.32 This menu item opens the windowwhere fades can be edited.
Figure 8.33 The default fade-in is a simple linear fade.
Figure 8.34 One of the fade curves that is available asa preset in Cubase.
Changing the VolumeLevel for an EventWhile you can use the two blue triangles in
a selected event to create fade-ins and fade-
outs, you can use the blue square to graphi-
cally edit the overall volume level for an
event when it is played back. This option, in
combination with the fade-in and fade-out
options, gives you deep control of dynamics
for any event in the Project window.
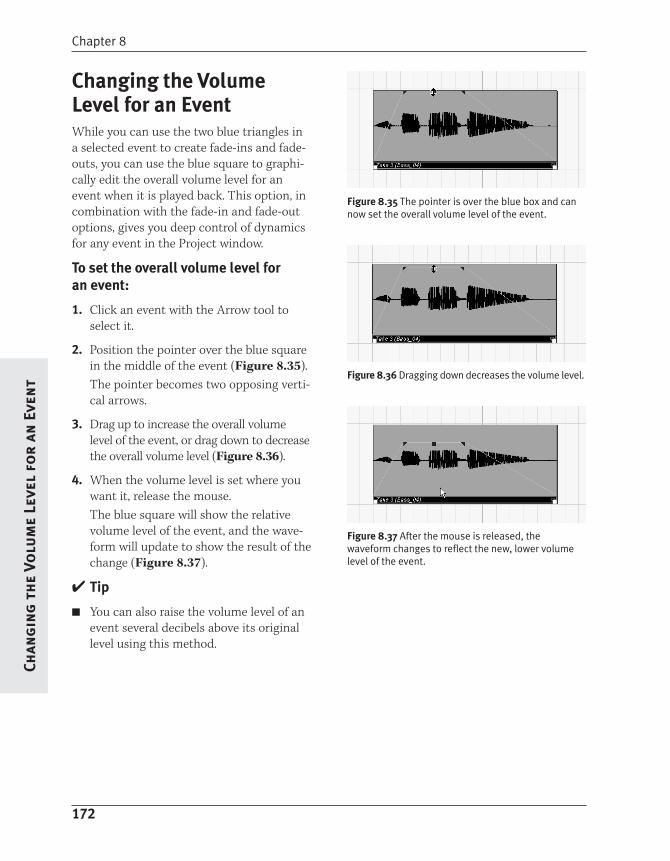
To set the overall volume level for
an event:
1. Click an event with the Arrow tool to
select it.
2. Position the pointer over the blue square
in the middle of the event (Figure 8.35).
The pointer becomes two opposing verti-
cal arrows.
3. Drag up to increase the overall volume
level of the event, or drag down to decrease
the overall volume level (Figure 8.36).
4. When the volume level is set where you
want it, release the mouse.
The blue square will show the relative
volume level of the event, and the wave-
form will update to show the result of the
change (Figure 8.37).
✔ Tip
■ You can also raise the volume level of an
event several decibels above its original
level using this method.
172
Chapter 8Ch
ang
ing
th
e Vo
lum
e Le
vel
for
an E
ven
t
Figure 8.35 The pointer is over the blue box and cannow set the overall volume level of the event.
Figure 8.36 Dragging down decreases the volume level.
Figure 8.37 After the mouse is released, thewaveform changes to reflect the new, lower volumelevel of the event.
Three Ways to ResizeAudio EventsYou might have heard the term nonlinear
editing used when describing how a multi-
track editor like Cubase works. Unlike a
tape-based system, in which recorded audio
plays back only at the time when it was
recorded, a digital editor gives you complete
freedom to choose which pieces of audio
play when. You can take the second phrase
of the great-sounding backing vocal you
sang over the first chorus and easily copy
it to every other chorus.
When you are making these type of edits,
you’ll nearly always need to take only certain
sections of an event or events: a phrase here,
two beats there, and so on. To do that, you’ll
often need to change the duration, or size, of
an event. Cubase offers three ways to change
the size of an event, all selected via a drop-
down menu on the object selection tool.
Each mode is fully described in the pages
that follow, but here’s a quick comparison to
keep in mind as you use the different modes:
◆ Normal Sizing might also be called
masking. Using this mode, you move the
start or end point of the event to play
only part of the audio. If you like only
the second part of a phrase in a perform-
ance, for instance, you use this mode to
move the starting point of the event so it
plays only the second half of the phrase.
◆ Sizing Moves Contents allows you to
keep the start or end of an event the
same while you push around the audio
content inside the event. This mode can
be useful when you’re trying to move a
drum hit or sound to a particular beat, or
when you want to correct a performance
that’s a little ahead of or behind the beat.
173
Basic Audio EditingTh
ree Ways to
Resize A
udio
Events
◆ Sizing Applies Time Stretch lets you
drag the start or end point of an event to
make the duration of the event longer or
shorter. Used in conjunction with Snap,
this mode is invaluable for forcing an
audio event to match the project tempo.
The mode you will most commonly use is
Normal Sizing. This mode lets you mask and
unmask any part of the audio in an event.
For instance, you can take a guitar part that
spans an entire five-minute song and resize
the event so that it plays only a single note.
Like all editing in Cubase, this is purely non-
destructive; you can always resize again and
hear the entire event or a different part of it.
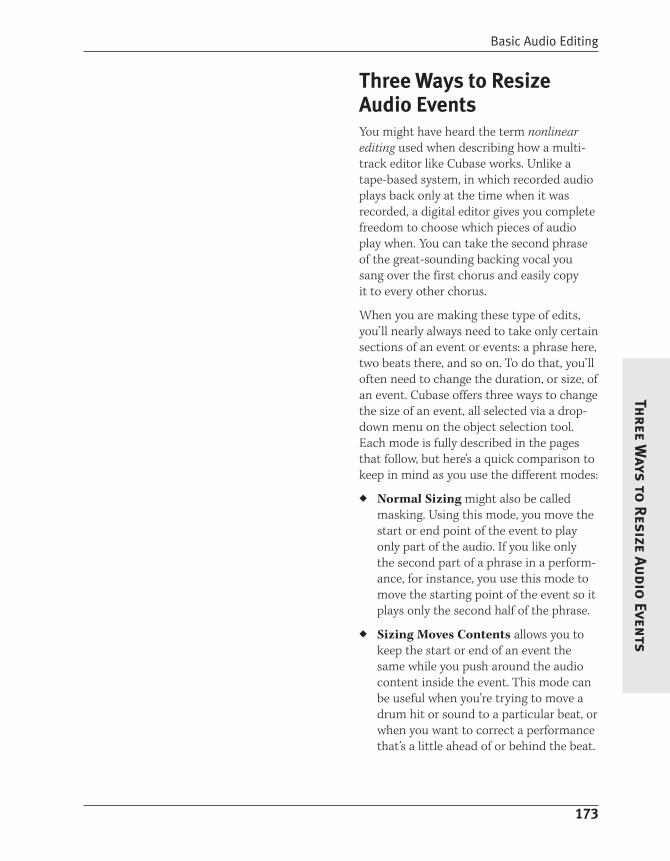
To resize an event using Normal Sizing:
1. Using the Arrow tool, click the event that
you want to resize to select it.
2. Position the pointer on the bottom cor-
ner of the beginning or end of the event
(Figure 8.38).
The pointer changes to a pair of oppos-
ing horizontal arrows.
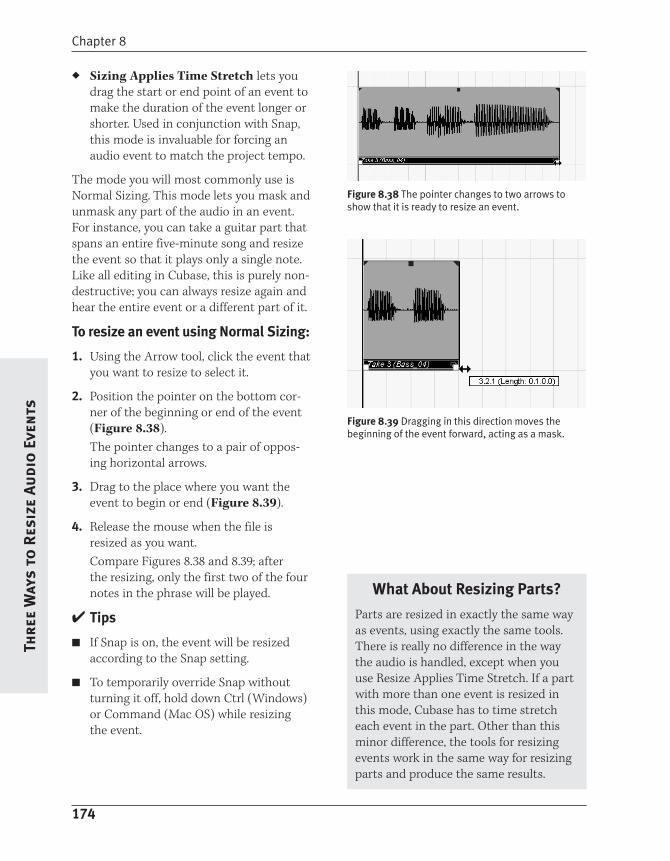
3. Drag to the place where you want the
event to begin or end (Figure 8.39).
4. Release the mouse when the file is
resized as you want.
Compare Figures 8.38 and 8.39; after
the resizing, only the first two of the four
notes in the phrase will be played.
✔ Tips
■ If Snap is on, the event will be resized
according to the Snap setting.
■ To temporarily override Snap without
turning it off, hold down Ctrl (Windows)
or Command (Mac OS) while resizing
the event.
174
Chapter 8Th
ree
Way
s to
Res
ize
Au
dio
Eve
nts
Figure 8.38 The pointer changes to two arrows toshow that it is ready to resize an event.
Figure 8.39 Dragging in this direction moves thebeginning of the event forward, acting as a mask.
What About Resizing Parts?
Parts are resized in exactly the same way
as events, using exactly the same tools.
There is really no difference in the way
the audio is handled, except when you
use Resize Applies Time Stretch. If a part
with more than one event is resized in
this mode, Cubase has to time stretch
each event in the part. Other than this
minor difference, the tools for resizing
events work in the same way for resizing
parts and produce the same results.
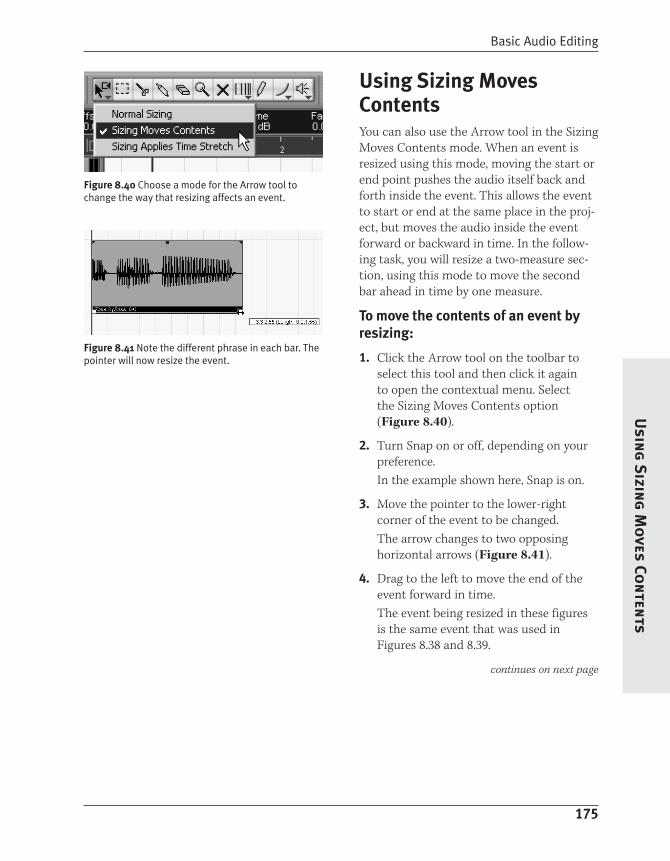
Using Sizing MovesContentsYou can also use the Arrow tool in the Sizing
Moves Contents mode. When an event is
resized using this mode, moving the start or
end point pushes the audio itself back and
forth inside the event. This allows the event
to start or end at the same place in the proj-
ect, but moves the audio inside the event
forward or backward in time. In the follow-
ing task, you will resize a two-measure sec-
tion, using this mode to move the second
bar ahead in time by one measure.
To move the contents of an event by
resizing:
1. Click the Arrow tool on the toolbar to
select this tool and then click it again
to open the contextual menu. Select
the Sizing Moves Contents option
(Figure 8.40).
2. Turn Snap on or off, depending on your
preference.
In the example shown here, Snap is on.
3. Move the pointer to the lower-right
corner of the event to be changed.
The arrow changes to two opposing
horizontal arrows (Figure 8.41).
4. Drag to the left to move the end of the
event forward in time.
The event being resized in these figures
is the same event that was used in
Figures 8.38 and 8.39.
continues on next page
175
Basic Audio EditingU
sing
Sizin
g M
oves Co
nten
ts
Figure 8.40 Choose a mode for the Arrow tool tochange the way that resizing affects an event.
Figure 8.41 Note the different phrase in each bar. Thepointer will now resize the event.
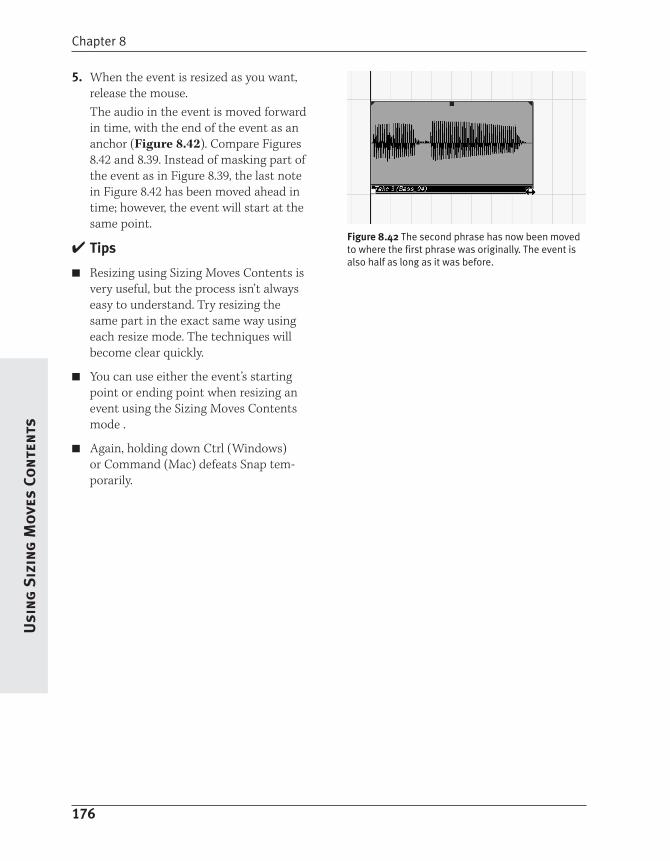
5. When the event is resized as you want,
release the mouse.
The audio in the event is moved forward
in time, with the end of the event as an
anchor (Figure 8.42). Compare Figures
8.42 and 8.39. Instead of masking part of
the event as in Figure 8.39, the last note
in Figure 8.42 has been moved ahead in
time; however, the event will start at the
same point.
✔ Tips
■ Resizing using Sizing Moves Contents is
very useful, but the process isn’t always
easy to understand. Try resizing the
same part in the exact same way using
each resize mode. The techniques will
become clear quickly.
■ You can use either the event’s starting
point or ending point when resizing an
event using the Sizing Moves Contents
mode .
■ Again, holding down Ctrl (Windows)
or Command (Mac) defeats Snap tem-
porarily.
176
Chapter 8U
sin
g S
izin
g M
ove
s Co
nte
nts
Figure 8.42 The second phrase has now been movedto where the first phrase was originally. The event isalso half as long as it was before.
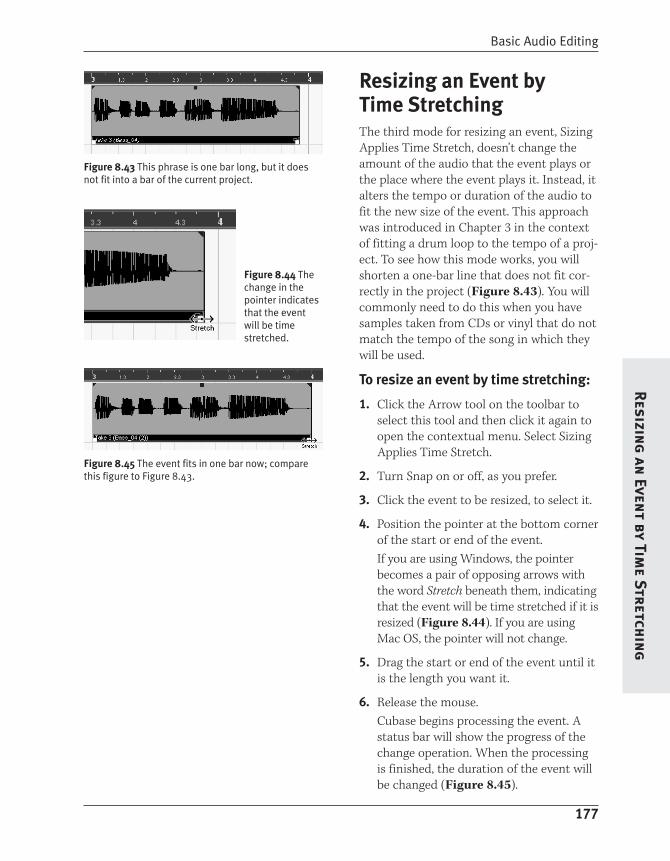
Resizing an Event by Time StretchingThe third mode for resizing an event, Sizing
Applies Time Stretch, doesn’t change the
amount of the audio that the event plays or
the place where the event plays it. Instead, it
alters the tempo or duration of the audio to
fit the new size of the event. This approach
was introduced in Chapter 3 in the context
of fitting a drum loop to the tempo of a proj-
ect. To see how this mode works, you will
shorten a one-bar line that does not fit cor-
rectly in the project (Figure 8.43). You will
commonly need to do this when you have
samples taken from CDs or vinyl that do not
match the tempo of the song in which they
will be used.
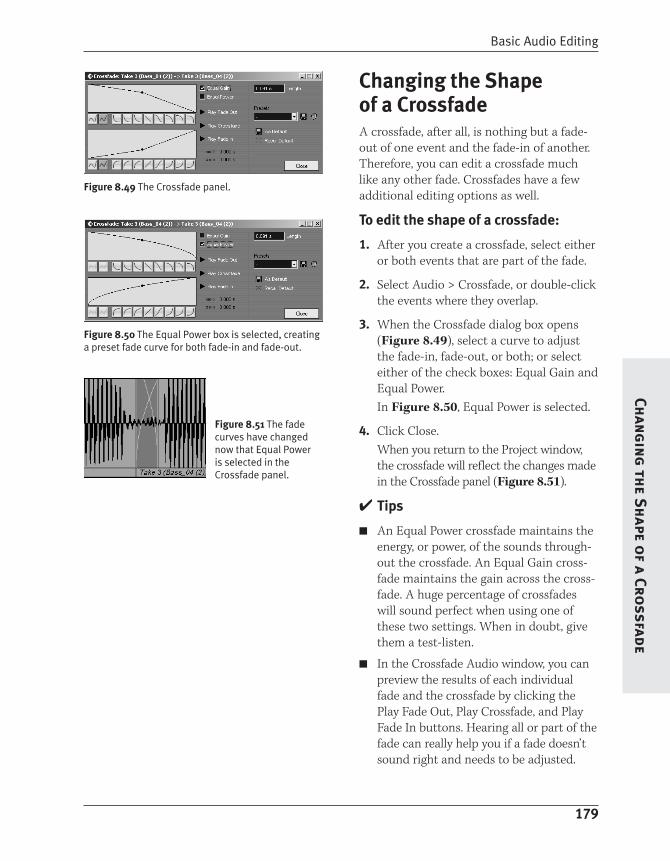
To resize an event by time stretching:
1. Click the Arrow tool on the toolbar to
select this tool and then click it again to
open the contextual menu. Select Sizing
Applies Time Stretch.
2. Turn Snap on or off, as you prefer.
3. Click the event to be resized, to select it.
4. Position the pointer at the bottom corner
of the start or end of the event.
If you are using Windows, the pointer
becomes a pair of opposing arrows with
the word Stretch beneath them, indicating
that the event will be time stretched if it is
resized (Figure 8.44). If you are using
Mac OS, the pointer will not change.
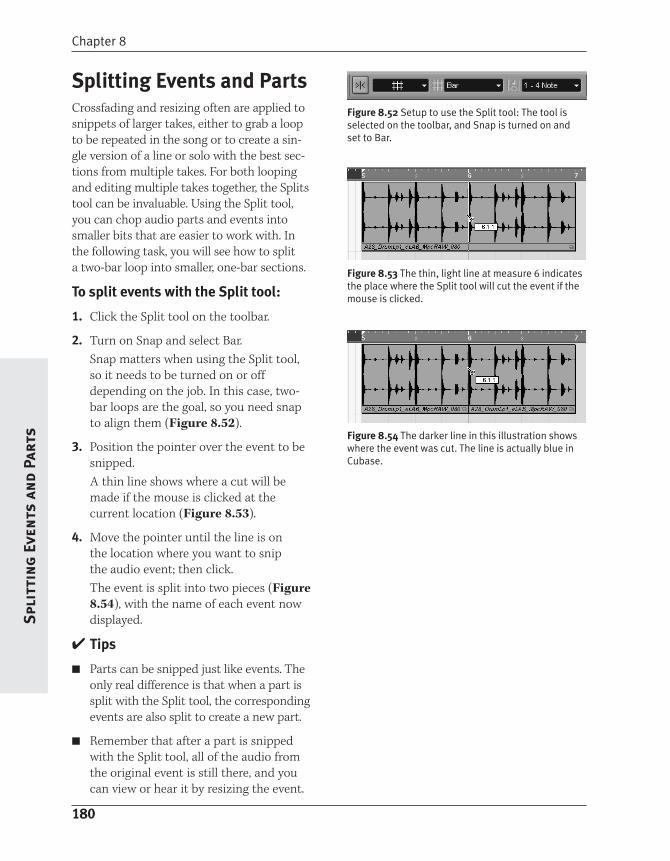
5. Drag the start or end of the event until it
is the length you want it.
6. Release the mouse.
Cubase begins processing the event. A
status bar will show the progress of the
change operation. When the processing
is finished, the duration of the event will
be changed (Figure 8.45).
177
Basic Audio EditingR
esizing
an Even
t by Time Stretch
ing
Figure 8.43 This phrase is one bar long, but it doesnot fit into a bar of the current project.
Figure 8.44 Thechange in thepointer indicatesthat the eventwill be timestretched.
Figure 8.45 The event fits in one bar now; comparethis figure to Figure 8.43.

Creating a CrossfadeA crossfade is a special combination of a
fade-in and a fade-out. Crossfades are used
in many ways, but their primary use is to
create a smooth transition between two dif-
ferent events on the same audio track. For
instance, if two takes of a solo part were
recorded, and the first half of one take
sounds great while the second half of the
other take sounds great, the two events can
be edited together. In some situations, the
transition between the two events will be
audible and unpleasant. Crossfading the
events together makes the transition nearly
inaudible. In this task, you will crossfade two
events for just such a transition.
To crossfade two events:
1. Resize both events so the section to be
crossfaded is at the very end of the first
event and at the very beginning of the
second event (Figure 8.46).
2. Resize the events over each other so that
the sections to be crossfaded overlap.
The area where the events overlap is indi-
cated by a darkened section (Figure 8.47).
3. Select both events by clicking them with
the Shift key held down, or use the Arrow
tool to draw a box over both events.
4. Select Audio > Crossfade. You can also
press the X key on the keyboard as a
shortcut.
The overlap of the events is outlined in
blue, and the fade curves are displayed
in blue (Figure 8.48).
178
Chapter 8Cr
eati
ng
a C
ross
fade
Figure 8.46 These two eventsneed to be joined seamlesslywith a crossfade.
Figure 8.47 Position eventsso that they overlap in a placein the performance where afade will not be too obvious.
Figure 8.48 After you choosethe Crossfade commandfrom the Audio menu, thelines in the crossfadeindicate the two fade curves.
✔ Tip
■ Creating good crossfades is a craft, if not
an art; it takes practice to find the best
fade points. The general rule of thumb,
however, is to find a place for the cross-
fade where not much is going on. The
less action at the fade point, the more
likely it is to be inaudible.
Changing the Shape of a CrossfadeA crossfade, after all, is nothing but a fade-
out of one event and the fade-in of another.
Therefore, you can edit a crossfade much
like any other fade. Crossfades have a few
additional editing options as well.
To edit the shape of a crossfade:
1. After you create a crossfade, select either
or both events that are part of the fade.
2. Select Audio > Crossfade, or double-click
the events where they overlap.
3. When the Crossfade dialog box opens
(Figure 8.49), select a curve to adjust
the fade-in, fade-out, or both; or select
either of the check boxes: Equal Gain and
Equal Power.
In Figure 8.50, Equal Power is selected.
4. Click Close.
When you return to the Project window,
the crossfade will reflect the changes made
in the Crossfade panel (Figure 8.51).
✔ Tips
■ An Equal Power crossfade maintains the
energy, or power, of the sounds through-
out the crossfade. An Equal Gain cross-
fade maintains the gain across the cross-
fade. A huge percentage of crossfades
will sound perfect when using one of
these two settings. When in doubt, give
them a test-listen.
■ In the Crossfade Audio window, you can
preview the results of each individual
fade and the crossfade by clicking the
Play Fade Out, Play Crossfade, and Play
Fade In buttons. Hearing all or part of the
fade can really help you if a fade doesn’t
sound right and needs to be adjusted.
179
Basic Audio EditingCh
ang
ing
the S
hape o
f a Crossfade
Figure 8.49 The Crossfade panel.
Figure 8.50 The Equal Power box is selected, creatinga preset fade curve for both fade-in and fade-out.
Figure 8.51 The fadecurves have changednow that Equal Poweris selected in theCrossfade panel.
Splitting Events and Parts Crossfading and resizing often are applied to
snippets of larger takes, either to grab a loop
to be repeated in the song or to create a sin-
gle version of a line or solo with the best sec-
tions from multiple takes. For both looping
and editing multiple takes together, the Splits
tool can be invaluable. Using the Split tool,
you can chop audio parts and events into
smaller bits that are easier to work with. In
the following task, you will see how to split
a two-bar loop into smaller, one-bar sections.
To split events with the Split tool:
1. Click the Split tool on the toolbar.
2. Turn on Snap and select Bar.
Snap matters when using the Split tool,
so it needs to be turned on or off
depending on the job. In this case, two-
bar loops are the goal, so you need snap
to align them (Figure 8.52).
3. Position the pointer over the event to be
snipped.
A thin line shows where a cut will be
made if the mouse is clicked at the
current location (Figure 8.53).
4. Move the pointer until the line is on
the location where you want to snip
the audio event; then click.
The event is split into two pieces (Figure
8.54), with the name of each event now
displayed.
✔ Tips
■ Parts can be snipped just like events. The
only real difference is that when a part is
split with the Split tool, the corresponding
events are also split to create a new part.
■ Remember that after a part is snipped
with the Split tool, all of the audio from
the original event is still there, and you
can view or hear it by resizing the event.
180
Chapter 8S
plit
tin
g E
ven
ts a
nd
Part
s
Figure 8.52 Setup to use the Split tool: The tool isselected on the toolbar, and Snap is turned on andset to Bar.
Figure 8.53 The thin, light line at measure 6 indicatesthe place where the Split tool will cut the event if themouse is clicked.
Figure 8.54 The darker line in this illustration showswhere the event was cut. The line is actually blue inCubase.

The Audio Part EditorAudio parts are useful for a number of rea-
sons; in particular, after a group of events
has been edited together into a part, you
can move, copy, process, and otherwise treat
them as a single entity. You use the Audio
Part editor (Figure 8.55), as you might
guess, to edit audio parts.
The Audio Part editor creates composite
takes, or comps. A comp is a single musical
phrase, line, or groove that is composed of
pieces from more than one performance.
Sometimes a comp is created to cover a mis-
take, such as a single flat note by a singer in
an otherwise solid performance. Comps can
also be heavily edited masterpieces of audio
artifice. The following pages walk you
through the basics of creating a comp in
the Audio Part editor.
Keep in mind that an audio part is just a
container in which audio events are kept, so
much of what you do in the Audio Part edi-
tor you could also do in the Project window.
181
Basic Audio EditingTh
e Au
dio Part Edito
r
Figure 8.55 The Audio Part editor with two events shown.
The Audio Part Editor vs.
Stacked Mode
By far the most common task done in the
Audio Part editor is comping tracks.
Comping is also the most common rea-
son for using Stacked mode to record a
track, and then editing the track in the
Project window. So it’s reasonable to ask:
which is the best choice?
If you’ve used the previous version of SX
for a while, you may be more comfortable
working in the familiar Audio Part editor
than in Stacked mode. Also, I find the
Audio Part editor to be a little more spa-
cious for comping; with more room to
move things around in lanes. Stacked
mode is great, though, because there’s
never a reason to leave the Project win-
dow. Try a similar comp using both
approaches to see which you find easier
and more effective. Chapter 9, “Advanced
Audio Editing,” discusses how to edit
tracks recorded in Stacked mode.
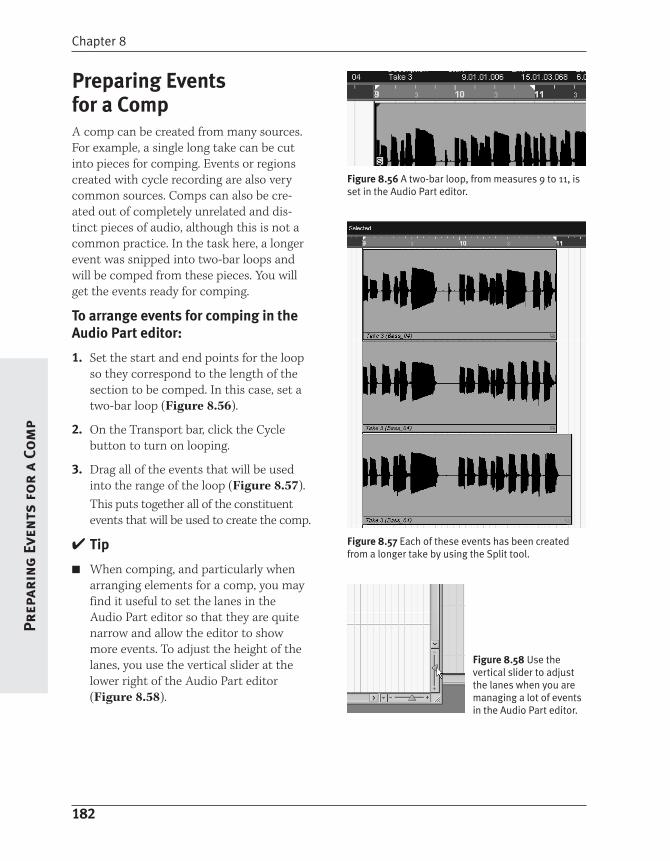
Preparing Events for a CompA comp can be created from many sources.
For example, a single long take can be cut
into pieces for comping. Events or regions
created with cycle recording are also very
common sources. Comps can also be cre-
ated out of completely unrelated and dis-
tinct pieces of audio, although this is not a
common practice. In the task here, a longer
event was snipped into two-bar loops and
will be comped from these pieces. You will
get the events ready for comping.
To arrange events for comping in the
Audio Part editor:
1. Set the start and end points for the loop
so they correspond to the length of the
section to be comped. In this case, set a
two-bar loop (Figure 8.56).
2. On the Transport bar, click the Cycle
button to turn on looping.
3. Drag all of the events that will be used
into the range of the loop (Figure 8.57).
This puts together all of the constituent
events that will be used to create the comp.
✔ Tip
■ When comping, and particularly when
arranging elements for a comp, you may
find it useful to set the lanes in the
Audio Part editor so that they are quite
narrow and allow the editor to show
more events. To adjust the height of the
lanes, you use the vertical slider at the
lower right of the Audio Part editor
(Figure 8.58).
182
Chapter 8Pr
epar
ing
Eve
nts
fo
r a
Com
p
Figure 8.56 A two-bar loop, from measures 9 to 11, isset in the Audio Part editor.
Figure 8.57 Each of these events has been createdfrom a longer take by using the Split tool.
Figure 8.58 Use thevertical slider to adjustthe lanes when you aremanaging a lot of eventsin the Audio Part editor.
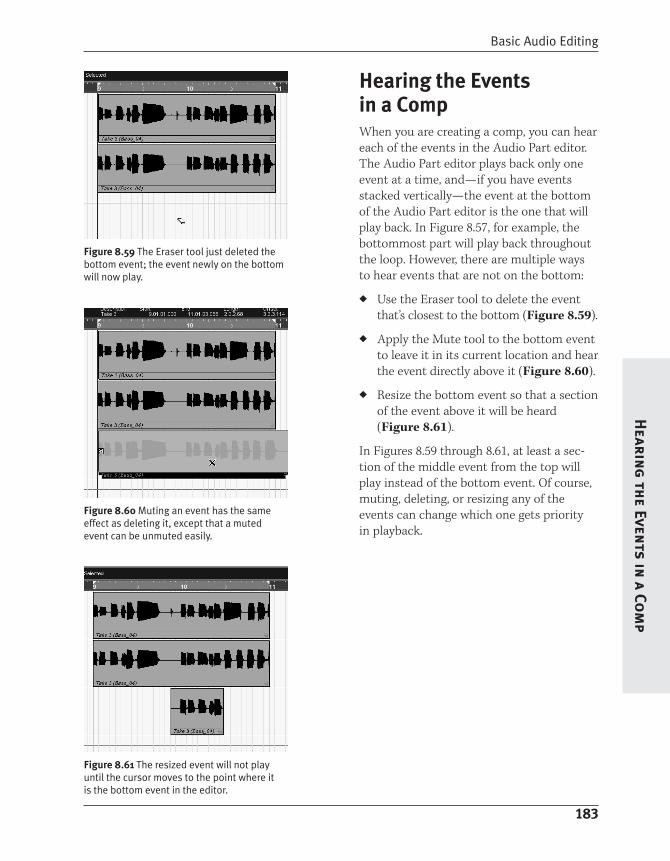
Hearing the Events in a CompWhen you are creating a comp, you can hear
each of the events in the Audio Part editor.
The Audio Part editor plays back only one
event at a time, and—if you have events
stacked vertically—the event at the bottom
of the Audio Part editor is the one that will
play back. In Figure 8.57, for example, the
bottommost part will play back throughout
the loop. However, there are multiple ways
to hear events that are not on the bottom:
◆ Use the Eraser tool to delete the event
that’s closest to the bottom (Figure 8.59).
◆ Apply the Mute tool to the bottom event
to leave it in its current location and hear
the event directly above it (Figure 8.60).
◆ Resize the bottom event so that a section
of the event above it will be heard
(Figure 8.61).
In Figures 8.59 through 8.61, at least a sec-
tion of the middle event from the top will
play instead of the bottom event. Of course,
muting, deleting, or resizing any of the
events can change which one gets priority
in playback.
183
Basic Audio EditingH
earing
the Even
ts in a Co
mp
Figure 8.59 The Eraser tool just deleted thebottom event; the event newly on the bottomwill now play.
Figure 8.60 Muting an event has the sameeffect as deleting it, except that a mutedevent can be unmuted easily.
Figure 8.61 The resized event will not playuntil the cursor moves to the point where itis the bottom event in the editor.
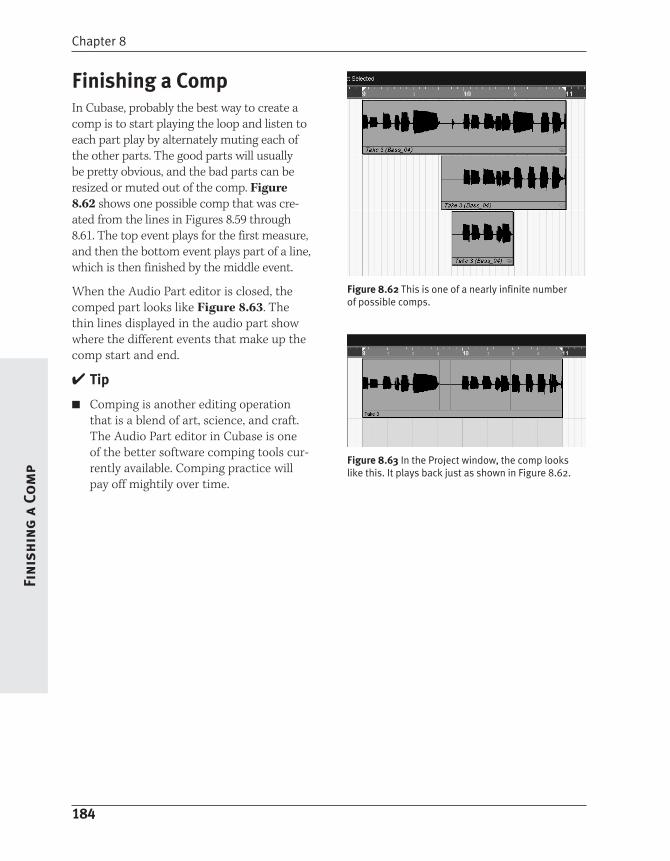
Finishing a CompIn Cubase, probably the best way to create a
comp is to start playing the loop and listen to
each part play by alternately muting each of
the other parts. The good parts will usually
be pretty obvious, and the bad parts can be
resized or muted out of the comp. Figure
8.62 shows one possible comp that was cre-
ated from the lines in Figures 8.59 through
8.61. The top event plays for the first measure,
and then the bottom event plays part of a line,
which is then finished by the middle event.
When the Audio Part editor is closed, the
comped part looks like Figure 8.63. The
thin lines displayed in the audio part show
where the different events that make up the
comp start and end.
✔ Tip
■ Comping is another editing operation
that is a blend of art, science, and craft.
The Audio Part editor in Cubase is one
of the better software comping tools cur-
rently available. Comping practice will
pay off mightily over time.
184
Chapter 8Fi
nis
hin
g a
Co
mp
Figure 8.62 This is one of a nearly infinite numberof possible comps.
Figure 8.63 In the Project window, the comp lookslike this. It plays back just as shown in Figure 8.62.