autodesk sketchbook - amazon simple storage service · perpetual. content what’s new 1 the basics...
TRANSCRIPT
Autodesk®
SketchBook® Pro 7.2

COPYRIGHTS AND TRADEMARKS
AUTODESK® SKETCHBOOK® PRO - v.7.2
©2015 Autodesk, Inc. All Rights Reserved. Except as otherwise permitted by Autodesk, Inc., this publication, or parts thereof, may not be reproduced in any form, by any method, for any purpose.
Certain materials included in this publication are reprinted with the permission of the copyright holder.
TRADEMARKSThe following are registered trademarks or trademarks of Autodesk, Inc., and/or its subsidiaries and/or affiliates in the USA and other countries:
SketchBook, SketchBook Copic Edition, SketchBook Designer, SketchBook Express, SketchBook Express for iPad, SketchBook Express for Android, SketchBook Ink, SketchBook Pro, SketchBook Pro for iPad, and SketchBook Pro for Android.
All other brand names, product names or trademarks belong to their respective holders.
DisclaimerTHIS PUBLICATION AND THE INFORMATION CONTAINED HEREIN IS MADE AVAILABLE BY AUTODESK, INC. “AS IS.” AUTODESK, INC. DISCLAIMS ALL WARRANTIES, EITHER EXPRESS OR IMPLIED, INCLUDING BUT NOT LIMITED TO ANY IMPLIED WARRANTIES OF MERCHANTABILITY OR FITNESS FOR A PARTICULAR PURPOSE REGARDING THESE MATERIALS.
PUBLISHED BY:Autodesk, Inc.
111 McInnis Parkway
San Rafael, CA
94903, USA
Perpetual
ContentWHAT’S NEW 1
THE BASICS 3The Canvas 4
Lagoon tool summary 4
Tool selection 5
Create a new sketch 6
What do i do next? 6
BRUSHES 7Choose a brush 8
Resize a brush 8
Changing brush opacity 8
Undo or redo a brushstroke 8
Clearing an area from the current Layer 9
Swap between two brushes 9
Change brush properties 9
Effects brushes 10
Smearing an area 10
Blurring an area 10
Sharpening an area 10
Brush Library 11
Customize the Brush Palette 11
Brush Types 12
Smudging an area 12
Using Synthetic Paint 12
Create custom Do-It-Yourself brushes 13
Create your own brush icons 14
Create a Texture Brush 15
Modifying a texture brush 16
Rename a texture brush 16
Saving a texture brush 16
Randomize 17
Random Color controls 17
Random Brush Size/Opacity 17
Random Brush Radius/Spacing 17
COLORS 18Colors 19
Create a custom color 19
Color Editor (Windows) 19
Set the RGB 19
Show/hide parts of the editor 19
Pick a color from the screen 19
Color Editor (Mac) 20
Pick a color from the screen 20
Create a customized color palette 20
Saving a customized color palette 20
Copic Color Library 21
Choose a color 21
Show/hide parts of the library 21
Copic Colorless Blender 21
Select the complementary color 21
Create a custom color set 21
Using the Color Puck 22
Creating a new color 22
Accessing the Gradient Fill Palette 22
Turning a brush into an eraser 22
Using the Color Picker 23
Using the Gradient Fill Palette 24
Flood Fills 25
Solid fill 25
Gradient Fill 25
Linear fill 25
Radial fill 25
Flood fill an area 26
Flood fill an active layer 26
Flood fill all visible layers 26
Gradient fill an area 26
Change Flood Fill properties 27
Using a transparent color 27
TOOLS FOR SKETCHING 28Draw Style tools 29
Lines 29
Rectangles 29
Ovals 29
Polylines 29
Steady Stroke 29
Free 29
Guides 30
Showing/hiding 30
Rulers 30
Ellipse 30
French curve 31

Distorting an image 40
Multi-layer distortion 40
Copy your sketch 40
Move, rotate, or scale a selected area 41
Crop 42
Crop the canvas 42
Rotate canvas 43
Flip or mirror your canvas 43
Add an image 44
Resize an image 44
Change resolution 44
Fit an image onto the screen 44
Color correct images 45
SAVE YOUR SKETCH 46Save your sketch as an Adobe® Photoshop® file 47
Save your sketch as a PXD 47
Save your sketch as an image file 47
Save location options 47
Save locally 47
Save to iCloud 47
Save with an alpha channel 48
Exporting 48
SketchBook landscape-oriented images to a device 48
SketchBook images to a device 48
Open a saved sketch 49
Open a sketch stored on iCloud 49
Open a PXD 49
Remove a project from the SketchBook iCloud Gallery 49
USE LAYERS 50How do I use layers? 51
Select a layer 51
Edit a layer 51
Adding a layer 51
Duplicating a layer 51
Clearing a layer 51
Renaming a layer 52
Locking layers 52
Deleting layers 52
Layer blending 53
Darken 53
Multiply 53
Color Burn 53
Linear Burn 53
Lighten 53
Screen 53
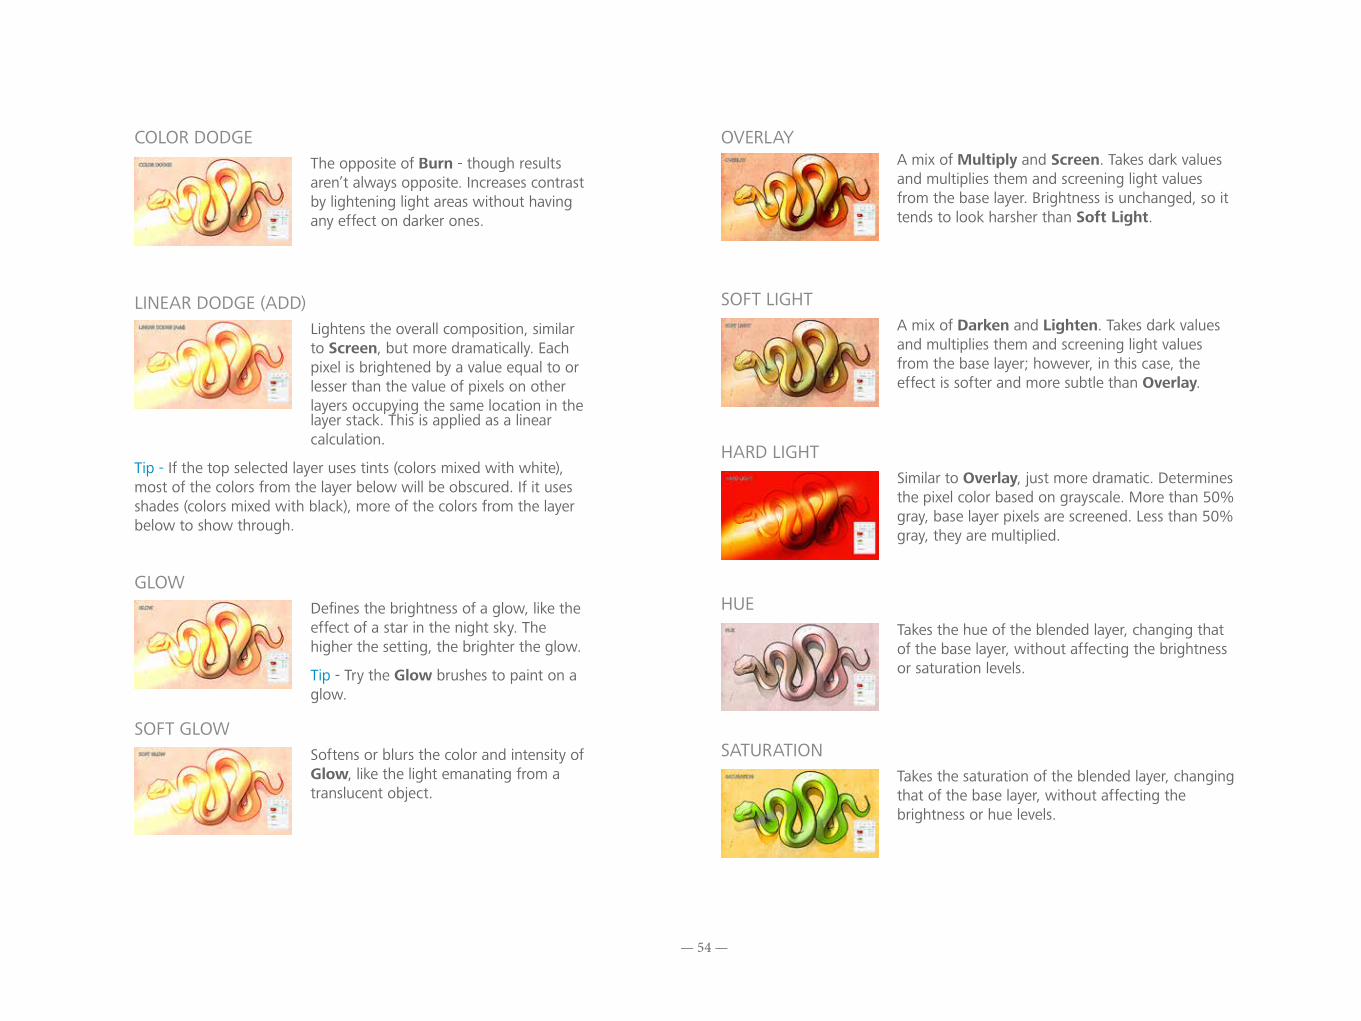
Color Dodge 54
Linear Dodge (Add) 54
Glow 54
Soft Glow 54
Overlay 54
Soft Light 54
Hard Light 54
Hue 54
Saturation 54
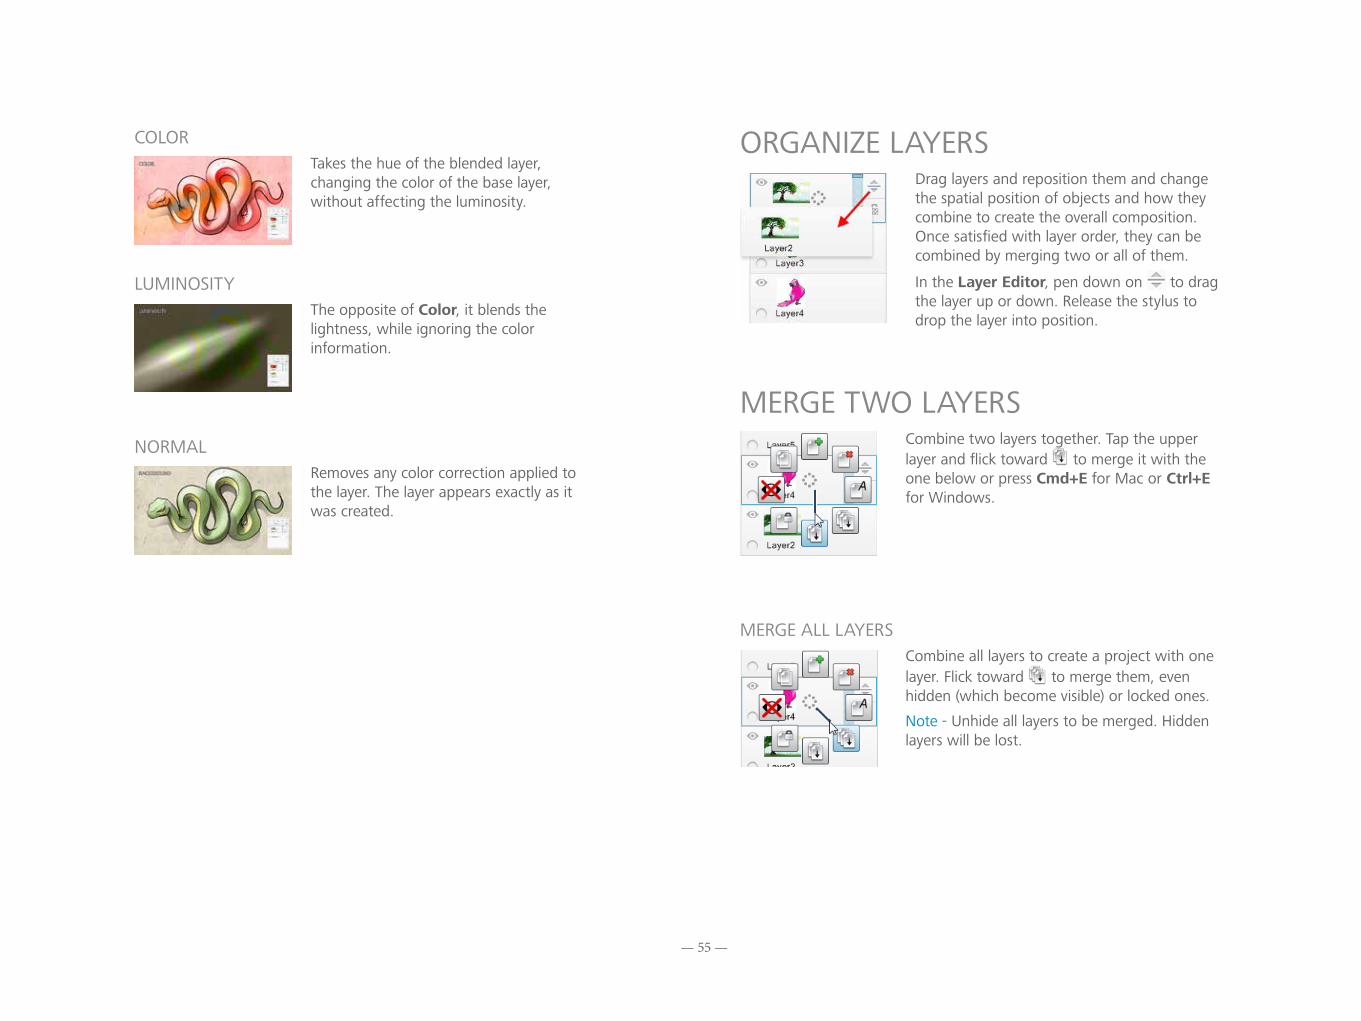
Color 55
Luminosity 55
Normal 55
Organize layers 55
Merge two layers 55
Merge all layers 55
Perspective 31
Perspective tools 31
Moving vanishing points 31
Hiding the horizon line 31
1 point mode 32
2 point mode 32
3 point mode 33
Fisheye mode 33
Symmetry 34
Symmetry tools 34
Moving the lines of symmetry 34
Locking and unlocking the lines of symmetry 34
Hiding the lines of symmetry 34
CHANGE YOUR VIEW 35Zoom in and move about 36
View an image’s actual size 36
Fit an image in the display 36
EDIT YOUR SKETCH 37Selection 38
Selection Modification tools 38
Select an area 38
Selection tools 38
Expand a selection 38
Remove content from a selection 38
Invert a selection 39
Deselect an area 39
Exit the selection mode 39
Distort 40
Bias 40
Grouping layers 56
Creating a layer group 56
Adding a layer to a group 56
Showing/hiding a layer group 56
Colored layer or layer group assignments 56
Collapsing/Expanding a group 56
Layer blending for groups 57
Change the transparency of a layer 57
Locking/unlocking layer transparency 57
ANNOTATE, SEND, PRINT & PRESENT 58Text 59
Adding text 59
Editing text - for Mac users 59
Editing text - for Windows users 59
Changing the transparency of text 59
Transforming text 59
Rasterizing a text layer 59
Email a sketch 60
Troubleshooting 60
ANIMATION 61Flipbook 62
Timeline 63
Adding a keyframe 63
Inserting an empty frame 63
Duplicating a keyframe 63
Deleting a keyframe 64
Displaying multiple keyframes 64
Playing back animation 65
Setting a playback range 65
Looping the animation 65
Moving keyframes in the timeline 65
Saving your flipbook 65
Exporting your animation 65
ADJUST SYSTEM & 66
PROGRAM SETTINGS 66Print a sketch 67
Flip through your sketches 67
Present images 67
Customizing lagoon icons 68
Customizing marking menus 68
Resetting your preferences 68
Reset the Lagoon 68
Reset Color Palette 68
Reset Brush Palette 68
Reset Preference Settings 68
Hide or move the interface 69
Hiding or showing scroll bars 69
Changing the behavior of Page Up and Page Down 69
Changing the Maximum Number of Undos 69
Changing the default canvas size for new files 69
Change the brush cursor 70
Remove the brush outline 70
Improve performance 70
HOTKEYS 71
— 1 —
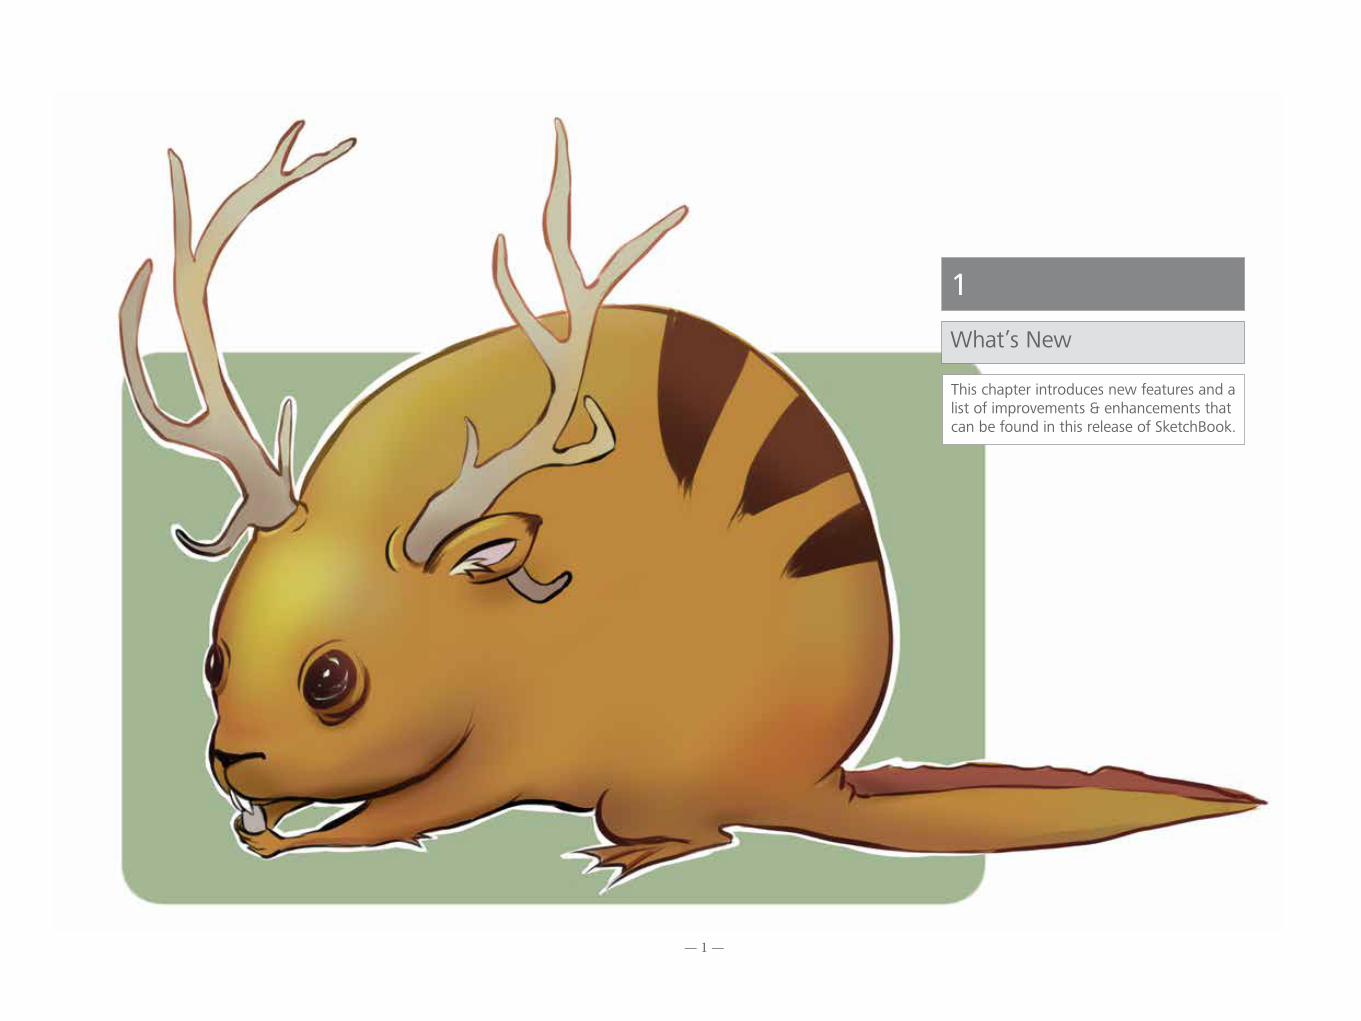
1What’s New
This chapter introduces new features and a list of improvements & enhancements that can be found in this release of SketchBook.
— 2 —
Here are the updates you’ll find in this version of SketchBook:
• Create a FlipBook from image sequences
• Import image sequences into a FlipBook:
• add a sequence of images to an existing FlipBook with Add Images as Frames.
• add images that are not part of a sequence or even the same file format to create a FlipBook with New FlipBook from Image Sequence.
• Export a frame with Export Current Frame or entire flipbook with Export FlipBook.
• New brushes and brush sets:
• Glow - Choose from an assortment of glow brushes in the Brush Library.
• Inking - Use this brush for all your inking needs. You can find it in the Brush Library.
• For Mac App Store users, pressure-sensitive sketching is available for the new Force Touch trackpad on MacBooks and MacBook Pros.
• Bug fixes and improvements

— 3 —
2The Basics
Get introduced to the interface, from the toolbar to shortcuts, pucks, and radial menus. Learn to navigate your scene, activate the palm rest, and change the size and opacity of a brush.
— 4 —
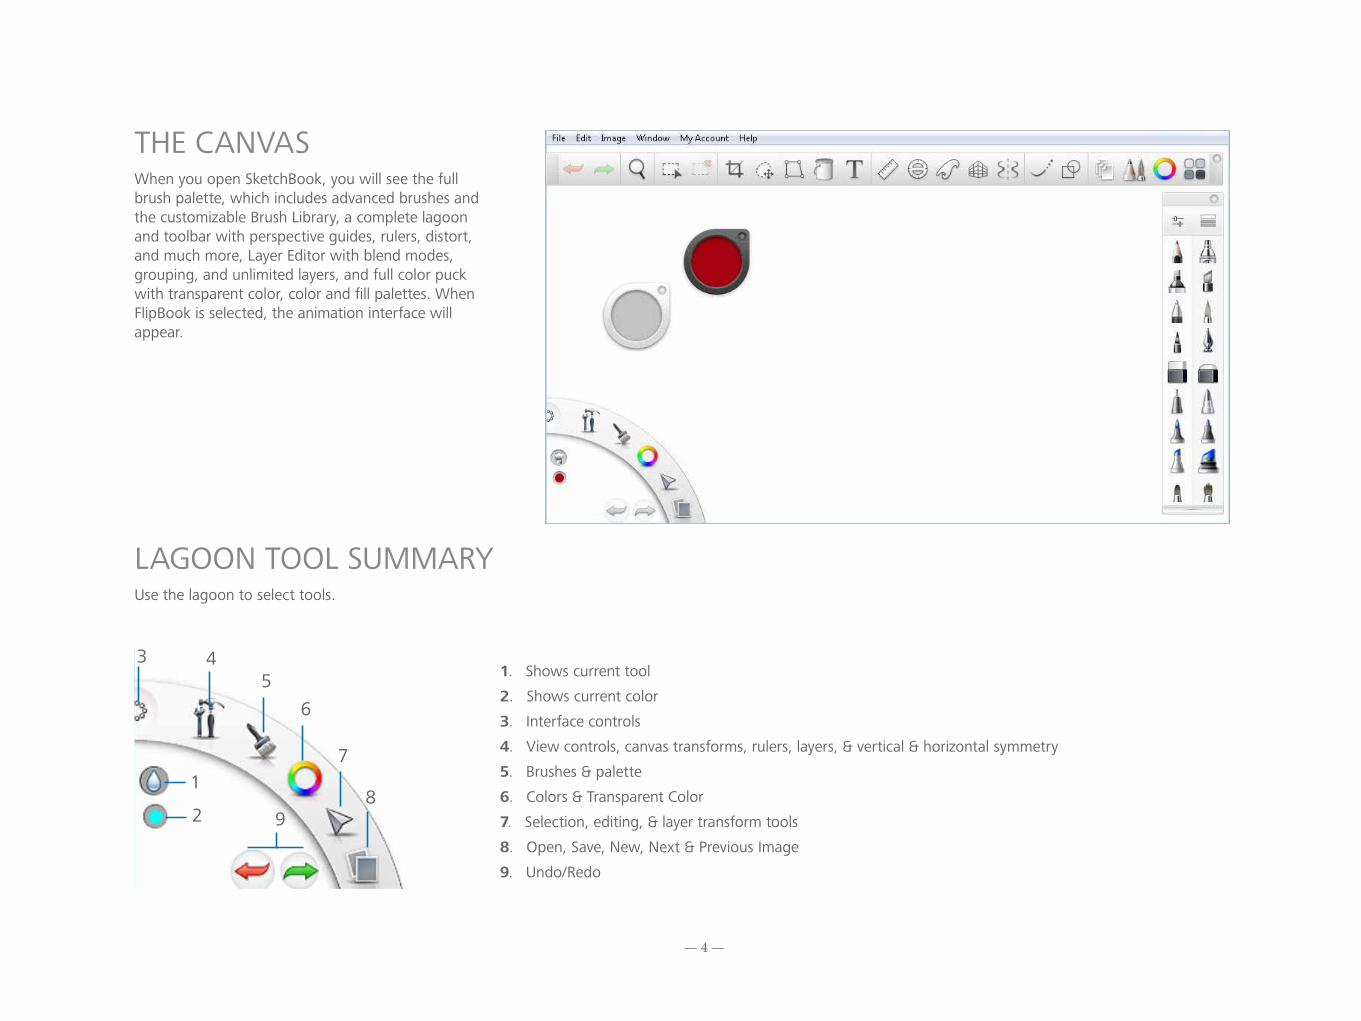
THE CANVASWhen you open SketchBook, you will see the full brush palette, which includes advanced brushes and the customizable Brush Library, a complete lagoon and toolbar with perspective guides, rulers, distort, and much more, Layer Editor with blend modes, grouping, and unlimited layers, and full color puck with transparent color, color and fill palettes. When FlipBook is selected, the animation interface will appear.
LAGOON TOOL SUMMARYUse the lagoon to select tools.
1. Shows current tool
2. Shows current color
3. Interface controls
4. View controls, canvas transforms, rulers, layers, & vertical & horizontal symmetry
5. Brushes & palette
6. Colors & Transparent Color
7. Selection, editing, & layer transform tools
8. Open, Save, New, Next & Previous Image
9. Undo/Redo
1
2
3 45
6
7
89
— 5 —
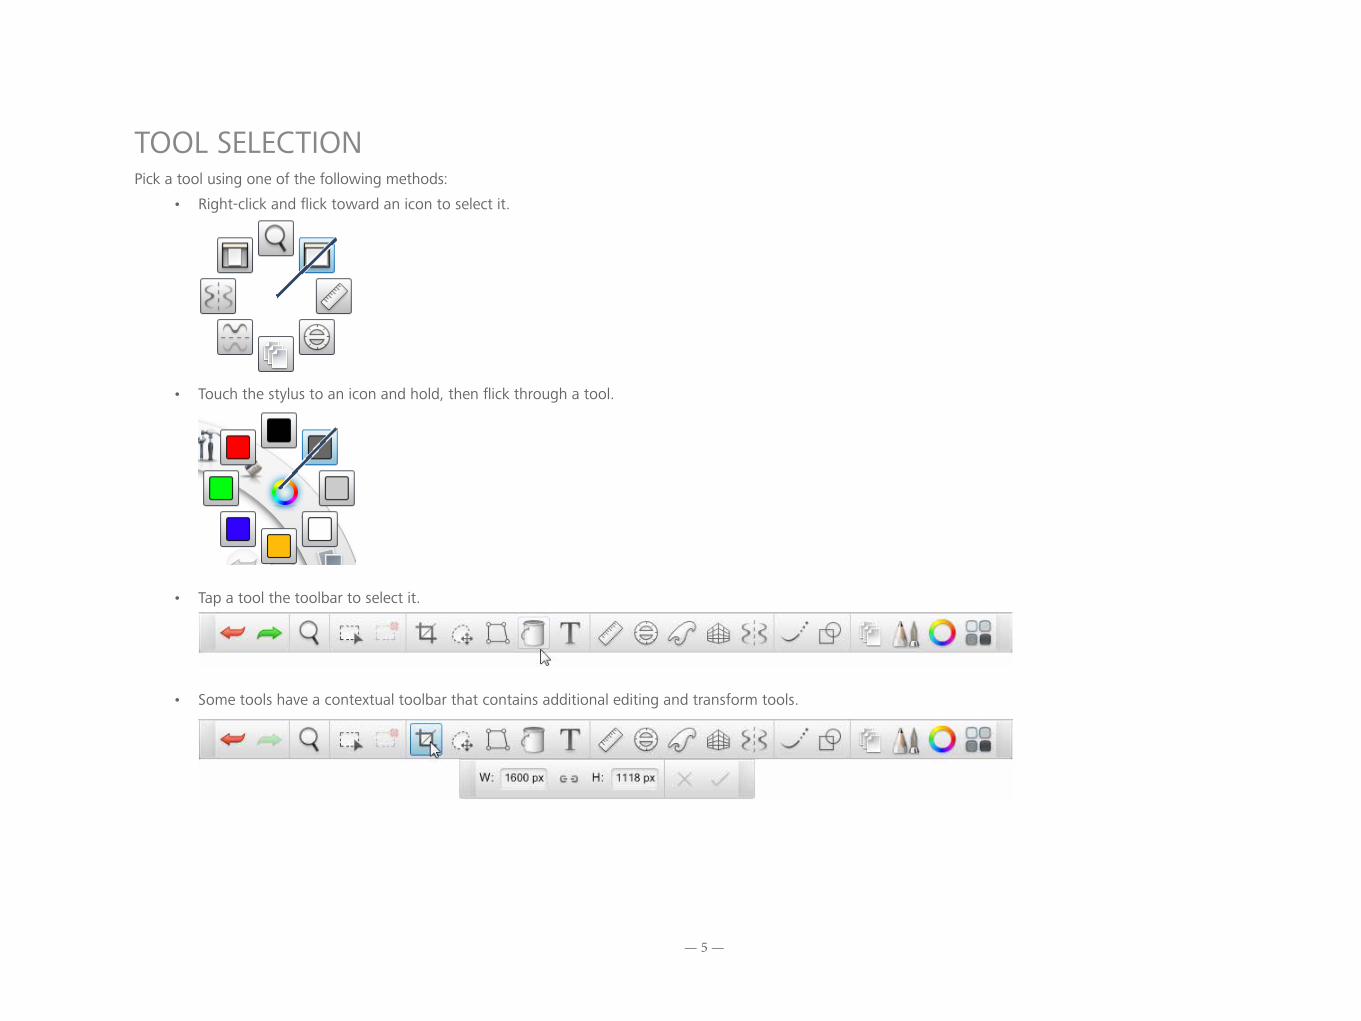
TOOL SELECTIONPick a tool using one of the following methods:
• Right-click and flick toward an icon to select it.
• Touch the stylus to an icon and hold, then flick through a tool.
• Tap a tool the toolbar to select it.
• Some tools have a contextual toolbar that contains additional editing and transform tools.
— 6 —
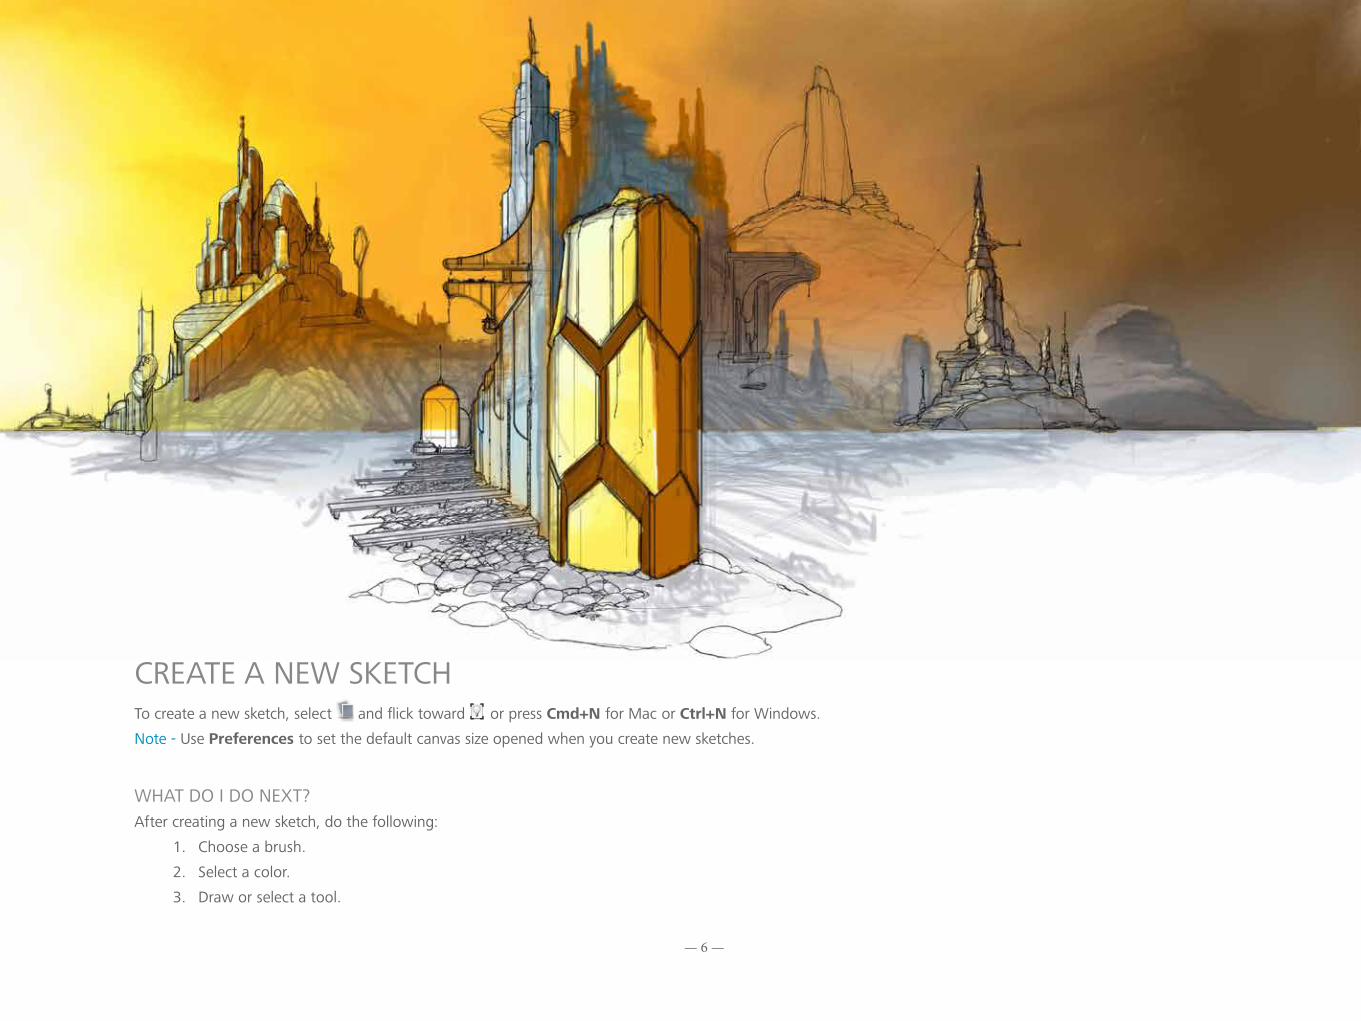
CREATE A NEW SKETCHTo create a new sketch, select and flick toward or press Cmd+N for Mac or Ctrl+N for Windows.
Note - Use Preferences to set the default canvas size opened when you create new sketches.
WHAT DO I DO NEXT?After creating a new sketch, do the following:
1. Choose a brush.
2. Select a color.
3. Draw or select a tool.

— 7 —
3Brushes
With SketchBook brushes, you won’t feel limited. Select from synthetic, effect, and texture to randomizing color, opacity, and size. Create DIY brushes and assign personalized icons to them. Share your brushes with friends or colleagues.

— 8 —
RESIZE A BRUSH To access the puck if not visible, select Window > Brush Puck. Hold down the B key or tap while in the puck and drag to the right to increase a brush’s size or left to decrease it.
To change brush size and opacity with the puck, in Edit > Preferences > Brush, select Change both brush size and opacity and tap OK.
To have the brush randomly change size as you lay down strokes, see Random Brush Size/Opacity.
CHANGING BRUSH OPACITYUse the O key to change the amount of paint applied by a brush. Tap a brush, then press-hold the O key as you drag up to increase a brush’s opacity or down to decrease it.
To have the brush randomly change size as you lay down strokes, see Random Brush Size/Opacity.
UNDO OR REDO A BRUSHSTROKE To undo the previous action, tap or press Cmd+Z for Mac or Ctrl+Z for Windows.
To redo an action, tap or press Shift+Cmd+Z for Mac or Ctrl+Y for Windows.
Note - You can change the number of undos in the General tab of the Preferences.
CHOOSE A BRUSH From the lagoon, tap a brush and start sketching. Select an eraser for modifications. You can also choose a brush from the Brush Palette.
Tip Tap-drag the bottom of the Brush Palette to expose more brushes or tap-drag upward within the palette for more brushes.
— 9 —
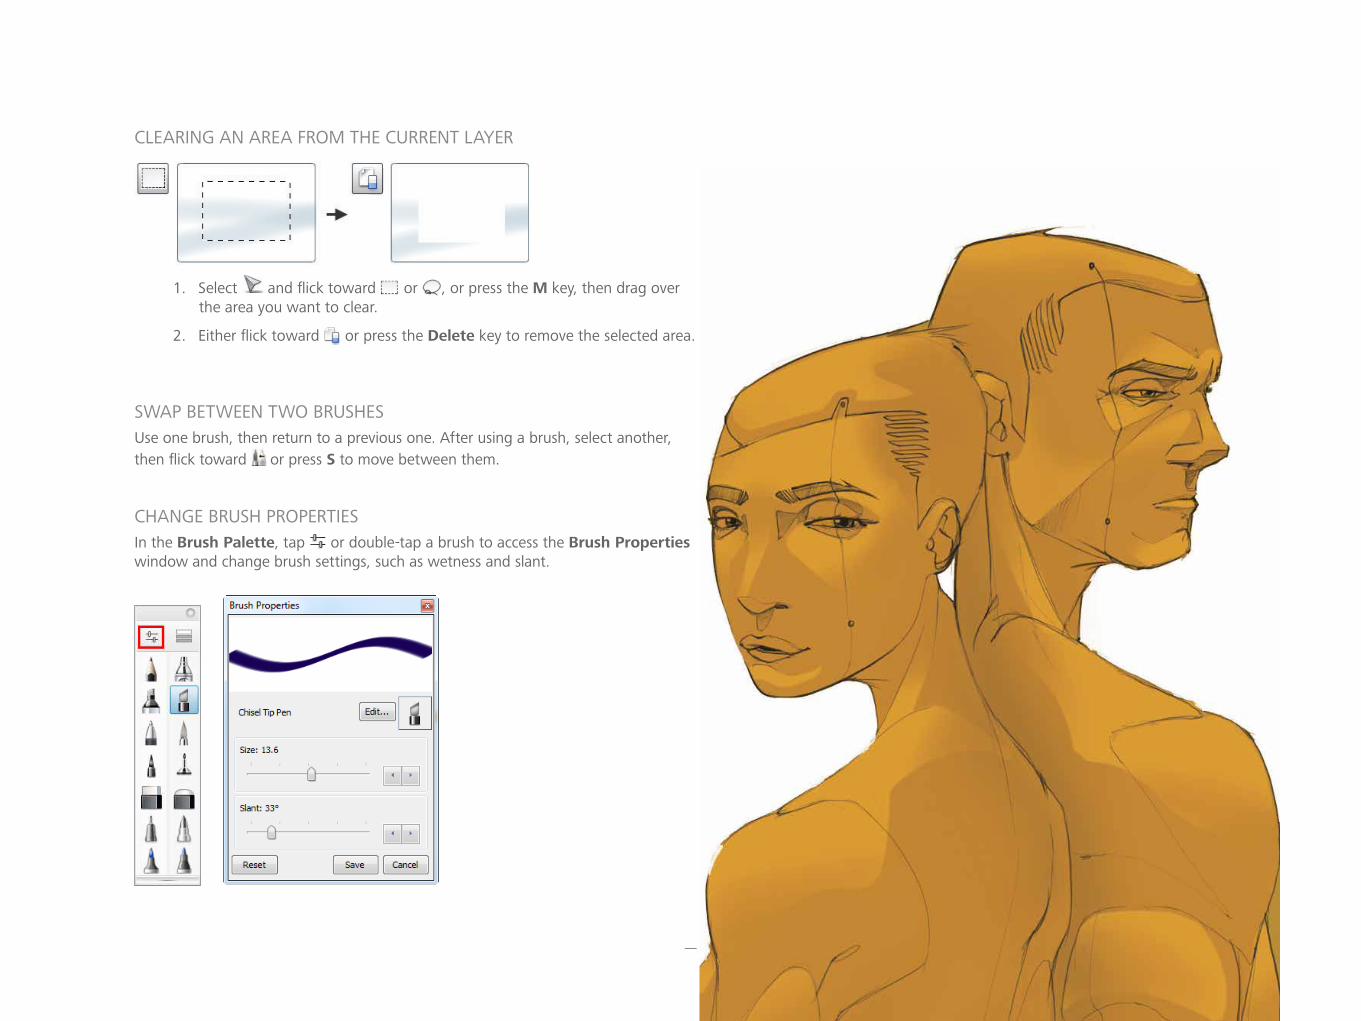
CLEARING AN AREA FROM THE CURRENT LAYER
1. Select and flick toward or , or press the M key, then drag over the area you want to clear.
2. Either flick toward or press the Delete key to remove the selected area.
SWAP BETWEEN TWO BRUSHES Use one brush, then return to a previous one. After using a brush, select another, then flick toward or press S to move between them.
CHANGE BRUSH PROPERTIES In the Brush Palette, tap or double-tap a brush to access the Brush Properties window and change brush settings, such as wetness and slant.
— 10 —
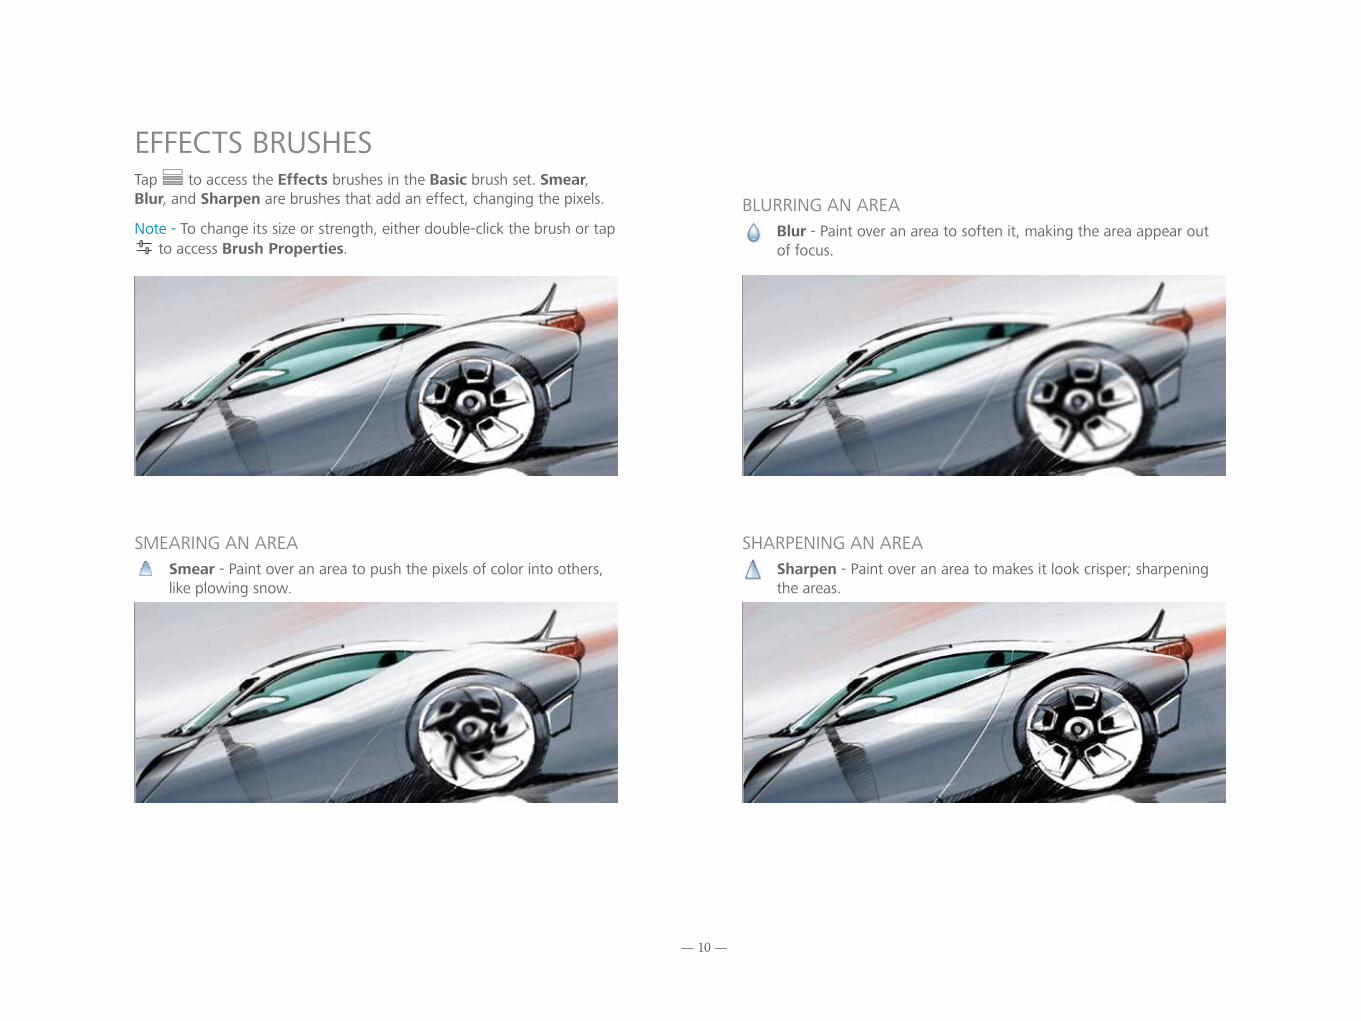
SMEARING AN AREASmear - Paint over an area to push the pixels of color into others, like plowing snow.
EFFECTS BRUSHESTap to access the Effects brushes in the Basic brush set. Smear, Blur, and Sharpen are brushes that add an effect, changing the pixels.
Note - To change its size or strength, either double-click the brush or tap to access Brush Properties.
BLURRING AN AREA Blur - Paint over an area to soften it, making the area appear out of focus.
SHARPENING AN AREA Sharpen - Paint over an area to makes it look crisper; sharpening the areas.
— 11 —
BRUSH LIBRARYIn the Brush Palette, tap to access the Brush Library.
It contains an assortment of default brush sets, including a set of Copic brushes, Smudge brushes, and Synthetic Paint brushes. Create Do-It-Yourself brushes.
Create custom sets to group and manage brushes. Export sets for others to use or save them to an external drive. Import and use brush sets created by others. Label your brush sets to help identify them.
In the Brush Library, tap to access the following options:
New Brush Set – Create a new brush set.
Rename Brush Set – Change the name of the selected brush set.
Export brush set – Share brushes with people working on different platforms.
Import Brush Set – Load an exported zipped brush set file into the Brush Library.
Delete Brush Set – Remove the selected brush set from the Brush Library.
New Brush – Create a new brush and add it to the selected brush set.
Copy Brush – Create a duplicate of a selected brush and add it to the selected brush set.
Delete Brush – Permanently remove a selected brush.
CUSTOMIZE THE BRUSH PALETTE Replace default brushes with others to create a customized
palette.
1. Tap , then select a brush from the Brush Library.
2. Tap-drag it onto the palette.
— 12 —
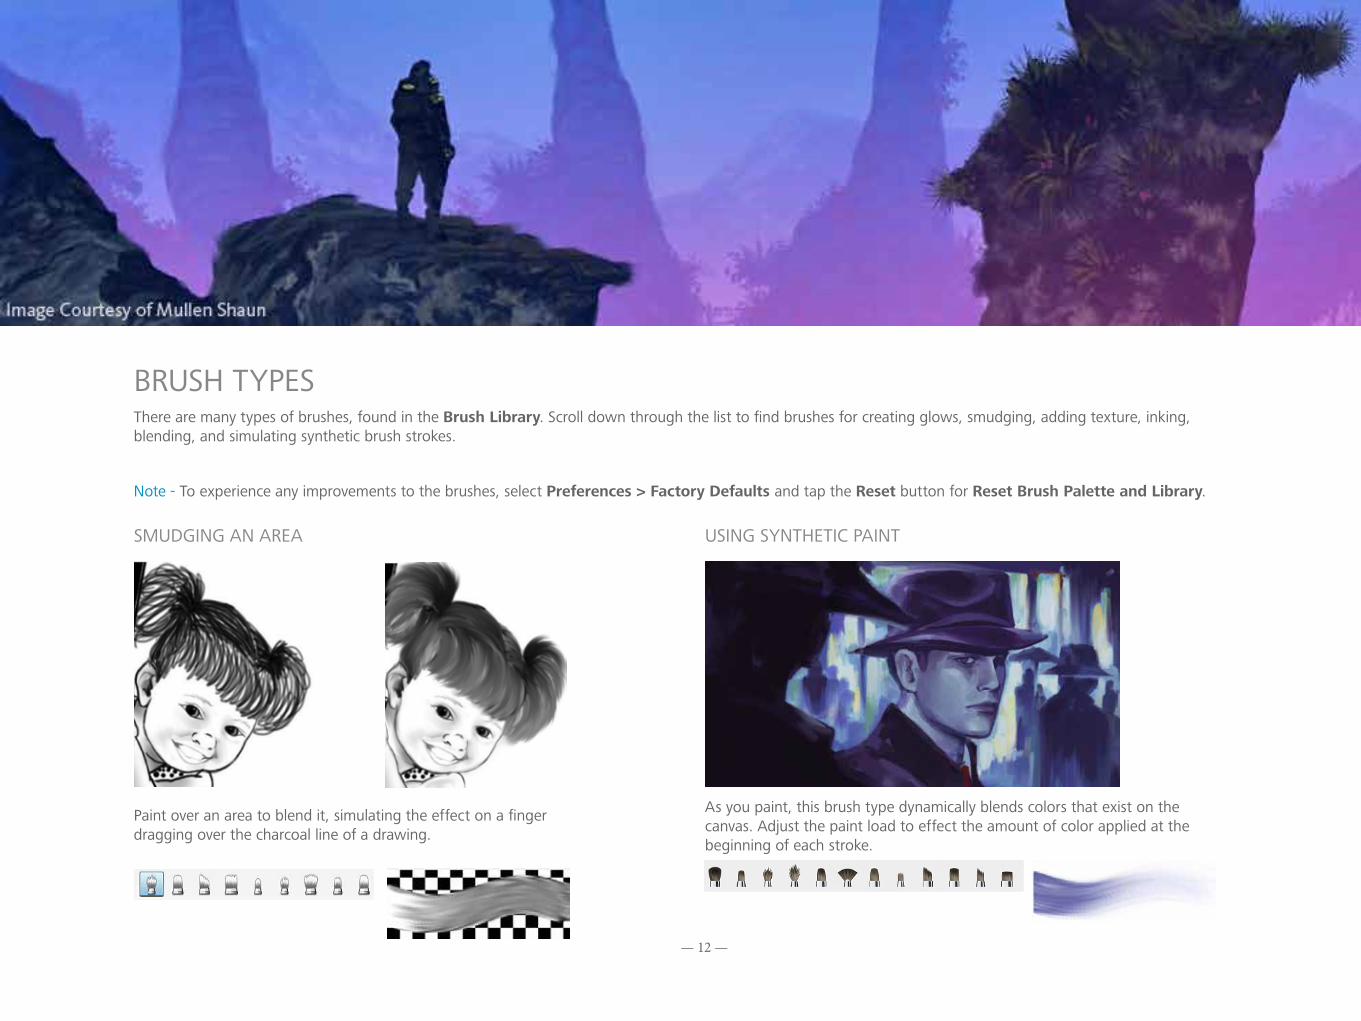
BRUSH TYPESThere are many types of brushes, found in the Brush Library. Scroll down through the list to find brushes for creating glows, smudging, adding texture, inking, blending, and simulating synthetic brush strokes.
Note - To experience any improvements to the brushes, select Preferences > Factory Defaults and tap the Reset button for Reset Brush Palette and Library.
USING SYNTHETIC PAINT
As you paint, this brush type dynamically blends colors that exist on the canvas. Adjust the paint load to effect the amount of color applied at the beginning of each stroke.
SMUDGING AN AREA
Paint over an area to blend it, simulating the effect on a finger dragging over the charcoal line of a drawing.
— 13 —
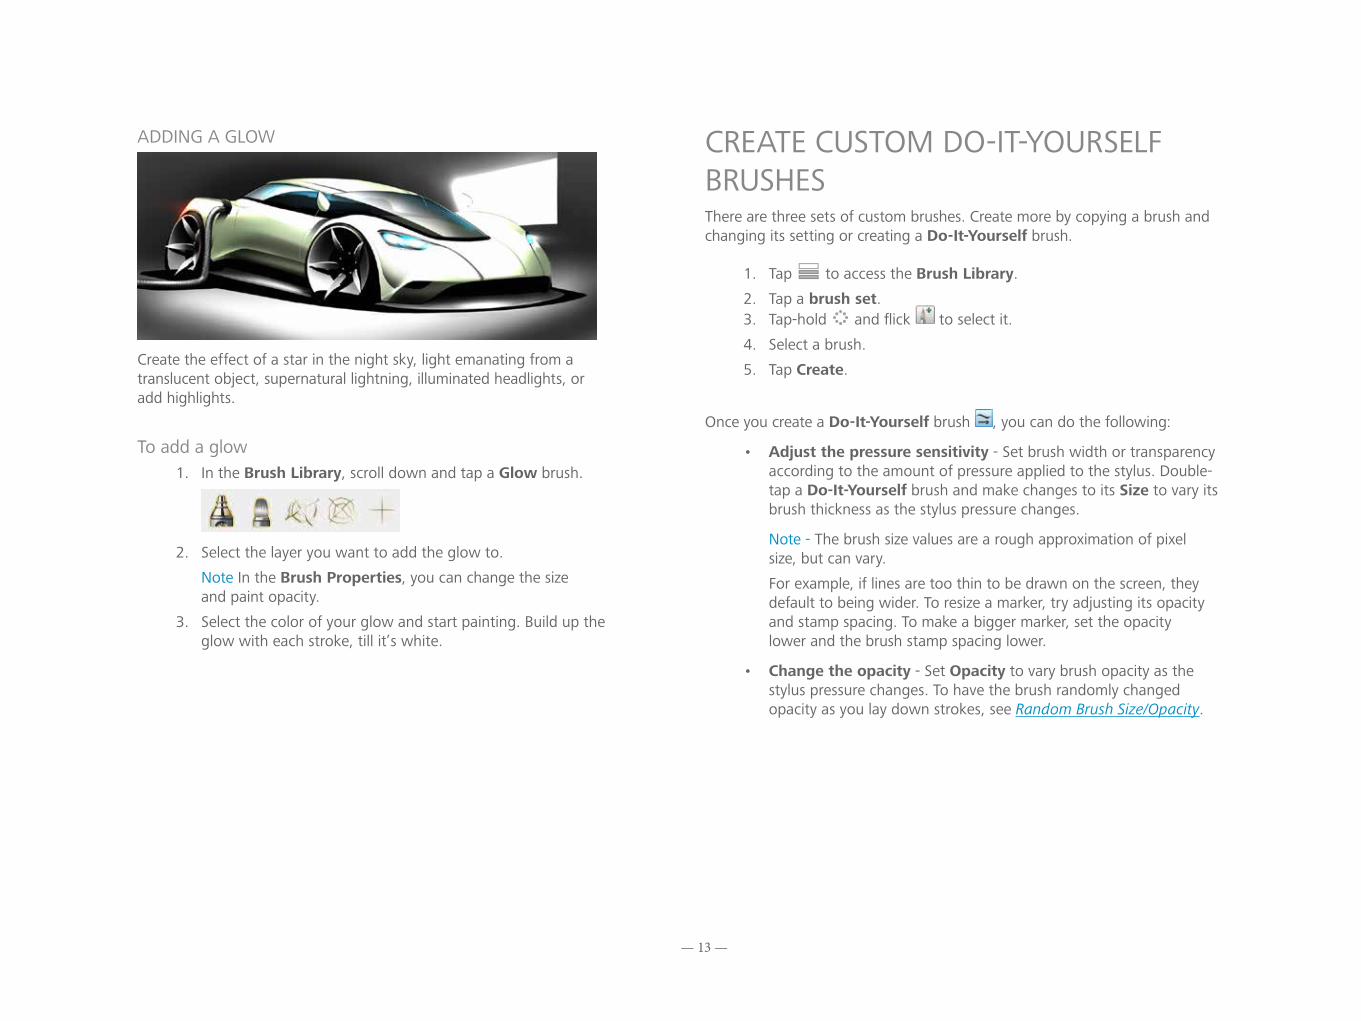
ADDING A GLOW
Create the effect of a star in the night sky, light emanating from a translucent object, supernatural lightning, illuminated headlights, or add highlights.
To add a glow1. In the Brush Library, scroll down and tap a Glow brush.
2. Select the layer you want to add the glow to.
Note In the Brush Properties, you can change the size and paint opacity.
3. Select the color of your glow and start painting. Build up the glow with each stroke, till it’s white.
CREATE CUSTOM DO-IT-YOURSELF BRUSHESThere are three sets of custom brushes. Create more by copying a brush and changing its setting or creating a Do-It-Yourself brush.
1. Tap to access the Brush Library.
2. Tap a brush set.3. Tap-hold and flick to select it.
4. Select a brush.
5. Tap Create.
Once you create a Do-It-Yourself brush , you can do the following:
• Adjust the pressure sensitivity - Set brush width or transparency according to the amount of pressure applied to the stylus. Double-tap a Do-It-Yourself brush and make changes to its Size to vary its brush thickness as the stylus pressure changes.
Note - The brush size values are a rough approximation of pixel size, but can vary.
For example, if lines are too thin to be drawn on the screen, they default to being wider. To resize a marker, try adjusting its opacity and stamp spacing. To make a bigger marker, set the opacity lower and the brush stamp spacing lower.
• Change the opacity - Set Opacity to vary brush opacity as the stylus pressure changes. To have the brush randomly changed opacity as you lay down strokes, see Random Brush Size/Opacity.
— 14 —
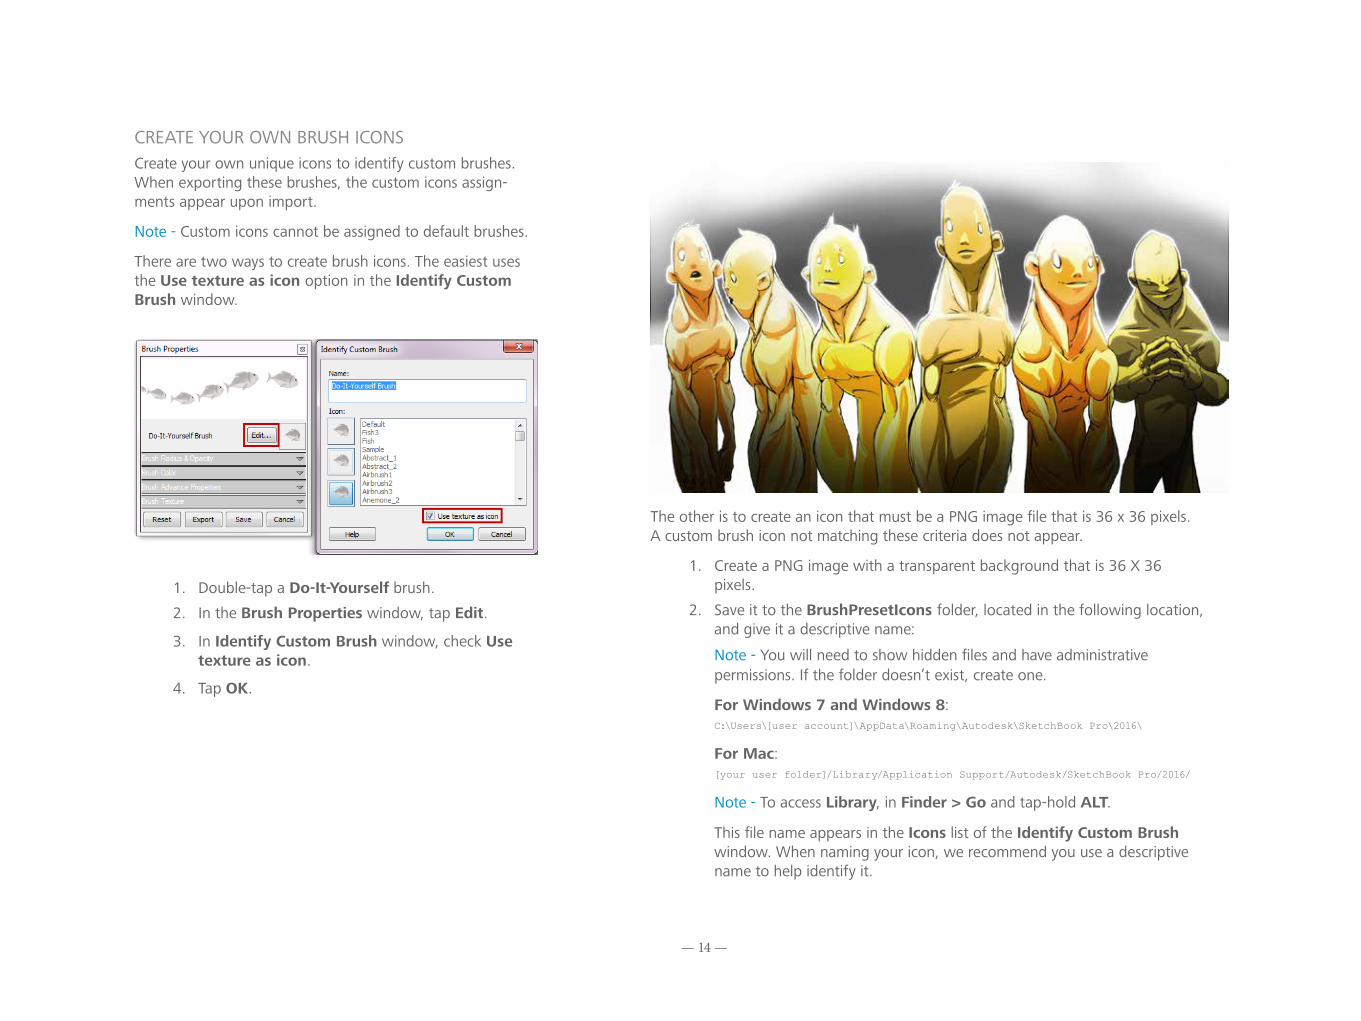
CREATE YOUR OWN BRUSH ICONSCreate your own unique icons to identify custom brushes. When exporting these brushes, the custom icons assign-ments appear upon import.
Note - Custom icons cannot be assigned to default brushes.
There are two ways to create brush icons. The easiest uses the Use texture as icon option in the Identify Custom Brush window.
1. Double-tap a Do-It-Yourself brush.
2. In the Brush Properties window, tap Edit.
3. In Identify Custom Brush window, check Use texture as icon.
4. Tap OK.
The other is to create an icon that must be a PNG image file that is 36 x 36 pixels. A custom brush icon not matching these criteria does not appear.
1. Create a PNG image with a transparent background that is 36 X 36 pixels.
2. Save it to the BrushPresetIcons folder, located in the following location, and give it a descriptive name:
Note - You will need to show hidden files and have administrative permissions. If the folder doesn’t exist, create one.
For Windows 7 and Windows 8:C:\Users\[user account]\AppData\Roaming\Autodesk\SketchBook Pro\2016\
For Mac:[your user folder]/Library/Application Support/Autodesk/SketchBook Pro/2016/
Note - To access Library, in Finder > Go and tap-hold ALT.
This file name appears in the Icons list of the Identify Custom Brush window. When naming your icon, we recommend you use a descriptive name to help identify it.
— 15 —
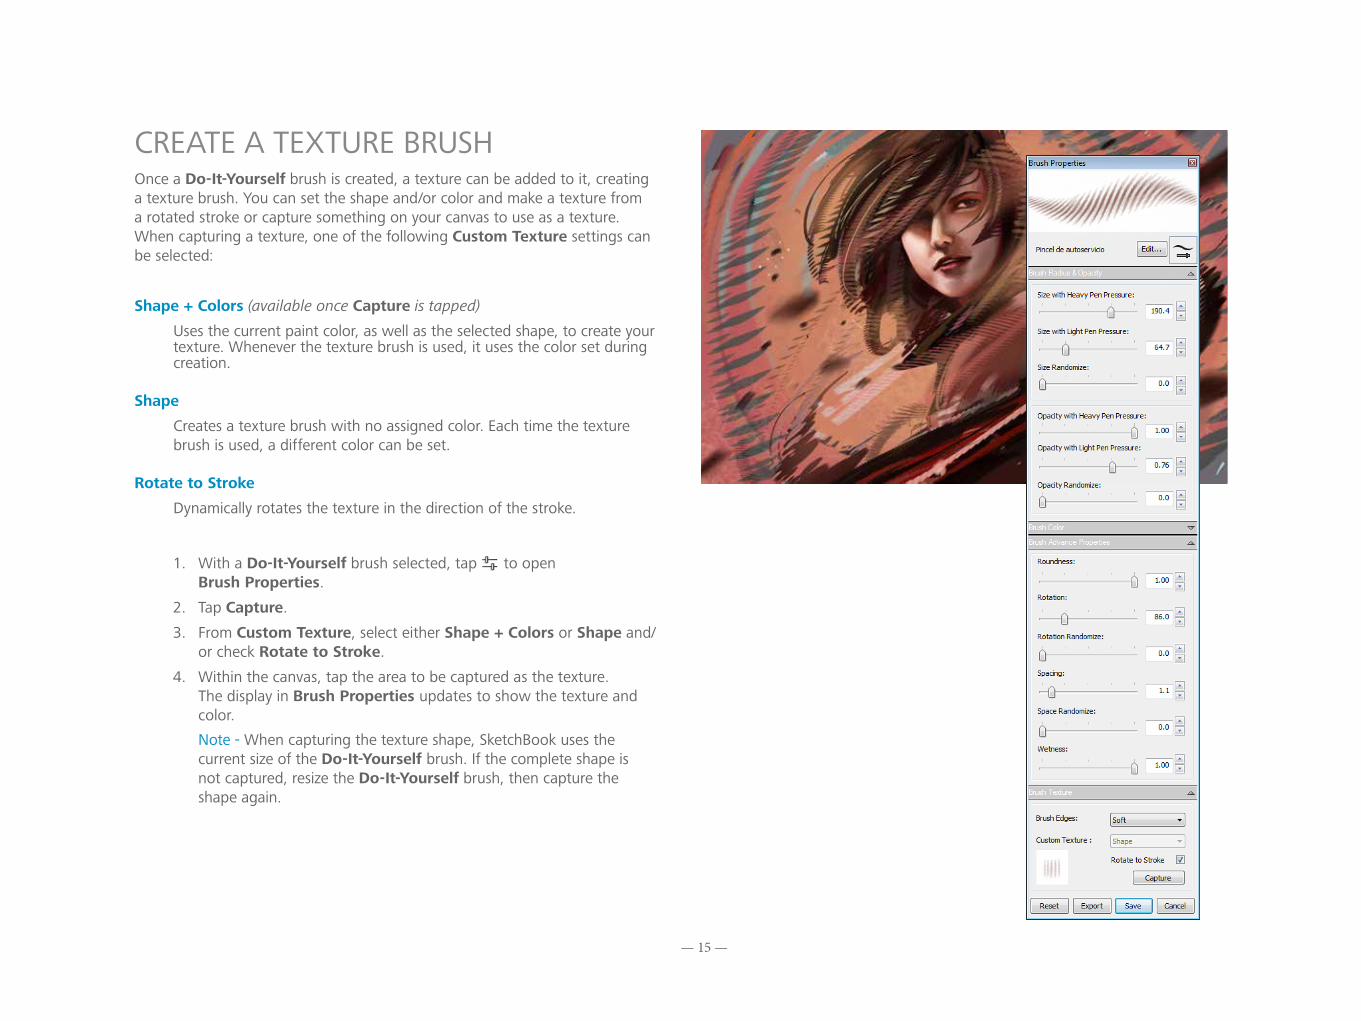
CREATE A TEXTURE BRUSHOnce a Do-It-Yourself brush is created, a texture can be added to it, creating a texture brush. You can set the shape and/or color and make a texture from a rotated stroke or capture something on your canvas to use as a texture. When capturing a texture, one of the following Custom Texture settings can be selected:
Shape + Colors (available once Capture is tapped)
Uses the current paint color, as well as the selected shape, to create your texture. Whenever the texture brush is used, it uses the color set during creation.
Shape
Creates a texture brush with no assigned color. Each time the texture brush is used, a different color can be set.
Rotate to Stroke
Dynamically rotates the texture in the direction of the stroke.
1. With a Do-It-Yourself brush selected, tap to open Brush Properties.
2. Tap Capture.
3. From Custom Texture, select either Shape + Colors or Shape and/ or check Rotate to Stroke.
4. Within the canvas, tap the area to be captured as the texture. The display in Brush Properties updates to show the texture and color.
Note - When capturing the texture shape, SketchBook uses the current size of the Do-It-Yourself brush. If the complete shape is not captured, resize the Do-It-Yourself brush, then capture the shape again.
— 16 —
MODIFYING A TEXTURE BRUSHThere are many ways to modify a texture brush, from resetting it, opening its properties and changing settings, changing a stroke, to assign a permanent color to it.
• Changing texture brush properties - Change attributes of a texture brush.
• Changing a texture - Change the stroke used by a texture brush.
• Setting color on a Shape texture brush - Set a different color for a texture brush.
• Adjust the brush stamp for a Do-It-Yourself brush - Adjust the roundness, rotation, spacing, space randomize, rotation randomize, and brush edge of a Do-It-Yourself brush.
• Setting brush stamp roundness and rotation - Use the Roundness and Rotation sliders in the Brush Properties window to control the shape of the brush stamp.
• Setting brush spacing - Use the Spacing slider in the Brush Properties window to control the spacing between these stamps.
• Replacing a custom brush icon - In the Identify Custom Brush window, select an item from the Icon list (Create your own brush icons).
• Setting brush edges - Normally, the brush type you have selected determines this setting. To achieve certain effects, change it.
• Soft edges gives soft, feathered brush edges. For example, an airbrush.
• Solid edges gives hard edges that still bleed slightly. For example, markers or ballpoint pens.
• Hard edges are hard. For example, a calligraphy pen on high-quality paper stock, or lines from computer drafting software.
• Identify a custom brush - Rename a custom brush or eraser (Rename a texture brush), or change its icon appearing in the expanded area at the bottom of the Brush Properties (Create your own brush icons).
Note - You cannot change the name or icon for the default brushes.
Tip - If you keep Brush Properties open when using a texture brush, you can change rotate the texture or change any other settings as you sketch.
RENAME A TEXTURE BRUSH1. In the Brush Library, tap a texture brush.
2. Tap .
3. In the Brush Properties window, tap Edit.
4. Rename the brush.
5. Tap OK.
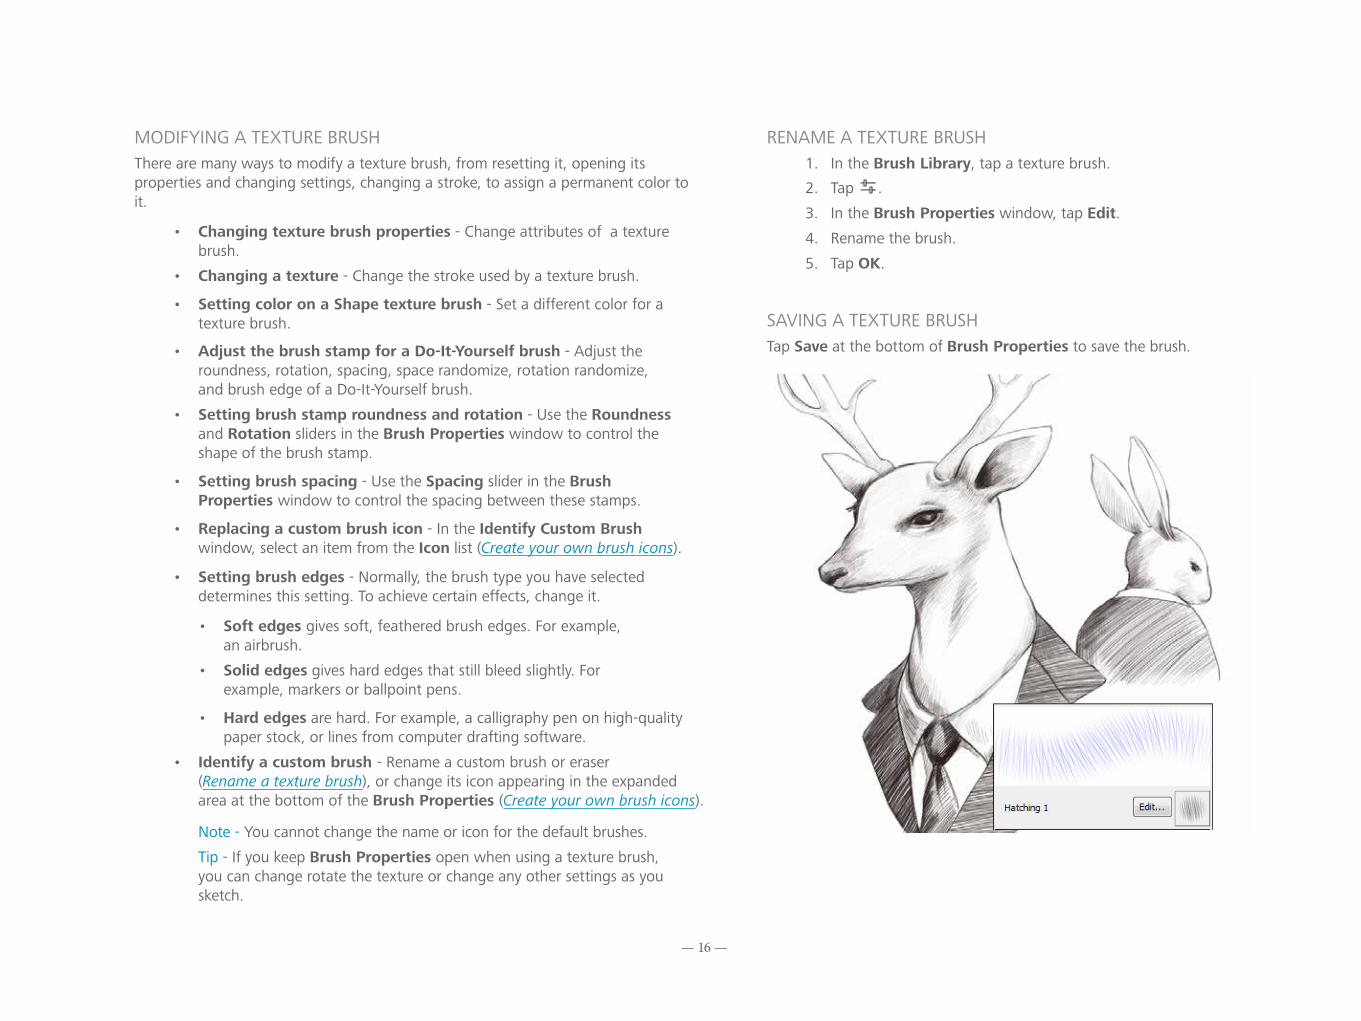
SAVING A TEXTURE BRUSHTap Save at the bottom of Brush Properties to save the brush.
— 17 —
RANDOM BRUSH SIZE/OPACITYQuickly lay down strokes of varying size and opacity, using the same brush. Set a range for the size and opacity of a brush.
1. Create custom Do-It-Yourself brushes or select a Traditional, Texture, Shape, or Splatter brush.
2. Tap to open Brush Properties.
3. In the Brush Radius & Opacity section, drag the Opacity Randomize or Size Randomize sliders to set the opacity and size range of the brush stamp.
4. Tap Save.
RANDOM BRUSH RADIUS/SPACINGQuickly lay down strokes with varying stamp rotation and spacing, using the same brush. Set a range for the rotation and spacing of a stamp.
1. Create custom Do-It-Yourself brushes or select a Traditional, Texture, Shape, or Splatter brush.
2. Tap to open Brush Properties.
3. In the Brush Advanced Properties section:
• Drag the Rotation Randomize slider to set the brush radius range.
• Drag the Space Randomize slider to set the brush transparency range.
4. Tap Save.
RANDOMIZEQuickly lay down stokes with variations in
color, size, and/or opacity, without the interruption of going into the Brush Properties or Color Editor to change these values.
RANDOM COLOR CONTROLSQuickly lay down varying colored
strokes using the same brush. Set a hue, saturation, and/or brightness range for the active color.
1. Create custom Do-It-Yourself brushes or select a Traditional, Texture, Shape, or Splatter brush.
2. Tap to open Brush Properties.
3. In the Brush Color section:
• Drag the Hue Randomize slider to set the hue range of the stroke.
• Drag the Saturation Randomize slider to set the saturation range of the stroke.
• Drag the Brightness Randomize slider to set the brightness range of the stroke.
4. Tap Save.
— 18 —
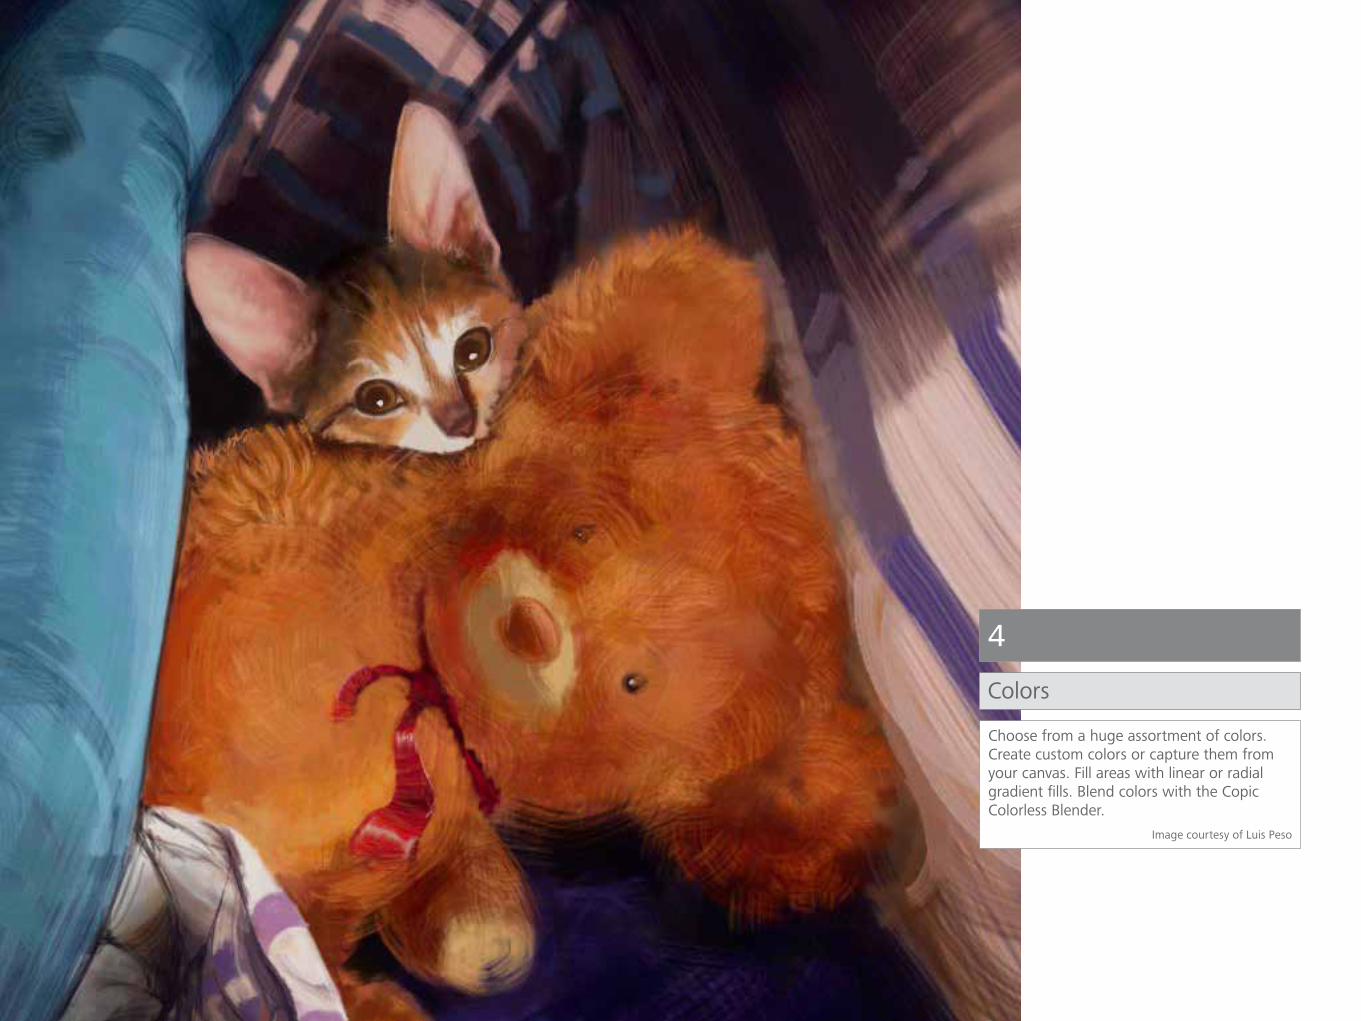
4Colors
Choose from a huge assortment of colors. Create custom colors or capture them from your canvas. Fill areas with linear or radial gradient fills. Blend colors with the Copic Colorless Blender.
Image courtesy of Luis Peso

— 19 —
COLORSTap , then flick toward a color.
CREATE A CUSTOM COLOR
Tap the Color Puck to access the Color Wheel and mix a color of your own.
COLOR EDITOR (WINDOWS)
1
2
3
4
5
6
Tap , then flick toward a color, tap to access the Color Editor, or select
Window > Color Editor to access the Color Editor.
Note - If you flick , your brush will erase existing color pixels on that layer. See Using a transparent color for more information.
1. RGB
2. Swatch (current color)
3. Customized palette (drop down)
4. Color Picker
5. Color Wheel
6. Saturation/Luminance Slider
SET THE RGBIn the Color Editor, tap the RGB fields and add numeric values. The color in the Color Wheel changes to display a color with those RGB values.
SHOW/HIDE PARTS OF THE EDITORTap the arrow at the top or bottom of the editor to show/hide parts of the editor.
PICK A COLOR FROM THE SCREENIn the Color Editor, tap , move over a color, then lift your stylus to pick the color. A swatch appears.

— 20 —
COLOR EDITOR (MAC)1
2
3
4
5
6
1. Tabs (various methods for picking colors):
Choose a hue or tints and the value (light).
Specify a color using color gradients, such as gray scale, RGB, CMYK, or HSB values.
Choose from a lists of colors (Apple, Developer, Crayons, Web Safe), or create your own list of colors.
Choose a color from a spectrum of hues and values.
Pick from 48 colors displayed as a box of crayons.
2. Swatch (current color)
3. Slider
4. Customized palette
5. Color Wheel
6. Magnifying glass (color picker)
PICK A COLOR FROM THE SCREEN Tap to change the cursor to . Move over and tap a color on your screen.
CREATE A CUSTOMIZED COLOR PALETTE Drag a color chip from the swatch to the palette at the bottom of the Color Editor.
SAVING A CUSTOMIZED COLOR PALETTE The next time SketchBook opens, your customized color palette appears.
— 21 —
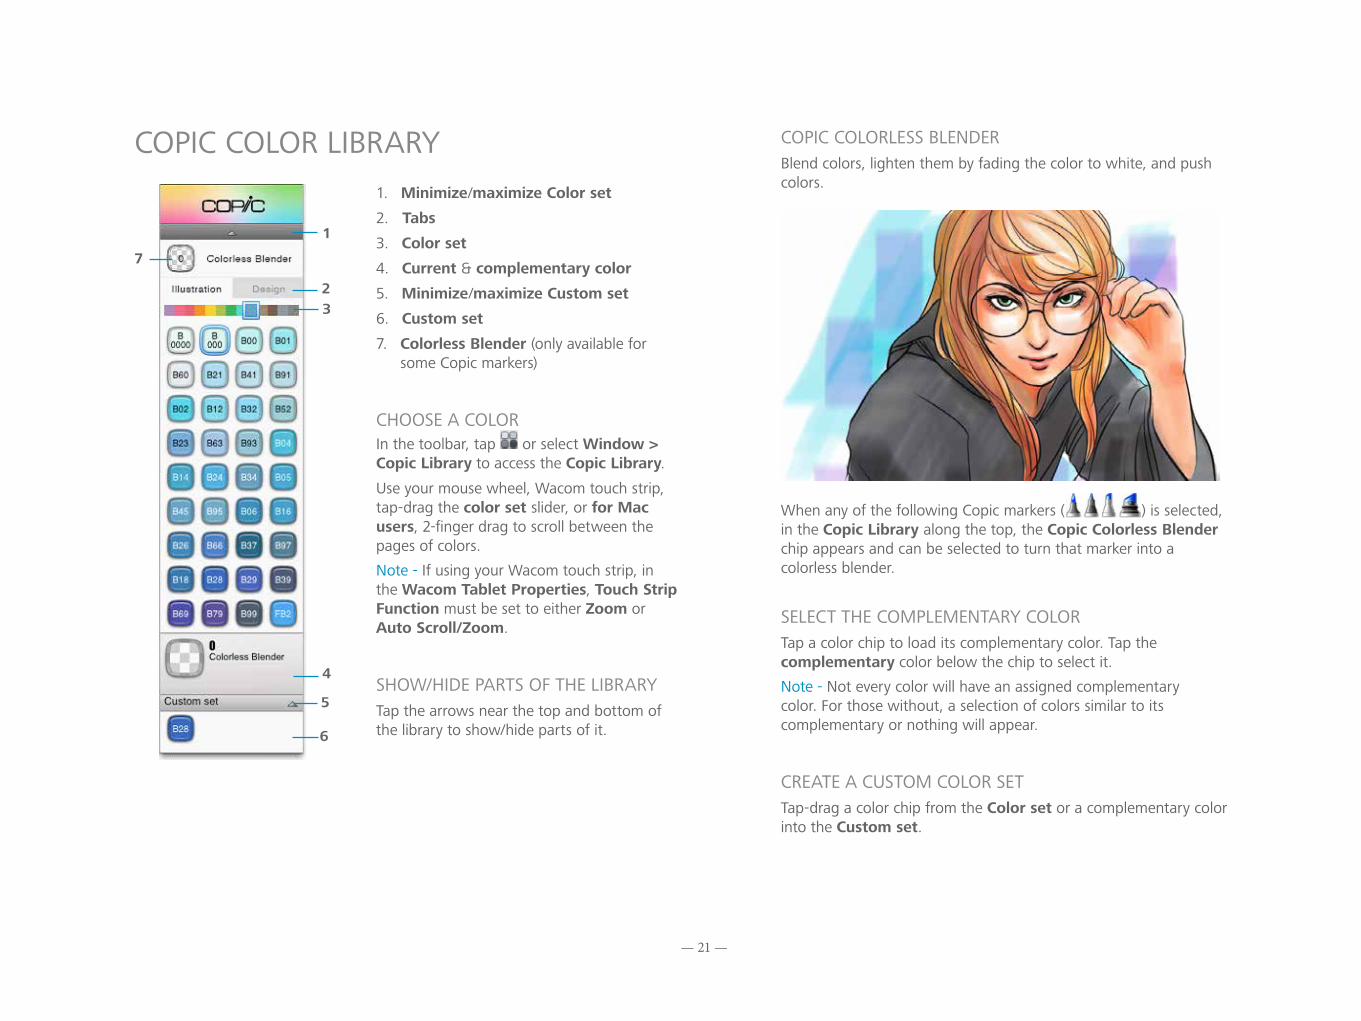
COPIC COLOR LIBRARY
1
23
4
5
6
7
1. Minimize/maximize Color set
2. Tabs
3. Color set
4. Current & complementary color
5. Minimize/maximize Custom set
6. Custom set
7. Colorless Blender (only available for some Copic markers)
CHOOSE A COLOR In the toolbar, tap or select Window > Copic Library to access the Copic Library.
Use your mouse wheel, Wacom touch strip, tap-drag the color set slider, or for Mac users, 2-finger drag to scroll between the pages of colors.
Note - If using your Wacom touch strip, in the Wacom Tablet Properties, Touch Strip Function must be set to either Zoom or Auto Scroll/Zoom.
SHOW/HIDE PARTS OF THE LIBRARY Tap the arrows near the top and bottom of the library to show/hide parts of it.
COPIC COLORLESS BLENDER Blend colors, lighten them by fading the color to white, and push colors.
When any of the following Copic markers ( ) is selected, in the Copic Library along the top, the Copic Colorless Blender chip appears and can be selected to turn that marker into a colorless blender.
SELECT THE COMPLEMENTARY COLOR Tap a color chip to load its complementary color. Tap the complementary color below the chip to select it.
Note - Not every color will have an assigned complementary color. For those without, a selection of colors similar to its complementary or nothing will appear.
CREATE A CUSTOM COLOR SET Tap-drag a color chip from the Color set or a complementary color into the Custom set.
— 22 —
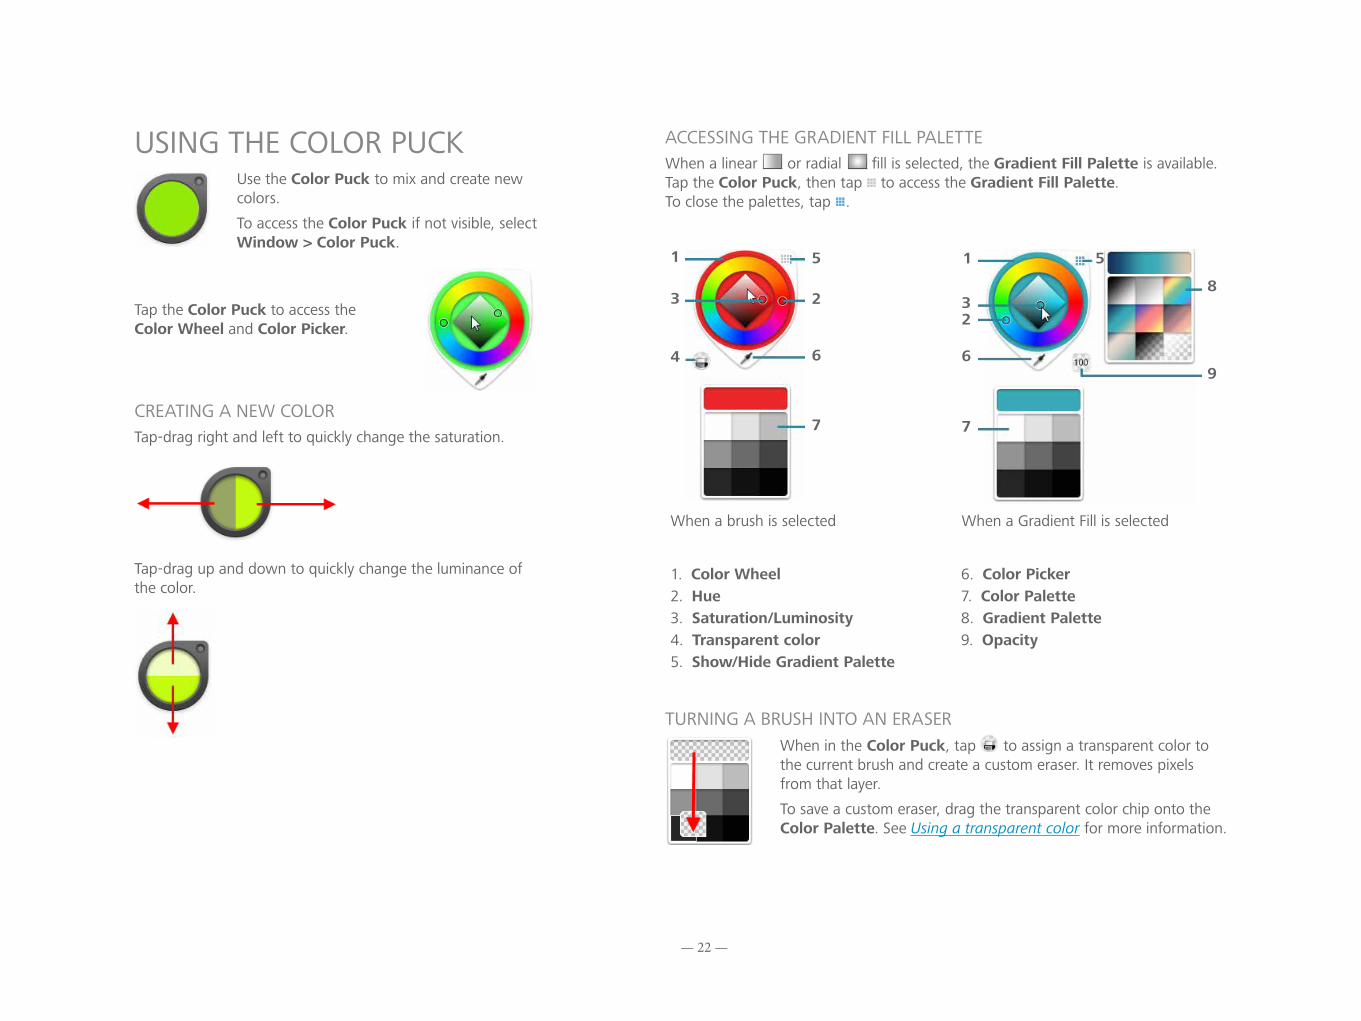
USING THE COLOR PUCKUse the Color Puck to mix and create new colors.
To access the Color Puck if not visible, select Window > Color Puck.
Tap the Color Puck to access the Color Wheel and Color Picker.
CREATING A NEW COLORTap-drag right and left to quickly change the saturation.
Tap-drag up and down to quickly change the luminance of the color.
ACCESSING THE GRADIENT FILL PALETTEWhen a linear or radial fill is selected, the Gradient Fill Palette is available. Tap the Color Puck, then tap to access the Gradient Fill Palette. To close the palettes, tap .
1
23
4
5
6
7
1
23
5
6
7
8
9
When a brush is selected When a Gradient Fill is selected
1. Color Wheel2. Hue3. Saturation/Luminosity4. Transparent color5. Show/Hide Gradient Palette
6. Color Picker7. Color Palette8. Gradient Palette9. Opacity
TURNING A BRUSH INTO AN ERASERWhen in the Color Puck, tap to assign a transparent color to the current brush and create a custom eraser. It removes pixels from that layer.
To save a custom eraser, drag the transparent color chip onto the Color Palette. See Using a transparent color for more information.
— 23 —
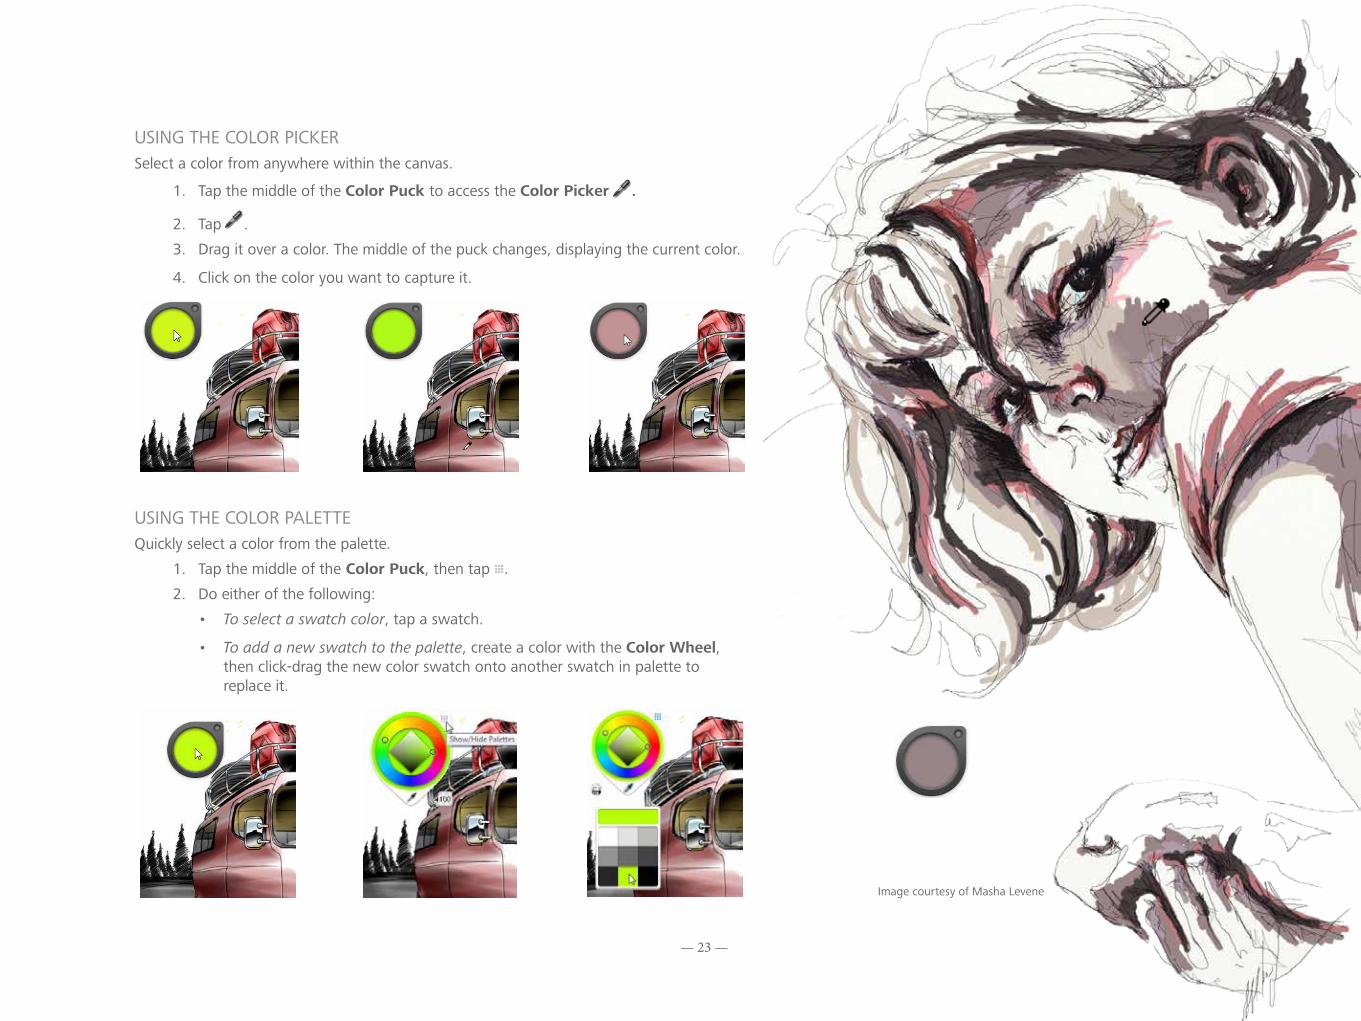
USING THE COLOR PICKERSelect a color from anywhere within the canvas.
1. Tap the middle of the Color Puck to access the Color Picker .
2. Tap .
3. Drag it over a color. The middle of the puck changes, displaying the current color.
4. Click on the color you want to capture it.
USING THE COLOR PALETTEQuickly select a color from the palette.
1. Tap the middle of the Color Puck, then tap .
2. Do either of the following:
• To select a swatch color, tap a swatch.
• To add a new swatch to the palette, create a color with the Color Wheel, then click-drag the new color swatch onto another swatch in palette to replace it.
Image courtesy of Masha Levene
— 24 —
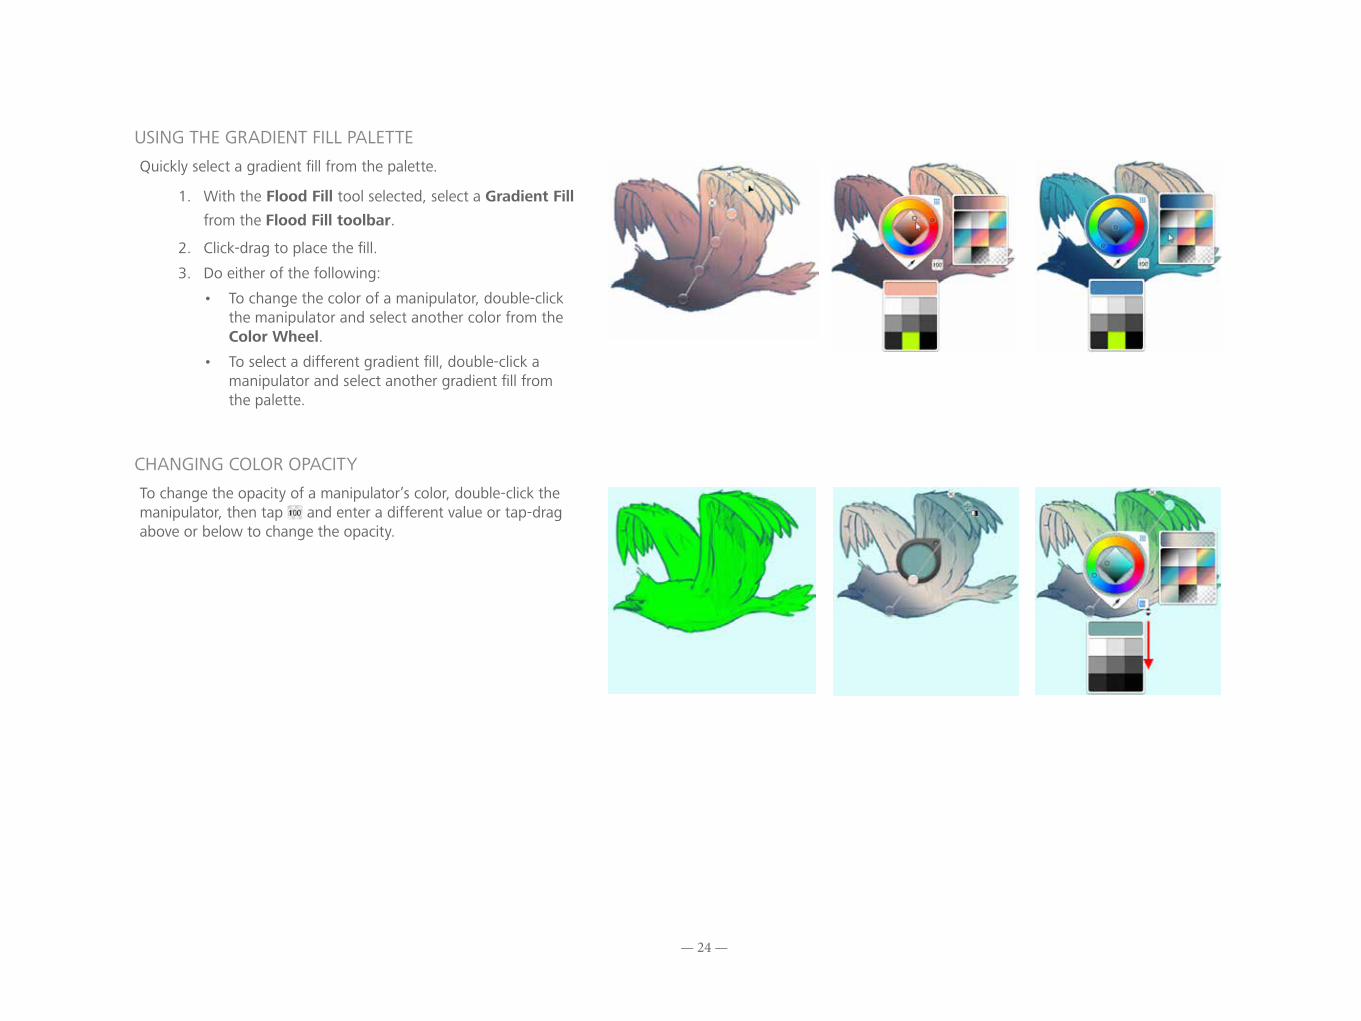
USING THE GRADIENT FILL PALETTE
Quickly select a gradient fill from the palette.
1. With the Flood Fill tool selected, select a Gradient Fill from the Flood Fill toolbar.
2. Click-drag to place the fill.
3. Do either of the following:
• To change the color of a manipulator, double-click the manipulator and select another color from the Color Wheel.
• To select a different gradient fill, double-click a manipulator and select another gradient fill from the palette.
CHANGING COLOR OPACITY
To change the opacity of a manipulator’s color, double-click the manipulator, then tap and enter a different value or tap-drag above or below to change the opacity.
— 25 —
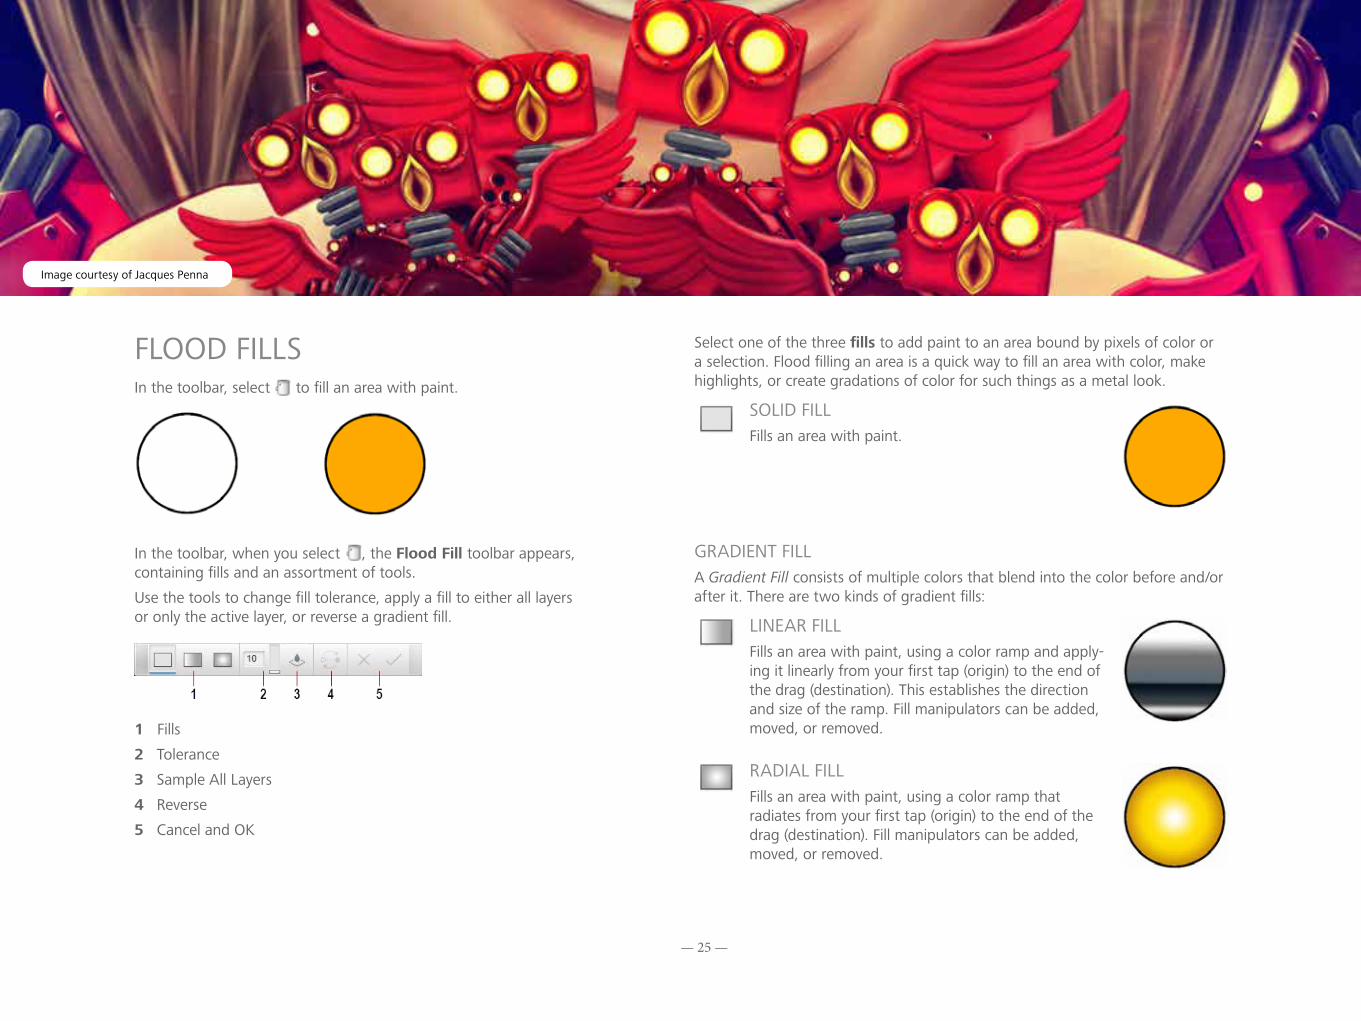
FLOOD FILLSIn the toolbar, select to fill an area with paint.
In the toolbar, when you select , the Flood Fill toolbar appears, containing fills and an assortment of tools.
Use the tools to change fill tolerance, apply a fill to either all layers or only the active layer, or reverse a gradient fill.
1 Fills
2 Tolerance
3 Sample All Layers
4 Reverse
5 Cancel and OK
Select one of the three fills to add paint to an area bound by pixels of color or a selection. Flood filling an area is a quick way to fill an area with color, make highlights, or create gradations of color for such things as a metal look.
SOLID FILL Fills an area with paint.
GRADIENT FILLA Gradient Fill consists of multiple colors that blend into the color before and/or after it. There are two kinds of gradient fills:
LINEAR FILL Fills an area with paint, using a color ramp and apply-ing it linearly from your first tap (origin) to the end of the drag (destination). This establishes the direction and size of the ramp. Fill manipulators can be added, moved, or removed.
RADIAL FILL Fills an area with paint, using a color ramp that radiates from your first tap (origin) to the end of the drag (destination). Fill manipulators can be added, moved, or removed.
Image courtesy of Jacques Penna

— 26 —
FLOOD FILL AN AREA Fill either the active or all visible layers with color.
To accept the fill, click . To decline the fill, click .
FLOOD FILL AN ACTIVE LAYER In the toolbar, tap . In the Fill toolbar, tap , select a fill ( ), then click an area to fill that area on that layer. Click .
FLOOD FILL ALL VISIBLE LAYERS In the Fill toolbar, tap then click an area to fill that area in all visible areas. Click .
GRADIENT FILL AN AREA Quickly select a gradient fill from the palette.
1. Create an area to be filled.
2. With the Flood Fill tool selected, select a Gradient Fill ( or ) from the Flood Fill toolbar.
3. Click-drag to place the fill.
4. Do either of the following:
• To change the color of a manipulator , double-click the manipulator and select another color from the Color Wheel.
• To select a different gradient fill, double-click a manipulator and select another gradient fill from the palette.
• To reposition the Fill manipulators, tap-drag them one at a time and move them into position.
• To add a manipulator, tap along the axis between manipulators.
• To delete a manipulator, tap the Delete manipulator.
• To change the tolerances of a fill, in the Fill toolbar, tap-drag the Tolerance slider. Increase the tolerance to increase the range of colored pixels affected by the fill. Decrease the fill to reduce this.
— 27 —
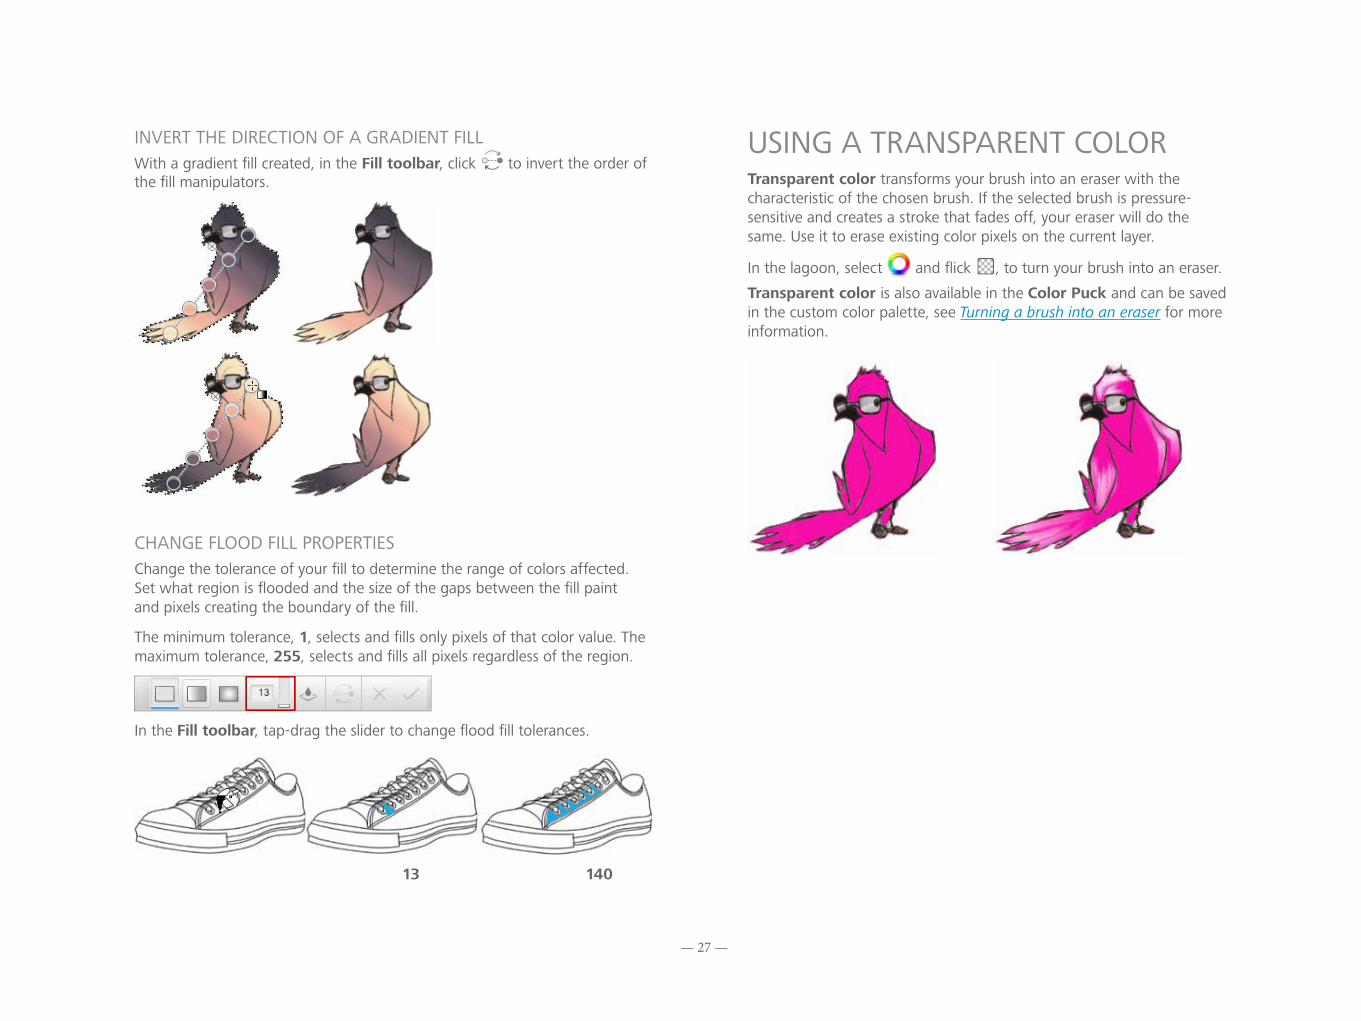
INVERT THE DIRECTION OF A GRADIENT FILLWith a gradient fill created, in the Fill toolbar, click to invert the order of the fill manipulators.
CHANGE FLOOD FILL PROPERTIESChange the tolerance of your fill to determine the range of colors affected. Set what region is flooded and the size of the gaps between the fill paint and pixels creating the boundary of the fill.
The minimum tolerance, 1, selects and fills only pixels of that color value. The maximum tolerance, 255, selects and fills all pixels regardless of the region.
In the Fill toolbar, tap-drag the slider to change flood fill tolerances.
13 140
USING A TRANSPARENT COLORTransparent color transforms your brush into an eraser with the characteristic of the chosen brush. If the selected brush is pressure-sensitive and creates a stroke that fades off, your eraser will do the same. Use it to erase existing color pixels on the current layer.
In the lagoon, select and flick , to turn your brush into an eraser.
Transparent color is also available in the Color Puck and can be saved in the custom color palette, see Turning a brush into an eraser for more information.
— 28 —
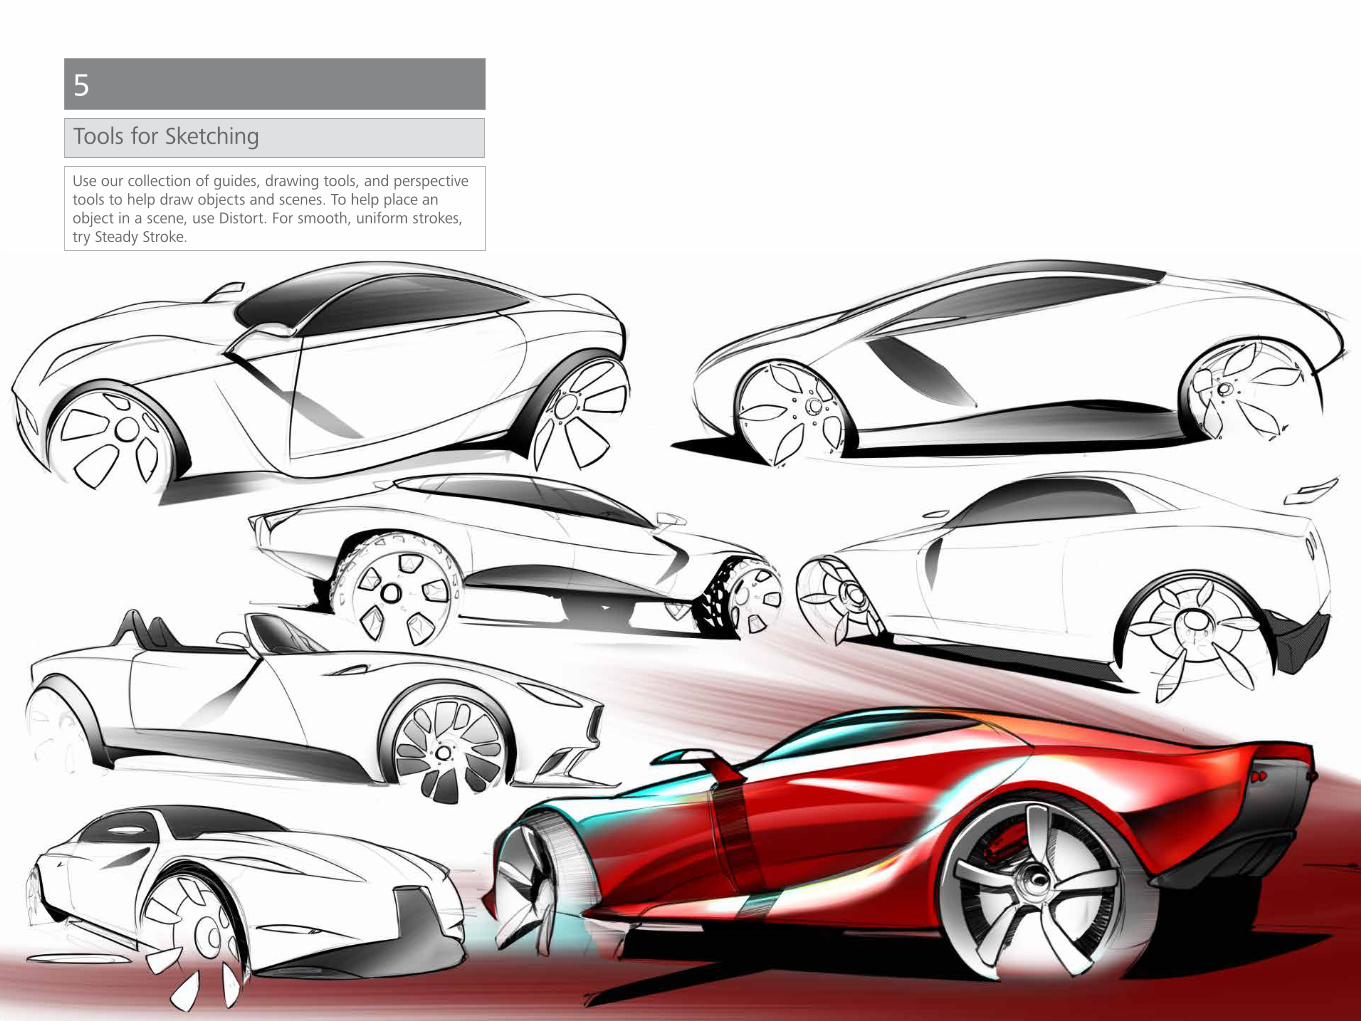
5Tools for Sketching
Use our collection of guides, drawing tools, and perspective tools to help draw objects and scenes. To help place an object in a scene, use Distort. For smooth, uniform strokes, try Steady Stroke.

— 29 —
DRAW STYLE TOOLS
In the toolbar, tap a Draw Style tool: Line, Rectangle, Oval, Polyline, Free, or Steady Stroke to help create shapes and lay down lines.
LINES
To draw a line, either tap or for a horizontal or vertical line, hold down the Shift key. Then, tap-drag. See Free for diagonal lines.
RECTANGLES To draw a rectangle, tap and tap-drag to draw the shape.
OVALSTo draw an oval or circle, tap and tap-drag to draw the shape.
POLYLINES To draw a polyline, tap and tap to place each point. Dbl-tap the last point to change the line to a solid line.
STEADY STROKETo draw uniform strokes, tap to create smoother strokes. Steady Stroke sets the offset between your cursor and the stroke, creating smooth strokes.
In the toolbar, tap to create a smoother stroke as you draw.
• To adjust the settings, select Edit > Steady Stroke. This change affects subsequent strokes.
• To draw large smooth curves, increase Steady Stroke.
• To draw small curves with tight turn radii, decrease Steady Stroke.
Note - Increasing Steady Stroke affects your stylus response time. When drawing short curves, if you have difficulties, lessen the smoothness setting.
FREETo return to freestyle stroke mode, exit Steady Stroke or the Draw Style tools.
— 30 —
GUIDESIn the toolbar, SketchBook contains an assortment of guides and rulers to help you as you draw. Each of these has additional tools found in contextual toolbars to aid you as you work.
When using the Ruler, Ellipse, or French curve, some or all of the following handles will appear. Use them to position and transform the selected guide:
• Tap-drag to pivot the ruler using the opposite handle as the pivot point. Dbl-tap any outer handle to reposition the ruler horizontally or vertically.
• Tap-drag to move the rulers.
• Tap-drag to rotate the ellipse or French curve around its center.
• Tap-drag to equally scale the ellipse or French curve in all directions.
• Tap-drag to flip the French curve.
• Tap-drag to scale the ellipse in one direction.
• Tap , , or to cycle through different French curves.
• Dbl-tap any scale handle to change the ellipse to a circle.
SHOWING/HIDINGTo hide the ruler, ellipse, or French curve, tap the close handle .
RULERSTap or press R for the straight ruler.
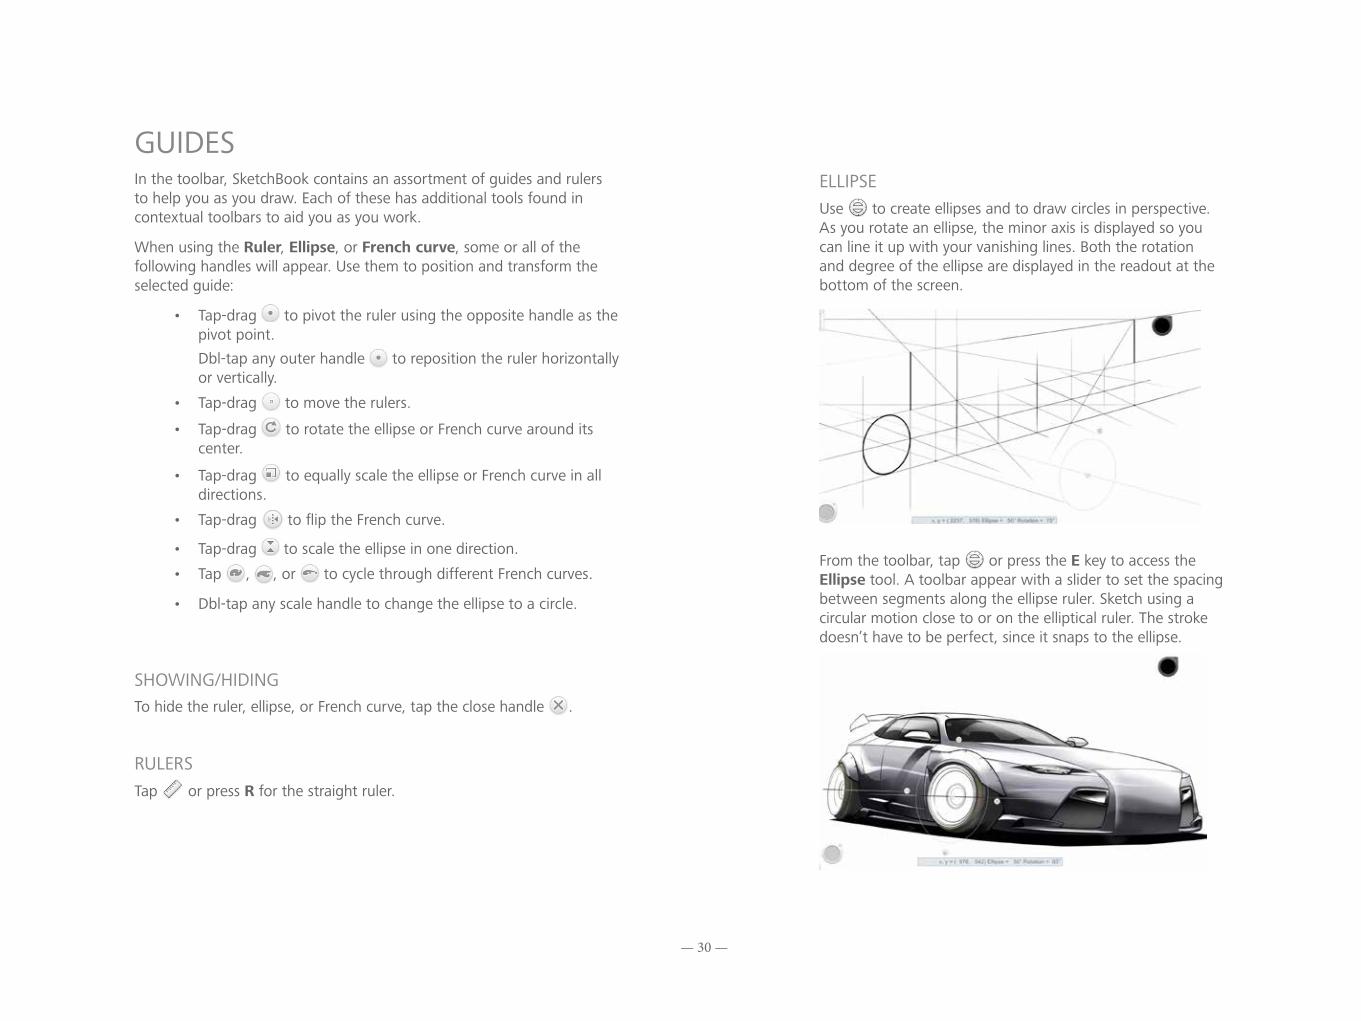
ELLIPSEUse to create ellipses and to draw circles in perspective. As you rotate an ellipse, the minor axis is displayed so you can line it up with your vanishing lines. Both the rotation and degree of the ellipse are displayed in the readout at the bottom of the screen.
From the toolbar, tap or press the E key to access the Ellipse tool. A toolbar appear with a slider to set the spacing between segments along the ellipse ruler. Sketch using a circular motion close to or on the elliptical ruler. The stroke doesn’t have to be perfect, since it snaps to the ellipse.
— 31 —
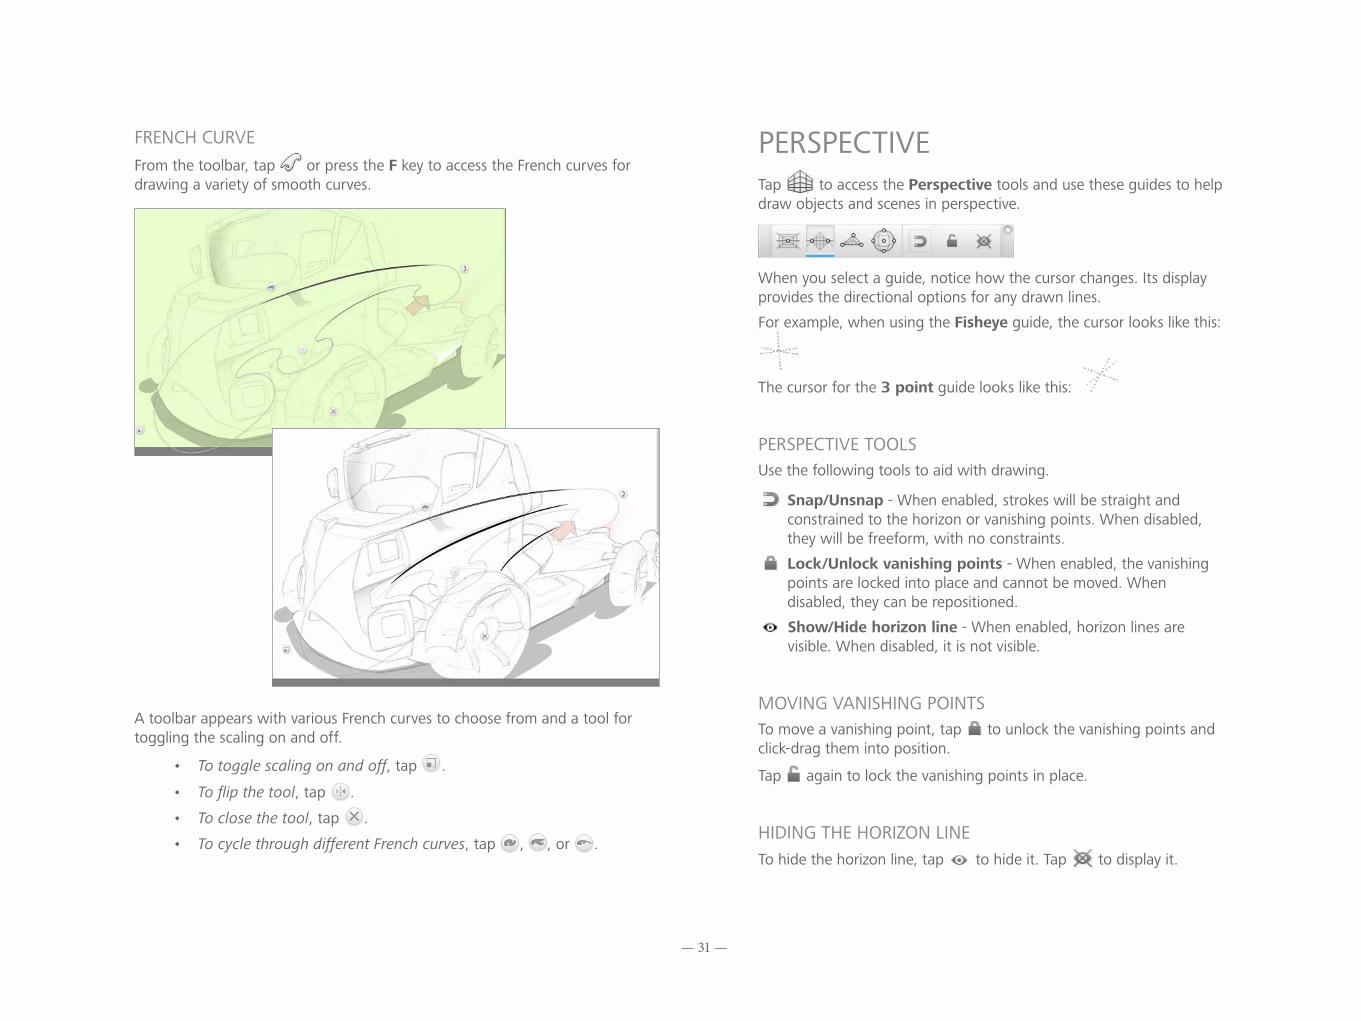
FRENCH CURVEFrom the toolbar, tap or press the F key to access the French curves for drawing a variety of smooth curves.
A toolbar appears with various French curves to choose from and a tool for toggling the scaling on and off.
• To toggle scaling on and off, tap .
• To flip the tool, tap .
• To close the tool, tap .
• To cycle through different French curves, tap , , or .
PERSPECTIVETap to access the Perspective tools and use these guides to help draw objects and scenes in perspective.
When you select a guide, notice how the cursor changes. Its display provides the directional options for any drawn lines.
For example, when using the Fisheye guide, the cursor looks like this:
The cursor for the 3 point guide looks like this:
PERSPECTIVE TOOLSUse the following tools to aid with drawing.
Snap/Unsnap - When enabled, strokes will be straight and constrained to the horizon or vanishing points. When disabled, they will be freeform, with no constraints.
Lock/Unlock vanishing points - When enabled, the vanishing points are locked into place and cannot be moved. When disabled, they can be repositioned.
Show/Hide horizon line - When enabled, horizon lines are visible. When disabled, it is not visible.
MOVING VANISHING POINTSTo move a vanishing point, tap to unlock the vanishing points and click-drag them into position.
Tap again to lock the vanishing points in place.
HIDING THE HORIZON LINETo hide the horizon line, tap to hide it. Tap to display it.
— 32 —
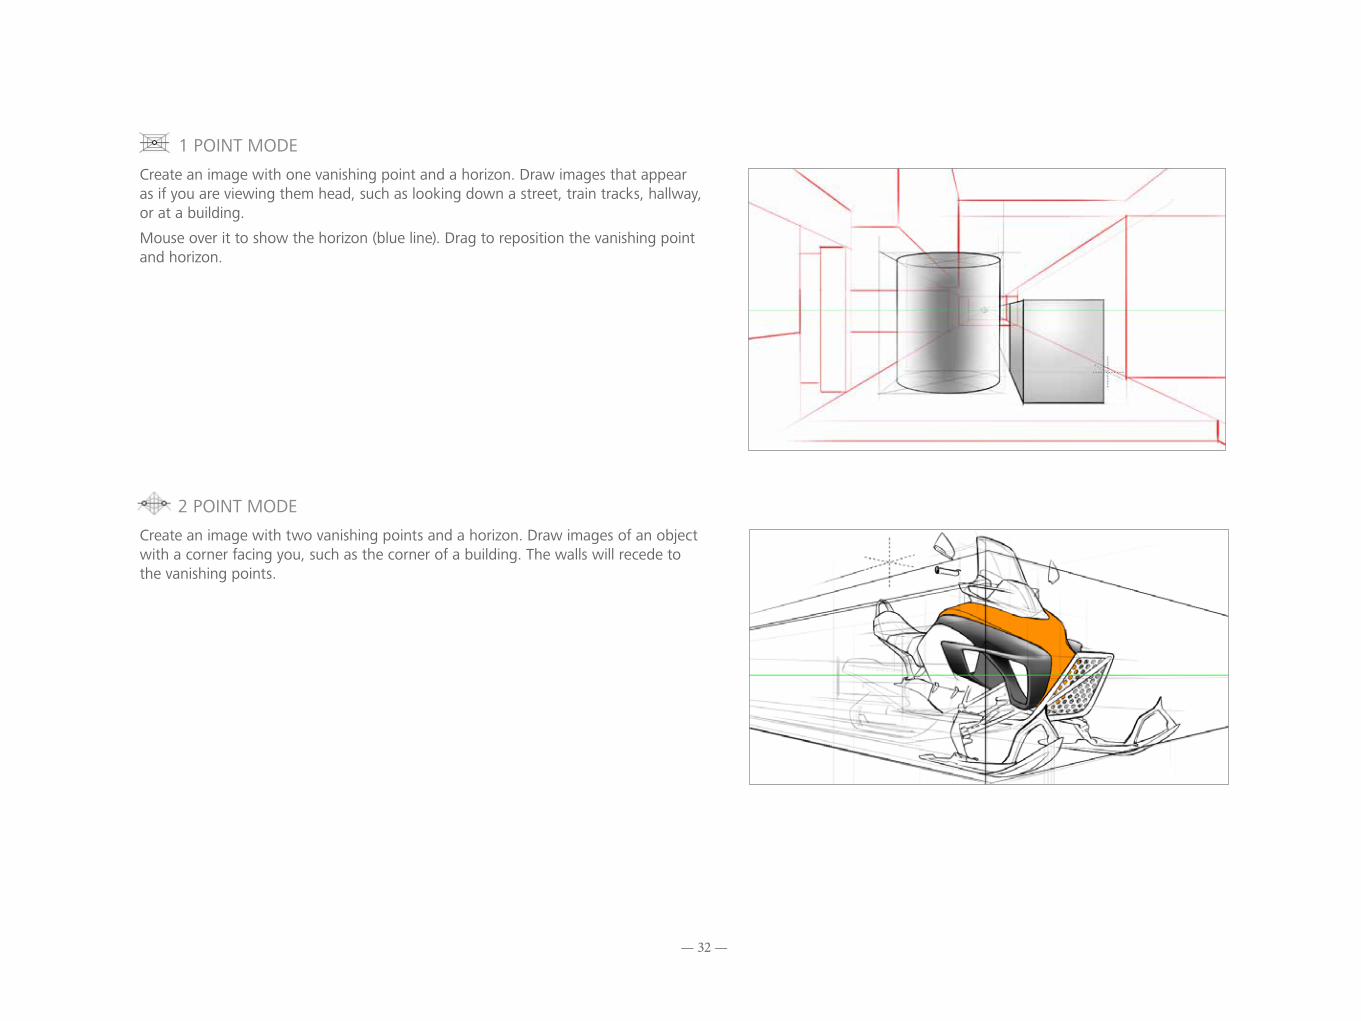
1 POINT MODE
Create an image with one vanishing point and a horizon. Draw images that appear as if you are viewing them head, such as looking down a street, train tracks, hallway, or at a building.
Mouse over it to show the horizon (blue line). Drag to reposition the vanishing point and horizon.
2 POINT MODE
Create an image with two vanishing points and a horizon. Draw images of an object with a corner facing you, such as the corner of a building. The walls will recede to the vanishing points.
— 33 —
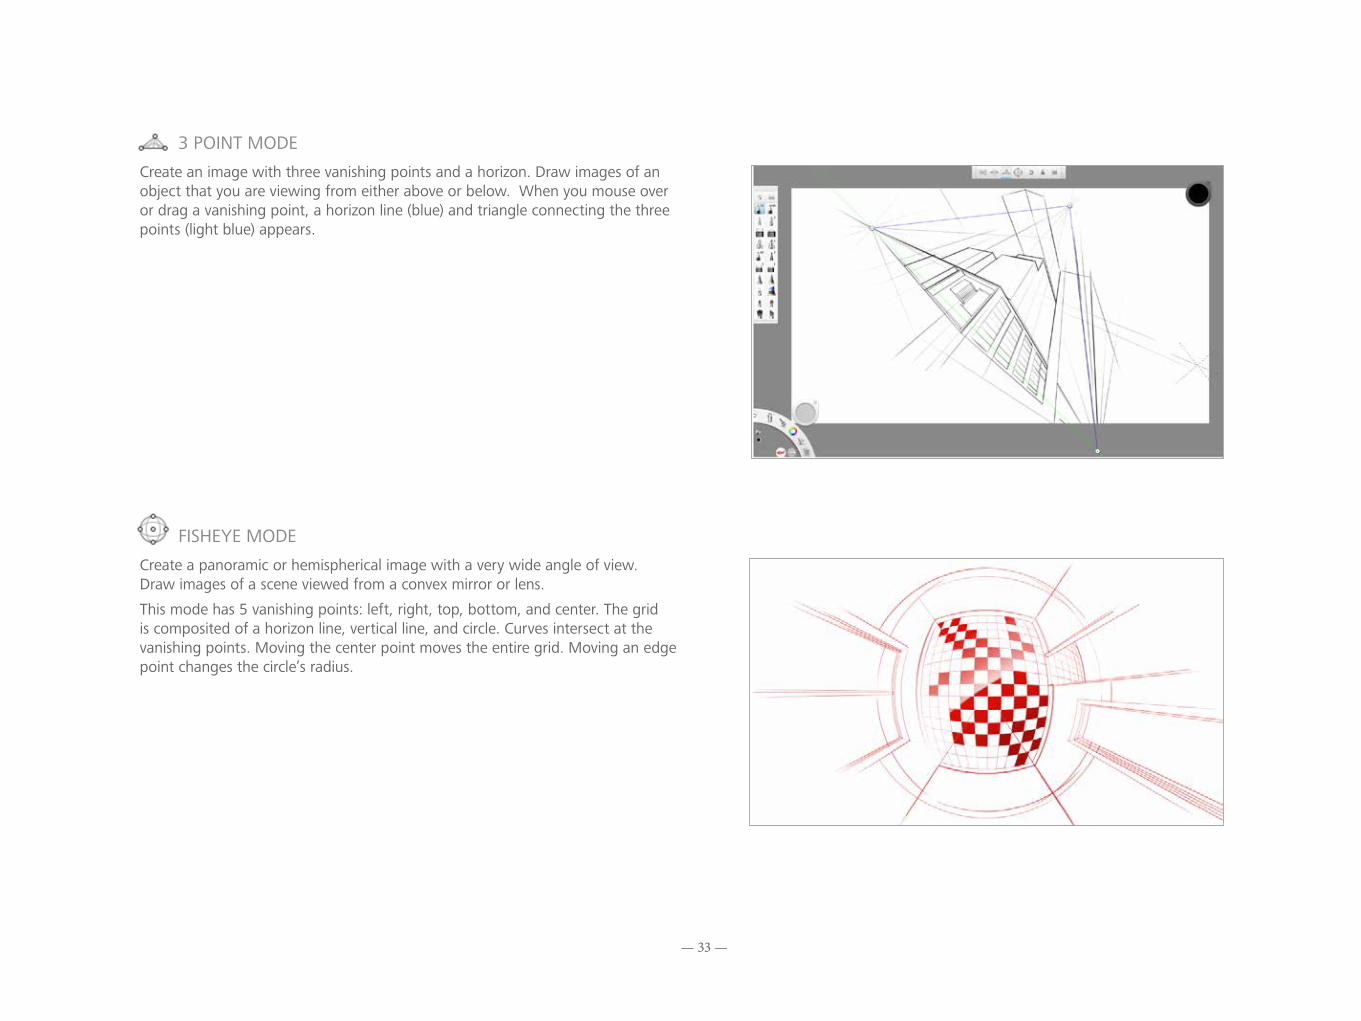
3 POINT MODE
Create an image with three vanishing points and a horizon. Draw images of an object that you are viewing from either above or below. When you mouse over or drag a vanishing point, a horizon line (blue) and triangle connecting the three points (light blue) appears.
FISHEYE MODE
Create a panoramic or hemispherical image with a very wide angle of view. Draw images of a scene viewed from a convex mirror or lens.
This mode has 5 vanishing points: left, right, top, bottom, and center. The grid is composited of a horizon line, vertical line, and circle. Curves intersect at the vanishing points. Moving the center point moves the entire grid. Moving an edge point changes the circle’s radius.
— 34 —
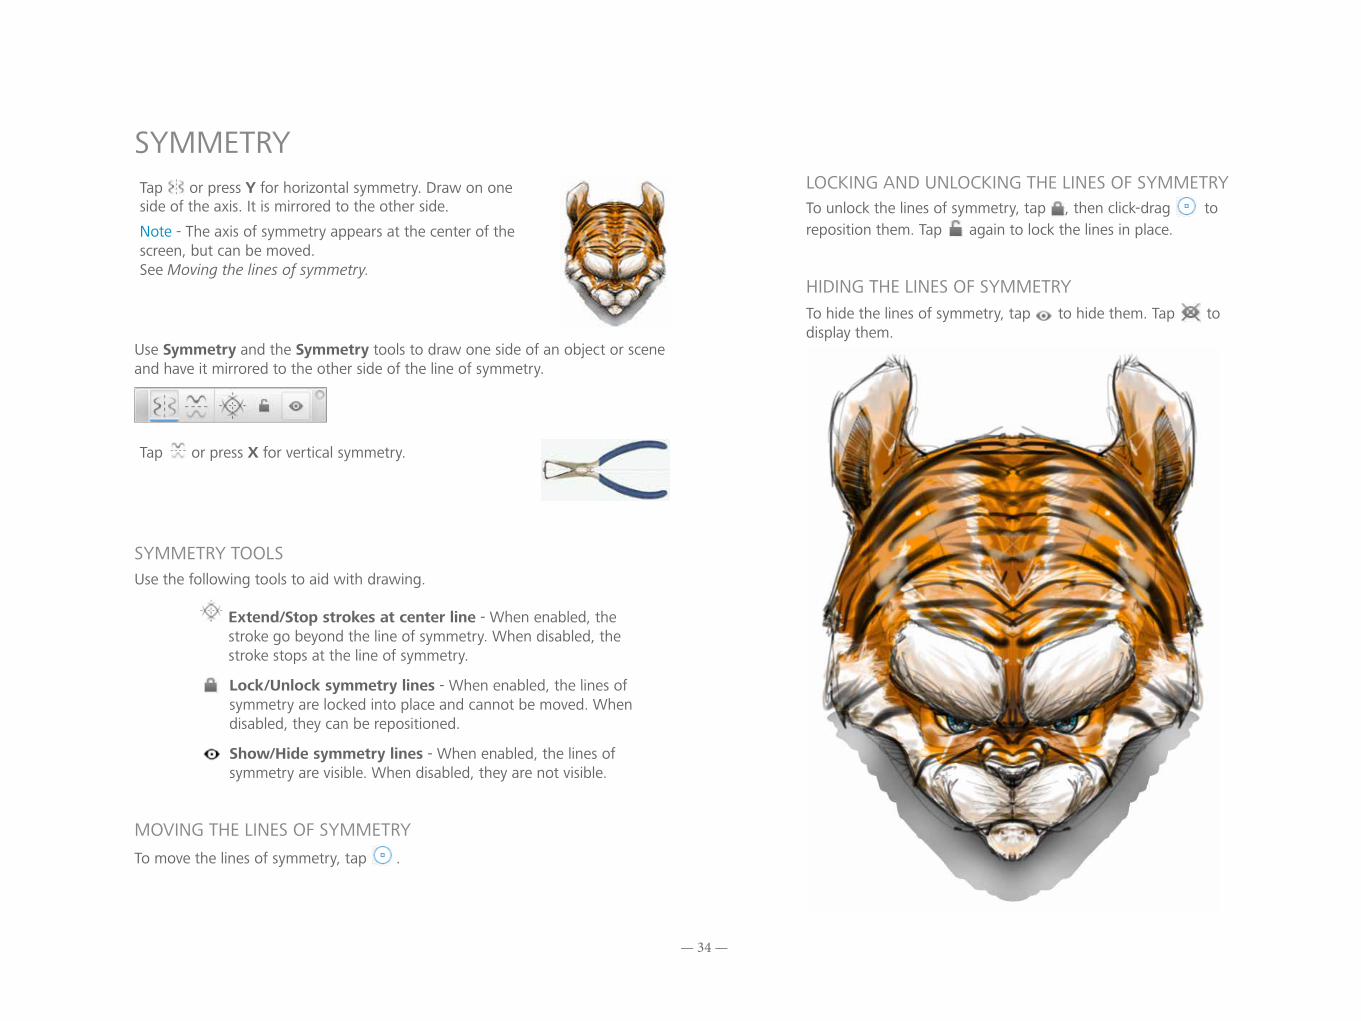
SYMMETRYTap or press Y for horizontal symmetry. Draw on one side of the axis. It is mirrored to the other side.
Note - The axis of symmetry appears at the center of the screen, but can be moved. See Moving the lines of symmetry.
Use Symmetry and the Symmetry tools to draw one side of an object or scene and have it mirrored to the other side of the line of symmetry.
Tap or press X for vertical symmetry.
SYMMETRY TOOLS Use the following tools to aid with drawing.
Extend/Stop strokes at center line - When enabled, the stroke go beyond the line of symmetry. When disabled, the stroke stops at the line of symmetry.
Lock/Unlock symmetry lines - When enabled, the lines of symmetry are locked into place and cannot be moved. When disabled, they can be repositioned.
Show/Hide symmetry lines - When enabled, the lines of symmetry are visible. When disabled, they are not visible.
MOVING THE LINES OF SYMMETRYTo move the lines of symmetry, tap .
LOCKING AND UNLOCKING THE LINES OF SYMMETRYTo unlock the lines of symmetry, tap , then click-drag to reposition them. Tap again to lock the lines in place.
HIDING THE LINES OF SYMMETRYTo hide the lines of symmetry, tap to hide them. Tap to display them.
— 35 —
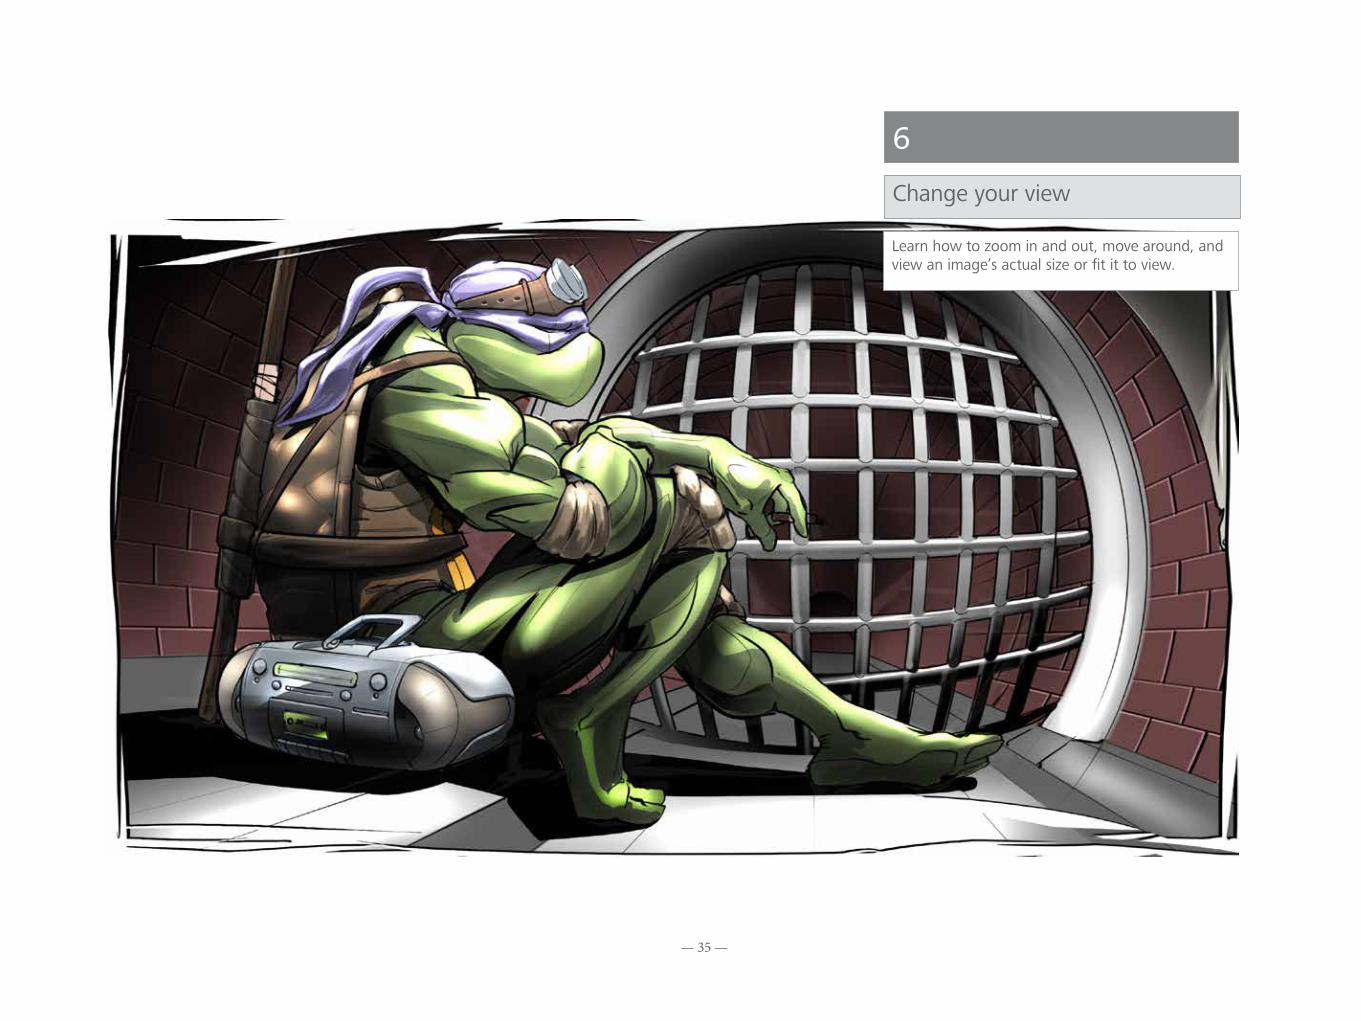
6Change your view
Learn how to zoom in and out, move around, and view an image’s actual size or fit it to view.
— 36 —
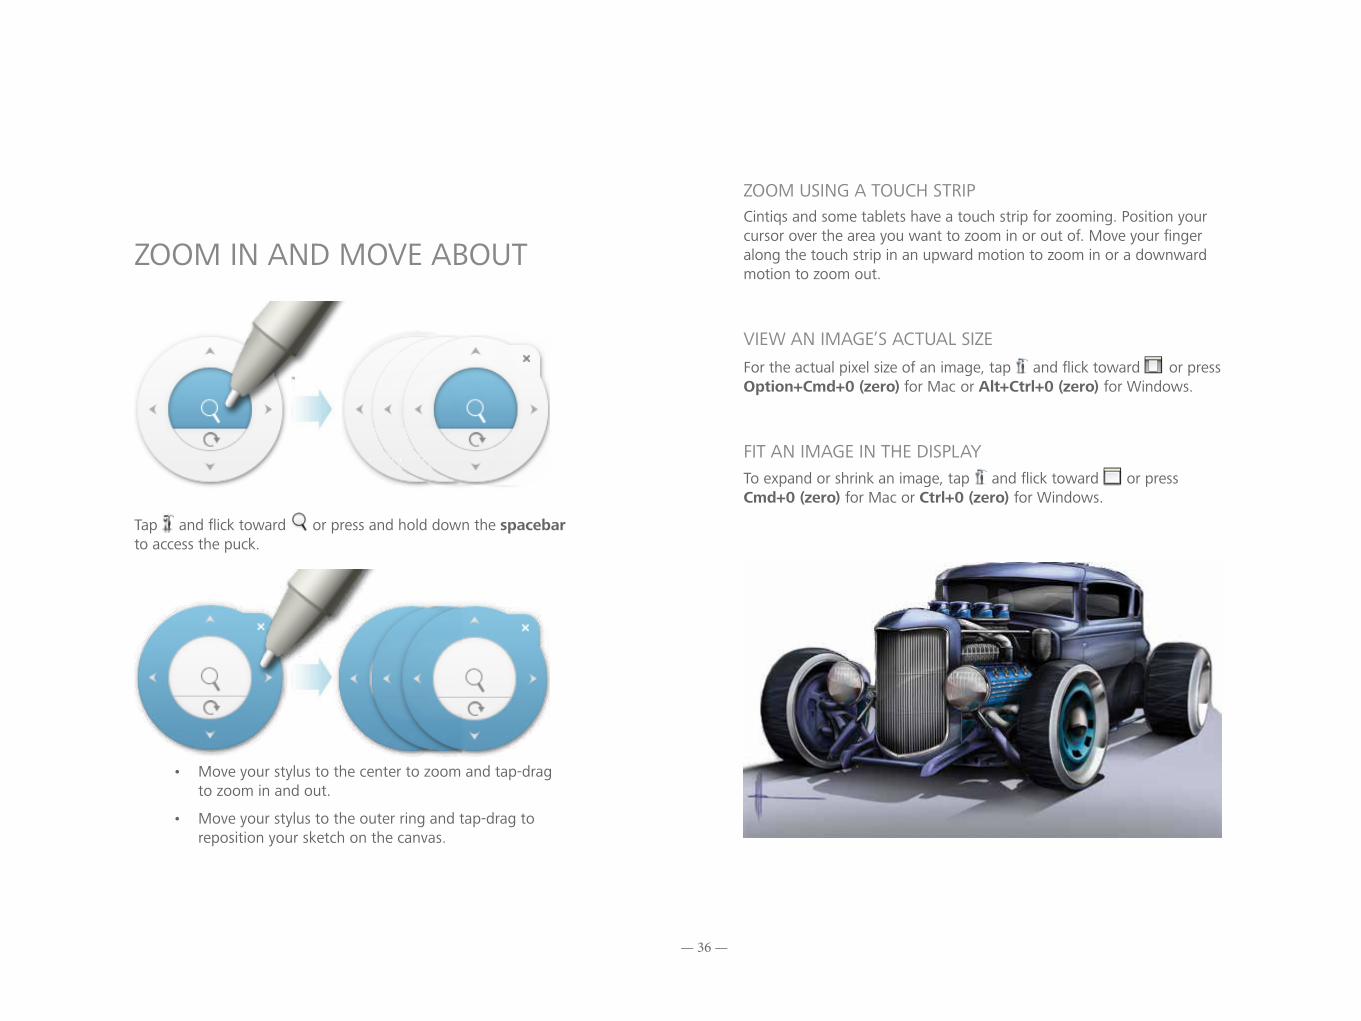
ZOOM IN AND MOVE ABOUT
Tap and flick toward or press and hold down the spacebar to access the puck.
• Move your stylus to the center to zoom and tap-drag to zoom in and out.
• Move your stylus to the outer ring and tap-drag to reposition your sketch on the canvas.
ZOOM USING A TOUCH STRIP Cintiqs and some tablets have a touch strip for zooming. Position your cursor over the area you want to zoom in or out of. Move your finger along the touch strip in an upward motion to zoom in or a downward motion to zoom out.
VIEW AN IMAGE’S ACTUAL SIZE For the actual pixel size of an image, tap and flick toward or press Option+Cmd+0 (zero) for Mac or Alt+Ctrl+0 (zero) for Windows.
FIT AN IMAGE IN THE DISPLAY To expand or shrink an image, tap and flick toward or press Cmd+0 (zero) for Mac or Ctrl+0 (zero) for Windows.
— 37 —
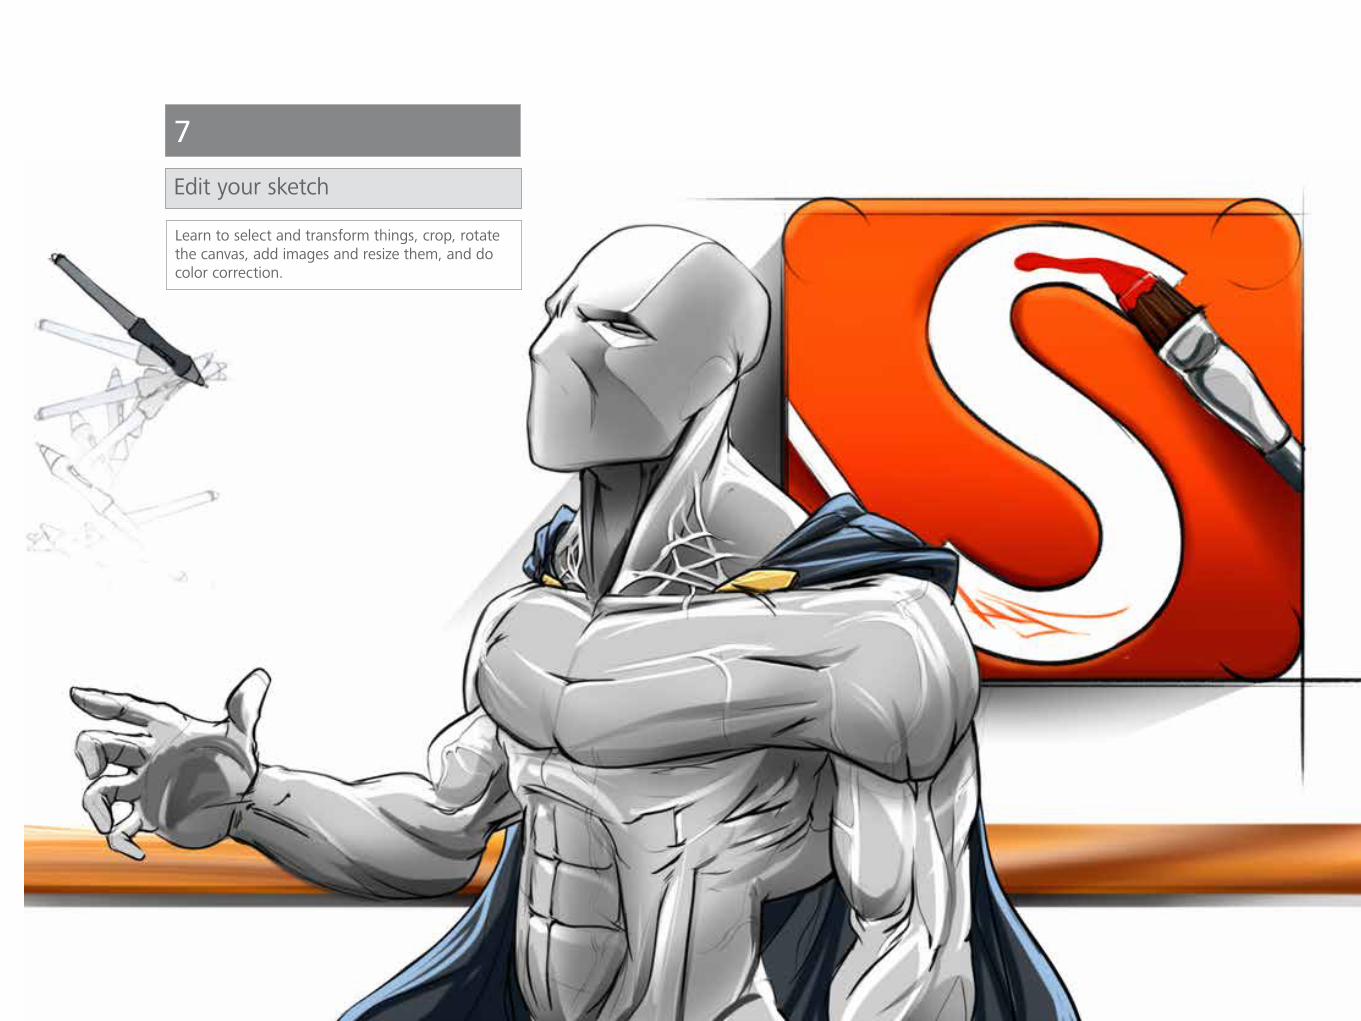
7Edit your sketch
Learn to select and transform things, crop, rotate the canvas, add images and resize them, and do color correction.
— 38 —
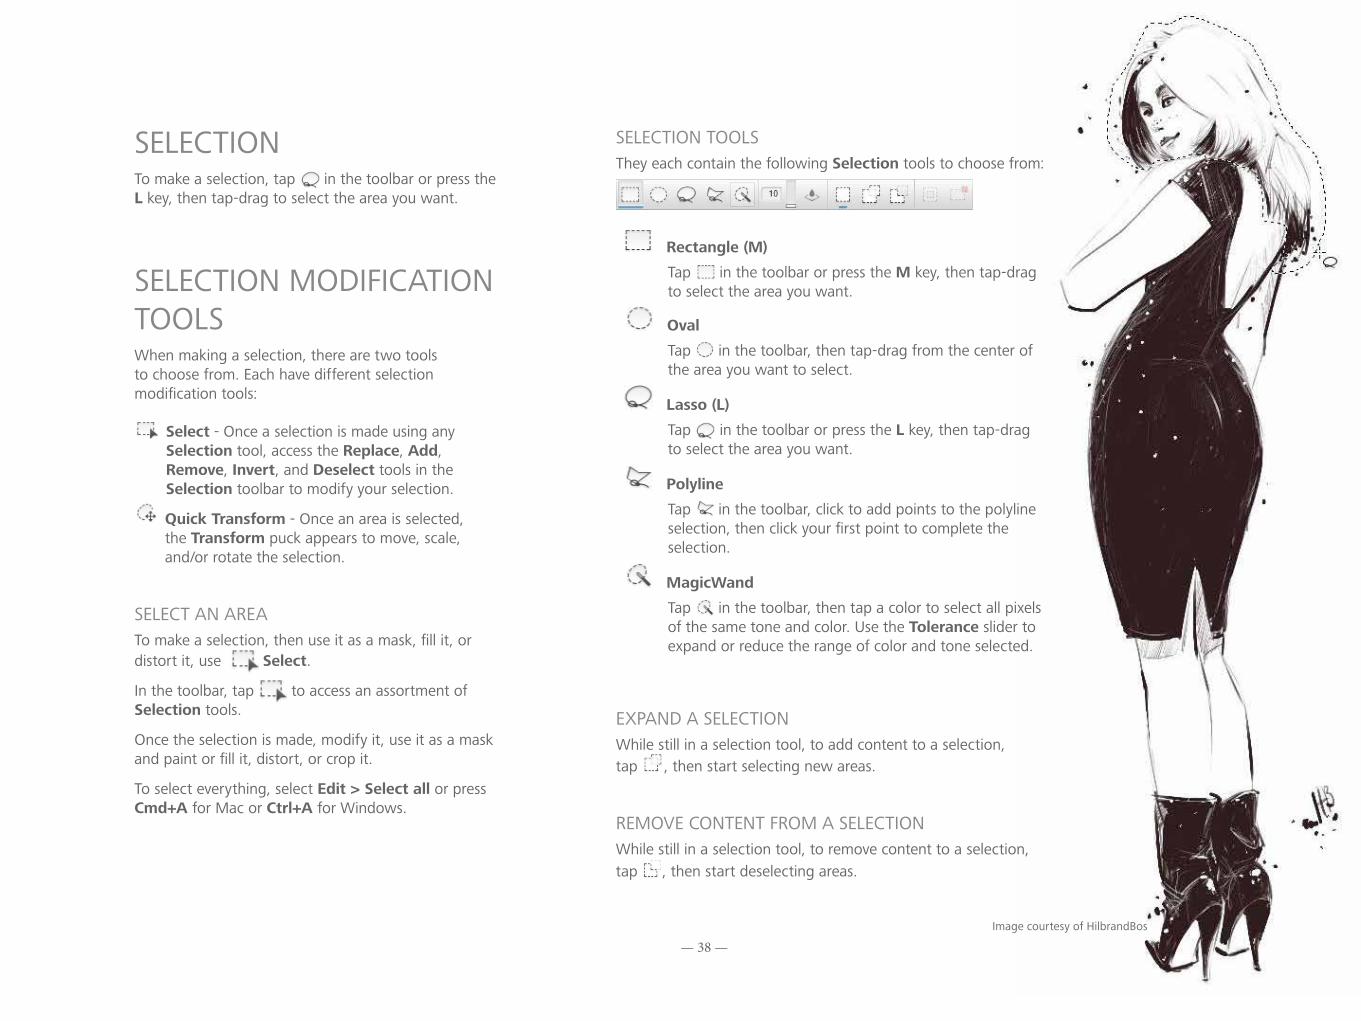
SELECTIONTo make a selection, tap in the toolbar or press the L key, then tap-drag to select the area you want.
SELECTION MODIFICATION TOOLSWhen making a selection, there are two tools to choose from. Each have different selection modification tools:
Select - Once a selection is made using any Selection tool, access the Replace, Add, Remove, Invert, and Deselect tools in the Selection toolbar to modify your selection.
Quick Transform - Once an area is selected, the Transform puck appears to move, scale, and/or rotate the selection.
SELECT AN AREATo make a selection, then use it as a mask, fill it, or distort it, use Select.
In the toolbar, tap to access an assortment of Selection tools.
Once the selection is made, modify it, use it as a mask and paint or fill it, distort, or crop it.
To select everything, select Edit > Select all or press Cmd+A for Mac or Ctrl+A for Windows.
Image courtesy of HilbrandBos
SELECTION TOOLSThey each contain the following Selection tools to choose from:
Rectangle (M)
Tap in the toolbar or press the M key, then tap-drag to select the area you want.
Oval
Tap in the toolbar, then tap-drag from the center of the area you want to select.
Lasso (L)
Tap in the toolbar or press the L key, then tap-drag to select the area you want.
Polyline
Tap in the toolbar, click to add points to the polyline selection, then click your first point to complete the selection.
MagicWand
Tap in the toolbar, then tap a color to select all pixels of the same tone and color. Use the Tolerance slider to expand or reduce the range of color and tone selected.
EXPAND A SELECTIONWhile still in a selection tool, to add content to a selection, tap , then start selecting new areas.
REMOVE CONTENT FROM A SELECTIONWhile still in a selection tool, to remove content to a selection, tap , then start deselecting areas.
— 39 —
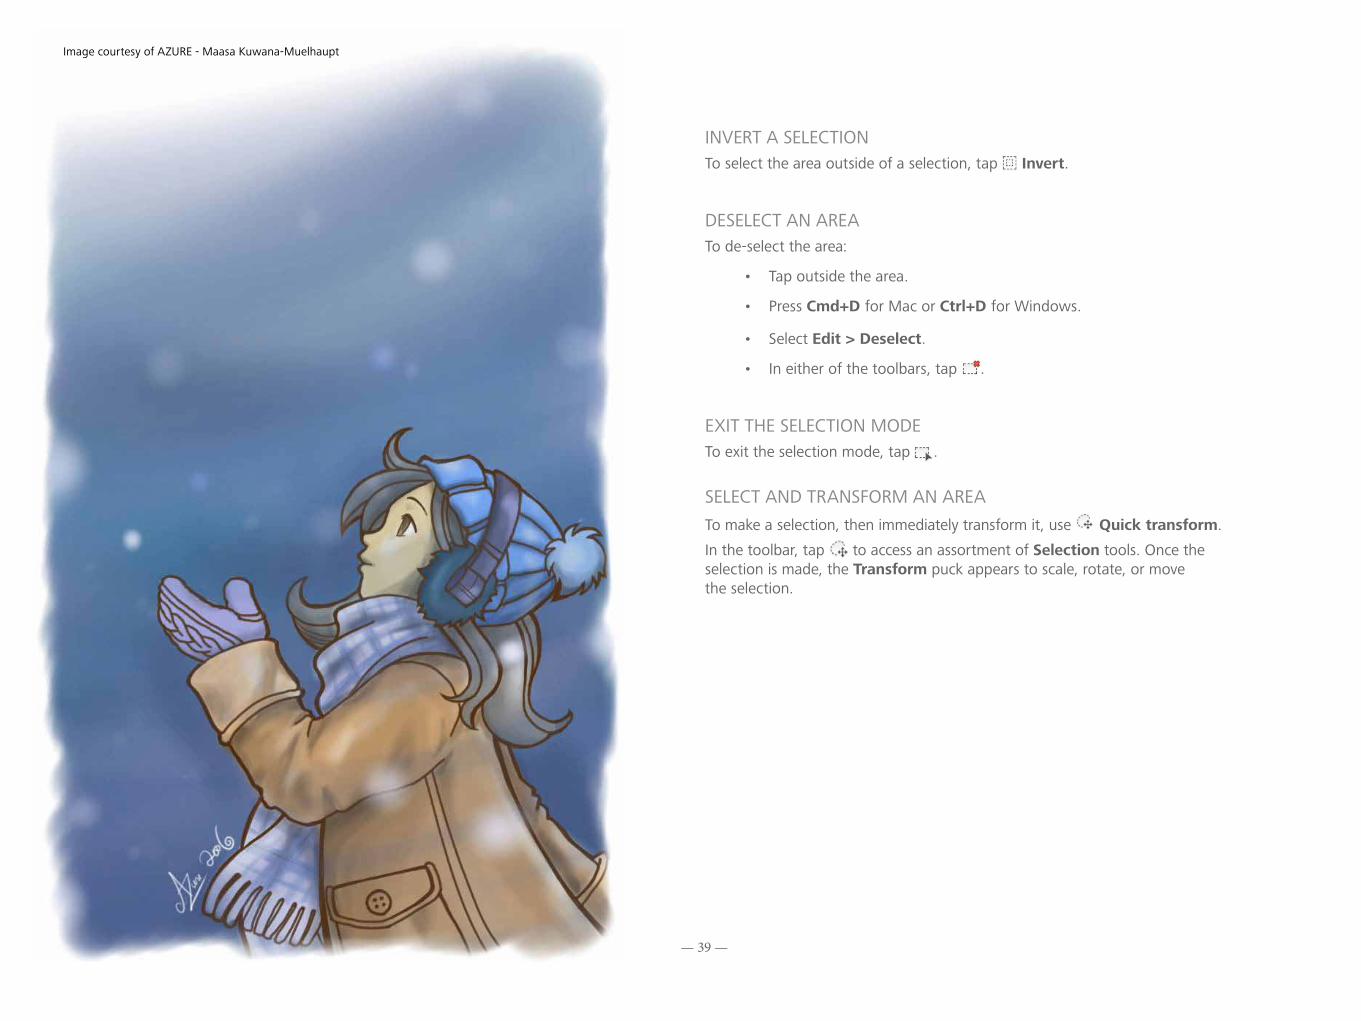
INVERT A SELECTIONTo select the area outside of a selection, tap Invert.
DESELECT AN AREATo de-select the area:
• Tap outside the area.
• Press Cmd+D for Mac or Ctrl+D for Windows.
• Select Edit > Deselect.
• In either of the toolbars, tap .
EXIT THE SELECTION MODETo exit the selection mode, tap .
SELECT AND TRANSFORM AN AREATo make a selection, then immediately transform it, use Quick transform.
In the toolbar, tap to access an assortment of Selection tools. Once the selection is made, the Transform puck appears to scale, rotate, or move the selection.
Image courtesy of AZURE - Maasa Kuwana-Muelhaupt
— 40 —
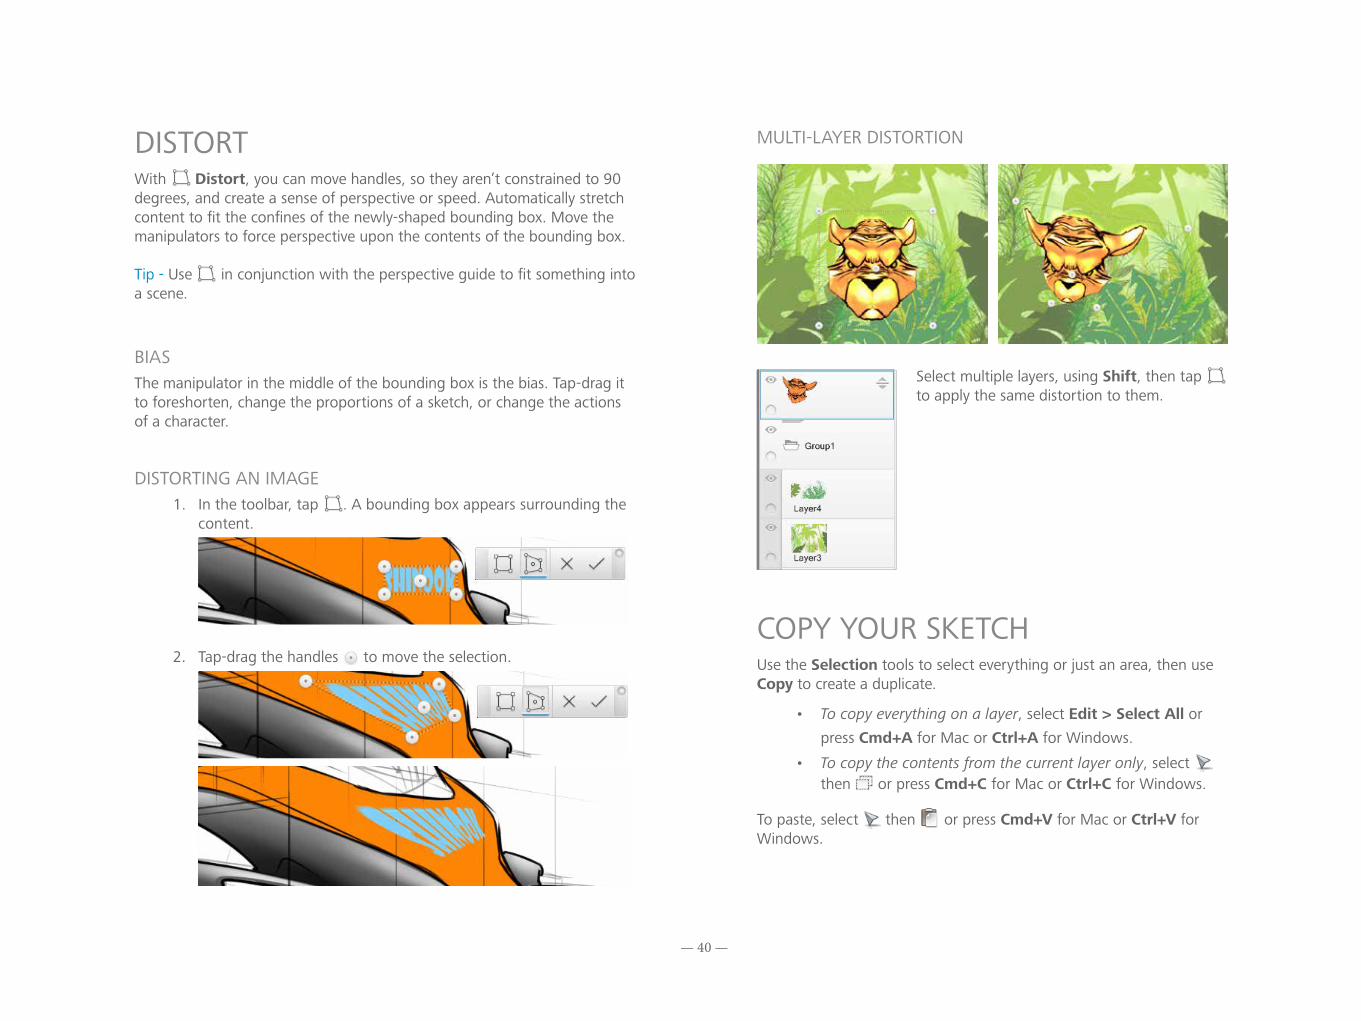
DISTORTWith Distort, you can move handles, so they aren’t constrained to 90 degrees, and create a sense of perspective or speed. Automatically stretch content to fit the confines of the newly-shaped bounding box. Move the manipulators to force perspective upon the contents of the bounding box.
Tip - Use in conjunction with the perspective guide to fit something into a scene.
BIASThe manipulator in the middle of the bounding box is the bias. Tap-drag it to foreshorten, change the proportions of a sketch, or change the actions of a character.
DISTORTING AN IMAGE1. In the toolbar, tap . A bounding box appears surrounding the
content.
2. Tap-drag the handles to move the selection.
MULTI-LAYER DISTORTION
Select multiple layers, using Shift, then tap to apply the same distortion to them.
COPY YOUR SKETCHUse the Selection tools to select everything or just an area, then use Copy to create a duplicate.
• To copy everything on a layer, select Edit > Select All or press Cmd+A for Mac or Ctrl+A for Windows.
• To copy the contents from the current layer only, select then or press Cmd+C for Mac or Ctrl+C for Windows.
To paste, select then or press Cmd+V for Mac or Ctrl+V for Windows.
— 41 —
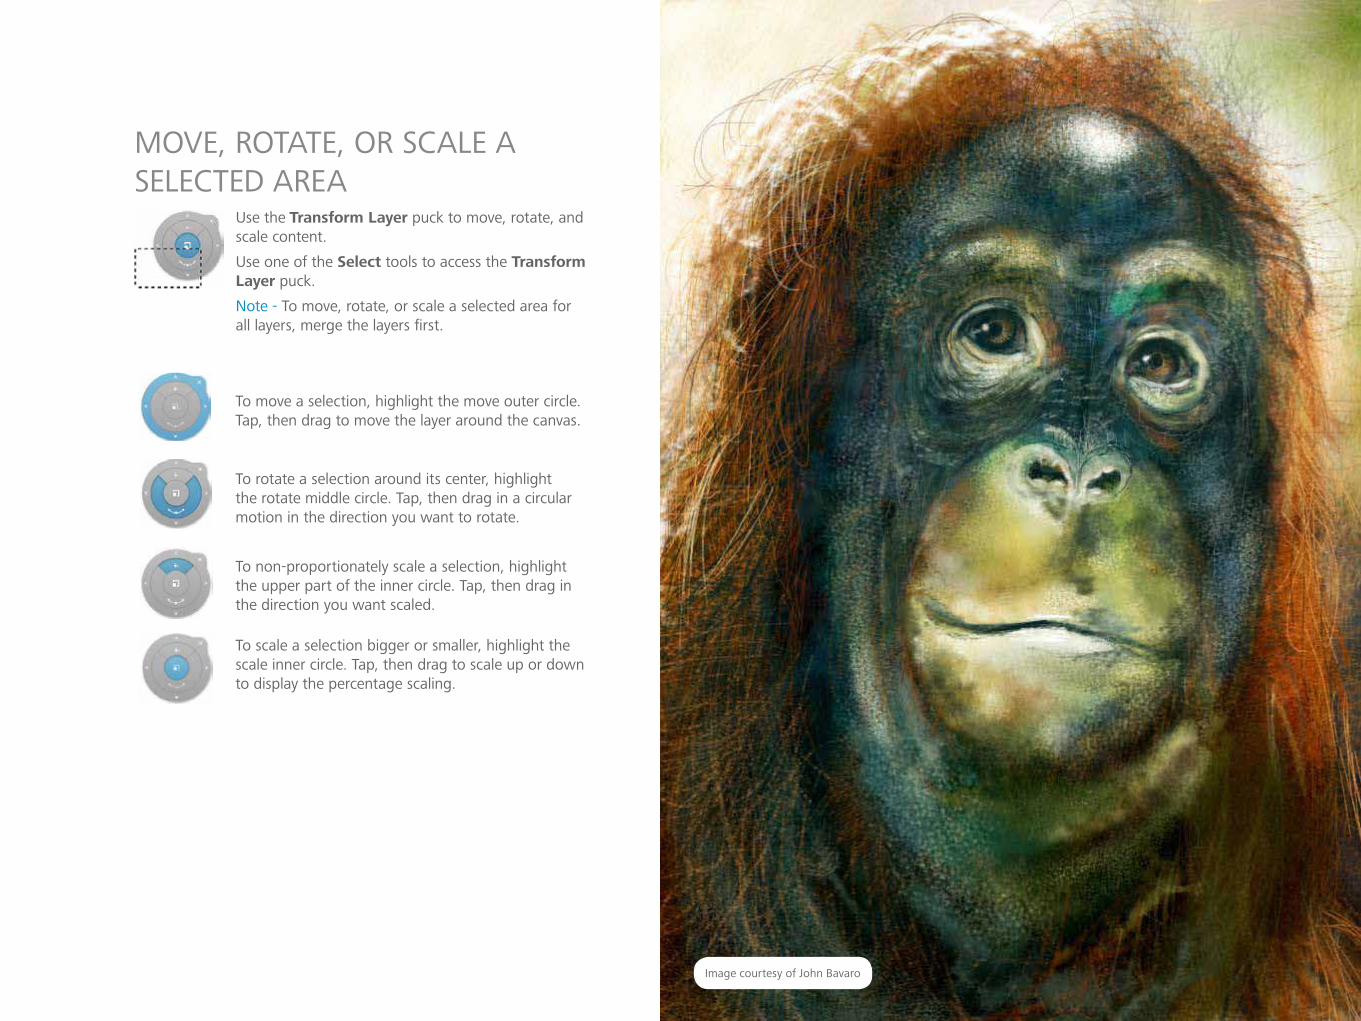
MOVE, ROTATE, OR SCALE A SELECTED AREA
Use the Transform Layer puck to move, rotate, and scale content.
Use one of the Select tools to access the Transform Layer puck.
Note - To move, rotate, or scale a selected area for all layers, merge the layers first.
To move a selection, highlight the move outer circle. Tap, then drag to move the layer around the canvas.
To rotate a selection around its center, highlight the rotate middle circle. Tap, then drag in a circular motion in the direction you want to rotate.
To non-proportionately scale a selection, highlight the upper part of the inner circle. Tap, then drag in the direction you want scaled.
To scale a selection bigger or smaller, highlight the scale inner circle. Tap, then drag to scale up or down to display the percentage scaling.
Image courtesy of John Bavaro

— 42 —
CROPUse Crop to tap-drag and select an area to be cropped. Use the Cropping tools to precisely increase or decrease the selected region and cancel or commit to the crop. Anything outside the selection is deleted.
• To increase or decrease the cropped area, change the Crop Width or Crop Height in the Crop toolbar. If you want to lock the width/height ratio, tap , then change one of the values.
• To cancel a crop selection, tap .
• To crop the selected area, tap .
CROP THE CANVASUse Image > Canvas Size to set size of the canvas, using inches, cm, or mm. Tap the Anchor interface to specify how to crop the canvas, then OK.
Image courtesy of Mia Robinson
— 43 —
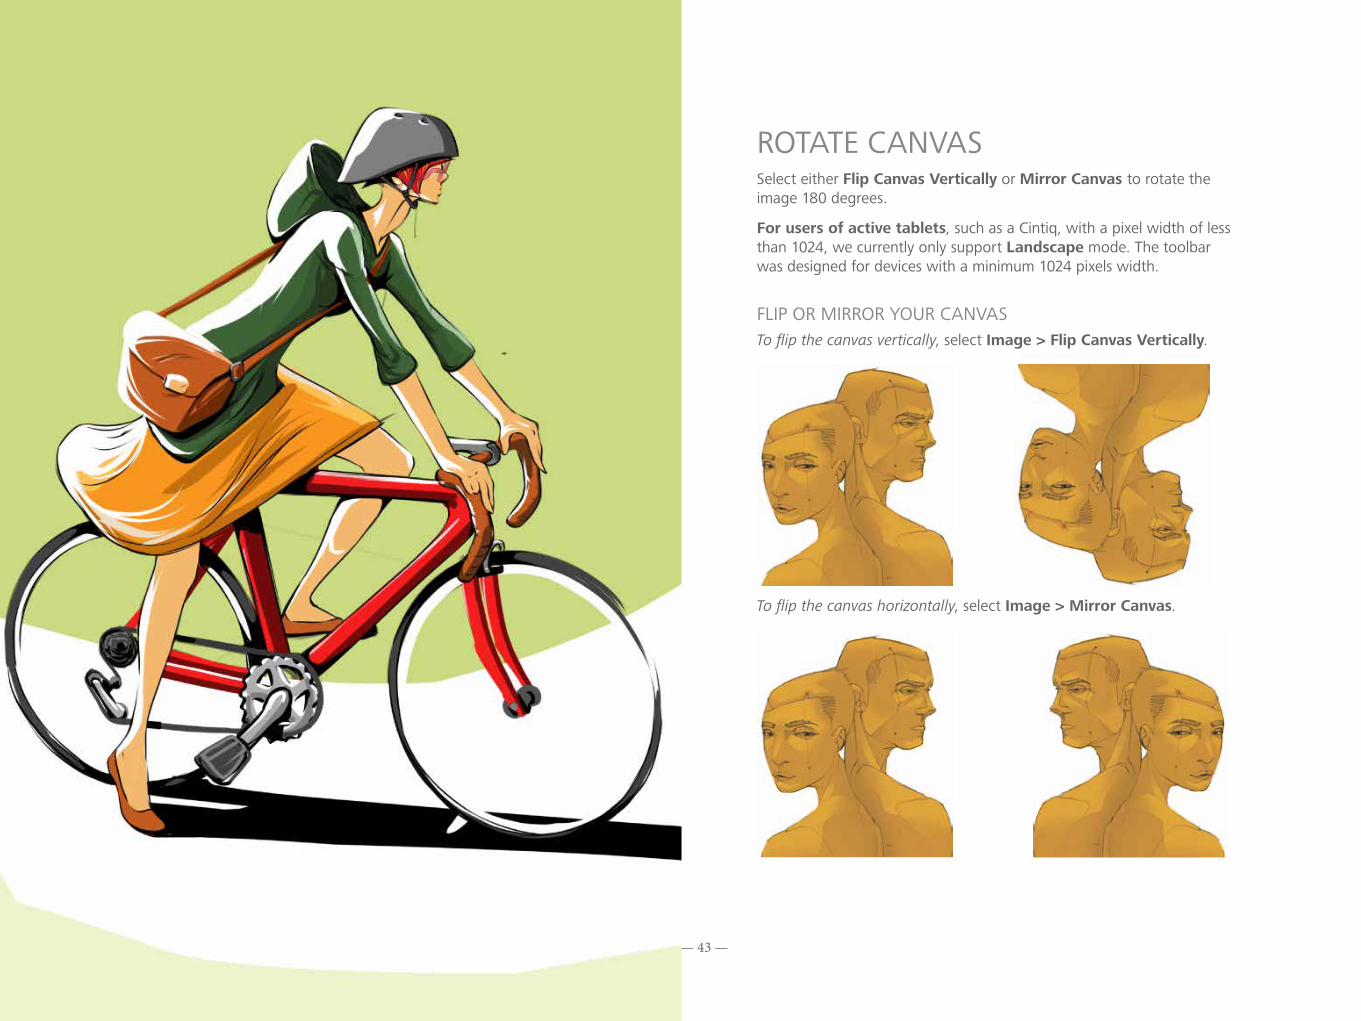
ROTATE CANVASSelect either Flip Canvas Vertically or Mirror Canvas to rotate the image 180 degrees.
For users of active tablets, such as a Cintiq, with a pixel width of less than 1024, we currently only support Landscape mode. The toolbar was designed for devices with a minimum 1024 pixels width.
FLIP OR MIRROR YOUR CANVASTo flip the canvas vertically, select Image > Flip Canvas Vertically.
To flip the canvas horizontally, select Image > Mirror Canvas.
— 44 —
ADD AN IMAGEAn image, such as a PXD from Pixlr, can be inserted onto the current layer or imported onto a new layer. Once an image is added, the Transform puck appears to reposition, rotate, and or scale the image.
• Select File > Add Image, then select a file.
• In the Layer Editor, click , then select a file.
Keep the following in mind:
• To add an image to a new layer, ensure that the preference Add Image: import into a new layer is checked.
• To add an image to the current layer, ensure that the preference Add Image: import into a new layer is not checked.
• When adding a PXD image to a sketch, SketchBook flattens the file, without making any visual changes.
• Once an image added to a layer, it’s “baked” into the current layer. You can no longer rotate, scale, or move it on its own. If you do not like its placement, choose to undo it and try again.
RESIZE AN IMAGEUse Image > Image size to change the dimensions of the image in pixels, its resolution, or the document size.
This change directly affects memory usage, quadrupling it if you double the pixel size. Due to memory requirements, 8192 x 8192-pixel upper limit on image size for the 64-bit version.
CHANGE RESOLUTIONResolution is the number of pixels per inch, cm, or mm. Leaving the document size the same increases the quality of the image and resolution; however, the memory size also increases.
FIT AN IMAGE ONTO THE SCREENTo expand or reduce an image to fill the screen, flick toward Fit to View or press Cmd+0 (zero) for Mac or Ctrl+0 (zero) for Windows.
— 45 —
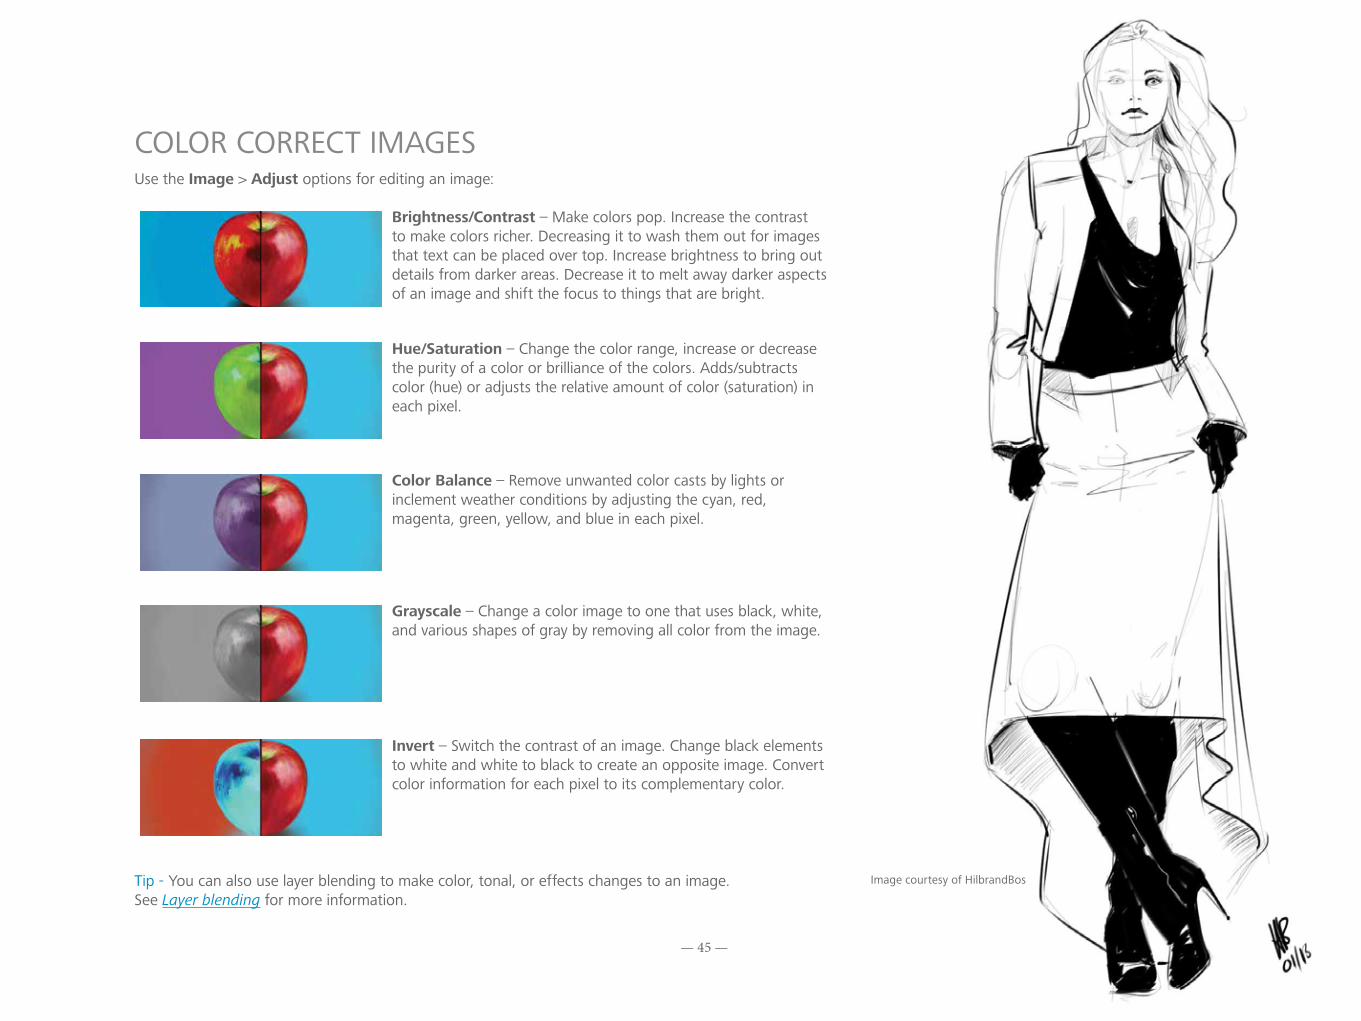
Brightness/Contrast – Make colors pop. Increase the contrast to make colors richer. Decreasing it to wash them out for images that text can be placed over top. Increase brightness to bring out details from darker areas. Decrease it to melt away darker aspects of an image and shift the focus to things that are bright.
Hue/Saturation – Change the color range, increase or decrease the purity of a color or brilliance of the colors. Adds/subtracts color (hue) or adjusts the relative amount of color (saturation) in each pixel.
Color Balance – Remove unwanted color casts by lights or inclement weather conditions by adjusting the cyan, red, magenta, green, yellow, and blue in each pixel.
Grayscale – Change a color image to one that uses black, white, and various shapes of gray by removing all color from the image.
Invert – Switch the contrast of an image. Change black elements to white and white to black to create an opposite image. Convert color information for each pixel to its complementary color.
Tip - You can also use layer blending to make color, tonal, or effects changes to an image. See Layer blending for more information.
COLOR CORRECT IMAGESUse the Image > Adjust options for editing an image:
Image courtesy of HilbrandBos
— 46 —
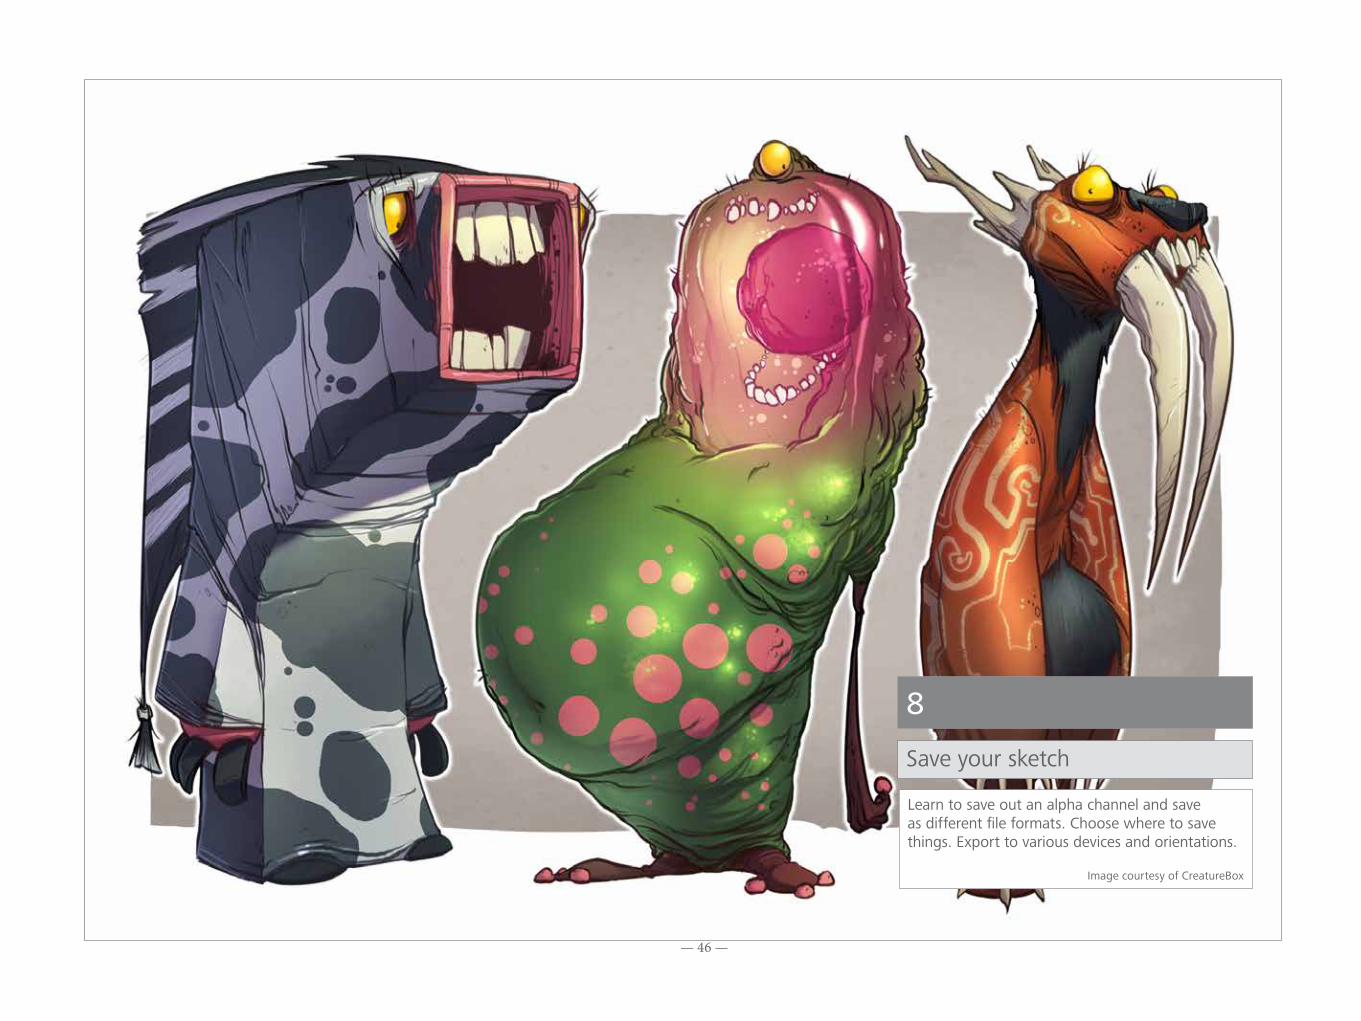
8Save your sketch
Learn to save out an alpha channel and save as different file formats. Choose where to save things. Export to various devices and orientations.
Image courtesy of CreatureBox
— 47 —
SAVE YOUR SKETCH AS AN ADOBE® PHOTOSHOP® FILEWhen saving, select the Adobe Photoshop PSD file type option for Mac or Adobe Photoshop Files (*.PSD) file type option for Windows.
SAVE YOUR SKETCH AS A PXDSave images as PXDs to work on them in Pixlr. For images with colored text, to preserve the color, SketchBook converts the text to an image.
To save a sketch that can be opened in Pixlr, select File > Save as > File Format > Pixlr PXD for Mac or Save as type > PXD Files (*.pxd) for Windows.
SAVE YOUR SKETCH AS AN IMAGE FILEWhen saving, in the Save as type (Mac) or File Format (Windows) dropdown, select the type of image you want saved.
Note - Only the TIFF and PSD image formats preserve layers. Saving them as any other image format flattens them. Only use Autodesk SketchBook to read TIFF files containing layers. We do not advise you to open these images in other programs because we cannot guarantee layer preservation.
SAVE LOCATION OPTIONSChoose where a project is saved - locally or to iCloud (Mac App Store version only).
For Mac App Store users, use SketchBook IOS Options to fit the file to a specific device. The format resizes the image and changes its orientation to fit the device. A maximum of 6 layers is preserved. Additional top layers will be merged.
For saving a file without these options, see “Exporting” on page 48.
SAVE LOCALLY Save a project to the computer you are using. In the Save or Save As dialog, browse to a location on your machine and tap Save. Files can be saved as any format.
SAVE TO ICLOUDFor Mac App Store users, save a project to iCloud to access it from anywhere and any device or platform. ICloud file management is only supported through the SketchBook iCloud Gallery.
1. If you aren’t logged into iCloud, enable the system preference iCloud > Documents & Data.
If you can’t save to iCloud, in your SketchBook General preferences, check Enable iCloud to access iCloud files and save to your iCloud account.
2. Select File > Save or Save As.
Important - If you suspect your iCloud Gallery could be full, we recommend saving your file locally and moving it to the cloud when space is available.
Important - If a file is open on 2 or more devices, there is no notification. The last device to save will overwrite the file.
— 48 —
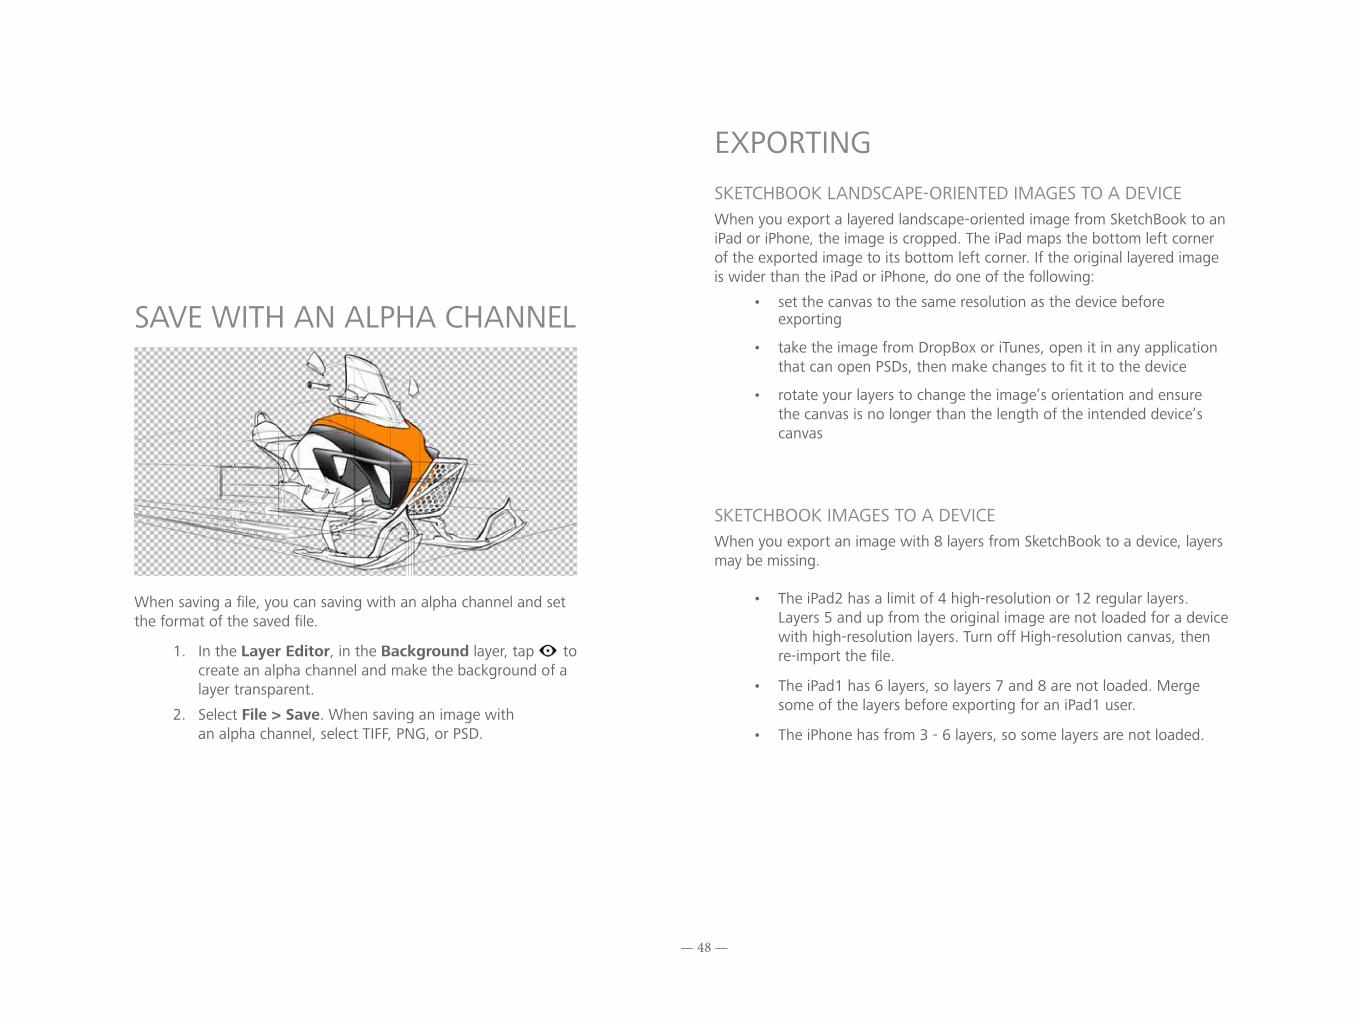
SAVE WITH AN ALPHA CHANNEL
When saving a file, you can saving with an alpha channel and set the format of the saved file.
1. In the Layer Editor, in the Background layer, tap to create an alpha channel and make the background of a layer transparent.
2. Select File > Save. When saving an image with an alpha channel, select TIFF, PNG, or PSD.
EXPORTING SKETCHBOOK LANDSCAPE-ORIENTED IMAGES TO A DEVICEWhen you export a layered landscape-oriented image from SketchBook to an iPad or iPhone, the image is cropped. The iPad maps the bottom left corner of the exported image to its bottom left corner. If the original layered image is wider than the iPad or iPhone, do one of the following:
• set the canvas to the same resolution as the device before exporting
• take the image from DropBox or iTunes, open it in any application that can open PSDs, then make changes to fit it to the device
• rotate your layers to change the image’s orientation and ensure the canvas is no longer than the length of the intended device’s canvas
SKETCHBOOK IMAGES TO A DEVICEWhen you export an image with 8 layers from SketchBook to a device, layers may be missing.
• The iPad2 has a limit of 4 high-resolution or 12 regular layers. Layers 5 and up from the original image are not loaded for a device with high-resolution layers. Turn off High-resolution canvas, then re-import the file.
• The iPad1 has 6 layers, so layers 7 and 8 are not loaded. Merge some of the layers before exporting for an iPad1 user.
• The iPhone has from 3 - 6 layers, so some layers are not loaded.
— 49 —
OPEN A SAVED SKETCHTo open sketches of various formats, select and flick toward or press Cmd+O for Mac or Ctrl+O for Windows.
OPEN A SKETCH STORED ON ICLOUDFor Mac App Store users, access a project stored on iCloud from anywhere and with any machine.
1. If you aren’t logged into iCloud, enable the system preference iCloud > Documents & Data.
If you can’t open from iCloud, in your SketchBook General preferences, check Enable iCloud to access iCloud files.
2. Select File > Open.
OPEN A PXDOpen an image from Pixlr in SketchBook. If the image uses a blend mode not supported by SketchBook, the Normal blend mode is used to replace it. To bring an image from Pixlr into SketchBook, select File > Open, then select a PXD file.
REMOVE A PROJECT FROM THE SKETCHBOOK ICLOUD GALLERYFor Mac App Store users, select a file and tap [X] Delete.
— 50 —
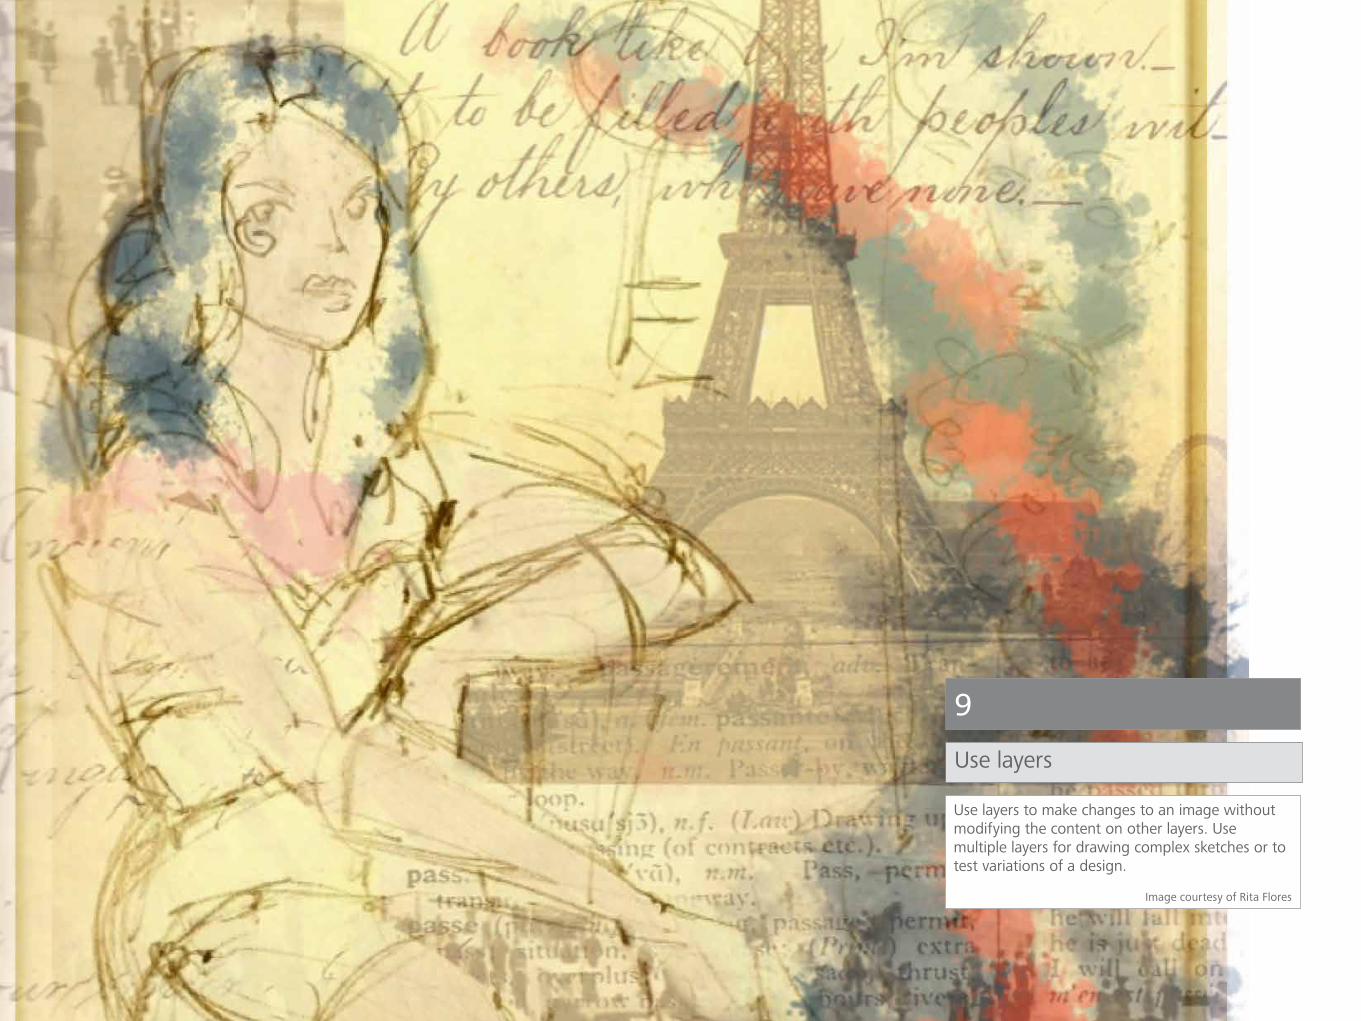
9Use layers
Use layers to make changes to an image without modifying the content on other layers. Use multiple layers for drawing complex sketches or to test variations of a design.
Image courtesy of Rita Flores
— 51 —
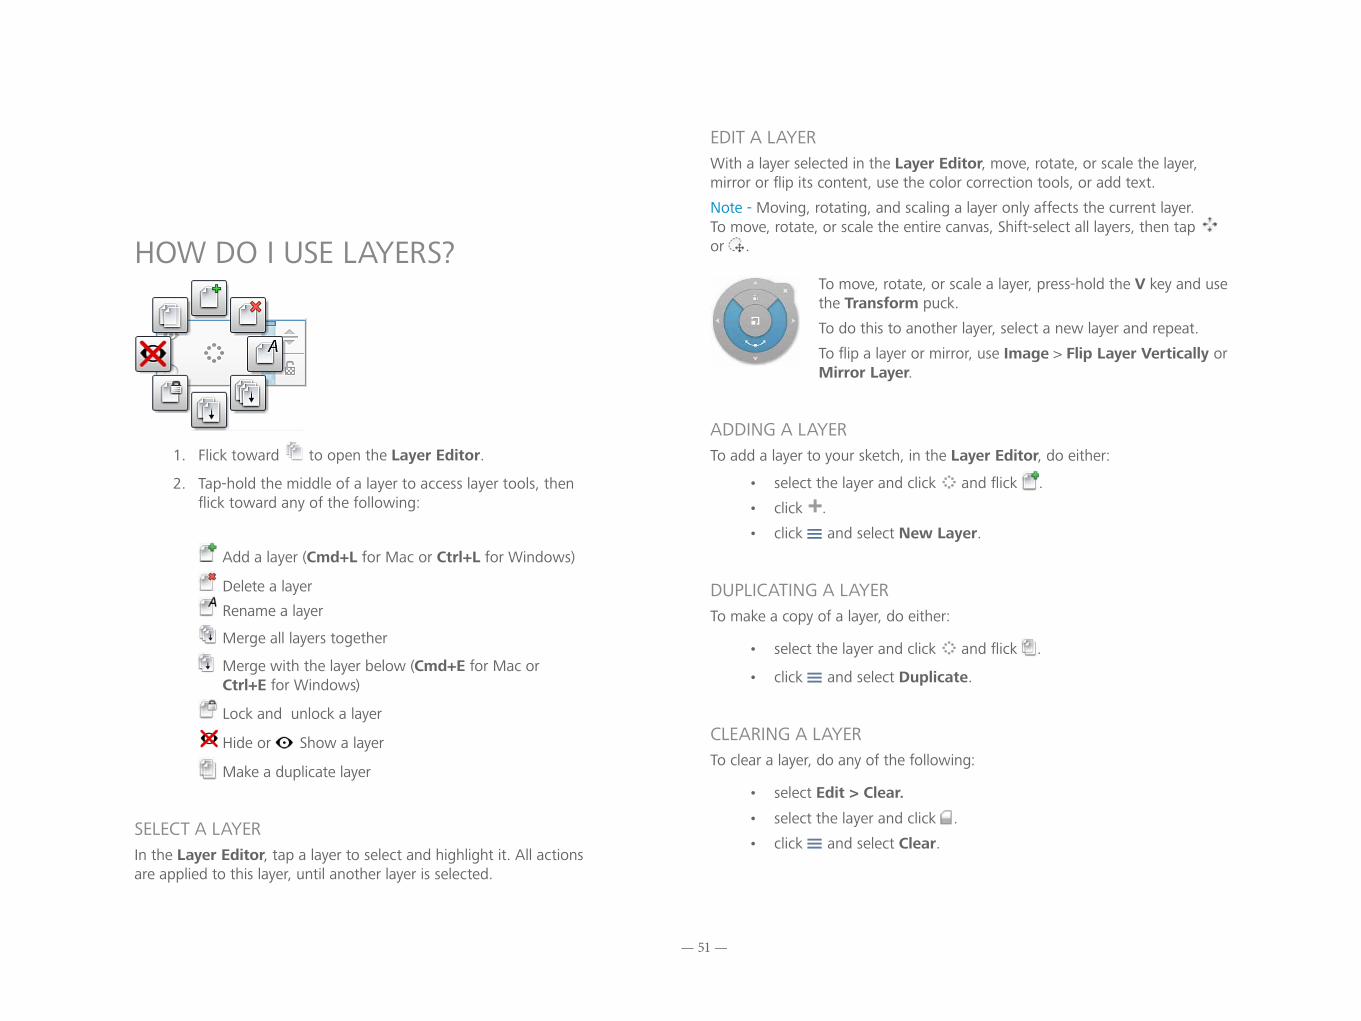
HOW DO I USE LAYERS?
1. Flick toward to open the Layer Editor.
2. Tap-hold the middle of a layer to access layer tools, then flick toward any of the following:
Add a layer (Cmd+L for Mac or Ctrl+L for Windows)
Delete a layer
Rename a layer
Merge all layers together
Merge with the layer below (Cmd+E for Mac or Ctrl+E for Windows)
Lock and unlock a layer
Hide or Show a layer
Make a duplicate layer
SELECT A LAYERIn the Layer Editor, tap a layer to select and highlight it. All actions are applied to this layer, until another layer is selected.
EDIT A LAYERWith a layer selected in the Layer Editor, move, rotate, or scale the layer, mirror or flip its content, use the color correction tools, or add text.
Note - Moving, rotating, and scaling a layer only affects the current layer. To move, rotate, or scale the entire canvas, Shift-select all layers, then tap or .
To move, rotate, or scale a layer, press-hold the V key and use the Transform puck.
To do this to another layer, select a new layer and repeat.
To flip a layer or mirror, use Image > Flip Layer Vertically or Mirror Layer.
ADDING A LAYERTo add a layer to your sketch, in the Layer Editor, do either:
• select the layer and click and flick .
• click .
• click and select New Layer.
DUPLICATING A LAYERTo make a copy of a layer, do either:
• select the layer and click and flick .
• click and select Duplicate.
CLEARING A LAYERTo clear a layer, do any of the following:
• select Edit > Clear.
• select the layer and click .
• click and select Clear.
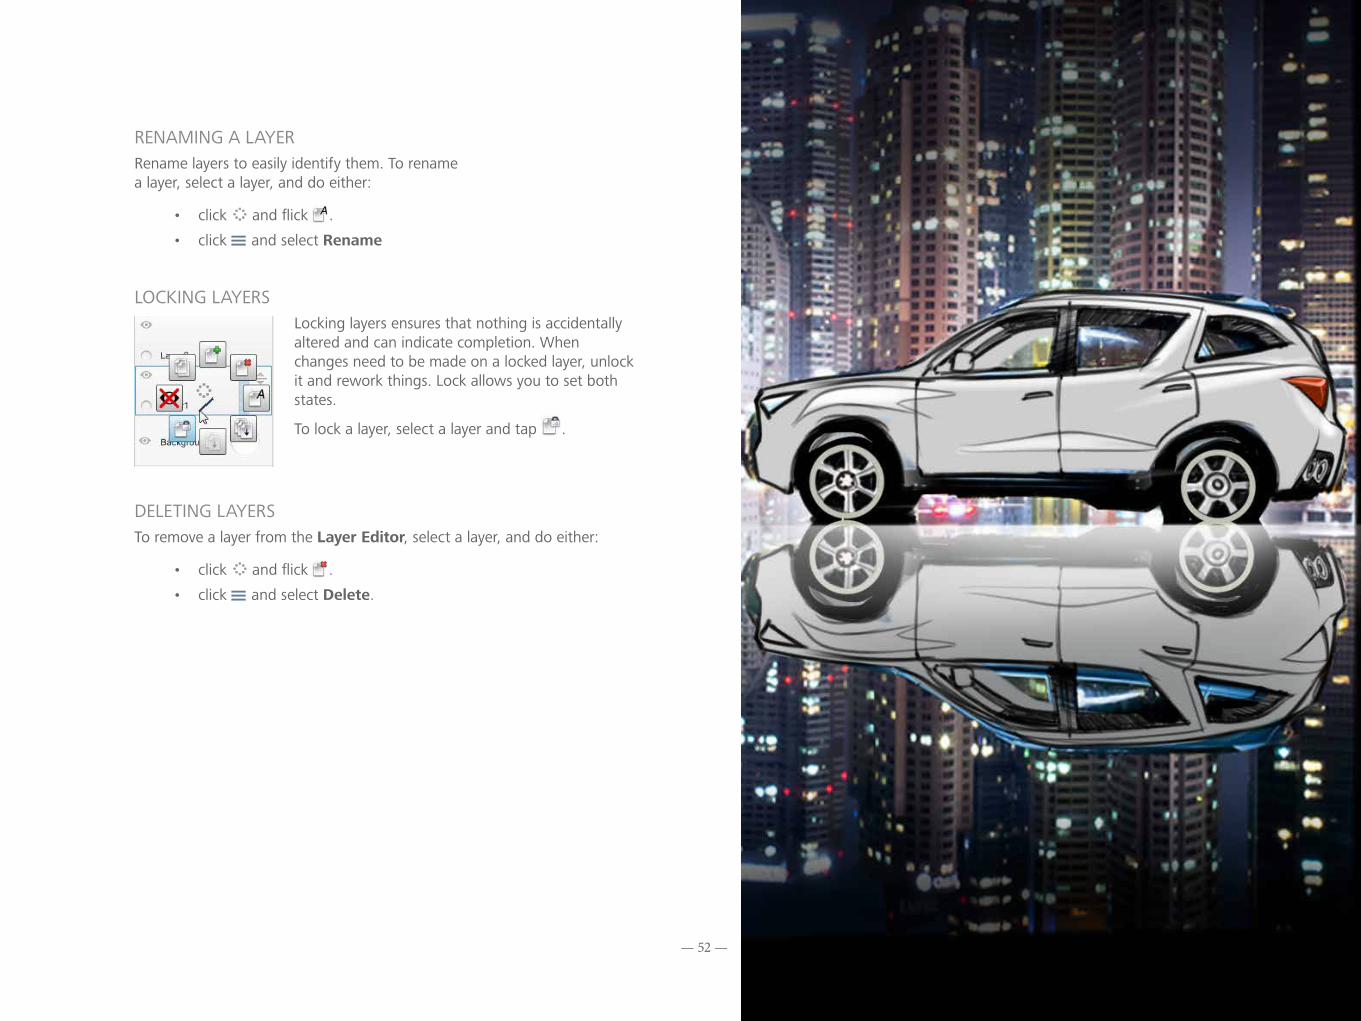
— 52 —
RENAMING A LAYERRename layers to easily identify them. To rename a layer, select a layer, and do either:
• click and flick .
• click and select Rename
LOCKING LAYERSLocking layers ensures that nothing is accidentally altered and can indicate completion. When changes need to be made on a locked layer, unlock it and rework things. Lock allows you to set both states.
To lock a layer, select a layer and tap .
DELETING LAYERSTo remove a layer from the Layer Editor, select a layer, and do either:
• click and flick .
• click and select Delete.
— 53 —
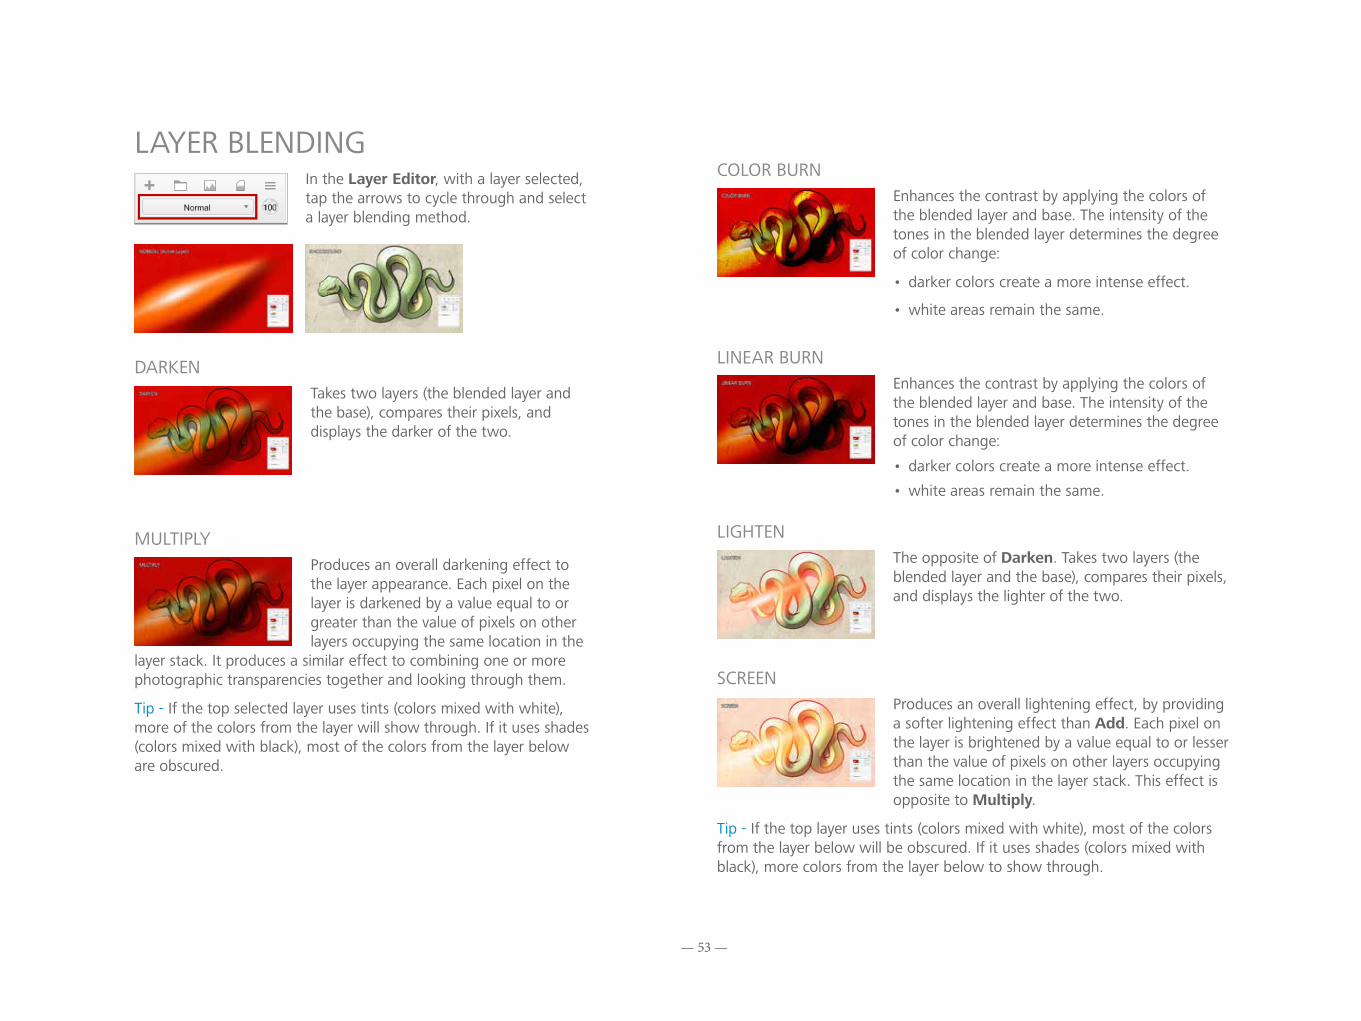
LAYER BLENDINGIn the Layer Editor, with a layer selected, tap the arrows to cycle through and select a layer blending method.
DARKEN Takes two layers (the blended layer and
the base), compares their pixels, and displays the darker of the two.
MULTIPLY Produces an overall darkening effect to the layer appearance. Each pixel on the layer is darkened by a value equal to or greater than the value of pixels on other layers occupying the same location in the
layer stack. It produces a similar effect to combining one or more photographic transparencies together and looking through them.
Tip - If the top selected layer uses tints (colors mixed with white), more of the colors from the layer will show through. If it uses shades (colors mixed with black), most of the colors from the layer below are obscured.
COLOR BURNEnhances the contrast by applying the colors of the blended layer and base. The intensity of the tones in the blended layer determines the degree of color change:
• darker colors create a more intense effect.
• white areas remain the same.
LINEAR BURNEnhances the contrast by applying the colors of the blended layer and base. The intensity of the tones in the blended layer determines the degree of color change:
• darker colors create a more intense effect.
• white areas remain the same.
LIGHTENThe opposite of Darken. Takes two layers (the blended layer and the base), compares their pixels, and displays the lighter of the two.
SCREEN Produces an overall lightening effect, by providing a softer lightening effect than Add. Each pixel on the layer is brightened by a value equal to or lesser than the value of pixels on other layers occupying the same location in the layer stack. This effect is opposite to Multiply.
Tip - If the top layer uses tints (colors mixed with white), most of the colors from the layer below will be obscured. If it uses shades (colors mixed with black), more colors from the layer below to show through.
— 54 —
COLOR DODGEThe opposite of Burn - though results aren’t always opposite. Increases contrast by lightening light areas without having any effect on darker ones.
LINEAR DODGE (ADD) Lightens the overall composition, similar
to Screen, but more dramatically. Each pixel is brightened by a value equal to or lesser than the value of pixels on other layers occupying the same location in the layer stack. This is applied as a linear calculation.
Tip - If the top selected layer uses tints (colors mixed with white), most of the colors from the layer below will be obscured. If it uses shades (colors mixed with black), more of the colors from the layer below to show through.
GLOW Defines the brightness of a glow, like the effect of a star in the night sky. The higher the setting, the brighter the glow.
Tip - Try the Glow brushes to paint on a glow.
SOFT GLOWSoftens or blurs the color and intensity of Glow, like the light emanating from a translucent object.
OVERLAYA mix of Multiply and Screen. Takes dark values and multiplies them and screening light values from the base layer. Brightness is unchanged, so it tends to look harsher than Soft Light.
SOFT LIGHTA mix of Darken and Lighten. Takes dark values and multiplies them and screening light values from the base layer; however, in this case, the effect is softer and more subtle than Overlay.
HARD LIGHTSimilar to Overlay, just more dramatic. Determines the pixel color based on grayscale. More than 50% gray, base layer pixels are screened. Less than 50% gray, they are multiplied.
HUETakes the hue of the blended layer, changing that of the base layer, without affecting the brightness or saturation levels.
SATURATIONTakes the saturation of the blended layer, changing that of the base layer, without affecting the brightness or hue levels.
— 55 —
COLORTakes the hue of the blended layer, changing the color of the base layer, without affecting the luminosity.
LUMINOSITYThe opposite of Color, it blends the lightness, while ignoring the color information.
NORMALRemoves any color correction applied to the layer. The layer appears exactly as it was created.
ORGANIZE LAYERSDrag layers and reposition them and change the spatial position of objects and how they combine to create the overall composition. Once satisfied with layer order, they can be combined by merging two or all of them.
In the Layer Editor, pen down on to drag the layer up or down. Release the stylus to drop the layer into position.
MERGE TWO LAYERSCombine two layers together. Tap the upper layer and flick toward to merge it with the one below or press Cmd+E for Mac or Ctrl+E for Windows.
MERGE ALL LAYERSCombine all layers to create a project with one layer. Flick toward to merge them, even hidden (which become visible) or locked ones.
Note - Unhide all layers to be merged. Hidden layers will be lost.
— 56 —
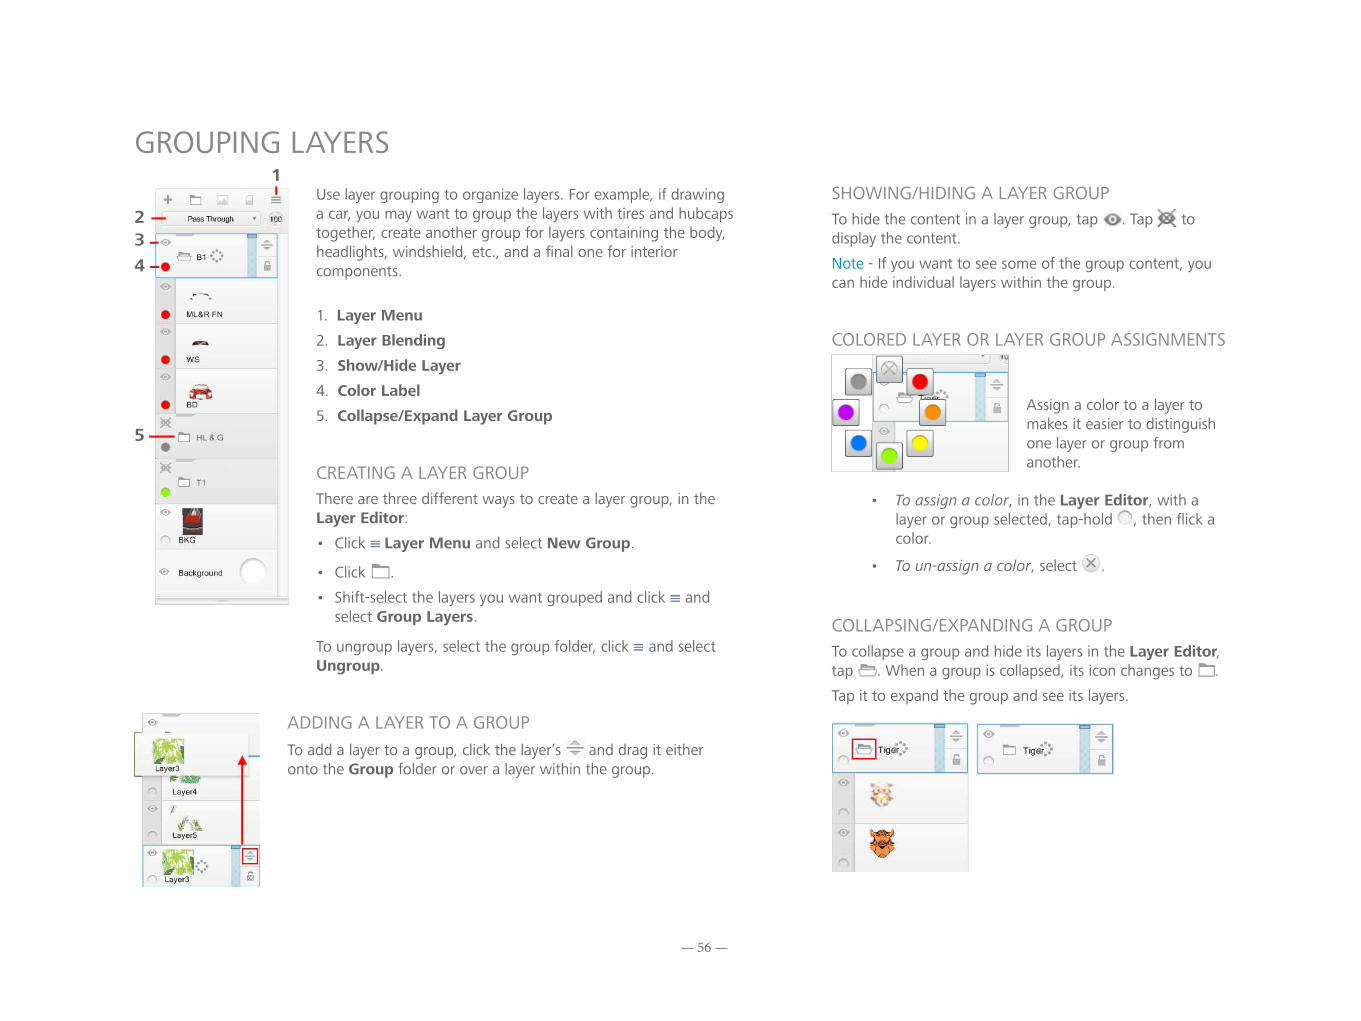
GROUPING LAYERS1
234
5
Use layer grouping to organize layers. For example, if drawing a car, you may want to group the layers with tires and hubcaps together, create another group for layers containing the body, headlights, windshield, etc., and a final one for interior components.
1. Layer Menu
2. Layer Blending
3. Show/Hide Layer
4. Color Label
5. Collapse/Expand Layer Group
CREATING A LAYER GROUPThere are three different ways to create a layer group, in the Layer Editor:
• Click Layer Menu and select New Group.
• Click .
• Shift-select the layers you want grouped and click and select Group Layers.
To ungroup layers, select the group folder, click and select Ungroup.
ADDING A LAYER TO A GROUPTo add a layer to a group, click the layer’s and drag it either onto the Group folder or over a layer within the group.
SHOWING/HIDING A LAYER GROUPTo hide the content in a layer group, tap . Tap to display the content.
Note - If you want to see some of the group content, you can hide individual layers within the group.
COLORED LAYER OR LAYER GROUP ASSIGNMENTS
Assign a color to a layer to makes it easier to distinguish one layer or group from another.
• To assign a color, in the Layer Editor, with a layer or group selected, tap-hold , then flick a color.
• To un-assign a color, select .
COLLAPSING/EXPANDING A GROUPTo collapse a group and hide its layers in the Layer Editor, tap . When a group is collapsed, its icon changes to .
Tap it to expand the group and see its layers.
— 57 —
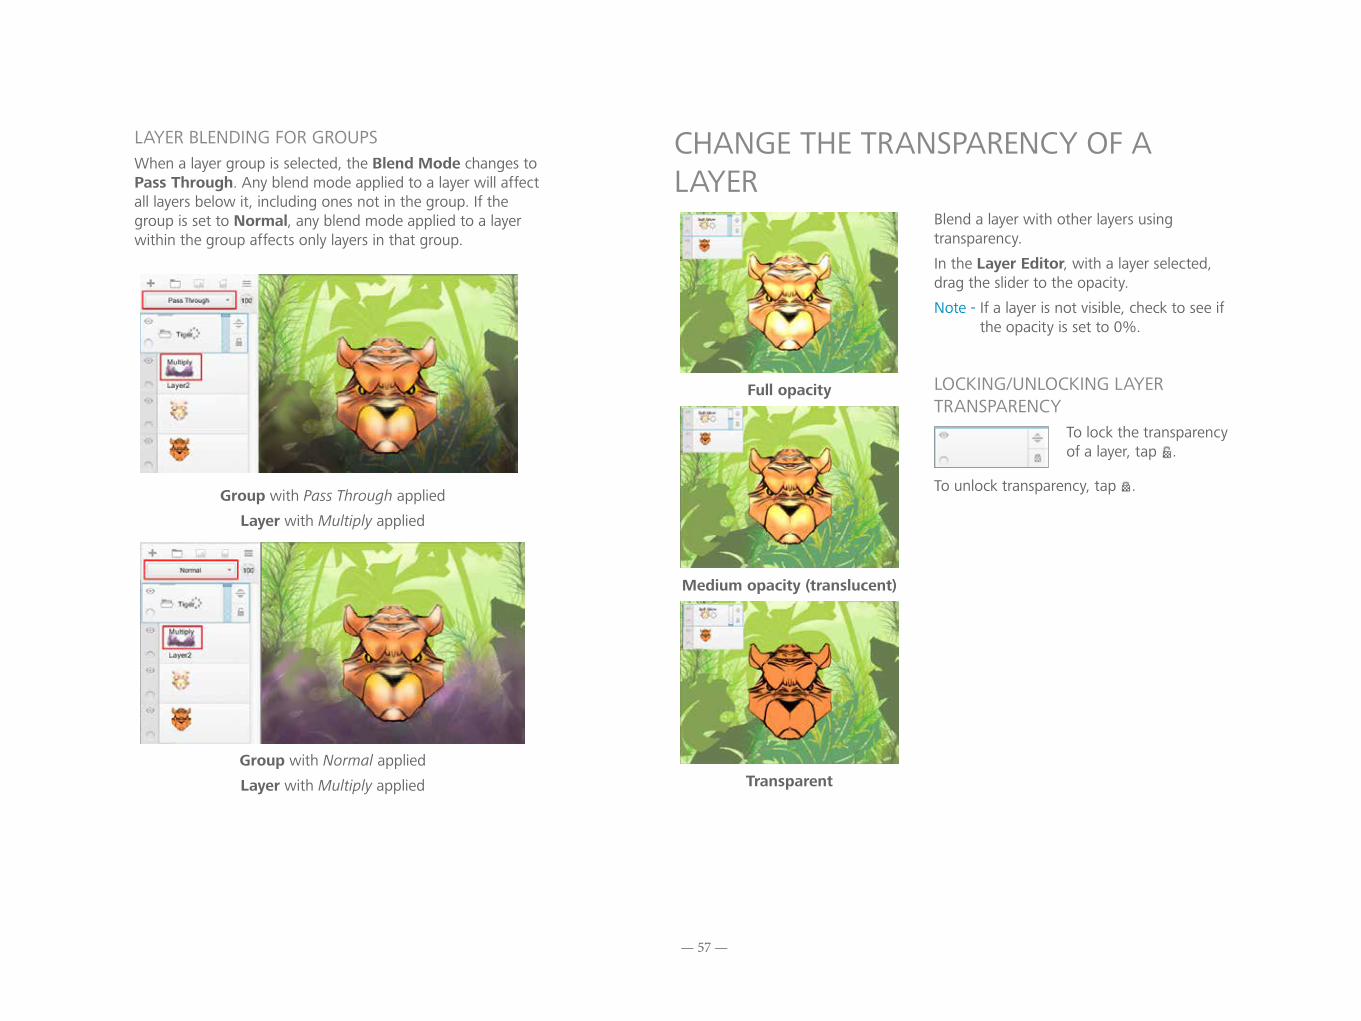
LAYER BLENDING FOR GROUPSWhen a layer group is selected, the Blend Mode changes to Pass Through. Any blend mode applied to a layer will affect all layers below it, including ones not in the group. If the group is set to Normal, any blend mode applied to a layer within the group affects only layers in that group.
Group with Pass Through applied
Layer with Multiply applied
Group with Normal applied
Layer with Multiply applied
CHANGE THE TRANSPARENCY OF A LAYER
Full opacity
Medium opacity (translucent)
Transparent
Blend a layer with other layers using transparency.
In the Layer Editor, with a layer selected, drag the slider to the opacity.
Note - If a layer is not visible, check to see if the opacity is set to 0%.
LOCKING/UNLOCKING LAYER TRANSPARENCY
To lock the transparency of a layer, tap .
To unlock transparency, tap .

— 58 —
10Annotate, Send, Print & Present
Print images or email them. Annotate sketches. Present sketches to colleagues, clients, or friends.
Image courtesy of Simone Kirschning
— 59 —
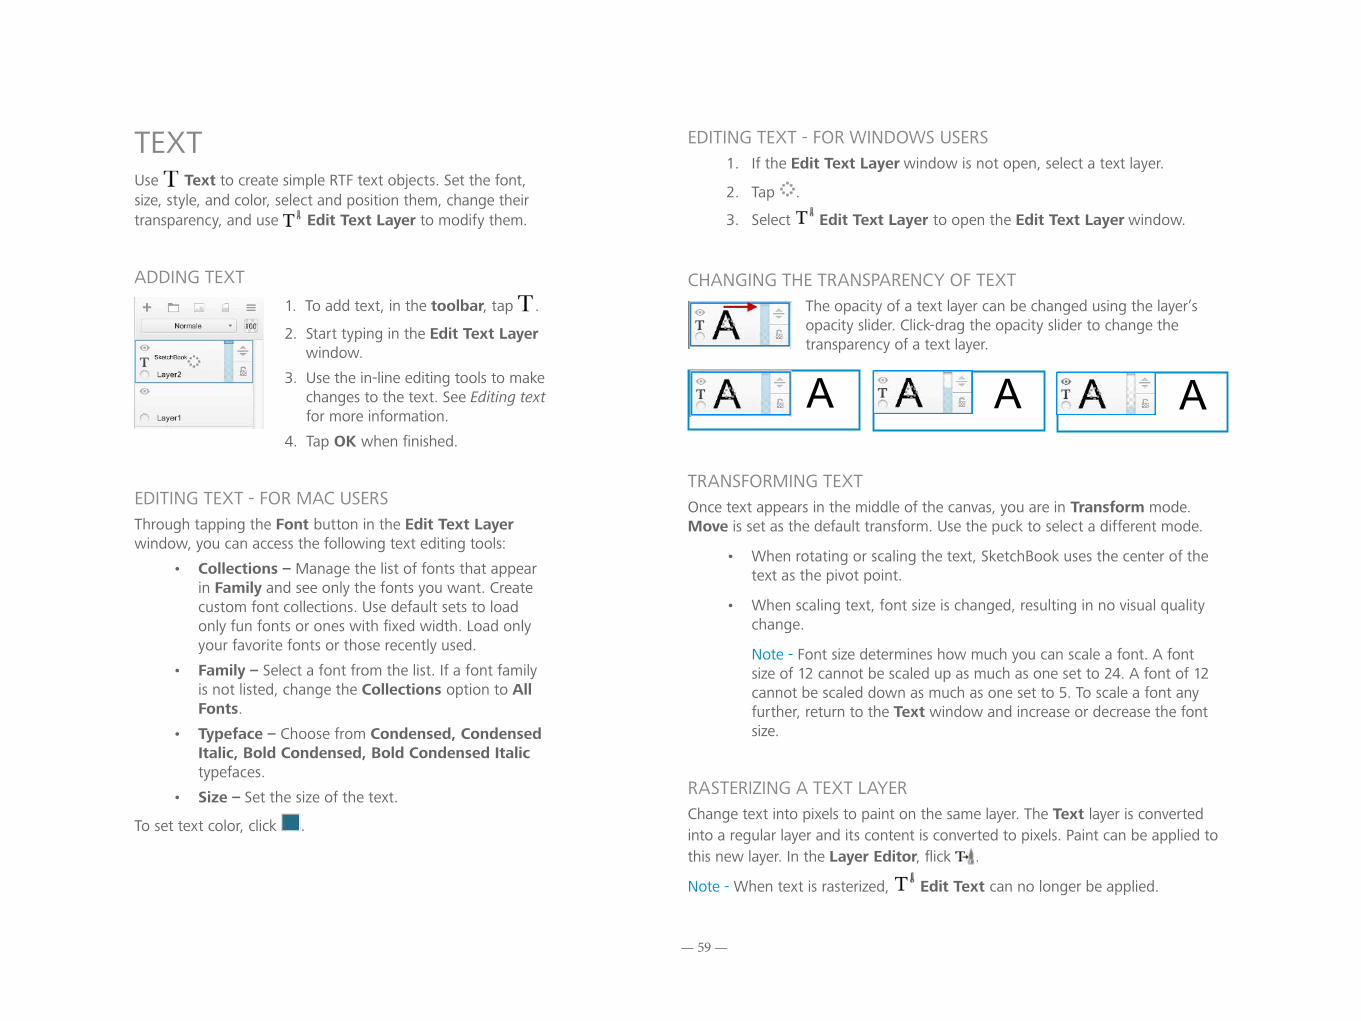
TEXTUse Text to create simple RTF text objects. Set the font, size, style, and color, select and position them, change their transparency, and use Edit Text Layer to modify them.
ADDING TEXT 1. To add text, in the toolbar, tap .
2. Start typing in the Edit Text Layer window.
3. Use the in-line editing tools to make changes to the text. See Editing text for more information.
4. Tap OK when finished.
EDITING TEXT - FOR MAC USERSThrough tapping the Font button in the Edit Text Layer window, you can access the following text editing tools:
• Collections – Manage the list of fonts that appear in Family and see only the fonts you want. Create custom font collections. Use default sets to load only fun fonts or ones with fixed width. Load only your favorite fonts or those recently used.
• Family – Select a font from the list. If a font family is not listed, change the Collections option to All Fonts.
• Typeface – Choose from Condensed, Condensed Italic, Bold Condensed, Bold Condensed Italic typefaces.
• Size – Set the size of the text.
To set text color, click .
EDITING TEXT - FOR WINDOWS USERS1. If the Edit Text Layer window is not open, select a text layer.
2. Tap .
3. Select Edit Text Layer to open the Edit Text Layer window.
CHANGING THE TRANSPARENCY OF TEXTThe opacity of a text layer can be changed using the layer’s opacity slider. Click-drag the opacity slider to change the transparency of a text layer.
TRANSFORMING TEXTOnce text appears in the middle of the canvas, you are in Transform mode. Move is set as the default transform. Use the puck to select a different mode.
• When rotating or scaling the text, SketchBook uses the center of the text as the pivot point.
• When scaling text, font size is changed, resulting in no visual quality change.
Note - Font size determines how much you can scale a font. A font size of 12 cannot be scaled up as much as one set to 24. A font of 12 cannot be scaled down as much as one set to 5. To scale a font any further, return to the Text window and increase or decrease the font size.
RASTERIZING A TEXT LAYERChange text into pixels to paint on the same layer. The Text layer is converted into a regular layer and its content is converted to pixels. Paint can be applied to this new layer. In the Layer Editor, flick .
Note - When text is rasterized, Edit Text can no longer be applied.
A A A
— 60 —
EMAIL A SKETCHFor Mac App Store users, email a sketch to someone by selecting File > Send Mail.
TROUBLESHOOTINGFor Windows users, if you get a message that you cannot email the image, check that:
You have an email account set up on your computer.
To select a default email application on Windows 7 or 8:
• Go to the Internet Properties control panel (Start > Control Panel > Network and Internet > Internet Options).
• Click the Programs tab.
• Pick the default email application from the E-mail dropdown list.
You have selected a default email application.
Your email program is open.Some email programs (for example, Microsoft Outlook) must be open before using this feature.
You can launch your default email program from outside of SketchBook.
Try the following:
• From the Windows Start menu, choose Run.
• Type the “mailto:” command.
• Click OK.
If a new empty message window does not appear, then there is a problem with the configuration of your email application and/or account.
For Mac users, if you get a message that you cannot email the image, check that:
• You have an email account set up on your computer.
• You have selected a default email application.
• You can launch your default email program from outside SketchBook.
If your email program creates the email message, but cannot send the message, ensure that your email service provider is operational. (Refer to the documentation of your email program for further information.)
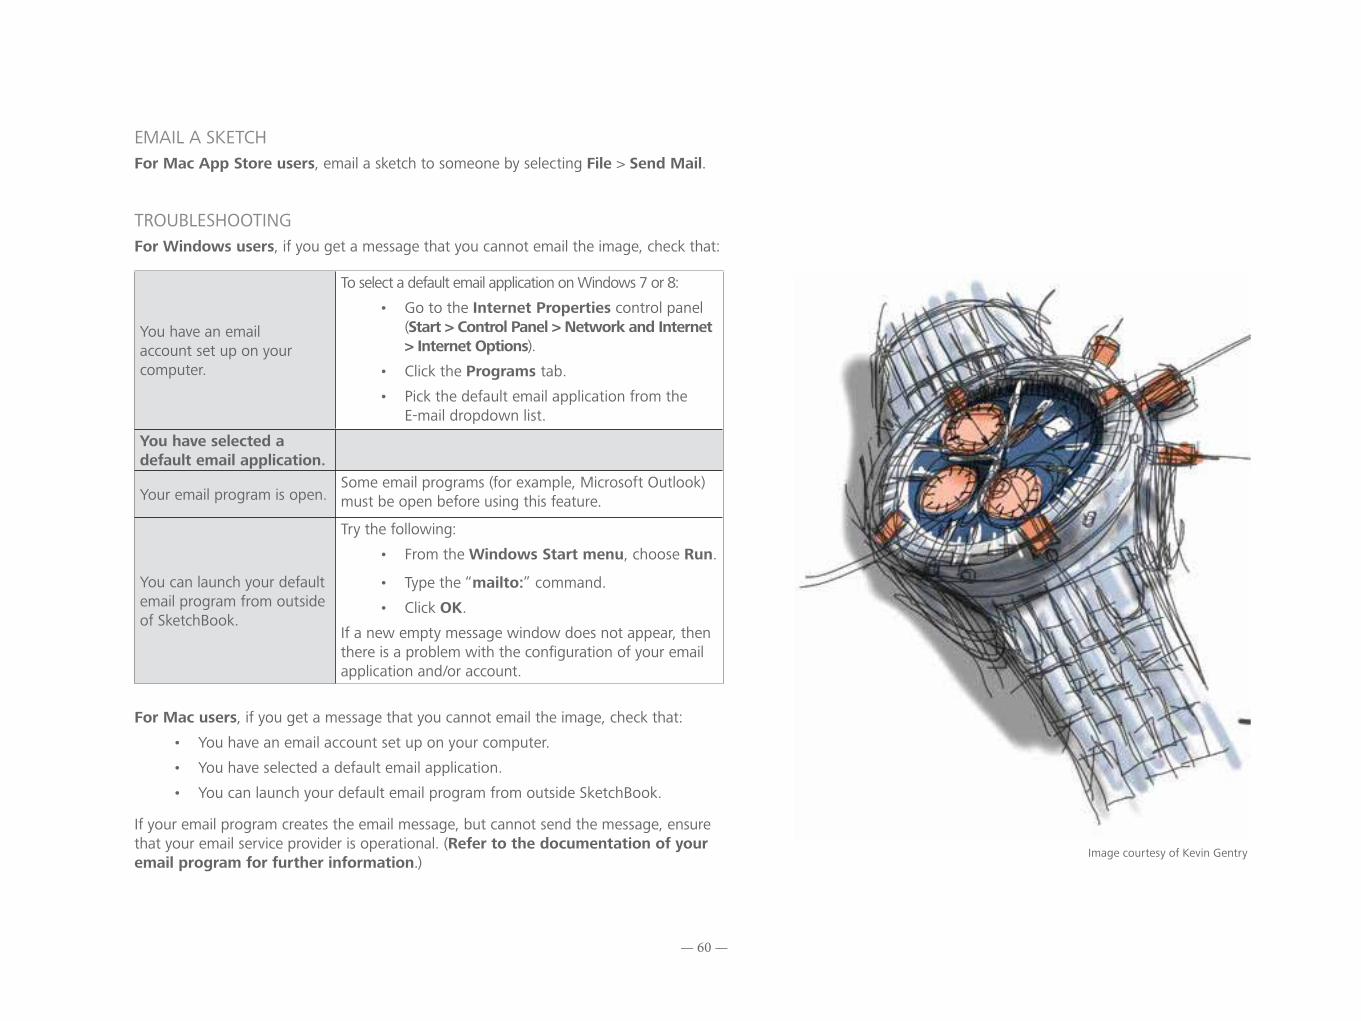
Image courtesy of Kevin Gentry
— 61 —
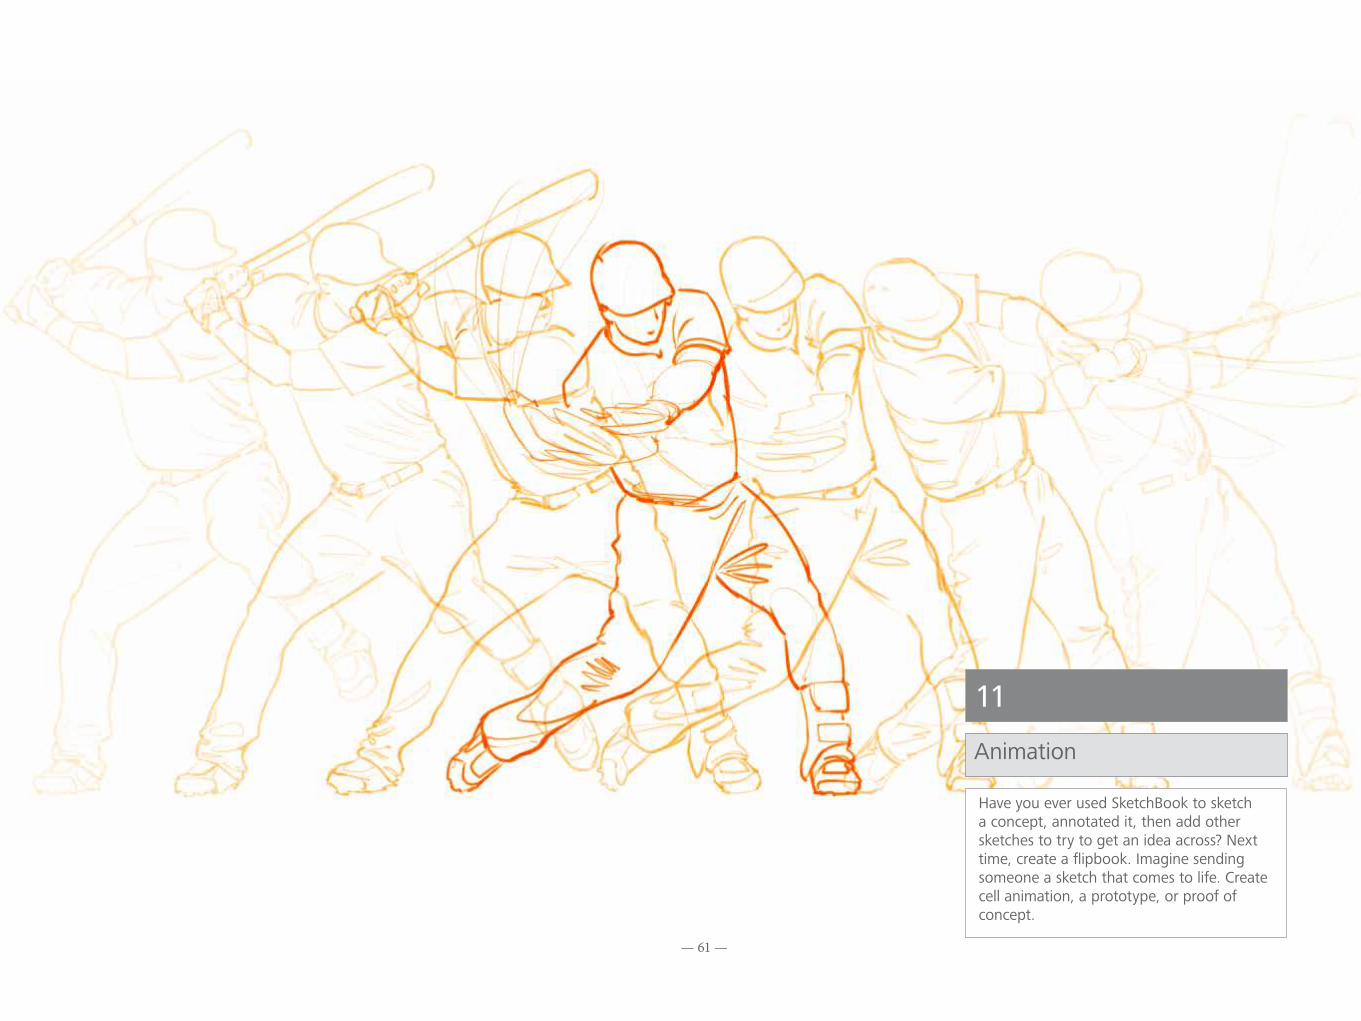
11Animation
Have you ever used SketchBook to sketch a concept, annotated it, then add other sketches to try to get an idea across? Next time, create a flipbook. Imagine sending someone a sketch that comes to life. Create cell animation, a prototype, or proof of concept.
— 62 —
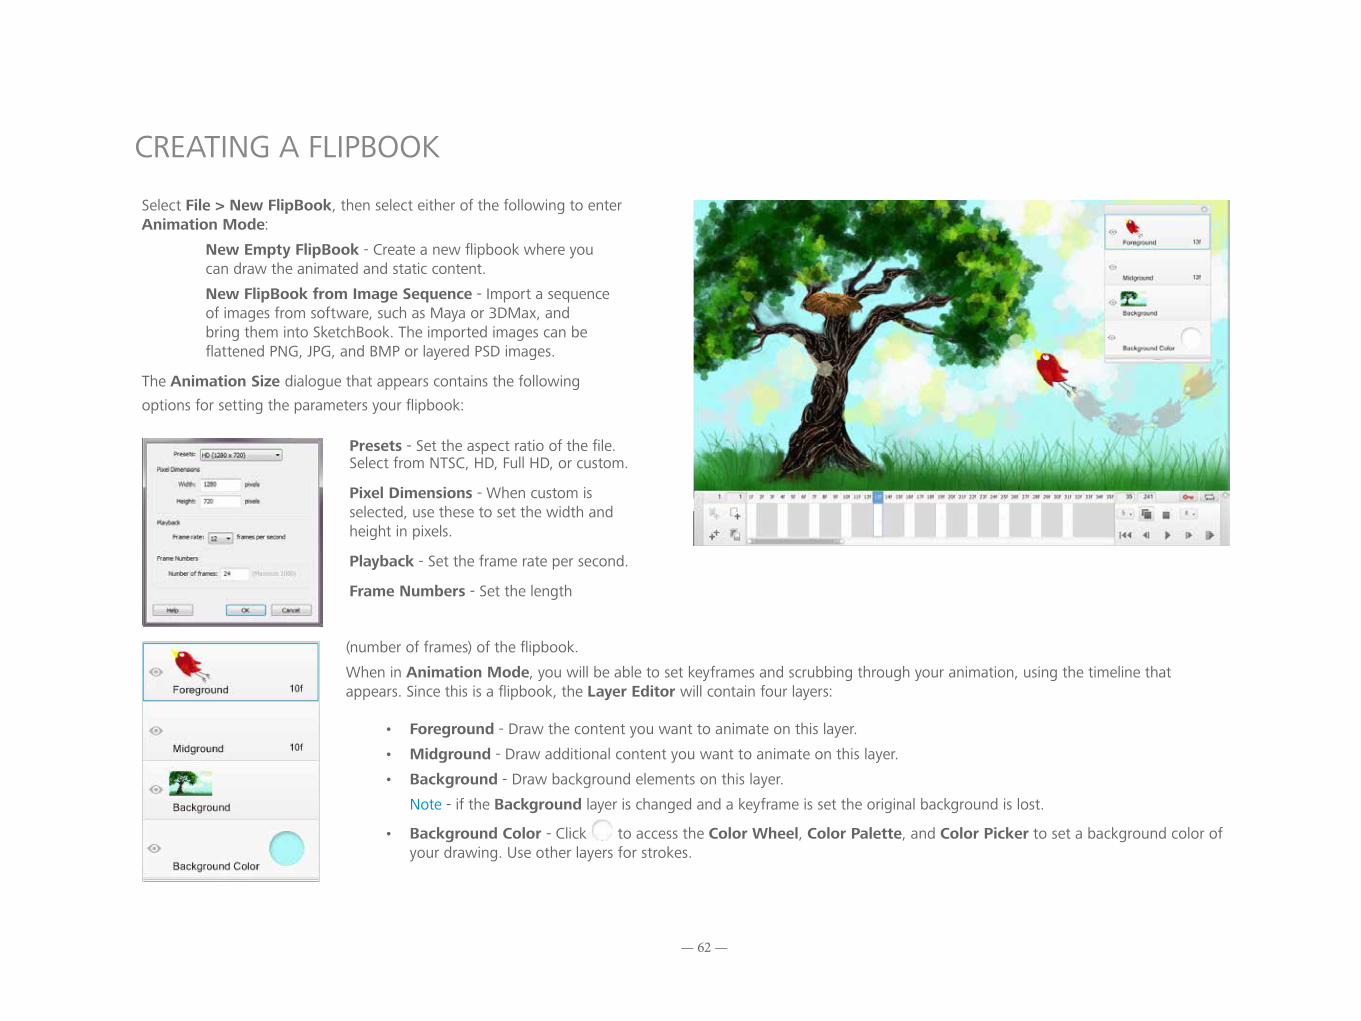
Select File > New FlipBook, then select either of the following to enter Animation Mode:
New Empty FlipBook - Create a new flipbook where you can draw the animated and static content.
New FlipBook from Image Sequence - Import a sequence of images from software, such as Maya or 3DMax, and bring them into SketchBook. The imported images can be flattened PNG, JPG, and BMP or layered PSD images.
The Animation Size dialogue that appears contains the following options for setting the parameters your flipbook:
Presets - Set the aspect ratio of the file. Select from NTSC, HD, Full HD, or custom.
Pixel Dimensions - When custom is selected, use these to set the width and height in pixels.
Playback - Set the frame rate per second.
Frame Numbers - Set the length
CREATING A FLIPBOOK
(number of frames) of the flipbook.
When in Animation Mode, you will be able to set keyframes and scrubbing through your animation, using the timeline that appears. Since this is a flipbook, the Layer Editor will contain four layers:
• Foreground - Draw the content you want to animate on this layer.
• Midground - Draw additional content you want to animate on this layer.
• Background - Draw background elements on this layer.
Note - if the Background layer is changed and a keyframe is set the original background is lost.
• Background Color - Click to access the Color Wheel, Color Palette, and Color Picker to set a background color of your drawing. Use other layers for strokes.

— 63 —
Image courtesy of AZURE - Maasa Kuwana-Muelhaupt
TIMELINEFor animating, use the timeline to add, duplicate, move, rearrange, clear, or delete keyframes, scrub through or playback your animation, turn on or off ghosting and set the number of frames ghosted, as well as set the playback range.
1 2 3 4 5 6
7 8
1 Starting frame of the flipbook/ Starting frame of the playback range
2 Current frame
3 End frame of the flipbook/ End frame of the playback range
4 Show/hide ghosting previous frame/ Show/hide ghosting next frame
5 Auto Keyframe
6 Loop
7 Playback range
8 Playback controls of frames
SETTING A PLAYBACK RANGEUse the playback range to play only a select range of frames.
Do either of the following:
• Click-drag starting end of the playback range into position. Click-drag the other end into place.
• Click the playback range options to enter the start and end values.
— 64 —
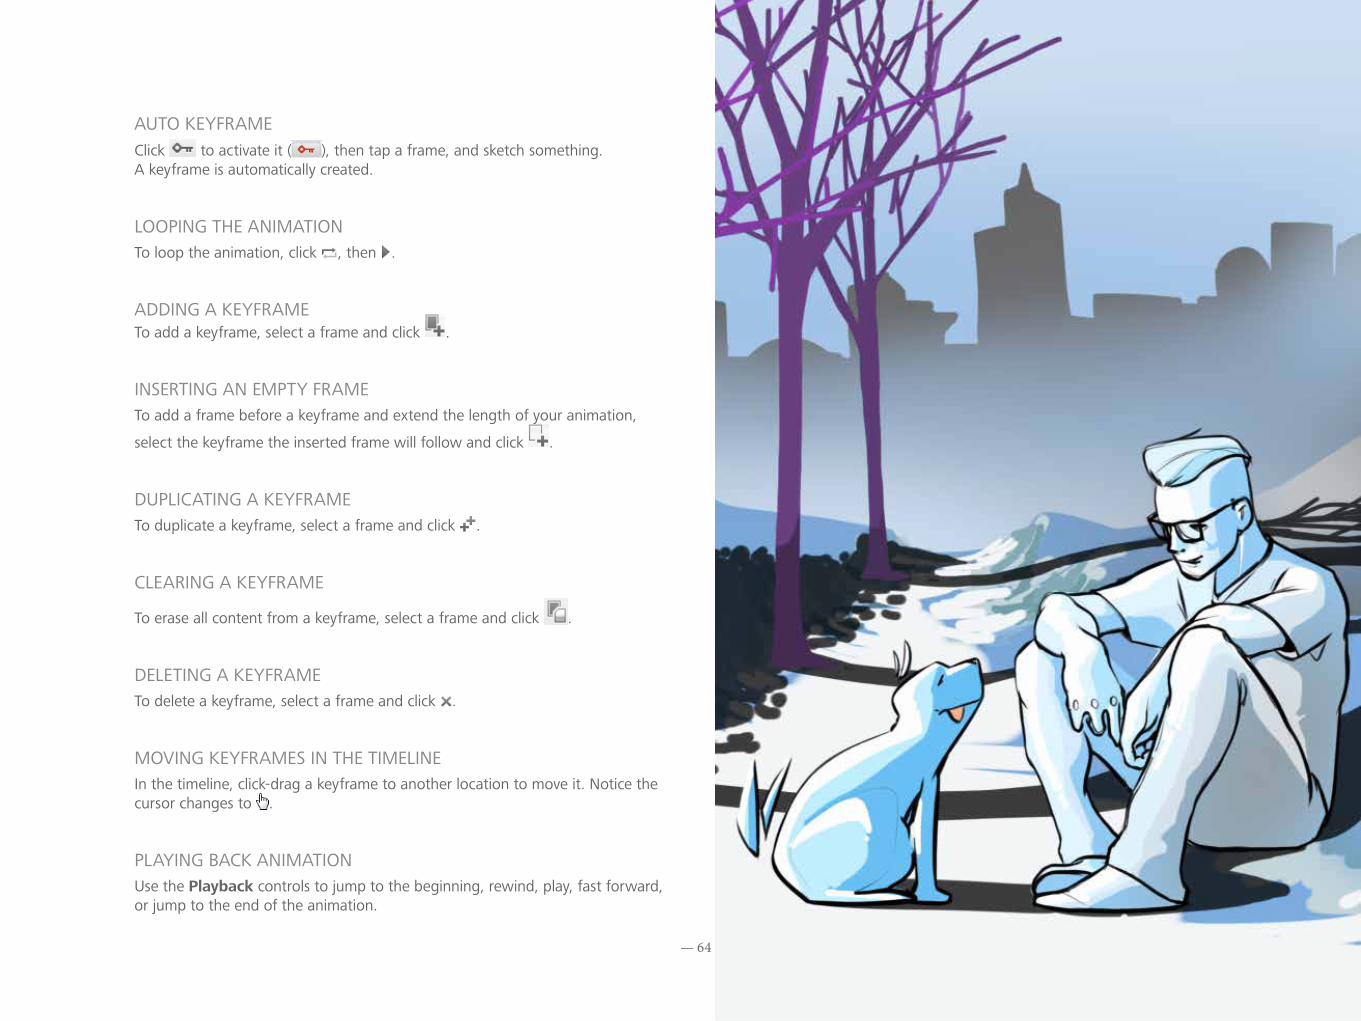
AUTO KEYFRAMEClick to activate it ( ), then tap a frame, and sketch something. A keyframe is automatically created.
LOOPING THE ANIMATIONTo loop the animation, click , then .
ADDING A KEYFRAMETo add a keyframe, select a frame and click .
INSERTING AN EMPTY FRAMETo add a frame before a keyframe and extend the length of your animation,
select the keyframe the inserted frame will follow and click .
DUPLICATING A KEYFRAMETo duplicate a keyframe, select a frame and click .
CLEARING A KEYFRAME
To erase all content from a keyframe, select a frame and click .
DELETING A KEYFRAMETo delete a keyframe, select a frame and click .
MOVING KEYFRAMES IN THE TIMELINEIn the timeline, click-drag a keyframe to another location to move it. Notice the cursor changes to .
PLAYING BACK ANIMATIONUse the Playback controls to jump to the beginning, rewind, play, fast forward, or jump to the end of the animation.
— 65 —
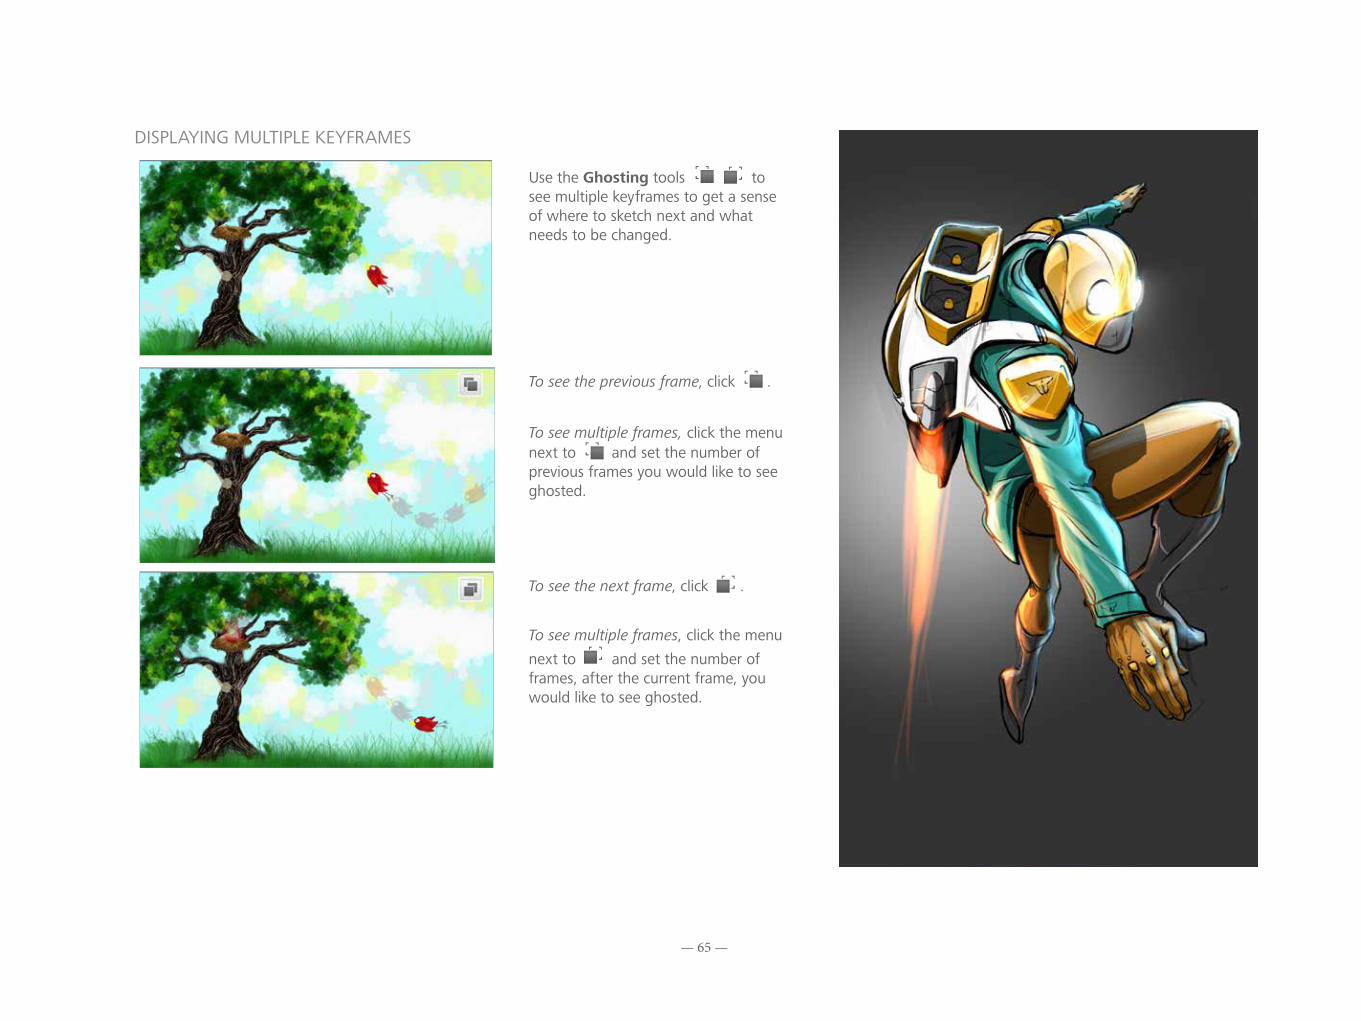
DISPLAYING MULTIPLE KEYFRAMES
Use the Ghosting tools to see multiple keyframes to get a sense of where to sketch next and what needs to be changed.
To see the previous frame, click .
To see multiple frames, click the menu next to and set the number of previous frames you would like to see ghosted.
To see the next frame, click .
To see multiple frames, click the menu next to and set the number of frames, after the current frame, you would like to see ghosted.
— 66 —
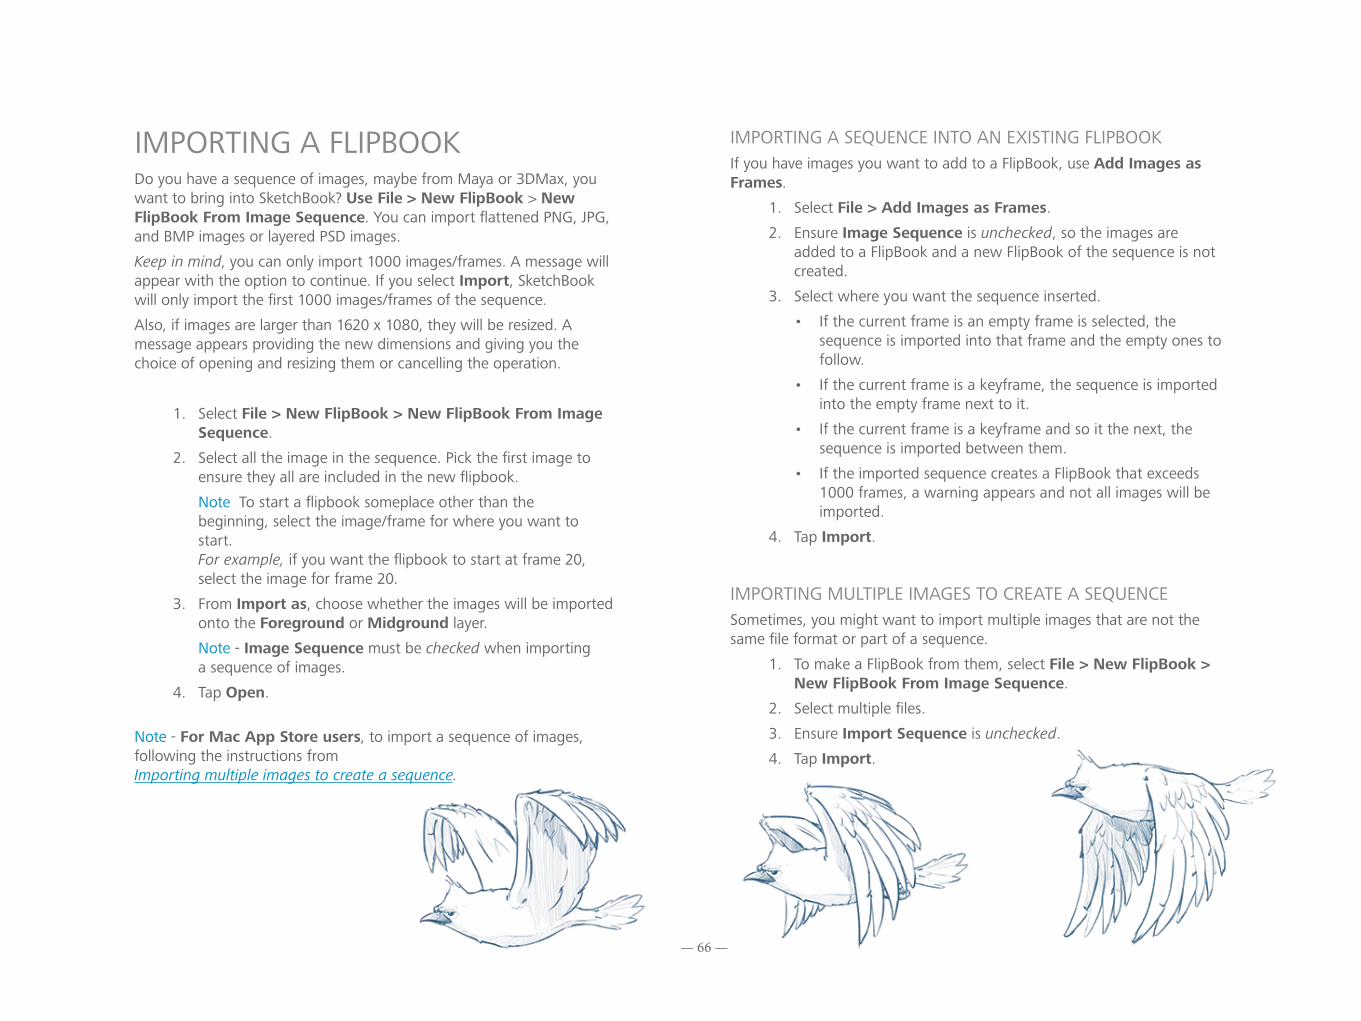
IMPORTING A FLIPBOOKDo you have a sequence of images, maybe from Maya or 3DMax, you want to bring into SketchBook? Use File > New FlipBook > New FlipBook From Image Sequence. You can import flattened PNG, JPG, and BMP images or layered PSD images.
Keep in mind, you can only import 1000 images/frames. A message will appear with the option to continue. If you select Import, SketchBook will only import the first 1000 images/frames of the sequence.
Also, if images are larger than 1620 x 1080, they will be resized. A message appears providing the new dimensions and giving you the choice of opening and resizing them or cancelling the operation.
1. Select File > New FlipBook > New FlipBook From Image Sequence.
2. Select all the image in the sequence. Pick the first image to ensure they all are included in the new flipbook.
Note To start a flipbook someplace other than the beginning, select the image/frame for where you want to start. For example, if you want the flipbook to start at frame 20, select the image for frame 20.
3. From Import as, choose whether the images will be imported onto the Foreground or Midground layer.
Note - Image Sequence must be checked when importing a sequence of images.
4. Tap Open.
Note - For Mac App Store users, to import a sequence of images, following the instructions from Importing multiple images to create a sequence.
IMPORTING A SEQUENCE INTO AN EXISTING FLIPBOOKIf you have images you want to add to a FlipBook, use Add Images as Frames.
1. Select File > Add Images as Frames.
2. Ensure Image Sequence is unchecked, so the images are added to a FlipBook and a new FlipBook of the sequence is not created.
3. Select where you want the sequence inserted.
• If the current frame is an empty frame is selected, the sequence is imported into that frame and the empty ones to follow.
• If the current frame is a keyframe, the sequence is imported into the empty frame next to it.
• If the current frame is a keyframe and so it the next, the sequence is imported between them.
• If the imported sequence creates a FlipBook that exceeds 1000 frames, a warning appears and not all images will be imported.
4. Tap Import.
IMPORTING MULTIPLE IMAGES TO CREATE A SEQUENCESometimes, you might want to import multiple images that are not the same file format or part of a sequence.
1. To make a FlipBook from them, select File > New FlipBook > New FlipBook From Image Sequence.
2. Select multiple files.
3. Ensure Import Sequence is unchecked.
4. Tap Import.
— 67 —
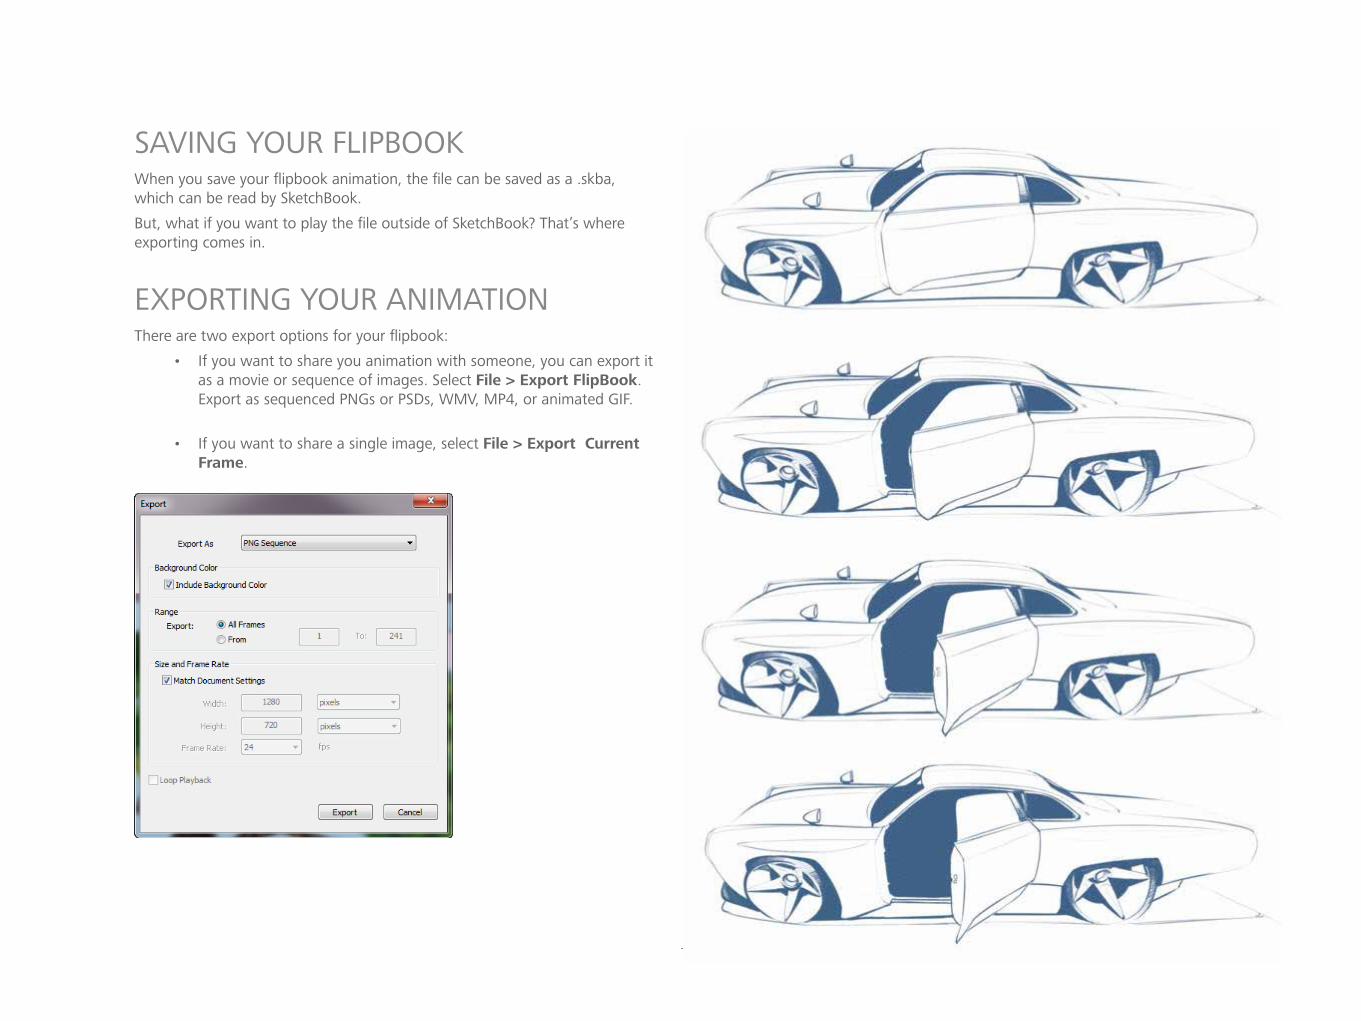
SAVING YOUR FLIPBOOKWhen you save your flipbook animation, the file can be saved as a .skba, which can be read by SketchBook.
But, what if you want to play the file outside of SketchBook? That’s where exporting comes in.
EXPORTING YOUR ANIMATIONThere are two export options for your flipbook:
• If you want to share you animation with someone, you can export it as a movie or sequence of images. Select File > Export FlipBook. Export as sequenced PNGs or PSDs, WMV, MP4, or animated GIF.
• If you want to share a single image, select File > Export Current Frame.
— 68 —
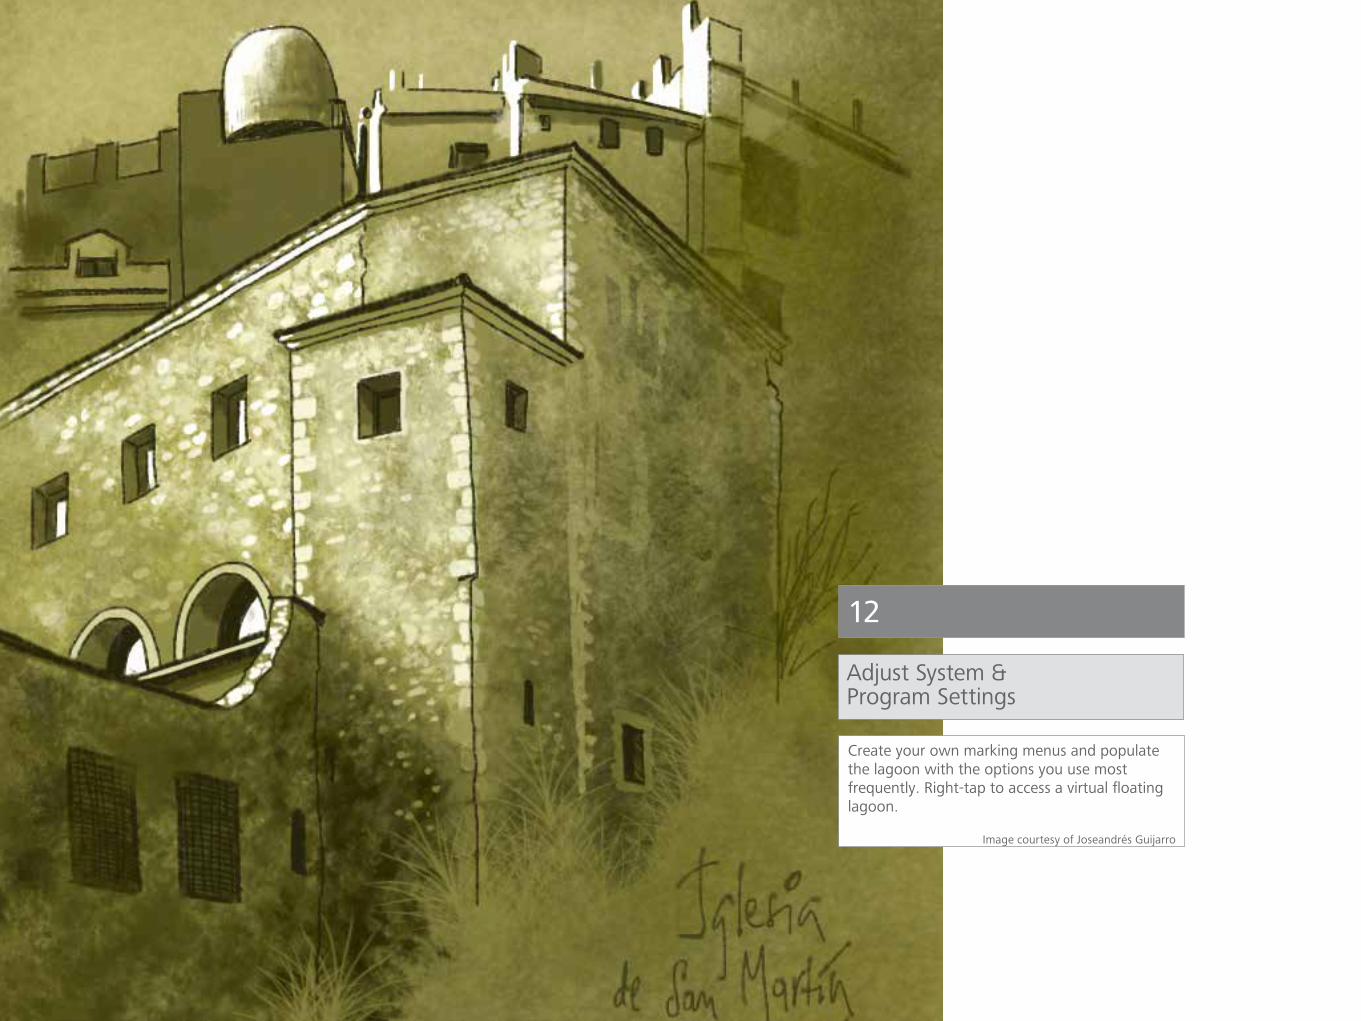
12Adjust System & Program Settings
Create your own marking menus and populate the lagoon with the options you use most frequently. Right-tap to access a virtual floating lagoon.
Image courtesy of Joseandrés Guijarro
— 69 —
PRINT A SKETCHMake printouts of your sketches by selecting File > Print.
FLIP THROUGH YOUR SKETCHESNot available for the Mac App Store version. View the images in a folder.
• To move to the next image in the current folder, tap , then flick toward . Images are displayed in increasing order by file name. For example, HOUSE1, HOUSE2, HOUSE3.
• To move to the previous image in the current folder, tap , then flick toward . Images are displayed in decreasing order by file name. For example, HOUSE3, HOUSE2, HOUSE1.
Note - If you mark up the images, a prompt to save your changes when you go to the previous or next image appears. To preserve the original image, save the marked-up image under a different file name.
PRESENT IMAGESNot available for the Mac App Store version. Organize and determine their order, then hide the interface to make the images the focal point.
• Put your images in order for presentation - Create a folder containing the images you want to include in the presentation. Rename the images in the folder in alphabetical or numerical order you want to present them.
• Presenting images - Browse to the folder containing the images you want to present. Open the first file in the folder.
• To show the next image, tap , then flick toward .
• To go backwards, tap , then flick toward .
• Hiding the interface for a bigger viewing area – To view a full-size display with no title bar or tools, tap , then flick . To move back and forth between images, use the Page Up and Page Down keys. To view all the tools again, tap , then flick .
Image courtesy of Carsten Bradley
— 70 —
CUSTOMIZING LAGOON ICONSChange the icons displayed in the lagoon, using the top section of the Lagoon Preferences.
CUSTOMIZING MARKING MENUSCustomize the marking menu for an icon in the lagoon, using the Lagoon Preferences to add tools that you commonly use. Once done, you can use clutch keys or left-click to access these custom marking menus with-out visiting the lagoon.
Lagoon position Mouse Stylus
First press 1, then right-click Press-hold 1 and pen-down (left click)
First press 2, then right-click Press-hold 2 and pen-down (left click)
First press 3, then right-click Press-hold 3 and pen-down (left click)
First press 4, then right-click Press-hold 4 and pen-down (left click)
First press 5, then right-click Press-hold 5 and pen-down (left click)
First press 6, then right-click Press-hold 6 and pen-down (left click)
RESETTING YOUR PREFERENCESAt any time, you can reset your preferences back to their original state.
RESET THE LAGOONResets the Lagoon to the factory default tools and marking menus.
Select Edit > Preferences > the Lagoon tab, tap Reset.
RESET COLOR PALETTEResets the Color Palette to the factory default colors. All custom swatches are removed.
Select Edit > Preferences > the Factory Defaults tab, for Reset Color Palette, tap Reset.
RESET BRUSH PALETTEResets all brushes to their original state. All custom brushes are removed.
Select Edit > Preferences > the Factory Defaults tab, for Reset Brush Palette and Library, tap Reset.
RESET PREFERENCE SETTINGSResets your preferences to the factory default settings.
Select Edit > Preferences > the Factory Defaults tab, for Reset Preference Settings, tap Reset.
— 71 —
HIDE OR MOVE THE INTERFACEUse these tools to set what interface elements are visible.
Displays the toolbar and lagoon and flips it to the left corner of the canvas.
Display the toolbar and lagoon and flips the lagoon to the right corner of the canvas.
Hide the toolbar and lagoon.
Display the toolbar, but hide the lagoon.
HIDING OR SHOWING SCROLL BARSSelect Edit > Preferences > Canvas tab. Turn off Enable canvas scroll bars.
Note - You can still use the Zoom and Move tool to view those parts of the image that are off the screen.
CHANGING THE BEHAVIOR OF PAGE UP AND PAGE DOWNSome machines use the Page Up and Page Down keys differently for browsing to previous or next files. Tap the General tab, in the Page Up section, tap one of the following setting to set up the program behavior that works best for your system.
• Open next image
• Open previous image
CHANGING THE MAXIMUM NUMBER OF UNDOSChanging the number of undos only takes effect once a file is created or another one is imported. We recommend you restart SketchBook. Tap the General tab. Enter the number of undos in Maximum undos.
CHANGING THE DEFAULT CANVAS SIZE FOR NEW FILESBy default, the size of a new image is the size of the display.
• Use width and height of window - To specify a custom size. Enter the width and height in the fields provided (choose from pixels, inches, cm, or mm).
Note - The maximum size is 8192 x 8192 for the 64-bit version.
• Use width and height of window - To use the default display size again.
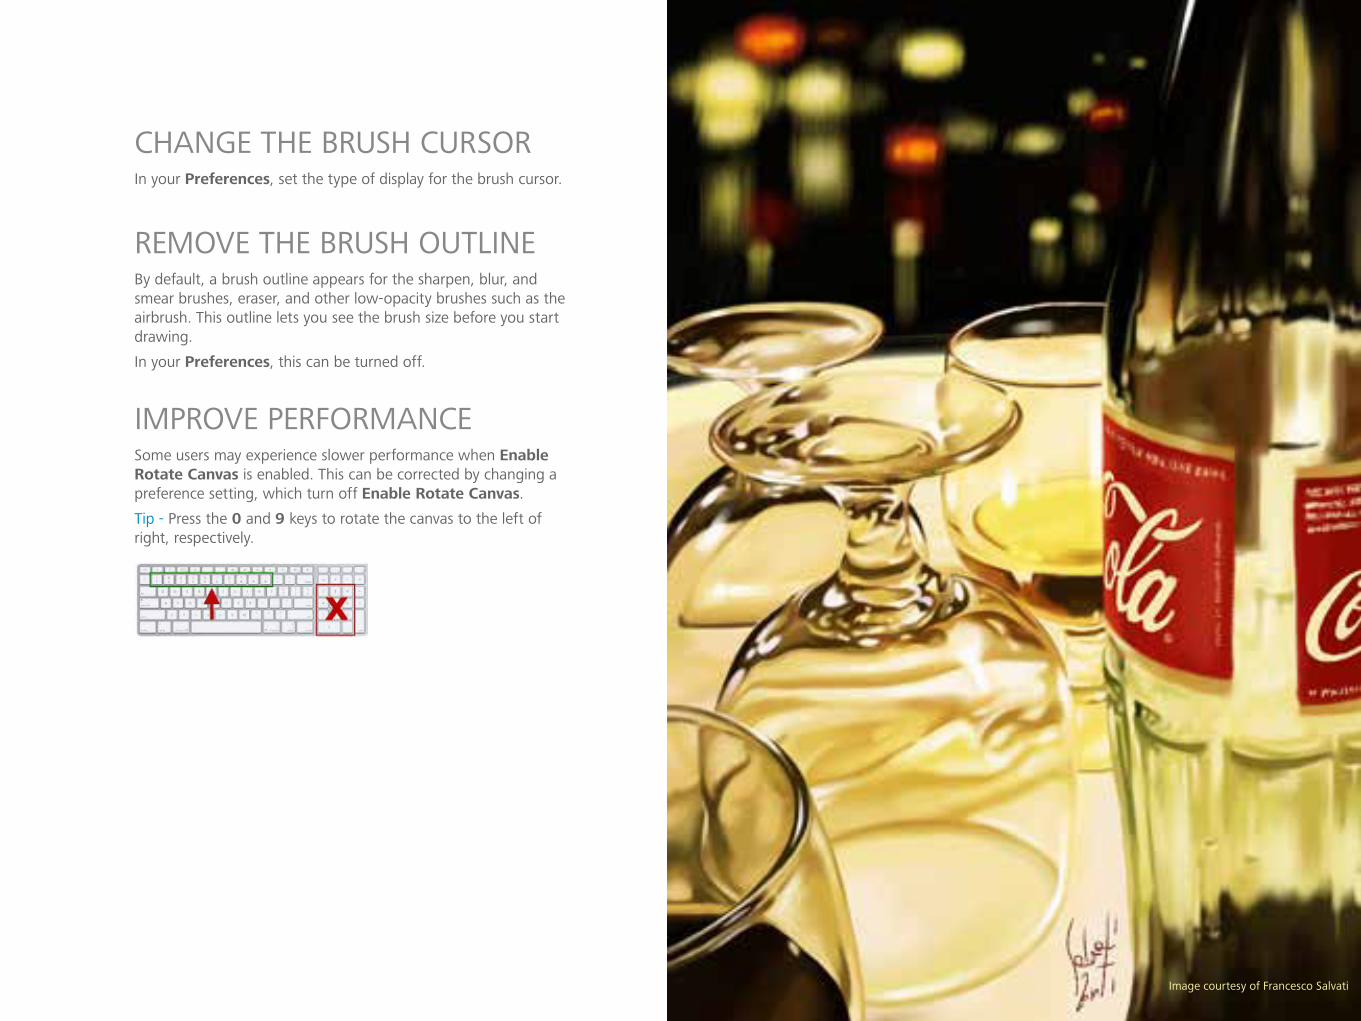
— 72 —
CHANGE THE BRUSH CURSORIn your Preferences, set the type of display for the brush cursor.
REMOVE THE BRUSH OUTLINEBy default, a brush outline appears for the sharpen, blur, and smear brushes, eraser, and other low-opacity brushes such as the airbrush. This outline lets you see the brush size before you start drawing.
In your Preferences, this can be turned off.
IMPROVE PERFORMANCESome users may experience slower performance when Enable Rotate Canvas is enabled. This can be corrected by changing a preference setting, which turn off Enable Rotate Canvas.
Tip - Press the 0 and 9 keys to rotate the canvas to the left of right, respectively.
Image courtesy of Francesco Salvati
— 73 —
Use this list to see the hotkey assignments in SketchBook.
Function Win MacAnimation Previous frame “,” (or “<“) “,” (or “<“) Brush Adjust size B BCrop Press Shift, drag corner to get
constrain scaleShift Shift
Distort In Distort mode, press shift to drag edge, only can move the edge alone the extension
Shift Shift
Fill Commit the result Enter EnterLayers Add layer Ctrl+L Command+LMenu New Ctrl+N Command+NPerspective Invoke Perspective tool P PSelection Invoke Lasso selection L LShape Press Shift key to get horizontal/
vertical line, square, circleShift Shift
Symmetry Invoke Symmetry X X XTransform Layer V VUI Hide UI T or Tab T or TabZoom/Rotate/Move Canvas
Spacekey Spacekey
Open Ctrl+O Command+O Save Ctrl+S Command+S Save As Ctrl+Shift+S Command+Shift+S Print Ctrl+P Command+P Exit Ctrl+Q Command+Q Undo Ctrl+Z Command+Z Redo Ctrl+Y Command+ Shift+Z Cut Ctrl+X Command+X Copy Ctrl+C Command+C Copy Merged Ctrl+Shift+C Command+Shift+C Paste Ctrl+V Command+V Select All Ctrl+A Command+A Deselect Ctrl+D Command+D Invert Selection Ctrl+Shift+I Command+Shift+I
Hotkeys
— 74 —
Function Win Mac Preference Ctrl+, Command+, SketchBook Help F1 N/A Next frame “.” (or “>”) “.” (or “>”) Previous keyframe Shift + “,” (or
“<“)Shift + “,” (or “<“)
Next keyframe Shift + “.” (or “>”)
Shift + “.” (or “>”)
Add keyframe (on next frame) Alt + “.” Alt + “.” Play/Stop Enter Enter Invoke Rectangle Selection M M Press ‘Shift’ before add selection,
add mode Press ‘Shift’ during adding selection, get circle or square
Shift Shift
Press ‘Alt’ before selection, remove mode
Alt Alt
Press ‘Shift’ after move selection, move horizontally or vertically
Shift Shift
Arrow key to move pixel Arrow Key Arrow Key Esc key to exit Selection tool Click outside of selection to cancel
the current selection
Polyline:
Delete key to delete last point
Double-click to confirm
Click the start point to confirm
Enter key to confirm Invoke Crop tool C C In Transform mode, press Shift to
drag corner and constrain scaleShift Shift
Exit the fill tool Esc Esc Snap or not D D Invoke Symmetry Y Y Y Ruler R R Ellipse E E French Curve F F

— 75 —
Function Win Mac Adjust Opacity O O Adjust Slant / / Increase brush size ] ] Decrease brush size [ [ Color picker Alt or I Alt or I Swap between two brushes S S Add Group Ctrl +G Command+G Merge with below Ctrl+E Command+E Clear Layer Backspace or
DeleteDelete
Fit to View Ctrl+0 (zero) Command+0 Actual size Ctrl+Alt+0(zero) Command+Alt+0 Rotate canvas left 9 (nine) 9 (nine) Rotate canvas right 0 (zero) 0 (zero) Previous image/Next image Page Up/Page
Down N/A
Hide Lagoon Ctrl+J Command+J Toggle Titlebar on/off Ctrl+Alt+J Command+Alt+J
Image courtesy of Creaturebox