autocad introduction to dynamic blocks
TRANSCRIPT

BONUS APPENDIX C
An Introduction to Dynamic Blocks
08776appC.qxd 4/4/06 8:45 AM Page 1

In Chapter 8, you generated elevations for the cabin. The front elevation is agood place to demonstrate how dynamic blocks work. You’ll insert into thiselevation a sample dynamic block created by Autodesk and included in the2007 program.
Follow these steps:
1. Open Cabin08a, and zoom in to the front elevation (see Figure C.1).
F I G U R E C . 1 : The front elevation of Cabin08a
2. Click the Tool Palettes Window button on the Standard toolbar to dis-play the palettes. Yours may appear differently. They can be docked,floating, or hidden behind the palette title bar. The one shown in Fig-ure C.2 is floating.
F I G U R E C . 2 : The Architectural tab of the Tool palettes
3. Click the Architectural tab. It may be abbreviated.
B o n u s A p p e n d i x C • A n I n t r o d u c t i o n t o D y n a m i c B l o c k s2
08776appC.qxd 4/4/06 8:45 AM Page 2

The lightning symbol on each of the diagrams indicates that these are dynamicblocks. You’ll drag one of them into the drawing and use it to enhance the detailon the bedroom windows.
Working with Dynamic BlocksEach of AutoCAD’s sample dynamic blocks has one or more variables, or para-meters, that are preset to vary the dimensions of the block in incremental steps.You’ll bring a dynamic block into the drawing, position it, and then select it andadjust its parameters.
Inserting a Dynamic BlockYou’ll use a block of a window in elevation for the bedroom windows. It has vari-able width and height parameters, allowing you to fit the block into several win-dows of the cabin:
1. With the Endpoint Osnap running, click and drag the AluminumWindow (Elevation) - Imperial block onto the drawing, and positionthe cursor on the lower-left corner of the left bedroom window. Whenthe Endpoint Osnap symbol appears there, release the mouse button.The dynamic window block is inserted into the drawing (see FigureC.3a). It’s a horizontal sliding window.
2. Click and drag the same block to the right bedroom window, but thistime position its insertion point at the upper-left corner of that win-dow. You’ll see why in a minute (see Figure C.3b).
Wo r k i n g w i t h D y n a m i c B l o c k s 3
08776appC.qxd 4/4/06 8:45 AM Page 3
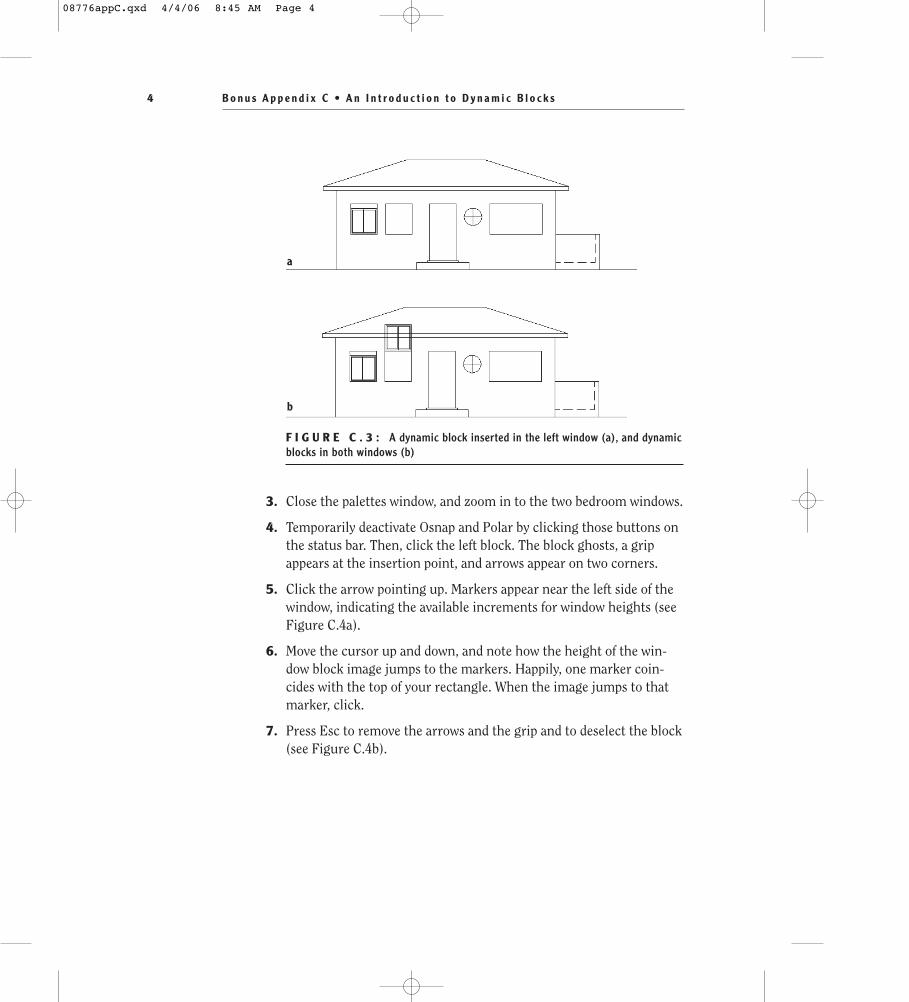
F I G U R E C . 3 : A dynamic block inserted in the left window (a), and dynamicblocks in both windows (b)
3. Close the palettes window, and zoom in to the two bedroom windows.
4. Temporarily deactivate Osnap and Polar by clicking those buttons onthe status bar. Then, click the left block. The block ghosts, a gripappears at the insertion point, and arrows appear on two corners.
5. Click the arrow pointing up. Markers appear near the left side of thewindow, indicating the available increments for window heights (seeFigure C.4a).
6. Move the cursor up and down, and note how the height of the win-dow block image jumps to the markers. Happily, one marker coin-cides with the top of your rectangle. When the image jumps to thatmarker, click.
7. Press Esc to remove the arrows and the grip and to deselect the block(see Figure C.4b).
B o n u s A p p e n d i x C • A n I n t r o d u c t i o n t o D y n a m i c B l o c k s4
a
b
08776appC.qxd 4/4/06 8:45 AM Page 4

F I G U R E C . 4 : The left block activated (a), and the result of the heightadjustment (b)
For the right bedroom window, you’ll do something a little different so youcan see how versatile this dynamic block is. You’ll rotate it and make it a double-hung window. Here are the steps:
1. Reactivate Osnap; then start the Rotate command, and select thewindow that’s currently sitting above the right bedroom window.Then, press ↵.
2. Click the upper-left corner of the original rectangle, also the inser-tion point of this window block.
3. At the prompt, enter -90↵. The window rotates into position. Thistime it needs to be expanded downward (see Figure C.5a).
4. Click the block to display the same grip and arrows. Then, click thedown-pointing arrow. Doing so activates the width markers that dis-play the available increments of widths. This time, they serve asheights because you’ve rotated the block 90° (see Figure C.5b).
Wo r k i n g w i t h D y n a m i c B l o c k s 5
b
a
08776appC.qxd 4/4/06 8:45 AM Page 5

5. As in the previous set of steps, move the cursor up and down to seehow the increment controls work and how the window image jumpsin size to match the markers.
6. Click to place the window in the original rectangle. Press Esc toremove the block and the arrows (see Figure C.5c).
F I G U R E C . 5 : The rotated right window (a), the dynamic block activated(b), and the result of the expansion (c)
B o n u s A p p e n d i x C • A n I n t r o d u c t i o n t o D y n a m i c B l o c k s6
a
b
c
08776appC.qxd 4/4/06 8:45 AM Page 6

Let’s insert this same dynamic block into the living room window:
1. Pan the drawing over to the living room window, display the Toolpalettes again, and make Architectural the current palette.
2. Drag the same block over to the living room window, and locate itsinsertion point at the lower-left corner of the window opening (seeFigure C.6a). Close the Tool palettes.
3. Select the block, click the height-adjusting arrow, stretch the blockup to fit the height of the opening, and click to position it.
4. Click the right-pointing arrow, and stretch the block as far to theright as you can (see Figure C.6b). You’ll find that it won’t stretch tothe full width of the window opening.
F I G U R E C . 6 : The window block inserted in the living room window opening(a), and the block stretched to the right (b)
5. Select the block again, and adjust it back to its 3' width. Press Esc toremove the grips.
Wo r k i n g w i t h D y n a m i c B l o c k s 7
a
b
08776appC.qxd 4/4/06 8:45 AM Page 7

The increments for the width of the window don’t extend beyond 5 feet, so theblock can’t be stretched any farther than that. Let’s look at how this dynamicblock is set up.
Editing a Parameter of a Dynamic BlockYou want to allow the dynamic window block to fit into the living room windowopening. You’ve already stretched the height so it fits in that direction. Now youneed to adjust the width increments so the window can be stretched to a widthof 6 feet. To do this, you’ll open the Dynamic Block Editor and use the Propertiespalette to add a 6' incremental value:
1. Click the window block in the living room to select it, right-click,and choose Block Editor from the shortcut menu. The Block Editoropens, and a window asks if you want to watch a demonstration onhow dynamic blocks are created. Click No for now. You can accessthis demo later by choosing Help ➣ New Features Workshop.
2. On the Block Authoring palette that appears, click the Parameters tabto bring it to the top (see Figure C.7a). The parameters on the paletteare variables that relate to various kinds of geometry, such as dis-tance, angle, rotation, and so on.
3. Click the Actions tab on the Block Authoring palette (see FigureC.7b). The Actions displayed here are assigned to a parameter. Theyare related to AutoCAD commands that change the parameters in aspecific way.
F I G U R E C . 7 : The Block Editor with the Parameters tab of the Block Authoring paletteactive (a), and the Actions tab (b)
B o n u s A p p e n d i x C • A n I n t r o d u c t i o n t o D y n a m i c B l o c k s8
a b
08776appC.qxd 4/4/06 8:45 AM Page 8

The window block in the Block Editor displays the information that controls thedynamics of the block. Window Width and Window Height are the two parametersin the block. They are made from the Linear Parameter on the Block Authoringpalette and then renamed. The Window Height parameter has one Action associ-ated with it—Stretch Height—so the window can stretch to any of a series ofpreset heights. The Window Width parameter has two Actions attached—StretchWidth and Stretch Divider—the second of which ensures that the middle dividestretches only half the distance that the entire window stretches and thereby stayscentered. You’ll make a change in the Window Width parameter.
1. Click the Window Width parameter in the Block Editor, and open theProperties palette.
2. Scroll down to the Value Set section. The Dist Value List line displaysthe increments of the preset window widths (see Figure C.8).
F I G U R E C . 8 : The Properties palette with the Window Width parameterselected in the Block Editor
3. Place the arrow cursor on the list. AutoCAD displays the complete listof incremental widths; 5' is the largest (see Figure C.9).
F I G U R E C . 9 : The full list of incremental widths displayed
Wo r k i n g w i t h D y n a m i c B l o c k s 9
08776appC.qxd 4/4/06 8:45 AM Page 9

4. Click the list, and then move the arrow off the list for a moment. Abrowse button appears on the right end of the list.
5. Move the arrow onto this button, and click to open the Add Dis-tance Value dialog box (see Figure C.10). Here you can change theincrements for the width. A cursor is flashing in the Distances ToAdd text box.
F I G U R E C . 1 0 : The Add Distance Value dialog box
6. Enter 6', click the Add button, and then click OK. Now the windowwill stretch to fit the width of the living room window opening.
7. Close the Properties palette. Back in the Block Editor, click the SaveBlock Definition button. It’s the second one from the left on the BlockEditor toolbar near the top of the drawing area. A warning windowappears. Click Yes. Then, click the Close Block Editor button at theright end of the Block Editor toolbar.
8. Back in the drawing, click the window block in the living room win-dow opening, and then click the arrow at the lower-right corner. Nowyou can see an increment marker that coincides with the opening’swidth (see Figure C.11).
B o n u s A p p e n d i x C • A n I n t r o d u c t i o n t o D y n a m i c B l o c k s1 0
08776appC.qxd 4/4/06 8:45 AM Page 10

F I G U R E C . 1 1 : The dynamic window block selected and displaying the new6' increment for width
9. Stretch the window to the right to fit it in the opening. Press Esc toclear the grips (see Figure C.12). The living room window is complete.
F I G U R E C . 1 2 : The completed living room window
10. Zoom out and pan to a view of the front elevation. Save this drawingas CabinCa.
If you completed the side and rear elevations in Chapter 8, you may want topractice inserting this block into the windows in those views. They are found inCabin08c.dwg. Next, we’ll look at setting up a dynamic block.
Wo r k i n g w i t h D y n a m i c B l o c k s 1 1
08776appC.qxd 4/4/06 8:45 AM Page 11

Creating a Dynamic BlockThe basic procedure for setting up a dynamic block is as follows:
� Create the block using the Make Block command.
� Right-click the block, and choose Block Editor.
� Click a parameter, and follow the Command window prompts toset up the parameter.
� Click the Actions tab, and click an Action to associate with a para-meter; then, follow the Command window prompts to set up theAction.
� Use the Properties palette to rename and specify settings for theparameter and any Actions associated with it.
� Save your work back to the block definition.
� Close the Block Editor.
You’ll work through this process by converting the door3_0 block from Cab-inCa into a dynamic block:
1. With CabinCa as the current drawing, pan up to the floor plan,choose Edit ➣ Copy With Base Point, use the Insert Osnap to selectthe insertion point of the front door block as the base point, and thenselect the front door block and press ↵.
2. Start a new drawing from scratch. Change the linear units to Archi-tectural. Then, choose Edit ➣ Paste, and, when prompted to specifythe base point, type 0,0↵.
3. Zoom to extents, and then zoom to .5x. Turn off the UCS icon.
4. Click the door block, right-click, and choose Block Editor from theshortcut menu. Pan the view, and adjust the Block Authoring palettesso that your screen looks similar to Figure C.13.
B o n u s A p p e n d i x C • A n I n t r o d u c t i o n t o D y n a m i c B l o c k s1 2
08776appC.qxd 4/4/06 8:45 AM Page 12

F I G U R E C . 1 3 : The door block in the Block Editor
You want to be able to use this door block for openings of the following widths:2'-0", 2'-6", 3'-0", and 3'-6". If you use the Scale command to size the door3_0block larger or smaller, the door thickness will be affected. The dynamic blockfeatures can solve this problem.
Setting Up Parameters and ActionsYou’ll use the Linear parameter to set up the 6" increments for the door width.Then, you’ll associate a Stretch Action with that parameter to allow the doorwidth to change, and you’ll associate a Scale Action to allow the door swing tochange. Follow these steps:
1. Be sure Parameters is the active palette in the Block AuthoringPalettes group, and then click the Linear Parameter icon.
2. Be sure Endpoint Osnap is running, click the lower-left corner of thedoor, and then click the lower endpoint of the door swing.
3. Move the cursor down to position the dimension symbol a little belowthe door block, and then click to place it (see Figure C.14).
C r e a t i n g a D y n a m i c B l o c k 1 3
08776appC.qxd 4/4/06 8:45 AM Page 13

F I G U R E C . 1 4 : The Linear parameter is placed.
Note the little exclamation symbol on a square yellow background. Thisreminds you that no action has been associated with this parameter. You’ll set upthe Stretch action first:
1. Click the Actions tab on the Block Authoring Palettes group, andthen click the Stretch Action icon.
2. Click the Distance parameter, and then click the right-pointingarrow.
3. Form a crossing window around the upper half of the door, as shownin Figure C.15.
B o n u s A p p e n d i x C • A n I n t r o d u c t i o n t o D y n a m i c B l o c k s1 4
08776appC.qxd 4/4/06 8:45 AM Page 14

F I G U R E C . 1 5 : The crossing window for the Stretch action
4. Select the door, and press ↵.
5. Turn off Polar and Osnap, and then click to place the lightning boltAction symbol just above the door.
6. Click the Scale Action icon on the Actions palette, select the Distanceparameter, select the arc, and then press ↵.
7. Place the Scale lightning bolt symbol just outside the arc (see Fig-ure C.16).
8. Close the Block Authoring palette.
C r e a t i n g a D y n a m i c B l o c k 1 5
08776appC.qxd 4/4/06 8:45 AM Page 15

F I G U R E C . 1 6 : The two actions have been associated with the parameter.
This completes your work with the Block Authoring palette. The rest of thetasks will be accomplished with the Properties palette.
Fine-Tuning the Dynamic Block with theProperties PaletteThe Distance linear parameter shows the width of the opening and is perpendic-ular to the door’s width. You need to set up an offset angle so the door widthchanges as the opening width changes. Then, you need to set up the incrementalwidths and rename the parameter and actions. You’ll set up the increments first:
1. Open the Properties palette, and select the Distance parameter.
2. In the Property Labels section on the palette, change Distance Labelfrom Distance to Door Opening.
3. Scroll down to the Value Set section, and click in the text box for theDist Type, where it says “none.” Then, open the drop-down list, andselect Increment.
4. Moving down, line by line, set Dist Increment to 6", Dist Minimum to2', and Dist Maximum to 3'6.
5. Remove the grips from the parameter. It now has the incrementmarkers for the door opening widths (see Figure C.17).
B o n u s A p p e n d i x C • A n I n t r o d u c t i o n t o D y n a m i c B l o c k s1 6
08776appC.qxd 4/4/06 8:45 AM Page 16

F I G U R E C . 1 7 : Dynamic door block with increment markers for the opening widths
Now, the final task is to fine-tune the Stretch action that controls the door size:
1. Click the Stretch Action symbol on the dynamic door block.
2. In the Properties palette, scroll down to the Overrides section; forAngle Offset, enter 90. The Distance multiplier stays at 1.0000because you want the width of the door to change in the same pro-portion as the width of the opening.
3. In the Misc section, change the Action Name from Stretch to Door Size.
4. Remove the grips from this action, and select the Scale action.
5. In the Misc section of the Properties palette, change the Action Namefrom Scale to Door Swing Size.
6. Close the Properties palette, click the Save Block Definition buttonon the Block Editor toolbar, and then click the Close Block Editorbutton to return to the drawing.
7. Click the new dynamic door block, and then click the right-pointingarrow. The increment markers appear. You can now resize the door andswing to any of three other widths while the door thickness remainsconstant (see Figure C.18). Play around with it.
C r e a t i n g a D y n a m i c B l o c k 1 7
08776appC.qxd 4/4/06 8:45 AM Page 17

F I G U R E C . 1 8 : The dynamic door block in action
8. Save this drawing as Dyn_Door.
When you use this block in your floor plans, insert it just as you would a regu-lar door block. Then, copy it to the various doorway openings in the plan, orientit, and adjust its size to fit the openings. When you worked with the elevationwindow block, you learned how easy it is to change the increment settings.Dynamic blocks are easily edited. It’s a versatile feature and a good tool to haveat your disposal.
This completes the appendix on dynamic blocks. If you want to experimentwith the dynamic block feature, watch the demo in the New Features Workshop,examine the sample dynamic blocks to see how they work and are set up, and tryto create one of your own.
B o n u s A p p e n d i x C • A n I n t r o d u c t i o n t o D y n a m i c B l o c k s1 8
08776appC.qxd 4/4/06 8:45 AM Page 18