assistive context-aware toolkit (acat) - … · 6.6 handling calibration ... text-to-speech...
TRANSCRIPT
ASSISTIVE CONTEXT-AWARE TOOLKIT (ACAT)
DEVELOPER’S GUIDE
VERSION 1.0.0
TABLE OF CONTENTS
1. INTRODUCTION ................................................................................................................................. 5
1.1 Overview ........................................................................................................................................ 5
1.2 References ..................................................................................................................................... 5
1.3 Organization ................................................................................................................................. 5
1.4 Glossary of terms ........................................................................................................................ 6
1.5 ACAT Components .................................................................................................................. 12
1.6 Build Instructions (base English version) ..................................................................... 13
1.7 Build Instructions (Language Pack) ................................................................................. 14
2. ARCHITECTURE .............................................................................................................................. 16
2.1 Introduction .............................................................................................................................. 16
2.2 The ACAT Core Library ......................................................................................................... 17
2.3 The ACAT Extension Library .............................................................................................. 26
2.4 ACAT Resources Library ....................................................................................................... 27
2.5 Extensions .................................................................................................................................. 27
3. CODE STRUCTURE ......................................................................................................................... 30
3.1 Solution Layout ........................................................................................................................ 30
3.2 Coding Standards and Styles ............................................................................................... 31
3.3 Building the framework ........................................................................................................ 32
3.4 Logging ........................................................................................................................................ 32
4. EXTENSIONS .................................................................................................................................... 33
4.1 Extension Categories ............................................................................................................. 33
4.2 Extension Folder Layout ...................................................................................................... 34
4.3 Extension Discovery ............................................................................................................... 35
4.4 Extension Descriptor ............................................................................................................. 35
4.5 Extension Invoker ................................................................................................................... 35
5. LOCALIZATION ................................................................................................................................ 37
5.1 Steps to localize ACAT for a new language. ................................................................... 38
6. ACTUATORS...................................................................................................................................... 42
6.1 Introduction .............................................................................................................................. 42
6.2 Enumeration ............................................................................................................................. 42

6.3 Actuator Configuration File ................................................................................................. 43
6.4 ACAT Actuator Extensions ................................................................................................... 46
6.5 Steps to create an Actuator extension ............................................................................. 48
6.6 Handling Calibration .............................................................................................................. 50
7. AGENTS .............................................................................................................................................. 52
7.1 Introduction .............................................................................................................................. 52
7.2 Enumeration ............................................................................................................................. 52
7.3 Application Agents .................................................................................................................. 52
7.4 Functional Agents ................................................................................................................... 54
7.5 Agent Configuration Files ..................................................................................................... 56
8. PANELS ............................................................................................................................................... 57
8.1 Introduction .............................................................................................................................. 57
8.2 Enumeration ............................................................................................................................. 58
8.3 Steps to create a scanner ...................................................................................................... 58
8.4 Setting preferred panel configurations .......................................................................... 69
9. WORD PREDICTORS ...................................................................................................................... 72
9.1 Introduction .............................................................................................................................. 72
9.2 Enumeration ............................................................................................................................. 72
9.3 Steps to create a Presage Word Predictor extension ................................................ 72
9.4 Steps to create a non-Presage Word Predictor extension ....................................... 74
10. TEXT-TO-SPEECH (TTS) .......................................................................................................... 75
10.1 Introduction .............................................................................................................................. 75
10.2 Enumeration ............................................................................................................................. 75
10.3 Alternate Pronunciations ..................................................................................................... 75
10.4 Steps to create a TTS Extension ......................................................................................... 76
11. SPELL CHECKER ......................................................................................................................... 80
11.1 Introduction .............................................................................................................................. 80
11.2 Enumeration ............................................................................................................................. 80
11.3 ACAT Spell Checker ................................................................................................................ 80
12. THEMES ......................................................................................................................................... 82
12.1 Introduction .............................................................................................................................. 82
12.2 Enumeration ............................................................................................................................. 82
12.3 Theme Configuration ............................................................................................................. 82
13. SCRIPTS .......................................................................................................................................... 84
13.1 Introduction .............................................................................................................................. 84
13.2 Syntax .......................................................................................................................................... 84
13.3 Functions .................................................................................................................................... 84
13.4 Macros ......................................................................................................................................... 88
14. COMMAND PROCESSING ......................................................................................................... 92
14.1 Introduction .............................................................................................................................. 92
14.2 Command Handlers ................................................................................................................ 92
14.3 ACAT Commands ..................................................................................................................... 94
15. SETTINGS .................................................................................................................................... 106
15.1 Introduction ............................................................................................................................ 106
15.2 Settings ...................................................................................................................................... 106
16. ACAT Installers .......................................................................................................................... 125
16.1 ACAT Setup (English) .......................................................................................................... 125
16.2 Language Pack Installers .................................................................................................... 127
5 INTRODUCTION | ACAT Developer’s Guide
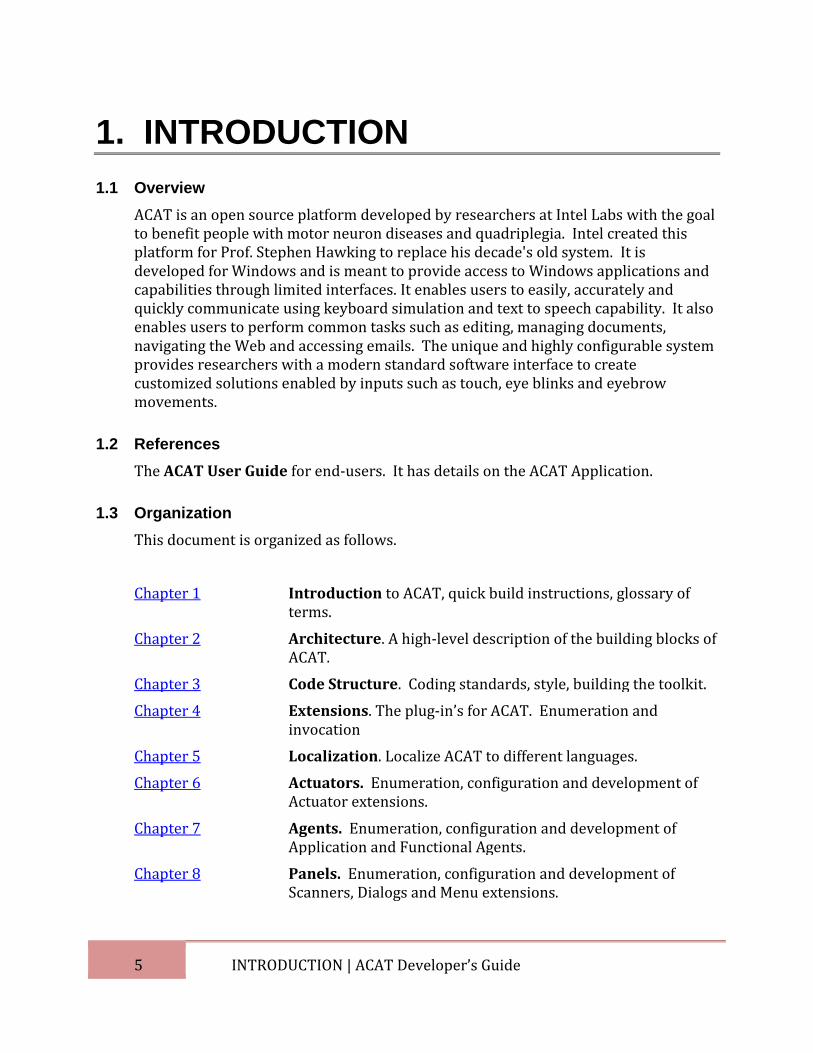
1. INTRODUCTION
1.1 Overview
ACAT is an open source platform developed by researchers at Intel Labs with the goal to benefit people with motor neuron diseases and quadriplegia. Intel created this platform for Prof. Stephen Hawking to replace his decade's old system. It is developed for Windows and is meant to provide access to Windows applications and capabilities through limited interfaces. It enables users to easily, accurately and quickly communicate using keyboard simulation and text to speech capability. It also enables users to perform common tasks such as editing, managing documents, navigating the Web and accessing emails. The unique and highly configurable system provides researchers with a modern standard software interface to create customized solutions enabled by inputs such as touch, eye blinks and eyebrow movements.
1.2 References
The ACAT User Guide for end-users. It has details on the ACAT Application.
1.3 Organization
This document is organized as follows.
Chapter 1 Introduction to ACAT, quick build instructions, glossary of terms.
Chapter 2 Architecture. A high-level description of the building blocks of ACAT.
Chapter 3 Code Structure. Coding standards, style, building the toolkit.
Chapter 4 Extensions. The plug-in’s for ACAT. Enumeration and invocation
Chapter 5 Localization. Localize ACAT to different languages.
Chapter 6 Actuators. Enumeration, configuration and development of Actuator extensions.
Chapter 7 Agents. Enumeration, configuration and development of Application and Functional Agents.
Chapter 8 Panels. Enumeration, configuration and development of Scanners, Dialogs and Menu extensions.
6 INTRODUCTION | ACAT Developer’s Guide
Chapter 9 Word Predictors. Enumeration, configuration and development of word predictor extensions.
Chapter 10 Text-to-Speech (TTS). Enumeration, configuration and development of TTS extensions.
Chapter 11 Spell Checker. Enumeration, configuration and development of Spell Check extensions.
Chapter 12 Themes. Configuration of color schemes for the ACAT UI.
Chapter 13 Scripts. The ACAT scripting language.
Chapter 14 Commands. ACAT Command handling.
Chapter 15 Settings. User preference settings.
Chapter 16 ACAT Installers. ACAT installer and ACAT language packs.
1.4 Glossary of terms
A glossary of terms is presented here. Some descriptions here use words that are defined in the glossary and these words are highlighted in in bold face.
Term Description
ACAT Assistive Context-Aware Toolkit.
Panel A generic term for an ACAT window. There are three types of Panels – Scanners, Dialogs and Menus
7 INTRODUCTION | ACAT Developer’s Guide
Term Description
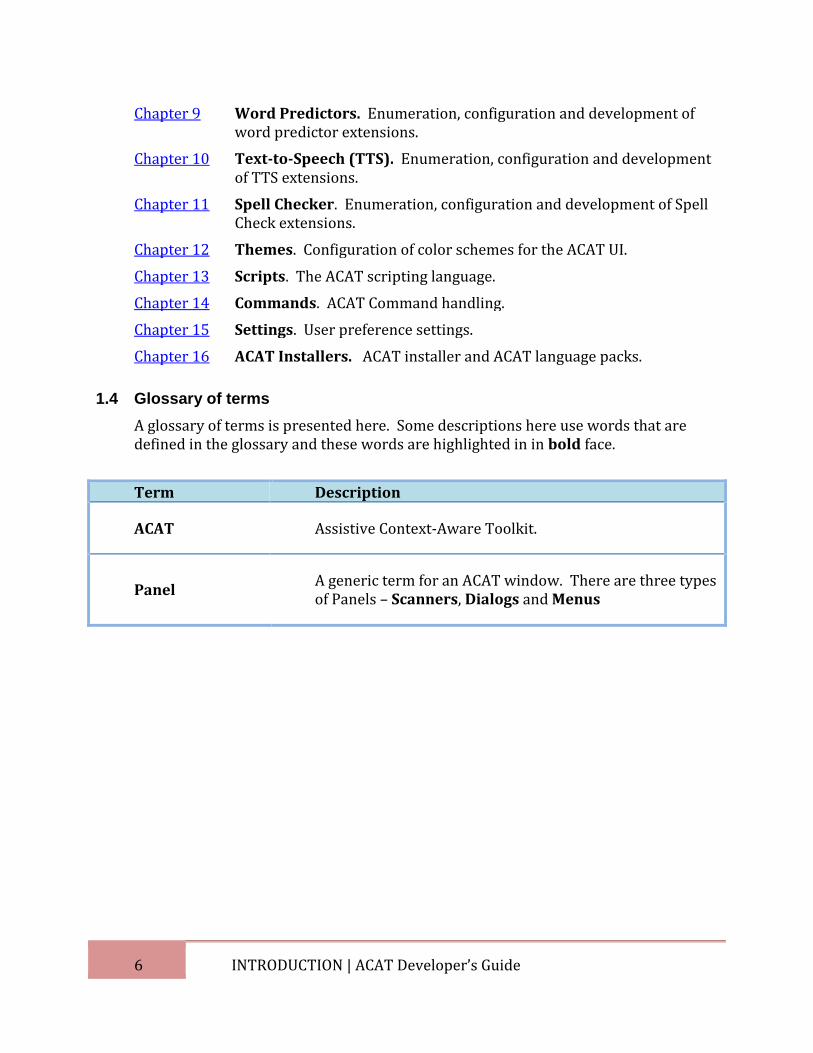
Scanner
A Panel primarily used for text entry, cursor navigation etc. The Alphabet scanner for instance, is used for text entry. The Mouse scanner is used to move the cursor on the desktop. The Alphabet scanner is shown here.
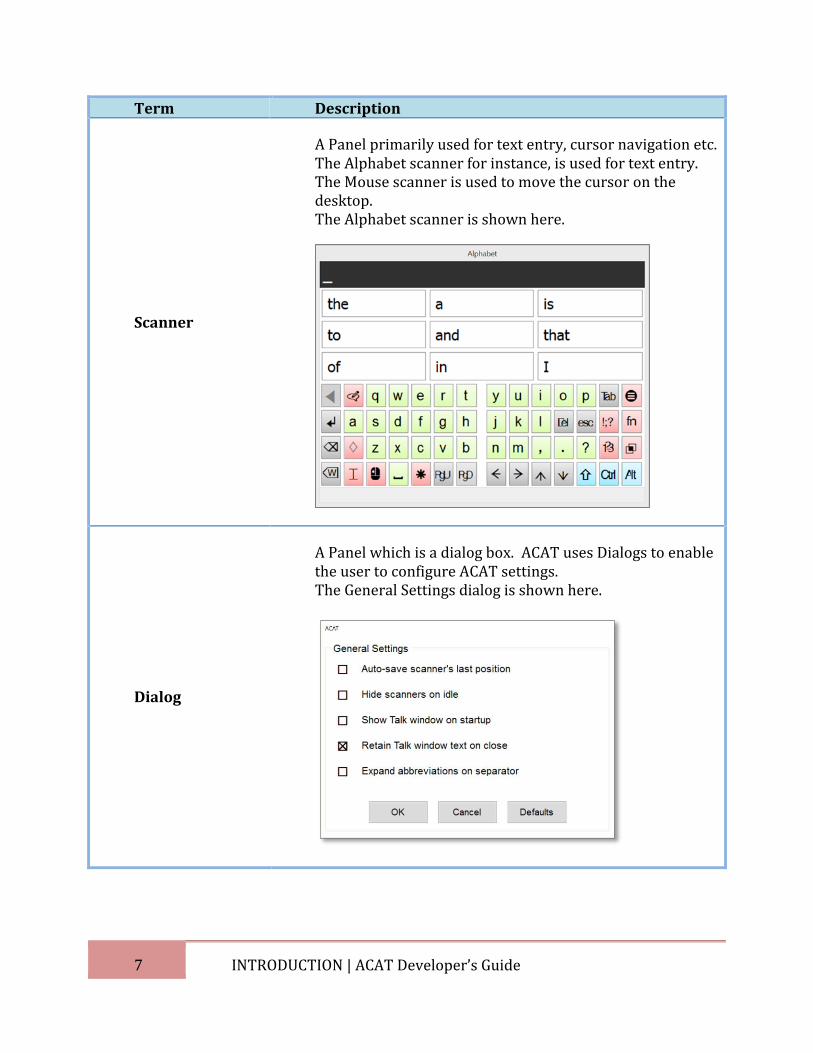
Dialog
A Panel which is a dialog box. ACAT uses Dialogs to enable the user to configure ACAT settings. The General Settings dialog is shown here.
8 INTRODUCTION | ACAT Developer’s Guide
Term Description
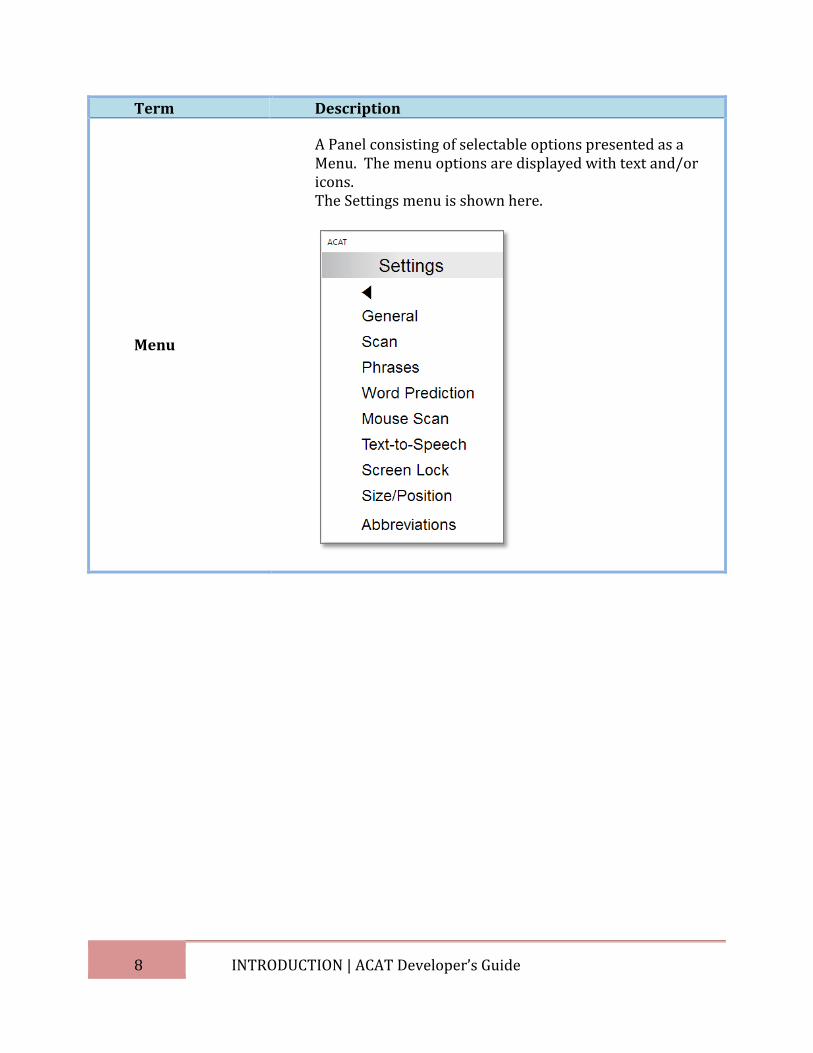
Menu
A Panel consisting of selectable options presented as a Menu. The menu options are displayed with text and/or icons. The Settings menu is shown here.
9 INTRODUCTION | ACAT Developer’s Guide
Term Description
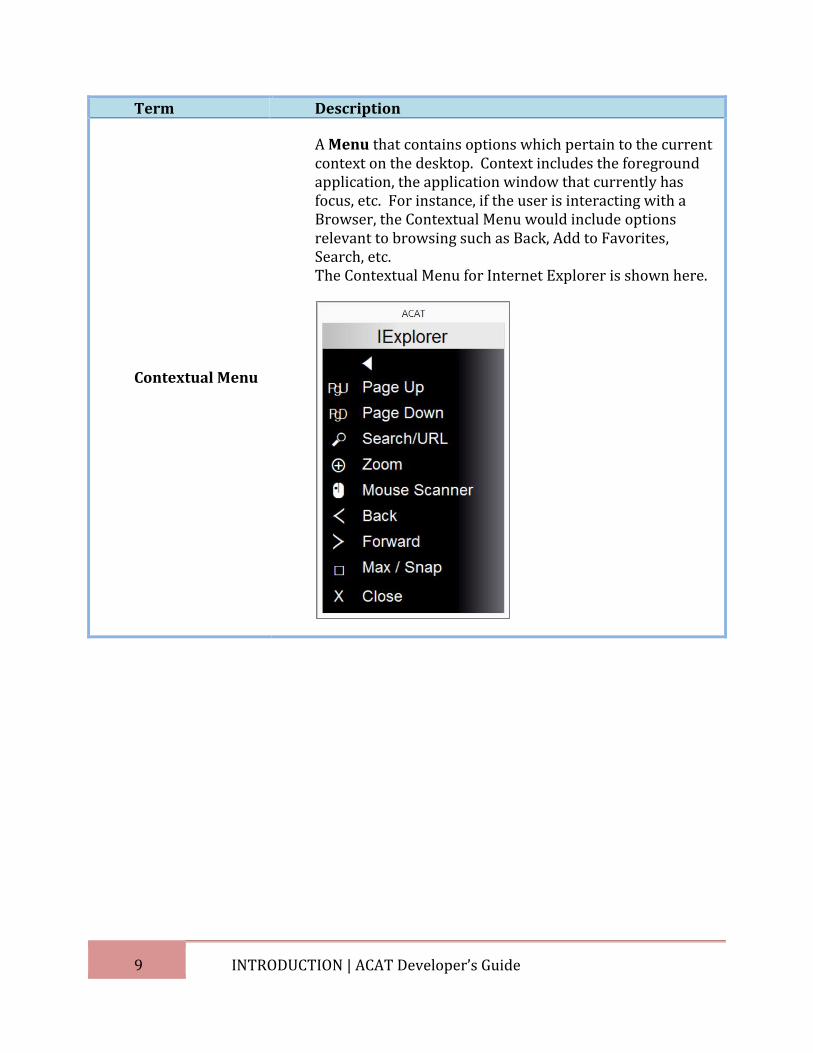
Contextual Menu
A Menu that contains options which pertain to the current context on the desktop. Context includes the foreground application, the application window that currently has focus, etc. For instance, if the user is interacting with a Browser, the Contextual Menu would include options relevant to browsing such as Back, Add to Favorites, Search, etc. The Contextual Menu for Internet Explorer is shown here.
10 INTRODUCTION | ACAT Developer’s Guide
Term Description
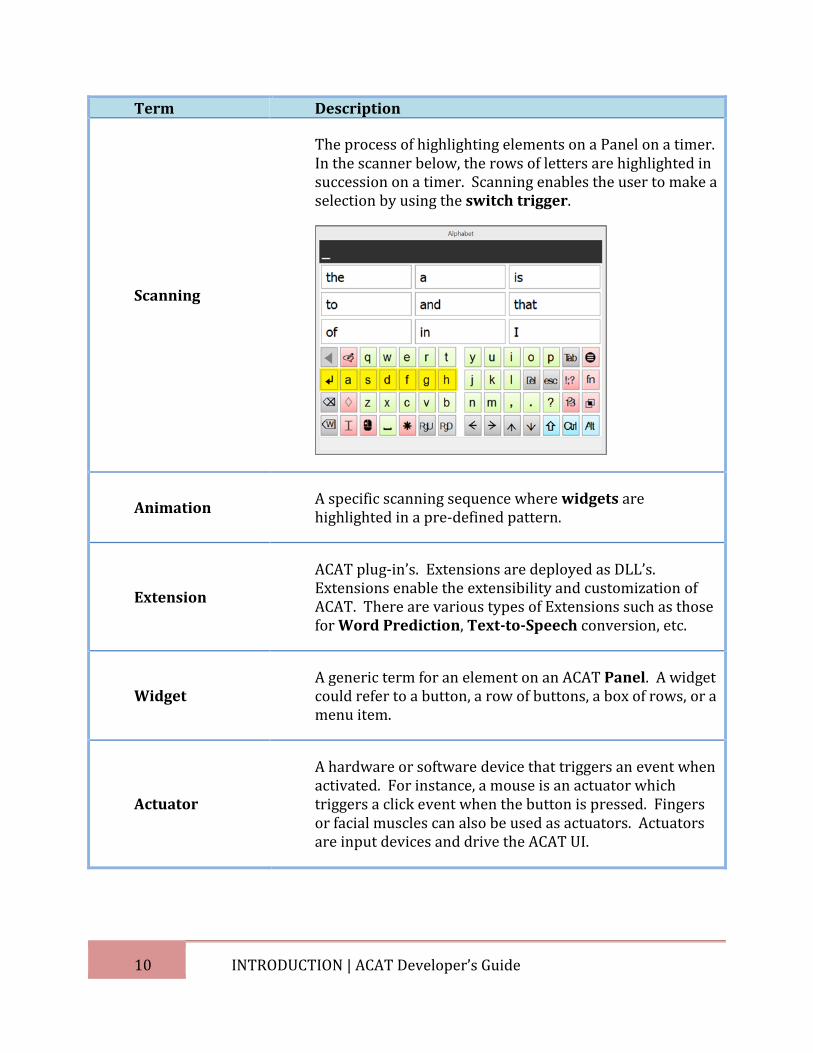
Scanning
The process of highlighting elements on a Panel on a timer. In the scanner below, the rows of letters are highlighted in succession on a timer. Scanning enables the user to make a selection by using the switch trigger.
Animation A specific scanning sequence where widgets are highlighted in a pre-defined pattern.
Extension
ACAT plug-in’s. Extensions are deployed as DLL’s. Extensions enable the extensibility and customization of ACAT. There are various types of Extensions such as those for Word Prediction, Text-to-Speech conversion, etc.
Widget A generic term for an element on an ACAT Panel. A widget could refer to a button, a row of buttons, a box of rows, or a menu item.
Actuator
A hardware or software device that triggers an event when activated. For instance, a mouse is an actuator which triggers a click event when the button is pressed. Fingers or facial muscles can also be used as actuators. Actuators are input devices and drive the ACAT UI.
11 INTRODUCTION | ACAT Developer’s Guide
Term Description
Switch
Actuators are composed of switches, which when triggered, raise events. The buttons on a mouse, the keys on a keyboard are examples of switches. Specific hand gestures or facial movements can also be recognized and translated into switch events.
Switch Trigger The process of activating a switch. A switch trigger generates an event which is translated into action such as activating a button or selecting a menu item.
Text-to-Speech The process of converting written text to audible speech.
TTS An acronym for Text-to-Speech.
Word Predictor Software that predicts the next word based on the previous words in a sentence.
Agent A generic name for ACAT Extension that can refer to an Application Agent or a Functional Agent.
Application Agent
An ACAT Extension that interfaces ACAT with an application such as Notepad, Microsoft Word, Internet Explorer etc. Application Agents provide contextual information about the applications to ACAT.
Functional Agent An ACAT Extension that implements a specific function such as File Browsing, Window Switching, Lecture Manager, etc.
Theme A set of color schemes used to visually render the Panels.
Talk Window The ACAT Talk window enables the user to converse. The user enters text into the window and presses ENTER to convert the text to speech.
12 INTRODUCTION | ACAT Developer’s Guide
Term Description
Configuration File
Configuration files are XML files that are used to customize ACAT.
1.5 ACAT Components
The components included in the Open Source ACAT solution are:
Scanners The scanners included are Alphabet, Cursor Navigation, Punctuations, and Mouse Navigation.
Word Prediction ACAT’s Word Prediction is powered by Presage, the intelligent predictive text engine created by Matteo Vescovi. http://presage.sourceforge.net
Text-to-Speech Conversion from text to speech through the Microsoft Speech Synthesizer which is a part of the Windows platform.
Spell Checker A rudimentary spell checker is included.
Actuators Actuator switches are supported are:
Keyboard Facial gesture recognition through the ACAT Vision
software Off-the-shelf assistive USB switches
Application Agents Applications supported through the Application Agents are:
Notepad Microsoft Word WordPad Acrobat Reader Internet Explorer Chrome Browser Firefox Browser Edge Browser Foxit PDF Reader Windows Media Player Windows Photo Viewer Microsoft Outlook Windows Calculator

13 INTRODUCTION | ACAT Developer’s Guide
Functional Agents Functional Agents included are:
File Browser Launch Application Switch Applications Switch Windows Lecture Manager Volume Control New File Phrases Abbreviations Management
1.6 Build Instructions (base English version)
This section contains build instructions for the default English version of ACAT.
The requirements for building the solution are:
Windows 7 or higher Visual Studio 2012 or higher. At least 1 GB of free disk space NET 4.5. Microsoft Office 2010 Primary Interop Assemblies (PIA). Download them
from https://www.microsoft.com/en-us/download/details.aspx?id=3508
There are no interdependencies between the any of the projects in the solution. All projects link with the ACATCore.dll, ACATExtension.dll and ACATResources.dll. The Post-Build action for these three libraries copies them to the $\Redistributable folder. All the projects in the solution reference them from this folder.
Never build an individual project in the solution. Always do a Build or Rebuild at the solution level as some of the projects have Post-Build scripts and they must execute to ensure that the DLL’s are copied and deployed properly. If you build an individual project, your changes may not take effect as your DLL may not get deployed to the applications run directory.
1. Install the ACAT application from https://github.com/01org/acat/releases. You need this because some of the large files like word prediction databases and data files for the Vision actuator component are not bundled with the source. You must copy these files from the installed application (instructions included below).
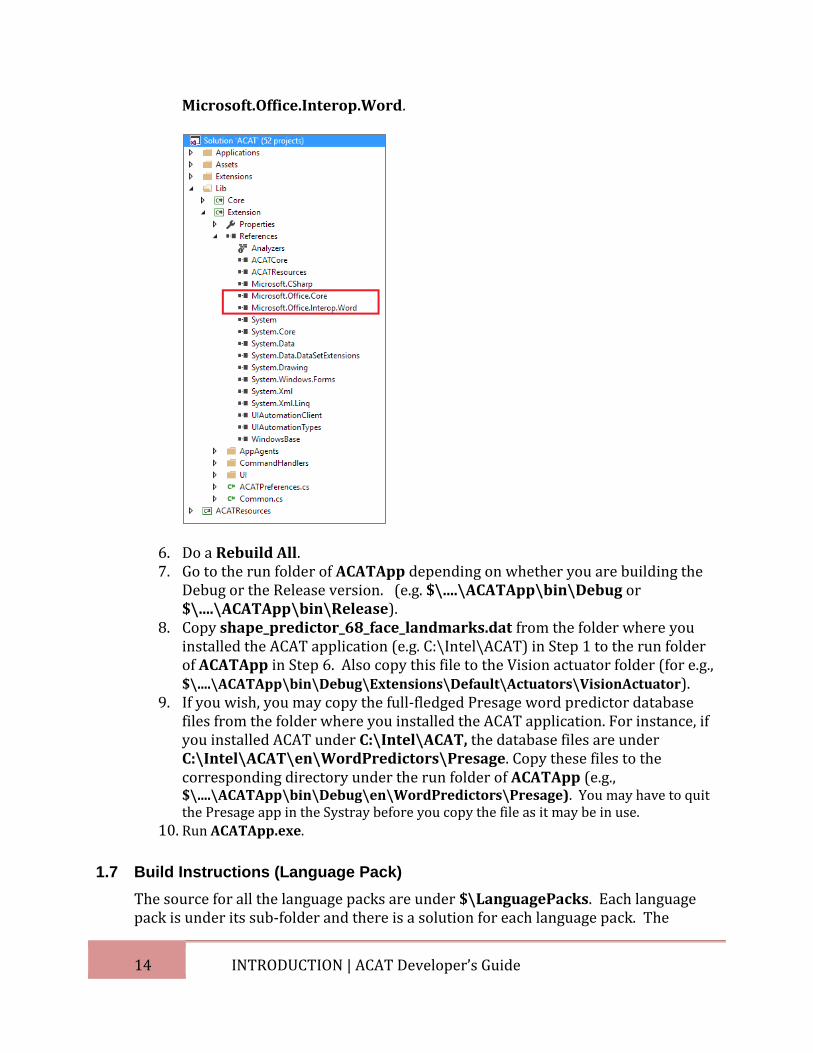
2. Download the ACAT source from https://github.com/01org/acat. 3. Open the solution ACAT.sln. 4. Make $\Applications\ACATApp as the startup project. 5. Update the references to Office Interop DLL’s in the $\Lib\Extension project.
The two references are Microsoft.Office.Core and
14 INTRODUCTION | ACAT Developer’s Guide
Microsoft.Office.Interop.Word.
6. Do a Rebuild All. 7. Go to the run folder of ACATApp depending on whether you are building the
Debug or the Release version. (e.g. $\....\ACATApp\bin\Debug or $\....\ACATApp\bin\Release).
8. Copy shape_predictor_68_face_landmarks.dat from the folder where you installed the ACAT application (e.g. C:\Intel\ACAT) in Step 1 to the run folder of ACATApp in Step 6. Also copy this file to the Vision actuator folder (for e.g., $\....\ACATApp\bin\Debug\Extensions\Default\Actuators\VisionActuator).
9. If you wish, you may copy the full-fledged Presage word predictor database files from the folder where you installed the ACAT application. For instance, if you installed ACAT under C:\Intel\ACAT, the database files are under C:\Intel\ACAT\en\WordPredictors\Presage. Copy these files to the corresponding directory under the run folder of ACATApp (e.g., $\....\ACATApp\bin\Debug\en\WordPredictors\Presage). You may have to quit the Presage app in the Systray before you copy the file as it may be in use.
10. Run ACATApp.exe.
1.7 Build Instructions (Language Pack)
The source for all the language packs are under $\LanguagePacks. Each language pack is under its sub-folder and there is a solution for each language pack. The
15 INTRODUCTION | ACAT Developer’s Guide
Spanish language pack is used as an example here. You can use these steps to build the other language packs as well.
1. First you must build the base English version of ACAT (see section 1.6). Choose either Debug or Release configuration depending on your preference.
2. Install the ACAT application (English) from https://github.com/01org/acat/releases.
3. Install the Spanish language pack from https://github.com/01org/acat/releases. You need this because some of the large files like word prediction databases and data files for the Vision actuator component are not bundled with the source. You must copy these files from the installed application (instructions included below).
4. Due to file size restrictions, the Presage word prediction database file bundled with the source code is a small version of the English database. You must overwrite this file with the Spanish database files. Copy the database files from where you installed ACAT in Step 2. For the Spanish pack, if you installed ACAT under C:\Intel\ACAT, the Spanish copy all the files from C:\Intel\ACAT\es\WordPredictors\Presage to your source tree under $\LanguagePacks\Spanish\Presage\Database.
5. Select Debug or Release as the configuration. This should match the configuration you picked to build the English version in Step 1. Do a Rebuild All in the Language pack solution.
6. The batch file $\LanguagePacks\Spanish\deploy.bat will copy all the files to the run directory (bin\Debug or bin\Release) of ACAT App that you built in Step 1.
7. Go to the run directory of ACATApp of the ACAT solution. There should be an es folder there containing all the Spanish language-specific files.
8. Run ACATConfig, select Langauge and choose Spanish. 9. Run ACATApp. It will display the Spanish version.
16 ARCHITECTURE | ACAT Developer’s Guide
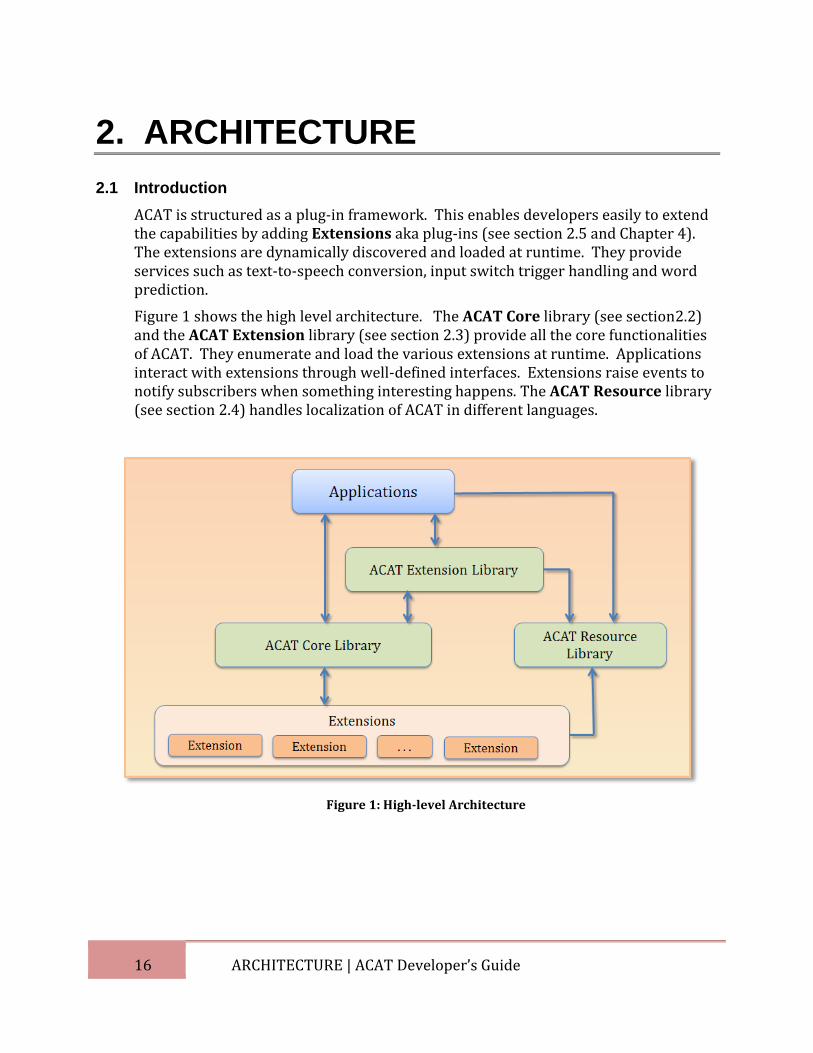
2. ARCHITECTURE
2.1 Introduction
ACAT is structured as a plug-in framework. This enables developers easily to extend the capabilities by adding Extensions aka plug-ins (see section 2.5 and Chapter 4). The extensions are dynamically discovered and loaded at runtime. They provide services such as text-to-speech conversion, input switch trigger handling and word prediction.
Figure 1 shows the high level architecture. The ACAT Core library (see section2.2) and the ACAT Extension library (see section 2.3) provide all the core functionalities of ACAT. They enumerate and load the various extensions at runtime. Applications interact with extensions through well-defined interfaces. Extensions raise events to notify subscribers when something interesting happens. The ACAT Resource library (see section 2.4) handles localization of ACAT in different languages.
Figure 1: High-level Architecture
17 ARCHITECTURE | ACAT Developer’s Guide
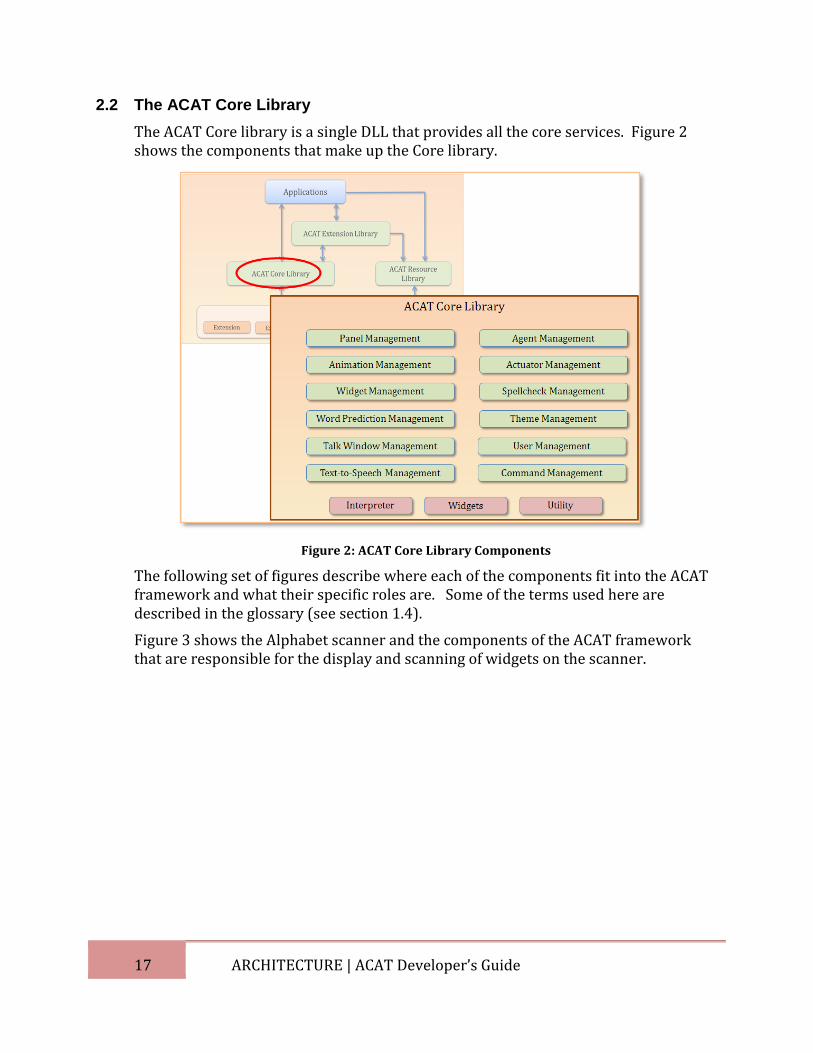
2.2 The ACAT Core Library
The ACAT Core library is a single DLL that provides all the core services. Figure 2 shows the components that make up the Core library.
Figure 2: ACAT Core Library Components
The following set of figures describe where each of the components fit into the ACAT framework and what their specific roles are. Some of the terms used here are described in the glossary (see section 1.4).
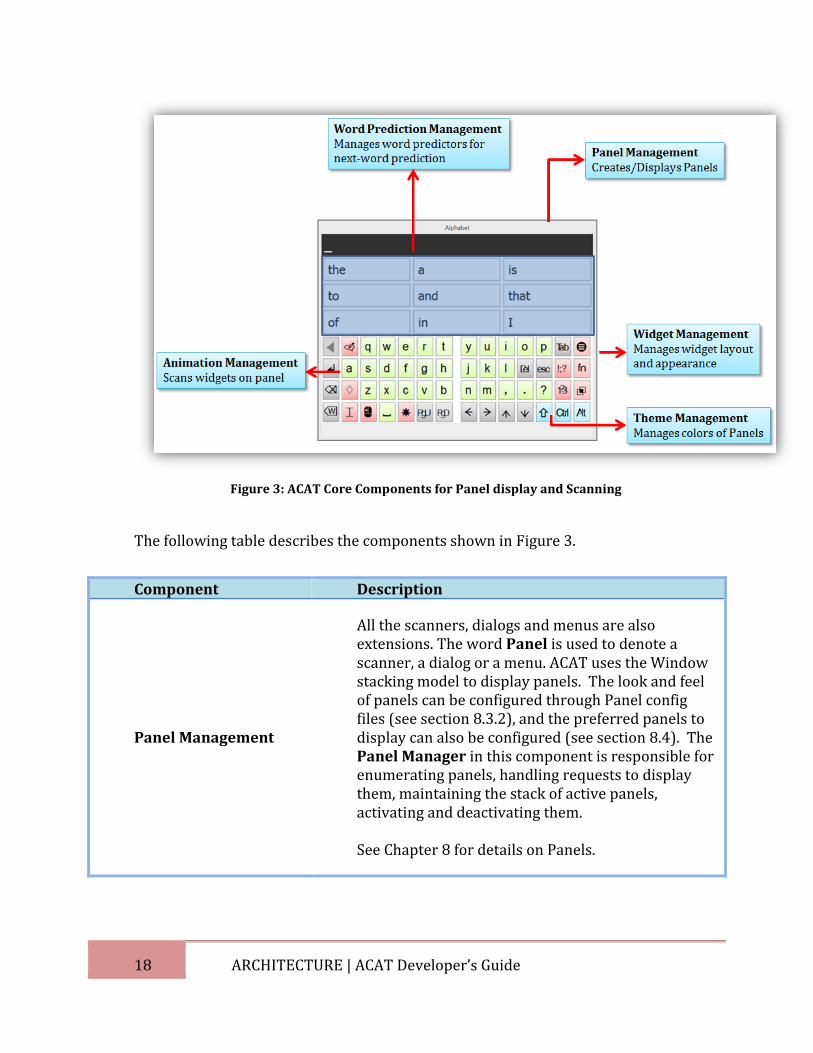
Figure 3 shows the Alphabet scanner and the components of the ACAT framework that are responsible for the display and scanning of widgets on the scanner.
18 ARCHITECTURE | ACAT Developer’s Guide
Figure 3: ACAT Core Components for Panel display and Scanning
The following table describes the components shown in Figure 3.
Component Description
Panel Management
All the scanners, dialogs and menus are also extensions. The word Panel is used to denote a scanner, a dialog or a menu. ACAT uses the Window stacking model to display panels. The look and feel of panels can be configured through Panel config files (see section 8.3.2), and the preferred panels to display can also be configured (see section 8.4). The Panel Manager in this component is responsible for enumerating panels, handling requests to display them, maintaining the stack of active panels, activating and deactivating them. See Chapter 8 for details on Panels.
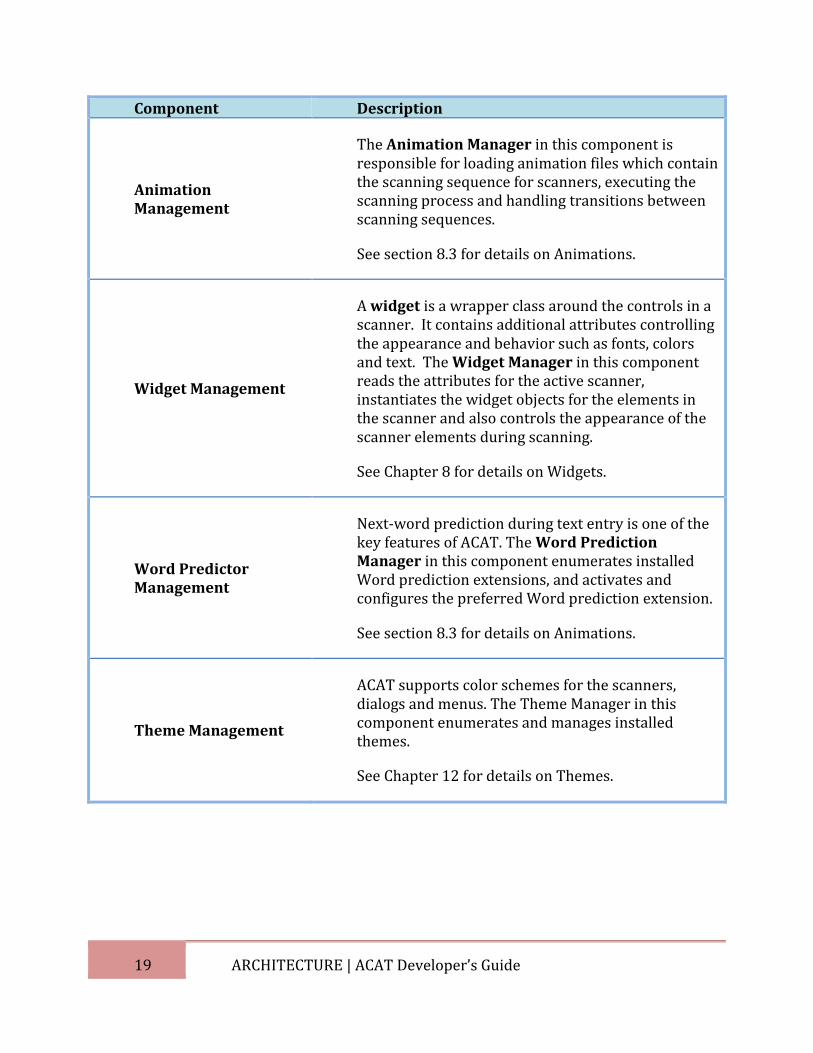
19 ARCHITECTURE | ACAT Developer’s Guide
Component Description
Animation Management
The Animation Manager in this component is responsible for loading animation files which contain the scanning sequence for scanners, executing the scanning process and handling transitions between scanning sequences.
See section 8.3 for details on Animations.
Widget Management
A widget is a wrapper class around the controls in a scanner. It contains additional attributes controlling the appearance and behavior such as fonts, colors and text. The Widget Manager in this component reads the attributes for the active scanner, instantiates the widget objects for the elements in the scanner and also controls the appearance of the scanner elements during scanning.
See Chapter 8 for details on Widgets.
Word Predictor Management
Next-word prediction during text entry is one of the key features of ACAT. The Word Prediction Manager in this component enumerates installed Word prediction extensions, and activates and configures the preferred Word prediction extension.
See section 8.3 for details on Animations.
Theme Management
ACAT supports color schemes for the scanners, dialogs and menus. The Theme Manager in this component enumerates and manages installed themes.
See Chapter 12 for details on Themes.
20 ARCHITECTURE | ACAT Developer’s Guide
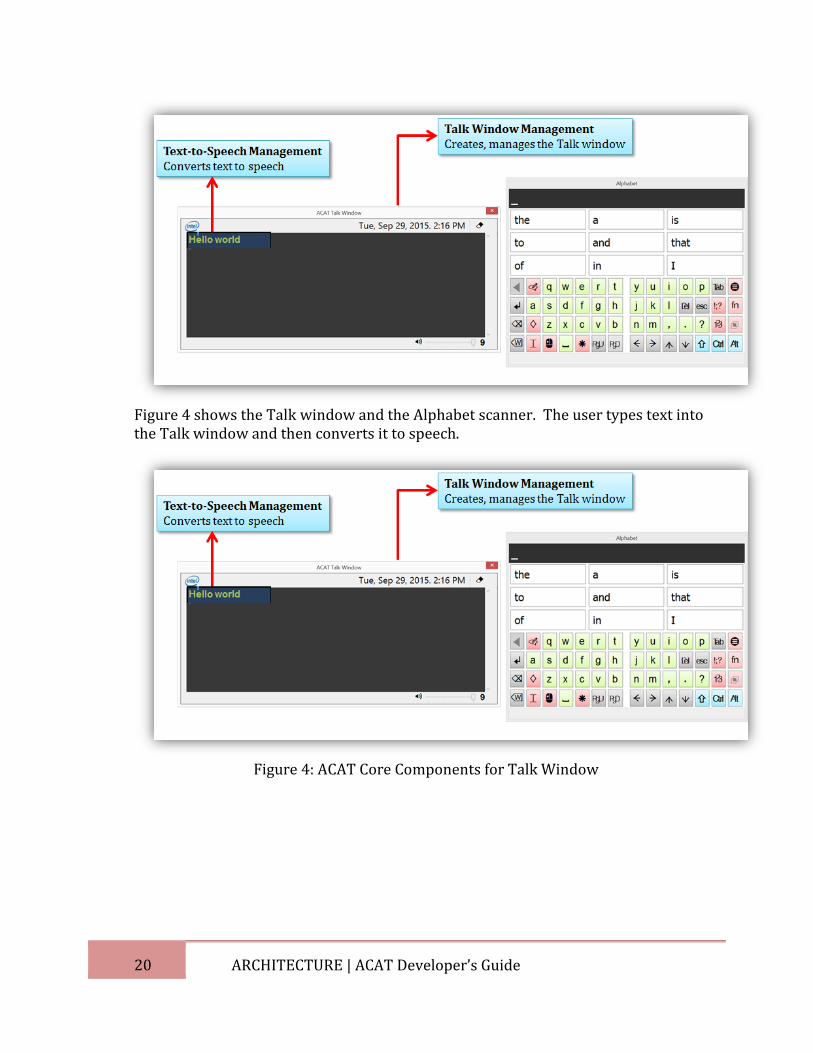
Figure 4 shows the Talk window and the Alphabet scanner. The user types text into the Talk window and then converts it to speech.
Figure 4: ACAT Core Components for Talk Window
21 ARCHITECTURE | ACAT Developer’s Guide
The following table describes the components shown in
Figure 4.
Component Description
Talk Window Management
The Talk window feature is primarily used to converse. The user types into the Talk window and ACAT converts the text to speech. It also enables the user to carry out web searches, and learns the user’s writing style for better word prediction. The Talk Window Manager in this component activates and manages the Talk window.
Text-to-Speech (TTS) Management
Text-to-Speech (TTS) extensions are used to convert text to audible speech. This enables the user to converse or deliver speeches. The TTS Manager in this component enumerates installed TTS extensions, activates and configures the preferred TTS extension.
See Chapter 10 for details on Text-to-Speech extensions.
22 ARCHITECTURE | ACAT Developer’s Guide
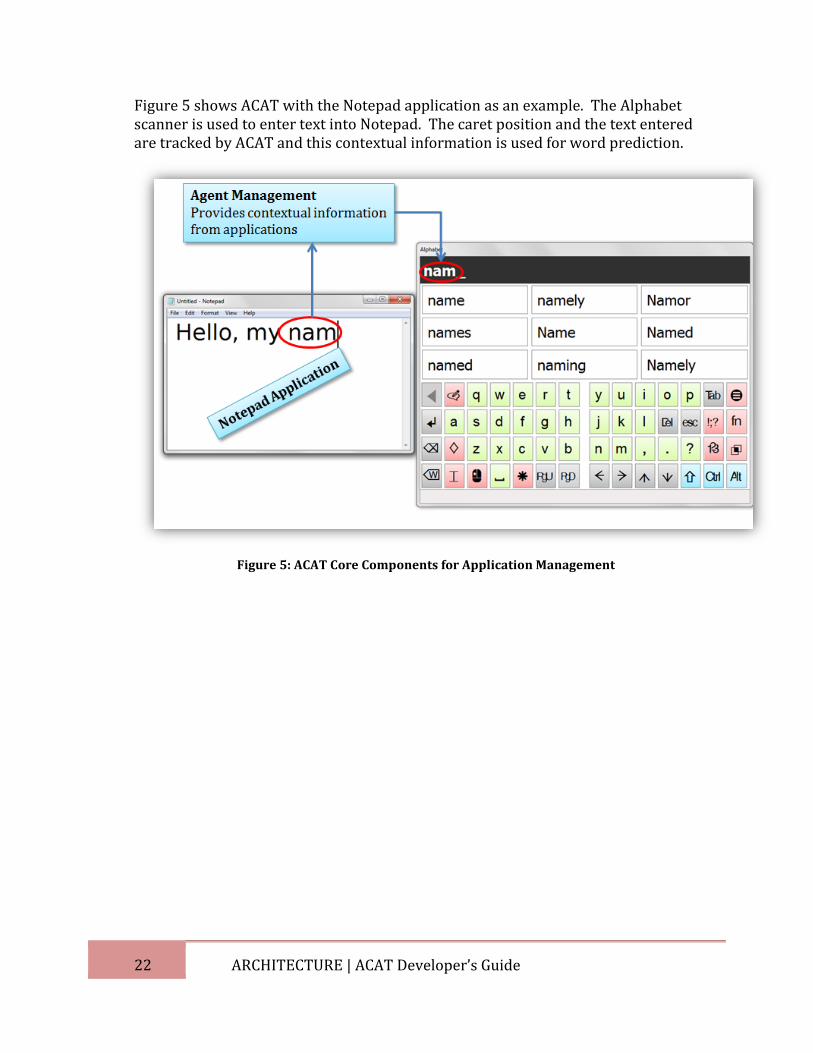
Figure 5 shows ACAT with the Notepad application as an example. The Alphabet scanner is used to enter text into Notepad. The caret position and the text entered are tracked by ACAT and this contextual information is used for word prediction.
Figure 5: ACAT Core Components for Application Management

23 ARCHITECTURE | ACAT Developer’s Guide
The following table describes the components shown in Figure 5.
Component Description
Agent Management
Application Agents are extensions that interact with applications such as Notepad, Microsoft Word ant Internet Explorer. They provide contextual information about the application such as the control that the user is interacting with, and if the user is editing a document, the text from the document etc. There are also Functional Agents which provide specific functionalities such as file browsing. The Agent Manager in this component is responsible for functions such as enumerating Agents, monitoring the foreground application, and activating agents.
See Chapter 7 for details on Agents.
Actuators are input switch triggers to drive ACAT. When triggered, they translated an action on the ACAT UI such as selecting a widget. ACAT supports a number of input switch mechanisms such as a camera using facial gestures as a switch, a keyboard or off-the-shelf assistive switches.
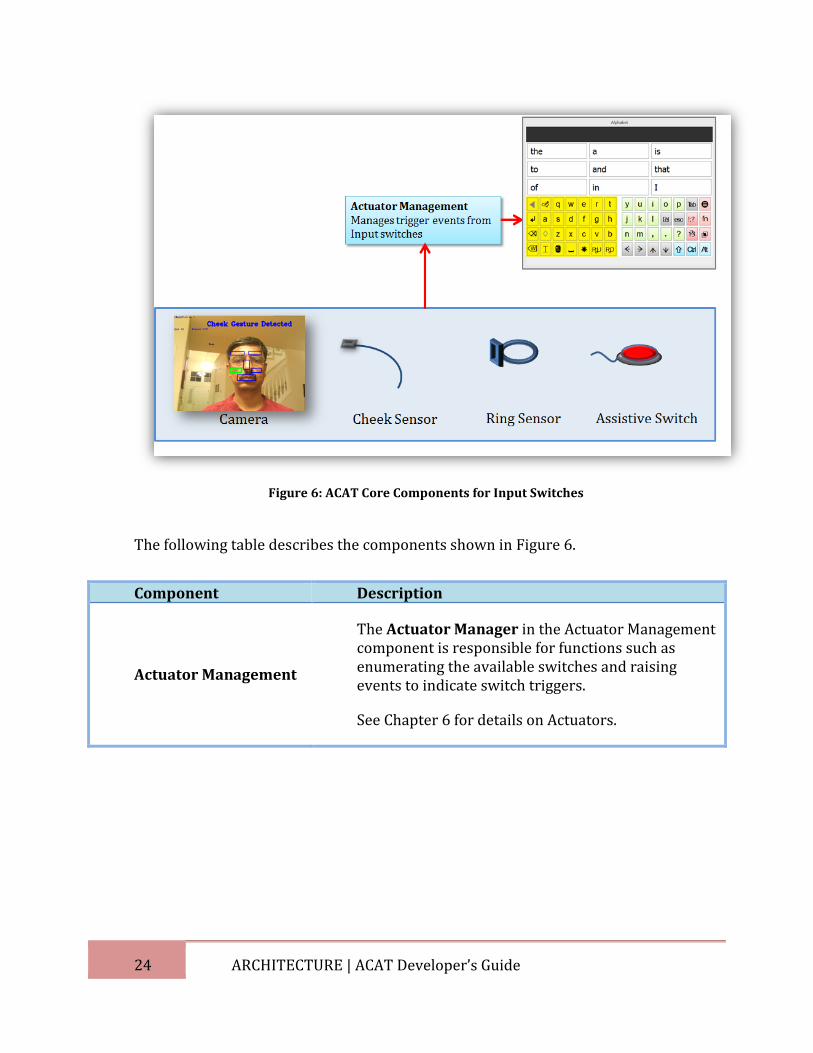
24 ARCHITECTURE | ACAT Developer’s Guide
Figure 6: ACAT Core Components for Input Switches
The following table describes the components shown in Figure 6.
Component Description
Actuator Management
The Actuator Manager in the Actuator Management component is responsible for functions such as enumerating the available switches and raising events to indicate switch triggers.
See Chapter 6 for details on Actuators.
25 ARCHITECTURE | ACAT Developer’s Guide
The following table describes the remaining components in the ACAT Core Library.
Component Description
Spellcheck Management
ACAT supports rudimentary spell checking and auto-correction. This is useful for applications such as Notepad which do not have a native spell checker or auto-corrector. The Spell Check Manager in this component enumerates installed spell check extensions, activates and configures the preferred extension to use.
See Chapter 11 for details on Spell Checkers.
User Management
ACAT supports the notation of a ‘user’ and each user can have multiple ‘profiles’. All ACAT settings such as scanner timings, look-and-feel, preferred panel configurations, preferred word predictors, preferred actuators are associated with a user and a profile. The User Manager in this component manages ACAT users and profiles.
Command Management
Some of the actions in ACAT are exposed through a set of ‘commands’. The commands can be mapped to widgets on a scanner or to input switch triggers. For e.g., CmdUndoLastEditChange undoes the last edit change. The Command Manager contains classes to map commands to their actions.
Interpreter
Scanning sequences are controlled through scripts. The Interpreter component interprets scripts into intermediate code which is then executed during scanning.
See Chapter 13 for details on Scripts.
Widgets The Core library has a Widget library that contains widgets for the various elements of the scanners, dialogs and menus.
26 ARCHITECTURE | ACAT Developer’s Guide
Component Description
Utility This component contains a host of utility functions for audit logging, debug trace logging, window management, timers, Win32 Interop etc.
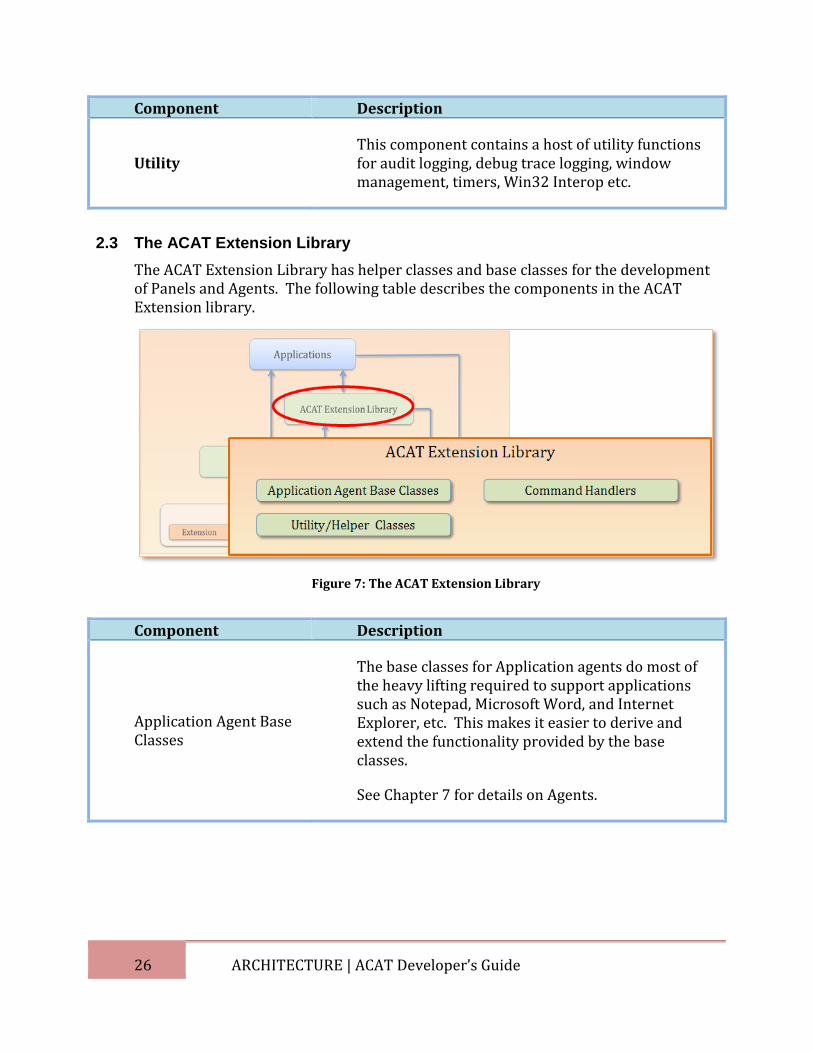
2.3 The ACAT Extension Library
The ACAT Extension Library has helper classes and base classes for the development of Panels and Agents. The following table describes the components in the ACAT Extension library.
Figure 7: The ACAT Extension Library
Component Description
Application Agent Base Classes
The base classes for Application agents do most of the heavy lifting required to support applications such as Notepad, Microsoft Word, and Internet Explorer, etc. This makes it easier to derive and extend the functionality provided by the base classes.
See Chapter 7 for details on Agents.
27 ARCHITECTURE | ACAT Developer’s Guide
Component Description
Command Handlers
ACAT supports a host of ‘commands’, strings that represent action verbs Examples of commands are CmdTalkWindowToggle to toggle the visibility of the Talk window, CmdMainMenu to display the Main menu. These commands can be attached to events such as actuating an element on a scanner or to input switches. The Extension library has default handlers for various commands.
See Chapter 14 for details on Command Handlers.
Utility Classes The Extension library has a number of utility/helper classes to display dialogs, load/store ACAT settings etc.
2.4 ACAT Resources Library
ACAT can be extended to languages other than English through localization. All strings that are visible to the user are contained in language-specific resource files. The ACAT Resource Library contains helper functions to access localized strings. See Chapter 5 for details on localization.
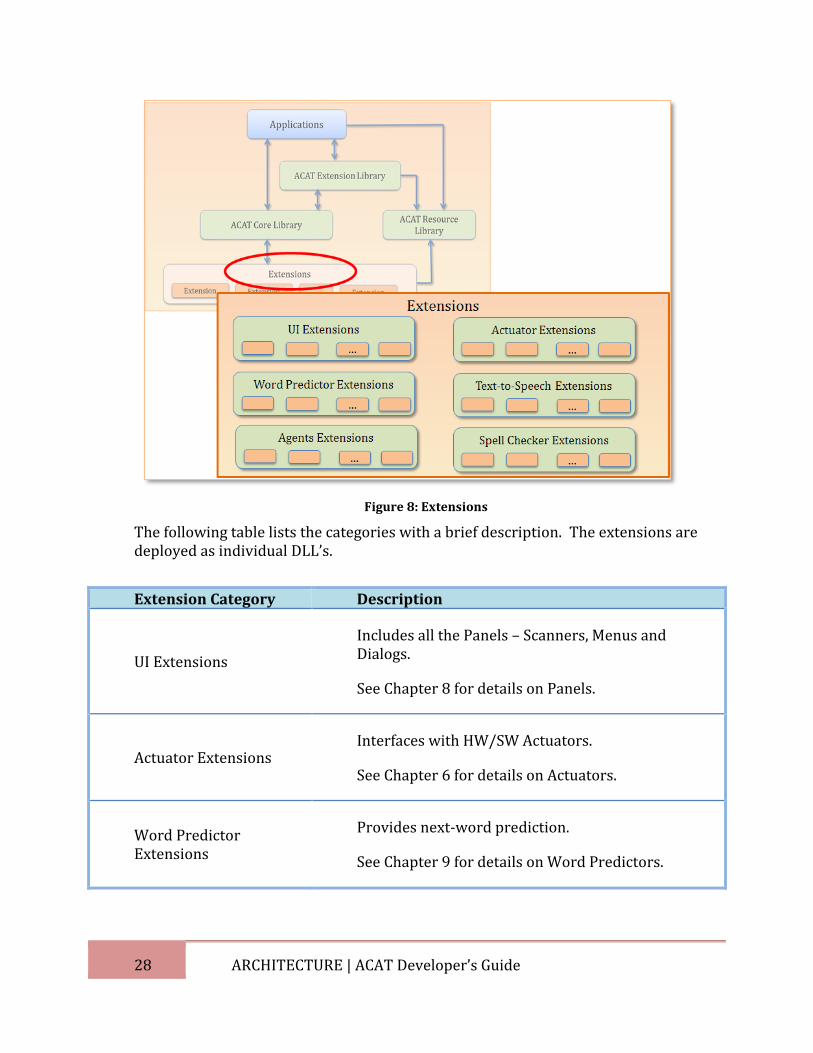
2.5 Extensions
Extensions are DLL’s or plug-in’s dynamically discovered and loaded at runtime. They provide services such as Text-to-Speech, Word Prediction etc. Figure 8 shows the six categories of Extensions.
Chapter 4 provides an introduction to Extensions.
28 ARCHITECTURE | ACAT Developer’s Guide
Figure 8: Extensions
The following table lists the categories with a brief description. The extensions are deployed as individual DLL’s.
Extension Category Description
UI Extensions
Includes all the Panels – Scanners, Menus and Dialogs.
See Chapter 8 for details on Panels.
Actuator Extensions Interfaces with HW/SW Actuators.
See Chapter 6 for details on Actuators.
Word Predictor Extensions
Provides next-word prediction.
See Chapter 9 for details on Word Predictors.
29 ARCHITECTURE | ACAT Developer’s Guide
Extension Category Description
Text-toSpeech Extensions
Converts text to speech
See Chapter 10 for details on Text-to-Speech extensions.
Agent Extensions
Includes Application and Functional Agents. Application Agents interface with apps on the desktop and Functional Agents provide services such as File Browsing.
See Chapter 7 for details on Agents.
Spell Checker Extensions
Performs spell checking for applications that don’t have native spell checkers.
See Chapter 11 for details on Spell Checkers.
30 CODE STRUCTURE | ACAT Developer’s Guide
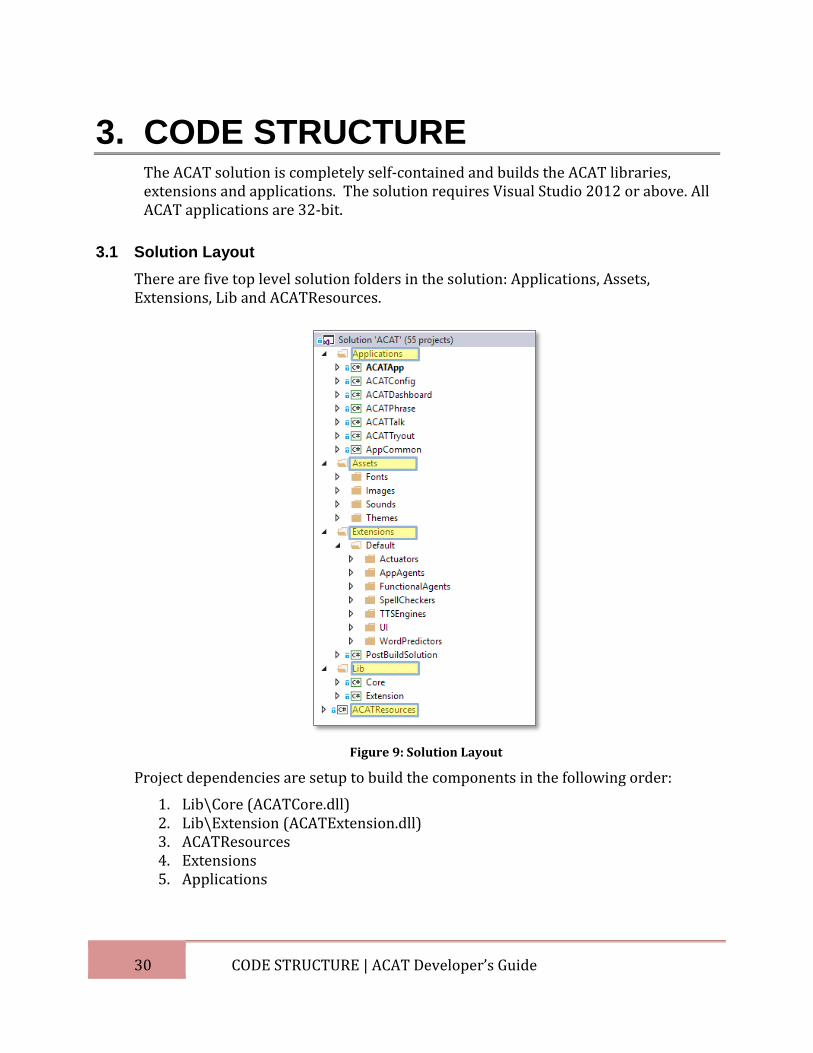
3. CODE STRUCTURE The ACAT solution is completely self-contained and builds the ACAT libraries, extensions and applications. The solution requires Visual Studio 2012 or above. All ACAT applications are 32-bit.
3.1 Solution Layout
There are five top level solution folders in the solution: Applications, Assets, Extensions, Lib and ACATResources.
Figure 9: Solution Layout
Project dependencies are setup to build the components in the following order:
1. Lib\Core (ACATCore.dll) 2. Lib\Extension (ACATExtension.dll) 3. ACATResources 4. Extensions 5. Applications
31 CODE STRUCTURE | ACAT Developer’s Guide
3.2 Coding Standards and Styles
The code for ACAT adheres to a uniform coding standard as enforced by StyleCop, which is based on Microsoft’s .NET Framework Design Guidelines. The following rules are followed:
1. One class per file. 2. Class members are defined in the following order
Fields Constructors Destructors Delegates Events Enums Interfaces Properties Indexers Methods Structs Classes
3. Within each category, class members are laid out alphabetically. 4. Naming conventions
All public members begin with an uppercase letter. All private fields begin with an underscore. All private and protected members begin with a lowercase. Hungarian notation is not used.
5. using statements are listed with the .NET imports first. They are listed alphabetically.
6. Every function, field and property, whether public, private or protected, is documented.
7. Local calls are not prefixed with the this operator. 8. Public properties have getters and setters. 9. Wherever applicable, classes are derived from IDisposable. 10. Most functions return void or a bool. 11. All errors are handled gracefully without escalating to the user. Only fatal
exceptions are displayed to the user. 12. Where ever possible, line lengths are restricted to around 80 characters.
3.2.1 Visual Studio Add-on’s
The following Visual Studio add-on’s make life easier: 1. StyleCop (free) which ensures the code follows .NET coding standards. 2. CodeMaid (free) which reorganizes and cleans up the code in accordance
with StyleCop rules 3. ReSharper (paid) which looks for unused variables, uninitialized variables
etc.
32 CODE STRUCTURE | ACAT Developer’s Guide
3.3 Building the framework
Refer to sections 1.6 and 1.7 for building the ACAT application and the Language packs.
3.4 Logging
ACAT uses debug log traces liberally. Debug logs can be enabled through a preference setting (see section 15.2.3) The DebugView utility (https://download.sysinternals.com/files/DebugView.zip )can be used to view debug messages. All debug messages are prefixed with the name of the class and the name of the function that made the call. These prefixes can be used in DebugView as filters to selectively view log messages.
33 EXTENSIONS | ACAT Developer’s Guide
4. EXTENSIONS ACAT extensions are DLL’s which are discovered at runtime and loaded dynamically. They are akin to plug-in’s.
4.1 Extension Categories
Extensions fall under one of the following categories.
Extension Category Description
Actuator Extensions
Extensions that interface with the switch input trigger mechanism. The user makes a selection in the UI by activating the switch. This is similar to clicking a mouse button.
Application Agent Extensions
Extensions that convey contextual information about an application such as Notepad or Microsoft Word. Typically, there is one Application Agent per application.
Functional Agent Extensions
Extensions that provide specific functions such as a File Browser to open files, Application Launcher to launch applications etc.
Spell Checker Extensions
Extensions that perform spell check and auto correct during text entry for applications such as Notepad which do not have native spell checkers or auto-correctors
Text-to-Speech (TTS) Extensions
Extensions that provide TTS services. For instance, ACAT has an extension that uses the Microsoft Speech Synthesizer to convert text to speech.
UI Extensions Extensions that contain scanners, dialogs and menus.
34 EXTENSIONS | ACAT Developer’s Guide
Extension Category Description
Word Prediction Extensions
Extensions that provide next-word prediction. ACAT has a word predictor based the Presage Intelligent Predictive Text Engine (http://presage.sourceforge.net)
4.2 Extension Folder Layout
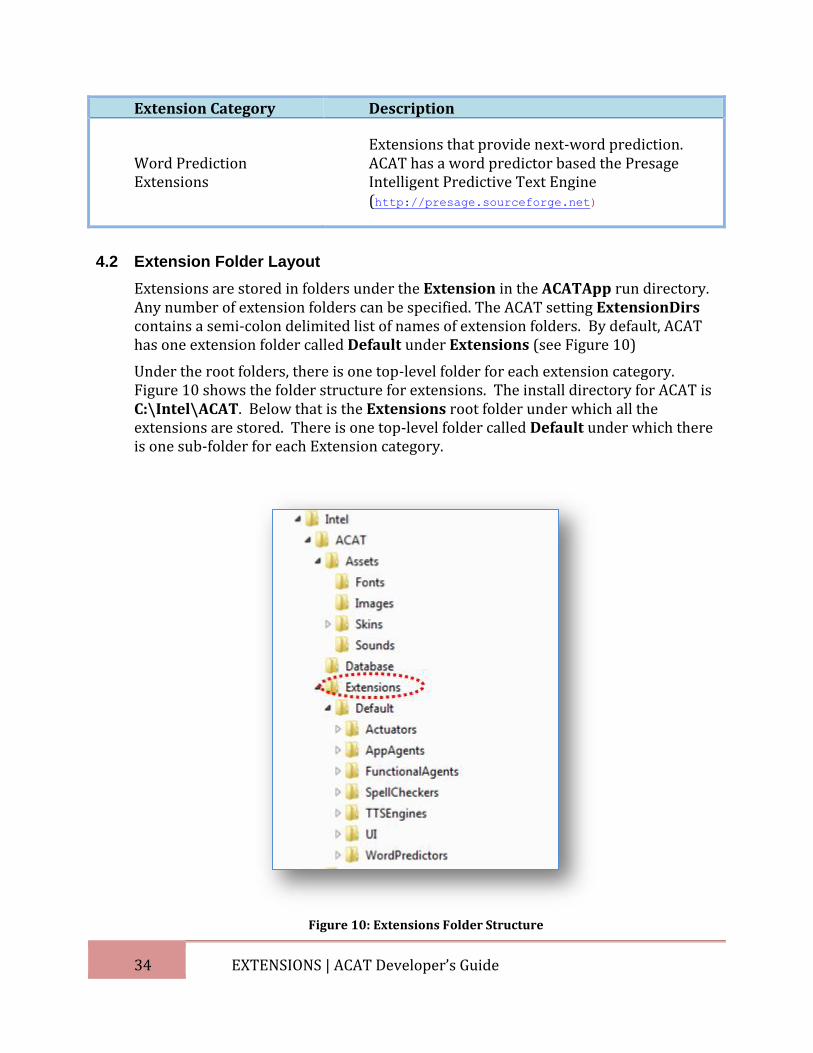
Extensions are stored in folders under the Extension in the ACATApp run directory. Any number of extension folders can be specified. The ACAT setting ExtensionDirs contains a semi-colon delimited list of names of extension folders. By default, ACAT has one extension folder called Default under Extensions (see Figure 10)
Under the root folders, there is one top-level folder for each extension category. Figure 10 shows the folder structure for extensions. The install directory for ACAT is C:\Intel\ACAT. Below that is the Extensions root folder under which all the extensions are stored. There is one top-level folder called Default under which there is one sub-folder for each Extension category.
Figure 10: Extensions Folder Structure
35 EXTENSIONS | ACAT Developer’s Guide
4.3 Extension Discovery
Each extension category has an Interface which must be implemented by all extensions that belong to the category. For instance, all Application Agents must implement the IApplicationAgent interface. All Word Predictior extensions must implement the IWordPredictor interface.
On startup, the manager for each Extension category traverses the depth of the top-level folder for that category. It enumerates all DLL’s under the folder and for each DLL, it caches the .NET types of classes that derive from the Interface for the category. For instance, the Word Predictor Manager would recursively descend into the WordPredictors folder, examine all the DLL’s there and look for classes that derive from IWordPredictor. Similarly, the TTS Manager would recursively descend into the TTSEngines folder. The Managers would then use .NET reflection to create an instances of the objects for the Extensions.
4.4 Extension Descriptor
Every extension class has a Descriptor that uniquely identifies the class. The Descriptor has three properties: a GUID which is a unique identifier for the extension, a name and a friendly description. These properties are encapsulated in the IDescriptor interface. Every extension classes must have a property that returns the IDescriptor interface for that class.
To simplify this, extension classes can define a custom attribute called DescriptorAttribute that defines the three properties –a GUID, name and description. The ACAT library has a helper class called DescriptorAttribute that reads the custom attributes and returns an IDescriptor object. As an example, the Internet Explorer Agent has the following DescriptorAttribute with the GUID, name and description:
Listing 1: Descriptor Attribute
4.5 Extension Invoker
Since all ACAT extensions are standalone DLL’s, they are not directly referenced in other projects. An application may want set Properties or invoke Methods in the extension. For instance, the File Browser functional agent returns the name of the file the user selected through a property in the File Browser Agent class. The YesNoScanner returns the Yes/No choice made by the user. So how does an
[DescriptorAttribute("0B183771-C3E7-4ED2-9886-741526343140",
"Internet Explorer Agent",
"Application Agent for Internet Explorer")]
internal class InternetExplorerAgent : InternetExplorerAgentBase
{
… }
36 EXTENSIONS | ACAT Developer’s Guide
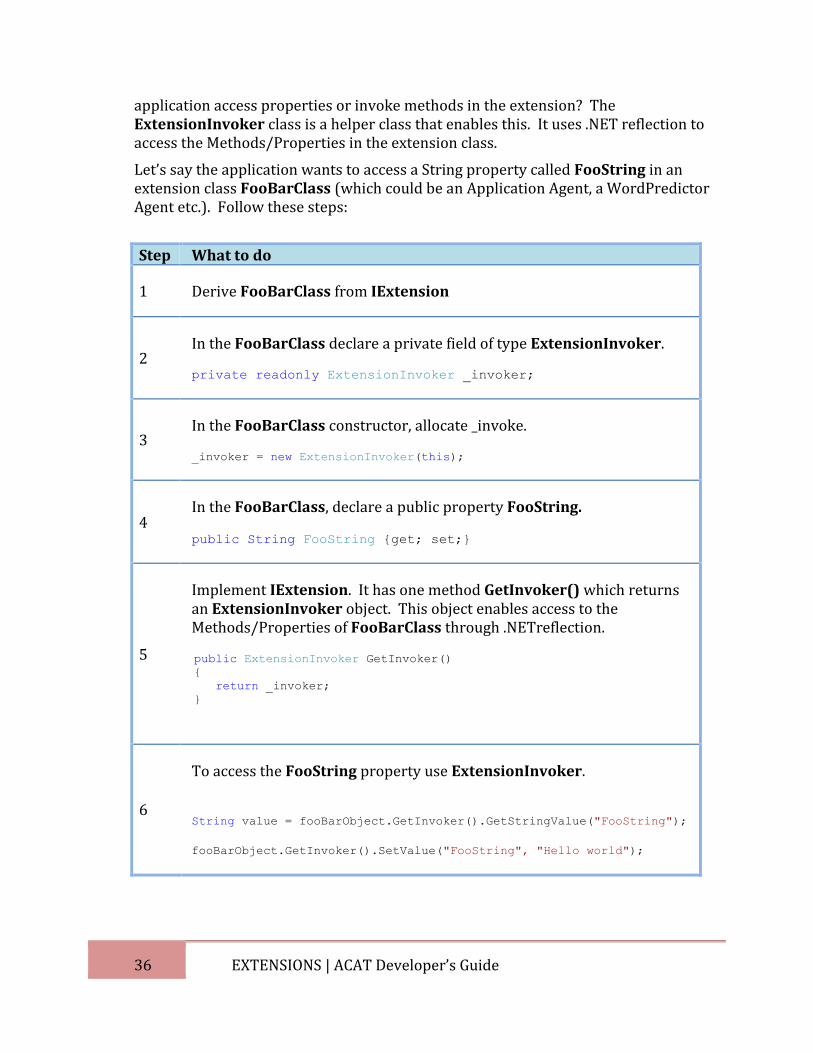
application access properties or invoke methods in the extension? The ExtensionInvoker class is a helper class that enables this. It uses .NET reflection to access the Methods/Properties in the extension class.
Let’s say the application wants to access a String property called FooString in an extension class FooBarClass (which could be an Application Agent, a WordPredictor Agent etc.). Follow these steps:
Step What to do
1 Derive FooBarClass from IExtension
2 In the FooBarClass declare a private field of type ExtensionInvoker.
private readonly ExtensionInvoker _invoker;
3 In the FooBarClass constructor, allocate _invoke.
_invoker = new ExtensionInvoker(this);
4 In the FooBarClass, declare a public property FooString.
public String FooString {get; set;}
5
Implement IExtension. It has one method GetInvoker() which returns an ExtensionInvoker object. This object enables access to the Methods/Properties of FooBarClass through .NETreflection.
public ExtensionInvoker GetInvoker()
{
return _invoker;
}
6
To access the FooString property use ExtensionInvoker.
String value = fooBarObject.GetInvoker().GetStringValue("FooString");
fooBarObject.GetInvoker().SetValue("FooString", "Hello world");
37 LOCALIZATION | ACAT Developer’s Guide
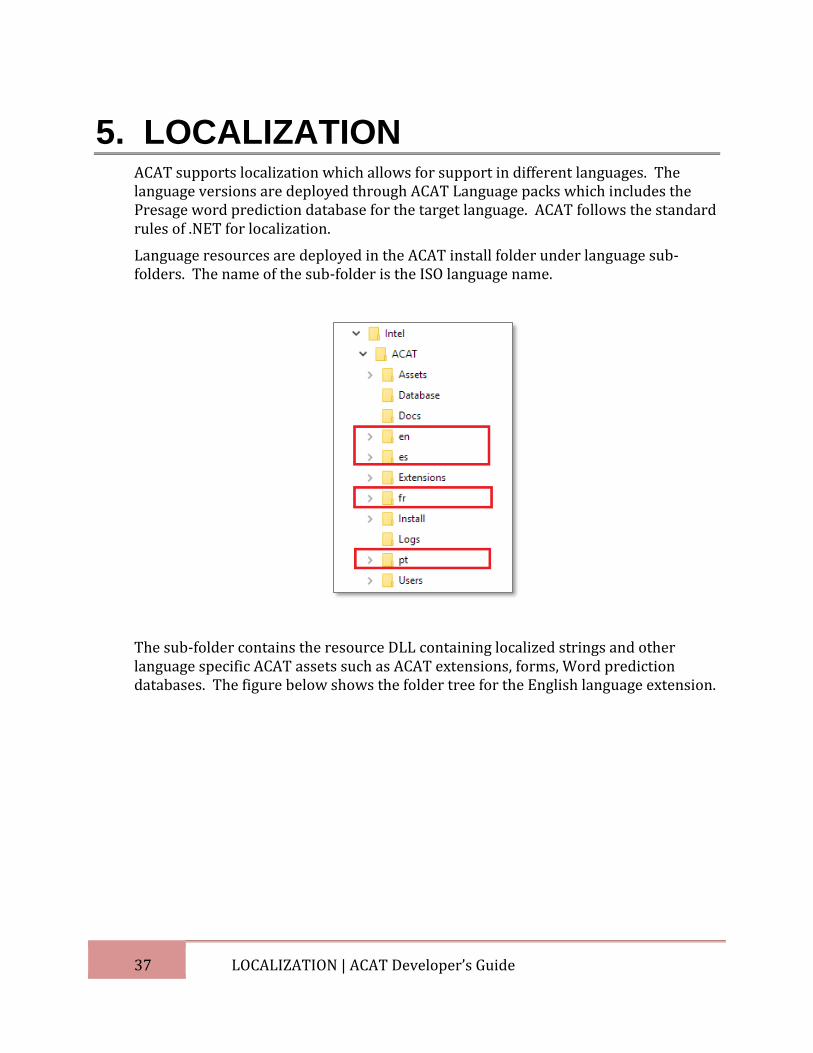
5. LOCALIZATION ACAT supports localization which allows for support in different languages. The language versions are deployed through ACAT Language packs which includes the Presage word prediction database for the target language. ACAT follows the standard rules of .NET for localization.
Language resources are deployed in the ACAT install folder under language sub-folders. The name of the sub-folder is the ISO language name.
The sub-folder contains the resource DLL containing localized strings and other language specific ACAT assets such as ACAT extensions, forms, Word prediction databases. The figure below shows the folder tree for the English language extension.
38 LOCALIZATION | ACAT Developer’s Guide
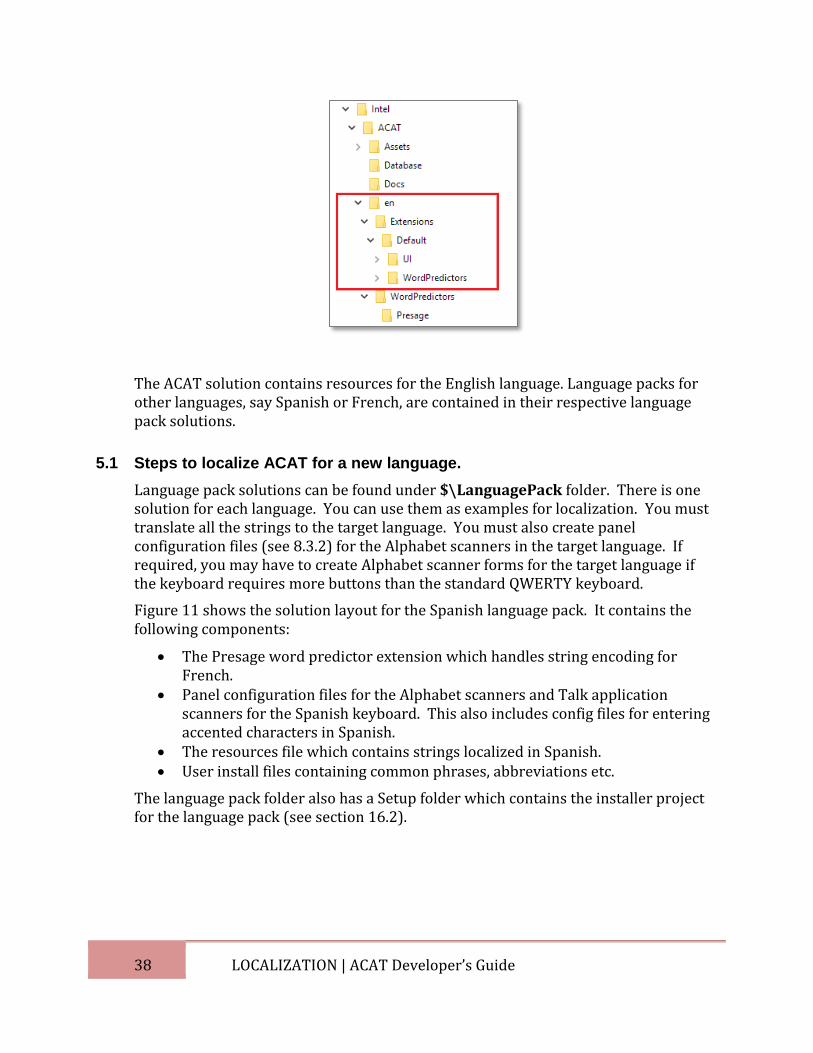
The ACAT solution contains resources for the English language. Language packs for other languages, say Spanish or French, are contained in their respective language pack solutions.
5.1 Steps to localize ACAT for a new language.
Language pack solutions can be found under $\LanguagePack folder. There is one solution for each language. You can use them as examples for localization. You must translate all the strings to the target language. You must also create panel configuration files (see 8.3.2) for the Alphabet scanners in the target language. If required, you may have to create Alphabet scanner forms for the target language if the keyboard requires more buttons than the standard QWERTY keyboard.
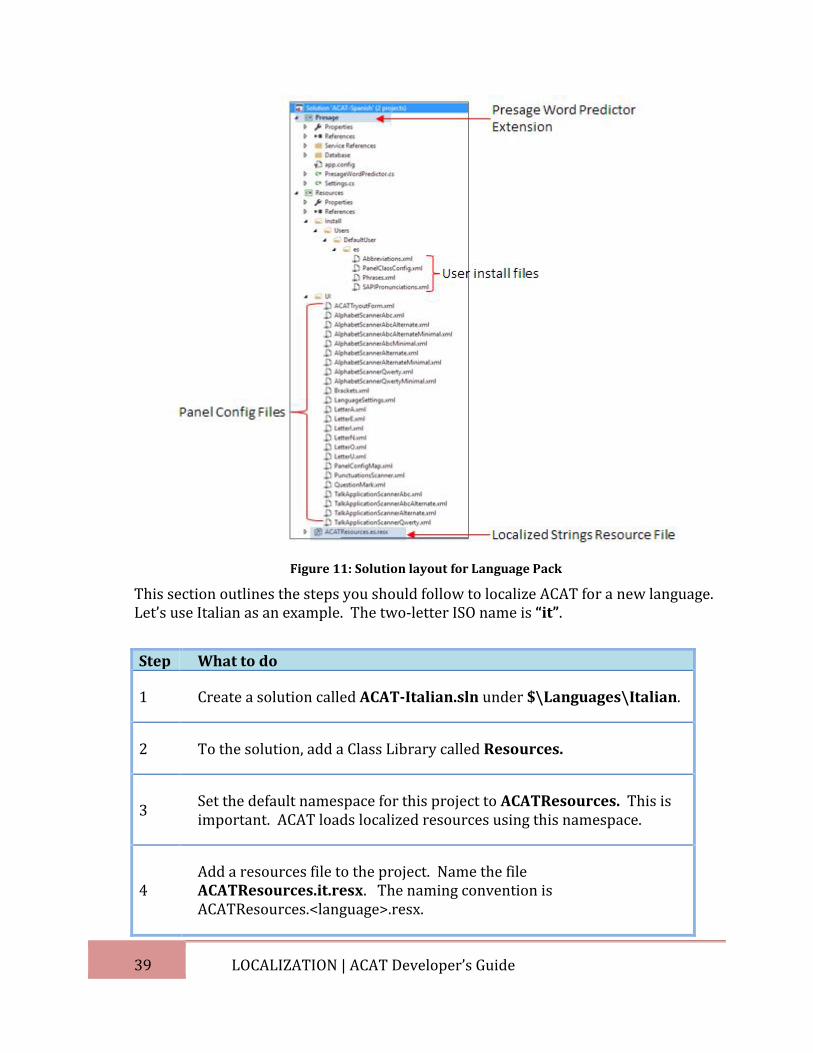
Figure 11 shows the solution layout for the Spanish language pack. It contains the following components:
The Presage word predictor extension which handles string encoding for French.
Panel configuration files for the Alphabet scanners and Talk application scanners for the Spanish keyboard. This also includes config files for entering accented characters in Spanish.
The resources file which contains strings localized in Spanish. User install files containing common phrases, abbreviations etc.
The language pack folder also has a Setup folder which contains the installer project for the language pack (see section 16.2).
39 LOCALIZATION | ACAT Developer’s Guide
Figure 11: Solution layout for Language Pack
This section outlines the steps you should follow to localize ACAT for a new language. Let’s use Italian as an example. The two-letter ISO name is “it”.
Step What to do
1 Create a solution called ACAT-Italian.sln under $\Languages\Italian.
2 To the solution, add a Class Library called Resources.
3 Set the default namespace for this project to ACATResources. This is important. ACAT loads localized resources using this namespace.
4 Add a resources file to the project. Name the file ACATResources.it.resx. The naming convention is ACATResources.<language>.resx.
40 LOCALIZATION | ACAT Developer’s Guide
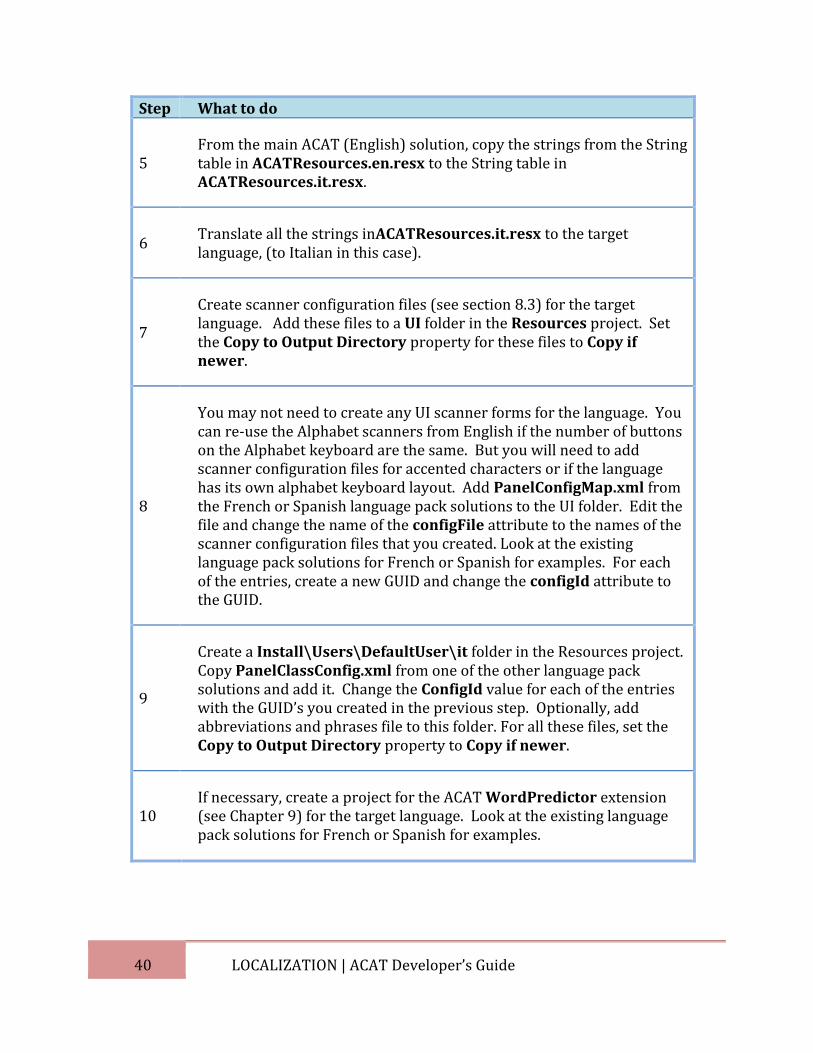
Step What to do
5 From the main ACAT (English) solution, copy the strings from the String table in ACATResources.en.resx to the String table in ACATResources.it.resx.
6 Translate all the strings inACATResources.it.resx to the target language, (to Italian in this case).
7
Create scanner configuration files (see section 8.3) for the target language. Add these files to a UI folder in the Resources project. Set the Copy to Output Directory property for these files to Copy if newer.
8
You may not need to create any UI scanner forms for the language. You can re-use the Alphabet scanners from English if the number of buttons on the Alphabet keyboard are the same. But you will need to add scanner configuration files for accented characters or if the language has its own alphabet keyboard layout. Add PanelConfigMap.xml from the French or Spanish language pack solutions to the UI folder. Edit the file and change the name of the configFile attribute to the names of the scanner configuration files that you created. Look at the existing language pack solutions for French or Spanish for examples. For each of the entries, create a new GUID and change the configId attribute to the GUID.
9
Create a Install\Users\DefaultUser\it folder in the Resources project. Copy PanelClassConfig.xml from one of the other language pack solutions and add it. Change the ConfigId value for each of the entries with the GUID’s you created in the previous step. Optionally, add abbreviations and phrases file to this folder. For all these files, set the Copy to Output Directory property to Copy if newer.
10 If necessary, create a project for the ACAT WordPredictor extension (see Chapter 9) for the target language. Look at the existing language pack solutions for French or Spanish for examples.
41 LOCALIZATION | ACAT Developer’s Guide
Step What to do
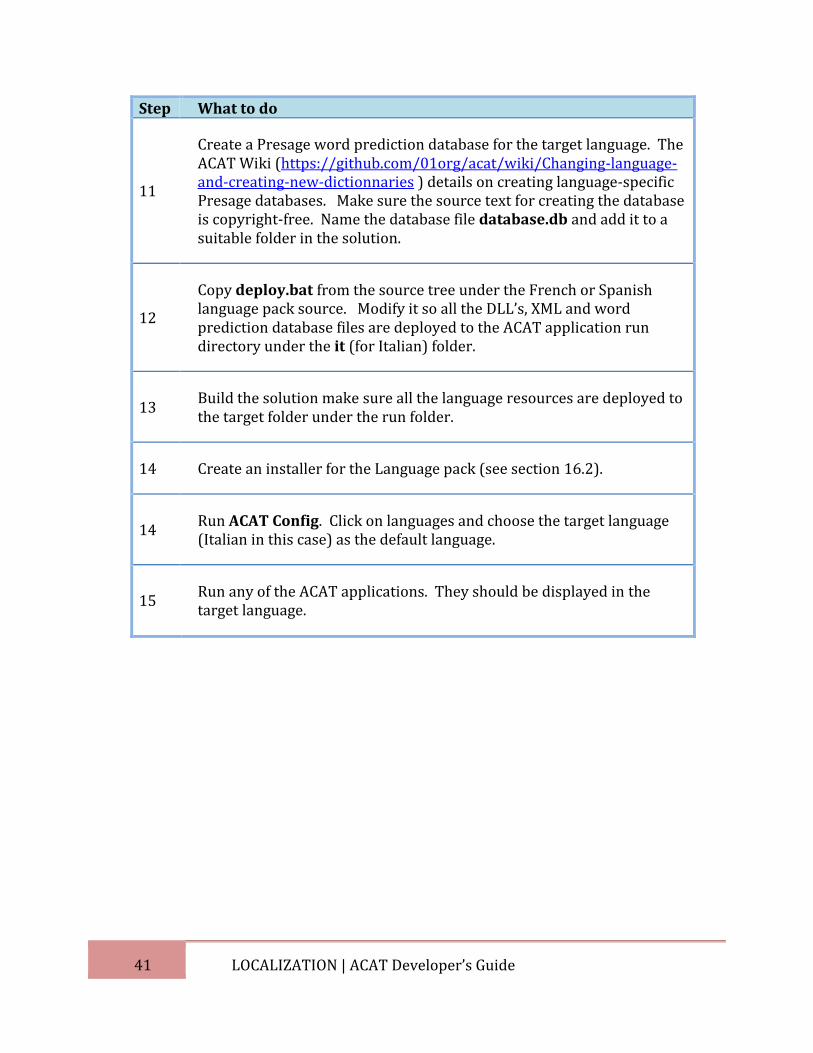
11
Create a Presage word prediction database for the target language. The ACAT Wiki (https://github.com/01org/acat/wiki/Changing-language-and-creating-new-dictionnaries ) details on creating language-specific Presage databases. Make sure the source text for creating the database is copyright-free. Name the database file database.db and add it to a suitable folder in the solution.
12
Copy deploy.bat from the source tree under the French or Spanish language pack source. Modify it so all the DLL’s, XML and word prediction database files are deployed to the ACAT application run directory under the it (for Italian) folder.
13 Build the solution make sure all the language resources are deployed to the target folder under the run folder.
14 Create an installer for the Language pack (see section 16.2).
14 Run ACAT Config. Click on languages and choose the target language (Italian in this case) as the default language.
15 Run any of the ACAT applications. They should be displayed in the target language.

42 ACTUATORS | ACAT Developer’s Guide
6. ACTUATORS
6.1 Introduction
Actuators are input trigger mechanisms. Actuators contain one or more switches. ACAT actions are mapped to each switch. Every time the switch is triggered, the ACAT user interface will respond with the action that is associated with that switch. For instance, if a button is highlighted in the scanner and user activates the switch, it will translate into a click event.
ACAT Actuators are managed by the Actuator Manager in the Actuator Management component.
The following switch mechanisms are supported by ACAT:
a. Keyboard: The function key F12 is the default key to trigger ACAT. Every time the user hits F12, the scanner will respond by executing the action associated with the highlighted element. You can change the default key through the ACAT Config utility. Refer to the ACAT User Guide or to the ACAT FAQ for details.
b. ACAT Vision: ACAT vision application uses a webcam to detect facial gestures which are then translated into trigger events.
c. Off-the-shelf switches: ACAT supports a number of off-the-shelf switches which plug into the USB interface of your computer. These switches can be configured to send specific keystrokes whenever the switch is activated. To work with ACAT, the switches should be configured to send a F12 key (or whichever is the default key) press event every time the switch is activated.
Note: Out of the box, ACAT supports keyboard and ACAT vision as input switch mechanisms. The mouse can also be used to activate the UI by pointing and clicking. New hardware or software switches can be integrated with ACAT through Actuator extensions. See section 6.5 for step-by-step instructions to develop Actuator extensions.
6.2 Enumeration
All Actuator extension DLL’s must be installed under the Actuators root folder which is [INSTALLDIR]\Extensions\[EXTENSION_DIR]\Actuators. Under this, each actuator DLL should reside in its own sub-folder. For instance, the ACAT vision actuator is installed under C:\Intel\ACAT\Extensions\Default\Actuators\VisionActuator. During initialization, the Actuator Manager walks recursively through the Actuators root folder, loads all the DLL’s in there and creates instances of classes that derive from ActuatorBase.
43 ACTUATORS | ACAT Developer’s Guide
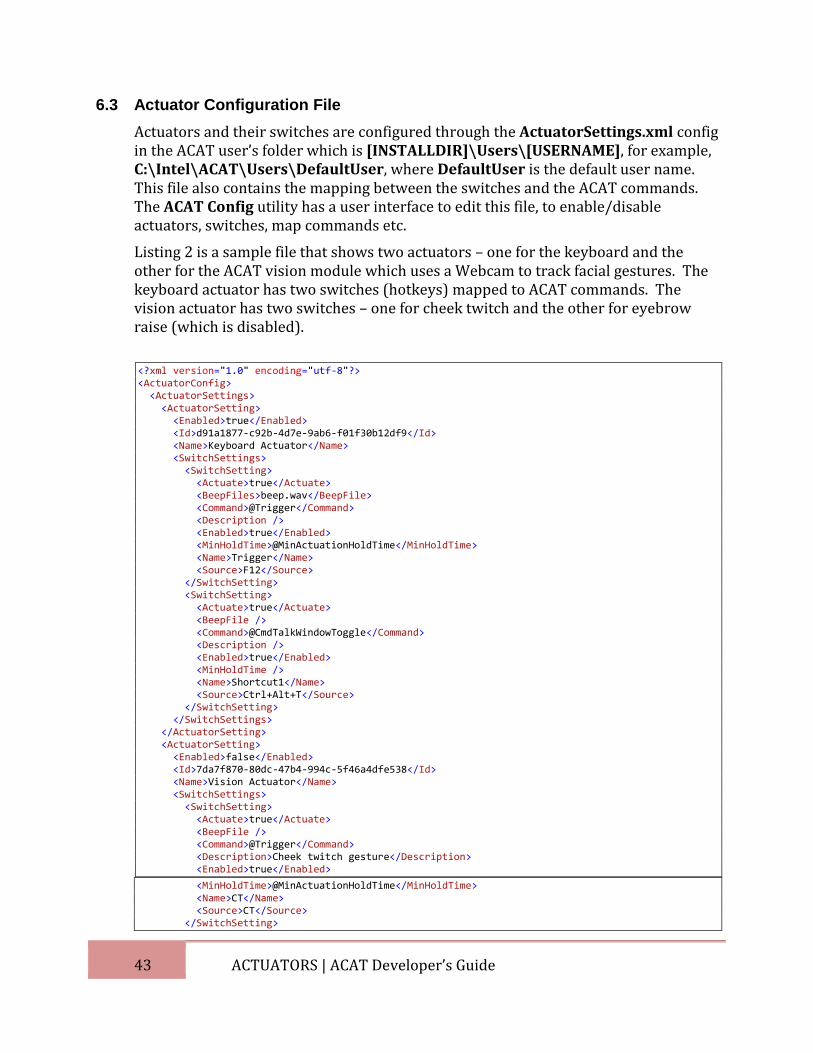
6.3 Actuator Configuration File
Actuators and their switches are configured through the ActuatorSettings.xml config in the ACAT user’s folder which is [INSTALLDIR]\Users\[USERNAME], for example, C:\Intel\ACAT\Users\DefaultUser, where DefaultUser is the default user name. This file also contains the mapping between the switches and the ACAT commands. The ACAT Config utility has a user interface to edit this file, to enable/disable actuators, switches, map commands etc.
Listing 2 is a sample file that shows two actuators – one for the keyboard and the other for the ACAT vision module which uses a Webcam to track facial gestures. The keyboard actuator has two switches (hotkeys) mapped to ACAT commands. The vision actuator has two switches – one for cheek twitch and the other for eyebrow raise (which is disabled).
<?xml version="1.0" encoding="utf-8"?> <ActuatorConfig> <ActuatorSettings> <ActuatorSetting> <Enabled>true</Enabled> <Id>d91a1877-c92b-4d7e-9ab6-f01f30b12df9</Id> <Name>Keyboard Actuator</Name> <SwitchSettings> <SwitchSetting> <Actuate>true</Actuate> <BeepFiles>beep.wav</BeepFile> <Command>@Trigger</Command> <Description /> <Enabled>true</Enabled> <MinHoldTime>@MinActuationHoldTime</MinHoldTime> <Name>Trigger</Name> <Source>F12</Source> </SwitchSetting> <SwitchSetting> <Actuate>true</Actuate> <BeepFile /> <Command>@CmdTalkWindowToggle</Command> <Description /> <Enabled>true</Enabled> <MinHoldTime /> <Name>Shortcut1</Name> <Source>Ctrl+Alt+T</Source> </SwitchSetting> </SwitchSettings> </ActuatorSetting> <ActuatorSetting> <Enabled>false</Enabled> <Id>7da7f870-80dc-47b4-994c-5f46a4dfe538</Id> <Name>Vision Actuator</Name> <SwitchSettings> <SwitchSetting> <Actuate>true</Actuate> <BeepFile /> <Command>@Trigger</Command> <Description>Cheek twitch gesture</Description> <Enabled>true</Enabled>
<MinHoldTime>@MinActuationHoldTime</MinHoldTime> <Name>CT</Name> <Source>CT</Source> </SwitchSetting>
44 ACTUATORS | ACAT Developer’s Guide
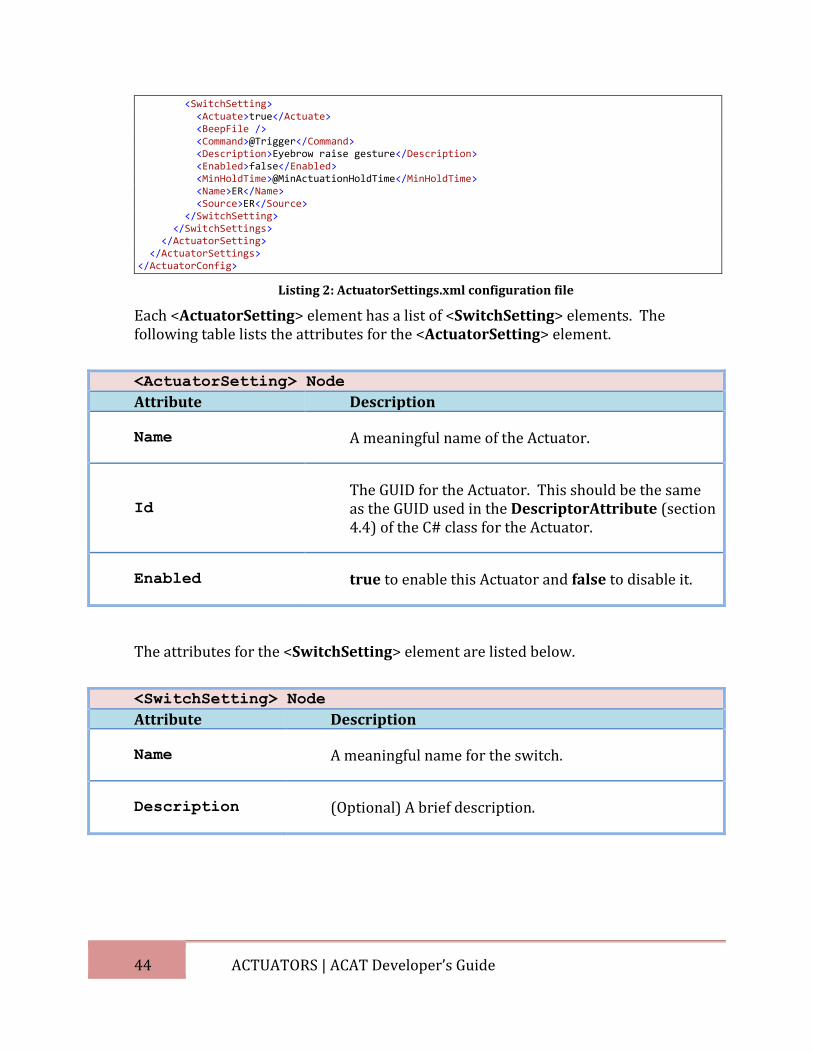
<SwitchSetting> <Actuate>true</Actuate> <BeepFile /> <Command>@Trigger</Command> <Description>Eyebrow raise gesture</Description> <Enabled>false</Enabled> <MinHoldTime>@MinActuationHoldTime</MinHoldTime> <Name>ER</Name> <Source>ER</Source> </SwitchSetting> </SwitchSettings> </ActuatorSetting> </ActuatorSettings> </ActuatorConfig>
Listing 2: ActuatorSettings.xml configuration file
Each <ActuatorSetting> element has a list of <SwitchSetting> elements. The following table lists the attributes for the <ActuatorSetting> element.
<ActuatorSetting> Node
Attribute Description
Name A meaningful name of the Actuator.
Id
The GUID for the Actuator. This should be the same as the GUID used in the DescriptorAttribute (section 4.4) of the C# class for the Actuator.
Enabled true to enable this Actuator and false to disable it.
The attributes for the <SwitchSetting> element are listed below.
<SwitchSetting> Node
Attribute Description
Name A meaningful name for the switch.
Description (Optional) A brief description.
45 ACTUATORS | ACAT Developer’s Guide
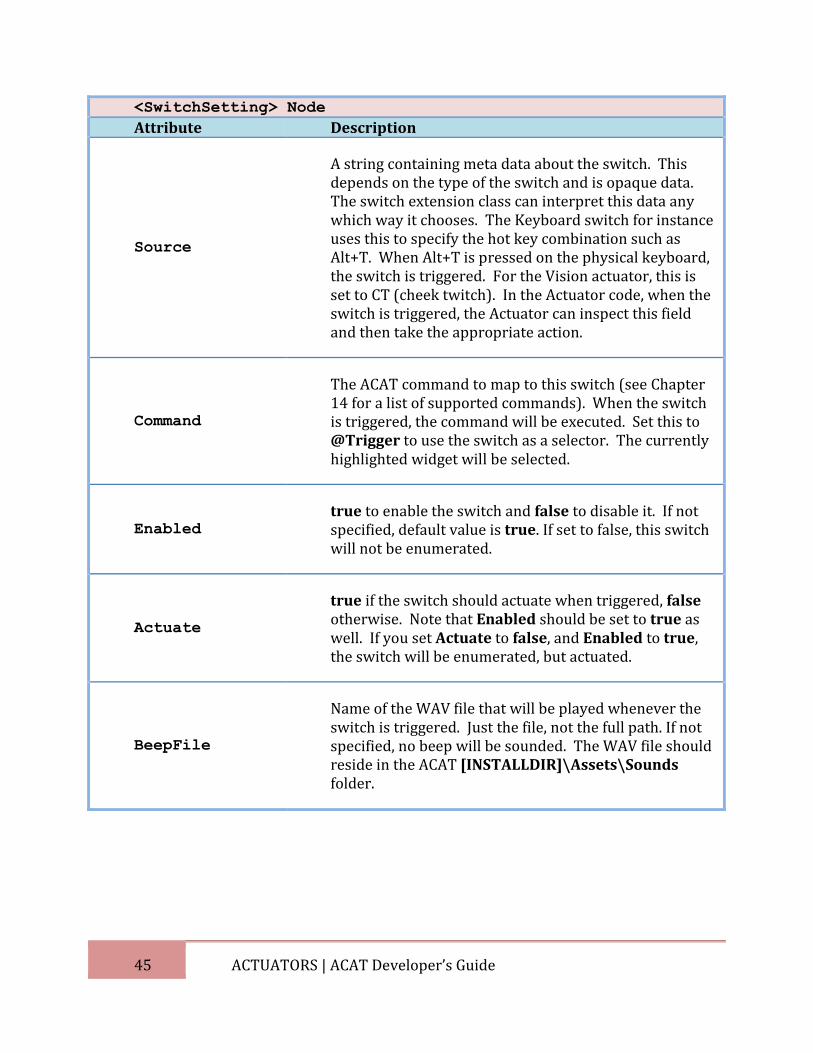
<SwitchSetting> Node
Attribute Description
Source
A string containing meta data about the switch. This depends on the type of the switch and is opaque data. The switch extension class can interpret this data any which way it chooses. The Keyboard switch for instance uses this to specify the hot key combination such as Alt+T. When Alt+T is pressed on the physical keyboard, the switch is triggered. For the Vision actuator, this is set to CT (cheek twitch). In the Actuator code, when the switch is triggered, the Actuator can inspect this field and then take the appropriate action.
Command
The ACAT command to map to this switch (see Chapter 14 for a list of supported commands). When the switch is triggered, the command will be executed. Set this to @Trigger to use the switch as a selector. The currently highlighted widget will be selected.
Enabled
true to enable the switch and false to disable it. If not specified, default value is true. If set to false, this switch will not be enumerated.
Actuate
true if the switch should actuate when triggered, false otherwise. Note that Enabled should be set to true as well. If you set Actuate to false, and Enabled to true, the switch will be enumerated, but actuated.
BeepFile
Name of the WAV file that will be played whenever the switch is triggered. Just the file, not the full path. If not specified, no beep will be sounded. The WAV file should reside in the ACAT [INSTALLDIR]\Assets\Sounds folder.
46 ACTUATORS | ACAT Developer’s Guide
<SwitchSetting> Node
Attribute Description
MinHoldTime
This is the minimum length of time in milliseconds that the switch should stay engaged in order for ACAT to recognize it as a valid switch event. This eliminates false positives in the detection algorithm. As an analogy, let’s say this is set to 100ms for a keyboard switch. The key would have to stay pressed for at least 100 ms to ACAT to recognize it as a valid key press. Choose this value carefully.
Set this to a numeric value in milliseconds. Or set it to the macro @MinHoldTime to indicate that the ACAT setting MinActuationHoldTime (see section 15.2.1) should be used as the value (see section 13.4 on Macros).
6.4 ACAT Actuator Extensions
The ACAT Core library has support for the Keyboard actuator, and provides base classes for developing USB HID, Winsock client Winsock server actuators.
6.4.1 Keyboard Actuator
The Keyboard actuator is a part of the Actuator Management component of the ACAT Core library. It uses Windows keyboard hooks to capture keystrokes no matter which application is active. Each keystroke is compared with the key mapping specified in the ActuatorSettings.xml file (see section 6.3). If an Actuator switch for keystroke is found, that switch is triggered.
6.4.2 USB HID Actuators
If the switch hardware is a USB HID device, the ACAT Core library you can use the USBDevice class which handles all the heavy lifting of opening the device, reading data asynchronously, detecting device connect/disconnect etc. You need this only if you want access to the raw data from the switch. If you are using an off-the-shelf switch, you do not need an actuator for it. All off-the-shelf switches appear to Windows as a keyboard HID device and the ACAT Keyboard actuator will handle input from them.
6.4.3 Winsock Actuators
The base classes for Winsock actuators can be used to develop a server or client based actuator. This is useful for software switches where the source of the switch can be another application or DLL. Switch events are sent to ACAT over a socket
47 ACTUATORS | ACAT Developer’s Guide
interface. The Winsock server actuator listens for incoming connections whereas the Winsock client actuator makes connections to a TCP/IP server.
The base classes also handle parsing of the switch event data received over the socket. After parsing the data, they also trigger switch events based on information in the data. The data for sending Actuator switch trigger events to ACAT is a semi-colon delimited string in the format described below. To use a different format, derive from the base class and override the functions that parse the data.
gesture=<gesture_type>;action=<gesture_event>;conf=<confidence>;
time=<timestamp>;actuate=<flag>;tag=<userdata>
Field Value
gesture
Should be the same as the Source field in ActuatorSettings.xml (see section 6.3). ACAT looks up the list of switches for the Actuator and finds the one whose Source value matches this.
action
Specifies the switch action. Should be one of the values of the SwitchAction enum type: Down to indicate the switch has engaged, similar to a key-down event on a keyboard), Up to indicate the switch has been released (similar to a key-up event on a keyboard) or Trigger to indicate the switch has been triggered (similar to a key-press keyboard event). Depending on the fidelity of the switch mechanism, a Down followed by an Up can be used, or the Trigger can be used instead. Note that if Up/Down events are used, ACAT will enforce the switch MinHoldTime (see section 15.2.1) to determine whether to raise a switch trigger event or not. If only Trigger is used, then MinHoldTime is ignored.
conf The confidence level (for future use)
time The timestamp of the event in Ticks.
actuate Value should be true to denote whether to actually carry out the action, false to denote otherwise.
48 ACTUATORS | ACAT Developer’s Guide
Field Value
tag Opaque data to pass meta-data to the Actuator.
6.5 Steps to create an Actuator extension
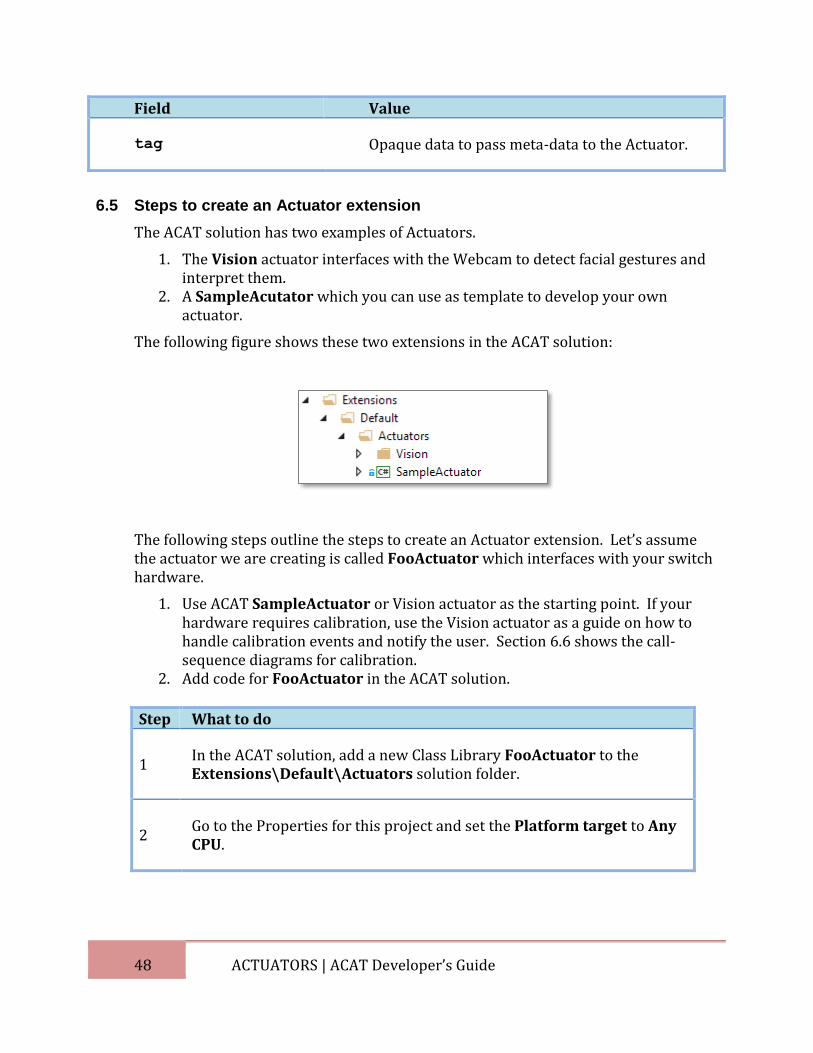
The ACAT solution has two examples of Actuators.
1. The Vision actuator interfaces with the Webcam to detect facial gestures and interpret them.
2. A SampleAcutator which you can use as template to develop your own actuator.
The following figure shows these two extensions in the ACAT solution:
The following steps outline the steps to create an Actuator extension. Let’s assume the actuator we are creating is called FooActuator which interfaces with your switch hardware.
1. Use ACAT SampleActuator or Vision actuator as the starting point. If your hardware requires calibration, use the Vision actuator as a guide on how to handle calibration events and notify the user. Section 6.6 shows the call-sequence diagrams for calibration.
2. Add code for FooActuator in the ACAT solution.
Step What to do
1 In the ACAT solution, add a new Class Library FooActuator to the Extensions\Default\Actuators solution folder.
2 Go to the Properties for this project and set the Platform target to Any CPU.
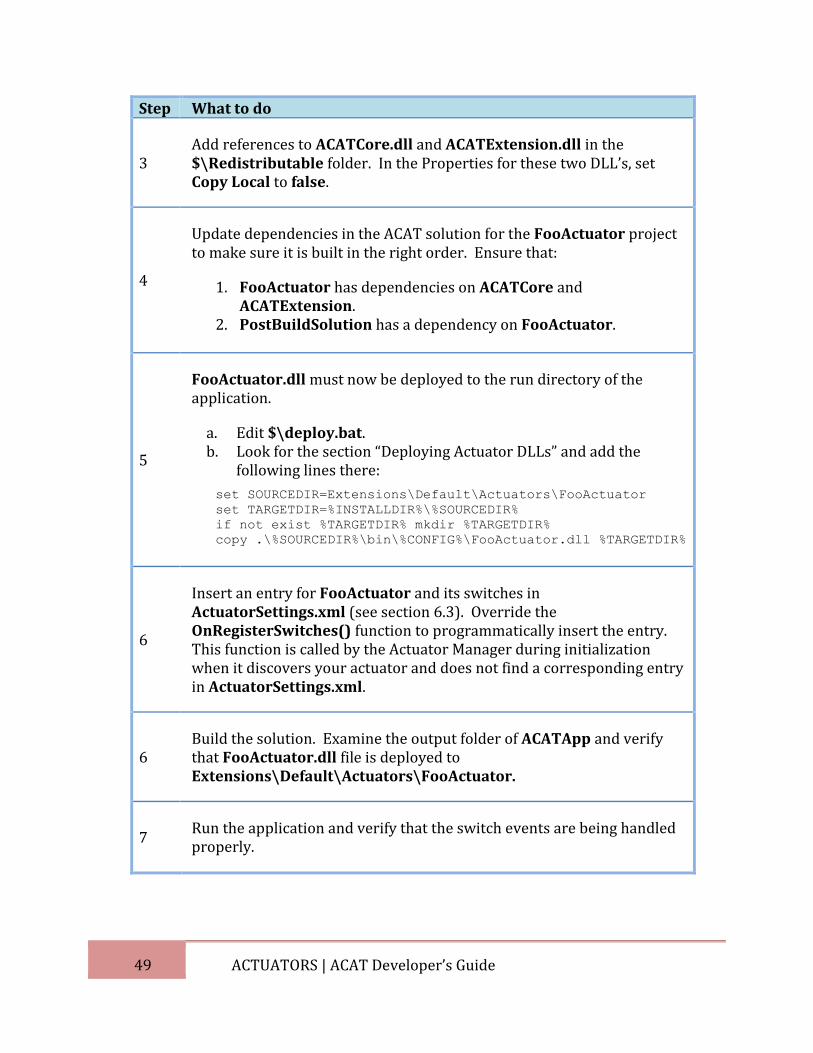
49 ACTUATORS | ACAT Developer’s Guide
Step What to do
3 Add references to ACATCore.dll and ACATExtension.dll in the $\Redistributable folder. In the Properties for these two DLL’s, set Copy Local to false.
4
Update dependencies in the ACAT solution for the FooActuator project to make sure it is built in the right order. Ensure that:
1. FooActuator has dependencies on ACATCore and ACATExtension.
2. PostBuildSolution has a dependency on FooActuator.
5
FooActuator.dll must now be deployed to the run directory of the application.
a. Edit $\deploy.bat. b. Look for the section “Deploying Actuator DLLs” and add the
following lines there:
set SOURCEDIR=Extensions\Default\Actuators\FooActuator
set TARGETDIR=%INSTALLDIR%\%SOURCEDIR%
if not exist %TARGETDIR% mkdir %TARGETDIR%
copy .\%SOURCEDIR%\bin\%CONFIG%\FooActuator.dll %TARGETDIR%
6
Insert an entry for FooActuator and its switches in ActuatorSettings.xml (see section 6.3). Override the OnRegisterSwitches() function to programmatically insert the entry. This function is called by the Actuator Manager during initialization when it discovers your actuator and does not find a corresponding entry in ActuatorSettings.xml.
6 Build the solution. Examine the output folder of ACATApp and verify that FooActuator.dll file is deployed to Extensions\Default\Actuators\FooActuator.
7 Run the application and verify that the switch events are being handled properly.
50 ACTUATORS | ACAT Developer’s Guide
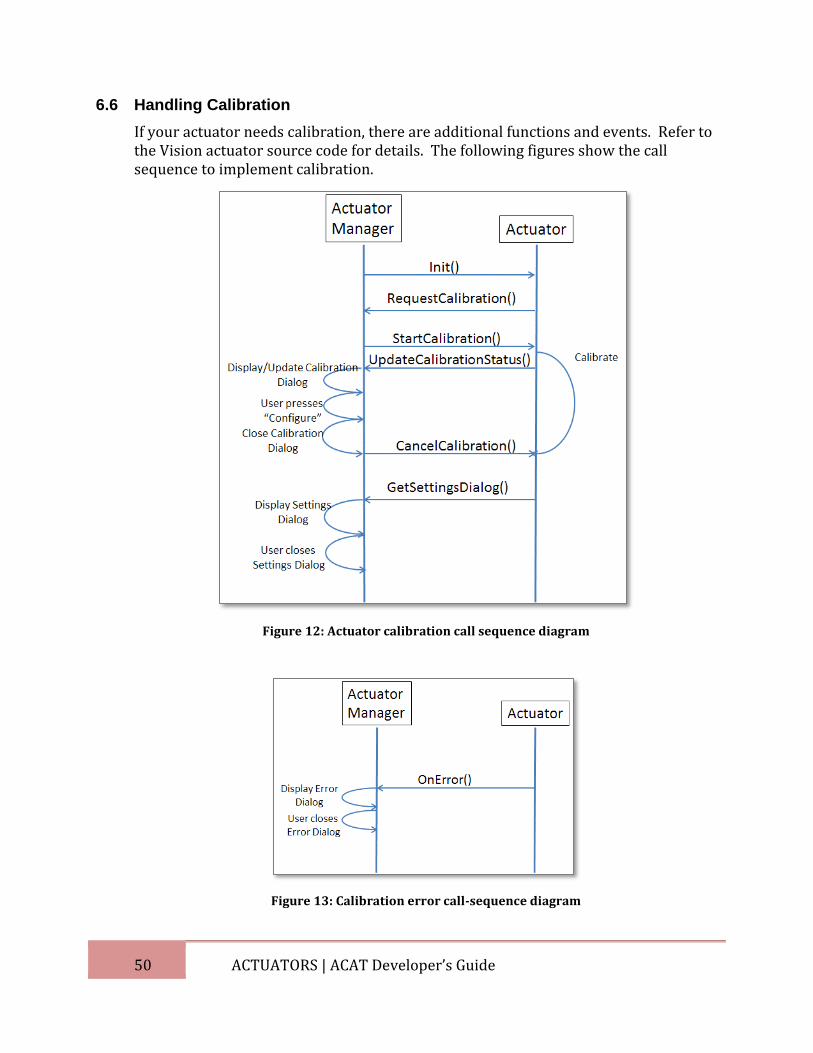
6.6 Handling Calibration
If your actuator needs calibration, there are additional functions and events. Refer to the Vision actuator source code for details. The following figures show the call sequence to implement calibration.
Figure 12: Actuator calibration call sequence diagram
Figure 13: Calibration error call-sequence diagram
51 ACTUATORS | ACAT Developer’s Guide
The Actuator extension can be developed as an independent project outside the ACAT solution. All the steps outlined above still hold. In the Post-Build event for the project, make sure the DLL is deployed into its proper location in the run folder of ACATApp.
52 AGENTS | ACAT Developer’s Guide
7. AGENTS
7.1 Introduction
Agents are ACAT extensions managed by the Agent Manager in the Agent Management component. There are two types of Agents – Application Agents and Functional Agents.
Application Agents are extensions that interact with applications such as Notepad, Microsoft Word ant Internet Explorer. They provide contextual information about the application such as the control that the user is interacting with, and if the user is editing a document, the text from the document etc.
The ACAT feature set is enhanced through Functional Agents such as the File Browser agent which enables the user to manage files, the Launch Application agent which enables the user to start instances of applications.
7.2 Enumeration
7.2.1 Application Agents
All Application Agents extension DLL’s must be installed under the top-level folder [INSTALLDIR]\Extensions\[EXTENSION_DIR]\AppAgents. Under this, each agent DLL should reside in its own sub-folder. For instance, the agent for Notepad is installed under C:\Intel\ACAT\Extensions\Default\AppAgents\NotepadAgent. During initialization, the Agent Manager walks recursively through the AppAgents folder, loads all the DLL’s in there and creates instances of classes that derive from IApplicationAgent.
7.2.2 Functional Agents
All Functional Agents extension DLL’s must be installed under the top-level folder [INSTALLDIR]\Extensions\[EXTENSION_DIR]\FunctionalAgents. Under this, each agent DLL should reside in its own sub-folder. For instance, the File Browser Functional agent is installed under C:\Intel\ACAT\Extensions\Default\FunctionalAgents\FileBrowserAgent. During initialization, the Agent Manager walks recursively through the FunctionalAgents folder, loads all the DLL’s in there and creates instances of classes that derive from IFunctionalAgent.
7.3 Application Agents
Application Agents are extension DLL’s associated with specific applications. The Agent Manager tracks focus changes on the user’s desktop. Whenever a focus change is detected, the Agent Manager checks the installed Application Agents to find the one
53 AGENTS | ACAT Developer’s Guide
is associated with the foreground process. If it finds one, it activates it and sends focus change messages to it. The Application Agent can then act on these messages by displaying a scanner that is appropriate for the application window or control that currently has focus. If the focused control is an edit control for instance, the agent can also track the caret position, extract the text where the cursor is and raise events to trigger next-word prediction.
For example, if the user is editing a document in Notepad, the Agent Manager automatically activates the Notepad Application Agent which tracks the caret position and editing changes. If the user then switches to Internet Explorer, the Agent Manager detects the focus shift and activates the Internet Explorer agent which then displays a contextual menu for Internet Explorer to enable the user to navigate the browser.
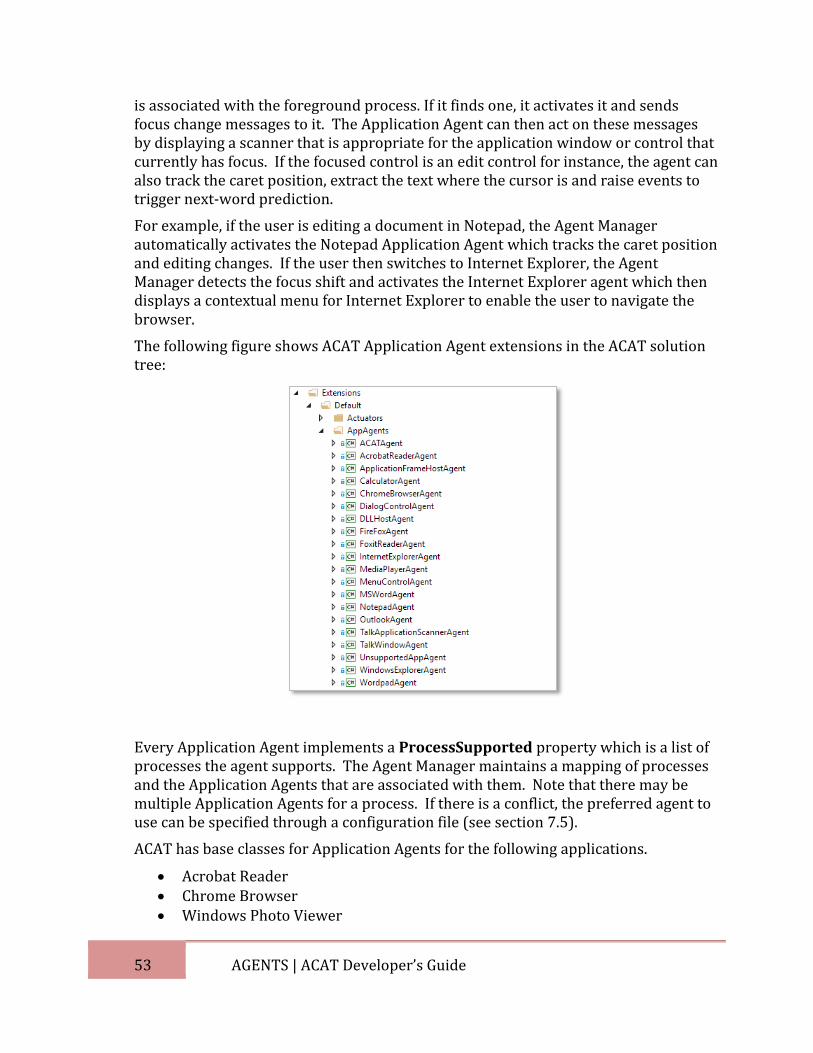
The following figure shows ACAT Application Agent extensions in the ACAT solution tree:
Every Application Agent implements a ProcessSupported property which is a list of processes the agent supports. The Agent Manager maintains a mapping of processes and the Application Agents that are associated with them. Note that there may be multiple Application Agents for a process. If there is a conflict, the preferred agent to use can be specified through a configuration file (see section 7.5).
ACAT has base classes for Application Agents for the following applications.
Acrobat Reader Chrome Browser Windows Photo Viewer
54 AGENTS | ACAT Developer’s Guide
Eudora Email Firefox Browser Internet Explorer Microsoft Word Notepad WordPad
In addition to these, there is an Agent to handle dialogs and one to handle menus. If the foreground window is either a dialog or a menu, the Agent Manager activates the dialog or menu agent. These agents display scanners to enable the user to easily navigate dialogs and menus.
7.4 Functional Agents
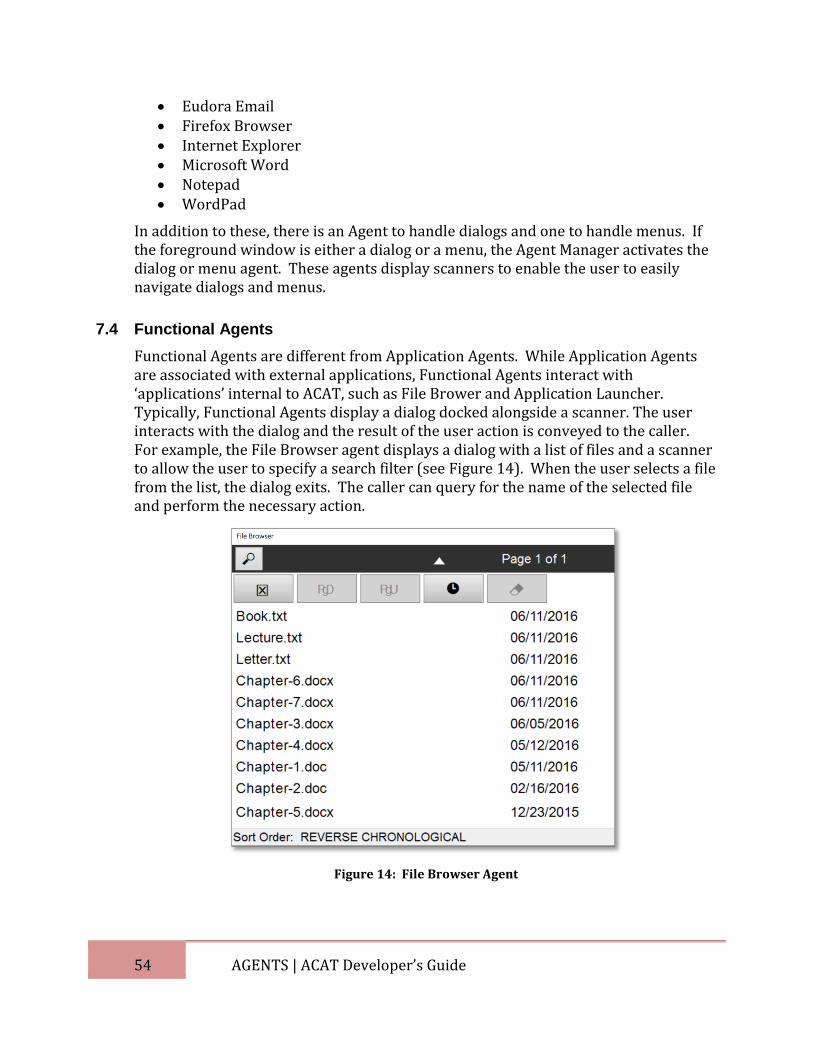
Functional Agents are different from Application Agents. While Application Agents are associated with external applications, Functional Agents interact with ‘applications’ internal to ACAT, such as File Brower and Application Launcher. Typically, Functional Agents display a dialog docked alongside a scanner. The user interacts with the dialog and the result of the user action is conveyed to the caller. For example, the File Browser agent displays a dialog with a list of files and a scanner to allow the user to specify a search filter (see Figure 14). When the user selects a file from the list, the dialog exits. The caller can query for the name of the selected file and perform the necessary action.
Figure 14: File Browser Agent

55 AGENTS | ACAT Developer’s Guide
Functional Agents are activated by calling ActivateAgent() in the Agent Manager. The name of the agent is passed as the parameter. The names of Functional Agents are specified in the DescriptorAttribute custom attribute (see section 4.4). If there are multiple Functional agents with the same name, the preferred agent can be specified though a configuration file (see section 7.5)
The following figure shows the Functional Agent extensions in the ACAT solution tree.
ACAT has the following Functional Agents:
Agent Name Description
Abbreviations Agent Enables the user to add/modify/delete abbreviations.
PhraseSpeak Agent Converts user-configurable canned phrases to speech.
FileBrowser Agent Enables file management – open/delete files.
Launch App Agent Displays a list of favorite applications and enables the user to launch them.
Lecture Manager Agent Enables delivery of speeches/lectures by converting text to speech. User can pace the lecture.
56 AGENTS | ACAT Developer’s Guide
Agent Name Description
New File Agent Enables user to create new text/Word documents.
Switch Windows Agent Displays a list of open windows and enable the user to activate a window (the Windows Alt+Tab equivalent)
Volume Settings Agent Enables the user to set the volume level of text-to-speech
Phrase Speak Agent Displays a list of user-defined phrases which can be converted to speech.
7.5 Agent Configuration Files
You may want to use your own application agent for Notepad instead of the default one that is bundled with ACAT. If there is a conflict where there are multiple Application Agents for the same process, or multiple Functional Agents with the same name, the preferred agent can be specified through the configuration file PreferredAgents.xml. This file resides in the ACAT user’s folder which is [INSTALLDIR]\Users\[USERNAME], for example, C:\Intel\ACAT\Users\DefaultUser, where DefaultUser is the default user name.
A sample PreferredAgents.xml is shown in the listing below.
Listing 3: PreferredAgents.xml
This file lists the GUID’s of the agents to use in case of a conflict. Each agent C# class has a GUID associated through the DescriptorAttribute custom attribute (see section 4.4).
<ACAT>
<PreferredAgents>
<PreferredAgent agentId="EC2EA972-934B-4EE0-A909-3EA0140AC738"/>
<PreferredAgent agentId="E9B930AD-CB35-478C-BDA6-D7FC43349019"/>
</PreferredAgents>
</ACAT>
57 PANELS | ACAT Developer’s Guide
8. PANELS
8.1 Introduction
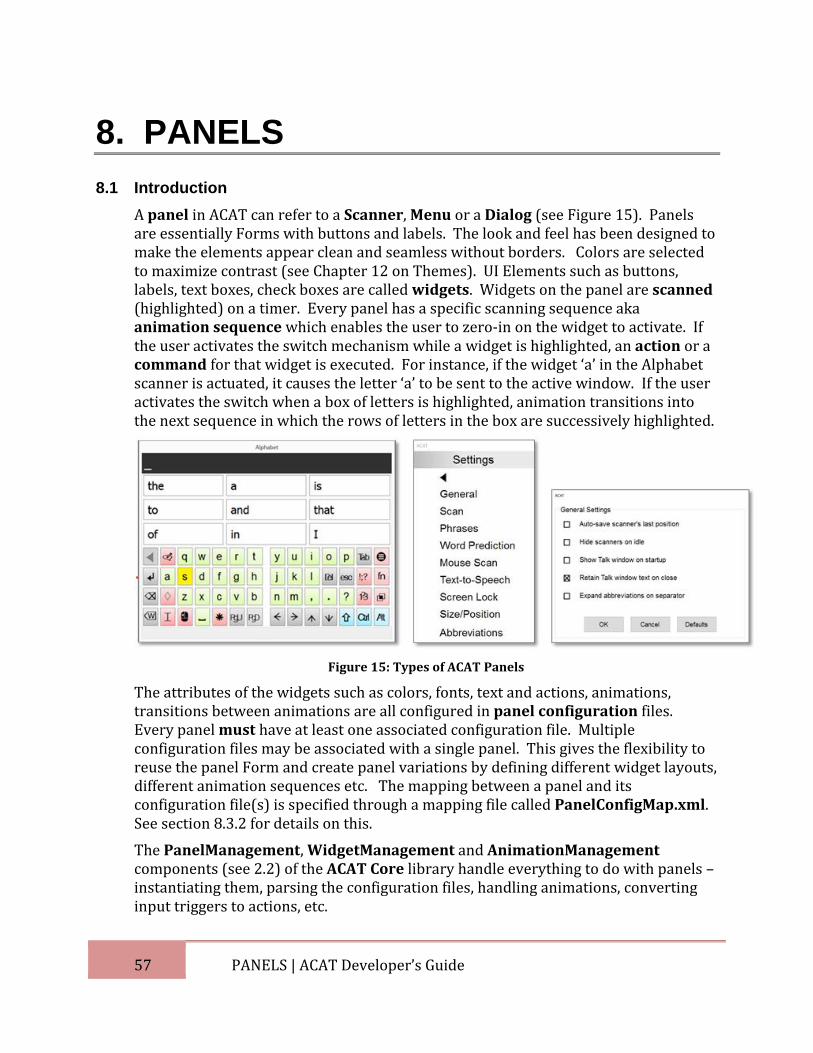
A panel in ACAT can refer to a Scanner, Menu or a Dialog (see Figure 15). Panels are essentially Forms with buttons and labels. The look and feel has been designed to make the elements appear clean and seamless without borders. Colors are selected to maximize contrast (see Chapter 12 on Themes). UI Elements such as buttons, labels, text boxes, check boxes are called widgets. Widgets on the panel are scanned (highlighted) on a timer. Every panel has a specific scanning sequence aka animation sequence which enables the user to zero-in on the widget to activate. If the user activates the switch mechanism while a widget is highlighted, an action or a command for that widget is executed. For instance, if the widget ‘a’ in the Alphabet scanner is actuated, it causes the letter ‘a’ to be sent to the active window. If the user activates the switch when a box of letters is highlighted, animation transitions into the next sequence in which the rows of letters in the box are successively highlighted.
Figure 15: Types of ACAT Panels
The attributes of the widgets such as colors, fonts, text and actions, animations, transitions between animations are all configured in panel configuration files. Every panel must have at least one associated configuration file. Multiple configuration files may be associated with a single panel. This gives the flexibility to reuse the panel Form and create panel variations by defining different widget layouts, different animation sequences etc. The mapping between a panel and its configuration file(s) is specified through a mapping file called PanelConfigMap.xml. See section 8.3.2 for details on this.
The PanelManagement, WidgetManagement and AnimationManagement components (see 2.2) of the ACAT Core library handle everything to do with panels – instantiating them, parsing the configuration files, handling animations, converting input triggers to actions, etc.
58 PANELS | ACAT Developer’s Guide
The rest of this section gives details on panel configurations and walks through the process creating panels.
8.2 Enumeration
All panels are .NET Forms, and must implement the IPanel interface. All DLL’s with panel forms must be installed under the top-level folder [INSTALLDIR]\Extensions\[EXTENSION_DIR]\UI. The recommended directory structure is to have Scanners, Dialogs and Menus DLL’s with their associated panel configuration files in their own sub-folders under the top-level folder. On startup, the Panel Manager descends recursively into the various sub-folders under the ACAT install directory and caches the .NET class Types of all the classes that implement IPanel and the names of the all configuration files.
The order in which the directories are descended into is:
1. [INSTALLDIR]\<languageName> where <languageName> is the ISO language name of the currently selected language for ACAT. Example: pt-Br for Brazilian Portuguese, es-MX for Spanish – Mexico
2. [INSTALLDIR]<twoLetterISOLanguageName> where ]<twoLetterISOLanguageName> is the two-letter ISO language name. Example: pt for Portuguese, es for Spanish
3. [INSTALLDIR]\en 4. [INSTALLDIR]\Extensions\<ExtensionDir>\AppAgents 5. [INSTALLDIR]\Extensions\<ExtensionDir>\FunctionalAgents 6. [INSTALLDIR]UI
In addition to the UI folder, the Panel Manager also walks through the top level folder for Agents (see section 7.2) as Agent DLL’s can also have Panels. For instance, the File Browser Agent DLL has a panel that displays the names of files.
8.3 Steps to create a scanner
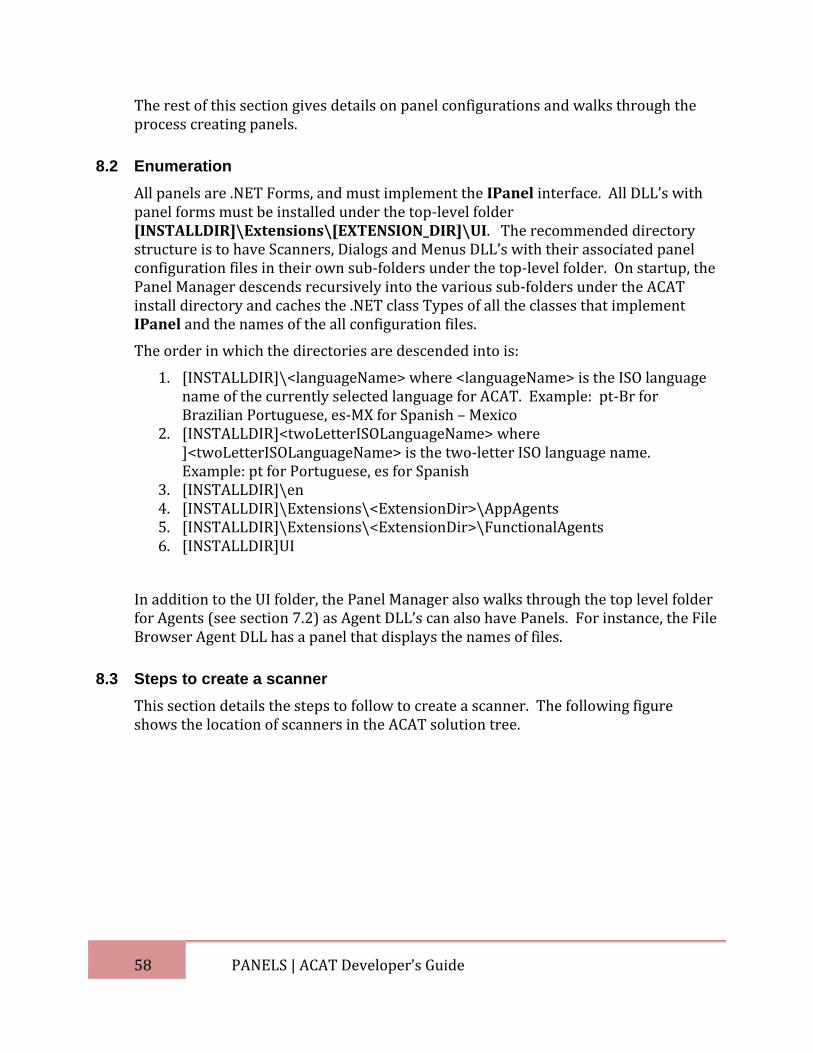
This section details the steps to follow to create a scanner. The following figure shows the location of scanners in the ACAT solution tree.
59 PANELS | ACAT Developer’s Guide
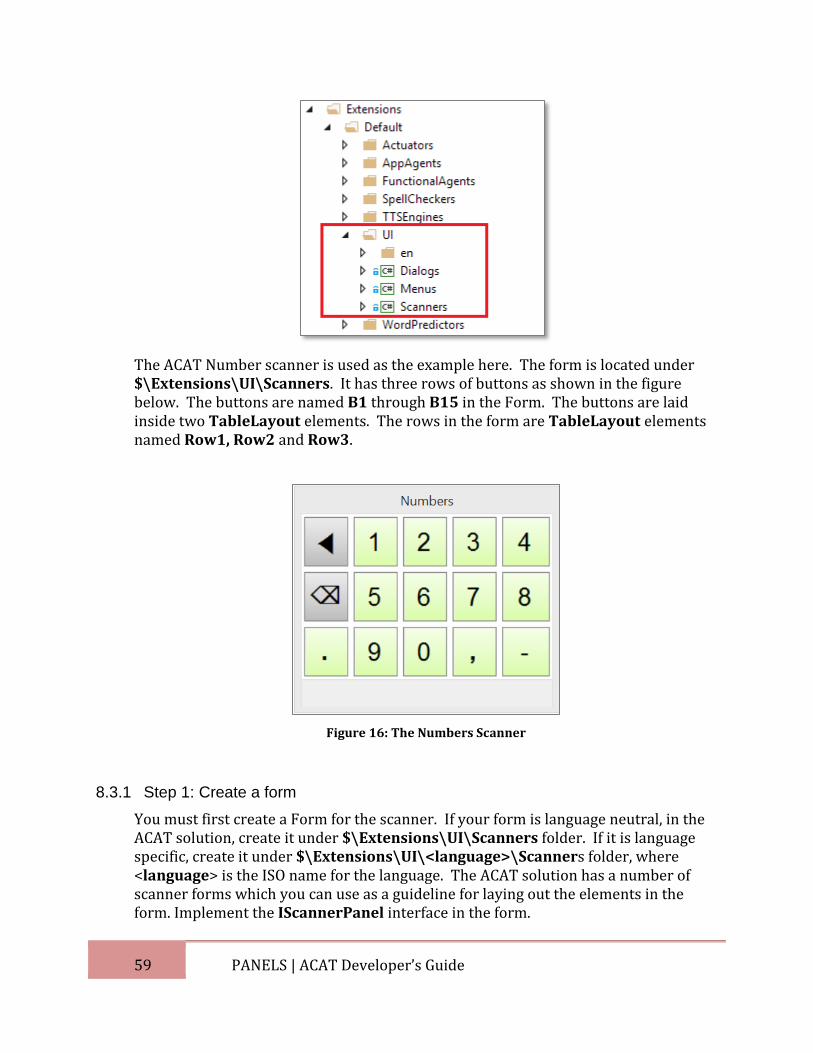
The ACAT Number scanner is used as the example here. The form is located under $\Extensions\UI\Scanners. It has three rows of buttons as shown in the figure below. The buttons are named B1 through B15 in the Form. The buttons are laid inside two TableLayout elements. The rows in the form are TableLayout elements named Row1, Row2 and Row3.
Figure 16: The Numbers Scanner
8.3.1 Step 1: Create a form
You must first create a Form for the scanner. If your form is language neutral, in the ACAT solution, create it under $\Extensions\UI\Scanners folder. If it is language specific, create it under $\Extensions\UI\<language>\Scanners folder, where <language> is the ISO name for the language. The ACAT solution has a number of scanner forms which you can use as a guideline for laying out the elements in the form. Implement the IScannerPanel interface in the form.
60 PANELS | ACAT Developer’s Guide
Specify the DescriptorAttribute (see section 4.4) with a GUID, a name and a friendly description for the form. The Alphabet scanner for example has the following DescriptorAttribute:
[[DescriptorAttribute("A2FAC295-9A8F-4214-B55C-BB611F09B252",
"NumbersScanner",
"Enter numbers 0-9")]
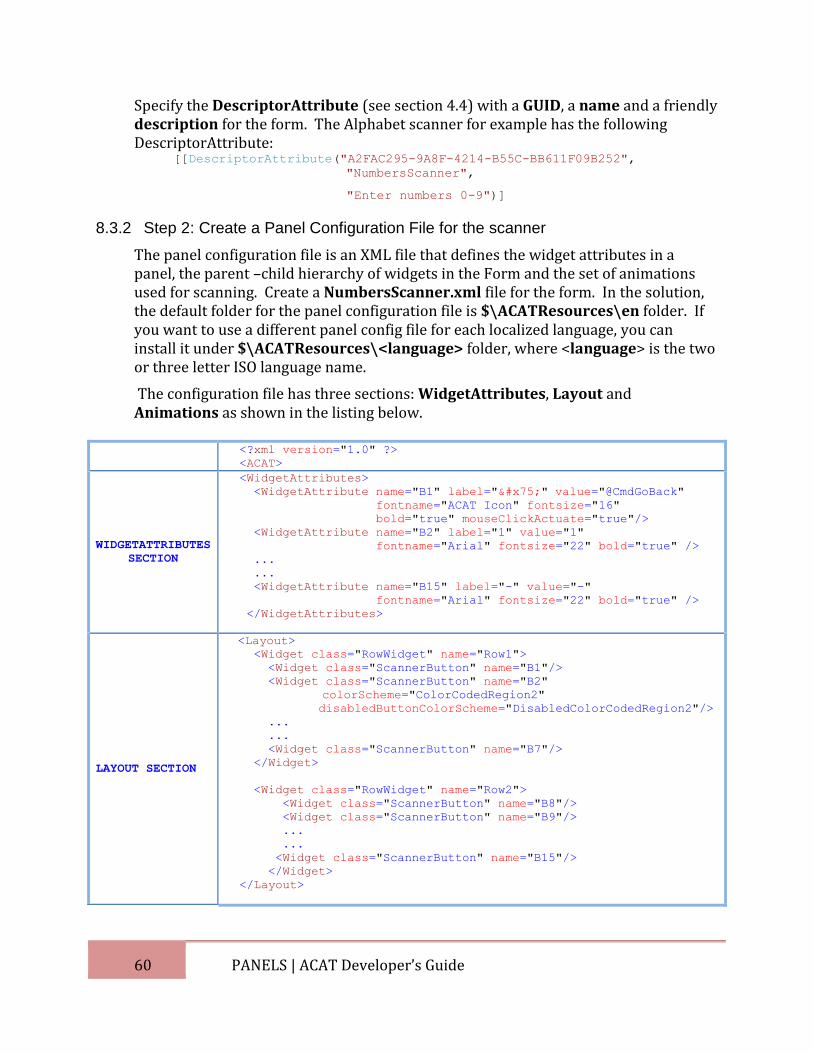
8.3.2 Step 2: Create a Panel Configuration File for the scanner
The panel configuration file is an XML file that defines the widget attributes in a panel, the parent –child hierarchy of widgets in the Form and the set of animations used for scanning. Create a NumbersScanner.xml file for the form. In the solution, the default folder for the panel configuration file is $\ACATResources\en folder. If you want to use a different panel config file for each localized language, you can install it under $\ACATResources\<language> folder, where <language> is the two or three letter ISO language name.
The configuration file has three sections: WidgetAttributes, Layout and Animations as shown in the listing below.
<?xml version="1.0" ?>
<ACAT>
WIDGETATTRIBUTES
SECTION
<WidgetAttributes>
<WidgetAttribute name="B1" label="u" value="@CmdGoBack" fontname="ACAT Icon" fontsize="16"
bold="true" mouseClickActuate="true"/>
<WidgetAttribute name="B2" label="1" value="1"
fontname="Arial" fontsize="22" bold="true" />
...
...
<WidgetAttribute name="B15" label="-" value="-"
fontname="Arial" fontsize="22" bold="true" />
</WidgetAttributes>
LAYOUT SECTION
<Layout>
<Widget class="RowWidget" name="Row1">
<Widget class="ScannerButton" name="B1"/>
<Widget class="ScannerButton" name="B2" colorScheme="ColorCodedRegion2" disabledButtonColorScheme="DisabledColorCodedRegion2"/>
...
...
<Widget class="ScannerButton" name="B7"/>
</Widget>
<Widget class="RowWidget" name="Row2">
<Widget class="ScannerButton" name="B8"/>
<Widget class="ScannerButton" name="B9"/>
...
...
<Widget class="ScannerButton" name="B15"/>
</Widget>
</Layout>
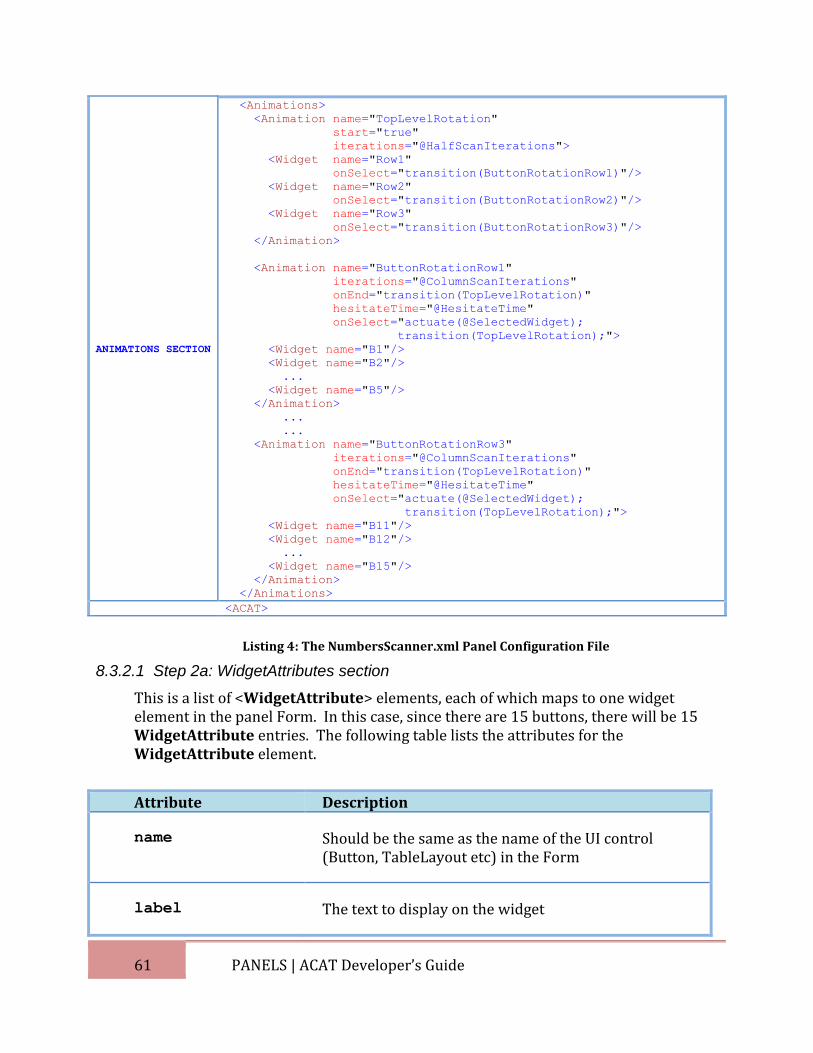
61 PANELS | ACAT Developer’s Guide
ANIMATIONS SECTION
<Animations>
<Animation name="TopLevelRotation"
start="true"
iterations="@HalfScanIterations">
<Widget name="Row1"
onSelect="transition(ButtonRotationRow1)"/>
<Widget name="Row2"
onSelect="transition(ButtonRotationRow2)"/>
<Widget name="Row3"
onSelect="transition(ButtonRotationRow3)"/>
</Animation>
<Animation name="ButtonRotationRow1"
iterations="@ColumnScanIterations"
onEnd="transition(TopLevelRotation)"
hesitateTime="@HesitateTime"
onSelect="actuate(@SelectedWidget);
transition(TopLevelRotation);">
<Widget name="B1"/>
<Widget name="B2"/>
...
<Widget name="B5"/>
</Animation>
...
...
<Animation name="ButtonRotationRow3"
iterations="@ColumnScanIterations"
onEnd="transition(TopLevelRotation)"
hesitateTime="@HesitateTime"
onSelect="actuate(@SelectedWidget);
transition(TopLevelRotation);">
<Widget name="B11"/>
<Widget name="B12"/>
...
<Widget name="B15"/>
</Animation>
</Animations>
<ACAT>
Listing 4: The NumbersScanner.xml Panel Configuration File
8.3.2.1 Step 2a: WidgetAttributes section
This is a list of <WidgetAttribute> elements, each of which maps to one widget element in the panel Form. In this case, since there are 15 buttons, there will be 15 WidgetAttribute entries. The following table lists the attributes for the WidgetAttribute element.
Attribute Description
name Should be the same as the name of the UI control (Button, TableLayout etc) in the Form
label The text to display on the widget
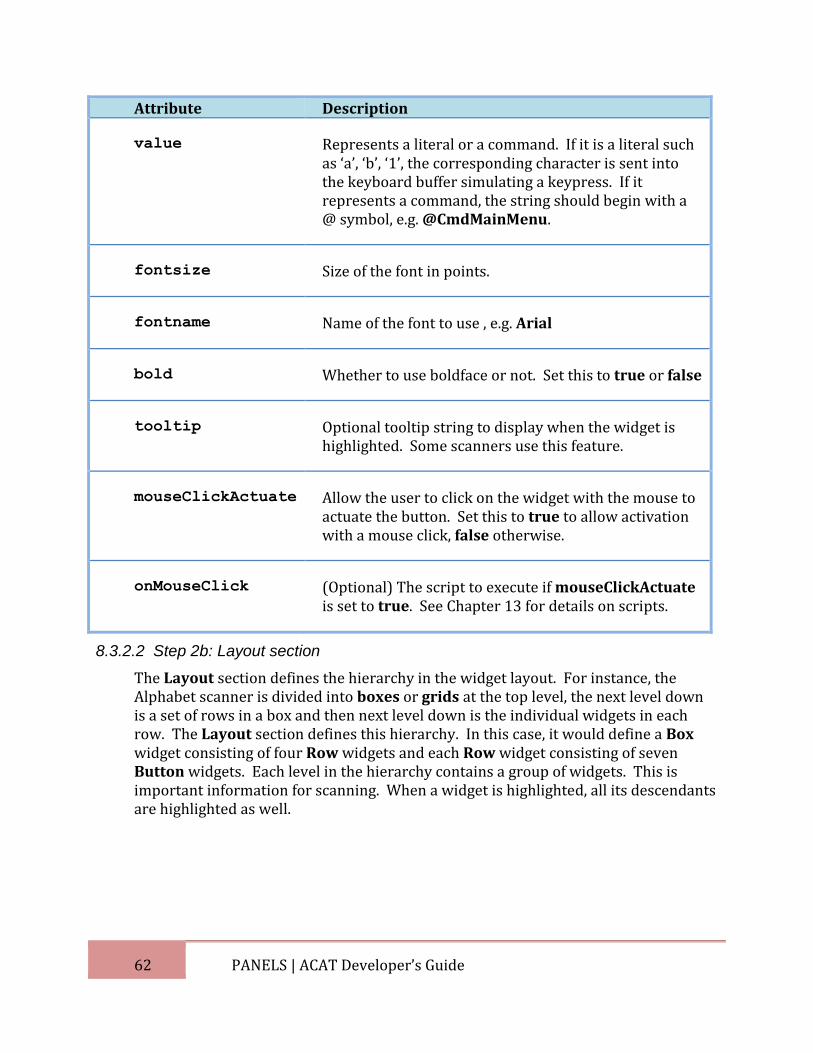
62 PANELS | ACAT Developer’s Guide
Attribute Description
value Represents a literal or a command. If it is a literal such as ‘a’, ‘b’, ‘1’, the corresponding character is sent into the keyboard buffer simulating a keypress. If it represents a command, the string should begin with a @ symbol, e.g. @CmdMainMenu.
fontsize Size of the font in points.
fontname Name of the font to use , e.g. Arial
bold Whether to use boldface or not. Set this to true or false
tooltip Optional tooltip string to display when the widget is highlighted. Some scanners use this feature.
mouseClickActuate Allow the user to click on the widget with the mouse to actuate the button. Set this to true to allow activation with a mouse click, false otherwise.
onMouseClick (Optional) The script to execute if mouseClickActuate is set to true. See Chapter 13 for details on scripts.
8.3.2.2 Step 2b: Layout section
The Layout section defines the hierarchy in the widget layout. For instance, the Alphabet scanner is divided into boxes or grids at the top level, the next level down is a set of rows in a box and then next level down is the individual widgets in each row. The Layout section defines this hierarchy. In this case, it would define a Box widget consisting of four Row widgets and each Row widget consisting of seven Button widgets. Each level in the hierarchy contains a group of widgets. This is important information for scanning. When a widget is highlighted, all its descendants are highlighted as well.
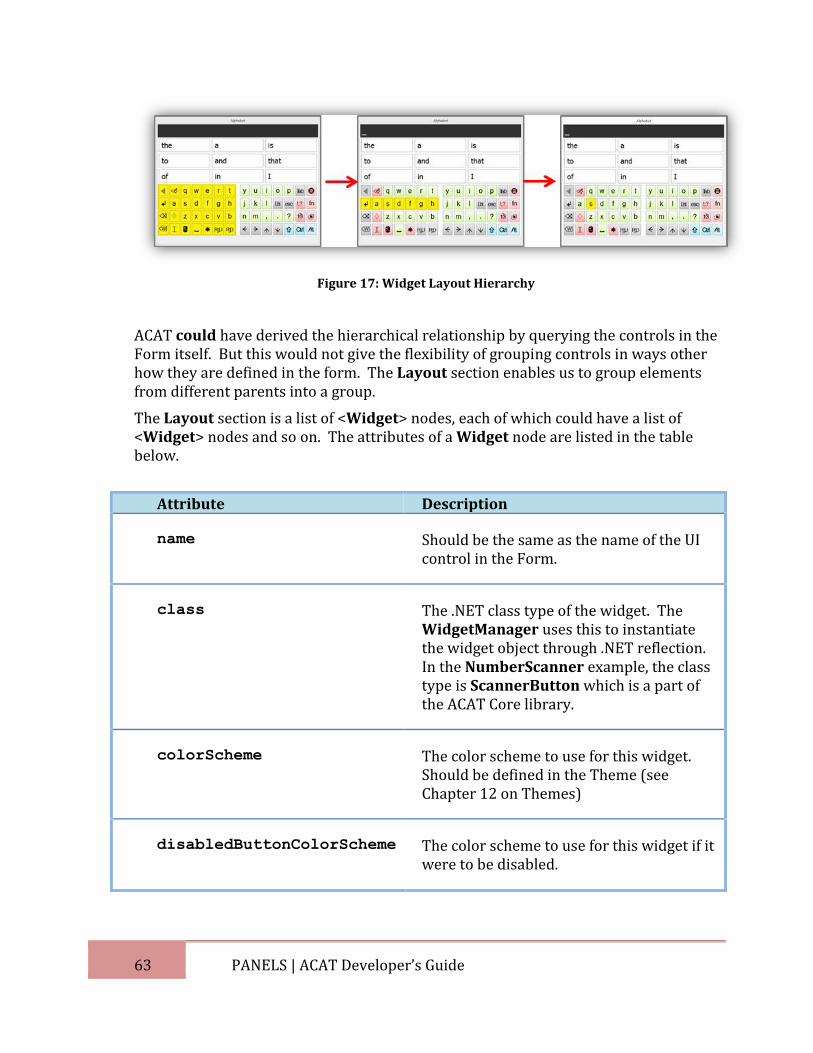
63 PANELS | ACAT Developer’s Guide
Figure 17: Widget Layout Hierarchy
ACAT could have derived the hierarchical relationship by querying the controls in the Form itself. But this would not give the flexibility of grouping controls in ways other how they are defined in the form. The Layout section enables us to group elements from different parents into a group.
The Layout section is a list of <Widget> nodes, each of which could have a list of <Widget> nodes and so on. The attributes of a Widget node are listed in the table below.
Attribute Description
name Should be the same as the name of the UI control in the Form.
class The .NET class type of the widget. The WidgetManager uses this to instantiate the widget object through .NET reflection. In the NumberScanner example, the class type is ScannerButton which is a part of the ACAT Core library.
colorScheme The color scheme to use for this widget. Should be defined in the Theme (see Chapter 12 on Themes)
disabledButtonColorScheme The color scheme to use for this widget if it were to be disabled.
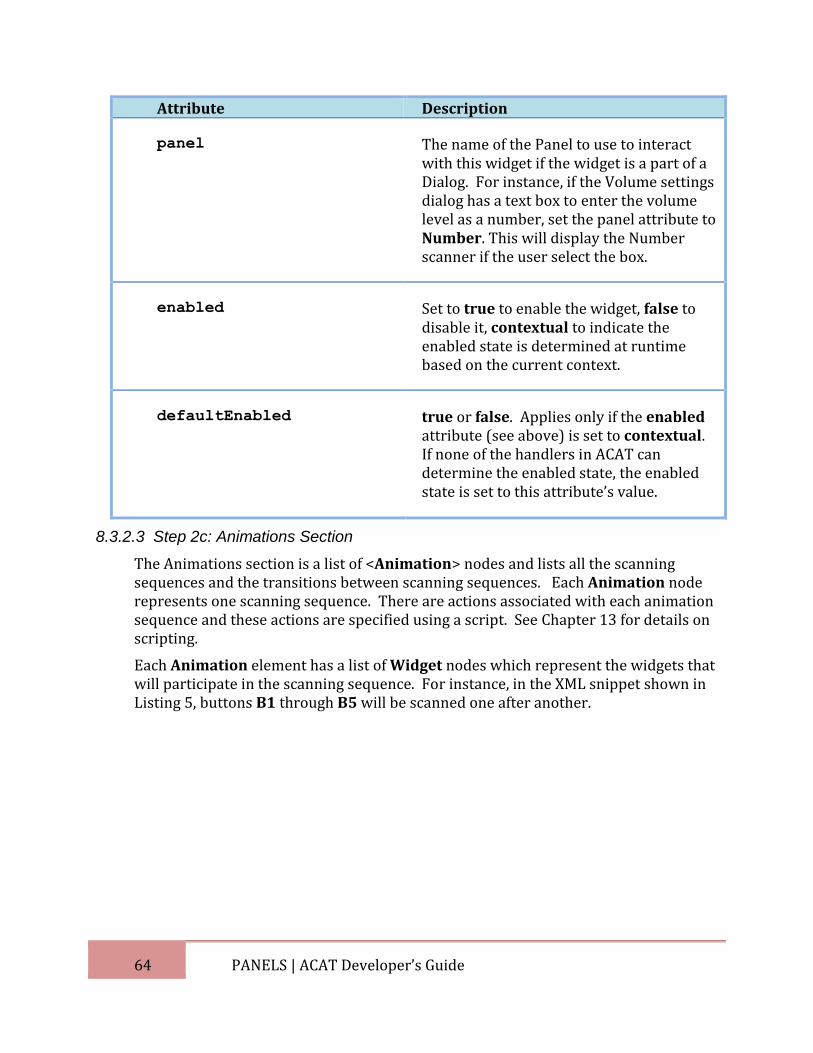
64 PANELS | ACAT Developer’s Guide
Attribute Description
panel The name of the Panel to use to interact with this widget if the widget is a part of a Dialog. For instance, if the Volume settings dialog has a text box to enter the volume level as a number, set the panel attribute to Number. This will display the Number scanner if the user select the box.
enabled Set to true to enable the widget, false to disable it, contextual to indicate the enabled state is determined at runtime based on the current context.
defaultEnabled true or false. Applies only if the enabled attribute (see above) is set to contextual. If none of the handlers in ACAT can determine the enabled state, the enabled state is set to this attribute’s value.
8.3.2.3 Step 2c: Animations Section
The Animations section is a list of <Animation> nodes and lists all the scanning sequences and the transitions between scanning sequences. Each Animation node represents one scanning sequence. There are actions associated with each animation sequence and these actions are specified using a script. See Chapter 13 for details on scripting.
Each Animation element has a list of Widget nodes which represent the widgets that will participate in the scanning sequence. For instance, in the XML snippet shown in Listing 5, buttons B1 through B5 will be scanned one after another.
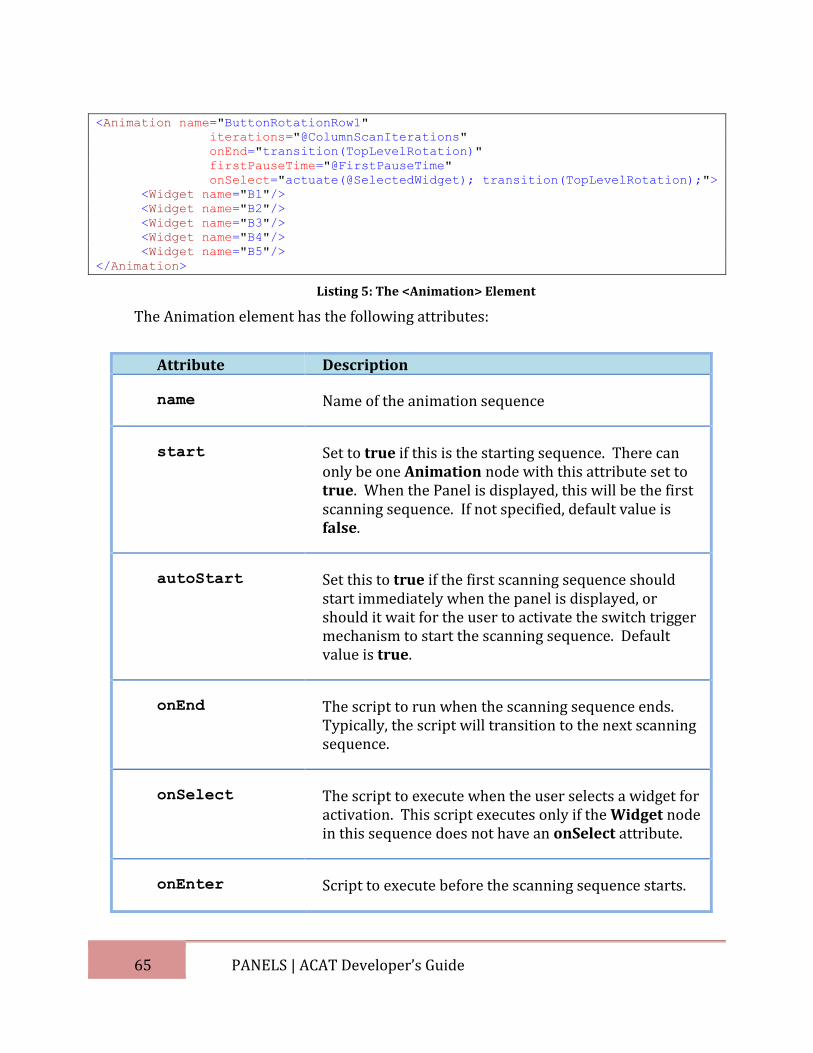
65 PANELS | ACAT Developer’s Guide
<Animation name="ButtonRotationRow1"
iterations="@ColumnScanIterations"
onEnd="transition(TopLevelRotation)"
firstPauseTime="@FirstPauseTime"
onSelect="actuate(@SelectedWidget); transition(TopLevelRotation);">
<Widget name="B1"/>
<Widget name="B2"/>
<Widget name="B3"/>
<Widget name="B4"/>
<Widget name="B5"/>
</Animation>
Listing 5: The <Animation> Element
The Animation element has the following attributes:
Attribute Description
name Name of the animation sequence
start Set to true if this is the starting sequence. There can only be one Animation node with this attribute set to true. When the Panel is displayed, this will be the first scanning sequence. If not specified, default value is false.
autoStart Set this to true if the first scanning sequence should start immediately when the panel is displayed, or should it wait for the user to activate the switch trigger mechanism to start the scanning sequence. Default value is true.
onEnd The script to run when the scanning sequence ends. Typically, the script will transition to the next scanning sequence.
onSelect The script to execute when the user selects a widget for activation. This script executes only if the Widget node in this sequence does not have an onSelect attribute.
onEnter Script to execute before the scanning sequence starts.
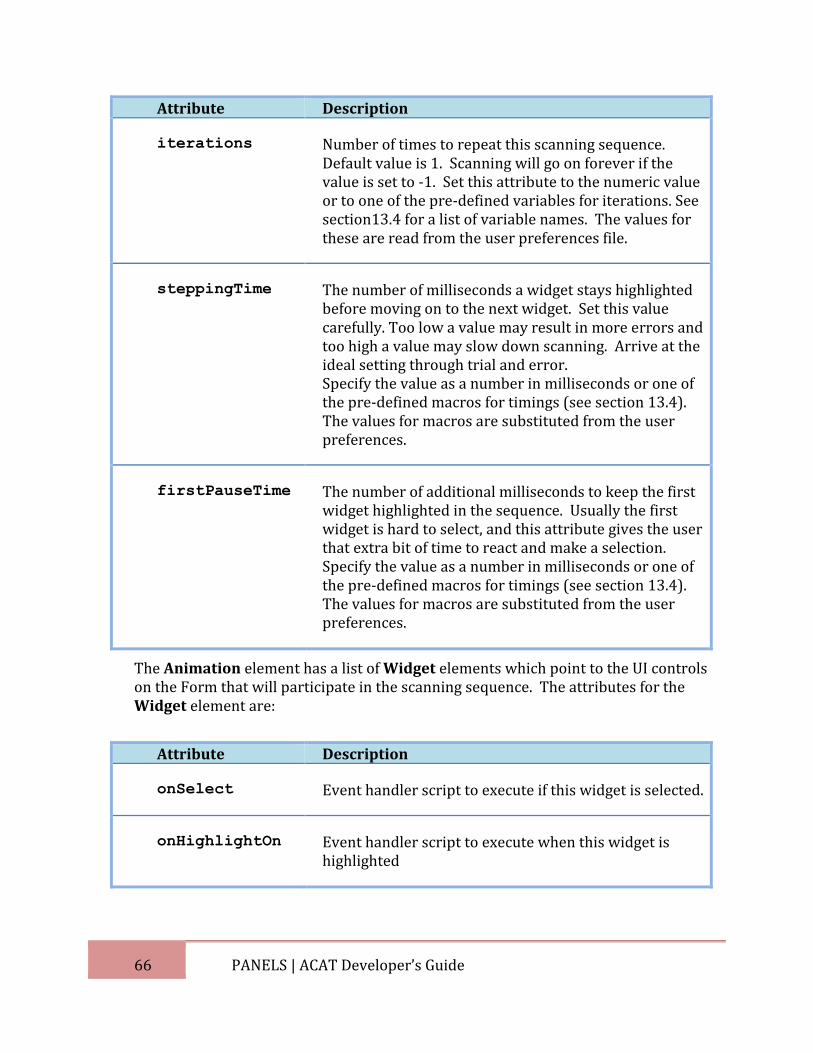
66 PANELS | ACAT Developer’s Guide
Attribute Description
iterations Number of times to repeat this scanning sequence. Default value is 1. Scanning will go on forever if the value is set to -1. Set this attribute to the numeric value or to one of the pre-defined variables for iterations. See section13.4 for a list of variable names. The values for these are read from the user preferences file.
steppingTime The number of milliseconds a widget stays highlighted before moving on to the next widget. Set this value carefully. Too low a value may result in more errors and too high a value may slow down scanning. Arrive at the ideal setting through trial and error. Specify the value as a number in milliseconds or one of the pre-defined macros for timings (see section 13.4). The values for macros are substituted from the user preferences.
firstPauseTime The number of additional milliseconds to keep the first widget highlighted in the sequence. Usually the first widget is hard to select, and this attribute gives the user that extra bit of time to react and make a selection. Specify the value as a number in milliseconds or one of the pre-defined macros for timings (see section 13.4). The values for macros are substituted from the user preferences.
The Animation element has a list of Widget elements which point to the UI controls on the Form that will participate in the scanning sequence. The attributes for the Widget element are:
Attribute Description
onSelect Event handler script to execute if this widget is selected.
onHighlightOn Event handler script to execute when this widget is highlighted
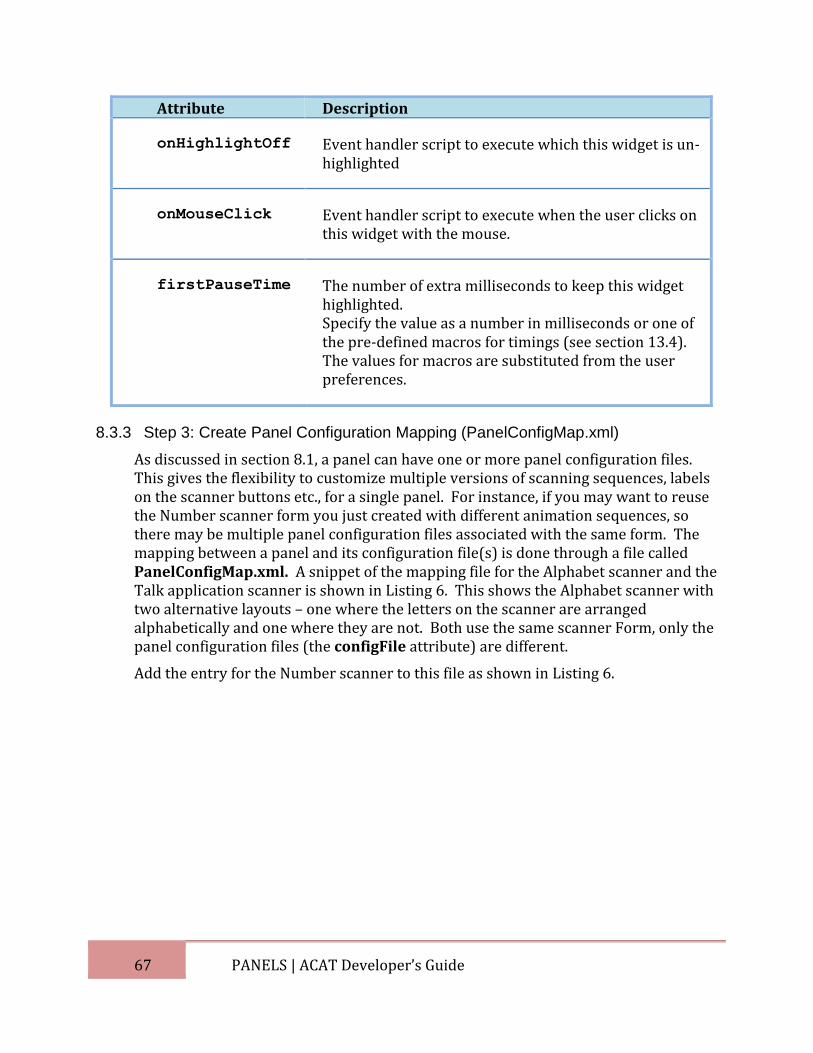
67 PANELS | ACAT Developer’s Guide
Attribute Description
onHighlightOff Event handler script to execute which this widget is un-highlighted
onMouseClick Event handler script to execute when the user clicks on this widget with the mouse.
firstPauseTime The number of extra milliseconds to keep this widget highlighted. Specify the value as a number in milliseconds or one of the pre-defined macros for timings (see section 13.4). The values for macros are substituted from the user preferences.
8.3.3 Step 3: Create Panel Configuration Mapping (PanelConfigMap.xml)
As discussed in section 8.1, a panel can have one or more panel configuration files. This gives the flexibility to customize multiple versions of scanning sequences, labels on the scanner buttons etc., for a single panel. For instance, if you may want to reuse the Number scanner form you just created with different animation sequences, so there may be multiple panel configuration files associated with the same form. The mapping between a panel and its configuration file(s) is done through a file called PanelConfigMap.xml. A snippet of the mapping file for the Alphabet scanner and the Talk application scanner is shown in Listing 6. This shows the Alphabet scanner with two alternative layouts – one where the letters on the scanner are arranged alphabetically and one where they are not. Both use the same scanner Form, only the panel configuration files (the configFile attribute) are different.
Add the entry for the Number scanner to this file as shown in Listing 6.
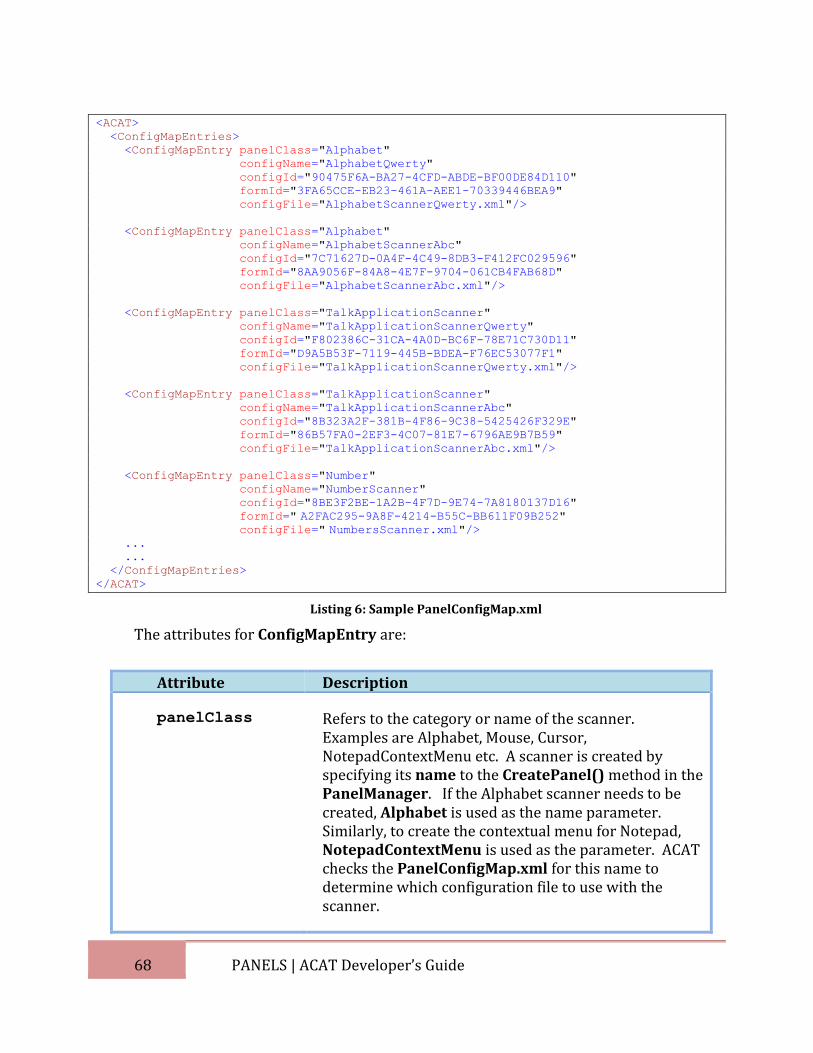
68 PANELS | ACAT Developer’s Guide
<ACAT>
<ConfigMapEntries>
<ConfigMapEntry panelClass="Alphabet"
configName="AlphabetQwerty"
configId="90475F6A-BA27-4CFD-ABDE-BF00DE84D110"
formId="3FA65CCE-EB23-461A-AEE1-70339446BEA9"
configFile="AlphabetScannerQwerty.xml"/>
<ConfigMapEntry panelClass="Alphabet"
configName="AlphabetScannerAbc"
configId="7C71627D-0A4F-4C49-8DB3-F412FC029596"
formId="8AA9056F-84A8-4E7F-9704-061CB4FAB68D"
configFile="AlphabetScannerAbc.xml"/>
<ConfigMapEntry panelClass="TalkApplicationScanner"
configName="TalkApplicationScannerQwerty"
configId="F802386C-31CA-4A0D-BC6F-78E71C730D11"
formId="D9A5B53F-7119-445B-BDEA-F76EC53077F1"
configFile="TalkApplicationScannerQwerty.xml"/>
<ConfigMapEntry panelClass="TalkApplicationScanner"
configName="TalkApplicationScannerAbc"
configId="8B323A2F-381B-4F86-9C38-5425426F329E"
formId="86B57FA0-2EF3-4C07-81E7-6796AE9B7B59"
configFile="TalkApplicationScannerAbc.xml"/>
<ConfigMapEntry panelClass="Number"
configName="NumberScanner"
configId="8BE3F2BE-1A2B-4F7D-9E74-7A8180137D16"
formId=" A2FAC295-9A8F-4214-B55C-BB611F09B252" configFile=" NumbersScanner.xml"/> ...
...
</ConfigMapEntries>
</ACAT>
Listing 6: Sample PanelConfigMap.xml
The attributes for ConfigMapEntry are:
Attribute Description
panelClass Refers to the category or name of the scanner. Examples are Alphabet, Mouse, Cursor, NotepadContextMenu etc. A scanner is created by specifying its name to the CreatePanel() method in the PanelManager. If the Alphabet scanner needs to be created, Alphabet is used as the name parameter. Similarly, to create the contextual menu for Notepad, NotepadContextMenu is used as the parameter. ACAT checks the PanelConfigMap.xml for this name to determine which configuration file to use with the scanner.
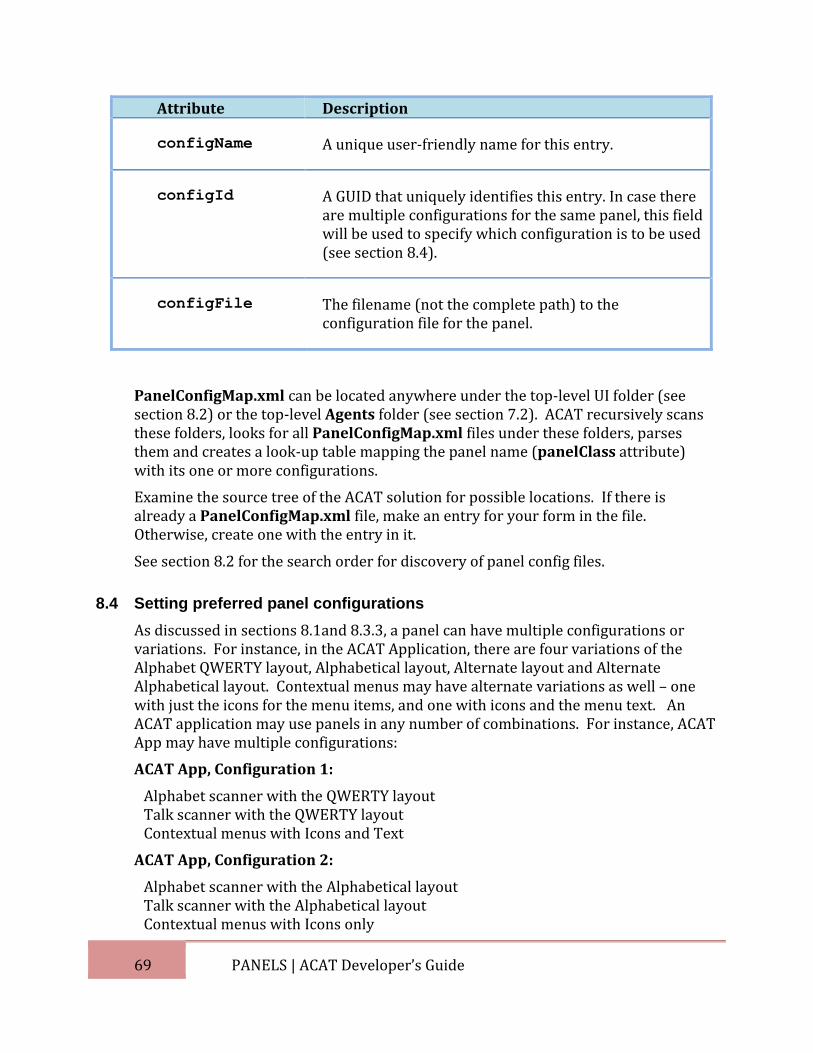
69 PANELS | ACAT Developer’s Guide
Attribute Description
configName A unique user-friendly name for this entry.
configId A GUID that uniquely identifies this entry. In case there are multiple configurations for the same panel, this field will be used to specify which configuration is to be used (see section 8.4).
configFile The filename (not the complete path) to the configuration file for the panel.
PanelConfigMap.xml can be located anywhere under the top-level UI folder (see section 8.2) or the top-level Agents folder (see section 7.2). ACAT recursively scans these folders, looks for all PanelConfigMap.xml files under these folders, parses them and creates a look-up table mapping the panel name (panelClass attribute) with its one or more configurations.
Examine the source tree of the ACAT solution for possible locations. If there is already a PanelConfigMap.xml file, make an entry for your form in the file. Otherwise, create one with the entry in it.
See section 8.2 for the search order for discovery of panel config files.
8.4 Setting preferred panel configurations
As discussed in sections 8.1and 8.3.3, a panel can have multiple configurations or variations. For instance, in the ACAT Application, there are four variations of the Alphabet QWERTY layout, Alphabetical layout, Alternate layout and Alternate Alphabetical layout. Contextual menus may have alternate variations as well – one with just the icons for the menu items, and one with icons and the menu text. An ACAT application may use panels in any number of combinations. For instance, ACAT App may have multiple configurations:
ACAT App, Configuration 1:
Alphabet scanner with the QWERTY layout Talk scanner with the QWERTY layout Contextual menus with Icons and Text
ACAT App, Configuration 2:
Alphabet scanner with the Alphabetical layout Talk scanner with the Alphabetical layout Contextual menus with Icons only
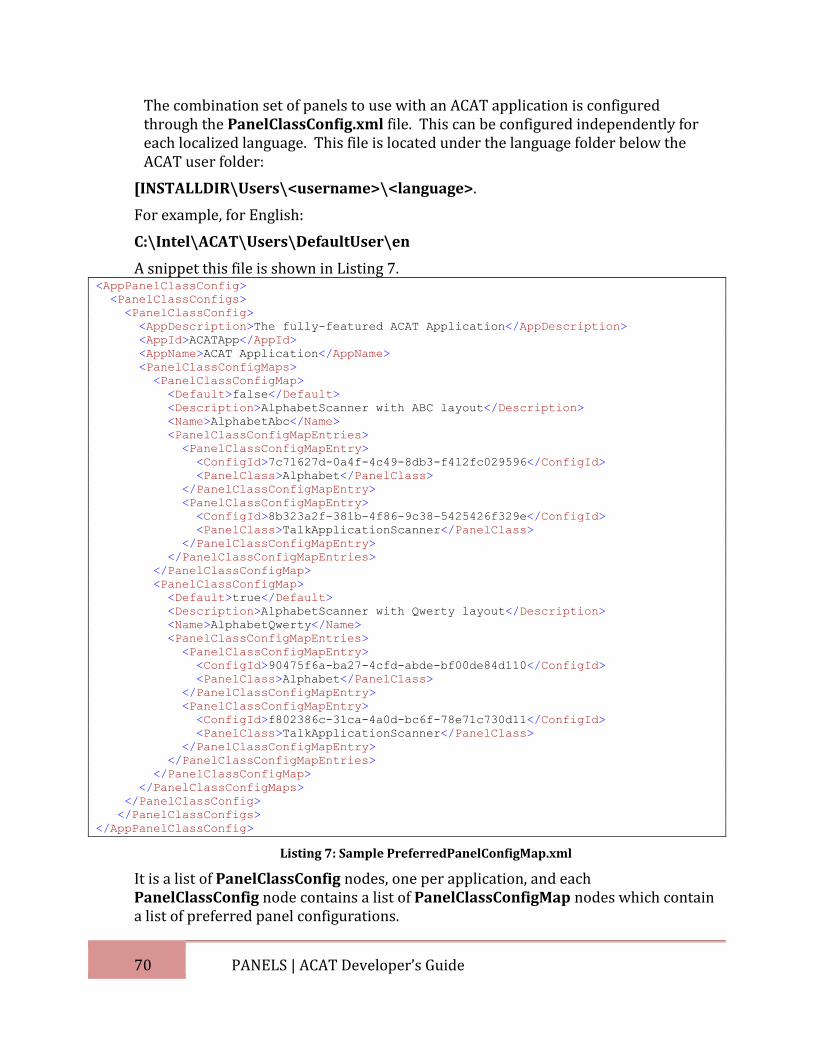
70 PANELS | ACAT Developer’s Guide
The combination set of panels to use with an ACAT application is configured through the PanelClassConfig.xml file. This can be configured independently for each localized language. This file is located under the language folder below the ACAT user folder:
[INSTALLDIR\Users\<username>\<language>.
For example, for English:
C:\Intel\ACAT\Users\DefaultUser\en
A snippet this file is shown in Listing 7. <AppPanelClassConfig>
<PanelClassConfigs>
<PanelClassConfig>
<AppDescription>The fully-featured ACAT Application</AppDescription>
<AppId>ACATApp</AppId>
<AppName>ACAT Application</AppName>
<PanelClassConfigMaps>
<PanelClassConfigMap>
<Default>false</Default>
<Description>AlphabetScanner with ABC layout</Description>
<Name>AlphabetAbc</Name>
<PanelClassConfigMapEntries>
<PanelClassConfigMapEntry>
<ConfigId>7c71627d-0a4f-4c49-8db3-f412fc029596</ConfigId>
<PanelClass>Alphabet</PanelClass>
</PanelClassConfigMapEntry>
<PanelClassConfigMapEntry>
<ConfigId>8b323a2f-381b-4f86-9c38-5425426f329e</ConfigId>
<PanelClass>TalkApplicationScanner</PanelClass>
</PanelClassConfigMapEntry>
</PanelClassConfigMapEntries>
</PanelClassConfigMap>
<PanelClassConfigMap>
<Default>true</Default>
<Description>AlphabetScanner with Qwerty layout</Description>
<Name>AlphabetQwerty</Name>
<PanelClassConfigMapEntries>
<PanelClassConfigMapEntry>
<ConfigId>90475f6a-ba27-4cfd-abde-bf00de84d110</ConfigId>
<PanelClass>Alphabet</PanelClass>
</PanelClassConfigMapEntry>
<PanelClassConfigMapEntry>
<ConfigId>f802386c-31ca-4a0d-bc6f-78e71c730d11</ConfigId>
<PanelClass>TalkApplicationScanner</PanelClass>
</PanelClassConfigMapEntry>
</PanelClassConfigMapEntries>
</PanelClassConfigMap>
</PanelClassConfigMaps>
</PanelClassConfig>
</PanelClassConfigs>
</AppPanelClassConfig>
Listing 7: Sample PreferredPanelConfigMap.xml
It is a list of PanelClassConfig nodes, one per application, and each PanelClassConfig node contains a list of PanelClassConfigMap nodes which contain a list of preferred panel configurations.
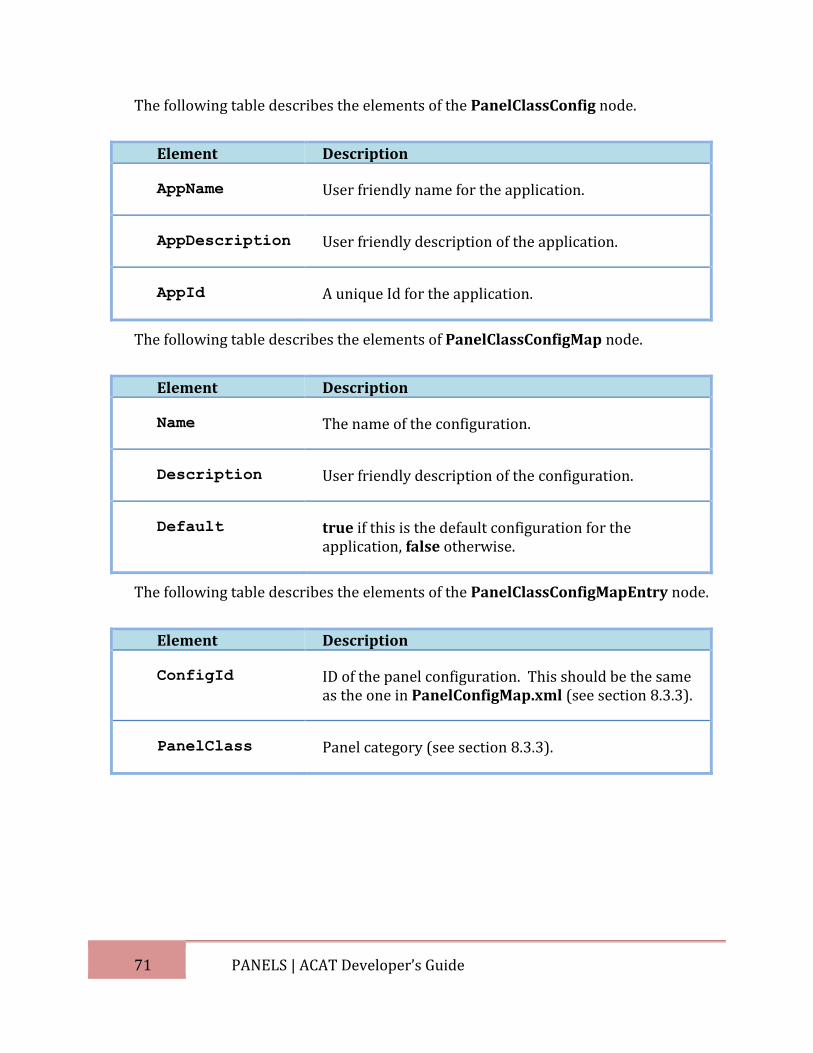
71 PANELS | ACAT Developer’s Guide
The following table describes the elements of the PanelClassConfig node.
Element Description
AppName User friendly name for the application.
AppDescription User friendly description of the application.
AppId A unique Id for the application.
The following table describes the elements of PanelClassConfigMap node.
Element Description
Name The name of the configuration.
Description User friendly description of the configuration.
Default true if this is the default configuration for the application, false otherwise.
The following table describes the elements of the PanelClassConfigMapEntry node.
Element Description
ConfigId ID of the panel configuration. This should be the same as the one in PanelConfigMap.xml (see section 8.3.3).
PanelClass Panel category (see section 8.3.3).
72 WORD PREDICTORS | ACAT Developer’s Guide
9. WORD PREDICTORS
9.1 Introduction
ACAT supports word auto-complete and next-word prediction during text entry. While the user enters text into a text window, ACAT tracks the word being typed. Depending on the application, ACAT can get the text in the window, the current position of the caret, and using this information, read the previous words in the sentence. It uses this as contextual information to make suggestions to for auto-completion or next-word prediction. The ACAT Word Predictor extensions provide prediction results based on the context. Prediction results are returned in the language that is currently active. The results are obtained by looking up a word prediction database that is created from source texts in that language.
9.2 Enumeration
During initialization, the Word Prediction Manager walks recursively through specific folders under the ACAT install directory, loads all the DLL’s in there and caches C# Types of classes derived from the IWordPredictor interface. All Word Predictor extensions must implement this interface.
Language specific word predictor extensions take precedence over language-neutral word predictor extensions. Extensions are loaded from these locations in this order:
1. [INSTALLDIR\<language>\Extensions\[EXTENSION_DIR]\WordPredictors\<WPDir> where <language> is the language name or the two-letter ISO name. For example, for the French Presage word predictor, this would be: C:\Intel\ACAT\fr\Extensions\Default\WordPredictors\Presage
2. [INSTALLDIR]\Extensions\[EXTENSION_DIR]\WordPredictors\<WP>. For the Presage word prediction extension for instance: C:\Intel\ACAT\Extensions\Default\WordPredictors\Presage Language neutral Word Predictor extensions should be installed here.
Only one Word Predictor can be active at any time. If there are multiple Word Predictor extensions, the preferred one can be selected by using the ACAT Config utility.
9.3 Steps to create a Presage Word Predictor extension
To create language-specific Presage Word Prediction extension in the ACAT Language pack solution (see section 5.1), follow these steps. The name of the extension is FooWordPredictor.
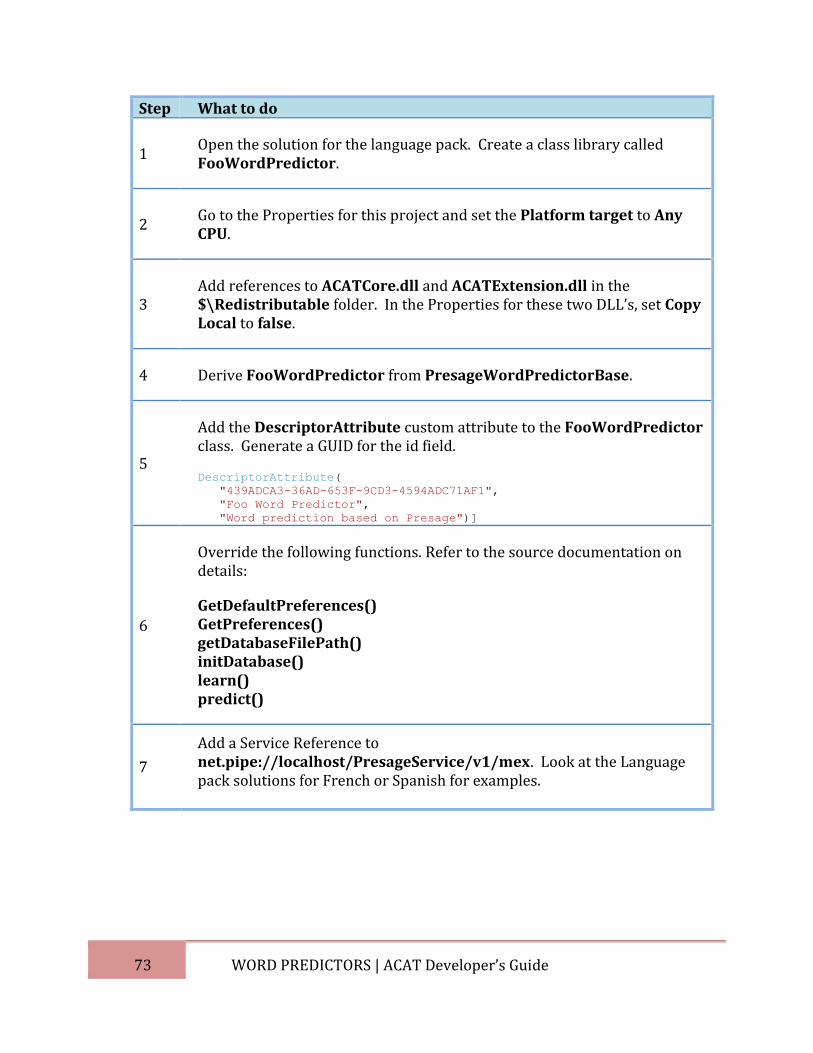
73 WORD PREDICTORS | ACAT Developer’s Guide
Step What to do
1 Open the solution for the language pack. Create a class library called FooWordPredictor.
2 Go to the Properties for this project and set the Platform target to Any CPU.
3 Add references to ACATCore.dll and ACATExtension.dll in the $\Redistributable folder. In the Properties for these two DLL’s, set Copy Local to false.
4 Derive FooWordPredictor from PresageWordPredictorBase.
5
Add the DescriptorAttribute custom attribute to the FooWordPredictor class. Generate a GUID for the id field.
DescriptorAttribute(
"439ADCA3-36AD-653F-9CD3-4594ADC71AF1",
"Foo Word Predictor",
"Word prediction based on Presage")]
6
Override the following functions. Refer to the source documentation on details:
GetDefaultPreferences() GetPreferences() getDatabaseFilePath() initDatabase() learn() predict()
7
Add a Service Reference to net.pipe://localhost/PresageService/v1/mex. Look at the Language pack solutions for French or Spanish for examples.
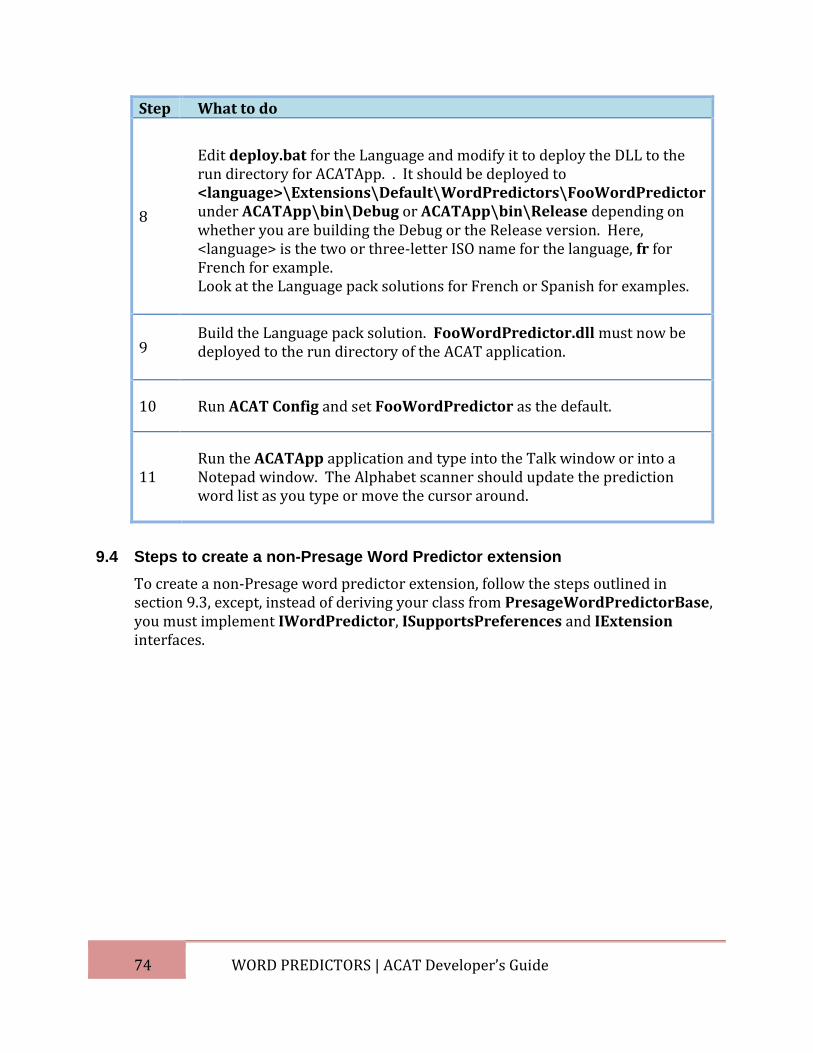
74 WORD PREDICTORS | ACAT Developer’s Guide
Step What to do
8
Edit deploy.bat for the Language and modify it to deploy the DLL to the run directory for ACATApp. . It should be deployed to <language>\Extensions\Default\WordPredictors\FooWordPredictor under ACATApp\bin\Debug or ACATApp\bin\Release depending on whether you are building the Debug or the Release version. Here, <language> is the two or three-letter ISO name for the language, fr for French for example. Look at the Language pack solutions for French or Spanish for examples.
9 Build the Language pack solution. FooWordPredictor.dll must now be deployed to the run directory of the ACAT application.
10 Run ACAT Config and set FooWordPredictor as the default.
11 Run the ACATApp application and type into the Talk window or into a Notepad window. The Alphabet scanner should update the prediction word list as you type or move the cursor around.
9.4 Steps to create a non-Presage Word Predictor extension
To create a non-Presage word predictor extension, follow the steps outlined in section 9.3, except, instead of deriving your class from PresageWordPredictorBase, you must implement IWordPredictor, ISupportsPreferences and IExtension interfaces.
75 TEXT-TO-SPEECH (TTS) | ACAT Developer’s Guide
10. TEXT-TO-SPEECH (TTS)
10.1 Introduction
Text-to-Speech (TTS) extensions perform text to speech conversions.
10.2 Enumeration
During initialization, the TTS Manager walks recursively through specific folders under the ACAT install directory, loads all the DLL’s in there and caches C# Types of classes that implement the ITTSEngine interface.
Language specific TTS extensions take precedence over language-neutral TTS extensions. Extensions are loaded from these locations in this order:
3. [INSTALLDIR\<language>\Extensions\[EXTENSION_DIR]\TTSEngines\<TTSDir> where <language> is the language name or the two-letter ISO name. For example, for the French TTS, this would be: C:\Intel\ACAT\fr\Extensions\Default\WordPredictors\Presage
4. [INSTALLDIR]\Extensions\[EXTENSION_DIR]\TTSEngines\<TTSDir>.
Only one TTS extension can be active at any time. If there are multiple TTS Engines, the preferred one can be selected by using the ACAT Config utility.
10.3 Alternate Pronunciations
Text-to-speech engines may have problems pronouncing certain words properly. ACAT uses an XML configuration file containing a mapping between the actual spelling and the phonetic spelling. The file should reside under the ACAT user’s folder which is [INSTALLDIR]\Users\[USERNAME], for example, C:\Intel\ACAT\Users\DefaultUser, where DefaultUser is the default user name.
The Text-to-speech Management component has a helper class called Pronunciations which loads the pronunciations XML file and maintains the mapping between the actual spelling and the phonetic spelling. It looks up the mapping table and replaces words in an input string with their phonetic spellings. When the result string is converted to speech, the all the words will be pronounced properly.
Listing 8 shows a sample pronunciations file with the actual spelling of words and their corresponding phonetic spelling.
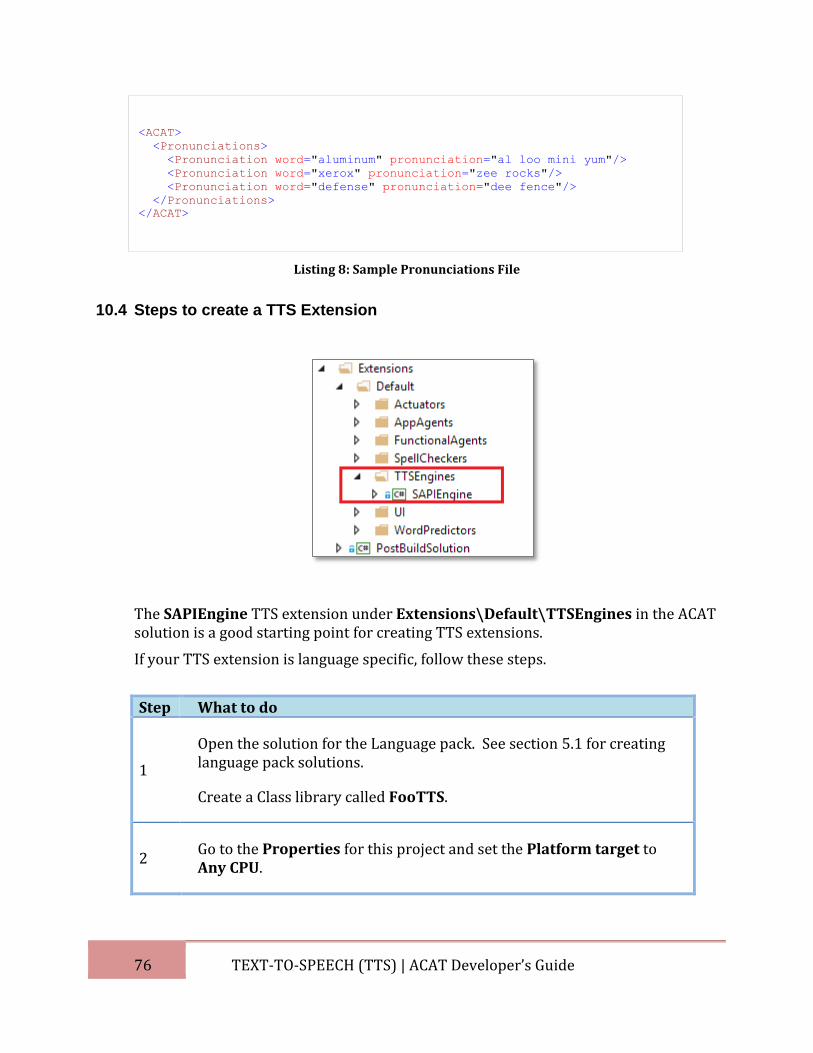
76 TEXT-TO-SPEECH (TTS) | ACAT Developer’s Guide
Listing 8: Sample Pronunciations File
10.4 Steps to create a TTS Extension
The SAPIEngine TTS extension under Extensions\Default\TTSEngines in the ACAT solution is a good starting point for creating TTS extensions.
If your TTS extension is language specific, follow these steps.
Step What to do
1
Open the solution for the Language pack. See section 5.1 for creating language pack solutions.
Create a Class library called FooTTS.
2 Go to the Properties for this project and set the Platform target to Any CPU.
<ACAT>
<Pronunciations>
<Pronunciation word="aluminum" pronunciation="al loo mini yum"/>
<Pronunciation word="xerox" pronunciation="zee rocks"/>
<Pronunciation word="defense" pronunciation="dee fence"/>
</Pronunciations>
</ACAT>
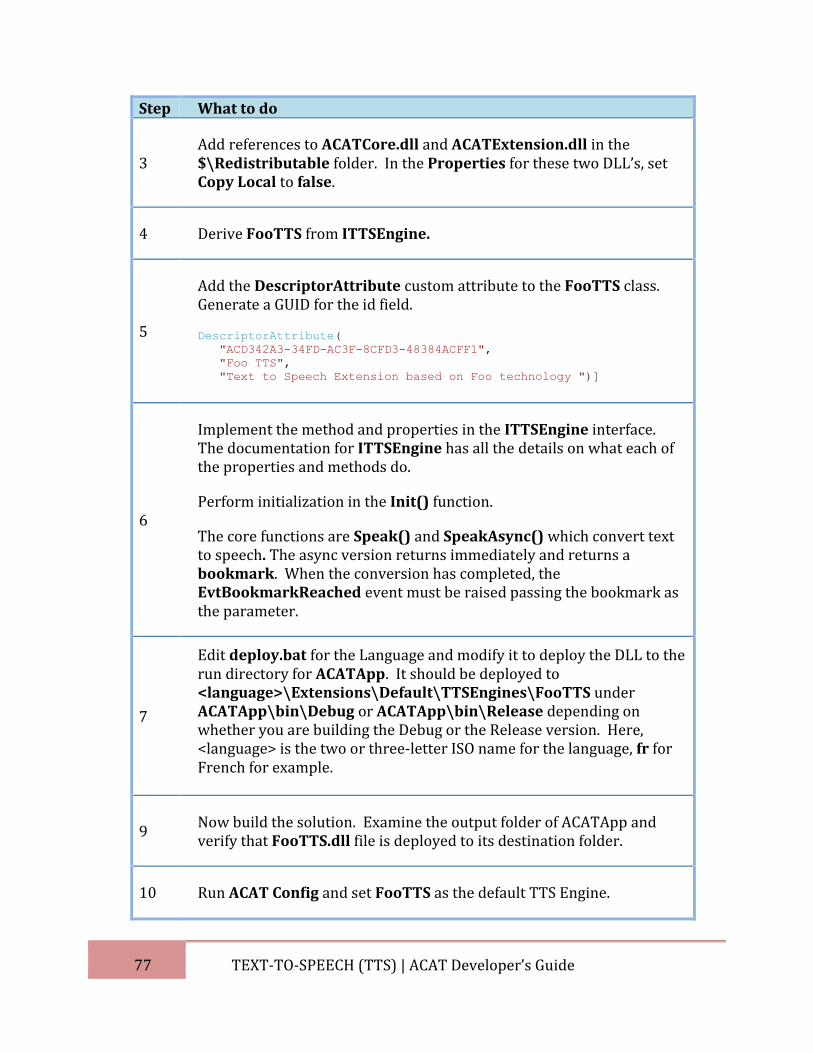
77 TEXT-TO-SPEECH (TTS) | ACAT Developer’s Guide
Step What to do
3 Add references to ACATCore.dll and ACATExtension.dll in the $\Redistributable folder. In the Properties for these two DLL’s, set Copy Local to false.
4 Derive FooTTS from ITTSEngine.
5
Add the DescriptorAttribute custom attribute to the FooTTS class. Generate a GUID for the id field.
DescriptorAttribute(
"ACD342A3-34FD-AC3F-8CFD3-48384ACFF1",
"Foo TTS",
"Text to Speech Extension based on Foo technology ")]
6
Implement the method and properties in the ITTSEngine interface. The documentation for ITTSEngine has all the details on what each of the properties and methods do.
Perform initialization in the Init() function.
The core functions are Speak() and SpeakAsync() which convert text to speech. The async version returns immediately and returns a bookmark. When the conversion has completed, the EvtBookmarkReached event must be raised passing the bookmark as the parameter.
7
Edit deploy.bat for the Language and modify it to deploy the DLL to the run directory for ACATApp. It should be deployed to <language>\Extensions\Default\TTSEngines\FooTTS under ACATApp\bin\Debug or ACATApp\bin\Release depending on whether you are building the Debug or the Release version. Here, <language> is the two or three-letter ISO name for the language, fr for French for example.
9 Now build the solution. Examine the output folder of ACATApp and verify that FooTTS.dll file is deployed to its destination folder.
10 Run ACAT Config and set FooTTS as the default TTS Engine.
78 TEXT-TO-SPEECH (TTS) | ACAT Developer’s Guide
Step What to do
11 Run the ACATApp application and type into the Talk window and press ENTER. FooTTS should convert the text just entered into speech.
If your TTS extension is language neutral, follow these steps.
Step What to do
1
Open the ACAT solution and create a Class library called FooTTS under $\Extensions\Default\TTSEngines.
2
Go to the Properties for this project and set the Platform target to Any CPU.
3
Add references to ACATCore.dll and ACATExtension.dll in the $\Redistributable folder. In the Properties for these two DLL’s, set Copy Local to false.
4
Add the DescriptorAttribute custom attribute to the FooTTS class. Generate a GUID for the id field. DescriptorAttribute(
"ACD342A3-34FD-AC3F-8CFD3-48384ACFF1",
"Foo TTS",
"Text to Speech Extension based on Foo technology ")]
5
Derive FooTTS from ITTSEngine. Implement the method and properties in the ITTSEngine interface. The documentation for ITTSEngine has all the details on what each of the properties and methods do. Perform initialization in the Init() function. The core functions are Speak() and SpeakAsync() which convert text to speech. The async version returns immediately and returns a ‘bookmark’. When the conversion has completed, the EvtBookmarkReached event must be raised passing the bookmark as the parameter.
79 TEXT-TO-SPEECH (TTS) | ACAT Developer’s Guide
Step What to do
6
Update dependencies in the ACAT solution for the FooTTS project to make sure it is built in the right order. Ensure that a. FooTTS has dependencies on ACATCore and ACATExtension projects. b. The PostBuildSolution project has a dependency on FooTTS.
7
FooTTS.dll must now be deployed to the run directory of the application. Edit $\deploy.bat Look for the section “Deploying TTSEngine DLLs” and add the code to deploy the DLL. Look at the examples already there on how to do this.
8
Now build the solution. Examine the output folder of ACATApp and verify that FooTTS.dll file is deployed to its destination folder.
9 Run ACAT Config and set FooTTS as the default TTS Engine.
10
Run the ACATApp application and type into the Talk window and press ENTER. FooTTS should convert the text just entered into speech.
80 SPELL CHECKER | ACAT Developer’s Guide
11. SPELL CHECKER
11.1 Introduction
Spell Checker extensions perform spell checks during text entry. Applications such as MS Word have built-in support for spell checking, but not all applications do. If the user were to use the auto-complete or next-word prediction through Word Prediction to enter text, spell check is really not required. However the feature is made available for developers to implement spell checking if they so desire.
During text entry, a call to the spell checker is made whenever a word is completed. The completed word is passed to the spell checker extension. The spell checker returns the correctly spelt word if it was misspelt. ACAT then does an in-place replacement of the misspelt word with the one that is correctly spelt.
11.2 Enumeration
During initialization, the SpellCheck Manager walks recursively through specific folders under the ACAT install directory, loads all the DLL’s in there and caches C# Types of classes derived from the ISpellChecker interface. All Spell Checker extensions must implement this interface.
Language specific spell check extensions take precedence over language-neutral spell check extensions. Extensions are loaded from these locations in this order:
1. [INSTALLDIR\<language>\Extensions\[EXTENSION_DIR]\SpellCheckers\<SpellCheckDir> where <language> is the language name or the two-letter ISO name. For example, if there were a spell checker extension for French, this would be: C:\Intel\ACAT\fr\Extensions\Default\SpellChecker\<SpellCheckDir>
2. [INSTALLDIR]\Extensions\[EXTENSION_DIR]\SpellCheckers\<SpellCheckDir>. Language neutral spell checker extensions should be installed here.
Only one Spell Checker can be active at any time. If there are multiple Spell Checker extensions, the preferred one can be selected by using the ACAT Config utility.
11.3 ACAT Spell Checker
ACAT has a rudimentary spell checker extension called SpellCheck. The following figure shows the ACAT spell checker extension in the ACAT solution tree.
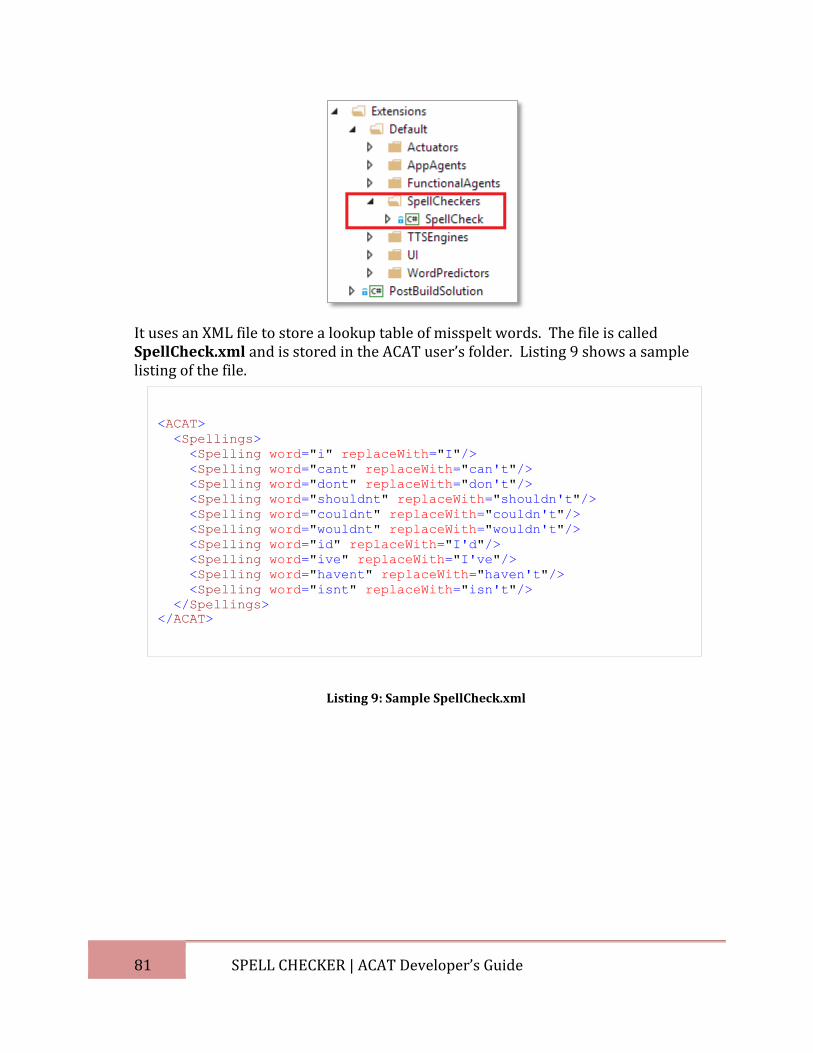
81 SPELL CHECKER | ACAT Developer’s Guide
It uses an XML file to store a lookup table of misspelt words. The file is called SpellCheck.xml and is stored in the ACAT user’s folder. Listing 9 shows a sample listing of the file.
Listing 9: Sample SpellCheck.xml
<ACAT>
<Spellings>
<Spelling word="i" replaceWith="I"/>
<Spelling word="cant" replaceWith="can't"/>
<Spelling word="dont" replaceWith="don't"/>
<Spelling word="shouldnt" replaceWith="shouldn't"/>
<Spelling word="couldnt" replaceWith="couldn't"/>
<Spelling word="wouldnt" replaceWith="wouldn't"/>
<Spelling word="id" replaceWith="I'd"/>
<Spelling word="ive" replaceWith="I've"/>
<Spelling word="havent" replaceWith="haven't"/>
<Spelling word="isnt" replaceWith="isn't"/>
</Spellings>
</ACAT>
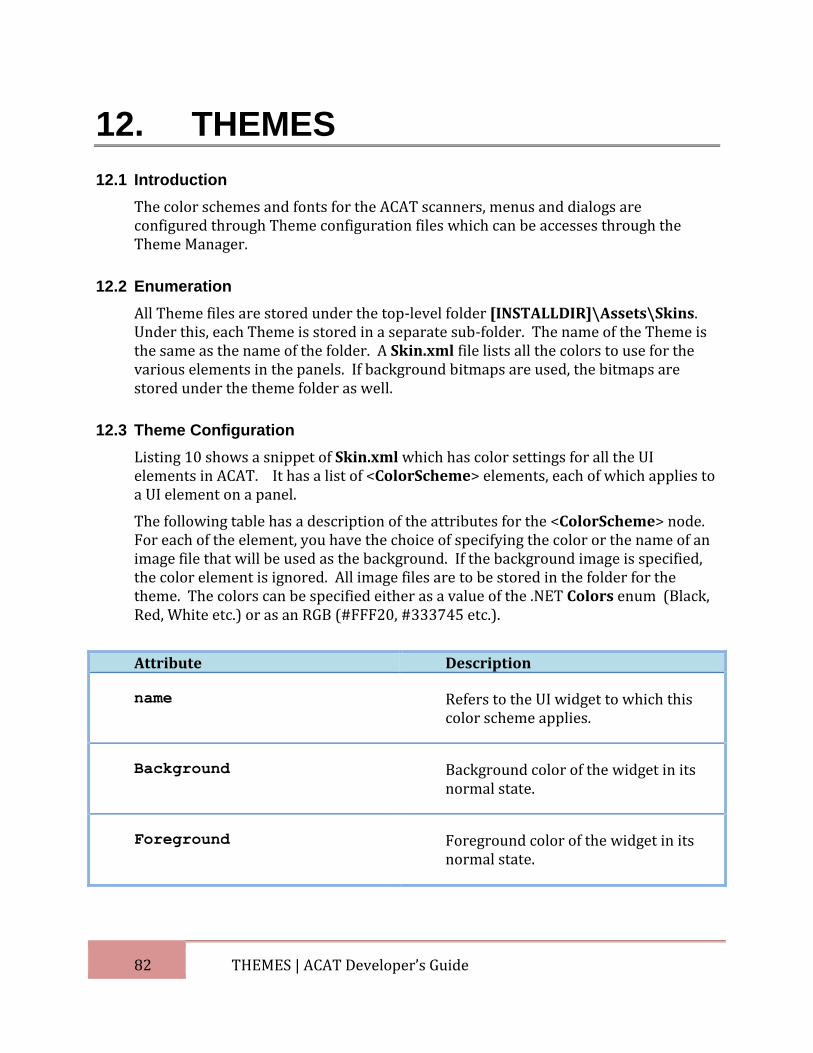
82 THEMES | ACAT Developer’s Guide
12. THEMES
12.1 Introduction
The color schemes and fonts for the ACAT scanners, menus and dialogs are configured through Theme configuration files which can be accesses through the Theme Manager.
12.2 Enumeration
All Theme files are stored under the top-level folder [INSTALLDIR]\Assets\Skins. Under this, each Theme is stored in a separate sub-folder. The name of the Theme is the same as the name of the folder. A Skin.xml file lists all the colors to use for the various elements in the panels. If background bitmaps are used, the bitmaps are stored under the theme folder as well.
12.3 Theme Configuration
Listing 10 shows a snippet of Skin.xml which has color settings for all the UI elements in ACAT. It has a list of <ColorScheme> elements, each of which applies to a UI element on a panel.
The following table has a description of the attributes for the <ColorScheme> node. For each of the element, you have the choice of specifying the color or the name of an image file that will be used as the background. If the background image is specified, the color element is ignored. All image files are to be stored in the folder for the theme. The colors can be specified either as a value of the .NET Colors enum (Black, Red, White etc.) or as an RGB (#FFF20, #333745 etc.).
Attribute Description
name Refers to the UI widget to which this color scheme applies.
Background Background color of the widget in its normal state.
Foreground Foreground color of the widget in its normal state.
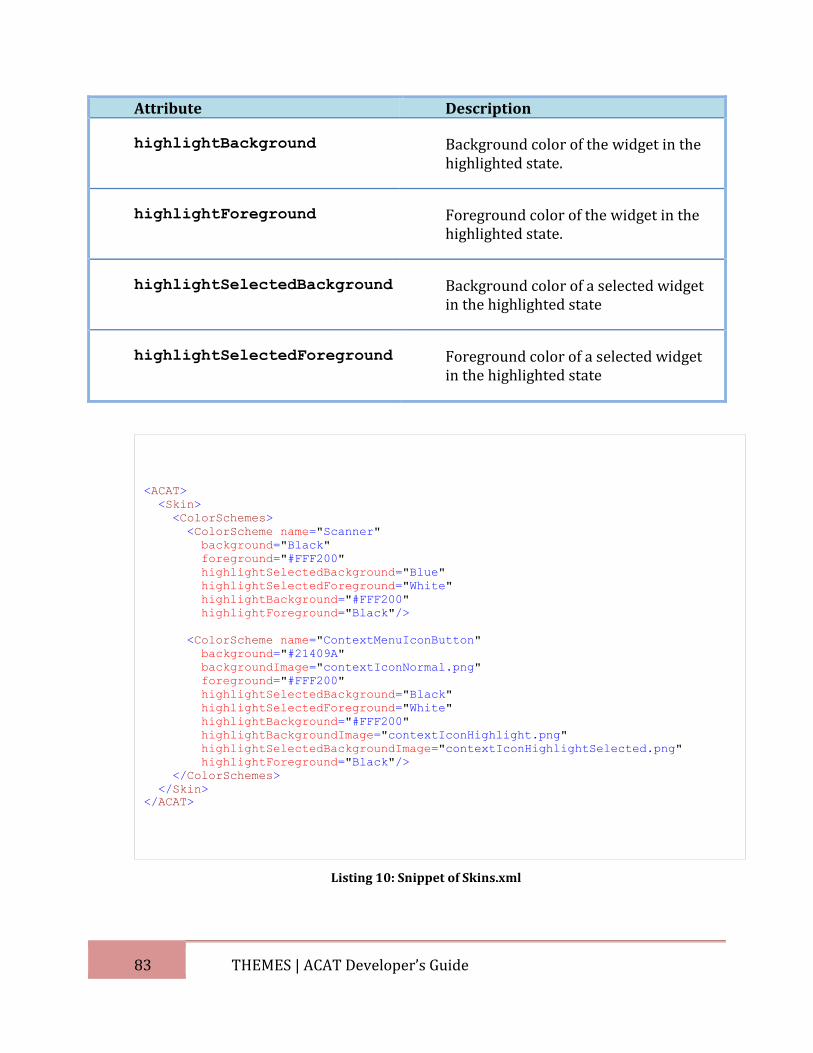
83 THEMES | ACAT Developer’s Guide
Attribute Description
highlightBackground Background color of the widget in the highlighted state.
highlightForeground Foreground color of the widget in the highlighted state.
highlightSelectedBackground Background color of a selected widget in the highlighted state
highlightSelectedForeground Foreground color of a selected widget in the highlighted state
Listing 10: Snippet of Skins.xml
<ACAT>
<Skin>
<ColorSchemes>
<ColorScheme name="Scanner"
background="Black"
foreground="#FFF200"
highlightSelectedBackground="Blue"
highlightSelectedForeground="White"
highlightBackground="#FFF200"
highlightForeground="Black"/>
<ColorScheme name="ContextMenuIconButton"
background="#21409A"
backgroundImage="contextIconNormal.png"
foreground="#FFF200"
highlightSelectedBackground="Black"
highlightSelectedForeground="White"
highlightBackground="#FFF200"
highlightBackgroundImage="contextIconHighlight.png"
highlightSelectedBackgroundImage="contextIconHighlightSelected.png"
highlightForeground="Black"/>
</ColorSchemes>
</Skin>
</ACAT>
84 SCRIPTS | ACAT Developer’s Guide
13. SCRIPTS
13.1 Introduction
Scripting is primarily used in Panel configuration files (see section 8.3.2) to handle transition between scanning sequences, and to execute actions when widgets are selected with the input switch trigger. The scripting language is very simple and the Interpreter module in ACAT interprets the script.
13.2 Syntax
The syntax is simple. The script is a semi-colon delimited list of function calls. Here is a snippet from the <Animations> section of a Panel configuration file.
<Widget name="B2
onSelect="actuate(@SelectedWidget);transition(TopLevelRotation)"/>
The onSelect attribute has a script that is executed when the widget B2 is selected. The script makes two function calls – actuate() and transition(). The call to actuate() has one argument – @SelectedWidget which is an macro for the selected widget. This call triggers the Actuate event in ACAT for widget B2. The transition() call switches the scanning sequence to the one named TopLevelRotation. Functions do not have any return values. All arguments are passed by value.
13.3 Functions
This section describes the syntax and usages of all the pre-defined functions supported by ACAT.
13.3.1 actuate
Syntax actuate(widgetNameOrMacro)
Parameters widgetNameOrAlias
Name or alias of the widget to actuate
Description Actuates the widget identified by the specified name or alias. Any command associated with the widget is executed. The command is specified in the WidgetAttribute section (see section 8.3.2.1) of the Panel configuration file. Use the @SelectedWidget macro (see section 13.4) as the alias for the widget that is currently selected.
85 SCRIPTS | ACAT Developer’s Guide
Examples
To actuate a widget identified by the name B1:
actuate(B1)
To actuate the currently selected widget:
actuate(@SelectedWidget)
13.3.2 highlight
Syntax highlight(widgetNameOrAlias, onOff)
Parameters widgetNameOrAlias
Name or alias of the widget to actuate
onOff
Set to true to highlight the widget, false to un-highlight it.
Description Highlights or un-highlights the specified widget. If onOff is true, highlights the widget using the highlightBackground and highlightForeground attributes from the active theme (see Chapter 12). If onOff is false, the widget is displayed in normal colors using the background and foreground attributes from the active theme.
If the parameter refers to an alias, it should be one of the following macros (see section 13.4).
@SelectedWidget for the currently selected widget
@SelectedRow for the currently selected row
@SelectedBox for the currently selected box.
Examples
To highlight a widget identified by the name B1:
highlight(B1, true)
To highlight a Row identified by the name Row1:
highlight(Row1, true)
To un-highlight a widget identified by the name B1:
highlight(B1, false)
To highlight the currently selected widget:
highlight(@SelectedWidget, true)
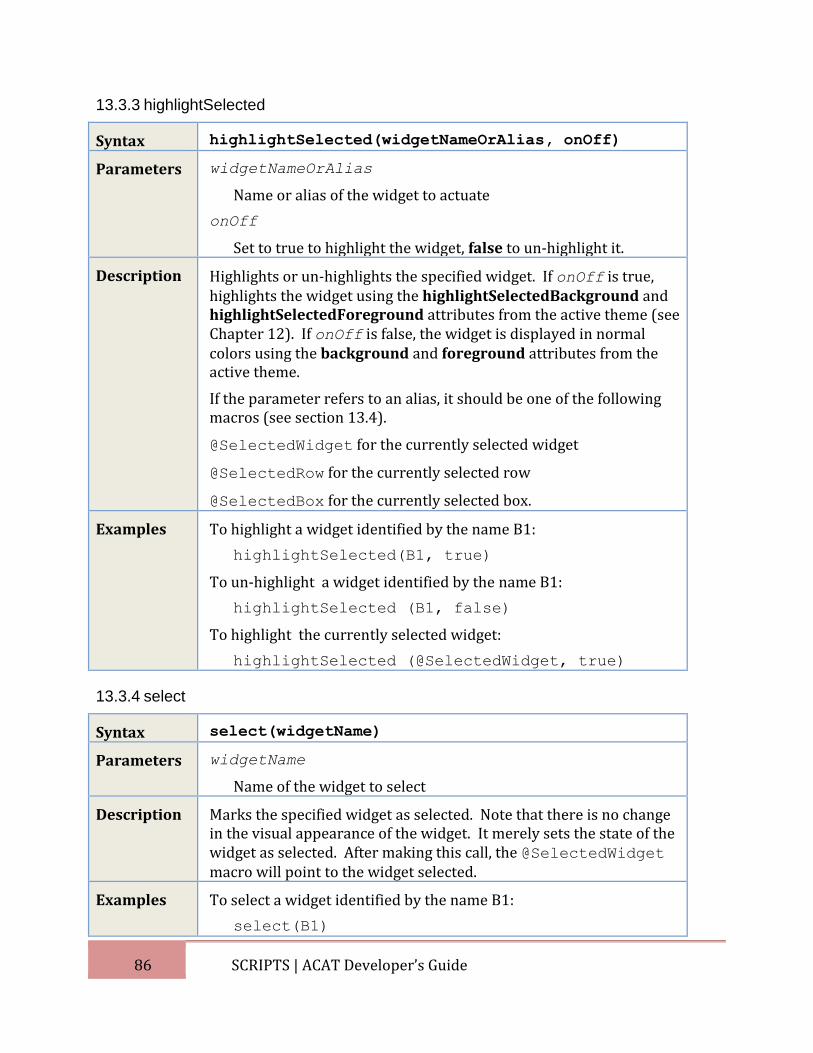
86 SCRIPTS | ACAT Developer’s Guide
13.3.3 highlightSelected
Syntax highlightSelected(widgetNameOrAlias, onOff)
Parameters widgetNameOrAlias
Name or alias of the widget to actuate
onOff
Set to true to highlight the widget, false to un-highlight it.
Description Highlights or un-highlights the specified widget. If onOff is true, highlights the widget using the highlightSelectedBackground and highlightSelectedForeground attributes from the active theme (see Chapter 12). If onOff is false, the widget is displayed in normal colors using the background and foreground attributes from the active theme.
If the parameter refers to an alias, it should be one of the following macros (see section 13.4).
@SelectedWidget for the currently selected widget
@SelectedRow for the currently selected row
@SelectedBox for the currently selected box.
Examples
To highlight a widget identified by the name B1:
highlightSelected(B1, true)
To un-highlight a widget identified by the name B1:
highlightSelected (B1, false)
To highlight the currently selected widget:
highlightSelected (@SelectedWidget, true)
13.3.4 select
Syntax select(widgetName)
Parameters widgetName
Name of the widget to select
Description Marks the specified widget as selected. Note that there is no change in the visual appearance of the widget. It merely sets the state of the widget as selected. After making this call, the @SelectedWidget macro will point to the widget selected.
Examples
To select a widget identified by the name B1:
select(B1)
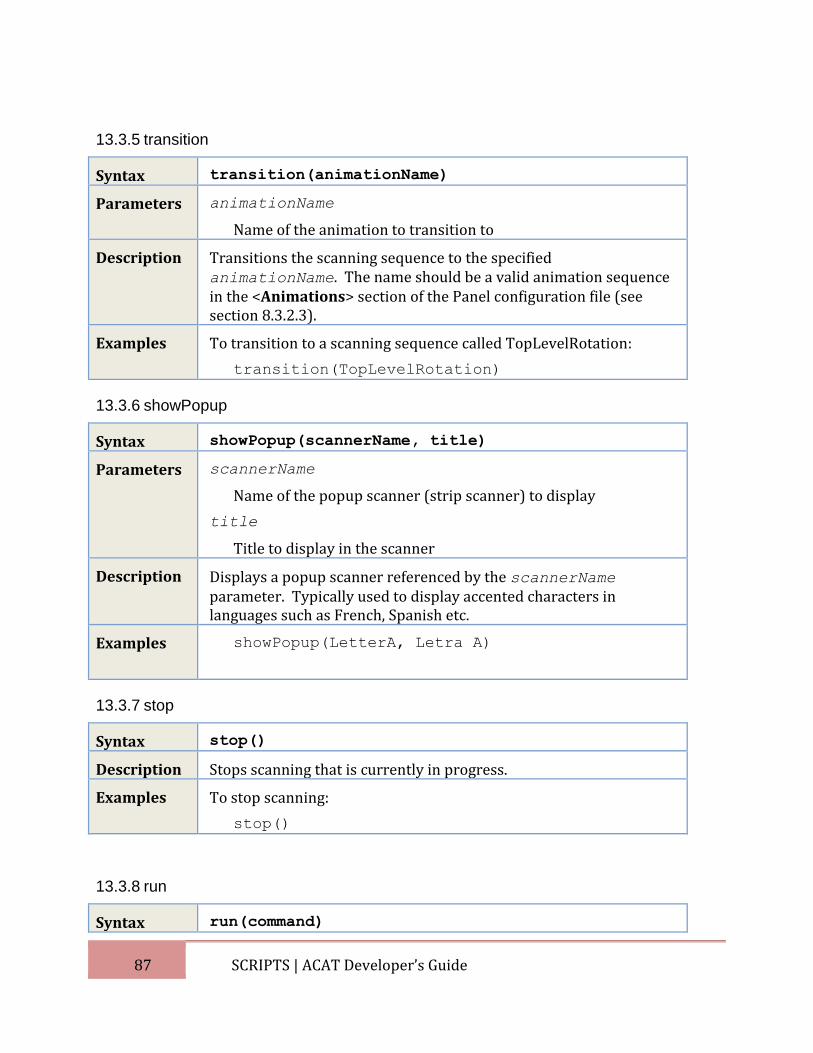
87 SCRIPTS | ACAT Developer’s Guide
13.3.5 transition
Syntax transition(animationName)
Parameters animationName
Name of the animation to transition to
Description Transitions the scanning sequence to the specified animationName. The name should be a valid animation sequence in the <Animations> section of the Panel configuration file (see section 8.3.2.3).
Examples
To transition to a scanning sequence called TopLevelRotation:
transition(TopLevelRotation)
13.3.6 showPopup
Syntax showPopup(scannerName, title)
Parameters scannerName
Name of the popup scanner (strip scanner) to display
title
Title to display in the scanner
Description Displays a popup scanner referenced by the scannerName parameter. Typically used to display accented characters in languages such as French, Spanish etc.
Examples
showPopup(LetterA, Letra A)
13.3.7 stop
Syntax stop()
Description Stops scanning that is currently in progress.
Examples
To stop scanning:
stop()
13.3.8 run
Syntax run(command)
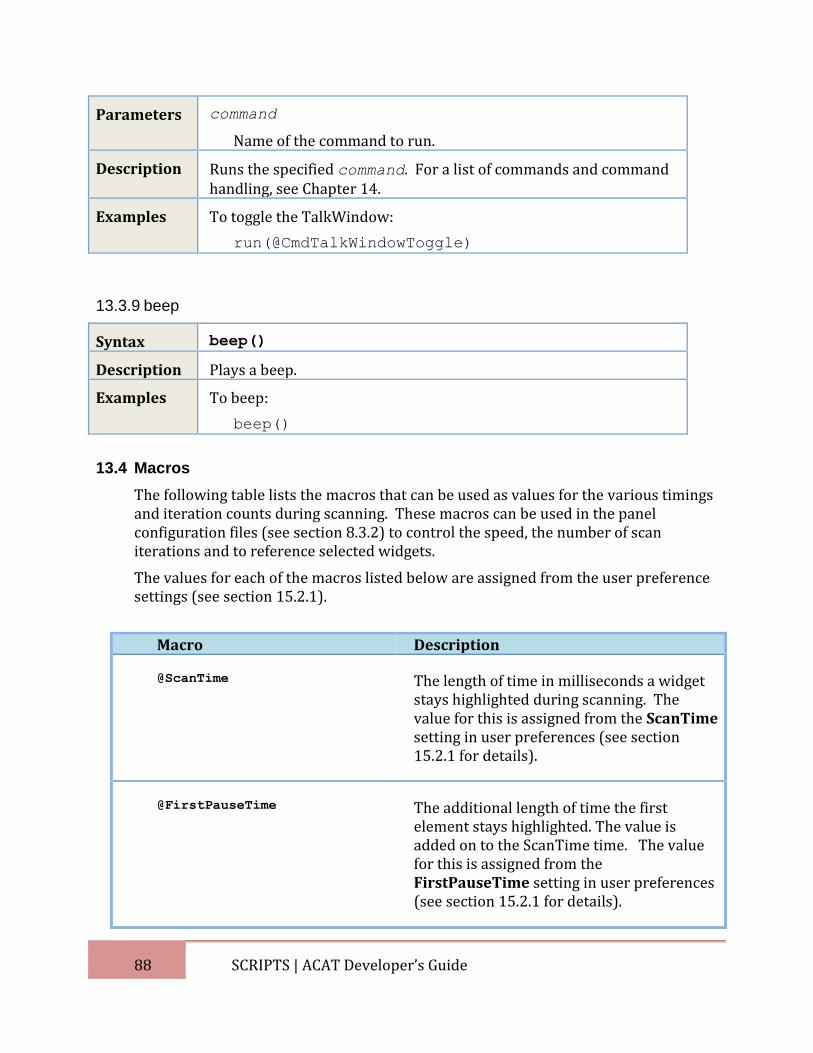
88 SCRIPTS | ACAT Developer’s Guide
Parameters command
Name of the command to run.
Description Runs the specified command. For a list of commands and command handling, see Chapter 14.
Examples
To toggle the TalkWindow:
run(@CmdTalkWindowToggle)
13.3.9 beep
Syntax beep()
Description Plays a beep.
Examples
To beep:
beep()
13.4 Macros
The following table lists the macros that can be used as values for the various timings and iteration counts during scanning. These macros can be used in the panel configuration files (see section 8.3.2) to control the speed, the number of scan iterations and to reference selected widgets.
The values for each of the macros listed below are assigned from the user preference settings (see section 15.2.1).
Macro Description
@ScanTime The length of time in milliseconds a widget stays highlighted during scanning. The value for this is assigned from the ScanTime setting in user preferences (see section 15.2.1 for details).
@FirstPauseTime The additional length of time the first element stays highlighted. The value is added on to the ScanTime time. The value for this is assigned from the FirstPauseTime setting in user preferences (see section 15.2.1 for details).
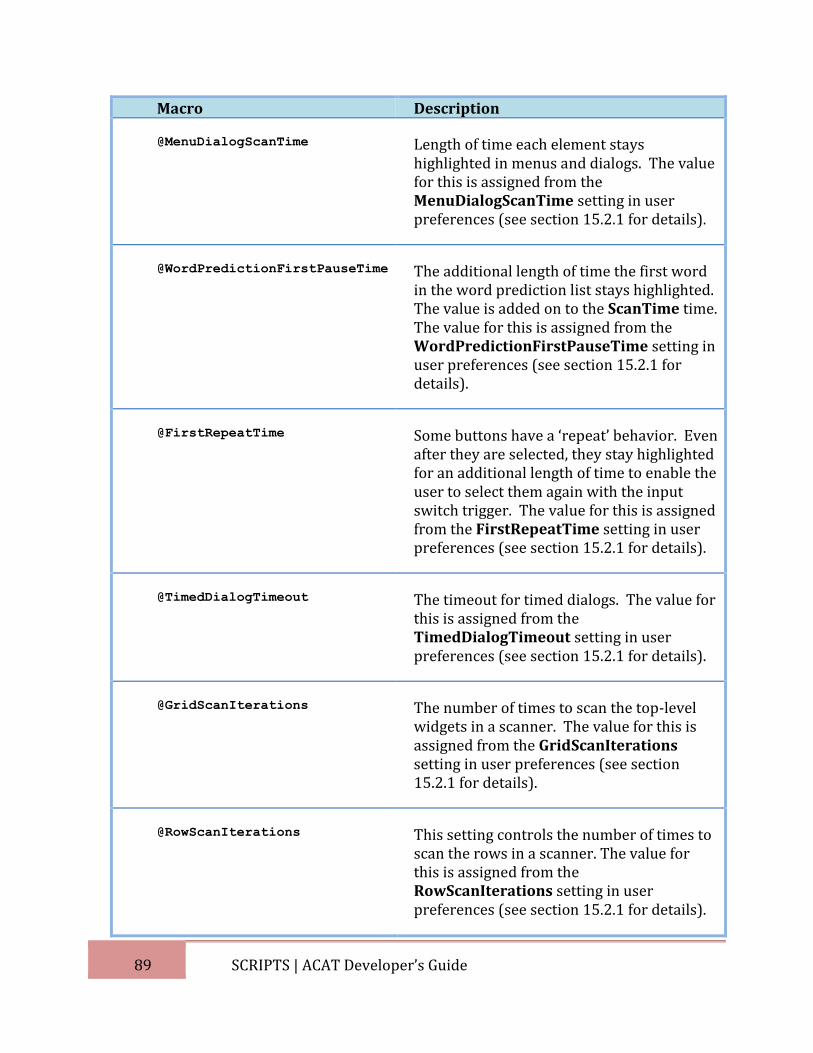
89 SCRIPTS | ACAT Developer’s Guide
Macro Description
@MenuDialogScanTime Length of time each element stays highlighted in menus and dialogs. The value for this is assigned from the MenuDialogScanTime setting in user preferences (see section 15.2.1 for details).
@WordPredictionFirstPauseTime The additional length of time the first word in the word prediction list stays highlighted. The value is added on to the ScanTime time. The value for this is assigned from the WordPredictionFirstPauseTime setting in user preferences (see section 15.2.1 for details).
@FirstRepeatTime Some buttons have a ‘repeat’ behavior. Even after they are selected, they stay highlighted for an additional length of time to enable the user to select them again with the input switch trigger. The value for this is assigned from the FirstRepeatTime setting in user preferences (see section 15.2.1 for details).
@TimedDialogTimeout The timeout for timed dialogs. The value for this is assigned from the TimedDialogTimeout setting in user preferences (see section 15.2.1 for details).
@GridScanIterations The number of times to scan the top-level widgets in a scanner. The value for this is assigned from the GridScanIterations setting in user preferences (see section 15.2.1 for details).
@RowScanIterations This setting controls the number of times to scan the rows in a scanner. The value for this is assigned from the RowScanIterations setting in user preferences (see section 15.2.1 for details).
90 SCRIPTS | ACAT Developer’s Guide
Macro Description
@ColumnScanIterations The number of times to scan the widgets in a row in a scanner. The value for this is assigned from the ColumnScanIterations setting in user preferences (see section 15.2.1 for details).
@StripScannerColumnIterations
The number of times to scan the widgets in a strip scanner. A strip scanner is typically used to display accented characters in languages such as French, Spanish etc. The value for this is assigned from the StripScannerColumnIterations setting in user preferences (see section 15.2.1 for details).
@WordPredictionScanIterations The number of times to scan the words in the word prediction list. The value for this is assigned from the WordPredictionScanIterations setting in user preferences (see section 15.2.1 for details).
@ScreenLockScanIterations The number of times the numbers in the screen unlock PIN scanner are scanned. The value for this is assigned from the ScreenLockScanIterations setting in user preferences (see section 15.2.1 for details).
@SelectedWidget The widget that is currently selected. A widget is tagged as ‘selected’ if the user actuates the input trigger while the widget is highlighted, or through a call to the select() function (see section 13.3.4).
91 SCRIPTS | ACAT Developer’s Guide
Macro Description
@SelectedRow The row of widgets that is currently selected. A row is tagged as ‘selected’ if the user actuates the input trigger while the row is highlighted, or through a call to the select() function (see section 13.3.4).
@SelectedBox The box (or grid) of rows that is currently selected. A box is tagged as ‘selected’ if the user actuates the input trigger while the row is highlighted, or through a call to the select() function (see section 13.3.4).
92 COMMAND PROCESSING | ACAT Developer’s Guide
14. COMMAND PROCESSING
14.1 Introduction
Commands are actions that are performed when the user actuates a widget through the input trigger switch. Commands are assigned to widgets in one of two ways:
1. By setting the value attribute for a widget in the WidgetAttributes section of the Panel configuration file (see section 8.3.2.1).
2. Through the run command (see section 13.3.8) in the Animations section of the Panel configuration file (see section 8.3.2.3).
3. By mapping the command to input switches through the Actuator configuration file. (see section 6.3). You can also use the ACAT Config utility to map commands to input switches.
14.2 Command Handlers
Commands are first sent to the currently active Panel. If the Panel does not handle it, the command is sent to the currently active Agent. Details on handling commands by Panels and Agents follow.
14.2.1 Panel Command Handlers
Scanners and Menus must implement command dispatchers to intercept and execute commands resulting from widget actuations by the user. Dialogs do not implement command handlers.
The RunCommandDispatcher class in Panel Management component processes commands. This class has a method called Execute() which is invoked to execute the command. Scanners and Menus implement the IScannerPanel interface. One of the properties of this interface is CommandDispatcher .
RunCommandDispatcher CommandDispatcher { get; }
ACAT invokes the Execute method in the returned object to execute a command.
14.2.1.1 DefaultCommandDispatcher
The DefaultCommandDispatcher class in the ACAT Extension library handles most of the commands. See section 14.3 for a list of commands supported by this class. If the Panel uses commands from the default list, it can return a DefaultCommandDispatcher object as the return value of the CommandDispatcher property.
14.2.1.2 Custom Commands
The following table lists steps to handle commands that are not in the default command list (see section 14.3) or to override handling of the default commands.
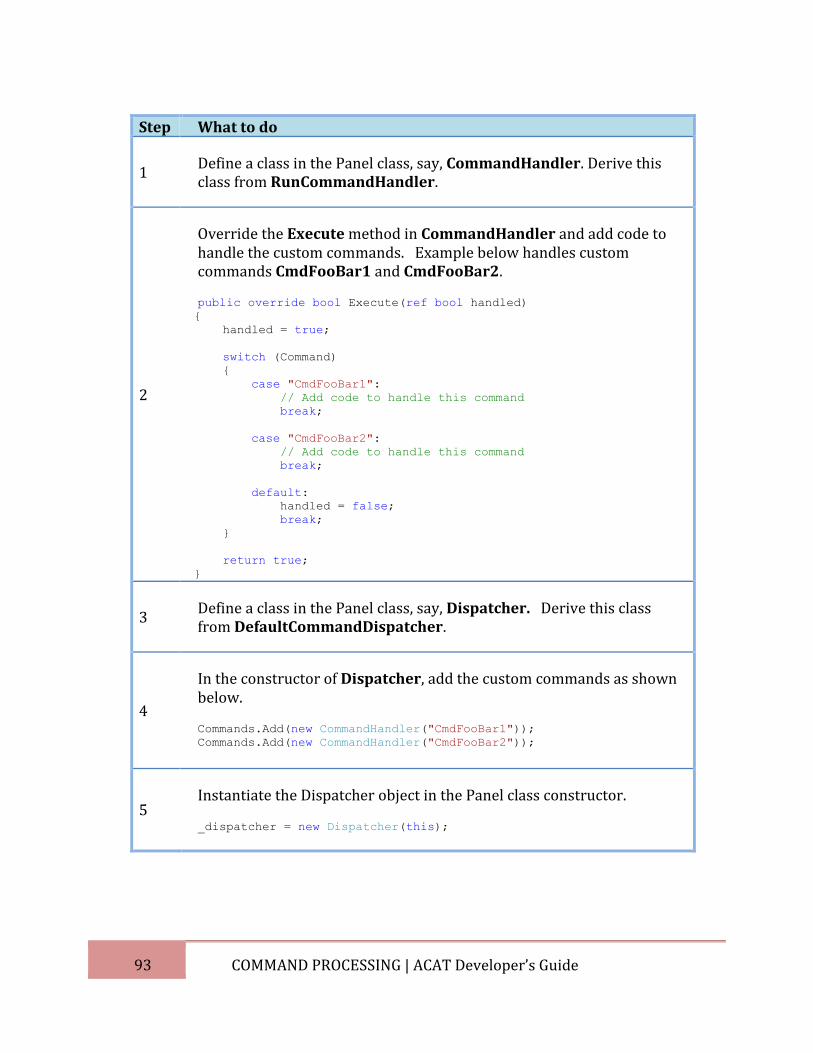
93 COMMAND PROCESSING | ACAT Developer’s Guide
Step What to do
1 Define a class in the Panel class, say, CommandHandler. Derive this class from RunCommandHandler.
2
Override the Execute method in CommandHandler and add code to handle the custom commands. Example below handles custom commands CmdFooBar1 and CmdFooBar2.
public override bool Execute(ref bool handled)
{
handled = true;
switch (Command)
{
case "CmdFooBar1":
// Add code to handle this command
break;
case "CmdFooBar2":
// Add code to handle this command
break;
default:
handled = false;
break;
}
return true;
}
3 Define a class in the Panel class, say, Dispatcher. Derive this class from DefaultCommandDispatcher.
4
In the constructor of Dispatcher, add the custom commands as shown below.
Commands.Add(new CommandHandler("CmdFooBar1"));
Commands.Add(new CommandHandler("CmdFooBar2"));
5 Instantiate the Dispatcher object in the Panel class constructor.
_dispatcher = new Dispatcher(this);
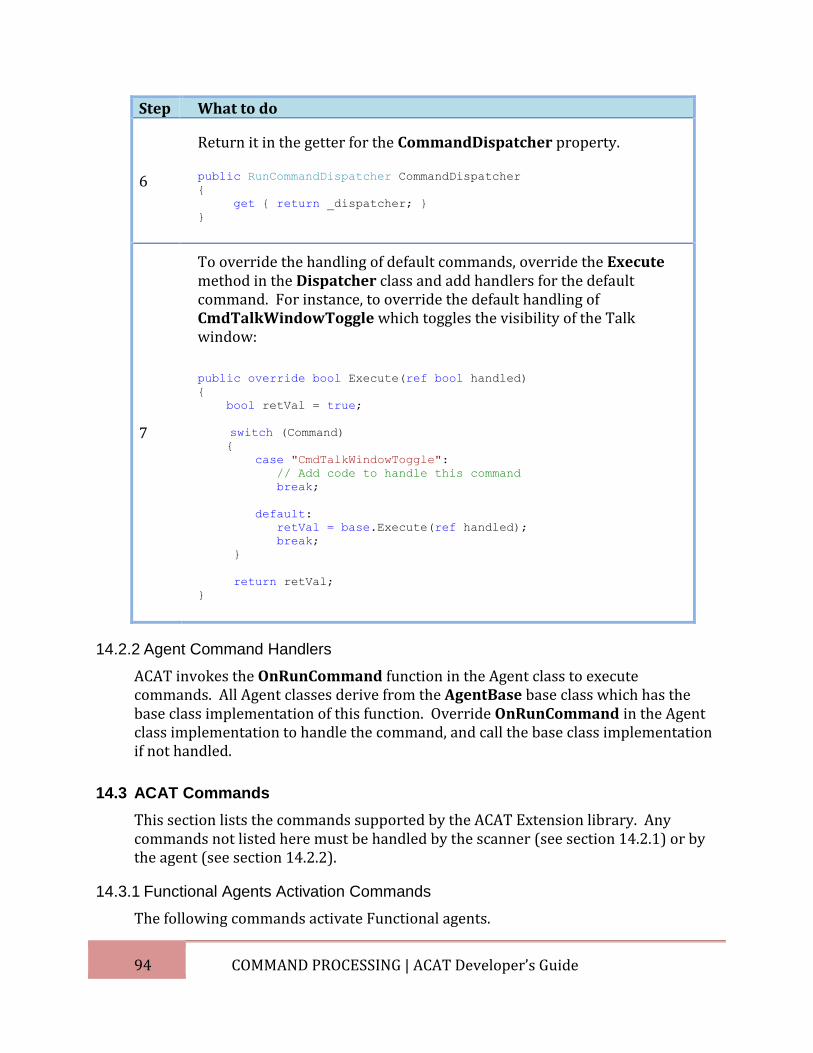
94 COMMAND PROCESSING | ACAT Developer’s Guide
Step What to do
6
Return it in the getter for the CommandDispatcher property. public RunCommandDispatcher CommandDispatcher
{
get { return _dispatcher; }
}
7
To override the handling of default commands, override the Execute method in the Dispatcher class and add handlers for the default command. For instance, to override the default handling of CmdTalkWindowToggle which toggles the visibility of the Talk window:
public override bool Execute(ref bool handled)
{
bool retVal = true;
switch (Command)
{
case "CmdTalkWindowToggle":
// Add code to handle this command
break;
default:
retVal = base.Execute(ref handled);
break;
}
return retVal;
}
14.2.2 Agent Command Handlers
ACAT invokes the OnRunCommand function in the Agent class to execute commands. All Agent classes derive from the AgentBase base class which has the base class implementation of this function. Override OnRunCommand in the Agent class implementation to handle the command, and call the base class implementation if not handled.
14.3 ACAT Commands
This section lists the commands supported by the ACAT Extension library. Any commands not listed here must be handled by the scanner (see section 14.2.1) or by the agent (see section 14.2.2).
14.3.1 Functional Agents Activation Commands
The following commands activate Functional agents.
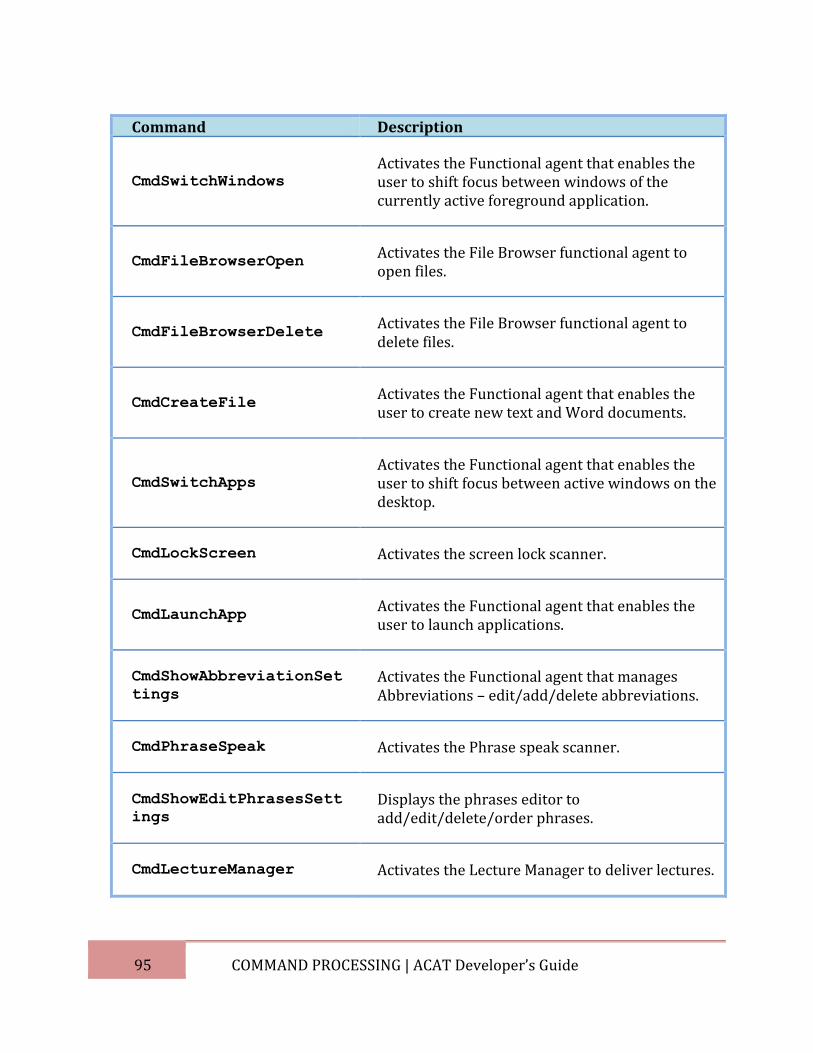
95 COMMAND PROCESSING | ACAT Developer’s Guide
Command Description
CmdSwitchWindows
Activates the Functional agent that enables the user to shift focus between windows of the currently active foreground application.
CmdFileBrowserOpen Activates the File Browser functional agent to open files.
CmdFileBrowserDelete Activates the File Browser functional agent to delete files.
CmdCreateFile Activates the Functional agent that enables the user to create new text and Word documents.
CmdSwitchApps
Activates the Functional agent that enables the user to shift focus between active windows on the desktop.
CmdLockScreen Activates the screen lock scanner.
CmdLaunchApp Activates the Functional agent that enables the user to launch applications.
CmdShowAbbreviationSet
tings
Activates the Functional agent that manages Abbreviations – edit/add/delete abbreviations.
CmdPhraseSpeak Activates the Phrase speak scanner.
CmdShowEditPhrasesSett
ings Displays the phrases editor to add/edit/delete/order phrases.
CmdLectureManager Activates the Lecture Manager to deliver lectures.
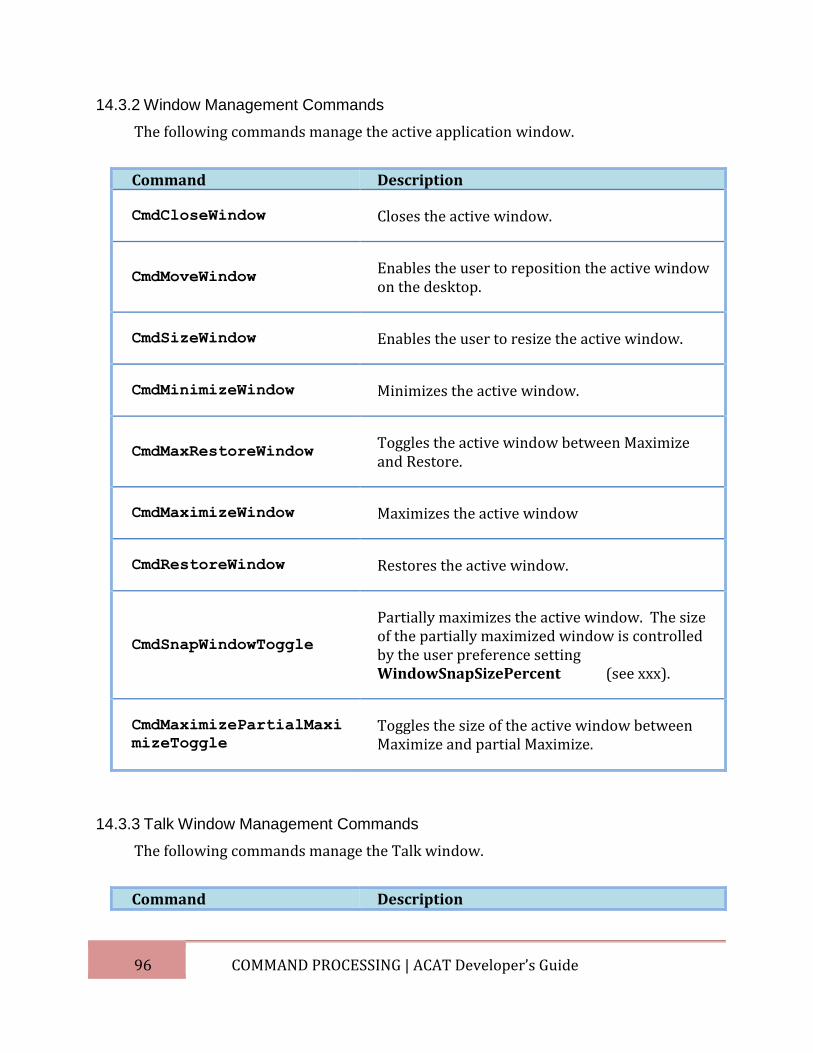
96 COMMAND PROCESSING | ACAT Developer’s Guide
14.3.2 Window Management Commands
The following commands manage the active application window.
Command Description
CmdCloseWindow Closes the active window.
CmdMoveWindow Enables the user to reposition the active window on the desktop.
CmdSizeWindow Enables the user to resize the active window.
CmdMinimizeWindow Minimizes the active window.
CmdMaxRestoreWindow Toggles the active window between Maximize and Restore.
CmdMaximizeWindow Maximizes the active window
CmdRestoreWindow Restores the active window.
CmdSnapWindowToggle
Partially maximizes the active window. The size of the partially maximized window is controlled by the user preference setting WindowSnapSizePercent (see xxx).
CmdMaximizePartialMaxi
mizeToggle
Toggles the size of the active window between Maximize and partial Maximize.
14.3.3 Talk Window Management Commands
The following commands manage the Talk window.
Command Description
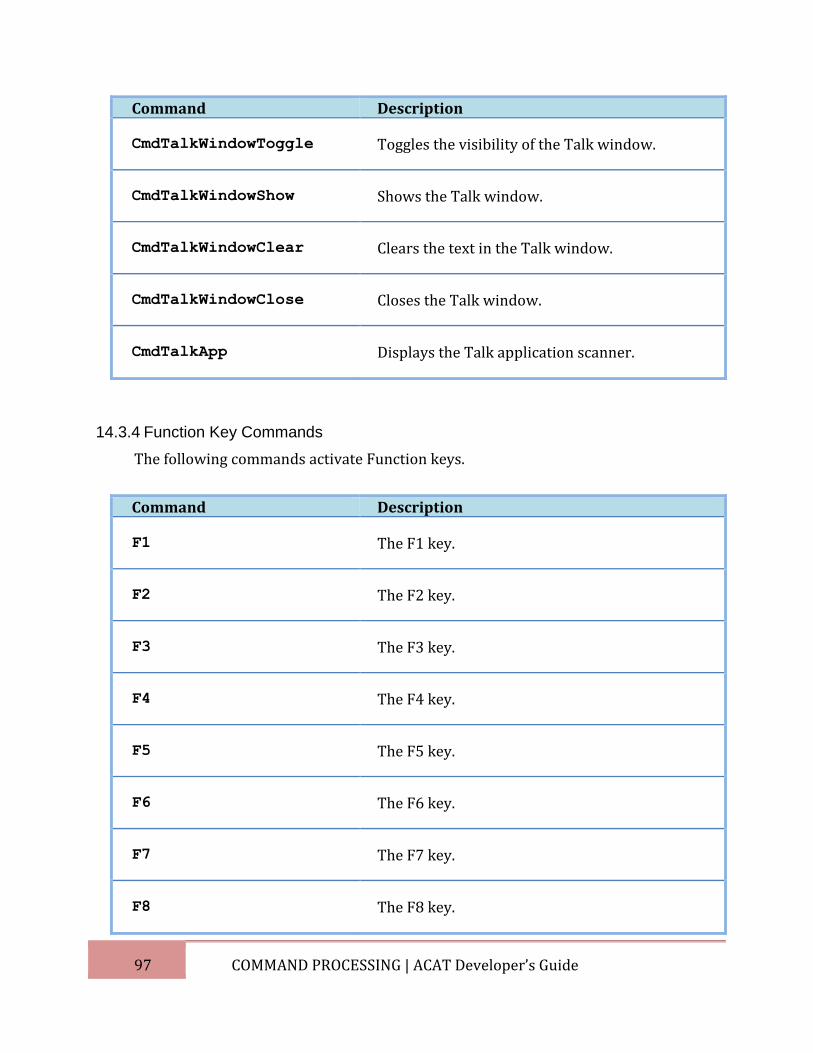
97 COMMAND PROCESSING | ACAT Developer’s Guide
Command Description
CmdTalkWindowToggle Toggles the visibility of the Talk window.
CmdTalkWindowShow Shows the Talk window.
CmdTalkWindowClear Clears the text in the Talk window.
CmdTalkWindowClose Closes the Talk window.
CmdTalkApp Displays the Talk application scanner.
14.3.4 Function Key Commands
The following commands activate Function keys.
Command Description
F1 The F1 key.
F2 The F2 key.
F3 The F3 key.
F4 The F4 key.
F5 The F5 key.
F6 The F6 key.
F7 The F7 key.
F8 The F8 key.
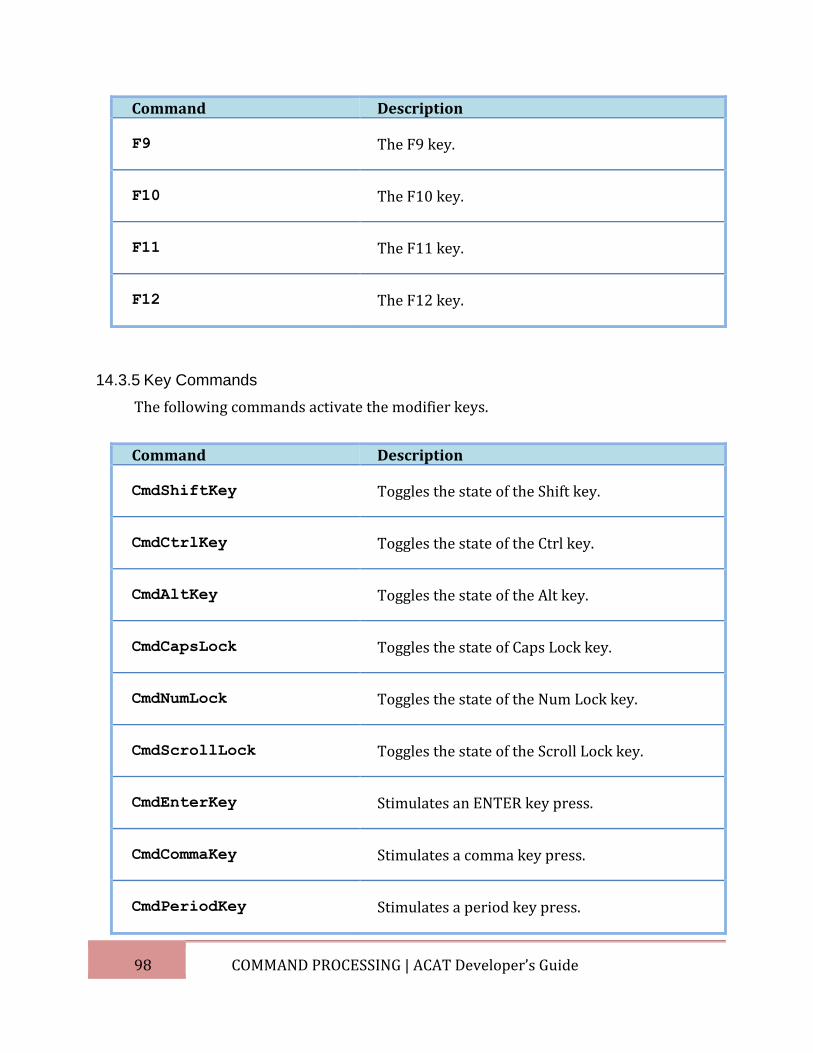
98 COMMAND PROCESSING | ACAT Developer’s Guide
Command Description
F9 The F9 key.
F10 The F10 key.
F11 The F11 key.
F12 The F12 key.
14.3.5 Key Commands
The following commands activate the modifier keys.
Command Description
CmdShiftKey Toggles the state of the Shift key.
CmdCtrlKey Toggles the state of the Ctrl key.
CmdAltKey Toggles the state of the Alt key.
CmdCapsLock Toggles the state of Caps Lock key.
CmdNumLock Toggles the state of the Num Lock key.
CmdScrollLock Toggles the state of the Scroll Lock key.
CmdEnterKey Stimulates an ENTER key press.
CmdCommaKey Stimulates a comma key press.
CmdPeriodKey Stimulates a period key press.
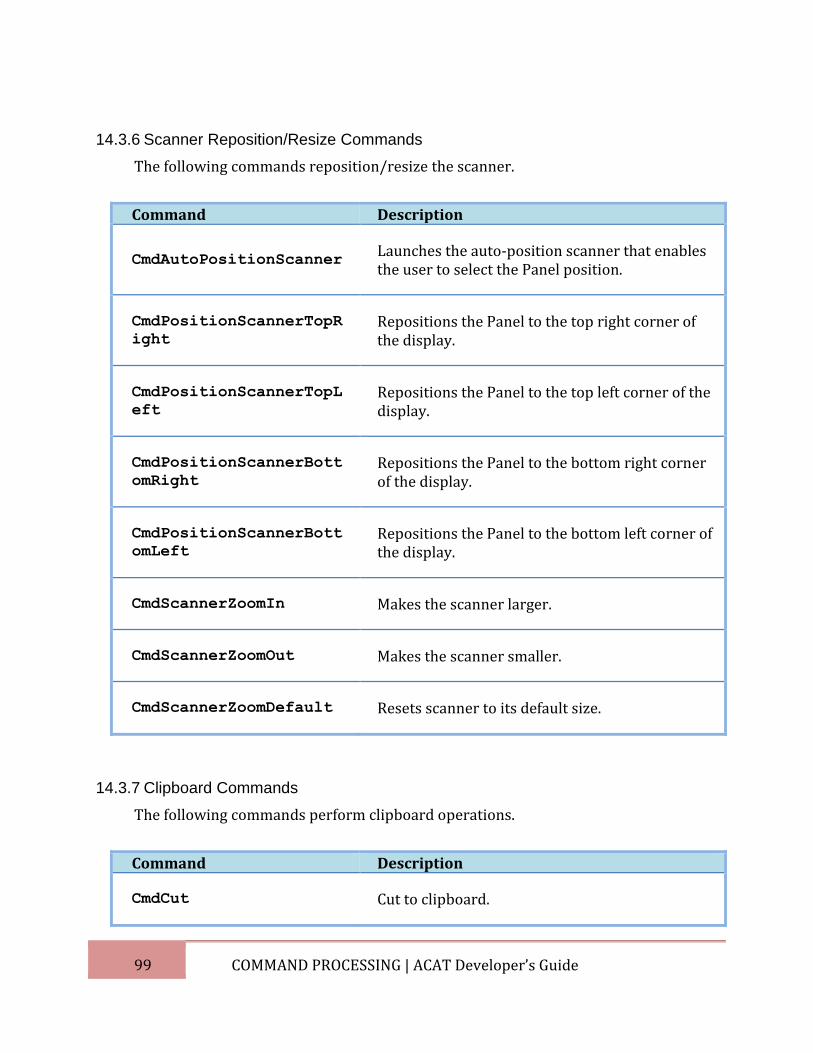
99 COMMAND PROCESSING | ACAT Developer’s Guide
14.3.6 Scanner Reposition/Resize Commands
The following commands reposition/resize the scanner.
Command Description
CmdAutoPositionScanner Launches the auto-position scanner that enables the user to select the Panel position.
CmdPositionScannerTopR
ight
Repositions the Panel to the top right corner of the display.
CmdPositionScannerTopL
eft Repositions the Panel to the top left corner of the display.
CmdPositionScannerBott
omRight
Repositions the Panel to the bottom right corner of the display.
CmdPositionScannerBott
omLeft Repositions the Panel to the bottom left corner of the display.
CmdScannerZoomIn Makes the scanner larger.
CmdScannerZoomOut Makes the scanner smaller.
CmdScannerZoomDefault Resets scanner to its default size.
14.3.7 Clipboard Commands
The following commands perform clipboard operations.
Command Description
CmdCut Cut to clipboard.
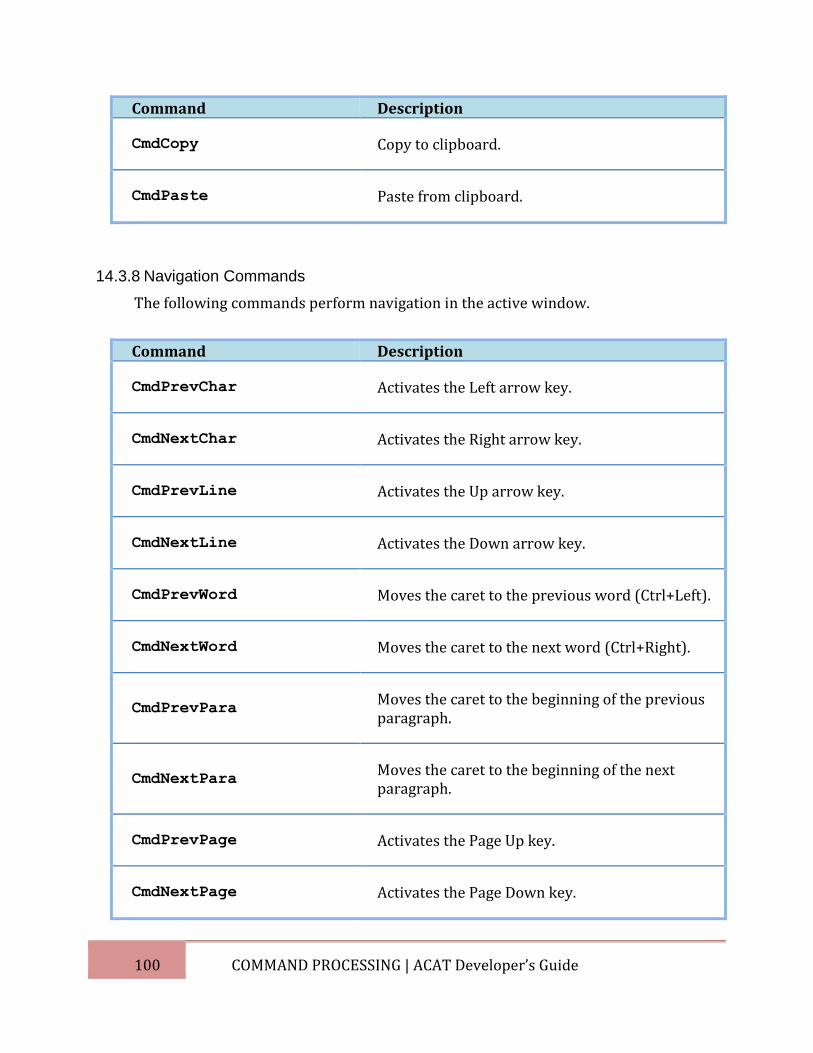
100 COMMAND PROCESSING | ACAT Developer’s Guide
Command Description
CmdCopy Copy to clipboard.
CmdPaste Paste from clipboard.
14.3.8 Navigation Commands
The following commands perform navigation in the active window.
Command Description
CmdPrevChar Activates the Left arrow key.
CmdNextChar Activates the Right arrow key.
CmdPrevLine Activates the Up arrow key.
CmdNextLine Activates the Down arrow key.
CmdPrevWord Moves the caret to the previous word (Ctrl+Left).
CmdNextWord Moves the caret to the next word (Ctrl+Right).
CmdPrevPara Moves the caret to the beginning of the previous paragraph.
CmdNextPara Moves the caret to the beginning of the next paragraph.
CmdPrevPage Activates the Page Up key.
CmdNextPage Activates the Page Down key.
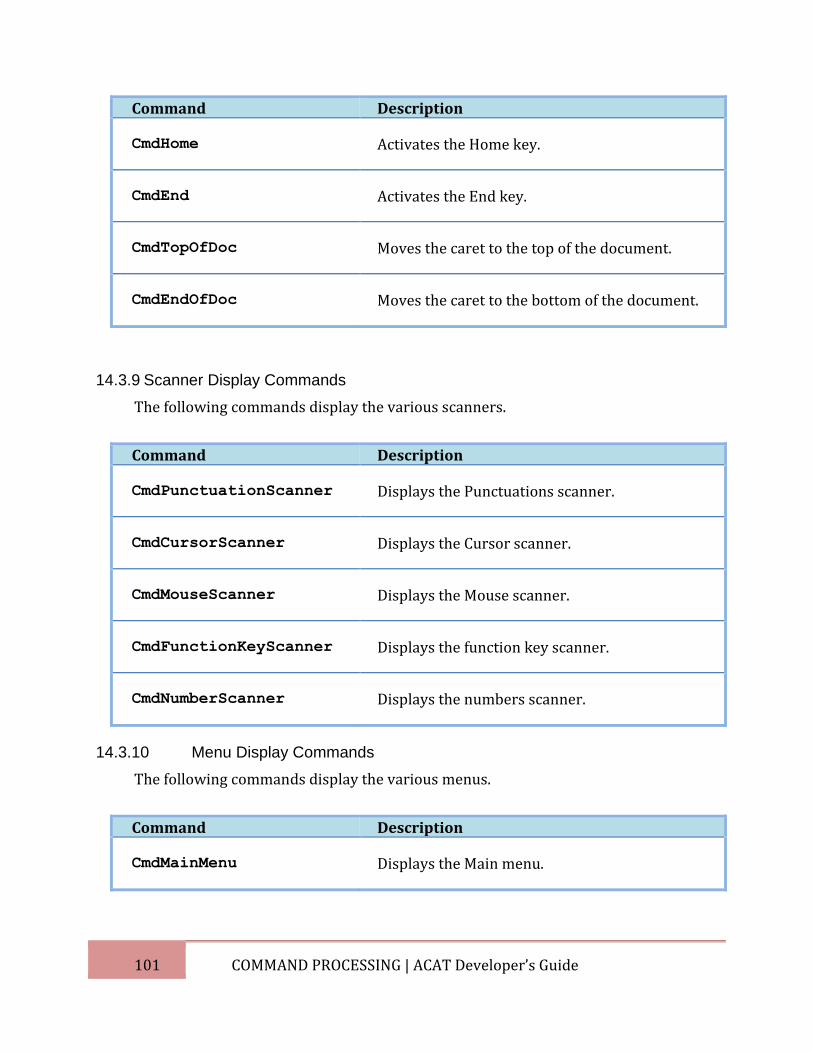
101 COMMAND PROCESSING | ACAT Developer’s Guide
Command Description
CmdHome Activates the Home key.
CmdEnd Activates the End key.
CmdTopOfDoc Moves the caret to the top of the document.
CmdEndOfDoc Moves the caret to the bottom of the document.
14.3.9 Scanner Display Commands
The following commands display the various scanners.
Command Description
CmdPunctuationScanner Displays the Punctuations scanner.
CmdCursorScanner Displays the Cursor scanner.
CmdMouseScanner Displays the Mouse scanner.
CmdFunctionKeyScanner Displays the function key scanner.
CmdNumberScanner Displays the numbers scanner.
14.3.10 Menu Display Commands
The following commands display the various menus.
Command Description
CmdMainMenu Displays the Main menu.
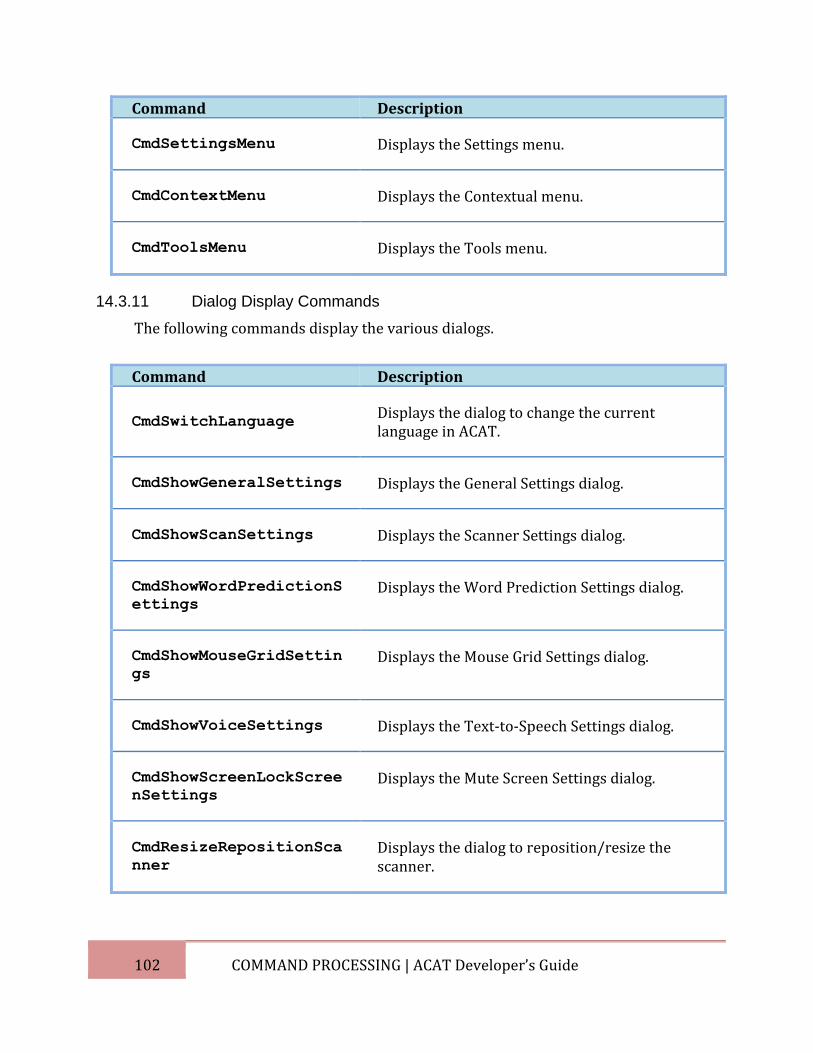
102 COMMAND PROCESSING | ACAT Developer’s Guide
Command Description
CmdSettingsMenu Displays the Settings menu.
CmdContextMenu Displays the Contextual menu.
CmdToolsMenu Displays the Tools menu.
14.3.11 Dialog Display Commands
The following commands display the various dialogs.
Command Description
CmdSwitchLanguage Displays the dialog to change the current language in ACAT.
CmdShowGeneralSettings Displays the General Settings dialog.
CmdShowScanSettings Displays the Scanner Settings dialog.
CmdShowWordPredictionS
ettings Displays the Word Prediction Settings dialog.
CmdShowMouseGridSettin
gs Displays the Mouse Grid Settings dialog.
CmdShowVoiceSettings Displays the Text-to-Speech Settings dialog.
CmdShowScreenLockScree
nSettings Displays the Mute Screen Settings dialog.
CmdResizeRepositionSca
nner
Displays the dialog to reposition/resize the scanner.
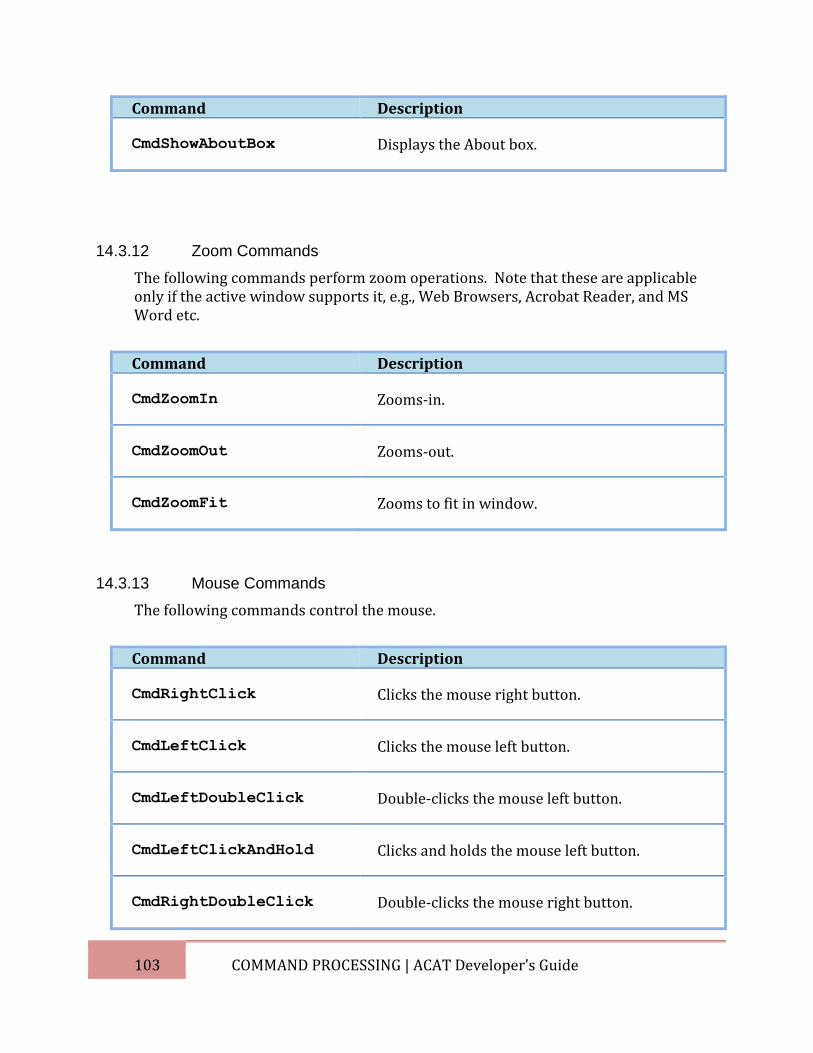
103 COMMAND PROCESSING | ACAT Developer’s Guide
Command Description
CmdShowAboutBox Displays the About box.
14.3.12 Zoom Commands
The following commands perform zoom operations. Note that these are applicable only if the active window supports it, e.g., Web Browsers, Acrobat Reader, and MS Word etc.
Command Description
CmdZoomIn Zooms-in.
CmdZoomOut Zooms-out.
CmdZoomFit Zooms to fit in window.
14.3.13 Mouse Commands
The following commands control the mouse.
Command Description
CmdRightClick Clicks the mouse right button.
CmdLeftClick Clicks the mouse left button.
CmdLeftDoubleClick Double-clicks the mouse left button.
CmdLeftClickAndHold Clicks and holds the mouse left button.
CmdRightDoubleClick Double-clicks the mouse right button.
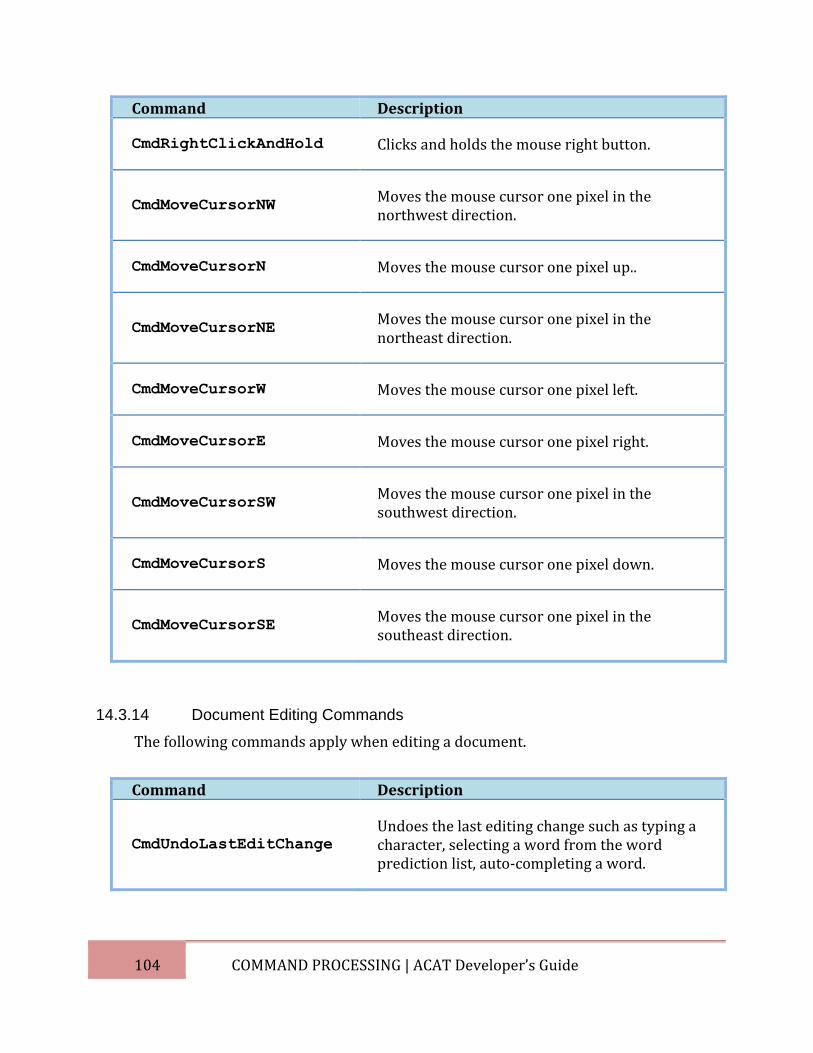
104 COMMAND PROCESSING | ACAT Developer’s Guide
Command Description
CmdRightClickAndHold Clicks and holds the mouse right button.
CmdMoveCursorNW Moves the mouse cursor one pixel in the northwest direction.
CmdMoveCursorN Moves the mouse cursor one pixel up..
CmdMoveCursorNE Moves the mouse cursor one pixel in the northeast direction.
CmdMoveCursorW Moves the mouse cursor one pixel left.
CmdMoveCursorE Moves the mouse cursor one pixel right.
CmdMoveCursorSW Moves the mouse cursor one pixel in the southwest direction.
CmdMoveCursorS Moves the mouse cursor one pixel down.
CmdMoveCursorSE Moves the mouse cursor one pixel in the southeast direction.
14.3.14 Document Editing Commands
The following commands apply when editing a document.
Command Description
CmdUndoLastEditChange
Undoes the last editing change such as typing a character, selecting a word from the word prediction list, auto-completing a word.
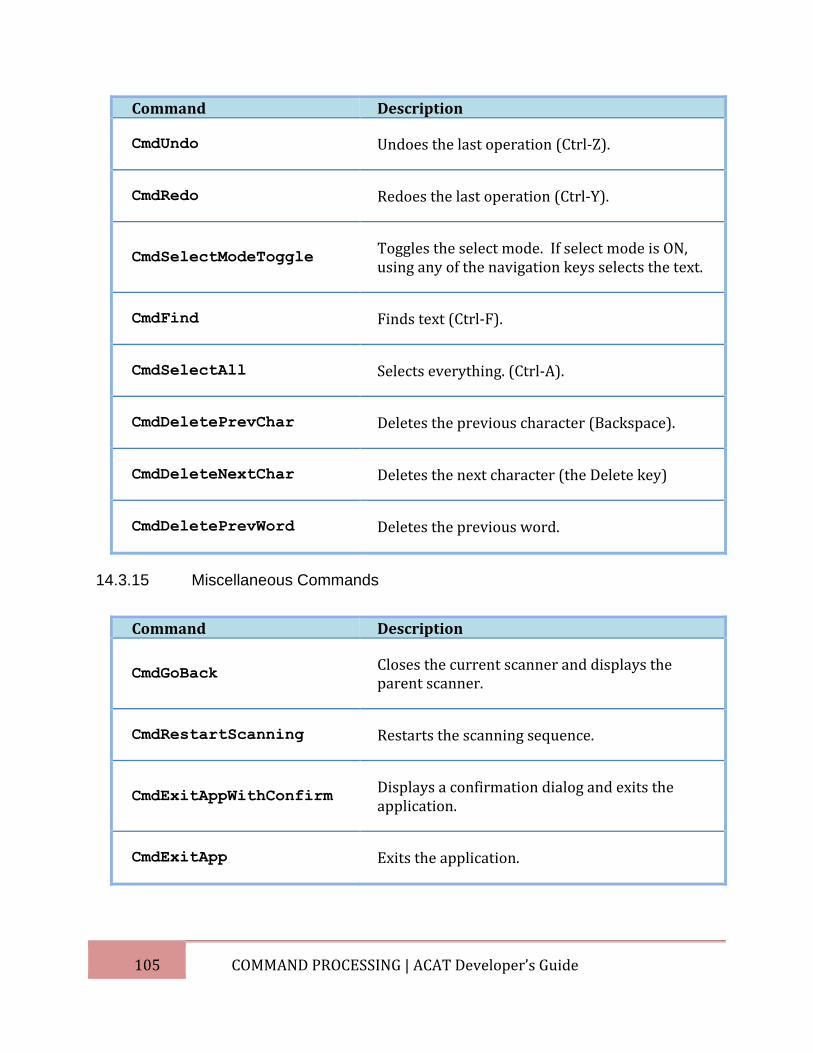
105 COMMAND PROCESSING | ACAT Developer’s Guide
Command Description
CmdUndo Undoes the last operation (Ctrl-Z).
CmdRedo Redoes the last operation (Ctrl-Y).
CmdSelectModeToggle Toggles the select mode. If select mode is ON, using any of the navigation keys selects the text.
CmdFind Finds text (Ctrl-F).
CmdSelectAll Selects everything. (Ctrl-A).
CmdDeletePrevChar Deletes the previous character (Backspace).
CmdDeleteNextChar Deletes the next character (the Delete key)
CmdDeletePrevWord Deletes the previous word.
14.3.15 Miscellaneous Commands
Command Description
CmdGoBack Closes the current scanner and displays the parent scanner.
CmdRestartScanning Restarts the scanning sequence.
CmdExitAppWithConfirm Displays a confirmation dialog and exits the application.
CmdExitApp Exits the application.
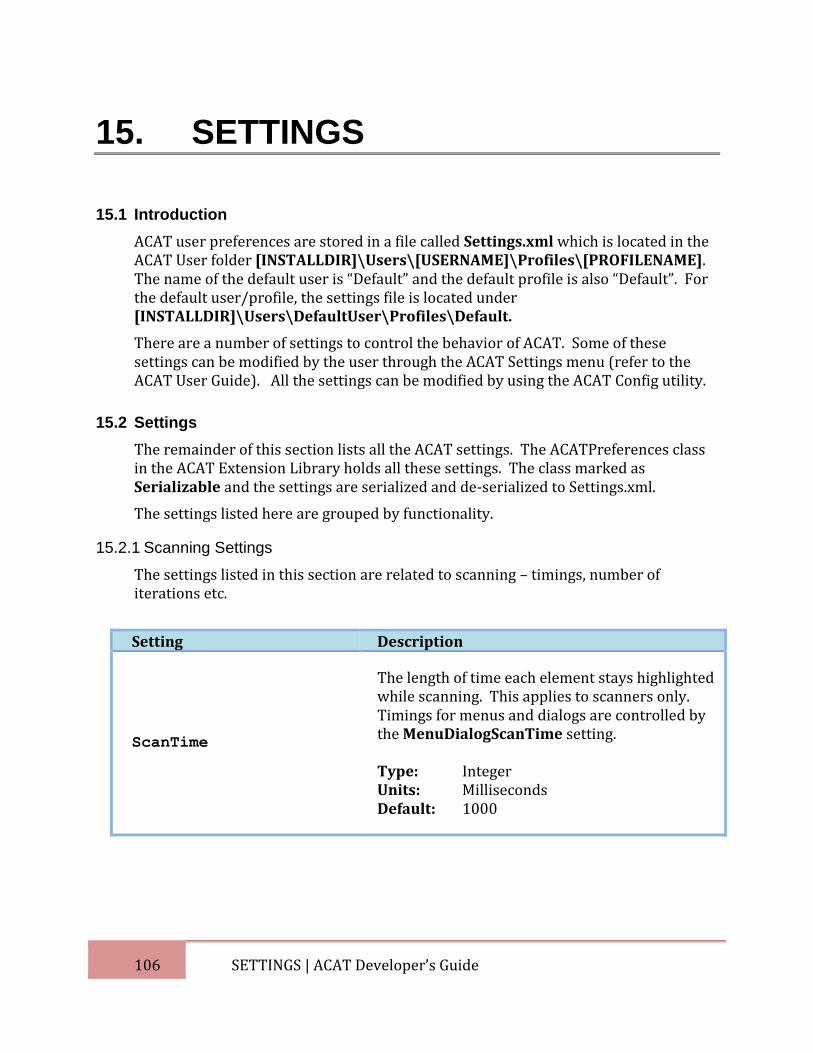
106 SETTINGS | ACAT Developer’s Guide
15. SETTINGS
15.1 Introduction
ACAT user preferences are stored in a file called Settings.xml which is located in the ACAT User folder [INSTALLDIR]\Users\[USERNAME]\Profiles\[PROFILENAME]. The name of the default user is “Default” and the default profile is also “Default”. For the default user/profile, the settings file is located under [INSTALLDIR]\Users\DefaultUser\Profiles\Default.
There are a number of settings to control the behavior of ACAT. Some of these settings can be modified by the user through the ACAT Settings menu (refer to the ACAT User Guide). All the settings can be modified by using the ACAT Config utility.
15.2 Settings
The remainder of this section lists all the ACAT settings. The ACATPreferences class in the ACAT Extension Library holds all these settings. The class marked as Serializable and the settings are serialized and de-serialized to Settings.xml.
The settings listed here are grouped by functionality.
15.2.1 Scanning Settings
The settings listed in this section are related to scanning – timings, number of iterations etc.
Setting Description
ScanTime
The length of time each element stays highlighted while scanning. This applies to scanners only. Timings for menus and dialogs are controlled by the MenuDialogScanTime setting. Type: Integer Units: Milliseconds Default: 1000
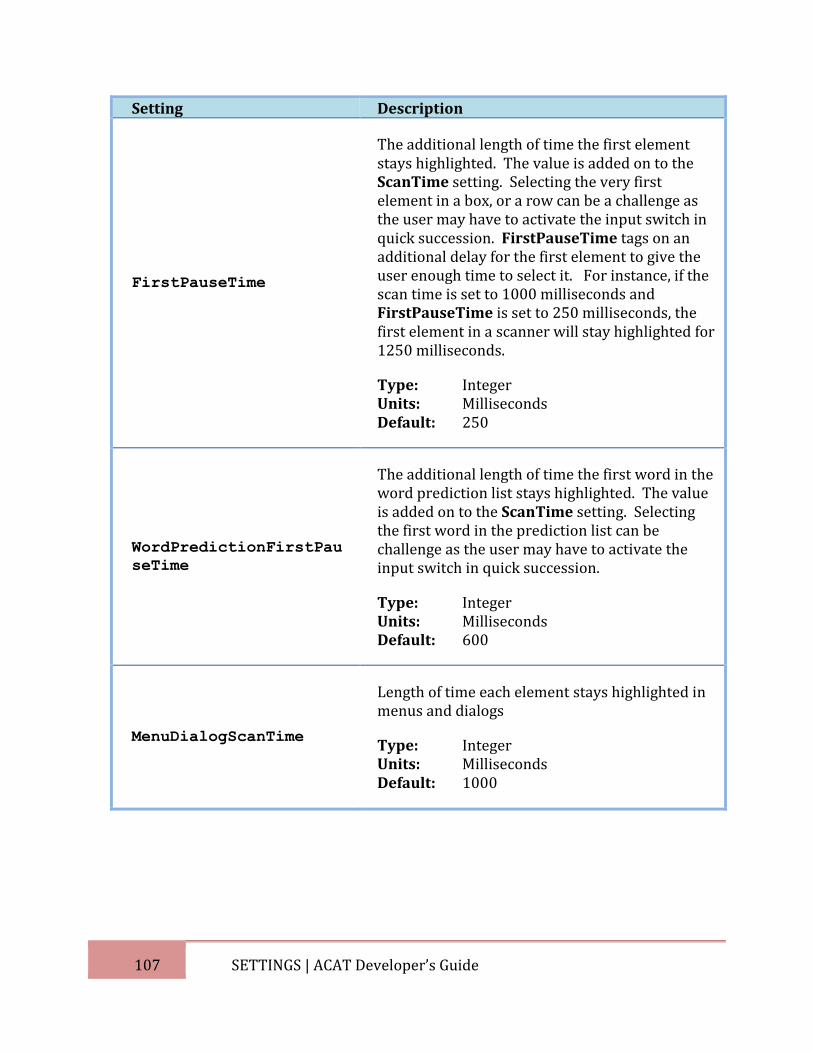
107 SETTINGS | ACAT Developer’s Guide
Setting Description
FirstPauseTime
The additional length of time the first element stays highlighted. The value is added on to the ScanTime setting. Selecting the very first element in a box, or a row can be a challenge as the user may have to activate the input switch in quick succession. FirstPauseTime tags on an additional delay for the first element to give the user enough time to select it. For instance, if the scan time is set to 1000 milliseconds and FirstPauseTime is set to 250 milliseconds, the first element in a scanner will stay highlighted for 1250 milliseconds.
Type: Integer Units: Milliseconds Default: 250
WordPredictionFirstPau
seTime
The additional length of time the first word in the word prediction list stays highlighted. The value is added on to the ScanTime setting. Selecting the first word in the prediction list can be challenge as the user may have to activate the input switch in quick succession.
Type: Integer Units: Milliseconds Default: 600
MenuDialogScanTime
Length of time each element stays highlighted in menus and dialogs
Type: Integer Units: Milliseconds Default: 1000
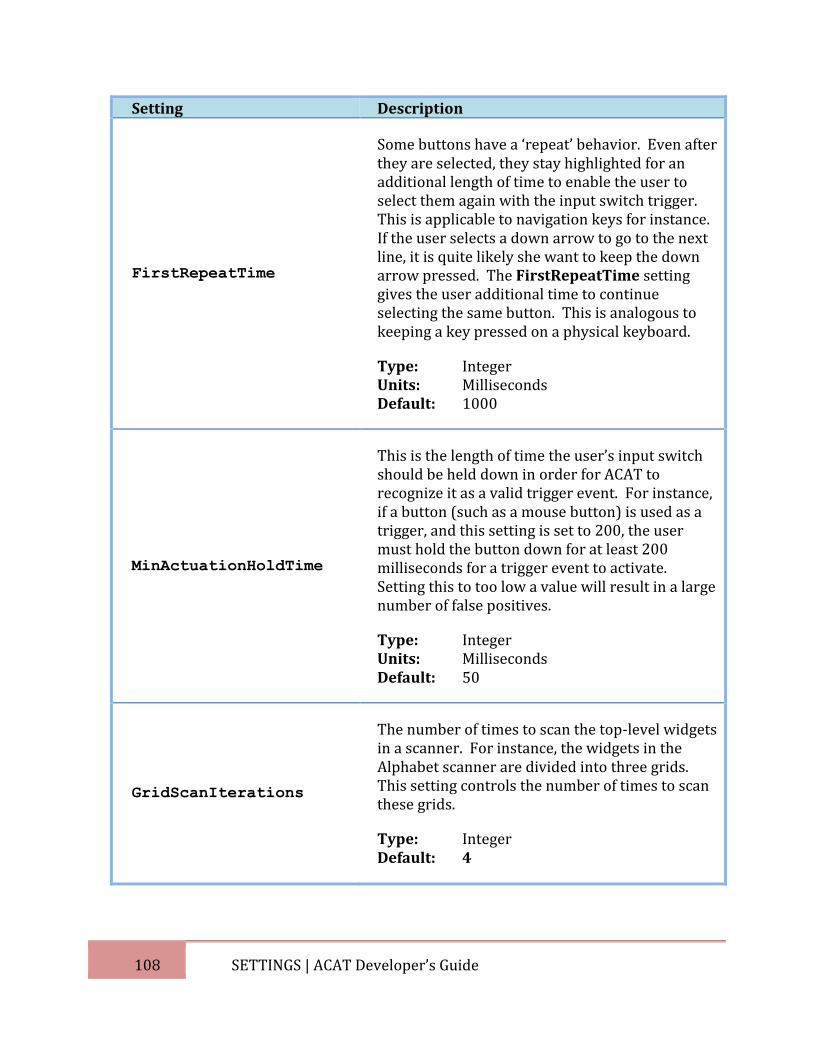
108 SETTINGS | ACAT Developer’s Guide
Setting Description
FirstRepeatTime
Some buttons have a ‘repeat’ behavior. Even after they are selected, they stay highlighted for an additional length of time to enable the user to select them again with the input switch trigger. This is applicable to navigation keys for instance. If the user selects a down arrow to go to the next line, it is quite likely she want to keep the down arrow pressed. The FirstRepeatTime setting gives the user additional time to continue selecting the same button. This is analogous to keeping a key pressed on a physical keyboard.
Type: Integer Units: Milliseconds Default: 1000
MinActuationHoldTime
This is the length of time the user’s input switch should be held down in order for ACAT to recognize it as a valid trigger event. For instance, if a button (such as a mouse button) is used as a trigger, and this setting is set to 200, the user must hold the button down for at least 200 milliseconds for a trigger event to activate. Setting this to too low a value will result in a large number of false positives.
Type: Integer Units: Milliseconds Default: 50
GridScanIterations
The number of times to scan the top-level widgets in a scanner. For instance, the widgets in the Alphabet scanner are divided into three grids. This setting controls the number of times to scan these grids.
Type: Integer Default: 4
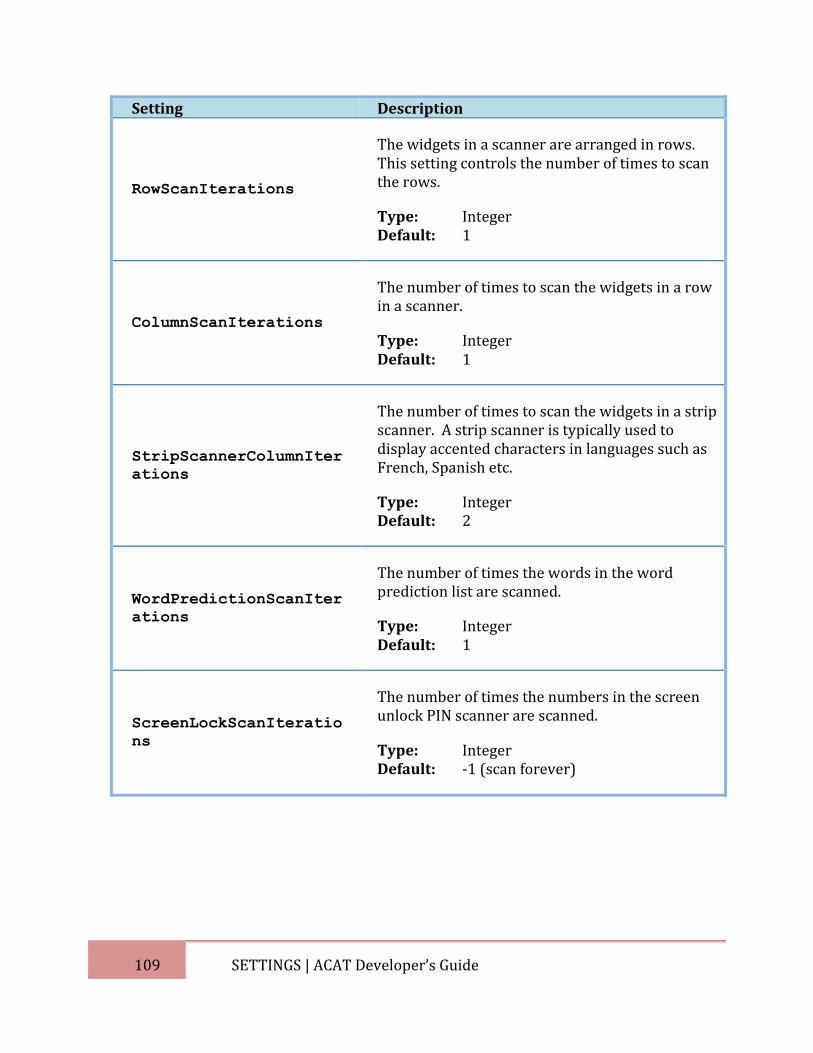
109 SETTINGS | ACAT Developer’s Guide
Setting Description
RowScanIterations
The widgets in a scanner are arranged in rows. This setting controls the number of times to scan the rows.
Type: Integer Default: 1
ColumnScanIterations
The number of times to scan the widgets in a row in a scanner.
Type: Integer Default: 1
StripScannerColumnIter
ations
The number of times to scan the widgets in a strip scanner. A strip scanner is typically used to display accented characters in languages such as French, Spanish etc.
Type: Integer Default: 2
WordPredictionScanIter
ations
The number of times the words in the word prediction list are scanned.
Type: Integer Default: 1
ScreenLockScanIteratio
ns
The number of times the numbers in the screen unlock PIN scanner are scanned.
Type: Integer Default: -1 (scan forever)
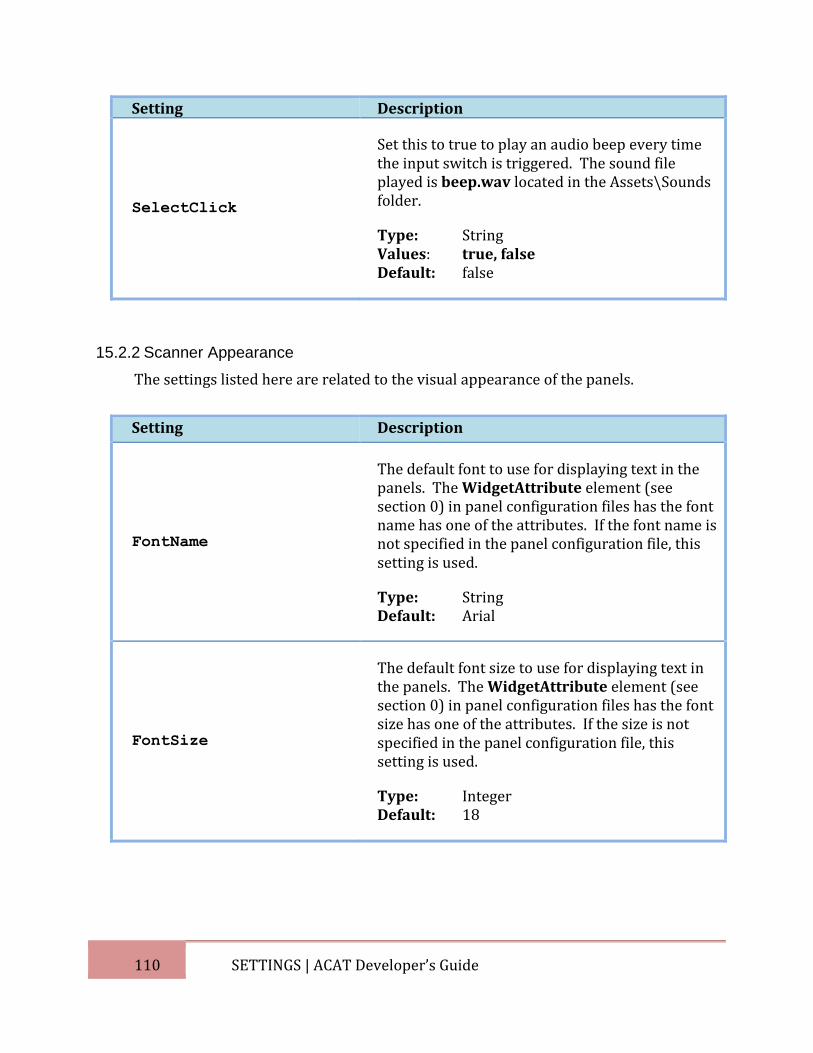
110 SETTINGS | ACAT Developer’s Guide
Setting Description
SelectClick
Set this to true to play an audio beep every time the input switch is triggered. The sound file played is beep.wav located in the Assets\Sounds folder.
Type: String Values: true, false Default: false
15.2.2 Scanner Appearance
The settings listed here are related to the visual appearance of the panels.
Setting Description
FontName
The default font to use for displaying text in the panels. The WidgetAttribute element (see section 0) in panel configuration files has the font name has one of the attributes. If the font name is not specified in the panel configuration file, this setting is used.
Type: String Default: Arial
FontSize
The default font size to use for displaying text in the panels. The WidgetAttribute element (see section 0) in panel configuration files has the font size has one of the attributes. If the size is not specified in the panel configuration file, this setting is used.
Type: Integer Default: 18
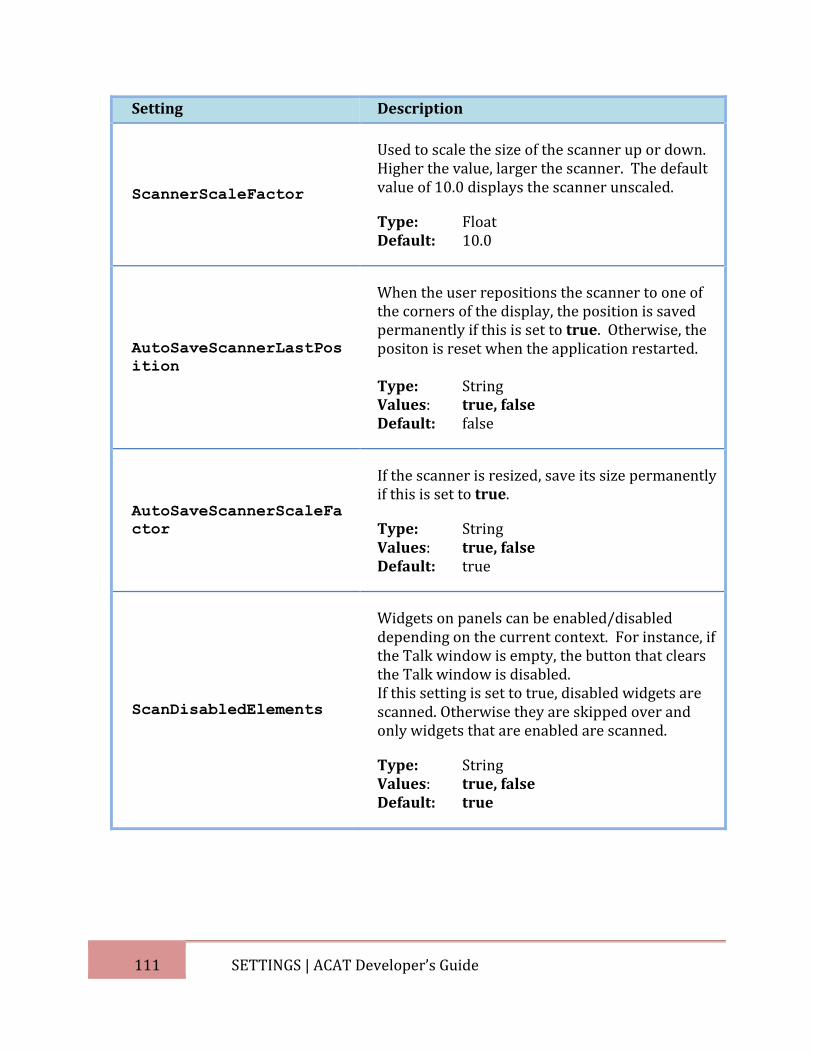
111 SETTINGS | ACAT Developer’s Guide
Setting Description
ScannerScaleFactor
Used to scale the size of the scanner up or down. Higher the value, larger the scanner. The default value of 10.0 displays the scanner unscaled.
Type: Float Default: 10.0
AutoSaveScannerLastPos
ition
When the user repositions the scanner to one of the corners of the display, the position is saved permanently if this is set to true. Otherwise, the positon is reset when the application restarted. Type: String Values: true, false Default: false
AutoSaveScannerScaleFa
ctor
If the scanner is resized, save its size permanently if this is set to true.
Type: String Values: true, false Default: true
ScanDisabledElements
Widgets on panels can be enabled/disabled depending on the current context. For instance, if the Talk window is empty, the button that clears the Talk window is disabled. If this setting is set to true, disabled widgets are scanned. Otherwise they are skipped over and only widgets that are enabled are scanned.
Type: String Values: true, false Default: true
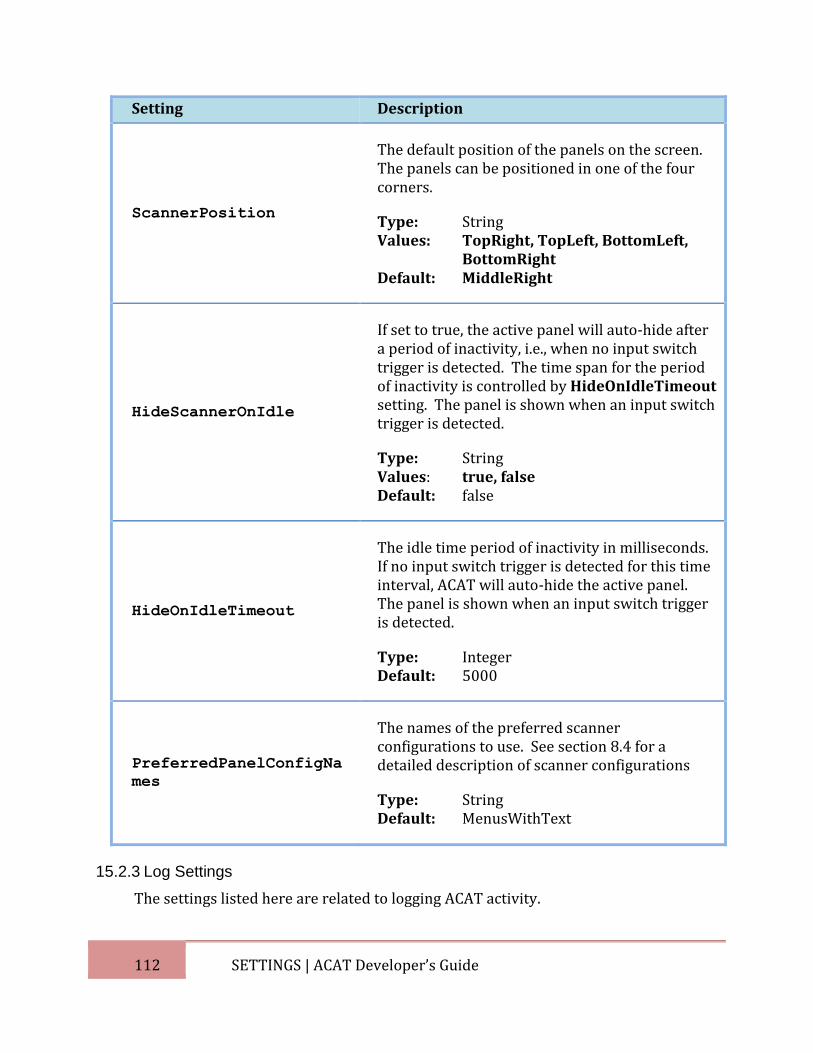
112 SETTINGS | ACAT Developer’s Guide
Setting Description
ScannerPosition
The default position of the panels on the screen. The panels can be positioned in one of the four corners.
Type: String Values: TopRight, TopLeft, BottomLeft, BottomRight Default: MiddleRight
HideScannerOnIdle
If set to true, the active panel will auto-hide after a period of inactivity, i.e., when no input switch trigger is detected. The time span for the period of inactivity is controlled by HideOnIdleTimeout setting. The panel is shown when an input switch trigger is detected.
Type: String Values: true, false Default: false
HideOnIdleTimeout
The idle time period of inactivity in milliseconds. If no input switch trigger is detected for this time interval, ACAT will auto-hide the active panel. The panel is shown when an input switch trigger is detected.
Type: Integer Default: 5000
PreferredPanelConfigNa
mes
The names of the preferred scanner configurations to use. See section 8.4 for a detailed description of scanner configurations
Type: String Default: MenusWithText
15.2.3 Log Settings
The settings listed here are related to logging ACAT activity.
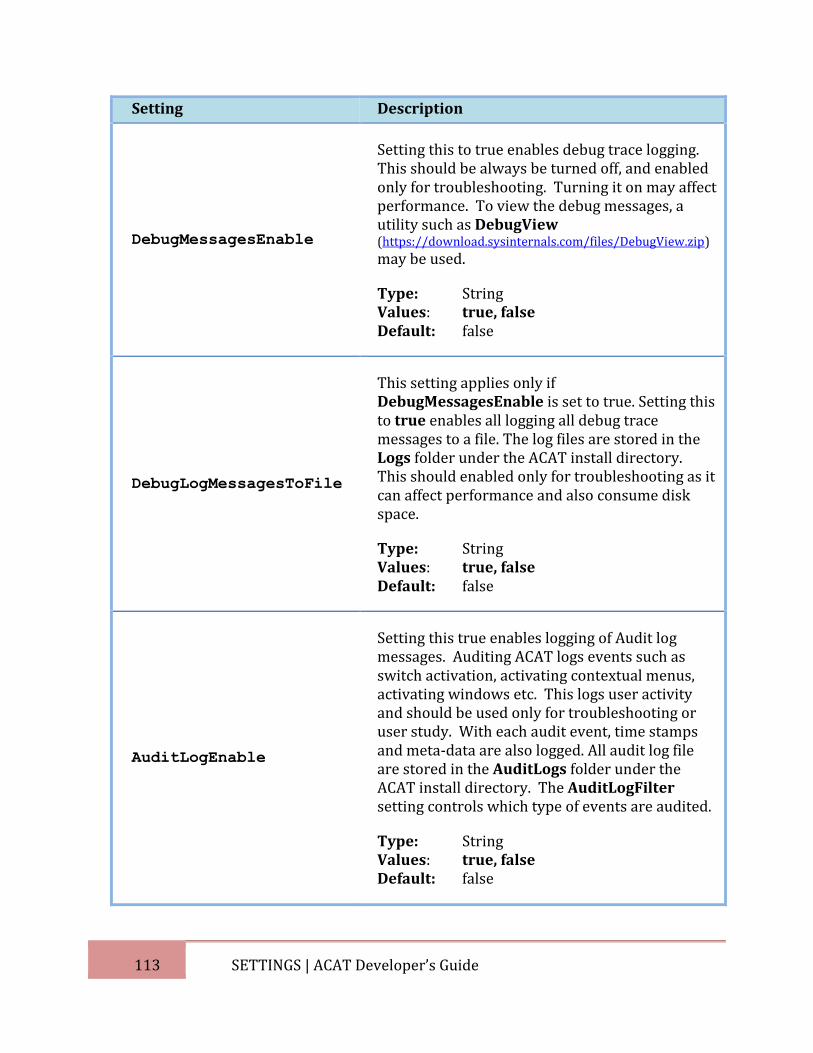
113 SETTINGS | ACAT Developer’s Guide
Setting Description
DebugMessagesEnable
Setting this to true enables debug trace logging. This should be always be turned off, and enabled only for troubleshooting. Turning it on may affect performance. To view the debug messages, a utility such as DebugView (https://download.sysinternals.com/files/DebugView.zip) may be used.
Type: String Values: true, false Default: false
DebugLogMessagesToFile
This setting applies only if DebugMessagesEnable is set to true. Setting this to true enables all logging all debug trace messages to a file. The log files are stored in the Logs folder under the ACAT install directory. This should enabled only for troubleshooting as it can affect performance and also consume disk space.
Type: String Values: true, false Default: false
AuditLogEnable
Setting this true enables logging of Audit log messages. Auditing ACAT logs events such as switch activation, activating contextual menus, activating windows etc. This logs user activity and should be used only for troubleshooting or user study. With each audit event, time stamps and meta-data are also logged. All audit log file are stored in the AuditLogs folder under the ACAT install directory. The AuditLogFilter setting controls which type of events are audited.
Type: String Values: true, false Default: false
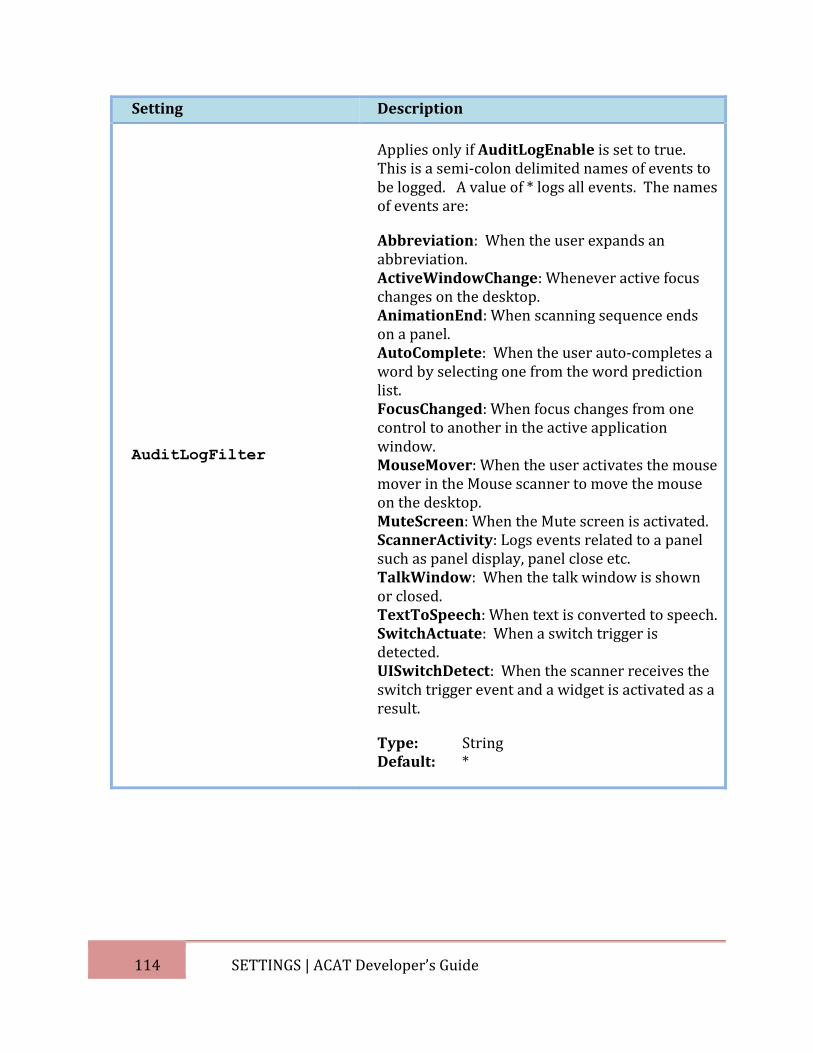
114 SETTINGS | ACAT Developer’s Guide
Setting Description
AuditLogFilter
Applies only if AuditLogEnable is set to true. This is a semi-colon delimited names of events to be logged. A value of * logs all events. The names of events are:
Abbreviation: When the user expands an abbreviation. ActiveWindowChange: Whenever active focus changes on the desktop. AnimationEnd: When scanning sequence ends on a panel. AutoComplete: When the user auto-completes a word by selecting one from the word prediction list. FocusChanged: When focus changes from one control to another in the active application window. MouseMover: When the user activates the mouse mover in the Mouse scanner to move the mouse on the desktop. MuteScreen: When the Mute screen is activated. ScannerActivity: Logs events related to a panel such as panel display, panel close etc. TalkWindow: When the talk window is shown or closed. TextToSpeech: When text is converted to speech. SwitchActuate: When a switch trigger is detected. UISwitchDetect: When the scanner receives the switch trigger event and a widget is activated as a result.
Type: String Default: *
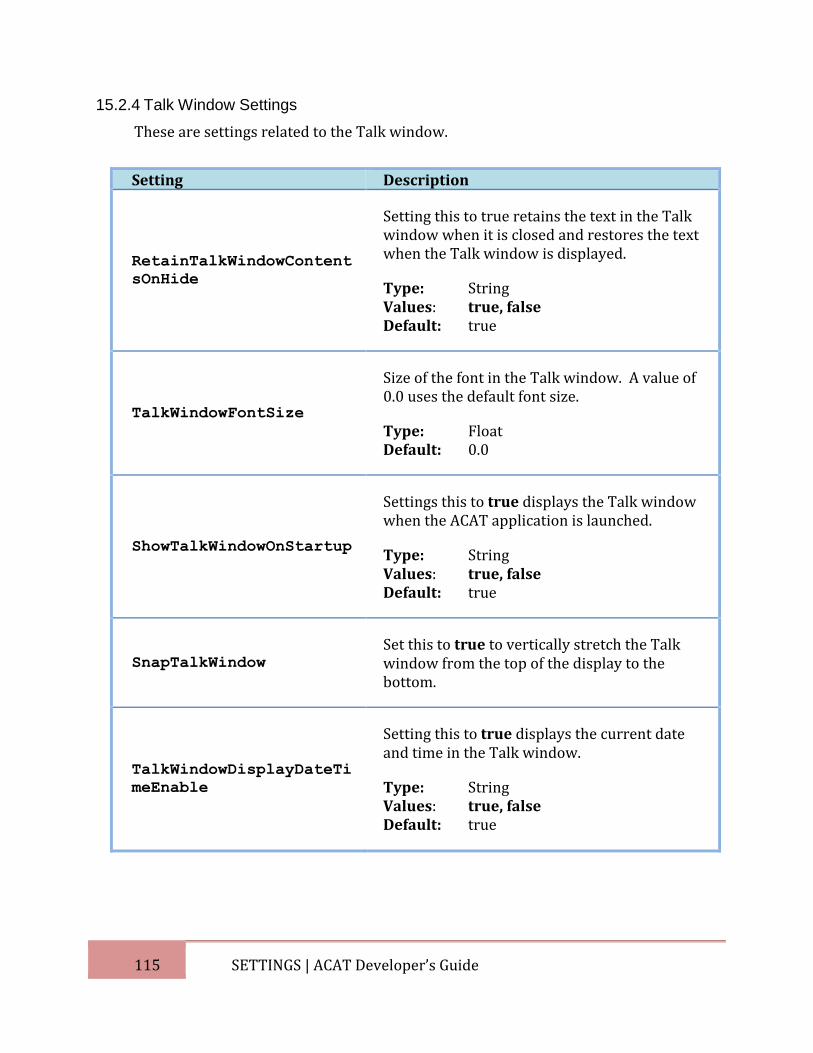
115 SETTINGS | ACAT Developer’s Guide
15.2.4 Talk Window Settings
These are settings related to the Talk window.
Setting Description
RetainTalkWindowContent
sOnHide
Setting this to true retains the text in the Talk window when it is closed and restores the text when the Talk window is displayed.
Type: String Values: true, false Default: true
TalkWindowFontSize
Size of the font in the Talk window. A value of 0.0 uses the default font size.
Type: Float Default: 0.0
ShowTalkWindowOnStartup
Settings this to true displays the Talk window when the ACAT application is launched.
Type: String Values: true, false Default: true
SnapTalkWindow
Set this to true to vertically stretch the Talk window from the top of the display to the bottom.
TalkWindowDisplayDateTi
meEnable
Setting this to true displays the current date and time in the Talk window.
Type: String Values: true, false Default: true
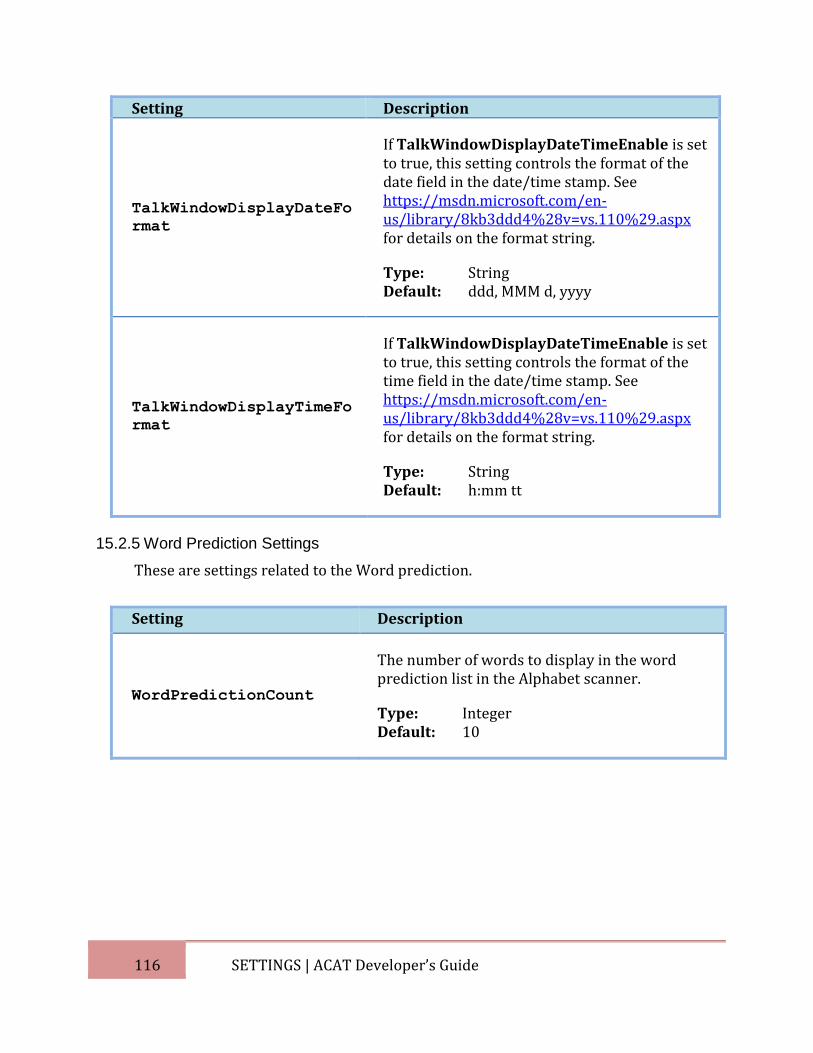
116 SETTINGS | ACAT Developer’s Guide
Setting Description
TalkWindowDisplayDateFo
rmat
If TalkWindowDisplayDateTimeEnable is set to true, this setting controls the format of the date field in the date/time stamp. See https://msdn.microsoft.com/en-us/library/8kb3ddd4%28v=vs.110%29.aspx for details on the format string.
Type: String Default: ddd, MMM d, yyyy
TalkWindowDisplayTimeFo
rmat
If TalkWindowDisplayDateTimeEnable is set to true, this setting controls the format of the time field in the date/time stamp. See https://msdn.microsoft.com/en-us/library/8kb3ddd4%28v=vs.110%29.aspx for details on the format string.
Type: String Default: h:mm tt
15.2.5 Word Prediction Settings
These are settings related to the Word prediction.
Setting Description
WordPredictionCount
The number of words to display in the word prediction list in the Alphabet scanner.
Type: Integer Default: 10
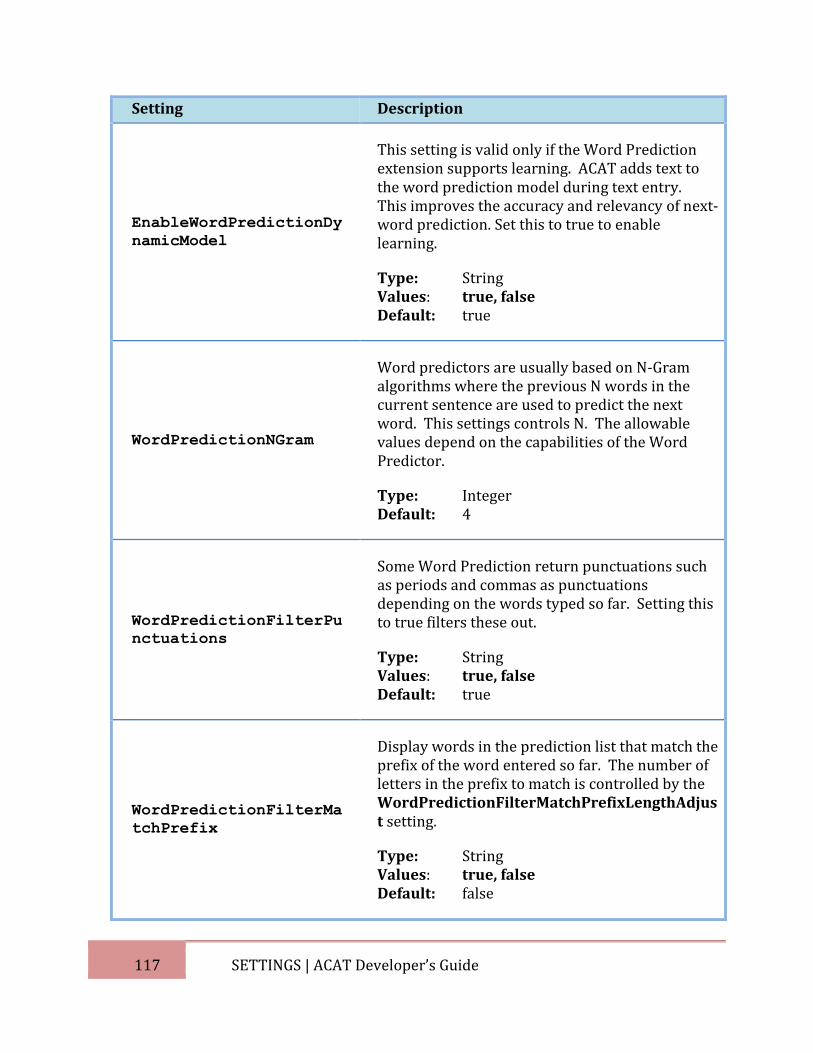
117 SETTINGS | ACAT Developer’s Guide
Setting Description
EnableWordPredictionDy
namicModel
This setting is valid only if the Word Prediction extension supports learning. ACAT adds text to the word prediction model during text entry. This improves the accuracy and relevancy of next-word prediction. Set this to true to enable learning.
Type: String Values: true, false Default: true
WordPredictionNGram
Word predictors are usually based on N-Gram algorithms where the previous N words in the current sentence are used to predict the next word. This settings controls N. The allowable values depend on the capabilities of the Word Predictor.
Type: Integer Default: 4
WordPredictionFilterPu
nctuations
Some Word Prediction return punctuations such as periods and commas as punctuations depending on the words typed so far. Setting this to true filters these out.
Type: String Values: true, false Default: true
WordPredictionFilterMa
tchPrefix
Display words in the prediction list that match the prefix of the word entered so far. The number of letters in the prefix to match is controlled by the WordPredictionFilterMatchPrefixLengthAdjust setting.
Type: String Values: true, false Default: false
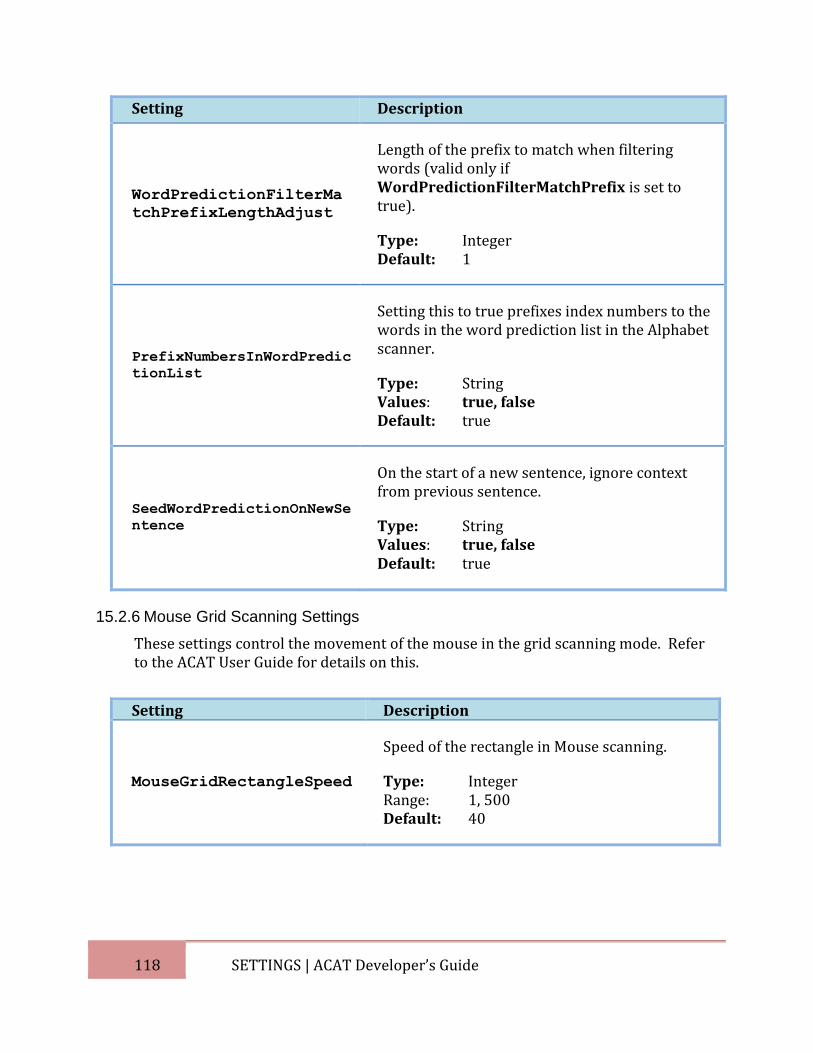
118 SETTINGS | ACAT Developer’s Guide
Setting Description
WordPredictionFilterMa
tchPrefixLengthAdjust
Length of the prefix to match when filtering words (valid only if WordPredictionFilterMatchPrefix is set to true).
Type: Integer Default: 1
PrefixNumbersInWordPredic
tionList
Setting this to true prefixes index numbers to the words in the word prediction list in the Alphabet scanner.
Type: String Values: true, false Default: true
SeedWordPredictionOnNewSe
ntence
On the start of a new sentence, ignore context from previous sentence.
Type: String Values: true, false Default: true
15.2.6 Mouse Grid Scanning Settings
These settings control the movement of the mouse in the grid scanning mode. Refer to the ACAT User Guide for details on this.
Setting Description
MouseGridRectangleSpeed
Speed of the rectangle in Mouse scanning.
Type: Integer Range: 1, 500 Default: 40
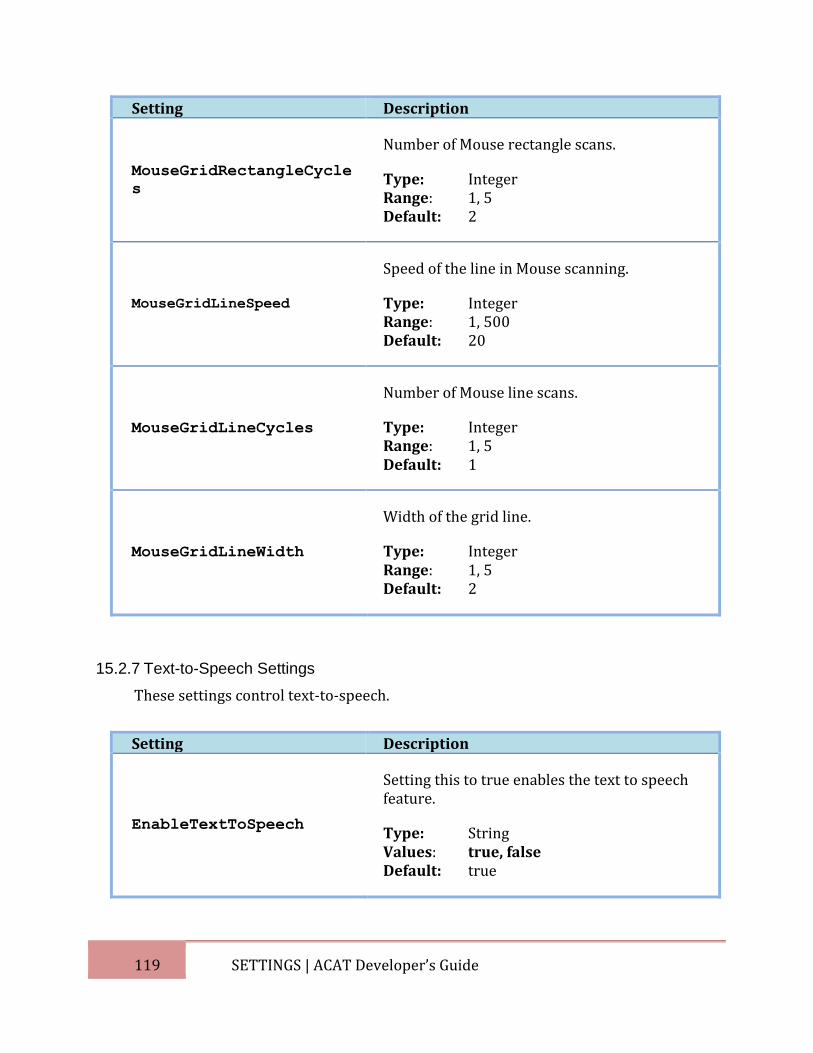
119 SETTINGS | ACAT Developer’s Guide
Setting Description
MouseGridRectangleCycle
s
Number of Mouse rectangle scans.
Type: Integer Range: 1, 5 Default: 2
MouseGridLineSpeed
Speed of the line in Mouse scanning.
Type: Integer Range: 1, 500 Default: 20
MouseGridLineCycles
Number of Mouse line scans.
Type: Integer Range: 1, 5 Default: 1
MouseGridLineWidth
Width of the grid line.
Type: Integer Range: 1, 5 Default: 2
15.2.7 Text-to-Speech Settings
These settings control text-to-speech.
Setting Description
EnableTextToSpeech
Setting this to true enables the text to speech feature.
Type: String Values: true, false Default: true
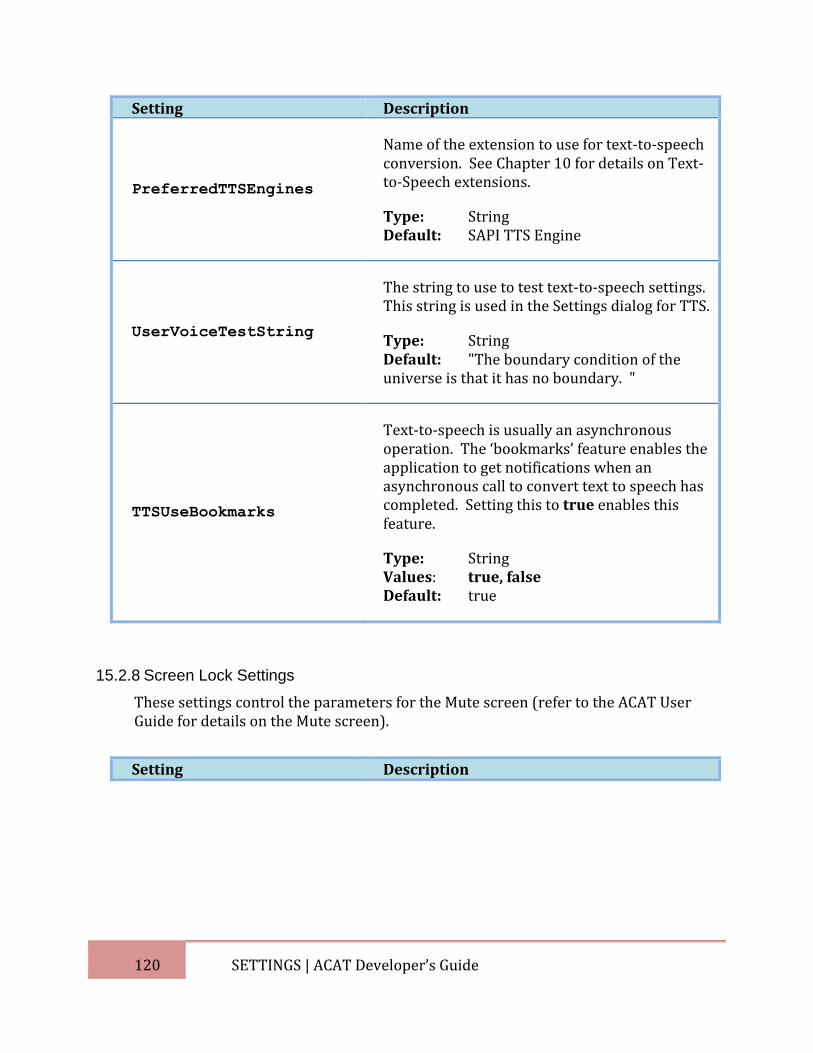
120 SETTINGS | ACAT Developer’s Guide
Setting Description
PreferredTTSEngines
Name of the extension to use for text-to-speech conversion. See Chapter 10 for details on Text-to-Speech extensions.
Type: String Default: SAPI TTS Engine
UserVoiceTestString
The string to use to test text-to-speech settings. This string is used in the Settings dialog for TTS.
Type: String Default: "The boundary condition of the universe is that it has no boundary. "
TTSUseBookmarks
Text-to-speech is usually an asynchronous operation. The ‘bookmarks’ feature enables the application to get notifications when an asynchronous call to convert text to speech has completed. Setting this to true enables this feature.
Type: String Values: true, false Default: true
15.2.8 Screen Lock Settings
These settings control the parameters for the Mute screen (refer to the ACAT User Guide for details on the Mute screen).
Setting Description
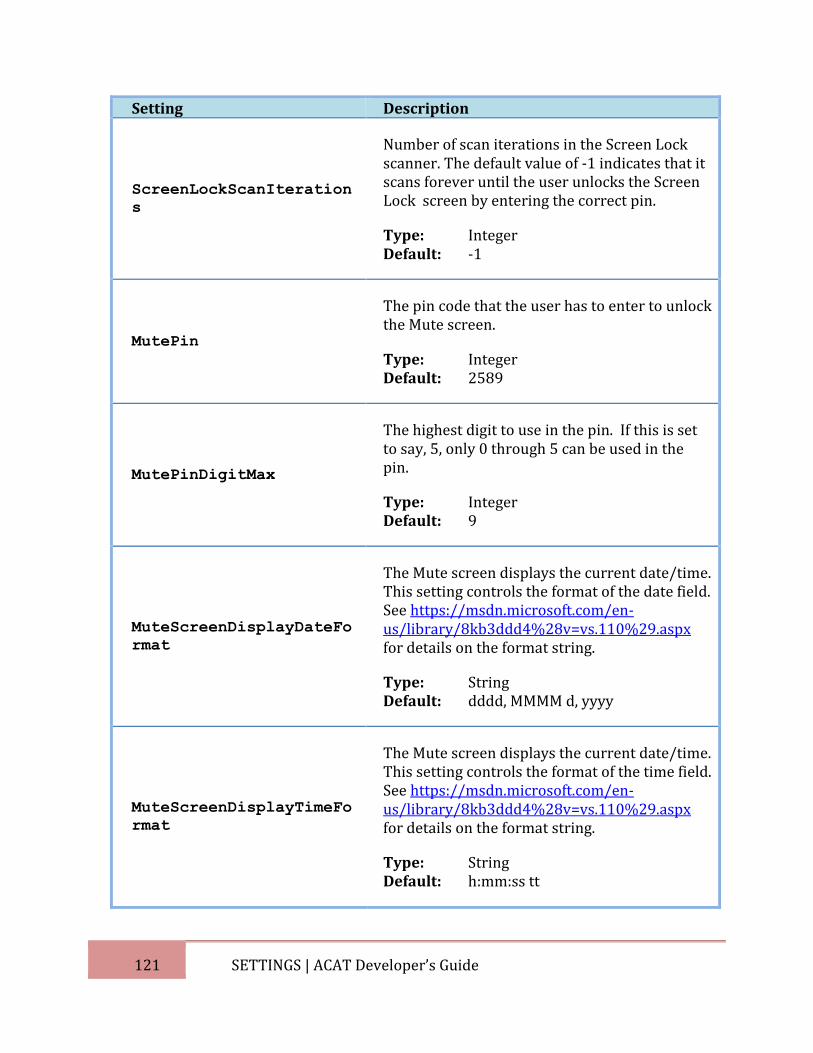
121 SETTINGS | ACAT Developer’s Guide
Setting Description
ScreenLockScanIteration
s
Number of scan iterations in the Screen Lock scanner. The default value of -1 indicates that it scans forever until the user unlocks the Screen Lock screen by entering the correct pin.
Type: Integer Default: -1
MutePin
The pin code that the user has to enter to unlock the Mute screen.
Type: Integer Default: 2589
MutePinDigitMax
The highest digit to use in the pin. If this is set to say, 5, only 0 through 5 can be used in the pin.
Type: Integer Default: 9
MuteScreenDisplayDateFo
rmat
The Mute screen displays the current date/time. This setting controls the format of the date field. See https://msdn.microsoft.com/en-us/library/8kb3ddd4%28v=vs.110%29.aspx for details on the format string.
Type: String Default: dddd, MMMM d, yyyy
MuteScreenDisplayTimeFo
rmat
The Mute screen displays the current date/time. This setting controls the format of the time field. See https://msdn.microsoft.com/en-us/library/8kb3ddd4%28v=vs.110%29.aspx for details on the format string.
Type: String Default: h:mm:ss tt
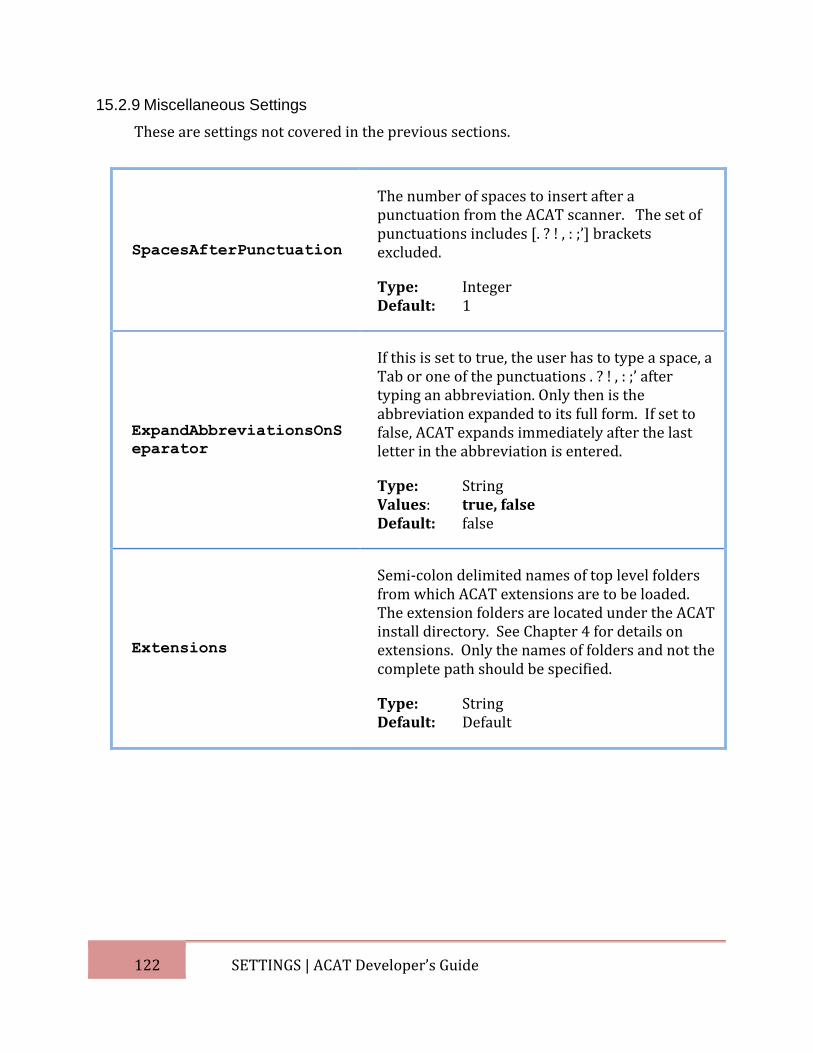
122 SETTINGS | ACAT Developer’s Guide
15.2.9 Miscellaneous Settings
These are settings not covered in the previous sections.
SpacesAfterPunctuation
The number of spaces to insert after a punctuation from the ACAT scanner. The set of punctuations includes [. ? ! , : ;’] brackets excluded.
Type: Integer Default: 1
ExpandAbbreviationsOnS
eparator
If this is set to true, the user has to type a space, a Tab or one of the punctuations . ? ! , : ;’ after typing an abbreviation. Only then is the abbreviation expanded to its full form. If set to false, ACAT expands immediately after the last letter in the abbreviation is entered.
Type: String Values: true, false Default: false
Extensions
Semi-colon delimited names of top level folders from which ACAT extensions are to be loaded. The extension folders are located under the ACAT install directory. See Chapter 4 for details on extensions. Only the names of folders and not the complete path should be specified.
Type: String Default: Default
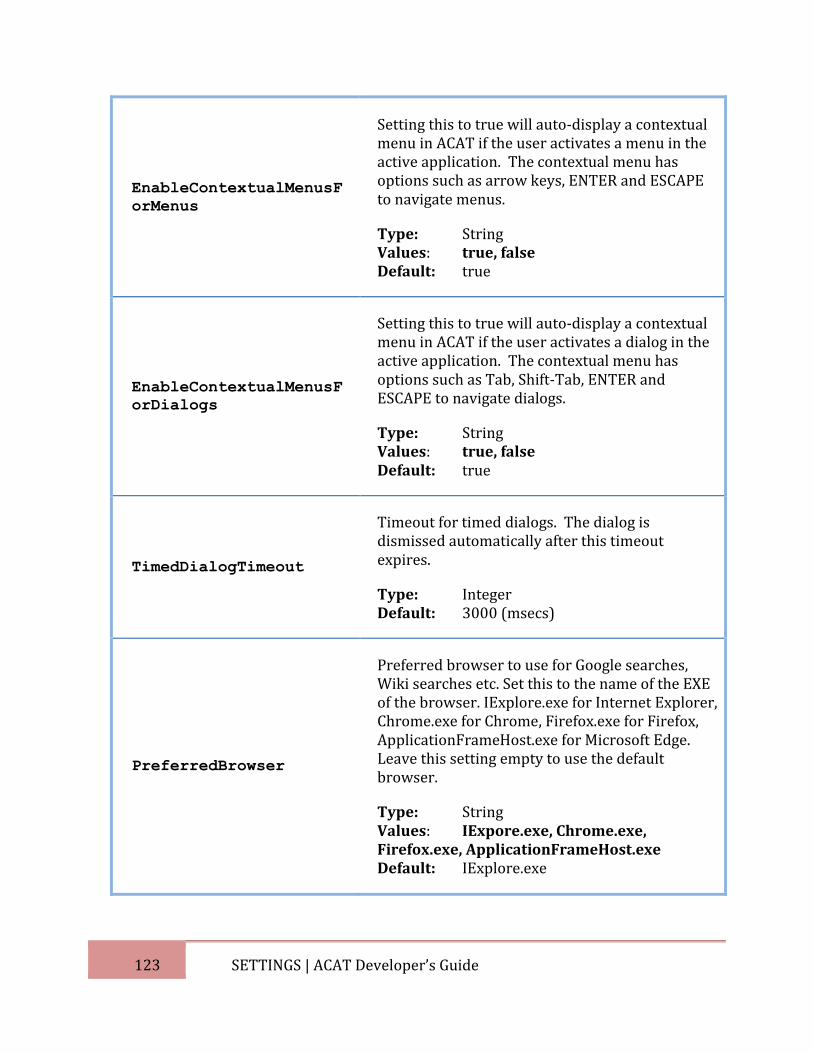
123 SETTINGS | ACAT Developer’s Guide
EnableContextualMenusF
orMenus
Setting this to true will auto-display a contextual menu in ACAT if the user activates a menu in the active application. The contextual menu has options such as arrow keys, ENTER and ESCAPE to navigate menus.
Type: String Values: true, false Default: true
EnableContextualMenusF
orDialogs
Setting this to true will auto-display a contextual menu in ACAT if the user activates a dialog in the active application. The contextual menu has options such as Tab, Shift-Tab, ENTER and ESCAPE to navigate dialogs.
Type: String Values: true, false Default: true
TimedDialogTimeout
Timeout for timed dialogs. The dialog is dismissed automatically after this timeout expires.
Type: Integer Default: 3000 (msecs)
PreferredBrowser
Preferred browser to use for Google searches, Wiki searches etc. Set this to the name of the EXE of the browser. IExplore.exe for Internet Explorer, Chrome.exe for Chrome, Firefox.exe for Firefox, ApplicationFrameHost.exe for Microsoft Edge. Leave this setting empty to use the default browser.
Type: String Values: IExpore.exe, Chrome.exe, Firefox.exe, ApplicationFrameHost.exe Default: IExplore.exe
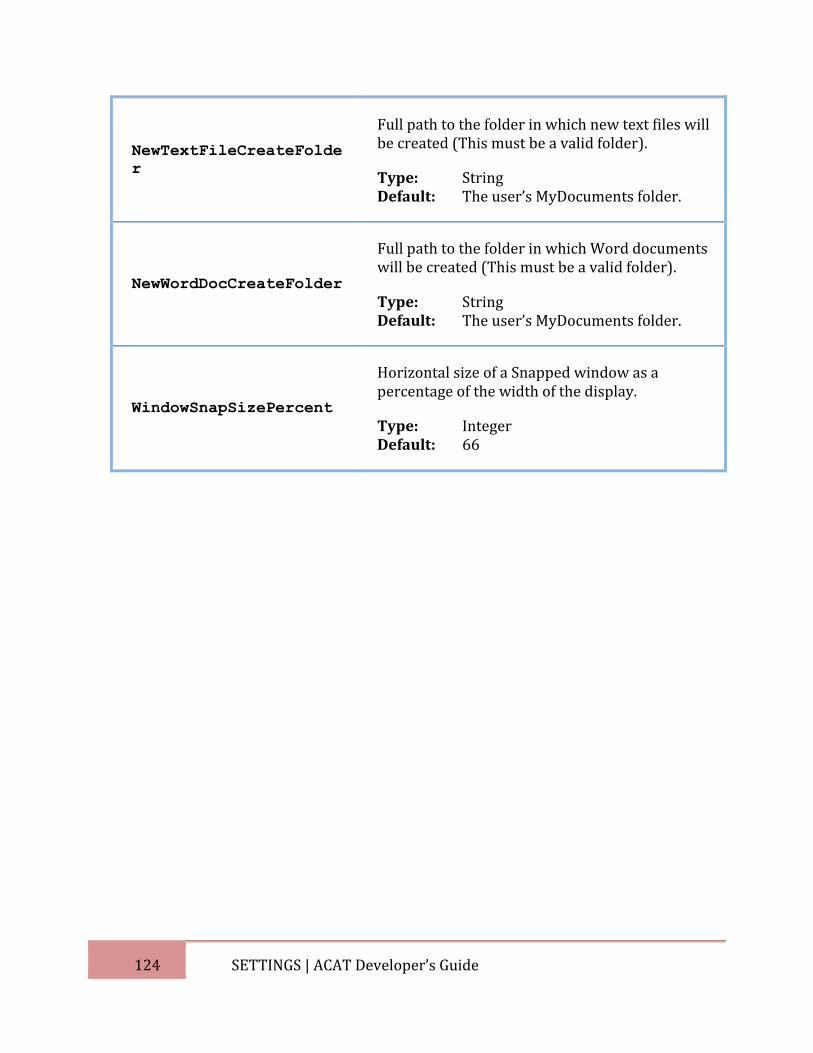
124 SETTINGS | ACAT Developer’s Guide
NewTextFileCreateFolde
r
Full path to the folder in which new text files will be created (This must be a valid folder).
Type: String Default: The user’s MyDocuments folder.
NewWordDocCreateFolder
Full path to the folder in which Word documents will be created (This must be a valid folder).
Type: String Default: The user’s MyDocuments folder.
WindowSnapSizePercent
Horizontal size of a Snapped window as a percentage of the width of the display.
Type: Integer Default: 66
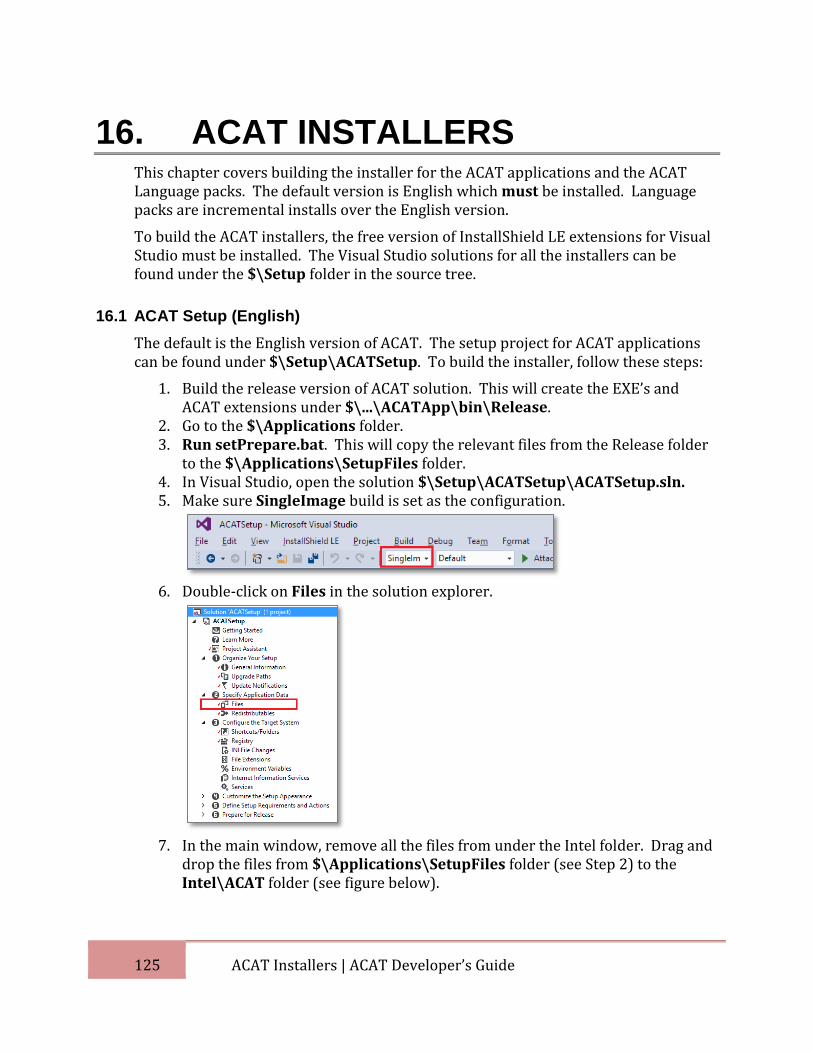
125 ACAT Installers | ACAT Developer’s Guide
16. ACAT INSTALLERS This chapter covers building the installer for the ACAT applications and the ACAT Language packs. The default version is English which must be installed. Language packs are incremental installs over the English version.
To build the ACAT installers, the free version of InstallShield LE extensions for Visual Studio must be installed. The Visual Studio solutions for all the installers can be found under the $\Setup folder in the source tree.
16.1 ACAT Setup (English)
The default is the English version of ACAT. The setup project for ACAT applications can be found under $\Setup\ACATSetup. To build the installer, follow these steps:
1. Build the release version of ACAT solution. This will create the EXE’s and ACAT extensions under $\...\ACATApp\bin\Release.
2. Go to the $\Applications folder. 3. Run setPrepare.bat. This will copy the relevant files from the Release folder
to the $\Applications\SetupFiles folder. 4. In Visual Studio, open the solution $\Setup\ACATSetup\ACATSetup.sln. 5. Make sure SingleImage build is set as the configuration.
6. Double-click on Files in the solution explorer.
7. In the main window, remove all the files from under the Intel folder. Drag and
drop the files from $\Applications\SetupFiles folder (see Step 2) to the Intel\ACAT folder (see figure below).
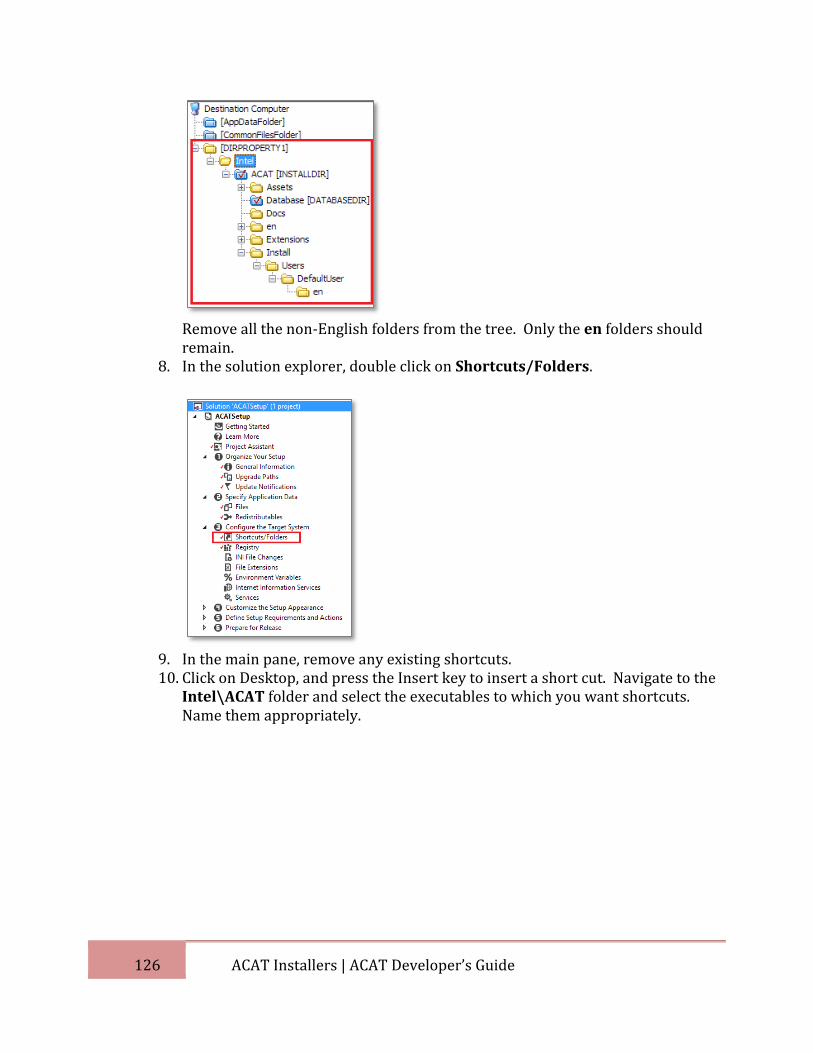
126 ACAT Installers | ACAT Developer’s Guide
Remove all the non-English folders from the tree. Only the en folders should remain.
8. In the solution explorer, double click on Shortcuts/Folders.
9. In the main pane, remove any existing shortcuts. 10. Click on Desktop, and press the Insert key to insert a short cut. Navigate to the
Intel\ACAT folder and select the executables to which you want shortcuts. Name them appropriately.
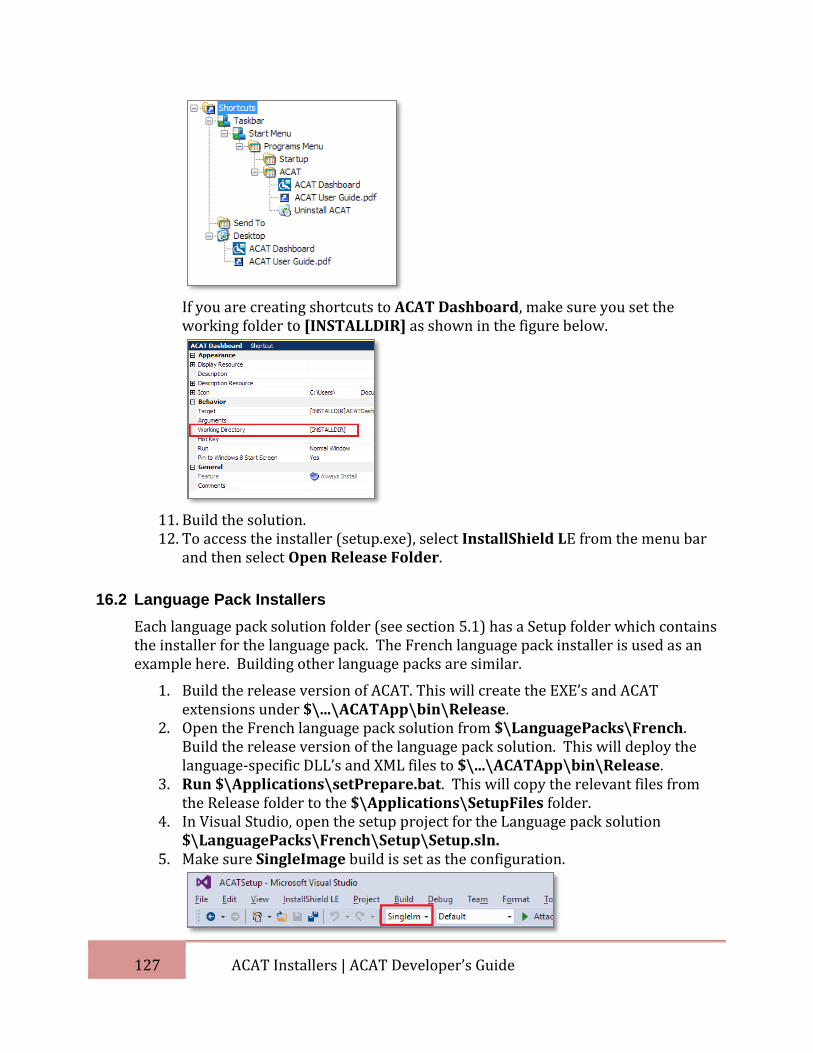
127 ACAT Installers | ACAT Developer’s Guide
If you are creating shortcuts to ACAT Dashboard, make sure you set the working folder to [INSTALLDIR] as shown in the figure below.
11. Build the solution. 12. To access the installer (setup.exe), select InstallShield LE from the menu bar
and then select Open Release Folder.
16.2 Language Pack Installers
Each language pack solution folder (see section 5.1) has a Setup folder which contains the installer for the language pack. The French language pack installer is used as an example here. Building other language packs are similar.
1. Build the release version of ACAT. This will create the EXE’s and ACAT extensions under $\...\ACATApp\bin\Release.
2. Open the French language pack solution from $\LanguagePacks\French. Build the release version of the language pack solution. This will deploy the language-specific DLL’s and XML files to $\...\ACATApp\bin\Release.
3. Run $\Applications\setPrepare.bat. This will copy the relevant files from the Release folder to the $\Applications\SetupFiles folder.
4. In Visual Studio, open the setup project for the Language pack solution $\LanguagePacks\French\Setup\Setup.sln.
5. Make sure SingleImage build is set as the configuration.

128 ACAT Installers | ACAT Developer’s Guide
6. Double-click on Files in the solution explorer.
7. In the main window, drag and drop the language-specific folders (French in
this case) from $\Applications\SetupFiles folder (see Step 2) to the Intel\ACAT folder (see figure below).
8. Build the solution. 9. To access the installer (setup.exe), select InstallShield LE from the menu bar
and then select Open Release Folder.