artist series and pro tools - avid · 2 artist series and pro tools about this guide this guide...
TRANSCRIPT

Artist Series and Pro Tools Guide®
EuControl v2.6
Legal Notices
This guide is copyrighted ©2011 by Avid Technology, Inc., (hereafter “Avid”), with all rights reserved. Under copyright laws, this guide may not be duplicated in whole or in part without the written consent of Avid.
003, 96 I/O, 96i I/O, 192 Digital I/O, 192 I/O, 888|24 I/O, 882|20 I/O, 1622 I/O, 24-Bit ADAT Bridge I/O, AudioSuite, Avid, Avid DNA, Avid Mojo, Avid Unity, Avid Unity ISIS, Avid Xpress, AVoption, Axiom, Beat Detective, Bomb Factory, Bruno, C|24, Command|8, Control|24, D-Command, D-Control, D-Fi, D-fx, D-Show, D-Verb, DAE, Digi 002, DigiBase, DigiDelivery, Digidesign, Digidesign Audio Engine, Digidesign Intelligent Noise Reduction, Digidesign TDM Bus, DigiDrive, DigiRack, DigiTest, DigiTranslator, DINR, DV Toolkit, EditPack, Eleven, EUCON, HD Core, HD Process, Hybrid, Impact, Interplay, LoFi, M-Audio, MachineControl, Maxim, Mbox, MediaComposer, MIDI I/O, MIX, MultiShell, Nitris, OMF, OMF Interchange, PRE, ProControl, Pro Tools M-Powered, Pro Tools, Pro Tools|HD, Pro Tools LE, QuickPunch, Recti-Fi, Reel Tape, Reso, Reverb One, ReVibe, RTAS, Sibelius, Smack!, SoundReplacer, Sound Designer II, Strike, Structure, SYNC HD, SYNC I/O, Synchronic, TL Aggro, TL AutoPan, TL Drum Rehab, TL Everyphase, TL Fauxlder, TL In Tune, TL MasterMeter, TL Metro, TL Space, TL Utilities, Transfuser, Trillium Lane Labs, Vari-Fi, Velvet, X-Form, and XMON are trademarks or registered trademarks of Avid Technology, Inc. Xpand! is Registered in the U.S. Patent and Trademark Office. All other trademarks are the property of their respective owners.
Bonjour, the Bonjour logo, and the Bonjour symbol are trademarks of Apple Computer, Inc.
Product features, specifications, system requirements, and availability are subject to change without notice.
Guide Part Number 9329-65088-00 REV A 5/11
Documentation Feedback
At Avid, we are always looking for ways to improve our documentation. If you have comments, corrections, or suggestions regarding our documentation, email us at [email protected].
contents
Chapter 1. Introduction . . . . . . . . . . . . . . . . . . . . . . . . . . . . . . . . . . . . . . . . . . . . . . . . . . . . . . 1
System Requirements and Compatibility . . . . . . . . . . . . . . . . . . . . . . . . . . . . . . . . . . . . . . . . 1
About This Guide. . . . . . . . . . . . . . . . . . . . . . . . . . . . . . . . . . . . . . . . . . . . . . . . . . . . . . . . . 2
About www.avid.com . . . . . . . . . . . . . . . . . . . . . . . . . . . . . . . . . . . . . . . . . . . . . . . . . . . . . . 4
Chapter 2. Software Configuration . . . . . . . . . . . . . . . . . . . . . . . . . . . . . . . . . . . . . . . . . . . . 5
Enabling EUCON in Pro Tools . . . . . . . . . . . . . . . . . . . . . . . . . . . . . . . . . . . . . . . . . . . . . . . . 5
Chapter 3. Track and Session Basics . . . . . . . . . . . . . . . . . . . . . . . . . . . . . . . . . . . . . . . . . . 9
EuControl Basics . . . . . . . . . . . . . . . . . . . . . . . . . . . . . . . . . . . . . . . . . . . . . . . . . . . . . . . . 10
Using the Transport . . . . . . . . . . . . . . . . . . . . . . . . . . . . . . . . . . . . . . . . . . . . . . . . . . . . . . 14
Banking Faders. . . . . . . . . . . . . . . . . . . . . . . . . . . . . . . . . . . . . . . . . . . . . . . . . . . . . . . . . 16
Fader Strip Controls. . . . . . . . . . . . . . . . . . . . . . . . . . . . . . . . . . . . . . . . . . . . . . . . . . . . . . 17
Track Basics . . . . . . . . . . . . . . . . . . . . . . . . . . . . . . . . . . . . . . . . . . . . . . . . . . . . . . . . . . . 19
Chapter 4. Recording . . . . . . . . . . . . . . . . . . . . . . . . . . . . . . . . . . . . . . . . . . . . . . . . . . . . . . . 27
Select and Record Enable Tracks . . . . . . . . . . . . . . . . . . . . . . . . . . . . . . . . . . . . . . . . . . . . 27
Loop Record, Quick Punch, and Other Record Modes . . . . . . . . . . . . . . . . . . . . . . . . . . . . . . 28
Additional Recording Features . . . . . . . . . . . . . . . . . . . . . . . . . . . . . . . . . . . . . . . . . . . . . . 28
Chapter 5. Editing . . . . . . . . . . . . . . . . . . . . . . . . . . . . . . . . . . . . . . . . . . . . . . . . . . . . . . . . . . 29
Selecting Edit Tools and Edit Modes . . . . . . . . . . . . . . . . . . . . . . . . . . . . . . . . . . . . . . . . . . 29
Using the Jog/Shuttle Wheel . . . . . . . . . . . . . . . . . . . . . . . . . . . . . . . . . . . . . . . . . . . . . . . 30
Using Markers. . . . . . . . . . . . . . . . . . . . . . . . . . . . . . . . . . . . . . . . . . . . . . . . . . . . . . . . . . 31
Soft Keys for Editing . . . . . . . . . . . . . . . . . . . . . . . . . . . . . . . . . . . . . . . . . . . . . . . . . . . . . 32
Track View for Editing . . . . . . . . . . . . . . . . . . . . . . . . . . . . . . . . . . . . . . . . . . . . . . . . . . . . 32
Chapter 6. Plug-ins and Sends . . . . . . . . . . . . . . . . . . . . . . . . . . . . . . . . . . . . . . . . . . . . . . . 33
Working with Plug-in Inserts . . . . . . . . . . . . . . . . . . . . . . . . . . . . . . . . . . . . . . . . . . . . . . . . 33
Working with Sends. . . . . . . . . . . . . . . . . . . . . . . . . . . . . . . . . . . . . . . . . . . . . . . . . . . . . . 38
Contents iii
iv
Chapter 7. Automation and Mixing. . . . . . . . . . . . . . . . . . . . . . . . . . . . . . . . . . . . . . . . . . . 43
Enabling and Suspending Automation . . . . . . . . . . . . . . . . . . . . . . . . . . . . . . . . . . . . . . . . 43
Track Automation Mode Selection . . . . . . . . . . . . . . . . . . . . . . . . . . . . . . . . . . . . . . . . . . . 43
Shortcuts to Display Automation Playlists . . . . . . . . . . . . . . . . . . . . . . . . . . . . . . . . . . . . . . 44
Multichannel Panning for Surround . . . . . . . . . . . . . . . . . . . . . . . . . . . . . . . . . . . . . . . . . . 47
Index . . . . . . . . . . . . . . . . . . . . . . . . . . . . . . . . . . . . . . . . . . . . . . . . . . . . . . . . . . . . . . . . . . . . . 49
Artist Series and Pro Tools
chapter 1
Introduction
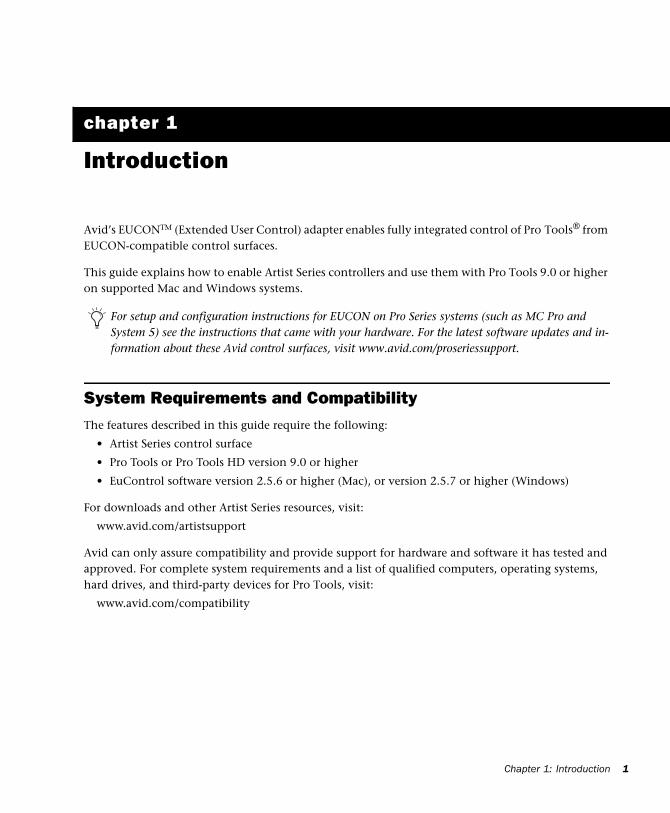
Avid’s EUCONTM (Extended User Control) adapter enables fully integrated control of Pro Tools® from EUCON-compatible control surfaces.
This guide explains how to enable Artist Series controllers and use them with Pro Tools 9.0 or higher on supported Mac and Windows systems.
System Requirements and CompatibilityThe features described in this guide require the following:
• Artist Series control surface
• Pro Tools or Pro Tools HD version 9.0 or higher
• EuControl software version 2.5.6 or higher (Mac), or version 2.5.7 or higher (Windows)
For downloads and other Artist Series resources, visit:
www.avid.com/artistsupport
Avid can only assure compatibility and provide support for hardware and software it has tested and approved. For complete system requirements and a list of qualified computers, operating systems, hard drives, and third-party devices for Pro Tools, visit:
www.avid.com/compatibility
For setup and configuration instructions for EUCON on Pro Series systems (such as MC Pro and System 5) see the instructions that came with your hardware. For the latest software updates and in-formation about these Avid control surfaces, visit www.avid.com/proseriessupport.
Chapter 1: Introduction 1

2
About This GuideThis guide explains how to enable EUCON and use Artist Series control surfaces with Pro Tools.
If you are installing an Artist Series controller for the first time, start with the following resources:
• For EuControl software and hardware installation, see the printed documentation that came with your controller.
• For complete information on your unit, see the electronic PDF version of its User Guide.
• For EuControl software setup and configuration information, see the EUCON Application Setup.pdf.
For instructions on connecting and configuring Pro Tools, see the software installation and hardware user guides that came with your Avid system. For information about using Pro Tools software, see the Pro Tools Reference Guide (in Pro Tools, choose Help > Pro Tools Reference Guide).
Conventions Used in This Guide
All of our guides use the following conventions to indicate menu choices and key commands::
The names of Commands, Options, and Settings that appear on-screen are in a different font.
The following symbols are used to highlight important information:
Convention Action
File > Save Choose Save from the File menu
Control+N Hold down the Control key and press the N key
Control-click Hold down the Control key and click the mouse button
Right-click Click with the right mouse button
User Tips are helpful hints for getting the most from your system.
Important Notices include information that could affect your data or the performance of your system.
Shortcuts show you useful keyboard or mouse shortcuts.
Cross References point to related sections in this and other Avid guides.
Artist Series and Pro Tools
Hardware Keys on Artist Series Units
The names of keys on Artist Series hardware are in bold (such as SEL). The SHIFT key on Artist Series hardware is indicated by bold text, in all-caps (SHIFT).
SHIFT and SHIFT Lock
The SHIFT key on Artist Series units is used in conjunction with other keys to access secondary func-tions that are labeled in blue above the primary function. Two SHIFT keys are located at the bottom-left and -right on both Artist Control and Artist Mix. Artist Transport provides a single SHIFT key at the bottom-right.
The following simplified terminology is used to describe SHIFT functions.
Example:
• “Press and hold the SHIFT key then press the AUX key”
is written as
• “Press SHIFT+AUX/GROUP”
How to Use this PDF Guide
The Acrobat PDF version of this manual can be a valuable online resource. These are some useful fea-tures of the PDF:
• The Bookmarks on the left serve as a continuously visible table of contents. Click on a subject heading to jump to that page. Click a + symbol to expand that heading to show subheadings. Click the – symbol to collapse a subheading.
• The Table of Contents provides active links to their pages. Select the hand cursor, allow it to hover over the heading until it turns into a finger. Then click to locate to that subject and page.
• All cross references are active links. Allow the hand cursor to hover over the reference until it turns into a finger and click to follow the reference.
• Select Find from the Edit menu to search for a subject.
Chapter 1: Introduction 3

4
About www.avid.comThe Avid website (www.avid.com) is your best online source for information to help you get the most out of your system. The following are just a few of the services and features available.
Product Registration
Register your purchase online.
Support and Downloads
Contact Avid Customer Success (technical support); download software updates and the latest online manuals; browse the Compatibility documents for system requirements; search the online Knowl-edge Base or join the worldwide Pro Tools community on the User Conference.
Training and Education
Study on your own using courses available online or find out how you can learn in a classroom setting at a certified Pro Tools training center.
Products and Developers
Learn about Avid products; download demo software or learn about our Development Partners and their plug-ins, applications, and hardware.
News and Events
Get the latest news from Avid or sign up for a demo.
Artist Series and Pro Tools
chapter 2
Software Configuration
Before you proceed, make sure you have completed the following:
• Installed Pro Tools or Pro Tools HD version 9.0 or higher
• Installed the latest EuControl software and attached your Artist Series hardware
Enabling EUCON in Pro Tools
To enable EUCON control in Pro Tools:
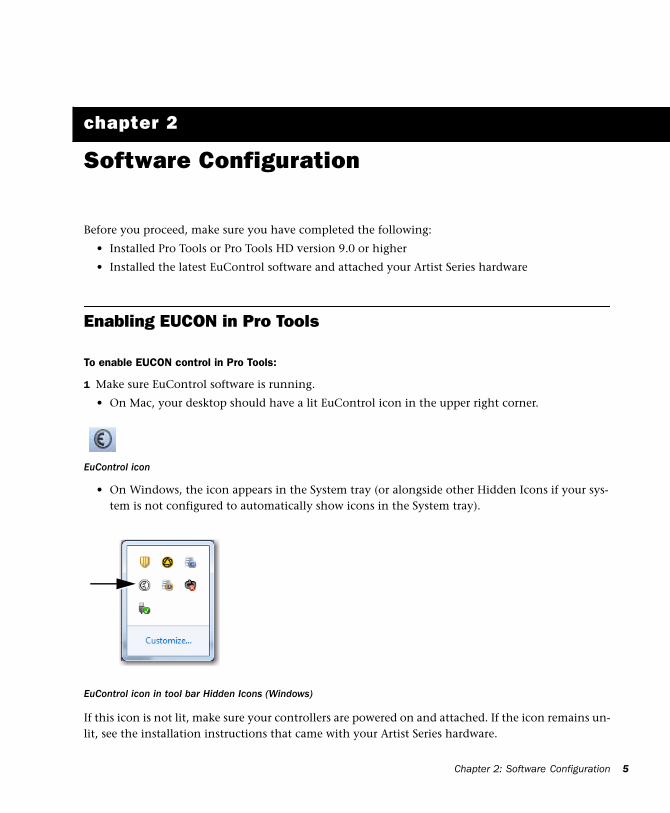
1 Make sure EuControl software is running.
• On Mac, your desktop should have a lit EuControl icon in the upper right corner.
• On Windows, the icon appears in the System tray (or alongside other Hidden Icons if your sys-tem is not configured to automatically show icons in the System tray).
If this icon is not lit, make sure your controllers are powered on and attached. If the icon remains un-lit, see the installation instructions that came with your Artist Series hardware.
EuControl icon
EuControl icon in tool bar Hidden Icons (Windows)
Chapter 2: Software Configuration 5
6
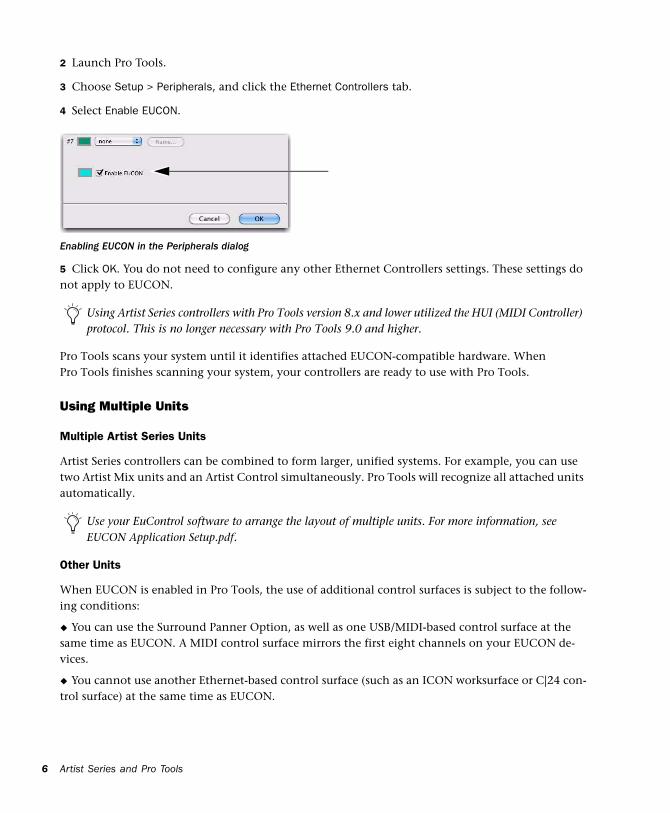
2 Launch Pro Tools.
3 Choose Setup > Peripherals, and click the Ethernet Controllers tab.
4 Select Enable EUCON.
5 Click OK. You do not need to configure any other Ethernet Controllers settings. These settings do not apply to EUCON.
Pro Tools scans your system until it identifies attached EUCON-compatible hardware. When Pro Tools finishes scanning your system, your controllers are ready to use with Pro Tools.
Using Multiple Units
Multiple Artist Series Units
Artist Series controllers can be combined to form larger, unified systems. For example, you can use two Artist Mix units and an Artist Control simultaneously. Pro Tools will recognize all attached units automatically.
Other Units
When EUCON is enabled in Pro Tools, the use of additional control surfaces is subject to the follow-ing conditions:
You can use the Surround Panner Option, as well as one USB/MIDI-based control surface at the same time as EUCON. A MIDI control surface mirrors the first eight channels on your EUCON de-vices.
You cannot use another Ethernet-based control surface (such as an ICON worksurface or C|24 con-trol surface) at the same time as EUCON.
Enabling EUCON in the Peripherals dialog
Using Artist Series controllers with Pro Tools version 8.x and lower utilized the HUI (MIDI Controller) protocol. This is no longer necessary with Pro Tools 9.0 and higher.
Use your EuControl software to arrange the layout of multiple units. For more information, see EUCON Application Setup.pdf.
Artist Series and Pro Tools
Confirm Installation
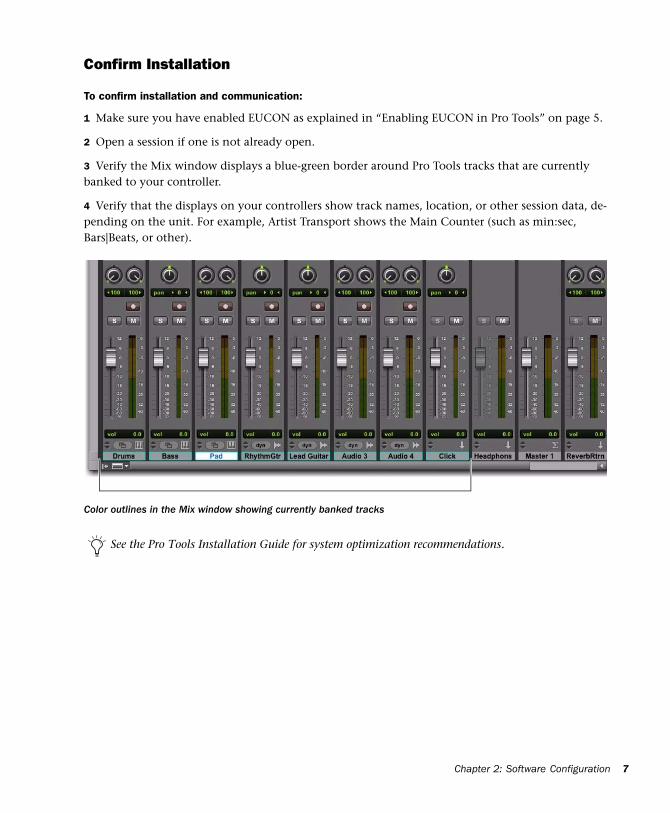
To confirm installation and communication:
1 Make sure you have enabled EUCON as explained in “Enabling EUCON in Pro Tools” on page 5.
2 Open a session if one is not already open.
3 Verify the Mix window displays a blue-green border around Pro Tools tracks that are currently banked to your controller.
4 Verify that the displays on your controllers show track names, location, or other session data, de-pending on the unit. For example, Artist Transport shows the Main Counter (such as min:sec, Bars|Beats, or other).
Color outlines in the Mix window showing currently banked tracks
See the Pro Tools Installation Guide for system optimization recommendations.
Chapter 2: Software Configuration 7

8
Artist Series and Pro Tools
chapter 3
Track and Session Basics
This chapter provides examples of the following:
EuControl Basics How to use EuControl software to view and customize mappings and hardware set-tings (see “EuControl Basics” on page 10).
Using the Transport How to use the Transport controls to play, stop, cue, record arm, and more (see “Using the Transport” on page 14).
Banking the Faders How to use Bank and Nudge to be able to view tracks on the fader strips (see “Banking Faders” on page 16).
Fader Controls How to adjust track volume and pan, solo and mute tracks (see “Fader Strip Controls” on page 17).
Track Basics How to select tracks, assign input and output routing, Show/Hide tracks, and use Groups (see “Track Basics” on page 19).
Chapter 3: Track and Session Basics 9
10
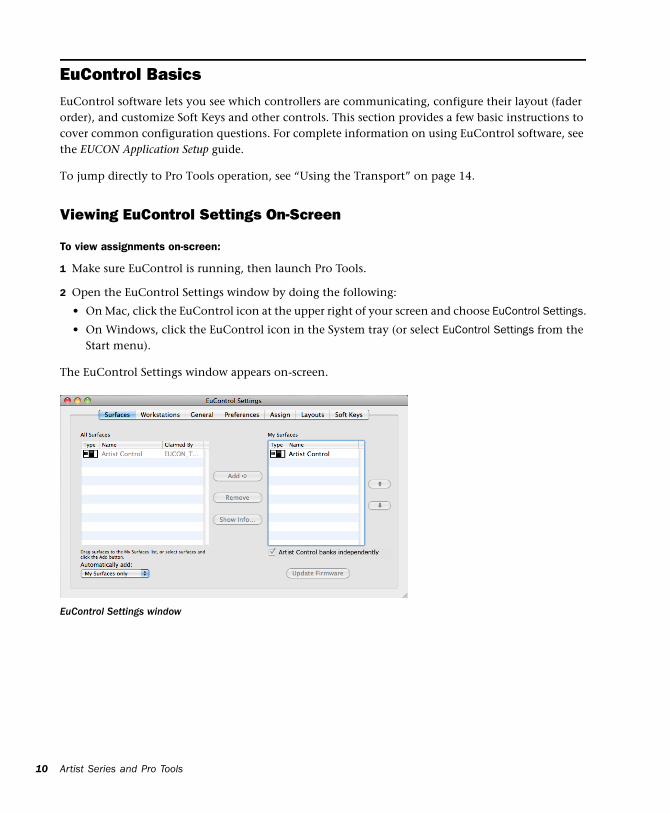
EuControl BasicsEuControl software lets you see which controllers are communicating, configure their layout (fader order), and customize Soft Keys and other controls. This section provides a few basic instructions to cover common configuration questions. For complete information on using EuControl software, see the EUCON Application Setup guide.
To jump directly to Pro Tools operation, see “Using the Transport” on page 14.
Viewing EuControl Settings On-Screen
To view assignments on-screen:
1 Make sure EuControl is running, then launch Pro Tools.
2 Open the EuControl Settings window by doing the following:
• On Mac, click the EuControl icon at the upper right of your screen and choose EuControl Settings.
• On Windows, click the EuControl icon in the System tray (or select EuControl Settings from the Start menu).
The EuControl Settings window appears on-screen.
EuControl Settings window
Artist Series and Pro Tools
Viewing EuControl Settings on Artist Transport
On Artist Transport, you can use the SHOW key to view assignments on the unit display.
To view assignments on the controller display:
1 Press the SHOW key.
2 Press any Soft Key, Transport, or numeric key on Artist Transport and its assignment is shown in the display.
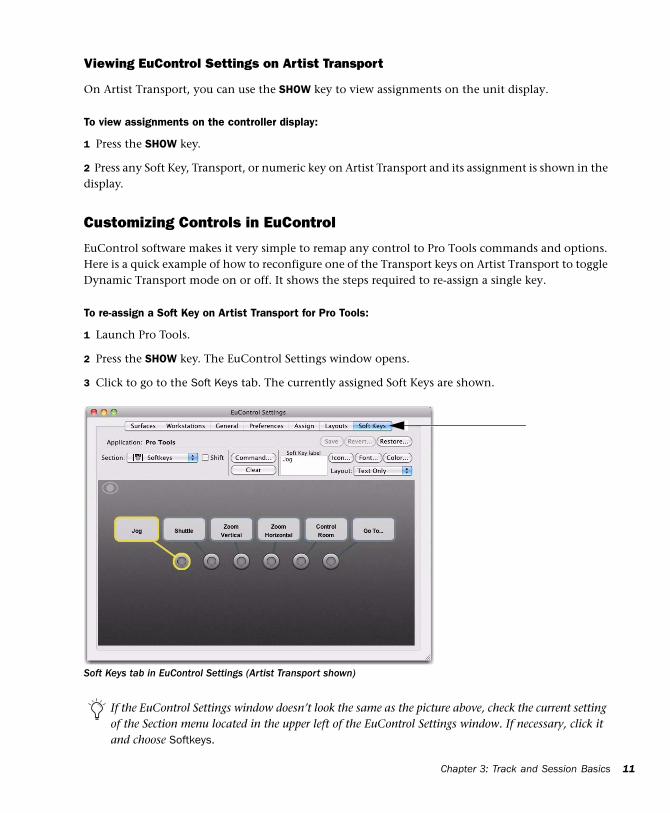
Customizing Controls in EuControl
EuControl software makes it very simple to remap any control to Pro Tools commands and options. Here is a quick example of how to reconfigure one of the Transport keys on Artist Transport to toggle Dynamic Transport mode on or off. It shows the steps required to re-assign a single key.
To re-assign a Soft Key on Artist Transport for Pro Tools:
1 Launch Pro Tools.
2 Press the SHOW key. The EuControl Settings window opens.
3 Click to go to the Soft Keys tab. The currently assigned Soft Keys are shown.
Soft Keys tab in EuControl Settings (Artist Transport shown)
If the EuControl Settings window doesn’t look the same as the picture above, check the current setting of the Section menu located in the upper left of the EuControl Settings window. If necessary, click it and choose Softkeys.
Chapter 3: Track and Session Basics 11
12
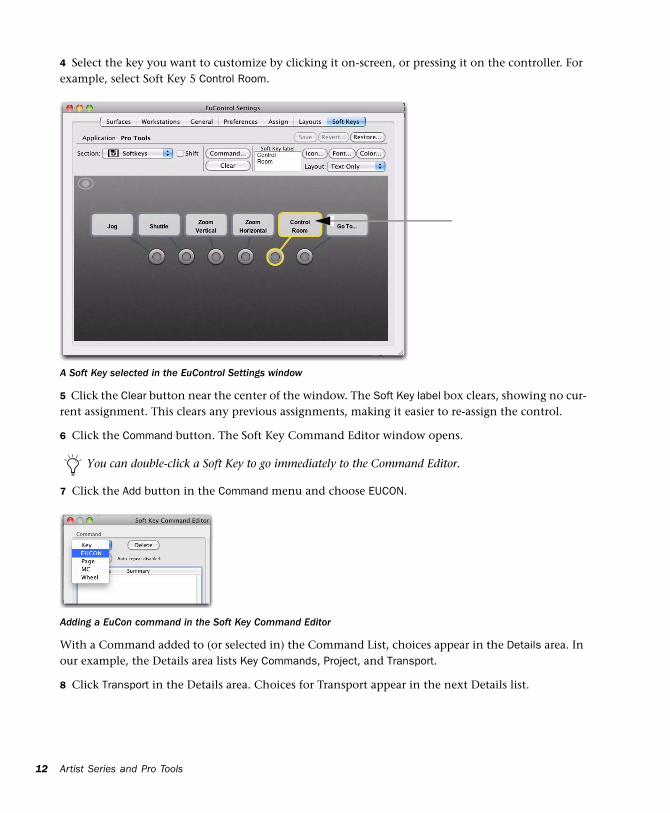
4 Select the key you want to customize by clicking it on-screen, or pressing it on the controller. For example, select Soft Key 5 Control Room.
5 Click the Clear button near the center of the window. The Soft Key label box clears, showing no cur-rent assignment. This clears any previous assignments, making it easier to re-assign the control.
6 Click the Command button. The Soft Key Command Editor window opens.
7 Click the Add button in the Command menu and choose EUCON.
With a Command added to (or selected in) the Command List, choices appear in the Details area. In our example, the Details area lists Key Commands, Project, and Transport.
8 Click Transport in the Details area. Choices for Transport appear in the next Details list.
A Soft Key selected in the EuControl Settings window
You can double-click a Soft Key to go immediately to the Command Editor.
Adding a EuCon command in the Soft Key Command Editor
Artist Series and Pro Tools
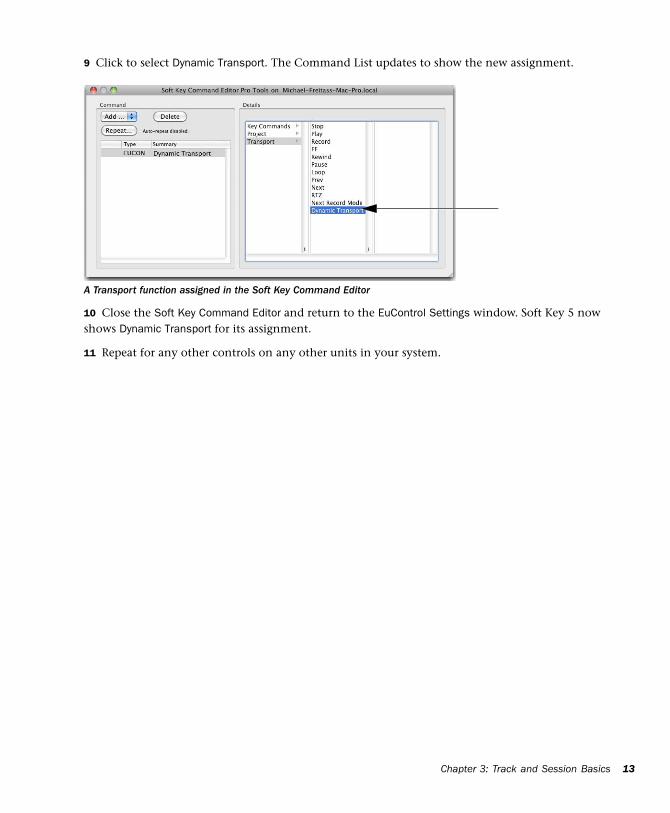
9 Click to select Dynamic Transport. The Command List updates to show the new assignment.
10 Close the Soft Key Command Editor and return to the EuControl Settings window. Soft Key 5 now shows Dynamic Transport for its assignment.
11 Repeat for any other controls on any other units in your system.
A Transport function assigned in the Soft Key Command Editor
Chapter 3: Track and Session Basics 13
14
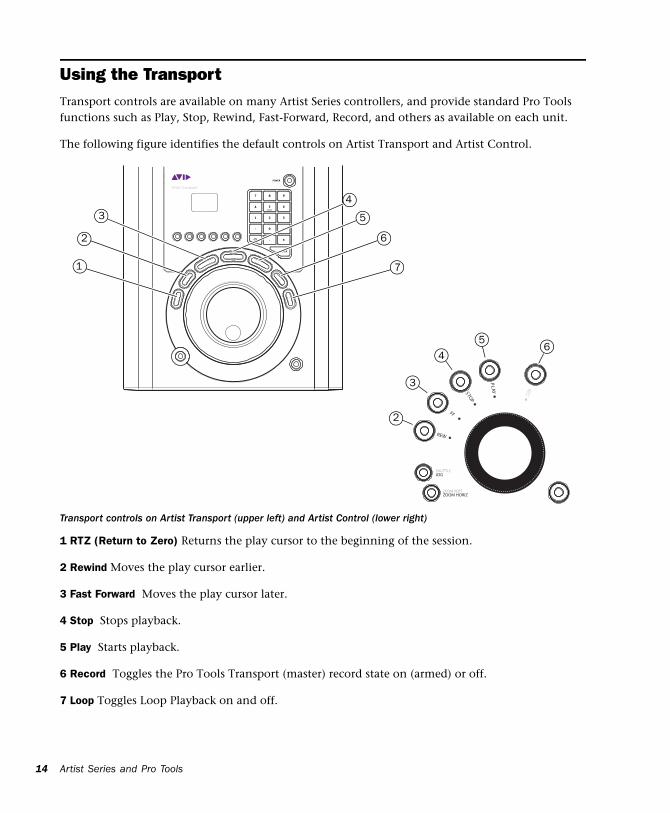
Using the TransportTransport controls are available on many Artist Series controllers, and provide standard Pro Tools functions such as Play, Stop, Rewind, Fast-Forward, Record, and others as available on each unit.
The following figure identifies the default controls on Artist Transport and Artist Control.
1 RTZ (Return to Zero) Returns the play cursor to the beginning of the session.
2 Rewind Moves the play cursor earlier.
3 Fast Forward Moves the play cursor later.
4 Stop Stops playback.
5 Play Starts playback.
6 Record Toggles the Pro Tools Transport (master) record state on (armed) or off.
7 Loop Toggles Loop Playback on and off.
Transport controls on Artist Transport (upper left) and Artist Control (lower right)
Artist Transport
7
JOGSHUTTLE
ZOOM HORIZZOOM VERT
REC
REW
FF
STOP
PLAY
2
3
4
56
1
2
3
4
5
6
Artist Series and Pro Tools
Using the Transport Controls
Playback
To play from the current location:
Press Play.
To stop playback:
Press Stop.
Transport Controls and Modifier Keys
You can use modifier keys on your computer keyboard in combination with EUCON hardware Trans-port controls for additional playback modes (such as to enable Loop Playback).
To toggle Loop Playback on/off:
Press Control + Play (Mac), or Ctrl + Play (Windows).
To toggle Pro Tools online or offline:
Press Option + Play (Mac), or Alt + Play (Windows).
Session Time Navigation
To jump to the beginning of the session:
Press RTZ (return to zero).
To rewind or fast-forward:
Press Rew or FFW.
Recording
To record arm the Pro Tools Transport:
Press Record.
Pro Tools provides preference settings to optimize rewind and fast forward (such as Audio During Fast Forward/Rewind, and Back/Forward Amount). For more information, see the Pro Tools Reference Guide.
For additional recording features, see Chapter 4, “Recording.”
Chapter 3: Track and Session Basics 15
16
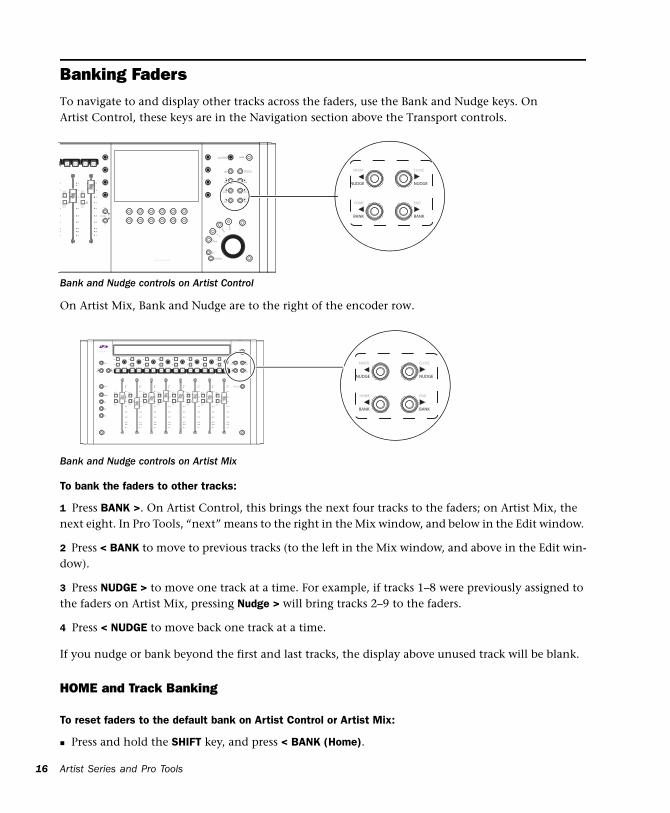
Banking FadersTo navigate to and display other tracks across the faders, use the Bank and Nudge keys. On Artist Control, these keys are in the Navigation section above the Transport controls.
On Artist Mix, Bank and Nudge are to the right of the encoder row.
To bank the faders to other tracks:
1 Press BANK >. On Artist Control, this brings the next four tracks to the faders; on Artist Mix, the next eight. In Pro Tools, “next” means to the right in the Mix window, and below in the Edit window.
2 Press < BANK to move to previous tracks (to the left in the Mix window, and above in the Edit win-dow).
3 Press NUDGE > to move one track at a time. For example, if tracks 1–8 were previously assigned to the faders on Artist Mix, pressing Nudge > will bring tracks 2–9 to the faders.
4 Press < NUDGE to move back one track at a time.
If you nudge or bank beyond the first and last tracks, the display above unused track will be blank.
HOME and Track Banking
To reset faders to the default bank on Artist Control or Artist Mix:
Press and hold the SHIFT key, and press < BANK (Home).
Bank and Nudge controls on Artist Control
Bank and Nudge controls on Artist Mix
CFG
PAGE
BANK
HOME
NUDGE
MIXER
END
BANK
CLOSE
NUDGE
WORK STATIONAPPLICATION
TOPBACK
JOGSHUTTLE
ZOOM HORIZZOOM VERT
POWER
REC
REW
FF
STOP
PLAY
SOFT KEYS
HOME
END
MC CONTROL
MONITORCONTROL ROOM
PAGE
CFG
AUTOREC N
ASSIGNSE L Y
AUTOREC N
ASSIGNSE L Y
2
60
40
6
0
5
0
20
30
8
12
60
40
6
0
5
10
20
30
8
12
60
40
6
0
5
10
20
30
8
SOLOON SOLOON
END
BANK
HOME
BANK
CLOSE
NUDGE
MIXER
NUDGE
SOLOSOLO ON ON SOLOSOLO ON ON SOLOSOLO ON ON SOLOSOLO ON ON
END
BANK
HOME
BANK
CLOSE
NUDGE
MIXER
NUDGE
Artist Series and Pro Tools
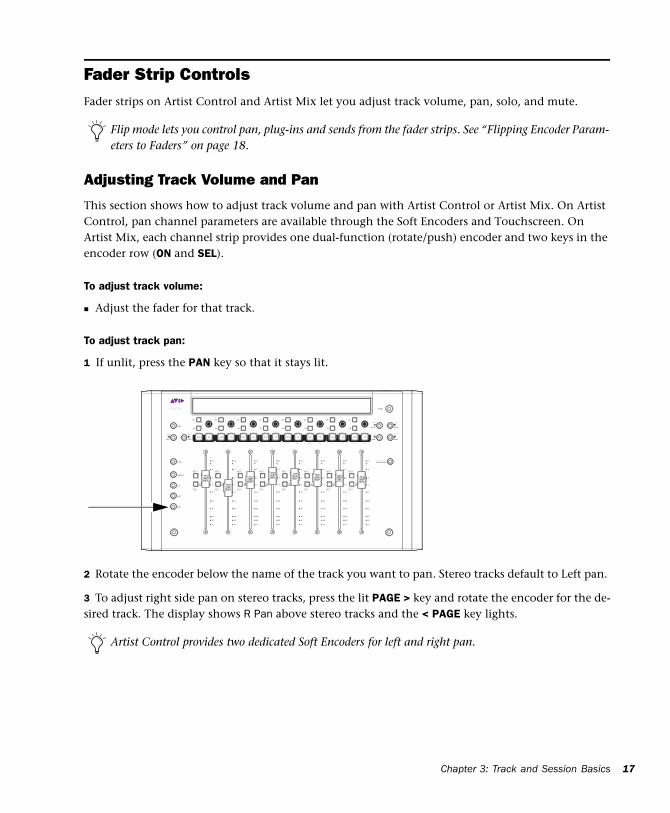
Fader Strip ControlsFader strips on Artist Control and Artist Mix let you adjust track volume, pan, solo, and mute.
Adjusting Track Volume and Pan
This section shows how to adjust track volume and pan with Artist Control or Artist Mix. On Artist Control, pan channel parameters are available through the Soft Encoders and Touchscreen. On Artist Mix, each channel strip provides one dual-function (rotate/push) encoder and two keys in the encoder row (ON and SEL).
To adjust track volume:
Adjust the fader for that track.
To adjust track pan:
1 If unlit, press the PAN key so that it stays lit.
2 Rotate the encoder below the name of the track you want to pan. Stereo tracks default to Left pan.
3 To adjust right side pan on stereo tracks, press the lit PAGE > key and rotate the encoder for the de-sired track. The display shows R Pan above stereo tracks and the < PAGE key lights.
Flip mode lets you control pan, plug-ins and sends from the fader strips. See “Flipping Encoder Param-eters to Faders” on page 18.
Artist Control provides two dedicated Soft Encoders for left and right pan.
SOLOSOLO ON ON SOLOSOLO ON ON SOLOSOLO ON ON SOLOSOLO ON ON
Chapter 3: Track and Session Basics 17
18
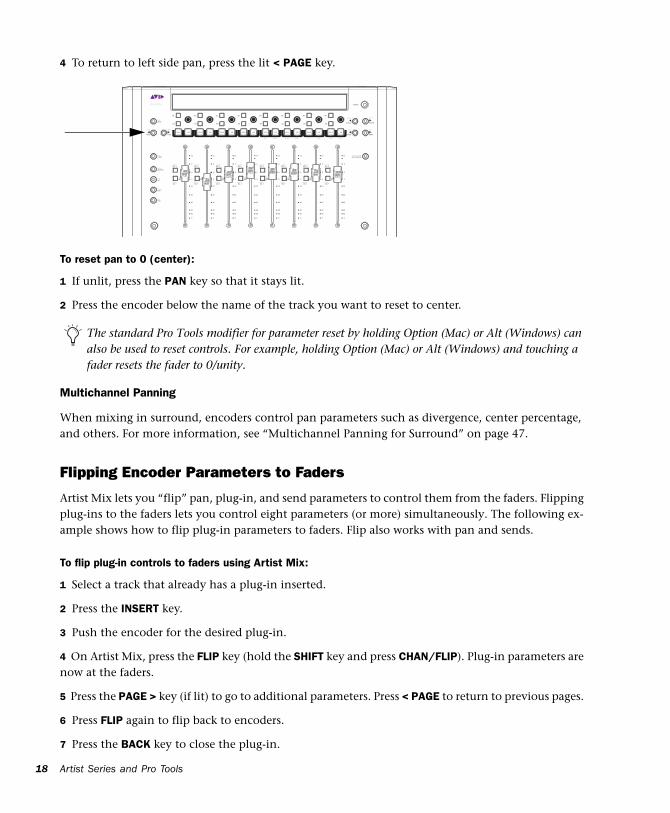
4 To return to left side pan, press the lit < PAGE key.
To reset pan to 0 (center):
1 If unlit, press the PAN key so that it stays lit.
2 Press the encoder below the name of the track you want to reset to center.
Multichannel Panning
When mixing in surround, encoders control pan parameters such as divergence, center percentage, and others. For more information, see “Multichannel Panning for Surround” on page 47.
Flipping Encoder Parameters to Faders
Artist Mix lets you “flip” pan, plug-in, and send parameters to control them from the faders. Flipping plug-ins to the faders lets you control eight parameters (or more) simultaneously. The following ex-ample shows how to flip plug-in parameters to faders. Flip also works with pan and sends.
To flip plug-in controls to faders using Artist Mix:
1 Select a track that already has a plug-in inserted.
2 Press the INSERT key.
3 Push the encoder for the desired plug-in.
4 On Artist Mix, press the FLIP key (hold the SHIFT key and press CHAN/FLIP). Plug-in parameters are now at the faders.
5 Press the PAGE > key (if lit) to go to additional parameters. Press < PAGE to return to previous pages.
6 Press FLIP again to flip back to encoders.
7 Press the BACK key to close the plug-in.
The standard Pro Tools modifier for parameter reset by holding Option (Mac) or Alt (Windows) can also be used to reset controls. For example, holding Option (Mac) or Alt (Windows) and touching a fader resets the fader to 0/unity.
SOLOSOLO ON ON SOLOSOLO ON ON SOLOSOLO ON ON SOLOSOLO ON ON
Artist Series and Pro Tools
Track BasicsThis section shows how to select, route, show/hide, and group tracks.
Selecting Tracks
You can select tracks using the fader strip SEL keys on Artist Mix and Artist Control.
To select a track on Artist Mix or Artist Control:
Press any fader SEL key.
The track is selected in Pro Tools. You can use standard Pro Tools shortcuts in combination with the fader SEL keys to do the following.
To select all tracks:
Hold Option (Mac) or Alt (Windows) on your computer keyboard and press any unlit track SEL key.
To deselect a track:
Hold Command (Mac) or Start (Windows) on your computer keyboard and press a lit track SEL key.
To deselect all selected tracks:
Hold Option key (Mac) or Alt (Windows) on your computer keyboard and press any lit track SEL key.
To select a range of tracks:
1 Press the SEL key on the first track (usually, the left-most track you want to include in the selection).
2 Hold the Shift key on your computer keyboard and press the SEL key on the last (right-most) track. All tracks between the two are selected.
To select non-adjacent tracks (add to a selection):
1 Press the SEL key to select any track.
2 Hold Command (Mac) or Start (Windows) on your computer keyboard and press an unlit track SEL key.
Default Soft Key assignments include the QWERTY key modifiers Shift, Control, Option, and Command (Mac) or Shift, Control, Alt, and Start (Windows) for convenient access on units that do not include a QWERTY keyboard.
Chapter 3: Track and Session Basics 19
20
Track Input and Output Routing
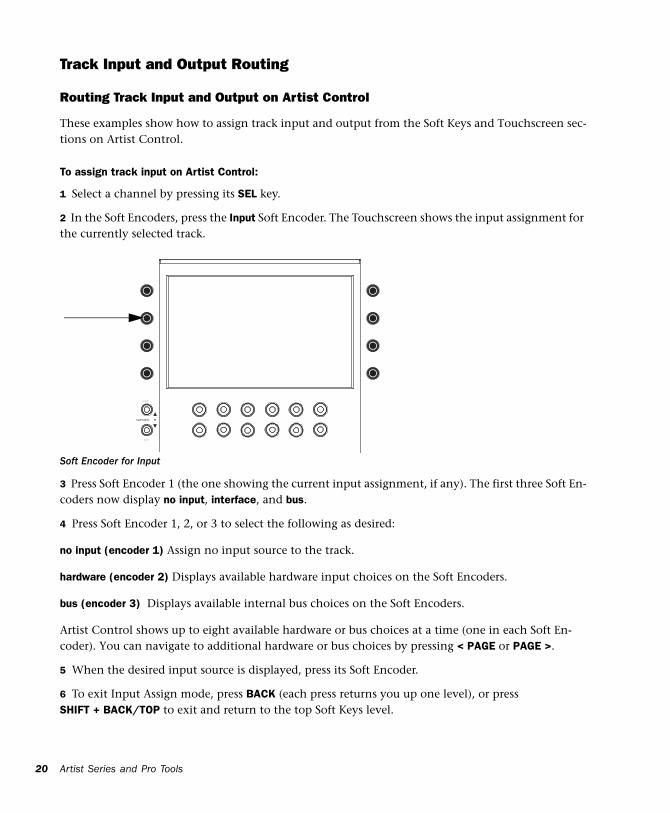
Routing Track Input and Output on Artist Control
These examples show how to assign track input and output from the Soft Keys and Touchscreen sec-tions on Artist Control.
To assign track input on Artist Control:
1 Select a channel by pressing its SEL key.
2 In the Soft Encoders, press the Input Soft Encoder. The Touchscreen shows the input assignment for the currently selected track.
3 Press Soft Encoder 1 (the one showing the current input assignment, if any). The first three Soft En-coders now display no input, interface, and bus.
4 Press Soft Encoder 1, 2, or 3 to select the following as desired:
no input (encoder 1) Assign no input source to the track.
hardware (encoder 2) Displays available hardware input choices on the Soft Encoders.
bus (encoder 3) Displays available internal bus choices on the Soft Encoders.
Artist Control shows up to eight available hardware or bus choices at a time (one in each Soft En-coder). You can navigate to additional hardware or bus choices by pressing < PAGE or PAGE >.
5 When the desired input source is displayed, press its Soft Encoder.
6 To exit Input Assign mode, press BACK (each press returns you up one level), or press SHIFT + BACK/TOP to exit and return to the top Soft Keys level.
Soft Encoder for Input
SOFT KEYS
HOME
END
Artist Series and Pro Tools
To assign track output on Artist Control:
1 Select a channel by pressing its SEL key.
2 In the Soft Encoders, press the Mix encoder. The Touchscreen shows the output assignment for the currently selected track.
3 Press Soft Encoder 1 (the one showing the current assignment, if any). The first three Soft Encoders now display the next level of choices for output assignment.
4 Press Soft Encoder 1, 2, or 3 to select the following as desired:
no output (encoder 1) Assigns no output to the track (the track will be silent).
hardware (encoder 2) Displays Output bus choices (such as Out 1–2) in the Soft Encoders.
bus (encoder 3) Displays internal bus choices in the Soft Encoders.
5 To see additional choices, press the lit < PAGE or PAGE > key.
6 When the desired output choice is displayed, press its Soft Encoder. A green LED lights next to the Soft Encoder, indicating assignment on the currently selected track(s).
7 To exit Output Assign mode, press BACK (each press returns you up one level), or press SHIFT + BACK/TOP to jump back to the top view.
Multiple Output Path Assignments
Pro Tools tracks can have multiple output paths assigned to them. When assigning track output from a EUCON unit, you can simply repeat the previous instructions and the new assignment will be added to the current assignments. When reassigning outputs, you must first assign no output, then assign the new output path.
Soft Encoder for Mix
SOFT KEYS
HOME
END
Chapter 3: Track and Session Basics 21
22
To reassign track output without adding additional output assignments on Artist Control:
1 Select a channel by pressing its SEL key.
2 In the Soft Encoders, press the Mix encoder. The Touchscreen shows the output assignment for the currently selected track.
3 Press Soft Encoder 1 (the one showing the current assignment, if any). The first three Soft Encoders now display the next level of choices for output assignment.
4 Press Soft Encoder 1 to select no output.
5 Press BACK (each press returns you up one level), or press SHIFT + BACK/TOP to jump back to the top view.
6 Repeat these steps and choose a new output path.
Routing Track Input and Output on Artist Mix
These examples show how to route track input and output from Artist Mix.
To assign track input on Artist Mix:
1 Select a channel by pressing its SEL key.
2 Press SHIFT+ the INSERTS/INPUT key. The display shows input assignments for banked tracks.
3 Press the Encoder for the track you want to assign. The first three Soft Encoders show the next choices for input assignment.
4 Press the Soft Encoder below the desired input choice:
• If you select no input, that encoder ON key lights.
• If you select interface or bus, available hardware inputs or internal busses are listed above the Soft Encoders. Press the < PAGE and/or PAGE > keys to navigate to other input choices.
5 When the desired input source is displayed, press its Soft Encoder. The encoder ON key lights.
6 To exit output assign mode, press PAN.
Display no input interface bus
Soft Encoder 1 2 3
Artist Series and Pro Tools

To assign track output on Artist Mix:
1 Select a channel by pressing its SEL key.
2 Press SHIFT+ the PAN/MIX key. The display shows the output assignment for each banked track.
3 Press the encoder for the track you want to assign.
4 Press the encoder below the desired output assignment as follows:
• If you select no output, the assignment is made and that encoder ON key lights.
• If you select output or bus, Output bus and internal bus choices are listed above each Soft En-coder. Press the < PAGE and/or PAGE > keys to navigate to other output choices.
5 When the desired output is displayed, press its Soft Encoder. That encoder ON key lights.
6 To exit output assign mode, press any other Knob Set selector (such as PAN).
Multiple Output Path Assignments
Pro Tools tracks can have multiple output paths assigned to them. When assigning track output from a EUCON unit, you can simply repeat the previous instructions and the new assignment will be added to the current assignments. When reassigning outputs, you must first assign no output, then assign the new output path.
To reassign track output on Artist Mix:
1 Select a channel by pressing its SEL key.
2 Press SHIFT+ the PAN/MIX key. The display shows the output assignment for each banked track.
3 Press the encoder for the track you want to assign.
4 Press the encoder for no output (encoder 1). The assignment is made and that encoder ON key lights.
5 To exit output assign mode, press any other Knob Set selector (such as PAN).
6 Repeat these steps and assign the new output path.
Display no output output bus
Soft Encoder 1 2 3
Chapter 3: Track and Session Basics 23
24
Working with Track Groups
This section shows how you can work with Pro Tools track Groups using an Artist Control or Artist Mix.
Working with Track Groups on Artist Control
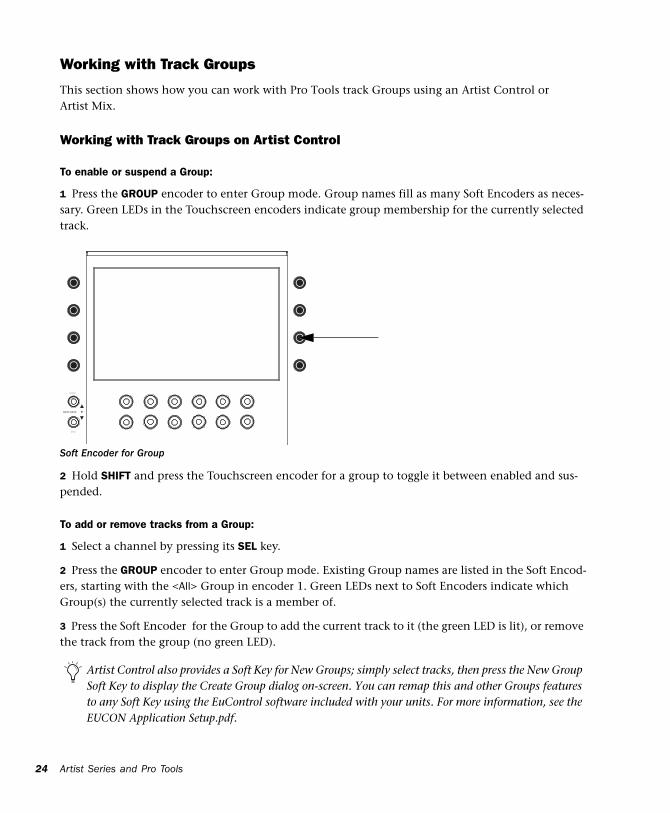
To enable or suspend a Group:
1 Press the GROUP encoder to enter Group mode. Group names fill as many Soft Encoders as neces-sary. Green LEDs in the Touchscreen encoders indicate group membership for the currently selected track.
2 Hold SHIFT and press the Touchscreen encoder for a group to toggle it between enabled and sus-pended.
To add or remove tracks from a Group:
1 Select a channel by pressing its SEL key.
2 Press the GROUP encoder to enter Group mode. Existing Group names are listed in the Soft Encod-ers, starting with the <All> Group in encoder 1. Green LEDs next to Soft Encoders indicate which Group(s) the currently selected track is a member of.
3 Press the Soft Encoder for the Group to add the current track to it (the green LED is lit), or remove the track from the group (no green LED).
Soft Encoder for Group
Artist Control also provides a Soft Key for New Groups; simply select tracks, then press the New Group Soft Key to display the Create Group dialog on-screen. You can remap this and other Groups features to any Soft Key using the EuControl software included with your units. For more information, see the EUCON Application Setup.pdf.
SOFT KEYS
HOME
END
Artist Series and Pro Tools

Working with Track Groups on Artist Mix
To enable or suspend a track Group using Artist Mix:
1 Press SHIFT+AUX/GROUP. The display shows <All> in every fader display (or, the letter designation of the last edited group).
2 Press the lit PAGE > keys to show other available Groups across the display. As you navigate to other Groups, the encoder SEL keys (in the encoder row) light to indicate an active (enabled) Group. In ad-dition, track ON keys light to indicate track membership in the currently displayed Group.
3 To enable a Group, press any unlit (encoder) SEL key so that it stays lit.
4 To suspend a Group, press any lit (encoder) SEL key.
To add or remove tracks from a Group using Artist Mix:
1 Press SHIFT+AUX/GROUP. The display shows <All> above each encoder (or the letter designation of the last edited group). All tracks are members of the <All> group by default.
2 Press the lit PAGE > keys to show other available Groups across the display. As you navigate to other Groups, track ON keys light to indicate track membership in the currently displayed Group.
3 To add a track to the currently displayed Group, press the encoder in the desired track (below the displayed Group name). The track ON key lights green showing that track is now a member of the Group.
4 To remove a track from a Group, press the encoder again so that the ON key in that track is unlit.
Chapter 3: Track and Session Basics 25

26
Artist Series and Pro Tools
chapter 4
Recording
This chapter explains default assignments for common Pro Tools recording tasks.
Select and Record Enable Tracks This section provides standard track and deck record enable commands that work with units such as the Artist Control and Artist Mix.
To record enable a track:
Press the track REC key.
To record enable additional tracks:
Hold the Shift key on your computer keyboard and press additional track REC keys.
To record enable all tracks:
Hold Option (Mac) or Alt (Windows) on your computer keyboard, then press a track REC key.
To record enable all selected tracks:
1 Select two or more tracks (see “Track Basics” on page 19).
2 On your computer keyboard, hold Option+Shift (Mac) or Alt+Shift (Windows), then press the track REC key on one of the selected tracks.
To arm the Pro Tools Transport:
Press the Record key in the Transport section.
You can set Pro Tools Preferences for latching record enable, so you don’t have to hold the Shift key to record enable additional tracks. For more information, see the Pro Tools Reference Guide.
Chapter 4: Recording 27
28
Loop Record, Quick Punch, and Other Record ModesSome supported controllers provide dedicated keys for enabling special Pro Tools recording modes. On other units, commands are available in EuControl software to let you cycle through available modes. (Some modes are available on all Pro Tools systems; other modes require Pro Tools HD.)
To enable alternate Record modes:
1 Hold Control (Mac) or Ctrl (Windows) on your computer keyboard and press the REC key (for ex-ample, on Artist Control, press the REC key in the Transport section). On-screen, the Pro Tools Trans-port master Record switch shows the current mode (P indicates QuickPunch, a Loop arrow appears when in Loop Record mode, and so on).
2 Press Control+REC (Mac) or Ctrl+REC (Windows) again to cycle to the next available recording mode.
Additional Recording FeaturesArtist Control and other units with a Touchscreen give you direct access to many additional controls related to recording workflows. From the Home screen (press the Home Soft Key, at the bottom left of the screen/keys), press the Transport key to be able to use factory Soft Keys for settings such as pre/post roll.
Artist Transport provides six Soft Keys that can be assigned to recording-related functions. In combi-nation with the SHIFT key, there are a total of 12 available Soft Key assignments. (For an example, see “Customizing Controls in EuControl” on page 11.)
Artist Series and Pro Tools
chapter 5
Editing
EUCON supports many Pro Tools editing features, including tool and mode selection, zooming, and Jog/Shuttle. Soft Keys provide many additional commands on units with Soft Keys or a Touchscreen.
Selecting Edit Tools and Edit ModesThis section shows how you can use the Soft Keys on Artist Control and other units for one-button access to Edit Tools and modes.
To change Edit Tools using an Artist Control:
1 Press SHIFT+SOFTKEYS/HOME to return the Soft Keys to their first (home) page.
2 Press the SOFT KEYS V (down) key once to navigate the Soft Keys to the second page.
The Soft Keys display shows Edit Tools and Edit Modes.
3 Press the Soft Key for the desired Edit Tool (such as the Smart Tool, Trim, or Grab).
Soft Keys V (down)
SOFT KEYS
HOME
END
Chapter 5: Editing 29
30
4 Press an Edit Tool Soft Key again to select the next option for that tool (for example, pressing Trim repeatedly cycles through all available Trim tool options).
To change Edit Modes using an Artist Control:
1 Press SHIFT+SOFTKEYS/HOME to return the Soft Keys to their first (home) page.
2 Press the SOFT KEYS v (down) key once to navigate the Soft Keys to the second page. The Soft Keys display now shows Edit Modes in the lower row.
3 Press the Soft Key for the desired Edit Mode (Shuffle, Slip, Spot, or Grid).
To toggle between Absolute and Relative Grid mode:
Press the Grid Soft Key again. In Pro Tools, the Edit Mode display shows Rel Grid when that mode is enabled.
Using the Jog/Shuttle WheelThe Jog wheel and Shuttle ring on many controllers (such as Artist Transport) perform a variety of functions, from basic Jog and Shuttle to zooming, adjusting track height, and moving selections.
To use the Jog wheel to jog and shuttle:
1 Enable Jog mode by pressing the JOG key (if available) or the Soft Key assigned to Jog.
2 Rotate the Jog wheel to jog back or forward.
3 To enable Shuttle mode, press the SHUTTLE key or the equivalent Soft Key, if available.
To zoom horizontally:
1 Press the ZOOM HORIZONTAL key, or assign a key to Zoom Horizontal using EuControl software.
2 Spin the Jog wheel to the left to zoom out horizontally (show more session time), or to the right to zoom in.
To adjust track height:
1 Press the ZOOM VERTICAL key (on Artist Control, press SHIFT + ZOOM HORIZ), or assign a key to it using EuControl software.
2 Spin the Jog wheel to the left to zoom out (reduce track height), or to the right to zoom in and in-crease track height.
If repeated pressing does not cycle through tool options, deselect Options > Edit/Tool Mode Keyboard Lock in Pro Tools. For more information, see the Pro Tools Reference Guide.
Artist Series and Pro Tools
Using Markers Pro Tools Markers and Memory Locations let you store and navigate to specific locations in your ses-sion (such as to mark the beginning of a verse, or the beginning of dialog), and/or selections in the timeline (such as an entire verse, or complete scene).
Any controller with a numeric keypad such as the Artist Transport can create and recall (go to) Mem-ory Locations.
Using Markers on Artist Transport
To create a Marker in a Pro Tools session using Artist Transport:
1 Begin playback.
2 At the point where you want to store a marker, press the Enter key on the numeric keypad.
To recall a Marker using Artist Transport:
On the Artist Transport numeric keypad, press Decimal (.), the Memory Location number, and Dec-imal (.) again.
Using Markers on Artist Control
On Artist Control and other units with a Touchscreen, Soft Keys are available to create, recall, and manage Markers. See the Home page of Touchscreen Soft Keys and look for “Memory Location.”
Enter key on the numeric keypad
Artist Transport
Chapter 5: Editing 31
32
Soft Keys for EditingThis section shows how to get to the default Touchscreen controls for editing with Artist Control. Steps on other units with a Touchscreen will be similar.
To use the Editing Soft Keys:
1 Make sure the Touchscreen is on Page 1 (press the HOME Touchscreen button if necessary).
2 In the Touchscreen, press the EDITING key (it has a small scissors icon). The Touchscreen and the Soft Keys change to show the default Editing assignments.
The Editing page provides a collection of commands and tasks specific to editing in Pro Tools. These commands can greatly speed up workflows by reducing the amount of mousing required for common actions including (but not limited to) changing the Nudge and Grid values, Region Groups, extend-ing selections to previous or next, trimming, and more.
Track View for EditingYou can use modifier keys in combination with Artist Series controls to change track views in the Edit window. This lets you quickly show waveform data in a track.
To show waveforms for a track on Artist Mix or Artist Control:
Hold Command+Control (Mac) or Start+Ctrl (WIndows) and press the track SEL key.
This same technique also lets you show automation data in track views. For additional shortcuts to view automation data, see “Shortcuts to Display Automation Playlists” on page 44.
Artist Series and Pro Tools
chapter 6
Plug-ins and Sends
This chapter explains how to assign and adjust plug-ins and sends on tracks.
Working with Plug-in InsertsThis section shows you how to work with plug-ins using Artist Control or Artist Mix.
Working with Plug-ins on Artist Control
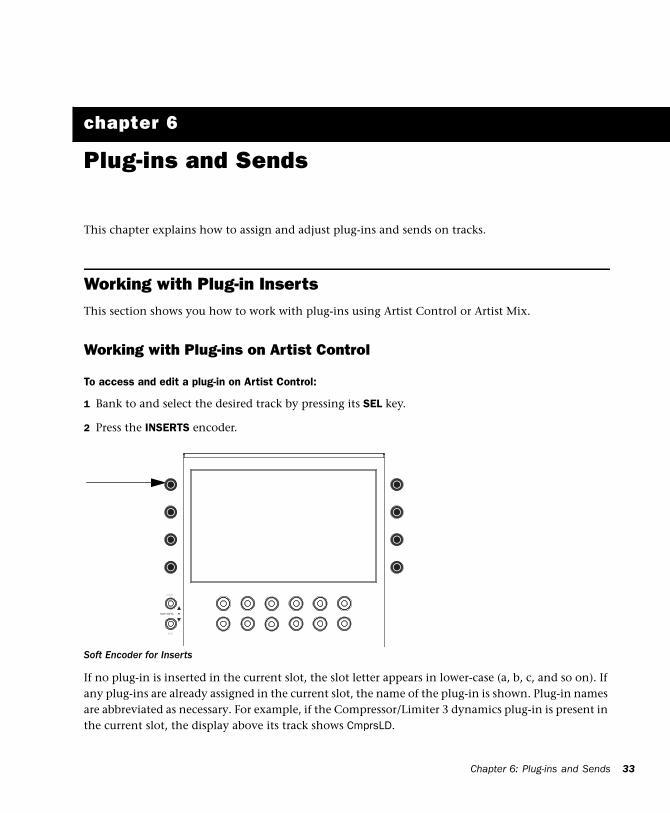
To access and edit a plug-in on Artist Control:
1 Bank to and select the desired track by pressing its SEL key.
2 Press the INSERTS encoder.
If no plug-in is inserted in the current slot, the slot letter appears in lower-case (a, b, c, and so on). If any plug-ins are already assigned in the current slot, the name of the plug-in is shown. Plug-in names are abbreviated as necessary. For example, if the Compressor/Limiter 3 dynamics plug-in is present in the current slot, the display above its track shows CmprsLD.
Soft Encoder for Inserts
SOFT KEYS
HOME
END
Chapter 6: Plug-ins and Sends 33
34
3 To view other insert slots, press PAGE > until that slot and any assigned plug-ins are displayed.
4 Press the encoder for the plug-in you want to edit.
The first page of parameters for that plug-in are mapped across the encoders.
5 Press PAGE > (or PAGE <) to access other parameters for the current plug-in.
Assigning Plug-ins on Artist Control
To assign a plug-in on Artist Control:
1 Select a track.
2 Press the Inserts encoder.
3 Press both PAGE keys (< PAGE and PAGE >) to enter Insert Assign mode. Insert slots are displayed in the Touchscreen (a, b, c, and so on), and both PAGE keys flash.
4 Press the encoder next to the desired insert slot.
5 The Soft Encoders show the next level of choices: no insert, multichannel, multi-mono, or I/O (for hard-ware inserts, when available).
6 Press the encoder for the desired insert type. The Soft Encoders show the next level of choices such as EQ, Dynamics, Reverb, and so on. (Choices shown on your system will vary depending on which plug-ins you have installed, and the Pro Tools setting to organize plug-ins by Category or Manufac-turer).
7 When the desired plug-in is displayed, press its encoder again to insert it on the selected track.
Making Plug-ins Inactive or Active on Artist Control
To toggle a plug-in between active and inactive:
1 Bank to and select the desired track.
2 Press the INSERTS encoder.
3 Navigate the Touchscreen until the desired insert slot and plug-in name is displayed.
4 Press both SHIFT keys simultaneously to enable Shift mode (both key LEDs stay lit).
5 Hold Command+Control (Mac) or Control+Start (Windows) and touch the insert name in the Touchscreen.
For information about plug-in automation, see Chapter 7, “Automation and Mixing.”
Artist Series and Pro Tools
Working with Plug-ins on Artist Mix
This section shows how to use the switches on Artist Mix to access any plug-in inserted on a track.
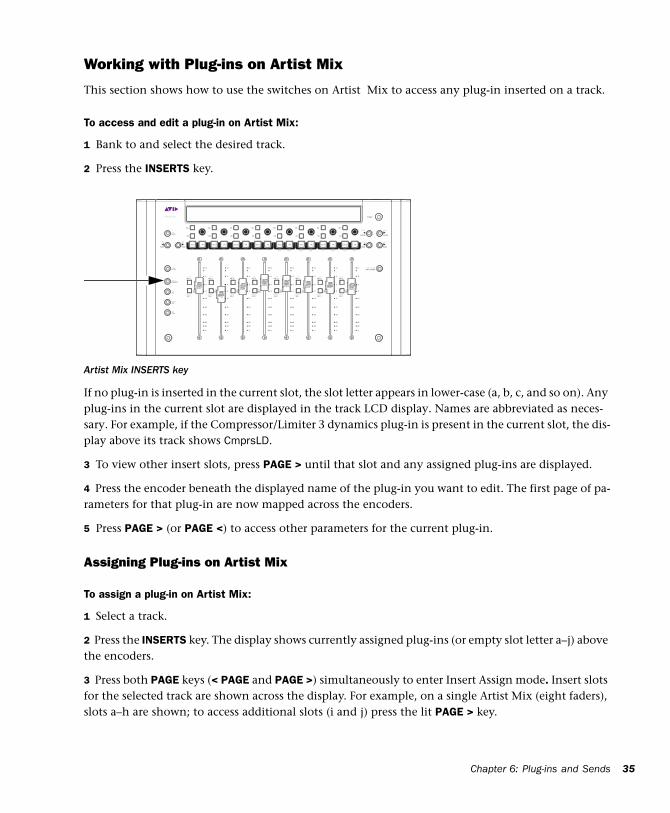
To access and edit a plug-in on Artist Mix:
1 Bank to and select the desired track.
2 Press the INSERTS key.
If no plug-in is inserted in the current slot, the slot letter appears in lower-case (a, b, c, and so on). Any plug-ins in the current slot are displayed in the track LCD display. Names are abbreviated as neces-sary. For example, if the Compressor/Limiter 3 dynamics plug-in is present in the current slot, the dis-play above its track shows CmprsLD.
3 To view other insert slots, press PAGE > until that slot and any assigned plug-ins are displayed.
4 Press the encoder beneath the displayed name of the plug-in you want to edit. The first page of pa-rameters for that plug-in are now mapped across the encoders.
5 Press PAGE > (or PAGE <) to access other parameters for the current plug-in.
Assigning Plug-ins on Artist Mix
To assign a plug-in on Artist Mix:
1 Select a track.
2 Press the INSERTS key. The display shows currently assigned plug-ins (or empty slot letter a–j) above the encoders.
3 Press both PAGE keys (< PAGE and PAGE >) simultaneously to enter Insert Assign mode. Insert slots for the selected track are shown across the display. For example, on a single Artist Mix (eight faders), slots a–h are shown; to access additional slots (i and j) press the lit PAGE > key.
Artist Mix INSERTS key
SOLOSOLO ON ON SOLOSOLO ON ON SOLOSOLO ON ON SOLOSOLO ON ON
Chapter 6: Plug-ins and Sends 35
36
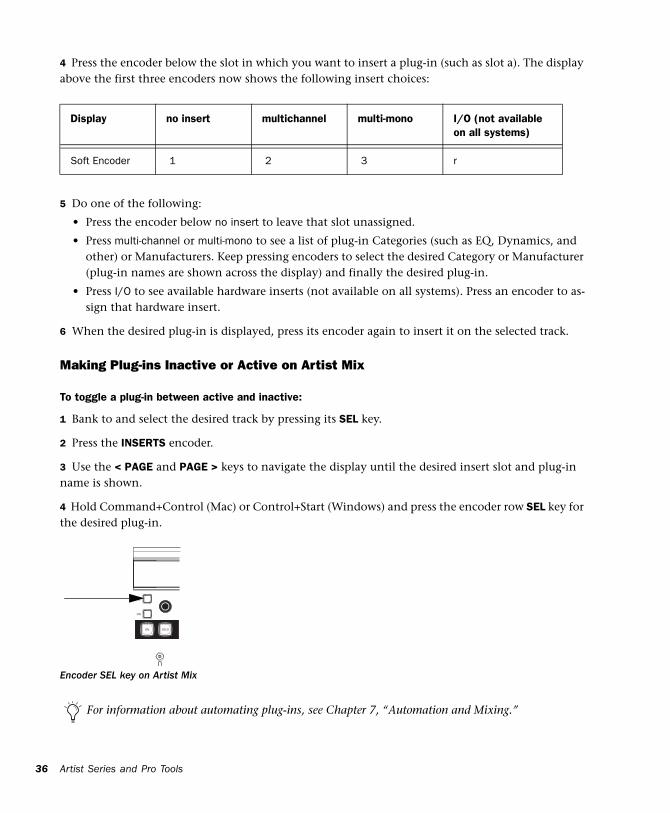
4 Press the encoder below the slot in which you want to insert a plug-in (such as slot a). The display above the first three encoders now shows the following insert choices:
5 Do one of the following:
• Press the encoder below no insert to leave that slot unassigned.
• Press multi-channel or multi-mono to see a list of plug-in Categories (such as EQ, Dynamics, and other) or Manufacturers. Keep pressing encoders to select the desired Category or Manufacturer (plug-in names are shown across the display) and finally the desired plug-in.
• Press I/O to see available hardware inserts (not available on all systems). Press an encoder to as-sign that hardware insert.
6 When the desired plug-in is displayed, press its encoder again to insert it on the selected track.
Making Plug-ins Inactive or Active on Artist Mix
To toggle a plug-in between active and inactive:
1 Bank to and select the desired track by pressing its SEL key.
2 Press the INSERTS encoder.
3 Use the < PAGE and PAGE > keys to navigate the display until the desired insert slot and plug-in name is shown.
4 Hold Command+Control (Mac) or Control+Start (Windows) and press the encoder row SEL key for the desired plug-in.
Display no insert multichannel multi-mono I/O (not available on all systems)
Soft Encoder 1 2 3 r
Encoder SEL key on Artist Mix
For information about automating plug-ins, see Chapter 7, “Automation and Mixing.”
SEL
ON
SOLOON
Artist Series and Pro Tools
Using the EQ and DYN Keys
You can use the EQ and DYN keys on the Artist Mix an Artist Control to quickly access inserted EQ or dynamics plug-ins.
To access an EQ or dynamics plug-in directly:
1 Bank to display a track with an EQ (or dynamics) plug-in inserted.
2 Press the EQ (or DYN) key. The display shows the names of any inserted EQ or dynamics plug-ins, regardless of their slot location (a–f).
3 Press the encoder below the EQ or dynamics plug-in you want to edit.
EQ/DYN Keys and Standard Plug-in Mapping
When you navigate to an EQ or Dynamics plug-in using the INSERTS key, the parameters are arranged across your hardware controls in a layout unique to that plug-in, and/or its manufacturer.
The EQ and DYN keys, by contrast, map plug-in parameters according to a standard control layout. This lets the controls appear in the same arrangement across your controller, regardless of the model or manufacturer.
Chapter 6: Plug-ins and Sends 37
38
Working with SendsThis section shows how you can assign and adjust Pro Tools sends.
Working with Sends on Artist Control
Assigning Sends
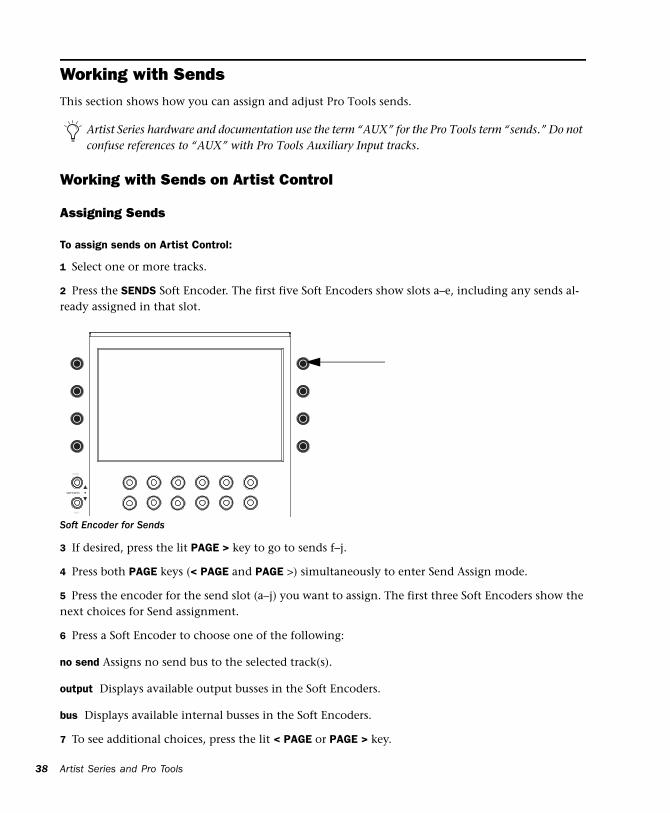
To assign sends on Artist Control:
1 Select one or more tracks.
2 Press the SENDS Soft Encoder. The first five Soft Encoders show slots a–e, including any sends al-ready assigned in that slot.
3 If desired, press the lit PAGE > key to go to sends f–j.
4 Press both PAGE keys (< PAGE and PAGE >) simultaneously to enter Send Assign mode.
5 Press the encoder for the send slot (a–j) you want to assign. The first three Soft Encoders show the next choices for Send assignment.
6 Press a Soft Encoder to choose one of the following:
no send Assigns no send bus to the selected track(s).
output Displays available output busses in the Soft Encoders.
bus Displays available internal busses in the Soft Encoders.
7 To see additional choices, press the lit < PAGE or PAGE > key.
Artist Series hardware and documentation use the term “AUX” for the Pro Tools term “sends.” Do not confuse references to “AUX” with Pro Tools Auxiliary Input tracks.
Soft Encoder for Sends
SOFT KEYS
HOME
END
Artist Series and Pro Tools

8 When the desired output or bus is displayed, press the Soft Encoder for the desired choice. A green dot appears indicating that send bus is now assigned to the currently selected tracks.
Opening and Editing Sends on Artist Control
To access and edit a send on Artist Control:
1 Select a track with send already assigned.
2 Press the SENDS Soft Encoder. The Soft Encoders show assigned sends, and empty slots (a–e, or f–j).
Once in Aux mode, do any of the following to adjust send parameters:
To adjust send level:
Rotate the encoder for the desired send.
To adjust send pan:
1 Press the encoder for the send you want to adjust.
2 Rotate the Soft Knob for L Pan and/or R Pan.
To mute a send:
Touch its Soft Encoder in the Touchscreen display (such as Bus 1). Touch again to unmute.
To toggle the send pre- or post-fader:
Hold SHIFT and touch the Soft Encoder for the send in the Touchscreen (such as Bus 1).
Making Sends Inactive or Active on Artist Control
To toggle a send between active and inactive:
1 Bank to and select the desired track.
2 Press the SENDS encoder.
3 Navigate the Touchscreen until the desired send is displayed.
4 Press both SHIFT keys simultaneously to enable Shift Lock mode (both key LEDs stay lit).
To assign the send to all selected tracks, hold Option+Shift (Mac) or Alt+Shift (Windows) and press the encoder. To assign the send on all tracks, hold Option (Mac) or Alt (Windows).
Chapter 6: Plug-ins and Sends 39

40
5 Hold Command+Control (Mac) or Control+Start (Windows) and touch the Send name in the Touchscreen.
Working with Sends on Artist Mix
Assigning Sends on Artist Mix
To assign a send on Artist Mix:
1 Select a track.
2 Press the AUX key.
3 Press both PAGE keys (< PAGE and PAGE >) to enter Send Assign mode. The display shows the cur-rent (or last viewed) send slot a–j (an 8-fader system will only show slots a–f). To see additional send slots, press the lit PAGE > key.
4 Press the encoder below desired send slot. For example, to assign a send to the current track in slot a, press encoder 1. The display above the first three encoders shows the following choices:
5 Do one of the following:
• Press the encoder below no send to leave that slot unassigned.
• Press output to see output bus choices (such as Out 1–2).
• Press bus to see available internal busses.
6 To see additional choices (beyond the number of faders in your system) press the lit PAGE > key.
7 When the desired send is displayed, press its encoder to make the assignment. In that fader strip, the encoder ON key lights.
To toggle all sends in that same slot (a–j) on all selected tracks, hold Option+Shift (Mac) or Alt+Shift (Windows) and touch the Send name. To toggle all sends in that slot on all tracks, hold Option (Mac) or Alt (Windows).
Display no send output bus
Soft Encoder 1 2 3
To assign a send in the same slot to all selected tracks, hold Option+Shift (Mac) or Alt+Shift (Win-dows) on your computer keyboard while pressing the desired encoder. To assign to all tracks, hold Op-tion (Mac) or Alt (Windows).
Artist Series and Pro Tools
Opening and Editing Sends on Artist Mix
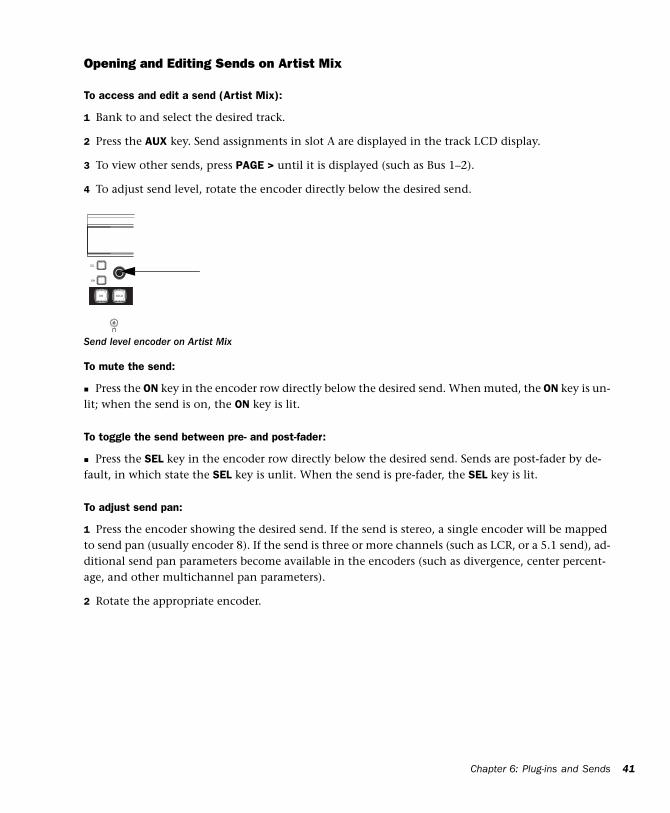
To access and edit a send (Artist Mix):
1 Bank to and select the desired track.
2 Press the AUX key. Send assignments in slot A are displayed in the track LCD display.
3 To view other sends, press PAGE > until it is displayed (such as Bus 1–2).
4 To adjust send level, rotate the encoder directly below the desired send.
To mute the send:
Press the ON key in the encoder row directly below the desired send. When muted, the ON key is un-lit; when the send is on, the ON key is lit.
To toggle the send between pre- and post-fader:
Press the SEL key in the encoder row directly below the desired send. Sends are post-fader by de-fault, in which state the SEL key is unlit. When the send is pre-fader, the SEL key is lit.
To adjust send pan:
1 Press the encoder showing the desired send. If the send is stereo, a single encoder will be mapped to send pan (usually encoder 8). If the send is three or more channels (such as LCR, or a 5.1 send), ad-ditional send pan parameters become available in the encoders (such as divergence, center percent-age, and other multichannel pan parameters).
2 Rotate the appropriate encoder.
Send level encoder on Artist Mix
SEL
ON
SOLOON
Chapter 6: Plug-ins and Sends 41

42
Making Sends Inactive or Active on Artist Mix
To toggle a send between active and inactive:
1 Bank to and select the desired track.
2 Press the AUX key.
3 Use the < PAGE and PAGE > keys to navigate the display until the desired send is shown.
4 Hold Command+Control (Mac) or Control+Start (Windows) and press the encoder row SEL key for the desired send.
Encoder SEL key on Artist Mix
To toggle all sends in the same slot on all selected tracks, hold Option+Shift (Mac) or Alt+Shift (Win-dows) and touch the press the encoder SEL key. To toggle all sends in the same slot on all tracks, hold Option (Mac) or Alt (Windows) and press the encoder.
SEL
ON
SOLOON
Artist Series and Pro Tools
chapter 7
Automation and Mixing
This chapter shows how to control automation settings and how to pan in multichannel for sur-round.
Enabling and Suspending AutomationYou can control many Pro Tools automation settings directly from the Touchscreen on Artist Control and other units.
To open the Automation window using Artist Control:
In the Soft Keys Home page, press the Auto key. (By default, this key appears in the Soft Key Home page.) The Automation window opens on-screen, and the Touchscreen displays automation controls.
To enable or disable automation types:
1 Press the Auto Soft Key.
2 Press the Touchscreen button for the desired parameter. For example, to toggle Volume automation enabled/suspended, press the Soft Key ENABLE VOLUME.
Track Automation Mode Selection
To select the Automation mode for a track on Artist Control or Artist Mix:
1 Hold SHIFT while pressing the REC/AUTO key on a track.
2 Press SHIFT+REC/AUTO again to cycle to the next available automation mode such as Off, Read, Latch, or Touch. Not all modes will be available; for additional modes, use the mouse and the on-screen track Automation mode selector.
Chapter 7: Automation and Mixing 43

44
Punching Out of Automation Recording
To punch out of an automation pass:
Press SHIFT+REC/AUTO on the desired track.
Shortcuts to Display Automation Playlists The following shortcuts let you quickly display the breakpoint automation playlist for a control by clicking it in combination with modifier keys on your computer keyboard. These shortcuts work on Artist Control and Artist Mix.
Waveform View
To show the waveform for a track in the Edit window:
Hold Command+Control (Mac) or Control+Start (Windows) and press the track SEL key.
Automation Views
Track Volume
To show volume automation for a track in the Edit window:
Hold Control+Command (Mac) or Control+Start (Windows) and touch the track fader.
Track Pan
To show track pan automation in the Edit window:
1 Press the PAN key to have pan on the encoders.
2 Hold Control+Command (Mac) or Ctrl+Start (Windows) and touch the Pan encoder on a track.
To do to all selected tracks, hold Option+Shift+Control+Command (Mac) or Alt+Shift+Control+Start (Windows) and press SEL. To do to all tracks, hold Option+Control+Command (Mac) or Alt+Con-trol+Start (Windows) and press SEL.
To do to all selected tracks, hold Option+Shift+Control+Command (Mac) or Alt+Shift+Control+Start (Windows) and touch the fader. To do to all tracks, hold Option+Control+Command (Mac) or Alt+Control+Start (Windows) and touch the fader.
To do to all selected tracks, hold Option+Shift+Control+Command (Mac) or Alt+Shift+Control+Start (Windows) and touch the Pan encoder on a selected track. To do to all tracks, hold Option+Con-trol+Command (Mac) or Alt+Control+Start (Windows) and touch any Pan encoder.
Artist Series and Pro Tools

Send Level
To show Send level automation in the Edit window:
1 Press the AUX key (Artist Mix) or the SENDS Soft Encoder (Artist Control) to bring sends to the en-coders.
2 If necessary, press the PAGE > key until the desired Send slot is displayed.
3 Hold Control+Command (Mac) or Ctrl+Start (Windows) and touch the Send encoder in the desired track.
Send Pan
To show Send pan automation in the Edit window:
1 Press the AUX key (Artist Mix) or the SENDS soft Knob (Artist Control) to bring sends to the encod-ers.
2 If necessary, press the PAGE > key until the desired send slot is displayed.
3 Press the encoder for the desired send.
4 Hold Control+Command (Mac) or Ctrl+Start (Windows) and touch the Send pan encoder on a track.
Plug-In Automation
Showing Plug-in Automation
To show automation for a continuous plug-in parameter:
1 Press the INSERTS key (Artist Mix) or the INSERTS Soft Knob (Artist Control).
2 Display the desired plug-in parameter using the encoders and <PAGE> keys. (See “Working with Plug-in Inserts” on page 33.)
3 Hold Control+Command (Mac) or Ctrl+Start (Windows) and touch the encoder for the desired plug-in parameter.
To do to all selected tracks, hold Option+Shift+Control+Command (Mac) or Alt+Shift+Control+Start (Windows) and touch the Send encoder on a selected track. To do to all tracks, hold Option+Con-trol+Command (Mac) or Alt+Control+Start (Windows) and touch any Send encoder.
To do to all selected tracks, hold Option+Shift+Control+Command (Mac) or Alt+Shift+Control+Start (Windows) and touch the Pan encoder on a selected track. To do to all tracks, hold Option+Con-trol+Command (Mac) or Alt+Control+Start (Windows) and touch any Send pan encoder.
Chapter 7: Automation and Mixing 45
46
To show automation for a switch-type plug-in parameter on Artist Control:
1 Press the INSERTS Soft Knob.
2 Display the desired plug-in parameter using the encoders and <PAGE> keys. (See “Working with Plug-ins on Artist Control” on page 33.)
3 Hold Control+Command (Mac) or Ctrl+Start (Windows) and touch the plug-in parameter in the Touchscreen.
To show automation for a switch-type plug-in parameter on Artist Mix:
1 Press the INSERTS key.
2 Display the desired plug-in parameter using the encoders and <PAGE> keys. (See “Working with Plug-ins on Artist Control” on page 33.)
3 Hold Control+Command (Mac) or Ctrl+Start (Windows) and touch the encoder.
Enabling All Plug-in Parameters for Automation
To enable all plug-in controls for automation on Artist Control:
1 Press the INSERTS Soft Knob.
2 Hold Control+Command+Option (Mac) or Control+Start+Alt (Windows) and touch the desired plug-in in the Touchscreen.
To enable all plug-in controls for automation on Artist Mix:
1 Press the INSERTS key.
2 Hold Control+Command+Option (Mac) or Control+Start+Alt (Windows) and press the ON key (in the encoder row) for the desired plug-in.
Artist Series and Pro Tools

Multichannel Panning for Surround This section shows how you can use Artist Control or Artist Mix to pan in multichannel for surround sound.
Surround Panning on Artist Control
In surround sessions, the Touchscreen lets you use the Soft Encoders to pan tracks in surround.
To pan in surround using the Soft Encoders:
1 Press a track SEL key to select a track assigned to a multichannel output path (such as a 5.1 or 7.1 output path).
2 Press the PAN encoder. Multichannel pan parameters such as divergence, pan, and center percent-age appear in the Soft Encoders.
3 Press the lit PAGE > key to show other available pan parameters.
4 Rotate an encoder to adjust the selected parameter.
5 To reset a parameter to its default setting, press the encoder for that parameter.
Surround Panning on Artist Mix
Artist Mix lets you use the encoders to control multichannel pan parameters.
To pan in surround:
1 Press a track SEL key to select a track assigned to a multichannel output path (such as a 5.1 or 7.1 output path).
2 Press the PAN key.
3 Press the CHAN key. Multichannel pan parameters such as Front Left/Right, Front/Rear, divergence, pan, and center percentage appear in the Soft Encoders.
4 Press the lit PAGE > key to show other available pan parameters.
5 Rotate an encoder to adjust the selected parameter.
6 To reset a parameter to its default setting, press the encoder for that parameter.
As an alternative to using the encoders, hold SHIFT and press the CHAN/FLIP key to flip pan controls to the faders. Press FLIP again to return to encoders.
For more information about multichannel tracks, busses, and output paths, see the Pro Tools Refer-ence Guide.
Chapter 7: Automation and Mixing 47

48
Artist Series and Pro Tools
Aactive/inactive
plug-ins 36plug-ins Artist Control 34sends 39sends, Artist Mix 42
Artist Controland Soft Keys for editing 32input and output routing 20plug-ins 33
Artist Mixinput and output routing 22plug-ins 35
Artist Transport 11markers 31
automation 43plug-ins 46shortcuts to show playlist 44
Avidcustomer success 4
BBank/Nudge 16banking 16
Ccompatibility 1customize (remap with EuControl) 10
EEdit Modes 30Edit Tools 29encoders 17EUCON 1EuControl
customizing 10EuControl Settings window 10
Ffader 17Fast Forward 14
GGrabber 29Grid 32Grid (rel and ab) 30groups 24
Hhome (bank) 16
IICON 6input 20, 22
JJog 30
LLoop Record 28
Mmake active/inactive
plug-ins (Artist Mix) 36Markers 31memory locations (see Markers)MIDI and EUCON 6
NNudge 32
Ooutput 20, 22
index
Index 49
50
Ppan 17
stereo tracks 17Pencil 29Play 14plug-ins
assigning 34, 35make active/inactive (Artist Control) 34
QQuickPunch 28
RRecord (Transport) 14recording 27
modes 28Rewind 14RTZ3 14
SScrubber 29SEL (Assign) 19selecting tracks 19Selector 29sends 41
assigning 38, 40level, pan, mute, pre/post 39
SHOW 11Shuffle 30Shuttle 30Slip 30Spot 30stereo pan 17Stop 14system requirements 1
Ttechnical support 4track height 30tracks
banking 16home 16selecting 19
Trimmer 29
Artist Series and Pro Tools
Vvolume (fader) 17
Zzoom using the Jog wheel 30Zoomer 29

Avid2001 Junipero Serra Boulevard Daly City, CA 94014-3886 USA
Technical Support (USA)Visit the Online Support Center at www.avid.com/support
Product InformationFor company and product information, visit us on the web at www.avid.com