art + science series photography 1: how does a camera … · art + science series photography 1:...
TRANSCRIPT
07/29/15 Page 1 of 17
Distance Learning at the Cleveland Museum of Art
Art + Science Series
Photography 1: How Does a Camera Work?
Grades 5-8
This packet includes:
HOW TO PREPARE YOUR CLASS FOR THE DISTANCE LEARNING PRESENTATION ......................... 2
PROGRAM OBJECTIVES: ....................................................................................................................................... 3
COMMON CORE STATE STANDARDS APPLICABLE: ................................................................................................ 3 NATIONAL EDUCATION STANDARDS: ...................................................................................................................... 4
SUPPLIES NEEDED FOR VIDEOCONFERENCE: .............................................................................................. 5
IMPORTANT SAFETY NOTE: ................................................................................................................................ 6
PRIOR TO THE PROGRAM: ................................................................................................................................... 6
VOCABULARY: ......................................................................................................................................................... 6
TEACHING EXTENSIONS: ..................................................................................................................................... 7
IDEAS FOR RESEARCH PROJECTS: ................................................................................................................... 9
ADDITIONAL RESOURCES: ................................................................................................................................... 9
THE CLEVELAND MUSEUM OF ART DISTANCE LEARNING EVALUATION FORM ........................... 11
DISPOSABLE CAMERA FRONT LABELED PHOTOGRAPH ........................................................................ 14
DISPOSABLE CAMERA BACK LABELED PHOTOGRAPH ........................................................................... 15
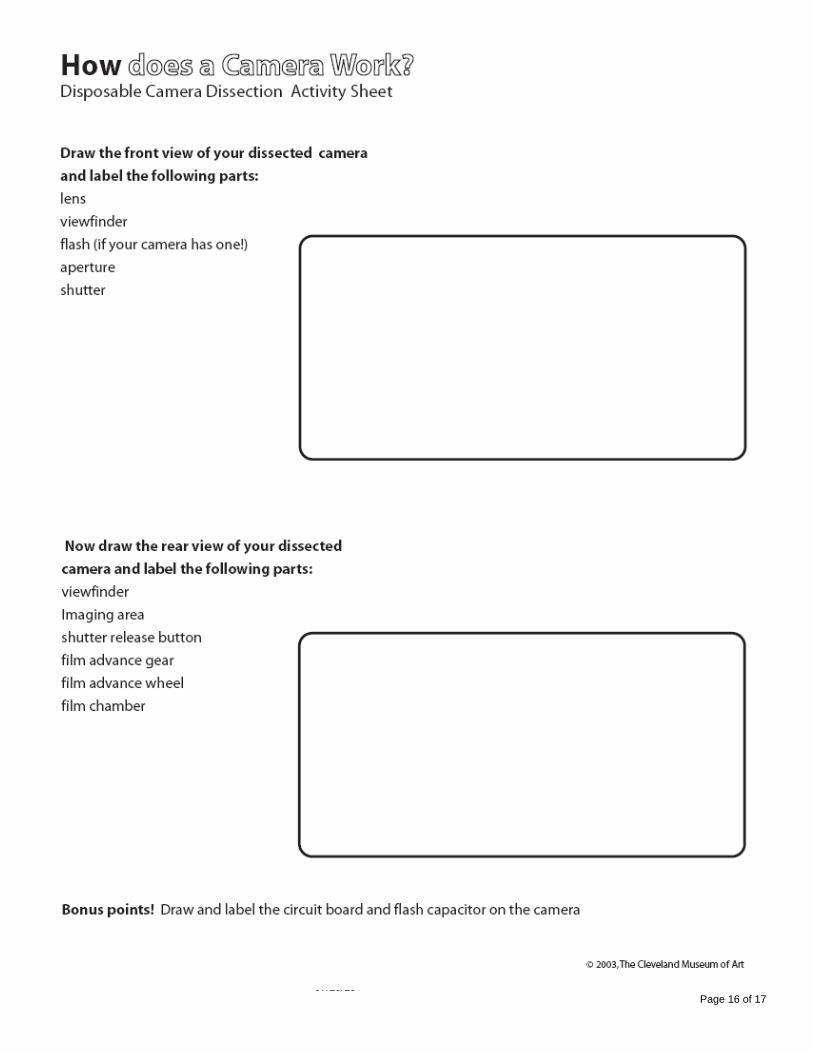
HOW DOES A CAMERA WORK? CAMERA DISSECTION ACTIVITY SHEET.….…………………….......11
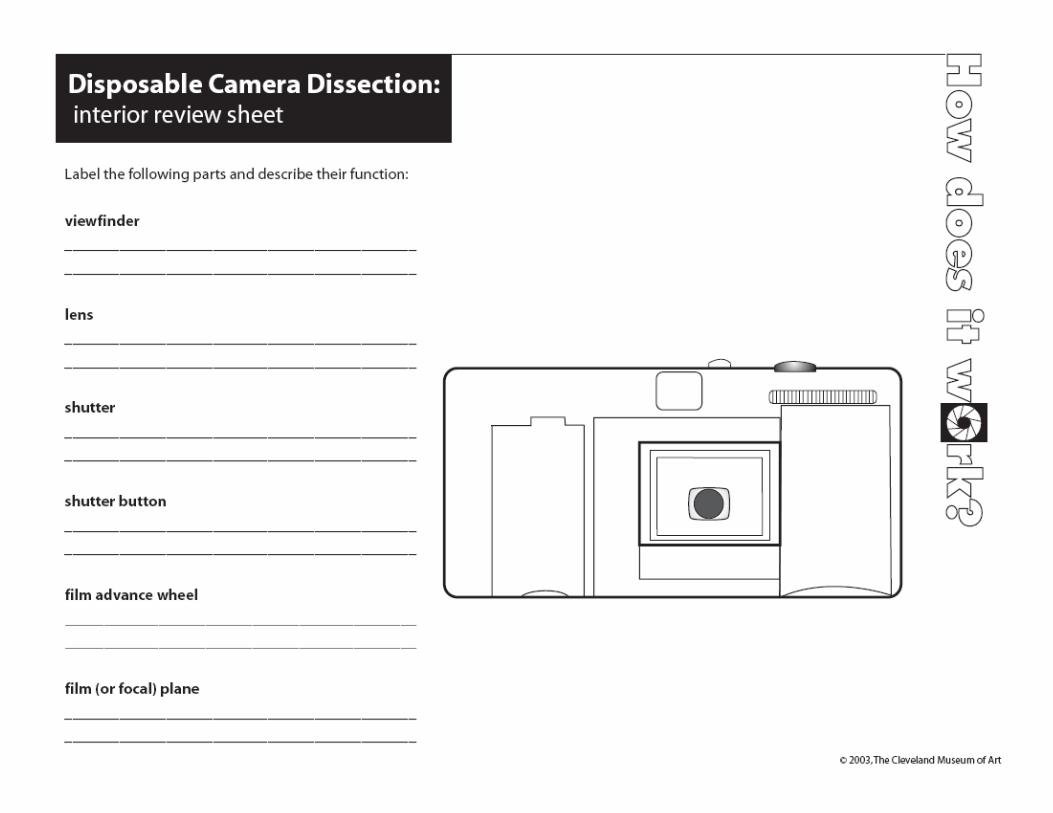
HOW DOES IT WORK? POST-LESSON STUDENT REVIEW SHEET….……………………………………12
Teacher note: In order to participate in this interactive program, please bring all the supplies listed in the
teaching information packet to your videoconferencing site, along with photocopies of the How
Does a Camera Work? Dissection Activity Sheet for every student.
07/29/15 Page 2 of 17
How to Prepare Your Class for the Distance Learning Presentation
Teacher Information will be sent or made available to you prior to the program.
Please familiarize yourself with the materials and discuss them with your class.
Have the Teacher Information Packet (T.I.P.) materials on hand in the classroom,
ready for the program. These materials may be used during the videoconference.
Be prepared to facilitate by calling on students yourself during the lesson.
Students are sometimes initially shy about responding to questions during a
distance learning lesson.
Explain to students that this is an interactive medium and encourage them to ask
questions.
Reinforce topics discussed in the program by asking students to complete some of
the suggested pre- and post-conference activities in the Teacher Information
Packet.
We ask teachers, after the program, to please fill out the Evaluation Form and
return it to:
Dale Hilton/Distance Learning
The Cleveland Museum of Art
11150 East Boulevard
Cleveland, OH 44106
Thank You!
07/29/15 Page 3 of 17
Distance Learning at the Cleveland Museum of Art
Art + Science Series
Photography 1: How Does a Camera Work?
Grades 5-8
Program Objectives:
Students will learn that a non-digital camera consists of three basic parts: an optical
component (lens), a mechanical component (camera body) and a chemical component
(film).
Students will identify the interior and exterior elements through dissection of a disposable
35mm camera and learn the function of the lens, aperture, shutter, shutter release and
viewfinder.
Students will learn how to handle and operate a camera safely.
Common Core State Standards Applicable:
English Language Art & Literacy in History/Social Studies, Science, and Technical Subjects-
5th Grade:
CCSS.ELA-Literacy.W.5.7
Conduct short research projects that use several sources to build knowledge through
investigation of different aspects of a topic.
CCSS.ELA-Literacy.SL.5.1
Engage effectively in a range of collaborative discussions (one-on-one, in groups, and teacher
led) with diverse partners on grade 5 topics and texts, building on others’ ideas and expressing
their own clearly.
6th Grade:
CCSS.ELA-Literacy.RI.6.7
Integrate information presented in different media or formats (e.g., visually, quantitatively) as
well as in words to develop a coherent understanding of a topic or issue.
CCSS.ELA-Literacy.W.6.7
CCSS.ELA-Literacy.WHST.6.7
Conduct short research projects to answer a question, drawing on several sources and
refocusing the inquiry when appropriate.
CCSS.ELA-Literacy.SL.6.1
Engage effectively in a range of collaborative discussions (one-on-one, in groups, and teacher
led)with diverse partners on grade 6 topics, texts, and issues, building on others’ ideas and
expressing their own clearly.
CCSS.ELA-Literacy.RH.6.3
07/29/15 Page 4 of 17
Follow precisely a multistep procedure when carrying out experiments, taking measurements, or
performing technical tasks.
CCSS.ELA-Literacy.RH.6.4
Determine the meaning of symbols, key terms, and other domain-specific words and phrases as
they are used in a specific scientific or technical context relevant to grades 6–8 texts and topics.
7th Grade:
CCSS.ELA-Literacy.W.7.7
CCSS.ELA-Literacy.WHST.7.7
Conduct short research projects to answer a question, drawing on several sources and
generating additional related, focused questions for further research and investigation.
CCSS.ELA-Literacy.SL.7.1
Engage effectively in a range of collaborative discussions (one-on-one, in groups, and teacher
led)with diverse partners on grade 7 topics, texts, and issues, building on others’ ideas and
expressing their own clearly.
CCSS.ELA-Literacy.RH.7.3
Follow precisely a multistep procedure when carrying out experiments, taking measurements, or
performing technical tasks.
CCSS.ELA-Literacy.RH.7.4
Determine the meaning of symbols, key terms, and other domain-specific words and phrases as
they are used in a specific scientific or technical context relevant to grades 6–8 texts and topics.
8th Grade:
CCSS.ELA-Literacy.W.8.7
CCSS.ELA-Literacy.WHST.8.7
Conduct short research projects to answer a question (including a self-generated question),
drawing on several sources and generating additional related, focused questions that allow for
multiple avenues of exploration.
CCSS.ELA-Literacy.SL.8.1
Engage effectively in a range of collaborative discussions (one-on-one, in groups, and teacher
led)with diverse partners on grade 8 topics, texts, and issues, building on others’ ideas and
expressing their own clearly.
CCSS.ELA-Literacy.RH.8.3
Follow precisely a multistep procedure when carrying out experiments, taking measurements, or
performing technical tasks.
CCSS.ELA-Literacy.RH.8.4
Determine the meaning of symbols, key terms, and other domain-specific words and phrases as
they are used in a specific scientific or technical context relevant to grades 6–8 texts and topics.
National Education Standards: For Visual Arts Education (grades 5-8):
Understanding and applying media, techniques, and processes.
Understanding the visual arts in relation to history and cultures.
07/29/15 Page 5 of 17
Making connections between visual arts and other disciplines.
For Science (grades 5-8):
Science as inquiry
Physical science
Science and technology
History and nature of science
Since its introduction to the public in 1839, photography has drastically altered both the way we
perceive the world and how we communicate with each other. The camera has also changed
drastically; yet at the same time, hardly at all. While it has changed in format from a large
wooden box with simple lenses to sleek models that fit in the palm and export images directly to
personal computers, it still shares three main elements with its earlier ancestors: a lightproof
container, an optical element, and an image-capturing device. In the first of a two-part program
exploring the science and art of photography, students will discover the inner workings of a
simple disposable camera and lay the foundation for the discovery of their own creative view
through the camera.
Supplies needed for videoconference:
For each student group –
1. used disposable cameras, preferably all Kodak brand (but not Kodak Power Flash)
(Retail film processors may have used disposable cameras available at no charge. Allow time prior to your
lesson to accumulate enough camera bodies for each student; plan to have 1/3 more than you actually
need).
2. eyeglass screwdriver -OR- orange stick (for manicures) -OR- popsicle stick
3. dissection or cafeteria tray
For each student –
4. rubber or latex gloves
5. safety goggles
6. How Does the Camera Work? Activity Sheet for diagramming front and back of camera.
7. pencil and eraser
Teacher -
8. rubber handled screwdriver
9. thick rubber gloves

07/29/15 Page 6 of 17
10. 2” x 2’ square of heavy gauge aluminum foil (or give each group their own piece of foil)
Important Safety Note:
Like most electronic devices, the disposable camera can be a source for hazardous electric shock.
Flash circuit voltage may be as high as 300V when fully charged, and can store up to 50V even
after the battery has been removed. Prior to the program, instruct students not to touch the
interior circuit board or battery connectors with their hands. If using flash cameras for dissection,
the teacher must remove the AA battery from the camera. During the program, we will
demonstrate how to short out the circuit board by rubbing it with the square of metal foil, before
allowing the students to handle the exposed camera interior. Do not touch the circuit board
with anything other than rubber-gloved hands or a rubber-handled screwdriver when
discharging the camera. If you do not want the students to discharge their own cameras, you
may do this part beforehand. However, the students should still be wearing rubber or latex
gloves during the dissection. The presenter for your lesson will explain this activity during the
video conference, but please feel free to contact us, if you have any concerns.
Prior to the Program:
Divide class into groups of two or three for camera dissection.
Distribute supplies needed for the videoconference.
Discuss safety guidelines.
You may want to ask students if they can describe what a camera is and what it does. Many
different styles of cameras are used to take photographs. While this lesson focuses on film (or
chemical-based) imaging, cameras which use digital imaging are becoming increasingly
common. Encourage student exploration of the difference between these two types of
technology.
Vocabulary:
Aperture – a circular opening that controls the amount of light entering the camera.
Camera – a machine that uses a lens or small opening to record light on a sensitized material.
Camera Obscura – “dark room” (Latin) where light enters through a small hole in a wall and
forms an upside-down image of the outside scene on the opposite inside wall.
Depth of Field – the area of a picture that is in focus.
Electronic Flash - additional light source that provides brief, intense, white light.
Exposure - the amount of light striking the film when a photograph is taken.
Film - a thin, transparent material with a light sensitive coating that records light entering the
camera.
ISO - a system of numbers which indicates the sensitivity of film to light. Also known as ASA.
07/29/15 Page 7 of 17
Lens - a curved piece of glass or plastic that can bend light. Used in a camera to focus light on
film. From the Latin word for “lentil.”
Negative - an image produced on film that has the light and dark or color areas reversed.
Photography – from the Greek word photos or “light” and graphia or “write.”
Positive - an image produced on film that reproduces the light and dark or color areas exactly as
seen.
Refraction – bending or turning of light rays when traveling obliquely from one medium into
another.
Shutter release - the button on a camera that triggers the operation of the shutter and flash.
Shutter speed - indicator of the length of time the shutter stays open.
35mm - a size or format of photographic film.
Viewfinder - a clear window on a camera used for seeing the subject area.
Teaching Extensions:
1. Investigating the property of light through the camera obscura (science)
Explanation: We can probably thank the phenomena of the solar eclipse for the invention of the
camera. In the ancient world, the Greek philosopher Aristotle (384-322 BC) described a safe
method of viewing the eclipse by using a hole punched in metal to create a projected image of
the sun. Arabian scholar Alhazen, c. 965 – 1039, also used a pinhole in his experiments with
light, proving his theory that light reflects off objects and does not emanate from the eye like
Superman’s x-ray vision. This pinhole principle known as the camera obscura became popular
during the Renaissance, when Italian artists and draftsmen used it as a drawing aid to accurately
depict perspective.
The early camera obscura was typically a completely dark room large enough for a
person to walk into, with a small hole on one wall to allow light to pass through and form an
upside down, reversed image of the outside scene on the opposite wall. The addition of a lens
and diaphragm in the 1500s aided in sharpening the image, while the room’s size shrank to the
form of a folding tent or box which could be carried from location to location.
Research: Artists and scientists to investigate include Aristotle, Alhazen, Leonardo da Vinci,
Canaletto, and Vermeer. Pick one or more of these individuals and briefly summarize their
thoughts or involvement with the properties of light. Then try one of the projects below.
Project:
Make a room-sized camera obscura
Required materials: room with a window, sunshine, black plastic sheeting, and masking
tape. Cover windows, doors, or anything that allows light into room with black plastic
and turn off all lights so the room is completely dark. Make a small hole in the black
plastic that covers one window. Experiment with holding a sheet of white paper parallel
to, and at various distances from the pinhole to determine your focal plane.
07/29/15 Page 8 of 17
Make a portable camera obscura
Excellent instructions for making a portable camera obscura out of a Pringles™ potato
chip can on the web: www.exploratorium.edu/science_explorer/pringles_pinhole.html
2. Exploring the relationship between intensity of light and exposure time (science)
Explanation: Both photographic film and paper are sensitive to light because of their coating
with a gelatin-based emulsion of silver halide crystals. Light striking the emulsion causes an
invisible chemical change—or latent image—to form on the surface. The film or paper is then
bathed in a chemical or developer that changes the silver halide crystals exposed to light into
silver metal, or shades of gray and black. The crystals not exposed to light remain unchanged, to
be washed away by another chemical, or fixer.
On black and white negative film, areas that received the most light—such as the sky—are
dark, or the reverse of their actual appearance. When light is projected through the negative onto
the photographic paper, the dark areas block the light falling onto the paper, leaving those areas
light as in their actual appearance.
The cyanotype (or Sunprint™ paper) offers an introductory printing experience for the
elementary classroom because it uses the same negative image principle as silver-based
photographic paper, yet only UV or sunlight and water are required for the development and
fixing process
Developed by scientist Sir John Herschel in 1842, the cyanotype produced a distinctive
blue image due to a light-sensitizing coating of ferric ammonium citrate and potassium
ferricyanide. While the process was simple to use, most 19th century photographers did not
admire the blue image. It’s most common use has been for the reproduction of engineering
drawings, or blueprints.
The cyanotype is a printing out process, which means the image appears as it is exposed
to light. Students will be able to see the chemical change and gauge the length of time necessary
for an image to develop. After enough exposure, the paper is washed in water to remove the
soluble unexposed salts. Upon drying, the image darkens as a result of slow oxidation in air.
Treatment with an oxidant such as hydrogen peroxide will create a darker blue image.
Research: Artists and scientists to investigate include Sir John Herschel, Anna Atkins, Edward
S. Curtis, Betty Hahn, and Robert Rauschenberg. Have students find information on, or a
cyanotype image by one of these individuals. Share the information or images with the class as a
prelude to the projects listed below.
Project: Experiment with cyanotype paper
Required materials: Sunprint paper, acrylic sheet, cardboard, a tub full of water,
interesting objects to print, sunlight. Complete online instructions, as well as illustrations:
http://www.sunprints.org/how-it-works/
07/29/15 Page 9 of 17
Sunprint paper is used for contact printing, so students will place objects directly on the
paper to produce a negative image. Encourage experimentation with objects of various
shapes and opacities. Students can make their own “film” negative by drawing on acetate
sheets with black markers, photocopying images onto copier-compatible acetate sheets,
or cutting out paper shapes (such as a silhouette) to place directly on the sunprint
material.
Pre-coated cyanotype (Sunprint) paper suppliers:
Sunprint, Lawrence Hall of Science, University of California, Berkeley
http://www.sunprints.org/products/
Freestyle Photographic Supplies:
http://www.freestylephoto.biz/
Ideas for research projects:
1. Explain how the technology of photography influences the quality of our life.
How do most of us know what Michael Jordan looks like, or the surface of Mars? How are
missing children located?
2. Examine how science and technology have advanced through the contribution of many
different people, cultures, and times in history.
Additional Resources:
Books for Students:
Haslam, Andrew. Make It Work! Photography. Chicago: World Book Inc. 1996.
Macaulay, David. The New Way Things Work. Houghton Mifflin Co. 1998.
Oxlade, Chris and Morrison, Alex. Investigations: Cameras. Lorenz Books. 2000.
Wallace, Joseph. The Camera. New York: Athaneum Books for Young Readers. 2000.
Books for Teachers:
Adams, Ansel with Baker, Robert. The Camera. Boston: Little Brown & Co. 2003. 1980.
Hedgecoe, John. The Photographer’s Handbook. New York: Knopf. 1992.
Shull, Jim. The Beginner’s Guide to Pinhole Photography. Buffalo: Amherst Media. 1999.
The Camera, by the editors of Time-Life Books. Alexandria: Time-Life Books. 1970, 1981.
Websites:
07/29/15 Page 10 of 17
Eastman Kodak. www.kodak.com
Comprehensive website provides information on cameras and film, as well as sections on
“Taking Great Photos”, extensive lesson plan section and biography of George Eastman
(access through “search” feature).
The Exploratorium: A Museum of Science, Art and Human Perception.
http://www.exploratorium.edu/sln/light_walk
Artist Bob Miller explores the nuances of light, shadow and images in an online “Light
Walk.” Includes activities to do in and out of the classroom.
How Stuff Works. http://www.howstuffworks.com/camera.htm
Easy to understand sections on how cameras work and how photographic film works.
Timeline of Photographic History. http://www.eastmanhouse.org/inc/collections/photography.php
Key events in the history of the photographic arts in an interactive timeline from the
George Eastman House
“Was it Done with Mirrors?” http://www.cbsnews.com/stories/2003/01/16/60minutes/main536814.shtml
CBS 60 Minutes news article about painter David Hockney’s controversial theory
concerning the old masters of the Renaissance and the science of optics.
Worldwide pinhole photography day. http://www.pinholeday.org/gallery/index.php
Online exhibit of images taken on April 23, 2003 by people with pinhole cameras around
the world.
This lesson was co-written by Colette Buck and Jennifer Vincenty, Lorain Middle School, Lorain, Ohio.
07/29/15 Page 11 of 17
The Cleveland Museum of Art Distance Learning Evaluation Form
Your Name______________________________________________________________
Your School_____________________________________________________________
School Address (with zip code) _____________________________________________
E-mail Address __________________________________________________________
Grade/Class of students (e.g. 10th grade French) ______________________________
Program Title ___________________________________________________________
Program Date ___________________________________________________________
Thank you so much for your participation in our distance learning program. We would appreciate
your response to these questions by circling the appropriate answer and returning the survey.
Please Mail or Fax to Dale Hilton at 216-707-6679
5= Strongly Agree 4= Agree 3= Neither Agree nor Disagree
2= Disagree 1= Strongly Disagree
1. The teacher information packet was helpful for preparing my class and me for the distance learning
lesson.
5 4 3 2 1
2. The teaching style of the on-camera instructor was interesting, engaging and fostered interaction.
5 4 3 2 1
3. The Teacher Information Packet was helpful in providing interdisciplinary extension activities that I
did use or plan to use.
5 4 3 2 1
4. The distance learning lesson successfully taught its objectives.
5 4 3 2 1
5. The distance learning lesson was not interrupted by technical difficulties.
5 4 3 2 1
6. The pre-requisites the distance learning lesson and extensions are aligned with The National
Education standards.
5 4 3 2 1
7. I plan to register for another distance learning lesson.
(circle one)
Yes No
If no, why?______________________________________________________________
07/29/15 Page 12 of 17
8. I would like more information about The Cleveland Museum of Art’s Teacher Resource Center.
(circle one)
Yes No
9. Why did you choose The Cleveland Museum of Art Distance Learning?
(circle one)
a.) Price Point
b.) Quality of lessons
c.) Selection of lessons
d.) Ease of working with CMA
e.) Other
10. How did you hear about The Cleveland Museum of Art Distance Learning program?
(circle all that apply)
a.) CMA inservice
b.) CILC
c.) TWICE
d.) Conference
e.) Brochure
f.) The Cleveland Museum of Art website
g.) The Teacher Resource Center
h.) Other
11. Do you have any additional comments about the distance learning lesson?
Please return the completed teacher evaluation form to:
Dale Hilton/Distance Learning
The Cleveland Museum of Art
11150 East Boulevard
Cleveland, OH 44106

07/29/15 Page 13 of 17
Or fax to Dale Hilton at 216-707-6679
07/29/15 Page 14 of 17
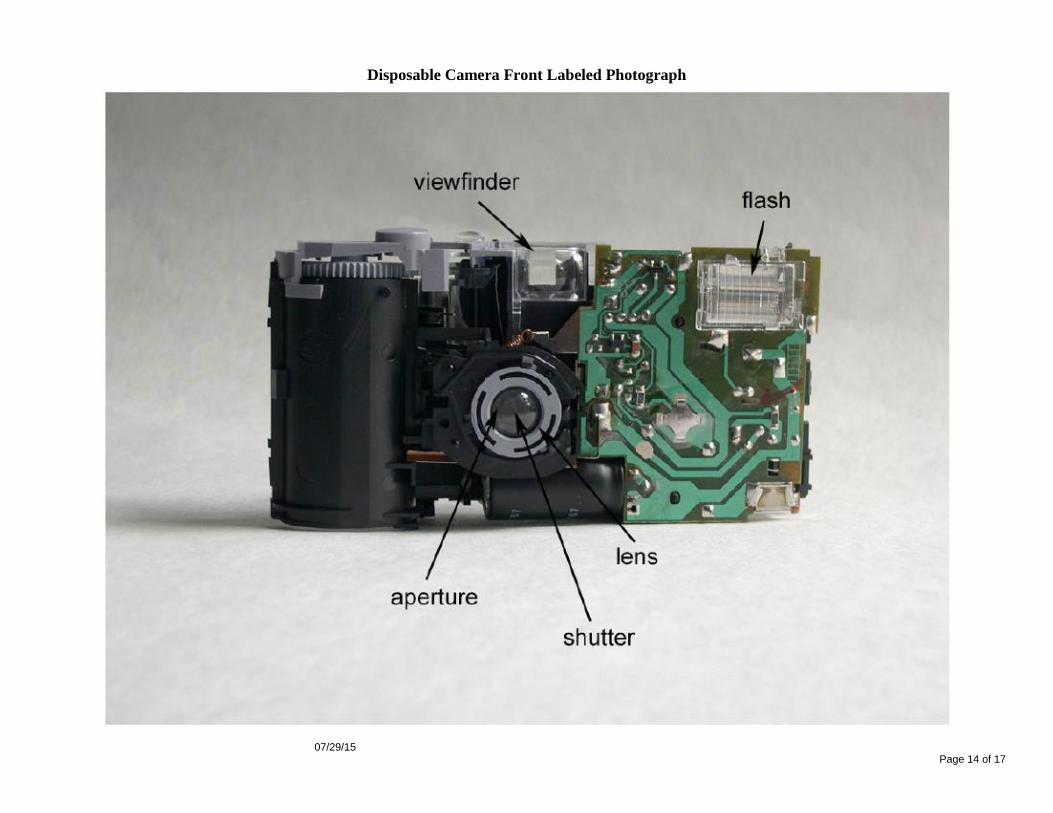
Disposable Camera Front Labeled Photograph
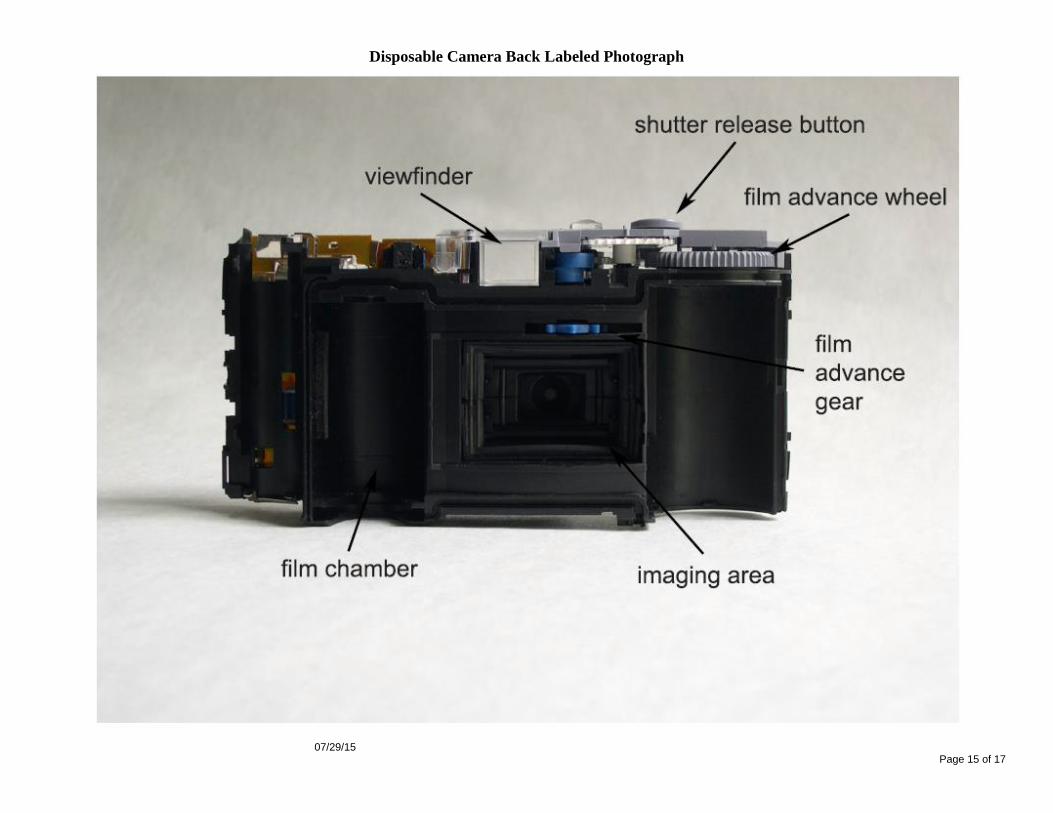
07/29/15 Page 15 of 17
Disposable Camera Back Labeled Photograph
07/29/15 Page 16 of 17
07/29/15 Page 17 of 17