ar-0202 matilda mk iii “desert” backdate (ta · included both aec-powered infantry tank mk iia...
TRANSCRIPT
AR-0202 Matilda Mk III “Desert” Backdate (TAM)
Copyright © 2009 All right reserved
(TAMIYA 35300)
Mastered by Mike Sills
CAUTION
Tigermodels uses mold release agents to aid in de-molding. Mold release agents may prevent paintfrom properly adhering to resin surfaces. To avoidthis, we recommend that you wash all resin piecesin warm, soapy water. For an even better result, usean appropriate primer before applying the finishpaint.
Resin is a soft plastic, and is susceptible towarping. In most cases, it is possible to repair
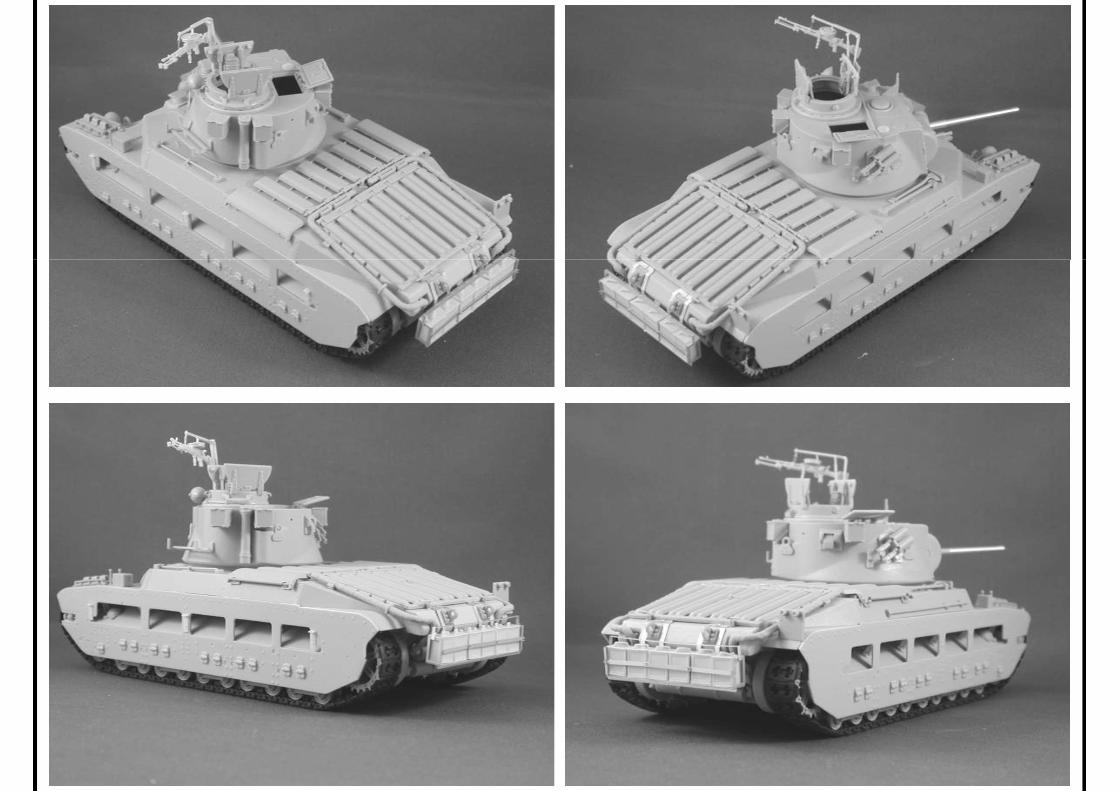
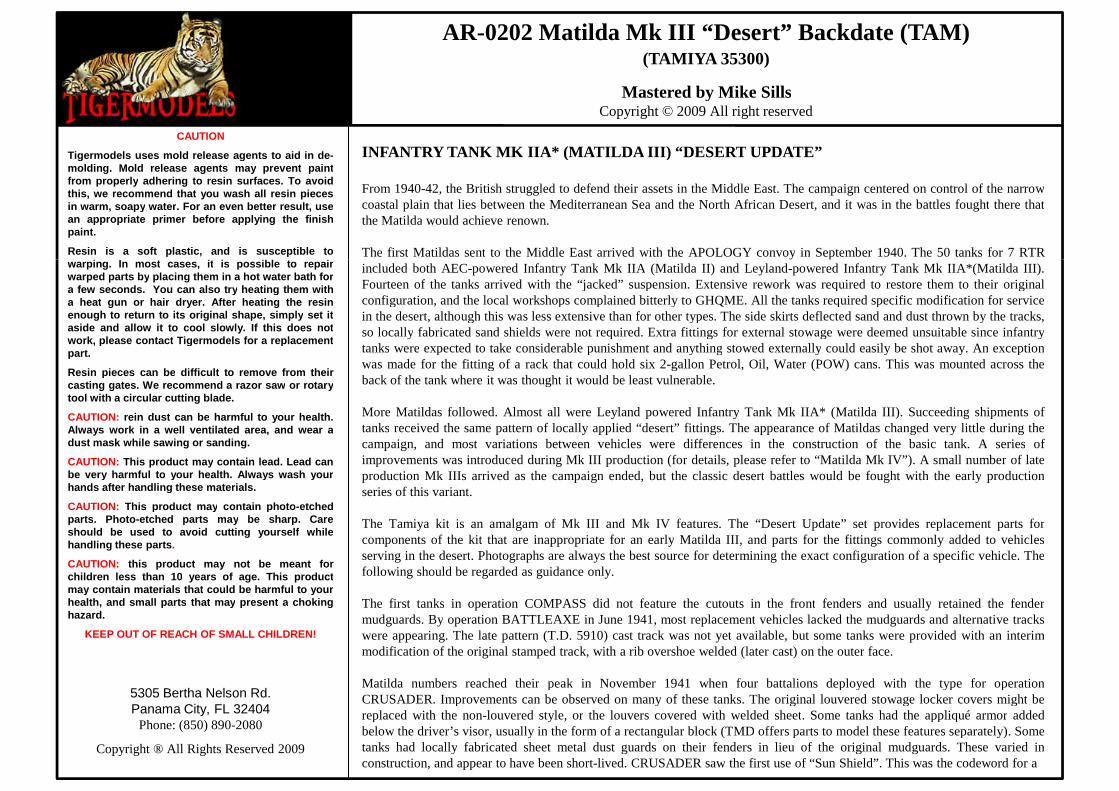
INFANTRY TANK MK IIA* (MATILDA III) “DESERT UPDATE”
From 1940-42, the British struggled to defend their assets in the Middle East. The campaign centered on control of the narrowcoastal plain that lies between the Mediterranean Sea and the North African Desert, and it was in the battles fought there thatthe Matilda would achieve renown.
The first Matildas sent to the Middle East arrived with the APOLOGY convoy in September 1940. The 50 tanks for 7 RTRwarping. In most cases, it is possible to repairwarped parts by placing them in a hot water bath fora few seconds. You can also try heating them witha heat gun or hair dryer. After heating the resinenough to return to its original shape, simply set itaside and allow it to cool slowly. If this does notwork, please contact Tigermodels for a replacementpart.
Resin pieces can be difficult to remove from theircasting gates. We recommend a razor saw or rotarytool with a circular cutting blade.
CAUTION: rein dust can be harmful to your health.Always work in a well ventilated area, and wear adust mask while sawing or sanding.
CAUTION: This product may contain lead. Lead canbe very harmful to your health. Always wash yourhands after handling these materials.
CAUTION: This product may contain photo-etchedparts. Photo-etched parts may be sharp. Careshould be used to avoid cutting yourself while
included both AEC-powered Infantry Tank Mk IIA (Matilda II) and Leyland-powered Infantry Tank Mk IIA*(Matilda III).Fourteen of the tanks arrived with the “jacked” suspension. Extensive rework was required to restore them to their originalconfiguration, and the local workshops complained bitterly to GHQME. All the tanks required specific modification for servicein the desert, although this was less extensive than for other types. The side skirts deflected sand and dust thrown by the tracks,so locally fabricated sand shields were not required. Extra fittings for external stowage were deemed unsuitable since infantrytanks were expected to take considerable punishment and anything stowed externally could easily be shot away. An exceptionwas made for the fitting of a rack that could hold six 2-gallon Petrol, Oil, Water (POW) cans. This was mounted across theback of the tank where it was thought it would be least vulnerable.
More Matildas followed. Almost all were Leyland powered Infantry Tank Mk IIA* (Matilda III). Succeeding shipments oftanks received the same pattern of locally applied “desert” fittings. The appearance of Matildas changed very little during thecampaign, and most variations between vehicles were differences in the construction of the basic tank. A series ofimprovements was introduced during Mk III production (for details, please refer to “Matilda Mk IV”). A small number of lateproduction Mk IIIs arrived as the campaign ended, but the classic desert battles would be fought with the early productionseries of this variant.
The Tamiya kit is an amalgam of Mk III and Mk IV features. The “Desert Update” set provides replacement parts forshould be used to avoid cutting yourself whilehandling these parts.
CAUTION: this product may not be meant forchildren less than 10 years of age. This productmay contain materials that could be harmful to yourhealth, and small parts that may present a chokinghazard.
KEEP OUT OF REACH OF SMALL CHILDREN!
5305 Bertha Nelson Rd.Panama City, FL 32404
Phone: (850) 890-2080
Copyright ® All Rights Reserved 2009
components of the kit that are inappropriate for an early Matilda III, and parts for the fittings commonly added to vehiclesserving in the desert. Photographs are always the best source for determining the exact configuration of a specific vehicle. Thefollowing should be regarded as guidance only.
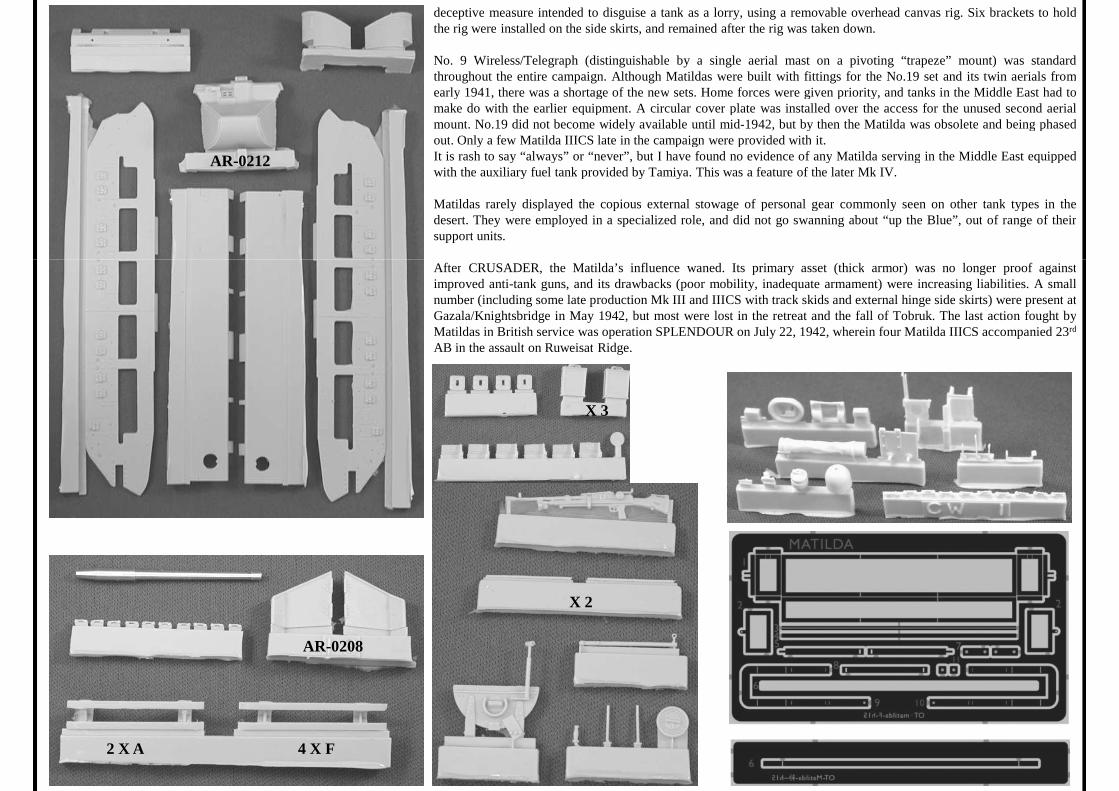
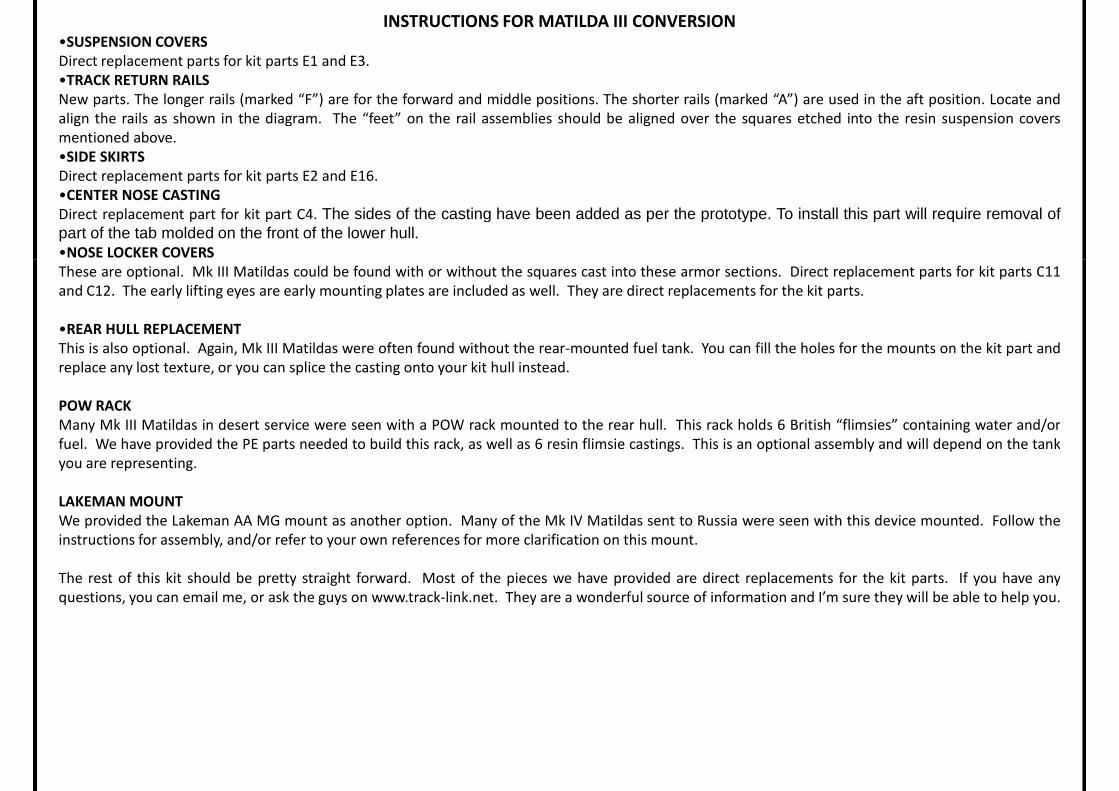
The first tanks in operation COMPASS did not feature the cutouts in the front fenders and usually retained the fendermudguards. By operation BATTLEAXE in June 1941, most replacement vehicles lacked the mudguards and alternative trackswere appearing. The late pattern (T.D. 5910) cast track was not yet available, but some tanks were provided with an interimmodification of the original stamped track, with a rib overshoe welded (later cast) on the outer face.
Matilda numbers reached their peak in November 1941 when four battalions deployed with the type for operationCRUSADER. Improvements can be observed on many of these tanks. The original louvered stowage locker covers might bereplaced with the non-louvered style, or the louvers covered with welded sheet. Some tanks had the appliqué armor addedbelow the driver’s visor, usually in the form of a rectangular block (TMD offers parts to model these features separately). Sometanks had locally fabricated sheet metal dust guards on their fenders in lieu of the original mudguards. These varied inconstruction, and appear to have been short-lived. CRUSADER saw the first use of “Sun Shield”. This was the codeword for a
deceptive measure intended to disguise a tank as a lorry, using a removable overhead canvas rig. Six brackets to holdthe rig were installed on the side skirts, and remained after the rig was taken down.
No. 9 Wireless/Telegraph (distinguishable by a single aerial mast on a pivoting “trapeze” mount) was standardthroughout the entire campaign. Although Matildas were built with fittings for the No.19 set and its twin aerials fromearly 1941, there was a shortage of the new sets. Home forces were given priority, and tanks in the Middle East had tomake do with the earlier equipment. A circular cover plate was installed over the access for the unused second aerialmount. No.19 did not become widely available until mid-1942, but by then the Matilda was obsolete and being phasedout. Only a few Matilda IIICS late in the campaign were provided with it.It is rash to say “always” or “never”, but I have found no evidence of any Matilda serving in the Middle East equippedwith the auxiliary fuel tank provided by Tamiya. This was a feature of the later Mk IV.
Matildas rarely displayed the copious external stowage of personal gear commonly seen on other tank types in thedesert. They were employed in a specialized role, and did not go swanning about “up the Blue”, out of range of theirsupport units.
AR-0212
After CRUSADER, the Matilda’s influence waned. Its primary asset (thick armor) was no longer proof againstimproved anti-tank guns, and its drawbacks (poor mobility, inadequate armament) were increasing liabilities. A smallnumber (including some late production Mk III and IIICS with track skids and external hinge side skirts) were present atGazala/Knightsbridge in May 1942, but most were lost in the retreat and the fall of Tobruk. The last action fought byMatildas in British service was operation SPLENDOUR on July 22, 1942, wherein four Matilda IIICS accompanied 23rd
AB in the assault on Ruweisat Ridge.
X 3
2 X A 4 X F
X 2
AR-0208
INSTRUCTIONS FOR MATILDA III CONVERSION•SUSPENSION COVERSDirect replacement parts for kit parts E1 and E3.•TRACK RETURN RAILSNew parts. The longer rails (marked “F”) are for the forward and middle positions. The shorter rails (marked “A”) are used in the aft position. Locate andalign the rails as shown in the diagram. The “feet” on the rail assemblies should be aligned over the squares etched into the resin suspension coversmentioned above.•SIDE SKIRTSDirect replacement parts for kit parts E2 and E16.•CENTER NOSE CASTINGDirect replacement part for kit part C4. The sides of the casting have been added as per the prototype. To install this part will require removal ofpart of the tab molded on the front of the lower hull.•NOSE LOCKER COVERS•NOSE LOCKER COVERSThese are optional. Mk III Matildas could be found with or without the squares cast into these armor sections. Direct replacement parts for kit parts C11and C12. The early lifting eyes are early mounting plates are included as well. They are direct replacements for the kit parts.
•REAR HULL REPLACEMENTThis is also optional. Again, Mk III Matildas were often found without the rear-mounted fuel tank. You can fill the holes for the mounts on the kit part andreplace any lost texture, or you can splice the casting onto your kit hull instead.
POW RACKMany Mk III Matildas in desert service were seen with a POW rack mounted to the rear hull. This rack holds 6 British “flimsies” containing water and/orfuel. We have provided the PE parts needed to build this rack, as well as 6 resin flimsie castings. This is an optional assembly and will depend on the tankyou are representing.
LAKEMAN MOUNTWe provided the Lakeman AA MG mount as another option. Many of the Mk IV Matildas sent to Russia were seen with this device mounted. Follow theinstructions for assembly, and/or refer to your own references for more clarification on this mount.instructions for assembly, and/or refer to your own references for more clarification on this mount.
The rest of this kit should be pretty straight forward. Most of the pieces we have provided are direct replacements for the kit parts. If you have anyquestions, you can email me, or ask the guys on www.track-link.net. They are a wonderful source of information and I’m sure they will be able to help you.
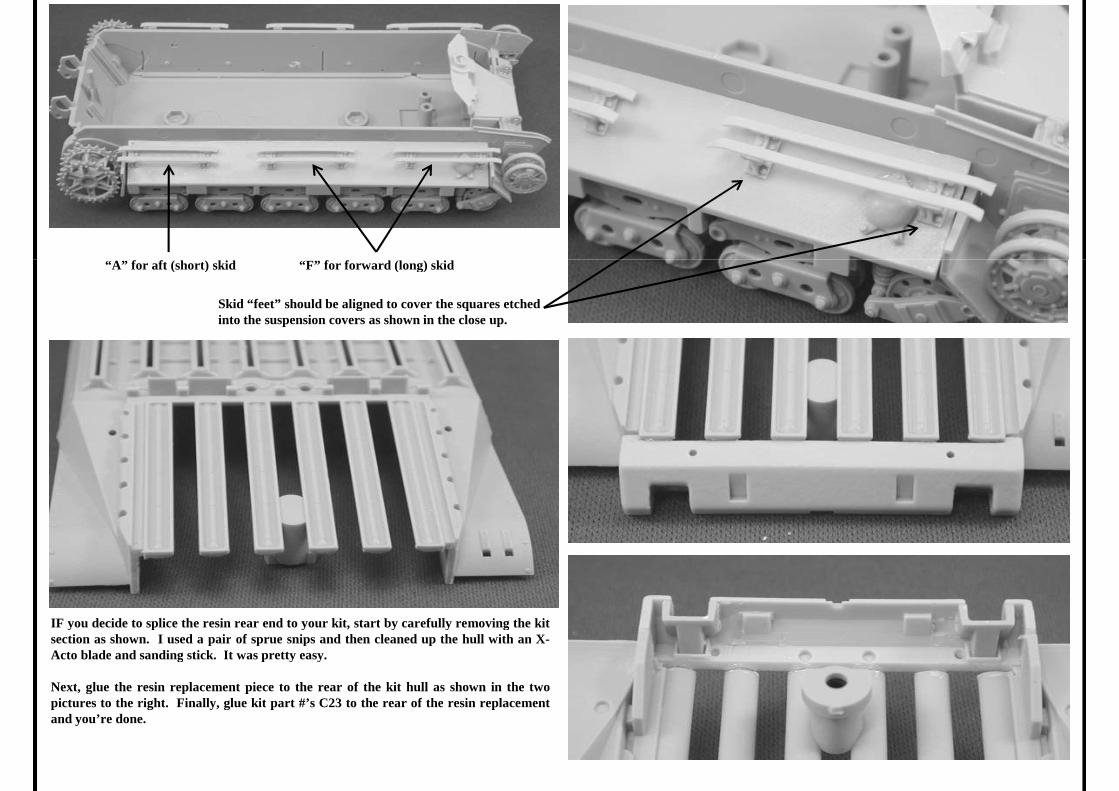
“A” for aft (short) skid “F” for forward (long) skid“A” for aft (short) skid “F” for forward (long) skid
Skid “feet” should be aligned to cover the squares etchedinto the suspension covers as shown in the close up.
IF you decide to splice the resin rear end to your kit, start by carefully removing the kitsection as shown. I used a pair of sprue snips and then cleaned up the hull with an X-Acto blade and sanding stick. It was pretty easy.
Next, glue the resin replacement piece to the rear of the kit hull as shown in the twopictures to the right. Finally, glue kit part #’s C23 to the rear of the resin replacementand you’re done.
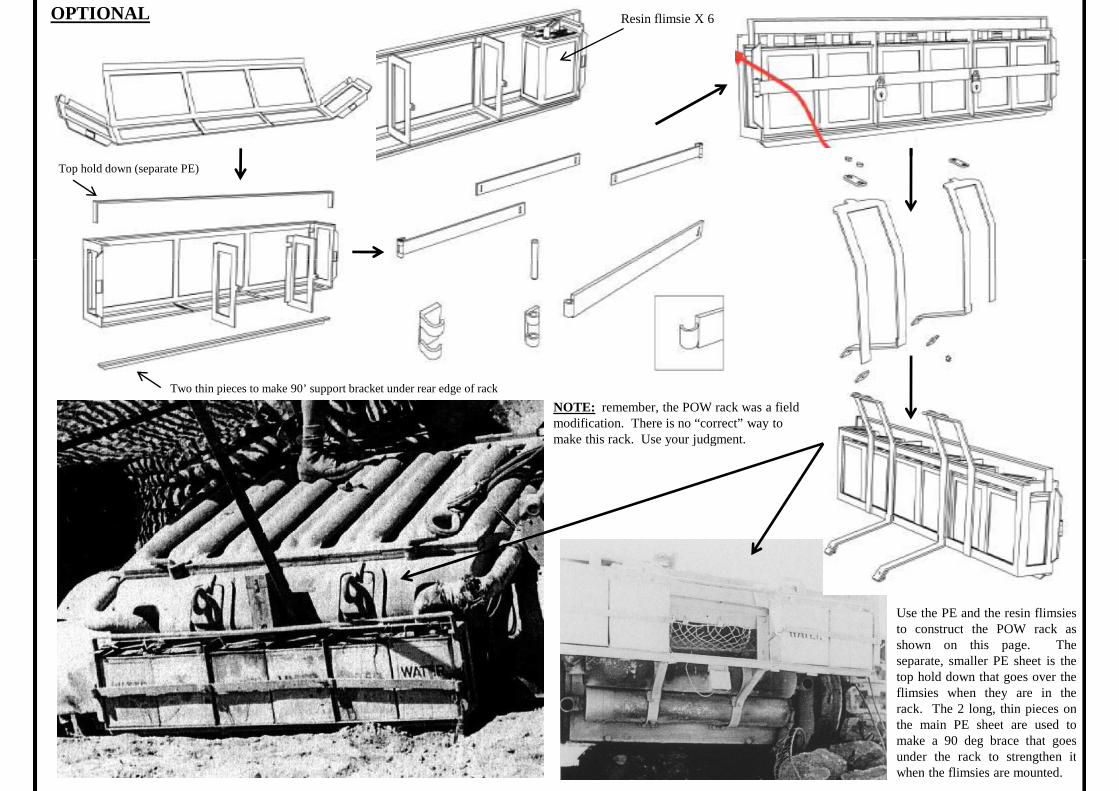
Top hold down (separate PE)
Resin flimsie X 6OPTIONAL
Two thin pieces to make 90’ support bracket under rear edge of rack
NOTE: remember, the POW rack was a fieldmodification. There is no “correct” way tomake this rack. Use your judgment.
Use the PE and the resin flimsiesto construct the POW rack asshown on this page. Theseparate, smaller PE sheet is thetop hold down that goes over theflimsies when they are in therack. The 2 long, thin pieces onthe main PE sheet are used tomake a 90 deg brace that goesunder the rack to strengthen itwhen the flimsies are mounted.
OPTIONAL
The round antennablank plate and sand
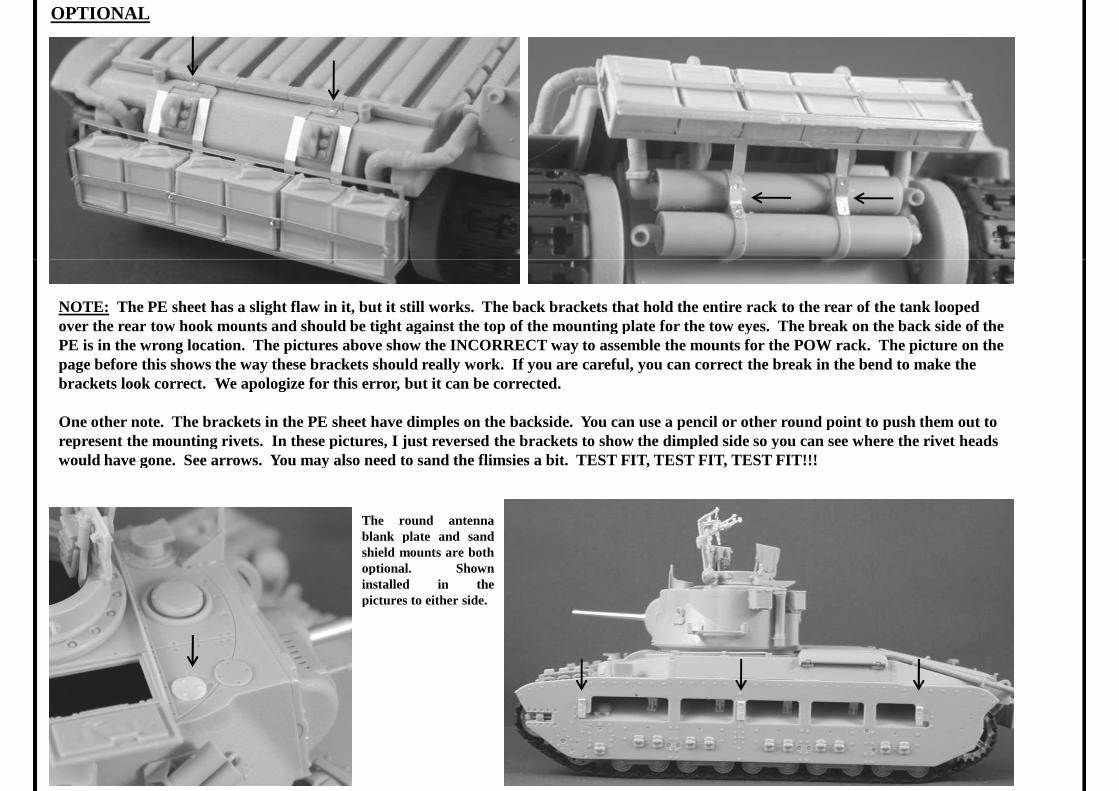
NOTE: The PE sheet has a slight flaw in it, but it still works. The back brackets that hold the entire rack to the rear of the tank loopedover the rear tow hook mounts and should be tight against the top of the mounting plate for the tow eyes. The break on the back side of thePE is in the wrong location. The pictures above show the INCORRECT way to assemble the mounts for the POW rack. The picture on thepage before this shows the way these brackets should really work. If you are careful, you can correct the break in the bend to make thebrackets look correct. We apologize for this error, but it can be corrected.
One other note. The brackets in the PE sheet have dimples on the backside. You can use a pencil or other round point to push them out torepresent the mounting rivets. In these pictures, I just reversed the brackets to show the dimpled side so you can see where the rivet headswould have gone. See arrows. You may also need to sand the flimsies a bit. TEST FIT, TEST FIT, TEST FIT!!!
blank plate and sandshield mounts are bothoptional. Showninstalled in thepictures to either side.
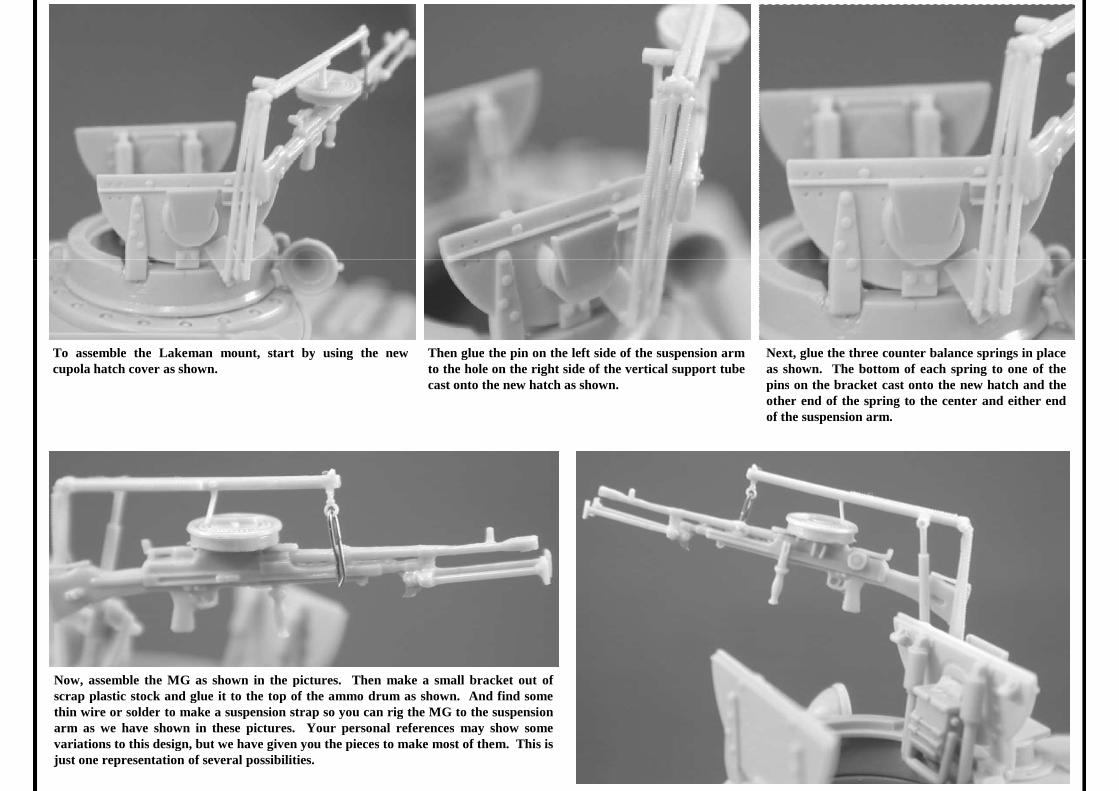
To assemble the Lakeman mount, start by using the newcupola hatch cover as shown.
Then glue the pin on the left side of the suspension armto the hole on the right side of the vertical support tubecast onto the new hatch as shown.
Next, glue the three counter balance springs in placeas shown. The bottom of each spring to one of thepins on the bracket cast onto the new hatch and theother end of the spring to the center and either endof the suspension arm.
Now, assemble the MG as shown in the pictures. Then make a small bracket out ofscrap plastic stock and glue it to the top of the ammo drum as shown. And find somethin wire or solder to make a suspension strap so you can rig the MG to the suspensionarm as we have shown in these pictures. Your personal references may show somevariations to this design, but we have given you the pieces to make most of them. This isjust one representation of several possibilities.