aquisition requisition steps
TRANSCRIPT
8/8/2019 Aquisition Requisition Steps
http://slidepdf.com/reader/full/aquisition-requisition-steps 1/10
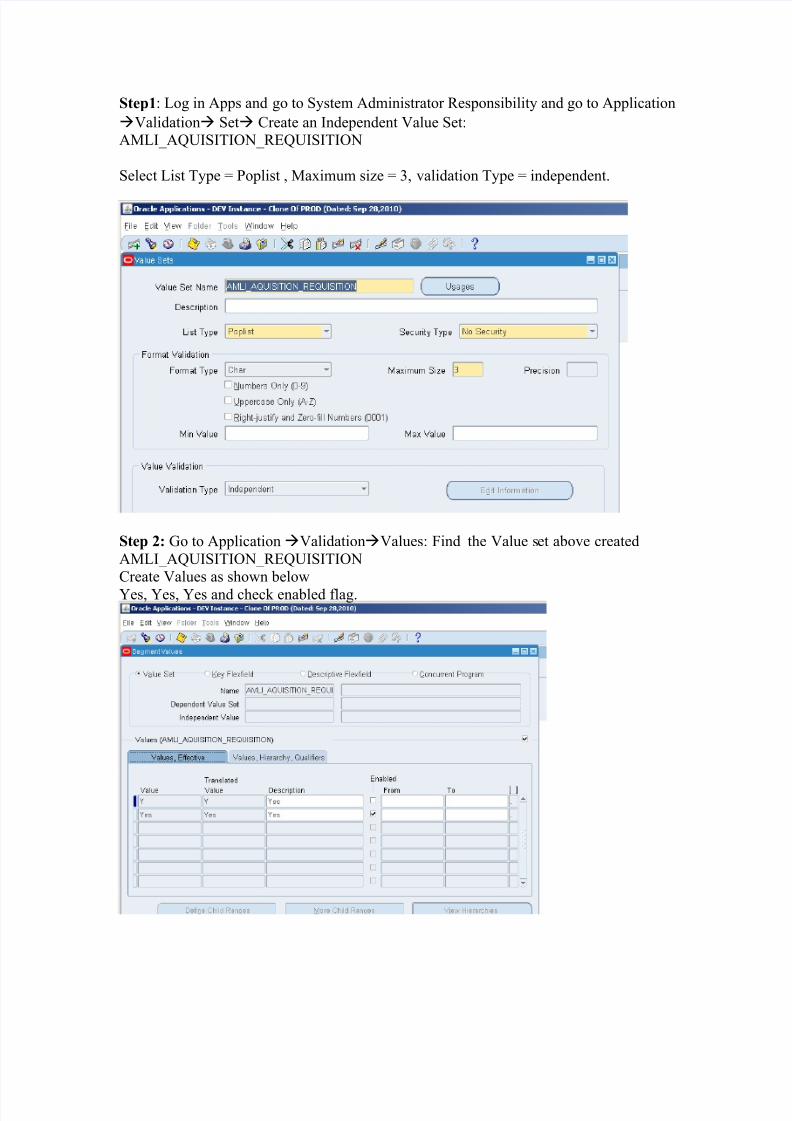
Step1: Log in Apps and go to System Administrator Responsibility and go to Application
Validation Set Create an Independent Value Set:AMLI_AQUISITION_REQUISITION
Select List Type = Poplist , Maximum size = 3, validation Type = independent.
Step 2: Go to ApplicationValidationValues: Find the Value set above created
AMLI_AQUISITION_REQUISITIONCreate Values as shown below
Yes, Yes, Yes and check enabled flag.
8/8/2019 Aquisition Requisition Steps
http://slidepdf.com/reader/full/aquisition-requisition-steps 2/10
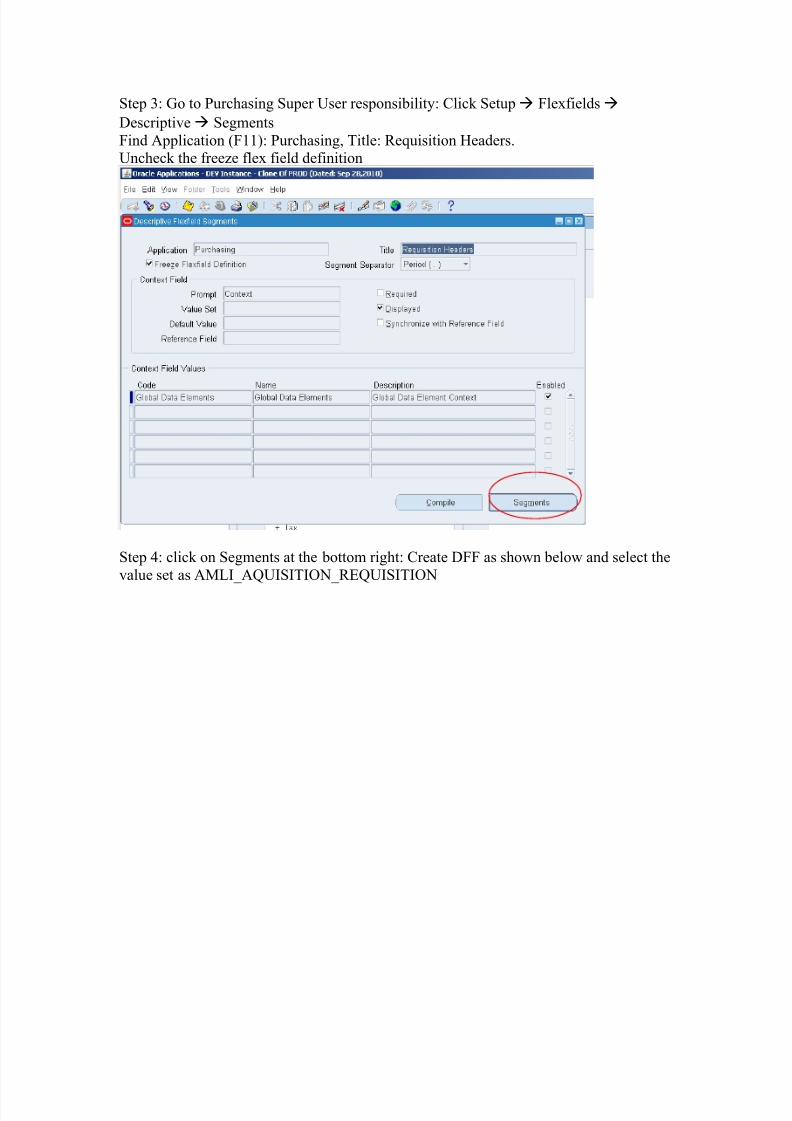
Step 3: Go to Purchasing Super User responsibility: Click Setup Flexfields
Descriptive Segments
Find Application (F11): Purchasing, Title: Requisition Headers.Uncheck the freeze flex field definition
Step 4: click on Segments at the bottom right: Create DFF as shown below and select the
value set as AMLI_AQUISITION_REQUISITION
8/8/2019 Aquisition Requisition Steps
http://slidepdf.com/reader/full/aquisition-requisition-steps 3/10
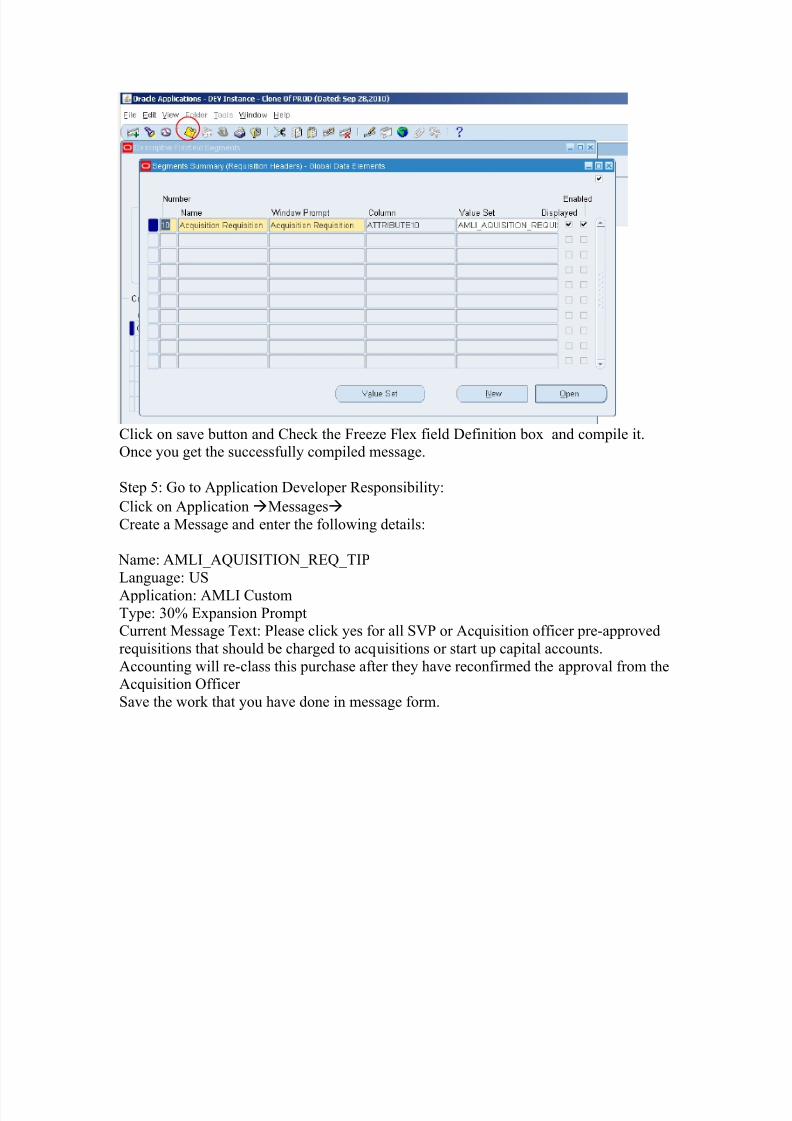
Click on save button and Check the Freeze Flex field Definition box and compile it.Once you get the successfully compiled message.
Step 5: Go to Application Developer Responsibility:
Click on ApplicationMessages
Create a Message and enter the following details:
Name: AMLI_AQUISITION_REQ_TIP
Language: US
Application: AMLI Custom
Type: 30% Expansion PromptCurrent Message Text: Please click yes for all SVP or Acquisition officer pre-approved
requisitions that should be charged to acquisitions or start up capital accounts.
Accounting will re-class this purchase after they have reconfirmed the approval from theAcquisition Officer
Save the work that you have done in message form.

8/8/2019 Aquisition Requisition Steps
http://slidepdf.com/reader/full/aquisition-requisition-steps 4/10
Step 6: Enable profile options in system administrator :
Personalize Self-Service Defn : YES,FND: Personalization Region Link Enabled : YES
Step 7 : Go to Iprocurement responsibility AMLi-Mart
Click on Requisitions Tab : select any requisition that is incomplete Status as shown
below and click on Complete button

8/8/2019 Aquisition Requisition Steps
http://slidepdf.com/reader/full/aquisition-requisition-steps 5/10
In the next page click YES.
YES
8/8/2019 Aquisition Requisition Steps
http://slidepdf.com/reader/full/aquisition-requisition-steps 6/10
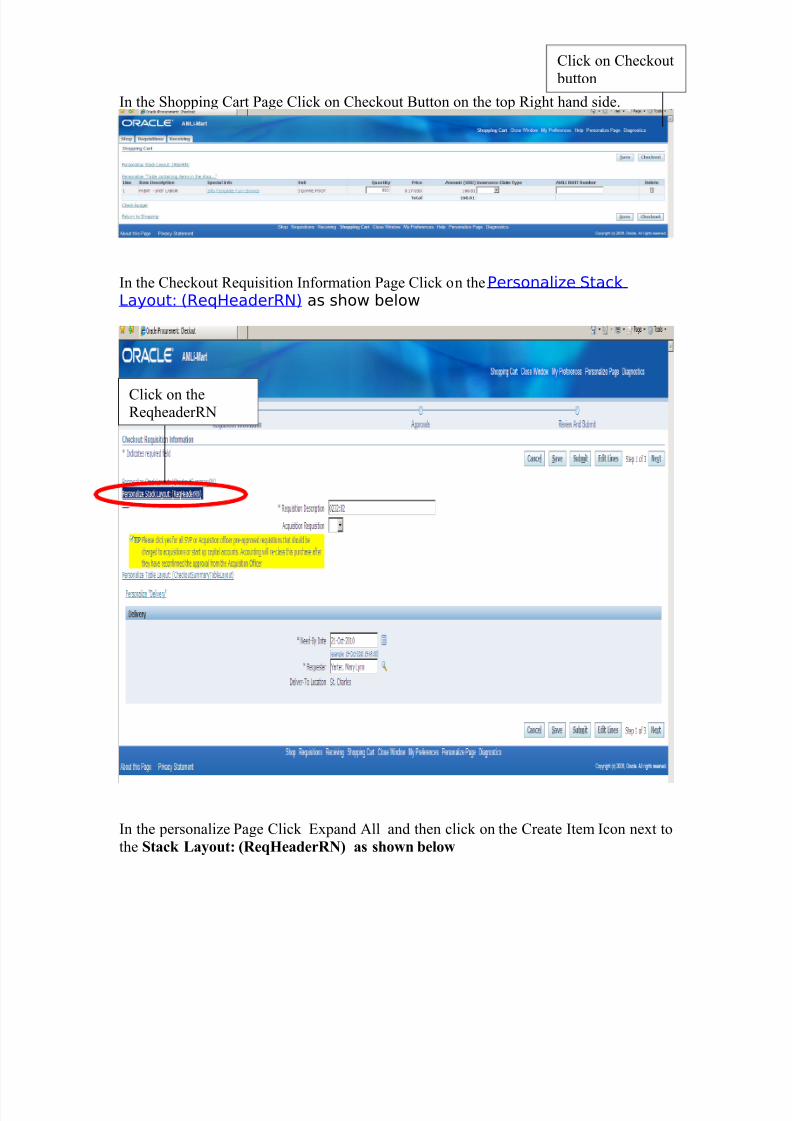
In the Shopping Cart Page Click on Checkout Button on the top Right hand side.
In the Checkout Requisition Information Page Click on the Personalize StackLayout: (ReqHeaderRN) as show below
In the personalize Page Click Expand All and then click on the Create Item Icon next to
the Stack Layout: (ReqHeaderRN) as shown below
Click on Checkout
button
Click on theReqheaderRN

8/8/2019 Aquisition Requisition Steps
http://slidepdf.com/reader/full/aquisition-requisition-steps 7/10
In the Create Item properties select the Item Style as TIP (last but one in the poplist)
Enter the following details in the respective fields
ID : AmliAquisitionTIP
Admin Personalization : True
CSS Class: TouchScreenYellowCell (Case sensitive : copy pastethis value as is)
Rendered : True
Tip Message Name : select AMLI_AQUISITION_REQ_TIP from the lsit of values.
Click on the Create Item Icon
here

8/8/2019 Aquisition Requisition Steps
http://slidepdf.com/reader/full/aquisition-requisition-steps 8/10
Click on Apply on the bottom right side. This will navigate to the personalization
page as shown below and make sure the TIP is created as highlighted and then click
on the Return to Application

8/8/2019 Aquisition Requisition Steps
http://slidepdf.com/reader/full/aquisition-requisition-steps 9/10
The TIP Message will be shown as below.

8/8/2019 Aquisition Requisition Steps
http://slidepdf.com/reader/full/aquisition-requisition-steps 10/10
Step 8 : Go to System Adminstrator Profile system
Set the following profile options to NO
Personalize Self-Service Defn : NO
FND: Personalization Region Link Enabled : NO