applicant checklists, activities, and dispostion · pdf fileapplicant checklists, activities,...
TRANSCRIPT
S NISWEB®
Scholastic ONline Information System for the Web
Applicant Checklists, Activities, and Dispositions © 2002 - 2006 RJM Systems – all rights reserved
Applicants have unique records and processes related to their applications. Appli-cants select a program which results in transcripts, references, and other items they must furnish. As items are received, they are marked as complete in the applicant’s checklist and activities records. Appraisal committees then decide on accepting, re-jecting, or wait-listing the applicant. This is called disposition. Your staff updates this record for each applicant. Your applicants can log on to your Web site and check their checklists and dispositions.
This text describes the records unique to applicants with emphasis on checklists and the processes in keeping those records. This text starts with navigating the func-tions on page 4; the most frequently used functions are at the front, starting on page 8. A summary and the introduction start on page 58. To see the changes in this edi-tion look on page 3.
March 2006
RJM Systems, Inc.

S NISWEB®
Applicant Checklists, Activities and Disposition 2 March 2006
Table of Contents TABLE OF CONTENTS ....................................................................................................................................................................2
NEW IN THIS EDITION...................................................................................................................................... 3
NAVIGATING THE FUNCTIONS ...................................................................................................................... 4
WHAT DO YOU WANT TO DO?.......................................................................................................................... 6 DIAGNOSING AND FIXING PROBLEMS........................................................................................................................................7 SETTING YOUR BROWSER FOR PROPER FUNCTION AND SECURITY.......................................................................................7
RECEIVING AN APPLICATION ......................................................................................................................... 8 THE ONLINE APPLICATION ..........................................................................................................................................................8 INSTRUCTIONS FOR ENTERING AN ONLINE APPLICATION .....................................................................................................9 FILLING OUT THE APPLICATION ...............................................................................................................................................10 VIEWING AND CHANGING AN ONLINE APPLICATION...........................................................................................................10 ONLINE APPLICATION DATA COLLECTED...............................................................................................................................11 ENTERING A PAPER APPLICATION ............................................................................................................................................12 GENERATE RECORD STATUS ......................................................................................................................................................13
ADDING A NEW APPLICANT STATUS OR A NEW APPLICANT............................................................... 14 ADDING A PERSON VERSUS ADDING A STATUS.......................................................................................................................14 ADDING A NEW STATUS OF APPLICANT ...................................................................................................................................14 ADDING A NEW APPLICANT.......................................................................................................................................................14
USING ON-LINE CATALOG AND PROGRAMS ACCESS ............................................................................. 16
FILLING IN THE APPLICATION AND CREATING A CHECKLIST AND AN ACTIVITIES LIST........ 18 ENTERING AN APPLICATION PAYMENT ...................................................................................................................................19 OPTIONAL ADDITIONS TO THE CHECKLIST.............................................................................................................................20
UPDATING CHECKLIST ITEMS ...................................................................................................................... 21
UPDATING CHECKLISTS FOR TRANSCRIPTS, REFERENCES, AND ACT-SAT TESTS....................... 22 EDUCATION AND REFERENCE RECORDS .................................................................................................................................22 ACT-SAT TEST RECORDS...........................................................................................................................................................25
DISPOSITION ACTIVITIES ............................................................................................................................... 26
DISPOSITION....................................................................................................................................................... 26 ENTERING OR UPDATING APPLICANT DISPOSITION..............................................................................................................26
ADMITTING THE APPLICANT AS A STUDENT .......................................................................................... 28
APPLICANT ACCESS TO CHECKLISTS AND DISPOSITION ..................................................................... 29
REPORTS .............................................................................................................................................................. 30 ACTIVITY REPORTS.......................................................................................................................................................................30 APPLICANT DISPOSITION REPORT.............................................................................................................................................31 APPLICANT LISTING.....................................................................................................................................................................32 APPLICATIONS BY CITY, STATE-PROVINCE, AND ZIP-POSTAL CODE ..................................................................................33
APPLICANT CHECKLIST REPORT ................................................................................................................. 34 CHECKLISTS AS ATTACHMENTS TO TIMED E-MAIL AND TIMED LETTERS..........................................................................35
SETTING UP APPLICATION FEES.................................................................................................................. 37
SETTING UP PROGRAMS AND CHECKLISTS .............................................................................................. 38
S NISWEB®
Applicant Checklists, Activities and Disposition 3 March 2006
SETTING UP PROGRAMS...............................................................................................................................................................38 CREATING AND CHANGING CHECKLIST ITEMS.......................................................................................................................39 BUILDING THE CORE AND PROGRAM CHECKLISTS ................................................................................................................41
SETTING UP APPLICANT ACTIVITIES AND DISPOSITION ACTIVITIES ............................................. 43 ADDING AND UPDATING ACTIVITIES .......................................................................................................................................43 ACTIVITIES TABLE........................................................................................................................................................................43
Timing and ‘Delta Days’ Explained............................................................................................................................................46 Salutation Choices .......................................................................................................................................................................47
BUILDING THE CORE AND PROGRAM ACTIVITIES ..................................................................................................................48 SETTING UP DISPOSITION ACTIVITIES ......................................................................................................................................49
CHANGING OR ADDING A STATUS OF APPLICANT FOR A PROSPECT............................................... 51
CHANGING OR ADDING THE STATUS OF STUDENT FOR AN APPLICANT....................................... 53 ADDING ACTIVITIES FOR A GROUP...........................................................................................................................................56
APPLICANT RECORDS AND PROCESSES ..................................................................................................... 58 TERMS.............................................................................................................................................................................................58 PROCESSES.....................................................................................................................................................................................59
GETTING STARTED - LOG IN AND THE USE OF TABS, BUTTONS AND FIELDS.............................. 63 Adobe® is the registered trademark of Adobe Systems, Inc. Cold Fusion ™ is a trademark of the Macromedia Corporation a part of Adobe Systems, Inc. Crystal Reports™ is a trademark of Business Objects SA. FireFox is a trademark of the Mozilla Foundation. Google® is the registered trademark of Google, Inc. Lotus®, Lotus 1-2-3™, and WordPro™ are trademarks of Lotus Development Corporation a subsidiary of the IBM Corp. Microsoft®, SQL Server™, and FoxPro™ are trademarks of the Microsoft Corporation. Netscape® is a trademark of Netscape Communications Corporation. OpenOffice and StarOffice™ is a trademarks of Sun® Microsystems, Inc. SONISWEB®, SONIS®, RJM Systems, and related logos are trademarks of RJM Systems, Inc. The Financial Edge® and The Raiser’s Edge® are trademarks of Blackbaud®, Inc. (ApplicantChecklistsDisposition.doc - 2/27/2006 4:03:00 PM)
NEW IN THIS EDITION This edition is for SONISWEB® version 2.0. A few of these changes were also
added to version 1.4.
Figure 1 Toolbar for those with User-ID access, Figure 2 Function Lists1 - Partial, page 5, Figure 79 Login Displays and Figure 80 Typical SONISWEB® Page, page 63.
Most of the reports have been rewritten in the Cold Fusion™ Report Builder. Those have “(RB)” following their names as seen in Figure 2. The older Crystal Re-ports™-Enterprise reports (without the “RB”) are still available in most cases.
Figure 12 Online Application Data Collected on page 11.
Figure 15 Generate Record Status, page 13.
Figure 22 PIN and SSN, page 18.
Figure 25 Checklist, page 20.
“Education and Reference Records”, page 22.
“ACT-SAT Test Records”, page 25 .

S NISWEB®
Applicant Checklists, Activities and Disposition 4 March 2006
Figure 36 Applicant's Status Display on page 29.
New reports and changes in existing reports, see page 30 to 35.
• Figure 1 Toolbar1 for those with User-ID access
NAVIGATING THE FUNCTIONS Administrative users have User-IDs and Passwords and see an initial display like Figure 1. Administrative users can be anyone in your system with an ID but typically they’re paid Staff and those few Faculty with additional administrative duties.
1 You only see what you’re authorized to see by your Profile and individual Limits and Privileges, so your choices may be fewer than these. Reports with “(RB)” in the name use the newer Cold Fusion™ Report Builder. Those without use Crystal Reports™-Enterprise.

S NISWEB®
Applicant Checklists, Activities and Disposition 5 March 2006
The access rights of an administrative user is defined by:
• Figure 2 Function Lists1 - Partial
1. The Profile selected when you were issued a User-ID and Pass-word. Typical Profile categories are the Registrar, the Registrar’s staff, the Financial Officer, Ad-missions staff, Deans, etc. One profile covers all the people in each staff category.
2. The individual limits specified for you when you were issued a User-ID and Password. Typical limits are preventing access to faculty and staff personal re-cords.
3. The privileges added for you when you were issued a User-ID and Password. The right to “Make Grades Official” or “View and Change PINs” are examples.
In Figure 1 click Names and select a name (page 53) to get the list on the left of Figure 2. Click Reports in Figure 1 to get the list on the top right, click Sys-tems to get the selections on the bottom right in Figure 2.

S NISWEB®
Applicant Checklists, Activities and Disposition 6 March 2006
WHAT DO YOU WANT TO DO? Checklists and Dispositions include lots of automation. For a brief introduction, see the SONISWEB® manual “Overview of the Recruiting and Admissions Options”. To see more detail on the setup of these automated processes, see “Applicant Records and Proc-esses” on page 58.
Adding a New Status of Applicant, page 14.
Adding Activities for a Group, page 56.
Adding and Updating Activities, page 43.
Admitting the Applicant as a Student, page 28
Application, online, page 8.
Application, paper, page 12.
Building the Core and Program Checklists, page 41.
Changing or Adding the Status of Student for an Applicant , page 53.
Checklist displayed online by Applicant, page 29.
Checklist in E-Mail or Letter, page 35.
Creating and Changing Checklist Items, page 39.
Entering a Paper Application, page 12.
Filling in the Application and Creating a Checklist, page 18.
Group Activities, page 56.
Online Application, page 8.
Optional Additions to the Checklist, page 20.
Reports, page 30.
Setting up Application Fees, page 37.
Setting up Disposition Activities, page 49.
Setting up Programs, page 38.
Updating Checklists for Transcripts, References, and ACT-SAT Tests, page 22.

S NISWEB®
Applicant Checklists, Activities and Disposition 7 March 2006
If you don’t see what you need above, check the table of contents on page 2. You can also use the Adobe® find or search func-tions illustrated in Figure 3. It allows a Goo-gle®-like search2 by word or phase.
• Figure 3 Adobe® Find and Search
Diagnosing and Fixing Problems See the text “Messages, Errors, and Diagnosis”.
Setting Your Browser for Proper Function and Security Internet Explorer3 (IE), Firefox™, Netscape®, and Opera Web browsers have an “auto-complete” or password-form save feature that is handy for individual computers but defeats privacy on shared computers like those in computer labs and libraries. See the text “Browser Settings” to set your browser for security, good performance, and to prevent your getting old data.
2 If you’re unfamiliar with this searching, click Adobe® reader Help or see the SONISWEB® text “Index to Texts”.
3 Only Internet Explorer (IE) version 5.5 or later is supported for administrative use.

S NISWEB®
Applicant Checklists, Activities and Disposition 8 March 2006
RECEIVING AN APPLICATION Prospective student can either:
Enter an online application described below or
Send a paper application that you enter on page 18.
The Online Application The online application is convenient for both you and the applicant. Many of the records that you need are partly filled in by the applicant over the Web. Each applicant is issued an ID and chooses a PIN4, so he or she has ready access to your system, However, you still have to complete these records:
The Online Application generates both an Application Checklist and Application Fees.
You may need to add special Checklist items as described on page 20.
Check and possibly correct the Education records. Using the on-line application, the prospective student may not select the proper institution or provide other infor-mation you need.
Depending on your institution’s requirements, you may need to enter more informa-tion in the Biographic record.
Check the Tests records to be certain that the applicant filled in the SAT and ACT scores correctly.
4 PIN = Personal Identification Number
S NISWEB®
Applicant Checklists, Activities and Disposition 9 March 2006
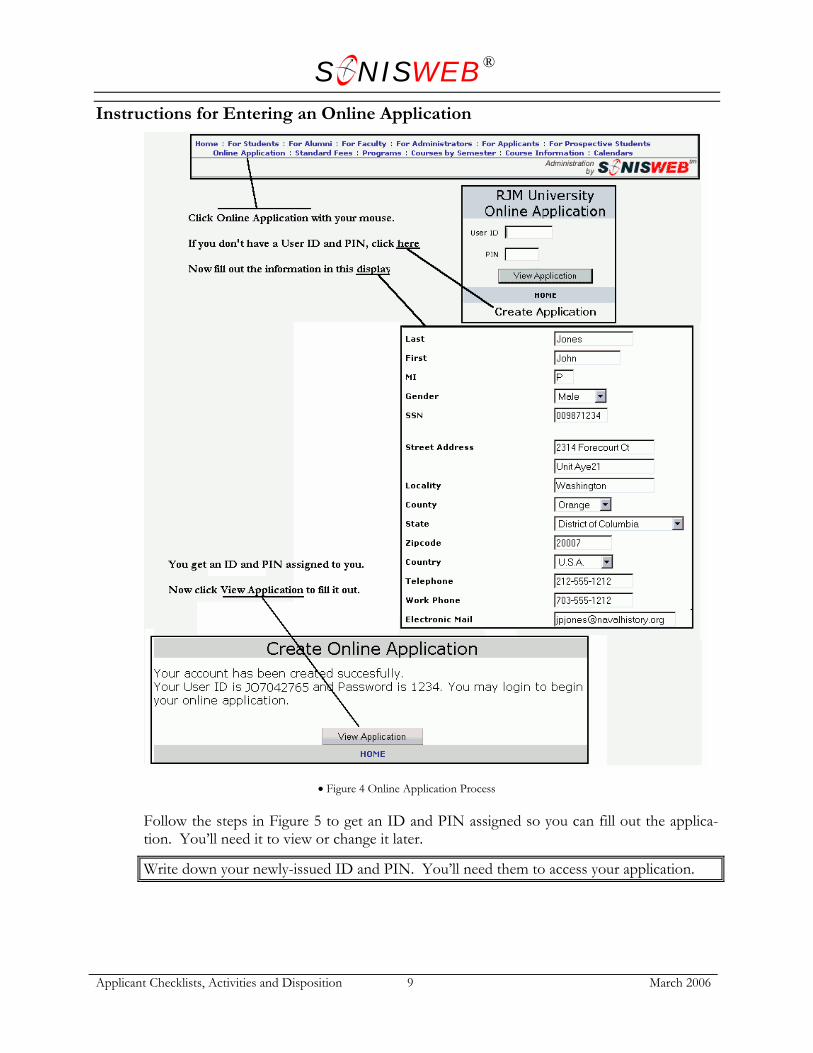
Instructions for Entering an Online Application
• Figure 4 Online Application Process
Follow the steps in Figure 5 to get an ID and PIN assigned so you can fill out the applica-tion. You’ll need it to view or change it later.
Write down your newly-issued ID and PIN. You’ll need them to access your application.

S NISWEB®
Applicant Checklists, Activities and Disposition 10 March 2006
Filling Out the Application Figure 6 shows the two special types of fields you use in filling out the application.
• Figure 6 Pulldown-Arrow Menus and Checkboxes
In the menu list, you pick one. It can be the “blank” one at the top if you don’t see a choice that fits.
When you see an Add button in a display like Figure 7, pick from the list or enter the requested information, then click the Add button. You keep adding until you have all you need, then click the Next button.
Clicking the Next button in Figure 8 takes you to the next section of the appli-cation. But, if you want to go directly to a section, click the arrow and pick the section from the menu.
Use the Reset button to clear what you just entered so you can start over.
• Figure 7 Adding and Removing Entries
• Figure 8 · Navigation from Section to Section
Note the guidance and instructions at the top of some displays. Figure 9 is an example.
• Figure 9 Instructions and Guidance
Viewing and Changing an Online Application After you’ve filled out your application you can view it again and make changes to it. Since you have an ID and PIN, enter them in Figure 10 and then click the View but-ton.
• Figure 10 Login to View or Change
Online Application
Use the choices shown in Figure 8 to get to the section you want to see or change.
You’ll see what you’ve already entered as illustrated in Figure 7.

S NISWEB®
Applicant Checklists, Activities and Disposition 11 March 2006
In Figure 11 notice that you can delete an entry by placing your mouse pointer over remove until it changes color and then clicking the mouse button. To see what you originally entered and change it click edit. Click the Add button (see Figure 7) to add a new item.
• Figure 11 Online Application Edit and Remove
Online Application Data Collected Figure 12 shows the data applicants can supply when they en-ter their online applications. The relationship to the records shown in Figure 2 are:
• Figure 12 Online Application Data
Collected
Personal Information in Figure 12 is Biographic and Address in Figure 2.
Academic Program in Figure 12 is Application and Education in Figure 2.
Educational Background in Figure 12 is Education in Figure 2.
Employment is the name in both Figure 12 and Figure 2.
References in Figure 12 is References in Figure 2.
Interests Figure 12 is Interests in Figure 2.
Additional Information in Figure 12 is Essay Memo in Figure 2.
Submit Application is where the applicant – when finished with all changes – sub-mits it to your institution.
Entering an online application creates the “Core” Activities and Checklist items in Figure 2.
Picking an Academic Program in Figure 12 creates program-specific Activities and Checklist items in Figure 2.
Online applicants are not forced to fill in every item, so the records are likely to be partially filled in. Your staff needs to review them and complete the information.
An authorized SONISWEB® user can change the guidance notes like that cir-cled in Figure 13. Instructions for changing the notes are in the “Admini-stration” manual.
• Figure 13 Online Application Notes

S NISWEB®
Applicant Checklists, Activities and Disposition 12 March 2006
Entering a Paper Application You can enter the application record anytime. The guidance starts on page 18. That doesn’t make the person an applicant. You have two ways to make the prospective student an appli-cant:
If your institution has set the Web Option of “Generate Record Status” (see page 13) you add5 the Applicant status using the Prospect Inquiry Detail below.
Add5 a new status of Applicant. as “Changing or Adding the Status of Student for an Applicant ” on page 53 for guidance.
Those sending an Online Application (see page 8) will not appear as prospective students and will not have a Prospect Inquiry Detail record, so these steps are unnecessary.
1. Select Names from Figure 1. You get Figure 68.
2. Enter as much as you know of the person’s name or ID in Figure 68, choose Pros-pect from “Record Status”, then click the Search button.
3. All persons with that name or ID will be presented in a list. In the list, click the radio button6 beside the name of the person you are updating, then click the View button. You get a record for that person and a function list on the left like Figure 2.
4. Click Prospect Inquiry Detail in Figure 2. You get Figure 14.
• Figure 14 Prospect Inquiry Details
5. In Figure 14, click the checkbox to show the application has been received. Today’s date is automatically entered but you can type over it to enter a different date.
6. Click the Submit button.
5 Normally you add a status, you don’t replace one. By adding a status of Applicant (AP) while leaving the Prospective Student (PS) status in place, you preserve all the prospective student records for future recruiting studies.
6 See Figure 81 for guidance on using these buttons.
S NISWEB®
Applicant Checklists, Activities and Disposition 13 March 2006
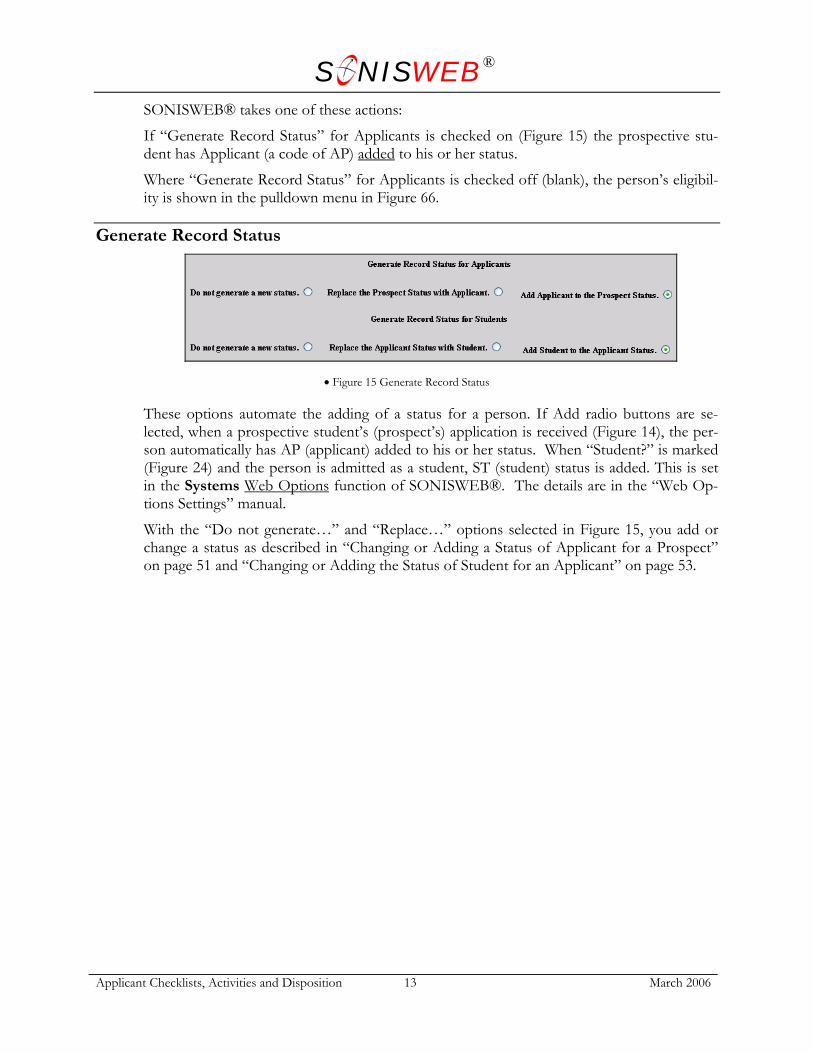
SONISWEB® takes one of these actions:
If “Generate Record Status” for Applicants is checked on (Figure 15) the prospective stu-dent has Applicant (a code of AP) added to his or her status.
Where “Generate Record Status” for Applicants is checked off (blank), the person’s eligibil-ity is shown in the pulldown menu in Figure 66.
Generate Record Status
• Figure 15 Generate Record Status
These options automate the adding of a status for a person. If Add radio buttons are se-lected, when a prospective student’s (prospect’s) application is received (Figure 14), the per-son automatically has AP (applicant) added to his or her status. When “Student?” is marked (Figure 24) and the person is admitted as a student, ST (student) status is added. This is set in the Systems Web Options function of SONISWEB®. The details are in the “Web Op-tions Settings” manual.
With the “Do not generate…” and “Replace…” options selected in Figure 15, you add or change a status as described in “Changing or Adding a Status of Applicant for a Prospect” on page 51 and “Changing or Adding the Status of Student for an Applicant” on page 53.

S NISWEB®
Applicant Checklists, Activities and Disposition 14 March 2006
ADDING A NEW APPLICANT STATUS OR A NEW APPLICANT
Adding a Person versus Adding a Status A Status is the role a person has at your institution: AP for applicant, OA for online
applicant, PS for prospective student, ST for student, FA for faculty, etc. It’s com-mon for a person to have more than one status. You can add a status for an existing person. There’s still just one person and one set of records for that person.
A person has at least one status and a set of records associated with him or her.
Adding a New Status of Applicant If the Web Option is set to “Generate Record Status” (see page 13), putting a checkmark in the “Application Received” checkbox in Figure 14 adds the status of Applicant (code of AP) to the student’s record. Otherwise you add or a change the status as described in “Changing or Adding a Status of Applicant for a Prospect” on page 51.
Adding a New Applicant Caution: You should not add a new applicant record if that person is already in your data-base as a prospect, student, or online applicant, etc.. Adding an applicant when the person already exists in your database results in lots of duplicate records and creates a mess you’ll eventually have to clean up. To fix a duplicate problem, see the SONISWEB® manual “Student, Faculty, Applicant, and Alumni/ae Record-keeping”.
To find out if there is any record for this person, enter as much as you know of their name in Figure 68, then click the Search button. If you include all of the choices in “Record Status”, “Division”, and “Campus”, all persons with that name will be presented in a list. If you find the person in your records, go to “Entering a Paper Application” (page 12) to add the new Applicant status.
1. Select Names from the top list (Figure 1). You get Figure 68.
2. In the category boxes near the bottom of the display click Applicant, click the divi-sion the person is applying to and the campus or location you expect the applicant to attend. Only one item in each “user type” will be selected. If you do not select one item each, you receive an error message as illustrated in Figure 65 (page 51).

S NISWEB®
Applicant Checklists, Activities and Disposition 15 March 2006
• Figure 16 New User Information
3. To add a new person, click the Add Name/Record Status button. You see a display like Figure 16 but with all the fields blank.
4. Enter the information in the fields. The fields with ** (asterisks) beside them are re-quired.
You can assign the applicant an ID (PID7) at this point. It is nine characters and can be a mixture of digits and letters. If you don’t enter an ID, the system generates a unique nine character ID number consisting of the first two characters of the last name followed by seven random digits.
5. Once you have entered all the information, click the Submit button to record your entries. Nothing is recorded until you press the Submit button. Use the Reset but-ton if you want to clear the display and start over.
6. Next you see Figure 17. Click Go to the above’s BIOGRAPHIC Record. You see a mostly-empty biographic record that you can fill in.
• Figure 17 Add Applicant Confirmation
7. Move to “Filling in the Appli-cation and Creating a Check-list” on page 18.
7 PID = Personal Identification Number, entered or generated when the person’s record is first entered in SONISWEB®. PID and ID are used interchangeably.

S NISWEB®
Applicant Checklists, Activities and Disposition 16 March 2006
USING ON-LINE CATALOG AND PROGRAMS ACCESS Because anyone accessing your Web site can check the on-line catalog, discussing the pro-grams and courses with potential students is simplified.
• Figure 18 Initial SONISWEB® Display
Clicking one of the choices in Figure 18 yields a display like Figure 21. (Each display is slightly different.)
When you choose Course Information, you are prompted to pick the department from a pulldown list as shown in Figure 19.
• Figure 19 Department Selection
• Figure 20 Semester (Course Section)
Choice
Where you choose Courses by Semester, you get a prompt to pick the School Year and Semester (Term) as shown in Figure 20.
S NISWEB®
Applicant Checklists, Activities and Disposition 17 March 2006
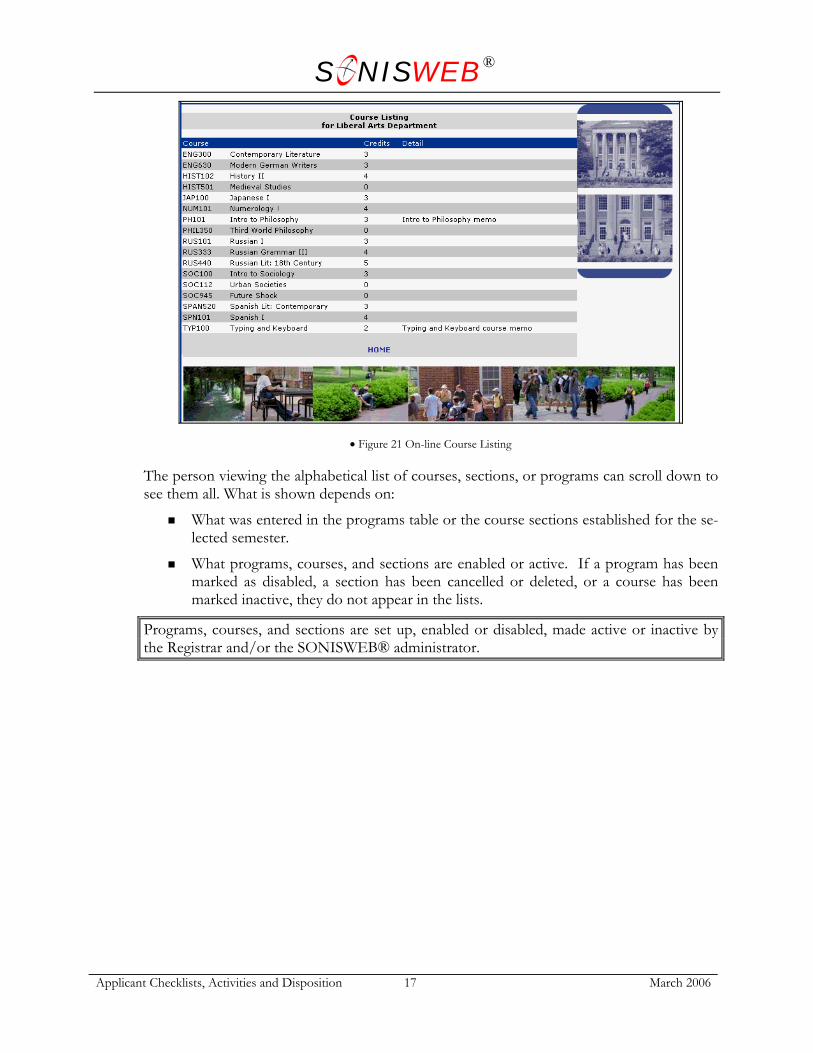
• Figure 21 On-line Course Listing
The person viewing the alphabetical list of courses, sections, or programs can scroll down to see them all. What is shown depends on:
What was entered in the programs table or the course sections established for the se-lected semester.
What programs, courses, and sections are enabled or active. If a program has been marked as disabled, a section has been cancelled or deleted, or a course has been marked inactive, they do not appear in the lists.
Programs, courses, and sections are set up, enabled or disabled, made active or inactive by the Registrar and/or the SONISWEB® administrator.

S NISWEB®
Applicant Checklists, Activities and Disposition 18 March 2006
FILLING IN THE APPLICATION AND CREATING A CHECKLIST AND AN ACTIVITIES LIST
• Figure 22 PIN and SSN
1. In the Biographic record (click Biographic in Figure 2), enter a PIN8 for the appli-cant so she or he can log onto your Web site and check the status of his or her appli-cation. (The portion of the biographic record containing the PIN field is shown above.) Call or send a note to the applicant informing her or him of your assigned PIN8 and PID7 number.
There’s a quicker way to assign PINs to lots of people. Clicking Systems PIN Number lets you assign them to all “w/o” (without) in a status group. See the “User Authorization & Profiles” manuals for guidance.
• Figure 23 Application List9
2. In Figure 2, click Application. You get Figure 23.
3. For a new applicant, Figure 23 will contain only the Add button. Click it.
8 As noted in “Applicant Access to Checklists and Disposition” (page 29), applicants cannot change their records.
9 Note in Figure 23 that a person can be an Applicant for one program and a Student in another.
S NISWEB®
Applicant Checklists, Activities and Disposition 19 March 2006
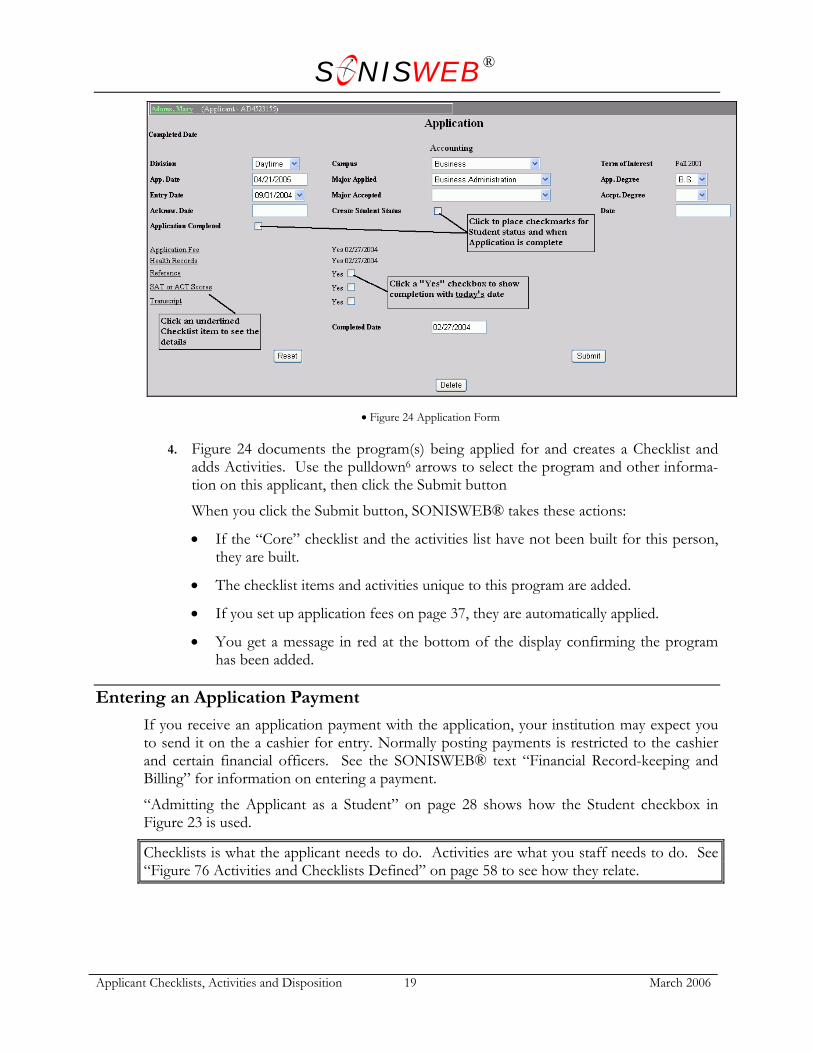
• Figure 24 Application Form
4. Figure 24 documents the program(s) being applied for and creates a Checklist and adds Activities. Use the pulldown6 arrows to select the program and other informa-tion on this applicant, then click the Submit button
When you click the Submit button, SONISWEB® takes these actions:
• If the “Core” checklist and the activities list have not been built for this person, they are built.
• The checklist items and activities unique to this program are added.
• If you set up application fees on page 37, they are automatically applied.
• You get a message in red at the bottom of the display confirming the program has been added.
Entering an Application Payment If you receive an application payment with the application, your institution may expect you to send it on the a cashier for entry. Normally posting payments is restricted to the cashier and certain financial officers. See the SONISWEB® text “Financial Record-keeping and Billing” for information on entering a payment.
“Admitting the Applicant as a Student” on page 28 shows how the Student checkbox in Figure 23 is used.
Checklists is what the applicant needs to do. Activities are what you staff needs to do. See “Figure 76 Activities and Checklists Defined” on page 58 to see how they relate.

S NISWEB®
Applicant Checklists, Activities and Disposition 20 March 2006
Optional Additions to the Checklist Make sure you want this task to be a checklist item and not an activity. See “Terms” on page 58 for an explanation of the difference between a checklist item and an activity. You add optional items to the applicant’s check list by clicking the Checklist function in Figure 2.
• Figure 25 Checklist
Click the Add button in Figure 25. You see a list of valid checklist items you can add. For example, a Visa or residency card is only required for non-citizens, so it is not a standard “Core” item. For foreign applicants you can add it in this process.
The list of checklist items is defined in “Creating and Changing Checklist Items” on page 39.
Activity lists are covered in “Setting up Applicant Activities and Disposition Activities” on page 43.

S NISWEB®
Applicant Checklists, Activities and Disposition 21 March 2006
UPDATING CHECKLIST ITEMS Some checklist items – usually transcripts – take you to the record so you can update it. See “Updating Checklists for Transcripts, References, and ACT-SAT Tests” on page 22 for those items.
For other items in the checklist you click the appropriate record for the student and update the record.
If using today’s date for completion is acceptable, there’s a quick check-off available in the Application record. See the checkboxes in Figure 24 on page 19.
You can also add new items as needed as described in “Optional Additions to the Checklist” (page 20).
1. Select Names from Figure 1. You get Figure 68.
2. Enter as much as you know of the applicant’s name or ID in Figure 68, click Appli-cant in the category boxes near the bottom, then click the Search button.
3. You get a list of one or more applicants that fit your search criteria. In the list, click the radio button6 beside the name of the person you are updating, then click the View button. You get a record for that person and a function list on the left like Figure 2.
4. Click the Checklist function in Figure 2. You get the checklist shown in Figure 25,
5. Click the underlined name of the item you want to update. That yields Figure 26.
• Figure 26 Checklist for an Applicant
6. To show completion, click the Complete checkbox in Figure 26 until there is a checkmark in it. Today’s date is automatically entered for the Completed Date. You can type over the date to change it.
7. Click the Submit button. When you next see it in Figure 25, the Complete column will have Y (for yes) in it with any date you entered.

S NISWEB®
Applicant Checklists, Activities and Disposition 22 March 2006
UPDATING CHECKLISTS FOR TRANSCRIPTS, REFERENCES, AND ACT-SAT TESTS
Education and Reference Records Education and Reference records (see the Records function list in Figure 2) are added in these ways:
An Online applicant enters the information directly, see page 8.
A staff member adds it and specifies that it’s also to be a checklist item with the school or reference name shown in the checklist using the optional button shown in Figure 27. Figure 25 shows Transcript checklist items with institution names created by this process. References are added in the same way with the name of the person refer-enced showing in the checklist.
• Figure 27 Add with Checklist
It’s added when a transcript or reference arrives as described below.
Figure 25 shows specific items added with Figure 27 and nonspecific items that usually come from the recruiting plan.
When you add or update the records for the references or educational background, including a transcript, SONISWEB® inquires whether or not you want to update the checklist.
These are the steps.
1. Select Names from Figure 1. You get Figure 68.
2. Enter as much as you know of the applicant’s name or ID in Figure 68, click Appli-cant in the category boxes near the bottom, then click the Search button.
3. You get a list of one or more applicants that fit your search criteria. In the list, click the radio button6 beside the name of the person you are updating, then click the View button. You get a record for that person and a function list on the left like Figure 2.
4. Click the Education function for transcripts or References for those in Figure 2. That yields Figure 28.
• Figure 28 Add an Education Transcript10
5. Click the Add button in Figure 28. You see Figure 29.
10 Education and Reference records are nearly identical in how they work with checklists.
S NISWEB®
Applicant Checklists, Activities and Disposition 23 March 2006
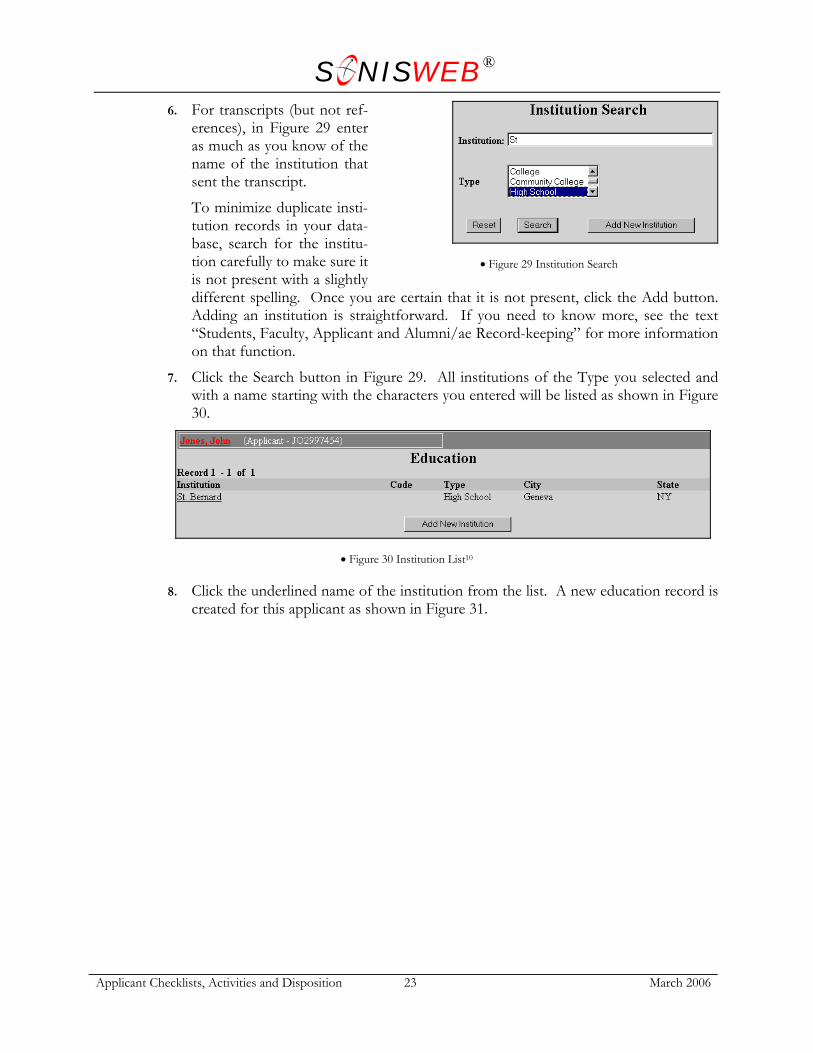
6. For transcripts (but not ref-erences), in Figure 29 enter as much as you know of the name of the institution that sent the transcript.
To minimize duplicate insti-tution records in your data-base, search for the institu-tion carefully to make sure it is not present with a slightly different spelling. Once you are certain that it is not present, click the Add button. Adding an institution is straightforward. If you need to know more, see the text “Students, Faculty, Applicant and Alumni/ae Record-keeping” for more information on that function.
• Figure 29 Institution Search
7. Click the Search button in Figure 29. All institutions of the Type you selected and with a name starting with the characters you entered will be listed as shown in Figure 30.
• Figure 30 Institution List10
8. Click the underlined name of the institution from the list. A new education record is created for this applicant as shown in Figure 31.
S NISWEB®
Applicant Checklists, Activities and Disposition 24 March 2006
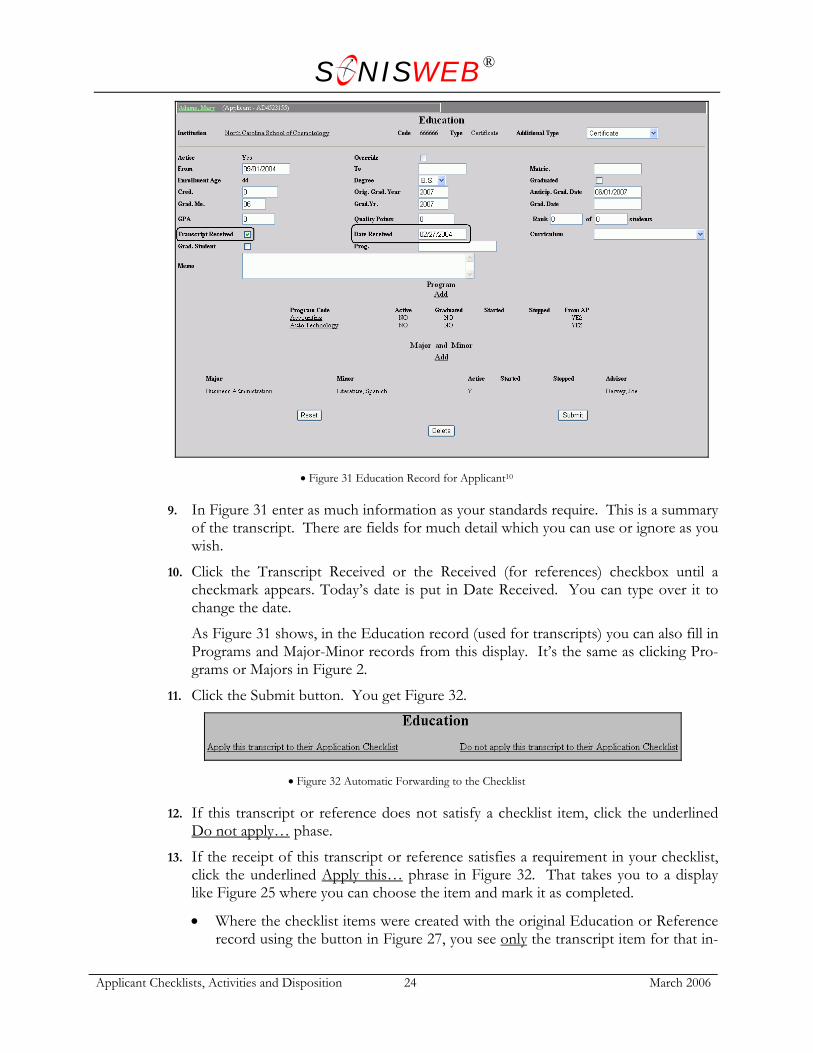
• Figure 31 Education Record for Applicant10
9. In Figure 31 enter as much information as your standards require. This is a summary of the transcript. There are fields for much detail which you can use or ignore as you wish.
10. Click the Transcript Received or the Received (for references) checkbox until a checkmark appears. Today’s date is put in Date Received. You can type over it to change the date.
As Figure 31 shows, in the Education record (used for transcripts) you can also fill in Programs and Major-Minor records from this display. It’s the same as clicking Pro-grams or Majors in Figure 2.
11. Click the Submit button. You get Figure 32.
• Figure 32 Automatic Forwarding to the Checklist
12. If this transcript or reference does not satisfy a checklist item, click the underlined Do not apply… phase.
13. If the receipt of this transcript or reference satisfies a requirement in your checklist, click the underlined Apply this… phrase in Figure 32. That takes you to a display like Figure 25 where you can choose the item and mark it as completed.
• Where the checklist items were created with the original Education or Reference record using the button in Figure 27, you see only the transcript item for that in-
S NISWEB®
Applicant Checklists, Activities and Disposition 25 March 2006
stitution or the reference item for that named person. Click it and it’s checked as completed.
• If there’s no transcript checklist item for the institution or reference item with a name, you get the list of nonspecific transcript or reference items, if there are any. You choose from those. See the instructions following Figure 26 (page 21) if you want to mark this item as complete.
ACT-SAT Test Records Unlike Education and Reference records described above, you do not set up an empty test record in anticipation of receiving one. Rather, when the test results arrive, you enter them.
1. Select Names from Figure 1. You get Figure 68.
2. Enter as much as you know of the applicant’s name or ID in Figure 68, click Appli-cant in the category boxes near the bottom, then click the Search button.
3. You get a list of one or more applicants that fit your search criteria. In the list, click the radio button6 beside the name of the person you are updating, then click the View button. You get a record for that person and a function list on the left like Figure 2.
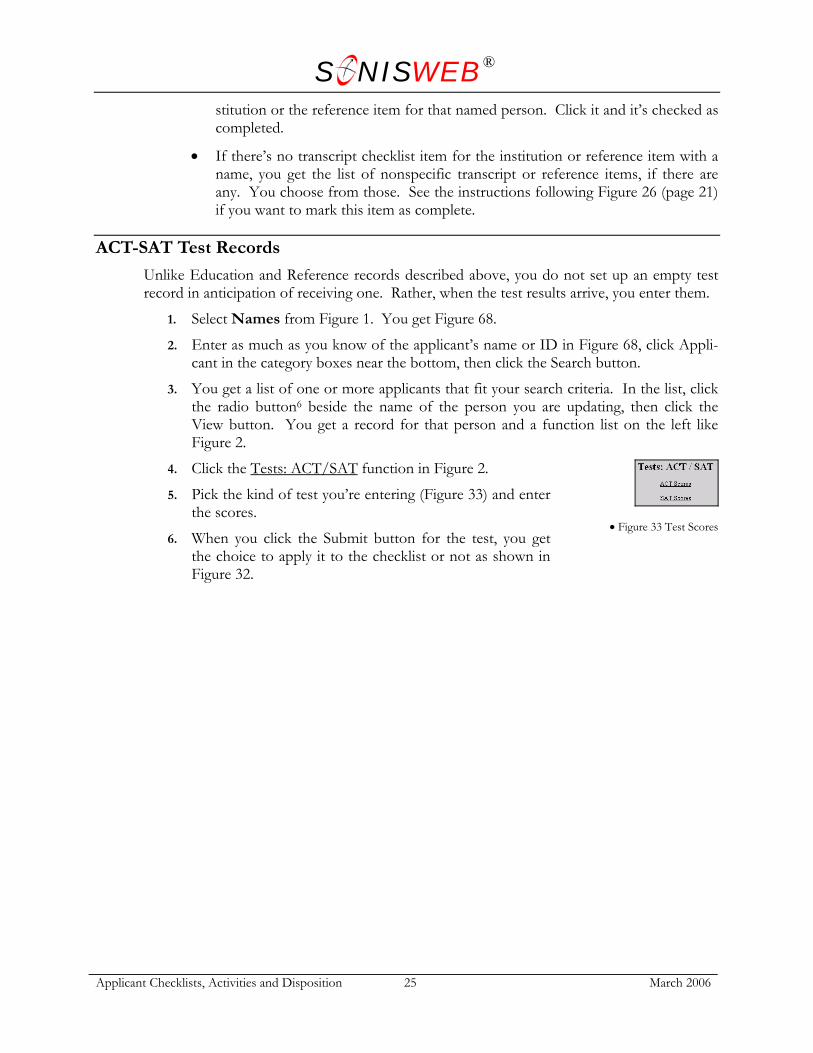
4. Click the Tests: ACT/SAT function in Figure 2.
• Figure 33 Test Scores
5. Pick the kind of test you’re entering (Figure 33) and enter the scores.
6. When you click the Submit button for the test, you get the choice to apply it to the checklist or not as shown in Figure 32.
S NISWEB®
Applicant Checklists, Activities and Disposition 26 March 2006
DISPOSITION ACTIVITIES These activities are automatically added to the applicant’s record when you enter a disposi-tion, see “Disposition” on page 26. Once added, you can view and edit them as described in “Adding and Updating Activities” above.
DISPOSITION Disposition – accepting, rejecting, or deferring – is a decision by your faculty and deans. Preceding the decision is getting information about the applicant using checklists as a meas-ure. Once the decision is made, there are activities (page 49) that result from the disposition and updating the applicant’s records (below).
Entering or Updating Applicant Disposition 1. Select Names from Figure 1. You get Figure 68.
2. Enter as much as you know of the applicant’s name or ID in Figure 68, click Appli-cant in the category boxes near the bottom, then click the Search button.
3. You get a list of one or more applicants that fit your search criteria. In the list, click the radio button6 beside the name of the person you are updating, then click the View button. You get a record for that person and a function list on the left like Figure 2.
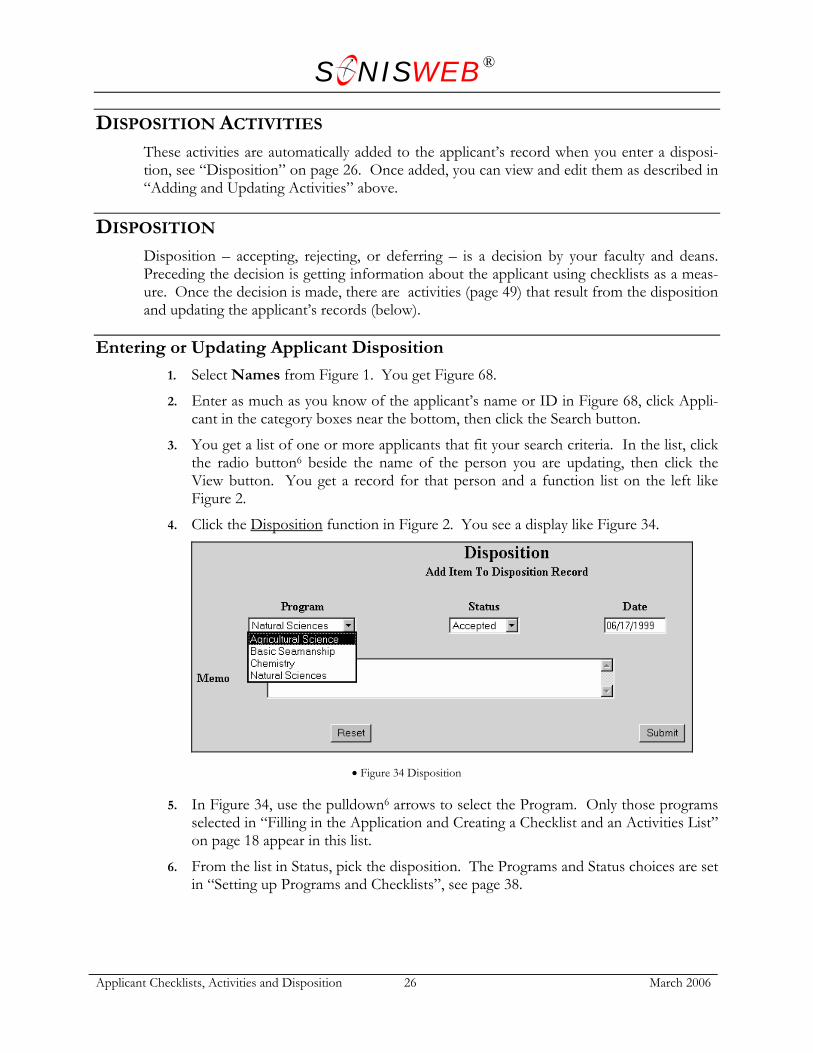
4. Click the Disposition function in Figure 2. You see a display like Figure 34.
• Figure 34 Disposition
5. In Figure 34, use the pulldown6 arrows to select the Program. Only those programs selected in “Filling in the Application and Creating a Checklist and an Activities List” on page 18 appear in this list.
6. From the list in Status, pick the disposition. The Programs and Status choices are set in “Setting up Programs and Checklists”, see page 38.
S NISWEB®
Applicant Checklists, Activities and Disposition 27 March 2006
If you do not want the applicant to receive the letter or note before seeing his or her disposition on the Web, do not click the Submit button. As soon as you click that button, the applicant can see her or his disposition if you issued PINs to your appli-cants.
7. Enter a memo if you wish, then click the Submit button. The disposition for this program is added to the applicant’s record and is visible the next time he or she logs in. If the applicant has another program that she or he applied for, you can enter the disposition for that by clicking the Disposition function in Figure 2.
If a disposition activity is assigned to the disposition (accepted, rejected, deferred, etc.) it will be added to the applicant’s activity list. See “Setting up Disposition Ac-tivities” (page 49) for assignment and “Adding and Updating Activities” (page 43) for viewing and editing.

S NISWEB®
Applicant Checklists, Activities and Disposition 28 March 2006
ADMITTING THE APPLICANT AS A STUDENT There are three ways to add Student (ST) status for a person.
You can add the person directly as a student without passing through the prospective student or applicant steps.
If the “Generate Record Status” (page 13) Web Option is set, clicking the “Student?” checkbox is checked in Figure 35 will add the status of Student (ST) for this person.
The instructions in “Changing or Adding the Status of Student for an Applicant” on page 53.
Follow the instructions in “Filling in the Application and Creating a Checklist and an Activi-ties List” on page 18 until you see the application record for the program accepted11.
With the Application Record (Figure 24) displayed, click the “Student?” checkbox6 until a checkmark appears, then click the Submit button.
• Figure 35 Setting Student Status
11 A applicant can apply to more than one program. Make sure you select the program that has been approved for admission.

S NISWEB®
Applicant Checklists, Activities and Disposition 29 March 2006
APPLICANT ACCESS TO CHECKLISTS AND DISPOSITION You can issue your applicants ID7s and PIN4s so they can check their status anytime via the Web.
The applicant accesses your Web site, selects Applicant log in, and enters his or her ID and PIN in the prompt shown in Figure 79 (page 63).
• Figure 36 Applicant's Status Display
The display in Figure 36 illustrates what the applicant sees. She or he cannot enter any in-formation. This is simply an information display that the applicant can print.
You can also send applicants e-mail notes or letters listing the incomplete checklist items as described in “Checklists as Attachments to Timed E-Mail and Timed Letters” on page 35.

S NISWEB®
Applicant Checklists, Activities and Disposition 30 March 2006
REPORTS Checklist reports are generally unnecessary since your Applicants can see their status directly on the Web (“Applicant Access to Checklists and Disposition” on page 29).
Checklists is what the applicant needs to do. Activities are what you staff needs to do. See “Figure 76 Activities and Checklists Defined” on page 58 to see how they relate.
Activity Reports This report lists the scheduled activities by person and shows what has been done and what has not. Your security profile must authorize you to access Reports.
1. Select Reports from Figure 1 then Activity Reports(RB)12 from Figure 2. You get Figure 37.
• Figure 37 Activity Reports Selection Prompt
2. Decide who this list is for, then pick the Activity(ies), campuses and other criteria for activities she or he is responsible for. Click the Build Report button. You can limit the report to a single person by entering her or his ID7.
If you have been processing a person’s records, you may find his or her ID7 in Figure 37. Use the Clear Name button to erase the ID7 number so you get all the people who meet your campus and activity criteria.
12 The “(RB)” reports use the newer Cold Fusion™ Report Builder. Those without use Crystal Reports™-Enterprise. Where both are of-fered, you can use either. Generally the “RB” reports work with a larger variety of Web browsers.

S NISWEB®
Applicant Checklists, Activities and Disposition 31 March 2006
• Figure 38 Activity Report
3. Figure 38 is the result. Your list will certainly be longer. The list is in alphabetical order by Activity name then the last name of the prospective students. For more in-formation on printing, paging through reports, or searching for content, see the text “Standard Reports”.
4.
Applicant Disposition Report There are two different reports available:
Applicant Disposition (RB)12 shows only the most recent dispositions for each appli-cant.
Applicant Disposition ALL-RB12 shows all the dispositions for each applicant.
It’s assumed that each Applicant has an Application record for each program. Those with-out an Application record for each program will not appear in this report.
1. Select Reports from Figure 1 then the disposition report you want from Figure 2. That yields Figure 39.

S NISWEB®
Applicant Checklists, Activities and Disposition 32 March 2006
• Figure 39 Applicant Disposition Report Prompt
2. In Figure 39 make your choices, then click the Build Report button.
Select Campus(es), Division(s), Department(s), and Program(s) to limit whose records you want to see. You can select more than one campus21.
Select the Disposition for the report.
Begin Date and End Date let you focus on only a limited set of entry dates. They are set in the Application record (Figure 24).
• Figure 40 Applicant Disposition Report
3. Figure 40 is the result. The list is in entry date order then alphabetical by last name. For more information on printing, paging through reports, or searching for content, see the text “Standard Reports”.
Applicant Listing 1. Select Reports from Figure 1 then Applicant Listing (RB)12 from Figure 2. That
yields a prompting display similar to Figure 39.
2. In Figure 39 make your choices, then click the Build Report button.
S NISWEB®
Applicant Checklists, Activities and Disposition 33 March 2006
Select Campus(es), Division(s), Department(s), and Program(s) to limit whose records you want to see. You can select more than one campus21.
3. Select the Entry Dates for the report to keep the list to only those of interest. If you leave this blank, you get the records of all applicants.
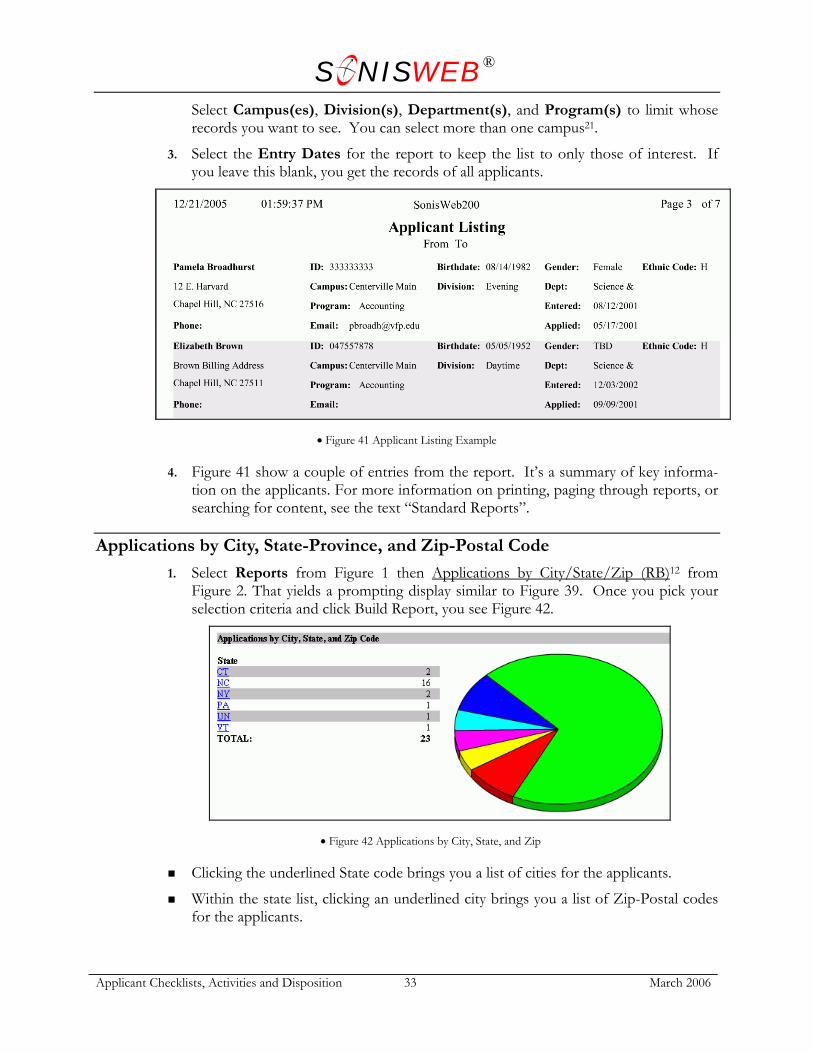
• Figure 41 Applicant Listing Example
4. Figure 41 show a couple of entries from the report. It’s a summary of key informa-tion on the applicants. For more information on printing, paging through reports, or searching for content, see the text “Standard Reports”.
Applications by City, State-Province, and Zip-Postal Code 1. Select Reports from Figure 1 then Applications by City/State/Zip (RB)12 from
Figure 2. That yields a prompting display similar to Figure 39. Once you pick your selection criteria and click Build Report, you see Figure 42.
• Figure 42 Applications by City, State, and Zip
Clicking the underlined State code brings you a list of cities for the applicants.
Within the state list, clicking an underlined city brings you a list of Zip-Postal codes for the applicants.

S NISWEB®
Applicant Checklists, Activities and Disposition 34 March 2006
Within the city-locality list, clicking an underlined Zip-Postal code provides a list of the applicants for that location.
Only those with an Application record (Figure 24, page 19) and an Address record are enu-merated for this report.
APPLICANT CHECKLIST REPORT Applicants logging on to your Web site see an online list of checklist items and statuses13.
You can include an automatically-added “missing checklist items” list to timed letters and e-mail notes.
This new “Applicant Checklist Report (Missing Items)” gives your staff the same information in report form. Standard report selection criteria are used to determine which applicants are included in the list.
• Figure 43 Applicants with Missing Checklist Items
• Figure 44 Missing Items for an Individual
Figure 43 shows the applicants with missing checklist items. Click the underlined name of an applicant and you get the detailed list shown in Figure 44. You can print these reports by clicking the printer icon on you Web browser.
13 Of course you have to issue your applicants IDs and PINs for them to log on and see their checklist.
S NISWEB®
Applicant Checklists, Activities and Disposition 35 March 2006
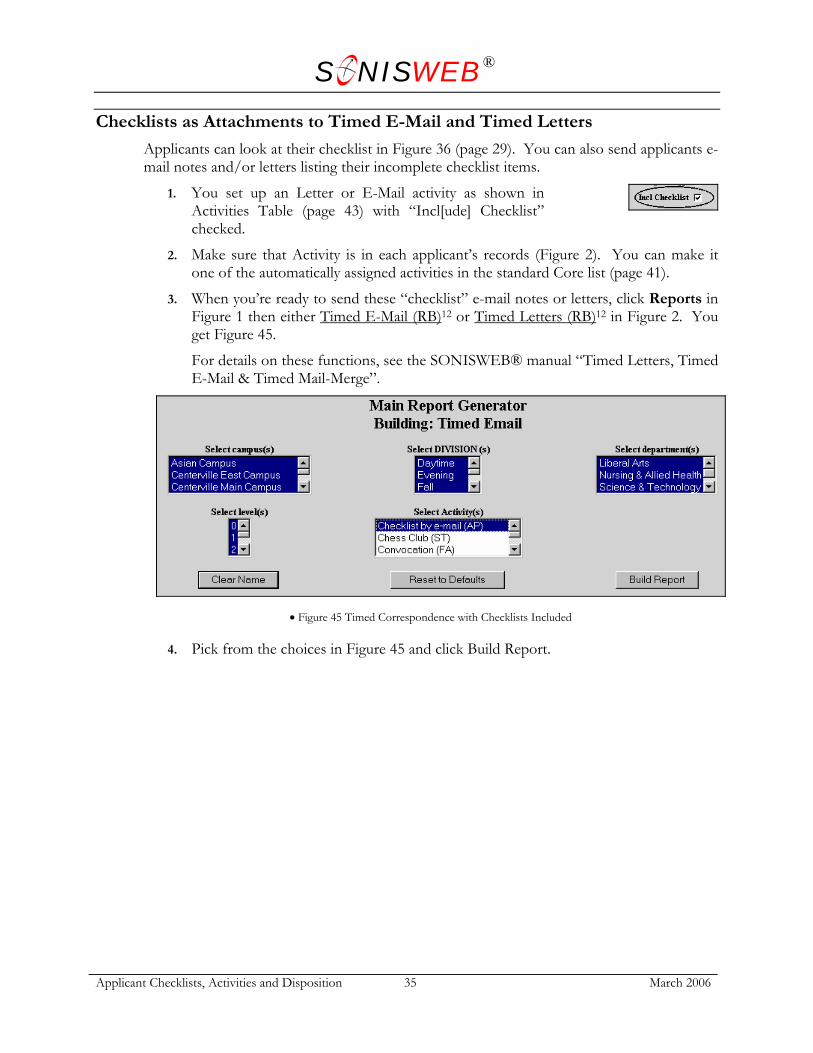
Checklists as Attachments to Timed E-Mail and Timed Letters Applicants can look at their checklist in Figure 36 (page 29). You can also send applicants e-mail notes and/or letters listing their incomplete checklist items.
1. You set up an Letter or E-Mail activity as shown in Activities Table (page 43) with “Incl[ude] Checklist” checked.
2. Make sure that Activity is in each applicant’s records (Figure 2). You can make it one of the automatically assigned activities in the standard Core list (page 41).
3. When you’re ready to send these “checklist” e-mail notes or letters, click Reports in Figure 1 then either Timed E-Mail (RB)12 or Timed Letters (RB)12 in Figure 2. You get Figure 45.
For details on these functions, see the SONISWEB® manual “Timed Letters, Timed E-Mail & Timed Mail-Merge”.
• Figure 45 Timed Correspondence with Checklists Included
4. Pick from the choices in Figure 45 and click Build Report.

S NISWEB®
Applicant Checklists, Activities and Disposition 36 March 2006
• Figure 46 Timed E-Mail with Checklist
5. If it’s e-mail you get a list like Figure 46. Make sure there a checkmarks by the names you want to receive this note then click Submit.
• Figure 47 Timed Letter with Checklist
If it’s a letter, it’ll look like Figure 47. Use the report generator’s printer icon, not the browser’s print icon, to print the letters for mailing.
With e-mail, the activity is checked off as complete in the applicants’ activity records. For letters, you’re given the choice of checking it off or not.

S NISWEB®
Applicant Checklists, Activities and Disposition 37 March 2006
SETTING UP APPLICATION FEES You have the option of establishing application fees. These fees are generated when an ap-plication record is created for a prospective student, an applicant, or an online applicant.
1. Select Systems from Figure 1 then Application Fees in Figure 2 to get Figure 48.
• Figure 48 Application Fees
If no application fees have been established, only the “Add New Fee” part of Figure 48 is present.
2. To add a new fee, use the pulldown to select the fee code, enter the amount of the fee, then click the Submit button.
3. Hidden behind the pulldown list in Figure 48 is a Reset button. If you click that be-fore the Submit button, your entries are erased so you can start over.
4. To change an existing fee, click in the upper right of Figure 48. That yields Figure 49.
• Figure 49 Edit Application Fees
5. Change the transaction code and/or amount then click the Submit button to save your changes.
6. To delete an application fee, click in the upper right of Figure 48. You get a confirming display asking if you really mean it. If you do, confirm it and the applica-tion fee is deleted.

S NISWEB®
Applicant Checklists, Activities and Disposition 38 March 2006
SETTING UP PROGRAMS AND CHECKLISTS There are three kinds of checklists:
Core items which every applicant must have. Transcripts are typical.
Program items which applicants must have for the program. An audition for a music major, a record of health immunizations for a nursing or medical school are exam-ples.
Optional items which are not a core need nor a program requirement. An example is the need for a visa or residency card for students who are not citizens of your nation.
“Setting up Programs” below covers defining your programs so you can apply checklist items and activities to them.
“Creating and Changing Checklist Items” on page 39 shows you how to create checklist items.
“Building the Core and Program Checklists” on page 41 guides you in applying items to a core or program checklist.
See “Terms” on page 58 for suggestions on what should be a checklist item and what should be an activity.
Setting up Programs Programs are covered in the SONISWEB® text “Table Configuration & Maintenance”. See that text to set up programs and programs types. See the text “Financial Record-keeping and Billing” for information on program fees.
S NISWEB®
Applicant Checklists, Activities and Disposition 39 March 2006
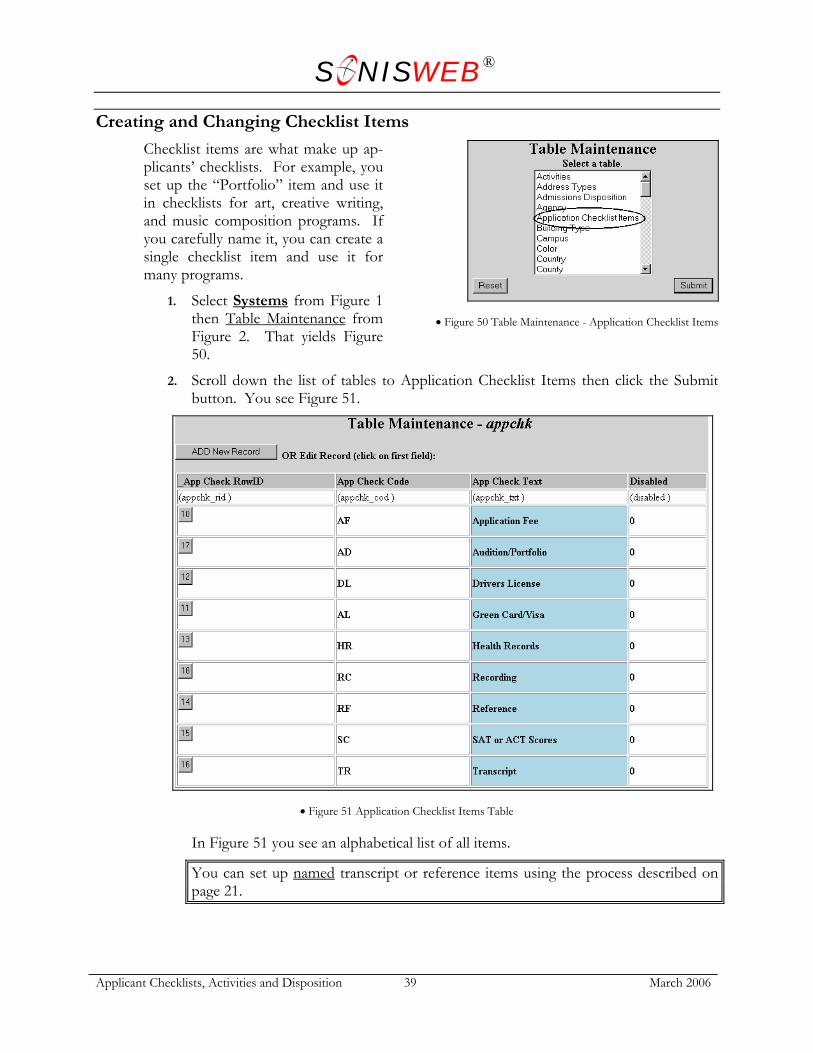
Creating and Changing Checklist Items Checklist items are what make up ap-plicants’ checklists. For example, you set up the “Portfolio” item and use it in checklists for art, creative writing, and music composition programs. If you carefully name it, you can create a single checklist item and use it for many programs.
• Figure 50 Table Maintenance - Application Checklist Items
1. Select Systems from Figure 1 then Table Maintenance from Figure 2. That yields Figure 50.
2. Scroll down the list of tables to Application Checklist Items then click the Submit button. You see Figure 51.
• Figure 51 Application Checklist Items Table
In Figure 51 you see an alphabetical list of all items.
You can set up named transcript or reference items using the process described on page 21.

S NISWEB®
Applicant Checklists, Activities and Disposition 40 March 2006
3. To add a new item, click the Add button. To edit an existing item, click its number button. In either case, you get a display like Figure 52, although it is blank for a new item.
• Figure 52 Checklist Item Record
4. Enter or change the data in the table, then click the Submit button.
App Check RowID is automatically assigned by SONISWEB®.
App Check Code is the abbreviation you want for this item.
App Check Text is the description of the item that appears on most displays and reports.
Disabled should be zero (0) unless you want to disable this item so it can no longer be selected. A one (1) mean it is disabled and cannot be selected for checklists.
5. If you wish to delete this entry, click the Delete button. You get a confirming display asking if you really mean it.

S NISWEB®
Applicant Checklists, Activities and Disposition 41 March 2006
Building the Core and Program Checklists The programs are defined (page 38). You have created the checklist items (page 39). Now it is time to create the checklists.
1. Select Systems from Figure 1 then Application Checklist from Figure 2. That yields Figure 53.
• Figure 53 Application Checklist Display
2. Select the action you want to take referring to Figure 54. You click the underlined word or phase in Figure 54 to execute the function.
• Figure 54 Application Checklist Actions Defined
Build a new checklist for a specific program. When you add a new program, you will do this.
Delete this checklist item only for this program. If the item no longer applies to the program, delete it. You get a confirming display asking if you really mean it.
Add a new checklist item to this existing program checklist. Usually this is some new requirement for the program.
Delete the entire checklist for this program. That means you must start over defining the checklist for the program. You get a confirming display asking if you really mean it.

S NISWEB®
Applicant Checklists, Activities and Disposition 42 March 2006
As you add items to a checklist, you get a display like Figure 55. (The items in Figure 55 were defined in “Creating and Changing Checklist Items”, page 39.)
• Figure 55 Checklist Item Selection
Selecting and removing items from the list
requires the use of the key on your keyboard:
Press and hold the Ctrl key and you are telling the system “don’t change anything but what I click with my mouse”.
With the Ctrl key held, when you click a highlighted item, it is re-moved from the selection and the highlighting disappears.
With the Ctrl key held, when you click an item not highlighted, it is selected and it is highlighted.
When you release the Ctrl key, whatever is left highlighted is what you selected and will be in the checklist. The next time you look at Figure 53, you will see the items in the list.
If you click an item in Figure 55 without holding the Ctrl key, you are telling the system “Pick only this item, remove all other selections”.

S NISWEB®
Applicant Checklists, Activities and Disposition 43 March 2006
SETTING UP APPLICANT ACTIVITIES AND DISPOSITION ACTIVITIES Applicant activities are recorded for each person as described in “Adding and Updating Ac-tivities” on page 43. Disposition activities are automatically created for each applicant when the disposition is entered in SONISWEB® as described in “Disposition” on page 26.
Adding and Updating Activities
Activities Table The Activities table contains activities for constituents, prospective students, applicants, nearly anyone in the SONISWEB® databases. It is a broadly shared table. In changing the table, take care not to change or delete a table entry used by another staff person for appli-cants, recruiting activities, etc.
Activities are defined in a table that is accessed through Activities under Systems. Your se-curity profile must give you permission to use Activities in order to access the tables.
1. Log on to SONISWEB® (page 63).
2. Select Systems from the top list Figure 1. You get Figure 2.
3. From the list in Figure 2, click Activities. That yields Figure 56.
• Figure 56 Activities Table
In Figure 56 you see an alphabetical list in Activity Code order.
shows you how many Activity records there are and which you are viewing in this display.
is the code defined when the activity was initially entered.
is the description for the activity.
S NISWEB®
Applicant Checklists, Activities and Disposition 44 March 2006
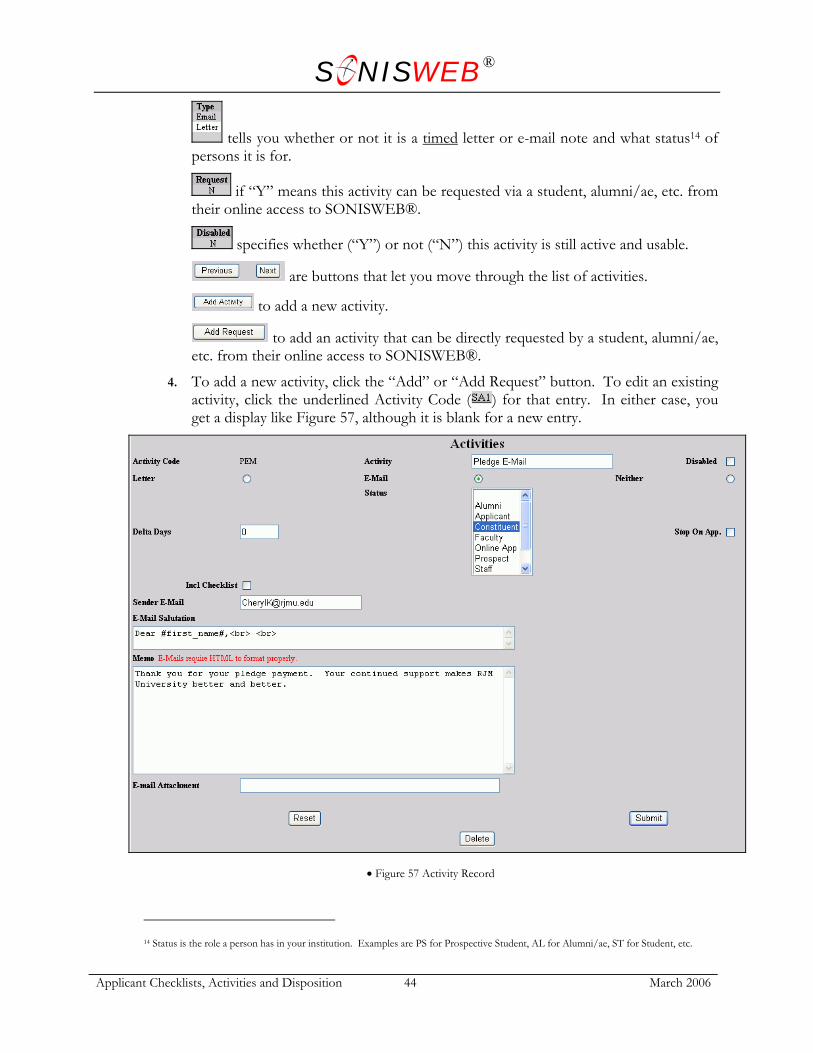
tells you whether or not it is a timed letter or e-mail note and what status14 of persons it is for.
if “Y” means this activity can be requested via a student, alumni/ae, etc. from their online access to SONISWEB®.
specifies whether (“Y”) or not (“N”) this activity is still active and usable.
are buttons that let you move through the list of activities.
to add a new activity.
to add an activity that can be directly requested by a student, alumni/ae, etc. from their online access to SONISWEB®.
4. To add a new activity, click the “Add” or “Add Request” button. To edit an existing activity, click the underlined Activity Code ( ) for that entry. In either case, you get a display like Figure 57, although it is blank for a new entry.
• Figure 57 Activity Record
14 Status is the role a person has in your institution. Examples are PS for Prospective Student, AL for Alumni/ae, ST for Student, etc.

S NISWEB®
Applicant Checklists, Activities and Disposition 45 March 2006
5. Enter or change the data in the table.
Activity Code is the abbreviation you want to use for this activity. When adding a new activity, you enter the code in a field. When editing an activity, you cannot change the code.
Activity is a description that should be clear, unique and related to the Activity Code so users know what it is and where it is used.
Disabled checkbox15; to disable this activity so it can no longer be selected, click the box until a checkmark appears. To enable the activity selected, click the box until it is empty.
Letter radio button15; a filled circle means this activity is a timed letter and will ap-pear as a choice when selecting timed letters. Click the radio button until it is filled if this is a timed letter activity.
E-Mail radio button15; a filled circle means this activity is a timed e-mail note and will appear as a choice when selecting timed e-mail. Click the radio button until it is filled if this is a timed e-mail activity.
Neither radio button15; a filled circle means it’s neither a timed letter nor an e-mail note.
Delta Days is a trigger that makes a person eligible for a timed letter. See “Timing and ‘Delta Days’ Explained” on page 46.
Status usage is shown in Figure 58.
Stop on App. is for applicants. It means that when an applica-tion is recorded in a prospective student’s Inquiry Details Record, this letter will not be mailed to him or her. The activity is marked as “stopped” and will not appear on the timed letter report.
• Figure 58 Status and Activities
When a person is admitted as a student – whether an application has been recorded or not – all activities marked as “Stop on App.” are treated as though an application has been received.
Incl[ude] Checklist is also unique to Applicants. It means the applicant checklist items not completed are to be listed at the end of the letter or e-mail note. See the text “Applicant Checklists, Activities, and Disposition” for more information.
Sender E-Mail is an option if the E-Mail radio button is filled. It is what will appear on the “From” and/or “Reply to” headers in the e-mail note. For example, if several people will be sending this e-mail note but you want all replies to come to one spe-cific address, put that address in “Sender E-Mail”.
15 See page Error! Reference source not found. for guidance.

S NISWEB®
Applicant Checklists, Activities and Disposition 46 March 2006
E-Mail Salutation lets you personalize the note. See “Salutation Choices” on page 47 for the choices.
Memo: If the Letter or the E-Mail radio button is filled, this is the body of the letter or the e-mail note.
If the Letter or the E-Mail radio button is blank, it is only a comment to fur-ther describe this activity.
E-mail Attachment is an op-tion if the E-Mail radio button is filled. You enter the file name of something you want to attach to the note. It can be anything that your e-mail software permits. In Figure 59 it’s a picture of the class rings available to seniors. Send any files you want to attach to the SONISWEB® administrator to be placed in the SONISWEB® Batch folder16 so you can attach them.
• Figure 59 E-Mail Attachment Example
6. Click the Reset button to clear what you entered and start over.
7. Click the Submit button to store what you entered. That yields Figure 56.
8. You can temporarily disable an activity so it cannot be selected as described in Dis-abled above. If you wish to permanently delete this entry, click the Delete button. You get a confirming display asking if you really mean it.
Timing and ‘Delta Days’ Explained A “Delta Days” of 0 means “right now”, a “Delta Days” of 30 means thirty days after the Activity was placed in the person’s record. Examples:
You fill in the Inquiry Detail Record for a prospect. Typically your recruiting plan17 specifies that three e-mail notes or letters are to be sent, so you set up three activities.
The first e-mail note is sent the next time you run Timed E-Mail. In Figure 57, E-Mail is checked, Stop on App. is checked, and Delta Days = 0. (If an ap-plication is recorded before this first e-mail note is sent it will not, of course, be sent.)
The second is sent in 30 days if an application has not been received. In Figure 57, you check E-Mail, Stop on App., and set Delta Days to 30. It is sent any-time you run Timed E-Mail after 30 days has passed if an application has not been received.
A third is sent in 60 days if an application has not been received. In Figure 57, you check E-Mail, Stop on App., and set Delta Days to 60. It is sent anytime
16 Using Web Options, your SONISWEB® administrator can change the directory-folder used for these attachments.
17 See the text “Recruiting Prospective Students”.

S NISWEB®
Applicant Checklists, Activities and Disposition 47 March 2006
you run Timed E-Mail after 60 days has passed if an application has not been received.
You add an activity to the records of every Constituent who has expressed interest in work on the new library. Letter is checked. Stop on App. and Delta Days are ig-nored. The letter is sent the next time you run Timed Letters.
Salutation Choices You use special codes to retrieve the salutation information from each person’s Biographic record. Here they are:
First Name: you enter #first_name# Last Name: you enter #last_name# Middle Initial: you enter #mi# Prefix such as Mr., Ms., Prof: you enter #prefix# Suffix such as Jr., III: you enter #suffix# Maiden Name: you enter #maiden#
You can put punctuation within the salutation. If you know Cold Fusion™ logic, you can add logic operators to control what is included.
SONISWEB® does not send letters or e-mails on its own. You invoke the timed function as with Reports functions such as Timed Email, etc. Everyone’s record is then examined for the “letter” or “e-mail” activity you selected. If the criteria described above are met, a letter or note for that person is displayed for printing or sending.

S NISWEB®
Applicant Checklists, Activities and Disposition 48 March 2006
Building the Core and Program Activities You defined the programs in “Setting up Programs” (page 38). You have created the activi-ties in “Adding and Updating Activities” (page 43). Now it is time to connect programs to activities.
1. Select Systems from Figure 1 then Application Activities in Figure 2. That yields Figure 60.
• Figure 60 Application Activities Display
2. Attaching activities to programs is just like connecting checklists. See the guidance below Figure 54 (page 41) to interpret Figure 60. You click the underlined word or phase in Figure 60 to execute the function.
• Figure 61 Adding Activities to Programs
As you add activities, you get a display like Figure 61. You scroll down the list, click the ac-tivity or activities you want to add, then click the Submit button and it is added. The next time you look at Figure 60, you will see the activity in the list. The activities in Figure 60 were defined in “Adding and Updating Activities” (page 43).

S NISWEB®
Applicant Checklists, Activities and Disposition 49 March 2006
Setting up Disposition Activities Activities are automatically added to applicant records when you record a disposition as de-scribed in “Disposition” on page 26. To attach an activity to a disposition, follow the steps below.
1. Select Systems from Figure 1then Disposition Activities in Figure 2. That yields Figure 62.
• Figure 62 Disposition Activities List
2. To add a new activity to a disposition, click the Add button in Figure 62. That yields Figure 63.
• Figure 63 Disposition Activities Display
3. In Figure 63, use the pulldown6 arrow to pick the disposition to which you want to attach activities.
4. Scroll through the list of activities, find the one you want, click it, then click the Submit button. The next time you see Figure 62, the added activity will be present in the list.
If you know the name of the activity you want to attach, there is a quick way to find it in the list. Click the first item in the list, then use your keyboard to enter the first letter of the activity name (description). That takes you directly to the first activity starting with that letter.
S NISWEB®
Applicant Checklists, Activities and Disposition 50 March 2006
5. To delete an activity from a disposition, click the Delete in Figure 62. You get a con-firming display asking if you really mean it.

S NISWEB®
Applicant Checklists, Activities and Disposition 51 March 2006
CHANGING OR ADDING A STATUS OF APPLICANT FOR A PROSPECT There are two ways to add Applicant (AP) status for a Prospective Student (PS).
The automatic change when Generate Record Status is checked on (page 13) and the “Application Received” checkbox is checked in Figure 14 (page 12).
The instructions below where you explicitly make the addition.
You can change a person’s status – eliminate the old status – or you can you simply add a new one while keeping the old one.
Many schools prefer to add a status and keep the old one(s) so they can do retrospective studies on those who inquired, those who applied, and those accepted.
Before you can add “Applicant” status to a prospective student, you must record the receipt of his or her application. That is done in “Receiving an Application” (page 8). If you have no record of this person, see “Adding a New Applicant Status or a New Applicant” on page 14.
1. Select Names from Figure 1. You get Figure 64.
• Figure 64 Names Search Prompt
2. In the category boxes near the bottom of the display click Applicant, the division the person is applying to, and the campus or location you expect the applicant to attend. Only one item in each “user type” will be selected. If you select more than one item, you receive an error message as illustrated in Figure 65.
• Figure 65 New User Error
3. Click the Add Name/Record Status button. You see a display like Figure 66.

S NISWEB®
Applicant Checklists, Activities and Disposition 52 March 2006
• Figure 66 Add Applicant Status Step 1
4. Click the pulldown by “Prospects With Applications” to get a list of those eligible for the new status.
This is a list of those whose “Application Received” checkboxes are checked18. If you don’t see the person you expected in the list, check his or her Prospect Inquiry Detail record, Figure 14 (page 12).
5. Click the name of the prospective student whose status you want to add then click the “Select Prospect” button. This yields Figure 67.
• Figure 67 Add-Applicant Status Choices
6. In Figure 67 you must make a choice. If your institution maintains prospect records for recruiting studies, click Add APPLICANT. That preserves all of the prospective student’s status. If you wish to discard the prospect status, click Change.
18 If the “Generate Record Status” for applicant is checked (Figure 15, page 13), the status is added without going through this process.
S NISWEB®
Applicant Checklists, Activities and Disposition 53 March 2006
CHANGING OR ADDING THE STATUS OF STUDENT FOR AN AP-PLICANT
There are two ways to add Student (ST) status for an Applicant (AP).
The automatic change when Generate Record Status is checked on (page 13) and the “Student?” checkbox is checked in Application Record, Figure 35 (page 28).
The instructions below where you explicitly make the addition.
If you have no record of this person, see “Adding a New Applicant Status or a New Appli-cant” on page 14.
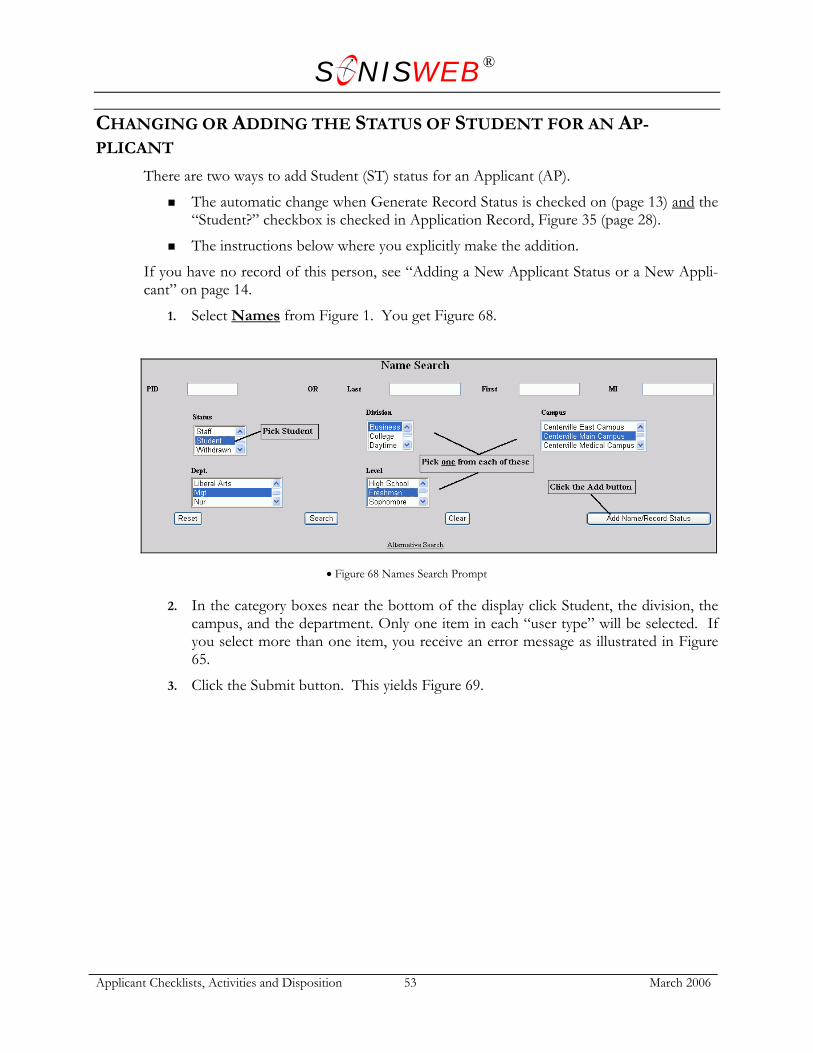
1. Select Names from Figure 1. You get Figure 68.
• Figure 68 Names Search Prompt
2. In the category boxes near the bottom of the display click Student, the division, the campus, and the department. Only one item in each “user type” will be selected. If you select more than one item, you receive an error message as illustrated in Figure 65.
3. Click the Submit button. This yields Figure 69.

S NISWEB®
Applicant Checklists, Activities and Disposition 54 March 2006
• Figure 69 Add Student Status Step 1
4. Click the pulldown by “Student-Ready Applicants” to get a list of those eligible for the new status.
This is a list of those whose “Student?” checkboxes are checked19. If you don’t see the person you expected in the list, check his or her Application Record, Figure 35 (page 28).
5. Click the name of the applicant whose status you want to add then click the “Select Applicant” button. This yields Figure 70.
• Figure 70 Add-Applicant Status Choices
6. You know you got the right person in Figure 70 because the biographic information at the top is what you expected. If this is not the person you want, click the Quit but-ton and start over.
7. In Figure 70, click the name of the person as applicant. That brings you to Figure 71.
19 If the “Generate Record Status” for student is checked (Figure 15, page 13), the status is added without going through this process.
S NISWEB®
Applicant Checklists, Activities and Disposition 55 March 2006
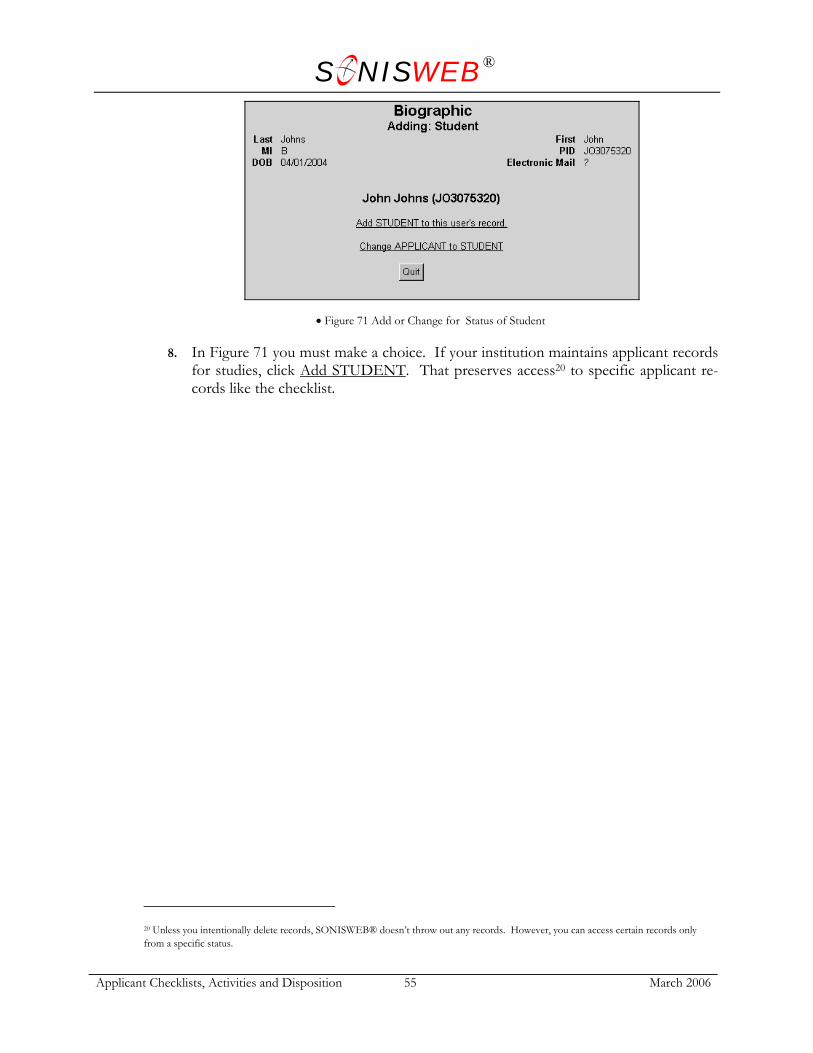
• Figure 71 Add or Change for Status of Student
8. In Figure 71 you must make a choice. If your institution maintains applicant records for studies, click Add STUDENT. That preserves access20 to specific applicant re-cords like the checklist.
20 Unless you intentionally delete records, SONISWEB® doesn’t throw out any records. However, you can access certain records only from a specific status.

S NISWEB®
Applicant Checklists, Activities and Disposition 56 March 2006
Adding Activities for a Group This is for assigning one or more activities to a group of people rather than assigning them individually.
1. Select Systems from Figure 1 then click Activities: Add by Group in Figure 2. That yields Figure 72.
• Figure 72 Activities by Group
2. In Figure 72 define the group by selecting21 those criteria that define the group.
3. To erase your selections and start over click the Reset button.
4. When you have selected the criteria, click the Submit button. You get Figure 75.
In selecting criteria, do this:
• Figure 73 "Blank" Selection
If a selection does not pertain to the group, select a blank entry. For example, if the group is not defined by a campus, select a “blank” campus as shown in Figure 73.
To pick all of the choices21, click the top item, hold down the Shift key on your keyboard, scroll to the last selec-tion, click it, then release the shift key. It will look like Figure 74.
• Figure 74 All Choices Selected
To pick more than one choice21 from a list, click the first item, hold down the Ctrl key on your keyboard, scroll to the next item you want, click it, continue holding the Ctrl, scroll the next item, click it, etc. until you have selected the last item. When you release the Ctrl key, all your choices will have been selected.
21 For guidance in making multiple choices from a menu, see Figure 82 and the description on page 64.

S NISWEB®
Applicant Checklists, Activities and Disposition 57 March 2006
5. In Figure 75 look first at the top. It confirms for you what you selected in Figure 72.
• Figure 75 Activity Selections for the Group
If what you see at the top of Figure 75 is not what you in-tended, go to Figure 2 again and click Activities: Add by Group to start over.
6. Choose one or more activities to be assigned to the group using the multiple choice technique21.
7. To erase your selec-tions and start over, click the Reset but-ton.
8. With your selections made, click the Submit button to have the activities assigned to the group you selected.

S NISWEB®
Applicant Checklists, Activities and Disposition 58 March 2006
APPLICANT RECORDS AND PROCESSES Most applicant records are the same as everyone else’s personal and professional records kept by SONISWEB®. These are described in the text “Students, Faculty, Applicant and Alumni/ae Record-keeping”.
This text describes the records unique to applicants with emphasis on activities, checklists. and the processes in keeping those records.
Terms Program Staff ActivitiesApplicant Checklist
Transcripts Core
Missing items letter
Two-month status e-mail
One-month status e-mail
Academic reference
Personal reference
Employment reference
Etc.
Engineering undergrad
Languages undergrad
Etc.
Notify alum mentor
Mass E-mail and Timed Letters
Etc.
Dean's letter
• Figure 76 Activities and Checklists Defined
Activities are what you and your staff – not the applicant – do and are responsible for. You use activity reports (page 30) to track completion. Many activities are internal to your staff, so you usually do not want your applicants to see them on the Web. You can also produce mailings based on activities.
Checklists are what the applicant does and is responsible for. You want your applicants to see their checklists via the Web (see Figure 36 on page 29).

S NISWEB®
Applicant Checklists, Activities and Disposition 59 March 2006
Disposition is a decision your institution makes – typically acceptance, rejection, or wait-list – then informs the applicant.
Processes Once a prospective student sends you the application, he or she becomes an applicant. You mark that in her or his SONISWEB® Prospect Inquiry Details record. That action adds the new AP (Applicant) status to his or her database record.
A person who fills out an online application on your Web site bypasses this process. The person is added as an OA (Online Applicant).
The diagram in Figure 77 shows the relationships among the tasks common to applicant processing.
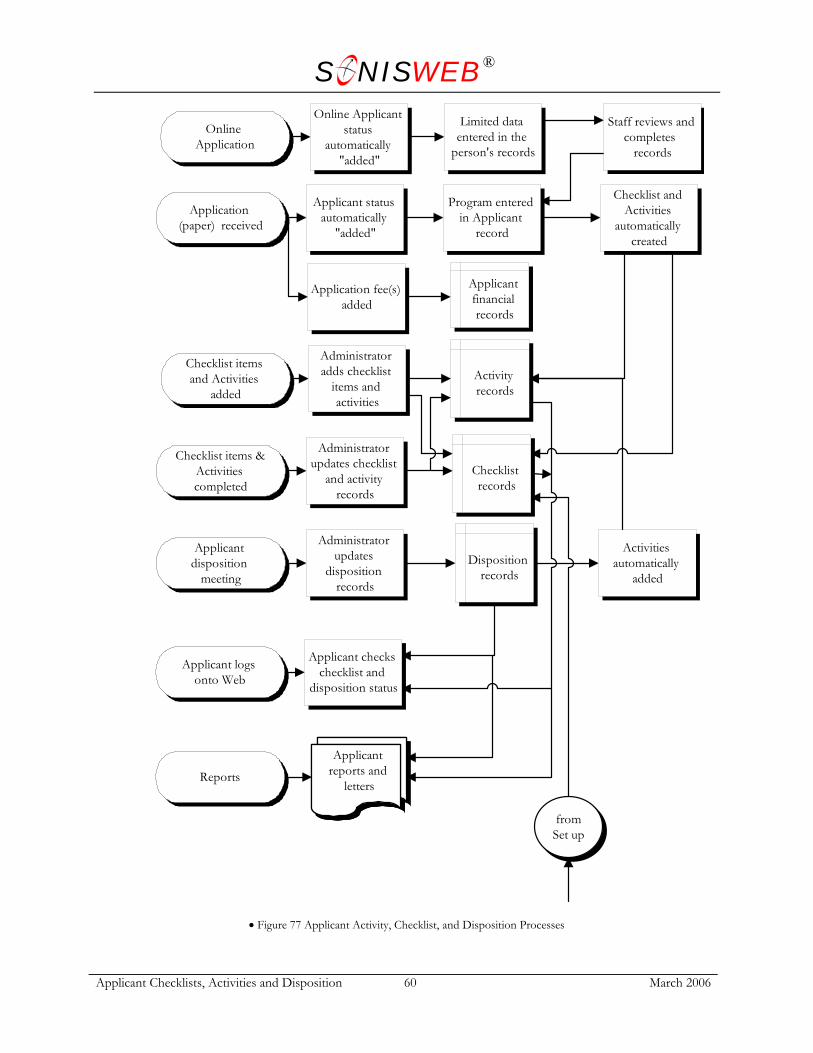
S NISWEB®
Applicant Checklists, Activities and Disposition 60 March 2006
Applicant status automatically
"added"
Application (paper) received
Checklist records
Applicant checks checklist and
disposition status
Applicant logs onto Web
Checklist and Activities
automatically created
Checklist items & Activities completed
Administrator updates checklist
and activity records
Applicant disposition
meeting
Administrator updates
disposition records
Disposition records
Program entered in Applicant
record
Reports
Applicant reports and
letters
Checklist items and Activities
added
Administrator adds checklist
items and activities
Activity records
from Set up
Activities automatically
added
Application fee(s) added
Applicant financial records
Online Applicant status
automatically "added"
Online Application
Limited data entered in the
person's records
Staff reviews and completes
records
• Figure 77 Applicant Activity, Checklist, and Disposition Processes

S NISWEB®
Applicant Checklists, Activities and Disposition 61 March 2006
Figure 77 contains the day-to-day functions. Figure 78 has the setup tasks you do whenever there is some change in your programs or requirements. Typically that is a yearly task.
Online Application entered by the prospective student directly from the Web adds the per-son and fills in parts of several records. As described on page 8, your staff still needs to check them and to trigger the checklist by filling out the Application record.
Application (paper) received can be an application from a prospective student or an appli-cation from someone otherwise unknown to you. In either case you add an Applicant re-cord. In the case of a prospective student, this “add” is really a marking of the prospect’s re-cords as “Applicant”. You then specify the program(s) the applicant is applying for. Once you have completed the process, the applicant will have a checklist of items that must be completed. SONISWEB® will also create a list of activities that your staff must complete.
Checklists and Activities are similar in content but differ in intent. See “Terms” on page 58 to understand their use and intent.
Application Fees, if you use them, are added. See “Filling in the Application and Creating a Checklist and an Activities List” on page 18. Checklist items and Activities added allows you to add items that are not automatically created in the “Application received” process.
Checklist items & Activities completed covers the entry of transcripts, references, etc. and the check-off of the items in the checklist and the activity list.
Applicant disposition meeting is followed by entering the disposition in the applicant’s re-cord. A person can apply for more than one program, so he or she may have more than one program record. You mark the disposition for each program.
Applicant logs onto Web is something the applicant does if you assign22 applicants IDs and PINs. Figure 36 (page 29) shows it. This reduces phone calls to your staff and gives your applicants convenient access. They can check the completion (your receipt and mark-ing) of checklist items and their disposition.
Reports are printed reports and mailing lists for tracking activities and sending dispositions. There is no report for checklist since the applicant can examine his or her checklist at will via the Web.
22 Online applicants get IDs and PINs automatically assigned.
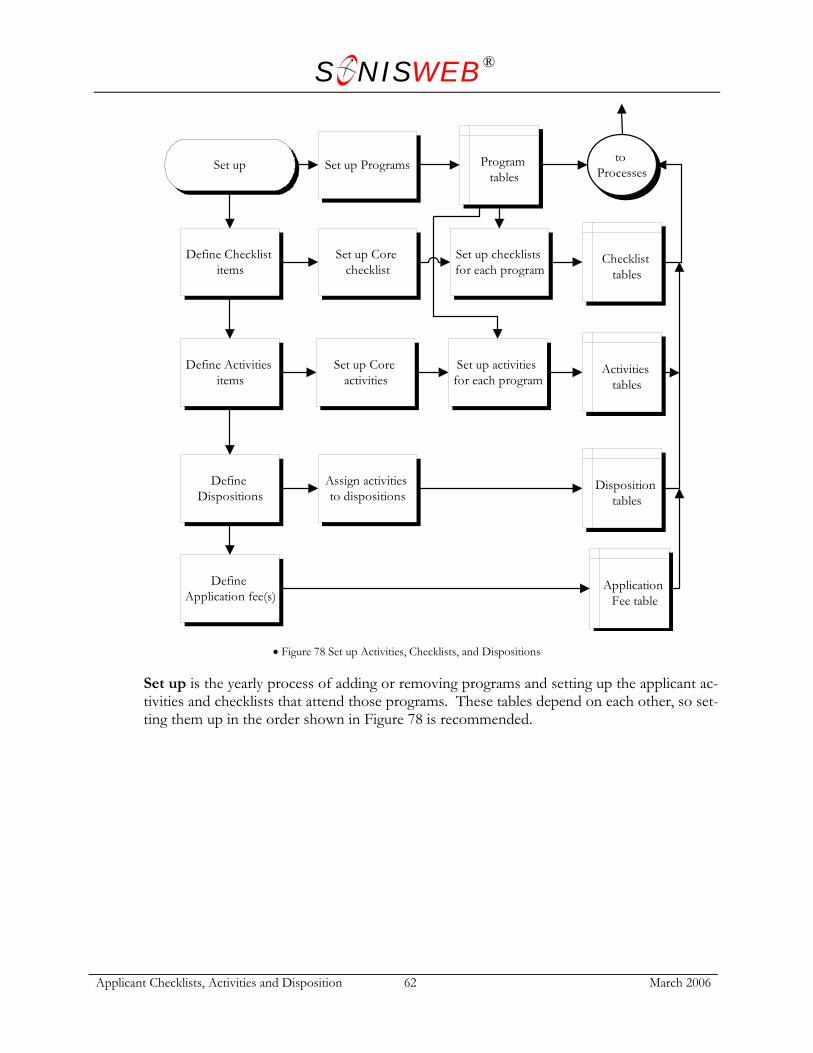
S NISWEB®
Applicant Checklists, Activities and Disposition 62 March 2006
Set up Core checklist
Set up checklists for each program
Program tables
Set up ProgramsSet up
Checklist tables
to Processes
Define Checklist items
Assign activities to dispositions
Activities tables
Define Dispositions
Disposition tables
Define Activities items
Set up Core activities
Set up activities for each program
Define Application fee(s)
Application Fee table
• Figure 78 Set up Activities, Checklists, and Dispositions
Set up is the yearly process of adding or removing programs and setting up the applicant ac-tivities and checklists that attend those programs. These tables depend on each other, so set-ting them up in the order shown in Figure 78 is recommended.

S NISWEB®
Applicant Checklists, Activities and Disposition 63 March 2006
GETTING STARTED - LOG IN AND THE USE OF TABS, BUTTONS AND FIELDS
Figure 79 Login Displays
To log in as an administrator, select that option from your Web page. The standard SONISWEB® login pages look like Figure 79.
Figure 80 is a typical SONISWEB® page. The actions authorized in your profile appear at the top, called the Toolbar.
• Figure 80 Typical SONISWEB® Page
When you make a selection from the Toolbar, the applicable Function List appears on the left. Only the functions authorized in your assigned profile and your individual limits and privileges appear. Some might have only Courses in the toolbar and only Course: Add/Edit for functions.
Not apparent on the display is whether or not the profile permits editing or changing the in-formation. Once the you select a function from the list on the left, you will see a Submit or similar button at the bottom of the display if you have the permissions to add, edit, or delete the data.
By clicking a Status Bar you quickly return to the “person” or the “course” you were proc-essing even if you left it temporarily to look at a financial display or a report. Of course, if you have not selected a person with Names or a course with Courses, there will be no Status Bars at the top.
In Figure 80 click an underlined Selectable Link and you go to that record.

S NISWEB®
Applicant Checklists, Activities and Disposition 64 March 2006
S e a r c h b y N a m e ID
Click your choice;the other choices turn off
Single Choice Radio Buttons
J o h n
Type the data
N e e d in fo o n s c h o la r s h ip sfo r h a n d ic a p p e d s tu d e n t s .A ls o n e e d t o k n o w a b o u tw h e e lc h a i r a c c e s s . C a n Ip a r k a v a n n e a r th e d o r m ?
Use arrows to bring text into view
Entry FieldS p r in g
S p r in g
In te r s e s sF a ll
S u m m e r
S p r in g
Click the arrow
Click your choice
Arrow-Pulldown
Click your choices;check mark means selected
Multiple Choice Checkboxes
P le a s e S e n d B r o c h u r e
P le a s e S e n d C a ta lo g
P le a s e S e n d A p p l ic a t io n
Figure 81 Arrows, Fields, Checkboxes and Buttons
SONISWEB® prompts you for information with windows like those in Figure 81. Use your mouse to click your selection.
Once you have made your selection(s), you must click an action button; usually it is Submit, Delete, Reset, etc.
For Entry Fields, click the beginning of the field so you don't get any blanks inserted in front of your entry.
With Multiple Choice Checkboxes, each time you click a box it goes from selected (check mark) to unselected (no check mark). Click it again and it is selected, etc.
Radio Buttons allow only one to be selected; when you click one, all the others are turned off.
Some SONISWEB® lists permit you to make multiple choices. It works just like most PC spread sheet software.
To pick two or more in a series, click the top selection, hold down the Shift key on the keyboard and click the bottom item in the series. Release the shift key and they are selected as shown on the left and middle of Figure 82.
• Figure 82 Selecting Multiple Choices
To pick two or more that are not adjacent, click the first item, hold the Ctrl key on the keyboard, select the next item and the next, etc. When you have picked the last item you want, release the Ctrl key and you see the selections like those on the right of Figure 82.