and stealth gps-4 lite - starlane · stealth gps-4 and stealth gps-4 lite installation and...
TRANSCRIPT
STEALTH GPS-4 and
STEALTH GPS-4 LITE
Installation and operation manual.
Manuale d’installazione e uso.
STEALTH GPS-4 is an automatic lap timer developed with double satellite
GPS + GLONASS technology and process algorithms used in the most advanced
airborne systems. Its features make it the most advanced,
complete and easy instrument for all the riders of:
Motorbikes and Scooters.
STEALTH GPS-4 è un cronometro automatico basato su doppia tecnologia satellitare GPS + GLONASS e algoritmi di calcolo utilizzati nei più moderni sistemi
dell'aviazione. Le sue caratteristiche lo rendono lo
strumento più avanzato, completo e semplice per tutti i piloti di:
Moto - Scooter.

1
http://www.starlane.com/en_downloads.htm
http://www.starlane.com/downloads.htm
2
Contents
Introduction ............................................................... 4
Functions .................................................................... 4
Front Panel ................................................................. 4
Installation ................................................................. 6
Assembly .................................................................... 6
Position and Orientation ........................................... 6
IMPORTANT! .............................................................. 6
READ CAREFULLY THE FOLLOWING INDICATIONS BEFORE PROCEEDING WITH THE INSTALLATION ... 6
Important for Go Kart, Mini Moto, Pit Bike and other 2 Stroke Vehicle users ............................................... 8
Power supply .............................................................. 8
Connection with the 12V battery of the vehicle .... 8
Updating the firmware ............................................... 8
Checking the Firmware version installed ............... 9
Downloading the update ....................................... 9
Follow the procedure described by the DigiRace-MMX software manual to download and install the latest Firmware update. ......................................... 9
Usage ....................................................................... 10
Turning ON/OFF the device ...................................... 10
Multi-page menu...................................................... 10
GPS signal acquisition ............................................... 11
Configuration ........................................................... 11
Setting the Freeze Time ....................................... 11
Aligning the GPS clock to the local timezone ....... 12
Selection of the units of measurement ................ 12
Energy saving and Auto Power-Off........................... 13
How to set the lap triggers on Starlane devices...... 14
SAFD-2 automatic positioning function .................... 15
Track management .................................................. 16
Learning the Finish Line and Intermediate positions16
Storing the coordinates of the Finish Line and Intermediate positions ......................................... 18
Loading the track coordinates ............................. 18
Automatic track recognition ................................ 19
Analysis of the stored times ................................. 20
Managing the Hour Meters ...................................... 21
Resetting the Hour Meters .................................. 21
Memory Management ............................................. 22
Session recording ................................................. 22
Checking the memory in use ................................ 23
Contenuti
Introduzione .............................................................. 4
Funzioni ..................................................................... 4
Pannello Frontale ...................................................... 4
Installazione .............................................................. 6
Montaggio ................................................................. 6
Posizione e Orientamento ........................................ 6
IMPORTANTE! ............................................................ 6
LEGGERE ATTENTAMENTE LE PRESENTI INDICAZIONI PRIMA DI PROCEDERE CON L’INSTALLAZIONE ................................................... 6
Importante per utenti di Go Kart, Mini Moto, Pit Bike e altri Veicoli 2 Tempi ............................................... 8
Alimentazione ............................................................ 8
Connessione alla batteria a 12V del veicolo ........ 8
Aggiornamento del firmware .................................... 8
Verifica della versione di Firmware installata ........ 9
Scarico dell’aggiornamento ................................... 9
Seguire la procedura indicata sul manuale del software DigiRace-MMX per eseguire correttamente l’aggiornamento all’ultima versione di Firmware. .......................................................... 9
Uso ...........................................................................10
Accensione e spegnimento del dispositivo ...............10
Menu multipagina ....................................................10
Acquisizione del segnale GPS ....................................11
Configurazione .........................................................11
Impostazione del tempo di visualizzazione a fine giro .......................................................................11
Allineamento dell’orologio GPS con il fuso orario 12
Selezione delle unità di misura .............................12
Risparmio energetico e autospegnimento ....................13
Come impostare i traguardi sui dispositivi Starlane14
Funzione di posizionamento automatico SAFD-2 ....15
Gestione circuiti ........................................................16
Apprendimento della linea di traguardo e degli intermedi..............................................................16
Memorizzazione delle coordinate di Traguardo e Intermedi .............................................................18
Richiamare le coordinate di un circuito ................18
Riconoscimento automatico del circuito ..............19
Analisi dei tempi memorizzati ..............................20
Gestione dei Contaore ..............................................21
3
Memory clearing .................................................. 23
Formatting the Memory ...................................... 24
EXTERNAL USB MEMORY MANAGEMENT ................ 25
Data download ......................................................... 25
Device name............................................................. 25
Track load ................................................................. 25
Track export ............................................................. 26
Cleaning the surfaces ............................................... 27
Warranty .................................................................. 27
Notes ........................................................................ 27
Azzeramento dei Contaore ...................................21
Gestione della memoria ...........................................22
Registrazione delle sessioni ..................................22
Verifica della memoria utilizzata ..........................23
Cancellazione della memoria ...............................23
Formattazione della Memoria ..............................24
GESTIONE DELLA MEMORIA USB ESTERNA ..............25
Scarico dati ...............................................................25
Nome del dispositivo ................................................25
Caricamento dei circuiti ............................................25
Esportazione dei circuiti ...........................................26
Pulizia delle superfici ................................................27
Garanzia ...................................................................27
Note ..........................................................................27

4
Introduction
Functions
STEALTH GPS-4 carries out the following basic functions:
GPS Lap timer.
Double Hour Meter.
GPS Tachometer.
Clock.
Measuring and recording of the track paths that can be analysed by means of the DigiRace-MMX that can be down-loaded for free from www.starlane.com .
Note: the Stealth GPS-4 Lite version comes with the same laptiming features as the normal non Lite, and uploads to the PC the report table of laptimes, split times and maximum speeds of each lap but it does not acquire the trajectories and is not expandable with RID optional modu-les, these features can be enabled at any time as an upgrade directly from the site www.starlane.com website.
Introduzione
Funzioni
STEALTH GPS-4 svolge le seguenti funzioni base:
Cronometro GPS.
Doppio Contaore.
Tachimetro GPS.
Orologio.
Acquisizione e registrazione delle traiettorie di pista analizzabili con il Software DigiRace-MMX scaricabile gratuitamente dal sito www.starlane.com .
Nota: la versione Stealth GPS-4 Lite ha le stesse funzionalità cronometriche di quella normale non Lite e consente di scaricare su PC la tabella di tempi , in-tertempi e velocità massime di ogni giro ma non acquisisce le traiettorie e non è espandibile con i moduli RID opzionali, tali funzionalità possono essere attivate in qualsiasi momento come upgrade di-rettamente dal sito www.starlane.com.
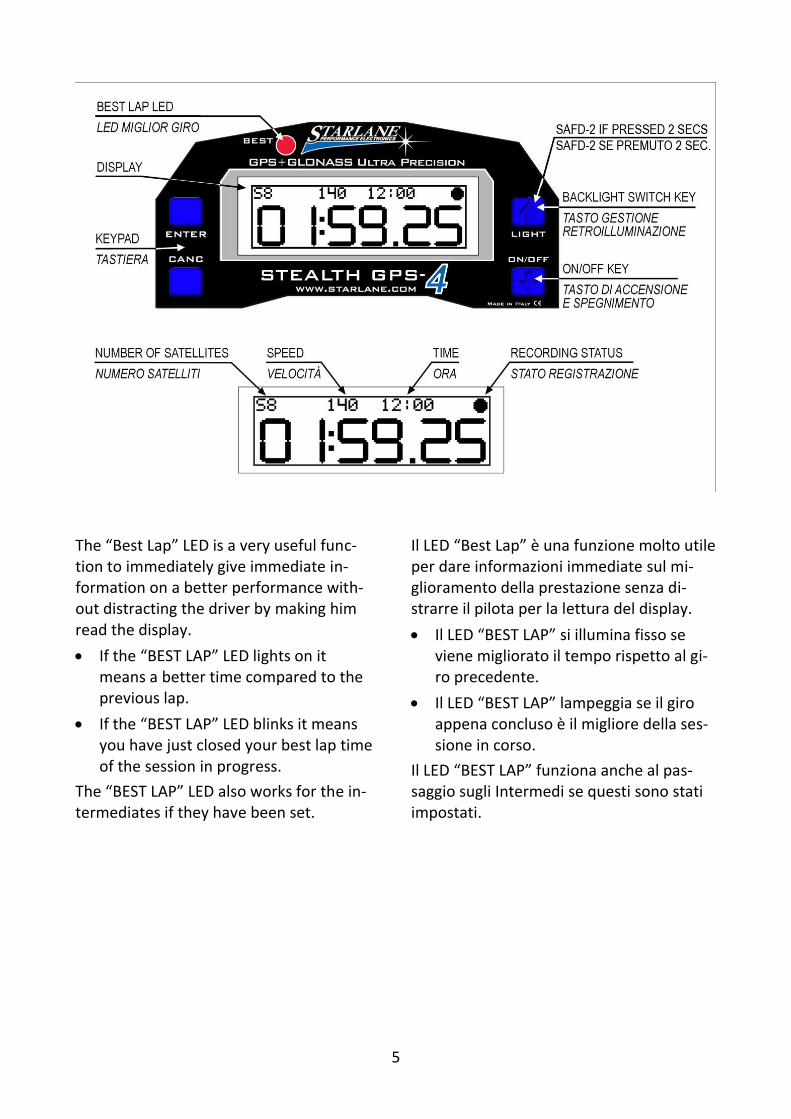
Front Panel
The Best Lap LED, the back-lit display and the 4-key keypad are located on the front panel.
Pannello Frontale
Sul Pannello Frontale si trovano il LED Best Lap, il display retroilluminato e la tastiera a 4 tasti.
5
The “Best Lap” LED is a very useful func-tion to immediately give immediate in-formation on a better performance with-out distracting the driver by making him read the display.
If the “BEST LAP” LED lights on it means a better time compared to the previous lap.
If the “BEST LAP” LED blinks it means you have just closed your best lap time of the session in progress.
The “BEST LAP” LED also works for the in-termediates if they have been set.
Il LED “Best Lap” è una funzione molto utile per dare informazioni immediate sul mi-glioramento della prestazione senza di-strarre il pilota per la lettura del display.
Il LED “BEST LAP” si illumina fisso se viene migliorato il tempo rispetto al gi-ro precedente.
Il LED “BEST LAP” lampeggia se il giro appena concluso è il migliore della ses-sione in corso.
Il LED “BEST LAP” funziona anche al pas-saggio sugli Intermedi se questi sono stati impostati.
6
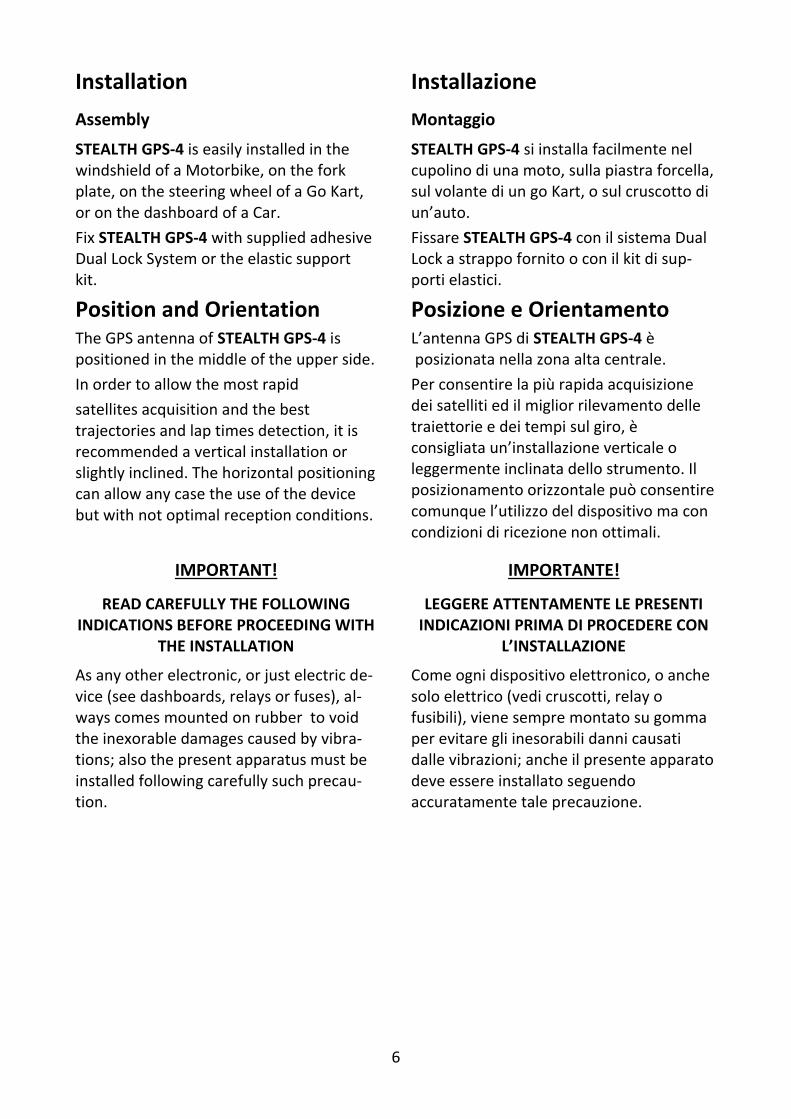
Installation
Assembly
STEALTH GPS-4 is easily installed in the windshield of a Motorbike, on the fork plate, on the steering wheel of a Go Kart, or on the dashboard of a Car.
Fix STEALTH GPS-4 with supplied adhesive Dual Lock System or the elastic support kit.
Installazione
Montaggio
STEALTH GPS-4 si installa facilmente nel cupolino di una moto, sulla piastra forcella, sul volante di un go Kart, o sul cruscotto di un’auto.
Fissare STEALTH GPS-4 con il sistema Dual Lock a strappo fornito o con il kit di sup-porti elastici.
Position and Orientation The GPS antenna of STEALTH GPS-4 is positioned in the middle of the upper side.
In order to allow the most rapid
satellites acquisition and the best trajectories and lap times detection, it is recommended a vertical installation or slightly inclined. The horizontal positioning can allow any case the use of the device but with not optimal reception conditions.
Posizione e Orientamento L’antenna GPS di STEALTH GPS-4 è posizionata nella zona alta centrale.
Per consentire la più rapida acquisizione dei satelliti ed il miglior rilevamento delle traiettorie e dei tempi sul giro, è consigliata un’installazione verticale o leggermente inclinata dello strumento. Il posizionamento orizzontale può consentire comunque l’utilizzo del dispositivo ma con condizioni di ricezione non ottimali.
IMPORTANT!
READ CAREFULLY THE FOLLOWING INDICATIONS BEFORE PROCEEDING WITH
THE INSTALLATION
As any other electronic, or just electric de-vice (see dashboards, relays or fuses), al-ways comes mounted on rubber to void the inexorable damages caused by vibra-tions; also the present apparatus must be installed following carefully such precau-tion.
IMPORTANTE!
LEGGERE ATTENTAMENTE LE PRESENTI INDICAZIONI PRIMA DI PROCEDERE CON
L’INSTALLAZIONE
Come ogni dispositivo elettronico, o anche solo elettrico (vedi cruscotti, relay o fusibili), viene sempre montato su gomma per evitare gli inesorabili danni causati dalle vibrazioni; anche il presente apparato deve essere installato seguendo accuratamente tale precauzione.
7
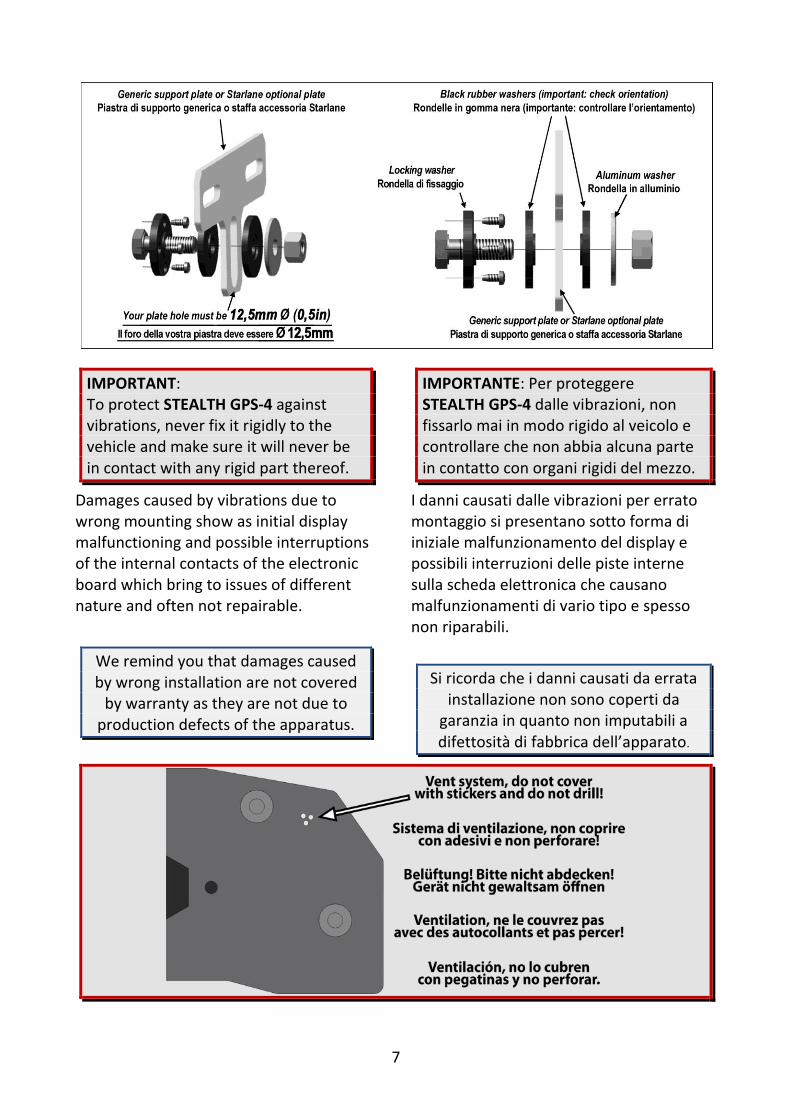
IMPORTANT: To protect STEALTH GPS-4 against vibrations, never fix it rigidly to the vehicle and make sure it will never be in contact with any rigid part thereof.
IMPORTANTE: Per proteggere STEALTH GPS-4 dalle vibrazioni, non fissarlo mai in modo rigido al veicolo e controllare che non abbia alcuna parte in contatto con organi rigidi del mezzo.
Damages caused by vibrations due to wrong mounting show as initial display malfunctioning and possible interruptions of the internal contacts of the electronic board which bring to issues of different nature and often not repairable.
We remind you that damages caused by wrong installation are not covered
by warranty as they are not due to production defects of the apparatus.
I danni causati dalle vibrazioni per errato montaggio si presentano sotto forma di iniziale malfunzionamento del display e possibili interruzioni delle piste interne sulla scheda elettronica che causano malfunzionamenti di vario tipo e spesso non riparabili.
Si ricorda che i danni causati da errata installazione non sono coperti da
garanzia in quanto non imputabili a difettosità di fabbrica dell’apparato.
8
Important for Go Kart, Mini Moto, Pit Bike and other 2 Stroke Vehicle users
On Go Kart, Mini moto and all the vehicles with strong electromagnetic emissions due to the ignition system, you must use spark plug caps of shielded type with 5000ohm internal resistor or spark plugs with internal resistor, often marked with the “R” letter in the code (e.g. NGK BR10EG instead of the normal B10EG).
Not using shielded cap or spark plug can caused the device hanging while the engine is running, requiring to unplug the power supply to restart the unit and the execution of the “FORMAT MEMORY” command in the MEMORY menu to restore the correct status of the internal memory.
Importante per utenti di Go Kart, Mini Moto, Pit Bike e altri Veicoli 2 Tempi
Su Go Kart, Mini moto e tutti i veicoli con forti emissioni elettromagnetiche per via del sistema di accensione, è ne-cessario utilizzare cappucci candela schermati con resistenza interna da 5000 ohm oppure candele nella versio-ne con resistenza interna, spesso con-traddistinte dalla lettera “R” nella sigla (esempio NGK BR10EG anziché la nor-male B10EG). Il mancato uso di pipetta o candela schermata può causare il bloccaggio del dispositivo a motore ac-ceso, richiedendo lo scollegamento dell’alimentazione per riavviarlo e l’esecuzione del comando “FORMAT MEMORY” nel menù MEMORY per ripristinare l’adeguato stato di funzionamento della memoria interna.
Power supply
You can supply STEALTH GPS-4 by means of a 12V battery of the vehicle or with specific external accessory batteries.
Alimentazione
È possibile alimentare STEALTH GPS-4 tra-mite la batteria a 12V del veicolo oppure con le specifiche batterie esterne accesso-rie.
Connection with the 12V battery of the vehicle
Connect the Red wire of the supplied ex-tension with the 12V Positive of the vehi-cle battery and the Black wire with an earth point on the frame or, even better, directly with the Negative of the battery.
Connessione alla batteria a 12V del vei-colo
Collegare il filo Rosso della prolunga fornita al Positivo 12V della batteria del veicolo e il filo Nero ad un punto di massa sul telaio o, meglio ancora, direttamente al Negativo della batteria.
Updating the firmware
The software installed inside STEALTH GPS-4 and intended to manage all func-tionalities is referred to as Firmware.
You can update the firmware when new versions with additional implementations and/or improvements are made available by Starlane.
Aggiornamento del firmware
Il software installato all’interno del STEALTH GPS-4 e che ne gestisce tutte le funzionalità ha il nome di Firmware.
È possibile aggiornare il Firmware quando ne siano rese disponibili da Starlane nuove versioni con implementazioni aggiuntive e/o migliorie.

9
Checking the Firmware version installed
You can check the exact model, the soft-ware version (firmware) and the serial number by accessing the System Info screen:
Verifica della versione di Firmware instal-lata
È possibile verificare l’esatto modello, versione di software (Firmware) e numero di serie accedendo alla schermata System Info:
Downloading the update
Check on the technical support page of the www.starlane.com web site whether more up-to-date Firmware or DigiRace-MMX versions (the version number is higher) are available for your device.
Follow the procedure described by the DigiRace-MMX software manual to download and install the latest Firmware update.
Scarico dell’aggiornamento
Verificare sulla pagina di supporto tecnico del sito www.starlane.com se sono dispo-nibili versioni di Firmware più aggiornate (numero di versione più alto) per il vostro dispositivo nonché la relativa versione ag-giornata di DigiRace-MMX.
Seguire la procedura indicata sul manuale del software DigiRace-MMX per eseguire correttamente l’aggiornamento all’ultima versione di Firmware.
10
Usage
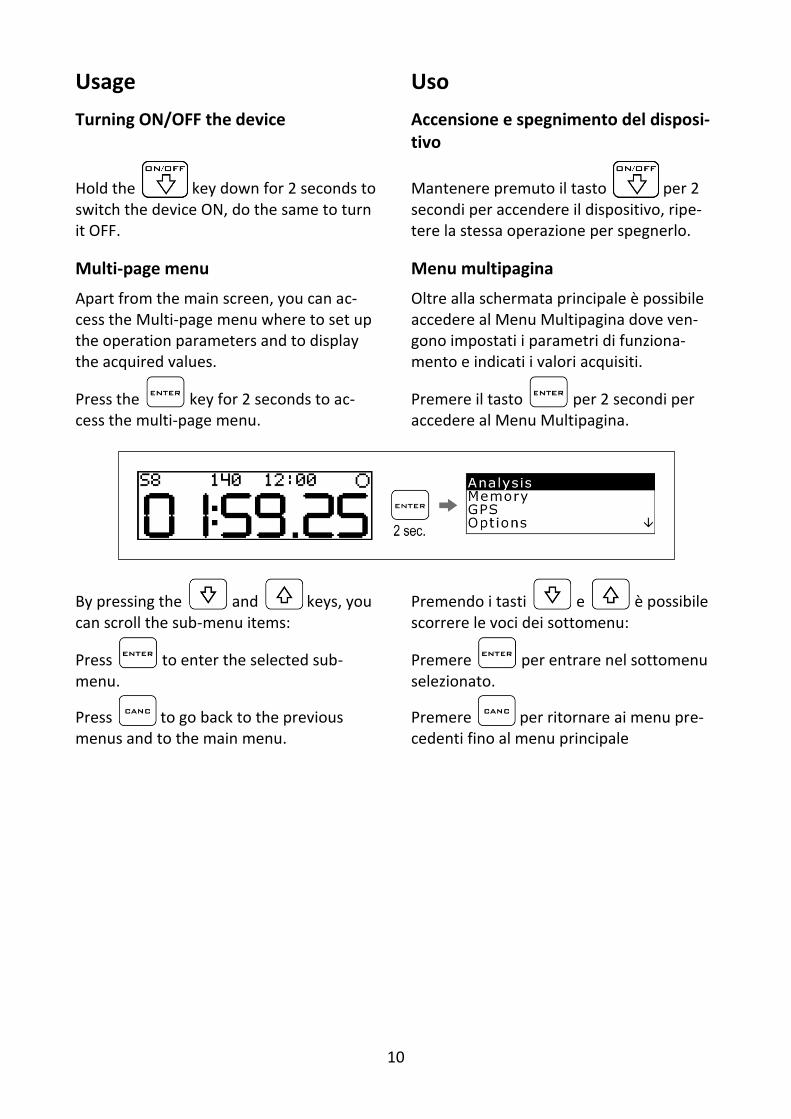
Turning ON/OFF the device
Hold the key down for 2 seconds to switch the device ON, do the same to turn it OFF.
Uso
Accensione e spegnimento del disposi-tivo
Mantenere premuto il tasto per 2 secondi per accendere il dispositivo, ripe-tere la stessa operazione per spegnerlo.
Multi-page menu
Apart from the main screen, you can ac-cess the Multi-page menu where to set up the operation parameters and to display the acquired values.
Press the key for 2 seconds to ac-cess the multi-page menu.
Menu multipagina
Oltre alla schermata principale è possibile accedere al Menu Multipagina dove ven-gono impostati i parametri di funziona-mento e indicati i valori acquisiti.
Premere il tasto per 2 secondi per accedere al Menu Multipagina.
By pressing the and keys, you
can scroll the sub-menu items:
Press to enter the selected sub-menu.
Press to go back to the previous menus and to the main menu.
Premendo i tasti e è possibile scorrere le voci dei sottomenu:
Premere per entrare nel sottomenu selezionato.
Premere per ritornare ai menu pre-cedenti fino al menu principale

11
GPS signal acquisition
The first time the system is switched on after a long time or at a considerable dis-tance from the previous place of operation it might require some minutes to find out the satellites and calculate its position, this phase is called “Cold Start”.
The next time the system will be used in the same location it will find out the satel-lites within just a few seconds and you will be able to operate immediately by enter-ing the track within just a few seconds.
To provide for a correct and rapid acquisi-tion before usage, it’s important to install STEALTH GPS-4 in the open where it can easily “see” a good portion of the sky.
Acquisizione del segnale GPS
La prima volta che il sistema viene acceso dopo un lungo periodo o a distanza consi-derevole dal luogo di utilizzo precedente potrebbe richiedere alcuni minuti per indi-viduare i satelliti e calcolare la propria po-sizione, questa fase viene chiamata “Avvio a Freddo”.
La volta successiva che il sistema sarà uti-lizzato nello stesso luogo, esso individuerà i satelliti in pochi secondi e sarà possibile procedere immediatamente, entrando in pista entro pochi secondi.
Per consentire una rapida e corretta acqui-sizione prima dell’uso è importante posi-zionare STEALTH GPS-4 all’aperto dove possa “vedere” un buona porzione di cielo.
Configuration
Setting the Freeze Time
You can set the lap time you wish to re-main on the display when the lap is over (Freeze Time).
Carry out the following operations to set the Freeze Time:
Configurazione
Impostazione del tempo di visualizzazione a fine giro
È possibile impostare il tempo per cui resta fissa sul display l’indicazione del giro appe-na concluso (Freeze Time).
Eseguire le seguenti operazioni per impo-stare il Freeze Time:
12
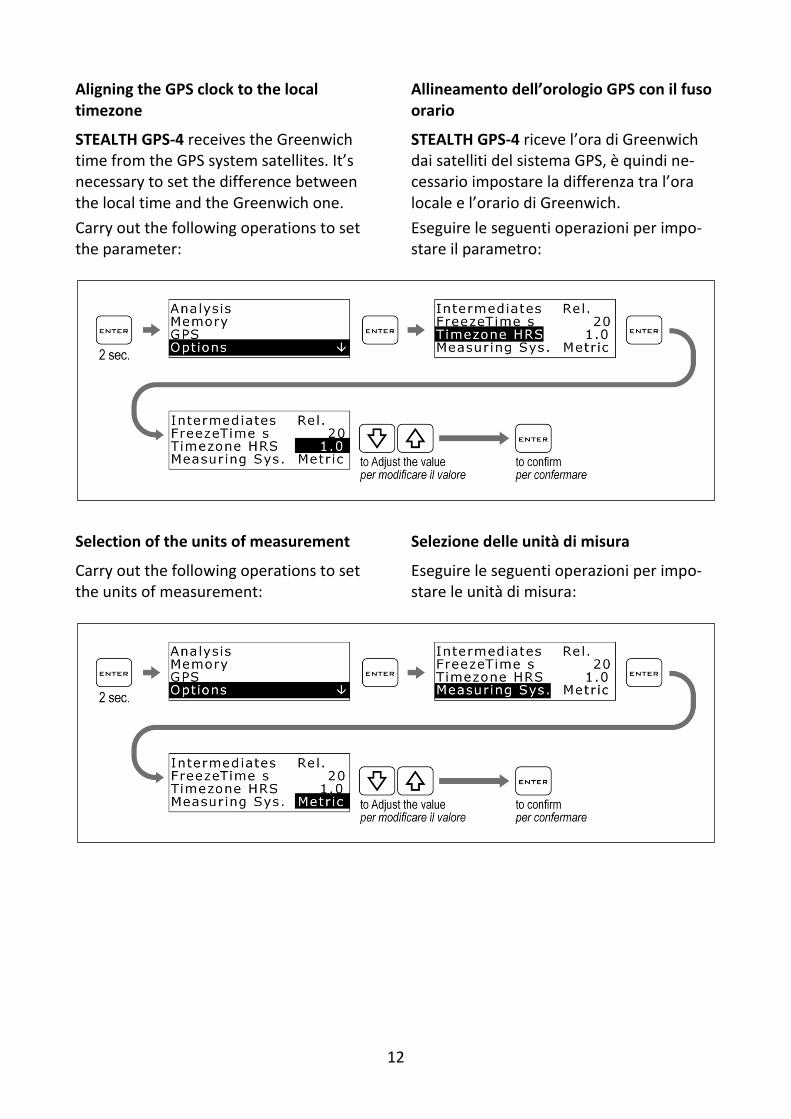
Aligning the GPS clock to the local timezone
STEALTH GPS-4 receives the Greenwich time from the GPS system satellites. It’s necessary to set the difference between the local time and the Greenwich one.
Carry out the following operations to set the parameter:
Allineamento dell’orologio GPS con il fuso orario
STEALTH GPS-4 riceve l’ora di Greenwich dai satelliti del sistema GPS, è quindi ne-cessario impostare la differenza tra l’ora locale e l’orario di Greenwich.
Eseguire le seguenti operazioni per impo-stare il parametro:
Selection of the units of measurement
Carry out the following operations to set the units of measurement:
Selezione delle unità di misura
Eseguire le seguenti operazioni per impo-stare le unità di misura:
13
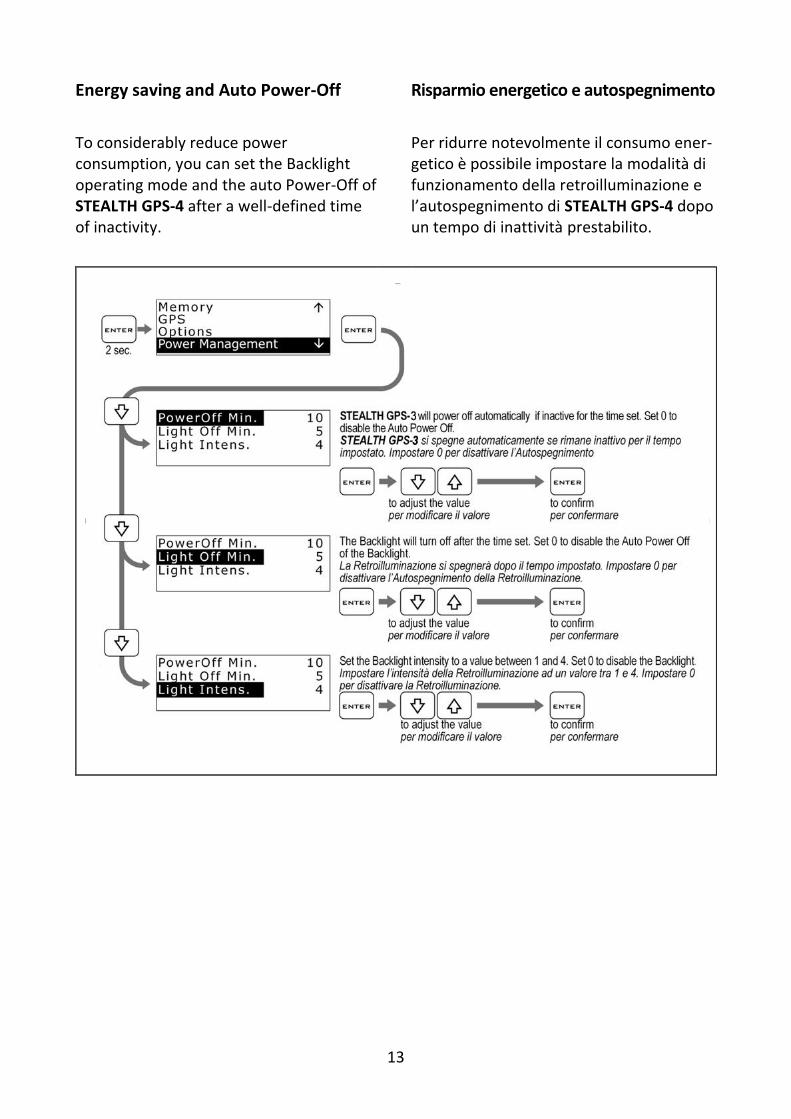
Energy saving and Auto Power-Off
To considerably reduce power consumption, you can set the Backlight operating mode and the auto Power-Off of STEALTH GPS-4 after a well-defined time of inactivity.
Risparmio energetico e autospegnimento
Per ridurre notevolmente il consumo ener-getico è possibile impostare la modalità di funzionamento della retroilluminazione e l’autospegnimento di STEALTH GPS-4 dopo un tempo di inattività prestabilito.
14
How to set the lap triggers on Starlane devices
You can set the finish line and intermedi-ates in 4 different ways on your choice:
A. Activating the automatic finish line positioning function: SAFD-2 (Starlane Automatic Finish line Detection). See page 15.
B. Sending the device the coordi-nates stored in the track list avail-able in DigiRace-MMX. See DigiRace-MMX user guide.
C. the finish line and intermediates on the track map drawn by DigiRace-MMX after a practice session data download. See DigiRace-MMX user guide.
D. Executing the manual procedure on the device directly on track. See page 16.
Come impostare i traguardi sui dispositivi Starlane
E’ possibile impostare i traguardi e gli in-termedi con 4 procedure diverse a propria scelta:
A. Attivando la funzione di posiziona-mento automatico del traguardo: SAFD-2 (Starlane Automatic Finish line Detection). Vedi pag. 15.
B. Inviando al dispositivo i traguardi archiviati nella lista circuiti dispo-nibile in DigiRace-MMX. Vedi manuale DigiRace-MMX.
C. Inserendo il traguardo e gli inter-medi sulla mappa del circuito rap-presentata da DigiRace-MMX dopo lo scarico dati di una sessione di pro-va. Vedi manuale DigiRace-MMX.
D. Con la procedura manuale da ef-fettuarsi direttamente in circuito sul dispositivo. Vedi pag. 16.
15
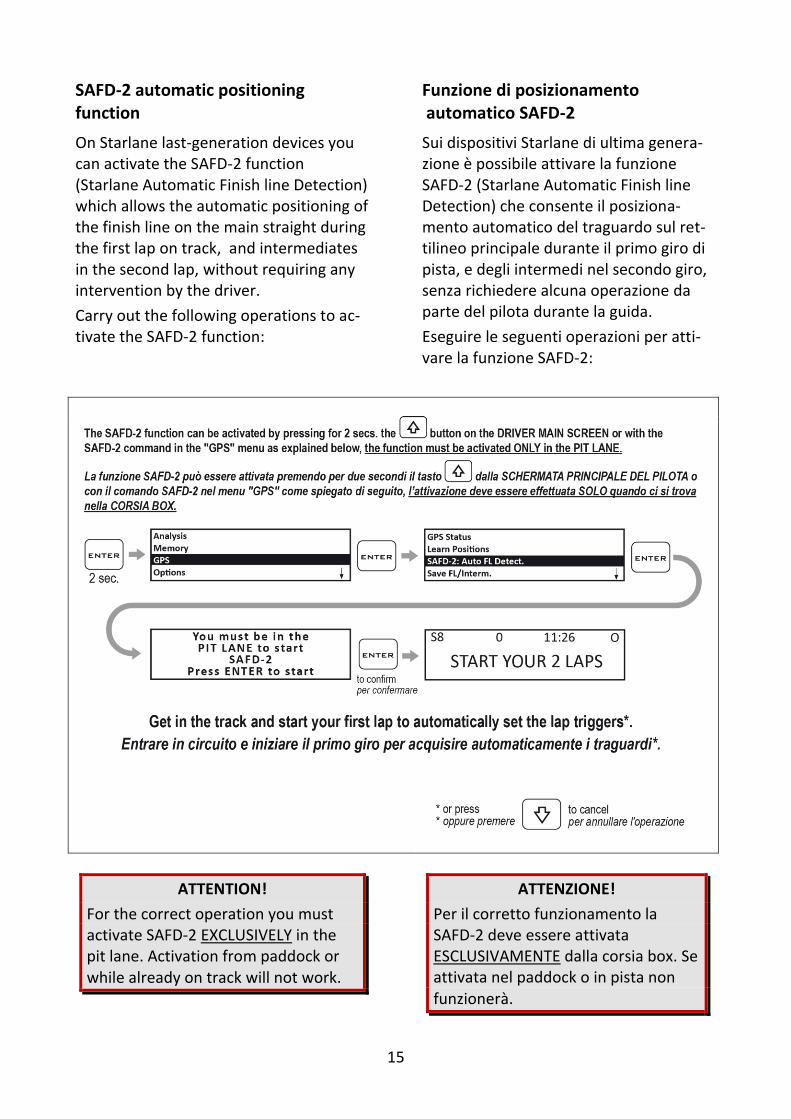
SAFD-2 automatic positioning function
On Starlane last-generation devices you can activate the SAFD-2 function (Starlane Automatic Finish line Detection) which allows the automatic positioning of the finish line on the main straight during the first lap on track, and intermediates in the second lap, without requiring any intervention by the driver.
Carry out the following operations to ac-tivate the SAFD-2 function:
Funzione di posizionamento automatico SAFD-2
Sui dispositivi Starlane di ultima genera-zione è possibile attivare la funzione SAFD-2 (Starlane Automatic Finish line Detection) che consente il posiziona-mento automatico del traguardo sul ret-tilineo principale durante il primo giro di pista, e degli intermedi nel secondo giro, senza richiedere alcuna operazione da parte del pilota durante la guida.
Eseguire le seguenti operazioni per atti-vare la funzione SAFD-2:
ATTENTION!
For the correct operation you must activate SAFD-2 EXCLUSIVELY in the pit lane. Activation from paddock or while already on track will not work.
ATTENZIONE!
Per il corretto funzionamento la SAFD-2 deve essere attivata ESCLUSIVAMENTE dalla corsia box. Se attivata nel paddock o in pista non
funzionerà.
16
Track management
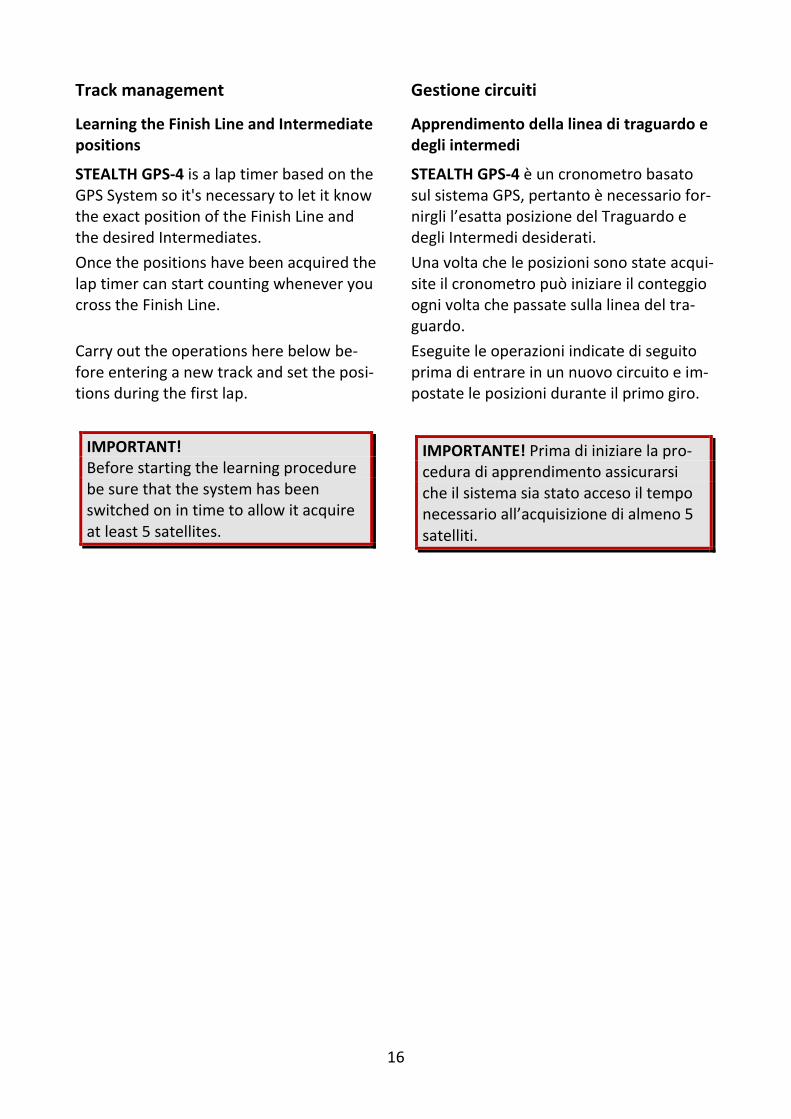
Learning the Finish Line and Intermediate positions
STEALTH GPS-4 is a lap timer based on the GPS System so it's necessary to let it know the exact position of the Finish Line and the desired Intermediates.
Once the positions have been acquired the lap timer can start counting whenever you cross the Finish Line.
Carry out the operations here below be-fore entering a new track and set the posi-tions during the first lap.
IMPORTANT! Before starting the learning procedure be sure that the system has been switched on in time to allow it acquire at least 5 satellites.
Gestione circuiti
Apprendimento della linea di traguardo e degli intermedi
STEALTH GPS-4 è un cronometro basato sul sistema GPS, pertanto è necessario for-nirgli l’esatta posizione del Traguardo e degli Intermedi desiderati.
Una volta che le posizioni sono state acqui-site il cronometro può iniziare il conteggio ogni volta che passate sulla linea del tra-guardo.
Eseguite le operazioni indicate di seguito prima di entrare in un nuovo circuito e im-postate le posizioni durante il primo giro.
IMPORTANTE! Prima di iniziare la pro-cedura di apprendimento assicurarsi che il sistema sia stato acceso il tempo necessario all’acquisizione di almeno 5 satelliti.
17
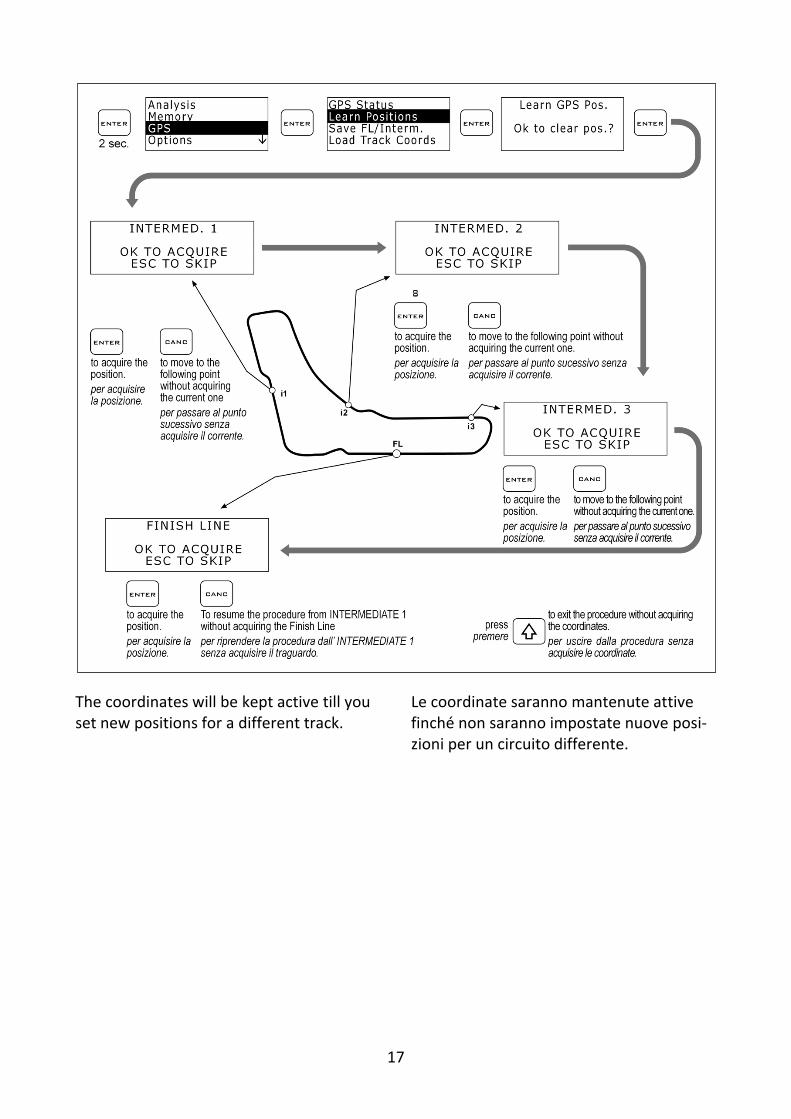
The coordinates will be kept active till you set new positions for a different track.
Le coordinate saranno mantenute attive finché non saranno impostate nuove posi-zioni per un circuito differente.
18
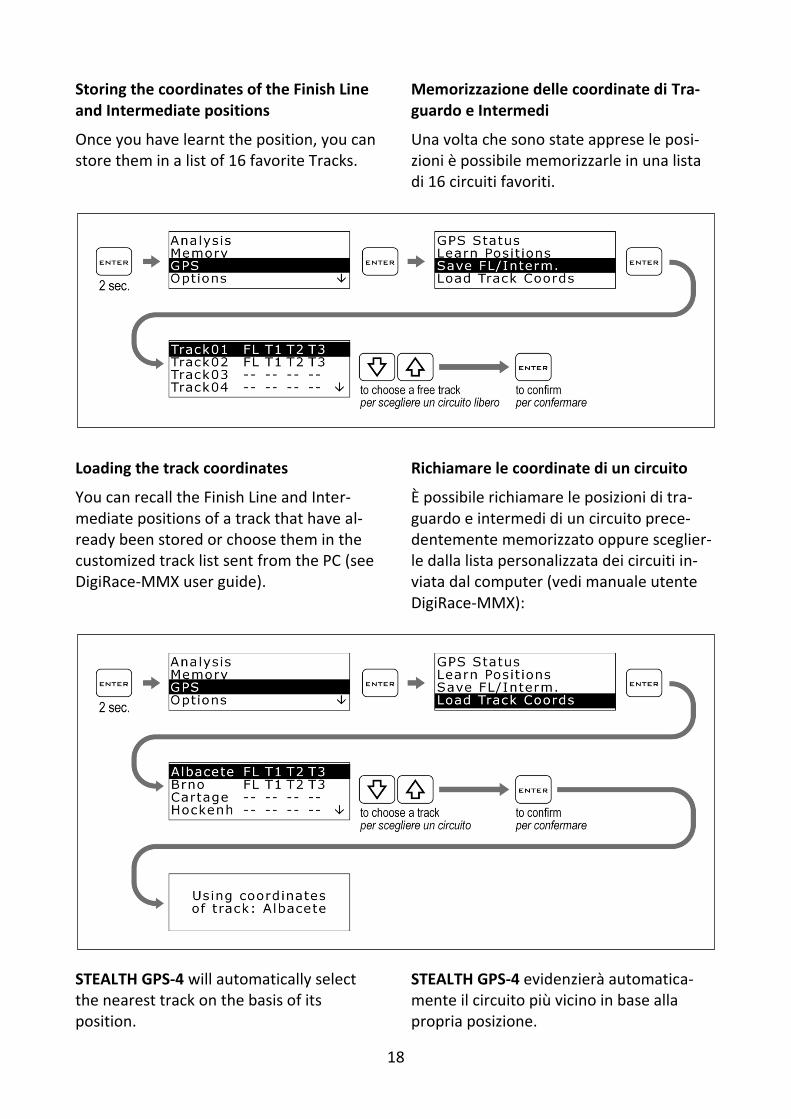
Storing the coordinates of the Finish Line and Intermediate positions
Once you have learnt the position, you can store them in a list of 16 favorite Tracks.
Memorizzazione delle coordinate di Tra-guardo e Intermedi
Una volta che sono state apprese le posi-zioni è possibile memorizzarle in una lista di 16 circuiti favoriti.
Loading the track coordinates
You can recall the Finish Line and Inter-mediate positions of a track that have al-ready been stored or choose them in the customized track list sent from the PC (see DigiRace-MMX user guide).
Richiamare le coordinate di un circuito
È possibile richiamare le posizioni di tra-guardo e intermedi di un circuito prece-dentemente memorizzato oppure sceglier-le dalla lista personalizzata dei circuiti in-viata dal computer (vedi manuale utente DigiRace-MMX):
STEALTH GPS-4 will automatically select the nearest track on the basis of its position.
STEALTH GPS-4 evidenzierà automatica-mente il circuito più vicino in base alla propria posizione.

19
Automatic track recognition
When Stealth GPS-4 is powered on and acquires the satellites near one of the tracks stored in the track list, it will automatically display a confirmation screen that allows to load the specific finish line information for that track.
To disable this function just set OFF the LIST NEAR TRACKS feature in the GPS menu.
Riconoscimento automatico del circuito
Quando Stealth GPS-4 viene acceso e acquisisce i satelliti nelle vicinanze di un circuito presente nella lista di quelli memorizzati, comparirà automaticamente una schermata di conferma per l’utilizzo dei traguardi disponibili in memoria per quel circuito.
Se si vuole disattivare tale funzione è sufficiente impostare come OFF la funzione LIST NEAR TRACKS nel menu GPS.
20
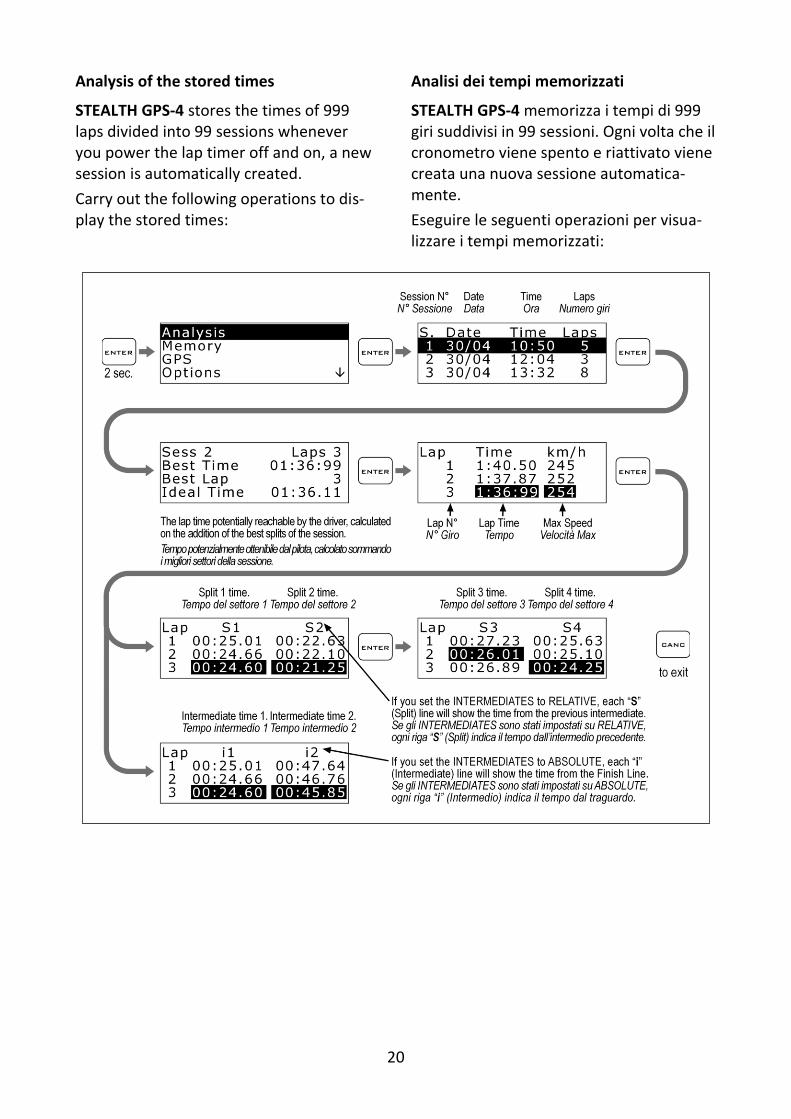
Analysis of the stored times
STEALTH GPS-4 stores the times of 999 laps divided into 99 sessions whenever you power the lap timer off and on, a new session is automatically created.
Carry out the following operations to dis-play the stored times:
Analisi dei tempi memorizzati
STEALTH GPS-4 memorizza i tempi di 999 giri suddivisi in 99 sessioni. Ogni volta che il cronometro viene spento e riattivato viene creata una nuova sessione automatica-mente.
Eseguire le seguenti operazioni per visua-lizzare i tempi memorizzati:
21
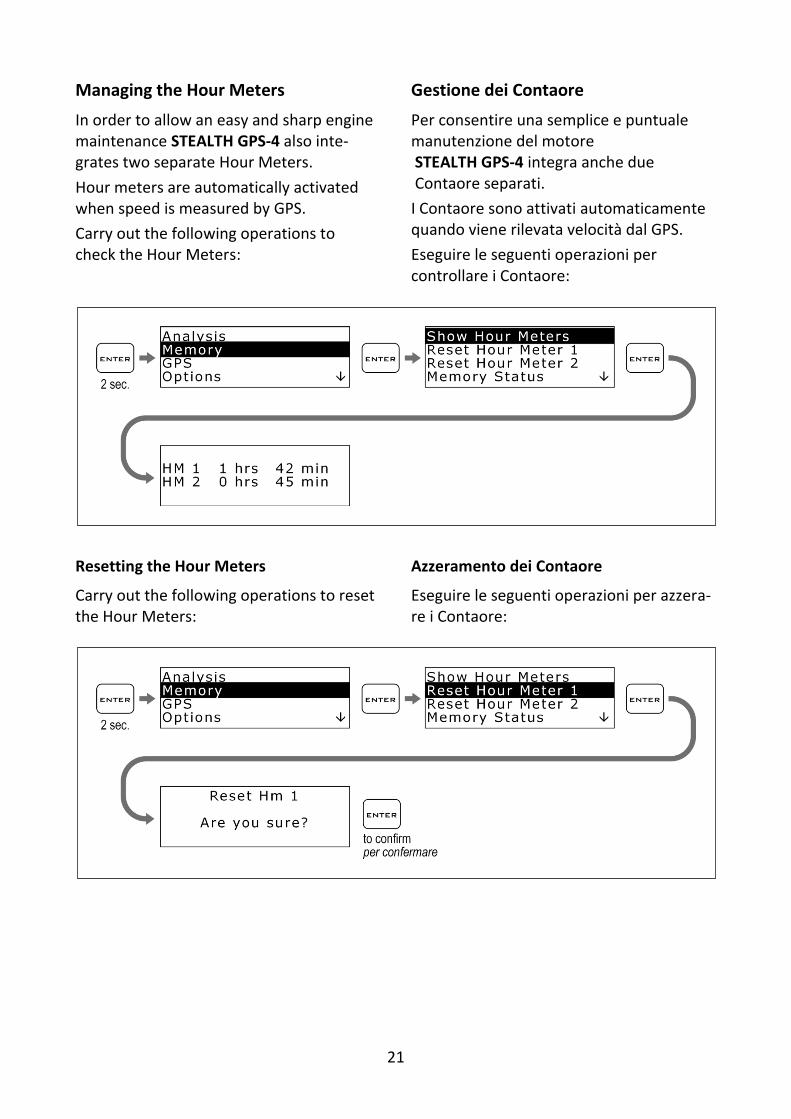
Managing the Hour Meters
In order to allow an easy and sharp engine maintenance STEALTH GPS-4 also inte-grates two separate Hour Meters.
Hour meters are automatically activated when speed is measured by GPS.
Carry out the following operations to check the Hour Meters:
Gestione dei Contaore
Per consentire una semplice e puntuale manutenzione del motore STEALTH GPS-4 integra anche due Contaore separati.
I Contaore sono attivati automaticamente quando viene rilevata velocità dal GPS.
Eseguire le seguenti operazioni per controllare i Contaore:
Resetting the Hour Meters
Carry out the following operations to reset the Hour Meters:
Azzeramento dei Contaore
Eseguire le seguenti operazioni per azzera-re i Contaore:

22
Memory Management
Gestione della memoria
Session recording
The device will automatically start record-ing a new session whenever the GPS speed goes over 25 Km/h (15.5 mph) for at least 3 seconds.
Recording will automatically stop if the GPS speed is below 10 Km/h (6.2 mph) for at least 5 seconds.
You can manually start and stop recording
just by holding the button down for 2 seconds.
Registrazione delle sessioni
Il dispositivo comincerà a registrare auto-maticamente una nuova sessione ogni vol-ta che la velocità GPS supera i 25 Km/h per almeno 3 secondi.
La registrazione si ferma automaticamente se la velocità GPS è inferiore a 10 Km/h per almeno 5 secondi.
È possibile attivare e fermare manualmen-te la registrazione premendo per 2 secondi
il tasto .
While STEALTH GPS-4 is recording, the re-cording indicator will turn on up on the right of the display.
NOTE: in order to void the memorization of useless sessions, STEALTH GPS-4 de-letes automatically every session of du-ration below 1 minute.
Mentre STEALTH GPS-4 è in registrazione si accende l'indicatore di registrazione in alto a destra del display.
NOTA: per evitare che vengano memorizzate sessioni inutili, STEALTH GPS-4 cancella automaticamente ogni registrazione di durata inferiore a 1 minuto.
23
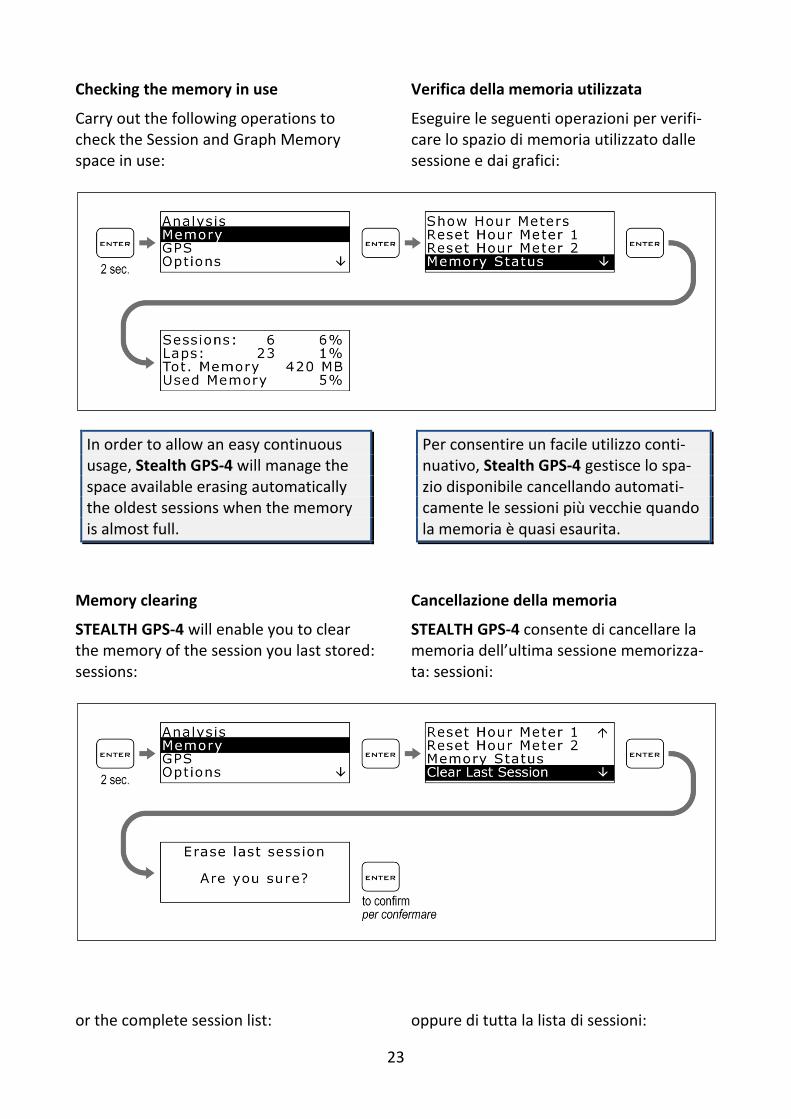
Checking the memory in use
Carry out the following operations to check the Session and Graph Memory space in use:
Verifica della memoria utilizzata
Eseguire le seguenti operazioni per verifi-care lo spazio di memoria utilizzato dalle sessione e dai grafici:
In order to allow an easy continuous usage, Stealth GPS-4 will manage the space available erasing automatically the oldest sessions when the memory is almost full.
Memory clearing
STEALTH GPS-4 will enable you to clear the memory of the session you last stored: sessions:
Per consentire un facile utilizzo conti-nuativo, Stealth GPS-4 gestisce lo spa-zio disponibile cancellando automati-camente le sessioni più vecchie quando la memoria è quasi esaurita.
Cancellazione della memoria
STEALTH GPS-4 consente di cancellare la memoria dell’ultima sessione memorizza-ta: sessioni:
or the complete session list:
oppure di tutta la lista di sessioni:

24
Formatting the Memory
You can completely format the STEALTH GPS-4 Memory where you have stored the Data by executing the following operations:
Formattazione della Memoria
È possibile formattare totalmente la Memoria di STEALTH GPS-4 nella quale vengono archiviati i dati eseguendo le operazioni indicate di seguito:
If you only wish to clear the Sessions you have already downloaded, you can do it by using the Clear Old Sessions command:
Se si vuole cancellare solo la Memoria delle Sessioni già scaricate è possibile farlo con il commando Clear Old Sessions:
25
EXTERNAL USB MEMORY MANAGEMENT
Data download
To transfer the acquired data from Stealth GPS-4 to the computer, just power on the instrument and insert a personal USB flash memory stick (not supplied) into the corresponding socket.
As soon as you insert the stick, the display will show the external memory manage-ment menu: select “EXPORT SESSIONS” and wait until the new sessions you have not downloaded yet are copied onto the USB key.
To analyse the acquired data, insert the stick into a USB port of the computer and follow the instructions supplied by the Digirace-MMX software manual.
Attention: if, inserting a USB pendrive larger than 2GB USB, after around 5 seconds the device doesn’t display the export menu, you need to initialize it using the “USB PENDRIVE INITIALIZATION” command in the “device” menu of DigiRace-MMX software.
Device name
You can rename your Stealth GPS-4 by us-ing a name of your choice:
1. Insert the USB stick into the com-puter.
2. Start the DigiRace-MMX software. 3. From the “Device” menu, select
“Rename”, type the name you wish and press OK.
4-Extract the USB stick and – when the in-strument is on – insert it into the Stealth GPS-4 socket, the lap timer will au-tomatically acquire the new name.
Track load
You can load the finishing lines of the
GESTIONE DELLA MEMORIA USB ESTERNA
Scarico dati
Per trasferire i dati acquisiti da STEALTH GPS-4 al computer è sufficiente accendere lo strumento ed inserire nell'apposita presa a cablaggio una chia-vetta di memoria flash USB personale (non in dotazione).
Appena si inserisce la chiavetta, sul display compare il menù di gestione della memoria esterna: selezionare “EXPORT SESSIONS” e attendere che le nuove sessioni non ancora scaricate vengano copiate sulla chiavetta USB.
Per analizzare i dati acquisiti inserire la chiavetta in una porta USB del computer e seguire le indicazioni sul manuale del soft-ware Digirace-MMX.
Attenzione: se, inserendo una chiavetta USB di dimensione maggiore di 2GB, dopo circa 5 secondi sullo strumento non compare il menù di esportazione, è necessario inizializzarla con il comando “INIZIALIZZA CHIAVE USB” nel menù “Dispositivo” di DigiRace-MMX.
Nome del dispositivo
E' possibile rinominare il vostro Stealth GPS-4 con un nome a vostra scelta:
1. Inserire la chiavetta USB nel computer. 2. Lanciare il software DigiRace-MMX. 3. Nel menu “Dispositivo”, selezionare
“Rinomina”, digitare il nome deside-rato e premere OK.
4. Estrarre la chiavetta USB e, a stru-mento acceso, inserirla nella presa di Stealth GPS-4, il cronometro ac-quisirà automaticamente il nuovo nome.
Caricamento dei circuiti
E' possibile caricare in Stealth GPS-4 i traguardi dei circuiti più famosi disponibili
26
best-known tracks made available in the Digirace-MMX software onto Stealth GPS-4:
1. Insert the USB stick into the com-puter.
2. Start the Digirace-MMX software. 3. Follow the instructions you can find
in the DigiRace-MMX software manual for the management of tracks.
4. Extract the USB stick and – when the instrument is on – insert it into the Stealth GPS-4 socket.
As soon as you insert the stick, the display will show the external memory management menu: select “IMPORT TRACKS” and wait un-til the tracks are loaded into the lap timer.
From now on, you can select the track you wish from the GPS>LOAD TRACK COORDINATES menu.
Track export
If you have acquired the coordinates of the finishing lines and intermediates di-rectly on the track by following the manu-al procedure, you can export the list of the tracks stored on the instrument in the computer:
1. Power on Stealth GPS-4. 2. Insert the USB stick into the lap
timer socket.
As soon as you insert the stick, the display will show the external memory management menu: select “EXPORT TRACKS” and wait until the tracks are copied onto the stick.
2. Start the DigiRace-MMX software. 3. Follow the instructions you can find in
the DigiRace-MMX software manual for the management of tracks.
nel software Digirace-MMX:
1. Inserire la chiavetta USB nel compu-ter.
2. Lanciare il software Digirace-MMX. 3. Seguire le indicazioni di gestione dei
circuiti nel manuale del software DigiRace-MMX.
4. Estrarre la chiavetta USB e, a stru-mento acceso, inserirla nella presa di Stealth GPS-4.
Appena si inserisce la chiavetta, sul display compare il menù di gestione della memoria esterna: selezionare “IMPORT TRACKS” e attendere che i circuiti vengano caricati nel cronometro.
Da questo momento sarà possibile selezio-nare il circuito desiderato dal menu GPS>LOAD TRACK COORDINATES.
Esportazione dei circuiti
Se si sono acquisite le coordinate dei tra-guardi e degli intermedi direttamente on pista con la procedura manuale, è possibile esportare la lista dei circuiti memorizzati sullo strumento nel computer:
1. Accendere Stealth GPS-4. 2. Inserire la chiavetta USB nella presa
del cronometro.
Appena si inserisce la chiavetta, sul display compare il menù di gestione della memoria esterna: selezionare “EXPORT TRACKS” e attendere che i circuiti vengano copiati nel-la chiavetta.
2. Lanciare il software DigiRace-MMX. 3. Seguire le indicazioni di gestione dei
circuiti nel manuale del software DigiRace-MMX.
27
Cleaning the surfaces
Use a soft cloth wetted with water to clean the surfaces of your STEALTH GPS-4. Using alcohol or aggressive detergents might turn the transparent areas opaque.
Warranty
STEALTH GPS-4 is covered by a 24 month warranty for all manufacturing defects.
Notes
On Go Karts, Mini Bikes and all vehicles with noisy electromagnetic emissions due to the ignition system, it’s recommended to use shielded spark plug caps with inter-nal 5000 ohm resistor.
STEALTH GPS-4 is not type-approved for road use.
Pulizia delle superfici
Per pulire le superfici del vostro STEALTH GPS-4 usate un panno morbido bagnato con acqua, l’uso di alcool o detergenti ag-gressivi può opacizzare le aree trasparenti.
Garanzia
STEALTH GPS-4 è coperto da 24 mesi di
garanzia sui difetti di fabbricazione.
Note
Su Go Kart, Mini moto e tutti i veicoli con forti emissioni elettromagnetiche per via del sistema di accensione, è consigliabile utilizzare cappucci candela schermati con resistenza interna da 5000 ohm.
STEALTH GPS-4 non è omologato per uso stradale.
NOTE: For any update to the present manual please visit the web site:
www.starlane.com
NOTA: Eventuali aggiornamenti al presente manuale sono disponibili sul sito:
www.starlane.com
User Guide Version: STEALTHGPS4_002
Versione Manuale: STEALTHGPS4_002
Starlane s.r.l.
Via Madonna delle Rose, 70
24061 - Albano S. Alessandro (BG)
Italia
Starlane s.r.l.
e-mail: [email protected]
http://www.starlane.com