an-pov-006 - support.automationdirect.com · an-pov-006 – configuring local viewer, secure...
TRANSCRIPT

AN-POV-006 – Configuring Local Viewer, Secure Viewer, and Web Clients in POV
1
Implementation Specifications or Requirements Category Item
Software
POV Version: 7.1 SP2 and later Service Pack: N/A Windows Version: WinXP/2000/Server2003/2008, Vista, Windows 7/8 Web Thin Client: Yes
Equipment
Panel Manufacturer: N/A Panel Model N/A Other Hardware N/A Comm. Driver: All Controller (e.g.: PLC) All Application Language: N/A
Software Demo Application N/A
. Summary
Point of View (POV) supports both Local and Remote Viewing. Local Viewing is the traditional method of visualizing Screens, whereby the PC running the application uses the PC’s graphics controller to generate the visual information on an attached monitor. Remote Viewing is what we generically call a Web Client Solution. Support for Web Clients is built into Point of View, providing cost-effective machine and process monitoring/control from a networked PC, whether that PC is in the same building or half-way around the world. The networked PC (i.e. the Web Thin Client) needs only minimal features, sufficient to support a thin client (Web Browser or Secure Viewer runtime).
Point of View Thin Client Solution supports two different application hosts; Microsoft Internet Explorer or a Point of View-developed host called Secure Viewer. For simplicity, when Microsoft Internet Explorer is used as the browser, it is referred to as a Web Thin Client, and when the Secure Viewer browser is used, it is referred to as a Secure Viewer Thin Client. The Secure Viewer Thin Client supports the feature to disable the ability of the current user to navigate outside the (Point of View) application, and is ideally suited for stations dedicated to run the application. The Microsoft Internet Explorer browser is ideally suited where the networked PC has multiple uses and Remote Viewing/Control of the application is only one of those uses. A POV application can support both Web Thin Clients and Secure Viewer Thin Clients simultaneously.
This Application Note describes how the Local Viewer, Secure Viewer Thin Clients and Web Thin Clients (Microsoft Internet Explorer-based) operate and communicate with the Point of View application, and how to configure each of them.
I. Quick Notes
Local Viewer
The ISSymbol ActiveX Control must be installed and registered on your Viewer platform. This is done automatically when you install the POV software. See Section VII.
You do not need to install the Local Viewer, this is done automatically when you install the POV software For normal operation, there is nothing to configure for the local Viewer. The Local Viewer does not use a Web Server. Be aware that not all Tag Fields may be communicated between the Server and the Local Viewer, even when
run on the same PC. Be aware that when using Scripting on the Viewer (e.g. Screen Script), Tag values are communicated at
discrete intervals, not continuously, between the Server and the Viewer.

AN-POV-006 – Configuring Local Viewer, Secure Viewer, and Web Clients in POV
2
Be aware that Point of View built-in functions such as CNFEmail() utilize environmental variables that are not visible in another Process.
See Section IX for information on how to support large (e.g widescreen) monitors and multiple monitors. Secure Viewer Thin Client
The ISSymbol ActiveX Control must be installed and registered on your Secure Viewer platform. This is done automatically when you install the Secure Viewer software. See Section VII.
The Secure Viewer requires the use of either a Web Server (e.g. IIS) or a mapped folder to access the application files on the runtime Server station. See Section XI for setting up a Web Server.
For Window Desktop and Server OS’s (XP/2K, Server 2003/2008, Vista, Windows 7/8) platforms, a Viewer Configuration utility (ViewerCfg) will allow you to configure basic Viewer settings. This utility is found in the Point of View Secure Viewer v7.1 folder. If you require additional advanced settings, you will need to edit the Viewer.ini file, found in the same folder.
Be aware that not all Tag Fields may be communicated between the Server and the Secure Viewer. Be aware that when using Scripting on the Viewer (e.g. Screen Script), Tag Values are communicated at
discrete intervals, not continuously, between the Server and the Viewer. Be aware that Point of View built-in functions such as CNFEmail() utilize environmental variables that are not
visible in another Process. See Sections VI & VIII for implementing security on a Secure Viewer. See Sections IV & XV when using both Secure Viewers and Web Clients with the same Web Server.
Web Thin Client
The ISSymbol ActiveX Control must be installed and registered on your Web Client platform. See Section VII for more information on installing the ISSymbol ActiveX Control.
The Web Client requires the use of either a Web Server (e.g. IIS) or a mapped folder to access the application files on the runtime Server station. See Section XI for more information.
Be aware that not all Tag Fields may be communicated between the Server and the Web Thin Client. Be aware that Point of View built-in functions such as CNFEmail() utilize environmental variables that are not
visible in another Process Be sure to set up MIME Types when using IIS 6 (Server 2003) or IIS 7 (Vista, Server 2008). See Section XI See Sections VI & X for implementing security on a Web Client See Sections IV & XV when using both Secure Viewers and Web Clients with the same Web Server.
Application Considerations: Avoid using logic (in a Screen Logic, Screen Script or Command Dynamic code segment) that is used
to synchronize events or actions in the Server. The Virtual Tags Database may not be updated until the logic sequence is done, leading to a deadlock situation. Instead, put sequencing logic in a Script Group, Math Worksheet or Global Script that executes on the Server (using the RunGlobalProcedureOnServer built-in function).

AN-POV-006 – Configuring Local Viewer, Secure Viewer, and Web Clients in POV
3
II. Licensing of the Local Viewer, Secure Viewers and Web Clients
Licensing of the Local Viewer The Local Viewer is part of the Point of View Runtime and does not need to be licensed separately. It is installed on the same platform as the Point of View Runtime. Licensing of Secure Viewer Thin Clients The license for Secure Viewer Thin Clients is part of the license installed on the Server (i.e. the Point of View Runtime). Typically, every Point of View Runtime license includes support for one (1) Secure Viewer Thin Client. If you want to have additional Secure Viewer Thin Clients operating concurrently, you must install/upgrade the license installed on the Server to support the number of Secure Viewer Thin Clients that you want to support simultaneously. The cost of the license is proportional to the number of Thin Clients supported simultaneously by the Server.
Windows XP, 2K, Server 2003/2008, Vista and Windows 7/8 platforms can support up to 128 concurrent Secure Viewer Thin Clients depending on the settings of the license installed on the Server. The number of Secure Viewer Thin Clients is irrespective of the number of Internet Explorer-based Web Thin Clients that are supported. Licensing of (Microsoft Internet Explorer-based) Web Clients The license for Microsoft Internet Explorer-based Web Clients is part of the license installed on the Server (i.e. the Point of View Runtime). Typically, every Point of View Runtime license includes support for one (1) Internet Explorer-based Web Thin Client. If you want to have additional Web Thin Clients operating concurrently, you must install/upgrade the license installed on the Server to support the number of Secure Viewer Thin Clients that you want to support simultaneously. The cost of the license is proportional to the number of Thin Clients supported simultaneously by the Server.
Windows XP, 2K, Server 2003/2008, Vista and Windows 7/8 platforms can support up to 128 concurrent Web Thin Clients depending on the settings of the license installed on the Server. The number of Web Thin Clients is irrespective of the number of Secure Viewer Thin Clients supported.
III. The Local Viewer
The Local Viewer provides visualization of screens on the Server PC during runtime operation. The Server PC is the PC that is running the Point of View runtime (i.e. the StudioManager Process). A Point of View application does not need to have a local display. For example, a “blind node” platform may have only remote viewing (uses a Thin Client solution). Likewise, the blind node platform may have neither local nor remote viewing. However, in most cases there is a local display consisting of a monitor or touch screen. The Local Viewer is responsible for generating the screens for local display and accepting user input, while remote viewing is done through a Thin Client Solution using either the Secure Viewer Thin Client or the Web Thin Client.
With Point of View Version 7.1 Service Pack 2, the (Local) Viewer is now a separate Process in the Server PC, and is no longer an integrated part of the StudioManager runtime Process. This Application Note covers the ramifications of this change in later sections. However, the Viewer is still an integral part of a runtime application as it controls the local visualization, i.e. the visual screens on the local platform that the Server software is running on.
Installing the Local Viewer The Local Viewer is automatically installed with the Point of View software on the Server PC. There is no separate installation procedure. However, you must be sure the ISSymbol ActiveX Control is installed and registered on you PC. On a Windows XP, 2K Server 2003/2008, Vista or Windows 7/8 platform, the ISSymbol ActiveX Control is automatically installed and registered when the Point of View Software is installed.

AN-POV-006 – Configuring Local Viewer, Secure Viewer, and Web Clients in POV
4
Running the Local Viewer With Point of View, the Viewer Process can be configured to start concurrently with the Point of View runtime Process StudioManager by doing the following:
Start the Point of View Development (Engineering) environment. The Development environment starts by clicking on the Point of View icon. This launches the Application RunStudio.exe that is located in the \BIN folder.
Click on Project Status Execution Tasks and make sure the Viewer task Startup Mode is set to Automatic. To change the current setting, click on the Startup… button.
If the Viewer task is set to Automatic, the Viewer will be automatically launched when the StudioManager Process (the Point of View runtime) launches. The StudioManager Runtime Process can be launched by one of the following steps:
1. Press the Run button with the Point of View Development environment open,
2. Creating a shortcut to RunStartup.exe (located in the \BIN folder) and clicking on it
3. Using the Point of View built-in function StartTask(“Viewer”) to start the Viewer Process.
Customization of the Local Viewer Customization of the Local Viewer can done by modifying parameters in either the project file <application>.app that is found in the Project folder, or by modifying the Program Settings.ini file that is found in the \BIN folder where the system files are installed. Parameters for modification include: <application>.app File Section Parameter Values Description
[Info] AppResolution Depends
on Monitor Defines the Viewer’s horizontal and vertical resolution. Example:AppResolution=1024 768
[Options] SpashWindow 0 | 1
Enable a splash window on startup (1=enable, 0=disable). Default is 1. Used in conjunction with the SplashWnd Parameter (in Program Settings.ini) Example: SplashWindows=1
[Objects] CheckboxSize 0 to
32,767 Size of the Checkbox object, in Pixels. Default is 13. Example: CheckboxSize=20
[Objects] RadioButtonSize 0 to
32,767 Size of the RadioButton object, in Pixels. Default is 13. Example:RadioButton=20

AN-POV-006 – Configuring Local Viewer, Secure Viewer, and Web Clients in POV
5
[Viewer] PrintScreen False or
True
When the PrtSc button on the keyboard is pressed, the Screen View will be sent to the Printer. Enabled (True) or Disabled (False). Default is False. Example: PrintScreen=False
Program Settings.ini File Section Parameter Values Description
[Install] GuestOnStartup 0 | 1 Logon as the user Guest when the application is started. (1=yes, 0=no). Default is 0. Example:GuestOnStartup=1
[OEM] SpashWnd String to
254 chars
Filepath to Splash Window bitmap. If only the filename is used, it will look in the \Bin folder. Example: SplashWnd=earth.bmp
[OEM] SplashWndTime 0 to
32,767
Defines the time the Splash Screen will be displayed, in milliseconds. Default is 1000 (1 second). Example: SplashWndTime=1000
[Keypad] ButtonWidth 0 to
32,767 Keypad button width in pixels. Default is 50. Example: ButtonWidth=75
[Keypad] ButtonHeight 0 to
32,767 Keypad button height in pixels. Default is 50. Example: ButtonHeight=75
[Keypad] ButtonSpace 0 to
32,767 Space between keypad buttons in pixels. Default is 2. Example: ButtonSpace=4
[Keypad] PosX 0 to
32,767 Keypad left coordinates in pixels. Default is 0. Example: PosX=0
[Keypad] PosY 0 to
32,767 Keypad right coordinates in pixels. Default is 0. Example: PosY=0
[Keypad] FontHeight 0 to
32,767 Keypad font height in pixels. Default is 15. Example: FontHeight=15

AN-POV-006 – Configuring Local Viewer, Secure Viewer, and Web Clients in POV
6
IV. The Point of View Web Client Solution
Point of View built on a Client/Server architecture, allowing you to build both Thick Client solutions (e.g. Redundant Systems) as well as Thin Client solutions (e.g. remote viewing via the Secure Viewer Thin Client or the Microsoft Internet Explorer-based Web Thin Client). Discussion of Thick Clients is outside the scope of this Application note.
Point of View supports two different types of Thin Clients or Remote Viewers. The first is called Secure Viewer Thin Client. The Secure Viewer Thin Client is a Point of View developed host that is typically used with dedicated PC, typically on a plant floor. The second type of Thin Client is called a Web Thin Client that uses Microsoft Internet Explorer as the browser. The Web Thin Client is typically used on PCs that perform other purposes in addition to remote viewing of the application.
Server
Port 1234
ISSymbol ActiveX Control
File Download from Web Server -
\<ApplicationFolder>\Web\*.* for Internet Explorer
- \<ApplicationFolder>\ for Secure Viewer
Virtual TCP/IP Client Virtual TCP/IP Tags Database
POV Tags Database
Data Server TCP/IP Server
Screen & Config Files
Web Server E.g. IIS v7.0
Host
Internet Explorer or
Secure Viewer
HTTP: Port 80 HTTPS: Port 443
- Optional - Web Tunneling Gateway (WTG)
Client

AN-POV-006 – Configuring Local Viewer, Secure Viewer, and Web Clients in POV
7
In a Client/Server architecture, the Point of View runtime (i.e. the StudioManager Process) executes on the Server, and a host (Secure Viewer or Microsoft Internet Explorer) executes on the Client PC. It is called a Thin Client solution since the Client does not need any special resources (only needs minimal memory, storage, graphics, etc) to execute. A very inexpensive, lightweight PC or Windows CE device can serve very effectively as a Thin Client. Furthermore, the following components are stored/installed only on the Server station (not on the Thin Client):
- Point of View
- Point of View license (hardkey)
- Point of View application (the project files)
The Web Thin Client Solution has a number of key components: Data Server [Server]
The Data Server is the TCP/IP thread of the StudioManager Process. Its job is to “push” any updated Tag values in the Tags Database to all connected Clients, and to receive all Tag changes from the Client(s) and inform other Clients or Threads of the updated values in the Tags Database.
By “pushing” out updated Tag values to the connected Clients, the Client has the freshest data possible and does not have to manually refresh its display nor poll the Server. The pushing of data to the Clients is the most efficient way to keep Tag data current and minimize network traffic.
Point of View Application [Server] The Point of View application defines the data sources (e.g. Drivers, OPC Servers, databases. etc.) that change Tag values. The application also has the screens that will be displayed on the Client. The Secure Viewer Thin Client displays the screens, based on the *.SCR files stored in the \Screen sub-folder of the application. The Web Thin Client displays the screens, based on the *.HTML and *.SCC files stored in the \Web sub-folder of the application.
Web Server [Server] The Web Server is used to communicate files between the Server and a browser on the Client. In most cases, these are Screen files and Configuration files. The browser on the Client can be either the Point of View Secure Viewer browser or it can be Microsoft Internet Explorer.
A Web Server responds to HTTP (hypertext transfer protocol) requests from the Client, responding with HTTP responses along with optional data contents (e.g. HTML Web Pages or data files). If the browser is the Secure Viewer, HTML web pages are not used. Instead, files such as binary screen files are downloaded to the Secure Viewer as the user navigates through the application. The files used by the Secure Viewer are in the Project Folder root (*.app) and in some sub-folders (\Database, \Screen). If the browser is Microsoft Internet Explorer, then the files downloaded are a mix of HTML files and Point of View configuration files, located in the \Web sub-folder of the application. Files for the Web Thin Client are in the Project Folder’s \Web subfolder.
The Web Server optionally handles user authentication (User Name and Password verification). It can also optionally provide file compression and HTTPS (Hypertext Transfer Protocol over Secure Socket Layer) for secure HTTP communications via encryption.
Web Tunneling Gateway [Server] The Web Tunneling Gateway is a bridge between the Web Server and the Data Server that is used in one of two scenarios. The first scenario is whenever data security is required (e.g. data exchanged between Point of View and the Web Thin Client needs to be encrypted) using HTTPS. The second scenario is when the Data Server is “hidden” behind a corporate Web Server with a firewall, and only the corporate Web Server IP address (or URL) is exposed.
POV supports a backup (Secondary) Web Tunneling Gateway to be used if the Primary Web Tunneling Gateway becomes unavailable. The Web Client will automatically switch over to the secondary Web Tunneling Gateway. The Web Tunneling Gateway can support multiple Data Servers.

AN-POV-006 – Configuring Local Viewer, Secure Viewer, and Web Clients in POV
8
The Web Tunneling Gateway is automatically installed when Point of View is installed on your PC if the installation program detects that Microsoft Internet Information Services (IIS) is present. If IIS is installed after installing Point of View, the Web Tunneling Gateway can be manually installed by executing the WebGtw.exe setup program from the \BIN sub-folder of Point of View.
TCP/IP Communications Link The Server and Client communicate over a TCP/IP link. This link can be a local intranet, Internet or a dialup connection. It is not a software component. The TCP/IP Communication Link is the physical infrastructure used to connect the Server with the Thin Client(s). Any physical link that supports TCP/IP can be used for the Point of View Thin Client solution.
ISSymbol [Client] ISSymbol is a sophisticated ActiveX Control developed by Point of View that executes on the Client platform. It handles all communication between the Client and the Data Server and Web Server. It also creates a virtual Tags Database and handles the graphics creation with the particular browser used (i.e. Secure Viewer or Microsoft Internet Explorer).
Host [Client] The host is an application operating on the Client platform that enables a user to visualize the Screen images and interact with the various Point of View objects, ActiveX objects, or .NET controls that may be utilized on the Screen. Point of View supports two different hosts; the Secure Viewer and Microsoft Internet Explorer. There are a number of 3rd party alternative browsers to Microsoft Internet Explorer, such as Mozilla FireFox, but these alternative browsers are not guaranteed to work as many of them do not support ActiveX Controls. The Local Viewer is not a browser and does not use the Web Client Solution.
Normally, the host and Client are on a separate platform from the Server, although there is no requirement of this.
As we will see later, it is important to note where various tasks or functions execute: Task Where Executes Alarms Worksheets Server Trend Worksheets Server Recipes Server Reports Server ODBC Worksheets Server Math Worksheets Server Script Worksheets Server Scheduler Server DB/ERP Worksheets Server Driver Worksheets Server OPC Worksheets Server TCP/IP Worksheets Server DDE Worksheets Server Screens Client Graphical objects on Screen Client Screen Groups Client HTML Pages Client (Internet Explorer Client only, not used with Secure Viewer) Screen Logic Client Screen Script Client Graphic Script Client POV Built-in Functions Server or Client, executes where used subject to restrictions Security System Server and Client

AN-POV-006 – Configuring Local Viewer, Secure Viewer, and Web Clients in POV
9
Point of View Web Thin Client Solution Advantages Point of View is built on a Client/Server architecture that supports true Thin Clients. This capability is built-into POV and is not an add-on. This means that:
The POV Data Server can support a large number of concurrent Web Clients (up to 128 Internet Explorer-based Web Thin Clients and 128 Secure Viewer Thin Clients). Each Thin Client can view the same or different screens as another Web Thin Client.
The POV Server keeps track of which Screen each Thin Client is viewing and automatically “pushes” any updated Tag values to the Thin Client, keeping the Thin Client Screen current and eliminating the need for screen refreshes.
The POV Server supports runtime language (idiom) switching for each Thin Client. This means that one Thin Client can be viewing a screen in English while another Thin Client can display the same screen in Spanish.
Many competitive products offer either a static display on a Thin Client (i.e. it must be manually “refreshed” to get the latest data), a Terminal Server solution (requires the Server to build multiple instances of the application to support each Thin Client), or offer a Thin Client solution similar to Point of View but as an expensive “add-on” software product, and requires extra-configuration during the application development.
Other advantages offered by the Point of View Thin Client Solution include: The Secure Viewer can be configured to prevent navigation outside the Point of View application.
Ability to run VBScript and the Point of View Scripting Language on the Thin Client
You can build a Thin Client solution using a Windows CE device as the Data Server and/or the Web Server.
Ability to support redundant Web Servers and Data Servers, with automatic switchover.
Support for a built-in embedded Data Server Firewall
Ability to support Web Tunneling (allows using the Data Server with a Corporate Web Server behind a firewall)
Ability to support secure communications using SSL (requires using Web Tunneling, partially implemented by Web Server).

AN-POV-006 – Configuring Local Viewer, Secure Viewer, and Web Clients in POV
10
V. Configuring the Point of View Application for use with a Web Thin Client
One of the main advantages of the Point of View Thin Client solution is the fact that it requires minimum configuration. In typical cases, the only configuration required is to save the screens as HTML and set the Home Directory (Web Root) for the Web Server (if any). However, the Point of View Thin Client solution is also very flexible and provides a high level of customization for different scenarios, as described here.
1) Configure the Communication Settings In the Development environment, select from the Main Menu Project Settings Communications to open the Communication Settings dialog box.
In the Communications Settings dialog box, you can specify various parameters for the TCP/IP Server.
Communication Settings Dialog Box Field Description TCP Port Specifies the Port used to communicate to the Web Clients. The default is Port 1234.
Send Period.
Defines the time interval when any updated Tags in the Server’s Tags Database are “pushed” out to any Clients that utilize those Tags (either directly to ISSymbol or to the Web Gateway). If no Tags are updated during this interval, then no updates are pushed. From a practical standpoint, this setting can typically be set to 400-500 ms (milliseconds) without any significant impact. The lower the number, the faster the updates to the Web Client(s) but the higher the network overhead.
Enable Binary Control
Indicates whether binary communications is to be used between the Data Server and the Clients. Binary communications is more secure but provides slower performance.
Preloading Tags from
Defines the maximum period of time (ms) spent preloading Tag data to the Client(s) before opening a screen. If a timeout occurs, the screen is open anyway and the Tags will continue to be pushed to the Client(s) but they will display ????? until receiving the Tag value.

AN-POV-006 – Configuring Local Viewer, Secure Viewer, and Web Clients in POV
11
2) Configure the Web Settings In the Development environment, select from the Main Menu Project Web Web to open the Web Settings dialog box.
In the Web Settings dialog box, you can specify various parameters for the behavior of the Web Client.
By clicking on the Advanced button, you can specify IP Addresses or URLs for secondary (redundant) Data Servers, secondary Web Servers and the Web Tunneling Gateway.
By clicking on the IP Security button, you can configure the Embedded Firewall for the Data Server. These settings specify the range of IP Addresses that the Data Server will respond to.
Web Settings Field Description
Data Server IP Address
The IP Address or Host Name of the Data Server as viewed from the Web Thin Client PC. If this parameter is left in blank, the Web Thin Client will use the IP Address typed in the URL on the Web Browser. When testing a Web Thin Client on the local machine, you can enter 127.0.0.1 or LocalHost in this field. This is the address of the local loopback.
Send Period
Is the corollary setting to the Send Period in the Communications Settings dialog box. In the Web Settings dialog box, the Send Period defines the time interval when any updated Tags in the Thin Client’s Virtual Tags Database (part of the ISSymbol ActiveX Control) are sent to the TCP/IP Server Thread (or to the Web Gateway) on the Server PC if the Web Client has updated a Tag value in its Virtual Tags Database. If no Virtual Tags are updated during this interval, then no updates are sent. This setting is also used by the Web Gateway to send any data (tag values and/or history data) to the Thin Clients. From a practical standpoint, this setting can typically be set to 400-500 ms (milliseconds) without any significant impact. The lower the number, the faster the updates to the TCP/IP (Data) Server but the higher the network overhead.
Disable Remote Client Commands
If checked, the Web Thin Clients will be operated in a “read-only” mode and will be unable to send Tag values back to the TCP/IP (Data) Server on the Server PC.
Enable Tooltips If checked, the Web Client will display any ToolTips configured for objects. Log
If checked, a Log File of Web Client communications will be generated on the Web Client for troubleshooting purposes. The Log File is specified in the Filename field.
Auto Screen Scaling
If checked, the screens will automatically scale to the resolution of the browser. Note: This function is not available under Windows CE.
Enable File Compression
If checked, the files in the \Web folder are compressed prior to being sent to the Web Client. This option reduces the download time on slow network connections.
Virtual Keyboard
If checked, the Virtual Keyboard is enabled for the Web Clients. This is commonly used with Touchscreen-based platforms. If the Virtual Keyboard is enabled, you can specify the Default Virtual Keyboard style, the Scale (e.g. 100%) to be used, whether or not to show a Hint, and whether to show Min/Max Fields (valid for Numeric Keypad only).

AN-POV-006 – Configuring Local Viewer, Secure Viewer, and Web Clients in POV
12
3) Advanced Dialog Box In the Web Settings dialog box, click on the Advanced button to open the Advanced Web Settings dialog box.
In the Advanced Dialog Box, you can specify secondary Data and Web Servers, the URL to download the ISSymbol ActiveX Control and configure the Web Tunneling Gateway. These settings are as follows:
Advanced Web Settings Field Description
Data Server IP Address (in the Web Settings Dialog Box)
Note: this Field is in the Web Settings dialog box. It is included here to explain how this field works in conjunction with the Web Tunneling Gateway checkbox.
When the Web Tunneling Gateway is Disabled:, ISSymbol uses the Data Server IP Address to connect to the Point of View Server’s TCP/IP Server Thread
When the Web Tunneling Gateway is Enabled:, The Web Tunneling Gateway uses the Data Server IP Address to connect to the Point of View’s TCP/IP Server Thread.
Secondary Data Server IP Address
Functions the same as the Data Server IP Address but is used when the connection with the Data Server IP Address fails. It is especially useful to switch the Web Thin Clients automatically to a redundant (stand-by) data server.

AN-POV-006 – Configuring Local Viewer, Secure Viewer, and Web Clients in POV
13
Backup URL
Specifies the IP Address or URL where of a secondary Web Server is located. The Secondary Web Server will be used only when the connection with the primary Web Server fails. It is especially useful to switch the Web Thin Clients automatically to a redundant (stand-by) web server. Note: For web browsers using Windows CE 3.0 or Windows CE Pocket PC, the Backup URL field must be configured the same as the IP Address or URL of the primary Web Server. The Windows CE 3.0 and Windows CE Pocket PC platforms do not support a redundant Web Server.
ISSymbol URL
Specifies the IP Address or URL where the browser will attempt to download the ISSymbol ActiveX Control from if ISSymbol is not registered on the Web Client.
For applications that do not have access to the public Internet, the ISSymbol.cab file (located in the \Bin folder) can be put into the Web Root folder (e.g. \Web subfolder). The ISSymbol URL field would reflect the URL of the Web Server.
Note: The ISSymbol ActiveX Control for Windows CE (ISSymbolCE.ocx) cannot be automatically downloaded for Windows CE-based browsers. This is a current limitation of Windows CE. Instead, the ISSymbol ActiveX Control for Windows CE must be manually installed (and registered) on the Windows CE platform.
Web Tunneling Gateway Checkbox
If checked, enables the Web Tunneling Gateway function. The Web Tunneling Gateway is a Web Service for the Microsoft Web Server (IIS – Internet Information Services). The Web Tunneling Gateway encapsulates the proprietary Point of View TCP/IP protocol over HTTP (or HTTPS). Therefore, if there is a firewall between the Server and the Thin Client, no additional TPC ports (other than either for HTTP or for HTTPS) must be open.
TCP Port If the Web Tunneling Gateway checkbox is checked, this specifies the TCP Port to be using when the Web Server is communicating with the Web Client using the HTTP protocol. The DEFAULT is Port 80.
SSL Port If the Web Tunneling Gateway checkbox is checked, this specifies the TCP Port to be using when the Web Server is communicating with the Web Client using the HTTPS (Secure Socket Layer, or SSL) protocol. The DEFAULT is Port 443
Web Tunneling Gateway IP Address
ISSymbol uses the Web Tunneling Gateway IP Address to connect to the Web Tunneling Gateway
Web Tunneling Gateway Secondary IP Address
Same as the Web Tunneling Gateway IP Address. However, the Web Tunneling Gateway Secondary IP Address is used only when the connection with the Web Tunneling Gateway IP Address fails. It is especially useful to switch the Web Thin Clients automatically to a redundant (stand-by) server.

AN-POV-006 – Configuring Local Viewer, Secure Viewer, and Web Clients in POV
14
4) IP Security Dialog Box In the Web Settings dialog box, click on the IP Security button to open the IP Security Settings dialog box.
In the IP Security Settings Box, if the Enabled button is checked, you can specify a range of IP Addresses that the Data Server will respond to. This function is an Embedded Firewall. If the Data Server receives a TCP packet from an IP address outside this IP Address Range, it will be ignored.
5) Configure the Preferences Settings In the Development environment, select from the Main Menu Project Settings Preferences to open the Preferences dialog box.
In the Preferences dialog box, there are a couple settings that you can use to control the behavior of the Thin Clients:
Preferences Field Description
Enforce Web Functionality equivalence in local application displays
When this option is checked, the development software will automatically warn you when you select built-in functions or features that are incompatible with Remote Viewers (Secure Viewer Thin Client or Web Thin Client). Furthermore, these built-in functions or features will not be supported even by the local Viewer.
Auto reload application on Viewer/Web Clients when it is changed
When this option is checked, the Remote Viewers (Secure Viewer Thin Client or Web Thin Client) will check the Web Server to verify if the most recent version of the application files is loaded. If not, the most recent version of the files will be downloaded from the Web Server.

AN-POV-006 – Configuring Local Viewer, Secure Viewer, and Web Clients in POV
15
6) Save Screens in HTML Format
If you are using Web Thin Clients (i.e. Microsoft Internet Explorer-based), then you must save all the Screens you will be using in HTML format. This can be done by selecting the POV ICON Publish Save All as HTML. This step is NOT required if you are using the Secure Viewer Thin Client only.
Once you invoke the Save All As HTML function, the \Web subfolder of your Application folder will be populated with various files necessary to support the Web Thin Client remote viewer.
Important Notes:
If you make any changes to the Web Settings or Preferences, you must execute the Verify Application tool. This tool can be executed from the Main Menu Bar using Tools Verify Application. This tool will update all HTML files with the new Web Settings and Preferences.
You only need to save screens in HTML if you are using Web Thin Clients. The Secure Viewer Thin Client does not use HTML
Do not put spaces in your Screen names.
7) Configure the Web Server No matter which Remote Viewer configuration you use, you will need a way to access the files from the Server, which is usually achieved using a Web Server. The Web Server can be on the same PC as the Data Server or it can be on a separate PC. In most cases, it will be on the same PC as the Data Server.
Point of View recommends using IIS for all Microsoft operating systems platforms (Windows XP, 2K, Server 2003/2008, Vista) and the Microsoft CE.NET Web Server for Windows CE platforms. These Web Servers run as a Windows Service and are robust Web Servers capable of supporting Point of View Web Client applications. Point of View provides light-weight Web Servers (NTWebServer for Windows XP. 2K, Server 2003/2008 and Vista, and CEWebServer for Windows CE platforms) that can be used for testing and evaluation, but these Web Servers are not meant for production use since they run as Windows Applications not Windows Services.
If the Server and the Thin Clients are in the same LAN (Local Aread Network) or connected via a VPN (Virtual Private Network), you can use a file URL to access the screens from the Server, as long as they are available within a mapped folder/drive.
See Section XI for additional information on configuring a Web Server.
8) Start the Point of View Runtime and the Web Server After completing the above steps, the final step is to start the Point of View runtime and start the Web Server. After completing this, you can then start the Web Client.

AN-POV-006 – Configuring Local Viewer, Secure Viewer, and Web Clients in POV
16
Using the SetWebConfig Function The Point of View SetWebConfig() built-in function allows the developer to programmatically configure the Data Server and Web Client configuration, and the resulting configuration settings are automatically updated in the application’s HTML files (located in the \Web subfolder). This function always runs on the POV Server, and works in both a Windows XP and Windows CE environment.
See technical reference manual for detailed description of the SetWebConfig() function.
Installing the Web Tunneling Gateway Web Clients are commonly connected to the Web Server via a wide area network (WAN) or the Internet. Data is exchanged between the Web Client and the Data Server (i.e. the TCP/IP Server Thread running on the Point of View runtime). In a typical, non-encrypted Web Client/Server architecture, the Web Server communicates with the Web Client using the TCP Port 80 (for HTTP) and the Data Server communicates with the Web Client using the TCP Port 1234 for exchange of data (e.g. Tag values).
This network architecture may need to be altered for a couple reasons: 1) For security reasons, you may not want to provide WAN or Internet access to the Data Server
2) For security reasons, you may have your Data Server sitting behind a Firewall that will not allow communications on Port 1234, i.e. communications has to be over Port 80 (HTTP) or Port 443 (HTTPS).
In either of the two cases above, you can use the Point of View-developed Web Tunneling Gateway (WTG). The term “tunneling” is used to describe when one network protocol (in this case the TCP/IP data packet between the Data Server and the Thin Client) is encapsulated into another protocol. The encapsulated protocol is called the “payload protocol” and the protocol carrying the encapsulated protocol is called the delivery protocol. By default, the TCP/IP packets between the Data Server and the Web Client use Port 1234, whereas the web pages are sent from the Web Server to the Web Client using Port 80. Typically, a firewall does not block Port 80. By use of the WTG, the data exchanged between the Data Server and the Web Client will be encapsulated into HTTP communicated over Port 80. You cannot simply reconfigure the Data Server to use Port 80, since that Port is already in use by the Web Server.
The Web Tunneling Gateway (WTG) can be used with: 1. Web Thin Clients (Internet Explorer-based browsers)
2. Secure Viewer Thin Clients
3. A Windows XP, 2K, Server 2003/2008 and Vista platform that is running a Microsoft IIS Server Note: On the Windows platform running Microsoft IIS and the WTG, IIS is used for exchanging data between
the Data Server and the Web Client. The data that is normally exchanged using Port 1234 will now be encapsulated into HTTP over Port 80. The IIS Server that is encapsulating the data may or may not be the same IIS Server that is used as the Web Server, serving up HTML pages to the Web Client. The IP address of the Data Server may not be accessible from the WAN side of a router or firewall, but the IP address of the Data Server must be accessible from the WTG.
The WTG is an ISAPI (Internet Service Application Programming Interface) extension for Microsoft. ISAPI is a Microsoft developed technology that allows expanded functionality of the Web Server (IIS or HTTPD) using applications implemented as ISAPI extensions. ASP and ASP.NET are other examples of ISAPI extensions.
The WTG and IIS can tunnel data for more than one Data Server simultaneously.
When tunneling data for the Data Server, the WTG and IIS can be configured to support non-encrypted communications over Port 80 (HTTP) or encrypted communications over Port 443 using SSL 3.1 (Secure Socket Layer). Note that the use of encrypted communications requires additional setup of IIS (or the HTTPD Server) as well as a security certificate.

AN-POV-006 – Configuring Local Viewer, Secure Viewer, and Web Clients in POV
17
Installing the Web Tunneling Gateway on Windows XP, 2K, Server 2003/2008, Vista, Windows 7 & 8 platforms The procedure for installing the WTG depends on whether IIS is currently installed and whether Point of View is being installed:
1. Point of View is being installed on the same platform as the WTG, IIS is already installed In this scenario, when Point of View is installed, if the IIS Service is detected, the Web Tunneling Gateway will automatically be installed.
2. Point of View is being installed on the same platform as the WTG, IIS is not already installed In this scenario, Point of View is being installed but IIS is not currently installed. If the Web Tunneling Gateway is to be installed and run on this same platform, you will need to manually install the WTG. This can be done by implementing the following steps:
a) Install the IIS Web Server from Control Panel Add/Remove Programs Windows Components.
b) Execute the WebGtw.exe file from the \BIN sub-folder where the Point of View.
3. The WTG is being installed on a different platform from Point of View In this scenario, you will be using a separate platform (PC) to host IIS and the WTG from where the Point of View runtime software (and Data Server) is located. You will need to manually install the WTG on this separate platform. This can be done by implementing the following steps:
a) Install IIS if it is not already installed
b) Copy the WebGtw.exe file from the \BIN sub-folder on the platform where the Point of View System files are installed to any directory on the separate platform. .
c) Execute the WebGtw.exe file on the separate platform
Web Client Configurations Examples
The following examples illustrate how to configure settings for various Web Client configurations.
Terminology for Configuration Examples Term Description LAN Local Area Network (for example, Intranet)
WAN Wide Area Network (for example, Internet)
Server
The PC where one or more of the following software components is running: Point of View runtime (including the TCP/IP Server, or Data Server) Web Server (e.g. Microsoft IIS) IIS Web Tunneling Gateway
The Web Server and Web Tunneling Gateway do not need to run on the same Server as the Point of View runtime or the Web Server
Web Client LAN Web Client Station (Secure Viewer Thin Client or Web Thin Client) where a browser and the ISSymbol ActiveX Control reside, connected to the Server via a LAN
Web Client WAN Web Client Station (Secure Viewer Thin Client or Web Thin Client) where a browser and the ISSymbol ActiveX Control reside, connected to the Server via a WAN
IP_WebServer_LAN IP Address of the Web Server on the LAN
IP_WebServer_WAN IP Address of the Web Server on the WAN
IP_DataServer_LAN IP Address of the Data Server on the LAN
IP_DataServer_WAN IP Address of the Data Server on the WAN
IP_WTGServer_LAN IP Address of the Server hosting the Web Tunneling Gateway on the LAN
IP_WTGServer_WAN IP Address of the Server hosting the Web Tunneling Gateway on the WAN
IP_Router_LAN IP Address of the Router on the LAN
IP_Router_WAN IP Address of the Router on the WAN
ScreenName Name of the application screen saved as HTML that is open on the Web Client station

AN-POV-006 – Configuring Local Viewer, Secure Viewer, and Web Clients in POV
18
Example 1: Web Server and Web Client in the same Intranet (LAN)
This is the very typical architecture, and is the simplest to configure. In this architecture, both the Web Server and the Data Server are running in the same PC (same IP address). The Web Client connects to the Web Server to download the screen file(s). Then the Web Client connects to the Data Server to exchange data with the POV runtime application. Since both the Web Client and the Server station are connected to the same network, the Web Client can access the Server station directly through its IP address (or host name). The IP Addresses are:
IP_DataServer_LAN = IP_WebServer_LAN
Point of View Configuration Settings Setting WTG Disabled WTG Enabled Data Server IP Address IP_DataServer_LAN IP_DataServer_LAN
Secondary Data Server IP Address -- --
Web Tunneling Gateway IP Address -- IP_DataServer_LAN Web Tunneling Gateway Secondary IP Address -- --
Web Server Configuration Settings Setting Secure Viewer Web Thin Client Home Directory* <application directory> <application directory>\Web
* See remarks below [LAN] Secure Viewer Thin Client Settings Setting Value URL http://IP_WebServer_LAN/<application directory>.app
Data Server IP Address IP_DataServer_LAN TCP Port 1234 (unless specified otherwise in Communication Settings) Secondary Data Server IP Address --
Web Tunneling Gateway Same as Point of View Configuration Settings [LAN] Web Thin Client Settings Setting Value URL (Web Thin Client) (Microsoft Internet Explorer-based)
http://IP_WebServer_LAN/ScreenName.html
Remarks
If your application has both Secure Viewer Web Clients and Web Thin Clients, the Web Server Home Directory should point to <application directory>. To initiate a Web Thin Client session, the URL for the Web Client should be http://IP_WebServer_LAN/Web/ScreenName.html. Be sure to put a copy of the Runtime translation file in each folder (ie. <application directory> and <application directory>\Web)
LAN
IP_SERVER_LAN
Web Client Server (Web Server & Data Server)

AN-POV-006 – Configuring Local Viewer, Secure Viewer, and Web Clients in POV
19
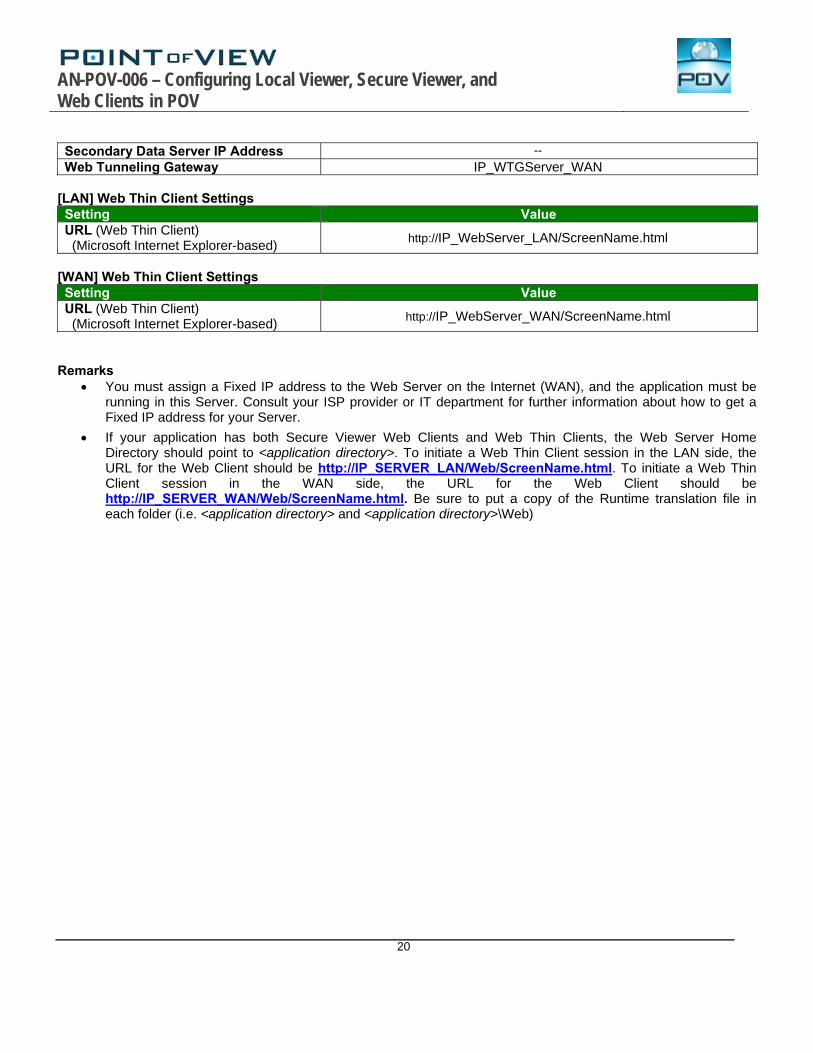
Example 2: Web Server with Intranet (LAN) and Internet (WAN) Connections
This architecture has both the Web Server and the Data Server running in the same PC. Web Clients can connect to the Server through either an Intranet (LAN) connection to the Server or an Internet (WAN) connection to the Server (e.g. two different Ethernet ports). The IP Addresses are
IP_DataServer_LAN = IP_WebServer_LAN = IP_WTGServer_LAN IP_DataServer_WAN = IP_WebServer_WAN = IP_WTGServer_WAN
Point of View Configuration Settings Setting WTG Disabled WTG Enabled Data Server IP Address IP_DataServer_LAN IP_DataServer_LAN
Secondary Data Server IP Address IP_DataServer_WAN IP_DataServer_LAN
Web Tunneling Gateway IP Address -- IP_WTGServer_LAN
Web Tunneling Gateway Secondary IP Address -- IP_WTGServer_WAN Web Server Configuration Settings Setting Secure Viewer Web Thin Client Home Directory* <application directory> <application directory>\Web
* See remarks below (LAN) Secure Viewer Thin Client Settings Setting Value URL http://IP_WebServer_LAN/<application directory>.app
Data Server IP Address IP_DataServer_LAN TCP Port 1234 (unless specified otherwise in Communication Settings) Secondary Data Server IP Address --
Web Tunneling Gateway IP_WTGServer_LAN (WAN) Secure Viewer Thin Client Settings Setting Value URL http://IP_WebServer_WAN/<application directory>.app
Data Server IP Address IP_DataServer_WAN TCP Port 1234 (unless specified otherwise in Communication Settings)
ServerWeb Thin ClientLAN
Web Thin ClientWAN
IP_SERVER_WANIP_SERVER_LAN
WAN
LAN
Web Client WAN
Server (Web Server & Data Server) Web Client LAN
AN-POV-006 – Configuring Local Viewer, Secure Viewer, and Web Clients in POV
20
Secondary Data Server IP Address --
Web Tunneling Gateway IP_WTGServer_WAN [LAN] Web Thin Client Settings Setting Value URL (Web Thin Client) (Microsoft Internet Explorer-based)
http://IP_WebServer_LAN/ScreenName.html
[WAN] Web Thin Client Settings Setting Value URL (Web Thin Client) (Microsoft Internet Explorer-based)
http://IP_WebServer_WAN/ScreenName.html
Remarks
You must assign a Fixed IP address to the Web Server on the Internet (WAN), and the application must be running in this Server. Consult your ISP provider or IT department for further information about how to get a Fixed IP address for your Server.
If your application has both Secure Viewer Web Clients and Web Thin Clients, the Web Server Home Directory should point to <application directory>. To initiate a Web Thin Client session in the LAN side, the URL for the Web Client should be http://IP_SERVER_LAN/Web/ScreenName.html. To initiate a Web Thin Client session in the WAN side, the URL for the Web Client should be http://IP_SERVER_WAN/Web/ScreenName.html. Be sure to put a copy of the Runtime translation file in each folder (i.e. <application directory> and <application directory>\Web)
AN-POV-006 – Configuring Local Viewer, Secure Viewer, and Web Clients in POV
21
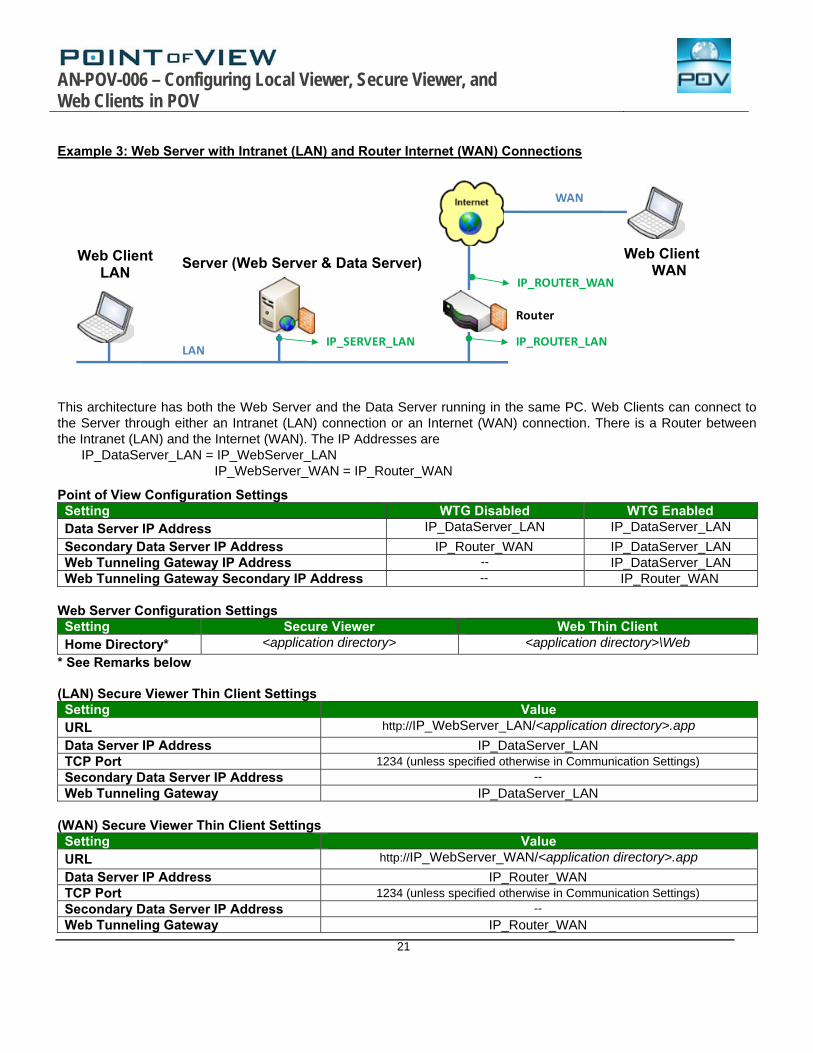
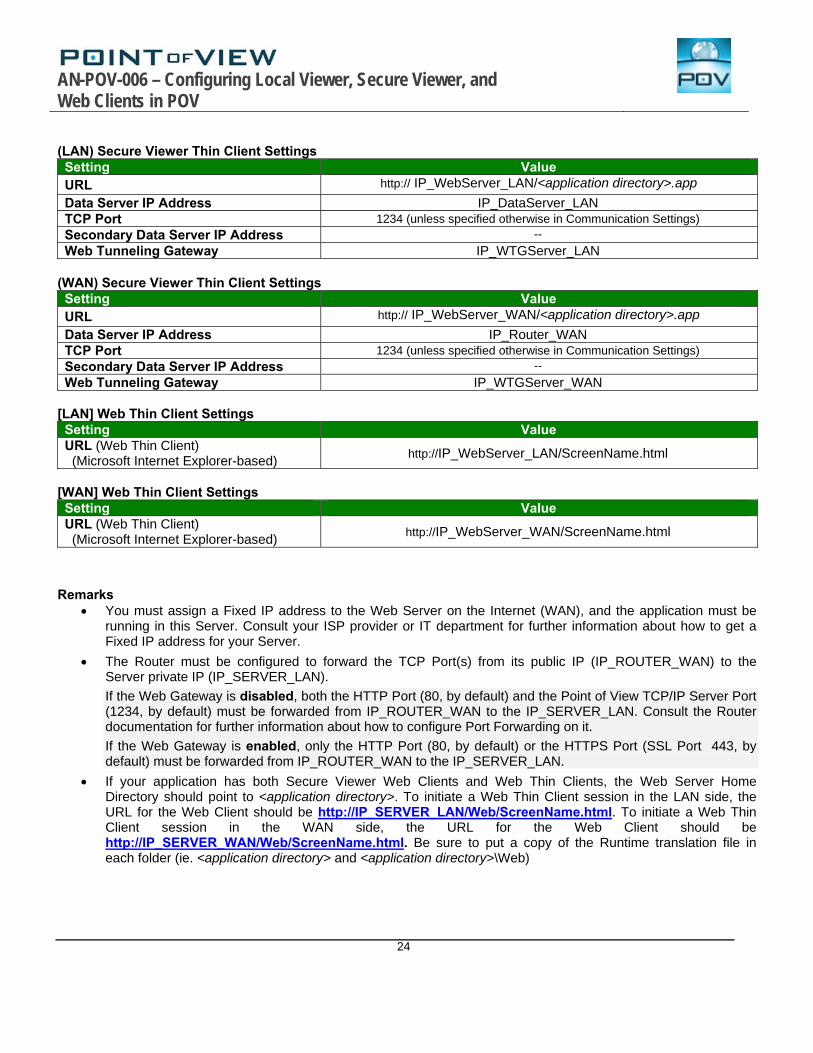
Example 3: Web Server with Intranet (LAN) and Router Internet (WAN) Connections
ServerWeb Thin ClientLAN
IP_ROUTER_LANIP_SERVER_LAN
Router
Web Thin ClientWAN
IP_ROUTER_WAN
WAN
LAN
This architecture has both the Web Server and the Data Server running in the same PC. Web Clients can connect to the Server through either an Intranet (LAN) connection or an Internet (WAN) connection. There is a Router between the Intranet (LAN) and the Internet (WAN). The IP Addresses are
IP_DataServer_LAN = IP_WebServer_LAN IP_WebServer_WAN = IP_Router_WAN
Point of View Configuration Settings Setting WTG Disabled WTG Enabled Data Server IP Address IP_DataServer_LAN IP_DataServer_LAN
Secondary Data Server IP Address IP_Router_WAN IP_DataServer_LAN Web Tunneling Gateway IP Address -- IP_DataServer_LAN Web Tunneling Gateway Secondary IP Address -- IP_Router_WAN
Web Server Configuration Settings Setting Secure Viewer Web Thin Client Home Directory* <application directory> <application directory>\Web
* See Remarks below (LAN) Secure Viewer Thin Client Settings Setting Value URL http://IP_WebServer_LAN/<application directory>.app
Data Server IP Address IP_DataServer_LAN TCP Port 1234 (unless specified otherwise in Communication Settings) Secondary Data Server IP Address --
Web Tunneling Gateway IP_DataServer_LAN (WAN) Secure Viewer Thin Client Settings Setting Value URL http://IP_WebServer_WAN/<application directory>.app
Data Server IP Address IP_Router_WAN TCP Port 1234 (unless specified otherwise in Communication Settings) Secondary Data Server IP Address --
Web Tunneling Gateway IP_Router_WAN
Server (Web Server & Data Server) Web Client
WANWeb Client
LAN

AN-POV-006 – Configuring Local Viewer, Secure Viewer, and Web Clients in POV
22
[LAN] Web Thin Client Settings Setting Value URL (Web Thin Client) (Microsoft Internet Explorer-based)
http://IP_WebServer_LAN/ScreenName.html
[WAN] Web Thin Client Settings Setting Value URL (Web Thin Client) (Microsoft Internet Explorer-based)
http://IP_WebServer_WAN/ScreenName.html
Remarks You must assign a Fixed IP address to the Web Server on the Internet (WAN), and the application must be
running in this Server. Consult your ISP provider or IT department for further information about how to get a Fixed IP address for your Server.
The Router must be configured to forward the TCP Port(s) from its public IP (IP_Router_WAN) to the Server private IP (IP_SERVER_LAN).
If the Web Gateway is disabled, both the HTTP Port (80, by default) and the Point of View TCP/IP Server Port (1234, by default) must be forwarded from IP_Router_WAN to the IP_SERVER_LAN. Consult the Router documentation for further information about how to configure Port Forwarding on it.
If the Web Gateway is enabled, only the HTTP Port (80, by default) or the HTTPS Port (SSL Port 443, by default) must be forwarded from IP_Roouter_WAN to the IP_SERVER_LAN.
If your application has both Secure Viewer Web Clients and Web Thin Clients, the Web Server Home Directory should point to <application directory>. To initiate a Web Thin Client session in the LAN side, the URL for the Web Client should be http://IP_SERVER_LAN/Web/ScreenName.html. To initiate a Web Thin Client session in the WAN side, the URL for the Web Client should be http://IP_SERVER_WAN/Web/ScreenName.html. Be sure to put a copy of the Runtime translation file in each folder (ie. <application directory> and <application directory>\Web)

AN-POV-006 – Configuring Local Viewer, Secure Viewer, and Web Clients in POV
23
Example 4: Web Server with Intranet (LAN) and Router Internet (WAN) Connections, WTG on Separate PC
This architecture has the Data Server (Point of View runtime), IIS & the WTG, and the Web Server all running on different PCs. Web Clients can connect to the Web Server and IIS/WTG through either an Intranet (LAN) connection or an Internet (WAN) connection. There is a Router between the Intranet (LAN) and the Internet (WAN). The IP Addresses are
IP_DataServer_LAN IP_WebServer_LAN IP_WebServer_WAN = IP_Router_WAN IP_WTGSever_LAN IP_WTGServer_WAN = IP_Router_WAN
Point of View Configuration Settings Setting WTG Disabled WTG Enabled Data Server IP Address IP_DataServer_LAN IP_DataServer_LAN
Secondary Data Server IP Address IP_Router_WAN IP_DataServer_LAN Web Tunneling Gateway IP Address -- IP_WTGServer_LAN Web Tunneling Gateway Secondary IP Address -- IP_WTGServer_WAN
Web Server Configuration Settings Setting Secure Viewer Web Thin Client Home Directory* <application directory> <application directory>\Web
* See Remarks below
Internet
Web Thin Client
Web Server+
IWS Web GatewayIWS
Web Router
CEView(WinCE HMI)
Web Server
IIS & WTG
Data Server
AN-POV-006 – Configuring Local Viewer, Secure Viewer, and Web Clients in POV
24
(LAN) Secure Viewer Thin Client Settings Setting Value URL http:// IP_WebServer_LAN/<application directory>.app
Data Server IP Address IP_DataServer_LAN TCP Port 1234 (unless specified otherwise in Communication Settings) Secondary Data Server IP Address --
Web Tunneling Gateway IP_WTGServer_LAN (WAN) Secure Viewer Thin Client Settings Setting Value URL http:// IP_WebServer_WAN/<application directory>.app
Data Server IP Address IP_Router_WAN TCP Port 1234 (unless specified otherwise in Communication Settings) Secondary Data Server IP Address --
Web Tunneling Gateway IP_WTGServer_WAN [LAN] Web Thin Client Settings Setting Value URL (Web Thin Client) (Microsoft Internet Explorer-based)
http://IP_WebServer_LAN/ScreenName.html
[WAN] Web Thin Client Settings Setting Value URL (Web Thin Client) (Microsoft Internet Explorer-based)
http://IP_WebServer_WAN/ScreenName.html
Remarks You must assign a Fixed IP address to the Web Server on the Internet (WAN), and the application must be
running in this Server. Consult your ISP provider or IT department for further information about how to get a Fixed IP address for your Server.
The Router must be configured to forward the TCP Port(s) from its public IP (IP_ROUTER_WAN) to the Server private IP (IP_SERVER_LAN).
If the Web Gateway is disabled, both the HTTP Port (80, by default) and the Point of View TCP/IP Server Port (1234, by default) must be forwarded from IP_ROUTER_WAN to the IP_SERVER_LAN. Consult the Router documentation for further information about how to configure Port Forwarding on it.
If the Web Gateway is enabled, only the HTTP Port (80, by default) or the HTTPS Port (SSL Port 443, by default) must be forwarded from IP_ROUTER_WAN to the IP_SERVER_LAN.
If your application has both Secure Viewer Web Clients and Web Thin Clients, the Web Server Home Directory should point to <application directory>. To initiate a Web Thin Client session in the LAN side, the URL for the Web Client should be http://IP_SERVER_LAN/Web/ScreenName.html. To initiate a Web Thin Client session in the WAN side, the URL for the Web Client should be http://IP_SERVER_WAN/Web/ScreenName.html. Be sure to put a copy of the Runtime translation file in each folder (ie. <application directory> and <application directory>\Web)

AN-POV-006 – Configuring Local Viewer, Secure Viewer, and Web Clients in POV
25
VI. Security for Web Clients
There are various methods for implementing security of Thin Client based Applications. You can use one or more of these methods to achieve your security requirements. An important advantage of the Thin Client solution is that the Security System configured for the local Viewer is shared by the Thin Clients, because the Security System is handled by the Server.
A. Password Protection
POV provides the ability to create Groups of Users and individual Users within a Group. Each Group (e.g. Operators, Supervisors, Maintenance) can have different security levels that access different levels of functionality. Individual passwords can be configured for each User. The Security settings are found by selecting Project Security System Configure.
In addition, Groups can have advanced settings, allowing features like minimum password size, password aging, e-signature on Objects with Command Dynamics, Account Auto-lockup (e.g. lock up after a number of invalid attempts to access), and User Account blocking (temporarily disable – e.g. when employee is on vacation).

AN-POV-006 – Configuring Local Viewer, Secure Viewer, and Web Clients in POV
26
If System Security is enabled, these Password Protection features are also available at the Web Client station. When a User at a Web Client station attempts to connect to the Web Server, they will be prompted for a User Name and a Password. If either is invalid, the User will not be let on to the system.
Within an application, the various Objects and their Dynamic Properties, and Screen access can have a security level assigned to it. The current User logged on must have an access level range which matches the desired Object or Screen. The following is a representative method of assigning security access levels by Group.

AN-POV-006 – Configuring Local Viewer, Secure Viewer, and Web Clients in POV
27
B. Disabling Web Thin Client Commands POV allows bi-directional data exchange between the Web Thin Client and the Data Server. However, for security reasons it may be advantageous to only allow the Web Thin Client to view the process or machine data, and not send any data back to the Data Server.
By checking the Disable Remote Client Commands check-box from the Project Settings Web dialog window of the POV development environment, this will insures that all commands coming from a Web Thin Client station are blocked. The communication becomes unidirectional (from the Server to the Web Thin Clients):
C. Embedded Firewall
This feature allows the developer to control access to the Point of View Data Server during runtime based on the Web Client’s IP Address. When a Web Thin Client attempts to connect to the Server station, the Server checks if the IP Address of the Web Thin Client station is authorized to access the application. The ranges of authorized IP Addresses can be configured in the Server station by pressing the IP Security button from the Project → Settings → Web dialog window of the Studio development environment:

AN-POV-006 – Configuring Local Viewer, Secure Viewer, and Web Clients in POV
28
D. Encrypted Communications (SSL) By enabling the Web Tunneling Gateway (WTG), you can enable all communications between the Data Server + Web Server and the Web Thin Client to be encrypted using RC6, a highly-secure 128-bit encryption standard. To use SSL, you must do the following:
From the POV development environment, select Project Web Web (tab). Click on the Advanced button. Check the Web Tunneling Gateway Enabled check-box. Click on the SSL radio button and be sure the SSL port is set to 442. Click OK.
In your Web Server, be sure SSL capabilities are enabled and that a SSL Certificate of Authentication is present.
Be sure SSL is enabled in the Web Client
Set up all other Web configurations to support the WTG.
E. VPN A VPN is a Virtual Private Network. It is called virtual since it really uses an existing network (e.g .Internet) to transport data from one computer to another. Generally, this network is encrypted using the IPSec Protocol and uses other security mechanisms enabled by the ISP, so it is a very secure Private Network. While VPN’s are inherently secure, they are more costly that a simple public Internet connection.
VII. The ISSymbol ActiveX Control
One of the key components that make the Local Viewer, Secure Viewer Thin Client and Web Client solution work is the Point of View-developed ISSymbol ActiveX Control. This ActiveX Control performs three (3) critical tasks:
Virtual TCP/IP Client The ISSymbol ActiveX Control is a Virtual TCP/IP Client. It is called “Virtual” since it does not run as a separate Process or Thread. (See Section XII for a discussion of Processes and Threads). The TCP/IP Server Thread on the Server Station (running in StudioManager Process) periodically “pushes” updated Tag values to the Virtual TCP/IP Client(s). Tags on the Server station may be updated by Drivers, Script Worksheets, other

AN-POV-006 – Configuring Local Viewer, Secure Viewer, and Web Clients in POV
29
Web Thin Clients, etc. The Virtual TCP/IP Client will also periodically send updated values from the Virtual Tags Database to the TCP/IP Server.
Virtual Tags Database The ISSymbol ActiveX Control creates and maintains a Virtual Tags Database that is a local copy of the Tags that are used by Screens being executed. When Screens are downloaded to the Local Viewer, Secure Viewer Thin Client or Web Client, ISSymbol scans the Screen file(s) or HTML file(s) which contain a list of Tags that are used by the Screen. If these Tags do not exist in the Virtual Tags Database, the ISSymbol ActiveX Control will create them and communicates with the TCP/IP Server Thread on the Server station, informing the TCP/IP Server of the new Tag(s) and requesting their most current value from the Server station.
Creates the Graphical Screen User Interface The ISSymbol ActiveX Control also contains a Graphics Module that creates the GUI (Graphical User Interface), displaying the various objects on the Screen(s), as well as manipulating the objects with any Dynamic Properties that were used. The Graphics Module works with the local graphics controller to create the screens.
ISSymbol ActiveX Control used with Local Viewer, Secure Viewer Thin Clients and Web Thin Clients
Web Server
Server Station
ISSymbol TCP/IP Server
Local Viewer
TCP/IP
Server Station
ISSymbol
TCP/IP Server
Secure Viewer Thin Client
TCP/IP
Web Server
Server Station
ISSymbol
TCP/IP Server
Internet Explorer Web Client
TCP/IP

AN-POV-006 – Configuring Local Viewer, Secure Viewer, and Web Clients in POV
30
Exchanging Data between the TCP/IP Server and the ISSymbol Virtual TCP/IP Client Data is exchanged between the TCP/IP Server, a Thread running on the Server station (where the StudioManager Process is running), and the Virtual TCP/IP Client at discrete time intervals – and only when there is data (i.e. updated Tag values) to exchange.
The TCP/IP Server send interval (Send Period) is specified in the Send Period (ms) field in the Communication tab dialog box (Project Settings Communication). This parameter defines how often the TCP/IP Server communicates with any TCP/IP Clients connected to it. TCP/IP Clients include another Point of View Runtime (TCP/IP Client Worksheet) as well as any Virtual TCP/IP Clients (ISSymbol used with the Local Viewer, Secure Viewer Thin Clients or Web Thin Clients). The default value is 1000 milliseconds, but this can be changed (as shown) to a different value. A lower value will result in faster Tag updates from the Server but add more overhead and increase network traffic. A higher value will decrease Tag update rates but lower overhead and decrease network traffic. Note that Tags will only be communicated at this time interval if the Tag(s) in the Server’s (i.e. StudioManager) Tags Database have changed value.
The ISSymbol ActiveX Control is used with the Local Viewer, Secure Viewer Thin Client and Web Thin Client to form a virtual Tags database in the Viewing module as well as function as a virtual TCP/IP Client. When a Tag value in ISSymbol’s Virtual Tags Database has been updated by the Local or Remote Viewer module, the Virtual TCP/IP Client will queue the Tag to be sent to the TCP/IP Server. However, the Tags in the Virtual Tags database only get sent from the Virtual TCP/IP Client to the StudioManager’s Data Server (TCP/IP Server) at defined intervals, according to the Send Period field. This Send Period is defined in the Web tab dialog box (Project Web Web). If no Tags were updated on the Viewer, no data will be sent to the TCP/IP Server regardless of the Send Period settings. This setting is used to define the update rate between the Thin Clients (ISSymbol) and the Web Tunneling Gateway (WTG).
Note that in the Viewer (Local or Remote) module, any Virtual Tags that are changed in a Script will not be sent to the Virtual Tags database until the end of the execution of the Screen Script, Graphics Script subroutine, Screen Logic script, Command Dynamic or other Dynamic Property that altered the Tag value.
Since the communication from the Virtual Tags Database via the Virtual TCP/IP Client to the Tags Database via the Server’s TCP/IP Server occurs at the end of the execution of a Screen Script, Graphics Script subroutine, Screen Logic script, Command Dynamic or other Dynamic Property, you should avoid using these for synchronization logic. In general, the Tag update rate is much faster when using the Local Viewer or a Secure Viewer Thin Client compared to a Web Thin Client.

AN-POV-006 – Configuring Local Viewer, Secure Viewer, and Web Clients in POV
31
Installing ISSymbol on a Windows XP, 2K, Server 2003/2008, Vista, 7 or 8 Platform ISSymbol can be installed on a Windows XP, 2K, Server 2003/2008, Vista, Windows 7 or 8 Platform using one of four (4) methods:
Method 1: Automatic install of ISSymbol on the Server Station Applies To: Local Viewer, Secure Viewer Thin Client and Web Thin Client running on the Server PC Notes: When you install Point of View on the Server Station (Development or Runtime), ISSymbol is
automatically installed and registered with the Operating System. There is nothing more to do.
Method 2: Automatic install of ISSymbol on a separate PC Applies To: Secure Viewer Thin Client installation on a separate PC from the Server. The PC running the
Secure Viewer Thin Client must be running Windows XP, 2K, Server 2003/2008, Vista, Windows 7 or 8.
Notes: When you install the Secure Viewer Web Client software on the Client PC, ISSymbol is automatically installed and registered with the Operating System. There is nothing more to do.
Method 3: Automatically downloaded when a Web Client is first launched Applies To: Web Client running on a separate PC from the Server. Web Client has Internet connectivity and
Internet Explorer is enabled to allow downloads of ActiveX Controls.The PC running the Web Client must be running Windows XP, 2K, Server 2003/2008, Vista, Windows 7 or 8.
Notes: When the Microsoft Explorer-based Web Client runs for the first time on Client PC, the first downloaded Web Page (Screen) will let Internet Explorer know that the ActiveX Control ISSymbol is required. If Internet Explorer is configured to allow ActiveX Controls to be downloaded, it will attempt to go to the URL specified in the ISSymbol URL field of the Advanced dialog box (Project Web Web Advanced). Note that this URL requires Internet Connectivity to the Point of View website.
If you do not have Internet connectivity and do not want to manually install ISSymbol in a Web Client PC, you can put the file ISSymbolVM.cab in the Web Root folder (i.e. the folder where the Web Server retrieves the HTML files from). When the Web Client is run the first time, it will prompt the User to allow downloading of the ISSymbol ActiveX Control. This downloading is required only one time.
Method 4: Manual install of ISSymbol Applies To: Web Client running on a separate PC from the Server. Web Client does not have Internet
connectivity or Internet Explorer is not allowed to download ActiveX Controls. The PC running the Web Client must be running Windows XP, 2K, Server 2003/2008, Vista, Windows 7 or 8.
Notes: In this situation, the ISSymbol ActiveX Control is not able to be downloaded and must be installed manually on the Client PC. Copy the following files from the C:\Program Files\Point of View v7.1\Bin folder and paste them into any folder in the Web Client station.
..\Point of View v7.1\Bin\ISSymbolReg.exe
..\Point of View v7.1\Bin\ISSymbolVM.cab
After doing this, run the file ISSymbolReg.exe to install and register the ISSymbol ActiveX Control.

AN-POV-006 – Configuring Local Viewer, Secure Viewer, and Web Clients in POV
32
VIII. Installing and Configuring the Secure Viewer Thin Client
The Secure Viewer Thin Client is a separate installation process from Point of View. Although in most cases, you would install a Secure Viewer Thin Client on a separate PC, you could install the Secure Viewer on the Server PC. For example, the Secure Viewer Thin Client and the Local Viewer on the same PC could be used to display screens on separate monitors in a multi-monitor system.
Installing the Secure Viewer on a Windows XP, Server 2003/2008, Vista, Windows 7 or 8 Platform To install the Secure Viewer, you can get the Installation files utilizing one the following options:
Install Secure Viewer from the Point of View CD Download Secure Viewer files from the AutomationDirect website (www.automationdirect.com)
The installation of the Secure Viewer is separate from the installation of Point of View.
Follow the instructions of the Installation Wizard. There are only two settings that are configured during installation: URL
This is the URL or Filepath to the application file (*.app) on the Web Server
Server IP This is the IP address or hostname of the TCP/IP Server (Data Server)
The settings you enter will be stored in the Viewer.ini file. If you do not know these settings, you can leave the fields blank and click on Next. These settings can be configured at a later time. Configuring the Secure Viewer The customization of the Secure Viewer Thin Client can be done in one of two ways:
1. Using ViewerCfg Applies to: Windows XP, 2K, Server 2003/2008 Vista, Windows 7 or 8-based Systems
2. Modifying the Viewer.ini file Applies to: All Windows-based Systems
Configuration Using ViewerCfg After installation of the Secure Viewer on the PC, there is an Application called ViewerCfg.exe that can be used to modify the Viewer.ini file settings. The ViewerCfg.exe file is located in the same folder as the Viewer Application. When ViewerCfg.exe is started, you will get a dialog box as shown.
This configuration utility provides the following options:
Load button: Click to load a viewer.ini file into the utility for editing.
Save button: Click to save your changes to the viewer.ini file.
Data Server IP field: Enter the IP address (or host name) of your data server station.
The data server station is the

AN-POV-006 – Configuring Local Viewer, Secure Viewer, and Web Clients in POV
33
computer or device where the TCP/IP Server module is running. TCP Port field: Enter the port number of the Data Server, if it is different than the default port of 1234. URL field: Enter the URL or filepath of the application file (*.app) on the Web Server. Enable Splash Window option: Check (enable) this option to see a splash window when you start the Secure
Viewer. Enable Progress Bar option: Check (enable) this option to
see a progress bar while the Secure Viewer loads the application file.
Advanced button: Click to access additional configuration options:
By clicking the Advanced button, you can access the following:
Secondary Data Server IP field: Type the IP address (or host name) of the secondary data server station. If the primary data server fails, the Secure Viewer will attempt to connect to the secondary data server automatically.
Web Tunneling Gateway: If you have configured a Web Tunneling Gateway to bridge your intranet to the Internet, then enter the addresses for the gateway, as well as define the Port to be used for either TCP or SSL communications.
Log on as Guest option: Check (enable) to have the Secure Viewer automatically log on as Guest, eliminating the need to enter a Username or Password.
For example, if the Point of View runtime is located at IP address 192.168.1.106 and the TCP/IP Server uses Port 1234 (default), enter the following information in the ViewerCfg dialog box: In the Secure Viewer configuration dialog box, enter the following:
Data Server IP = 192.168.1.106 TCP Port = 1234 URL = http://192.168.1.106/SecureViewerTest.app

AN-POV-006 – Configuring Local Viewer, Secure Viewer, and Web Clients in POV
34
Configuration by Modifying the Viewer.ini file The second way to change the configuration of the Secure Viewer is to manually edit the Viewer.ini file with a text editor such as Microsoft Notepad. The Parameters for the Viewer.ini file are shown below.
The following are examples of Viewer.ini files: Example 1: //In this example, the Point of View Application is on the local machine [Options] url=file://C:/Program Files/Point of View v7.1/Demos/NTDemo/NTDemo.app NoSplash=1 noprogressbar=1 [OEM] Splash=Splash.bmp Example 2: //In this example, the Point of View application is on a networked machine (IP=192.168.1.106) //Project is SecureViewerTest, the Application file is SecureViewerTest.app [Options] url= http://192.168.1.106/SecureViewerTest.app noprogressbar=1 ds1=192.168.1.106 nosplash=1 dsp=1234 user=Guest pass=
Notes: Unless you put a full path name in the Splash Parameter (that specifies the file path for the bitmap Splash
Graphic), the file should be located in the same directory as the Secure Viewer application (Viewer.exe). The Secure Viewer Configurator is not available for Windows CE. Modify the Viewer.ini file settings instead.

AN-POV-006 – Configuring Local Viewer, Secure Viewer, and Web Clients in POV
35
Viewer.ini Parameters
Section Fieldname Default Value
Range of Values
Description
[Options] url <None> to 260 chars Application file (.APP) that will be loaded [Options] Noprogressbar 0 0 or 1 Progress bar to be enabled (0) or disabled (1) [Options] Nosplash 0 0 or 1 Splash window to be displayed (0) or hidden (1) [Options] ds1 Localhost to 128 chars Primary Data Server IP Address [Options] ds2 <None> to 128 chars Secondary Data Server IP Address [Options] Dsp 1234 Integer Data Server IP Port [Options] wtg1 <None> to 2048 chars Primary Web Tunneling Gateway [Options] wtg2 <None> to 2048 chars Secondary Web Tunneling Gateway [Options] User <None> to 256 chars User Name [Options] Pass <None> to 256 chars User Password [Options] Proxyip <None> to 2048 chars Proxy IP Address [Options] proxyPort 0 Integer Proxy IP Port [Options] Ceemul 0 0 or 1 CE emulation to be disabled (0) or enabled (1) [Options] UseLanguage <None> to 256 chars Language that will be used (fr-FR, de-GE, etc.) [Options]
BackupURL* <None> to 260 chars Backup Application file (.APP) that will be used when application from url is unavailable
[Options] DisableCommands* 0 0 or 1 Command dynamics enabled (0) or disabled (1) [Options] TimeoutForSwitchStations* 0 integer Tmeout for switching stations (in seconds) [OEM] Splash Splash.bmp to 260 chars BMP file [Parameters] ProductName Studio to 1024 chars Product Name [Parameters] ProductVersion 6 to 1024 chars Product Version [Parameters] SendPeriod 1000 Integer TCP send period (in ms) [Parameters] ConnectRetryTimeout 30 Integer Time for connection retry (in seconds) [Parameters] EnableToolTip 1 0 or 1 Tooltips disabled (0) or enabled (1) [Parameters] ShowError 1 0 or 1 Error display(????) disabled (0) or enabled (1) [Parameters] EnableLog 0 0 or 1 Tooltips disabled (0) or enabled (1) [Parameters] LogFileName <None> to 1024 chars Log file name [Parameters] MaxAlarms 300 Integer Max number of alarms (Alarm object) [Parameters] EnableTranslate 1 0 or 1 App translation disabled (0) or enabled (1) [Parameters] AutoScreenScaling 1 0 or 1 Auto Screen Scaling disabled (0) or enabled (1) [Parameters] ScreenScalingResolution 1024 768 to 1024 chars Screen Scaling Resolution [Parameters] MaxMessagesAlarmControl 16000 Integer Max number of alarms (Alarm Control object) [Parameters] VKScale 100 Integer Virtual Keyboard Scale [Parameters] VKSystemDefaultName <None> to 1024 chars Virtual Keyboard Default Name [Parameters] VKSystemDefaultType 1 0 or 1 Virtual Keyboard Default Type. Parameters] SecurityVKName <None> to 1024 chars Virtual Keyboard Default Name – Logon Parameters]
SecurityVKType 1 0 or 1 Virtual Keyboard Default Type – Logon. (0 - Custom (IndVKCus.dll) or 1 - Standard (IndVKStd.dll))
[Parameters] CheckBoxSize 13 integer Size of CheckBox [Parameters] RadioButtonSize 13 integer Size of Radion Button [Parameters]
InternationalOrder* DMY (See right) Order of date (DMY, DYM, YDM, YMD, MDY or MYD)
[Parameters] InternationalSeparator* / char Separator of date [Period] BlinkSlow 500 Integer Blink slow (in ms) Period] BlinkFast 200 integer Blink fast (in ms)
* For Point of View v7.1 SP2 or later

AN-POV-006 – Configuring Local Viewer, Secure Viewer, and Web Clients in POV
36
IX. Setting the Local Viewer and Secure Viewer Resolution
For most uses, there is minimal configuration to use the Local Viewer. The main items to set up are the Application Resolution (which is usually set to reflect the resolution of a monitor), and the resolution (and offsets) of Screens or Group of Screens which will be used. The Application Resolution is specified when the Project is first created (as shown). Standard Application Resolutions are:
240 x 320 320 x 240 640 x 240 640 x 480 800 x 600 1024 x 768 1280 x 1024
The Application Resolution is stored in the <application>.app file found in the project folder as the Parameter AppResolution under the Section [Info]. For example, an Application Resolution of 1024 x 768 would be stored as:
<application.app> file [Info] AppResolution=1024 768
The Application Resolution setting defines the size (X & Y size in pixels of the Viewer). The Application Resolution can be subsequently modified to a different resolution by selecting Tools Convert Resolution. However, this tool also scales each screen by the ratio between the original Application Resolution and the new Application Resolution.
In most cases, the Screen resolution is set to match the application resolution. If a Group of Screens are used, the cumulative resolution is the sum of the individual Screen resolutions based on their relative orientation to one another, which should total up to match the application resolution.
Supporting Alternative Screen Resolutions (e.g. Wide Screen) and Multiple Monitors Point of View provides a built-in function that is useful for changing the Viewer size and position at runtime. This function is SetViewerPos(). When you call this function, you can change the size (X and Y size in pixels) as well as the offset (from the top and left in pixels).
The SetviewerPos() function is useful when you need to support Monitor resolutions that are not listed in the standard Application Resolutions (see above). For example, if you had a wide-screen monitor with a resolution of 1920 x 1200, there is no standard Application Resolution that supports this Monitor resolution. To have the Viewer configured to support the full resolution of the Monitor, you have two choices:
1) Edit the <application>.app file and change the Parameter AppResolution to AppResolution=1920 1200
2) Call the SetViewerPos() built-in function to change resolution. E.g. SetViewerPos(0, 0, 1920, 1200)
It is best to call the SetViewerPos() function from the Graphics Script in the Graphics_OnStart section. This will ensure that the SetViewerPos() does not execute until the Viewer.exe Process is running.

AN-POV-006 – Configuring Local Viewer, Secure Viewer, and Web Clients in POV
37
Of course, you can always check the Auto Screen Scaling checkbox in the Project Settings Runtime Desktop dialog box. This however, only scales the screen but does not increase the Viewer resolution.
Note that the SetViewerPos() function does not modify the <application.app> file.
To support multiple Monitors, you must have a graphics controller that is capable of supporting multiple outputs. These graphics controller cards are becoming quite commonplace as the price of Monitors comes down. Setup of the graphics controller is beyond the scope of this document, but in general multiple monitor applications can be set up so that the resolution of each monitor can be combined to support larger desktop resolution (e.g. two 1024 x 768 monitors can be combined to behave as a 2048 x 768 desktop).
In a multiple Monitor application, you could choose to use the entire desktop resolution with your Point of View application. This is easily done by setting the Viewer size to the entire desktop size as previously discussed. Alternatively, you may want to have one non-Point of View Application being displayed on one Monitor and the Point of View Application being displayed on the other. To support two or more Applications on multiple Monitors, you need to specify not only the Size of the Monitor but also the X and Y pixel offsets from the Top/Left edges of the effective desktop. For example, two 1024 x 768 resolution Monitors can be combined into one 2048 x 768 resolution desktop. If the Viewer is to be displayed in the right half of the desktop, you would need to call the SetViewerPos() function as follows:
SetViewerPos(1024, 0, 1024, 768)
Note that to support multiple monitors where the Viewer does not occupy the full desktop and has an offset from the Top/Left edge, the SetViewerPos() function must be used. Changing the AppResolution Parameter in the <application.app> file will not support the offset. SetViewerPos Description Sets the Width, Height, and Left/Right starting position of the Viewer
Usage SetViewerPos(numLeft, numTop, optnumWidth, optnumHeight)
Arguments numLeft A numeric tag, VBScript variable or integer value specifying the left-side position of the Viewer in pixels
numTop A numeric tag, VBScript variable or integer value specifying the top-side position of the Viewer in pixels
optnumWidth An optional numeric tag, VBScript variable or integer value specifying the width of the Viewer in pixels
optnumHeight A optional numeric tag, VBScript variable or integer value specifying the height of the Viewer in pixels
Environment Supported Server (Windows XP, 2K, Server 2003/2008, Vista) Local Viewer Secure Viewer Thin Client
Not Supported Windows CE Web Client (Internet Explorer-based)
Remarks It is best to call this function from a Graphics Script (e.g. Sub Graphics_OnStart) to ensure the Viewer Process is running. This function can be called from the Server, but you must be sure the Viewer Process is running in order for the function to execute without an error. If you call the SetViewerPos function from the Server, it will only effect the position for the Local Viewer.

AN-POV-006 – Configuring Local Viewer, Secure Viewer, and Web Clients in POV
38
Return Values 0 = Error 1 = Success
Example SetViewerPos(1024, 0, 1024, 768) //Supports a dual monitor, where Viewer is in right-most monitor The following is a short VBScript routine to check if the Viewer.exe Process is running:
'Variables available only for this group can be declared here. Dim objWMIService, colItems, objItem Dim strComputer, boolIsFound 'The code configured here is executed while the condition configured in the Execution field is TRUE. boolIsFound=False strComputer="." Set objWMIService=GetObject("winmgmts:\\" & strComputer & "\root\CIMV2") Set colItems=objWMIService.ExecQuery("SELECT * FROM Win32_Process",,48) For Each objItem In colItems If objItem.Name="Viewer.exe" Then 'The string "Viewer.exe" is case sensitive boolIsfound=True End If Next
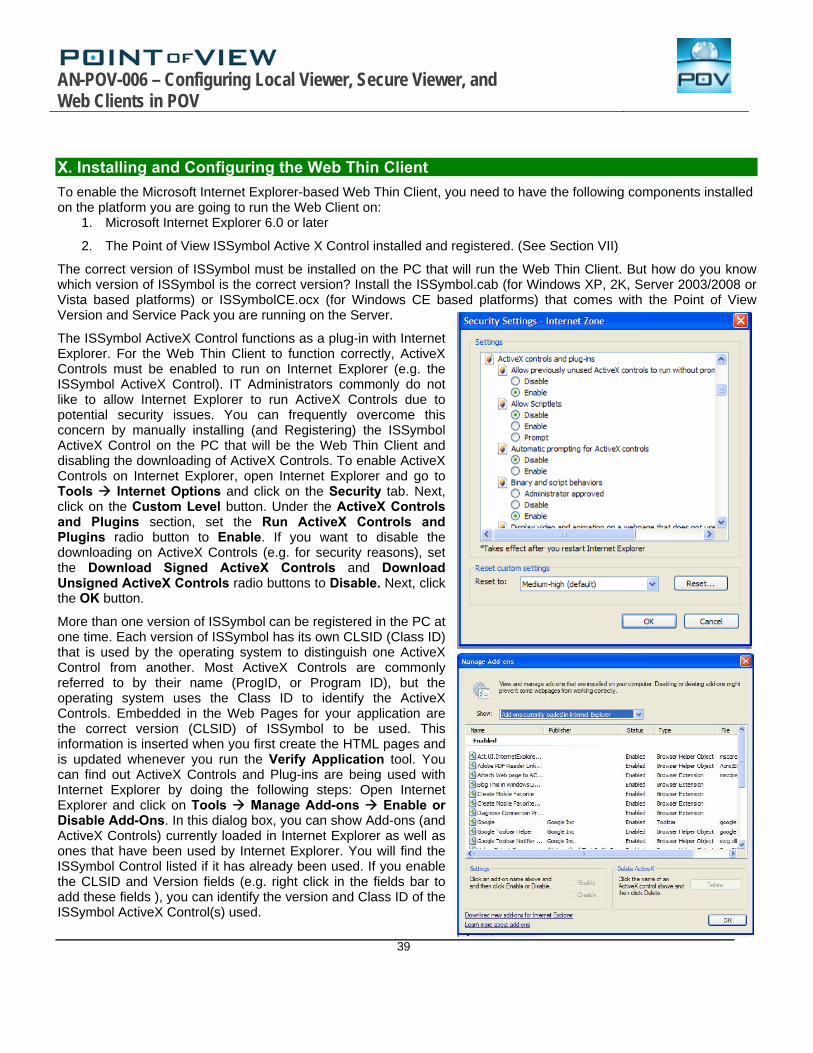
AN-POV-006 – Configuring Local Viewer, Secure Viewer, and Web Clients in POV
39
X. Installing and Configuring the Web Thin Client
To enable the Microsoft Internet Explorer-based Web Thin Client, you need to have the following components installed on the platform you are going to run the Web Client on:
1. Microsoft Internet Explorer 6.0 or later
2. The Point of View ISSymbol Active X Control installed and registered. (See Section VII)
The correct version of ISSymbol must be installed on the PC that will run the Web Thin Client. But how do you know which version of ISSymbol is the correct version? Install the ISSymbol.cab (for Windows XP, 2K, Server 2003/2008 or Vista based platforms) or ISSymbolCE.ocx (for Windows CE based platforms) that comes with the Point of View Version and Service Pack you are running on the Server.
The ISSymbol ActiveX Control functions as a plug-in with Internet Explorer. For the Web Thin Client to function correctly, ActiveX Controls must be enabled to run on Internet Explorer (e.g. the ISSymbol ActiveX Control). IT Administrators commonly do not like to allow Internet Explorer to run ActiveX Controls due to potential security issues. You can frequently overcome this concern by manually installing (and Registering) the ISSymbol ActiveX Control on the PC that will be the Web Thin Client and disabling the downloading of ActiveX Controls. To enable ActiveX Controls on Internet Explorer, open Internet Explorer and go to Tools Internet Options and click on the Security tab. Next, click on the Custom Level button. Under the ActiveX Controls and Plugins section, set the Run ActiveX Controls and Plugins radio button to Enable. If you want to disable the downloading on ActiveX Controls (e.g. for security reasons), set the Download Signed ActiveX Controls and Download Unsigned ActiveX Controls radio buttons to Disable. Next, click the OK button.
More than one version of ISSymbol can be registered in the PC at one time. Each version of ISSymbol has its own CLSID (Class ID) that is used by the operating system to distinguish one ActiveX Control from another. Most ActiveX Controls are commonly referred to by their name (ProgID, or Program ID), but the operating system uses the Class ID to identify the ActiveX Controls. Embedded in the Web Pages for your application are the correct version (CLSID) of ISSymbol to be used. This information is inserted when you first create the HTML pages and is updated whenever you run the Verify Application tool. You can find out ActiveX Controls and Plug-ins are being used with Internet Explorer by doing the following steps: Open Internet Explorer and click on Tools Manage Add-ons Enable or Disable Add-Ons. In this dialog box, you can show Add-ons (and ActiveX Controls) currently loaded in Internet Explorer as well as ones that have been used by Internet Explorer. You will find the ISSymbol Control listed if it has already been used. If you enable the CLSID and Version fields (e.g. right click in the fields bar to add these fields ), you can identify the version and Class ID of the ISSymbol ActiveX Control(s) used.

AN-POV-006 – Configuring Local Viewer, Secure Viewer, and Web Clients in POV
40
Configuring the Web Thin Client
There are not a lot of configuration options for Internet Explorer. However, you there are two modes you can enable for Internet Explorer:
1. Full Screen The Full Screen mode can be enabled or disabled by toggling the F11 key. When in the Full Screen mode, the Internet Explorer Title Bar, Menus, Tool Bars and Status Bars will “wipe away” off the top of the screen. My moving your mouse to the top of the screen, these items can reappear.
2. Kiosk Mode When you run in the Kiosk mode, the Internet Explorer Title Bar, Menus, Toolbars and Status Bar are not displayed and Internet Explorer runs in Full Screen mode. You cannot reach the Windows Desktop when running Internet Explorer in the Kiosk mode (i.e. there is no window Minimize option available). You can still switch to another Application by pressing ALT + TAB, or invoke the Windows Task Manager by pressing CTRL + ALT + DEL.
To start Internet Explorer in the Kiosk mode, you can do one of the following: a. Click on Start, click on Run, then type the following command in the Open dialog box and then click
Ok. iexplore –k <webpage or url>
b. Create a shortcut on the desktop by moving your mouse to a blank area of the desktop, right click your mouse, choose New and then choose Shortcut. In the Location box, type the following (including the quotes):
“C:\Program Files\Internet Explorer\IEXPLORE.EXE” –k <webpage or url>
Click on Next and type in whatever name you would like for the shortcut.
There are a number of Keyboard Shortcuts for the Kiosk mode. They include: Key Combination Function ALT + F4 Close (Exit Kiosk mode, will also close Internet Explorer) CTRL + L Opens the location dialog box CTRL + N Opens a new Window in non-Kiosk mode CTRL + O Opens the location dialog box (same as CTRL + L) CTRL + P Print CTRL + R Refresh CTRL + W Close (same as ALT + F4) ESC Stop F5 Refresh
When invoking the Web Thin Client, you can specify a UserName and Password in the command line. E.g.
Iexplore /user:John /pass:myPassword

AN-POV-006 – Configuring Local Viewer, Secure Viewer, and Web Clients in POV
41
XI. Installing and Configuring a Web Server
There are several different Web Servers that can be used with a Point of View application to support Web Thin Clients and Secure Viewer Clients. The choice of Web Server depends on the platform used. You do not need to use a Web Server with the Local Viewer, but you must use a Web Server when using either the Web Thin Client or Secure Viewer Thin Client. Examples of Web Servers include:
Web Server Operating System Comments NTWebServer Windows NT, 2000, XP, Server
2003, Vista Point of View provided light weight Web Server. An application, not a Service.
IIS 5.0 Windows 2K Microsoft Internet Information Services Web Server IIS 5.1 Windows XP Pro, 2K Default max of 10 simultaneous connections, can
reconfigure to 40. IIS 6.0 Windows Server 2003 No limit on simultaneous connections IIS 7.0 Windows Vista, Server 2008 No limit on simultaneous connections IIS 7.5 Windows 7 Windows Server
2008 R2 No limit on simultaneous connections
IIS 8.0 Windows 8 Windows Server 2012
No limit on simultaneous connections
IIS 8.5 Windows 8.1 Windows Server 2012 R2
No limit on simultaneous connections
Apache 2.0 for Windows Windows XP, 2000, Server 2003 Can run as an Application or Service
The Web Server generally resides on the same PC as the Point of View runtime application (i.e. StudioManager), although there is no requirement that the Web Server and the Data Server (i.e. StudioManager’s TCP/IP Server) reside on the same PC. You may want to locate the Web Server PC on a separate PC, such as a corporate Web Server. If you use the Web Tunneling Gateway, the Web Tunneling Gateway must be on the same computer as the Web Server, and the Web Server must be Microsoft IIS (Internet Information Services) for Windows XP, 2K, Server 2003/2008 and Vista platforms, or Microsoft CE.NET.HTTPD Web Server for Windows CE platforms.
NTWebServerf The NTWebServer is a lightweight Web Server developed by Point of View designed for use in Microsoft Windows XP, 2K, Server 2003/2008 and Vista platforms. NTWebServer was designed primarily for simple tests and/or for limited application use. Point of View recommends using Microsoft IIS (Internet Information Services) Web Server for production-grade applications since NTWebServer runs as an Application, not a Windows Service.
NTWebServer is located in the \Bin subfolder of the POV program folder. To use NTWebServer, copy and paste it into your application’s \Web subfolder. Execute it from this folder. The home directory (Web Root directory) is the directory where it is executed.
IIS Microsoft’s Internet Information Server (IIS) is a Web Server that runs on multiple Windows operating system platforms. It is actually a set of Servers for HTTP/HTTPS, FTP, SNMP and NNTP. It runs as a Service of Windows, and is faster and more robust than the Point of View NTWebServer. IIS is currently the world’s second most popular Web Server behind the Apache Web Server. The charts above show the various IIS versions based on the particular Windows operating system version used, and the features offered by the different versions of IIS. IIS supports many advanced features such as tunneling, proxy servers, and encryption via SSL (128-bit RC6). IIS also supports ASP and ASP.NET, web automation languages commonly used in web sites. Neither ASP nor ASP.NET are used in the Point of View Web Client Solution.

AN-POV-006 – Configuring Local Viewer, Secure Viewer, and Web Clients in POV
42
Because of the many different features and options provided by IIS, its setup can initially seem a bit complex. Later in this material, a step by step procedure is outlined to get a Point of View application working with IIS.
Apache for Windows Apache is a very popular open-source HTTP Web Server commonly used with commercial websites. Although it is typically used with Unix operating systems, there is an Apache for Windows version available. The configuration and use of Apache for Windows is beyond the scope of this document, but you can learn more about Apache for Windows at www.apache.org.

AN-POV-006 – Configuring Local Viewer, Secure Viewer, and Web Clients in POV
43
Using NTWebServer NTWebServer is used with Windows XP, 2K, Server 2003/2008 and Vista platforms. There is really no configuration of NTWebServer that a user needs to do. To use NTWebServer, follow these steps:
Be sure any current Web Server is stopped. This includes IIS. Since a Web Server typically uses Port 80, any Windows Application or Service that uses Port 80 will cause NTWebServer to fail at startup.
Find the file NTWebServer.exe that is located in the \Bin subfolder of the Point of View System folder. Copy the NTWebServer.exe file to the \Web subfolder of your application folder. NTWebServer does not provide a GUI to configure its Home Directory. The directory where you run the NTWebServer.exe from is automatically set as the Home Directory for that instance of NTWebServer.
Start NTWebServer by doing any of the following: a) Double clicking on the NTWebServer.exe file in your application’s \Web subdirectory
b) Put a shortcut to the NTWebServer.exe file (in your application’s \Web subdirectory) into a Windows Startup Folder. NTWebServer will then start when Windows is restarted.
c) Execute the following VBScript in a Background Script (e.g. Startup Script) 'Start up NTWebServer if not running $If $AppIsRunning("CET Web Server") = 0 Then $WinExec($GetAppPath() & "Web\NTWebServer.exe") End If
Once NTWebServer starts successfully, you should see a message as shown below:
If NTWebServer fails at startup, you may see a message as shown below. This means that Port 80 is being used by another Application or Service.

AN-POV-006 – Configuring Local Viewer, Secure Viewer, and Web Clients in POV
44
Using IIS IIS is Microsoft’s premier Web Server that is typically with Web Sites running ASP (Active Server Pages) or ASP.NET. In a Point of View application, we will not run ASP or ASP.NET, so many of the setup options can be ignored.
Installing IIS Typically, IIS is not automatically installed with the Windows installation and must be installed separately. To install IIS, go to Control Panel Add or Remove Programs Add/Remove Windows Components. Check the Internet Information Services checkbox. You can click on Details to add or remove various IIS components. Be sure the World Wide Web (WWW) component is included. You will likely be prompted to add your Windows Installation CD.
After IIS is installed, it needs to be configured. Once configured, you then need to start the IIS Service. Configuring IIS Manually Before configuring IIS, you need to make sure that your Internet Connection Firewall is properly configured (if it is enabled). The Internet Connection Firewall is a software-based firewall that prevents unauthorized connections to your Web Server from remote computers. This includes Port-blocking capability. To configure the Internet Connection Firewall, do the following:
a) From the Control Panel, double click on Network Connections b) Right-click on Local Area Connection and select Properties c) Click on the Advanced tab d) Click on the Windows Firewall Settings button.
or e) From the Control Panel, double click on Windows Firewall f) From the Windows Firewall dialog box, you can enable or disable the Windows Firewall. If disabled (Off), then
you do not need to perform any additional steps g) Click on the Exceptions tab. Make sure the Studio Manager checkbox is checked and Port 1234 is open.
You can add a Port by clicking on the Add Port button.
In addition, see later in this Section on configuring the Windows Firewall with VBScript. Microsoft includes an IIS Manager tool with IIS. You can invoke the IIS Manager using one or more methods, depending on your version of Windows:
a) From the Control Panel, click on Administrative Tools. Next, select Internet Information Services. b) Click Start, point to Administrative Tools, and then click on Internet Information Services Manager. c) From the Start menu, click Run. In the Open box, type inetmgr and click OK. d) From the Start menu, right-click My Computer and click Manage. In the console tree, expand the Services
and Applications node. Click Internet Information Services. e) Execute the file C:\Windows\System32\inetsvr\inetmgr.exe
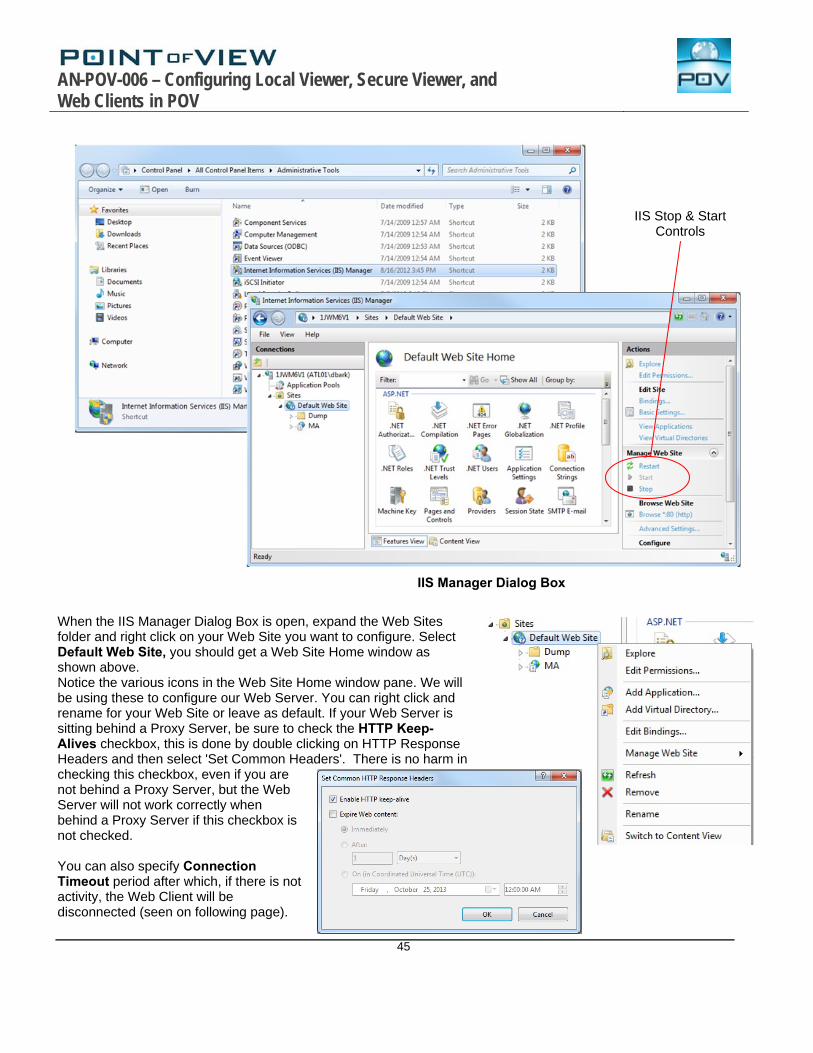
AN-POV-006 – Configuring Local Viewer, Secure Viewer, and Web Clients in POV
45
When the IIS Manager Dialog Box is open, expand the Web Sites folder and right click on your Web Site you want to configure. Select Default Web Site, you should get a Web Site Home window as shown above. Notice the various icons in the Web Site Home window pane. We will be using these to configure our Web Server. You can right click and rename for your Web Site or leave as default. If your Web Server is sitting behind a Proxy Server, be sure to check the HTTP Keep-Alives checkbox, this is done by double clicking on HTTP Response Headers and then select 'Set Common Headers'. There is no harm in checking this checkbox, even if you are not behind a Proxy Server, but the Web Server will not work correctly when behind a Proxy Server if this checkbox is not checked. You can also specify Connection Timeout period after which, if there is not activity, the Web Client will be disconnected (seen on following page).
IIS Stop & Start Controls
IIS Manager Dialog Box

AN-POV-006 – Configuring Local Viewer, Secure Viewer, and Web Clients in POV
46
In the Home Directory tab, you can specify the Home Directory (also known as the Web Root directory) where the web pages are stored. This is an important setting. When using a Web Thin Client, you specify an IP Address in the Address Bar (e.g. HTTP://<IP_WebServer>/MyScreen.html, The file MyScreen.html will be found in the path specified in the Home Directory Physical Path setting. Set the Home Directory as follows:
Web Thin Client Only Set the Home Directory to <application>\Web
Secure Viewer Thin Client Set the Home Directory to <application>
Secure Viewer Thin Client and Web Thin Client Set the Home Directory to <application>
Where <application> is the path to the Point of View application folder, or directory where the web files/pages are located.
Be sure to leave the TCP Port set to Port 80.

AN-POV-006 – Configuring Local Viewer, Secure Viewer, and Web Clients in POV
47
If you are using Microsoft Server 2003/2008 or Vista, you will need to set the MIME Map. The MIME Map specifies which file types can be send by the Web Server to the Web Client. IIS version 5.1 used for Windows XP includes a wildcard character for the file types, so the MIME Map does not need to be specified. But additional file types used in a Point of View application do need to be specified in the MIME Map for IIS version 6.0 and later. The MIME Map is covered in more detail later in this Section.
Depending on the security established in your Windows environment, you may need to change settings under the Authentication icon. Authentication home panel is where encrypted communications is set up. Contact your IT Administrator or Systems Administrator for additional information.
Once you have made changes to any of these settings in the Web Site Properties dialog box, you should Stop and Restart IIS for these changes to take effect. You can stop and start the IIS Web Server through the controls in IIS Manager or by typing IISRestart on the Command Line Utility.

AN-POV-006 – Configuring Local Viewer, Secure Viewer, and Web Clients in POV
48
IIS Startup and Troubleshooting Since IIS has a number of configuration options, it is recommended to take a 4 step approach to starting up the IIS Web Server.
Step 1: Use NTWebServer and Local Loopback In this step, we will test the Point of View application (DataServer) and the NTWebServer on our local machine. This step ensures that the Point of View application is correct.
a) In the Web Settings dialog box (Project Web Web), set the Data Server IP Address to 127.0.0.1 or localhost. The IP Address 127.0.0.1 (or localhost) is the IP Address (or name) of your local loopback. You do not need any TCP/IP connection to an external network to complete Step 1.
b) Click on the IP Security button and be sure the Enable checkbox is unchecked.
c) Click on the Advanced button and be sure the Web Tunneling Gateway Enabled checkbox is unchecked.
d) Close the Project Settings Web dialog box. e) Select Project Status Execution and be sure the
TCP/IP Server is set to Automatic. f) Be sure to save all your screens in HTML (File Save All As HTML) g) Run the Verify Application tool (Tools Verify Application) h) Copy NTWebServer.exe from the \Bin subfolder (where Point of View system files are installed) and put it
into the application’s \Web subfolder. i) Start the NTWebServer from the \Web subfolder by double-clicking on it. A dialog box should appear, and
the last line should end in “listening”. If it does not end in “listening” and instead ends in “Failed”, close the NTWebServer and make sure no other Web Servers are running in your system (e.g. IIS). Restart NTWebServer.
j) Start your application (i.e put it in the Run mode). k) Launch Microsoft Internet Explorer and connect to the Web Server. In the Address Bar of Internet
Explorer, type http://127.0.0.1/<StartScreen>.html and hit enter. l) If System Security is enabled, sign in as a User or sign in as UserName Guest with no Password.
If the Web Thin Client appears to work correctly, then proceed to Step 2. If not, verify the Project Settings Web dialog box settings and run the Verify Application tool.
Step 2: Use NTWebServer and a LAN Connection In this step, we will test that the network connection is working properly and that your Web Server and Data Server are responding to Web Client requests properly.
a) Stop the Point of View Runtime b) In the Web Settings dialog box (Project Settings Web), set the Data Server IP Address to
<IP_DataServer_LAN> which is the IP Address of your PC that is running the Point of View application, or just leave this field in blank. The IP Address of this machine is the IP Address for the Data Server as well as the Web Server. For this step, you will need a functional TCP/IP network. If you do not know your PC’s IP address, use IPConfig or run the Point of View built-in function GetComputerIP().
c) Run the Verify Application tool (Tools Verify Application), This will update the Web Setting (Data Server IP Address) changes into all HTML web pages.
d) Be sure NTWebServer.is still running. If not, restart it.

AN-POV-006 – Configuring Local Viewer, Secure Viewer, and Web Clients in POV
49
e) Start your application (i.e put it in the Run mode). f) On a separate PC, launch Microsoft Internet Explorer and connect to the Web Server. In the Address Bar
of Internet Explorer, type http:// <IP_WebServer_LAN>/<StartScreen>.html and hit enter. g) If System Security is enabled, sign in as a User or sign in as UserName Guest with no Password.
If the Web Thin Client appears to work correctly, proceed to Step 3. If not, verify the TCP/IP connection (e.g. Ping the IP Address). Also, verify settings in the Project Settings Web dialog box. If you make any changes, run the Verify Application tool.
Step 3: Use IIS and a LAN Connection If you have gotten to this step, your application is working with a Web Server and the Data Server both on the local loopback as well as over a LAN Connection. Now we will configure and use the Microsoft IIS Web Server.
a) Stop the Point of View Runtime b) Terminate the NTWebServer application. You can remove this from the \Web folder if you desire. c) Configure the Microsoft IIS Web Server by using the Microsoft IIS Manager tool. Open the Web Site
Properties dialog box. 1) In the Web Site tab, check the HTTP Keep-Alives Enabled checkbox. This is not a necessity if your
Web Server is not behind a Proxy Server but it does not affect anything if it is checked and you are not behind a Proxy Server. You can change the name of the Web Site by changing the Description field.
2) In the Home Directory tab, put the path to the <application>\web folder in the Local Path field. 3) If you operating is Server 2003, Server 2008 or Vista, click on the HTTP Headers tab and click on the
File Types button. Set the MIME Map. (See the MIME MAP Section). 4) If your IT Administrator or Systems Administrator has enabled Windows Directory Security, then
configure the settings in the Directory Security tab to match your system configuration. d) Start from the IIS Manager tool, start the IIS.Web Server. e) On a separate PC, launch Microsoft Internet Explorer and connect to the Web Server. In the Address Bar
of Internet Explorer, type http:// <IP_WebServer_LAN>/<StartScreen>.html and hit enter. f) If System Security is enabled, sign in as a User or sign in as UserName Guest with no Password.
If the Web Thin Client appears to work correctly – congratulations - you now have IIS working. If not, verify the IIS settings. If you make any changes, be sure to stop and restart IIS.
Step 4: Adding other features or configuration options to IIS If you have reached this step, you have IIS working and can now proceed with adding other IIS features or Point of View functions. For troubleshooting purposes, it is best to add these features one at a time in order to isolate any errors. For example, you can add:
a) WAN access with a Router b) A Firewall c) Web Tunneling Gateway d) Proxy Server

AN-POV-006 – Configuring Local Viewer, Secure Viewer, and Web Clients in POV
50
Troubleshooting The following are some basic troubleshooting steps you can undertake to resolve problems:
Error Message: “Can’t Find Server” - From the PC running the Remote Viewer, ping the Server IP Address (primary and secondary Servers).
E.g. from the Command Line Processor run Ping 152.57.100.25 or Ping ServerName - Check to make sure the Web Server (e.g. IIS) is running - Make sure the Point of View runtime is started - Make sure the StudioManager TCP/IP Server thread is running - Make sure the Port numbers are correct (e.g. HTTP uses Port 80, HTTPS (SSL) uses Port 443, Data
Server uses Port 1234). Make sure the Firewall is not blocking these ports - Make sure ISSymbol is properly installed and registered with the System Registry - Be sure your Point of View runtime license supports the Web Client configuration you are attempting to
use.
Error Message: “Page cannot be displayed” - Make sure the IIS Local Path setting is set to the correct directory (root directory) - Stop and restart IIS (make sure any changes to IIS configuration are used) - Be sure the MIME Map is accurate - Make sure you have updated your web pages (e.g. Save as HTML) and user the Verify Application tool
to make sure all the embedded web settings are correct. - Verify the Windows Security (and Directory Security) settings are correct - Be sure that the Screen (or Group Screen) name and web page/file name is correct and does not have
any spaces in the name
Error Message: “HTTP Error 404 – File or Directory not found” - This error message occurs when the Web Client requests a file name extension that is not defined in the
MIME Map
Other - Be sure your Remote Viewer (Secure Viewer Thin Client or Web Thin Client) is pointing to the correct
URL. - Be sure your backup Web Server has correct (updated) web pages/files - You can get additional information on IIS by opening Internet Explorer on the PC that is running IIS and
type in the Address Bar http://localhost/iishelp (IIS must be running)
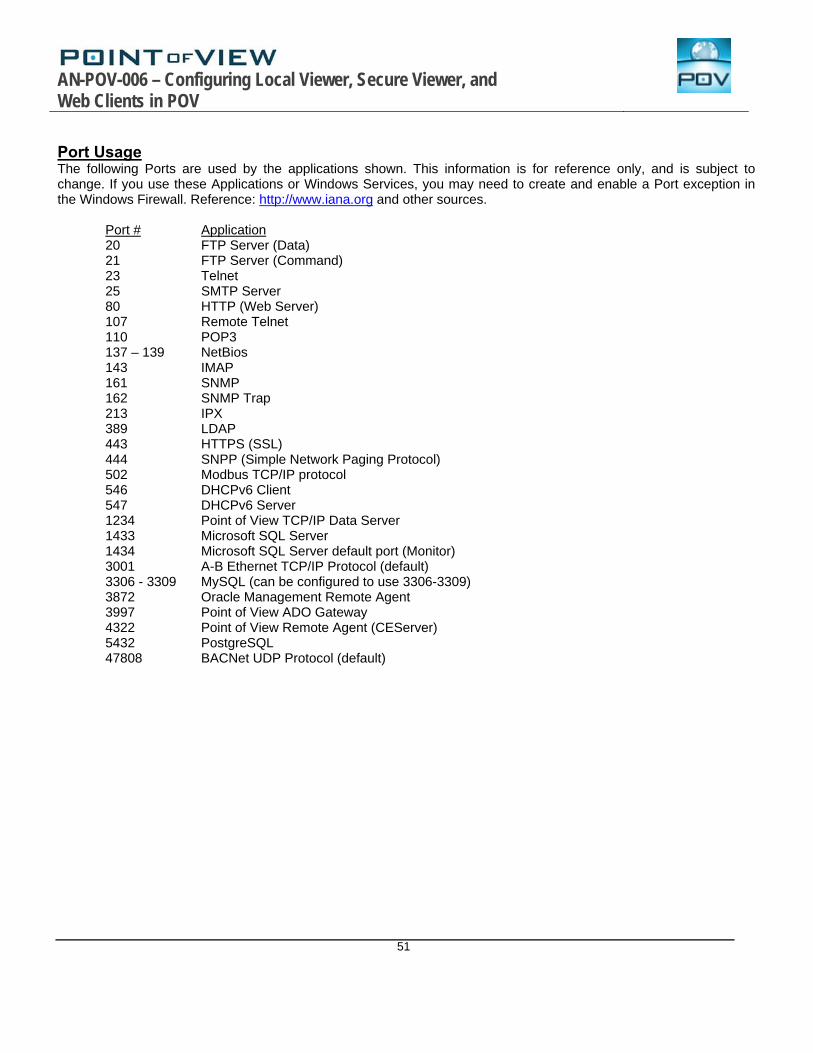
AN-POV-006 – Configuring Local Viewer, Secure Viewer, and Web Clients in POV
51
Port Usage The following Ports are used by the applications shown. This information is for reference only, and is subject to change. If you use these Applications or Windows Services, you may need to create and enable a Port exception in the Windows Firewall. Reference: http://www.iana.org and other sources.
Port # Application 20 FTP Server (Data) 21 FTP Server (Command) 23 Telnet 25 SMTP Server 80 HTTP (Web Server) 107 Remote Telnet 110 POP3 137 – 139 NetBios 143 IMAP 161 SNMP 162 SNMP Trap 213 IPX 389 LDAP 443 HTTPS (SSL) 444 SNPP (Simple Network Paging Protocol) 502 Modbus TCP/IP protocol 546 DHCPv6 Client 547 DHCPv6 Server 1234 Point of View TCP/IP Data Server 1433 Microsoft SQL Server 1434 Microsoft SQL Server default port (Monitor) 3001 A-B Ethernet TCP/IP Protocol (default) 3306 - 3309 MySQL (can be configured to use 3306-3309) 3872 Oracle Management Remote Agent 3997 Point of View ADO Gateway 4322 Point of View Remote Agent (CEServer) 5432 PostgreSQL 47808 BACNet UDP Protocol (default)

AN-POV-006 – Configuring Local Viewer, Secure Viewer, and Web Clients in POV
52
MIME Map MIME is an abbreviation for Multipurpose Internet Mail Extensions, an Internet standard originally developed to extend the format of emails by defining the content type (e.g. text, non-text, etc). This Standard has been integrated with the HTTP standard in Web Servers, since HTTP requires that data be transmitted in the context of email-like messages even though the data is not an email. The MIME Type instructs a Web Browser how to handle files received from a Server. For example, when a Web browser requests an item (file) on a Server, it also requests the MIME type of the object. Some MIME types, like graphics, can be displayed inside the browser. Others, such as word processing documents, require an external helper application to be displayed.
The MIME Map is a mapping of a file extension (media) to a content type. This allows the Web Server to know what type of information it is transmitting to the Web Client. Standard MIME types are registered with the IANA (Internet Assigned Numbers Authority) although the standard allows for non-standard Content Types to be defined. Examples of standard Content Types include:
text/html for normal web pages text/plain for plain text text/xml for Extensible Markup Language (XML) application/octet-stream for an arbitrary byte stream, signifies a file of unknown type, typically used to
download a file. application/pdf for Adobe PDF documents application/xhtml+xml for XHTML files application/msl-dtd for XML DTD files image/jpeg for a JPEG image file image/gif for a GIF image file
Microsoft IIS Version 5 included a wildcard character MIME mapping, permitting IIS to access any file regardless of the Content Type. However, by default IIS versions 6.0 (Windows Server 2003) and 7.0 (Windows Server 2008 and Vista) do not include this wildcard character MIME mapping and will not serve any file of a Content Type (file extension) that is not defined in the MIMEMap node in the IIS Metabase. If you attempt to use a Content Type that has not been predefined, you will get the following 404.3 Error Message:
HTTP Error 404 – File or Directory not found.
If you are using Microsoft IIS Version 6 or higher, for a Web Client to work properly you must do one of the following: Option 1: Add the wildcard mapping to the IIS MIME map
a. Open the IIS Microsoft Management Console (Windows Control Panel Administrative Tools Internet Information Services)
b. Expand the Local Computer Name c. Expand the Web Sites folder d. Left click on the Default Web Site then
click MIME types e. Click on the Open Feature f. In the Actions panel, click the Add button g. In the Associated Extension field, type
an asterisk (*) h. In the Content Type (MIME) field, type
application/octet-stream i. Click on Ok to close j. You must restart IIS for the changes to
take effect

AN-POV-006 – Configuring Local Viewer, Secure Viewer, and Web Clients in POV
53
Option 2: Configure the MIME Types for all specific extensions used
a. Open the IIS Microsoft Management Console (Windows Control Panel Administrative Tools Internet Information Services)
b. Expand the Local Computer Name c. Expand the Web Sites folder d. Right-click on the Default Web Site then click Properties e. Click on the HTTP Headers tab f. In the MIME Map pane, click the File Types button g. For each file extension in the <application>/web subfolder, do steps s through u
.app
.bin
.csv
.gis
.html
.ico
.ini Not necessarily a complete list
.lst
.scc
.sg
.stmp
.tra
.txt h. In the File Types dialog box, click on New Type i. In the Associated Extension field, enter the file extension j. In the Content Type (MIME) field, type application/octet-stream k. Click on Ok to close l. You must stop and restart IIS for the changes to take effect
Note Microsoft does not recommend using the Wildcard mapping of the IIS MIME map for anything other than
a temporary solution during troubleshooting

AN-POV-006 – Configuring Local Viewer, Secure Viewer, and Web Clients in POV
54
Accessing the IIS Metabase from VBScript The Metabase is a structure for storing IIS configuration settings. It performs many of the same type of functions as the Windows Registry, but it is specific to IIS. With every version of IIS, there have typically been new Keys and Values added. Starting in IIS Version 6, the Metabase is in XML format, while prior versions had the Metabase stored in a .bin file format. When IIS is started, the Metabase is loaded into memory, where it stays until IIS is either restarted or terminated.
ADSI is a set of COM Objects that make Providers and Automation interfaces available. The Providers are components that access directories. The Microsoft ADSI Provider for IIS provides a standard syntax for accessing IIS Metabase configuration data through the use of IIS admin objects. The examples in this Section use the Microsoft ADSI interface. Starting with IIS Version 6, a WMI Provider for IIS was included. However, but there is no WMI Provider for IIS Version 5.1 (used with Windows XP Professional).
Local Machine NameSpace The Local Machine (LM) Namespace is the parent location in the hierarchical structure of keys where all services and sites are organized. These keys, each being contained in their own location, are organized in the following format:
/LM/Service/ROOT/VirtualDirectory/Directory/File where: Service = W3SVC Web Service (HTTP/HTTPS) MSFTOSVC FTP Service SmtpSvc SMTP Service NNTP NNTP Service
ROOT = Root Virtual Directory of the site
VirtualDirectory = Virtual Directory
Directory = Physical Directory
File = FileName
Each web site is a virtual instance of the Server and is referred to by the number used in its namespace. For example, /LM/W3SVC/1 specifies the location of the key that contains the first web site, and /LM/W3SVC/3 specifies the location of the key that contains the third website. In IIS version 5.1 and earlier, the web site numbers were generated sequentially (i.e. 1, 2, 3, ..). Starting with IIS version 6.0, these web site numbers were randomly generated based on the web site name. To enable sequential numbering of web sites in IIS version 6 and later, set the Local Machine Metabase Locations Location Comments /LM/W3SVC Configures Properties that are global to the IIS Web Service /LM/W3SVC/1 Configures Properties that are specific to the first Web Server /LM/W3SVC/n Configures Properties that are specific to the n(th) Web Server /LM/W3SVC/n/ROOT Root Virtual Directory of the nth Web Server /LM/W3SVC/n/ROOT/file_name IIS Web File /LM/W3SVC/n/physical_directory_name IIS Web Directory /LM/MimeMap Configures the MimeMap Properties /LM/MSFTPSVC Configures the FTP (File Transfer Protocol) Service /LM/NNTPSVC Configures the NNTP (Network News Transfer Protocol) Service /LM/SmtpSvc Configures the SMTP (Simple Mail Transfer Protocol) Service
The following are partial listings of the various Local Machine Metabase Properties and Methods used to manipulate commonly used features with a Point of View application, followed by VBScript code examples using these Metabase Properties. Note that many of these Properties can work in the various Local Machine Metabase Locations, but they have been listed in a table where they would most frequently be used.

AN-POV-006 – Configuring Local Viewer, Secure Viewer, and Web Clients in POV
55
LM/W3SVC/1 Metabase Path Property Description AllowKeepAlive Specifies whether Keep-Alive processing is permitted. AnonymousPasswordSync Indicates whether IIS should handle the User Password for anonymous
users attempting to access resources. Anonymous access will function as follows: 1) If AnonymousPasswordSync=False and Administrator has not
manually set the AnonymousUserPass user password property, anonymous access will not function properly
2) If AnonymousPasswordSync=True then the anonymous user password is set by IIS
3) If AnonymousPasswordSync=True and AllowAnymous=False, no anonymous users will be allowed to log on the FTP Server
AnonymousUserName Specifies the name of the registered local user that is used to authenticate anonymous users.
AnonymousUserPass Specifies the password of the registered local user that is used to authenticate anonymous users.
Class Returns Class Type ConnectionTimeout Specifies the number of seconds that the Server waits before disconnecting
an inactive Connection. Values are 1 – 65535. Default is 120 seconds. IPSecurity Specifies the IP Address access restrictions for a URL. Can be used to
assign or deny access by browsers, based either on an IP address or DNS Host Name. It is an Object.
MaxConnections Specifies the maximum number of simultaneous connections to the Server. Valid range is 0 to 4294967295 (&HFFFFFFFF) (unlimited). Note: IIS V5.1 for Windows XP Pro has a default value of 10 but can be increased to 40.
MaxEndPointConnections Specifies the maximum number of “listen” sockets that will be aggregated on a network endpoint. If the value is set to 15, then a maximum of 15 sockets can be made to a single port even if more than one domain is bound to the port. In IIS v 5.1, unlimited is -1 (default). In later versions of IIS, unlimited is &HFFFFFFFF.
ServerComment Description Field ServerBindings Specifies a string that IIS uses to determine which network end points are
used by the Web Server instance. Note: the string format is IP: Port: Hostname The IP and Hostname parameters are optional, if empty they will default to a wildcard.
ServerState Returns status of Web Server 1=Starting 2=Started (Running) 3=Stopping 4=Stopped 5=Pausing 6=Paused 7=Continuing
Status Returns status of Web Server Name WebServer ID (e.g.1, 2, ..n)

AN-POV-006 – Configuring Local Viewer, Secure Viewer, and Web Clients in POV
56
LM/W3SVC/1 Metabase Path Method Description Continue Continue the Web Server operation after it has been paused Get Retrieves a Metabase Property value from the Object and stores it in a
variable. With VBScript, you can use the object.property syntax as an alternative..
GetEx Retrieves a single value or a multivalued Property value from the Object and puts it into a variant-array variable
GetInfo Retrieves the current site configuration information Pause Pauses the Web Server operation. Put Sets the value for a Metabase Property in an Object. With VBScript, you can
use the object.property syntax as an alternative.. PutEx Sets the value for a single valued or multi-valued Metabase Property in the
Object. You can also use the PutEx Method to remove, or clear, a Property from a Metabase Key.
SetInfo Updates information (changes in Metabase Properties) Start Start the Web Server Stop Stop the Web Server
LM/W3SVC/MimeMap Metabase Path Property Description MimeMap Provides a list of file name extensions for Multipurpose Internet Mail
Extension (MIME) Mappings. LM/W3SVC/MimeMap Metabase Path Method Description Get Retrieves a Metabase Property value from the Object and stores it in a
variable. With VBScript, you can use the object.property syntax as an alternative..
GetEx Retrieves a single value or a multivalued Property value from the Object and puts it into a variant-array variable
Put Sets the value for a Metabase Property in an Object. With VBScript, you can use the object.property syntax as an alternative..
PutEx Sets the value for a single valued or multi-valued Metabase Property in the Object. You can also use the PutEx Method to remove, or clear, a Property from a Metabase Key.
SetInfo Updates information (changes in Metabase Properties

AN-POV-006 – Configuring Local Viewer, Secure Viewer, and Web Clients in POV
57
LM/W3SVC/1/ROOT Metabase Path Property Description AnonymousUserName Specifies the name of the registered local user that is used to authenticate anonymous
users. AnonymousUserPass Specifies the password of the registered local user that is used to authenticate
anonymous users. AnonymousPasswordSync Indicates whether IIS should handle the User Password for anonymous users
attempting to access resources. Anonymous access will function as follows: 1) If AnonymousPasswordSync=False and Administrator has not manually set
the AnonymousUserPass user password property, anonymous access will not function properly
2) If AnonymousPasswordSync=True then the anonymous user password is set by IIS
3) If AnonymousPasswordSync=True and AllowAnymous=False, no anonymous users will be allowed to log on
Path Specifies the physical path associated with a virtual directory DefaultDoc Contains one or more file names of default documents that will be returned to the client
if no file name is included in the Client’s request. The EnableDefaultDoc flag must be set to True.
EnableDefaultFlag Enables the DefaultDoc to be used if the file is not specified in the URL AccessScript Part of the AccessFlags Property. A value of True indicates that the file or the contents
of the Folder may be executed of they are script files or static content. A value of False only allows static files (e.g. HTML files) to be server.
AccessRead Part of the AccessFlags Property. A value of True indicates that the file or the contents of the folder may be read through Microsoft Internet Explorer.
AccessWrite Part of the AccessFlags Property. A value of True indicates that users are allowed to upload files and their associated properties to the enabled directory on the Web Server or to change content in a write-enabled file. Write can only be implemented with a browser that supports the PUT feature of the HTTP 1.1 protocol standard.
AccessExecute Part of the AccessFlags Property. A value of True indicates that the file or the contents of the folder may be executed, regardless of the file type.
AuthAnonymous Part of the AuthFlags Property. Specifies Anonymous authentication as one of the Windows authentication schemes returned to clients as being available.
LM/W3SVC/1/ROOT Metabase Path Method Description SetInfo Updates information (changes in Metabase Properties)
VBScript to Display Class Objects within the Web Service 'This code was tested with IIS Version 5.1 Dim strComputer, objIIS, objSite, objSite2, msg strComputer = "LocalHost" Set objIIS = GetObject("IIS://" & strComputer & "/W3SVC") msg="" For Each objSite In objIIS

AN-POV-006 – Configuring Local Viewer, Secure Viewer, and Web Clients in POV
58
objSite.getinfo msg = msg & "Class=" & objSite.Class & " Name=" & objSite.name & vbCrLf For Each objSite2 In objSite objSite.getinfo msg = msg & " Class=" & objSite2.Class & " Name=" & objSite2.name & vbCrLf Next Next MsgBox msg
VBScript to Retrieve IIS Status 'This code was tested with IIS Version 5.1 Dim StrComputer, objIIS, objSite, msg, intStatus strComputer = "LocalHost" Set objIIS = GetObject("IIS://" & strComputer & "/W3SVC/1") intStatus = objIIS.Status Select Case intStatus Case 1 msg= "The Web server is starting." Case 2 msg= "The Web server is running." Case 3 msg= "The Web server is stopping." Case 4 msg= "The Web server is stopped." Case 5 msg= "The Web server is pausing." Case 6 msg= "The Web server is paused." Case 7 msg= "The Web server is continuing." End Select msg = "" msg = msg & vbCrLf & "Allow Keep Alive: " & objIIS.AllowKeepAlive msg = msg & vbCrLf & "Application Root: " & objIIS.AppRoot msg = msg & vbCrLf & "server Comment" & objiis.servercomment For Each item In objiis.serverbindings msg = msg & vbCrLf & "Server Bindings " & item Next Set objIIS = GetObject("IIS://" & strComputer & "/W3SVC/1/Root") msg = msg & vbCrLf & "Anonymous User: " & objIIS.AnonymousUserName msg = msg & vbCrLf & "Access Script: " & objIIS.AccessScript 'True|False msg = msg & vbCrLf & "Access Write: " & objIIS.AccessWrite 'True|False msg = msg & vbCrLf & "Access Read: " & objIIS.AccessRead 'True|False msg = msg & vbCrLf & "Access Execute: " & objIIS.AccessExecute 'True|False msg = msg & vbCrLf & "Auth Anonymous: " & objIIS.AuthAnonymous msg = msg & vbCrLf & "Anonymous Password Sync: " & objIIS.AnonymousPasswordSync msg = msg & vbCrLf & “Path: “ & objIIS.Path msg = msg & vbCrLf & "Default Document =" & objIIS.defaultDoc MsgBox msg

AN-POV-006 – Configuring Local Viewer, Secure Viewer, and Web Clients in POV
59
VBScript to Start the IIS Service 'This code was tested with IIS Version 5.1 Function IISV5Start(strComputer) 'This code stops and starts the specific web site. Dim objIIS Set objIIS = GetObject("IIS://" & strComputer & "/W3SVC/1") objIIS.Start Set objIIS = GetObject("IIS://" & strComputer & "/W3SVC/1") IISV5Start = objIIS.Status 'Returns status Set objIIS=Nothing End Function Dim IntStatus, msg intStatus=IISV5Start("LocalHost") Select Case intStatus Case 1 msg= "The Web server is starting." Case 2 msg= "The Web server is running." Case 3 msg= "The Web server is stopping." Case 4 msg= "The Web server is stopped." Case 5 msg= "The Web server is pausing." Case 6 msg= "The Web server is paused." Case 7 msg= "The Web server is continuing." End Select MsgBox msg VBScript to Stop the IIS Service 'This code was tested with IIS Version 5.1 Function IISV5Stop(strComputer) 'This code stops and starts the specific web site. Dim objIIS Set objIIS = GetObject("IIS://" & strComputer & "/W3SVC/1") objIIS.Stop Set objIIS = GetObject("IIS://" & strComputer & "/W3SVC/1") IISV5Stop = objIIS.Status Set objIIS=Nothing End Function Dim intStatus, msg intStatus=IISV5Stop("LocalHost") Select Case intStatus Case 1 msg= "The Web server is starting." Case 2 msg= "The Web server is running." Case 3 msg= "The Web server is stopping." Case 4 msg= "The Web server is stopped." Case 5 msg= "The Web server is pausing." Case 6 msg= "The Web server is paused." Case 7 msg= "The Web server is continuing." End Select MsgBox msg

AN-POV-006 – Configuring Local Viewer, Secure Viewer, and Web Clients in POV
60
VBScript to Set the Web Site Identification Description 'This code was tested with IIS Version 5.1 Dim strComputer, objIIS strComputer = "LocalHost" Set objIIS = GetObject("IIS://" & strComputer & "/W3SVC/1") objiis.ServerComment="My Web Site" objiis.setinfo VBScript to Display the IIS Server Bindings 'This code was tested with IIS Version 5.1 Dim strComputer, objIIS, Item, msg strComputer = "LocalHost" Set objIIS = GetObject("IIS://" & strComputer & "/W3SVC/1") For Each Item In objiis.serverbindings msg = msg & vbCrLf & "Server Bindings " & item Next MsgBox msg VBScript to Set the IIS Server Bindings to Port 80 'This code was tested with IIS Version 5.1 Dim strComputer, objIIS, arrNewBindings strComputer = "LocalHost" Set objIIS = GetObject("IIS://" & strComputer & "/W3SVC/1") ReDim arrNewBindings(0) arrNewBindings(0) = ":80:" objIIS.Put "ServerBindings", (arrNewBindings) objIIS.SetInfo VBScript to Add another IIS Server Binding 'This code was tested with IIS Version 5.1 Dim strComputer, objIIS Dim arrOldBindings, arrNewBindings, intSize, i Const intNewBinding="8080" strComputer = "LocalHost" Set objIIS = GetObject("IIS://" & strComputer & "/W3SVC/1") arrOldBindings=objiis.ServerBindings intSize = UBound(arrOldBindings) ReDim arrNewBindings(intSize +1) For i = 0 To intSize arrNewBindings(i) = arrOldBindings(i) Next arrNewBindings(intSize+1)=":" & intNewBinding & ":" objIIS.Put "ServerBindings", (arrNewBindings) objIIS.SetInfo

AN-POV-006 – Configuring Local Viewer, Secure Viewer, and Web Clients in POV
61
VBScript to Display the Default Documents 'This code was tested with IIS Version 5.1 Dim StrComputer, objIIS, msg strComputer = "LocalHost" Set objIIS = GetObject("IIS://" & strComputer & "/W3SVC/1/ROOT") MsgBox "Default doc = " & objIIS.DefaultDoc VBScript to Clear the Default Documents Dim StrComputer, objIIS strComputer = "LocalHost" Set objIIS = GetObject("IIS://" & strComputer & "/W3SVC/1/ROOT") objIIS.DefaultDoc=”” objiis.EnableDefaultDoc=True objiis.setinfo VBScript to Set the Default Documents Dim StrComputer, objIIS, objSite, msg, intStatus, item strComputer = "LocalHost" Set objIIS = GetObject("IIS://" & strComputer & "/W3SVC/1/ROOT") msg = "Original Default doc = " & objIIS.DefaultDoc objIIS.DefaultDoc="startup.html" objiis.EnableDefaultDoc=True objiis.setinfo VBScript to Display the MIME Map 'This code was tested with IIS Version 5.1 Dim strComputer, objIIS, arrMaps, msg, i, count strComputer = "LocalHost" Set objIIS = GetObject("IIS://" & strComputer & "/MimeMap") arrMaps = objIIS.GetEx("MimeMap") msg="" For i = 0 To UBound(arrMaps) msg=msg & vbCrLf & "Extension: " & arrMaps(i).Extension msg=msg & " " & arrMaps(i).MimeType count = count+1 If count> 20 Then MsgBox msg 'Must print periodically else get an overflow count=0 msg ="" End If Next MsgBox msg

AN-POV-006 – Configuring Local Viewer, Secure Viewer, and Web Clients in POV
62
VBScript to Add a File Extension to the MIME Map 'This code was tested with IIS Version 5.1 Dim strComputer, objMimeMap, MimeMapList, i Const ADS_Property_Update=2 strComputer = "LocalHost" Set objMimeMap= GetObject("IIS://" & strComputer & "/MimeMap") MimeMapList=objMimeMap.GetEx ("MimeMap") 'Get the Current Mime Map List i = UBound(MimeMapList) + 1 ReDim Preserve MimeMapList(i) Set MimeMapList(i)=CreateObject("MimeMap") MimeMapList(i).Extension=".scc" 'Create a new item in the Array MimeMapList(i).MimeType="application/octet-stream" objMimeMap.PutEx ADS_Property_Update, "MimeMap", MimeMapList objMimeMap.SetInfo VBScript to Delete a File Extension from the MIME Map 'This code was tested with IIS Version 5.1 Dim strComputer, objMimeMap, varMimeMap, aMimeMapNew, MMItem, i, strExtDel Const ADS_Property_Update=2 strComputer = "LocalHost" strExtDel = ".abc" Set objMimeMap= GetObject("IIS://" & strComputer & "/MimeMap") varMimeMap=objMimeMap.GetEx("MimeMap") aMimeMapNew=objMimeMap.MimeMap i=0 For Each MMItem In varMimeMap If MMItem.Extension <> strExtDel Then ReDim Preserve aMimeMapNew(i) Set aMimeMapNew(i)=CreateObject("MimeMap") aMimeMapNew(i).Extension=MMItem.Extension aMimeMapNew(i).MimeType=MMItem.MimeType i=i+1 End If Next objMimeMap.PutEx ADS_Property_Update, "MimeMap", aMimeMapNew objMimeMap.SetInfo

AN-POV-006 – Configuring Local Viewer, Secure Viewer, and Web Clients in POV
63
VBScript to Display the Current Home Directory 'This code was tested with IIS Version 5.1 Dim StrComputer, objIIS strComputer = "LocalHost" Set objIIS = GetObject("IIS://" & strComputer & "/W3SVC/1/Root") MsgBox "Old Home Directory Path: " & objIIS.Path 'Current Home Directory VBScript to Set a New Home Directory 'This code was tested with IIS Version 5.1 Dim StrComputer, objIIS strComputer = "LocalHost" Set objIIS = GetObject("IIS://" & strComputer & "/W3SVC/1/Root") objIIS.Path="C:\Test" 'Set new Home Directory objIIS.SetInfo VBScript to Display the Home Directory (ROOT) 'This code was tested with IIS Version 5.1 Dim strComputer, objIIS strComputer = "LocalHost" Set objIIS = GetObject("IIS://" & strComputer & "/W3SVC/1/Root") MsgBox objIIS.Path VBScript to Set the Home Directory (ROOT) 'This code was tested with IIS Version 5.1 Dim strComputer, objIIS strComputer = "LocalHost" Set objIIS = GetObject("IIS://" & strComputer & "/W3SVC/1/Root") objIIS.Path=”C:\Test” objIIS.SetInfo VBScript to Set the Anonymous User and Password 'This code was tested with IIS Version 5.1 Dim strComputer, objIIS strComputer = "LocalHost" Set objIIS = GetObject("IIS://" & strComputer & "/W3SVC/1/Root") objIIS.AnonymousUserName="Joe" objIIS.AnonymousUserPass="JoePass" objIIS.SetInfo

AN-POV-006 – Configuring Local Viewer, Secure Viewer, and Web Clients in POV
64
VBScript to View all Banned IP Addresses from Accessing the Web Server 'This code was tested with IIS Version 5.1 Dim StrComputer, objIIS, objIPRestrict, arrDeny, i, msg strComputer = "LocalHost" Set objIIS = GetObject("IIS://" & strComputer & "/W3SVC/1") Set objIPRestrict=objIIS.IPSecurity arrDeny=objIIS.Get("IPSecurity").IPDeny For i = 0 To UBound(arrDeny) msg = msg & arrDeny(i) & vbCrLf Next If Len(msg)>0 Then MsgBox msg Else MsgBox "No IPs have been denied" End If VBScript to Ban Selected IP Addresses from Accessing the Web Server 'This code was tested with IIS Version 5.1 Dim strComputer, objIIS, objIPRestrict, arrDeny strComputer = "LocalHost" arrDeny=Array("10.0.10.100", "20.30.40.50") Set objIIS = GetObject("IIS://" & strComputer & "/W3SVC/1") Set objIPRestrict=objIIS.IPSecurity objIPRestrict.GrantByDefault=True objIPRestrict.IPDeny=arrDeny objIIS.IPSecurity=objIPRestrict objIIS.SetInfo VBScript to UnBan All IP Addresses from Accessing the Web Server 'This code was tested with IIS Version 5.1 im strComputer, objIIS, objIPRestrict, arrDeny strComputer = "LocalHost" arrDeny=Array("0.0.0.0") 'Unban by putting in a dummy address Set objIIS = GetObject("IIS://" & strComputer & "/W3SVC/1") Set objIPRestrict=objIIS.IPSecurity objIPRestrict.GrantByDefault=True objIPRestrict.IPDeny=arrDeny objIIS.IPSecurity=objIPRestrict objIIS.SetInfo

AN-POV-006 – Configuring Local Viewer, Secure Viewer, and Web Clients in POV
65
VBScript to Turn On the AllowKeepAlive Metabase Property 'This code was tested with IIS Version 5.1 Dim StrComputer, objIIS strComputer = "LocalHost" Set objIIS = GetObject("IIS://" & strComputer & "/W3SVC/1") objIIS.AllowKeepAlive = True objIIS.SetInfo VBScript to Turn Off the AllowKeepAlive Metabase Property 'This code was tested with IIS Version 5.1 Dim StrComputer, objIIS strComputer = "LocalHost" Set objIIS = GetObject("IIS://" & strComputer & "/W3SVC/1") objIIS.AllowKeepAlive = False objIIS.SetInfo VBScript to Display Custom Error Messages 'This code was tested with IIS Version 5.1 Dim StrComputer, objIIS, objSite, msg, intStatus, strDescription strComputer = "LocalHost" Set objIIS = GetObject("IIS://" & strComputer & "/W3SVC/INFO") msg = "" For Each strDescription In objIIS.CustomErrorDescriptions msg = msg & vbCrLf & "Custom Error Description: " & strDescription Next msg = msg & vbCrLf & "Server Configuration Flags: " & objIIS.ServerConfigFlags MsgBox msg

AN-POV-006 – Configuring Local Viewer, Secure Viewer, and Web Clients in POV
66
Accessing the Windows Firewall from VBScript As discussed earlier, Microsoft operating systems (Windows XP, 2K Server 2003/2008 and Vista) include an Internet Connection Firewall (Windows Firewall) which is a software-based firewall allowing (or preventing) certain types of access to your computer. It may open or block specific TCP or UDP Ports from being used.
The Windows Firewall Manager interface can be accessed from the Windows Control Panel, as previously discussed.. However, in some circumstances it may be advantageous to programmatically configure the Windows Firewall. VBScript can be used in these circumstances.
To Enable the Windows FIrewall Dim objFirewall, objPolicy Set objFirewall = CreateObject("HNetCfg.FwMgr") Set objPolicy = objFirewall.LocalPolicy.CurrentProfile objPolicy.FirewallEnabled = True Disable the Windows Firewall Dim objFirewall, objPolicy Set objFirewall = CreateObject("HNetCfg.FwMgr") Set objPolicy = objFirewall.LocalPolicy.CurrentProfile objPolicy.FirewallEnabled = False Delete an open Firewall Port Function DeleteFirewallPort(intPortNumber, strPortType) 'Usage ' Result=DeleteFirewallPort(9999, "TCP") 'Arguments ' intPortNumber //Port number (numeric integer value) ' strPortType = "TCP"|"UDP" //Port type UDP or TCP ' Returns ' Null character if ok, non-null error message if an error Dim objFirewall, objPolicy, colPorts, Protocol Const UDP_Protocol=17 Const TCP_Protocol=6 Set objFirewall = CreateObject("HNetCfg.FwMgr") Set objPolicy = objFirewall.LocalPolicy.CurrentProfile Set colPorts = objPolicy.GloballyOpenPorts If strPortType="UDP" Then 'Set the port Protocol Protocol=UDP_Protocol Else Protocol=TCP_Protocol End If DeleteFirewallPort = colPorts.Remove(intPortNumber, Protocol) End Function

AN-POV-006 – Configuring Local Viewer, Secure Viewer, and Web Clients in POV
67
Create a Firewall Port Function CreateFirewallPort(intPortNumber, strPortName, strPortType, boolPortEnabled, strScope) 'Usage ' Result=CreateFirewallPort(9999, "Test Port", "TCP", True, strScope) ' e.g. MsgBox CreateFirewallPort(9999, "Test Port", "TCP", False, "Local") 'Arguments ' intPortNumber //Port number (numeric integer value) ' strPortName //Port name (string) ' strPortType = "TCP"|"UDP" //Port type UDP or TCP ' boolPortEnabled = False|True //Port is to be enabled or disabled ' strScope = "Any"|"Local" //scope for which the port is unblocked ' Returns ' Null character if ok, non-null error message if an error Dim objFirewall, objPolicy, objPort, colPorts Const UDP_Protocol=17 Const TCP_Protocol=6 Const Scope_Any=0 'Port enabled for any computer (including those on a network Const Scope_Local=1 'Port enabled for computers on the local subnet only Set objFirewall=CreateObject("HNetCfg.FwMgr") Set objPolicy=objFirewall.LocalPolicy.CurrentProfile Set objPort=CreateObject("HNetCfg.FwOpenPort") objPort.Port=intPortNumber objPort.Name=strPortName If strPortType="UDP" Then 'Set the port Protocol objPort.Protocol=UDP_Protocol Else objPort.Protocol=TCP_Protocol End If If strScope="Any" Then 'Set the port Scope objPort.Scope=Scope_Any Else objPort.Scope=Scope_Local End If objPort.Enabled=boolPortEnabled 'Enable or disable the port Set colPorts=objPolicy.GloballyOpenPorts On Error Resume Next CreateFirewallPort=colPorts.Add(objPort) End Function
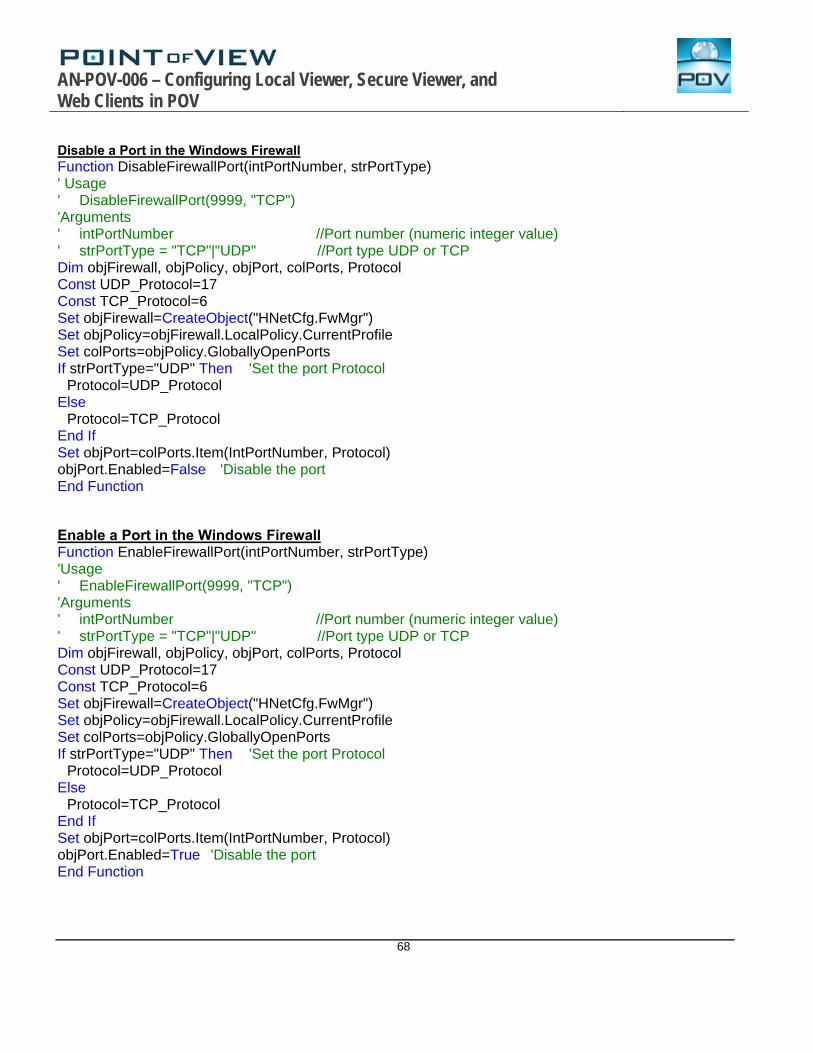
AN-POV-006 – Configuring Local Viewer, Secure Viewer, and Web Clients in POV
68
Disable a Port in the Windows Firewall Function DisableFirewallPort(intPortNumber, strPortType) ' Usage ' DisableFirewallPort(9999, "TCP") 'Arguments ' intPortNumber //Port number (numeric integer value) ' strPortType = "TCP"|"UDP" //Port type UDP or TCP Dim objFirewall, objPolicy, objPort, colPorts, Protocol Const UDP_Protocol=17 Const TCP_Protocol=6 Set objFirewall=CreateObject("HNetCfg.FwMgr") Set objPolicy=objFirewall.LocalPolicy.CurrentProfile Set colPorts=objPolicy.GloballyOpenPorts If strPortType="UDP" Then 'Set the port Protocol Protocol=UDP_Protocol Else Protocol=TCP_Protocol End If Set objPort=colPorts.Item(IntPortNumber, Protocol) objPort.Enabled=False 'Disable the port End Function Enable a Port in the Windows Firewall Function EnableFirewallPort(intPortNumber, strPortType) 'Usage ' EnableFirewallPort(9999, "TCP") 'Arguments ' intPortNumber //Port number (numeric integer value) ' strPortType = "TCP"|"UDP" //Port type UDP or TCP Dim objFirewall, objPolicy, objPort, colPorts, Protocol Const UDP_Protocol=17 Const TCP_Protocol=6 Set objFirewall=CreateObject("HNetCfg.FwMgr") Set objPolicy=objFirewall.LocalPolicy.CurrentProfile Set colPorts=objPolicy.GloballyOpenPorts If strPortType="UDP" Then 'Set the port Protocol Protocol=UDP_Protocol Else Protocol=TCP_Protocol End If Set objPort=colPorts.Item(IntPortNumber, Protocol) objPort.Enabled=True 'Disable the port End Function

AN-POV-006 – Configuring Local Viewer, Secure Viewer, and Web Clients in POV
69
Check to see if a Port in the Windows Firewall is allowed on a specified IP address Function IsFirewallPortAllowed(intPortNumber, strPortType, strIPVersion, strIP) 'Usage ' Result=IsFirewallPortAllowed (9999, "TCP", "IPV4", "192.168.1.110", True, True) 'Arguments ' intPortNumber //Port number (numeric integer value) ' strPortType = "TCP"|"UDP" //Port type UDP or TCP ' strIPVersion //IP version “IPV4”, “IPV6”, otherwise “Any” ' strIP //IP Address ' Returns ' String indicating whether the Port is allowed on the IP address and whether it is restricted Dim objFirewall, objPolicy, objPort, colPorts, Allowed, Restricted, IPVersion, Protocol Const IP_Version4=0 Const IP_Version6=1 Const IP_VersionAny=2 Const UDP_Protocol=17 Const TCP_Protocol=6 Set objFirewall=CreateObject("HNetCfg.FwMgr") IPVersion=IP_VersionAny If strIPVersion="IPV4" Then IPVersion=IP_Version4 If strIPVersion="IPV6" Then IPVersion=IP_Version6 Protocol=TCP_Protocol If strPortType="UDP" Then Protocol=UDP_Protocol objFirewall.isPortAllowed vbNullString, IPVersion, IntPortNumber, strIP, Protocol, allowed, restricted IsFirewallPortAllowed="Is TCP Port " & IntPortNumber & " allowed on interface " & strIP &_ " Allowed:" & Allowed & " Restricted:" & Restricted & vbCrLf End Function

AN-POV-006 – Configuring Local Viewer, Secure Viewer, and Web Clients in POV
70
XII. Relationship between the StudioManager Process and the Viewer Process
It is important to understand that the Point of View Runtime Application has two main Processes; StudioManager.exe
StudioManager is a multi-threaded Process that manages most of the runtime tasks. This Process is run on the Server
Viewer.exe Viewer is a single-threaded Process that manages the runtime graphical interface. It exchanges tag values with the StudioManager Process via the StudioManager TCP/IP Server thread using a TCP/IP connection. The Viewer can be run locally (Local Viewer) on the PC where the StudioManager Process is running, or in a remote station (Secure Viewer Thin Client).
StudioManager Process The StudioManager.exe file is located in the folder containing the system files, typically installed into the C:\Program Files\Point of View v7.1\Bin folder. The StudioManager.exe file, when invoked for execution, becomes a multi-threaded Process that controls the execution of the Point of View runtime and all associated Execution Tasks. Prior to Point of View v7.1 SP2, the Viewer Task was an Execution Task (i.e. a Thread) controlled by the StudioManager Main Thread. As a Thread within the StudioManager Process, the Viewer had direct access to the Tags Database.
Viewer Process Beginning with Point of View v7.1 SP2, the Viewer task (Thread) has been become a Viewer Process, consistent with the functionality of the Secure Viewer Thin Client. This Viewer Process now communicates with the StudioManager Process over a TCP/IP connection. The Viewer Process supports either visualization (Local Viewer) or remote visualization (Secure Viewer Thin Client).
Unlike a Web Thin Client that uses Microsoft Internet Explorer as the browser, the Viewer Process directly connects to the Point of View application runtime and can be configured to disable operator navigation outside of the application, whether using a Local Viewer or a Secure Viewer Web Client. You would typically use the Viewer (Local or Secure Viewer Thin Client) on dedicated plant-floor PCs.
Definitions: StudioManager.exe
StudioManager.exe is the Point of View runtime and/or development Process StudioManager.exe is a multi-threaded Process
Viewer The Viewer Process manages the graphical interface (screens) for the Point of View runtime Starting with Point of View v7.1 SP2, the Viewer is a separate Process from StudioManager.exe Viewer is a single-threaded Process The Viewer can either be run on the same station as the Point of View runtime (StudioManager.exe
Process) or on a remote station (Secure Viewer Thin Client) Regardless of where the Viewer Process is run (local or remote station), it communicates with the
StudioManager.exe Process using a TCP/IP connection. The Viewer keeps its own “virtual” copy of the tags referenced by the Screen(s) open in the Viewer
Process and synchronizes these virtual tags with the real tags contained in the Tags Database at discrete intervals.
To optimize performance and minimize TCP/IP overhead, the Viewer Process synchronizes tag data with the Tags Database in the StudioManager.exe Process at discrete intervals, not continuously. The may have implications for applications developed prior to v7.1 SP2 that utilize Screen Scripts.

AN-POV-006 – Configuring Local Viewer, Secure Viewer, and Web Clients in POV
71
The following diagram represents the internal architecture of the Point of View runtime.
StudioManager.exe Process
Priority Queue
Background Task
Driver Runtime
DDE Client
ODBC Runtime
OPC HDA Server
OPC DA Server
OPC Client
DDE Server
TCP/IP Client
TCP/IP Server
Logwin
Database Spy
DB Client Runtime
Process Threads
POV Tags Database
Process Memory
Background Task
Driver Runtime
DDE Client
ODBC Runtime
OPC HDA Server
OPC DA Server
OPC Client
DDE Server
TCP/IP Client
TCP/IP Server
Logwin
Database Spy
DB Client Runtime
Process Threads
POV Tags Database
Scheduler
Priority Queue
Windows Scheduler
TCP/IP Port
Viewer Process
Viewer
ISSymbol ActiveX
Process Memory
Virtual Tag Database
Process Thread
Priority Queue
Scheduler
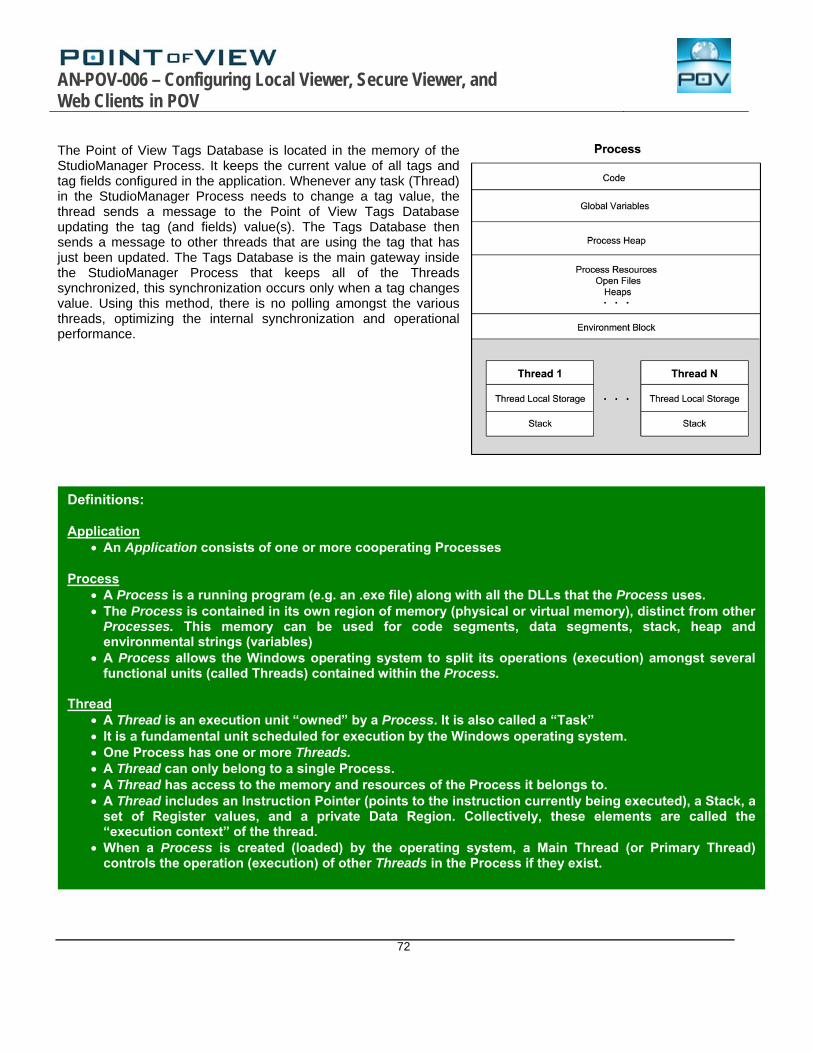
AN-POV-006 – Configuring Local Viewer, Secure Viewer, and Web Clients in POV
72
The Point of View Tags Database is located in the memory of the StudioManager Process. It keeps the current value of all tags and tag fields configured in the application. Whenever any task (Thread) in the StudioManager Process needs to change a tag value, the thread sends a message to the Point of View Tags Database updating the tag (and fields) value(s). The Tags Database then sends a message to other threads that are using the tag that has just been updated. The Tags Database is the main gateway inside the StudioManager Process that keeps all of the Threads synchronized, this synchronization occurs only when a tag changes value. Using this method, there is no polling amongst the various threads, optimizing the internal synchronization and operational performance.
Definitions: Application
An Application consists of one or more cooperating Processes Process
A Process is a running program (e.g. an .exe file) along with all the DLLs that the Process uses. The Process is contained in its own region of memory (physical or virtual memory), distinct from other
Processes. This memory can be used for code segments, data segments, stack, heap and environmental strings (variables)
A Process allows the Windows operating system to split its operations (execution) amongst several functional units (called Threads) contained within the Process.
Thread
A Thread is an execution unit “owned” by a Process. It is also called a “Task” It is a fundamental unit scheduled for execution by the Windows operating system. One Process has one or more Threads. A Thread can only belong to a single Process. A Thread has access to the memory and resources of the Process it belongs to. A Thread includes an Instruction Pointer (points to the instruction currently being executed), a Stack, a
set of Register values, and a private Data Region. Collectively, these elements are called the “execution context” of the thread.
When a Process is created (loaded) by the operating system, a Main Thread (or Primary Thread) controls the operation (execution) of other Threads in the Process if they exist.

AN-POV-006 – Configuring Local Viewer, Secure Viewer, and Web Clients in POV
73
XIII. Thread Prioritization within Windows
Windows XP, 2000, Server 2003, Server 2008, Vista and Windows CE are all preemptive operating systems. This means that these various versions of the Windows operating systems allow several applications (programs) to be loaded into memory simultaneously and switch the execution among them on a rapid basis so as to create the illusion that all programs are running simultaneously on the computer.
The Windows Scheduler determines how the CPU’s resources are switched from one thread to another. The Windows Scheduler switches from thread to thread roughly every 10 msec (for single processor version) to 15 msec (for multi-processor versions) although this timeslice interval can be set at a different time interval. In a Server application, this timeslice may be substantially longer to minimize switching overhead. This timeslice interval is called a quantum.
The Windows Scheduler is non-trivial in its operation, and considers factors such as the relative priority that the developer has designated for each thread when switching from one thread to another as well as the time each thread has run or not run. Additionally, the Scheduler manages the running of threads on a multi-core CPU when applicable.
In the Windows Desktop and Server operating systems (i.e. all Windows versions except Windows CE), the Windows operating systems implements a 32-level priority queue. In general, the higher the priority number, the higher the priority. Level 0 is reserved for the system zero page thread. Non real-time threads have a priority from 1 to 15, while soft real-time (time critical) threads have a priority from 16 to 31. The priority levels are further refined into priority classes:
Priority Class Priority Base Priority Range Real-time Critical 31 31 Real-time 24 22-26 Real-time Idle 16 16 Dynamic time Critical 15 15 High 13 11 - 15 Above Normal 10 8 - 12 Normal 8 6 - 10 Below Normal 6 4 - 8 Idle 4 2 - 6 Dynamic Idle 1 1
A Process has only a single base priority value (i.e. the value assigned by the developer that is used when starting the application). Note that the Windows Task Manager can alter the Priority value for the Process. Each Thread has two priority values: a base priority value and the current priority value. The Windows Scheduler will schedule the Thread for execution based on its current priority value.
If the thread priority is 15 or less, i.e. non soft real-time, Windows uses the concept of “Boosting” and “Decay” to vary thread priorities at runtime, typically on the occurrence of events such as mouse movement or keyboard input. This insures that lower level priority threads get to run when a specific event occurs. The Scheduler also supports a “Balance Set Manager” that will look to see if a thread has not run in a specified time period, e.g. every four (4) seconds. If the thread has not run for this time period, its priority may be temporarily boosted so that it will run.
The Thread’s base priority value is typically inherited from the Process base priority. However, with a multi-threaded Process, the main Thread can alter the base priority of each Thread. Certain Windows system processes may have base priorities set slightly higher than the default for the Normal class to ensure that they execute. The StudioManager Process has a base priority of 7.
Under Windows CE, the Scheduler operates somewhat differently. Windows CE was designed to run on devices with less powerful CPUs and less memory. There are some key differences in the Scheduler for Windows CE:
Windows CE has 256 different priority levels, with Level 0 being the highest priority. Under Windows XP (et. al.), the higher the number, the higher the priority.
16
15
1 0
31
16 soft real-time levels
15 variable levels
1 System Level
Thread Priority levels

AN-POV-006 – Configuring Local Viewer, Secure Viewer, and Web Clients in POV
74
Only limited Priority Boosting is performed Windows CE does not have a Balance Set Manager equivalent
Threads not only have a priority assigned to them, but are also in different Thread states. The available Thread states differ amongst the various Windows Operating Systems versions, but they include:
Running The Windows Dispatcher has performed a context switch to the Thread and has entered the running state. The Thread is now executing. It will continue to execute until the quantum (timeslice) ends, it is preempted by a higher priority Thread, it terminates execution or voluntarily enters the Waiting state.
Ready The Thread is waiting to execute. When determining which Thread to execute, the Windows Scheduler & Dispatcher only considers the pool of Threads in the Ready state (and their relative priority)
Standby A Thread in the Standby state has been selected to be the next Thread to run. Only one Thread can be in the Standby state. A Thread can be preempted from the Standby state if a higher priority Thread is ready to execute before the Thread in Standby begins execution.
Waiting The Thread is in a Waiting state when it is waiting for an object to synchronize its execution (waiting for I/O, a message from another Thread, etc.). When the Thread’s wait ends, it either begins running immediately or is moved back to a Ready state.
Terminate Is when the Thread finishes executing. The Main Thread may or may not release memory used by the Thread.
Based in the Thread priority and the Thread state, the Windows Scheduler and Dispatcher will determine which Thread to execute next when the current Thread is done executing. The Scheduler and Dispatcher use a DRL (Dispatch Ready List), which is essentially a multi-level queue consisting of Threads in the Ready state, to determine which Thread to run next.
The StudioManager Process and Viewer Process both run at a Windows priority class of Normal (Level 7) by default. This priority is set in the Program Settings.ini file found in the Point of View system files folder (e.g. C:\Program Files\Point of View v7.1\Bin folder). In this Program Settings.ini file, the parameter ProcessPriorityClass {valid values Time Critical, Highest, Above Normal,Normal, Below Normal, Lowest, and Idle} in the Section [Options] is used to set the Priority of the StudioManager Process, with Normal being the default.
StudioManager Process is multi-threaded so it must manage the other Threads that are part of its Process. Viewer is a single-threaded Process so it has no other Threads to manage.
StudioManager supports Thread priorities ranging from -3 to +3. When the StudioManager Process is executing within its quantum (timeslice) in the Windows OS, StudioManager will schedule its Threads for execution based on their Priority, TimeSlice and Period values.
The TimeSlice and Period values for the StudioManager Threads (Tasks) are set in the [TimeSlice] and [Period] sections, respectively, in the Program Settings.ini file found in the Point of View system files folder (e.g. C:\Program Files\Point of View
Thread Priority Queue
T1
…
Priority 7
Priority 8
…
Priority 0
Priority 31
T2
StudioManager Thread Priority Queue
Priority 1
Priority -1
Priority 0
Priority -2
Priority -3
Priority 2
Priority 3

AN-POV-006 – Configuring Local Viewer, Secure Viewer, and Web Clients in POV
75
v7.1\Bin folder). The TimeSlice parameter defines how long (in msec) a Thread can run while the Period parameter defines how the time period the Thread can remain inactive (assuming it is enabled).
The Priority of each of the StudioManager’s Threads (Tasks) is defined in the [Priorities] Section of the <Application>.app file. You should not change these values.
XIV. Synchronization between the StudioManager Process and the Viewer Process
The StudioManager TCP/IP Server task (Thread) is the conduit by which the Tags Database in the StudioManager Process is synchronized with the Virtual Tags Database (values and fields) in the Viewer Process through ISSymbol.
Example 1: When the Driver Runtime Thread executes and a new value is read from a PLC register, a message is sent to the Tags Database to update the corresponding Tag value. The Tags database then sends a message to all other threads that are using that specific Tag at the time the Tag update occurred. So if a Viewer Process has an open screen that displays the value of the tag, at defined intervals the TCP/IP Server task “pushes” the new tag value to the Viewer Process. The ISSymbol ActiveX will store the tag value and fields in the Virtual Tags database and then update the screen display where the new tag value or field is used.
Example 2: When the user changes a Tag or Tag Field on the Viewer Process, the new value is stored in the Virtual Tags database managed by the ActiveX Control ISSymbol. At defined intervals (specified in the Project Settings Web dialog box Send Period field), the updated Tags and Tag Fields are sent to the TCP/IP Server, which in turn sends a message to the Tags Database. The Tags Database will inform all other threads on the Server that are using the specific tag at the time the tag update occurred.
In addition to Tag values, the following Tag fields are communicated between the Viewer Process and the StudioManager TCP/IP Server. These fields are hard-coded and cannot be edited by the user.
Tag Fields communicated between the StudioManager TCP/IP Server Thread and a Viewer Process Fieldname R | W Description Quality R Tag quality (192=Good, 0=Bad) TimeStamp R A string containing the Date and Time when the tag last changed value Ack R Indicates if alarms associated with tag require acknowledgement Unit R/W A brief description (max. 9 characters) of the Engineering Unit. Min R/W The minimum value that can be written to the tag during runtime Max R/W The maximum value that can be written to the tag during runtime LoLoLimit R/W Limit value for the LoLo alarm LoLimit R/W Limit value for the Lo alarm HiHiLimit R/W Limit value for the HiHi alarm HiLimit R/W Limit value for the Hi alarm RateLimit R/W Limit value for the Rate alarm DevPLimit R/W Limit value for the DevP alarm DevMLimit R/W Limit value for the DevM alarm DevSetPoint R/W Setpoint value for the Deviation alarms Blocked R/W When set to (1), tag is blocked from use, treated as though tag doesn’t exist. (0)=Unblocked LoLo R Indicates if LoLo alarm is active, Active=1, Not Active=0 Lo R Indicates if Lo alarm is active, Active=1, Not Active=0 HiHi R Indicates if HiHi alarm is active, Active=1, Not Active=0 Hi R Indicates if Hi alarm is active, Active=1, Not Active=0 Rate R Indicates if Rate alarm is active, Active=1, Not Active=0 DevP R Indicates if DevP alarm is active, Active=1, Not Active=0 DevM R Indicates if DevM alarm is active, Active=1, Not Active=0 AlrStatus R Integer value indicating the current active alarms associated with the tag

AN-POV-006 – Configuring Local Viewer, Secure Viewer, and Web Clients in POV
76
AlrDisable R/W Enables (0) or Disables (1) alarms associated with the tag Description* R/W A string description of the tag as configured in the Tags Datasheet AlrOnValue R/W Text string (max. 32 char) associated with Active state of a Boolean tag AlrOffValue R/W Text string (max. 32 char) associated with Normalized state of a Boolean tag AlrAckValue R/W Text string (max. 32 char) associated with Acknowledged state of a Boolean tag UnAck R/W Alarms associated with tag do (0) or don’t (1) require acknowledgement (opposite of Ack)
* Available in Point of View v7.1 SP5 or later Synchronization Intervals It is important to first understand that the execution of the StudioManager Process and the execution of the Viewer Process are asynchronous, and the Windows operating system executes the various threads in a multi-tasking fashion. The inter-thread communication within the StudioManager Process was designed to provide optimal performance at runtime.
Synchronization between the Tags Database in StudioManager and Virtual Tags Database in the Viewer does not occur continuously but at discrete intervals in an attempt to balance the optimization of system performance and network bandwidth vs. Tag synchronization. Communication between the StudioManager Process and the Viewer Process occurs over a TCP/IP connection, regardless of whether the Viewer Process is on the same PC as the Server (Local Viewer) or in a remote PC (Secure Viewer).
When the Viewer Process starts, it will look to the <application>.app file to determine which Screen or Screen Group to load. If the Web Thin Client is used, an initial HTML file gets specified. Each Screen file has embedded in the file a list of the Tags utilized within the Screen. Each Screen file loaded is parsed by ISSymbol for a list of tags utilized and the ISSymbol ActiveX Control (acting as a virtual TCP/IP Client) informs the TCP/IP Server thread in the StudioManager Process that the Viewer wants to receive the current Tag values and any Tag updates (value or specific fields) that occur. The TCP/IP Server then “pushes” these new Tag values to the Client when they occur. So the TCP/IP Server keeps a list of all Clients connected to it, their IP addresses, and which Tags they want to receive updates for.
Within the StudioManager Process, whenever a Tag is changed by any of the Server’s Threads (e.g. Driver, OPC, or Background Task(s) such as Script Worksheets, Math Worksheets, etc.), a message is immediately sent to the Tags Database. The Tags Database in turn informs other Threads within StudioManager that use the specific Tag in the Tags Database has changed value. If the Tag is being used in the Viewer or Web Thin Client, a message will be sent to the TCP/IP Server, letting it know that the Tag value changed. In turn, the TCP/IP Server will push the new Tag value and fields out to the TCP/IP Clients that use the specific Tag.
The TCP/IP Server data push to the TCP/IP Client does not occur continuously, but uses settings found in the ProjectSettingsCommunication dialog box. These settings include:
TCP/IP Port This is the Port number that the TCP/IP Server is to use to communicate to TCP/IP Clients. It can be changed, but it must be a valid, non-reserved Port that does not conflict with any other Application or Windows Service.
TCP/IP Send Period (ms) This value defines the time period (in milliseconds) in which the TCP/IP Server pushes Tag changes out to the TCP/IP Clients. For example, a value of 1000 means that every 1000

AN-POV-006 – Configuring Local Viewer, Secure Viewer, and Web Clients in POV
77
msec (1 second), any Tags changed in the Tags Database will be pushed by the TCP/IP Server to the TCP/IP Client(s) that use the Tags. This value can be lowered, especially if the Viewer is local. However, keep in mind that this is a global setting for all TCP/IP Server communications. The lower the value, the faster the updates but more network bandwidth will be consumed.
So what does this mean? It means that any Tag values displayed on the Thin Client will be updated by the TCP/IP Server Thread in the StudioManager Process at a rate of once/second based on the values configured as shown. To update twice/second, use a value of 500 in the TCP/IP Send Period (ms) field. The TCP/IP Server ignores this setting for the local Viewer and assumes a Send Period equals to 10ms for the local Viewer. How do Tags in the Local Viewer or Secure Viewer Process Virtual Tags Database get synchronized with the Server’s Tags Database? This is done via by the Virtual TCP/IP Client functionality of the ISSymbol ActiveX Control working in combination with the Viewer Process (for the Local Viewer or Secure Viewer Thin Clients) or Microsoft Internet Explorer (for Web Clients).
Since the Viewer is a single-threaded Process, there is no separate Thread for managing the communication back to the Server. This is handled by the ISSymbol ActiveX Control. Tag values in ISSymbol’s Virtual Tags Database that have been updated by the Local Viewer, Secure Viewer Thin Client or Web Thin Client will be sent to the Server’s TCP/IP Server at the end of the execution of a Screen Script, Graphics Script subroutine, Screen Logic script, Command Dynamic or other Dynamic Property that altered the Virtual Tag value, synchronized by a Send Period. If any Tags or Tag Fields in the Virtual Tags Database were updated, they will be sent by the Virtual TCP/IP Client to the Server’s TCP/IP Server when the Send Period interval occurs.
The Send Period for communicating back to the Server from the Viewer (or Web Client) is specified by the Send Period (ms) field in the Web tab dialog box (Project Settings Web). The value specified in this field defines how often the Viewer or Web Client communicates any updated Tag values in the Virtual Tags Database back to the Server’s TCP/IP Server. By default, this Send Period is set to 1000 milliseconds but this can be changed. A lower value will result in faster Tag updates to the Server but add more overhead and increase network traffic. A higher value will decrease Tag update rates but lower overhead and decrease network traffic. Note that Tags will only be communicated at this time interval if the Tag(s) in the Server (i.e. StudioManager) Tags Database have changed value
Tags in the Viewer’s Virtual Tags Database get updated following specific events that occur in the Viewer, and of course by a data push from the TCP/IP Server. These specific events in the Viewer that can change a Tag value or field in the Virtual Tags Database’s are:
Executing an Object with a User-Input Dynamic Property E.g. Text I/O, using an Object with the Position Property as a Slider
Executing a Command Dynamic E.g. VBScript, Point of View Scripting Language, Set a Tag, Reset a Tag or Toggle a Tag
VBScript code in a section of the Graphics Script VBScript code in a section of the Screen Script Point of View Scripting Language in a Screen Logic section VBScript code in Global Procedures**.

AN-POV-006 – Configuring Local Viewer, Secure Viewer, and Web Clients in POV
78
** While VBScript code in a Global Procedures can change the value of a Virtual Tag, it is not a “triggering” event that can cause the Virtual TCP/IP Client to send updated values to the TCP/IP Server. (See notes below)
In the Viewer Process, the above events must complete their execution after which the synchronization between the Virtual Tags Database and the Server’s Tag Database occurs by ISSymbol’s Virtual TCP/IP Client sending updated Tag values to the StudioManager TCP/IP Server. For example, let’s assume we have a Screen Script that has the following code in the WhileOpen section:
Sub Screen_WhileOpen() Dim i For i = 1 To 1000 $myTag = i Next End Sub
The Tag myTag is updated in the Viewer’s Virtual Tags Database at every iteration of the FOR…NEXT loop. But, the StudioManager Tag Database on the Server is not updated until the event (in this example the Subroutine WhileOpen) has completed execution and the Send Period interval occurs. Furthermore, only the last value of the Tag in the Viewer’s Virtual Tag Database will be sent to the StudioManager’s Tags Database. In the above example, only at the end of the WhileOpen subroutine will the myTag Virtual Tag will have a value of 1000 and this will be the only value from this execution event written to the Studio Manager’s Tags Database. The effects of this method of Tag value synchronization can be significant in an application, and the implication is that any sequencing logic based on Tag values altered by other StudioManager Threads should not be implemented in a Command Dynamic, Screen Script, Graphics Script or a Screen Logic section. Instead, use the Background Script Worksheets or Math Worksheets..
There are a couple important notes: 1) Global Procedures can be executed on the Server or on the Viewer. Unless specified, the Global Procedures
are run on the Viewer.
2) To run a Global Procedure on the Server, use the Point of View built-in function RunGlobalProcedureOnServer. Calling this function will suspend execution on the Viewer until the function completes on the Server. Running a Global Procedure on the Server that changes Tag values will make the changes on the Server, which may in turn be pushed out to the Viewer (if the Tag is used in the Viewer Process.
Since the communication from the Virtual Tags Database via the Virtual TCP/IP Client to the Tags Database via the Server’s TCP/IP Server occurs at the end of the execution of a Screen Script, Graphics Script subroutine, Screen Logic script, Command Dynamic or other Dynamic Property, in general the Tag update rate is much faster when using the Local Viewer or a Secure Viewer Thin Client.
Notes If you need to change a tag field not listed in the previous table, you can accomplish this by running a
Script or Global Procedure on the Server (i.e. in the StudioManager Process). Exercise caution when using a Command Dynamic, Screen Script, Graphics Script or Screen Logic
section to set Tag Values, especially when sequencing logic is involved. These sections will only use the values in the Virtual Tags database until the event (i.e. Command Dynamic, Screen Script subroutine, Graphics Script Subroutine, or Screen Logic) has completed execution.
Sequencing logic can be put into a Script Worksheet or Math Worksheet (executed on the Server) and triggered from the Viewer.
VBScript Global Procedures can be run either on the Server (i.e. StudioManager Process) or on the Viewer. By default, the Global Procedures will run on the Viewer. Use the Point of View built-in function RunGlobalProcedureOnServer() to execute a VBScript Global Procedure on the Server.

AN-POV-006 – Configuring Local Viewer, Secure Viewer, and Web Clients in POV
79
Process Environmental Variables Every Process (and Thread) has local storage of environmental settings and variables. This memory is not accessible to another Process in the Windows platform. Since the Viewer is now a separate Process from StudioManager, environmental variables such as Email settings are not shared between the Viewer and the StudioManager Processes.
The effect of this is that when you call the built-in Point of View function CNFEmail(), the settings such as the SMTP Server address, UserName, Password, etc. are stored in the Process’s environmental settings. Thus if the CNFEmail() function is called from a Thread in Studio Manager (e.g. Script Task, Math Worksheet, Scheduler, etc.), the Email settings are only available on the Server (i.e the StudioManager Process). If you attempt to send an email from the Viewer Process (e.g. from a Screen Script, Screen Logic, or Command Dynamic), you will get an error. Conversely, if you execute the CNFEmail() function on the Viewer Process, you will be unable to send an Email from the StudioManager Process. The solution is to execute the CNFEmail() function in both the StudioManager Process and the Viewer Process if you need to send an email from both Processes.
Preloading of Tags into the Viewer Virtual Tags Database When a Screen is loaded on the Viewer for the first time, the Viewer must parse the Screen file to determine which Tags are used by the Screen, and if necessary create the Tags in the Virtual Tags Database of the Viewer and load the Tag values from the TCP/IP Server. This is generally a fast process, taking less than one second. But depending on number of Tags, the network traffic and to a lesser extent any other Threads executing in StudioManager, this process could take a few seconds longer.
Beginning with Point of View Version 7.1 , you can define a Timeout period for preloading of the Tag data into the Viewer’s Virtual Tags Database. The Timeout period defines the maximum amount of time that can be spent preloading Tag data into the Viewer’s Virtual Tags Database before opening the Screen. If a Timeout condition occurs, the Screen opens and any objects displaying a non-loaded Tag value will display a ???? indicating a bad Tag quality. After the Screen is open, the remaining Tags continue to be retrieved from the StudioManager’s Tags Database and stored in the Viewer’s Virtual Tags Database until all the necessary Tags are retrieved.
These Timeout settings are found in the ProjectSettingsCommunication dialog box. These settings include:
Timeout when executing on Remote The value in this field defines the number of milliseconds that can be spend preloading Tag values into the remove Viewer (Secure Viewer) before a Timeout condition occurs. The default value for this field is 3000 milliseconds (3 seconds).
Timeout when executing on local The value in this field defines the number of milliseconds that can be spend preloading Tag values into the remove Viewer (Secure Viewer) before a Timeout condition occurs. The default value for this field is 1000 milliseconds (1 second).
AN-POV-006 – Configuring Local Viewer, Secure Viewer, and Web Clients in POV
80
XV. Miscellaneous
Tag Scope When configuring the Point of View Tags Database, you can set the scope of the Tag to be Server or Local. A Server scope tag means that the Server, the local Viewer, and Web Clients (Secure Viewer Thin Client or Web Thin Client) are all referring to the same Tag. With Server scope tags, any update on the Tag on the Server will result in updating the value to the local Viewer as well as Web Clients. On the other hand, if the Tag scope is set to Local, the ISSymbol ActiveX Control in a Thin Client will keep a separate virtual Tag value for each Tag declared to be a Local Tag. Local Tags in a Web Client are not synchronized with the Server’s Tags Database. The Local Viewer treats Local Tags as having Server scope since the Local Viewer is only run on the Server. Don’t use spaces in Sceen Names When developing your application, be sure not to use spaces in your screen name. Use of spaces requires special consideration when typing the URL. URL specification RFC 1738 limits the use of allowed characters in URLs to “…Only alphanumerics [0-9 a-z A-Z], the special characters “$-_.+!*’(),” [not including the quotes], and reserved characters used for their reserved purposes may be used unencoded within a URL” This means that the space character is not defined by RFC 1738. Most Browsers and Web Servers will substitute a %20 for a space character, but there is no guarantee of this. Using both the Secure Viewer Thin Client and Web Thin Client in the same Application It is possible to support an Point of View application that uses both Secure Viewer Thin Clients and Web Thin Clients. To accomplish this, set your Web Server’s Home Directory (Root Folder) to the <application> path instead of the <application>\Web path. When configuring the Secure Viewer Thin Client, point the URL to http://IP_WebServer/<application>.app. For the Web Thin Client (Microsoft Internet Explorer), point the URL to http://IP_WebServer/Web/StartScreen.html Secure Viewer Date Format Settings When running the Secure Viewer in a different PC than the Server application, it is necessary to use the Point of View built-in function SetDateFormat() function to adjust the date format to be the same as the Server application configuration. The default setting is MDY. It is necessary to invoke this function to avoid any incompatibility with the Trend Control Object and the Alarm/Event Control Object.