amazon elasticache - user guide
TRANSCRIPT

Amazon ElastiCacheUser Guide
API Version 2015-02-02

Amazon ElastiCache User Guide
Amazon ElastiCache: User GuideCopyright © 2018 Amazon Web Services, Inc. and/or its affiliates. All rights reserved.
Amazon's trademarks and trade dress may not be used in connection with any product or service that is not Amazon's, in any mannerthat is likely to cause confusion among customers, or in any manner that disparages or discredits Amazon. All other trademarks notowned by Amazon are the property of their respective owners, who may or may not be affiliated with, connected to, or sponsored byAmazon.
Amazon ElastiCache User Guide
Table of ContentsWhat Is Amazon ElastiCache? .... . . . . . . . . . . . . . . . . . . . . . . . . . . . . . . . . . . . . . . . . . . . . . . . . . . . . . . . . . . . . . . . . . . . . . . . . . . . . . . . . . . . . . . . . . . . . . . . . . . . . . . . . . . 1
Use Cases .... . . . . . . . . . . . . . . . . . . . . . . . . . . . . . . . . . . . . . . . . . . . . . . . . . . . . . . . . . . . . . . . . . . . . . . . . . . . . . . . . . . . . . . . . . . . . . . . . . . . . . . . . . . . . . . . . . . . . . . . . . . . . . . 2In-Memory Data Cache .... . . . . . . . . . . . . . . . . . . . . . . . . . . . . . . . . . . . . . . . . . . . . . . . . . . . . . . . . . . . . . . . . . . . . . . . . . . . . . . . . . . . . . . . . . . . . . . . . . . . 2Gaming Leaderboards (Redis Sorted Lists) ... . . . . . . . . . . . . . . . . . . . . . . . . . . . . . . . . . . . . . . . . . . . . . . . . . . . . . . . . . . . . . . . . . . . . . . . . . . 3Messaging (Redis pub/sub) ... . . . . . . . . . . . . . . . . . . . . . . . . . . . . . . . . . . . . . . . . . . . . . . . . . . . . . . . . . . . . . . . . . . . . . . . . . . . . . . . . . . . . . . . . . . . . . . . 4Recommendation Data (Redis Counters & Hashes) ... . . . . . . . . . . . . . . . . . . . . . . . . . . . . . . . . . . . . . . . . . . . . . . . . . . . . . . . . . . . . . . . 5Other Redis Uses .... . . . . . . . . . . . . . . . . . . . . . . . . . . . . . . . . . . . . . . . . . . . . . . . . . . . . . . . . . . . . . . . . . . . . . . . . . . . . . . . . . . . . . . . . . . . . . . . . . . . . . . . . . . . 5Testimonials ... . . . . . . . . . . . . . . . . . . . . . . . . . . . . . . . . . . . . . . . . . . . . . . . . . . . . . . . . . . . . . . . . . . . . . . . . . . . . . . . . . . . . . . . . . . . . . . . . . . . . . . . . . . . . . . . . . . . 6
ElastiCache Resources .... . . . . . . . . . . . . . . . . . . . . . . . . . . . . . . . . . . . . . . . . . . . . . . . . . . . . . . . . . . . . . . . . . . . . . . . . . . . . . . . . . . . . . . . . . . . . . . . . . . . . . . . . . . . . . 7Tutorial Videos .... . . . . . . . . . . . . . . . . . . . . . . . . . . . . . . . . . . . . . . . . . . . . . . . . . . . . . . . . . . . . . . . . . . . . . . . . . . . . . . . . . . . . . . . . . . . . . . . . . . . . . . . . . . . . . . . . . . . . . . . 9
Introductory Video Tutorials ... . . . . . . . . . . . . . . . . . . . . . . . . . . . . . . . . . . . . . . . . . . . . . . . . . . . . . . . . . . . . . . . . . . . . . . . . . . . . . . . . . . . . . . . . . . . . . 9Advanced Video Tutorials ... . . . . . . . . . . . . . . . . . . . . . . . . . . . . . . . . . . . . . . . . . . . . . . . . . . . . . . . . . . . . . . . . . . . . . . . . . . . . . . . . . . . . . . . . . . . . . . . . . 9
Components and Features .... . . . . . . . . . . . . . . . . . . . . . . . . . . . . . . . . . . . . . . . . . . . . . . . . . . . . . . . . . . . . . . . . . . . . . . . . . . . . . . . . . . . . . . . . . . . . . . . . . . . . . 12Nodes .... . . . . . . . . . . . . . . . . . . . . . . . . . . . . . . . . . . . . . . . . . . . . . . . . . . . . . . . . . . . . . . . . . . . . . . . . . . . . . . . . . . . . . . . . . . . . . . . . . . . . . . . . . . . . . . . . . . . . . . . . . 12Shards (Redis) ... . . . . . . . . . . . . . . . . . . . . . . . . . . . . . . . . . . . . . . . . . . . . . . . . . . . . . . . . . . . . . . . . . . . . . . . . . . . . . . . . . . . . . . . . . . . . . . . . . . . . . . . . . . . . . . . 13Clusters ... . . . . . . . . . . . . . . . . . . . . . . . . . . . . . . . . . . . . . . . . . . . . . . . . . . . . . . . . . . . . . . . . . . . . . . . . . . . . . . . . . . . . . . . . . . . . . . . . . . . . . . . . . . . . . . . . . . . . . . . . 13Replication .... . . . . . . . . . . . . . . . . . . . . . . . . . . . . . . . . . . . . . . . . . . . . . . . . . . . . . . . . . . . . . . . . . . . . . . . . . . . . . . . . . . . . . . . . . . . . . . . . . . . . . . . . . . . . . . . . . . 15Regions and Availability Zones .... . . . . . . . . . . . . . . . . . . . . . . . . . . . . . . . . . . . . . . . . . . . . . . . . . . . . . . . . . . . . . . . . . . . . . . . . . . . . . . . . . . . . . . . 16Endpoints ... . . . . . . . . . . . . . . . . . . . . . . . . . . . . . . . . . . . . . . . . . . . . . . . . . . . . . . . . . . . . . . . . . . . . . . . . . . . . . . . . . . . . . . . . . . . . . . . . . . . . . . . . . . . . . . . . . . . . . 17Parameter Groups .... . . . . . . . . . . . . . . . . . . . . . . . . . . . . . . . . . . . . . . . . . . . . . . . . . . . . . . . . . . . . . . . . . . . . . . . . . . . . . . . . . . . . . . . . . . . . . . . . . . . . . . . . 17Security ... . . . . . . . . . . . . . . . . . . . . . . . . . . . . . . . . . . . . . . . . . . . . . . . . . . . . . . . . . . . . . . . . . . . . . . . . . . . . . . . . . . . . . . . . . . . . . . . . . . . . . . . . . . . . . . . . . . . . . . . . 18Security Groups .... . . . . . . . . . . . . . . . . . . . . . . . . . . . . . . . . . . . . . . . . . . . . . . . . . . . . . . . . . . . . . . . . . . . . . . . . . . . . . . . . . . . . . . . . . . . . . . . . . . . . . . . . . . . . 18Subnet Groups .... . . . . . . . . . . . . . . . . . . . . . . . . . . . . . . . . . . . . . . . . . . . . . . . . . . . . . . . . . . . . . . . . . . . . . . . . . . . . . . . . . . . . . . . . . . . . . . . . . . . . . . . . . . . . . 18Backups/Snapshots (Redis) ... . . . . . . . . . . . . . . . . . . . . . . . . . . . . . . . . . . . . . . . . . . . . . . . . . . . . . . . . . . . . . . . . . . . . . . . . . . . . . . . . . . . . . . . . . . . . . 18Events .... . . . . . . . . . . . . . . . . . . . . . . . . . . . . . . . . . . . . . . . . . . . . . . . . . . . . . . . . . . . . . . . . . . . . . . . . . . . . . . . . . . . . . . . . . . . . . . . . . . . . . . . . . . . . . . . . . . . . . . . . . 19
ElastiCache for Redis Terminology .... . . . . . . . . . . . . . . . . . . . . . . . . . . . . . . . . . . . . . . . . . . . . . . . . . . . . . . . . . . . . . . . . . . . . . . . . . . . . . . . . . . . . . . . . . . 20Accessing ElastiCache .... . . . . . . . . . . . . . . . . . . . . . . . . . . . . . . . . . . . . . . . . . . . . . . . . . . . . . . . . . . . . . . . . . . . . . . . . . . . . . . . . . . . . . . . . . . . . . . . . . . . . . . . . . . . . 22Managing ElastiCache .... . . . . . . . . . . . . . . . . . . . . . . . . . . . . . . . . . . . . . . . . . . . . . . . . . . . . . . . . . . . . . . . . . . . . . . . . . . . . . . . . . . . . . . . . . . . . . . . . . . . . . . . . . . . 23
Managing ElastiCache (Console) ... . . . . . . . . . . . . . . . . . . . . . . . . . . . . . . . . . . . . . . . . . . . . . . . . . . . . . . . . . . . . . . . . . . . . . . . . . . . . . . . . . . . . . . 23Managing ElastiCache (AWS CLI) ... . . . . . . . . . . . . . . . . . . . . . . . . . . . . . . . . . . . . . . . . . . . . . . . . . . . . . . . . . . . . . . . . . . . . . . . . . . . . . . . . . . . . . 23Managing ElastiCache (AWS SDK) .... . . . . . . . . . . . . . . . . . . . . . . . . . . . . . . . . . . . . . . . . . . . . . . . . . . . . . . . . . . . . . . . . . . . . . . . . . . . . . . . . . . . 23Managing ElastiCache (ElastiCache API) ... . . . . . . . . . . . . . . . . . . . . . . . . . . . . . . . . . . . . . . . . . . . . . . . . . . . . . . . . . . . . . . . . . . . . . . . . . . . . 23
Getting Started .... . . . . . . . . . . . . . . . . . . . . . . . . . . . . . . . . . . . . . . . . . . . . . . . . . . . . . . . . . . . . . . . . . . . . . . . . . . . . . . . . . . . . . . . . . . . . . . . . . . . . . . . . . . . . . . . . . . . . . . . . . . . . 24Determine Your Requirements [Every time] .... . . . . . . . . . . . . . . . . . . . . . . . . . . . . . . . . . . . . . . . . . . . . . . . . . . . . . . . . . . . . . . . . . . . . . . . . . . . . . . 25
Memory and Processor Requirements .... . . . . . . . . . . . . . . . . . . . . . . . . . . . . . . . . . . . . . . . . . . . . . . . . . . . . . . . . . . . . . . . . . . . . . . . . . . . . . 25Scaling Requirements .... . . . . . . . . . . . . . . . . . . . . . . . . . . . . . . . . . . . . . . . . . . . . . . . . . . . . . . . . . . . . . . . . . . . . . . . . . . . . . . . . . . . . . . . . . . . . . . . . . . . . 26Failover Requirements .... . . . . . . . . . . . . . . . . . . . . . . . . . . . . . . . . . . . . . . . . . . . . . . . . . . . . . . . . . . . . . . . . . . . . . . . . . . . . . . . . . . . . . . . . . . . . . . . . . . . 26Access Requirements .... . . . . . . . . . . . . . . . . . . . . . . . . . . . . . . . . . . . . . . . . . . . . . . . . . . . . . . . . . . . . . . . . . . . . . . . . . . . . . . . . . . . . . . . . . . . . . . . . . . . . . 26Region and Availability Zone Requirements .... . . . . . . . . . . . . . . . . . . . . . . . . . . . . . . . . . . . . . . . . . . . . . . . . . . . . . . . . . . . . . . . . . . . . . 27
Step 1: Create an AWS Account and Permissions .... . . . . . . . . . . . . . . . . . . . . . . . . . . . . . . . . . . . . . . . . . . . . . . . . . . . . . . . . . . . . . . . . . . . . . . 28Step 1a: Create Your AWS Account .... . . . . . . . . . . . . . . . . . . . . . . . . . . . . . . . . . . . . . . . . . . . . . . . . . . . . . . . . . . . . . . . . . . . . . . . . . . . . . . . . . 28Step 1b: Set Up Your Permissions (New ElastiCache Customers only) ... . . . . . . . . . . . . . . . . . . . . . . . . . . . . . . . . . . . . 28
Step 2: Launch a Cluster ... . . . . . . . . . . . . . . . . . . . . . . . . . . . . . . . . . . . . . . . . . . . . . . . . . . . . . . . . . . . . . . . . . . . . . . . . . . . . . . . . . . . . . . . . . . . . . . . . . . . . . . . . 29Step 3: (Optional) View Cluster Details ... . . . . . . . . . . . . . . . . . . . . . . . . . . . . . . . . . . . . . . . . . . . . . . . . . . . . . . . . . . . . . . . . . . . . . . . . . . . . . . . . . . . . . 31Step 4: Authorize Access .... . . . . . . . . . . . . . . . . . . . . . . . . . . . . . . . . . . . . . . . . . . . . . . . . . . . . . . . . . . . . . . . . . . . . . . . . . . . . . . . . . . . . . . . . . . . . . . . . . . . . . . . 33
Step 4.1: Determine Environment .... . . . . . . . . . . . . . . . . . . . . . . . . . . . . . . . . . . . . . . . . . . . . . . . . . . . . . . . . . . . . . . . . . . . . . . . . . . . . . . . . . . . 33Step 4.2: Grant Access .... . . . . . . . . . . . . . . . . . . . . . . . . . . . . . . . . . . . . . . . . . . . . . . . . . . . . . . . . . . . . . . . . . . . . . . . . . . . . . . . . . . . . . . . . . . . . . . . . . . 35
Step 5: Connect to a Cluster's Node .... . . . . . . . . . . . . . . . . . . . . . . . . . . . . . . . . . . . . . . . . . . . . . . . . . . . . . . . . . . . . . . . . . . . . . . . . . . . . . . . . . . . . . . . 37Step 5.1: Find your Node Endpoints ... . . . . . . . . . . . . . . . . . . . . . . . . . . . . . . . . . . . . . . . . . . . . . . . . . . . . . . . . . . . . . . . . . . . . . . . . . . . . . . . . . 37Step 5.2: Connect to a Memcached Cluster ... . . . . . . . . . . . . . . . . . . . . . . . . . . . . . . . . . . . . . . . . . . . . . . . . . . . . . . . . . . . . . . . . . . . . . . . 37Step 5.2: Connect to a Redis Cluster or Replication Group .... . . . . . . . . . . . . . . . . . . . . . . . . . . . . . . . . . . . . . . . . . . . . . . . . . . 38
Step 6: Delete Your Cluster ... . . . . . . . . . . . . . . . . . . . . . . . . . . . . . . . . . . . . . . . . . . . . . . . . . . . . . . . . . . . . . . . . . . . . . . . . . . . . . . . . . . . . . . . . . . . . . . . . . . . . 42Where Do I Go From Here? .... . . . . . . . . . . . . . . . . . . . . . . . . . . . . . . . . . . . . . . . . . . . . . . . . . . . . . . . . . . . . . . . . . . . . . . . . . . . . . . . . . . . . . . . . . . . . . . . . . . . . 43
Engines and Versions .... . . . . . . . . . . . . . . . . . . . . . . . . . . . . . . . . . . . . . . . . . . . . . . . . . . . . . . . . . . . . . . . . . . . . . . . . . . . . . . . . . . . . . . . . . . . . . . . . . . . . . . . . . . . . . . . . . . . . 44
API Version 2015-02-02iii

Amazon ElastiCache User Guide
Choosing an Engine: Memcached, Redis (cluster mode disabled), or Redis (cluster mode enabled) ... . . . . . 45Determine Available Engine Versions .... . . . . . . . . . . . . . . . . . . . . . . . . . . . . . . . . . . . . . . . . . . . . . . . . . . . . . . . . . . . . . . . . . . . . . . . . . . . . . . . . . . . . . . 48
Determine Available Engine Versions (Console) ... . . . . . . . . . . . . . . . . . . . . . . . . . . . . . . . . . . . . . . . . . . . . . . . . . . . . . . . . . . . . . . . . . . 48Determine Available Engine Versions (AWS CLI) ... . . . . . . . . . . . . . . . . . . . . . . . . . . . . . . . . . . . . . . . . . . . . . . . . . . . . . . . . . . . . . . . . . 48Determine Available Engine Versions (ElastiCache API) ... . . . . . . . . . . . . . . . . . . . . . . . . . . . . . . . . . . . . . . . . . . . . . . . . . . . . . . . 48
Memcached Versions .... . . . . . . . . . . . . . . . . . . . . . . . . . . . . . . . . . . . . . . . . . . . . . . . . . . . . . . . . . . . . . . . . . . . . . . . . . . . . . . . . . . . . . . . . . . . . . . . . . . . . . . . . . . . . . 50Upgrading to a Newer Version .... . . . . . . . . . . . . . . . . . . . . . . . . . . . . . . . . . . . . . . . . . . . . . . . . . . . . . . . . . . . . . . . . . . . . . . . . . . . . . . . . . . . . . . . 50Memcached 1.4.34 .... . . . . . . . . . . . . . . . . . . . . . . . . . . . . . . . . . . . . . . . . . . . . . . . . . . . . . . . . . . . . . . . . . . . . . . . . . . . . . . . . . . . . . . . . . . . . . . . . . . . . . . . 50Memcached 1.4.33 .... . . . . . . . . . . . . . . . . . . . . . . . . . . . . . . . . . . . . . . . . . . . . . . . . . . . . . . . . . . . . . . . . . . . . . . . . . . . . . . . . . . . . . . . . . . . . . . . . . . . . . . . 50Memcached 1.4.24 .... . . . . . . . . . . . . . . . . . . . . . . . . . . . . . . . . . . . . . . . . . . . . . . . . . . . . . . . . . . . . . . . . . . . . . . . . . . . . . . . . . . . . . . . . . . . . . . . . . . . . . . . 51Memcached 1.4.14 .... . . . . . . . . . . . . . . . . . . . . . . . . . . . . . . . . . . . . . . . . . . . . . . . . . . . . . . . . . . . . . . . . . . . . . . . . . . . . . . . . . . . . . . . . . . . . . . . . . . . . . . . 51Memcached 1.4.5 .... . . . . . . . . . . . . . . . . . . . . . . . . . . . . . . . . . . . . . . . . . . . . . . . . . . . . . . . . . . . . . . . . . . . . . . . . . . . . . . . . . . . . . . . . . . . . . . . . . . . . . . . . . 51
Redis Versions .... . . . . . . . . . . . . . . . . . . . . . . . . . . . . . . . . . . . . . . . . . . . . . . . . . . . . . . . . . . . . . . . . . . . . . . . . . . . . . . . . . . . . . . . . . . . . . . . . . . . . . . . . . . . . . . . . . . . . . . 52Redis 3.2.10 (Enhanced) ... . . . . . . . . . . . . . . . . . . . . . . . . . . . . . . . . . . . . . . . . . . . . . . . . . . . . . . . . . . . . . . . . . . . . . . . . . . . . . . . . . . . . . . . . . . . . . . . . . 53Redis 3.2.6 (Enhanced) ... . . . . . . . . . . . . . . . . . . . . . . . . . . . . . . . . . . . . . . . . . . . . . . . . . . . . . . . . . . . . . . . . . . . . . . . . . . . . . . . . . . . . . . . . . . . . . . . . . . . 53Redis 3.2.4 (Enhanced) ... . . . . . . . . . . . . . . . . . . . . . . . . . . . . . . . . . . . . . . . . . . . . . . . . . . . . . . . . . . . . . . . . . . . . . . . . . . . . . . . . . . . . . . . . . . . . . . . . . . . 54Redis 2.8.24 (Enhanced) ... . . . . . . . . . . . . . . . . . . . . . . . . . . . . . . . . . . . . . . . . . . . . . . . . . . . . . . . . . . . . . . . . . . . . . . . . . . . . . . . . . . . . . . . . . . . . . . . . . 55Redis 2.8.23 (Enhanced) ... . . . . . . . . . . . . . . . . . . . . . . . . . . . . . . . . . . . . . . . . . . . . . . . . . . . . . . . . . . . . . . . . . . . . . . . . . . . . . . . . . . . . . . . . . . . . . . . . . 55Redis 2.8.22 (Enhanced) ... . . . . . . . . . . . . . . . . . . . . . . . . . . . . . . . . . . . . . . . . . . . . . . . . . . . . . . . . . . . . . . . . . . . . . . . . . . . . . . . . . . . . . . . . . . . . . . . . . 55Redis 2.8.21 .... . . . . . . . . . . . . . . . . . . . . . . . . . . . . . . . . . . . . . . . . . . . . . . . . . . . . . . . . . . . . . . . . . . . . . . . . . . . . . . . . . . . . . . . . . . . . . . . . . . . . . . . . . . . . . . . . . 56Redis 2.8.19 .... . . . . . . . . . . . . . . . . . . . . . . . . . . . . . . . . . . . . . . . . . . . . . . . . . . . . . . . . . . . . . . . . . . . . . . . . . . . . . . . . . . . . . . . . . . . . . . . . . . . . . . . . . . . . . . . . . 56Redis 2.8.6 .... . . . . . . . . . . . . . . . . . . . . . . . . . . . . . . . . . . . . . . . . . . . . . . . . . . . . . . . . . . . . . . . . . . . . . . . . . . . . . . . . . . . . . . . . . . . . . . . . . . . . . . . . . . . . . . . . . . 56Redis 2.6.13 .... . . . . . . . . . . . . . . . . . . . . . . . . . . . . . . . . . . . . . . . . . . . . . . . . . . . . . . . . . . . . . . . . . . . . . . . . . . . . . . . . . . . . . . . . . . . . . . . . . . . . . . . . . . . . . . . . . 56
Upgrading Engine Versions .... . . . . . . . . . . . . . . . . . . . . . . . . . . . . . . . . . . . . . . . . . . . . . . . . . . . . . . . . . . . . . . . . . . . . . . . . . . . . . . . . . . . . . . . . . . . . . . . . . . . . 57Important Notes on Memcached Engine Upgrades .... . . . . . . . . . . . . . . . . . . . . . . . . . . . . . . . . . . . . . . . . . . . . . . . . . . . . . . . . . . . . 57Important Notes on Redis Engine Upgrades .... . . . . . . . . . . . . . . . . . . . . . . . . . . . . . . . . . . . . . . . . . . . . . . . . . . . . . . . . . . . . . . . . . . . . . 57How to Upgrade Engine Versions .... . . . . . . . . . . . . . . . . . . . . . . . . . . . . . . . . . . . . . . . . . . . . . . . . . . . . . . . . . . . . . . . . . . . . . . . . . . . . . . . . . . . 58
Maintenance Window ..... . . . . . . . . . . . . . . . . . . . . . . . . . . . . . . . . . . . . . . . . . . . . . . . . . . . . . . . . . . . . . . . . . . . . . . . . . . . . . . . . . . . . . . . . . . . . . . . . . . . . . . . . . . . 59Choosing Regions and Availability Zones .... . . . . . . . . . . . . . . . . . . . . . . . . . . . . . . . . . . . . . . . . . . . . . . . . . . . . . . . . . . . . . . . . . . . . . . . . . . . . . . . . . . . . . . . . . 61
Locating Your Nodes .... . . . . . . . . . . . . . . . . . . . . . . . . . . . . . . . . . . . . . . . . . . . . . . . . . . . . . . . . . . . . . . . . . . . . . . . . . . . . . . . . . . . . . . . . . . . . . . . . . . . . . . . . . . . . . 62Supported Regions & Endpoints ... . . . . . . . . . . . . . . . . . . . . . . . . . . . . . . . . . . . . . . . . . . . . . . . . . . . . . . . . . . . . . . . . . . . . . . . . . . . . . . . . . . . . . . . . . . . . . . 63
Finding Endpoints ... . . . . . . . . . . . . . . . . . . . . . . . . . . . . . . . . . . . . . . . . . . . . . . . . . . . . . . . . . . . . . . . . . . . . . . . . . . . . . . . . . . . . . . . . . . . . . . . . . . . . . . . . . . . . . . . . . . . . . . . . . 66Finding Memcached Endpoints (Console) ... . . . . . . . . . . . . . . . . . . . . . . . . . . . . . . . . . . . . . . . . . . . . . . . . . . . . . . . . . . . . . . . . . . . . . . . . . . . . . . . . . . 67Finding Redis (cluster mode disabled) Cluster Endpoints (Console) ... . . . . . . . . . . . . . . . . . . . . . . . . . . . . . . . . . . . . . . . . . . . . . . . 69Finding Redis (cluster mode enabled) Cluster Endpoints (Console) ... . . . . . . . . . . . . . . . . . . . . . . . . . . . . . . . . . . . . . . . . . . . . . . . . 71Finding Endpoints (AWS CLI) ... . . . . . . . . . . . . . . . . . . . . . . . . . . . . . . . . . . . . . . . . . . . . . . . . . . . . . . . . . . . . . . . . . . . . . . . . . . . . . . . . . . . . . . . . . . . . . . . . . . . 73
Finding Endpoints for Nodes and Clusters (AWS CLI) ... . . . . . . . . . . . . . . . . . . . . . . . . . . . . . . . . . . . . . . . . . . . . . . . . . . . . . . . . . . 73Finding the Endpoints for Replication Groups (AWS CLI) ... . . . . . . . . . . . . . . . . . . . . . . . . . . . . . . . . . . . . . . . . . . . . . . . . . . . . . 74
Finding Endpoints (ElastiCache API) ... . . . . . . . . . . . . . . . . . . . . . . . . . . . . . . . . . . . . . . . . . . . . . . . . . . . . . . . . . . . . . . . . . . . . . . . . . . . . . . . . . . . . . . . . . 77Finding Endpoints for Nodes and Clusters (ElastiCache API) ... . . . . . . . . . . . . . . . . . . . . . . . . . . . . . . . . . . . . . . . . . . . . . . . . 77Finding Endpoints for Replication Groups (ElastiCache API) ... . . . . . . . . . . . . . . . . . . . . . . . . . . . . . . . . . . . . . . . . . . . . . . . . . 77
Notifications .... . . . . . . . . . . . . . . . . . . . . . . . . . . . . . . . . . . . . . . . . . . . . . . . . . . . . . . . . . . . . . . . . . . . . . . . . . . . . . . . . . . . . . . . . . . . . . . . . . . . . . . . . . . . . . . . . . . . . . . . . . . . . . . . . 79Alert: LRU Crawler ... . . . . . . . . . . . . . . . . . . . . . . . . . . . . . . . . . . . . . . . . . . . . . . . . . . . . . . . . . . . . . . . . . . . . . . . . . . . . . . . . . . . . . . . . . . . . . . . . . . . . . . . . . . . . . . . . . 79
Best Practices .... . . . . . . . . . . . . . . . . . . . . . . . . . . . . . . . . . . . . . . . . . . . . . . . . . . . . . . . . . . . . . . . . . . . . . . . . . . . . . . . . . . . . . . . . . . . . . . . . . . . . . . . . . . . . . . . . . . . . . . . . . . . . . . 80Ensuring You Have Sufficient Memory to Create a Redis Snapshot .... . . . . . . . . . . . . . . . . . . . . . . . . . . . . . . . . . . . . . . . . . . . . . . 81
Background Write Process and Memory Usage .... . . . . . . . . . . . . . . . . . . . . . . . . . . . . . . . . . . . . . . . . . . . . . . . . . . . . . . . . . . . . . . . . . 81Avoiding Running Out of Memory When Executing a Background Write .... . . . . . . . . . . . . . . . . . . . . . . . . . . . . . . . 82
Managing Reserved Memory (Redis) ... . . . . . . . . . . . . . . . . . . . . . . . . . . . . . . . . . . . . . . . . . . . . . . . . . . . . . . . . . . . . . . . . . . . . . . . . . . . . . . . . . . . . . . . . 83How Much Reserved Memory Do You Need? .... . . . . . . . . . . . . . . . . . . . . . . . . . . . . . . . . . . . . . . . . . . . . . . . . . . . . . . . . . . . . . . . . . . . . 83Parameters to Manage Reserved Memory .... . . . . . . . . . . . . . . . . . . . . . . . . . . . . . . . . . . . . . . . . . . . . . . . . . . . . . . . . . . . . . . . . . . . . . . . . 83Changing Between the reserved-memory and reserved-memory-percent Parameters ... . . . . . . . . . . . . . . 85
Mitigating Out-of-Disk-Space Issues When Using Redis AOF .... . . . . . . . . . . . . . . . . . . . . . . . . . . . . . . . . . . . . . . . . . . . . . . . . . . . . . . . 87Enabling Redis Multi-AZ as a Better Approach to Fault Tolerance .... . . . . . . . . . . . . . . . . . . . . . . . . . . . . . . . . . . . . . . . . 87
Mitigating Failures .... . . . . . . . . . . . . . . . . . . . . . . . . . . . . . . . . . . . . . . . . . . . . . . . . . . . . . . . . . . . . . . . . . . . . . . . . . . . . . . . . . . . . . . . . . . . . . . . . . . . . . . . . . . . . . . . . 87Mitigating Failures when Running Memcached .... . . . . . . . . . . . . . . . . . . . . . . . . . . . . . . . . . . . . . . . . . . . . . . . . . . . . . . . . . . . . . . . . . 87Mitigating Failures when Running Redis ... . . . . . . . . . . . . . . . . . . . . . . . . . . . . . . . . . . . . . . . . . . . . . . . . . . . . . . . . . . . . . . . . . . . . . . . . . . . 88Recommendations .... . . . . . . . . . . . . . . . . . . . . . . . . . . . . . . . . . . . . . . . . . . . . . . . . . . . . . . . . . . . . . . . . . . . . . . . . . . . . . . . . . . . . . . . . . . . . . . . . . . . . . . . . 90
API Version 2015-02-02iv

Amazon ElastiCache User Guide
Configuring Your ElastiCache Client for Efficient Load Balancing .... . . . . . . . . . . . . . . . . . . . . . . . . . . . . . . . . . . . . . . . . . . . . . . . . . 92Consistent Hashing Using Java .... . . . . . . . . . . . . . . . . . . . . . . . . . . . . . . . . . . . . . . . . . . . . . . . . . . . . . . . . . . . . . . . . . . . . . . . . . . . . . . . . . . . . . . . 92Consistent Hashing Using PHP .... . . . . . . . . . . . . . . . . . . . . . . . . . . . . . . . . . . . . . . . . . . . . . . . . . . . . . . . . . . . . . . . . . . . . . . . . . . . . . . . . . . . . . . . 92Consistent Hashing Using .NET .... . . . . . . . . . . . . . . . . . . . . . . . . . . . . . . . . . . . . . . . . . . . . . . . . . . . . . . . . . . . . . . . . . . . . . . . . . . . . . . . . . . . . . . . 93
Best Practices: Online Resharding .... . . . . . . . . . . . . . . . . . . . . . . . . . . . . . . . . . . . . . . . . . . . . . . . . . . . . . . . . . . . . . . . . . . . . . . . . . . . . . . . . . . . . . . . . . . . 93Error Messages .... . . . . . . . . . . . . . . . . . . . . . . . . . . . . . . . . . . . . . . . . . . . . . . . . . . . . . . . . . . . . . . . . . . . . . . . . . . . . . . . . . . . . . . . . . . . . . . . . . . . . . . . . . . . . . . . . . . . . . . . . . . . . . 95Caching Strategies .... . . . . . . . . . . . . . . . . . . . . . . . . . . . . . . . . . . . . . . . . . . . . . . . . . . . . . . . . . . . . . . . . . . . . . . . . . . . . . . . . . . . . . . . . . . . . . . . . . . . . . . . . . . . . . . . . . . . . . . . . 96
Lazy Loading .... . . . . . . . . . . . . . . . . . . . . . . . . . . . . . . . . . . . . . . . . . . . . . . . . . . . . . . . . . . . . . . . . . . . . . . . . . . . . . . . . . . . . . . . . . . . . . . . . . . . . . . . . . . . . . . . . . . . . . . . 96Scenario 1: Cache Hit ... . . . . . . . . . . . . . . . . . . . . . . . . . . . . . . . . . . . . . . . . . . . . . . . . . . . . . . . . . . . . . . . . . . . . . . . . . . . . . . . . . . . . . . . . . . . . . . . . . . . . . 96Scenario 2: Cache Miss ... . . . . . . . . . . . . . . . . . . . . . . . . . . . . . . . . . . . . . . . . . . . . . . . . . . . . . . . . . . . . . . . . . . . . . . . . . . . . . . . . . . . . . . . . . . . . . . . . . . . 96Advantages and Disadvantages of Lazy Loading .... . . . . . . . . . . . . . . . . . . . . . . . . . . . . . . . . . . . . . . . . . . . . . . . . . . . . . . . . . . . . . . . 97Lazy Loading Code .... . . . . . . . . . . . . . . . . . . . . . . . . . . . . . . . . . . . . . . . . . . . . . . . . . . . . . . . . . . . . . . . . . . . . . . . . . . . . . . . . . . . . . . . . . . . . . . . . . . . . . . . 97
Write Through .... . . . . . . . . . . . . . . . . . . . . . . . . . . . . . . . . . . . . . . . . . . . . . . . . . . . . . . . . . . . . . . . . . . . . . . . . . . . . . . . . . . . . . . . . . . . . . . . . . . . . . . . . . . . . . . . . . . . . . 98Advantages and Disadvantages of Write Through .... . . . . . . . . . . . . . . . . . . . . . . . . . . . . . . . . . . . . . . . . . . . . . . . . . . . . . . . . . . . . . 98Write Through Code .... . . . . . . . . . . . . . . . . . . . . . . . . . . . . . . . . . . . . . . . . . . . . . . . . . . . . . . . . . . . . . . . . . . . . . . . . . . . . . . . . . . . . . . . . . . . . . . . . . . . . . 99
Adding TTL .... . . . . . . . . . . . . . . . . . . . . . . . . . . . . . . . . . . . . . . . . . . . . . . . . . . . . . . . . . . . . . . . . . . . . . . . . . . . . . . . . . . . . . . . . . . . . . . . . . . . . . . . . . . . . . . . . . . . . . . . . . . 99Code Example .... . . . . . . . . . . . . . . . . . . . . . . . . . . . . . . . . . . . . . . . . . . . . . . . . . . . . . . . . . . . . . . . . . . . . . . . . . . . . . . . . . . . . . . . . . . . . . . . . . . . . . . . . . . . . . . 99
Related Topics ... . . . . . . . . . . . . . . . . . . . . . . . . . . . . . . . . . . . . . . . . . . . . . . . . . . . . . . . . . . . . . . . . . . . . . . . . . . . . . . . . . . . . . . . . . . . . . . . . . . . . . . . . . . . . . . . . . . . . . 100Nodes .... . . . . . . . . . . . . . . . . . . . . . . . . . . . . . . . . . . . . . . . . . . . . . . . . . . . . . . . . . . . . . . . . . . . . . . . . . . . . . . . . . . . . . . . . . . . . . . . . . . . . . . . . . . . . . . . . . . . . . . . . . . . . . . . . . . . . . . . 101
Redis Nodes and Shards .... . . . . . . . . . . . . . . . . . . . . . . . . . . . . . . . . . . . . . . . . . . . . . . . . . . . . . . . . . . . . . . . . . . . . . . . . . . . . . . . . . . . . . . . . . . . . . . . . . . . . . . 101Choosing Your Node Size .... . . . . . . . . . . . . . . . . . . . . . . . . . . . . . . . . . . . . . . . . . . . . . . . . . . . . . . . . . . . . . . . . . . . . . . . . . . . . . . . . . . . . . . . . . . . . . . . . . . . . . 103
Choosing Your Node Size (Memcached) ... . . . . . . . . . . . . . . . . . . . . . . . . . . . . . . . . . . . . . . . . . . . . . . . . . . . . . . . . . . . . . . . . . . . . . . . . . . 103Choosing Your Node Size (Redis) ... . . . . . . . . . . . . . . . . . . . . . . . . . . . . . . . . . . . . . . . . . . . . . . . . . . . . . . . . . . . . . . . . . . . . . . . . . . . . . . . . . . . 104
Connecting to Nodes .... . . . . . . . . . . . . . . . . . . . . . . . . . . . . . . . . . . . . . . . . . . . . . . . . . . . . . . . . . . . . . . . . . . . . . . . . . . . . . . . . . . . . . . . . . . . . . . . . . . . . . . . . . . 107Memcached .... . . . . . . . . . . . . . . . . . . . . . . . . . . . . . . . . . . . . . . . . . . . . . . . . . . . . . . . . . . . . . . . . . . . . . . . . . . . . . . . . . . . . . . . . . . . . . . . . . . . . . . . . . . . . . . . 107Redis ... . . . . . . . . . . . . . . . . . . . . . . . . . . . . . . . . . . . . . . . . . . . . . . . . . . . . . . . . . . . . . . . . . . . . . . . . . . . . . . . . . . . . . . . . . . . . . . . . . . . . . . . . . . . . . . . . . . . . . . . . . . 108
Reserved Nodes .... . . . . . . . . . . . . . . . . . . . . . . . . . . . . . . . . . . . . . . . . . . . . . . . . . . . . . . . . . . . . . . . . . . . . . . . . . . . . . . . . . . . . . . . . . . . . . . . . . . . . . . . . . . . . . . . . . . 111Understanding Utilization Levels ... . . . . . . . . . . . . . . . . . . . . . . . . . . . . . . . . . . . . . . . . . . . . . . . . . . . . . . . . . . . . . . . . . . . . . . . . . . . . . . . . . . . 111Getting Info About Reserved Node Offerings .... . . . . . . . . . . . . . . . . . . . . . . . . . . . . . . . . . . . . . . . . . . . . . . . . . . . . . . . . . . . . . . . . . 113Purchasing a Reserved Node .... . . . . . . . . . . . . . . . . . . . . . . . . . . . . . . . . . . . . . . . . . . . . . . . . . . . . . . . . . . . . . . . . . . . . . . . . . . . . . . . . . . . . . . . . 116Getting Info About Your Reserved Nodes .... . . . . . . . . . . . . . . . . . . . . . . . . . . . . . . . . . . . . . . . . . . . . . . . . . . . . . . . . . . . . . . . . . . . . . . . 119
Supported Node Types .... . . . . . . . . . . . . . . . . . . . . . . . . . . . . . . . . . . . . . . . . . . . . . . . . . . . . . . . . . . . . . . . . . . . . . . . . . . . . . . . . . . . . . . . . . . . . . . . . . . . . . . . . 121Supported Node Types by Region .... . . . . . . . . . . . . . . . . . . . . . . . . . . . . . . . . . . . . . . . . . . . . . . . . . . . . . . . . . . . . . . . . . . . . . . . . . . . . . . . . . 122
Actions You Can Take When a Node is Scheduled for Replacement .... . . . . . . . . . . . . . . . . . . . . . . . . . . . . . . . . . . . . . . . . . . . . 124Memcached .... . . . . . . . . . . . . . . . . . . . . . . . . . . . . . . . . . . . . . . . . . . . . . . . . . . . . . . . . . . . . . . . . . . . . . . . . . . . . . . . . . . . . . . . . . . . . . . . . . . . . . . . . . . . . . . . 124Redis ... . . . . . . . . . . . . . . . . . . . . . . . . . . . . . . . . . . . . . . . . . . . . . . . . . . . . . . . . . . . . . . . . . . . . . . . . . . . . . . . . . . . . . . . . . . . . . . . . . . . . . . . . . . . . . . . . . . . . . . . . . . 125
Node Auto Discovery (Memcached) ... . . . . . . . . . . . . . . . . . . . . . . . . . . . . . . . . . . . . . . . . . . . . . . . . . . . . . . . . . . . . . . . . . . . . . . . . . . . . . . . . . . . . . . . . . . . . . . . . 127Benefits of Auto Discovery .... . . . . . . . . . . . . . . . . . . . . . . . . . . . . . . . . . . . . . . . . . . . . . . . . . . . . . . . . . . . . . . . . . . . . . . . . . . . . . . . . . . . . . . . . . . . . . . . . . . . 128How Auto Discovery Works .... . . . . . . . . . . . . . . . . . . . . . . . . . . . . . . . . . . . . . . . . . . . . . . . . . . . . . . . . . . . . . . . . . . . . . . . . . . . . . . . . . . . . . . . . . . . . . . . . . . 129
Connecting to Cache Nodes .... . . . . . . . . . . . . . . . . . . . . . . . . . . . . . . . . . . . . . . . . . . . . . . . . . . . . . . . . . . . . . . . . . . . . . . . . . . . . . . . . . . . . . . . . . 129Normal Cluster Operations .... . . . . . . . . . . . . . . . . . . . . . . . . . . . . . . . . . . . . . . . . . . . . . . . . . . . . . . . . . . . . . . . . . . . . . . . . . . . . . . . . . . . . . . . . . . 130Other Operations .... . . . . . . . . . . . . . . . . . . . . . . . . . . . . . . . . . . . . . . . . . . . . . . . . . . . . . . . . . . . . . . . . . . . . . . . . . . . . . . . . . . . . . . . . . . . . . . . . . . . . . . . 131
Using Auto Discovery .... . . . . . . . . . . . . . . . . . . . . . . . . . . . . . . . . . . . . . . . . . . . . . . . . . . . . . . . . . . . . . . . . . . . . . . . . . . . . . . . . . . . . . . . . . . . . . . . . . . . . . . . . . . 132Step 1: Obtain the Configuration Endpoint ... . . . . . . . . . . . . . . . . . . . . . . . . . . . . . . . . . . . . . . . . . . . . . . . . . . . . . . . . . . . . . . . . . . . . . 132Step 2: Download the ElastiCache Cluster Client ... . . . . . . . . . . . . . . . . . . . . . . . . . . . . . . . . . . . . . . . . . . . . . . . . . . . . . . . . . . . . . . 133Step 3: Modify Your Application Program ..... . . . . . . . . . . . . . . . . . . . . . . . . . . . . . . . . . . . . . . . . . . . . . . . . . . . . . . . . . . . . . . . . . . . . . 134
Connecting to Cache Nodes Manually ... . . . . . . . . . . . . . . . . . . . . . . . . . . . . . . . . . . . . . . . . . . . . . . . . . . . . . . . . . . . . . . . . . . . . . . . . . . . . . . . . . . . . 137Adding Auto Discovery To Your Client Library .... . . . . . . . . . . . . . . . . . . . . . . . . . . . . . . . . . . . . . . . . . . . . . . . . . . . . . . . . . . . . . . . . . . . . . . . . 138
Cache Engine Version 1.4.14 or Higher .... . . . . . . . . . . . . . . . . . . . . . . . . . . . . . . . . . . . . . . . . . . . . . . . . . . . . . . . . . . . . . . . . . . . . . . . . . . 138Cache Engine Version Lower Than 1.4.14 .... . . . . . . . . . . . . . . . . . . . . . . . . . . . . . . . . . . . . . . . . . . . . . . . . . . . . . . . . . . . . . . . . . . . . . . . 138Output Format .... . . . . . . . . . . . . . . . . . . . . . . . . . . . . . . . . . . . . . . . . . . . . . . . . . . . . . . . . . . . . . . . . . . . . . . . . . . . . . . . . . . . . . . . . . . . . . . . . . . . . . . . . . . . 139
Auto Discovery Clients ... . . . . . . . . . . . . . . . . . . . . . . . . . . . . . . . . . . . . . . . . . . . . . . . . . . . . . . . . . . . . . . . . . . . . . . . . . . . . . . . . . . . . . . . . . . . . . . . . . . . . . . . . . 139Installing & Compiling Clients ... . . . . . . . . . . . . . . . . . . . . . . . . . . . . . . . . . . . . . . . . . . . . . . . . . . . . . . . . . . . . . . . . . . . . . . . . . . . . . . . . . . . . . . . 140Configuring Clients ... . . . . . . . . . . . . . . . . . . . . . . . . . . . . . . . . . . . . . . . . . . . . . . . . . . . . . . . . . . . . . . . . . . . . . . . . . . . . . . . . . . . . . . . . . . . . . . . . . . . . . . 151
Shards (Redis) ... . . . . . . . . . . . . . . . . . . . . . . . . . . . . . . . . . . . . . . . . . . . . . . . . . . . . . . . . . . . . . . . . . . . . . . . . . . . . . . . . . . . . . . . . . . . . . . . . . . . . . . . . . . . . . . . . . . . . . . . . . . . . . 157Clusters ... . . . . . . . . . . . . . . . . . . . . . . . . . . . . . . . . . . . . . . . . . . . . . . . . . . . . . . . . . . . . . . . . . . . . . . . . . . . . . . . . . . . . . . . . . . . . . . . . . . . . . . . . . . . . . . . . . . . . . . . . . . . . . . . . . . . . . . 158
Memcached Versions .... . . . . . . . . . . . . . . . . . . . . . . . . . . . . . . . . . . . . . . . . . . . . . . . . . . . . . . . . . . . . . . . . . . . . . . . . . . . . . . . . . . . . . . . . . . . . . . . . . . . . . . . . . . . 158
API Version 2015-02-02v

Amazon ElastiCache User Guide
Redis Versions .... . . . . . . . . . . . . . . . . . . . . . . . . . . . . . . . . . . . . . . . . . . . . . . . . . . . . . . . . . . . . . . . . . . . . . . . . . . . . . . . . . . . . . . . . . . . . . . . . . . . . . . . . . . . . . . . . . . . . 159Other ElastiCache Cluster Operations .... . . . . . . . . . . . . . . . . . . . . . . . . . . . . . . . . . . . . . . . . . . . . . . . . . . . . . . . . . . . . . . . . . . . . . . . . . . . . . . . . . . . . 159Creating a Cluster ... . . . . . . . . . . . . . . . . . . . . . . . . . . . . . . . . . . . . . . . . . . . . . . . . . . . . . . . . . . . . . . . . . . . . . . . . . . . . . . . . . . . . . . . . . . . . . . . . . . . . . . . . . . . . . . . . 160
Creating a Cluster: Memcached (Console) ... . . . . . . . . . . . . . . . . . . . . . . . . . . . . . . . . . . . . . . . . . . . . . . . . . . . . . . . . . . . . . . . . . . . . . . . 161Creating a Redis (cluster mode disabled) Cluster (Console) ... . . . . . . . . . . . . . . . . . . . . . . . . . . . . . . . . . . . . . . . . . . . . . . . . 163Creating a Redis (cluster mode enabled) Cluster (Console) ... . . . . . . . . . . . . . . . . . . . . . . . . . . . . . . . . . . . . . . . . . . . . . . . . . 167Creating a Cluster (CLI) ... . . . . . . . . . . . . . . . . . . . . . . . . . . . . . . . . . . . . . . . . . . . . . . . . . . . . . . . . . . . . . . . . . . . . . . . . . . . . . . . . . . . . . . . . . . . . . . . . 172Creating a Cluster (API) ... . . . . . . . . . . . . . . . . . . . . . . . . . . . . . . . . . . . . . . . . . . . . . . . . . . . . . . . . . . . . . . . . . . . . . . . . . . . . . . . . . . . . . . . . . . . . . . . . 174
Viewing a Cluster's Details ... . . . . . . . . . . . . . . . . . . . . . . . . . . . . . . . . . . . . . . . . . . . . . . . . . . . . . . . . . . . . . . . . . . . . . . . . . . . . . . . . . . . . . . . . . . . . . . . . . . . . 176Viewing a Cluster's Details: Memcached (Console) ... . . . . . . . . . . . . . . . . . . . . . . . . . . . . . . . . . . . . . . . . . . . . . . . . . . . . . . . . . . . . 176Viewing a Redis (cluster mode disabled) Cluster's Details (Console) ... . . . . . . . . . . . . . . . . . . . . . . . . . . . . . . . . . . . . . 178Viewing a Redis (cluster mode enabled) Cluster's Details (Console) ... . . . . . . . . . . . . . . . . . . . . . . . . . . . . . . . . . . . . . 179Viewing a Cluster's Details (AWS CLI) ... . . . . . . . . . . . . . . . . . . . . . . . . . . . . . . . . . . . . . . . . . . . . . . . . . . . . . . . . . . . . . . . . . . . . . . . . . . . . . 180Viewing a Cluster's Details (ElastiCache API) ... . . . . . . . . . . . . . . . . . . . . . . . . . . . . . . . . . . . . . . . . . . . . . . . . . . . . . . . . . . . . . . . . . . . . 182
Modifying a Cluster ... . . . . . . . . . . . . . . . . . . . . . . . . . . . . . . . . . . . . . . . . . . . . . . . . . . . . . . . . . . . . . . . . . . . . . . . . . . . . . . . . . . . . . . . . . . . . . . . . . . . . . . . . . . . . . 183Modifying a Cluster (Console) ... . . . . . . . . . . . . . . . . . . . . . . . . . . . . . . . . . . . . . . . . . . . . . . . . . . . . . . . . . . . . . . . . . . . . . . . . . . . . . . . . . . . . . . . 183Modifying a Cache Cluster (AWS CLI) ... . . . . . . . . . . . . . . . . . . . . . . . . . . . . . . . . . . . . . . . . . . . . . . . . . . . . . . . . . . . . . . . . . . . . . . . . . . . . . 184Modifying a Cache Cluster (ElastiCache API) ... . . . . . . . . . . . . . . . . . . . . . . . . . . . . . . . . . . . . . . . . . . . . . . . . . . . . . . . . . . . . . . . . . . . . 185
Rebooting a Cluster ... . . . . . . . . . . . . . . . . . . . . . . . . . . . . . . . . . . . . . . . . . . . . . . . . . . . . . . . . . . . . . . . . . . . . . . . . . . . . . . . . . . . . . . . . . . . . . . . . . . . . . . . . . . . . . 186Rebooting a Cluster (Console) ... . . . . . . . . . . . . . . . . . . . . . . . . . . . . . . . . . . . . . . . . . . . . . . . . . . . . . . . . . . . . . . . . . . . . . . . . . . . . . . . . . . . . . . . 186Rebooting a Cache Cluster (AWS CLI) ... . . . . . . . . . . . . . . . . . . . . . . . . . . . . . . . . . . . . . . . . . . . . . . . . . . . . . . . . . . . . . . . . . . . . . . . . . . . . . 186Rebooting a Cache Cluster (ElastiCache API) ... . . . . . . . . . . . . . . . . . . . . . . . . . . . . . . . . . . . . . . . . . . . . . . . . . . . . . . . . . . . . . . . . . . . . 187
Monitoring a Cluster's Costs ... . . . . . . . . . . . . . . . . . . . . . . . . . . . . . . . . . . . . . . . . . . . . . . . . . . . . . . . . . . . . . . . . . . . . . . . . . . . . . . . . . . . . . . . . . . . . . . . . . . 188Adding Nodes to a Cluster ... . . . . . . . . . . . . . . . . . . . . . . . . . . . . . . . . . . . . . . . . . . . . . . . . . . . . . . . . . . . . . . . . . . . . . . . . . . . . . . . . . . . . . . . . . . . . . . . . . . . . 188
Adding Nodes to a Cluster (Console) ... . . . . . . . . . . . . . . . . . . . . . . . . . . . . . . . . . . . . . . . . . . . . . . . . . . . . . . . . . . . . . . . . . . . . . . . . . . . . . . 188Adding Nodes to a Cache Cluster (AWS CLI) ... . . . . . . . . . . . . . . . . . . . . . . . . . . . . . . . . . . . . . . . . . . . . . . . . . . . . . . . . . . . . . . . . . . . . 191Adding Nodes to a Cache Cluster (ElastiCache API) ... . . . . . . . . . . . . . . . . . . . . . . . . . . . . . . . . . . . . . . . . . . . . . . . . . . . . . . . . . . 192
Removing Nodes from a Cluster ... . . . . . . . . . . . . . . . . . . . . . . . . . . . . . . . . . . . . . . . . . . . . . . . . . . . . . . . . . . . . . . . . . . . . . . . . . . . . . . . . . . . . . . . . . . . . 194Removing Nodes from a Cluster (Console) ... . . . . . . . . . . . . . . . . . . . . . . . . . . . . . . . . . . . . . . . . . . . . . . . . . . . . . . . . . . . . . . . . . . . . . . 194Removing Nodes from a Cluster (AWS CLI) ... . . . . . . . . . . . . . . . . . . . . . . . . . . . . . . . . . . . . . . . . . . . . . . . . . . . . . . . . . . . . . . . . . . . . . . 196Removing Nodes from a Cluster (ElastiCache API) ... . . . . . . . . . . . . . . . . . . . . . . . . . . . . . . . . . . . . . . . . . . . . . . . . . . . . . . . . . . . . 198
Canceling Pending Add or Delete Node Operations .... . . . . . . . . . . . . . . . . . . . . . . . . . . . . . . . . . . . . . . . . . . . . . . . . . . . . . . . . . . . . . . . . . 200Canceling Pending Add or Delete Node Operations (Console) ... . . . . . . . . . . . . . . . . . . . . . . . . . . . . . . . . . . . . . . . . . . . . 200
Deleting a Cluster ... . . . . . . . . . . . . . . . . . . . . . . . . . . . . . . . . . . . . . . . . . . . . . . . . . . . . . . . . . . . . . . . . . . . . . . . . . . . . . . . . . . . . . . . . . . . . . . . . . . . . . . . . . . . . . . . . 201Deleting a Cluster (Console) ... . . . . . . . . . . . . . . . . . . . . . . . . . . . . . . . . . . . . . . . . . . . . . . . . . . . . . . . . . . . . . . . . . . . . . . . . . . . . . . . . . . . . . . . . . . 201Deleting a Cache Cluster (AWS CLI) ... . . . . . . . . . . . . . . . . . . . . . . . . . . . . . . . . . . . . . . . . . . . . . . . . . . . . . . . . . . . . . . . . . . . . . . . . . . . . . . . . 201Deleting a Cache Cluster (ElastiCache API) ... . . . . . . . . . . . . . . . . . . . . . . . . . . . . . . . . . . . . . . . . . . . . . . . . . . . . . . . . . . . . . . . . . . . . . . 202
Scaling .... . . . . . . . . . . . . . . . . . . . . . . . . . . . . . . . . . . . . . . . . . . . . . . . . . . . . . . . . . . . . . . . . . . . . . . . . . . . . . . . . . . . . . . . . . . . . . . . . . . . . . . . . . . . . . . . . . . . . . . . . . . . . . . . . . . . . . . 203Scaling Memcached .... . . . . . . . . . . . . . . . . . . . . . . . . . . . . . . . . . . . . . . . . . . . . . . . . . . . . . . . . . . . . . . . . . . . . . . . . . . . . . . . . . . . . . . . . . . . . . . . . . . . . . . . . . . . . 205
Scaling Memcached Horizontally ... . . . . . . . . . . . . . . . . . . . . . . . . . . . . . . . . . . . . . . . . . . . . . . . . . . . . . . . . . . . . . . . . . . . . . . . . . . . . . . . . . . . 205Scaling Memcached Vertically ... . . . . . . . . . . . . . . . . . . . . . . . . . . . . . . . . . . . . . . . . . . . . . . . . . . . . . . . . . . . . . . . . . . . . . . . . . . . . . . . . . . . . . . . 206
Scaling Single-Node Redis (cluster mode disabled) Clusters ... . . . . . . . . . . . . . . . . . . . . . . . . . . . . . . . . . . . . . . . . . . . . . . . . . . . . . . . 208Scaling Up Single-Node Redis Clusters ... . . . . . . . . . . . . . . . . . . . . . . . . . . . . . . . . . . . . . . . . . . . . . . . . . . . . . . . . . . . . . . . . . . . . . . . . . . . 209Scaling Down Redis Cache Clusters ... . . . . . . . . . . . . . . . . . . . . . . . . . . . . . . . . . . . . . . . . . . . . . . . . . . . . . . . . . . . . . . . . . . . . . . . . . . . . . . . . 214
Scaling Redis (cluster mode disabled) Clusters with Replica Nodes .... . . . . . . . . . . . . . . . . . . . . . . . . . . . . . . . . . . . . . . . . . . . . 217Scaling Up Redis Clusters with Replicas .... . . . . . . . . . . . . . . . . . . . . . . . . . . . . . . . . . . . . . . . . . . . . . . . . . . . . . . . . . . . . . . . . . . . . . . . . . 218Scaling Down Redis Clusters with Replicas .... . . . . . . . . . . . . . . . . . . . . . . . . . . . . . . . . . . . . . . . . . . . . . . . . . . . . . . . . . . . . . . . . . . . . . 224Increasing Read Capacity .... . . . . . . . . . . . . . . . . . . . . . . . . . . . . . . . . . . . . . . . . . . . . . . . . . . . . . . . . . . . . . . . . . . . . . . . . . . . . . . . . . . . . . . . . . . . . . 227Decreasing Read Capacity .... . . . . . . . . . . . . . . . . . . . . . . . . . . . . . . . . . . . . . . . . . . . . . . . . . . . . . . . . . . . . . . . . . . . . . . . . . . . . . . . . . . . . . . . . . . . . 228
Scaling for Amazon ElastiCache for Redis—Redis (cluster mode enabled) ... . . . . . . . . . . . . . . . . . . . . . . . . . . . . . . . . . . . . 229ElastiCache for Redis Offline Resharding .... . . . . . . . . . . . . . . . . . . . . . . . . . . . . . . . . . . . . . . . . . . . . . . . . . . . . . . . . . . . . . . . . . . . . . . . . 230ElastiCache for Redis Online Resharding and Rebalancing .... . . . . . . . . . . . . . . . . . . . . . . . . . . . . . . . . . . . . . . . . . . . . . . . . 230
Replication (Redis) ... . . . . . . . . . . . . . . . . . . . . . . . . . . . . . . . . . . . . . . . . . . . . . . . . . . . . . . . . . . . . . . . . . . . . . . . . . . . . . . . . . . . . . . . . . . . . . . . . . . . . . . . . . . . . . . . . . . . . . . . 239Redis Replication .... . . . . . . . . . . . . . . . . . . . . . . . . . . . . . . . . . . . . . . . . . . . . . . . . . . . . . . . . . . . . . . . . . . . . . . . . . . . . . . . . . . . . . . . . . . . . . . . . . . . . . . . . . . . . . . . . 240
Redis (cluster mode disabled) ... . . . . . . . . . . . . . . . . . . . . . . . . . . . . . . . . . . . . . . . . . . . . . . . . . . . . . . . . . . . . . . . . . . . . . . . . . . . . . . . . . . . . . . . . 240Redis (cluster mode enabled) ... . . . . . . . . . . . . . . . . . . . . . . . . . . . . . . . . . . . . . . . . . . . . . . . . . . . . . . . . . . . . . . . . . . . . . . . . . . . . . . . . . . . . . . . . 240
Replication: Redis (cluster mode disabled) vs. Redis (cluster mode enabled) ... . . . . . . . . . . . . . . . . . . . . . . . . . . . . . . . . . 241
API Version 2015-02-02vi

Amazon ElastiCache User Guide
Which should I choose? .... . . . . . . . . . . . . . . . . . . . . . . . . . . . . . . . . . . . . . . . . . . . . . . . . . . . . . . . . . . . . . . . . . . . . . . . . . . . . . . . . . . . . . . . . . . . . . . . 243Replication: Multi-AZ with Automatic Failover (Redis) ... . . . . . . . . . . . . . . . . . . . . . . . . . . . . . . . . . . . . . . . . . . . . . . . . . . . . . . . . . . . . . . . 244
Automatic Failover Overview .... . . . . . . . . . . . . . . . . . . . . . . . . . . . . . . . . . . . . . . . . . . . . . . . . . . . . . . . . . . . . . . . . . . . . . . . . . . . . . . . . . . . . . . . . 244Notes on Multi-AZ with Automatic Failover ... . . . . . . . . . . . . . . . . . . . . . . . . . . . . . . . . . . . . . . . . . . . . . . . . . . . . . . . . . . . . . . . . . . . . . 245Failure Scenarios with Multi-AZ and Automatic Failover Responses .... . . . . . . . . . . . . . . . . . . . . . . . . . . . . . . . . . . . . 246Enabling Multi-AZ with Automatic Failover ... . . . . . . . . . . . . . . . . . . . . . . . . . . . . . . . . . . . . . . . . . . . . . . . . . . . . . . . . . . . . . . . . . . . . . 250Testing Multi-AZ with Automatic Failover ... . . . . . . . . . . . . . . . . . . . . . . . . . . . . . . . . . . . . . . . . . . . . . . . . . . . . . . . . . . . . . . . . . . . . . . . 253
How Synchronization and Backup are Implemented .... . . . . . . . . . . . . . . . . . . . . . . . . . . . . . . . . . . . . . . . . . . . . . . . . . . . . . . . . . . . . . . . . 257Redis Version 2.8.22 and Later ... . . . . . . . . . . . . . . . . . . . . . . . . . . . . . . . . . . . . . . . . . . . . . . . . . . . . . . . . . . . . . . . . . . . . . . . . . . . . . . . . . . . . . . 257Redis Versions Prior to 2.8.22 .... . . . . . . . . . . . . . . . . . . . . . . . . . . . . . . . . . . . . . . . . . . . . . . . . . . . . . . . . . . . . . . . . . . . . . . . . . . . . . . . . . . . . . . 257
Creating a Cluster with Replicas .... . . . . . . . . . . . . . . . . . . . . . . . . . . . . . . . . . . . . . . . . . . . . . . . . . . . . . . . . . . . . . . . . . . . . . . . . . . . . . . . . . . . . . . . . . . . 258Creating a Cluster with Replicas Using an Existing Cluster ... . . . . . . . . . . . . . . . . . . . . . . . . . . . . . . . . . . . . . . . . . . . . . . . . . 259Creating a Redis Cluster with Replicas from Scratch .... . . . . . . . . . . . . . . . . . . . . . . . . . . . . . . . . . . . . . . . . . . . . . . . . . . . . . . . . 264
Viewing a Replication Group's Details ... . . . . . . . . . . . . . . . . . . . . . . . . . . . . . . . . . . . . . . . . . . . . . . . . . . . . . . . . . . . . . . . . . . . . . . . . . . . . . . . . . . . . . 278Viewing a Redis (cluster mode disabled) with Replicas Details: Redis (cluster mode disabled) ... . . . 278Viewing a Replication Group's Details: Redis (cluster mode enabled) ... . . . . . . . . . . . . . . . . . . . . . . . . . . . . . . . . . . . 279Viewing a Replication Group's Details: (AWS CLI) ... . . . . . . . . . . . . . . . . . . . . . . . . . . . . . . . . . . . . . . . . . . . . . . . . . . . . . . . . . . . . . . 279Viewing a Replication Group's Details: (ElastiCache API) ... . . . . . . . . . . . . . . . . . . . . . . . . . . . . . . . . . . . . . . . . . . . . . . . . . . . . 281
Finding Replication Group Endpoints ... . . . . . . . . . . . . . . . . . . . . . . . . . . . . . . . . . . . . . . . . . . . . . . . . . . . . . . . . . . . . . . . . . . . . . . . . . . . . . . . . . . . . . 283Redis (cluster mode disabled) ... . . . . . . . . . . . . . . . . . . . . . . . . . . . . . . . . . . . . . . . . . . . . . . . . . . . . . . . . . . . . . . . . . . . . . . . . . . . . . . . . . . . . . . . . 283Redis (cluster mode enabled) ... . . . . . . . . . . . . . . . . . . . . . . . . . . . . . . . . . . . . . . . . . . . . . . . . . . . . . . . . . . . . . . . . . . . . . . . . . . . . . . . . . . . . . . . . 284Finding Replication Group Endpoints (ElastiCache API) ... . . . . . . . . . . . . . . . . . . . . . . . . . . . . . . . . . . . . . . . . . . . . . . . . . . . . . 285
Modifying a Cluster with Replicas .... . . . . . . . . . . . . . . . . . . . . . . . . . . . . . . . . . . . . . . . . . . . . . . . . . . . . . . . . . . . . . . . . . . . . . . . . . . . . . . . . . . . . . . . . . 288Modifying a Redis Cluster (Console) ... . . . . . . . . . . . . . . . . . . . . . . . . . . . . . . . . . . . . . . . . . . . . . . . . . . . . . . . . . . . . . . . . . . . . . . . . . . . . . . . 288Modifying a Replication Group (AWS CLI) ... . . . . . . . . . . . . . . . . . . . . . . . . . . . . . . . . . . . . . . . . . . . . . . . . . . . . . . . . . . . . . . . . . . . . . . . 288Modifying a Replication Group (ElastiCache API) ... . . . . . . . . . . . . . . . . . . . . . . . . . . . . . . . . . . . . . . . . . . . . . . . . . . . . . . . . . . . . . . 289
Deleting a Cluster with Replicas .... . . . . . . . . . . . . . . . . . . . . . . . . . . . . . . . . . . . . . . . . . . . . . . . . . . . . . . . . . . . . . . . . . . . . . . . . . . . . . . . . . . . . . . . . . . . 290Deleting a Replication Group (Console) ... . . . . . . . . . . . . . . . . . . . . . . . . . . . . . . . . . . . . . . . . . . . . . . . . . . . . . . . . . . . . . . . . . . . . . . . . . . . 290Deleting a Replication Group (AWS CLI) ... . . . . . . . . . . . . . . . . . . . . . . . . . . . . . . . . . . . . . . . . . . . . . . . . . . . . . . . . . . . . . . . . . . . . . . . . . . 290Deleting a Replication Group (ElastiCache API) ... . . . . . . . . . . . . . . . . . . . . . . . . . . . . . . . . . . . . . . . . . . . . . . . . . . . . . . . . . . . . . . . . 290
Adding a Read Replica .... . . . . . . . . . . . . . . . . . . . . . . . . . . . . . . . . . . . . . . . . . . . . . . . . . . . . . . . . . . . . . . . . . . . . . . . . . . . . . . . . . . . . . . . . . . . . . . . . . . . . . . . . 291Adding a Read Replica to a Cluster (Console) ... . . . . . . . . . . . . . . . . . . . . . . . . . . . . . . . . . . . . . . . . . . . . . . . . . . . . . . . . . . . . . . . . . . 291Adding a Read Replica to a Replication Group (AWS CLI) ... . . . . . . . . . . . . . . . . . . . . . . . . . . . . . . . . . . . . . . . . . . . . . . . . . . . 291Adding a Read Replica to a Replication Group (ElastiCache API) ... . . . . . . . . . . . . . . . . . . . . . . . . . . . . . . . . . . . . . . . . . 292
Promoting a Read-Replica .... . . . . . . . . . . . . . . . . . . . . . . . . . . . . . . . . . . . . . . . . . . . . . . . . . . . . . . . . . . . . . . . . . . . . . . . . . . . . . . . . . . . . . . . . . . . . . . . . . . . 293Promoting a Read-Replica to Primary (Console) ... . . . . . . . . . . . . . . . . . . . . . . . . . . . . . . . . . . . . . . . . . . . . . . . . . . . . . . . . . . . . . . . 293Promoting a Read-Replica to Primary (AWS CLI) ... . . . . . . . . . . . . . . . . . . . . . . . . . . . . . . . . . . . . . . . . . . . . . . . . . . . . . . . . . . . . . . 294Promoting a Read-Replica to Primary (ElastiCache API) ... . . . . . . . . . . . . . . . . . . . . . . . . . . . . . . . . . . . . . . . . . . . . . . . . . . . . . 294
Deleting a Read Replica .... . . . . . . . . . . . . . . . . . . . . . . . . . . . . . . . . . . . . . . . . . . . . . . . . . . . . . . . . . . . . . . . . . . . . . . . . . . . . . . . . . . . . . . . . . . . . . . . . . . . . . . . 296Backup and Restore (Redis) ... . . . . . . . . . . . . . . . . . . . . . . . . . . . . . . . . . . . . . . . . . . . . . . . . . . . . . . . . . . . . . . . . . . . . . . . . . . . . . . . . . . . . . . . . . . . . . . . . . . . . . . . . . . . 297
Constraints ... . . . . . . . . . . . . . . . . . . . . . . . . . . . . . . . . . . . . . . . . . . . . . . . . . . . . . . . . . . . . . . . . . . . . . . . . . . . . . . . . . . . . . . . . . . . . . . . . . . . . . . . . . . . . . . . . . . . . . . . . . 298Costs ... . . . . . . . . . . . . . . . . . . . . . . . . . . . . . . . . . . . . . . . . . . . . . . . . . . . . . . . . . . . . . . . . . . . . . . . . . . . . . . . . . . . . . . . . . . . . . . . . . . . . . . . . . . . . . . . . . . . . . . . . . . . . . . . . . . 298Performance Impact of Backups .... . . . . . . . . . . . . . . . . . . . . . . . . . . . . . . . . . . . . . . . . . . . . . . . . . . . . . . . . . . . . . . . . . . . . . . . . . . . . . . . . . . . . . . . . . . . 298
Backups when running Redis 2.8.22 and later ... . . . . . . . . . . . . . . . . . . . . . . . . . . . . . . . . . . . . . . . . . . . . . . . . . . . . . . . . . . . . . . . . . 298Backups when running Redis versions prior to 2.8.22 .... . . . . . . . . . . . . . . . . . . . . . . . . . . . . . . . . . . . . . . . . . . . . . . . . . . . . . . 298Improving Backup Performance .... . . . . . . . . . . . . . . . . . . . . . . . . . . . . . . . . . . . . . . . . . . . . . . . . . . . . . . . . . . . . . . . . . . . . . . . . . . . . . . . . . . . . 299
Scheduling Automatic Backups .... . . . . . . . . . . . . . . . . . . . . . . . . . . . . . . . . . . . . . . . . . . . . . . . . . . . . . . . . . . . . . . . . . . . . . . . . . . . . . . . . . . . . . . . . . . . . . 300Making Manual Backups .... . . . . . . . . . . . . . . . . . . . . . . . . . . . . . . . . . . . . . . . . . . . . . . . . . . . . . . . . . . . . . . . . . . . . . . . . . . . . . . . . . . . . . . . . . . . . . . . . . . . . . . 301
Using the Console .... . . . . . . . . . . . . . . . . . . . . . . . . . . . . . . . . . . . . . . . . . . . . . . . . . . . . . . . . . . . . . . . . . . . . . . . . . . . . . . . . . . . . . . . . . . . . . . . . . . . . . . 301Using the AWS CLI ... . . . . . . . . . . . . . . . . . . . . . . . . . . . . . . . . . . . . . . . . . . . . . . . . . . . . . . . . . . . . . . . . . . . . . . . . . . . . . . . . . . . . . . . . . . . . . . . . . . . . . . . 302Using the ElastiCache API ... . . . . . . . . . . . . . . . . . . . . . . . . . . . . . . . . . . . . . . . . . . . . . . . . . . . . . . . . . . . . . . . . . . . . . . . . . . . . . . . . . . . . . . . . . . . . . 305
Creating a Final Backup .... . . . . . . . . . . . . . . . . . . . . . . . . . . . . . . . . . . . . . . . . . . . . . . . . . . . . . . . . . . . . . . . . . . . . . . . . . . . . . . . . . . . . . . . . . . . . . . . . . . . . . . . 307Creating a Final Backup (Console) ... . . . . . . . . . . . . . . . . . . . . . . . . . . . . . . . . . . . . . . . . . . . . . . . . . . . . . . . . . . . . . . . . . . . . . . . . . . . . . . . . . . 307Creating a Final Backup (AWS CLI) ... . . . . . . . . . . . . . . . . . . . . . . . . . . . . . . . . . . . . . . . . . . . . . . . . . . . . . . . . . . . . . . . . . . . . . . . . . . . . . . . . . 307Creating a Final Backup (ElastiCache API) ... . . . . . . . . . . . . . . . . . . . . . . . . . . . . . . . . . . . . . . . . . . . . . . . . . . . . . . . . . . . . . . . . . . . . . . . 308
Describing Backups .... . . . . . . . . . . . . . . . . . . . . . . . . . . . . . . . . . . . . . . . . . . . . . . . . . . . . . . . . . . . . . . . . . . . . . . . . . . . . . . . . . . . . . . . . . . . . . . . . . . . . . . . . . . . . . 310Describing Backups (Console) ... . . . . . . . . . . . . . . . . . . . . . . . . . . . . . . . . . . . . . . . . . . . . . . . . . . . . . . . . . . . . . . . . . . . . . . . . . . . . . . . . . . . . . . . . 310
API Version 2015-02-02vii

Amazon ElastiCache User Guide
Describing Backups (AWS CLI) ... . . . . . . . . . . . . . . . . . . . . . . . . . . . . . . . . . . . . . . . . . . . . . . . . . . . . . . . . . . . . . . . . . . . . . . . . . . . . . . . . . . . . . . . 310Describing Backups (ElastiCache API) ... . . . . . . . . . . . . . . . . . . . . . . . . . . . . . . . . . . . . . . . . . . . . . . . . . . . . . . . . . . . . . . . . . . . . . . . . . . . . . . 310
Copying a Backup .... . . . . . . . . . . . . . . . . . . . . . . . . . . . . . . . . . . . . . . . . . . . . . . . . . . . . . . . . . . . . . . . . . . . . . . . . . . . . . . . . . . . . . . . . . . . . . . . . . . . . . . . . . . . . . . . 312Copying a Backup (Console) ... . . . . . . . . . . . . . . . . . . . . . . . . . . . . . . . . . . . . . . . . . . . . . . . . . . . . . . . . . . . . . . . . . . . . . . . . . . . . . . . . . . . . . . . . . . 312Copying a Backup (AWS CLI) ... . . . . . . . . . . . . . . . . . . . . . . . . . . . . . . . . . . . . . . . . . . . . . . . . . . . . . . . . . . . . . . . . . . . . . . . . . . . . . . . . . . . . . . . . . 312Copying a Backup (ElastiCache API) ... . . . . . . . . . . . . . . . . . . . . . . . . . . . . . . . . . . . . . . . . . . . . . . . . . . . . . . . . . . . . . . . . . . . . . . . . . . . . . . . 313
Exporting a Backup .... . . . . . . . . . . . . . . . . . . . . . . . . . . . . . . . . . . . . . . . . . . . . . . . . . . . . . . . . . . . . . . . . . . . . . . . . . . . . . . . . . . . . . . . . . . . . . . . . . . . . . . . . . . . . . 314Step 1: Create an Amazon S3 Bucket .... . . . . . . . . . . . . . . . . . . . . . . . . . . . . . . . . . . . . . . . . . . . . . . . . . . . . . . . . . . . . . . . . . . . . . . . . . . . . 314Step 2: Grant ElastiCache Access to Your Amazon S3 Bucket .... . . . . . . . . . . . . . . . . . . . . . . . . . . . . . . . . . . . . . . . . . . . . 315Step 3: Export an ElastiCache Backup .... . . . . . . . . . . . . . . . . . . . . . . . . . . . . . . . . . . . . . . . . . . . . . . . . . . . . . . . . . . . . . . . . . . . . . . . . . . . 316
Restoring from a Backup .... . . . . . . . . . . . . . . . . . . . . . . . . . . . . . . . . . . . . . . . . . . . . . . . . . . . . . . . . . . . . . . . . . . . . . . . . . . . . . . . . . . . . . . . . . . . . . . . . . . . . . 321Restoring From a Backup (Console) ... . . . . . . . . . . . . . . . . . . . . . . . . . . . . . . . . . . . . . . . . . . . . . . . . . . . . . . . . . . . . . . . . . . . . . . . . . . . . . . . . 322Restoring From a Backup (AWS CLI) ... . . . . . . . . . . . . . . . . . . . . . . . . . . . . . . . . . . . . . . . . . . . . . . . . . . . . . . . . . . . . . . . . . . . . . . . . . . . . . . . 323Restoring From a Backup (ElastiCache API) ... . . . . . . . . . . . . . . . . . . . . . . . . . . . . . . . . . . . . . . . . . . . . . . . . . . . . . . . . . . . . . . . . . . . . . 323
Seeding a Cluster with a Backup (Redis) ... . . . . . . . . . . . . . . . . . . . . . . . . . . . . . . . . . . . . . . . . . . . . . . . . . . . . . . . . . . . . . . . . . . . . . . . . . . . . . . . . . 324Step 1: Create a Redis Backup .... . . . . . . . . . . . . . . . . . . . . . . . . . . . . . . . . . . . . . . . . . . . . . . . . . . . . . . . . . . . . . . . . . . . . . . . . . . . . . . . . . . . . . . 325Step 2: Create an Amazon S3 Bucket and Folder ... . . . . . . . . . . . . . . . . . . . . . . . . . . . . . . . . . . . . . . . . . . . . . . . . . . . . . . . . . . . . . 325Step 3: Upload Your Backup to Amazon S3 .... . . . . . . . . . . . . . . . . . . . . . . . . . . . . . . . . . . . . . . . . . . . . . . . . . . . . . . . . . . . . . . . . . . . . 326Step 4: Grant ElastiCache Read Access to the .rdb File ... . . . . . . . . . . . . . . . . . . . . . . . . . . . . . . . . . . . . . . . . . . . . . . . . . . . . . . 326Step 5: Seed the ElastiCache Cluster With the .rdb File Data .... . . . . . . . . . . . . . . . . . . . . . . . . . . . . . . . . . . . . . . . . . . . . . 327
Tagging Backups .... . . . . . . . . . . . . . . . . . . . . . . . . . . . . . . . . . . . . . . . . . . . . . . . . . . . . . . . . . . . . . . . . . . . . . . . . . . . . . . . . . . . . . . . . . . . . . . . . . . . . . . . . . . . . . . . . 329Deleting a Backup .... . . . . . . . . . . . . . . . . . . . . . . . . . . . . . . . . . . . . . . . . . . . . . . . . . . . . . . . . . . . . . . . . . . . . . . . . . . . . . . . . . . . . . . . . . . . . . . . . . . . . . . . . . . . . . . 330
Deleting a Backup (Console) ... . . . . . . . . . . . . . . . . . . . . . . . . . . . . . . . . . . . . . . . . . . . . . . . . . . . . . . . . . . . . . . . . . . . . . . . . . . . . . . . . . . . . . . . . . 330Deleting a Backup (AWS CLI) ... . . . . . . . . . . . . . . . . . . . . . . . . . . . . . . . . . . . . . . . . . . . . . . . . . . . . . . . . . . . . . . . . . . . . . . . . . . . . . . . . . . . . . . . . . 330Deleting a Backup (ElastiCache API) ... . . . . . . . . . . . . . . . . . . . . . . . . . . . . . . . . . . . . . . . . . . . . . . . . . . . . . . . . . . . . . . . . . . . . . . . . . . . . . . . 330
Redis Append Only Files (AOF) .... . . . . . . . . . . . . . . . . . . . . . . . . . . . . . . . . . . . . . . . . . . . . . . . . . . . . . . . . . . . . . . . . . . . . . . . . . . . . . . . . . . . . . . . . . . . . . 331Security Groups [EC2-Classic] ... . . . . . . . . . . . . . . . . . . . . . . . . . . . . . . . . . . . . . . . . . . . . . . . . . . . . . . . . . . . . . . . . . . . . . . . . . . . . . . . . . . . . . . . . . . . . . . . . . . . . . . . . 332
Creating a Security Group .... . . . . . . . . . . . . . . . . . . . . . . . . . . . . . . . . . . . . . . . . . . . . . . . . . . . . . . . . . . . . . . . . . . . . . . . . . . . . . . . . . . . . . . . . . . . . . . . . . . . . 333Using the AWS Management Console .... . . . . . . . . . . . . . . . . . . . . . . . . . . . . . . . . . . . . . . . . . . . . . . . . . . . . . . . . . . . . . . . . . . . . . . . . . . . . 333Using the AWS CLI ... . . . . . . . . . . . . . . . . . . . . . . . . . . . . . . . . . . . . . . . . . . . . . . . . . . . . . . . . . . . . . . . . . . . . . . . . . . . . . . . . . . . . . . . . . . . . . . . . . . . . . . . 333Using the ElastiCache API ... . . . . . . . . . . . . . . . . . . . . . . . . . . . . . . . . . . . . . . . . . . . . . . . . . . . . . . . . . . . . . . . . . . . . . . . . . . . . . . . . . . . . . . . . . . . . . 333
Listing Available Security Groups .... . . . . . . . . . . . . . . . . . . . . . . . . . . . . . . . . . . . . . . . . . . . . . . . . . . . . . . . . . . . . . . . . . . . . . . . . . . . . . . . . . . . . . . . . . . 335Using the AWS Management Console .... . . . . . . . . . . . . . . . . . . . . . . . . . . . . . . . . . . . . . . . . . . . . . . . . . . . . . . . . . . . . . . . . . . . . . . . . . . . . 335Using the AWS CLI ... . . . . . . . . . . . . . . . . . . . . . . . . . . . . . . . . . . . . . . . . . . . . . . . . . . . . . . . . . . . . . . . . . . . . . . . . . . . . . . . . . . . . . . . . . . . . . . . . . . . . . . . 335Using the ElastiCache API ... . . . . . . . . . . . . . . . . . . . . . . . . . . . . . . . . . . . . . . . . . . . . . . . . . . . . . . . . . . . . . . . . . . . . . . . . . . . . . . . . . . . . . . . . . . . . . 335
Viewing a Security Group .... . . . . . . . . . . . . . . . . . . . . . . . . . . . . . . . . . . . . . . . . . . . . . . . . . . . . . . . . . . . . . . . . . . . . . . . . . . . . . . . . . . . . . . . . . . . . . . . . . . . . 337Using the AWS Management Console .... . . . . . . . . . . . . . . . . . . . . . . . . . . . . . . . . . . . . . . . . . . . . . . . . . . . . . . . . . . . . . . . . . . . . . . . . . . . . 337Using the AWS CLI ... . . . . . . . . . . . . . . . . . . . . . . . . . . . . . . . . . . . . . . . . . . . . . . . . . . . . . . . . . . . . . . . . . . . . . . . . . . . . . . . . . . . . . . . . . . . . . . . . . . . . . . . 337Using the ElastiCache API ... . . . . . . . . . . . . . . . . . . . . . . . . . . . . . . . . . . . . . . . . . . . . . . . . . . . . . . . . . . . . . . . . . . . . . . . . . . . . . . . . . . . . . . . . . . . . . 337
Authorizing Network Access to an Amazon EC2 Security Group .... . . . . . . . . . . . . . . . . . . . . . . . . . . . . . . . . . . . . . . . . . . . . . . . . . 339Using the AWS Management Console .... . . . . . . . . . . . . . . . . . . . . . . . . . . . . . . . . . . . . . . . . . . . . . . . . . . . . . . . . . . . . . . . . . . . . . . . . . . . . 339Using the AWS CLI ... . . . . . . . . . . . . . . . . . . . . . . . . . . . . . . . . . . . . . . . . . . . . . . . . . . . . . . . . . . . . . . . . . . . . . . . . . . . . . . . . . . . . . . . . . . . . . . . . . . . . . . . 339Using the ElastiCache API ... . . . . . . . . . . . . . . . . . . . . . . . . . . . . . . . . . . . . . . . . . . . . . . . . . . . . . . . . . . . . . . . . . . . . . . . . . . . . . . . . . . . . . . . . . . . . . 340
Parameters and Parameter Groups .... . . . . . . . . . . . . . . . . . . . . . . . . . . . . . . . . . . . . . . . . . . . . . . . . . . . . . . . . . . . . . . . . . . . . . . . . . . . . . . . . . . . . . . . . . . . . . . . 341Parameter Management .... . . . . . . . . . . . . . . . . . . . . . . . . . . . . . . . . . . . . . . . . . . . . . . . . . . . . . . . . . . . . . . . . . . . . . . . . . . . . . . . . . . . . . . . . . . . . . . . . . . . . . . 342Parameter Group Tiers ... . . . . . . . . . . . . . . . . . . . . . . . . . . . . . . . . . . . . . . . . . . . . . . . . . . . . . . . . . . . . . . . . . . . . . . . . . . . . . . . . . . . . . . . . . . . . . . . . . . . . . . . . . 343Creating a Parameter Group .... . . . . . . . . . . . . . . . . . . . . . . . . . . . . . . . . . . . . . . . . . . . . . . . . . . . . . . . . . . . . . . . . . . . . . . . . . . . . . . . . . . . . . . . . . . . . . . . . 344
Creating a Parameter Group (Console) ... . . . . . . . . . . . . . . . . . . . . . . . . . . . . . . . . . . . . . . . . . . . . . . . . . . . . . . . . . . . . . . . . . . . . . . . . . . . . 344Creating a Parameter Group (AWS CLI) ... . . . . . . . . . . . . . . . . . . . . . . . . . . . . . . . . . . . . . . . . . . . . . . . . . . . . . . . . . . . . . . . . . . . . . . . . . . . 344Creating a Parameter Group (ElastiCache API) ... . . . . . . . . . . . . . . . . . . . . . . . . . . . . . . . . . . . . . . . . . . . . . . . . . . . . . . . . . . . . . . . . . 345
Listing Parameter Groups by Name .... . . . . . . . . . . . . . . . . . . . . . . . . . . . . . . . . . . . . . . . . . . . . . . . . . . . . . . . . . . . . . . . . . . . . . . . . . . . . . . . . . . . . . . . 347Listing Parameter Groups by Name (Console) ... . . . . . . . . . . . . . . . . . . . . . . . . . . . . . . . . . . . . . . . . . . . . . . . . . . . . . . . . . . . . . . . . . . 347Listing Parameter Groups by Name (AWS CLI) ... . . . . . . . . . . . . . . . . . . . . . . . . . . . . . . . . . . . . . . . . . . . . . . . . . . . . . . . . . . . . . . . . . 347Listing Parameter Groups by Name (ElastiCache API) ... . . . . . . . . . . . . . . . . . . . . . . . . . . . . . . . . . . . . . . . . . . . . . . . . . . . . . . . . 348
Listing a Parameter Group's Values .... . . . . . . . . . . . . . . . . . . . . . . . . . . . . . . . . . . . . . . . . . . . . . . . . . . . . . . . . . . . . . . . . . . . . . . . . . . . . . . . . . . . . . . . 350Listing a Parameter Group's Values (Console) ... . . . . . . . . . . . . . . . . . . . . . . . . . . . . . . . . . . . . . . . . . . . . . . . . . . . . . . . . . . . . . . . . . . 350Listing a Parameter Group's Values (AWS CLI) ... . . . . . . . . . . . . . . . . . . . . . . . . . . . . . . . . . . . . . . . . . . . . . . . . . . . . . . . . . . . . . . . . . . 350
API Version 2015-02-02viii
Amazon ElastiCache User Guide
Listing a Parameter Group's Values (ElastiCache API) ... . . . . . . . . . . . . . . . . . . . . . . . . . . . . . . . . . . . . . . . . . . . . . . . . . . . . . . . . 351Modifying a Parameter Group .... . . . . . . . . . . . . . . . . . . . . . . . . . . . . . . . . . . . . . . . . . . . . . . . . . . . . . . . . . . . . . . . . . . . . . . . . . . . . . . . . . . . . . . . . . . . . . . 352
Modifying a Parameter Group (Console) ... . . . . . . . . . . . . . . . . . . . . . . . . . . . . . . . . . . . . . . . . . . . . . . . . . . . . . . . . . . . . . . . . . . . . . . . . . 353Modifying a Parameter Group (AWS CLI) ... . . . . . . . . . . . . . . . . . . . . . . . . . . . . . . . . . . . . . . . . . . . . . . . . . . . . . . . . . . . . . . . . . . . . . . . . 353Modifying a Parameter Group (ElastiCache API) ... . . . . . . . . . . . . . . . . . . . . . . . . . . . . . . . . . . . . . . . . . . . . . . . . . . . . . . . . . . . . . . . 354
Deleting a Parameter Group .... . . . . . . . . . . . . . . . . . . . . . . . . . . . . . . . . . . . . . . . . . . . . . . . . . . . . . . . . . . . . . . . . . . . . . . . . . . . . . . . . . . . . . . . . . . . . . . . . 355Deleting a Parameter Group (Console) ... . . . . . . . . . . . . . . . . . . . . . . . . . . . . . . . . . . . . . . . . . . . . . . . . . . . . . . . . . . . . . . . . . . . . . . . . . . . . 355Deleting a Parameter Group (AWS CLI) ... . . . . . . . . . . . . . . . . . . . . . . . . . . . . . . . . . . . . . . . . . . . . . . . . . . . . . . . . . . . . . . . . . . . . . . . . . . . 355Deleting a Parameter Group (ElastiCache API) ... . . . . . . . . . . . . . . . . . . . . . . . . . . . . . . . . . . . . . . . . . . . . . . . . . . . . . . . . . . . . . . . . . 355
Memcached Specific Parameters ... . . . . . . . . . . . . . . . . . . . . . . . . . . . . . . . . . . . . . . . . . . . . . . . . . . . . . . . . . . . . . . . . . . . . . . . . . . . . . . . . . . . . . . . . . . . . 357Memcached 1.4.34 Added Parameters ... . . . . . . . . . . . . . . . . . . . . . . . . . . . . . . . . . . . . . . . . . . . . . . . . . . . . . . . . . . . . . . . . . . . . . . . . . . . . 357Memcached 1.4.33 Added Parameters ... . . . . . . . . . . . . . . . . . . . . . . . . . . . . . . . . . . . . . . . . . . . . . . . . . . . . . . . . . . . . . . . . . . . . . . . . . . . . 357Memcached 1.4.24 Added Parameters ... . . . . . . . . . . . . . . . . . . . . . . . . . . . . . . . . . . . . . . . . . . . . . . . . . . . . . . . . . . . . . . . . . . . . . . . . . . . . 359Memcached 1.4.14 Added Parameters ... . . . . . . . . . . . . . . . . . . . . . . . . . . . . . . . . . . . . . . . . . . . . . . . . . . . . . . . . . . . . . . . . . . . . . . . . . . . . 360Memcached 1.4.5 Supported Parameters ... . . . . . . . . . . . . . . . . . . . . . . . . . . . . . . . . . . . . . . . . . . . . . . . . . . . . . . . . . . . . . . . . . . . . . . . . 361Memcached Connection Overhead .... . . . . . . . . . . . . . . . . . . . . . . . . . . . . . . . . . . . . . . . . . . . . . . . . . . . . . . . . . . . . . . . . . . . . . . . . . . . . . . . . 363Memcached Node-Type Specific Parameters ... . . . . . . . . . . . . . . . . . . . . . . . . . . . . . . . . . . . . . . . . . . . . . . . . . . . . . . . . . . . . . . . . . . . . 364
Redis Specific Parameters ... . . . . . . . . . . . . . . . . . . . . . . . . . . . . . . . . . . . . . . . . . . . . . . . . . . . . . . . . . . . . . . . . . . . . . . . . . . . . . . . . . . . . . . . . . . . . . . . . . . . . . 366Redis 3.2.10 Parameter Changes .... . . . . . . . . . . . . . . . . . . . . . . . . . . . . . . . . . . . . . . . . . . . . . . . . . . . . . . . . . . . . . . . . . . . . . . . . . . . . . . . . . . . 367Redis 3.2.6 Parameter Changes .... . . . . . . . . . . . . . . . . . . . . . . . . . . . . . . . . . . . . . . . . . . . . . . . . . . . . . . . . . . . . . . . . . . . . . . . . . . . . . . . . . . . . 367Redis 3.2.4 Parameter Changes .... . . . . . . . . . . . . . . . . . . . . . . . . . . . . . . . . . . . . . . . . . . . . . . . . . . . . . . . . . . . . . . . . . . . . . . . . . . . . . . . . . . . . 367Redis 2.8.24 (Enhanced) Added Parameters ... . . . . . . . . . . . . . . . . . . . . . . . . . . . . . . . . . . . . . . . . . . . . . . . . . . . . . . . . . . . . . . . . . . . . . 370Redis 2.8.23 (Enhanced) Added Parameters ... . . . . . . . . . . . . . . . . . . . . . . . . . . . . . . . . . . . . . . . . . . . . . . . . . . . . . . . . . . . . . . . . . . . . . 370Redis 2.8.22 (Enhanced) Added Parameters ... . . . . . . . . . . . . . . . . . . . . . . . . . . . . . . . . . . . . . . . . . . . . . . . . . . . . . . . . . . . . . . . . . . . . . 372Redis 2.8.21 Added Parameters ... . . . . . . . . . . . . . . . . . . . . . . . . . . . . . . . . . . . . . . . . . . . . . . . . . . . . . . . . . . . . . . . . . . . . . . . . . . . . . . . . . . . . . 372Redis 2.8.19 Added Parameters ... . . . . . . . . . . . . . . . . . . . . . . . . . . . . . . . . . . . . . . . . . . . . . . . . . . . . . . . . . . . . . . . . . . . . . . . . . . . . . . . . . . . . . 372Redis 2.8.6 Added Parameters ... . . . . . . . . . . . . . . . . . . . . . . . . . . . . . . . . . . . . . . . . . . . . . . . . . . . . . . . . . . . . . . . . . . . . . . . . . . . . . . . . . . . . . . . 372Redis 2.6.13 Parameters ... . . . . . . . . . . . . . . . . . . . . . . . . . . . . . . . . . . . . . . . . . . . . . . . . . . . . . . . . . . . . . . . . . . . . . . . . . . . . . . . . . . . . . . . . . . . . . . . 375Redis Node-Type Specific Parameters ... . . . . . . . . . . . . . . . . . . . . . . . . . . . . . . . . . . . . . . . . . . . . . . . . . . . . . . . . . . . . . . . . . . . . . . . . . . . . . 381
Subnets and Subnet Groups .... . . . . . . . . . . . . . . . . . . . . . . . . . . . . . . . . . . . . . . . . . . . . . . . . . . . . . . . . . . . . . . . . . . . . . . . . . . . . . . . . . . . . . . . . . . . . . . . . . . . . . . . . 383Creating a Subnet Group .... . . . . . . . . . . . . . . . . . . . . . . . . . . . . . . . . . . . . . . . . . . . . . . . . . . . . . . . . . . . . . . . . . . . . . . . . . . . . . . . . . . . . . . . . . . . . . . . . . . . . . 384
Creating a Subnet Group (Console) ... . . . . . . . . . . . . . . . . . . . . . . . . . . . . . . . . . . . . . . . . . . . . . . . . . . . . . . . . . . . . . . . . . . . . . . . . . . . . . . . . 384Creating a Subnet Group (AWS CLI) ... . . . . . . . . . . . . . . . . . . . . . . . . . . . . . . . . . . . . . . . . . . . . . . . . . . . . . . . . . . . . . . . . . . . . . . . . . . . . . . . 385Creating a Subnet Group (ElastiCache API) ... . . . . . . . . . . . . . . . . . . . . . . . . . . . . . . . . . . . . . . . . . . . . . . . . . . . . . . . . . . . . . . . . . . . . . . 385
Assigning a Subnet Group to a Cluster or Replication Group .... . . . . . . . . . . . . . . . . . . . . . . . . . . . . . . . . . . . . . . . . . . . . . . . . . . . . . 387Modifying a Subnet Group .... . . . . . . . . . . . . . . . . . . . . . . . . . . . . . . . . . . . . . . . . . . . . . . . . . . . . . . . . . . . . . . . . . . . . . . . . . . . . . . . . . . . . . . . . . . . . . . . . . . . 388
Modifying Subnet Groups (Console) ... . . . . . . . . . . . . . . . . . . . . . . . . . . . . . . . . . . . . . . . . . . . . . . . . . . . . . . . . . . . . . . . . . . . . . . . . . . . . . . . 388Modifying Subnet Groups (AWS CLI) ... . . . . . . . . . . . . . . . . . . . . . . . . . . . . . . . . . . . . . . . . . . . . . . . . . . . . . . . . . . . . . . . . . . . . . . . . . . . . . . 388Modifying Subnet Groups (ElastiCache API) ... . . . . . . . . . . . . . . . . . . . . . . . . . . . . . . . . . . . . . . . . . . . . . . . . . . . . . . . . . . . . . . . . . . . . . 389
Deleting a Subnet Group .... . . . . . . . . . . . . . . . . . . . . . . . . . . . . . . . . . . . . . . . . . . . . . . . . . . . . . . . . . . . . . . . . . . . . . . . . . . . . . . . . . . . . . . . . . . . . . . . . . . . . . 390Deleting a Subnet Group (Console) ... . . . . . . . . . . . . . . . . . . . . . . . . . . . . . . . . . . . . . . . . . . . . . . . . . . . . . . . . . . . . . . . . . . . . . . . . . . . . . . . . 390Deleting a Subnet Group (AWS CLI) ... . . . . . . . . . . . . . . . . . . . . . . . . . . . . . . . . . . . . . . . . . . . . . . . . . . . . . . . . . . . . . . . . . . . . . . . . . . . . . . . 390Deleting a Subnet Group (ElastiCache API) ... . . . . . . . . . . . . . . . . . . . . . . . . . . . . . . . . . . . . . . . . . . . . . . . . . . . . . . . . . . . . . . . . . . . . . . 390
Amazon VPC with ElastiCache .... . . . . . . . . . . . . . . . . . . . . . . . . . . . . . . . . . . . . . . . . . . . . . . . . . . . . . . . . . . . . . . . . . . . . . . . . . . . . . . . . . . . . . . . . . . . . . . . . . . . . . . 392Understanding ElastiCache and Amazon VPCs .... . . . . . . . . . . . . . . . . . . . . . . . . . . . . . . . . . . . . . . . . . . . . . . . . . . . . . . . . . . . . . . . . . . . . . . . . 393
Overview of ElastiCache In an Amazon VPC .... . . . . . . . . . . . . . . . . . . . . . . . . . . . . . . . . . . . . . . . . . . . . . . . . . . . . . . . . . . . . . . . . . . . 393Why use the Amazon VPC instead of EC2 Classic with your ElastiCache deployment? .... . . . . . . . . . . . . 395Prerequisites ... . . . . . . . . . . . . . . . . . . . . . . . . . . . . . . . . . . . . . . . . . . . . . . . . . . . . . . . . . . . . . . . . . . . . . . . . . . . . . . . . . . . . . . . . . . . . . . . . . . . . . . . . . . . . . . . 395Routing and Security ... . . . . . . . . . . . . . . . . . . . . . . . . . . . . . . . . . . . . . . . . . . . . . . . . . . . . . . . . . . . . . . . . . . . . . . . . . . . . . . . . . . . . . . . . . . . . . . . . . . . 395Amazon VPC Documentation .... . . . . . . . . . . . . . . . . . . . . . . . . . . . . . . . . . . . . . . . . . . . . . . . . . . . . . . . . . . . . . . . . . . . . . . . . . . . . . . . . . . . . . . . 396
Amazon VPC Access Patterns .... . . . . . . . . . . . . . . . . . . . . . . . . . . . . . . . . . . . . . . . . . . . . . . . . . . . . . . . . . . . . . . . . . . . . . . . . . . . . . . . . . . . . . . . . . . . . . . . 397Accessing an ElastiCache Cluster when it and the Amazon EC2 Instance are in the SameAmazon VPC .... . . . . . . . . . . . . . . . . . . . . . . . . . . . . . . . . . . . . . . . . . . . . . . . . . . . . . . . . . . . . . . . . . . . . . . . . . . . . . . . . . . . . . . . . . . . . . . . . . . . . . . . . . . . . . . 397Accessing an ElastiCache Cluster when it and the Amazon EC2 Instance are in Different AmazonVPCs .... . . . . . . . . . . . . . . . . . . . . . . . . . . . . . . . . . . . . . . . . . . . . . . . . . . . . . . . . . . . . . . . . . . . . . . . . . . . . . . . . . . . . . . . . . . . . . . . . . . . . . . . . . . . . . . . . . . . . . . . . . 398Accessing an ElastiCache Cluster from an Application Running in a Customer's Data Center ... . . . . 401
Creating a Virtual Private Cloud (VPC) .... . . . . . . . . . . . . . . . . . . . . . . . . . . . . . . . . . . . . . . . . . . . . . . . . . . . . . . . . . . . . . . . . . . . . . . . . . . . . . . . . . . 404
API Version 2015-02-02ix
Amazon ElastiCache User Guide
Creating an Amazon VPC (Console) ... . . . . . . . . . . . . . . . . . . . . . . . . . . . . . . . . . . . . . . . . . . . . . . . . . . . . . . . . . . . . . . . . . . . . . . . . . . . . . . . . 404Creating a Cache Subnet Group .... . . . . . . . . . . . . . . . . . . . . . . . . . . . . . . . . . . . . . . . . . . . . . . . . . . . . . . . . . . . . . . . . . . . . . . . . . . . . . . . . . . . . . . . . . . . . 406Creating a Cache Cluster in an Amazon VPC .... . . . . . . . . . . . . . . . . . . . . . . . . . . . . . . . . . . . . . . . . . . . . . . . . . . . . . . . . . . . . . . . . . . . . . . . . . . 407
Creating a Cache Cluster in an Amazon VPC (Console) ... . . . . . . . . . . . . . . . . . . . . . . . . . . . . . . . . . . . . . . . . . . . . . . . . . . . . . . 407Creating a Replication Group in an Amazon VPC .... . . . . . . . . . . . . . . . . . . . . . . . . . . . . . . . . . . . . . . . . . . . . . . . . . . . . . . . . . . . . . . . . . . . . . 408
Creating a Replication Group in an Amazon VPC (Console) ... . . . . . . . . . . . . . . . . . . . . . . . . . . . . . . . . . . . . . . . . . . . . . . . . 408Connecting to a Cluster or Replication Group Running in an Amazon VPC .... . . . . . . . . . . . . . . . . . . . . . . . . . . . . . . . . . . 409
Data Security and Compliance .... . . . . . . . . . . . . . . . . . . . . . . . . . . . . . . . . . . . . . . . . . . . . . . . . . . . . . . . . . . . . . . . . . . . . . . . . . . . . . . . . . . . . . . . . . . . . . . . . . . . . . . 410Security Groups .... . . . . . . . . . . . . . . . . . . . . . . . . . . . . . . . . . . . . . . . . . . . . . . . . . . . . . . . . . . . . . . . . . . . . . . . . . . . . . . . . . . . . . . . . . . . . . . . . . . . . . . . . . . . . . . . . . . 410
Amazon VPC: Amazon VPC Security Groups .... . . . . . . . . . . . . . . . . . . . . . . . . . . . . . . . . . . . . . . . . . . . . . . . . . . . . . . . . . . . . . . . . . . . 410Amazon EC2-Classic: ElastiCache Security Groups .... . . . . . . . . . . . . . . . . . . . . . . . . . . . . . . . . . . . . . . . . . . . . . . . . . . . . . . . . . . . 410
Authentication & Access Control ... . . . . . . . . . . . . . . . . . . . . . . . . . . . . . . . . . . . . . . . . . . . . . . . . . . . . . . . . . . . . . . . . . . . . . . . . . . . . . . . . . . . . . . . . . . . . 411Authentication .... . . . . . . . . . . . . . . . . . . . . . . . . . . . . . . . . . . . . . . . . . . . . . . . . . . . . . . . . . . . . . . . . . . . . . . . . . . . . . . . . . . . . . . . . . . . . . . . . . . . . . . . . . . . 411Access Control ... . . . . . . . . . . . . . . . . . . . . . . . . . . . . . . . . . . . . . . . . . . . . . . . . . . . . . . . . . . . . . . . . . . . . . . . . . . . . . . . . . . . . . . . . . . . . . . . . . . . . . . . . . . . . . 412Overview of Managing Access .... . . . . . . . . . . . . . . . . . . . . . . . . . . . . . . . . . . . . . . . . . . . . . . . . . . . . . . . . . . . . . . . . . . . . . . . . . . . . . . . . . . . . . . 413Using Identity-Based Policies (IAM Policies) ... . . . . . . . . . . . . . . . . . . . . . . . . . . . . . . . . . . . . . . . . . . . . . . . . . . . . . . . . . . . . . . . . . . . . . 417Using Service-Linked Roles .... . . . . . . . . . . . . . . . . . . . . . . . . . . . . . . . . . . . . . . . . . . . . . . . . . . . . . . . . . . . . . . . . . . . . . . . . . . . . . . . . . . . . . . . . . . 421ElastiCache API Permissions Reference .... . . . . . . . . . . . . . . . . . . . . . . . . . . . . . . . . . . . . . . . . . . . . . . . . . . . . . . . . . . . . . . . . . . . . . . . . . . 428
Authenticating with AUTH (Redis) ... . . . . . . . . . . . . . . . . . . . . . . . . . . . . . . . . . . . . . . . . . . . . . . . . . . . . . . . . . . . . . . . . . . . . . . . . . . . . . . . . . . . . . . . . . . 431Overview of AUTH ..... . . . . . . . . . . . . . . . . . . . . . . . . . . . . . . . . . . . . . . . . . . . . . . . . . . . . . . . . . . . . . . . . . . . . . . . . . . . . . . . . . . . . . . . . . . . . . . . . . . . . . 432Applying Authentication .... . . . . . . . . . . . . . . . . . . . . . . . . . . . . . . . . . . . . . . . . . . . . . . . . . . . . . . . . . . . . . . . . . . . . . . . . . . . . . . . . . . . . . . . . . . . . . . 432Related topics ... . . . . . . . . . . . . . . . . . . . . . . . . . . . . . . . . . . . . . . . . . . . . . . . . . . . . . . . . . . . . . . . . . . . . . . . . . . . . . . . . . . . . . . . . . . . . . . . . . . . . . . . . . . . . . 433
Data Encryption (Redis) ... . . . . . . . . . . . . . . . . . . . . . . . . . . . . . . . . . . . . . . . . . . . . . . . . . . . . . . . . . . . . . . . . . . . . . . . . . . . . . . . . . . . . . . . . . . . . . . . . . . . . . . . . 433In-Transit Encryption (Redis) ... . . . . . . . . . . . . . . . . . . . . . . . . . . . . . . . . . . . . . . . . . . . . . . . . . . . . . . . . . . . . . . . . . . . . . . . . . . . . . . . . . . . . . . . . . 433At-Rest Encryption (Redis) ... . . . . . . . . . . . . . . . . . . . . . . . . . . . . . . . . . . . . . . . . . . . . . . . . . . . . . . . . . . . . . . . . . . . . . . . . . . . . . . . . . . . . . . . . . . . . 438
HIPAA Compliance (Redis) ... . . . . . . . . . . . . . . . . . . . . . . . . . . . . . . . . . . . . . . . . . . . . . . . . . . . . . . . . . . . . . . . . . . . . . . . . . . . . . . . . . . . . . . . . . . . . . . . . . . . . . 443ElastiCache for Redis HIPAA Requirements .... . . . . . . . . . . . . . . . . . . . . . . . . . . . . . . . . . . . . . . . . . . . . . . . . . . . . . . . . . . . . . . . . . . . . . 443
Accessing ElastiCache Resources from Outside AWS ..... . . . . . . . . . . . . . . . . . . . . . . . . . . . . . . . . . . . . . . . . . . . . . . . . . . . . . . . . . . . . . . . . . . . . . . . 445Requirements .... . . . . . . . . . . . . . . . . . . . . . . . . . . . . . . . . . . . . . . . . . . . . . . . . . . . . . . . . . . . . . . . . . . . . . . . . . . . . . . . . . . . . . . . . . . . . . . . . . . . . . . . . . . . . . . . . . . . . . 445Considerations .... . . . . . . . . . . . . . . . . . . . . . . . . . . . . . . . . . . . . . . . . . . . . . . . . . . . . . . . . . . . . . . . . . . . . . . . . . . . . . . . . . . . . . . . . . . . . . . . . . . . . . . . . . . . . . . . . . . . . 445Limitations .... . . . . . . . . . . . . . . . . . . . . . . . . . . . . . . . . . . . . . . . . . . . . . . . . . . . . . . . . . . . . . . . . . . . . . . . . . . . . . . . . . . . . . . . . . . . . . . . . . . . . . . . . . . . . . . . . . . . . . . . . . 445How to Access ElastiCache Resources from Outside AWS ..... . . . . . . . . . . . . . . . . . . . . . . . . . . . . . . . . . . . . . . . . . . . . . . . . . . . . . . . . 446Related topics ... . . . . . . . . . . . . . . . . . . . . . . . . . . . . . . . . . . . . . . . . . . . . . . . . . . . . . . . . . . . . . . . . . . . . . . . . . . . . . . . . . . . . . . . . . . . . . . . . . . . . . . . . . . . . . . . . . . . . . 448
Monitoring .... . . . . . . . . . . . . . . . . . . . . . . . . . . . . . . . . . . . . . . . . . . . . . . . . . . . . . . . . . . . . . . . . . . . . . . . . . . . . . . . . . . . . . . . . . . . . . . . . . . . . . . . . . . . . . . . . . . . . . . . . . . . . . . . . . 449Monitoring Use .... . . . . . . . . . . . . . . . . . . . . . . . . . . . . . . . . . . . . . . . . . . . . . . . . . . . . . . . . . . . . . . . . . . . . . . . . . . . . . . . . . . . . . . . . . . . . . . . . . . . . . . . . . . . . . . . . . . 450
Dimensions for ElastiCache Metrics ... . . . . . . . . . . . . . . . . . . . . . . . . . . . . . . . . . . . . . . . . . . . . . . . . . . . . . . . . . . . . . . . . . . . . . . . . . . . . . . . . 450Host-Level Metrics ... . . . . . . . . . . . . . . . . . . . . . . . . . . . . . . . . . . . . . . . . . . . . . . . . . . . . . . . . . . . . . . . . . . . . . . . . . . . . . . . . . . . . . . . . . . . . . . . . . . . . . . . 450Metrics for Memcached .... . . . . . . . . . . . . . . . . . . . . . . . . . . . . . . . . . . . . . . . . . . . . . . . . . . . . . . . . . . . . . . . . . . . . . . . . . . . . . . . . . . . . . . . . . . . . . . . 451Metrics for Redis ... . . . . . . . . . . . . . . . . . . . . . . . . . . . . . . . . . . . . . . . . . . . . . . . . . . . . . . . . . . . . . . . . . . . . . . . . . . . . . . . . . . . . . . . . . . . . . . . . . . . . . . . . . 453Which Metrics Should I Monitor? ... . . . . . . . . . . . . . . . . . . . . . . . . . . . . . . . . . . . . . . . . . . . . . . . . . . . . . . . . . . . . . . . . . . . . . . . . . . . . . . . . . . . 457Choosing Metric Statistics and Periods .... . . . . . . . . . . . . . . . . . . . . . . . . . . . . . . . . . . . . . . . . . . . . . . . . . . . . . . . . . . . . . . . . . . . . . . . . . . 459Monitoring CloudWatch Cache Cluster and Cache Node Metrics ... . . . . . . . . . . . . . . . . . . . . . . . . . . . . . . . . . . . . . . . . . 459
Monitoring Events .... . . . . . . . . . . . . . . . . . . . . . . . . . . . . . . . . . . . . . . . . . . . . . . . . . . . . . . . . . . . . . . . . . . . . . . . . . . . . . . . . . . . . . . . . . . . . . . . . . . . . . . . . . . . . . . 462Managing ElastiCache Amazon SNS Notifications .... . . . . . . . . . . . . . . . . . . . . . . . . . . . . . . . . . . . . . . . . . . . . . . . . . . . . . . . . . . . . 462Viewing ElastiCache Events .... . . . . . . . . . . . . . . . . . . . . . . . . . . . . . . . . . . . . . . . . . . . . . . . . . . . . . . . . . . . . . . . . . . . . . . . . . . . . . . . . . . . . . . . . . . 465Event Notifications and Amazon SNS .... . . . . . . . . . . . . . . . . . . . . . . . . . . . . . . . . . . . . . . . . . . . . . . . . . . . . . . . . . . . . . . . . . . . . . . . . . . . . 467
Monitoring Costs with Tags .... . . . . . . . . . . . . . . . . . . . . . . . . . . . . . . . . . . . . . . . . . . . . . . . . . . . . . . . . . . . . . . . . . . . . . . . . . . . . . . . . . . . . . . . . . . . . . . . . . . 471Managing Tags Using the Console .... . . . . . . . . . . . . . . . . . . . . . . . . . . . . . . . . . . . . . . . . . . . . . . . . . . . . . . . . . . . . . . . . . . . . . . . . . . . . . . . . 472Managing Tags Using the AWS CLI ... . . . . . . . . . . . . . . . . . . . . . . . . . . . . . . . . . . . . . . . . . . . . . . . . . . . . . . . . . . . . . . . . . . . . . . . . . . . . . . . . . 476Managing Tags Using the ElastiCache API ... . . . . . . . . . . . . . . . . . . . . . . . . . . . . . . . . . . . . . . . . . . . . . . . . . . . . . . . . . . . . . . . . . . . . . . . 479Copying Tags to Your ElastiCache Resource .... . . . . . . . . . . . . . . . . . . . . . . . . . . . . . . . . . . . . . . . . . . . . . . . . . . . . . . . . . . . . . . . . . . . . 481
Using the ElastiCache API ... . . . . . . . . . . . . . . . . . . . . . . . . . . . . . . . . . . . . . . . . . . . . . . . . . . . . . . . . . . . . . . . . . . . . . . . . . . . . . . . . . . . . . . . . . . . . . . . . . . . . . . . . . . . . . 483Using the Query API ... . . . . . . . . . . . . . . . . . . . . . . . . . . . . . . . . . . . . . . . . . . . . . . . . . . . . . . . . . . . . . . . . . . . . . . . . . . . . . . . . . . . . . . . . . . . . . . . . . . . . . . . . . . . . 483
Query Parameters ... . . . . . . . . . . . . . . . . . . . . . . . . . . . . . . . . . . . . . . . . . . . . . . . . . . . . . . . . . . . . . . . . . . . . . . . . . . . . . . . . . . . . . . . . . . . . . . . . . . . . . . . . 483Query Request Authentication .... . . . . . . . . . . . . . . . . . . . . . . . . . . . . . . . . . . . . . . . . . . . . . . . . . . . . . . . . . . . . . . . . . . . . . . . . . . . . . . . . . . . . . . 483
Available Libraries ... . . . . . . . . . . . . . . . . . . . . . . . . . . . . . . . . . . . . . . . . . . . . . . . . . . . . . . . . . . . . . . . . . . . . . . . . . . . . . . . . . . . . . . . . . . . . . . . . . . . . . . . . . . . . . . . 485Troubleshooting Applications .... . . . . . . . . . . . . . . . . . . . . . . . . . . . . . . . . . . . . . . . . . . . . . . . . . . . . . . . . . . . . . . . . . . . . . . . . . . . . . . . . . . . . . . . . . . . . . . . 485
API Version 2015-02-02x

Amazon ElastiCache User Guide
Retrieving Errors ... . . . . . . . . . . . . . . . . . . . . . . . . . . . . . . . . . . . . . . . . . . . . . . . . . . . . . . . . . . . . . . . . . . . . . . . . . . . . . . . . . . . . . . . . . . . . . . . . . . . . . . . . . . 486Troubleshooting Tips .... . . . . . . . . . . . . . . . . . . . . . . . . . . . . . . . . . . . . . . . . . . . . . . . . . . . . . . . . . . . . . . . . . . . . . . . . . . . . . . . . . . . . . . . . . . . . . . . . . . . 486
Logging API Calls ... . . . . . . . . . . . . . . . . . . . . . . . . . . . . . . . . . . . . . . . . . . . . . . . . . . . . . . . . . . . . . . . . . . . . . . . . . . . . . . . . . . . . . . . . . . . . . . . . . . . . . . . . . . . . . . . . 486ElastiCache Information in CloudTrail .. . . . . . . . . . . . . . . . . . . . . . . . . . . . . . . . . . . . . . . . . . . . . . . . . . . . . . . . . . . . . . . . . . . . . . . . . . . . . . . 487Deciphering ElastiCache Log File Entries ... . . . . . . . . . . . . . . . . . . . . . . . . . . . . . . . . . . . . . . . . . . . . . . . . . . . . . . . . . . . . . . . . . . . . . . . . . 487
Tutorials ... . . . . . . . . . . . . . . . . . . . . . . . . . . . . . . . . . . . . . . . . . . . . . . . . . . . . . . . . . . . . . . . . . . . . . . . . . . . . . . . . . . . . . . . . . . . . . . . . . . . . . . . . . . . . . . . . . . . . . . . . . . . . . . . . . . . . . 490Document History .... . . . . . . . . . . . . . . . . . . . . . . . . . . . . . . . . . . . . . . . . . . . . . . . . . . . . . . . . . . . . . . . . . . . . . . . . . . . . . . . . . . . . . . . . . . . . . . . . . . . . . . . . . . . . . . . . . . . . . . 491AWS Glossary .... . . . . . . . . . . . . . . . . . . . . . . . . . . . . . . . . . . . . . . . . . . . . . . . . . . . . . . . . . . . . . . . . . . . . . . . . . . . . . . . . . . . . . . . . . . . . . . . . . . . . . . . . . . . . . . . . . . . . . . . . . . . . . 501
API Version 2015-02-02xi
Amazon ElastiCache User Guide
What Is Amazon ElastiCache?Welcome to the Amazon ElastiCache User Guide. ElastiCache is a web service that makes it easy to setup, manage, and scale a distributed in-memory data store or cache environment in the cloud. It providesa high-performance, scalable, and cost-effective caching solution, while removing the complexityassociated with deploying and managing a distributed cache environment.
With ElastiCache, you can quickly deploy your cache environment, without having to provision hardwareor install software. You can choose from Memcached or Redis protocol-compliant cache engine software,and let ElastiCache perform software upgrades and patch management for you. For enhanced security,ElastiCache can be run in the Amazon Virtual Private Cloud (Amazon VPC) environment, giving youcomplete control over network access to your clusters. With just a few clicks in the AWS ManagementConsole, you can add or remove resources such as nodes, clusters, or read replicas to your ElastiCacheenvironment to meet your business needs and application requirements.
Existing applications that use Memcached or Redis can use ElastiCache with almost no modification. Yourapplications simply need to know the host names and port numbers of the ElastiCache nodes that youhave deployed. The ElastiCache Auto Discovery feature for Memcached lets your applications identify allof the nodes in a cache cluster and connect to them, rather than having to maintain a list of availablehost names and port numbers. In this way, your applications are effectively insulated from changes tonode membership in a cluster.
ElastiCache has multiple features to enhance reliability for critical production deployments:
• Automatic detection and recovery from cache node failures.• Multi-AZ with Automatic Failover of a failed primary cluster to a read replica in Redis clusters that
support replication (called replication groups in the ElastiCache API and AWS CLI.• Flexible Availability Zone placement of nodes and clusters.• Integration with other AWS services such as Amazon EC2, Amazon CloudWatch, AWS CloudTrail, and
Amazon SNS to provide a secure, high-performance, managed in-memory caching solution.
Topics• ElastiCache Use Cases (p. 2)• Amazon ElastiCache Resources (p. 7)• ElastiCache Tutorial Videos (p. 9)• ElastiCache Components and Features (p. 12)• ElastiCache for Redis Terminology (p. 20)• Accessing Amazon ElastiCache (p. 22)• Managing ElastiCache (p. 23)
API Version 2015-02-021
Amazon ElastiCache User GuideUse Cases
ElastiCache Use CasesWhether serving up the latest news, a Top-10 leaderboard, a product catalog, or selling tickets to anevent, speed is the name of the game. The success of your website and business is significantly impactedby the speed at which you deliver content. According to research reported by the New York Timesin 2012, "For Impatient Web Users, an Eye Blink Is Just Too Long to Wait," users can register a 250-millisecond (1/4 second) difference between competing sites and opt out of the slower site in favor ofthe faster site. Tests done at Amazon in 2007, cited in How Webpage Load Time Is Related to VisitorLoss, revealed that for every 100-ms (1/10 second) increase in load time, sales decrease 1 percent. Ifsomeone wants data, whether for a webpage or a report that drives business decisions, you can deliverthat data faster if it is cached, much faster. Can your business afford to not cache your webpages so as todeliver them with the shortest latency possible?
It may be intuitively obvious that you want to cache your most heavily requested items. But why notcache your less frequently requested items? Even the most optimized database query or remote APIcall is going to be noticeably slower than retrieving a flat key from an in-memory cache. Remember,noticeably slower is what sends customers elsewhere.
The following examples illustrate some of the ways using ElastiCache can improve overall performanceof your application.
Amazon ElastiCache Use Cases• In-Memory Data Cache (p. 2)
• Gaming Leaderboards (Redis Sorted Lists) (p. 3)
• Messaging (Redis pub/sub) (p. 4)
• Recommendation Data (Redis Counters & Hashes) (p. 5)
• Other Redis Uses (p. 5)
• Testimonials (p. 6)
In-Memory Data CacheThe primary purpose of an in-memory key-value store is to provide ultra-fast (submillisecond latency)and inexpensive access to copies of data. Most data stores have areas of data that are frequentlyaccessed but seldom updated. Additionally, querying a database is always slower and more expensivethan locating a key in a key-value pair cache. Some database queries are especially expensive to perform,for example, queries that involve joins across multiple tables or queries with intensive calculations. Bycaching such query results, you pay the price of the query once and then are able to quickly retrieve thedata multiple times without having to re-execute the query.
What Should I Cache?When deciding what data to cache you should consider these factors:
Speed and Expense – It is always slower and more expensive to acquire data from a database than froma cache. Some database queries are inherently slower and more expensive than others. For example,queries that perform joins on multiple tables are significantly slower and more expensive than simple,single table queries. If the interesting data requires a slow and expensive query to acquire, it is acandidate for caching. If acquiring the data requires a relatively quick and simple query, it may still be acandidate for caching, depending on other factors.
Data and Access Pattern – Determining what to cache also involves understanding the data itself and itsaccess patterns. For example, it doesn't make sense to cache data that is rapidly changing or is seldomaccessed. For caching to provide a meaningful benefit, the data should be relatively static and frequently
API Version 2015-02-022
Amazon ElastiCache User GuideGaming Leaderboards (Redis Sorted Lists)
accessed, such as a personal profile on a social media site. Conversely, you don't want to cache data ifcaching it provides no speed or cost advantage. For example, it doesn't make sense to cache webpagesthat return the results of a search since such queries and results are almost always unique.
Staleness – By definition, cached data is stale data—even if in certain circumstances it isn't stale, itshould always be considered and treated as stale. In determining whether your data is a candidate forcaching, you need to determine your application's tolerance for stale data. Your application may be ableto tolerate stale data in one context, but not another. For example, when serving up a publicly tradedstock price on a web site, staleness might be quite acceptable, along with a disclaimer that prices may beup to n minutes delayed. But, when serving up the price for the same stock to a broker making a sale orpurchase you want real-time data.
In summary, consider caching your data if:
• It is slow or expensive to acquire when compared to cache retrieval.• It is accessed with sufficient frequency.• It is relatively static, or if rapidly changing, staleness is not a significant issue.
For more information, see Caching Strategies (p. 96).
Gaming Leaderboards (Redis Sorted Lists)Redis sorted sets move the computational complexity associated with leaderboards from yourapplication to your Redis cluster.
Leaderboards, such as the Top 10 scores for a game, are computationally complex, especially with alarge number of concurrent players and continually changing scores. Redis sorted sets guarantee bothuniqueness and element ordering. Using Redis sorted sets, each time a new element is added to thesorted set it is re-ranked in real time and added to the set in its appropriate numeric position.
Example - Redis Leaderboard
In this example four gamers and their scores are entered into a sorted list using ZADD. The commandZREVRANGEBYSCORE lists the players by their score, high to low. Next, ZADD is used to update June'sscore by overwriting the existing entry. Finally ZREVRANGEBYSCORE list the players by their score, highto low, showing that June has moved up in the rankings.
ZADD leaderboard 132 RobertZADD leaderboard 231 SandraZADD leaderboard 32 JuneZADD leaderboard 381 Adam ZREVRANGEBYSCORE leaderboard +inf -inf1) Adam2) Sandra3) Robert4) June
ZADD leaderboard 232 June
ZREVRANGEBYSCORE leaderboard +inf -inf1) Adam2) June3) Sandra4) Robert
The following command lets June know where she ranks among all the players. Since ranking is zero-based, ZREVRANK returns a 1 for June who is in second position.
API Version 2015-02-023

Amazon ElastiCache User GuideMessaging (Redis pub/sub)
ZREVRANK leaderboard June 1
For more information, see the Redis Documentation on sorted sets.
Messaging (Redis pub/sub)When you send an email message, you send it to one or more specified recipients. In the pub/subparadigm, you send a message to a specific channel not knowing who, if anyone, receives it. Recipientsof the message are those who are subscribed to the channel. For example, suppose you subscribe tothe news.sports.golf channel. You and all others subscribed to the news.sports.golf channel receive anymessages published to news.sports.golf.
Redis pub/sub functionality has no relation to any key space. Therefore, it doesn't interfere on any level.
SubscribingTo receive messages on a channel you must subscribe to the channel. You may subscribe to a singlechannel, multiple specified channels, or all channels that match a pattern. To cancel a subscription youunsubscribe from the channel specified when you subscribed to it or the same pattern you used if yousubscribed using pattern matching.
Example - Subscription to a Single Channel
To subscribe to a single channel, use the SUBSCRIBE command specifying the channel you want tosubscribe to. In the following example, a client subscribes to the news.sports.golf channel.
SUBSCRIBE news.sports.golf
After a while, the client cancels their subscription to the channel using the UNSUBSCRIBE commandspecifying the channel to unsubscribe from.
UNSUBSCRIBE news.sports.golf
Example - Subscriptions to Multiple Specified Channels
To subscribe to multiple specific channels, list the channels with the SUBSCRIBE command. Inthe following example, a client subscribes to both the news.sports.golf, news.sports.soccer andnews.sports.skiing channels.
SUBSCRIBE news.sports.golf news.sports.soccer news.sports.skiing
To cancel a subscription to a specific channel, use the UNSUBSCRIBE command specifying the channel tounsubscribe from.
UNSUBSCRIBE news.sports.golf
To cancel subscriptions to multiple channels, use the UNSUBSCRIBE command specifying the channels tounsubscribe from.
UNSUBSCRIBE news.sports.golf news.sports.soccer
To cancel all subscriptions, use UNSUBSCRIBE and specify each channel or UNSUBSCRIBE withoutspecifying any channel.
API Version 2015-02-024

Amazon ElastiCache User GuideRecommendation Data (Redis Counters & Hashes)
UNSUBSCRIBE news.sports.golf news.sports.soccer news.sports.skiing
UNSUBSCRIBE
Example - Subscriptions Using Pattern Matching
Clients can subscribe to all channels that match a pattern by using the PSUBSCRIBE command.
In the following example, a client subscribes to all sports channels. Rather than listing all the sportschannels individually, as you do using SUBSCRIBE, pattern matching is used with the PSUBSCRIBEcommand.
PSUBSCRIBE news.sports.*
To cancel subscriptions to these channels, use the PUNSUBSCRIBE command.
PUNSUBSCRIBE news.sports.*
ImportantThe channel string sent to a [P]SUBSCRIBE command and to the [P]UNSUBSCRIBE commandmust match. You cannot PSUBSCRIBE to news.* and PUNSUBSCRIBE from news.sports.* orUNSUBSCRIBE from news.sports.golf.
PublishingTo send a message to all subscribers to a channel, use the PUBLISH command, specifying the channeland the message. The following example publishes the message, “It’s Saturday and sunny. I’m headed tothe links.” to the news.sports.golf channel.
PUBLISH news.sports.golf "It's Saturday and sunny. I'm headed to the links."
A client cannot publish to a channel to which it is subscribed.
For more information, see Pub/Sub in the Redis documentation.
Recommendation Data (Redis Counters & Hashes)Redis counters and hashes make compiling recommendations simple. Each time a user "likes" a product,you increment an item:productID:like counter. Each time a user "dislikes" a product, you increment anitem:productID:dislike counter. Using Redis hashes, you can also maintain a list of everyone who has likedor disliked a product.
Example - Likes & Dislikes
INCR item:38923:likesHSET item:38923:ratings Susan 1INCR item:38923:dislikesHSET item:38923:ratings Tommy -1
Other Redis UsesAn article by Salvatore Sanfilippo (How to take advantage of Redis just adding it to your stack) discussesa number of common database uses and how they can be easily solved using Redis, thus removing loadfrom your database and improving performance.
API Version 2015-02-025

Amazon ElastiCache User GuideTestimonials
TestimonialsTo learn about how businesses like Airbnb, PBS, Esri, and others are using Amazon ElastiCache to growtheir businesses with improved customer experience, see Testimonials.
API Version 2015-02-026

Amazon ElastiCache User GuideElastiCache Resources
Amazon ElastiCache ResourcesWe recommend that you begin by reading the following sections, and refer to them as you need them:
• Service Highlights and Pricing – The product detail page provides a general product overview ofElastiCache, service highlights, and pricing.
• ElastiCache Videos – The ElastiCache Tutorial Videos (p. 9) section has videos that introduce youto Amazon ElastiCache, cover common use cases for ElastiCache, and demo how to use ElastiCache toreduce latency and improve throughput of your applications.
• Getting Started – The Getting Started with Amazon ElastiCache (p. 24) section includes an examplethat walks you through the process of creating a cache cluster, authorizing access to the cache cluster,connecting to a cache node, and deleting the cache cluster.
• Performance at Scale – The Performance at Scale with Amazon ElastiCache white paper addressescaching strategies that enable your application to perform well at scale.
After you complete the preceding sections, read these sections:
• Engines and Versions (p. 44)
ElastiCache supports two engines—Memcached and Redis. This topic helps you determine whichengine is best for your scenario.
• Choosing Your Node Size (p. 103)
You want your nodes to be large enough to accommodate all the data you want to cache. At the sametime, you don't want to pay for more cache than you need. You can use this topic to help select thebest node size.
• Best Practices for Amazon ElastiCache (p. 80)
Identify and address issues that can impact the efficiency of your cluster.
If you want to use the AWS Command Line Interface (AWS CLI), you can use these documents to help youget started:
• AWS Command Line Interface Documentation
This section provides information on downloading the AWS CLI, getting the AWS CLI working on yoursystem, and providing your AWS credentials.
• AWS CLI Documentation for ElastiCache
This separate document covers all of the AWS CLI for ElastiCache commands, including syntax andexamples.
You can write application programs to use the ElastiCache API with a variety of popular programminglanguages. Here are some resources:
• Tools for Amazon Web Services
Amazon Web Services provides a number of software development kits (SDKs) with support forElastiCache. You can code for ElastiCache using Java, .NET, PHP, Ruby, and other languages. TheseSDKs can greatly simplify your application development by formatting your requests to ElastiCache,parsing responses, and providing retry logic and error handling.
• Using the ElastiCache API (p. 483)
API Version 2015-02-027

Amazon ElastiCache User GuideElastiCache Resources
If you don't want to use the AWS SDKs, you can interact with ElastiCache directly using the QueryAPI. You can find troubleshooting tips and information on creating and authenticating requests andhandling responses in this section.
• Amazon ElastiCache API Reference
This separate document covers all of the ElastiCache API operations, including syntax and examples.
API Version 2015-02-028

Amazon ElastiCache User GuideTutorial Videos
ElastiCache Tutorial VideosFollowing, you can find tutorial videos to help you learn basic and advanced Amazon ElastiCacheconcepts. For information about AWS Training, see AWS Training & Certification.
Contents• Introductory Video Tutorials (p. 9)
• DAT204—Building Scalable Applications on AWS NoSQL Services (re:Invent 2015) (p. 9)• DAT207—Accelerating Application Performance with Amazon ElastiCache (AWS re:Invent
2013) (p. 9)• Advanced Video Tutorials (p. 9)
• DAT305—Amazon ElastiCache Deep Dive (re:Invent 2017) (p. 10)• DAT306—Amazon ElastiCache Deep Dive (re:Invent 2016) (p. 10)• DAT317—How IFTTT Uses ElastiCache for Redis to Predict Events (re:Invent 2016) (p. 10)• DAT407—Amazon ElastiCache Deep Dive (re:Invent 2015) (p. 10)• SDD402—Amazon ElastiCache Deep Dive (re:Invent 2014) (p. 11)• DAT307—Deep Dive into Amazon ElastiCache Architecture and Design Patterns (re:Invent
2013) (p. 11)
Introductory Video TutorialsThe following videos introduce you to Amazon ElastiCache.
DAT204—Building Scalable Applications on AWS NoSQLServices (re:Invent 2015)In this session, we discuss the benefits of NoSQL databases and take a tour of the main NoSQL servicesoffered by AWS—Amazon DynamoDB and Amazon ElastiCache. Then, we hear from two leadingcustomers, Expedia and Mapbox, about their use cases and architectural challenges, and how theyaddressed them using AWS NoSQL services, including design patterns and best practices. You shouldcome out of this session having a better understanding of NoSQL and its powerful capabilities, ready totackle your database challenges with confidence.
DAT204—Building Scalable Applications on AWS NoSQL Services (re:Invent 2015)
DAT207—Accelerating Application Performance with AmazonElastiCache (AWS re:Invent 2013)In this tutorial, learn how you can use Amazon ElastiCache to easily deploy a Memcached- or Redis-compatible in-memory caching system to speed up your application performance. We show you howto use Amazon ElastiCache to improve your application latency and reduce the load on your databaseservers. We'll also show you how to build a caching layer that is easy to manage and scale as yourapplication grows. During this session, we go over various scenarios and use cases that can benefit byenabling caching, and discuss the features provided by Amazon ElastiCache.
DAT207 - Accelerating Application Performance with Amazon ElastiCache (re:Invent 2013)
Advanced Video TutorialsThe following videos cover more advanced Amazon ElastiCache topics.
API Version 2015-02-029

Amazon ElastiCache User GuideAdvanced Video Tutorials
Topics• DAT305—Amazon ElastiCache Deep Dive (re:Invent 2017) (p. 10)• DAT306—Amazon ElastiCache Deep Dive (re:Invent 2016) (p. 10)• DAT317—How IFTTT Uses ElastiCache for Redis to Predict Events (re:Invent 2016) (p. 10)• DAT407—Amazon ElastiCache Deep Dive (re:Invent 2015) (p. 10)• SDD402—Amazon ElastiCache Deep Dive (re:Invent 2014) (p. 11)• DAT307—Deep Dive into Amazon ElastiCache Architecture and Design Patterns (re:Invent
2013) (p. 11)
DAT305—Amazon ElastiCache Deep Dive (re:Invent 2017)Look behind the scenes to learn about Amazon ElastiCache's design and architecture. See commondesign patterns with our Redis and Memcached offerings and how customers have used them for in-memory operations to reduce latency and improve application throughput. During this video, we reviewElastiCache best practices, design patterns, and anti-patterns.
The video introduces the following:
• ElastiCache for Redis online resharding• ElastiCache security and encryption• ElastiCache for Redis version 3.2.10
DAT305—Amazon ElastiCache Deep Dive (re:Invent 2017)
DAT306—Amazon ElastiCache Deep Dive (re:Invent 2016)Look behind the scenes to learn about Amazon ElastiCache's design and architecture. See commondesign patterns with our Redis and Memcached offerings and how customers have used them for in-memory operations to reduce latency and improve application throughput. During this session, wereview ElastiCache best practices, design patterns, and anti-patterns.
DAT306—Amazon ElastiCache Deep Dive (re:Invent 2016)
DAT317—How IFTTT Uses ElastiCache for Redis to PredictEvents (re:Invent 2016)IFTTT is a free service that empowers people to do more with the services they love, from automatingsimple tasks to transforming how someone interacts with and controls their home. IFTTT usesElastiCache for Redis to store transaction run history and schedule predictions as well as indexes for logdocuments on Amazon S3. View this session to learn how the scripting power of Lua and the data typesof Redis allow people to accomplish something they can't elsewhere.
DAT407—Amazon ElastiCache Deep Dive (re:Invent 2015)
DAT407—Amazon ElastiCache Deep Dive (re:Invent 2015)Peek behind the scenes to learn about Amazon ElastiCache's design and architecture. See commondesign patterns of our Memcached and Redis offerings and how customers have used them for in-memory operations and achieved improved latency and throughput for applications. During this session,we review best practices, design patterns, and anti-patterns related to Amazon ElastiCache.
DAT407—Amazon ElastiCache Deep Dive (re:Invent 2015)
API Version 2015-02-0210

Amazon ElastiCache User GuideAdvanced Video Tutorials
SDD402—Amazon ElastiCache Deep Dive (re:Invent 2014)In this tutorial, we examine common caching use cases, the Memcached and Redis engines, patterns thathelp you determine which engine is better for your needs, consistent hashing, and more as means tobuilding fast, scalable applications. Frank Wiebe, Principal Scientist at Adobe, details how Adobe usesAmazon ElastiCache to improve customer experience and scale their business.
DAT402—Amazon ElastiCache Deep Dive (re:Invent 2014)
DAT307—Deep Dive into Amazon ElastiCache Architecture andDesign Patterns (re:Invent 2013)In this tutorial, we examine caching, caching strategies, scaling out, monitoring. We also compare theMemcached and Redis engines. During this session, also we review best practices and design patternsrelated to Amazon ElastiCache.
DAT307 - Deep Dive into Amazon ElastiCache Architecture and Design Patterns (AWS re:Invent 2013).
API Version 2015-02-0211
Amazon ElastiCache User GuideComponents and Features
ElastiCache Components and FeaturesIn the topics in this section, you can find an overview of the major components of an Amazon ElastiCachedeployment.
Topics
• ElastiCache Nodes (p. 12)
• ElastiCache Shards (Redis) (p. 13)
• ElastiCache Clusters (p. 13)
• ElastiCache Replication (Redis) (p. 15)
• Regions and Availability Zones (p. 16)
• ElastiCache Endpoints (p. 17)
• ElastiCache Parameter Groups (p. 17)
• ElastiCache Security (p. 18)
• ElastiCache Security Groups (p. 18)
• ElastiCache Subnet Groups (p. 18)
• ElastiCache Backups/Snapshots (Redis) (p. 18)
• ElastiCache Events (p. 19)
ElastiCache NodesA node is the smallest building block of an ElastiCache deployment. A node can exist in isolation from orin some relationship to other nodes.
A node is a fixed-size chunk of secure, network-attached RAM. Each node runs an instance of eitherMemcached or Redis, depending on which was chosen when you created your cluster. If necessary,you can scale the nodes in a cluster up or down to a different instance type. For more information, seeScaling (p. 203).
Every node within a cluster is the same instance type and runs the same cache engine. Each cache nodehas its own Domain Name Service (DNS) name and port. Multiple types of cache nodes are supported,each with varying amounts of associated memory. For a list of supported node instance types, seeSupported Node Types (p. 121).
You can purchase nodes on a pay-as-you-go basis, where you only pay for your use of a node. Oryou can purchase reserved nodes at a significantly reduced hourly rate. If your usage rate is high,purchasing reserved nodes can save you money. Suppose that your cluster is almost always in use, andyou occasionally add nodes to handle use spikes. In this case, you can purchase a number of reservednodes to run most of the time and purchase pay-as-you-go nodes for the times you occasionally need toadd nodes. For more information on reserved nodes, see ElastiCache Reserved Nodes (p. 111).
The Memcached engine supports Auto Discovery—the ability for client programs to automaticallyidentify all of the nodes in a cache cluster, and to initiate and maintain connections to all of these nodes.With Auto Discovery, your application does not need to manually connect to individual nodes; instead,your application connects to a configuration endpoint. The configuration endpoint DNS entry containsthe CNAME entries for each of the cache node endpoints. Thus, by connecting to the configurationendpoint, your application immediately knows about all of the nodes in the cluster and can connect to allof them. You don't need to hard code the individual cache node endpoints in your application. For moreinformation on Auto Discovery, see Node Auto Discovery (Memcached) (p. 127).
For more information on nodes, see ElastiCache Nodes (p. 101).
API Version 2015-02-0212
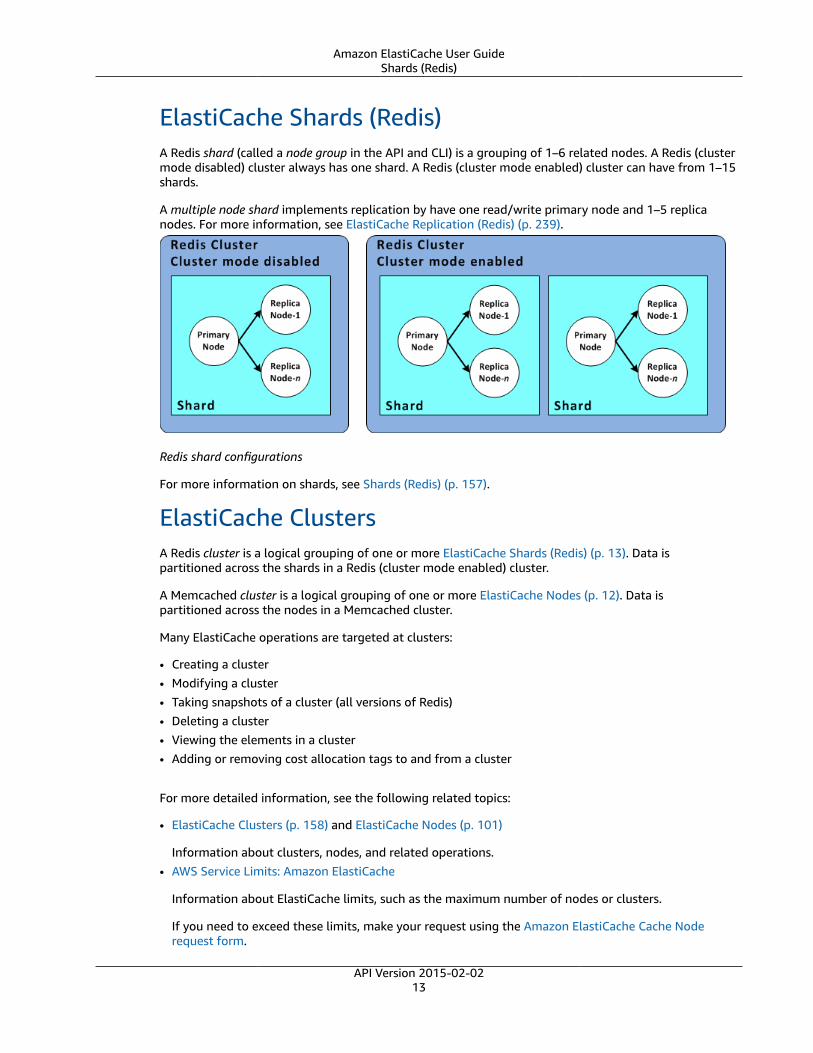
Amazon ElastiCache User GuideShards (Redis)
ElastiCache Shards (Redis)A Redis shard (called a node group in the API and CLI) is a grouping of 1–6 related nodes. A Redis (clustermode disabled) cluster always has one shard. A Redis (cluster mode enabled) cluster can have from 1–15shards.
A multiple node shard implements replication by have one read/write primary node and 1–5 replicanodes. For more information, see ElastiCache Replication (Redis) (p. 239).
Redis shard configurations
For more information on shards, see Shards (Redis) (p. 157).
ElastiCache ClustersA Redis cluster is a logical grouping of one or more ElastiCache Shards (Redis) (p. 13). Data ispartitioned across the shards in a Redis (cluster mode enabled) cluster.
A Memcached cluster is a logical grouping of one or more ElastiCache Nodes (p. 12). Data ispartitioned across the nodes in a Memcached cluster.
Many ElastiCache operations are targeted at clusters:
• Creating a cluster• Modifying a cluster• Taking snapshots of a cluster (all versions of Redis)• Deleting a cluster• Viewing the elements in a cluster• Adding or removing cost allocation tags to and from a cluster
For more detailed information, see the following related topics:
• ElastiCache Clusters (p. 158) and ElastiCache Nodes (p. 101)
Information about clusters, nodes, and related operations.• AWS Service Limits: Amazon ElastiCache
Information about ElastiCache limits, such as the maximum number of nodes or clusters.
If you need to exceed these limits, make your request using the Amazon ElastiCache Cache Noderequest form.
API Version 2015-02-0213

Amazon ElastiCache User GuideClusters
• Mitigating Failures (p. 87)
Information about improving the fault tolerance of your clusters and replication groups.
Typical Cluster ConfigurationsDepending on the engine you choose, possible cluster configurations differ.
Memcached supports up to 100 nodes per customer per region with each cluster having 1–20 nodes. Youcan partition your data across the nodes in a Memcached cluster.
A Redis cluster contains 1–15 shards (in the API, called node groups), each of which is a partition of yourdata. Redis (cluster mode disabled) always has just one shard.
Following are typical cluster configurations for the Memcached and Redis engines.
Memcached Clusters
When you run the Memcached engine, clusters can be made up of 1–20 nodes. You can partitionyour database across the nodes. Your application reads and writes to each node's endpoint. For moreinformation, see Node Auto Discovery (Memcached) (p. 127).
For improved fault tolerance, locate your Memcached nodes in various Availability Zones (AZs) withinthe cluster's region. That way, a failure in one AZ has minimal impact upon your entire cluster andapplication. For more information, see Mitigating Failures (p. 87).
As demand upon your Memcached cluster changes, you can scale out or in by adding or removingnodes and repartitioning your data across the new number of nodes. When you partition your data, werecommend using consistent hashing. For more information about consistent hashing, see ConfiguringYour ElastiCache Client for Efficient Load Balancing (p. 92).
Memcached clusters: single node and multiple node clusters
Redis Clusters
A Redis (cluster mode enabled) cluster contains 1–15 shards (in the API and CLI, called node groups).Redis (cluster mode disabled) clusters always contain just one shard (in the API and CLI, one nodegroup). A Redis shard contains 1–6 nodes. If there is more than one node in a shard, the shard supportsreplication with one node being the read/write primary node and the others read-only replica nodes.
For improved fault tolerance, we recommend having at least two nodes in a Redis cluster and enablingMulti-AZ with automatic failover. For more information, see Mitigating Failures (p. 87).
As demand upon your Redis (cluster mode disabled) cluster changes, you can scale up or downby moving your cluster to a different node instance type. If your application is read intensive, werecommend adding read-only replicas Redis (cluster mode disabled) cluster so you can spread the readsacross a more appropriate number of nodes.
ElastiCache supports changing a Redis (cluster mode disabled) cluster's node type to a larger nodetype dynamically. For information on scaling up or down, see Scaling Single-Node Redis (clustermode disabled) Clusters (p. 208) or Scaling Redis (cluster mode disabled) Clusters with ReplicaNodes (p. 217).
API Version 2015-02-0214
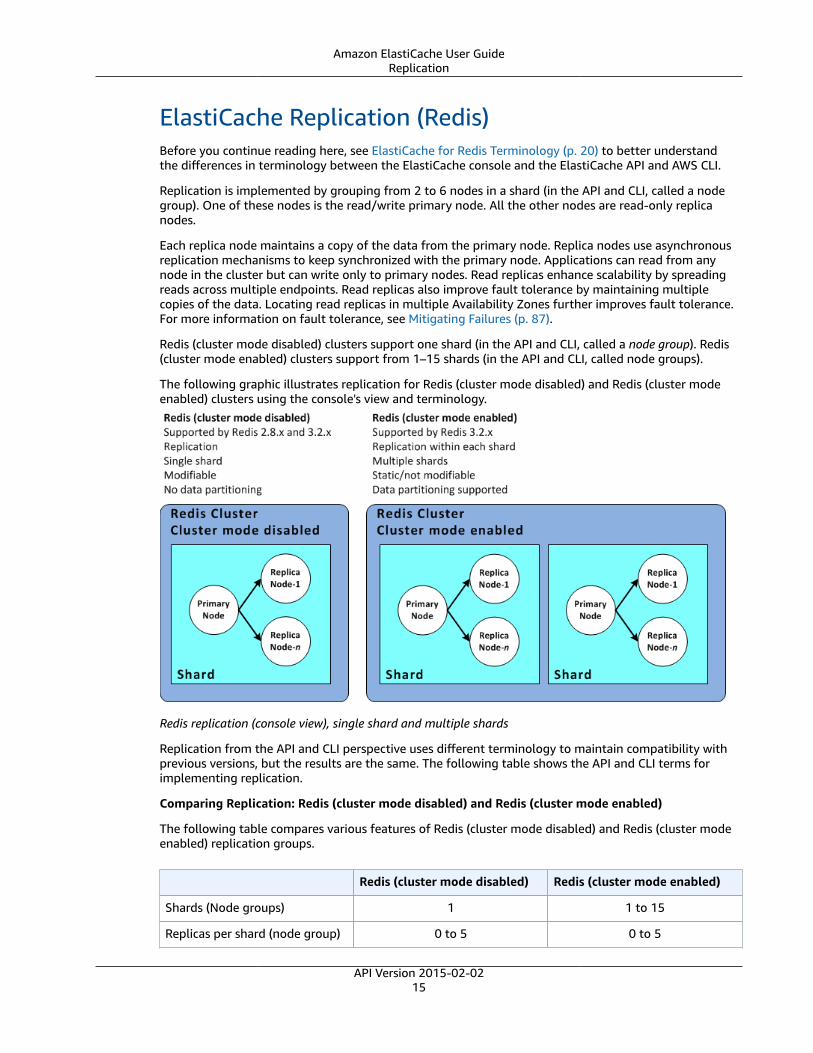
Amazon ElastiCache User GuideReplication
ElastiCache Replication (Redis)Before you continue reading here, see ElastiCache for Redis Terminology (p. 20) to better understandthe differences in terminology between the ElastiCache console and the ElastiCache API and AWS CLI.
Replication is implemented by grouping from 2 to 6 nodes in a shard (in the API and CLI, called a nodegroup). One of these nodes is the read/write primary node. All the other nodes are read-only replicanodes.
Each replica node maintains a copy of the data from the primary node. Replica nodes use asynchronousreplication mechanisms to keep synchronized with the primary node. Applications can read from anynode in the cluster but can write only to primary nodes. Read replicas enhance scalability by spreadingreads across multiple endpoints. Read replicas also improve fault tolerance by maintaining multiplecopies of the data. Locating read replicas in multiple Availability Zones further improves fault tolerance.For more information on fault tolerance, see Mitigating Failures (p. 87).
Redis (cluster mode disabled) clusters support one shard (in the API and CLI, called a node group). Redis(cluster mode enabled) clusters support from 1–15 shards (in the API and CLI, called node groups).
The following graphic illustrates replication for Redis (cluster mode disabled) and Redis (cluster modeenabled) clusters using the console's view and terminology.
Redis replication (console view), single shard and multiple shards
Replication from the API and CLI perspective uses different terminology to maintain compatibility withprevious versions, but the results are the same. The following table shows the API and CLI terms forimplementing replication.
Comparing Replication: Redis (cluster mode disabled) and Redis (cluster mode enabled)
The following table compares various features of Redis (cluster mode disabled) and Redis (cluster modeenabled) replication groups.
Redis (cluster mode disabled) Redis (cluster mode enabled)
Shards (Node groups) 1 1 to 15
Replicas per shard (node group) 0 to 5 0 to 5
API Version 2015-02-0215
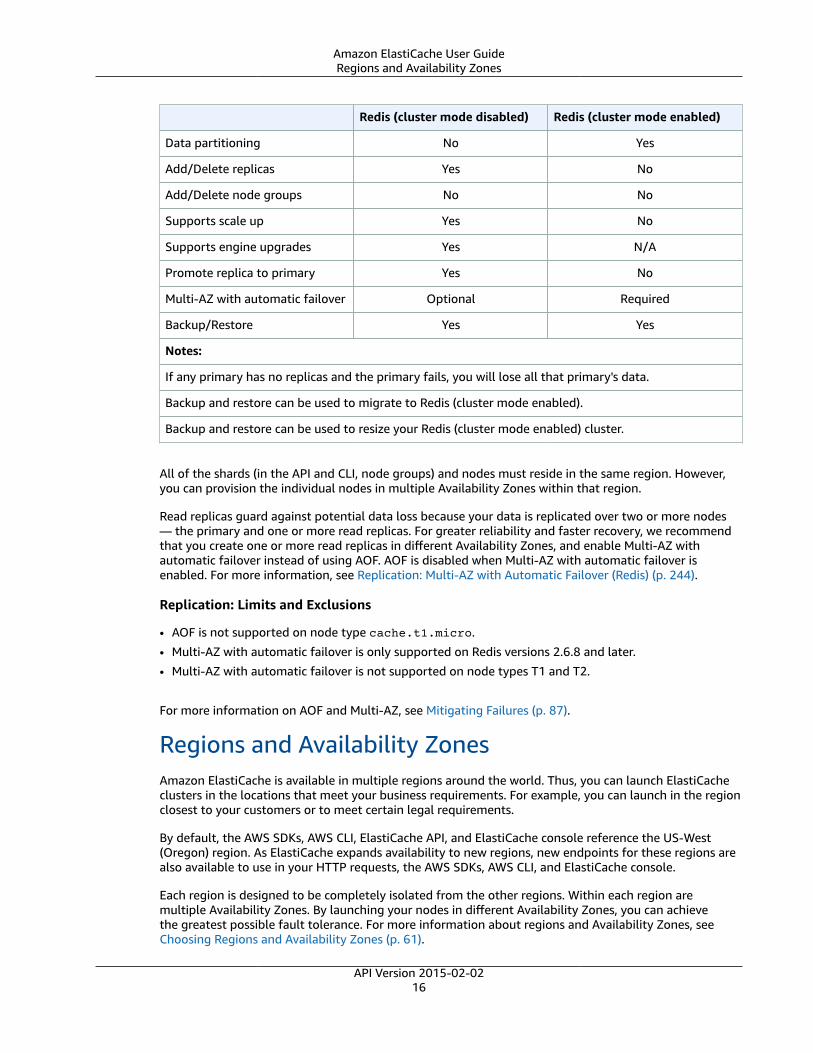
Amazon ElastiCache User GuideRegions and Availability Zones
Redis (cluster mode disabled) Redis (cluster mode enabled)
Data partitioning No Yes
Add/Delete replicas Yes No
Add/Delete node groups No No
Supports scale up Yes No
Supports engine upgrades Yes N/A
Promote replica to primary Yes No
Multi-AZ with automatic failover Optional Required
Backup/Restore Yes Yes
Notes:
If any primary has no replicas and the primary fails, you will lose all that primary's data.
Backup and restore can be used to migrate to Redis (cluster mode enabled).
Backup and restore can be used to resize your Redis (cluster mode enabled) cluster.
All of the shards (in the API and CLI, node groups) and nodes must reside in the same region. However,you can provision the individual nodes in multiple Availability Zones within that region.
Read replicas guard against potential data loss because your data is replicated over two or more nodes— the primary and one or more read replicas. For greater reliability and faster recovery, we recommendthat you create one or more read replicas in different Availability Zones, and enable Multi-AZ withautomatic failover instead of using AOF. AOF is disabled when Multi-AZ with automatic failover isenabled. For more information, see Replication: Multi-AZ with Automatic Failover (Redis) (p. 244).
Replication: Limits and Exclusions
• AOF is not supported on node type cache.t1.micro.
• Multi-AZ with automatic failover is only supported on Redis versions 2.6.8 and later.
• Multi-AZ with automatic failover is not supported on node types T1 and T2.
For more information on AOF and Multi-AZ, see Mitigating Failures (p. 87).
Regions and Availability ZonesAmazon ElastiCache is available in multiple regions around the world. Thus, you can launch ElastiCacheclusters in the locations that meet your business requirements. For example, you can launch in the regionclosest to your customers or to meet certain legal requirements.
By default, the AWS SDKs, AWS CLI, ElastiCache API, and ElastiCache console reference the US-West(Oregon) region. As ElastiCache expands availability to new regions, new endpoints for these regions arealso available to use in your HTTP requests, the AWS SDKs, AWS CLI, and ElastiCache console.
Each region is designed to be completely isolated from the other regions. Within each region aremultiple Availability Zones. By launching your nodes in different Availability Zones, you can achievethe greatest possible fault tolerance. For more information about regions and Availability Zones, seeChoosing Regions and Availability Zones (p. 61).
API Version 2015-02-0216
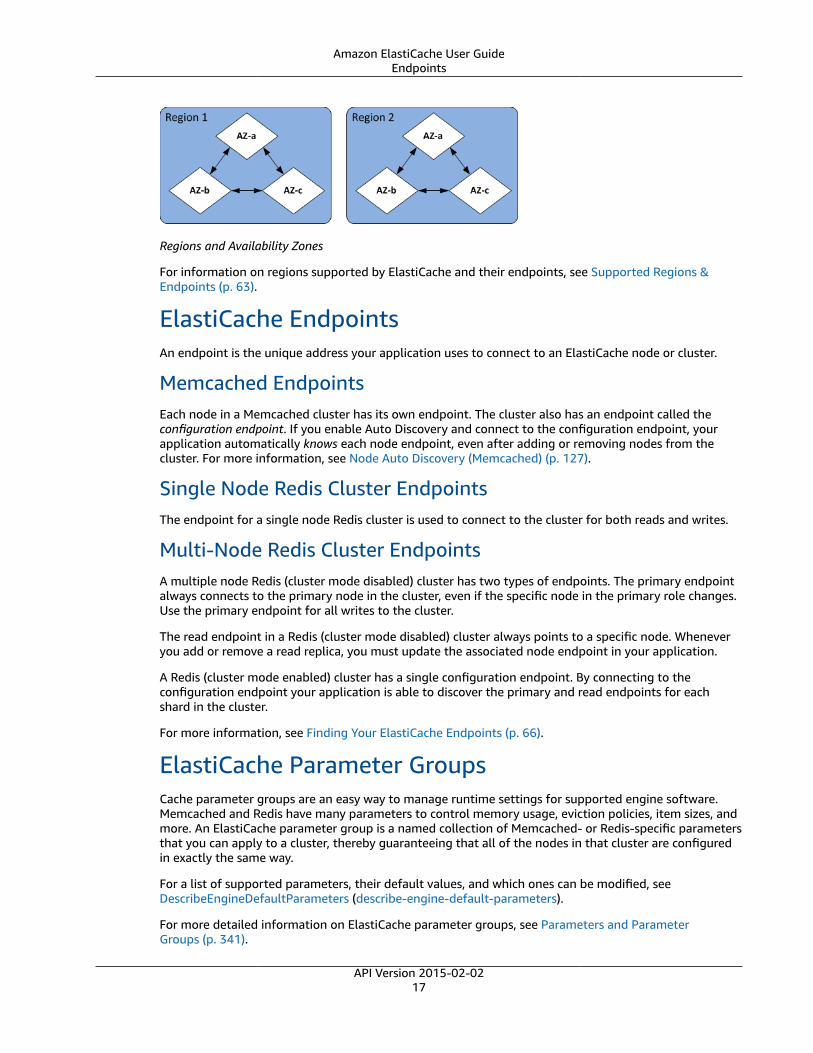
Amazon ElastiCache User GuideEndpoints
Regions and Availability Zones
For information on regions supported by ElastiCache and their endpoints, see Supported Regions &Endpoints (p. 63).
ElastiCache EndpointsAn endpoint is the unique address your application uses to connect to an ElastiCache node or cluster.
Memcached EndpointsEach node in a Memcached cluster has its own endpoint. The cluster also has an endpoint called theconfiguration endpoint. If you enable Auto Discovery and connect to the configuration endpoint, yourapplication automatically knows each node endpoint, even after adding or removing nodes from thecluster. For more information, see Node Auto Discovery (Memcached) (p. 127).
Single Node Redis Cluster EndpointsThe endpoint for a single node Redis cluster is used to connect to the cluster for both reads and writes.
Multi-Node Redis Cluster EndpointsA multiple node Redis (cluster mode disabled) cluster has two types of endpoints. The primary endpointalways connects to the primary node in the cluster, even if the specific node in the primary role changes.Use the primary endpoint for all writes to the cluster.
The read endpoint in a Redis (cluster mode disabled) cluster always points to a specific node. Wheneveryou add or remove a read replica, you must update the associated node endpoint in your application.
A Redis (cluster mode enabled) cluster has a single configuration endpoint. By connecting to theconfiguration endpoint your application is able to discover the primary and read endpoints for eachshard in the cluster.
For more information, see Finding Your ElastiCache Endpoints (p. 66).
ElastiCache Parameter GroupsCache parameter groups are an easy way to manage runtime settings for supported engine software.Memcached and Redis have many parameters to control memory usage, eviction policies, item sizes, andmore. An ElastiCache parameter group is a named collection of Memcached- or Redis-specific parametersthat you can apply to a cluster, thereby guaranteeing that all of the nodes in that cluster are configuredin exactly the same way.
For a list of supported parameters, their default values, and which ones can be modified, seeDescribeEngineDefaultParameters (describe-engine-default-parameters).
For more detailed information on ElastiCache parameter groups, see Parameters and ParameterGroups (p. 341).
API Version 2015-02-0217

Amazon ElastiCache User GuideSecurity
ElastiCache SecurityFor enhanced security, ElastiCache node access is restricted to applications running on whitelistedAmazon EC2 instances. You can control the Amazon EC2 instances that can access your cluster by usingsubnet groups or security groups.
By default, all new ElastiCache clusters are launched in an Amazon Virtual Private Cloud (Amazon VPC)environment. You can use subnet groups to grant cluster access from Amazon EC2 instances running onspecific subnets. If you choose to run your cluster outside of Amazon VPC, you can create security groupsto authorize Amazon EC2 instances running within specific Amazon EC2 security groups.
ElastiCache Security GroupsNoteElastiCache security groups are only applicable to clusters that are not running in an AmazonVirtual Private Cloud (Amazon VPC) environment. If you are running your ElastiCache nodes inan Amazon VPC, you control access to your cache clusters with Amazon VPC security groups,which are different from ElastiCache security groups.For more information on using ElastiCache in an Amazon VPC, see Amazon Virtual Private Cloud(Amazon VPC) with ElastiCache (p. 392).
ElastiCache allows you to control access to your clusters using security groups. A security group acts likea firewall, controlling network access to your cluster. By default, network access to your clusters is turnedoff. If you want your applications to access your cluster, you must explicitly enable access from hostsin specific Amazon EC2 security groups. After ingress rules are configured, the same rules apply to allclusters associated with that security group.
To allow network access to your cluster, create a security group and use theAuthorizeCacheSecurityGroupIngress API or the authorize-cache-security-group-ingress AWS CLIcommand to authorize the desired Amazon EC2 security group (which in turn specifies the Amazon EC2instances allowed). The security group can be associated with your cluster at the time of creation, or byusing the ElastiCache management console or the ModifyCacheCluster or (modify-cache-cluster) AWSCLI for ElastiCache command.
ImportantIP-range based access control is currently not enabled for clusters. All clients to a cluster mustbe within the Amazon EC2 network, and authorized via security groups as described previously.
For more information about security groups, see Security Groups [EC2-Classic] (p. 332).
ElastiCache Subnet GroupsA subnet group is a collection of subnets (typically private) that you can designate for your clustersrunning in an Amazon Virtual Private Cloud (Amazon VPC) environment.
If you create a cluster in an Amazon VPC, then you must specify a cache subnet group. ElastiCache usesthat cache subnet group to choose a subnet and IP addresses within that subnet to associate with yourcache nodes.
For more information about cache subnet group usage in an Amazon VPC environment, see AmazonVirtual Private Cloud (Amazon VPC) with ElastiCache (p. 392), Step 4: Authorize Access (p. 33), andSubnets and Subnet Groups (p. 383).
ElastiCache Backups/Snapshots (Redis)A backup is a point-in-time copy of a Redis cluster. Backups can be used to restore an existing cluster orto seed a new cluster. Backups consist of all the data in a cluster plus some metadata. Backups are notsupported by the Memcached engine.
API Version 2015-02-0218

Amazon ElastiCache User GuideEvents
Depending upon the version of Redis running on your cluster, the backup process requires differingamounts of reserved memory to succeed. For more information, see:
• ElastiCache Backup and Restore (Redis) (p. 297)• How Synchronization and Backup are Implemented (p. 257)• Performance Impact of Backups (p. 298)• Ensuring You Have Sufficient Memory to Create a Redis Snapshot (p. 81)
ElastiCache EventsWhen significant events happen on a cache cluster, such as a failure to add a node, success in addinga node, the modification of a security group and others, ElastiCache sends notification to a specificAmazon SNS topic. By monitoring for key events you can know the current state of your clusters and,depending upon the event, be able to take corrective action.
For more information on ElastiCache events, see Monitoring ElastiCache Events (p. 462).
API Version 2015-02-0219

Amazon ElastiCache User GuideElastiCache for Redis Terminology
ElastiCache for Redis TerminologyIn October 2016, Amazon ElastiCache launched support for Redis 3.2. Among other things, the newfeatures launched then added support for partitioning your data across up to 15 shards (called nodegroups in the ElastiCache API and AWS CLI). To preserve compatibility with previous versions, weextended API version 2015-02-02 operations to include the new Redis functionality. In parallel, webegan using terminology in the ElastiCache console that is used in this new functionality and commonacross the industry. These changes mean that at some points, the terminology used in the API and CLImight be different from the terminology used in the console. The following list identifies terms thatmight differ between the API and CLI and the console.
Cache Cluster or Node vs. Node
Because of the one-to-one relationship between a node and a cache cluster when there are noreplica nodes, the ElastiCache console often used the terms interchangeably. Going forward, theconsole now uses the term node throughout. The one exception is the Create Cluster button, whichlaunches the process to create a cluster with or without replica nodes.
The ElastiCache API and AWS CLI continue to use the terms as they have in the past.
Cluster vs. Replication Group
The console now uses the term cluster for all ElastiCache for Redis clusters. The console uses theterm cluster in all these circumstances:
• When the cluster is a single node Redis cluster.
• When the cluster is a Redis (cluster mode disabled) cluster that supports replication within a singleshard (in the API and CLI, called a node group).
• When the cluster is a Redis (cluster mode enabled) cluster that supports replication within 1–15shards.
The following diagram illustrates the various topologies of ElastiCache for Redis clusters from theconsole's perspective.
ElastiCache for Redis clusters (Console view)
The ElastiCache API and AWS CLI operations still distinguish single node ElastiCache for Redisclusters from multi-node replication groups. The following diagram illustrates the variousElastiCache for Redis topologies from the ElastiCache API and AWS CLI perspective.
API Version 2015-02-0220
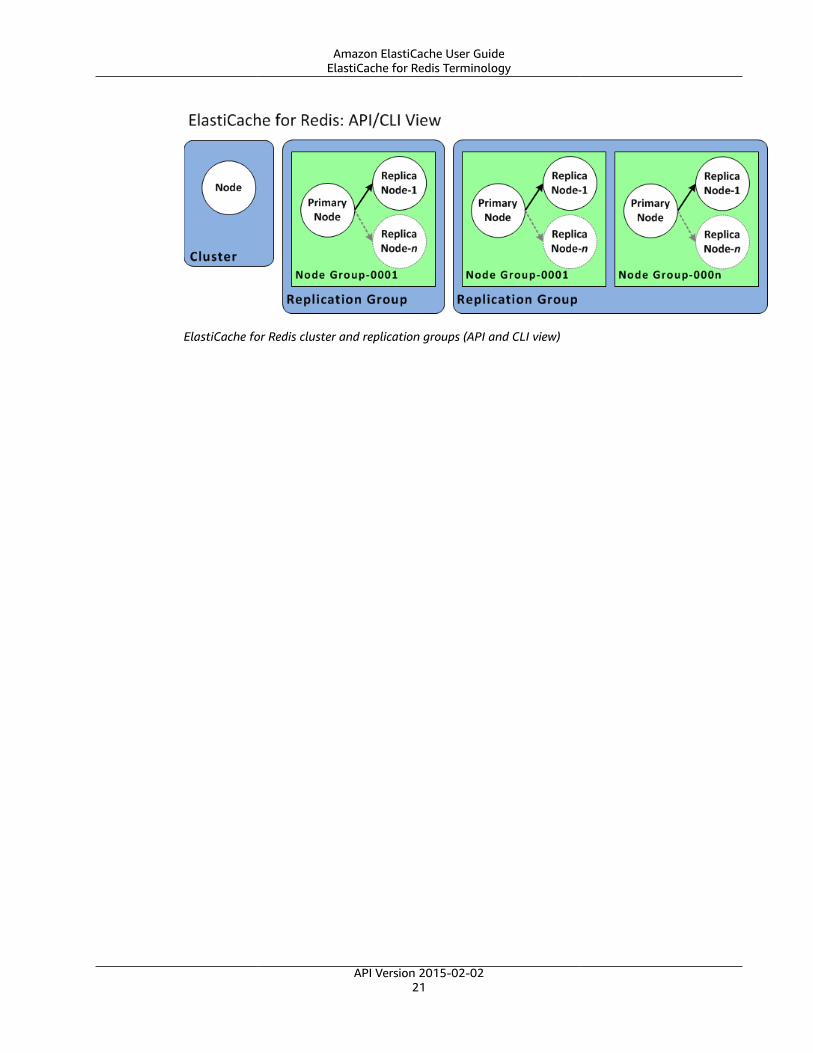
Amazon ElastiCache User GuideElastiCache for Redis Terminology
ElastiCache for Redis cluster and replication groups (API and CLI view)
API Version 2015-02-0221

Amazon ElastiCache User GuideAccessing ElastiCache
Accessing Amazon ElastiCacheYour Amazon ElastiCache instances can only be accessed through an Amazon EC2 instance.
If you launched your ElastiCache instance in an Amazon Virtual Private Cloud (Amazon VPC), you canaccess your ElastiCache instance from an Amazon EC2 instance in the same Amazon VPC. Or, by usingVPC peering, you can access your ElastiCache instance from an Amazon EC2 in a different Amazon VPC.
If you launched your ElastiCache instance in EC2 Classic, you allow the EC2 instance to access your clusterby granting the Amazon EC2 security group associated with the instance access to your cache securitygroup. By default, access to a cluster is restricted to the account that launched the cluster.
For more information on granting Amazon EC2 access to your cluster, see Step 4: AuthorizeAccess (p. 33) and Accessing ElastiCache Resources from Outside AWS (p. 445).
API Version 2015-02-0222

Amazon ElastiCache User GuideManaging ElastiCache
Managing ElastiCacheOnce you have granted your Amazon EC2 instance access to your ElastiCache cluster, you have fourmeans by which you can manage your ElastiCache cluster: the AWS Management Console, the AWS CLIfor ElastiCache, the AWS SDK for ElastiCache, and the ElastiCache API.
Managing ElastiCache (Console)The AWS Management Console is the easiest way to manage Amazon ElastiCache. The console letsyou create cache clusters, add and remove cache nodes, and perform other administrative taskswithout having to write any code. The console also provides cache node performance graphs fromCloudWatch, showing cache engine activity, memory and CPU utilization, as well as other metrics. Formore information, see specific topics in this User Guide.
Managing ElastiCache (AWS CLI)You can also use the AWS Command Line Interface (AWS CLI) for ElastiCache. The AWS CLI makes it easyto perform one-at-a-time operations, such as starting or stopping your cache cluster. You can also invokeAWS CLI for ElastiCache commands from a scripting language of your choice, letting you automaterepeating tasks. For more information about the AWS CLI, see the User Guide and the AWS CLI CommandReference.
Managing ElastiCache (AWS SDK)If you want to access ElastiCache from an application, you can use one of the AWS software developmentkits (SDKs). The SDKs wrap the ElastiCache API calls, and insulate your application from the low-level details of the ElastiCache API. You provide your credentials, and the SDK libraries take care ofauthentication and request signing. For more information about using the AWS SDKs, see Tools forAmazon Web Services.
Managing ElastiCache (ElastiCache API)You can also write application code directly against the ElastiCache web service API. When using the API,you must write the necessary code to construct and authenticate your HTTP requests, parse the resultsfrom ElastiCache, and handle any errors. For more information about the API, see Using the ElastiCacheAPI (p. 483).
API Version 2015-02-0223

Amazon ElastiCache User Guide
Getting Started with AmazonElastiCache
Beginning with determining the requirements for your cluster and creating your own AWS account, thetopics in this section walk you through the process of creating, granting access to, connecting to, andfinally deleting a Redis (cluster mode disabled) cluster using the ElastiCache console.
Amazon ElastiCache supports high availability through the use of Redis replication groups. Forinformation about Redis replication groups and how to create them, see ElastiCache Replication(Redis) (p. 239).
Beginning with Redis version 3.2, ElastiCache Redis supports partitioning your data across multiple nodegroups, with each node group implementing a replication group. This exercise creates a standalone Rediscluster.
Topics• Determine Your Requirements [Every time] (p. 25)• Step 1: Create an AWS Account and Set Up Permissions [One time] (p. 28)• Step 2: Launch a Cluster (p. 29)• Step 3: (Optional) View Cluster Details (p. 31)• Step 4: Authorize Access (p. 33)• Step 5: Connect to a Cluster's Node (p. 37)• Step 6: Delete Your Cluster [Avoid Unnecessary Charges] (p. 42)• Where Do I Go From Here? (p. 43)
API Version 2015-02-0224

Amazon ElastiCache User GuideDetermine Your Requirements [Every time]
Determine Your Requirements [Every time]Before you create a cluster or replication group, you should always determine the requirements for thecluster so that when you create the cluster or replication group it will meet your business needs and notneed to be redone.
Topics• Memory and Processor Requirements (p. 25)• Scaling Requirements (p. 26)• Failover Requirements (p. 26)• Access Requirements (p. 26)• Region and Availability Zone Requirements (p. 27)
Memory and Processor RequirementsThe basic building block of Amazon ElastiCache is the node. Nodes are configured singularly or ingroupings to form clusters. When determining the node type to use for your cluster, take the cluster’snode configuration and the amount of data you have to store into consideration.
The Memcached engine is multi-threaded, so a node’s number of cores impacts the compute poweravailable to the cluster. On the other hand, the Redis engine is single threaded, so a node’s number ofcores is irrelevant.
Memcached Cluster ConfigurationMemcached clusters are comprised of from 1 to 20 nodes. The data in a Memcached cluster ispartitioned across all the nodes in the cluster. Your application connects with a Memcached cluster usinga network address called an Endpoint. Each node in a Memcached cluster has its own endpoint whichyour application can use to read from or write to a specific node. In addition to the node endpoints, theMemcached cluster itself has an endpoint called the Configuration Endpoint which your application canuse to read from or write to the cluster, leaving the determination of which node to read from or write toup to Automatic Discovery.
Redis Cluster ConfigurationsAmazon ElastiCache for Redis clusters provide a variety of node configurations. There are three nodeconfigurations when running the ElastiCache for Redis engine. Your application connects with yourElastiCache for Redis cluster using a network address called an Endpoint. Depending upon yourElastiCache for Redis cluster configuration, you will use the endpoints differently.
• Single Node
The simplest configuration is a single node cluster. The node in a single-node Redis cluster must havesufficient memory to accommodate all your in-memory data plus overhead. A single-node Rediscluster does not provide high availability as there is no replication of data across multiple nodes.
• Single Shard Multiple Nodes
A single shard configuration groups up to 6 nodes in a single cluster, a read/write Primary nodeand up to 5 read-only Replica nodes. Like the single node configuration, each node must be able toaccommodate all your in-memory data plus overhead. Configurations with 1 or more replica nodesprovide high availability by replicating your in-memory data across all nodes in the shard. Thus if onenode fails you still have your data in one or more of the replica nodes.
• Multiple Shards Multiple Nodes
API Version 2015-02-0225

Amazon ElastiCache User GuideScaling Requirements
A multiple shard configuration partitions your data across up to 20 shards in the cluster. Each shardhas a read/write Primary node and up to 5 read-only replica nodes. Since your in-memory data ispartitioned across multiple shards, each node in a shard only needs enough memory to accommodateits copy of the shard’s portion of your in-memory data plus overhead. Shard configurations with 1 ormore replica nodes provide high availability by replicating your in-memory data across all nodes in theshard. Thus if one node fails you still have the shard’s data in one or more of the replica nodes.
For more information, see Choosing Your Node Size (p. 103) in this guide.
Scaling RequirementsAll clusters can be scaled up by creating a new cluster with the new, larger node type. When scaling upa Memcached cluster the new cluster will start out empty. When scaling up a Redis cluster, you can seedthe new cluster with data from the old cluster so that the new cluster is populated with data when youstart using it.
Memcached and Redis multiple shard clusters can be scaled out or in. To scale a Memcached cluster outor in you merely add or remove nodes from the cluster. If you have enabled Automatic Discovery andyour application is connecting to the cluster’s configuration endpoint, you do not need to make anychanges in your application when you add or remove nodes.
To scale a Redis multiple shard cluster, you add or remove shards from the cluster. If your applicationis connecting to the cluster’s configuration endpoint, you do not need to make any changes in yourapplication when you add or remove shards.
For more information, see Scaling (p. 203) in this guide.
Failover RequirementsDepending upon how critical access to a cluster’s data is to your business, you may want to enableautomatic failover on your cluster. When Automatic Failover is enabled, if a Redis Primary node fails forany reason, one of the shard’s read-only replica nodes is promoted to Primary. If Automatic Failover isnot enabled and the Primary fails, ElastiCache for Redis spins up a new node to fill the Primary role. Thisoperation is much more time consuming than failing over to a replica node.
Automatic failover is only available on clusters running the Redis engine with multiple nodes.
For more information, see Replication: Multi-AZ with Automatic Failover (Redis) (p. 244) in this guide.
Access RequirementsBy design, Amazon ElastiCache are accessed from Amazon EC2 instances. Network access to anElastiCache cluster is limited to the user account that created the cluster. Therefore, before you canaccess a cluster from an Amazon EC2 instance, you must authorize the Amazon EC2 instance to accessthe cluster. The steps to do this vary, depending upon whether you launched into EC2-VPC or EC2-Classic.
If you launched your cluster into EC2-VPC you need to grant network ingress to the cluster. If youlaunched your cluster into EC2-Classic you need to grant the Amazon Elastic Compute Cloud securitygroup associated with the instance access to your ElastiCache security group. For detailed instructions,see Step 4: Authorize Access (p. 33) in this guide.
API Version 2015-02-0226

Amazon ElastiCache User GuideRegion and Availability Zone Requirements
Region and Availability Zone RequirementsAmazon ElastiCache supports all AWS regions. By locating your ElastiCache clusters in a region closeto your application you can reduce latency. If your cluster has multiple nodes, locating your nodes indifferent Availability Zones can reduce the impact of failures on your cluster.
For more information, see:
• Choosing Regions and Availability Zones (p. 61)• Mitigating Failures (p. 87)
API Version 2015-02-0227

Amazon ElastiCache User GuideStep 1: Create an AWS Account and Permissions
Step 1: Create an AWS Account and Set UpPermissions [One time]
In order to use Amazon ElastiCache you must have an active AWS account and permissions to accessElastiCache as well as other AWS resources.
Step 1a: Create Your AWS AccountIf you don't already have an AWS account, you'll be prompted to create one when you sign up. You willonly be charged for usage time on AWS services that you sign up for.
To create an AWS account
1. Open https://aws.amazon.com/, and then choose Create an AWS Account.
NoteThis might be unavailable in your browser if you previously signed into the AWSManagement Console. In that case, choose Sign in to a different account, and then chooseCreate a new AWS account.
2. Follow the online instructions.
Part of the sign-up procedure involves receiving a phone call and entering a PIN using the phonekeypad.
Step 1b: Set Up Your Permissions (New ElastiCacheCustomers only)Amazon ElastiCache creates and uses Service linked roles (SLR) to provision resources and access otherAWS resources and services on your behalf. In order for ElastiCache to create the SLR for you, youmust use the AmazonElastiCacheFullAccess AWS managed policy, which comes pre-provisioned withpermission that the service requires to create a Service Linked Role on your behalf.
If you are not using the default policy and choose to use a custom managed policy, ensure you haveeither permissions to call iam:createServiceLinkedRole or you have created the ElastiCache ServiceLinked Role.
For more information, see:
• Creating a New Policy (IAM)• AWS Managed (Predefined) Policies for Amazon ElastiCache (p. 418)• Using Service-Linked Roles for ElastiCache (p. 421)
API Version 2015-02-0228

Amazon ElastiCache User GuideStep 2: Launch a Cluster
Step 2: Launch a ClusterBefore you continue, be sure you have completed Determine Your Requirements [Every time] (p. 25).
The cluster you're about to launch will be live, and not running in a sandbox. You will incur the standardElastiCache usage fees for the instance until you delete it. The total charges will be minimal (typicallyless than a dollar) if you complete the exercise described here in one sitting and delete your cluster whenyou are finished. For more information about ElastiCache usage rates, see https://aws.amazon.com/elasticache/.
ImportantYour cluster will be launched in an Amazon VPC. Before you start creating your cluster, you needto create a subnet group. For more information, see Creating a Subnet Group (p. 384).
To create a standalone Redis (cluster mode disabled) cluster
1. Sign in to the AWS Management Console and open the Amazon ElastiCache console at https://console.aws.amazon.com/elasticache/.
2. Choose Get Started Now.
If you already have an available cluster, choose Launch Cluster.
3. From the dropdown in the upper right corner, choose the region you want to launch this cluster in.
4. For Cluster engine, choose Redis.
5. Make sure Cluster Mode enabled (Scale Out) is not chosen.
6. Complete the Redis settings section as follows:
a. In Name, type a name for your cluster.
Cluster naming constraints
• Must contain from 1 to 20 alphanumeric characters or hyphens.
• Must begin with a letter.
• Cannot contain two consecutive hyphens.
• Cannot end with a hyphen.
b. From the Engine version compatibility list, choose the Redis engine version you want to run onthis cluster. Unless you have a specific reason to run an older version, we recommend that youchoose the latest version.
c. In Port, accept the default port, 6379. If you have a reason to use a different port, enter theport number.
d. From Parameter group, choose the parameter group you want to use with this cluster, orchoose "Create new" to create a new parameter group to use with this cluster. For this exercise,accept the default parameter group.
For more information, see Creating a Parameter Group (p. 344).
e. For Node type, choose the node type that you want to use for this cluster. For this exercise,above the table choose the t2 instance family, choose cache.t2.small, and finally choose Save.
For more information, see Choosing Your Node Size (p. 103).
f. From Number of replicas, choose the number of read replicas you want for this cluster. Since inthis exercise we're creating a standalone cluster, choose None.
When you choose None, the Replication group description field disappears.
7. Choose Advanced Redis settings and complete the section as follows:API Version 2015-02-0229
Amazon ElastiCache User GuideStep 2: Launch a Cluster
NoteThe Advanced Redis settings details are slightly different if you are creating a Redis (clustermode enabled) replication group. For a step-by-step walk through to create a Redis (clustermode enabled) replication group, see Creating a Redis (cluster mode enabled) Cluster withReplicas from Scratch (p. 271).
a. From the Subnet group list, choose the subnet you want to apply to this cluster. For thisexercise, choose default.
For more information, see Subnets and Subnet Groups (p. 383).b. For Availability zone(s), you have two options.
• No preference – ElastiCache will choose the Availability Zone.• Specify availability zones – You specify the Availability Zone for your cluster.
For this exercise, choose Specify availability zones and then choose an Availability Zone fromthe list below Primary.
For more information, see Choosing Regions and Availability Zones (p. 61).c. From the Security groups list, choose the security groups that you want to use for this cluster.
For this exercise, choose default.
For more information, see ElastiCache and Security Groups (p. 410).d. If you are going to seed your cluster with data from a .RDB file, in the Seed RDB file S3
location box, enter the Amazon S3 location of the .RDB file.
For more information, see Seeding a New Cluster with an Externally Created Backup(Redis) (p. 324).
e. Because this is not a production cluster, clear the Enable automatic backups check box.
For more information on Redis backup and restore, see ElastiCache Backup and Restore(Redis) (p. 297).
f. The Maintenance window is the time, generally an hour, each week where ElastiCacheschedules system maintenance on your cluster. You can allow ElastiCache to specify the day andtime for your maintenance window (No preference), or you can specify the day and time yourself(Specify maintenance window. If you choose Specify maintenance window, specify the Start day,Start time, and Duration (in hours) for your maintenance window. For this exercise, choose Nopreference.
For more information, see Maintenance Window (p. 59).g. For Notifications, leave it as Disabled.
8. Choose Create cluster to launch your cluster, or Cancel to cancel the operation.
API Version 2015-02-0230
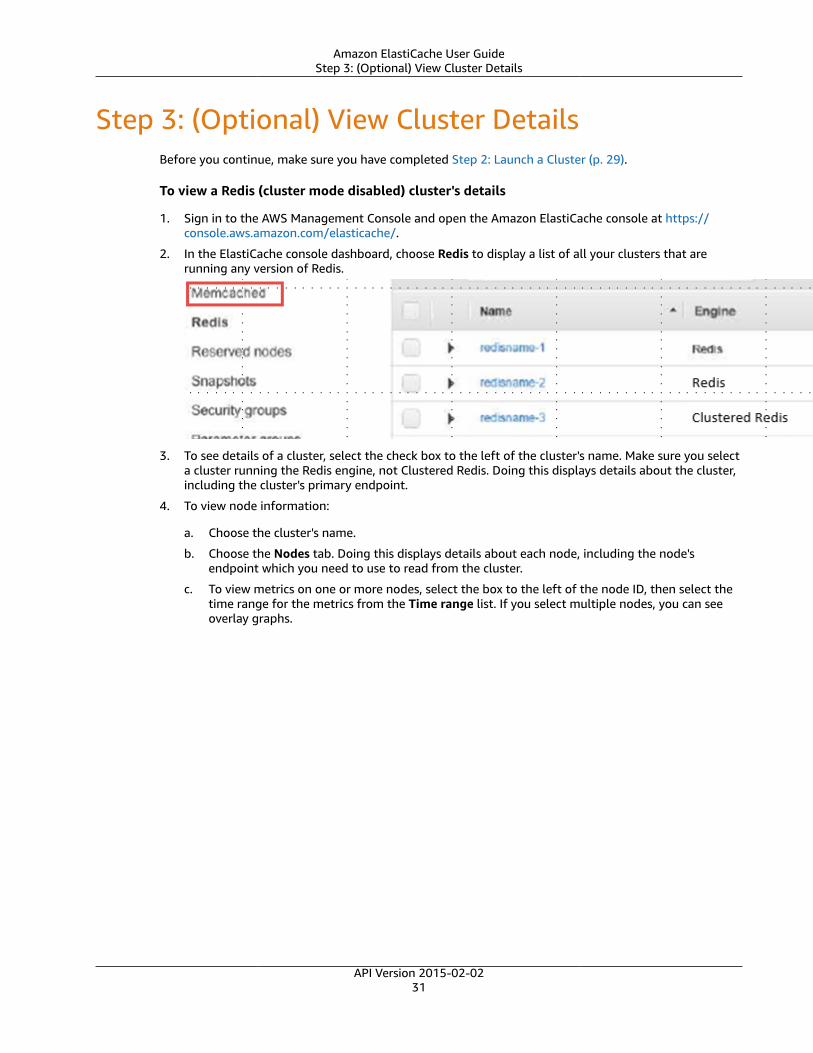
Amazon ElastiCache User GuideStep 3: (Optional) View Cluster Details
Step 3: (Optional) View Cluster DetailsBefore you continue, make sure you have completed Step 2: Launch a Cluster (p. 29).
To view a Redis (cluster mode disabled) cluster's details
1. Sign in to the AWS Management Console and open the Amazon ElastiCache console at https://console.aws.amazon.com/elasticache/.
2. In the ElastiCache console dashboard, choose Redis to display a list of all your clusters that arerunning any version of Redis.
3. To see details of a cluster, select the check box to the left of the cluster's name. Make sure you selecta cluster running the Redis engine, not Clustered Redis. Doing this displays details about the cluster,including the cluster's primary endpoint.
4. To view node information:
a. Choose the cluster's name.
b. Choose the Nodes tab. Doing this displays details about each node, including the node'sendpoint which you need to use to read from the cluster.
c. To view metrics on one or more nodes, select the box to the left of the node ID, then select thetime range for the metrics from the Time range list. If you select multiple nodes, you can seeoverlay graphs.
API Version 2015-02-0231
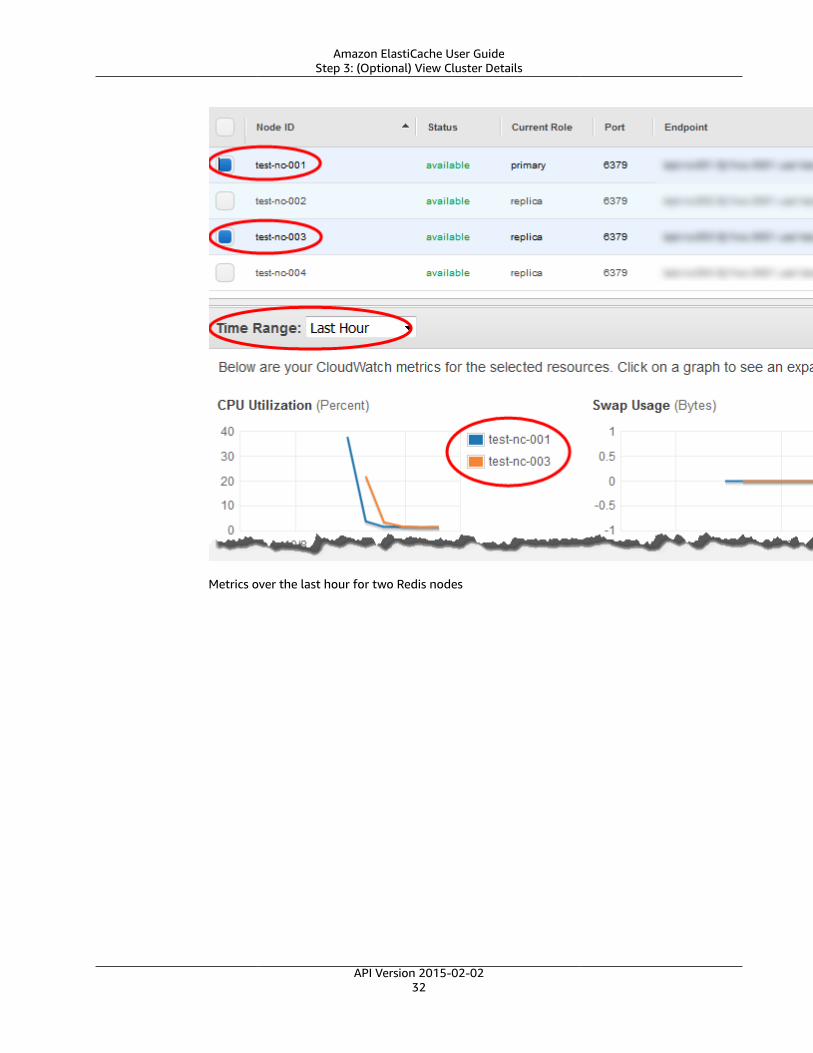
Amazon ElastiCache User GuideStep 3: (Optional) View Cluster Details
Metrics over the last hour for two Redis nodes
API Version 2015-02-0232
Amazon ElastiCache User GuideStep 4: Authorize Access
Step 4: Authorize AccessThis section assumes that you are familiar with launching and connecting to Amazon EC2 instances. Formore information, go to the Amazon EC2 Getting Started Guide.
All ElastiCache clusters are designed to be accessed from an Amazon EC2 instance. The most commonscenario is to access an ElastiCache cluster from an Amazon EC2 instance in the same Amazon VirtualPrivate Cloud (Amazon VPC). This is the scenario covered in this topic. For information on accessing yourElastiCache cluster from a different Amazon VPC, a different region, or even your corporate network, see:
• Access Patterns for Accessing an ElastiCache Cluster in an Amazon VPC (p. 397)
• Accessing ElastiCache Resources from Outside AWS (p. 445)
By default, network access to your cluster is limited to the user account that was used to launch it. Beforeyou can connect to a cluster from an EC2 instance, you must authorize the EC2 instance to access thecluster. The steps required depend upon whether you launched your cluster into EC2-VPC or EC2-Classic.
Steps to authorize access
• Step 4.1: Determine the Cluster's Environment (p. 33)
• Determining Your Clusters Platform using the ElastiCache Console (p. 33)
• Determining Your Clusters Platform using the AWS CLI (p. 34)
• Step 4.2: Grant Access (p. 35)
• You Launched Your Cluster into EC2-VPC (p. 35)
• You Launched Your Cluster Running in EC2-Classic (p. 36)
Step 4.1: Determine the Cluster's EnvironmentBefore you continue, determine whether you launched your cluster into EC2-VPC or EC2-Classic.
For more information, see Detecting Your Supported Platforms and Whether You Have a Default VPC.
Determining Your Clusters Platform using the ElastiCacheConsole
The following procedure uses the ElastiCache console to determine whether you launched your clusterinto EC2-VPC or EC2-Classic.
To determine a cluster's platform using the ElastiCache console
1. Sign in to the AWS Management Console and open the ElastiCache console at https://console.aws.amazon.com/elasticache/.
2. In the left navigation pane, choose the engine that is running on your cluster – either Memcached orRedis.
3. In the list of clusters, expand the cluster you want to authorize access to by choosing the box to theleft of the cluster name.
4. Locate Subnet group:.
API Version 2015-02-0233
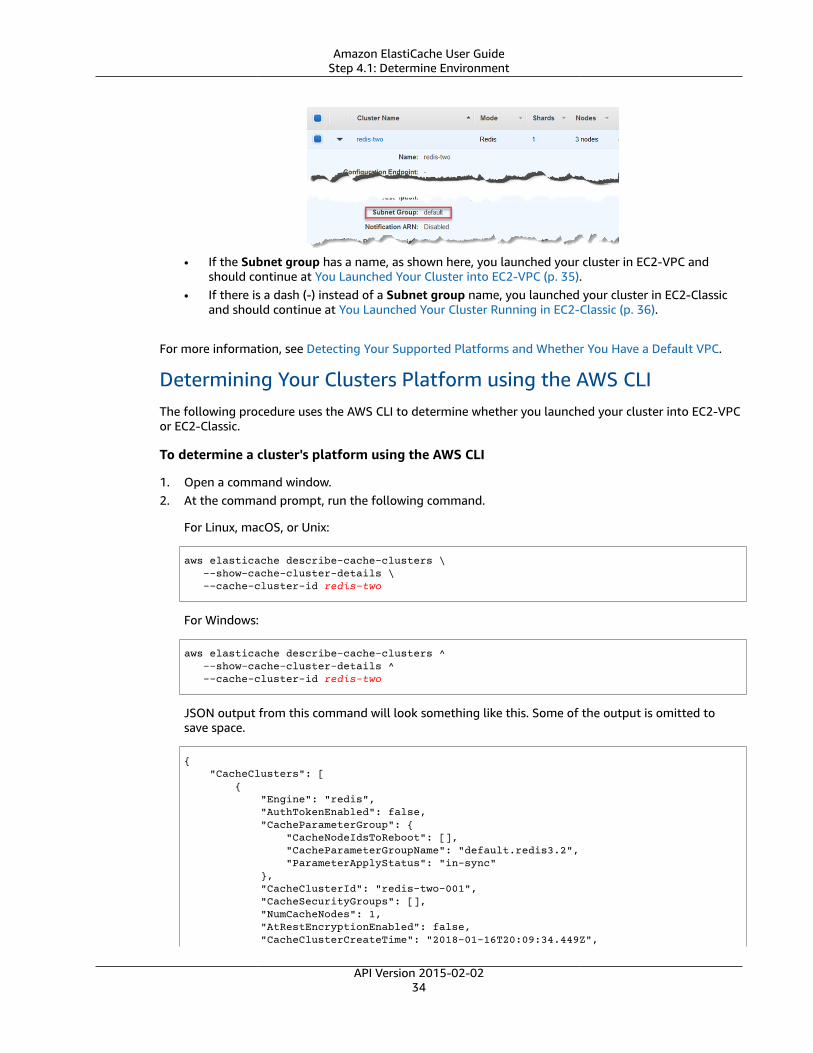
Amazon ElastiCache User GuideStep 4.1: Determine Environment
• If the Subnet group has a name, as shown here, you launched your cluster in EC2-VPC andshould continue at You Launched Your Cluster into EC2-VPC (p. 35).
• If there is a dash (-) instead of a Subnet group name, you launched your cluster in EC2-Classicand should continue at You Launched Your Cluster Running in EC2-Classic (p. 36).
For more information, see Detecting Your Supported Platforms and Whether You Have a Default VPC.
Determining Your Clusters Platform using the AWS CLIThe following procedure uses the AWS CLI to determine whether you launched your cluster into EC2-VPCor EC2-Classic.
To determine a cluster's platform using the AWS CLI
1. Open a command window.2. At the command prompt, run the following command.
For Linux, macOS, or Unix:
aws elasticache describe-cache-clusters \ --show-cache-cluster-details \ --cache-cluster-id redis-two
For Windows:
aws elasticache describe-cache-clusters ^ --show-cache-cluster-details ^ --cache-cluster-id redis-two
JSON output from this command will look something like this. Some of the output is omitted tosave space.
{ "CacheClusters": [ { "Engine": "redis", "AuthTokenEnabled": false, "CacheParameterGroup": { "CacheNodeIdsToReboot": [], "CacheParameterGroupName": "default.redis3.2", "ParameterApplyStatus": "in-sync" }, "CacheClusterId": "redis-two-001", "CacheSecurityGroups": [], "NumCacheNodes": 1, "AtRestEncryptionEnabled": false, "CacheClusterCreateTime": "2018-01-16T20:09:34.449Z",
API Version 2015-02-0234

Amazon ElastiCache User GuideStep 4.2: Grant Access
"ReplicationGroupId": "redis-two", "AutoMinorVersionUpgrade": true, "CacheClusterStatus": "available", "PreferredAvailabilityZone": "us-east-2a", "ClientDownloadLandingPage": "https://console.aws.amazon.com/elasticache/home#client-download:", "SecurityGroups": [ { "Status": "active", "SecurityGroupId": "sg-e8c03081" } ], "TransitEncryptionEnabled": false, "CacheSubnetGroupName": "default", "EngineVersion": "3.2.10", "PendingModifiedValues": {}, "PreferredMaintenanceWindow": "sat:05:30-sat:06:30", "CacheNodeType": "cache.t2.medium" } ]}
• If there is a value for CacheSubnetGroupName, you launched your cluster in EC2-VPC andshould continue at You Launched Your Cluster into EC2-VPC (p. 35).
• If there is no value for CacheSubnetGroupName, you launched your cluster in EC2-Classic andshould continue at You Launched Your Cluster Running in EC2-Classic (p. 36).
Step 4.2: Grant Access
You Launched Your Cluster into EC2-VPC
If you launched your cluster into an Amazon Virtual Private Cloud (Amazon VPC), you can connect toyour ElastiCache cluster only from an Amazon EC2 instance that is running in the same Amazon VPC. Inthis case, you will need to grant network ingress to the cluster.
To grant network ingress from an Amazon VPC security group to a cluster
1. Sign in to the AWS Management Console and open the Amazon EC2 console at https://console.aws.amazon.com/ec2/.
2. In the navigation pane, under Network & Security, choose Security Groups.
3. From the list of security groups, choose the security group for your Amazon VPC. Unless you createda security group for ElastiCache use, this security group will be named default.
4. Choose the Inbound tab, and then do the following:
a. Choose Edit.
b. Choose Add rule.
c. In the Type column, choose Custom TCP rule.
d. In the Port range box, type the port number for your cluster node. This number must be thesame one that you specified when you launched the cluster. The default ports are as follows:
• Memcached: port 11211
• Redis: port 6379
e. In the Source box, choose Anywhere which has the port range (0.0.0.0/0) so that any AmazonEC2 instance that you launch within your Amazon VPC can connect to your ElastiCache nodes.
API Version 2015-02-0235

Amazon ElastiCache User GuideStep 4.2: Grant Access
ImportantOpening up the ElastiCache cluster to 0.0.0.0/0 (Step 4.e.) does not expose the clusterto the Internet because it has no public IP address and therefore cannot be accessedfrom outside the VPC. However, the default security group may be applied to otherAmazon EC2 instances in the customer’s account, and those instances may have apublic IP address. If they happen to be running something on port 6379, then thatservice could be exposed unintentionally. Therefore, we recommend creating a VPCSecurity Group that will be used exclusively by ElastiCache. For more information, seeCustom Security Groups.
f. Choose Save.
When you launch an Amazon EC2 instance into your Amazon VPC, that instance will be able to connectto your ElastiCache cluster.
You Launched Your Cluster Running in EC2-ClassicIf you launched your cluster into EC2-Classic, to allow an Amazon EC2 instance to access your clusteryou will need to grant the Amazon EC2 security group associated with the instance access to your cachesecurity group.
To grant an Amazon EC2 security group access to a cluster
1. Sign in to the AWS Management Console and open the ElastiCache console at https://console.aws.amazon.com/elasticache/.
2. To see a list of security groups, from the left navigation pane, choose Security Groups.
ImportantIf Security Groups is not listed in the navigation pane, you launched your cluster in EC2-VPC rather than EC2-Classic and should follow the instructions at You Launched YourCluster into EC2-VPC (p. 35).
3. Choose the box to the left of default security group.4. From the list at the bottom of the screen, choose the EC2 Security Group Name you want to
authorize.5. To authorize access, choose Add.
Amazon EC2 instances that are associated with the security group are now authorized to connect toyour ElastiCache cluster.
To revoke a security group's access, locate the security group in the list of authorized security groups, andthen choose Remove.
For more information on ElastiCache Security Groups, see Security Groups [EC2-Classic] (p. 332).
API Version 2015-02-0236

Amazon ElastiCache User GuideStep 5: Connect to a Cluster's Node
Step 5: Connect to a Cluster's NodeBefore you continue, be sure you have completed Step 4: Authorize Access (p. 33).
This section assumes that you've created an Amazon EC2 instance and can connect to it. For instructionson how to do this, go to the Amazon EC2 Getting Started Guide.
An Amazon EC2 instance can connect to a cluster node only if you have authorized it to do so. For moreinformation, see Step 4: Authorize Access (p. 33).
Step 5.1: Find your Node EndpointsOnce your cluster is in the available state and you've authorized access to it (Step 4: AuthorizeAccess (p. 33)), you can log in to an Amazon EC2 instance and connect to the cluster. To do so, you mustfirst determine the endpoint.
To find your endpoints, see the relevant topic for the engine and cluster type you're running. When youfind the endpoint you need, copy it to your clipboard for use in Step 5.2.
• Finding Your ElastiCache Endpoints (p. 66)• Finding a Memcached Cluster's Endpoints (Console) (p. 67)—You need the cluster's Configuration
endpoint.• Finding a Redis (cluster mode disabled) Cluster's Endpoints (Console) (p. 69)—You need the Primary
endpoint of a replication group or the node endpoimt of a stand-alone node.• Finding a Redis (cluster mode enabled) Cluster's Endpoints (Console) (p. 71)—You need the cluster's
Configuration endpoint.• Finding Endpoints (AWS CLI) (p. 73)• Finding Endpoints (ElastiCache API) (p. 77)
Step 5.2: Connect to a Memcached ClusterOnce your cluster is in the available state and you've authorized access to it (Step 4: AuthorizeAccess (p. 33), you can log in to an Amazon EC2 instance and connect to the cluster.
To connect to a Memcached cluster
1. Sign in to the AWS Management Console and open the Amazon EC2 console at https://console.aws.amazon.com/ec2/.
2. At the command prompt of your Amazon EC2 instance, type the following command, substitutingthe endpoint of your cluster and port for those shown in this example.
telnet mycachecluster.eaogs8.0001.usw2.cache.amazonaws.com 11211
This will produce output similar to the following.
Trying 128.0.0.1...Connected to mycachecluster.eaogs8.0001.usw2.cache.amazonaws.com.Escape character is '^]'.>
3. Run Memcached commands.
You are now connected to the cluster and can run Memcached commands like the following.
API Version 2015-02-0237
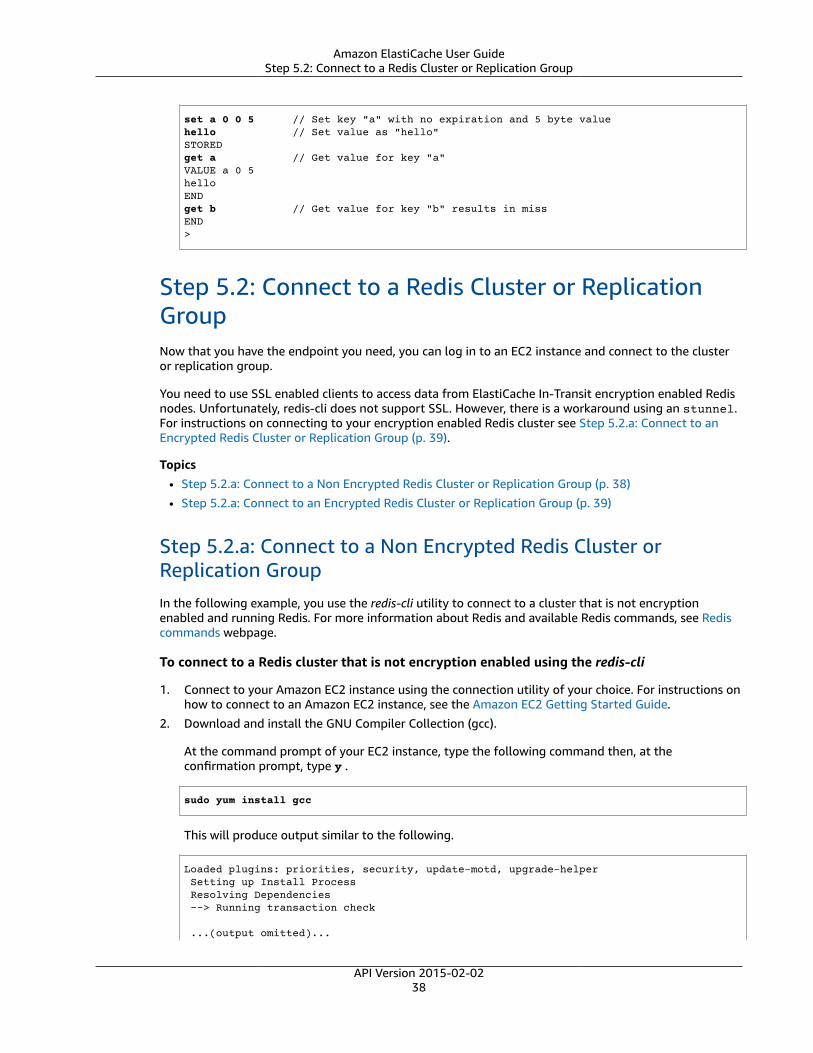
Amazon ElastiCache User GuideStep 5.2: Connect to a Redis Cluster or Replication Group
set a 0 0 5 // Set key "a" with no expiration and 5 byte valuehello // Set value as "hello"STOREDget a // Get value for key "a"VALUE a 0 5helloENDget b // Get value for key "b" results in missEND>
Step 5.2: Connect to a Redis Cluster or ReplicationGroupNow that you have the endpoint you need, you can log in to an EC2 instance and connect to the clusteror replication group.
You need to use SSL enabled clients to access data from ElastiCache In-Transit encryption enabled Redisnodes. Unfortunately, redis-cli does not support SSL. However, there is a workaround using an stunnel.For instructions on connecting to your encryption enabled Redis cluster see Step 5.2.a: Connect to anEncrypted Redis Cluster or Replication Group (p. 39).
Topics• Step 5.2.a: Connect to a Non Encrypted Redis Cluster or Replication Group (p. 38)
• Step 5.2.a: Connect to an Encrypted Redis Cluster or Replication Group (p. 39)
Step 5.2.a: Connect to a Non Encrypted Redis Cluster orReplication GroupIn the following example, you use the redis-cli utility to connect to a cluster that is not encryptionenabled and running Redis. For more information about Redis and available Redis commands, see Rediscommands webpage.
To connect to a Redis cluster that is not encryption enabled using the redis-cli
1. Connect to your Amazon EC2 instance using the connection utility of your choice. For instructions onhow to connect to an Amazon EC2 instance, see the Amazon EC2 Getting Started Guide.
2. Download and install the GNU Compiler Collection (gcc).
At the command prompt of your EC2 instance, type the following command then, at theconfirmation prompt, type y .
sudo yum install gcc
This will produce output similar to the following.
Loaded plugins: priorities, security, update-motd, upgrade-helper Setting up Install Process Resolving Dependencies --> Running transaction check ...(output omitted)...
API Version 2015-02-0238

Amazon ElastiCache User GuideStep 5.2: Connect to a Redis Cluster or Replication Group
Total download size: 27 M Installed size: 53 M Is this ok [y/N]: y Downloading Packages: (1/11): binutils-2.22.52.0.1-10.36.amzn1.x86_64.rpm | 5.2 MB 00:00 (2/11): cpp46-4.6.3-2.67.amzn1.x86_64.rpm | 4.8 MB 00:00 (3/11): gcc-4.6.3-3.10.amzn1.noarch.rpm | 2.8 kB 00:00 ...(output omitted)... Complete!
3. Download and compile the redis-cli utility. This utility is included in the Redis softwaredistribution.
At the command prompt of your EC2 instance, type the following commands:
wget http://download.redis.io/redis-stable.tar.gz tar xvzf redis-stable.tar.gz cd redis-stable make distclean // Ubuntu systems only make
4. At the command prompt of your EC2 instance, type the following command, substituting theendpoint of your cluster and port for what is shown in this example.
src/redis-cli -c -h mycachecluster.eaogs8.0001.usw2.cache.amazonaws.com -p 6379
This results in a Redis command prompt similar to the following.
redis mycachecluster.eaogs8.0001.usw2.cache.amazonaws.com 6379>
5. Run Redis commands.
You are now connected to the cluster and can run Redis commands like the following.
set a "hello" // Set key "a" with a string value and no expirationOKget a // Get value for key "a""hello"get b // Get value for key "b" results in miss(nil) set b "Good-bye" EX 5 // Set key "b" with a string value and a 5 second expiration"Good-bye"get b // Get value for key "b""Good-bye" // wait >= 5 secondsget b(nil) // key has expired, nothing returnedquit // Exit from redis-cli
Step 5.2.a: Connect to an Encrypted Redis Cluster or ReplicationGroup
Amazon ElastiCache introduced Encryption in In-Transit, At-Rest and Authentication. To connect to anEncryption in transit enabled cluster we need to use a client that supports SSL. Unfortunately, redis-clidoes not support SSL.
API Version 2015-02-0239

Amazon ElastiCache User GuideStep 5.2: Connect to a Redis Cluster or Replication Group
Thank you to Jayakrishnan L for the following process and code.
The redis-cli does not support SSL/TLS connections.
redis-cli -h master.ssltest.xxxxxx.use1.cache.amazonaws.com -p 6379master.ssltest.xxxxxx.use1.cache.amazonaws.com:6379>set key1 value
Output from the preceding command:
Error: Connection reset by peer
Because tools like redis-cli and telnet are useful for running ad-hoc commands, this section will show youhow to create and use an SSL tunnel to your Redis cluster and then use redis-cli to run commands.
We can create SSL tunnel using stunnel and use redis-cli over it to connect to encrypted Redis. It is veryeasy to setup stunnel as most of the configuration setup are already done at the ElastiCache layer.
1. Install stunnel.
sudo yum install stunnel
2. Configure stunnel. You can set up as many connections as are needed.
cat /etc/stunnel/redis-cli.conffips=nosetuid=rootsetgid=rootpid=/var/run//stunnel.piddebug=7options=NO_SSLv2options=NO_SSLv3[redis-cli] client = yes accept = 127.0.0.1:6379 connect = master.ssltest.xxxxxx.use1.cache.amazonaws.com:6379[redis-cli-slave] client = yes accept = 127.0.0.1:6380 connect = ssltest-002.ssltest.xxxxxx.use1.cache.amazonaws.com:6379
3. Start stunnel.
sudo stunnel /etc/stunnel/redis-cli.conf
Output from the preceding command:
# netstat -tulnp | grep -i stunneltcp 0 0 127.0.0.1:6379 0.0.0.0:* LISTEN 3189/stunnel tcp 0 0 127.0.0.1:6380 0.0.0.0:* LISTEN 3189/stunnel
4. Use redis-cli to connect to the encrypted redis node using the local endpoint of the tunnel.
Using redis-cli:
redis-cli -h localhost -p 6379 -a MySecretPassword
API Version 2015-02-0240

Amazon ElastiCache User GuideStep 5.2: Connect to a Redis Cluster or Replication Group
Run redis-cli commands.
set key1 valueget key1"value"
Using telnet:
telnet localhost 6379Trying 127.0.0.1...Connected to localhost.Escape character is '^]'.auth MySecretPassword+OKget key1$5value
5. Stop and close the SSL tunnel by killing the stunnel process.
sudo pkill stunnel
API Version 2015-02-0241

Amazon ElastiCache User GuideStep 6: Delete Your Cluster
Step 6: Delete Your Cluster [Avoid UnnecessaryCharges]
Before you continue, be sure you have completed at least as far as Step 2: Launch a Cluster (p. 29).
ImportantIt is almost always a good idea to delete clusters that you are not using. Until a cluster's status isdeleted you continue to incur charges for it.
To delete a cluster
1. Sign in to the AWS Management Console and open the Amazon ElastiCache console at https://console.aws.amazon.com/elasticache/.
2. In the ElastiCache console dashboard, select the engine the cluster you want to delete is running,either Memcached or Redis.
A list of all clusters running the selected engine appears.3. To select the cluster to delete, select the cluster's name from the list of clusters.
ImportantYou can only delete one cluster at a time from the ElastiCache console. Selecting multipleclusters disables the delete operation.
4. Select the Actions button and then select Delete from the list of actions.5. In the Delete Cluster confirmation screen:
a. If this is a Redis cluster, specify whether or not a final snapshot should be taken, and, if you wanta final snapshot, the name of the snapshot.
b. Choose Delete to delete the cluster, or select Cancel to keep the cluster.
If you chose Delete, the status of the cluster changes to deleting.
As soon as your cluster is no longer listed in the list of clusters, you stop incurring charges for it.
Congratulations! You have successfully launched, authorized access to, connected to, viewed, and deleteda Redis cluster.
API Version 2015-02-0242

Amazon ElastiCache User GuideWhere Do I Go From Here?
Where Do I Go From Here?Now that you have tried the Getting Started exercise, you can explore the following sections to learnmore about ElastiCache and available tools.
• Getting Started with AWS• Tools for Amazon Web Services• The AWS Command Line Interface• Amazon ElastiCache API Reference
If you haven't already read them, here are some ElastiCache topics you should become familiar with.
After you complete the Getting Started exercise, you can read these sections to learn more aboutElastiCache administration:
• Engines and Versions (p. 44)
ElastiCache supports two engines–Memcached and Redis. This topic helps you determine which engineis best for your scenario.
• Choosing Your Node Size (p. 103)
You want your cache to be large enough to accommodate all the data you want to cache. At the sametime you don't want to pay for more cache than you need. This topic assists you in choosing the bestnode size.
• Best Practices for Amazon ElastiCache (p. 80)
Identify and address issues that can impact the efficiency of your cluster.
API Version 2015-02-0243

Amazon ElastiCache User Guide
Engines and VersionsAmazon ElastiCache supports the Memcached and Redis cache engines. Each engine provides someadvantages. Use the information in this topic to help you choose the engine and version that best meetsyour requirements.
ImportantAfter you create a cache cluster or replication group, you can upgrade to a newer engine version(see Upgrading Engine Versions (p. 57)), but you cannot downgrade to an older engineversion. If you want to use an older engine version, you must delete the existing cache cluster orreplication group and create it anew with the earlier engine version.
Topics• Choosing an Engine: Memcached, Redis (cluster mode disabled), or Redis (cluster mode
enabled) (p. 45)• Determine Available Engine Versions (p. 48)• ElastiCache for Memcached Versions (p. 50)• ElastiCache for Redis Versions (p. 52)• Upgrading Engine Versions (p. 57)• Maintenance Window (p. 59)
API Version 2015-02-0244
Amazon ElastiCache User GuideChoosing an Engine: Memcached, Redis (clustermode disabled), or Redis (cluster mode enabled)
Choosing an Engine: Memcached, Redis (clustermode disabled), or Redis (cluster mode enabled)
On the surface, the engines look similar. Each of them is an in-memory key/value store. However, inpractice there are significant differences.
Choose Memcached if the following apply to your situation:
• You need the simplest model possible.• You need to run large nodes with multiple cores or threads.• You need the ability to scale out/in, adding and removing nodes as demand on your system increases
and decreases.• You need to cache objects, such as a database.
Choose a version of ElastiCache for Redis if the following apply to your situation:
• Choose ElastiCache for Redis 3.2.10 if you require the ability to dynamically add or removeshards from your Redis (cluster mode enabled) cluster:
ImportantCurrently ElastiCache for Redis 3.2.10 does not support encryption.
For more information, see:• Best Practices: Online Resharding (p. 93)• At-rest encryption. For more information, see Online Resharding and Shard Rebalancing for
ElastiCache for Redis—Redis (cluster mode enabled) (p. 230)• Choose ElastiCache for Redis 3.2.6 if you require all the functionality of the earlier Redis
versions plus:
• In-transit encryption. For more information, see Amazon ElastiCache for Redis In-TransitEncryption (p. 433)
• At-rest encryption. For more information, see Amazon ElastiCache for Redis At-RestEncryption (p. 438)
• HIPAA compliance certification. For more information, see HIPAA Compliance for AmazonElastiCache for Redis (p. 443)
• Choose Redis 3.2.4 (clustered mode) if you require all the functionality of Redis 2.8.x with
the following differences:
• You need to partition your data across 2 to 15 node groups (cluster mode only).• You need geospatial indexing (clustered mode or non-clustered mode).• You do not need to support multiple databases.• Important
Redis (cluster mode enabled) cluster mode has the following limitations:• No scale up to larger node types.• No changing the number of replicas in a node group (partition).
• Choose Redis 2.8.x or Redis 3.2.4 (non-clustered mode) if the following apply to yoursituation:
• You need complex data types, such as strings, hashes, lists, sets, sorted sets, and bitmaps.• You need to sort or rank in-memory data-sets.
API Version 2015-02-0245

Amazon ElastiCache User GuideChoosing an Engine: Memcached, Redis (clustermode disabled), or Redis (cluster mode enabled)
• You need persistence of your key store.• You need to replicate your data from the primary to one or more read replicas for read intensive
applications.• You need automatic failover if your primary node fails.• You need publish and subscribe (pub/sub) capabilities—to inform clients about events on the server.• You need backup and restore capabilities.• You need to support multiple databases.
API Version 2015-02-0246

Amazon ElastiCache User GuideChoosing an Engine: Memcached, Redis (clustermode disabled), or Redis (cluster mode enabled)
Comparison summary of Memcached, Redis (cluster mode disabled), and Redis (cluster modeenabled)
Memcached Redis (clustermode disabled)
Redis (clustermode enabled)
Engine versions 1.4.x 2.8.x and 3.2.x 3.2.x
Redis 2.8.x - Complex *Data types Simple
Redis 3.2.x - Complex Complex
Online resharding No 3.2.10 only 3.2.10 only
Encryption No 3.2.6 only 3.2.6 only
HIPAA Compliance No 3.2.6 only 3.2.6 only
Multi-threaded Yes No No
Cluster is modifiable Yes Yes Limited
Node type upgrade No Yes No
Engine upgrading Yes Yes No
Data partitioning Yes No Yes
Persistence of key store No Yes Yes
High availability(Replication)
No Yes Yes
Automatic Failover ofPrimary
No Optional Required
Pub/Sub capabilities No Yes Yes
Sorted lists No Yes Yes
Counters & hashes No Yes Yes
Backup/Restorecapabilities
No Yes Yes
Redis 2.8.x - NoGeospatial indexing No
Redis 3.2.x - YesYes
Notes:
string, objects (like databases)
* string, sets, sorted sets, lists, hashes, bitmaps, hyperloglog
string, sets, sorted sets, lists, hashes, bitmaps, hyperloglog, geospatial indexes
After you choose the engine for your cluster, we recommend that you use the most recent version of thatengine. For more information, see ElastiCache for Memcached Versions (p. 50) or ElastiCache for RedisVersions (p. 52).
API Version 2015-02-0247
Amazon ElastiCache User GuideDetermine Available Engine Versions
Determine Available Engine VersionsNot all versions of an engine are available in every region. Therefore, before you create a cluster orreplication group, you should determine which engine versions are supported in your region.
You can determine which engine versions are supported in a region using the ElastiCache console, theAWS CLI, or the ElastiCache API.
Determine Available Engine Versions (Console)When creating a cluster or replication group you are asked to choose an engine version from a list. Theengine versions in the list are those available in the current region.
For more information, see Creating a Cluster (p. 160) or Creating a Redis Cluster with Replicas fromScratch (p. 264).
Determine Available Engine Versions (AWS CLI)To determine which engine versions are available in a region, use the describe-cache-engine-versions operation. Use the optional parameter --region to specify which region you want the availableengine versions for. If you omit the --region parameter, engine versions are described for your currentregion.
aws elasticache describe-cache-engine-versions --region us-east-2
The output of this operation should look something like this (JSON format).
{ "CacheEngineVersions": [ { "Engine": "memcached", "CacheEngineDescription": "memcached", "CacheEngineVersionDescription": "memcached version 1.4.14", "CacheParameterGroupFamily": "memcached1.4", "EngineVersion": "1.4.14" }, ... some output omitted for brevity { "Engine": "redis", "CacheEngineDescription": "Redis", "CacheEngineVersionDescription": "redis version 2.8.6", "CacheParameterGroupFamily": "redis2.8", "EngineVersion": "2.8.6" } ]}
For more information, see describe-cache-engine-versions.
Determine Available Engine Versions (ElastiCacheAPI)To determine which engine versions are available in a region, use the DescribeCacheEngineVersionsaction. Use the optional parameter Region to specify which region you want the available engine versionsfor. If you omit the Region parameter, engine versions are described for your current region.
API Version 2015-02-0248

Amazon ElastiCache User GuideDetermine Available Engine Versions (ElastiCache API)
https://elasticache.us-west-2.amazonaws.com/ ?Action=DescribeCacheEngineVersions &Region=us-east-2 &Version=2015-02-02 &SignatureVersion=4 &SignatureMethod=HmacSHA256 &Timestamp=20150202T192317Z &X-Amz-Credential=<credential>
For more information, see DescribeCacheEngineVersions.
API Version 2015-02-0249
Amazon ElastiCache User GuideMemcached Versions
ElastiCache for Memcached VersionsElastiCache supports the following Memcached versions and upgrading to newer versions. Whenupgrading to a newer version, pay careful attention to the conditions which if not met will cause yourupgrade to fail.
ElastiCache for Memcached Versions
• Upgrading to a Newer Version (p. 50)
• Memcached Version 1.4.34 (p. 50)
• Memcached Version 1.4.33 (p. 50)
• Memcached Version 1.4.24 (p. 51)
• Memcached Version 1.4.14 (p. 51)
• Memcached Version 1.4.5 (p. 51)
Upgrading to a Newer VersionTo upgrade to a newer Memcached version, modify your cache cluster specifying the new engine versionyou want to use. Upgrading to a newer Memcached version is a destructive process – you lose your dataand start with a cold cache. For more information, see Modifying an ElastiCache Cluster (p. 183).
You should be aware of the following requirements when upgrading from an older version ofMemcached to Memcached version 1.4.33 or newer. CreateCacheCluster and ModifyCacheClusterfails under the following conditions:
• If slab_chunk_max > max_item_size.
• If max_item_size modulo slab_chunk_max != 0.
• If max_item_size > ((max_cache_memory - memcached_connections_overhead) / 4).
The value (max_cache_memory - memcached_connections_overhead) is the node's memoryuseable for data. For more information, see Memcached Connection Overhead (p. 363).
Memcached Version 1.4.34ElastiCache for Memcached version 1.4.34 adds no new features to version 1.4.33. Version 1.4.34 is a bugfix release that is larger than the usual such release.
For more information, see Memcached 1.4.34 Release Notes at Memcached on GitHub.
Memcached Version 1.4.33Memcached improvements added since version 1.4.24 include the following:
• Ability to dump all of the metadata for a particular slab class, a list of slab classes, or all slab classes.For more information, see Memcached 1.4.31 Release Notes.
• Improved support for large items over the 1 megabyte default. For more information, see Memcached1.4.29 Release Notes.
• Ability to specify how long a client can be idle before being asked to close.
Ability to dynamically increase the amount of memory available to Memcached without having torestart the cluster. For more information, see Memcached 1.4.27 Release Notes.
API Version 2015-02-0250
Amazon ElastiCache User GuideMemcached 1.4.24
• Logging of fetchers, mutations, and evictions are now supported. For more information, seeMemcached 1.4.26 Release Notes.
• Freed memory can be reclaimed back into a global pool and reassigned to new slab classes. For moreinformation, see Memcached 1.4.25 Release Notes.
• Several bug fixes.• Some new commands and parameters. For a list, see Memcached 1.4.33 Added Parameters (p. 357).
Memcached Version 1.4.24Memcached improvements added since version 1.4.14 include the following:
• Least recently used (LRU) management using a background process.• Added the option of using jenkins or murmur3 as your hash algorithm.• Some new commands and parameters. For a list, see Memcached 1.4.24 Added Parameters (p. 359).• Several bug fixes.
Memcached Version 1.4.14Memcached improvements added since version 1.4.5 include the following:
• Enhanced slab rebalancing capability.• Performance and scalability improvement.• Introduced the touch command to update the expiration time of an existing item without fetching it.• Auto discovery—the ability for client programs to automatically determine all of the cache nodes in a
cluster, and to initiate and maintain connections to all of these nodes.
Memcached Version 1.4.5Memcached version 1.4.5 was the initial engine and version supported by Amazon ElastiCache.
API Version 2015-02-0251

Amazon ElastiCache User GuideRedis Versions
ElastiCache for Redis VersionsIf you enable at-rest, in-transit encryption, and Redis AUTH when you create a Redis cluster usingElastiCache for Redis version 3.2.6, you can use Amazon ElastiCache for Redis to build HIPAA-compliantapplications. You can store healthcare-related information, including protected health information (PHI),under an executed Business Associate Agreement (BAA) with AWS. AWS Services in Scope have been fullyassessed by a third-party auditor and result in a certification, attestation of compliance, or Authority toOperate (ATO). For more information, see the following topics:
• AWS Cloud Compliance
• HIPAA Compliance
• AWS Services in Scope by Compliance Program
• Amazon ElastiCache for Redis Data Encryption (p. 433)
• Authenticating Users with AUTH (Redis) (p. 431)
Supported ElastiCache for Redis versions
• ElastiCache for Redis Version 3.2.10 (Enhanced) (p. 53)
• ElastiCache for Redis Version 3.2.6 (Enhanced) (p. 53)
• ElastiCache for Redis Version 3.2.4 (Enhanced) (p. 54)
• ElastiCache for Redis Version 2.8.24 (Enhanced) (p. 55)
• ElastiCache for Redis Version 2.8.23 (Enhanced) (p. 55)
• ElastiCache for Redis Version 2.8.22 (Enhanced) (p. 55)
• ElastiCache for Redis Version 2.8.21 (p. 56)
• ElastiCache for Redis Version 2.8.19 (p. 56)
• ElastiCache for Redis Version 2.8.6 (p. 56)
• ElastiCache for Redis Version 2.6.13 (p. 56)
NoteBecause the newer Redis versions provide a better and more stable user experience, Redisversions 2.6.13, 2.8.6, and 2.8.19 are deprecated when using the ElastiCache console. Werecommend against using these Redis versions. If you need to use one of them, work with theAWS CLI or ElastiCache API.For more information, see the following topics:
AWS CLI ElastiCache API
Create Cluster Creating a Cache Cluster(AWS CLI) (p. 172)
This action cannot be usedto create a replication groupwith cluster mode enabled.
Creating a Cache Cluster(ElastiCache API) (p. 174)
This action cannot be usedto create a replication groupwith cluster mode enabled.
Modify Cluster Modifying a Cache Cluster(AWS CLI) (p. 184)
This action cannot be usedto create a replication groupwith cluster mode enabled.
Modifying a Cache Cluster(ElastiCache API) (p. 185)
This action cannot be usedto create a replication groupwith cluster mode enabled.
API Version 2015-02-0252

Amazon ElastiCache User GuideRedis 3.2.10 (Enhanced)
AWS CLI ElastiCache API
Create Replication Group Creating a Redis (clustermode disabled) Cluster withReplicas from Scratch (AWSCLI) (p. 265)
Creating a Redis (clustermode enabled) Cluster withReplicas from Scratch (AWSCLI) (p. 271)
Creating a Redis (clustermode disabled) Clusterwith Replicas from Scratch(ElastiCache API) (p. 268)
Creating a Redis (clustermode enabled) Clusterwith Replicas from Scratch(ElastiCache API) (p. 275)
Modify Replication Group Modifying a ReplicationGroup (AWS CLI) (p. 288)
This action cannot be usedto create a replication groupwith cluster mode enabled.
Modifying a ReplicationGroup (ElastiCacheAPI) (p. 289)
This action cannot be usedto create a replication groupwith cluster mode enabled.
ElastiCache for Redis Version 3.2.10 (Enhanced)Amazon ElastiCache for Redis introduces the next major version of the Redis engine supported byAmazon ElastiCache. ElastiCache for Redis 3.2.10 introduces online cluster resizing to add or removeshards from the cluster while it continues to serve incoming I/O requests. ElastiCache for Redis 3.2.10users have all the functionality of earlier Redis versions except the ability to encrypt their data which iscurrently only available in version 3.2.6.
Comparing ElastiCache for Redis versions 3.2.6 and 3.2.10
Version
Online cluster resizing * No Yes
In-transit encryption Yes No
At rest encryption Yes No
* Adding, removing, and rebalancing shards.
Required for HIPAA compliant applications.
For more information, see:
• Online Resharding and Shard Rebalancing for ElastiCache for Redis—Redis (cluster modeenabled) (p. 230)
• Best Practices: Online Resharding (p. 93)
ElastiCache for Redis Version 3.2.6 (Enhanced)Amazon ElastiCache for Redis introduces the next major version of the Redis engine supported byAmazon ElastiCache. ElastiCache for Redis 3.2.6 users have all the functionality of earlier Redis versionsplus the option to encrypt their data. For more information, see:
• Amazon ElastiCache for Redis In-Transit Encryption (p. 433)
API Version 2015-02-0253
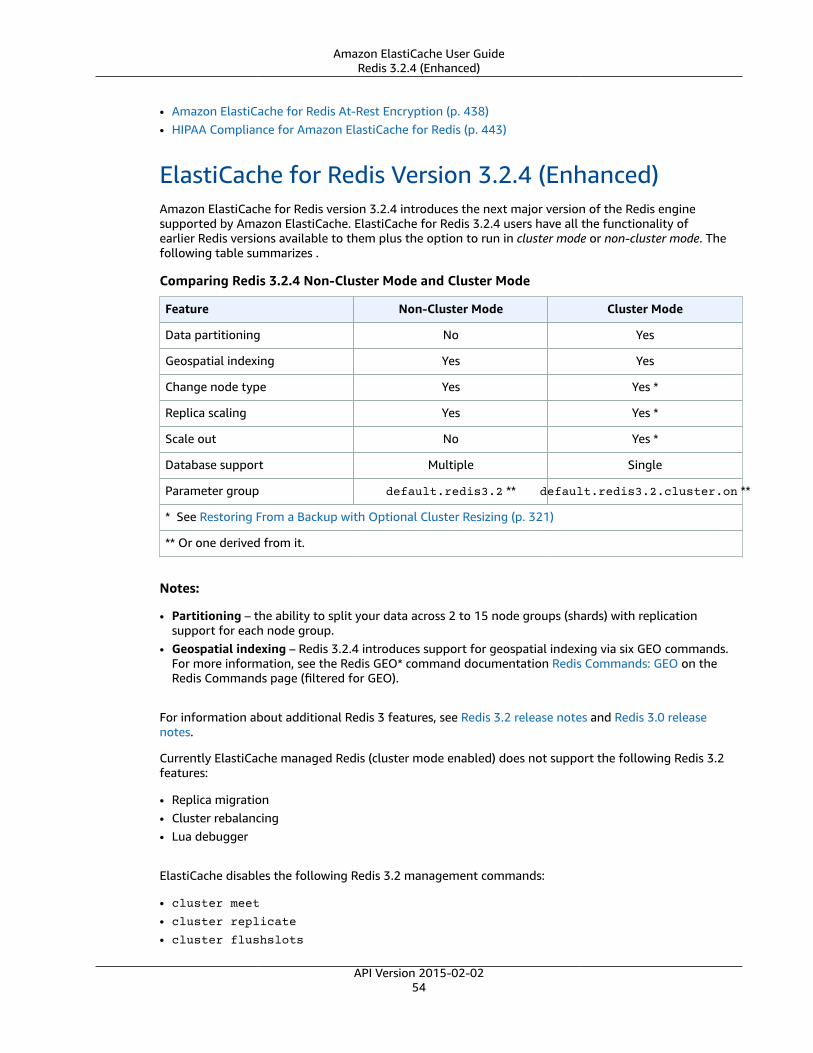
Amazon ElastiCache User GuideRedis 3.2.4 (Enhanced)
• Amazon ElastiCache for Redis At-Rest Encryption (p. 438)• HIPAA Compliance for Amazon ElastiCache for Redis (p. 443)
ElastiCache for Redis Version 3.2.4 (Enhanced)Amazon ElastiCache for Redis version 3.2.4 introduces the next major version of the Redis enginesupported by Amazon ElastiCache. ElastiCache for Redis 3.2.4 users have all the functionality ofearlier Redis versions available to them plus the option to run in cluster mode or non-cluster mode. Thefollowing table summarizes .
Comparing Redis 3.2.4 Non-Cluster Mode and Cluster Mode
Feature Non-Cluster Mode Cluster Mode
Data partitioning No Yes
Geospatial indexing Yes Yes
Change node type Yes Yes *
Replica scaling Yes Yes *
Scale out No Yes *
Database support Multiple Single
Parameter group default.redis3.2 ** default.redis3.2.cluster.on **
* See Restoring From a Backup with Optional Cluster Resizing (p. 321)
** Or one derived from it.
Notes:
• Partitioning – the ability to split your data across 2 to 15 node groups (shards) with replicationsupport for each node group.
• Geospatial indexing – Redis 3.2.4 introduces support for geospatial indexing via six GEO commands.For more information, see the Redis GEO* command documentation Redis Commands: GEO on theRedis Commands page (filtered for GEO).
For information about additional Redis 3 features, see Redis 3.2 release notes and Redis 3.0 releasenotes.
Currently ElastiCache managed Redis (cluster mode enabled) does not support the following Redis 3.2features:
• Replica migration• Cluster rebalancing• Lua debugger
ElastiCache disables the following Redis 3.2 management commands:
• cluster meet
• cluster replicate
• cluster flushslots
API Version 2015-02-0254

Amazon ElastiCache User GuideRedis 2.8.24 (Enhanced)
• cluster addslots
• cluster delslots
• cluster setslot
• cluster saveconfig
• cluster forget
• cluster failover
• cluster bumpepoch
• cluster set-config-epoch
• cluster reset
For information about Redis 3.2.4 parameters, see Redis 3.2.4 Parameter Changes (p. 367).
ElastiCache for Redis Version 2.8.24 (Enhanced)Redis improvements added since version 2.8.23 include bug fixes and logging of bad memory accessaddresses. For more information, see Redis 2.8 release notes.
ElastiCache for Redis Version 2.8.23 (Enhanced)Redis improvements added since version 2.8.22 include bug fixes. For more information, see Redis 2.8release notes. This release also includes support for the new parameter close-on-slave-write which,if enabled, disconnects clients who attempt to write to a read-only replica.
For more information on Redis 2.8.23 parameters, see Redis 2.8.23 (Enhanced) AddedParameters (p. 370) in the ElastiCache User Guide.
ElastiCache for Redis Version 2.8.22 (Enhanced)Redis improvements added since version 2.8.21 include the following:
• Support for forkless backups and synchronizations, which allows you to allocate less memory forbackup overhead and more for your application. For more information, see How Synchronization andBackup are Implemented (p. 257). The forkless process can impact both latency and throughput. Inthe case of high write throughput, when a replica re-syncs, it may be unreachable for the entire time itis syncing.
• In the event of a failover, replication groups now recover faster because replicas perform partial syncswith the primary rather than full syncs whenever possible. Additionally, both the primary and replicasno longer use the disk during syncs, providing further speed gains.
• Support for two new CloudWatch metrics.• ReplicationBytes – The number of bytes a replication group's primary cluster is sending to the
read replicas.• SaveInProgress – A binary value that indicates whether or not there is a background save process
running.
For more information, see Metrics for Redis (p. 453).• A number of critical bug fixes in replication PSYNC behavior. For more information, see Redis 2.8
release notes.• To maintain enhanced replication performance in Multi-AZ replication groups and for increased cluster
stability, non-ElastiCache replicas are no longer supported.• To improve data consistency between the primary cluster and replicas in a replication group, the
replicas no longer evict keys independent of the primary cluster.
API Version 2015-02-0255
Amazon ElastiCache User GuideRedis 2.8.21
• Redis configuration variables appendonly and appendfsync are not supported on Redis version2.8.22 and later.
• In low-memory situations, clients with a large output buffer may be disconnected from a replicacluster. If disconnected, the client needs to reconnect. Such situations are most likely to occur forPUBSUB clients.
ElastiCache for Redis Version 2.8.21Redis improvements added since version 2.8.19 include a number of bug fixes. For more information, seeRedis 2.8 release notes.
ElastiCache for Redis Version 2.8.19Redis improvements added since version 2.8.6 include the following:
• Support for HyperLogLog. For more information, go to Redis new data structure: HyperLogLog.• The sorted set data type now has support for lexicographic range queries with the new commandsZRANGEBYLEX, ZLEXCOUNT, and ZREMRANGEBYLEX.
• To prevent a primary node from sending stale data to replica nodes, the master SYNC fails if abackground save (bgsave) child process is aborted.
• Support for the HyperLogLogBasedCommands CloudWatch metric. For more information, see Metricsfor Redis (p. 453).
ElastiCache for Redis Version 2.8.6Redis improvements added since version 2.6.13 include the following:
• Improved resiliency and fault tolerance for read replicas.• Support for partial resynchronization.• Support for user-defined minimum number of read replicas that must be available at all times.• Full support for pub/sub—notifying clients of events on the server.• Automatic detection of a primary node failure and failover of your primary node to a secondary node.
ElastiCache for Redis Version 2.6.13Redis version 2.6.13 was the initial version of Redis supported by Amazon ElastiCache. Multi-AZ withautomatic failover is not supported on Redis 2.6.13.
API Version 2015-02-0256

Amazon ElastiCache User GuideUpgrading Engine Versions
Upgrading Engine VersionsYou can control if and when the protocol-compliant software powering your cache cluster is upgradedto new versions that are supported by ElastiCache. This level of control enables you to maintaincompatibility with specific Memcached or Redis versions, test new versions with your application beforedeploying in production, and perform version upgrades on your own terms and timelines.
Because version upgrades might involve some compatibility risk, they don't occur automatically. Youmust initiate them.
You initiate version upgrades to your cluster or replication group by modifying it and specifying a newengine version. For more information, see Modifying an ElastiCache Cluster (p. 183) or Modifying aCluster with Replicas (p. 288).
Important
• You can upgrade to a newer engine version, but you can’t downgrade to an older engineversion. If you want to use an older engine version, you must delete the existing cluster andcreate it anew with the older engine version.
• Although engine version management functionality is intended to give you as much control aspossible over how patching occurs, ElastiCache reserves the right to patch your cluster on yourbehalf in the unlikely event of a critical security vulnerability in the system or cache software.
• Redis (cluster mode enabled) does not support changing engine versions.• ElastiCache does not support switching between cluster enabled and cluster disabled.
Important Notes on Memcached Engine UpgradesBecause the Memcached engine does not support persistence, Memcached engine version upgrades arealways a disruptive process which clears all cache data in the cluster.
Important Notes on Redis Engine UpgradesThe Amazon ElastiCache engine upgrade process is designed to make a best effort to retain your existingdata and requires successful Redis replication.
ImportantIf you want to upgrade your engine from Redis 2.x to Redis 3.x you can do so, but you cannotupgrade from Redis (cluster mode disabled) to Redis (cluster mode enabled). To upgrade toRedis (cluster mode enabled), you must create a new Redis (cluster mode enabled) cluster. Youcan seed this new cluster using a Redis (cluster mode disabled) snapshot if both the old and newclusters have the same number of shards (API/CLI: node groups).
• For single Redis clusters and clusters with Multi-AZ disabled, we recommend that sufficient memorybe made available to Redis as described in Ensuring You Have Sufficient Memory to Create a RedisSnapshot (p. 81). Please note that in these cases, the primary is unavailable to service requestsduring the upgrade process.
• For Redis clusters with Multi-AZ enabled, in addition to the preceding, we also recommend that youschedule engine upgrades during periods of low incoming write traffic. The primary continues to beavailable to service requests during the upgrade process, except for a few minutes when a failover isinitiated.
Blocked Redis Engine Upgrades
As shown in the following table, your Redis engine upgrade operation is blocked if you have a pendingscale up operation.
API Version 2015-02-0257

Amazon ElastiCache User GuideHow to Upgrade Engine Versions
Pending Operations Blocked Operations
Scale up Immediate engine upgrade
Engine upgrade Immediate scale up
Scale up and engine upgrade Immediate scale up
Scale up and engine upgrade Immediate engine upgrade
To resolve a blocked engine upgrade, do one of the following
• Schedule your Redis engine upgrade operation for the next maintenance window byclearing the Apply immediately check box (CLI use: --no-apply-immediately, API use:ApplyImmediately=false).
• Wait until your next maintenance window (or after) to perform your Redis engine upgrade operation.
• Add the Redis scale up operation to this cluster modification with the Apply Immediately check box
chosen (CLI use: --apply-immediately, API use: ApplyImmediately=true). (This effectivelycancels the engine upgrade during the next maintenance window by performing it immediately.)
How to Upgrade Engine VersionsYou initiate version upgrades to your cluster or replication group by modifying it using the ElastiCacheconsole, the AWS CLI, or the ElastiCache API and specifying a newer engine version. For moreinformation, see the following topics.
ImportantRemember, for Redis (cluster mode enabled) you cannot modify clusters or replication groups.
Clusters Replication Groups
Using the console Modifying a Cluster(Console) (p. 183)
Modifying a Redis Cluster(Console) (p. 288)
Using the AWS CLI Modifying a Cache Cluster (AWSCLI) (p. 184)
Modifying a Replication Group(AWS CLI) (p. 288)
Using the ElastiCache API Modifying a Cache Cluster(ElastiCache API) (p. 185)
Modifying a Replication Group(ElastiCache API) (p. 289)
API Version 2015-02-0258

Amazon ElastiCache User GuideMaintenance Window
Maintenance WindowEvery cluster has a weekly maintenance window during which any system changes are applied. If youdon't specify a preferred maintenance window when you create or modify a cache cluster, ElastiCacheassigns a 60-minute maintenance window within your region's maintenance window on a randomlychosen day of the week.
The 60-minute maintenance window is chosen at random from an 8-hour block of time per region. Thefollowing table lists the time blocks for each region from which the default maintenance windows areassigned. You may choose a preferred maintenance window outside the region's maintenance windowblock.
Region Code Region Name Region Maintenance Window
ap-northeast-1 Asia Pacific(Tokyo) Region
13:00–21:00 UTC
ap-south-1 Asia Pacific(Mumbai)Region
17:30–1:30 UTC
ap-southeast-1 Asia Pacific(Singapore)Region
14:00–22:00 UTC
ap-southeast-2 Asia Pacific(Sydney) Region
12:00–20:00 UTC
cn-north-1 China (Beijing)region
14:00–22:00 UTC
eu-central-1 EU (Frankfurt)Region
23:00–07:00 UTC
eu-west-1 EU (Ireland)Region
22:00–06:00 UTC
sa-east-1 South America(São Paulo)Region
01:00–09:00 UTC
us-east-1 US East (N.Virginia) Region
03:00–11:00 UTC
us-east-2 US East (Ohio)Region
04:00–12:00 UTC
us-gov-west-1 AWS GovCloud(US) region
06:00–14:00 UTC
us-west-1 US West (N.California)Region
06:00–14:00 UTC
us-west-2 US West(Oregon) Region
06:00–14:00 UTC
API Version 2015-02-0259

Amazon ElastiCache User GuideMaintenance Window
The maintenance window should fall at the time of lowest usage and thus might need modification fromtime to time. You can specify a time range of up to 24 hours in duration during which any maintenanceactivities you have requested should occur. Any deferred or pending cluster modifications you requestedoccur during this time.
For more information about how to adjust the preferred maintenance window for your cache clusters,see Modifying an ElastiCache Cluster (p. 183) or Modifying a Cluster with Replicas (p. 288).
API Version 2015-02-0260

Amazon ElastiCache User Guide
Choosing Regions and AvailabilityZones
AWS cloud computing resources are housed in highly available data center facilities. To provideadditional scalability and reliability, these data center facilities are located in different physical locations.These locations are categorized by regions and Availability Zones.
Regions are large and widely dispersed into separate geographic locations. Availability Zones are distinctlocations within a region that are engineered to be isolated from failures in other Availability Zones andprovide inexpensive, low latency network connectivity to other Availability Zones in the same region.
ImportantEach region is completely independent. Any ElastiCache activity you initiate (for example,creating clusters) runs only in your current default region.
To create or work with a cluster in a specific region, use the corresponding regional service endpoint. Forservice endpoints, see Supported Regions & Endpoints (p. 63).
Regions and Availability Zones
Topics• Locating Your Nodes (p. 62)• Supported Regions & Endpoints (p. 63)
API Version 2015-02-0261

Amazon ElastiCache User GuideLocating Your Nodes
Locating Your NodesAmazon ElastiCache supports locating all of a cluster's nodes in a single or multiple Availability Zones(AZs). Further, if you elect to locate your nodes in multiple AZs (recommended), ElastiCache enables youto either choose the AZ for each node, or allow ElastiCache to choose them for you.
By locating the nodes in different AZs, you eliminate the chance that a failure, such as a power outage, inone AZ will cause your entire system to fail. Testing has demonstrated that there is no significant latencydifference between locating all nodes in one AZ or spreading them across multiple AZs.
You can specify an AZ for each node when you create a cluster or by adding nodes when you modify anexisting cluster. For more information, see:
• Creating a Cluster (p. 160)• Creating a Redis Cluster with Replicas (p. 258)• Modifying an ElastiCache Cluster (p. 183)• Adding Nodes to a Cluster (p. 188)• Adding a Read Replica to a Redis Cluster (p. 291)
API Version 2015-02-0262

Amazon ElastiCache User GuideSupported Regions & Endpoints
Supported Regions & EndpointsAmazon ElastiCache is available in multiple regions so that you can launch ElastiCache clusters inlocations that meet your requirements, such as launching in the region closest to your customers or tomeet certain legal requirements.
By default, the AWS SDKs, AWS CLI, ElastiCache API, and ElastiCache console reference the US-West(Oregon) region. As ElastiCache expands availability to new regions, new endpoints for these regions arealso available to use in your HTTP requests, the AWS SDKs, AWS CLI, and the console.
Each region is designed to be completely isolated from the other regions. Within each region aremultiple Availability Zones (AZ). By launching your nodes in different AZs you are able to achieve thegreatest possible fault tolerance. For more information on regions and Availability Zones, go to ChoosingRegions and Availability Zones (p. 61) at the top of this topic.
Regions where ElastiCache is supported
Region Name/Region Endpoint Protocol
US East (Ohio) Region
us-east-2
elasticache.us-east-2.amazonaws.com
HTTPS
US East (N. Virginia)Region
us-east-1
elasticache.us-east-1.amazonaws.com
HTTPS
US West (N. California)Region
us-west-1
elasticache.us-west-1.amazonaws.com
HTTPS
US West (Oregon)Region
us-west-2
elasticache.us-west-2.amazonaws.com
HTTPS
Canada (Central) Region
ca-central-1
elasticache.ca-central-1.amazonaws.com
HTTPS
Asia Pacific (Mumbai)Region
ap-south-1
elasticache.ap-south-1.amazonaws.com
HTTPS
Asia Pacific (Tokyo)Region
ap-northeast-1
elasticache.ap-northeast-1.amazonaws.com
HTTPS
Asia Pacific (Seoul)Region
ap-northeast-2
elasticache.ap-northeast-2.amazonaws.com
HTTPS
Asia Pacific (Osaka-Local) Region *
elasticache.ap-northeast-3.amazonaws.com
HTTPS
API Version 2015-02-0263

Amazon ElastiCache User GuideSupported Regions & Endpoints
Region Name/Region Endpoint Protocol
ap-northeast-3
Asia Pacific (Singapore)Region
ap-southeast-1
elasticache.ap-southeast-1.amazonaws.com
HTTPS
Asia Pacific (Sydney)Region
ap-southeast-2
elasticache.ap-southeast-2.amazonaws.com
HTTPS
EU (Frankfurt) Region
eu-central-1
elasticache.eu-central-1.amazonaws.com
HTTPS
EU (Ireland) Region
eu-west-1
elasticache.eu-west-1.amazonaws.com
HTTPS
EU (London) Region
eu-west-2
elasticache.eu-west-2.amazonaws.com
HTTPS
EU (Paris) Region
eu-west-3
elasticache.eu-west-3.amazonaws.com
HTTPS
South America (SãoPaulo) Region
sa-east-1
elasticache.sa-east-1.amazonaws.com
HTTPS
China (Beijing) Region
cn-north-1
elasticache.cn-north-1.amazonaws.com.cn
HTTPS
China (Ningxia) Region
cn-northwest-1
elasticache.cn-northwest-1.amazonaws.com.cn
HTTPS
AWS GovCloud (US)
us-gov-west-1
elasticache.us-gov-west-1.amazonaws.com
HTTPS
For information on using the AWS GovCloud (US) with ElastiCache, seeServices in the AWS GovCloud (US) region: ElastiCache.
Notes:
The Asia Pacific (Osaka-Local) Region is a local region that is availableto select AWS customers who request access. Customers wishing touse the Asia Pacific (Osaka-Local) Region should speak with their salesrepresentative. The Asia Pacific (Osaka-Local) Region supports a singleavailavility zone.
Some regions support a subset of node types. For a table of supported node types by region, seeSupported Node Types by Region (p. 122).
API Version 2015-02-0264

Amazon ElastiCache User GuideSupported Regions & Endpoints
For a table of AWS products and services by region, see Products and Services by Region.
API Version 2015-02-0265
Amazon ElastiCache User Guide
Finding Your ElastiCache EndpointsYour application connects to your cluster using endpoints. An endpoint is a node or cluster's uniqueaddress.
Which endpoints to use
• Memcached cluster, If you use Automatic Discovery, you can use the cluster's configuration endpoint toconfigure your Memcached client. This means you must use a client that supports Automatic Discovery.
If you don't use Automatic Discovery, you must configure your client to use the individual nodeendpoints for reads and writes. You must also keep track of them as you add and remove nodes.
• Redis standalone node, use the node's endpoint for both read and write operations.
• Redis (cluster mode disabled) clusters, use the Primary Endpoint for all write operations. Use the
individual Node Endpoints for read operations (In the API/CLI these are referred to as Read Endpoints).
• Redis (cluster mode enabled) clusters, use the cluster's Configuration Endpoint for all operations.
You must use a client that supports Redis Cluster (Redis 3.2). You can still read from individual nodeendpoints (In the API/CLI these are referred to as Read Endpoints).
The following sections guide you through discovering the endpoints you'll need for the engine you'rerunning.
Topics• Finding a Memcached Cluster's Endpoints (Console) (p. 67)• Finding a Redis (cluster mode disabled) Cluster's Endpoints (Console) (p. 69)• Finding a Redis (cluster mode enabled) Cluster's Endpoints (Console) (p. 71)• Finding Endpoints (AWS CLI) (p. 73)• Finding Endpoints (ElastiCache API) (p. 77)
API Version 2015-02-0266

Amazon ElastiCache User GuideFinding Memcached Endpoints (Console)
Finding a Memcached Cluster's Endpoints(Console)
All Memcached endpoints are read/write endpoints. To connect to nodes in a Memcached cluster yourapplication can use either the endpoints for each node, or the cluster's configuration endpoint alongwith Automatic Discovery. To use Automatic Discovery you must use a client that supports AutomaticDiscovery.
When using Automatic Discovery, your client application connects to your Memcached cluster usingthe configuration endpoint. As you scale your cluster by adding or removing nodes, your applicationwill automatically "know" all the nodes in the cluster and be able to connect to any of them. WithoutAutomatic Discovery your application would have to do this, or you'd have to manually update endpointsin your application each time you added or removed a node. For additional information on AutomaticDiscovery, see Node Auto Discovery (Memcached) (p. 127).
The following procedure demonstrates how to find and copy a cluster's configuration endpoint or any ofthe node endpoints using the ElastiCache console.
To find and copy the endpoints for a Memcached cluster (console)
1. Sign in to the AWS Management Console and open the ElastiCache console at https://console.aws.amazon.com/elasticache/.
2. From the navigation pane, choose Memcached.
The cache clusters screen will appear with a list of Memcached clusters.3. Find the Memcached cluster you want the endpoints for.
If all you want is the configuration endpoint, you're done. The configurationendpoint is in the Configuration Endpoint column and looks something like this,clusterName.xxxxxx.cfg.usw2.cache.amazonaws.com:port.
If you want to also see the individual node endpoints or copy any of the endpoints to your clipboard,choose Copy Node Endpoint.
Endpoints for a Memcached cluster4. To copy an endpoint to your clipboard:
a. On the Copy Node Endpoint screen, highlight the endpoint you want to copy.b. Right–click the highlighted endpoint, and then choose Copy from the context menu.
The highlighted endpoint is now copied to your clipboard.
API Version 2015-02-0267
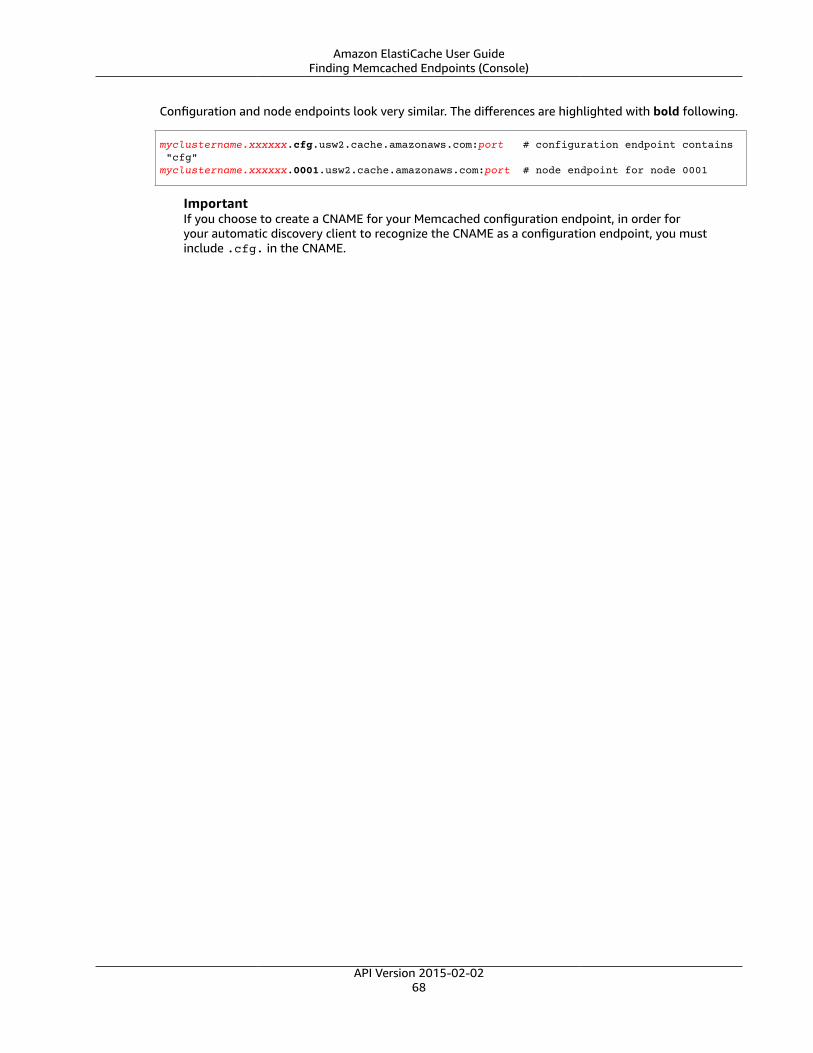
Amazon ElastiCache User GuideFinding Memcached Endpoints (Console)
Configuration and node endpoints look very similar. The differences are highlighted with bold following.
myclustername.xxxxxx.cfg.usw2.cache.amazonaws.com:port # configuration endpoint contains "cfg"myclustername.xxxxxx.0001.usw2.cache.amazonaws.com:port # node endpoint for node 0001
ImportantIf you choose to create a CNAME for your Memcached configuration endpoint, in order foryour automatic discovery client to recognize the CNAME as a configuration endpoint, you mustinclude .cfg. in the CNAME.
API Version 2015-02-0268
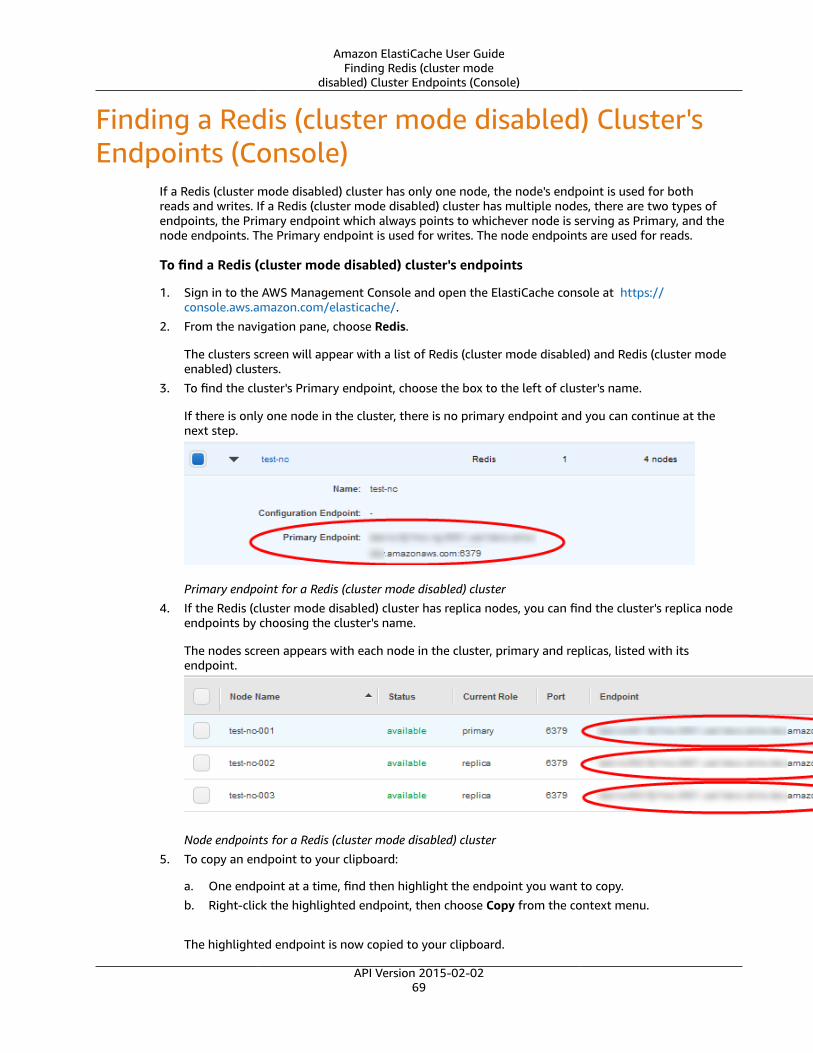
Amazon ElastiCache User GuideFinding Redis (cluster mode
disabled) Cluster Endpoints (Console)
Finding a Redis (cluster mode disabled) Cluster'sEndpoints (Console)
If a Redis (cluster mode disabled) cluster has only one node, the node's endpoint is used for bothreads and writes. If a Redis (cluster mode disabled) cluster has multiple nodes, there are two types ofendpoints, the Primary endpoint which always points to whichever node is serving as Primary, and thenode endpoints. The Primary endpoint is used for writes. The node endpoints are used for reads.
To find a Redis (cluster mode disabled) cluster's endpoints
1. Sign in to the AWS Management Console and open the ElastiCache console at https://console.aws.amazon.com/elasticache/.
2. From the navigation pane, choose Redis.
The clusters screen will appear with a list of Redis (cluster mode disabled) and Redis (cluster modeenabled) clusters.
3. To find the cluster's Primary endpoint, choose the box to the left of cluster's name.
If there is only one node in the cluster, there is no primary endpoint and you can continue at thenext step.
Primary endpoint for a Redis (cluster mode disabled) cluster
4. If the Redis (cluster mode disabled) cluster has replica nodes, you can find the cluster's replica nodeendpoints by choosing the cluster's name.
The nodes screen appears with each node in the cluster, primary and replicas, listed with itsendpoint.
Node endpoints for a Redis (cluster mode disabled) cluster
5. To copy an endpoint to your clipboard:
a. One endpoint at a time, find then highlight the endpoint you want to copy.
b. Right-click the highlighted endpoint, then choose Copy from the context menu.
The highlighted endpoint is now copied to your clipboard.
API Version 2015-02-0269

Amazon ElastiCache User GuideFinding Redis (cluster mode
disabled) Cluster Endpoints (Console)
A Redis (cluster mode disabled) primary endpoint looks something like the following. There is adifference depending upon whether or not In-Transit encryption is enabled.
In-transit encryption not enabled
clusterName.xxxxxx.nodeId.regionAndAz.cache.amazonaws.com:port redis-01.7abc2d.0001.usw2.cache.amazonaws.com:6379
In-transit encryption enabled
master.clusterName.xxxxxx.regionAndAz.cache.amazonaws.com:port
master.ncit.ameaqx.use1.cache.amazonaws.com:6379
API Version 2015-02-0270

Amazon ElastiCache User GuideFinding Redis (cluster mode
enabled) Cluster Endpoints (Console)
Finding a Redis (cluster mode enabled) Cluster'sEndpoints (Console)
Use the Configuration Endpoint for both read and write operations. Redis determines which of thecluster's node to access.
The following procedure demonstrates how to find and copy Redis (cluster mode enabled) clusterendpoints.
To find the configuration endpoint for a Redis (cluster mode enabled) cluster
1. Sign in to the AWS Management Console and open the ElastiCache console at https://console.aws.amazon.com/elasticache/.
2. From the navigation pane, choose Redis.
A list of clusters running any version of Redis appears.3. From the list of clusters, choose the box to the left of a cluster running "Clustered Redis".
The screen expands showing details about the selected cluster.4. Locate the Configuration endpoint.
Configuration endpoint for a Redis (cluster mode enabled) cluster
To find the node endpoints for a Redis (cluster mode enabled) cluster
1. Sign in to the AWS Management Console and open the ElastiCache console at https://console.aws.amazon.com/elasticache/.
2. From the navigation pane, choose Redis.
A list of clusters running any version of Redis appears.3. From the list of clusters, choose the cluster name of a cluster running "Clustered Redis".
The shards page opens.4. Choose the name of the shard you want node endpoint for.
A list of the shard's nodes appears with each node's endpoint.5. Locate the Endpoint column and read the endpoint for each node.
API Version 2015-02-0271
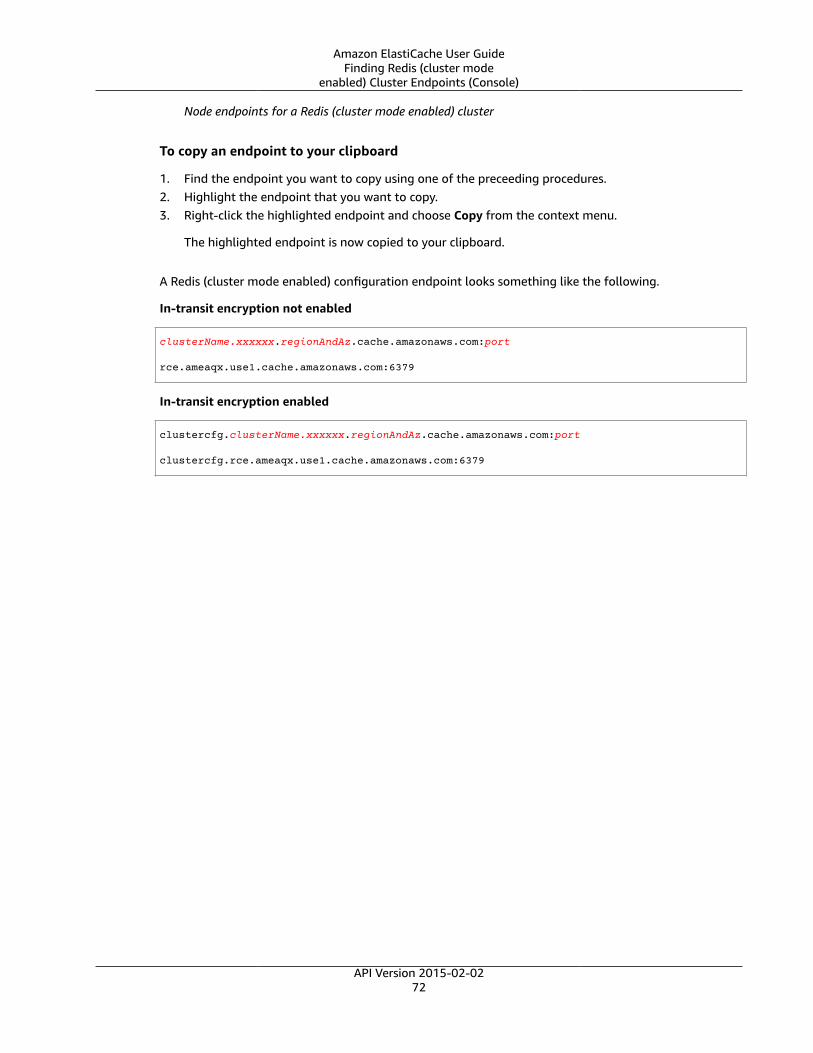
Amazon ElastiCache User GuideFinding Redis (cluster mode
enabled) Cluster Endpoints (Console)
Node endpoints for a Redis (cluster mode enabled) cluster
To copy an endpoint to your clipboard
1. Find the endpoint you want to copy using one of the preceeding procedures.2. Highlight the endpoint that you want to copy.3. Right-click the highlighted endpoint and choose Copy from the context menu.
The highlighted endpoint is now copied to your clipboard.
A Redis (cluster mode enabled) configuration endpoint looks something like the following.
In-transit encryption not enabled
clusterName.xxxxxx.regionAndAz.cache.amazonaws.com:port rce.ameaqx.use1.cache.amazonaws.com:6379
In-transit encryption enabled
clustercfg.clusterName.xxxxxx.regionAndAz.cache.amazonaws.com:port clustercfg.rce.ameaqx.use1.cache.amazonaws.com:6379
API Version 2015-02-0272

Amazon ElastiCache User GuideFinding Endpoints (AWS CLI)
Finding Endpoints (AWS CLI)You can use the AWS CLI for Amazon ElastiCache to discover the endpoints for nodes, clusters, andreplication groups
Topics• Finding Endpoints for Nodes and Clusters (AWS CLI) (p. 73)• Finding the Endpoints for Replication Groups (AWS CLI) (p. 74)
Finding Endpoints for Nodes and Clusters (AWS CLI)You can use the AWS CLI to discover the endpoints for a cluster and its nodes with the describe-cache-clusters command. For Redis clusters, the command returns the cluster endpoint. ForMemcached clusters, the command returns the configuration endpoint. If you include the optionalparameter --show-cache-node-info, the command will also return the endpoints of the individualnodes in the cluster.
The following command retrieves the configuration endpoint (ConfigurationEndpoint) andindividual node endpoints (Endpoint) for the Memcached cluster mycluster.
For Linux, macOS, or Unix:
aws elasticache describe-cache-clusters \ --cache-cluster-id mycluster \ --show-cache-node-info
For Windows:
aws elasticache describe-cache-clusters ^ --cache-cluster-id mycluster ^ --show-cache-node-info
Output from the above operation should look something like this (JSON format).
{ "CacheClusters": [ { "Engine": "memcached", "CacheNodes": [ { "CacheNodeId": "0001", "Endpoint": { "Port": 11211, "Address": "mycluster.1abc4d.0001.usw2.cache.amazonaws.com" }, "CacheNodeStatus": "available", "ParameterGroupStatus": "in-sync", "CacheNodeCreateTime": "2016-09-22T21:30:29.967Z", "CustomerAvailabilityZone": "us-west-2b" }, { "CacheNodeId": "0002", "Endpoint": { "Port": 11211, "Address": "mycluster.1abc4d.0002.usw2.cache.amazonaws.com" }, "CacheNodeStatus": "available",
API Version 2015-02-0273

Amazon ElastiCache User GuideFinding the Endpoints for Replication Groups (AWS CLI)
"ParameterGroupStatus": "in-sync", "CacheNodeCreateTime": "2016-09-22T21:30:29.967Z", "CustomerAvailabilityZone": "us-west-2b" }, { "CacheNodeId": "0003", "Endpoint": { "Port": 11211, "Address": "mycluster.1abc4d.0003.usw2.cache.amazonaws.com" }, "CacheNodeStatus": "available", "ParameterGroupStatus": "in-sync", "CacheNodeCreateTime": "2016-09-22T21:30:29.967Z", "CustomerAvailabilityZone": "us-west-2b" } ], "CacheParameterGroup": { "CacheNodeIdsToReboot": [], "CacheParameterGroupName": "default.memcached1.4", "ParameterApplyStatus": "in-sync" }, "CacheClusterId": "mycluster", "PreferredAvailabilityZone": "us-west-2b", "ConfigurationEndpoint": { "Port": 11211, "Address": "mycluster.1abc4d.cfg.usw2.cache.amazonaws.com" }, "CacheSecurityGroups": [], "CacheClusterCreateTime": "2016-09-22T21:30:29.967Z", "AutoMinorVersionUpgrade": true, "CacheClusterStatus": "available", "NumCacheNodes": 3, "ClientDownloadLandingPage": "https://console.aws.amazon.com/elasticache/home#client-download:", "CacheSubnetGroupName": "default", "EngineVersion": "1.4.24", "PendingModifiedValues": {}, "PreferredMaintenanceWindow": "mon:09:00-mon:10:00", "CacheNodeType": "cache.m4.large" } ] }
ImportantIf you choose to create a CNAME for your Memcached configuration endpoint, in order for yourPHP client to recognize the CNAME as a configuration endpoint, you must include .cfg. in theCNAME. For example, mycluster.cfg.local in your php.ini file for the session.save_pathparameter.
For more information, go to the topic describe-cache-clusters.
Finding the Endpoints for Replication Groups (AWSCLI)You can use the AWS CLI to discover the endpoints for a replication group and its clusters with thedescribe-replication-groups command. The command returns the replication group's primaryendpoint and a list of all the clusters in the replication group with their endpoints.
The following operation retrieves the primary endpoint (PrimaryEndpoint) and individual node endpoints(ReadEndpoint) for the replication group myreplgroup. Use the primary endpoint for all writeoperations and the individual node endpoints for all read operations.
API Version 2015-02-0274

Amazon ElastiCache User GuideFinding the Endpoints for Replication Groups (AWS CLI)
For Linux, macOS, or Unix:
aws elasticache describe-replication-groups \ --replication-group-id myreplgroup
For Windows:
aws elasticache describe-replication-groups ^ --replication-group-id myreplgroup
Output from this operation should look something like this (JSON format).
{ "ReplicationGroups": [ { "Status": "available", "Description": "test", "NodeGroups": [ { "Status": "available", "NodeGroupMembers": [ { "CurrentRole": "primary", "PreferredAvailabilityZone": "us-west-2a", "CacheNodeId": "0001", "ReadEndpoint": { "Port": 6379, "Address": "myreplgroup-001.1abc4d.0001.usw2.cache.amazonaws.com" }, "CacheClusterId": "myreplgroup-001" }, { "CurrentRole": "replica", "PreferredAvailabilityZone": "us-west-2b", "CacheNodeId": "0001", "ReadEndpoint": { "Port": 6379, "Address": "myreplgroup-002.1abc4d.0001.usw2.cache.amazonaws.com" }, "CacheClusterId": "myreplgroup-002" }, { "CurrentRole": "replica", "PreferredAvailabilityZone": "us-west-2c", "CacheNodeId": "0001", "ReadEndpoint": { "Port": 6379, "Address": "myreplgroup-003.1abc4d.0001.usw2.cache.amazonaws.com" }, "CacheClusterId": "myreplgroup-003" } ], "NodeGroupId": "0001", "PrimaryEndpoint": { "Port": 6379, "Address": "myreplgroup.1abc4d.ng.0001.usw2.cache.amazonaws.com" } } ], "ReplicationGroupId": "myreplgroup", "AutomaticFailover": "enabled", "SnapshottingClusterId": "myreplgroup-002", "MemberClusters": [
API Version 2015-02-0275
Amazon ElastiCache User GuideFinding the Endpoints for Replication Groups (AWS CLI)
"myreplgroup-001", "myreplgroup-002", "myreplgroup-003" ], "PendingModifiedValues": {} } ]}
For more information, see describe-replication-groups in the AWS CLI Command Reference.
API Version 2015-02-0276
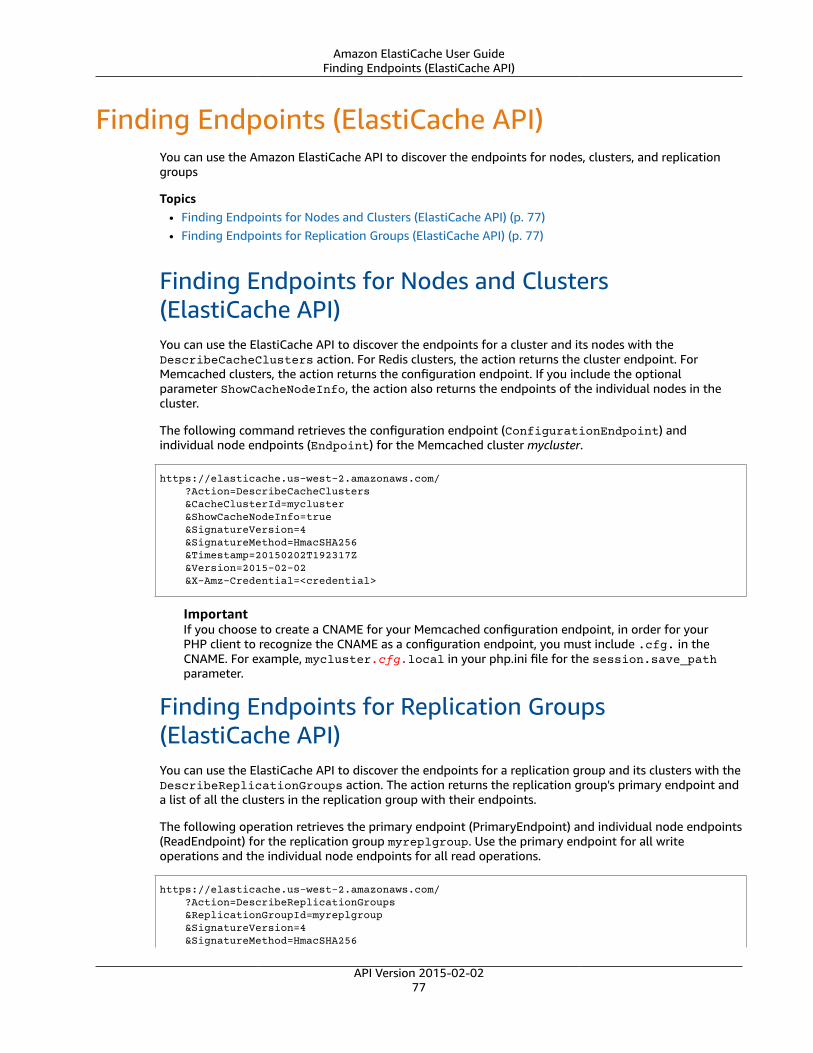
Amazon ElastiCache User GuideFinding Endpoints (ElastiCache API)
Finding Endpoints (ElastiCache API)You can use the Amazon ElastiCache API to discover the endpoints for nodes, clusters, and replicationgroups
Topics• Finding Endpoints for Nodes and Clusters (ElastiCache API) (p. 77)• Finding Endpoints for Replication Groups (ElastiCache API) (p. 77)
Finding Endpoints for Nodes and Clusters(ElastiCache API)You can use the ElastiCache API to discover the endpoints for a cluster and its nodes with theDescribeCacheClusters action. For Redis clusters, the action returns the cluster endpoint. ForMemcached clusters, the action returns the configuration endpoint. If you include the optionalparameter ShowCacheNodeInfo, the action also returns the endpoints of the individual nodes in thecluster.
The following command retrieves the configuration endpoint (ConfigurationEndpoint) andindividual node endpoints (Endpoint) for the Memcached cluster mycluster.
https://elasticache.us-west-2.amazonaws.com/ ?Action=DescribeCacheClusters &CacheClusterId=mycluster &ShowCacheNodeInfo=true &SignatureVersion=4 &SignatureMethod=HmacSHA256 &Timestamp=20150202T192317Z &Version=2015-02-02 &X-Amz-Credential=<credential>
ImportantIf you choose to create a CNAME for your Memcached configuration endpoint, in order for yourPHP client to recognize the CNAME as a configuration endpoint, you must include .cfg. in theCNAME. For example, mycluster.cfg.local in your php.ini file for the session.save_pathparameter.
Finding Endpoints for Replication Groups(ElastiCache API)You can use the ElastiCache API to discover the endpoints for a replication group and its clusters with theDescribeReplicationGroups action. The action returns the replication group's primary endpoint anda list of all the clusters in the replication group with their endpoints.
The following operation retrieves the primary endpoint (PrimaryEndpoint) and individual node endpoints(ReadEndpoint) for the replication group myreplgroup. Use the primary endpoint for all writeoperations and the individual node endpoints for all read operations.
https://elasticache.us-west-2.amazonaws.com/ ?Action=DescribeReplicationGroups &ReplicationGroupId=myreplgroup &SignatureVersion=4 &SignatureMethod=HmacSHA256
API Version 2015-02-0277

Amazon ElastiCache User GuideFinding Endpoints for Replication Groups (ElastiCache API)
&Timestamp=20150202T192317Z &Version=2015-02-02 &X-Amz-Credential=<credential>
For more information, see DescribeReplicationGroups.
API Version 2015-02-0278
Amazon ElastiCache User GuideAlert: LRU Crawler
ElastiCache NotificationsThis topic covers ElastiCache notifications that you might be interested in. A notification is a situationor event that, in most cases, is temporary, lasting only until a solution is found and implemented.Notifications generally have a start date and a resolution date, after which the notification is no longerrelevant. Any one notification might or might not be relevant to you. We recommend an implementationguideline that, if followed, improves the performance of your cluster.
Notifications do not announce new or improved ElastiCache features or functionality.
Alert: Memcached LRU Crawler CausingSegmentation Faults
Alert Date: February 28, 2017In some circumstances, your cluster might display instability with a segmentation fault in theMemcached LRU Crawler. This is an issue within the Memcached engine that has existed forsome time. The issue became apparent in Memcached 1.4.33 when the LRU Crawler was enabledby default.If you are experiencing this issue, we recommend that you disable the LRU Crawler until there isa fix. To do so, use lru_crawler disable at the command line or modify the lru_crawlerparameter value (preferred).Resolved Date:Resolution:
API Version 2015-02-0279

Amazon ElastiCache User Guide
Best Practices for AmazonElastiCache
Following, you can find recommended best practices for Amazon ElastiCache. Following these improvesyour cluster's performance and reliability.
Topics• Ensuring You Have Sufficient Memory to Create a Redis Snapshot (p. 81)• Managing Reserved Memory (Redis) (p. 83)• Mitigating Out-of-Disk-Space Issues When Using Redis AOF (p. 87)• Mitigating Failures (p. 87)• Configuring Your ElastiCache Client for Efficient Load Balancing (p. 92)• Best Practices: Online Resharding (p. 93)
API Version 2015-02-0280
Amazon ElastiCache User GuideEnsuring You Have Sufficient
Memory to Create a Redis Snapshot
Ensuring You Have Sufficient Memory to Create aRedis Snapshot
Redis snapshots and synchronizations in version 2.8.22 and later
Redis 2.8.22 introduces a forkless save process that allows you to allocate more of your memory to yourapplication's use without incurring increased swap usage during synchronizations and saves. For moreinformation, see How Synchronization and Backup are Implemented (p. 257).
Redis snapshots and synchronizations before version 2.8.22
When you work with Redis ElastiCache, Redis calls a background write command in a number of cases:
• When creating a snapshot for a backup.
• When synchronizing replicas with the primary in a replication group.
• When enabling the append-only file feature (AOF) for Redis.
• When promoting a replica to master (which causes a primary/replica sync).
Whenever Redis executes a background write process, you must have sufficient available memory toaccommodate the process overhead. Failure to have sufficient memory available causes the process tofail. Because of this, it is important to choose a node instance type that has sufficient memory whencreating your Redis cluster.
Background Write Process and Memory UsageWhenever a background write process is called, Redis forks its process (remember, Redis is singlethreaded). One fork persists your data to disk in a Redis .rdb snapshot file. The other fork services allread and write operations. To ensure that your snapshot is a point-in-time snapshot, all data updates andadditions are written to an area of available memory separate from the data area.
As long as you have sufficient memory available to record all write operations while the data is beingpersisted to disk, you should have no insufficient memory issues. You are likely to experience insufficientmemory issues if any of the following are true:
• Your application performs many write operations, thus requiring a large amount of available memoryto accept the new or updated data.
• You have very little memory available in which to write new or updated data.
• You have a large dataset that takes a long time to persist to disk, thus requiring a large number ofwrite operations.
The following diagram illustrates memory use when executing a background write process.
API Version 2015-02-0281

Amazon ElastiCache User GuideAvoiding Running Out of Memory
When Executing a Background Write
For information on the impact of doing a backup on performance, see Performance Impact ofBackups (p. 298).
For more information on how Redis performs snapshots, see http://redis.io.
For more information on regions and Availability Zones, see Choosing Regions and AvailabilityZones (p. 61).
Avoiding Running Out of Memory When Executing aBackground WriteWhenever a background write process such as BGSAVE or BGREWRITEAOF is called, to keep the processfrom failing, you must have more memory available than will be consumed by write operations duringthe process. The worst-case scenario is that during the background write operation every Redis recordis updated and some new records are added to the cache. Because of this, we recommend that you setreserved-memory-percent to 50 (50 percent) for Redis versions before 2.8.22 or 25 (25 percent) forRedis versions 2.8.22 and later. For more information, see Managing Reserved Memory (Redis) (p. 83).
The maxmemory value indicates the memory available to you for data and operational overhead. Becauseyou cannot modify the reserved-memory parameter in the default parameter group, you must createa custom parameter group for the cluster. The default value for reserved-memory is 0, which allowsRedis to consume all of maxmemory with data, potentially leaving too little memory for other uses,such as a background write process. For maxmemory values by node instance type, see Redis Node-TypeSpecific Parameters (p. 381).
You can also use reserved-memory parameter to reduce the amount of memory Redis uses on the box.
For more information on Redis-specific parameters in ElastiCache, see Redis SpecificParameters (p. 366).
For information on creating and modifying parameter groups, see Creating a Parameter Group (p. 344)and Modifying a Parameter Group (p. 352).
API Version 2015-02-0282

Amazon ElastiCache User GuideManaging Reserved Memory (Redis)
Managing Reserved Memory (Redis)Reserved memory is memory set aside for nondata use. When performing a backup or failover, Redisuses available memory to record write operations to your cluster while the cluster's data is beingwritten to the .rdb file. If you don't have sufficient memory available for all the writes, the process fails.Following, you can find information on options for managing reserved memory for ElastiCache for Redisand how to apply those options.
How Much Reserved Memory Do You Need?If you are running a version of Redis prior to 2.8.22, you need to reserve more memory for backupsand failovers than if you are running Redis 2.8.22 or later. This requirement is due to the different waysthat ElastiCache for Redis implements the backup process. The rule of thumb is to reserve half of anode type’s maxmemory value for Redis overhead for versions prior to 2.8.22, and one-fourth for Redisversions 2.8.22 and later. For more information, see Ensuring You Have Sufficient Memory to Create aRedis Snapshot (p. 81) and How Synchronization and Backup are Implemented (p. 257).
Parameters to Manage Reserved MemoryThe reserved-memory ParameterPrior to March 16, 2017, all ElastiCache for Redis reserved memory management was done using theparameter reserved-memory. The default value of reserved-memory is 0. This default reserves nomemory for Redis overhead and allows Redis to consume all of a node's memory with data. Changingreserved-memory so you have sufficient memory available for backups and failovers requires you tocreate a custom parameter group. In this custom parameter group, you set reserved-memory to avalue appropriate for the Redis version running on your cluster and cluster’s node type.
The ElastiCache for Redis parameter reserved-memory is specific to ElastiCache for Redis and isn't partof the Redis distribution.
The following procedure shows how to use reserved-memory to manage the memory on your Rediscluster.
To reserve memory using reserved-memory
1. Create a custom parameter group specifying the parameter group family matching the engineversion you’re running—for example, specifying the redis2.8 parameter group family.
aws elasticache create-cache-parameter-group \ --cache-parameter-group-name redis28-m3xl \ --cache-parameter-group-family redis2.8
2. Calculate how many bytes of memory you need to reserve for Redis overhead. You can find thevalue of maxmemory for your node type at Redis Node-Type Specific Parameters (p. 381).
3. Modify the custom parameter group so that the parameter reserved-memory is the number ofbytes you calculated in the previous step. The following AWS CLI example assumes you’re running aversion of Redis prior to 2.8.22 and need to reserve half of the node’s maxmemory.
aws elasticache modify-cache-parameter-group \ --cache-parameter-group-name redis28-m3xl \ --parameter-name-values “ParameterName=reserved-memory, ParameterValue=7130316800”
Note that you need a separate custom parameter group for each node type that you use, becauseeach node type has a different maxmemory value. Thus, each node type needs a different value forreserved-memory.
API Version 2015-02-0283

Amazon ElastiCache User GuideParameters to Manage Reserved Memory
4. Apply the custom parameter group to your cluster.
The following CLI example applies the redis28-m3xl parameter group to the cluster my-redis-cluster.
aws elasticache modify-cache-cluster \ --cache-cluster-id my-redis-cluster \ --cache-parameter-group-name redis28-m3xl \ --apply-immediately
The following CLI example applies the redis28-m3xl parameter group to the replication group (inthe console, the cluster) my-redis-repl-grp.
aws elasticache modify-replication-group \ --replication-group-id my-redis-repl-grp \ --cache-parameter-group-name redis28-m3xl \ --apply-immediately
For more information, see Modifying an ElastiCache Cluster (p. 183) or Modifying a Cluster withReplicas (p. 288).
The reserved-memory-percent parameterOn March 16, 2017, Amazon ElastiCache introduced the parameter reserved-memory-percent andmade it available on all versions of ElastiCache for Redis. The purpose of reserved-memory-percentis to simplify reserved memory management across all your clusters. It does so by enabling you to havea single parameter group for each parameter group family (such as redis2.8) to manage your clusters'reserved memory, regardless of node type. The default value for reserved-memory-percent is 25 (25percent).
The ElastiCache for Redis parameter reserved-memory-percent, like reserved-memory, is specificto ElastiCache for Redis and isn't part of the Redis distribution.
To use reserved-memory-percent to manage the memory on your ElastiCache for Redis cluster, doone of the following:
• If you are running Redis 2.8.22 or later, just assign the default parameter group to your cluster. Thedefault 25 percent should be adequate. If not, you can follow the steps in the next bullet to changethe value.
• If you are running a version of Redis prior to 2.8.22, you likely will need to reserve more memory thanreserved-memory-percent's default 25 percent. To do so, use the following procedure.
To reserve memory using reserved-memory-percent
1. Create a custom parameter group specifying the parameter group family matching the engineversion you’re running—for example, specifying the redis2.8 parameter group family. A customparameter group is necessary because you cannot modify a default parameter group.
aws elasticache create-cache-parameter-group \ --cache-parameter-group-name redis28-50 \ --cache-parameter-group-family redis2.8
API Version 2015-02-0284

Amazon ElastiCache User GuideChanging Between the reserved-memory
and reserved-memory-percent Parameters
Because reserved-memory-percent reserves memory as a percent of a node’s maxmemory, youdon't need a custom parameter group for each node type.
2. Modify the custom parameter group so that reserved-memory-percent is 50 (50 percent).
aws elasticache modify-cache-parameter-group \ --cache-parameter-group-name redis28-50 \ --parameter-name-values "ParameterName=reserved-memory-percent, ParameterValue=50"
3. Use this custom parameter group for any Redis clusters running a version of Redis older than 2.8.22.
The following CLI example applies the redis28 parameter group to the cluster my-redis-cluster.
aws elasticache modify-cache-cluster \ --cache-cluster-id my-redis-cluster \ --cache-parameter-group-name redis28-50 \ --apply-immediately
The following CLI example applies the redis28-50 parameter group to the replication group (inthe console, the cluster) my-redis-repl-grp.
aws elasticache modify-replication-group \ --replication-group-id my-redis-repl-grp \ --cache-parameter-group-name redis28-50 \ --apply-immediately
For more information, see Modifying an ElastiCache Cluster (p. 183) or Modifying a Cluster withReplicas (p. 288).
Changing Between the reserved-memory andreserved-memory-percent ParametersIf you were a current ElastiCache customer on March 16, 2017, your default reserved memorymanagement parameter is reserved-memory. If you became an ElastiCache customer after March 16,2017, your default reserved memory management parameter is reserved-memory-percent. Youcan change your reserved memory management parameter if you want using either the AWS CLI orElastiCache API.
The parameters reserved-memory and reserved-memory-percent are mutually exclusive. Aparameter group will always have one but never both. You can change which parameter a parametergroup uses for reserved memory management by modifying the parameter group. The parameter groupmust be a custom one, because you cannot modify default parameter groups.
The following CLI example modifies the custom parameter group redis32-cluster-on so that it usesreserved-memory-percent to manage reserved memory. Because the engine version is newer than2.8.22, it sets the value of reserved-memory-percent to 25 (25 percent) even though that is thedefault. It does so because reserved-memory-percent must be assigned some value to convert theparameter group from reserved-memory to reserved-memory-percent.
aws elasticache modify-cache-parameter-group \ --cache-parameter-group-name redis32-cluster-on \ --parameter-name-values "ParameterName=reserved-memory-percent, ParameterValue=25"
API Version 2015-02-0285

Amazon ElastiCache User GuideChanging Between the reserved-memory
and reserved-memory-percent Parameters
The following CLI example modifies the custom parameter group redis32-m3xl so that it usesreserved-memory to manage reserved memory. Because the engine version is newer than 2.8.22, itsets the value to 3565158400 which is one-fourth of a cache.m3.xlarge’s maxmemory.
aws elasticache modify-cache-parameter-group \ --cache-parameter-group-name redis32-m3xl \ --parameter-name-values "ParameterName=reserved-memory, ParameterValue=3565158400"
API Version 2015-02-0286

Amazon ElastiCache User GuideMitigating Out-of-Disk-Space Issues When Using Redis AOF
Mitigating Out-of-Disk-Space Issues When UsingRedis AOF
When planning your Amazon ElastiCache implementation, you should plan so that failures have the leastimpact possible.
You enable AOF because an AOF file is useful in recovery scenarios. In case of a node restart or servicecrash, Redis replays the updates from an AOF file, thereby recovering the data lost due to the restart orcrash.
WarningAOF cannot protect against all failure scenarios. For example, if a node fails due to a hardwarefault in an underlying physical server, ElastiCache provisions a new node on a different server. Inthis case, the AOF file is no longer available and cannot be used to recover the data. Thus, Redisrestarts with a cold cache.
Enabling Redis Multi-AZ as a Better Approach to FaultToleranceIf you are enabling AOF to protect against data loss, consider using a replication group with Multi-AZ enabled instead of AOF. When using a Redis replication group, if a replica fails, it is automaticallyreplaced and synchronized with the primary cluster. If Multi-AZ is enabled on a Redis replication groupand the primary fails, it fails over to a read replica. Generally, this functionality is much faster thanrebuilding the primary from an AOF file. For greater reliability and faster recovery, we recommend thatyou create a replication group with one or more read replicas in different Availability Zones and enableMulti-AZ instead of using AOF. Because there is no need for AOF in this scenario, ElastiCache disablesAOF on Multi-AZ replication groups.
For more information, see the following topics:
• Mitigating Failures (p. 87)• ElastiCache Replication (Redis) (p. 239)• Replication: Multi-AZ with Automatic Failover (Redis) (p. 244)
Mitigating FailuresWhen planning your Amazon ElastiCache implementation, you should plan so that failures have aminimal impact upon your application and data. The topics in this section cover approaches you can taketo protect your application and data from failures.
Topics• Mitigating Failures when Running Memcached (p. 87)• Mitigating Failures when Running Redis (p. 88)• Recommendations (p. 90)
Mitigating Failures when Running MemcachedWhen running the Memcached engine, you have the following options for minimizing the impact ofa failure. There are two types of failures to address in your failure mitigation plans: node failure andAvailability Zone failure.
API Version 2015-02-0287

Amazon ElastiCache User GuideMitigating Failures when Running Redis
Mitigating Node FailuresTo mitigate the impact of a node failure, spread your cached data over more nodes. Because Memcacheddoes not support replication, a node failure will always result in some data loss from your cluster.
When you create your Memcached cluster you can create it with 1 to 20 nodes, or more by specialrequest. Partitioning your data across a greater number of nodes means you'll lose less data if a nodefails. For example, if you partition your data across 10 nodes, any single node stores approximately 10%of your cached data. In this case, a node failure loses approximately 10% of your cache which needsto be replaced when a replacement node is created and provisioned. If the same data were cached in 3larger nodes, the failure of a node would lose approximately 33% of your cached data.
If you need more than 20 nodes in a Memcached cluster, or more than 100 nodes total in a region, pleasefill out the ElastiCache Limit Increase Request form at https://aws.amazon.com/contact-us/elasticache-node-limit-request/.
For information on specifying the number of nodes in a Memcached cluster, go to Creating a Cluster(Console): Memcached (p. 161).
Mitigating Availability Zone FailuresTo mitigate the impact of an Availability Zone failure, locate your nodes in as many Availability Zonesas possible. In the unlikely event of an AZ failure, you will lose the data cached in that AZ, not the datacached in the other AZs.
Why so many nodes?
If my region has only 3 Availability Zones, why do I need more than 3 nodes since if an AZ fails I loseapproximately one-third of my data?
This is an excellent question. Remember that we’re attempting to mitigate two distinct types of failures,node and Availability Zone. You’re right, if your data is spread across Availability Zones and one of thezones fails, you will lose only the data cached in that AZ, irrespective of the number of nodes you have.However, if a node fails, having more nodes will reduce the proportion of data lost.
There is no "magic formula" for determining how many nodes to have in your cluster. You must weightthe impact of data loss vs. the likelihood of a failure vs. cost, and come to your own conclusion.
For information on specifying the number of nodes in a Memcached cluster, go to Creating a Cluster(Console): Memcached (p. 161).
For more information on regions and Availability Zones, go to Choosing Regions and AvailabilityZones (p. 61).
Mitigating Failures when Running RedisWhen running the Redis engine, you have the following options for minimizing the impact of a node orAvailability Zone failure.
Mitigating Node FailuresTo mitigate the impact of Redis node failures, you have the following options:
Topics• Mitigating Failures: Redis Append Only Files (AOF) (p. 89)• Mitigating Failures: Redis Replication Groups (p. 89)
API Version 2015-02-0288

Amazon ElastiCache User GuideMitigating Failures when Running Redis
Mitigating Failures: Redis Append Only Files (AOF)
When AOF is enabled for Redis, whenever data is written to your Redis cluster, a correspondingtransaction record is written to a Redis append only file (AOF). If your Redis process restarts, ElastiCachecreates a replacement cluster and provisions it. You can then run the AOF against the cluster torepopulate it with data.
Some of the shortcomings of using Redis AOF to mitigate cluster failures are:
• It is time consuming.
Creating and provisioning a cluster can take several minutes. Depending upon the size of the AOF,running it against the cluster will add even more time during which your application cannot accessyour cluster for data, forcing it to hit the database directly.
• The AOF can get big.
Because every write to your cluster is written to a transaction record, AOFs can become very large,larger than the .rdb file for the dataset in question. Because ElastiCache relies on the local instancestore, which is limited in size, enabling AOF can cause out-of-disk-space issues. You can avoid out-of-disk-space issues by using a replication group with Multi-AZ enabled.
• Using AOF cannot protect you from all failure scenarios.
For example, if a node fails due to a hardware fault in an underlying physical server, ElastiCache willprovision a new node on a different server. In this case, the AOF is not available and cannot be used torecover the data.
For more information, see Redis Append Only Files (AOF) (p. 331).
Mitigating Failures: Redis Replication Groups
A Redis replication group is comprised of a single primary node which your application can both readfrom and write to, and from 1 to 5 read-only replica nodes. Whenever data is written to the primarynode it is also asynchronously updated on the read replica nodes.
When a read replica fails
1. ElastiCache detects the failed read replica.2. ElastiCache takes the failed node off line.3. ElastiCache launches and provisions a replacement node in the same AZ.4. The new node synchronizes with the Primary node.
During this time your application can continue reading and writing using the other nodes.
Redis Multi-AZ with Automatic Failover
You can enable Multi-AZ with automatic failover on your Redis replication groups. Whether you enableMulti-AZ with auto failover or not, a failed Primary will be detected and replaced automatically. How thistakes place varies whether or not Multi-AZ is or is not enabled.
When Multi-AZ with Auto Failover is enabled
1. ElastiCache detects the Primary node failure.2. ElastiCache promotes the read replica node with the least replication lag to primary node.
API Version 2015-02-0289
Amazon ElastiCache User GuideRecommendations
3. The other replicas sync with the new primary node.4. ElastiCache spins up a read replica in the failed primary's AZ.5. The new node syncs with the newly promoted primary.
Failing over to a replica node is generally faster than creating and provisioning a new Primary node.This means your application can resume writing to your Primary node sooner than if Multi-AZ were notenabled.
For more information, see Replication: Multi-AZ with Automatic Failover (Redis) (p. 244).
When Multi-AZ with Auto Failover is disabled
1. ElastiCache detects Primary failure.2. ElastiCache takes the Primary offline.3. ElastiCache creates and provisions a new Primary node to replace the failed Primary.4. ElastiCache syncs the new Primary with one of the existing replicas.5. When the sync is finished, the new node functions as the cluster's Primary node.
During this process, steps 1 through 4, your application cannot write to the Primary node. However, yourapplication can continue reading from your replica nodes.
For added protection, we recommend that you launch the nodes in your replication group in differentAvailability Zones (AZs). If you do this, an AZ failure will only impact the nodes in that AZ and not theothers.
For more information, see ElastiCache Replication (Redis) (p. 239).
Mitigating Availability Zone FailuresTo mitigate the impact of an Availability Zone failure, locate your nodes in as many Availability Zones aspossible.
No matter how many nodes you have, if they are all located in the same Availability Zone, a catastrophicfailure of that AZ results in your losing all your cache data. However, if you locate your nodes in multipleAZs, a failure of any AZ results in your losing only the nodes in that AZ.
Any time you lose a node you can experience a performance degradation since read operations are nowshared by fewer nodes. This performance degradation will continue until the nodes are replaced. Becauseyour data is not partitioned across Redis nodes, you risk some data loss only when the primary node islost.
For information on specifying the Availability Zones for Redis nodes, go to Creating a Redis (cluster modedisabled) Cluster (Console) (p. 163).
For more information on regions and Availability Zones, go to Choosing Regions and AvailabilityZones (p. 61).
RecommendationsThere are two types of failures you need to plan for, individual node failures and broad Availability Zonefailures. The best failure mitigation plan will address both kinds of failures.
Minimizing the Impact of FailuresTo minimize the impact of a node failure, we recommend that your implementation use multiple nodesin each shard and distribute the nodes across multiple availability zones.
API Version 2015-02-0290

Amazon ElastiCache User GuideRecommendations
If you're running Memcached and partitioning your data across nodes, the more nodes you use thesmaller the data loss if any one node fails.
If you’re running Redis, we also recommend that you enable Multi-AZ on your replication group so thatElastiCache will automatically fail over to a replica if the primary node fails.
Minimizing the Impact of Availability Zone FailuresTo minimize the impact of an availability zone failure, we recommend launching your nodes in as manydifferent availability zones as are available. Spreading your nodes evenly across AZs will minimize theimpact in the unlikely event of an AZ failure.
Other precautionsIf you're running Redis, then in addition to the above, we recommend that you schedule regular backupsof your cluster. Backups (snapshots) create a .rdb file you can use to restore your cluster in case of failureor corruption. For more information, see ElastiCache Backup and Restore (Redis) (p. 297).
API Version 2015-02-0291

Amazon ElastiCache User GuideConfiguring Your ElastiCache
Client for Efficient Load Balancing
Configuring Your ElastiCache Client for EfficientLoad Balancing
NoteThis section applies to multi-node Memcached clusters.
To effectively use multiple ElastiCache Memcached nodes, you need to be able to spread your cachekeys across the nodes. A simple way to load balance a cluster with n nodes is to calculate the hash ofthe object’s key and mod the result by n - hash(key) mod n. The resulting value (0 through n–1) is thenumber of the node where you place the object.
This approach is simple and works well as long as the number of nodes (n) is constant. However,whenever you add or remove a node from the cluster, the number of keys that need to be moved is (n -1) / n (where n is the new number of nodes). Thus, this approach results in a large number of keys beingmoved, which translates to a large number of initial cache misses, especially as the number of nodes getslarge. Scaling from 1 to 2 nodes results in (2-1) / 2 (50 percent) of the keys being moved, the best case.Scaling from 9 to 10 nodes results in (10–1)/10 (90 percent) of the keys being moved. If you're scaling updue to a spike in traffic, you don't want to have a large number of cache misses. A large number of cachemisses results in hits to the database, which is already overloaded due to the spike in traffic.
The solution to this dilemma is consistent hashing. Consistent hashing uses an algorithm such thatwhenever a node is added or removed from a cluster, the number of keys that must be moved is roughly1 / n (where n is the new number of nodes). Scaling from 1 to 2 nodes results in 1/2 (50 percent) of thekeys being moved, the worst case. Scaling from 9 to 10 nodes results in 1/10 (10 percent) of the keysbeing moved.
As the user, you control which hashing algorithm is used for multi-node clusters. We recommend thatyou configure your clients to use consistent hashing. Fortunately, there are many Memcached clientlibraries in most popular languages that implement consistent hashing. Check the documentation for thelibrary you are using to see if it supports consistent hashing and how to implement it.
If you are working in Java, PHP, or .NET, we recommend you use one of the Amazon ElastiCache clientlibraries.
Consistent Hashing Using JavaThe ElastiCache Memcached Java client is based on the open-source spymemcached Java client, whichhas consistent hashing capabilities built in. The library includes a KetamaConnectionFactory class thatimplements consistent hashing. By default, consistent hashing is turned off in spymemcached.
For more information, go to the KetamaConnectionFactory documentation at http://dustin.sallings.org/java-memcached-client/apidocs/net/spy/memcached/KetamaConnectionFactory.html.
Consistent Hashing Using PHPThe ElastiCache Memcached PHP client is a wrapper around the built-in Memcached PHP library. Bydefault, consistent hashing is turned off by the Memcached PHP library.
Use the following code to turn on consistent hashing.
$m = new Memcached();$m->setOption(Memcached::OPT_DISTRIBUTION, Memcached::DISTRIBUTION_CONSISTENT);
In addition to the preceding code, we recommend that you also turnmemcached.sess_consistent_hash on in your php.ini file.
API Version 2015-02-0292
Amazon ElastiCache User GuideConsistent Hashing Using .NET
For more information, go to the run-time configuration documentation for MemcachedPHP at http://php.net/manual/en/memcached.configuration.php. Note specifically thememcached.sess_consistent_hash parameter.
Consistent Hashing Using .NETThe ElastiCache Memcached .NET client is a wrapper around Enyim Memcached. By default, consistenthashing is turned on by the Enyim Memcached client.
For more information, go to the memcached/locator documentation at https://github.com/enyim/EnyimMemcached/wiki/MemcachedClient-Configuration#user-content-memcachedlocator.
Best Practices: Online ReshardingResharding involves adding and removing shards to your cluster and redistributing slots across shards.As a result, multiple things have an impact on the resharding operation, such as the load on the cluster,memory utilization, and overall size of data. For the best experience, we recommend that you followoverall cluster best practices for uniform workload pattern distribution. In addition, we recommendtaking the following steps.
Before initiating resharding, we recommend the following:
• Test your application – Test your application behavior during resharding in a staging environment ifpossible.
• Get early notification for scaling issues – Because resharding is a compute intensive operation,we recommend keeping CPU utilization under 80 percent on multicore instances and less than50 percent on single core instances during resharding. Monitor ElastiCache for Redis metrics andinitiate resharding before your application starts observing scaling issues. Useful metrics to track areCPUUtilization, NetworkBytesIn, NetworkBytesOut, CurrConnections, NewConnections,FreeableMemory, SwapUsage, and BytesUsedForCache.
• Ensure sufficient free memory is available before scaling in – If you're scaling in, ensure that freememory available on the shards to be retained is at least 1.5 times the memory used on the shardsyou plan to remove.
• Initiate resharding during off-peak hours – This practice helps to reduce the latency and throughputimpact on the client during the resharding operation. It also helps to complete resharding faster asmore resources can be used for slot redistribution.
• Review client timeout behavior – Some clients might observe higher latency during online resharding.Configuring your client library with a higher timeout can help by giving the system time to connecteven under higher load conditions on server. If you open a large number of connections to the server,consider adding exponential backoff to reconnect logic to prevent a burst of new connections hittingthe server at the same time.
During resharding, we recommend the following:
• Avoid expensive commands – Avoid running any computationally and I/O intensive operations, suchas the KEYS and SMEMBERS commands. We suggest this approach because these operations increasethe load on the cluster and have an impact on the performance of the cluster. Instead, use the SCANand SSCAN commands.
• Follow Lua best practices – Avoid long running Lua scripts, and always declare keys used in Luascripts up front. We recommend this approach to determine that the Lua script is not using cross slotcommands. Ensure that the keys used in Lua scripts belong to the same slot.
After resharding, note the following:
API Version 2015-02-0293

Amazon ElastiCache User GuideBest Practices: Online Resharding
• Scale-in might be partially successful if insufficient memory is available on target shards. If such aresult occurs, review available memory and retry the operation, if necessary.
• Slots with large items are not migrated. In particular, slots with items larger than 256 MB post-serialization are not migrated.
• The BRPOPLPUSH command is not supported if it operates on the slot being migrated. FLUSHALL andFLUSHDB commands are not supported inside Lua scripts during a resharding operation.
API Version 2015-02-0294

Amazon ElastiCache User Guide
Amazon ElastiCache Error MessagesThe following error messages are returned by Amazon ElastiCache. You may receive other error messagesthat are returned by ElastiCache, other AWS services, or by Memcached or Redis. For descriptions of errormessages from sources other than ElastiCache, see the documentation from the source that is generatingthe error message.
• Cluster node quota exceeded (p. 95)• Customer's node quota exceeded (p. 95)• Manual snapshot quota exceeded (p. 95)
Error Message: Cluster node quota exceeded. Each cluster can have at most %n nodes in this region.
Cause: You attempted to create or modify a cluster with the result that the cluster would have morethan %n nodes.
Solution: Change your request so that the cluster does not have more than %n nodes. Or, if youneed more than %n nodes, make your request using the Amazon ElastiCache Node request form.
For more information, see Amazon ElastiCache Limits in Amazon Web Services General Reference.Error Messages: Customer node quota exceeded. You can have at most %n nodes in this region Or, Youhave already reached your quota of %s nodes in this region.
Cause: You attempted to create or modify a cluster with the result that your account would havemore than %n nodes across all clusters in this region.
Solution: Change your request so that the total nodes in the region across all clusters for thisaccount does not exceed %n. Or, if you need more than %n nodes, make your request using theAmazon ElastiCache Node request form.
For more information, see Amazon ElastiCache Limits in Amazon Web Services General Reference.Error Messages: The maximum number of manual snapshots for this cluster taken within 24 hours hasbeen reached or The maximum number of manual snapshots for this node taken within 24 hours hasbeen reached its quota of %n
Cause: You attempted to take a manual snapshot of a cluster when you have already taken themaximum number of manual snapshots allowed in a 24-hour period.
Solution: Wait 24 hours to attempt another manual snapshot of the cluster. Or, if you need to take amanual snapshot now, take the snapshot of another node that has the same data, such as a differentnode in a cluster.
API Version 2015-02-0295
Amazon ElastiCache User GuideLazy Loading
Caching StrategiesThis topic covers strategies for populating and maintaining your cache.
The strategy or strategies you want to implement for populating and maintaining your cache dependupon what data you are caching and the access patterns to that data. For example, you likely would notwant to use the same strategy for both a Top-10 leaderboard on a gaming site, Facebook posts, andtrending news stories. In the remainder of this section we discuss common cache maintenance strategies,their advantages, and their disadvantages.
Topics• Lazy Loading (p. 96)
• Write Through (p. 98)
• Adding TTL (p. 99)
• Related Topics (p. 100)
Lazy LoadingAs the name implies, lazy loading is a caching strategy that loads data into the cache only whennecessary.
How Lazy Loading Works
Amazon ElastiCache is an in-memory key/value store that sits between your application and the datastore (database) that it accesses. Whenever your application requests data, it first makes the request tothe ElastiCache cache. If the data exists in the cache and is current, ElastiCache returns the data to yourapplication. If the data does not exist in the cache, or the data in the cache has expired, your applicationrequests the data from your data store which returns the data to your application. Your application thenwrites the data received from the store to the cache so it can be more quickly retrieved next time it isrequested.
Scenario 1: Cache HitWhen data is in the cache and isn't expired
1. Application requests data from the cache.
2. Cache returns the data to the application.
Scenario 2: Cache MissWhen data isn’t in the cache or is expired
1. Application requests data from the cache.
2. Cache doesn't have the requested data, so returns a null.
3. Application requests and receives the data from the database.
4. Application updates the cache with the new data.
API Version 2015-02-0296

Amazon ElastiCache User GuideAdvantages and Disadvantages of Lazy Loading
The following diagram illustrates both these processes.
Advantages and Disadvantages of Lazy LoadingAdvantages of Lazy Loading
• Only requested data is cached.
Since most data is never requested, lazy loading avoids filling up the cache with data that isn'trequested.
• Node failures are not fatal.
When a node fails and is replaced by a new, empty node the application continues to function, thoughwith increased latency. As requests are made to the new node each cache miss results in a query of thedatabase and adding the data copy to the cache so that subsequent requests are retrieved from thecache.
Disadvantages of Lazy Loading
• There is a cache miss penalty.
Each cache miss results in 3 trips,
1. Initial request for data from the cache
2. Query of the database for the data
3. Writing the data to the cache
which can cause a noticeable delay in data getting to the application.
• Stale data.
If data is only written to the cache when there is a cache miss, data in the cache can become stale sincethere are no updates to the cache when data is changed in the database. This issue is addressed by theWrite Through (p. 98) and Adding TTL (p. 99) strategies.
Lazy Loading CodeThe following code is a pseudo code example of lazy loading logic.
// *****************************************// function that returns a customer's record.
API Version 2015-02-0297
Amazon ElastiCache User GuideWrite Through
// Attempts to retrieve the record from the cache.// If it is retrieved, the record is returned to the application.// If the record is not retrieved from the cache, it is// retrieved from the database, // added to the cache, and // returned to the application// *****************************************get_customer(customer_id)
customer_record = cache.get(customer_id) if (customer_record == null) customer_record = db.query("SELECT * FROM Customers WHERE id == {0}", customer_id) cache.set(customer_id, customer_record) return customer_record
The application code that retrieves the data would be:
customer_record = get_customer(12345)
Write ThroughThe write through strategy adds data or updates data in the cache whenever data is written to thedatabase.
Advantages and Disadvantages of Write ThroughAdvantages of Write Through
• Data in the cache is never stale.
Since the data in the cache is updated every time it is written to the database, the data in the cache isalways current.
• Write penalty vs. Read penalty.
Every write involves two trips:1. A write to the cache2. A write to the database
Which adds latency to the process. That said, end users are generally more tolerant of latency whenupdating data than when retrieving data. There is an inherent sense that updates are more work andthus take longer.
Disadvantages of Write Through
• Missing data.
In the case of spinning up a new node, whether due to a node failure or scaling out, there is missingdata which continues to be missing until it is added or updated on the database. This can be minimizedby implementing Lazy Loading (p. 96) in conjunction with Write Through.
• Cache churn.
Since most data is never read, there can be a lot of data in the cluster that is never read. This is a wasteof resources. By Adding TTL (p. 99) you can minimize wasted space.
API Version 2015-02-0298
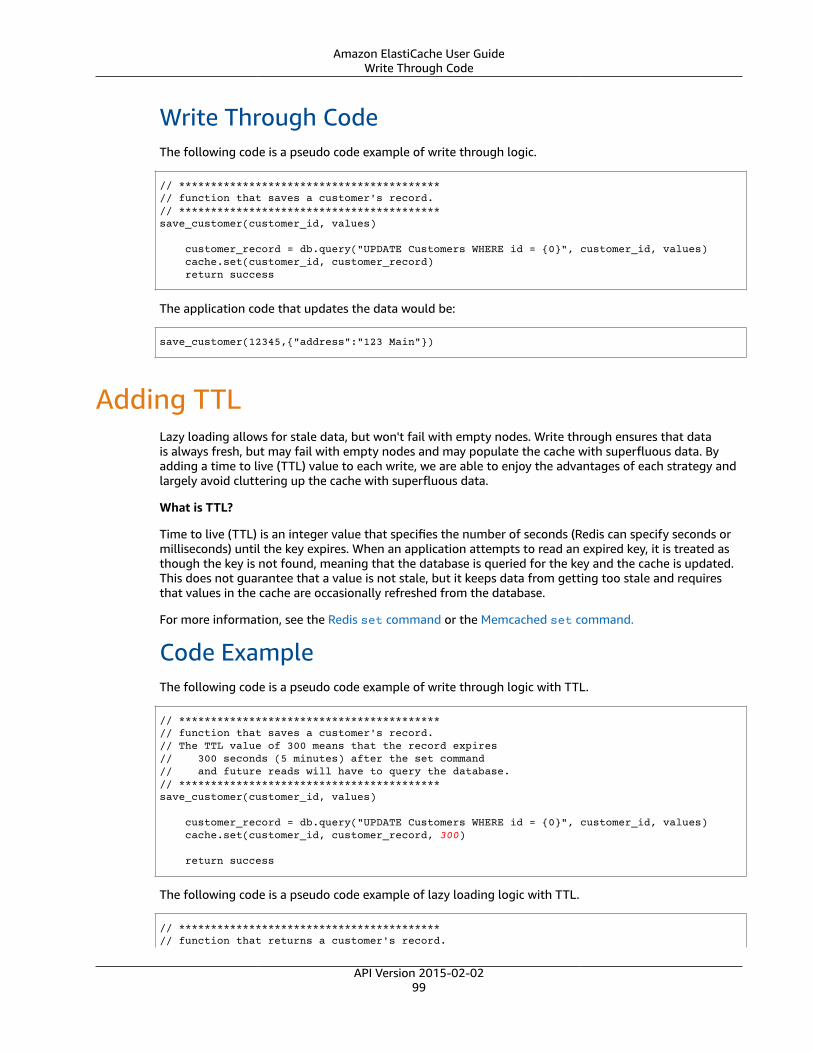
Amazon ElastiCache User GuideWrite Through Code
Write Through CodeThe following code is a pseudo code example of write through logic.
// *****************************************// function that saves a customer's record.// *****************************************save_customer(customer_id, values)
customer_record = db.query("UPDATE Customers WHERE id = {0}", customer_id, values) cache.set(customer_id, customer_record) return success
The application code that updates the data would be:
save_customer(12345,{"address":"123 Main"})
Adding TTLLazy loading allows for stale data, but won't fail with empty nodes. Write through ensures that datais always fresh, but may fail with empty nodes and may populate the cache with superfluous data. Byadding a time to live (TTL) value to each write, we are able to enjoy the advantages of each strategy andlargely avoid cluttering up the cache with superfluous data.
What is TTL?
Time to live (TTL) is an integer value that specifies the number of seconds (Redis can specify seconds ormilliseconds) until the key expires. When an application attempts to read an expired key, it is treated asthough the key is not found, meaning that the database is queried for the key and the cache is updated.This does not guarantee that a value is not stale, but it keeps data from getting too stale and requiresthat values in the cache are occasionally refreshed from the database.
For more information, see the Redis set command or the Memcached set command.
Code ExampleThe following code is a pseudo code example of write through logic with TTL.
// *****************************************// function that saves a customer's record.// The TTL value of 300 means that the record expires// 300 seconds (5 minutes) after the set command // and future reads will have to query the database.// *****************************************save_customer(customer_id, values)
customer_record = db.query("UPDATE Customers WHERE id = {0}", customer_id, values) cache.set(customer_id, customer_record, 300)
return success
The following code is a pseudo code example of lazy loading logic with TTL.
// *****************************************// function that returns a customer's record.
API Version 2015-02-0299

Amazon ElastiCache User GuideRelated Topics
// Attempts to retrieve the record from the cache.// If it is retrieved, the record is returned to the application.// If the record is not retrieved from the cache, it is // retrieved from the database, // added to the cache, and // returned to the application.// The TTL value of 300 means that the record expires// 300 seconds (5 minutes) after the set command // and subsequent reads will have to query the database.// *****************************************get_customer(customer_id)
customer_record = cache.get(customer_id) if (customer_record != null) if (customer_record.TTL < 300) return customer_record // return the record and exit function // do this only if the record did not exist in the cache OR // the TTL was >= 300, i.e., the record in the cache had expired. customer_record = db.query("SELECT * FROM Customers WHERE id = {0}", customer_id) cache.set(customer_id, customer_record, 300) // update the cache return customer_record // return the newly retrieved record and exit function
The application code would be:
save_customer(12345,{"address":"123 Main"})
customer_record = get_customer(12345)
Related Topics• What Should I Cache? (p. 2)• Engines and Versions (p. 44)• Scaling (p. 203)
API Version 2015-02-02100
Amazon ElastiCache User GuideRedis Nodes and Shards
ElastiCache Nodes
A node is the smallest building block of an Amazon ElastiCache deployment. It is a fixed-size chunk ofsecure, network-attached RAM. Each node runs either Memcached or Redis, depending on what waschosen when the cluster was created. Each node has its own Domain Name Service (DNS) name and port.Multiple types of ElastiCache nodes are supported, each with varying amounts of associated memory.
The node instance type you need for your deployment is influenced by both the amount of data youwant in your cluster and the engine you use. Generally speaking, due to its support for sharding,Memcached deployments will have more and smaller nodes while Redis deployments will use fewer,larger node types. See Choosing Your Node Size for Memcached Clusters (p. 103) and Choosing YourNode Size for Redis Clusters (p. 104) for a more detailed discussion of which node size to use.
Topics
• Redis Nodes and Shards (p. 101)
• Choosing Your Node Size (p. 103)
• Connecting to Nodes (p. 107)
• ElastiCache Reserved Nodes (p. 111)
• Supported Node Types (p. 121)
• Actions You Can Take When a Node is Scheduled for Replacement (p. 124)
Other ElastiCache Node Operations
Additional operations involving nodes:
• Adding Nodes to a Cluster (p. 188)
• Removing Nodes from a Cluster (p. 194)
• Scaling (p. 203)
• Finding Your ElastiCache Endpoints (p. 66)
• Node Auto Discovery (Memcached) (p. 127)
Redis Nodes and ShardsA shard (API/CLI: node group) is a hierarchical arrangement of nodes (each wrapped in a cluster). Shardssupport replication. Within a shard, one node functions as the read/write primary node. All the othernodes in a shard function as read-only replicas of the primary node. Redis version 3.2 and later supportmultiple shards within a cluster (API/CLI: replication group) thereby enabling partitioning your data in aRedis (cluster mode enabled) cluster.
The following diagram illustrates the differences between a Redis (cluster mode disabled) cluster and aRedis (cluster mode enabled) cluster.
API Version 2015-02-02101
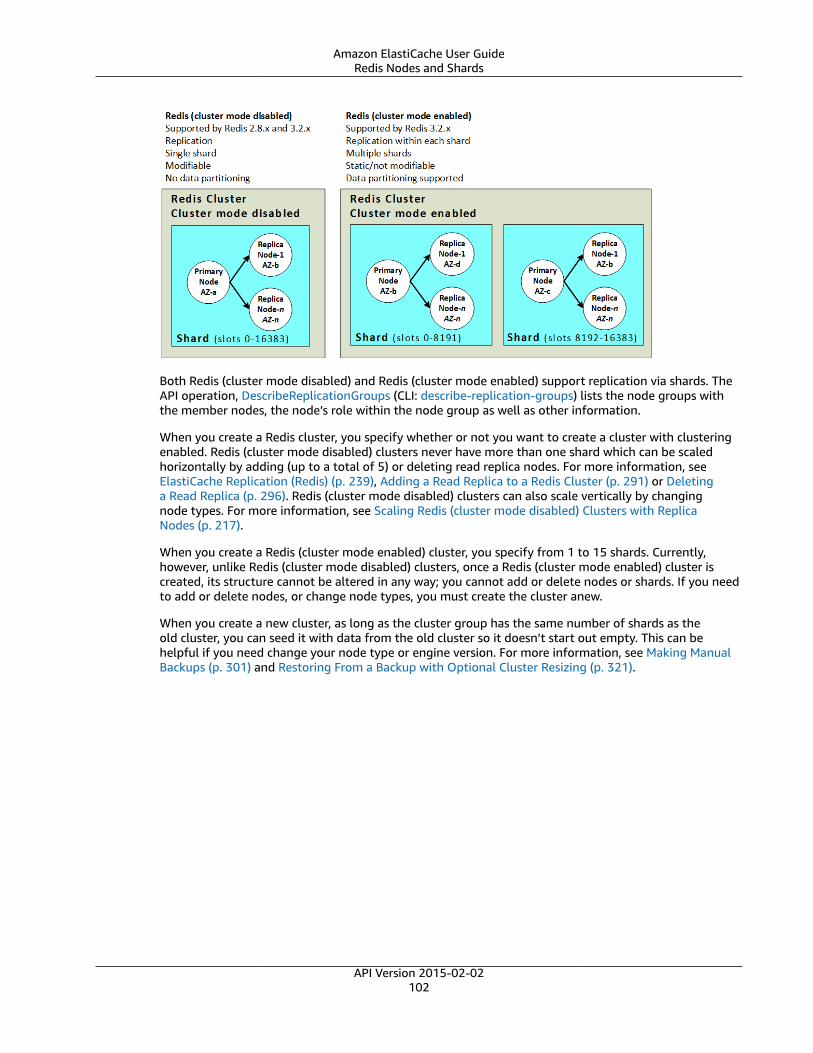
Amazon ElastiCache User GuideRedis Nodes and Shards
Both Redis (cluster mode disabled) and Redis (cluster mode enabled) support replication via shards. TheAPI operation, DescribeReplicationGroups (CLI: describe-replication-groups) lists the node groups withthe member nodes, the node’s role within the node group as well as other information.
When you create a Redis cluster, you specify whether or not you want to create a cluster with clusteringenabled. Redis (cluster mode disabled) clusters never have more than one shard which can be scaledhorizontally by adding (up to a total of 5) or deleting read replica nodes. For more information, seeElastiCache Replication (Redis) (p. 239), Adding a Read Replica to a Redis Cluster (p. 291) or Deletinga Read Replica (p. 296). Redis (cluster mode disabled) clusters can also scale vertically by changingnode types. For more information, see Scaling Redis (cluster mode disabled) Clusters with ReplicaNodes (p. 217).
When you create a Redis (cluster mode enabled) cluster, you specify from 1 to 15 shards. Currently,however, unlike Redis (cluster mode disabled) clusters, once a Redis (cluster mode enabled) cluster iscreated, its structure cannot be altered in any way; you cannot add or delete nodes or shards. If you needto add or delete nodes, or change node types, you must create the cluster anew.
When you create a new cluster, as long as the cluster group has the same number of shards as theold cluster, you can seed it with data from the old cluster so it doesn’t start out empty. This can behelpful if you need change your node type or engine version. For more information, see Making ManualBackups (p. 301) and Restoring From a Backup with Optional Cluster Resizing (p. 321).
API Version 2015-02-02102

Amazon ElastiCache User GuideChoosing Your Node Size
Choosing Your Node SizeThis section helps you determine what node instance type you need for your scenarios. Since theengines, Memcached and Redis, implement clusters differently, the engine you choose will make adifference in the node size you needed by your application.
Topics• Choosing Your Node Size for Memcached Clusters (p. 103)• Choosing Your Node Size for Redis Clusters (p. 104)
Choosing Your Node Size for Memcached ClustersMemcached clusters contain one or more nodes. Because of this, the memory needs of the clusterand the memory of a node are related, but not the same. You can attain your needed cluster memorycapacity by having a few large nodes or many smaller nodes. Further, as your needs change, you can addnode to or remove nodes from the cluster and thus pay only for what you need.
The total memory capacity of your cluster is calculated by multiplying the number of nodes in the clusterby the RAM capacity of each node. The capacity of each node is based on the node type.
The number of nodes in the cluster is a key factor in the availability of your cluster running Memcached.The failure of a single node can have an impact on the availability of your application and the loadon your back-end database while ElastiCache provisions a replacement for the failed node and it getsrepopulated. You can reduce this potential availability impact by spreading your memory and computecapacity over a larger number of nodes, each with smaller capacity, rather than using a fewer number ofhigh capacity nodes.
In a scenario where you want to have 40 GB of cache memory, you can set it up in any of the followingconfigurations:
• 13 cache.t2.medium nodes with 3.22 GB of memory and 2 threads each = 41.86 GB and 26 threads.
• 7 cache.m3.large nodes with 6.05 GB of memory and 2 threads each = 42.35 GB and 14 threads.
7 cache.m4.large nodes with 6.42 GB of memory and 2 threads each = 44.94 GB and 14 threads.
• 3 cache.r3.large nodes with 13.50 GB of memory and 2 threads each = 40.50 GB and 6 threads.
3 cache.m4.xlarge nodes with 14.28 GB of memory and 4 threads each = 42.84 GB and 12 threads.
Comparing node options
Node type Memory Cores HourlyCost *
NodesNeeded
TotalMemory
TotalCores
MonthlyCost
cache.t2.medium3.22 GB 2 $ 0.068 13 41.86 GB 26 $ 636.48
cache.m3.large 6.05 GB 2 $ 0.182 7 42.35 GB 14 $ 917.28
cache.m4.large 6.42 GB 2 $ 0.156 7 44.94 GB 14 $ 768.24
cache.r3.large 13.50 GB 2 $ 0.228 3 40.50 GB 6 $ 492.48
cache.m4.xlarge14.28 GB 4 $ 0.311 3 42.84 GB 12 $ 671.76
API Version 2015-02-02103

Amazon ElastiCache User GuideChoosing Your Node Size (Redis)
Node type Memory Cores HourlyCost *
NodesNeeded
TotalMemory
TotalCores
MonthlyCost
* Hourly cost per node as of August 4, 2016.
Monthly cost at 100% usage for 30 days (720 hours).
These options each provide similar memory capacity but different computational capacity and cost. Tocompare the costs of your specific options, see Amazon ElastiCache Pricing.
For clusters running Memcached, some of the available memory on each node is used for connectionoverhead. For more information, see Memcached Connection Overhead (p. 363)
Using multiple nodes will require spreading the keys across them. Each node has its own endpoint. Foreasy endpoint management, you can use the ElastiCache the Auto Discovery feature, which enablesclient programs to automatically identify all of the nodes in a cluster. For more information, see NodeAuto Discovery (Memcached) (p. 127).
If you're unsure about how much capacity you need, for testing we recommend starting with onecache.m3.medium node and monitoring the memory usage, CPU utilization, and cache hit rate withthe ElastiCache metrics that are published to CloudWatch. For more information on CloudWatch metricsfor ElastiCache, see Monitoring Use with CloudWatch Metrics (p. 450). For production and largerworkloads, the R3 nodes provide the best performance and RAM cost value.
If your cluster does not have the desired hit rate, you can easily add more nodes, thereby increasing thetotal available memory in your cluster.
If your cluster turns out to be bound by CPU but it has sufficient hit rate, try setting up a new clusterwith a node type that provides more compute power.
Choosing Your Node Size for Redis ClustersAnswering the following questions will help you determine the minimum node type you need for yourRedis implementation.
• How much total memory do you need for your data?
You can get a general estimate by taking the size of the items you want to cache and multiplying it bythe number of items you want to keep in the cache at the same time. To get a reasonable estimationof the item size, serialize your cache items then count the characters, then divide this over the numberof shards in your cluster.
• What version of Redis are you running?
Redis versions prior to 2.8.22 require you to reserve more memory for failover, snapshot,synchronizing, and promoting a replica to primary operations. This requirement occurs because youmust have sufficient memory available for all writes that occur during the process.
Redis version 2.8.22 and later use a forkless save process that requires less available memory than theearlier process.
For more information, see the following:
API Version 2015-02-02104

Amazon ElastiCache User GuideChoosing Your Node Size (Redis)
• How Synchronization and Backup are Implemented (p. 257)
• Ensuring You Have Sufficient Memory to Create a Redis Snapshot (p. 81)
• How write-heavy is your application?
Write heavy applications can require significantly more available memory, memory not used by data,when taking snapshots or failing over. Whenever the BGSAVE process is performed–when taking asnapshot, when syncing a primary cluster with a replica in a cluster, when enabling the append-onlyfile (AOF) feature, or promoting a replica to primary (if you have Multi-AZ with auto failover enabled)–you must have sufficient memory that is unused by data to accommodate all the writes that transpireduring the BGSAVE process. Worst case would be when all of your data is rewritten during the process,in which case you would need a node instance size with twice as much memory as needed for dataalone.
For more detailed information, go to Ensuring You Have Sufficient Memory to Create a RedisSnapshot (p. 81).
• Will your implementation be a standalone Redis (cluster mode disabled) cluster or a Redis (clustermode enabled) cluster with multiple shards?
Redis (cluster mode disabled) cluster
If you're implementing a Redis (cluster mode disabled) cluster, your node type must be able toaccommodate all your data plus the necessary overhead as described in the previous bullet.
For example, if you estimate that the total size of all your items to be 12 GB, you can use acache.m3.xlarge node with 13.3 GB of memory or a cache.r3.large node with 13.5 GB ofmemory. However, you may need more memory for BGSAVE operations. If your application is writeheavy, you should double the memory requirements to at least 24 GB, meaning you should use eithera cache.m3.2xlarge with 27.9 GB of memory or a cache.r3.rge with 28.4 GB of memory.
Redis (cluster mode enabled) with multiple shards
If you're implementing a Redis (cluster mode enabled) cluster with multiple shards, then the node typemust be able to accommodate bytes-for-data-and-overhead / number-of-shards bytes ofdata.
For example, if you estimate that the total size of all your items to be 12 GB and you have 2shards, you can use a cache.m3.large node with 6.05 GB of memory (12 GB / 2). However, youmay need more memory for BGSAVE operations. If your application is write heavy, you shoulddouble the memory requirements to at least 12 GB per shard, meaning you should use either acache.m3.xlarge with 13.3 GB of memory or a cache.r3.large with 13.5 GB of memory.
API Version 2015-02-02105

Amazon ElastiCache User GuideChoosing Your Node Size (Redis)
Currently you cannot add shards to a Redis (cluster mode enabled) cluster. Therefore, you may want touse a somewhat larger node type to accommodate anticipated growth.
While your cluster is running, you can monitor the memory usage, processor utilization, cache hits, andcache misses metrics that are published to CloudWatch. If your cluster does not have the desired hit rateor you notice that keys are being evicted too often, you can choose a different node size with larger CPUand memory specifications.
When monitoring CPU usage, remember that Redis is single-threaded, so you need to multiply thereported CPU usage by the number of CPU cores to get that actual usage. For example, a four core CPUreporting a 20% usage rate is actually the one core Redis is using running at 80%.
API Version 2015-02-02106

Amazon ElastiCache User GuideConnecting to Nodes
Connecting to NodesIn order for you to use your cache, your application must connect to the nodes in the cluster. This sectioncovers how to connect to nodes in Memcached and Redis clusters.
This section assumes that you've created an Amazon EC2 instance and can connect to it. For instructionson how to do this, go to the Amazon EC2 Getting Started Guide.
An Amazon EC2 instance can connect to a cluster node only if you have authorized it to do so. For moreinformation, see Step 4: Authorize Access (p. 33).
Topics
• Connecting to Memcached Nodes (p. 107)
• Connecting to Redis Nodes (p. 108)
Connecting to Memcached NodesBefore attempting to connect to your Memcached cluster, you must have the endpoints for the nodes. Tofind the endpoints, see:
• Finding a Memcached Cluster's Endpoints (Console) (p. 67)
• Finding Endpoints (AWS CLI) (p. 73)
• Finding Endpoints (ElastiCache API) (p. 77)
In the following example, you use the telnet utility to connect to a node that is running Memcached.
NoteFor more information about Memcached and available Memcached commands, see theMemcached website.
To connect to a node using telnet
1. Connect to your Amazon EC2 instance by using the connection utility of your choice.
NoteFor instructions on how to connect to an Amazon EC2 instance, see the Amazon EC2 GettingStarted Guide.
2. Download and install the telnet utility on your Amazon EC2 instance. At the command prompt ofyour Amazon EC2 instance, type the following command and type y at the command prompt.
sudo yum install telnet
Output similar to the following appears.
Loaded plugins: priorities, security, update-motd, upgrade-helperSetting up Install ProcessResolving Dependencies--> Running transaction check
...(output omitted)...
Total download size: 63 k
API Version 2015-02-02107

Amazon ElastiCache User GuideRedis
Installed size: 109 kIs this ok [y/N]: yDownloading Packages:telnet-0.17-47.7.amzn1.x86_64.rpm | 63 kB 00:00
...(output omitted)...
Complete!
3. At the command prompt of your Amazon EC2 instance, type the following command, substitutingthe endpoint of your node for the one shown in this example.
telnet mycachecluster.eaogs8.0001.usw2.cache.amazonaws.com 11211
Output similar to the following appears.
Trying 128.0.0.1...Connected to mycachecluster.eaogs8.0001.usw2.cache.amazonaws.com.Escape character is '^]'.>
4. Test the connection by running Memcached commands.
You are now connected to a node, and you can run Memcached commands. The following is anexample.
set a 0 0 5 // Set key "a" with no expiration and 5 byte valuehello // Set value as "hello"STOREDget a // Get value for key "a"VALUE a 0 5helloENDget b // Get value for key "b" results in missEND>
Connecting to Redis NodesBefore attempting to connect to the nodes in your Redis cluster, you must have the endpoints for thenodes. To find the endpoints, see:
• Finding a Redis (cluster mode disabled) Cluster's Endpoints (Console) (p. 69)
• Finding a Redis (cluster mode enabled) Cluster's Endpoints (Console) (p. 71)
• Finding Endpoints (AWS CLI) (p. 73)
• Finding Endpoints (ElastiCache API) (p. 77)
In the following example, you use the redis-cli utility to connect to a cluster that is running Redis.
NoteFor more information about Redis and available Redis commands, see the http://redis.io/commands webpage.
To connect to a Redis cluster using the redis-cli
1. Connect to your Amazon EC2 instance using the connection utility of your choice.
API Version 2015-02-02108

Amazon ElastiCache User GuideRedis
NoteFor instructions on how to connect to an Amazon EC2 instance, see the Amazon EC2 GettingStarted Guide.
2. Before you can build redis-cli, you will need to download and install the GNU Compiler Collection(gcc). At the command prompt of your EC2 instance, type the following command and type y at theconfirmation prompt.
sudo yum install gcc
Output similar to the following appears.
Loaded plugins: priorities, security, update-motd, upgrade-helperSetting up Install ProcessResolving Dependencies--> Running transaction check
...(output omitted)...
Total download size: 27 MInstalled size: 53 MIs this ok [y/N]: yDownloading Packages:(1/11): binutils-2.22.52.0.1-10.36.amzn1.x86_64.rpm | 5.2 MB 00:00 (2/11): cpp46-4.6.3-2.67.amzn1.x86_64.rpm | 4.8 MB 00:00 (3/11): gcc-4.6.3-3.10.amzn1.noarch.rpm | 2.8 kB 00:00
...(output omitted)...
Complete!
3. Download and compile the redis-cli utility. This utility is included in the Redis software distribution.At the command prompt of your EC2 instance, type the following commands:
NoteFor Ubuntu systems, prior to running make, run make distclean.
wget http://download.redis.io/redis-stable.tar.gztar xvzf redis-stable.tar.gzcd redis-stablemake distclean // ubuntu systems onlymake
4. At the command prompt of your EC2 instance, type the following command, substituting theendpoint of your cluster for the one shown in this example.
Repeat this step for each node in your cluster that you want to connect to.
src/redis-cli -c -h mycachecluster.eaogs8.0001.usw2.cache.amazonaws.com -p 6379
A Redis command prompt similar to the following appears.
redis mycachecluster.eaogs8.0001.usw2.cache.amazonaws.com 6379>
5. Test the connection by running Redis commands.
You are now connected to the cluster and can run Redis commands. The following are some examplecommands with their Redis responses.
API Version 2015-02-02109

Amazon ElastiCache User GuideRedis
set a "hello" // Set key "a" with a string value and no expirationOKget a // Get value for key "a""hello"get b // Get value for key "b" results in miss(nil) set b "Good-bye" EX 5 // Set key "b" with a string value and a 5 second expirationget b"Good-bye" // wait 5 secondsget b(nil) // key has expired, nothing returnedquit // Exit from redis-cli
API Version 2015-02-02110

Amazon ElastiCache User GuideReserved Nodes
ElastiCache Reserved NodesReserving one or more nodes may be a way for you to reduce costs. Reserved nodes are charged an upfront fee that depends upon the node type and the length of reservation – 1 or 3 years. In addition tothe up front charge there is an hourly usage charge which is significantly less than the hourly usagecharge you incur with On-Demand nodes. To determine whether reserved nodes would be a cost savingsfor your use cases, determine the node size and number of nodes you need, estimate the usage of thenode, then compare the total cost to you using On-Demand nodes versus reserved nodes. You can mixand match reserved and On-Demand node usage in your clusters. For pricing information, see AmazonElastiCache Pricing.
You can use the AWS Management Console, the AWS CLI, or the ElastiCache API to list and purchaseavailable reserved node offerings.
For more information on reserved nodes, go to Amazon ElastiCache Reserved Cache Nodes.
Topics
• Understanding Utilization Levels (p. 111)
• Getting Info About Reserved Node Offerings (p. 113)
• Purchasing a Reserved Node (p. 116)
• Getting Info About Your Reserved Nodes (p. 119)
Understanding Utilization LevelsThere are three levels of node reservations – Heavy Utilization, Medium Utilization, and Light Utilization.Nodes can be reserved at any utilization level for either 1 or 3 years. The node type, utilization level,and reservation term will impact your total costs. You should verify the savings that reserved nodes canprovide your business by comparing various models before you purchase reserved nodes.
Nodes purchased at one utilization level or term cannot be converted to a different utilization level orterm.
Utilization Levels
Heavy Utilization reserved nodes enable workloads that have a consistent baseline of capacity or runsteady-state workloads. Heavy Utilization reserved nodes require a high up-front commitment, but ifyou plan to run more than 79 percent of the reserved node term you can earn the largest savings (up to70 percent off of the On-Demand price). With Heavy Utilization reserved nodes you pay a one-time fee,followed by a lower hourly fee for the duration of the term regardless of whether or not your node isrunning.
Medium Utilization reserved nodes are the best option if you plan to leverage your reserved nodes asubstantial amount of the time, but you want either a lower one-time fee or the flexibility to stop payingfor your node when you shut it off. Medium Utilization reserved nodes are a more cost-effective optionwhen you plan to run more than 40 percent of the reserved nodes term. This option can save you upto 64 percent off of the On-Demand price. With Medium Utilization reserved nodes, you pay a slightlyhigher one-time fee than with Light Utilization reserved nodes, and you receive lower hourly usage rateswhen you run a node.
Light Utilization reserved nodes are ideal for periodic workloads that run only a couple of hours a dayor a few days per week. Using Light Utilization reserved nodes, you pay a one-time fee followed by adiscounted hourly usage fee when your node is running. You can start saving when your node is runningmore than 17 percent of the reserved node term, and you can save up to 56 percent off of the On-Demand rates over the entire term of your reserved node.
API Version 2015-02-02111

Amazon ElastiCache User GuideUnderstanding Utilization Levels
Reserved Cache Node Offerings
Offering Up-Front Cost Usage Fee Advantage
Heavy Utilization Highest Lowest hourly fee.Applied to the wholeterm whether ornot you're using thereserved node.
Lowest overall cost ifyou plan to run yourreserved nodes morethan 79 percent of athree-year term.
Medium Utilization Medium Hourly usage feecharged for each hourthe node is running. Nohourly charge when thenode is not running.
Suitable for elasticworkloads or when youexpect moderate usage,more than 40 percentof a three-year term.
Light Utilization Lowest Hourly usage feecharged for each hourthe node is running. Nohourly charge when thenode is not running.Highest hourly fees ofall the offering types,but fees apply onlywhen the reserved nodeis running.
Highest overall costif you plan to run allof the time; however,lowest overall cost ifyou anticipate you willuse your reserved nodeinfrequently, more thanabout 15 percent of athree-year term.
On-Demand Use(No reserved nodes)
None Highest hourly fee.Applied whenever thenode is running.
Highest hourly cost.
For more information, see Amazon ElastiCache Pricing.
API Version 2015-02-02112

Amazon ElastiCache User GuideGetting Info About Reserved Node Offerings
Getting Info About Reserved Node OfferingsBefore you purchase reserved nodes, you can get information about available reserved node offerings.
The following exampleS show how to get pricing and information about available reserved nodeofferings using the AWS Management Console, AWS CLI, and ElastiCache API.
Topics• Getting Info About Reserved Node Offerings (Console) (p. 113)• Getting Info About Reserved Node Offerings (AWS CLI) (p. 113)• Getting Info About Reserved Node Offerings (ElastiCache API) (p. 114)
Getting Info About Reserved Node Offerings (Console)To get pricing and other information about available reserved cluster offerings using the AWSManagement Console, follow the steps in the follwing procedure.
To get information about available reserved node offerings
1. Sign in to the AWS Management Console and open the ElastiCache console at https://console.aws.amazon.com/elasticache/.
2. In the navigation list, choose the Reserved Cache Nodes link.3. Choose the Purchase Reserved Cache Node button.4. From the Product Description drop down list box, choose the engine - Memcached or Redis.5. To determine the available offerings, make selections from the next 3 drop down list boxes:
• Cache Node Type• Term• Offering Type
After you make these selections, the cost per node and total cost of your selections is shows in thePurchase Reserved Cache Nodes wizard.
6. Choose Cancel to avoid purchasing these nodes and incurring charges.
Getting Info About Reserved Node Offerings (AWS CLI)To get pricing and other information about available reserved node offerings, type the followingcommand at a command prompt:
aws elasticache describe-reserved-cache-nodes-offerings
This operation produces output similar to the following (JSON format):
{ "ReservedCacheNodesOfferings": [ { "OfferingType": "Heavy Utilization", "FixedPrice": 4328.0, "ReservedCacheNodesOfferingId": "0192caa9-daf2-4159-b1e5-a79bb1916695", "UsagePrice": 0.0, "RecurringCharges": [ {
API Version 2015-02-02113

Amazon ElastiCache User GuideGetting Info About Reserved Node Offerings
"RecurringChargeAmount": 0.491, "RecurringChargeFrequency": "Hourly" } ], "ProductDescription": "memcached", "Duration": 31536000, "CacheNodeType": "cache.r3.4xlarge" },
*********** some output omitted for brevity ***********
{ "OfferingType": "Heavy Utilization", "FixedPrice": 4132.0, "ReservedCacheNodesOfferingId": "fb766e0a-79d7-4e8f-a780-a2a6ed5ed439", "UsagePrice": 0.0, "RecurringCharges": [ { "RecurringChargeAmount": 0.182, "RecurringChargeFrequency": "Hourly" } ], "ProductDescription": "redis", "Duration": 94608000, "CacheNodeType": "cache.r3.2xlarge" } ]}
For more information, see describe-reserved-cache-nodes-offerings in the AWS CLI Reference.
Getting Info About Reserved Node Offerings (ElastiCache API)To get pricing and information about available reserved node offerings, call theDescribeReservedCacheNodesOfferings action.
Example
https://elasticache.us-west-2.amazonaws.com/ ?Action=DescribeReservedCacheNodesOfferings &Version=2014-12-01 &SignatureVersion=4 &SignatureMethod=HmacSHA256 &Timestamp=20141201T220302Z &X-Amz-Algorithm &X-Amz-SignedHeaders=Host &X-Amz-Expires=20141201T220302Z &X-Amz-Credential=<credential> &X-Amz-Signature=<signature>
This call returns output similar to the following:
<DescribeReservedCacheNodesOfferingsResponse xmlns="http://elasticache.us-west-2.amazonaws.com/doc/2013-06-15/"> <DescribeReservedCacheNodesOfferingsResult> <ReservedCacheNodesOfferings> <ReservedCacheNodesOffering> <Duration>31536000</Duration> <OfferingType>Medium Utilization</OfferingType> <CurrencyCode>USD</CurrencyCode> <RecurringCharges/> <FixedPrice>1820.0</FixedPrice>
API Version 2015-02-02114
Amazon ElastiCache User GuideGetting Info About Reserved Node Offerings
<ProductDescription>memcached</ProductDescription> <UsagePrice>0.368</UsagePrice> <ReservedCacheNodesOfferingId>438012d3-4052-4cc7-b2e3-8d3372e0e706</ReservedCacheNodesOfferingId> <CacheNodeType>cache.m1.large</CacheNodeType> </ReservedCacheNodesOffering> <ReservedCacheNodesOffering>
(...some output omitted for brevity...)
</ReservedCacheNodesOffering> </ReservedCacheNodesOfferings> </DescribeReservedCacheNodesOfferingsResult> <ResponseMetadata> <RequestId>5e4ec40b-2978-11e1-9e6d-771388d6ed6b</RequestId> </ResponseMetadata></DescribeReservedCacheNodesOfferingsResponse>
For more information, see DescribeReservedCacheNodesOfferings in the ElastiCache API Reference.
API Version 2015-02-02115
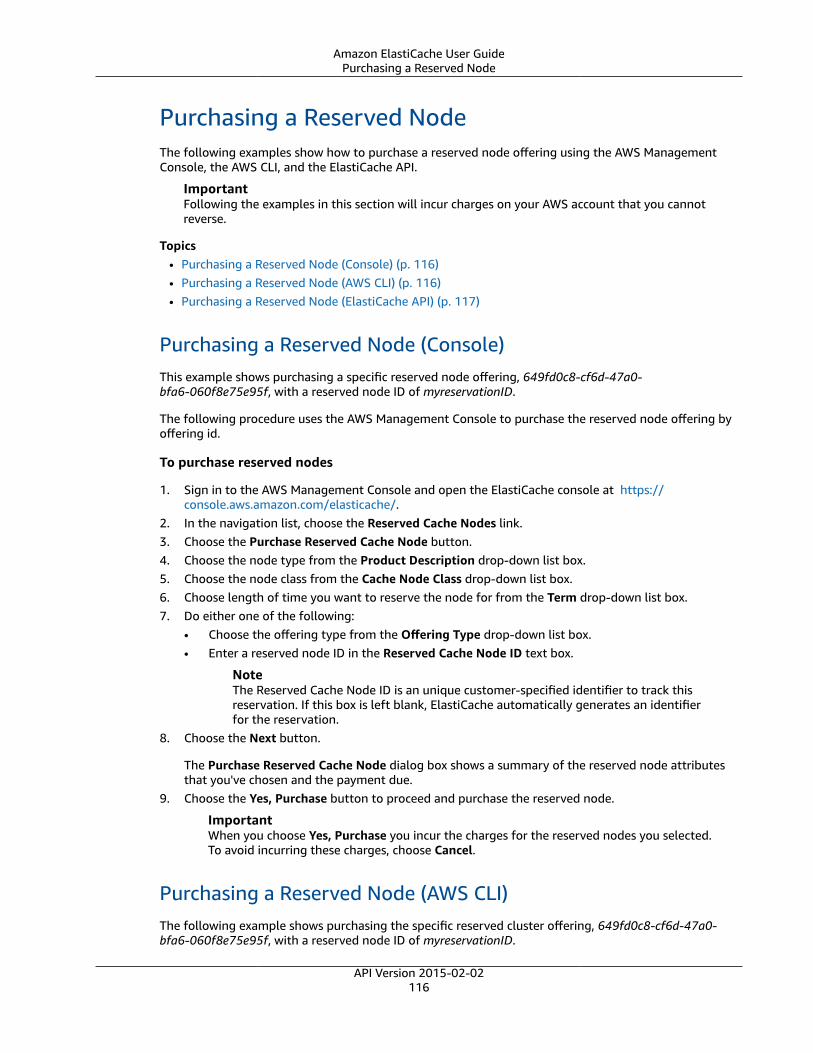
Amazon ElastiCache User GuidePurchasing a Reserved Node
Purchasing a Reserved NodeThe following examples show how to purchase a reserved node offering using the AWS ManagementConsole, the AWS CLI, and the ElastiCache API.
ImportantFollowing the examples in this section will incur charges on your AWS account that you cannotreverse.
Topics• Purchasing a Reserved Node (Console) (p. 116)• Purchasing a Reserved Node (AWS CLI) (p. 116)• Purchasing a Reserved Node (ElastiCache API) (p. 117)
Purchasing a Reserved Node (Console)This example shows purchasing a specific reserved node offering, 649fd0c8-cf6d-47a0-bfa6-060f8e75e95f, with a reserved node ID of myreservationID.
The following procedure uses the AWS Management Console to purchase the reserved node offering byoffering id.
To purchase reserved nodes
1. Sign in to the AWS Management Console and open the ElastiCache console at https://console.aws.amazon.com/elasticache/.
2. In the navigation list, choose the Reserved Cache Nodes link.3. Choose the Purchase Reserved Cache Node button.4. Choose the node type from the Product Description drop-down list box.5. Choose the node class from the Cache Node Class drop-down list box.6. Choose length of time you want to reserve the node for from the Term drop-down list box.7. Do either one of the following:
• Choose the offering type from the Offering Type drop-down list box.• Enter a reserved node ID in the Reserved Cache Node ID text box.
NoteThe Reserved Cache Node ID is an unique customer-specified identifier to track thisreservation. If this box is left blank, ElastiCache automatically generates an identifierfor the reservation.
8. Choose the Next button.
The Purchase Reserved Cache Node dialog box shows a summary of the reserved node attributesthat you've chosen and the payment due.
9. Choose the Yes, Purchase button to proceed and purchase the reserved node.
ImportantWhen you choose Yes, Purchase you incur the charges for the reserved nodes you selected.To avoid incurring these charges, choose Cancel.
Purchasing a Reserved Node (AWS CLI)The following example shows purchasing the specific reserved cluster offering, 649fd0c8-cf6d-47a0-bfa6-060f8e75e95f, with a reserved node ID of myreservationID.
API Version 2015-02-02116
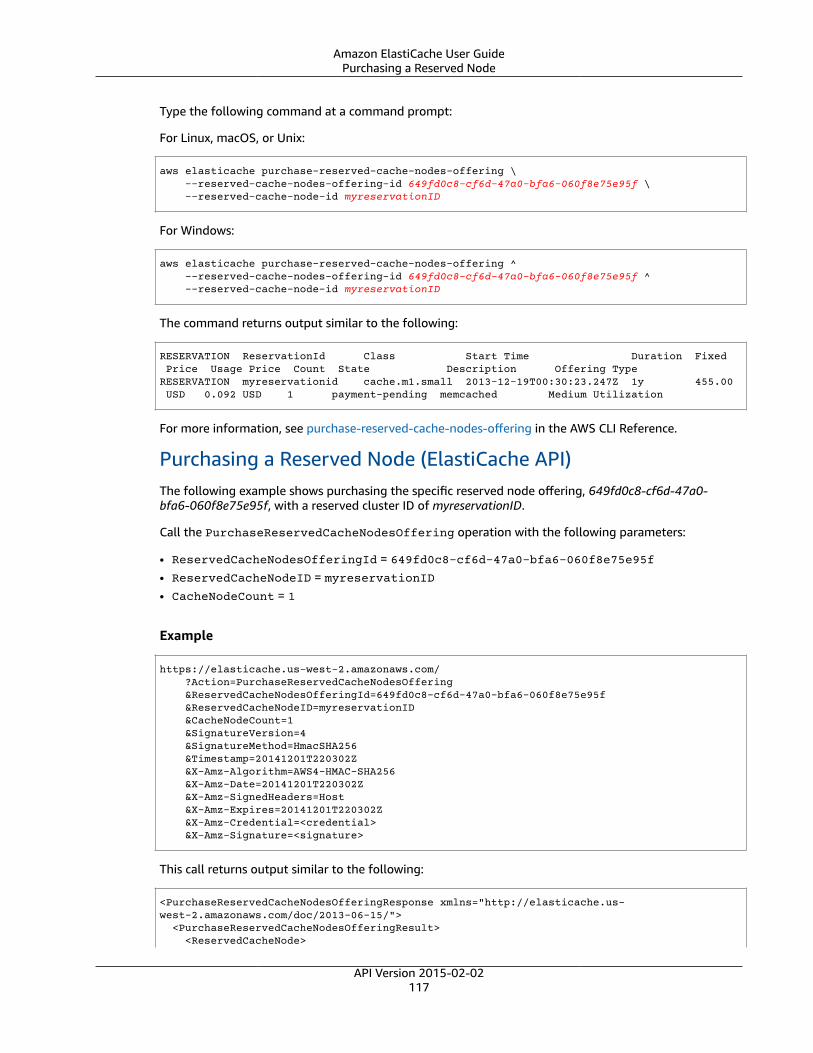
Amazon ElastiCache User GuidePurchasing a Reserved Node
Type the following command at a command prompt:
For Linux, macOS, or Unix:
aws elasticache purchase-reserved-cache-nodes-offering \ --reserved-cache-nodes-offering-id 649fd0c8-cf6d-47a0-bfa6-060f8e75e95f \ --reserved-cache-node-id myreservationID
For Windows:
aws elasticache purchase-reserved-cache-nodes-offering ^ --reserved-cache-nodes-offering-id 649fd0c8-cf6d-47a0-bfa6-060f8e75e95f ^ --reserved-cache-node-id myreservationID
The command returns output similar to the following:
RESERVATION ReservationId Class Start Time Duration Fixed Price Usage Price Count State Description Offering TypeRESERVATION myreservationid cache.m1.small 2013-12-19T00:30:23.247Z 1y 455.00 USD 0.092 USD 1 payment-pending memcached Medium Utilization
For more information, see purchase-reserved-cache-nodes-offering in the AWS CLI Reference.
Purchasing a Reserved Node (ElastiCache API)The following example shows purchasing the specific reserved node offering, 649fd0c8-cf6d-47a0-bfa6-060f8e75e95f, with a reserved cluster ID of myreservationID.
Call the PurchaseReservedCacheNodesOffering operation with the following parameters:
• ReservedCacheNodesOfferingId = 649fd0c8-cf6d-47a0-bfa6-060f8e75e95f• ReservedCacheNodeID = myreservationID• CacheNodeCount = 1
Example
https://elasticache.us-west-2.amazonaws.com/ ?Action=PurchaseReservedCacheNodesOffering &ReservedCacheNodesOfferingId=649fd0c8-cf6d-47a0-bfa6-060f8e75e95f &ReservedCacheNodeID=myreservationID &CacheNodeCount=1 &SignatureVersion=4 &SignatureMethod=HmacSHA256 &Timestamp=20141201T220302Z &X-Amz-Algorithm=AWS4-HMAC-SHA256 &X-Amz-Date=20141201T220302Z &X-Amz-SignedHeaders=Host &X-Amz-Expires=20141201T220302Z &X-Amz-Credential=<credential> &X-Amz-Signature=<signature>
This call returns output similar to the following:
<PurchaseReservedCacheNodesOfferingResponse xmlns="http://elasticache.us-west-2.amazonaws.com/doc/2013-06-15/"> <PurchaseReservedCacheNodesOfferingResult> <ReservedCacheNode>
API Version 2015-02-02117

Amazon ElastiCache User GuidePurchasing a Reserved Node
<OfferingType>Medium Utilization</OfferingType> <CurrencyCode>USD</CurrencyCode> <RecurringCharges/> <ProductDescription>memcached</ProductDescription> <ReservedCacheNodesOfferingId>649fd0c8-cf6d-47a0-bfa6-060f8e75e95f</ReservedCacheNodesOfferingId> <State>payment-pending</State> <ReservedCacheNodeId>myreservationID</ReservedCacheNodeId> <CacheNodeCount>10</CacheNodeCount> <StartTime>2013-07-18T23:24:56.577Z</StartTime> <Duration>31536000</Duration> <FixedPrice>123.0</FixedPrice> <UsagePrice>0.123</UsagePrice> <CacheNodeType>cache.m1.small</CacheNodeType> </ReservedCacheNode> </PurchaseReservedCacheNodesOfferingResult> <ResponseMetadata> <RequestId>7f099901-29cf-11e1-bd06-6fe008f046c3</RequestId> </ResponseMetadata></PurchaseReservedCacheNodesOfferingResponse>
For more information, see PurchaseReservedCacheNodesOffering in the ElastiCache API Reference.
API Version 2015-02-02118

Amazon ElastiCache User GuideGetting Info About Your Reserved Nodes
Getting Info About Your Reserved NodesYou can get information about the reserved nodes you've purchased using the AWS ManagementConsole, the AWS CLI, and the ElastiCache API.
Topics• Getting Info About Your Reserved Nodes (Console) (p. 119)• Getting Info About Your Reserved Nodes (AWS CLI) (p. 119)• Getting Info About Your Reserved Nodes (ElastiCache API) (p. 119)
Getting Info About Your Reserved Nodes (Console)The following procedure describes how to use the AWS Management Console to get information aboutthe reserved nodes you purchased.
To get information about your purchased reserved nodes
1. Sign in to the AWS Management Console and open the ElastiCache console at https://console.aws.amazon.com/elasticache/.
2. In the navigation list, choose the Reserved Cache Nodes link.
The reserved nodes for your account appear in the Reserved Cache Nodes list. You can choose any ofthe reserved nodes in the list to see detailed information about the reserved node in the detail paneat the bottom of the console.
Getting Info About Your Reserved Nodes (AWS CLI)To get information about reserved nodes for your AWS account, type the following command at acommand prompt:
aws elasticache describe-reserved-cache-nodes
This operation produces output similar to the following (JSON format):
{ "ReservedCacheNodeId": "myreservationid", "ReservedCacheNodesOfferingId": "649fd0c8-cf6d-47a0-bfa6-060f8e75e95f", "CacheNodeType": "cache.m1.small", "Duration": "31536000", "ProductDescription": "memcached", "OfferingType": "Medium Utilization", "MaxRecords": 0}
For more information, see describe--reserved-cache-nodes in the AWS CLI Reference.
Getting Info About Your Reserved Nodes (ElastiCache API)To get information about reserved nodes for your AWS account, call theDescribeReservedCacheNodes operation.
Example
https://elasticache.us-west-2.amazonaws.com/
API Version 2015-02-02119

Amazon ElastiCache User GuideGetting Info About Your Reserved Nodes
?Action=DescribeReservedCacheNodes &Version=2014-12-01 &SignatureVersion=4 &SignatureMethod=HmacSHA256 &Timestamp=20141201T220302Z &X-Amz-Algorithm=AWS4-HMAC-SHA256 &X-Amz-Date=20141201T220302Z &X-Amz-SignedHeaders=Host &X-Amz-Expires=20141201T220302Z &X-Amz-Credential=<credential> &X-Amz-Signature=<signature>
This call returns output similar to the following:
<DescribeReservedCacheNodesResponse xmlns="http://elasticache.us-west-2.amazonaws.com/doc/2013-06-15/"> <DescribeReservedCacheNodesResult> <ReservedCacheNodes> <ReservedCacheNode> <OfferingType>Medium Utilization</OfferingType> <CurrencyCode>USD</CurrencyCode> <RecurringCharges/> <ProductDescription>memcached</ProductDescription> <ReservedCacheNodesOfferingId>649fd0c8-cf6d-47a0-bfa6-060f8e75e95f</ReservedCacheNodesOfferingId> <State>payment-failed</State> <ReservedCacheNodeId>myreservationid</ReservedCacheNodeId> <CacheNodeCount>1</CacheNodeCount> <StartTime>2010-12-15T00:25:14.131Z</StartTime> <Duration>31536000</Duration> <FixedPrice>227.5</FixedPrice> <UsagePrice>0.046</UsagePrice> <CacheNodeType>cache.m1.small</CacheNodeType> </ReservedCacheNode> <ReservedCacheNode>
(...some output omitted for brevity...)
</ReservedCacheNode> </ReservedCacheNodes> </DescribeReservedCacheNodesResult> <ResponseMetadata> <RequestId>23400d50-2978-11e1-9e6d-771388d6ed6b</RequestId> </ResponseMetadata></DescribeReservedCacheNodesResponse>
For more information, see DescribeReservedCacheNodes in the ElastiCache API Reference.
API Version 2015-02-02120
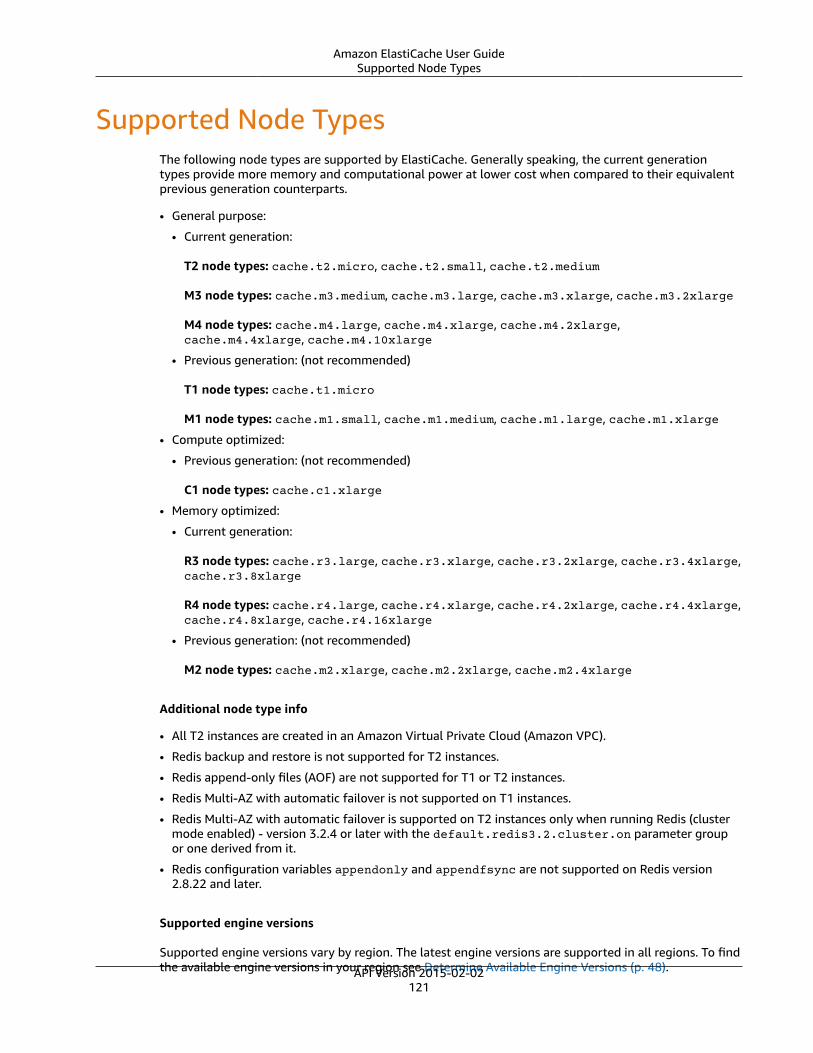
Amazon ElastiCache User GuideSupported Node Types
Supported Node TypesThe following node types are supported by ElastiCache. Generally speaking, the current generationtypes provide more memory and computational power at lower cost when compared to their equivalentprevious generation counterparts.
• General purpose:
• Current generation:
T2 node types: cache.t2.micro, cache.t2.small, cache.t2.medium
M3 node types: cache.m3.medium, cache.m3.large, cache.m3.xlarge, cache.m3.2xlarge
M4 node types: cache.m4.large, cache.m4.xlarge, cache.m4.2xlarge,cache.m4.4xlarge, cache.m4.10xlarge
• Previous generation: (not recommended)
T1 node types: cache.t1.micro
M1 node types: cache.m1.small, cache.m1.medium, cache.m1.large, cache.m1.xlarge
• Compute optimized:
• Previous generation: (not recommended)
C1 node types: cache.c1.xlarge
• Memory optimized:
• Current generation:
R3 node types: cache.r3.large, cache.r3.xlarge, cache.r3.2xlarge, cache.r3.4xlarge,cache.r3.8xlarge
R4 node types: cache.r4.large, cache.r4.xlarge, cache.r4.2xlarge, cache.r4.4xlarge,cache.r4.8xlarge, cache.r4.16xlarge
• Previous generation: (not recommended)
M2 node types: cache.m2.xlarge, cache.m2.2xlarge, cache.m2.4xlarge
Additional node type info
• All T2 instances are created in an Amazon Virtual Private Cloud (Amazon VPC).
• Redis backup and restore is not supported for T2 instances.
• Redis append-only files (AOF) are not supported for T1 or T2 instances.
• Redis Multi-AZ with automatic failover is not supported on T1 instances.
• Redis Multi-AZ with automatic failover is supported on T2 instances only when running Redis (clustermode enabled) - version 3.2.4 or later with the default.redis3.2.cluster.on parameter groupor one derived from it.
• Redis configuration variables appendonly and appendfsync are not supported on Redis version2.8.22 and later.
Supported engine versions
Supported engine versions vary by region. The latest engine versions are supported in all regions. To findthe available engine versions in your region see Determine Available Engine Versions (p. 48).API Version 2015-02-02
121
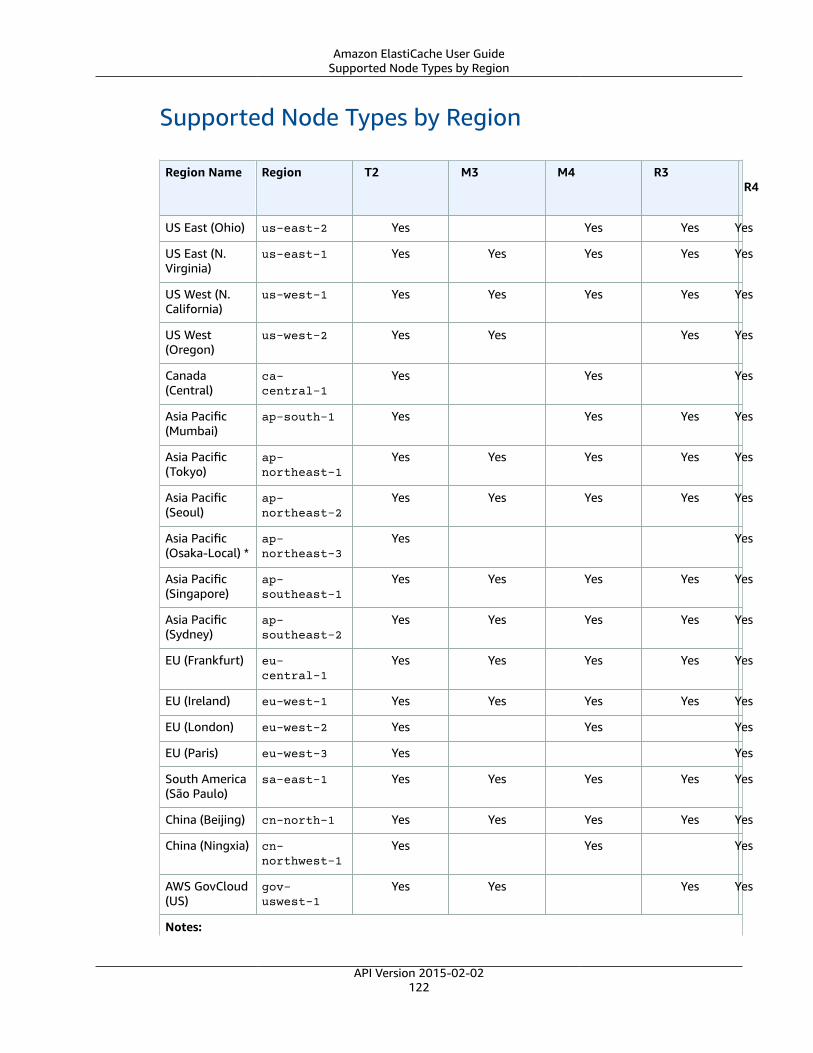
Amazon ElastiCache User GuideSupported Node Types by Region
Supported Node Types by Region
Region Name Region T2 M3 M4 R3 R4
US East (Ohio) us-east-2 Yes Yes Yes Yes
US East (N.Virginia)
us-east-1 Yes Yes Yes Yes Yes
US West (N.California)
us-west-1 Yes Yes Yes Yes Yes
US West(Oregon)
us-west-2 Yes Yes Yes Yes
Canada(Central)
ca-central-1
Yes Yes Yes
Asia Pacific(Mumbai)
ap-south-1 Yes Yes Yes Yes
Asia Pacific(Tokyo)
ap-northeast-1
Yes Yes Yes Yes Yes
Asia Pacific(Seoul)
ap-northeast-2
Yes Yes Yes Yes Yes
Asia Pacific(Osaka-Local) *
ap-northeast-3
Yes Yes
Asia Pacific(Singapore)
ap-southeast-1
Yes Yes Yes Yes Yes
Asia Pacific(Sydney)
ap-southeast-2
Yes Yes Yes Yes Yes
EU (Frankfurt) eu-central-1
Yes Yes Yes Yes Yes
EU (Ireland) eu-west-1 Yes Yes Yes Yes Yes
EU (London) eu-west-2 Yes Yes Yes
EU (Paris) eu-west-3 Yes Yes
South America(São Paulo)
sa-east-1 Yes Yes Yes Yes Yes
China (Beijing) cn-north-1 Yes Yes Yes Yes Yes
China (Ningxia) cn-northwest-1
Yes Yes Yes
AWS GovCloud(US)
gov-uswest-1
Yes Yes Yes Yes
Notes:
API Version 2015-02-02122

Amazon ElastiCache User GuideSupported Node Types by Region
Region Name Region T2 M3 M4 R3 R4
The Asia Pacific (Osaka-Local) Region is a local region that is available to select AWS customers whorequest access. Customers wishing to use the Asia Pacific (Osaka-Local) Region should speak with theirsales representative. The Asia Pacific (Osaka-Local) Region supports a single availavility zone.
For a complete list of node types and specifications, see the following:
• Amazon ElastiCache Product Features and Details• Memcached Node-Type Specific Parameters• Redis Node-Type Specific Parameters
API Version 2015-02-02123

Amazon ElastiCache User GuideActions You Can Take When a Node
is Scheduled for Replacement
Actions You Can Take When a Node is Scheduledfor Replacement
The following sections specify actions you can take when ElastiCache schedules one or more of yournodes for replacement.
MemcachedThe following list identifies actions you can take when ElastiCache schedules one of your Memcachednodes for replacement.
• Do nothing – If you do nothing, ElastiCache will replace the node as scheduled. When ElastiCacheautomatically replaces the node with a new node, the new node is initially empty.
• Change your maintenance window – For scheduled maintenance events where you receive an emailor a notification event from ElastiCache, if you change your maintenance window before the scheduledreplacement time, your node will now be replaced at the new time. The new maintenance time can beno earlier than the originally scheduled time, and no later than a week from the originally scheduledtime.
NoteThe ability to change your replacement window by moving your maintenance window is onlyavailable when the ElastiCache notification includes a maintenance window. If the notificationdoes not include a maintenance window, you cannot change your replacement window.
For example:
Let's say, currently it's Thursday, 11/09 at 1500 and the next maintenance window is Friday, 11/10, at1700. Following are 3 scenarios with their outcomes:
• You change your maintenance window to Fridays at 1600 (after the current datetime and before thenext scheduled maintenance window). The node will be replaced on Friday, 11/10, at 1600.
• You change your maintenance window to Saturday at 1600 (after the current datetime and after thenext scheduled maintenance window). The node will be replaced on Saturday, 11/11, at 1600.
• You change your maintenance window to Wednesday at 1600 (earlier in the week than the currentdatetime). The node will be replaced next Wednesday, 11/15, at 1600.
For instructions, see Maintenance Window (p. 59).
• Manually replace the node – If you need to replace the node before the next maintenance window,manually replace the node.
If you manually replace the node, keys will be redistributed which will cause cache misses.
To manually replace a Memcached node
1. Delete the node scheduled for replacement. For instructions, see Removing Nodes from aCluster (p. 194).
2. Add a new node to the cluster. For instructions, see Adding Nodes to a Cluster (p. 188).
3. If you are not using Node Auto Discovery (Memcached) (p. 127) on this cluster, go to yourapplication and replace every instance of the old node's endpoint with the new node's endpoint.
API Version 2015-02-02124

Amazon ElastiCache User GuideRedis
RedisThe following list identifies actions you can take when ElastiCache schedules one of your Redis nodes forreplacement. To expedite finding the information you need for your situation, choose from the followingmenu.
• Do nothing (p. 125) – Let Amazon ElastiCache replace the node as scheduled.
• Change your maintenance window (p. 125) – Change your maintenance window to a better time.
• Replace a read-replica (p. 125) – A procedure to manually replace a read-replica in a Redis replicationgroup.
• Replace the primary node (p. 126) – A procedure to manually replace the primary node in a Redisreplication group.
• Replace a standalone node (p. 126) – Two different procedures to replace a standalone Redis node.
Redis node replacement options
• Do nothing – If you do nothing, ElastiCache will replace the node as scheduled.
If the node is a member of a Redis (cluster mode disabled) cluster, the replacement node will sync withthe primary node.
If the node is standalone, ElastiCache will first launch a replacement node and then sync from theexisting node. The existing node will not be available for service requests during this time. Once thesync is complete, the existing node is terminated and the new node takes its place. ElastiCache makesa best effort to retain your data during this operation.
• Change your maintenance window – For scheduled maintenance events where you receive an emailor a notification event from ElastiCache, if you change your maintenance window before the scheduledreplacement time, your node will now be replaced at the new time. The new maintenance time can beno earlier than the originally scheduled time, and no later than a week from the originally scheduledtime.
NoteThe ability to change your replacement window by moving your maintenance window is onlyavailable when the ElastiCache notification includes a maintenance window. If the notificationdoes not include a maintenance window, you cannot change your replacement window.
For example:
Let's say, currently it's Thursday, 11/09, at 1500 and the next maintenance window is Friday, 11/10, at1700. Following are 3 scenarios with their outcomes:
• You change your maintenance window to Fridays at 1600 (after the current datetime and before thenext scheduled maintenance window). The node will be replaced on Friday, 11/10, at 1600.
• You change your maintenance window to Saturday at 1600 (after the current datetime and after thenext scheduled maintenance window). The node will be replaced on Saturday, 11/11, at 1600.
• You change your maintenance window to Wednesday at 1600 (earlier in the week than the currentdatetime). The node will be replaced next Wednesday, 11/15, at 1600.
For instructions, see Maintenance Window (p. 59).
• Replace a read-replica – If the node is a read-replica, replace the node.
If your cluster has only 2 nodes and Multi-AZ is enabled, you must disable Multi-AZ before you candelete the replica. For instructions, see Modifying a Cluster with Replicas (p. 288).
API Version 2015-02-02125
Amazon ElastiCache User GuideRedis
To replace a read replica
1. Delete the replica that is scheduled for replacement. For instructions, see Deleting aCluster (p. 201).
2. Add a new replica to replace the one that is scheduled for replacement. If you use the same nameas the replica you just deleted, you can skip step 3. For instructions, see Adding a Read Replica to aRedis Cluster (p. 291).
3. In your application, replace the old replica's endpoint with the new replica's endpoint.4. If you disabled Multi-AZ at the start, re-enable it now. For instructions, see Enabling Multi-AZ with
Automatic Failover (p. 250).• Replace the primary node – If the node is the primary node, promote a read-replica to primary, and
then delete the former primary node.
If your cluster has only two nodes and Multi-AZ is enabled, you must disable Multi-AZ before you candelete the replica in step 2. For instructions, see Modifying a Cluster with Replicas (p. 288).
To replace a primary node
1. Promote a read-replica to primary. For instructions, see Promoting a Read-Replica toPrimary (p. 293).
2. Delete the node that is scheduled for replacement (the old primary). For instructions, see Deletinga Cluster (p. 201).
3. Add a new replica to replace the one scheduled for replacement. If you use the same name as thenode you just deleted, you can skip step 4.
For instructions, see Adding a Read Replica to a Redis Cluster (p. 291).4. In your application, replace the old node's endpoint with the new node's endpoint.5. If you disabled Multi-AZ at the start, re-enable it now. For instructions, see Enabling Multi-AZ with
Automatic Failover (p. 250).• Replace a standalone node – If the node does not have any read replicas, you have two options to
replace it:
Option 1: Replace the node using backup and restore
1. Create a snapshot of the node. For instructions, see Making Manual Backups (p. 301).2. Create a new node seeding it from the snapshot. For instructions, see Restoring From a Backup
with Optional Cluster Resizing (p. 321).3. Delete the node scheduled for replacement. For instructions, see Deleting a Cluster (p. 201).4. In your application, replace the old node's endpoint with the new node's endpoint.
Option 2: Replace the node using replication
1. Add replication to the cluster with the node scheduled for replacement as the primary. Do notenable Multi-AZ on this cluster. For instructions, see To add replication to a Redis cluster with noshards (p. 188).
2. Add a read-replica to the cluster. For instructions, see To add nodes to a Memcached or Redis(cluster mode disabled) cluster with one shard (console) (p. 189).
3. Promote the newly created read-replica to primary. For instructions, see Promoting a Read-Replicato Primary (p. 293).
4. Delete the node scheduled for replacement. For instructions, see Deleting a Cluster (p. 201).5. In your application, replace the old node's endpoint with the new node's endpoint.
API Version 2015-02-02126

Amazon ElastiCache User Guide
Node Auto Discovery (Memcached)For clusters running the Memcached engine, ElastiCache supports Auto Discovery—the ability for clientprograms to automatically identify all of the nodes in a cache cluster, and to initiate and maintainconnections to all of these nodes.
NoteAuto Discovery is added for cache clusters running on Amazon ElastiCache Memcached. Redis(cluster mode enabled) clusters natively support auto discovery.
With Auto Discovery, your application does not need to manually connect to individual cache nodes;instead, your application connects to one Memcached node and retrieves the list of nodes. From that listyour application is aware of the rest of the nodes in the cluster and can connect to any of them. You donot need to hard code the individual cache node endpoints in your application.
All of the cache nodes in the cluster maintain a list of metadata about all of the other nodes. Thismetadata is updated whenever nodes are added or removed from the cluster.
Topics• Benefits of Auto Discovery (p. 128)• How Auto Discovery Works (p. 129)• Using Auto Discovery (p. 132)• Connecting to Cache Nodes Manually (p. 137)• Adding Auto Discovery To Your Client Library (p. 138)• ElastiCache Clients with Auto Discovery (p. 139)
API Version 2015-02-02127
Amazon ElastiCache User GuideBenefits of Auto Discovery
Benefits of Auto DiscoveryAuto Discovery offers the following benefits:
• When you increase the number of nodes in a cache cluster, the new nodes register themselves withthe configuration endpoint and with all of the other nodes. When you remove nodes from the cachecluster, the departing nodes deregister themselves. In both cases, all of the other nodes in the clusterare updated with the latest cache node metadata.
• Cache node failures are automatically detected; failed nodes are automatically replaced.
NoteUntil node replacement completes, the node will continue to fail.
• A client program only needs to connect to the configuration endpoint. After that, the Auto Discoverylibrary connects to all of the other nodes in the cluster.
• Client programs poll the cluster once per minute (this interval can be adjusted if necessary). If thereare any changes to the cluster configuration, such as new or deleted nodes, the client receives anupdated list of metadata. Then the client connects to, or disconnects from, these nodes as needed.
Auto Discovery is enabled on all ElastiCache Memcached cache clusters. You do not need to reboot anyof your cache nodes to use this feature.
API Version 2015-02-02128
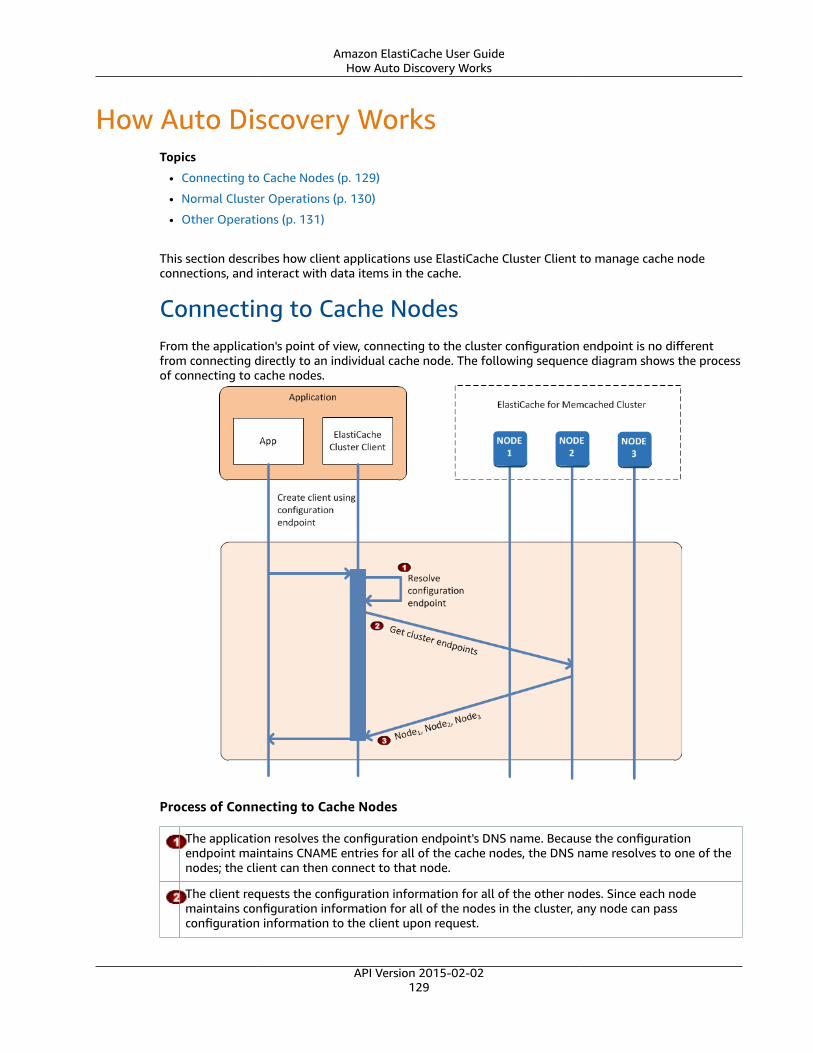
Amazon ElastiCache User GuideHow Auto Discovery Works
How Auto Discovery WorksTopics
• Connecting to Cache Nodes (p. 129)
• Normal Cluster Operations (p. 130)
• Other Operations (p. 131)
This section describes how client applications use ElastiCache Cluster Client to manage cache nodeconnections, and interact with data items in the cache.
Connecting to Cache NodesFrom the application's point of view, connecting to the cluster configuration endpoint is no differentfrom connecting directly to an individual cache node. The following sequence diagram shows the processof connecting to cache nodes.
Process of Connecting to Cache Nodes
The application resolves the configuration endpoint's DNS name. Because the configurationendpoint maintains CNAME entries for all of the cache nodes, the DNS name resolves to one of thenodes; the client can then connect to that node.
The client requests the configuration information for all of the other nodes. Since each nodemaintains configuration information for all of the nodes in the cluster, any node can passconfiguration information to the client upon request.
API Version 2015-02-02129

Amazon ElastiCache User GuideNormal Cluster Operations
The client receives the current list of cache node hostnames and IP addresses. It can then connectto all of the other nodes in the cluster.
NoteThe client program refreshes its list of cache node hostnames and IP addresses once per minute.This polling interval can be adjusted if necessary.
Normal Cluster OperationsWhen the application has connected to all of the cache nodes, ElastiCache Cluster Client determineswhich nodes should store individual data items, and which nodes should be queried for those data itemslater. The following sequence diagram shows the process of normal cluster operations.
Process of Normal Cluster Operations
The application issues a get request for a particular data item, identified by its key.
The client uses a hashing algorithm against the key to determine which cache node contains thedata item.
The data item is requested from the appropriate node.
The data item is returned to the application.
API Version 2015-02-02130

Amazon ElastiCache User GuideOther Operations
Other OperationsThere may arise situations where there is a change in the cluster due to adding an additional node toaccommodate additional demand, deleting a node to save money during periods of reduced demand, orreplacing a node due to a node failure of one sort or another.
When there is a change in the cluster that requires a metadata update to the cluster's endpoints, thatchange is made to all nodes at the same time. Thus the metadata in any given node is consistent withthe metadata in all of the other nodes in the cluster.
In each of these cases, the metadata is consistent among all the nodes at all times since the metadata isupdated at the same time for all nodes in the cluster. You should always use the configuration endpointto obtain the endpoints of the various nodes in the cluster. By using the configuration endpoint, youensure that you will not be obtaining endpoint data from a node that “disappears” on you.
Adding a NodeDuring the time that the node is being spun up, its endpoint is not included in the metadata. As soonas the node is available, it is added to the metadata of each of the cluster’s nodes. In this scenario, themetadata is consistent among all the nodes and you will be able to interact with the new node only afterit is available. Prior to the node being available, you will not know about it and will interact with thenodes in your cluster the same as though the new node does not exist.
Deleting a NodeWhen a node is removed, its endpoint is first removed from the metadata and then the node is removedfrom the cluster. In this scenario the metadata in all the nodes is consistent and there is no time in whichit will contain the endpoint for the node to be removed while the node is not available. During the noderemoval time it is not reported in the metadata and so your application will only be interacting with then-1 remaining nodes, as though the node does not exist.
Replacing a NodeIf a node fails, ElastiCache takes down that node and spins up a replacement. The replacement processtakes a few minutes. During this time the metadata in all the nodes still shows the endpoint for thefailed node, but any attempt to interact with the node will fail. Therefore, your logic should alwaysinclude retry logic.
API Version 2015-02-02131

Amazon ElastiCache User GuideUsing Auto Discovery
Using Auto DiscoveryTo begin using Auto Discovery, follow these steps:
• Step 1: Obtain the Configuration Endpoint (p. 132)
• Step 2: Download the ElastiCache Cluster Client (p. 133)
• Step 3: Modify Your Application Program (p. 134)
Step 1: Obtain the Configuration EndpointTo connect to a cluster, client programs must know the cluster configuration endpoint. See the topicFinding a Memcached Cluster's Endpoints (Console) (p. 67)
You can also use the aws elasticache describe-cache-clusters command with the --show-cache-node-info parameter:
Whatever method you use to find the cluster's endpoints, the configuration endpoint will always have.cfg in its address.
Example Finding endpoints using the AWS CLI for ElastiCache
For Linux, macOS, or Unix:
aws elasticache describe-cache-clusters \ --cache-cluster-id mycluster \ --show-cache-node-info
For Windows:
aws elasticache describe-cache-clusters ^ --cache-cluster-id mycluster ^ --show-cache-node-info
This operation produces output similar to the following (JSON format):
{ "CacheClusters": [ { "Engine": "memcached", "CacheNodes": [ { "CacheNodeId": "0001", "Endpoint": { "Port": 11211, "Address": "mycluster.fnjyzo.cfg.0001.use1.cache.amazonaws.com" }, "CacheNodeStatus": "available", "ParameterGroupStatus": "in-sync", "CacheNodeCreateTime": "2016-10-12T21:39:28.001Z", "CustomerAvailabilityZone": "us-east-1e" }, { "CacheNodeId": "0002", "Endpoint": { "Port": 11211,
API Version 2015-02-02132

Amazon ElastiCache User GuideStep 2: Download the ElastiCache Cluster Client
"Address": "mycluster.fnjyzo.cfg.0002.use1.cache.amazonaws.com" }, "CacheNodeStatus": "available", "ParameterGroupStatus": "in-sync", "CacheNodeCreateTime": "2016-10-12T21:39:28.001Z", "CustomerAvailabilityZone": "us-east-1a" } ], "CacheParameterGroup": { "CacheNodeIdsToReboot": [], "CacheParameterGroupName": "default.memcached1.4", "ParameterApplyStatus": "in-sync" }, "CacheClusterId": "mycluster", "PreferredAvailabilityZone": "Multiple", "ConfigurationEndpoint": { "Port": 11211, "Address": "mycluster.fnjyzo.cfg.use1.cache.amazonaws.com" }, "CacheSecurityGroups": [], "CacheClusterCreateTime": "2016-10-12T21:39:28.001Z", "AutoMinorVersionUpgrade": true, "CacheClusterStatus": "available", "NumCacheNodes": 2, "ClientDownloadLandingPage": "https://console.aws.amazon.com/elasticache/home#client-download:", "CacheSubnetGroupName": "default", "EngineVersion": "1.4.24", "PendingModifiedValues": {}, "PreferredMaintenanceWindow": "sat:06:00-sat:07:00", "CacheNodeType": "cache.r3.large" } ]}
Step 2: Download the ElastiCache Cluster ClientTo take advantage of Auto Discovery, client programs must use the ElastiCache Cluster Client. TheElastiCache Cluster Client is available for Java, PHP, and .NET and contains all of the necessary logic fordiscovering and connecting to all of your cache nodes.
To download the ElastiCache Cluster Client
1. Sign in to the AWS Management Console and open the ElastiCache console at https://console.aws.amazon.com/elasticache/.
2. From the ElastiCache console, choose ElastiCache Cluster Client then choose Download.
The source code for the ElastiCache Cluster Client for Java is available at https://github.com/amazonwebservices/aws-elasticache-cluster-client-memcached-for-java. This library is based on thepopular Spymemcached client. The ElastiCache Cluster Client is released under the Amazon SoftwareLicense https://aws.amazon.com/asl. You are free to modify the source code as you see fit. You can evenincorporate the code into other open source Memcached libraries, or into your own client code.
NoteTo use the ElastiCache Cluster Client for PHP, you will first need to install it on your Amazon EC2instance. For more information, see Installing the ElastiCache Cluster Client for PHP (p. 142).To use the ElastiCache Cluster Client for .NET, you will first need to install it on yourAmazon EC2 instance. For more information, see Installing the ElastiCache Cluster Clientfor .NET (p. 140).
API Version 2015-02-02133

Amazon ElastiCache User GuideStep 3: Modify Your Application Program
Step 3: Modify Your Application ProgramModify your application program so that it uses Auto Discovery. The following sections show how to usethe ElastiCache Cluster Client for Java, PHP, and .NET.
ImportantWhen specifying the cluster's configuration endpoint, be sure that the endpoint has ".cfg" in itsaddress as shown here. Do not use a CNAME or an endpoint without ".cfg" in it.
"mycluster.fnjyzo.cfg.use1.cache.amazonaws.com";
Failure to explicitly specify the cluster's configuration endpoint results in configuring to aspecific node.
Topics
• Using the ElastiCache Cluster Client for Java (p. 134)
• Using the ElastiCache Cluster Client for PHP (p. 134)
• Using the ElastiCache Cluster Client for .NET (p. 135)
Using the ElastiCache Cluster Client for JavaThe program below demonstrates how to use the ElastiCache Cluster Client to connect to a clusterconfiguration endpoint and add a data item to the cache. Using Auto Discovery, the program connects toall of the nodes in the cluster without any further intervention.
package com.amazon.elasticache;
import java.io.IOException;import java.net.InetSocketAddress;
// Import the AWS-provided library with Auto Discovery support import net.spy.memcached.MemcachedClient;
public class AutoDiscoveryDemo {
public static void main(String[] args) throws IOException { String configEndpoint = "mycluster.fnjyzo.cfg.use1.cache.amazonaws.com"; Integer clusterPort = 11211;
MemcachedClient client = new MemcachedClient( new InetSocketAddress(configEndpoint, clusterPort)); // The client will connect to the other cache nodes automatically.
// Store a data item for an hour. // The client will decide which cache host will store this item. client.set("theKey", 3600, "This is the data value"); }}
Using the ElastiCache Cluster Client for PHPThe program below demonstrates how to use the ElastiCache Cluster Client to connect to a clusterconfiguration endpoint and add a data item to the cache. Using Auto Discovery, the program will connectto all of the nodes in the cluster without any further intervention.
API Version 2015-02-02134
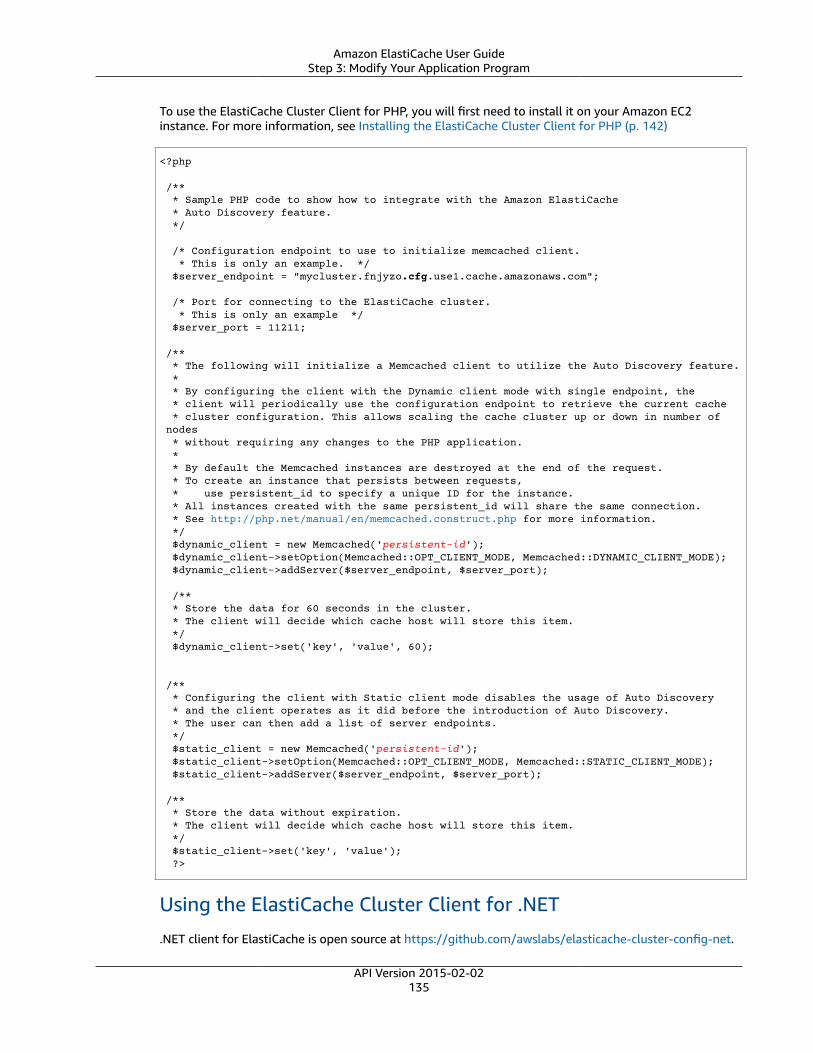
Amazon ElastiCache User GuideStep 3: Modify Your Application Program
To use the ElastiCache Cluster Client for PHP, you will first need to install it on your Amazon EC2instance. For more information, see Installing the ElastiCache Cluster Client for PHP (p. 142)
<?php /** * Sample PHP code to show how to integrate with the Amazon ElastiCache * Auto Discovery feature. */
/* Configuration endpoint to use to initialize memcached client. * This is only an example. */ $server_endpoint = "mycluster.fnjyzo.cfg.use1.cache.amazonaws.com"; /* Port for connecting to the ElastiCache cluster. * This is only an example */ $server_port = 11211;
/** * The following will initialize a Memcached client to utilize the Auto Discovery feature. * * By configuring the client with the Dynamic client mode with single endpoint, the * client will periodically use the configuration endpoint to retrieve the current cache * cluster configuration. This allows scaling the cache cluster up or down in number of nodes * without requiring any changes to the PHP application. * * By default the Memcached instances are destroyed at the end of the request. * To create an instance that persists between requests, * use persistent_id to specify a unique ID for the instance. * All instances created with the same persistent_id will share the same connection. * See http://php.net/manual/en/memcached.construct.php for more information. */ $dynamic_client = new Memcached('persistent-id'); $dynamic_client->setOption(Memcached::OPT_CLIENT_MODE, Memcached::DYNAMIC_CLIENT_MODE); $dynamic_client->addServer($server_endpoint, $server_port); /** * Store the data for 60 seconds in the cluster. * The client will decide which cache host will store this item. */ $dynamic_client->set('key', 'value', 60);
/** * Configuring the client with Static client mode disables the usage of Auto Discovery * and the client operates as it did before the introduction of Auto Discovery. * The user can then add a list of server endpoints. */ $static_client = new Memcached('persistent-id'); $static_client->setOption(Memcached::OPT_CLIENT_MODE, Memcached::STATIC_CLIENT_MODE); $static_client->addServer($server_endpoint, $server_port);
/** * Store the data without expiration. * The client will decide which cache host will store this item. */ $static_client->set('key', 'value'); ?>
Using the ElastiCache Cluster Client for .NET
.NET client for ElastiCache is open source at https://github.com/awslabs/elasticache-cluster-config-net.
API Version 2015-02-02135

Amazon ElastiCache User GuideStep 3: Modify Your Application Program
.NET applications typically get their configurations from their config file. The following is a sampleapplication config file.
<?xml version="1.0" encoding="utf-8"?><configuration> <configSections> <section name="clusterclient" type="Amazon.ElastiCacheCluster.ClusterConfigSettings, Amazon.ElastiCacheCluster" /> </configSections>
<clusterclient> <!-- the hostname and port values are from step 1 above --> <endpoint hostname="mycluster.fnjyzo.cfg.use1.cache.amazonaws.com" port="11211" /> </clusterclient></configuration>
The C# program below demonstrates how to use the ElastiCache Cluster Client to connect to a clusterconfiguration endpoint and add a data item to the cache. Using Auto Discovery, the program will connectto all of the nodes in the cluster without any further intervention.
// *****************// Sample C# code to show how to integrate with the Amazon ElastiCcache Auto Discovery feature.
using System;
using Amazon.ElastiCacheCluster;
using Enyim.Caching;using Enyim.Caching.Memcached;
public class DotNetAutoDiscoveryDemo {
public static void Main(String[] args) { // instantiate a new client. ElastiCacheClusterConfig config = new ElastiCacheClusterConfig(); MemcachedClient memClient = new MemcachedClient(config); // Store the data for 3600 seconds (1hour) in the cluster. // The client will decide which cache host will store this item. memClient.Store(StoreMode.Set, 3600, "This is the data value."); } // end Main } // end class DotNetAutoDiscoverDemo
API Version 2015-02-02136
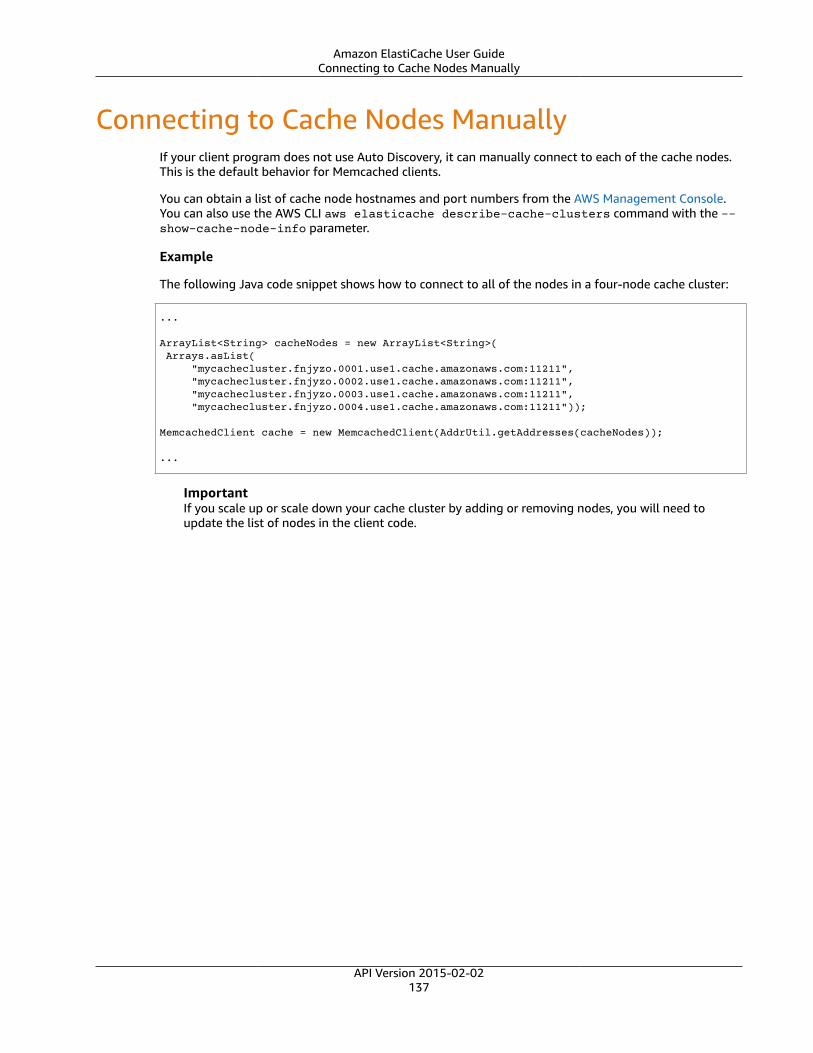
Amazon ElastiCache User GuideConnecting to Cache Nodes Manually
Connecting to Cache Nodes ManuallyIf your client program does not use Auto Discovery, it can manually connect to each of the cache nodes.This is the default behavior for Memcached clients.
You can obtain a list of cache node hostnames and port numbers from the AWS Management Console.You can also use the AWS CLI aws elasticache describe-cache-clusters command with the --show-cache-node-info parameter.
Example
The following Java code snippet shows how to connect to all of the nodes in a four-node cache cluster:
...
ArrayList<String> cacheNodes = new ArrayList<String>( Arrays.asList( "mycachecluster.fnjyzo.0001.use1.cache.amazonaws.com:11211", "mycachecluster.fnjyzo.0002.use1.cache.amazonaws.com:11211", "mycachecluster.fnjyzo.0003.use1.cache.amazonaws.com:11211", "mycachecluster.fnjyzo.0004.use1.cache.amazonaws.com:11211")); MemcachedClient cache = new MemcachedClient(AddrUtil.getAddresses(cacheNodes));
...
ImportantIf you scale up or scale down your cache cluster by adding or removing nodes, you will need toupdate the list of nodes in the client code.
API Version 2015-02-02137

Amazon ElastiCache User GuideAdding Auto Discovery To Your Client Library
Adding Auto Discovery To Your Client LibraryThe configuration information for Auto Discovery is stored redundantly in each cache cluster node. Clientapplications can query any cache node and obtain the configuration information for all of the nodes inthe cluster.
The way in which an application does this depends upon the cache engine version:
• If the cache engine version is 1.4.14 or higher, use the config command.
• If the cache engine version is lower than 1.4.14, use the get AmazonElastiCache:clustercommand.
The outputs from these two commands are identical, and are described in the Output Format (p. 139)section below.
Cache Engine Version 1.4.14 or HigherFor cache engine version 1.4.14 or higher, use the config command. This command has been added tothe Memcached ASCII and binary protocols by ElastiCache, and is implemented in the ElastiCache ClusterClient. If you want to use Auto Discovery with another client library, then that library will need to beextended to support the config command.
NoteThe following documentation pertains to the ASCII protocol; however, the config commandsupports both ASCII and binary. If you want to add Auto Discovery support using the binaryprotocol, refer to the source code for the ElastiCache Cluster Client.
Syntax
config [sub-command] [key]
Options
Name Description Required
sub-command
The sub-command used to interact with a cache node. For AutoDiscovery, this sub-command is get.
Yes
key The key under which the cluster configuration is stored. For AutoDiscovery, this key is named cluster.
Yes
To get the cluster configuration information, use the following command:
config get cluster
Cache Engine Version Lower Than 1.4.14To get the cluster configuration information, use the following command:
get AmazonElastiCache:cluster
API Version 2015-02-02138
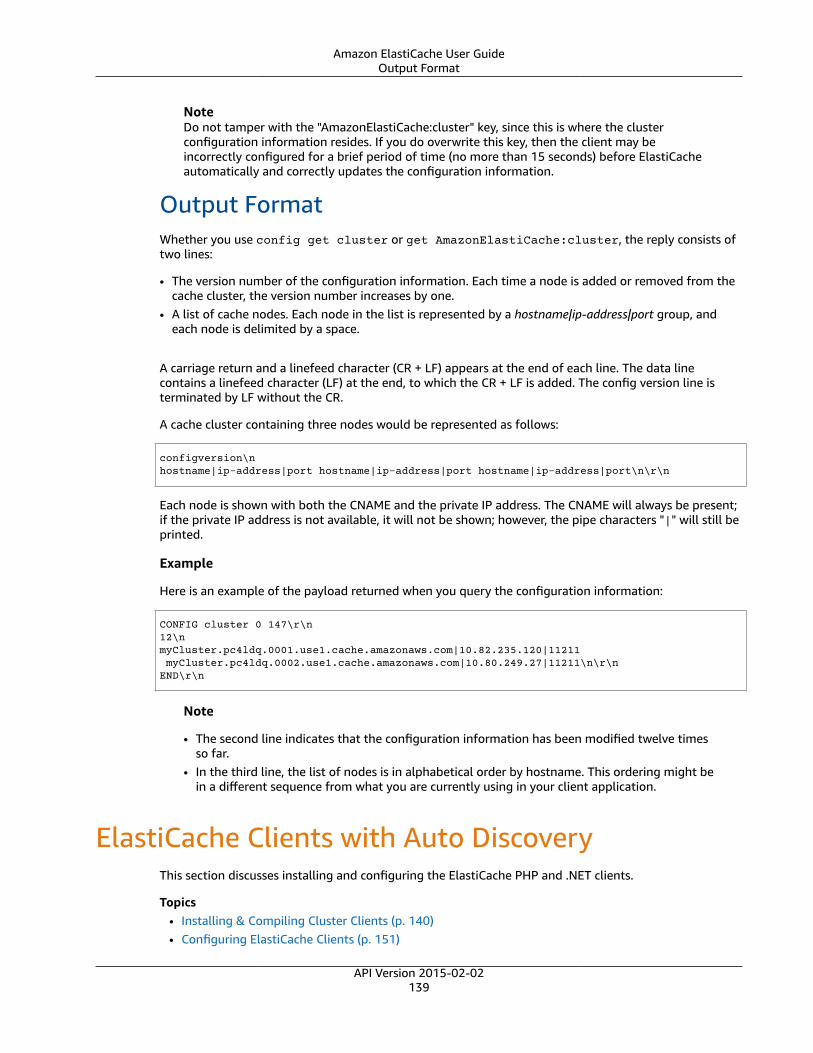
Amazon ElastiCache User GuideOutput Format
NoteDo not tamper with the "AmazonElastiCache:cluster" key, since this is where the clusterconfiguration information resides. If you do overwrite this key, then the client may beincorrectly configured for a brief period of time (no more than 15 seconds) before ElastiCacheautomatically and correctly updates the configuration information.
Output FormatWhether you use config get cluster or get AmazonElastiCache:cluster, the reply consists oftwo lines:
• The version number of the configuration information. Each time a node is added or removed from thecache cluster, the version number increases by one.
• A list of cache nodes. Each node in the list is represented by a hostname|ip-address|port group, andeach node is delimited by a space.
A carriage return and a linefeed character (CR + LF) appears at the end of each line. The data linecontains a linefeed character (LF) at the end, to which the CR + LF is added. The config version line isterminated by LF without the CR.
A cache cluster containing three nodes would be represented as follows:
configversion\nhostname|ip-address|port hostname|ip-address|port hostname|ip-address|port\n\r\n
Each node is shown with both the CNAME and the private IP address. The CNAME will always be present;if the private IP address is not available, it will not be shown; however, the pipe characters "|" will still beprinted.
Example
Here is an example of the payload returned when you query the configuration information:
CONFIG cluster 0 147\r\n12\nmyCluster.pc4ldq.0001.use1.cache.amazonaws.com|10.82.235.120|11211 myCluster.pc4ldq.0002.use1.cache.amazonaws.com|10.80.249.27|11211\n\r\n END\r\n
Note
• The second line indicates that the configuration information has been modified twelve timesso far.
• In the third line, the list of nodes is in alphabetical order by hostname. This ordering might bein a different sequence from what you are currently using in your client application.
ElastiCache Clients with Auto DiscoveryThis section discusses installing and configuring the ElastiCache PHP and .NET clients.
Topics• Installing & Compiling Cluster Clients (p. 140)• Configuring ElastiCache Clients (p. 151)
API Version 2015-02-02139

Amazon ElastiCache User GuideInstalling & Compiling Clients
Installing & Compiling Cluster ClientsThis section covers installing, configuring, and compiling the PHP and .NET Amazon ElastiCache autodiscovery cluster clients.
Topics• Installing the ElastiCache Cluster Client for .NET (p. 140)• Installing the ElastiCache Cluster Client for PHP (p. 142)• Compiling the Source Code for the ElastiCache Cluster Client for PHP (p. 149)
Installing the ElastiCache Cluster Client for .NETYou can find the ElastiCache .NET Cluster Client code as open source at https://github.com/awslabs/elasticache-cluster-config-net.
This section describes how to install, update, and remove the .NET components for the ElastiCacheCluster Client on Amazon EC2 instances. For more information about auto discovery, see Node AutoDiscovery (Memcached) (p. 127). For sample .NET code to use the client, see Using the ElastiCacheCluster Client for .NET (p. 135).
Topics• Installing .NET (p. 140)• Download the ElastiCache .NET Cluster Client for ElastiCache (p. 140)• Install AWS Assemblies with NuGet (p. 140)
Installing .NET
You must have .NET 3.5 or later installed to use the AWS .NET SDK for ElastiCache. If you don't have .NET3.5 or later, you can download and install the latest version from http://www.microsoft.com/net.
Download the ElastiCache .NET Cluster Client for ElastiCache
To download the ElastiCache .NET cluster client
1. Sign in to the AWS Management Console and open the ElastiCache console at https://console.aws.amazon.com/elasticache/.
2. On the navigation pane, click ElastiCache Cluster Client.3. In the Download ElastiCache Memcached Cluster Client list, select .NET, and then click Download.
Install AWS Assemblies with NuGet
NuGet is a package management system for the .NET platform. NuGet is aware of assemblydependencies and installs all required files automatically. NuGet installed assemblies are stored withyour solution, rather than in a central location such as Program Files, so you can install versionsspecific to an application without creating compatibility issues.
Installing NuGet
NuGet can be installed from the Installation Gallery on MSDN; go to https://visualstudiogallery.msdn.microsoft.com/27077b70-9dad-4c64-adcf-c7cf6bc9970c. If you are usingVisual Studio 2010 or later, NuGet is automatically installed.
You can use NuGet from either Solution Explorer or Package Manager Console.
API Version 2015-02-02140
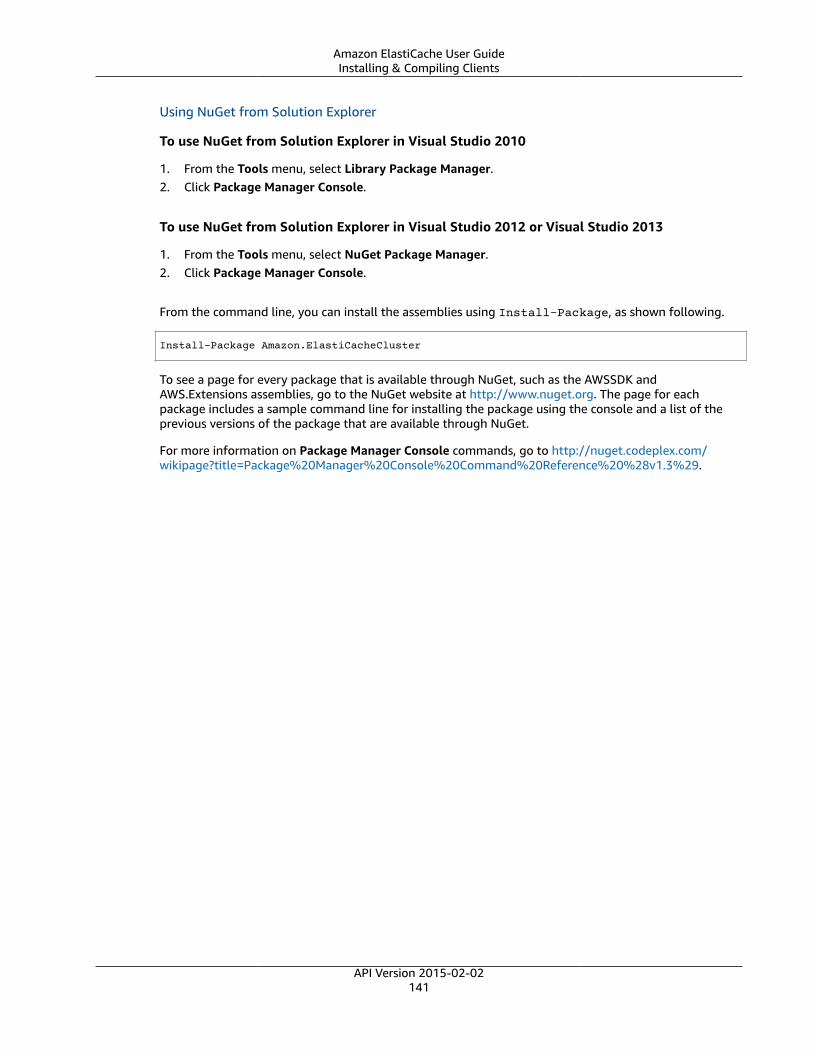
Amazon ElastiCache User GuideInstalling & Compiling Clients
Using NuGet from Solution Explorer
To use NuGet from Solution Explorer in Visual Studio 2010
1. From the Tools menu, select Library Package Manager.2. Click Package Manager Console.
To use NuGet from Solution Explorer in Visual Studio 2012 or Visual Studio 2013
1. From the Tools menu, select NuGet Package Manager.2. Click Package Manager Console.
From the command line, you can install the assemblies using Install-Package, as shown following.
Install-Package Amazon.ElastiCacheCluster
To see a page for every package that is available through NuGet, such as the AWSSDK andAWS.Extensions assemblies, go to the NuGet website at http://www.nuget.org. The page for eachpackage includes a sample command line for installing the package using the console and a list of theprevious versions of the package that are available through NuGet.
For more information on Package Manager Console commands, go to http://nuget.codeplex.com/wikipage?title=Package%20Manager%20Console%20Command%20Reference%20%28v1.3%29.
API Version 2015-02-02141
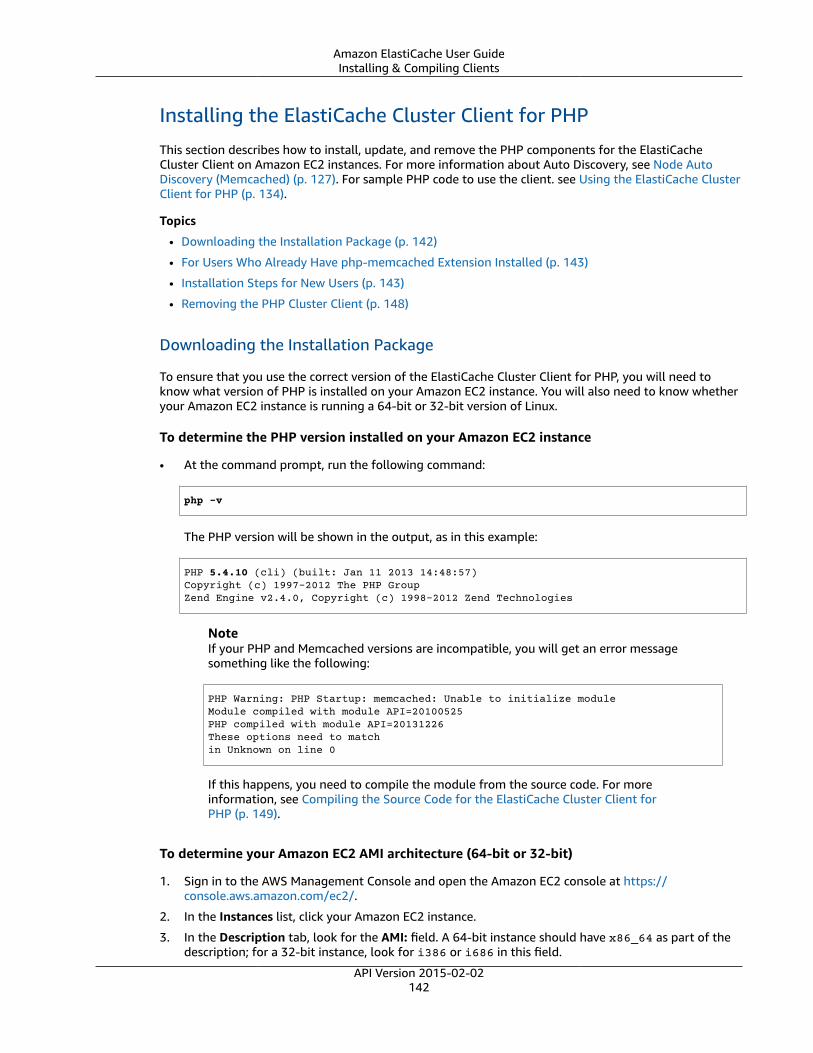
Amazon ElastiCache User GuideInstalling & Compiling Clients
Installing the ElastiCache Cluster Client for PHP
This section describes how to install, update, and remove the PHP components for the ElastiCacheCluster Client on Amazon EC2 instances. For more information about Auto Discovery, see Node AutoDiscovery (Memcached) (p. 127). For sample PHP code to use the client. see Using the ElastiCache ClusterClient for PHP (p. 134).
Topics
• Downloading the Installation Package (p. 142)
• For Users Who Already Have php-memcached Extension Installed (p. 143)
• Installation Steps for New Users (p. 143)
• Removing the PHP Cluster Client (p. 148)
Downloading the Installation Package
To ensure that you use the correct version of the ElastiCache Cluster Client for PHP, you will need toknow what version of PHP is installed on your Amazon EC2 instance. You will also need to know whetheryour Amazon EC2 instance is running a 64-bit or 32-bit version of Linux.
To determine the PHP version installed on your Amazon EC2 instance
• At the command prompt, run the following command:
php -v
The PHP version will be shown in the output, as in this example:
PHP 5.4.10 (cli) (built: Jan 11 2013 14:48:57) Copyright (c) 1997-2012 The PHP GroupZend Engine v2.4.0, Copyright (c) 1998-2012 Zend Technologies
NoteIf your PHP and Memcached versions are incompatible, you will get an error messagesomething like the following:
PHP Warning: PHP Startup: memcached: Unable to initialize moduleModule compiled with module API=20100525PHP compiled with module API=20131226These options need to matchin Unknown on line 0
If this happens, you need to compile the module from the source code. For moreinformation, see Compiling the Source Code for the ElastiCache Cluster Client forPHP (p. 149).
To determine your Amazon EC2 AMI architecture (64-bit or 32-bit)
1. Sign in to the AWS Management Console and open the Amazon EC2 console at https://console.aws.amazon.com/ec2/.
2. In the Instances list, click your Amazon EC2 instance.
3. In the Description tab, look for the AMI: field. A 64-bit instance should have x86_64 as part of thedescription; for a 32-bit instance, look for i386 or i686 in this field.
API Version 2015-02-02142

Amazon ElastiCache User GuideInstalling & Compiling Clients
You are now ready to download the ElastiCache Cluster Client.
To download the ElastiCache Cluster Client for PHP
1. Sign in to the AWS Management Console and open the ElastiCache console at https://console.aws.amazon.com/elasticache/.
2. From the ElastiCache console, choose ElastiCache Cluster Client.
3. From the Download ElastiCache Memcached Cluster Client list, choose the ElastiCache ClusterClient that matches your PHP version and AMI architecture, then choose the Download button.
For Users Who Already Have php-memcached Extension Installed
To update the php-memcached installation
1. Remove the previous installation of the Memcached extension for PHP as described by the topicRemoving the PHP Cluster Client (p. 148).
2. Install the new ElastiCache php-memcached extension as described previously in Installation Stepsfor New Users (p. 143).
Installation Steps for New Users
Topics• Installing PHP 7.x for New Users (p. 143)
• Installing PHP 5.x for New Users (p. 145)
Installing PHP 7.x for New Users
Topics• To install PHP 7 on a Ubuntu Server 14.04 LTS AMI (64-bit and 32-bit) (p. 143)
• To install PHP 7 on an Amazon Linux 201609 AMI (p. 144)
• To install PHP 7 on an SUSE Linux AMI (p. 144)
To install PHP 7 on a Ubuntu Server 14.04 LTS AMI (64-bit and 32-bit)
1. Launch a new instance from the AMI.
2. Run the following commands:
sudo apt-get updatesudo apt-get install gcc g++
3. Install PHP 7.
sudo yum install php70
4. Download the Amazon ElastiCache Cluster Client.
wget https://elasticache-downloads.s3.amazonaws.com/ClusterClient/PHP-7.0/latest-64bit
5. Extract latest-64bit.
tar -zxvf latest-64bit
API Version 2015-02-02143

Amazon ElastiCache User GuideInstalling & Compiling Clients
6. With root permissions, copy the extracted artifact file amazon-elasticache-cluster-client.so into /usr/lib/php/20151012.
sudo mv artifact/amazon-elasticache-cluster-client.so /usr/lib/php/20151012
7. Insert the line extension=amazon-elasticache-cluster-client.so into the file /etc/php/7.0/cli/php.ini.
echo "extension=amazon-elasticache-cluster-client.so" | sudo tee --append /etc/php/7.0/cli/php.ini
8. Start or restart your Apache server.
sudo /etc/init.d/httpd start
To install PHP 7 on an Amazon Linux 201609 AMI
1. Launch a new instance from the AMI.2. Run the following command:
sudo yum install gcc-c++
3. Install PHP 7.
sudo yum install php70
4. Download the Amazon ElastiCache Cluster Client.
wget https://elasticache-downloads.s3.amazonaws.com/ClusterClient/PHP-7.0/latest-64bit
5. Extract latest-64bit.
tar -zxvf latest-64bit
6. With root permission, copy the extracted artifact file amazon-elasticache-cluster-client.sointo /usr/lib64/php/7.0/modules/.
sudo mv artifact/amazon-elasticache-cluster-client.so /usr/lib64/php/7.0/modules/
7. Create the 50-memcached.ini file.
echo "extension=amazon-elasticache-cluster-client.so" | sudo tee --append /etc/php-7.0.d/50-memcached.ini
8. Start or restart your Apache server.
sudo /etc/init.d/httpd start
To install PHP 7 on an SUSE Linux AMI
1. Launch a new instance from the AMI.
API Version 2015-02-02144
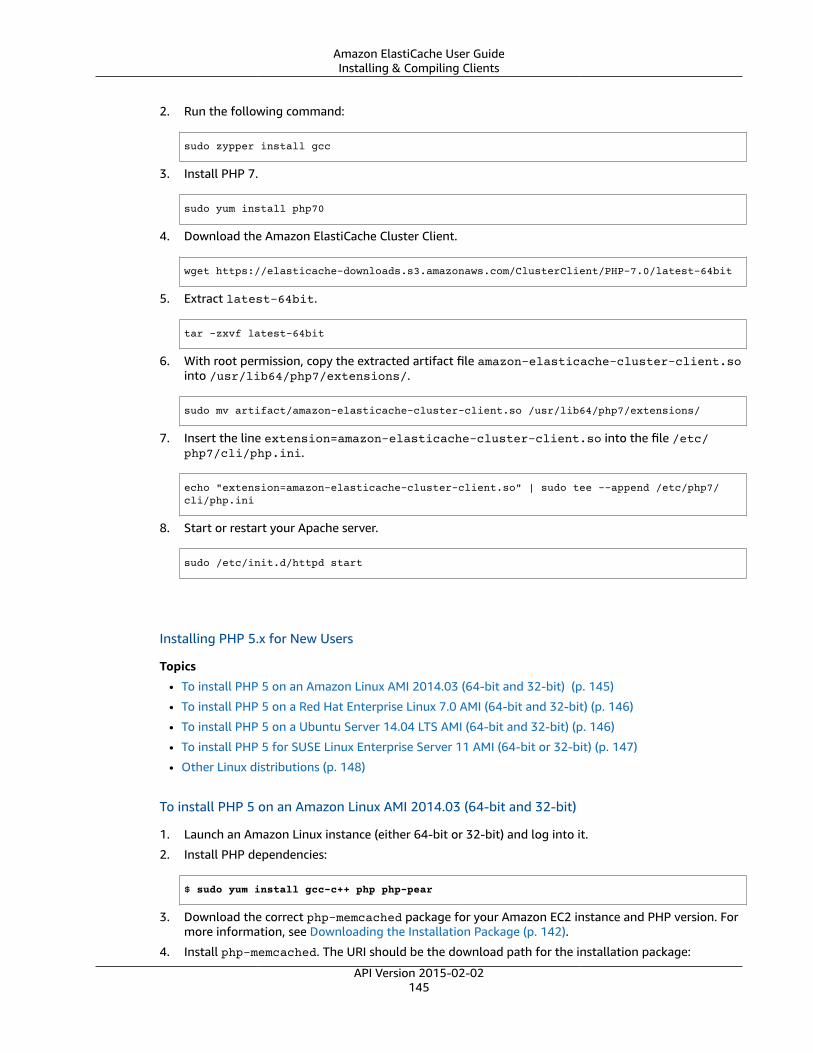
Amazon ElastiCache User GuideInstalling & Compiling Clients
2. Run the following command:
sudo zypper install gcc
3. Install PHP 7.
sudo yum install php70
4. Download the Amazon ElastiCache Cluster Client.
wget https://elasticache-downloads.s3.amazonaws.com/ClusterClient/PHP-7.0/latest-64bit
5. Extract latest-64bit.
tar -zxvf latest-64bit
6. With root permission, copy the extracted artifact file amazon-elasticache-cluster-client.sointo /usr/lib64/php7/extensions/.
sudo mv artifact/amazon-elasticache-cluster-client.so /usr/lib64/php7/extensions/
7. Insert the line extension=amazon-elasticache-cluster-client.so into the file /etc/php7/cli/php.ini.
echo "extension=amazon-elasticache-cluster-client.so" | sudo tee --append /etc/php7/cli/php.ini
8. Start or restart your Apache server.
sudo /etc/init.d/httpd start
Installing PHP 5.x for New Users
Topics
• To install PHP 5 on an Amazon Linux AMI 2014.03 (64-bit and 32-bit) (p. 145)
• To install PHP 5 on a Red Hat Enterprise Linux 7.0 AMI (64-bit and 32-bit) (p. 146)
• To install PHP 5 on a Ubuntu Server 14.04 LTS AMI (64-bit and 32-bit) (p. 146)
• To install PHP 5 for SUSE Linux Enterprise Server 11 AMI (64-bit or 32-bit) (p. 147)
• Other Linux distributions (p. 148)
To install PHP 5 on an Amazon Linux AMI 2014.03 (64-bit and 32-bit)
1. Launch an Amazon Linux instance (either 64-bit or 32-bit) and log into it.
2. Install PHP dependencies:
$ sudo yum install gcc-c++ php php-pear
3. Download the correct php-memcached package for your Amazon EC2 instance and PHP version. Formore information, see Downloading the Installation Package (p. 142).
4. Install php-memcached. The URI should be the download path for the installation package:
API Version 2015-02-02145

Amazon ElastiCache User GuideInstalling & Compiling Clients
$ sudo pecl install <package download path>
Here is a sample installation command for PHP 5.4, 64-bit Linux. In this sample, replace X.Y.Z withthe actual version number:
$ sudo pecl install /home/AmazonElastiCacheClusterClient-X.Y.Z-PHP54-64bit.tgz
NotePlease use the latest version of the install artifact.
5. With root/sudo permission, add a new file named memcached.ini in the /etc/php.d directory,and insert "extension=amazon-elasticache-cluster-client.so" in the file:
$ echo "extension=amazon-elasticache-cluster-client.so" | sudo tee --append /etc/php.d/memcached.ini
6. Start or restart your Apache server.
sudo /etc/init.d/httpd start
To install PHP 5 on a Red Hat Enterprise Linux 7.0 AMI (64-bit and 32-bit)
1. Launch a Red Hat Enterprise Linux instance (either 64-bit or 32-bit) and log into it.2. Install PHP dependencies:
sudo yum install gcc-c++ php php-pear
3. Download the correct php-memcached package for your Amazon EC2 instance and PHP version. Formore information, see Downloading the Installation Package (p. 142).
4. Install php-memcached. The URI should be the download path for the installation package:
sudo pecl install <package download path>
5. With root/sudo permission, add a new file named memcached.ini in the /etc/php.d directory,and insert extension=amazon-elasticache-cluster-client.so in the file.
echo "extension=amazon-elasticache-cluster-client.so" | sudo tee --append /etc/php.d/memcached.ini
6. Start or restart your Apache server.
sudo /etc/init.d/httpd start
To install PHP 5 on a Ubuntu Server 14.04 LTS AMI (64-bit and 32-bit)
1. Launch an Ubuntu Linux instance (either 64-bit or 32-bit) and log into it.2. Install PHP dependencies:
sudo apt-get update
API Version 2015-02-02146

Amazon ElastiCache User GuideInstalling & Compiling Clients
sudo apt-get install gcc g++ php5 php-pear
3. Download the correct php-memcached package for your Amazon EC2 instance and PHP version. Formore information, see Downloading the Installation Package (p. 142).
4. Install php-memcached. The URI should be the download path for the installation package.
$ sudo pecl install <package download path>
NoteThis installation step installs the build artifact amazon-elasticache-cluster-client.so into the /usr/lib/php5/20121212* directory. Please verify the absolutepath of the build artifact because it is needed by the next step.
If the previous command doesn't work, you need to manually extract the PHP client artifactamazon-elasticache-cluster-client.so from the downloaded *.tgz file, and copy it to the/usr/lib/php5/20121212* directory.
$ tar -xvf <package download path>cp amazon-elasticache-cluster-client.so /usr/lib/php5/20121212/
5. With root/sudo permission, add a new file named memcached.ini in the /etc/php5/cli/conf.ddirectory, and insert "extension=<absolute path to amazon-elasticache-cluster-client.so>" in the file.
$ echo "extension=<absolute path to amazon-elasticache-cluster-client.so>" | sudo tee --append /etc/php5/cli/conf.d/memcached.ini
6. Start or restart your Apache server.
sudo /etc/init.d/httpd start
To install PHP 5 for SUSE Linux Enterprise Server 11 AMI (64-bit or 32-bit)
1. Launch a SUSE Linux instance (either 64-bit or 32-bit) and log into it.
2. Install PHP dependencies:
$ sudo zypper install gcc php53-devel
3. Download the correct php-memcached package for your Amazon EC2 instance and PHP version. Formore information, see Downloading the Installation Package (p. 142).
4. Install php-memcached. The URI should be the download path for the installation package.
$ sudo pecl install <package download path>
5. With root/sudo permission, add a new file named memcached.ini in the /etc/php5/conf.ddirectory, and insert extension=amazon-elasticache-cluster-client.so in the file.
$ echo "extension=amazon-elasticache-cluster-client.so" | sudo tee --append /etc/php5/conf.d/memcached.ini
6. Start or restart your Apache server.
sudo /etc/init.d/httpd start
API Version 2015-02-02147

Amazon ElastiCache User GuideInstalling & Compiling Clients
NoteIf Step 5 doesn't work for any of the previous platforms, please verify the install path foramazon-elasticache-cluster-client.so, and specify the full path of the binary in theextension. Also, verify that the PHP in use is a supported version. We support versions 5.3through 5.5.
Other Linux distributions
On some systems, notably CentOS7 and Red Hat Enterprise Linux (RHEL) 7.1, libsasl2.so.3has replaced libsasl2.so.2. On those systems, when you load the ElastiCache cluster client,it attempts and fails to find and load libsasl2.so.2. To resolve this issue, create a symboliclink to libsasl2.so.3 so that when the client attempts to load libsasl2.so.2, it is redirected tolibsasl2.so.3. The following code creates this symbolic link.
cd /usr/lib64$ sudo ln libsasl2.so.3 libsasl2.so.2
Removing the PHP Cluster Client
Topics• Removing an earlier version of PHP 7 (p. 148)• Removing an earlier version of PHP 5 (p. 148)
Removing an earlier version of PHP 7
To remove an earlier version of PHP 7
1. Remove the amazon-elasticache-cluster-client.so file from the appropriate PHP libdirectory as previously indicated in the installation instructions. See the section for your installationat For Users Who Already Have php-memcached Extension Installed (p. 143).
2. Remove the line extension=amazon-elasticache-cluster-client.so from the php.inifile.
3. Start or restart your Apache server.
sudo /etc/init.d/httpd start
Removing an earlier version of PHP 5
To remove an earlier version of PHP 5
1. Remove the php-memcached extension:
sudo pecl uninstall __uri/AmazonElastiCacheClusterClient
2. Remove the memcached.ini file added in the appropriate directory as indicated in the previousinstallation steps.
API Version 2015-02-02148

Amazon ElastiCache User GuideInstalling & Compiling Clients
Compiling the Source Code for the ElastiCache Cluster Client forPHPThis section covers how to obtain and compile the source code for the ElastiCache Cluster Client for PHP.
There are two packages you need to pull from GitHub and compile; aws-elasticache-cluster-client-libmemcached and aws-elasticache-cluster-client-memcached-for-php.
Topics• Compiling the libmemcached Library (p. 149)• Compiling the ElastiCache Memcached Auto Discovery Client for PHP (p. 149)
Compiling the libmemcached Library
To compile the aws-elasticache-cluster-client-libmemcached library
1. Launch an Amazon EC2 instance.2. Install the library dependencies.
• On Amazon Linux 201509 AMI
sudo yum install gcc gcc-c++ autoconf libevent-devel
• On Ubuntu 14.04 AMI
sudo apt-get updatesudo apt-get install libevent-dev gcc g++ make autoconf libsasl2-dev
3. Pull the repository and compile the code.
git clone https://github.com/awslabs/aws-elasticache-cluster-client-libmemcached.gitcd aws-elasticache-cluster-client-libmemcachedmkdir BUILDcd BUILD../configure --prefix=<libmemcached-install-directory> --with-picmakesudo make install
Compiling the ElastiCache Memcached Auto Discovery Client for PHP
The following sections describe how to compile the ElastiCache Memcached Auto Discovery Client
Topics• Compiling the ElastiCache Memcached Client for PHP 7 (p. 149)• Compiling the ElastiCache Memcached Client for PHP 5 (p. 150)
Compiling the ElastiCache Memcached Client for PHP 7
Run the following set of commands under the code directory.
git clone https://github.com/awslabs/aws-elasticache-cluster-client-memcached-for-php.gitcd aws-elasticache-cluster-client-memcached-for-php git checkout php7sudo yum install php70-devel
API Version 2015-02-02149

Amazon ElastiCache User GuideInstalling & Compiling Clients
phpize./configure --with-libmemcached-dir=<libmemcached-install-directory> --disable-memcached-saslmakemake install
NoteYou can statically link the libmemcached library into the PHP binary so it can be ported acrossvarious Linux platforms. To do that, run the following command before make:
sed -i "s#-lmemcached#<libmemcached-install-directory>/lib/libmemcached.a -lcrypt -lpthread -lm -lstdc++ -lsasl2#" Makefile
Compiling the ElastiCache Memcached Client for PHP 5
Compile the aws-elasticache-cluster-client-memcached-for-php by running the followingcommands under the aws-elasticache-cluster-client-memcached-for-php/ folder.
git clone https://github.com/awslabs/aws-elasticache-cluster-client-memcached-for-php.gitcd aws-elasticache-cluster-client-memcached-for-php sudo yum install zlib-develphpize./configure --with-libmemcached-dir=<libmemcached-install-directory>makemake install
API Version 2015-02-02150
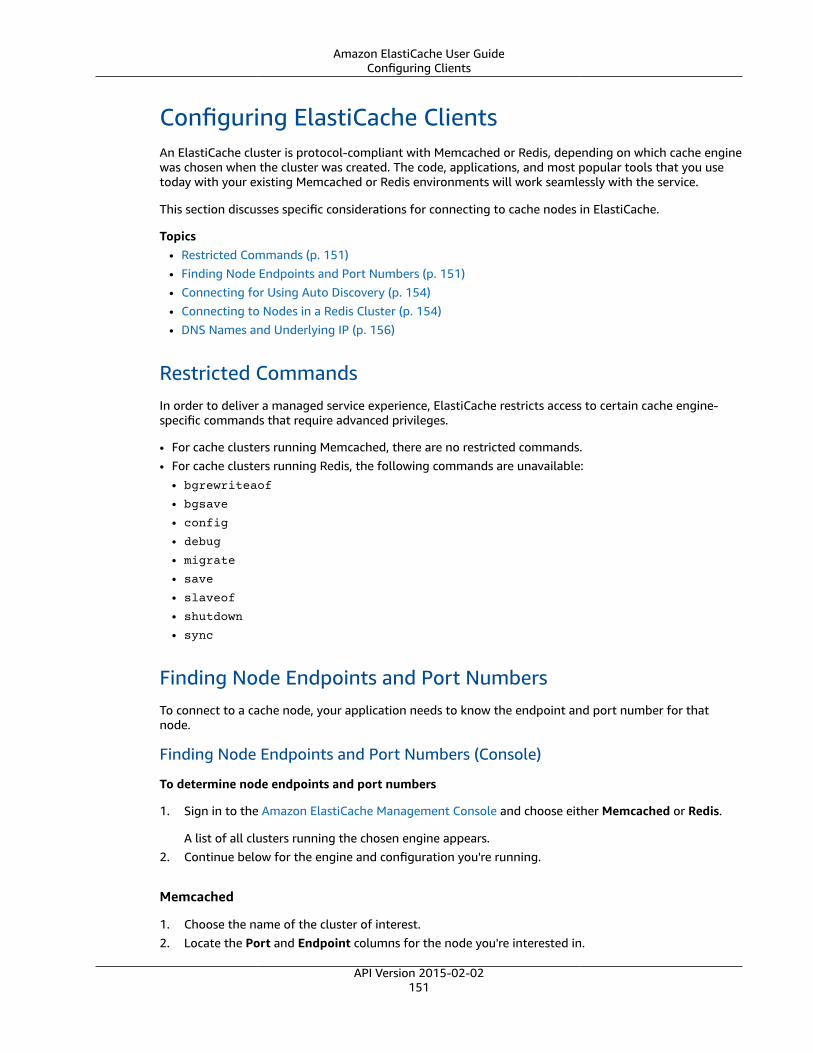
Amazon ElastiCache User GuideConfiguring Clients
Configuring ElastiCache ClientsAn ElastiCache cluster is protocol-compliant with Memcached or Redis, depending on which cache enginewas chosen when the cluster was created. The code, applications, and most popular tools that you usetoday with your existing Memcached or Redis environments will work seamlessly with the service.
This section discusses specific considerations for connecting to cache nodes in ElastiCache.
Topics• Restricted Commands (p. 151)• Finding Node Endpoints and Port Numbers (p. 151)• Connecting for Using Auto Discovery (p. 154)• Connecting to Nodes in a Redis Cluster (p. 154)• DNS Names and Underlying IP (p. 156)
Restricted CommandsIn order to deliver a managed service experience, ElastiCache restricts access to certain cache engine-specific commands that require advanced privileges.
• For cache clusters running Memcached, there are no restricted commands.• For cache clusters running Redis, the following commands are unavailable:
• bgrewriteaof
• bgsave
• config
• debug
• migrate
• save
• slaveof
• shutdown
• sync
Finding Node Endpoints and Port NumbersTo connect to a cache node, your application needs to know the endpoint and port number for thatnode.
Finding Node Endpoints and Port Numbers (Console)
To determine node endpoints and port numbers
1. Sign in to the Amazon ElastiCache Management Console and choose either Memcached or Redis.
A list of all clusters running the chosen engine appears.2. Continue below for the engine and configuration you're running.
Memcached
1. Choose the name of the cluster of interest.2. Locate the Port and Endpoint columns for the node you're interested in.
API Version 2015-02-02151

Amazon ElastiCache User GuideConfiguring Clients
Redis: Non-cluster mode
1. Choose the name of the cluster of interest.2. Locate the Port and Endpoint columns for the node you're interested in.
Redis: Cluster mode
1. Choose the name of the cluster of interest.
A list of all the shards in that cluster appears.2. Choose the name of the shard of interest.
A list of all the nodes in that shard appears3. Locate the Port and Endpoint columns for the node you're interested in.
Finding Cache Node Endpoints and Port Numbers (AWS CLI)
To determine cache node endpoints and port numbers, use the command describe-cache-clusterswith the --show-cache-node-info parameter.
aws elasticache describe-cache-clusters --show-cache-node-info
This command should produce output similar to the following:
{ "CacheClusters": [ { "Engine": "redis", "CacheNodes": [ { "CacheNodeId": "0001", "Endpoint": { "Port": 6379, "Address": "redis0x1.7adw3s.0001.usw2.cache.amazonaws.com" }, "CacheNodeStatus": "available", "ParameterGroupStatus": "in-sync", "CacheNodeCreateTime": "2017-04-05T20:45:28.907Z", "CustomerAvailabilityZone": "us-west-2b" } ], "CacheParameterGroup": { "CacheNodeIdsToReboot": [], "CacheParameterGroupName": "default.redis3.2", "ParameterApplyStatus": "in-sync" }, "SnapshotRetentionLimit": 1, "CacheClusterId": "redis0x1", "CacheSecurityGroups": [], "NumCacheNodes": 1, "SnapshotWindow": "00:00-01:00", "CacheClusterCreateTime": "2017-04-05T20:45:28.907Z", "AutoMinorVersionUpgrade": true, "CacheClusterStatus": "available", "PreferredAvailabilityZone": "us-west-2b", "ClientDownloadLandingPage": "https://console.aws.amazon.com/elasticache/home#client-download:", "CacheSubnetGroupName": "default", "EngineVersion": "3.2.4", "PendingModifiedValues": {},
API Version 2015-02-02152

Amazon ElastiCache User GuideConfiguring Clients
"PreferredMaintenanceWindow": "sun:06:00-sun:07:00", "CacheNodeType": "cache.m3.medium" }, ******* some output omitted for brevity ******* { "Engine": "memcached", "CacheNodes": [ { "CacheNodeId": "0001", "Endpoint": { "Port": 11211, "Address": "mem03.5edv7s.0001.usw2.cache.amazonaws.com" }, "CacheNodeStatus": "available", "ParameterGroupStatus": "in-sync", "CacheNodeCreateTime": "2017-04-25T19:24:38.977Z", "CustomerAvailabilityZone": "us-west-2a" } ], "CacheParameterGroup": { "CacheNodeIdsToReboot": [], "CacheParameterGroupName": "default.memcached1.4", "ParameterApplyStatus": "in-sync" }, "CacheClusterId": "mem03", "PreferredAvailabilityZone": "us-west-2a", "ConfigurationEndpoint": { "Port": 11211, "Address": "mem03.9dcv5r.cfg.usw2.cache.amazonaws.com" }, "CacheSecurityGroups": [], "CacheClusterCreateTime": "2017-04-25T19:24:38.977Z", "AutoMinorVersionUpgrade": true, "CacheClusterStatus": "available", "NumCacheNodes": 1, "ClientDownloadLandingPage": "https://console.aws.amazon.com/elasticache/home#client-download:", "SecurityGroups": [ { "Status": "active", "SecurityGroupId": "sg-dbe93fa2" } ], "CacheSubnetGroupName": "default", "EngineVersion": "1.4.34", "PendingModifiedValues": {}, "PreferredMaintenanceWindow": "thu:10:30-thu:11:30", "CacheNodeType": "cache.t2.micro" }, ]}
The fully qualified DNS names and port numbers are in the Endpoint section of the output.
Finding Cache Node Endpoints and Port Numbers (ElastiCache API)
To determine cache node endpoints and port numbers, use the action DescribeCacheClusters withthe ShowCacheNodeInfo=true parameter.
Example
API Version 2015-02-02153

Amazon ElastiCache User GuideConfiguring Clients
https://elasticache.us-west-2.amazonaws.com / ?Action=DescribeCacheClusters &ShowCacheNodeInfo=true &SignatureVersion=4 &SignatureMethod=HmacSHA256 &Timestamp=20140421T220302Z &Version=2014-09-30 &X-Amz-Algorithm=AWS4-HMAC-SHA256 &X-Amz-Credential=<credential> &X-Amz-Date=20140421T220302Z &X-Amz-Expires=20140421T220302Z &X-Amz-Signature=<signature> &X-Amz-SignedHeaders=Host
Connecting for Using Auto DiscoveryIf your applications use Auto Discovery, you only need to know the configuration endpoint for thecluster, rather than the individual endpoints for each cache node. For more information, see Node AutoDiscovery (Memcached) (p. 127).
NoteAt this time, Auto Discovery is only available for cache clusters running Memcached.
Connecting to Nodes in a Redis ClusterNoteAt this time, clusters (API/CLI: replication groups) that support replication and read replicas areonly supported for clusters running Redis.
For clusters, ElastiCache provides console, CLI, and API interfaces to obtain connection information forindividual nodes.
For read-only activity, applications can connect to any node in the cluster. However, for write activity,we recommend that your applications connect to the primary endpoint (Redis (cluster mode disabled))or configuration endpoint (Redis (cluster mode enabled)) for the cluster instead of connecting directlyto a node. This will ensure that your applications can always find the correct node, even if you decide toreconfigure your cluster by promoting a read replica to the primary role.
Connecting to Clusters in a Cluster (Console)
To determine endpoints and port numbers
• See the topic, Finding a Redis (cluster mode disabled) Cluster's Endpoints (Console) (p. 69).
Connecting to Clusters in a Replication Group (AWS CLI)
To determine cache node endpoints and port numbers
Use the command describe-replication-groups with the name of your replication group:
aws elasticache describe-replication-groups redis2x2
This command should produce output similar to the following:
{ "ReplicationGroups": [ { "Status": "available",
API Version 2015-02-02154
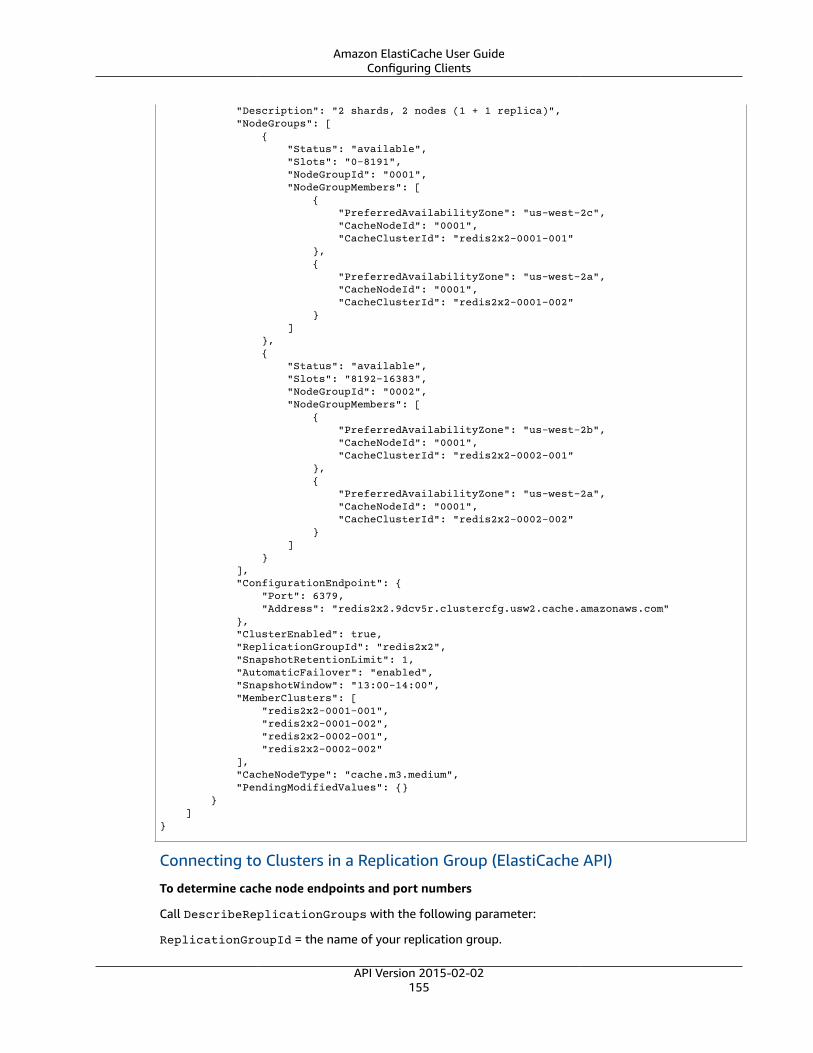
Amazon ElastiCache User GuideConfiguring Clients
"Description": "2 shards, 2 nodes (1 + 1 replica)", "NodeGroups": [ { "Status": "available", "Slots": "0-8191", "NodeGroupId": "0001", "NodeGroupMembers": [ { "PreferredAvailabilityZone": "us-west-2c", "CacheNodeId": "0001", "CacheClusterId": "redis2x2-0001-001" }, { "PreferredAvailabilityZone": "us-west-2a", "CacheNodeId": "0001", "CacheClusterId": "redis2x2-0001-002" } ] }, { "Status": "available", "Slots": "8192-16383", "NodeGroupId": "0002", "NodeGroupMembers": [ { "PreferredAvailabilityZone": "us-west-2b", "CacheNodeId": "0001", "CacheClusterId": "redis2x2-0002-001" }, { "PreferredAvailabilityZone": "us-west-2a", "CacheNodeId": "0001", "CacheClusterId": "redis2x2-0002-002" } ] } ], "ConfigurationEndpoint": { "Port": 6379, "Address": "redis2x2.9dcv5r.clustercfg.usw2.cache.amazonaws.com" }, "ClusterEnabled": true, "ReplicationGroupId": "redis2x2", "SnapshotRetentionLimit": 1, "AutomaticFailover": "enabled", "SnapshotWindow": "13:00-14:00", "MemberClusters": [ "redis2x2-0001-001", "redis2x2-0001-002", "redis2x2-0002-001", "redis2x2-0002-002" ], "CacheNodeType": "cache.m3.medium", "PendingModifiedValues": {} } ]}
Connecting to Clusters in a Replication Group (ElastiCache API)
To determine cache node endpoints and port numbers
Call DescribeReplicationGroups with the following parameter:
ReplicationGroupId = the name of your replication group.
API Version 2015-02-02155

Amazon ElastiCache User GuideConfiguring Clients
Example
https://elasticache.us-west-2.amazonaws.com / ?Action=DescribeCacheClusters &ReplicationGroupId=repgroup01 &Version=2014-09-30 &SignatureVersion=4 &SignatureMethod=HmacSHA256 &Timestamp=20140421T220302Z &X-Amz-Algorithm=AWS4-HMAC-SHA256 &X-Amz-Date=20140421T220302Z &X-Amz-SignedHeaders=Host &X-Amz-Expires=20140421T220302Z &X-Amz-Credential=<credential> &X-Amz-Signature=<signature>
DNS Names and Underlying IPMemcached and Redis clients maintain a server list containing the addresses and ports of the serversholding the cache data. When using ElastiCache, the DescribeCacheClusters API (or the describe-cache-clusters command line utility) returns a fully qualified DNS entry and port number that can be used forthe server list.
ImportantIt is important that client applications are configured to frequently resolve DNS names of cachenodes when they attempt to connect to a cache node endpoint.
VPC Installations
ElastiCache ensures that both the DNS name and the IP address of the cache node remain the samewhen cache nodes are recovered in case of failure.
Non-VPC Installations
ElastiCache ensures that the DNS name of a cache node is unchanged when cache nodes are recovered incase of failure; however, the underlying IP address of the cache node can change.
Most Memcached and Redis client libraries support persistent cache node connections by default. Werecommend using persistent cache node connections when using ElastiCache. Client-side DNS cachingcan occur in multiple places, including client libraries, the language runtime, or the client operatingsystem. You should review your application configuration at each layer to ensure that you are frequentlyresolving IP addresses for your cache nodes.
API Version 2015-02-02156
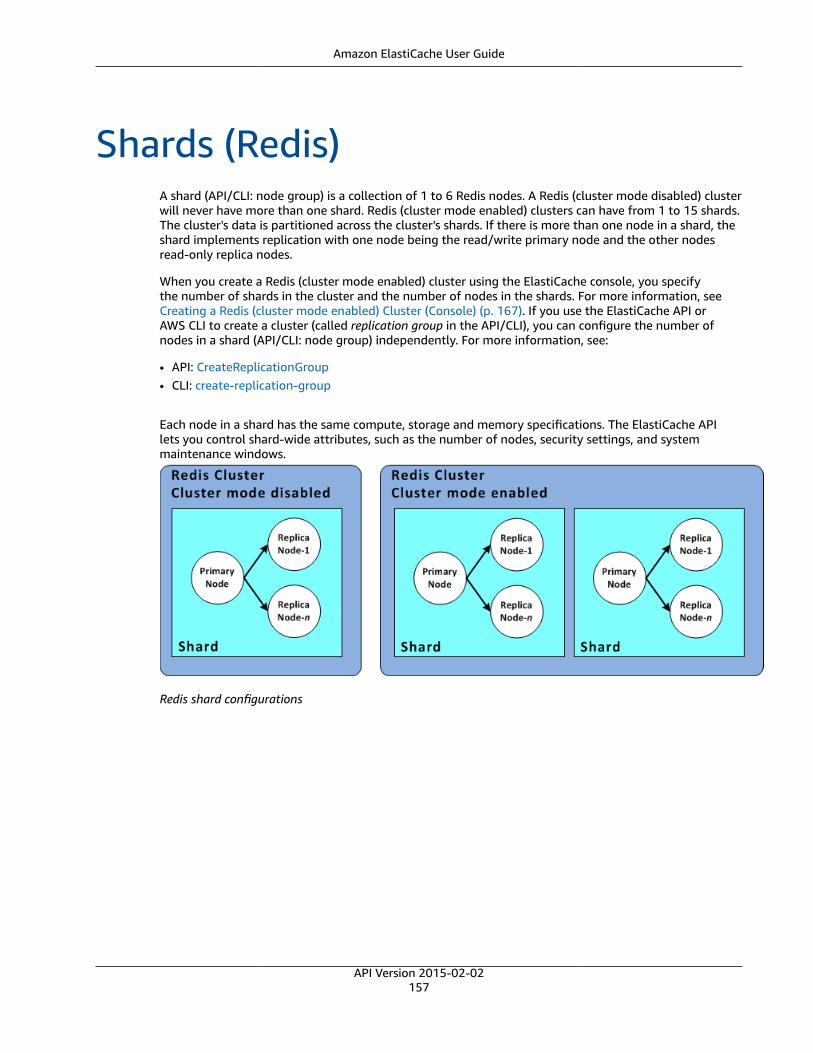
Amazon ElastiCache User Guide
Shards (Redis)A shard (API/CLI: node group) is a collection of 1 to 6 Redis nodes. A Redis (cluster mode disabled) clusterwill never have more than one shard. Redis (cluster mode enabled) clusters can have from 1 to 15 shards.The cluster's data is partitioned across the cluster's shards. If there is more than one node in a shard, theshard implements replication with one node being the read/write primary node and the other nodesread-only replica nodes.
When you create a Redis (cluster mode enabled) cluster using the ElastiCache console, you specifythe number of shards in the cluster and the number of nodes in the shards. For more information, seeCreating a Redis (cluster mode enabled) Cluster (Console) (p. 167). If you use the ElastiCache API orAWS CLI to create a cluster (called replication group in the API/CLI), you can configure the number ofnodes in a shard (API/CLI: node group) independently. For more information, see:
• API: CreateReplicationGroup• CLI: create-replication-group
Each node in a shard has the same compute, storage and memory specifications. The ElastiCache APIlets you control shard-wide attributes, such as the number of nodes, security settings, and systemmaintenance windows.
Redis shard configurations
API Version 2015-02-02157
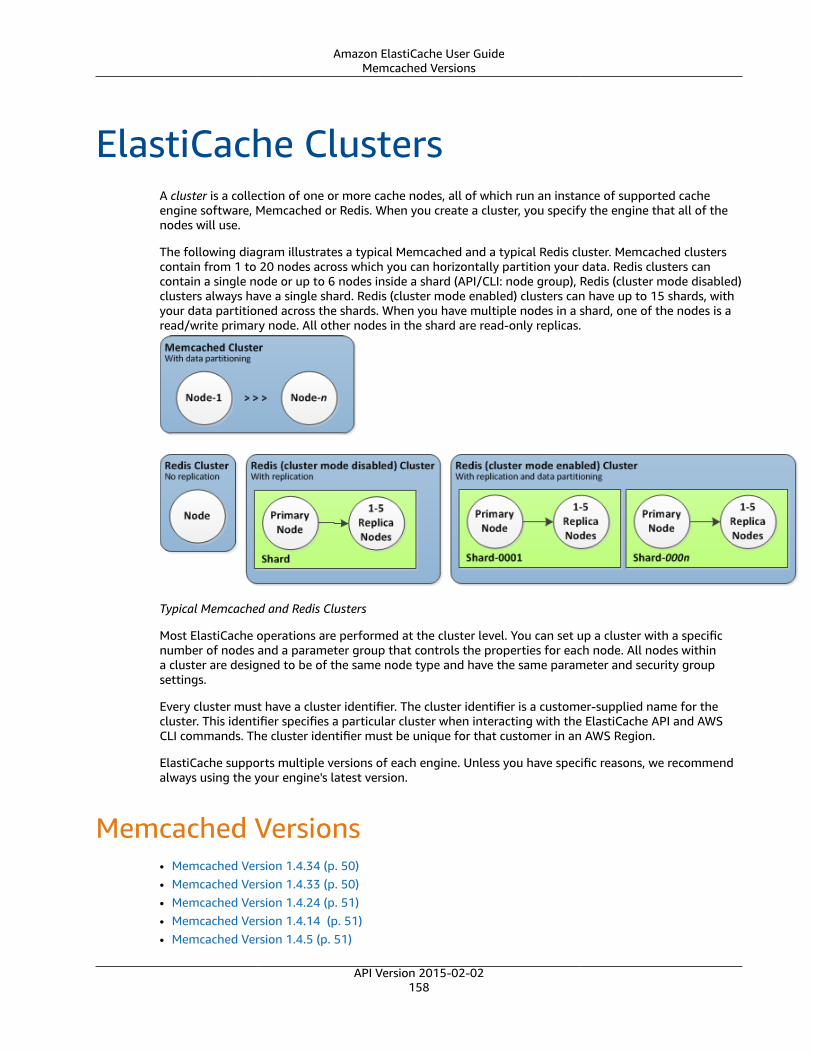
Amazon ElastiCache User GuideMemcached Versions
ElastiCache ClustersA cluster is a collection of one or more cache nodes, all of which run an instance of supported cacheengine software, Memcached or Redis. When you create a cluster, you specify the engine that all of thenodes will use.
The following diagram illustrates a typical Memcached and a typical Redis cluster. Memcached clusterscontain from 1 to 20 nodes across which you can horizontally partition your data. Redis clusters cancontain a single node or up to 6 nodes inside a shard (API/CLI: node group), Redis (cluster mode disabled)clusters always have a single shard. Redis (cluster mode enabled) clusters can have up to 15 shards, withyour data partitioned across the shards. When you have multiple nodes in a shard, one of the nodes is aread/write primary node. All other nodes in the shard are read-only replicas.
Typical Memcached and Redis Clusters
Most ElastiCache operations are performed at the cluster level. You can set up a cluster with a specificnumber of nodes and a parameter group that controls the properties for each node. All nodes withina cluster are designed to be of the same node type and have the same parameter and security groupsettings.
Every cluster must have a cluster identifier. The cluster identifier is a customer-supplied name for thecluster. This identifier specifies a particular cluster when interacting with the ElastiCache API and AWSCLI commands. The cluster identifier must be unique for that customer in an AWS Region.
ElastiCache supports multiple versions of each engine. Unless you have specific reasons, we recommendalways using the your engine's latest version.
Memcached Versions• Memcached Version 1.4.34 (p. 50)• Memcached Version 1.4.33 (p. 50)• Memcached Version 1.4.24 (p. 51)• Memcached Version 1.4.14 (p. 51)• Memcached Version 1.4.5 (p. 51)
API Version 2015-02-02158

Amazon ElastiCache User GuideRedis Versions
Redis Versions• ElastiCache for Redis Version 3.2.10 (Enhanced) (p. 53)• ElastiCache for Redis Version 3.2.6 (Enhanced) (p. 53)• ElastiCache for Redis Version 3.2.4 (Enhanced) (p. 54)• ElastiCache for Redis Version 2.8.23 (Enhanced) (p. 55)• ElastiCache for Redis Version 2.8.22 (Enhanced) (p. 55)• ElastiCache for Redis Version 2.8.19 (p. 56)• ElastiCache for Redis Version 2.8.6 (p. 56)• ElastiCache for Redis Version 2.6.13 (p. 56)
Other ElastiCache Cluster OperationsAdditional operations involving clusters:
• Finding Your ElastiCache Endpoints (p. 66)• Accessing ElastiCache Resources from Outside AWS (p. 445)
API Version 2015-02-02159
Amazon ElastiCache User GuideCreating a Cluster
Creating a ClusterWhen you launch an Amazon ElastiCache cluster, you can choose to use the Memcached or Redis engine.The Redis engine has two flavors, Redis (cluster mode disabled) and Redis (cluster mode enabled) Todetermine which engine will best suit your needs, see Engines and Versions (p. 44) in this guide.
In this section you will find instructions on creating a standalone cluster using the ElastiCache console,AWS CLI, or ElastiCache API.
Knowing the answers to these questions before you begin will expedite creating your cluster.
• Which engine you will use?
For a comparison of engines and engine versions, see Engines and Versions (p. 44).• Which node instance type do you need?
For guidance on choosing an instance node type, see Choosing Your Node Size (p. 103).• Will you launch your cluster in a VPC or an Amazon VPC?
ImportantIf you're going to launch your cluster in an Amazon VPC, you need to create a subnet groupin the same VPC before you start creating a cluster. For more information, see Subnets andSubnet Groups (p. 383).An advantage of launching in a Amazon VPC is that, though ElastiCache is designed to beaccessed from within AWS using Amazon EC2, if your cluster is in an Amazon VPC you canprovide access from outside AWS. For more information, see Accessing ElastiCache Resourcesfrom Outside AWS (p. 445).
• Do you need to customize any parameter values?
If you do, you need to create a custom Parameter Group. For more information, see Creating aParameter Group (p. 344).
If you're running Redis you may want to consider at least setting reserved-memory or reserved-memory-percent. For more information, see Managing Reserved Memory (Redis) (p. 83).
• Do you need to create your own Security Group or VPC Security Group?
For more information, see Security Groups [EC2-Classic] (p. 332) and Security in Your VPC.• How do you intend to implement fault tolerance?
For more information, see Mitigating Failures (p. 87).
Topics• Creating a Cluster (Console): Memcached (p. 161)• Creating a Redis (cluster mode disabled) Cluster (Console) (p. 163)• Creating a Redis (cluster mode enabled) Cluster (Console) (p. 167)• Creating a Cache Cluster (AWS CLI) (p. 172)• Creating a Cache Cluster (ElastiCache API) (p. 174)
API Version 2015-02-02160
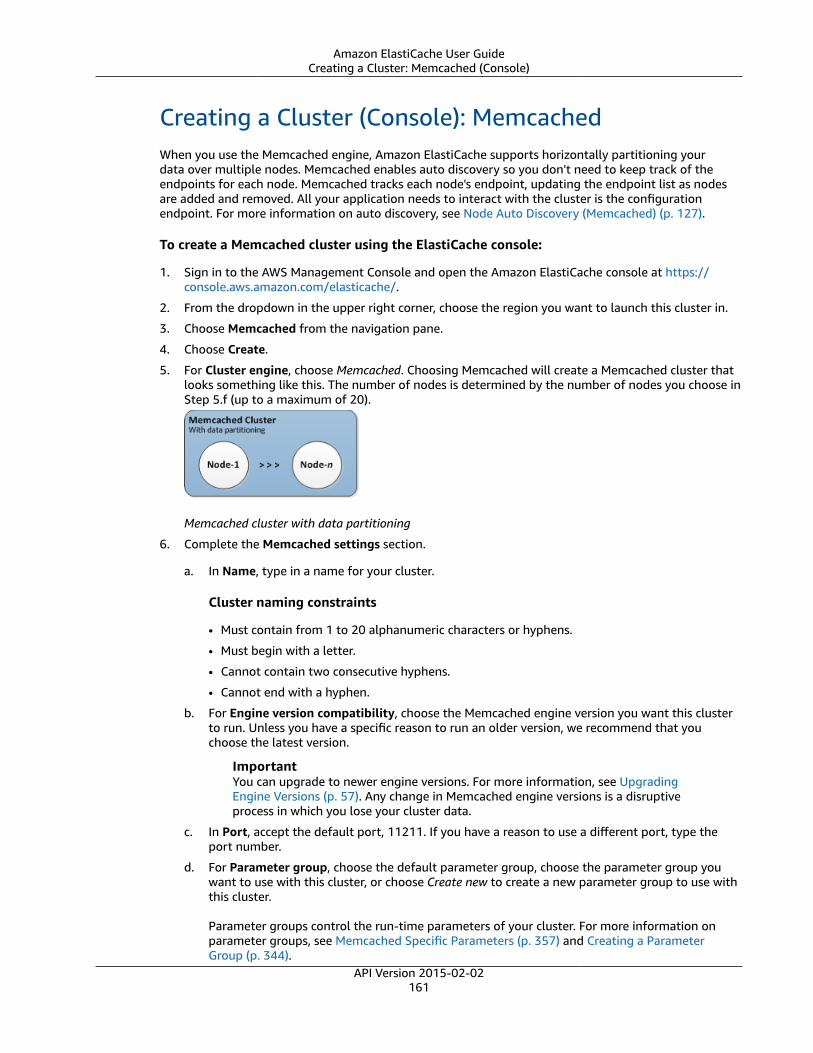
Amazon ElastiCache User GuideCreating a Cluster: Memcached (Console)
Creating a Cluster (Console): MemcachedWhen you use the Memcached engine, Amazon ElastiCache supports horizontally partitioning yourdata over multiple nodes. Memcached enables auto discovery so you don't need to keep track of theendpoints for each node. Memcached tracks each node's endpoint, updating the endpoint list as nodesare added and removed. All your application needs to interact with the cluster is the configurationendpoint. For more information on auto discovery, see Node Auto Discovery (Memcached) (p. 127).
To create a Memcached cluster using the ElastiCache console:
1. Sign in to the AWS Management Console and open the Amazon ElastiCache console at https://console.aws.amazon.com/elasticache/.
2. From the dropdown in the upper right corner, choose the region you want to launch this cluster in.
3. Choose Memcached from the navigation pane.
4. Choose Create.
5. For Cluster engine, choose Memcached. Choosing Memcached will create a Memcached cluster thatlooks something like this. The number of nodes is determined by the number of nodes you choose inStep 5.f (up to a maximum of 20).
Memcached cluster with data partitioning
6. Complete the Memcached settings section.
a. In Name, type in a name for your cluster.
Cluster naming constraints
• Must contain from 1 to 20 alphanumeric characters or hyphens.
• Must begin with a letter.
• Cannot contain two consecutive hyphens.
• Cannot end with a hyphen.
b. For Engine version compatibility, choose the Memcached engine version you want this clusterto run. Unless you have a specific reason to run an older version, we recommend that youchoose the latest version.
ImportantYou can upgrade to newer engine versions. For more information, see UpgradingEngine Versions (p. 57). Any change in Memcached engine versions is a disruptiveprocess in which you lose your cluster data.
c. In Port, accept the default port, 11211. If you have a reason to use a different port, type theport number.
d. For Parameter group, choose the default parameter group, choose the parameter group youwant to use with this cluster, or choose Create new to create a new parameter group to use withthis cluster.
Parameter groups control the run-time parameters of your cluster. For more information onparameter groups, see Memcached Specific Parameters (p. 357) and Creating a ParameterGroup (p. 344).
API Version 2015-02-02161

Amazon ElastiCache User GuideCreating a Cluster: Memcached (Console)
e. For Node type, click the down arrow ( ). In the Change node type dialog box, choose theInstance family of the node type you want, choose the node type you want to use for thiscluster, and then choose Save.
For more information, see Choosing Your Node Size (p. 103).f. For Number of nodes, choose the number of nodes you want for this cluster. You will partition
your data across the cluster's nodes.
If you need to change the number of nodes later, scaling horizontally is quite easy withMemcached. For more information, see Scaling Memcached (p. 205)
7. Click Advanced Memcached settings and complete the section.
a. For Subnet group, choose the subnet you want to apply to this cluster.
For more information, see Subnets and Subnet Groups (p. 383).b. For Availability zone(s), you have two options:
• No preference – ElastiCache chooses the Availability Zone for each node in your cluster.• Specify availability zones – Specify the Availability Zone for each node in your cluster.
If you chose to specify the Availability Zones, for each node choose an Availability Zone fromthe list to the right of each node name.
We recommend locating your nodes in multiple Availability Zones for improved faulttolerance. For more information, see Mitigating Availability Zone Failures (p. 88).
For more information, see Choosing Regions and Availability Zones (p. 61).c. For Security groups, choose the security groups you want to apply to this cluster.
For more information, see ElastiCache and Security Groups (p. 410).d. The Maintenance window is the time, generally an hour in length, each week when ElastiCache
schedules system maintenance for your cluster. You can allow ElastiCache choose the day andtime for your maintenance window (No preference), or you can choose the day, time, andduration yourself (Specify maintenance window). If you choose Specify maintenance window,choose the Start day, Start time, and Duration (in hours) for your maintenance window. Alltimes are UCT times.
For more information, see Maintenance Window (p. 59).e. For Notifications, choose an existing Amazon Simple Notification Service (Amazon SNS) topic,
or choose manual ARN input and type in the topic Amazon Resource Name (ARN). Amazon SNSallows you to push notifications to Internet-connected smart devices. The default is to disablenotifications. For more information, see https://aws.amazon.com/sns/.
8. Review all your entries and choices, then go back and make any needed corrections. When you'reready, choose Create to launch your cluster.
As soon as your cluster's status is available, you can grant Amazon EC2 access to it, connect to it, andbegin using it. For more information, see Step 4: Authorize Access (p. 33) and Step 5: Connect to aCluster's Node (p. 37).
ImportantAs soon as your cluster becomes available, you're billed for each hour or partial hour that thecluster is active, even if you're not actively using it. To stop incurring charges for this cluster, youmust delete it. See Deleting a Cluster (p. 201).
API Version 2015-02-02162

Amazon ElastiCache User GuideCreating a Redis (cluster mode disabled) Cluster (Console)
Creating a Redis (cluster mode disabled) Cluster(Console)ElastiCache supports replication when you use the Redis engine. To monitor the latency between whendata is written to a Redis read/write primary cluster and when it is propagated to a read-only secondarycluster, ElastiCache adds to the cluster a special key, ElastiCacheMasterReplicationTimestamp.This key is the current Universal Coordinated Time (UCT) time. Because a Redis cluster might be addedto a replication group at a later time, this key is included in all Redis clusters, even if initially they are notmembers of a replication group. For more information on replication groups, see ElastiCache Replication(Redis) (p. 239).
To create a standalone Redis (cluster mode disabled) cluster
1. Sign in to the AWS Management Console and open the Amazon ElastiCache console at https://console.aws.amazon.com/elasticache/.
2. From the dropdown in the upper right corner, choose the region you want to launch this cluster in.3. Choose Redis from the navigation pane.4. Choose Create.5. For Cluster engine, choose Redis, and then clear the Cluster Mode enabled (Scale Out) check box.6. Complete the Redis settings section.
a. In Name, type a name for your cluster.
Cluster naming constraints
• Must contain from 1 to 20 alphanumeric characters or hyphens.• Must begin with a letter.• Cannot contain two consecutive hyphens.• Cannot end with a hyphen.
b. In the Description box, type in a description for this cluster.c. For Engine version compatibility, choose the ElastiCache for Redis engine version you want
to run on this cluster. Unless you have a specific reason to run an older version, we recommendthat you choose the latest version.
ImportantYou can upgrade to newer engine versions (see Upgrading Engine Versions (p. 57)), butyou cannot downgrade to older engine versions except by deleting the existing Clusterand creating it anew.
Because the newer Redis versions provide a better and more stable user experience, Redisversions 2.6.13, 2.8.6, and 2.8.19 are deprecated when using the ElastiCache console. Werecommend against using these Redis versions. If you need to use one of them, work with theAWS CLI or ElastiCache API.
For more information, see the following topics:
AWS CLI ElastiCache API
Create Cluster Creating a Cache Cluster(AWS CLI) (p. 172)
This action cannot be usedto create a replication groupwith cluster mode enabled.
Creating a Cache Cluster(ElastiCache API) (p. 174)
This action cannot be usedto create a replication groupwith cluster mode enabled.
API Version 2015-02-02163

Amazon ElastiCache User GuideCreating a Redis (cluster mode disabled) Cluster (Console)
AWS CLI ElastiCache API
Modify Cluster Modifying a Cache Cluster(AWS CLI) (p. 184)
This action cannot be usedto create a replication groupwith cluster mode enabled.
Modifying a Cache Cluster(ElastiCache API) (p. 185)
This action cannot be usedto create a replication groupwith cluster mode enabled.
Create Replication Group Creating a Redis (clustermode disabled) Cluster withReplicas from Scratch (AWSCLI) (p. 265)
Creating a Redis (clustermode enabled) Cluster withReplicas from Scratch (AWSCLI) (p. 271)
Creating a Redis (clustermode disabled) Clusterwith Replicas from Scratch(ElastiCache API) (p. 268)
Creating a Redis (clustermode enabled) Clusterwith Replicas from Scratch(ElastiCache API) (p. 275)
Modify Replication Group Modifying a ReplicationGroup (AWS CLI) (p. 288)
This action cannot be usedto create a replication groupwith cluster mode enabled.
Modifying a ReplicationGroup (ElastiCacheAPI) (p. 289)
This action cannot be usedto create a replication groupwith cluster mode enabled.
d. To encrypt your data while it is in transit, for Encryption, choose Yes.
e. If you chose Yes for Encryption, you can require users to enter a password when executing Rediscommands. To require a password when executing commands, do the following:
i. Choose Yes from the AUTH list.
ii. Type in a password in the AUTH token box:
AUTH Token Constraints when using with ElastiCache
• Passwords must be at least 16 and a maximum of 128 printable characters.
• The printable characters @, ", and / cannot be used in passwords.
• AUTH can only be enabled when creating clusters where in-transit encryption is enabled.
• The password set at cluster creation cannot be changed.
We recommend that you follow a stricter policy such as:
• Must include a mix of characters that includes at least three of the following charactertypes:
• Uppercase characters
• Lowercase characters
• Digits
• Non-alphanumeric characters (!, &, #, $, ^, <, >, -)
• Must not contain a dictionary word or a slightly modified dictionary word.
• Must not be the same as or similar to a recently used password.
f. In Port, accept the default port, 6379. If you have a reason to use a different port, type the portnumber.
g. For Parameter group, choose the parameter group you want to use with this cluster, or chooseCreate new to create a new parameter group to use with this cluster.API Version 2015-02-02
164
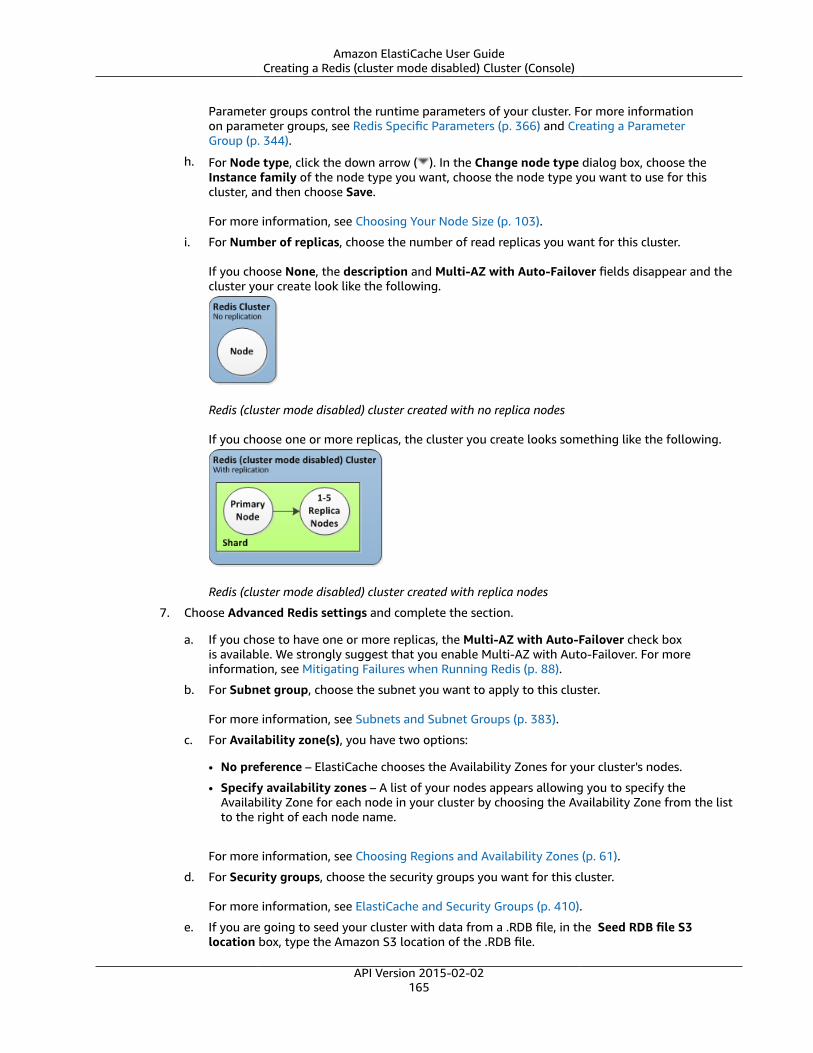
Amazon ElastiCache User GuideCreating a Redis (cluster mode disabled) Cluster (Console)
Parameter groups control the runtime parameters of your cluster. For more informationon parameter groups, see Redis Specific Parameters (p. 366) and Creating a ParameterGroup (p. 344).
h. For Node type, click the down arrow ( ). In the Change node type dialog box, choose theInstance family of the node type you want, choose the node type you want to use for thiscluster, and then choose Save.
For more information, see Choosing Your Node Size (p. 103).
i. For Number of replicas, choose the number of read replicas you want for this cluster.
If you choose None, the description and Multi-AZ with Auto-Failover fields disappear and thecluster your create look like the following.
Redis (cluster mode disabled) cluster created with no replica nodes
If you choose one or more replicas, the cluster you create looks something like the following.
Redis (cluster mode disabled) cluster created with replica nodes
7. Choose Advanced Redis settings and complete the section.
a. If you chose to have one or more replicas, the Multi-AZ with Auto-Failover check boxis available. We strongly suggest that you enable Multi-AZ with Auto-Failover. For moreinformation, see Mitigating Failures when Running Redis (p. 88).
b. For Subnet group, choose the subnet you want to apply to this cluster.
For more information, see Subnets and Subnet Groups (p. 383).
c. For Availability zone(s), you have two options:
• No preference – ElastiCache chooses the Availability Zones for your cluster's nodes.
• Specify availability zones – A list of your nodes appears allowing you to specify theAvailability Zone for each node in your cluster by choosing the Availability Zone from the listto the right of each node name.
For more information, see Choosing Regions and Availability Zones (p. 61).
d. For Security groups, choose the security groups you want for this cluster.
For more information, see ElastiCache and Security Groups (p. 410).
e. If you are going to seed your cluster with data from a .RDB file, in the Seed RDB file S3location box, type the Amazon S3 location of the .RDB file.
API Version 2015-02-02165
Amazon ElastiCache User GuideCreating a Redis (cluster mode disabled) Cluster (Console)
For more information, see Seeding a New Cluster with an Externally Created Backup(Redis) (p. 324).
f. If you want regularly scheduled automatic backups, choose Enable automatic backups, andthen type the number of days you want an automatic backup retained before it is automaticallydeleted. If you don't want regularly scheduled automatic backups, clear the Enable automaticbackups check box. In either case, you always have the option to create manual backups, whichmust be deleted manually.
For more information on Redis backup and restore, see ElastiCache Backup and Restore(Redis) (p. 297).
g. The Maintenance window is the time, generally an hour in length, each week when ElastiCacheschedules system maintenance for your cluster. You can allow ElastiCache to choose the dayand time for your maintenance window (No preference), or you can choose the day, time, andduration yourself (Specify maintenance window). If you choose Specify maintenance window,choose the Start day, Start time, and Duration (in hours) for your maintenance window. Alltimes are UCT times.
For more information, see Maintenance Window (p. 59).h. For Notifications, choose an existing Amazon Simple Notification Service (Amazon SNS) topic,
or choose manual ARN input and type in the topic Amazon Resource Name (ARN). Amazon SNSallows you to push notifications to Internet-connected smart devices. The default is to disablenotifications. For more information, see https://aws.amazon.com/sns/.
8. Review all your entries and choices, then go back and make any needed corrections. When you'reready, choose Create to launch your cluster.
As soon as your cluster's status is available, you can grant Amazon EC2 access to it, connect to it, andbegin using it. For more information, see Step 4: Authorize Access (p. 33) and Step 5: Connect to aCluster's Node (p. 37).
ImportantAs soon as your cluster becomes available, you're billed for each hour or partial hour that thecluster is active, even if you're not actively using it. To stop incurring charges for this cluster, youmust delete it. See Deleting a Cluster (p. 201).
API Version 2015-02-02166
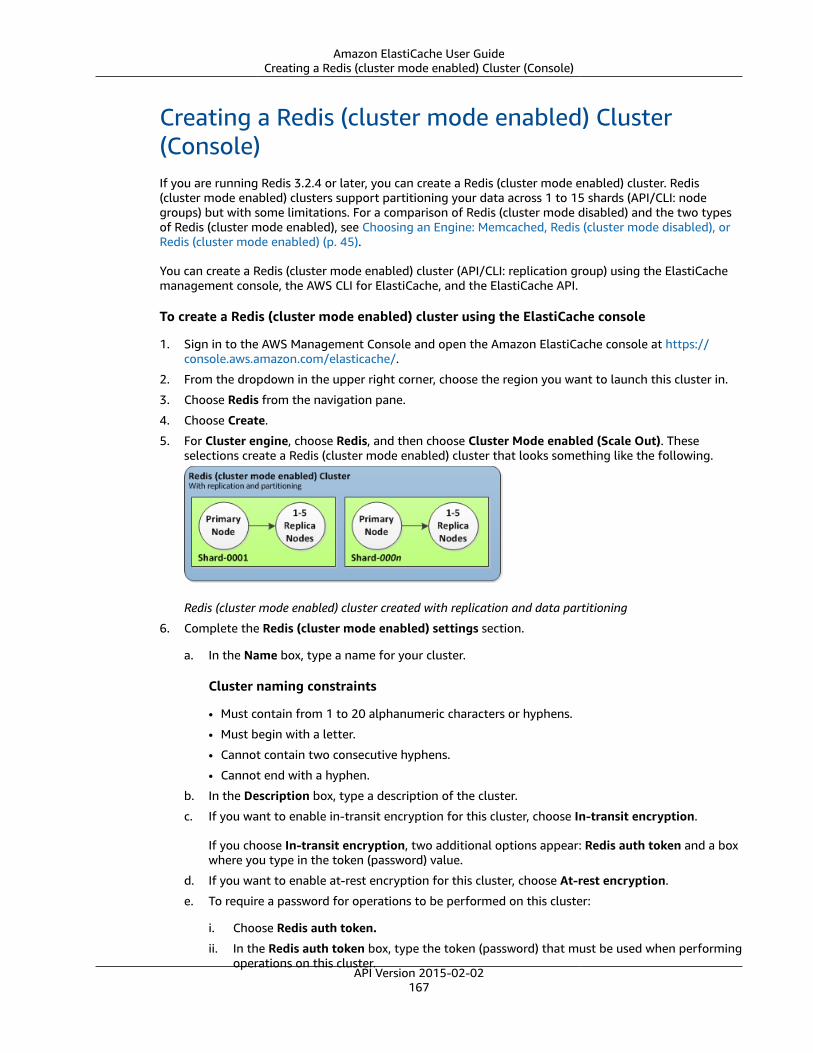
Amazon ElastiCache User GuideCreating a Redis (cluster mode enabled) Cluster (Console)
Creating a Redis (cluster mode enabled) Cluster(Console)If you are running Redis 3.2.4 or later, you can create a Redis (cluster mode enabled) cluster. Redis(cluster mode enabled) clusters support partitioning your data across 1 to 15 shards (API/CLI: nodegroups) but with some limitations. For a comparison of Redis (cluster mode disabled) and the two typesof Redis (cluster mode enabled), see Choosing an Engine: Memcached, Redis (cluster mode disabled), orRedis (cluster mode enabled) (p. 45).
You can create a Redis (cluster mode enabled) cluster (API/CLI: replication group) using the ElastiCachemanagement console, the AWS CLI for ElastiCache, and the ElastiCache API.
To create a Redis (cluster mode enabled) cluster using the ElastiCache console
1. Sign in to the AWS Management Console and open the Amazon ElastiCache console at https://console.aws.amazon.com/elasticache/.
2. From the dropdown in the upper right corner, choose the region you want to launch this cluster in.
3. Choose Redis from the navigation pane.
4. Choose Create.
5. For Cluster engine, choose Redis, and then choose Cluster Mode enabled (Scale Out). Theseselections create a Redis (cluster mode enabled) cluster that looks something like the following.
Redis (cluster mode enabled) cluster created with replication and data partitioning
6. Complete the Redis (cluster mode enabled) settings section.
a. In the Name box, type a name for your cluster.
Cluster naming constraints
• Must contain from 1 to 20 alphanumeric characters or hyphens.
• Must begin with a letter.
• Cannot contain two consecutive hyphens.
• Cannot end with a hyphen.
b. In the Description box, type a description of the cluster.
c. If you want to enable in-transit encryption for this cluster, choose In-transit encryption.
If you choose In-transit encryption, two additional options appear: Redis auth token and a boxwhere you type in the token (password) value.
d. If you want to enable at-rest encryption for this cluster, choose At-rest encryption.
e. To require a password for operations to be performed on this cluster:
i. Choose Redis auth token.
ii. In the Redis auth token box, type the token (password) that must be used when performingoperations on this cluster.
API Version 2015-02-02167

Amazon ElastiCache User GuideCreating a Redis (cluster mode enabled) Cluster (Console)
AUTH Token Constraints when using with ElastiCache
• Passwords must be at least 16 and a maximum of 128 printable characters.
• The printable characters @, ", and / cannot be used in passwords.
• AUTH can only be enabled when creating clusters where in-transit encryption is enabled.
• The password set at cluster creation cannot be changed.
We recommend that you follow a stricter policy such as:
• Must include a mix of characters that includes at least three of the following charactertypes:
• Uppercase characters
• Lowercase characters
• Digits
• Non-alphanumeric characters (!, &, #, $, ^, <, >, -)
• Must not contain a dictionary word or a slightly modified dictionary word.
• Must not be the same as or similar to a recently used password.
f. For Engine version compatibility, choose the ElastiCache for Redis engine version you wantto run on this cluster. Unless you have a specific reason to run an older version, we recommendthat you choose the latest version.
g. To encrypt your data while it is in transit, for Encryption, choose Yes.
h. If you chose Yes for Encryption, you can require users to enter a password when executing Rediscommands. To require a password when executing commands, do the following:
i. Choose Yes from the AUTH list.
ii. Type in a password in the AUTH token box.
AUTH Token Constraints when using with ElastiCache
• Passwords must be at least 16 and a maximum of 128 printable characters.
• The printable characters @, ", and / cannot be used in passwords.
• AUTH can only be enabled when creating clusters where in-transit encryption is enabled.
• The password set at cluster creation cannot be changed.
We recommend that you follow a stricter policy such as:
• Must include a mix of characters that includes at least three of the following charactertypes:
• Uppercase characters
• Lowercase characters
• Digits
• Non-alphanumeric characters (!, &, #, $, ^, <, >, -)
• Must not contain a dictionary word or a slightly modified dictionary word.
• Must not be the same as or similar to a recently used password.
i. In the Port box, accept the default port, 6379. If you have a reason to use a different port, typethe port number.
j. For Parameter group, choose the parameter group you want to use with this cluster, or chooseCreate new to create a new parameter group to use with this cluster.
API Version 2015-02-02168

Amazon ElastiCache User GuideCreating a Redis (cluster mode enabled) Cluster (Console)
Parameter groups control the run-time parameters of your cluster. For more informationon parameter groups, see Redis Specific Parameters (p. 366) and Creating a ParameterGroup (p. 344).
k. For Node type, choose the down arrow ( ). In the Change node type dialog box, choose theInstance family of the node type you want, choose the node type you want to use for thiscluster, and then choose Save.
For more information, see Choosing Your Node Size (p. 103).
l. For Number of shards, choose the number of shards (partitions/node groups) you want for thisRedis (cluster mode enabled) cluster.
In Redis (cluster mode enabled), depending upon the version of Redis running on your cluster,you may be able to change the number of shards in your cluster dynamically.
• Redis 3.2.10—If your cluster is running Redis 3.2.10 you can change the number of shards inyour cluster dynamically. For more information, see Scaling for Amazon ElastiCache for Redis—Redis (cluster mode enabled) (p. 229).
• Other Redis versions—If your cluster is running a version of Redis other than version 3.2.10,to change the number of shards in your cluster, you must create a new cluster with the newnumber of shards. For more information, see Restoring From a Backup with Optional ClusterResizing (p. 321).
m. For Replicas per shard, choose the number of read replica nodes you want in each shard.
The following restrictions exist for Redis (cluster mode enabled).
• The number of replicas is the same for each shard when creating the cluster using theconsole.
• The number of read replicas per shard is fixed and cannot be changed. If you find you needmore or fewer replicas per shard (API/CLI: node group), you must create a new cluster withthe new number of replicas. For more information, see Seeding a New Cluster with anExternally Created Backup (Redis) (p. 324).
n. For Subnet group, choose the subnet you want to apply to this cluster.
For more information, see Subnets and Subnet Groups (p. 383).
7. Click Advanced Redis settings and complete the section.
a. For Slots and keyspaces, choose how you want your keys distributed over your shards(partitions). There are 16,384 keys to be distributed (numbered 0 through 16383).
• Equal distribution – ElastiCache distributes your keyspace as equally as possible over yourshards.
• Custom distribution – You specify the range of keys for each shard in the table belowAvailability zone(s).
b. For Availability zone(s), you have two options:
• No preference – ElastiCache chooses the Availability Zone.
• Specify availability zones – You specify the Availability Zone for each cluster.
If you chose to specify the Availability Zones, for each cluster in each shard, choose theAvailability Zone from the list.
API Version 2015-02-02169
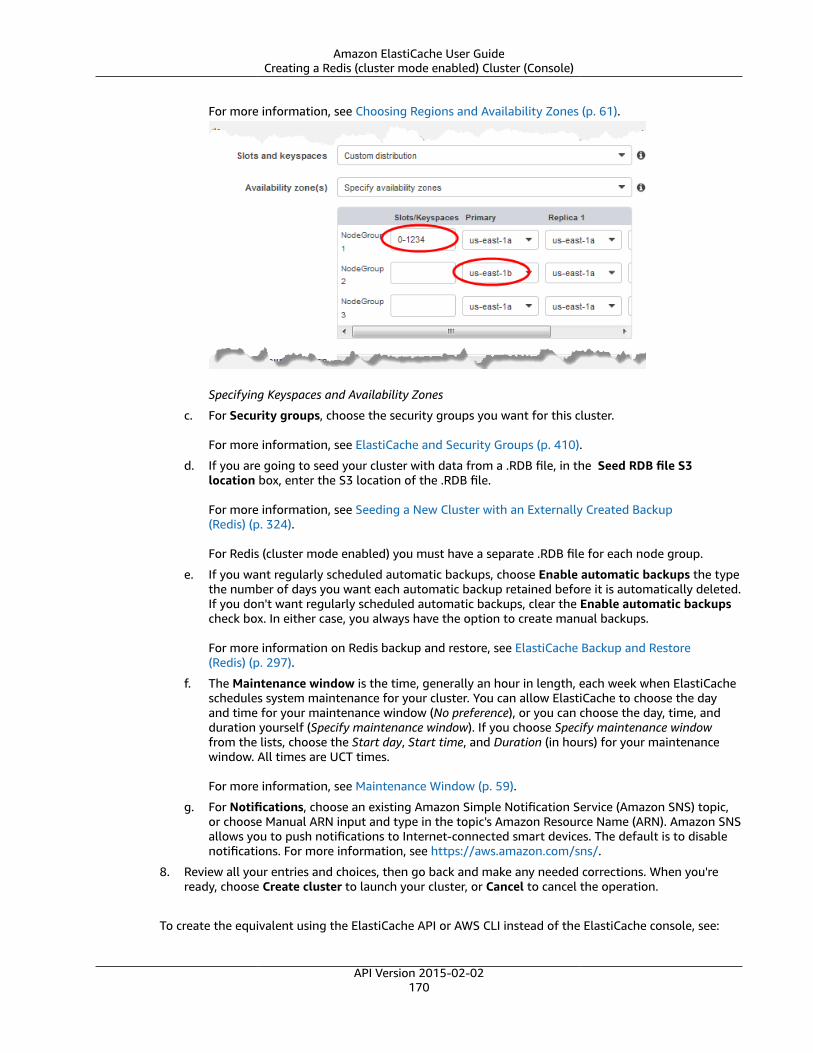
Amazon ElastiCache User GuideCreating a Redis (cluster mode enabled) Cluster (Console)
For more information, see Choosing Regions and Availability Zones (p. 61).
Specifying Keyspaces and Availability Zones
c. For Security groups, choose the security groups you want for this cluster.
For more information, see ElastiCache and Security Groups (p. 410).
d. If you are going to seed your cluster with data from a .RDB file, in the Seed RDB file S3location box, enter the S3 location of the .RDB file.
For more information, see Seeding a New Cluster with an Externally Created Backup(Redis) (p. 324).
For Redis (cluster mode enabled) you must have a separate .RDB file for each node group.
e. If you want regularly scheduled automatic backups, choose Enable automatic backups the typethe number of days you want each automatic backup retained before it is automatically deleted.If you don't want regularly scheduled automatic backups, clear the Enable automatic backupscheck box. In either case, you always have the option to create manual backups.
For more information on Redis backup and restore, see ElastiCache Backup and Restore(Redis) (p. 297).
f. The Maintenance window is the time, generally an hour in length, each week when ElastiCacheschedules system maintenance for your cluster. You can allow ElastiCache to choose the dayand time for your maintenance window (No preference), or you can choose the day, time, andduration yourself (Specify maintenance window). If you choose Specify maintenance windowfrom the lists, choose the Start day, Start time, and Duration (in hours) for your maintenancewindow. All times are UCT times.
For more information, see Maintenance Window (p. 59).
g. For Notifications, choose an existing Amazon Simple Notification Service (Amazon SNS) topic,or choose Manual ARN input and type in the topic's Amazon Resource Name (ARN). Amazon SNSallows you to push notifications to Internet-connected smart devices. The default is to disablenotifications. For more information, see https://aws.amazon.com/sns/.
8. Review all your entries and choices, then go back and make any needed corrections. When you'reready, choose Create cluster to launch your cluster, or Cancel to cancel the operation.
To create the equivalent using the ElastiCache API or AWS CLI instead of the ElastiCache console, see:
API Version 2015-02-02170

Amazon ElastiCache User GuideCreating a Redis (cluster mode enabled) Cluster (Console)
• API: CreateReplicationGroup• CLI: create-replication-group
As soon as your cluster's status is available, you can grant EC2 access to it, connect to it, and beginusing it. For more information, see Step 4: Authorize Access (p. 33) and Step 5: Connect to a Cluster'sNode (p. 37).
ImportantAs soon as your cluster becomes available, you're billed for each hour or partial hour that thecluster is active, even if you're not actively using it. To stop incurring charges for this cluster, youmust delete it. See Deleting a Cluster (p. 201).
API Version 2015-02-02171

Amazon ElastiCache User GuideCreating a Cluster (CLI)
Creating a Cache Cluster (AWS CLI)To create a cluster using the AWS CLI, use the create-cache-cluster command. The followingexample creates a single node Redis (cluster mode enabled) cluster named my-redis-cluster and seeds itwith the snapshot file snap.rdb that has been copied to Amazon S3.
If you want a Redis cluster that supports replication, see Creating a Redis (cluster mode disabled) Clusterwith Replicas from Scratch (AWS CLI) (p. 265).
ImportantAs soon as your cluster becomes available, you're billed for each hour or partial hour that thecluster is active, even if you're not actively using it. To stop incurring charges for this cluster, youmust delete it. See Deleting a Cluster (p. 201).
Topics• Creating a Memcached Cache Cluster (AWS CLI) (p. 172)• Creating a Redis (cluster mode disabled) Cache Cluster (AWS CLI) (p. 172)• Creating a Redis (cluster mode enabled) Cluster (AWS CLI) (p. 173)
Creating a Memcached Cache Cluster (AWS CLI)The following CLI code creates a Memcached cache cluster.
For Linux, macOS, or Unix:
aws elasticache create-cache-cluster \ --cache-cluster-id my-memcached-cluster \ --cache-node-type cache.r4.large \ --engine memcached \ --engine-version 1.4.24 \ --cache-parameter-group default.memcached1.4 \ --num-cache-nodes 3
For Windows:
aws elasticache create-cache-cluster ^ --cache-cluster-id my-memcached-cluster ^ --cache-node-type cache.r4.large ^ --engine memcached ^ --engine-version 1.4.24 ^ --cache-parameter-group default.memcached1.4 ^ --num-cache-nodes 3
Creating a Redis (cluster mode disabled) Cache Cluster (AWS CLI)
Example – A Redis (cluster mode disabled) Cluster with no read replicas
The following CLI code creates a Redis (cluster mode disabled) cache cluster with no replicas.
For Linux, macOS, or Unix:
aws elasticache create-cache-cluster \ --cache-cluster-id my-redis3-cluster \ --cache-node-type cache.r4.large \ --engine redis \ --engine-version 3.2.4 \
API Version 2015-02-02172

Amazon ElastiCache User GuideCreating a Cluster (CLI)
--num-cache-nodes 1 \ --cache-parameter-group default.redis3.2 \ --snapshot-arns arn:aws:s3:myS3Bucket/snap.rdb
For Windows:
aws elasticache create-cache-cluster ^ --cache-cluster-id my-redis3-cluster ^ --cache-node-type cache.r4.large ^ --engine redis ^ --engine-version 3.2.4 ^ --num-cache-nodes 1 ^ --cache-parameter-group default.redis3.2 ^ --snapshot-arns arn:aws:s3:myS3Bucket/snap.rdb
Creating a Redis (cluster mode enabled) Cluster (AWS CLI)Redis (cluster mode enabled) clusters (API/CLI: replication groups) cannot be created using the create-cache-cluster operation. To create a Redis (cluster mode enabled) cluster (API/CLI: replication group),see Creating a Redis (cluster mode enabled) Cluster with Replicas from Scratch (AWS CLI) (p. 271).
For more information, go to the AWS CLI for ElastiCache reference topic create-replication-group.
API Version 2015-02-02173
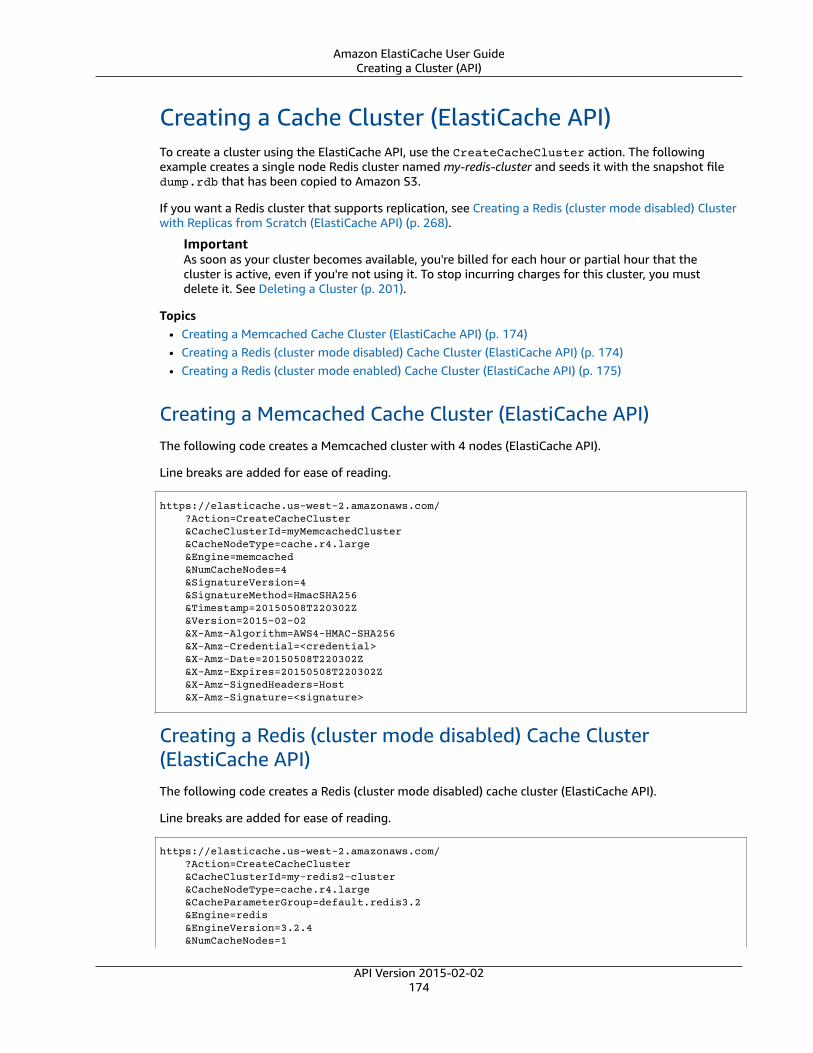
Amazon ElastiCache User GuideCreating a Cluster (API)
Creating a Cache Cluster (ElastiCache API)To create a cluster using the ElastiCache API, use the CreateCacheCluster action. The followingexample creates a single node Redis cluster named my-redis-cluster and seeds it with the snapshot filedump.rdb that has been copied to Amazon S3.
If you want a Redis cluster that supports replication, see Creating a Redis (cluster mode disabled) Clusterwith Replicas from Scratch (ElastiCache API) (p. 268).
ImportantAs soon as your cluster becomes available, you're billed for each hour or partial hour that thecluster is active, even if you're not using it. To stop incurring charges for this cluster, you mustdelete it. See Deleting a Cluster (p. 201).
Topics• Creating a Memcached Cache Cluster (ElastiCache API) (p. 174)• Creating a Redis (cluster mode disabled) Cache Cluster (ElastiCache API) (p. 174)• Creating a Redis (cluster mode enabled) Cache Cluster (ElastiCache API) (p. 175)
Creating a Memcached Cache Cluster (ElastiCache API)The following code creates a Memcached cluster with 4 nodes (ElastiCache API).
Line breaks are added for ease of reading.
https://elasticache.us-west-2.amazonaws.com/ ?Action=CreateCacheCluster &CacheClusterId=myMemcachedCluster &CacheNodeType=cache.r4.large &Engine=memcached &NumCacheNodes=4 &SignatureVersion=4 &SignatureMethod=HmacSHA256 &Timestamp=20150508T220302Z &Version=2015-02-02 &X-Amz-Algorithm=AWS4-HMAC-SHA256 &X-Amz-Credential=<credential> &X-Amz-Date=20150508T220302Z &X-Amz-Expires=20150508T220302Z &X-Amz-SignedHeaders=Host &X-Amz-Signature=<signature>
Creating a Redis (cluster mode disabled) Cache Cluster(ElastiCache API)The following code creates a Redis (cluster mode disabled) cache cluster (ElastiCache API).
Line breaks are added for ease of reading.
https://elasticache.us-west-2.amazonaws.com/ ?Action=CreateCacheCluster &CacheClusterId=my-redis2-cluster &CacheNodeType=cache.r4.large &CacheParameterGroup=default.redis3.2 &Engine=redis &EngineVersion=3.2.4 &NumCacheNodes=1
API Version 2015-02-02174

Amazon ElastiCache User GuideCreating a Cluster (API)
&SignatureVersion=4 &SignatureMethod=HmacSHA256 &SnapshotArns.member.1=arn%3Aaws%3As3%3A%3A%3AmyS3Bucket%2Fdump.rdb &Timestamp=20150508T220302Z &Version=2015-02-02 &X-Amz-Algorithm=AWS4-HMAC-SHA256 &X-Amz-Credential=<credential> &X-Amz-Date=20150508T220302Z &X-Amz-Expires=20150508T220302Z &X-Amz-SignedHeaders=Host &X-Amz-Signature=<signature>
Creating a Redis (cluster mode enabled) Cache Cluster(ElastiCache API)Redis (cluster mode enabled) clusters (API/CLI: replication groups) cannot be created using theCreateCacheCluster operation. To create a Redis (cluster mode enabled) cluster (API/CLI: replicationgroup), see Creating a Redis (cluster mode enabled) Cluster with Replicas from Scratch (ElastiCacheAPI) (p. 275).
For more information, go to the ElastiCache API reference topic CreateReplicationGroup.
API Version 2015-02-02175

Amazon ElastiCache User GuideViewing a Cluster's Details
Viewing a Cluster's DetailsYou can view detail information about one or more clusters using the ElastiCache console, AWS CLI, orElastiCache API.
Topics
• Viewing a Cluster's Details: Memcached (Console) (p. 176)
• Viewing a Redis (cluster mode disabled) Cluster's Details (Console) (p. 178)
• Viewing a Redis (cluster mode enabled) Cluster's Details (Console) (p. 179)
• Viewing a Cluster's Details (AWS CLI) (p. 180)
• Viewing a Cluster's Details (ElastiCache API) (p. 182)
Viewing a Cluster's Details: Memcached (Console)You can view the details of a Memcached cluster using the ElastiCache console, the AWS CLI forElastiCache, or the ElastiCache API.
The following procedure details how to view the details of a Memcached cluster using the ElastiCacheconsole.
To view a Memcached cluster's details
1. Sign in to the AWS Management Console and open the Amazon ElastiCache console at https://console.aws.amazon.com/elasticache/.
2. From the dropdown in the upper right corner, choose the region you are interested in.
3. In the ElastiCache console dashboard, choose Memcached. This will display a list of all your clustersthat are running any version of Memcached.
4. To see details of a cluster, choose the box to the left of the cluster's name.
5. To view node information:
a. Choose the cluster's name.
b. Choose the Nodes tab.
c. To view metrics on one or more nodes, choose the box to the left of the Node ID, and thenchoose the time range for the metrics from the Time range list. Selecting multiple nodes willgenerate overlay graphs.
API Version 2015-02-02176

Amazon ElastiCache User GuideViewing a Cluster's Details: Memcached (Console)
Metrics over the last hour for two Memcached nodes
API Version 2015-02-02177
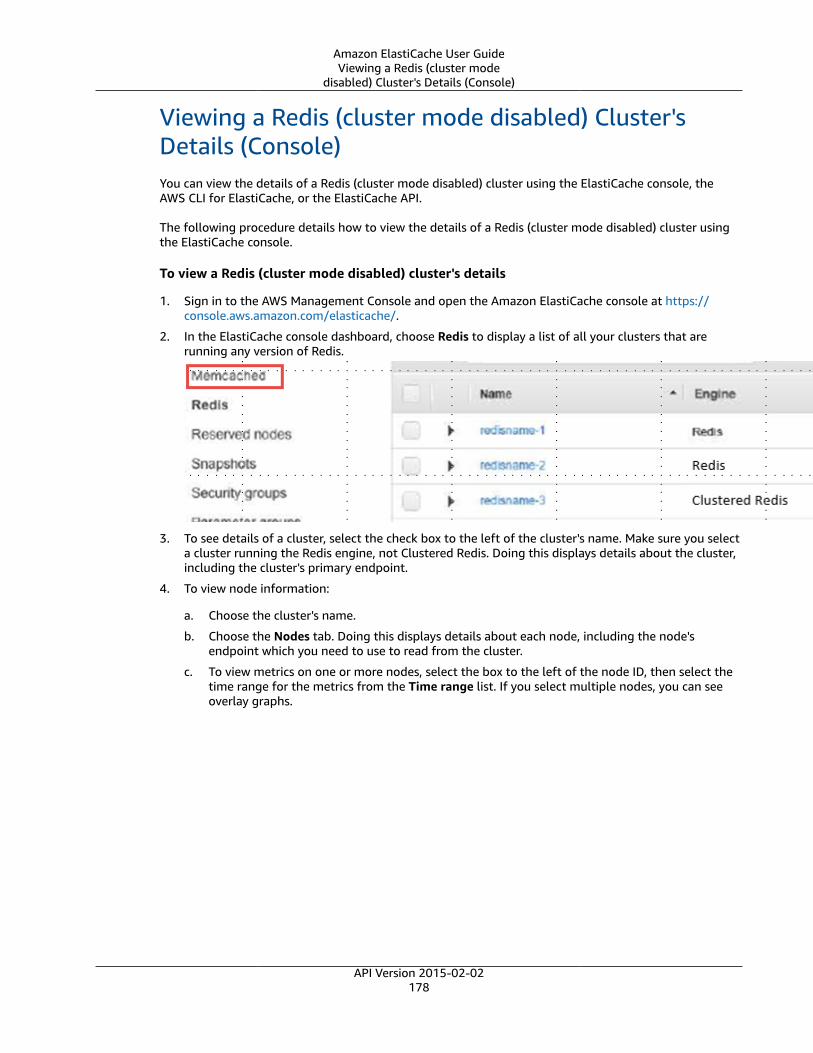
Amazon ElastiCache User GuideViewing a Redis (cluster mode
disabled) Cluster's Details (Console)
Viewing a Redis (cluster mode disabled) Cluster'sDetails (Console)You can view the details of a Redis (cluster mode disabled) cluster using the ElastiCache console, theAWS CLI for ElastiCache, or the ElastiCache API.
The following procedure details how to view the details of a Redis (cluster mode disabled) cluster usingthe ElastiCache console.
To view a Redis (cluster mode disabled) cluster's details
1. Sign in to the AWS Management Console and open the Amazon ElastiCache console at https://console.aws.amazon.com/elasticache/.
2. In the ElastiCache console dashboard, choose Redis to display a list of all your clusters that arerunning any version of Redis.
3. To see details of a cluster, select the check box to the left of the cluster's name. Make sure you selecta cluster running the Redis engine, not Clustered Redis. Doing this displays details about the cluster,including the cluster's primary endpoint.
4. To view node information:
a. Choose the cluster's name.
b. Choose the Nodes tab. Doing this displays details about each node, including the node'sendpoint which you need to use to read from the cluster.
c. To view metrics on one or more nodes, select the box to the left of the node ID, then select thetime range for the metrics from the Time range list. If you select multiple nodes, you can seeoverlay graphs.
API Version 2015-02-02178

Amazon ElastiCache User GuideViewing a Redis (cluster mode
enabled) Cluster's Details (Console)
Metrics over the last hour for two Redis nodes
Viewing a Redis (cluster mode enabled) Cluster'sDetails (Console)You can view the details of a Redis (cluster mode enabled) cluster using the ElastiCache console, the AWSCLI for ElastiCache, or the ElastiCache API.
The following procedure details how to view the details of a Redis (cluster mode enabled) cluster usingthe ElastiCache console.
To view a Redis (cluster mode enabled) cluster's details
1. Sign in to the AWS Management Console and open the Amazon ElastiCache console at https://console.aws.amazon.com/elasticache/.
2. From the dropdown in the upper right corner, choose the region you are interested in.3. In the ElastiCache console dashboard, choose Redis to display a list of all your clusters that are
running any version of Redis.4. To see details of a Redis (cluster mode enabled) cluster, choose the box to the left of the cluster's
name. Make sure you choose a cluster running the Clustered Redis engine, not just Redis.
The screen expands below the cluster and display details about the cluster, including the cluster'sconfiguration endpoint.
API Version 2015-02-02179

Amazon ElastiCache User GuideViewing a Cluster's Details (AWS CLI)
5. To see a listing of the cluster's shards and the number of nodes in each shard, choose the cluster'sname.
6. To view specific information on a node:
a. Choose the shard's ID.b. Choose the Nodes tab.
This will display information about each node, including each node's endpoint that you need touse to read data from the cluster.
c. To view metrics on one or more nodes, choose the box to the left of the node's id, and thenchoose the time range for the metrics from the Time range list. Selecting multiple nodes willgenerate overlay graphs.
Metrics over the last hour for two Redis nodes
Viewing a Cluster's Details (AWS CLI)You can view the details for a cluster using the AWS CLI describe-cache-clusters command. Ifthe --cache-cluster-id parameter is omitted, details for multiple clusters, up to --max-items,are returned. If the --cache-cluster-id parameter is included, details for the specified cluster arereturned. You can limit the number of records returned with the --max-items parameter.
The following code lists the details for myCluster.
aws elasticache describe-cache-clusters --cache-cluster-id myCluster
The following code list the details for up to 25 clusters.
aws elasticache describe-cache-clusters --max-items 25
API Version 2015-02-02180
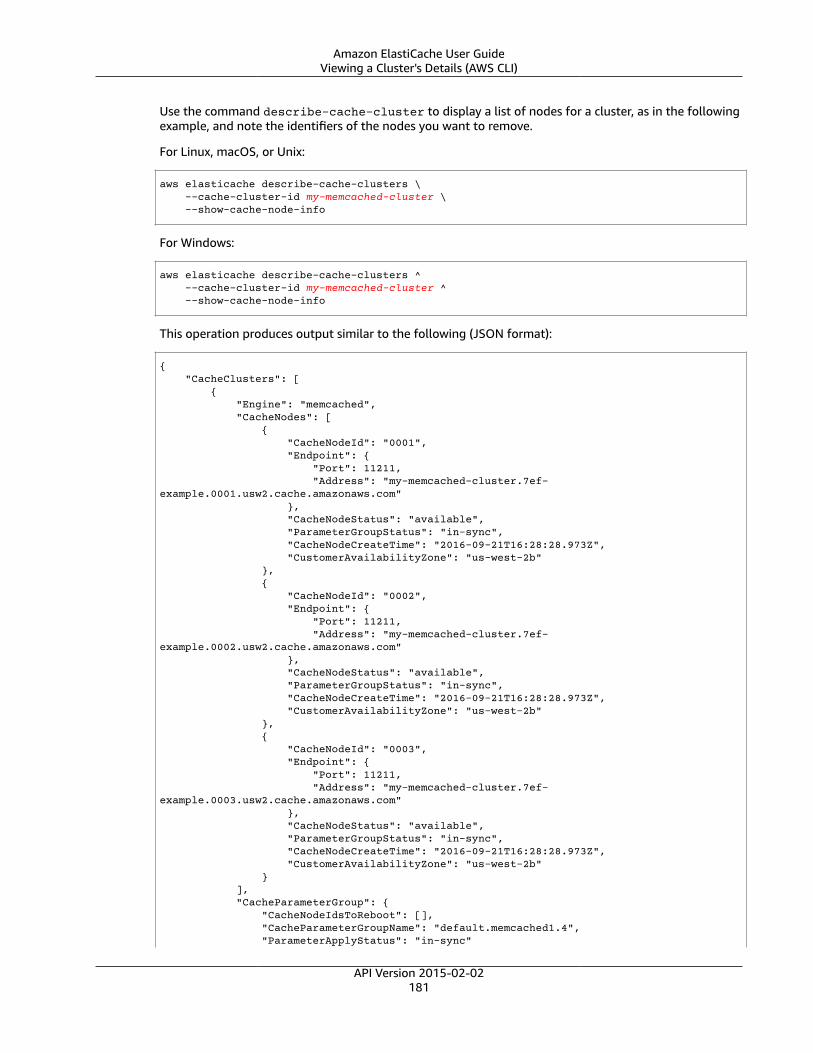
Amazon ElastiCache User GuideViewing a Cluster's Details (AWS CLI)
Use the command describe-cache-cluster to display a list of nodes for a cluster, as in the followingexample, and note the identifiers of the nodes you want to remove.
For Linux, macOS, or Unix:
aws elasticache describe-cache-clusters \ --cache-cluster-id my-memcached-cluster \ --show-cache-node-info
For Windows:
aws elasticache describe-cache-clusters ^ --cache-cluster-id my-memcached-cluster ^ --show-cache-node-info
This operation produces output similar to the following (JSON format):
{ "CacheClusters": [ { "Engine": "memcached", "CacheNodes": [ { "CacheNodeId": "0001", "Endpoint": { "Port": 11211, "Address": "my-memcached-cluster.7ef-example.0001.usw2.cache.amazonaws.com" }, "CacheNodeStatus": "available", "ParameterGroupStatus": "in-sync", "CacheNodeCreateTime": "2016-09-21T16:28:28.973Z", "CustomerAvailabilityZone": "us-west-2b" }, { "CacheNodeId": "0002", "Endpoint": { "Port": 11211, "Address": "my-memcached-cluster.7ef-example.0002.usw2.cache.amazonaws.com" }, "CacheNodeStatus": "available", "ParameterGroupStatus": "in-sync", "CacheNodeCreateTime": "2016-09-21T16:28:28.973Z", "CustomerAvailabilityZone": "us-west-2b" }, { "CacheNodeId": "0003", "Endpoint": { "Port": 11211, "Address": "my-memcached-cluster.7ef-example.0003.usw2.cache.amazonaws.com" }, "CacheNodeStatus": "available", "ParameterGroupStatus": "in-sync", "CacheNodeCreateTime": "2016-09-21T16:28:28.973Z", "CustomerAvailabilityZone": "us-west-2b" } ], "CacheParameterGroup": { "CacheNodeIdsToReboot": [], "CacheParameterGroupName": "default.memcached1.4", "ParameterApplyStatus": "in-sync"
API Version 2015-02-02181
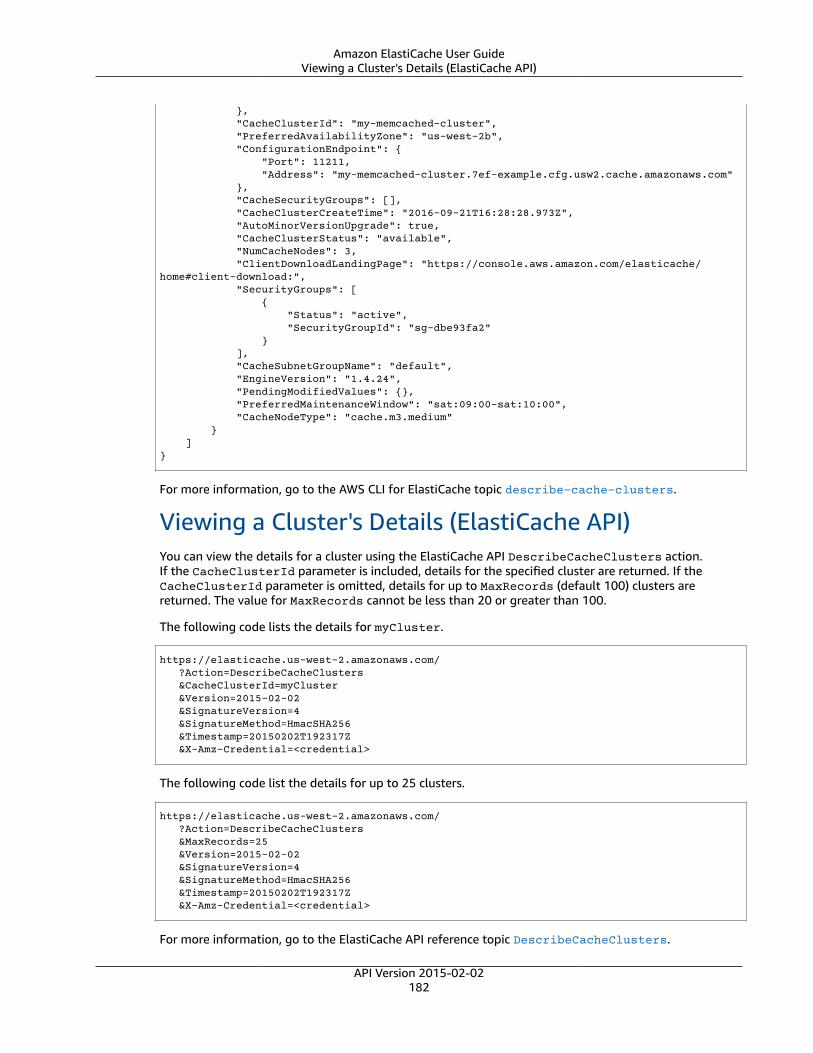
Amazon ElastiCache User GuideViewing a Cluster's Details (ElastiCache API)
}, "CacheClusterId": "my-memcached-cluster", "PreferredAvailabilityZone": "us-west-2b", "ConfigurationEndpoint": { "Port": 11211, "Address": "my-memcached-cluster.7ef-example.cfg.usw2.cache.amazonaws.com" }, "CacheSecurityGroups": [], "CacheClusterCreateTime": "2016-09-21T16:28:28.973Z", "AutoMinorVersionUpgrade": true, "CacheClusterStatus": "available", "NumCacheNodes": 3, "ClientDownloadLandingPage": "https://console.aws.amazon.com/elasticache/home#client-download:", "SecurityGroups": [ { "Status": "active", "SecurityGroupId": "sg-dbe93fa2" } ], "CacheSubnetGroupName": "default", "EngineVersion": "1.4.24", "PendingModifiedValues": {}, "PreferredMaintenanceWindow": "sat:09:00-sat:10:00", "CacheNodeType": "cache.m3.medium" } ]}
For more information, go to the AWS CLI for ElastiCache topic describe-cache-clusters.
Viewing a Cluster's Details (ElastiCache API)You can view the details for a cluster using the ElastiCache API DescribeCacheClusters action.If the CacheClusterId parameter is included, details for the specified cluster are returned. If theCacheClusterId parameter is omitted, details for up to MaxRecords (default 100) clusters arereturned. The value for MaxRecords cannot be less than 20 or greater than 100.
The following code lists the details for myCluster.
https://elasticache.us-west-2.amazonaws.com/ ?Action=DescribeCacheClusters &CacheClusterId=myCluster &Version=2015-02-02 &SignatureVersion=4 &SignatureMethod=HmacSHA256 &Timestamp=20150202T192317Z &X-Amz-Credential=<credential>
The following code list the details for up to 25 clusters.
https://elasticache.us-west-2.amazonaws.com/ ?Action=DescribeCacheClusters &MaxRecords=25 &Version=2015-02-02 &SignatureVersion=4 &SignatureMethod=HmacSHA256 &Timestamp=20150202T192317Z &X-Amz-Credential=<credential>
For more information, go to the ElastiCache API reference topic DescribeCacheClusters.
API Version 2015-02-02182

Amazon ElastiCache User GuideModifying a Cluster
Modifying an ElastiCache ClusterIn addition to adding or removing nodes from a cluster, there can be times where you need to makeother changes to an existing cluster, such as, adding a security group, changing the maintenance windowor a parameter group.
We recommend that you have your maintenance window fall at the time of lowest usage. Thus it mightneed modification from time to time.
When you make a change to a cluster's parameters, either by changing the cluster's parameter group orby changing a parameter value in the cluster's parameter group, the changes are applied to the clustereither immediately or after the cluster is restarted. To determine when a particular parameter change isapplied, see the Changes Take Effect column in the tables for Memcached Specific Parameters (p. 357)and Redis Specific Parameters (p. 366). For information on rebooting a cluster, go to Rebooting aCluster (p. 186).
Modifying a Cluster (Console)To modify a cluster (console)
1. Sign in to the AWS Management Console and open the ElastiCache console at https://console.aws.amazon.com/elasticache/.
2. From the dropdown in the upper right corner, choose the region you are interested in.
3. In the navigation pane, choose Redis or Memcached.
A list of the chosen engine's clusters appears.
4. In the list of clusters, choose the name of the cluster you want to modify. The modifications youcan make to a Redis (cluster mode enabled) cluster are limited to modifications to security groups,description, parameter groups, backup options, maintenance window, and SNS notifications.
5. Choose Modify.
The Modify Cluster window appears.
6. In the Modify Cluster window, make the modification(s) you want.
ImportantYou can upgrade to newer engine versions (see Upgrading Engine Versions (p. 57)), butyou cannot downgrade to older engine versions except by deleting the existing cluster andcreating it anew.
Because the newer Redis versions provide a better and more stable user experience, Redis versions2.6.13, 2.8.6, and 2.8.19 are deprecated when using the ElastiCache console. We recommend againstusing these Redis versions. If you need to use one of them, work with the AWS CLI or ElastiCacheAPI.
For more information, see the following topics:
AWS CLI ElastiCache API
Create Cluster Creating a Cache Cluster (AWSCLI) (p. 172)
This action cannot be used tocreate a replication group withcluster mode enabled.
Creating a Cache Cluster(ElastiCache API) (p. 174)
This action cannot be used tocreate a replication group withcluster mode enabled.
API Version 2015-02-02183

Amazon ElastiCache User GuideModifying a Cache Cluster (AWS CLI)
AWS CLI ElastiCache API
Modify Cluster Modifying a Cache Cluster(AWS CLI) (p. 184)
This action cannot be used tocreate a replication group withcluster mode enabled.
Modifying a Cache Cluster(ElastiCache API) (p. 185)
This action cannot be used tocreate a replication group withcluster mode enabled.
Create Replication Group Creating a Redis (clustermode disabled) Cluster withReplicas from Scratch (AWSCLI) (p. 265)
Creating a Redis (clustermode enabled) Cluster withReplicas from Scratch (AWSCLI) (p. 271)
Creating a Redis (cluster modedisabled) Cluster with Replicasfrom Scratch (ElastiCacheAPI) (p. 268)
Creating a Redis (cluster modeenabled) Cluster with Replicasfrom Scratch (ElastiCacheAPI) (p. 275)
Modify Replication Group Modifying a Replication Group(AWS CLI) (p. 288)
This action cannot be used tocreate a replication group withcluster mode enabled.
Modifying a Replication Group(ElastiCache API) (p. 289)
This action cannot be used tocreate a replication group withcluster mode enabled.
The Apply Immediately box applies only to modifications in node type and engine version. If youwant to apply any of these changes immediately, choose the Apply Immediately check box. Ifthis box is not chosen, engine version and node type modifications will be applied during the nextmaintenance window. Other modifications, such as changing the maintenance window, are appliedimmediately.
7. Choose Modify.
Modifying a Cache Cluster (AWS CLI)You can modify an existing cluster using the AWS CLI modify-cache-cluster operation. To modify acluster's configuration value, specify the cluster's ID, the parameter to change and the parameter's newvalue. The following example changes the maintenance window for a cluster named myCluster andapplies the change immediately.
ImportantYou can upgrade to newer engine versions (see Upgrading Engine Versions (p. 57)), but youcannot downgrade to older engine versions except by deleting the existing cache cluster orreplication group and creating it anew.
For Linux, macOS, or Unix:
aws elasticache modify-cache-cluster \ --cache-cluster-id myCluster \ --preferred-maintenance-window sun:23:00-mon:02:00
For Windows:
aws elasticache modify-cache-cluster ^ --cache-cluster-id myCluster ^
API Version 2015-02-02184
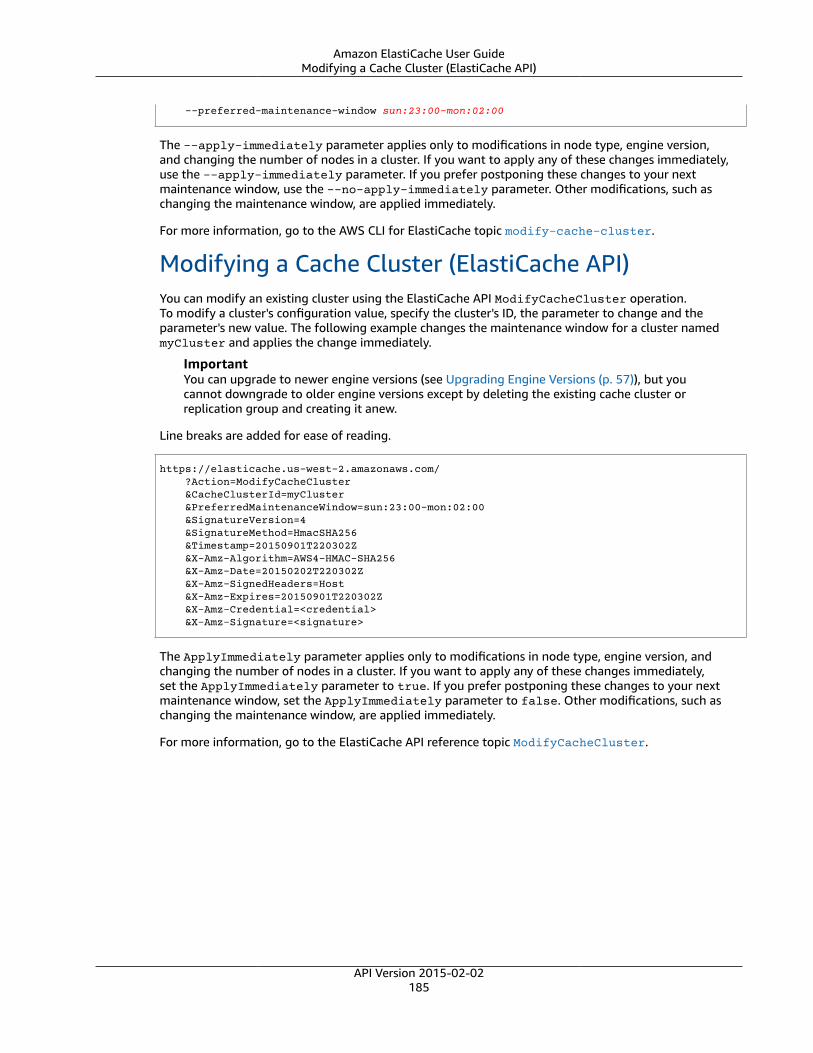
Amazon ElastiCache User GuideModifying a Cache Cluster (ElastiCache API)
--preferred-maintenance-window sun:23:00-mon:02:00
The --apply-immediately parameter applies only to modifications in node type, engine version,and changing the number of nodes in a cluster. If you want to apply any of these changes immediately,use the --apply-immediately parameter. If you prefer postponing these changes to your nextmaintenance window, use the --no-apply-immediately parameter. Other modifications, such aschanging the maintenance window, are applied immediately.
For more information, go to the AWS CLI for ElastiCache topic modify-cache-cluster.
Modifying a Cache Cluster (ElastiCache API)You can modify an existing cluster using the ElastiCache API ModifyCacheCluster operation.To modify a cluster's configuration value, specify the cluster's ID, the parameter to change and theparameter's new value. The following example changes the maintenance window for a cluster namedmyCluster and applies the change immediately.
ImportantYou can upgrade to newer engine versions (see Upgrading Engine Versions (p. 57)), but youcannot downgrade to older engine versions except by deleting the existing cache cluster orreplication group and creating it anew.
Line breaks are added for ease of reading.
https://elasticache.us-west-2.amazonaws.com/ ?Action=ModifyCacheCluster &CacheClusterId=myCluster &PreferredMaintenanceWindow=sun:23:00-mon:02:00 &SignatureVersion=4 &SignatureMethod=HmacSHA256 &Timestamp=20150901T220302Z &X-Amz-Algorithm=AWS4-HMAC-SHA256 &X-Amz-Date=20150202T220302Z &X-Amz-SignedHeaders=Host &X-Amz-Expires=20150901T220302Z &X-Amz-Credential=<credential> &X-Amz-Signature=<signature>
The ApplyImmediately parameter applies only to modifications in node type, engine version, andchanging the number of nodes in a cluster. If you want to apply any of these changes immediately,set the ApplyImmediately parameter to true. If you prefer postponing these changes to your nextmaintenance window, set the ApplyImmediately parameter to false. Other modifications, such aschanging the maintenance window, are applied immediately.
For more information, go to the ElastiCache API reference topic ModifyCacheCluster.
API Version 2015-02-02185

Amazon ElastiCache User GuideRebooting a Cluster
Rebooting a ClusterSome changes require that the cluster be rebooted for the changes to be applied. For example, for someparameters, changing the parameter value in a parameter group is only applied after a reboot.
When you reboot a cluster, the cluster flushes all its data and restarts its engine. During this process youcannot access the cluster. Because the cluster flushed all its data, when the cluster is available again, youare starting with an empty cluster.
Rebooting a cluster is currently supported on Memcached and Redis (cluster mode disabled) clusters.Rebooting is not supported on Redis (cluster mode enabled) clusters.
You are able to reboot a cluster using the ElastiCache console, the AWS CLI, or the ElastiCache API.Whether you use the ElastiCache console, the AWS CLI or the ElastiCache API, you can only initiaterebooting a single cluster. To reboot multiple clusters you must iterate on the process or operation.
Redis (cluster mode enabled) and RebootsIf you make changes to parameters that require a Redis (cluster mode enabled) cluster rebootfor the changes to be applied, follow these steps.
1. Create a manual backup of your cluster. See Making Manual Backups (p. 301).2. Delete the Redis (cluster mode enabled) cluster. See Deleting a Cluster (p. 201).3. Restore the cluster using the altered parameter group and backup to seed the new cluster.
See Restoring From a Backup with Optional Cluster Resizing (p. 321).
Rebooting a Cluster (Console)You can reboot a cluster using the ElastiCache console.
To reboot a cluster (console)
1. Sign in to the AWS Management Console and open the ElastiCache console at https://console.aws.amazon.com/elasticache/.
2. From the dropdown in the upper right corner, choose the region you are interested in.3. In the navigation pane, choose Memcached or Redis.
A list of clusters running the chosen engine will appear.4. Choose the cluster to reboot by choosing on the box to the left of the cluster's name.
The Reboot button will become active.
If you choose more than one cluster, the Reboot button becomes disabled.5. Choose Reboot.
The reboot cluster confirmation screen appears.6. To reboot the cluster, choose Reboot. The status of the cluster will change to rebooting cluster nodes.
To not reboot the cluster, choose Cancel.
To reboot multiple clusters, repeat steps 2 through 5 for each cluster you want to reboot.
Rebooting a Cache Cluster (AWS CLI)To reboot a cluster (AWS CLI), use the reboot-cache-cluster CLI operation.
API Version 2015-02-02186

Amazon ElastiCache User GuideRebooting a Cache Cluster (ElastiCache API)
To reboot specific nodes in the cluster, use the --cache-node-ids-to-reboot to list the specificclusters to reboot. The following command reboots the nodes 0001, 0002, and 0004 of myCluster.
For Linux, macOS, or Unix:
aws elasticache reboot-cache-cluster \ --cache-cluster-id myCluster \ --cache-node-ids-to-reboot 0001 0002 0004
For Windows:
aws elasticache reboot-cache-cluster ^ --cache-cluster-id myCluster ^ --cache-node-ids-to-reboot 0001 0002 0004
To reboot all the nodes in the cluster, use the --cache-node-ids-to-reboot parameter and list allthe cluster's node ids. For more information, see reboot-cache-cluster.
Rebooting a Cache Cluster (ElastiCache API)To reboot a cluster using the ElastiCache API, use the RebootCacheCluster action.
To reboot specific nodes in the cluster, use the CacheNodeIdsToReboot to list the specific clusters toreboot. The following command reboots the nodes 0001, 0002, and 0004 of myCluster.
https://elasticache.us-west-2.amazonaws.com/ ?Action=RebootCacheCluster &CacheClusterId=myCluster &CacheNodeIdsToReboot.member.1=0001 &CacheNodeIdsToReboot.member.2=0002 &CacheNodeIdsToReboot.member.3=0004 &Version=2015-02-02 &SignatureVersion=4 &SignatureMethod=HmacSHA256 &Timestamp=20150202T192317Z &X-Amz-Credential=<credential>
To reboot all the nodes in the cluster, use the CacheNodeIdsToReboot parameter and list all thecluster's node ids. For more information, see RebootCacheCluster.
API Version 2015-02-02187

Amazon ElastiCache User GuideMonitoring a Cluster's Costs
Monitoring a Cluster's CostsCost allocation tags are key-value pairs that you can use to track and manage your AWS costs bygrouping expenses on your invoices by the tag values on a resource.
You can use cost allocation tags to organize your AWS bill to reflect your own cost structure. To do this,sign up to get your AWS account bill with tag key values included. Then, to see the cost of combinedresources, organize your billing information according to resources with the same tag key values. Forexample, you can tag several resources with a specific application name, and then organize your billinginformation to see the total cost of that application across one or more services.
For more information on Cost Allocation tags and steps to add or remove them from a cluster, seeMonitoring Costs with Cost Allocation Tags (p. 471).
Adding Nodes to a ClusterAdding nodes to a cluster currently applies only if you are running Memcached or Redis (cluster modedisabled). If you are running Redis (cluster mode disabled), the nodes you add to the cluster are replicanodes.
You can use the ElastiCache Management Console, the AWS CLI or ElastiCache API to add nodes to yourcluster.
Each time you change the number of nodes in your Memcached cluster, you must re-map at least someof your keyspace so it maps to the correct node. For more detailed information on load balancing yourMemcached cluster, see Configuring Your ElastiCache Client for Efficient Load Balancing (p. 92).
Adding Nodes to a Cluster (Console)The process to add a node to a Memcached or Redis (cluster mode disabled) cluster with replicationenabled is the same. If you want to add a node to a single-node Redis (cluster mode disabled) cluster(one without replication enabled), it's a two-step process: first add replication, and then add a replicanode.
Topics
• To add replication to a Redis cluster with no shards (p. 188)• To add nodes to a Memcached or Redis (cluster mode disabled) cluster with one shard
(console) (p. 189)
The following procedure adds replication to a single-node Redis that does not have replication enabled.When you add replication, the existing node becomes the primary node in the replication-enabledcluster. After replication is added, you can add up to 5 replica nodes to the cluster.
To add replication to a Redis cluster with no shards
1. Sign in to the AWS Management Console and open the ElastiCache console at https://console.aws.amazon.com/elasticache/.
2. From the navigation pane, choose Redis.
A list of clusters running the Redis engine is displayed.3. Choose the name of a cluster that you want to add to.
The following is true of a Redis cluster that does not have replication enabled:
API Version 2015-02-02188
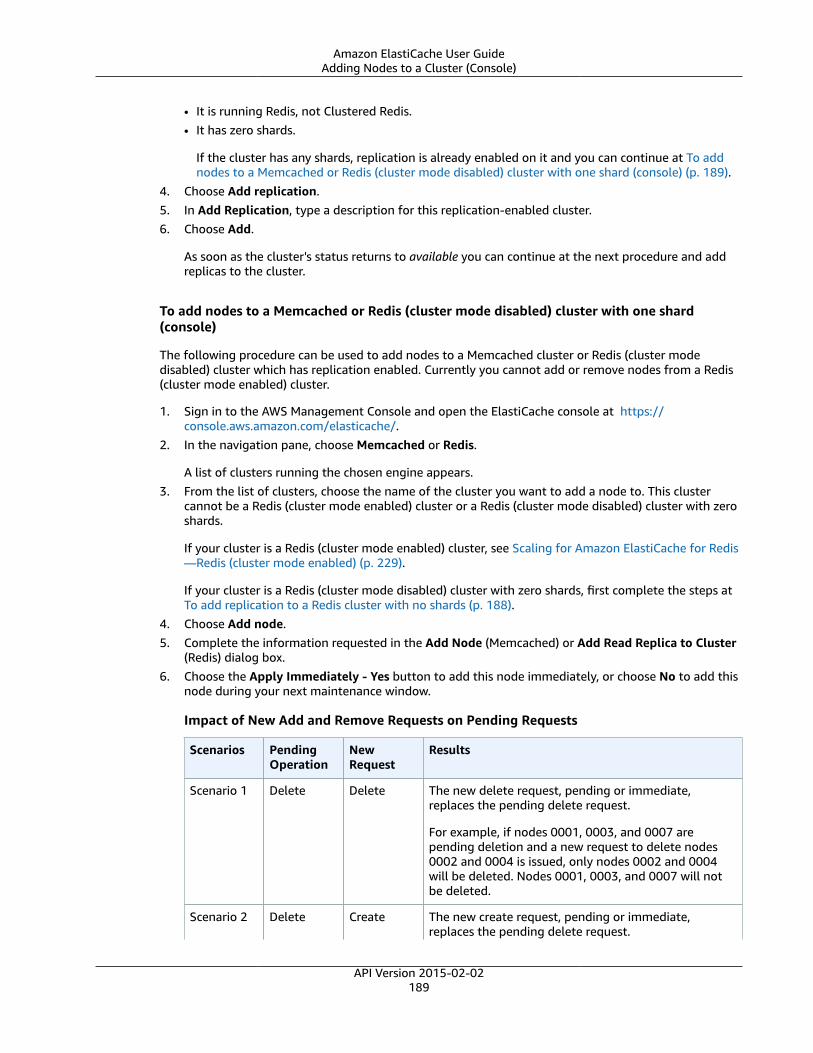
Amazon ElastiCache User GuideAdding Nodes to a Cluster (Console)
• It is running Redis, not Clustered Redis.• It has zero shards.
If the cluster has any shards, replication is already enabled on it and you can continue at To addnodes to a Memcached or Redis (cluster mode disabled) cluster with one shard (console) (p. 189).
4. Choose Add replication.5. In Add Replication, type a description for this replication-enabled cluster.6. Choose Add.
As soon as the cluster's status returns to available you can continue at the next procedure and addreplicas to the cluster.
To add nodes to a Memcached or Redis (cluster mode disabled) cluster with one shard(console)
The following procedure can be used to add nodes to a Memcached cluster or Redis (cluster modedisabled) cluster which has replication enabled. Currently you cannot add or remove nodes from a Redis(cluster mode enabled) cluster.
1. Sign in to the AWS Management Console and open the ElastiCache console at https://console.aws.amazon.com/elasticache/.
2. In the navigation pane, choose Memcached or Redis.
A list of clusters running the chosen engine appears.3. From the list of clusters, choose the name of the cluster you want to add a node to. This cluster
cannot be a Redis (cluster mode enabled) cluster or a Redis (cluster mode disabled) cluster with zeroshards.
If your cluster is a Redis (cluster mode enabled) cluster, see Scaling for Amazon ElastiCache for Redis—Redis (cluster mode enabled) (p. 229).
If your cluster is a Redis (cluster mode disabled) cluster with zero shards, first complete the steps atTo add replication to a Redis cluster with no shards (p. 188).
4. Choose Add node.5. Complete the information requested in the Add Node (Memcached) or Add Read Replica to Cluster
(Redis) dialog box.6. Choose the Apply Immediately - Yes button to add this node immediately, or choose No to add this
node during your next maintenance window.
Impact of New Add and Remove Requests on Pending Requests
Scenarios PendingOperation
NewRequest
Results
Scenario 1 Delete Delete The new delete request, pending or immediate,replaces the pending delete request.
For example, if nodes 0001, 0003, and 0007 arepending deletion and a new request to delete nodes0002 and 0004 is issued, only nodes 0002 and 0004will be deleted. Nodes 0001, 0003, and 0007 will notbe deleted.
Scenario 2 Delete Create The new create request, pending or immediate,replaces the pending delete request.
API Version 2015-02-02189

Amazon ElastiCache User GuideAdding Nodes to a Cluster (Console)
Scenarios PendingOperation
NewRequest
Results
For example, if nodes 0001, 0003, and 0007 arepending deletion and a new request to create a nodeis issued, a new node will be created and nodes 0001,0003, and 0007 will not be deleted.
Scenario 3 Create Delete The new delete request, pending or immediate,replaces the pending create request.
For example, if there is a pending request to create twonodes and a new request is issued to delete node 0003,no new nodes will be created and node 0003 will bedeleted.
Scenario 4 Create Create The new create request is added to the pending createrequest.
For example, if there is a pending request to createtwo nodes and a new request is issued to create threenodes, the new requests is added to the pendingrequest and five nodes will be created.
ImportantIf the new create request is set to ApplyImmediately - Yes, all create requests areperformed immediately. If the new createrequest is set to Apply Immediately - No, allcreate requests are pending.
To determine what operations are pending, choose the Description tab and check to see how manypending creations or deletions are shown. You cannot have both pending creations and pendingdeletions.
7. Choose the Add button.
API Version 2015-02-02190
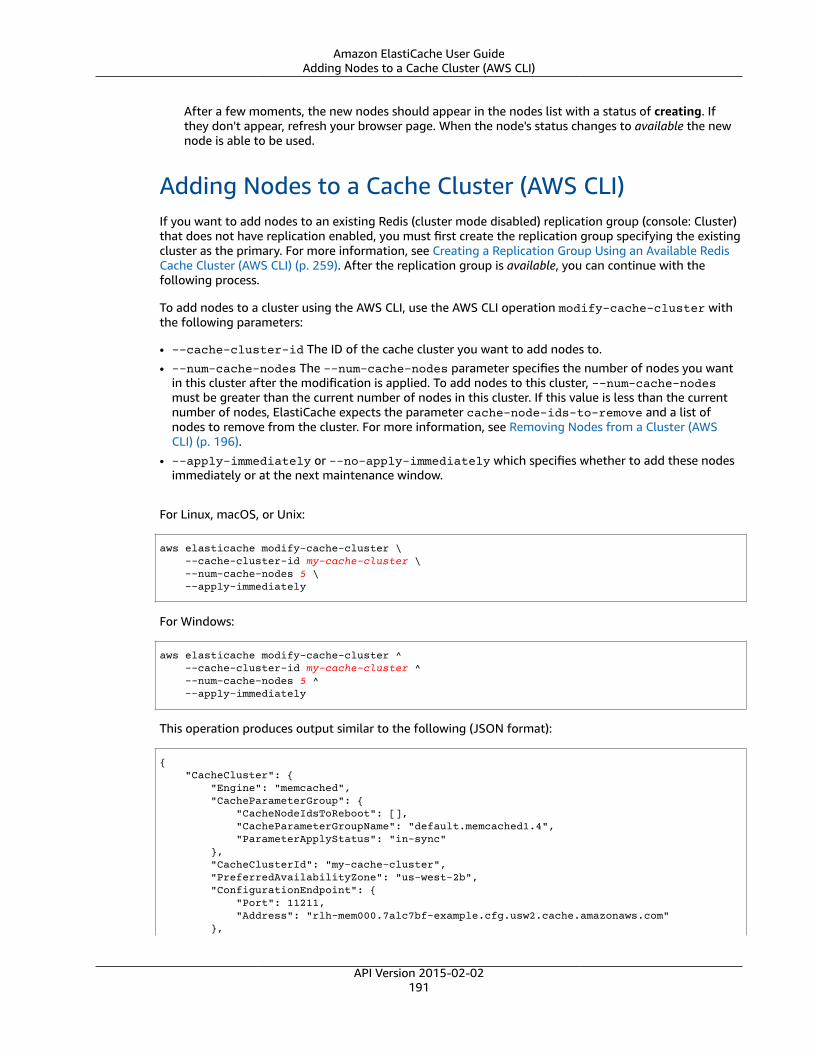
Amazon ElastiCache User GuideAdding Nodes to a Cache Cluster (AWS CLI)
After a few moments, the new nodes should appear in the nodes list with a status of creating. Ifthey don't appear, refresh your browser page. When the node's status changes to available the newnode is able to be used.
Adding Nodes to a Cache Cluster (AWS CLI)If you want to add nodes to an existing Redis (cluster mode disabled) replication group (console: Cluster)that does not have replication enabled, you must first create the replication group specifying the existingcluster as the primary. For more information, see Creating a Replication Group Using an Available RedisCache Cluster (AWS CLI) (p. 259). After the replication group is available, you can continue with thefollowing process.
To add nodes to a cluster using the AWS CLI, use the AWS CLI operation modify-cache-cluster withthe following parameters:
• --cache-cluster-id The ID of the cache cluster you want to add nodes to.• --num-cache-nodes The --num-cache-nodes parameter specifies the number of nodes you want
in this cluster after the modification is applied. To add nodes to this cluster, --num-cache-nodesmust be greater than the current number of nodes in this cluster. If this value is less than the currentnumber of nodes, ElastiCache expects the parameter cache-node-ids-to-remove and a list ofnodes to remove from the cluster. For more information, see Removing Nodes from a Cluster (AWSCLI) (p. 196).
• --apply-immediately or --no-apply-immediately which specifies whether to add these nodesimmediately or at the next maintenance window.
For Linux, macOS, or Unix:
aws elasticache modify-cache-cluster \ --cache-cluster-id my-cache-cluster \ --num-cache-nodes 5 \ --apply-immediately
For Windows:
aws elasticache modify-cache-cluster ^ --cache-cluster-id my-cache-cluster ^ --num-cache-nodes 5 ^ --apply-immediately
This operation produces output similar to the following (JSON format):
{ "CacheCluster": { "Engine": "memcached", "CacheParameterGroup": { "CacheNodeIdsToReboot": [], "CacheParameterGroupName": "default.memcached1.4", "ParameterApplyStatus": "in-sync" }, "CacheClusterId": "my-cache-cluster", "PreferredAvailabilityZone": "us-west-2b", "ConfigurationEndpoint": { "Port": 11211, "Address": "rlh-mem000.7alc7bf-example.cfg.usw2.cache.amazonaws.com" },
API Version 2015-02-02191
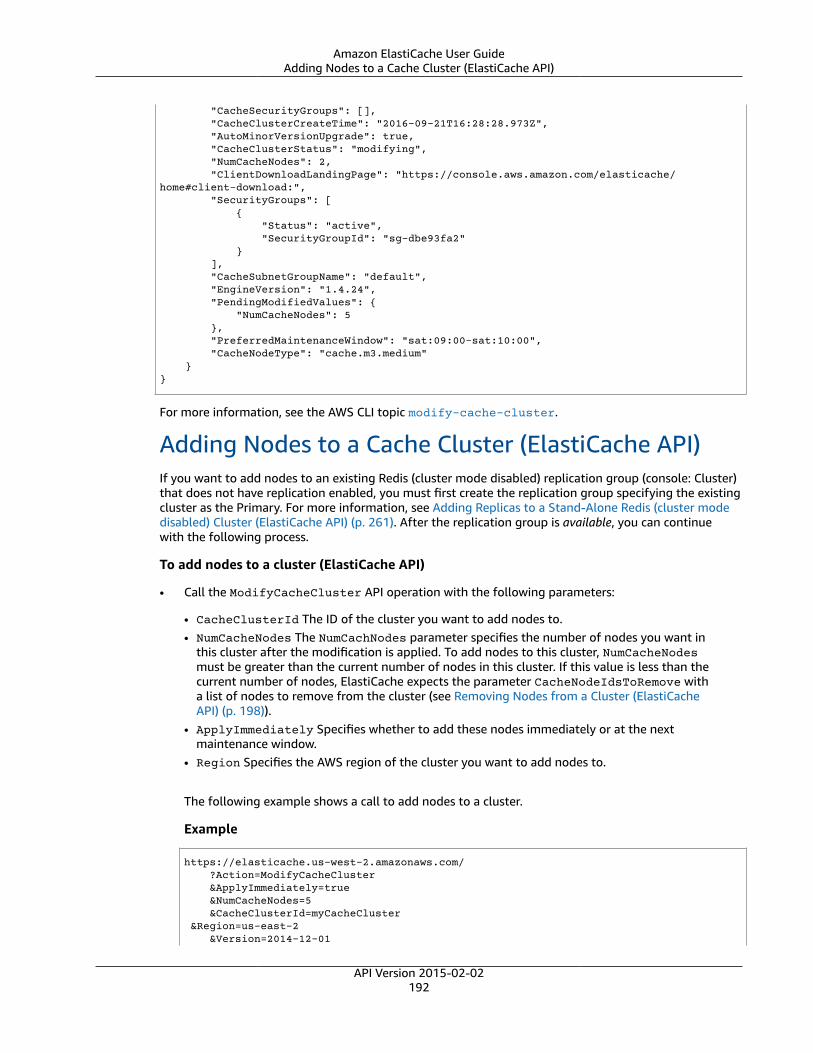
Amazon ElastiCache User GuideAdding Nodes to a Cache Cluster (ElastiCache API)
"CacheSecurityGroups": [], "CacheClusterCreateTime": "2016-09-21T16:28:28.973Z", "AutoMinorVersionUpgrade": true, "CacheClusterStatus": "modifying", "NumCacheNodes": 2, "ClientDownloadLandingPage": "https://console.aws.amazon.com/elasticache/home#client-download:", "SecurityGroups": [ { "Status": "active", "SecurityGroupId": "sg-dbe93fa2" } ], "CacheSubnetGroupName": "default", "EngineVersion": "1.4.24", "PendingModifiedValues": { "NumCacheNodes": 5 }, "PreferredMaintenanceWindow": "sat:09:00-sat:10:00", "CacheNodeType": "cache.m3.medium" }}
For more information, see the AWS CLI topic modify-cache-cluster.
Adding Nodes to a Cache Cluster (ElastiCache API)If you want to add nodes to an existing Redis (cluster mode disabled) replication group (console: Cluster)that does not have replication enabled, you must first create the replication group specifying the existingcluster as the Primary. For more information, see Adding Replicas to a Stand-Alone Redis (cluster modedisabled) Cluster (ElastiCache API) (p. 261). After the replication group is available, you can continuewith the following process.
To add nodes to a cluster (ElastiCache API)
• Call the ModifyCacheCluster API operation with the following parameters:
• CacheClusterId The ID of the cluster you want to add nodes to.• NumCacheNodes The NumCachNodes parameter specifies the number of nodes you want in
this cluster after the modification is applied. To add nodes to this cluster, NumCacheNodesmust be greater than the current number of nodes in this cluster. If this value is less than thecurrent number of nodes, ElastiCache expects the parameter CacheNodeIdsToRemove witha list of nodes to remove from the cluster (see Removing Nodes from a Cluster (ElastiCacheAPI) (p. 198)).
• ApplyImmediately Specifies whether to add these nodes immediately or at the nextmaintenance window.
• Region Specifies the AWS region of the cluster you want to add nodes to.
The following example shows a call to add nodes to a cluster.
Example
https://elasticache.us-west-2.amazonaws.com/ ?Action=ModifyCacheCluster &ApplyImmediately=true &NumCacheNodes=5 &CacheClusterId=myCacheCluster &Region=us-east-2 &Version=2014-12-01
API Version 2015-02-02192
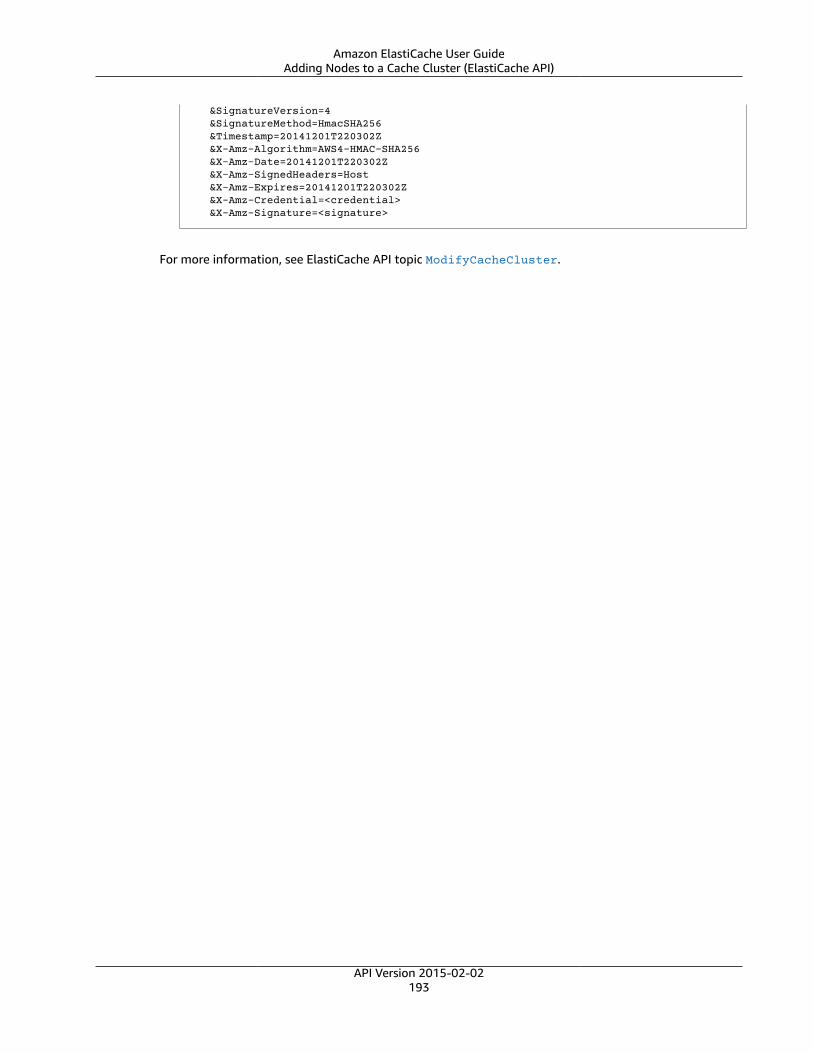
Amazon ElastiCache User GuideAdding Nodes to a Cache Cluster (ElastiCache API)
&SignatureVersion=4 &SignatureMethod=HmacSHA256 &Timestamp=20141201T220302Z &X-Amz-Algorithm=AWS4-HMAC-SHA256 &X-Amz-Date=20141201T220302Z &X-Amz-SignedHeaders=Host &X-Amz-Expires=20141201T220302Z &X-Amz-Credential=<credential> &X-Amz-Signature=<signature>
For more information, see ElastiCache API topic ModifyCacheCluster.
API Version 2015-02-02193

Amazon ElastiCache User GuideRemoving Nodes from a Cluster
Removing Nodes from a ClusterRemoving nodes from a cluster applies only if you are not running the Clustered Redis engine.
Each time you change the number of nodes in a Memcached cluster, you must re-map at least someof your keyspace so it maps to the correct node. For more detailed information on load balancing aMemcached cluster, see Configuring Your ElastiCache Client for Efficient Load Balancing (p. 92).
Topics• Removing Nodes from a Cluster (Console) (p. 194)
• Removing Nodes from a Cluster (AWS CLI) (p. 196)
• Removing Nodes from a Cluster (ElastiCache API) (p. 198)
Removing Nodes from a Cluster (Console)To remove nodes from a cluster (console)
1. Sign in to the AWS Management Console and open the ElastiCache console at https://console.aws.amazon.com/elasticache/.
2. From the dropdown in the upper right corner, choose the region of the cluster you want to removenodes from.
3. In the navigation pane, choose Memcached or Redis.
A list of clusters running the chosen engine appears.
4. From the list of clusters, choose the cluster name from which you want to remove a node.
A list of the cluster's nodes appears.
5. Choose the box to the left of the node ID for the node you want to delete. Using the ElastiCacheconsole, you can only delete one node at a time, so choosing multiple nodes will disable the Deletenode button.
The Delete Node dialog appears.
6. To delete the node, complete the Delete Node dialog box and choose Delete Node. To not deletethe node, choose the Cancel.
Impact of New Add and Remove Requests on Pending Requests
Scenarios PendingOperation
NewRequest
Results
Scenario 1 Delete Delete The new delete request, pending or immediate, replacesthe pending delete request.
For example, if nodes 0001, 0003, and 0007 are pendingdeletion and a new request to delete nodes 0002 and0004 is issued, only nodes 0002 and 0004 will be deleted.Nodes 0001, 0003, and 0007 will not be deleted.
Scenario 2 Delete Create The new create request, pending or immediate, replacesthe pending delete request.
For example, if nodes 0001, 0003, and 0007 are pendingdeletion and a new request to create a node is issued,
API Version 2015-02-02194

Amazon ElastiCache User GuideRemoving Nodes from a Cluster (Console)
Scenarios PendingOperation
NewRequest
Results
a new node will be created and nodes 0001, 0003, and0007 will not be deleted.
Scenario 3 Create Delete The new delete request, pending or immediate, replacesthe pending create request.
For example, if there is a pending request to create twonodes and a new request is issued to delete node 0003,no new nodes will be created and node 0003 will bedeleted.
Scenario 4 Create Create The new create request is added to the pending createrequest.
For example, if there is a pending request to create twonodes and a new request is issued to create three nodes,the new requests is added to the pending request andfive nodes will be created.
ImportantIf the new create request is set to ApplyImmediately - Yes, all create requests areperformed immediately. If the new createrequest is set to Apply Immediately - No, allcreate requests are pending.
To determine what operations are pending, choose the Description tab and check to see how manypending creations or deletions are shown. You cannot have both pending creations and pendingdeletions.
API Version 2015-02-02195

Amazon ElastiCache User GuideRemoving Nodes from a Cluster (AWS CLI)
Removing Nodes from a Cluster (AWS CLI)1. Use the command describe-cache-cluster to display a list of nodes for a cluster, as in the
following example, and note the identifiers of the nodes you want to remove.
For Linux, macOS, or Unix:
aws elasticache describe-cache-clusters \ --cache-cluster-id my-memcached-cluster \ --show-cache-node-info
For Windows:
aws elasticache describe-cache-clusters ^ --cache-cluster-id my-memcached-cluster ^ --show-cache-node-info
This operation produces output similar to the following (JSON format):
{ "CacheClusters": [ { "Engine": "memcached", "CacheNodes": [ { "CacheNodeId": "0001", "Endpoint": { "Port": 11211, "Address": "my-memcached-cluster.7ef-example.0001.usw2.cache.amazonaws.com" }, "CacheNodeStatus": "available", "ParameterGroupStatus": "in-sync", "CacheNodeCreateTime": "2016-09-21T16:28:28.973Z", "CustomerAvailabilityZone": "us-west-2b" }, { "CacheNodeId": "0002", "Endpoint": { "Port": 11211, "Address": "my-memcached-cluster.7ef-example.0002.usw2.cache.amazonaws.com" }, "CacheNodeStatus": "available", "ParameterGroupStatus": "in-sync", "CacheNodeCreateTime": "2016-09-21T16:28:28.973Z", "CustomerAvailabilityZone": "us-west-2b" }, { "CacheNodeId": "0003", "Endpoint": { "Port": 11211, "Address": "my-memcached-cluster.7ef-example.0003.usw2.cache.amazonaws.com" }, "CacheNodeStatus": "available", "ParameterGroupStatus": "in-sync", "CacheNodeCreateTime": "2016-09-21T16:28:28.973Z", "CustomerAvailabilityZone": "us-west-2b" } ],
API Version 2015-02-02196
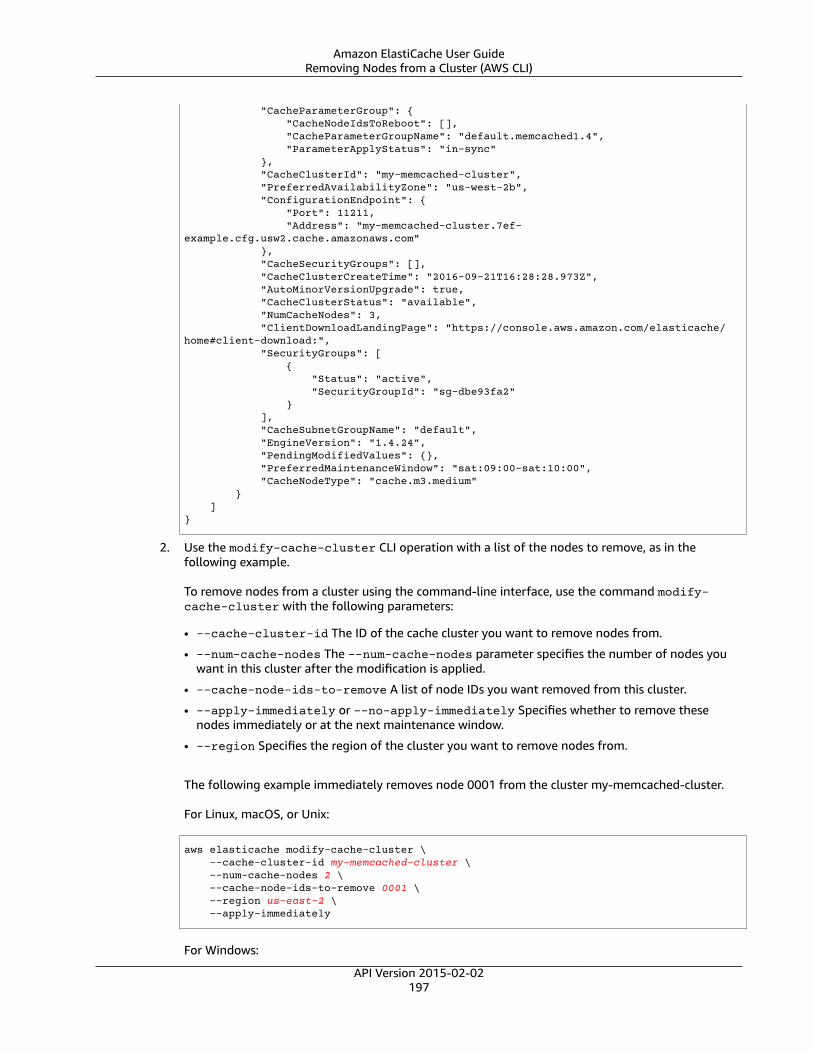
Amazon ElastiCache User GuideRemoving Nodes from a Cluster (AWS CLI)
"CacheParameterGroup": { "CacheNodeIdsToReboot": [], "CacheParameterGroupName": "default.memcached1.4", "ParameterApplyStatus": "in-sync" }, "CacheClusterId": "my-memcached-cluster", "PreferredAvailabilityZone": "us-west-2b", "ConfigurationEndpoint": { "Port": 11211, "Address": "my-memcached-cluster.7ef-example.cfg.usw2.cache.amazonaws.com" }, "CacheSecurityGroups": [], "CacheClusterCreateTime": "2016-09-21T16:28:28.973Z", "AutoMinorVersionUpgrade": true, "CacheClusterStatus": "available", "NumCacheNodes": 3, "ClientDownloadLandingPage": "https://console.aws.amazon.com/elasticache/home#client-download:", "SecurityGroups": [ { "Status": "active", "SecurityGroupId": "sg-dbe93fa2" } ], "CacheSubnetGroupName": "default", "EngineVersion": "1.4.24", "PendingModifiedValues": {}, "PreferredMaintenanceWindow": "sat:09:00-sat:10:00", "CacheNodeType": "cache.m3.medium" } ]}
2. Use the modify-cache-cluster CLI operation with a list of the nodes to remove, as in thefollowing example.
To remove nodes from a cluster using the command-line interface, use the command modify-cache-cluster with the following parameters:
• --cache-cluster-id The ID of the cache cluster you want to remove nodes from.
• --num-cache-nodes The --num-cache-nodes parameter specifies the number of nodes youwant in this cluster after the modification is applied.
• --cache-node-ids-to-remove A list of node IDs you want removed from this cluster.
• --apply-immediately or --no-apply-immediately Specifies whether to remove thesenodes immediately or at the next maintenance window.
• --region Specifies the region of the cluster you want to remove nodes from.
The following example immediately removes node 0001 from the cluster my-memcached-cluster.
For Linux, macOS, or Unix:
aws elasticache modify-cache-cluster \ --cache-cluster-id my-memcached-cluster \ --num-cache-nodes 2 \ --cache-node-ids-to-remove 0001 \ --region us-east-2 \ --apply-immediately
For Windows:
API Version 2015-02-02197
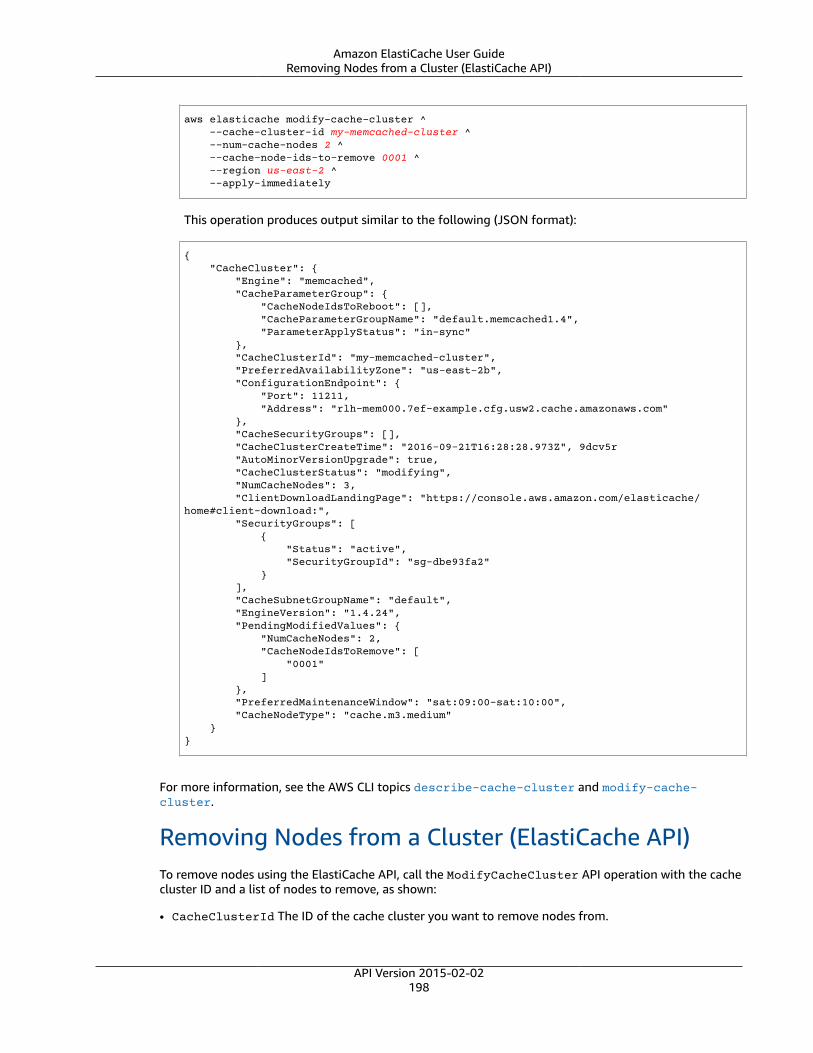
Amazon ElastiCache User GuideRemoving Nodes from a Cluster (ElastiCache API)
aws elasticache modify-cache-cluster ^ --cache-cluster-id my-memcached-cluster ^ --num-cache-nodes 2 ^ --cache-node-ids-to-remove 0001 ^ --region us-east-2 ^ --apply-immediately
This operation produces output similar to the following (JSON format):
{ "CacheCluster": { "Engine": "memcached", "CacheParameterGroup": { "CacheNodeIdsToReboot": [], "CacheParameterGroupName": "default.memcached1.4", "ParameterApplyStatus": "in-sync" }, "CacheClusterId": "my-memcached-cluster", "PreferredAvailabilityZone": "us-east-2b", "ConfigurationEndpoint": { "Port": 11211, "Address": "rlh-mem000.7ef-example.cfg.usw2.cache.amazonaws.com" }, "CacheSecurityGroups": [], "CacheClusterCreateTime": "2016-09-21T16:28:28.973Z", 9dcv5r "AutoMinorVersionUpgrade": true, "CacheClusterStatus": "modifying", "NumCacheNodes": 3, "ClientDownloadLandingPage": "https://console.aws.amazon.com/elasticache/home#client-download:", "SecurityGroups": [ { "Status": "active", "SecurityGroupId": "sg-dbe93fa2" } ], "CacheSubnetGroupName": "default", "EngineVersion": "1.4.24", "PendingModifiedValues": { "NumCacheNodes": 2, "CacheNodeIdsToRemove": [ "0001" ] }, "PreferredMaintenanceWindow": "sat:09:00-sat:10:00", "CacheNodeType": "cache.m3.medium" }}
For more information, see the AWS CLI topics describe-cache-cluster and modify-cache-cluster.
Removing Nodes from a Cluster (ElastiCache API)To remove nodes using the ElastiCache API, call the ModifyCacheCluster API operation with the cachecluster ID and a list of nodes to remove, as shown:
• CacheClusterId The ID of the cache cluster you want to remove nodes from.
API Version 2015-02-02198

Amazon ElastiCache User GuideRemoving Nodes from a Cluster (ElastiCache API)
• NumCacheNodes The NumCacheNodes parameter specifies the number of nodes you want in thiscluster after the modification is applied.
• CacheNodeIdsToRemove.member.n The list of node IDs to remove from the cluster.• CacheNodeIdsToRemove.member.1=0004
• CacheNodeIdsToRemove.member.1=0005
• ApplyImmediately Specifies whether to remove these nodes immediately or at the nextmaintenance window.
• Region Specifies the region of the cluster you want to remove a node from.
The following example immediately removes nodes 0004 and 0005 from the cluster myCacheCluster.
https://elasticache.us-west-2.amazonaws.com/ ?Action=ModifyCacheCluster &CacheClusterId=myCacheCluster &ApplyImmediately=true &CacheNodeIdsToRemove.member.1=0004 &CacheNodeIdsToRemove.member.2=0005 &NumCacheNodes=3 &Region us-east-2 &Version=2014-12-01 &SignatureVersion=4 &SignatureMethod=HmacSHA256 &Timestamp=20141201T220302Z &X-Amz-Algorithm=AWS4-HMAC-SHA256 &X-Amz-Date=20141201T220302Z &X-Amz-SignedHeaders=Host &X-Amz-Expires=20141201T220302Z &X-Amz-Credential=<credential> &X-Amz-Signature=<signature>
For more information, see ElastiCache API topic ModifyCacheCluster.
API Version 2015-02-02199

Amazon ElastiCache User GuideCanceling Pending Add or Delete Node Operations
Canceling Pending Add or Delete Node OperationsCanceling Pending Add or Delete Node Operations(Console)If you elected to not apply a change immediately, the operation has pending status until it is performedat your next maintenance window. You can cancel any pending operation.
To cancel a pending operation
1. Sign in to the AWS Management Console and open the ElastiCache console at https://console.aws.amazon.com/elasticache/.
2. From the dropdown in the upper right corner, choose the region you want to cancel a pending addor delete node operation in.
3. In the navigation pane, click Memcached or Redis. A list of clusters running the chosen engine willappear.
4. In the list of clusters, choose the name of the cluster that has pending operations you want tocancel.
5. To determine what operations are pending, choose the Description tab and check to see how manypending creations or deletions are shown. You cannot have both pending creations and pendingdeletions.
6. Choose the Nodes tab.7. To cancel all pending operations, click Cancel Pending. The Cancel Pending dialog box appears.8. Confirm that you want to cancel all pending operations by choosing the Cancel Pending button, or
to keep the operations, choose Cancel.
API Version 2015-02-02200

Amazon ElastiCache User GuideDeleting a Cluster
Deleting a ClusterAs long as a cluster is in the available state, you are being charged for it, whether or not you are activelyusing it. To stop incurring charges, delete the cluster.
Deleting a Cluster (Console)The following procedure deletes a single cluster from your deployment. To delete multiple clusters,repeat the procedure for each cluster you want to delete. You do not need to wait for one cluster tofinish deleting before starting the procedure to delete another cluster.
To delete a cluster
1. Sign in to the AWS Management Console and open the Amazon ElastiCache console at https://console.aws.amazon.com/elasticache/.
2. In the ElastiCache console dashboard, select the engine the cluster you want to delete is running,either Memcached or Redis.
A list of all clusters running the selected engine appears.3. To select the cluster to delete, select the cluster's name from the list of clusters.
ImportantYou can only delete one cluster at a time from the ElastiCache console. Selecting multipleclusters disables the delete operation.
4. Select the Actions button and then select Delete from the list of actions.5. In the Delete Cluster confirmation screen:
a. If this is a Redis cluster, specify whether or not a final snapshot should be taken, and, if you wanta final snapshot, the name of the snapshot.
b. Choose Delete to delete the cluster, or select Cancel to keep the cluster.
If you chose Delete, the status of the cluster changes to deleting.
As soon as your cluster is no longer listed in the list of clusters, you stop incurring charges for it.
Deleting a Cache Cluster (AWS CLI)The following code deletes the cache cluster myCluster.
aws elasticache delete-cache-cluster --cache-cluster-id myCluster
The delete-cache-cluster CLI action only deletes one cache cluster. To delete multiple cacheclusters, call delete-cache-cluster for each cache cluster you want to delete. You do not need towait for one cache cluster to finish deleting before deleting another.
For Linux, macOS, or Unix:
aws elasticache delete-cache-cluster \ --cache-cluster-id myCluster \ --region us-east-2
For Windows:
API Version 2015-02-02201
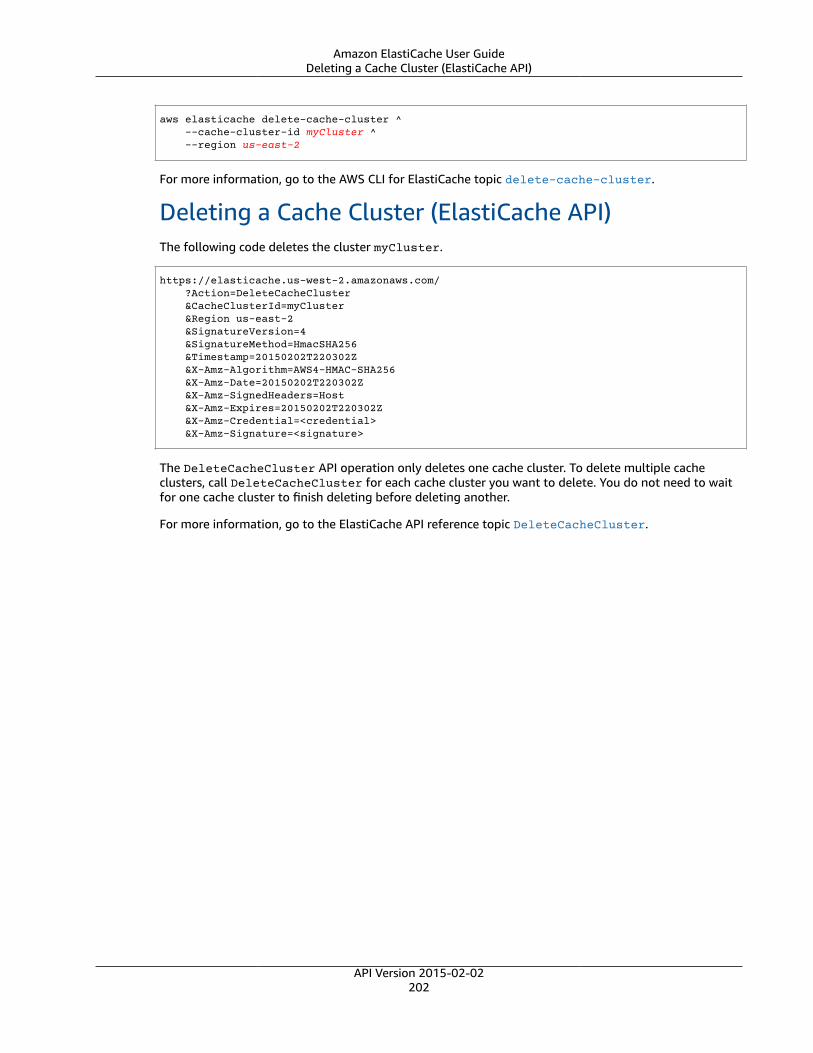
Amazon ElastiCache User GuideDeleting a Cache Cluster (ElastiCache API)
aws elasticache delete-cache-cluster ^ --cache-cluster-id myCluster ^ --region us-east-2
For more information, go to the AWS CLI for ElastiCache topic delete-cache-cluster.
Deleting a Cache Cluster (ElastiCache API)The following code deletes the cluster myCluster.
https://elasticache.us-west-2.amazonaws.com/ ?Action=DeleteCacheCluster &CacheClusterId=myCluster &Region us-east-2 &SignatureVersion=4 &SignatureMethod=HmacSHA256 &Timestamp=20150202T220302Z &X-Amz-Algorithm=AWS4-HMAC-SHA256 &X-Amz-Date=20150202T220302Z &X-Amz-SignedHeaders=Host &X-Amz-Expires=20150202T220302Z &X-Amz-Credential=<credential> &X-Amz-Signature=<signature>
The DeleteCacheCluster API operation only deletes one cache cluster. To delete multiple cacheclusters, call DeleteCacheCluster for each cache cluster you want to delete. You do not need to waitfor one cache cluster to finish deleting before deleting another.
For more information, go to the ElastiCache API reference topic DeleteCacheCluster.
API Version 2015-02-02202
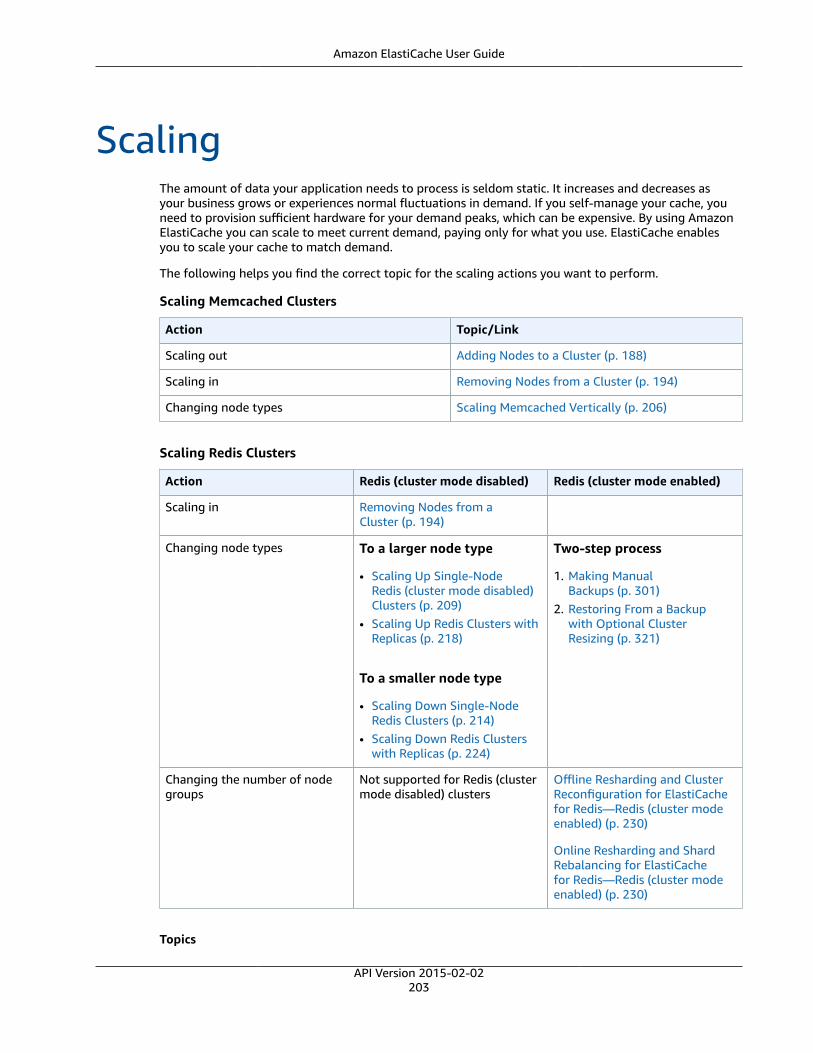
Amazon ElastiCache User Guide
ScalingThe amount of data your application needs to process is seldom static. It increases and decreases asyour business grows or experiences normal fluctuations in demand. If you self-manage your cache, youneed to provision sufficient hardware for your demand peaks, which can be expensive. By using AmazonElastiCache you can scale to meet current demand, paying only for what you use. ElastiCache enablesyou to scale your cache to match demand.
The following helps you find the correct topic for the scaling actions you want to perform.
Scaling Memcached Clusters
Action Topic/Link
Scaling out Adding Nodes to a Cluster (p. 188)
Scaling in Removing Nodes from a Cluster (p. 194)
Changing node types Scaling Memcached Vertically (p. 206)
Scaling Redis Clusters
Action Redis (cluster mode disabled) Redis (cluster mode enabled)
Scaling in Removing Nodes from aCluster (p. 194)
Changing node types To a larger node type
• Scaling Up Single-NodeRedis (cluster mode disabled)Clusters (p. 209)
• Scaling Up Redis Clusters withReplicas (p. 218)
To a smaller node type
• Scaling Down Single-NodeRedis Clusters (p. 214)
• Scaling Down Redis Clusterswith Replicas (p. 224)
Two-step process
1. Making ManualBackups (p. 301)
2. Restoring From a Backupwith Optional ClusterResizing (p. 321)
Changing the number of nodegroups
Not supported for Redis (clustermode disabled) clusters
Offline Resharding and ClusterReconfiguration for ElastiCachefor Redis—Redis (cluster modeenabled) (p. 230)
Online Resharding and ShardRebalancing for ElastiCachefor Redis—Redis (cluster modeenabled) (p. 230)
Topics
API Version 2015-02-02203

Amazon ElastiCache User Guide
• Scaling Memcached (p. 205)• Scaling Single-Node Redis (cluster mode disabled) Clusters (p. 208)• Scaling Redis (cluster mode disabled) Clusters with Replica Nodes (p. 217)• Scaling for Amazon ElastiCache for Redis—Redis (cluster mode enabled) (p. 229)
API Version 2015-02-02204

Amazon ElastiCache User GuideScaling Memcached
Scaling MemcachedMemcached clusters are composed of 1 to 20 nodes. Scaling a Memcached cluster out and in is as easy asadding or removing nodes from the cluster.
If you need more than 20 nodes in a Memcached cluster, or more than 100 nodes total in a region, pleasefill out the ElastiCache Limit Increase Request form at https://aws.amazon.com/contact-us/elasticache-node-limit-request/.
Because you can partition your data across all the nodes in a Memcached cluster, scaling up to a nodetype with greater memory is seldom required. If you scale to a different node type, you must create anew cluster which will start out empty unless your application populates it.
Topics• Scaling Memcached Horizontally (p. 205)• Scaling Memcached Vertically (p. 206)
Scaling Memcached HorizontallyThe Memcached engine supports partitioning your data across multiple nodes. Because of this,Memcached clusters scale horizontally easily. A Memcached cluster can have from 1 to 20 nodes. Tohorizontally scale your Memcached cluster, merely add or remove nodes.
If you need more than 20 nodes in a Memcached cluster, or more than 100 nodes total in a region, pleasefill out the ElastiCache Limit Increase Request form at https://aws.amazon.com/contact-us/elasticache-node-limit-request/.
The following topics detail how to scale your Memcached cluster out or in by adding or removing nodes.
• Adding Nodes to a Cluster (p. 188)• Removing Nodes from a Cluster (p. 194)
Each time you change the number of nodes in your Memcached cluster, you must re-map at least someof your keyspace so it maps to the correct node. For more detailed information on load balancing yourMemcached cluster, see Configuring Your ElastiCache Client for Efficient Load Balancing (p. 92).
If you use auto discovery on your Memcached cluster, you do not need to change the endpoints inyour application as you add or remove nodes. For more information on auto discovery, see Node AutoDiscovery (Memcached) (p. 127). If you do not use auto discovery, each time you change the number ofnodes in your Memcached cluster you must update the endpoints in your application.
API Version 2015-02-02205

Amazon ElastiCache User GuideScaling Memcached Vertically
Scaling Memcached VerticallyWhen you scale your Memcached cluster up or down, you must create a new cluster. Memcached clustersalways start out empty unless your application populates it.
ImportantIf you are scaling down to a smaller node type, be sure that the smaller node type is adequatefor your data and overhead. For more information, see Choosing Your Node Size for MemcachedClusters (p. 103).
Topics• Scaling Memcached Vertically (Console) (p. 206)• Scaling Memcached Vertically (AWS CLI) (p. 206)• Scaling Memcached Vertically (ElastiCache API) (p. 206)
Scaling Memcached Vertically (Console)The following procedure walks you through scaling your Memcached cluster vertically using theElastiCache console.
To scale a Memcached cluster vertically (console)
1. Create a new cluster with the new node type. For more information, see Creating a Cluster (Console):Memcached (p. 161).
2. In your application, update the endpoints to the new cluster's endpoints. For more information, seeFinding a Memcached Cluster's Endpoints (Console) (p. 67).
3. Delete the old cluster. For more information, see Deleting a Cluster (Console) (p. 201).
Scaling Memcached Vertically (AWS CLI)The following procedure walks you through scaling your Memcached cache cluster vertically using theAWS CLI.
To scale a Memcached cache cluster vertically (AWS CLI)
1. Create a new cache cluster with the new node type. For more information, see Creating a CacheCluster (AWS CLI) (p. 172).
2. In your application, update the endpoints to the new cluster's endpoints. For more information, seeFinding Endpoints (AWS CLI) (p. 73).
3. Delete the old cache cluster. For more information, see Deleting a Cache Cluster (AWS CLI) (p. 201).
Scaling Memcached Vertically (ElastiCache API)The following procedure walks you through scaling your Memcached cache cluster vertically using theElastiCache API.
To scale a Memcached cache cluster vertically (ElastiCache API)
1. Create a new cache cluster with the new node type. For more information, see Creating a CacheCluster (ElastiCache API) (p. 174).
2. In your application, update the endpoints to the new cache cluster's endpoints. For moreinformation, see Finding Endpoints (ElastiCache API) (p. 77).
API Version 2015-02-02206

Amazon ElastiCache User GuideScaling Memcached Vertically
3. Delete the old cache cluster. For more information, see Deleting a Cache Cluster (ElastiCacheAPI) (p. 202).
API Version 2015-02-02207

Amazon ElastiCache User GuideScaling Single-Node Redis (cluster mode disabled) Clusters
Scaling Single-Node Redis (cluster mode disabled)Clusters
Redis (cluster mode disabled) nodes must be large enough to contain all the cache's data plus Redisoverhead. To change the data capacity of your Redis (cluster mode disabled) cluster, you must scalevertically; scaling up to a larger node type to increase data capacity, or scaling down to a smaller nodetype to reduce data capacity.
The ElastiCache scaling up process is designed to make a best effort to retain your existing data andrequires successful Redis replication. For Redis (cluster mode disabled) Redis clusters, we recommendthat sufficient memory be made available to Redis as described in the topic Ensuring You Have SufficientMemory to Create a Redis Snapshot (p. 81).
The scaling down process is completely manual and makes no attempt at data retention other than whatyou do.
You cannot partition your data across multiple Redis (cluster mode disabled) clusters. However, if youonly need to increase or decrease your cluster's read capacity, you can create a Redis (cluster modedisabled) cluster with replica nodes and add or remove read replicas. To create a Redis (cluster modedisabled) cluster with replica nodes using your single-node Redis cache cluster as the primary cluster, seeCreating a Redis (cluster mode disabled) Cluster (Console) (p. 163).
After you create the cluster with replicas, you can increase read capacity by adding read replicas. Later,if you need to, you can reduce read capacity by removing read replicas. For more information, seeIncreasing Read Capacity (p. 227) or Decreasing Read Capacity (p. 228).
In addition to being able to scale read capacity, Redis (cluster mode disabled) clusters with replicasprovide other business advantages. For more information, see ElastiCache Replication (Redis) (p. 239).
ImportantIf your parameter group uses reserved-memory to set aside memory for Redis overhead,before you begin scaling be sure that you have a custom parameter group that reserves thecorrect amount of memory for your new node type. Alternatively, you can modify a customparameter group so that it uses reserved-memory-percent and use that parameter group foryour new cluster.If you're using reserved-memory-percent, doing this is not necessary.For more information, see Managing Reserved Memory (Redis) (p. 83).
Topics• Scaling Up Single-Node Redis (cluster mode disabled) Clusters (p. 209)• Scaling Down Single-Node Redis Clusters (p. 214)
API Version 2015-02-02208

Amazon ElastiCache User GuideScaling Up Single-Node Redis Clusters
Scaling Up Single-Node Redis (cluster mode disabled)ClustersWhen you scale up a single-node Redis cluster, ElastiCache performs the following process, whether youuse the ElastiCache console, the AWS CLI, or the ElastiCache API.
1. All reads from and writes to the cache cluster are blocked.2. A new cache cluster with the new node type is spun up in the same Availability Zone as the existing
cache cluster.3. The cache data in the existing cache cluster is copied to the new cache cluster. How long this process
takes depends upon your node type and how much data is in the cache cluster.4. Reads and writes are resumed using the new cache cluster. Because the new cache cluster's
endpoints are the same as they were for the old cache cluster, you do not need to update theendpoints in your application.
5. ElastiCache deletes the old cache cluster.
Because writes to and reads from your cache cluster are blocked during the scale-up process, you shouldschedule the scale up for a time of low demand on your cache cluster.
As shown in the following table, your Redis scale-up operation is blocked if you have an engine upgradescheduled for the next maintenance window. For more information on Maintenance Windows, seeMaintenance Window (p. 59).
Blocked Redis operations
Pending Operations Blocked Operations
Scale up Immediate engine upgrade
Engine upgrade Immediate scale up
Immediate scale upScale up and engine upgrade
Immediate engine upgrade
If you have a pending operation that is blocking you, you can do one of the following.
• Schedule your Redis scale-up operation for the next maintenance window by clearing the Applyimmediately check box (CLI use: --no-apply-immediately, API use: ApplyImmediately=false).
• Wait until your next maintenance window (or after) to perform your Redis scale up operation.• Add the Redis engine upgrade to this cache cluster modification with the Apply Immediately check
box chosen (CLI use: --apply-immediately, API use: ApplyImmediately=true). This unblocksyour scale up operation by causing the engine upgrade to be performed immediately.
You can scale up a single-node Redis (cluster mode disabled) cluster using the ElastiCache console, theAWS CLI, or ElastiCache API.
ImportantIf your parameter group uses reserved-memory to set aside memory for Redis overhead,before you begin scaling be sure that you have a custom parameter group that reserves thecorrect amount of memory for your new node type. Alternatively, you can modify a customparameter group so that it uses reserved-memory-percent and use that parameter group foryour new cluster.If you're using reserved-memory-percent, doing this is not necessary.
API Version 2015-02-02209
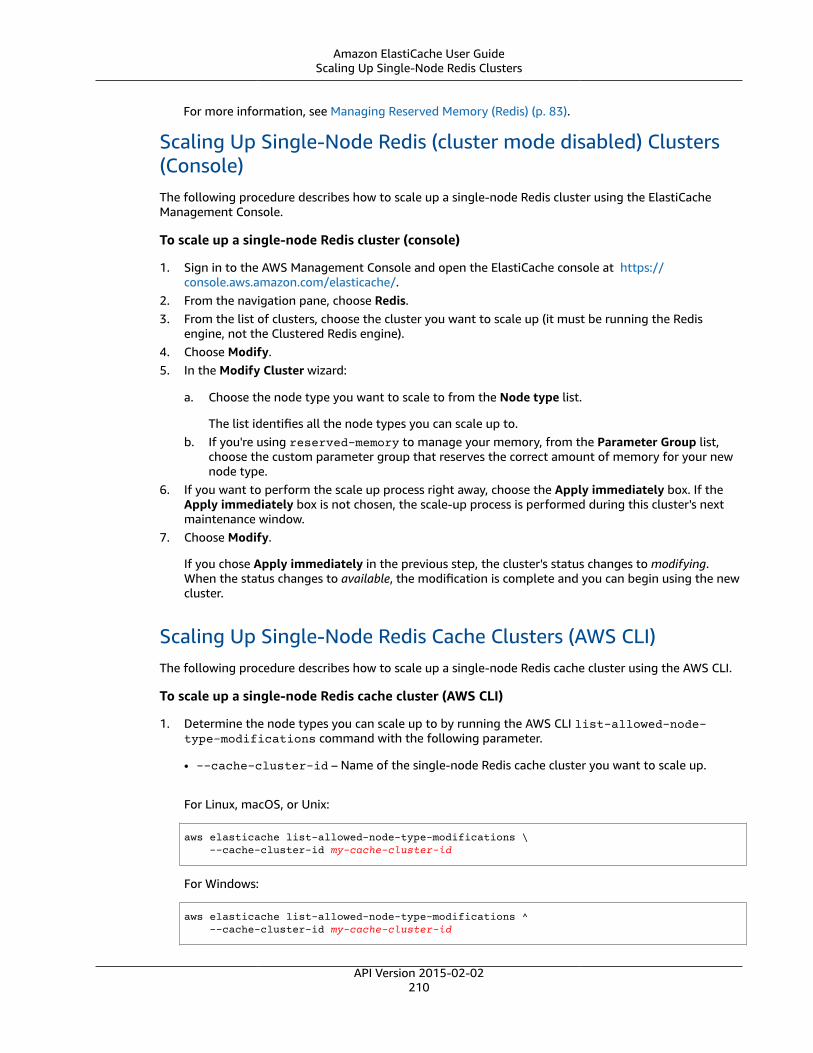
Amazon ElastiCache User GuideScaling Up Single-Node Redis Clusters
For more information, see Managing Reserved Memory (Redis) (p. 83).
Scaling Up Single-Node Redis (cluster mode disabled) Clusters(Console)The following procedure describes how to scale up a single-node Redis cluster using the ElastiCacheManagement Console.
To scale up a single-node Redis cluster (console)
1. Sign in to the AWS Management Console and open the ElastiCache console at https://console.aws.amazon.com/elasticache/.
2. From the navigation pane, choose Redis.3. From the list of clusters, choose the cluster you want to scale up (it must be running the Redis
engine, not the Clustered Redis engine).4. Choose Modify.5. In the Modify Cluster wizard:
a. Choose the node type you want to scale to from the Node type list.
The list identifies all the node types you can scale up to.b. If you're using reserved-memory to manage your memory, from the Parameter Group list,
choose the custom parameter group that reserves the correct amount of memory for your newnode type.
6. If you want to perform the scale up process right away, choose the Apply immediately box. If theApply immediately box is not chosen, the scale-up process is performed during this cluster's nextmaintenance window.
7. Choose Modify.
If you chose Apply immediately in the previous step, the cluster's status changes to modifying.When the status changes to available, the modification is complete and you can begin using the newcluster.
Scaling Up Single-Node Redis Cache Clusters (AWS CLI)The following procedure describes how to scale up a single-node Redis cache cluster using the AWS CLI.
To scale up a single-node Redis cache cluster (AWS CLI)
1. Determine the node types you can scale up to by running the AWS CLI list-allowed-node-type-modifications command with the following parameter.
• --cache-cluster-id – Name of the single-node Redis cache cluster you want to scale up.
For Linux, macOS, or Unix:
aws elasticache list-allowed-node-type-modifications \ --cache-cluster-id my-cache-cluster-id
For Windows:
aws elasticache list-allowed-node-type-modifications ^ --cache-cluster-id my-cache-cluster-id
API Version 2015-02-02210

Amazon ElastiCache User GuideScaling Up Single-Node Redis Clusters
Output from the above command looks something like this (JSON format).
{ "ScaleUpModifications": [ "cache.m3.2xlarge", "cache.m3.large", "cache.m3.xlarge", "cache.m4.10xlarge", "cache.m4.2xlarge", "cache.m4.4xlarge", "cache.m4.large", "cache.m4.xlarge", "cache.r3.2xlarge", "cache.r3.4xlarge", "cache.r3.8xlarge", "cache.r3.large", "cache.r3.xlarge" ]}
For more information, see list-allowed-node-type-modifications in the AWS CLI Reference.
2. Modify your existing cache cluster specifying the cache cluster to scale up and the new, larger nodetype, using the AWS CLI modify-cache-cluster command and the following parameters.
• --cache-cluster-id – The name of the cache cluster you are scaling up.
• --cache-node-type – The new node type you want to scale the cache cluster up to. This valuemust be one of the node types returned by the list-allowed-node-type-modificationscommand in step 1.
• --cache-parameter-group-name – [Optional] Use this parameter if you are using reserved-memory to manage your cluster's reserved memory. Specify a custom cache parameter groupthat reserves the correct amount of memory for your new node type. If you are using reserved-memory-percent you can omit this parameter.
• --apply-immediately – Causes the scale-up process to be applied immediately. To postponethe scale-up process to the cluster's next maintenance window, use the --no-apply-immediately parameter.
For Linux, macOS, or Unix:
aws elasticache modify-cache-cluster \ --cache-cluster-id my-redis-cache-cluster \ --cache-node-type cache.m2.xlarge \ --cache-parameter-group-name redis32-m2-xl \ --apply-immediately
For Windows:
aws elasticache modify-cache-cluster ^ --cache-cluster-id my-redis-cache-cluster ^ --cache-node-type cache.m2.xlarge ^ --cache-parameter-group-name redis32-m2-xl ^ --apply-immediately
Output from the above command looks something like this (JSON format).
{ "CacheCluster": {
API Version 2015-02-02211

Amazon ElastiCache User GuideScaling Up Single-Node Redis Clusters
"Engine": "redis", "CacheParameterGroup": { "CacheNodeIdsToReboot": [], "CacheParameterGroupName": "default.redis3.2", "ParameterApplyStatus": "in-sync" }, "SnapshotRetentionLimit": 1, "CacheClusterId": "my-redis-cache-cluster", "CacheSecurityGroups": [], "NumCacheNodes": 1, "SnapshotWindow": "00:00-01:00", "CacheClusterCreateTime": "2017-02-21T22:34:09.645Z", "AutoMinorVersionUpgrade": true, "CacheClusterStatus": "modifying", "PreferredAvailabilityZone": "us-west-2a", "ClientDownloadLandingPage": "https://console.aws.amazon.com/elasticache/home#client-download:", "CacheSubnetGroupName": "default", "EngineVersion": "3.2.4", "PendingModifiedValues": { "CacheNodeType": "cache.m3.2xlarge" }, "PreferredMaintenanceWindow": "tue:11:30-tue:12:30", "CacheNodeType": "cache.m3.medium" }}
For more information, see modify-cache-cluster in the AWS CLI Reference.
3. If you used the --apply-immediately, check the status of the new cache cluster using the AWSCLI describe-cache-clusters command with the following parameter. When the status changesto available, you can begin using the new, larger cache cluster.
• --cache-cache cluster-id – The name of your single-node Redis cache cluster. Use thisparameter to describe a particular cache cluster rather than all cache clusters.
aws elasticache describe-cache-clusters --cache-cluster-id my-redis-cache-cluster
For more information, see describe-cache-clusters in the AWS CLI Reference.
Scaling Up Single-Node Redis Cache Clusters (ElastiCache API)
The following procedure describes how to scale up a single-node Redis cache cluster using theElastiCache API.
To scale up a single-node Redis cache cluster (ElastiCache API)
1. Determine the node types you can scale up to by running the ElastiCache APIListAllowedNodeTypeModifications action with the following parameter.
• CacheClusterId – The name of the single-node Redis cache cluster you want to scale up.
https://elasticache.us-west-2.amazonaws.com/ ?Action=ListAllowedNodeTypeModifications &CacheClusterId=MyRedisCacheCluster &Version=2015-02-02 &SignatureVersion=4 &SignatureMethod=HmacSHA256
API Version 2015-02-02212

Amazon ElastiCache User GuideScaling Up Single-Node Redis Clusters
&Timestamp=20150202T192317Z &X-Amz-Credential=<credential>
For more information, see ListAllowedNodeTypeModifications in the Amazon ElastiCache APIReference.
2. Modify your existing cache cluster specifying the cache cluster to scale up and the new, larger nodetype, using the ModifyCacheCluster ElastiCache API action and the following parameters.
• CacheClusterId – The name of the cache cluster you are scaling up.• CacheNodeType – The new, larger node type you want to scale the cache cluster up to. This value
must be one of the node types returned by the ListAllowedNodeTypeModifications actionin step 1.
• CacheParameterGroupName – [Optional] Use this parameter if you are using reserved-memory to manage your cluster's reserved memory. Specify a custom cache parameter groupthat reserves the correct amount of memory for your new node type. If you are using reserved-memory-percent you can omit this parameter.
• ApplyImmediately – Set to true to cause the scale-up process to be performedimmediately. To postpone the scale-up process to the cluster's next maintenance window, useApplyImmediately=false.
https://elasticache.us-west-2.amazonaws.com/ ?Action=ModifyCacheCluster &ApplyImmediately=true &CacheClusterId=MyRedisCacheCluster &CacheNodeType=cache.m2.xlarge &CacheParameterGroupName redis32-m2-xl &Version=2015-02-02 &SignatureVersion=4 &SignatureMethod=HmacSHA256 &Timestamp=20150202T192317Z &X-Amz-Credential=<credential>
For more information, see ModifyCacheCluster in the Amazon ElastiCache API Reference.3. If you used ApplyImmediately=true, check the status of the new cache cluster using the
ElastiCache API DescribeCacheClusters action with the following parameter. When the statuschanges to available, you can begin using the new, larger cache cluster.
• CacheClusterId – The name of your single-node Redis cache cluster. Use this parameter todescribe a particular cache cluster rather than all cache clusters.
https://elasticache.us-west-2.amazonaws.com/ ?Action=DescribeCacheClusters &CacheClusterId=MyRedisCacheCluster &Version=2015-02-02 &SignatureVersion=4 &SignatureMethod=HmacSHA256 &Timestamp=20150202T192317Z &X-Amz-Credential=<credential>
For more information, see DescribeCacheClusters in the Amazon ElastiCache API Reference.
API Version 2015-02-02213

Amazon ElastiCache User GuideScaling Down Redis Cache Clusters
Scaling Down Single-Node Redis ClustersThe ElastiCache process for scaling your Redis cluster down is completely manual and makes no attemptat data retention other than what you do.
The following sections walk you through how to scale a single-node Redis cluster down to a smaller nodetype. Ensuring that the new, smaller node type is large enough to accommodate all the data and Redisoverhead is important to the long-term success of your new Redis cluster. For more information, seeEnsuring You Have Sufficient Memory to Create a Redis Snapshot (p. 81).
Topics
• Scaling Down a Single-Node Redis Cluster (Console) (p. 214)
• Scaling Down a Single-Node Redis Cache Cluster (AWS CLI) (p. 215)
• Scaling Down a Single-Node Redis (cluster mode disabled) Cache Cluster (ElastiCache API) (p. 215)
Scaling Down a Single-Node Redis Cluster (Console)The following procedure walks you through scaling your single-node Redis cluster down to a smallernode type using the ElastiCache console.
ImportantIf your parameter group uses reserved-memory to set aside memory for Redis overhead,before you begin scaling be sure that you have a custom parameter group that reserves thecorrect amount of memory for your new node type. Alternatively, you can modify a customparameter group so that it uses reserved-memory-percent and use that parameter group foryour new cluster.If you're using reserved-memory-percent, doing this is not necessary.For more information, see Managing Reserved Memory (Redis) (p. 83).
To scale down your single-node Redis cluster (console)
1. Ensure that the smaller node type is adequate for your data and overhead needs. For moreinformation, see Ensuring You Have Sufficient Memory to Create a Redis Snapshot (p. 81).
2. If your parameter group uses reserved-memory to set aside memory for Redis overhead, ensurethat you have a custom parameter group to set aside the correct amount of memory for your newnode type.
Alternatively, you can modify your custom parameter group to use reserved-memory-percent.For more information, see Managing Reserved Memory (Redis) (p. 83).
3. Sign in to the AWS Management Console and open the ElastiCache console at https://console.aws.amazon.com/elasticache/.
4. Take a snapshot of the cluster. For details on how to take a snapshot, see Creating a Manual Backup(Console) (p. 301).
5. Restore from this snapshot specifying the new node type for the new cluster and, if necessary, aparameter group to reserve the correct amount of memory. For more information, see RestoringFrom a Backup (Console) (p. 322).
Alternatively, you can launch a new cluster using the new node type and parameter group, andseeding it from the snapshot. For more information, see Seeding a New Cluster with an ExternallyCreated Backup (Redis) (p. 324).
6. In your application, update the endpoints to the new cluster's endpoints. For more information, seeFinding a Redis (cluster mode disabled) Cluster's Endpoints (Console) (p. 69).
7. Delete the old cluster. For more information, see Deleting a Cluster (Console) (p. 201).
API Version 2015-02-02214

Amazon ElastiCache User GuideScaling Down Redis Cache Clusters
8. If you no longer need it, delete the snapshot. For more information, see Deleting a Backup(Console) (p. 330).
TipIf you don't mind your cluster being unavailable while it's being created or restored, you caneliminate the need to update the endpoints in your application. To do so, delete the old clusterright after taking the snapshot and reuse the old cluster's name for the new cluster.
Scaling Down a Single-Node Redis Cache Cluster (AWS CLI)The following procedure walks you through scaling your single-node Redis cache cluster down to asmaller node type using the AWS CLI.
To scale down a single-node Redis cache cluster (AWS CLI)
1. Ensure that the smaller node type is adequate for your data and overhead needs. For moreinformation, see Ensuring You Have Sufficient Memory to Create a Redis Snapshot (p. 81).
2. If your parameter group uses reserved-memory to set aside memory for Redis overhead, ensurethat you have a custom parameter group to set aside the correct amount of memory for your newnode type.
Alternatively, you can modify your custom parameter group to use reserved-memory-percent.For more information, see Managing Reserved Memory (Redis) (p. 83).
3. Create a snapshot of your existing Redis cache cluster. For instructions, see Creating a ManualBackup (AWS CLI) (p. 302).
4. Restore from the snapshot using the new, smaller node type as the cache cluster's node type, and,if needed, the new parameter group. For more information, see Restoring From a Backup (AWSCLI) (p. 323).
5. In your application, update the endpoints to the new cache cluster's endpoints. For moreinformation, see Finding Endpoints for Nodes and Clusters (AWS CLI) (p. 73).
6. Delete your old cache cluster. For more information, see Deleting a Cache Cluster (AWS CLI) (p. 201).7. If you no longer need it, delete the snapshot. For more information, see Deleting a Backup (AWS
CLI) (p. 330).
TipIf you don't mind your cache cluster being unavailable while it's being created or restored, youcan eliminate the need to update the endpoints in your application. To do so, delete the oldcache cluster right after taking the snapshot and reuse the old cache cluster's name for the newcache cluster.
Scaling Down a Single-Node Redis (cluster mode disabled)Cache Cluster (ElastiCache API)The following procedure walks you through scaling your single-node Redis cache cluster down to asmaller node type using the ElastiCache API.
To scale down a single-node Redis cache cluster (ElastiCache API)
1. Ensure that the smaller node type is adequate for your data and overhead needs. For moreinformation, see Ensuring You Have Sufficient Memory to Create a Redis Snapshot (p. 81).
2. If your parameter group uses reserved-memory to set aside memory for Redis overhead, ensurethat you have a custom parameter group to set aside the correct amount of memory for your newnode type.
API Version 2015-02-02215

Amazon ElastiCache User GuideScaling Down Redis Cache Clusters
Alternatively, you can modify your custom parameter group to use reserved-memory-percent.For more information, see Managing Reserved Memory (Redis) (p. 83).
3. Create a snapshot of your existing Redis cache cluster. For instructions, see Creating a ManualBackup (ElastiCache API) (p. 305).
4. Restore from the snapshot using the new, smaller node type as the cache cluster's node type, and, ifneeded, the new parameter group. For more information, see Restoring From a Backup (ElastiCacheAPI) (p. 323).
5. In your application, update the endpoints to the new cache cluster's endpoints. For moreinformation, see Finding Endpoints for Nodes and Clusters (ElastiCache API) (p. 77).
6. Delete your old cache cluster. For more information, see Deleting a Cache Cluster (ElastiCacheAPI) (p. 202).
7. If you no longer need it, delete the snapshot. For more information, see Deleting a Backup(ElastiCache API) (p. 330).
TipIf you don't mind your cache cluster being unavailable while it's being created or restored, youcan eliminate the need to update the endpoints in your application. To do so, delete the oldcache cluster right after taking the snapshot and reuse the old cache cluster's name for the newcache cluster.
API Version 2015-02-02216

Amazon ElastiCache User GuideScaling Redis (cluster mode disabled)
Clusters with Replica Nodes
Scaling Redis (cluster mode disabled) Clusters withReplica Nodes
A Redis cluster with replica nodes (called replication group in the API/CLI) provides high availability viareplication that has Multi-AZ with automatic failover enabled. A cluster with replica nodes is a logicalcollection of up to six Redis clusters where one cluster, the Primary, is able to serve both read and writerequests. All the other clusters in the cluster are read-only replicas of the Primary. Data written to thePrimary is asynchronously replicated to all the read replicas in the cluster. Because Redis (cluster modedisabled) does not support partitioning your data across multiple clusters, each cluster in a Redis (clustermode disabled) replication group contains the entire cache dataset. Redis (cluster mode enabled) clusterssupport partitioning your data across up to 15 shards.
To change the data capacity of your cluster you must scale it up to a larger node type, or down to asmaller node type.
To change the read capacity of your cluster, add more read replicas, up to a maximum of 5, or removeread replicas.
The ElastiCache scaling up process is designed to make a best effort to retain your existing data andrequires successful Redis replication. For Redis clusters with replicas, we recommend that sufficientmemory be made available to Redis as described in the topic Ensuring You Have Sufficient Memory toCreate a Redis Snapshot (p. 81).
The scaling down process is completely manual and makes no attempt at data retention other than whatyou do.
Related Topics
• ElastiCache Replication (Redis) (p. 239)• Replication: Redis (cluster mode disabled) vs. Redis (cluster mode enabled) (p. 241)• Replication: Multi-AZ with Automatic Failover (Redis) (p. 244)• Ensuring You Have Sufficient Memory to Create a Redis Snapshot (p. 81)
Topics• Scaling Up Redis Clusters with Replicas (p. 218)• Scaling Down Redis Clusters with Replicas (p. 224)• Increasing Read Capacity (p. 227)• Decreasing Read Capacity (p. 228)
API Version 2015-02-02217

Amazon ElastiCache User GuideScaling Up Redis Clusters with Replicas
Scaling Up Redis Clusters with ReplicasAmazon ElastiCache provides console, CLI, and API support for scaling your Redis (cluster mode disabled)replication group up.
When the scale-up process is initiated, ElastiCache does the following:
1. Blocks all reads from and writes to the primary node. Reads from the replicas continue until step 5when they are briefly interrupted while ElastiCache switches you from your current replicas to thenew replicas.
2. Launches a new Redis replication group using the new node type.3. Copies all the data from the current primary node to the new primary node.4. Sync the new read replicas with the new primary node.5. Updates the DNS entries so they point to the new nodes. Because of this you don't have to update
the endpoints in your application.
ImportantReads from read replica nodes are interrupted while ElastiCache switches you from yourcurrent replicas to the new replicas.
6. Reinstates reads from and writes to the new primary node.7. Deletes the old cluster (CLI/API: replication group).
How long this process takes is dependent upon your node type and how much data is in your cluster.
As shown in the following table, your Redis scale-up operation is blocked if you have an engine upgradescheduled for the cluster’s next maintenance window.
Blocked Redis operations
Pending Operations Blocked Operations
Scale up Immediate engine upgrade
Engine upgrade Immediate scale up
Immediate scale upScale up and engine upgrade
Immediate engine upgrade
If you have a pending operation that is blocking you, you can do one of the following.
• Schedule your Redis scale-up operation for the next maintenance window by clearing the Applyimmediately check box (CLI use: --no-apply-immediately, API use: ApplyImmediately=false).
• Wait until your next maintenance window (or after) to perform your Redis scale-up operation.• Add the Redis engine upgrade to this cache cluster modification with the Apply Immediately check
box chosen (CLI use: --apply-immediately, API use: ApplyImmediately=true). This unblocksyour scale-up operation by causing the engine upgrade to be performed immediately.
The following sections describe how to scale your Redis cluster with replicas up using the ElastiCacheconsole, the AWS CLI, and the ElastiCache API.
ImportantIf your parameter group uses reserved-memory to set aside memory for Redis overhead,before you begin scaling be sure that you have a custom parameter group that reserves thecorrect amount of memory for your new node type. Alternatively, you can modify a custom
API Version 2015-02-02218

Amazon ElastiCache User GuideScaling Up Redis Clusters with Replicas
parameter group so that it uses reserved-memory-percent and use that parameter group foryour new cluster.If you're using reserved-memory-percent, doing this is not necessary.For more information, see Managing Reserved Memory (Redis) (p. 83).
Scaling Up a Redis Cluster with Replicas (Console)The amount of time it takes to scale up to a larger node type varies, depending upon the node type andthe amount of data in your current cluster.
The following process scales your cluster with replicas from its current node type to a new, larger nodetype using the ElastiCache console. During this process, until the status changes from modifying toavailable, all reads and writes between your application and the primary cache cluster are blocked.
To scale up Redis cluster with replicas (console)
1. Sign in to the AWS Management Console and open the ElastiCache console at https://console.aws.amazon.com/elasticache/.
2. From the navigation pane, choose Redis3. From the list of clusters, choose the cluster you want to scale up. This cluster must be running the
Redis engine and not the Clustered Redis engine.4. Choose Modify.5. In the Modify Cluster wizard:
a. Choose the node type you want to scale to from the Node type list.
The list identifies all the node types you can scale up to.b. If you're using reserved-memory to manage your memory, from the Parameter Group list,
choose the custom parameter group that reserves the correct amount of memory for your newnode type.
6. If you want to perform the scale-up process right away, choose the Apply immediately check box. Ifthe Apply immediately check box is left not chosen, the scale-up process is performed during thiscluster's next maintenance window.
7. Choose Modify.8. When the cluster’s status changes from modifying to available, your cluster has scaled to the
new node type and you can resume using it. There is no need to update the endpoints in yourapplication.
Scaling Up a Redis Replication Group (AWS CLI)The following process scales your replication group (console: cluster with replicas) from its current nodetype to a new, larger node type using the AWS CLI. During this process, until the status changes frommodifying to available, all reads and writes between your application and the primary cache cluster areblocked.
The amount of time it takes to scale up to a larger node type varies, depending upon your node type andthe amount of data in your current cache cluster.
To scale up a Redis Replication Group (AWS CLI)
1. Determine which node types you can scale up to by running the AWS CLI list-allowed-node-type-modifications command with the following parameter.
• --replication-group-id – the name of the replication group. Use this parameter to describea particular replication group rather than all replication groups.
API Version 2015-02-02219
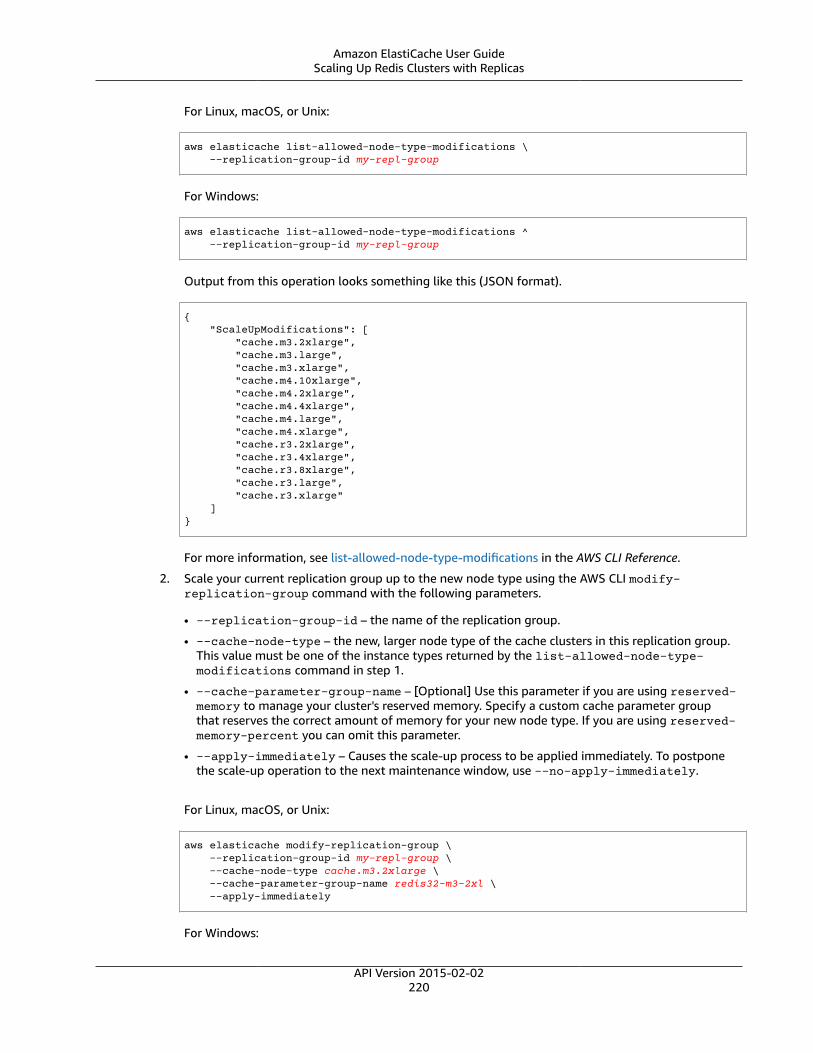
Amazon ElastiCache User GuideScaling Up Redis Clusters with Replicas
For Linux, macOS, or Unix:
aws elasticache list-allowed-node-type-modifications \ --replication-group-id my-repl-group
For Windows:
aws elasticache list-allowed-node-type-modifications ^ --replication-group-id my-repl-group
Output from this operation looks something like this (JSON format).
{ "ScaleUpModifications": [ "cache.m3.2xlarge", "cache.m3.large", "cache.m3.xlarge", "cache.m4.10xlarge", "cache.m4.2xlarge", "cache.m4.4xlarge", "cache.m4.large", "cache.m4.xlarge", "cache.r3.2xlarge", "cache.r3.4xlarge", "cache.r3.8xlarge", "cache.r3.large", "cache.r3.xlarge" ]}
For more information, see list-allowed-node-type-modifications in the AWS CLI Reference.
2. Scale your current replication group up to the new node type using the AWS CLI modify-replication-group command with the following parameters.
• --replication-group-id – the name of the replication group.
• --cache-node-type – the new, larger node type of the cache clusters in this replication group.This value must be one of the instance types returned by the list-allowed-node-type-modifications command in step 1.
• --cache-parameter-group-name – [Optional] Use this parameter if you are using reserved-memory to manage your cluster's reserved memory. Specify a custom cache parameter groupthat reserves the correct amount of memory for your new node type. If you are using reserved-memory-percent you can omit this parameter.
• --apply-immediately – Causes the scale-up process to be applied immediately. To postponethe scale-up operation to the next maintenance window, use --no-apply-immediately.
For Linux, macOS, or Unix:
aws elasticache modify-replication-group \ --replication-group-id my-repl-group \ --cache-node-type cache.m3.2xlarge \ --cache-parameter-group-name redis32-m3-2xl \ --apply-immediately
For Windows:
API Version 2015-02-02220

Amazon ElastiCache User GuideScaling Up Redis Clusters with Replicas
aws elasticache modify-replication-group ^ --replication-group-id my-repl-group ^ --cache-node-type cache.m3.2xlarge ^ --cache-parameter-group-name redis32-m3-2xl \ --apply-immediately
Output from this command looks something like this (JSON format).
{ "ReplicationGroup": { "Status": "available", "Description": "Some description", "NodeGroups": [ { "Status": "available", "NodeGroupMembers": [ { "CurrentRole": "primary", "PreferredAvailabilityZone": "us-west-2b", "CacheNodeId": "0001", "ReadEndpoint": { "Port": 6379, "Address": "my-repl-group-001.8fdx4s.0001.usw2.cache.amazonaws.com" }, "CacheClusterId": "my-repl-group-001" }, { "CurrentRole": "replica", "PreferredAvailabilityZone": "us-west-2c", "CacheNodeId": "0001", "ReadEndpoint": { "Port": 6379, "Address": "my-repl-group-002.8fdx4s.0001.usw2.cache.amazonaws.com" }, "CacheClusterId": "my-repl-group-002" } ], "NodeGroupId": "0001", "PrimaryEndpoint": { "Port": 6379, "Address": "my-repl-group.8fdx4s.ng.0001.usw2.cache.amazonaws.com" } } ], "ReplicationGroupId": "my-repl-group", "SnapshotRetentionLimit": 1, "AutomaticFailover": "disabled", "SnapshotWindow": "12:00-13:00", "SnapshottingClusterId": "my-repl-group-002", "MemberClusters": [ "my-repl-group-001", "my-repl-group-002", ], "PendingModifiedValues": {} }}
For more information, see modify-replication-group in the AWS CLI Reference.
API Version 2015-02-02221

Amazon ElastiCache User GuideScaling Up Redis Clusters with Replicas
3. If you used the --apply-immediately parameter, monitor the status of the replication groupusing the AWS CLI describe-replication-group command with the following parameter.When the status changes from modifying to available, you can begin writing to your new, scaled upreplication group.
• --replication-group-id – the name of the replication group. Use this parameter to describea particular replication group rather than all replication groups.
For Linux, macOS, or Unix:
aws elasticache describe-replication-group \ --replication-group-id my-replication-group
For Windows:
aws elasticache describe-replication-groups ^ --replication-group-id my-replication-group
For more information, see describe-replication-groups in the AWS CLI Reference.
Scaling Up a Redis Replication Group (ElastiCache API)
The following process scales your replication group from its current node type to a new, larger node typeusing the ElastiCache API. During this process, until the status changes from modifying to available, allreads and writes between your application and the primary cache cluster are blocked. However, readsfrom the read replica cache clusters continue uninterrupted.
The amount of time it takes to scale up to a larger node type varies, depending upon your node type andthe amount of data in your current cache cluster.
To scale up a Redis Replication Group (ElastiCache API)
1. Determine which node types you can scale up to using the ElastiCache APIListAllowedNodeTypeModifications action with the following parameter.
• ReplicationGroupId – the name of the replication group. Use this parameter to describe aspecific replication group rather than all replication groups.
https://elasticache.us-west-2.amazonaws.com/ ?Action=ListAllowedNodeTypeModifications &ReplicationGroupId=MyReplGroup &Version=2015-02-02 &SignatureVersion=4 &SignatureMethod=HmacSHA256 &Timestamp=20150202T192317Z &X-Amz-Credential=<credential>
For more information, see ListAllowedNodeTypeModifications in the Amazon ElastiCache APIReference.
2. Scale your current replication group up to the new node type using theModifyRedplicationGroup ElastiCache API action and with the following parameters.
• ReplicationGroupId – the name of the replication group.
API Version 2015-02-02222

Amazon ElastiCache User GuideScaling Up Redis Clusters with Replicas
• CacheNodeType – the new, larger node type of the cache clusters in thisreplication group. This value must be one of the instance types returned by theListAllowedNodeTypeModifications action in step 1.
• CacheParameterGroupName – [Optional] Use this parameter if you are using reserved-memory to manage your cluster's reserved memory. Specify a custom cache parameter groupthat reserves the correct amount of memory for your new node type. If you are using reserved-memory-percent you can omit this parameter.
• ApplyImmediately – Set to true to causes the scale-up process to be applied immediately. Topostpone the scale-up process to the next maintenance window, use ApplyImmediately=false.
https://elasticache.us-west-2.amazonaws.com/ ?Action=ModifyReplicationGroup &ApplyImmediately=true &CacheNodeType=cache.m3.2xlarge &CacheParameterGroupName=redis32-m3-2xl &ReplicationGroupId=myReplGroup &SignatureVersion=4 &SignatureMethod=HmacSHA256 &Timestamp=20141201T220302Z &Version=2014-12-01 &X-Amz-Algorithm=AWS4-HMAC-SHA256 &X-Amz-Date=20141201T220302Z &X-Amz-SignedHeaders=Host &X-Amz-Expires=20141201T220302Z &X-Amz-Credential=<credential> &X-Amz-Signature=<signature>
For more information, see ModifyReplicationGroup in the Amazon ElastiCache API Reference.3. If you used ApplyImmediately=true, monitor the status of the replication group using the
ElastiCache API DescribeReplicationGroups action with the following parameters. When thestatus changes from modifying to available, you can begin writing to your new, scaled up replicationgroup.
• ReplicationGroupId – the name of the replication group. Use this parameter to describe aparticular replication group rather than all replication groups.
https://elasticache.us-west-2.amazonaws.com/ ?Action=DescribeReplicationGroups &ReplicationGroupId=MyReplGroup &Version=2015-02-02 &SignatureVersion=4 &SignatureMethod=HmacSHA256 &Timestamp=20150202T192317Z &X-Amz-Credential=<credential>
For more information, see DescribeReplicationGroups in the Amazon ElastiCache API Reference.
API Version 2015-02-02223
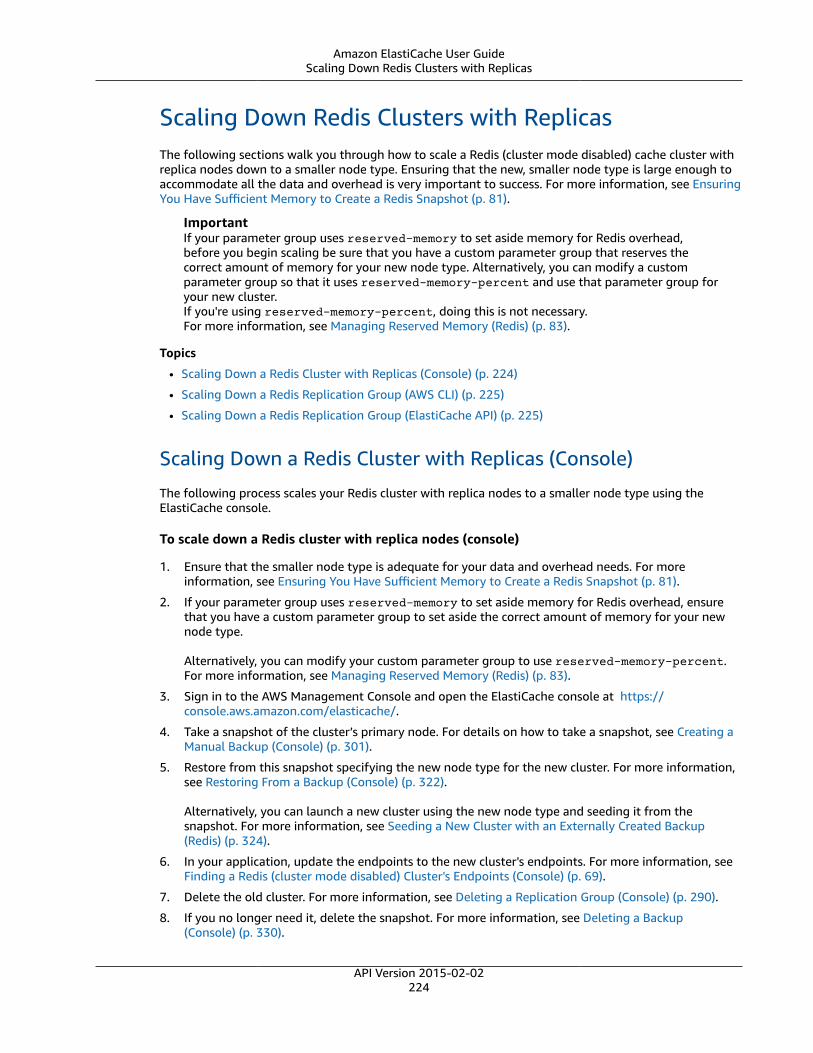
Amazon ElastiCache User GuideScaling Down Redis Clusters with Replicas
Scaling Down Redis Clusters with ReplicasThe following sections walk you through how to scale a Redis (cluster mode disabled) cache cluster withreplica nodes down to a smaller node type. Ensuring that the new, smaller node type is large enough toaccommodate all the data and overhead is very important to success. For more information, see EnsuringYou Have Sufficient Memory to Create a Redis Snapshot (p. 81).
ImportantIf your parameter group uses reserved-memory to set aside memory for Redis overhead,before you begin scaling be sure that you have a custom parameter group that reserves thecorrect amount of memory for your new node type. Alternatively, you can modify a customparameter group so that it uses reserved-memory-percent and use that parameter group foryour new cluster.If you're using reserved-memory-percent, doing this is not necessary.For more information, see Managing Reserved Memory (Redis) (p. 83).
Topics
• Scaling Down a Redis Cluster with Replicas (Console) (p. 224)
• Scaling Down a Redis Replication Group (AWS CLI) (p. 225)
• Scaling Down a Redis Replication Group (ElastiCache API) (p. 225)
Scaling Down a Redis Cluster with Replicas (Console)
The following process scales your Redis cluster with replica nodes to a smaller node type using theElastiCache console.
To scale down a Redis cluster with replica nodes (console)
1. Ensure that the smaller node type is adequate for your data and overhead needs. For moreinformation, see Ensuring You Have Sufficient Memory to Create a Redis Snapshot (p. 81).
2. If your parameter group uses reserved-memory to set aside memory for Redis overhead, ensurethat you have a custom parameter group to set aside the correct amount of memory for your newnode type.
Alternatively, you can modify your custom parameter group to use reserved-memory-percent.For more information, see Managing Reserved Memory (Redis) (p. 83).
3. Sign in to the AWS Management Console and open the ElastiCache console at https://console.aws.amazon.com/elasticache/.
4. Take a snapshot of the cluster’s primary node. For details on how to take a snapshot, see Creating aManual Backup (Console) (p. 301).
5. Restore from this snapshot specifying the new node type for the new cluster. For more information,see Restoring From a Backup (Console) (p. 322).
Alternatively, you can launch a new cluster using the new node type and seeding it from thesnapshot. For more information, see Seeding a New Cluster with an Externally Created Backup(Redis) (p. 324).
6. In your application, update the endpoints to the new cluster's endpoints. For more information, seeFinding a Redis (cluster mode disabled) Cluster's Endpoints (Console) (p. 69).
7. Delete the old cluster. For more information, see Deleting a Replication Group (Console) (p. 290).
8. If you no longer need it, delete the snapshot. For more information, see Deleting a Backup(Console) (p. 330).
API Version 2015-02-02224
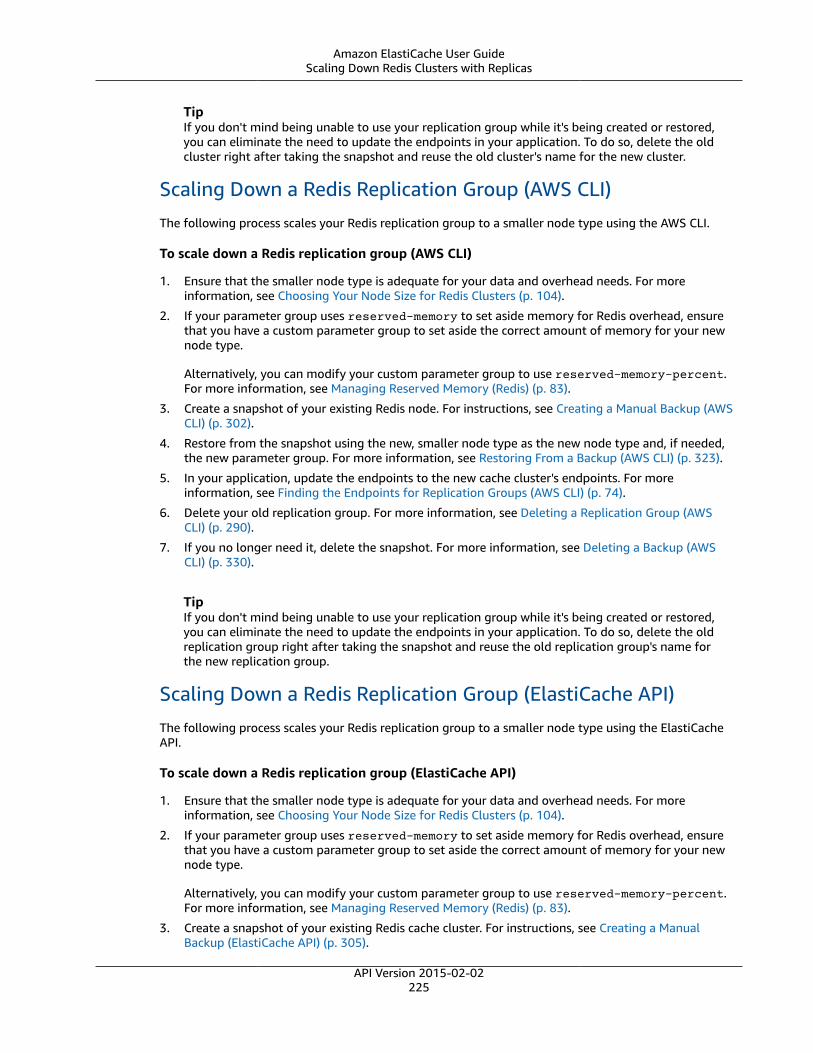
Amazon ElastiCache User GuideScaling Down Redis Clusters with Replicas
TipIf you don't mind being unable to use your replication group while it's being created or restored,you can eliminate the need to update the endpoints in your application. To do so, delete the oldcluster right after taking the snapshot and reuse the old cluster's name for the new cluster.
Scaling Down a Redis Replication Group (AWS CLI)The following process scales your Redis replication group to a smaller node type using the AWS CLI.
To scale down a Redis replication group (AWS CLI)
1. Ensure that the smaller node type is adequate for your data and overhead needs. For moreinformation, see Choosing Your Node Size for Redis Clusters (p. 104).
2. If your parameter group uses reserved-memory to set aside memory for Redis overhead, ensurethat you have a custom parameter group to set aside the correct amount of memory for your newnode type.
Alternatively, you can modify your custom parameter group to use reserved-memory-percent.For more information, see Managing Reserved Memory (Redis) (p. 83).
3. Create a snapshot of your existing Redis node. For instructions, see Creating a Manual Backup (AWSCLI) (p. 302).
4. Restore from the snapshot using the new, smaller node type as the new node type and, if needed,the new parameter group. For more information, see Restoring From a Backup (AWS CLI) (p. 323).
5. In your application, update the endpoints to the new cache cluster's endpoints. For moreinformation, see Finding the Endpoints for Replication Groups (AWS CLI) (p. 74).
6. Delete your old replication group. For more information, see Deleting a Replication Group (AWSCLI) (p. 290).
7. If you no longer need it, delete the snapshot. For more information, see Deleting a Backup (AWSCLI) (p. 330).
TipIf you don't mind being unable to use your replication group while it's being created or restored,you can eliminate the need to update the endpoints in your application. To do so, delete the oldreplication group right after taking the snapshot and reuse the old replication group's name forthe new replication group.
Scaling Down a Redis Replication Group (ElastiCache API)The following process scales your Redis replication group to a smaller node type using the ElastiCacheAPI.
To scale down a Redis replication group (ElastiCache API)
1. Ensure that the smaller node type is adequate for your data and overhead needs. For moreinformation, see Choosing Your Node Size for Redis Clusters (p. 104).
2. If your parameter group uses reserved-memory to set aside memory for Redis overhead, ensurethat you have a custom parameter group to set aside the correct amount of memory for your newnode type.
Alternatively, you can modify your custom parameter group to use reserved-memory-percent.For more information, see Managing Reserved Memory (Redis) (p. 83).
3. Create a snapshot of your existing Redis cache cluster. For instructions, see Creating a ManualBackup (ElastiCache API) (p. 305).
API Version 2015-02-02225

Amazon ElastiCache User GuideScaling Down Redis Clusters with Replicas
4. Restore from the snapshot using the new, smaller node type as the new node type and, if needed,the new parameter group. For more information, see Restoring From a Backup (ElastiCacheAPI) (p. 323).
5. In your application, update the endpoints to the new cache cluster's endpoints. For moreinformation, see Finding Endpoints (ElastiCache API) (p. 77).
6. Delete your old replication group. For more information, see Deleting a Replication Group(ElastiCache API) (p. 290).
7. If you no longer need it, delete the snapshot. For more information, see Deleting a Backup(ElastiCache API) (p. 330).
TipIf you don't mind being unable to use your replication group while it's being created or restored,you can eliminate the need to update the endpoints in your application. To do so, delete the oldreplication group right after taking the snapshot and reuse the old replication group's name forthe new replication group.
API Version 2015-02-02226

Amazon ElastiCache User GuideIncreasing Read Capacity
Increasing Read CapacityTo increase read capacity, add read replicas (up to a maximum of five) to your Redis replication group.
You can scale your Redis cluster’s read capacity using the ElastiCache console, the AWS CLI, or theElastiCache API. For more information, see Adding a Read Replica to a Redis Cluster (p. 291).
API Version 2015-02-02227

Amazon ElastiCache User GuideDecreasing Read Capacity
Decreasing Read CapacityTo decrease read capacity, delete one or more read replicas from your Redis cluster with replicas(called replication group in the API/CLI). If the cluster is Multi-AZ with automatic failover enabled, youcannot delete the last read replica without first disabling Multi-AZ with automatic failover. For moreinformation, see Modifying a Cluster with Replicas (p. 288).
For more information, see Deleting a Read Replica (p. 296).
API Version 2015-02-02228
Amazon ElastiCache User GuideScaling for Amazon ElastiCache for
Redis—Redis (cluster mode enabled)
Scaling for Amazon ElastiCache for Redis—Redis(cluster mode enabled)
As demand on your clusters changes, you might decide to improve performance or reduce costs bychanging the number of shards in your Redis (cluster mode enabled) cluster. We recommend using onlinehorizontal scaling to do so, because it allows your cluster to continue serving requests during the scalingprocess.
Conditions under which you might decide to rescale your cluster include the following:
• Memory pressure:
If the nodes in your cluster are under memory pressure, you might decide to scale out so that you havemore resources to better store data and serve requests.
You can determine whether your nodes are under memory pressure by monitoring the followingmetrics: FreeableMemory, SwapUsage, and BytesUseForCache.
• CPU or network bottleneck:
If latency/throughput issues are plaguing your cluster, you might need to scale out to resolve theissues.
You can monitor your latency and throughput levels by monitoring the following metrics:CPUUtilization, NetworkBytesIn, NetworkBytesOut, CurrConnections, and NewConnections.
• Your cluster is over-scaled:
Current demand on your cluster is such that scaling in doesn't hurt performance and reduces yourcosts.
You can monitor your cluster's use to determine whether or not you can safely scale in using thefollowing metrics: FreeableMemory, SwapUseage, BytesUseForCache, CPUUtilization, NetworkBytesIn,NetworkBytesOut, CurrConnections, and NewConnections.
Performance Impact of Scaling
When you scale using the offline process, your cluster is offline for a significant portion of the processand thus unable to serve requests. When you scale using the online method, because scaling is acompute-intensive operation, there is some degradation in performance, nevertheless, your clustercontinues to serve requests throughout the scaling operation. How much degradation you experiencedepends upon your normal CPU utilization and your data.
There are two ways to scale your Redis (cluster mode enabled) cluster; offline and online. Whichever youchoose, you can do the following:
• Change the number of node groups (shards) in the replication group by adding or removing nodegroups.
• Configure the slots in your new cluster differently than they were in the old cluster. Offline methodonly.
• Change the node type of the cluster's nodes. If you are changing to a smaller node type, be sure thatthe new node size has sufficient memory for your data and Redis overhead. Offline method only.
For more information, see Choosing Your Node Size (p. 103).
Topics
API Version 2015-02-02229

Amazon ElastiCache User GuideElastiCache for Redis Offline Resharding
• Offline Resharding and Cluster Reconfiguration for ElastiCache for Redis—Redis (cluster modeenabled) (p. 230)
• Online Resharding and Shard Rebalancing for ElastiCache for Redis—Redis (cluster modeenabled) (p. 230)
Offline Resharding and Cluster Reconfiguration forElastiCache for Redis—Redis (cluster mode enabled)The main advantage you get from offline shard reconfiguration is that you can do more than merely addor remove shards from your replication group. When you reshard offline, in addition to changing thenumber of shards in your replication group, you can do the following:
• Change the node type of your replication group.
• Specify the Availability Zone for each node in the replication group.
• Upgrade to a newer engine version.
• Specify the number of replica nodes in each shard independently.
• Specify the keyspace for each shard.
The main disadvantage of offline shard reconfiguration is that your cluster is offline beginning with therestore portion of the process and continuing until you update the endpoints in your application. Thelength of time that your cluster is offline varies with the amount of data in your cluster.
To reconfigure your shards Redis (cluster mode enabled) cluster offline
1. Create a manual backup of your existing Redis cluster. For more information, see Making ManualBackups (p. 301).
2. Create a new cluster by restoring from the backup. For more information, see Restoring From aBackup with Optional Cluster Resizing (p. 321).
3. Update the endpoints in your application to the new cluster's endpoints. For more information, seeFinding Your ElastiCache Endpoints (p. 66).
Online Resharding and Shard Rebalancing forElastiCache for Redis—Redis (cluster mode enabled)By using online resharding and shard rebalancing with Amazon ElastiCache for Redis, you can scale yourElastiCache for Redis (cluster mode enabled) dynamically with no downtime. This approach means thatyour cluster can continue to serve requests even while scaling or rebalancing is in process.
You can do the following:
• Scale out – Increase read and write capacity by adding shards (node groups) to your Redis (clustermode enabled) cluster (replication group).
If you add one or more shards to your replication group, the number of nodes in each new shard is thesame as the number of nodes in the smallest of the existing shards.
• Scale in – Reduce read and write capacity, and thereby costs, by removing shards from your Redis(cluster mode enabled) cluster.
• Rebalance – Move the keyspaces among the shards in your ElastiCache for Redis (cluster modeenabled) cluster so they are as equally distributed among the shards as possible.
API Version 2015-02-02230

Amazon ElastiCache User GuideElastiCache for Redis Online Resharding and Rebalancing
You can't do the following:
• Scale up/down: Change your node type. To do this, you must use the offline process.
• Upgrade your engine: Change your engine version to a newer version. To do this, you must use theoffline process.
• Configure shards independently:
• You can't specify the number of nodes in each shard independently. To do this, you must use theoffline process.
• You can't specify the keyspace for shards independently. To do this, you must use the offline process.
Currently, the following limitations apply to ElastiCache for Redis online resharding and rebalancing:
• These processes require Redis engine version 3.2.10 or newer. For information on upgrading yourengine version, see Upgrading Engine Versions (p. 57).
• There are limitations with slots or keyspaces and large items:
If any of the keys in a shard contain a large item, that key isn't be migrated to a new shard whenscaling out or rebalancing. This functionality can result in unbalanced shards.
If any of the keys in a shard contain a large item (items greater than 256 MB after serialization), thatshard isn't deleted when scaling in. This functionality can result in some shards not being deleted.
• When scaling out, the number of nodes in any new shards equals the number of nodes in the smallestexisting shard.
• When scaling out, any tags that are common to all existing shards are copied to the new shards.
For more information, see Best Practices: Online Resharding (p. 93).
You can horizontally scale or rebalance your ElastiCache for Redis (cluster mode enabled) clusters usingthe AWS Management Console, the AWS CLI, and the ElastiCache API.
Adding Shards with Online ReshardingYou can add shards to your Redis (cluster mode enabled) cluster using the AWS Management Console,AWS CLI, or ElastiCache API. When you add shards to a Redis (cluster mode enabled) cluster, any tags onthe existing shards are copied over to the new shards.
Topics
• Adding Shards (Console) (p. 231)
• Adding Shards (AWS CLI) (p. 232)
• Adding Shards (ElastiCache API) (p. 233)
Adding Shards (Console)
You can use the AWS Management Console to add one or more shards to your Redis (cluster modeenabled) cluster. The following procedure describes the process.
To add shards to your Redis (cluster mode enabled) cluster
1. Open the ElastiCache console at https://console.aws.amazon.com/elasticache/.
2. From the navigation pane, choose Redis.
3. Locate and choose the name of the Redis (cluster mode enabled) cluster that you want to add shardsto.
API Version 2015-02-02231

Amazon ElastiCache User GuideElastiCache for Redis Online Resharding and Rebalancing
TipRedis (cluster mode enabled) clusters have a value of 1 or greater in the Shards column.
4. Choose Add shard.
a. For Number of shards to be added, choose the number of shards you want added to thiscluster.
b. For Availability zone(s), choose either No preference or Specify availability zones.
c. If you chose Specify availability zones, for each node in each shard, select the node'sAvailability Zone from the list of Availability Zones.
d. Choose Add.
Adding Shards (AWS CLI)
The following process describes how to reconfigure the shards in your Redis (cluster mode enabled)cluster by adding shards using the AWS CLI.
Use the following parameters with modify-replication-group-shard-configuration.
Parameters
• --apply-immediately – Required. Specifies the shard reconfiguration operation is to be startedimmediately.
• --replication-group-id – Required. Specifies which replication group (cluster) the shardreconfiguration operation is to be performed on.
• --node-group-count – Required. Specifies the number of shards (node groups) to exist when theoperation is completed. When adding shards, the value of --node-group-count must be greaterthan the current number of shards.
Optionally, you can specify the Availability Zone for each node in the replication group using --resharding-configuration.
• --resharding-configuration – Optional. A list of preferred Availability Zones for each node ineach shard in the replication group. Use this parameter only if the value of --node-group-count isgreater than the current number of shards. If this parameter is omitted when adding shards, AmazonElastiCache selects the Availability Zones for the new nodes.
The following example reconfigures the keyspaces over four shards in the Redis (cluster mode enabled)cluster my-cluster. The example also specifies the Availability Zone for each node in each shard. Theoperation begins immediately.
Example - Adding Shards
For Linux, macOS, or Unix:
aws elasticache modify-replication-group-shard-configuration \ --replication-group-id my-cluster \ --node-group-count 4 \ --resharding-configuration \ "PreferredAvailabilityZones=us-east-2a,us-east-2c" \ "PreferredAvailabilityZones=us-east-2b,us-east-2a" \ "PreferredAvailabilityZones=us-east-2c,us-east-2d" \ "PreferredAvailabilityZones=us-east-2d,us-east-2c" \ --apply-immediately
For Windows:
API Version 2015-02-02232
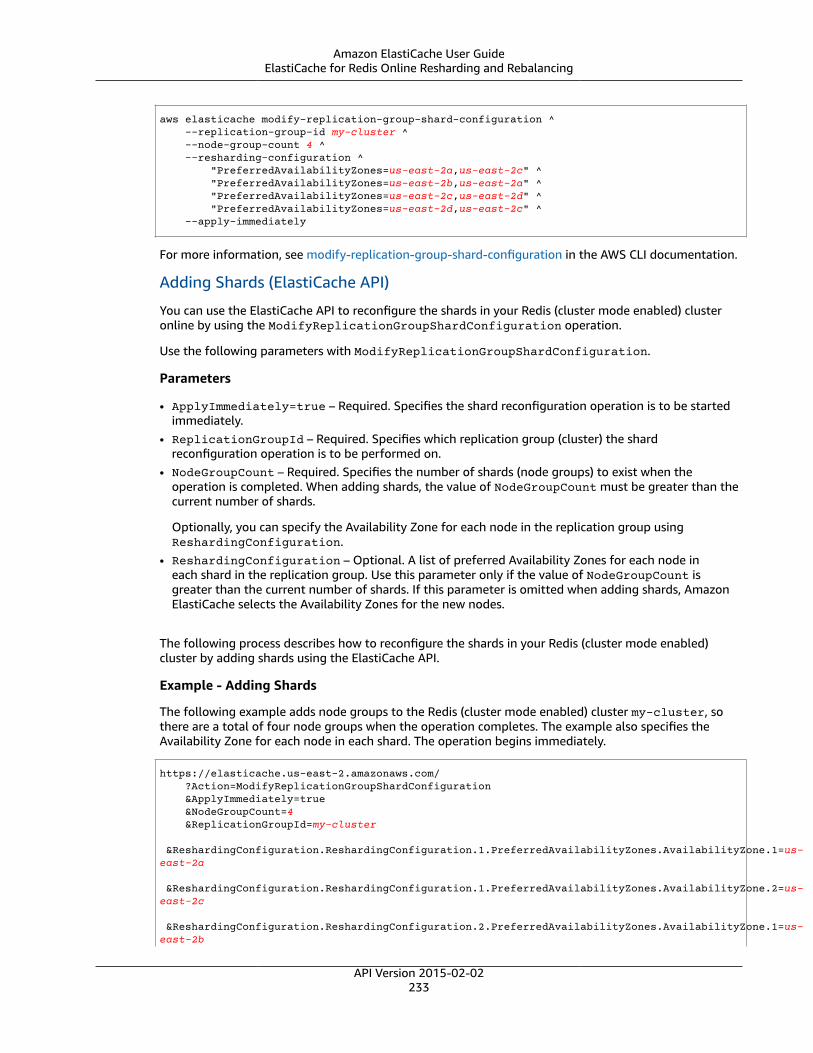
Amazon ElastiCache User GuideElastiCache for Redis Online Resharding and Rebalancing
aws elasticache modify-replication-group-shard-configuration ^ --replication-group-id my-cluster ^ --node-group-count 4 ^ --resharding-configuration ^ "PreferredAvailabilityZones=us-east-2a,us-east-2c" ^ "PreferredAvailabilityZones=us-east-2b,us-east-2a" ^ "PreferredAvailabilityZones=us-east-2c,us-east-2d" ^ "PreferredAvailabilityZones=us-east-2d,us-east-2c" ^ --apply-immediately
For more information, see modify-replication-group-shard-configuration in the AWS CLI documentation.
Adding Shards (ElastiCache API)
You can use the ElastiCache API to reconfigure the shards in your Redis (cluster mode enabled) clusteronline by using the ModifyReplicationGroupShardConfiguration operation.
Use the following parameters with ModifyReplicationGroupShardConfiguration.
Parameters
• ApplyImmediately=true – Required. Specifies the shard reconfiguration operation is to be startedimmediately.
• ReplicationGroupId – Required. Specifies which replication group (cluster) the shardreconfiguration operation is to be performed on.
• NodeGroupCount – Required. Specifies the number of shards (node groups) to exist when theoperation is completed. When adding shards, the value of NodeGroupCount must be greater than thecurrent number of shards.
Optionally, you can specify the Availability Zone for each node in the replication group usingReshardingConfiguration.
• ReshardingConfiguration – Optional. A list of preferred Availability Zones for each node ineach shard in the replication group. Use this parameter only if the value of NodeGroupCount isgreater than the current number of shards. If this parameter is omitted when adding shards, AmazonElastiCache selects the Availability Zones for the new nodes.
The following process describes how to reconfigure the shards in your Redis (cluster mode enabled)cluster by adding shards using the ElastiCache API.
Example - Adding Shards
The following example adds node groups to the Redis (cluster mode enabled) cluster my-cluster, sothere are a total of four node groups when the operation completes. The example also specifies theAvailability Zone for each node in each shard. The operation begins immediately.
https://elasticache.us-east-2.amazonaws.com/ ?Action=ModifyReplicationGroupShardConfiguration &ApplyImmediately=true &NodeGroupCount=4 &ReplicationGroupId=my-cluster &ReshardingConfiguration.ReshardingConfiguration.1.PreferredAvailabilityZones.AvailabilityZone.1=us-east-2a &ReshardingConfiguration.ReshardingConfiguration.1.PreferredAvailabilityZones.AvailabilityZone.2=us-east-2c &ReshardingConfiguration.ReshardingConfiguration.2.PreferredAvailabilityZones.AvailabilityZone.1=us-east-2b
API Version 2015-02-02233
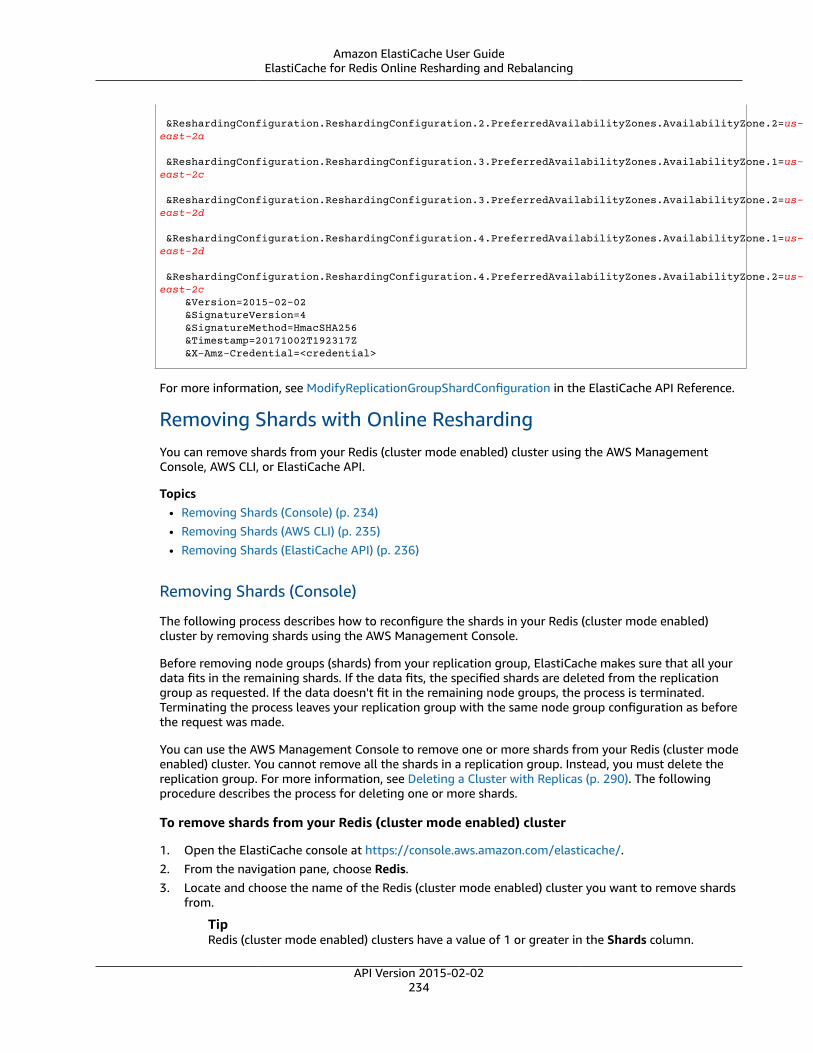
Amazon ElastiCache User GuideElastiCache for Redis Online Resharding and Rebalancing
&ReshardingConfiguration.ReshardingConfiguration.2.PreferredAvailabilityZones.AvailabilityZone.2=us-east-2a &ReshardingConfiguration.ReshardingConfiguration.3.PreferredAvailabilityZones.AvailabilityZone.1=us-east-2c &ReshardingConfiguration.ReshardingConfiguration.3.PreferredAvailabilityZones.AvailabilityZone.2=us-east-2d &ReshardingConfiguration.ReshardingConfiguration.4.PreferredAvailabilityZones.AvailabilityZone.1=us-east-2d &ReshardingConfiguration.ReshardingConfiguration.4.PreferredAvailabilityZones.AvailabilityZone.2=us-east-2c &Version=2015-02-02 &SignatureVersion=4 &SignatureMethod=HmacSHA256 &Timestamp=20171002T192317Z &X-Amz-Credential=<credential>
For more information, see ModifyReplicationGroupShardConfiguration in the ElastiCache API Reference.
Removing Shards with Online ReshardingYou can remove shards from your Redis (cluster mode enabled) cluster using the AWS ManagementConsole, AWS CLI, or ElastiCache API.
Topics• Removing Shards (Console) (p. 234)• Removing Shards (AWS CLI) (p. 235)• Removing Shards (ElastiCache API) (p. 236)
Removing Shards (Console)
The following process describes how to reconfigure the shards in your Redis (cluster mode enabled)cluster by removing shards using the AWS Management Console.
Before removing node groups (shards) from your replication group, ElastiCache makes sure that all yourdata fits in the remaining shards. If the data fits, the specified shards are deleted from the replicationgroup as requested. If the data doesn't fit in the remaining node groups, the process is terminated.Terminating the process leaves your replication group with the same node group configuration as beforethe request was made.
You can use the AWS Management Console to remove one or more shards from your Redis (cluster modeenabled) cluster. You cannot remove all the shards in a replication group. Instead, you must delete thereplication group. For more information, see Deleting a Cluster with Replicas (p. 290). The followingprocedure describes the process for deleting one or more shards.
To remove shards from your Redis (cluster mode enabled) cluster
1. Open the ElastiCache console at https://console.aws.amazon.com/elasticache/.2. From the navigation pane, choose Redis.3. Locate and choose the name of the Redis (cluster mode enabled) cluster you want to remove shards
from.
TipRedis (cluster mode enabled) clusters have a value of 1 or greater in the Shards column.
API Version 2015-02-02234

Amazon ElastiCache User GuideElastiCache for Redis Online Resharding and Rebalancing
4. From the list of shards, choose the box by the name of each shard that you want to delete.5. Choose Delete shard.
Removing Shards (AWS CLI)
The following process describes how to reconfigure the shards in your Redis (cluster mode enabled)cluster by removing shards using the AWS CLI.
ImportantBefore removing node groups (shards) from your replication group, ElastiCache makes sure thatall your data fits in the remaining shards. If the data fits, the specified shards (--node-groups-to-remove) are deleted from the replication group as requested and their keyspaces mappedinto the remaining shards. If the data doesn't fit in the remaining node groups, the process isterminated. Terminating the process leaves your replication group with the same node groupconfiguration as before the request was made.
You can use the AWS CLI to remove one or more shards from your Redis (cluster mode enabled) cluster.You cannot remove all the shards in a replication group. Instead, you must delete the replication group.For more information, see Deleting a Cluster with Replicas (p. 290).
Use the following parameters with modify-replication-group-shard-configuration.
Parameters
• --apply-immediately – Required. Specifies the shard reconfiguration operation is to be startedimmediately.
• --replication-group-id – Required. Specifies which replication group (cluster) the shardreconfiguration operation is to be performed on.
• --node-group-count – Required. Specifies the number of shards (node groups) to exist when theoperation is completed. When removing shards, the value of --node-group-count must be less thanthe current number of shards.
• --node-groups-to-remove – Required when --node-group-count is less than the currentnumber of node groups (shards). A list of shard (node group) IDs to remove from the replication group.
The following procedure describes the process for deleting one or more shards.
Example - Removing Shards
The following example removes two node groups from the Redis (cluster mode enabled) cluster my-cluster, so there are a total of two node groups when the operation completes. The keyspaces fromthe removed shards are distributed evenly over the remaining shards.
For Linux, macOS, or Unix:
aws elasticache modify-replication-group-shard-configuration \ --replication-group-id my-cluster \ --node-group-count 2 \ --node-groups-to-remove "0002" "0003" \ --apply-immediately
For Windows:
aws elasticache modify-replication-group-shard-configuration ^ --replication-group-id my-cluster ^ --node-group-count 2 ^ --node-groups-to-remove "0002" "0003" ^
API Version 2015-02-02235

Amazon ElastiCache User GuideElastiCache for Redis Online Resharding and Rebalancing
--apply-immediately
For more information, see modify-replication-group-shard-configuration in the AWS CLI documentation.
Removing Shards (ElastiCache API)
You can use the ElastiCache API to reconfigure the shards in your Redis (cluster mode enabled) clusteronline by using the ModifyReplicationGroupShardConfiguration operation.
The following process describes how to reconfigure the shards in your Redis (cluster mode enabled)cluster by removing shards using the ElastiCache API.
ImportantBefore removing node groups (shards) from your replication group, ElastiCache makessure that all your data fits in the remaining shards. If the data fits, the specified shards(NodeGroupsToRemove) are deleted from the replication group as requested and theirkeyspaces mapped into the remaining shards. If the data doesn't fit in the remaining nodegroups, the process is terminated. Terminating the process leaves your replication group withthe same node group configuration as before the request was made.
You can use the ElastiCache API to remove one or more shards from your Redis (cluster mode enabled)cluster. You cannot remove all the shards in a replication group. Instead, you must delete the replicationgroup. For more information, see Deleting a Cluster with Replicas (p. 290).
Use the following parameters with ModifyReplicationGroupShardConfiguration.
Parameters
• ApplyImmediately=true – Required. Specifies the shard reconfiguration operation is to be startedimmediately.
• ReplicationGroupId – Required. Specifies which replication group (cluster) the shardreconfiguration operation is to be performed on.
• NodeGroupCount – Required. Specifies the number of shards (node groups) to exist when theoperation is completed. When removing shards, the value of NodeGroupCount must be less than thecurrent number of shards.
• NodeGroupsToRemove – Required when --node-group-count is less than the current number ofnode groups (shards). A list of shard (node group) IDs to remove from the replication group.
The following procedure describes the process for deleting one or more shards.
Example - Removing Shards
The following example removes two node groups from the Redis (cluster mode enabled) cluster my-cluster, so there are a total of two node groups when the operation completes. The keyspaces fromthe removed shards are distributed evenly over the remaining shards.
https://elasticache.us-east-2.amazonaws.com/ ?Action=ModifyReplicationGroupShardConfiguration &ApplyImmediately=true &NodeGroupCount=2 &ReplicationGroupId=my-cluster &NodeGroupsToRemove.member.1=0002 &NodeGroupsToRemove.member.2=0003 &Version=2015-02-02 &SignatureVersion=4 &SignatureMethod=HmacSHA256 &Timestamp=20171002T192317Z &X-Amz-Credential=<credential>
API Version 2015-02-02236
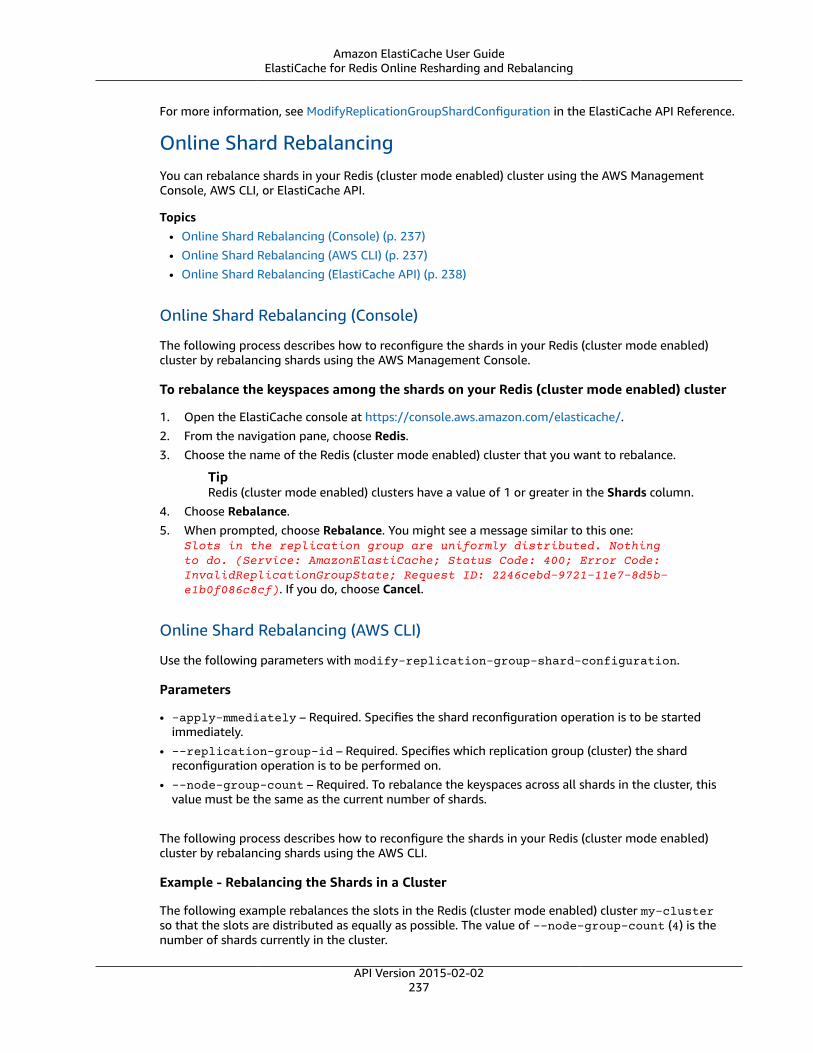
Amazon ElastiCache User GuideElastiCache for Redis Online Resharding and Rebalancing
For more information, see ModifyReplicationGroupShardConfiguration in the ElastiCache API Reference.
Online Shard RebalancingYou can rebalance shards in your Redis (cluster mode enabled) cluster using the AWS ManagementConsole, AWS CLI, or ElastiCache API.
Topics• Online Shard Rebalancing (Console) (p. 237)• Online Shard Rebalancing (AWS CLI) (p. 237)• Online Shard Rebalancing (ElastiCache API) (p. 238)
Online Shard Rebalancing (Console)
The following process describes how to reconfigure the shards in your Redis (cluster mode enabled)cluster by rebalancing shards using the AWS Management Console.
To rebalance the keyspaces among the shards on your Redis (cluster mode enabled) cluster
1. Open the ElastiCache console at https://console.aws.amazon.com/elasticache/.2. From the navigation pane, choose Redis.3. Choose the name of the Redis (cluster mode enabled) cluster that you want to rebalance.
TipRedis (cluster mode enabled) clusters have a value of 1 or greater in the Shards column.
4. Choose Rebalance.5. When prompted, choose Rebalance. You might see a message similar to this one:
Slots in the replication group are uniformly distributed. Nothingto do. (Service: AmazonElastiCache; Status Code: 400; Error Code:InvalidReplicationGroupState; Request ID: 2246cebd-9721-11e7-8d5b-e1b0f086c8cf). If you do, choose Cancel.
Online Shard Rebalancing (AWS CLI)
Use the following parameters with modify-replication-group-shard-configuration.
Parameters
• -apply-mmediately – Required. Specifies the shard reconfiguration operation is to be startedimmediately.
• --replication-group-id – Required. Specifies which replication group (cluster) the shardreconfiguration operation is to be performed on.
• --node-group-count – Required. To rebalance the keyspaces across all shards in the cluster, thisvalue must be the same as the current number of shards.
The following process describes how to reconfigure the shards in your Redis (cluster mode enabled)cluster by rebalancing shards using the AWS CLI.
Example - Rebalancing the Shards in a Cluster
The following example rebalances the slots in the Redis (cluster mode enabled) cluster my-clusterso that the slots are distributed as equally as possible. The value of --node-group-count (4) is thenumber of shards currently in the cluster.
API Version 2015-02-02237

Amazon ElastiCache User GuideElastiCache for Redis Online Resharding and Rebalancing
For Linux, macOS, or Unix:
aws elasticache modify-replication-group-shard-configuration \ --replication-group-id my-cluster \ --node-group-count 4 \ --apply-immediately
For Windows:
aws elasticache modify-replication-group-shard-configuration ^ --replication-group-id my-cluster ^ --node-group-count 4 ^ --apply-immediately
For more information, see modify-replication-group-shard-configuration in the AWS CLI documentation.
Online Shard Rebalancing (ElastiCache API)
You can use the ElastiCache API to reconfigure the shards in your Redis (cluster mode enabled) clusteronline by using the ModifyReplicationGroupShardConfiguration operation.
Use the following parameters with ModifyReplicationGroupShardConfiguration.
Parameters
• ApplyImmediately=true – Required. Specifies the shard reconfiguration operation is to be startedimmediately.
• ReplicationGroupId – Required. Specifies which replication group (cluster) the shardreconfiguration operation is to be performed on.
• NodeGroupCount – Required. To rebalance the keyspaces across all shards in the cluster, this valuemust be the same as the current number of shards.
The following process describes how to reconfigure the shards in your Redis (cluster mode enabled)cluster by rebalancing the shards using the ElastiCache API.
Example - Rebalancing a Cluster
The following example rebalances the slots in the Redis (cluster mode enabled) cluster my-cluster sothat the slots are distributed as equally as possible. The value of NodeGroupCount (4) is the number ofshards currently in the cluster.
https://elasticache.us-east-2.amazonaws.com/ ?Action=ModifyReplicationGroupShardConfiguration &ApplyImmediately=true &NodeGroupCount=4 &ReplicationGroupId=my-cluster &Version=2015-02-02 &SignatureVersion=4 &SignatureMethod=HmacSHA256 &Timestamp=20171002T192317Z &X-Amz-Credential=<credential>
For more information, see ModifyReplicationGroupShardConfiguration in the ElastiCache API Reference.
API Version 2015-02-02238

Amazon ElastiCache User Guide
ElastiCache Replication (Redis)Single-node Amazon ElastiCache Redis clusters are in-memory entities with limited data protectionservices (AOF). If your cluster fails for any reason, you will lose all the cluster's data. However, if you'rerunning the Redis engine, you can group 2 to 6 nodes into a cluster with replicas where 1 to 5 read-onlynodes contain replicate data of the group's single read/write primary node. In this scenario, if one nodefails for any reason, you do not lose all your data since it is replicated in one or more other nodes. Due toreplication latency, some data may be lost if it is the primary read/write node that fails.
As seen in the following graphic, the replication structure is contained within a shard (called node groupin the API/CLI) which is contained within a Redis cluster. Redis (cluster mode disabled) clusters alwayshave one shard. Redis (cluster mode enabled) clusters can have up to 15 shards with the cluster's datapartitioned across the shards.
Redis (cluster mode disabled) cluster has one shard and 1 to 5 replica nodes
If the cluster with replicas has Multi-AZ with automatic failover enabled and the primary node fails, theprimary fails over to a read replica. Because the data is updated on the replica nodes asynchronously,there may be some data loss due to latency in updating the replica nodes. For more information, seeMitigating Failures when Running Redis (p. 88).
Topics• Redis Replication (p. 240)• Replication: Redis (cluster mode disabled) vs. Redis (cluster mode enabled) (p. 241)• Replication: Multi-AZ with Automatic Failover (Redis) (p. 244)• How Synchronization and Backup are Implemented (p. 257)• Creating a Redis Cluster with Replicas (p. 258)• Viewing a Replication Group's Details (p. 278)• Finding Replication Group Endpoints (p. 283)• Modifying a Cluster with Replicas (p. 288)• Deleting a Cluster with Replicas (p. 290)• Adding a Read Replica to a Redis Cluster (p. 291)• Promoting a Read-Replica to Primary (p. 293)• Deleting a Read Replica (p. 296)
API Version 2015-02-02239

Amazon ElastiCache User GuideRedis Replication
Redis ReplicationRedis implements replication in two ways:
1. Redis (cluster mode disabled) with a single shard that contains all of the cluster's data in each node,and
2. Redis (cluster mode enabled) with data partitioned across up to 15 shards.
Topics• Redis (cluster mode disabled) (p. 240)• Redis (cluster mode enabled) (p. 240)
Redis (cluster mode disabled)A Redis (cluster mode disabled) cluster has a single shard, inside of which is a collection of Redis nodes;one primary read-write node and up to five secondary, read-only replica nodes. Each read replicamaintains a copy of the data from the cluster's primary node. Asynchronous replication mechanisms areused to keep the read-replicas synchronized with the primary. Applications can read from any node inthe cluster. Applications can write only to the primary node. Read replicas improve read throughput andguard against data loss in cases of a node failure.
Redis (cluster mode disabled) cluster with a single shard and replica nodes
You can use Redis (cluster mode disabled) clusters with replica nodes to scale your Redis solution forElastiCache to handle applications that are read-intensive or to support large numbers of clients thatsimultaneously read from the same cluster.
All of the nodes in a Redis (cluster mode disabled) cluster must reside in the same region. To improvefault tolerance, you can provision read replicas in multiple Availability Zones within that region.
When you add a read replica to a cluster, all of the data from the primary is copied to the new node.From that point on, whenever data is written to the primary, the changes are asynchronously propagatedto all the read replicas.
To improve fault tolerance and reduce write down time, enable Multi-AZ with automatic failover for yourRedis (cluster mode disabled) cluster with replicas. For more information, see Replication: Multi-AZ withAutomatic Failover (Redis) (p. 244).
You can change the roles of the nodes within the Redis (cluster mode disabled) cluster, with the primaryand one of the replicas exchanging roles. You might decide to do this for performance tuning reasons.For example, with a web application that has heavy write activity, you can choose the node that has thelowest network latency. For more information, see Promoting a Read-Replica to Primary (p. 293).
Redis (cluster mode enabled)A Redis (cluster mode enabled) cluster is comprised of from 1 to 15 shards (API/CLI: node groups). Eachshard has a primary node and up to five read-only replica nodes. Each read replica in a shard maintains
API Version 2015-02-02240

Amazon ElastiCache User GuideReplication: Redis (cluster mode disabled)
vs. Redis (cluster mode enabled)
a copy of the data from the shard's primary. Asynchronous replication mechanisms are used to keepthe read-replicas synchronized with the primary. Applications can read from any node in the cluster.Applications can write only to the primary nodes. Read replicas enhance read scalability and guardagainst data loss. Data is partitioned across the shards in a Redis (cluster mode enabled) cluster.
Applications use the Redis (cluster mode enabled) cluster's configuration endpoint to connect with thenodes in the cluster. For more information, see Finding Your ElastiCache Endpoints (p. 66).
Redis (cluster mode enabled) cluster with multiple shards and replica nodes
All of the nodes in a Redis (cluster mode enabled) cluster must reside in the same region. To improvefault tolerance, you can provision both primaries and read replicas in multiple Availability Zones withinthat region.
Multi-AZ with automatic failover is required for all Redis (cluster mode enabled) clusters. For moreinformation, see Replication: Multi-AZ with Automatic Failover (Redis) (p. 244).
Currently, in Redis (cluster mode enabled), there are some limitations.
• You cannot manually promote any of the replica nodes to primary.
• Multi-AZ with automatic failover is required.
• The structure of a cluster, node type and number of nodes, can only be changed by restoring from abackup. For more information, see Restoring From a Backup with Optional Cluster Resizing (p. 321).The number of shards in a Redis (cluster mode enabled) cluster can be changed dynamically, while thecluster continues to serve read and write requests. For more information, see Online Resharding andShard Rebalancing for ElastiCache for Redis—Redis (cluster mode enabled) (p. 230).
Replication: Redis (cluster mode disabled) vs. Redis(cluster mode enabled)
Beginning with Redis version 3.2, you have the ability to create one of two distinct types of Redis clusters(API/CLI: replication groups). A Redis (cluster mode disabled) cluster always has a single shard (API/CLI:node group) with up to 5 read replica nodes. A Redis (cluster mode enabled) cluster has up to 15 shardswith 1 to 5 read replica nodes in each.
API Version 2015-02-02241

Amazon ElastiCache User GuideReplication: Redis (cluster mode disabled)
vs. Redis (cluster mode enabled)
Redis (cluster mode disabled) and Redis (cluster mode enabled) clusters
The following table summarizes important differences between Redis (cluster mode disabled) and Redis(cluster mode enabled) clusters.
Comparing Redis (cluster mode disabled) and Redis (cluster mode enabled) Clusters
Feature Redis (cluster mode disabled) Redis (cluster mode enabled)
Modifiable Yes. Supports adding anddeleting replica nodes, andscaling up node type.
Limited. Version 3.2.10 can addand remove shards dynamically.Other changes require creating anew cluster.
Data Partitioning No Yes
Shards 1 1 to 15 The number of shards(API/CLI: node groups) is setwhen the cluster (API/CLI:replication group) is created.
Read replicas 0 to 5
ImportantIf you have no replicasand the node fails, youwill experience totaldata loss.
0 to 5 per shard.
Multi-AZ with AutomaticFailover
Yes, with at least 1 replica.
Optional. On by default.
Yes. Required.
Snapshots (Backups) Yes, creating a single .rdb file. Yes, creating a unique .rdb filefor each shard.
Restore Yes, using a single .rdb file. Yes. You can resize your clusterwhen restoring.
Supported by All Redis versions Redis 3.2 and following
Engine upgradeable Yes N/A
API Version 2015-02-02242

Amazon ElastiCache User GuideWhich should I choose?
Feature Redis (cluster mode disabled) Redis (cluster mode enabled)
Encryption Version 3.2.6 only Version 3.2.6 only
HIPAA Compliant Version 3.2.6 only Version 3.2.6 only
Which should I choose?When choosing between Redis (cluster mode disabled) or Redis (cluster mode enabled) you shouldconsider the following factors:
• Scaling v. Partitioning – Business needs change. You need to either provision for peak demand orscale as demand changes. Redis (cluster mode disabled) supports scaling. You can scale read capacityby adding or deleting replica nodes, or you can scale capacity by scaling up to a larger node type. Bothof these operations take time. For more information, see Scaling Redis (cluster mode disabled) Clusterswith Replica Nodes (p. 217).
Redis (cluster mode enabled) supports partitioning your data across up to 15 node groups. Youcan dynamically change the number of shards as your business needs change. One advantage ofpartitioning is that you spread your load over a greater number of endpoints which reduces accessbottle necks during peak demand. Additionally, you can accommodate a larger data set since thedata can be spread across multiple servers. For information on scaling your partitions, see Scaling forAmazon ElastiCache for Redis—Redis (cluster mode enabled) (p. 229).
• Node size v. Number of nodes – Because a Redis (cluster mode disabled) cluster has only one shard,
the node type must be large enough to accommodate all the cluster's data plus necessary overhead.On the other hand, because you can partition your data across several shards when using a Redis(cluster mode enabled) cluster, the node types can be smaller, though you will need more of them. Formore information, see Choosing Your Node Size for Redis Clusters (p. 104).
• Reads v. Writes – If the primary load on your cluster is applications reading data, you can scale a Redis
(cluster mode disabled) cluster by adding and deleting read replicas, though you should note thatthere is a maximum of 5 read replicas. If the load on your cluster is write heavy, you can benefit fromthe additional write endpoints of a Redis (cluster mode enabled) cluster with multiple shards.
Whichever type of cluster you choose to implement, be sure to choose a node type that is adequate foryour current and future needs.
API Version 2015-02-02243
Amazon ElastiCache User GuideReplication: Multi-AZ with Automatic Failover (Redis)
Replication: Multi-AZ with Automatic Failover(Redis)
Enabling Amazon ElastiCache's Multi-AZ with automatic failover functionality on your Redis cluster (inthe API and AWS CLI, replication group) improves your fault tolerance in those cases where your cluster'sread/write primary cluster becomes unreachable or fails for any reason. Multi-AZ with automatic failoveris only supported on Redis clusters that support replication.
Automatic Failover Contents
• Automatic Failover Overview (p. 244)
• Notes on Redis Multi-AZ with Automatic Failover (p. 245)
• Failure Scenarios with Multi-AZ and Automatic Failover Responses (p. 246)
• When Only the Primary Node Fails (p. 246)
• When the Primary Node and Some Read Replicas Fail (p. 247)
• When the Entire Cluster Fails (p. 248)
• Enabling Multi-AZ with Automatic Failover (p. 250)
• Enabling Multi-AZ with Automatic Failover (Console) (p. 250)
• Enabling Multi-AZ with Automatic Failover When Creating a Cluster Using theElastiCache Console (p. 250)
• Enabling Multi-AZ with Automatic Failover on an Existing Cluster(Console) (p. 250)
• Enabling Multi-AZ with Automatic Failover (AWS CLI) (p. 250)
• Enabling Multi-AZ with Automatic Failover (ElastiCache API) (p. 251)
• Testing Multi-AZ with Automatic Failover (p. 253)
• Testing Automatic Failover Using the AWS Management Console (p. 253)
• Testing Automatic Failover Using the AWS CLI (p. 254)
• Testing Automatic Failover Using the ElastiCache API (p. 256)
Automatic Failover OverviewAn ElastiCache Redis cluster that supports replication, consists of one to 15 shards, called node groupsin the API and CLI. Each shard consists of a primary node and one to five read replica nodes. In certainsituations, if your cluster is Multi-AZ enabled, ElastiCache automatically detects the primary node'sfailure, selects a read replica node, and promotes it to primary. These situations include certain types ofplanned maintenance, or the unlikely event of a primary node or Availability Zone failure. This failuredetection and replica promotion ensure that you can resume writing to the new primary as soon aspromotion is complete.
ElastiCache also propagates the Domain Name Service (DNS) name of the promoted replica. It does sobecause then if your application is writing to the primary endpoint, no endpoint change is required inyour application. However, because you read from individual endpoints, you need to change the readendpoint of the replica promoted to primary to the new replica's endpoint.
The promotion process generally takes just a few minutes. This process is much faster than recreatingand provisioning a new primary, which is the process if you don't enable Multi-AZ with automaticfailover.
You can enable Multi-AZ with Automatic Failover using the ElastiCache Management Console, the AWSCLI, or the ElastiCache API.
API Version 2015-02-02244

Amazon ElastiCache User GuideNotes on Multi-AZ with Automatic Failover
Notes on Redis Multi-AZ with Automatic FailoverThe following points should be noted for Redis Multi-AZ with Automatic Failover:
• Multi-AZ with Automatic Failover is supported on Redis version 2.8.6 and later.• Redis Multi-AZ with Automatic Failover is not supported on T1 node types.• Redis Multi-AZ with Automatic Failover is supported on T2 node types only if you are running Redis
version 3.2.4 or later with cluster mode enabled.• Redis replication is asynchronous. Therefore, when a primary cluster fails over to a replica, a small
amount of data might be lost due to replication lag.• When choosing the replica to promote to primary, ElastiCache chooses the replica with the least
replication lag (that is, the one that is most current).• Promoting read replicas to primary:
• You can only promote a read replica to primary when Multi-AZ with Automatic Failover is disabled.To promote a read replica node to primary, you must first disable Multi-AZ with Automatic Failoveron the cluster, do the promotion, and then re-enable Multi-AZ with Automatic Failover.
• You cannot disable Multi-AZ with Automatic Failover on Redis (cluster mode enabled) clusters.Therefore, you cannot manually promote a replica to primary on any Redis (cluster mode enabled)cluster.
• ElastiCache Multi-AZ with Automatic Failover and append-only file (AOF) are mutually exclusive. If youenable one, you cannot enable the other.
• When a node's failure is caused by the rare event of an entire Availability Zone failing, the replicareplacing the failed primary is created only when the Availability Zone is back up. For example,consider a replication group with the primary in AZ-a and replicas in AZ-b and AZ-c. If the primary fails,the replica with the least replication lag is promoted to primary cluster. Then, ElastiCache creates anew replica in AZ-a (where the failed primary was located) only when AZ-a is back up and available.
• A customer-initiated reboot of a primary does not trigger automatic failover. Other reboots andfailures do trigger automatic failover.
• Whenever the primary is rebooted, it is cleared of data when it comes back online. When the readreplicas see the cleared primary cluster, they clear their copy of the data, which causes data loss.
• After a read replica has been promoted, the other replicas sync with the new primary. After the initialsync, the replicas' content is deleted and they sync the data from the new primary, causing a briefinterruption during which the replicas are not accessible. This sync process also causes a temporaryload increase on the primary while syncing with the replicas. This behavior is native to Redis and isn’tunique to ElastiCache Multi-AZ. For details regarding this Redis behavior, see http://redis.io/topics/replication.
Important
• For Redis version 2.8.22 and later, external replicas are not permitted.• For Redis versions prior to 2.8.22, we recommend that you do not connect an external Redis
replica to an ElastiCache Redis cluster that is Multi-AZ with Automatic Failover enabled. Thisis an unsupported configuration that can create issues that prevent ElastiCache from properlyperforming failover and recovery. If you need to connect an external Redis replica to anElastiCache cluster, make sure that Multi-AZ with Automatic Failover is disabled before youmake the connection.
API Version 2015-02-02245
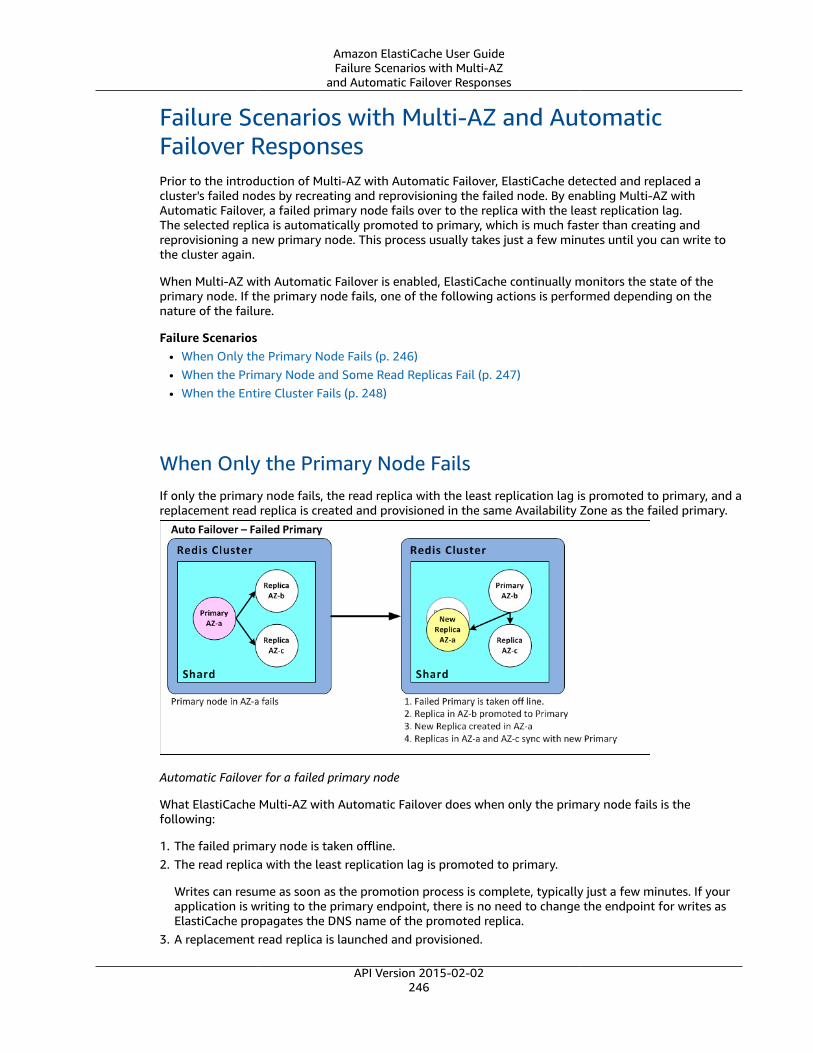
Amazon ElastiCache User GuideFailure Scenarios with Multi-AZ
and Automatic Failover Responses
Failure Scenarios with Multi-AZ and AutomaticFailover ResponsesPrior to the introduction of Multi-AZ with Automatic Failover, ElastiCache detected and replaced acluster's failed nodes by recreating and reprovisioning the failed node. By enabling Multi-AZ withAutomatic Failover, a failed primary node fails over to the replica with the least replication lag.The selected replica is automatically promoted to primary, which is much faster than creating andreprovisioning a new primary node. This process usually takes just a few minutes until you can write tothe cluster again.
When Multi-AZ with Automatic Failover is enabled, ElastiCache continually monitors the state of theprimary node. If the primary node fails, one of the following actions is performed depending on thenature of the failure.
Failure Scenarios• When Only the Primary Node Fails (p. 246)• When the Primary Node and Some Read Replicas Fail (p. 247)• When the Entire Cluster Fails (p. 248)
When Only the Primary Node FailsIf only the primary node fails, the read replica with the least replication lag is promoted to primary, and areplacement read replica is created and provisioned in the same Availability Zone as the failed primary.
Automatic Failover for a failed primary node
What ElastiCache Multi-AZ with Automatic Failover does when only the primary node fails is thefollowing:
1. The failed primary node is taken offline.2. The read replica with the least replication lag is promoted to primary.
Writes can resume as soon as the promotion process is complete, typically just a few minutes. If yourapplication is writing to the primary endpoint, there is no need to change the endpoint for writes asElastiCache propagates the DNS name of the promoted replica.
3. A replacement read replica is launched and provisioned.
API Version 2015-02-02246
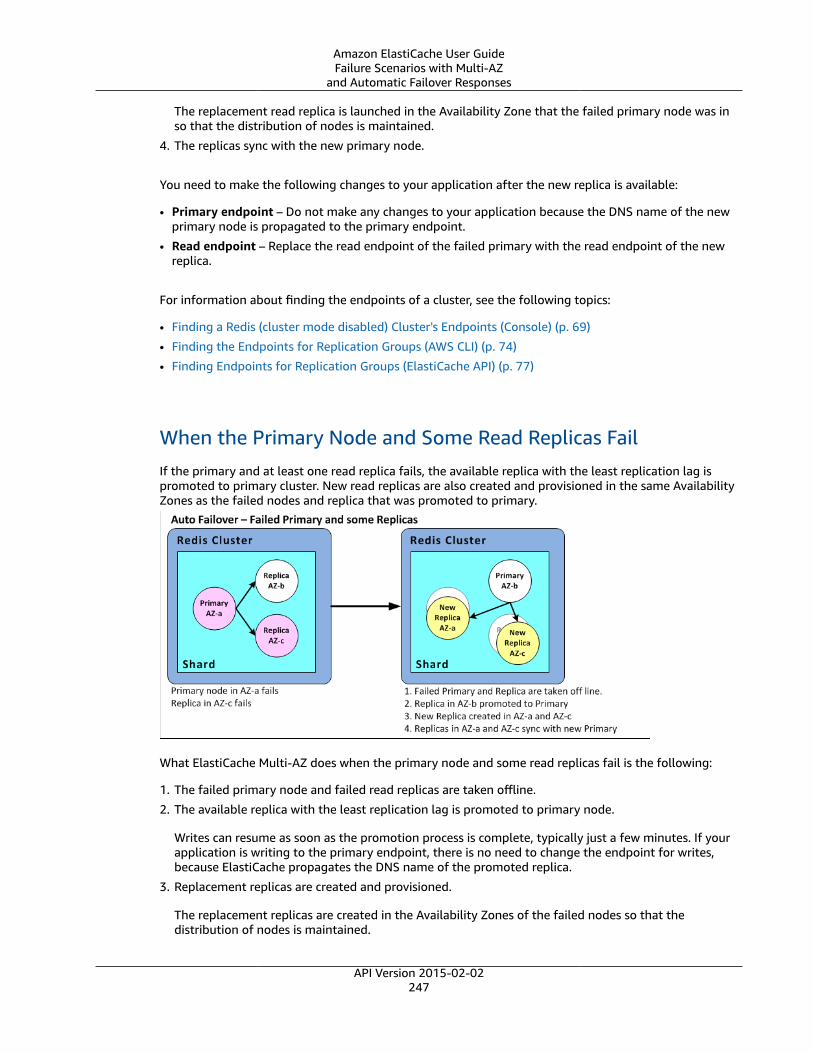
Amazon ElastiCache User GuideFailure Scenarios with Multi-AZ
and Automatic Failover Responses
The replacement read replica is launched in the Availability Zone that the failed primary node was inso that the distribution of nodes is maintained.
4. The replicas sync with the new primary node.
You need to make the following changes to your application after the new replica is available:
• Primary endpoint – Do not make any changes to your application because the DNS name of the newprimary node is propagated to the primary endpoint.
• Read endpoint – Replace the read endpoint of the failed primary with the read endpoint of the newreplica.
For information about finding the endpoints of a cluster, see the following topics:
• Finding a Redis (cluster mode disabled) Cluster's Endpoints (Console) (p. 69)
• Finding the Endpoints for Replication Groups (AWS CLI) (p. 74)
• Finding Endpoints for Replication Groups (ElastiCache API) (p. 77)
When the Primary Node and Some Read Replicas FailIf the primary and at least one read replica fails, the available replica with the least replication lag ispromoted to primary cluster. New read replicas are also created and provisioned in the same AvailabilityZones as the failed nodes and replica that was promoted to primary.
What ElastiCache Multi-AZ does when the primary node and some read replicas fail is the following:
1. The failed primary node and failed read replicas are taken offline.
2. The available replica with the least replication lag is promoted to primary node.
Writes can resume as soon as the promotion process is complete, typically just a few minutes. If yourapplication is writing to the primary endpoint, there is no need to change the endpoint for writes,because ElastiCache propagates the DNS name of the promoted replica.
3. Replacement replicas are created and provisioned.
The replacement replicas are created in the Availability Zones of the failed nodes so that thedistribution of nodes is maintained.
API Version 2015-02-02247

Amazon ElastiCache User GuideFailure Scenarios with Multi-AZ
and Automatic Failover Responses
4. All clusters sync with the new primary node.
You need to make the following changes to your application after the new nodes are available:
• Primary endpoint – Do not make any changes to your application because the DNS name of the newprimary node is propagated to the primary endpoint.
• Read endpoint – Replace the read endpoint of the failed primary and failed replicas with the nodeendpoints of the new replicas.
For information about finding the endpoints of a replication group, see the following topics:
• Finding a Redis (cluster mode disabled) Cluster's Endpoints (Console) (p. 69)• Finding the Endpoints for Replication Groups (AWS CLI) (p. 74)• Finding Endpoints for Replication Groups (ElastiCache API) (p. 77)
When the Entire Cluster FailsIf everything fails, all the nodes are recreated and provisioned in the same Availability Zones as theoriginal nodes.
In this scenario, all the data in the cluster is lost due to the failure of every node in the cluster. Thisoccurrence is rare.
What ElastiCache Multi-AZ does when the entire cluster fails is the following:
1. The failed primary node and read replicas are taken offline.2. A replacement primary node is created and provisioned.3. Replacement replicas are created and provisioned.
The replacements are created in the Availability Zones of the failed nodes so that the distribution ofnodes is maintained.
Because the entire cluster failed, data is lost and all the new nodes start cold.
Because each of the replacement nodes will have the same endpoint as the node it is replacing, you don'tneed to make any endpoint changes in your application.
API Version 2015-02-02248

Amazon ElastiCache User GuideFailure Scenarios with Multi-AZ
and Automatic Failover Responses
For information about finding the endpoints of a replication group, see the following topics:
• Finding a Redis (cluster mode disabled) Cluster's Endpoints (Console) (p. 69)• Finding the Endpoints for Replication Groups (AWS CLI) (p. 74)• Finding Endpoints for Replication Groups (ElastiCache API) (p. 77)
We recommend that you create the primary node and read replicas in different Availability Zones to raiseyour fault tolerance level.
API Version 2015-02-02249

Amazon ElastiCache User GuideEnabling Multi-AZ with Automatic Failover
Enabling Multi-AZ with Automatic FailoverYou can enable Multi-AZ with Automatic Failover when you create or modify a cluster (API or CLI,replication group) using the ElastiCache console, AWS CLI, or the ElastiCache API.
You can enable Multi-AZ with Automatic Failover only on Redis (cluster mode disabled) clusters that haveat least one available read replica. Multi-AZ with Automatic Failover is required on all Redis (cluster modeenabled) clusters, whether or not they have read replicas. Clusters without read replicas do not providehigh availability or fault tolerence. For information about creating a cluster with replication, see Creatinga Redis Cluster with Replicas (p. 258). For information about adding a read replica to a cluster withreplication, see Adding a Read Replica to a Redis Cluster (p. 291).
Topics• Enabling Multi-AZ with Automatic Failover (Console) (p. 250)• Enabling Multi-AZ with Automatic Failover (AWS CLI) (p. 250)• Enabling Multi-AZ with Automatic Failover (ElastiCache API) (p. 251)
Enabling Multi-AZ with Automatic Failover (Console)You can enable Multi-AZ with Automatic Failover using the ElastiCache console when you create a newRedis cluster or by modifying an existing Redis cluster with replication.
Multi-AZ with Automatic Failover is enabled by default and cannot be disabled on Redis (cluster modeenabled) clusters.
Enabling Multi-AZ with Automatic Failover When Creating a Cluster Using theElastiCache Console
For more information on this process, see Creating a Redis (cluster mode disabled) Cluster(Console) (p. 163). Be sure to have one or more replicas and enable Multi-AZ with Automatic Failover.
Enabling Multi-AZ with Automatic Failover on an Existing Cluster (Console)
For more information on this process, see Modifying a Cluster (Console) (p. 183).
Enabling Multi-AZ with Automatic Failover (AWS CLI)The following code example uses the AWS CLI to enable Multi-AZ with Automatic Failover for thereplication group redis12.
ImportantThe replication group redis12 must already exist and have at least one available read replica.
For Linux, macOS, or Unix:
aws elasticache modify-replication-group \ --replication-group-id redis12 \ --automatic-failover-enabled \ --apply-immediately
For Windows:
aws elasticache modify-replication-group ^ --replication-group-id redis12 ^ --automatic-failover-enabled ^ --apply-immediately
API Version 2015-02-02250
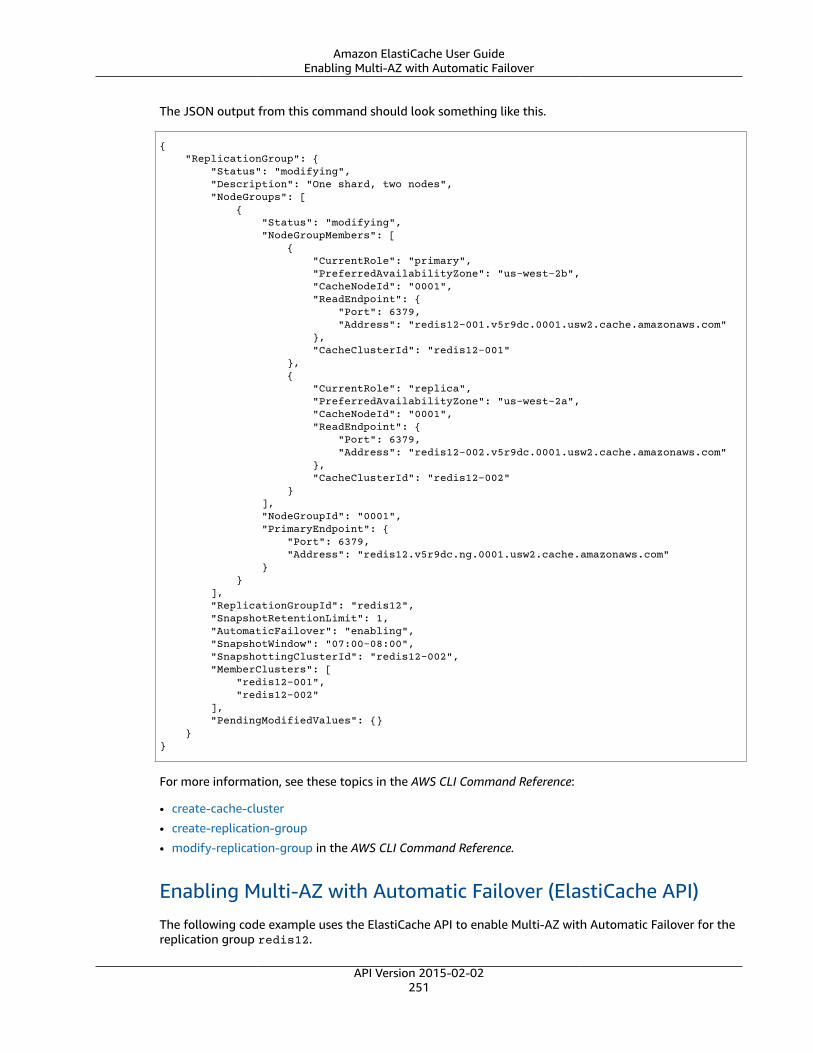
Amazon ElastiCache User GuideEnabling Multi-AZ with Automatic Failover
The JSON output from this command should look something like this.
{ "ReplicationGroup": { "Status": "modifying", "Description": "One shard, two nodes", "NodeGroups": [ { "Status": "modifying", "NodeGroupMembers": [ { "CurrentRole": "primary", "PreferredAvailabilityZone": "us-west-2b", "CacheNodeId": "0001", "ReadEndpoint": { "Port": 6379, "Address": "redis12-001.v5r9dc.0001.usw2.cache.amazonaws.com" }, "CacheClusterId": "redis12-001" }, { "CurrentRole": "replica", "PreferredAvailabilityZone": "us-west-2a", "CacheNodeId": "0001", "ReadEndpoint": { "Port": 6379, "Address": "redis12-002.v5r9dc.0001.usw2.cache.amazonaws.com" }, "CacheClusterId": "redis12-002" } ], "NodeGroupId": "0001", "PrimaryEndpoint": { "Port": 6379, "Address": "redis12.v5r9dc.ng.0001.usw2.cache.amazonaws.com" } } ], "ReplicationGroupId": "redis12", "SnapshotRetentionLimit": 1, "AutomaticFailover": "enabling", "SnapshotWindow": "07:00-08:00", "SnapshottingClusterId": "redis12-002", "MemberClusters": [ "redis12-001", "redis12-002" ], "PendingModifiedValues": {} }}
For more information, see these topics in the AWS CLI Command Reference:
• create-cache-cluster
• create-replication-group
• modify-replication-group in the AWS CLI Command Reference.
Enabling Multi-AZ with Automatic Failover (ElastiCache API)The following code example uses the ElastiCache API to enable Multi-AZ with Automatic Failover for thereplication group redis12.
API Version 2015-02-02251

Amazon ElastiCache User GuideEnabling Multi-AZ with Automatic Failover
NoteTo use this example, the replication group redis12 must already exist and have at least oneavailable read replica.
https://elasticache.us-west-2.amazonaws.com/ ?Action=ModifyReplicationGroup &ApplyImmediately=true &AutoFailover=true &ReplicationGroupId=redis12 &Version=2015-02-02 &SignatureVersion=4 &SignatureMethod=HmacSHA256 &Timestamp=20140401T192317Z &X-Amz-Credential=<credential>
For more information, see these topics in the ElastiCache API Reference:
• CreateCacheCluster• CreateReplicationGroup• ModifyReplicationGroup
API Version 2015-02-02252

Amazon ElastiCache User GuideTesting Multi-AZ with Automatic Failover
Testing Multi-AZ with Automatic FailoverAfter you enable Multi-AZ with Automatic Failover, you can test it using the ElastiCache console, the AWSCLI, and the ElastiCache API.
When testing, note the following:
• You can use this operation to test automatic failover on up to five shards (called node groups in theElastiCache API and AWS CLI) in any rolling 24-hour period.
• If you call this operation on shards in different clusters (called replication groups in the API and CLI),you can make the calls concurrently.
• If you call this operation multiple times on different shards in the same Redis (cluster mode enabled)replication group, the first node replacement must complete before a subsequent call can be made.
• To determine whether the node replacement is complete you can check Events using the AmazonElastiCache console, the AWS CLI, or the ElastiCache API. Look for the following automatic failoverrelated events, listed here in order of occurrance:
1. Replication group message: Test Failover API called for node group <node-group-id>
2. Cache cluster message: Failover from master node <primary-node-id> to replicanode <node-id> completed
3. Replication group message: Failover from master node <primary-node-id> to replicanode <node-id> completed
4. Cache cluster message: Recovering cache nodes <node-id>
5. Cache cluster message: Finished recovery for cache nodes <node-id>
For more information, see the following:
• Viewing ElastiCache Events (p. 465) in the ElastiCache User Guide
• DescribeEvents in the ElastiCache API Reference
• describe-events in the AWS CLI Command Reference.
Testing Automatic Failover
• Testing Automatic Failover Using the AWS Management Console (p. 253)
• Testing Automatic Failover Using the AWS CLI (p. 254)
• Testing Automatic Failover Using the ElastiCache API (p. 256)
Testing Automatic Failover Using the AWS Management Console
The following procedure walks you through testing automatic failover.
To test automatic failover
1. Sign in to the AWS Management Console and open the ElastiCache console at https://console.aws.amazon.com/elasticache/.
2. In the navigation pane, choose Redis.
3. From the list of Redis clusters, choose the box to the left of the cluster you want to test. This clustermust have at least one read replica node.
API Version 2015-02-02253

Amazon ElastiCache User GuideTesting Multi-AZ with Automatic Failover
4. In the Details area, confirm that this cluster is Multi-AZ enabled. If the cluster is not Multi-AZenabled, either choose a different cluster or modify this cluster to enable Multi-AZ. For moreinformation, see Modifying a Cluster (Console) (p. 183).
5. For Redis (cluster mode disabled), choose the cluster's name.
For Redis (cluster mode enabled), do the following:
a. Choose the cluster's name.b. On the Shards page, for the shard (called node group in the API and CLI) on which you want to
test failover, choose the shard's name.6. On the Nodes page, choose Failover Primary.7. Choose Continue to fail over the primary, or Cancel to cancel the operation and not fail over the
primary node.
During the failover process, the console continues to show the node's status as available. To trackthe progress of your failover test, choose Events from the console navigation pane. On the Eventstab, watch for events that indicate your failover has started (Test Failover API called) andcompleted (Recovery completed).
Testing Automatic Failover Using the AWS CLIYou can test automatic failover on any Multi-AZ with Automatic Failover enabled cluster using the AWSCLI operation test-failover.
Parameters
• --replication-group-id – Required. The replication group (on the console, cluster) that is to betested.
• --node-group-id – Required. The name of the node group you want to test automatic failover on.You can test a maximum of five node groups in a rolling 24-hour period.
The following example uses the AWS CLI to test automatic failover on the node group redis00-0003 inthe Redis (cluster mode enabled) cluster redis00.
Example Test Automatic Failover
For Linux, macOS, or Unix:
aws elasticache test-failover \
API Version 2015-02-02254
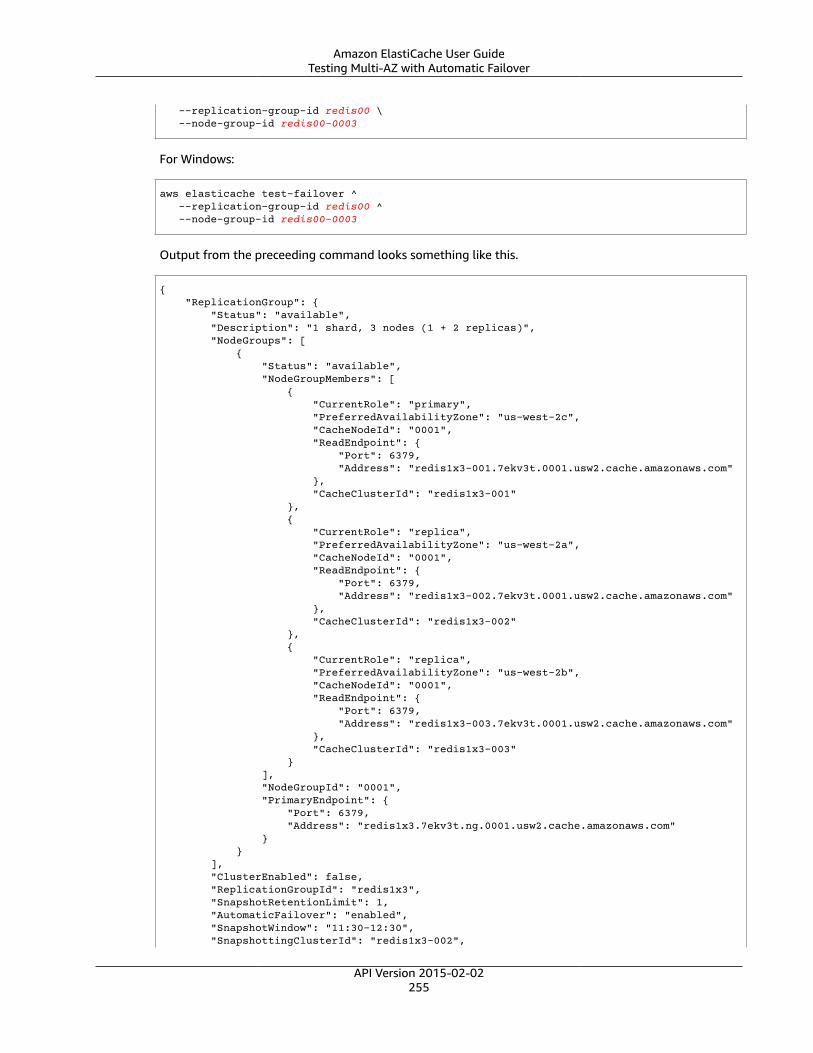
Amazon ElastiCache User GuideTesting Multi-AZ with Automatic Failover
--replication-group-id redis00 \ --node-group-id redis00-0003
For Windows:
aws elasticache test-failover ^ --replication-group-id redis00 ^ --node-group-id redis00-0003
Output from the preceeding command looks something like this.
{ "ReplicationGroup": { "Status": "available", "Description": "1 shard, 3 nodes (1 + 2 replicas)", "NodeGroups": [ { "Status": "available", "NodeGroupMembers": [ { "CurrentRole": "primary", "PreferredAvailabilityZone": "us-west-2c", "CacheNodeId": "0001", "ReadEndpoint": { "Port": 6379, "Address": "redis1x3-001.7ekv3t.0001.usw2.cache.amazonaws.com" }, "CacheClusterId": "redis1x3-001" }, { "CurrentRole": "replica", "PreferredAvailabilityZone": "us-west-2a", "CacheNodeId": "0001", "ReadEndpoint": { "Port": 6379, "Address": "redis1x3-002.7ekv3t.0001.usw2.cache.amazonaws.com" }, "CacheClusterId": "redis1x3-002" }, { "CurrentRole": "replica", "PreferredAvailabilityZone": "us-west-2b", "CacheNodeId": "0001", "ReadEndpoint": { "Port": 6379, "Address": "redis1x3-003.7ekv3t.0001.usw2.cache.amazonaws.com" }, "CacheClusterId": "redis1x3-003" } ], "NodeGroupId": "0001", "PrimaryEndpoint": { "Port": 6379, "Address": "redis1x3.7ekv3t.ng.0001.usw2.cache.amazonaws.com" } } ], "ClusterEnabled": false, "ReplicationGroupId": "redis1x3", "SnapshotRetentionLimit": 1, "AutomaticFailover": "enabled", "SnapshotWindow": "11:30-12:30", "SnapshottingClusterId": "redis1x3-002",
API Version 2015-02-02255
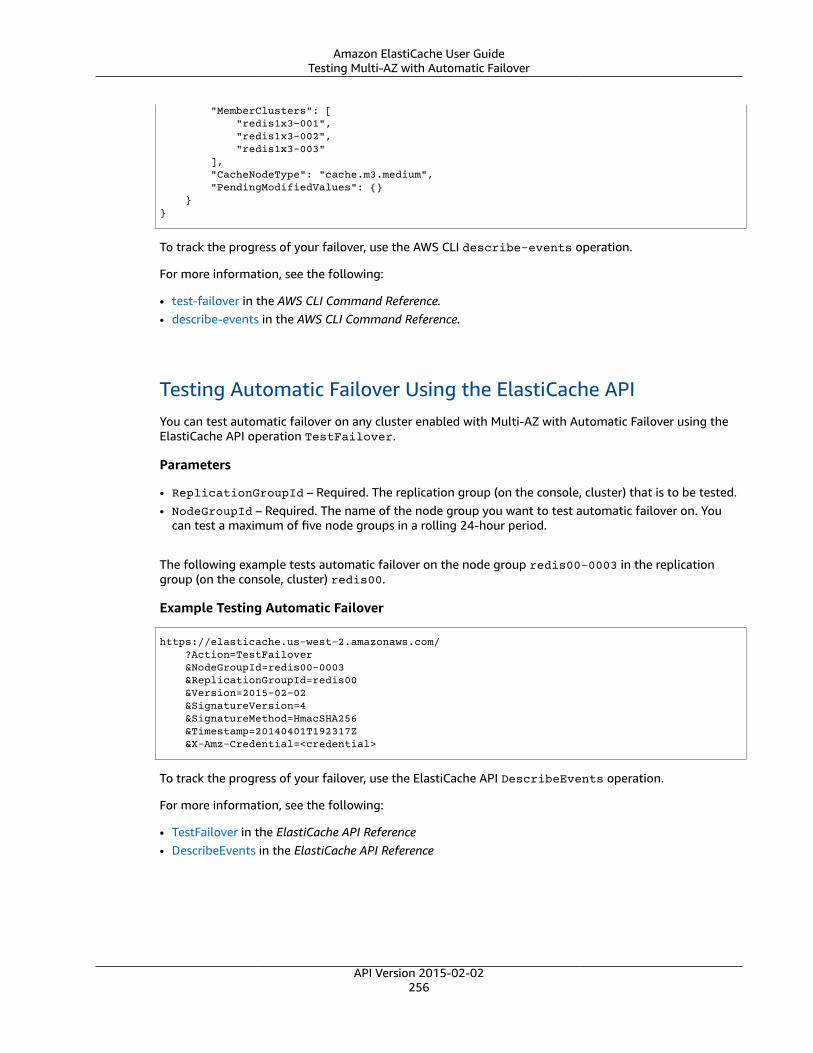
Amazon ElastiCache User GuideTesting Multi-AZ with Automatic Failover
"MemberClusters": [ "redis1x3-001", "redis1x3-002", "redis1x3-003" ], "CacheNodeType": "cache.m3.medium", "PendingModifiedValues": {} }}
To track the progress of your failover, use the AWS CLI describe-events operation.
For more information, see the following:
• test-failover in the AWS CLI Command Reference.• describe-events in the AWS CLI Command Reference.
Testing Automatic Failover Using the ElastiCache APIYou can test automatic failover on any cluster enabled with Multi-AZ with Automatic Failover using theElastiCache API operation TestFailover.
Parameters
• ReplicationGroupId – Required. The replication group (on the console, cluster) that is to be tested.• NodeGroupId – Required. The name of the node group you want to test automatic failover on. You
can test a maximum of five node groups in a rolling 24-hour period.
The following example tests automatic failover on the node group redis00-0003 in the replicationgroup (on the console, cluster) redis00.
Example Testing Automatic Failover
https://elasticache.us-west-2.amazonaws.com/ ?Action=TestFailover &NodeGroupId=redis00-0003 &ReplicationGroupId=redis00 &Version=2015-02-02 &SignatureVersion=4 &SignatureMethod=HmacSHA256 &Timestamp=20140401T192317Z &X-Amz-Credential=<credential>
To track the progress of your failover, use the ElastiCache API DescribeEvents operation.
For more information, see the following:
• TestFailover in the ElastiCache API Reference• DescribeEvents in the ElastiCache API Reference
API Version 2015-02-02256

Amazon ElastiCache User GuideHow Synchronization and Backup are Implemented
How Synchronization and Backup areImplemented
All supported versions of Redis support backup and synchronization between the primary and replicaclusters. However, the way that backup and synchronization is implemented varies depending on theRedis version.
Redis Version 2.8.22 and LaterRedis replication, in versions 2.8.22 and later, choose between two methods. For more information, seeRedis Versions Prior to 2.8.22 (p. 257) and ElastiCache Backup and Restore (Redis) (p. 297).
During the forkless process, if the write loads are heavy, writes to the cluster are delayed to ensure thatyou don't accumulate too many changes and thus prevent a successful snapshot.
Redis Versions Prior to 2.8.22Redis backup and synchronization in versions prior to 2.8.22, is a three-step process.
1. Fork, and in the background process, serialize the cluster data to disk. This creates a point-in-timesnapshot.
2. In the foreground, accumulate a change log in the client output buffer.
ImportantIf the change log exceeds the client output buffer size, the backup or synchronizationfails. For more information, see Ensuring You Have Sufficient Memory to Create a RedisSnapshot (p. 81).
3. Finally, transmit the cache data and then the change log to the replica cluster.
API Version 2015-02-02257
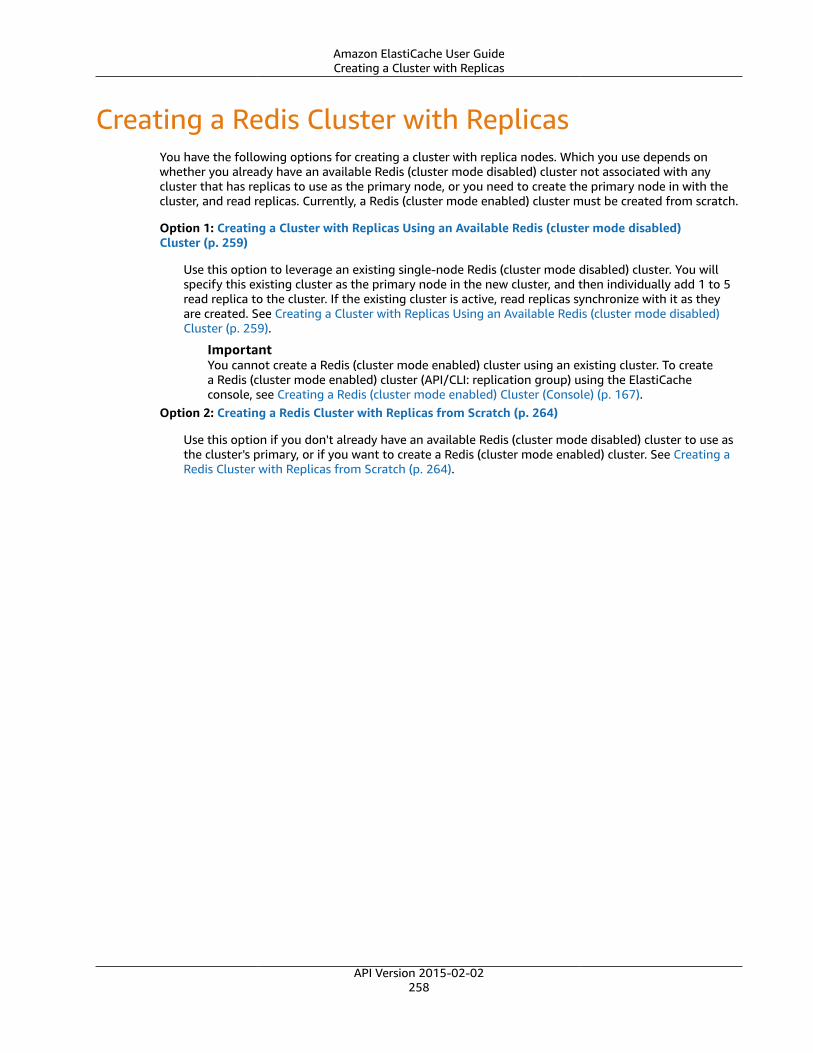
Amazon ElastiCache User GuideCreating a Cluster with Replicas
Creating a Redis Cluster with ReplicasYou have the following options for creating a cluster with replica nodes. Which you use depends onwhether you already have an available Redis (cluster mode disabled) cluster not associated with anycluster that has replicas to use as the primary node, or you need to create the primary node in with thecluster, and read replicas. Currently, a Redis (cluster mode enabled) cluster must be created from scratch.
Option 1: Creating a Cluster with Replicas Using an Available Redis (cluster mode disabled)Cluster (p. 259)
Use this option to leverage an existing single-node Redis (cluster mode disabled) cluster. You willspecify this existing cluster as the primary node in the new cluster, and then individually add 1 to 5read replica to the cluster. If the existing cluster is active, read replicas synchronize with it as theyare created. See Creating a Cluster with Replicas Using an Available Redis (cluster mode disabled)Cluster (p. 259).
ImportantYou cannot create a Redis (cluster mode enabled) cluster using an existing cluster. To createa Redis (cluster mode enabled) cluster (API/CLI: replication group) using the ElastiCacheconsole, see Creating a Redis (cluster mode enabled) Cluster (Console) (p. 167).
Option 2: Creating a Redis Cluster with Replicas from Scratch (p. 264)
Use this option if you don't already have an available Redis (cluster mode disabled) cluster to use asthe cluster's primary, or if you want to create a Redis (cluster mode enabled) cluster. See Creating aRedis Cluster with Replicas from Scratch (p. 264).
API Version 2015-02-02258

Amazon ElastiCache User GuideCreating a Cluster with Replicas Using an Existing Cluster
Creating a Cluster with Replicas Using an AvailableRedis (cluster mode disabled) ClusterAn available cluster is an existing single-node Redis cluster. Currently, Redis (cluster mode enabled)does not support creating a cluster with replicas using an available single-node cluster. If you wantto create a Redis (cluster mode enabled) cluster, see Creating a Redis (cluster mode enabled) Cluster(Console) (p. 271).
The following procedure can only be used if you have a Redis (cluster mode disabled) single-nodecluster. This cluster becomes the primary in the new cluster. If you do not have a Redis (cluster modedisabled) cluster you can use as the new cluster's primary, see Creating a Redis Cluster with Replicas fromScratch (p. 264).
Creating a Cluster with Replicas Using an Available Redis Cluster(Console)See the topic Adding Nodes to a Cluster (Console) (p. 188).
Creating a Replication Group Using an Available Redis CacheCluster (AWS CLI)There are two steps to creating a replication group with read replicas when using an available RedisCache Cluster for the primary when using the AWS CLI.
When using the AWS CLI you create a replication group specifying the available stand-alone node as thecluster's primary node, --primary-cluster-id and the number of nodes you want in the cluster usingthe CLI command, create-replication-group. Include the following parameters.
--replication-group-id
The name of the replication group you are creating. The value of this parameter is used as the basisfor the names of the added nodes with a sequential 3-digit number added to the end of the --replication-group-id. For example, new-group-001.
Redis (cluster mode disabled) Replication Group naming constraints
• Must contain from 1 to 20 alphanumeric characters or hyphens.• Must begin with a letter.• Cannot contain two consecutive hyphens.• Cannot end with a hyphen.
--replication-group-description
Description of the replication group.--num-cache-clusters
The total number of nodes you want in this clusters, including the primary node. This parameter hasa maximum value of 6.
--primary-cluster-id
The name of the available Redis (cluster mode disabled) cluster that you want to be the primarynode in this replication group.
If you want to enable in-transit or at-rest encryption on this cluster, add these parameters:
API Version 2015-02-02259

Amazon ElastiCache User GuideCreating a Cluster with Replicas Using an Existing Cluster
• --transit-encryption-enabled
If you enable in-transit encryption, the cluster must be created in a Amazon VPC and you must alsoinclude the parameter --cache-subnet-group.
• --auth-token with the customer specified string value for your AUTH token (password) needed toperform operations on this cluster.
• --at-rest-encryption-enabled
The following command creates the replication group new-group using the available Redis (clustermode disabled) cluster redis01 as the replication group's primary node. It creates 2 new nodes whichare read replicas. The settings of redis01 (that is, parameter group, security group, node type, engineversion, etc.) will be applied to all nodes in the replication group.
For Linux, macOS, or Unix:
aws elasticache create-replication-group \ --replication-group-id new-group \ --replication-group-description "demo cluster with replicas" \ --num-cache-clusters 3 \ --primary-cluster-id redis01
For Windows:
aws elasticache create-replication-group ^ --replication-group-id new-group ^ --replication-group-description "demo cluster with replicas" ^ --num-cache-clusters 3 ^ --primary-cluster-id redis01
For additional information and parameters you might want to use, see the AWS CLI topic create-replication-group.
Next, add read replicas to the replication group
After the replication group is created, add one to five read replicas to it using the create-cache-cluster command, being sure to include the following parameters.
--cache-cluster-id
The name of the cluster you are adding to the replication group.
Cluster naming constraints
• Must contain from 1 to 20 alphanumeric characters or hyphens.• Must begin with a letter.• Cannot contain two consecutive hyphens.• Cannot end with a hyphen.
--replication-group-id
The name of the replication group to which you are adding this cache cluster.
Repeat this command for each read replica you want to add to the replication group, changing only thevalue of the --cache-cluster-id parameter.
NoteRemember, a replication group cannot have more than five read replicas. Attempting to add aread replica to a replication group that already has five read replicas causes the operation to fail.
API Version 2015-02-02260

Amazon ElastiCache User GuideCreating a Cluster with Replicas Using an Existing Cluster
The following code adds the read replica my-replica01 to the replication group my-repl-group. Thesettings of the primary cluster–parameter group, security group, node type, etc.–will be applied to nodesas they are added to the replication group.
For Linux, macOS, or Unix:
aws elasticache create-cache-cluster \ --cache-cluster-id my-replica01 \ --replication-group-id my-repl-group
For Windows:
aws elasticache create-cache-cluster ^ --cache-cluster-id my-replica01 ^ --replication-group-id my-repl-group
Output from this command will look something like this.
{ "ReplicationGroup": { "Status": "creating", "Description": "demo cluster with replicas", "ClusterEnabled": false, "ReplicationGroupId": "new-group", "SnapshotRetentionLimit": 1, "AutomaticFailover": "disabled", "SnapshotWindow": "00:00-01:00", "SnapshottingClusterId": "redis01", "MemberClusters": [ "new-group-001", "new-group-002", "redis01" ], "CacheNodeType": "cache.m4.large", "PendingModifiedValues": {} }}
For additional information, see the AWS CLI topics:
• create-replication-group• modify-replication-group
Adding Replicas to a Stand-Alone Redis (cluster mode disabled)Cluster (ElastiCache API)When using the ElastiCache API you create a replication group specifying the available stand-alone nodeas the cluster's primary node, PrimaryClusterId and the number of nodes you want in the clusterusing the CLI command, CreateReplicationGroup. Include the following parameters.
ReplicationGroupId
The name of the replication group you are creating. The value of this parameter is used as thebasis for the names of the added nodes with a sequential 3-digit number added to the end of theReplicationGroupId. For example, new-group-001.
Redis (cluster mode disabled) Replication Group naming constraints• Must contain from 1 to 20 alphanumeric characters or hyphens.
API Version 2015-02-02261

Amazon ElastiCache User GuideCreating a Cluster with Replicas Using an Existing Cluster
• Must begin with a letter.• Cannot contain two consecutive hyphens.• Cannot end with a hyphen.
ReplicationGroupDescription
Description of the cluster with replicas.NumCacheClusters
The total number of nodes you want in this cluster, including the primary node. This parameter has amaximum value of 6.
PrimaryClusterId
The name of the available Redis (cluster mode disabled) cluster that you want to be the primarynode in this cluster.
The following command creates the cluster with replicas new-group using the available Redis (clustermode disabled) cluster redis01 as the replication group's primary node. It creates 2 new nodes whichare read replicas. The settings of redis01 (that is, parameter group, security group, node type, engineversion, etc.) will be applied to all nodes in the replication group.
https://elasticache.us-west-2.amazonaws.com/ ?Action=CreateReplicationGroup &Engine=redis &EngineVersion=3.2.4 &ReplicationGroupDescription=Demo%20cluster%20with%20replicas &ReplicationGroupId=new-group &PrimaryClusterId=redis01 &Version=2015-02-02 &SignatureVersion=4 &SignatureMethod=HmacSHA256 &Timestamp=20150202T192317Z &X-Amz-Credential=<credential>
For additional information, see the ElastiCache APL topics:
• CreateReplicationGroup• ModifyReplicationGroup
Next, add read replicas to the replication group
After the replication group is created, add one to five read replicas to it using theCreateCacheCluster operation, being sure to include the following parameters.
CacheClusterId
The name of the cluster you are adding to the replication group.
Cluster naming constraints
• Must contain from 1 to 20 alphanumeric characters or hyphens.• Must begin with a letter.• Cannot contain two consecutive hyphens.• Cannot end with a hyphen.
ReplicationGroupId
The name of the replication group to which you are adding this cache cluster.
API Version 2015-02-02262

Amazon ElastiCache User GuideCreating a Cluster with Replicas Using an Existing Cluster
Repeat this operation for each read replica you want to add to the replication group, changing only thevalue of the CacheClusterId parameter.
The following code adds the read replica myReplica01 to the replication group myReplGroup Thesettings of the primary cluster–parameter group, security group, node type, etc.–will be applied to nodesas they are added to the replication group.
https://elasticache.us-west-2.amazonaws.com/ ?Action=CreateCacheCluster &CacheClusterId=myReplica01 &ReplicationGroupId=myReplGroup &SignatureMethod=HmacSHA256 &SignatureVersion=4 &Version=2015-02-02 &X-Amz-Algorithm=AWS4-HMAC-SHA256 &X-Amz-Credential=[your-access-key-id]/20150202/us-west-2/elasticache/aws4_request &X-Amz-Date=20150202T170651Z &X-Amz-SignedHeaders=content-type;host;user-agent;x-amz-content-sha256;x-amz-date &X-Amz-Signature=[signature-value]
For additional information and parameters you might want to use, see the ElastiCache API topicCreateCacheCluster.
API Version 2015-02-02263
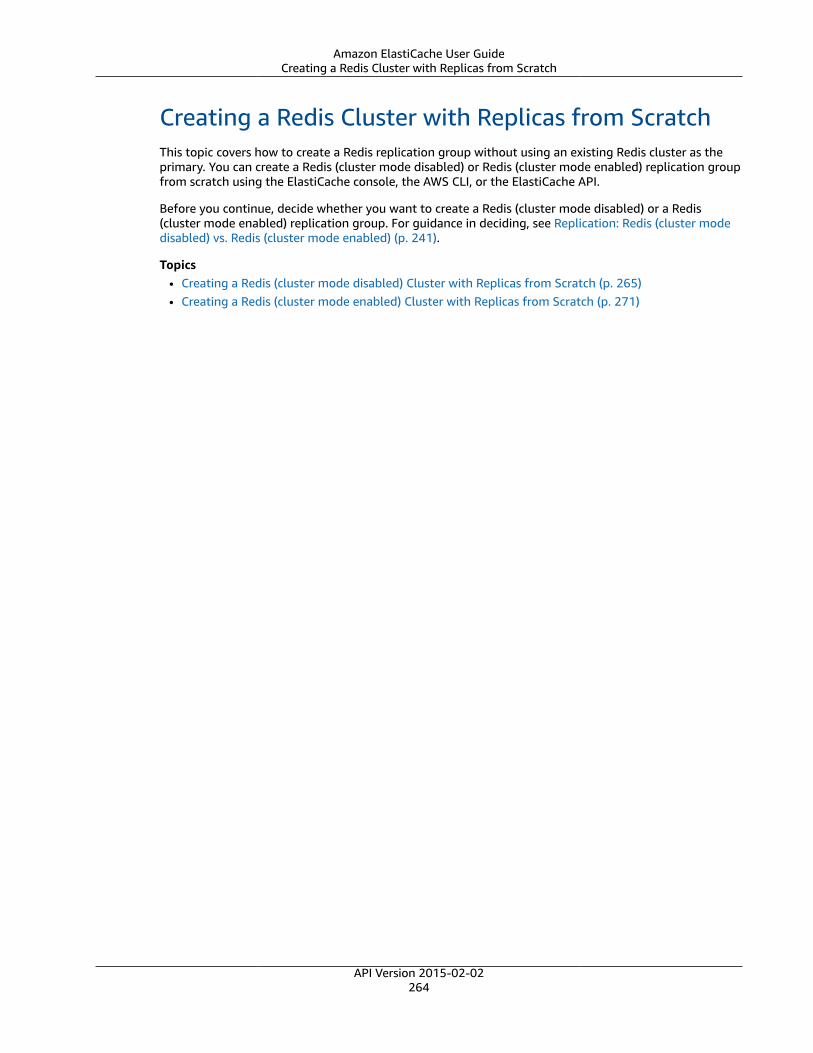
Amazon ElastiCache User GuideCreating a Redis Cluster with Replicas from Scratch
Creating a Redis Cluster with Replicas from ScratchThis topic covers how to create a Redis replication group without using an existing Redis cluster as theprimary. You can create a Redis (cluster mode disabled) or Redis (cluster mode enabled) replication groupfrom scratch using the ElastiCache console, the AWS CLI, or the ElastiCache API.
Before you continue, decide whether you want to create a Redis (cluster mode disabled) or a Redis(cluster mode enabled) replication group. For guidance in deciding, see Replication: Redis (cluster modedisabled) vs. Redis (cluster mode enabled) (p. 241).
Topics• Creating a Redis (cluster mode disabled) Cluster with Replicas from Scratch (p. 265)• Creating a Redis (cluster mode enabled) Cluster with Replicas from Scratch (p. 271)
API Version 2015-02-02264

Amazon ElastiCache User GuideCreating a Redis Cluster with Replicas from Scratch
Creating a Redis (cluster mode disabled) Cluster with Replicasfrom ScratchYou can create a Redis (cluster mode disabled) replication group from scratch using the ElastiCacheconsole, the AWS CLI, or the ElastiCache API. A Redis (cluster mode disabled) replication groupalways has one node group, a primary cluster, and up to 5 read replicas. Redis (cluster mode disabled)replication groups do not support partitioning your data.
Creating a Redis (cluster mode disabled) Cluster with Replicas from Scratch
• Creating a Redis (cluster mode disabled) Cluster with Replicas from Scratch (Console) (p. 265)
• Creating a Redis (cluster mode disabled) Cluster with Replicas from Scratch (AWS CLI) (p. 265)
• Creating a Redis (cluster mode disabled) Cluster with Replicas from Scratch (ElastiCacheAPI) (p. 268)
Creating a Redis (cluster mode disabled) Cluster with Replicas from Scratch(Console)
To create a Redis (cluster mode disabled) cluster with replicas, see Creating a Redis (cluster modedisabled) Cluster (Console) (p. 163). Specify at least one replica node.
Creating a Redis (cluster mode disabled) Cluster with Replicas from Scratch(AWS CLI)
The following procedure creates a Redis (cluster mode disabled) replication group using the AWS CLI.
When you create a Redis (cluster mode disabled) replication group from scratch, you create thereplication group and all its nodes with a single call to the AWS CLI create-replication-groupcommand. Include the following parameters.
--replication-group-id
The name of the replication group you are creating.
Redis (cluster mode disabled) Replication Group naming constraints
• Must contain from 1 to 20 alphanumeric characters or hyphens.
• Must begin with a letter.
• Cannot contain two consecutive hyphens.
• Cannot end with a hyphen.
--replication-group-description
Description of the replication group.
--num-cache-clusters
The total number of clusters (nodes) you want created with this replication group, primary and readreplicas combined.
If you enable Multi-AZ (--automatic-failover-enabled), the value of --num-cache-clusters must be at least 2.
--cache-node-type
The node type for each node in the replication group.
API Version 2015-02-02265

Amazon ElastiCache User GuideCreating a Redis Cluster with Replicas from Scratch
The following node types are supported by ElastiCache. Generally speaking, the current generationtypes provide more memory and computational power at lower cost when compared to theirequivalent previous generation counterparts.
• General purpose:
• Current generation:
T2 node types: cache.t2.micro, cache.t2.small, cache.t2.medium
M3 node types: cache.m3.medium, cache.m3.large, cache.m3.xlarge,cache.m3.2xlarge
M4 node types: cache.m4.large, cache.m4.xlarge, cache.m4.2xlarge,cache.m4.4xlarge, cache.m4.10xlarge
• Previous generation: (not recommended)
T1 node types: cache.t1.micro
M1 node types: cache.m1.small, cache.m1.medium, cache.m1.large,cache.m1.xlarge
• Compute optimized:
• Previous generation: (not recommended)
C1 node types: cache.c1.xlarge
• Memory optimized:
• Current generation:
R3 node types: cache.r3.large, cache.r3.xlarge, cache.r3.2xlarge,cache.r3.4xlarge, cache.r3.8xlarge
R4 node types: cache.r4.large, cache.r4.xlarge, cache.r4.2xlarge,cache.r4.4xlarge, cache.r4.8xlarge, cache.r4.16xlarge
• Previous generation: (not recommended)
M2 node types: cache.m2.xlarge, cache.m2.2xlarge, cache.m2.4xlarge
Additional node type info
• All T2 instances are created in an Amazon Virtual Private Cloud (Amazon VPC).
• Redis backup and restore is not supported for T2 instances.
• Redis append-only files (AOF) are not supported for T1 or T2 instances.
• Redis Multi-AZ with automatic failover is not supported on T1 instances.
• Redis Multi-AZ with automatic failover is supported on T2 instances only when running Redis(cluster mode enabled) - version 3.2.4 or later with the default.redis3.2.cluster.onparameter group or one derived from it.
• Redis configuration variables appendonly and appendfsync are not supported on Redis version2.8.22 and later.
--cache-parameter-group
Specify a parameter group that corresponds to your engine version. If you are running Redis3.2.4 or later, specify the default.redis3.2 parameter group or a parameter group derivedfrom default.redis3.2 to create a Redis (cluster mode disabled) replication group. For moreinformation, see Redis Specific Parameters (p. 366).
--engine
redisAPI Version 2015-02-02
266
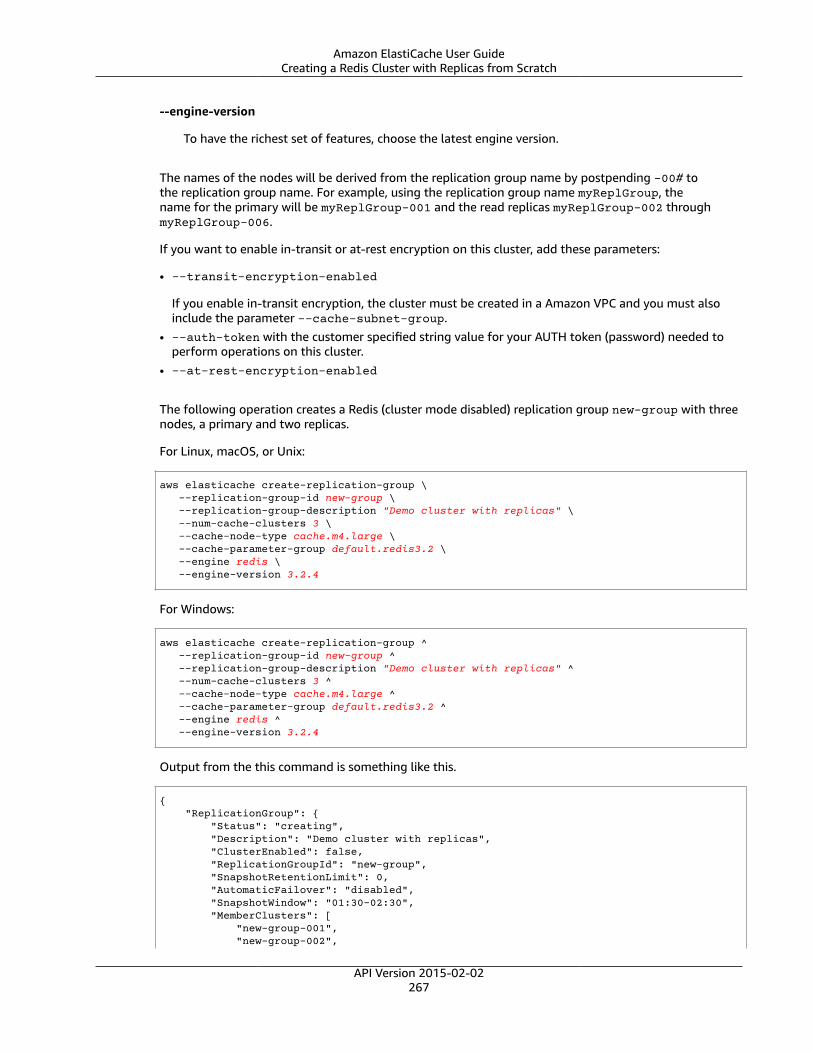
Amazon ElastiCache User GuideCreating a Redis Cluster with Replicas from Scratch
--engine-version
To have the richest set of features, choose the latest engine version.
The names of the nodes will be derived from the replication group name by postpending -00# tothe replication group name. For example, using the replication group name myReplGroup, thename for the primary will be myReplGroup-001 and the read replicas myReplGroup-002 throughmyReplGroup-006.
If you want to enable in-transit or at-rest encryption on this cluster, add these parameters:
• --transit-encryption-enabled
If you enable in-transit encryption, the cluster must be created in a Amazon VPC and you must alsoinclude the parameter --cache-subnet-group.
• --auth-token with the customer specified string value for your AUTH token (password) needed toperform operations on this cluster.
• --at-rest-encryption-enabled
The following operation creates a Redis (cluster mode disabled) replication group new-group with threenodes, a primary and two replicas.
For Linux, macOS, or Unix:
aws elasticache create-replication-group \ --replication-group-id new-group \ --replication-group-description "Demo cluster with replicas" \ --num-cache-clusters 3 \ --cache-node-type cache.m4.large \ --cache-parameter-group default.redis3.2 \ --engine redis \ --engine-version 3.2.4
For Windows:
aws elasticache create-replication-group ^ --replication-group-id new-group ^ --replication-group-description "Demo cluster with replicas" ^ --num-cache-clusters 3 ^ --cache-node-type cache.m4.large ^ --cache-parameter-group default.redis3.2 ^ --engine redis ^ --engine-version 3.2.4
Output from the this command is something like this.
{ "ReplicationGroup": { "Status": "creating", "Description": "Demo cluster with replicas", "ClusterEnabled": false, "ReplicationGroupId": "new-group", "SnapshotRetentionLimit": 0, "AutomaticFailover": "disabled", "SnapshotWindow": "01:30-02:30", "MemberClusters": [ "new-group-001", "new-group-002",
API Version 2015-02-02267
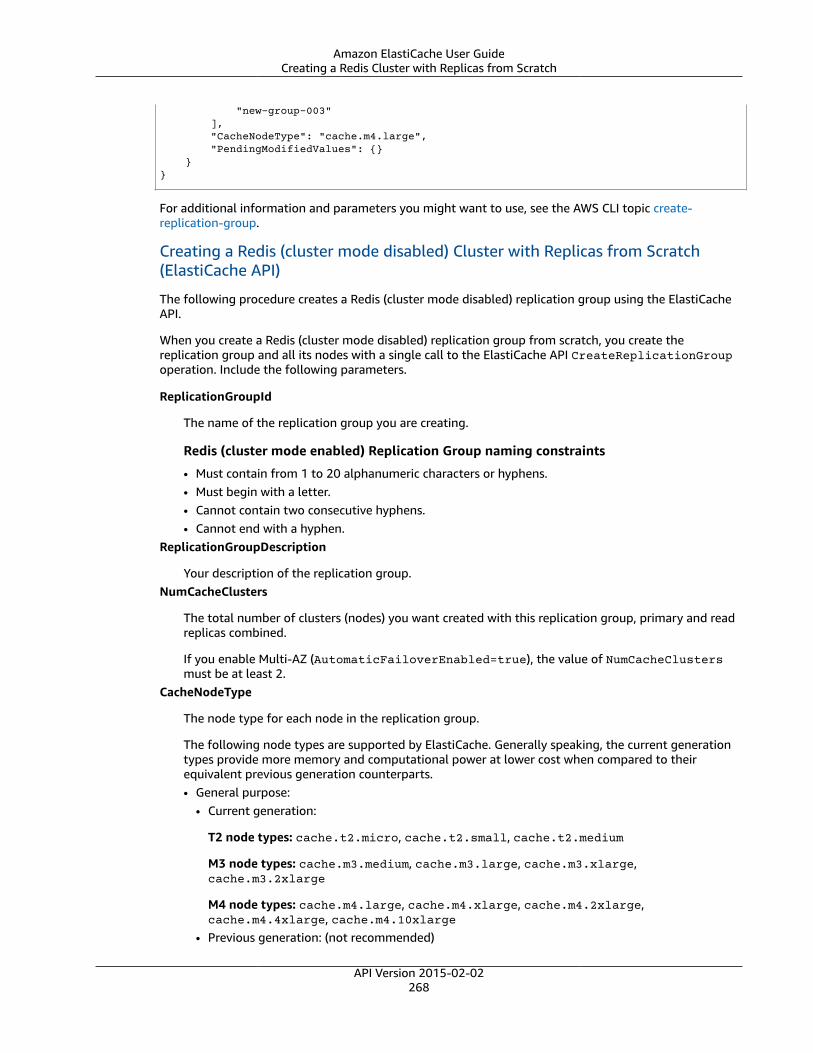
Amazon ElastiCache User GuideCreating a Redis Cluster with Replicas from Scratch
"new-group-003" ], "CacheNodeType": "cache.m4.large", "PendingModifiedValues": {} }}
For additional information and parameters you might want to use, see the AWS CLI topic create-replication-group.
Creating a Redis (cluster mode disabled) Cluster with Replicas from Scratch(ElastiCache API)
The following procedure creates a Redis (cluster mode disabled) replication group using the ElastiCacheAPI.
When you create a Redis (cluster mode disabled) replication group from scratch, you create thereplication group and all its nodes with a single call to the ElastiCache API CreateReplicationGroupoperation. Include the following parameters.
ReplicationGroupId
The name of the replication group you are creating.
Redis (cluster mode enabled) Replication Group naming constraints
• Must contain from 1 to 20 alphanumeric characters or hyphens.• Must begin with a letter.• Cannot contain two consecutive hyphens.• Cannot end with a hyphen.
ReplicationGroupDescription
Your description of the replication group.NumCacheClusters
The total number of clusters (nodes) you want created with this replication group, primary and readreplicas combined.
If you enable Multi-AZ (AutomaticFailoverEnabled=true), the value of NumCacheClustersmust be at least 2.
CacheNodeType
The node type for each node in the replication group.
The following node types are supported by ElastiCache. Generally speaking, the current generationtypes provide more memory and computational power at lower cost when compared to theirequivalent previous generation counterparts.• General purpose:
• Current generation:
T2 node types: cache.t2.micro, cache.t2.small, cache.t2.medium
M3 node types: cache.m3.medium, cache.m3.large, cache.m3.xlarge,cache.m3.2xlarge
M4 node types: cache.m4.large, cache.m4.xlarge, cache.m4.2xlarge,cache.m4.4xlarge, cache.m4.10xlarge
• Previous generation: (not recommended)
API Version 2015-02-02268
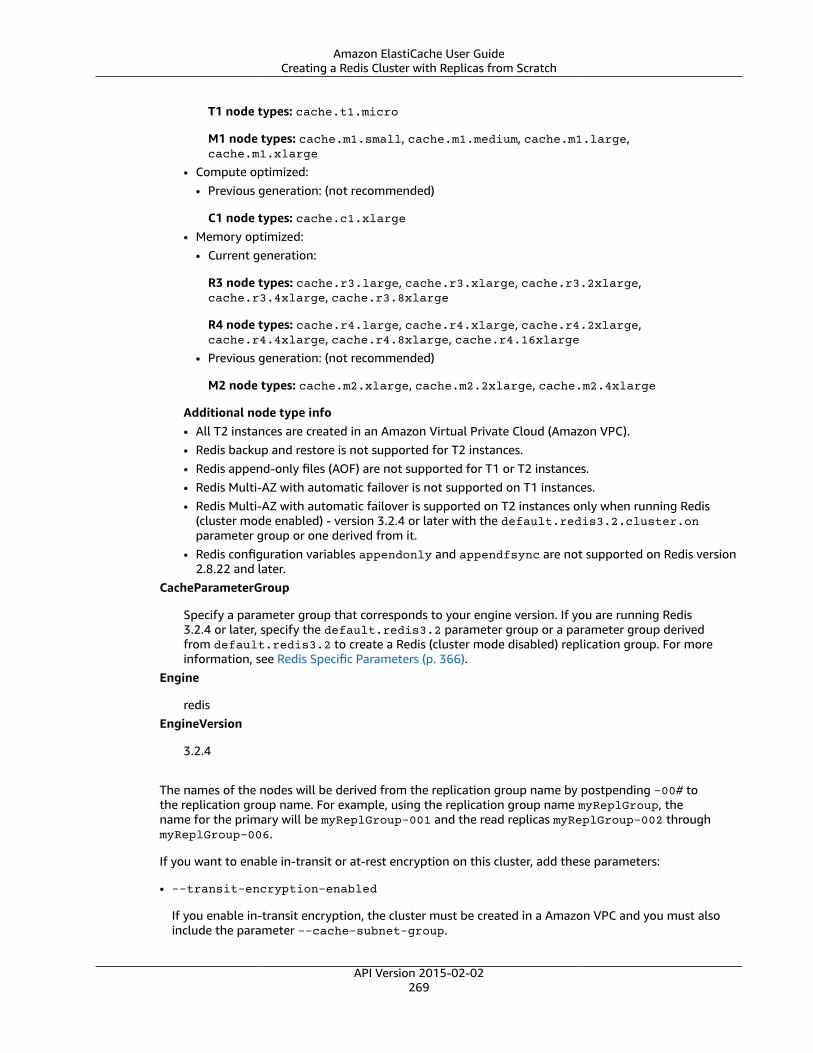
Amazon ElastiCache User GuideCreating a Redis Cluster with Replicas from Scratch
T1 node types: cache.t1.micro
M1 node types: cache.m1.small, cache.m1.medium, cache.m1.large,cache.m1.xlarge
• Compute optimized:• Previous generation: (not recommended)
C1 node types: cache.c1.xlarge• Memory optimized:
• Current generation:
R3 node types: cache.r3.large, cache.r3.xlarge, cache.r3.2xlarge,cache.r3.4xlarge, cache.r3.8xlarge
R4 node types: cache.r4.large, cache.r4.xlarge, cache.r4.2xlarge,cache.r4.4xlarge, cache.r4.8xlarge, cache.r4.16xlarge
• Previous generation: (not recommended)
M2 node types: cache.m2.xlarge, cache.m2.2xlarge, cache.m2.4xlarge
Additional node type info• All T2 instances are created in an Amazon Virtual Private Cloud (Amazon VPC).• Redis backup and restore is not supported for T2 instances.• Redis append-only files (AOF) are not supported for T1 or T2 instances.• Redis Multi-AZ with automatic failover is not supported on T1 instances.• Redis Multi-AZ with automatic failover is supported on T2 instances only when running Redis
(cluster mode enabled) - version 3.2.4 or later with the default.redis3.2.cluster.onparameter group or one derived from it.
• Redis configuration variables appendonly and appendfsync are not supported on Redis version2.8.22 and later.
CacheParameterGroup
Specify a parameter group that corresponds to your engine version. If you are running Redis3.2.4 or later, specify the default.redis3.2 parameter group or a parameter group derivedfrom default.redis3.2 to create a Redis (cluster mode disabled) replication group. For moreinformation, see Redis Specific Parameters (p. 366).
Engine
redisEngineVersion
3.2.4
The names of the nodes will be derived from the replication group name by postpending -00# tothe replication group name. For example, using the replication group name myReplGroup, thename for the primary will be myReplGroup-001 and the read replicas myReplGroup-002 throughmyReplGroup-006.
If you want to enable in-transit or at-rest encryption on this cluster, add these parameters:
• --transit-encryption-enabled
If you enable in-transit encryption, the cluster must be created in a Amazon VPC and you must alsoinclude the parameter --cache-subnet-group.
API Version 2015-02-02269

Amazon ElastiCache User GuideCreating a Redis Cluster with Replicas from Scratch
• --auth-token with the customer specified string value for your AUTH token (password) needed toperform operations on this cluster.
• --at-rest-encryption-enabled
The following operation creates the Redis (cluster mode disabled) replication group myReplGroup withthree nodes, a primary and two replicas.
https://elasticache.us-west-2.amazonaws.com/ ?Action=CreateReplicationGroup &CacheNodeType=cache.m4.large &CacheParameterGroup=default.redis3.2 &Engine=redis &EngineVersion=3.2.4 &NumCacheClusters=3 &ReplicationGroupDescription=test%20group &ReplicationGroupId=myReplGroup &Version=2015-02-02 &SignatureVersion=4 &SignatureMethod=HmacSHA256 &Timestamp=20150202T192317Z &X-Amz-Credential=<credential>
For additional information and parameters you might want to use, see the ElastiCache API topicCreateReplicationGroup.
API Version 2015-02-02270

Amazon ElastiCache User GuideCreating a Redis Cluster with Replicas from Scratch
Creating a Redis (cluster mode enabled) Cluster with Replicasfrom ScratchYou can create a Redis (cluster mode enabled) cluster (API/CLI: replication group) using the ElastiCacheconsole, the AWS CLI, or the ElastiCache API. A Redis (cluster mode enabled) replication group has from1 to 15 shards (API/CLI: node groups), a primary cluster in each shard, and up to 5 read replicas in eachshard. When you use the ElastiCache console to create the cluster, the number of read replicas is thesame for every shard.
Creating a Redis (cluster mode enabled) Cluster• Creating a Redis (cluster mode enabled) Cluster (Console) (p. 271)• Creating a Redis (cluster mode enabled) Cluster with Replicas from Scratch (AWS CLI) (p. 271)• Creating a Redis (cluster mode enabled) Cluster with Replicas from Scratch (ElastiCache
API) (p. 275)
Creating a Redis (cluster mode enabled) Cluster (Console)
To create a Redis (cluster mode enabled) cluster, see Creating a Redis (cluster mode enabled) Cluster(Console) (p. 167). Be sure to enable cluster mode, Cluster Mode enabled (Scale Out), and specify atleast two shards and one replica node.
Creating a Redis (cluster mode enabled) Cluster with Replicas from Scratch (AWSCLI)
The following procedure creates a Redis (cluster mode enabled) replication group using the AWS CLI.
When you create a Redis (cluster mode enabled) replication group from scratch, you create thereplication group and all its nodes with a single call to the AWS CLI create-replication-groupcommand. Include the following parameters.
--replication-group-id
The name of the replication group you are creating.
Redis (cluster mode enabled) Replication Group naming constraints
• Must contain from 1 to 20 alphanumeric characters or hyphens.• Must begin with a letter.• Cannot contain two consecutive hyphens.• Cannot end with a hyphen.
--replication-group-description
Description of the replication group.--cache-node-type
The node type for each node in the replication group.
The following node types are supported by ElastiCache. Generally speaking, the current generationtypes provide more memory and computational power at lower cost when compared to theirequivalent previous generation counterparts.• General purpose:
• Current generation:
T2 node types: cache.t2.micro, cache.t2.small, cache.t2.medium
API Version 2015-02-02271

Amazon ElastiCache User GuideCreating a Redis Cluster with Replicas from Scratch
M3 node types: cache.m3.medium, cache.m3.large, cache.m3.xlarge,cache.m3.2xlarge
M4 node types: cache.m4.large, cache.m4.xlarge, cache.m4.2xlarge,cache.m4.4xlarge, cache.m4.10xlarge
• Previous generation: (not recommended)
T1 node types: cache.t1.micro
M1 node types: cache.m1.small, cache.m1.medium, cache.m1.large,cache.m1.xlarge
• Compute optimized:• Previous generation: (not recommended)
C1 node types: cache.c1.xlarge• Memory optimized:
• Current generation:
R3 node types: cache.r3.large, cache.r3.xlarge, cache.r3.2xlarge,cache.r3.4xlarge, cache.r3.8xlarge
R4 node types: cache.r4.large, cache.r4.xlarge, cache.r4.2xlarge,cache.r4.4xlarge, cache.r4.8xlarge, cache.r4.16xlarge
• Previous generation: (not recommended)
M2 node types: cache.m2.xlarge, cache.m2.2xlarge, cache.m2.4xlarge
Additional node type info• All T2 instances are created in an Amazon Virtual Private Cloud (Amazon VPC).• Redis backup and restore is not supported for T2 instances.• Redis append-only files (AOF) are not supported for T1 or T2 instances.• Redis Multi-AZ with automatic failover is not supported on T1 instances.• Redis Multi-AZ with automatic failover is supported on T2 instances only when running Redis
(cluster mode enabled) - version 3.2.4 or later with the default.redis3.2.cluster.onparameter group or one derived from it.
• Redis configuration variables appendonly and appendfsync are not supported on Redis version2.8.22 and later.
--cache-parameter-group
Specify the default.redis3.2.cluster.on parameter group or a parameter group derived fromdefault.redis3.2.cluster.on to create a Redis (cluster mode enabled) replication group. Formore information, see Redis 3.2.4 Parameter Changes (p. 367).
--engine
redis--engine-version
3.2.4--num-node-groups
The number of node groups in this replication group. Valid values are 1 to 15.--replicas-per-node-group
The number of replica nodes in each node group. Valid values are 0 to 5.
API Version 2015-02-02272
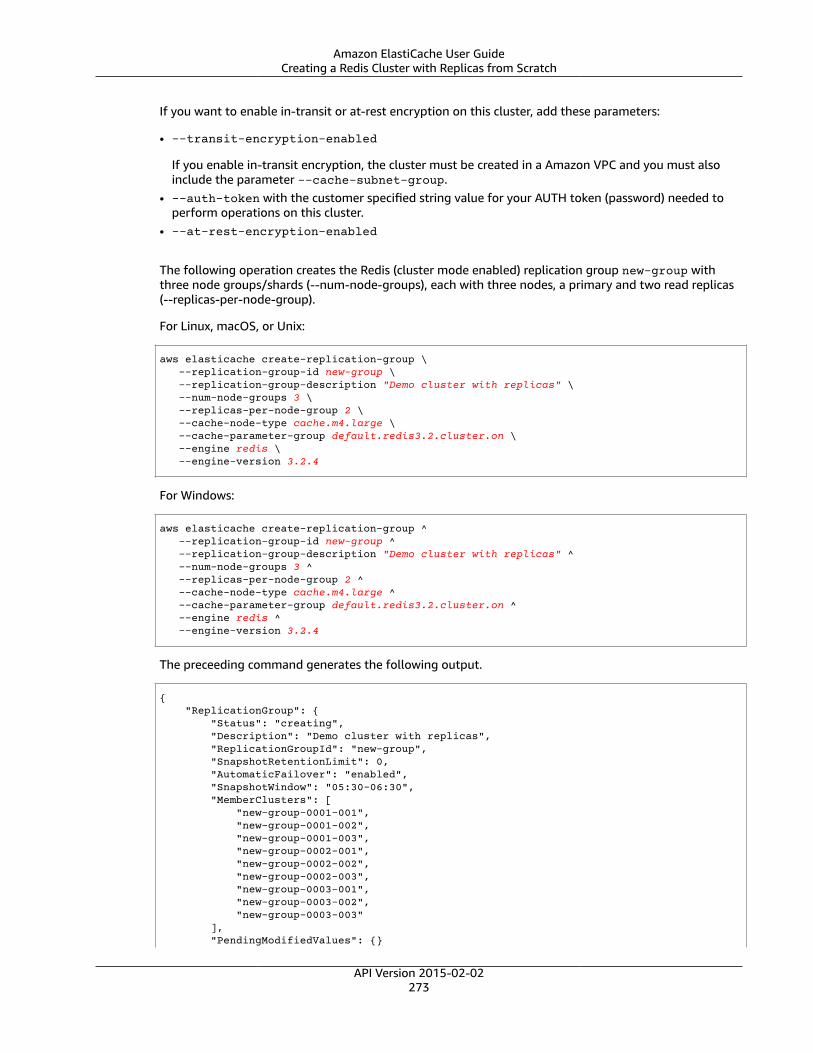
Amazon ElastiCache User GuideCreating a Redis Cluster with Replicas from Scratch
If you want to enable in-transit or at-rest encryption on this cluster, add these parameters:
• --transit-encryption-enabled
If you enable in-transit encryption, the cluster must be created in a Amazon VPC and you must alsoinclude the parameter --cache-subnet-group.
• --auth-token with the customer specified string value for your AUTH token (password) needed toperform operations on this cluster.
• --at-rest-encryption-enabled
The following operation creates the Redis (cluster mode enabled) replication group new-group withthree node groups/shards (--num-node-groups), each with three nodes, a primary and two read replicas(--replicas-per-node-group).
For Linux, macOS, or Unix:
aws elasticache create-replication-group \ --replication-group-id new-group \ --replication-group-description "Demo cluster with replicas" \ --num-node-groups 3 \ --replicas-per-node-group 2 \ --cache-node-type cache.m4.large \ --cache-parameter-group default.redis3.2.cluster.on \ --engine redis \ --engine-version 3.2.4
For Windows:
aws elasticache create-replication-group ^ --replication-group-id new-group ^ --replication-group-description "Demo cluster with replicas" ^ --num-node-groups 3 ^ --replicas-per-node-group 2 ^ --cache-node-type cache.m4.large ^ --cache-parameter-group default.redis3.2.cluster.on ^ --engine redis ^ --engine-version 3.2.4
The preceeding command generates the following output.
{ "ReplicationGroup": { "Status": "creating", "Description": "Demo cluster with replicas", "ReplicationGroupId": "new-group", "SnapshotRetentionLimit": 0, "AutomaticFailover": "enabled", "SnapshotWindow": "05:30-06:30", "MemberClusters": [ "new-group-0001-001", "new-group-0001-002", "new-group-0001-003", "new-group-0002-001", "new-group-0002-002", "new-group-0002-003", "new-group-0003-001", "new-group-0003-002", "new-group-0003-003" ], "PendingModifiedValues": {}
API Version 2015-02-02273
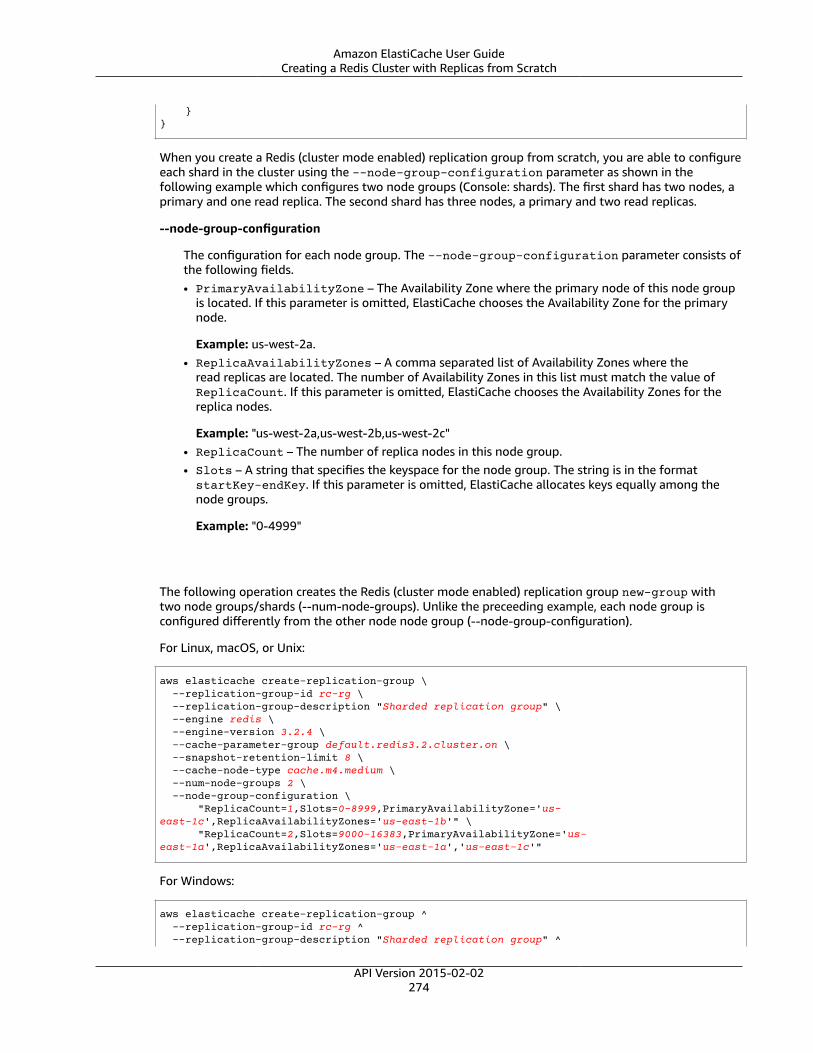
Amazon ElastiCache User GuideCreating a Redis Cluster with Replicas from Scratch
}}
When you create a Redis (cluster mode enabled) replication group from scratch, you are able to configureeach shard in the cluster using the --node-group-configuration parameter as shown in thefollowing example which configures two node groups (Console: shards). The first shard has two nodes, aprimary and one read replica. The second shard has three nodes, a primary and two read replicas.
--node-group-configuration
The configuration for each node group. The --node-group-configuration parameter consists ofthe following fields.• PrimaryAvailabilityZone – The Availability Zone where the primary node of this node group
is located. If this parameter is omitted, ElastiCache chooses the Availability Zone for the primarynode.
Example: us-west-2a.• ReplicaAvailabilityZones – A comma separated list of Availability Zones where the
read replicas are located. The number of Availability Zones in this list must match the value ofReplicaCount. If this parameter is omitted, ElastiCache chooses the Availability Zones for thereplica nodes.
Example: "us-west-2a,us-west-2b,us-west-2c"• ReplicaCount – The number of replica nodes in this node group.• Slots – A string that specifies the keyspace for the node group. The string is in the formatstartKey-endKey. If this parameter is omitted, ElastiCache allocates keys equally among thenode groups.
Example: "0-4999"
The following operation creates the Redis (cluster mode enabled) replication group new-group withtwo node groups/shards (--num-node-groups). Unlike the preceeding example, each node group isconfigured differently from the other node node group (--node-group-configuration).
For Linux, macOS, or Unix:
aws elasticache create-replication-group \ --replication-group-id rc-rg \ --replication-group-description "Sharded replication group" \ --engine redis \ --engine-version 3.2.4 \ --cache-parameter-group default.redis3.2.cluster.on \ --snapshot-retention-limit 8 \ --cache-node-type cache.m4.medium \ --num-node-groups 2 \ --node-group-configuration \ "ReplicaCount=1,Slots=0-8999,PrimaryAvailabilityZone='us-east-1c',ReplicaAvailabilityZones='us-east-1b'" \ "ReplicaCount=2,Slots=9000-16383,PrimaryAvailabilityZone='us-east-1a',ReplicaAvailabilityZones='us-east-1a','us-east-1c'"
For Windows:
aws elasticache create-replication-group ^ --replication-group-id rc-rg ^ --replication-group-description "Sharded replication group" ^
API Version 2015-02-02274

Amazon ElastiCache User GuideCreating a Redis Cluster with Replicas from Scratch
--engine redis ^ --engine-version 3.2.4 ^ --cache-parameter-group default.redis3.2.cluster.on ^ --snapshot-retention-limit 8 ^ --cache-node-type cache.m4.medium ^ --num-node-groups 2 ^ --node-group-configuration \ "ReplicaCount=1,Slots=0-8999,PrimaryAvailabilityZone='us-east-1c',ReplicaAvailabilityZones='us-east-1b'" \ "ReplicaCount=2,Slots=9000-16383,PrimaryAvailabilityZone='us-east-1a',ReplicaAvailabilityZones='us-east-1a','us-east-1c'"
The preceeding operation generates the following output.
{ "ReplicationGroup": { "Status": "creating", "Description": "Sharded replication group", "ReplicationGroupId": "rc-rg", "SnapshotRetentionLimit": 8, "AutomaticFailover": "enabled", "SnapshotWindow": "10:00-11:00", "MemberClusters": [ "rc-rg-0001-001", "rc-rg-0001-002", "rc-rg-0002-001", "rc-rg-0002-002", "rc-rg-0002-003" ], "PendingModifiedValues": {} }}
For additional information and parameters you might want to use, see the AWS CLI topic create-replication-group.
Creating a Redis (cluster mode enabled) Cluster with Replicas from Scratch(ElastiCache API)
The following procedure creates a Redis (cluster mode enabled) replication group using the ElastiCacheAPI.
When you create a Redis (cluster mode enabled) replication group from scratch, you create thereplication group and all its nodes with a single call to the ElastiCache API CreateReplicationGroupoperation. Include the following parameters.
ReplicationGroupId
The name of the replication group you are creating.
Redis (cluster mode enabled) Replication Group naming constraints
• Must contain from 1 to 20 alphanumeric characters or hyphens.
• Must begin with a letter.
• Cannot contain two consecutive hyphens.
• Cannot end with a hyphen.
ReplicationGroupDescription
Description of the replication group.
API Version 2015-02-02275
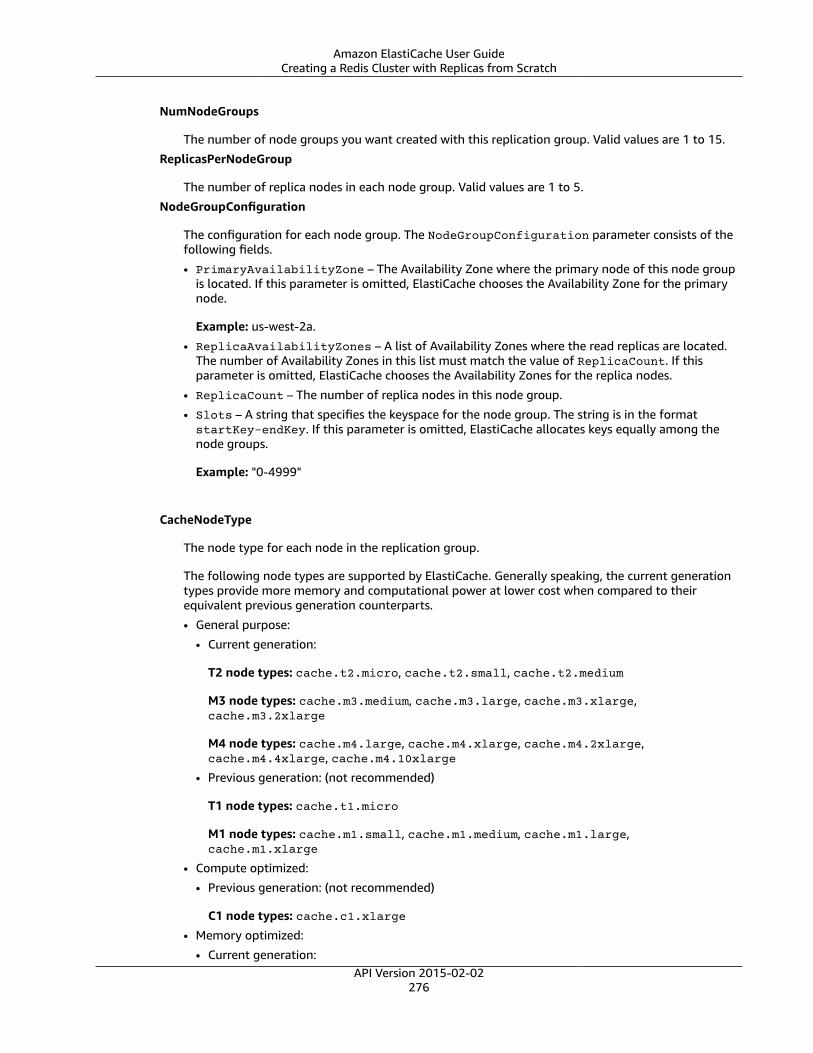
Amazon ElastiCache User GuideCreating a Redis Cluster with Replicas from Scratch
NumNodeGroups
The number of node groups you want created with this replication group. Valid values are 1 to 15.
ReplicasPerNodeGroup
The number of replica nodes in each node group. Valid values are 1 to 5.
NodeGroupConfiguration
The configuration for each node group. The NodeGroupConfiguration parameter consists of thefollowing fields.
• PrimaryAvailabilityZone – The Availability Zone where the primary node of this node groupis located. If this parameter is omitted, ElastiCache chooses the Availability Zone for the primarynode.
Example: us-west-2a.
• ReplicaAvailabilityZones – A list of Availability Zones where the read replicas are located.The number of Availability Zones in this list must match the value of ReplicaCount. If thisparameter is omitted, ElastiCache chooses the Availability Zones for the replica nodes.
• ReplicaCount – The number of replica nodes in this node group.
• Slots – A string that specifies the keyspace for the node group. The string is in the formatstartKey-endKey. If this parameter is omitted, ElastiCache allocates keys equally among thenode groups.
Example: "0-4999"
CacheNodeType
The node type for each node in the replication group.
The following node types are supported by ElastiCache. Generally speaking, the current generationtypes provide more memory and computational power at lower cost when compared to theirequivalent previous generation counterparts.
• General purpose:
• Current generation:
T2 node types: cache.t2.micro, cache.t2.small, cache.t2.medium
M3 node types: cache.m3.medium, cache.m3.large, cache.m3.xlarge,cache.m3.2xlarge
M4 node types: cache.m4.large, cache.m4.xlarge, cache.m4.2xlarge,cache.m4.4xlarge, cache.m4.10xlarge
• Previous generation: (not recommended)
T1 node types: cache.t1.micro
M1 node types: cache.m1.small, cache.m1.medium, cache.m1.large,cache.m1.xlarge
• Compute optimized:
• Previous generation: (not recommended)
C1 node types: cache.c1.xlarge
• Memory optimized:
• Current generation:API Version 2015-02-02
276
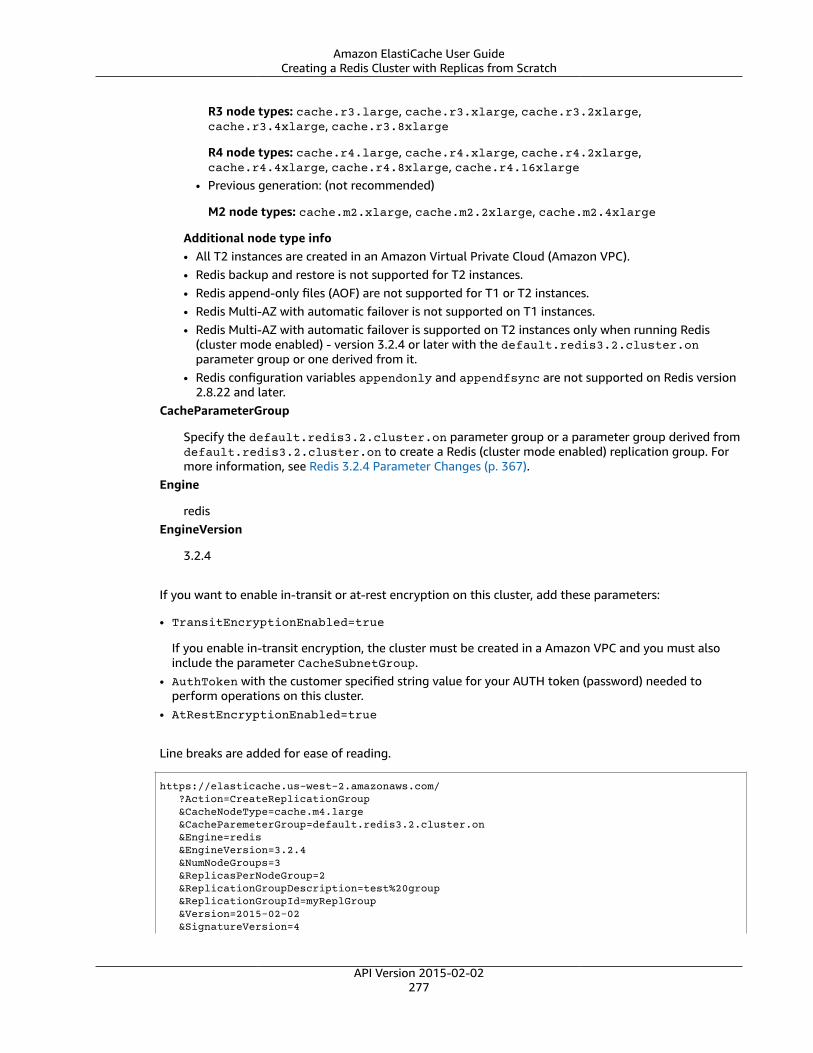
Amazon ElastiCache User GuideCreating a Redis Cluster with Replicas from Scratch
R3 node types: cache.r3.large, cache.r3.xlarge, cache.r3.2xlarge,cache.r3.4xlarge, cache.r3.8xlarge
R4 node types: cache.r4.large, cache.r4.xlarge, cache.r4.2xlarge,cache.r4.4xlarge, cache.r4.8xlarge, cache.r4.16xlarge
• Previous generation: (not recommended)
M2 node types: cache.m2.xlarge, cache.m2.2xlarge, cache.m2.4xlarge
Additional node type info• All T2 instances are created in an Amazon Virtual Private Cloud (Amazon VPC).• Redis backup and restore is not supported for T2 instances.• Redis append-only files (AOF) are not supported for T1 or T2 instances.• Redis Multi-AZ with automatic failover is not supported on T1 instances.• Redis Multi-AZ with automatic failover is supported on T2 instances only when running Redis
(cluster mode enabled) - version 3.2.4 or later with the default.redis3.2.cluster.onparameter group or one derived from it.
• Redis configuration variables appendonly and appendfsync are not supported on Redis version2.8.22 and later.
CacheParameterGroup
Specify the default.redis3.2.cluster.on parameter group or a parameter group derived fromdefault.redis3.2.cluster.on to create a Redis (cluster mode enabled) replication group. Formore information, see Redis 3.2.4 Parameter Changes (p. 367).
Engine
redisEngineVersion
3.2.4
If you want to enable in-transit or at-rest encryption on this cluster, add these parameters:
• TransitEncryptionEnabled=true
If you enable in-transit encryption, the cluster must be created in a Amazon VPC and you must alsoinclude the parameter CacheSubnetGroup.
• AuthToken with the customer specified string value for your AUTH token (password) needed toperform operations on this cluster.
• AtRestEncryptionEnabled=true
Line breaks are added for ease of reading.
https://elasticache.us-west-2.amazonaws.com/ ?Action=CreateReplicationGroup &CacheNodeType=cache.m4.large &CacheParemeterGroup=default.redis3.2.cluster.on &Engine=redis &EngineVersion=3.2.4 &NumNodeGroups=3 &ReplicasPerNodeGroup=2 &ReplicationGroupDescription=test%20group &ReplicationGroupId=myReplGroup &Version=2015-02-02 &SignatureVersion=4
API Version 2015-02-02277

Amazon ElastiCache User GuideViewing a Replication Group's Details
&SignatureMethod=HmacSHA256 &Timestamp=20150202T192317Z &X-Amz-Credential=<credential>
For additional information and parameters you might want to use, see the ElastiCache API topicCreateReplicationGroup.
Viewing a Replication Group's DetailsThere are times you may want to view the details of a replication group. You can use the ElastiCacheconsole, the AWS CLI for ElastiCache, or the ElastiCache API. The console process is different for Redis(cluster mode disabled) and Redis (cluster mode enabled).
Viewing a Replication Group's Details• Viewing a Redis (cluster mode disabled) with Replicas Details: Redis (cluster mode disabled) (p. 278)
• Viewing a Redis (cluster mode disabled) Cluster with Replicas Details (Console) (p. 278)• Viewing a Redis (cluster mode disabled) Cluster with Replicas Details (AWS CLI) (p. 278)• Viewing a Redis (cluster mode disabled) Cluster with Replicas Details (ElastiCache
API) (p. 279)• Viewing a Replication Group's Details: Redis (cluster mode enabled) (p. 279)
• Viewing a Redis (cluster mode enabled) Cluster's Details (Console) (p. 279)• Viewing a Redis (cluster mode enabled) Cluster's Details (AWS CLI) (p. 279)• Viewing a Redis (cluster mode enabled) Cluster's Details (ElastiCache API) (p. 279)
• Viewing a Replication Group's Details: (AWS CLI) (p. 279)• Viewing a Replication Group's Details: (ElastiCache API) (p. 281)
Viewing a Redis (cluster mode disabled) with ReplicasDetails: Redis (cluster mode disabled)You can view the details of a Redis (cluster mode disabled) cluster with replicas (API/CLI: replicationgroup) using the ElastiCache console, the AWS CLI for ElastiCache, or the ElastiCache API.
Viewing a Redis (cluster mode disabled) Cluster's Details• Viewing a Redis (cluster mode disabled) Cluster with Replicas Details (Console) (p. 278)• Viewing a Redis (cluster mode disabled) Cluster with Replicas Details (AWS CLI) (p. 278)• Viewing a Redis (cluster mode disabled) Cluster with Replicas Details (ElastiCache API) (p. 279)
Viewing a Redis (cluster mode disabled) Cluster with ReplicasDetails (Console)To view the details of a Redis (cluster mode disabled) cluster with replicas using the ElastiCache console,see the topic Viewing a Redis (cluster mode disabled) Cluster's Details (Console) (p. 178).
Viewing a Redis (cluster mode disabled) Cluster with ReplicasDetails (AWS CLI)For an AWS CLI example that displays a Redis (cluster mode disabled) replication group's details, seeViewing a Replication Group's Details: (AWS CLI) (p. 279).
API Version 2015-02-02278

Amazon ElastiCache User GuideViewing a Replication Group's
Details: Redis (cluster mode enabled)
Viewing a Redis (cluster mode disabled) Cluster with ReplicasDetails (ElastiCache API)For an ElastiCache API example that displays a Redis (cluster mode disabled) replication group's details,see Viewing a Replication Group's Details: (ElastiCache API) (p. 281).
Viewing a Replication Group's Details: Redis (clustermode enabled)Viewing a Redis (cluster mode enabled) Cluster's Details(Console)To view the details of a Redis (cluster mode enabled) cluster using the ElastiCache console, see Viewing aRedis (cluster mode enabled) Cluster's Details (Console) (p. 179).
Viewing a Redis (cluster mode enabled) Cluster's Details (AWSCLI)For an ElastiCache CLI example that displays a Redis (cluster mode enabled) replication group's details,see Viewing a Replication Group's Details: (AWS CLI) (p. 279).
Viewing a Redis (cluster mode enabled) Cluster's Details(ElastiCache API)For an ElastiCache API example that displays a Redis (cluster mode enabled) replication group's details,see Viewing a Replication Group's Details: (ElastiCache API) (p. 281).
Viewing a Replication Group's Details: (AWS CLI)You can view the details for a replication using the AWS CLI describe-replication-groupscommand. Use the following optional parameters to refine the listing. Omitting the parameters returnsthe details for up to 100 replication groups.
Optional Parameters
• --replication-group-id – Use this parameter to list the details of a specific replication group. Ifthe specified replication group has more than one node group, results are returned grouped by nodegroup.
• --max-items – Use this parameter to limit the number of replication groups listed. The value of --max-items cannot be less than 20 or greater than 100.
Example
The following code lists the details for up to 100 replication groups.
aws elasticache describe-replication-groups
The following code lists the details for my-repl-group.
aws elasticache describe-replication-groups --replication-group-id my-repl-group
API Version 2015-02-02279
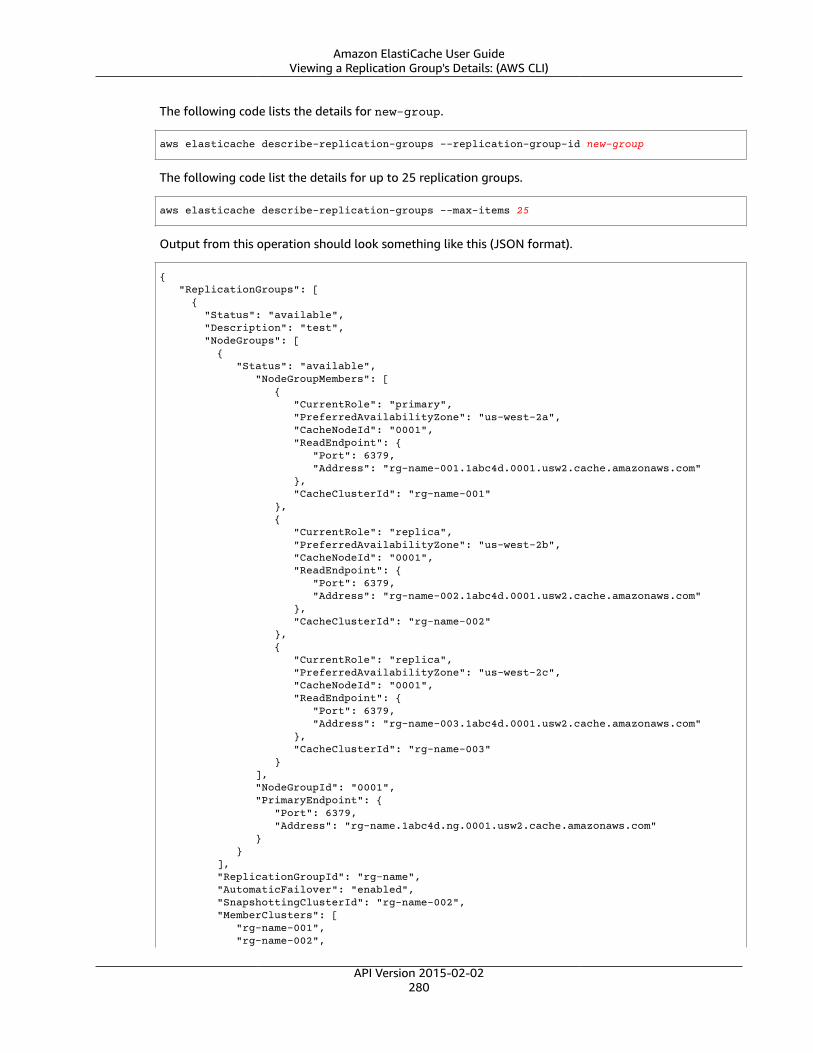
Amazon ElastiCache User GuideViewing a Replication Group's Details: (AWS CLI)
The following code lists the details for new-group.
aws elasticache describe-replication-groups --replication-group-id new-group
The following code list the details for up to 25 replication groups.
aws elasticache describe-replication-groups --max-items 25
Output from this operation should look something like this (JSON format).
{ "ReplicationGroups": [ { "Status": "available", "Description": "test", "NodeGroups": [ { "Status": "available", "NodeGroupMembers": [ { "CurrentRole": "primary", "PreferredAvailabilityZone": "us-west-2a", "CacheNodeId": "0001", "ReadEndpoint": { "Port": 6379, "Address": "rg-name-001.1abc4d.0001.usw2.cache.amazonaws.com" }, "CacheClusterId": "rg-name-001" }, { "CurrentRole": "replica", "PreferredAvailabilityZone": "us-west-2b", "CacheNodeId": "0001", "ReadEndpoint": { "Port": 6379, "Address": "rg-name-002.1abc4d.0001.usw2.cache.amazonaws.com" }, "CacheClusterId": "rg-name-002" }, { "CurrentRole": "replica", "PreferredAvailabilityZone": "us-west-2c", "CacheNodeId": "0001", "ReadEndpoint": { "Port": 6379, "Address": "rg-name-003.1abc4d.0001.usw2.cache.amazonaws.com" }, "CacheClusterId": "rg-name-003" } ], "NodeGroupId": "0001", "PrimaryEndpoint": { "Port": 6379, "Address": "rg-name.1abc4d.ng.0001.usw2.cache.amazonaws.com" } } ], "ReplicationGroupId": "rg-name", "AutomaticFailover": "enabled", "SnapshottingClusterId": "rg-name-002", "MemberClusters": [ "rg-name-001", "rg-name-002",
API Version 2015-02-02280
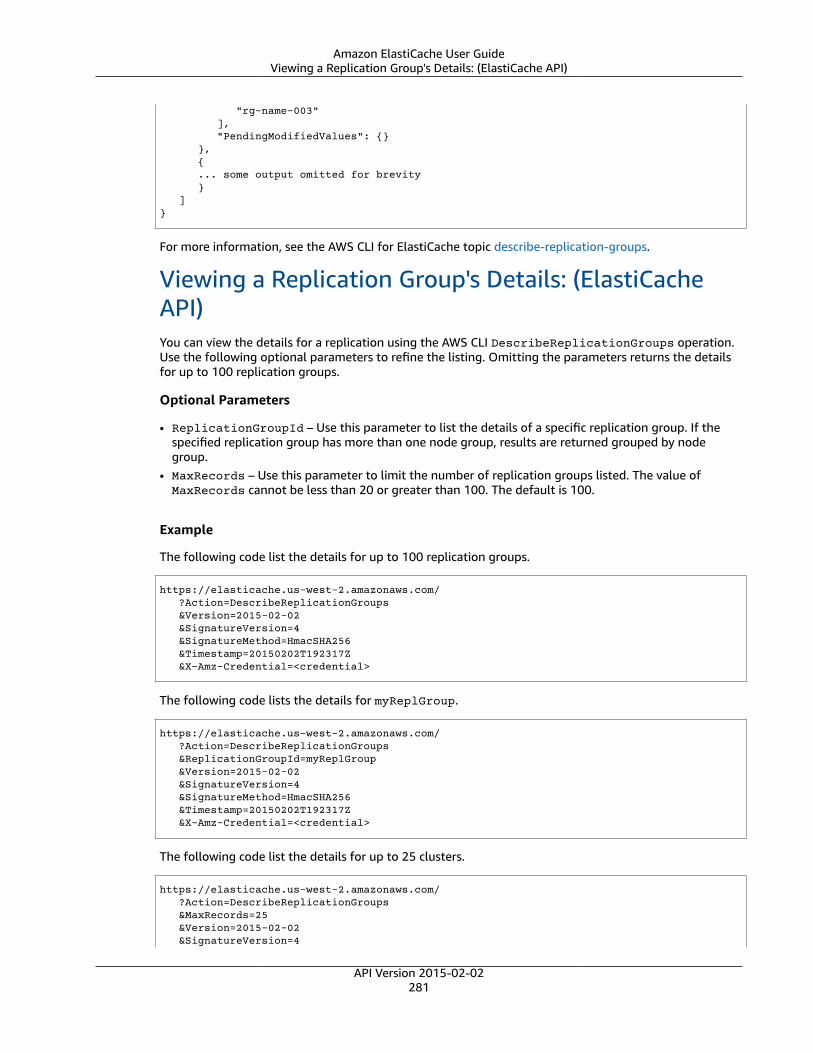
Amazon ElastiCache User GuideViewing a Replication Group's Details: (ElastiCache API)
"rg-name-003" ], "PendingModifiedValues": {} }, { ... some output omitted for brevity } ]}
For more information, see the AWS CLI for ElastiCache topic describe-replication-groups.
Viewing a Replication Group's Details: (ElastiCacheAPI)You can view the details for a replication using the AWS CLI DescribeReplicationGroups operation.Use the following optional parameters to refine the listing. Omitting the parameters returns the detailsfor up to 100 replication groups.
Optional Parameters
• ReplicationGroupId – Use this parameter to list the details of a specific replication group. If thespecified replication group has more than one node group, results are returned grouped by nodegroup.
• MaxRecords – Use this parameter to limit the number of replication groups listed. The value ofMaxRecords cannot be less than 20 or greater than 100. The default is 100.
Example
The following code list the details for up to 100 replication groups.
https://elasticache.us-west-2.amazonaws.com/ ?Action=DescribeReplicationGroups &Version=2015-02-02 &SignatureVersion=4 &SignatureMethod=HmacSHA256 &Timestamp=20150202T192317Z &X-Amz-Credential=<credential>
The following code lists the details for myReplGroup.
https://elasticache.us-west-2.amazonaws.com/ ?Action=DescribeReplicationGroups &ReplicationGroupId=myReplGroup &Version=2015-02-02 &SignatureVersion=4 &SignatureMethod=HmacSHA256 &Timestamp=20150202T192317Z &X-Amz-Credential=<credential>
The following code list the details for up to 25 clusters.
https://elasticache.us-west-2.amazonaws.com/ ?Action=DescribeReplicationGroups &MaxRecords=25 &Version=2015-02-02 &SignatureVersion=4
API Version 2015-02-02281

Amazon ElastiCache User GuideViewing a Replication Group's Details: (ElastiCache API)
&SignatureMethod=HmacSHA256 &Timestamp=20150202T192317Z &X-Amz-Credential=<credential>
For more information, see the ElastiCache API reference topic DescribeReplicationGroups.
API Version 2015-02-02282

Amazon ElastiCache User GuideFinding Replication Group Endpoints
Finding Replication Group EndpointsAn application can connect to any node in a replication group, provided that it has the DNS endpoint andport number for that node. Depending upon whether you are running a Redis (cluster mode disabled) ora Redis (cluster mode enabled) replication group, you will be interested in different endpoints.
Redis (cluster mode disabled)
Redis (cluster mode disabled) clusters with replicas have two types of endpoints; the primary endpointand the node endpoints. The primary endpoint is a DNS name that always resolves to the primary node inthe cluster. The primary endpoint is immune to changes to your cluster, such as promoting a read replicato the primary role. For write activity, we recommend that your applications connect to the primaryendpoint instead of connecting directly to the primary.
For read activity, applications can connect to any node in the cluster. Unlike the primary endpoint, nodeendpoints resolve to specific endpoints. If you make a change in your cluster, such as adding or deleting areplica, you must update the node endpoints in your application.
For read activity, applications can connect to any node in the cluster. Unlike the primary endpoint, nodeendpoints resolve to specific endpoints. If you make a change in your cluster, such as adding or deleting areplica, you must update the node endpoints in your application.
Redis (cluster mode enabled)
Redis (cluster mode enabled) clusters with replicas, because they have multiple shards (API/CLI: nodegroups), which mean they also have multiple primary nodes, have a different endpoint structure thanRedis (cluster mode disabled) clusters. Redis (cluster mode enabled) has a configuration endpoint which"knows" all the primary and node endpoints in the cluster. Your application connects to the configurationendpoint. Whenever your application writes to or reads from the cluster's configuration endpoint, Redis,behind the scenes, determines which shard the key belongs to and which endpoint in that shard to use. Itis all quite transparent to your application.
You can find the endpoints for a cluster using the ElastiCache console, the AWS CLI, or the ElastiCacheAPI.
Finding Replication Group Endpoints
To find the endpoints for your replication group, see one of the following topics:
• Finding a Redis (cluster mode disabled) Cluster's Endpoints (Console) (p. 69)
• Finding a Redis (cluster mode enabled) Cluster's Endpoints (Console) (p. 71)
• Finding the Endpoints for Replication Groups (AWS CLI) (p. 74)
• Finding Endpoints for Replication Groups (ElastiCache API) (p. 77)
Redis (cluster mode disabled)Redis (cluster mode disabled) clusters with replicas have two types of endpoints; the primary endpointand the node endpoints. The primary endpoint is a DNS name that always resolves to the primary node inthe cluster. The primary endpoint is immune to changes to your cluster, such as promoting a read replicato the primary role. For write activity, we recommend that your applications connect to the primaryendpoint instead of connecting directly to the primary.
For read activity, applications can connect to any node in the cluster. Unlike the primary endpoint, nodeendpoints resolve to specific endpoints. If you make a change in your cluster, such as adding or deleting areplica, you must update the node endpoints in your application.
API Version 2015-02-02283
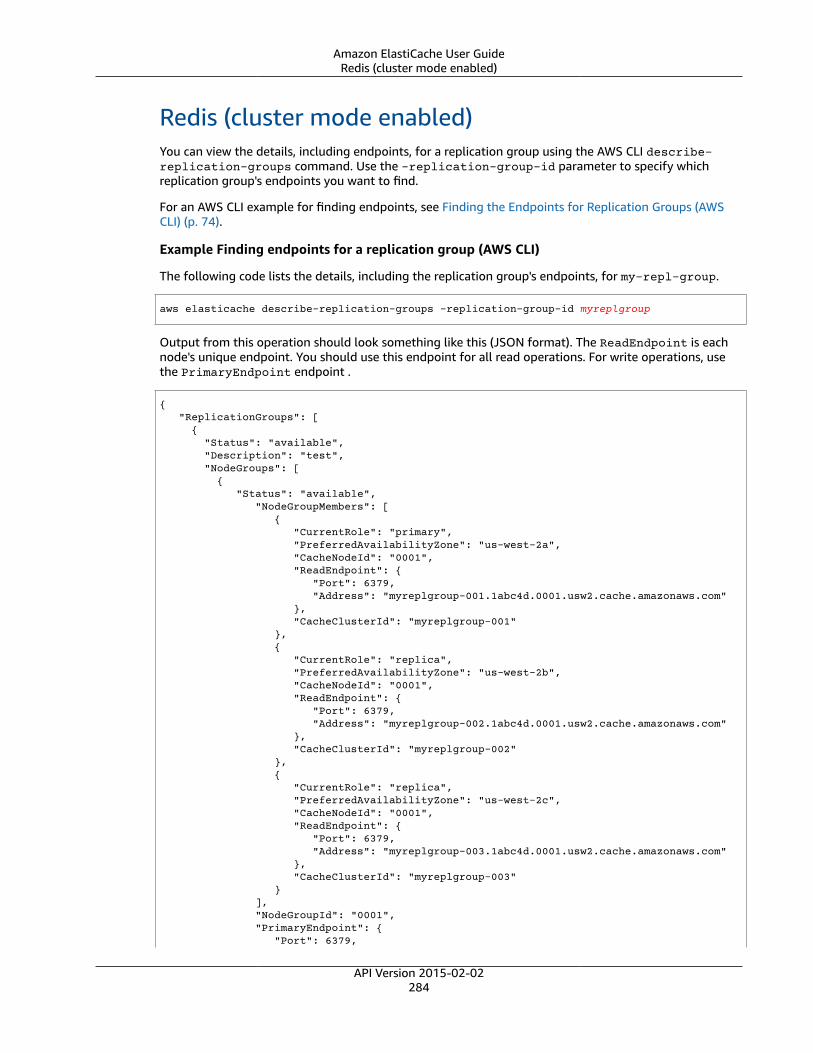
Amazon ElastiCache User GuideRedis (cluster mode enabled)
Redis (cluster mode enabled)You can view the details, including endpoints, for a replication group using the AWS CLI describe-replication-groups command. Use the -replication-group-id parameter to specify whichreplication group's endpoints you want to find.
For an AWS CLI example for finding endpoints, see Finding the Endpoints for Replication Groups (AWSCLI) (p. 74).
Example Finding endpoints for a replication group (AWS CLI)
The following code lists the details, including the replication group's endpoints, for my-repl-group.
aws elasticache describe-replication-groups -replication-group-id myreplgroup
Output from this operation should look something like this (JSON format). The ReadEndpoint is eachnode's unique endpoint. You should use this endpoint for all read operations. For write operations, usethe PrimaryEndpoint endpoint .
{ "ReplicationGroups": [ { "Status": "available", "Description": "test", "NodeGroups": [ { "Status": "available", "NodeGroupMembers": [ { "CurrentRole": "primary", "PreferredAvailabilityZone": "us-west-2a", "CacheNodeId": "0001", "ReadEndpoint": { "Port": 6379, "Address": "myreplgroup-001.1abc4d.0001.usw2.cache.amazonaws.com" }, "CacheClusterId": "myreplgroup-001" }, { "CurrentRole": "replica", "PreferredAvailabilityZone": "us-west-2b", "CacheNodeId": "0001", "ReadEndpoint": { "Port": 6379, "Address": "myreplgroup-002.1abc4d.0001.usw2.cache.amazonaws.com" }, "CacheClusterId": "myreplgroup-002" }, { "CurrentRole": "replica", "PreferredAvailabilityZone": "us-west-2c", "CacheNodeId": "0001", "ReadEndpoint": { "Port": 6379, "Address": "myreplgroup-003.1abc4d.0001.usw2.cache.amazonaws.com" }, "CacheClusterId": "myreplgroup-003" } ], "NodeGroupId": "0001", "PrimaryEndpoint": { "Port": 6379,
API Version 2015-02-02284
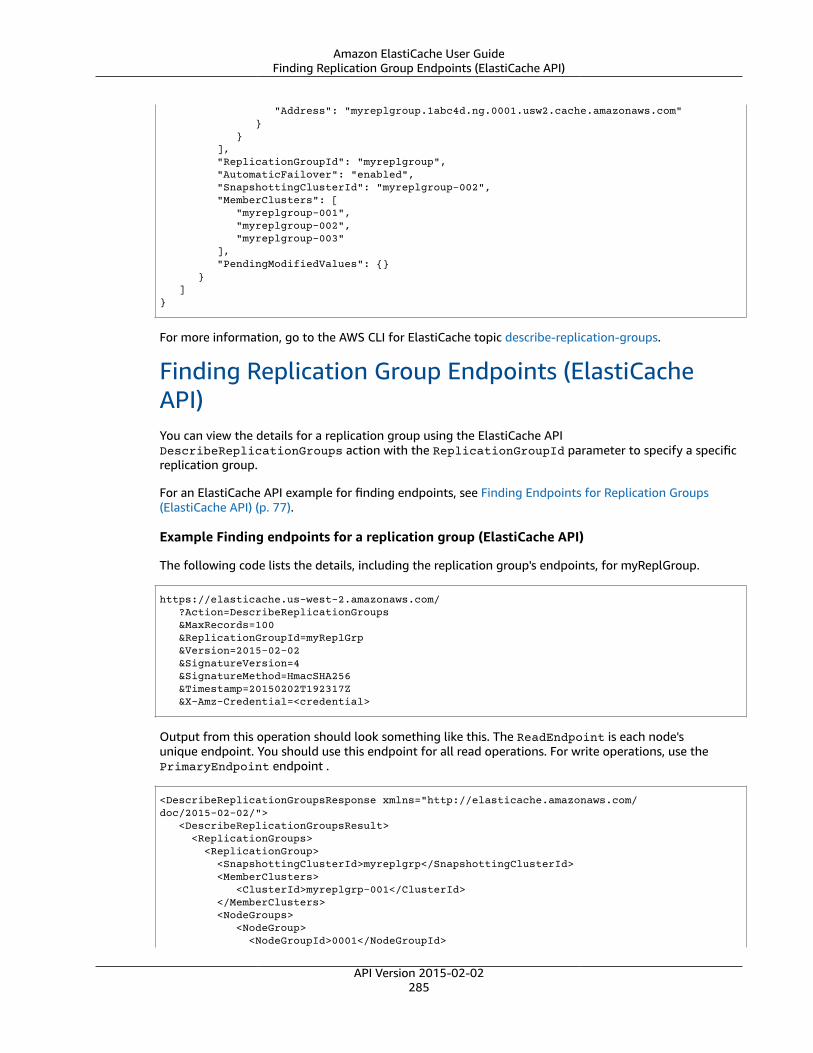
Amazon ElastiCache User GuideFinding Replication Group Endpoints (ElastiCache API)
"Address": "myreplgroup.1abc4d.ng.0001.usw2.cache.amazonaws.com" } } ], "ReplicationGroupId": "myreplgroup", "AutomaticFailover": "enabled", "SnapshottingClusterId": "myreplgroup-002", "MemberClusters": [ "myreplgroup-001", "myreplgroup-002", "myreplgroup-003" ], "PendingModifiedValues": {} } ]}
For more information, go to the AWS CLI for ElastiCache topic describe-replication-groups.
Finding Replication Group Endpoints (ElastiCacheAPI)You can view the details for a replication group using the ElastiCache APIDescribeReplicationGroups action with the ReplicationGroupId parameter to specify a specificreplication group.
For an ElastiCache API example for finding endpoints, see Finding Endpoints for Replication Groups(ElastiCache API) (p. 77).
Example Finding endpoints for a replication group (ElastiCache API)
The following code lists the details, including the replication group's endpoints, for myReplGroup.
https://elasticache.us-west-2.amazonaws.com/ ?Action=DescribeReplicationGroups &MaxRecords=100 &ReplicationGroupId=myReplGrp &Version=2015-02-02 &SignatureVersion=4 &SignatureMethod=HmacSHA256 &Timestamp=20150202T192317Z &X-Amz-Credential=<credential>
Output from this operation should look something like this. The ReadEndpoint is each node'sunique endpoint. You should use this endpoint for all read operations. For write operations, use thePrimaryEndpoint endpoint .
<DescribeReplicationGroupsResponse xmlns="http://elasticache.amazonaws.com/doc/2015-02-02/"> <DescribeReplicationGroupsResult> <ReplicationGroups> <ReplicationGroup> <SnapshottingClusterId>myreplgrp</SnapshottingClusterId> <MemberClusters> <ClusterId>myreplgrp-001</ClusterId> </MemberClusters> <NodeGroups> <NodeGroup> <NodeGroupId>0001</NodeGroupId>
API Version 2015-02-02285
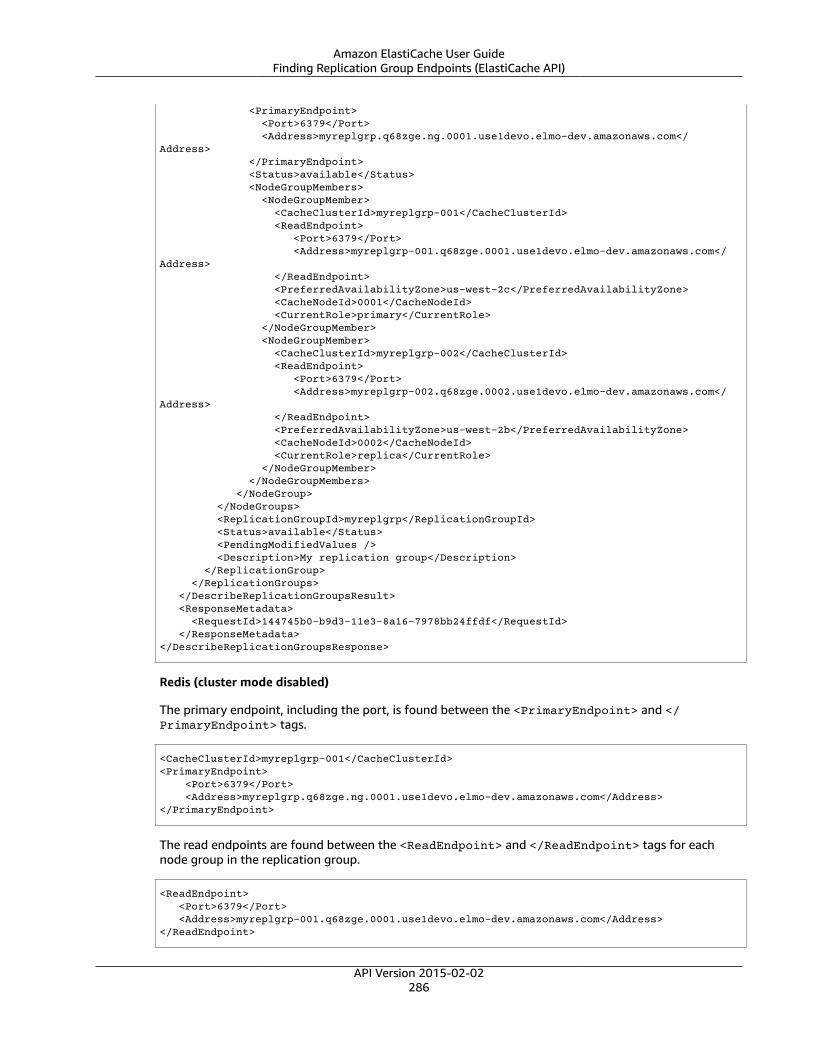
Amazon ElastiCache User GuideFinding Replication Group Endpoints (ElastiCache API)
<PrimaryEndpoint> <Port>6379</Port> <Address>myreplgrp.q68zge.ng.0001.use1devo.elmo-dev.amazonaws.com</Address> </PrimaryEndpoint> <Status>available</Status> <NodeGroupMembers> <NodeGroupMember> <CacheClusterId>myreplgrp-001</CacheClusterId> <ReadEndpoint> <Port>6379</Port> <Address>myreplgrp-001.q68zge.0001.use1devo.elmo-dev.amazonaws.com</Address> </ReadEndpoint> <PreferredAvailabilityZone>us-west-2c</PreferredAvailabilityZone> <CacheNodeId>0001</CacheNodeId> <CurrentRole>primary</CurrentRole> </NodeGroupMember> <NodeGroupMember> <CacheClusterId>myreplgrp-002</CacheClusterId> <ReadEndpoint> <Port>6379</Port> <Address>myreplgrp-002.q68zge.0002.use1devo.elmo-dev.amazonaws.com</Address> </ReadEndpoint> <PreferredAvailabilityZone>us-west-2b</PreferredAvailabilityZone> <CacheNodeId>0002</CacheNodeId> <CurrentRole>replica</CurrentRole> </NodeGroupMember> </NodeGroupMembers> </NodeGroup> </NodeGroups> <ReplicationGroupId>myreplgrp</ReplicationGroupId> <Status>available</Status> <PendingModifiedValues /> <Description>My replication group</Description> </ReplicationGroup> </ReplicationGroups> </DescribeReplicationGroupsResult> <ResponseMetadata> <RequestId>144745b0-b9d3-11e3-8a16-7978bb24ffdf</RequestId> </ResponseMetadata> </DescribeReplicationGroupsResponse>
Redis (cluster mode disabled)
The primary endpoint, including the port, is found between the <PrimaryEndpoint> and </PrimaryEndpoint> tags.
<CacheClusterId>myreplgrp-001</CacheClusterId> <PrimaryEndpoint> <Port>6379</Port> <Address>myreplgrp.q68zge.ng.0001.use1devo.elmo-dev.amazonaws.com</Address> </PrimaryEndpoint>
The read endpoints are found between the <ReadEndpoint> and </ReadEndpoint> tags for eachnode group in the replication group.
<ReadEndpoint> <Port>6379</Port> <Address>myreplgrp-001.q68zge.0001.use1devo.elmo-dev.amazonaws.com</Address> </ReadEndpoint>
API Version 2015-02-02286

Amazon ElastiCache User GuideFinding Replication Group Endpoints (ElastiCache API)
and
<CacheClusterId>myreplgrp-002</CacheClusterId> <ReadEndpoint> <Port>6379</Port> <Address>myreplgrp-002.q68zge.0001.use1devo.elmo-dev.amazonaws.com</Address> </ReadEndpoint>
Redis (cluster mode enabled)
The configuration endpoint, including the port, is found between the <ConfigurationEndpoint> and</ConfigurationEndpoint> tags.
<CacheClusterId>myreplgrp-001</CacheClusterId>
For more information, go to the ElastiCache API reference topic DescribeReplicationGroups.
API Version 2015-02-02287
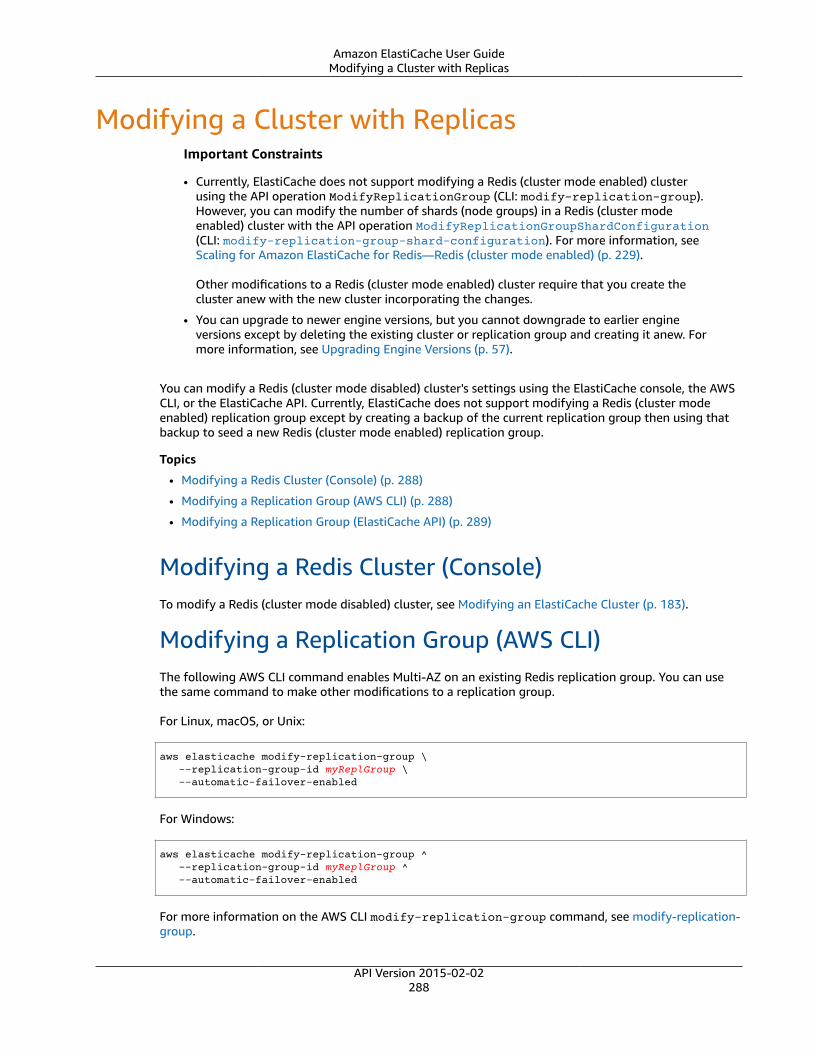
Amazon ElastiCache User GuideModifying a Cluster with Replicas
Modifying a Cluster with ReplicasImportant Constraints
• Currently, ElastiCache does not support modifying a Redis (cluster mode enabled) clusterusing the API operation ModifyReplicationGroup (CLI: modify-replication-group).However, you can modify the number of shards (node groups) in a Redis (cluster modeenabled) cluster with the API operation ModifyReplicationGroupShardConfiguration(CLI: modify-replication-group-shard-configuration). For more information, seeScaling for Amazon ElastiCache for Redis—Redis (cluster mode enabled) (p. 229).
Other modifications to a Redis (cluster mode enabled) cluster require that you create thecluster anew with the new cluster incorporating the changes.
• You can upgrade to newer engine versions, but you cannot downgrade to earlier engineversions except by deleting the existing cluster or replication group and creating it anew. Formore information, see Upgrading Engine Versions (p. 57).
You can modify a Redis (cluster mode disabled) cluster's settings using the ElastiCache console, the AWSCLI, or the ElastiCache API. Currently, ElastiCache does not support modifying a Redis (cluster modeenabled) replication group except by creating a backup of the current replication group then using thatbackup to seed a new Redis (cluster mode enabled) replication group.
Topics
• Modifying a Redis Cluster (Console) (p. 288)
• Modifying a Replication Group (AWS CLI) (p. 288)
• Modifying a Replication Group (ElastiCache API) (p. 289)
Modifying a Redis Cluster (Console)To modify a Redis (cluster mode disabled) cluster, see Modifying an ElastiCache Cluster (p. 183).
Modifying a Replication Group (AWS CLI)The following AWS CLI command enables Multi-AZ on an existing Redis replication group. You can usethe same command to make other modifications to a replication group.
For Linux, macOS, or Unix:
aws elasticache modify-replication-group \ --replication-group-id myReplGroup \ --automatic-failover-enabled
For Windows:
aws elasticache modify-replication-group ^ --replication-group-id myReplGroup ^ --automatic-failover-enabled
For more information on the AWS CLI modify-replication-group command, see modify-replication-group.
API Version 2015-02-02288

Amazon ElastiCache User GuideModifying a Replication Group (ElastiCache API)
Modifying a Replication Group (ElastiCache API)The following ElastiCache API operation enables Multi-AZ on an existing Redis replication group. You canuse the same operation to make other modifications to a replication group.
https://elasticache.us-west-2.amazonaws.com/ ?Action=ModifyReplicationGroup &AutomaticFailoverEnabled=true &ReplicationGroupId=myReplGroup &SignatureVersion=4 &SignatureMethod=HmacSHA256 &Timestamp=20141201T220302Z &Version=2014-12-01 &X-Amz-Algorithm=AWS4-HMAC-SHA256 &X-Amz-Date=20141201T220302Z &X-Amz-SignedHeaders=Host &X-Amz-Expires=20141201T220302Z &X-Amz-Credential=<credential> &X-Amz-Signature=<signature>
For more information on the ElastiCache API ModifyReplicationGroup operation, seeModifyReplicationGroup.
API Version 2015-02-02289

Amazon ElastiCache User GuideDeleting a Cluster with Replicas
Deleting a Cluster with ReplicasIf you no longer need one of your clusters with replicas (called replication groups in the API/CLI), you candelete it. When you delete a replication group, ElastiCache deletes all of the nodes in that group.
Once you have begun this operation, it cannot be interrupted or cancelled.
Deleting a Replication Group (Console)To delete a cluster that has replicas, see Deleting a Cluster (p. 201).
Deleting a Replication Group (AWS CLI)Use the command delete-replication-group to delete a replication group.
aws elasticache delete-replication-group --replication-group-id my-repgroup
A prompt asks you to confirm your decision. Enter y (yes) to start the operation immediately. After theprocess starts, it is irreversible.
After you begin deleting this replication group, all of its nodes will be deleted as well. Are you sure you want to delete this replication group? [Ny]y
REPLICATIONGROUP my-repgroup My replication group deleting
Deleting a Replication Group (ElastiCache API)Call DeleteReplicationGroup with the ReplicationGroup parameter.
Example
https://elasticache.us-west-2.amazonaws.com/ ?Action=DeleteReplicationGroup &ReplicationGroupId=my-repgroup &Version=2014-12-01 &SignatureVersion=4 &SignatureMethod=HmacSHA256 &Timestamp=20141201T220302Z &X-Amz-Algorithm=AWS4-HMAC-SHA256 &X-Amz-Date=20141201T220302Z &X-Amz-SignedHeaders=Host &X-Amz-Expires=20141201T220302Z &X-Amz-Credential=<credential> &X-Amz-Signature=<signature>
NoteIf you set the RetainPrimaryCluster parameter to true, all of the read replicas will bedeleted, but the primary cluster will be retained.
API Version 2015-02-02290
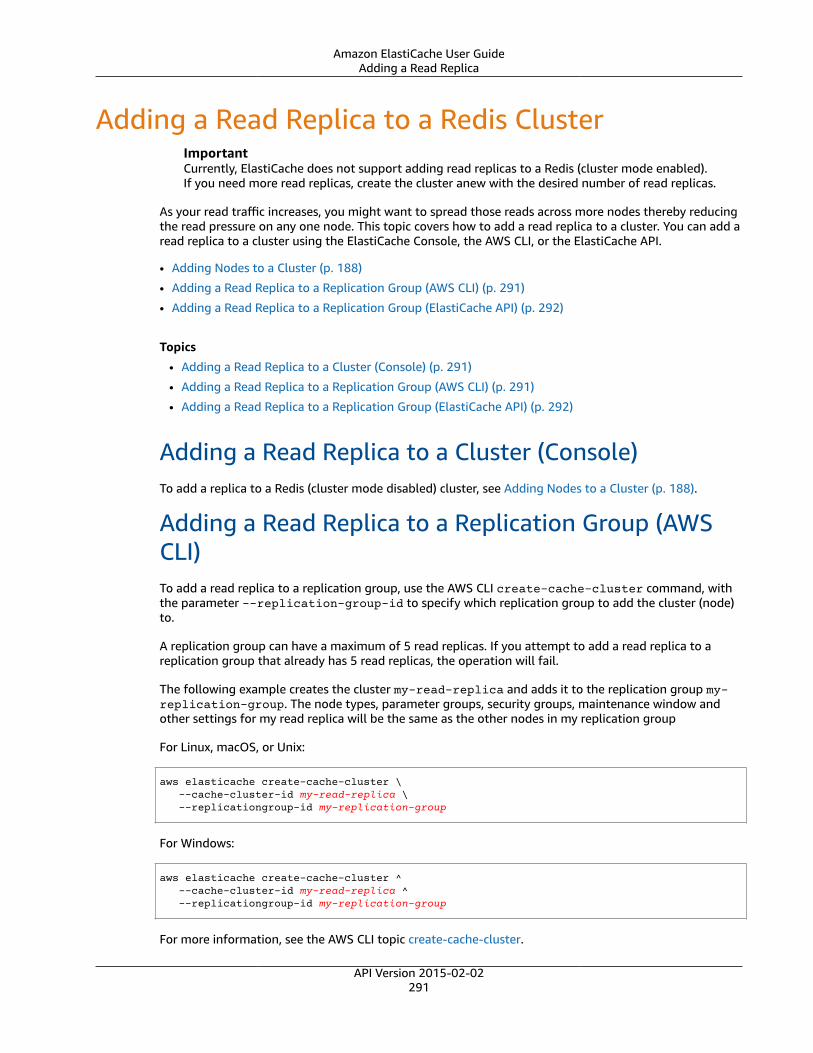
Amazon ElastiCache User GuideAdding a Read Replica
Adding a Read Replica to a Redis ClusterImportantCurrently, ElastiCache does not support adding read replicas to a Redis (cluster mode enabled).If you need more read replicas, create the cluster anew with the desired number of read replicas.
As your read traffic increases, you might want to spread those reads across more nodes thereby reducingthe read pressure on any one node. This topic covers how to add a read replica to a cluster. You can add aread replica to a cluster using the ElastiCache Console, the AWS CLI, or the ElastiCache API.
• Adding Nodes to a Cluster (p. 188)
• Adding a Read Replica to a Replication Group (AWS CLI) (p. 291)
• Adding a Read Replica to a Replication Group (ElastiCache API) (p. 292)
Topics
• Adding a Read Replica to a Cluster (Console) (p. 291)
• Adding a Read Replica to a Replication Group (AWS CLI) (p. 291)
• Adding a Read Replica to a Replication Group (ElastiCache API) (p. 292)
Adding a Read Replica to a Cluster (Console)To add a replica to a Redis (cluster mode disabled) cluster, see Adding Nodes to a Cluster (p. 188).
Adding a Read Replica to a Replication Group (AWSCLI)To add a read replica to a replication group, use the AWS CLI create-cache-cluster command, withthe parameter --replication-group-id to specify which replication group to add the cluster (node)to.
A replication group can have a maximum of 5 read replicas. If you attempt to add a read replica to areplication group that already has 5 read replicas, the operation will fail.
The following example creates the cluster my-read-replica and adds it to the replication group my-replication-group. The node types, parameter groups, security groups, maintenance window andother settings for my read replica will be the same as the other nodes in my replication group
For Linux, macOS, or Unix:
aws elasticache create-cache-cluster \ --cache-cluster-id my-read-replica \ --replicationgroup-id my-replication-group
For Windows:
aws elasticache create-cache-cluster ^ --cache-cluster-id my-read-replica ^ --replicationgroup-id my-replication-group
For more information, see the AWS CLI topic create-cache-cluster.
API Version 2015-02-02291

Amazon ElastiCache User GuideAdding a Read Replica to a
Replication Group (ElastiCache API)
Adding a Read Replica to a Replication Group(ElastiCache API)To add a read replica to a replication group, use the ElastiCache CreateCacheCluster operation, withthe parameter ReplicationGroupId to specify which replication group to add the cluster (node) to.
A replication group can have a maximum of five read replicas. If you attempt to add a read replica to areplication group that already has five read replicas, the operation will fail.
The following example creates the cluster myReadReplica and adds it to the replication groupmyReplicationGroup. The node types, parameter groups, security groups, maintenance window andother settings for my read replica will be the same as the other nodes in my replication group
https://elasticache.us-west-2.amazonaws.com/ ?Action=CreateCacheCluster &CacheClusterId=myReadReplica &ReplicationGroupId=myReplicationGroup &Version=2015-02-02 &SignatureVersion=4 &SignatureMethod=HmacSHA256 &Timestamp=20150202T192317Z &X-Amz-Credential=<credential>
For more information, see the ElastiCache API topic CreateCacheCluster.
API Version 2015-02-02292
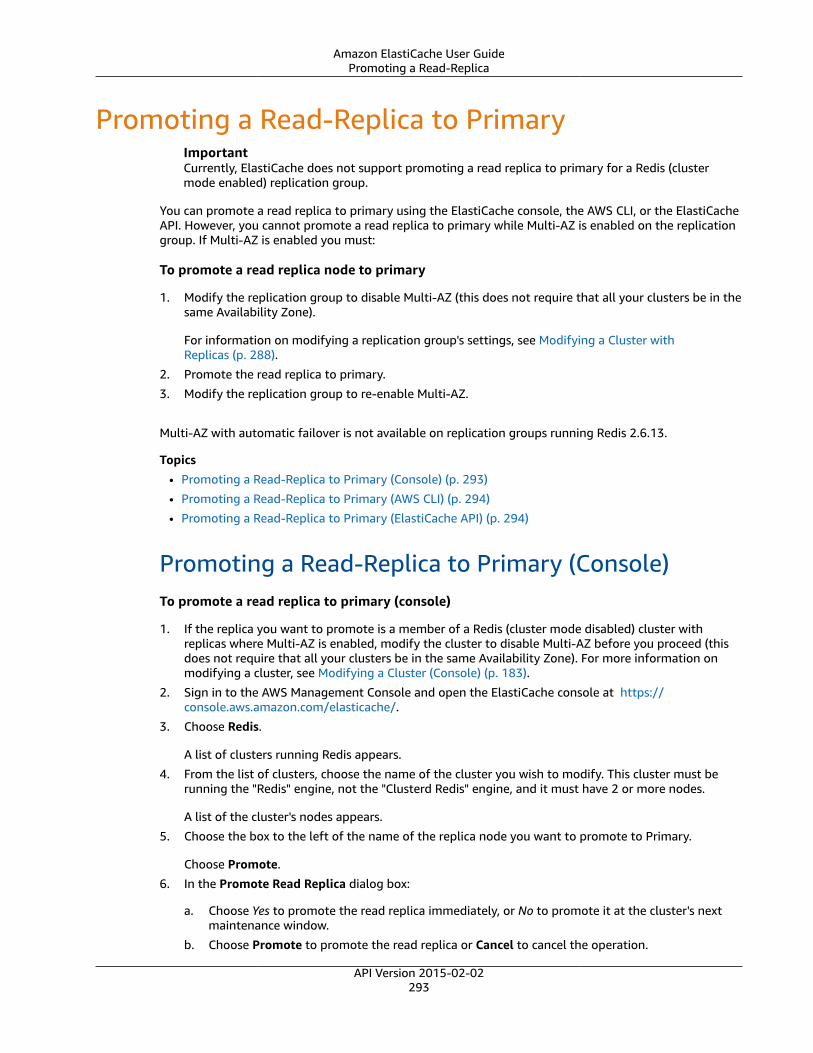
Amazon ElastiCache User GuidePromoting a Read-Replica
Promoting a Read-Replica to PrimaryImportantCurrently, ElastiCache does not support promoting a read replica to primary for a Redis (clustermode enabled) replication group.
You can promote a read replica to primary using the ElastiCache console, the AWS CLI, or the ElastiCacheAPI. However, you cannot promote a read replica to primary while Multi-AZ is enabled on the replicationgroup. If Multi-AZ is enabled you must:
To promote a read replica node to primary
1. Modify the replication group to disable Multi-AZ (this does not require that all your clusters be in thesame Availability Zone).
For information on modifying a replication group's settings, see Modifying a Cluster withReplicas (p. 288).
2. Promote the read replica to primary.
3. Modify the replication group to re-enable Multi-AZ.
Multi-AZ with automatic failover is not available on replication groups running Redis 2.6.13.
Topics
• Promoting a Read-Replica to Primary (Console) (p. 293)
• Promoting a Read-Replica to Primary (AWS CLI) (p. 294)
• Promoting a Read-Replica to Primary (ElastiCache API) (p. 294)
Promoting a Read-Replica to Primary (Console)To promote a read replica to primary (console)
1. If the replica you want to promote is a member of a Redis (cluster mode disabled) cluster withreplicas where Multi-AZ is enabled, modify the cluster to disable Multi-AZ before you proceed (thisdoes not require that all your clusters be in the same Availability Zone). For more information onmodifying a cluster, see Modifying a Cluster (Console) (p. 183).
2. Sign in to the AWS Management Console and open the ElastiCache console at https://console.aws.amazon.com/elasticache/.
3. Choose Redis.
A list of clusters running Redis appears.
4. From the list of clusters, choose the name of the cluster you wish to modify. This cluster must berunning the "Redis" engine, not the "Clusterd Redis" engine, and it must have 2 or more nodes.
A list of the cluster's nodes appears.
5. Choose the box to the left of the name of the replica node you want to promote to Primary.
Choose Promote.
6. In the Promote Read Replica dialog box:
a. Choose Yes to promote the read replica immediately, or No to promote it at the cluster's nextmaintenance window.
b. Choose Promote to promote the read replica or Cancel to cancel the operation.
API Version 2015-02-02293

Amazon ElastiCache User GuidePromoting a Read-Replica to Primary (AWS CLI)
7. If the cluster had Multi-AZ enabled before you began the promotion process, modify the clusterto re-enable Multi-AZ. For more information about modifying a cluster, see Modifying a Cluster(Console) (p. 183)
Promoting a Read-Replica to Primary (AWS CLI)You cannot promote a read replica to primary if the replication group is Multi-AZ enabled. If the replicayou want to promote is a member of a replication group where Multi-AZ is enabled, you must modify thereplication group to disable Multi-AZ before you proceed (this does not require that all your clusters bein the same Availability Zone). For more information on modifying a replication group, see Modifying aReplication Group (AWS CLI) (p. 288).
The following AWS CLI command modifies the replication group new-group, making the read replicamy-replica-1 the primary in the replication group.
For Linux, macOS, or Unix:
aws elasticache modify-replication-group \ --replication-group-id new-group \ --primary-cluster-id my-replica-1
For Windows:
aws elasticache modify-replication-group ^ --replication-group-id new-group ^ --primary-cluster-id my-replica-1
For more information on modifying a replication group, see the AWS CLI topic modify-replication-group.
Promoting a Read-Replica to Primary (ElastiCacheAPI)You cannot promote a read replica to primary if the replication group is Multi-AZ enabled. If the replicayou want to promote is a member of a replication group where Multi-AZ is enabled, you must modify thereplication group to disable Multi-AZ before you proceed (this does not require that all your clusters bein the same Availability Zone). For more information on modifying a replication group, see Modifying aReplication Group (ElastiCache API) (p. 289).
The following ElastiCache API action modifies the replication group myReplGroup, making the readreplica myReplica-1 the primary in the replication group.
https://elasticache.us-west-2.amazonaws.com/ ?Action=ModifyReplicationGroup &ReplicationGroupId=myReplGroup &PrimaryClusterId=myReplica-1 &Version=2014-12-01 &SignatureVersion=4 &SignatureMethod=HmacSHA256 &Timestamp=20141201T220302Z &X-Amz-Algorithm=AWS4-HMAC-SHA256 &X-Amz-Date=20141201T220302Z &X-Amz-SignedHeaders=Host &X-Amz-Expires=20141201T220302Z &X-Amz-Credential=<credential> &X-Amz-Signature=<signature>
API Version 2015-02-02294

Amazon ElastiCache User GuidePromoting a Read-Replica to Primary (ElastiCache API)
For more information on modifying a replication group, see the ElastiCache API topicModifyReplicationGroup.
API Version 2015-02-02295
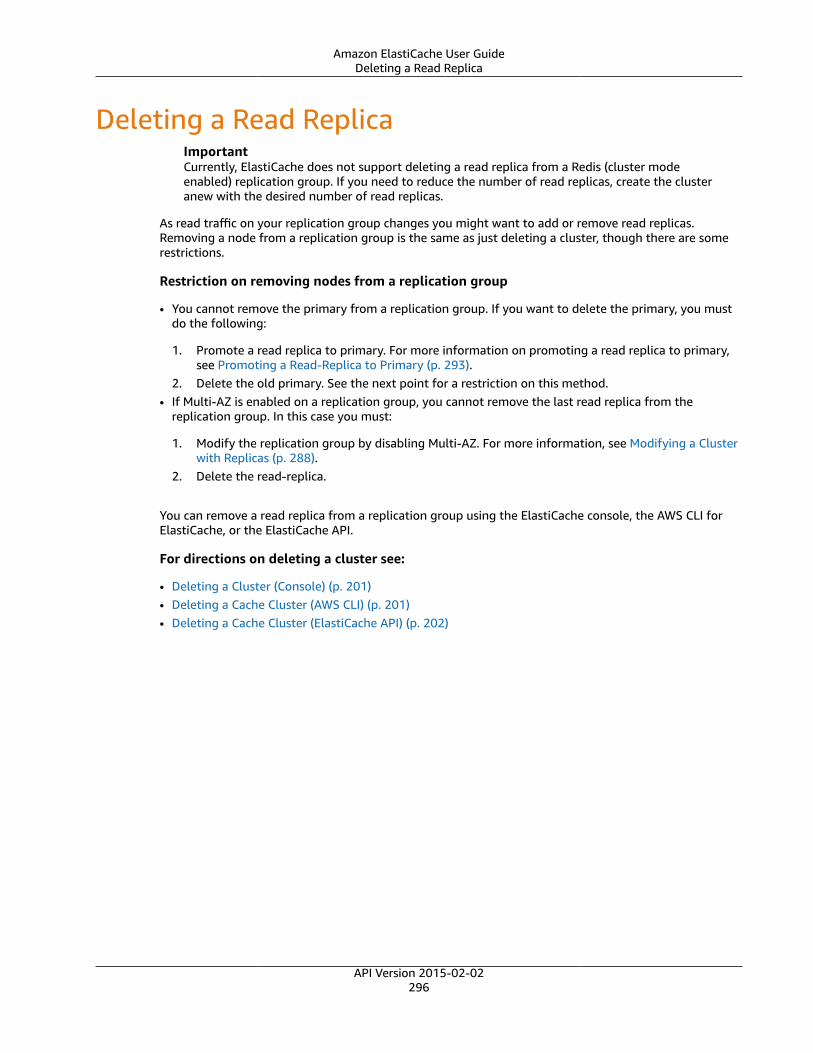
Amazon ElastiCache User GuideDeleting a Read Replica
Deleting a Read ReplicaImportantCurrently, ElastiCache does not support deleting a read replica from a Redis (cluster modeenabled) replication group. If you need to reduce the number of read replicas, create the clusteranew with the desired number of read replicas.
As read traffic on your replication group changes you might want to add or remove read replicas.Removing a node from a replication group is the same as just deleting a cluster, though there are somerestrictions.
Restriction on removing nodes from a replication group
• You cannot remove the primary from a replication group. If you want to delete the primary, you mustdo the following:
1. Promote a read replica to primary. For more information on promoting a read replica to primary,see Promoting a Read-Replica to Primary (p. 293).
2. Delete the old primary. See the next point for a restriction on this method.• If Multi-AZ is enabled on a replication group, you cannot remove the last read replica from the
replication group. In this case you must:
1. Modify the replication group by disabling Multi-AZ. For more information, see Modifying a Clusterwith Replicas (p. 288).
2. Delete the read-replica.
You can remove a read replica from a replication group using the ElastiCache console, the AWS CLI forElastiCache, or the ElastiCache API.
For directions on deleting a cluster see:
• Deleting a Cluster (Console) (p. 201)• Deleting a Cache Cluster (AWS CLI) (p. 201)• Deleting a Cache Cluster (ElastiCache API) (p. 202)
API Version 2015-02-02296
Amazon ElastiCache User Guide
ElastiCache Backup and Restore(Redis)
Amazon ElastiCache clusters running Redis can back up their data. The backup can be used to restore acluster or seed a new cluster. The backup consists of the cluster's metadata, along with all of the datain the cluster. All backups are written to Amazon Simple Storage Service (Amazon S3), which providesdurable storage. At any time, you can restore your data by creating a new Redis cluster and populating itwith data from a backup. ElastiCache lets you manage backups using the AWS Management Console, theAWS Command Line Interface (AWS CLI), and the ElastiCache API.
Beginning with Redis version 2.8.22, the backup method is selected based upon available memory. Ifthere is sufficient available memory, a child process is spawned which writes all changes to the cache'sreserved memory while the cache is being backed up. This child process could, depending on the numberof writes to the cache during the backup process, consume all reserved memory, causing the backup tofail.
If there is insufficient memory available, a forkless, cooperative background process is employed.The forkless method can impact both latency and throughput. For more information, see HowSynchronization and Backup are Implemented (p. 257).
For more information about the performance impact of the backup process, see Performance Impact ofBackups (p. 298).
This section provides an overview of working with backup and restore.
ImportantThough rare, there are times when the backup process fails to create a backup, including finalbackups. Insufficient reserved memory is often the cause of backup failures. Therefore, youshould be sure you have sufficient reserved memory before attempting a backup. If you haveinsufficient memory you can either evict some keys, or increase the value of reserved-memory-percent.For more information, see:
• Ensuring You Have Sufficient Memory to Create a Redis Snapshot (p. 81)• Managing Reserved Memory (Redis) (p. 83)
If you are planning to delete the cluster and it’s important to preserve the data, you can takean extra precaution by creating a manual backup first, verify that its status is available, andthen proceed with deleting the cluster. This will ensure that if the backup fails you still have thecluster data available so you can retry making a backup, following the best practices outlinedabove.
Topics• Backup Constraints (p. 298)• Backup Costs (p. 298)• Performance Impact of Backups (p. 298)• Scheduling Automatic Backups (p. 300)• Making Manual Backups (p. 301)• Creating a Final Backup (p. 307)• Describing Backups (p. 310)
API Version 2015-02-02297
Amazon ElastiCache User GuideConstraints
• Copying a Backup (p. 312)• Exporting a Backup (p. 314)• Restoring From a Backup with Optional Cluster Resizing (p. 321)• Seeding a New Cluster with an Externally Created Backup (Redis) (p. 324)• Tagging Backups (p. 329)• Deleting a Backup (p. 330)• Redis Append Only Files (AOF) (p. 331)
Backup ConstraintsThe following constraints should be considered when planning or making backups:
• At this time, backup and restore are supported only for clusters running on Redis.• For Redis (cluster mode disabled) clusters, backup and restore are not supported on cache.t1.micro
or cache.t2.* nodes. All other cache node types are supported.• For Redis (cluster mode enabled) clusters, backup and restore are supported for all node types.• During any contiguous 24-hour period, you can create no more than 20 manual backups per node in
the cluster.• Redis (cluster mode enabled) only supports taking backups on the cluster level (for the API or CLI, the
replication group level), not at the shard level (for the API or CLI, the node group level).• During the backup process you cannot perform any additional API or CLI operations on the cluster.
Backup CostsElastiCache allows you to store one backup for each active Redis cluster free of charge. Storage spacefor additional backups is charged at a rate of $0.085/GB per month for all regions. There are no datatransfer fees for creating a backup, or for restoring data from a backup to a Redis cluster.
Performance Impact of BackupsThe backup process depends upon which Redis version you're running. Beginning with Redis 2.8.22, theprocess is forkless.
Backups when running Redis 2.8.22 and laterRedis backups, in versions 2.8.22 and later, choose between two backup methods. If there is insufficientmemory to support a forked backup, ElastiCache use a forkless method that employs cooperativebackground processing. If there is sufficient memory to support a forked save process, the same processas in prior Redis versions is employed.
If the write load is high during a forkless backup, writes to the cache are delayed to ensure that you don'taccumulate too many changes and thus prevent a successful backup.
Backups when running Redis versions prior to 2.8.22Backups are created using Redis' native BGSAVE operation: The Redis process on the cache node spawnsa child process to write all the data from the cache to a Redis .rdb file. It can take up to ten secondsto spawn the child process, and during this time the parent process is unable to accept incoming
API Version 2015-02-02298

Amazon ElastiCache User GuideImproving Backup Performance
application requests. After the child process is running independently, the parent process resumesnormal operations. The child process exits when the backup operation is complete.
While the backup is being written, additional cache node memory is used for new writes. If thisadditional memory usage exceeds the node's available memory, processing can become slow due toexcessive paging, or fail.
Improving Backup PerformanceThe following are guidelines for improving backup performance.
• Set the reserved-memory-percent parameter—To mitigate excessive paging, we recommend that youset the reserved-memory-percent parameter. This parameter prevents Redis from consuming all of thenode's available memory, and can help reduce the amount of paging. You might also see performanceimprovements by simply using a larger node. For more information about the reserved-memory andreserved-memory-percent parameters, see Managing Reserved Memory (Redis) (p. 83).
• Create backups from a read replica—If you are running Redis in a node group with more than one
node, you can take a backup from the primary node or one of the read replicas. Because of the systemresources required during BGSAVE, we recommend that you create backups from one of the readreplicas. While the backup is being created from the replica, the primary node remains unaffected byBGSAVE resource requirements, and can continue serving requests without slowing down.
If you delete a replication group and request a final backup, ElastiCache will always take the backup fromthe primary node. This ensures that you capture the very latest Redis data, before the replication groupis deleted.
API Version 2015-02-02299
Amazon ElastiCache User GuideScheduling Automatic Backups
Scheduling Automatic BackupsFor any Redis cluster, you can enable automatic backups. When automatic backups are enabled,ElastiCache creates a backup of the cluster on a daily basis. Automatic backups can help guard againstdata loss. In the event of a failure, you can create a new cluster, restoring your data from the most recentbackup. The result is a warm-started cluster, pre-loaded with your data and ready for use. For moreinformation, go to Restoring From a Backup with Optional Cluster Resizing (p. 321).
When you schedule automatic backups, you should plan the following settings:
• Backup window – A period during each day when ElastiCache will begin creating a backup. Theminimum length for the backup window is 60 minutes. You can set the backup window for any timewhen it's most convenient for you, or for a time of day that avoids doing backups during particularlyhigh-utilization periods.
If you do not specify a backup window, ElastiCache will assign one automatically.
• Backup retention limit – The number of days the backup will be retained in Amazon S3. For example,
if you set the retention limit to 5, then a backup taken today would be retained for 5 days. When theretention limit expires, the backup is automatically deleted.
The maximum backup retention limit is 35 days. If the backup retention limit is set to 0, automaticbackups are disabled for the cluster.
You can enable or disable automatic backups on an existing Redis cluster or replication group bymodifying it using the ElastiCache console, the AWS CLI, or the ElastiCache API. For more information onhow to enable or disable automatic backups on an existing cluster or replication group, go to Modifyingan ElastiCache Cluster (p. 183) or Modifying a Cluster with Replicas (p. 288).
You can enable or disable automatic backups when creating a Redis cluster or replication group usingthe ElastiCache console, the AWS CLI, or the ElastiCache API. You can enable automatic backups whenyou create a Redis cluster by checking the Enable Automatic Backups box in the Advanced RedisSettings section. For more information, see step 2 of Creating a Redis (cluster mode disabled) Cluster(Console) (p. 163). You can enable automatic backups when you create a Redis replication group ifyou are not using an existing cluster as the primary cluster. For more information, see Creating a RedisCluster with Replicas from Scratch (p. 264).
API Version 2015-02-02300

Amazon ElastiCache User GuideMaking Manual Backups
Making Manual BackupsIn addition to automatic backups, you can create a manual backup at any time. Unlike automaticbackups, which are automatically deleted after a specified retention period, manual backups do not havea retention period after which they are automatically deleted. You must manually delete any manualbackup. Even if you delete a cluster or node, any manual backups from that cluster or node are retained.If you no longer want to keep a manual backup, you must explicitly delete it yourself.
Manual backups are useful for testing and archiving. For example, suppose that you've developed a set ofbaseline data for testing purposes. You can create a manual backup of the data and restore it wheneveryou want. After you test an application that modifies the data, you can reset the data by creating a newcluster and restoring from your baseline backup. When the cluster is ready, you can test your applicationsagainst the baseline data again—and repeat this process as often as needed.
In addition to directly creating a manual backup, you can create a manual backup in one of the followingways:
• Copying a Backup (p. 312) It does not matter whether the source backup was created automaticallyor manually.
• Creating a Final Backup (p. 307) Create a backup immediately before deleting a cluster or node.
Other topics of import
• Backup Constraints (p. 298)• Backup Costs (p. 298)• Performance Impact of Backups (p. 298)
You can create a manual backup of a node using the AWS Management Console, the AWS CLI, or theElastiCache API.
Creating a Manual Backup (Console)To create a backup of a cluster (console)
1. Sign in to the AWS Management Console and open the ElastiCache console at https://console.aws.amazon.com/elasticache/.
2. From the navigation pane, choose Redis.
The Redis clusters screen appears.3. Choose the box to the left of the name of the Redis cluster you want to back up.4. Choose Backup.5. In the Create Backup dialog, type in a name for your backup in the Backup Name box. We
recommend that the name indicate which cluster was backedup and the date and time the backupwas made.
Cluster naming constraints
• Must contain from 1 to 20 alphanumeric characters or hyphens.• Must begin with a letter.• Cannot contain two consecutive hyphens.• Cannot end with a hyphen.
6. Choose Create Backup.
API Version 2015-02-02301
Amazon ElastiCache User GuideUsing the AWS CLI
The status of the cluster changes to snapshotting. When the status returns to available the backup iscomplete.
Creating a Manual Backup (AWS CLI)To create a manual backup of a cluster using the AWS CLI, use the create-snapshot AWS CLIoperation with the following parameters:
• --cache-cluster-id
• If the cluster you're backing up has no replica nodes, --cache-cluster-id is the name of the cluster youare backing up, e.g., mycluster.
• If the cluster you're backing up has one or more replica nodes, --cache-cluster-id is the name of thenode in the cluster you want to use for the backup, e.g., mycluster-002.
Only use this parameter when backing up a Redis (cluster mode disabled) cluster.
• --replication-group-id – Name of the Redis (cluster mode enabled) cluster (CLI/API: a replicationgroup) to use as the source for the backup. Use this parameter when backing up a Redis (cluster modeenabled) cluster.
• --snapshot-name – Name of the snapshot to be created.
Cluster naming constraints
• Must contain from 1 to 20 alphanumeric characters or hyphens.
• Must begin with a letter.
• Cannot contain two consecutive hyphens.
• Cannot end with a hyphen.
AWS CLI Code Examples
• Example 1: Backing Up a Redis (cluster mode disabled) Cluster That Has No Replica Nodes (p. 302)
• Example 2: Backing Up a Redis (cluster mode disabled) Cluster with Replica Nodes (p. 303)
• Example 3: Backing Up a Redis (cluster mode enabled) Cluster (p. 304)
• AWS CLI Related Topics (p. 304)
Example 1: Backing Up a Redis (cluster mode disabled) ClusterThat Has No Replica NodesThe following AWS CLI operation creates the backup bkup-20150515 from the Redis (cluster modedisabled) cluster myNonClusteredRedis that has no read replicas.
For Linux, macOS, or Unix:
aws elasticache create-snapshot \ --cache-cluster-id myNonClusteredRedis \ --snapshot-name bkup-20150515
For Windows:
API Version 2015-02-02302

Amazon ElastiCache User GuideUsing the AWS CLI
aws elasticache create-snapshot ^ --cache-cluster-id myNonClusteredRedis ^ --snapshot-name bkup-20150515
Example 2: Backing Up a Redis (cluster mode disabled) Clusterwith Replica Nodes
The following AWS CLI operation creates the backup bkup-20150515 from the Redis (cluster modedisabled) cluster myNonClusteredRedis which has one or more read replicas.
For Linux, macOS, or Unix:
aws elasticache create-snapshot \ --cache-cluster-id myNonClusteredRedis-001 \ --snapshot-name bkup-20150515
For Windows:
aws elasticache create-snapshot ^ --cache-cluster-id myNonClusteredRedis-001 ^ --snapshot-name bkup-20150515
Example Output: Backing Up a Redis (cluster mode disabled) Cluster with Replica Nodes
Output from the operation will look something like the following.
{ "Snapshot": { "Engine": "redis", "CacheParameterGroupName": "default.redis3.2", "VpcId": "vpc-91280df6", "CacheClusterId": "myNonClusteredRedis-001", "SnapshotRetentionLimit": 0, "NumCacheNodes": 1, "SnapshotName": "bkup-20150515", "CacheClusterCreateTime": "2017-01-12T18:59:48.048Z", "AutoMinorVersionUpgrade": true, "PreferredAvailabilityZone": "us-east-1c", "SnapshotStatus": "creating", "SnapshotSource": "manual", "SnapshotWindow": "08:30-09:30", "EngineVersion": "3.2.4", "NodeSnapshots": [ { "CacheSize": "", "CacheNodeId": "0001", "CacheNodeCreateTime": "2017-01-12T18:59:48.048Z" } ], "CacheSubnetGroupName": "default", "Port": 6379, "PreferredMaintenanceWindow": "wed:07:30-wed:08:30", "CacheNodeType": "cache.m3.2xlarge" }}
API Version 2015-02-02303

Amazon ElastiCache User GuideUsing the AWS CLI
Example 3: Backing Up a Redis (cluster mode enabled) Cluster
The following AWS CLI operation creates the backup bkup-20150515 from the Redis (cluster modeenabled) cluster myClusteredRedis. Note the use of --replication-group-id instead of --cache-cluster-id to identify the source.
For Linux, macOS, or Unix:
aws elasticache create-snapshot \ --replication-group-id myClusteredRedis \ --snapshot-name bkup-20150515
For Windows:
aws elasticache create-snapshot ^ --replication-group-id myClusteredRedis ^ --snapshot-name bkup-20150515
Example Output: Backing Up a Redis (cluster mode enabled) Cluster
Output from this operation will look something like the following.
{ "Snapshot": { "Engine": "redis", "CacheParameterGroupName": "default.redis3.2.cluster.on", "VpcId": "vpc-91280df6", "NodeSnapshots": [ { "CacheSize": "", "NodeGroupId": "0001" }, { "CacheSize": "", "NodeGroupId": "0002" } ], "NumNodeGroups": 2, "SnapshotName": "bkup-20150515", "ReplicationGroupId": "myClusteredRedis", "AutoMinorVersionUpgrade": true, "SnapshotRetentionLimit": 1, "AutomaticFailover": "enabled", "SnapshotStatus": "creating", "SnapshotSource": "manual", "SnapshotWindow": "10:00-11:00", "EngineVersion": "3.2.4", "CacheSubnetGroupName": "default", "ReplicationGroupDescription": "2 shards 2 nodes each", "Port": 6379, "PreferredMaintenanceWindow": "sat:03:30-sat:04:30", "CacheNodeType": "cache.r3.large" }}
AWS CLI Related Topics
For more information, see create-snapshot in the AWS CLI Command Reference.
API Version 2015-02-02304
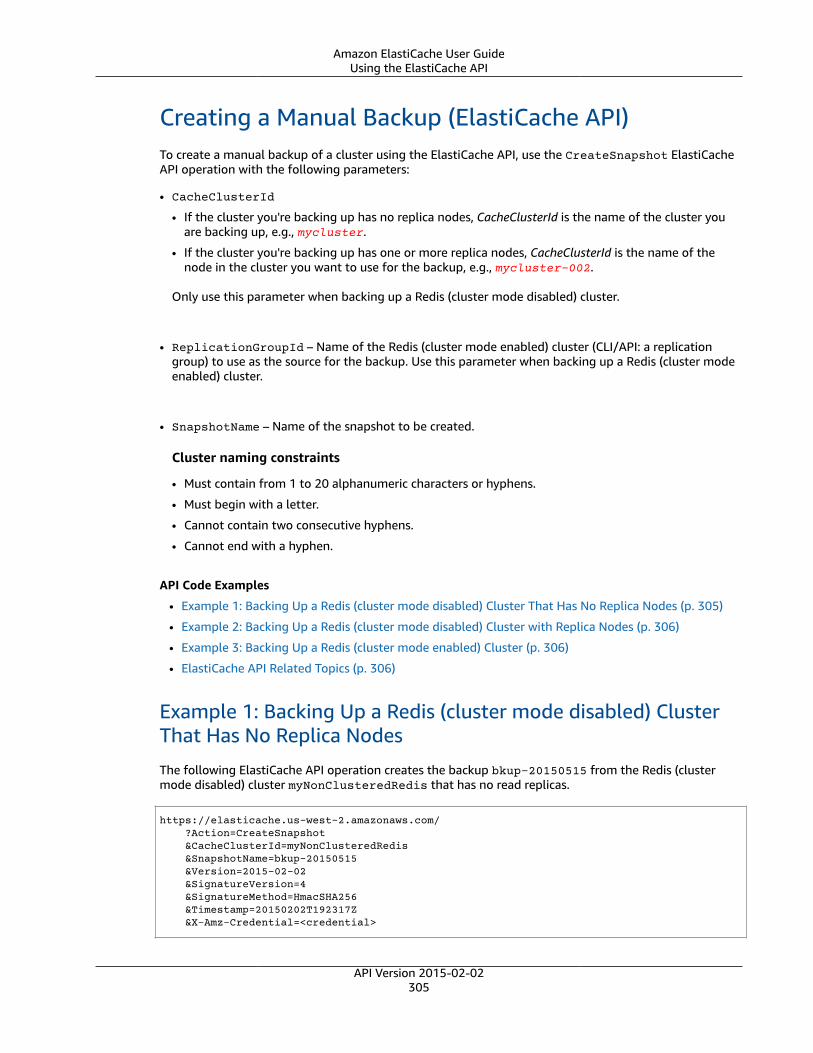
Amazon ElastiCache User GuideUsing the ElastiCache API
Creating a Manual Backup (ElastiCache API)To create a manual backup of a cluster using the ElastiCache API, use the CreateSnapshot ElastiCacheAPI operation with the following parameters:
• CacheClusterId
• If the cluster you're backing up has no replica nodes, CacheClusterId is the name of the cluster youare backing up, e.g., mycluster.
• If the cluster you're backing up has one or more replica nodes, CacheClusterId is the name of thenode in the cluster you want to use for the backup, e.g., mycluster-002.
Only use this parameter when backing up a Redis (cluster mode disabled) cluster.
• ReplicationGroupId – Name of the Redis (cluster mode enabled) cluster (CLI/API: a replicationgroup) to use as the source for the backup. Use this parameter when backing up a Redis (cluster modeenabled) cluster.
• SnapshotName – Name of the snapshot to be created.
Cluster naming constraints
• Must contain from 1 to 20 alphanumeric characters or hyphens.
• Must begin with a letter.
• Cannot contain two consecutive hyphens.
• Cannot end with a hyphen.
API Code Examples
• Example 1: Backing Up a Redis (cluster mode disabled) Cluster That Has No Replica Nodes (p. 305)
• Example 2: Backing Up a Redis (cluster mode disabled) Cluster with Replica Nodes (p. 306)
• Example 3: Backing Up a Redis (cluster mode enabled) Cluster (p. 306)
• ElastiCache API Related Topics (p. 306)
Example 1: Backing Up a Redis (cluster mode disabled) ClusterThat Has No Replica Nodes
The following ElastiCache API operation creates the backup bkup-20150515 from the Redis (clustermode disabled) cluster myNonClusteredRedis that has no read replicas.
https://elasticache.us-west-2.amazonaws.com/ ?Action=CreateSnapshot &CacheClusterId=myNonClusteredRedis &SnapshotName=bkup-20150515 &Version=2015-02-02 &SignatureVersion=4 &SignatureMethod=HmacSHA256 &Timestamp=20150202T192317Z &X-Amz-Credential=<credential>
API Version 2015-02-02305
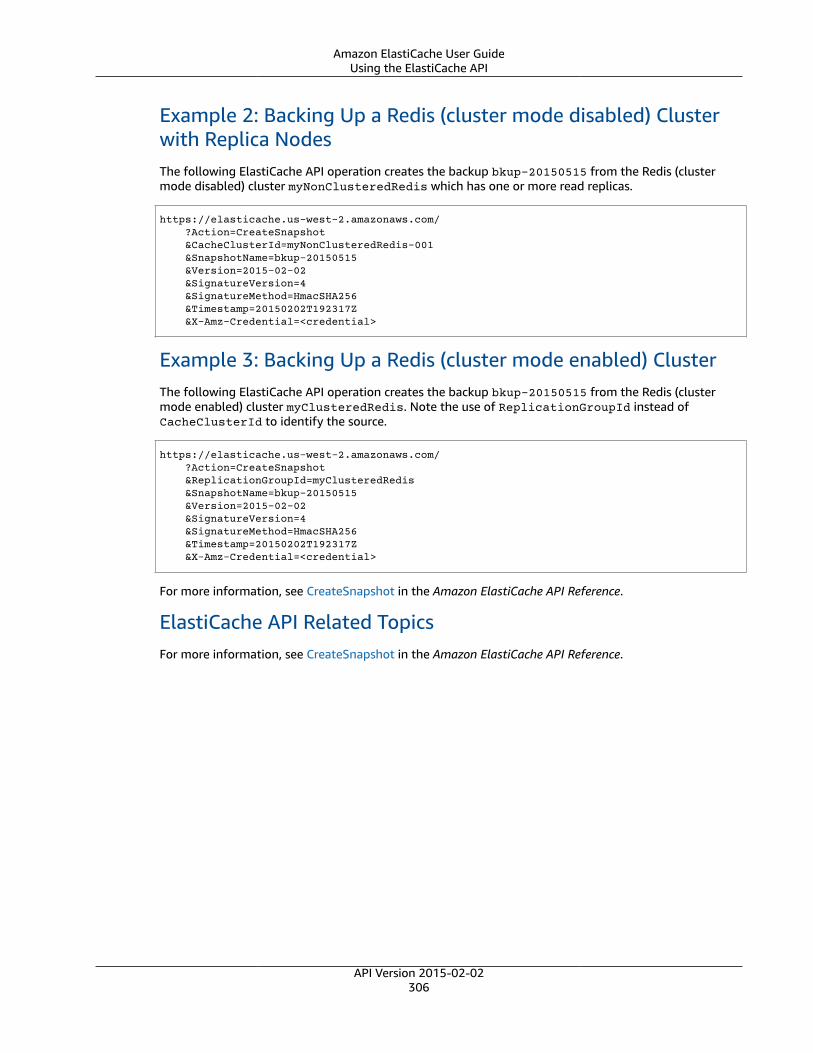
Amazon ElastiCache User GuideUsing the ElastiCache API
Example 2: Backing Up a Redis (cluster mode disabled) Clusterwith Replica NodesThe following ElastiCache API operation creates the backup bkup-20150515 from the Redis (clustermode disabled) cluster myNonClusteredRedis which has one or more read replicas.
https://elasticache.us-west-2.amazonaws.com/ ?Action=CreateSnapshot &CacheClusterId=myNonClusteredRedis-001 &SnapshotName=bkup-20150515 &Version=2015-02-02 &SignatureVersion=4 &SignatureMethod=HmacSHA256 &Timestamp=20150202T192317Z &X-Amz-Credential=<credential>
Example 3: Backing Up a Redis (cluster mode enabled) ClusterThe following ElastiCache API operation creates the backup bkup-20150515 from the Redis (clustermode enabled) cluster myClusteredRedis. Note the use of ReplicationGroupId instead ofCacheClusterId to identify the source.
https://elasticache.us-west-2.amazonaws.com/ ?Action=CreateSnapshot &ReplicationGroupId=myClusteredRedis &SnapshotName=bkup-20150515 &Version=2015-02-02 &SignatureVersion=4 &SignatureMethod=HmacSHA256 &Timestamp=20150202T192317Z &X-Amz-Credential=<credential>
For more information, see CreateSnapshot in the Amazon ElastiCache API Reference.
ElastiCache API Related TopicsFor more information, see CreateSnapshot in the Amazon ElastiCache API Reference.
API Version 2015-02-02306

Amazon ElastiCache User GuideCreating a Final Backup
Creating a Final BackupYou can create a final backup using the ElastiCache console, the AWS CLI, or the ElastiCache API.
Creating a Final Backup (Console)You can create a final backup when you delete either a Redis cluster (for the API or CLI, a replicationgroup) using the ElastiCache console.
To create a final backup when deleting a Redis cluster, on the delete dialog box (step 5), choose Yes andgive the backup a name.
Related Topics
• Deleting a Cluster (Console) (p. 201)
• Deleting a Replication Group (Console) (p. 290)
Creating a Final Backup (AWS CLI)You can create a final backup when deleting a Redis cluster (for the API or CLI, a replication group) usingthe AWS CLI.
Topics
• When Deleting a Redis Cluster With No Read Replicas (p. 307)
• When Deleting a Redis Cluster With Read Replicas (p. 308)
When Deleting a Redis Cluster With No Read ReplicasTo create a final backup, use the delete-cache-cluster AWS CLI operation with the followingparameters.
• --cache-cluster-id – Name of the cluster being deleted.
• --final-snapshot-identifier – Name of the backup.
The following code creates the final backup bkup-20150515-final when deleting the clustermyRedisCluster.
For Linux, macOS, or Unix:
aws elasticache delete-cache-cluster \ --cache-cluster-id myRedisCluster \ --final-snapshot-identifier bkup-20150515-final
For Windows:
aws elasticache delete-cache-cluster ^ --cache-cluster-id myRedisCluster ^ --final-snapshot-identifier bkup-20150515-final
For more information, see delete-cache-cluster in the AWS CLI Command Reference.
API Version 2015-02-02307

Amazon ElastiCache User GuideCreating a Final Backup (ElastiCache API)
When Deleting a Redis Cluster With Read ReplicasTo create a final backup when deleting a replication group, use the delete-replication-group AWSCLI operation, with the following parameters:
• --replication-group-id – Name of the replication group being deleted.• --final-snapshot-identifier – Name of the final backup.
The following code takes the final backup bkup-20150515-final when deleting the replication groupmyReplGroup.
For Linux, macOS, or Unix:
aws elasticache delete-replication-group \ --replication-group-id myReplGroup \ --final-snapshot-identifier bkup-20150515-final
For Windows:
aws elasticache delete-replication-group ^ --replication-group-id myReplGroup ^ --final-snapshot-identifier bkup-20150515-final
For more information, see delete-replication-group in the AWS CLI Command Reference.
Creating a Final Backup (ElastiCache API)You can create a final backup when deleting a Redis cluster or replication group using the ElastiCacheAPI.
Topics• When Deleting a Redis Cluster (p. 308)• When Deleting a Redis Replication Group (p. 309)
When Deleting a Redis ClusterTo create a final backup, use the DeleteCacheCluster ElastiCache API operation with the followingparameters.
• CacheClusterId – Name of the cluster being deleted.• FinalSnapshotIdentifier – Name of the backup.
The following ElastiCache API operation creates the backup bkup-20150515-final when deleting thecluster myRedisCluster.
https://elasticache.us-west-2.amazonaws.com/ ?Action=DeleteCacheCluster &CacheClusterId=myRedisCluster &FinalSnapshotIdentifier=bkup-20150515-final &Version=2015-02-02 &SignatureVersion=4 &SignatureMethod=HmacSHA256 &Timestamp=20150202T192317Z
API Version 2015-02-02308

Amazon ElastiCache User GuideCreating a Final Backup (ElastiCache API)
&X-Amz-Credential=<credential>
For more information, see DeleteCacheCluster in the Amazon ElastiCache API Reference.
When Deleting a Redis Replication GroupTo create a final backup when deleting a replication group, use the DeleteReplicationGroupElastiCache API operation, with the following parameters:
• ReplicationGroupId – Name of the replication group being deleted.• FinalSnapshotIdentifier – Name of the final backup.
The following ElastiCache API operation creates the backup bkup-20150515-final when deleting thereplication group myReplGroup.
https://elasticache.us-west-2.amazonaws.com/ ?Action=DeleteReplicationGroup &FinalSnapshotIdentifier=bkup-20150515-final &ReplicationGroupId=myReplGroup &Version=2015-02-02 &SignatureVersion=4 &SignatureMethod=HmacSHA256 &Timestamp=20150202T192317Z &X-Amz-Credential=<credential>
For more information, see DeleteReplicationGroup in the Amazon ElastiCache API Reference.
API Version 2015-02-02309
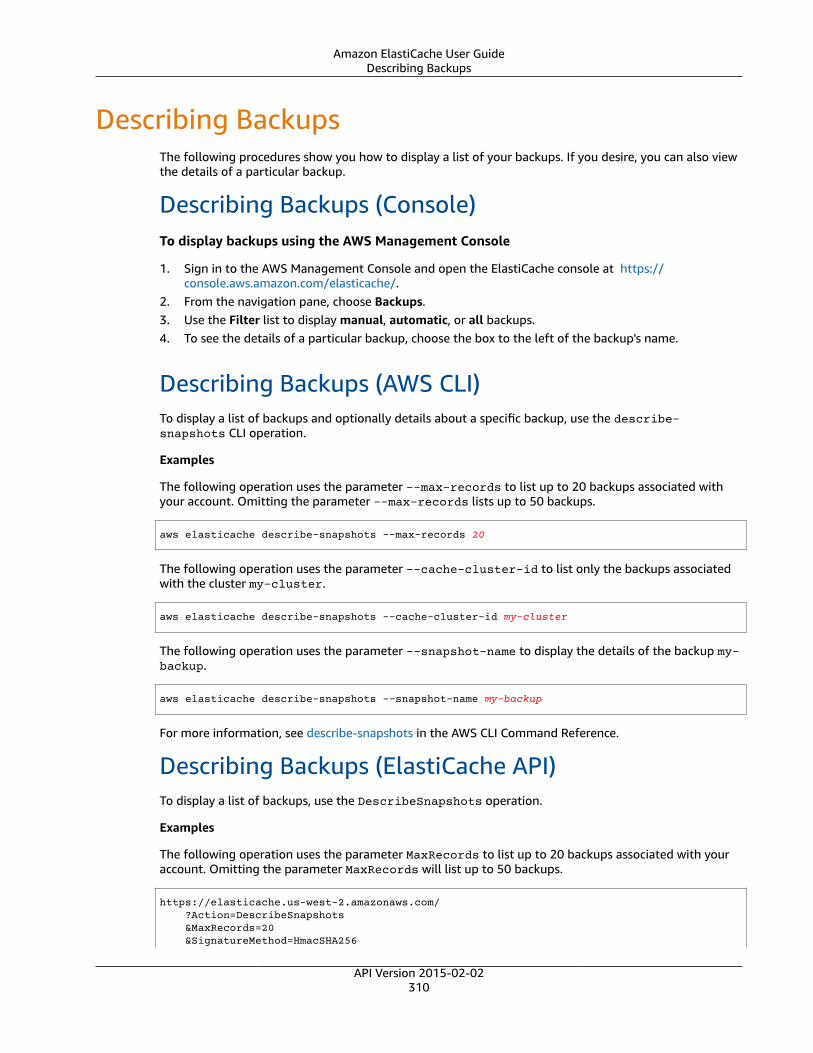
Amazon ElastiCache User GuideDescribing Backups
Describing BackupsThe following procedures show you how to display a list of your backups. If you desire, you can also viewthe details of a particular backup.
Describing Backups (Console)To display backups using the AWS Management Console
1. Sign in to the AWS Management Console and open the ElastiCache console at https://console.aws.amazon.com/elasticache/.
2. From the navigation pane, choose Backups.3. Use the Filter list to display manual, automatic, or all backups.4. To see the details of a particular backup, choose the box to the left of the backup's name.
Describing Backups (AWS CLI)To display a list of backups and optionally details about a specific backup, use the describe-snapshots CLI operation.
Examples
The following operation uses the parameter --max-records to list up to 20 backups associated withyour account. Omitting the parameter --max-records lists up to 50 backups.
aws elasticache describe-snapshots --max-records 20
The following operation uses the parameter --cache-cluster-id to list only the backups associatedwith the cluster my-cluster.
aws elasticache describe-snapshots --cache-cluster-id my-cluster
The following operation uses the parameter --snapshot-name to display the details of the backup my-backup.
aws elasticache describe-snapshots --snapshot-name my-backup
For more information, see describe-snapshots in the AWS CLI Command Reference.
Describing Backups (ElastiCache API)To display a list of backups, use the DescribeSnapshots operation.
Examples
The following operation uses the parameter MaxRecords to list up to 20 backups associated with youraccount. Omitting the parameter MaxRecords will list up to 50 backups.
https://elasticache.us-west-2.amazonaws.com/ ?Action=DescribeSnapshots &MaxRecords=20 &SignatureMethod=HmacSHA256
API Version 2015-02-02310

Amazon ElastiCache User GuideDescribing Backups (ElastiCache API)
&SignatureVersion=4 &Timestamp=20141201T220302Z &Version=2014-12-01 &X-Amz-Algorithm=AWS4-HMAC-SHA256 &X-Amz-Date=20141201T220302Z &X-Amz-SignedHeaders=Host &X-Amz-Expires=20141201T220302Z &X-Amz-Credential=<credential> &X-Amz-Signature=<signature>
The following operation uses the parameter CacheClusterId to list all backups associated with thecluster MyCluster.
https://elasticache.us-west-2.amazonaws.com/ ?Action=DescribeSnapshots &CacheClusterId=MyCluster &SignatureMethod=HmacSHA256 &SignatureVersion=4 &Timestamp=20141201T220302Z &Version=2014-12-01 &X-Amz-Algorithm=AWS4-HMAC-SHA256 &X-Amz-Date=20141201T220302Z &X-Amz-SignedHeaders=Host &X-Amz-Expires=20141201T220302Z &X-Amz-Credential=<credential> &X-Amz-Signature=<signature>
The following operation uses the parameter SnapshotName to display the details for the backupMyBackup.
https://elasticache.us-west-2.amazonaws.com/ ?Action=DescribeSnapshots &SignatureMethod=HmacSHA256 &SignatureVersion=4 &SnapshotName=MyBackup &Timestamp=20141201T220302Z &Version=2014-12-01 &X-Amz-Algorithm=AWS4-HMAC-SHA256 &X-Amz-Date=20141201T220302Z &X-Amz-SignedHeaders=Host &X-Amz-Expires=20141201T220302Z &X-Amz-Credential=<credential> &X-Amz-Signature=<signature>
For more information, see DescribeSnapshots.
API Version 2015-02-02311

Amazon ElastiCache User GuideCopying a Backup
Copying a BackupYou can make a copy of any backup, whether it was created automatically or manually. You can alsoexport your backup so you can access it from outside ElastiCache. For guidance on exporting yourbackup, see Exporting a Backup (p. 314).
The following procedures show you how to copy a backup.
Copying a Backup (Console)To copy a backup (console)
1. Sign in to the AWS Management Console and open the ElastiCache console at https://console.aws.amazon.com/elasticache/.
2. To see a list of your backups, from the left navigation pane choose Backups.3. From the list of backups, choose the box to the left of the name of the backup you want to copy.4. Choose Copy.5. In the Create Copy of the Backup? dialog box, do the following:
a. In the New backup name box, type a name for your new backup.b. Leave the optional Target S3 Bucket box blank. This field should only be used to export
your backup and requires special S3 permissions. For information on exporting a backup, seeExporting a Backup (p. 314).
c. Choose Copy.
Copying a Backup (AWS CLI)To copy a backup, use the copy-snapshot operation.
Parameters
• --source-snapshot-name – Name of the backup to be copied.• --target-snapshot-name – Name of the backup's copy.• --target-bucket – Reserved for exporting a backup. Do not use this parameter when making a copy
of a backup. For more information, see Exporting a Backup (p. 314).
The following example makes a copy of an automatic backup.
For Linux, macOS, or Unix:
aws elasticache copy-snapshot \ --source-snapshot-name automatic.my-redis-primary-2014-03-27-03-15 \ --target-snapshot-name my-backup-copy
For Windows:
aws elasticache copy-snapshot ^ --source-snapshot-name automatic.my-redis-primary-2014-03-27-03-15 ^ --target-snapshot-name my-backup-copy
For more information, see copy-snapshot in the AWS CLI.
API Version 2015-02-02312
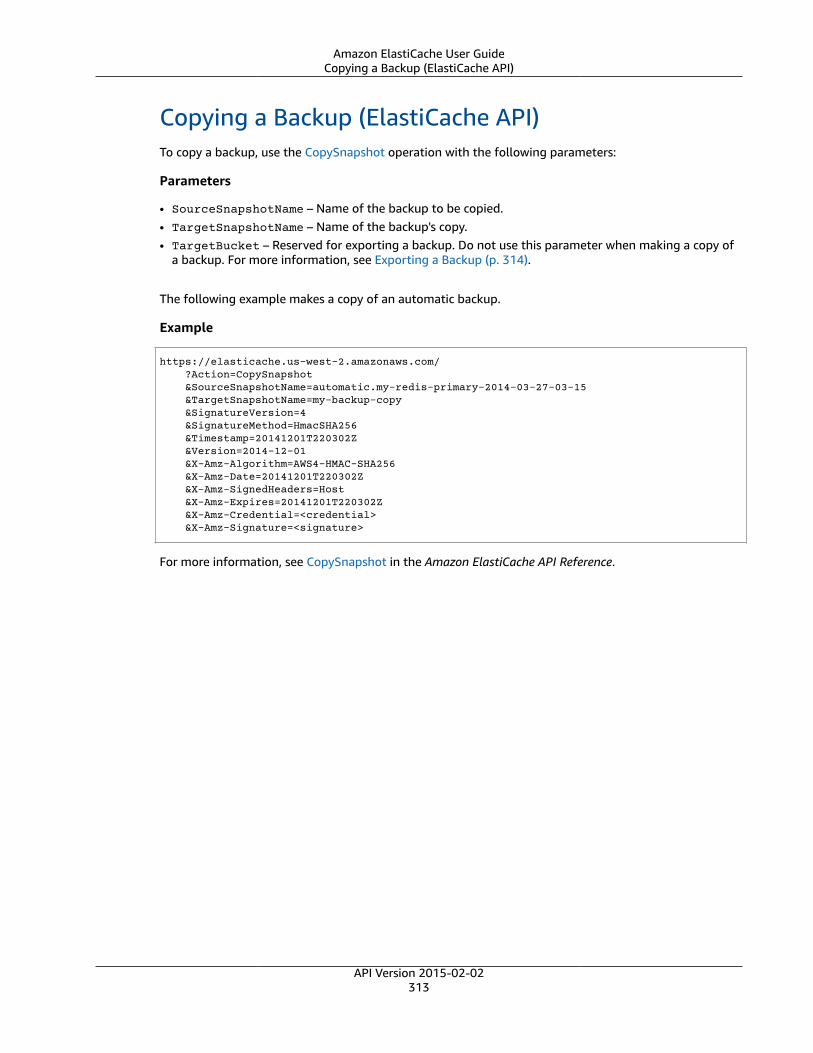
Amazon ElastiCache User GuideCopying a Backup (ElastiCache API)
Copying a Backup (ElastiCache API)To copy a backup, use the CopySnapshot operation with the following parameters:
Parameters
• SourceSnapshotName – Name of the backup to be copied.• TargetSnapshotName – Name of the backup's copy.• TargetBucket – Reserved for exporting a backup. Do not use this parameter when making a copy of
a backup. For more information, see Exporting a Backup (p. 314).
The following example makes a copy of an automatic backup.
Example
https://elasticache.us-west-2.amazonaws.com/ ?Action=CopySnapshot &SourceSnapshotName=automatic.my-redis-primary-2014-03-27-03-15 &TargetSnapshotName=my-backup-copy &SignatureVersion=4 &SignatureMethod=HmacSHA256 &Timestamp=20141201T220302Z &Version=2014-12-01 &X-Amz-Algorithm=AWS4-HMAC-SHA256 &X-Amz-Date=20141201T220302Z &X-Amz-SignedHeaders=Host &X-Amz-Expires=20141201T220302Z &X-Amz-Credential=<credential> &X-Amz-Signature=<signature>
For more information, see CopySnapshot in the Amazon ElastiCache API Reference.
API Version 2015-02-02313

Amazon ElastiCache User GuideExporting a Backup
Exporting a BackupAmazon ElastiCache supports exporting your ElastiCache backup to an Amazon Simple Storage Service(Amazon S3) bucket, which gives you access to it from outside ElastiCache. You can export a backupusing the ElastiCache console, the AWS CLI, or the ElastiCache API.
Exporting a backup can be helpful if you need to launch a cluster in a another region. You can exportyour data in one region, copy the .rdb file to the new region, and then use that .rdb file to seed the newcluster instead of waiting for the new cluster to populate through use. For information about seedinga new cluster, see Seeding a New Cluster with an Externally Created Backup (Redis) (p. 324). Anotherreason you might want to export your cluster's data is to use the .rdb file for offline processing.
Important
• The ElastiCache backup and the Amazon S3 bucket that you want to copy it to must be in thesame region.
• Though backups copied to an Amazon S3 bucket are encrypted, we strongly recommendthat you do not grant others access to the Amazon S3 bucket where you want to store yourbackups.
Before you can export a backup to an Amazon S3 bucket you must have an Amazon S3 bucket in thesame region as the backup, and then grant ElastiCache access to the bucket. The first two steps show youhow to do this.
Warning: Data VulnerabilityThe following scenarios expose your data in ways you may not want.
• When another person has access to the Amazon S3 bucket you exported your backup to.
To control access to your backups, only allow access to the Amazon Amazon S3 bucket tothose who you want to access your data. For information about managing access to anAmazon Amazon S3 bucket, see Managing Access in the Amazon S3 Developer Guide.
• When another person has permissions to use the CopySnapshot API.
Users or groups that have permissions to use the CopySnapshot API can create their ownAmazon S3 buckets and copy backups to it. To control access to your backups, use an IAMpolicy to control who has the ability to use the CopySnapshot API. For more information aboutusing IAM to control the use of ElastiCache APIs, see Authentication and Access Control forAmazon ElastiCache (p. 411) in the ElastiCache User Guide.
Topics
• Step 1: Create an Amazon S3 Bucket (p. 314)
• Step 2: Grant ElastiCache Access to Your Amazon S3 Bucket (p. 315)
• Step 3: Export an ElastiCache Backup (p. 316)
Step 1: Create an Amazon S3 BucketThe following procedure uses the Amazon S3 console to create an Amazon S3 bucket where you willexport and store your ElastiCache backup.
API Version 2015-02-02314
Amazon ElastiCache User GuideStep 2: Grant ElastiCache Access to Your Amazon S3 Bucket
To create an Amazon S3 bucket
1. Sign in to the AWS Management Console and open the Amazon S3 console at https://console.aws.amazon.com/s3/.
2. Choose Create Bucket.3. In Create a Bucket - Select a Bucket Name and Region, do the following:
a. In Bucket Name, type a name for your Amazon S3 bucket.
The name of your Amazon S3 bucket must be DNS-compliant. Otherwise, ElastiCache cannotaccess your backup file. The rules for DNS compliance are:
• Names must be at least 3 and no more than 63 characters long.• Names must be a series of one or more labels separated by a period (.) where each label:
• Starts with a lowercase letter or a number.• Ends with a lowercase letter or a number.• Contains only lowercase letters, numbers, and dashes.
• Names cannot be formatted as an IP address (e.g., 192.0.2.0).b. From the Region list, choose a region for your Amazon S3 bucket. This region must be the same
region as the ElastiCache backup you want to export.c. Choose Create.
For more information about creating an Amazon S3 bucket, see Creating a Bucket in the Amazon SimpleStorage Service Console User Guide.
Step 2: Grant ElastiCache Access to Your Amazon S3BucketIn order for ElastiCache to copy a snapshot to an Amazon S3 bucket, it must have access to the bucket.The following procedure grants ElastiCache access to the Amazon S3 bucket you created in the previousstep.
WarningEven though backups copied to an Amazon S3 bucket are encrypted, your data may be accessedby anyone with access to your Amazon S3 bucket. Therefore, we strongly recommend thatyou set up IAM policies to prevent unauthorized access to this Amazon S3 bucket. For moreinformation, see Managing Access in the Amazon S3 Developer Guide.
To grant ElastiCache access to an Amazon S3 bucket
1. Sign in to the AWS Management Console and open the Amazon S3 console at https://console.aws.amazon.com/s3/.
2. Choose the name of the Amazon S3 bucket that you want to copy the backup to. This should be theS3 bucket you created in Step 1: Create an Amazon S3 Bucket (p. 314).
3. Make sure that the bucket's region is the same as your ElastiCache backup's region. If it isn't, returnto Step 1: Create an Amazon S3 Bucket (p. 314) and create a new bucket in the same region as thecluster you will backup.
4. Choose Permissions.5. Choose Access Control List.6. Under Access for other AWS accounts, choose + Add account.7. In the box, add the region's canonical id as shown in the following list:
• China (Beijing) and China (Ningxia) Regions:
API Version 2015-02-02315
Amazon ElastiCache User GuideStep 3: Export an ElastiCache Backup
b14d6a125bdf69854ed8ef2e71d8a20b7c490f252229b806e514966e490b8d83
• AWS GovCloud (US) Region:
40fa568277ad703bd160f66ae4f83fc9dfdfd06c2f1b5060ca22442ac3ef8be6
ImportantThe backup must be exported to an S3 bucket in AWS GovCloud (US).
• All other regions:
540804c33a284a299d2547575ce1010f2312ef3da9b3a053c8bc45bf233e4353
8. Set the permissions on the bucket by choosing Yes for:
a. List objectsb. Write objectsc. Read bucket permissions
9. Choose Save.
Your Amazon S3 bucket is now ready for you to export an ElastiCache backup to using the ElastiCacheconsole, the AWS CLI, or the ElastiCache API.
Step 3: Export an ElastiCache BackupNow that you've created your S3 bucket and granted ElastiCache permissions to access it, you can usethe ElastiCache console, the AWS CLI, or the ElastiCache API to export your snapshot to it. The followingassumes that you have the following additional S3 specific IAM permissions.
{"Statement": { "Effect": "Allow", "Action": [ "s3:GetBucketLocation", "s3:ListAllMyBuckets" ], "Resource": "arn:aws:s3:::*" } "Version": "2012-10-17"}
Topics• Exporting an ElastiCache Backup (Console) (p. 316)• Exporting an ElastiCache Backup (AWS CLI) (p. 317)• Exporting an ElastiCache Backup (ElastiCache API) (p. 319)
Exporting an ElastiCache Backup (Console)The following process uses the ElastiCache console to export a backup to an Amazon S3 bucket so thatyou can access it from outside ElastiCache. The Amazon S3 bucket must be in the same region as theElastiCache backup.
API Version 2015-02-02316

Amazon ElastiCache User GuideStep 3: Export an ElastiCache Backup
To export an ElastiCache backup to an Amazon S3 bucket
1. Sign in to the AWS Management Console and open the ElastiCache console at https://console.aws.amazon.com/elasticache/.
2. To see a list of your backups, from the left navigation pane choose Backups.
3. From the list of backups, choose the box to the left of the name of the backup you want to export.
4. Choose Copy.
5. In Create a Copy of the Backup?, do the following:
a. In New backup name box, type a name for your new backup.
The name must be between 1 and 1,000 characters and able to be UTF-8 encoded.
ElastiCache adds an instance identifier and .rdb to the value that you enter here. For example,if you enter my-exported-backup, ElastiCache creates my-exported-backup-0001.rdb.
b. From the Target S3 Location list, choose the name of the Amazon S3 bucket that youwant to copy your backup to (the bucket that you created in Step 1: Create an Amazon S3Bucket (p. 314)).
The Target S3 Location must be an Amazon S3 bucket in the backup's region with the followingpermissions for the export process to succeed.
• Object access – Read and Write.
• Permissions access – Read.
For more information, see Step 2: Grant ElastiCache Access to Your Amazon S3Bucket (p. 315).
c. Choose Copy.
NoteIf your S3 bucket does not have the permissions needed for ElastiCache to export a backup to it,you will receive one of the following error messages. Return to Step 2: Grant ElastiCache Accessto Your Amazon S3 Bucket (p. 315) to add the permissions specified and retry exporting yourbackup.
• ElastiCache has not been granted READ permissions %s on the S3 Bucket.
Solution: Add Read permissions on the bucket.
• ElastiCache has not been granted WRITE permissions %s on the S3 Bucket.
Solution: Add Write permissions on the bucket.
• ElastiCache has not been granted READ_ACP permissions %s on the S3 Bucket.
Solution: Add Read for Permissions access on the bucket.
If you want to copy your backup to another region, use Amazon S3 to copy it. For more information, seeCopying an Object in the Amazon Simple Storage Service Console User Guide.
Exporting an ElastiCache Backup (AWS CLI)
Export the backup to an Amazon S3 bucket using the copy-snapshot CLI operation with the followingparameters:
API Version 2015-02-02317

Amazon ElastiCache User GuideStep 3: Export an ElastiCache Backup
Parameters
• --source-snapshot-name – Name of the backup to be copied.
• --target-snapshot-name – Name of the backup's copy.
The name must be between 1 and 1,000 characters and able to be UTF-8 encoded.
ElastiCache adds an instance identifier and .rdb to the value you enter here. For example, if you entermy-exported-backup, ElastiCache creates my-exported-backup-0001.rdb.
• --target-bucket – Name of the Amazon S3 bucket where you want to export the backup. A copy ofthe backup is made in the specified bucket.
The --target-bucket must be an Amazon S3 bucket in the backup's region with the followingpermissions for the export process to succeed.
• Object access – Read and Write.
• Permissions access – Read.
For more information, see Step 2: Grant ElastiCache Access to Your Amazon S3 Bucket (p. 315).
The following operation copies a backup to my-s3-bucket.
For Linux, macOS, or Unix:
aws elasticache copy-snapshot \ --source-snapshot-name automatic.my-redis-primary-2016-06-27-03-15 \ --target-snapshot-name my-exported-backup \ --target-bucket my-s3-bucket
For Windows:
aws elasticache copy-snapshot ^ --source-snapshot-name automatic.my-redis-primary-2016-06-27-03-15 ^ --target-snapshot-name my-exported-backup ^ --target-bucket my-s3-bucket
NoteIf your S3 bucket does not have the permissions needed for ElastiCache to export a backup to it,you will receive one of the following error messages. Return to Step 2: Grant ElastiCache Accessto Your Amazon S3 Bucket (p. 315) to add the permissions specified and retry exporting yourbackup.
• ElastiCache has not been granted READ permissions %s on the S3 Bucket.
Solution: Add Read permissions on the bucket.
• ElastiCache has not been granted WRITE permissions %s on the S3 Bucket.
Solution: Add Write permissions on the bucket.
• ElastiCache has not been granted READ_ACP permissions %s on the S3 Bucket.
Solution: Add Read for Permissions access on the bucket.
For more information, see copy-snapshot in the AWS CLI Command Reference.
If you want to copy your backup to another region, use Amazon S3 copy. For more information, seeCopying an Object in the Amazon Simple Storage Service Console User Guide.
API Version 2015-02-02318
Amazon ElastiCache User GuideStep 3: Export an ElastiCache Backup
Exporting an ElastiCache Backup (ElastiCache API)Export the backup to an Amazon S3 bucket using the CopySnapshot API operation with theseparameters.
Parameters
• SourceSnapshotName – Name of the backup to be copied.• TargetSnapshotName – Name of the backup's copy.
The name must be between 1 and 1,000 characters and able to be UTF-8 encoded.
ElastiCache will add an instance identifier and .rdb to the value you enter here. For example, if youenter my-exported-backup, you will get my-exported-backup-0001.rdb.
• TargetBucket – Name of the Amazon S3 bucket where you want to export the backup. A copy of thebackup is made in the specified bucket.
The TargetBucket must be an Amazon S3 bucket in the backup's region with the followingpermissions for the export process to succeed.• Object access – Read and Write.• Permissions access – Read.
For more information, see Step 2: Grant ElastiCache Access to Your Amazon S3 Bucket (p. 315).
The following example makes a copy of an automatic backup to the Amazon S3 bucket my-s3-bucket.
Example
https://elasticache.us-west-2.amazonaws.com/ ?Action=CopySnapshot &SourceSnapshotName=automatic.my-redis-primary-2016-06-27-03-15 &TargetBucket=my-s3-bucket &TargetSnapshotName=my-backup-copy &SignatureVersion=4 &SignatureMethod=HmacSHA256 &Timestamp=20141201T220302Z &Version=2016-01-01 &X-Amz-Algorithm=AWS4-HMAC-SHA256 &X-Amz-Date=20141201T220302Z &X-Amz-SignedHeaders=Host &X-Amz-Expires=20141201T220302Z &X-Amz-Credential=<credential> &X-Amz-Signature=<signature>
NoteIf your S3 bucket does not have the permissions needed for ElastiCache to export a backup to it,you will receive one of the following error messages. Return to Step 2: Grant ElastiCache Accessto Your Amazon S3 Bucket (p. 315) to add the permissions specified and retry exporting yourbackup.
• ElastiCache has not been granted READ permissions %s on the S3 Bucket.
Solution: Add Read permissions on the bucket.• ElastiCache has not been granted WRITE permissions %s on the S3 Bucket.
Solution: Add Write permissions on the bucket.• ElastiCache has not been granted READ_ACP permissions %s on the S3 Bucket.
API Version 2015-02-02319

Amazon ElastiCache User GuideStep 3: Export an ElastiCache Backup
Solution: Add Read for Permissions access on the bucket.
For more information, see CopySnapshot in the Amazon ElastiCache API Reference.
If you want to copy your backup to another region, use Amazon S3 copy to copy the exported backup tothe Amazon S3 bucket in another region. For more information, see Copying an Object in the AmazonSimple Storage Service Console User Guide.
API Version 2015-02-02320

Amazon ElastiCache User GuideRestoring from a Backup
Restoring From a Backup with Optional ClusterResizing
You can restore the data from a Redis .rdb backup file to a new cluster at any time.
The Amazon ElastiCache for Redis restore process supports the following:
• Upgrading from a Redis (cluster mode disabled) cluster to a Redis (cluster mode enabled) clusterrunning Redis version 3.2.4.
• Migrating from one or more .rdb backup files you created from your self-managed Redis clusters to asingle ElastiCache for Redis (cluster mode enabled) cluster.
The .rdb files must be put in S3 to perform the restore.
• Specifying a number of shards (API/CLI: node groups) in the new cluster that is different from thenumber of shards in the cluster that was used to create the backup file.
• Specifying a different node type for the new cluster—larger or smaller. If scaling to a smaller nodetype, be sure that the new node type has sufficient memory for your data and Redis overhead. Formore information, see Choosing Your Node Size (p. 103).
• Configuring the slots of the new Redis (cluster mode enabled) cluster differently than in the clusterthat was used to create the backup file.
Important
• You cannot restore from a backup created using a Redis (cluster mode enabled) cluster to aRedis (cluster mode disabled) cluster.
• Redis (cluster mode enabled) clusters do not support multiple databases. Therefore, whenrestoring to a Redis (cluster mode enabled) your restore will fail if the RDB file referencesmore than one database.
Whether you make any changes when restoring a cluster from a backup or not is governed by the choicesyou make in the Restore Cluster dialog box when using the ElastiCache console, or parameter valueswhen using the AWS CLI or ElastiCache API to restore.
During the restore operation, ElastiCache creates the new cluster, and then populates it with data fromthe backup file. When this process is complete, the Redis cluster is warmed up and ready to acceptrequests.
ImportantBefore you proceed, be sure you have created a backup of the cluster you want to restore from.For more information, see Making Manual Backups (p. 301).If you want to restore from an externally created backup, see Seeding a New Cluster with anExternally Created Backup (Redis) (p. 324).
The following procedures show you how to restore a backup to a new cluster using the ElastiCacheconsole, the AWS CLI, or the ElastiCache API.
API Version 2015-02-02321

Amazon ElastiCache User GuideRestoring From a Backup (Console)
Topics• Restoring From a Backup (Console) (p. 322)• Restoring From a Backup (AWS CLI) (p. 323)• Restoring From a Backup (ElastiCache API) (p. 323)
Restoring From a Backup (Console)You can restore a Redis backup to either a single-node Redis (cluster mode disabled) cluster or to a Rediscluster with read replicas (replication group)— either Redis (cluster mode disabled) or Redis (clustermode enabled).
To restore a backup to a new cluster (console)
1. Sign in to the AWS Management Console and open the ElastiCache console at https://console.aws.amazon.com/elasticache/.
2. From the navigation pane, choose Backups.3. In the list of backups, choose the box to the left of the backup name you want to restore from.4. Choose Restore.5. Complete the Restore Cluster dialog box. Be sure to complete all the "Required" fields and any of
the others you want to change from the defaults.
Redis (cluster mode disabled)
1. Cluster ID – Required. The name of the new cluster.2. Engine version compatibility – The ElastiCache for Redis engine version you want to run.3. Cluster mode enabled (scale out) – Choose this to convert your Redis (cluster mode disabled)
cluster to a Redis (cluster mode enabled) (the engine version will become 3.2.4.
If you choose Cluster mode enabled (scale out):
a. Choose the number of shards you want in the new cluster (API/CLI: node groups).b. Choose the number of read replicas you want in each shard.c. Distribute your keys among the slots as you desire.
4. Node Type – Specify the node type you want for the new cluster.5. Availability zone(s) – Specify how you want the cluster's Availability Zones selected.6. Port – Change this only if you want the new cluster to use a different port.7. Choose a VPC – Choose the VPC in which to create this cluster.8. Parameter Group – Choose a parameter group that reserves sufficient memory for Redis
overhead for the node type you selected.
Redis (cluster mode enabled)
1. Cluster ID – Required. The name of the new cluster.2. Cluster mode enabled (scale out) – Choose this for a Redis (cluster mode enabled) cluster. Clear
it for a Redis (cluster mode disabled) cluster.3. Node Type – Specify the node type you want for the new cluster.4. Number of Shards – Choose the number of shards you want in the new cluster (API/CLI: node
groups).5. Replicas per Shard – Choose the number of read replica nodes you want in each shard.
API Version 2015-02-02322
Amazon ElastiCache User GuideRestoring From a Backup (AWS CLI)
6. Slots and keyspaces – Choose how you want keys distributed among the shards. If you chooseto specify the key distributions complete the table specifying the key ranges for each shard.
7. Availability zone(s) – Specify how you want the cluster's Availability Zones selected.8. Port – Change this only if you want the new cluster to use a different port.9. Choose a VPC – Choose the VPC in which to create this cluster.10. Parameter Group – Choose a parameter group that reserves sufficient memory for Redis
overhead for the node type you selected.6. When the settings are as you want them, choose Launch Cluster.
Restoring From a Backup (AWS CLI)You can restore a Redis (cluster mode disabled) backup to either a single-node Redis (cluster modedisabled) cluster using the AWS CLI operation create-cache-cluster or a Redis cluster with readreplicas (replication group)— either Redis (cluster mode disabled) or Redis (cluster mode enabled) usingthe AWS CLI operation create-replication-group and seeding it with a Redis .rdb file.
When using either the create-cache-cluster or create-replication-group operation, besure to include the parameter --snapshot-name or --snapshot-arns to seed the new cluster orreplication group with the data from the backup.
For more information, see the following:
• Creating a Cache Cluster (AWS CLI) (p. 172) in the ElastiCache User Guide.• create-cache-cluster in the AWS CLI Command Reference.
• Creating a Redis Cluster with Replicas from Scratch (p. 264) in the ElastiCache User Guide.• create-replication-group in the AWS CLI Command Reference.
Restoring From a Backup (ElastiCache API)You can restore a Redis backup to either a single-node Redis (cluster mode disabled) cluster using theElastiCache API operation CreateCacheCluster or to a Redis cluster with read replicas (replicationgroup)— either Redis (cluster mode disabled) or Redis (cluster mode enabled) using the ElastiCache APIoperation CreateReplicationGrooup and seeding it with a Redis .rdb file.
When using either the CreateCacheCluster or CreateReplicationGroup operation, be sure toinclude the parameter SnapshotName or SnapshotArns to seed the new cluster or replication groupwith the data from the backup.
For more information, see the following:
• Creating a Cache Cluster (ElastiCache API) (p. 174) in the ElastiCache User Guide.• CreateCacheCluster in the ElastiCache API Reference.
• Creating a Redis Cluster with Replicas from Scratch (p. 264) in the ElastiCache User Guide.• CreateReplicationGroup in the ElastiCache API Reference.
API Version 2015-02-02323

Amazon ElastiCache User GuideSeeding a Cluster with a Backup (Redis)
Seeding a New Cluster with an Externally CreatedBackup (Redis)
When you create a new Redis cluster, you can seed it with data from a Redis .rdb backup file. Seeding thecluster is useful if you currently manage a Redis instance outside of ElastiCache and want to populateyour new ElastiCache for Redis cluster with your existing Redis data.
To see a new Redis cluster from a Redis backup created within Amazon ElastiCache, see Restoring From aBackup with Optional Cluster Resizing (p. 321).
When you use a Redis .rdb file to seed a new Redis cluster, you can do the following:
• Upgrade from a nonpartitioned cluster to a Redis (cluster mode enabled) cluster running Redis version3.2.4.
• Specify a number of shards (called node groups in the API and CLI) in the new cluster that is differentfrom the number of shards in the cluster that was used to create the backup file.
• Specify a different node type for the new cluster—larger or smaller than that used in the cluster thatmade the backup. If you scale to a smaller node type, be sure that the new node type has sufficientmemory for your data and Redis overhead. For more information, see Ensuring You Have SufficientMemory to Create a Redis Snapshot (p. 81).
• Distribute your keys in the slots of the new Redis (cluster mode enabled) cluster differently than in thecluster that was used to create the backup file.
NoteYou cannot seed a Redis (cluster mode disabled) cluster from an .rdb file created from a Redis(cluster mode enabled) cluster.
Important
• You must ensure that your Redis backup data doesn't exceed the resources of the node. Forexample, you can't upload an .rdb file with 5 GB of Redis data to a cache.m3.medium nodethat has 2.9 GB of memory.
If the backup is too large, the resulting cluster will have a status of restore-failed. If thishappens, you must delete the cluster and start over.
For a complete listing of node types and specifications, see Redis Node-Type SpecificParameters (p. 381) and Amazon ElastiCache Product Features and Details.
• Encrypting a Redis .rdb file with Amazon S3 server-side encryption (SSE) is not supported.
Following, you can find topics that walk you through migrating your Redis cluster from outsideElastiCache for Redis to ElastiCache for Redis.
Migrating to ElastiCache for Redis• Step 1: Create a Redis Backup (p. 325)• Step 2: Create an Amazon S3 Bucket and Folder (p. 325)• Step 3: Upload Your Backup to Amazon S3 (p. 326)• Step 4: Grant ElastiCache Read Access to the .rdb File (p. 326)• Step 5: Seed the ElastiCache Cluster With the .rdb File Data (p. 327)
Topics
Step 1: Create a Redis Backup (p. 325)
API Version 2015-02-02324

Amazon ElastiCache User GuideStep 1: Create a Redis Backup
Step 3: Upload Your Backup to Amazon S3 (p. 326)
Step 4: Grant ElastiCache Read Access to the .rdb File (p. 326)
Step 5: Seed the ElastiCache Cluster With the .rdb File Data (p. 327)
Step 1: Create a Redis BackupTo create the Redis backup from which you will seed your ElastiCache for Redis instance
1. Connect to your existing Redis instance.
2. Run either the Redis BGSAVE or SAVE operation to create a backup. Note where your .rdb file islocated.
BGSAVE is asynchronous and does not block other clients while processing. For more information,see BGSAVE at the Redis website.
SAVE is synchronous and blocks other processes until finished. For more information, see SAVE atthe Redis website.
For additional information on creating a backup, see Redis Persistence at the Redis website.
Step 2: Create an Amazon S3 Bucket and FolderWhen you have created the backup file, you need to upload it to a folder within an Amazon S3 bucket.To do that, you must first have an Amazon S3 bucket and folder within that bucket. If you already havean Amazon S3 bucket and folder with the appropriate permissions, you can skip to Step 3: Upload YourBackup to Amazon S3 (p. 326).
To create an Amazon S3 bucket
1. Sign in to the AWS Management Console and open the Amazon S3 console at https://console.aws.amazon.com/s3/.
2. Follow the instructions for creating an Amazon S3 bucket in Creating a Bucket in the Amazon SimpleStorage Service Console User Guide.
The name of your Amazon S3 bucket must be DNS-compliant. Otherwise, ElastiCache cannot accessyour backup file. The rules for DNS compliance are:
• Names must be at least 3 and no more than 63 characters long.
• Names must be a series of one or more labels separated by a period (.) where each label:
• Starts with a lowercase letter or a number.
• Ends with a lowercase letter or a number.
• Contains only lowercase letters, numbers, and dashes.
• Names cannot be formatted as an IP address (e.g., 192.0.2.0).
We strongly recommend that you create your Amazon S3 bucket in the same region as your newElastiCache for Redis cluster. This approach will ensure the highest data transfer speed whenElastiCache reads your .rdb file from Amazon S3.
Security AdvisoryTo keep your data as secure as possible, make the permissions on your Amazon S3 bucket asrestrictive as you can while still allowing the bucket and its contents to be used to seed yournew Redis cluster.
API Version 2015-02-02325
Amazon ElastiCache User GuideStep 3: Upload Your Backup to Amazon S3
To add a folder to an Amazon S3 bucket
1. Sign in to the AWS Management Console and open the Amazon S3 console at https://console.aws.amazon.com/s3/.
2. Choose the name of the bucket you will upload your .rdb file to.
3. Choose Create folder.
4. Type in a name for your new folder.
5. Choose Save.
Make note of both the bucket name and the folder name.
Step 3: Upload Your Backup to Amazon S3It is now time to upload the .rdb file your created in Step 1: Create a Redis Backup (p. 325) to theAmazon S3 bucket and folder you created in Step 2: Create an Amazon S3 Bucket and Folder (p. 325).For more information on this task, see Add an Object to a Bucket. Between steps 2 and 3, choose thename of the folder you created .
To upload your .rdb file to an Amazon S3 folder
1. Sign in to the AWS Management Console and open the Amazon S3 console at https://console.aws.amazon.com/s3/.
2. Choose the name of the Amazon S3 bucket you created in Step 2.
3. Choose the name of the folder you created in Step 2.
4. Choose Upload.
5. Choose Add files.
6. Browse to find the file or files you want to upload, then choose the file or files. To choose multiplefiles, hold down the Ctrl key while choosing a file name.
7. Choose Open.
8. Confirm the correct file or files are listed in the Upload dialog box, and then choose Upload.
It is important that you note the path to your .rdb file. For example, if my bucket name is myBucket andthe path is myFolder/redis.rdb, you type myBucket/myFolder/redis.rdb. You need this path toseed the new cluster with the data in this backup.
For additional information, see Bucket Restrictions and Limitations in the Amazon Simple Storage ServiceDeveloper Guide.
Step 4: Grant ElastiCache Read Access to the .rdb FileTo grant ElastiCache read access to the backup file
1. Sign in to the AWS Management Console and open the Amazon S3 console at https://console.aws.amazon.com/s3/.
2. Choose the name of the S3 bucket that contains your .rdb file.
3. Choose the name of the folder that contains your .rdb file.
4. Choose the name of your .rdb backup file. The name of the selected file will appear above the tabsat the top of the page.
API Version 2015-02-02326

Amazon ElastiCache User GuideStep 5: Seed the ElastiCache Cluster With the .rdb File Data
File selected in S3 console
5. Choose Permissions.
6. If aws-scs-s3-readonly or one of the canonical IDs in the following list is not listed as a user, do thefollowing:
a. Under Access for other AWS accounts, choose + Add account.
b. In the box, add the region's canonical id as shown in the following list:
• China (Beijing) and China (Ningxia) Regions:
b14d6a125bdf69854ed8ef2e71d8a20b7c490f252229b806e514966e490b8d83
• AWS GovCloud (US) Region:
40fa568277ad703bd160f66ae4f83fc9dfdfd06c2f1b5060ca22442ac3ef8be6
ImportantThe backup must be located in an S3 bucket in AWS GovCloud (US) for you todownload it to a Redis cluster in AWS GovCloud (US).
• All other regions:
540804c33a284a299d2547575ce1010f2312ef3da9b3a053c8bc45bf233e4353
c. Set the permissions on the bucket by choosing Yes for:
i. Read object
ii. Read object permissions
d. Choose Save.
7. Choose Overview.
8. Choose Download.
Step 5: Seed the ElastiCache Cluster With the .rdbFile DataNow you are ready to create an ElastiCache cluster and seed it with the data from the .rdb file. To createthe cluster, follow the directions at Creating a Cluster (p. 160) or Creating a Redis Cluster with Replicasfrom Scratch (p. 264). Be sure to choose Redis as your cluster engine.
The method you use to tell ElastiCache where to find the Redis backup you uploaded to Amazon S3depends on the method you use to create the cluster:
• Seed the ElastiCache Cluster With the .rdb File Data Using the ElastiCache ConsoleAPI Version 2015-02-02
327

Amazon ElastiCache User GuideStep 5: Seed the ElastiCache Cluster With the .rdb File Data
After you choose the Redis engine, expand the Advanced Redis settings section and locate Importdata to cluster. In the Seed RDB file S3 location box, type in the Amazon S3 path for the files(s). Ifyou have multiple .rdb files, type in the path for each file in a comma separated list. The Amazon S3path will look something like myBucket/myFolder/myBackupFilename.rdb.
• Seed the ElastiCache Cluster With the .rdb File Data Using the AWS CLI
If you use the create-cache-cluster or the create-replication-group operation, usethe parameter --snapshot-arns to specify a fully qualified ARN for each .rdb file. For example,arn:aws:s3:::myBucket/myFolder/myBackupFilename.rdb. The ARN must resolve to thebackup files you stored in Amazon S3.
• Seed the ElastiCache Cluster With the .rdb File Data Using the ElastiCache API
If you use the CreateCacheCluster or the CreateReplicationGroup ElastiCache API operation,use the parameter SnapshotArns to specify a fully qualified ARN for each .rdb file. For example,arn:aws:s3:::myBucket/myFolder/myBackupFilename.rdb. The ARN must resolve to thebackup files you stored in Amazon S3.
During the process of creating your cluster, the data in your Redis backup will be written to thecluster. You can monitor the progress by viewing the ElastiCache event messages. To do this, go to theElastiCache console and choose Cache Events. You can also use the AWS ElastiCache command lineinterface or ElastiCache API to obtain event messages. For more information, see Viewing ElastiCacheEvents (p. 465).
API Version 2015-02-02328

Amazon ElastiCache User GuideTagging Backups
Tagging BackupsCost allocation tags are a means of tracking your costs across multiple AWS services by grouping yourexpenses on invoices by tag values. To learn more about cost allocation tags, see Use Cost AllocationTags.
Using the ElastiCache console, the AWS CLI, or ElastiCache API you can add, list, modify, remove, or copycost allocation tags on your backups. For more information, see Monitoring Costs with Cost AllocationTags (p. 471).
API Version 2015-02-02329

Amazon ElastiCache User GuideDeleting a Backup
Deleting a BackupAn automatic backup is automatically deleted when its retention limit expires. If you delete a cluster, allof its automatic backups are also deleted. If you delete a replication group, all of the automatic backupsfrom the clusters in that group are also deleted.
ElastiCache provides a deletion API that lets you delete a backup at any time, regardless of whether thebackup was created automatically or manually. (Since manual backups do not have a retention limit,manual deletion is the only way to remove them.)
You can delete a backup using the ElastiCache console, the AWS CLI, or the ElastiCache API.
Deleting a Backup (Console)The following procedure deletes a backup using the ElastiCache console.
To delete a backup
1. Sign in to the AWS Management Console and open the ElastiCache console at https://console.aws.amazon.com/elasticache/.
2. In the navigation pane, choose Backups.
The Backups screen appears with a list of your backups.3. Choose the box to the left of the name of the backup you want to delete.4. Choose Delete.5. If you want to delete this backup, choose Delete on the Delete Backup confirmation screen. The
status changes to deleting.
Deleting a Backup (AWS CLI)Use the delete-snapshot AWS CLI operation with the following parameter to delete a backup.
• --snapshot-name – Name of the backup to be deleted.
The following code deletes the backup myBackup.
aws elasticache delete-snapshot --snapshot-name myBackup
For more information, see delete-snapshot in the AWS CLI Command Reference.
Deleting a Backup (ElastiCache API)Use the DeleteSnapshot API operation with the following parameter to delete a backup.
• SnapshotName – Name of the backup to be deleted.
The following code deletes the backup myBackup.
https://elasticache.us-west-2.amazonaws.com/ ?Action=DeleteSnapshot &SignatureVersion=4 &SignatureMethod=HmacSHA256
API Version 2015-02-02330
Amazon ElastiCache User GuideRedis Append Only Files (AOF)
&SnapshotId=myBackup &Timestamp=20150202T192317Z &Version=2015-02-02 &X-Amz-Credential=<credential>
For more information, see DeleteSnapshot in the Amazon ElastiCache API Reference.
Redis Append Only Files (AOF)By default, the data in a Redis node on ElastiCache resides only in memory, and is not persistent. If anode is rebooted, or if the underlying physical server experiences a hardware failure, the data in thecache is lost.
If you require data durability, you can enable the Redis append-only file feature (AOF). When this featureis enabled, the node writes all of the commands that change cache data to an append-only file. When anode is rebooted and the cache engine starts, the AOF is "replayed"; the result is a warm Redis cache withall of the data intact.
AOF is disabled by default. To enable AOF for a cluster running Redis, you must create a parameter groupwith the appendonly parameter set to yes, and then assign that parameter group to your cluster. Youcan also modify the appendfsync parameter to control how often Redis writes to the AOF file.
ImportantAppend-only files (AOF) are not supported for cache.t1.micro and cache.t2.* nodes. For nodes ofthese types, the appendonly parameter value is ignored.For Multi-AZ replication groups, AOF is disabled.AOF is not supported on Redis versions 2.8.22 and later.
WarningAOF cannot protect against all failure scenarios. For example, if a node fails due to a hardwarefault in an underlying physical server, ElastiCache will provision a new node on a different server.In this case, the AOF file will no longer be available and cannot be used to recover the data.Thus, Redis will restart with a cold cache.For greater reliability and faster recovery, we recommend that you create one or more readreplicas in different Availability Zones for your cluster, and enable Multi-AZ on the replicationgroup instead of using AOF. AOF is disabled for Multi-AZ replication groups.For more information on mitigating failures, see Mitigating Failures when Running Redis (p. 88).
For more information see:
• Redis Specific Parameters (p. 366)• Replication: Multi-AZ with Automatic Failover (Redis) (p. 244)• Mitigating Failures (p. 87)
API Version 2015-02-02331

Amazon ElastiCache User Guide
Security Groups [EC2-Classic]ImportantAmazon ElastiCache security groups are only applicable to clusters that are not running inan Amazon Virtual Private Cloud environment (VPC). If you are running in an Amazon VirtualPrivate Cloud, Security Groups is not available in the console navigation pane.If you are running your ElastiCache nodes in an Amazon VPC, you control access to your clusterswith Amazon VPC security groups, which are different from ElastiCache security groups. Formore information about using ElastiCache in an Amazon VPC, see Amazon Virtual Private Cloud(Amazon VPC) with ElastiCache (p. 392)
Amazon ElastiCache allows you to control access to your clusters using ElastiCache security groups. AnElastiCache security group acts like a firewall, controlling network access to your cluster. By default,network access is turned off to your clusters. If you want your applications to access your cluster, youmust explicitly enable access from hosts in specific Amazon EC2 security groups. Once ingress rules areconfigured, the same rules apply to all clusters associated with that security group.
To allow network access to your cluster, create a security group and use theAuthorizeCacheSecurityGroupIngress API operation (CLI: authorize-cache-security-group-ingress) to authorize the desired Amazon EC2 security group (which in turn specifies theAmazon EC2 instances allowed). The security group can be associated with your cluster at the time ofcreation, or using the ModifyCacheCluster API operation (CLI: modify-cache-cluster).
ImportantAccess control based on IP range is currently not enabled at the individual cluster level. Allclients to a cluster must be within the EC2 network, and authorized via security groups asdescribed previously.
For more information about using ElastiCache with Amazon VPCs, see Amazon Virtual Private Cloud(Amazon VPC) with ElastiCache (p. 392).
Note that Amazon EC2 instances running in an Amazon VPC can't connect to ElastiCache clusters in EC2-Classic.
Topics• Creating a Security Group (p. 333)• Listing Available Security Groups (p. 335)• Viewing a Security Group (p. 337)• Authorizing Network Access to an Amazon EC2 Security Group (p. 339)
API Version 2015-02-02332
Amazon ElastiCache User GuideCreating a Security Group
Creating a Security GroupThis topic is relevant to you only if you are not running in an Amazon VPC. If you are running in anAmazon VPC, see Amazon Virtual Private Cloud (Amazon VPC) with ElastiCache (p. 392).
To create a security group, you need to provide a name and a description.
The following procedures show you how to create a new security group.
Creating a Security Group (Console)1. Sign in to the AWS Management Console and open the ElastiCache console at https://
console.aws.amazon.com/elasticache/.2. In the navigation pane, choose Security Groups.3. Choose Create Security Group.4. In Create Security Group, type the name of the new security group in Security Group.5. In Description, type a description for the new security group.6. Choose Create.
Creating a Security Group (AWS CLI)At a command prompt, use the create-cache-security-group command with the followingparameters:
• --cache-security-group-name – The name of the security group you are creating.
Example: mysecuritygroup• --description – A description for this security group.
Example: "My new security group"
For Linux, macOS, or Unix:
aws elasticache create-cache-security-group \ --cache-security-group-name mysecuritygroup \ --description "My new security group"
For Windows:
aws elasticache create-cache-security-group ^ --cache-security-group-name mysecuritygroup ^ --description "My new security group"
For more information, see create-cache-security-group.
Creating a Security Group (ElastiCache API)Using the ElastiCache API operation CreateCacheSecurityGroup with the following parameters:
• CacheSecurityGroupName – The name of the security group you are creating.
Example: mysecuritygroup
API Version 2015-02-02333

Amazon ElastiCache User GuideUsing the ElastiCache API
• Description – A URL encoded description for this security group.
Example: My%20security%20group
Example
Line breaks are added for ease of reading.
https://elasticache.us-west-2.amazonaws.com / ?Action=CreateCacheSecurityGroup &CacheSecurityGroupName=mysecuritygroup &Description=My%20security%20group &Version=2015-02-02 &SignatureVersion=4 &SignatureMethod=HmacSHA256 &Timestamp=20150202T220302Z &X-Amz-Algorithm=AWS4-HMAC-SHA256 &X-Amz-Date=20150202T220302Z &X-Amz-SignedHeaders=Host &X-Amz-Expires=20150202T220302Z &X-Amz-Credential=<credential> &X-Amz-Signature=<signature>
API Version 2015-02-02334

Amazon ElastiCache User GuideListing Available Security Groups
Listing Available Security GroupsThis topic is relevant to you only if you are not running in an Amazon VPC. If you are running in anAmazon VPC, see Amazon Virtual Private Cloud (Amazon VPC) with ElastiCache (p. 392).
You can list which security groups have been created for your AWS account.
The following procedures show you how to list the available security groups for your AWS account.
Listing Available Security Groups (Console)1. Sign in to the AWS Management Console and open the ElastiCache console at https://
console.aws.amazon.com/elasticache/.2. In the navigation pane, choose Security Groups.
The available security groups appear in the Security Groups list.
Listing Available Security Groups (AWS CLI)At a command prompt, use the describe-cache-security-groups command to list all availablesecurity groups for your AWS account.
aws elasticache describe-cache-security-groups
JSON output from this command will look something like this.
{ "Marker": "Marker", "CacheSecurityGroups": [ { "OwnerId": "OwnerId", "CacheSecurityGroupName": "CacheSecurityGroupName", "Description": "Description", "EC2SecurityGroups": [ { "Status": "Status", "EC2SecurityGroupName": "EC2SecurityGroupName", "EC2SecurityGroupOwnerId": "EC2SecurityGroupOwnerId" } ] } ]}
For more information, see describe-cache-security-groups.
Listing Available Security Groups (ElastiCache API)Using the ElastiCache API, call DescribeCacheSecurityGroups.
Example
Line breaks are added for ease of reading.
https://elasticache.us-west-2.amazonaws.com/
API Version 2015-02-02335

Amazon ElastiCache User GuideUsing the ElastiCache API
?Action=DescribeCacheSecurityGroups &MaxRecords=100 &Version=2015-02-02 &SignatureVersion=4 &SignatureMethod=HmacSHA256 &Timestamp=20150202T220302Z &X-Amz-Algorithm=AWS4-HMAC-SHA256 &X-Amz-Date=20150202T220302Z &X-Amz-SignedHeaders=Host &X-Amz-Expires=20150202T220302Z &X-Amz-Credential=<credential> &X-Amz-Signature=<signature>
API Version 2015-02-02336
Amazon ElastiCache User GuideViewing a Security Group
Viewing a Security GroupThis topic is relevant to you only if you are not running in an Amazon VPC. If you are running in anAmazon VPC, see Amazon Virtual Private Cloud (Amazon VPC) with ElastiCache (p. 392).
You can view detailed information about your security group.
The following procedures show you how to view the properties of a security group using the ElastiCacheconsole, AWS CLI, and ElastiCache API.
Viewing a Security Group (Console)1. Sign in to the AWS Management Console and open the ElastiCache console at https://
console.aws.amazon.com/elasticache/.2. In the navigation pane, choose Security Groups.
The available cache security groups appear in the Security Groups list.3. Choose a cache security group from the Security Groups list.
The list of authorizations defined for the security group appears in the detail section at the bottomof the window.
Viewing a Security Group (AWS CLI)At the command prompt, use the AWS CLI describe-cache-security-groups command with thename of the security group you want to view.
• --cache-security-group-name – the name of the security group to return details for.
aws elasticache describe-cache-security-groups --cache-security-group-name mysecuritygroup
JSON output from this command will look something like this.
{ "CacheSecurityGroup": { "OwnerId": "OwnerId", "CacheSecurityGroupName": "CacheSecurityGroupName", "Description": "Description", "EC2SecurityGroups": [ { "Status": "Status", "EC2SecurityGroupName": "EC2SecurityGroupName", "EC2SecurityGroupOwnerId": "EC2SecurityGroupOwnerId" } ] }}
For more information, see describe-cache-security-groups.
Viewing a Security Group (ElastiCache API)Using the ElastiCache API, call DescribeCacheSecurityGroups with the name of the security groupyou want to view.
API Version 2015-02-02337

Amazon ElastiCache User GuideUsing the ElastiCache API
• CacheSecurityGroupName – the name of the cache security group to return details for.
Example
Line breaks are added for ease of reading.
https://elasticache.amazonaws.com/ ?Action=DescribeCacheSecurityGroups &CacheSecurityGroupName=mysecuritygroup &Version=2015-02-02 &SignatureVersion=4 &SignatureMethod=HmacSHA256 &Timestamp=20150202T220302Z &X-Amz-Algorithm=AWS4-HMAC-SHA256 &X-Amz-Date=20150202T220302Z &X-Amz-SignedHeaders=Host &X-Amz-Expires=20150202T220302Z &X-Amz-Credential=<credential> &X-Amz-Signature=<signature>
API Version 2015-02-02338
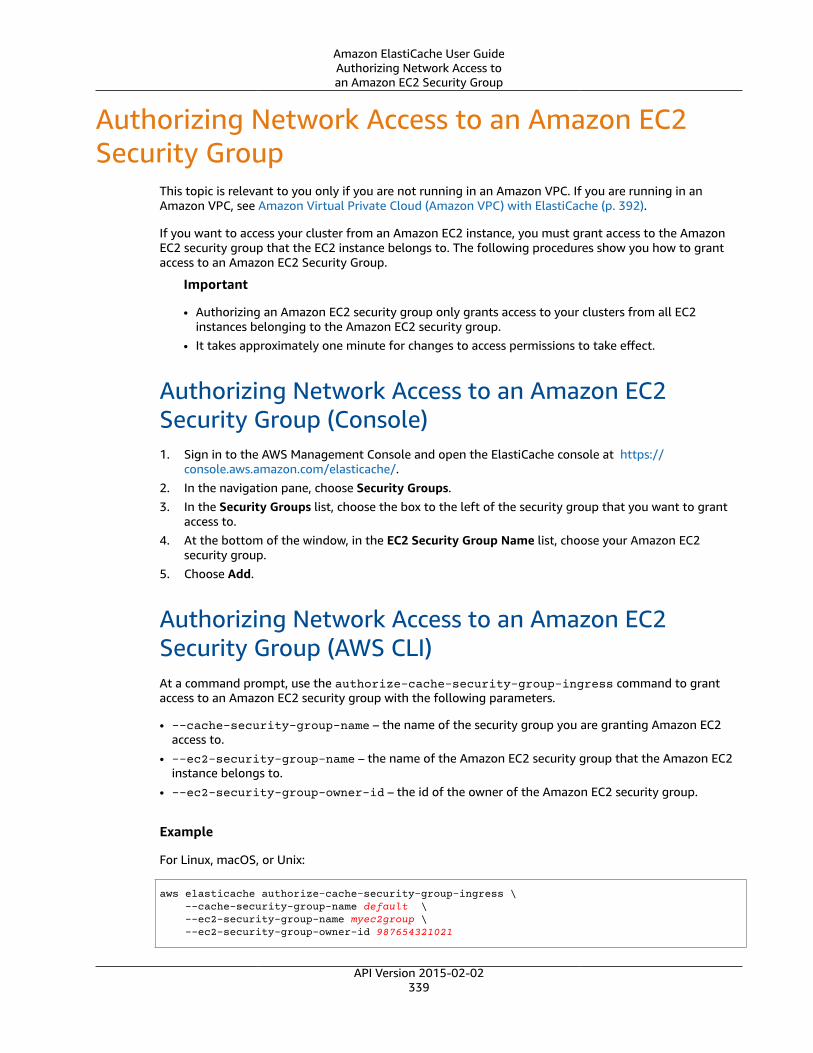
Amazon ElastiCache User GuideAuthorizing Network Access toan Amazon EC2 Security Group
Authorizing Network Access to an Amazon EC2Security Group
This topic is relevant to you only if you are not running in an Amazon VPC. If you are running in anAmazon VPC, see Amazon Virtual Private Cloud (Amazon VPC) with ElastiCache (p. 392).
If you want to access your cluster from an Amazon EC2 instance, you must grant access to the AmazonEC2 security group that the EC2 instance belongs to. The following procedures show you how to grantaccess to an Amazon EC2 Security Group.
Important
• Authorizing an Amazon EC2 security group only grants access to your clusters from all EC2instances belonging to the Amazon EC2 security group.
• It takes approximately one minute for changes to access permissions to take effect.
Authorizing Network Access to an Amazon EC2Security Group (Console)1. Sign in to the AWS Management Console and open the ElastiCache console at https://
console.aws.amazon.com/elasticache/.2. In the navigation pane, choose Security Groups.3. In the Security Groups list, choose the box to the left of the security group that you want to grant
access to.4. At the bottom of the window, in the EC2 Security Group Name list, choose your Amazon EC2
security group.5. Choose Add.
Authorizing Network Access to an Amazon EC2Security Group (AWS CLI)At a command prompt, use the authorize-cache-security-group-ingress command to grantaccess to an Amazon EC2 security group with the following parameters.
• --cache-security-group-name – the name of the security group you are granting Amazon EC2access to.
• --ec2-security-group-name – the name of the Amazon EC2 security group that the Amazon EC2instance belongs to.
• --ec2-security-group-owner-id – the id of the owner of the Amazon EC2 security group.
Example
For Linux, macOS, or Unix:
aws elasticache authorize-cache-security-group-ingress \ --cache-security-group-name default \ --ec2-security-group-name myec2group \ --ec2-security-group-owner-id 987654321021
API Version 2015-02-02339

Amazon ElastiCache User GuideUsing the ElastiCache API
For Windows:
aws elasticache authorize-cache-security-group-ingress ^ --cache-security-group-name default ^ --ec2-security-group-name myec2group ^ --ec2-security-group-owner-id 987654321021
The command should produce output similar to the following:
{ "CacheSecurityGroup": { "OwnerId": "OwnerId", "CacheSecurityGroupName": "CacheSecurityGroupName", "Description": "Description", "EC2SecurityGroups": [ { "Status": "available", "EC2SecurityGroupName": "EC2SecurityGroupName", "EC2SecurityGroupOwnerId": "EC2SecurityGroupOwnerId" } ] }}
For more information, see authorize-cache-security-group-ingress.
Authorizing Network Access to an Amazon EC2Security Group (ElastiCache API)Using the ElastiCache API, call AuthorizeCacheSecurityGroupIngress with the followingparameters:
• CacheSecurityGroupName – the name of the security group you are granting Amazon EC2 access to.• EC2SecurityGroupName – the name of the Amazon EC2 security group that the Amazon EC2
instance belongs to.• EC2SecurityGroupOwnerId – the id of the owner of the Amazon EC2 security group.
Example
https://elasticache.us-west-2.amazonaws.com/ ?Action=AuthorizeCacheSecurityGroupIngress &EC2SecurityGroupOwnerId=987654321021 &EC2SecurityGroupName=myec2group &Version=2015-02-02 &SignatureVersion=4 &SignatureMethod=HmacSHA256 &Timestamp=20150202T220302Z &X-Amz-Algorithm=AWS4-HMAC-SHA256 &X-Amz-Date=20150202T220302Z &X-Amz-SignedHeaders=Host &X-Amz-Expires=20150202T220302Z &X-Amz-Credential=<credential> &X-Amz-Signature=<signature>
For more information, see AuthorizeCacheSecurityGroupIngress.
API Version 2015-02-02340
Amazon ElastiCache User Guide
Parameters and Parameter GroupsAmazon ElastiCache uses parameters to control the runtime properties of your nodes and clusters.Generally, newer engine versions include additional parameters to support the newer functionality. Fortables of parameters by engine and version, see Memcached Specific Parameters (p. 357) and RedisSpecific Parameters (p. 366).
As you would expect, some parameter values, such as max_cache_memory, are determined by theengine and node type. For a table of these parameter values by node type, see Memcached Node-TypeSpecific Parameters (p. 364) and Redis Node-Type Specific Parameters (p. 381).
Topics• Parameter Management (p. 342)• Cache Parameter Group Tiers (p. 343)• Creating a Parameter Group (p. 344)• Listing Parameter Groups by Name (p. 347)• Listing a Parameter Group's Values (p. 350)• Modifying a Parameter Group (p. 352)• Deleting a Parameter Group (p. 355)• Memcached Specific Parameters (p. 357)• Redis Specific Parameters (p. 366)
API Version 2015-02-02341

Amazon ElastiCache User GuideParameter Management
Parameter ManagementParameters are grouped together into named parameter groups for easier parameter management.A parameter group represents a combination of specific values for the parameters that are passed tothe engine software during startup. These values determine how the engine processes on each nodewill behave at runtime. The parameter values on a specific parameter group apply to all nodes that areassociated with the group, regardless of which cluster they belong to.
To fine tune your cluster's performance, you can modify some parameter values or change the cluster'sparameter group.
Constraints
• You cannot modify or delete the default parameter groups. If you need custom parameter values, youmust create a custom parameter group.
• The parameter group family and the cluster you're assigning it to must be compatible. For example, ifyour cluster is running Redis version 2.8.6, you can only use parameter groups, default or custom, fromthe Redis 2.8 family, not the Redis 2.6 parameter group family.
• If you change a cluster's parameter group, the values for any conditionally modifiable parameter mustbe the same in both the current and new parameter groups.
• When running Redis 3.2.4 or later you have the option of running it as Redis (cluster mode disabled) orRedis (cluster mode enabled).• To run Redis (cluster mode disabled) use the parameter group default.redis3.2 or one derived
from it.• To run Redis (cluster mode enabled) use the parameter group default.redis3.2.cluster.on or
one derived from it.• When you make a change to a cluster's parameters, either by changing the cluster's parameter
group or by changing a parameter value in the cluster's parameter group, the changes are appliedto the cluster either immediately or after the cluster is restarted. To determine when a particularparameter change is applied, see the Changes Take Effect column in the tables for MemcachedSpecific Parameters (p. 357) and Redis Specific Parameters (p. 366). For information on rebooting acluster, go to Rebooting a Cluster (p. 186).
API Version 2015-02-02342

Amazon ElastiCache User GuideParameter Group Tiers
Cache Parameter Group TiersAmazon ElastiCache has three tiers of cache parameter groups as illustrated here.
Amazon ElastiCache parameter group tiers
Global Default
The top-level root parameter group for all Amazon ElastiCache customers in the region.
The global default cache parameter group:
• Is reserved for ElastiCache and not available to the customer.
Customer Default
A copy of the Global Default cache parameter group which is created for the customer's use.
The Customer Default cache parameter group:
• Is created and owned by ElastiCache.
• Is available to the customer for use as a cache parameter group for any clusters running an engineversion supported by this cache parameter group. For example, default.redis2.8 supports Redisengine versions 2.8.x.
• Cannot be edited by the customer.
Customer Owned
A copy of the Customer Default cache parameter group. A Customer Owned cache parameter group iscreated whenever the customer creates a cache parameter group.
The Customer Owned cache parameter group:
• Is created and owned by the customer.
• Can be assigned to any of the customer's compatible clusters. For example, a cache parameter groupcreated with the family redis2.8 is compatible with any cluster running Redis 2.8.x.
• Can be modified by the customer to create a custom cache parameter group.
Not all parameter values can be modified. For more information, see either Memcached SpecificParameters (p. 357) or Redis Specific Parameters (p. 366).
API Version 2015-02-02343

Amazon ElastiCache User GuideCreating a Parameter Group
Creating a Parameter GroupYou need to create a new parameter group if there is one or more parameter values that you wantchanged from the default values. You can create a parameter group using the ElastiCache console, theAWS CLI, or the ElastiCache API.
Creating a Parameter Group (Console)The following procedure shows how to create a parameter group using the ElastiCache console.
To create a parameter group using the ElastiCache console
1. Sign in to the AWS Management Console and open the ElastiCache console at https://console.aws.amazon.com/elasticache/.
2. To see a list of all available parameter groups, in the left hand navigation pane choose ParameterGroups.
3. To create a parameter group, choose Create Parameter Group.
The Create Parameter Group screen will appear.4. From the Family list, choose the parameter group family that will be the template for your
parameter group.
The parameter group family, such as redis2.8, defines the actual parameters in your parameter groupand their initial values. The parameter group family must coincide with the cluster's engine andversion. For example, you cannot create a parameter group with the family redis2.8 and use it withclusters running Redis version 2.6.
5. In the Name box, type in a unique name for this parameter group.
When creating a cluster or modifying a cluster's parameter group, you will choose the parametergroup by its name. Therefore, we recommend that the name be informative and somehow identifythe parameter group's family. For example, Redis2-8-24-Custom.
Parameter Group naming constraints
• Must begin with an ASCII letter.• Can only contain ASCII letters, digits, and hyphens.• Must be between 1 and 255 characters long.• Cannot contain two consecutive hyphens.• Cannot end with a hyphen.
6. In the Description box, type in a description for the parameter group.7. To create the parameter group, choose Create.
To terminate the process without creating the parameter group, choose Cancel.8. When the parameter group is created, it will have the family's default values. To change the default
values you must modify the parameter group. For more information, see Modifying a ParameterGroup (p. 352).
Creating a Parameter Group (AWS CLI)To create a parameter group using the AWS CLI, use the command create-cache-parameter-groupwith these parameters.
• --cache-parameter-group-name — The name of the parameter group.
API Version 2015-02-02344
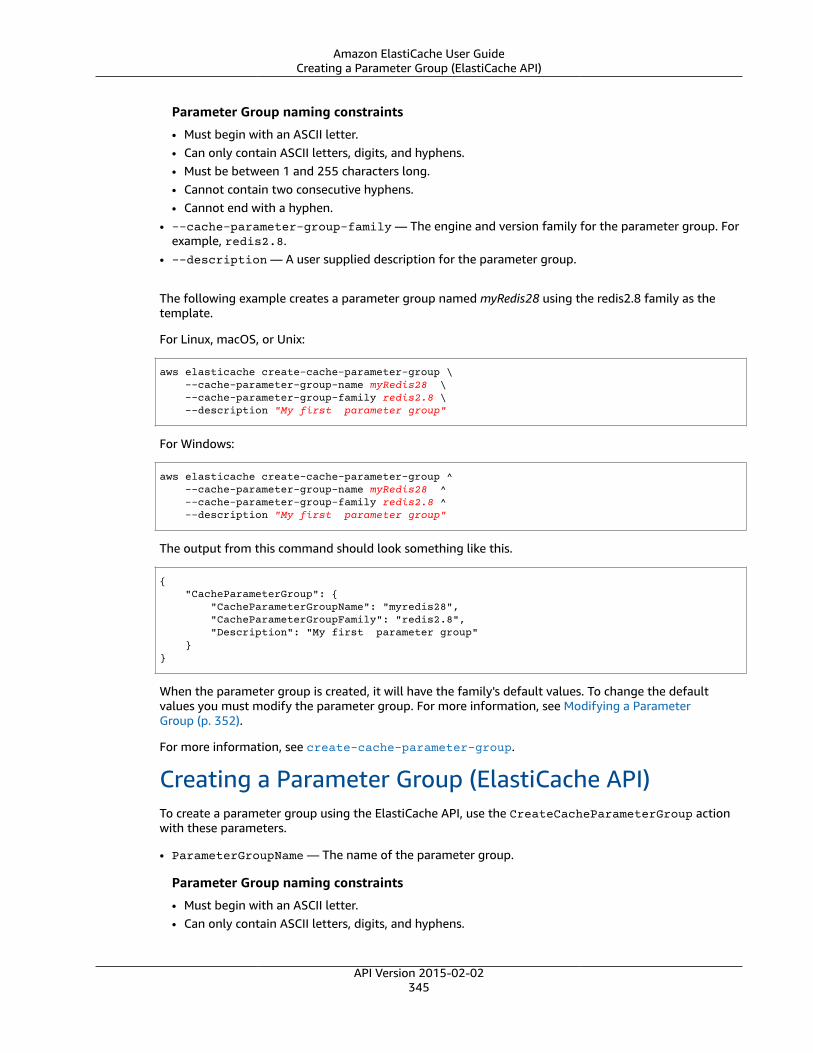
Amazon ElastiCache User GuideCreating a Parameter Group (ElastiCache API)
Parameter Group naming constraints
• Must begin with an ASCII letter.• Can only contain ASCII letters, digits, and hyphens.• Must be between 1 and 255 characters long.• Cannot contain two consecutive hyphens.• Cannot end with a hyphen.
• --cache-parameter-group-family — The engine and version family for the parameter group. Forexample, redis2.8.
• --description — A user supplied description for the parameter group.
The following example creates a parameter group named myRedis28 using the redis2.8 family as thetemplate.
For Linux, macOS, or Unix:
aws elasticache create-cache-parameter-group \ --cache-parameter-group-name myRedis28 \ --cache-parameter-group-family redis2.8 \ --description "My first parameter group"
For Windows:
aws elasticache create-cache-parameter-group ^ --cache-parameter-group-name myRedis28 ^ --cache-parameter-group-family redis2.8 ^ --description "My first parameter group"
The output from this command should look something like this.
{ "CacheParameterGroup": { "CacheParameterGroupName": "myredis28", "CacheParameterGroupFamily": "redis2.8", "Description": "My first parameter group" }}
When the parameter group is created, it will have the family's default values. To change the defaultvalues you must modify the parameter group. For more information, see Modifying a ParameterGroup (p. 352).
For more information, see create-cache-parameter-group.
Creating a Parameter Group (ElastiCache API)To create a parameter group using the ElastiCache API, use the CreateCacheParameterGroup actionwith these parameters.
• ParameterGroupName — The name of the parameter group.
Parameter Group naming constraints
• Must begin with an ASCII letter.• Can only contain ASCII letters, digits, and hyphens.
API Version 2015-02-02345

Amazon ElastiCache User GuideCreating a Parameter Group (ElastiCache API)
• Must be between 1 and 255 characters long.• Cannot contain two consecutive hyphens.• Cannot end with a hyphen.
• CacheParameterGroupFamily — The engine and version family for the parameter group. Forexample, redis2.8.
• Description — A user supplied description for the parameter group.
The following example creates a parameter group named myRedis28 using the redis2.8 family as thetemplate.
https://elasticache.us-west-2.amazonaws.com/ ?Action=CreateCacheParameterGroup &CacheParameterGroupFamily=redis2.8 &CacheParameterGroupName=myRedis28 &Description=My%20first%20parameter%20group &SignatureVersion=4 &SignatureMethod=HmacSHA256 &Timestamp=20150202T192317Z &Version=2015-02-02 &X-Amz-Credential=<credential>
The response from this action should look something like this.
<CreateCacheParameterGroupResponse xmlns="http://elasticache.amazonaws.com/doc/2013-06-15/"> <CreateCacheParameterGroupResult> <CacheParameterGroup> <CacheParameterGroupName>myRedis28</CacheParameterGroupName> <CacheParameterGroupFamily>redis2.8</CacheParameterGroupFamily> <Description>My first parameter group</Description> </CacheParameterGroup> </CreateCacheParameterGroupResult> <ResponseMetadata> <RequestId>d8465952-af48-11e0-8d36-859edca6f4b8</RequestId> </ResponseMetadata></CreateCacheParameterGroupResponse>
When the parameter group is created, it will have the family's default values. To change the defaultvalues you must modify the parameter group. For more information, see Modifying a ParameterGroup (p. 352).
For more information, see CreateCacheParameterGroup.
API Version 2015-02-02346
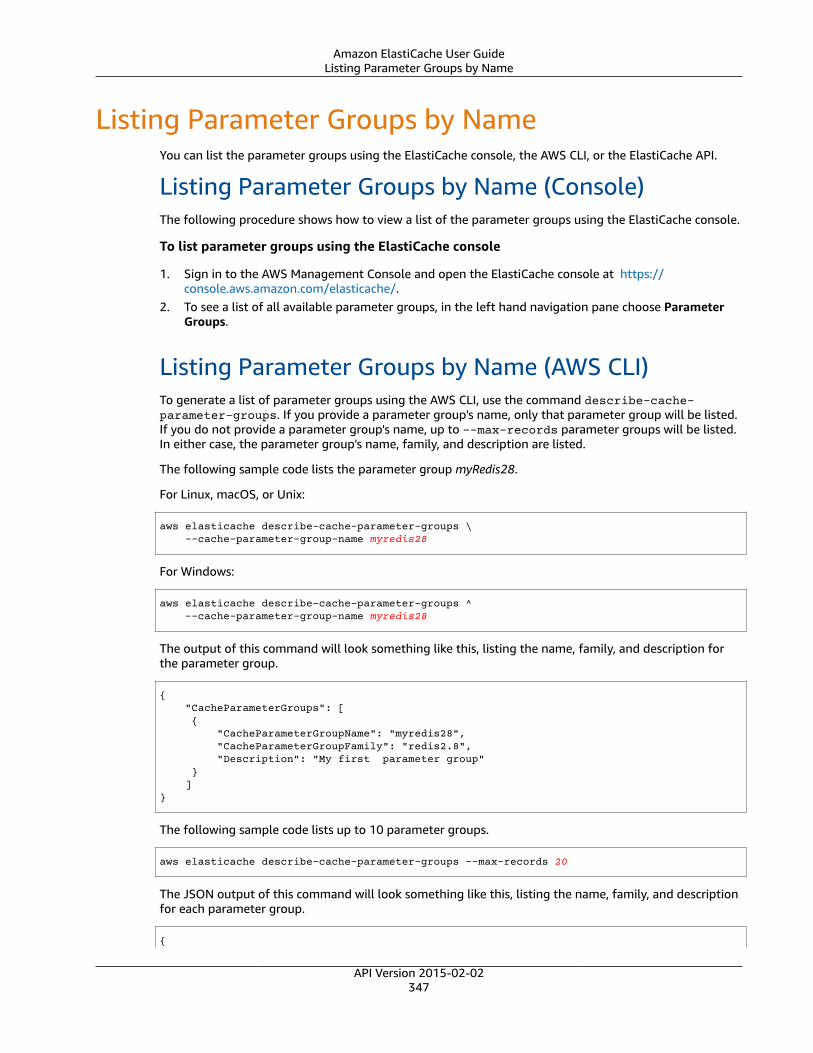
Amazon ElastiCache User GuideListing Parameter Groups by Name
Listing Parameter Groups by NameYou can list the parameter groups using the ElastiCache console, the AWS CLI, or the ElastiCache API.
Listing Parameter Groups by Name (Console)The following procedure shows how to view a list of the parameter groups using the ElastiCache console.
To list parameter groups using the ElastiCache console
1. Sign in to the AWS Management Console and open the ElastiCache console at https://console.aws.amazon.com/elasticache/.
2. To see a list of all available parameter groups, in the left hand navigation pane choose ParameterGroups.
Listing Parameter Groups by Name (AWS CLI)To generate a list of parameter groups using the AWS CLI, use the command describe-cache-parameter-groups. If you provide a parameter group's name, only that parameter group will be listed.If you do not provide a parameter group's name, up to --max-records parameter groups will be listed.In either case, the parameter group's name, family, and description are listed.
The following sample code lists the parameter group myRedis28.
For Linux, macOS, or Unix:
aws elasticache describe-cache-parameter-groups \ --cache-parameter-group-name myredis28
For Windows:
aws elasticache describe-cache-parameter-groups ^ --cache-parameter-group-name myredis28
The output of this command will look something like this, listing the name, family, and description forthe parameter group.
{ "CacheParameterGroups": [ { "CacheParameterGroupName": "myredis28", "CacheParameterGroupFamily": "redis2.8", "Description": "My first parameter group" } ]}
The following sample code lists up to 10 parameter groups.
aws elasticache describe-cache-parameter-groups --max-records 20
The JSON output of this command will look something like this, listing the name, family, and descriptionfor each parameter group.
{
API Version 2015-02-02347

Amazon ElastiCache User GuideListing Parameter Groups by Name (ElastiCache API)
"CacheParameterGroups": [ { "CacheParameterGroupName": "custom-redis32", "CacheParameterGroupFamily": "redis3.2", "Description": "custom parameter group with reserved-memory > 0" }, { "CacheParameterGroupName": "default.memcached1.4", "CacheParameterGroupFamily": "memcached1.4", "Description": "Default parameter group for memcached1.4" }, { "CacheParameterGroupName": "default.redis2.6", "CacheParameterGroupFamily": "redis2.6", "Description": "Default parameter group for redis2.6" }, { "CacheParameterGroupName": "default.redis2.8", "CacheParameterGroupFamily": "redis2.8", "Description": "Default parameter group for redis2.8" }, { "CacheParameterGroupName": "default.redis3.2", "CacheParameterGroupFamily": "redis3.2", "Description": "Default parameter group for redis3.2" }, { "CacheParameterGroupName": "default.redis3.2.cluster.on", "CacheParameterGroupFamily": "redis3.2", "Description": "Customized default parameter group for redis3.2 with cluster mode on" } ]}
For more information, see describe-cache-parameter-groups.
Listing Parameter Groups by Name (ElastiCache API)To generate a list of parameter groups using the ElastiCache API, use theDescribeCacheParameterGroups action. If you provide a parameter group's name, only thatparameter group will be listed. If you do not provide a parameter group's name, up to MaxRecordsparameter groups will be listed. In either case, the parameter group's name, family, and description arelisted.
The following sample code lists the parameter group myRedis28.
https://elasticache.us-west-2.amazonaws.com/ ?Action=DescribeCacheParameterGroups &CacheParameterGroupName=myRedis28 &SignatureVersion=4 &SignatureMethod=HmacSHA256 &Timestamp=20150202T192317Z &Version=2015-02-02 &X-Amz-Credential=<credential>
The response from this action will look something like this, listing the name, family, and description foreach parameter group.
<DescribeCacheParameterGroupsResponse xmlns="http://elasticache.amazonaws.com/doc/2013-06-15/">
API Version 2015-02-02348

Amazon ElastiCache User GuideListing Parameter Groups by Name (ElastiCache API)
<DescribeCacheParameterGroupsResult> <CacheParameterGroups> <CacheParameterGroup> <CacheParameterGroupName>myRedis28</CacheParameterGroupName> <CacheParameterGroupFamily>redis 2.8</CacheParameterGroupFamily> <Description>My Redis 2.8 parameter group</Description> </CacheParameterGroup> </CacheParameterGroups> </DescribeCacheParameterGroupsResult> <ResponseMetadata> <RequestId>3540cc3d-af48-11e0-97f9-279771c4477e</RequestId> </ResponseMetadata></DescribeCacheParameterGroupsResponse>
The following sample code lists up to 10 parameter groups.
https://elasticache.us-west-2.amazonaws.com/ ?Action=DescribeCacheParameterGroups &MaxRecords=10 &SignatureVersion=4 &SignatureMethod=HmacSHA256 &Timestamp=20150202T192317Z &Version=2015-02-02 &X-Amz-Credential=<credential>
The response from this action will look something like this, listing the name, family, and description foreach parameter group.
<DescribeCacheParameterGroupsResponse xmlns="http://elasticache.amazonaws.com/doc/2013-06-15/"> <DescribeCacheParameterGroupsResult> <CacheParameterGroups> <CacheParameterGroup> <CacheParameterGroupName>myRedis28</CacheParameterGroupName> <CacheParameterGroupFamily>redis2.8</CacheParameterGroupFamily> <Description>My Redis 2.8 parameter group</Description> </CacheParameterGroup> <CacheParameterGroup> <CacheParameterGroupName>myMem14</CacheParameterGroupName> <CacheParameterGroupFamily>memcached1.4</CacheParameterGroupFamily> <Description>My Memcached 1.4 parameter group</Description> </CacheParameterGroup> </CacheParameterGroups> </DescribeCacheParameterGroupsResult> <ResponseMetadata> <RequestId>3540cc3d-af48-11e0-97f9-279771c4477e</RequestId> </ResponseMetadata></DescribeCacheParameterGroupsResponse>
For more information, see DescribeCacheParameterGroups.
API Version 2015-02-02349

Amazon ElastiCache User GuideListing a Parameter Group's Values
Listing a Parameter Group's ValuesYou can list the parameters and their values for a parameter group using the ElastiCache console, theAWS CLI, or the ElastiCache API.
Listing a Parameter Group's Values (Console)The following procedure shows how to list the parameters and their values for a parameter group usingthe ElastiCache console.
To list a parameter group's parameters and their values using the ElastiCache console
1. Sign in to the AWS Management Console and open the ElastiCache console at https://console.aws.amazon.com/elasticache/.
2. To see a list of all available parameter groups, in the left hand navigation pane choose ParameterGroups.
3. Choose the parameter group for which you want to list the parameters and values by choosing thebox to the left of the parameter group's name.
The parameters and their values will be listed at the bottom of the screen. Due to the number ofparameters, you may have to scroll up and down to find the parameter you're interested in.
Listing a Parameter Group's Values (AWS CLI)To list a parameter group's parameters and their values using the AWS CLI, use the commanddescribe-cache-parameters.
The following sample code list all the parameters and their values for the parameter group myRedis28.
For Linux, macOS, or Unix:
aws elasticache describe-cache-parameters \ --cache-parameter-group-name myRedis28
For Windows:
aws elasticache describe-cache-parameters ^ --cache-parameter-group-name myRedis28
The output of this command will look something like this.
{ "Parameters": [ { "Description": "Apply rehashing or not.", "DataType": "string", "ChangeType": "requires-reboot", "IsModifiable": true, "AllowedValues": "yes,no", "Source": "system", "ParameterValue": "yes", "ParameterName": "activerehashing", "MinimumEngineVersion": "2.8.6" }, (...sample truncated...) { "Description": "Enable Redis persistence.",
API Version 2015-02-02350
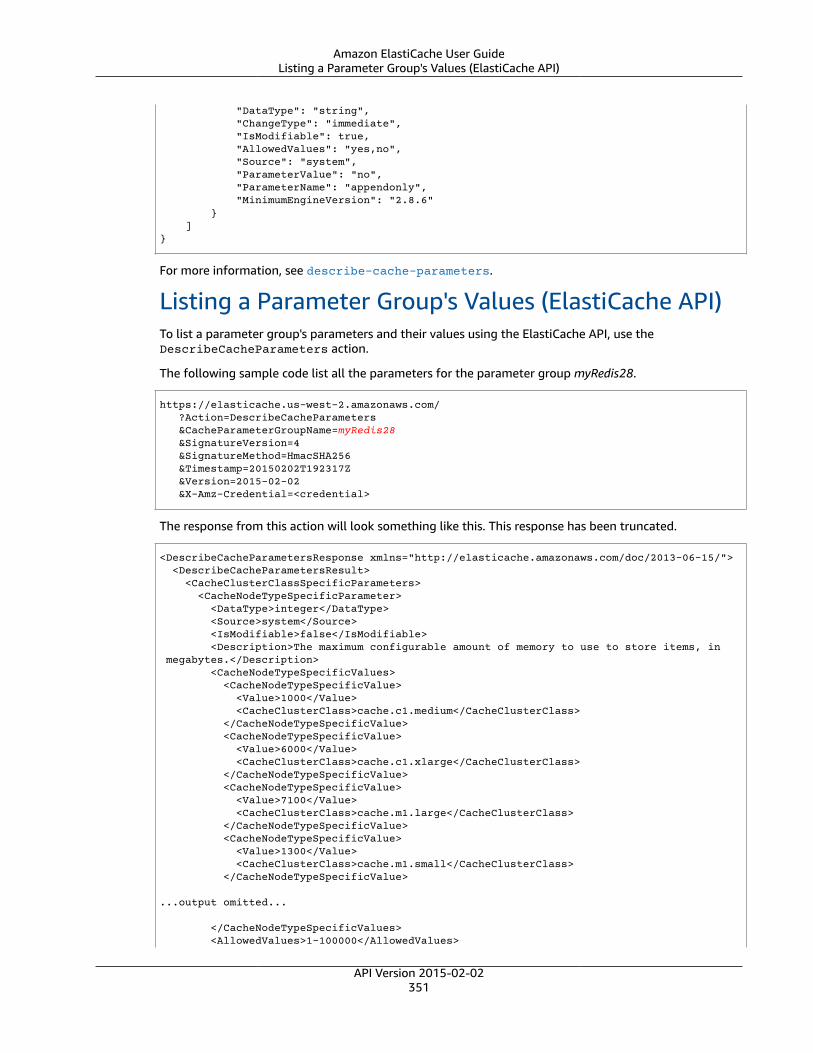
Amazon ElastiCache User GuideListing a Parameter Group's Values (ElastiCache API)
"DataType": "string", "ChangeType": "immediate", "IsModifiable": true, "AllowedValues": "yes,no", "Source": "system", "ParameterValue": "no", "ParameterName": "appendonly", "MinimumEngineVersion": "2.8.6" } ]}
For more information, see describe-cache-parameters.
Listing a Parameter Group's Values (ElastiCache API)To list a parameter group's parameters and their values using the ElastiCache API, use theDescribeCacheParameters action.
The following sample code list all the parameters for the parameter group myRedis28.
https://elasticache.us-west-2.amazonaws.com/ ?Action=DescribeCacheParameters &CacheParameterGroupName=myRedis28 &SignatureVersion=4 &SignatureMethod=HmacSHA256 &Timestamp=20150202T192317Z &Version=2015-02-02 &X-Amz-Credential=<credential>
The response from this action will look something like this. This response has been truncated.
<DescribeCacheParametersResponse xmlns="http://elasticache.amazonaws.com/doc/2013-06-15/"> <DescribeCacheParametersResult> <CacheClusterClassSpecificParameters> <CacheNodeTypeSpecificParameter> <DataType>integer</DataType> <Source>system</Source> <IsModifiable>false</IsModifiable> <Description>The maximum configurable amount of memory to use to store items, in megabytes.</Description> <CacheNodeTypeSpecificValues> <CacheNodeTypeSpecificValue> <Value>1000</Value> <CacheClusterClass>cache.c1.medium</CacheClusterClass> </CacheNodeTypeSpecificValue> <CacheNodeTypeSpecificValue> <Value>6000</Value> <CacheClusterClass>cache.c1.xlarge</CacheClusterClass> </CacheNodeTypeSpecificValue> <CacheNodeTypeSpecificValue> <Value>7100</Value> <CacheClusterClass>cache.m1.large</CacheClusterClass> </CacheNodeTypeSpecificValue> <CacheNodeTypeSpecificValue> <Value>1300</Value> <CacheClusterClass>cache.m1.small</CacheClusterClass> </CacheNodeTypeSpecificValue>
...output omitted...
</CacheNodeTypeSpecificValues> <AllowedValues>1-100000</AllowedValues>
API Version 2015-02-02351

Amazon ElastiCache User GuideModifying a Parameter Group
<ParameterName>max_cache_memory</ParameterName> <MinimumEngineVersion>1.4.5</MinimumEngineVersion> </CacheNodeTypeSpecificParameter> <CacheNodeTypeSpecificParameter> <DataType>integer</DataType> <Source>system</Source> <IsModifiable>false</IsModifiable> <Description>The number of memcached threads to use.</Description> <CacheNodeTypeSpecificValues> <CacheNodeTypeSpecificValue> <Value>2</Value> <CacheClusterClass>cache.c1.medium</CacheClusterClass> </CacheNodeTypeSpecificValue> <CacheNodeTypeSpecificValue> <Value>8</Value> <CacheClusterClass>cache.c1.xlarge</CacheClusterClass> </CacheNodeTypeSpecificValue>
...output omitted...
</CacheNodeTypeSpecificValues> <AllowedValues>1-8</AllowedValues> <ParameterName>num_threads</ParameterName> <MinimumEngineVersion>1.4.5</MinimumEngineVersion> </CacheNodeTypeSpecificParameter> </CacheClusterClassSpecificParameters> <Parameters> <Parameter> <ParameterValue>1024</ParameterValue> <DataType>integer</DataType> <Source>system</Source> <IsModifiable>false</IsModifiable> <Description>The backlog queue limit.</Description> <AllowedValues>1-10000</AllowedValues> <ParameterName>backlog_queue_limit</ParameterName> <MinimumEngineVersion>1.4.5</MinimumEngineVersion> </Parameter> <Parameter> <ParameterValue>auto</ParameterValue> <DataType>string</DataType> <Source>system</Source> <IsModifiable>false</IsModifiable> <Description>Binding protocol.</Description> <AllowedValues>auto,binary,ascii</AllowedValues> <ParameterName>binding_protocol</ParameterName> <MinimumEngineVersion>1.4.5</MinimumEngineVersion> </Parameter>
...output omitted...
</Parameters> </DescribeCacheParametersResult> <ResponseMetadata> <RequestId>6d355589-af49-11e0-97f9-279771c4477e</RequestId> </ResponseMetadata></DescribeCacheParametersResponse>
For more information, see DescribeCacheParameters.
Modifying a Parameter GroupImportantYou cannot modify any default parameter group.
API Version 2015-02-02352

Amazon ElastiCache User GuideModifying a Parameter Group (Console)
You can modify some parameter values in a parameter group. These parameter values are applied toclusters associated with the parameter group. For more information on when a parameter value changeis applied to a parameter group, see Memcached Specific Parameters (p. 357) and Redis SpecificParameters (p. 366).
Modifying a Parameter Group (Console)The following procedure shows how to change the binding_protocol parameter's value using theElastiCache console. You would use the same procedure to change the value of any parameter.
To change a parameter's value using the ElastiCache console
1. Sign in to the AWS Management Console and open the ElastiCache console at https://console.aws.amazon.com/elasticache/.
2. To see a list of all available parameter groups, in the left hand navigation pane choose ParameterGroups.
3. Choose the parameter group you want to modify by choosing the box to the left of the parametergroup's name.
The parameter group's parameters will be listed at the bottom of the screen. You may need to pagethrough the list to see all the parameters.
4. To modify one or more parameters, choose Edit Parameters.5. In the Edit Parameter Group: screen, scroll using the left and right arrows until you find the
binding_protocol parameter, then type ascii in the Value column.6. Choose Save Changes.7. Find the name of the parameter you changed in one of these topics:
• Memcached Specific Parameters (p. 357)• Redis Specific Parameters (p. 366)
If changes to the parameter take place After restart, reboot every cluster that uses this parametergroup. For more information, see Rebooting a Cluster (p. 186).
Modifying a Parameter Group (AWS CLI)To change a parameter's value using the AWS CLI, use the command modify-cache-parameter-group.
The following sample code sets the value of two parameters, reserved-memory-percent and cluster-enabled on the parameter group myredis32-on-30. We set reserved-memory-percent to 30 (30 percent)and cluster-enabled to yes so that the parameter group can be used with Redis (cluster mode enabled)clusters (replication groups).
For Linux, macOS, or Unix:
aws elasticache modify-cache-parameter-group \ --cache-parameter-group-name myredis32-on-30 \ --parameter-name-values \ ParameterName=reserved-memory-percent,ParameterValue=30 \ ParameterName=cluster-enabled,ParameterValue=yes
For Windows:
aws elasticache modify-cache-parameter-group ^
API Version 2015-02-02353

Amazon ElastiCache User GuideModifying a Parameter Group (ElastiCache API)
--cache-parameter-group-name myredis32-on-30 ^ --parameter-name-values ^ ParameterName=reserved-memory-percent,ParameterValue=30 ^ ParameterName=cluster-enabled,ParameterValue=yes
Output from this command will look something like this.
{ "CacheParameterGroupName": "my-redis32-on-30"}
For more information, see modify-cache-parameter-group.
Find the name and permitted values of the parameter you want to change in one of these topics:
• Memcached Specific Parameters (p. 357)• Redis Specific Parameters (p. 366)
If changes to the parameter take place After restart, reboot every cluster that uses this parameter group.For more information, see Rebooting a Cluster (p. 186).
Modifying a Parameter Group (ElastiCache API)To change a parameter group's parameter values using the ElastiCache API, use theModifyCacheParameterGroup action.
The following sample code sets the value of two parameters, reserved-memory-percent and cluster-enabled on the parameter group myredis32-on-30. We set reserved-memory-percent to 30 (30 percent)and cluster-enabled to yes so that the parameter group can be used with Redis (cluster mode enabled)clusters (replication groups).
https://elasticache.us-west-2.amazonaws.com/ ?Action=ModifyCacheParameterGroup &CacheParameterGroupName=myredis32-on-30 &ParameterNameValues.member.1.ParameterName=reserved-memory-percent &ParameterNameValues.member.1.ParameterValue=30 &ParameterNameValues.member.2.ParameterName=cluster-enabled &ParameterNameValues.member.2.ParameterValue=yes &SignatureVersion=4 &SignatureMethod=HmacSHA256 &Timestamp=20150202T192317Z &Version=2015-02-02 &X-Amz-Credential=<credential>
For more information, see ModifyCacheParameterGroup.
After updating and saving the parameter, if the change takes place only after a reboot, reboot eachcluster that uses the changed parameter group. For more information, see Rebooting a Cluster (p. 186).
Find the name of the parameter you changed in one of these topics:
• Memcached Specific Parameters (p. 357)• Redis Specific Parameters (p. 366)
If changes to the parameter take place After restart, reboot every cluster that uses this parameter group.For more information, see Rebooting a Cluster (p. 186).
API Version 2015-02-02354

Amazon ElastiCache User GuideDeleting a Parameter Group
Deleting a Parameter GroupYou can delete a custom parameter group using the ElastiCache console, the AWS CLI, or the ElastiCacheAPI.
You cannot delete a parameter group if it is associated with any clusters. Nor can you delete any of thedefault parameter groups.
Deleting a Parameter Group (Console)The following procedure shows how to delete a parameter group using the ElastiCache console.
To delete a parameter group using the ElastiCache console
1. Sign in to the AWS Management Console and open the ElastiCache console at https://console.aws.amazon.com/elasticache/.
2. To see a list of all available parameter groups, in the left hand navigation pane choose ParameterGroups.
3. Choose the parameter groups you want to delete by choosing the box to the left of the parametergroup's name.
The Delete button will become active.4. Choose Delete.
The Delete Parameter Groups confirmation screen will appear.5. To delete the parameter groups, on the Delete Parameter Groups confirmation screen, choose
Delete.
To keep the parameter groups, choose Cancel.
Deleting a Parameter Group (AWS CLI)To delete a parameter group using the AWS CLI, use the command delete-cache-parameter-group.For the parameter group to delete, the parameter group specified by --cache-parameter-group-name cannot have any clusters associated with it, nor can it be a default parameter group.
The following sample code deletes the myRedis28 parameter group.
For Linux, macOS, or Unix:
aws elasticache delete-cache-parameter-group \ --cache-parameter-group-name myRedis28
For Windows:
aws elasticache delete-cache-parameter-group ^ --cache-parameter-group-name myRedis28
For more information, see delete-cache-parameter-group.
Deleting a Parameter Group (ElastiCache API)To delete a parameter group using the ElastiCache API, use the DeleteCacheParameterGroup action.For the parameter group to delete, the parameter group specified by CacheParameterGroupNamecannot have any clusters associated with it, nor can it be a default parameter group.
API Version 2015-02-02355
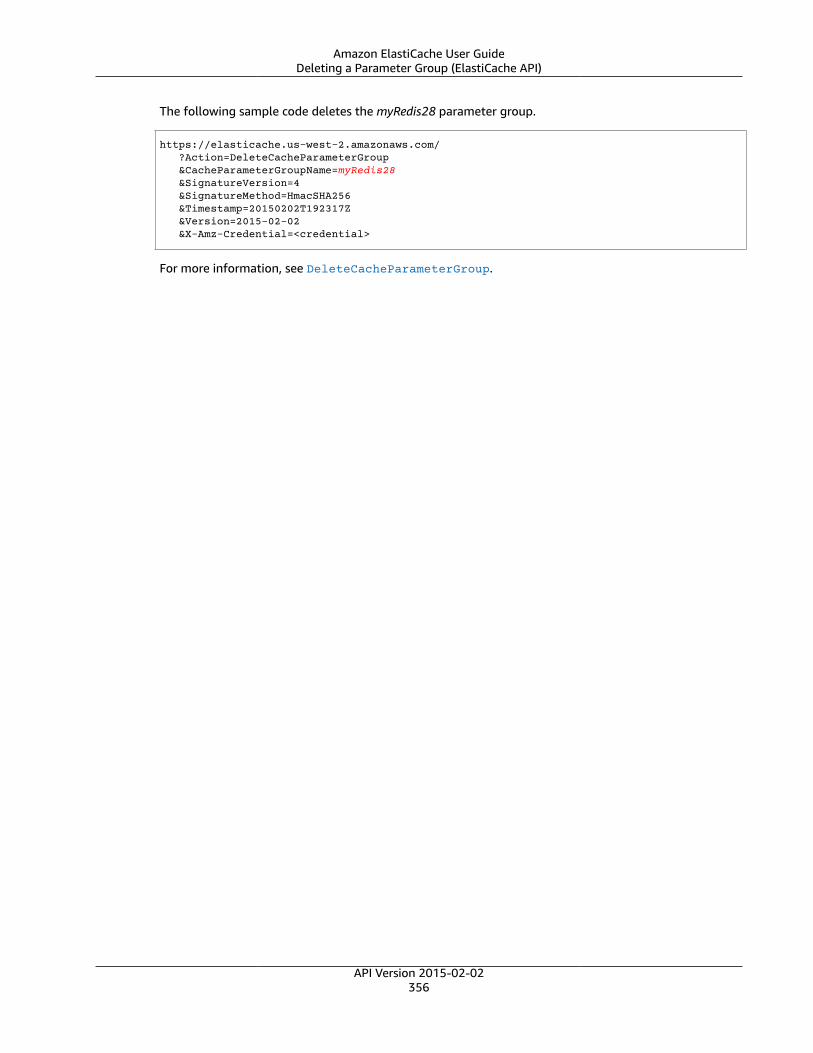
Amazon ElastiCache User GuideDeleting a Parameter Group (ElastiCache API)
The following sample code deletes the myRedis28 parameter group.
https://elasticache.us-west-2.amazonaws.com/ ?Action=DeleteCacheParameterGroup &CacheParameterGroupName=myRedis28 &SignatureVersion=4 &SignatureMethod=HmacSHA256 &Timestamp=20150202T192317Z &Version=2015-02-02 &X-Amz-Credential=<credential>
For more information, see DeleteCacheParameterGroup.
API Version 2015-02-02356

Amazon ElastiCache User GuideMemcached Specific Parameters
Memcached Specific ParametersIf you do not specify a parameter group for your Memcached cluster, then a default parameter group(default.memcached1.4) will be used. You cannot change the values of any parameters in a defaultparameter group; however, you can create a custom parameter group and assign it to your cluster at anytime.
Topics• Memcached 1.4.34 Added Parameters (p. 357)• Memcached 1.4.33 Added Parameters (p. 357)• Memcached 1.4.24 Added Parameters (p. 359)• Memcached 1.4.14 Added Parameters (p. 360)• Memcached 1.4.5 Supported Parameters (p. 361)• Memcached Connection Overhead (p. 363)• Memcached Node-Type Specific Parameters (p. 364)
Memcached 1.4.34 Added ParametersFor Memcached 1.4.34, no additional parameters are supported.
Parameter group family: memcached1.4
Memcached 1.4.33 Added ParametersFor Memcached 1.4.33, the following additional parameters are supported.
Parameter group family: memcached1.4
Name Details Description
modern Default: enabled
Type: boolean
Modifiable: Yes
Changes Take Effect: Atlaunch
An alias to multiple features.Enabling modern is equivalentto turning following commandson and using a murmur3 hashalgorithm: slab_reassign,slab_automove, lru_crawler,lru_maintainer, maxconns_fast,and hash_algorithm=murmur3.
watch Default: enabled
Type: boolean
Modifiable: Yes
Changes Take Effect: Immediately
Logs can get droppedif user hits theirwatcher_logbuf_sizeandworker_logbuf_sizelimits.
Logs fetches, evictions or mutations.When, for example, user turns watchon, they can see logs when get, set,delete, or update occur.
API Version 2015-02-02357
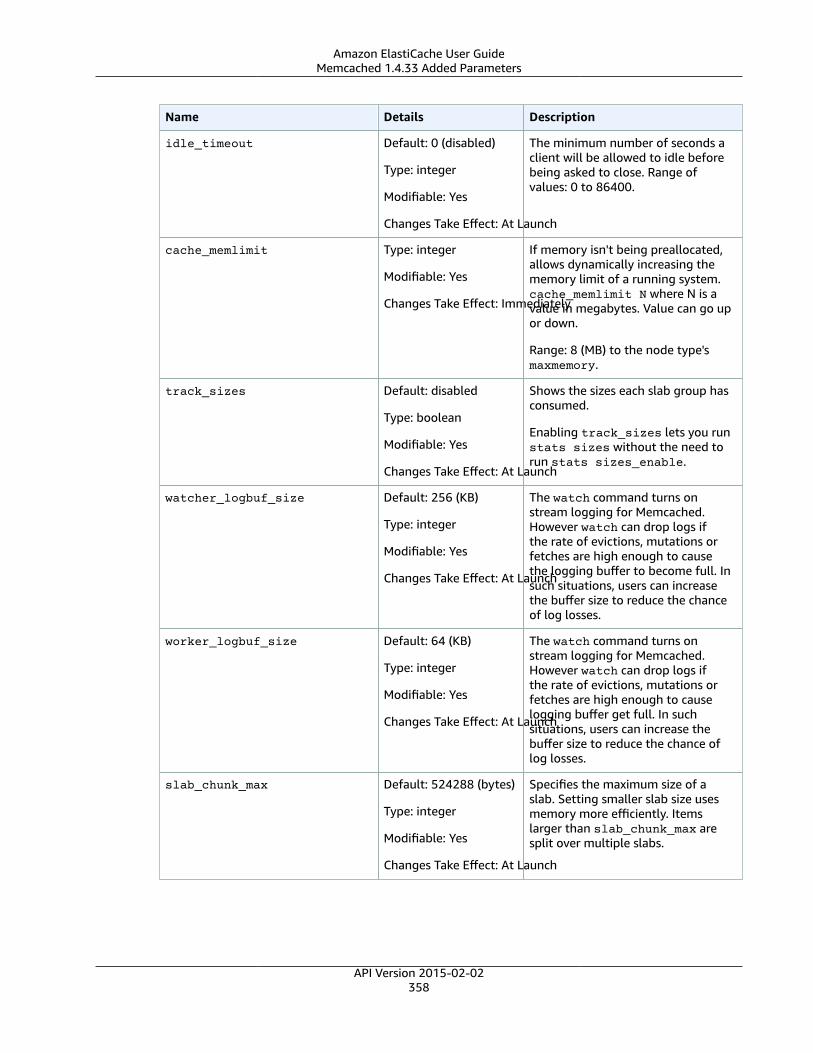
Amazon ElastiCache User GuideMemcached 1.4.33 Added Parameters
Name Details Description
idle_timeout Default: 0 (disabled)
Type: integer
Modifiable: Yes
Changes Take Effect: At Launch
The minimum number of seconds aclient will be allowed to idle beforebeing asked to close. Range ofvalues: 0 to 86400.
cache_memlimit Type: integer
Modifiable: Yes
Changes Take Effect: Immediately
If memory isn't being preallocated,allows dynamically increasing thememory limit of a running system.cache_memlimit N where N is avalue in megabytes. Value can go upor down.
Range: 8 (MB) to the node type'smaxmemory.
track_sizes Default: disabled
Type: boolean
Modifiable: Yes
Changes Take Effect: At Launch
Shows the sizes each slab group hasconsumed.
Enabling track_sizes lets you runstats sizes without the need torun stats sizes_enable.
watcher_logbuf_size Default: 256 (KB)
Type: integer
Modifiable: Yes
Changes Take Effect: At Launch
The watch command turns onstream logging for Memcached.However watch can drop logs ifthe rate of evictions, mutations orfetches are high enough to causethe logging buffer to become full. Insuch situations, users can increasethe buffer size to reduce the chanceof log losses.
worker_logbuf_size Default: 64 (KB)
Type: integer
Modifiable: Yes
Changes Take Effect: At Launch
The watch command turns onstream logging for Memcached.However watch can drop logs ifthe rate of evictions, mutations orfetches are high enough to causelogging buffer get full. In suchsituations, users can increase thebuffer size to reduce the chance oflog losses.
slab_chunk_max Default: 524288 (bytes)
Type: integer
Modifiable: Yes
Changes Take Effect: At Launch
Specifies the maximum size of aslab. Setting smaller slab size usesmemory more efficiently. Itemslarger than slab_chunk_max aresplit over multiple slabs.
API Version 2015-02-02358
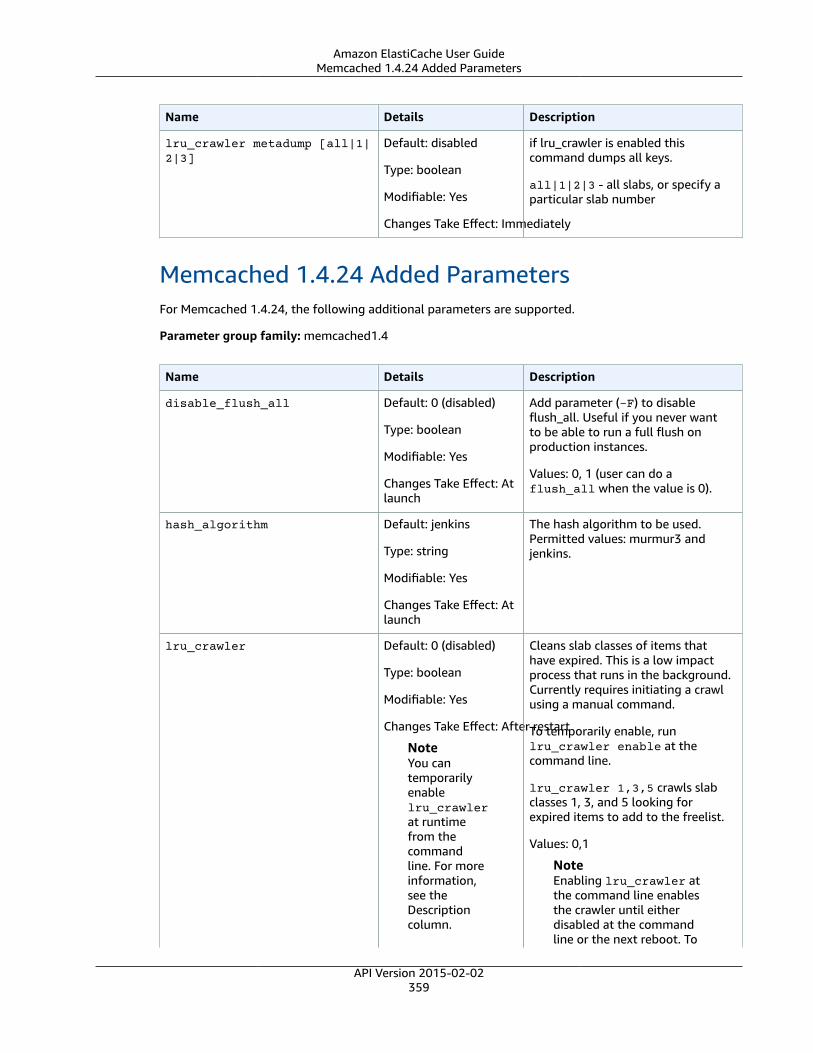
Amazon ElastiCache User GuideMemcached 1.4.24 Added Parameters
Name Details Description
lru_crawler metadump [all|1|2|3]
Default: disabled
Type: boolean
Modifiable: Yes
Changes Take Effect: Immediately
if lru_crawler is enabled thiscommand dumps all keys.
all|1|2|3 - all slabs, or specify aparticular slab number
Memcached 1.4.24 Added ParametersFor Memcached 1.4.24, the following additional parameters are supported.
Parameter group family: memcached1.4
Name Details Description
disable_flush_all Default: 0 (disabled)
Type: boolean
Modifiable: Yes
Changes Take Effect: Atlaunch
Add parameter (-F) to disableflush_all. Useful if you never wantto be able to run a full flush onproduction instances.
Values: 0, 1 (user can do aflush_all when the value is 0).
hash_algorithm Default: jenkins
Type: string
Modifiable: Yes
Changes Take Effect: Atlaunch
The hash algorithm to be used.Permitted values: murmur3 andjenkins.
lru_crawler Default: 0 (disabled)
Type: boolean
Modifiable: Yes
Changes Take Effect: After restart
NoteYou cantemporarilyenablelru_crawlerat runtimefrom thecommandline. For moreinformation,see theDescriptioncolumn.
Cleans slab classes of items thathave expired. This is a low impactprocess that runs in the background.Currently requires initiating a crawlusing a manual command.
To temporarily enable, runlru_crawler enable at thecommand line.
lru_crawler 1,3,5 crawls slabclasses 1, 3, and 5 looking forexpired items to add to the freelist.
Values: 0,1
NoteEnabling lru_crawler atthe command line enablesthe crawler until eitherdisabled at the commandline or the next reboot. To
API Version 2015-02-02359
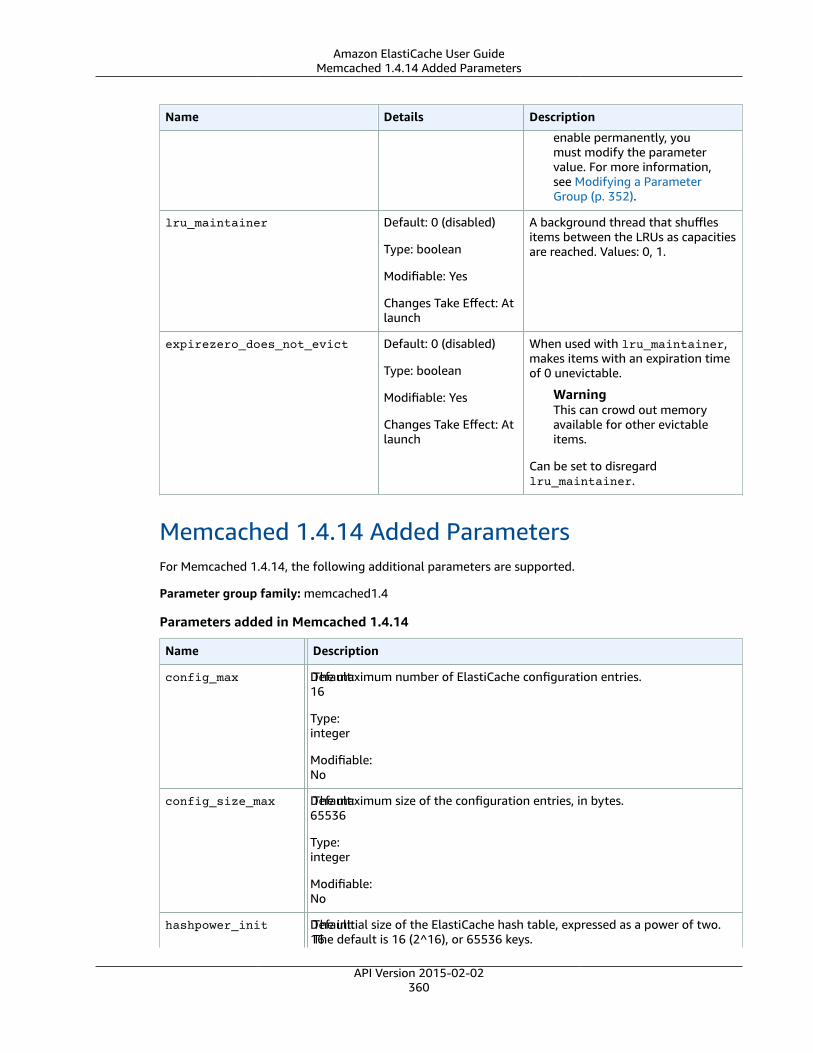
Amazon ElastiCache User GuideMemcached 1.4.14 Added Parameters
Name Details Description
enable permanently, youmust modify the parametervalue. For more information,see Modifying a ParameterGroup (p. 352).
lru_maintainer Default: 0 (disabled)
Type: boolean
Modifiable: Yes
Changes Take Effect: Atlaunch
A background thread that shufflesitems between the LRUs as capacitiesare reached. Values: 0, 1.
expirezero_does_not_evict Default: 0 (disabled)
Type: boolean
Modifiable: Yes
Changes Take Effect: Atlaunch
When used with lru_maintainer,makes items with an expiration timeof 0 unevictable.
WarningThis can crowd out memoryavailable for other evictableitems.
Can be set to disregardlru_maintainer.
Memcached 1.4.14 Added ParametersFor Memcached 1.4.14, the following additional parameters are supported.
Parameter group family: memcached1.4
Parameters added in Memcached 1.4.14
Name DetailsDescription
config_max Default:16
Type:integer
Modifiable:No
The maximum number of ElastiCache configuration entries.
config_size_max Default:65536
Type:integer
Modifiable:No
The maximum size of the configuration entries, in bytes.
hashpower_init Default:16The initial size of the ElastiCache hash table, expressed as a power of two.The default is 16 (2^16), or 65536 keys.
API Version 2015-02-02360

Amazon ElastiCache User GuideMemcached 1.4.5 Supported Parameters
Name DetailsDescription
Type:integer
Modifiable:No
maxconns_fast Default:0 (false)
Type:Boolean
Modifiable:Yes
Changes Take Effect: After restart
Changes the way in which new connections requests are handled when themaximum connection limit is reached. If this parameter is set to 0 (zero),new connections are added to the backlog queue and will wait until otherconnections are closed. If the parameter is set to 1, ElastiCache sends anerror to the client and immediately closes the connection.
slab_automove Default:0
Type:integer
Modifiable:Yes
Changes Take Effect: After restart
Adjusts the slab automove algorithm: If this parameter is set to 0 (zero),the automove algorithm is disabled. If it is set to 1, ElastiCache takes aslow, conservative approach to automatically moving slabs. If it is set to 2,ElastiCache aggressively moves slabs whenever there is an eviction. (Thismode is not recommended except for testing purposes.)
slab_reassign Default:0 (false)
Type:Boolean
Modifiable:Yes
Changes Take Effect: After restart
Enable or disable slab reassignment. If this parameter is set to 1, you canuse the "slabs reassign" command to manually reassign memory.
Memcached 1.4.5 Supported ParametersParameter group family: memcached1.4
For Memcached 1.4.5, the following parameters are supported.
Parameters added in Memcached 1.4.5
Name Details Description
backlog_queue_limitDefault: 1024
Type: integer
Modifiable: No
The backlog queue limit.
binding_protocolDefault: auto
Type: string
The binding protocol.
Permissible values are: ascii and auto.
API Version 2015-02-02361
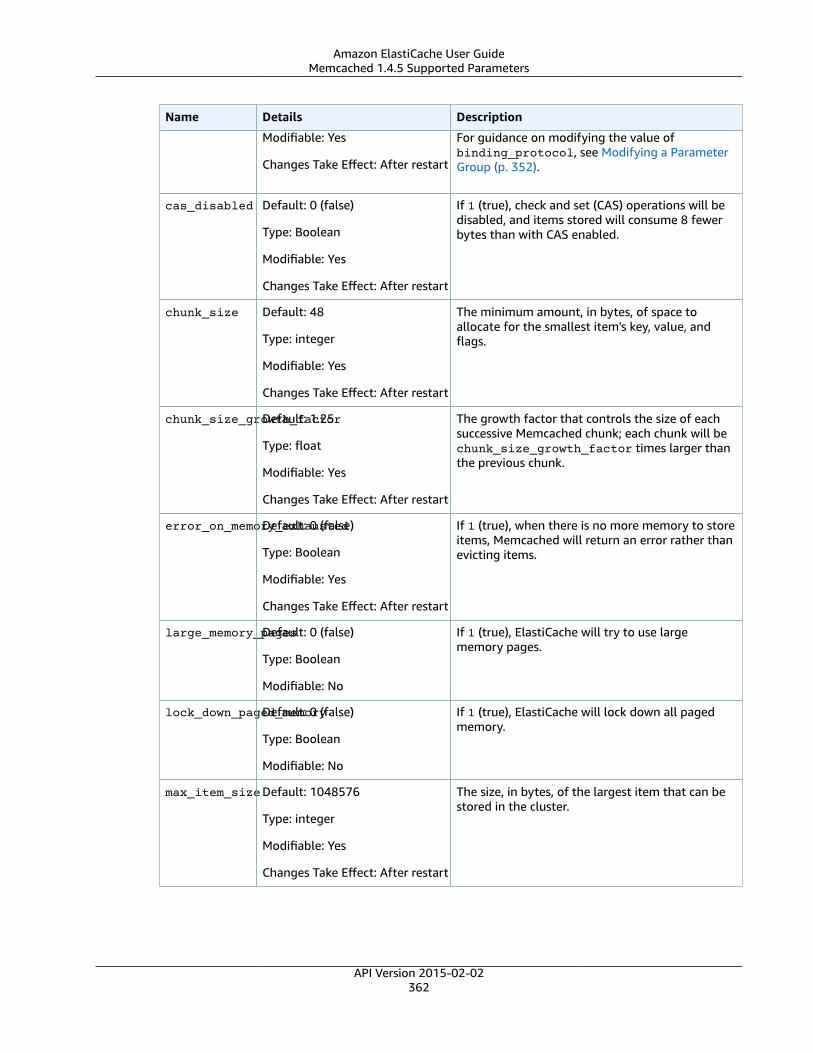
Amazon ElastiCache User GuideMemcached 1.4.5 Supported Parameters
Name Details Description
Modifiable: Yes
Changes Take Effect: After restart
For guidance on modifying the value ofbinding_protocol, see Modifying a ParameterGroup (p. 352).
cas_disabled Default: 0 (false)
Type: Boolean
Modifiable: Yes
Changes Take Effect: After restart
If 1 (true), check and set (CAS) operations will bedisabled, and items stored will consume 8 fewerbytes than with CAS enabled.
chunk_size Default: 48
Type: integer
Modifiable: Yes
Changes Take Effect: After restart
The minimum amount, in bytes, of space toallocate for the smallest item's key, value, andflags.
chunk_size_growth_factorDefault: 1.25
Type: float
Modifiable: Yes
Changes Take Effect: After restart
The growth factor that controls the size of eachsuccessive Memcached chunk; each chunk will bechunk_size_growth_factor times larger thanthe previous chunk.
error_on_memory_exhaustedDefault: 0 (false)
Type: Boolean
Modifiable: Yes
Changes Take Effect: After restart
If 1 (true), when there is no more memory to storeitems, Memcached will return an error rather thanevicting items.
large_memory_pagesDefault: 0 (false)
Type: Boolean
Modifiable: No
If 1 (true), ElastiCache will try to use largememory pages.
lock_down_paged_memoryDefault: 0 (false)
Type: Boolean
Modifiable: No
If 1 (true), ElastiCache will lock down all pagedmemory.
max_item_sizeDefault: 1048576
Type: integer
Modifiable: Yes
Changes Take Effect: After restart
The size, in bytes, of the largest item that can bestored in the cluster.
API Version 2015-02-02362

Amazon ElastiCache User GuideMemcached Connection Overhead
Name Details Description
max_simultaneous_connectionsDefault: 65000
Type: integer
Modifiable: No
The maximum number of simultaneousconnections.
maximize_core_file_limitDefault: 0 (false)
Type: Boolean
Modifiable:
Changes Take Effect: No
If 1 (true), ElastiCache will maximize the core filelimit.
memcached_connections_overheadDefault: 100
Type: integer
Modifiable: Yes
Changes Take Effect: After restart
The amount of memory to be reserved forMemcached connections and other miscellaneousoverhead. For information about this parameter,see Memcached Connection Overhead (p. 363).
requests_per_eventDefault: 20
Type: integer
Modifiable: No
The maximum number of requests per event for agiven connection. This limit is required to preventresource starvation.
Memcached Connection OverheadOn each node, the memory made available for storing items is the total available memory on thatnode (which is stored in the max_cache_memory parameter) minus the memory used for connectionsand other overhead (which is stored in the memcached_connections_overhead parameter). Forexample, a node of type cache.m1.small has a max_cache_memory of 1300MB. With the defaultmemcached_connections_overhead value of 100MB, the Memcached process will have 1200MBavailable to store items.
The default values for the memcached_connections_overhead parameter satisfy most use cases;however, the required amount of allocation for connection overhead can vary depending on multiplefactors, including request rate, payload size, and the number of connections.
You can change the value of the memcached_connections_overhead to better suit the needs ofyour application. For example, increasing the value of the memcached_connections_overheadparameter will reduce the amount of memory available for storing items and provide a larger buffer forconnection overhead. Decreasing the value of the memcached_connections_overhead parameterwill give you more memory to store items, but can increase your risk of swap usage and degradedperformance. If you observe swap usage and degraded performance, try increasing the value of thememcached_connections_overhead parameter.
ImportantFor the cache.t1.micro node type, the value for memcached_connections_overhead isdetermined as follows:
• If you cluster is using the default parameter group, ElastiCache will set the value formemcached_connections_overhead to 13MB.
• If your cluster is using a parameter group that you have created yourself, you can set the valueof memcached_connections_overhead to a value of your choice.
API Version 2015-02-02363

Amazon ElastiCache User GuideMemcached Node-Type Specific Parameters
Memcached Node-Type Specific ParametersAlthough most parameters have a single value, some parameters have different values depending onthe node type used. The following table shows the default values for the max_cache_memory andnum_threads parameters for each node type. The values on these parameters cannot be modified.
Node Type-Specific Parameters
Node Type max_cache_memory (MiB) num-threads
cache.t1.micro 213 1
cache.t2.micro 555 1
cache.t2.small 1588 1
cache.t2.medium 3301 2
cache.m1.small 1300 1
cache.m1.medium 3350 1
cache.m1.large 7100 2
cache.m1.xlarge 14600 4
cache.m2.xlarge 16700 2
cache.m2.2xlarge 33800 4
cache.m2.4xlarge 68000 8
cache.m3.medium 2850 1
cache.m3.large 6200 2
cache.m3.xlarge 13600 4
cache.m3.2xlarge 28600 8
cache.m4.large 6573 2
cache.m4.xlarge 14618 4
cache.m4.2xlarge 30412 8
cache.m4.4xlarge 62234 16
cache.m4.10xlarge 158355 40
cache.c1.xlarge 6600 8
cache.r3.large 13800 2
cache.r3.xlarge 29100 4
cache.r3.2xlarge 59600 8
cache.r3.4xlarge 120600 16
cache.r3.8xlarge 242600 32
cache.r4.large 12590 2
API Version 2015-02-02364

Amazon ElastiCache User GuideMemcached Node-Type Specific Parameters
Node Type max_cache_memory (MiB) num-threads
cache.r4.xlarge 25652 4
cache.r4.2xlarge 51686 8
cache.r4.4xlarge 103815 16
cache.r4.8xlarge 208144 32
cache.r4.16xlarge 416776 64
NoteAll T2 instances are created in an Amazon Virtual Private Cloud (Amazon VPC).
API Version 2015-02-02365

Amazon ElastiCache User GuideRedis Specific Parameters
Redis Specific ParametersIf you do not specify a parameter group for your Redis cluster, then a default parameter group will beused (either default.redis2.6, default.redis2.8, or default.redis3.2. You cannot change thevalues of any parameters in the default parameter group; however, you can create a custom parametergroup and assign it to your cluster at any time as long as the values of conditionally modifiableparameters are the same in both parameter groups.
Contents• Redis 3.2.10 Parameter Changes (p. 367)• Redis 3.2.6 Parameter Changes (p. 367)• Redis 3.2.4 Parameter Changes (p. 367)
• New Parameters for Redis 3.2.4 (p. 367)• Parameters Changed in Redis 3.2.4 (Enhanced) (p. 369)
• Redis 2.8.24 (Enhanced) Added Parameters (p. 370)• Redis 2.8.23 (Enhanced) Added Parameters (p. 370)
• How close-on-slave-write works (p. 370)• Why disable close-on-slave-write? (p. 372)
• Redis 2.8.22 (Enhanced) Added Parameters (p. 372)• Redis 2.8.21 Added Parameters (p. 372)• Redis 2.8.19 Added Parameters (p. 372)• Redis 2.8.6 Added Parameters (p. 372)• Redis 2.6.13 Parameters (p. 375)• Redis Node-Type Specific Parameters (p. 381)
NoteBecause the newer Redis versions provide a better and more stable user experience, Redisversions 2.6.13, 2.8.6, and 2.8.19 are deprecated when using the ElastiCache console. Werecommend against using these Redis versions. If you need to use one of them, work with theAWS CLI or ElastiCache API.For more information, see the following topics:
AWS CLI ElastiCache API
Create Cluster Creating a Cache Cluster(AWS CLI) (p. 172)
This action cannot be usedto create a replication groupwith cluster mode enabled.
Creating a Cache Cluster(ElastiCache API) (p. 174)
This action cannot be usedto create a replication groupwith cluster mode enabled.
Modify Cluster Modifying a Cache Cluster(AWS CLI) (p. 184)
This action cannot be usedto create a replication groupwith cluster mode enabled.
Modifying a Cache Cluster(ElastiCache API) (p. 185)
This action cannot be usedto create a replication groupwith cluster mode enabled.
Create Replication Group Creating a Redis (clustermode disabled) Cluster withReplicas from Scratch (AWSCLI) (p. 265)
Creating a Redis (clustermode disabled) Clusterwith Replicas from Scratch(ElastiCache API) (p. 268)
API Version 2015-02-02366
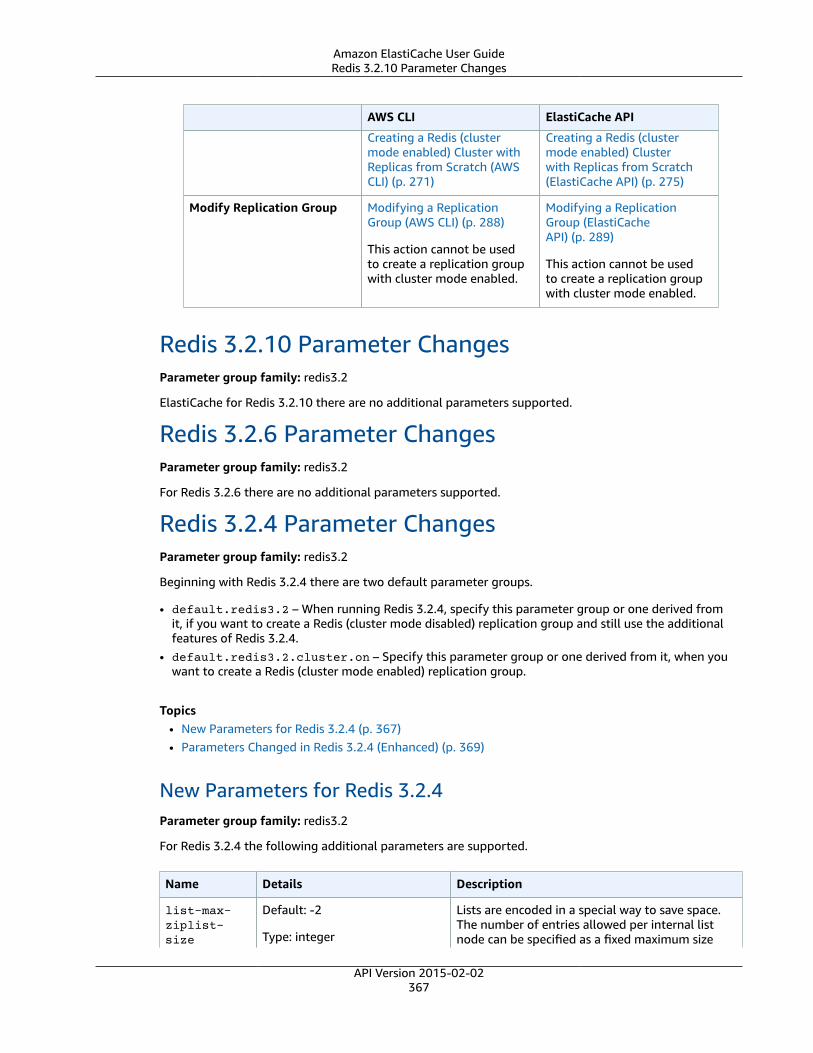
Amazon ElastiCache User GuideRedis 3.2.10 Parameter Changes
AWS CLI ElastiCache API
Creating a Redis (clustermode enabled) Cluster withReplicas from Scratch (AWSCLI) (p. 271)
Creating a Redis (clustermode enabled) Clusterwith Replicas from Scratch(ElastiCache API) (p. 275)
Modify Replication Group Modifying a ReplicationGroup (AWS CLI) (p. 288)
This action cannot be usedto create a replication groupwith cluster mode enabled.
Modifying a ReplicationGroup (ElastiCacheAPI) (p. 289)
This action cannot be usedto create a replication groupwith cluster mode enabled.
Redis 3.2.10 Parameter ChangesParameter group family: redis3.2
ElastiCache for Redis 3.2.10 there are no additional parameters supported.
Redis 3.2.6 Parameter ChangesParameter group family: redis3.2
For Redis 3.2.6 there are no additional parameters supported.
Redis 3.2.4 Parameter ChangesParameter group family: redis3.2
Beginning with Redis 3.2.4 there are two default parameter groups.
• default.redis3.2 – When running Redis 3.2.4, specify this parameter group or one derived fromit, if you want to create a Redis (cluster mode disabled) replication group and still use the additionalfeatures of Redis 3.2.4.
• default.redis3.2.cluster.on – Specify this parameter group or one derived from it, when youwant to create a Redis (cluster mode enabled) replication group.
Topics• New Parameters for Redis 3.2.4 (p. 367)• Parameters Changed in Redis 3.2.4 (Enhanced) (p. 369)
New Parameters for Redis 3.2.4Parameter group family: redis3.2
For Redis 3.2.4 the following additional parameters are supported.
Name Details Description
list-max-ziplist-size
Default: -2
Type: integer
Lists are encoded in a special way to save space.The number of entries allowed per internal listnode can be specified as a fixed maximum size
API Version 2015-02-02367
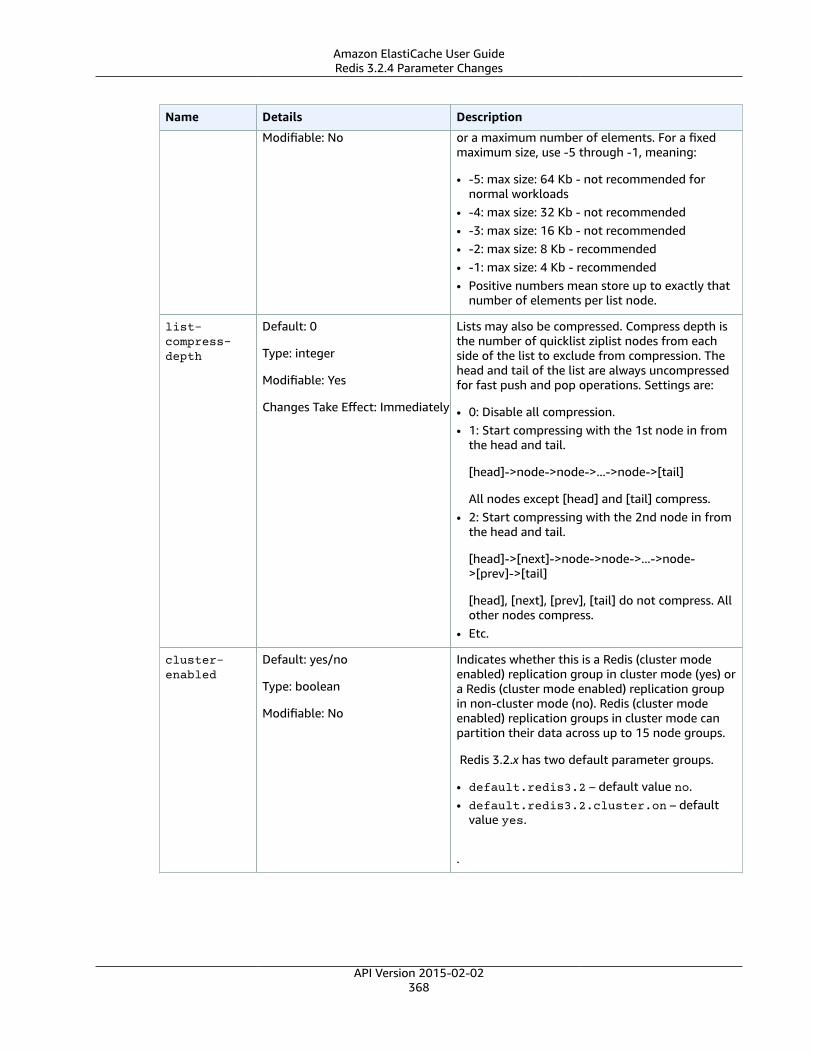
Amazon ElastiCache User GuideRedis 3.2.4 Parameter Changes
Name Details Description
Modifiable: No or a maximum number of elements. For a fixedmaximum size, use -5 through -1, meaning:
• -5: max size: 64 Kb - not recommended fornormal workloads
• -4: max size: 32 Kb - not recommended• -3: max size: 16 Kb - not recommended• -2: max size: 8 Kb - recommended• -1: max size: 4 Kb - recommended• Positive numbers mean store up to exactly that
number of elements per list node.
list-compress-depth
Default: 0
Type: integer
Modifiable: Yes
Changes Take Effect: Immediately
Lists may also be compressed. Compress depth isthe number of quicklist ziplist nodes from eachside of the list to exclude from compression. Thehead and tail of the list are always uncompressedfor fast push and pop operations. Settings are:
• 0: Disable all compression.• 1: Start compressing with the 1st node in from
the head and tail.
[head]->node->node->...->node->[tail]
All nodes except [head] and [tail] compress.• 2: Start compressing with the 2nd node in from
the head and tail.
[head]->[next]->node->node->...->node->[prev]->[tail]
[head], [next], [prev], [tail] do not compress. Allother nodes compress.
• Etc.
cluster-enabled
Default: yes/no
Type: boolean
Modifiable: No
Indicates whether this is a Redis (cluster modeenabled) replication group in cluster mode (yes) ora Redis (cluster mode enabled) replication groupin non-cluster mode (no). Redis (cluster modeenabled) replication groups in cluster mode canpartition their data across up to 15 node groups.
Redis 3.2.x has two default parameter groups.
• default.redis3.2 – default value no.• default.redis3.2.cluster.on – default
value yes.
.
API Version 2015-02-02368
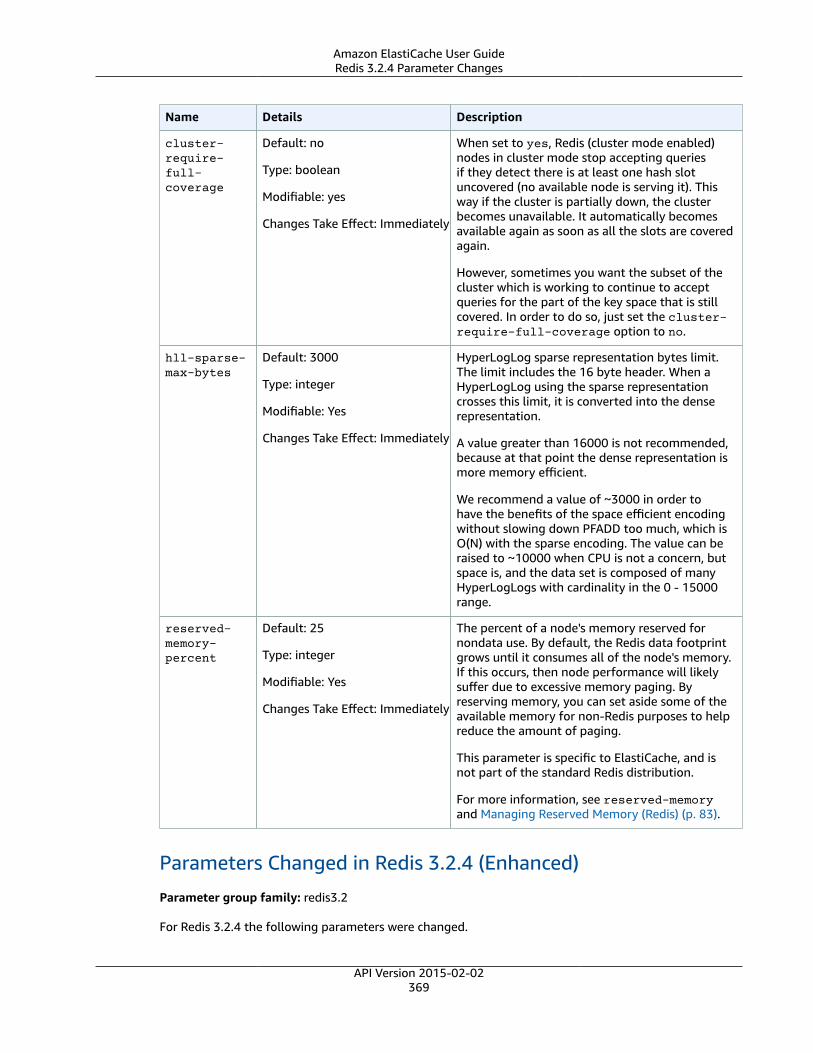
Amazon ElastiCache User GuideRedis 3.2.4 Parameter Changes
Name Details Description
cluster-require-full-coverage
Default: no
Type: boolean
Modifiable: yes
Changes Take Effect: Immediately
When set to yes, Redis (cluster mode enabled)nodes in cluster mode stop accepting queriesif they detect there is at least one hash slotuncovered (no available node is serving it). Thisway if the cluster is partially down, the clusterbecomes unavailable. It automatically becomesavailable again as soon as all the slots are coveredagain.
However, sometimes you want the subset of thecluster which is working to continue to acceptqueries for the part of the key space that is stillcovered. In order to do so, just set the cluster-require-full-coverage option to no.
hll-sparse-max-bytes
Default: 3000
Type: integer
Modifiable: Yes
Changes Take Effect: Immediately
HyperLogLog sparse representation bytes limit.The limit includes the 16 byte header. When aHyperLogLog using the sparse representationcrosses this limit, it is converted into the denserepresentation.
A value greater than 16000 is not recommended,because at that point the dense representation ismore memory efficient.
We recommend a value of ~3000 in order tohave the benefits of the space efficient encodingwithout slowing down PFADD too much, which isO(N) with the sparse encoding. The value can beraised to ~10000 when CPU is not a concern, butspace is, and the data set is composed of manyHyperLogLogs with cardinality in the 0 - 15000range.
reserved-memory-percent
Default: 25
Type: integer
Modifiable: Yes
Changes Take Effect: Immediately
The percent of a node's memory reserved fornondata use. By default, the Redis data footprintgrows until it consumes all of the node's memory.If this occurs, then node performance will likelysuffer due to excessive memory paging. Byreserving memory, you can set aside some of theavailable memory for non-Redis purposes to helpreduce the amount of paging.
This parameter is specific to ElastiCache, and isnot part of the standard Redis distribution.
For more information, see reserved-memoryand Managing Reserved Memory (Redis) (p. 83).
Parameters Changed in Redis 3.2.4 (Enhanced)
Parameter group family: redis3.2
For Redis 3.2.4 the following parameters were changed.
API Version 2015-02-02369

Amazon ElastiCache User GuideRedis 2.8.24 (Enhanced) Added Parameters
Name Details Change
appendonly Default: off
Modifiable: No
If you want to upgrade from an earlier Redisversion, you must first turn appendonly off.
appendfsync Default: off
Modifiable: No
If you want to upgrade from an earlier Redisversion, you must first turn appendfsync off.
repl-timeout
Default: 60
Modifiable: No
Is now unmodifiable with a default of 60.
tcp-keepalive
Default: 300 Default was 0.
list-max-ziplist-entries
Parameter is no longer available.
list-max-ziplist-value
Parameter is no longer available.
Redis 2.8.24 (Enhanced) Added ParametersParameter group family: redis2.8
For Redis 2.8.24 there are no additional parameters supported.
Redis 2.8.23 (Enhanced) Added ParametersParameter group family: redis2.8
For Redis 2.8.23 the following additional parameter is supported.
Name Details Description
close-on-slave-write
Default: yes
Type: string (yes/no)
Modifiable: Yes
Changes Take Effect: Immediately
If enabled, clients who attempt to write to a read-only replica will be disconnected.
How close-on-slave-write works
The close-on-slave-write parameter is introduced by Amazon ElastiCache to give you morecontrol over how your cluster responds when a primary node and a read replica node swap roles due topromoting a read replica to primary.
API Version 2015-02-02370

Amazon ElastiCache User GuideRedis 2.8.23 (Enhanced) Added Parameters
If the read-replica cluster is promoted to primary for any reason other than a Multi-AZ enabledreplication group failing over, the client will continue trying to write to endpoint A. Because endpointA is now the endpoint for a read-replica, these writes will fail. This is the behavior for Redis prior toElastiCache introducing close-on-slave-write and the behavior if you disable close-on-slave-write.
With close-on-slave-write enabled, any time a client attempts to write to a read-replica, the clientconnection to the cluster is closed. Your application logic should detect the disconnection, check the DNStable, and reconnect to the primary endpoint, which now would be endpoint B.
API Version 2015-02-02371

Amazon ElastiCache User GuideRedis 2.8.22 (Enhanced) Added Parameters
Why disable close-on-slave-write?If disabling close-on-slave-write results in writes to the failing cluster, why would you want todisable close-on-slave-write?
As previously mentioned, with close-on-slave-write enabled, any time a client attempts to writeto a read-replica the client connection to the cluster is closed. Since establishing a new connection tothe node takes time, disconnecting and reconnecting as a result of a write request to the replica wouldalso impact the latency of read requests that were served through the same connection, until a newconnection is established. Therefore, if your application is especially read-heavy or very latency-sensitive,you my prefer to keep your clients connected so as to not degrade read performance.
Redis 2.8.22 (Enhanced) Added ParametersParameter group family: redis2.8
For Redis 2.8.22 there are no additional parameters supported.
Important
• Beginning with Redis version 2.8.22, repl-backlog-size applies to the primary cluster aswell as to replica clusters.
• Beginning with Redis version 2.8.22, the repl-timeout parameter is not supported. If it ischanged, ElastiCache will overwrite with the default (60s), as we do with appendonly.
The following parameters are no longer supported.
• appendonly• appendfsync• repl-timeout
Redis 2.8.21 Added ParametersParameter group family: redis2.8
For Redis 2.8.21, there are no additional parameters supported.
Redis 2.8.19 Added ParametersParameter group family: redis2.8
For Redis 2.8.19 there are no additional parameters supported.
Redis 2.8.6 Added ParametersParameter group family: redis2.8
For Redis 2.8.6 the following additional parameters are supported.
Name Details Description
min-slaves-max-lag Default: 10
Type: integer
The number of seconds within whichthe primary node must receive aping request from a read replica. If
API Version 2015-02-02372
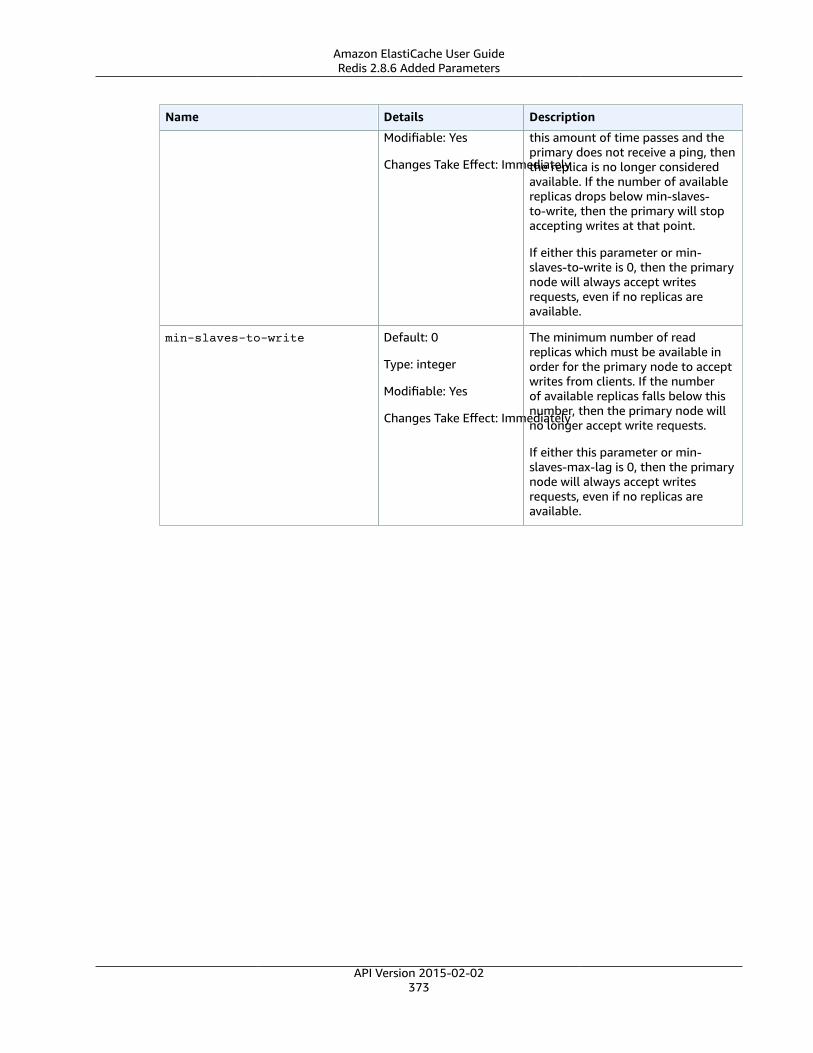
Amazon ElastiCache User GuideRedis 2.8.6 Added Parameters
Name Details Description
Modifiable: Yes
Changes Take Effect: Immediately
this amount of time passes and theprimary does not receive a ping, thenthe replica is no longer consideredavailable. If the number of availablereplicas drops below min-slaves-to-write, then the primary will stopaccepting writes at that point.
If either this parameter or min-slaves-to-write is 0, then the primarynode will always accept writesrequests, even if no replicas areavailable.
min-slaves-to-write Default: 0
Type: integer
Modifiable: Yes
Changes Take Effect: Immediately
The minimum number of readreplicas which must be available inorder for the primary node to acceptwrites from clients. If the numberof available replicas falls below thisnumber, then the primary node willno longer accept write requests.
If either this parameter or min-slaves-max-lag is 0, then the primarynode will always accept writesrequests, even if no replicas areavailable.
API Version 2015-02-02373
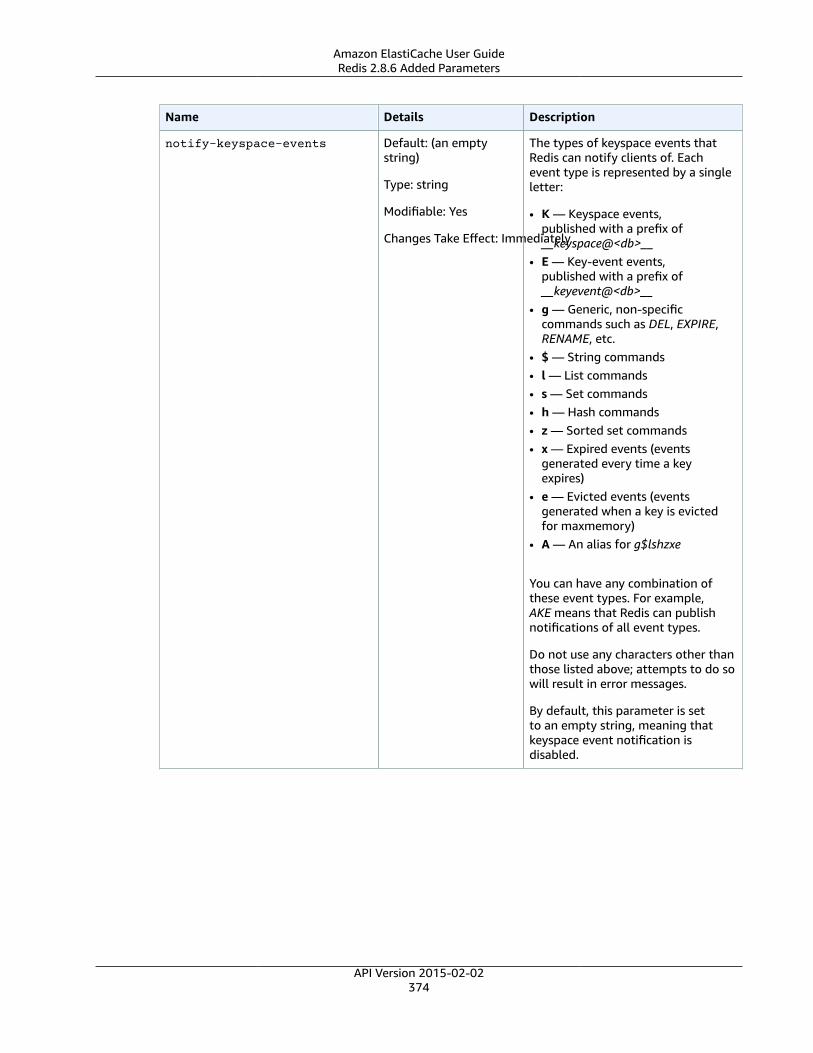
Amazon ElastiCache User GuideRedis 2.8.6 Added Parameters
Name Details Description
notify-keyspace-events Default: (an emptystring)
Type: string
Modifiable: Yes
Changes Take Effect: Immediately
The types of keyspace events thatRedis can notify clients of. Eachevent type is represented by a singleletter:
• K — Keyspace events,published with a prefix of__keyspace@<db>__
• E — Key-event events,published with a prefix of__keyevent@<db>__
• g — Generic, non-specificcommands such as DEL, EXPIRE,RENAME, etc.
• $ — String commands• l — List commands• s — Set commands• h — Hash commands• z — Sorted set commands• x — Expired events (events
generated every time a keyexpires)
• e — Evicted events (eventsgenerated when a key is evictedfor maxmemory)
• A — An alias for g$lshzxe
You can have any combination ofthese event types. For example,AKE means that Redis can publishnotifications of all event types.
Do not use any characters other thanthose listed above; attempts to do sowill result in error messages.
By default, this parameter is setto an empty string, meaning thatkeyspace event notification isdisabled.
API Version 2015-02-02374
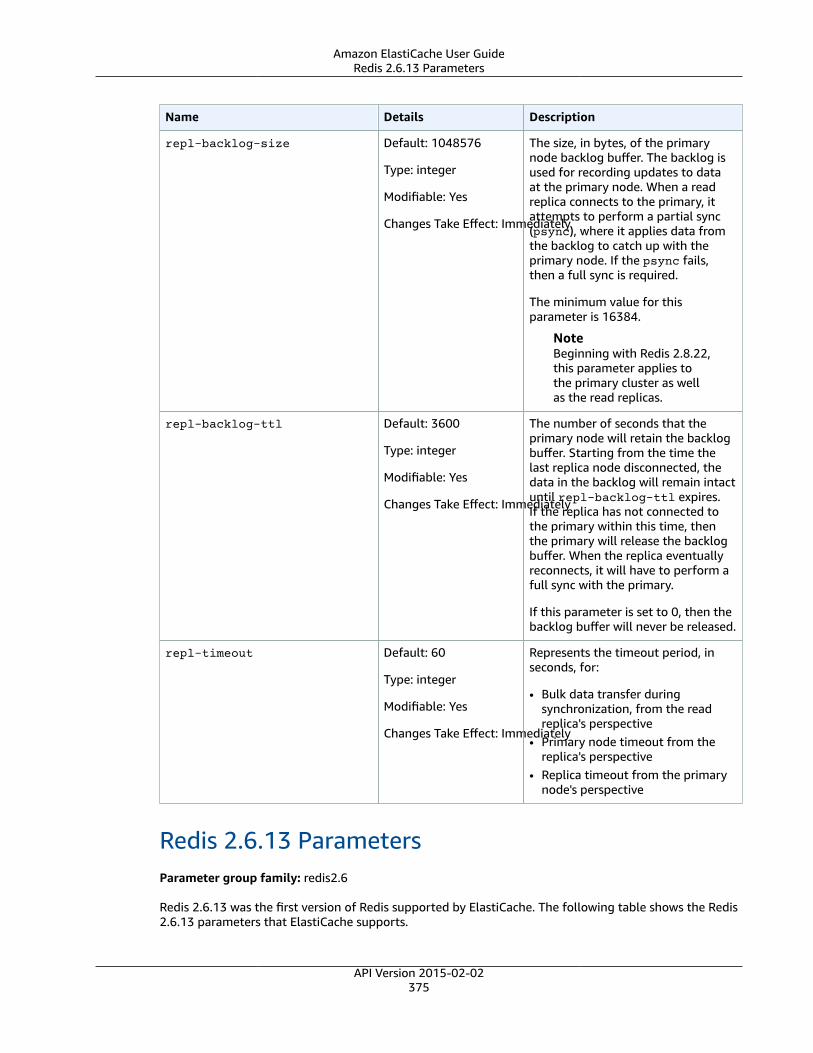
Amazon ElastiCache User GuideRedis 2.6.13 Parameters
Name Details Description
repl-backlog-size Default: 1048576
Type: integer
Modifiable: Yes
Changes Take Effect: Immediately
The size, in bytes, of the primarynode backlog buffer. The backlog isused for recording updates to dataat the primary node. When a readreplica connects to the primary, itattempts to perform a partial sync(psync), where it applies data fromthe backlog to catch up with theprimary node. If the psync fails,then a full sync is required.
The minimum value for thisparameter is 16384.
NoteBeginning with Redis 2.8.22,this parameter applies tothe primary cluster as wellas the read replicas.
repl-backlog-ttl Default: 3600
Type: integer
Modifiable: Yes
Changes Take Effect: Immediately
The number of seconds that theprimary node will retain the backlogbuffer. Starting from the time thelast replica node disconnected, thedata in the backlog will remain intactuntil repl-backlog-ttl expires.If the replica has not connected tothe primary within this time, thenthe primary will release the backlogbuffer. When the replica eventuallyreconnects, it will have to perform afull sync with the primary.
If this parameter is set to 0, then thebacklog buffer will never be released.
repl-timeout Default: 60
Type: integer
Modifiable: Yes
Changes Take Effect: Immediately
Represents the timeout period, inseconds, for:
• Bulk data transfer duringsynchronization, from the readreplica's perspective
• Primary node timeout from thereplica's perspective
• Replica timeout from the primarynode's perspective
Redis 2.6.13 ParametersParameter group family: redis2.6
Redis 2.6.13 was the first version of Redis supported by ElastiCache. The following table shows the Redis2.6.13 parameters that ElastiCache supports.
API Version 2015-02-02375

Amazon ElastiCache User GuideRedis 2.6.13 Parameters
Name Details Description
activerehashingDefault: yes
Type: string (yes/no)
Modifiable: At Creation
Determines whether to enable Redis' activerehashing feature. The main hash table isrehashed ten times per second; each rehashoperation consumes 1 millisecond of CPU time.
This value is set when you create the parametergroup. When assigning a new parameter group toa cluster, this value must be the same in both theold and new parameter groups.
appendonly Default: no
Type: string
Modifiable: Yes
Changes Take Effect: Immediately
Enables or disables Redis' append only file feature(AOF). AOF captures any Redis commands thatchange data in the cache, and is used to recoverfrom certain node failures.
The default value is no, meaning AOF is turned off.Set this parameter to yes to enable AOF.
For more information, see MitigatingFailures (p. 87).
NoteAppend Only Files (AOF) is not supportedfor cache.t1.micro and cache.t2.* nodes.For nodes of this type, the appendonlyparameter value is ignored.
NoteFor Multi-AZ replication groups, AOF isnot allowed.
appendfsync Default: everysec
Type: string
Modifiable: Yes
Changes Take Effect: Immediately
Controls how often the AOF output buffer iswritten to disk:
• no — the buffer is flushed to disk on an as-needed basis.
• everysec — the buffer is flushed once persecond. This is the default.
• always — the buffer is flushed every time thatdata in the cluster is modified.
ImportantSome aspects value of this parameterchanged in Redis version 3.2.4. SeeParameters Changed in Redis 3.2.4(Enhanced) (p. 369).
client-output-buffer-limit-normal-hard-limit
Default: 0
Type: integer
Modifiable: Yes
Changes Take Effect: Immediately
If a client's output buffer reaches the specifiednumber of bytes, the client will be disconnected.The default is zero (no hard limit).
API Version 2015-02-02376
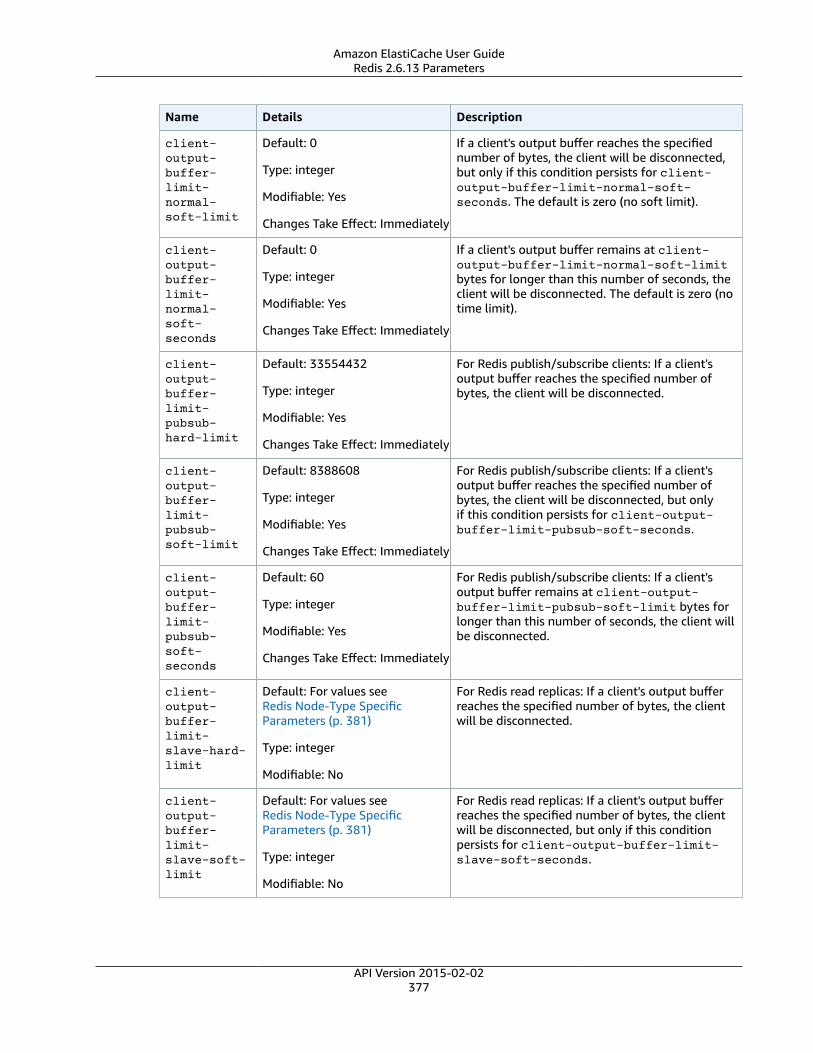
Amazon ElastiCache User GuideRedis 2.6.13 Parameters
Name Details Description
client-output-buffer-limit-normal-soft-limit
Default: 0
Type: integer
Modifiable: Yes
Changes Take Effect: Immediately
If a client's output buffer reaches the specifiednumber of bytes, the client will be disconnected,but only if this condition persists for client-output-buffer-limit-normal-soft-seconds. The default is zero (no soft limit).
client-output-buffer-limit-normal-soft-seconds
Default: 0
Type: integer
Modifiable: Yes
Changes Take Effect: Immediately
If a client's output buffer remains at client-output-buffer-limit-normal-soft-limitbytes for longer than this number of seconds, theclient will be disconnected. The default is zero (notime limit).
client-output-buffer-limit-pubsub-hard-limit
Default: 33554432
Type: integer
Modifiable: Yes
Changes Take Effect: Immediately
For Redis publish/subscribe clients: If a client'soutput buffer reaches the specified number ofbytes, the client will be disconnected.
client-output-buffer-limit-pubsub-soft-limit
Default: 8388608
Type: integer
Modifiable: Yes
Changes Take Effect: Immediately
For Redis publish/subscribe clients: If a client'soutput buffer reaches the specified number ofbytes, the client will be disconnected, but onlyif this condition persists for client-output-buffer-limit-pubsub-soft-seconds.
client-output-buffer-limit-pubsub-soft-seconds
Default: 60
Type: integer
Modifiable: Yes
Changes Take Effect: Immediately
For Redis publish/subscribe clients: If a client'soutput buffer remains at client-output-buffer-limit-pubsub-soft-limit bytes forlonger than this number of seconds, the client willbe disconnected.
client-output-buffer-limit-slave-hard-limit
Default: For values seeRedis Node-Type SpecificParameters (p. 381)
Type: integer
Modifiable: No
For Redis read replicas: If a client's output bufferreaches the specified number of bytes, the clientwill be disconnected.
client-output-buffer-limit-slave-soft-limit
Default: For values seeRedis Node-Type SpecificParameters (p. 381)
Type: integer
Modifiable: No
For Redis read replicas: If a client's output bufferreaches the specified number of bytes, the clientwill be disconnected, but only if this conditionpersists for client-output-buffer-limit-slave-soft-seconds.
API Version 2015-02-02377

Amazon ElastiCache User GuideRedis 2.6.13 Parameters
Name Details Description
client-output-buffer-limit-slave-soft-seconds
Default: 60
Type: integer
Modifiable: No
For Redis read replicas: If a client's outputbuffer remains at client-output-buffer-limit-slave-soft-limit bytes for longerthan this number of seconds, the client will bedisconnected.
databases Default: 16
Type: integer
Modifiable: At Creation
The number of logical partitions the databases issplit into. We recommend keeping this value low.
This value is set when you create the parametergroup. When assigning a new parameter group toa cluster, this value must be the same in both theold and new parameter groups.
hash-max-ziplist-entries
Default: 512
Type: integer
Modifiable: Yes
Changes Take Effect: Immediately
Determines the amount of memory used forhashes. Hashes with fewer than the specifiednumber of entries are stored using a specialencoding that saves space.
hash-max-ziplist-value
Default: 64
Type: integer
Modifiable: Yes
Changes Take Effect: Immediately
Determines the amount of memory used forhashes. Hashes with entries that are smaller thanthe specified number of bytes are stored using aspecial encoding that saves space.
list-max-ziplist-entries
Default: 512
Type: integer
Modifiable: Yes
Changes Take Effect: Immediately
Determines the amount of memory used for lists.Lists with fewer than the specified number ofentries are stored using a special encoding thatsaves space.
list-max-ziplist-value
Default: 64
Type: integer
Modifiable: Yes
Changes Take Effect: Immediately
Determines the amount of memory used forlists. Lists with entries that are smaller than thespecified number of bytes are stored using aspecial encoding that saves space.
lua-time-limit
Default: 5000
Type: integer
Modifiable: No
The maximum execution time for a Lua script, inmilliseconds, before ElastiCache takes action tostop the script.
If lua-time-limit is exceeded, all Rediscommands will return an error of the form ____-BUSY. Since this state can cause interference withmany essential Redis operations, ElastiCachewill first issue a SCRIPT KILL command. If thisis unsuccessful, ElastiCache will forcibly restartRedis.
API Version 2015-02-02378
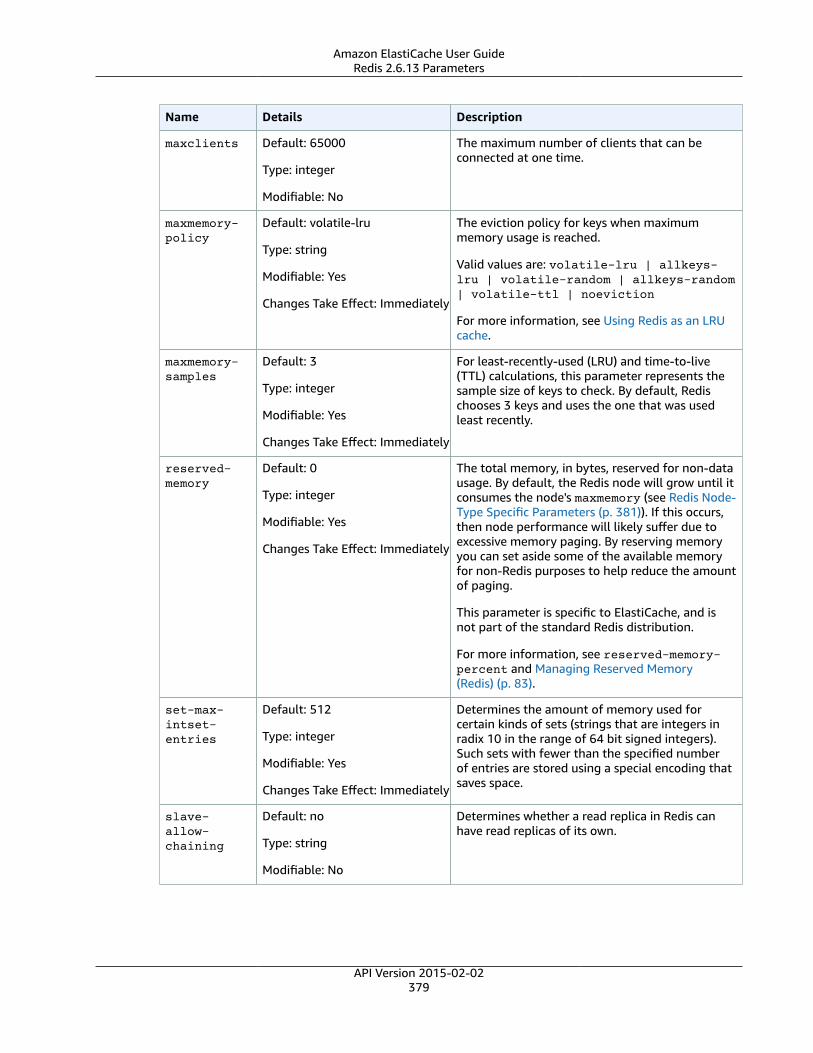
Amazon ElastiCache User GuideRedis 2.6.13 Parameters
Name Details Description
maxclients Default: 65000
Type: integer
Modifiable: No
The maximum number of clients that can beconnected at one time.
maxmemory-policy
Default: volatile-lru
Type: string
Modifiable: Yes
Changes Take Effect: Immediately
The eviction policy for keys when maximummemory usage is reached.
Valid values are: volatile-lru | allkeys-lru | volatile-random | allkeys-random| volatile-ttl | noeviction
For more information, see Using Redis as an LRUcache.
maxmemory-samples
Default: 3
Type: integer
Modifiable: Yes
Changes Take Effect: Immediately
For least-recently-used (LRU) and time-to-live(TTL) calculations, this parameter represents thesample size of keys to check. By default, Redischooses 3 keys and uses the one that was usedleast recently.
reserved-memory
Default: 0
Type: integer
Modifiable: Yes
Changes Take Effect: Immediately
The total memory, in bytes, reserved for non-datausage. By default, the Redis node will grow until itconsumes the node's maxmemory (see Redis Node-Type Specific Parameters (p. 381)). If this occurs,then node performance will likely suffer due toexcessive memory paging. By reserving memoryyou can set aside some of the available memoryfor non-Redis purposes to help reduce the amountof paging.
This parameter is specific to ElastiCache, and isnot part of the standard Redis distribution.
For more information, see reserved-memory-percent and Managing Reserved Memory(Redis) (p. 83).
set-max-intset-entries
Default: 512
Type: integer
Modifiable: Yes
Changes Take Effect: Immediately
Determines the amount of memory used forcertain kinds of sets (strings that are integers inradix 10 in the range of 64 bit signed integers).Such sets with fewer than the specified numberof entries are stored using a special encoding thatsaves space.
slave-allow-chaining
Default: no
Type: string
Modifiable: No
Determines whether a read replica in Redis canhave read replicas of its own.
API Version 2015-02-02379
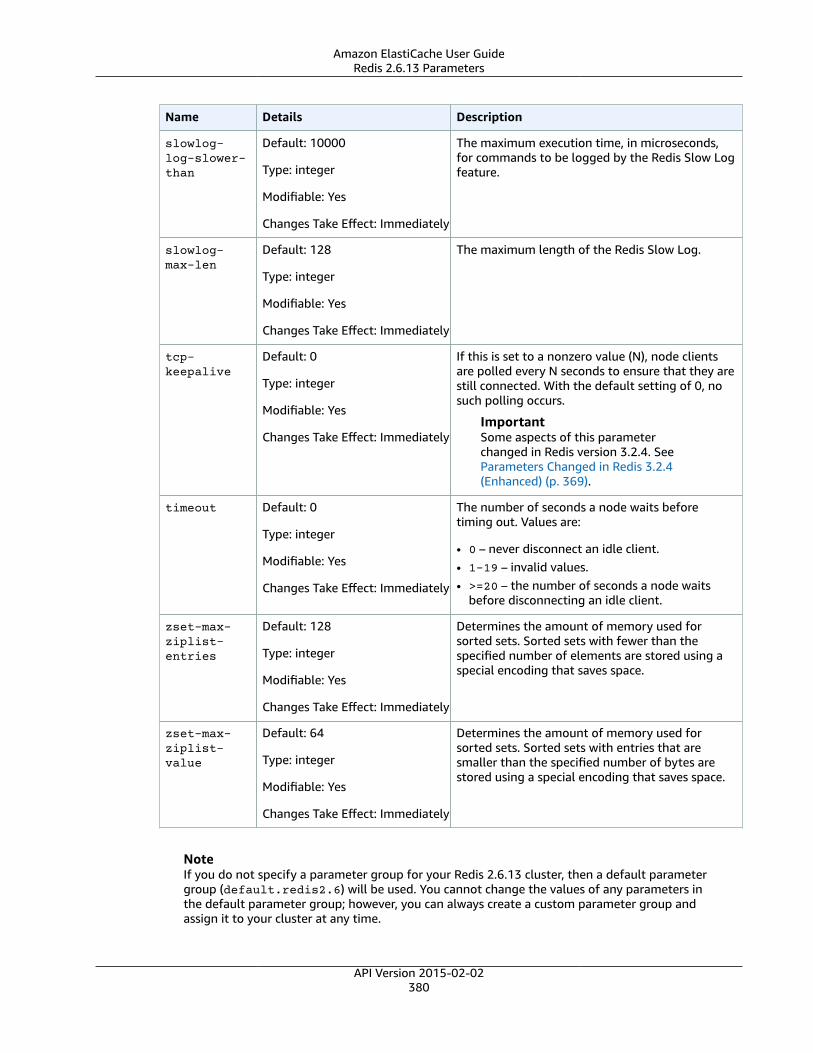
Amazon ElastiCache User GuideRedis 2.6.13 Parameters
Name Details Description
slowlog-log-slower-than
Default: 10000
Type: integer
Modifiable: Yes
Changes Take Effect: Immediately
The maximum execution time, in microseconds,for commands to be logged by the Redis Slow Logfeature.
slowlog-max-len
Default: 128
Type: integer
Modifiable: Yes
Changes Take Effect: Immediately
The maximum length of the Redis Slow Log.
tcp-keepalive
Default: 0
Type: integer
Modifiable: Yes
Changes Take Effect: Immediately
If this is set to a nonzero value (N), node clientsare polled every N seconds to ensure that they arestill connected. With the default setting of 0, nosuch polling occurs.
ImportantSome aspects of this parameterchanged in Redis version 3.2.4. SeeParameters Changed in Redis 3.2.4(Enhanced) (p. 369).
timeout Default: 0
Type: integer
Modifiable: Yes
Changes Take Effect: Immediately
The number of seconds a node waits beforetiming out. Values are:
• 0 – never disconnect an idle client.• 1-19 – invalid values.• >=20 – the number of seconds a node waits
before disconnecting an idle client.
zset-max-ziplist-entries
Default: 128
Type: integer
Modifiable: Yes
Changes Take Effect: Immediately
Determines the amount of memory used forsorted sets. Sorted sets with fewer than thespecified number of elements are stored using aspecial encoding that saves space.
zset-max-ziplist-value
Default: 64
Type: integer
Modifiable: Yes
Changes Take Effect: Immediately
Determines the amount of memory used forsorted sets. Sorted sets with entries that aresmaller than the specified number of bytes arestored using a special encoding that saves space.
NoteIf you do not specify a parameter group for your Redis 2.6.13 cluster, then a default parametergroup (default.redis2.6) will be used. You cannot change the values of any parameters inthe default parameter group; however, you can always create a custom parameter group andassign it to your cluster at any time.
API Version 2015-02-02380

Amazon ElastiCache User GuideRedis Node-Type Specific Parameters
Redis Node-Type Specific ParametersAlthough most parameters have a single value, some parameters have different values depending on thenode type used. The following table shows the default values for the maxmemory, client-output-buffer-limit-slave-hard-limit, and client-output-buffer-limit-slave-soft-limitparameters for each node type. The value of maxmemory is the maximum number of bytes available toyou for use, data and other uses, on the node.
NoteThe maxmemory parameter cannot be modified.
Node Type maxmemory client-output-buffer-limit-slave-hard-limit
client-output-buffer-limit-slave-soft-limit
cache.t1.micro 142606336 14260633 14260633
cache.t2.micro 581959680 58195968 58195968
cache.t2.small 1665138688 166513868 166513868
cache.t2.medium 3461349376 346134937 346134937
cache.m1.small 943718400 943718400 943718400
cache.m1.medium 3093299200 309329920 309329920
cache.m1.large 7025459200 702545920 702545920
cache.m1.xlarge 14889779200 1488977920 1488977920
cache.m2.xlarge 17091788800 1709178880 1709178880
cache.m2.2xlarge 35022438400 3502243840 3502243840
cache.m2.4xlarge 70883737600 7088373760 7088373760
cache.m3.medium 2988441600 309329920 309329920
cache.m3.large 6501171200 650117120 650117120
cache.m3.xlarge 14260633600 1426063360 1426063360
cache.m3.2xlarge 29989273600 2998927360 2998927360
cache.m4.large 6892593152 689259315 689259315
cache.m4.xlarge 15328501760 1532850176 1532850176
cache.m4.2xlarge 31889126359 3188912636 3188912636
cache.m4.4xlarge 65257290629 6525729063 6525729063
cache.m4.10xlarge 166047614239 16604761424 16604761424
cache.c1.xlarge 6501171200 650117120 650117120
cache.r3.large 14470348800 1468006400 1468006400
cache.r3.xlarge 30513561600 3040870400 3040870400
cache.r3.2xlarge 62495129600 6081740800 6081740800
API Version 2015-02-02381
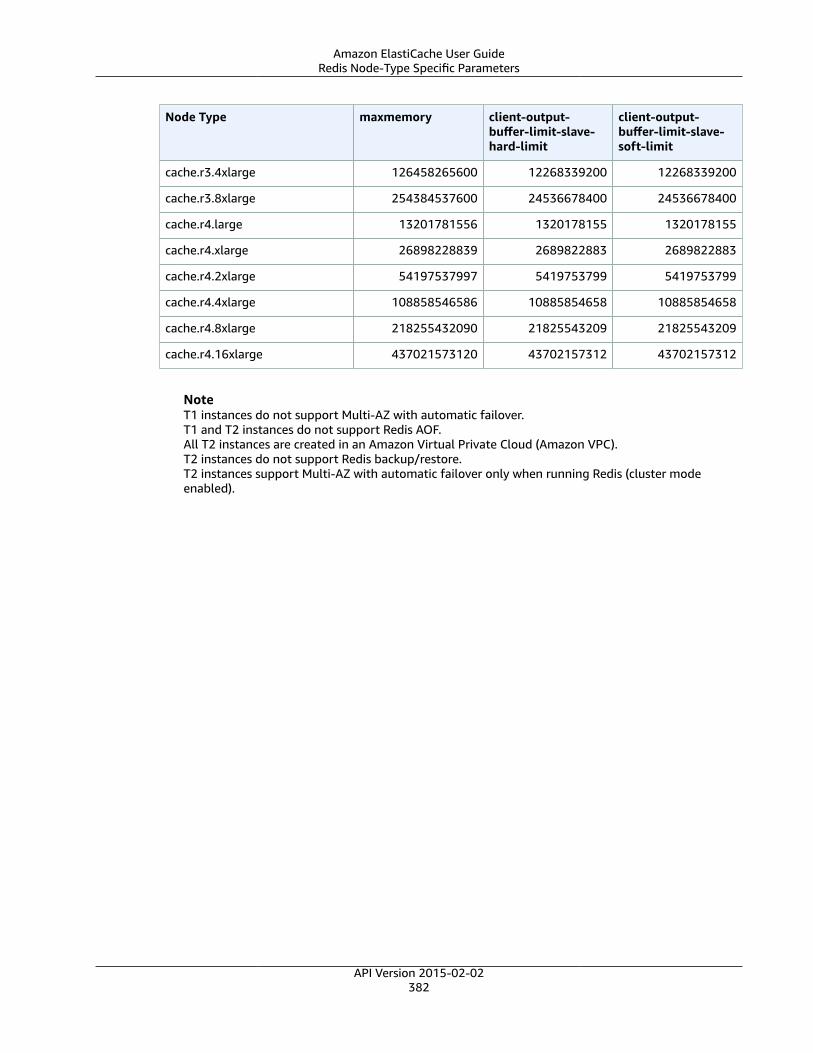
Amazon ElastiCache User GuideRedis Node-Type Specific Parameters
Node Type maxmemory client-output-buffer-limit-slave-hard-limit
client-output-buffer-limit-slave-soft-limit
cache.r3.4xlarge 126458265600 12268339200 12268339200
cache.r3.8xlarge 254384537600 24536678400 24536678400
cache.r4.large 13201781556 1320178155 1320178155
cache.r4.xlarge 26898228839 2689822883 2689822883
cache.r4.2xlarge 54197537997 5419753799 5419753799
cache.r4.4xlarge 108858546586 10885854658 10885854658
cache.r4.8xlarge 218255432090 21825543209 21825543209
cache.r4.16xlarge 437021573120 43702157312 43702157312
NoteT1 instances do not support Multi-AZ with automatic failover.T1 and T2 instances do not support Redis AOF.All T2 instances are created in an Amazon Virtual Private Cloud (Amazon VPC).T2 instances do not support Redis backup/restore.T2 instances support Multi-AZ with automatic failover only when running Redis (cluster modeenabled).
API Version 2015-02-02382

Amazon ElastiCache User Guide
Subnets and Subnet GroupsA subnet group is a collection of subnets (typically private) that you can designate for your clustersrunning in an Amazon Virtual Private Cloud (VPC) environment.
If you create a cluster in an Amazon VPC, you must specify a subnet group. ElastiCache uses that subnetgroup to choose a subnet and IP addresses within that subnet to associate with your nodes.
This section covers how to create and leverage subnets and subnet groups to manage access to yourElastiCache resources.
For more information about subnet group usage in an Amazon VPC environment, see Step 4: AuthorizeAccess (p. 33).
Topics• Creating a Subnet Group (p. 384)• Assigning a Subnet Group to a Cluster or Replication Group (p. 387)• Modifying a Subnet Group (p. 388)• Deleting a Subnet Group (p. 390)
API Version 2015-02-02383
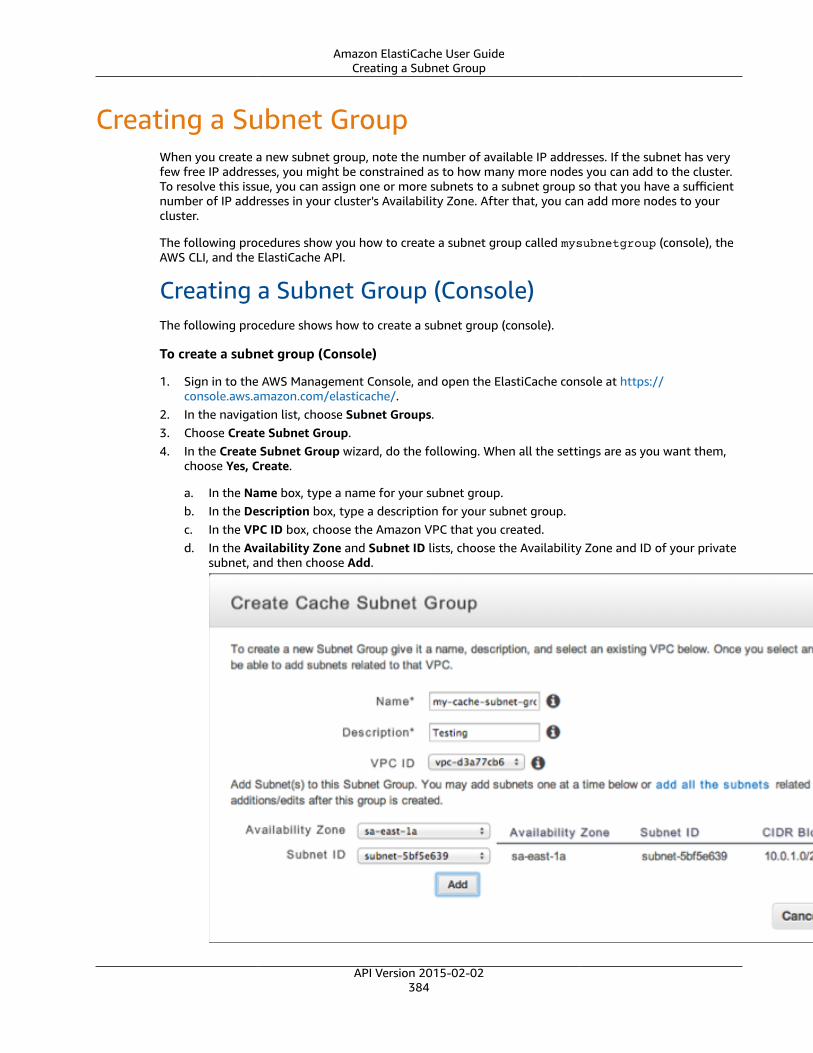
Amazon ElastiCache User GuideCreating a Subnet Group
Creating a Subnet GroupWhen you create a new subnet group, note the number of available IP addresses. If the subnet has veryfew free IP addresses, you might be constrained as to how many more nodes you can add to the cluster.To resolve this issue, you can assign one or more subnets to a subnet group so that you have a sufficientnumber of IP addresses in your cluster's Availability Zone. After that, you can add more nodes to yourcluster.
The following procedures show you how to create a subnet group called mysubnetgroup (console), theAWS CLI, and the ElastiCache API.
Creating a Subnet Group (Console)The following procedure shows how to create a subnet group (console).
To create a subnet group (Console)
1. Sign in to the AWS Management Console, and open the ElastiCache console at https://console.aws.amazon.com/elasticache/.
2. In the navigation list, choose Subnet Groups.3. Choose Create Subnet Group.4. In the Create Subnet Group wizard, do the following. When all the settings are as you want them,
choose Yes, Create.
a. In the Name box, type a name for your subnet group.b. In the Description box, type a description for your subnet group.c. In the VPC ID box, choose the Amazon VPC that you created.d. In the Availability Zone and Subnet ID lists, choose the Availability Zone and ID of your private
subnet, and then choose Add.
API Version 2015-02-02384
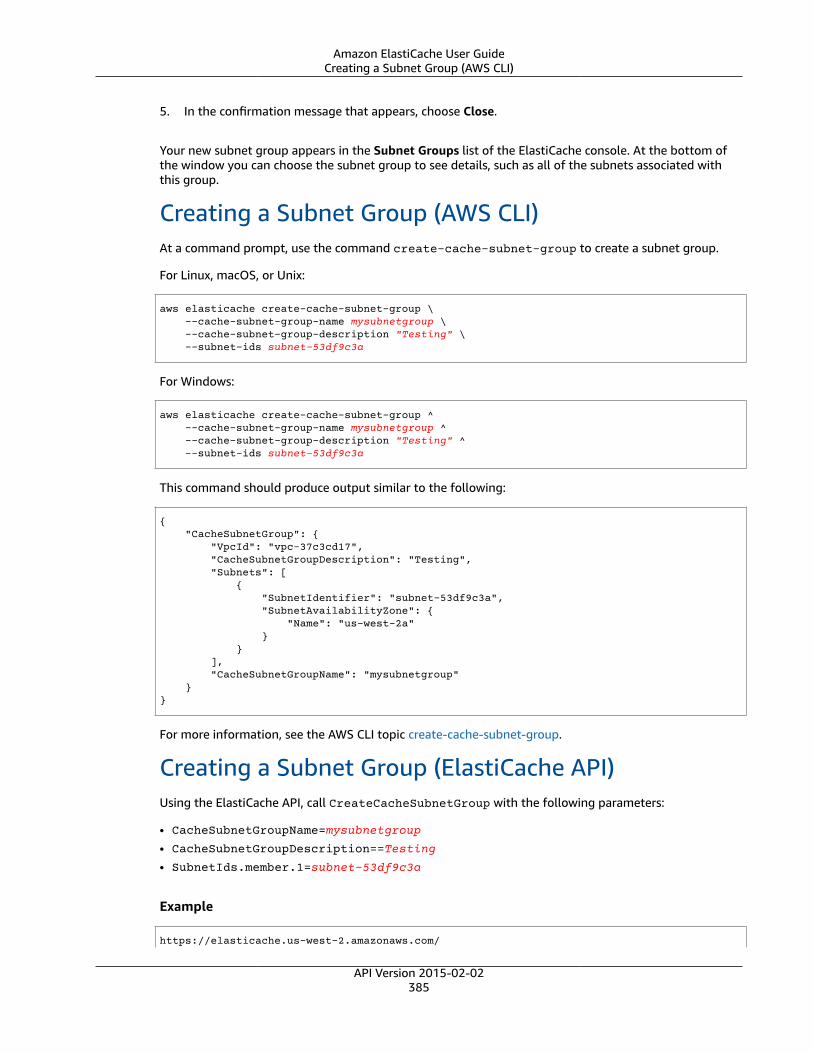
Amazon ElastiCache User GuideCreating a Subnet Group (AWS CLI)
5. In the confirmation message that appears, choose Close.
Your new subnet group appears in the Subnet Groups list of the ElastiCache console. At the bottom ofthe window you can choose the subnet group to see details, such as all of the subnets associated withthis group.
Creating a Subnet Group (AWS CLI)At a command prompt, use the command create-cache-subnet-group to create a subnet group.
For Linux, macOS, or Unix:
aws elasticache create-cache-subnet-group \ --cache-subnet-group-name mysubnetgroup \ --cache-subnet-group-description "Testing" \ --subnet-ids subnet-53df9c3a
For Windows:
aws elasticache create-cache-subnet-group ^ --cache-subnet-group-name mysubnetgroup ^ --cache-subnet-group-description "Testing" ^ --subnet-ids subnet-53df9c3a
This command should produce output similar to the following:
{ "CacheSubnetGroup": { "VpcId": "vpc-37c3cd17", "CacheSubnetGroupDescription": "Testing", "Subnets": [ { "SubnetIdentifier": "subnet-53df9c3a", "SubnetAvailabilityZone": { "Name": "us-west-2a" } } ], "CacheSubnetGroupName": "mysubnetgroup" }}
For more information, see the AWS CLI topic create-cache-subnet-group.
Creating a Subnet Group (ElastiCache API)Using the ElastiCache API, call CreateCacheSubnetGroup with the following parameters:
• CacheSubnetGroupName=mysubnetgroup
• CacheSubnetGroupDescription==Testing
• SubnetIds.member.1=subnet-53df9c3a
Example
https://elasticache.us-west-2.amazonaws.com/
API Version 2015-02-02385
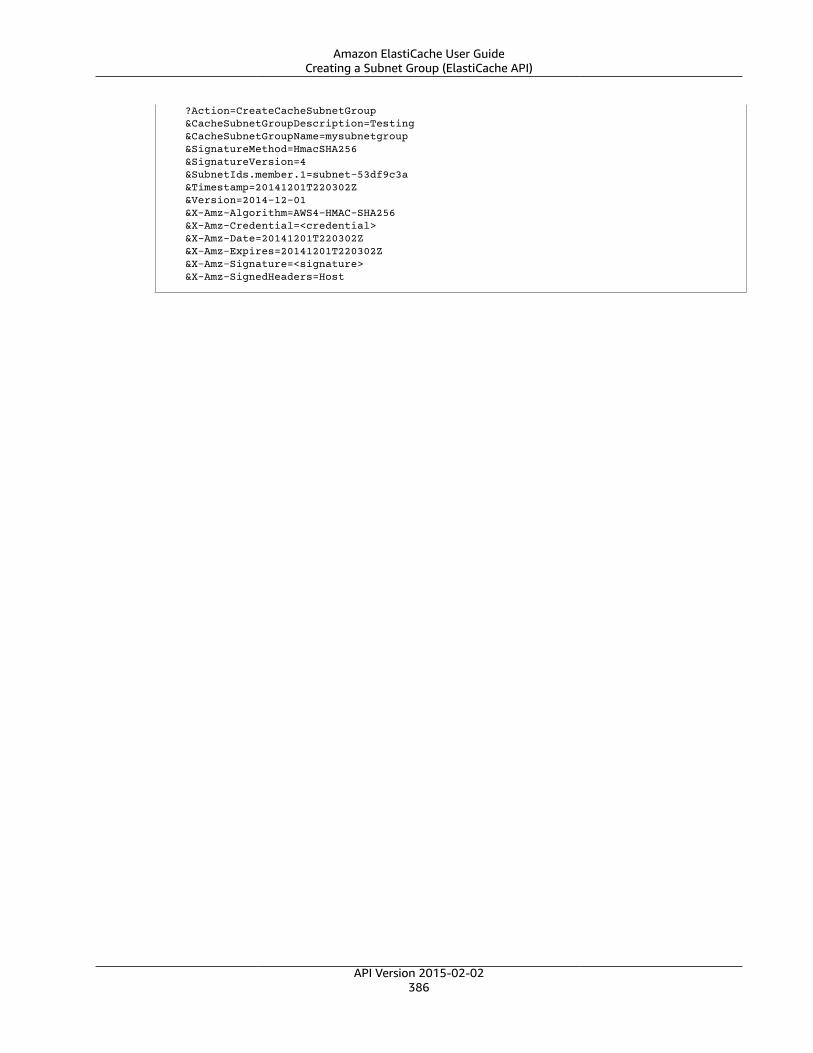
Amazon ElastiCache User GuideCreating a Subnet Group (ElastiCache API)
?Action=CreateCacheSubnetGroup &CacheSubnetGroupDescription=Testing &CacheSubnetGroupName=mysubnetgroup &SignatureMethod=HmacSHA256 &SignatureVersion=4 &SubnetIds.member.1=subnet-53df9c3a &Timestamp=20141201T220302Z &Version=2014-12-01 &X-Amz-Algorithm=AWS4-HMAC-SHA256 &X-Amz-Credential=<credential> &X-Amz-Date=20141201T220302Z &X-Amz-Expires=20141201T220302Z &X-Amz-Signature=<signature> &X-Amz-SignedHeaders=Host
API Version 2015-02-02386

Amazon ElastiCache User GuideAssigning a Subnet Group to a Cluster or Replication Group
Assigning a Subnet Group to a Cluster orReplication Group
After you have created a subnet group, you can launch a cluster or replication group in an Amazon VPC.For more information, see one of the following topics.
• Memcached cluster – To launch a Memcached cluster, see Creating a Cluster (Console):Memcached (p. 161). In step 5.a (Advanced Memcached Settings), choose a VPC subnet group.
• Standalone Redis cluster – To launch a single-node Redis cluster, see Creating a Redis (cluster modedisabled) Cluster (Console) (p. 163). In step 5.a (Advanced Redis Settings), choose a VPC subnet group.
• Redis (cluster mode disabled) replication group – To launch a Redis (cluster mode disabled)replication group in a VPC, see Creating a Redis (cluster mode disabled) Cluster with Replicas fromScratch (Console) (p. 265). In step 5.b (Advanced Redis Settings), choose a VPC subnet group.
• Redis (cluster mode enabled) replication group – Creating a Redis (cluster mode enabled) Cluster(Console) (p. 271). In step 5.a (Advanced Redis Settings), choose a VPC subnet group.
API Version 2015-02-02387

Amazon ElastiCache User GuideModifying a Subnet Group
Modifying a Subnet GroupYou can modify a subnet group's description, or modify the list of subnet IDs associated with the subnetgroup. You cannot delete a subnet ID from a subnet group if a cluster is currently using that subnet.
The following procedures show you how to modify a subnet group.
Modifying Subnet Groups (Console)To modify a subnet group
1. Sign in to the AWS Management Console and open the ElastiCache console at https://console.aws.amazon.com/elasticache/.
2. In the navigation pane, choose Subnet Groups.3. In the list of subnet groups, choose the one you want to modify.4. In the lower portion of the ElastiCache console, make any changes to the description or the list of
subnet IDs for the subnet group. To save your changes, choose Save.
Modifying Subnet Groups (AWS CLI)At a command prompt, use the command modify-cache-subnet-group to modify a subnet group.
For Linux, macOS, or Unix:
aws elasticache modify-cache-subnet-group \ --cache-subnet-group-name mysubnetgroup \ --cache-subnet-group-description "New description" \ --subnet-ids "subnet-42df9c3a" "subnet-48fc21a9"
For Windows:
aws elasticache modify-cache-subnet-group ^ --cache-subnet-group-name mysubnetgroup ^ --cache-subnet-group-description "New description" ^ --subnet-ids "subnet-42df9c3a" "subnet-48fc21a9"
This command should produce output similar to the following:
{ "CacheSubnetGroup": { "VpcId": "vpc-73cd3c17", "CacheSubnetGroupDescription": "New description", "Subnets": [ { "SubnetIdentifier": "subnet-42dcf93a", "SubnetAvailabilityZone": { "Name": "us-west-2a" } }, { "SubnetIdentifier": "subnet-48fc12a9", "SubnetAvailabilityZone": { "Name": "us-west-2a" } }
API Version 2015-02-02388
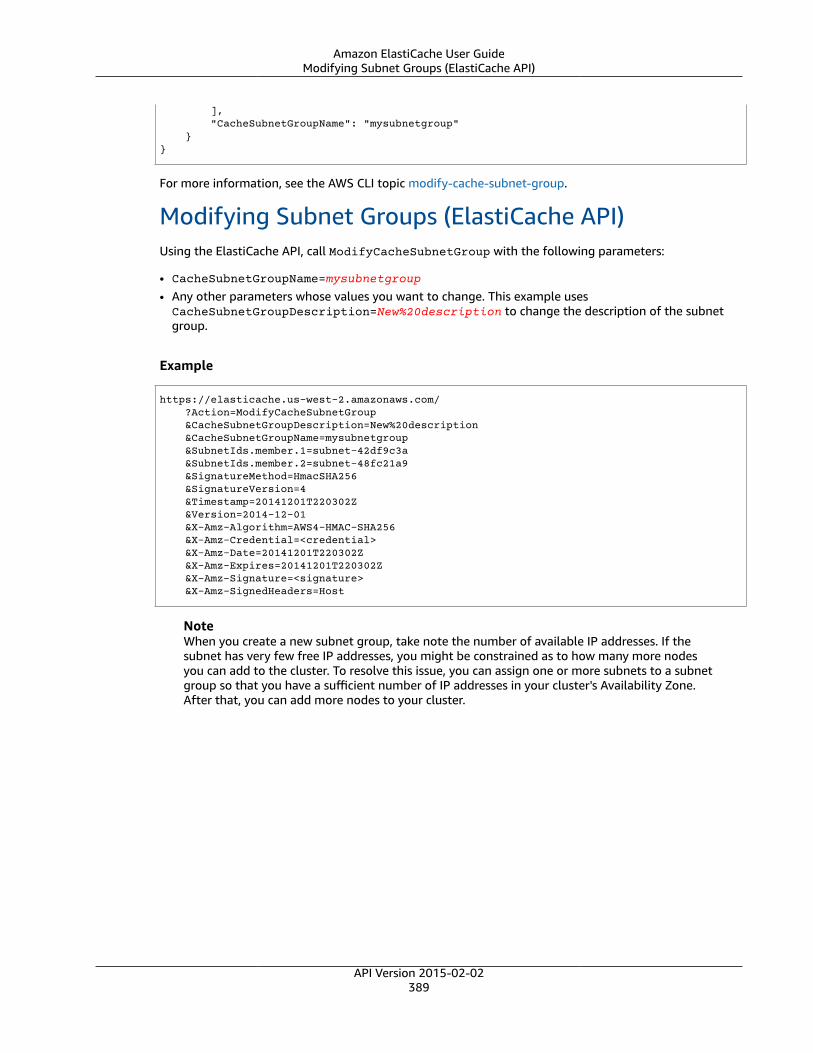
Amazon ElastiCache User GuideModifying Subnet Groups (ElastiCache API)
], "CacheSubnetGroupName": "mysubnetgroup" }}
For more information, see the AWS CLI topic modify-cache-subnet-group.
Modifying Subnet Groups (ElastiCache API)Using the ElastiCache API, call ModifyCacheSubnetGroup with the following parameters:
• CacheSubnetGroupName=mysubnetgroup
• Any other parameters whose values you want to change. This example usesCacheSubnetGroupDescription=New%20description to change the description of the subnetgroup.
Example
https://elasticache.us-west-2.amazonaws.com/ ?Action=ModifyCacheSubnetGroup &CacheSubnetGroupDescription=New%20description &CacheSubnetGroupName=mysubnetgroup &SubnetIds.member.1=subnet-42df9c3a &SubnetIds.member.2=subnet-48fc21a9 &SignatureMethod=HmacSHA256 &SignatureVersion=4 &Timestamp=20141201T220302Z &Version=2014-12-01 &X-Amz-Algorithm=AWS4-HMAC-SHA256 &X-Amz-Credential=<credential> &X-Amz-Date=20141201T220302Z &X-Amz-Expires=20141201T220302Z &X-Amz-Signature=<signature> &X-Amz-SignedHeaders=Host
NoteWhen you create a new subnet group, take note the number of available IP addresses. If thesubnet has very few free IP addresses, you might be constrained as to how many more nodesyou can add to the cluster. To resolve this issue, you can assign one or more subnets to a subnetgroup so that you have a sufficient number of IP addresses in your cluster's Availability Zone.After that, you can add more nodes to your cluster.
API Version 2015-02-02389

Amazon ElastiCache User GuideDeleting a Subnet Group
Deleting a Subnet GroupIf you decide that you no longer need your subnet group, you can delete it. You cannot delete a subnetgroup if it is currently in use by a cluster.
The following procedures show you how to delete a subnet group.
Deleting a Subnet Group (Console)To delete a subnet group
1. Sign in to the AWS Management Console and open the ElastiCache console at https://console.aws.amazon.com/elasticache/.
2. In the navigation pane, choose Subnet Groups.3. In the list of subnet groups, choose the one you want to delete and then choose Delete.4. When you are asked to confirm this operation, choose Yes, Delete.
Deleting a Subnet Group (AWS CLI)Using the AWS CLI, call the command delete-cache-subnet-group with the following parameter:
• --cache-subnet-group-name mysubnetgroup
For Linux, macOS, or Unix:
aws elasticache delete-cache-subnet-group \ --cache-subnet-group-name mysubnetgroup
For Windows:
aws elasticache delete-cache-subnet-group ^ --cache-subnet-group-name mysubnetgroup
This command produces no output.
For more information, see the AWS CLI topic delete-cache-subnet-group.
Deleting a Subnet Group (ElastiCache API)Using the ElastiCache API, call DeleteCacheSubnetGroup with the following parameter:
• CacheSubnetGroupName=mysubnetgroup
Example
Line breaks are added for ease of reading.
https://elasticache.us-west-2.amazonaws.com/ ?Action=DeleteCacheSubnetGroup &CacheSubnetGroupName=mysubnetgroup &SignatureMethod=HmacSHA256 &SignatureVersion=4
API Version 2015-02-02390
Amazon ElastiCache User GuideDeleting a Subnet Group (ElastiCache API)
&Timestamp=20141201T220302Z &Version=2014-12-01 &X-Amz-Algorithm=AWS4-HMAC-SHA256 &X-Amz-Credential=<credential> &X-Amz-Date=20141201T220302Z &X-Amz-Expires=20141201T220302Z &X-Amz-Signature=<signature> &X-Amz-SignedHeaders=Host
This command produces no output.
For more information, see the ElastiCache API topic DeleteCacheSubnetGroup.
API Version 2015-02-02391

Amazon ElastiCache User Guide
Amazon Virtual Private Cloud(Amazon VPC) with ElastiCache
The Amazon Virtual Private Cloud (Amazon VPC) service defines a virtual network that closely resemblesa traditional data center. When you configure your Amazon VPC you can select its IP address range,create subnets, and configure route tables, network gateways, and security settings. You can also adda cache cluster to the virtual network, and control access to the cache cluster by using Amazon VPCsecurity groups.
This section explains how to manually configure an ElastiCache cluster in an Amazon VPC. Thisinformation is intended for users who want a deeper understanding of how ElastiCache and Amazon VPCwork together.
Topics• Understanding ElastiCache and Amazon VPCs (p. 393)• Access Patterns for Accessing an ElastiCache Cluster in an Amazon VPC (p. 397)• Creating a Virtual Private Cloud (VPC) (p. 404)• Creating a Cache Subnet Group (p. 406)• Creating a Cache Cluster in an Amazon VPC (p. 407)• Creating a Replication Group in an Amazon VPC (p. 408)• Connecting to a Cluster or Replication Group Running in an Amazon VPC (p. 409)
API Version 2015-02-02392
Amazon ElastiCache User GuideUnderstanding ElastiCache and Amazon VPCs
Understanding ElastiCache and Amazon VPCsElastiCache is fully integrated with the Amazon Virtual Private Cloud (Amazon VPC). For ElastiCacheusers, this means the following:
• If your AWS account supports only the EC2-VPC platform, ElastiCache always launches your cluster inan Amazon VPC.
• If you're new to AWS, your clusters will be deployed into an Amazon VPC. A default VPC will be createdfor you automatically.
• If you have a default VPC and don't specify a subnet when you launch a cluster, the cluster launchesinto your default Amazon VPC.
For more information, see Detecting Your Supported Platforms and Whether You Have a Default VPC.
With Amazon Virtual Private Cloud, you can create a virtual network in the AWS cloud that closelyresembles a traditional data center. You can configure your Amazon VPC, including selecting its IPaddress range, creating subnets, and configuring route tables, network gateways, and security settings.
The basic functionality of ElastiCache is the same in a virtual private cloud; ElastiCache managessoftware upgrades, patching, failure detection and recovery whether your clusters are deployed inside oroutside an Amazon VPC.
ElastiCache cache nodes deployed outside an Amazon VPC are assigned an IP address to which theendpoint/DNS name resolves. This provides connectivity from Amazon Elastic Compute Cloud (AmazonEC2) instances. When you launch an ElastiCache cluster into an Amazon VPC private subnet, every cachenode is assigned a private IP address within that subnet.
Overview of ElastiCache In an Amazon VPCThe following diagram and table describe the Amazon VPC environment, along with ElastiCache clustersand Amazon EC2 instances that are launched in the Amazon VPC.
API Version 2015-02-02393

Amazon ElastiCache User GuideOverview of ElastiCache In an Amazon VPC
The Amazon VPC is an isolated portion of the AWS cloud that is assigned its own block of IPaddresses.
An Internet gateway connects your Amazon VPC directly to the Internet and provides accessto other AWS resources such as Amazon Simple Storage Service (Amazon S3) that are runningoutside your Amazon VPC.
An Amazon VPC subnet is a segment of the IP address range of an Amazon VPC where you canisolate AWS resources according to your security and operational needs.
A routing table in the Amazon VPC directs network traffic between the subnet and the Internet.The Amazon VPC has an implied router, which is symbolized in this diagram by the circle withthe R.
API Version 2015-02-02394
Amazon ElastiCache User GuideWhy use the Amazon VPC instead of EC2
Classic with your ElastiCache deployment?
An Amazon VPC security group controls inbound and outbound traffic for your ElastiCacheclusters and Amazon EC2 instances.
You can launch an ElastiCache cluster in the subnet. The cache nodes have private IP addressesfrom the subnet's range of addresses.
You can also launch Amazon EC2 instances in the subnet. Each Amazon EC2 instance has aprivate IP address from the subnet's range of addresses. The Amazon EC2 instance can connectto any cache node in the same subnet.
For an Amazon EC2 instance in your Amazon VPC to be reachable from the Internet, you needto assign a static, public address called an Elastic IP address to the instance.
Why use the Amazon VPC instead of EC2 Classic withyour ElastiCache deployment?Launching your instances into an Amazon VPC allows you to:
• Assign static private IP addresses to your instances that persist across starts and stops.• Assign multiple IP addresses to your instances.• Define network interfaces, and attach one or more network interfaces to your instances.• Change security group membership for your instances while they're running.• Control the outbound traffic from your instances (egress filtering) in addition to controlling the
inbound traffic to them (ingress filtering).• Add an additional layer of access control to your instances in the form of network access control lists
(ACL).• Run your instances on single-tenant hardware.
For a comparison of Amazon EC2 Classic, Default VPC, and Non-default VPC, go to Differences BetweenEC2-Classic and EC2-VPC.
The Amazon VPC must allow non-dedicated Amazon EC2 instances. You cannot use ElastiCache in anAmazon VPC that is configured for dedicated instance tenancy.
PrerequisitesIn order to create an ElastiCache cluster within an Amazon VPC, your Amazon VPC must meet thefollowing requirements:
• The Amazon VPC must allow nondedicated Amazon EC2 instances. You cannot use ElastiCache in anAmazon VPC that is configured for dedicated instance tenancy.
• A cache subnet group must be defined for your Amazon VPC. ElastiCache uses that cache subnet groupto select a subnet and IP addresses within that subnet to associate with your cache nodes.
• A cache security group must be defined for your Amazon VPC, or you can use the default provided.• CIDR blocks for each subnet must be large enough to provide spare IP addresses for ElastiCache to use
during maintenance activities.
Routing and SecurityYou can configure routing in your Amazon VPC to control where traffic flows (for example, to theInternet gateway or virtual private gateway). With an Internet gateway, your Amazon VPC has direct
API Version 2015-02-02395

Amazon ElastiCache User GuideAmazon VPC Documentation
access to other AWS resources that are not running in your Amazon VPC. If you choose to have onlya virtual private gateway with a connection to your organization's local network, you can route yourInternet-bound traffic over the VPN and use local security policies and firewall to control egress. In thatcase, you incur additional bandwidth charges when you access AWS resources over the Internet.
You can use Amazon VPC security groups to help secure the ElastiCache clusters and Amazon EC2instances in your Amazon VPC. Security groups act like a firewall at the instance level, not the subnetlevel.
NoteWe strongly recommend that you use DNS names to connect to your cache nodes, as theunderlying IP address can change if you reboot the cache node.
Amazon VPC DocumentationAmazon VPC has its own set of documentation to describe how to create and use your Amazon VPC. Thefollowing table gives links to the Amazon VPC guides.
Description Documentation
How to get started using Amazon VPC Amazon VPC Getting Started Guide
How to use Amazon VPC through the AWSManagement Console
Amazon VPC User Guide
Complete descriptions of all the Amazon VPCcommands
Amazon EC2 Command Line Reference (theAmazon VPC commands are part of the AmazonEC2 reference)
Complete descriptions of the Amazon VPC APIactions, data types, and errors
Amazon EC2 API Reference (the Amazon VPC APIactions are part of the Amazon EC2 reference)
Information for the network administrator whoneeds to configure the gateway at your end of anoptional IPsec VPN connection
Amazon VPC Network Administrator Guide
For more detailed information about Amazon Virtual Private Cloud, see Amazon Virtual Private Cloud.
API Version 2015-02-02396
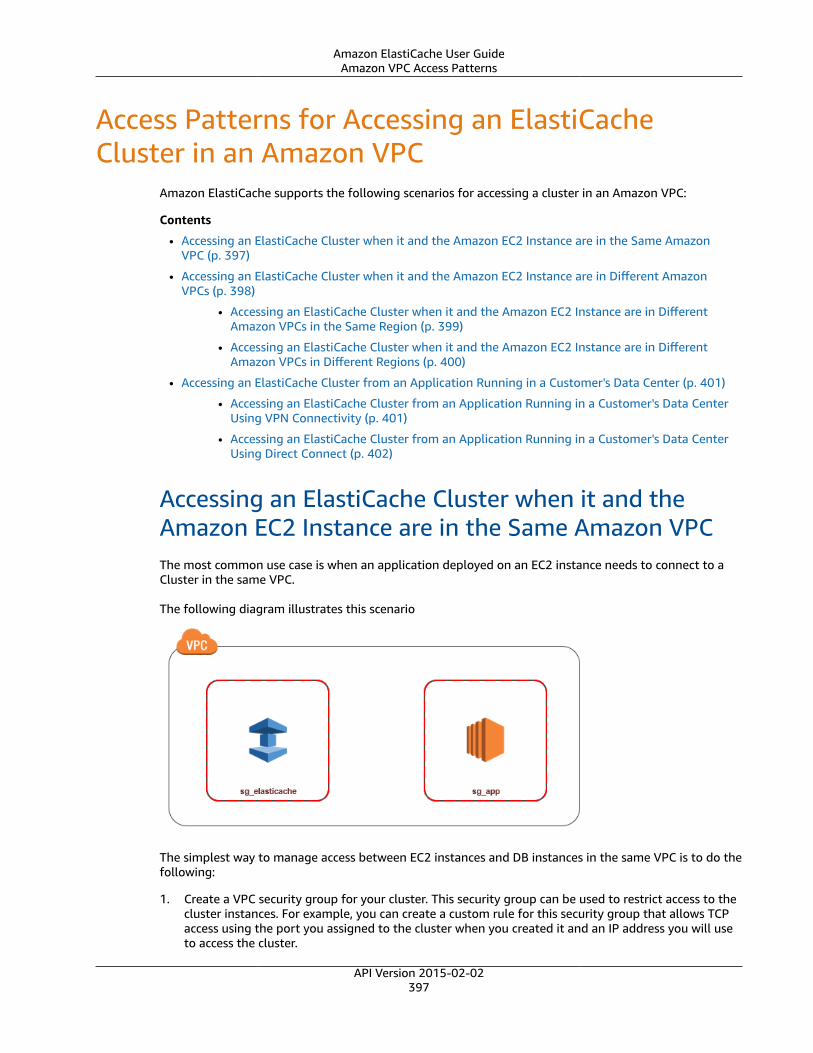
Amazon ElastiCache User GuideAmazon VPC Access Patterns
Access Patterns for Accessing an ElastiCacheCluster in an Amazon VPC
Amazon ElastiCache supports the following scenarios for accessing a cluster in an Amazon VPC:
Contents
• Accessing an ElastiCache Cluster when it and the Amazon EC2 Instance are in the Same AmazonVPC (p. 397)
• Accessing an ElastiCache Cluster when it and the Amazon EC2 Instance are in Different AmazonVPCs (p. 398)
• Accessing an ElastiCache Cluster when it and the Amazon EC2 Instance are in DifferentAmazon VPCs in the Same Region (p. 399)
• Accessing an ElastiCache Cluster when it and the Amazon EC2 Instance are in DifferentAmazon VPCs in Different Regions (p. 400)
• Accessing an ElastiCache Cluster from an Application Running in a Customer's Data Center (p. 401)
• Accessing an ElastiCache Cluster from an Application Running in a Customer's Data CenterUsing VPN Connectivity (p. 401)
• Accessing an ElastiCache Cluster from an Application Running in a Customer's Data CenterUsing Direct Connect (p. 402)
Accessing an ElastiCache Cluster when it and theAmazon EC2 Instance are in the Same Amazon VPCThe most common use case is when an application deployed on an EC2 instance needs to connect to aCluster in the same VPC.
The following diagram illustrates this scenario
The simplest way to manage access between EC2 instances and DB instances in the same VPC is to do thefollowing:
1. Create a VPC security group for your cluster. This security group can be used to restrict access to thecluster instances. For example, you can create a custom rule for this security group that allows TCPaccess using the port you assigned to the cluster when you created it and an IP address you will useto access the cluster.
API Version 2015-02-02397

Amazon ElastiCache User GuideAccessing an ElastiCache Cluster when it and the
Amazon EC2 Instance are in Different Amazon VPCs
Default Ports
• Memcached: 11211
• Redis: 6379
2. Create a VPC security group for your EC2 instances (web and application servers). This security groupcan, if needed, allow access to the EC2 instance from the Internet via the VPC's routing table. Forexample, you can set rules on this security group to allow TCP access to the EC2 instance over port22.
3. Create custom rules in the security group for your Cluster that allow connections from the securitygroup you created for your EC2 instances. This would allow any member of the security group toaccess the DB instances.
To create a rule in a VPC security group that allows connections from another security group
1. Sign in to the AWS Management Console and open the Amazon VPC console at https://console.aws.amazon.com/vpc.
2. In the navigation pane, choose Security Groups.
3. Select or create a security group that you will use for your Cluster instances. Choose Add Rule. Thissecurity group will allow access to members of another security group.
4. From Type choose Custom TCP Rule.
a. For Port Range, specify the port you used when you created your cluster.
Default Ports
• Memcached: 11211
• Redis: 6379
b. In the Source box, start typing the ID of the security group. From the list select the securitygroup you will use for your Amazon EC2 instances.
5. Choose Save when you finish.
Accessing an ElastiCache Cluster when it and theAmazon EC2 Instance are in Different Amazon VPCsWhen your Cluster is in a different VPC from the EC2 instance you are using to access it, there are severalways to access the DB instance. If the Cluster and EC2 instance are in different VPCs but in the sameregion, you can use VPC peering. If the Cluster and the EC2 instance are in different regions, you cancreate VPN connectivity between regions.
API Version 2015-02-02398
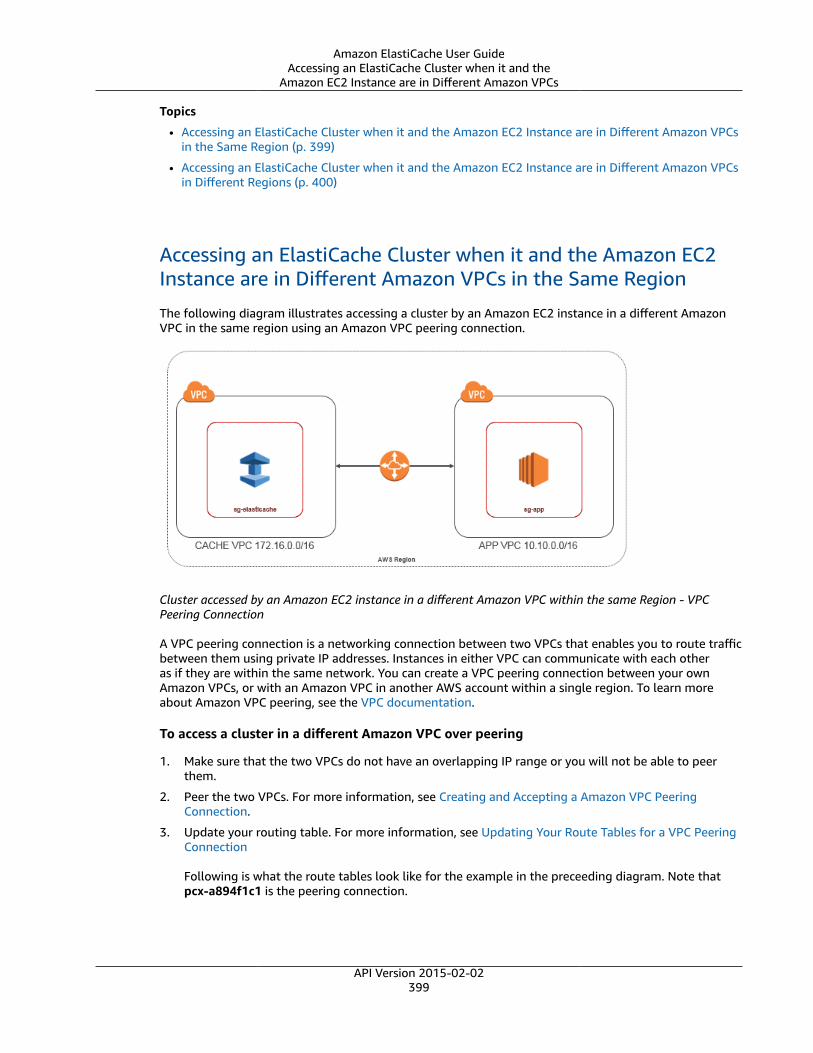
Amazon ElastiCache User GuideAccessing an ElastiCache Cluster when it and the
Amazon EC2 Instance are in Different Amazon VPCs
Topics
• Accessing an ElastiCache Cluster when it and the Amazon EC2 Instance are in Different Amazon VPCsin the Same Region (p. 399)
• Accessing an ElastiCache Cluster when it and the Amazon EC2 Instance are in Different Amazon VPCsin Different Regions (p. 400)
Accessing an ElastiCache Cluster when it and the Amazon EC2Instance are in Different Amazon VPCs in the Same Region
The following diagram illustrates accessing a cluster by an Amazon EC2 instance in a different AmazonVPC in the same region using an Amazon VPC peering connection.
Cluster accessed by an Amazon EC2 instance in a different Amazon VPC within the same Region - VPCPeering Connection
A VPC peering connection is a networking connection between two VPCs that enables you to route trafficbetween them using private IP addresses. Instances in either VPC can communicate with each otheras if they are within the same network. You can create a VPC peering connection between your ownAmazon VPCs, or with an Amazon VPC in another AWS account within a single region. To learn moreabout Amazon VPC peering, see the VPC documentation.
To access a cluster in a different Amazon VPC over peering
1. Make sure that the two VPCs do not have an overlapping IP range or you will not be able to peerthem.
2. Peer the two VPCs. For more information, see Creating and Accepting a Amazon VPC PeeringConnection.
3. Update your routing table. For more information, see Updating Your Route Tables for a VPC PeeringConnection
Following is what the route tables look like for the example in the preceeding diagram. Note thatpcx-a894f1c1 is the peering connection.
API Version 2015-02-02399

Amazon ElastiCache User GuideAccessing an ElastiCache Cluster when it and the
Amazon EC2 Instance are in Different Amazon VPCs
VPC Routing Table
4. Modify the Security Group of your ElastiCache cluster to allow inbound connection from theApplication security group in the peered VPC. For more information, see Reference Peer VPC SecurityGroups.
Accessing a cluster over a peering connection will incur additional data transfer costs.
Accessing an ElastiCache Cluster when it and the Amazon EC2Instance are in Different Amazon VPCs in Different RegionsOne common strategy for connecting multiple, geographically disperse VPCs and remote networks isto create a transit VPC that serves as a global network transit center. A transit VPC simplifies networkmanagement and minimizes the number of connections required to connect multiple VPCs and remotenetworks. This design can save time and effort and also reduce costs, as it is implemented virtuallywithout the traditional expense of establishing a physical presence in a colocation transit hub ordeploying physical network gear.
Connecting across different VPCs in different regions
Once the Transit Amazon VPC is established, an application deployed in a “spoke” VPC in one region canconnect to an ElastiCache cluster in a “spoke” VPC within another region.
To access a cluster in a different VPC within a different Region
1. Deploy a Transit VPC Solution. For more information, see, How do I build a global transit network onAWS?.
API Version 2015-02-02400

Amazon ElastiCache User GuideAccessing an ElastiCache Cluster from an
Application Running in a Customer's Data Center
2. Update the VPC routing tables in the App and Cache VPCs to route traffic through the VGW (VirtualPrivate Gateway) and the VPN Appliance. In case of Dynamic Routing with Border Gateway Protocol(BGP) your routes may be automatically propagated.
3. Modify the Security Group of your ElastiCache cluster to allow inbound connection from theApplication instances IP range. Note that you will not be able to reference the application serverSecurity Group in this scenario.
Accessing a cluster across regions will introduce networking latencies and additional cross-region datatransfer costs.
Accessing an ElastiCache Cluster from an ApplicationRunning in a Customer's Data CenterAnother possible scenario is a Hybrid architecture where clients or applications in the customer’s datacenter may need to access an ElastiCache Cluster in the VPC. This scenario is also supported providingthere is connectivity between the customers’ VPC and the data center either through VPN or DirectConnect.
Topics
• Accessing an ElastiCache Cluster from an Application Running in a Customer's Data Center Using VPNConnectivity (p. 401)
• Accessing an ElastiCache Cluster from an Application Running in a Customer's Data Center UsingDirect Connect (p. 402)
Accessing an ElastiCache Cluster from an Application Running ina Customer's Data Center Using VPN Connectivity
The following diagram illustrates accessing an ElastiCache cluster from an application running in yourcorporate network using VPN connections.
API Version 2015-02-02401

Amazon ElastiCache User GuideAccessing an ElastiCache Cluster from an
Application Running in a Customer's Data Center
Connecting to ElastiCache from your data center via a VPN
To access a cluster in a VPC from on-prem application over VPN connection
1. Establish VPN Connectivity by adding a hardware Virtual Private Gateway to your VPC. For moreinformation, see Adding a Hardware Virtual Private Gateway to Your VPC.
2. Update the VPC routing table for the subnet where your ElastiCache cluster is deployed to allowtraffic from your on-premises application server. In case of Dynamic Routing with BGP your routesmay be automatically propagated.
3. Modify the Security Group of your ElastiCache cluster to allow inbound connection from the on-premises application servers.
Accessing a cluster over a VPN connection will introduce networking latencies and additional datatransfer costs.
Accessing an ElastiCache Cluster from an Application Running ina Customer's Data Center Using Direct Connect
The following diagram illustrates accessing an ElastiCache cluster from an application running on yourcorporate network using Direct Connect.
API Version 2015-02-02402
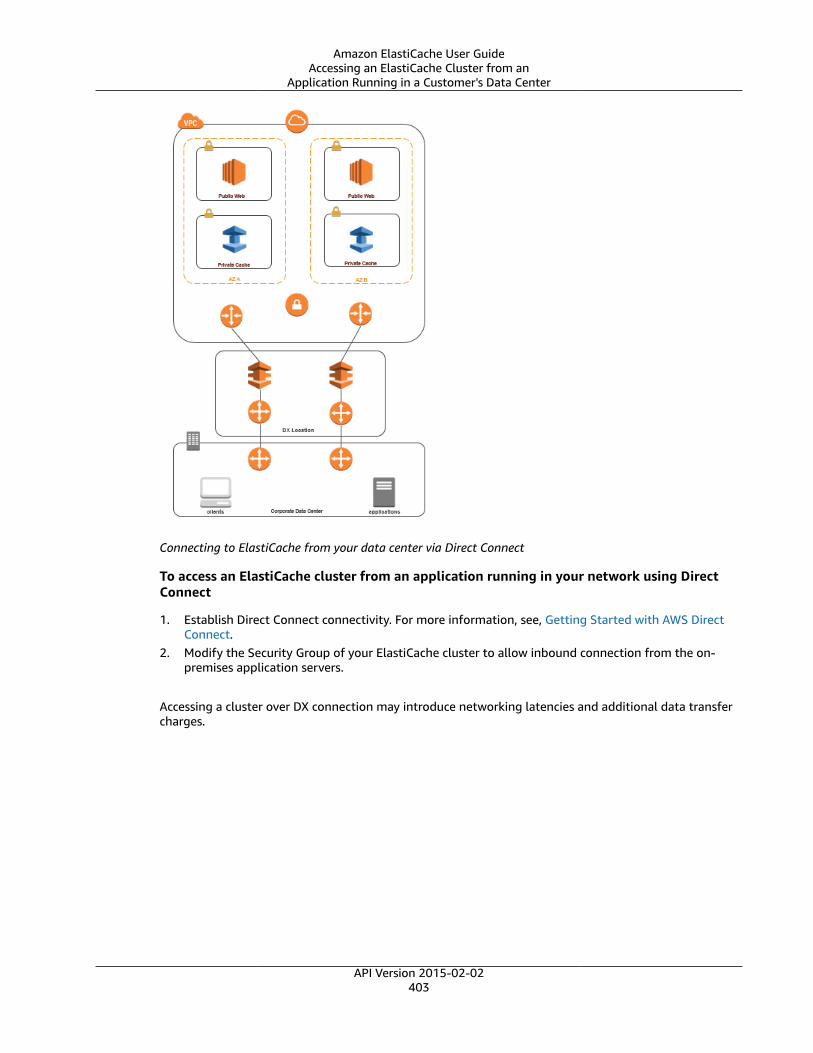
Amazon ElastiCache User GuideAccessing an ElastiCache Cluster from an
Application Running in a Customer's Data Center
Connecting to ElastiCache from your data center via Direct Connect
To access an ElastiCache cluster from an application running in your network using DirectConnect
1. Establish Direct Connect connectivity. For more information, see, Getting Started with AWS DirectConnect.
2. Modify the Security Group of your ElastiCache cluster to allow inbound connection from the on-premises application servers.
Accessing a cluster over DX connection may introduce networking latencies and additional data transfercharges.
API Version 2015-02-02403

Amazon ElastiCache User GuideCreating a Virtual Private Cloud (VPC)
Creating a Virtual Private Cloud (VPC)In this example, you create an Amazon VPC with a private subnet for each Availability Zone.
Creating an Amazon VPC (Console)To create an ElastiCache cache cluster inside an Amazon Virtual Private Cloud
1. Sign in to the AWS Management Console, and open the Amazon VPC console at https://console.aws.amazon.com/vpc/.
2. Create a new Amazon VPC by using the Amazon Virtual Private Cloud wizard:
a. In the navigation list, choose VPC Dashboard.
b. Choose Start VPC Wizard.
c. In the Amazon VPC wizard, choose VPC with Public and Private Subnets, and then chooseNext.
d. On the VPC with Public and Private Subnets page, keep the default options, and then chooseCreate VPC.
e. In the confirmation message that appears, choose Close.
3. Confirm that there are two subnets in your Amazon VPC, a public subnet and a private subnet. Thesesubnets are created automatically.
a. In the navigation list, choose Subnets.
b. In the list of subnets, find the two subnets that are in your Amazon VPC:
The public subnet will have one fewer available IP address, because the wizard creates anAmazon EC2 NAT instance and an Elastic IP address (for which Amazon EC2 rates apply) foroutbound communication to the Internet from your private subnet.
TipMake a note of your two subnet identifiers, and which is public and private. You willneed this information later when you launch your cache clusters and add an Amazon EC2instance to your Amazon VPC.
4. Create an Amazon VPC security group. You will use this group for your cache cluster and yourAmazon EC2 instance.
a. In the navigation pane of the Amazon VPC Management console, choose Security Groups.
b. Choose Create Security Group.
c. Type a name and a description for your security group in the corresponding boxes. In the VPCbox, choose the identifier for your Amazon VPC.
API Version 2015-02-02404
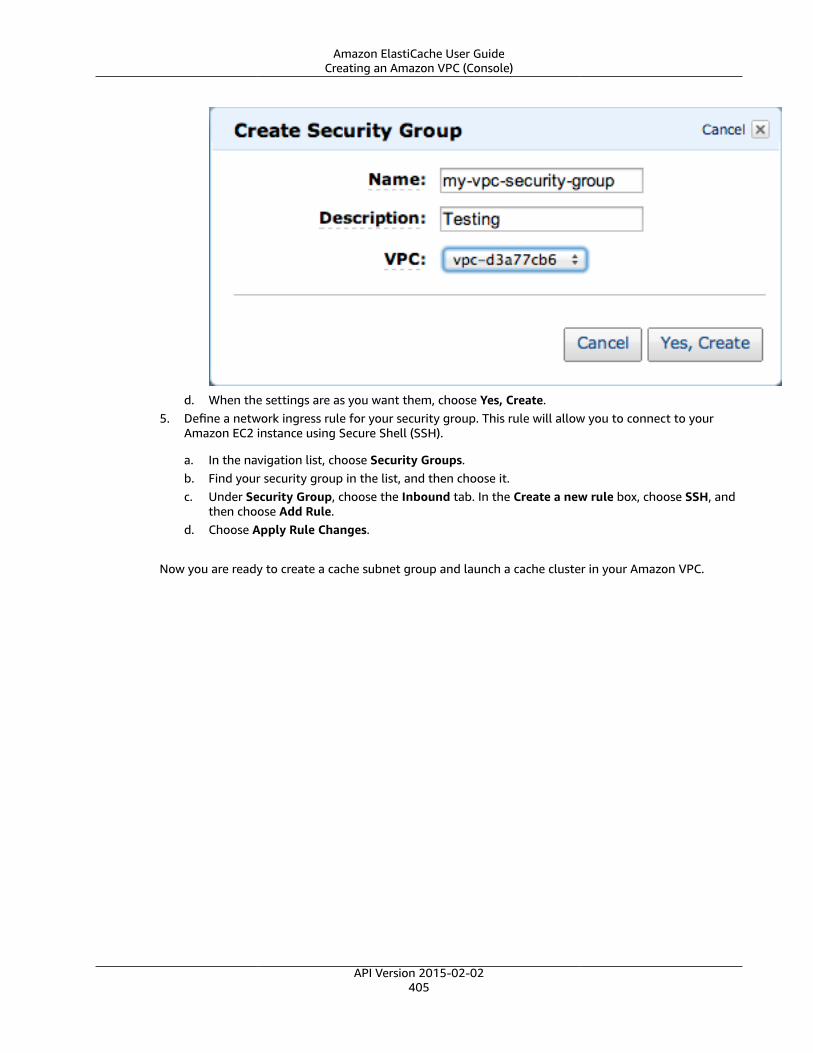
Amazon ElastiCache User GuideCreating an Amazon VPC (Console)
d. When the settings are as you want them, choose Yes, Create.5. Define a network ingress rule for your security group. This rule will allow you to connect to your
Amazon EC2 instance using Secure Shell (SSH).
a. In the navigation list, choose Security Groups.b. Find your security group in the list, and then choose it.c. Under Security Group, choose the Inbound tab. In the Create a new rule box, choose SSH, and
then choose Add Rule.d. Choose Apply Rule Changes.
Now you are ready to create a cache subnet group and launch a cache cluster in your Amazon VPC.
API Version 2015-02-02405

Amazon ElastiCache User GuideCreating a Cache Subnet Group
Creating a Cache Subnet GroupA cache subnet group is a collection of subnets that you may want to designate for your cache clusters inan Amazon VPC. When launching a cache cluster in an Amazon VPC, you need to select a cache subnetgroup. Then ElastiCache uses that cache subnet group to assign IP addresses within that subnet to eachcache node in the cluster.
For guidance on how to create a subnet group using the ElastiCache Management Console, the AWS CLI,or the ElastiCache API, go to Creating a Subnet Group (p. 384).
After you create a cache subnet group, you can launch a cache cluster to run in your Amazon VPC.Continue to the next topic Creating a Cache Cluster in an Amazon VPC (p. 407).
API Version 2015-02-02406

Amazon ElastiCache User GuideCreating a Cache Cluster in an Amazon VPC
Creating a Cache Cluster in an Amazon VPCIn this example, you create a cache cluster in your Amazon VPC.
Creating a Cache Cluster in an Amazon VPC (Console)• To launch a Memcached cache cluster, see Creating a Cluster (Console): Memcached (p. 161). In step 6.c
select a VPC subnet group.• To launch a Redis cache cluster, see Creating a Redis (cluster mode disabled) Cluster (Console) (p. 163).
In step 6.d select a VPC subnet group.
You have now launched a cache cluster inside an Amazon VPC. For an example of one way to connect toyour new cache cluster running in the Amazon VPC, continue to Connecting to a Cluster or ReplicationGroup Running in an Amazon VPC (p. 409).
API Version 2015-02-02407

Amazon ElastiCache User GuideCreating a Replication Group in an Amazon VPC
Creating a Replication Group in an Amazon VPCIn this example, you create a Redis replication group in your Amazon VPC.
Creating a Replication Group in an Amazon VPC(Console)To launch a Redis (cluster mode disabled) replication group in a VPC, see Creating a Redis (cluster modedisabled) Cluster with Replicas from Scratch (Console) (p. 265) In step 5.b, select a VPC subnet group.
To launch a Redis (cluster mode enabled) replication group, see Creating a Redis (cluster mode enabled)Cluster (Console) (p. 271) In step 6.d, select a VPC subnet group.
You have now launched a Redis replication group inside an Amazon VPC. For an example of one way toconnect to your new replication group running in the Amazon VPC, continue to Connecting to a Clusteror Replication Group Running in an Amazon VPC (p. 409).
API Version 2015-02-02408
Amazon ElastiCache User GuideConnecting to a Cluster or Replication
Group Running in an Amazon VPC
Connecting to a Cluster or Replication GroupRunning in an Amazon VPC
This example shows how to launch an Amazon EC2 instance in your Amazon VPC. You can then log in tothis instance and access the ElastiCache cluster that is running in the Amazon VPC.
NoteFor information about using Amazon EC2, see the Amazon EC2 Getting Started Guide in theAmazon EC2 documentation.
ImportantTo avoid incurring additional charges on your AWS account, be sure to delete any AWS resourcesyou no longer want after trying these examples.
For information on connecting to your Memcached or Redis cluster, see Step 5: Connect to a Cluster'sNode (p. 37) in the ElastiCache User Guide.
API Version 2015-02-02409
Amazon ElastiCache User GuideSecurity Groups
Amazon ElastiCache Data Securityand Compliance
Amazon ElastiCache uses the following techniques to secure your cache data and protect it fromunauthorized access:
Topics• ElastiCache and Security Groups (p. 410)• Authentication and Access Control for Amazon ElastiCache (p. 411)• Authenticating Users with AUTH (Redis) (p. 431)• Amazon ElastiCache for Redis Data Encryption (p. 433)• HIPAA Compliance for Amazon ElastiCache for Redis (p. 443)
ElastiCache and Security GroupsBecause data security is important, ElastiCache provides means for you to control who has access to yourdata. How you control access to your data is dependent upon whether or not you launched your clustersin an Amazon Virtual Private Cloud (Amazon VPC) or Amazon EC2-Classic.
Topics• Amazon Virtual Private Cloud: Amazon VPC Security Groups (p. 410)• Amazon EC2-Classic: ElastiCache Security Groups (p. 410)
Amazon Virtual Private Cloud: Amazon VPC SecurityGroupsWhen running your clusters in an Amazon Virtual Private Cloud, you configure your Amazon VPCby choosing its IP address range, creating subnets, and configuring route tables, network gateways,and security settings. You can also add a cache cluster to the virtual network, and control access tothe cache cluster by using Amazon VPC security groups, which should not be confused with AmazonElastiCache security groups. For more information, see Amazon Virtual Private Cloud (Amazon VPC) withElastiCache (p. 392).
Amazon EC2-Classic: ElastiCache Security GroupsAmazon ElastiCache allows you to control access to your clusters using ElastiCache cache security groups.An ElastiCache cache security group acts like a firewall, controlling network access to your cluster.By default, network access is turned off to your clusters. If you want your applications to access yourcluster, you must explicitly enable access from hosts in specific Amazon EC2 security groups. For moreinformation, see Security Groups [EC2-Classic] (p. 332) .
API Version 2015-02-02410

Amazon ElastiCache User GuideAuthentication & Access Control
Authentication and Access Control for AmazonElastiCache
Access to Amazon ElastiCache requires credentials that AWS can use to authenticate your requests. Thosecredentials must have permissions to access AWS resources, such as an ElastiCache cache cluster or anAmazon Elastic Compute Cloud (Amazon EC2) instance. The following sections provide details on howyou can use AWS Identity and Access Management (IAM) and ElastiCache to help secure your resourcesby controlling who can access them.
• Authentication (p. 411)
• Access Control (p. 412)
AuthenticationYou can access AWS as any of the following types of identities:
• AWS account root user – When you first create an AWS account, you begin with a single sign-inidentity that has complete access to all AWS services and resources in the account. This identity iscalled the AWS account root user and is accessed by signing in with the email address and passwordthat you used to create the account. We strongly recommend that you do not use the root user foryour everyday tasks, even the administrative ones. Instead, adhere to the best practice of using theroot user only to create your first IAM user. Then securely lock away the root user credentials and usethem to perform only a few account and service management tasks.
• IAM user – An IAM user is an identity within your AWS account that has specific custom permissions(for example, permissions to create a cluster in ElastiCache). You can use an IAM user name andpassword to sign in to secure AWS webpages like the AWS Management Console, AWS DiscussionForums, or the AWS Support Center.
In addition to a user name and password, you can also generate access keys for each user. You canuse these keys when you access AWS services programmatically, either through one of the severalSDKs or by using the AWS Command Line Interface (CLI). The SDK and CLI tools use the access keysto cryptographically sign your request. If you don’t use AWS tools, you must sign the request yourself.ElastiCache supports Signature Version 4, a protocol for authenticating inbound API requests. For moreinformation about authenticating requests, see Signature Version 4 Signing Process in the AWS GeneralReference.
• IAM role – An IAM role is an IAM identity that you can create in your account that has specificpermissions. It is similar to an IAM user, but it is not associated with a specific person. An IAM roleenables you to obtain temporary access keys that can be used to access AWS services and resources.IAM roles with temporary credentials are useful in the following situations:
• Federated user access – Instead of creating an IAM user, you can use existing user identities fromAWS Directory Service, your enterprise user directory, or a web identity provider. These are known asfederated users. AWS assigns a role to a federated user when access is requested through an identityprovider. For more information about federated users, see Federated Users and Roles in the IAM UserGuide.
API Version 2015-02-02411
Amazon ElastiCache User GuideAccess Control
• AWS service access – You can use an IAM role in your account to grant an AWS service permissionsto access your account’s resources. For example, you can create a role that allows Amazon Redshiftto access an Amazon S3 bucket on your behalf and then load data from that bucket into an AmazonRedshift cluster. For more information, see Creating a Role to Delegate Permissions to an AWSService in the IAM User Guide.
• Applications running on Amazon EC2 – You can use an IAM role to manage temporary credentials
for applications that are running on an EC2 instance and making AWS API requests. This is preferableto storing access keys within the EC2 instance. To assign an AWS role to an EC2 instance and makeit available to all of its applications, you create an instance profile that is attached to the instance.An instance profile contains the role and enables programs that are running on the EC2 instanceto get temporary credentials. For more information, see Using an IAM Role to Grant Permissions toApplications Running on Amazon EC2 Instances in the IAM User Guide.
Access ControlYou can have valid credentials to authenticate your requests, but unless you have permissions you cannotcreate or access Amazon ElastiCache resources. For example, you must have permissions to create anElastiCache cache cluster.
The following sections describe how to manage permissions for Amazon ElastiCache. We recommendthat you read the overview first.
• Overview of Managing Access Permissions to Your ElastiCache Resources (p. 413)• Using Identity-Based Policies (IAM Policies) for Amazon ElastiCache (p. 417)
API Version 2015-02-02412
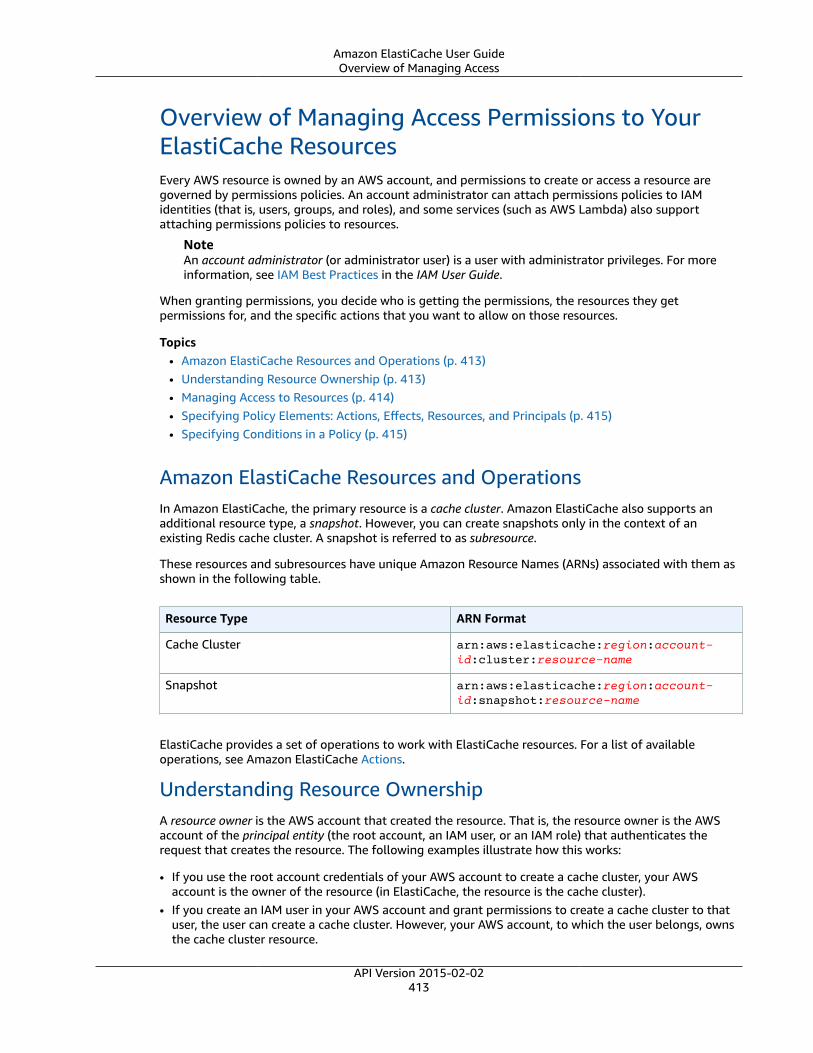
Amazon ElastiCache User GuideOverview of Managing Access
Overview of Managing Access Permissions to YourElastiCache ResourcesEvery AWS resource is owned by an AWS account, and permissions to create or access a resource aregoverned by permissions policies. An account administrator can attach permissions policies to IAMidentities (that is, users, groups, and roles), and some services (such as AWS Lambda) also supportattaching permissions policies to resources.
NoteAn account administrator (or administrator user) is a user with administrator privileges. For moreinformation, see IAM Best Practices in the IAM User Guide.
When granting permissions, you decide who is getting the permissions, the resources they getpermissions for, and the specific actions that you want to allow on those resources.
Topics• Amazon ElastiCache Resources and Operations (p. 413)• Understanding Resource Ownership (p. 413)• Managing Access to Resources (p. 414)• Specifying Policy Elements: Actions, Effects, Resources, and Principals (p. 415)• Specifying Conditions in a Policy (p. 415)
Amazon ElastiCache Resources and OperationsIn Amazon ElastiCache, the primary resource is a cache cluster. Amazon ElastiCache also supports anadditional resource type, a snapshot. However, you can create snapshots only in the context of anexisting Redis cache cluster. A snapshot is referred to as subresource.
These resources and subresources have unique Amazon Resource Names (ARNs) associated with them asshown in the following table.
Resource Type ARN Format
Cache Cluster arn:aws:elasticache:region:account-id:cluster:resource-name
Snapshot arn:aws:elasticache:region:account-id:snapshot:resource-name
ElastiCache provides a set of operations to work with ElastiCache resources. For a list of availableoperations, see Amazon ElastiCache Actions.
Understanding Resource OwnershipA resource owner is the AWS account that created the resource. That is, the resource owner is the AWSaccount of the principal entity (the root account, an IAM user, or an IAM role) that authenticates therequest that creates the resource. The following examples illustrate how this works:
• If you use the root account credentials of your AWS account to create a cache cluster, your AWSaccount is the owner of the resource (in ElastiCache, the resource is the cache cluster).
• If you create an IAM user in your AWS account and grant permissions to create a cache cluster to thatuser, the user can create a cache cluster. However, your AWS account, to which the user belongs, ownsthe cache cluster resource.
API Version 2015-02-02413

Amazon ElastiCache User GuideOverview of Managing Access
• If you create an IAM role in your AWS account with permissions to create a cache cluster, anyone whocan assume the role can create a cache cluster. Your AWS account, to which the role belongs, owns thecache cluster resource.
Managing Access to ResourcesA permissions policy describes who has access to what. The following section explains the availableoptions for creating permissions policies.
NoteThis section discusses using IAM in the context of Amazon ElastiCache. It doesn't providedetailed information about the IAM service. For complete IAM documentation, see What Is IAM?in the IAM User Guide. For information about IAM policy syntax and descriptions, see AWS IAMPolicy Reference in the IAM User Guide.
Policies attached to an IAM identity are referred to as identity-based policies (IAM polices) and policiesattached to a resource are referred to as resource-based policies. Amazon ElastiCache supports onlyidentity-based policies (IAM policies).
Topics• Identity-Based Policies (IAM Policies) (p. 414)• Resource-Based Policies (p. 415)
Identity-Based Policies (IAM Policies)
You can attach policies to IAM identities. For example, you can do the following:
• Attach a permissions policy to a user or a group in your account – An account administrator canuse a permissions policy that is associated with a particular user to grant permissions for that user tocreate an ElastiCache resource, such as a cache cluster, parameter group, or security group.
• Attach a permissions policy to a role (grant cross-account permissions) – You can attach anidentity-based permissions policy to an IAM role to grant cross-account permissions. For example,the administrator in Account A can create a role to grant cross-account permissions to another AWSaccount (for example, Account B) or an AWS service as follows:1. Account A administrator creates an IAM role and attaches a permissions policy to the role that
grants permissions on resources in Account A.2. Account A administrator attaches a trust policy to the role identifying Account B as the principal
who can assume the role.3. Account B administrator can then delegate permissions to assume the role to any users in Account
B. Doing this allows users in Account B to create or access resources in Account A. The principalin the trust policy can also be an AWS service principal if you want to grant an AWS servicepermissions to assume the role.
For more information about using IAM to delegate permissions, see Access Management in the IAMUser Guide.
The following is an example policy that allows a user to perform the DescribeCacheClusters actionfor your AWS account. In the current implementation, ElastiCache doesn't support identifying specificresources using the resource ARNs (also referred to as resource-level permissions) for any API actions, soyou must specify a wildcard character (*).
{ "Version": "2012-10-17", "Statement": [{ "Sid": "DescribeCacheClusters",
API Version 2015-02-02414

Amazon ElastiCache User GuideOverview of Managing Access
"Effect": "Allow", "Action": [ "elasticache:DescribeCacheClusters"], "Resource": "*" } ]}
For more information about using identity-based policies with ElastiCache, see Using Identity-BasedPolicies (IAM Policies) for Amazon ElastiCache (p. 417). For more information about users, groups, roles,and permissions, see Identities (Users, Groups, and Roles in the IAM User Guide.
Resource-Based Policies
Other services, such as Amazon S3, also support resource-based permissions policies. For example, youcan attach a policy to an S3 bucket to manage access permissions to that bucket. Amazon ElastiCachedoesn't support resource-based policies.
Specifying Policy Elements: Actions, Effects, Resources, andPrincipalsFor each Amazon ElastiCache resource (see Amazon ElastiCache Resources and Operations (p. 413)),the service defines a set of API operations (see Actions). To grant permissions for these API operations,ElastiCache defines a set of actions that you can specify in a policy. For example, for the ElastiCachesnapshot resource, the following actions are defined: CreateSnapshot, DeleteSnapshot, andDescribeSnapshots. Note that, performing an API operation can require permissions for more thanone action.
The following are the most basic policy elements:
• Resource – In a policy, you use an Amazon Resource Name (ARN) to identify the resource to which thepolicy applies. For ElastiCache resources, you always use the wildcard character (*) in IAM policies. Formore information, see Amazon ElastiCache Resources and Operations (p. 413).
• Action – You use action keywords to identify resource operations that you want to allow or deny. Forexample, depending on the specified Effect, the elasticache:CreateCacheCluster permissionallows or denies the user permissions to perform the Amazon ElastiCache CreateCacheClusteroperation.
• Effect – You specify the effect when the user requests the specific action—this can be either allow ordeny. If you don't explicitly grant access to (allow) a resource, access is implicitly denied. You can alsoexplicitly deny access to a resource, which you might do to make sure that a user cannot access it, evenif a different policy grants access.
• Principal – In identity-based policies (IAM policies), the user that the policy is attached to is theimplicit principal. For resource-based policies, you specify the user, account, service, or other entitythat you want to receive permissions (applies to resource-based policies only). ElastiCache doesn'tsupport resource-based policies.
To learn more about IAM policy syntax and descriptions, see AWS IAM Policy Reference in the IAM UserGuide.
For a table showing all of the Amazon ElastiCache API actions, see ElastiCache API Permissions: Actions,Resources, and Conditions Reference (p. 428).
Specifying Conditions in a PolicyWhen you grant permissions, you can use the IAM policy language to specify the conditions when apolicy should take effect. For example, you might want a policy to be applied only after a specific date.
API Version 2015-02-02415

Amazon ElastiCache User GuideOverview of Managing Access
For more information about specifying conditions in a policy language, see Condition in the IAM UserGuide.
To express conditions, you use predefined condition keys. There are no condition keys specific to AmazonElastiCache. However, there are AWS-wide condition keys that you can use as appropriate. For a completelist of AWS-wide keys, see Available Keys for Conditions in the IAM User Guide.
API Version 2015-02-02416
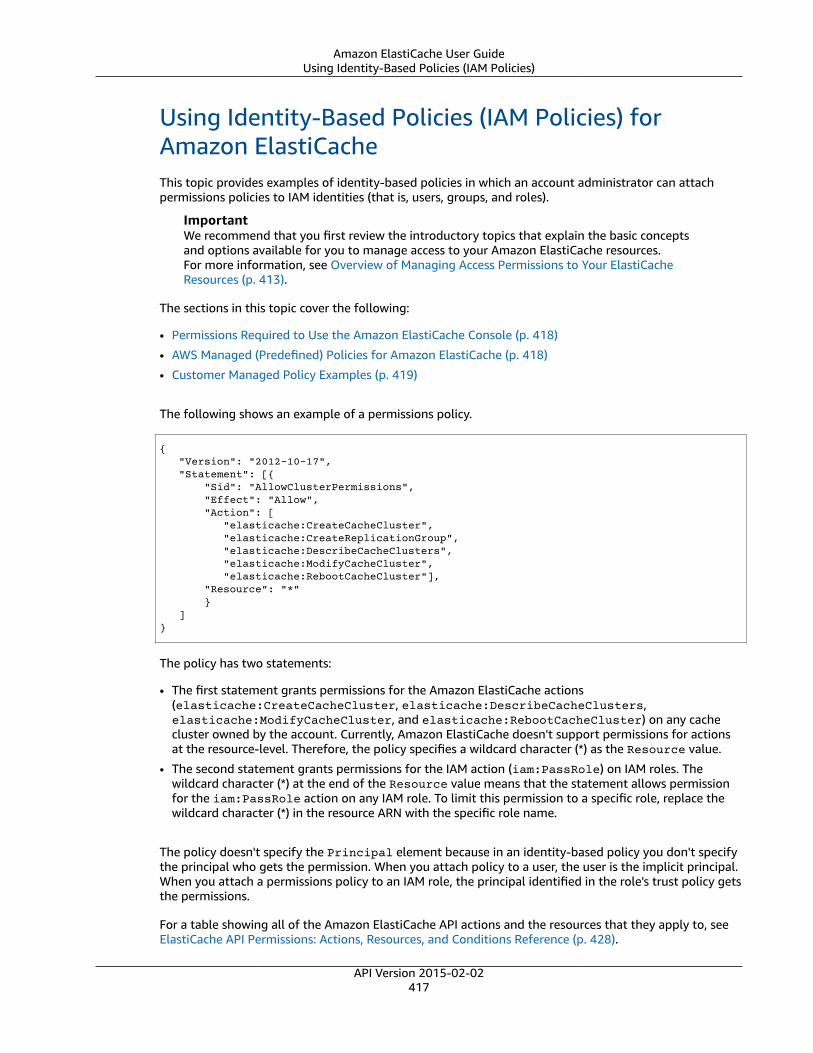
Amazon ElastiCache User GuideUsing Identity-Based Policies (IAM Policies)
Using Identity-Based Policies (IAM Policies) forAmazon ElastiCacheThis topic provides examples of identity-based policies in which an account administrator can attachpermissions policies to IAM identities (that is, users, groups, and roles).
ImportantWe recommend that you first review the introductory topics that explain the basic conceptsand options available for you to manage access to your Amazon ElastiCache resources.For more information, see Overview of Managing Access Permissions to Your ElastiCacheResources (p. 413).
The sections in this topic cover the following:
• Permissions Required to Use the Amazon ElastiCache Console (p. 418)
• AWS Managed (Predefined) Policies for Amazon ElastiCache (p. 418)
• Customer Managed Policy Examples (p. 419)
The following shows an example of a permissions policy.
{ "Version": "2012-10-17", "Statement": [{ "Sid": "AllowClusterPermissions", "Effect": "Allow", "Action": [ "elasticache:CreateCacheCluster", "elasticache:CreateReplicationGroup", "elasticache:DescribeCacheClusters", "elasticache:ModifyCacheCluster", "elasticache:RebootCacheCluster"], "Resource": "*" } ]}
The policy has two statements:
• The first statement grants permissions for the Amazon ElastiCache actions(elasticache:CreateCacheCluster, elasticache:DescribeCacheClusters,elasticache:ModifyCacheCluster, and elasticache:RebootCacheCluster) on any cachecluster owned by the account. Currently, Amazon ElastiCache doesn't support permissions for actionsat the resource-level. Therefore, the policy specifies a wildcard character (*) as the Resource value.
• The second statement grants permissions for the IAM action (iam:PassRole) on IAM roles. Thewildcard character (*) at the end of the Resource value means that the statement allows permissionfor the iam:PassRole action on any IAM role. To limit this permission to a specific role, replace thewildcard character (*) in the resource ARN with the specific role name.
The policy doesn't specify the Principal element because in an identity-based policy you don't specifythe principal who gets the permission. When you attach policy to a user, the user is the implicit principal.When you attach a permissions policy to an IAM role, the principal identified in the role's trust policy getsthe permissions.
For a table showing all of the Amazon ElastiCache API actions and the resources that they apply to, seeElastiCache API Permissions: Actions, Resources, and Conditions Reference (p. 428).
API Version 2015-02-02417

Amazon ElastiCache User GuideUsing Identity-Based Policies (IAM Policies)
Permissions Required to Use the Amazon ElastiCache Console
The permissions reference table lists the Amazon ElastiCache API operations and shows the requiredpermissions for each operation. For more information about ElastiCache API operations, see ElastiCacheAPI Permissions: Actions, Resources, and Conditions Reference (p. 428).
To use the Amazon ElastiCache console, you need to grant permissions for additional actions as shown inthe following permissions policy:
{ "Version": "2012-10-17", "Statement": [{ "Sid": "MinPermsForECConsole", "Effect": "Allow", "Action": [ "elasticache:Describe*", "elasticache:List*", "ec2:DescribeAvailabilityZones", "ec2:DescribeVpcs", "ec2:DescribeAccountAttributes", "ec2:DescribeSecurityGroups", "cloudwatch:GetMetricStatistics", "cloudwatch:DescribeAlarms", "s3:ListAllMyBuckets", "sns:ListTopics", "sns:ListSubscriptions" ], "Resource": "*" } ]}
The ElastiCache console needs these additional permissions for the following reasons:
• Permissions for the ElastiCache actions enable the console to display ElastiCache resources in theaccount.
• The console needs permissions for the ec2 actions to query Amazon EC2 so it can display AvailabilityZones, VPCs, security groups, and account attributes.
• The permissions for cloudwatch actions enable the console to retrieve Amazon CloudWatch metricsand alarms, and display them in the console.
• The permissions for sns actions enable the console to retrieve Amazon Simple Notification Service(Amazon SNS) topics and subscriptions, and display them in the console.
AWS Managed (Predefined) Policies for Amazon ElastiCache
AWS addresses many common use cases by providing standalone IAM policies that are created andadministered by AWS. Managed policies grant necessary permissions for common use cases so you canavoid having to investigate what permissions are needed. For more information, see AWS ManagedPolicies in the IAM User Guide.
The following AWS managed policies, which you can attach to users in your account, are specific toElastiCache:
• AmazonElastiCacheReadOnlyAccess - Grants read-only access to Amazon ElastiCache resources.
• AmazonElastiCacheFullAccess - Grants full access to Amazon ElastiCache resources.
API Version 2015-02-02418
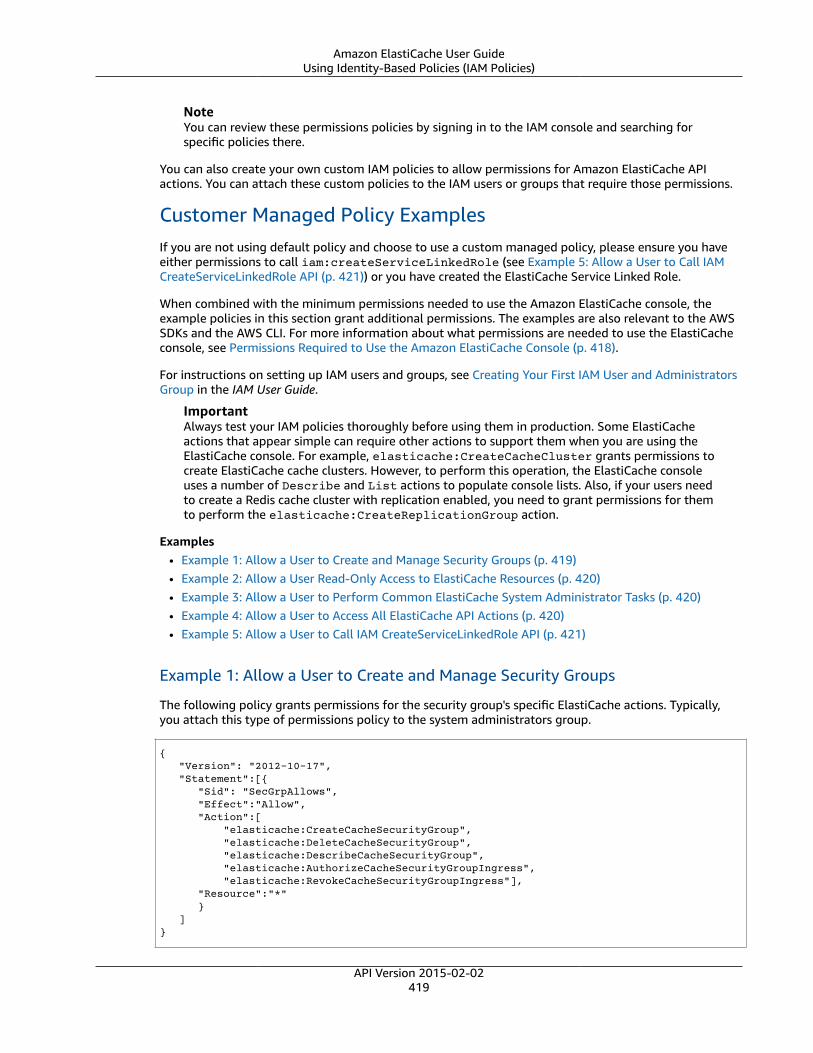
Amazon ElastiCache User GuideUsing Identity-Based Policies (IAM Policies)
NoteYou can review these permissions policies by signing in to the IAM console and searching forspecific policies there.
You can also create your own custom IAM policies to allow permissions for Amazon ElastiCache APIactions. You can attach these custom policies to the IAM users or groups that require those permissions.
Customer Managed Policy ExamplesIf you are not using default policy and choose to use a custom managed policy, please ensure you haveeither permissions to call iam:createServiceLinkedRole (see Example 5: Allow a User to Call IAMCreateServiceLinkedRole API (p. 421)) or you have created the ElastiCache Service Linked Role.
When combined with the minimum permissions needed to use the Amazon ElastiCache console, theexample policies in this section grant additional permissions. The examples are also relevant to the AWSSDKs and the AWS CLI. For more information about what permissions are needed to use the ElastiCacheconsole, see Permissions Required to Use the Amazon ElastiCache Console (p. 418).
For instructions on setting up IAM users and groups, see Creating Your First IAM User and AdministratorsGroup in the IAM User Guide.
ImportantAlways test your IAM policies thoroughly before using them in production. Some ElastiCacheactions that appear simple can require other actions to support them when you are using theElastiCache console. For example, elasticache:CreateCacheCluster grants permissions tocreate ElastiCache cache clusters. However, to perform this operation, the ElastiCache consoleuses a number of Describe and List actions to populate console lists. Also, if your users needto create a Redis cache cluster with replication enabled, you need to grant permissions for themto perform the elasticache:CreateReplicationGroup action.
Examples• Example 1: Allow a User to Create and Manage Security Groups (p. 419)• Example 2: Allow a User Read-Only Access to ElastiCache Resources (p. 420)• Example 3: Allow a User to Perform Common ElastiCache System Administrator Tasks (p. 420)• Example 4: Allow a User to Access All ElastiCache API Actions (p. 420)• Example 5: Allow a User to Call IAM CreateServiceLinkedRole API (p. 421)
Example 1: Allow a User to Create and Manage Security Groups
The following policy grants permissions for the security group's specific ElastiCache actions. Typically,you attach this type of permissions policy to the system administrators group.
{ "Version": "2012-10-17", "Statement":[{ "Sid": "SecGrpAllows", "Effect":"Allow", "Action":[ "elasticache:CreateCacheSecurityGroup", "elasticache:DeleteCacheSecurityGroup", "elasticache:DescribeCacheSecurityGroup", "elasticache:AuthorizeCacheSecurityGroupIngress", "elasticache:RevokeCacheSecurityGroupIngress"], "Resource":"*" } ]}
API Version 2015-02-02419

Amazon ElastiCache User GuideUsing Identity-Based Policies (IAM Policies)
Example 2: Allow a User Read-Only Access to ElastiCache Resources
The following policy grants permissions ElastiCache actions that allow a user to list resources. Typically,you attach this type of permissions policy to a managers group.
{ "Version": "2012-10-17", "Statement":[{ "Sid": "ECUnrestricted", "Effect":"Allow", "Action": [ "elasticache:Describe*", "elasticache:List*"], "Resource":"*" } ]}
Example 3: Allow a User to Perform Common ElastiCache System AdministratorTasks
Common system administrator tasks include modifying cache clusters, parameters, and parametergroups. A system administrator may also want to get information about the ElastiCache events. Thefollowing policy grants a user permissions to perform ElastiCache actions for these common systemadministrator tasks. Typically, you attach this type of permissions policy to the system administratorsgroup.
{ "Version": "2012-10-17", "Statement":[{ "Sid": "ECAllowSpecific", "Effect":"Allow", "Action":[ "elasticache:ModifyCacheCluster", "elasticache:RebootCacheCluster", "elasticache:DescribeCacheClusters", "elasticache:DescribeEvents", "elasticache:ModifyCacheParameterGroup", "elasticache:DescribeCacheParameterGroups", "elasticache:DescribeCacheParameters", "elasticache:ResetCacheParameterGroup", "elasticache:DescribeEngineDefaultParameters"], "Resource":"*" } ]}
Example 4: Allow a User to Access All ElastiCache API Actions
The following policy allows a user to access all ElastiCache actions. We recommend that you grant thistype of permissions policy only to an administrator user.
{ "Version": "2012-10-17", "Statement":[{ "Sid": "ECAllowSpecific", "Effect":"Allow", "Action":[ "elasticache:*" ],
API Version 2015-02-02420
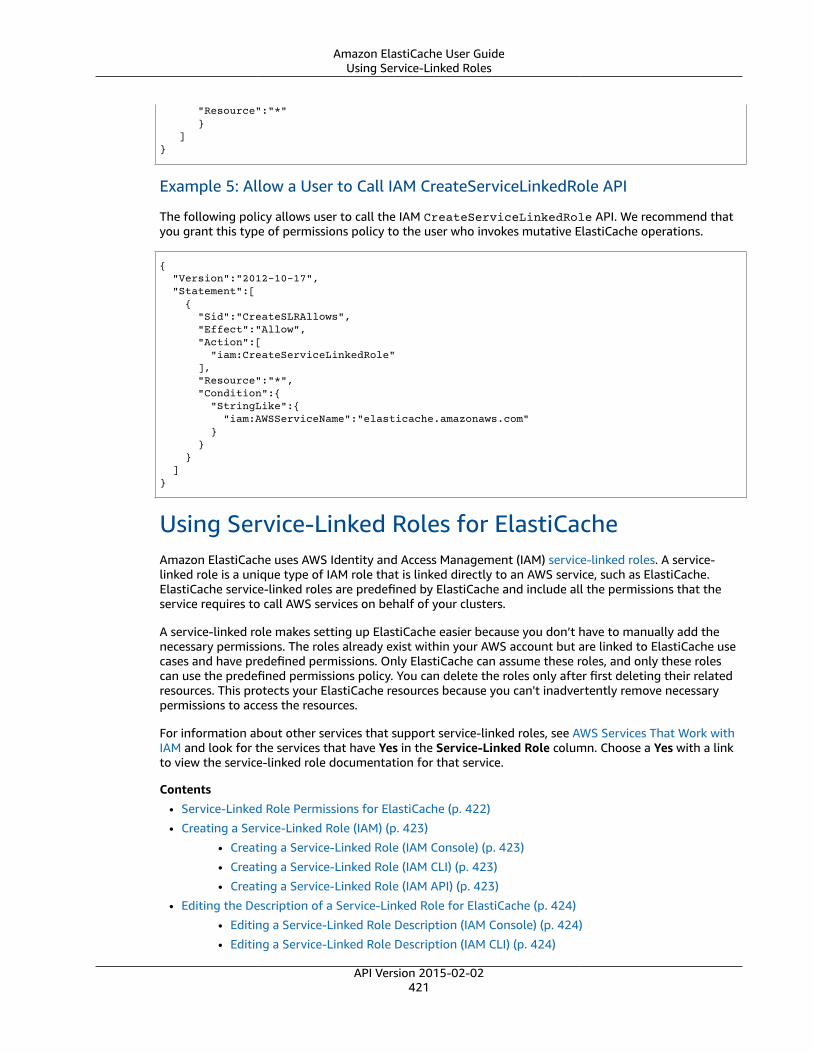
Amazon ElastiCache User GuideUsing Service-Linked Roles
"Resource":"*" } ]}
Example 5: Allow a User to Call IAM CreateServiceLinkedRole API
The following policy allows user to call the IAM CreateServiceLinkedRole API. We recommend thatyou grant this type of permissions policy to the user who invokes mutative ElastiCache operations.
{ "Version":"2012-10-17", "Statement":[ { "Sid":"CreateSLRAllows", "Effect":"Allow", "Action":[ "iam:CreateServiceLinkedRole" ], "Resource":"*", "Condition":{ "StringLike":{ "iam:AWSServiceName":"elasticache.amazonaws.com" } } } ]}
Using Service-Linked Roles for ElastiCacheAmazon ElastiCache uses AWS Identity and Access Management (IAM) service-linked roles. A service-linked role is a unique type of IAM role that is linked directly to an AWS service, such as ElastiCache.ElastiCache service-linked roles are predefined by ElastiCache and include all the permissions that theservice requires to call AWS services on behalf of your clusters.
A service-linked role makes setting up ElastiCache easier because you don’t have to manually add thenecessary permissions. The roles already exist within your AWS account but are linked to ElastiCache usecases and have predefined permissions. Only ElastiCache can assume these roles, and only these rolescan use the predefined permissions policy. You can delete the roles only after first deleting their relatedresources. This protects your ElastiCache resources because you can't inadvertently remove necessarypermissions to access the resources.
For information about other services that support service-linked roles, see AWS Services That Work withIAM and look for the services that have Yes in the Service-Linked Role column. Choose a Yes with a linkto view the service-linked role documentation for that service.
Contents• Service-Linked Role Permissions for ElastiCache (p. 422)
• Creating a Service-Linked Role (IAM) (p. 423)
• Creating a Service-Linked Role (IAM Console) (p. 423)
• Creating a Service-Linked Role (IAM CLI) (p. 423)
• Creating a Service-Linked Role (IAM API) (p. 423)
• Editing the Description of a Service-Linked Role for ElastiCache (p. 424)
• Editing a Service-Linked Role Description (IAM Console) (p. 424)
• Editing a Service-Linked Role Description (IAM CLI) (p. 424)
API Version 2015-02-02421
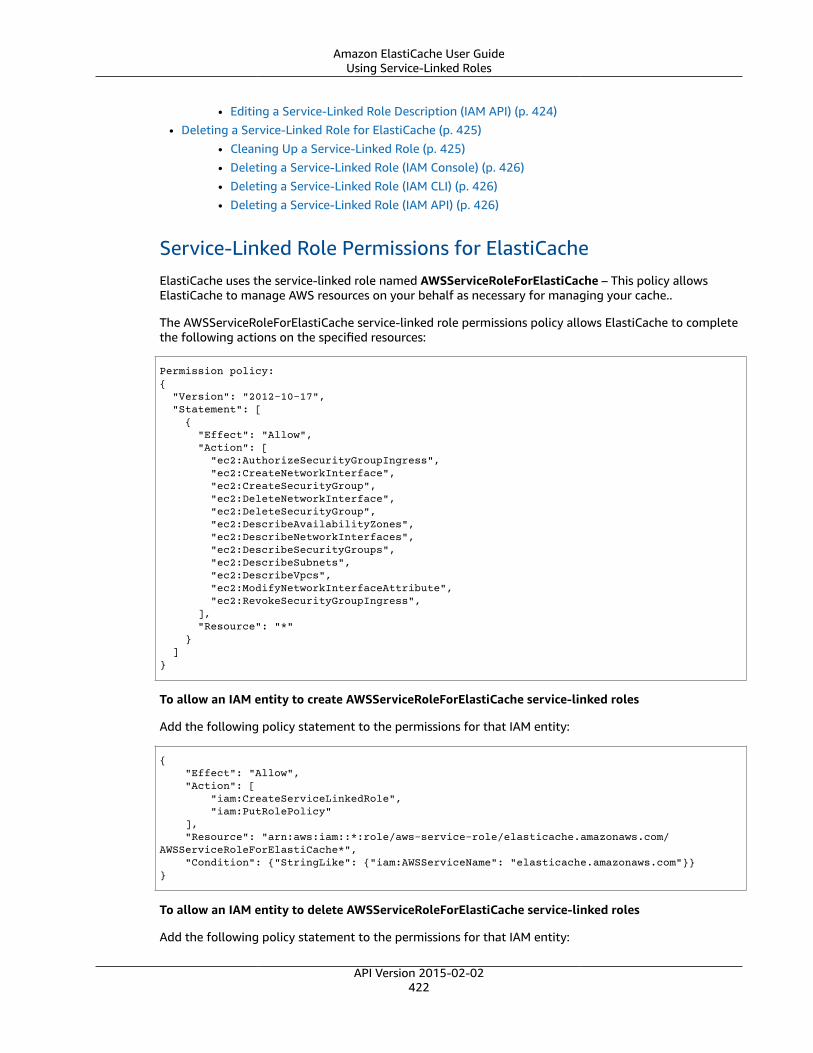
Amazon ElastiCache User GuideUsing Service-Linked Roles
• Editing a Service-Linked Role Description (IAM API) (p. 424)• Deleting a Service-Linked Role for ElastiCache (p. 425)
• Cleaning Up a Service-Linked Role (p. 425)• Deleting a Service-Linked Role (IAM Console) (p. 426)• Deleting a Service-Linked Role (IAM CLI) (p. 426)• Deleting a Service-Linked Role (IAM API) (p. 426)
Service-Linked Role Permissions for ElastiCacheElastiCache uses the service-linked role named AWSServiceRoleForElastiCache – This policy allowsElastiCache to manage AWS resources on your behalf as necessary for managing your cache..
The AWSServiceRoleForElastiCache service-linked role permissions policy allows ElastiCache to completethe following actions on the specified resources:
Permission policy:{ "Version": "2012-10-17", "Statement": [ { "Effect": "Allow", "Action": [ "ec2:AuthorizeSecurityGroupIngress", "ec2:CreateNetworkInterface", "ec2:CreateSecurityGroup", "ec2:DeleteNetworkInterface", "ec2:DeleteSecurityGroup", "ec2:DescribeAvailabilityZones", "ec2:DescribeNetworkInterfaces", "ec2:DescribeSecurityGroups", "ec2:DescribeSubnets", "ec2:DescribeVpcs", "ec2:ModifyNetworkInterfaceAttribute", "ec2:RevokeSecurityGroupIngress", ], "Resource": "*" } ]}
To allow an IAM entity to create AWSServiceRoleForElastiCache service-linked roles
Add the following policy statement to the permissions for that IAM entity:
{ "Effect": "Allow", "Action": [ "iam:CreateServiceLinkedRole", "iam:PutRolePolicy" ], "Resource": "arn:aws:iam::*:role/aws-service-role/elasticache.amazonaws.com/AWSServiceRoleForElastiCache*", "Condition": {"StringLike": {"iam:AWSServiceName": "elasticache.amazonaws.com"}}}
To allow an IAM entity to delete AWSServiceRoleForElastiCache service-linked roles
Add the following policy statement to the permissions for that IAM entity:
API Version 2015-02-02422

Amazon ElastiCache User GuideUsing Service-Linked Roles
{ "Effect": "Allow", "Action": [ "iam:DeleteServiceLinkedRole", "iam:GetServiceLinkedRoleDeletionStatus" ], "Resource": "arn:aws:iam::*:role/aws-service-role/elasticache.amazonaws.com/AWSServiceRoleForElastiCache*", "Condition": {"StringLike": {"iam:AWSServiceName": "elasticache.amazonaws.com"}}}
Alternatively, you can use an AWS managed policy to provide full access to ElastiCache.
Creating a Service-Linked Role (IAM)You can create a service-linked role using the IAM console, CLI, or API.
Creating a Service-Linked Role (IAM Console)
You can use the IAM console to create a service-linked role.
To create a service-linked role (console)
1. Sign in to the AWS Management Console and open the IAM console at https://console.aws.amazon.com/iam/.
2. In the navigation pane of the IAM console, choose Roles. Then choose Create new role.3. Expand the AWS service-linked role section, and then select the service that you want to allow to
assume this new service-linked role.4. Next to the AWSServiceRoleForElastiCache service-linked role, choose Select.5. For Role name, type a suffix to add to the service-linked role default name. This suffix helps you
identify the purpose of this role. Role names must be unique within your AWS account. They are notdistinguished by case. For example, you cannot create roles named both <service-linked-role-name>_SAMPLE and <service-linked-role-name>_sample. Because various entities mightreference the role, you cannot edit the name of the role after it has been created.
6. (Optional) For Role description, edit the description for the new service-linked role.7. Review the role and then choose Create role.
Creating a Service-Linked Role (IAM CLI)
You can use IAM operations from the AWS Command Line Interface to create a service-linked role withthe trust policy and inline policies that the service needs to assume the role.
To create a service-linked role (CLI)
Use the following operation:
$ aws iam create-service-linked-role --aws-service-name elasticache.amazonaws.com
Creating a Service-Linked Role (IAM API)
You can use the IAM API to create a service-linked role with the trust policy and inline policies that theservice needs to assume the role.
To create a service-linked role (API)
API Version 2015-02-02423

Amazon ElastiCache User GuideUsing Service-Linked Roles
Use the CreateServiceLinkedRole API call. In the request, specify a service name ofelasticache.amazonaws.com.
Editing the Description of a Service-Linked Role for ElastiCacheElastiCache does not allow you to edit the AWSServiceRoleForElastiCache service-linked role. After youcreate a service-linked role, you cannot change the name of the role because various entities mightreference the role. However, you can edit the description of the role using IAM.
Editing a Service-Linked Role Description (IAM Console)
You can use the IAM console to edit a service-linked role description.
To edit the description of a service-linked role (console)
1. In the navigation pane of the IAM console, choose Roles.2. Choose the name of the role to modify.3. To the far right of Role description, choose Edit.4. Type a new description in the box and choose Save.
Editing a Service-Linked Role Description (IAM CLI)
You can use IAM operations from the AWS Command Line Interface to edit a service-linked roledescription.
To change the description of a service-linked role (CLI)
1. (Optional) To view the current description for a role, use the AWS CLI for IAM operation get-role.
Example
$ aws iam get-role --role-name AWSServiceRoleForElastiCache
Use the role name, not the ARN, to refer to roles with the CLI operations. For example, if a role hasthe following ARN: arn:aws:iam::123456789012:role/myrole, refer to the role as myrole.
2. To update a service-linked role's description, use the AWS CLI for IAM operation update-role-description.
For Linux, macOS, or Unix:
$ aws iam update-role-description \ --role-name AWSServiceRoleForElastiCache \ --description "new description"
For Windows:
$ aws iam update-role-description ^ --role-name AWSServiceRoleForElastiCache ^ --description "new description"
Editing a Service-Linked Role Description (IAM API)
You can use the IAM API to edit a service-linked role description.
API Version 2015-02-02424

Amazon ElastiCache User GuideUsing Service-Linked Roles
To change the description of a service-linked role (API)
1. (Optional) To view the current description for a role, use the IAM API operation GetRole.
Example
https://iam.amazonaws.com/ ?Action=GetRole &RoleName=AWSServiceRoleForElastiCache &Version=2010-05-08 &AUTHPARAMS
2. To update a role's description, use the IAM API operation UpdateRoleDescription.
Example
https://iam.amazonaws.com/ ?Action=UpdateRoleDescription &RoleName=AWSServiceRoleForElastiCache &Version=2010-05-08 &Description="New description"
Deleting a Service-Linked Role for ElastiCacheIf you no longer need to use a feature or service that requires a service-linked role, we recommendthat you delete that role. That way you don’t have an unused entity that is not actively monitored ormaintained. However, you must clean up your service-linked role before you can delete it.
Amazon ElastiCache does not delete the service-linked role for you.
Cleaning Up a Service-Linked Role
Before you can use IAM to delete a service-linked role, you must first confirm that the role has noresources, clusters or replication groups, associated with the role.
To check whether the service-linked role has an active session in the IAM console
1. Sign in to the AWS Management Console and open the IAM console at https://console.aws.amazon.com/iam/.
2. In the navigation pane of the IAM console, choose Roles. Then choose the name (not the check box)of the AWSServiceRoleForElastiCache role.
3. On the Summary page for the selected role, choose the Access Advisor tab.
4. On the Access Advisor tab, review recent activity for the service-linked role.
To delete ElastiCache resources that require AWSServiceRoleForElastiCache (console)
• To delete a cluster, see one of the following:
• Deleting a Cluster (Console) (p. 201)
• Deleting a Cache Cluster (AWS CLI) (p. 201)
• Deleting a Cache Cluster (ElastiCache API) (p. 202)
• To delete a replication group, see one of the following:
• Deleting a Replication Group (Console) (p. 290)
• Deleting a Replication Group (AWS CLI) (p. 290)API Version 2015-02-02
425

Amazon ElastiCache User GuideUsing Service-Linked Roles
• Deleting a Replication Group (ElastiCache API) (p. 290)
Deleting a Service-Linked Role (IAM Console)
You can use the IAM console to delete a service-linked role.
To delete a service-linked role (console)
1. Sign in to the AWS Management Console and open the IAM console at https://console.aws.amazon.com/iam/.
2. In the navigation pane of the IAM console, choose Roles. Then select the check box next to the rolename that you want to delete, not the name or row itself.
3. For Role actions at the top of the page, choose Delete role.4. In the confirmation dialog box, review the service last accessed data, which shows when each of the
selected roles last accessed an AWS service. This helps you to confirm whether the role is currentlyactive. If you want to proceed, choose Yes, Delete to submit the service-linked role for deletion.
5. Watch the IAM console notifications to monitor the progress of the service-linked role deletion.Because the IAM service-linked role deletion is asynchronous, after you submit the role for deletion,the deletion task can succeed or fail. If the task fails, you can choose View details or View Resourcesfrom the notifications to learn why the deletion failed.
Deleting a Service-Linked Role (IAM CLI)
You can use IAM operations from the AWS Command Line Interface to delete a service-linked role.
To delete a service-linked role (CLI)
1. If you don't know the name of the service-linked role that you want to delete, type the followingoperation to list the roles and their Amazon Resource Names (ARNs) in your account:
$ aws iam get-role --role-name role-name
Use the role name, not the ARN, to refer to roles with the CLI operations. For example, if a rolehas the following ARN: arn:aws:iam::123456789012:role/myrole, you refer to the role asmyrole.
2. Because a service-linked role cannot be deleted if it is being used or has associated resources, youmust submit a deletion request. That request can be denied if these conditions are not met. Youmust capture the deletion-task-id from the response to check the status of the deletion task.Type the following to submit a service-linked role deletion request:
$ aws iam delete-service-linked-role --role-name role-name
3. Type the following to check the status of the deletion task:
$ aws iam get-service-linked-role-deletion-status --deletion-task-id deletion-task-id
The status of the deletion task can be NOT_STARTED, IN_PROGRESS, SUCCEEDED, or FAILED. If thedeletion fails, the call returns the reason that it failed so that you can troubleshoot.
Deleting a Service-Linked Role (IAM API)
You can use the IAM API to delete a service-linked role.
API Version 2015-02-02426

Amazon ElastiCache User GuideUsing Service-Linked Roles
To delete a service-linked role (API)
1. To submit a deletion request for a service-linked roll, call DeleteServiceLinkedRole. In the request,specify a role name.
Because a service-linked role cannot be deleted if it is being used or has associated resources, youmust submit a deletion request. That request can be denied if these conditions are not met. Youmust capture the DeletionTaskId from the response to check the status of the deletion task.
2. To check the status of the deletion, call GetServiceLinkedRoleDeletionStatus. In the request, specifythe DeletionTaskId.
The status of the deletion task can be NOT_STARTED, IN_PROGRESS, SUCCEEDED, or FAILED. If thedeletion fails, the call returns the reason that it failed so that you can troubleshoot.
API Version 2015-02-02427
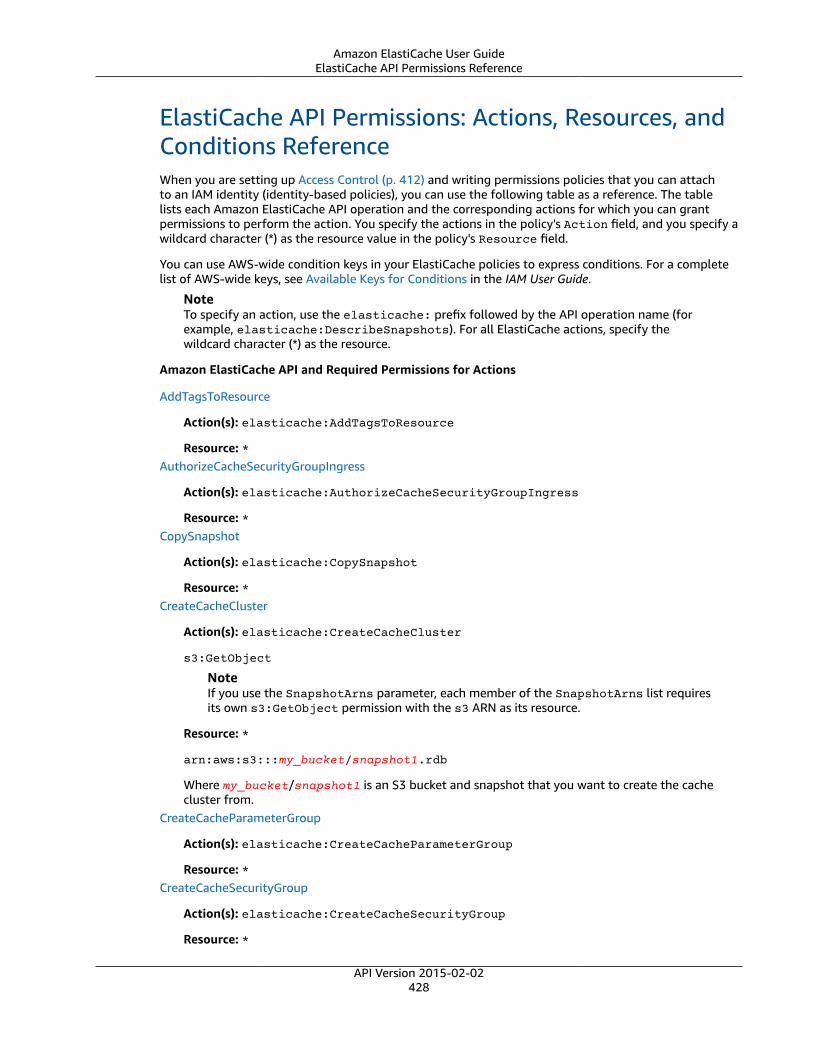
Amazon ElastiCache User GuideElastiCache API Permissions Reference
ElastiCache API Permissions: Actions, Resources, andConditions ReferenceWhen you are setting up Access Control (p. 412) and writing permissions policies that you can attachto an IAM identity (identity-based policies), you can use the following table as a reference. The tablelists each Amazon ElastiCache API operation and the corresponding actions for which you can grantpermissions to perform the action. You specify the actions in the policy's Action field, and you specify awildcard character (*) as the resource value in the policy's Resource field.
You can use AWS-wide condition keys in your ElastiCache policies to express conditions. For a completelist of AWS-wide keys, see Available Keys for Conditions in the IAM User Guide.
NoteTo specify an action, use the elasticache: prefix followed by the API operation name (forexample, elasticache:DescribeSnapshots). For all ElastiCache actions, specify thewildcard character (*) as the resource.
Amazon ElastiCache API and Required Permissions for Actions
AddTagsToResource
Action(s): elasticache:AddTagsToResource
Resource: *AuthorizeCacheSecurityGroupIngress
Action(s): elasticache:AuthorizeCacheSecurityGroupIngress
Resource: *CopySnapshot
Action(s): elasticache:CopySnapshot
Resource: *CreateCacheCluster
Action(s): elasticache:CreateCacheCluster
s3:GetObject
NoteIf you use the SnapshotArns parameter, each member of the SnapshotArns list requiresits own s3:GetObject permission with the s3 ARN as its resource.
Resource: *
arn:aws:s3:::my_bucket/snapshot1.rdb
Where my_bucket/snapshot1 is an S3 bucket and snapshot that you want to create the cachecluster from.
CreateCacheParameterGroup
Action(s): elasticache:CreateCacheParameterGroup
Resource: *CreateCacheSecurityGroup
Action(s): elasticache:CreateCacheSecurityGroup
Resource: *
API Version 2015-02-02428
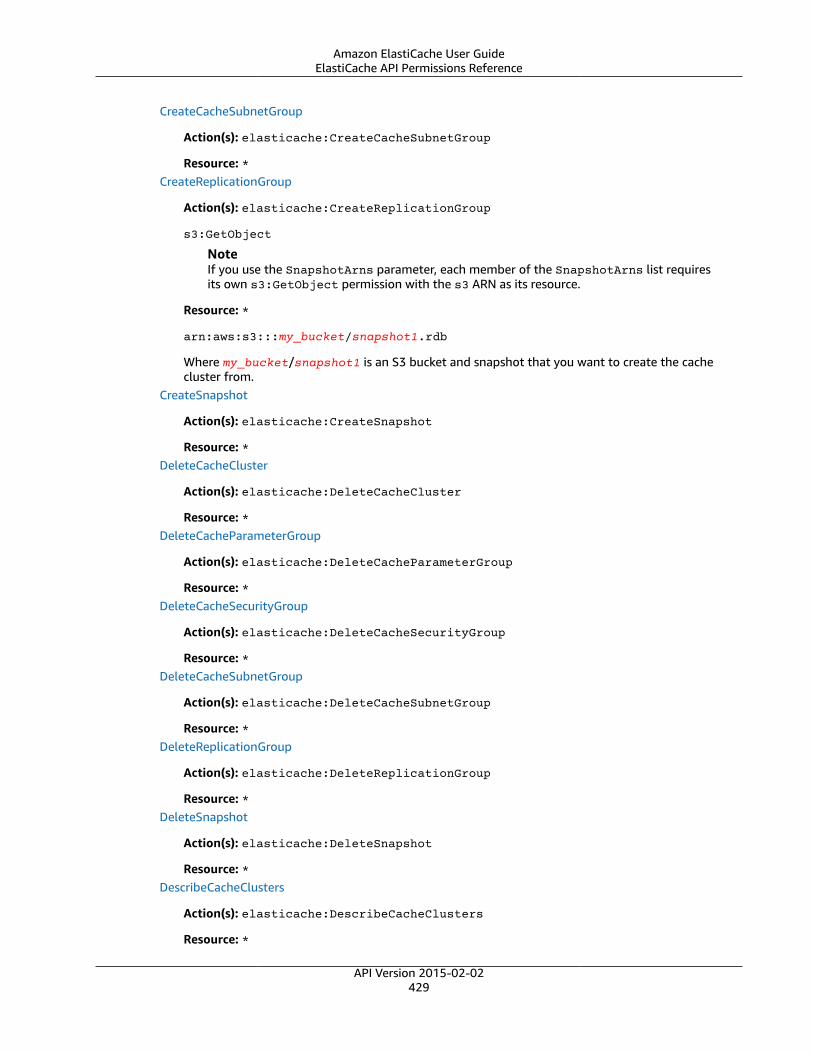
Amazon ElastiCache User GuideElastiCache API Permissions Reference
CreateCacheSubnetGroup
Action(s): elasticache:CreateCacheSubnetGroup
Resource: *CreateReplicationGroup
Action(s): elasticache:CreateReplicationGroup
s3:GetObject
NoteIf you use the SnapshotArns parameter, each member of the SnapshotArns list requiresits own s3:GetObject permission with the s3 ARN as its resource.
Resource: *
arn:aws:s3:::my_bucket/snapshot1.rdb
Where my_bucket/snapshot1 is an S3 bucket and snapshot that you want to create the cachecluster from.
CreateSnapshot
Action(s): elasticache:CreateSnapshot
Resource: *DeleteCacheCluster
Action(s): elasticache:DeleteCacheCluster
Resource: *DeleteCacheParameterGroup
Action(s): elasticache:DeleteCacheParameterGroup
Resource: *DeleteCacheSecurityGroup
Action(s): elasticache:DeleteCacheSecurityGroup
Resource: *DeleteCacheSubnetGroup
Action(s): elasticache:DeleteCacheSubnetGroup
Resource: *DeleteReplicationGroup
Action(s): elasticache:DeleteReplicationGroup
Resource: *DeleteSnapshot
Action(s): elasticache:DeleteSnapshot
Resource: *DescribeCacheClusters
Action(s): elasticache:DescribeCacheClusters
Resource: *
API Version 2015-02-02429
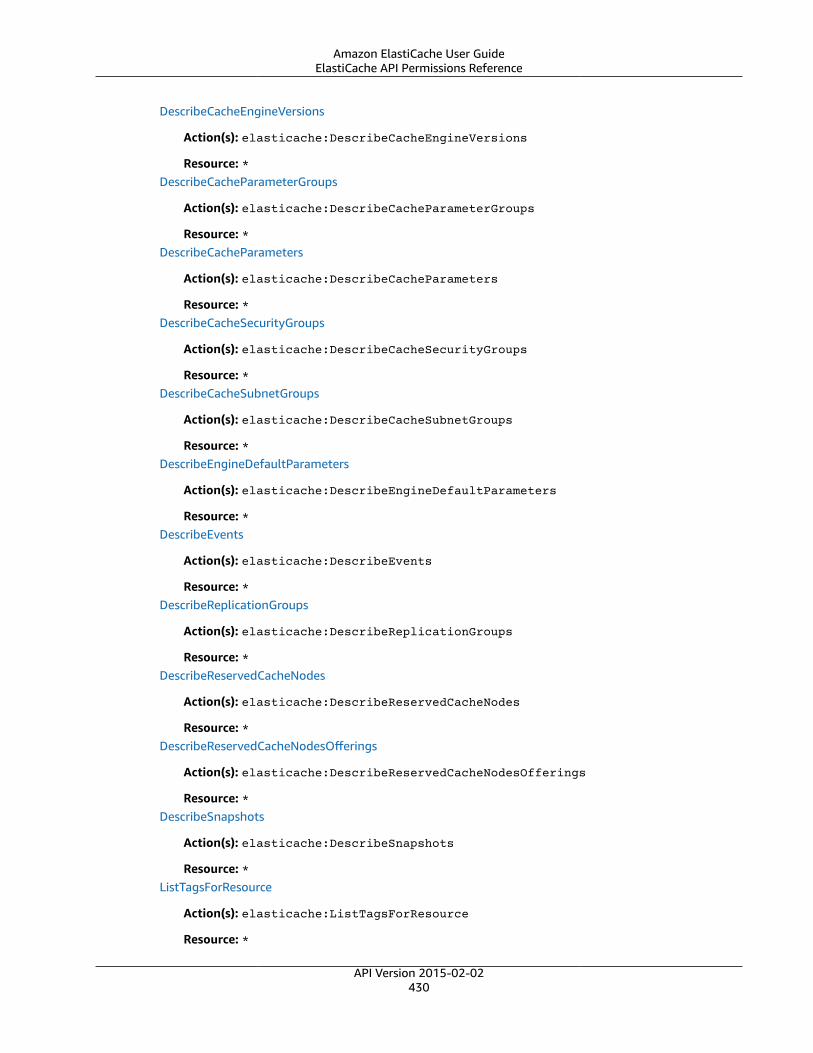
Amazon ElastiCache User GuideElastiCache API Permissions Reference
DescribeCacheEngineVersions
Action(s): elasticache:DescribeCacheEngineVersions
Resource: *DescribeCacheParameterGroups
Action(s): elasticache:DescribeCacheParameterGroups
Resource: *DescribeCacheParameters
Action(s): elasticache:DescribeCacheParameters
Resource: *DescribeCacheSecurityGroups
Action(s): elasticache:DescribeCacheSecurityGroups
Resource: *DescribeCacheSubnetGroups
Action(s): elasticache:DescribeCacheSubnetGroups
Resource: *DescribeEngineDefaultParameters
Action(s): elasticache:DescribeEngineDefaultParameters
Resource: *DescribeEvents
Action(s): elasticache:DescribeEvents
Resource: *DescribeReplicationGroups
Action(s): elasticache:DescribeReplicationGroups
Resource: *DescribeReservedCacheNodes
Action(s): elasticache:DescribeReservedCacheNodes
Resource: *DescribeReservedCacheNodesOfferings
Action(s): elasticache:DescribeReservedCacheNodesOfferings
Resource: *DescribeSnapshots
Action(s): elasticache:DescribeSnapshots
Resource: *ListTagsForResource
Action(s): elasticache:ListTagsForResource
Resource: *
API Version 2015-02-02430
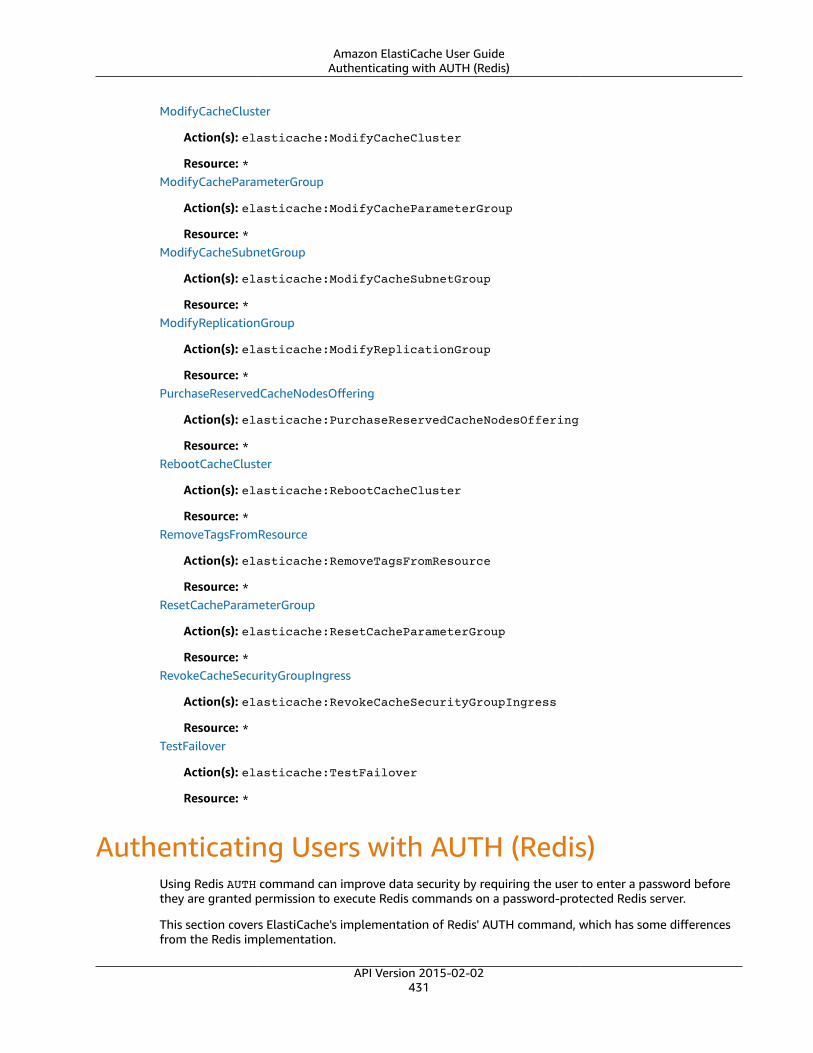
Amazon ElastiCache User GuideAuthenticating with AUTH (Redis)
ModifyCacheCluster
Action(s): elasticache:ModifyCacheCluster
Resource: *ModifyCacheParameterGroup
Action(s): elasticache:ModifyCacheParameterGroup
Resource: *ModifyCacheSubnetGroup
Action(s): elasticache:ModifyCacheSubnetGroup
Resource: *ModifyReplicationGroup
Action(s): elasticache:ModifyReplicationGroup
Resource: *PurchaseReservedCacheNodesOffering
Action(s): elasticache:PurchaseReservedCacheNodesOffering
Resource: *RebootCacheCluster
Action(s): elasticache:RebootCacheCluster
Resource: *RemoveTagsFromResource
Action(s): elasticache:RemoveTagsFromResource
Resource: *ResetCacheParameterGroup
Action(s): elasticache:ResetCacheParameterGroup
Resource: *RevokeCacheSecurityGroupIngress
Action(s): elasticache:RevokeCacheSecurityGroupIngress
Resource: *TestFailover
Action(s): elasticache:TestFailover
Resource: *
Authenticating Users with AUTH (Redis)Using Redis AUTH command can improve data security by requiring the user to enter a password beforethey are granted permission to execute Redis commands on a password-protected Redis server.
This section covers ElastiCache's implementation of Redis' AUTH command, which has some differencesfrom the Redis implementation.
API Version 2015-02-02431

Amazon ElastiCache User GuideOverview of AUTH
Contents• Overview of ElastiCache for Redis AUTH (p. 432)• Applying Authentication to an ElastiCache Command (p. 432)• Related topics (p. 433)
Overview of ElastiCache for Redis AUTHWhen using Redis AUTH with your ElastiCache cluster, there are some refinements you need to be awareof.
AUTH Token Constraints when using with ElastiCache
• Passwords must be at least 16 and a maximum of 128 printable characters.• The printable characters @, ", and / cannot be used in passwords.• AUTH can only be enabled when creating clusters where in-transit encryption is enabled.• The password set at cluster creation cannot be changed.
We recommend that you follow a stricter policy such as:
• Must include a mix of characters that includes at least three of the following character types:• Uppercase characters• Lowercase characters• Digits• Non-alphanumeric characters (!, &, #, $, ^, <, >, -)
• Must not contain a dictionary word or a slightly modified dictionary word.• Must not be the same as or similar to a recently used password.
Applying Authentication to an ElastiCache CommandTo require that users enter a password on a password-protected Redis server, add the line requirepassin the server's configuration file. ElastiCache for Redis commands must then include the parameter --auth-token (API: AuthToken) and the correct password to execute.
The following AWS CLI operation creates a replication group with Encryption In-Transit enabled and theAUTH token "this-is-a-sample-token". Replace the subnet group sng-test with a subnet group thatexists.
Key Parameters
• --engine – must be redis.• --engine-version – must be 3.2.6.• --transit-encryption-enabled – encryption in-transit must be enabled to use authentication
and for HIPAA compliance.• --auth-token – must be the correct password for this password-protected Redis server and must be
specified for HIPAA compliance.• --cache-subnet-group – must be specified for HIPAA compliance.
For Linux, macOS, or Unix:
aws elasticache create-replication-group \
API Version 2015-02-02432
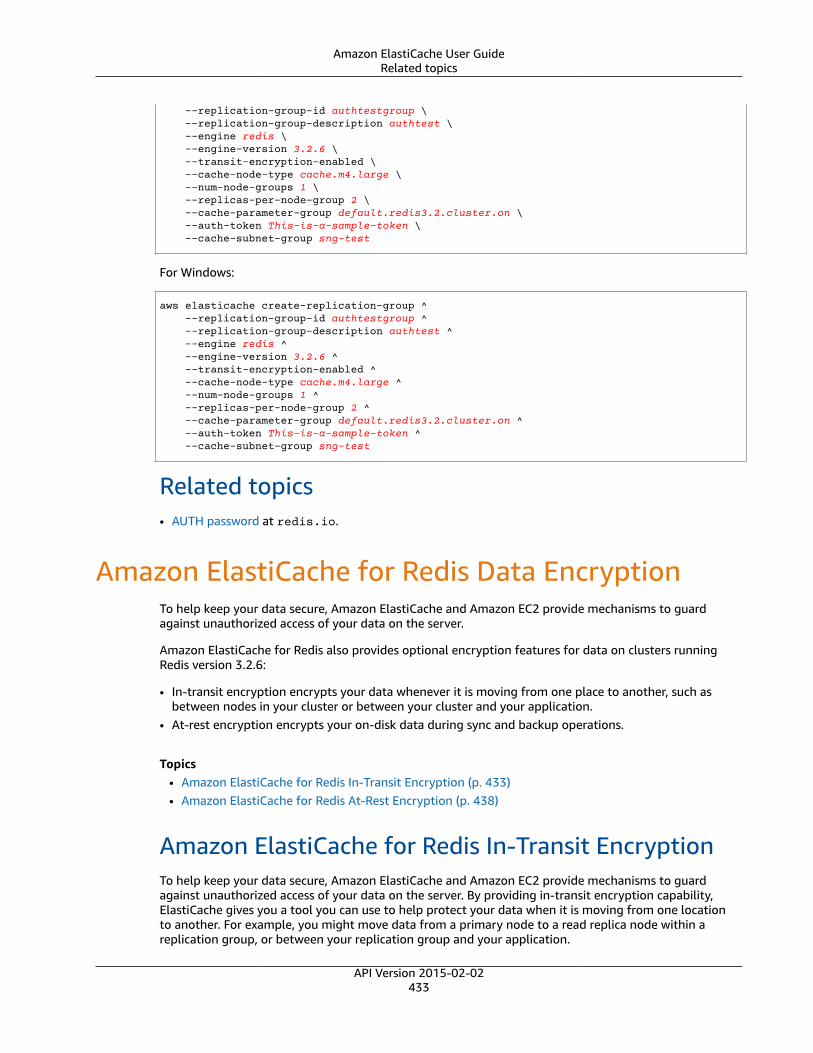
Amazon ElastiCache User GuideRelated topics
--replication-group-id authtestgroup \ --replication-group-description authtest \ --engine redis \ --engine-version 3.2.6 \ --transit-encryption-enabled \ --cache-node-type cache.m4.large \ --num-node-groups 1 \ --replicas-per-node-group 2 \ --cache-parameter-group default.redis3.2.cluster.on \ --auth-token This-is-a-sample-token \ --cache-subnet-group sng-test
For Windows:
aws elasticache create-replication-group ^ --replication-group-id authtestgroup ^ --replication-group-description authtest ^ --engine redis ^ --engine-version 3.2.6 ^ --transit-encryption-enabled ^ --cache-node-type cache.m4.large ^ --num-node-groups 1 ^ --replicas-per-node-group 2 ^ --cache-parameter-group default.redis3.2.cluster.on ^ --auth-token This-is-a-sample-token ^ --cache-subnet-group sng-test
Related topics• AUTH password at redis.io.
Amazon ElastiCache for Redis Data EncryptionTo help keep your data secure, Amazon ElastiCache and Amazon EC2 provide mechanisms to guardagainst unauthorized access of your data on the server.
Amazon ElastiCache for Redis also provides optional encryption features for data on clusters runningRedis version 3.2.6:
• In-transit encryption encrypts your data whenever it is moving from one place to another, such asbetween nodes in your cluster or between your cluster and your application.
• At-rest encryption encrypts your on-disk data during sync and backup operations.
Topics• Amazon ElastiCache for Redis In-Transit Encryption (p. 433)• Amazon ElastiCache for Redis At-Rest Encryption (p. 438)
Amazon ElastiCache for Redis In-Transit EncryptionTo help keep your data secure, Amazon ElastiCache and Amazon EC2 provide mechanisms to guardagainst unauthorized access of your data on the server. By providing in-transit encryption capability,ElastiCache gives you a tool you can use to help protect your data when it is moving from one locationto another. For example, you might move data from a primary node to a read replica node within areplication group, or between your replication group and your application.
API Version 2015-02-02433

Amazon ElastiCache User GuideIn-Transit Encryption (Redis)
In-transit encryption is optional and can only be enabled on Redis replication groups when theyare created. You enable in-transit encryption on a replication group by setting the parameterTransitEncryptionEnabled (CLI: --transit-encryption-enabled) to true when you createthe replication group. You can do this whether you are creating the replication group using the AWSManagement Console, the AWS CLI, or the ElastiCache API. If TransitEncryptionEnabled is set totrue, you must also provide a value for CacheSubnetGroup.
ImportantThe parameters TransitEncryptionEnabled (CLI: --transit-encryption-enabledare only available when using the CreateReplicationGroup (CLI: create-replication-group operation.
Topics• In-Transit Encryption Overview (p. 434)• In-Transit Encryption Constraints (p. 434)• Enabling In-Transit Encryption (p. 435)• See Also (p. 437)
In-Transit Encryption OverviewAmazon ElastiCache in-transit encryption is an optional feature that allows you to increase the securityof your data at its most vulnerable points—when it is in transit from one location to another. Becausethere is some processing needed to encrypt and decrypt the data at the endpoints, enabling in-transitencryption can have some performance impact. You should benchmark your data with and without in-transit encryption to determine the performance impact for your use cases.
ElastiCache in-transit encryption implements the following features:
• Encrypted connections—both the server and client connections are Secure Socket Layer (SSL)encrypted.
• Encrypted replication—data moving between a primary node and replica nodes is encrypted.• Server authentication—clients can authenticate that they are connecting to the right server.• Client authentication—using the Redis AUTH feature, the server can authenticate the clients.
In-Transit Encryption ConstraintsThe following constraints on Amazon ElastiCache in-transit encryption should be kept in mind when youplan your implementation:
• In-transit encryption is supported on replication groups running Redis version 3.2.6. It is not supportedon clusters running Memcached.
In-transit encryption is supported only for replication groups running in an Amazon VPC.• In-transit encryption is only supported for replication groups running most current generation node
types. It is not supported on replication groups running on previous generation node types. For moreinformation, see Supported Node Types (p. 121)
• In-transit encryption is enabled by setting the parameter TransitEncryptionEnabled to true.Because the default value of TransitEncryptionEnabled is false, you must explicitly set it totrue when creating your replication group. If TransitEncryptionEnabled is set to true, you mustalso provide a value for CacheSubnetGroup.
• You can enable in-transit encryption on a replication group only when creating the replication group.You cannot toggle in-transit encryption on and off by modifying a replication group. For informationon implementing in-transit encryption on an existing replication group, see Enabling In-TransitEncryption (p. 435).
API Version 2015-02-02434

Amazon ElastiCache User GuideIn-Transit Encryption (Redis)
• To connect to an in-transit encryption enabled replication group, a database must be enabled fortransport layer security (TLS). To connect to a replication group that is not in-transit encryptionenabled, the database cannot be TLS-enabled.
Because of the processing required to encrypt and decrypt the data at the endpoints, implementing in-transit encryption can reduce performance. Benchmark in-transit encryption compared to no encryptionon your own data to determine its impact on performance for your implementation.
You can reduce the performance impact of in-transit encryption by persisting your SSL connections,because creating new connections can be expensive.
Enabling In-Transit EncryptionYou can enable in-transit encryption when you create an ElastiCache for Redis replication group usingthe AWS Management Console, the AWS CLI, or the ElastiCache API.
Enabling In-Transit Encryption on an Existing Cluster
You can only enable in-transit encryption when you create a Redis replication group. If you have anexisting replication group on which you want to enable in-transit encryption, do the following.
To enable in-transit encryption for an existing Redis replication group
1. Create a manual backup of the replication group. For more information, see Making ManualBackups (p. 301).
2. Create a new replication group by restoring from the backup setting the engine version to 3.2.6 andthe parameter TransitEncryptionEnabled to true (CLI: --transit-encryption-enabled).For more information, see Restoring From a Backup with Optional Cluster Resizing (p. 321).
3. Update the endpoints in your application to the new replication group's endpoints. For moreinformation, see Finding Your ElastiCache Endpoints (p. 66).
4. Delete the old replication group. For more information, see the following:
• Deleting a Cluster (p. 201)• Deleting a Cluster with Replicas (p. 290)
Enabling In-Transit Encryption Using the AWS Management Console
To enable in-transit encryption when creating a replication group using the AWS Management Console,make the following selections:
• Choose Redis as your engine.• Choose engine version 3.2.6.• Choose Yes from the Encryption in-transit list.
For the step-by-step process, see the following:
• Creating a Redis (cluster mode disabled) Cluster (Console) (p. 163)• Creating a Redis (cluster mode enabled) Cluster (Console) (p. 167)
API Version 2015-02-02435

Amazon ElastiCache User GuideIn-Transit Encryption (Redis)
Enabling In-Transit Encryption Using the AWS CLI
To enable in-transit encryption when creating a Redis replication group using the AWS CLI, use theparameter transit-encryption-enabled.
Enabling In-Transit Encryption on a Redis (cluster mode disabled) Cluster (CLI)
Use the AWS CLI operation create-replication-group and the following parameters to create aRedis replication group with replicas that has in-transit encryption enabled:
• --engine must be redis.
• --engine-version must be 3.2.6.
• --transit-encryption-enabled. If you enable in-transit encryption you must also provide a valuefor the --cache-subnet-group parameter.
• --num-cache-clusters must be at least 1. The maximum value for this parameter is 6.
For more information, see the following:
• Creating a Redis (cluster mode disabled) Cluster with Replicas from Scratch (AWS CLI) (p. 265)
• create-replication-group
Enabling In-Transit Encryption on a Redis (cluster mode enabled) Cluster (CLI)
Use the AWS CLI operation create-replication-group and the following parameters to create aRedis (cluster mode enabled) replication group that has in-transit encryption enabled:
• --engine must be redis.
• --engine-version must be 3.2.6.
• --transit-encryption-enabled. If you enable in-transit encryption you must also provide a valuefor the --cache-subnet-group parameter.
• Use one of the following parameter sets to specify the configuration of the replication group's nodegroups:
• --num-node-groups to specify the number of shards (node groups) in this replication group. Themaximum value of this parameter is 15.
--replicas-per-node-group to specify the number of replica nodes in each node group. Thevalue specified here is applied to all shards in this replication group. The maximum value of thisparameter is 5.
• --node-group-configuration to specify the configuration of each shard independently.
For more information, see the following:
• Creating a Redis (cluster mode enabled) Cluster with Replicas from Scratch (AWS CLI) (p. 271)
• create-replication-group
Enabling In-Transit Encryption Using the AWS API
To enable in-transit encryption when creating a Redis replication group using the ElastiCache API, set theparameter TransitEncryptionEnabled to true with either CreateCacheCluster for a single nodeRedis replication group, or CreateReplicationGroup for a replication group with read replicas.
API Version 2015-02-02436

Amazon ElastiCache User GuideIn-Transit Encryption (Redis)
Enabling In-Transit Encryption on a Redis (cluster mode disabled) Cluster (API)
Use the ElastiCache API operation CreateReplicationGroup and the following parameters to create aRedis (cluster mode disabled) replication group that has in-transit encryption enabled:
• Engine must be redis.• EngineVersion must be 3.2.6.• TransitEncryptionEnabled must set to true.
If TransitEncryptionEnabled is set to true, you must also provide a value forCacheSubnetGroup.
• NumCacheClusters must be at least 1. The maximum value for this parameter is 6.
For more information, see the following:
• Creating a Redis (cluster mode disabled) Cluster with Replicas from Scratch (ElastiCache API) (p. 268)• CreateReplicationGroup
Enabling In-Transit Encryption on a Redis (cluster mode enabled) Cluster (API)
Use the ElastiCache API operation CreateReplicationGroup and the following parameters to create aRedis (cluster mode enabled) replication group that has in-transit encryption enabled:
• Engine must be redis.• EngineVersion must be 3.2.6.• TransitEncryptionEnabled must set to true.• Use one of the following parameter sets to specify the configuration of the replication group's node
groups:• NumNodeGroups to specify the number of shards (node groups) in this replication group. The
maximum value of this parameter is 15.
ReplicasPerNodeGroup to specify the number of replica nodes in each node group. The valuespecified here is applied to all shards in this replication group. The maximum value of this parameteris 5.
• NodeGroupConfiguration to specify the configuration of each shard independently.
For more information, see the following:
• Creating a Redis (cluster mode enabled) Cluster with Replicas from Scratch (ElastiCache API) (p. 275)• CreateReplicationGroup
See Also• Amazon ElastiCache for Redis At-Rest Encryption (p. 438)• Authenticating Users with AUTH (Redis) (p. 431)• ElastiCache and Security Groups (p. 410)• Authentication and Access Control for Amazon ElastiCache (p. 411)
API Version 2015-02-02437

Amazon ElastiCache User GuideAt-Rest Encryption (Redis)
Amazon ElastiCache for Redis At-Rest EncryptionTo help keep your data secure, Amazon ElastiCache and Amazon S3 provide mechanisms to restrictaccess to your data when it's in your cache. For more information, see ElastiCache and SecurityGroups (p. 410) and Authentication and Access Control for Amazon ElastiCache (p. 411).
When ElastiCache for Redis at-rest encryption is enabled on a replication group, your data is encryptedwhen it's on the disk during sync and backup operations. This approach is different from ElastiCache forRedis in-transit encryption. In-transit encryption encrypts your data when it is moving from one place toanother, such as between your replication group and your application. For information about ElastiCachefor Redis in-transit encryption, see Amazon ElastiCache for Redis In-Transit Encryption (p. 433). At-restencryption is optional, and can be enables on a replication group only when it is created.
Topics• At-Rest Encryption Overview (p. 438)• At-Rest Encryption Constraints (p. 438)• Enabling At-Rest Encryption (p. 438)• See Also (p. 443)
At-Rest Encryption OverviewAmazon ElastiCache for Redis at-rest encryption is an optional feature to increase data security byencrypting on-disk data during sync and backup or snapshot operations. Because there is someprocessing needed to encrypt and decrypt the data, enabling at-rest encryption can have someperformance impact during these operations. You should benchmark your data with and without at-restencryption to determine the performance impact for your use cases.
At-Rest Encryption ConstraintsThe following constraints on ElastiCache at-rest encryption should be kept in mind when you plan yourimplementation of ElastiCache encryption at-rest:
• At-rest encryption is supported only on replication groups running Redis version 3.2.6. It is notsupported on clusters running Memcached.
• At-rest encryption is supported only for replication groups running in an Amazon VPC.• At-rest encryption is supported for replication groups running any node type.
You can implement at-rest encryption on a replication group only when creating the replication group.You cannot toggle at-rest encryption on and off on a replication group. For more information, seeEnabling At-Rest Encryption on an Existing Redis Cluster (p. 439).
Implementing at-rest encryption can reduce performance during backup and node sync operations.Benchmark at-rest encryption compared to no encryption on your own data to determine its impact onperformance for your implementation.
Enabling At-Rest EncryptionYou can enable ElastiCache at-rest encryption when you create a Redis replication group by settingthe parameter AtRestEncryptionEnabled to true. You can't enable at-rest encryption on existingreplication groups.
You can enable at-rest encryption when you create an ElastiCache for Redis replication group using theAWS Management Console, the AWS CLI, or the ElastiCache API.
API Version 2015-02-02438

Amazon ElastiCache User GuideAt-Rest Encryption (Redis)
Contents• Enabling At-Rest Encryption on an Existing Redis Cluster (p. 439)• Enabling At-Rest Encryption Using the AWS Management Console (p. 439)• Enabling At-Rest Encryption Using the AWS CLI (p. 439)
• Enabling At-Rest Encryption on a Redis (cluster mode disabled) Cluster (CLI) (p. 439)• Enabling At-Rest Encryption on a Redis (cluster mode enabled) Cluster (CLI) (p. 440)
• Enabling At-Rest Encryption Using the ElastiCache API (p. 441)• Enabling At-Rest Encryption on a Redis (cluster mode disabled) Cluster (API) (p. 441)• Enabling At-Rest Encryption on a Redis (cluster mode enabled) Cluster (API) (p. 442)
Enabling At-Rest Encryption on an Existing Redis Cluster
You can only enable at-rest encryption when you create a Redis replication group. If you have an existingreplication group on which you want to enable at-rest encryption, do the following.
To enable at-rest encryption on an existing replication group
1. Create a manual backup of your existing replication group. For more information, see MakingManual Backups (p. 301).
2. Create a new replication grouo by restoring from the backup. On the new replication group, enableat-rest encryption. For more information, see Restoring From a Backup with Optional ClusterResizing (p. 321).
3. Update the endpoints in your application to point to the new replication group.4. Delete the old replication group. For more information, see Deleting a Cluster (p. 201) or Deleting a
Cluster with Replicas (p. 290).
Enabling At-Rest Encryption Using the AWS Management Console
To enable at-rest encryption when creating a replication group using the AWS Management Console,make the following selections:
• Choose Redis as your engine.• Choose version 3.2.6 as your engine version.• Choose Yes from the Encryption at-rest list.
For the step-by-step procedure, see the following:
• Creating a Redis (cluster mode disabled) Cluster (Console) (p. 163)• Creating a Redis (cluster mode enabled) Cluster (Console) (p. 167)
Enabling At-Rest Encryption Using the AWS CLI
To enable at-rest encryption when creating a Redis cluster using the AWS CLI, use the --at-rest-encryption-enabled parameter when creating a replication group.
Enabling At-Rest Encryption on a Redis (cluster mode disabled) Cluster (CLI)
The following operation creates the Redis (cluster mode disabled) replication group my-classic-rgwith three nodes (--num-cache-clusters), a primary and two read replicas. At-rest encryption is enabledfor this replication group (--at-rest-encryption-enabled).
The following parameters and their values are necessary to enable encryption on this replication group:
API Version 2015-02-02439
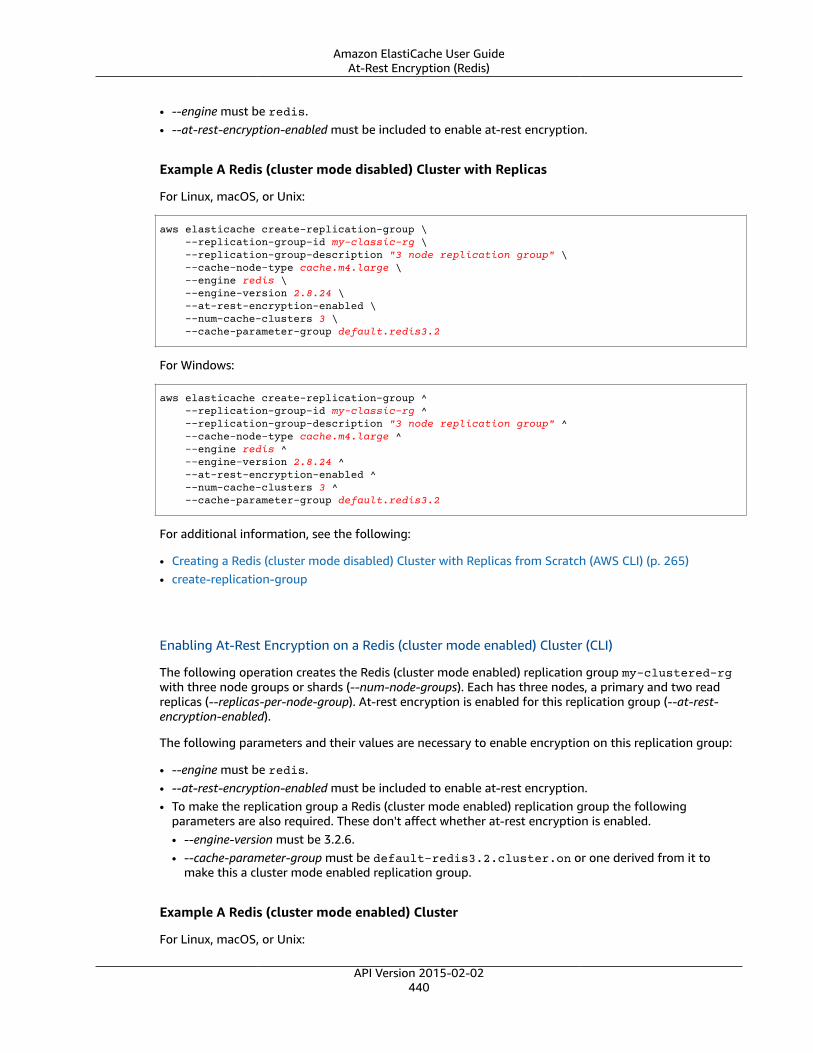
Amazon ElastiCache User GuideAt-Rest Encryption (Redis)
• --engine must be redis.• --at-rest-encryption-enabled must be included to enable at-rest encryption.
Example A Redis (cluster mode disabled) Cluster with Replicas
For Linux, macOS, or Unix:
aws elasticache create-replication-group \ --replication-group-id my-classic-rg \ --replication-group-description "3 node replication group" \ --cache-node-type cache.m4.large \ --engine redis \ --engine-version 2.8.24 \ --at-rest-encryption-enabled \ --num-cache-clusters 3 \ --cache-parameter-group default.redis3.2
For Windows:
aws elasticache create-replication-group ^ --replication-group-id my-classic-rg ^ --replication-group-description "3 node replication group" ^ --cache-node-type cache.m4.large ^ --engine redis ^ --engine-version 2.8.24 ^ --at-rest-encryption-enabled ^ --num-cache-clusters 3 ^ --cache-parameter-group default.redis3.2
For additional information, see the following:
• Creating a Redis (cluster mode disabled) Cluster with Replicas from Scratch (AWS CLI) (p. 265)• create-replication-group
Enabling At-Rest Encryption on a Redis (cluster mode enabled) Cluster (CLI)
The following operation creates the Redis (cluster mode enabled) replication group my-clustered-rgwith three node groups or shards (--num-node-groups). Each has three nodes, a primary and two readreplicas (--replicas-per-node-group). At-rest encryption is enabled for this replication group (--at-rest-encryption-enabled).
The following parameters and their values are necessary to enable encryption on this replication group:
• --engine must be redis.• --at-rest-encryption-enabled must be included to enable at-rest encryption.• To make the replication group a Redis (cluster mode enabled) replication group the following
parameters are also required. These don't affect whether at-rest encryption is enabled.• --engine-version must be 3.2.6.• --cache-parameter-group must be default-redis3.2.cluster.on or one derived from it to
make this a cluster mode enabled replication group.
Example A Redis (cluster mode enabled) Cluster
For Linux, macOS, or Unix:
API Version 2015-02-02440

Amazon ElastiCache User GuideAt-Rest Encryption (Redis)
aws elasticache create-replication-group \ --replication-group-id my-clustered-rg \ --replication-group-description "redis clustered cluster" \ --cache-node-type cache.m3.large \ --num-node-groups 3 \ --replicas-per-node-group 2 \ --engine redis \ --engine-version 3.2.6 \ --at-rest-encryption-enabled \ --cache-parameter-group default.redis3.2.cluster.on
For Windows:
aws elasticache create-replication-group ^ --replication-group-id my-clustered-rg ^ --replication-group-description "redis clustered cluster" ^ --cache-node-type cache.m3.large ^ --num-node-groups 3 ^ --replicas-per-node-group 2 ^ --engine redis ^ --engine-version 3.2.6 ^ --at-rest-encryption-enabled ^ --cache-parameter-group default.redis3.2.cluster.on
For additional information, see the following:
• Creating a Redis (cluster mode enabled) Cluster with Replicas from Scratch (AWS CLI) (p. 271)• create-replication-group
Enabling At-Rest Encryption Using the ElastiCache API
To enable at-rest encryption when creating a Redis replication group using the ElastiCache API, set theparameter AtRestEncryptionEnabled to true with CreateReplicationGroup.
Enabling At-Rest Encryption on a Redis (cluster mode disabled) Cluster (API)
The following operation creates the Redis (cluster mode disabled) replication group my-classic-rgwith three nodes (NumCacheClusters), a primary and two read replicas. At-rest encryption is enabled forthis replication group (AtRestEncryptionEnabled=true).
The following parameters and their values are necessary to enable encryption on this replication group:
• Engine must be redis.• AtRestEncryptionEnabled must be true.
Example – A Redis (cluster mode disabled) Cluster with Replicas
Line breaks are added for ease of reading.
https://elasticache.us-west-2.amazonaws.com/ ?Action=CreateReplicationGroup &AtRestEncryptionEnabled=true &CacheNodeType=cache.m3.large &CacheParameterGroup=default.redis3.2 &Engine=redis &EngineVersion=2.8.24 &NumCacheClusters=3 &ReplicationGroupDescription=test%20group
API Version 2015-02-02441

Amazon ElastiCache User GuideAt-Rest Encryption (Redis)
&ReplicationGroupId=my-classic-rg &Version=2015-02-02 &SignatureVersion=4 &SignatureMethod=HmacSHA256 &Timestamp=20150202T192317Z &X-Amz-Credential=<credential>
For additional information, see the following:
• Creating a Redis (cluster mode disabled) Cluster with Replicas from Scratch (ElastiCache API) (p. 268)• CreateReplicationGroup
Enabling At-Rest Encryption on a Redis (cluster mode enabled) Cluster (API)
The following operation creates the Redis (cluster mode enabled) replication group my-clustered-rg with three node groups/shards (NumNodeGroups), each with three nodes, a primary and tworead replicas (ReplicasPerNodeGroup). At-rest encryption is enabled for this replication group(AtRestEncryptionEnabled=true).
The following parameters and their values are necessary to enable encryption on this replication group:
• Engine must be redis.• AtRestEncryptionEnabled must be true.• To make the replication group a Redis (cluster mode enabled) cluster the following parameters are also
required. These don't affect whether at-rest encryption is enabled.• EngineVersion must be 3.2.6.• CacheParameterGroup must be default-redis3.2.cluster.on, or one derived from it.
Example – A Redis (cluster mode enabled) Cluster
Line breaks are added for ease of reading.
https://elasticache.us-west-2.amazonaws.com/ ?Action=CreateReplicationGroup &AtRestEncryptionEnabled=true &CacheNodeType=cache.m3.large &CacheParemeterGroup=default.redis3.2.cluster.on &Engine=redis &EngineVersion=3.2.6 &NumNodeGroups=3 &ReplicasPerNodeGroup=2 &ReplicationGroupDescription=test%20group &ReplicationGroupId=my-clustered-rg &Version=2015-02-02 &SignatureVersion=4 &SignatureMethod=HmacSHA256 &Timestamp=20150202T192317Z &X-Amz-Credential=<credential>
For additional information, see the following:
• Creating a Redis (cluster mode enabled) Cluster with Replicas from Scratch (ElastiCache API) (p. 275)• CreateReplicationGroup
API Version 2015-02-02442

Amazon ElastiCache User GuideHIPAA Compliance (Redis)
See Also• ElastiCache and Security Groups (p. 410)• Authentication and Access Control for Amazon ElastiCache (p. 411)
HIPAA Compliance for Amazon ElastiCache forRedis
You can find information about Amazon ElastiCache for Redis requirements for HIPAA compliance atElastiCache for Redis HIPAA Requirements (p. 443). There is no additional charge beyond the normalElastiCache for Redis charges for making your cluster HIPAA-compliant.
The AWS HIPAA compliance program includes Amazon ElastiCache for Redis as a HIPAA Eligible Service.If you have an executed Business Associate Agreement (BAA) with AWS, you can use Amazon ElastiCachefor Redis to build your HIPAA-compliant applications containing protected health information (PHI). Formore information, see HIPAA Compliance. AWS Services in Scope have been fully assessed by a third-party auditor and result in a certification, attestation of compliance, or Authority to Operate (ATO). Formore information, see AWS Services in Scope by Compliance Program.
ElastiCache for Redis HIPAA RequirementsTo enable HIPAA support on your ElastiCache for Redis cluster, in addition to executing the BAA, yourcluster and nodes within the cluster must satisfy the following requirements:
• Data security requirements – Your cluster must enable in-transit encryption, at-rest encryption, andRedis AUTH. For more information, see the following:• Amazon ElastiCache for Redis In-Transit Encryption (p. 433)• Amazon ElastiCache for Redis At-Rest Encryption (p. 438)• Authenticating Users with AUTH (Redis) (p. 431)
• Engine version requirements – Your cluster must be running ElastiCache for Redis version 3.2.6to qualify for HIPAA compliance. For more information, see ElastiCache for Redis Version 3.2.6(Enhanced) (p. 53).
• Node type requirements – Your cluster must be running a current-generation node type—M3, M4, T2,or R3. For more information, see the following:• Supported Node Types (p. 121)• Choosing Your Node Size for Redis Clusters (p. 104)
When you have created a compliant ElastiCache for Redis cluster, you can start storing PHI. If you want,you can seed the new cluster with data from an existing cluster. For more information, see the following:
• Creating a Cluster (p. 160)• Creating a Redis Cluster with Replicas from Scratch (p. 264)• Seeding a New Cluster with an Externally Created Backup (Redis) (p. 324)
For general information about AWS Cloud and HIPAA compliance, see the following:
• AWS Cloud Compliance• Shared Responsibility Model• HIPAA Compliance
API Version 2015-02-02443

Amazon ElastiCache User GuideElastiCache for Redis HIPAA Requirements
• AWS Services in Scope by Compliance Program
API Version 2015-02-02444

Amazon ElastiCache User GuideRequirements
Accessing ElastiCache Resourcesfrom Outside AWS
Amazon ElastiCache is an AWS service that provides cloud-based in-memory key-value store. On theback end it uses either the Memcached or Redis engine. The service is designed to be accessed exclusivelyfrom within AWS. However, if the ElastiCache cluster is hosted inside an Amazon VPC, there are a numberof ways to access a cluster from outside AWS, one of which is using a Network Address Translation(NAT) instance to provide outside access, as described in this topic. For other patterns, see Accessing anElastiCache Cluster from an Application Running in a Customer's Data Center (p. 401).
Topics• Requirements (p. 445)• Considerations (p. 445)• Limitations (p. 445)• How to Access ElastiCache Resources from Outside AWS (p. 446)• Related topics (p. 448)
RequirementsThe following requirements must be met for you to access your ElastiCache resources from outsideAWS using a NAT instance. For other ways of accessing ElastiCache from outside AWS see, Accessing anElastiCache Cluster from an Application Running in a Customer's Data Center (p. 401).
• The cluster must reside within an Amazon VPC and be accessed through a Network Address Translation(NAT) instance.
• The NAT instance must be launched in the same Amazon VPC as the cluster.• The NAT instance must be launched in a public subnet separate from the cluster.• An Elastic IP Address (EIP) must be associated with the NAT instance. The port forwarding feature of
iptables is used to forward a port on the NAT instance to the cache node port within the Amazon VPC.
ConsiderationsThe following considerations should be kept in mind when accessing your ElastiCache resources fromoutside ElastiCache.
• Clients connect to the EIP and cache port of the NAT instance. Port forwarding on the NAT instanceforwards traffic to the appropriate cache cluster node.
• If a cluster node is added or replaced, the iptables rules need to be updated to reflect this change.
LimitationsThis approach should be used for testing and development purposes only. It is not recommended forproduction use due to the following limitations:
• The NAT instance is acting as a proxy between clients and multiple clusters. The addition of a proxyimpacts the performance of the cache cluster. The impact increases with number of cache clusters youare accessing through the NAT instance.
API Version 2015-02-02445

Amazon ElastiCache User GuideHow to Access ElastiCache Resources from Outside AWS
• The traffic from clients to the NAT instance is unencrypted. Therefore, you should avoid sendingsensitive data via the NAT instance.
• The NAT instance adds the overhead of maintaining another instance.
• The NAT instance serves as a single point of failure. For information about how to set up highavailability NAT on VPC, see High Availability for Amazon VPC NAT Instances: An Example.
How to Access ElastiCache Resources from OutsideAWS
The following procedure demonstrates how to connect to your ElastiCache resources using a NATinstance.
TipYou can modify the following process to work for any Amazon ElastiCache cluster. Justsubstitute the cluster's port number for the port numbers in the example.
These steps assume the following:
• You are accessing a Memcached cluster with the IP address 10.0.1.230, the default Memcached port11211, and security group sg-bd56b7da.
• Your trusted client has the IP address 198.51.100.27.
• Your NAT instance has the Elastic IP Address 203.0.113.73.
• Your NAT instance has security group sg-ce56b7a9.
When you finish creating your NAT instance using the following steps, the following should be true.
• IP forwarding is enabled for the NAT instance. The following command can be used to confirm this.
cat /proc/sys/net/ipv4/ip_forward
• Masquerading is enabled. The following command can be used to enable masquerading.
iptables -t nat -A POSTROUTING -o eth0 -j MASQUERADE
To connect to your ElastiCache resources using a NAT instance
1. Create a NAT instance in the same VPC as your cache cluster but in a public subnet.
By default, the VPC wizard will launch a cache.m1.small node type. You should choose a node sizebased on your needs.
For information about creating a NAT instance, see NAT Instances in the AWS VPC User Guide.
2. Create security group rules for the cache cluster and NAT instance.
The NAT instance security group should have the following rules:
• Two inbound rules
• One to allow TCP connections from trusted clients to each cache port forwarded from the NATinstance (11211 - 11213).
• A second to allow SSH access to trusted clients.
API Version 2015-02-02446
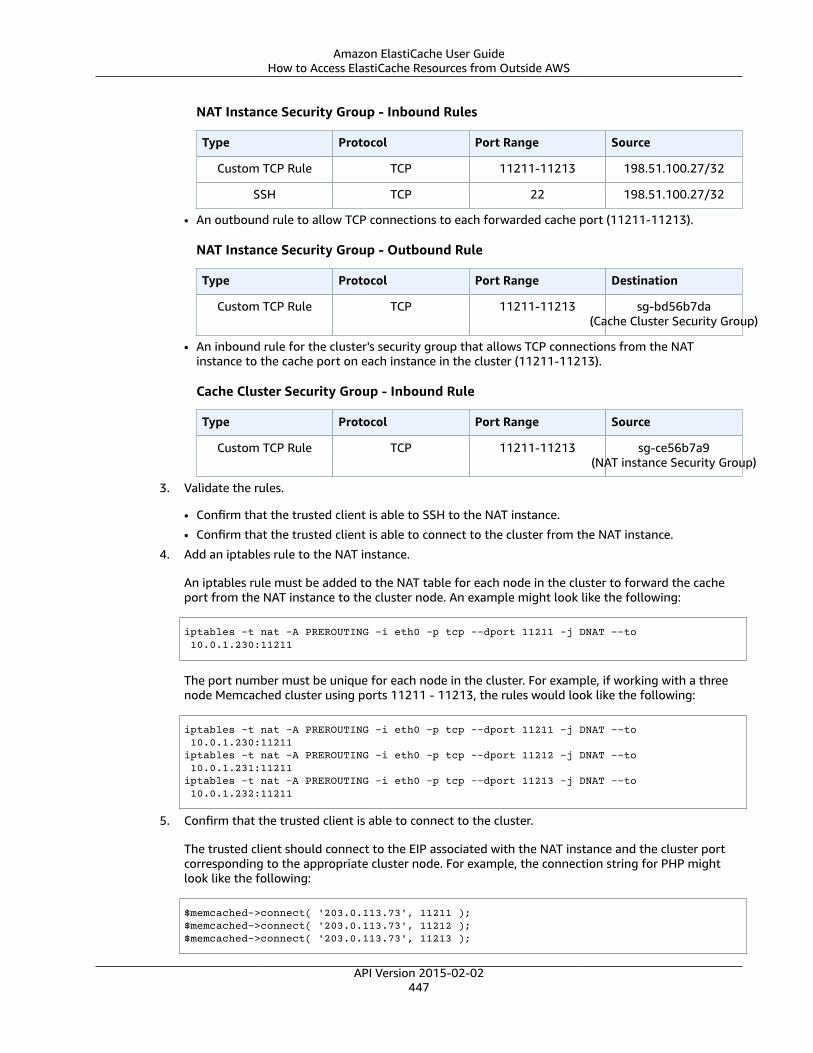
Amazon ElastiCache User GuideHow to Access ElastiCache Resources from Outside AWS
NAT Instance Security Group - Inbound Rules
Type Protocol Port Range Source
Custom TCP Rule TCP 11211-11213 198.51.100.27/32
SSH TCP 22 198.51.100.27/32
• An outbound rule to allow TCP connections to each forwarded cache port (11211-11213).
NAT Instance Security Group - Outbound Rule
Type Protocol Port Range Destination
Custom TCP Rule TCP 11211-11213 sg-bd56b7da(Cache Cluster Security Group)
• An inbound rule for the cluster's security group that allows TCP connections from the NATinstance to the cache port on each instance in the cluster (11211-11213).
Cache Cluster Security Group - Inbound Rule
Type Protocol Port Range Source
Custom TCP Rule TCP 11211-11213 sg-ce56b7a9(NAT instance Security Group)
3. Validate the rules.
• Confirm that the trusted client is able to SSH to the NAT instance.
• Confirm that the trusted client is able to connect to the cluster from the NAT instance.
4. Add an iptables rule to the NAT instance.
An iptables rule must be added to the NAT table for each node in the cluster to forward the cacheport from the NAT instance to the cluster node. An example might look like the following:
iptables -t nat -A PREROUTING -i eth0 -p tcp --dport 11211 -j DNAT --to 10.0.1.230:11211
The port number must be unique for each node in the cluster. For example, if working with a threenode Memcached cluster using ports 11211 - 11213, the rules would look like the following:
iptables -t nat -A PREROUTING -i eth0 -p tcp --dport 11211 -j DNAT --to 10.0.1.230:11211iptables -t nat -A PREROUTING -i eth0 -p tcp --dport 11212 -j DNAT --to 10.0.1.231:11211iptables -t nat -A PREROUTING -i eth0 -p tcp --dport 11213 -j DNAT --to 10.0.1.232:11211
5. Confirm that the trusted client is able to connect to the cluster.
The trusted client should connect to the EIP associated with the NAT instance and the cluster portcorresponding to the appropriate cluster node. For example, the connection string for PHP mightlook like the following:
$memcached->connect( '203.0.113.73', 11211 );$memcached->connect( '203.0.113.73', 11212 );$memcached->connect( '203.0.113.73', 11213 );
API Version 2015-02-02447

Amazon ElastiCache User GuideRelated topics
A telnet client can also be used to verify the connection. For example:
telnet 203.0.113.73 11211telnet 203.0.113.73 11212telnet 203.0.113.73 11213
6. Save the iptables configuration.
Save the rules after you test and verify them. If you are using a Redhat-based Linux distribution (likeAmazon Linux), run the following command:
service iptables save
Related topics• Access Patterns for Accessing an ElastiCache Cluster in an Amazon VPC (p. 397)• NAT Instances• Configuring ElastiCache Clients• High Availability for Amazon VPC NAT Instances: An Example
API Version 2015-02-02448

Amazon ElastiCache User Guide
Monitoring Usage, Events, and CostsKnowing how your clusters are performing, the resources they're consuming, the events that are beinggenerated, and the costs of your deployment are important factors in managing your enterprise cachingsolution. CloudWatch provides metrics for monitoring your cache performance. Cost allocation tags helpyou monitor and manage costs.
Topics• Monitoring Use with CloudWatch Metrics (p. 450)• Monitoring ElastiCache Events (p. 462)• Monitoring Costs with Cost Allocation Tags (p. 471)
API Version 2015-02-02449
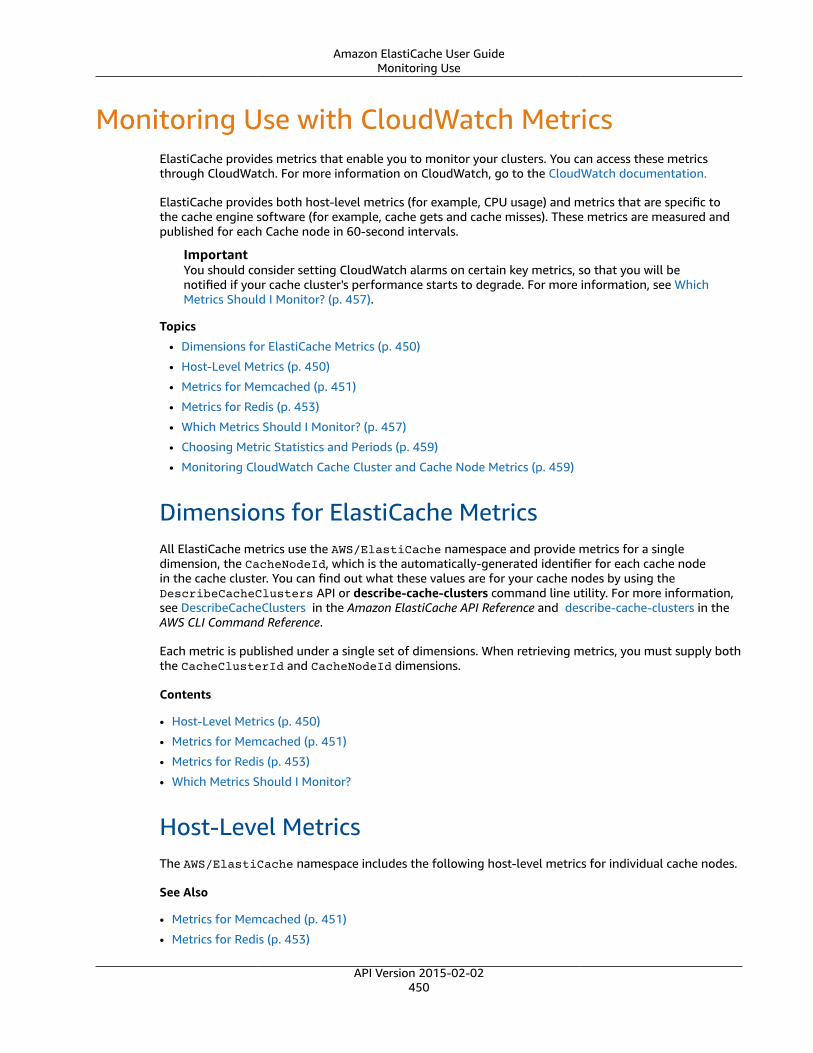
Amazon ElastiCache User GuideMonitoring Use
Monitoring Use with CloudWatch MetricsElastiCache provides metrics that enable you to monitor your clusters. You can access these metricsthrough CloudWatch. For more information on CloudWatch, go to the CloudWatch documentation.
ElastiCache provides both host-level metrics (for example, CPU usage) and metrics that are specific tothe cache engine software (for example, cache gets and cache misses). These metrics are measured andpublished for each Cache node in 60-second intervals.
ImportantYou should consider setting CloudWatch alarms on certain key metrics, so that you will benotified if your cache cluster's performance starts to degrade. For more information, see WhichMetrics Should I Monitor? (p. 457).
Topics
• Dimensions for ElastiCache Metrics (p. 450)
• Host-Level Metrics (p. 450)
• Metrics for Memcached (p. 451)
• Metrics for Redis (p. 453)
• Which Metrics Should I Monitor? (p. 457)
• Choosing Metric Statistics and Periods (p. 459)
• Monitoring CloudWatch Cache Cluster and Cache Node Metrics (p. 459)
Dimensions for ElastiCache MetricsAll ElastiCache metrics use the AWS/ElastiCache namespace and provide metrics for a singledimension, the CacheNodeId, which is the automatically-generated identifier for each cache nodein the cache cluster. You can find out what these values are for your cache nodes by using theDescribeCacheClusters API or describe-cache-clusters command line utility. For more information,see DescribeCacheClusters in the Amazon ElastiCache API Reference and describe-cache-clusters in theAWS CLI Command Reference.
Each metric is published under a single set of dimensions. When retrieving metrics, you must supply boththe CacheClusterId and CacheNodeId dimensions.
Contents
• Host-Level Metrics (p. 450)
• Metrics for Memcached (p. 451)
• Metrics for Redis (p. 453)
• Which Metrics Should I Monitor?
Host-Level MetricsThe AWS/ElastiCache namespace includes the following host-level metrics for individual cache nodes.
See Also
• Metrics for Memcached (p. 451)
• Metrics for Redis (p. 453)
API Version 2015-02-02450
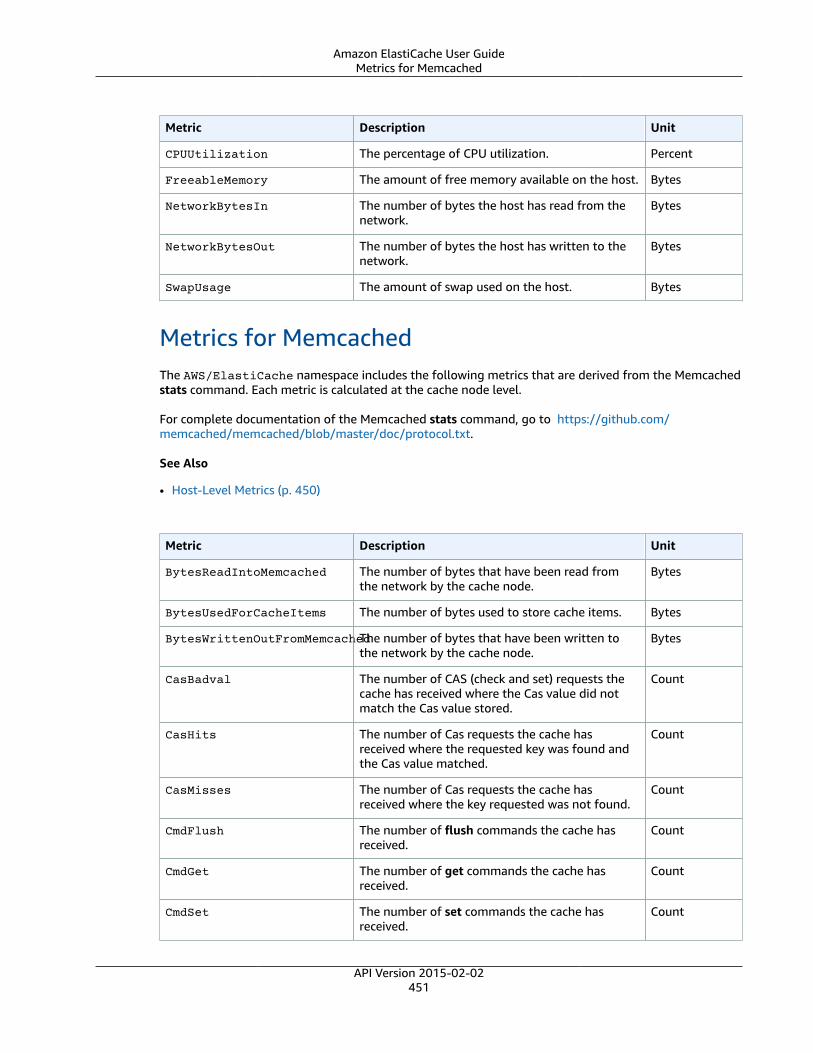
Amazon ElastiCache User GuideMetrics for Memcached
Metric Description Unit
CPUUtilization The percentage of CPU utilization. Percent
FreeableMemory The amount of free memory available on the host. Bytes
NetworkBytesIn The number of bytes the host has read from thenetwork.
Bytes
NetworkBytesOut The number of bytes the host has written to thenetwork.
Bytes
SwapUsage The amount of swap used on the host. Bytes
Metrics for MemcachedThe AWS/ElastiCache namespace includes the following metrics that are derived from the Memcachedstats command. Each metric is calculated at the cache node level.
For complete documentation of the Memcached stats command, go to https://github.com/memcached/memcached/blob/master/doc/protocol.txt.
See Also
• Host-Level Metrics (p. 450)
Metric Description Unit
BytesReadIntoMemcached The number of bytes that have been read fromthe network by the cache node.
Bytes
BytesUsedForCacheItems The number of bytes used to store cache items. Bytes
BytesWrittenOutFromMemcachedThe number of bytes that have been written tothe network by the cache node.
Bytes
CasBadval The number of CAS (check and set) requests thecache has received where the Cas value did notmatch the Cas value stored.
Count
CasHits The number of Cas requests the cache hasreceived where the requested key was found andthe Cas value matched.
Count
CasMisses The number of Cas requests the cache hasreceived where the key requested was not found.
Count
CmdFlush The number of flush commands the cache hasreceived.
Count
CmdGet The number of get commands the cache hasreceived.
Count
CmdSet The number of set commands the cache hasreceived.
Count
API Version 2015-02-02451

Amazon ElastiCache User GuideMetrics for Memcached
Metric Description Unit
CurrConnections A count of the number of connections connectedto the cache at an instant in time. ElastiCache usestwo to three of the connections to monitor thecluster in each case.
Count
CurrItems A count of the number of items currently stored inthe cache.
Count
DecrHits The number of decrement requests the cache hasreceived where the requested key was found.
Count
DecrMisses The number of decrement requests the cache hasreceived where the requested key was not found.
Count
DeleteHits The number of delete requests the cache hasreceived where the requested key was found.
Count
DeleteMisses The number of delete requests the cache hasreceived where the requested key was not found.
Count
Evictions The number of non-expired items the cacheevicted to allow space for new writes.
Count
GetHits The number of get requests the cache hasreceived where the key requested was found.
Count
GetMisses The number of get requests the cache hasreceived where the key requested was not found.
Count
IncrHits The number of increment requests the cache hasreceived where the key requested was found.
Count
IncrMisses The number of increment requests the cache hasreceived where the key requested was not found.
Count
Reclaimed The number of expired items the cache evicted toallow space for new writes.
Count
For Memcached 1.4.14, the following additional metrics are provided.
Metric Description Unit
BytesUsedForHash The number of bytes currently used by hashtables.
Bytes
CmdConfigGet The cumulative number of config get requests. Count
CmdConfigSet The cumulative number of config set requests. Count
CmdTouch The cumulative number of touch requests. Count
CurrConfig The current number of configurations stored. Count
EvictedUnfetched The number of valid items evicted from the leastrecently used cache (LRU) which were nevertouched after being set.
Count
API Version 2015-02-02452
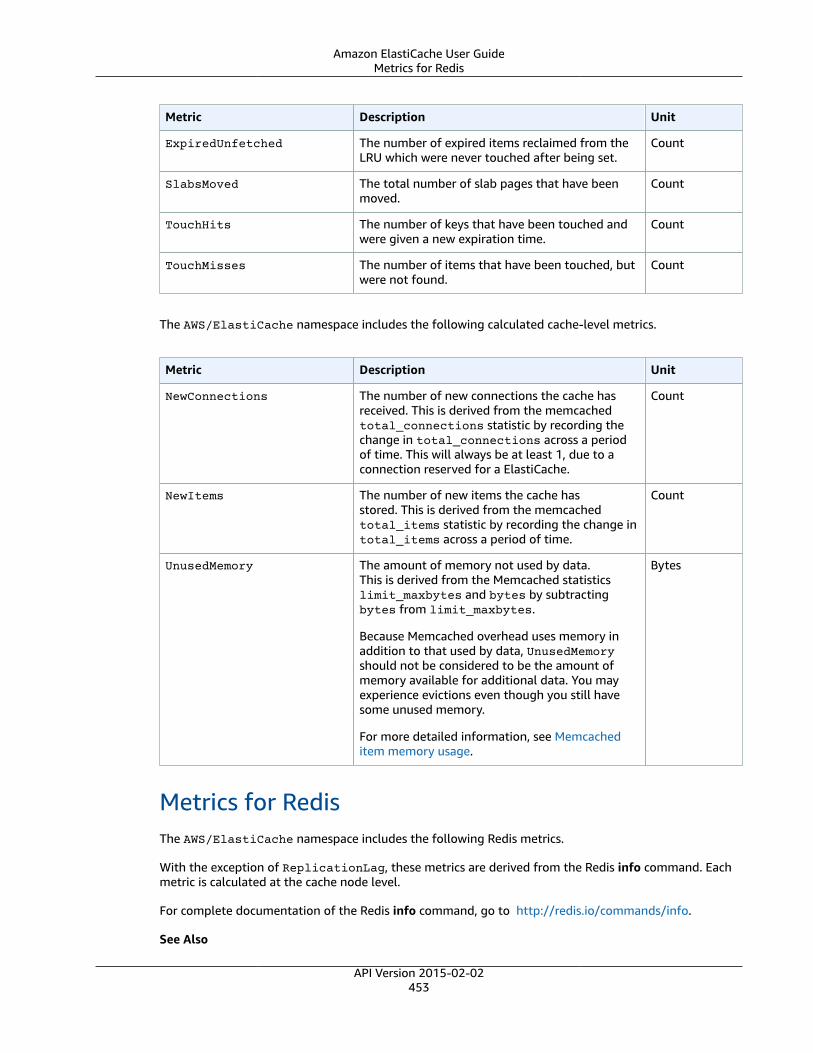
Amazon ElastiCache User GuideMetrics for Redis
Metric Description Unit
ExpiredUnfetched The number of expired items reclaimed from theLRU which were never touched after being set.
Count
SlabsMoved The total number of slab pages that have beenmoved.
Count
TouchHits The number of keys that have been touched andwere given a new expiration time.
Count
TouchMisses The number of items that have been touched, butwere not found.
Count
The AWS/ElastiCache namespace includes the following calculated cache-level metrics.
Metric Description Unit
NewConnections The number of new connections the cache hasreceived. This is derived from the memcachedtotal_connections statistic by recording thechange in total_connections across a periodof time. This will always be at least 1, due to aconnection reserved for a ElastiCache.
Count
NewItems The number of new items the cache hasstored. This is derived from the memcachedtotal_items statistic by recording the change intotal_items across a period of time.
Count
UnusedMemory The amount of memory not used by data.This is derived from the Memcached statisticslimit_maxbytes and bytes by subtractingbytes from limit_maxbytes.
Because Memcached overhead uses memory inaddition to that used by data, UnusedMemoryshould not be considered to be the amount ofmemory available for additional data. You mayexperience evictions even though you still havesome unused memory.
For more detailed information, see Memcacheditem memory usage.
Bytes
Metrics for RedisThe AWS/ElastiCache namespace includes the following Redis metrics.
With the exception of ReplicationLag, these metrics are derived from the Redis info command. Eachmetric is calculated at the cache node level.
For complete documentation of the Redis info command, go to http://redis.io/commands/info.
See Also
API Version 2015-02-02453
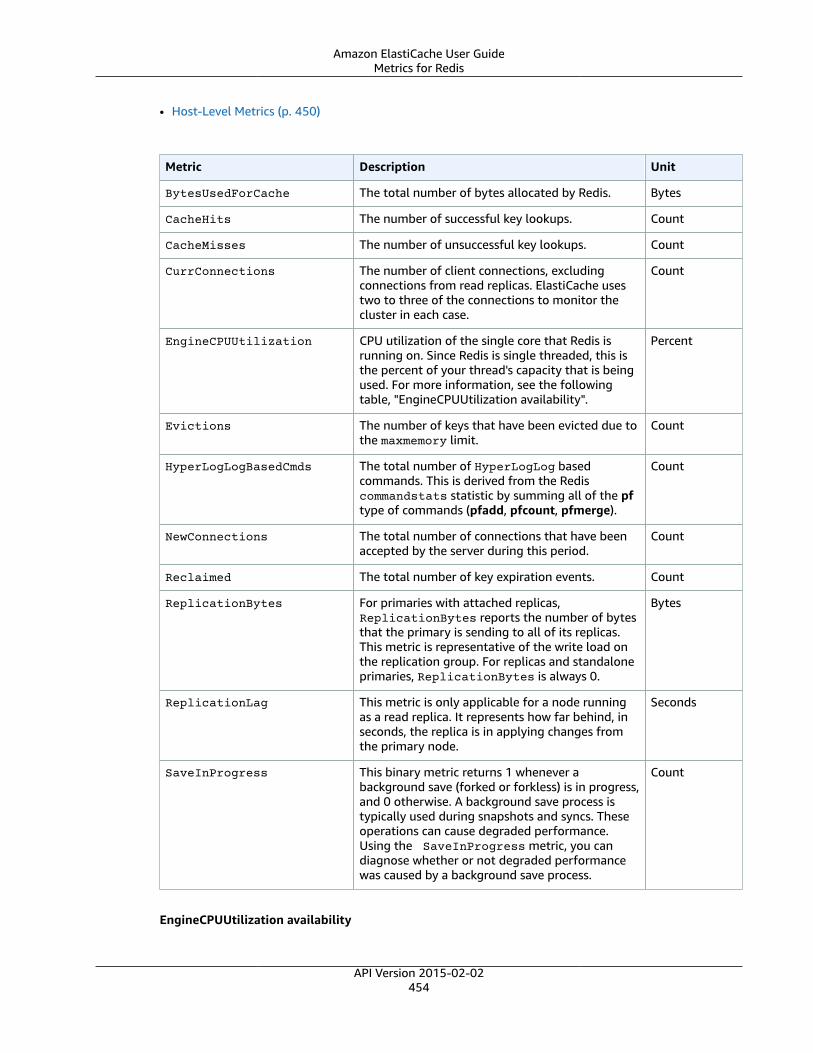
Amazon ElastiCache User GuideMetrics for Redis
• Host-Level Metrics (p. 450)
Metric Description Unit
BytesUsedForCache The total number of bytes allocated by Redis. Bytes
CacheHits The number of successful key lookups. Count
CacheMisses The number of unsuccessful key lookups. Count
CurrConnections The number of client connections, excludingconnections from read replicas. ElastiCache usestwo to three of the connections to monitor thecluster in each case.
Count
EngineCPUUtilization CPU utilization of the single core that Redis isrunning on. Since Redis is single threaded, this isthe percent of your thread's capacity that is beingused. For more information, see the followingtable, "EngineCPUUtilization availability".
Percent
Evictions The number of keys that have been evicted due tothe maxmemory limit.
Count
HyperLogLogBasedCmds The total number of HyperLogLog basedcommands. This is derived from the Rediscommandstats statistic by summing all of the pftype of commands (pfadd, pfcount, pfmerge).
Count
NewConnections The total number of connections that have beenaccepted by the server during this period.
Count
Reclaimed The total number of key expiration events. Count
ReplicationBytes For primaries with attached replicas,ReplicationBytes reports the number of bytesthat the primary is sending to all of its replicas.This metric is representative of the write load onthe replication group. For replicas and standaloneprimaries, ReplicationBytes is always 0.
Bytes
ReplicationLag This metric is only applicable for a node runningas a read replica. It represents how far behind, inseconds, the replica is in applying changes fromthe primary node.
Seconds
SaveInProgress This binary metric returns 1 whenever abackground save (forked or forkless) is in progress,and 0 otherwise. A background save process istypically used during snapshots and syncs. Theseoperations can cause degraded performance.Using the SaveInProgress metric, you candiagnose whether or not degraded performancewas caused by a background save process.
Count
EngineCPUUtilization availability
API Version 2015-02-02454
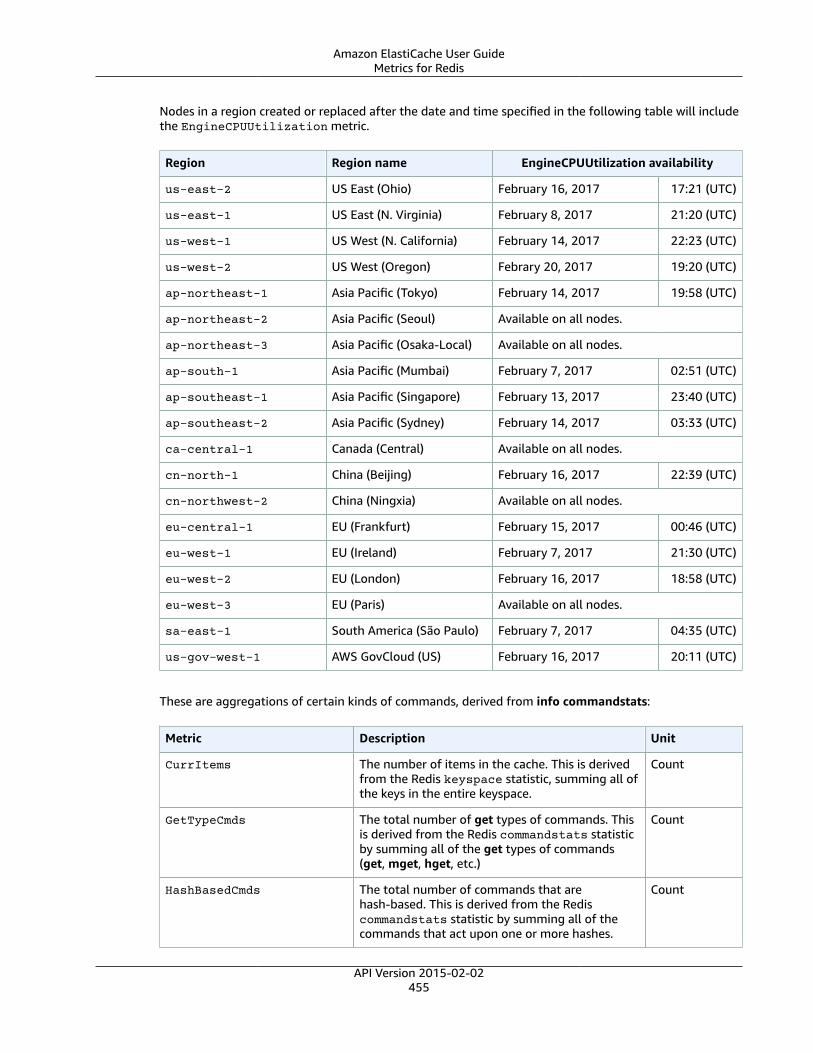
Amazon ElastiCache User GuideMetrics for Redis
Nodes in a region created or replaced after the date and time specified in the following table will includethe EngineCPUUtilization metric.
Region Region name EngineCPUUtilization availability
us-east-2 US East (Ohio) February 16, 2017 17:21 (UTC)
us-east-1 US East (N. Virginia) February 8, 2017 21:20 (UTC)
us-west-1 US West (N. California) February 14, 2017 22:23 (UTC)
us-west-2 US West (Oregon) Febrary 20, 2017 19:20 (UTC)
ap-northeast-1 Asia Pacific (Tokyo) February 14, 2017 19:58 (UTC)
ap-northeast-2 Asia Pacific (Seoul) Available on all nodes.
ap-northeast-3 Asia Pacific (Osaka-Local) Available on all nodes.
ap-south-1 Asia Pacific (Mumbai) February 7, 2017 02:51 (UTC)
ap-southeast-1 Asia Pacific (Singapore) February 13, 2017 23:40 (UTC)
ap-southeast-2 Asia Pacific (Sydney) February 14, 2017 03:33 (UTC)
ca-central-1 Canada (Central) Available on all nodes.
cn-north-1 China (Beijing) February 16, 2017 22:39 (UTC)
cn-northwest-2 China (Ningxia) Available on all nodes.
eu-central-1 EU (Frankfurt) February 15, 2017 00:46 (UTC)
eu-west-1 EU (Ireland) February 7, 2017 21:30 (UTC)
eu-west-2 EU (London) February 16, 2017 18:58 (UTC)
eu-west-3 EU (Paris) Available on all nodes.
sa-east-1 South America (São Paulo) February 7, 2017 04:35 (UTC)
us-gov-west-1 AWS GovCloud (US) February 16, 2017 20:11 (UTC)
These are aggregations of certain kinds of commands, derived from info commandstats:
Metric Description Unit
CurrItems The number of items in the cache. This is derivedfrom the Redis keyspace statistic, summing all ofthe keys in the entire keyspace.
Count
GetTypeCmds The total number of get types of commands. Thisis derived from the Redis commandstats statisticby summing all of the get types of commands(get, mget, hget, etc.)
Count
HashBasedCmds The total number of commands that arehash-based. This is derived from the Rediscommandstats statistic by summing all of thecommands that act upon one or more hashes.
Count
API Version 2015-02-02455

Amazon ElastiCache User GuideMetrics for Redis
Metric Description Unit
KeyBasedCmds The total number of commands that arekey-based. This is derived from the Rediscommandstats statistic by summing all of thecommands that act upon one or more keys.
Count
ListBasedCmds The total number of commands that arelist-based. This is derived from the Rediscommandstats statistic by summing all of thecommands that act upon one or more lists.
Count
SetBasedCmds The total number of commands that areset-based. This is derived from the Rediscommandstats statistic by summing all of thecommands that act upon one or more sets.
Count
SetTypeCmds The total number of set types of commands. Thisis derived from the Redis commandstats statisticby summing all of the set types of commands(set, hset, etc.)
Count
SortedSetBasedCmds The total number of commands that are sortedset-based. This is derived from the Rediscommandstats statistic by summing all of thecommands that act upon one or more sorted sets.
Count
StringBasedCmds The total number of commands that arestring-based. This is derived from the Rediscommandstats statistic by summing all of thecommands that act upon one or more strings.
Count
API Version 2015-02-02456

Amazon ElastiCache User GuideWhich Metrics Should I Monitor?
Which Metrics Should I Monitor?The following CloudWatch metrics offer good insight into ElastiCache performance. In most cases, werecommend that you set CloudWatch alarms for these metrics so that you can take corrective actionbefore performance issues occur.
Metrics to Monitor• CPUUtilization (p. 457)• SwapUsage (p. 457)• Evictions (p. 457)• CurrConnections (p. 458)
CPUUtilizationThis is a host-level metric reported as a percent. For more information, see Host-Level Metrics (p. 450).
Generally speaking, we suggest you set your threshold at 90% of your available CPU bandwidth. BecauseRedis is single-threaded, the actual threshold value should be calculated as a fraction of the node's totalcapacity. For example, suppose you are using a node type that has four cores. In this case, the thresholdfor CPUUtilization would be 90/4, or 22.5%. To find the number of cores (vCPUs) your node type has, seeAmazon ElastiCache Pricing.
You will need to determine your own threshold, based on the number of cores in the cache node thatyou are using. If you exceed this threshold, and your main workload is from read requests, scale yourcache cluster out by adding read replicas. If the main workload is from write requests, depending on yourcluster configuration, we recommend that you:
• Redis (cluster mode disabled) clusters: scale up by using a larger cache instance type.• Redis (cluster mode enabled) clusters: add more shards to distribute the write workload across more
primary nodes.
TipInstead of using the Host-Level metric CPUUtilization, Redis users might be able to use theRedis metric EngineCPUUtilization which reports the percent of usage on the single coreavailable to you. To see if this metric is available on your nodes and for more information, seeMetrics for Redis.
SwapUsageThis is a host-level metric reported in bytes. For more information, see Host-Level Metrics (p. 450).
• Memcached: This metric should not exceed 50 MB. If it does, we recommend that you increase theConnectionOverhead parameter value.
• Redis: At this time, we have no recommendation for this parameter; you do not need to set aCloudWatch alarm for it.
EvictionsThis is a cache engine metric, published for both Memcached and Redis cache clusters. We recommendthat you determine your own alarm threshold for this metric based on your application needs.
• Memcached: If you exceed your chosen threshold, scale your cluster up by using a larger node type, orscale out by adding more nodes.
API Version 2015-02-02457

Amazon ElastiCache User GuideWhich Metrics Should I Monitor?
• Redis: If you exceed your chosen threshold, scale your cluster up by using a larger node type.
CurrConnectionsThis is a cache engine metric, published for both Memcached and Redis cache clusters. We recommendthat you determine your own alarm threshold for this metric based on your application needs.
Whether you are running Memcached or Redis, an increasing number of CurrConnections might indicate aproblem with your application; you will need to investigate the application behavior to address this issue.
API Version 2015-02-02458
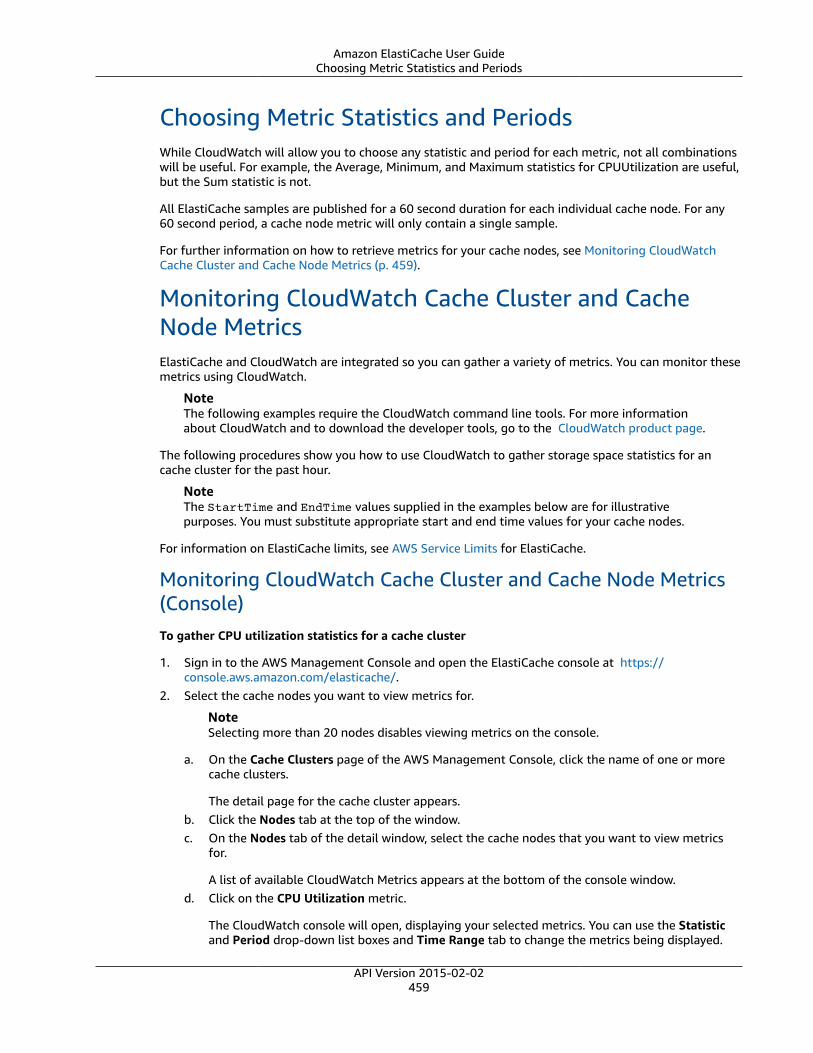
Amazon ElastiCache User GuideChoosing Metric Statistics and Periods
Choosing Metric Statistics and PeriodsWhile CloudWatch will allow you to choose any statistic and period for each metric, not all combinationswill be useful. For example, the Average, Minimum, and Maximum statistics for CPUUtilization are useful,but the Sum statistic is not.
All ElastiCache samples are published for a 60 second duration for each individual cache node. For any60 second period, a cache node metric will only contain a single sample.
For further information on how to retrieve metrics for your cache nodes, see Monitoring CloudWatchCache Cluster and Cache Node Metrics (p. 459).
Monitoring CloudWatch Cache Cluster and CacheNode MetricsElastiCache and CloudWatch are integrated so you can gather a variety of metrics. You can monitor thesemetrics using CloudWatch.
NoteThe following examples require the CloudWatch command line tools. For more informationabout CloudWatch and to download the developer tools, go to the CloudWatch product page.
The following procedures show you how to use CloudWatch to gather storage space statistics for ancache cluster for the past hour.
NoteThe StartTime and EndTime values supplied in the examples below are for illustrativepurposes. You must substitute appropriate start and end time values for your cache nodes.
For information on ElastiCache limits, see AWS Service Limits for ElastiCache.
Monitoring CloudWatch Cache Cluster and Cache Node Metrics(Console)To gather CPU utilization statistics for a cache cluster
1. Sign in to the AWS Management Console and open the ElastiCache console at https://console.aws.amazon.com/elasticache/.
2. Select the cache nodes you want to view metrics for.
NoteSelecting more than 20 nodes disables viewing metrics on the console.
a. On the Cache Clusters page of the AWS Management Console, click the name of one or morecache clusters.
The detail page for the cache cluster appears.b. Click the Nodes tab at the top of the window.c. On the Nodes tab of the detail window, select the cache nodes that you want to view metrics
for.
A list of available CloudWatch Metrics appears at the bottom of the console window.d. Click on the CPU Utilization metric.
The CloudWatch console will open, displaying your selected metrics. You can use the Statisticand Period drop-down list boxes and Time Range tab to change the metrics being displayed.
API Version 2015-02-02459

Amazon ElastiCache User GuideMonitoring CloudWatch Cache
Cluster and Cache Node Metrics
Monitoring CloudWatch Cache Cluster and Cache Node MetricsUsing the CloudWatch CLI
To gather CPU utilization statistics for a cache cluster
• Use the CloudWatch command mon-get-stats with the following parameters (note that the startand end times are shown as examples only; you will need to substitute your own appropriate startand end times):
For Linux, macOS, or Unix:
mon-get-stats CPUUtilization \ --dimensions="CacheClusterId=mycachecluster,CacheNodeId=0002" \ --statistics=Average \ --namespace="AWS/ElastiCache" \ --start-time 2013-07-05T00:00:00 \ --end-time 2013-07-06T00:00:00 \ --period=60
For Windows:
mon-get-stats CPUUtilization ^ --dimensions="CacheClusterId=mycachecluster,CacheNodeId=0002" ^ --statistics=Average ^ --namespace="AWS/ElastiCache" ^ --start-time 2013-07-05T00:00:00 ^ --end-time 2013-07-06T00:00:00 ^ --period=60
Monitoring CloudWatch Cache Cluster and Cache Node MetricsUsing the CloudWatch API
To gather CPU utilization statistics for a cache cluster
• Call the CloudWatch API GetMetricStatistics with the following parameters (note that the startand end times are shown as examples only; you will need to substitute your own appropriate startand end times):
• Statistics.member.1=Average
• Namespace=AWS/ElastiCache
• StartTime=2013-07-05T00:00:00
• EndTime=2013-07-06T00:00:00
• Period=60
• MeasureName=CPUUtilization
• Dimensions=CacheClusterId=mycachecluster,CacheNodeId=0002
Example
http://monitoring.amazonaws.com/ ?SignatureVersion=4 &Action=GetMetricStatistics &Version=2014-12-01
API Version 2015-02-02460

Amazon ElastiCache User GuideMonitoring CloudWatch Cache
Cluster and Cache Node Metrics
&StartTime=2013-07-16T00:00:00 &EndTime=2013-07-16T00:02:00 &Period=60 &Statistics.member.1=Average &Dimensions.member.1="CacheClusterId=mycachecluster" &Dimensions.member.2="CacheNodeId=0002" &Namespace=AWS/ElastiCache &MeasureName=CPUUtilization &Timestamp=2013-07-07T17%3A48%3A21.746Z &AWSAccessKeyId=<AWS Access Key ID> &Signature=<Signature>
API Version 2015-02-02461
Amazon ElastiCache User GuideMonitoring Events
Monitoring ElastiCache EventsWhen significant events happen on a cluster, such as a failure to add a node, success in adding a node,the modification of a security group and others, ElastiCache sends notification to a specific Amazon SNStopic. By monitoring for key events you can know the current state of your clusters and, depending uponthe event, be able to take corrective action.
Topics• Managing ElastiCache Amazon SNS Notifications (p. 462)• Viewing ElastiCache Events (p. 465)• Event Notifications and Amazon SNS (p. 467)
Managing ElastiCache Amazon SNS NotificationsYou can configure ElastiCache to send notifications for important cluster events using Amazon SimpleNotification Service (Amazon SNS). In these examples, you will configure a cluster with the AmazonResource Name (ARN) of an Amazon SNS topic to receive notifications.
NoteThis topic assumes that you've signed up for Amazon SNS and have set up and subscribed toan Amazon SNS topic. For information on how to do this, see the Amazon Simple NotificationService Developer Guide.
Adding an Amazon SNS TopicThe following sections show you how to add an Amazon SNS topic using the AWS Console, the AWS CLI,or the ElastiCache API.
Adding an Amazon SNS Topic (Console)
The following procedure shows you how to add an Amazon SNS topic for a cluster. To add an AmazonSNS topic for a replication group, in step 2, instead of choosing a cluster, choose a replication group thenfollow the same remaining steps.
NoteThis process can also be used to modify the Amazon SNS topic.
To add or modify an Amazon SNS topic for a cluster (Console)
1. Sign in to the AWS Management Console and open the ElastiCache console at https://console.aws.amazon.com/elasticache/.
2. In Clusters, choose the cluster for which you want to add or modify an Amazon SNS topic ARN.3. Choose Modify.4. In Modify Cluster under Topic for SNS Notification, choose the SNS topic you want to add, or
choose Manual ARN input and type the ARN of the Amazon SNS topic.5. Choose Modify.
Adding an Amazon SNS Topic (AWS CLI)
To add or modify an Amazon SNS topic for a cluster, use the AWS CLI command modify-cache-cluster. To add or modify an Amazon SNS topic for a replication group, use the AWS CLI commandmodify-replication-group.
The following code example adds an Amazon SNS topic arn to my-cluster.
API Version 2015-02-02462

Amazon ElastiCache User GuideManaging ElastiCache Amazon SNS Notifications
For Linux, macOS, or Unix:
aws elasticache modify-cache-cluster \ --cache-cluster-id my-cluster \ --notification-topic-arn arn:aws:sns:us-west-2:565419523791:ElastiCacheNotifications
For Windows:
aws elasticache modify-cache-cluster ^ --cache-cluster-id my-cluster ^ --notification-topic-arn arn:aws:sns:us-west-2:565419523791:ElastiCacheNotifications
For more information, see modify-cache-cluster and modify-replication-group.
Adding an Amazon SNS Topic (ElastiCache API)
To add or modify an Amazon SNS topic for a cluster, call the ModifyCacheCluster action with thefollowing parameters:
• CacheClusterId=my-cluster
• TopicArn=arn%3Aaws%3Asns%3Aus-west-2%3A565419523791%3AElastiCacheNotifications
To add or modify an Amazon SNS topic for a replication group, call the ModifyReplicationGroupaction.
Example
https://elasticache.amazon.com/ ?Action=ModifyCacheCluster &ApplyImmediately=false &CacheClusterId=my-cluster &NotificationTopicArn=arn%3Aaws%3Asns%3Aus-west-2%3A565419523791%3AElastiCacheNotifications &Version=2014-12-01 &SignatureVersion=4 &SignatureMethod=HmacSHA256 &Timestamp=20141201T220302Z &X-Amz-Algorithm=AWS4-HMAC-SHA256 &X-Amz-Date=20141201T220302Z &X-Amz-SignedHeaders=Host &X-Amz-Expires=20141201T220302Z &X-Amz-Credential=<credential> &X-Amz-Signature=<signature>
For more information, see ModifyCacheCluster and ModifyReplicationGroup.
Enabling and Disabling Amazon SNS NotificationsYou can turn notifications on or off for a cluster. The following procedures show you how to disableAmazon SNS notifications.
Enabling and Disabling Amazon SNS Notifications (Console)
To disable Amazon SNS notifications using the AWS Management Console
1. Sign in to the AWS Management Console and open the ElastiCache console at https://console.aws.amazon.com/elasticache/.
API Version 2015-02-02463

Amazon ElastiCache User GuideManaging ElastiCache Amazon SNS Notifications
2. Choose the engine running on the cluster you want to modify notifications for, either Memcached orRedis.
A list of clusters running the chosen engine is displayed.3. In either the Memcached or Redis list, choose the box to the left of the cluster you want to modify
notification for.4. Choose Modify.5. In Modify Cluster under Topic for SNS Notification, choose Disable Notifications.6. Choose Modify.
Enabling and Disabling Amazon SNS Notifications (AWS CLI)
To disable Amazon SNS notifications, use the command modify-cache-cluster with the followingparameters:
For Linux, macOS, or Unix:
aws elasticache modify-cache-cluster \ --cache-cluster-id my-cluster \ --notification-topic-status inactive
For Windows:
aws elasticache modify-cache-cluster ^ --cache-cluster-id my-cluster ^ --notification-topic-status inactive
Enabling and Disabling Amazon SNS Notifications (ElastiCache API)
To disable Amazon SNS notifications, call the ModifyCacheCluster action with the followingparameters:
• CacheClusterId=my-cluster
• NotificationTopicStatus=inactive
This call returns output similar to the following:
Example
https://elasticache.us-west-2.amazonaws.com/ ?Action=ModifyCacheCluster &ApplyImmediately=false &CacheClusterId=my-cluster &NotificationTopicStatus=inactive &Version=2014-12-01 &SignatureVersion=4 &SignatureMethod=HmacSHA256 &Timestamp=20141201T220302Z &X-Amz-Algorithm=AWS4-HMAC-SHA256 &X-Amz-Date=20141201T220302Z &X-Amz-SignedHeaders=Host &X-Amz-Expires=20141201T220302Z &X-Amz-Credential=<credential> &X-Amz-Signature=<signature>
API Version 2015-02-02464

Amazon ElastiCache User GuideViewing ElastiCache Events
Viewing ElastiCache EventsElastiCache logs events that relate to your cluster instances, security groups, and parameter groups. Thisinformation includes the date and time of the event, the source name and source type of the event, anda description of the event. You can easily retrieve events from the log using the ElastiCache console, theAWS CLI describe-events command, or the ElastiCache API action DescribeEvents.
The following procedures show you how to view all ElastiCache events for the past 24 hours (1440minutes).
Viewing ElastiCache Events (Console)The following procedure displays events using the ElastiCache console.
To view events using the ElastiCache console
1. Sign in to the AWS Management Console and open the ElastiCache console at https://console.aws.amazon.com/elasticache/.
2. In the navigation pane, choose Events.
The Events screen appears listing all available events. Each row of the list represents one event anddisplays the event source, the event type (cache-cluster, cache-parameter-group, cache-security-group, cache-subnet-group, or replication-group), the GMT time of the event, and the description ofthe event.
Using the Filter you can specify whether you want to see all events, or just events of a specific typein the event list.
Viewing ElastiCache Events (AWS CLI)To generate a list of ElastiCache events using the AWS CLI, use the command describe-events. Youcan use optional parameters to control the type of events listed, the time frame of the events listed, themaximum number of events to list, and more.
The following code lists up to 40 cache cluster events.
aws elasticache describe-events --source-type cache-cluster --max-items 40
The following code lists all events for the past 24 hours (1440 minutes).
aws elasticache describe-events --duration 1440
The output from the describe-events command looks something like this.
{ "Events": [ { "Date": "2017-03-30T14:39:14.295Z", "Message": "Automatic failover has been turned on for replication group redis12", "SourceIdentifier": "redis12", "SourceType": "replication-group" }, { "Date": "2017-03-29T22:17:37.781Z", "Message": "Added cache node 0001 in Availability Zone us-west-2a", "SourceIdentifier": "redis01", "SourceType": "cache-cluster"
API Version 2015-02-02465

Amazon ElastiCache User GuideViewing ElastiCache Events
}, { "Date": "2017-03-29T22:17:37.769Z", "Message": "Cache cluster created", "SourceIdentifier": "redis01", "SourceType": "cache-cluster" } ]}
For more information, such as available parameters and permitted parameter values, see describe-events.
Viewing ElastiCache Events (ElastiCache API)To generate a list of ElastiCache events using the ElastiCache API, use the DescribeEvents action. Youcan use optional parameters to control the type of events listed, the time frame of the events listed, themaximum number of events to list, and more.
The following code lists the 40 most recent cache-cluster events.
https://elasticache.us-west-2.amazonaws.com/ ?Action=DescribeEvents &MaxRecords=40 &SignatureVersion=4 &SignatureMethod=HmacSHA256 &SourceType=cache-cluster &Timestamp=20150202T192317Z &Version=2015-02-02 &X-Amz-Credential=<credential>
The following code lists the cache-cluster events for the past 24 hours (1440 minutes).
https://elasticache.us-west-2.amazonaws.com/ ?Action=DescribeEvents &Duration=1440 &SignatureVersion=4 &SignatureMethod=HmacSHA256 &SourceType=cache-cluster &Timestamp=20150202T192317Z &Version=2015-02-02 &X-Amz-Credential=<credential>
The above actions should produce output similar to the following.
<DescribeEventsResponse xmlns="http://elasticache.amazonaws.com/doc/2015-02-02/"> <DescribeEventsResult> <Events> <Event> <Message>Cache cluster created</Message> <SourceType>cache-cluster</SourceType> <Date>2015-02-02T18:22:18.202Z</Date> <SourceIdentifier>my-redis-primary</SourceIdentifier> </Event> (...output omitted...) </Events> </DescribeEventsResult> <ResponseMetadata> <RequestId>e21c81b4-b9cd-11e3-8a16-7978bb24ffdf</RequestId> </ResponseMetadata>
API Version 2015-02-02466
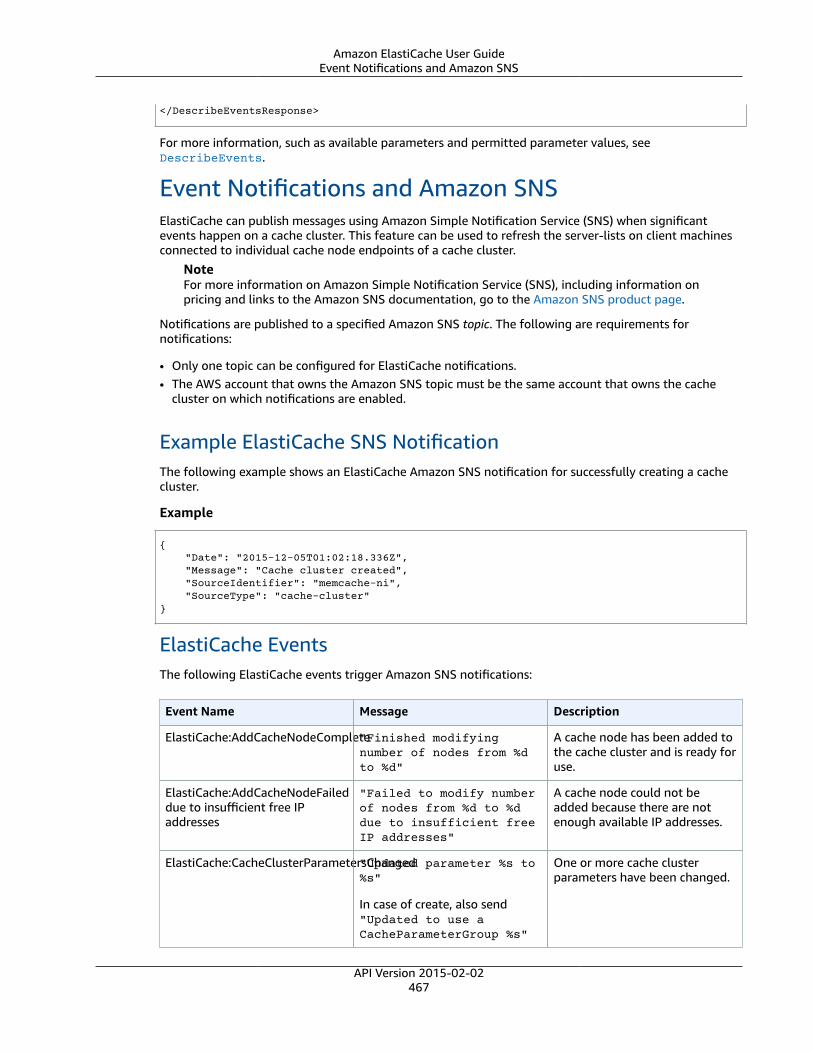
Amazon ElastiCache User GuideEvent Notifications and Amazon SNS
</DescribeEventsResponse>
For more information, such as available parameters and permitted parameter values, seeDescribeEvents.
Event Notifications and Amazon SNSElastiCache can publish messages using Amazon Simple Notification Service (SNS) when significantevents happen on a cache cluster. This feature can be used to refresh the server-lists on client machinesconnected to individual cache node endpoints of a cache cluster.
NoteFor more information on Amazon Simple Notification Service (SNS), including information onpricing and links to the Amazon SNS documentation, go to the Amazon SNS product page.
Notifications are published to a specified Amazon SNS topic. The following are requirements fornotifications:
• Only one topic can be configured for ElastiCache notifications.• The AWS account that owns the Amazon SNS topic must be the same account that owns the cache
cluster on which notifications are enabled.
Example ElastiCache SNS NotificationThe following example shows an ElastiCache Amazon SNS notification for successfully creating a cachecluster.
Example
{ "Date": "2015-12-05T01:02:18.336Z", "Message": "Cache cluster created", "SourceIdentifier": "memcache-ni", "SourceType": "cache-cluster"}
ElastiCache EventsThe following ElastiCache events trigger Amazon SNS notifications:
Event Name Message Description
ElastiCache:AddCacheNodeComplete"Finished modifyingnumber of nodes from %dto %d"
A cache node has been added tothe cache cluster and is ready foruse.
ElastiCache:AddCacheNodeFaileddue to insufficient free IPaddresses
"Failed to modify numberof nodes from %d to %ddue to insufficient freeIP addresses"
A cache node could not beadded because there are notenough available IP addresses.
ElastiCache:CacheClusterParametersChanged"Updated parameter %s to%s"
In case of create, also send"Updated to use aCacheParameterGroup %s"
One or more cache clusterparameters have been changed.
API Version 2015-02-02467
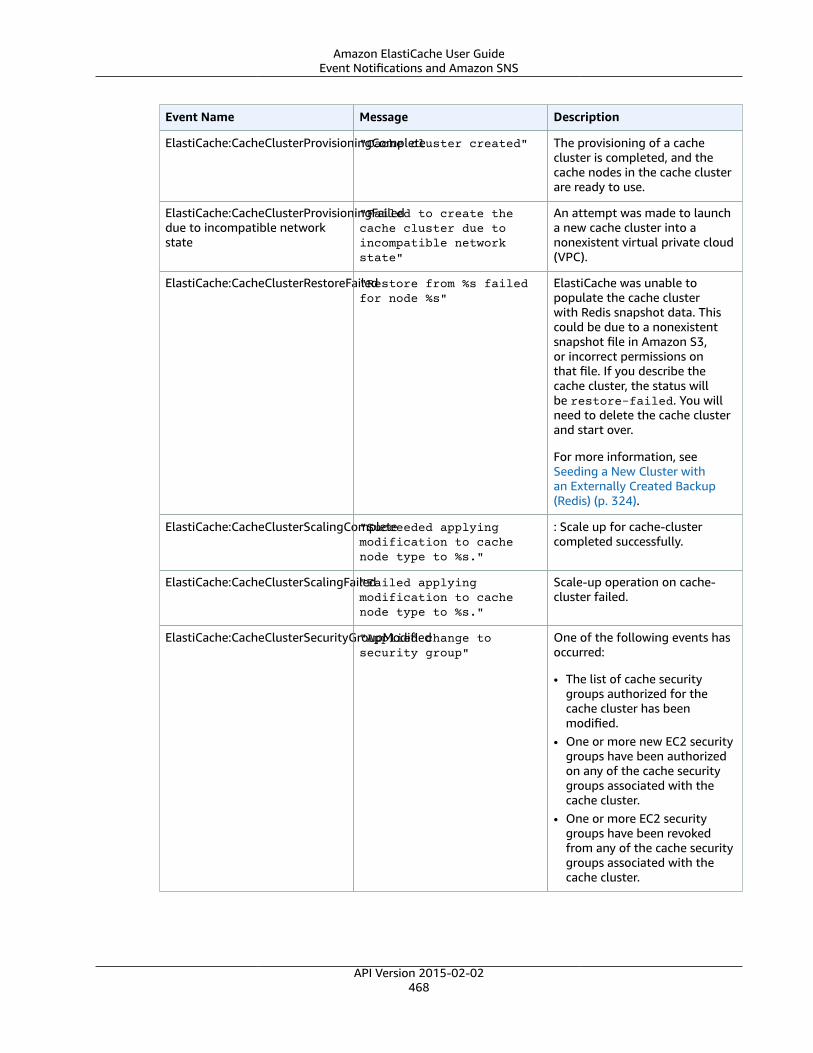
Amazon ElastiCache User GuideEvent Notifications and Amazon SNS
Event Name Message Description
ElastiCache:CacheClusterProvisioningComplete"Cache cluster created" The provisioning of a cachecluster is completed, and thecache nodes in the cache clusterare ready to use.
ElastiCache:CacheClusterProvisioningFaileddue to incompatible networkstate
"Failed to create thecache cluster due toincompatible networkstate"
An attempt was made to launcha new cache cluster into anonexistent virtual private cloud(VPC).
ElastiCache:CacheClusterRestoreFailed"Restore from %s failedfor node %s"
ElastiCache was unable topopulate the cache clusterwith Redis snapshot data. Thiscould be due to a nonexistentsnapshot file in Amazon S3,or incorrect permissions onthat file. If you describe thecache cluster, the status willbe restore-failed. You willneed to delete the cache clusterand start over.
For more information, seeSeeding a New Cluster withan Externally Created Backup(Redis) (p. 324).
ElastiCache:CacheClusterScalingComplete"Succeeded applyingmodification to cachenode type to %s."
: Scale up for cache-clustercompleted successfully.
ElastiCache:CacheClusterScalingFailed"Failed applyingmodification to cachenode type to %s."
Scale-up operation on cache-cluster failed.
ElastiCache:CacheClusterSecurityGroupModified"Applied change tosecurity group"
One of the following events hasoccurred:
• The list of cache securitygroups authorized for thecache cluster has beenmodified.
• One or more new EC2 securitygroups have been authorizedon any of the cache securitygroups associated with thecache cluster.
• One or more EC2 securitygroups have been revokedfrom any of the cache securitygroups associated with thecache cluster.
API Version 2015-02-02468
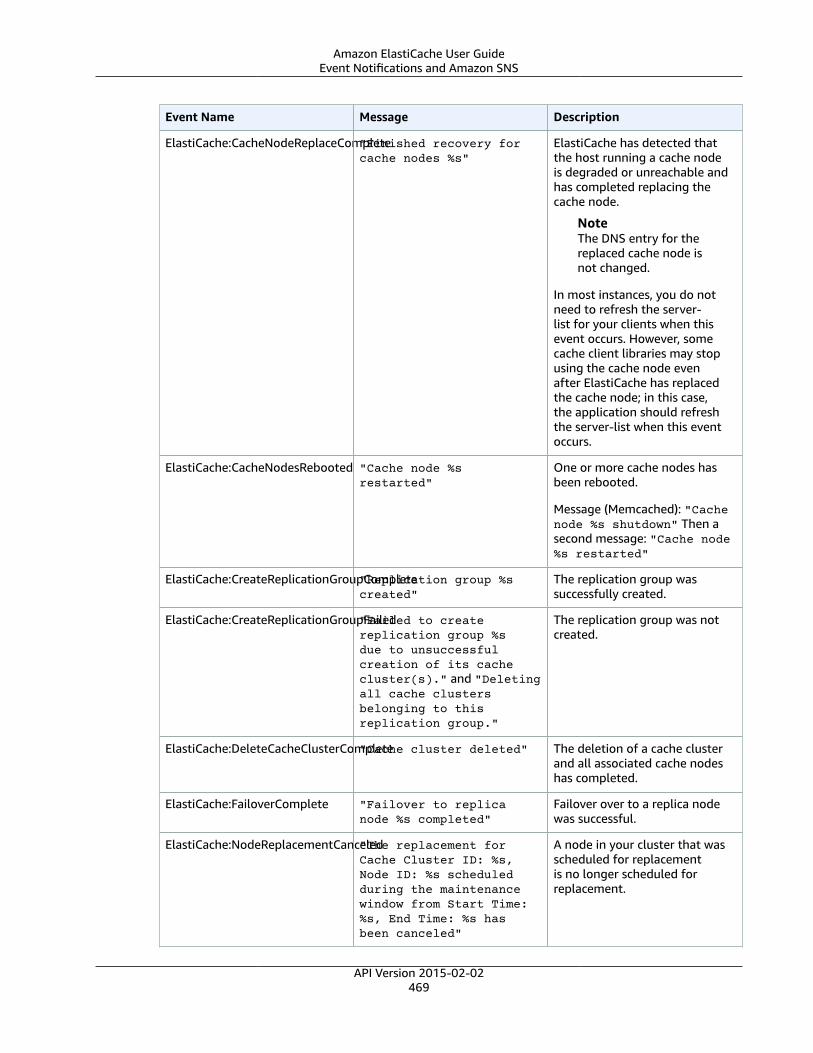
Amazon ElastiCache User GuideEvent Notifications and Amazon SNS
Event Name Message Description
ElastiCache:CacheNodeReplaceComplete"Finished recovery forcache nodes %s"
ElastiCache has detected thatthe host running a cache nodeis degraded or unreachable andhas completed replacing thecache node.
NoteThe DNS entry for thereplaced cache node isnot changed.
In most instances, you do notneed to refresh the server-list for your clients when thisevent occurs. However, somecache client libraries may stopusing the cache node evenafter ElastiCache has replacedthe cache node; in this case,the application should refreshthe server-list when this eventoccurs.
ElastiCache:CacheNodesRebooted "Cache node %srestarted"
One or more cache nodes hasbeen rebooted.
Message (Memcached): "Cachenode %s shutdown" Then asecond message: "Cache node%s restarted"
ElastiCache:CreateReplicationGroupComplete"Replication group %screated"
The replication group wassuccessfully created.
ElastiCache:CreateReplicationGroupFailed"Failed to createreplication group %sdue to unsuccessfulcreation of its cachecluster(s)." and "Deletingall cache clustersbelonging to thisreplication group."
The replication group was notcreated.
ElastiCache:DeleteCacheClusterComplete"Cache cluster deleted" The deletion of a cache clusterand all associated cache nodeshas completed.
ElastiCache:FailoverComplete "Failover to replicanode %s completed"
Failover over to a replica nodewas successful.
ElastiCache:NodeReplacementCanceled"The replacement forCache Cluster ID: %s,Node ID: %s scheduledduring the maintenancewindow from Start Time:%s, End Time: %s hasbeen canceled"
A node in your cluster that wasscheduled for replacementis no longer scheduled forreplacement.
API Version 2015-02-02469
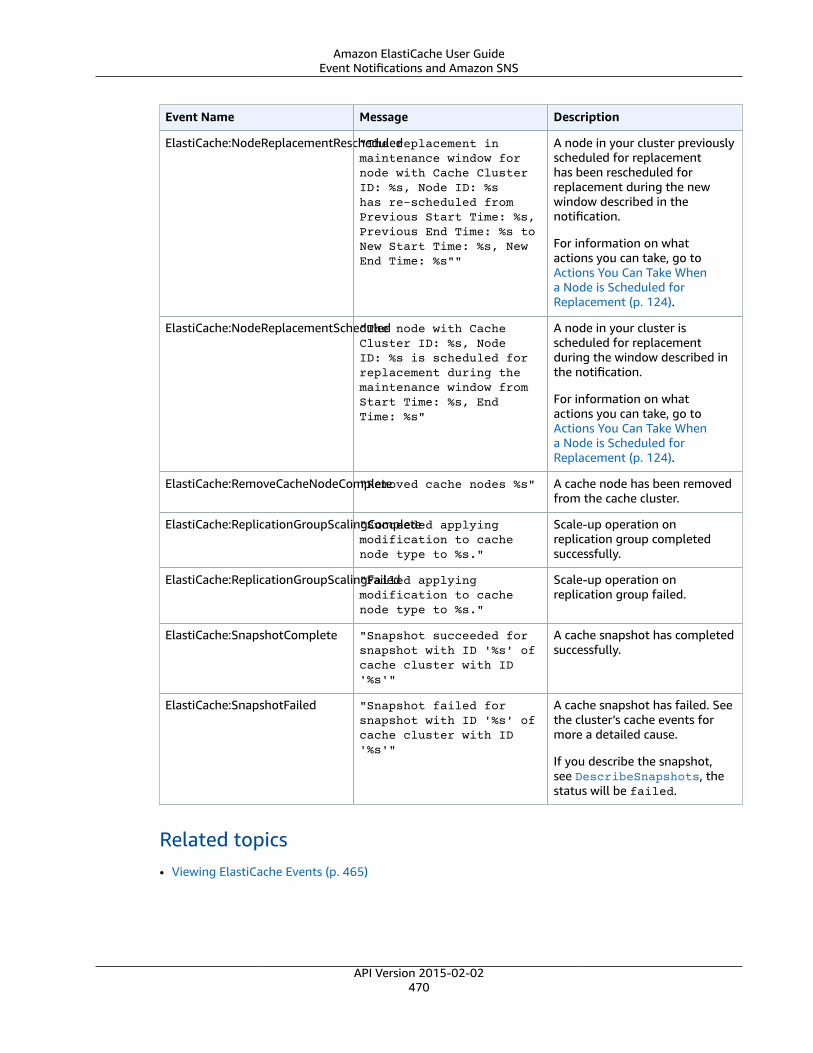
Amazon ElastiCache User GuideEvent Notifications and Amazon SNS
Event Name Message Description
ElastiCache:NodeReplacementRescheduled"The replacement inmaintenance window fornode with Cache ClusterID: %s, Node ID: %shas re-scheduled fromPrevious Start Time: %s,Previous End Time: %s toNew Start Time: %s, NewEnd Time: %s""
A node in your cluster previouslyscheduled for replacementhas been rescheduled forreplacement during the newwindow described in thenotification.
For information on whatactions you can take, go toActions You Can Take Whena Node is Scheduled forReplacement (p. 124).
ElastiCache:NodeReplacementScheduled"The node with CacheCluster ID: %s, NodeID: %s is scheduled forreplacement during themaintenance window fromStart Time: %s, EndTime: %s"
A node in your cluster isscheduled for replacementduring the window described inthe notification.
For information on whatactions you can take, go toActions You Can Take Whena Node is Scheduled forReplacement (p. 124).
ElastiCache:RemoveCacheNodeComplete"Removed cache nodes %s" A cache node has been removedfrom the cache cluster.
ElastiCache:ReplicationGroupScalingComplete"Succeeded applyingmodification to cachenode type to %s."
Scale-up operation onreplication group completedsuccessfully.
ElastiCache:ReplicationGroupScalingFailed"Failed applyingmodification to cachenode type to %s."
Scale-up operation onreplication group failed.
ElastiCache:SnapshotComplete "Snapshot succeeded forsnapshot with ID '%s' ofcache cluster with ID'%s'"
A cache snapshot has completedsuccessfully.
ElastiCache:SnapshotFailed "Snapshot failed forsnapshot with ID '%s' ofcache cluster with ID'%s'"
A cache snapshot has failed. Seethe cluster’s cache events formore a detailed cause.
If you describe the snapshot,see DescribeSnapshots, thestatus will be failed.
Related topics• Viewing ElastiCache Events (p. 465)
API Version 2015-02-02470

Amazon ElastiCache User GuideMonitoring Costs with Tags
Monitoring Costs with Cost Allocation TagsWhen you add cost allocation tags to your resources in Amazon ElastiCache, you can track costs bygrouping expenses on your invoices by resource tag values.
An ElastiCache cost allocation tag is a key-value pair that you define and associate with an ElastiCacheresource. The key and value are case-sensitive. You can use a tag key to define a category, and the tagvalue can be an item in that category. For example, you might define a tag key of CostCenter and a tagvalue of 10010, indicating that the resource is assigned to the 10010 cost center. You can also use tagsto designate resources as being used for test or production by using a key such as Environment andvalues such as test or production. We recommend that you use a consistent set of tag keys to make iteasier to track costs associated with your resources.
Use cost allocation tags to organize your AWS bill to reflect your own cost structure. To do this, sign upto get your AWS account bill with tag key values included. Then, to see the cost of combined resources,organize your billing information according to resources with the same tag key values. For example, youcan tag several resources with a specific application name, and then organize your billing information tosee the total cost of that application across several services.
You can also combine tags to track costs at a greater level of detail. For example, to track your servicecosts by region you might use the tag keys Service and Region. On one resource you might havethe values ElastiCache and Asia Pacific (Singapore), and on another resource the valuesElastiCache and EU (Frankfurt). You can then see your total ElastiCache costs broken out byregion. For more information, see Use Cost Allocation Tags in the AWS Billing and Cost Management UserGuide.
You can add ElastiCache cost allocation tags to Memcached clusters, Redis nodes, and backups. Whenyou add, list, modify, copy, or remove a tag, the operation is applied only to the specified cluster, node,or backup.
Tags added to backups are not used for cost allocation reports. Tags on backups are used to retain orrestore tags on clusters. When you create a backup, the tags on the cluster are copied to the backup.When you restore from a backup, the tags on the backup are copied to the cluster.
Characteristics of ElastiCache cost allocation tags
• Cost allocation tags are applied to ElastiCache resources which are specified in CLI and API operationsas an ARN. The resource-type will be a "cluster" or a "snapshot".
Sample ARN: arn:aws:elasticache:<region>:<customer-id>:<resource-type>:<resource-name>
• Memcached: Tags are applied to clusters.
Sample arn: arn:aws:elasticache:us-west-2:1234567890:cluster:mymemcached• Redis: Tags are applied to individual nodes. Because of this, nodes in Redis clusters with replication
can have different tags.
Sample arns• Redis (cluster mode disabled) no replication:
Sample arn: arn:aws:elasticache:us-west-2:1234567890:cluster:myredis• Redis (cluster mode disabled) with replication:
Sample arn: arn:aws:elasticache:us-west-2:1234567890:cluster:myredis-001• Redis (cluster mode enabled):
Sample arn: arn:aws:elasticache:us-west-2:1234567890:cluster:myredis-0001-001
API Version 2015-02-02471

Amazon ElastiCache User GuideManaging Tags Using the Console
• Backups (Redis): Tags are applied to the backup.
Sample arn: arn:aws:elasticache:us-west-2:1234567890:snapshot:myredisbackup
• The tag key is the required name of the tag. The key's string value can be from 1 to 128 Unicodecharacters long and cannot be prefixed with aws:. The string can contain only the set of Unicodeletters, digits, blank spaces, underscores ( _ ), periods ( . ), colons ( : ), backslashes ( \ ), equal signs ( = ),plus signs ( + ), hyphens ( - ), or at signs ( @ ).
• The tag value is the optional value of the tag. The value's string value can be from 1 to 256 Unicodecharacters in length and cannot be prefixed with aws:. The string can contain only the set of Unicodeletters, digits, blank spaces, underscores ( _ ), periods ( . ), colons ( : ), backslashes ( \ ), equal signs ( = ),plus signs ( + ), hyphens ( - ), or at signs ( @ ).
• A tag can be applied to an ElastiCache resource; a cluster (Memcached), a node (Redis), or a backup(Redis).
• An ElastiCache resource can have a maximum of 50 tags.
• Values do not have to be unique in a tag set. For example, you can have a tag set where the keysService and Application both have the value ElastiCache.
AWS does not apply any semantic meaning to your tags. Tags are interpreted strictly as character strings.AWS does not automatically set any tags on any ElastiCache resource.
You can add, list, modify, or remove tags from an ElastiCache resource by using the ElastiCachemanagement console, AWS CLI, or ElastiCache API.
Topics
• Managing Your Tags Using the ElastiCache Console (p. 472)
• Managing Your Cost Allocation Tags Using the AWS CLI (p. 476)
• Managing Your Cost Allocation Tags Using the ElastiCache API (p. 479)
• Copying Tags to Your ElastiCache Resource (p. 481)
Managing Your Tags Using the ElastiCache ConsoleYou can use the Amazon ElastiCache console to add, modify, or remove cost allocation tags.
Topics
• Managing Tags on a Memcached Cluster (Console) (p. 473)
• Managing Tags on a Redis (cluster mode disabled) Cluster (Console) (p. 473)
• Managing Tags on a Redis (cluster mode enabled) Cluster (Console) (p. 474)
• Managing Tags on a Backup (Console) (p. 475)
API Version 2015-02-02472
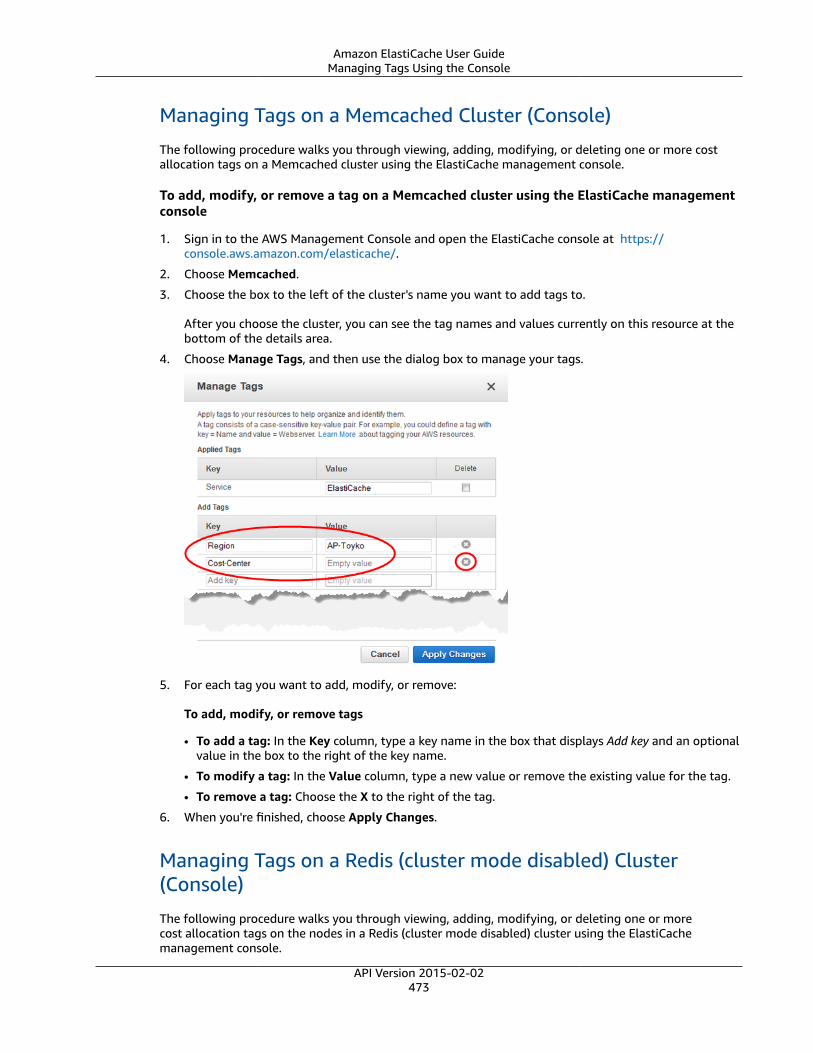
Amazon ElastiCache User GuideManaging Tags Using the Console
Managing Tags on a Memcached Cluster (Console)
The following procedure walks you through viewing, adding, modifying, or deleting one or more costallocation tags on a Memcached cluster using the ElastiCache management console.
To add, modify, or remove a tag on a Memcached cluster using the ElastiCache managementconsole
1. Sign in to the AWS Management Console and open the ElastiCache console at https://console.aws.amazon.com/elasticache/.
2. Choose Memcached.
3. Choose the box to the left of the cluster's name you want to add tags to.
After you choose the cluster, you can see the tag names and values currently on this resource at thebottom of the details area.
4. Choose Manage Tags, and then use the dialog box to manage your tags.
5. For each tag you want to add, modify, or remove:
To add, modify, or remove tags
• To add a tag: In the Key column, type a key name in the box that displays Add key and an optionalvalue in the box to the right of the key name.
• To modify a tag: In the Value column, type a new value or remove the existing value for the tag.
• To remove a tag: Choose the X to the right of the tag.
6. When you're finished, choose Apply Changes.
Managing Tags on a Redis (cluster mode disabled) Cluster(Console)
The following procedure walks you through viewing, adding, modifying, or deleting one or morecost allocation tags on the nodes in a Redis (cluster mode disabled) cluster using the ElastiCachemanagement console.
API Version 2015-02-02473

Amazon ElastiCache User GuideManaging Tags Using the Console
To add, modify, or remove a tag on a Redis (cluster mode disabled) node using theElastiCache management console
1. Sign in to the AWS Management Console and open the ElastiCache console at https://console.aws.amazon.com/elasticache/.
2. Choose Redis.
3. Choose the name of the cluster on which you want to add, modify, or remove tags.
4. For each node in the cluster you want to view, add, modify, or remove tags on, do the following:
a. Choose the box to the left of the node's name.
b. Choose Actions, then choose Manage tags.
c. For each tag you want to add, modify, or remove:
To add, modify, or remove tags on a node
• To add a tag: In the Key column, type a key name in the box that displays Add key. To add anoptional value, tab to the Empty value box and type a value for the key.
• To modify a tag: In the Value column to the right of the key name, type a new value orremove the existing value for the tag.
• To remove a tag: Choose the X to the right of the tag.
d. When you're finished, choose Apply Changes.
Managing Tags on a Redis (cluster mode enabled) Cluster(Console)
The following procedure walks you through viewing, adding, modifying, or deleting one or more costallocation tags on the nodes in a Redis (cluster mode enabled) cluster using the ElastiCache managementconsole.
API Version 2015-02-02474
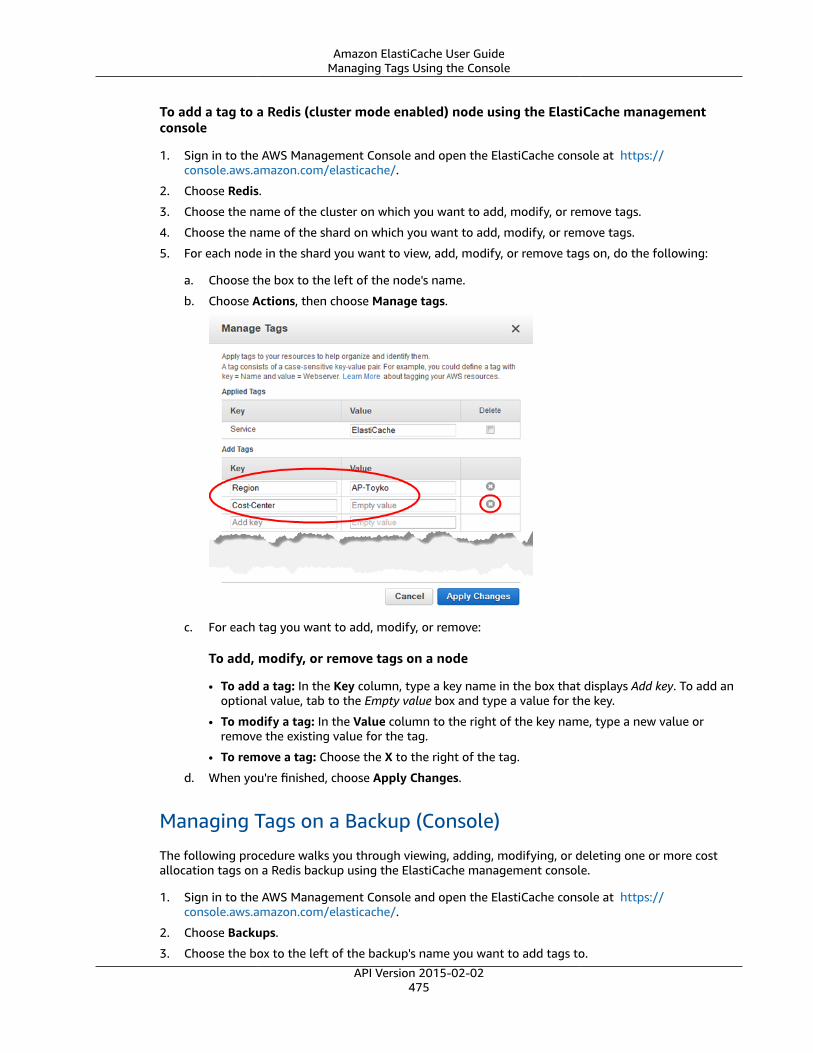
Amazon ElastiCache User GuideManaging Tags Using the Console
To add a tag to a Redis (cluster mode enabled) node using the ElastiCache managementconsole
1. Sign in to the AWS Management Console and open the ElastiCache console at https://console.aws.amazon.com/elasticache/.
2. Choose Redis.
3. Choose the name of the cluster on which you want to add, modify, or remove tags.
4. Choose the name of the shard on which you want to add, modify, or remove tags.
5. For each node in the shard you want to view, add, modify, or remove tags on, do the following:
a. Choose the box to the left of the node's name.
b. Choose Actions, then choose Manage tags.
c. For each tag you want to add, modify, or remove:
To add, modify, or remove tags on a node
• To add a tag: In the Key column, type a key name in the box that displays Add key. To add anoptional value, tab to the Empty value box and type a value for the key.
• To modify a tag: In the Value column to the right of the key name, type a new value orremove the existing value for the tag.
• To remove a tag: Choose the X to the right of the tag.
d. When you're finished, choose Apply Changes.
Managing Tags on a Backup (Console)
The following procedure walks you through viewing, adding, modifying, or deleting one or more costallocation tags on a Redis backup using the ElastiCache management console.
1. Sign in to the AWS Management Console and open the ElastiCache console at https://console.aws.amazon.com/elasticache/.
2. Choose Backups.
3. Choose the box to the left of the backup's name you want to add tags to.
API Version 2015-02-02475

Amazon ElastiCache User GuideManaging Tags Using the AWS CLI
After you choose the cluster, you can see the tag names and values currently on this resource at thebottom of the details area.
4. Choose Manage Tags, and then use the dialog box to manage your tags.
5. For each tag you want to add, modify, or remove:
To add, modify, or remove tags
• To add a tag: In the Key column, type a key name in the box that displays Add key and an optionalvalue in the box to the right of the key name.
• To modify a tag: In the Value column, type a new value or remove the existing value for the tag.
• To remove a tag: choose the X to the right of the tag.
6. When you're finished, choose Apply Changes.
Managing Your Cost Allocation Tags Using the AWSCLIYou can use the AWS CLI to add, modify, or remove cost allocation tags.
Cost allocation tags are applied to ElastiCache resources. What that resource is and how it is specified inan ARN depends on the engine and structure of the cluster.
• Memcached: Tags are applied to clusters.
Sample arn: arn:aws:elasticache:us-west-2:1234567890:cluster:mymemcached
• Redis: Tags are applied to individual nodes. Because of this, nodes in Redis clusters with replication canhave different tags.
Sample arns
• Redis (cluster mode disabled) no replication:
Sample arn: arn:aws:elasticache:us-west-2:1234567890:cluster:myredis
• Redis (cluster mode disabled) with replication:
API Version 2015-02-02476

Amazon ElastiCache User GuideManaging Tags Using the AWS CLI
Sample arn: arn:aws:elasticache:us-west-2:1234567890:cluster:myredis-001• Redis (cluster mode enabled):
Sample arn: arn:aws:elasticache:us-west-2:1234567890:cluster:myredis-0001-001• Backups (Redis): Tags are applied to the backup.
Sample arn: arn:aws:elasticache:us-west-2:1234567890:snapshot:myredisbackup
Topics• Listing Tags Using the AWS CLI (p. 477)• Adding Tags Using the AWS CLI (p. 478)• Modifying Tags Using the AWS CLI (p. 478)• Removing Tags Using the AWS CLI (p. 479)
Listing Tags Using the AWS CLIYou can use the AWS CLI to list tags on an existing ElastiCache resource by using the list-tags-for-resource operation.
The following code uses the AWS CLI to list the tags on the Memcached cluster myCluster in the us-west-2 region.
For Linux, macOS, or Unix:
aws elasticache list-tags-for-resource \ --resource-name arn:aws:elasticache:us-west-2:0123456789:cluster:myCluster
For Windows:
aws elasticache list-tags-for-resource ^ --resource-name arn:aws:elasticache:us-west-2:0123456789:cluster:myCluster
Output from this operation will look something like the following, a list of all the tags on the resource.
{ "TagList": [ { "Value": "10110", "Key": "CostCenter" }, { "Value": "EC2", "Key": "Service" } ]}
If there are no tags on the resource, the output will be an empty TagList.
{ "TagList": []}
For more information, see the AWS CLI for ElastiCache list-tags-for-resource.
API Version 2015-02-02477

Amazon ElastiCache User GuideManaging Tags Using the AWS CLI
Adding Tags Using the AWS CLIYou can use the AWS CLI to add tags to an existing ElastiCache resource by using the add-tags-to-resource CLI operation. If the tag key does not exist on the resource, the key and value are added to theresource. If the key already exists on the resource, the value associated with that key is updated to thenew value.
The following code uses the AWS CLI to add the keys Service and Region with the valueselasticache and us-west-2 respectively to the resource myCluster in the us-west-2 region.
For Linux, macOS, or Unix:
aws elasticache add-tags-to-resource \ --resource-name arn:aws:elasticache:us-west-2:0123456789:cluster:memcluster \ --tags Key=Service,Value=elasticache \ Key=Region,Value=us-west-2
For Windows:
aws elasticache add-tags-to-resource ^ --resource-name arn:aws:elasticache:us-west-2:0123456789:cluster:memcluster ^ --tags Key=PM ^ Key=Region,Value=us-west-2
Output from this operation will look something like the following, a list of all the tags on the resourcefollowing the operation.
{ "TagList": [ { "Value": "10110", "Key": "CostCenter" }, { "Value": "EC2", "Key": "Service" }, { "Value": "", "Key": "PM" }, { "Value": "us-west-2", "Key": "Region" } ]}
For more information, see the AWS CLI for ElastiCache add-tags-to-resource.
You can also use the AWS CLI to add tags to a cluster when you create a new cluster by using theoperation create-cache-cluster, or when you create a new replication group by using the operationcreate-replication-group. Note that you cannot add tags during resource creation with the ElastiCachemanagement console. After the cluster or replication group is created, you can then use the console toadd tags to the resource.
Modifying Tags Using the AWS CLIYou can use the AWS CLI to modify the tags on an ElastiCache resource.
API Version 2015-02-02478

Amazon ElastiCache User GuideManaging Tags Using the ElastiCache API
To modify the value of a tag:
• Use add-tags-to-resource to either add a new tag and value or to change the value associated with anexisting tag.
• Use remove-tags-from-resource to remove specified tags from the resource.
Output from either operation will be a list of tags and their values on the specified resource.
Removing Tags Using the AWS CLIYou can use the AWS CLI to remove tags from an existing ElastiCache resource by using the remove-tags-from-resource operation.
The following code uses the AWS CLI to remove the tags with the keys Service and Region from theresource myCluster in the us-west-2 region.
For Linux, macOS, or Unix:
aws elasticache remove-tags-from-resource \ --resource-name arn:aws:elasticache:us-west-2:0123456789:cluster:myCluster \ --tag-keys PM Service
For Windows:
aws elasticache remove-tags-from-resource ^ --resource-name arn:aws:elasticache:us-west-2:0123456789:cluster:myCluster ^ --tag-keys PM Service
Output from this operation will look something like the following, a list of all the tags on the resourcefollowing the operation.
{ "TagList": [ { "Value": "10110", "Key": "CostCenter" }, { "Value": "us-west-2", "Key": "Region" } ]}
For more information, see the AWS CLI for ElastiCache remove-tags-from-resource.
Managing Your Cost Allocation Tags Using theElastiCache APIYou can use the ElastiCache API to add, modify, or remove cost allocation tags.
Cost allocation tags are applied to ElastiCache resources. What that resource is and how it is specified inan ARN depends on the engine and structure of the cluster.
• Memcached: Tags are applied to clusters.
API Version 2015-02-02479

Amazon ElastiCache User GuideManaging Tags Using the ElastiCache API
Sample arn: arn:aws:elasticache:us-west-2:1234567890:cluster:mymemcached• Redis: Tags are applied to individual nodes. Because of this, nodes in Redis clusters with replication can
have different tags.
Sample arns• Redis (cluster mode disabled) no replication:
Sample arn: arn:aws:elasticache:us-west-2:1234567890:cluster:myredis• Redis (cluster mode disabled) with replication:
Sample arn: arn:aws:elasticache:us-west-2:1234567890:cluster:myredis-001• Redis (cluster mode enabled):
Sample arn: arn:aws:elasticache:us-west-2:1234567890:cluster:myredis-0001-001• Backups (Redis): Tags are applied to the backup.
Sample arn: arn:aws:elasticache:us-west-2:1234567890:snapshot:myredisbackup
Topics• Listing Tags Using the ElastiCache API (p. 480)• Adding Tags Using the ElastiCache API (p. 480)• Modifying Tags Using the ElastiCache API (p. 481)• Removing Tags Using the ElastiCache API (p. 481)
Listing Tags Using the ElastiCache APIYou can use the ElastiCache API to list tags on an existing resource by using the ListTagsForResourceoperation.
The following code uses the ElastiCache API to list the tags on the resource myCluster in the us-west-2region.
https://elasticache.us-west-2.amazonaws.com/ ?Action=ListTagsForResource &ResourceName=arn:aws:elasticache:us-west-2:0123456789:cluster:myCluster &SignatureVersion=4 &SignatureMethod=HmacSHA256 &Version=2015-02-02 &Timestamp=20150202T192317Z &X-Amz-Credential=<credential>
Adding Tags Using the ElastiCache APIYou can use the ElastiCache API to add tags to an existing ElastiCache resource by using theAddTagsToResource operation. If the tag key does not exist on the resource, the key and value are addedto the resource. If the key already exists on the resource, the value associated with that key is updated tothe new value.
The following code uses the ElastiCache API to add the keys Service and Region with the valueselasticache and us-west-2 respectively to the resource myCluster in the us-west-2 region.
https://elasticache.us-west-2.amazonaws.com/ ?Action=AddTagsToResource &ResourceName=arn:aws:elasticache:us-west-2:0123456789:cluster:memclusterr
API Version 2015-02-02480

Amazon ElastiCache User GuideCopying Tags to Your ElastiCache Resource
&SignatureVersion=4 &SignatureMethod=HmacSHA256 &Tags.member.1.Key=Service &Tags.member.1.Value=elasticache &Tags.member.2.Key=Region &Tags.member.2.Value=us-west-2 &Version=2015-02-02 &Timestamp=20150202T192317Z &X-Amz-Credential=<credential>
For more information, see AddTagsToResource in the Amazon ElastiCache API Reference.
Modifying Tags Using the ElastiCache APIYou can use the ElastiCache API to modify the tags on an ElastiCache resource.
To modify the value of a tag:
• Use AddTagsToResource operation to either add a new tag and value or to change the value of anexisting tag.
• Use RemoveTagsFromResource to remove tags from the resource.
Output from either operation will be a list of tags and their values on the specified resource.
Use RemoveTagsFromResource to remove tags from the resource.
Removing Tags Using the ElastiCache APIYou can use the ElastiCache API to remove tags from an existing ElastiCache resource by using theRemoveTagsFromResource operation.
The following code uses the ElastiCache API to remove the tags with the keys Service and Regionfrom the resource myCluster in the us-west-2 region.
https://elasticache.us-west-2.amazonaws.com/ ?Action=RemoveTagsFromResource &ResourceName=arn:aws:elasticache:us-west-2:0123456789:cluster:myCluster &SignatureVersion=4 &SignatureMethod=HmacSHA256 &TagKeys.member.1=Service &TagKeys.member.2=Region &Version=2015-02-02 &Timestamp=20150202T192317Z &X-Amz-Credential=<credential>
Copying Tags to Your ElastiCache ResourceWhen you perform certain operations on your ElastiCache resources using the ElastiCache API or AWSCLI, if tags exist on the resource the tags are copied. The following list identifies those operations andwhat copying occurs.
• CopySnapshot or copy-snapshot – When you make a copy of a backup, if there are any tags on thesource backup, they are copied to the copy.
• CreateSnapshot or create-snapshot – When you create a backup, if there are any tags on the sourcecluster, they are copied to the backup.
• DeleteSnapshot or delete-snapshot – When you delete a backup, if there are any tags on the backup,they are deleted with the backup.
API Version 2015-02-02481

Amazon ElastiCache User GuideCopying Tags to Your ElastiCache Resource
• CreateCacheCluster or create-cache-cluster – When you create a cluster and seed it from a backup,any tags on the backup are copies to the new cluster.
• DeleteCacheCluster or delete-cache-cluster – When you delete a cluster, any tags on the cluster aredeleted with the cluster. However, if you make a final backup, the tags are copied to the backup.
• CreateReplicationGroup or create-replication-group – When you create a replication group and seedit from one or more backups, any tags on the backups are copies to the new replication group.
• DeleteReplicationGroup or delete-replication-group – When you delete a replication group, any tagson the replication group are deleted with the replication group. However, if you make a final backup,the tags are copied to the backup.
API Version 2015-02-02482
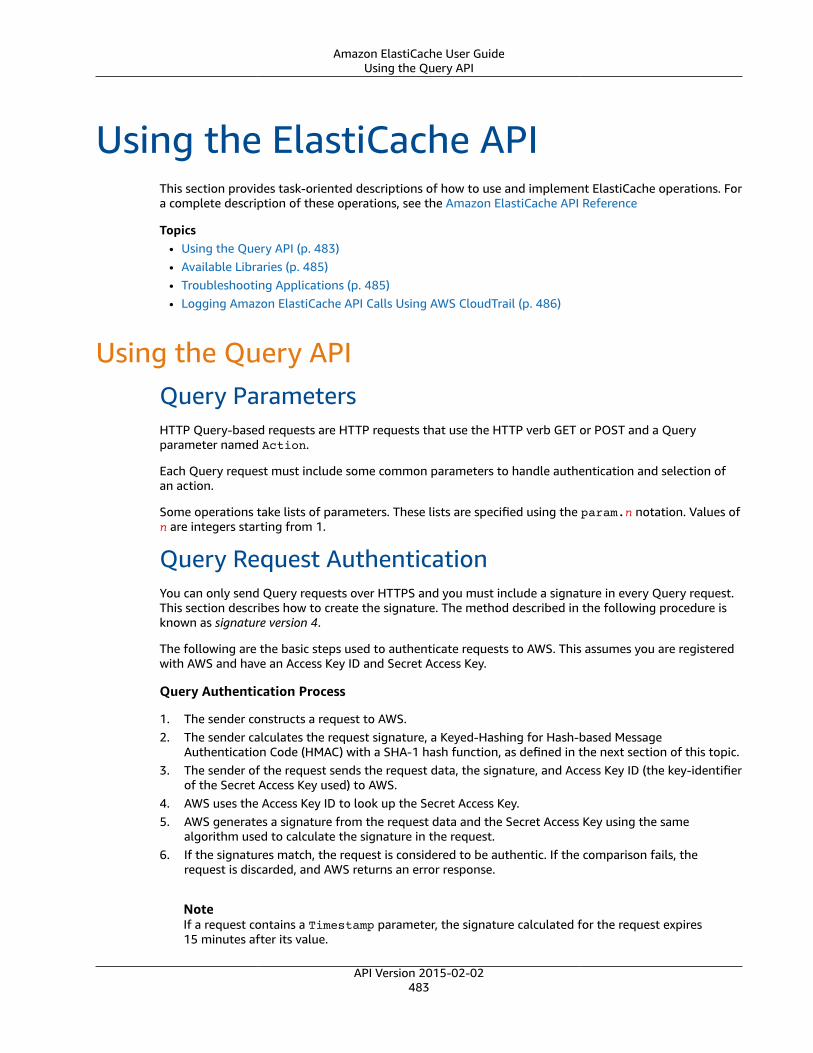
Amazon ElastiCache User GuideUsing the Query API
Using the ElastiCache APIThis section provides task-oriented descriptions of how to use and implement ElastiCache operations. Fora complete description of these operations, see the Amazon ElastiCache API Reference
Topics• Using the Query API (p. 483)• Available Libraries (p. 485)• Troubleshooting Applications (p. 485)• Logging Amazon ElastiCache API Calls Using AWS CloudTrail (p. 486)
Using the Query APIQuery ParametersHTTP Query-based requests are HTTP requests that use the HTTP verb GET or POST and a Queryparameter named Action.
Each Query request must include some common parameters to handle authentication and selection ofan action.
Some operations take lists of parameters. These lists are specified using the param.n notation. Values ofn are integers starting from 1.
Query Request AuthenticationYou can only send Query requests over HTTPS and you must include a signature in every Query request.This section describes how to create the signature. The method described in the following procedure isknown as signature version 4.
The following are the basic steps used to authenticate requests to AWS. This assumes you are registeredwith AWS and have an Access Key ID and Secret Access Key.
Query Authentication Process
1. The sender constructs a request to AWS.2. The sender calculates the request signature, a Keyed-Hashing for Hash-based Message
Authentication Code (HMAC) with a SHA-1 hash function, as defined in the next section of this topic.3. The sender of the request sends the request data, the signature, and Access Key ID (the key-identifier
of the Secret Access Key used) to AWS.4. AWS uses the Access Key ID to look up the Secret Access Key.5. AWS generates a signature from the request data and the Secret Access Key using the same
algorithm used to calculate the signature in the request.6. If the signatures match, the request is considered to be authentic. If the comparison fails, the
request is discarded, and AWS returns an error response.
NoteIf a request contains a Timestamp parameter, the signature calculated for the request expires15 minutes after its value.
API Version 2015-02-02483
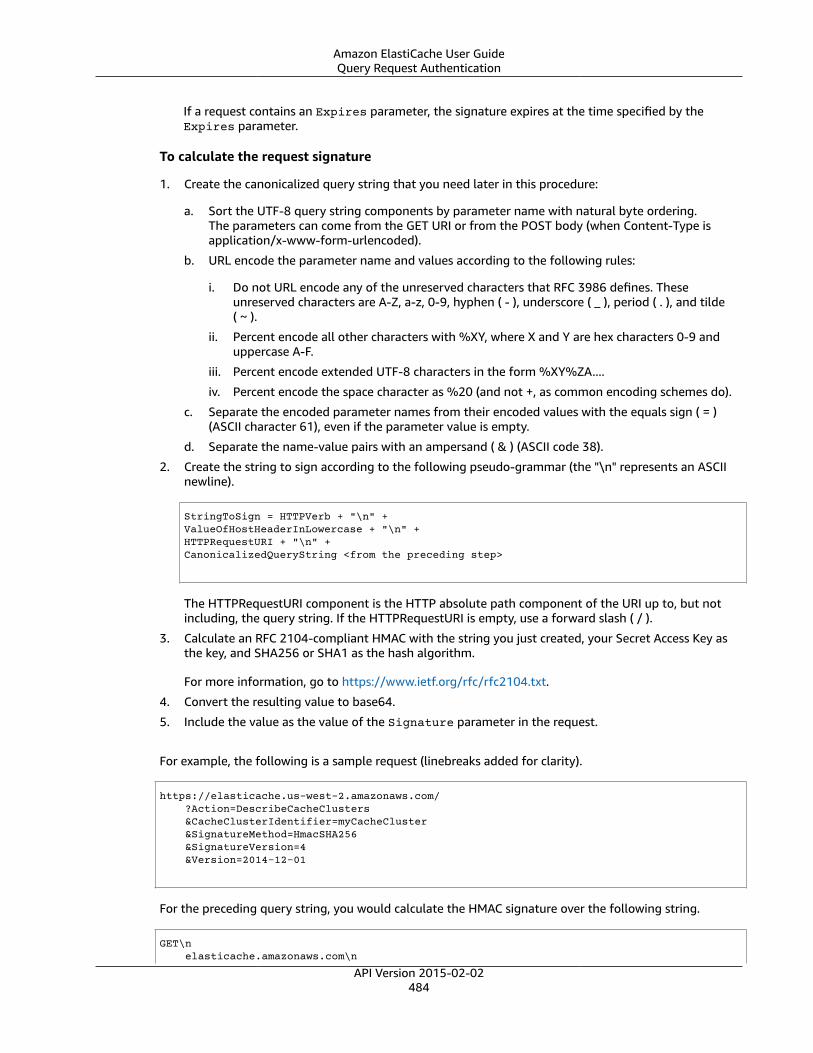
Amazon ElastiCache User GuideQuery Request Authentication
If a request contains an Expires parameter, the signature expires at the time specified by theExpires parameter.
To calculate the request signature
1. Create the canonicalized query string that you need later in this procedure:
a. Sort the UTF-8 query string components by parameter name with natural byte ordering.The parameters can come from the GET URI or from the POST body (when Content-Type isapplication/x-www-form-urlencoded).
b. URL encode the parameter name and values according to the following rules:
i. Do not URL encode any of the unreserved characters that RFC 3986 defines. Theseunreserved characters are A-Z, a-z, 0-9, hyphen ( - ), underscore ( _ ), period ( . ), and tilde( ~ ).
ii. Percent encode all other characters with %XY, where X and Y are hex characters 0-9 anduppercase A-F.
iii. Percent encode extended UTF-8 characters in the form %XY%ZA....
iv. Percent encode the space character as %20 (and not +, as common encoding schemes do).
c. Separate the encoded parameter names from their encoded values with the equals sign ( = )(ASCII character 61), even if the parameter value is empty.
d. Separate the name-value pairs with an ampersand ( & ) (ASCII code 38).
2. Create the string to sign according to the following pseudo-grammar (the "\n" represents an ASCIInewline).
StringToSign = HTTPVerb + "\n" +ValueOfHostHeaderInLowercase + "\n" +HTTPRequestURI + "\n" +CanonicalizedQueryString <from the preceding step>
The HTTPRequestURI component is the HTTP absolute path component of the URI up to, but notincluding, the query string. If the HTTPRequestURI is empty, use a forward slash ( / ).
3. Calculate an RFC 2104-compliant HMAC with the string you just created, your Secret Access Key asthe key, and SHA256 or SHA1 as the hash algorithm.
For more information, go to https://www.ietf.org/rfc/rfc2104.txt.
4. Convert the resulting value to base64.
5. Include the value as the value of the Signature parameter in the request.
For example, the following is a sample request (linebreaks added for clarity).
https://elasticache.us-west-2.amazonaws.com/ ?Action=DescribeCacheClusters &CacheClusterIdentifier=myCacheCluster &SignatureMethod=HmacSHA256 &SignatureVersion=4 &Version=2014-12-01
For the preceding query string, you would calculate the HMAC signature over the following string.
GET\n elasticache.amazonaws.com\n
API Version 2015-02-02484

Amazon ElastiCache User GuideAvailable Libraries
Action=DescribeCacheClusters &CacheClusterIdentifier=myCacheCluster &SignatureMethod=HmacSHA256 &SignatureVersion=4 &Version=2014-12-01 &X-Amz-Algorithm=AWS4-HMAC-SHA256 &X-Amz-Credential=AKIADQKE4SARGYLE%2F20140523%2Fus-west-2%2Felasticache%2Faws4_request &X-Amz-Date=20141201T223649Z &X-Amz-SignedHeaders=content-type%3Bhost%3Buser-agent%3Bx-amz-content-sha256%3Bx-amz-date content-type: host:elasticache.us-west-2.amazonaws.com user-agent:CacheServicesAPICommand_Client x-amz-content-sha256: x-amz-date:
The result is the following signed request.
https://elasticache.us-west-2.amazonaws.com/ ?Action=DescribeCacheClusters &CacheClusterIdentifier=myCacheCluster &SignatureMethod=HmacSHA256 &SignatureVersion=4 &Version=2014-12-01 &X-Amz-Algorithm=AWS4-HMAC-SHA256 &X-Amz-Credential=AKIADQKE4SARGYLE/20141201/us-west-2/elasticache/aws4_request &X-Amz-Date=20141201T223649Z &X-Amz-SignedHeaders=content-type;host;user-agent;x-amz-content-sha256;x-amz-date &X-Amz-Signature=2877960fced9040b41b4feaca835fd5cfeb9264f768e6a0236c9143f915ffa56
For detailed information on the signing process and calculating the request signature, see the topicSignature Version 4 Signing Process and its subtopics.
Available LibrariesAWS provides software development kits (SDKs) for software developers who prefer to build applicationsusing language-specific APIs instead of the Query API. These SDKs provide basic functions (not includedin the APIs), such as request authentication, request retries, and error handling so that it is easier to getstarted. SDKs and additional resources are available for the following programming languages:
• Java
• Windows and .NET
• PHP
• Python
• Ruby
For information about other languages, go to Sample Code & Libraries.
Troubleshooting ApplicationsElastiCache provides specific and descriptive errors to help you troubleshoot problems while interactingwith the ElastiCache API.
API Version 2015-02-02485
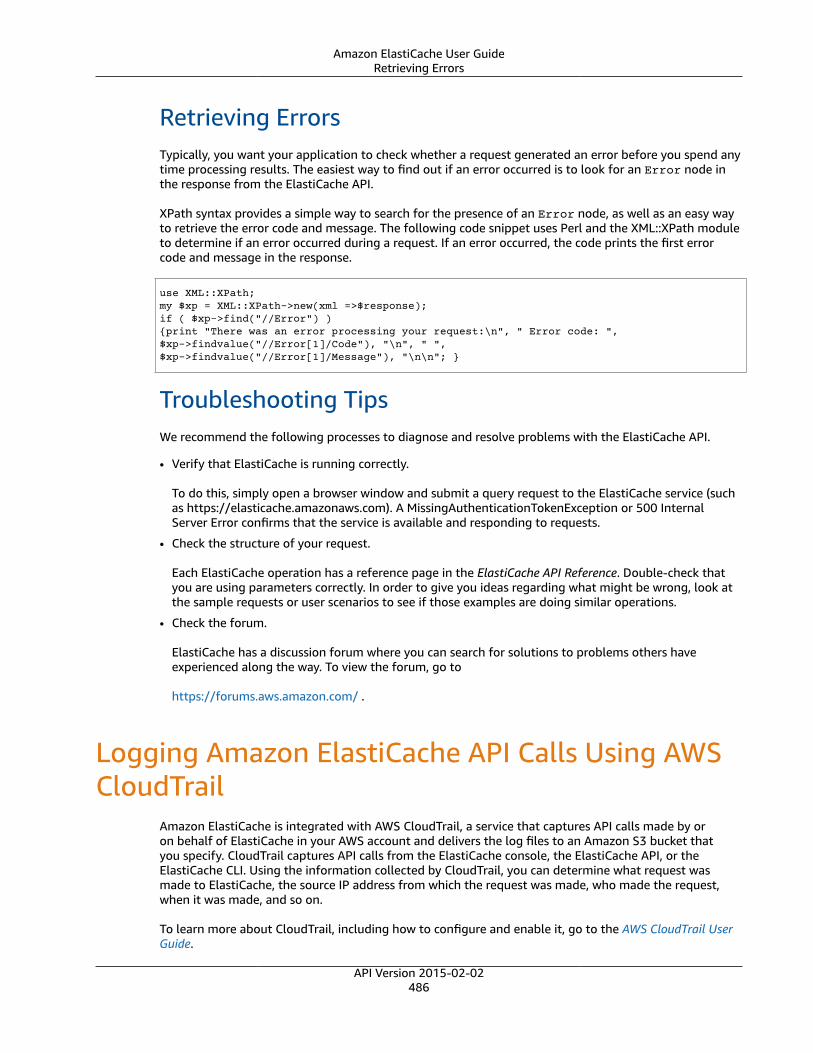
Amazon ElastiCache User GuideRetrieving Errors
Retrieving ErrorsTypically, you want your application to check whether a request generated an error before you spend anytime processing results. The easiest way to find out if an error occurred is to look for an Error node inthe response from the ElastiCache API.
XPath syntax provides a simple way to search for the presence of an Error node, as well as an easy wayto retrieve the error code and message. The following code snippet uses Perl and the XML::XPath moduleto determine if an error occurred during a request. If an error occurred, the code prints the first errorcode and message in the response.
use XML::XPath; my $xp = XML::XPath->new(xml =>$response); if ( $xp->find("//Error") ) {print "There was an error processing your request:\n", " Error code: ",$xp->findvalue("//Error[1]/Code"), "\n", " ",$xp->findvalue("//Error[1]/Message"), "\n\n"; }
Troubleshooting TipsWe recommend the following processes to diagnose and resolve problems with the ElastiCache API.
• Verify that ElastiCache is running correctly.
To do this, simply open a browser window and submit a query request to the ElastiCache service (suchas https://elasticache.amazonaws.com). A MissingAuthenticationTokenException or 500 InternalServer Error confirms that the service is available and responding to requests.
• Check the structure of your request.
Each ElastiCache operation has a reference page in the ElastiCache API Reference. Double-check thatyou are using parameters correctly. In order to give you ideas regarding what might be wrong, look atthe sample requests or user scenarios to see if those examples are doing similar operations.
• Check the forum.
ElastiCache has a discussion forum where you can search for solutions to problems others haveexperienced along the way. To view the forum, go to
https://forums.aws.amazon.com/ .
Logging Amazon ElastiCache API Calls Using AWSCloudTrail
Amazon ElastiCache is integrated with AWS CloudTrail, a service that captures API calls made by oron behalf of ElastiCache in your AWS account and delivers the log files to an Amazon S3 bucket thatyou specify. CloudTrail captures API calls from the ElastiCache console, the ElastiCache API, or theElastiCache CLI. Using the information collected by CloudTrail, you can determine what request wasmade to ElastiCache, the source IP address from which the request was made, who made the request,when it was made, and so on.
To learn more about CloudTrail, including how to configure and enable it, go to the AWS CloudTrail UserGuide.
API Version 2015-02-02486
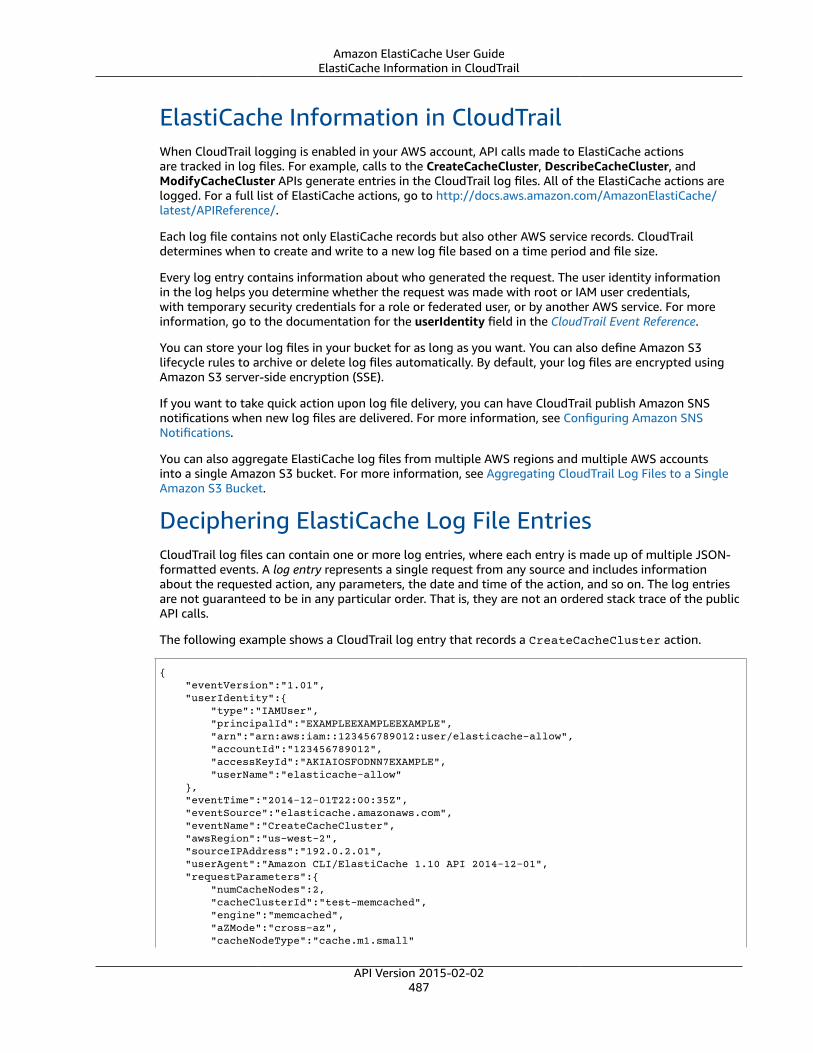
Amazon ElastiCache User GuideElastiCache Information in CloudTrail
ElastiCache Information in CloudTrailWhen CloudTrail logging is enabled in your AWS account, API calls made to ElastiCache actionsare tracked in log files. For example, calls to the CreateCacheCluster, DescribeCacheCluster, andModifyCacheCluster APIs generate entries in the CloudTrail log files. All of the ElastiCache actions arelogged. For a full list of ElastiCache actions, go to http://docs.aws.amazon.com/AmazonElastiCache/latest/APIReference/.
Each log file contains not only ElastiCache records but also other AWS service records. CloudTraildetermines when to create and write to a new log file based on a time period and file size.
Every log entry contains information about who generated the request. The user identity informationin the log helps you determine whether the request was made with root or IAM user credentials,with temporary security credentials for a role or federated user, or by another AWS service. For moreinformation, go to the documentation for the userIdentity field in the CloudTrail Event Reference.
You can store your log files in your bucket for as long as you want. You can also define Amazon S3lifecycle rules to archive or delete log files automatically. By default, your log files are encrypted usingAmazon S3 server-side encryption (SSE).
If you want to take quick action upon log file delivery, you can have CloudTrail publish Amazon SNSnotifications when new log files are delivered. For more information, see Configuring Amazon SNSNotifications.
You can also aggregate ElastiCache log files from multiple AWS regions and multiple AWS accountsinto a single Amazon S3 bucket. For more information, see Aggregating CloudTrail Log Files to a SingleAmazon S3 Bucket.
Deciphering ElastiCache Log File EntriesCloudTrail log files can contain one or more log entries, where each entry is made up of multiple JSON-formatted events. A log entry represents a single request from any source and includes informationabout the requested action, any parameters, the date and time of the action, and so on. The log entriesare not guaranteed to be in any particular order. That is, they are not an ordered stack trace of the publicAPI calls.
The following example shows a CloudTrail log entry that records a CreateCacheCluster action.
{ "eventVersion":"1.01", "userIdentity":{ "type":"IAMUser", "principalId":"EXAMPLEEXAMPLEEXAMPLE", "arn":"arn:aws:iam::123456789012:user/elasticache-allow", "accountId":"123456789012", "accessKeyId":"AKIAIOSFODNN7EXAMPLE", "userName":"elasticache-allow" }, "eventTime":"2014-12-01T22:00:35Z", "eventSource":"elasticache.amazonaws.com", "eventName":"CreateCacheCluster", "awsRegion":"us-west-2", "sourceIPAddress":"192.0.2.01", "userAgent":"Amazon CLI/ElastiCache 1.10 API 2014-12-01", "requestParameters":{ "numCacheNodes":2, "cacheClusterId":"test-memcached", "engine":"memcached", "aZMode":"cross-az", "cacheNodeType":"cache.m1.small"
API Version 2015-02-02487

Amazon ElastiCache User GuideDeciphering ElastiCache Log File Entries
}, "responseElements":{ "engine":"memcached", "clientDownloadLandingPage":"&url-console-domain;elasticache/home#client-download:", "cacheParameterGroup":{ "cacheParameterGroupName":"default.memcached1.4", "cacheNodeIdsToReboot":{ }, "parameterApplyStatus":"in-sync" }, "preferredAvailabilityZone":"Multiple", "numCacheNodes":2, "cacheNodeType":"cache.m1.small", "cacheClusterStatus":"creating", "autoMinorVersionUpgrade":true, "preferredMaintenanceWindow":"thu:05:00-thu:06:00", "cacheClusterId":"test-memcached", "engineVersion":"1.4.14", "cacheSecurityGroups":[ { "status":"active", "cacheSecurityGroupName":"default" } ], "pendingModifiedValues":{ } }, "requestID":"104f30b3-3548-11e4-b7b8-6d79ffe84edd", "eventID":"92762127-7a68-42ce-8787-927d2174cde1" }
The following example shows a CloudTrail log entry that records a DescribeCacheCluster action.Note that for all ElastiCache Describe calls (Describe*), the ResponseElements section is removedand appears as null.
{ "eventVersion":"1.01", "userIdentity":{ "type":"IAMUser", "principalId":"EXAMPLEEXAMPLEEXAMPLE", "arn":"arn:aws:iam::123456789012:user/elasticache-allow", "accountId":"123456789012", "accessKeyId":"AKIAIOSFODNN7EXAMPLE", "userName":"elasticache-allow" }, "eventTime":"2014-12-01T22:01:00Z", "eventSource":"elasticache.amazonaws.com", "eventName":"DescribeCacheClusters", "awsRegion":"us-west-2", "sourceIPAddress":"192.0.2.01", "userAgent":"Amazon CLI/ElastiCache 1.10 API 2014-12-01", "requestParameters":{ "showCacheNodeInfo":false, "maxRecords":100 }, "responseElements":null, "requestID":"1f0b5031-3548-11e4-9376-c1d979ba565a", "eventID":"a58572a8-e81b-4100-8e00-1797ed19d172"}
The following example shows a CloudTrail log entry that records a ModifyCacheCluster action.
API Version 2015-02-02488

Amazon ElastiCache User GuideDeciphering ElastiCache Log File Entries
{ "eventVersion":"1.01", "userIdentity":{ "type":"IAMUser", "principalId":"EXAMPLEEXAMPLEEXAMPLE", "arn":"arn:aws:iam::123456789012:user/elasticache-allow", "accountId":"123456789012", "accessKeyId":"AKIAIOSFODNN7EXAMPLE", "userName":"elasticache-allow" }, "eventTime":"2014-12-01T22:32:21Z", "eventSource":"elasticache.amazonaws.com", "eventName":"ModifyCacheCluster", "awsRegion":"us-west-2", "sourceIPAddress":"192.0.2.01", "userAgent":"Amazon CLI/ElastiCache 1.10 API 2014-12-01", "requestParameters":{ "applyImmediately":true, "numCacheNodes":3, "cacheClusterId":"test-memcached" }, "responseElements":{ "engine":"memcached", "clientDownloadLandingPage":"&url-console-domain;elasticache/home#client-download:", "cacheParameterGroup":{ "cacheParameterGroupName":"default.memcached1.4", "cacheNodeIdsToReboot":{ }, "parameterApplyStatus":"in-sync" }, "cacheClusterCreateTime":"Dec 1, 2014 10:16:06 PM", "preferredAvailabilityZone":"Multiple", "numCacheNodes":2, "cacheNodeType":"cache.m1.small", "cacheClusterStatus":"modifying", "autoMinorVersionUpgrade":true, "preferredMaintenanceWindow":"thu:05:00-thu:06:00", "cacheClusterId":"test-memcached", "engineVersion":"1.4.14", "cacheSecurityGroups":[ { "status":"active", "cacheSecurityGroupName":"default" } ], "configurationEndpoint":{ "address":"test-memcached.example.cfg.use1prod.cache.amazonaws.com", "port":11211 }, "pendingModifiedValues":{ "numCacheNodes":3 } }, "requestID":"807f4bc3-354c-11e4-9376-c1d979ba565a", "eventID":"e9163565-376f-4223-96e9-9f50528da645"}
API Version 2015-02-02489

Amazon ElastiCache User Guide
ElastiCache TutorialsThe following tutorials address tasks of interest to the Amazon ElastiCache user.
• Tutorial: Configuring a Lambda Function to Access Amazon ElastiCache in an Amazon VPC
API Version 2015-02-02490
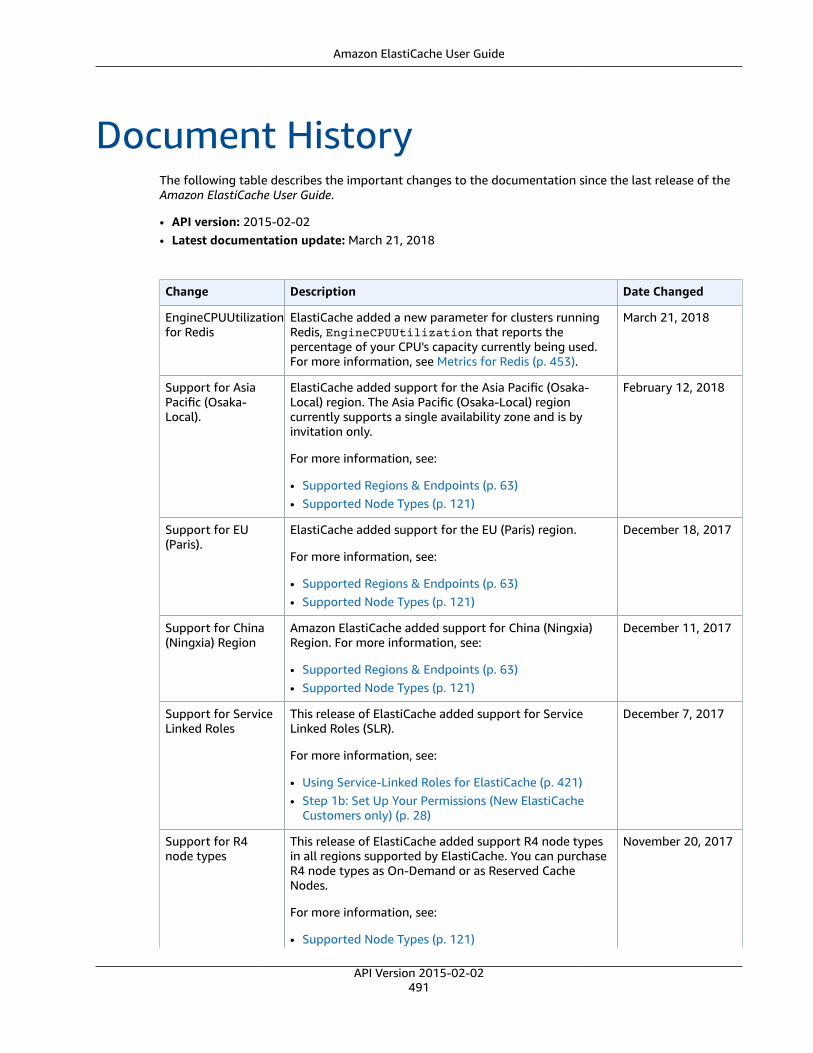
Amazon ElastiCache User Guide
Document HistoryThe following table describes the important changes to the documentation since the last release of theAmazon ElastiCache User Guide.
• API version: 2015-02-02• Latest documentation update: March 21, 2018
Change Description Date Changed
EngineCPUUtilizationfor Redis
ElastiCache added a new parameter for clusters runningRedis, EngineCPUUtilization that reports thepercentage of your CPU's capacity currently being used.For more information, see Metrics for Redis (p. 453).
March 21, 2018
Support for AsiaPacific (Osaka-Local).
ElastiCache added support for the Asia Pacific (Osaka-Local) region. The Asia Pacific (Osaka-Local) regioncurrently supports a single availability zone and is byinvitation only.
For more information, see:
• Supported Regions & Endpoints (p. 63)• Supported Node Types (p. 121)
February 12, 2018
Support for EU(Paris).
ElastiCache added support for the EU (Paris) region.
For more information, see:
• Supported Regions & Endpoints (p. 63)• Supported Node Types (p. 121)
December 18, 2017
Support for China(Ningxia) Region
Amazon ElastiCache added support for China (Ningxia)Region. For more information, see:
• Supported Regions & Endpoints (p. 63)• Supported Node Types (p. 121)
December 11, 2017
Support for ServiceLinked Roles
This release of ElastiCache added support for ServiceLinked Roles (SLR).
For more information, see:
• Using Service-Linked Roles for ElastiCache (p. 421)• Step 1b: Set Up Your Permissions (New ElastiCache
Customers only) (p. 28)
December 7, 2017
Support for R4node types
This release of ElastiCache added support R4 node typesin all regions supported by ElastiCache. You can purchaseR4 node types as On-Demand or as Reserved CacheNodes.
For more information, see:
• Supported Node Types (p. 121)
November 20, 2017
API Version 2015-02-02491

Amazon ElastiCache User Guide
Change Description Date Changed
• Memcached Node-Type Specific Parameters (p. 364)• Redis Node-Type Specific Parameters (p. 381)
ElastiCache forRedis 3.2.10 andsupport for onlineresharding
Amazon ElastiCache for Redis adds support forElastiCache for Redis 3.2.10. ElastiCache for Redis alsointroduces online cluster resizing to add or remove shardsfrom the cluster while it continues to serve incoming I/Orequests.
For more information, see the following:
• Choosing an Engine: Memcached, Redis (cluster modedisabled), or Redis (cluster mode enabled) (p. 45)
• Best Practices: Online Resharding (p. 93)• Online Resharding and Shard Rebalancing for
ElastiCache for Redis—Redis (cluster modeenabled) (p. 230)
November 9, 2017
HIPAA compliance ElastiCache for Redis version 3.2.6 is now certified forHIPAA compliance when encryption is enabled on yourcluster. For more information, see HIPAA Compliancefor Amazon ElastiCache for Redis (p. 443) and AmazonElastiCache for Redis Data Encryption (p. 433).
November 2, 2017
ElastiCache forRedis 3.2.6 andsupport forencryption
ElastiCache adds support for ElastiCache for Redis 3.2.6,which includes two encryption features:
• In-transit encryption encrypts your data wheneverit is in transit, such as between nodes in a cluster orbetween a cluster and your application.
• At-rest encryption encrypts your on-disk data duringsync and backup operations.
For more information, see Amazon ElastiCache forRedis Data Encryption (p. 433) and Choosing an Engine:Memcached, Redis (cluster mode disabled), or Redis(cluster mode enabled) (p. 45) in this ElastiCache UserGuide.
October 25, 2017
Connection patternstopic
ElastiCache documentation adds a topic covering variouspatterns for accessing an ElastiCache cluster in anAmazon VPC.
For more information, see Access Patterns for Accessingan ElastiCache Cluster in an Amazon VPC (p. 397) in theElastiCache User Guide.
April 24, 2017
Support forMemcached 1.4.34
ElastiCache adds support Memcached version 1.4.34,which incorporates a number of fixes to earlierMemcached versions.
For more information, see Memcached 1.4.34 ReleaseNotes at Memcached on GitHub.
April 10, 2017
API Version 2015-02-02492
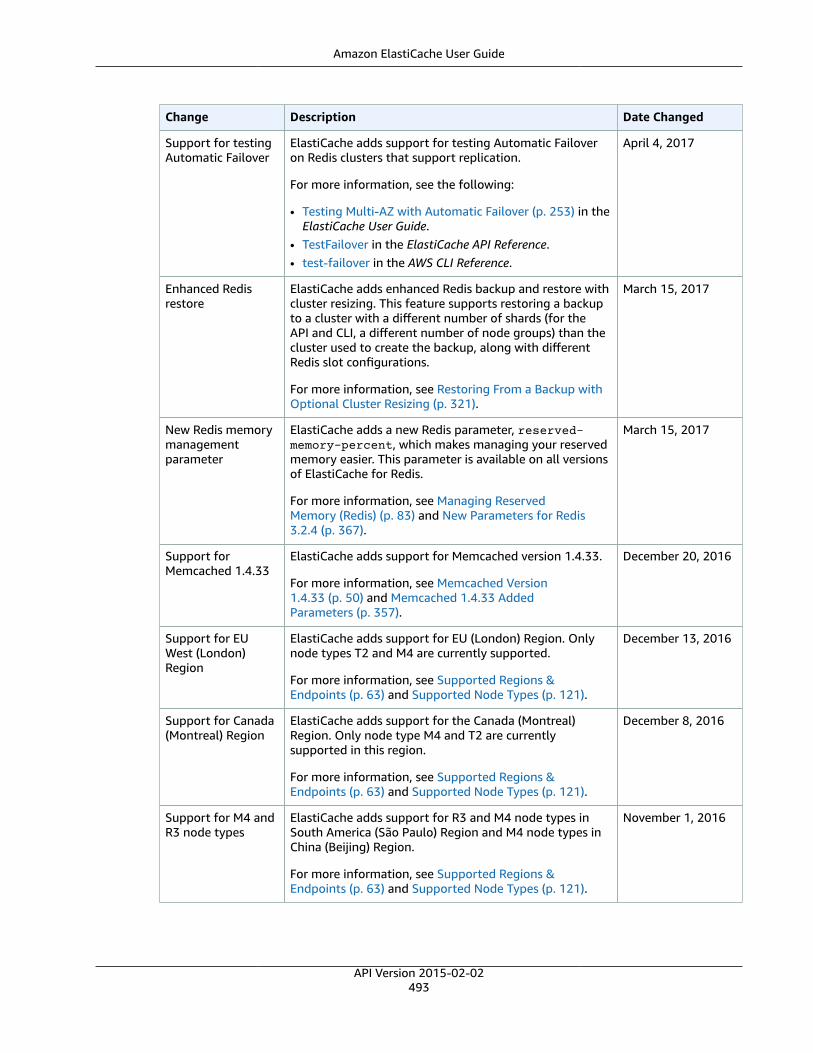
Amazon ElastiCache User Guide
Change Description Date Changed
Support for testingAutomatic Failover
ElastiCache adds support for testing Automatic Failoveron Redis clusters that support replication.
For more information, see the following:
• Testing Multi-AZ with Automatic Failover (p. 253) in theElastiCache User Guide.
• TestFailover in the ElastiCache API Reference.• test-failover in the AWS CLI Reference.
April 4, 2017
Enhanced Redisrestore
ElastiCache adds enhanced Redis backup and restore withcluster resizing. This feature supports restoring a backupto a cluster with a different number of shards (for theAPI and CLI, a different number of node groups) than thecluster used to create the backup, along with differentRedis slot configurations.
For more information, see Restoring From a Backup withOptional Cluster Resizing (p. 321).
March 15, 2017
New Redis memorymanagementparameter
ElastiCache adds a new Redis parameter, reserved-memory-percent, which makes managing your reservedmemory easier. This parameter is available on all versionsof ElastiCache for Redis.
For more information, see Managing ReservedMemory (Redis) (p. 83) and New Parameters for Redis3.2.4 (p. 367).
March 15, 2017
Support forMemcached 1.4.33
ElastiCache adds support for Memcached version 1.4.33.
For more information, see Memcached Version1.4.33 (p. 50) and Memcached 1.4.33 AddedParameters (p. 357).
December 20, 2016
Support for EUWest (London)Region
ElastiCache adds support for EU (London) Region. Onlynode types T2 and M4 are currently supported.
For more information, see Supported Regions &Endpoints (p. 63) and Supported Node Types (p. 121).
December 13, 2016
Support for Canada(Montreal) Region
ElastiCache adds support for the Canada (Montreal)Region. Only node type M4 and T2 are currentlysupported in this region.
For more information, see Supported Regions &Endpoints (p. 63) and Supported Node Types (p. 121).
December 8, 2016
Support for M4 andR3 node types
ElastiCache adds support for R3 and M4 node types inSouth America (São Paulo) Region and M4 node types inChina (Beijing) Region.
For more information, see Supported Regions &Endpoints (p. 63) and Supported Node Types (p. 121).
November 1, 2016
API Version 2015-02-02493

Amazon ElastiCache User Guide
Change Description Date Changed
US East 2 (Ohio)Region support
ElastiCache adds support for the US East (Ohio) Region(us-east-2) with M4, T2, and R3 node types.
For more information, see Supported Regions &Endpoints (p. 63) and Supported Node Types (p. 121).
October 17, 2016
Support for RedisCluster
ElastiCache adds support for Redis Cluster (enhanced).Customers using Redis Cluster, can partition theirdata across up to 15 shards (node groups). Each shardsupports replication with up to 5 read replicas per shard.Redis Cluster automatic failover times are about onefourth as long as those of earlier versions.
This release includes a redesigned management consolethat uses terminology in keeping with industry usage.
For more information, see the following topics:
• Engines and Versions (p. 44)• ElastiCache Components and Features (p. 12) —
note the sections on Nodes, Shards, Clusters, andReplication.
• ElastiCache for Redis Terminology (p. 20)
October 12, 2016
M4 node typesupport
ElastiCache adds support for the M4 family of nodetypes in most regions supported by ElastiCache. You canpurchase M4 node types as On-Demand or as ReservedCache Nodes.
For more information, see Supported NodeTypes (p. 121), Memcached Node-Type SpecificParameters (p. 364), and Redis Node-Type SpecificParameters (p. 381).
August 3, 2016
Mumbai Regionsupport
ElastiCache adds support for the Asia Pacific (Mumbai)Region.
For more information, see Supported Regions &Endpoints (p. 63).
June 27, 2016
Snapshot export ElastiCache adds the ability to export a Redis snapshot soyou can access it from outside ElastiCache.
For more information, see Exporting a Backup (p. 314) inthe Amazon ElastiCache User Guide and CopySnapshot inthe Amazon ElastiCache API Reference.
May 26, 2016
Node type scale up ElastiCache adds the ability to scale up your Redis nodetype.
For more information, see Scaling (p. 203).
March 24, 2016
Easy engineupgrade
ElastiCache adds the ability to easily upgrade your Rediscache engine.
For more information, see Upgrading EngineVersions (p. 57).
March 22, 2016
API Version 2015-02-02494

Amazon ElastiCache User Guide
Change Description Date Changed
Support for R3node types
ElastiCache adds support for R3 node types in the China(Beijing) and South America (Sao Paulo) regions.
For more information, see Supported NodeTypes (p. 121).
March 16, 2016
AccessingElastiCache using aLambda function
Added a tutorial on configuring a Lambda function toaccess ElastiCache in an Amazon VPC.
For more information, see ElastiCache Tutorials (p. 490).
February 12, 2016
Support for Redis2.8.24
ElastiCache adds support for Redis version 2.8.24 withimprovements added since Redis 2.8.23. Improvementsinclude bug fixes and support for logging bad memoryaccess addresses.
For more information, see ElastiCache for Redis Version2.8.24 (Enhanced) (p. 55) and Redis 2.8 Release Notes.
January 20, 2016
Support for AsiaPacific (Seoul)Region
ElastiCache adds support for the Asia Pacific (Seoul) (ap-northeast-2) Region with t2, m3, and r3 node types.
January 6, 2016
Amazon ElastiCacheconsole change.
Because the newer Redis versions provide a better andmore stable user experience, Redis versions 2.6.13,2.8.6, and 2.8.19 are no longer listed in the ElastiCacheManagement Console.
For other options and more information, see ElastiCachefor Redis Versions (p. 52).
December 15, 2015
Support for Redis2.8.23.
ElastiCache adds support for Redis version 2.8.23 withimprovements added since Redis 2.8.22. Improvementsinclude bug fixes and support for the new parameterclose-on-slave-write which, if enabled, disconnectsclients who attempt to write to a read-only replica.
For more information, see ElastiCache for Redis Version2.8.23 (Enhanced) (p. 55).
November 13, 2015
API Version 2015-02-02495

Amazon ElastiCache User Guide
Change Description Date Changed
Support for Redis2.8.22.
ElastiCache adds support for Redis version 2.8.22 withElastiCache added enhancements and improvementssince version 2.8.21. Improvements include:
• Implementation of a forkless save process that enablesa successful save when low available memory couldcause a forked save to fail.
• Additional CloudWatch metrics – SaveInProgress andReplicationBytes.
• To enable partial synchronizations, the Redis parameterrepl-backlog-size now applies to all clusters.
For a complete list of changes and more information, seeElastiCache for Redis Version 2.8.22 (Enhanced) (p. 55).
This documentation release includes a reorganizationof the documentation and removal of the ElastiCachecommand line interface (CLI) documentation. Forcommand line use, refer to the AWS Command Line forElastiCache.
September 28, 2015
Support forMemcached 1.4.28.
ElastiCache adds support for Memcached version 1.4.24and Memcached improvements since version 1.4.14. Thisrelease adds support for least recently used (LRU) cachemanagement as a background task, choice of jenkins ormurmur3 as your hashing algorithm, new commands, andmiscellaneous bug fixes.
For more information, go to Memcached release notesand ElastiCache for Memcached Versions (p. 50) in theElastiCache User Guide.
August 27, 2015
Support for Redis2.8.21.
Support forMemcached AutoDiscovery using PHP5.6.
ElastiCache adds support for Redis version 2.8.21 andRedis improvements since version 2.8.19. This Redisrelease includes several bug fixes.
For more information, go to Redis 2.8 release notes.
This release of Amazon ElastiCache adds support forMemcached Auto Discovery client for PHP version 5.6.
For more information, go to Compiling the Source Codefor the ElastiCache Cluster Client for PHP (p. 149).
July 29, 2015
New topic:AccessingElastiCache fromoutside AWS
Added new topic on how to access ElastiCache resourcesfrom outside AWS.
For more information , go to ElastiCache's AccessingElastiCache Resources from Outside AWS (p. 445).
July 9, 2015
API Version 2015-02-02496

Amazon ElastiCache User Guide
Change Description Date Changed
Node replacementmessages added
ElastiCache adds three messagespertaining to scheduled node replacement.ElastiCache:NodeReplacementScheduled,ElastiCache:NodeReplacementRescheduled, andElastiCache:NodeReplacementCanceled.
For more information and actions you can take when anode is scheduled for replacement, go to ElastiCache'sEvent Notifications and Amazon SNS (p. 467).
June 11, 2015
Support for Redis v.2.8.19.
ElastiCache adds support for Redis version 2.8.19 andRedis improvements since version 2.8.6. This supportincludes support for:
• The HyperLogLog data structure, with the Rediscommands PFADD, PFCOUNT, and PFMERGE.
• Lexicographic range queries with the new commandsZRANGEBYLEX, ZLEXCOUNT, and ZREMRANGEBYLEX.
• Introduced a number of bug fixes, namely preventing aprimary node from sending stale data to replica nodesby failing the master SYNC when a background save(bgsave) child process terminates unexpectedly.
For more information on HyperLogLog, go to Redis newdata structure: the HyperLogLog. For more informationon PFADD, PFCOUNT, and PFMERGE, go to the RedisDocumentation and click HyperLogLog.
March 11, 2015
Support for costallocation tags
ElastiCache adds support for cost allocation tags.
For more information, see Monitoring Costs with CostAllocation Tags (p. 471).
February 9, 2015
Support for AWSGovCloud (US)Region
ElastiCache adds support for the AWS GovCloud (US) (us-gov-west-1) Region.
January 29, 2015
Support for EU(Frankfurt) Region
ElastiCache adds support for the EU (Frankfurt) (eu-central-1) Region.
January 19, 2015
Multi-AZ with autofailover support forRedis replicationgroups
ElastiCache adds support for Multi-AZ with automaticfailover from the primary node to a read replica in a Redisreplication group. ElastiCache monitors the health ofthe replication group. If the primary fails, ElastiCacheautomatically promotes a replica to primary, thenreplaces the replica.
For more information, see Replication: Multi-AZ withAutomatic Failover (Redis) (p. 244).
October 24, 2014
AWS CloudTraillogging of API callssupported
ElastiCache adds support for using AWS CloudTrail to logall ElastiCache API calls.
For more information, see Logging Amazon ElastiCacheAPI Calls Using AWS CloudTrail (p. 486).
September 15, 2014
API Version 2015-02-02497

Amazon ElastiCache User Guide
Change Description Date Changed
New instance sizessupported
ElastiCache adds support for additional General Purpose(T2) instances.
For more information, see Parameters and ParameterGroups (p. 341).
September 11, 2014
Flexible nodeplacementsupported forMemcached
ElastiCache adds support for creating Memcached nodesacross multiple Availability Zones.
For more information, see Step 2: Launch aCluster (p. 29).
July 23, 2014
New instance sizessupported
ElastiCache adds support for additional General Purpose(M3) instances and Memory Optimized (R3) instances.
For more information, see Parameters and ParameterGroups (p. 341).
July 1, 2014
PHP auto discovery Added support for PHP version 5.5 auto discovery.
For more information, see Installing the ElastiCacheCluster Client for PHP (p. 142).
May 13, 2014
Backup and restorefor Redis clusters
In this release, ElastiCache allows customers to createsnapshots of their Redis clusters, and create new clustersusing these snapshots. A backup is a copy of the clusterat a specific moment in time, and consists of clustermetadata and all of the data in the Redis cache. Backupsare stored in Amazon S3, and customers can restore thedata from a snapshot into a new cluster at any time.
For more information, see ElastiCache Backup andRestore (Redis) (p. 297).
April 24, 2014
Redis 2.8.6 ElastiCache supports Redis 2.8.6, in addition to Redis2.6.13. With Redis 2.8.6, customers can improve theresiliency and fault tolerance of read replicas, withsupport for partial resynchronization, and a user-definedminimum number of read replicas that must be availableat all times. Redis 2.8.6 also offers full support forpublish-and-subscribe, where clients can be notified ofevents that occur on the server.
March 13, 2014
API Version 2015-02-02498

Amazon ElastiCache User Guide
Change Description Date Changed
Redis cache engine ElastiCache offers Redis cache engine software, inaddition to Memcached. Customers who currently useRedis can "seed" a new ElastiCache Redis cache clusterwith their existing data from a Redis snapshot file, easingmigration to a managed ElastiCache environment.
To support Redis replication capabilities, the ElastiCacheAPI now supports replication groups. Customers cancreate a replication group with a primary Redis cachenode, and add one or more read replica nodes thatautomatically stay synchronized with cache data inthe primary node. Read-intensive applications can beoffloaded to a read replica, reducing the load on theprimary node. Read replicas can also guard against dataloss in the event of a primary cache node failure.
September 3, 2013
Support for defaultAmazon VirtualPrivate Cloud (VPC)
In this release, ElastiCache is fully integrated withAmazon Virtual Private Cloud (VPC). For new customers,cache clusters are created in an Amazon VPC by default.
For more information, see Amazon Virtual Private Cloud(Amazon VPC) with ElastiCache (p. 392).
January 8, 2013
PHP support forcache node autodiscovery
The initial release of cache node auto discovery providedsupport for Java programs. In this release, ElastiCachebrings cache node auto discovery support to PHP.
January 2, 2013
Support for AmazonVirtual PrivateCloud (VPC)
In this release, ElastiCache clusters can be launched inAmazon Virtual Private Cloud (VPC). By default, newcustomers' cache clusters are created in an Amazon VPCautomatically; existing customers can migrate to AmazonVPC at their own pace.
For more information, see Amazon Virtual Private Cloud(Amazon VPC) with ElastiCache (p. 392).
December 20, 2012
Cache node autodiscovery andnew cache engineversion
ElastiCache provides cache node auto discovery—theability for client programs to automatically determineall of the cache nodes in a cluster, and to initiate andmaintain connections to all of these nodes.
This release also offers a new cache engine version:Memcached version 1.4.14. This new cache engineprovides enhanced slab rebalancing capability, significantperformance and scalability improvements, and severalbug fixes. There are several new cache parameters thatcan be configured.
For more information, see Parameters and ParameterGroups (p. 341).
November 28, 2012
New cache nodetypes
This release provides four additional cache node types. November 13, 2012
Reserved cachenodes
This release adds support for reserved cache nodes. April 5, 2012
API Version 2015-02-02499

Amazon ElastiCache User Guide
Change Description Date Changed
New guide This is the first release of Amazon ElastiCache User Guide. August 22, 2011
API Version 2015-02-02500

Amazon ElastiCache User Guide
AWS GlossaryFor the latest AWS terminology, see the AWS Glossary in the AWS General Reference.
API Version 2015-02-02501