almyta small business software (sbs) software … small business software (sbs) software manual...
TRANSCRIPT
Almyta Small Business Software (SBS) Software Manual
Contents
Almyta Small Business Software (SBS) Software Manual ................................................................................................. 1
Software Navigation...................................................................................................................................................... 3
Personalizing your company ....................................................................................................................................... 10
Importing Data ............................................................................................................................................................ 15
Managing Batch Scanner Transactions. ...................................................................................................................... 22
Managing Item Master list .......................................................................................................................................... 26
Managing Purchase Orders ......................................................................................................................................... 30
Receiving against Purchase Orders ............................................................................................................................. 33
Direct Positive Inventory Adjustments ....................................................................................................................... 35
Direct Negative Inventory Adjustments ...................................................................................................................... 36
Managing Sales Orders ............................................................................................................................................... 37
Managing Sales Quotes ............................................................................................................................................... 41
Using Point of Sale Screen .......................................................................................................................................... 42
Managing Straight Commissions transactions. ........................................................................................................... 43
Managing Invoices ...................................................................................................................................................... 45
Posting Payments ........................................................................................................................................................ 46
Managing Refunds ...................................................................................................................................................... 48
Managing Request for Quotation (RFQ) ..................................................................................................................... 51
Browsing data and printing reports ............................................................................................................................ 53
Almyta Small Business Software (SBS) Software Manual
v.147 2
.................................................................................................................................................................................... 53
Button Image meanings .............................................................................................................................................. 55
Understanding Links and Shortcuts ............................................................................................................................ 58
Using Data Utilities ...................................................................................................................................................... 62
Customizing Screens ................................................................................................................................................... 67
Appendix A .................................................................................................................................................................. 75
Appendix B .................................................................................................................................................................. 77
Appendix C .................................................................................................................................................................. 81
Almyta Small Business Software (SBS) Software Manual
v.147 3
Software Navigation
Menu usage and terminology
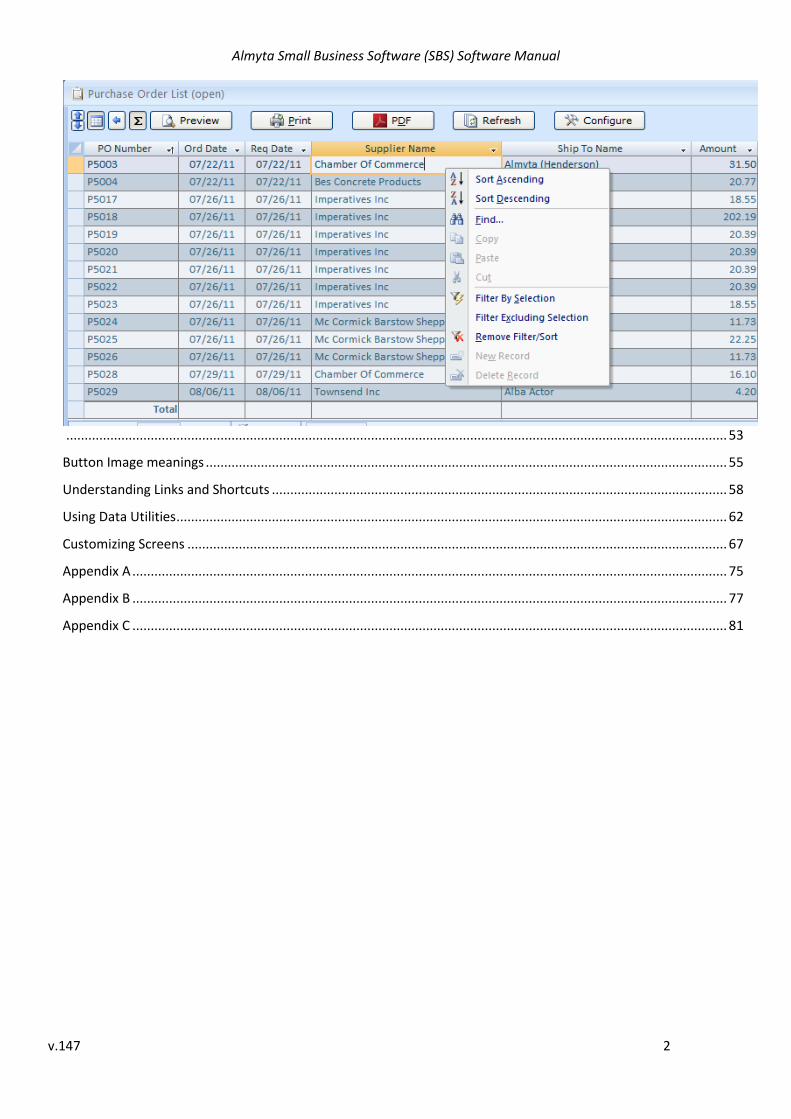
The main menu choices are Home, Activities, Reports, Lists, Configuration, Report Preview, and Help. Each such choice is represented by a menu tab.
Each menu tab contains menu choices divided into the groups. In the Activities menu tab, the groups are Purchase Orders & RFQs, Inventory, Sales Orders & Quotations, and Invoices & Payments.
The menu choices are divided into two major types: single and multi-choice. Multi-choices are identified by a small down arrow on the right. Clicking arrow explodes drop down menu.
There is one special menu called the Report Preview. This menu gets activated when we preview report. It gives us quick choices such is sending report to a printer or Adobe PDF, formatting the report or exiting it (the far right Red Cross button).
Almyta Small Business Software (SBS) Software Manual
v.147 4
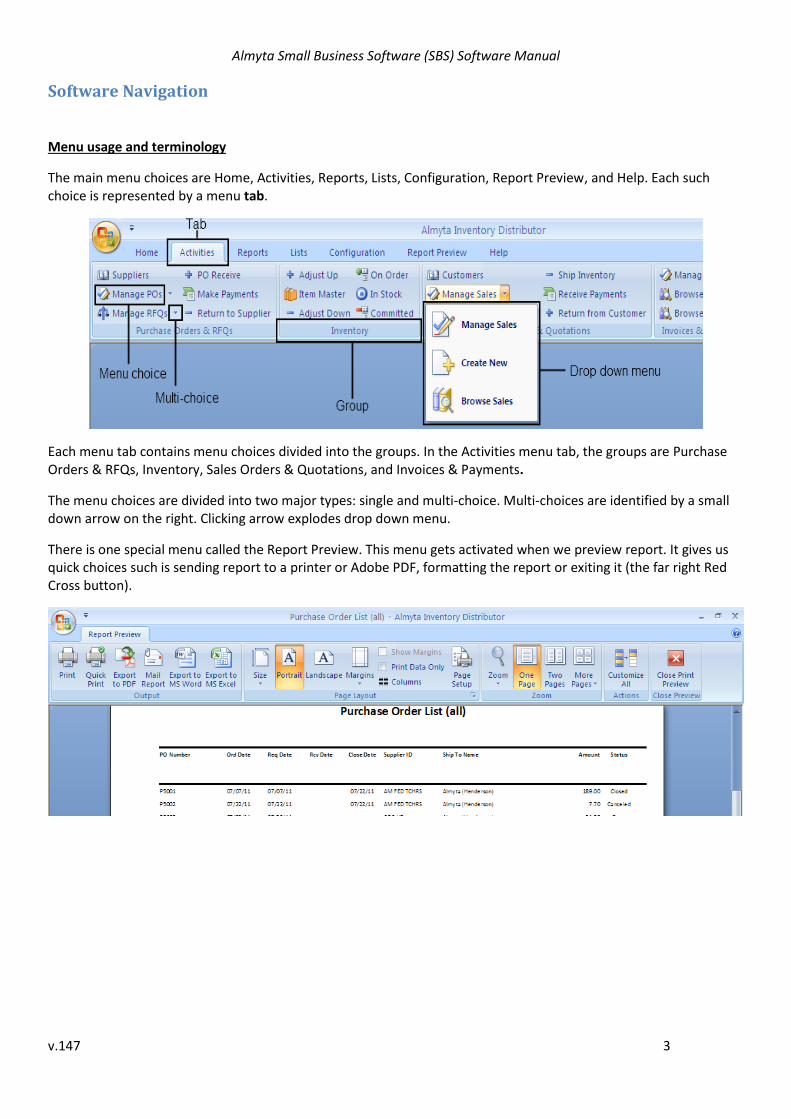
Dashboard
Click any label or icon on the Dashboard to access a desired report, screen, or function. To find out what a label or
icon does, place a mouse cursor on a top of it and wait for two seconds.
Click any menu tab to expand the menus for one a time use.
Double-click any menu tab to expand the menus for a multi-use.
Adding New records
Click button to add new orders, RFQs, quotations, inventory items, customers, suppliers, invoices, and logos.
Click button to add new record to a static list.
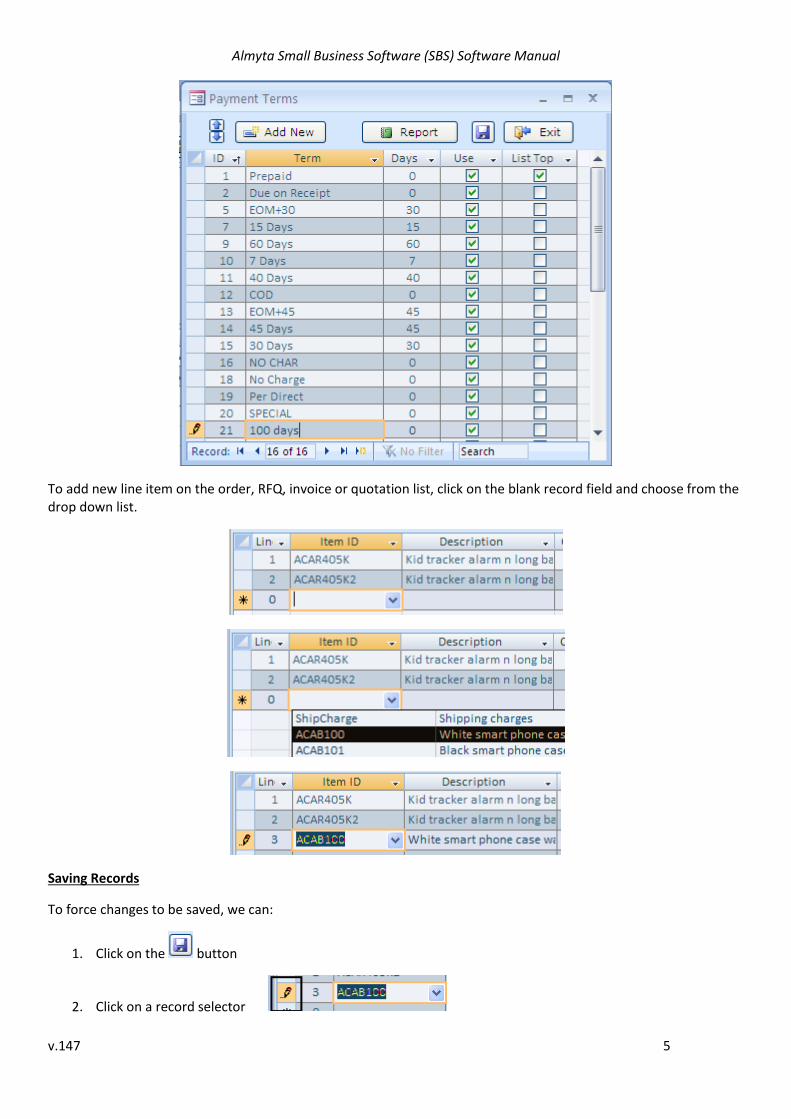
Click the Add New button and type in new value (like 100 days) and press button to save. Close screen.
Almyta Small Business Software (SBS) Software Manual
v.147 5
To add new line item on the order, RFQ, invoice or quotation list, click on the blank record field and choose from the drop down list.
Saving Records
To force changes to be saved, we can:
1. Click on the button
2. Click on a record selector
Almyta Small Business Software (SBS) Software Manual
v.147 6
3. Go to a different record
4. And finally, just close the screen
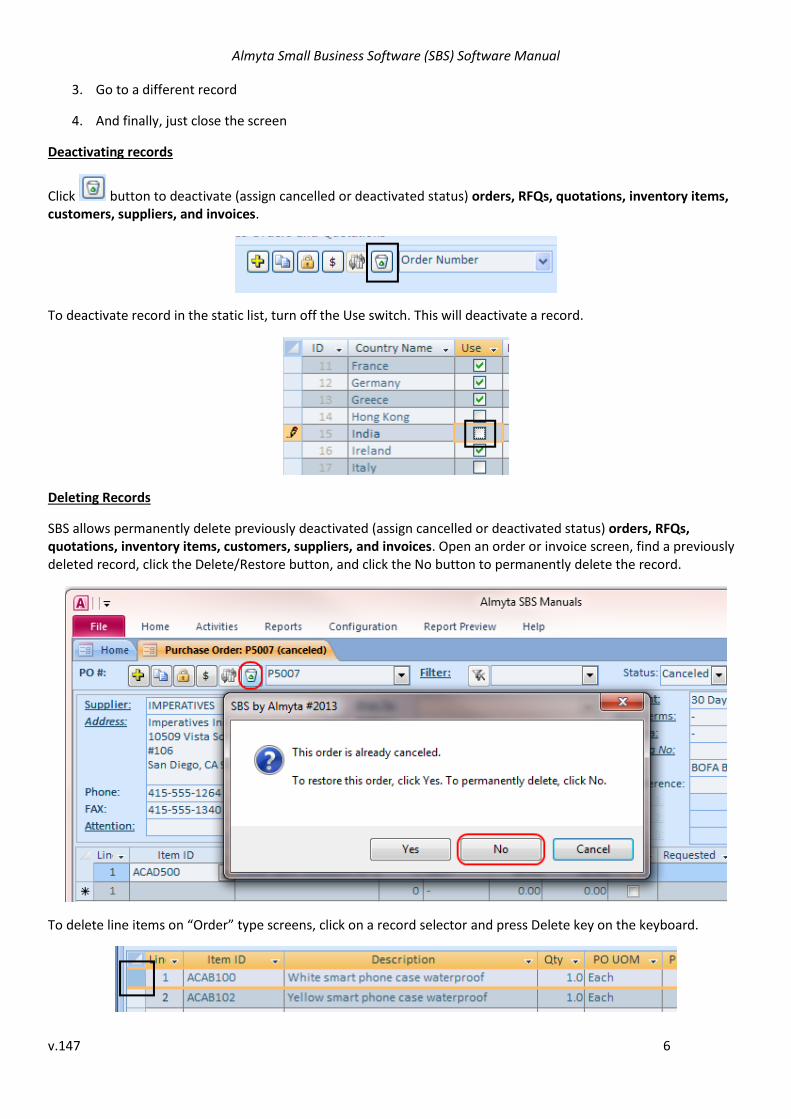
Deactivating records
Click button to deactivate (assign cancelled or deactivated status) orders, RFQs, quotations, inventory items, customers, suppliers, and invoices.
To deactivate record in the static list, turn off the Use switch. This will deactivate a record.
Deleting Records
SBS allows permanently delete previously deactivated (assign cancelled or deactivated status) orders, RFQs, quotations, inventory items, customers, suppliers, and invoices. Open an order or invoice screen, find a previously deleted record, click the Delete/Restore button, and click the No button to permanently delete the record.
To delete line items on “Order” type screens, click on a record selector and press Delete key on the keyboard.
Almyta Small Business Software (SBS) Software Manual
v.147 7
Confirm the deletion when prompted.
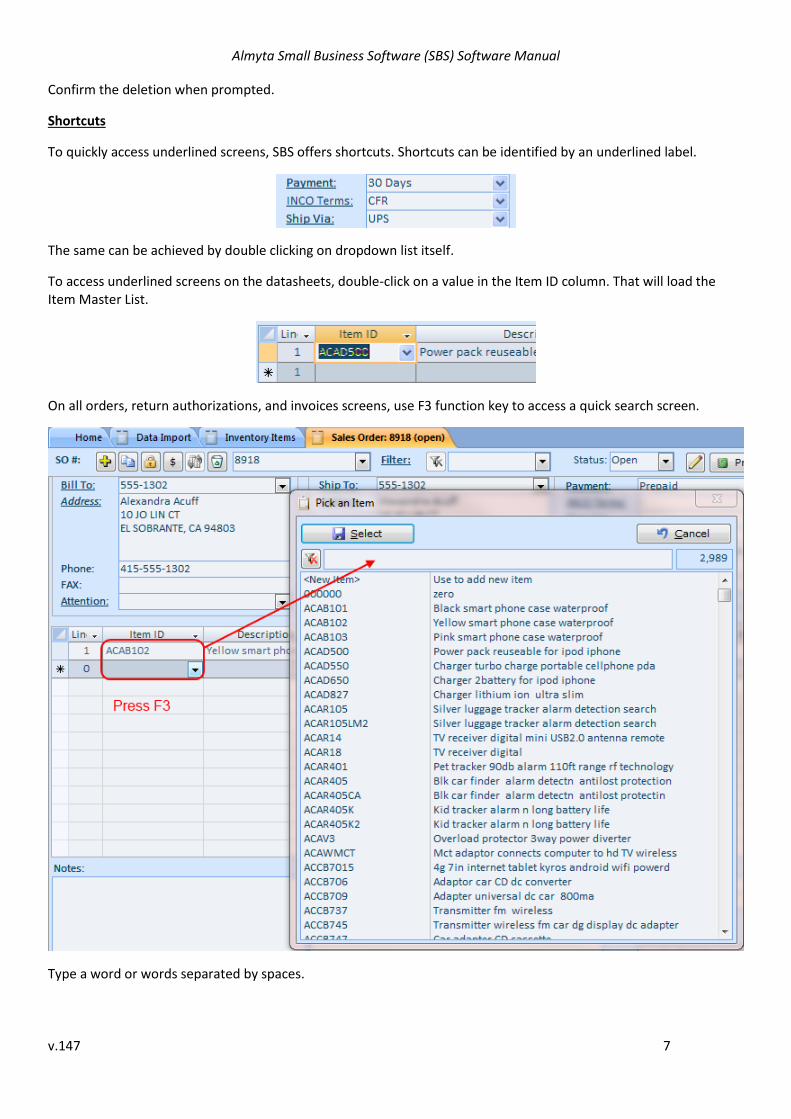
Shortcuts
To quickly access underlined screens, SBS offers shortcuts. Shortcuts can be identified by an underlined label.
The same can be achieved by double clicking on dropdown list itself.
To access underlined screens on the datasheets, double-click on a value in the Item ID column. That will load the Item Master List.
On all orders, return authorizations, and invoices screens, use F3 function key to access a quick search screen.
Type a word or words separated by spaces.
Almyta Small Business Software (SBS) Software Manual
v.147 8
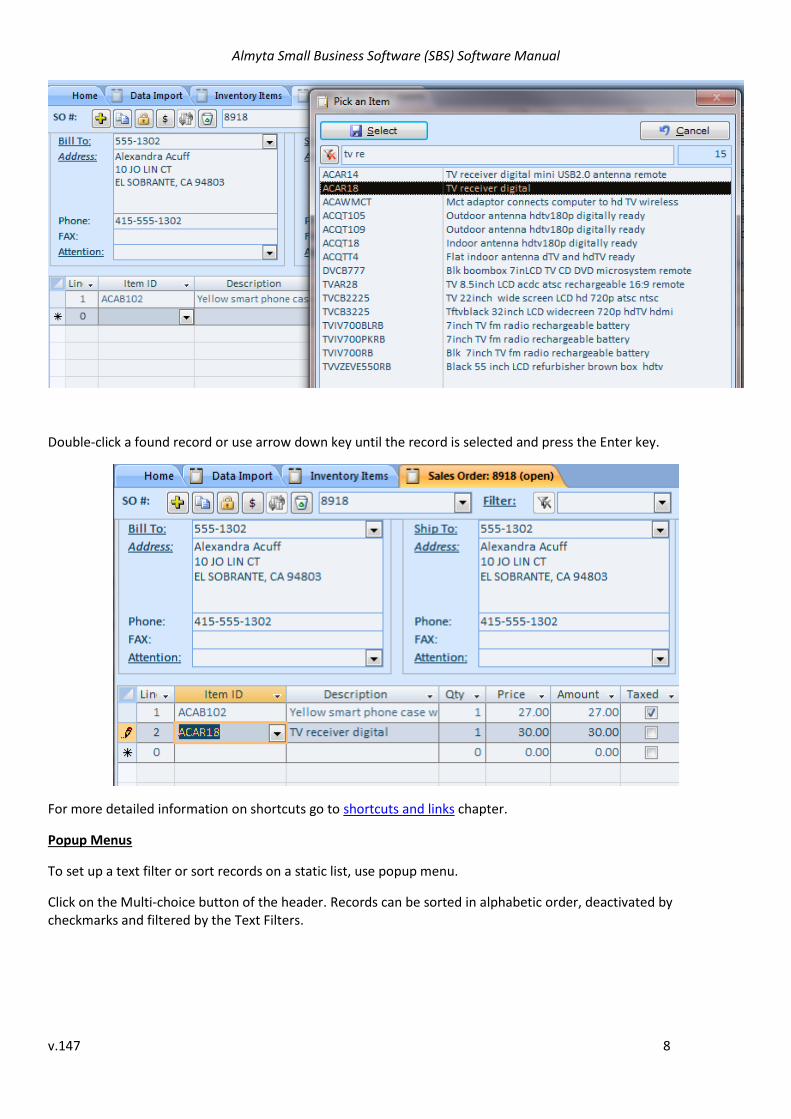
Double-click a found record or use arrow down key until the record is selected and press the Enter key.
For more detailed information on shortcuts go to shortcuts and links chapter.
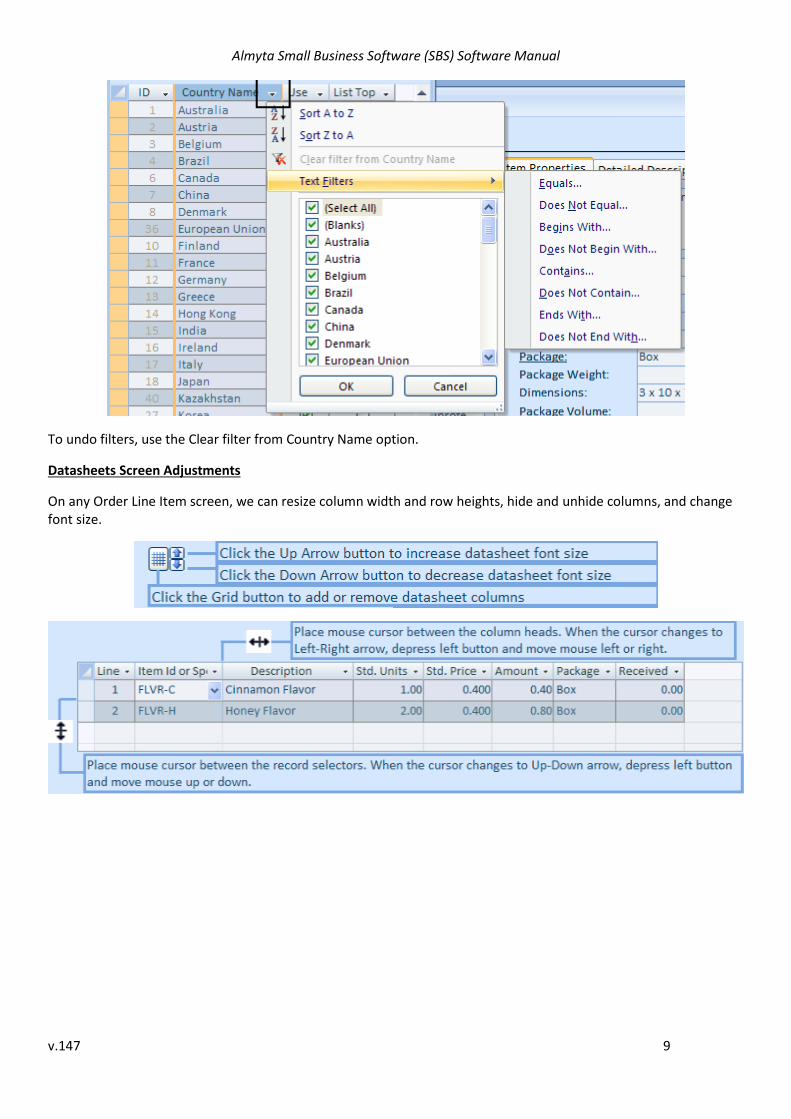
Popup Menus
To set up a text filter or sort records on a static list, use popup menu.
Click on the Multi-choice button of the header. Records can be sorted in alphabetic order, deactivated by checkmarks and filtered by the Text Filters.
Almyta Small Business Software (SBS) Software Manual
v.147 9
To undo filters, use the Clear filter from Country Name option.
Datasheets Screen Adjustments
On any Order Line Item screen, we can resize column width and row heights, hide and unhide columns, and change font size.
Almyta Small Business Software (SBS) Software Manual
v.147 10
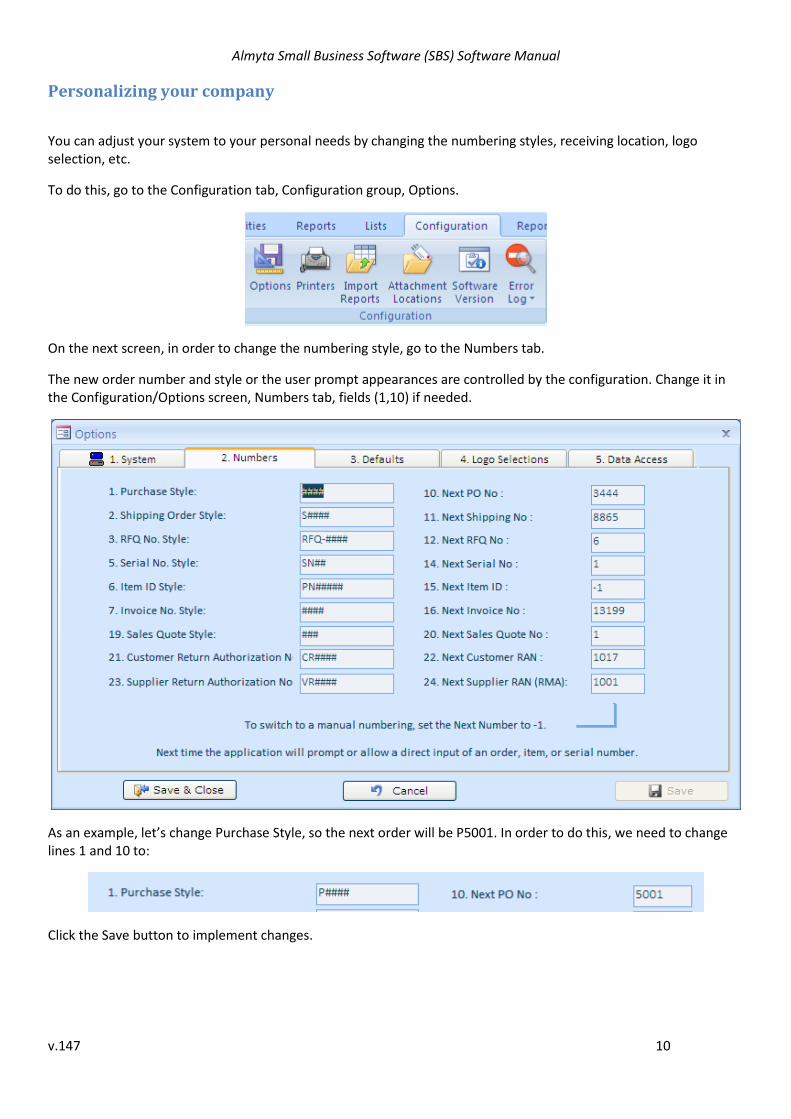
Personalizing your company
You can adjust your system to your personal needs by changing the numbering styles, receiving location, logo selection, etc.
To do this, go to the Configuration tab, Configuration group, Options.
On the next screen, in order to change the numbering style, go to the Numbers tab.
The new order number and style or the user prompt appearances are controlled by the configuration. Change it in the Configuration/Options screen, Numbers tab, fields (1,10) if needed.
As an example, let’s change Purchase Style, so the next order will be P5001. In order to do this, we need to change lines 1 and 10 to:
Click the Save button to implement changes.
Almyta Small Business Software (SBS) Software Manual
v.147 11
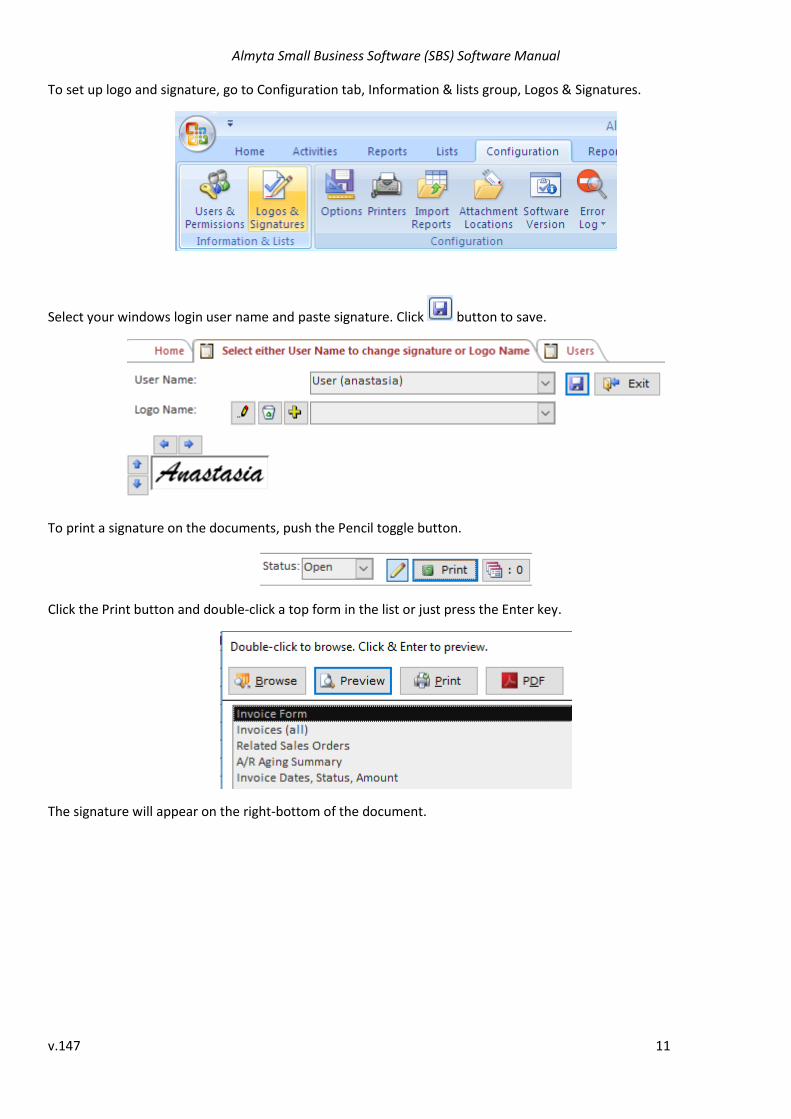
To set up logo and signature, go to Configuration tab, Information & lists group, Logos & Signatures.
Select your windows login user name and paste signature. Click button to save.
To print a signature on the documents, push the Pencil toggle button.
Click the Print button and double-click a top form in the list or just press the Enter key.
The signature will appear on the right-bottom of the document.

Almyta Small Business Software (SBS) Software Manual
v.147 12
If you need to print a company seal on the documents, you can use the same signature function, but provide your seal or seal with and overlaid signature on the top.
For a new logo, click the Yellow Plus button and type in the logo name.
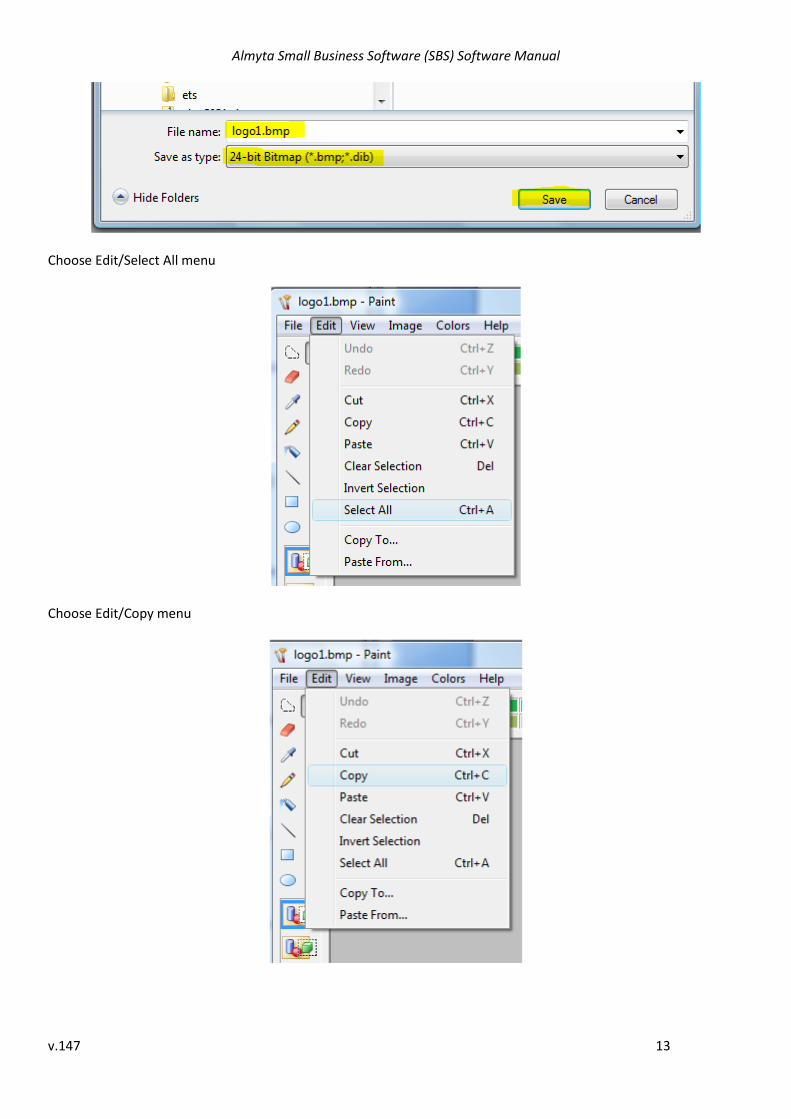
Convert the logo into BMP format. To do this, open the logo with Windows Paint (in Windows Explorer, right-click
select Open With, Paint). In Paint, select File/Save As menu, select 24-bit Bitmap, specify file name, and click Save.
Almyta Small Business Software (SBS) Software Manual
v.147 13
Choose Edit/Select All menu
Choose Edit/Copy menu
Almyta Small Business Software (SBS) Software Manual
v.147 14
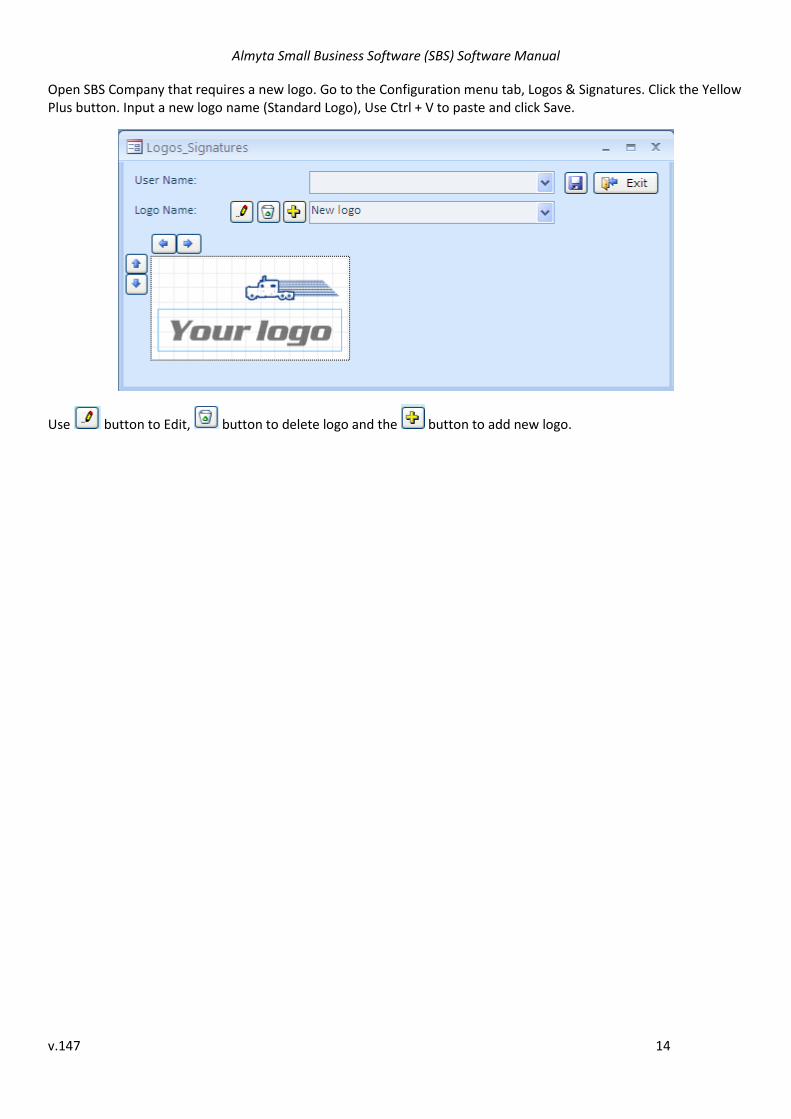
Open SBS Company that requires a new logo. Go to the Configuration menu tab, Logos & Signatures. Click the Yellow Plus button. Input a new logo name (Standard Logo), Use Ctrl + V to paste and click Save.
Use button to Edit, button to delete logo and the button to add new logo.

Almyta Small Business Software (SBS) Software Manual
v.147 15
Importing Data
To import data in the system, go to the Configuration tab, Data group.
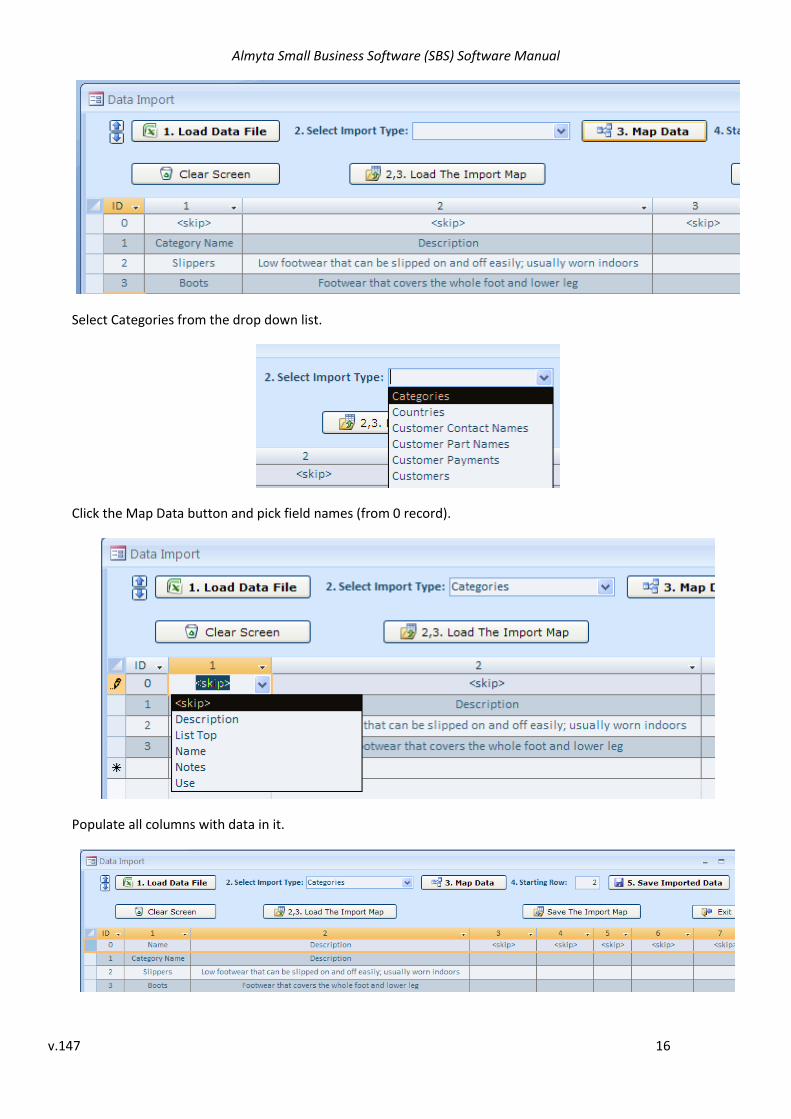
a. Categories import. Click on the Import option. If data will be imported from the file, click the Load Data File
button, locate the file and open it.
There are two records from the file.
Almyta Small Business Software (SBS) Software Manual
v.147 16
Select Categories from the drop down list.
Click the Map Data button and pick field names (from 0 record).
Populate all columns with data in it.
Almyta Small Business Software (SBS) Software Manual
v.147 17
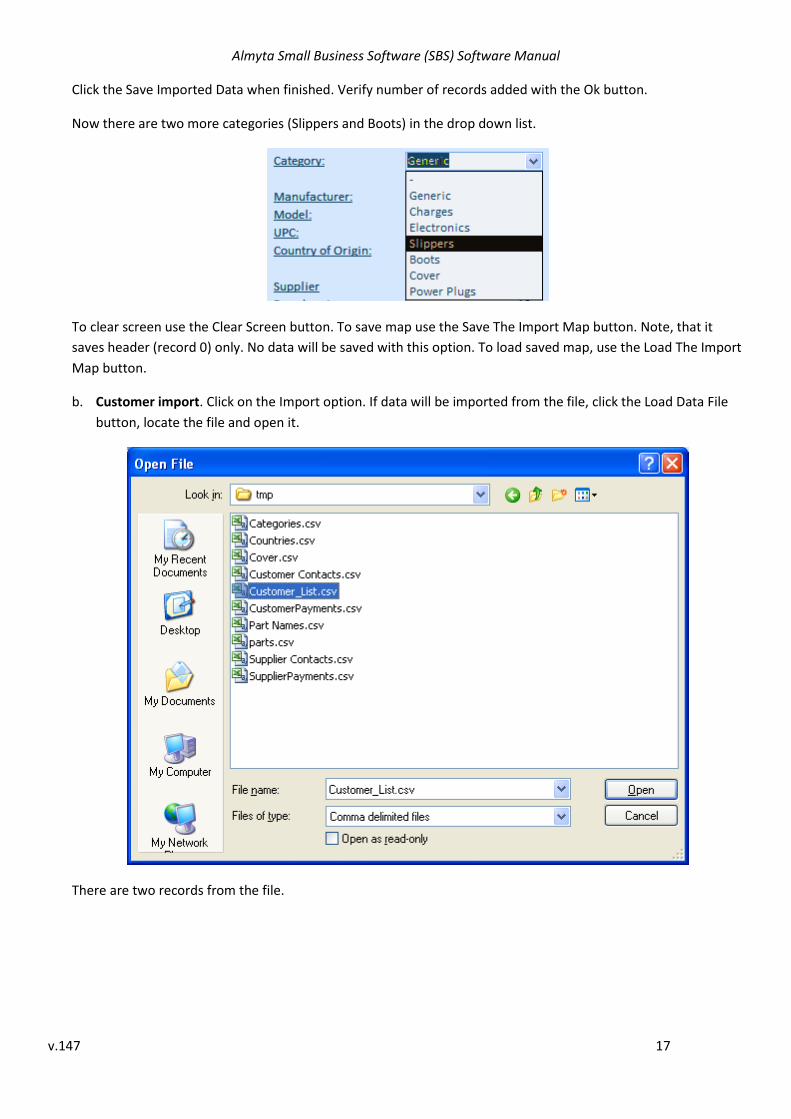
Click the Save Imported Data when finished. Verify number of records added with the Ok button.
Now there are two more categories (Slippers and Boots) in the drop down list.
To clear screen use the Clear Screen button. To save map use the Save The Import Map button. Note, that it
saves header (record 0) only. No data will be saved with this option. To load saved map, use the Load The Import
Map button.
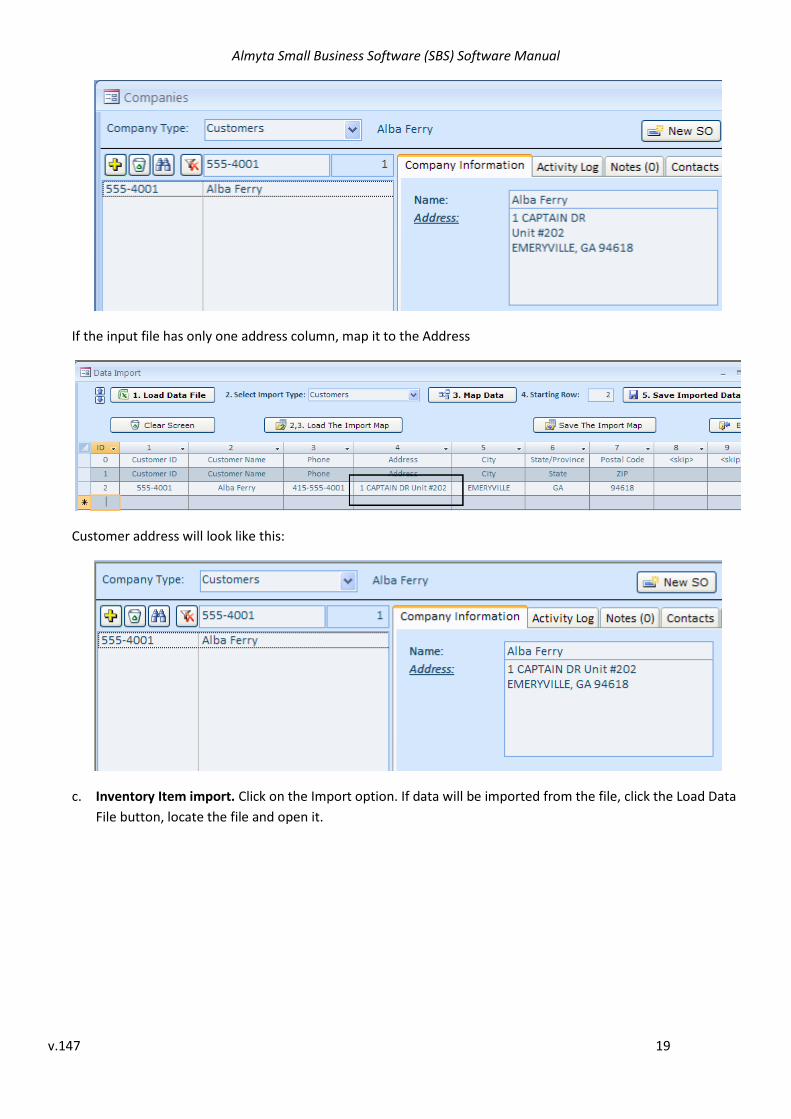
b. Customer import. Click on the Import option. If data will be imported from the file, click the Load Data File
button, locate the file and open it.
There are two records from the file.
Almyta Small Business Software (SBS) Software Manual
v.147 18
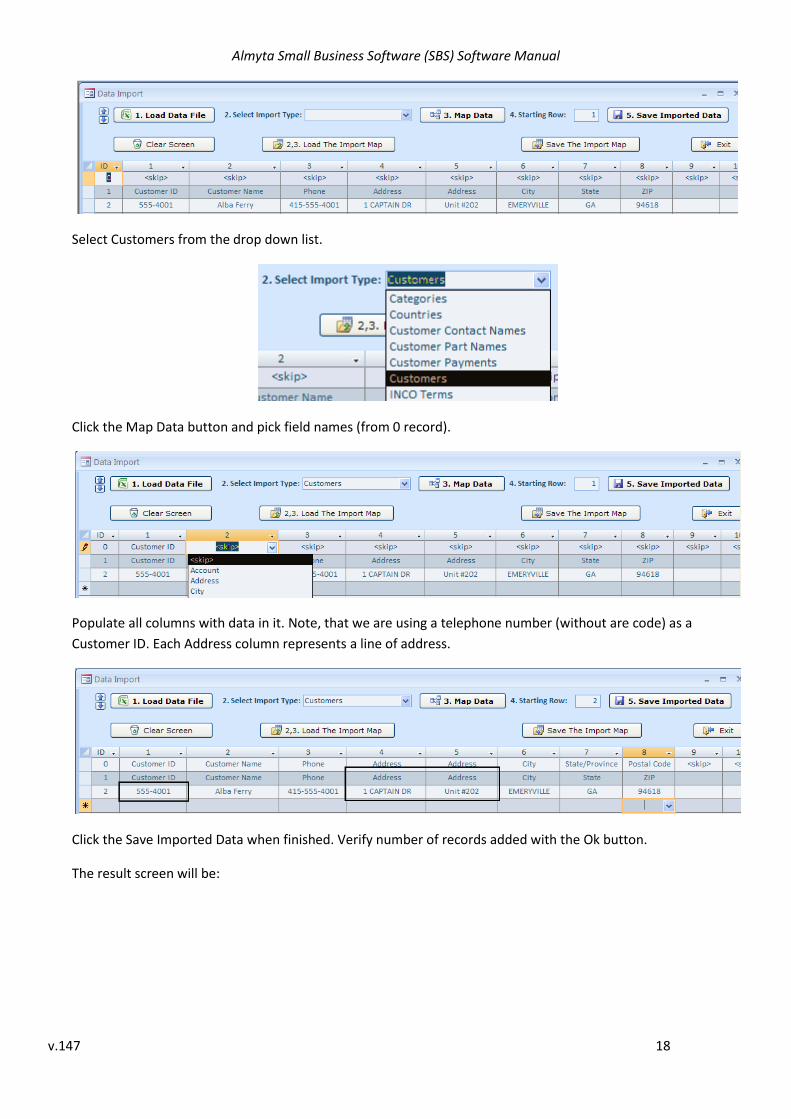
Select Customers from the drop down list.
Click the Map Data button and pick field names (from 0 record).
Populate all columns with data in it. Note, that we are using a telephone number (without are code) as a
Customer ID. Each Address column represents a line of address.
Click the Save Imported Data when finished. Verify number of records added with the Ok button.
The result screen will be:
Almyta Small Business Software (SBS) Software Manual
v.147 19
If the input file has only one address column, map it to the Address
Customer address will look like this:
c. Inventory Item import. Click on the Import option. If data will be imported from the file, click the Load Data
File button, locate the file and open it.

Almyta Small Business Software (SBS) Software Manual
v.147 20
There is one record in this file.
Select Item Master from the drop down list.
Click the Map Data button and pick field names (from 0 record).

Almyta Small Business Software (SBS) Software Manual
v.147 21
Populate all columns with data in it.
Click the Save Imported Data when finished. Verify number of records added with the Ok button.
Inventory Item screen will show new item
Almyta Small Business Software (SBS) Software Manual
v.147 22
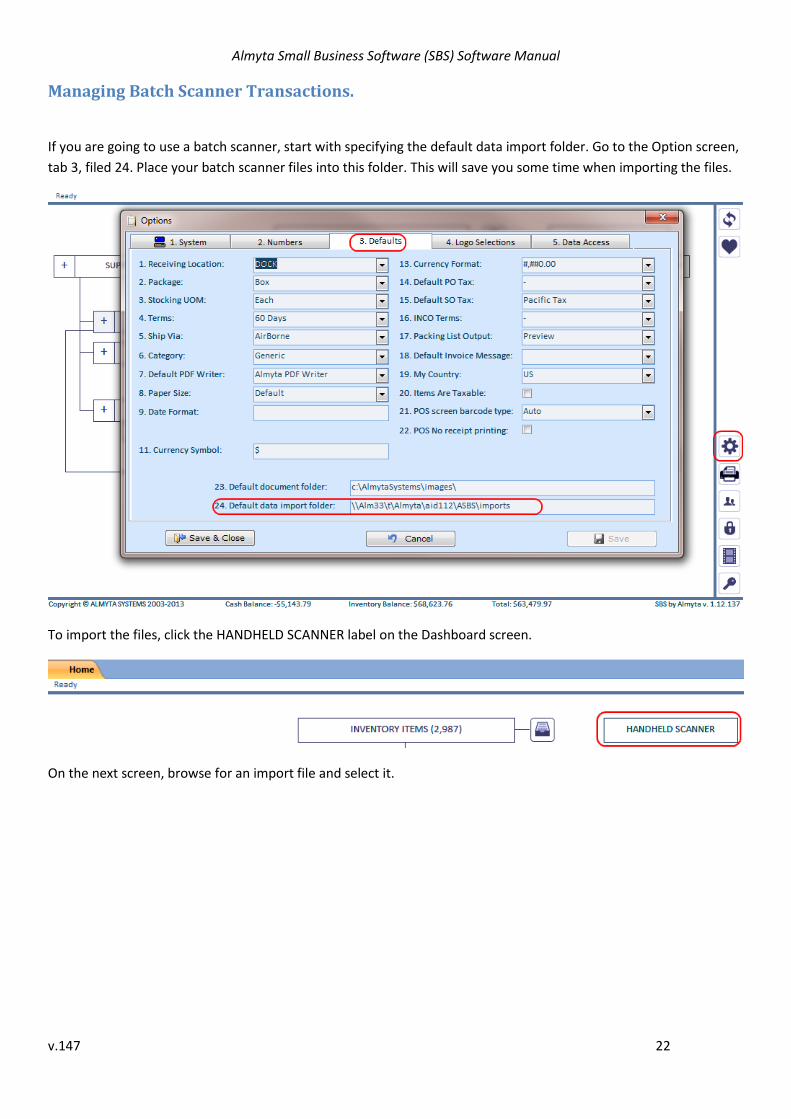
Managing Batch Scanner Transactions.
If you are going to use a batch scanner, start with specifying the default data import folder. Go to the Option screen,
tab 3, filed 24. Place your batch scanner files into this folder. This will save you some time when importing the files.
To import the files, click the HANDHELD SCANNER label on the Dashboard screen.
On the next screen, browse for an import file and select it.
Almyta Small Business Software (SBS) Software Manual
v.147 23
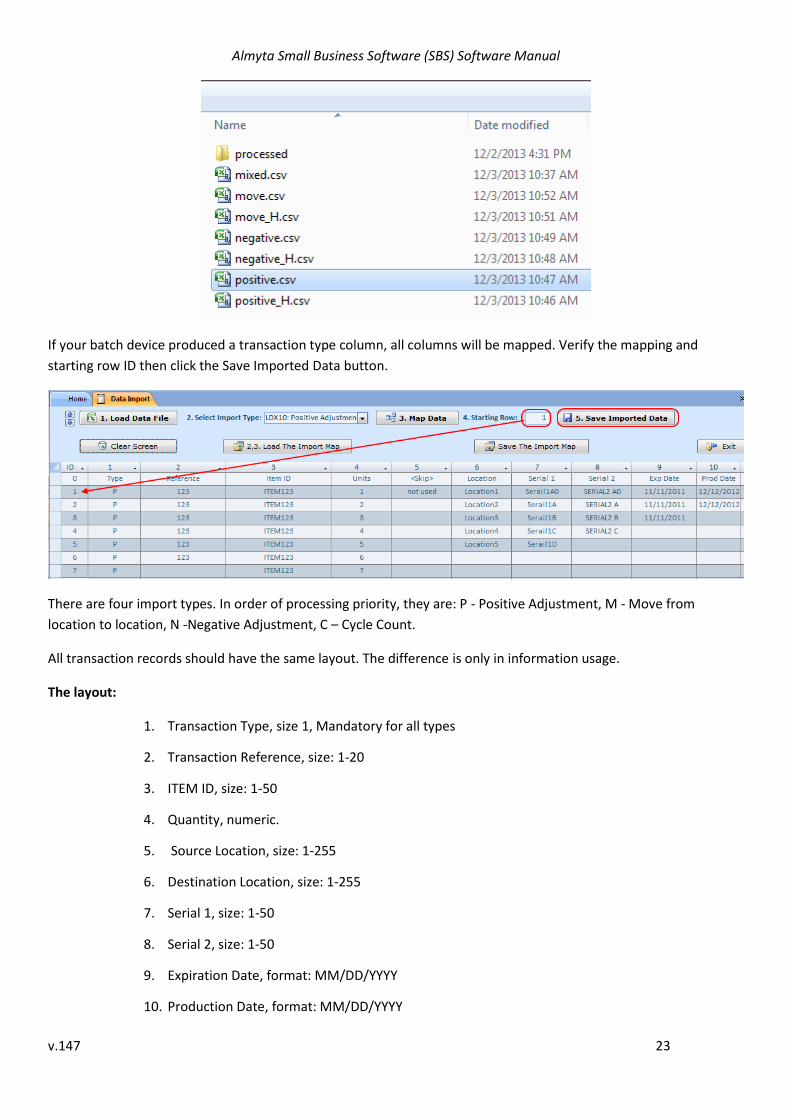
If your batch device produced a transaction type column, all columns will be mapped. Verify the mapping and
starting row ID then click the Save Imported Data button.
There are four import types. In order of processing priority, they are: P - Positive Adjustment, M - Move from
location to location, N -Negative Adjustment, C – Cycle Count.
All transaction records should have the same layout. The difference is only in information usage.
The layout:
1. Transaction Type, size 1, Mandatory for all types
2. Transaction Reference, size: 1-20
3. ITEM ID, size: 1-50
4. Quantity, numeric.
5. Source Location, size: 1-255
6. Destination Location, size: 1-255
7. Serial 1, size: 1-50
8. Serial 2, size: 1-50
9. Expiration Date, format: MM/DD/YYYY
10. Production Date, format: MM/DD/YYYY
Almyta Small Business Software (SBS) Software Manual
v.147 24
Positive adjustment
1. Transaction Type: fixed value P
2. Transaction Reference: optional, PO number or transaction ID
3. ITEM ID: mandatory
4. Quantity, mandatory
5. Source Location: not in use
6. Destination Location: optional
7. Serial 1: optional
8. Serial 2: optional
9. Expiration Date: optional
10. Production Date: optional
Move
1. Transaction Type: fixed value M
2. Transaction Reference: not in use
3. ITEM ID: mandatory
4. Quantity: optional
5. Source Location: optional
6. Destination Location: mandatory
7. Serial 1: optional
8. Serial 2: not in use
9. Expiration Date: not in use
10. Production Date: not in use
Negative Adjustment
1. Transaction Type: fixed value N
2. Transaction Reference: optional, SO number or transaction ID
3. ITEM ID: mandatory
4. Quantity: mandatory
5. Source Location: not in use
Almyta Small Business Software (SBS) Software Manual
v.147 25
6. Destination Location: optional
7. Serial 1: optional
8. Serial 2: optional
9. Expiration Date: not in use
10. Production Date: not in use
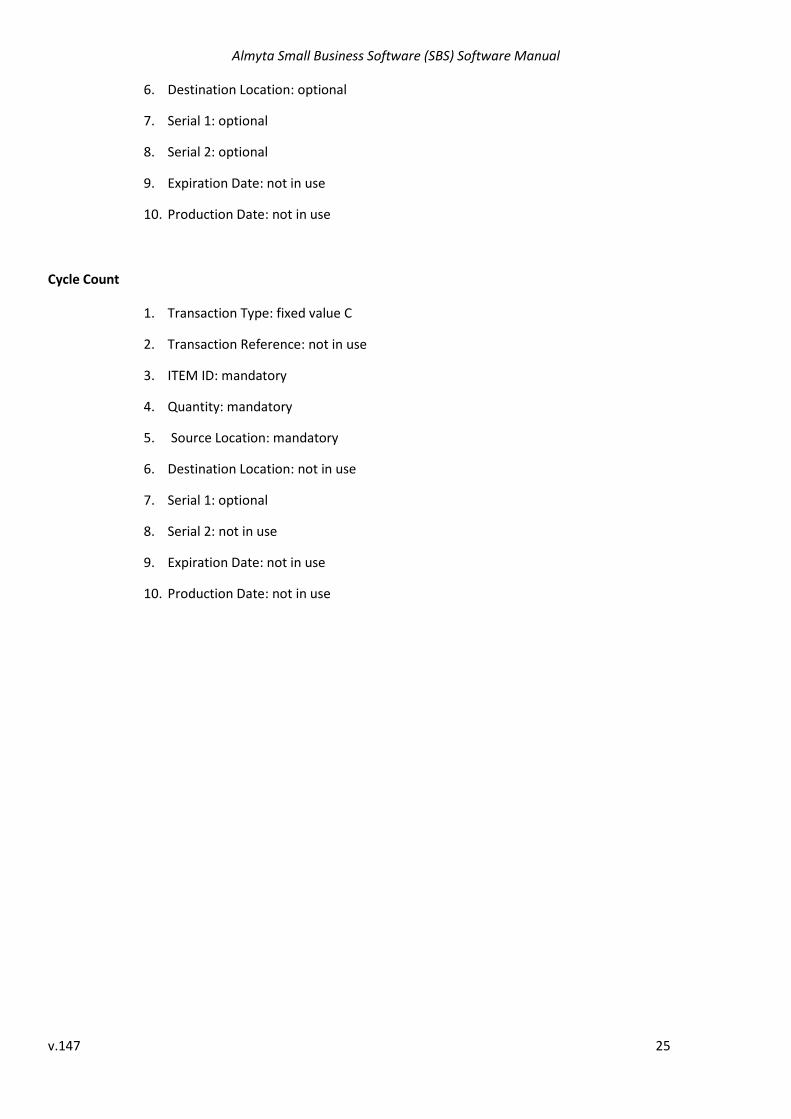
Cycle Count
1. Transaction Type: fixed value C
2. Transaction Reference: not in use
3. ITEM ID: mandatory
4. Quantity: mandatory
5. Source Location: mandatory
6. Destination Location: not in use
7. Serial 1: optional
8. Serial 2: not in use
9. Expiration Date: not in use
10. Production Date: not in use
Almyta Small Business Software (SBS) Software Manual
v.147 26
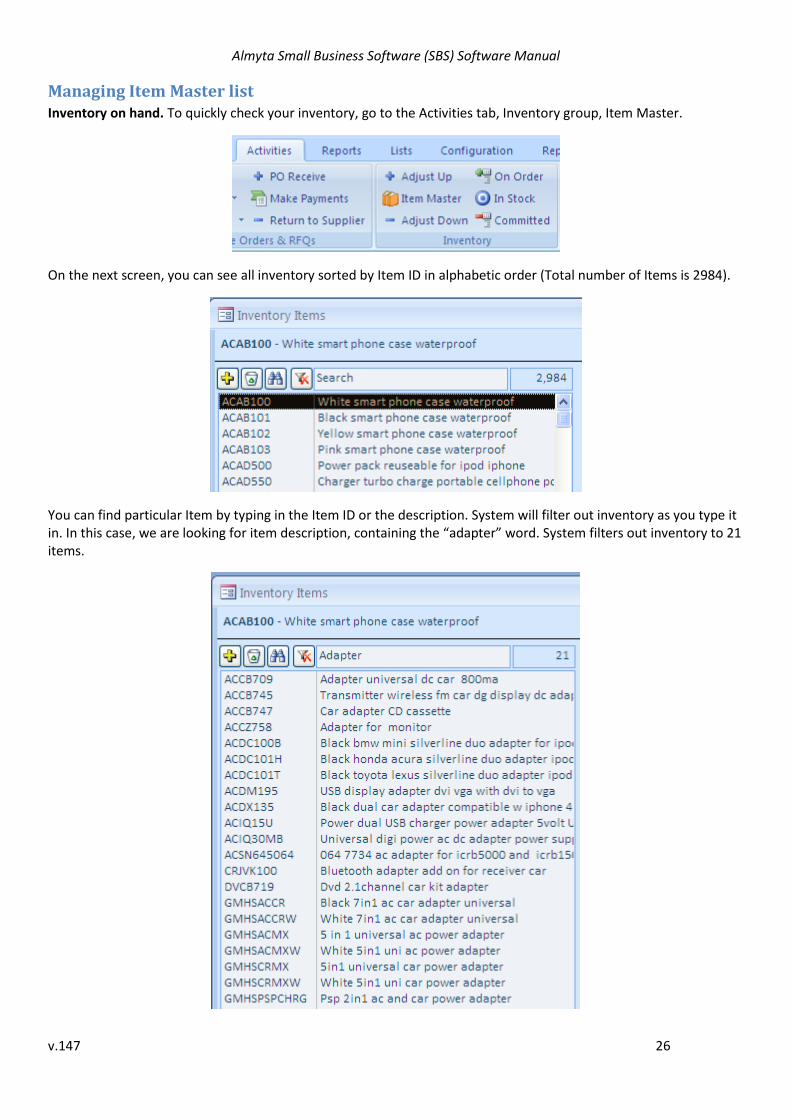
Managing Item Master list Inventory on hand. To quickly check your inventory, go to the Activities tab, Inventory group, Item Master.
On the next screen, you can see all inventory sorted by Item ID in alphabetic order (Total number of Items is 2984).
You can find particular Item by typing in the Item ID or the description. System will filter out inventory as you type it in. In this case, we are looking for item description, containing the “adapter” word. System filters out inventory to 21 items.
Almyta Small Business Software (SBS) Software Manual
v.147 27
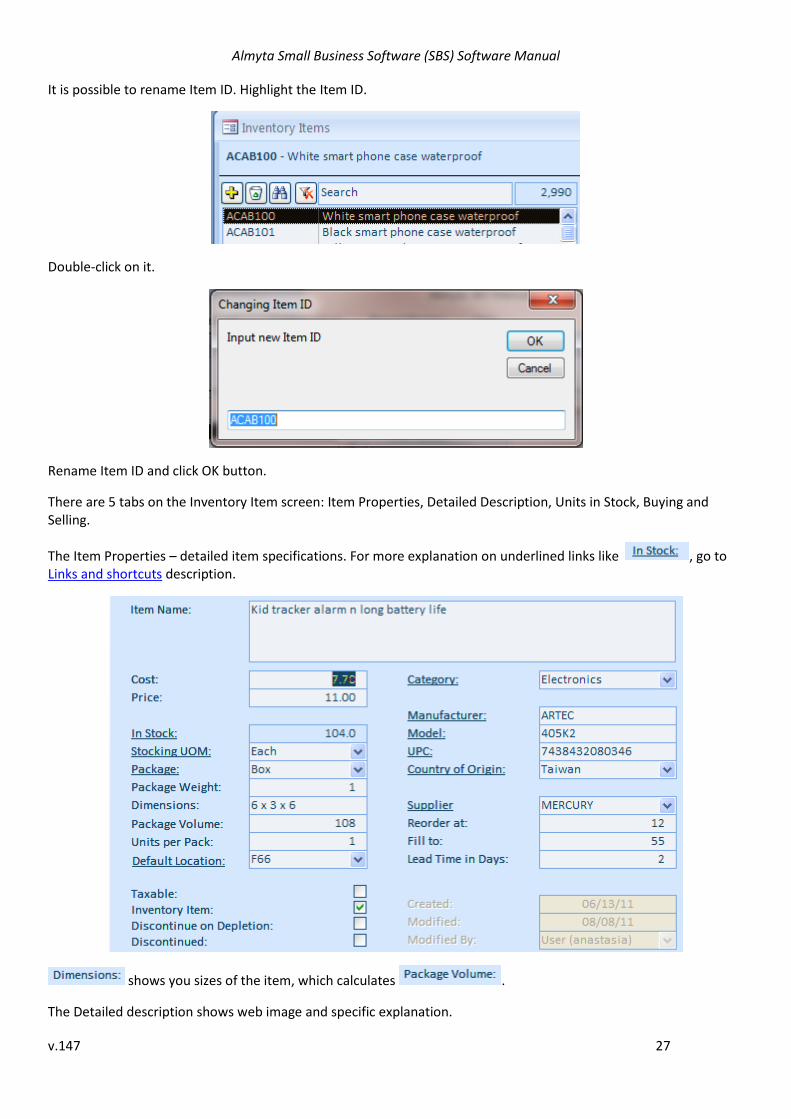
It is possible to rename Item ID. Highlight the Item ID.
Double-click on it.
Rename Item ID and click OK button.
There are 5 tabs on the Inventory Item screen: Item Properties, Detailed Description, Units in Stock, Buying and Selling.
The Item Properties – detailed item specifications. For more explanation on underlined links like , go to Links and shortcuts description.
shows you sizes of the item, which calculates .
The Detailed description shows web image and specific explanation.
Almyta Small Business Software (SBS) Software Manual
v.147 28
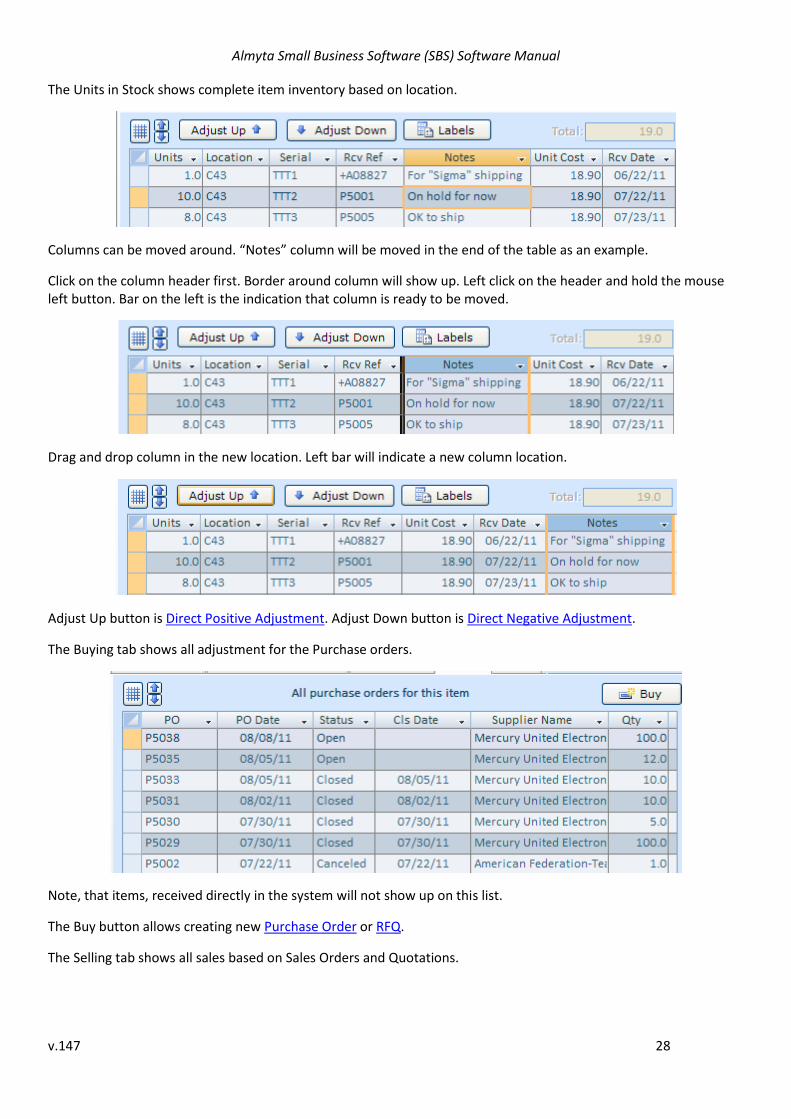
The Units in Stock shows complete item inventory based on location.
Columns can be moved around. “Notes” column will be moved in the end of the table as an example.
Click on the column header first. Border around column will show up. Left click on the header and hold the mouse left button. Bar on the left is the indication that column is ready to be moved.
Drag and drop column in the new location. Left bar will indicate a new column location.
Adjust Up button is Direct Positive Adjustment. Adjust Down button is Direct Negative Adjustment.
The Buying tab shows all adjustment for the Purchase orders.
Note, that items, received directly in the system will not show up on this list.
The Buy button allows creating new Purchase Order or RFQ.
The Selling tab shows all sales based on Sales Orders and Quotations.

Almyta Small Business Software (SBS) Software Manual
v.147 29
The Sell button allows creating new Sales Order or Sales Quote.
Almyta Small Business Software (SBS) Software Manual
v.147 30
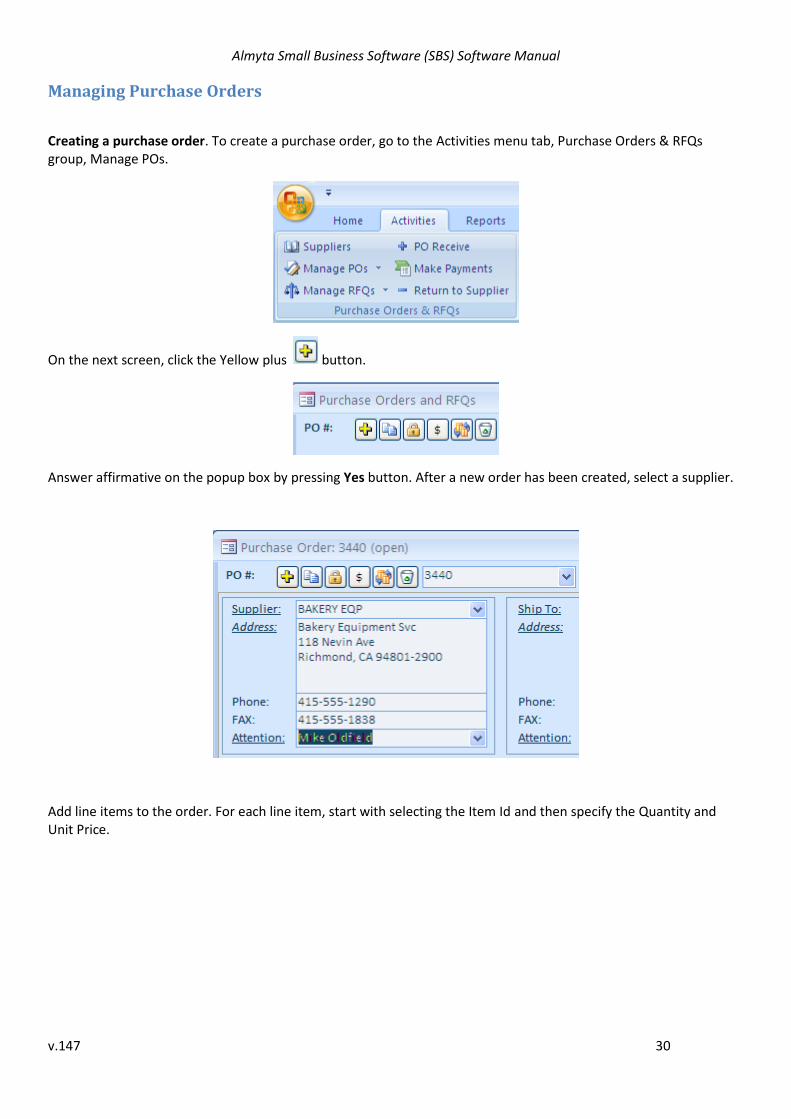
Managing Purchase Orders
Creating a purchase order. To create a purchase order, go to the Activities menu tab, Purchase Orders & RFQs group, Manage POs.
On the next screen, click the Yellow plus button.
Answer affirmative on the popup box by pressing Yes button. After a new order has been created, select a supplier.
Add line items to the order. For each line item, start with selecting the Item Id and then specify the Quantity and Unit Price.
Almyta Small Business Software (SBS) Software Manual
v.147 31
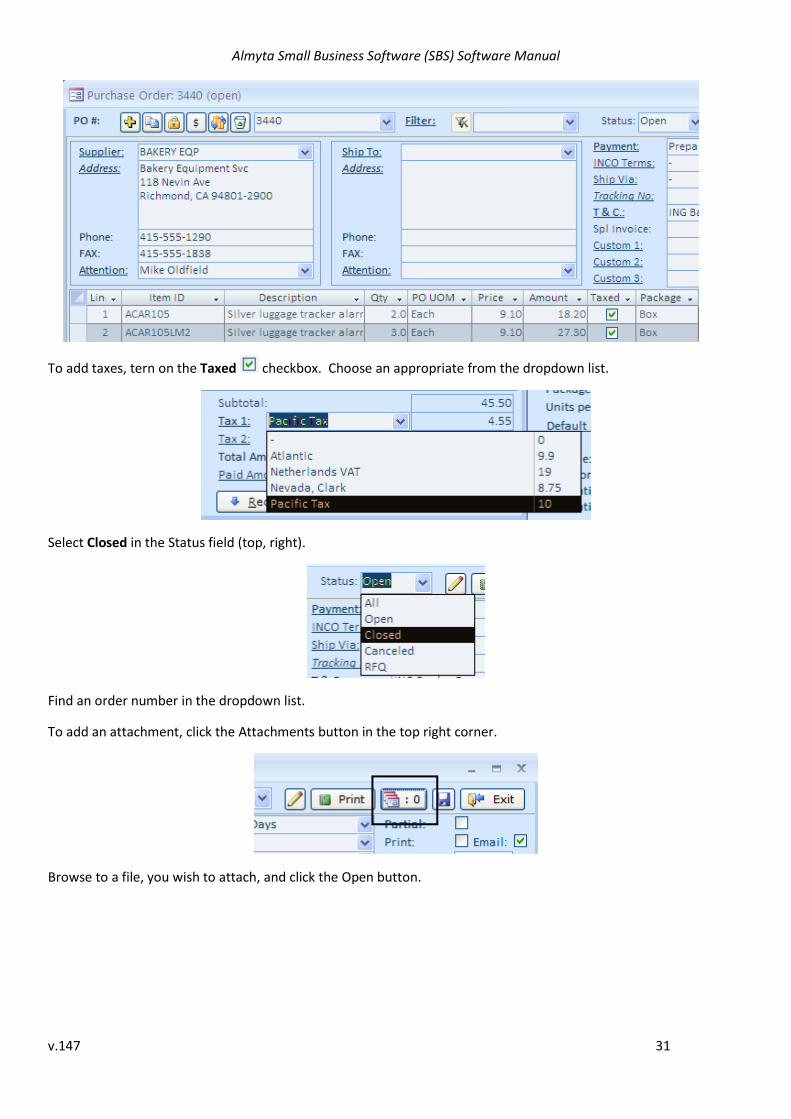
To add taxes, tern on the Taxed checkbox. Choose an appropriate from the dropdown list.
Select Closed in the Status field (top, right).
Find an order number in the dropdown list.
To add an attachment, click the Attachments button in the top right corner.
Browse to a file, you wish to attach, and click the Open button.
Almyta Small Business Software (SBS) Software Manual
v.147 32
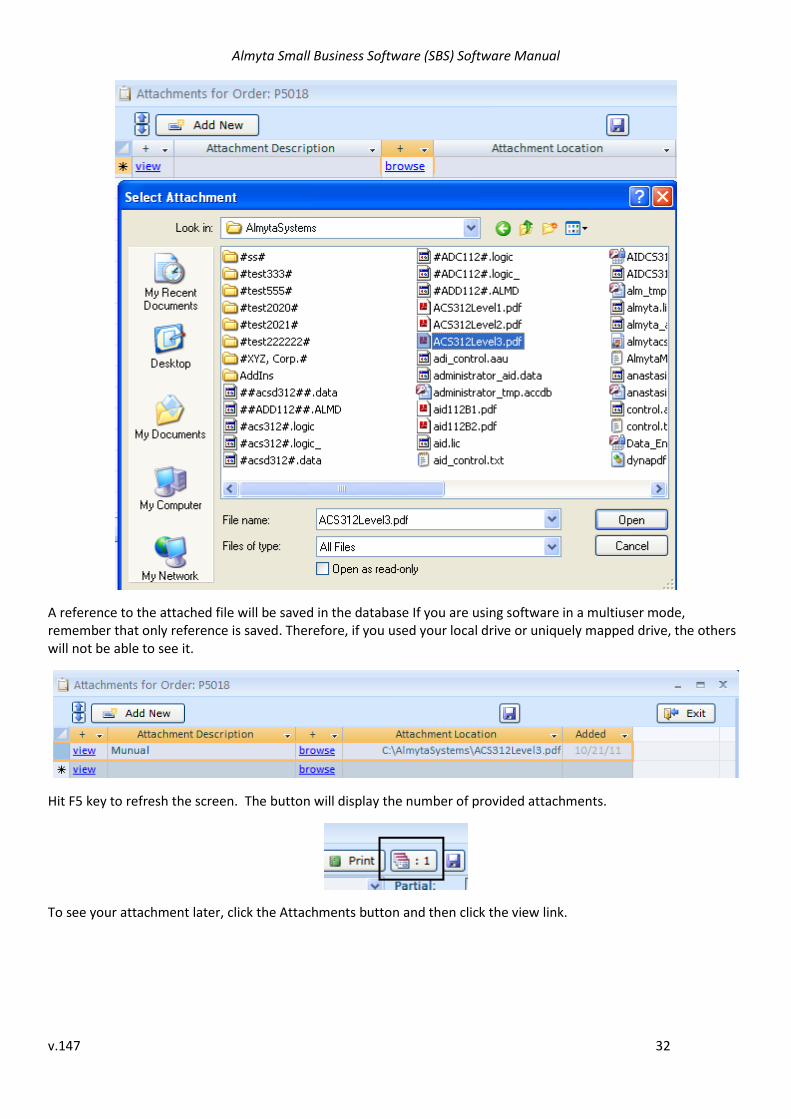
A reference to the attached file will be saved in the database If you are using software in a multiuser mode, remember that only reference is saved. Therefore, if you used your local drive or uniquely mapped drive, the others will not be able to see it.
Hit F5 key to refresh the screen. The button will display the number of provided attachments.
To see your attachment later, click the Attachments button and then click the view link.
Almyta Small Business Software (SBS) Software Manual
v.147 33
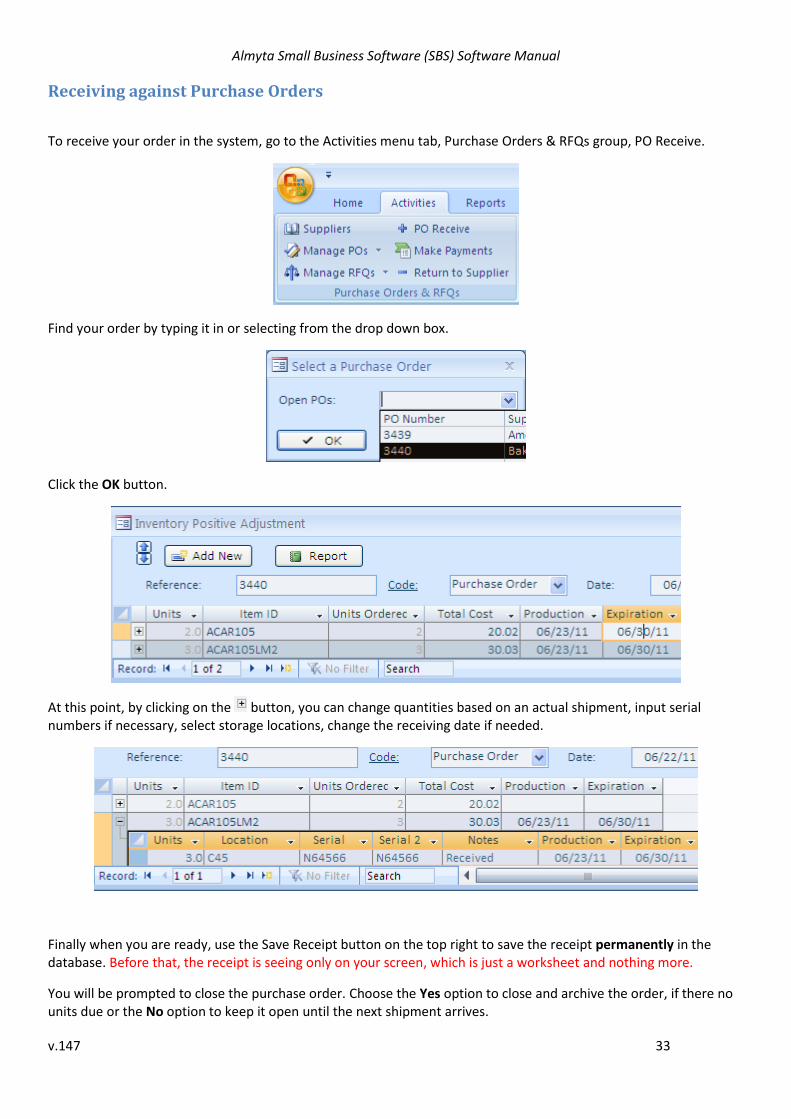
Receiving against Purchase Orders
To receive your order in the system, go to the Activities menu tab, Purchase Orders & RFQs group, PO Receive.
Find your order by typing it in or selecting from the drop down box.
Click the OK button.
At this point, by clicking on the button, you can change quantities based on an actual shipment, input serial numbers if necessary, select storage locations, change the receiving date if needed.
Finally when you are ready, use the Save Receipt button on the top right to save the receipt permanently in the database. Before that, the receipt is seeing only on your screen, which is just a worksheet and nothing more.
You will be prompted to close the purchase order. Choose the Yes option to close and archive the order, if there no units due or the No option to keep it open until the next shipment arrives.

Almyta Small Business Software (SBS) Software Manual
v.147 34
For more information on inventory adjustments go to Direct Positive Adjustment process.
To return items to supplier go to Purchase Order Refund process.
Almyta Small Business Software (SBS) Software Manual
v.147 35
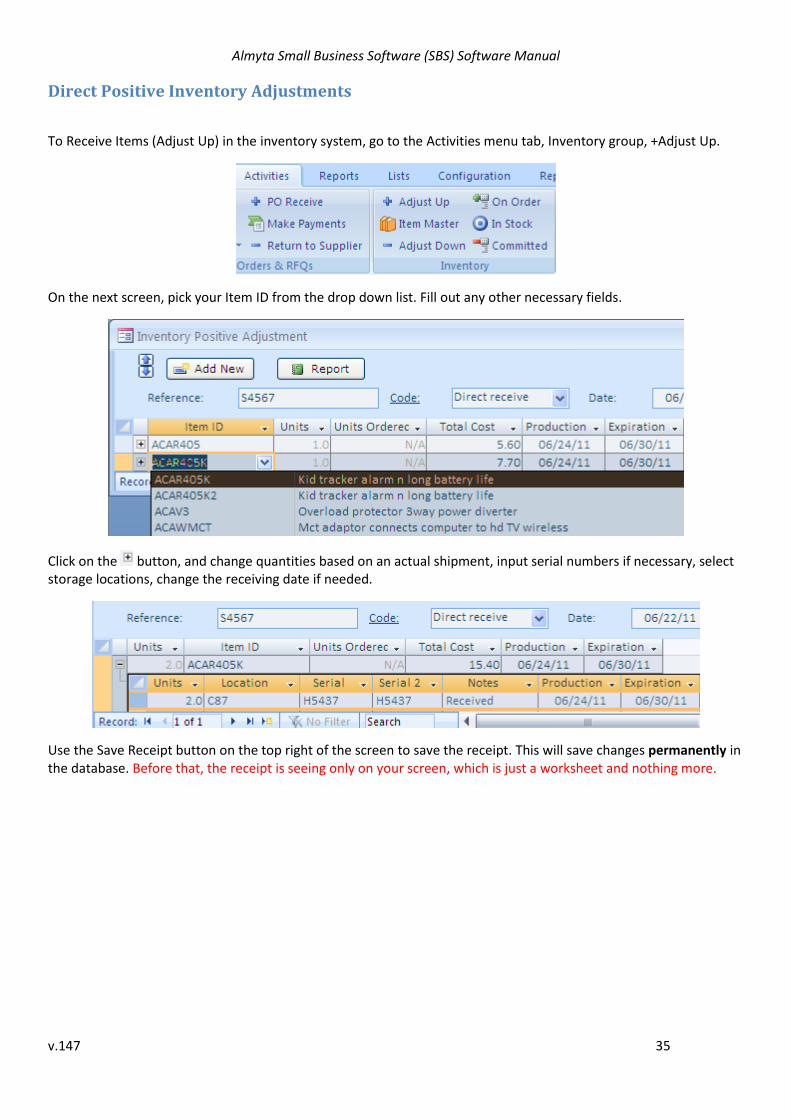
Direct Positive Inventory Adjustments
To Receive Items (Adjust Up) in the inventory system, go to the Activities menu tab, Inventory group, +Adjust Up.
On the next screen, pick your Item ID from the drop down list. Fill out any other necessary fields.
Click on the button, and change quantities based on an actual shipment, input serial numbers if necessary, select storage locations, change the receiving date if needed.
Use the Save Receipt button on the top right of the screen to save the receipt. This will save changes permanently in the database. Before that, the receipt is seeing only on your screen, which is just a worksheet and nothing more.
Almyta Small Business Software (SBS) Software Manual
v.147 36
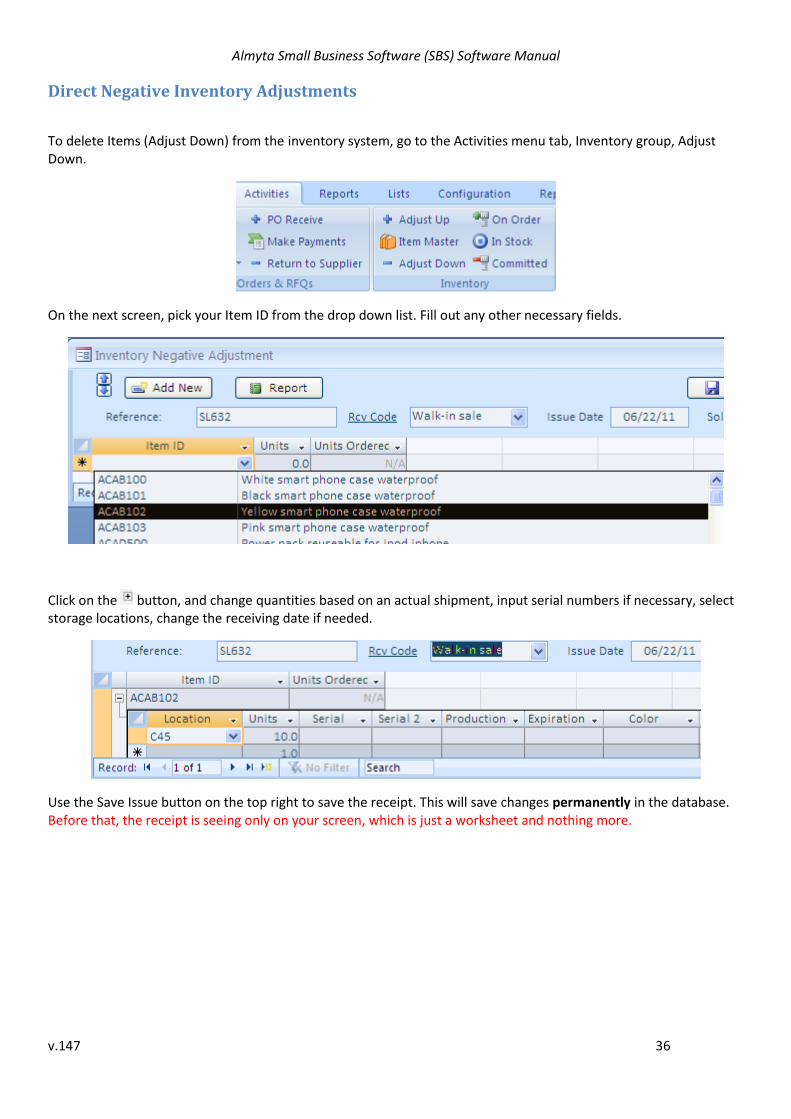
Direct Negative Inventory Adjustments
To delete Items (Adjust Down) from the inventory system, go to the Activities menu tab, Inventory group, Adjust Down.
On the next screen, pick your Item ID from the drop down list. Fill out any other necessary fields.
Click on the button, and change quantities based on an actual shipment, input serial numbers if necessary, select storage locations, change the receiving date if needed.
Use the Save Issue button on the top right to save the receipt. This will save changes permanently in the database. Before that, the receipt is seeing only on your screen, which is just a worksheet and nothing more.
Almyta Small Business Software (SBS) Software Manual
v.147 37
Managing Sales Orders
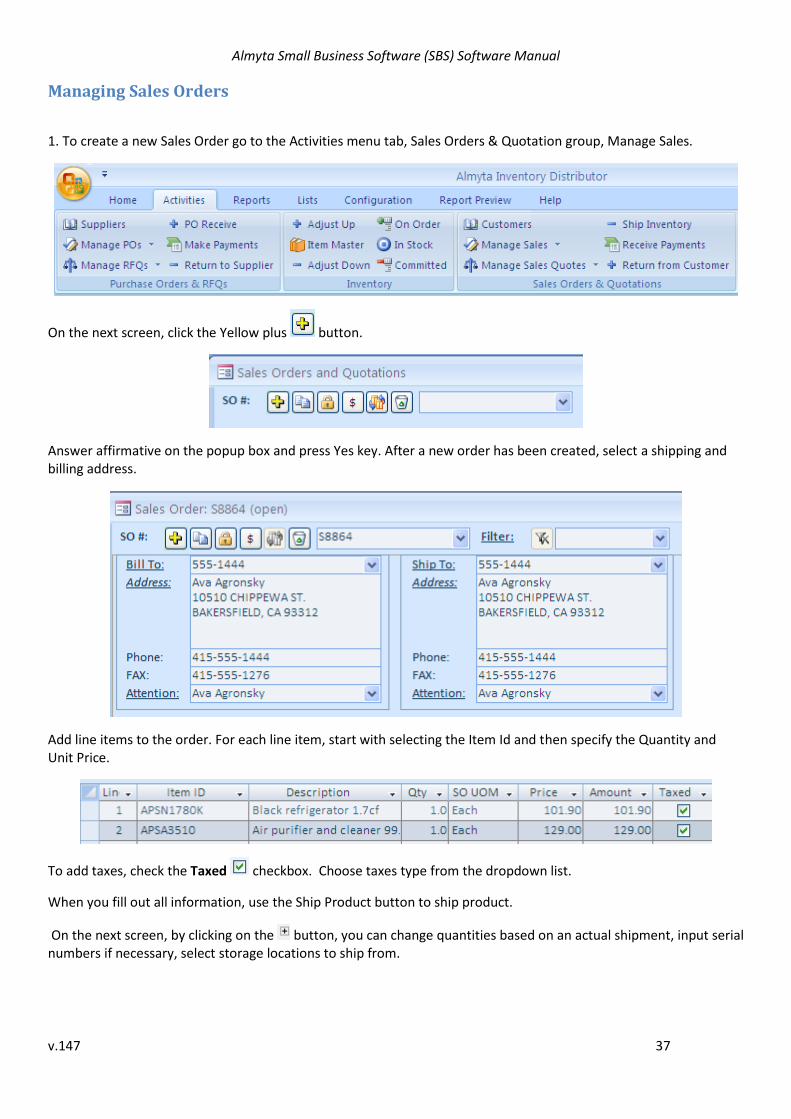
1. To create a new Sales Order go to the Activities menu tab, Sales Orders & Quotation group, Manage Sales.
On the next screen, click the Yellow plus button.
Answer affirmative on the popup box and press Yes key. After a new order has been created, select a shipping and billing address.
Add line items to the order. For each line item, start with selecting the Item Id and then specify the Quantity and Unit Price.
To add taxes, check the Taxed checkbox. Choose taxes type from the dropdown list.
When you fill out all information, use the Ship Product button to ship product.
On the next screen, by clicking on the button, you can change quantities based on an actual shipment, input serial numbers if necessary, select storage locations to ship from.

Almyta Small Business Software (SBS) Software Manual
v.147 38
When all information is filled, use the Save Issue button to finalize the shipment. Before that, the receipt is seeing only on your screen, which is just a worksheet and nothing more.
Shipping order with invoice.
Go to the Activities menu tab, Sales Orders & Quotation group, Manage Sales. Find your Sales Order.
Click the Create Invoice button in the bottom right for invoice. Answer affirmative on the popup box by pressing Yes button.
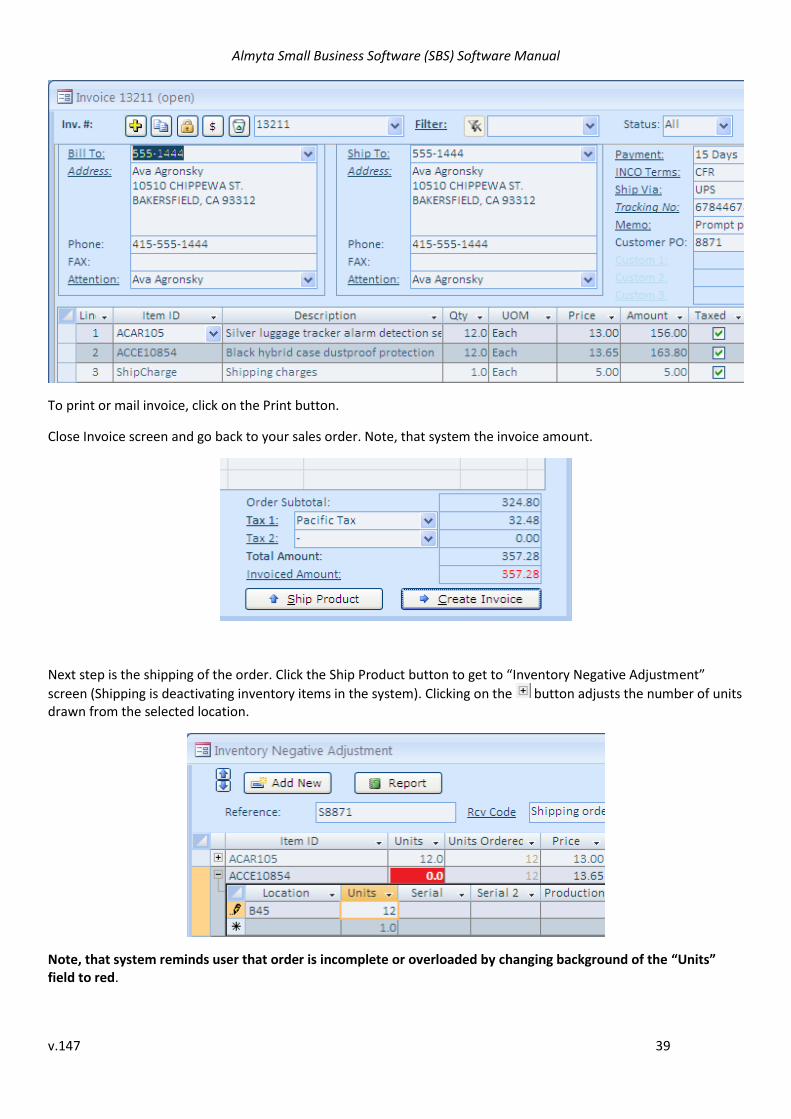
Adjust quantities on the Invoice screen if necessary. Note that the name of the screen contains invoice number and shows status of invoice (in this case its invoice 13211, status is “open”).
Almyta Small Business Software (SBS) Software Manual
v.147 39
To print or mail invoice, click on the Print button.
Close Invoice screen and go back to your sales order. Note, that system the invoice amount.
Next step is the shipping of the order. Click the Ship Product button to get to “Inventory Negative Adjustment”
screen (Shipping is deactivating inventory items in the system). Clicking on the button adjusts the number of units drawn from the selected location.
Note, that system reminds user that order is incomplete or overloaded by changing background of the “Units” field to red.
Almyta Small Business Software (SBS) Software Manual
v.147 40
Click the Save Issue button on the top right to save changes permanently in the system. Answer affirmative on the popup box and press Yes key.
For more information on adjusting inventory go to Direct Negative Adjustment process.
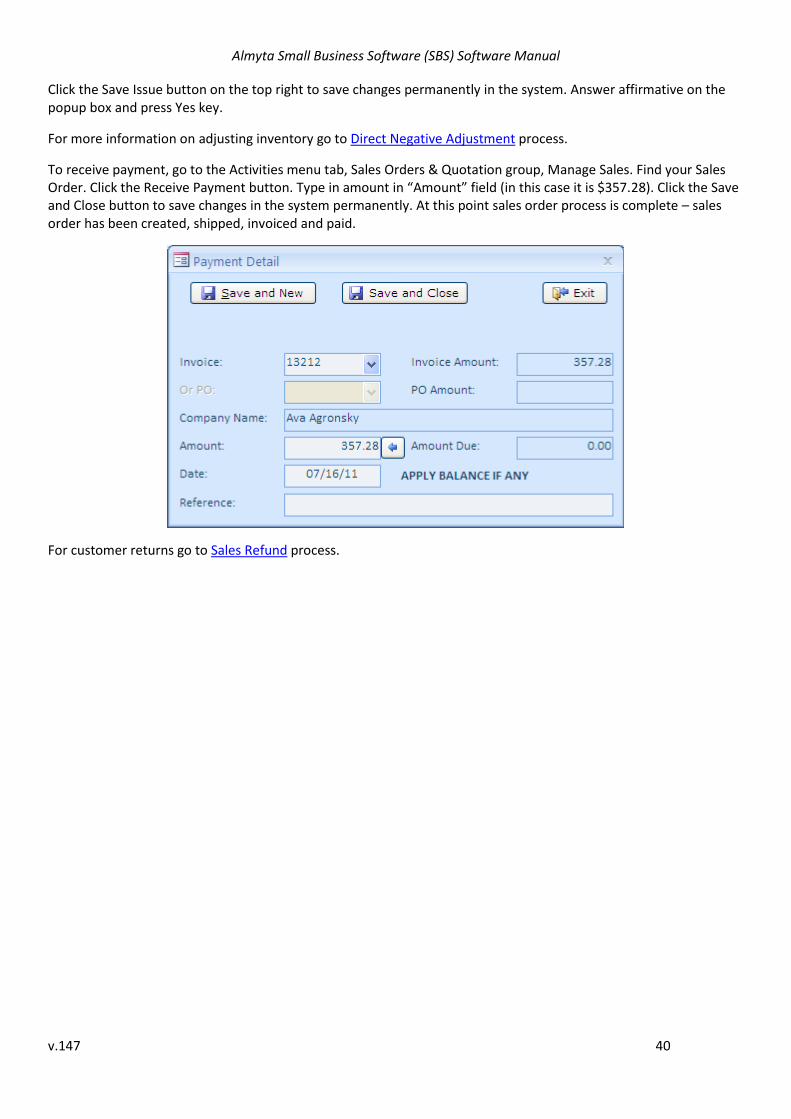
To receive payment, go to the Activities menu tab, Sales Orders & Quotation group, Manage Sales. Find your Sales Order. Click the Receive Payment button. Type in amount in “Amount” field (in this case it is $357.28). Click the Save and Close button to save changes in the system permanently. At this point sales order process is complete – sales order has been created, shipped, invoiced and paid.
For customer returns go to Sales Refund process.
Almyta Small Business Software (SBS) Software Manual
v.147 41
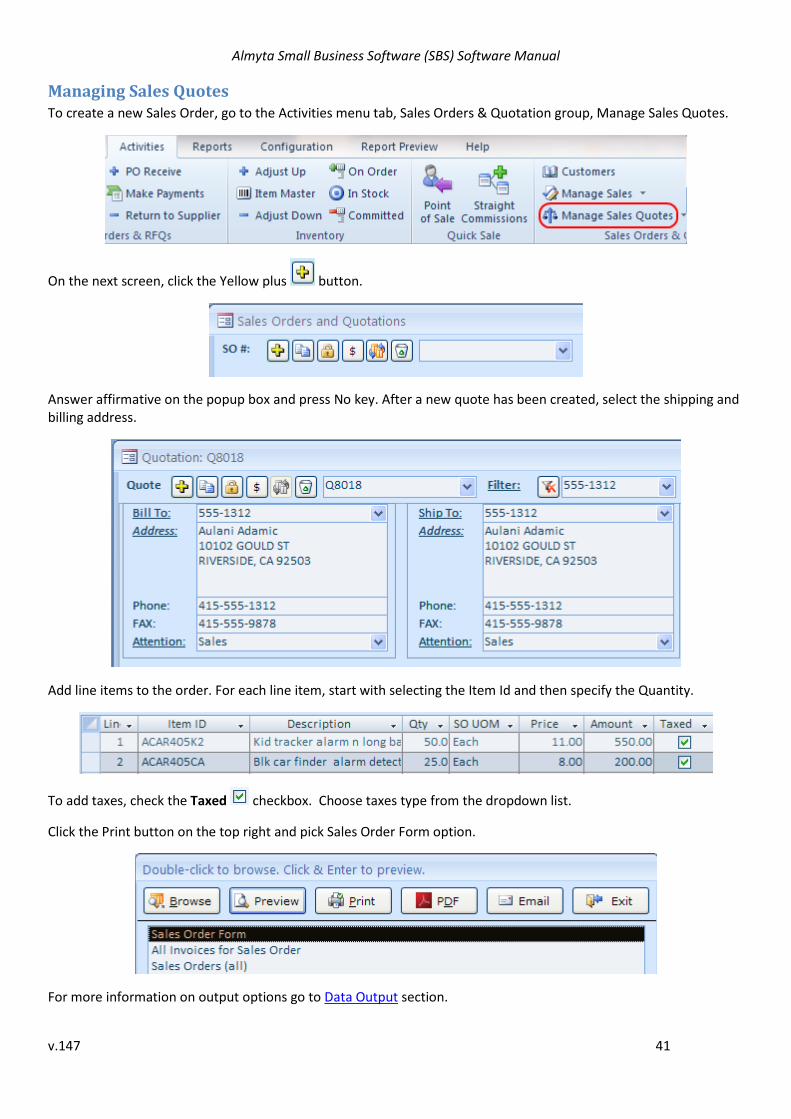
Managing Sales Quotes To create a new Sales Order, go to the Activities menu tab, Sales Orders & Quotation group, Manage Sales Quotes.
On the next screen, click the Yellow plus button.
Answer affirmative on the popup box and press No key. After a new quote has been created, select the shipping and billing address.
Add line items to the order. For each line item, start with selecting the Item Id and then specify the Quantity.
To add taxes, check the Taxed checkbox. Choose taxes type from the dropdown list.
Click the Print button on the top right and pick Sales Order Form option.
For more information on output options go to Data Output section.
Almyta Small Business Software (SBS) Software Manual
v.147 42
Using Point of Sale Screen
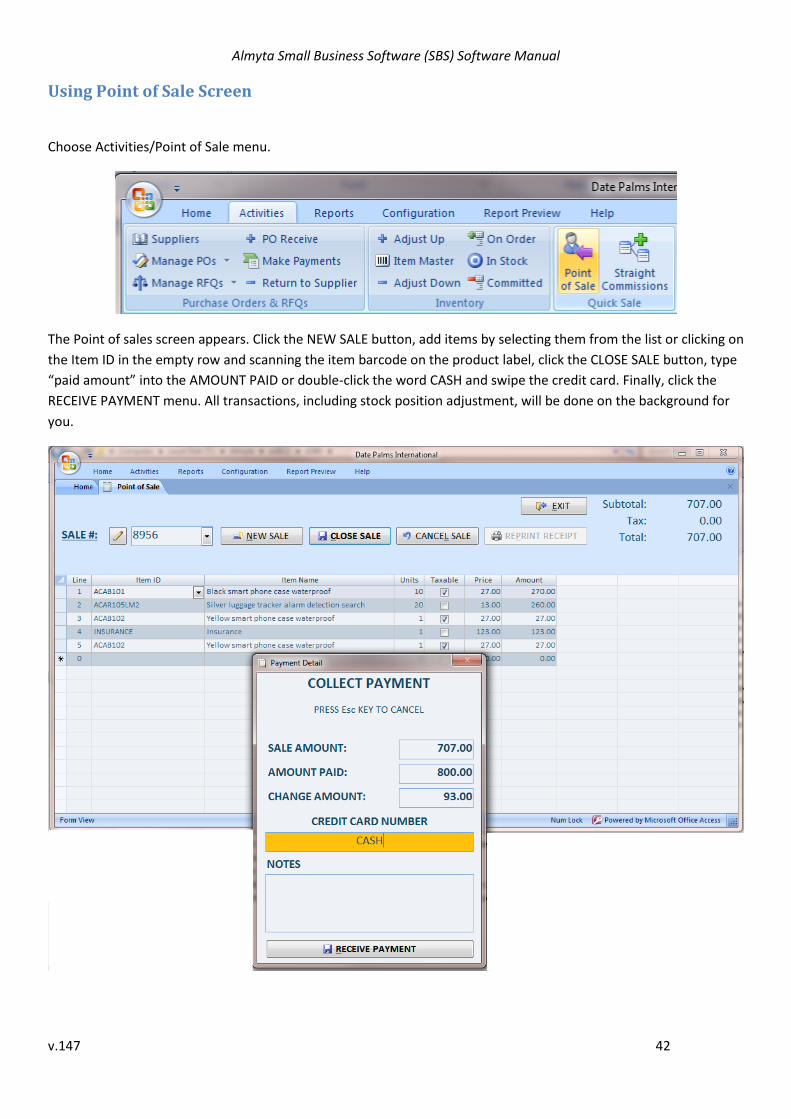
Choose Activities/Point of Sale menu.
The Point of sales screen appears. Click the NEW SALE button, add items by selecting them from the list or clicking on
the Item ID in the empty row and scanning the item barcode on the product label, click the CLOSE SALE button, type
“paid amount” into the AMOUNT PAID or double-click the word CASH and swipe the credit card. Finally, click the
RECEIVE PAYMENT menu. All transactions, including stock position adjustment, will be done on the background for
you.
Almyta Small Business Software (SBS) Software Manual
v.147 43
Managing Straight Commissions transactions.
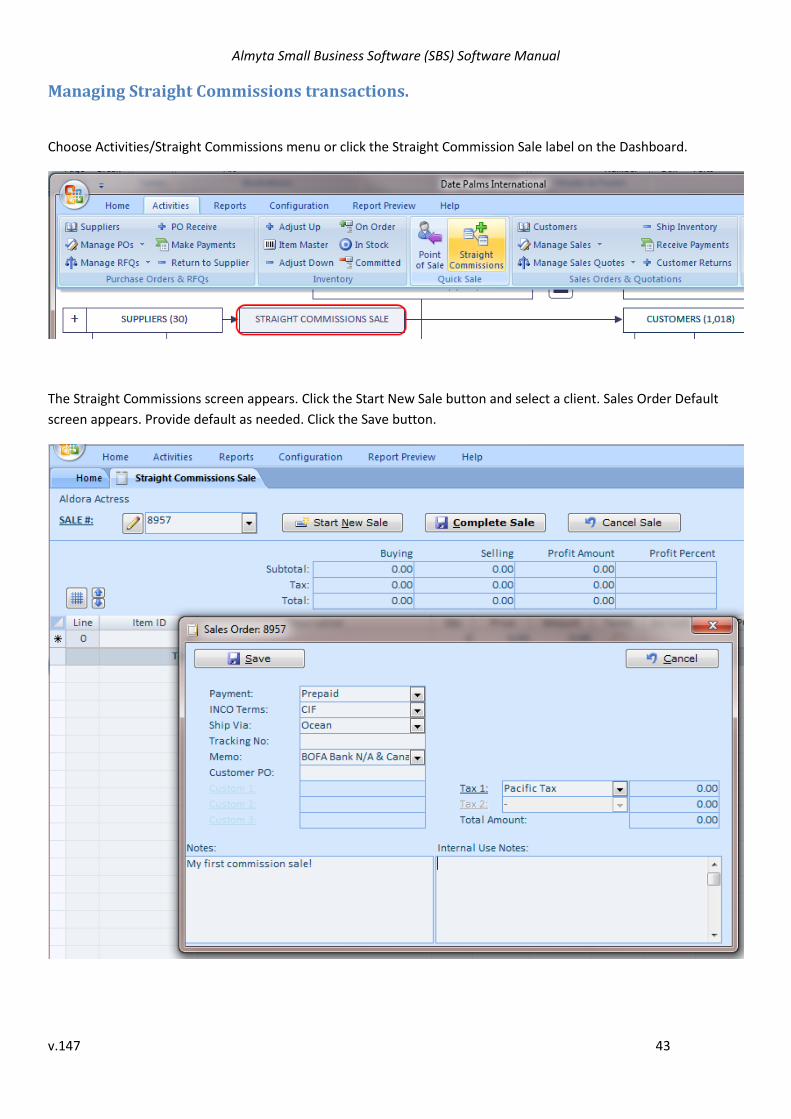
Choose Activities/Straight Commissions menu or click the Straight Commission Sale label on the Dashboard.
The Straight Commissions screen appears. Click the Start New Sale button and select a client. Sales Order Default
screen appears. Provide default as needed. Click the Save button.
Almyta Small Business Software (SBS) Software Manual
v.147 44
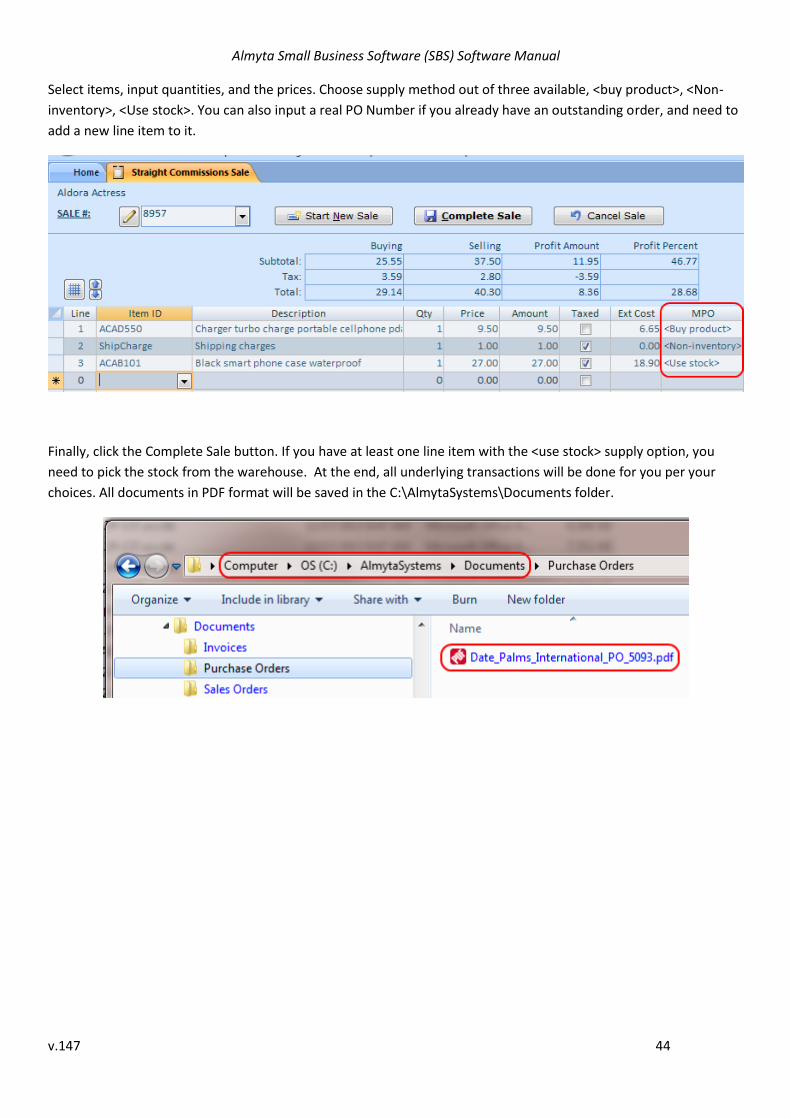
Select items, input quantities, and the prices. Choose supply method out of three available, <buy product>, <Non-
inventory>, <Use stock>. You can also input a real PO Number if you already have an outstanding order, and need to
add a new line item to it.
Finally, click the Complete Sale button. If you have at least one line item with the <use stock> supply option, you
need to pick the stock from the warehouse. At the end, all underlying transactions will be done for you per your
choices. All documents in PDF format will be saved in the C:\AlmytaSystems\Documents folder.
Almyta Small Business Software (SBS) Software Manual
v.147 45
Managing Invoices
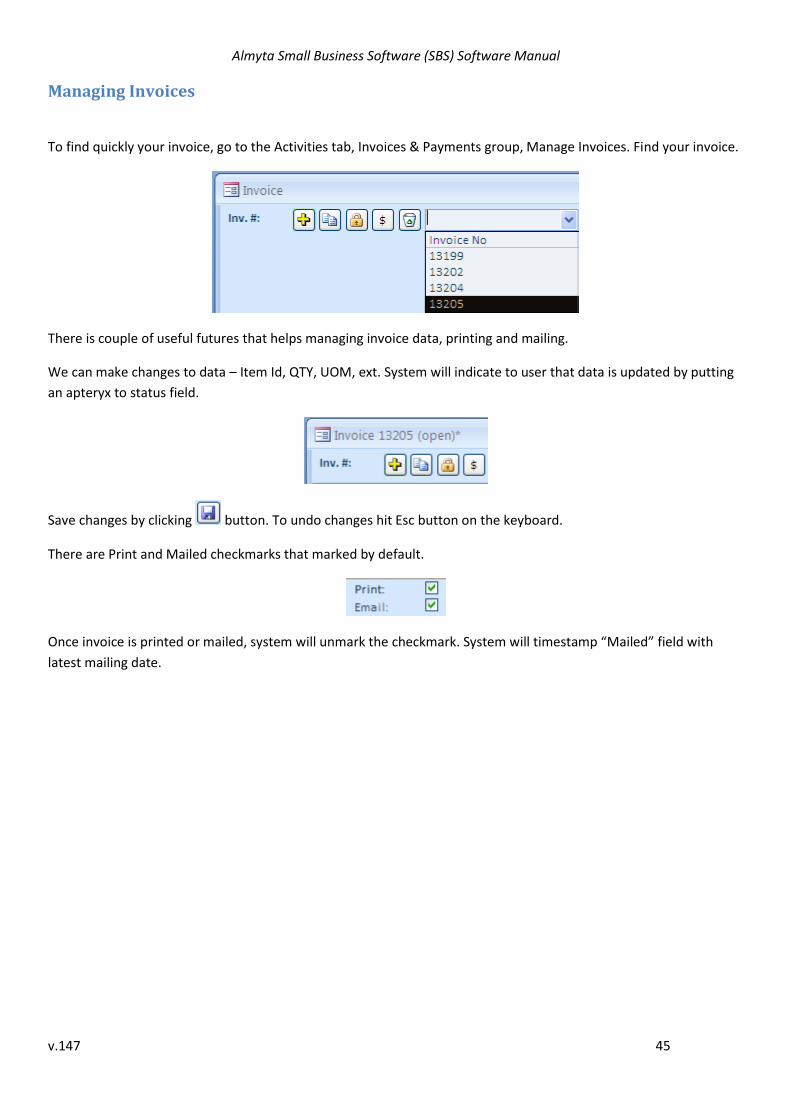
To find quickly your invoice, go to the Activities tab, Invoices & Payments group, Manage Invoices. Find your invoice.
There is couple of useful futures that helps managing invoice data, printing and mailing.
We can make changes to data – Item Id, QTY, UOM, ext. System will indicate to user that data is updated by putting
an apteryx to status field.
Save changes by clicking button. To undo changes hit Esc button on the keyboard.
There are Print and Mailed checkmarks that marked by default.
Once invoice is printed or mailed, system will unmark the checkmark. System will timestamp “Mailed” field with
latest mailing date.
Almyta Small Business Software (SBS) Software Manual
v.147 46
Posting Payments The Supplier/Customer payments flowchart can be found in Appendix D.
There are 2 types of payments in the system:
1. Purchase Order payments.
2. Customer Invoice payment.
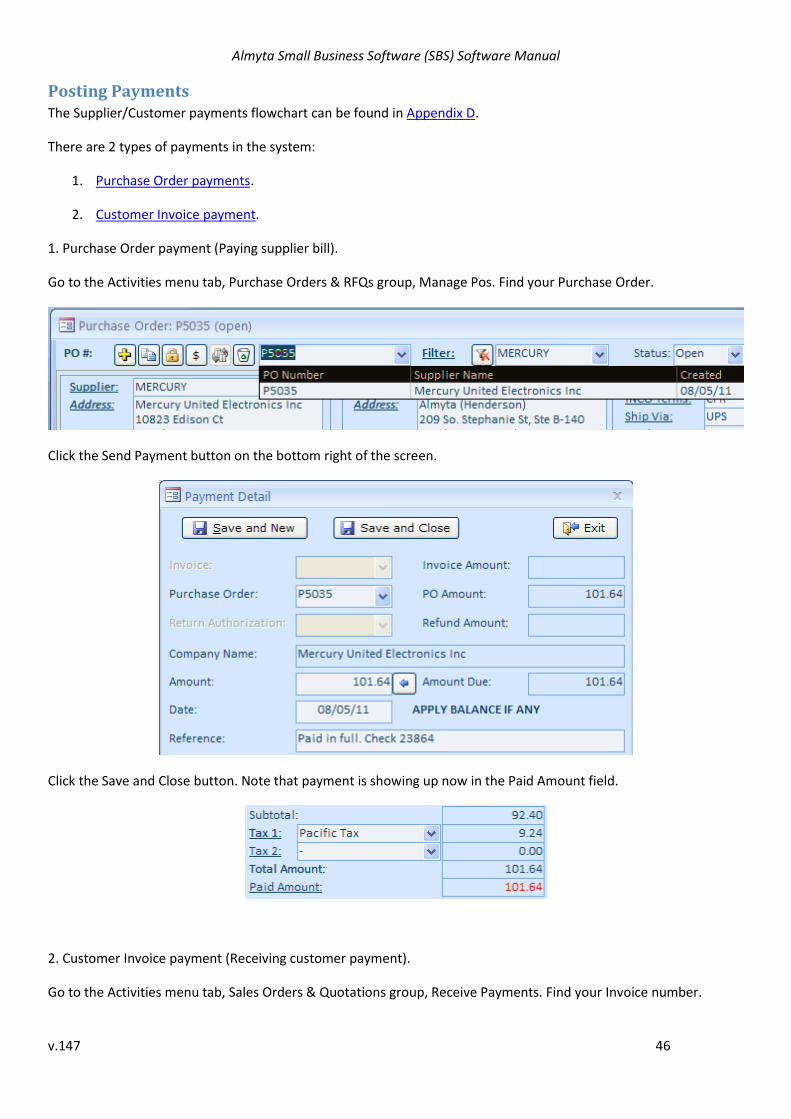
1. Purchase Order payment (Paying supplier bill).
Go to the Activities menu tab, Purchase Orders & RFQs group, Manage Pos. Find your Purchase Order.
Click the Send Payment button on the bottom right of the screen.
Click the Save and Close button. Note that payment is showing up now in the Paid Amount field.
2. Customer Invoice payment (Receiving customer payment).
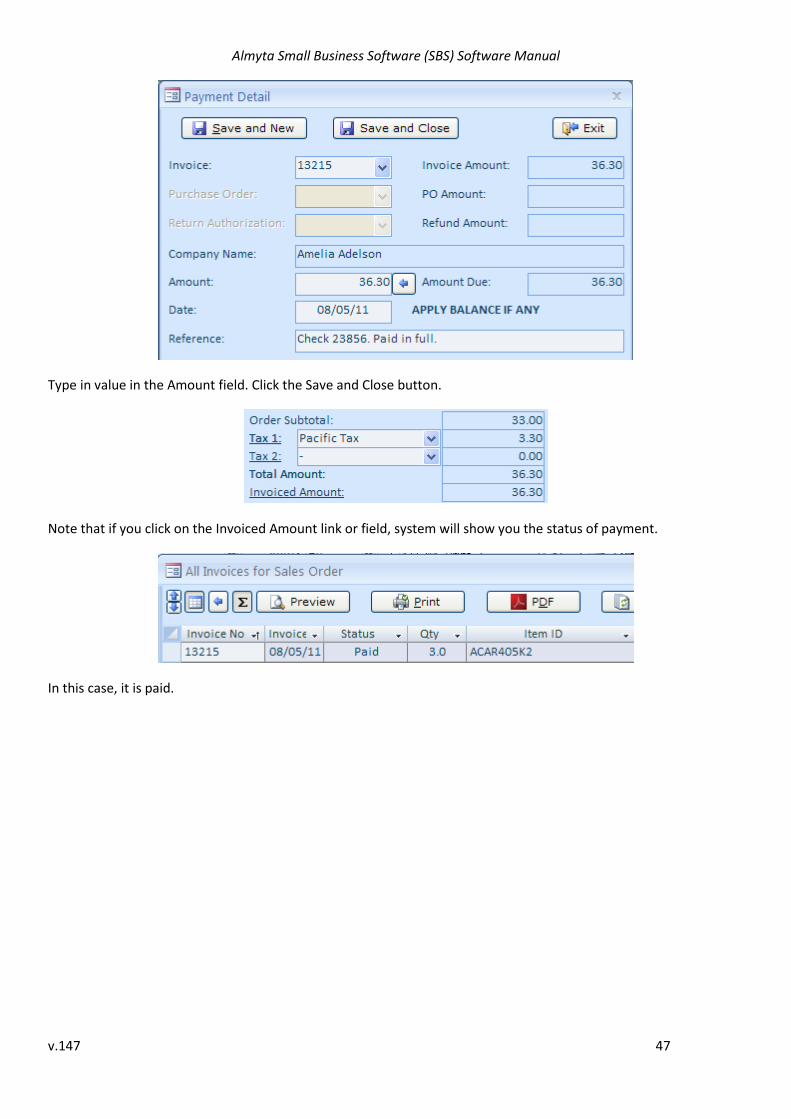
Go to the Activities menu tab, Sales Orders & Quotations group, Receive Payments. Find your Invoice number.
Almyta Small Business Software (SBS) Software Manual
v.147 47
Type in value in the Amount field. Click the Save and Close button.
Note that if you click on the Invoiced Amount link or field, system will show you the status of payment.
In this case, it is paid.
Almyta Small Business Software (SBS) Software Manual
v.147 48
Managing Refunds
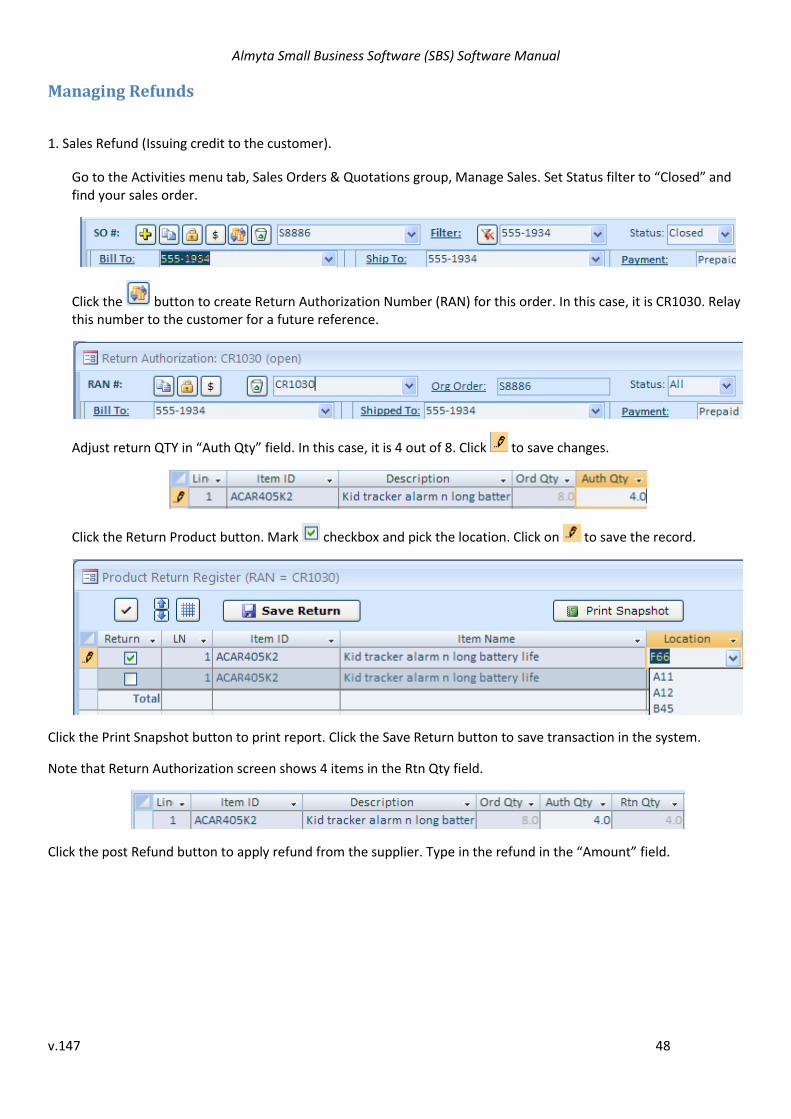
1. Sales Refund (Issuing credit to the customer).
Go to the Activities menu tab, Sales Orders & Quotations group, Manage Sales. Set Status filter to “Closed” and find your sales order.
Click the button to create Return Authorization Number (RAN) for this order. In this case, it is CR1030. Relay this number to the customer for a future reference.
Adjust return QTY in “Auth Qty” field. In this case, it is 4 out of 8. Click to save changes.
Click the Return Product button. Mark checkbox and pick the location. Click on to save the record.
Click the Print Snapshot button to print report. Click the Save Return button to save transaction in the system.
Note that Return Authorization screen shows 4 items in the Rtn Qty field.
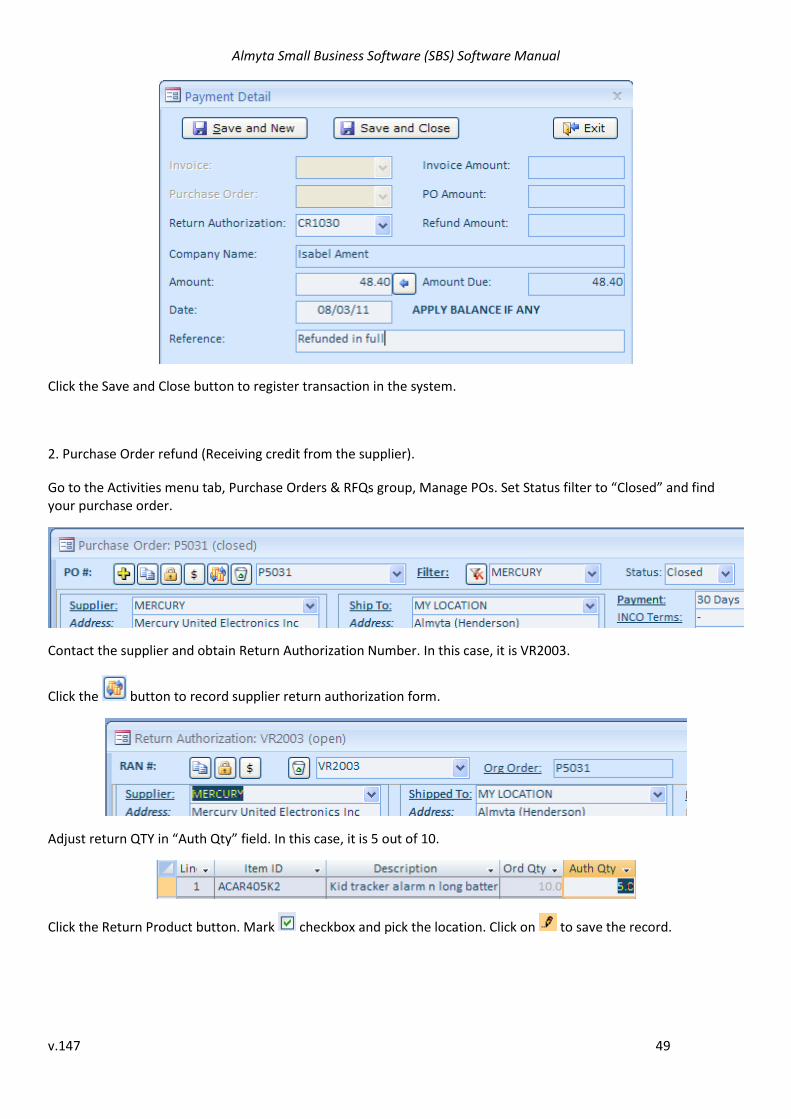
Click the post Refund button to apply refund from the supplier. Type in the refund in the “Amount” field.
Almyta Small Business Software (SBS) Software Manual
v.147 49
Click the Save and Close button to register transaction in the system.
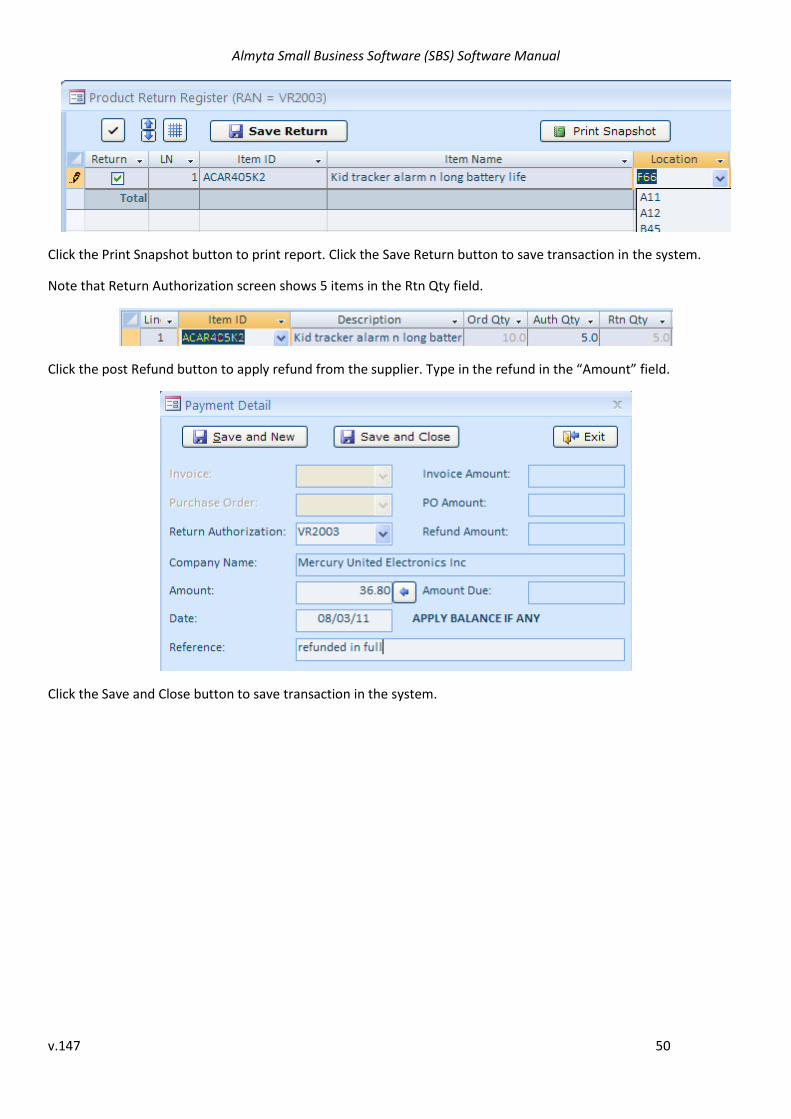
2. Purchase Order refund (Receiving credit from the supplier).
Go to the Activities menu tab, Purchase Orders & RFQs group, Manage POs. Set Status filter to “Closed” and find your purchase order.
Contact the supplier and obtain Return Authorization Number. In this case, it is VR2003.
Click the button to record supplier return authorization form.
Adjust return QTY in “Auth Qty” field. In this case, it is 5 out of 10.
Click the Return Product button. Mark checkbox and pick the location. Click on to save the record.
Almyta Small Business Software (SBS) Software Manual
v.147 50
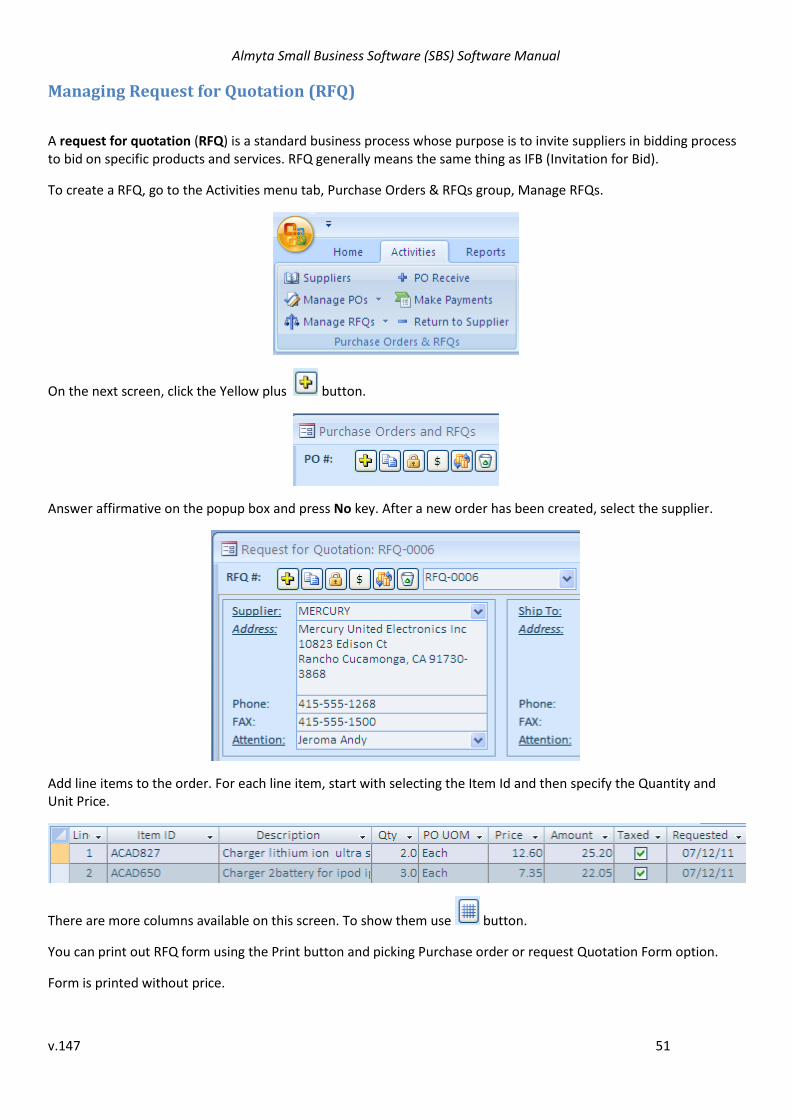
Click the Print Snapshot button to print report. Click the Save Return button to save transaction in the system.
Note that Return Authorization screen shows 5 items in the Rtn Qty field.
Click the post Refund button to apply refund from the supplier. Type in the refund in the “Amount” field.
Click the Save and Close button to save transaction in the system.
Almyta Small Business Software (SBS) Software Manual
v.147 51
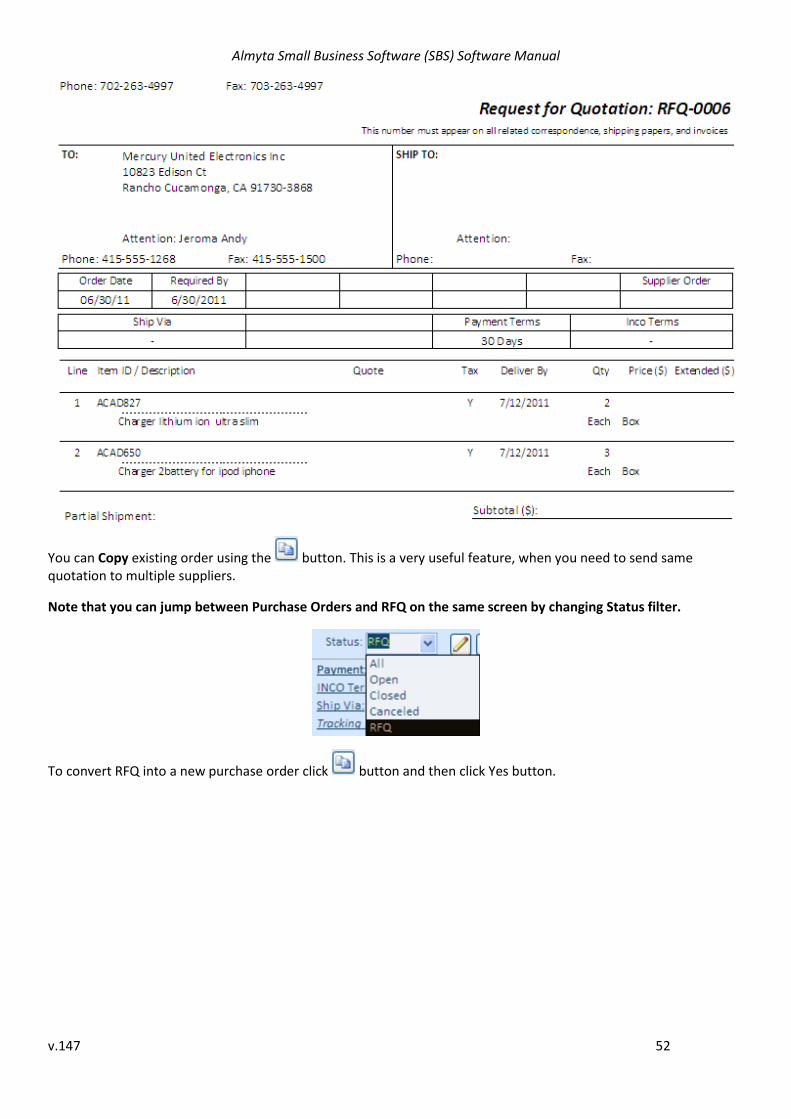
Managing Request for Quotation (RFQ)
A request for quotation (RFQ) is a standard business process whose purpose is to invite suppliers in bidding process to bid on specific products and services. RFQ generally means the same thing as IFB (Invitation for Bid).
To create a RFQ, go to the Activities menu tab, Purchase Orders & RFQs group, Manage RFQs.
On the next screen, click the Yellow plus button.
Answer affirmative on the popup box and press No key. After a new order has been created, select the supplier.
Add line items to the order. For each line item, start with selecting the Item Id and then specify the Quantity and Unit Price.
There are more columns available on this screen. To show them use button.
You can print out RFQ form using the Print button and picking Purchase order or request Quotation Form option.
Form is printed without price.
Almyta Small Business Software (SBS) Software Manual
v.147 52
You can Copy existing order using the button. This is a very useful feature, when you need to send same quotation to multiple suppliers.
Note that you can jump between Purchase Orders and RFQ on the same screen by changing Status filter.
To convert RFQ into a new purchase order click button and then click Yes button.
Almyta Small Business Software (SBS) Software Manual
v.147 53
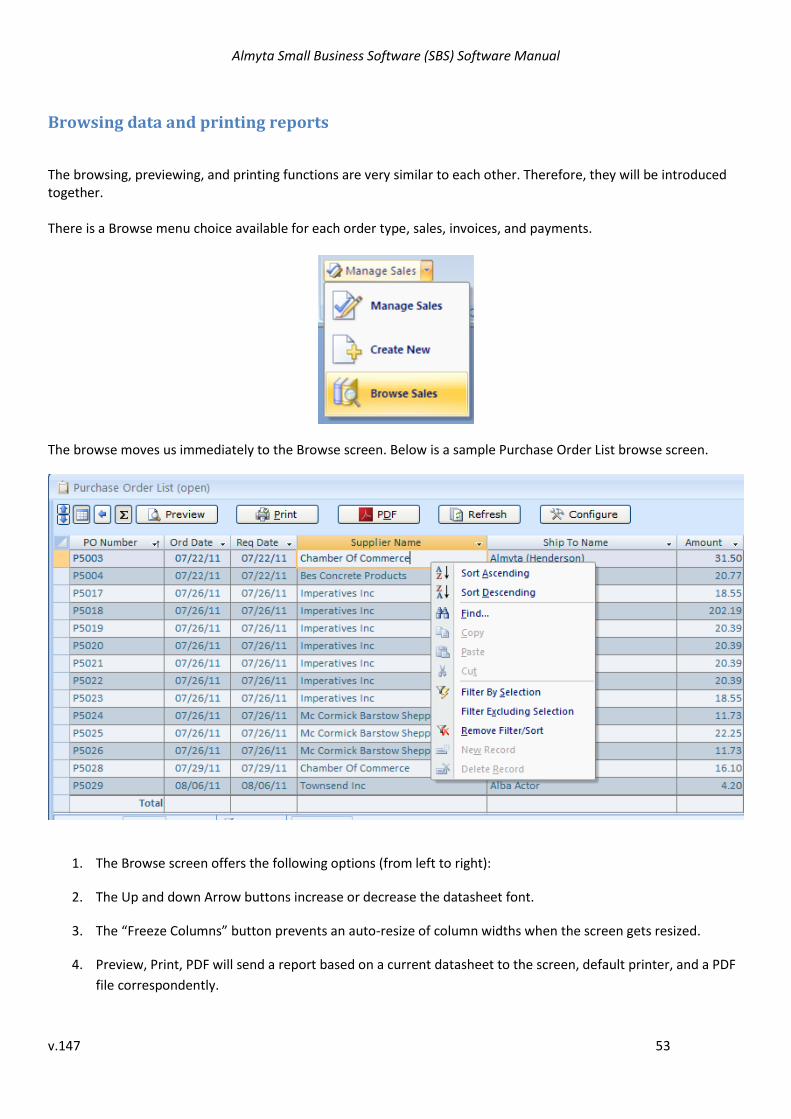
Browsing data and printing reports
The browsing, previewing, and printing functions are very similar to each other. Therefore, they will be introduced together. There is a Browse menu choice available for each order type, sales, invoices, and payments.
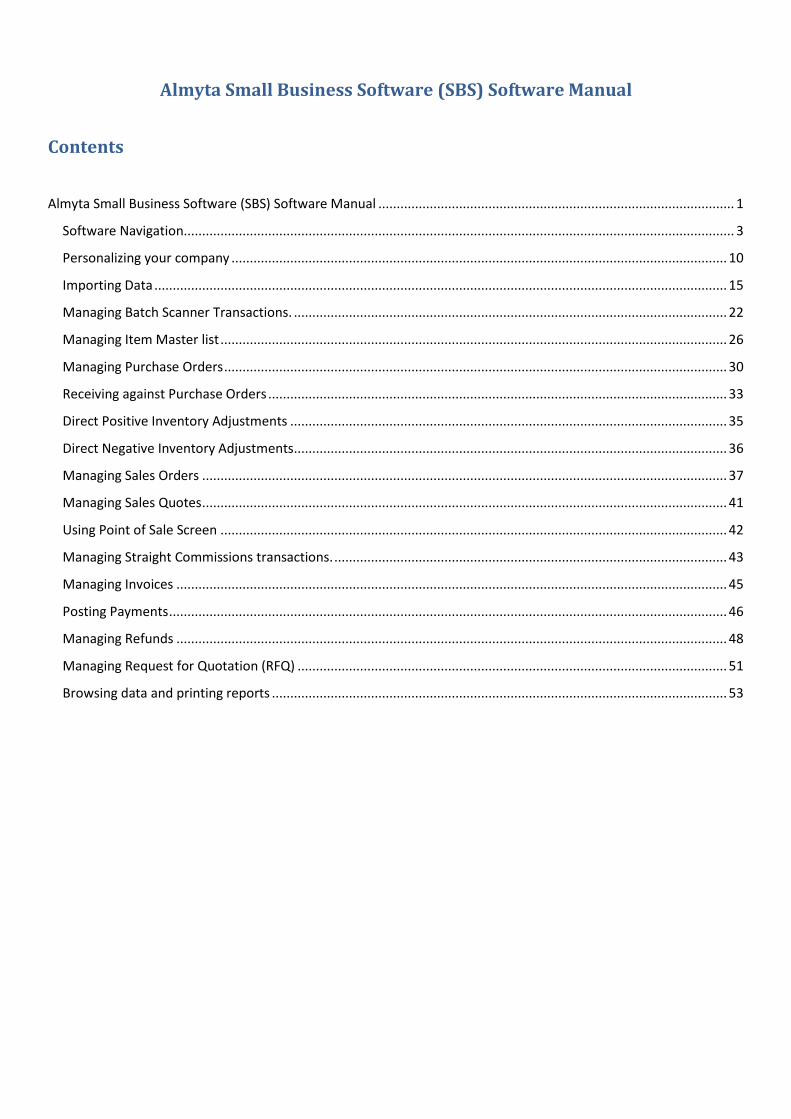
The browse moves us immediately to the Browse screen. Below is a sample Purchase Order List browse screen.
1. The Browse screen offers the following options (from left to right):
2. The Up and down Arrow buttons increase or decrease the datasheet font.
3. The “Freeze Columns” button prevents an auto-resize of column widths when the screen gets resized.
4. Preview, Print, PDF will send a report based on a current datasheet to the screen, default printer, and a PDF
file correspondently.
Almyta Small Business Software (SBS) Software Manual
v.147 54
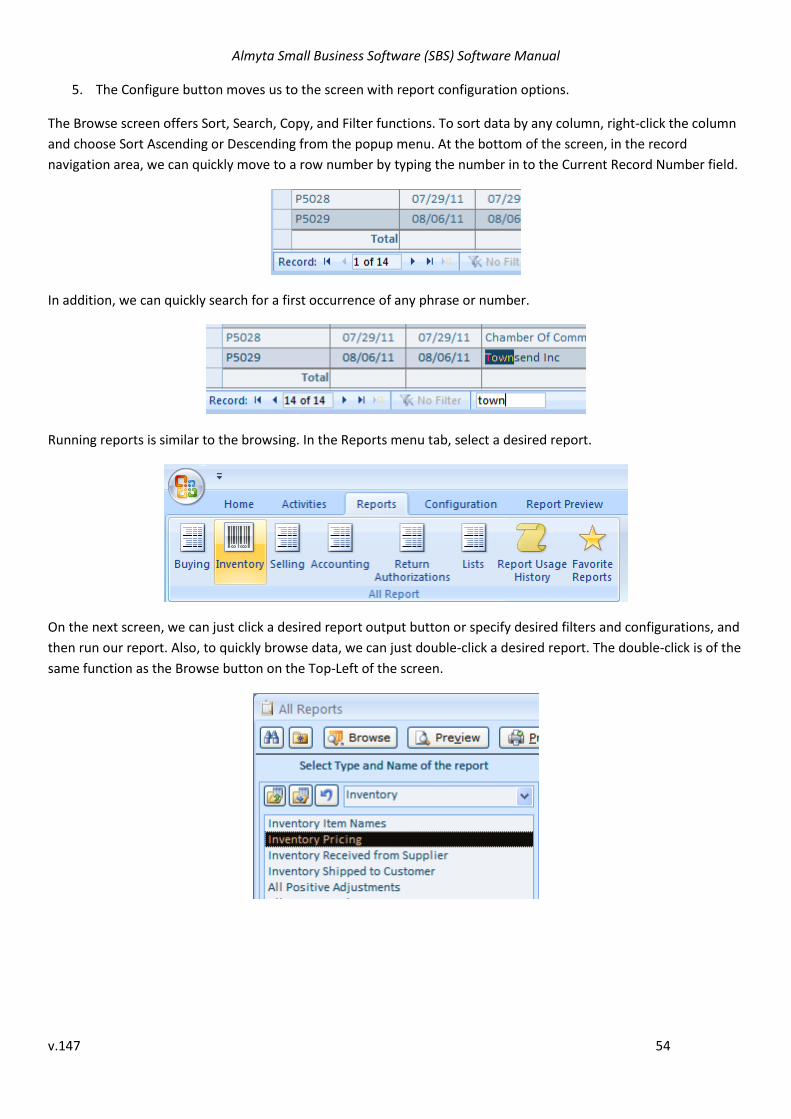
5. The Configure button moves us to the screen with report configuration options.
The Browse screen offers Sort, Search, Copy, and Filter functions. To sort data by any column, right-click the column
and choose Sort Ascending or Descending from the popup menu. At the bottom of the screen, in the record
navigation area, we can quickly move to a row number by typing the number in to the Current Record Number field.
In addition, we can quickly search for a first occurrence of any phrase or number.
Running reports is similar to the browsing. In the Reports menu tab, select a desired report.
On the next screen, we can just click a desired report output button or specify desired filters and configurations, and
then run our report. Also, to quickly browse data, we can just double-click a desired report. The double-click is of the
same function as the Browse button on the Top-Left of the screen.
Almyta Small Business Software (SBS) Software Manual
v.147 55
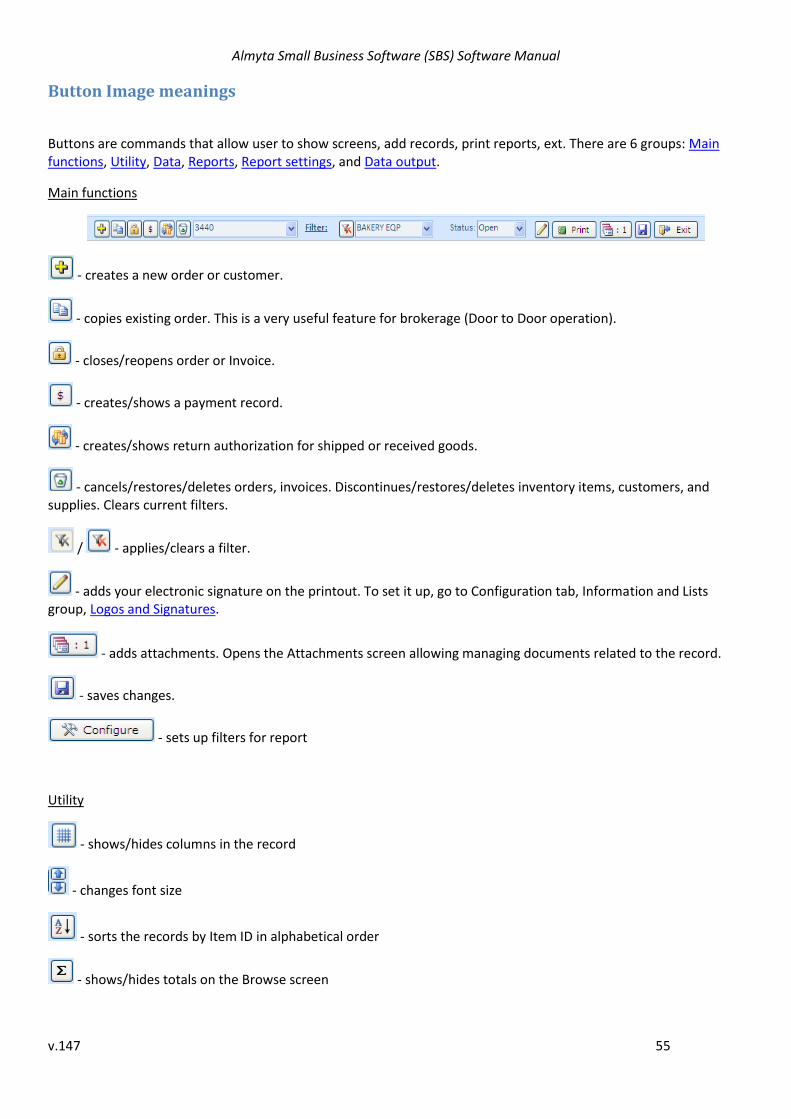
Button Image meanings
Buttons are commands that allow user to show screens, add records, print reports, ext. There are 6 groups: Main functions, Utility, Data, Reports, Report settings, and Data output.
Main functions
- creates a new order or customer.
- copies existing order. This is a very useful feature for brokerage (Door to Door operation).
- closes/reopens order or Invoice.
- creates/shows a payment record.
- creates/shows return authorization for shipped or received goods.
- cancels/restores/deletes orders, invoices. Discontinues/restores/deletes inventory items, customers, and supplies. Clears current filters.
/ - applies/clears a filter.
- adds your electronic signature on the printout. To set it up, go to Configuration tab, Information and Lists group, Logos and Signatures.
- adds attachments. Opens the Attachments screen allowing managing documents related to the record.
- saves changes.
- sets up filters for report
Utility
- shows/hides columns in the record
- changes font size
- sorts the records by Item ID in alphabetical order
- shows/hides totals on the Browse screen
Almyta Small Business Software (SBS) Software Manual
v.147 56
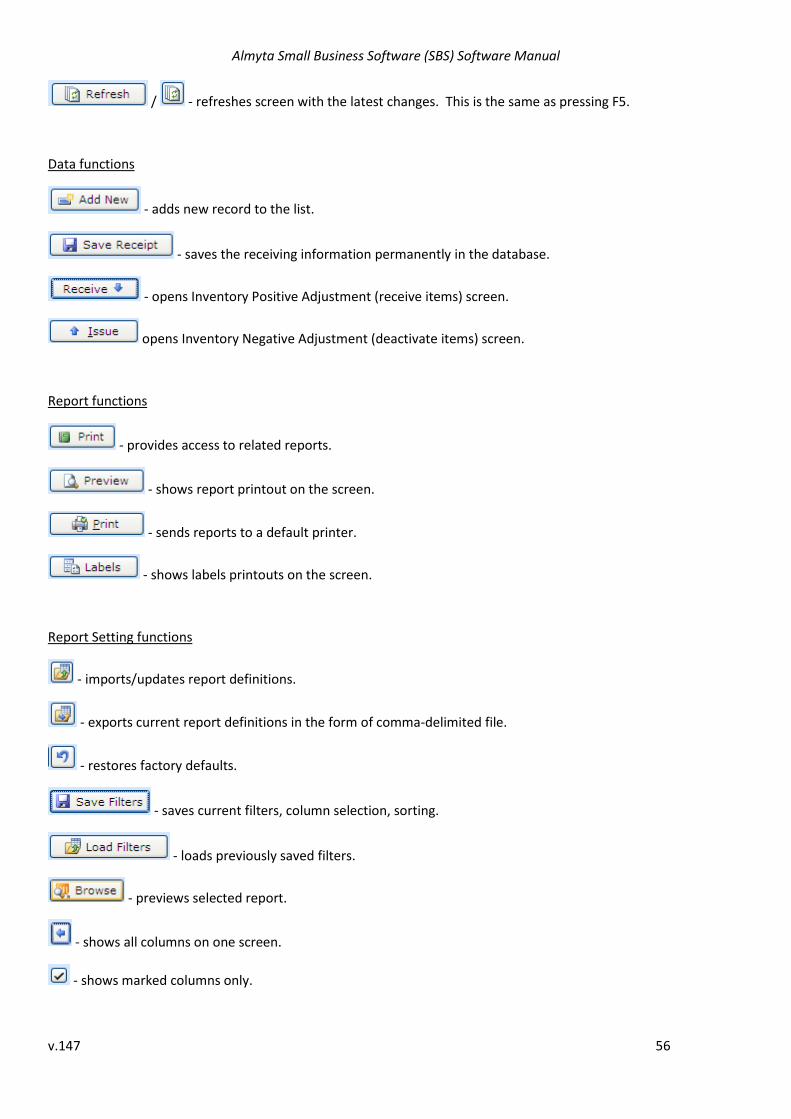
/ - refreshes screen with the latest changes. This is the same as pressing F5.
Data functions
- adds new record to the list.
- saves the receiving information permanently in the database.
- opens Inventory Positive Adjustment (receive items) screen.
opens Inventory Negative Adjustment (deactivate items) screen.
Report functions
- provides access to related reports.
- shows report printout on the screen.
- sends reports to a default printer.
- shows labels printouts on the screen.
Report Setting functions
- imports/updates report definitions.
- exports current report definitions in the form of comma-delimited file.
- restores factory defaults.
- saves current filters, column selection, sorting.
- loads previously saved filters.
- previews selected report.
- shows all columns on one screen.
- shows marked columns only.
Almyta Small Business Software (SBS) Software Manual
v.147 57
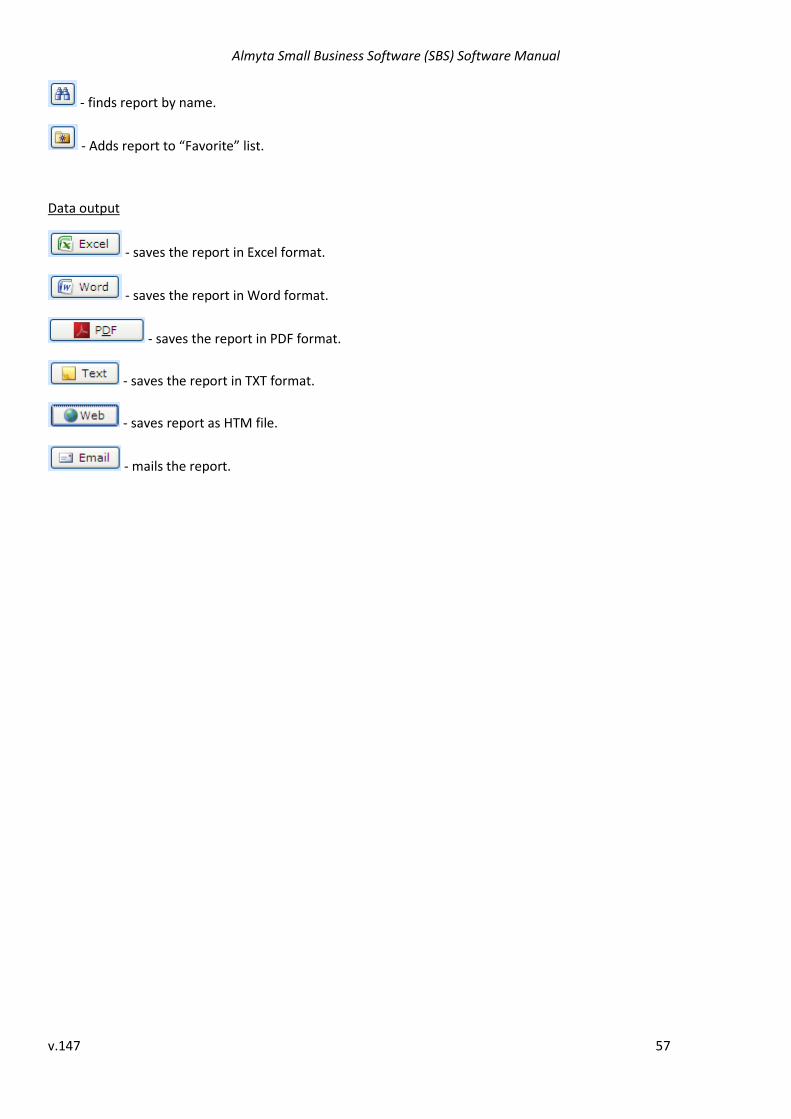
- finds report by name.
- Adds report to “Favorite” list.
Data output
- saves the report in Excel format.
- saves the report in Word format.
- saves the report in PDF format.
- saves the report in TXT format.
- saves report as HTM file.
- mails the report.
Almyta Small Business Software (SBS) Software Manual
v.147 58
Understanding Links and Shortcuts
Links and shortcuts.
To quickly access underlined screens, SBS offers shortcuts. Shortcuts can be identified by an underlined label. On a datasheet (spreadsheet like) screens, column names are not underlined. Because of that, there is no way to say if any particular cell is a shortcut or not. The rule is that the items, customers, suppliers, orders, invoices, payments, return authorizations, emails are always shortcuts.
Note, that underlined labels work like links. Double-click it or a related field to go to an underlining detail.
Main Link description (in alphabetic order).
- opens address on the map
- opens the Contacts screen
- opens the Inventory Categories screen
- opens the Countries screen
- does not work yet
- opens the Locations screen. You can choose one to be a default location for the Item ID
- opens Unite in Stock tab
- opens the Inventory Item Names screen
- opens the Inventory Item Names screen
- opens the Payments screen
- opens the Payment Terms screen
- opens Companies screen
- opens Companies screen
- opens the Ship Via screen
- opens the Units of Measure screen
- opens the Taxes screen
- shows shipment information
- Shows bank information
- …?
Popup Menus
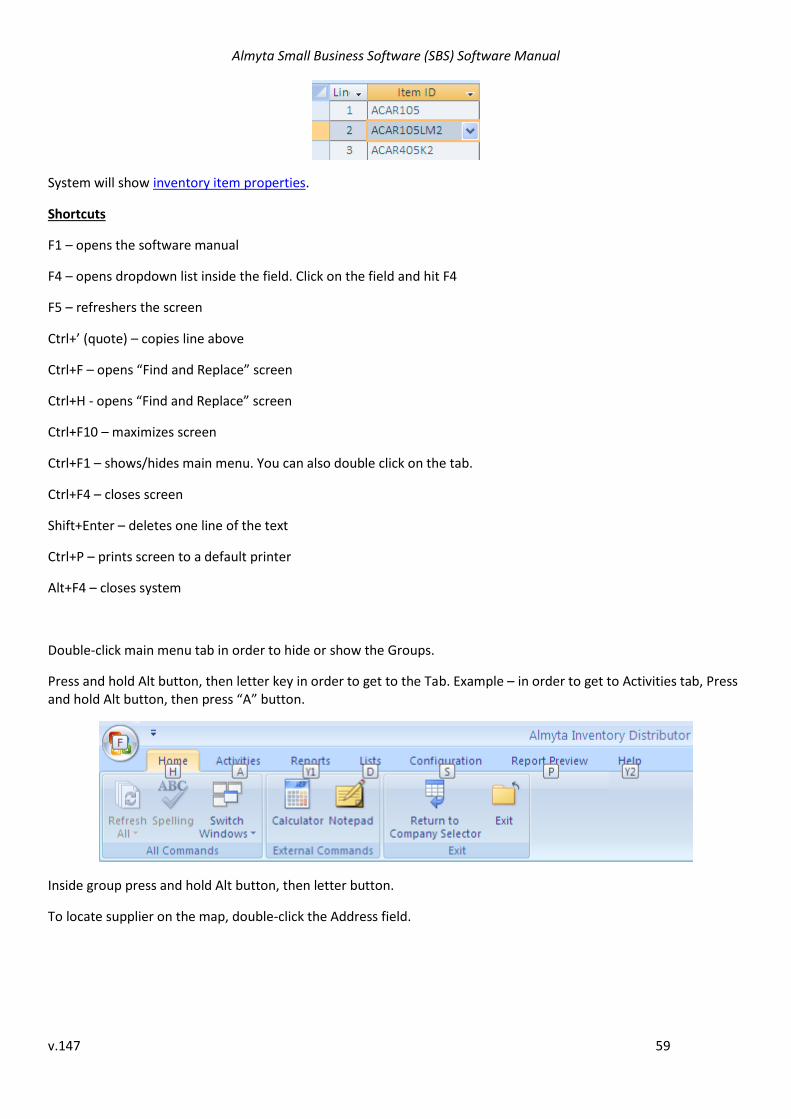
To quickly find information about inventory item, double-click on Item ID field.
Almyta Small Business Software (SBS) Software Manual
v.147 59
System will show inventory item properties.
Shortcuts
F1 – opens the software manual
F4 – opens dropdown list inside the field. Click on the field and hit F4
F5 – refreshers the screen
Ctrl+’ (quote) – copies line above
Ctrl+F – opens “Find and Replace” screen
Ctrl+H - opens “Find and Replace” screen
Ctrl+F10 – maximizes screen
Ctrl+F1 – shows/hides main menu. You can also double click on the tab.
Ctrl+F4 – closes screen
Shift+Enter – deletes one line of the text
Ctrl+P – prints screen to a default printer
Alt+F4 – closes system
Double-click main menu tab in order to hide or show the Groups.
Press and hold Alt button, then letter key in order to get to the Tab. Example – in order to get to Activities tab, Press and hold Alt button, then press “A” button.
Inside group press and hold Alt button, then letter button.
To locate supplier on the map, double-click the Address field.
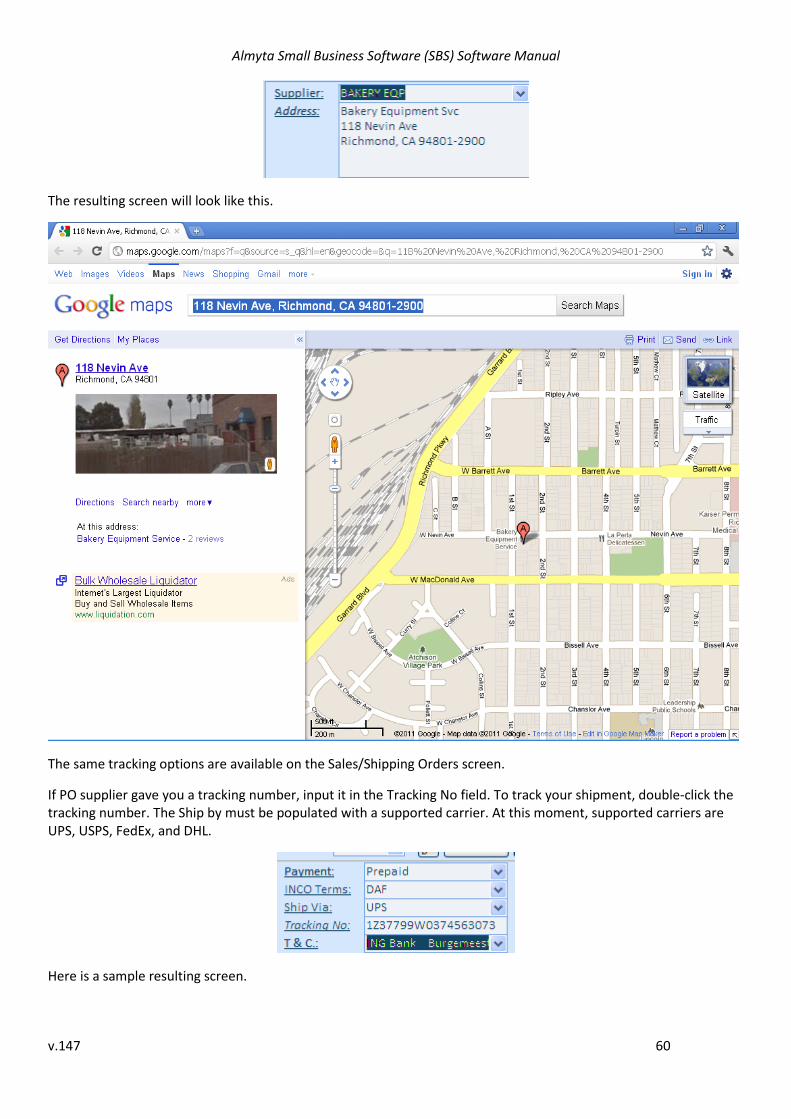
Almyta Small Business Software (SBS) Software Manual
v.147 60
The resulting screen will look like this.
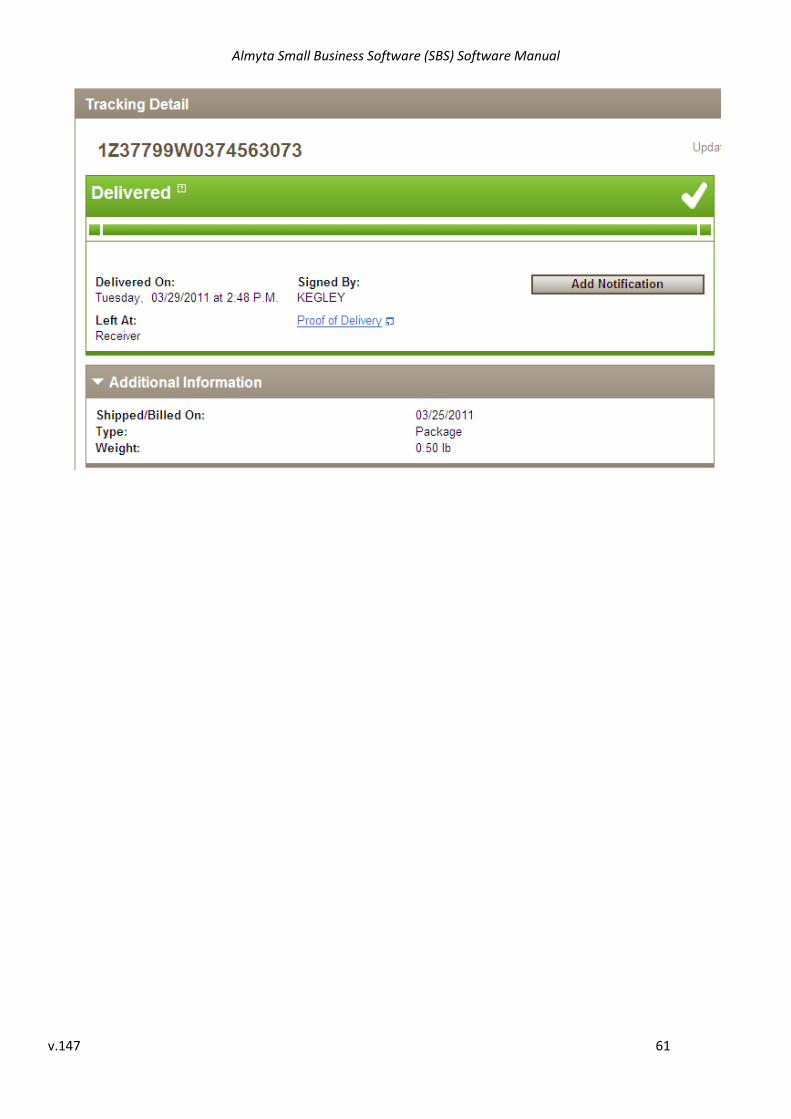
The same tracking options are available on the Sales/Shipping Orders screen.
If PO supplier gave you a tracking number, input it in the Tracking No field. To track your shipment, double-click the tracking number. The Ship by must be populated with a supported carrier. At this moment, supported carriers are UPS, USPS, FedEx, and DHL.
Here is a sample resulting screen.
Almyta Small Business Software (SBS) Software Manual
v.147 61

Almyta Small Business Software (SBS) Software Manual
v.147 62
Using Data Utilities
To manage data in the system, go to the Configuration tab, Data group.
Linking data file to the system
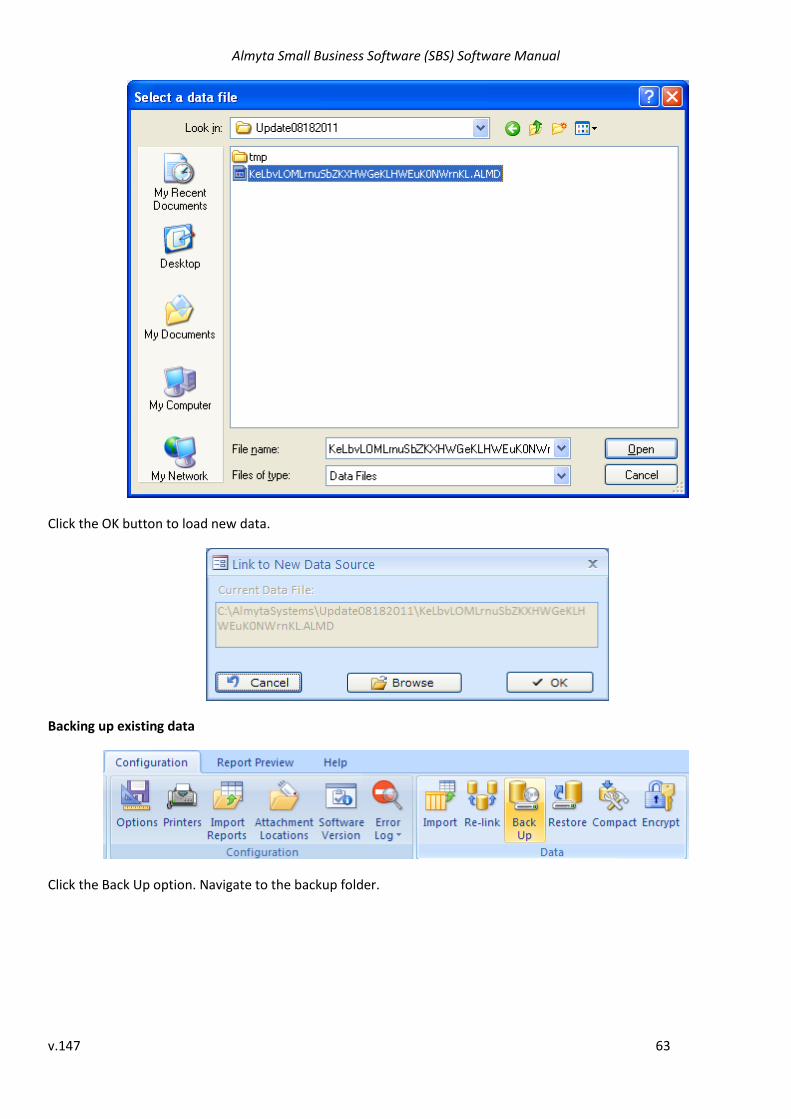
Click the Re-link option and the Browse button to navigate to new data source.
Highlight new data source file and click the Open button.
Almyta Small Business Software (SBS) Software Manual
v.147 63
Click the OK button to load new data.
Backing up existing data
Click the Back Up option. Navigate to the backup folder.
Almyta Small Business Software (SBS) Software Manual
v.147 64
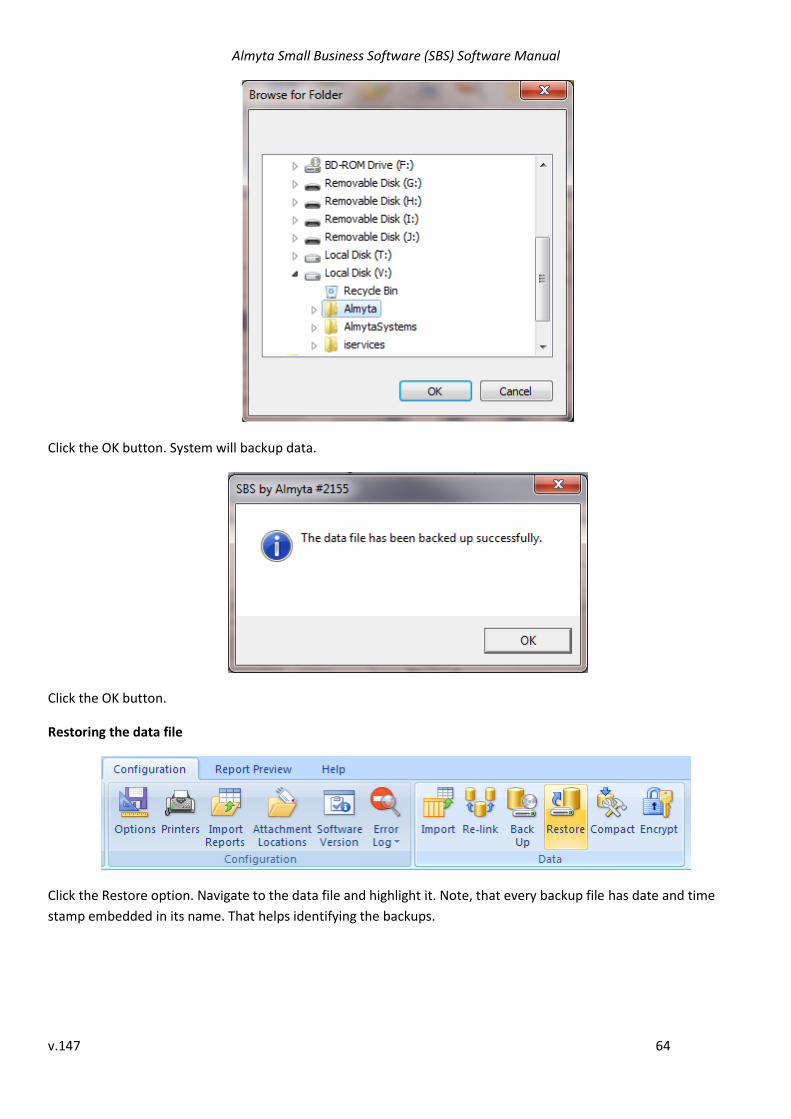
Click the OK button. System will backup data.
Click the OK button.
Restoring the data file
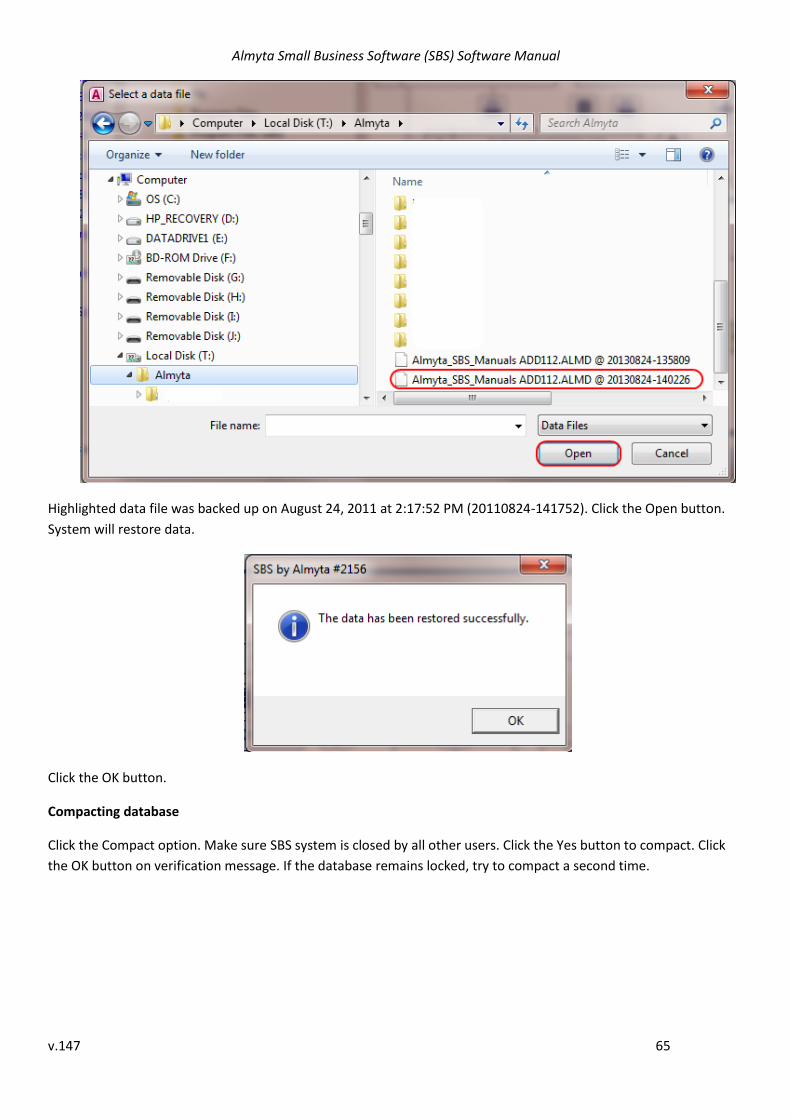
Click the Restore option. Navigate to the data file and highlight it. Note, that every backup file has date and time
stamp embedded in its name. That helps identifying the backups.
Almyta Small Business Software (SBS) Software Manual
v.147 65
Highlighted data file was backed up on August 24, 2011 at 2:17:52 PM (20110824-141752). Click the Open button.
System will restore data.
Click the OK button.
Compacting database
Click the Compact option. Make sure SBS system is closed by all other users. Click the Yes button to compact. Click
the OK button on verification message. If the database remains locked, try to compact a second time.

Almyta Small Business Software (SBS) Software Manual
v.147 66
Encrypting data in the system
Originally, data is encrypted in the system. Unencrypted data was not supported at the time when this manual has
been published.
Almyta Small Business Software (SBS) Software Manual
v.147 67
Customizing Screens
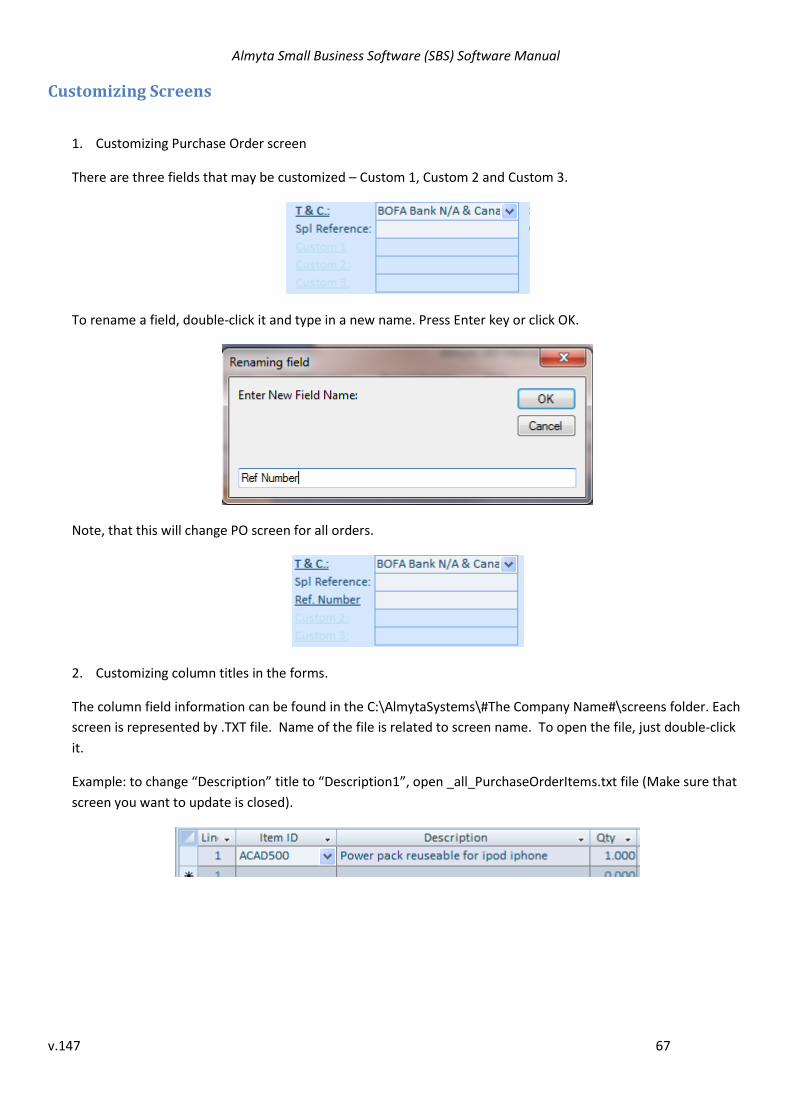
1. Customizing Purchase Order screen
There are three fields that may be customized – Custom 1, Custom 2 and Custom 3.
To rename a field, double-click it and type in a new name. Press Enter key or click OK.
Note, that this will change PO screen for all orders.
2. Customizing column titles in the forms.
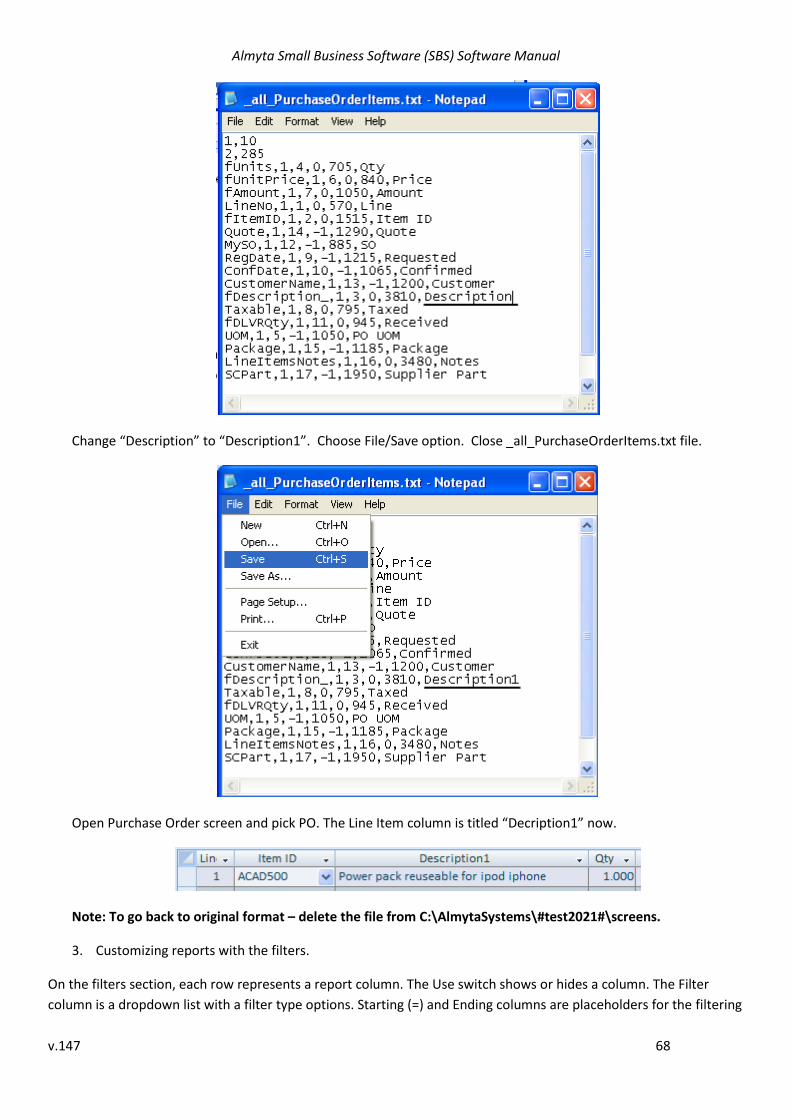
The column field information can be found in the C:\AlmytaSystems\#The Company Name#\screens folder. Each
screen is represented by .TXT file. Name of the file is related to screen name. To open the file, just double-click
it.
Example: to change “Description” title to “Description1”, open _all_PurchaseOrderItems.txt file (Make sure that
screen you want to update is closed).
Almyta Small Business Software (SBS) Software Manual
v.147 68
Change “Description” to “Description1”. Choose File/Save option. Close _all_PurchaseOrderItems.txt file.
Open Purchase Order screen and pick PO. The Line Item column is titled “Decription1” now.
Note: To go back to original format – delete the file from C:\AlmytaSystems\#test2021#\screens.
3. Customizing reports with the filters.
On the filters section, each row represents a report column. The Use switch shows or hides a column. The Filter
column is a dropdown list with a filter type options. Starting (=) and Ending columns are placeholders for the filtering
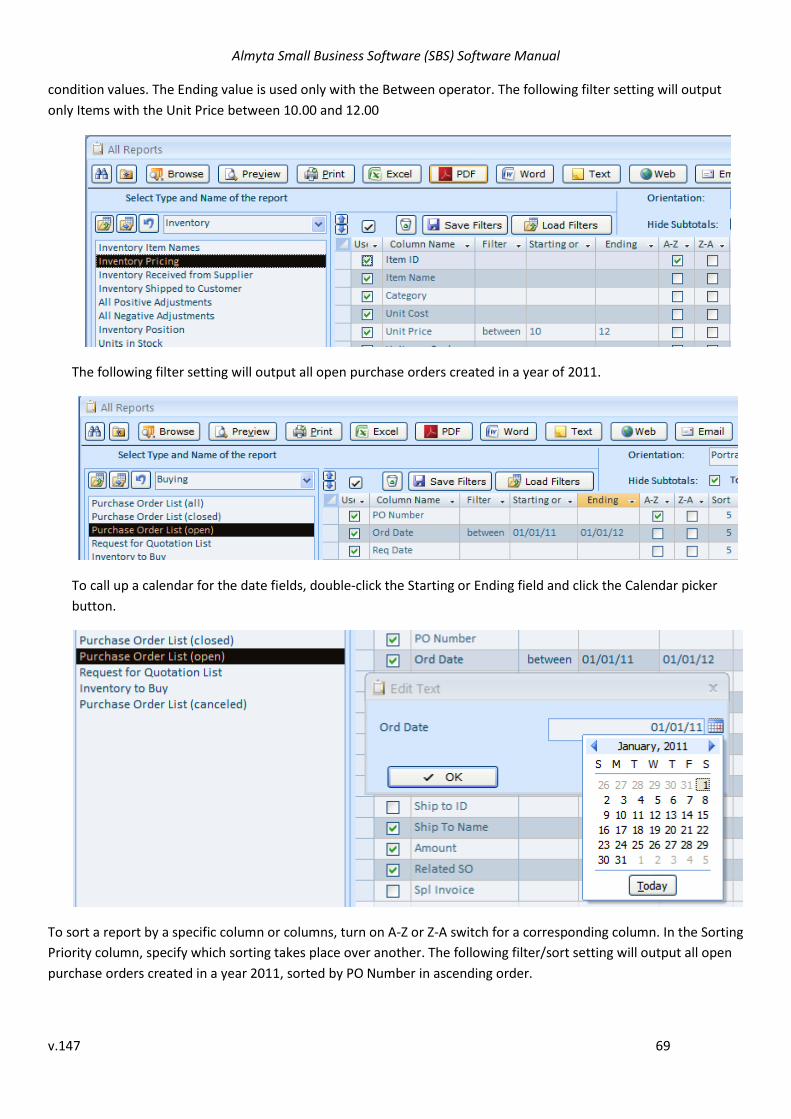
Almyta Small Business Software (SBS) Software Manual
v.147 69
condition values. The Ending value is used only with the Between operator. The following filter setting will output
only Items with the Unit Price between 10.00 and 12.00
The following filter setting will output all open purchase orders created in a year of 2011.
To call up a calendar for the date fields, double-click the Starting or Ending field and click the Calendar picker
button.
To sort a report by a specific column or columns, turn on A-Z or Z-A switch for a corresponding column. In the Sorting
Priority column, specify which sorting takes place over another. The following filter/sort setting will output all open
purchase orders created in a year 2011, sorted by PO Number in ascending order.
Almyta Small Business Software (SBS) Software Manual
v.147 70
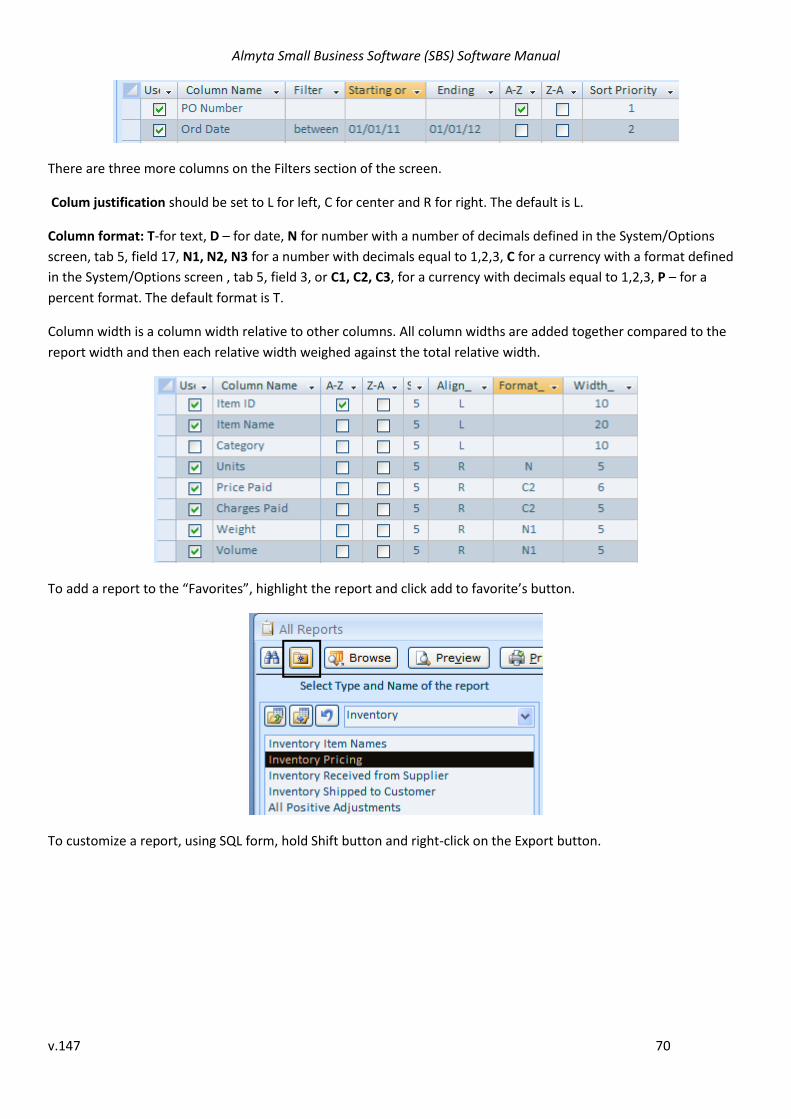
There are three more columns on the Filters section of the screen.
Colum justification should be set to L for left, C for center and R for right. The default is L.
Column format: T-for text, D – for date, N for number with a number of decimals defined in the System/Options
screen, tab 5, field 17, N1, N2, N3 for a number with decimals equal to 1,2,3, C for a currency with a format defined
in the System/Options screen , tab 5, field 3, or C1, C2, C3, for a currency with decimals equal to 1,2,3, P – for a
percent format. The default format is T.
Column width is a column width relative to other columns. All column widths are added together compared to the
report width and then each relative width weighed against the total relative width.
To add a report to the “Favorites”, highlight the report and click add to favorite’s button.
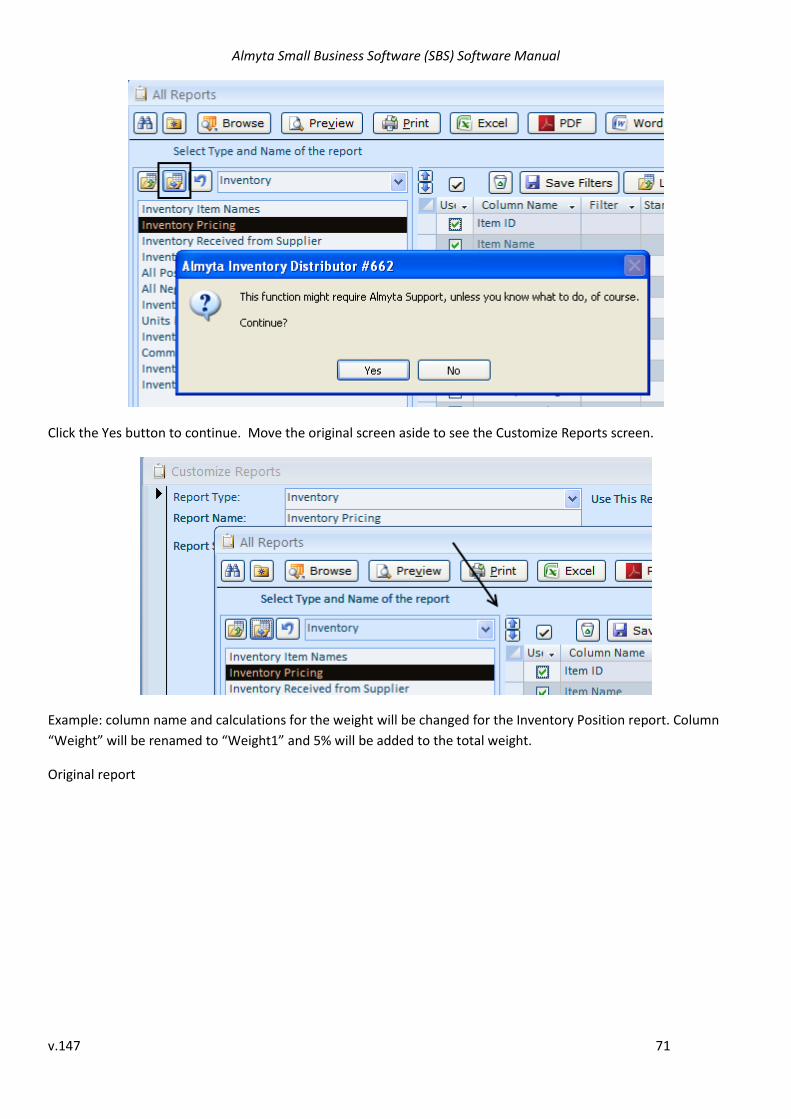
To customize a report, using SQL form, hold Shift button and right-click on the Export button.
Almyta Small Business Software (SBS) Software Manual
v.147 71
Click the Yes button to continue. Move the original screen aside to see the Customize Reports screen.
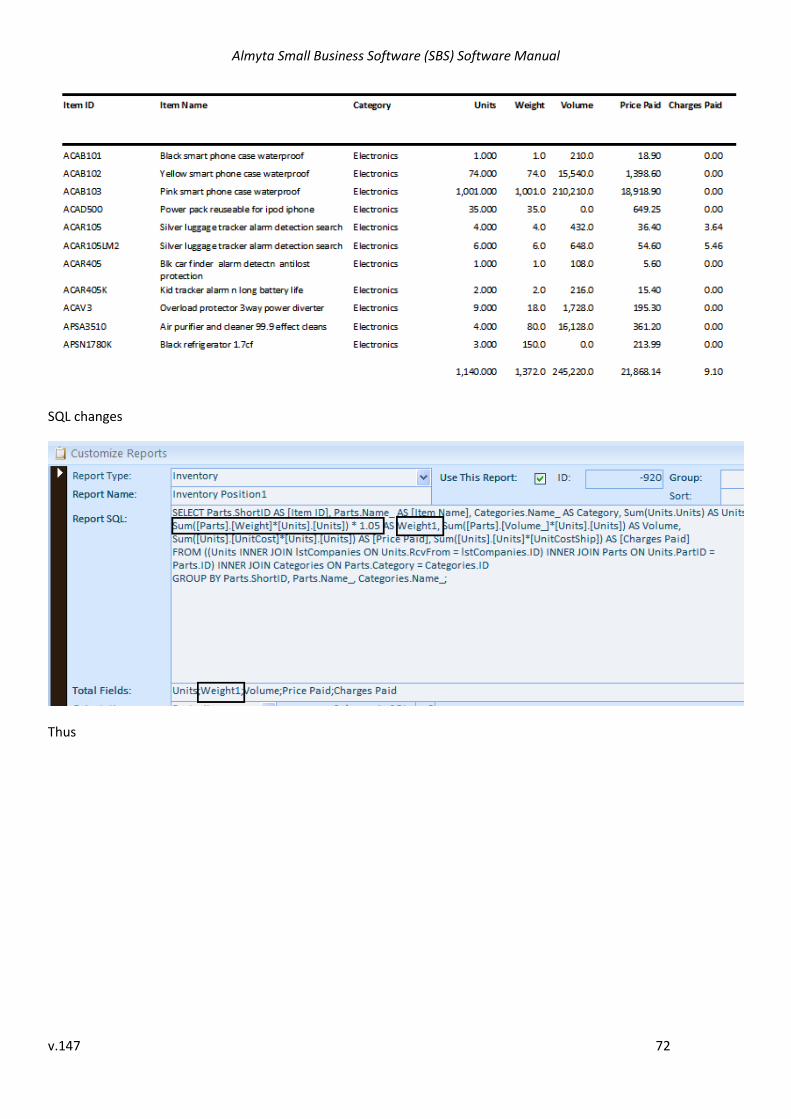
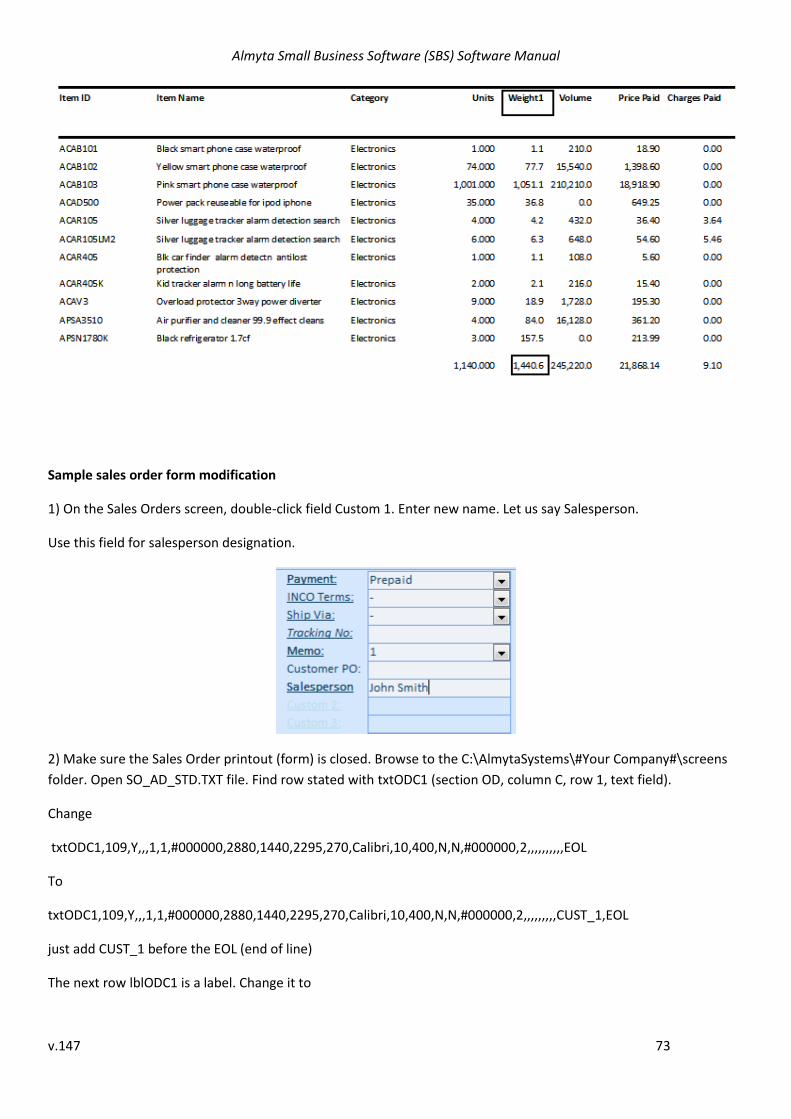
Example: column name and calculations for the weight will be changed for the Inventory Position report. Column
“Weight” will be renamed to “Weight1” and 5% will be added to the total weight.
Original report
Almyta Small Business Software (SBS) Software Manual
v.147 72
SQL changes
Thus
Almyta Small Business Software (SBS) Software Manual
v.147 73
Sample sales order form modification
1) On the Sales Orders screen, double-click field Custom 1. Enter new name. Let us say Salesperson.
Use this field for salesperson designation.
2) Make sure the Sales Order printout (form) is closed. Browse to the C:\AlmytaSystems\#Your Company#\screens
folder. Open SO_AD_STD.TXT file. Find row stated with txtODC1 (section OD, column C, row 1, text field).
Change
txtODC1,109,Y,,,1,1,#000000,2880,1440,2295,270,Calibri,10,400,N,N,#000000,2,,,,,,,,,,EOL
To
txtODC1,109,Y,,,1,1,#000000,2880,1440,2295,270,Calibri,10,400,N,N,#000000,2,,,,,,,,,CUST_1,EOL
just add CUST_1 before the EOL (end of line)
The next row lblODC1 is a label. Change it to

Almyta Small Business Software (SBS) Software Manual
v.147 74
lblODC1,100,Y,,,1,1,#000000,2880,1440,2025,270,Calibri,9,400,N,N,#000000,2,,,,,,,,,Salesperson,EOL
add the Salesperson just before the EOL.
Save the file. When you modify the screen files, the forms must be closed. If not, your modifications will be lost
when you close the form.

Almyta Small Business Software (SBS) Software Manual
v.147 75
Appendix A - opens the company information
- opens the list of contacts for shipping destination (Customers filter)
- opens the list of contacts for supplier
- opens the Payment Terms list
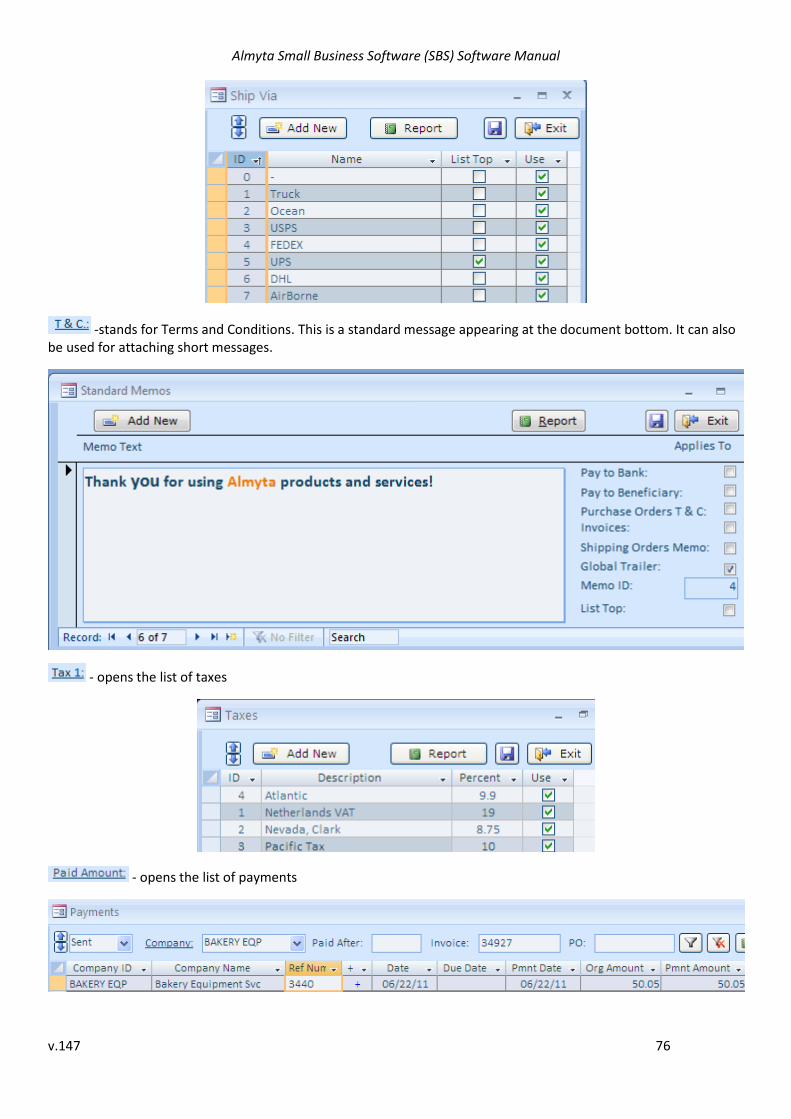
- opens the list of shipping methods
Almyta Small Business Software (SBS) Software Manual
v.147 76
-stands for Terms and Conditions. This is a standard message appearing at the document bottom. It can also be used for attaching short messages.
- opens the list of taxes
- opens the list of payments
Almyta Small Business Software (SBS) Software Manual
v.147 77
Appendix B
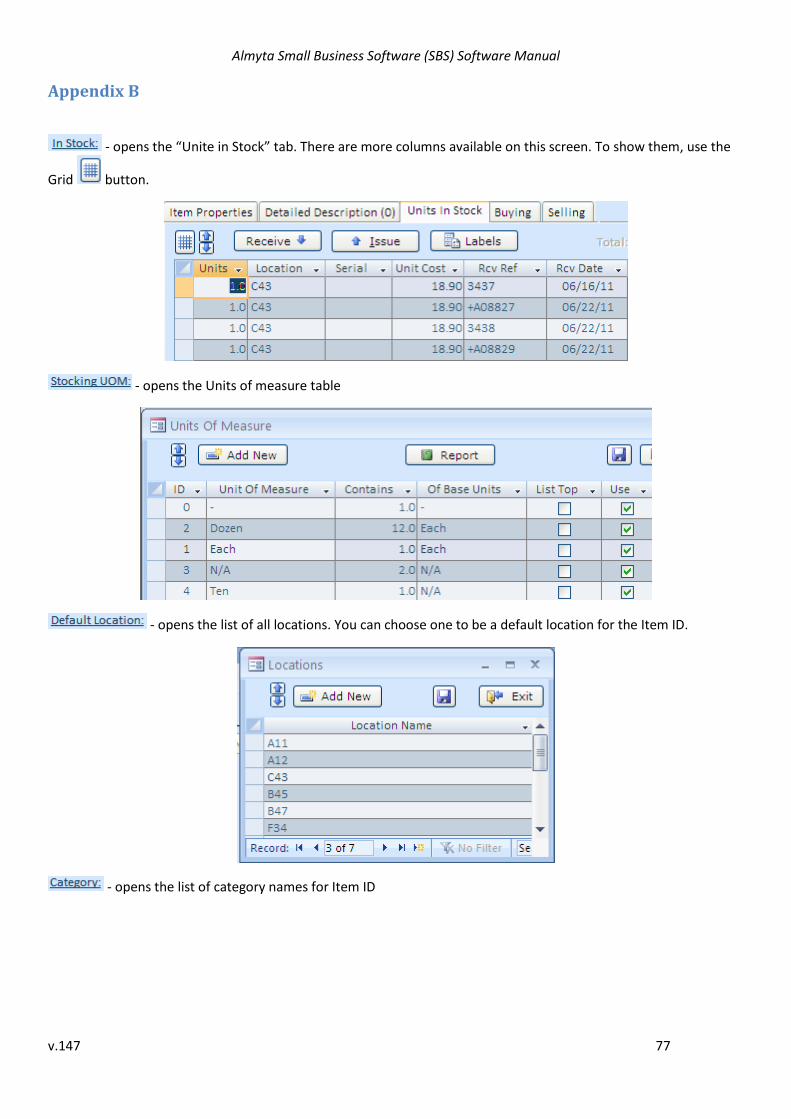
- opens the “Unite in Stock” tab. There are more columns available on this screen. To show them, use the
Grid button.
- opens the Units of measure table
- opens the list of all locations. You can choose one to be a default location for the Item ID.
- opens the list of category names for Item ID
Almyta Small Business Software (SBS) Software Manual
v.147 78
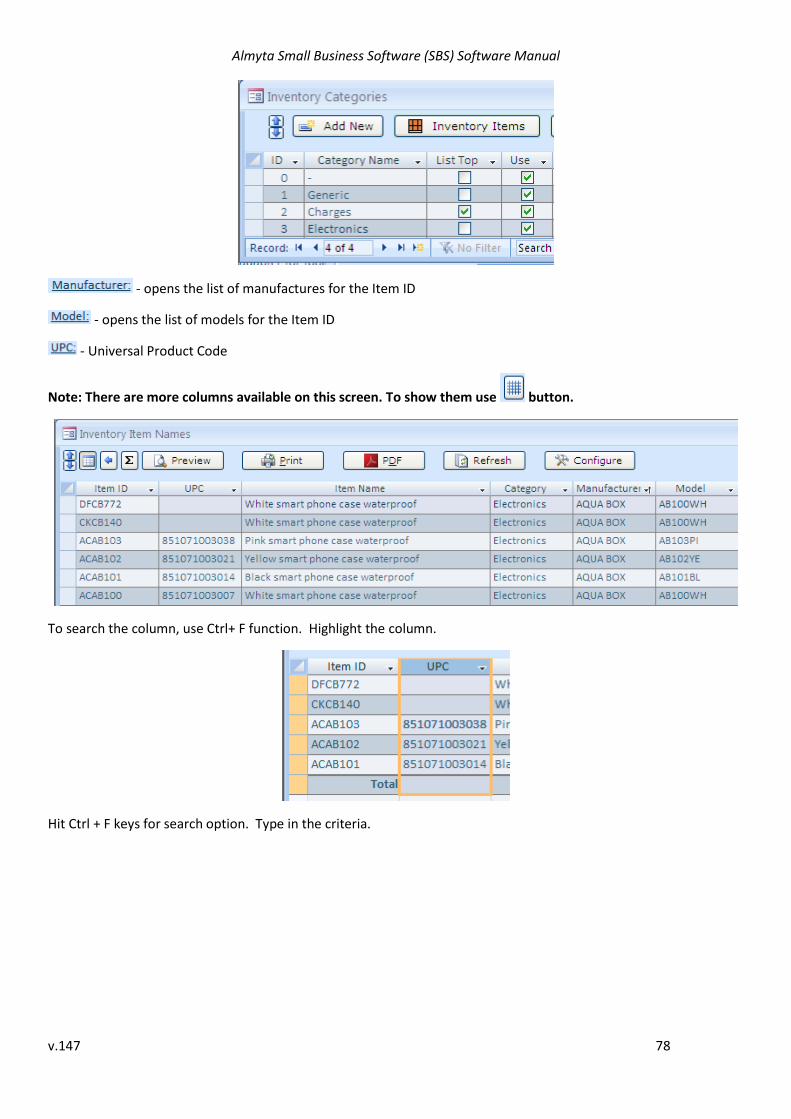
- opens the list of manufactures for the Item ID
- opens the list of models for the Item ID
- Universal Product Code
Note: There are more columns available on this screen. To show them use button.
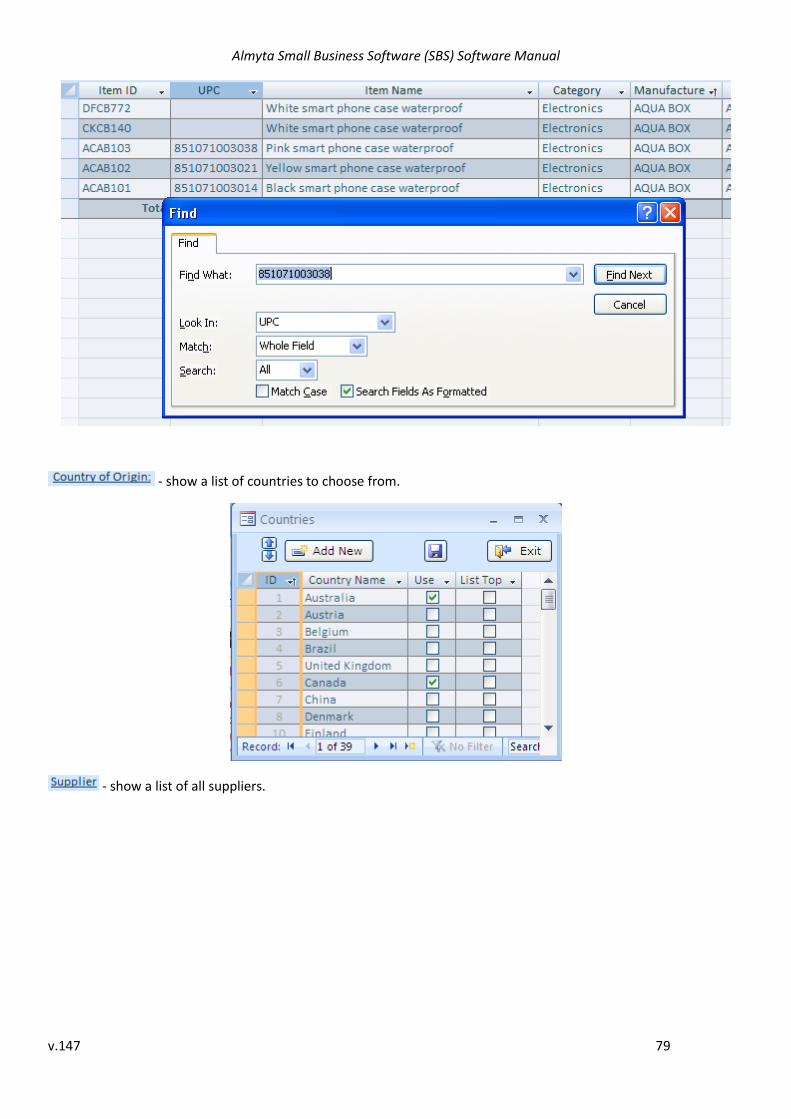
To search the column, use Ctrl+ F function. Highlight the column.
Hit Ctrl + F keys for search option. Type in the criteria.
Almyta Small Business Software (SBS) Software Manual
v.147 79
- show a list of countries to choose from.
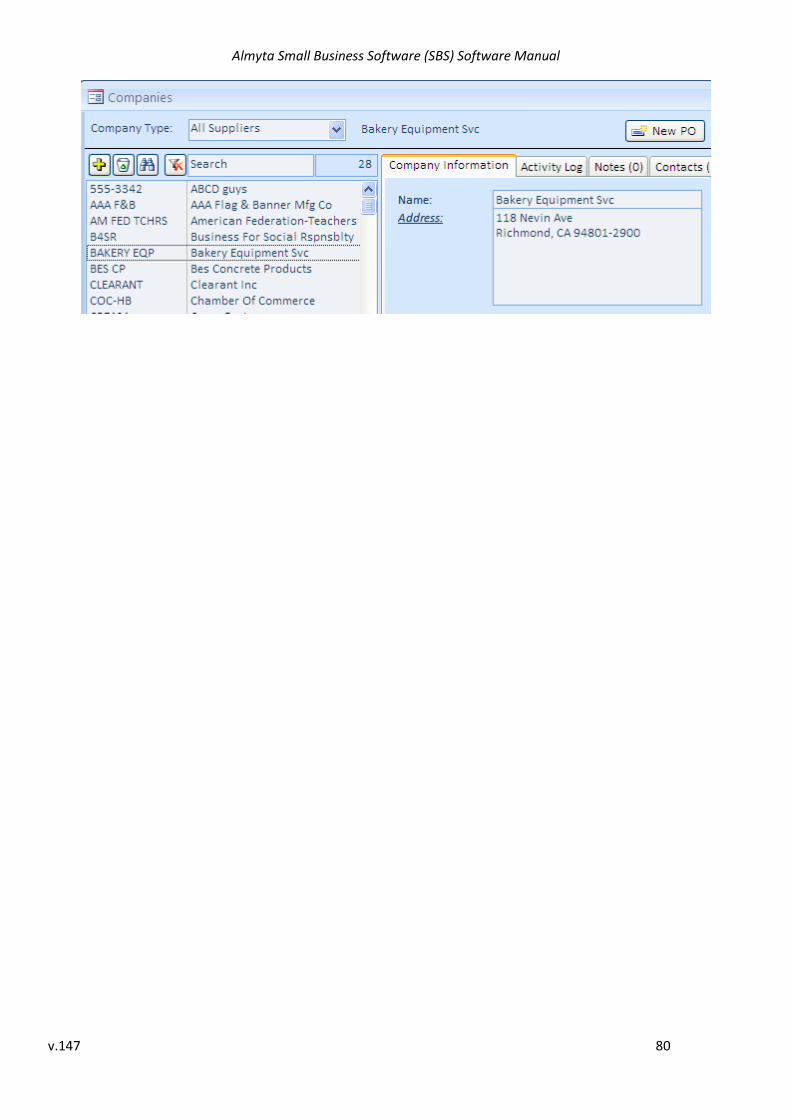
- show a list of all suppliers.
Almyta Small Business Software (SBS) Software Manual
v.147 80
Almyta Small Business Software (SBS) Software Manual
v.147 81
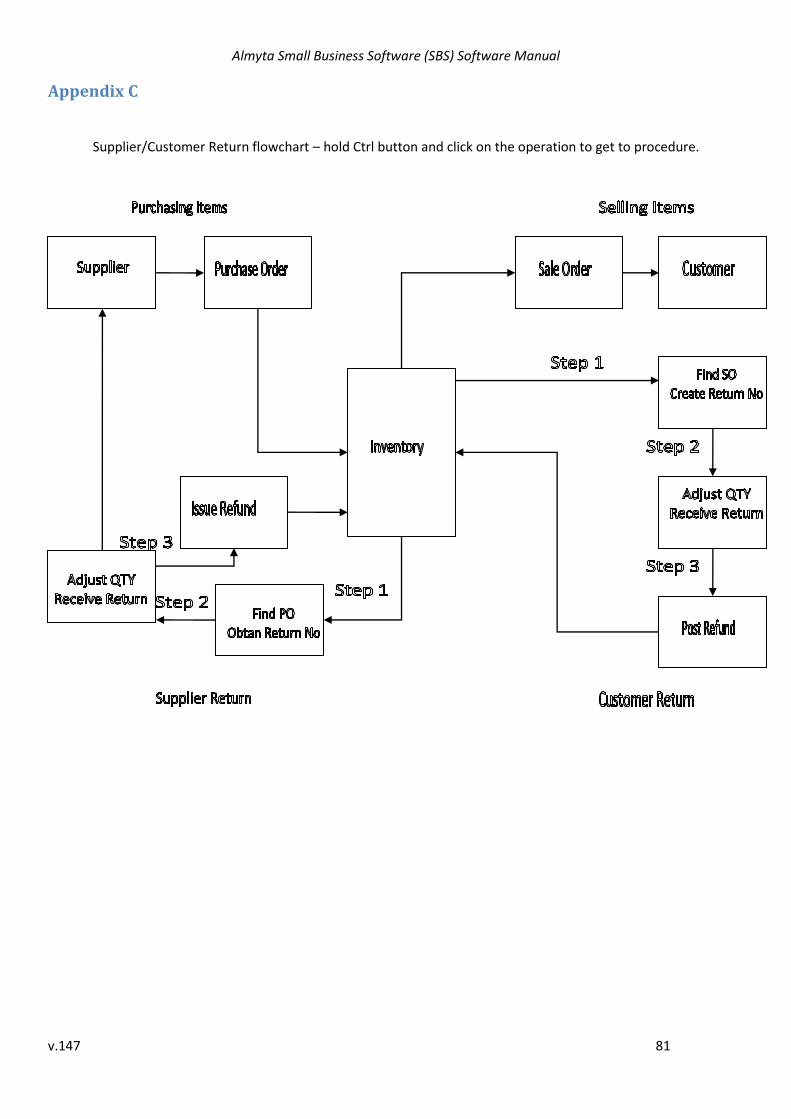
Appendix C
Supplier/Customer Return flowchart – hold Ctrl button and click on the operation to get to procedure.