alabama smart yard - alabama master gardeners
DESCRIPTION
Alabama Smart Yard - Alabama Master GardenersTRANSCRIPT

IInnttrroodduucciinngg
EEnnvviirroonnmmeennttaall CCoonnsscciioouussnneessss
aanndd
PPrraaccttiiccaall mmaannaaggeemmeenntt OOppttiioonnss
ttoo oouurr
YYaarrddss && nneeiigghhbboorrhhooooddss
Alabama A&M and Auburn Universities ANR-1359

ii
is a motto that reflects our state’s natural resources and biodiversity. Using scientifically based, environmentally sustainable landscape practices, we can maintain and enhance the unique natural beauty of Alabama for ourselves and for generations to follow. Conservation and efficient, responsible use of our natural resources is the overriding concept and the educational goal of the Alabama Smart Yards (ASY) program. Participating in this process will save you time, energy, and money while preserving our natural heritage. ASY is a cooperative alliance and mission developed by the Alabama Cooperative Extension System, the Alabama Department of Environmental Management, the Alabama Nursery and Landscape Association, the Alabama Master Gardeners Association, and the Auburn University Department of Horticulture. Information contained in this manual was edited and adapted for Alabama's climate and soils from the Florida Yards and Neighborhoods Program with permission from the authors. We thank the authors for their hard work and the US Environmental Protection Agency for partial support of this program. We also would like to thank the authors of the Tennessee Yards and Neighborhoods Program for sharing ideas and marketing concepts.
1. GETTING STARTED A Successful Landscape Plan.................................................................................................................................1 Common Landscape Mistakes...............................................................................................................................3
2. LANDSCAPE INSTALLATION Plant Selection and Placement ..............................................................................................................................7 Planting Tips...........................................................................................................................................................8 Proper Tree Planting..............................................................................................................................................9 Turfgrasses ...........................................................................................................................................................11 Ask the Experts.....................................................................................................................................................13
3. WATERING EFFICIENTLY/IRRIGATION PRACTICES Watering Tips.......................................................................................................................................................15 Calibrating Irrigation Systems............................................................................................................................17
4. CARE AND MAINTENANCE Pruning .................................................................................................................................................................19 Lawn Maintenance and Mowing .......................................................................................................................21 Fertilizing Lawns..................................................................................................................................................21 Fertilizing Woody Landscape Plants ..................................................................................................................24 Soil Testing ...........................................................................................................................................................25 Indicator Species of Healthy Environment ........................................................................................................26
5. MULCHING Mulch Facts ..........................................................................................................................................................27 Guidelines for Using Mulch................................................................................................................................27 How Much to Buy................................................................................................................................................28 Using Yard Waste as Mulch ...............................................................................................................................29
iii

6. RECYCLING YARD WASTE Recycle While You Mow.....................................................................................................................................31 Composting ..........................................................................................................................................................32 7. ATTRACTING WILDLIFE Requirements for Wildlife...................................................................................................................................35 Butterfly Gardens.................................................................................................................................................36 Honey Bees ...........................................................................................................................................................37 Good Plants for Bees ............................................................................................................................................38 8. MANAGING YARD PESTS RESPONSIBLY Integrated Pest Management ..............................................................................................................................41 Avoiding Pest Problems .......................................................................................................................................42 Identifying Pest Problems....................................................................................................................................43 Treating Pest Problems ........................................................................................................................................43 Common Landscape Pests and Their Management ..........................................................................................44 Plant Diseases .......................................................................................................................................................46 9. REDUCING STORMWATER RUNOFF Nonpoint Source Pollution..................................................................................................................................47 Making Every Raindrop Count ...........................................................................................................................48 Grass–lined Swale................................................................................................................................................48 Non–impervious Surfaces ...................................................................................................................................49 Rain Barrels and Cisterns ....................................................................................................................................50 Controlling Mosquitoes and Algae.....................................................................................................................53 Rain Chains ..........................................................................................................................................................53 Rain Gardens ........................................................................................................................................................54 Constructed Wetlands and Retention Ponds .....................................................................................................56 10. PROTECTING THE WATERFRONT Saltwater Considerations.....................................................................................................................................59 Freshwater Considerations..................................................................................................................................60 Man–made Lakes and Ponds...............................................................................................................................60 Stormwater Control Ponds (Retention Ponds)...................................................................................................61 Seasonal Ponds .....................................................................................................................................................61 APPENDIX
Extension Agents ........................................................................................................................................63 Extension Master Gardener Helpline.......................................................................................................63 Publications ................................................................................................................................................63 Plant List .....................................................................................................................................................65 Plants for Rain Gardens.............................................................................................................................79 Regional Plant Nurseries ...........................................................................................................................81 Site Assessment Instructions .....................................................................................................................85 Site Assessment Checklist ..........................................................................................................................89
iv

Contributing authors Eve Brantley
Willie Datcher Mark Dougherty
Glenn Fain Tony Glover
Ellen Huckabay Patti Hurley
Charlene Lebleu Gerald McQueen Jr.
Sallie Michael Eric Reutebuch Roland Roark Katie Werneth Amy Wright
EDITORS
Bernice Fischman Kerry Smith
Ken Tilt
DESIGN Bernice Fischman
v

vi
CHAPTER ONE: GETTING STARTED A Successful Landscape Plan
Common Landscape Mistakes
A SUCCESSFUL LANDSCAPE PLAN
An Alabama Smart Yard doesn’t merely offer a good–looking, low–maintenance landscape; it also becomes an asset to the environment, protecting natural resources and preserving our state’s unique beauty. Recognizing that the home landscape is part of a larger natural system will help create an Alabama Smart Yard. Designing a beautiful yard begins with good decisions based on what you and your landscape require. Whether you are designing on a shoestring budget or hiring a professional landscape architect, understanding a few basic concepts will help you make good decisions and avoid problems down the road. The secret to creating a successful landscape design is using a logical planning process. Follow the steps outlined below to develop your own landscape plan. Decide Why You Want to Landscape and Set Goals Most homeowners recognize landscaping as a way to add beauty to their home or to improve the resale value. Other reasons to landscape might include more specific needs such as noise reduction, creating a focal point, or attracting wildlife to a yard. The ASY program aims to protect the environment while meeting these needs. Appropriate landscaping stabilizes soil, prevents erosion, filters pollutants, saves energy, and reduces harmful runoff, all of which contribute to preserving Alabama’s unique natural resources.
GLOSSARY BOX: Runoff: the portion of rain or irrigation water on an area that is discharged through stream channels. The water
that is lost without entering the soil is called surface runoff.
How will you use your property? You might need a play area for your children or wish to entertain family and friends outdoors. Your passion may be raising vegetables or simply maintaining a small flowerbed at the mailbox. Decide how much time you want to spend in your yard. Creating a low–maintenance yard will ultimately save time and money. Analyze the Existing Site (Use the Site Assessment Instructions and Checklist in the Appendix – page 85). Walk around your property and note your site’s conditions. Does your site demand plants that are tolerant of full sun, shade, drought, or occasional flooding? If you do not know your soil’s pH and nutrient content you may want to conduct a soil test (see page 25). Look at existing plants and decide which ones you want to keep. Trees with long life spans like live oak (Quercus virginiana) and bald cypress (Taxodium distichum) are desirable and should be preserved. Plants that always seem to have one problem or another throughout the year are good candidates for removal. You should always remove any invasive species like privet (Ligustrum sinense) and kudzu (Pueraria lobata).
1

Understanding USDA hardiness zones The USDA hardiness zone map of the United States http://www.usna.usda.gov/Hardzone/ushzmap.html is broken down into zones of average minimum temperatures. You should only select plants that can tolerate average lowest temperatures for your area. Alabama covers two hardiness zones: Zone 8 reaches from about Clanton southward; Zone 7 is above Clanton. Average minimum temperature for the southern half of Alabama is 10°F to 20°F. The northern half of the state averages 0°F to 10°F minimum temperature.
Pink: average minimum temperatures = 0 to 5°F Red: average minimum temperatures = 5 to 10°F Light green: average minimum temperatures = 10 to 15°F Dark green: average minimum temperatures = 15 to 20°F Know your soil Determine your soil’s texture. Sandy soil will be better drained than clayey soil. For an in–depth explanation of Alabama soil types go to the National Resources Conservation Service site: http://www.mo15.nrcs.usda.gov/states/al_soils.html
Before fertilizing, conduct a soil test: http://www.aces.edu/pubs/docs/A/ANR-0006-A/ANR-0006-
A.pdf for an analysis of your soil’s nutrients and pH. Follow recommendations for fertilizer and other amendments. Your soil's pH is one of the most important measurements you need to know. Neutralizing a soil’s pH makes certain valuable nutrients more available to plants. Soil tests may recommend (Liming and Fertilizing Ornamental Plants: http://www.aces.edu/pubs/docs/A/ANR-0388/) amending the soil with lime or with sulfur. Knowing your soil’s pH will also help you make better use of plant reference guides, which often specify pH needs along with other requirements for plant health. It is also important to realize that concrete slab foundations, brick, mortar, plaster, and other building materials are strongly alkaline. These materials leach into surrounding soils, drastically raising the pH over time. For this reason, azaleas (Rhododendron spp.), blueberries (Vaccinium corymbosum), camellias (Camellia spp.), and other acid–loving plants should not be planted near the concrete foundation of a home, without some modifications. Many new homes are built on raised platforms of compacted “fill dirt” imported by the construction company. Such compacted soils don’t absorb water readily and can restrict a plant's healthy root growth. If you have a landscape that has compacted soil, amend the soil with organic matter as you add planting beds. Some soils have a sub–layer of hardpan, which limits root penetration, essentially establishing a barrier to plant roots. Always examine your soil to a depth of about 18" before making final plant selections. If you intend to plant deeply rooted trees that will grow large, examine soil to a depth beyond 18". Make a Plan Plan first and plant last. The secret to creating a successful landscape design is using a logical planning process. Remember that gardens are very dynamic, change with the seasons, and grow and expand greatly over time. Successful gardens create balance for the diverse mixture living there. Consider all the components in your plan – soil, plants, water, wildlife, pests – and how they will each be part of your changing garden spaces over time. Make this plan one step at a time and have fun with it! Draw a Land Use Plan You do not have to be an artist to tackle this step. You will need a pencil, ruler, and graph paper. Decide a scale for your drawing (example: 1" = 10'). If you work in a large scale, details will appear large in your drawing and you will need a large piece of paper. If your mortgage bank or courthouse has your property records with a detailed plat map, this step will be even easier. Draw your house to the chosen scale and pencil in existing trees and shrubs you want to keep. If your yard has a septic tank, underground utilities, overhead power lines, or an irrigation system, include these on your drawing. Indicate where certain activities will take place in your yard. Consider views from indoor windows. Note unpleasant sites that you wish to hide or views you wish to frame or accentuate.
2

If you live on the water, place intensively maintained plantings, such as turfgrass and vegetable gardens, away from the water’s edge to reduce the potential for polluted runoff entering surface waterways. In many circumstances, a no fertilizer, no pesticide buffer zone of at least 10' along the shoreline significantly reduces pollution from upland areas. Never allow fertilizers or pesticides to enter water directly. See the Extension publication, Residential Landscape Design ( http://www.aces.edu/pubs/docs/A/ANR-0813/) for more details on the aesthetic considerations for designing a landscape. Irrigation Plan In–ground irrigation systems are not necessary in every landscape, especially if you use drought tolerant plants. Research your irrigation needs. If you decide you need a system, determine which type would be most appropriate for your property. Consider this tip: while plants are establishing in your yard, you may want a temporary watering system. It is convenient and usually worth the effort. Add any new irrigation plans to your drawing. Read more about irrigation techniques and water conservation strategies in Chapter 3. Add Plants to Your Plan Determine the types of plants you want in different locations. Don’t worry about specific plant identification yet – just draw where you want trees, shrub beds, groundcover areas, or flower beds. Draw these locations as free–form shapes designating the whole group of shrubs, flowers, etc. Plants fulfill multiple roles in a landscape: they form eye pleasing scenery, are a key to reducing energy use, and protect our natural resources. Trees planted in groups provide more atmospheric cooling than the same number of isolated trees. Trees planted with accompanying shrubs and groundcovers beneath them form effective windbreaks. Grouping plants according to their water needs also makes watering more efficient and keeps plants healthier. Once you are pleased with the planting areas, next decide on the specific plants for each. Choose plants that are native and/or those fully adapted to growing in your area. Please note that native plants are desirable for our climate but disturbed urban soils or soils which are not part of their native environment may limit their use. Choose lower maintenance plants and those requiring less supplemental water. Know the mature sizes of the plants you select. Place plants far enough away from buildings and from each other so that they have room to grow. Buy Quality Plants Choose the healthiest plants you can find. Look for foliage that is not wilted and stems that are not damaged. Slip plants out of pots to inspect roots. Healthy roots are white or light brown and smell like damp soil; diseased roots are brown or black and often have a sour or rotting odor. Large roots that are growing in a circle inside the bottom of the pot indicate a root–bound plant. Purchase another plant, if possible. Plan for Maintenance Maintenance includes proper watering, fertilizing, composting, pruning, mowing, mulching, and pest management. The more thorough you are with the steps above, the less you will have to worry about maintenance. It is possible to maintain an established landscape with minimal amounts of pesticide, fertilizers, and supplemental water. Watering efficiently, fertilizing appropriately, and managing yard pests responsibly are all part of proper landscape maintenance.
COMMON LANDSCAPE MISTAKES
Now you have the basics of implementing a successful landscape. Here are some additional tips to make your yard beautiful, healthy, and an asset to the surrounding environment.
Did You Call First? Do you know where your underground utilities are? Digging without knowing can cause tremendous damage, interrupting your electric, telephone, cable television, water, sewer, gas service, and possibly even causing injury or loss of life! If you are digging anywhere, state law requires you to contact your local utility providers Alabama One Call (http://www.al1call.com/) two full business days before you dig. The toll free number is 800–292–8525. Underground facility owners will locate any underground utilities in the area you wish to dig. The service is free. If you don’t follow this procedure and underground lines are damaged, you could be fined. This can be a substantial amount if a fiber optics cable is cut. For more information, visit the Alabama One Call site.
3

Poor Soil Prep The importance of thorough soil preparation cannot be overemphasized. A healthy root system makes plants tougher, ultimately saving time and money. Soil is like a living, dynamic sponge that holds water, stores nutrients and air, gives beneficial organisms a habitat, and filters, traps, and degrades contaminants in runoff. Roots and soil organisms need oxygen. Infiltration provides for gas exchange. Increasing your soil’s infiltration capability improves your soil’s health and ultimately the toughness of your plants. Make soil prep an integral step every time you plant. It can be as simple as tilling the soil with pine bark, peat moss, or other organic compost for aeration, or as thorough as combining the soil test recommendations with 3" of composted manure over a large area. Soil amendments are any materials that, when added to a soil, improve its physical, biological, and chemical properties. Lime or sulfur, for example, may be needed to adjust the soil pH for maximum nutrient availability. Compost is added to increase soil structure and feed fungi, bacteria, and other living creatures required to maintain a biologically active soil community. Healthy soils are prepared to host larger root systems that are better able to withstand drought and other stresses. Mulches can also add to soil health. These are materials applied over the surface of the soil to reduce moisture loss, moderate soil temperatures, reduce erosion, and suppress weeds. Over–planting Resist the urge to plant an instant landscape or be prepared to remove plants as they become crowded. Make sure you know the mature size of your plants before planting. Give them room to grow into their mature size. When plants grow too tall for the landscape areas, they require extra pruning and maintenance in the long run. Plants too close together suffer from decreased light and air circulation resulting in increased stress and disease problems. Tightly spaced plants are in constant competition for nutrients and water. Plant reference guides and books suggest general spacing requirements for each plant. These spacing suggestions are measured from the center of one plant to the center of the next plant. A newly landscaped area may look sparse at first, but resist the urge for the instant landscape because in time your plants will mature into the space you have allotted for them. You can fill voids with annual and perennial flowers that provide color and filler until permanent plants mature. Most landscape designers use 5 to 10 years as a timeframe to determine maturation of a landscape with the 10 year time designated for trees. Failure to Group Plants Some plants need more water than others. Planting plants with different water requirements together in the same bed often has poor results. Plants receiving too much or too little water are more susceptible to rotting
or wilting. Where possible, plants should be grouped according to the amount of water they require.
Plants against the House Another common mistake is placing plants too close to the house. These plants have more pest and disease problems because of persistently wet foliage and lack of air circulation. They are also inconvenient when home repairs are needed. Foundation plantings should be planted at least half their mature width plus one foot away from the house. A shrub that will grow to be 5' wide should be planted 3½' away from the house.
Lack of Foresight – Invest in Trees Trees defy our logical understanding. They seemingly have super powers like: a possible lifespan up to 500 years, taking 100+ gallons of water from
the soil in one day, and having roots with a 50 yard diameter. Trees are often a misunderstood plant in the yard and need special considerations, especially for root space to grow. All hard construction should be finished prior to planting new trees to avoid potential conflicts. Because tree roots reach far beyond the tree canopy’s drip line it is even more important to remember this during construction around established trees. Imagine a wine glass placed on a dinner plate. The glass represents
4

the above ground tree and the plate is the below ground portion. Damaging 50% or more of a tree’s root system can cause its death. (See Chapter 2 for specific techniques for planting new trees.) Can You Spot the Professionals? The Alabama Certified Landscape Professional Program (ALCLP) offers landscape professionals the opportunity to be recognized as the best in their field. For more information about this program go on–line to the Education page (http://www.alnla.org/Education/ ) of the Alabama Nursery and Landscape Association. All landscape designers should be certified by the State of Alabama. The ALCLP program is a voluntary certification program that assures competence beyond the basic state requirements.
PLEASE NOTE: The Alabama Cooperative Extension System does not endorse or guarantee any product and does not recommend one product instead of another that might be similar.
5

6

CHAPTER TWO: LANDSCAPE INSTALLATION Plant Selection and Placement
Planting Tips Proper Tree Planting
Turfgrasses Ask the Experts
PLANT SELECTION AND PLACEMENT Have you ever bought a plant that looked great at the nursery or garden center, only to have it die once you planted it? One way to avoid this heartbreaking scenario is by putting the right plant in the right place by matching the plant’s needs to the site conditions. This endeavor encompasses far more than simply putting sun loving plants in your yard’s sunny spots. You also need to consider things like maintenance and water needs. Wet vs. Dry Some drought tolerant plants thrive on elevated dry spots or in windy areas, but they can quickly succumb to root diseases and pest problems if you plant them in low lying areas where water tends to pool after heavy rains. Drought favoring plants also do well in exposed areas, on berms, and along the unshaded southern or western walls of buildings.
GLOSSARY BOX: Drought tolerant: describes plants that require less water once established
because they are adapted to regions with frequent drought.
Position plants adapted to wet soils in low spots or areas with poor drainage. The bottom line when placing plants in your landscape is not to waste time, energy, and money caring for a plant that is not adapted to the spot you have set aside for it. Made in the Shade Position trees and shrubs strategically to improve your home’s heating and cooling capacity. Shade trees can reduce air conditioning costs by an estimated 50 percent. Plant deciduous shade trees on the south, east, and west sides of a house to cast shade in the summer and let warming light enter windows in winter.
GLOSSARY BOX: Deciduous: a plant that sheds all of its leaves at one time each year.
You can also save on energy bills by shading your outdoor air conditioning unit from direct sun. Be careful not to block the unit’s airflow. If the warm discharge air cannot escape, the intake air temperature rises, causing the unit to operate less efficiently. Plant Matchmaking A common landscape plan scatters woody plants across an expanse of lawn, with no clear design pattern. While this may look the norm, the truth is that turf and woody ornamentals have different water, light, fertilizer, and maintenance needs. A misplaced shrub can disrupt mowing and irrigation patterns. Reduce maintenance and
7
conserve water in the landscape by grouping plants in beds according to water requirements and maintenance needs.
PLANTing tips
Choosing plants is the fun part of landscaping. Alabama’s climate supports countless varieties of plants, many of which are grown by local nurseries. The plants you choose determine how much maintenance your yard will require and also how long your landscape will last. For example, fast growing trees often have a shorter life span than slow growing trees.
Focus first on low maintenance plants suitable to your site Once these plants are established in the right location, most require little, if any, supplemental water, fertilizers, or pesticides.
GLOSSARY BOX: Established: for roots to fully extend into the surrounding soil and become “established” can take one to two years.
Select drought tolerant plants suited to your soil
Alabama’s horticultural focus is now on plants that can tolerate extended dry conditions. Once these plants are established, your watering chores will be easier.
Welcome wildlife
Provide flowering and fruiting plants, seeds, and nuts to bring birds and butterflies into your yard: red tubular flowers for hummingbirds, nectar and larval food for butterflies as Alabama is a stopover for many migrating and wintering butterflies and birds. Design a landscape that caters to these colorful, winged creatures.
Plant for impact
Limit the number of plants with high water and maintenance requirements, placing them where they will have the greatest visual impact with access to water during drought periods.
Avoid invasives
Do not plant exotic, invasive species. If these plants are present in your yard, remove them. They crowd out native plants and seriously threaten Alabama’s ecosystems and wildlife.
Aim for diversity
Create a mosaic of trees, shrubs, groundcovers, native grasses, and wildflowers. Monocultures, large expanses of the same plant species, are prone to disease and insect infestation and aren’t as sustainable as a diverse plant community.
Cope with a slope
It’s hard to mow grass on sloped or in extremely wet areas, so avoid planting turf where you can’t easily cut it. Use groundcovers (Ground Covers: http://www.aces.edu/pubs/docs/A/ANR-0181/ANR-0181.pdf) on slopes where grass may not thrive but the potential for runoff exists.
Beg off quick fixes
Do not be fooled by the quick fix appeal of fast growing plants. Such plants may require frequent pruning, which creates more clippings and yard waste. Also, fast growth yields lots of lush, green shoots which can attract certain pests. Slow growing plants may take longer to fill in your landscape, but they’ll ultimately last longer and create less work.
Maintenance needs
Do not overlook maintenance needs when designing your landscape. Place hedges where you can access them easily from all sides or trimming chores will quickly become nightmares.
8

Fall planting Perennial plants (flowers, shrubs, or trees) are best transplanted in the fall or winter. During this dormant period the plant’s energy is devoted to the important work of root growth whereas in spring and summer the plant primarily uses its resources for above ground growth.
Irrigation
After you have spent time and money to create your desired landscape, water will be a critical consideration during the first 6 to 12 months. New roots need water to establish plants into the native soil. Make sure any irrigation method you use operates efficiently by targeting the plant needing water and not wasting water to runoff or evaporation. Consider drip or other micro–irrigation devices.
Native plants
Some Alabama native plants are widely available at local garden centers, and others are becoming more available as demand for them grows. Native does not mean sacrifice. Some of our most beautiful landscape plants are natives and selections are available for improved cultivars (see the Appendix for locations of regional plant nurseries).
GLOSSARY BOX: Native plant: a plant that occurs naturally in a particular region, state, ecosystem, and habitat
without direct or indirect human actions.
Want to learn more about native plants suitable for your yard? Try these tips to get started:
• Visit parks, wildlife preserves, botanical gardens, ASY demonstration landscapes, and nurseries to view native plants.
• Visit libraries or bookstores (particularly those at botanical gardens) to find good reference books on Alabama native plants. Search the web for information on native plants.
• Remember: Just because a plant is native does not guarantee its success in your landscape. Always put the right plant in the right place.
PROPER TREE PLANTING
Establishing a tree canopy is a great way to begin creating an eco–friendly yard. Trees not only provide shade and wildlife habitat, but they also help to reduce stormwater runoff while increasing the value of your home. According to the American Forestry Association, trees have other significant monetary benefits. Each year, a single tree provides $73 worth of air conditioning savings, $75 worth of erosion control, $75 worth of wildlife shelter, and $50 worth of air pollution reduction. Compounding this total of $273 annually for 50 years at 5% interest results in a tree value of $57,151. The overall benefits far outweigh the initial cost of each tree. Landscaping is an investment in your home and health. Before you plant trees, put in hardscapes, such as walkways or patios. Trees are a more permanent addition to the landscape so site selection and proper planting techniques are essential. This section is adapted from Dr. Ed Gilman’s website, Planting Trees in Landscapes (http://hort.ifas.ufl.edu/woody/planting.shtml), reprinted with permission. Plant according to the following sequence:
1. Determine the mature size of the tree If there are overhead lines or wire, security lights, or a building nearby that could interfere with the tree as it grows, find a new planting site. 2. Dig a proper sized hole A shallow hole is better than a deep hole. Many people plant trees too deeply. Dig a hole that is 1½ to 3 times the width of the root ball. Use even wider holes for compacted soil and wet sites. Make sure the depth of the hole is slightly LESS than the height of the root ball, especially in compacted or wet soil. If you inadvertently dig the hole too deep, add soil to the bottom of the hole.
9

Break up compacted soil around a newly planted tree to give emerging roots room to expand into loose soil. This will hasten root growth and encourage establishment. Some trees are particularly sensitive to compacted soil including beech (Fagus grandifolia), dogwood (Cornus spp.), pine (Pinus spp.), and white oak (Quercus alba).
GLOSSARY BOX: Establishment: the period during which a plant grows its roots into the native soil
sufficient to support continuing plant growth.
3. Find the point where the topmost root emerges from the trunk This point is called trunk flare, root flare, or root crown and should be within 2" of the soil surface. If the topmost root is buried within the rootball, remove enough soil from the top of the rootball so the point where the topmost root emerges from the trunk will be within the top 2" of soil. Loosen circling roots, especially in the top half of the rootball. Selectively remove small roots that are kinked or circling. If many roots circle the bottom or sides of the rootball, slice the rootball about 1" deep in four places (like at the points of a compass) from top to bottom before planting. This reduces the likelihood of these roots causing problems later. If you cut large roots, the tree might go into shock and die. To avoid having to slice roots, buy plants that are not rootbound. For plants that are not too large to handle, slip them out of pots at the nursery and inspect the roots. If plants are too heavy to lift, tilt the pot and inspect the roots as much as possible through the drainage holes. Sometimes you will be able to see circling roots through the drainage holes.
4. Slide tree carefully into the planting hole To avoid damaging the tree when placing it in the hole, lift it with straps or rope around the rootball, and not by the trunk. Use special strapping mechanisms constructed for carefully lifting trees out of large containers. 5. Position the trunk flare (which is where the topmost root emerges from the trunk) slightly above the surface of the landscape soil. Most horticulturists agree it is better to plant the tree a little high than to plant it too deep. If the tree is a little too deep, tip it to one side and slide some soil under it; then tip it back the other way and slide more soil under the root ball. Once the tree is at the appropriate depth, place a small amount of soil around the rootball to stabilize it. Soil amendments are usually of no benefit. The soil removed from the hole usually makes the best backfill, unless it is substandard or contaminated.
6. Straighten the tree in the hole Before you begin filling the hole with soil, have someone view the tree from two directions perpendicular to each other to confirm that it is straight. Fill in with some more backfill soil to secure the tree in the upright position. Once you add large amounts of soil, it is difficult to reposition the tree. 7. At planting time, remove all synthetic materials from around the trunk and root ball. This includes string, rope, synthetic burlap, strapping, plastic, and other materials that won’t decompose in the soil. 8. Fill the planting hole with backfill soil As you add the soil, slice a shovel down into it twenty to thirty times, all around the tree. Break up clay soil clumps as much as possible. Do NOT step firmly on the backfill soil. This could compact it, restricting root
10

growth, especially in clay soil. When the planting hole is filled with soil, the rootball should rest 1" (small trees) to 3" (larger trees) above the backfill soil.
9. Add 10 to 20 gallons of water to the rootball Fill any air pockets with soil. 10. Cover the backfill soil with mulch Apply mulch to a minimum 8' diameter circle around the tree, if possible. Do not construct a berm from soil, since this soil could end up over the root ball several months later. Water the mulch well after spreading. 11. Stake the tree, if necessary Staking holds the rootball firmly in the soil. If the tree moves in the wind, the rootball may shift, and emerging roots could break or the plant could fall over. Young trees might require staking until enough trunk strength develops. Remove staking materials after the tree becomes established. If not removed, ties and stakes can girdle a tree, which can kill it.
GLOSSARY BOX: Berm: a raised earthen area used in the past to catch water and direct it to the root zone.
Girdle: to constrict or destroy the bark in a ring around the trunk or branch of a plant, cutting off flow of nutrients
and water through the bark; ultimately the plant dies.
12. Water trees frequently so roots fully establish Light, frequent irrigation fosters the quickest establishment for trees. Following the initial few months of frequent irrigation, water weekly until plants are fully established. At each watering, apply about 1 to 2 gallons of water per inch of trunk diameter (i.e., 2 to 4 gallons for a 2" tree). Never water if the rootball is saturated. In Alabama the typical establishment period for trees is 3 months per 1" of trunk diameter. This could take longer depending on climate, watering schedule, and species. Water is crucial during the first and second growing season. Fertilizing during the establishment period doesn’t improve survival rates. For more information see Street Trees: Site Selection, Planting, and Maintenance in the Urban Landscape: http://www.aces.edu/pubs/docs/A/ANR-0814/.
turfgrasses
Home lawns are often a focal point in the landscape and can be a real asset. A beautiful lawn enhances the landscape by improving not only the aesthetic and economic value of the home, but by providing many environmental benefits as well. A dense, healthy lawn prevents soil erosion, reduces glare from the sun, helps cool temperatures on hot days, and absorbs many airborne pollutants, like dust. Perhaps the most important factor in establishing and maintaining an attractive and trouble free home lawn is selecting the proper turfgrass. Since a home lawn is intended to be a long term investment, the proper selection of a turfgrass is an important first step. What Type of Lawn is Desired or Expected? Having a perfect, dark green, lush lawn that does not need to be mowed, fertilized, or irrigated is a myth. For practical purposes, decide if the lawn is to be a "perennial yard of the month," an average lawn, or just a groundcover to lessen soil erosion and provide soil stability around the home. What Level of Maintenance Will the Lawn be Given? Most turfgrasses will respond to a range of maintenance levels; however, each turfgrass has a preferred maintenance level for optimum results. Levels of maintenance are closely related to how much time and how much money one wants to spend on the lawn. Obviously, a higher level of maintenance will require a higher level of cost. Are there Any Physical or Environmental Limitations to the Site? A quality lawn may require some irrigation; therefore, water quantity and quality are important lawn selection factors. Can the area be easily mowed on a frequent basis? Is the lawn going to be very shaded? What is the soil type? Is drainage going to be a problem? With answers to these basic questions in mind, use the following
11

information to select the proper turfgrass for your home lawn. (NOTE: some turfgrasses are shade tolerant. All do better and require less maintenance in full sun and free of competition from adjacent plant roots.) Environmental and soil conditions vary greatly throughout the state of Alabama, and certain turfgrasses grow better under some of these conditions and locations than others do. There are several turfgrass species and cultivars from which to choose. Some turfgrasses can be planted anywhere in the state; others perform best in a certain region. Turfgrasses can be divided into two categories based on their adaptation: cool season turfgrasses and warm season turfgrasses. Cool season turfgrasses, such as tall fescue and Kentucky bluegrass, are best adapted to cooler climates and exhibit optimum growth during the cooler months of fall, winter, and early spring. Tall fescue is the only cool season turfgrass that is recommended for home lawns in Alabama. Warm season turfgrasses, such as bahiagrass, bermudagrass, centipedegrass, St. Augustinegrass, and zoysiagrass grow best during hot summer months. Most lawns across the state are warm season turfgrasses. You must consider the range of temperatures between the northern and southern parts of Alabama before choosing a turfgrass. For example, winter temperature extremes in the northern part of Alabama are too severe for the survival of St. Augustinegrass; and the summer heat in the southern part of the state is too severe for the survival of tall fescue. The simplest method to determine which turfgrass is best adapted to your area is to check the lawns in your neighborhood to see which turfgrass survives and looks the best. If you need further assistance in terms of adaptation, refer to the table below.
Turfgrasses Condition Heat tolerant
Bluegrass Bermudagrass Centipedegrass St. Augustine Tall fescue Zoysiagrass
Adaptation 1 N N,C,S C,S C,S N N,C,S Drought tolerance
Fair Excellent Good Good Fair Excellent
Sunlight 2 Full to partial Full Full to partial Full to shade Full to shade Full to partial Salt tolerance Poor Good Poor Good Poor Good
Wear tolerance
Fair Excellent Poor Poor Fair Excellent
Soil pH 5.5 to 7.0 5.5 to 7.0 5.5 to 7.0 5.5 to 7.0 5.5 to 7.0 5.5 to 7.0 Establishment
methods Seed, sod Sprigs, plugs,
sod, seed 4 Sprigs, plugs,
sod, seed Sprigs, plugs,
sod Seed, sod Sprigs, plugs,
sod Leaf color Dark Medium to
dark Light Medium to
dark Medium Medium to
dark Leaf texture Medium Medium to
fine Coarse to medium
Coarse Coarse to medium
Coarse to fine
Maintenance level 3
High Medium to high
Low Medium Medium Medium
Mowing height
2.5 to 3" 1 to 1.5" 1 to 1.5" 2.5 to 4" 2 to 3" 1 to 2"
1 Adaptation: N=north, C=central, S=south 2 Sunlight: Full=at least 6 hours of sunlight; Partial=at least 4 hours of sunlight; Shade=at least 2 hours of sunlight
3 Maintenance Level: Low = fewer than 2 fertilizations per year; Medium = 2 to 4 fertilizations per year; High = more than 4 fertilizations per year
4 Common bermudagrass types only Turfgrasses Recommended for Use in Alabama The ultimate consideration is simply this: which turfgrass do you consider to be the most appealing, the most beautiful, and the most enjoyable? Some may prefer the fine texture; some may want the one with the dark green color. It’s your decision! There are six turfgrasses currently recommended for use on home lawns in Alabama: bahiagrass, bermudagrass, centipedegrass, St. Augustinegrass, tall fescue, and zoysiagrass.
Bahiagrass Bahiagrass is normally considered a pasture turfgrass; however, it can be used for home lawns. It spreads by both rhizomes (underground stems) and stolons (aboveground stems). Bahiagrass has excellent drought tolerance but forms what is considered to be a low quality lawn. It is suitable for low use or utility turfgrass areas such as roadsides. One of the primary reasons bahiagrass is considered by most to be an undesirable
12

lawn is the fact that it produces rather tall seed heads after it is mowed. Seed is available for the two most common varieties, 'Pensacola' and 'Tifton 9.' Bermudagrass Bermudagrass is the most common turfgrass used for home lawns primarily due to its market availability and drought tolerance. It is a long lived, perennial, warm season turfgrass that is adapted across all of Alabama. It spreads by both rhizomes and stolons. There are two types available: common and hybrid. Common bermudagrass produces viable seed. Hybrid bermudagrasses, such as 'Tifway', are also available. The hybrids are only available as sprigs, plugs, or sod, but are more commonly used due to ease of lawn establishment. Centipedegrass Centipedegrass is a slow growing turfgrass that spreads by stolons that resemble centipedes, hence its name. This warm season turf is adapted for use as a low maintenance turfgrass and is ideal for someone who wants a fairly attractive lawn that needs little care. Most of the centipedegrass that is sold is of the common variety. Improved varieties of centipedegrass are available, including 'Oklawn' and 'AU Centennial.'
St. Augustinegrass St. Augustinegrass is native to both the coastal regions of the Gulf of Mexico and the Mediterranean. It is primarily used for home lawns in the coastal plains area of Alabama. St. Augustinegrass spreads by stolons and produces some viable seed; however, most St. Augustinegrass lawns are established by vegetative plantings. St. Augustinegrass has good salt tolerance and handles shade better than any other warm season turfgrass. There are several cultivars of St. Augustinegrass available, including common, 'Bitterblue,' 'Floratine,' 'Floratam,' 'Floralawn,' 'Jade,' 'Delmar,' 'Raleigh,' 'Gulf Star,' 'Mercedes,' 'Palmetto,' and 'Seville.'
Tall Fescue Tall fescue is a cool season turfgrass that is tough enough to be grown in certain areas of the southeastern United States, including Alabama (Cullman and northward). Tall fescue is a bunch–type turfgrass that spreads by tillers; therefore, it must be established by seeding. The greatest advantage that it has over the warm season turfgrasses is its ability to grow well in shade and stay green throughout the winter. There are several varieties of tall fescue available, including many new, improved turf–type varieties that have finer leaf texture and improved heat and shade tolerance. For best results, use a mixture (blend) of three or four of these new turf–type tall fescues.
Zoysiagrass Zoysiagrass is native to southern Asia and is the most cold tolerant of the warm season turfgrasses. Zoysiagrass is a very slow growing turfgrass, but it forms a very dense lawn once established. There are several species and cultivars of zoysiagrass available, but the improved cultivars are recommended. Some of these zoysiagrasses include 'Z–52,' 'Meyer,' 'Emerald,' 'El Toro,' 'Matrella,' and 'Cashmere.'
ask the experts Throughout Alabama, experts who can assist you in your plant choices abound. Try these services, most of which are free, for advice on putting the right plant in the right place:
• Alabama Cooperative Extension Service: http://www.aces.edu
• Alabama Master Gardeners: http://www.aces.edu/mg • Alabama Master Gardeners Association: http://www.alabamamg.org
• Certified Horticultural Professionals: http://www.alnla.org/Education-Opportunities/alabama-certified-landscape-professional- aclp • Alabama Wildflower Society: http://alwildflowers.org/ • Alabama Nursery and Landscape Association: http://www.alnla.org
• Water Management Districts: http://water.sam.usace.army.mil/ • USDA Natural Resources Conservation Service: http://www.nrcs.usda.gov/
• Libraries
13

14

CHAPTER THREE: WATERING EFFICIENTLY & IRRIGATION PRACTICES
Watering Tips Calibrating Irrigation Systems
Even though watering restrictions are not yet commonplace throughout Alabama, homeowners should still take measures not to overwater. Overwatering does more than deplete the water supply; it also makes plants prone to pests and adds to stormwater runoff, which pollutes our water systems. By choosing and operating a watering system correctly, you can reduce water bills, insect and disease problems, and maintenance requirements. To maintain a healthy lawn can require as much as 2" of water per week during peak growing season. The more you water your lawn, the faster it grows and the more it needs to be mowed. Established trees and shrubs may require less than half as much water as an established turf. When severe drought leads to water restrictions, water authorities will typically restrict irrigation to certain days and times. But realize that even if it is your assigned day to irrigate, that does not mean you must irrigate. Pre–scheduled watering can waste time, money, and resources. Don’t let the calendar tell you when to water. Look not only at your plants for early signs of wilting, but also evaluate soil moisture on a daily basis.
GLOSSARY BOX: Wilting: the drooping of plant parts, especially leaves (leaf blades folded in half, blue gray color,
and footprints remain on the lawn), sometimes because of a lack of water. However, plant wilting can also be a sign of overwatering.
watering tips
Reduce the need for watering by choosing water efficient and drought tolerant plants, including those native to your site, and plant them in the right place. If you group plants according to their water (and light) needs (called a hydrozone), you can simplify watering methods and systems. For example, turf areas and shrub areas should always be separated into different hydrozones. Install a rain shutoff
device or soil moisture sensor (if you have an automatic sprinkler system) that will override the system when it rains or when the soil reaches a preset moisture level. Your county’s Extension office, the Natural Resources Conservation Service (http://www.nrcs.usda.gov/) or a certified irrigation professional can provide technical assistance.
15

Water in the early morning (4 to 7 a.m.) This is the most efficient time because temperature and wind speeds are at their lowest, which reduces evaporation and, more importantly, drift. Also, grasses are less susceptible to fungal problems if water is applied at the time that dew normally forms. Avoid watering between 10 a.m. and 4 p.m.
Temperature and wind speeds are at their highest during this time so water waste is more likely. Follow a simple watering schedule for grass:
apply ½" to ¾" of water when grass shows signs of distress (bluish gray color/folded leaf blades). Do not water again until symptoms reappear. If rain is predicted within the next 24 hours, delay watering
Experiment with gradual reductions in your watering times and frequencies
to see if plants can tolerate less water. Little or no supplemental water is required in cooler months
(November to March). Sprinkler system should operate properly and apply uniform coverage
Sprinkler calibration is one of the most effective ways to conserve water in an irrigation system. Check your system periodically
for broken heads or leaks.
Use a rain gauge to measure rainfall depth.
Overhead Irrigation or Drip? You are probably familiar with automated pop–up sprinklers that are part of a residential irrigation system. For lawns, those kinds of sprinklers are usually the best watering method. However, for other landscape plantings, consider drip irrigation as a water conserving alternative. Drip irrigation systems can be designed to deliver water directly to the root zone through low–flow–rate emitters. Other micro–irrigation devices such as bubblers, micro–sprays, and misters can be used effectively if properly designed and operated. As with any system it is important to avoid runoff, overwatering, and the irrigation of paved or non–landscaped areas. Proper installation and design will insure that each plant receives sufficient water.
GLOSSARY BOX: Precipitation rate: The rate, in inches per hour, that
an irrigation system applies water. The precipitation rate should not exceed the infiltration rate (capacity) of
the soil. Precipitation rate is a critical design component used by an irrigation professional, along with plant water requirement, to set irrigation system run times and cycles.
16
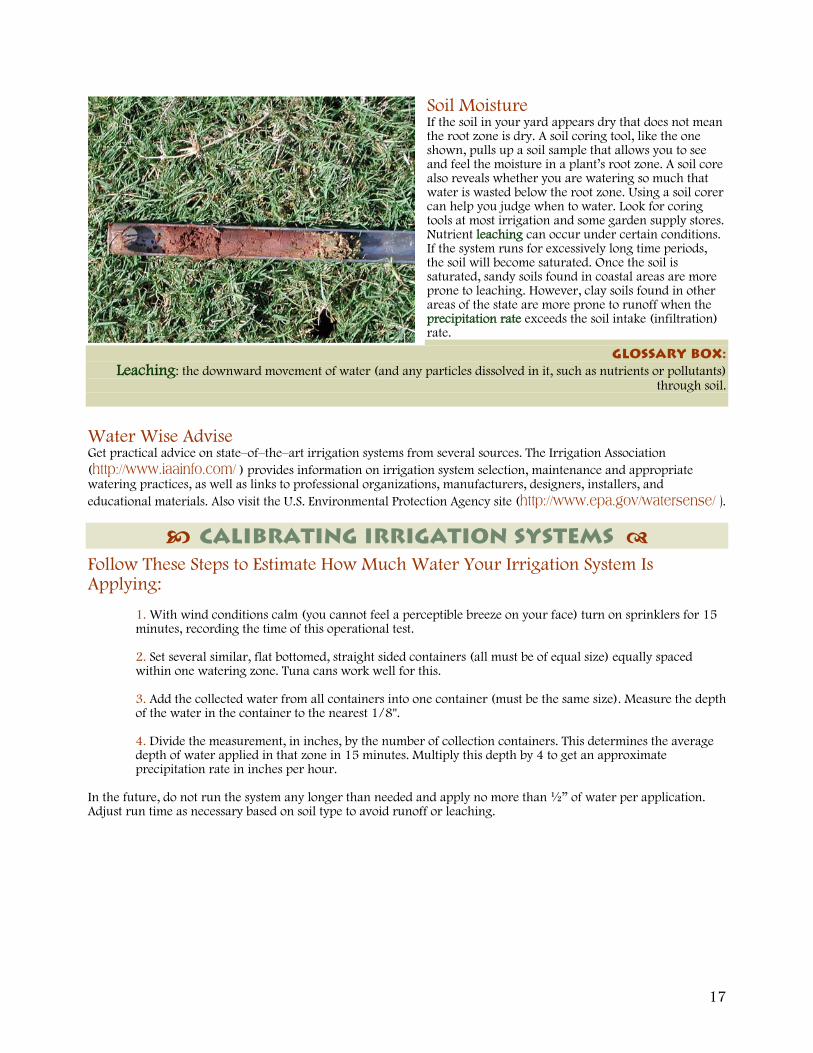
Soil Moisture If the soil in your yard appears dry that does not mean the root zone is dry. A soil coring tool, like the one shown, pulls up a soil sample that allows you to see and feel the moisture in a plant’s root zone. A soil core also reveals whether you are watering so much that water is wasted below the root zone. Using a soil corer can help you judge when to water. Look for coring tools at most irrigation and some garden supply stores. Nutrient leaching can occur under certain conditions. If the system runs for excessively long time periods, the soil will become saturated. Once the soil is saturated, sandy soils found in coastal areas are more prone to leaching. However, clay soils found in other areas of the state are more prone to runoff when the precipitation rate exceeds the soil intake (infiltration) rate.
GLOSSARY BOX: Leaching: the downward movement of water (and any particles dissolved in it, such as nutrients or pollutants)
through soil.
Water Wise Advise Get practical advice on state–of–the–art irrigation systems from several sources. The Irrigation Association (http://www.iaainfo.com/ ) provides information on irrigation system selection, maintenance and appropriate watering practices, as well as links to professional organizations, manufacturers, designers, installers, and educational materials. Also visit the U.S. Environmental Protection Agency site (http://www.epa.gov/watersense/ ).
calibrating irrigation systems
Follow These Steps to Estimate How Much Water Your Irrigation System Is Applying:
1. With wind conditions calm (you cannot feel a perceptible breeze on your face) turn on sprinklers for 15 minutes, recording the time of this operational test. 2. Set several similar, flat bottomed, straight sided containers (all must be of equal size) equally spaced within one watering zone. Tuna cans work well for this. 3. Add the collected water from all containers into one container (must be the same size). Measure the depth of the water in the container to the nearest 1/8". 4. Divide the measurement, in inches, by the number of collection containers. This determines the average depth of water applied in that zone in 15 minutes. Multiply this depth by 4 to get an approximate precipitation rate in inches per hour.
In the future, do not run the system any longer than needed and apply no more than ½” of water per application. Adjust run time as necessary based on soil type to avoid runoff or leaching.
17

18

CHAPTER FOUR: CARE AND MAINTENANCE Pruning
Lawn Maintenance and Mowing Fertilizing Lawns
Fertilizing Woody Landscape Plants Soil Testing
Indicator Species of a Healthy Environment
PRunING
Pruning is the removal of unwanted growth to make a plant develop or respond in a desired manner. Plants can be pruned for several reasons. You may prune plants to produce more blooms and fruit, develop a desired shape, maintain a certain size, remove older stems, or remove diseased or damaged portions (for informative drawings on pruning cuts see Care and Maintenance of Landscape Plants at http://www.aces.edu/pubs/docs/A/ANR-0958/ANR-0958.pdf). Even if you have chosen plants that require little maintenance, chances are at some point they will need some pruning. Shrubs often need pruning to serve their intended purpose in the landscape. Except for a few dwarf or extremely slow growing plants, all shrubs should be pruned regularly, usually every year or two. Major pruning cuts for trees and shrubs should be done at one of two periods, during dormancy (before growth begins in spring) or immediately after flowering based on the May Rule. Small pruning cuts can be done at any time.
GLOSSARY BOX: May Rule: If the plant blooms before May 1, prune soon after flowering has ended (flowers are produced on old
wood or last year’s growth). Examples: azaleas, camellias, forsythia, spireas.
If the plant blooms after May 1, prune during the dormant season prior to new growth in the spring (flowers are produced on new growth or current year’s growth). Examples: crapemyrtles, lilac chaste trees, gardenias
.
Pruning Techniques: Thinning In trees or shrubs, side branches are cut back to their point of origin or to the collar. Thinning gives a plant an open appearance. Where growth was dense before pruning, afterwards you can see daylight. Thinning encourages new growth inside the plant crown and increases light penetration and air circulation inside the crown. It also results in fewer branches that grow thicker, developing stronger resistance to wind damage. Read more at Pruning Ornamental Plants at http://www.aces.edu/pubs/docs/A/ANR-0258/ANR-0258.pdf
Heading Back Selectively cutting the tips of twigs or young branches back to a bud is called heading back. Heading back produces a denser shrub because it usually increases the number of shoots and leaves. To make pruning cuts that aren’t visible, locate them inside the plant so they are covered up by the remaining foliage. You can use heading back on annuals at planting time to create more flowering stems, but you will have to wait for more flower buds to develop. Never make heading cuts on trees.
GLOSSARY BOX: Bud: an undeveloped or compressed stem.
19

Hedging Hedging is the process of removing shoots or branches from a shrub to maintain a dense row of plants. Formal hedges feature neatly clipped shrubs while informal hedges let shrubs grow to their natural shape. Formal hedges must be pruned frequently during the growing season; informal hedges can be trimmed annually, enough to keep growth from overwhelming nearby walkways or structures or from shading lawns. Hedging can establish and maintain a barrier that can provide privacy as a screen or form a windbreak. Correct hedging cuts help a hedge to remain healthy and grow actively from top to bottom. Cut your hedge so that the top is narrower than the bottom, ensuring that light can reach each part of the hedge. If light does not reach lower leaves, leaves die and drop creating a “leggy” plant, bare at the base. Hedging is best done either just before active growth begins in spring or during the active growing season.
Basic Pruning Tips
Remove dead, diseased, or injured branches at any time Dip pruning shears and saws
in a weak alcohol solution (one part alcohol to nine parts water) to prevent spreading diseases between plants. Remove branches that cross or
touch each other and any that look out of place. Remove or transplant a shrub
if it is too large for its location. If the shrub requires excessive heading back, then the best
recommendation is to remove it or to transplant it to a more spacious area. Pruning is stressful on a plant’s system
Insure speedy and healthy new growth by avoiding pruning during times of environmental extremes.
Calling the Professionals If you are unsure about proper pruning techniques, consider hiring a Certified Arborist to prune your trees. An arborist is a specialist in the care of individual trees. Certified Arborists are knowledgeable about the needs of trees and are trained and equipped through Continuing Education administered by the International Society of Arboriculture to provide proper care. Go to http://www.isaarbor.com/home.aspx. Reduce Your Pruning Load An Alabama Smart Yard keeps pruning chores to a minimum.
• Select slow growing plants.
• Place plants far enough from walkways, driveways, buildings, or overhead wires to allow them to reach maturity without encountering obstructions that require labor intensive pruning.
• Reconsider the formal look or minimize the extent of it. Is that the appearance you want everywhere, and do you want to commit the time and resources to maintaining that look? Soft, flowing, natural lines are attractive and easier to maintain.
Raking Deciduous trees reduce energy costs (by 11.4%) by shading a house in summer. Depending on the amount of shade cover, energy savings can range from $10 to $43 per month. After leaves fall, sunshine has access to windows to heat a house in winter. If you desire turf under trees, then you should thin trees and rake leaves to improve light penetration to the turf. Trees and turf are healthier when kept separate.
20

If you do not want turf, permit leaves to remain under trees to form a self mulching area. Leaves add nutrients to soil as they decompose. If you want a different, more diverse understory, plant shrubs and groundcovers under trees to avoid raking. They will benefit from decomposing plant litter and help to hold leaves in place so they don’t clutter the landscape.
lawn maintenance and mowing
Whatever quality level you desire for your lawn, the objective should be to have a healthy, dense stand of turfgrass. Correctly implementing proper turfgrass maintenance practices (see Home Lawn Maintenance at http://www.aces.edu/pubs/docs/A/ANR-0239/ ) can reduce the need for supplementary practices such as pest control. Mowing and fertilizing are considered basic maintenance practices, and each has a significant impact on the quality of a lawn. These routine maintenance practices are normally done when it is convenient for the homeowner; however, they should be done relative to the lawn’s needs. Remember to plan for the size lawn you are willing to maintain. Expansive lawns often become a drain on your time or an expense for regular professional care. Develop the lawn you need for aesthetics and recreation but use other, lower maintenance plantings to reduce maintenance demands. Mowing is the most important maintenance practice for a good quality lawn and it is probably the most overlooked maintenance practice as well. Fertilizing, overseeding, and other treatments will accomplish very little if lawns are not mowed at a height that is healthy for that turfgrass. Mowing has a measurable effect on the way turfgrass grows. Mowing is the process that produces a lawn rather than a pasture or a meadow. Proper mowing creates a good quality lawn by encouraging a dense stand of turfgrass thus blocking weed seeds and sunlight from the soil surface. Mowing Heights For the best appearance and quality, turfgrasses should be mowed at the optimum mowing height for the proper growth and health of the specific turfgrass species that is present. Turfgrass species that spread or grow horizontally, such as bermudagrass, can usually be mowed at a lower mowing height than an upright growing bunch–type turfgrass like tall fescue. Turfgrasses with smaller leaves (fine textured) such as zoysiagrass can usually be mowed lower than turfgrasses with larger leaves (coarse textured) like St. Augustinegrass. Turfgrasses that are under environmental stress such as drought, heat, or shade should be mowed at the highest recommended rates as listed below. Table 1 outlines the range of mowing heights for each turfgrass species used for home lawns in Alabama.
Table 1. Recommended Mowing Heights for Lawn Turfgrasses Turfgrass Optimum Mowing Height (inches) Mowing Frequency (days) Mower Type
Bahiagrass 3 – 4 7 – 17 Rotary Bermudagrass .5 – 1.5 3 – 5 Rotary or Reel* Centipedegrass 1.5 – 2 10 – 14 Rotary
St. Augustinegrass 2.5 – 4 7 – 14 Rotary Tall fescue 2 – 3.5 7 – 14 Rotary Zoysiagrass 1– 2 10 – 14 Rotary or Reel*
*Reel mowers provide a superior quality cut.
Mowing Frequency Mowing frequency should depend on the growth rate of the turfgrass, but it is often based on when a convenient opportunity presents itself. The rate of turfgrass growth depends on the type of turfgrass present in the lawn, soil fertility (especially nitrogen), and weather or environmental conditions. Watering practices also play a role in how often you have to mow your lawn; more frequent irrigation means mowing more often. Another factor involved with mowing frequency is mowing height (see Table 1). A good rule of thumb is to mow your lawn regularly and to never remove or mow more than one third of the turfgrass height at any one mowing. For example, if you are maintaining your lawn at a mowing height of 2", you should mow the lawn when or before the turfgrass reaches 3" in height. By following this one third rule of thumb, you will have fewer and smaller turfgrass clippings. If the turfgrass becomes too tall between mowings, raise the mowing height and then gradually reduce it until the recommended height is reached.
fertilizing lawns
Properly fertilized lawns absorb nonpoint source pollutants, help stabilize soil, reduce ambient air temperatures and promote a healthy ecosystem of its own. Overfertilizing can aggravate pest problems, stimulate excessive growth,
21
and require frequent watering. In addition, when people use too much fertilizer on their landscapes, it can seep through the ground, past the root zone of the grass, plants or trees and into the community aquifer polluting the area water source. It can also be washed off by rainfall or irrigation and runoff directly into surface water or stormwater systems causing algal blooms, fish kills, and nitrate poisoning. The way you fertilize your lawn influences how much fertilizer is taken up by grass and how much might be lost to leaching or runoff. Before you apply fertilizer, it is very important that you read and understand the label. Several factors determine pollution potential from lawn fertilizing. Among these are:
• Type of fertilizer
• How much you apply
• How you apply it
• When you fertilize
• How much irrigation you apply afterwards
• Overall health of the lawn Selecting a Fertilizer When selecting fertilizer, look at the 3 numbers on the bag. They will read something like 15–0–15 or 16–2–8. The first number represents the percentage of nitrogen in the bag, the second refers to phosphorus, and the third number refers to potassium. For example, a 50 lb. bag of 16–2–8 contains 16% nitrogen, or 8 pounds of nitrogen, 2% phosphorus, or 1 pound, and 8% potassium, or 4 pounds. The remaining weight is usually comprised of inert ingredients. Nitrogen and phosphorus cause the most problems with regard to water pollution. Nitrogen is a mobile nutrient and leaches easily through groundwater while phosphorous has a tendency to runoff the surface causing pollution to groundwater. Soil tests will indicate the number of pounds to apply for a specified area.
How much phosphorus and potassium should I look for in a fertilizer? If you have ample phosphorus in your soil, look for a fertilizer with no more than 2% phosphorus. As for potassium, look for a fertilizer with at least half as much potassium as nitrogen (16–2–8) or equal amounts of nitrogen and potassium (15–0–15), depending on the results of your soil test.
What fertilizer is best to buy? Look for slow release fertilizers, or fertilizers that have a high percentage of slow release nitrogen in them. These products have less potential to leach or run off into Alabama’s waterways than quick release sources. Nitrogen promotes shoot growth, so if you use slower, more uniform release of nitrogen provided by slow release or controlled release fertilizers, you’ll also have less of a growth surge. In lawns, that means less thatch accumulation following fertilizer application which ultimately means less mowing.
GLOSSARY BOX: Slow release fertilizer: a fertilizer that releases its nutrients gradually, over a period of time.
Thatch: a layer of dead and living plant matter that accumulates between soil and turf,
often blocking water and nutrient movement into soil.
How do you know if a fertilizer is slow release? Look at the fertilizer sources listed on the back of the bag and find the amount of nitrogen that is slow release. The higher the percentage of slow release, the less chance of leaching and less thatch and mowing.
How Much Fertilizer to Apply Depends on Three Things:
1. Your desired level of maintenance 2. The amount of nitrogen in the bag 3. What percentage of that nitrogen is slow release
At times an underfertilized lawn may be less pest or disease resistant and unable to perform as well in preventing erosion. If you are applying a fertilizer with less than 30% of its nitrogen in a slow release form, only apply ½ pound of nitrogen per 1,000 square feet of lawn per application. If it has at least 30% slow
22

release nitrogen, you may apply up to 1 pound of nitrogen per 1,000 square feet of lawn per application. Regardless of the total nitrogen applied over a year, even at high maintenance levels, it is the amount of nitrogen applied at any one time and the proper application and watering–in that has the greatest impact on the potential for creating pollution.
How Should I Apply Fertilizer to a Lawn?
1. Determine the annual fertility needs of your grass species by referring to Table 2 (below). 2. Measure the square footage of your lawn area. Do not include landscape plants in this area calculation. 3. Determine how much slow release nitrogen is in your fertilizer. 4. Refer to Table 3 (below) to find out how much fertilizer to apply to your lawn area, based on the percentage
of nitrogen in your fertilizer product. These figures are based on ½ pound of soluble fertilizer per 1,000 square feet. If you are using a product with over 30% nitrogen in slow release form, double these amounts to apply 1 pound nitrogen per 1,000 square feet.
5. Broadcast the fertilizer over the lawn with a drop spreader.
Table 2. Fertilization Guidelines for Established Turfgrass Lawns in Three Regions of Alabama
Nitrogen recommendations (lbs N/1000 ft2/year)* Species North Central South
Bahiagrass 2–3 2–4 2–4 Bermudagrass 3–5 4–6 5–7 Centipedegrass 1–2 2–3 2–3 St. Augustinegrass 2–4 2–5 4–6 Zoysiagrass 3–5 3–6 4–6 *Homeowner preferences for lawn quality and maintenance will vary, so we recommend a range of fertility rates for each grass species and location. Also, effects within a localized region (for instance, shade, drought, soil conditions and irrigation) will require using a range of fertility rates. These recommendations assume that grass clippings are recycled.
Table 3. Proper Application Rates for Specific Fertilizer Products
% Nitrogen in Fertilizer Bag Area (sq ft) 6% 10% 12% 15% 16% 23% 27%
1.3 oz 0.8 oz 0.7 oz 0.5 oz 0.5 oz 0.4 oz 0.3 oz 10 3T 1.5 T 1.5 T 3.5 t 1 T 2.5 t 2.25 t
6.6 oz 4 oz 3.3 oz 2.7 oz 2.5 oz 1.7 oz 1.5 oz 50 14 T .5 c 7 T 6 T 5.25 T 4.5 T .25 c
13.3 oz 8 oz 6.7 oz 5.3 oz 5 oz 3.5 oz 3 oz 100 1.75 c 1 c 14 T .75 c 10.5 T 9 T .5 c 8.4 lb 5 lb 4.2 lb 3.3 lb 3.1 lb 2.2 lb 1.9 lb 1000 17.5 c 9.5 c 8.75 c 7.25 c 6.5 c 5.5 c 4.75 c 13 lb 7.5 lb 6.5 lb 4.9 lb 4.8 lb 3.3 lb 2.9 lb 1500
26.25 c 14.25 c 13 c 11 c 9.75 c 8.25 c 7.25 c 25.2 lb 15 lb 12.6 lb 9.8 lb 9.4 lb 6.6 lb 5.8 lb 3000 52.25 c 28.5 c 26 c 21.75 c 19.5 c 16.5 c 14.5 c
42 lb 25 lb 21 lb 16.4 lb 15.8 lb 11 lb 9.8 lb 5000 87.25 c 47.5 c 43.5 c 36.5 c 32.5 c 27.5 c 24.5 c
The chart explains the approximate weight of fertilizer to use for a given lawn or landscape area in pounds or a fraction thereof (first number) and also in cups or a fraction thereof (second number) to deliver ½ lb N/1000 square feet (the recommended rate for a single application of soluble fertilizer).
23

Fertilizer BMPs One of the main things you can do to prevent pollution is to use caution when applying fertilizers.
Do not spill fertilizer granules If you do have an accident, sweep the granules up. Rinsing fertilizer off with a hose could send it down the storm drain. Do not spread fertilizer onto water bodies or impervious surfaces
such as driveways or sidewalks. Particles on hard surfaces can wind up in waterways.
Use a drop spreader which puts particles down directly beneath the spreader, rather than a rotary spreader, which flings particles a farther distance.
Make sure equipment used to distribute fertilizer is properly calibrated
See Calibration of Equipment for Applying Fertilizers and Pesticides to Turfgrass at http://www.aces.edu/pubs/docs/A/ANR-1136/ANR-1136.pdf.
Avoid using “weed and feed” products that contain herbicides and fertilizer together These products can injure some trees and shrubs. Tree and shrub root systems can extend far beyond the visible foliage, intermingling with turf. In addition, pesticides, including herbicides, should be applied only to affected areas, rather than broadcast over the entire yard as occurs with a weed and feed product.
Do not fertilize if heavy rain is forecast This increases the potential for fertilizers to run off into storm drains or to leach through soil with the rainwater.
In summer, when turf is actively growing, apply an iron source instead of a nitrogen fertilizer to green the lawn without increasing growth. Use chelated iron or iron sulfate.
GLOSSARY BOX: Herbicide: a chemical that kills plants or inhibits their growth; typically intended for weed control.
Chelate: a complex organic molecule that surrounds certain trace elements, such as iron,
and keeps them dissolved in a solution.
When Should I Apply Fertilizer to a Lawn? Apply fertilizer when grass is actively growing, not when it is dormant. Do not apply too much nitrogen at one time in summer months when grass is already growing rapidly. Consult your county Extension office with questions or call the Extension Master Gardeners Helpline toll free (877–252–4769). How Do I Water in Fertilizer? Most fertilizers need to be watered in to move fertilizer below the soil surface to grass roots. This process requires only about ¼" of irrigation water. To find out how long it takes your sprinkler system to deliver this much water read Calibrating Irrigation Systems in Chapter 3. Do not overwater or you will increase the potential to move fertilizer past the root zone and into ground water.
fertilizing woody landscape plants
In the soil, roots of trees, shrubs, turfgrass, and bedding plants intermingle and compete for water and nutrients. In fact, the roots of a single mature tree may extend 60' or more out into your lawn or flowerbeds. Fertilizer applied to one plant can be absorbed by the roots of another plant. Every treatment you apply to your lawn (fertilizer and herbicide, for example) can impact your trees and shrubs. Conversely, treatments applied to a tree, such as pruning and fertilizing, can influence the appearance and health of underlying turfgrass, shrubs, or bedding plants.
24

Table 4. Fertilization Guidelines for Established Landscape Plants
Level of Maintenance Amount of Nitrogen (lbs N/1000 ft2/year)
Basic 1.0 lbs Moderate 1.7 lbs
High 3.0 lbs High and moderate rates should be split into 2 to 3 applications
during the year unless slow release fertilizer is used.
GLOSSARY BOX: Bedding plants: herbaceous annual or perennial plants that are used in flower or vegetable gardens.
Mature tree: a tree that has reached at least 75 percent of its final height and spread.
In areas where tree or shrub fertilization zones overlap with lawn fertilization zones, fertilize for one or the other of the plant types, but not both. If trees and shrubs are not located near fertilized turfgrass, you can apply additional nitrogen to enhance growth of established trees and shrubs. Table 3 contains helpful information on calculating the amount of fertilizer to apply to a given area. Broadcast fertilizer uniformly over the desired areas of the landscape. Apply water soluble fertilizers at no more than ½ pound of actual nitrogen per 1,000 square feet per application. Application rates of controlled release fertilizers depend on release rates of the product.
SOIL TESTING
Proper soil sampling is important to ensure representative soil test results and proper fertilizer and lime recommendations. Soil test results supply a wealth of information concerning the nutritional status of your soil and may aid in the detection of potential problems that could limit plant growth and quality. A typical soil test report will supply information about soil pH, lime requirements, and soil nutrient levels for phosphorus, potassium, calcium, magnesium, manganese, and zinc. It is important to let the Soil Testing Laboratory know what crops you intend to grow so that fertilizer recommendations can be made based on your plants. See Alabama Extension publication, Home Soil Testing: Taking a Sample at http://www.aces.edu/pubs/docs/A/ANR-0006-A/ for a description of the proper technique for taking soil samples and having them analyzed. The nitrogen requirements for a lawn cannot be reliably evaluated by a soil test; therefore, the soil test report will not contain a nitrogen recommendation. The type of turfgrass that is present in the lawn, as well as the desired level of quality, will determine the amount of nitrogen that should be applied to a lawn. If you have any questions regarding
25

the soil test report and/or recommendations, call the Extension Master Gardeners Helpline toll free (877–252–4769).
indicator species of a healthy evironment
Now that you’ve completed your assessment and plan, here are some indications of the health of your landscape environment. There are many species of plants and animals that, if present, are indicators of good environmental conditions in an ecosystem or landscape. These are known as indicator species or bioindicators. Although some indicator species may be associated with large, natural, undeveloped areas, there are some that can inhabit residential areas and can provide an indication of the health of your landscape. If you observe any of the following indicator species in the landscape, these often suggest that ecologically healthy conditions exist in the environments listed next to them.
Indicator Species Desired Environmental Condition
Associated Habitat
Lichens Low air pollution (ozone, sulfur dioxide) Spotted owls, red cockaded
woodpeckers Old growth forests
Mayflies, stoneflies Aquatic ecosystems Fish Aquatic ecosystems
Frogs, salamanders, toads Watershed and terrestrial ecosystems
Lizards, snakes Watershed and terrestrial ecosystems
Butterflies, garden spiders, lacewings
Low insecticide contamination watershed and terrestrial ecosystems
Earthworms Low insecticide contamination, soil organic matter
Kestrel, killdeer Low insecticide contamination Songbirds Watershed and terrestrial
ecosystems For more information on specific indicator species, visit the following sites:
Use of Amphibians as Indicators of Ecosystem Restoration Success at http://pubs.usgs.gov/fs/2004/3106/
Indicator Species at http://science.jrank.org/pages/3553/IndicatorSpecies.html
Indicator species at http://www.scienceclarified.com/HeIn/IndicatorSpecies.html
26
CHAPTER FIVE: MULCHING Mulch Facts
Guidelines for Using Mulch How Much to Buy
Using Yard Waste as Mulch
mulch facts
A mulch layer around trees, shrubs, and planted beds, and the covering of bare ground with mulch provides many benefits. In areas that are difficult to mow, irrigate or otherwise maintain, use mulch to replace turf or groundcovers. Also consider placing mulch in shady areas where plants don’t grow well.
Organic mulch materials improve soil fertility as they decompose Organic mulches include bark materials, pine needles, compost, and paper. Over time, many types of mulch improve soil aeration, structure and drainage. Mulch buffers soil temperature
keeping soils warmer in winter and cooler in summer. Mulch helps maintain soil moisture by reducing evaporation
A layer of mulch also minimizes water needs for established plants. Fresh mulch inhibits weed seed germination and growth
A mulch layer can inhibit certain plant diseases. Mulch around trees and shrubs (not against the trunk) eases maintenance
and reduces the likelihood of damage from string trimmers. Mulch gives a neat and uniform appearance
to planting beds adding a contrast of color and texture that complements plantings. Fine–textured mulches that mat together decrease erosion
guidelines for using mulch
Follow these tips when adding mulch to your landscape:
For well–drained sites, apply a 2 to 3" layer (after settling) of mulch around trees, shrubs and bedding plants. Coarse materials, such as pine nuggets, may be applied to a depth of 4", but don’t allow mulch to accumulate to a greater depth. Do not add mulch if there is a sufficient layer already in place (2" to 3"). Avoid more than 1" of mulch on a newly planted rootball or shrub
Too much can cause drought stress to new plants because the mulch intercepts water meant for the roots.
27

Resist “Volcano mulching” as it hinders oxygen exchange to roots which stresses the plant causing root rot. If much is piled against the trunk, uncover the base of the trunk and the root flare as this mulch holds moisture.
Stems and trunks that remain constantly wet are prone to crown rot. Mulch piled high against the trunks/stems of young trees and shrubs may also create habitats for rodents that chew the bark. This can girdle and kill the plant. Mulch out to a tree’s drip line
or beyond, at least an 8' diameter around the tree. Remember that in a forest environment, a tree’s entire root system (which extends well beyond the drip line) would be mulched. Create self–mulching natural
areas under trees where leaves can stay where they fall. Fallen leaves are a site resource, not yard waste.
Avoid thick blankets of mulch and prevent matting
Matted mulch prevents water and air from seeping through. Rake old mulch to break up any matted layers and to refresh the appearance. Organic mulches may require weeding and replenishment
once or twice a year to maintain a total depth of 2" to 3". Do not use cypress mulch
There are no regulations to manage wild harvesting which depletes our necessary wetlands. Shells, crushed stone, or pebbles can be used as mulch
but they won’t contribute to the soil’s nutrient and organic content or water holding capacity. Limestone and shells both raise soil pH. These materials also reflect heat. While some Mediterranean plants, like lavender, may enjoy this, the excess temperature can stress other plants and increase their water needs. These mulches are also difficult to maintain. They collect organic debris that is difficult to clean and keep the intended appearance.
how much to buy
Mulch is often sold in bags, by the yard, or by the truckload. So, how much mulch do you need for your yard if you want to achieve the recommended depth of 3"?
By the BAG: 1 bag containing 2 cubic feet covers 8 square feet (2' x 4') By the BALE: 1 bale of pine straw covers 18 to 20 square feet. By the YARD: 1 cubic yard covers 108 square feet (9' x 12') By the TRUCKLOAD: 1 mini pickup holds 1.5 yards and covers 162 square feet (9' x 18') 1 full sized pickup holds 2.5 yards and covers 270 square feet (9' x 30')
28

When purchasing 2 cubic feet of mulch you will need the following amounts to achieve desired thickness
DEPTH OF MULCH YOUR PLANT BED IN SQUARE FEET 2" 3" 4"
25 sq. ft. 2 bags 3 bags 4 bags 50 sq. ft. 4 bags 6 bags 9 bags
100 sq. ft. 9 bags 13 bags 17 bags
using yard waste as mulch
Search locally for sources of recycled organic materials. Sometimes you can even acquire mulch for free. Tips on Obtaining Recycled Products for Mulching:
Use mulch that originates in your own landscape such as leaves, pine needles, or grass and shrub clippings. Chipping or shredding of fallen leaves prevents matting. Local power companies, municipal solid waste departments, and tree services
may supply free or low–cost mulch and may sometimes deliver bulk quantities. Try to get only mulch from branch trimming. It is generally more disease free than mulch from other sources, such as roots. Team up with other homeowners and have bulk quantities delivered
to your neighborhood. Place an ad in the local newspaper so suppliers come to you
if you need lots of mulch for a new landscape.
29

30

CHAPTER SIX: RECYCLING YARD WASTE Recycle While You Mow
Composting Landscape maintenance activities, mowing, pruning, and raking, generate yard waste that you can return to the soil, recycling valuable nutrients. It is easy to recycle yard waste. Try a few of these simple ideas to get started.
• Compost or mulch with your yard’s clippings to reduce the amount of solid waste in landfills. Consider any plant debris as a useful site resource.
• Leaves and pine needles provide a source of mulch that is a real asset in the landscape, and it is virtually free. If your yard generates more leaf mulch than you can use, compost the material or share some with a neighbor.
• Pruned branches from trees and shrubs can be chipped to speed decomposition in the compost pile, or broken into smaller pieces and simply tossed behind a shrub.
• NEVER dump grass clippings or other yard waste into storm drains or waterways. Such activities are illegal, can pollute water systems and clog municipal street drains. Grass clippings are a significant source of nitrogen, so keep them on the lawn and out of the water.
recycle while you mow
Following a few simple tips is all it takes to cultivate a lush lawn:
Leave grass clippings on the lawn
to decompose and return nitrogen to the soil. Research indicates this practice improves soil fertility, gradually reducing the need for nitrogen fertilization up to 50% without a decrease in turfgrass quality. Never mow more than one third
of the turfgrass at a single cutting. This clipping amount decomposes sufficiently to prevent thatch buildup. Mowing grass too short, more than the 1/3, is also stressful and may cause turf damage.
Don’t waste valuable site resources
Mulching mowers cut grass into smaller pieces, speeding decomposition for procrastinators who don’t mow regularly.
31

Spread thin layers of clippings behind shrubs or add them to a compost pile if grass grows too tall between mowings. Avoid mounds or clumps of clippings in turfgrass since it may cause damage. Sharpen mower blades monthly to protect against disease
Clean cut leaves seal better. Ragged, torn leaf edges are open to disease pathogens. Strive to limit turfgrass areas to match your specific goals
Avoid the pasture effect on residential properties. You’ll mow less, saving time, energy, and money. Where grass doesn’t serve a function, opt for low maintenance groundcovers instead of grass. Under plant trees with shrubs and groundcovers.
composting
A common misconception about plant care is that plants require fertilizer. Plants need nutrients, but they might not need additional fertilizer. That is because as organic matter decomposes, nutrients are released back to the soil for plants to use. Some key nutrients for plants include nitrogen, phosphorus, potassium, magnesium, calcium, zinc, iron, and manganese.
A great way to supply some of these key nutrients to plants, while also recycling yard waste, is to compost. Enhance compost with yard or kitchen waste materials. As compost decomposes in soil, it releases essential nutrients. Add generous amounts of composted material frequently to soil and it can create the perfect medium for sustained plant health. THINK ROOTS! An old horticulture axiom is: “If you make a good environment for roots, the top will take care of itself.” Compost is the best ingredient to improve the root environment. Adding Compost to Soil Can:
• Improve soil structure
• Increase the water holding capacity
• Increase the amount of air space in soil
• Help loosen compacted soils and improve drainage
• Promote soil fertility and stimulate root development
• Create a favorable environment for beneficial microorganisms, earthworms, and insects that are nature’s soil builders
32

Composting Can Be Simple Place leaves, grass clippings, and small cuttings behind shrubs or in a hidden corner of the yard and let nature take its course. Chipping or shredding these materials speeds up decomposition and makes the finished compost faster. Homemade or manufactured compost bins allow you to easily incorporate kitchen waste, such as vegetable and fruit scraps, eggshells, and coffee grounds. Numerous types of compost bins are commercially available; many are attractive. Gardening magazines, catalogs, and garden centers are good sources for composting products. Consult Backyard Composting at http://www.aces.edu/pubs/docs/A/ANR-0638/ANR-0638.pdf for more information.
GLOSSARY BOX: Composting: the process of converting plant debris into useful soil additives.
Microorganisms drive the composting process. Keeping them healthy makes for faster compost. They need adequate moisture, oxygen, nitrogen, and carbon. The more closely you monitor and manipulate these factors, the healthier the microorganisms and the faster decomposition occurs giving you rich compost for fertilizing plants and amending soil. Compost as a Soil Amendment Organic materials improve soil in many ways. This is the primary reason gardeners use organic materials for mulches since they decay over time at the soil surface. In short, organic mulches are a lazy man’s compost. If you want to improve your soil faster add already composted materials. Make sure the material is well composted, meaning you can no longer see the original components of leaves, sticks, or other yard waste materials. Amend any garden area by applying 2 to 3" (2 to 3 tons per 1,000 square feet by weight) to the soil surface and mixing it with the native soil. Adding compost is particularly easy to do and especially beneficial in new beds and new garden areas. Compost amended soil makes any yard smarter: roots will grow farther and deeper, plants will need water less often, and the beneficial microorganisms will thrive and improve your soil. Follow these Tips for Successful Composting:
Bins are not necessary but they help keep piles neat, retain heat and moisture, and prevent complaints from neighbors. The minimum recommended size is 1 cubic yard (3' square by 3' high). Composting can take as little as 4 to 6 weeks
or as long as one to two years, depending on the size and type of material in the pile and the amount of attention you give it. Proper moisture is necessary
for the microbes to survive. Covering the pile retains moisture and prevents the decomposing material from getting too soggy when it rains. You should not be able to squeeze water from the material produced at the bottom of the pile. Maintaining heat is important
for faster composting, so a sunny location is better than a shady one. Combining different materials in the pile
such as leaves and grass clippings, will achieve the right proportions of carbon and nitrogen for effective composting. You might know this as the brown (leaves and wood materials – the carbon) to green (grass clippings and manures – the nitrogen) ratio. The optimum ratio of carbon to nitrogen (C:N) is 30:1
Too little N and the microbial population cannot grow to optimum size so decomposition slows down. On the other hand, too much N compared to C allows excessively rapid microbial growth speeding up decomposition, but leads to depleted oxygen and causes odors as the excess N is given off as ammonia gas. Too much N eventually leads to microbe declines due to anaerobic conditions.
33

Always bury kitchen waste inside the pile to discourage pests and to prevent odor from rotting fruit and vegetables. Frequent turning, which speeds decomposition, also decreases odor. Turn the pile with a pitchfork or stir it on a weekly basis in warm weather
for faster composting. Stabbing the pile with a length of pipe or rake handle will help aerate and mix the material. NEVER add meat, animal fat or dairy products to a compost pile
34

CHAPTER SEVEN: ATTRACTING WILDLIFE Requirements for Wildlife
Butterfly Gardens Honey Bees
Good Plants for Bees
requirements for wildlife
Alabama’s diverse wildlife population is being threatened by rapidly growing urban development which is depleting native wildlife habitats. As our communities expand, we lament the loss of birds and other wildlife, but often our own yards are partly to blame (See Attracting Wildlife to your Backyard at http://www.aces.edu/pubs/docs/A/ANR-0778/). Your Alabama Smart Yard Can Provide Habitat for Wildlife in Two Major Ways:
1. It increases biodiversity, in part by using a variety of plants in your yard’s design. 2. It creates landscaped islands and natural corridors of plants, in essence building shelter for wildlife (Building Shelter for Wildlife: http://www.aces.edu/pubs/docs/A/ANR-0785/) that connect bordering properties. Animals use these corridors to travel from one natural area to another, which in turn benefits wildlife on a larger neighborhood scale.
As you create a new landscape or improve your existing one (see Wildlife Plantings and Practices at http://www.aces.edu/pubs/docs/A/ANR-0485/), add a few features for wildlife, and you will bring your yard to life with birds, butterflies, and beneficial insects. Food, water, and cover attract wildlife, functioning as their habitat. You also need to maintain your yard using methods that have a minimal impact on the environment. Try a Few of these Ideas for Attracting Wildlife to Your Yard:
Food Provide food in the form of plants that bear seed, fruit, foliage, or flowers that you’re willing to share with birds, larval butterflies (caterpillars), or adult butterflies. Berries, fleshy fruits, nuts, and acorns are all treats for wildlife. Wildlife find meadow grasses especially attractive and they add a graceful feature to any landscape. Running water
The sound of running water will attract wildlife to your yard. This sound could come from a natural feature, such as a pond, creek, or other body of fresh water. A fountain will also beckon wildlife. Even a simple birdbath that captures rainwater can suffice. Empty and clean your birdbath every few days. Do not clean it with soap or bleach; just physically scrub all surfaces with a brush or scouring type sponge. Changing water regularly prevents mosquito breeding and bacterial contamination. Reduce insecticide use
Each time you apply an insecticide to your landscape, you reduce insect populations, which form an important food source for birds. Some chemicals can also poison birds and other animals that feed on affected insects. See Chapter Eight for specifics of pest management.
35

Reduce the amount of mowed lawn area Over time, unmowed areas contain more plant species than mowed areas. Reduce the mowed area around your house, especially in low traffic areas, such as corners of the yard. In other spots, trade turf for diverse plant species that will create shelter and food for many animals. Plant diversity attracts more wildlife. Increase vertical layering
Plant a variety of plants in different sizes and heights. This provides more cover and feeding opportunities for wildlife species. Manage pets
If you permit pets to harass wildlife, you will only frustrate your efforts to attract wildlife. This is especially true for house cats allowed to roam in yards. If you permit your cat to wander in your yard, it is better not to attract birds and other animals whose lives would be in danger. Snags
Leave dead trees in place if they do not create a hazard. Many birds use snags for perching, nesting and feeding.
Attracting specific groups of wildlife: BIRDS To attract birds, design planted areas that include a tree canopy, smaller understory trees and shrubs, and grasses or flowers. Allow grasses and flowers to go to seed on occasion as this is a real draw for birds. HUMMINGBIRDS Hummingbirds (Hummingbirds in Alabama at: http://www.aces.edu/pubs/docs/A/ANR-0716/) are attracted to colors like red, orange, and pink, and tubular flowers such as trumpet honeysuckle (Lonicera sempervirens). However, you can also use hummingbird feeders filled with sugar water to attract them. BUTTERFLIES A combination of both larval (caterpillar) and nectar plants will attract a variety of butterflies to your yard. Nectar plants are those with trumpet shaped flowers and/or those with flowers in clusters. CATERPILLARS These are the larvae of butterflies and moths. Each butterfly species lays its eggs on a preferred host plant. Caterpillars must eat to grow large enough to form a chrysalis so they often strip larval plants of leaves. If you want to attract butterflies to your yard, expect a certain level of damage. One way to keep outdoor living areas attractive while cultivating a crop of butterflies is to intersperse larval and nectar plants in a bed or devote an entire planting area that is out of view for larval food plants.
In Chapter Four, see INDICATOR SPECIES OF A HEALTHY ENVIRONMENT, for more related information on wildlife.
GLOSSARY BOX: Chrysalis: the pupa (stage before adult) of a butterfly.
butterfly gardens
Butterflies have co–evolved with certain flowers; for example, they prefer blooms that occur in clusters, such as coneflowers (Echinacea spp.) and milkweed (Asclepias spp.). These flowers also provide adequate landing pads for butterflies that walk around while sipping nectar from each flower. This sipping is done via a long straw like tongue called a proboscis, which uncoils to feed then coils back into their heads for easier flying. It is during the feeding process that adult butterflies accidentally pollinate many plants. Different butterflies also prefer different nectar sources. Some prefer larger flowers; many prefer smaller flowers. Skippers seem to be especially drawn to purple flowers, while many hairstreaks prefer white flowers. And, because
36

butterflies fly from early spring to late fall, you’ll want a progression of flowers for use as butterfly feeding stations throughout the year. In addition, many butterfly species feed on small, inconspicuous plants that most gardeners would regard as weeds. If possible, allow a few areas of your garden, perhaps areas that are not easily seen, to become weedy. With careful planning, a butterfly garden (http://www.aces.edu/pubs/docs/A/ANR-1290/) can sustain the entire life cycle of butterflies; nectar for adults and foliage for the young, or caterpillar stage. A well planned garden contains plants that bloom for a long period, or a series of plants that provide bloom from spring through fall. Brightly colored flowers in shades of red and orange are favored; in the Southeast, try planting some of these in sunny spots.
Host Plants for Caterpillars Nectar Plants for Adults false indigo (Baptisia australis) butterfly weed (Asclepias tuberosa)
white turtlehead (Chelone glabra) sweet pepperbush (Clethra alnifolia) white wood aster (Aster divaricatus) purple coneflower (Echinacea purpurea) passionflower (Passiflora incarnate) Joe–pye weed (Eupatorium purpureum)
roughleafed goldenrod (Solidago rugosa) cutleaf coneflower (Rudbeckia laciniata)
Echinacea purpurea Rudbeckia lacinata While the list of butterflies found in Alabama is extensive, a few of our best known are: redspotted purple, Gulf fritillary, monarch, American lady, common buckeye, painted lady, red admiral, black swallowtail, pipevine swallowtail, zebra swallowtail, and numerous members of the Skipper family. In addition to plants listed above, a number of shrubs, vines, and trees provide both host or nectar sources for our butterflies. For more tips on butterfly habitats see Butterfly Gardens at http://www.aces.edu/pubs/docs/A/ANR-1290/.
honeybees
HEALTH NOTE: Be aware that insect stings are a serious matter. If you are allergic to bee stings we do not recommend planting flowers that will attract them to your yard.
Bees are the workaholics of pollinators; they are diligent and dependable fertilizing many flowers and pollinating approximately one third of the plants we eat. They are the exclusive pollinators of many wildflowers, some of which are imperiled, such as native monkshoods and lady’s tresses orchids. As many gardeners are aware, bees are in trouble. Honey bee populations have been undermined in recent years by parasitic mites; their natural habitats being degraded and destroyed; and a mysterious malady called Colony Collapse Disorder (CCD) has wiped out large numbers of our honey producers. It is also important to protect honeybees from
37

irresponsible pesticide use (see Protecting Honey Bees from Pesticides at http://www.aces.edu/pubs/docs/A/ANR-1088/). Other bees that offer pollination services are bumblebees (chubby bees with stripes on their furry rear ends), solitary bees (so named because they don’t live in hives), carpenter bees (look a lot like bumblebees except their rears are shiny [see Carpenter Bees – Biology and Management at http://www.aces.edu/pubs/docs/A/ANR-1302/]), mason bees, and digger bees. Gardeners act as bee helpers when they plant flowers that attract them whether the garden is an acre or a window box. Gardeners should provide a steady supply of food by growing plants that bloom during seasons when bees are active (spring through fall). Nesting sites are important to attract and keep bees in an area. This can be an out of the way brush pile, some clumps of moss, or any other natural area. Bees are attracted to flowers that usually bloom yellow or blue; some blooms have lines or spots on their petals that guide the bees to the spot. Bees have good “noses” so flowers they pollinate usually have delicate, sweet scents. Bee attracting blooms usually have small, narrow floral tubes to accommodate their tongue length which has evolved over time to have a compatible relationship with these companion plants. Some flowers are particularly suited for pollination by bumblebees: modified lower petals serve as landing pads; flowers like monkshoods will open only if the bee is hefty enough to pop open its petals.
good plants for bees
Here are a few examples of good nectar and pollen producing plants of Alabama.
Native Trees and Shrubs: sweet pepperbush (Clethra alnifolia)
Cornelian cherry dogwood (Cornus mas) blueberries (Vaccinium spp.) American holly (Ilex opaca)
palmetto (Sabal spp.) redbud (Cercis canadensis)
sourwood (Oxydendrum arboreum)
Native Wildflowers: indigo bushes (Amorpha fruiticosa)
goldenrod (Solidago spp.) ironweed (Vernonia altissima)
aster (Asteraceae family) butterflyweed/milkweed (Asclepias spp.)
mountain mint (Pycnanthemum flexuosum)
Nonnative annuals and perennials: anise hyssop (Agastache foeniculum)
borage (Borago officinalis) oregano (Origanum vulgare) lavenders (Lavandula spp.)
catmints, catnips (Nepeta spp.) Russian sage (Perovskia atriplicifolia)
speedwell (Veronica spicata, V. latifolium) clovers (Trifolium spp., Melilotus spp.)
beebalm (Monarda spp.) candytuft (Iberis sempervirens)
38

Asclepias tuberosa Lavendula stoechas
39

40

CHAPTER EIGHT: MANAGING YARD PESTS RESPONSIBLY Integrated Pest Management
Avoiding Pest Problems Identifying Pest Problems
Treating Pest Problems Common Landscape Pests and Their Management
Plant Diseases
integrated pest management
Due to concerns about health, the environment, and pesticide resistance, pest control practices once taken for granted are now under scrutiny. Regular preventive pesticide applications are often unnecessary. Healthy plants can usually defend against or tolerate pest attacks. Natural controls, such as beneficial insects and birds, can often suppress undesirable insects making the preventive and indiscriminate use of pesticides imprudent. Spraying broad spectrum pesticides kills insect pests as well as beneficial insects resulting in increased plant damage due to the loss of beneficial insects. A better approach to managing pests is Integrated Pest Management (IPM) which uses a combination of methods that focus on preventing pest problems.
GLOSSARY BOX: Pesticide Resistance: after repeated applications of a certain pesticide, pests may adapt to the chemical and are no
longer harmed by it. These pests that survive then breed and pass the resistance genes to their offspring.
Integrated Pest Management: a sustainable approach to managing pests by combining biological, cultural, physical, and chemical tools in a way that minimizes economic, health, and environmental risks.
Basic Building Blocks of IPM
IPM begins with education Learn about the plants in your yard; learn the potential problems and opportunities with those plants; learn the beneficial predators that might assist your landscape. What options are available for managing certain pests? Educating yourself in the beginning better prepares you when problems arise. Prevent problems by purchasing pest–free and pest–resistant plants
and designing a landscape that preserves the natural controls. Diversity in the landscape helps achieve a balance between pests and beneficials. Managing the garden for optimum plant health is the best defense against pests
Regular scouting
or keeping an eye on your yard’s plants, helps detect pest problems early, before significant damage occurs.
41

Plants with aesthetic damage don’t necessarily need to be treated with pesticides Consider the amount of aesthetic damage you are willing to accept. Learn when plant damage is a serious problem and when it is a temporary problem the plant can later outgrow. If you see a pest outbreak, are natural enemies already present and working on your
behalf? If pest control proves necessary, try the safest alternatives first
such as handpicking insects or pruning infected parts of a plant. If pesticides become necessary, choose and apply those most specific for pest injury. The insecticides least harmful to beneficial insects and other non–target organisms (people, pets, and wildlife) include insecticidal soap, horticultural oil, and microbials (e.g., spinosad, abamectin, Bacillus thuringiensis). Pesticides should only be used to spot treat the offending pest
not in blanket applications. Always follow the label directions with any chemicals you use. Re–evaluate your management techniques
Continue to learn from your garden experiences: was a particular treatment effective? What were the results? Were there unexpected results? How will these and other outcomes affect your future choices and decisions for pest management?
GLOSSARY BOX: Spot treatment: application of a pesticide to the problem plant or area, rather than a blanket application
or wall to wall coverage.
avoiding pest problems
The way that you design and maintain your yard either establishes a barrier against pests or throws out the welcome mat for them. Follow These Tips to Prevent Pests:
Think before you plant Each time you place a plant in a spot that’s not ideal, you increase the chance of problems from pests. Plants in unfavorable growing conditions (compacted soil, inappropriate pH or light, competition with weeds, etc.) are targets for pests. Choose insect and disease resistant plant varieties
Go easy on water and fertilizer
Too much causes excessive growth, potentially attracting insects and diseases. Encourage healthy growth by applying fertilizer and water only when needed and in moderate amounts. Mow to the proper height and prune selectively
Mowing grass too short and severely pruning trees and shrubs weakens them, inviting pests. Use barriers to block pest entry onto new seedlings
Encourage beneficial insects
by choosing some plants that provide the nectar or pollen needed by adults and by minimizing the use of broad spectrum pesticides.
42

identifying pest problems
Inspecting plants helps identify pest problems (http://www.aces.edu/pubs/docs/A/ANR-0910/ANR-0910.pdf) early, before they get out of hand. You can give plants the once–over anytime you water by hand, mow, or are tending to other outdoor chores. If you need to scout more than once every week or two you’ve planted the wrong plants. If you know key pests for certain plants and when to expect to see them it will make scouting (Commercial Ornamental Nursery Scouting Manual: http://mrec.ifas.ufl.edu/lso/SCOUT/INTRO.htm) much easier. Common plant pests (What’s Buggin’ You: http://www.aces.edu/pubs/docs/A/ANR-1289/) in Alabama include aphids, mealybugs, scales, whiteflies, thrips, and caterpillars. Often you will spot evidence of a pest’s activity before you see the insect itself. If you see curled, rolled or deformed leaves, mold on leaves or stems, ants scurrying up and down plant stems or discolored trails on leaves, you are likely to find a pest lurking somewhere. Detecting small insects and mites can be difficult. One method that works well is to flick the leaves of small branches against a sheet of white paper. Use a magnifying glass to search for movement or evidence of pests. Look on the branches and on the upper and undersides of leaves for pests such as scales and immature whiteflies. Sooty mold (http://www.ces.ncsu.edu/depts/ent/notes/O&T/houseplants/note41/note41.html) on leaves is a telltale clue to an infestation by what are known as piercing–sucking insects. Aphids are one example. These pests pierce the plant with sharp mouthparts and suck the sap. Some piercing–sucking insects secrete a sugary substance called honeydew, on which the black colored sooty mold fungus feeds and grows. Sooty mold doesn’t injure a plant directly, but it does block sunlight from leaves, reducing photosynthesis and making plants unsightly. Ants also signal the potential presence of pests. Ants feed on honeydew and often protect the insects that produce it.
GLOSSARY BOX: Photosynthesis: the process that turns light energy into chemical energy in green plants.
There are also instances where chewing damage can be seen but the causal agent is not present. In these cases it is good to check back during the night. Many chewing plant feeders like snails, slugs, and some beetles and caterpillars are active at night. You may also see plant damage but few pests indicating that beneficial insects (Beneficial Insects and Mites at: http://edis.ifas.ufl.edu/in078) are already taking care of the problem. These may include ladybugs and their larvae, lacewings and their larvae, assassin bugs, spiders, parasitic wasps, and parasitic flies (syrphid or hoverfly larvae and tachinid flies). Accept some insect damage on plants. No one can maintain a completely pest free landscape and a little damage will not hurt your plants. If a pest problem persists, take a sample of the damaged plant and pest to your Extension office for identification and suggestions on how to proceed in using IPM techniques. You can also call the Extension Master Gardeners Helpline toll free (877–252–4769). Photos of pests can be sent via email for identification.
treating pest problems
What do you do when you have a pest infestation or a disease outbreak? IPM focuses on using chemicals as a last resort. IPM methods form a first line of defense to deal with problems.
• Always treat for specific pests, and only treat the affected plant.
• Read all product labels carefully and follow them accordingly. Remember that the label is the law! Do not attempt to mix your own chemicals or apply homemade recipes unless you have been properly trained to do so.
• For large, slow moving pests, picking insects off by hand can often defeat the problem. Dispose of any captured insects so they do not return to feed again.
• Avoid using broad spectrum pesticides. They are not selective and kill all insects in the area even those that are not problematic. Safer alternatives to traditional pesticides include insecticidal soaps and horticultural oils, both of which work to reduce populations of sucking insects. Products containing an extract of the bacterium Bacillus thuringiensis specifically kills caterpillars.
43

• When pest populations are high, you can often reduce or eliminate the problem simply by removing the affected leaves or plant parts. Crush, burn or compost (high heat method) these infested plant parts to prevent the disease or insect pest from spreading.
It is usually best to apply soaps, oils, and other pesticides during the cooler part of the day to avoid sunburn or sun scald on plants. Do not apply before a rainstorm or in windy conditions, which may end up getting more pesticide on you instead of the plant. Do not apply insecticides when bees are foraging. Wait until after sundown to spray plants where bees have been foraging. Pay attention to warnings on insecticide labels regarding hazards to bees. Always read the label to find out if any plants are listed as being sensitive to the product. To determine if the product will hurt your plants, apply it to a small portion of a leaf first, and check for leaf burn after 1 to 2 days. Phytotoxicity often looks like a burn on the edge of leaves.
GLOSSARY BOX: Phytotoxicity: degree to which a chemical is toxic to (injures) plants; plant sensitivity to a particular chemical,
application rate and environmental conditions influence degree of damage that may result from chemical treatment.
common landscape pests and their management
Ants Ants have three body segments and range in size from 1/16" to 1/2", depending on species. Most species are not harmful. In the landscape, they do not affect plants but the bite and sting of fire ants and carpenter ants affects people. When ants are present, you may observe mounds, ants in trails and on plants. Ants may also signify the presence of aphids or other honeydew producing insects.
• Natural enemies: Phorid flies (decapitating fire ants), Thelohania fire ant disease.
• Other controls: Baits effectively control fire ants. Be sure the material is dry and fresh. Apply in late afternoon or evening around edges of mound or as broadcast. Do not apply when ground or grass is wet. Do not disturb mound. Store baits in a cool and dry environment.
Aphids Aphids can be winged or wingless with pear shaped bodies that may be green, yellow, black, red, or multicolored. They are typically found feeding on new growth. Damaged leaves appear yellow, twisted, or distorted; ants or sooty mold may also be present. A strong stream of water can knock off most aphids giving beneficial organisms a chance to control the infestation.
• Natural enemies: Ladybug adults and larvae, lacewing larvae, syrphid fly larvae, parasitic wasps.
• Other controls: Prune infested plant parts. Apply insecticidal soaps or horticultural oils. You can also apply a soil drench with a product containing imidacloprid.
Caterpillars Caterpillars are the larvae of butterflies and moths. They chew on foliage, which creates notched leaves. You may also see greenish fecal pellets on leaves or below plants.
• Natural enemies: Wasps, predatory stinkbugs, big–eyed bugs, birds, lizards.
• Other controls: Remove by hand (use pliers to remove stinging caterpillars), apply Bacillus thuringiensis 'Kurstaki' (most effective when caterpillars are small).
44
Chinch Bugs Adult chinch bugs are 1/5" long and black with white patches on wings. Young nymphs are smaller, reddish, and have a white stripe across their backs. Chinch bugs feed on St. Augustinegrass, often in stressed areas in full sun or near pavement. Injured turf yellows and dies.
• Natural enemies: Big–eyed bugs, earwigs, and parasitic wasps.
• Other controls: Avoid high fertilizer rates. Maintain St. Augustinegrass at height of 3" in sun and 4" in shade. Use chinch bug resistant grass varieties when available. Spot–treat infestations with insecticides labeled for chinch bugs.
Mealybugs Mealybugs are soft bodied insects that are 1/16" to 1/8" long with well developed legs. Their bodies and egg masses are covered by a powdery white wax. Mealybugs attack leaves, twigs, and roots and leave behind white, mealy wax deposits. They can often be found in the leaf axils. Sooty mold or ants may also be present.
• Natural enemies: Ladybugs, lacewing larvae.
• Other controls: Spray with horticultural oil or insecticidal soap. If that fails, apply a systemic insecticide (i.e., imidacloprid) to the root system. Soil drench systemics may take several weeks to work. Choose a product that affects only pests that feed on plant sap.
GLOSSARY BOX: Leaf axils: where the leaf attaches to the stem.
Systemic insecticides: are commonly applied as a soil drench but can be spray applied. These insecticides are
taken up by the plant and move in the plant through the sap. Insects with piercing–sucking mouthparts are infected when they feed on the treated plants.
Mole Crickets Mole crickets are velvety brown, 1½" long, and feed on turfgrass and vegetable roots. They have flattened front legs adapted for burrowing. Mole crickets affect all grasses, but prefer bahiagrass and bermudagrass. Injured turf may be spongy and thinning, with ¾" round holes that are signs of tunneling. Infestation usually occurs in the same area each year. You can test for infestation by flushing the area with soapy water (1 to 2 tablespoons soap in a gallon of water). Mole crickets will surface within 3 to 5 minutes if they are present.
• Natural enemies: Parasitic wasp, red–eyed fly, insect parasitic nematodes, and birds.
• Other controls: For chronic infestation, consider replacing turf with trees, shrubs or groundcovers. If necessary, spot treat infestations in May or June with insecticides labeled for mole cricket control.
Plant Feeding Mites Mites are so small that they may not be visible to the naked eye. They are about 1/32" and may be red, yellow, or green with oval bodies. They may also have spots. Some spin loose webs on foliage. Mites reproduce rapidly in hot weather resulting in large populations. Injuries to plants look like light colored dots, giving leaves a dull, gray/green, speckled appearance. Some mites live and feed in the growing tips resulting in distorted new growth. Other mites cause plants to form galls which are abnormal ball–like swellings of plant tissue.
• Natural enemies: Ladybugs and predatory mites.
• Other controls: Flush with water, and then alternate with soap and oils if necessary.
Scales Scales can vary in size, shape and color, but are, for the most part, approximately 1/8" in diameter. Soft scales and armored scales are the most common. Soft scales produce honeydew (sugary secretion). The armored scale body is hidden under a waxy scale covering. Mature scales are stationary and feed on leaves, twigs, stems, and fruit. Watch for feeding damage resulting in yellow spots on top of leaves with the scale underneath. Ants or sooty mold may also be present. Crawlers are the immatures and are the easiest to control because they are the most vulnerable.
• Natural enemies: Ladybugs, parasitic wasps.
• Other controls: Scrape scales off plant tissue. See other controls for mealybugs.
45
Thrips Thrips are approximately 1/32" winged insects that scar leaves, buds, and flower petals to drink sap from wounds. Injured plants may be dull gray with curling, distorted leaves.
• Natural enemies: Predaceous thrips, predatory mites.
• Other controls: Apply horticultural oils, insecticidal soaps, spinosad spray. Whiteflies Adult whiteflies look like tiny white moths on plants. They take flight when leaves are disturbed. Eggs are on leaf undersides. Nymphs are oval, flat, transparent to greenish in color, and may look like scales. They are stationary and are located on undersides of leaves. Ants or sooty mold may be present.
• Natural enemies: Fungi (most effective in humid weather), parasitic wasps, ladybugs.
• Other controls: Spray with insecticidal soap. Follow with horticultural oils or soil drenches with insecticides containing imidacloprid, if necessary. Be aware that several species are resistant to insecticides.
plant diseases
Plant diseases are caused by viruses, fungi and bacteria. Diseases can be quite specific in the plant species they commonly attack, but identifying diseases can still be extremely difficult. Home gardeners often mistake environmental damage or maintenance problems as diseases. For example, Spanish moss, lichens, and ball moss are not parasites that should be killed or removed; they are merely plants themselves. Another common misdiagnosis in coastal areas is mistaking saltwater damage for disease. Irrigating plants with salty well water can cause yellowing around the edges of leaves and leaf drop starting from the bottom part of the plant’s canopy. When a plant does have a disease, the problem may be merely cosmetic rather than truly damaging to plant health. Examples are minor leaf spots or other damage to select leaves. Such minor aesthetic concerns are no cause for alarm and healthy cultural management will remedy the problem. There are serious diseases, however, that can damage or kill plants they affect. Examples are mushroom root rot on woody ornamentals, fire blight on pears, and brown patch on turf. Because diseases are difficult to identify, do not assume a disease is the culprit just because of a plant’s appearance. Use a magnifying glass to look for insect pests that may be causing the damage. Also analyze maintenance practices for causes related to visible symptoms. If you still suspect a disease, contact your county’s Extension office for advice on how to collect and submit plant samples for disease diagnosis and recommendations on the least toxic methods of treatment.
Other Extension publications of interest are Garden Insect Pest Management in the Home Vegetable Garden at http://www.aces.edu/pubs/docs/A/ANR-1045/, and Be Smart – Be Safe, A Pesticide Safety Guide for Home Gardeners at http://www.aces.edu/pubs/docs/A/ANR-1097/. Large trees often present frustrating concerns for landscape professionals and home gardeners. The days of spraying pesticides 40 to 60' in the air to reach canopy leaves are no longer an acceptable IPM measure. Tree injections are an alternative but can be expensive. The Best Management Practice for healthy trees is to mulch at least to the edge of the tree canopy and light fertilizer applications.
46

CHAPTER NINE: REDUCING STORMWATER RUNOFF Nonpoint Source Pollution
Making Every Raindrop Count Grass lined Swale
Non–Impervious Surfaces Rain Barrels and Cisterns
Controlling Mosquitoes and Algae Rain Chains
Rain Gardens Constructed Wetlands and Retention Ponds
nonpoint source pollution
Great strides have been made toward maintaining and restoring water quality throughout the United States since the formation of the EPA and the passage of the Clean Water Act. This has been accomplished through regulating point source pollution, such as smokestacks and sewage discharge. However, a more diffuse source of pollution, nonpoint source (NPS) pollution threatens Alabama’s ecosystems See Reducing Nonpoint Source Pollution in Residential Landscapes at http://www.aces.edu/pubs/docs/A/ANR-1238/. Many of Alabama’s water resources are highly susceptible to pollution (Primary Environmental Concerns in Alabama: http://www.aces.edu/department/crd/publications/ANR-718.html) due to our unique geology and climate. Alabamians obtain their drinking water from ground water and surface water. Dissolved pollutants reach ground water through a process called leaching and reach surface water when carried in runoff. These impurities affect the quality of our drinking water. Heavy rainfall is a major cause of leaching and stormwater runoff. See the Water Quality and Pollution Control Handbook at http://www.aces.edu/pubs/docs/A/ANR-0790/. Plants and animals that live in our lakes, streams, rivers, and estuaries are sensitive to even small amounts of pollution.
glossary box: Point source pollution: water pollution that results from water discharges into receiving waters from easily
identifiable points; common point sources of pollution are discharges from factories and municipal sewage treatment plants.
Nonpoint source (NPS) pollution: NPS pollution cannot be pinpointed to a single source. Over time, pollutants
from our everyday activities accumulate on the land. Examples of NPS pollutants include pet feces, gasoline, fertilizer, pesticides, and even soil. NPS pollution is a problem when rainfall or heavy irrigation carries sediments
and dissolved chemicals to waterways in stormwater runoff and by leaching or percolating through soil.
Stormwater runoff: water that runs off impervious or water saturated surfaces, transporting sediments and dissolved chemicals into nearby waters.
A stormwater system is the collection of ditches, pipes, detention basins, and other conveyances that carry excess stormwater out of your neighborhood. In many communities across the state this water does not go to a treatment plant before it is released into local creeks and rivers.
47

A healthy, properly maintained lawn helps treat stormwater by absorbing stormwater runoff. If stormwater runoff is not absorbed and contains unused nitrogen and phosphorus from fertilizers these chemicals enter natural waterways and can fuel abundant algal blooms that smother natural vegetation, deplete oxygen, and possibly kill fish. These nutrients, if applied improperly, can cause invasive weeds to flourish, changing Alabama’s natural plant communities. These ASY Guidelines Will Help Reduce Nonpoint Sources of Pollution:
Pick up after pets This will help reduce bacterial and nutrient pollution entering storm drain systems.
Clean up oil spills and leaks on driveways Spread cat litter over oil, sweep it up and then throw it in the trash.
Sweep up grass clippings, fertilizer, and soil from driveways and streets and spread back onto the lawn or planting beds or add to compost pile. Remove trash from street gutters before it gets washed into storm drains.
Avoid over–fertilizing your lawn Get a soil test to find out if your lawn needs phosphorus (many Alabama lawns do not). If results indicate that phosphorus is not needed, make sure your fertilizer formulation does not include it. Phosphorus is a serious pollutant to lakes, rivers and streams when it flushes off lawns during significant rain events. Excessive phosphorus in waterways (eutrophication) increases aquatic plant growth leading to a corresponding loss of dissolved oxygen when these plants die and decompose. This decreased oxygen is unhealthy for fish and other aquatic life. With sandy soils or high levels of fertilizer application, use slow release fertilizer or divide applications equally over 2 to 3 events.
making every raindrop count
One of the basic concepts of an Alabama Smart Yard is that rain that falls in your yard should stay in your yard. After all, rainfall is an excellent water source for your landscape, and reducing runoff protects waterways. Water that does not have the opportunity to be absorbed into the soil picks up fertilizers, debris, and pesticides transporting them into our waterways. Retaining rainfall long enough for it to percolate through soil is challenging in neighborhoods built on compacted fill soils or steep slopes. For additional information go to http://www.aces.edu/waterquality/raincatchers
Consider These Practical Tips for Reducing Runoff from Your Yard:
Direct downspouts and gutters to drain onto the lawn, plant beds or containment areas where rain will soak into the soil rather than run off the yard. Be sure that water doesn’t pool next to
buildings Choose plants adapted to wet/dry extremes
if you decide to landscape the area where the downspouts drain.
Amend soil to increase percolation and absorbency
Consult your County Extension agent for help in amending your soil type.
grass lined swales
Consider altering topography in your landscape to move water more efficiently. Create swales and berms to help
48

catch, hold, and filter runoff that would otherwise rush from your yard. Decrease soil erosion by maintaining vegetative groundcover on areas under trees or on steep slopes. A densely growing turfgrass or ground cover is especially useful in capturing rainwater, filtering nutrients, recharging ground water, and reducing soil erosion. Consider converting ditches that are rock lined, concrete lined, or eroding into swales that are broad bottomed and grass lined.
glossary box: Swale: a small dip in the ground.
Practical Tips for Directing Runoff in Your Yard: Major earthwork should have a professional touch
Minor alterations to the lay of the land won’t require permits or experts, but any major work will require regulatory review. Consult a landscape architect or stormwater engineer for design assistance. Check with the Alabama Department of Environmental Management (ADEM) before
making any changes to shorelines of creeks, streams, lakes, or beach front.
nonimpervious surfaces
Rooftops, driveways, and walkways are commonly called “impervious surfaces” because water cannot penetrate them. Consider replacing these hard surfaces with permeable ones that allow rainwater to soak into the ground. Soil is a natural pollutant remover and by allowing stormwater to percolate through the ground, most pollutants can be filtered out before reaching our waterways. Also, increased infiltration translates into less ponding and flooding. Whenever possible, use bricks, gravel, turf block, mulch, pervious concrete, or other porous materials for walkways, driveways, or patios.
49
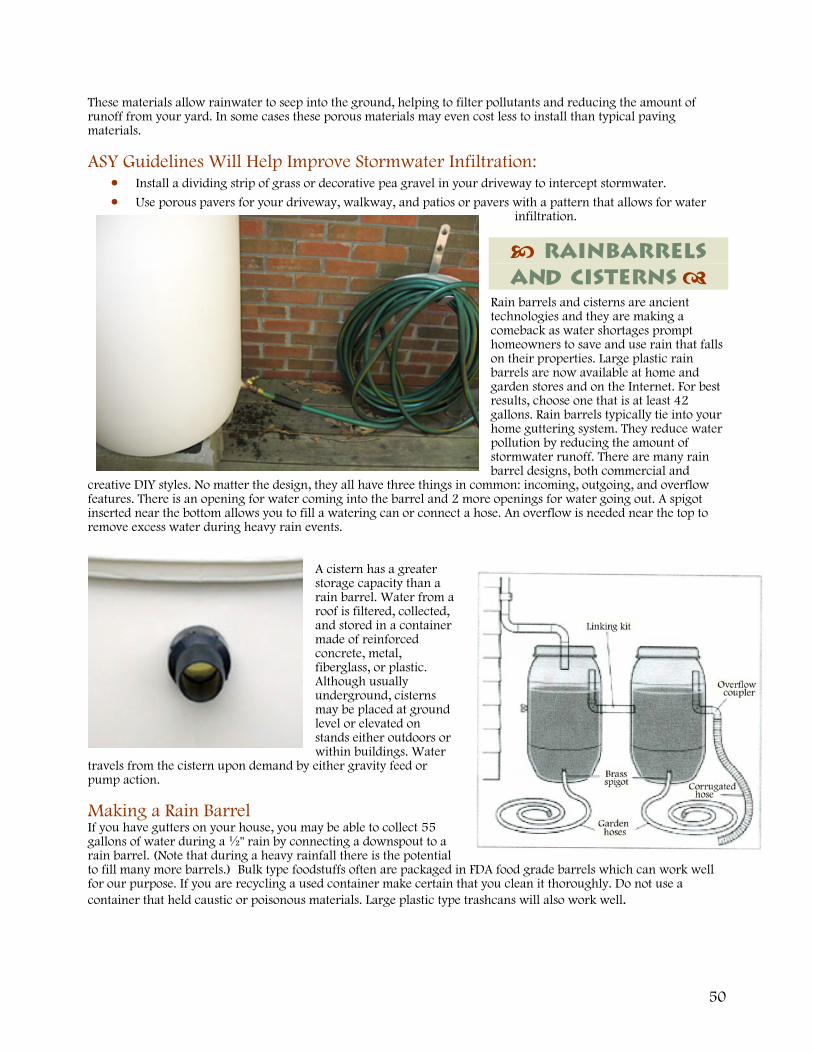
These materials allow rainwater to seep into the ground, helping to filter pollutants and reducing the amount of runoff from your yard. In some cases these porous materials may even cost less to install than typical paving materials. ASY Guidelines Will Help Improve Stormwater Infiltration:
• Install a dividing strip of grass or decorative pea gravel in your driveway to intercept stormwater.
• Use porous pavers for your driveway, walkway, and patios or pavers with a pattern that allows for water infiltration.
rainbarrels and cisterns
Rain barrels and cisterns are ancient technologies and they are making a comeback as water shortages prompt homeowners to save and use rain that falls on their properties. Large plastic rain barrels are now available at home and garden stores and on the Internet. For best results, choose one that is at least 42 gallons. Rain barrels typically tie into your home guttering system. They reduce water pollution by reducing the amount of stormwater runoff. There are many rain barrel designs, both commercial and
creative DIY styles. No matter the design, they all have three things in common: incoming, outgoing, and overflow features. There is an opening for water coming into the barrel and 2 more openings for water going out. A spigot inserted near the bottom allows you to fill a watering can or connect a hose. An overflow is needed near the top to remove excess water during heavy rain events.
A cistern has a greater storage capacity than a rain barrel. Water from a roof is filtered, collected, and stored in a container made of reinforced concrete, metal, fiberglass, or plastic. Although usually underground, cisterns may be placed at ground level or elevated on stands either outdoors or within buildings. Water
travels from the cistern upon demand by either gravity feed or pump action. Making a Rain Barrel If you have gutters on your house, you may be able to collect 55 gallons of water during a ½" rain by connecting a downspout to a rain barrel. (Note that during a heavy rainfall there is the potential to fill many more barrels.) Bulk type foodstuffs often are packaged in FDA food grade barrels which can work well for our purpose. If you are recycling a used container make certain that you clean it thoroughly. Do not use a container that held caustic or poisonous materials. Large plastic type trashcans will also work well.
50

Supplies: Plastic barrel (55 gallon most common) ¾" spigot (hose bibb) with male threads PVC cement or Teflon tape 1 ¼" sump hose (8' or longer) 3' x 3' fiberglass screen wire Bungee cord Flexible downspout elbow
Tools:
Drill (electric best but hand drill will work) Spade bits or hole saws: 1" and 1 3/8" Reciprocating or jig saw (electric best but
hand saw will work) Adjustable pliers
Directions: Rinse the barrel out well. Incoming Use the reciprocating or jig saw to cut out the top leaving the thick rim for support. The entire top will become a collection point for rain water. Outgoing Lay the barrel on its side and drill a 1" hole near the barrel bottom, above the point where the barrel side is curved. Be careful to hold the drill straight to get a good, round hole. Brace the barrel firmly to assist this step.
Carefully turn the male threaded faucet into the barrel, threading it into the plastic. Use the pliers, if necessary. Keep it straight for a good fit. Then back the faucet out, preserving the threading. Apply Teflon tape or PVC cement to the faucet threads and screw it back into the barrel. The faucet should fit flush with the barrel surface and point downward.
Overflow Drill a 1 3/8" hole near the top of the barrel. If you know where the barrel will be installed, think of the best side for the overflow hole to be located. If you don’t know, just put the hole above the faucet. Again, drill the hole carefully to keep it round. Installing the Rain Barrel The barrel should be raised above the ground to allow room to connect a garden hose to the faucet or to place a watering can underneath it. Three or four concrete blocks (one or two layers) underneath the barrel work well. Place the 3' x 3' screen over the barrel top and use the bungee cord to keep it tightly in place. Smooth the screen and trim with scissors, if you like. If your site has a gutter downspout, remove the lower part of the down spout and attach a flexible, plastic downspout to it. Direct the flexible spout to lay on the barrel screening.
51

Using a sump hose for the overflow has several advantages. It is long enough to direct water where you want it; its flexibility aids in directing water; it can be easily perforated; and it is inexpensive. Insert the sump hose into the overflow hole near the top of the barrel. Lay out the hose to direct the overflow water to a safe location (lawn, flower bed, rain garden, etc.). Punching holes into the hose will let water soak into the soil over a larger area or insert the hose end into another perforated hose or pipe to direct water to planted areas nearby. This open top design is very forgiving during excessively heavy rain events. However, to enhance the irrigation potential of your overflow, add a second overflow hose. Increase water storage by connecting several rain barrels using a 2" PVC connector.
Helpful Rain Barrel Hints: • Barrels either have sealed lids or lids that can be removed. Those with sealed lids typically have 2 small round threaded openings. These can be used to clean out the barrel or to attach PVC fittings for incoming/outgoing water.
• Barrels with flat bottoms are more stable.
• Barrels made of white plastic seem to disintegrate more quickly in the sun if not painted (the darker the color the less algal growth also). When painting your barrel use a paint that is suitable for plastic surfaces.
• Make sure the overflow directs water away from the foundation of your house.
52

controlling mosquitoes and algae
Rain barrels are great for hand watering, and they are not mosquito breeding grounds if the downspout fits tightly (see Mosquitoes in and Around the Home at http://www.aces.edu/pubs/docs/A/ANR-1116/). If your barrel is open at the top, use Bacillus thuringiensis (Bt) products (often sold as a floating donut) to kill mosquito larvae in a safe way.
If you happen to have algae take root in your rain barrel, treat the water with submersible bacterial packets sold in pond supply stores. A rain barrel is not unsightly; however, a four foot shrub can easily shield it from view if needed.
rain chains
Rain Chains are a beautiful and functional alternative to traditional downspouts. They guide rainwater from the roof to the ground, and are typically handcrafted of copper that will gain a verdigris patina color as it ages (much less expensive material can also be used). They produce soothing sounds as they guide rainwater from the rooftop to the ground. Rain Chains replace the traditional downspout on a typical household gutter system. Rain Chains, otherwise known as “kusari doi” in Japanese, are not a new idea. For hundreds of years, the Japanese have used the roofs of their homes to collect water, using chains to transport it into large barrels for household water usage. Rain Chains are easy to install by making a copper hook to rest in the gutter hole. The Rain Chain is hung from the hook. Building a Rain Chain
1. For an 8 to 9' Rain Chain, you will need about 40' of ¼" soft metal tubing for large rings and 15' for small rings. Cut the tubing with pruning shears or wire cutters, working the pieces back and forth until they separate. Save one foot of the tubing to be used later. 2. Link the large rings together, and join each pair of large rings with a small ring using a pair of pliers.
53

3. Remove your downspout. Shape the 1' piece of tubing, and then place it in the gap as shown. Secure the chain to the tubing using the top ring. 4. Place a container (such as a rain barrel or large earthenware jar) underneath the chain to catch rainwater, and use the collected water to irrigate your garden.
Hints to Customize Your Rain Chain:
• You will need roughly 3.5 times as long a piece of metal tubing (found in the plumbing department of home improvement stores) as you would like your finished chain.
• Large rings are about 3" and small rings are roughly 1" in diameter.
• To create the large rings, wrap the tubing around a 3" piece of PVC (or similar sized tube); to create small rings, wrap the tubing around a 1 to 2" piece of PVC (or similar sized tube).
rain gardens
Rain gardens catch, filter, and hold stormwater. They are simple gardens designed in pocket like depressions to capture rain water from your roof top, driveway, and upland areas and then allow the rain water to slowly soak into the ground over a period of a day.
If you are not collecting your roof runoff in a rain barrel, you can extend your gutter downspout to flow into a rain garden so that your roof runoff infiltrates and provides ground water recharge. Among their many benefits, rain gardens:
• Filter pollutants and reduce and slow down stormwater runoff
• Can be designed to create stunning landscape features
• Can include a variety of plants to attract birds, butterflies, and other wildlife
54

• Do not breed mosquitoes because they drain within 48 hours
Rain gardens are typically landscaped with native plants (see the Rain Garden Plant List in the Appendix) that require occasional weeding as well as watering in times of drought. They can be built by homeowners or professionally designed, placed in low lying areas in your lawn and designed to hold 6 to 18" of water. How to Construct a Rain Garden Materials needed are native plants, garden hose, string, level, shovel or spade, humus or other soil amendment, measuring tape.
1. Measure the footprint of your house and determine how much of your rooftop area drains to the downspout you’re using for your garden. For gutters with a downspout at each end, assume that half the water goes to each downspout. Be sure to measure the house footprint only. 2. Locate the garden at least 10' away from your home’s foundation.
3. Maintain a minimum of 1% slope (1' drop/100') from the lawn down to the rain garden, or create a grassed swale to ensure the water flows from the roof to the garden, or use a downspout extension to direct the flow into the garden. 4. Lay out the boundary of the garden with a garden hose.
5. Dig a depression 6 to 8" deep across the entire surface of the garden. 6. If the soil lacks organic matter, you can improve it by digging the hole 10 to 12" deep and adding 4 to 6"
of humus or other organic material. 7. If necessary, create a berm on the lower side of the garden using the soil you have removed, or use a down spout extension or a grass swale to direct water into the rain garden. Rain Garden sizing example:
30' x 30' house area ¼ of this area drains to one downspout 15' x 15' = 225 square feet 20% of 225 square feet = 45 square feet 30% of 225 square feet = 67.5 square feet The rain garden area should be between 45 and
67.5 square feet depending on soil type (less 20% for sandier soils).
55
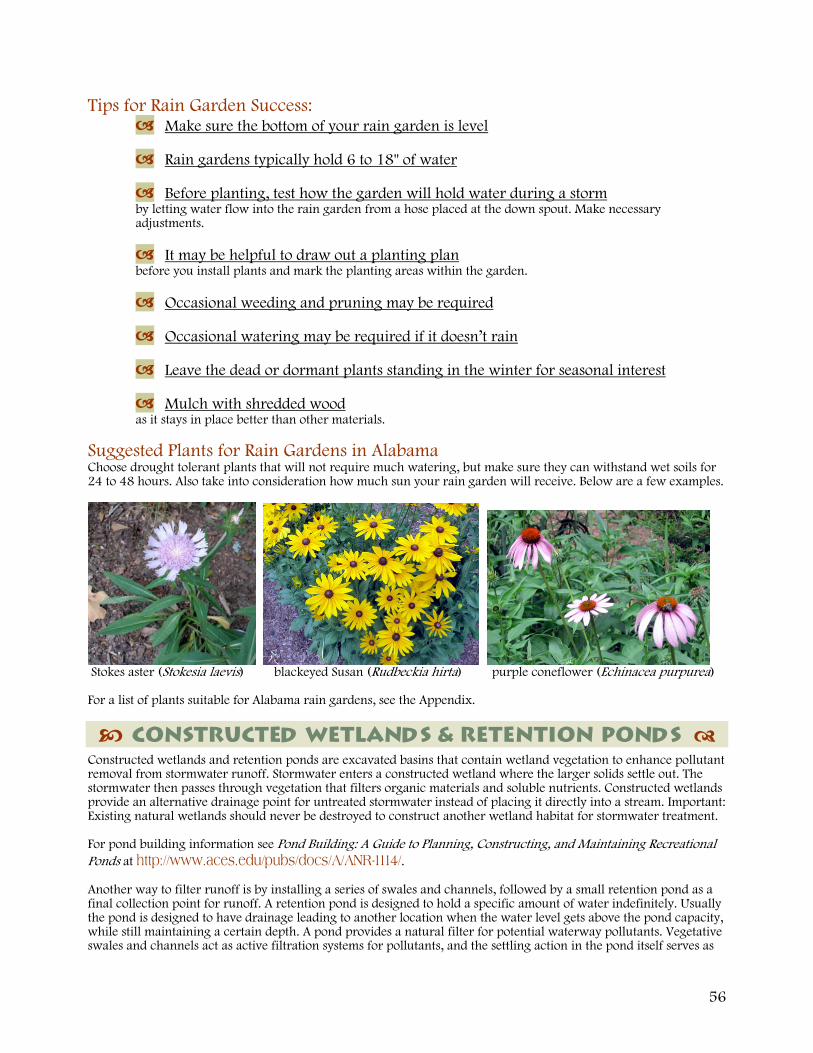
Tips for Rain Garden Success: Make sure the bottom of your rain garden is level
Rain gardens typically hold 6 to 18" of water
Before planting, test how the garden will hold water during a storm
by letting water flow into the rain garden from a hose placed at the down spout. Make necessary adjustments. It may be helpful to draw out a planting plan
before you install plants and mark the planting areas within the garden. Occasional weeding and pruning may be required
Occasional watering may be required if it doesn’t rain
Leave the dead or dormant plants standing in the winter for seasonal interest
Mulch with shredded wood
as it stays in place better than other materials.
Suggested Plants for Rain Gardens in Alabama Choose drought tolerant plants that will not require much watering, but make sure they can withstand wet soils for 24 to 48 hours. Also take into consideration how much sun your rain garden will receive. Below are a few examples.
Stokes aster (Stokesia laevis) blackeyed Susan (Rudbeckia hirta) purple coneflower (Echinacea purpurea) For a list of plants suitable for Alabama rain gardens, see the Appendix.
constructed wetlands & retention ponds
Constructed wetlands and retention ponds are excavated basins that contain wetland vegetation to enhance pollutant removal from stormwater runoff. Stormwater enters a constructed wetland where the larger solids settle out. The stormwater then passes through vegetation that filters organic materials and soluble nutrients. Constructed wetlands provide an alternative drainage point for untreated stormwater instead of placing it directly into a stream. Important: Existing natural wetlands should never be destroyed to construct another wetland habitat for stormwater treatment. For pond building information see Pond Building: A Guide to Planning, Constructing, and Maintaining Recreational Ponds at http://www.aces.edu/pubs/docs/A/ANR-1114/. Another way to filter runoff is by installing a series of swales and channels, followed by a small retention pond as a final collection point for runoff. A retention pond is designed to hold a specific amount of water indefinitely. Usually the pond is designed to have drainage leading to another location when the water level gets above the pond capacity, while still maintaining a certain depth. A pond provides a natural filter for potential waterway pollutants. Vegetative swales and channels act as active filtration systems for pollutants, and the settling action in the pond itself serves as
56

another way to remove pollutants. A well built pond that supports plant life can significantly improve the quality of water draining into Alabama’s waterways. Helpful Hints Constructed wetlands and retention ponds are considered major earthwork, require permits, and must be designed to regulations. Contact a landscape architect or stormwater engineer to help you design your pond to meet regulations.
57

58
CHAPTER TEN: PROTECTING THE WATERFRONT Saltwater Considerations
Freshwater Considerations Manmade Lakes and Ponds
Stormwater Control Ponds (Retention Ponds) Seasonal Ponds
Waterfront property owners have firsthand knowledge of the special contribution that lakes, ponds, rivers, streams, and lagoons make to Alabama’s quality of life. Owners of Alabama yards located on a waterfront must address certain challenges and responsibilities. As a next door neighbor to these natural resource treasures, you must make it your mission to practice good environmental stewardship. To design and maintain a landscape that borders a waterfront of any sort requires a strong focus on the natural environment, as well as on environmental impact. If you presently live on the waterfront or are considering moving to a waterfront location, review these points to make the most of your landscape so that you can create a yard that is beautifully functional for you and environmentally safe for the natural resources of our state.
saltwater considerations
Naturally sloping shorelines, particularly when buffered by a fringe of marsh grass, help smooth out waves and reduce cloudiness in the water. In addition, shoreline plants contribute to the food web, attract wildlife, such as wading birds, and help prevent erosion at the water’s edge. The area in which shoreline plants grow is known as the littoral zone, the boundary between land and water. Unfortunately, seawalls have traditionally been placed directly in this intertidal, littoral zone. If you desire to restore a natural shoreline with natural vegetation, you face a complex decision. Begin by inquiring about your city, county, and state ordinances to determine whether removal is an option.
glossary box: Littoral zone: the area between high and low tide in coastal waters, or the shoreline of a freshwater lake.
If you can legally replace a shoreline protection structure with a natural littoral zone along your property, your options will be limited by several factors:
• Depth of your lot
• Distance from the waterline to upland structures
• Wave impact against your shore
• Your budget
• Shoreline condition of neighboring properties Shoreline protection alternatives comprise very site specific considerations, and you will need expert advice. The Alabama Sea Grant Marine Extension agent in your county, natural resources employees of local governments and the Alabama Department of Conservation State Lands Division are good places to find help and information. Keep in mind that submerged land is not your property, but belongs to the State of Alabama. For information on permitting requirements, contact the Alabama Department of Conservation State Lands Division Coastal office. Consult their website at http://www.outdooralabama.com/outdoor-adventures/5rivers/facilities/coastal.cfm
59
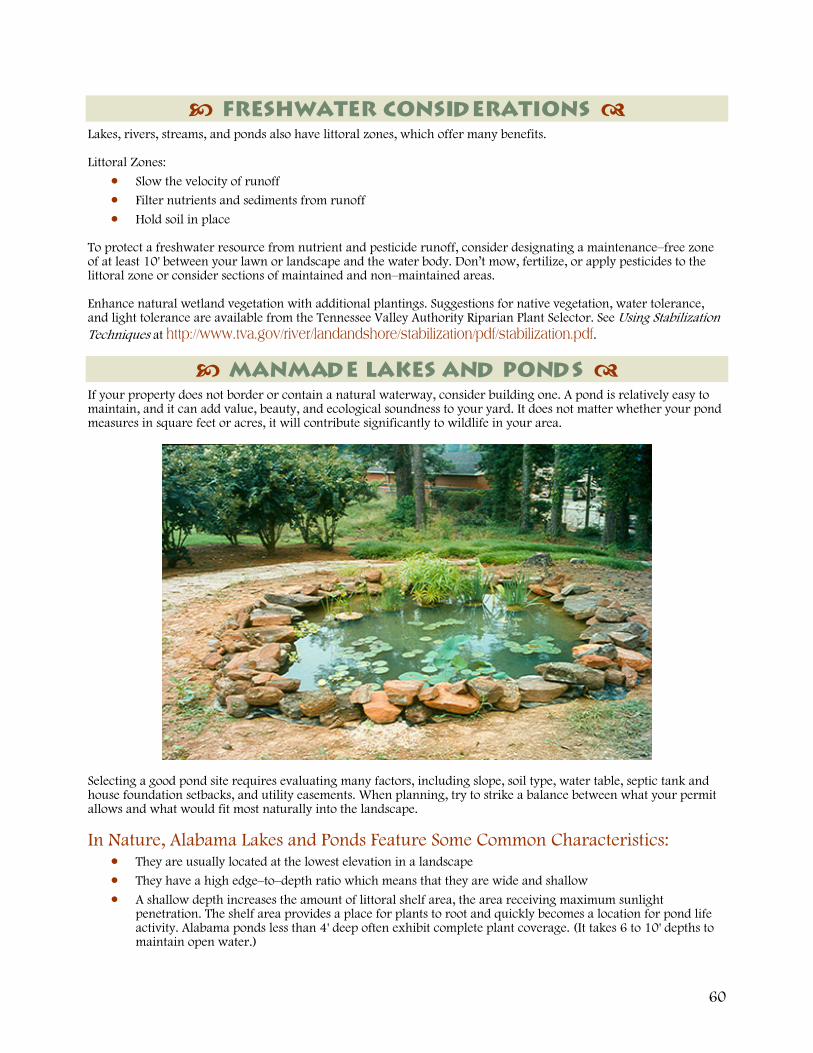
freshwater considerations
Lakes, rivers, streams, and ponds also have littoral zones, which offer many benefits. Littoral Zones:
• Slow the velocity of runoff
• Filter nutrients and sediments from runoff
• Hold soil in place To protect a freshwater resource from nutrient and pesticide runoff, consider designating a maintenance–free zone of at least 10' between your lawn or landscape and the water body. Don’t mow, fertilize, or apply pesticides to the littoral zone or consider sections of maintained and non–maintained areas. Enhance natural wetland vegetation with additional plantings. Suggestions for native vegetation, water tolerance, and light tolerance are available from the Tennessee Valley Authority Riparian Plant Selector. See Using Stabilization Techniques at http://www.tva.gov/river/landandshore/stabilization/pdf/stabilization.pdf.
manmade lakes and ponds
If your property does not border or contain a natural waterway, consider building one. A pond is relatively easy to maintain, and it can add value, beauty, and ecological soundness to your yard. It does not matter whether your pond measures in square feet or acres, it will contribute significantly to wildlife in your area.
Selecting a good pond site requires evaluating many factors, including slope, soil type, water table, septic tank and house foundation setbacks, and utility easements. When planning, try to strike a balance between what your permit allows and what would fit most naturally into the landscape. In Nature, Alabama Lakes and Ponds Feature Some Common Characteristics:
• They are usually located at the lowest elevation in a landscape
• They have a high edge–to–depth ratio which means that they are wide and shallow
• A shallow depth increases the amount of littoral shelf area, the area receiving maximum sunlight penetration. The shelf area provides a place for plants to root and quickly becomes a location for pond life activity. Alabama ponds less than 4' deep often exhibit complete plant coverage. (It takes 6 to 10' depths to maintain open water.)
60

stormwater control ponds (retention ponds)
If you live on a waterfront, evaluate stormwater runoff patterns to determine if you are inadvertently dumping runoff from your landscape directly into the natural waterway. One way to filter runoff is by installing a series of swales and channels, followed by a small pond as a final collection point for runoff. A pond provides a natural filter for potential waterway pollutants. It acts as an active filtration system for pollutants, and the settling action in the pond itself serves as another way to remove pollutants. A well built pond that supports plant life can significantly improve the quality of water draining into Alabama’s waterways and the aesthetics of your property. Another advantage these systems offer is extending the soak time of stormwater, or increasing the amount of water allowed to percolate. Water that percolates through soil recharges ground water directly, as opposed to water that empties into waterways. If you find yourself managing one of these natural stormwater filtration systems, follow our DO’S and DONT’S checklist to maintain them properly: Pond Management Do’s
• DO plant appropriate native aquatic, emergent and upland vegetation — they stabilize soil greatly
• DO use pond water for non–potable irrigation needs
• DO fertilize surrounding areas with the least amount of fertilizer possible, always using a slow release type
• DO use organic compost in lieu of fertilizer
• DO use mulch around plants to retain moisture
• DO keep pet wastes out of water bodies Pond Management Don’ts
• DON’T allow livestock to graze pond bank sides
• DON’T swim in or eat fish caught in stormwater ponds
• DON’T allow invasive plants to clog waterways
• DON’T direct grass clippings into stormwater ponds
seasonal ponds
A common pond type, and perhaps the easiest to imitate as a yard feature, is a shallow seasonal pond, typically 2' to 5' deep and 25' to 150' across. Variations in seasonal rainfall cause fluctuations in water level, appearance, and function. In winter, standing water recedes, often drying down completely, depending on the pond’s water depth, soil type, and the local water table. But even in this dry down condition, a seasonal pond offers moisture sources, the damp habitats required by many amphibians, reptiles, birds, and small mammals. If You Wish to Construct a Pond to Replicate these Important Habitats, Choose an Area that:
• Accommodates the shallow and wide profile
• Already contains suitable plant life and soil types
• Provides access for wildlife
61

62

APPENDIX EXTENSION AGENTS The Alabama Cooperative Extension System is an outreach program designed to help Alabamians by providing research, experience, and knowledge. Extension agents are assigned to every county in Alabama and are at your service to answer questions and offer urban landscape and agricultural advice. Go ACES County Offices at http://www.aces.edu/counties/ for a list of county agents. EXTENSION MASTER GARDENER HELPLINE Master Gardeners are trained volunteers who can answer your gardening questions. Call a Master Gardener in your area at 877–252–4769 toll free. You can also take classes and become part of the volunteer force to increase your knowledge and share your expertise and talents with the community. PUBLICATIONS Alabama Cooperative Extension also provides many publications dealing with common landscape topics and issues. These publications are written by experts to share their knowledge with the public. There are specific publications for plants for Alabama, insect pests, and common disease problems, to name a few. The URL for Extension Publications is http://www.aces.edu/pubs. PLANT LIST (page 65) Many nurseries and garden centers carry native plants. The key is in knowing which plants are native. Each plant’s light and water requirements are provided along with their habit (tree, shrub, vine, etc.). Keep in mind that just because the plant is on the list does not mean it will grow in your yard. Plants specifically well suited for the Black Belt region are marked with three asterisks. Remember that every Alabama yard is different regarding soil type and texture, sunlight, and climate. Conduct a site evaluation of your yard with the attached checklist. PLANTS FOR RAIN GARDENS (page 79) This list provides information on plants particularly appropriate for rain gardens. REGIONAL PLANT NURSERIES (page 81) Plant nurseries for Alabama and the surrounding region. SITE ASSESSMENT INSTRUCTIONS (page 85) AND CHECKLIST (page 89)
63

64

plant list ***Plants well suited to Black Belt soils AL=native to Alabama PS=part shade S=shade
GENUS SPECIFIC EPITHET COMMON NAME HABIT AL WET MOD DRY SUN PS S
Abelia x grandiflora glossy abelia shrub X X X X
Acer barbatum southern sugar maple
tree X X X
Acer leucoderme chalk maple*** tree X X
Acer rubrum red maple*** tree X X X X
Acer saccharinum silver maple*** tree X X
Acer saccharum sugar maple tree X X X
Achillea millefolium common yarrow herb X X X X X
Acorus gramineus Japanese sweet flag
ground cover
X X X X
Acorus calamus sweetflag herb grass X X X X X
Adiantum capillus–veneris maidenhair fern herb X X X X
Aesculus parviflora bottlebrush buckeye
shrub X X X X X
Aesculus pavia red buckeye*** shrub/ small tree X X X X
Agarista populifolia Florida leucothoe shrub X X X X X X
Ajuga reptans 'Caitlin’s Giant'
Caitlin’s giant carpet bugle
ground cover
X X
X X
Aletris farinosa white colic root herb X X X X
Amelanchier arborea alabamansis Alabama serviceberry tree X X X X
Amorpha canescens lead plant*** shrub X X X X
Amorpha fruiticosa false indigo*** shrub X X X X
Ampelopsis arborea pepper vine*** vine X X X X
Amsonia tabernaemontana eastern bluestar herb X X X
Andropogon ternarius broom straw/ beard grass*** grass X X X
Andropogon virginicus brown sedge*** grass X X
Anemone berlandieri wind–flower*** herb X
Anemone caroliniana wind–flower*** herb X
Aquilegia canadensis red columbine herb X X X X X
Aquilegia vulgaris columbine*** upright X X X
65

plant list ***Plants well suited to Black Belt soils AL=native to Alabama PS=part shade S=shade
GENUS SPECIFIC EPITHET COMMON NAME HABIT AL WET MOD DRY SUN PS S
Aralia spinosa devil’s walking stick
shrub/ small tree X X X X X X
Ardisia japonica Japanese ardisia ground cover X X
Argemone albiflora bluestem pricklypoppy herb X X X
Asclepias incarnata swamp milkweed herb X X X X
Asclepias tuberosa butterfly milkweed herb X X X
Asclepias virdis spider milkweed*** herb X X X
Asimina parviflora dwarf pawpaw shrub X X X
Asimina triloba common pawpaw***
shrub/ small tree X X X X
Aspidistra elatior cast–iron plant ground cover X X X X
Asplenium platyneuron spleenwort*** fern X X X X
Aster pilosus awl aster*** herb X X X X
Astragalus canadensis Canadian milkvetch*** vine X X X X
Athyrium filix–femina ladyfern herb X X X X X
Aureolaria flava smooth foxglove*** herb X X X X
Aureolaria virginica downy foxglove*** herb X X X
Bacopa monnieri water hyssop herb X X X X X
Baptisia alba white wild indigo herb X X X
Baptisia australis blue indigo herb X X X X
Berchemia scandens supplejack*** vine X X X X X
Betula nigra river birch tree X X X X X
Bignonia capreolata crossvine vine X X X X
Blephilia ciliata wood mint*** herb X X X X
Boltonia asteroides white doll’s daisy herb X X X
Callicarpa americana American beautyberry*** shrub X X X
Calycanthus floridus sweetshrub shrub X X X X X
66
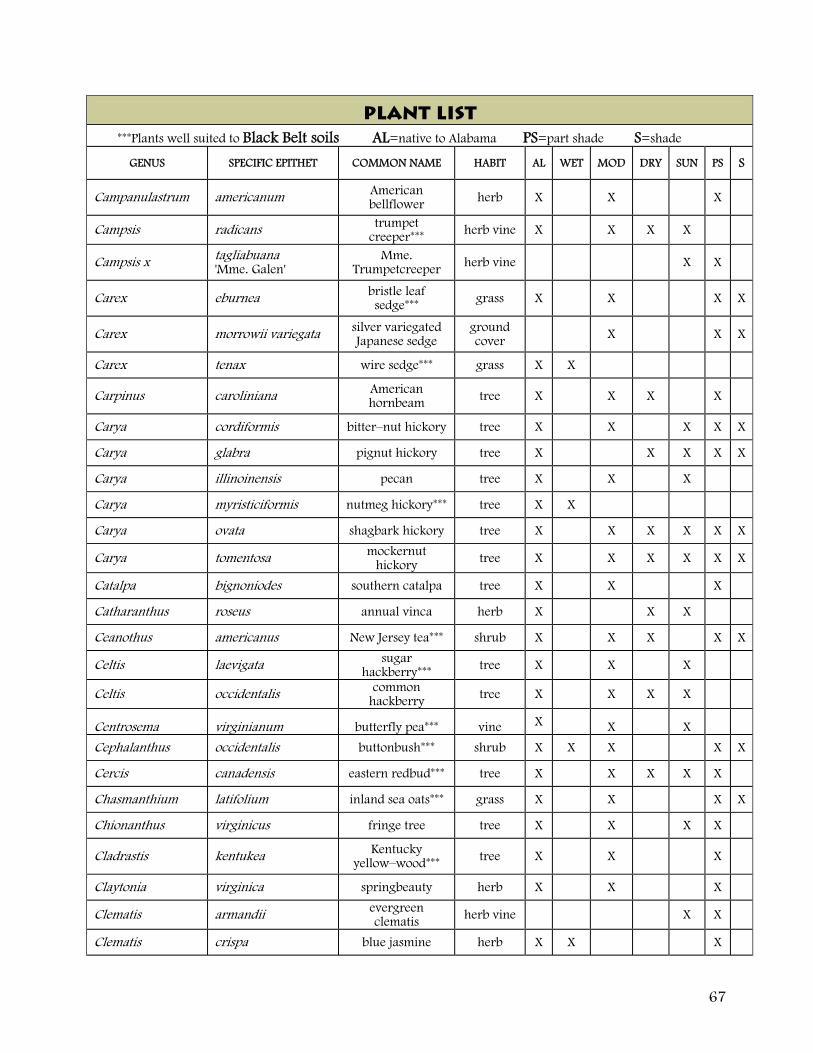
plant list ***Plants well suited to Black Belt soils AL=native to Alabama PS=part shade S=shade
GENUS SPECIFIC EPITHET COMMON NAME HABIT AL WET MOD DRY SUN PS S
Campanulastrum americanum American bellflower herb X X X
Campsis radicans trumpet creeper*** herb vine X X X X
Campsis x tagliabuana 'Mme. Galen'
Mme. Trumpetcreeper herb vine X X
Carex eburnea bristle leaf sedge*** grass X X X X
Carex morrowii variegata silver variegated Japanese sedge
ground cover X X X
Carex tenax wire sedge*** grass X X
Carpinus caroliniana American hornbeam tree X X X X
Carya cordiformis bitter–nut hickory tree X X X X X
Carya glabra pignut hickory tree X X X X X
Carya illinoinensis pecan tree X X X
Carya myristiciformis nutmeg hickory*** tree X X
Carya ovata shagbark hickory tree X X X X X X
Carya tomentosa mockernut hickory tree X X X X X X
Catalpa bignoniodes southern catalpa tree X X X
Catharanthus roseus annual vinca herb X X X
Ceanothus americanus New Jersey tea*** shrub X X X X X
Celtis laevigata sugar hackberry*** tree X X X
Celtis occidentalis common hackberry tree X X X X
Centrosema virginianum butterfly pea*** vine X X X
Cephalanthus occidentalis buttonbush*** shrub X X X X X
Cercis canadensis eastern redbud*** tree X X X X X
Chasmanthium latifolium inland sea oats*** grass X X X X
Chionanthus virginicus fringe tree tree X X X X
Cladrastis kentukea Kentucky yellow–wood*** tree X X X
Claytonia virginica springbeauty herb X X X
Clematis armandii evergreen clematis herb vine X X
Clematis crispa blue jasmine herb X X X
67

plant list ***Plants well suited to Black Belt soils AL=native to Alabama PS=part shade S=shade
GENUS SPECIFIC EPITHET COMMON NAME HABIT AL WET MOD DRY SUN PS S
Clematis terniflora sweet autumn clematis herb vine X X X
Clematis x jackmanii Jackman clematis herb vine X X
Clethra alnifolia summer sweet clethra shrub X X X X X X
Conoclinium coelestinum blue mistflower herb X X X X
Coreopsis auriculata lobed tickseed herb X X X
Coreopsis basalis goldenmane tickseed herb X X X
Coreopsis lanceolata tickseed herb X X X X
Coreopsis nudata Georgia tickseed herb X X X X
Coreopsis tinctoria calliopsis herb X X X X
Coreopsis verticillata threadleaf coreopsis*** herb X X X
Cornus amomum silky dogwood shrub X X X X
Cornus florida flowering dogwood*** small tree X X X X
Cotinus obovatus American smoke tree tree X X X
Crataegus spathulata littlehip hawthorn tree X X X
Crataegus triflora three–flower hawthorn*** shrub X X X X
Crinum americanum swamp lily herb X X X
Croton alabamensis Alabama croton shrub X X X
Croton punctatus Gulf croton*** herb
Cyrilla racemiflora swamp titi herb X X X
Cyrtomium falcatum holly fern ground cover X X X
Dalea candida white prairie clover*** herb X X X
Dalea purpurea purple prairie coneflower*** herb X X X
Datura wrightii angel trumpet herb X X X
Decumaria barbara wild hydrangea vine herb vine X X X X
Delphinium carolinianum blue larkspur*** herb X X X
68

plant list ***Plants well suited to Black Belt soils AL=native to Alabama PS=part shade S=shade
GENUS SPECIFIC EPITHET COMMON NAME HABIT AL WET MOD DRY SUN PS S
Delphinium tricorne dwarf larkspur herb X X X
Dianthus gratianopolitanus 'Bath’s Pink'
Bath’s pink dianthus perennial X X X
Dicentra cucullaria Dutchman’s breeches herb X X X X X
Diospyros virginiana persimmon*** tree X X X
Dracopis amplexicaulis clasping coneflower herb X X X
Drosera rotundifolia roundleaf sundew herb X X X
Dryopteris erythosora autumn fern ground cover X X X
Dryopteris ludoviciana southern shield fern herb X X X
Echinacea pallida pale purple coneflower*** herb X X X X
Echinacea purpurea purple coneflower herb X X X X
Epimedium sp. barrenwort ground cover X X
Erythrina herbacea coral bean*** shrub X X X
Euonymus americanus American strawberry bush shrub X X X
Euonymus atropurpureus burning bush shrub X X X
Euonymus fortunei coloratus purple leaf winter creeper
ground cover X X X X
Euonymus fortunei radicans winter creeper shrub X X X X X X X
Euonymus kiatschovica spreading euonymus shrub X X X
Euphorbia corollata flowering spurge*** herb X X
Ficus pumilla climbing fig vine X X X
Fothergilla gardenii fothergilla shrub X X X X
Fraxinus americana white ash*** tree X X X X X
Fraxinus pennsylvanica green ash*** tree X X X X X
Fraxinus quadrangulata blue ash*** tree X X X X X
Gaillardia aestivalis blanket flower*** herb X X X
Gaillardia pulchella firewheel herb X X X X
69
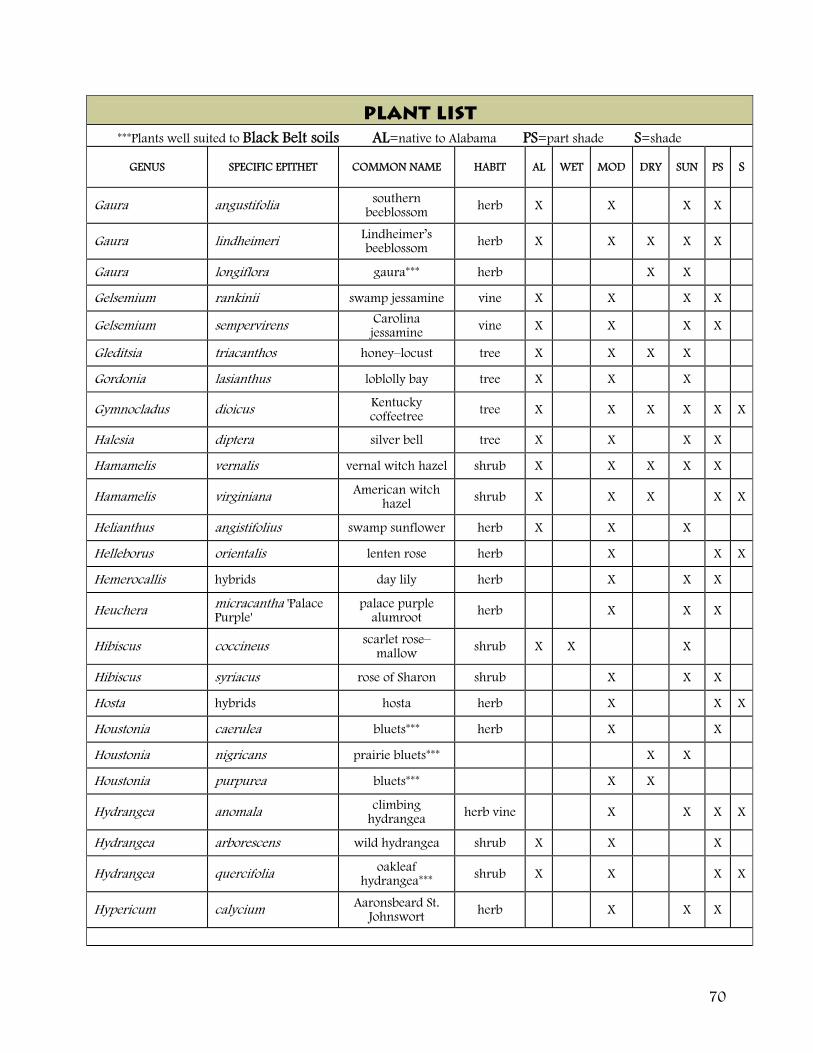
plant list ***Plants well suited to Black Belt soils AL=native to Alabama PS=part shade S=shade
GENUS SPECIFIC EPITHET COMMON NAME HABIT AL WET MOD DRY SUN PS S
Gaura angustifolia southern beeblossom herb X X X X
Gaura lindheimeri Lindheimer’s beeblossom herb X X X X X
Gaura longiflora gaura*** herb X X
Gelsemium rankinii swamp jessamine vine X X X X
Gelsemium sempervirens Carolina jessamine vine X X X X
Gleditsia triacanthos honey–locust tree X X X X
Gordonia lasianthus loblolly bay tree X X X
Gymnocladus dioicus Kentucky coffeetree tree X X X X X X
Halesia diptera silver bell tree X X X X
Hamamelis vernalis vernal witch hazel shrub X X X X X
Hamamelis virginiana American witch hazel shrub X X X X X
Helianthus angistifolius swamp sunflower herb X X X
Helleborus orientalis lenten rose herb X X X
Hemerocallis hybrids day lily herb X X X
Heuchera micracantha 'Palace Purple'
palace purple alumroot herb X X X
Hibiscus coccineus scarlet rose–mallow shrub X X X
Hibiscus syriacus rose of Sharon shrub X X X
Hosta hybrids hosta herb X X X
Houstonia caerulea bluets*** herb X X
Houstonia nigricans prairie bluets*** X X
Houstonia purpurea bluets*** X X
Hydrangea anomala climbing hydrangea herb vine X X X X
Hydrangea arborescens wild hydrangea shrub X X X
Hydrangea quercifolia oakleaf hydrangea*** shrub X X X X
Hypericum calycium Aaronsbeard St. Johnswort herb X X X
70

plant list ***Plants well suited to Black Belt soils AL=native to Alabama PS=part shade S=shade
GENUS SPECIFIC EPITHET COMMON NAME HABIT AL WET MOD DRY SUN PS S
Hypericum sphaerocarpum round–fruited St. Johns wart*** herb X X X X
Hypoxis hirsuta yellow star grass*** herb X X X X
Ilex americana American holly***
Ilex cassine Dahoon holly tree X X X X X
Ilex decidua possum haw holly*** tree X X
Ilex glabra inkberry shrub X X X
Ilex opaca American holly*** tree X X
Ilex verticillata winterberry shrub/ small tree X X X X X
Ilex vomitoria yaupon*** small tree X X X X X
Illicium floridanum Florida anise tree shrub X X X X X
Ipomoea pandurata wild potato vine*** vine X X X X X
Ipomopsis rubra standing cypress*** herb X X X X
Itea virginica sweetspire shrub X X X X X X X
Juglans nigra black walnut tree X X X X
Juniperus virginiana eastern red cedar*** tree X X X
Kalmia latifolia mountain laurel shrub X X X
Lagerstroemia indica crapemyrtle tree X X
Lespedeza virginia slender bush clover***
Leucothoe axillaris coastal leucothoe shrub X X X
Liatris graminifolia grass–leafed blazing star***
Liatris spicata spike gayfeather herb X X X X
Liatris squarrosa plains blazing star***
Lindera benzoin spicebush shrub X X X X X
Liquidambar styraciflua sweetgum*** tree X X X
Liriodendron tulipifera tulip poplar*** tree X X X X X
Lobelia cardinalis cardinal flower herb X X X
71

plant list ***Plants well suited to Black Belt soils AL=native to Alabama PS=part shade S=shade
GENUS SPECIFIC EPITHET COMMON NAME HABIT AL WET MOD DRY SUN PS S
Lobelia siphilitica great blue lobelia herb X X X X X X
Lobelia spicata pale–spiked lobelia*** herb X X X X
Lonicera sempervirens trumpet
honeysuckle/coral honeysuckle***
herb vine X X X X
Lonicera x heckrottii goldflame honeysuckle herb vine X X
Lysimachia ciliata fringed loosestrife herb X X X
Lythrum alatum winged loosestrife***
Maclura pomifera osage orange*** tree X X
Magnolia acuminata cucumbertree magnolia*** tree X X X X X
Magnolia grandiflora southern magnolia tree X X X X X
Magnolia tripetala umbrella magnolia*** tree X X
Magnolia virginiana sweetbay magnolia tree X X X X
Malus angustifolia southern crabapple tree X X X
Michelia figo banana shrub tree X X X X
Millettia reticulata evergreen wisteria herb vine X X X
Monarda citriodora lemon
beebalm/lemon mint***
herb X X X X
Morella cerifera southern wax myrtle shrub X X X X X
Morus rubra red mulberry*** tree X X X X X X
Narcissus pseudo narcissus daffodil***
Nemastylis geminifolia prarie iris*** herb X X X X
Oenothera speciosa
pink evening–primrose/showy
evening primrose***
herb X X X
Osmanthus americanus devilwood shrub X X X
Osmunda cinnamomea cinnamon fern herb X X X X X
Osmunda regalis royal fern herb X X X
72
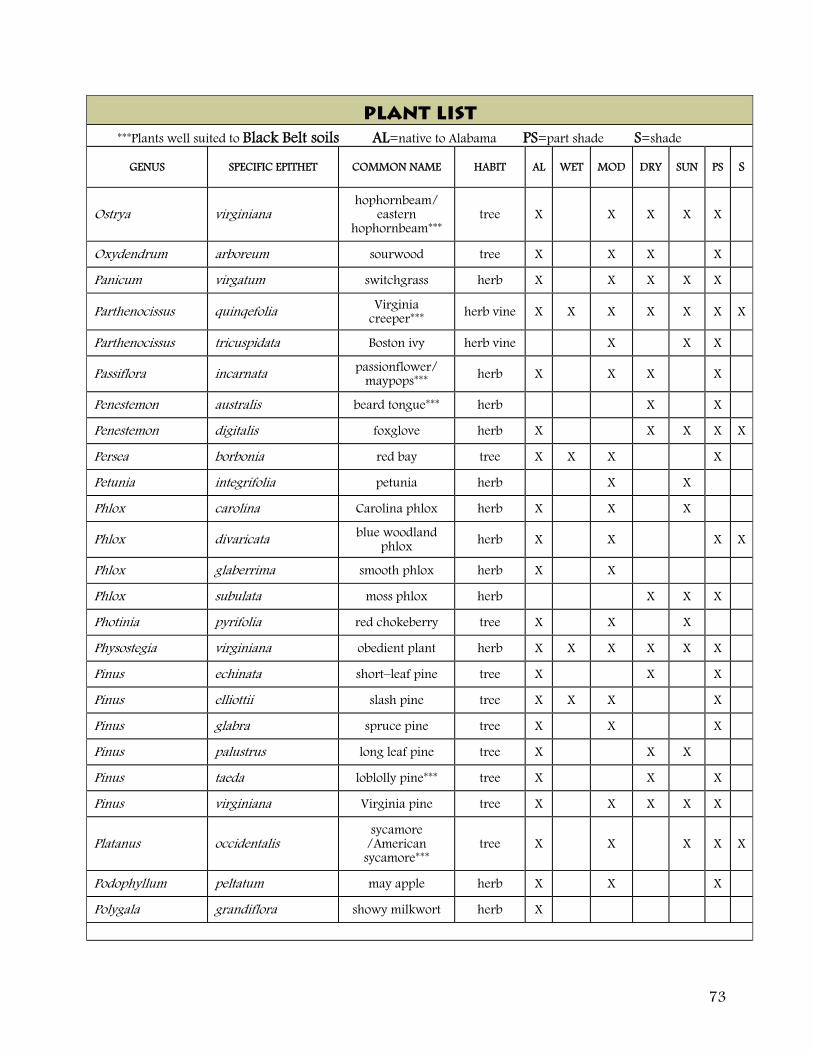
plant list ***Plants well suited to Black Belt soils AL=native to Alabama PS=part shade S=shade
GENUS SPECIFIC EPITHET COMMON NAME HABIT AL WET MOD DRY SUN PS S
Ostrya virginiana hophornbeam/
eastern hophornbeam***
tree X X X X X
Oxydendrum arboreum sourwood tree X X X X
Panicum virgatum switchgrass herb X X X X X
Parthenocissus quinqefolia Virginia creeper*** herb vine X X X X X X X
Parthenocissus tricuspidata Boston ivy herb vine X X X
Passiflora incarnata passionflower/ maypops*** herb X X X X
Penestemon australis beard tongue*** herb X X
Penestemon digitalis foxglove herb X X X X X
Persea borbonia red bay tree X X X X
Petunia integrifolia petunia herb X X
Phlox carolina Carolina phlox herb X X X
Phlox divaricata blue woodland phlox herb X X X X
Phlox glaberrima smooth phlox herb X X
Phlox subulata moss phlox herb X X X
Photinia pyrifolia red chokeberry tree X X X
Physostegia virginiana obedient plant herb X X X X X X
Pinus echinata short–leaf pine tree X X X
Pinus elliottii slash pine tree X X X X
Pinus glabra spruce pine tree X X X
Pinus palustrus long leaf pine tree X X X
Pinus taeda loblolly pine*** tree X X X
Pinus virginiana Virginia pine tree X X X X X
Platanus occidentalis sycamore
/American sycamore***
tree X X X X X
Podophyllum peltatum may apple herb X X X
Polygala grandiflora showy milkwort herb X
73

plant list ***Plants well suited to Black Belt soils AL=native to Alabama PS=part shade S=shade
GENUS SPECIFIC EPITHET COMMON NAME HABIT AL WET MOD DRY SUN PS S
Polypodium polypodioides resurrection fern*** herb/fern
Polystichum acrostichoides Christmas fern herb X X X X X
Prunus angustifolia chickasaw plum*** tree X X X
Prunus caroliniana Carolina laurelcherry
shrub/ small tree X X X X
Prunus serotina black cherry*** tree X X X X X X
Quercus alba white oak tree X X X
Quercus arkansana Arkansas oak*** tree
Quercus bicolor swamp white oak tree X X X X
Quercus falcata sothern red oak*** tree X X X
Quercus laurifolia laurel oak tree X X X
Quercus lyrata overcup oak tree X X X X X X
Quercus michauxii swamp chestnut oak tree X X X
Quercus muehlenbergii chinquapin oak*** tree X X
Quercus nigra water oak*** tree X X X X
Quercus phellos willow oak tree X X X X
Quercus rubra northern red oak*** tree X X X X X
Quercus shumardii shumard oak/ swamp red oak*** tree X X X X X
Quercus sinuata shallow–lobed oak*** tree
Quercus stellata post oak tree X X X
Quercus virginiana live oak tree X X X X
Ratibida pinnata gray–headed coneflower*** herb X X X X
Rhamnus caroliniana Carolina buckthorn*** tree X X
Rhapidophyllum hystrix needle palm shrub X X X X X
Rhododendron arborescens smooth azalea shrub X X X
Rhododendron austrinum Florida flame azalea shrub X X X
Rhododendron canescens piedmont azalea shrub X X X
74

plant list ***Plants well suited to Black Belt soils AL=native to Alabama PS=part shade S=shade
GENUS SPECIFIC EPITHET COMMON NAME HABIT AL WET MOD DRY SUN PS S
Rhododendron catawbiense catawba rhododendron shrub X X X
Rhododendron viscosum swamp azalea shrub X X X
Rhus aromatica aromatic sumac*** shrub X X X X X
Rhus copallina winged sumac*** shrub X X
Rhus glabra smooth sumac*** shrub X X X X
Robinia pseudoacacia honey–locust/ black locust*** tree X X X X
Rosa banksiae 'Lutea' lady banks rose vine X X X
Rosa bracteata McCartney rose***
Rosa carolina wild rose***
Rosa sp. climbing roses herb vine X X
Rubus argutus blackberry*** shrub
Rudbeckia fulgida orange coneflower*** herb X X X X
Rudbeckia hirta black eyed Susan*** herb X X X X X X
Ruellia caroliniensis Carolina wild petunia herb X X X
Ruellia humilis fringeleaf wild petunia herb X X X
Sabal minor dwarf palmetto shrub X X X X X X
Sabatia angularis rose–pink sabatia***
Salix nigra black willow*** tree X X X X X
Salvia azurea azure blue sage*** herb X X X
Salvia coccinea Texas sage herb X X X X X
Salvia lyrata lyre–leaved sage*** herb X X X X X
Sambucus nigra canadensis elderberry shrub X X X
Sassafras albidum sassafras*** tree X X X X X
Schizophragma hydrangeiodes moonlight climbing
hydrangea herb vine X X
Scutellaria integrifolia skullcap*** herb X X
Scutellaria parvula little skullcap*** herb X
75

plant list ***Plants well suited to Black Belt soils AL=native to Alabama PS=part shade S=shade
GENUS SPECIFIC EPITHET COMMON NAME HABIT AL WET MOD DRY SUN PS S
Sedum pulchellum rock stonecrop herb X
Sedum ternatum wild stonecrop herb X X X
Silene virginica fire pink*** herb X X X
Silphium laciniatum compass plant*** herb
Silphium trifoliatum var. latifolium
whorled rosin weed herb X X X
Sisyrinchium angustifolium blue–eyed grass*** herb X X X X
Smilax smallii jackson Vine vine X X X
Solidago altissima goldenrod herb X X X X
Spigelia marilandica indian pink herb X X X
Spiranthes cemua nodding ladies tresses*** herb X X
Stewartia malacodendron silky camellia shrub X X
Stokesia laevis Stoke’s aster herb X X X
Symphoricarpos orbiculatus coralberry shrub X X X X X
Taxodium distichum bald cypress*** tree X X X X
Ternstroemia gymnanthera cleyera shrub X X X X X
Tilia americana var. caroliniana
American basswood*** tree X X X X X X
Trachelospermum jasminoides confederate jasmine vine X X X X
Tsuga canadensis eastern hemlock tree X X X
Ulmus alata winged elm*** tree X X X
Ulmus americana American elm*** tree X X X X
Vaccinium arboreum farkleberry shrub X X X
Vaccinium corymbosum highbush blueberry shrub X X X X X X X
Verbascum thapsus wooly mullein***
Verbena simplex narrow–leaved verbena*** herb X X
Verbena stricta hoary verbena*** herb X X
Verbena tenoiseata verbena***
Viburnum nudum possumhaw shrub X X X X X X
76

plant list ***Plants well suited to Black Belt soils AL=native to Alabama PS=part shade S=shade
GENUS SPECIFIC EPITHET COMMON NAME HABIT AL WET MOD DRY SUN PS S
Viburnum nudum dentatum southern arrow wood shrub X X X X X
Viburnum nudum obovatum small leaf–arrow wood shrub X X X
Viburnum rufidulum rusty black haw*** tree X X
Viola pedata bird–foot violet herb X X X X X
Vitex–agnus castus lilac chaste tree small tree
Vitis rotundifolia muscadine*** vine X X X
Wisteria frutescens American wisteria herb vine X X X X
Woodwardia areolata chain fern herb X X X
Yucca aloifolia aloe yucca shrub X X X
Yucca filamentosa Adam’s needle yucca shrub X X X X
Zanthoxylum clava–herculis toothache tree*** tree X X
Zephranthes atamasca atamasca lily herb X X X X
77

78
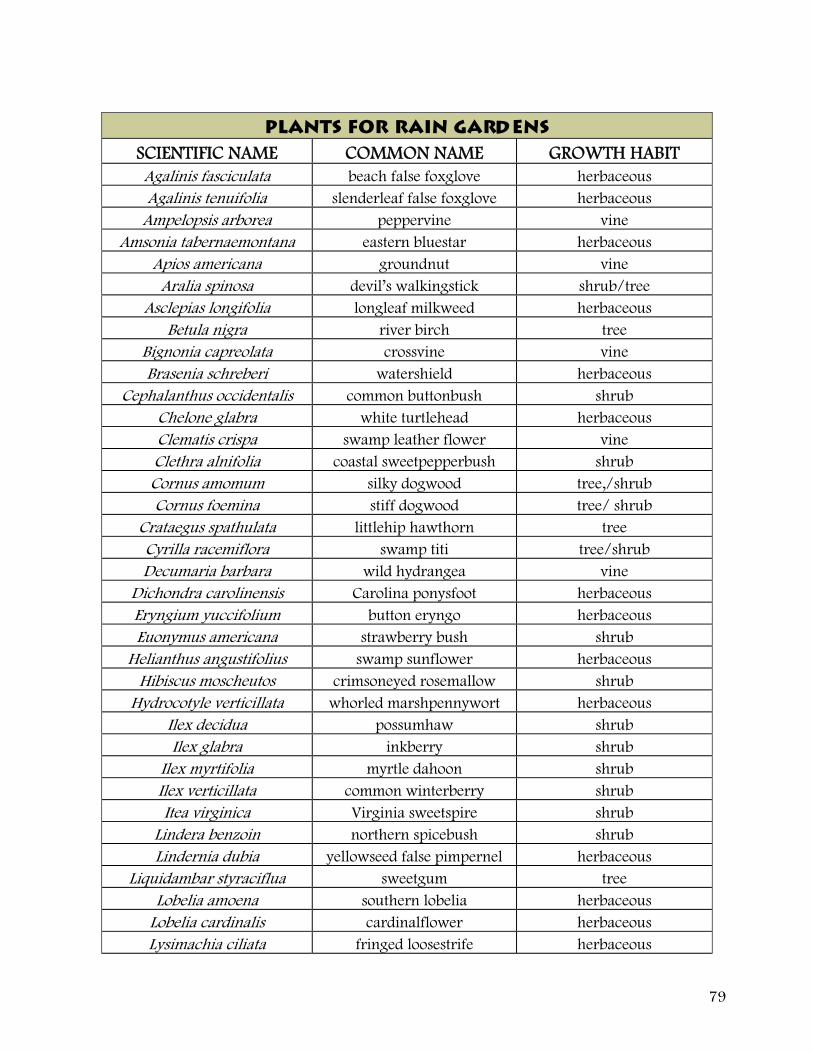
plants for rain gardens SCIENTIFIC NAME COMMON NAME GROWTH HABIT Agalinis fasciculata beach false foxglove herbaceous Agalinis tenuifolia slenderleaf false foxglove herbaceous
Ampelopsis arborea peppervine vine Amsonia tabernaemontana eastern bluestar herbaceous
Apios americana groundnut vine Aralia spinosa devil’s walkingstick shrub/tree
Asclepias longifolia longleaf milkweed herbaceous Betula nigra river birch tree
Bignonia capreolata crossvine vine Brasenia schreberi watershield herbaceous
Cephalanthus occidentalis common buttonbush shrub Chelone glabra white turtlehead herbaceous Clematis crispa swamp leather flower vine Clethra alnifolia coastal sweetpepperbush shrub Cornus amomum silky dogwood tree,/shrub Cornus foemina stiff dogwood tree/ shrub
Crataegus spathulata littlehip hawthorn tree Cyrilla racemiflora swamp titi tree/shrub Decumaria barbara wild hydrangea vine
Dichondra carolinensis Carolina ponysfoot herbaceous Eryngium yuccifolium button eryngo herbaceous Euonymus americana strawberry bush shrub
Helianthus angustifolius swamp sunflower herbaceous Hibiscus moscheutos crimsoneyed rosemallow shrub
Hydrocotyle verticillata whorled marshpennywort herbaceous Ilex decidua possumhaw shrub Ilex glabra inkberry shrub
Ilex myrtifolia myrtle dahoon shrub Ilex verticillata common winterberry shrub Itea virginica Virginia sweetspire shrub
Lindera benzoin northern spicebush shrub Lindernia dubia yellowseed false pimpernel herbaceous
Liquidambar styraciflua sweetgum tree Lobelia amoena southern lobelia herbaceous
Lobelia cardinalis cardinalflower herbaceous Lysimachia ciliata fringed loosestrife herbaceous
79

plants for rain gardens SCIENTIFIC NAME COMMON NAME GROWTH HABIT Lysimachia lanceolata lanceleaf loosestrife herbaceous
Macrothelypteris torresiana swordfern herbaceous Mimulus ringens Allegheny monkeyflower herbaceous Onoclea sensibilis sensitive fern herbaceous
Ophioglossum vulgatum southern adderstongue herbaceous Osmunda cinnamomea cinnamon fern herbaceous
Phlox carolina thickleaf phlox herbaceous Platanus occidentalis American sycamore tree
Quercus lyrata overcup oak tree Quercus nigra water oak tree
Quercus phellos willow oak tree Quercus shumardii Shumard’s oak tree
Rhexia mariana meadowbeauty herbaceous Rhexia virginica handsome Harry herbaceous
Rhododendron arborescens sweet azalea shrub Rhododendron viscosum swamp azalea shrub
Rudbeckia fulgida orange coneflower herbaceous Rudbeckia laciniata cutleaf coneflower herbaceous
Salix nigra black willow tree Salvia lyrata lyreleaf sage herbaceous
Scutellaria integrifolia helmet flower herbaceous Styrax americanus American snowbell tree Thelypteris dentata downy maiden fern herbaceous Utricularia gibba humped bladderwort herbaceous
Vaccinium corymbosum highbush blueberry shrub Vernonia gigantea giant ironweed herbaceous Viburnum nudum possumhaw shrub Vitis rotundifolia muscadine vine
Wisteria frutescens American wisteria vine Woodwardia areolata netted chainfern herbaceous
Xanthorhiza simplicissima yellowroot herbaceous Zizia aptera meadow zizia herbaceous
80

REGIONAL PLANT NURSERIES in Alabama, Georgia, and the region offering
Native Plants
NOTE that many of these nurseries are wholesale only but you can give the plant name and name of the wholesale nursery to your local retail garden center. They may be able to order plants if
they do not have them in stock.
A L A B A M A Wildflower Inc.
Jan Midgley Wilsonville, AL 205–669–4097
[email protected] Specializing in native perennials. Will grow requested plants. Call or email for availability. Retail only.
Biophilia
12695 C.R. 95 Elberta, Alabama 36530
251–987–1200 http://www.biophilia.com
Specializing in native perennials and shrubs. Check website for availability. Website also makes great plant suggestions for attracting wildlife. Retail only.
Alabama Nurseries and Orchards
Larry Foster 800–222–1280
[email protected] Specializing in oak trees and shrubs. Bulk wholesale and bare root with discounts available over 15,000.
Email for availability.
Joshua Timberlands LLC Sam Campbell
Elberta, AL 251–986–5210
[email protected] Specializing in hardwoods. Bulk whole sale and bare root. Minimum order $25.00. Trees only available to ship from
December to March. Email for availability.
SmurfitStone Terry D. Willaford
Brewton, AL 866–407–9556
[email protected] Specializing in hardwoods. Bare root, wholesale with a minimum order of $25.00. Trees available to ship November
through March. Email for availability. Will grow plants on request.
Tom Dodd Nurseries, Inc. Semmes, AL
800–866–3633 www.tomdodd.com
Some native shrubs and perennials. Check website for availability. Wholesale only.
81

Cohn Flowers Rebecca Cohn
9549 Derby Dr. Birmingham, AL 205–527–5431
Fax 205–870–3813 www.cohnflowers.net
Primarily sun loving native plants grown from seed. Some shade tolerant native perennials with a limited (but growing) number of wetland grasses and perennials. Additional plants can be grown on request. Available plants
include: Hibiscus coccineus, seashore mallow, ironweed, sunflowers, Lobelia cardinalis, etc.
Lone Wolf’s Den 502 Circle Dr.
Roanoke, AL 36274 334–863–5948
G E O R G I A
Randy’s Perennials and Watergardens Inc. Randy Kucera
Lawrenceville, GA 770–822–0676
www.randysnursery.com Specializing in aquatic plants and water gardens, also with a large selection of native perennials and shrubs.
Retail only. Call for availability.
Blue Creek Nursery Cleveland, GA
706–663–7964 Specializing in native perennials and shrubs. Small wholesale only. Call for availability.
Garden Delights Pine Mountain, GA
706–663–7964 http://www.lazyknursery.com/garden_center.html
[email protected] Specializing in native azaleas. Check website for availability. Call or email for pricing.
Wholesale, on–line, and garden center.
Nearly Native Nursery 776 McBride Road
Fayetteville, GA 30215 phone: 770–599–8210
fax: 770–599–0120 www.nearlynativenursery.com/
Retail.
O T H E R S T A T E S
Carolina Native Nursery
1126 Prices Creek Rd. Burnsville, NC 28714
828–682–1471 http://www.carolinanativenursery.com/
82

Bobtown Nursery 16212 Country Club Road
Melfa, VA 23410 757–787–8484
Fax 757–787–8611 Native trees and Shrubs.
Plant Delights Nursery
Juniper Level, North Carolina With questions contact: [email protected]
www.plantdelights.com 919–772–4794
Fax: 919–662–0370 Retail.
Woodlander’s Nursery
Aiken, South Carolina Bob McCartney 803–648–7522
Retail www.woodlanders.net
Environmental Concern, Inc.
201 Boundary Lane P.O. Box P
St. Michaels, MD 21663 410–745–9620
Fax 410–745–3517 [email protected]
www.wetland.org Good selection of native wetland plants. Check website for availability.
The Natives Sarah Kiefer
Davenport, FL 863–422–6664
[email protected] Native trees and shrubs. Email for availability.
Shooting Star Nursery
Frankfurt, KY 502–223–1679
[email protected] www.shootingstarnursery.com
Good selection of native plants. Check website for availability.
Ernst Conservation Seeds 9006 Mercer Pike
Meadville, PA 16335 800–873–3321
Fax 814–336–5191 [email protected]
Specializing in native grasses and perennials.
Hillis Nursery Co., Inc. 92 Gardner Road
McMinnville, TN 37110 931–668–4364
Fax 931–668–7432 Specializing in native trees and shrubs.
83

Kurt Bluemel, Inc. 2740 Greene Lane
Baldwin, MD 210139523 800–498–1560
Fax 410–557–9785 [email protected]
Specializing in native grasses and perennials.
Shadow Nursery, Inc. 254 Shadow Nursery Road
Winchester, TN 37398 931–967–6059
Fax 931–967–6079 Specializing in native trees and shrubs.
84

Site Assessment instructions
Suggested Tools and Materials Hand pruners Insect identification manual Measuring tape Weed identification manual Yardstick Ornamental plant identification manual Shovel Paper towels Plastic bags Pencils/pens, and extra paper Optional Tools: soil probe, vials containing alcohol for unknown insects
1. Site Location
Note the address of your site.
2. Site Description A brief overview of the site including: general use or function, approximate size, accessibility, and general topography (gentle slope, steep hill, etc.)
3. Climate and Views a. USDA Hardiness Zone
Check the USDA Hardiness Zone of the site (north Alabama: 7a, 7b; south Alabama: 8a, 8b). See page 2 of the manual. If planting in containers above the ground, you may want to regard the site as a zone colder than listed. Roots of trees in containers are more exposed and sensitive to cold winter temperatures than trees in the ground.
b. Micro–climate Factors Re–reflected heat load: Determine if the site, or some portion of it, has heat pockets due to reflected and re–radiated heat loads from pavement, automobiles, buildings, or other surfaces. This can cause landscape plants to heat up and lose water from their leaves at a faster than normal rate. These pockets are often south facing and have a tremendous amount of heat load. On sunny days, these areas will be noticeably warmer than nearby spots. Drought resistant plants should be chosen for these areas. Frost pockets: Frost pockets are often found in low areas at the bottom of a slope. Cooler air, being heavier, collects in these areas, lowering air temperatures. Wind: Excessively windy sites will often place stress on landscape plants, particularly those with large leaves. Plants in these areas may need supplemental watering to prevent them from drying out too quickly. Excessive winds cause trees to lean or grow
85
in the same direction. Other landscape plants will have stunted growth on the side that faces the full force of the wind.
Other: Are there other factors that might affect the climate or precipitation levels? Are there wide rain shadows formed by the overhang of a building? Is the site located near a large body of water that may moderate the climate?
c. Sunlight Levels
Shady sites determined by the sun and shade patterns around buildings may limit the choice of trees and other landscape plants. Consider that a site has full sun if it receives more than 6 hours of direct sunlight. Partial sun has direct sun (often morning sun) for less than 6 hours, or filtered light (as would be common under pine trees or trees with fine textured leaves) for most of the day. An area is considered shady if it receives little or no direct sunlight, or if it receives less than 6 hours of filtered light.
d. Irrigation Levels Note the presence or absence of an automatic irrigation system. If possible, record the method of delivery (overhead, drip, micro–irrigation), the weekly amount of water applied and the rate at which it is applied. You may wish to test the system by placing collection containers in different locations on the site and running the system for a specified amount of time to test the delivery rate (see Chapter 3).
e. Views Note unsightly views that need to be screened such as parking lots, signs, trash areas.
Also note views that should be framed or accentuated such as mountains, ponds, meadows, etc.
4. Soil Factors a. Texture
In the landscape, test the soil texture using the soil texture–by–feel method, and record the results on the checklist. If you must know the exact soil texture, record the general soil type on the checklist and collect soil samples to be analyzed by the Auburn University Soil Testing Lab. A sandy soil will suffer less from the effects of compaction but may be less able to supply water to landscape plants. In heavier clay soils, compaction may cause it to be too wet, making oxygen less available for landscape plants.
b. Compaction Levels There are several ways to test for soil compaction. The simplest test is to dig a small pit and gauge the difficulty of hand digging. Repeat the ‘shovel test’ in several spots.
c. Drainage Characteristics Determining the drainage characteristics of your site requires combining the results of several factors:
Presence of mottled soil: The strongest indication of poor drainage is mottled (marked with spots or blotches) soil. Dig a small hole at least 12–15 inches deep and remove several clods for examination. Clods that have grey mottling and/or have a foul odor will indicate poor drainage.
86

Low–lying areas: Study your landscape for low–lying areas that collect surface runoff and that may be poorly drained. Indicator plants: Plants that indicate poorly drained (wet) sites include willow, pin oak, swamp white oak, and tupelo. Plants that indicate moist soils are sycamore and tulip trees. Plants that indicate well–drained soil are sugar maple, red oaks, and hickories.
d. Other Soil Considerations
Indications of soil layer disturbance: Look for areas that show evidence of soil removal or fills. Some clues include mature trees that do not show a trunk flare (due to soil piled against the trunks) or have retaining walls near their bases. You may wish to dig a hole approximately two feet deep to examine the soil horizons, especially if the site has recently had construction activity. Soil layers that are noticeably lighter in color than lower layers indicate that the subsoil has been spread on top of the original grade. The absence of a rich, brown, organic layer at the top may indicate that the topsoil has been removed. Evidence of recent construction: Clues that indicate recent construction are: newly paved surfaces, turf that is noticeably thinner than surrounding areas, new retaining walls, or unnatural soil levels. Also consider the route or routes taken by heavy equipment into the site and where materials were stored during construction. Presence of noxious weeds: Use a guide to identify weeds. Pay particular attention to perennial noxious weeds that need to be eliminated from the landscape. Some of these weeds include: bindweed, poison ivy, nutsedge, kudzu, and Florida betony. Erosion of soil evident: Determine the extent and severity of soil erosion. Note the size of eroded areas. Factors that affect soil erosion include: rainfall intensity, quantity, and runoff; slope length and grade; amount of stabilizing plant material or other erosion control practices; the infiltration rate and the structural stability of the soil. Evidence of soil contamination: Soil samples from suspected areas of contamination will need to be tested to determine the actual soil contaminants. Usage that compacts soil: Are there areas in the landscape that are sometimes used for parking? Are there pathways that have been created from walking in certain areas of the landscape?
e. Specific Soil Problems Use this space to record specific soil problems that occur on the site. Problems might include an inability to surface drain a site, possible soil chemical contaminants, and extremely dry areas.
5. Structural Factors a. Limitations to above–ground space
Overhead wire height: Describe the location and estimate the height of overhead utility wires.
87

Proximity to buildings and structures: If you anticipate buildings or structures having an impact on the canopy space of landscape plantings, make note of this on your checklist. Other: Are there any other limitations to above ground space? Examples include: access lanes that must be kept clear, heat vents, or building or planting setbacks.
b. Limitations to below ground space Utilities: Mark utilities on the sketch. Identify individual utilities if possible. Know that you must hand dig within two feet on either side of the marked line. Call toll free number (800–252–8525) before digging to get lines marked.
6. Visual Assessment of Existing Plants
a. Species Identify plant species. Be specific. You may wish to collect plant samples to bring back to your local Extension office for identification of unknown species.
b. Growth Rate Determine this year’s annual shoot extension by measuring the twig length between the grow tip (terminal bud) and the bud scale scar. Measure several branches that are growing in the sun on the upper part of the plant. Record the average growth rate. Less than 2 inches of growth is considered poor, 2 to 6 inches is moderate growth, and greater than 6 inches per year is vigorous growth.
c. Visual Assessment Note aesthetic quality and general health of each plant. Indicate mechanical injury to plant parts. Also note the presence of insects or diseases. Keep in mind that diseases and insects often attack stressed landscape plants and may not be the primary cause of health problems. Trunk assessment: Look for evidence of mower or string trimmer damage at the base of the trunk. Also look for excessive suckering or bark splitting. Note any trees that do not exhibit a trunk flare (indication of recent re–grading activity or that it was planted too deeply). Roots: Note any excessive surface roots and girdling roots. These may indicate poor drainage, too–deep planting, and/or compacted soils. Test the stability of newly planted trees by gently rocking them. If there is excessive movement, the tree may have root problems, or the roots were never able to establish after transplanting. Leaves and branches: Stressed trees and other landscape plants often exhibit small, off–color leaves that drop early in the fall. Also note trees with leaves that show marginal leaf scorch and whose branches have tip die–back. If there is significant die–back, is it all on one side of the canopy or is it on both sides? Do all of one species on the site exhibit the same symptoms? Note the presence of witches’ broom, water sprouts, and other abnormalities.
Resource: Cornell University, Urban Horticulture Institute – Adapted from directions for site assessment checklist publication.
88

Site Assessment Checklist (See Site Assessment Addendum Instructions for anything that is not clear)
1. Site Location___________________________________________________________
2. Site Description________________________________________________________ __________________________________________________________________________ __________________________________________________________________________
3. Climate and Views a. USDA Hardiness Zone b. Sunlight Levels □ zone 7 – Clanton northward □ full sun (6 hours or more) □ zone 8 – Clanton southward □ partial sun or filtered light □ shade
c. Microclimate factors d. Irrigation Levels □ Re–reflected heat load □ No supplemental irrigation □ Frost pocket □ Automatic irrigation system □ Wind □ Irrigation amount and rate: □ Other_________________ ________________________ e. House Front Orientation f. Views
North South Unattractive views for Screening East West ___________________________
Views to Frame ___________________________
4. Soil Factors a. Texture b. Drainage Characteristics □ Clay □ Presence of mottled soil □ Loamy □ Low–lying areas □ Sandy □ Indicator plants suggest site drainage
□ wet □ well–drained □ dry □ Note problem areas ____________________________ _______________________
89

c. Compaction Levels d. Other Soil Considerations Severely compacted Indications of soil layer disturbance Moderately compacted □ Evidence of soil contamination Not compacted Noxious weeds present _______________________________ __________________________ Erosion of soil evident Evidence of soil contamination Usage that compacts soil
e. Specific Soil Problems: _____________________________________________________________________ _____________________________________________________________________ _____________________________________________________________________
5. Structural Factors
a. Limitations to above–ground space b. Limitations to below ground space □ Overhead wires (height________) □ Utilities marked and noted
□ Proximity to buildings/structures Phone: 800–252–8525 □ Other_______________________
6. Visual Assessment of Existing Plants
Species Size Growth Rate Visual Assessment
90

Sketch of site (Note north arrow, air circulation patterns, location of overhead wires, underground utilities, buildings and pavement, as well as problem drainage areas.)
NOTES
Take mental notes of obvious actions that need to be addressed (e.g. improve drainage; dangerous tree removal, wind breaks, screen planting, erosion and runoff concerns, etc.).
____________________________________________________________________________________________________________________________________________________________________________________________________________________________________________________________________________________________________________________________________________________________________________________________________________________________________________________________________________________________________________________________________________________________________________________________________________________________________________________________________________________________________________________________________________________________________________________________________________________________________________________________________________________________________________________________________________________________________________________________________________________________________________________________
Resource: Cornell University, Urban Horticulture Institute – Adapted from site assessment checklist publication
91

ANR–1359
Published by the Alabama Cooperative Extension System (Alabama A&M University
and Auburn University), an equal opportunity
educator and employer.
92
