administration guide for ciscoworks network compliance ... · 16 restoring databases ... ncm...
TRANSCRIPT
Administration Guide for CiscoWorks Network Compliance Manager
Americas HeadquartersCisco Systems, Inc.170 West Tasman DriveSan Jose, CA 95134-1706 USAhttp://www.cisco.comTel: 408 526-4000
800 553-NETS (6387)Fax: 408 527-0883
Text Part Number: OL-27468-01

THE SPECIFICATIONS AND INFORMATION REGARDING THE PRODUCTS IN THIS MANUAL ARE SUBJECT TO CHANGE WITHOUT NOTICE. ALL STATEMENTS, INFORMATION, AND RECOMMENDATIONS IN THIS MANUAL ARE BELIEVED TO BE ACCURATE BUT ARE PRESENTED WITHOUT WARRANTY OF ANY KIND, EXPRESS OR IMPLIED. USERS MUST TAKE FULL RESPONSIBILITY FOR THEIR APPLICATION OF ANY PRODUCTS.
THE SOFTWARE LICENSE AND LIMITED WARRANTY FOR THE ACCOMPANYING PRODUCT ARE SET FORTH IN THE INFORMATION PACKET THAT SHIPPED WITH THE PRODUCT AND ARE INCORPORATED HEREIN BY THIS REFERENCE. IF YOU ARE UNABLE TO LOCATE THE SOFTWARE LICENSE OR LIMITED WARRANTY, CONTACT YOUR CISCO REPRESENTATIVE FOR A COPY.
The Cisco implementation of TCP header compression is an adaptation of a program developed by the University of California, Berkeley (UCB) as part of UCB’s public domain version of the UNIX operating system. All rights reserved. Copyright © 1981, Regents of the University of California.
NOTWITHSTANDING ANY OTHER WARRANTY HEREIN, ALL DOCUMENT FILES AND SOFTWARE OF THESE SUPPLIERS ARE PROVIDED “AS IS” WITH ALL FAULTS. CISCO AND THE ABOVE-NAMED SUPPLIERS DISCLAIM ALL WARRANTIES, EXPRESSED OR IMPLIED, INCLUDING, WITHOUT LIMITATION, THOSE OF MERCHANTABILITY, FITNESS FOR A PARTICULAR PURPOSE AND NONINFRINGEMENT OR ARISING FROM A COURSE OF DEALING, USAGE, OR TRADE PRACTICE.
IN NO EVENT SHALL CISCO OR ITS SUPPLIERS BE LIABLE FOR ANY INDIRECT, SPECIAL, CONSEQUENTIAL, OR INCIDENTAL DAMAGES, INCLUDING, WITHOUT LIMITATION, LOST PROFITS OR LOSS OR DAMAGE TO DATA ARISING OUT OF THE USE OR INABILITY TO USE THIS MANUAL, EVEN IF CISCO OR ITS SUPPLIERS HAVE BEEN ADVISED OF THE POSSIBILITY OF SUCH DAMAGES.
Cisco and the Cisco logo are trademarks or registered trademarks of Cisco and/or its affiliates in the U.S. and other countries. To view a list of Cisco trademarks, go to this URL: www.cisco.com/go/trademarks. Third-party trademarks mentioned are the property of their respective owners. The use of the word partner does not imply a partnership relationship between Cisco and any other company. (1110R)
Any Internet Protocol (IP) addresses and phone numbers used in this document are not intended to be actual addresses and phone numbers. Any examples, command display output, network topology diagrams, and other figures included in the document are shown for illustrative purposes only. Any use of actual IP addresses or phone numbers in illustrative content is unintentional and coincidental.
Administration Guide for CiscoWorks Network Compliance Manager © 2012 Cisco Systems, Inc. All rights reserved.

NCM Administration Guide
1 About This Guide . . . . . . . . . . . . . . . . . . . . . . . . . . . . . . . . . . . . . . . . . . . . . . . . . . . . . . . . . . . . . . . . . . . . . . . . . . . . .3
Revision History . . . . . . . . . . . . . . . . . . . . . . . . . . . . . . . . . . . . . . . . . . . . . . . . . . . . . . . . . . . . . . . . . . . . . . . . . . . . . . . . .3
2 CiscoWorks Network Compliance Manager Software Architecture. . . . . . . . . . . . . . . . . . . . . . . . . . . . . . .5
3 NCMIPv6 Readiness . . . . . . . . . . . . . . . . . . . . . . . . . . . . . . . . . . . . . . . . . . . . . . . . . . . . . . . . . . . . . . . . . . . . . . . . . .7
Installation. . . . . . . . . . . . . . . . . . . . . . . . . . . . . . . . . . . . . . . . . . . . . . . . . . . . . . . . . . . . . . . . . . . . . . . . . . . . . . . . . . . . . .7
Network Services . . . . . . . . . . . . . . . . . . . . . . . . . . . . . . . . . . . . . . . . . . . . . . . . . . . . . . . . . . . . . . . . . . . . . . . . . . . . . . . .8
Clients . . . . . . . . . . . . . . . . . . . . . . . . . . . . . . . . . . . . . . . . . . . . . . . . . . . . . . . . . . . . . . . . . . . . . . . . . . . . . . . . . . . . . . . . .8
IPv6 Presentation . . . . . . . . . . . . . . . . . . . . . . . . . . . . . . . . . . . . . . . . . . . . . . . . . . . . . . . . . . . . . . . . . . . . . . . . . . . . . . . .8
NCM Features Supporting IPv6 . . . . . . . . . . . . . . . . . . . . . . . . . . . . . . . . . . . . . . . . . . . . . . . . . . . . . . . . . . . . . . . . . . . . .9
Drivers. . . . . . . . . . . . . . . . . . . . . . . . . . . . . . . . . . . . . . . . . . . . . . . . . . . . . . . . . . . . . . . . . . . . . . . . . . . . . . . . . . . . . . . . .9
4 Working with .rcx Files . . . . . . . . . . . . . . . . . . . . . . . . . . . . . . . . . . . . . . . . . . . . . . . . . . . . . . . . . . . . . . . . . . . . . . . 11
5 Using Certificates with NCM . . . . . . . . . . . . . . . . . . . . . . . . . . . . . . . . . . . . . . . . . . . . . . . . . . . . . . . . . . . . . . . . .13
Default NCM Certificates . . . . . . . . . . . . . . . . . . . . . . . . . . . . . . . . . . . . . . . . . . . . . . . . . . . . . . . . . . . . . . . . . . . . . . . . .14
Truecontrol Key Store . . . . . . . . . . . . . . . . . . . . . . . . . . . . . . . . . . . . . . . . . . . . . . . . . . . . . . . . . . . . . . . . . . . . . . . . .14
Accepting the Truecontrol Certificate in a Web Browser . . . . . . . . . . . . . . . . . . . . . . . . . . . . . . . . . . . . . . . . . . .14
Viewing the Truecontrol Key Store . . . . . . . . . . . . . . . . . . . . . . . . . . . . . . . . . . . . . . . . . . . . . . . . . . . . . . . . . . . .14
Truecontrol Trust Store . . . . . . . . . . . . . . . . . . . . . . . . . . . . . . . . . . . . . . . . . . . . . . . . . . . . . . . . . . . . . . . . . . . . . . . .15
Adding a Self-Signed Certificate to NCM . . . . . . . . . . . . . . . . . . . . . . . . . . . . . . . . . . . . . . . . . . . . . . . . . . . . . . . . . . . .15
Adding a CA-Signed Certificate to NCM. . . . . . . . . . . . . . . . . . . . . . . . . . . . . . . . . . . . . . . . . . . . . . . . . . . . . . . . . . . . .19
Troubleshooting . . . . . . . . . . . . . . . . . . . . . . . . . . . . . . . . . . . . . . . . . . . . . . . . . . . . . . . . . . . . . . . . . . . . . . . . . . . . . . . .23
Incorrect Magic . . . . . . . . . . . . . . . . . . . . . . . . . . . . . . . . . . . . . . . . . . . . . . . . . . . . . . . . . . . . . . . . . . . . . . . . . . . . . .24
httpmonitor Errors . . . . . . . . . . . . . . . . . . . . . . . . . . . . . . . . . . . . . . . . . . . . . . . . . . . . . . . . . . . . . . . . . . . . . . . . . . . .24
6 Enabling FIPS Mode . . . . . . . . . . . . . . . . . . . . . . . . . . . . . . . . . . . . . . . . . . . . . . . . . . . . . . . . . . . . . . . . . . . . . . . . .25
7 Configuring the Task Completion Email Content. . . . . . . . . . . . . . . . . . . . . . . . . . . . . . . . . . . . . . . . . . . . . . .27
8 Configuring the Default Setting of the Force Save Check Box for New Tasks. . . . . . . . . . . . . . . . . . . .29
9 Disabling the Use of Adobe Flash . . . . . . . . . . . . . . . . . . . . . . . . . . . . . . . . . . . . . . . . . . . . . . . . . . . . . . . . . . . . .31
10 Parsing Cisco ACS 5.x Logs for Change Detection . . . . . . . . . . . . . . . . . . . . . . . . . . . . . . . . . . . . . . . . . . . . .33
11 Extending the Number of Custom Enhanced Fields. . . . . . . . . . . . . . . . . . . . . . . . . . . . . . . . . . . . . . . . . . . . .35
12 Changing NCM Credentials When Connecting to a New Database Location . . . . . . . . . . . . . . . . . . . . .37
13 Full-Text Search of Configuration Text (Oracle and SQL Server) . . . . . . . . . . . . . . . . . . . . . . . . . . . . . . .39
Enabling Full-Text Search of Configuration Text. . . . . . . . . . . . . . . . . . . . . . . . . . . . . . . . . . . . . . . . . . . . . . . . . . . . . . .40
Enabling Full-Text Search on Oracle . . . . . . . . . . . . . . . . . . . . . . . . . . . . . . . . . . . . . . . . . . . . . . . . . . . . . . . . . . . . .41
Enabling Full-Text Search on Microsoft SQL Server . . . . . . . . . . . . . . . . . . . . . . . . . . . . . . . . . . . . . . . . . . . . . . . . .43
Disabling Full-Text Search . . . . . . . . . . . . . . . . . . . . . . . . . . . . . . . . . . . . . . . . . . . . . . . . . . . . . . . . . . . . . . . . . . . . . . . .44
14 Enabling Case-Insensitive Search (Oracle) . . . . . . . . . . . . . . . . . . . . . . . . . . . . . . . . . . . . . . . . . . . . . . . . . . . . .47
Affected Fields . . . . . . . . . . . . . . . . . . . . . . . . . . . . . . . . . . . . . . . . . . . . . . . . . . . . . . . . . . . . . . . . . . . . . . . . . . . . . . . . .47
Search Box . . . . . . . . . . . . . . . . . . . . . . . . . . . . . . . . . . . . . . . . . . . . . . . . . . . . . . . . . . . . . . . . . . . . . . . . . . . . . . . . .47
Search Criteria . . . . . . . . . . . . . . . . . . . . . . . . . . . . . . . . . . . . . . . . . . . . . . . . . . . . . . . . . . . . . . . . . . . . . . . . . . . . . . .47
1

NCM Administration Guide
Device Selector . . . . . . . . . . . . . . . . . . . . . . . . . . . . . . . . . . . . . . . . . . . . . . . . . . . . . . . . . . . . . . . . . . . . . . . . . . . . . .47
Reports. . . . . . . . . . . . . . . . . . . . . . . . . . . . . . . . . . . . . . . . . . . . . . . . . . . . . . . . . . . . . . . . . . . . . . . . . . . . . . . . . . . . .48
Enabling Case-Insensitive Search of an Oracle Database. . . . . . . . . . . . . . . . . . . . . . . . . . . . . . . . . . . . . . . . . . . . . . . . .49
Disabling Case-Insensitive Search . . . . . . . . . . . . . . . . . . . . . . . . . . . . . . . . . . . . . . . . . . . . . . . . . . . . . . . . . . . . . . . . . .50
15 Reclaiming Unused Space (Oracle) . . . . . . . . . . . . . . . . . . . . . . . . . . . . . . . . . . . . . . . . . . . . . . . . . . . . . . . . . . . .51
16 Restoring Databases . . . . . . . . . . . . . . . . . . . . . . . . . . . . . . . . . . . . . . . . . . . . . . . . . . . . . . . . . . . . . . . . . . . . . . . . . .53
Oracle . . . . . . . . . . . . . . . . . . . . . . . . . . . . . . . . . . . . . . . . . . . . . . . . . . . . . . . . . . . . . . . . . . . . . . . . . . . . . . . . . . . . . . . .53
SQL Server . . . . . . . . . . . . . . . . . . . . . . . . . . . . . . . . . . . . . . . . . . . . . . . . . . . . . . . . . . . . . . . . . . . . . . . . . . . . . . . . . . . .53
MySQL . . . . . . . . . . . . . . . . . . . . . . . . . . . . . . . . . . . . . . . . . . . . . . . . . . . . . . . . . . . . . . . . . . . . . . . . . . . . . . . . . . . . . . .54
2 Chapter

NCM Administration Guide
1 About This Guide
This guide contains a collection of information and best practices for administering CiscoWorks Network Compliance Manager Software (NCM). This guide is for an expert system administrator, network engineer, or Cisco support engineer with experience deploying and managing networks in large installations.
This guide assumes that you have already installed NCM and that you are familiar with start-up configuration tasks. To learn more about these tasks, see the Installation and Upgrade Guide for CiscoWorks Network Compliance Manager 1.8 and the NCM help.
This guide is updated between product releases as new information becomes available.
Revision History
Table 1 lists the major changes for each new release of this document.
Table 1 Document Changes
Document Release Date Description of Major Changes
May 2012 (1.81.8) First publication for NCM version 1.8.
About This Guide 3

NCM Administration Guide
4 Chapter 1
NCM Administration Guide
2 CiscoWorks Network Compliance Manager Software Architecture
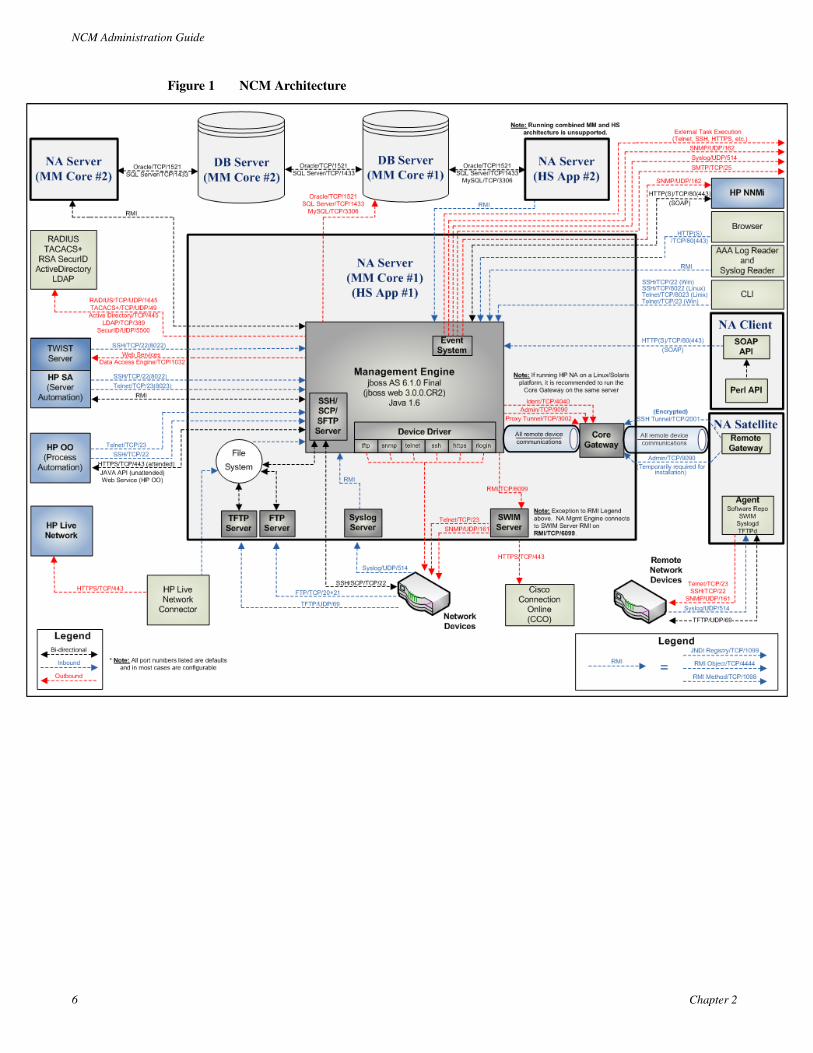
The NCM architecture diagram in Figure 1 illustrates the NCM Core components and their logical connections. The diagram also includes external products and components with which NCM integrates.
An NCM Core is comprised of both an NCM server and a database server. The center of the diagram shows the NCM server, identified as both the Multimaster Core (MM) #1 and Horizontal Scalability (HS) App #1. Just above the NCM server is the database server that is part of Multimaster (MM) Core #1 or the Horizontal Scalability configuration.
NCM Cores can be meshed together to provide data replication, high availability, and disaster recovery. In the upper left of the diagram are a second NCM server and a second database server, both identified as MM Core #2, along with the required connections between the database servers of MM Core #1 and MM Core #2 to create the mesh.
Included in the NCM server are the NCM Management Engine, the Core Gateway, the TFTP server, the FTP server, the Syslog server, and the SWIM server processes. The SSH/SCP/SFTP server and the Event System shown inside the NCM Management Engine are embedded within the NCM Management Engine process.
Around the perimeter of the diagram are the external entities with which the NCM Core server integrates. Each connection from the NCM Management Engine to an external entitiy identifies the service name, protocol, port number, and direction (bidirectional, inbound, or outbound) with respect to the NCM Management Engine.
CiscoWorks Network Compliance Manager Software Architecture 5
NCM Administration Guide
Figure 1 NCM Architecture
6 Chapter 2
NCM Administration Guide
3 NCMIPv6 Readiness
CiscoWorks Network Compliance Manager (NCM) is a robust network element management and automation tool. NCM communicates with network elements via numerous protocols and authentication methods to gather information. NCM then parses the information, normalizing it in a searchable and presentable format.
NCM supports IPv6, both as transport and as parsed searchable and presentable bits of IPv6 specific information. NCM supports IPv6 connections to DBMS. This includes Microsoft SQL Server 2005.
NCM’s adoption of IPv6 is focused on providing:
• Transparent access to network elements via IPv4 and/or IPv6
• Information on network element IPv6 configurations
• IPv6 support across NCM features
Installation
NCM installs and automatically detects network provisioning on the server. The available protocol determines what protocol NCM uses for communicating to elements and NCM listening servers. This includes:
• IPv4 only
• IPv6 only
• Dual stack environments (whether native or using a transition mechanism)
If NCM is installed on a server that is to be updated to support IPv6, the following procedure is recommended:
1 Shut down NCM.
2 Add IPv6 support to the server.
3 Restart NCM.
4 Check the Admin options for various servers to ensure correct IPv6 address discovery.
NCMIPv6 Readiness 7
NCM Administration Guide
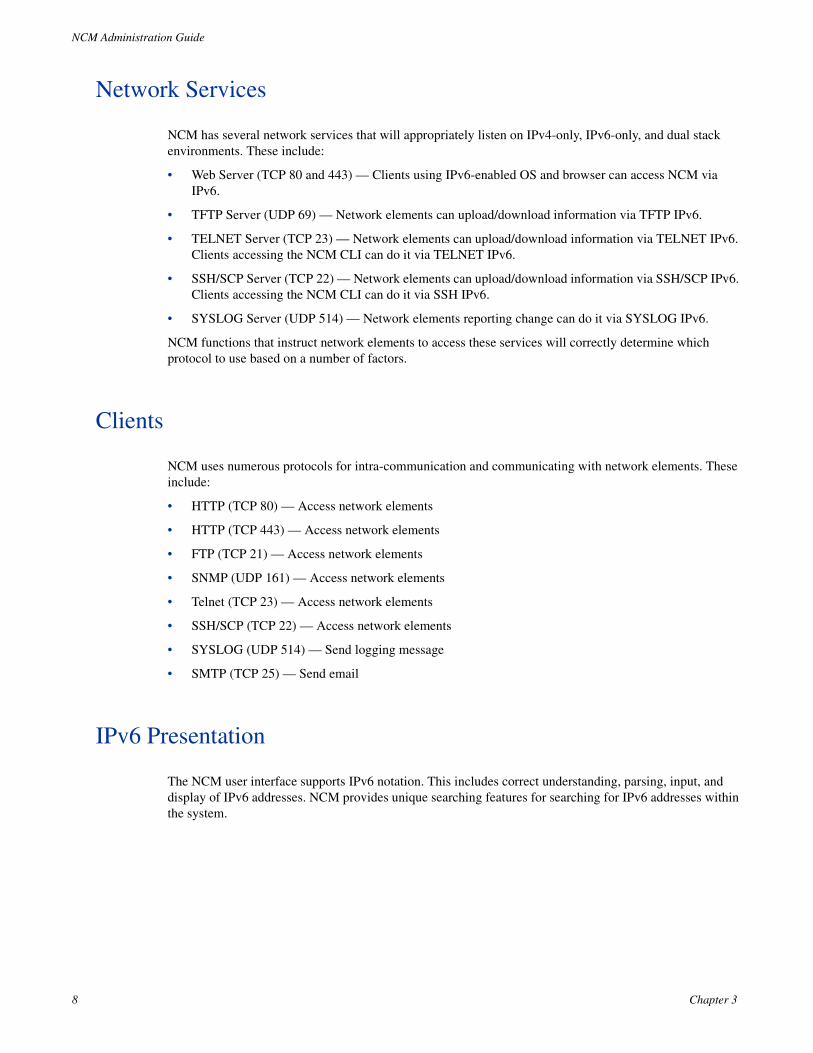
Network Services
NCM has several network services that will appropriately listen on IPv4-only, IPv6-only, and dual stack environments. These include:
• Web Server (TCP 80 and 443) — Clients using IPv6-enabled OS and browser can access NCM via IPv6.
• TFTP Server (UDP 69) — Network elements can upload/download information via TFTP IPv6.
• TELNET Server (TCP 23) — Network elements can upload/download information via TELNET IPv6. Clients accessing the NCM CLI can do it via TELNET IPv6.
• SSH/SCP Server (TCP 22) — Network elements can upload/download information via SSH/SCP IPv6. Clients accessing the NCM CLI can do it via SSH IPv6.
• SYSLOG Server (UDP 514) — Network elements reporting change can do it via SYSLOG IPv6.
NCM functions that instruct network elements to access these services will correctly determine which protocol to use based on a number of factors.
Clients
NCM uses numerous protocols for intra-communication and communicating with network elements. These include:
• HTTP (TCP 80) — Access network elements
• HTTP (TCP 443) — Access network elements
• FTP (TCP 21) — Access network elements
• SNMP (UDP 161) — Access network elements
• Telnet (TCP 23) — Access network elements
• SSH/SCP (TCP 22) — Access network elements
• SYSLOG (UDP 514) — Send logging message
• SMTP (TCP 25) — Send email
IPv6 Presentation
The NCM user interface supports IPv6 notation. This includes correct understanding, parsing, input, and display of IPv6 addresses. NCM provides unique searching features for searching for IPv6 addresses within the system.
8 Chapter 3
NCM Administration Guide
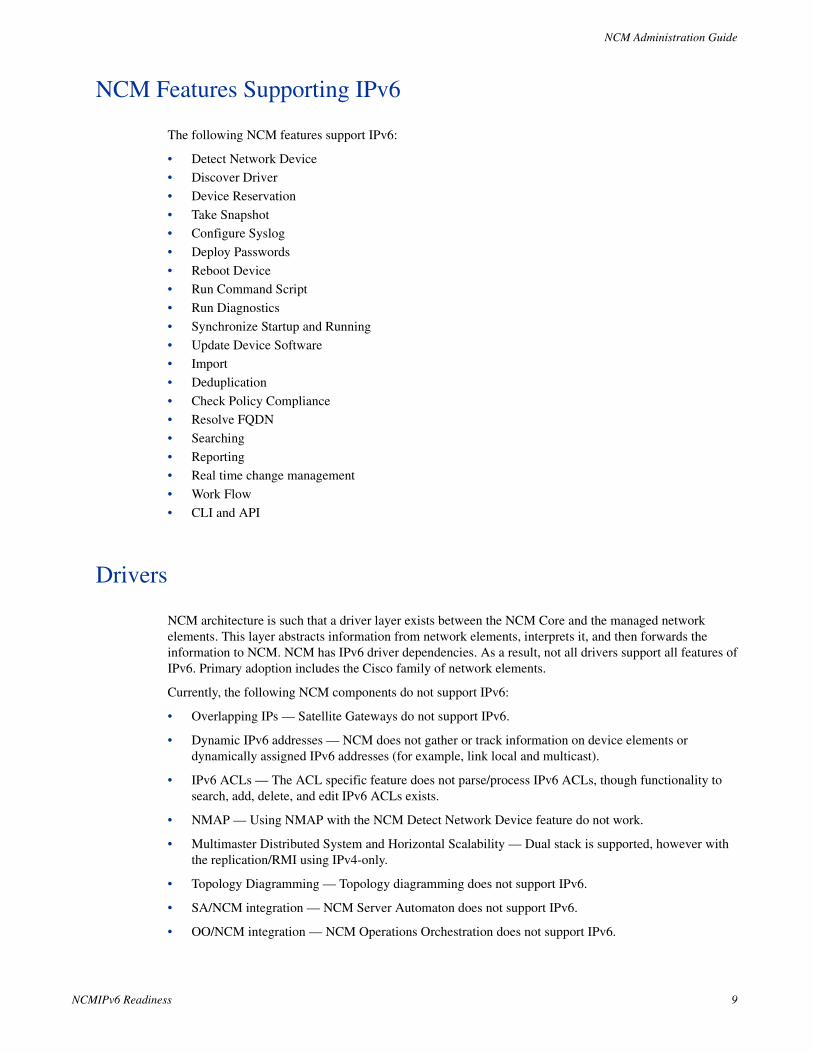
NCM Features Supporting IPv6
The following NCM features support IPv6:
• Detect Network Device
• Discover Driver
• Device Reservation
• Take Snapshot
• Configure Syslog
• Deploy Passwords
• Reboot Device
• Run Command Script
• Run Diagnostics
• Synchronize Startup and Running
• Update Device Software
• Import
• Deduplication
• Check Policy Compliance
• Resolve FQDN
• Searching
• Reporting
• Real time change management
• Work Flow
• CLI and API
Drivers
NCM architecture is such that a driver layer exists between the NCM Core and the managed network elements. This layer abstracts information from network elements, interprets it, and then forwards the information to NCM. NCM has IPv6 driver dependencies. As a result, not all drivers support all features of IPv6. Primary adoption includes the Cisco family of network elements.
Currently, the following NCM components do not support IPv6:
• Overlapping IPs — Satellite Gateways do not support IPv6.
• Dynamic IPv6 addresses — NCM does not gather or track information on device elements or dynamically assigned IPv6 addresses (for example, link local and multicast).
• IPv6 ACLs — The ACL specific feature does not parse/process IPv6 ACLs, though functionality to search, add, delete, and edit IPv6 ACLs exists.
• NMAP — Using NMAP with the NCM Detect Network Device feature do not work.
• Multimaster Distributed System and Horizontal Scalability — Dual stack is supported, however with the replication/RMI using IPv4-only.
• Topology Diagramming — Topology diagramming does not support IPv6.
• SA/NCM integration — NCM Server Automaton does not support IPv6.
• OO/NCM integration — NCM Operations Orchestration does not support IPv6.
NCMIPv6 Readiness 9

NCM Administration Guide
• NNMi/NCM integration- NCM Network Node Manager with dual stack is supported, but not with IPv6-only.
• BSAE/NCM integration — Business Service Automaton Essentials does not support IPv6.
• DDS integration — The Driver Delivery System does not support IPv6.
10 Chapter 3
NCM Administration Guide
4 Working with .rcx Files
The CiscoWorks Network Compliance Manager Software (NCM) property files use the .rcx extension. NCM reads .rcx files in reverse alphabetical order. If a given setting is in multiple .rcx files, NCM uses the last-read value. Thus, the settings in the adjustable_options.rcx file take precedence over the settings in the other .rcx files installed with NCM.
In Horizontal Scalability environments, NCM shares the actual values of most settings, not the .rcx files, across the NCM cores. When a setting is modified on one NCM core, that setting is replicated to the other NCM cores. If an NCM core is not operational during the change replication, that NCM core does not receive the change. In that case, at a later time, use the Admin > Distributed > Renew Configuration Options page to push changes to other NCM cores.
Some configuration changes require .rcx file modifications. The .rcx files are located in the following directory:
• Windows: %NCM_HOME%\jre\
• Unix: $NCM_HOME/jre/
The general procedure for changing .rcx files is as follows:
1 Back up the .rcx file to a location outside the $NCM_HOME (%NCM_HOME% on Windows) directory.
(NCM reads all .rcx files within the NCM directory structure.)
2 Add new content or update existing content as described in the instructions.
3 Save the .rcx file.
At startup, NCM reads all files in the jre directory and interprets their contents for NCM configuration options. For this reason, save all backup copies of .rcx files outside the root NCM directory.
The distributed system options section of the appserver.rcx file lists the settings that are specific to one NCM core and are not shared across the NCM cores.
Always edit .rcx files with care. These files use XML format. If a .rcx file change results in invalid XML, the NCM console might not start correctly.
It is recommended to make all configuration changes in the adjustable_options.rcx file. NCM patch installations and product upgrades might overwrite any of the other NCM-installed .rcx files.
Working with .rcx Files 11

NCM Administration Guide
4 Reload the .rcx settings by doing one of the following:
• In the NCM console, on the Admin > Administrative Settings > User Interface page, click Save.
• Run the reload server options command from the NCM proxy.
• Restart the NCM services.
Some changes do not take effect until the NCM services have been restarted.
12 Chapter 4
NCM Administration Guide
5 Using Certificates with NCM
A certificate identifies the web server to the browser or one server to another. This certificate can be self-signed or signed by a certificate authority (CA). CiscoWorks Network Compliance Manager Software (NCM) uses the following certificate files:
• The Truecontrol key store file stores private keys and certificates with their corresponding public keys. It is located as follows:
— Windows:%NCM_HOME%\server\ext\jboss\server\default\conf\truecontrol.keystore
— UNIX: $NCM_HOME/server/ext/jboss/server/default/conf/truecontrol.keystore
• The Truecontrol trust store file contains certificates from other parties that you expect to communicate with, or from certificate authorities that you trust to identify other parties. It is located as follows:
— Windows:%NCM_HOME%\server\ext\jboss\server\default\conf\truecontrol.truststore
— UNIX: $NCM_HOME/server/ext/jboss/server/default/conf/truecontrol.truststore
• The CAcerts key store file also stores private keys and certificates with their corresponding public keys. It is part of the Java Development Kit (JDK) installed with NCM and is located as follows:
— Windows: %NCM_HOME%\jre\lib\security\cacerts
— UNIX: $NCM_HOME/jre/lib/security/cacerts
This chapter contains the following topics:
• Default NCM Certificates on page 14
• Adding a Self-Signed Certificate to NCM on page 15
• Adding a CA-Signed Certificate to NCM on page 19
The truecontrol.truststore file is new as of NCM version 1.8.
Using Certificates with NCM 13
NCM Administration Guide
Default NCM Certificates
At installation, NCM includes self-signed certificates in the Truecontrol key store, Truecontrol trust store, and the CAcerts key store. The NCM-provided certificates are the same on all NCM servers. For that reason, it is recommended to replace the default self-signed certificates with a new self-signed or CA-signed certificate. For information, see Adding a Self-Signed Certificate to NCM on page 15 or Adding a CA-Signed Certificate to NCM on page 19.
Truecontrol Key Store
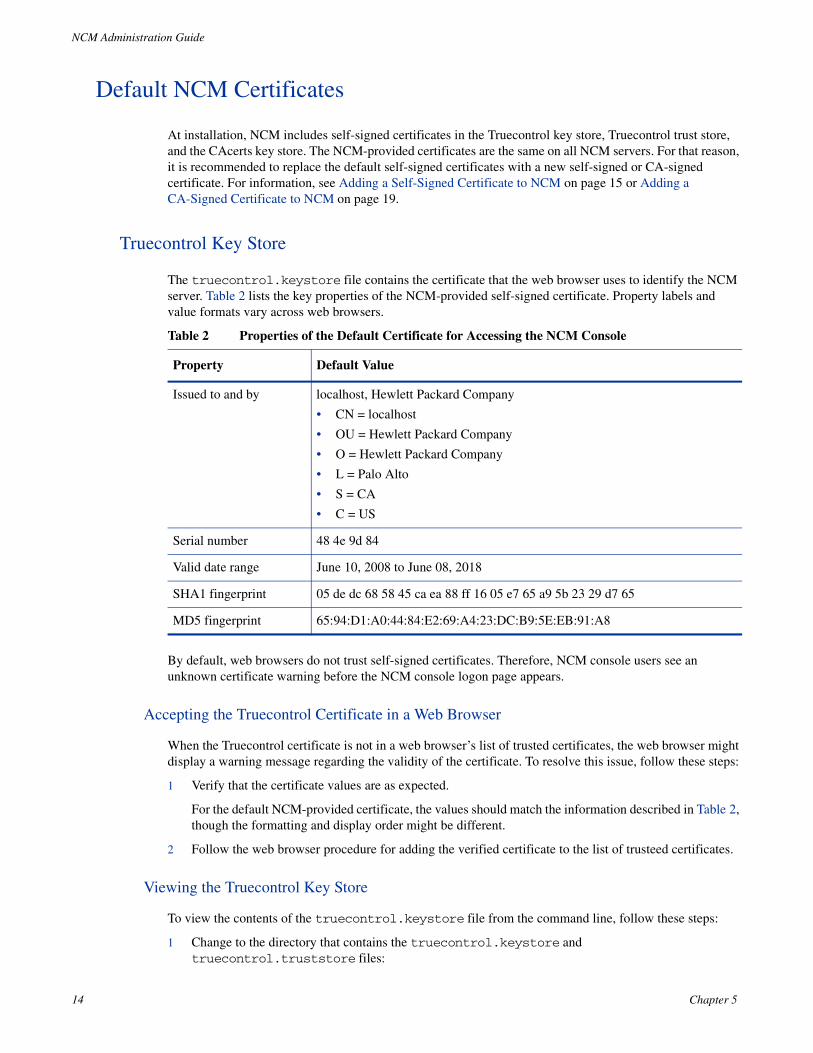
The truecontrol.keystore file contains the certificate that the web browser uses to identify the NCM server. Table 2 lists the key properties of the NCM-provided self-signed certificate. Property labels and value formats vary across web browsers.
By default, web browsers do not trust self-signed certificates. Therefore, NCM console users see an unknown certificate warning before the NCM console logon page appears.
Accepting the Truecontrol Certificate in a Web Browser
When the Truecontrol certificate is not in a web browser’s list of trusted certificates, the web browser might display a warning message regarding the validity of the certificate. To resolve this issue, follow these steps:
1 Verify that the certificate values are as expected.
For the default NCM-provided certificate, the values should match the information described in Table 2, though the formatting and display order might be different.
2 Follow the web browser procedure for adding the verified certificate to the list of trusteed certificates.
Viewing the Truecontrol Key Store
To view the contents of the truecontrol.keystore file from the command line, follow these steps:
1 Change to the directory that contains the truecontrol.keystore and truecontrol.truststore files:
Table 2 Properties of the Default Certificate for Accessing the NCM Console
Property Default Value
Issued to and by localhost, Hewlett Packard Company
• CN = localhost
• OU = Hewlett Packard Company
• O = Hewlett Packard Company
• L = Palo Alto
• S = CA
• C = US
Serial number 48 4e 9d 84
Valid date range June 10, 2008 to June 08, 2018
SHA1 fingerprint 05 de dc 68 58 45 ca ea 88 ff 16 05 e7 65 a9 5b 23 29 d7 65
MD5 fingerprint 65:94:D1:A0:44:84:E2:69:A4:23:DC:B9:5E:EB:91:A8
14 Chapter 5
NCM Administration Guide
• Windows: %NCM_HOME%\server\ext\jboss\server\default\conf
• UNIX: $NCM_HOME/server/ext/jboss/server/default/conf
2 Examine the contents of the Truecontrol key store file by entering the following command:
• Windows:%NCM_HOME%\jre\bin\keytool.exe -list -keystore truecontrol.keystore
• UNIX:$NCM_HOME/jre/bin/keytool -list -keystore truecontrol.keystore
When prompted for the key store password, enter: sentinel
The key store output is of the following form:
Keystore type: JKSKeystore provider: SUNYour keystore contains 1 entrysentinel, 10-Jun-2008, PrivateKeyEntry,Certificate fingerprint (MD5): 65:94:D1:A0:44:84:E2:69:A4:23:DC:B9:5E:EB:91:A8
Alternatively, use the -v (verbose) option for more output in the following form:
Keystore type: JKSKeystore provider: SUNYour keystore contains 1 entryAlias name: sentinelCreation date: 10-Jun-2008Entry type: PrivateKeyEntryCertificate chain length: 1Certificate[1]:Owner: CN=localhost, OU=Hewlett Packard Company, O=Hewlett Packard Company, L=Palo Alto, ST=CA, C=USIssuer: CN=localhost, OU=Hewlett Packard Company, O=Hewlett Packard Company, L=Palo Alto, ST=CA, C=USSerial number: 484e9d84Valid from: Tue Jun 10 16:28:04 BST 2008 until: Fri Jun 08 16:28:04 BST 2018Certificate fingerprints: MD5: 65:94:D1:A0:44:84:E2:69:A4:23:DC:B9:5E:EB:91:A8 SHA1: 05:DE:DC:68:58:45:CA:EA:88:FF:16:05:E7:65:A9:5B:23:29:D7:65 Signature algorithm name: SHA1withRSA Version: 3
Truecontrol Trust Store
At NCM installation, the truecontrol.truststore file contains one self-signed certificate. You can add other products’ certificates to this file to support inter-application communication across secure sockets layer (SSL).
For information about importing the NCM Network Node Manager i Software certificate into the truecontrol.truststore file, see the HP Network Node Manager i Software–Cisco Network Automation Integration Guide.
Adding a Self-Signed Certificate to NCM
You can create a new self-signed certificate that is unique to your environment. Using a new self-signed certificate does not require third-party involvement but could require that each NCM console user configure their web browser to trust the new self-signed certificate.
Using Certificates with NCM 15
NCM Administration Guide
To create a self-signed certificate and add it to NCM, follow these steps:
1 Generate a new self-signed certificate as follows:
a Change to the directory that contains the truecontrol.keystore and truecontrol.truststore files:
— Windows: %NCM_HOME%\server\ext\jboss\server\default\conf
— UNIX: $NCM_HOME/server/ext/jboss/server/default/conf
b Create a backup copy of the truecontrol.keystore file.
c Use the keytool command to generate a new certificate in the Truecontrol key store file. For example:
— Windows:%NCM_HOME%\jre\bin\keytool.exe -genkey -keyalg RSA -keysize 2048 \-validity 3650 -alias nacert -keystore truecontrol.keystore
— UNIX:$NCM_HOME/jre/bin/keytool -genkey -keyalg RSA -keysize 2048 \-validity 3650 -alias nacert -keystore truecontrol.keystore
When prompted for the key store password, enter: sentinel
d Enter the requested information:
— When prompted for your first and last name, enter the identifier of the NCM server, which could be localhost, the short hostname, or the IP address.
— When prompted to confirm the organization informtion (for example, Is CN=hostname, OU=someOU, O=someORG, L=someCITY, ST=someSTATE, C=AB correct? [no]:), type yes, and then press Enter.
— When prompted for a password, press Enter to use the key store password.
2 Use the keytool command to export the newly-created certificate to a file. For example, from the directory that contains the truecontrol.keystore and truecontrol.truststore files:
• Windows:%NCM_HOME%\jre\bin\keytool.exe -export -alias nacert \-file nacert.cer -keystore truecontrol.keystore
• UNIX:$NCM_HOME/jre/bin/keytool -export -alias nacert -file nacert.cer \-keystore truecontrol.keystore
When prompted for the key store password, enter: sentinel
The command output is of the following form:
Certificate stored in file nacert.cer
3 Import the exported certificate into the CAcerts key store as follows:
For more information, run the keytool command with no options.
Do not enter the fully-qualified domain name (FQDN) of the NCM server.
Using a value other than localhost adds an additional configuration step that requires restarting the NCM services.
Specify the alias used when generating the certificate in step 1 on page 16.
The output file (for example, nacert.cer) is created in the location from which the command is run.
16 Chapter 5
NCM Administration Guide
a Move the export file from its current location to the directory that contains the cacerts file. For example, from the directory that contains the truecontrol.keystore and truecontrol.truststore files:
— Windows: move nacert.cer %NCM_HOME%\jre\lib\security
— UNIX: mv nacert.cer $NCM_HOME/jre/lib/security
b Change to the directory that contains the cacerts file:
— Windows: %NCM_HOME%\jre\lib\security
— UNIX: $NCM_HOME/jre/lib/security
c Create a backup copy of the cacerts file.
d Use the keytool command to import the new certificate into the CAcerts key store file. For example:
— Windows:%NCM_HOME%\jre\bin\keytool.exe -import -alias nacert \-file nacert.cer -keystore cacerts
— UNIX:$NCM_HOME/jre/bin/keytool -import -alias nacert -file nacert.cer \-keystore cacerts
When prompted for the key store password, enter: changeit
When prompted to trust the certificate, type yes, and then press Enter.
The command output is of the following form:
Owner: CN=myhost, OU=Some OU, O=Some O, L=Mytown, ST=My State, C=ABIssuer: CN=myhost, OU=Some OU, O=Some O, L=Mytown, ST=My State, C=ABSerial number: 4e79d241Valid from: Wed Sep 21 13:02:09 BST 2011 until: Sat Sep 18 13:02:09 BST 2021Certificate fingerprints: MD5: FA:B1:86:18:18:47:43:30:8B:38:38:E6:8E:73:DB:84 SHA1: CC:F2:69:F3:2C:7E:8E:03:BE:EC:F2:18:78:80:41:0A:BA:95:48:F8 Signature algorithm name: SHA1withRSA Version: 3Trust this certificate? [no]: yesCertificate was added to keystore
Specify the file (for example, nacert.cer) created in step 2 on page 16.
The alias is the identifier of the new certificate in the cacerts file. It does not need to match the alias in the truecontrol.keystore file.
Using Certificates with NCM 17
NCM Administration Guide
4 To force NCM to use the new certificate, remove the NCM-provided certificate from the Truecontrol key store as follows:
a Change to the directory that contains the truecontrol.keystore and truecontrol.truststore files:
— Windows: %NCM_HOME%\server\ext\jboss\server\default\conf
— UNIX: $NCM_HOME/server/ext/jboss/server/default/conf
b Use the keytool command to export the sentinel certificate to a backup file. For example:
— Windows:%NCM_HOME%\jre\bin\keytool.exe -export -alias sentinel \-file sentinel_from_truecontrol_keystore.cer \-keystore truecontrol.keystore
— UNIX:$NCM_HOME/jre/bin/keytool -export -alias sentinel \-file sentinel_from_truecontrol_keystore.cer \-keystore truecontrol.keystore
When prompted for the key store password, enter: sentinel
The command output is of the following form:
Certificate stored in file sentinel_from_truecontrol_keystore.cer
c Move the backup file (for example, sentinel_from_truecontrol_keystore.cer) to a safe location.
d Use the keytool command to delete the existing sentinel certificate from the Truecontrol key store. For example:
— Windows:%NCM_HOME%\jre\bin\keytool.exe -delete -alias sentinel \-keystore truecontrol.keystore
— UNIX:$NCM_HOME/jre/bin/keytool -delete -alias sentinel \-keystore truecontrol.keystore
When prompted for the key store password, enter: sentinel
The command output is of the following form:
[Storing truecontrol.keystore]
5 Optional. In step 1 on page 16, if the identifier of the NCM server was not localhost, update the NCM configuration as follows:
a Change to the directory that contains the .rcx files:
— Windows: %NCM_HOME%\jre
— UNIX: $NCM_HOME/jre
b Back up the adjustable_options.rcx file to a location outside of the <NCM_HOME> directory.
c In the adjustable_options.rcx file, add the following line:
<option name="startup/precompile/http.prefix">http://"hostname"/</option>
d In the new line, replace hostname with the identifier entered for first and last name in step d of step 1 on page 16.
e Save the adjustable_options.rcx file.
18 Chapter 5

NCM Administration Guide
Completing this step improves the NCM console user experience by removing the wait time for each new page within the NCM console.
6 Restart all NCM services:
• Windows: Open the Services control panel. In the list of services, right-click each of the following services, and then click Restart:
— TrueControl ManagementEngine
— TrueControl FTP Server
— TrueControl SWIM Server
— TrueControl Syslog Server
— TrueControl TFTP Server
• UNIX: Run the following command:
/etc/init.d/truecontrol restart
7 Instruct each NCM console user to add the new certificate to their web browser’s list of trusted certificates.
Adding a CA-Signed Certificate to NCM
Using a new CA-signed certificate requires interaction with a third-party but does not require that each NCM console user configure their web browser to trust the certificate.
To request a CA-signed certificate and add it to NCM, follow these steps:
1 Generate a new local certificate as follows:
a Change to the directory that contains the truecontrol.keystore and truecontrol.truststore files:
— Windows: %NCM_HOME%\server\ext\jboss\server\default\conf
— UNIX: $NCM_HOME/server/ext/jboss/server/default/conf
b Create a backup copy of the truecontrol.keystore file.
c Use the keytool command to generate a new certificate in the Truecontrol key store file. For example:
— Windows:%NCM_HOME%\jre\bin\keytool.exe -genkey -keyalg RSA -keysize 2048 \-validity 3650 -alias nacacert -keystore truecontrol.keystore
— UNIX:$NCM_HOME/jre/bin/keytool -genkey -keyalg RSA -keysize 2048 \-validity 3650 -alias nacacert -keystore truecontrol.keystore
When prompted for the key store password, enter: sentinel
For more information, run the keytool command with no options.
Using Certificates with NCM 19
NCM Administration Guide
d Enter the requested information:
— When prompted for your first and last name, enter the fully-qualified domain name (FQDN) of the NCM server.
— When prompted to confirm the organization informtion (for example, Is CN=hostname, OU=someOU, O=someORG, L=someCITY, ST=someSTATE, C=AB correct? [no]:), type yes, and then press Enter.
— When prompted for a password, press Enter to use the key store password.
2 Use the keytool command to create a certificate signing request (CSR) from the new local certificate. For example, from the directory that contains the truecontrol.keystore and truecontrol.truststore files:
• Windows:%NCM_HOME%\jre\bin\keytool.exe -certreq -alias nacacert \-file narequest.csr -keystore truecontrol.keystore
• UNIX:$NCM_HOME/jre/bin/keytool -certreq -alias nacacert -file narequest.csr \-keystore truecontrol.keystore
3 Submit the CSR to the CA. If given the option, request that the new certificate be in a Tomcat-compatible or Apache-compatible format.
The CA should return one of the following:
• One file, a signed certificate, referred to as server.crt in this procedure.
The server.crt file contains both the server certificate (the top certificate contained in the file) and one or more CA certificates (the last certificates contained in the file).
In a text editor such as WordPad or vi, copy the contents of the CA certificate into a new file, the CA.crt file.
Use the server.crt file when importing the server certificate into the truecontrol.keystore file and the CA.crt file when importing the CA certificate into the truecontrol.truststore file.
• Two files, referred to as server.crt and CA.crt in this procedure.
In a text editor such as WordPad or vi, add the contents of the CA.crt file to the end of the server.crt file.
Use the modified server.crt file when importing the server certificate into the truecontrol.keystore file and the CA.crt file when importing the CA certificate into the truecontrol.truststore file.
Specify the alias used when generating the local certificate in step 1 on page 19.
The output file (for example, narequest.csr) is created in the location from which the command is run.
20 Chapter 5
NCM Administration Guide
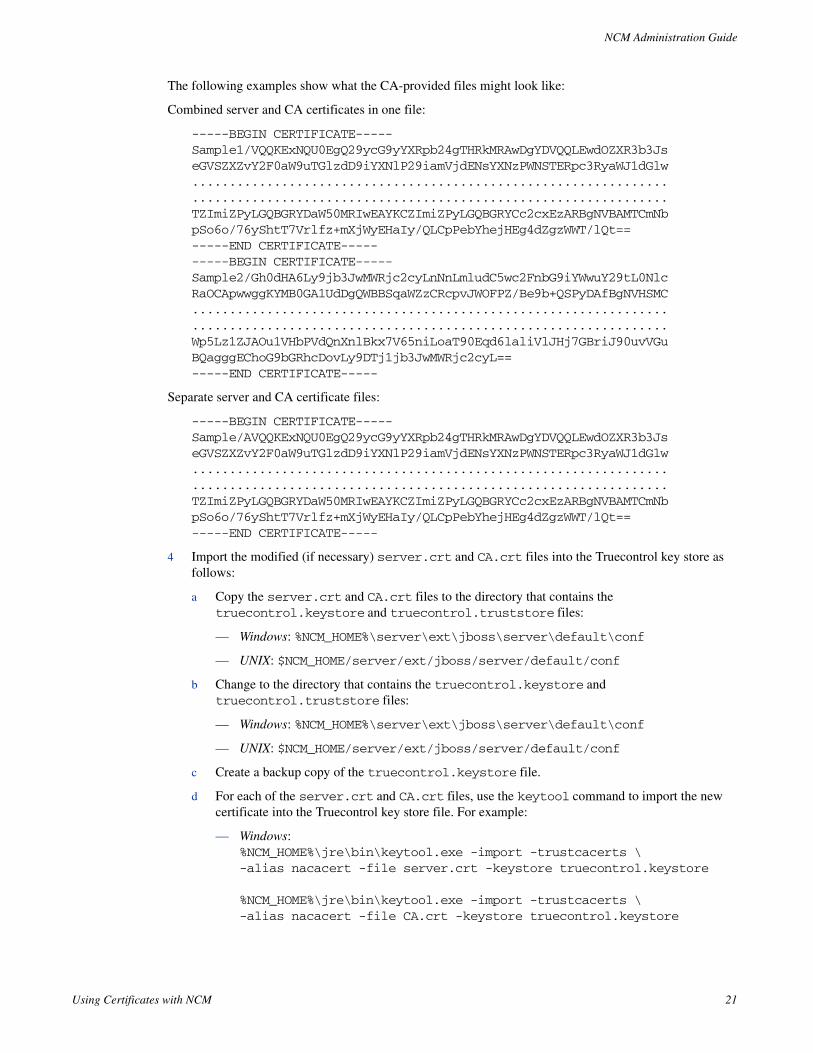
The following examples show what the CA-provided files might look like:
Combined server and CA certificates in one file:
-----BEGIN CERTIFICATE-----Sample1/VQQKExNQU0EgQ29ycG9yYXRpb24gTHRkMRAwDgYDVQQLEwdOZXR3b3JseGVSZXZvY2F0aW9uTGlzdD9iYXNlP29iamVjdENsYXNzPWNSTERpc3RyaWJ1dGlw................................................................................................................................TZImiZPyLGQBGRYDaW50MRIwEAYKCZImiZPyLGQBGRYCc2cxEzARBgNVBAMTCmNbpSo6o/76yShtT7Vrlfz+mXjWyEHaIy/QLCpPebYhejHEg4dZgzWWT/lQt==-----END CERTIFICATE----------BEGIN CERTIFICATE-----Sample2/Gh0dHA6Ly9jb3JwMWRjc2cyLnNnLmludC5wc2FnbG9iYWwuY29tL0NlcRaOCApwwggKYMB0GA1UdDgQWBBSqaWZzCRcpvJWOFPZ/Be9b+QSPyDAfBgNVHSMC................................................................................................................................Wp5Lz1ZJAOu1VHbPVdQnXnlBkx7V65niLoaT90Eqd6laliVlJHj7GBriJ90uvVGuBQagggEChoG9bGRhcDovLy9DTj1jb3JwMWRjc2cyL==-----END CERTIFICATE-----
Separate server and CA certificate files:
-----BEGIN CERTIFICATE-----Sample/AVQQKExNQU0EgQ29ycG9yYXRpb24gTHRkMRAwDgYDVQQLEwdOZXR3b3JseGVSZXZvY2F0aW9uTGlzdD9iYXNlP29iamVjdENsYXNzPWNSTERpc3RyaWJ1dGlw................................................................................................................................TZImiZPyLGQBGRYDaW50MRIwEAYKCZImiZPyLGQBGRYCc2cxEzARBgNVBAMTCmNbpSo6o/76yShtT7Vrlfz+mXjWyEHaIy/QLCpPebYhejHEg4dZgzWWT/lQt==-----END CERTIFICATE-----
4 Import the modified (if necessary) server.crt and CA.crt files into the Truecontrol key store as follows:
a Copy the server.crt and CA.crt files to the directory that contains the truecontrol.keystore and truecontrol.truststore files:
— Windows: %NCM_HOME%\server\ext\jboss\server\default\conf
— UNIX: $NCM_HOME/server/ext/jboss/server/default/conf
b Change to the directory that contains the truecontrol.keystore and truecontrol.truststore files:
— Windows: %NCM_HOME%\server\ext\jboss\server\default\conf
— UNIX: $NCM_HOME/server/ext/jboss/server/default/conf
c Create a backup copy of the truecontrol.keystore file.
d For each of the server.crt and CA.crt files, use the keytool command to import the new certificate into the Truecontrol key store file. For example:
— Windows:%NCM_HOME%\jre\bin\keytool.exe -import -trustcacerts \-alias nacacert -file server.crt -keystore truecontrol.keystore
%NCM_HOME%\jre\bin\keytool.exe -import -trustcacerts \-alias nacacert -file CA.crt -keystore truecontrol.keystore
Using Certificates with NCM 21
NCM Administration Guide
— UNIX:$NCM_HOME/jre/bin/keytool -import -trustcacerts -alias nacert \-file server.crt -keystore truecontrol.keystore
$NCM_HOME/jre/bin/keytool -import -trustcacerts -alias nacert \-file CA.crt -keystore truecontrol.keystore
When prompted for the key store password, enter: sentinel
When prompted to trust the certificate, type yes, and then press Enter.
The command output is of the following form:
Owner: CN=NCM_server.example.comIssuer: CN=NCM_server.example.comSerial number: 4e79d241Valid from: Wed Sep 21 13:02:09 BST 2011 until: Sat Sep 18 13:02:09 BST 2021Certificate fingerprints: MD5: FA:B1:86:18:18:47:43:30:8B:38:38:E6:8E:73:DB:84 SHA1: CC:F2:69:F3:2C:7E:8E:03:BE:EC:F2:18:78:80:41:0A:BA:95:48:F8 Signature algorithm name: SHA1withRSA Version: 3Trust this certificate? [no]: yesCertificate was added to keystore
e Repeat step d until all CA-provided certificates have been imported into the truecontrol.keystore file.
5 To force NCM to use the new certificate, remove the NCM-provided certificate from the Truecontrol key store as follows:
a Change to the directory that contains the truecontrol.keystore and truecontrol.truststore files:
— Windows: %NCM_HOME%\server\ext\jboss\server\default\conf
— UNIX: $NCM_HOME/server/ext/jboss/server/default/conf
b Use the keytool command to export the sentinel certificate to a backup file. For example:
— Windows:%NCM_HOME%\jre\bin\keytool.exe -export -alias sentinel \-file sentinel_from_truecontrol_keystore.cer \-keystore truecontrol.keystore
— UNIX:$NCM_HOME/jre/bin/keytool -export -alias sentinel \-file sentinel_from_truecontrol_keystore.cer \-keystore truecontrol.keystore
When prompted for the key store password, enter: sentinel
The command output is of the following form:
Certificate stored in file sentinel_from_truecontrol_keystore.cer
c Move the backup file (for example, sentinel_from_truecontrol_keystore.cer) to a safe location.
The alias is the identifier of the new certificate in each file. It usually matches the alias used to generate the certificate request in step 2 on page 20.
22 Chapter 5
NCM Administration Guide
d Use the keytool command to delete the existing sentinel certificate from the Truecontrol key store. For example:
— Windows:%NCM_HOME%\jre\bin\keytool.exe -delete -alias sentinel \-keystore truecontrol.keystore
— UNIX:$NCM_HOME/jre/bin/keytool -delete -alias sentinel \-keystore truecontrol.keystore
When prompted for the key store password, enter: sentinel
The command output is of the following form:
[Storing truecontrol.keystore]
6 Update the NCM configuration as follows:
a Change to the directory that contains the .rcx files:
— Windows: %NCM_HOME%\jre
— UNIX: $NCM_HOME/jre
b Back up the adjustable_options.rcx file to a location outside of the <NCM_HOME> directory.
c In the adjustable_options.rcx file, add the following line:
<option name="startup/precompile/http.prefix">http://"hostname"/</option>
d In the new line, replace hostname with the identifier entered for first and last name in step d of step 1 on page 19.
e Save the adjustable_options.rcx file.
Completing this step improves the NCM console user experience by removing the wait time for each new page within the NCM console.
7 Restart all NCM services:
• Windows: Open the Services control panel. In the list of services, right-click each of the following services, and then click Restart:
— TrueControl ManagementEngine
— TrueControl FTP Server
— TrueControl SWIM Server
— TrueControl Syslog Server
— TrueControl TFTP Server
• UNIX: Run the following command:
/etc/init.d/truecontrol restart
8 Test the new certificate by logging on to the NCM console. If the web browser trusts the CA, it will trust the connection to the NCM console with no warning message.
Troubleshooting
This section contains information about errors you might see while working with certificates in NCM.
Using Certificates with NCM 23
NCM Administration Guide
Incorrect Magic
Some operating systems, such as RedHat Linux, include a keytool utility. If the version of the keytool provided with the operating system does not match the NCM JRE version, you will see an error message similar to the following:
keytool error: gnu.javax.crypto.keyring.MalformedKeyringException: incorrect magic
In this case, use the keytool utility provided with NCM:
• Windows: %NCM_HOME%\jre\bin\keytool.exe
• UNIX: $NCM_HOME/jre/bin/keytool
httpmonitor Errors
If you change the certificate and do not import it into the CAcerts key store, you will see httpmonitor errors.
Correct this problem by importing the new certificate into the NCM key store as described in Adding a Self-Signed Certificate to NCM on page 15.
24 Chapter 5
NCM Administration Guide
6 Enabling FIPS Mode
The Federal Information Processing Standardization (FIPS) specifies cryptography requirements for both software and hardware. For NCM managed devices, FIPS functionality is only pertinent for SSH/SCP device access or SNMPv3 use. Devices that do not support SSH/SCP or SNMPv3 are not affected.
Enabling FIPS mode affects device access as follows:
• Restricts the encryption algorithms that can be used. For example, AES and 3DES are permitted; however Blowfish and DES are not.
• Replaces implementation of other encryption algorithms with a FIPS-compliant encryption algorithm.
To enable FIPS mode, follow these steps:
1 Add the following line to the adjustable_options.rcx file:
<option name="crypto/fips/enabled">true</option>
2 Restart the NCM management engine.
In the log file, a message incidates that FIPS mode is enabled. For example:
{system/crypto} [main] 75 FIPS140Mode: Loading FIPS JCE Provider
3 Log on to the NCM console as an administrative user.
4 Navigate to the View Details page (Admin > System Status > BaseServerMonitor > View Details).
Text indicates that FIPS mode is enabled. For example:
crypto/fips/cipher_list = [3des-cbc, aes128-cbc, aes128-ctr, aes192-cbccrypto/fips/mac_list = [hmac-sha1, hmac-sha1-96]
To disable FIPS mode, follow these steps:
1 Add the following line to the adjustable_options.rcx file:
<option name="crypto/fips/enabled">false</option>
2 Restart the NCM management engine.
Because enabling FIPS restricts the algorithms NCM uses to communicate with devices, NCM might not be able to communicate with non-FIPS compliant devices.
Enabling FIPS Mode 25

NCM Administration Guide
26 Chapter 6

NCM Administration Guide
7 Configuring the Task Completion Email Content
For each task, you can set NCM to send an email message upon task completion. The format of the email content (subject and body) is the same for all tasks.
The default format of the email message subject is as follows:
<option name="task/email/subject">Task $TaskName$ completed. Task status: $TaskStatus$</option>
The default format of the email message body is as follows:
<option name="task/email/text">Task : $TaskName$ originated by : $OriginatorName$ scheduled on : $TaskScheduleDate$ completed with the following status:
$TaskStatus$. The following devices have been processed:
$TaskDevices$. View the task information here:
$AppURL$/task.view.htm?taskID=$TaskID$</option>
This format produces an email message similar to the example shown in Table 3.
To change the format, language, or both of the email content, follow these steps:
1 Back up the adjustable_options.rcx file to a location outside the $NCM_HOME (%NCM_HOME% on Windows) directory.
2 In the appserver.rcx file, locate the following comment line:
<!-- task email notification options -->
Table 3 Example of the Default Task Completion Email Message
Content Type Example
Subject Task Import Users completed. Task status: Succeeded
Body Task : Import Users
originated by : admin
scheduled at : 2011-08-16 12:35:45.0
completed with the following status:
Succeeded.
The following devices have been processed:
None.
View the task information here:
https://server.example.com:8443//task.view.htm?taskID=2801
Configuring the Task Completion Email Content 27
NCM Administration Guide
3 Copy the following blocks from the appserver.rcx file to the adjustable_options.rcx file:
• <option name="task/email/subject">
• <option name="task/email/text">
4 Edit the subject and text values. Table 4 lists the available variables for use in these options.
5 Save the adjustable_options.rcx file.
6 Restart the NCM management engine.
Table 4 Variables for the Task Completion Email Content
Variable Description
$ApprovalDate$ Task approval date.
$ApproverEmails$ Comma separated list of email addresses of the task approvers.
$ApprovalPriority$ Task approval priority.
$OriginatorFirstName$ The first name of the task originator.
$OriginatorLastName$ The last name of the task originator.
$OriginatorName$ The name of the task originator.
$TaskName$ The task name.
$TaskComments$ The task comments.
$TaskDevices$ A list of devices affected by the task.
$TaskFrequency$ The frequency of the task.
$TaskID$ The task identifier.
$TaskScheduleDate$ The task scheduled timestamp.
$TaskStatus$ The task status. For example; Succeeded, Failed, or Skipped.
28 Chapter 7
NCM Administration Guide
8 Configuring the Default Setting of the Force Save Check Box for New Tasks
For many NCM device tasks, the Force Save task option specifies whether NCM should overwrite the startup configuration with the current running configuration at the completion of the task. The setting applies to only those devices that support a startup configuration. The default value of this setting is configurable per task type in the appserver.rcx file.
For each device task, the appserver.rcx file contains an option in the following format:
<option name="DeviceInteraction/EnforceConfigurationSave/task_name">setting</option>
Possible values for task_name are:
• Take Snapshot
• Discover Driver
• Run ICMP Test
• Deploy Passwords
• Deploy Config
• Configure Syslog
• Run Command Script
• Run Diagnostics
• Synchronize Startup and Running
• Update Device Software
• Backup Device Software
• Reboot Device
• Run Device Script
• Delete ACLs
• VLAN Task
Possible values for setting are:
• true—The Force Save field is visible for this task type and defaults to selected (overwrite the startup configuration). The user running the task can override the default setting by clearing the Force Save check box.
• false—The Force Save field is visible for this task type and defaults to cleared (do not change the startup configuration). The user running the task can override the default setting by selecting the Force Save check box.
• disabled—The Force Save field is not visible for this task type. The task will never attempt to overwrite the startup configuration with the running configuration.
Configuring the Default Setting of the Force Save Check Box for New Tasks 29
NCM Administration Guide
To change the default setting of the Force Save check box for a specific device task type, follow these steps:
1 Back up the adjustable_options.rcx file to a location outside the $NCM_HOME (%NCM_HOME% on Windows) directory.
2 In the appserver.rcx file, locate the following line for the task that you want to change:
<option name="DeviceInteraction/EnforceConfigurationSave/task_name">setting</option>
3 Copy the line to change from the appserver.rcx file to the adjustable_options.rcx file.
4 In the adjustable_options.rcx file, edit the setting value.
5 Save the adjustable_options.rcx file.
6 Restart the NCM management engine.
The change take effect for new tasks only.
30 Chapter 8

NCM Administration Guide
9 Disabling the Use of Adobe Flash
CiscoWorks Network Compliance Manager Software (NCM) uses Adobe® Flash for displaying the device selector. If you disable the use of Flash, the NCM console uses a pure HTML and JavaScript version of the device selector. Generally speaking, this version is slower than the Flash version because of the underlying protocol for communication between NCM and the NCM console, especially for large data sets (for example, 10,000 devices).
To disable the use of Adobe Flash in the NCM console, follow these steps:
1 Back up the adjustable_options.rcx file to a location outside the $NCM_HOME (%NCM_HOME% on Windows) directory.
2 In the appserver.rcx file, locate the following line:
<option name="flexui/devicechooser">true</option>
3 Copy the line from the appserver.rcx file to the adjustable_options.rcx file.
4 In the adjustable_options.rcx file, change the copied line to:
<option name="flexui/devicechooser">false</option>
5 In the adjustable_options.rcx file, to control how many items the search box should return, add the following line:
<option name="flexui/devicechooser/return_count">12</option>
Optionally change the default value of 12 in this line.
6 Save the adjustable_options.rcx file.
7 Restart all NCM services.
• Windows: Open the Services control panel. In the list of services, right-click each of the following services, and then click Restart:
— TrueControl ManagementEngine
— TrueControl FTP Server
— TrueControl SWIM Server
— TrueControl Syslog Server
— TrueControl TFTP Server
• UNIX: Run the following command:
/etc/init.d/truecontrol restart
To reduce the number of search results, narrow the search pattern. For example, "192.168" might yield too many results to be displayed. Use "192.168.5" instead.
Disabling the Use of Adobe Flash 31

NCM Administration Guide
32 Chapter 9
NCM Administration Guide
10 Parsing Cisco ACS 5.x Logs for Change Detection
As of version 1.8, CiscoWorks Network Compliance Manager Software (NCM) provides a mechanism for parsing Cisco Secure Access Control System (ACS) 5.x logs for change detection when those logs are forwarded by ACS 5.x to the NCM Syslog server.
To enable the use of ACS 5.x logs for change detection, follow these steps:
1 Configure the ACS 5.x server to forward ACS logs to the NCM syslog server:
a On ACS 5.x, use System Administration > Log Configuration > Remote Log Targets > Create to set the IP address of the NCM Syslog server.
Use Advanced Syslog Options to verify that the Port and Facility Code values match the configuration of the NCM Syslog server.
b On ACS 5.x, use System Administration > Log Configuration > Log Categories > Global (or Per Instance) to set the categories of logs to be forwarded (for example, AAA Audit).
For the selected categories, use the Remote Log Target tab to add the NCM Syslog server configured in the previous step as a target.
For more information, see:
http://www.cisco.com/en/US/products/ps9911/products_user_guide_list.html
2 On the NCM server, update the syslog configuration
a Back up the adjustable_options.rcx file to a location outside the $NCM_HOME (%NCM_HOME% on Windows) directory.
b In the appserver.rcx file, locate the following line:
<option name="syslog/process_other_treatments">false</option>
c Copy the line from the appserver.rcx file to the adjustable_options.rcx file.
d In the adjustable_options.rcx file, change the copied line to:
<option name="syslog/process_other_treatments">true</option>
e Save the adjustable_options.rcx file.
The NCM AAA Log Reader Agent cannot be used to process ACS 5.x logs because ACS 5.x uses a format different from that of standard RFC-compliant logs. Also, the NCM AAA Log Reader Agent is a Windows application while ACS 5.x is installable on a Cisco Secure ACS appliance or VMware.
Parsing Cisco ACS 5.x Logs for Change Detection 33

NCM Administration Guide
3 Restart all NCM services.
• Windows: Open the Services control panel. In the list of services, right-click each of the following services, and then click Restart:
— TrueControl ManagementEngine
— TrueControl FTP Server
— TrueControl SWIM Server
— TrueControl Syslog Server
— TrueControl TFTP Server
• UNIX: Run the following command:
/etc/init.d/truecontrol restart
4 In the NCM console, go to Admin > Administrative Settings > Configuration Mgmt, and then add the pattern "CSCOacs" to the Syslog Detection Patterns list.
34 Chapter 10
NCM Administration Guide
11 Extending the Number of Custom Enhanced Fields
In the NCM console, you can configure up to 31 custom data fields each for the Device Details page and the Device Interfaces page. These fields are available as follows:
• Six fields can be configured on the Admin > Custom Data Setup page.
• 25 fields can be configured on the Admin > Enhanced Custom Fields Setup page (when the Enable Enhanced Custom Fields check box is selected on the Admin > Administrative Settings > User Interface page).
To extend the available number of enhanced custom fields for the Device Details page, the Device Interfaces page, or both pages, follow these steps:
1 Back up the adjustable_options.rcx file to a location outside the $NCM_HOME (%NCM_HOME% on Windows) directory.
2 In a text editor, such as Word or vi, edit the adjustable_options.rcx file as follows:
• To extend the number of enhanced custom fields for the Device Details page, add the following line:
<option name=" metadata/field_limit/RN_DEVICE">100</option>
• To extend the number of enhanced custom fields for the Device Interfaces page, add the following line:
<option name=" metadata/field_limit/RN_DEVICE_PORT">100</option>
3 Save the adjustable_options.rcx file.
4 Reload the .rcx settings by doing one of the following:
• Run the reload server options command from the NCM proxy.
• Restart the NCM management engine.
To restrict the number of available enhanced custom fields, replace 100 with a smaller value. (Specifying a larger value has the same effect as the leaving the value at 100.)
Extending the Number of Custom Enhanced Fields 35

NCM Administration Guide
36 Chapter 11
NCM Administration Guide
12 Changing NCM Credentials When Connecting to a New Database Location
If the NCM database has been moved to a different server, use the tc_tools utility to configure NCM to connect to the new database location. This location must include a valid NCM database. For information about installing the NCM database, see the Installation and Upgrade Guide for CiscoWorks Network Compliance Manager 1.8 or consult your database administrator.
The tc_tools utility updates the following information on the NCM server:
• Database server name
• Database port
• Database name
• Database username
• Database user password
To connect NCM to a different NCM database, follow these steps:
1 At a command prompt, run the following command:
• Windows: <installdir>\client\tc_tools.bat
• UNIX: <installdir>/client/tc_tools.sh
2 Type 1 to change the database connection information.
3 At each prompt, do one of the following:
• Type the new value for the prompt.
• Press Enter to retain the value between the brackets ([ ]).
4 At the prompt to choose an operation, type 4 to exit the utility.
5 Restart the NCM management engine.
Changing NCM Credentials When Connecting to a New Database Location 37

NCM Administration Guide
38 Chapter 12
NCM Administration Guide
13 Full-Text Search of Configuration Text (Oracle and SQL Server)
CiscoWorks Network Compliance Manager Software (NCM) supports a contains (full text) search of Configuration Text. After full-text search is enabled, faster configuration text search is available for the following report options:
• Reports > Search For > Devices > Configuration Text > contains (full text)
• Reports > Search For > Configurations > Configuration Text > contains (full text)
• Reports > Search For > Device Templates > Configuration Text > contains (full text)
• Reports > Advanced Search > Search Criteria > Configuration Text > contains (full text)
Additionally, you can create a dynamic group or a dynamic policy scope based on the results of a Search Criteria > Configuration Text > contains (full text) search.
Similarly, these searches also support searching for configuration text that does not contain (full text). The search is always case insensitive for the contains (full text) and does not contain (full text) operators.
The contains (full text) search is an indexed search and requires that the database is enabled for full-text search.
Because the contains (full text) search is indexed, it returns results faster than does the contains search. However, the contains (full text) search supports fewer options than does the contains search.
This topic contains the following topics:
• Enabling Full-Text Search of Configuration Text on page 40
• Disabling Full-Text Search on page 44
This feature is not supported on MySQL.
Full-Text Search of Configuration Text (Oracle and SQL Server) 39
NCM Administration Guide
Enabling Full-Text Search of Configuration Text
Full-text search accesses an index of the text records in the database. The initial index generation requires available time and disk space.
NCM maintains the full text index by incrementally indexing new configurations added during snapshot tasks and by removing the index entries of deleted configurations.
In a Horizontal Scalability environment, enable full-text searching on one NCM server.
In a Multimaster Distributed System environment, enable full-text searching on each NCM server. Run the enablement procedures in parallel. That is, complete step 1 on each NCM server before initiating step 2 on any NCM server, and so forth.
Follow the steps appropriate to the database type:
• Enabling Full-Text Search on Oracle on page 41
• Enabling Full-Text Search on Microsoft SQL Server on page 43
If Oracle Text (for an Oracle database) or the SQL Server Full Text Search service (for a Microsoft SQL Server database) is not yet enabled, also plan for database downtime.
Note the following:
• Because index generation is CPU-intensive, NCM tasks might run slower than normal during the process of enabling full text search.
• Do not restart the NCM management engine while index generation is in progress.
40 Chapter 13
NCM Administration Guide
Enabling Full-Text Search on Oracle
To enable full-text search on an Oracle database, follow these steps:
1 Verify that Oracle Text is enabled and has the required privileges and space:
a Log on to the NCM proxy with the credentials used to install NCM.
b Run the following command:
fulltextsearch -option analyze
c Examine the output of the analyze command.
— If Oracle Text is not enabled, engage the Oracle database administrator to change the configuration. For information about enabling Oracle Text, see “Administering Oracle Text” in the Oracle Text Application Developer’s Guide.
— If Oracle Text is enabled, do the following:
– Determine whether data pruning is needed. If the analyze command output recommends database pruning, complete this process before generating the full-text index. For more information, see “Data Pruning” in the Installation and Upgrade Guide for CiscoWorks Network Compliance Manager 1.8.
– Verify that the approximate additional space required for the index generation process is available on the database server.
The index configuration process requires available disk space of 50% to 200% of the configuration text size. Actual space requirements depend on the database contents.
The index configuration process is resource-intensive. Actual time depends on database hardware and configuration as well as the volume of text to be indexed.
For more information, see “Frequently Asked Questions About Indexing Performance” in the Oracle Text Application Developer’s Guide.
2 In the NCM console, delay any Take Snapshot tasks that are scheduled to start before the end of the approximate time required for index generation to complete.
3 Generate the full-text index:
a From the NCM proxy, run the following command:
fulltextsearch -option enable -numthreads T
T is the number of parallel threads. Possible values range from 1 to one less than the number of database server cores.
Another information source is the Oracle MetaLink document collection, for which you must have a MetaLink account with Oracle. Documents of interest include the following:
– 280713.1: Manual installation, deinstallation of Oracle Text 10gR1
– 979705.1: Manual installation, deinstallation of Oracle Text 10gR2
– 579601.1: Manual installation, deinstallation and verification of Oracle Text 11gR1
– 970473.1: Manual installation, deinstallation and verification of Oracle Text 11gR2
Full-Text Search of Configuration Text (Oracle and SQL Server) 41
NCM Administration Guide
b Examine the output of the enable command.
— The expected status is COMPLETE & VALID.
— If the status is IN PROGRESS, wait for index generation to complete.
— If the status is INVALID, remove the index with the fulltextsearch -option disable command, and then repeat step a.
4 In a Horizontal Scalability environment, synchronize the database configuration by restarting NCM on all other NCM servers connected to the NCM database:
• Windows: Open the Services control panel. In the list of services, right-click each of the following services, and then click Restart:
— TrueControl ManagementEngine
— TrueControl FTP Server
— TrueControl SWIM Server
— TrueControl Syslog Server
— TrueControl TFTP Server
• UNIX: Run the following command:
/etc/init.d/truecontrol restart
5 In the NCM console, examine the status of recent Take Snapshot tasks. Rerun any that failed.
You can close the command prompt window during index generation. In this case, run the following command to determine the status of the index generation:
fulltextsearch -option status
Alternatively, you can watch the NCM logs with the troubleshooting option feature/proxy set to debug.
On an Oracle database, the log file contains an error for any Take Snapshot tasks that were running during the generation of the full text index. You can ignore the following error:
java.sql.SQLException: ORA-29861: domain index is marked LOADING/FAILED/UNUSABLE
42 Chapter 13
NCM Administration Guide
Enabling Full-Text Search on Microsoft SQL Server
To enable full-text search on a Microsoft SQL Server database, follow these steps:
1 Verify that the SQL Server Full Text Search service is enabled and has the required privileges:
a Log on to the NCM proxy with the credentials used to install NCM.
b Run the following command:
fulltextsearch -option analyze
c Examine the output of the analyze command.
— If the SQL Server Full Text Search service is not enabled, engage the SQL Server database administrator to change the configuration.
— If the SQL Server Full Text Search service is enabled, determine whether data pruning is needed. If the analyze command output recommends database pruning, complete this process before generating the full-text index. For more information, see “Data Pruning” in the Installation and Upgrade Guide for CiscoWorks Network Compliance Manager 1.8.
2 On SQL Server 2005, remove the SQL Server noise words as follows:
a Change to the $SQL_Server_Install_Path\Microsoft SQL Server\MSSQL.1\MSSQL\FTDATA\ directory.
b Back up the noiseENU.txt file.
c Delete all entries in the noiseENU.txt file to leave an empty file.
For more information about editing noise words, see the “Noise Words” topic in the MSDN library:
http://msdn.microsoft.com/en-us/library/ms142551(v=sql.90).aspx
3 Generate the full-text index:
a Log on to the NCM proxy with the credentials used to install NCM.
b Run the following command:
fulltextsearch -option enable
4 Determine the status of the index generation by running the following command:
fulltextsearch -option status
• The expected status is COMPLETE & VALID.
• If the status is IN PROGRESS, wait for index generation to complete.
• If the status is INVALID, remove the index with the fulltextsearch -option disable command. If necessary, increase the available disk space, and then repeat step 3.
5 In a Horizontal Scalability environment, synchronize the database configuration by restarting NCM on all other NCM servers connected to the NCM database:
• Windows: Open the Services control panel. In the list of services, right-click each of the following services, and then click Restart:
On SQL Server 2008, by default no noise words are enabled.
On SQL Server, this command returns immediately and starts full-text indexing. Wait some time before you start using the new search. In the output, verify that this run did not generate any SQL exceptions.
Alternatively, you can watch the NCM logs with the troubleshooting option feature/proxy set to debug.
Full-Text Search of Configuration Text (Oracle and SQL Server) 43
NCM Administration Guide
— TrueControl ManagementEngine
— TrueControl FTP Server
— TrueControl SWIM Server
— TrueControl Syslog Server
— TrueControl TFTP Server
• UNIX: Run the following command:
/etc/init.d/truecontrol restart
Disabling Full-Text Search
In a Horizontal Scalability environment, disable full-text searching on one NCM server.
In a Multimaster Distributed System environment, disable full-text searching on each NCM server. Run the disablement procedures in parallel. That is, complete step 1 on each NCM server before initiating step 2 on any NCM server, and so forth.
To permanently disable the contains (full text) search operator in the NCM console and to remove the full-text index from the database, follow these steps:
1 If any dynamic groups are configured to use the contains (full text) or does not contain (full text) operator, edit or delete these dynamic group configurations.
2 If any dynamic policy scopes are configured to use the contains (full text) or does not contain (full text) operator, edit or delete these dynamic policy configurations.
3 Remove the full-text index:
a Log on to the NCM proxy with the credentials used to install NCM.
b Run the following command:
fulltextsearch -option disable
4 Disable the full-text search feature by removing the contains (full text) and does not contain (full text) operators from the NCM console:
a Change to the directory that contains the .rcx files:
— Windows: %NCM_HOME%\jre
— UNIX: $NCM_HOME/jre
b Back up the adjustable_options.rcx file to a location outside the $NCM_HOME (%NCM_HOME% on Windows) directory.
c In the adjustable_options.rcx file, add the following line:
<option name="fulltextsearch/enabled">false</option>
d Save the adjustable_options.rcx file.
44 Chapter 13

NCM Administration Guide
e Reload the .rcx settings by doing one of the following:
— Run the reload server options command from the NCM proxy.
— Restart the NCM management engine.
5 In a Horizontal Scalability environment, synchronize the database configuration by restarting NCM on all other NCM servers connected to the NCM database:
• Windows: Open the Services control panel. In the list of services, right-click each of the following services, and then click Restart:
— TrueControl ManagementEngine
— TrueControl FTP Server
— TrueControl SWIM Server
— TrueControl Syslog Server
— TrueControl TFTP Server
• UNIX: Run the following command:
/etc/init.d/truecontrol restart
Full-Text Search of Configuration Text (Oracle and SQL Server) 45

NCM Administration Guide
46 Chapter 13
NCM Administration Guide
14 Enabling Case-Insensitive Search (Oracle)
CiscoWorks Network Compliance Manager Software (NCM) supports case-insensitive searches of many objects in the NCM database on Oracle. (The MySQL and Microsoft SQL Server database searches are already case-insensitive.)
This topic contains the following sections:
• Affected Fields on page 47
• Enabling Case-Insensitive Search of an Oracle Database on page 49
• Disabling Case-Insensitive Search on page 50
Affected Fields
When enabled, case-insensitive search is available for most text fields in the NCM console.
Search Box
The IP or Hostname search box follows the case-sensitivity configuration.
Search Criteria
The Search Criteria field is available for the following functions:
• Defining a dynamic device group on the New Group and Edit Group pages.
• Defining a dynamic policy scope on the New Policy and Edit Policy pages.
• Creating a custom search on the Advanced Search page.
With an Oracle database, case-insensitive search is not available for the following fields:
• ACL Application
• ACL Configuration
• Comments
• Configuration Text with the contains and does not contain operators. (The contains (full text) and does not contain (full text) operators are always case-insensitive.)
All other fields follow the case-sensitivity configuration.
Device Selector
For the New Task and Rerun Task pages, the Filter box on the device selector follows the case-sensitivity configuration.
Enabling Case-Insensitive Search (Oracle) 47
NCM Administration Guide
Reports
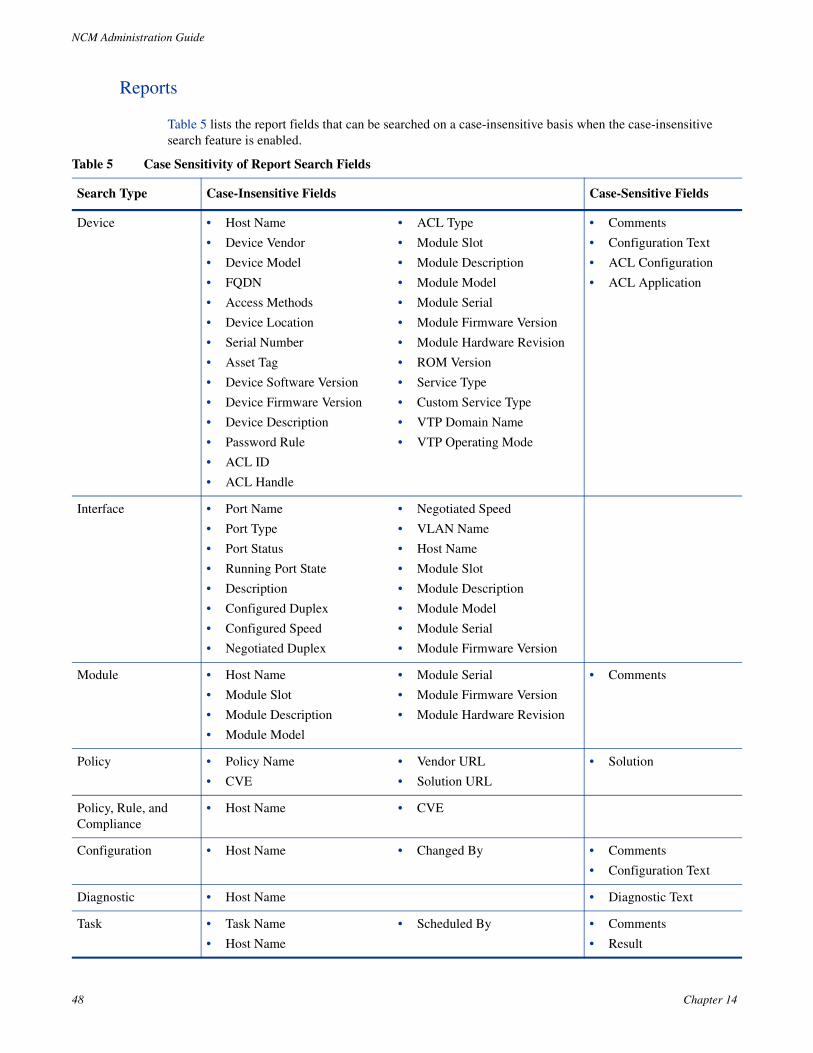
Table 5 lists the report fields that can be searched on a case-insensitive basis when the case-insensitive search feature is enabled.
Table 5 Case Sensitivity of Report Search Fields
Search Type Case-Insensitive Fields Case-Sensitive Fields
Device • Host Name
• Device Vendor
• Device Model
• FQDN
• Access Methods
• Device Location
• Serial Number
• Asset Tag
• Device Software Version
• Device Firmware Version
• Device Description
• Password Rule
• ACL ID
• ACL Handle
• ACL Type
• Module Slot
• Module Description
• Module Model
• Module Serial
• Module Firmware Version
• Module Hardware Revision
• ROM Version
• Service Type
• Custom Service Type
• VTP Domain Name
• VTP Operating Mode
• Comments
• Configuration Text
• ACL Configuration
• ACL Application
Interface • Port Name
• Port Type
• Port Status
• Running Port State
• Description
• Configured Duplex
• Configured Speed
• Negotiated Duplex
• Negotiated Speed
• VLAN Name
• Host Name
• Module Slot
• Module Description
• Module Model
• Module Serial
• Module Firmware Version
Module • Host Name
• Module Slot
• Module Description
• Module Model
• Module Serial
• Module Firmware Version
• Module Hardware Revision
• Comments
Policy • Policy Name
• CVE
• Vendor URL
• Solution URL
• Solution
Policy, Rule, and Compliance
• Host Name • CVE
Configuration • Host Name • Changed By • Comments
• Configuration Text
Diagnostic • Host Name • Diagnostic Text
Task • Task Name
• Host Name
• Scheduled By • Comments
• Result
48 Chapter 14
NCM Administration Guide
Enabling Case-Insensitive Search of an Oracle Database
For an Oracle database, case-insensitive search accesses a case-insensitive index of the text records in the database for each field in the query.
In a Horizontal Scalability environment, enable case-insensitive searching on one NCM server.
In a Multimaster Distributed System environment, enable case-insensitive searching on each NCM server.
To enable case-insensitive search of NCM with an Oracle database, follow these steps to generate the case-insensitive indexes:
1 Connect to the NCM proxy with the credentials used to install NCM.
2 Run the following command:
mod oraclecaseinsensitive -option enable
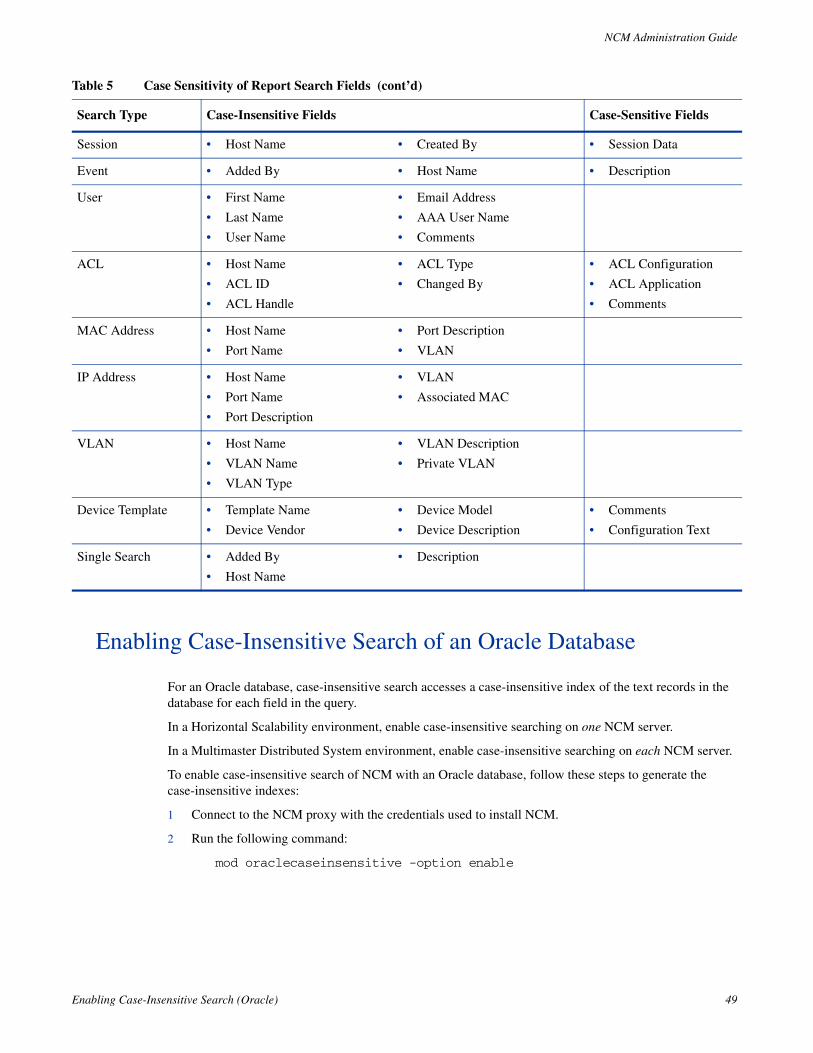
Session • Host Name • Created By • Session Data
Event • Added By • Host Name • Description
User • First Name
• Last Name
• User Name
• Email Address
• AAA User Name
• Comments
ACL • Host Name
• ACL ID
• ACL Handle
• ACL Type
• Changed By
• ACL Configuration
• ACL Application
• Comments
MAC Address • Host Name
• Port Name
• Port Description
• VLAN
IP Address • Host Name
• Port Name
• Port Description
• VLAN
• Associated MAC
VLAN • Host Name
• VLAN Name
• VLAN Type
• VLAN Description
• Private VLAN
Device Template • Template Name
• Device Vendor
• Device Model
• Device Description
• Comments
• Configuration Text
Single Search • Added By
• Host Name
• Description
Table 5 Case Sensitivity of Report Search Fields (cont’d)
Search Type Case-Insensitive Fields Case-Sensitive Fields
Enabling Case-Insensitive Search (Oracle) 49
NCM Administration Guide
3 In a Horizontal Scalability environment, synchronize the database configuration by restarting NCM on all other NCM servers connected to the NCM database:
• Windows: Open the Services control panel. In the list of services, right-click each of the following services, and then click Restart:
— TrueControl ManagementEngine
— TrueControl FTP Server
— TrueControl SWIM Server
— TrueControl Syslog Server
— TrueControl TFTP Server
• UNIX: Run the following command:
/etc/init.d/truecontrol restart
Disabling Case-Insensitive Search
In a Horizontal Scalability environment, disable case-insensitive searching on one NCM server.
In a Multimaster Distributed System environment, disable case-insensitive searching on each NCM server.
To permanently disable case-insensitive search of NCM with an Oracle database and to remove the case-insensitive indexes from the database, follow these steps:
1 If any dynamic groups are configured with case-insensitive search criteria, edit or delete these dynamic group configurations.
2 If any policies are configured with case-insensitive search criteria, edit or delete these policy configurations.
3 Remove the case-insensitive indexes:
a Connect to the NCM proxy with the credentials used to install NCM.
b Run the following command:
mod oraclecaseinsensitive -option disable
4 In a Horizontal Scalability environment, synchronize the database configuration by restarting NCM on all other NCM servers connected to the NCM database:
• Windows: Open the Services control panel. In the list of services, right-click each of the following services, and then click Restart:
— TrueControl ManagementEngine
— TrueControl FTP Server
— TrueControl SWIM Server
— TrueControl Syslog Server
— TrueControl TFTP Server
• UNIX: Run the following command:
/etc/init.d/truecontrol restart
50 Chapter 14
NCM Administration Guide
15 Reclaiming Unused Space (Oracle)
Database maintenance often involves deleting data chunks within a database table, which results in free space inside the table. New records added after this maintenance populates the free space inside the table first, so the new records can be spread across several physical locations within the table. This fragmentation degrades database performance by extending data access times.
CiscoWorks Network Compliance Manager Software (NCM) pruning tasks can cause database table fragmentation. This section identifies one way to defragment an Oracle database tablespace. This procedure can be performed while the database is online.
Tablespace defragmentation can be run against all tables in the NCM schema. Table 6 lists the NCM database tables and the associated LOB columns that are most frequently affected by fragmentation.
This documentation describes one approach to this database administration task. Read the prerequisites to determine whether this approach applies to your situation. For other approaches and more detailed information, see the documentation for your database type and version.
Table 6 NCM Database Tables Frequently Affected by Fragmentation
Table Name Target LOB Columns
RN_DEVICE_ACCESS_LOG • ChangeEventData
• Comments
RN_DEVICE_DATA • DataBlock
• Comments
RN_DEVICE_TOPOLOGY_DATA
RN_DIAGNOSTIC_DATA • DataBlock
• Comments
RN_EVENT • EventText
• EventData
RN_EVENT_MESSAGE • MessageBody
RN_SCHEDULE_TASK • Comments
• Result
• TaskData
Reclaiming Unused Space (Oracle) 51
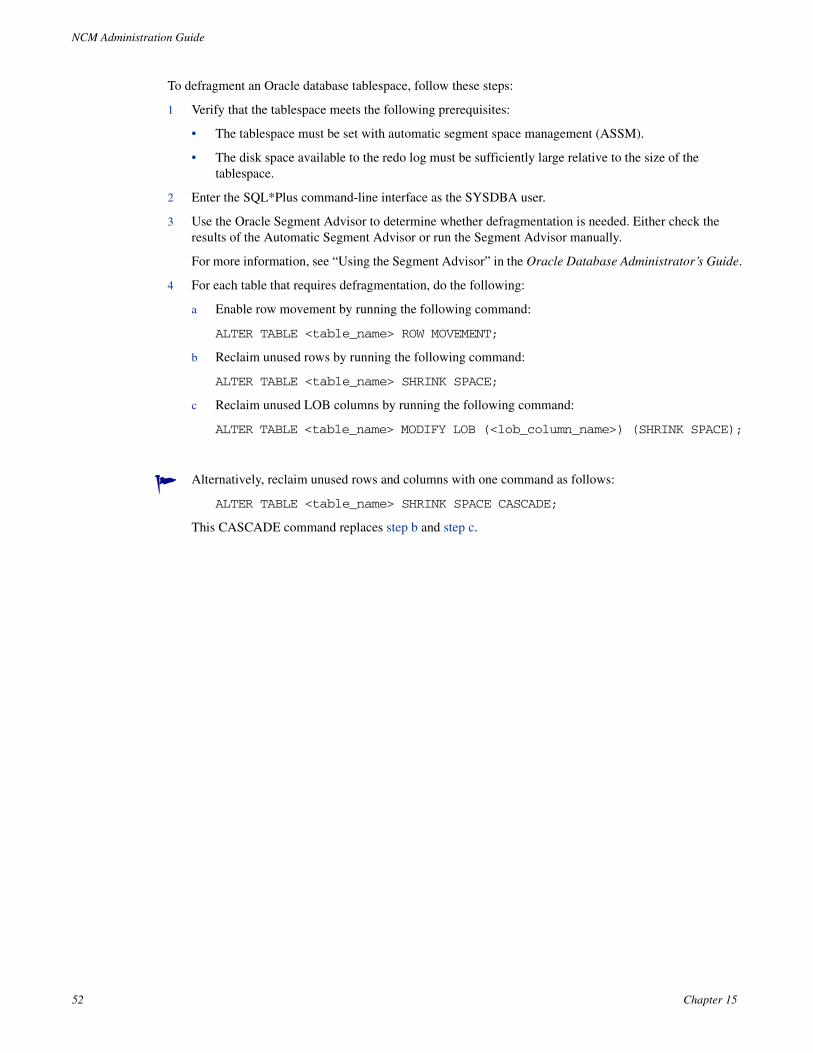
NCM Administration Guide
To defragment an Oracle database tablespace, follow these steps:
1 Verify that the tablespace meets the following prerequisites:
• The tablespace must be set with automatic segment space management (ASSM).
• The disk space available to the redo log must be sufficiently large relative to the size of the tablespace.
2 Enter the SQL*Plus command-line interface as the SYSDBA user.
3 Use the Oracle Segment Advisor to determine whether defragmentation is needed. Either check the results of the Automatic Segment Advisor or run the Segment Advisor manually.
For more information, see “Using the Segment Advisor” in the Oracle Database Administrator’s Guide.
4 For each table that requires defragmentation, do the following:
a Enable row movement by running the following command:
ALTER TABLE <table_name> ROW MOVEMENT;
b Reclaim unused rows by running the following command:
ALTER TABLE <table_name> SHRINK SPACE;
c Reclaim unused LOB columns by running the following command:
ALTER TABLE <table_name> MODIFY LOB (<lob_column_name>) (SHRINK SPACE);
Alternatively, reclaim unused rows and columns with one command as follows:
ALTER TABLE <table_name> SHRINK SPACE CASCADE;
This CASCADE command replaces step b and step c.
52 Chapter 15
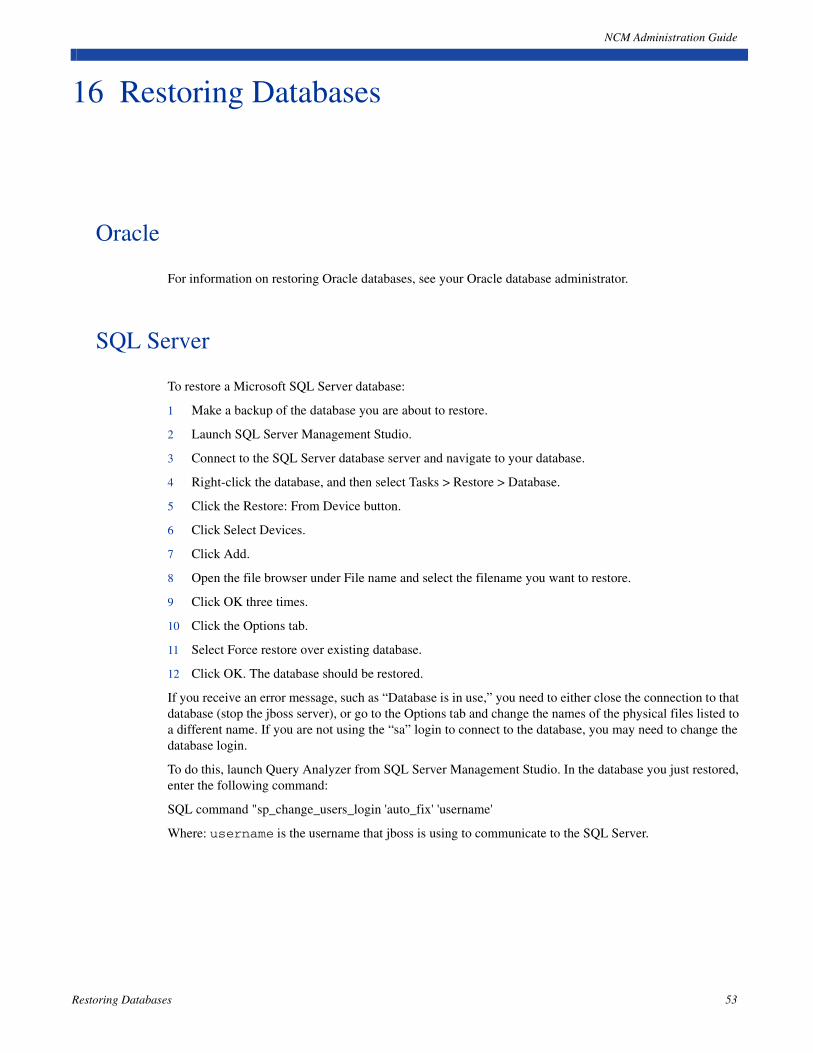
NCM Administration Guide
16 Restoring Databases
Oracle
For information on restoring Oracle databases, see your Oracle database administrator.
SQL Server
To restore a Microsoft SQL Server database:
1 Make a backup of the database you are about to restore.
2 Launch SQL Server Management Studio.
3 Connect to the SQL Server database server and navigate to your database.
4 Right-click the database, and then select Tasks > Restore > Database.
5 Click the Restore: From Device button.
6 Click Select Devices.
7 Click Add.
8 Open the file browser under File name and select the filename you want to restore.
9 Click OK three times.
10 Click the Options tab.
11 Select Force restore over existing database.
12 Click OK. The database should be restored.
If you receive an error message, such as “Database is in use,” you need to either close the connection to that database (stop the jboss server), or go to the Options tab and change the names of the physical files listed to a different name. If you are not using the “sa” login to connect to the database, you may need to change the database login.
To do this, launch Query Analyzer from SQL Server Management Studio. In the database you just restored, enter the following command:
SQL command "sp_change_users_login 'auto_fix' 'username'
Where: username is the username that jboss is using to communicate to the SQL Server.
Restoring Databases 53
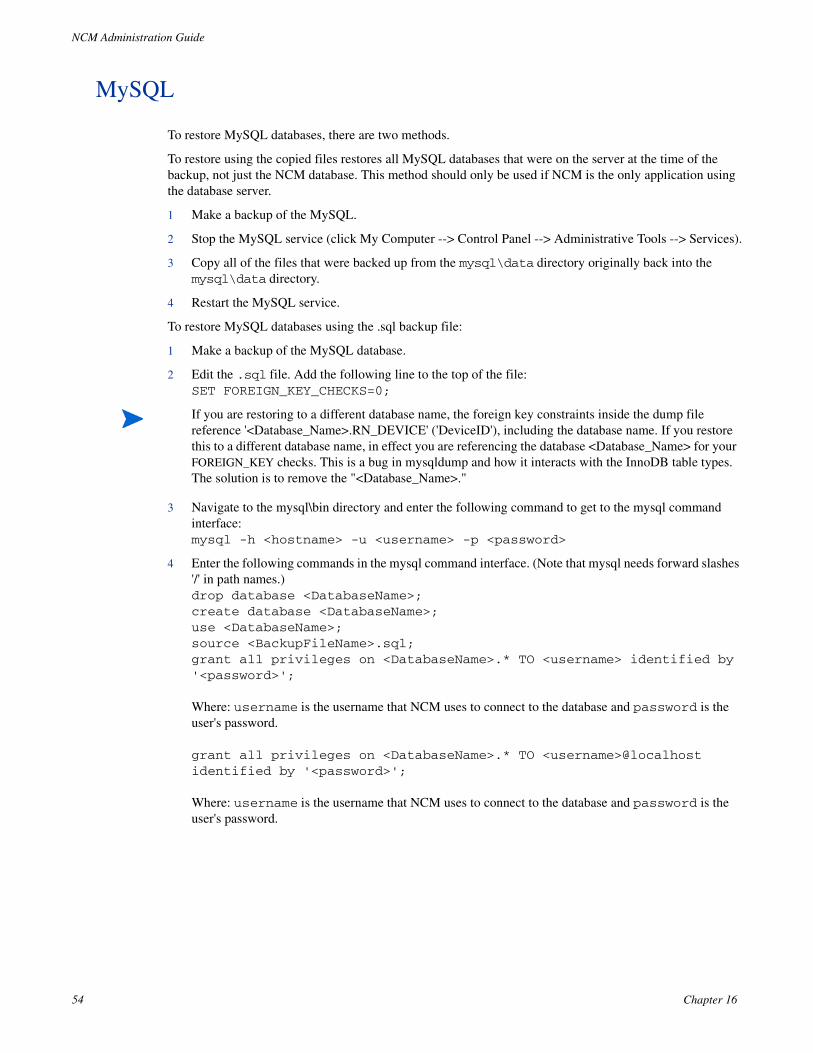
NCM Administration Guide
MySQL
To restore MySQL databases, there are two methods.
To restore using the copied files restores all MySQL databases that were on the server at the time of the backup, not just the NCM database. This method should only be used if NCM is the only application using the database server.
1 Make a backup of the MySQL.
2 Stop the MySQL service (click My Computer --> Control Panel --> Administrative Tools --> Services).
3 Copy all of the files that were backed up from the mysql\data directory originally back into the mysql\data directory.
4 Restart the MySQL service.
To restore MySQL databases using the .sql backup file:
1 Make a backup of the MySQL database.
2 Edit the .sql file. Add the following line to the top of the file:SET FOREIGN_KEY_CHECKS=0;
3 Navigate to the mysql\bin directory and enter the following command to get to the mysql command interface:mysql -h <hostname> -u <username> -p <password>
4 Enter the following commands in the mysql command interface. (Note that mysql needs forward slashes '/' in path names.)drop database <DatabaseName>;create database <DatabaseName>;use <DatabaseName>;source <BackupFileName>.sql;grant all privileges on <DatabaseName>.* TO <username> identified by '<password>';
Where: username is the username that NCM uses to connect to the database and password is the user's password.
grant all privileges on <DatabaseName>.* TO <username>@localhost identified by '<password>';
Where: username is the username that NCM uses to connect to the database and password is the user's password.
If you are restoring to a different database name, the foreign key constraints inside the dump file reference '<Database_Name>.RN_DEVICE' ('DeviceID'), including the database name. If you restore this to a different database name, in effect you are referencing the database <Database_Name> for your FOREIGN_KEY checks. This is a bug in mysqldump and how it interacts with the InnoDB table types. The solution is to remove the "<Database_Name>."
54 Chapter 16