administer cisco ise...administerciscoise •administratoraccessconsole,onpage1...
TRANSCRIPT
Administer Cisco ISE
• Administrator Access Console, on page 1• Specify Proxy Settings in Cisco ISE, on page 2• Ports Used by the Admin Portal, on page 3• Enable External RESTful Services APIs , on page 3• External RESTful Services SDK , on page 5• Specify System Time and NTP Server Settings, on page 5• Changing the System Time Zone, on page 6• Configure SMTP Server to Support Notifications, on page 7• Cisco ISE Deployment Upgrade, on page 7• Cisco ISE Software Patches, on page 11• Roll Back Software Patches, on page 12• View Patch Install and Rollback Changes, on page 13• FIPS Mode Support, on page 14• Securing SSH Key Exchange Using Diffie-Hellman Algorithm, on page 18• Configure Cisco ISE to Send Secure Syslog, on page 18• Default Secure Syslog Collector, on page 20• Offline Maintenance, on page 21
Administrator Access ConsoleThe following steps describe how to log into the Administrative portal.
Step 1 Enter the Cisco ISE URL in the address bar of your browser (for example, https://<ise hostname or ip address>/admin/).Step 2 Enter the username and case-sensitive password, that was specified and configured during the initial Cisco ISE setup.Step 3 Click Login or press Enter.
If your login is unsuccessful, click the Problem logging in? link in the Login page and follow the instructions.
Related TopicsAdministrator Login Browser Support, on page 2
Administer Cisco ISE1
Administrator Login Browser SupportThe Cisco ISE Admin portal supports the following HTTPS-enabled browsers:
• Mozilla Firefox 72 and earlier versions
• Mozilla Firefox ESR 60.9 and earlier versions
• Google Chrome 80 and earlier versions
• Microsoft Edge beta 77 and earlier versions
• Microsoft Internet Explorer 10.x and 11.x
If you are using Internet Explorer 10.x, enable TLS 1.1 and TLS 1.2, and disable SSL 3.0 and TLS 1.0(Internet Options > Advanced).
ISE Community Resource
ISE Pages Fail to Fully Load When Adblock Plus is Used
Administrator Lockout Following Failed Login AttemptsIf you enter an incorrect password for an administrator user ID enough times, the account would either besuspended for a specified time or locked out (as configured). If you choose to get locked out, the Admin portal"locks you out" of the system. Cisco ISE adds a log entry in the Server Administrator Logins report, andsuspends the credentials for that administrator ID. You can reset the password for that administrator ID, asdescribed in the "Reset a Disabled Password Due to Administrator Lockout" section in the Cisco IdentityServices Engine Installation Guide. The number of allowed failed attempts before disabling the administratoraccount is configurable and is described in the Administrative Access to Cisco ISE section in theCisco IdentityServices Engine Administrator Guide. After an administrator user account is locked out, Cisco ISE sendse-mail to the associated administrator user, if configured.
Disabled System administrators' status can be enabled by any Super Admin, including Active Directory users.
Specify Proxy Settings in Cisco ISEIf your existing network topology requires you to use a proxy for Cisco ISE, to access external resources (suchas the remote download site where you can find client provisioning and posture-related resources), you canuse the Admin portal to specify proxy properties.
The proxy settings impact the following Cisco ISE functions:
• Partner Mobile Management• Endpoint Profiler Feed Service Update• Endpoint Posture Update• Endpoint Posture Agent Resources Download• CRL (Certificate Revocation List) Download• Guest Notifications
The Cisco ISE proxy configuration supports basic authentication for proxy servers. NT LANManager (NTLM)authentication is not supported.
Administer Cisco ISE2
Administer Cisco ISEAdministrator Login Browser Support
Step 1 Choose Administration > System > Settings > Proxy.Step 2 Enter the proxy IP address or DNS-resolvable host name and specify the port through which proxy traffic travels to and
from Cisco ISE in Proxy host server : port .Step 3 Check Password required check box, if required.Step 4 Enter the user name and password used to authenticate to the proxy servers in the User Name and Password fields.Step 5 Enter the IP address or address range of hosts or domains to be bypassed in Bypass proxy for these hosts and domain.Step 6 Click Save.
Ports Used by the Admin PortalThe Admin portal is set to use HTTP port 80 and HTTPS port 443, and you cannot change these settings.Cisco ISE also prevents you from assigning any of the end-user portals to use the same ports, which reducesthe risk to the Admin portal.
Enable External RESTful Services APIsThe External RESTful Services APIs are based on HTTPS protocol and REST methodology and uses port9060.
The External RESTful Services APIs support basic authentication. The authentication credentials are encryptedand are part of the request header.
You can use any REST client like JAVA, curl linux command, python or any other client to invoke ExternalRESTful Services API calls.
The ISE administrator must assign special privileges to a user to perform operations using the External RESTfulServices APIs. In Cisco ISE 2.6 and later, ERS users can be either internal users or belong to an external AD.The AD group to which the external users belong must be mapped to either ERS Admin or ERS Operatorgroups:
• External RESTful Services Admin—Full access to all ERS APIs (GET, POST, DELETE, PUT). Thisuser can Create, Read, Update, and Delete ERS API requests.
• External RESTful Services Operator-Read Only access (GET request only).
The Super Admin user can access all ERS APIs.Note
The External RESTful Services APIs are not enabled by default. If you try to evoke the External RESTfulServices API calls before enabling them, you will receive an error response. You must enable the Cisco ISEREST API in order for applications developed for a Cisco ISE REST API to be able to access Cisco ISE. TheCisco REST APIs uses HTTPS port 9060, which is closed by default. If the Cisco ISE REST APIs are notenabled on the Cisco ISE admin server, the client application will receive a time-out error from the server forany Guest REST API request.
Administer Cisco ISE3
Administer Cisco ISEPorts Used by the Admin Portal
Step 1 Choose Administration > System > Settings > ERS Settings.Step 2 Choose Enable ERS for Read/Write for the Primary Administration Node.Step 3 Choose Enable ERS for Read for All Other Nodes if there are any secondary nodes.
External RESTful Service requests of all types are valid only for the primary ISE node. Secondary nodes have read-access(GET requests).
Step 4 Select one of the following options:
• Use CSRF Check for Enhanced Security—If this option is enabled, the ERS client must send a GET request to fetchthe Cross-Site Request Forgery (CSRF) token from Cisco ISE and include the CSRF token in the requests sent toCisco ISE. Cisco ISE will validate the CSRF token when a request is received from the ERS client. Cisco ISEprocesses the request only if the token is valid. This option is not applicable for pre ISE 2.3 Clients.
• Disable CSRF for ERS Request—If this option is enabled, CSRF validation is not performed. This option can beused for pre ISE 2.3 Clients.
Step 5 Click Save.
All REST operations are audited and the logs are logged in the system logs. External RESTful Services APIshave a debug logging category, which you can enable from the debug logging page of the Cisco ISE GUI.
When you disable External RESTful Services in Cisco ISE, port 9060 remains open but no communicationis allowed through the port.
Related TopicsExternal RESTful Services SDK , on page 5
Enable External AD Access for ERS APIsThe following steps will allow you to enable External AD access for ERS APIs:
Step 1 Choose Administration > Identity Management > External Identity Sources > Active Directory.Step 2 Add the AD groups that the external user belongs to as an external identity source.
See Active Directory as an External Identity Source
Step 3 Add user groups from the ADs.
See Add Users
See the section "Add Users" in Chapter "Asset Visibility" in Cisco ISE Administrator Guide.
Step 4 Choose Administration > Admin Access > Authentication > Authentication Method.Step 5 Choose AD: <Join Point Name> from the Identity Source drop-down.Step 6 Choose either Password Based or Client Certificate Based authentication.Step 7 ChooseAdministration > System > Admin Access > Administrators > Admin Groups.Step 8 Add external group(s) to ERSAdmin group or ERSOperator group as a member user. Go toAdministration > System >
Admin Access > Administrators > Admin Groups > ERS AdminERS Operators.
Administer Cisco ISE4
Administer Cisco ISEEnable External AD Access for ERS APIs
Step 9 Click Add.Step 10 Select the user.Step 11 Click Save.
External RESTful Services SDKYou can use the External RESTful Services SDK to start building your own tools. You can access the ExternalRESTful Services SDK from the following URL: https://<ISE-ADMIN-NODE>:9060/ers/sdk. ExternalRESTful Services SDK can be accessed by the External RESTful Services Admin users only.
The SDK consists the following components:
• Quick reference API documentation
• Complete list of all available API operations
• Schema files available for download
• Sample application in Java available for download
• Use cases in curl script format
• Use cases in python script format
• Instructions on using Chrome Postman
Specify System Time and NTP Server SettingsCisco ISE allows you to configure up to three Network Time Protocol (NTP) servers. You can use the NTPservers to maintain accurate time and synchronize time across different timezones. You can also specifywhether or not Cisco ISE should use only authenticated NTP servers, and you can enter one or moreauthentication keys for that purpose.
Cisco recommends that you set all Cisco ISE nodes to the Coordinated Universal Time (UTC)timezone—especially if your Cisco ISE nodes are installed in a distributed deployment. This procedure ensuresthat the reports and logs from the various nodes in your deployment are always in sync with regard to thetimestamps.
Cisco ISE also supports public-key authentication for NTP servers. NTPv4 uses symmetric-key cryptographyand also provides a new Autokey scheme based on public-key cryptography. Public-key cryptography isgenerally considered more secure than symmetric-key cryptography because the security is based on a privatevalue, which is generated by each server and never revealed.With Autokey, all key distribution andmanagementfunctions involve only public values, which considerably simplifies key distribution and storage.
You can configure Autokey for NTP server from the Cisco ISE CLI in Configuration Mode. We recommendthat you use the IFF (identify Friend or Foe) Identification scheme as this scheme is most widely used.
Before you begin
You must have either the Super Admin or System Admin administrator role assigned.
Administer Cisco ISE5
Administer Cisco ISEExternal RESTful Services SDK
If you have both a primary and a secondary Cisco ISE node, you must log in to the user interface of thesecondary node and configure the system time and NTP server settings on each Cisco ISE node in yourdeployment individually.
Step 1 Choose Administration > System > Settings > System Time.Step 2 Enter unique IP addresses (IPv4/IPv6/FQDN) for your NTP servers.Step 3 Check the Only allow authenticated NTP servers check box if you want to restrict Cisco ISE to use only authenticated
NTP servers to keep system and network time.Step 4 (Optional) If you want to authenticate the NTP server using private keys, click the NTP Authentication Keys tab and
specify one or more authentication keys if any of the servers that you specify requires authentication via an authenticationkey, as follows:a) Click Add.b) Enter the necessaryKey ID andKey Value. Specify whether the key in question is trusted by activating or deactivating
the Trusted Key option, and click OK. The Key ID field supports numeric values between 1 to 65535 and the KeyValue field supports up to 15 alphanumeric characters.
c) Return to the NTP Server Configuration tab when you are finished entering the NTP Server Authentication Keys.
Step 5 (Optional) If you want to authenticate the NTP server using public-key authentication, configure Autokey on Cisco ISEfrom the command-line interface (CLI). See the ntp server and crypto commands in the Cisco Identity Services EngineCLI Reference Guide for your release of ISE for more details.
Step 6 Click Save.
Changing the System Time ZoneOnce set, you cannot edit the time zone from the Admin portal. To change the time zone setting, you mustenter the following command in the Cisco ISE CLI:
clock timezone timezone
Cisco ISE uses POSIX-style signs in the time zone names and the output abbreviations. Therefore, zones westof Greenwich have a positive sign and zones east of Greenwich have a negative sign. For example,TZ='Etc/GMT+4' corresponds to 4 hours behind Universal Time (UT).
Note
Changing the time zone on a Cisco ISE appliance after installation requires ISE services to be restarted onthat particular node. Hence we recommend that you perform such changes within a maintenance window.Also, it is important to have all the nodes in a single ISE deployment configured to the same time zone. Ifyou have ISE nodes located in different geographical locations or time zones, you should use a global timezone such as UTC on all the ISE nodes.
Caution
For more information on the clock timezone command, refer to the Cisco Identity Services Engine CLIReference Guide.
Administer Cisco ISE6
Administer Cisco ISEChanging the System Time Zone
Configure SMTP Server to Support NotificationsConfigure a Simple Mail Transfer Protocol (SMTP) server to send email notifications for alarms, to enablesponsors to send email notification to guests with their login credentials and password reset instructions, andto enable guests to automatically receive their login credentials after they successfully register themselvesand with actions to take before their guest accounts expire.
Which ISE Nodes Send Email
The following list shows which node in a distributed ISE environment sends email.
Node That Sends the EmailEmail Purpose
Primary PANguest expiration
Active MnTalarms
PSNsponsor and guest notifications from guest and sponsorportals
Primary PANpassword expirations
Step 1 Choose Administration > System > Settings > SMTP Server.
Step 2 Choose Settings > SMTP Server.
Step 3 Enter the hostname of the outbound SMTP server in the SMTP server field. This SMTP host server must be accessiblefrom the Cisco ISE server. The maximum length for this field is 60 characters.
Step 4 Choose one of these options:
• Use email address from Sponsor to send guest notification email from the email address of the sponsor and chooseEnable Notifications.
• Use the default email address to specify a specific email address from which to send all guest notifications and enterit in the Default email addressfield.
Step 5 Click Save.
The recipient of alarm notifications can be any internal admin users with the Include system alarms in emailsoption enabled. The sender’s email address for sending alarm notifications is hardcoded as ise@<hostname>.
Cisco ISE Deployment UpgradeCisco ISE offers a GUI-based centralized upgrade from the Admin portal. The upgrade process is muchsimplified and the progress of the upgrade and the status of the nodes are displayed on screen. Refer to theCisco Identity Services Engine Upgrade Guide for a list of pre and post upgrade tasks.
The Upgrade Overview page lists all the nodes in your deployment, the personas that are enabled on them,the version of ISE installed, and the status (indicates whether a node is active or inactive) of the node. Youcan begin upgrade only if the nodes are in the Active state.
Administer Cisco ISE7
Administer Cisco ISEConfigure SMTP Server to Support Notifications

Different Types of Deployment• Standalone Node—A single Cisco ISE node assuming the Administration, Policy Service, andMonitoringpersona.
• Multi-Node Deployment—A distributed deployment with several ISE nodes. The procedure to upgradea distributed deployment is discussed in the following listed references.
ISE Community Resource
For information on how to assess the network for ISE deployment readiness, see ISE Deployment Assistant(IDA).
Upgrade a Distributed DeploymentYou can upgrade all the nodes in a Cisco ISE deployment using the Admin portal from Release 2.0 onwards,you can also upgarde a Limited Availability Release of Cisco ISE 2.0 or later to the General AvailabilityRelease.
Before you begin
Ensure that you have performed the following tasks before you upgrade:
• Obtain a backup of the ISE configuration and operational data.
• Obtain a backup of the system logs.
• Disable scheduled backups. Reconfigure the backup schedules after deployment upgrade is complete.
• Export the certificates and private keys.
• Configure a repository. Download the upgrade bundle and place it in the repository.
• Make a note of Active Directory join credentials and RSA SecurID node secret, if applicable. You needthis information to connect to Active Directory or RSA SecurID server after upgrade.
• Purge the operational data to improve upgrade performance.
• Ensure that your Internet connection to the repository is good.
When you download an upgrade bundle from a repository to a node, the downloadtimes out if it takes more than 35 minutes to complete. This issue occurs becauseof poor Internet bandwidth.
Note
Step 1 Click the Upgrade tab in the Admin portal.Step 2 Click Proceed.
The Review Checklist window appears. Read the given instructions carefully.
Step 3 Check the I have reviewed the checklist check box, and click Continue.
Administer Cisco ISE8
Administer Cisco ISEDifferent Types of Deployment
The Download Bundle to Nodes window appears.
Step 4 Download the upgrade bundle from the repository to the nodes:a) Check the check box next to the nodes to which you want to download the upgrade bundle.b) Click Download.
The Select Repository and Bundle window appears.
c) Select the repository.
You can select the same repository or different repositories on different nodes, but you must select the same upgradebundle on all the nodes.
d) Check the check box next to the bundle that you want to use for the upgrade.e) Click Confirm.
Once the bundle is downloaded to the node, the node status changes to Ready for Upgrade.
Step 5 Click Continue.
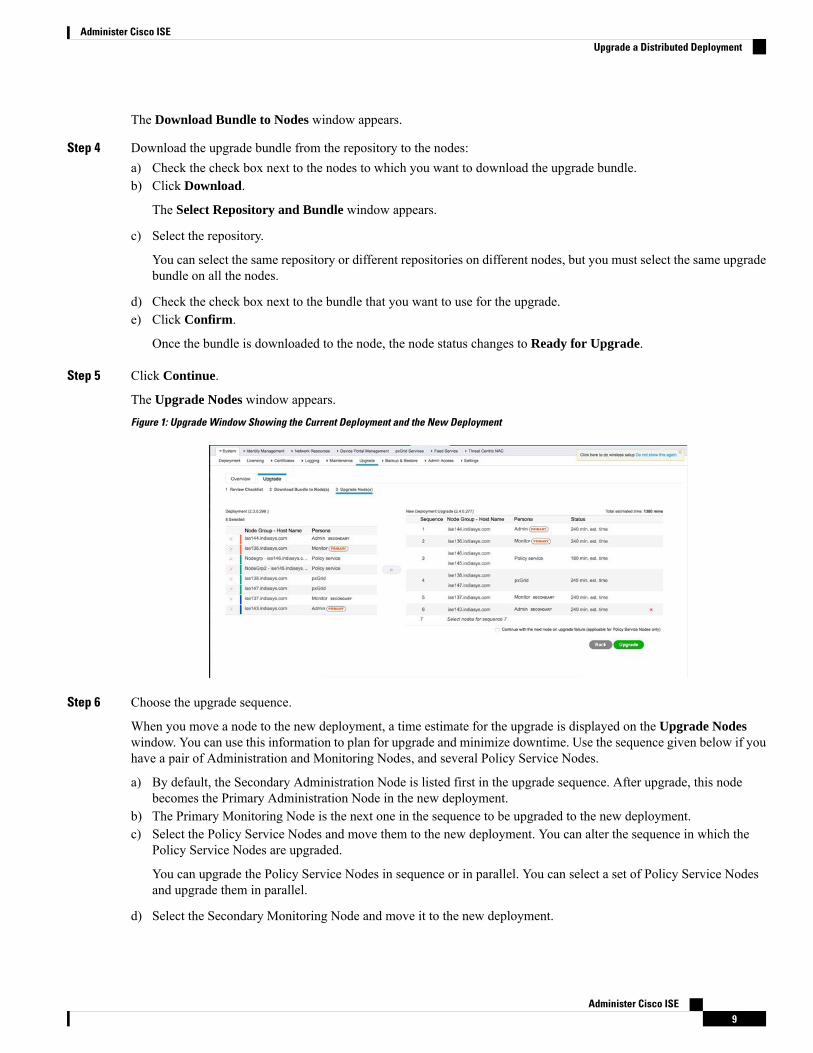
The Upgrade Nodes window appears.
Figure 1: Upgrade Window Showing the Current Deployment and the New Deployment
Step 6 Choose the upgrade sequence.
When you move a node to the new deployment, a time estimate for the upgrade is displayed on the Upgrade Nodeswindow. You can use this information to plan for upgrade and minimize downtime. Use the sequence given below if youhave a pair of Administration and Monitoring Nodes, and several Policy Service Nodes.
a) By default, the Secondary Administration Node is listed first in the upgrade sequence. After upgrade, this nodebecomes the Primary Administration Node in the new deployment.
b) The Primary Monitoring Node is the next one in the sequence to be upgraded to the new deployment.c) Select the Policy Service Nodes and move them to the new deployment. You can alter the sequence in which the
Policy Service Nodes are upgraded.
You can upgrade the Policy Service Nodes in sequence or in parallel. You can select a set of Policy Service Nodesand upgrade them in parallel.
d) Select the Secondary Monitoring Node and move it to the new deployment.
Administer Cisco ISE9
Administer Cisco ISEUpgrade a Distributed Deployment
e) Finally, select the Primary Administration Node and move it to the new deployment.
Step 7 Check the Continue with upgrade on failure check box if you want to continue with the upgrade even if the upgradefails on any of the Policy Service Nodes in the upgrade sequence.
This option is not applicable for the Secondary Administration Node and the Primary Monitoring Node. If any one ofthese nodes fail, the upgrade process is rolled back. If any of the Policy Service Nodes fail, the Secondary MonitoringNode and the Primary Administration Node are not upgraded and remain in the old deployment.
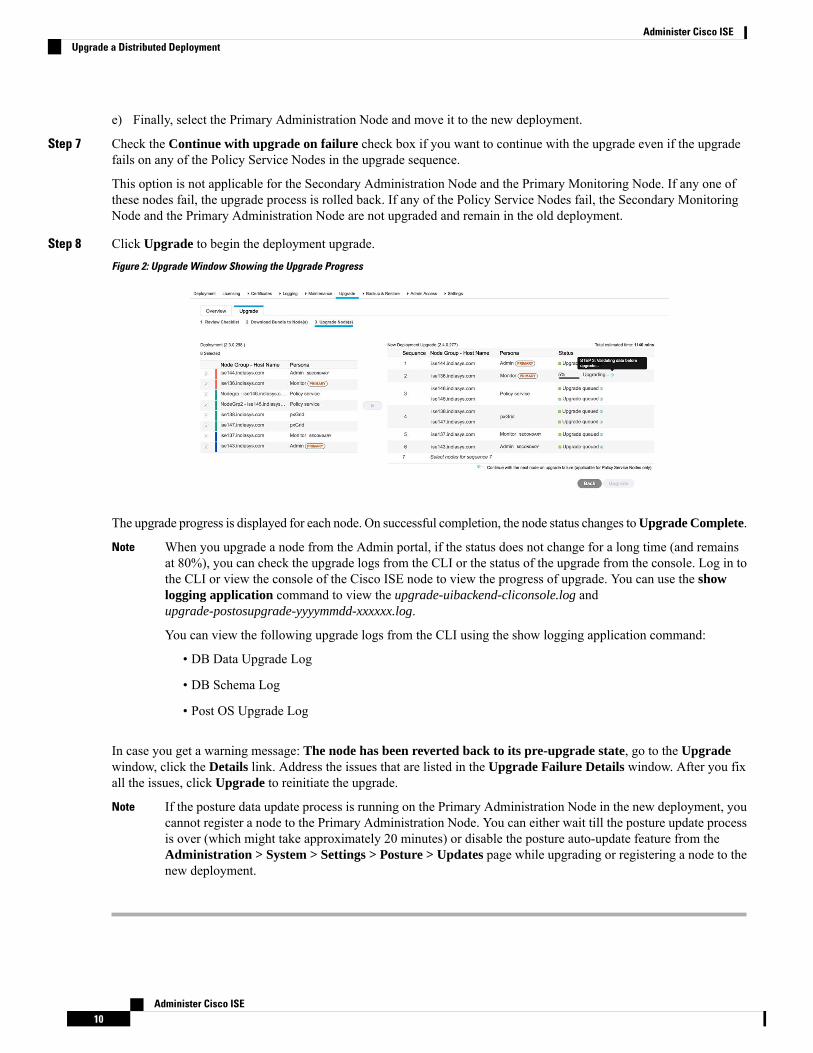
Step 8 Click Upgrade to begin the deployment upgrade.
Figure 2: Upgrade Window Showing the Upgrade Progress
The upgrade progress is displayed for each node. On successful completion, the node status changes toUpgrade Complete.
When you upgrade a node from the Admin portal, if the status does not change for a long time (and remainsat 80%), you can check the upgrade logs from the CLI or the status of the upgrade from the console. Log in tothe CLI or view the console of the Cisco ISE node to view the progress of upgrade. You can use the showlogging application command to view the upgrade-uibackend-cliconsole.log andupgrade-postosupgrade-yyyymmdd-xxxxxx.log.
You can view the following upgrade logs from the CLI using the show logging application command:
• DB Data Upgrade Log
• DB Schema Log
• Post OS Upgrade Log
Note
In case you get a warning message: The node has been reverted back to its pre-upgrade state, go to the Upgradewindow, click the Details link. Address the issues that are listed in the Upgrade Failure Details window. After you fixall the issues, click Upgrade to reinitiate the upgrade.
If the posture data update process is running on the Primary Administration Node in the new deployment, youcannot register a node to the Primary Administration Node. You can either wait till the posture update processis over (which might take approximately 20 minutes) or disable the posture auto-update feature from theAdministration > System > Settings > Posture > Updates page while upgrading or registering a node to thenew deployment.
Note
Administer Cisco ISE10
Administer Cisco ISEUpgrade a Distributed Deployment
Cisco ISE Software PatchesCisco ISE software patches are usually cumulative. Cisco ISE allows you to perform patch installation androllback from CLI or GUI.
You can install patches on Cisco ISE servers in your deployment from the Primary PAN. To install a patchfrom the Primary PAN, you must download the patch from Cisco.com to the system that runs your clientbrowser.
If you are installing the patch from the GUI, the patch is automatically installed on the Primary PAN first.The system then installs the patch on the other nodes in the deployment in the order listed in the GUI. Youcannot control the order in which the nodes are updated.
If you are installing the patch from the CLI, you can control the order in which the nodes are updated. However,we recommend that you install the patch on the Primary PAN first.
If you want to validate the patch on some of the nodes before upgrading the entire deployment, you can usethe CLI to install the patch on selected nodes. Use the following CLI command to install the patch:patch install <patch_bundle> <repository_that_stores_patch_file>
For more information, see the Cisco Identity Services Engine CLI Reference Guide.
You can install the required patch version directly. For example, if you are currently using Cisco ISE 2.x andwould like to install Cisco ISE 2.x patch 5, you can directly install Cisco ISE 2.x patch 5, without installingthe previous patches (in this example, Cisco ISE 2.x patches 1 – 4).
Related TopicsSoftware Patch Installation Guidelines, on page 11Install a Software Patch, on page 12Software Patch Installation Guidelines, on page 11Software Patch Rollback Guidelines, on page 13Install a Software Patch, on page 12Roll Back Software Patches, on page 12
Software Patch Installation GuidelinesWhen you install a patch on an ISE node, the node is rebooted after the installation is complete. You mighthave to wait for a few minutes before you can log in again. You can schedule patch installations during amaintenance window to avoid temporary outage.
Ensure that you install patches that are applicable for the Cisco ISE version that is deployed in your network.Cisco ISE reports any mismatch in versions as well as any errors in the patch file.
You cannot install a patch with a version that is lower than the patch that is currently installed on Cisco ISE.Similarly, you cannot roll back changes of a lower-version patch if a higher version is currently installed onCisco ISE. For example, if patch 3 is installed on your Cisco ISE servers, you cannot install or roll back patch1 or 2.
When you install a patch from the Primary PAN that is part of a distributed deployment, Cisco ISE installsthe patch on the primary node and then all the secondary nodes in the deployment. If the patch installation issuccessful on the Primary PAN, Cisco ISE then continues patch installation on the secondary nodes. If it failson the Primary PAN, the installation does not proceed to the secondary nodes. However, if the installation
Administer Cisco ISE11
Administer Cisco ISECisco ISE Software Patches
fails on any of the secondary nodes for any reason, it still continues with the next secondary node in yourdeployment.
When you install a patch from the Primary PAN that is part of a two-node deployment, Cisco installs thepatch on the primary node and then on the secondary node. If the patch installation is successful on the PrimaryPAN, Cisco then continues patch installation on the secondary node. If it fails on the Primary PAN, theinstallation does not proceed to the secondary node.
Install a Software Patch
Before you begin
• You must have the Super Admin or System Admin administrator role assigned.
• Go toAdministration > System >Deployment > PAN Failover, and ensure that theEnable PAN AutoFailover check box is unchecked. The PAN auto-failover configuration must be disabled for the durationof this task.
Step 1 Choose Administration > System > Maintenance > Patch Management > Install.
Step 2 Click Browse and choose the patch that you downloaded from Cisco.com.Step 3 Click Install to install the patch.
After the patch is installed on the PAN, Cisco ISE logs you out and you have to wait for a few minutes before you canlog in again.
When patch installation is in progress, Show Node Status is the only function that is accessible on the PatchManagement page.
Note
Step 4 Choose Administration > System > Maintenance > Patch Management to return to the Patch Installation page.Step 5 Click the radio button next to the patch that you have installed on any secondary node and click Show Node Status to
verify whether installation is complete.
What to do next
If you need to install the patch on one or more secondary nodes, ensure that the nodes are up and repeat theprocess to install the patch on the remaining nodes.
Roll Back Software PatchesWhen you roll back a patch from the PAN that is part of a deployment with multiple nodes, Cisco ISE rollsback the patch on the primary node and then all the secondary nodes in the deployment.
Before you begin
• You must have either the Super Admin or System Admin administrator role assigned.
Administer Cisco ISE12
Administer Cisco ISEInstall a Software Patch
Step 1 Choose Administration > System > Maintenance > Patch Management.Step 2 Click the radio button for the patch version whose changes you want to roll back and click Rollback.
When a patch rollback is in progress, Show Node Status is the only function that is accessible on the PatchManagement page.
After the patch is rolled back from the PAN, Cisco ISE logs you out and you have to wait a few minutes beforeyou can log in again.
Note
Step 3 After you log in, click the Alarms link at the bottom of the page to view the status of the rollback operation.Step 4 Choose Administration > System > Maintenance > Patch Management.Step 5 To view the progress of the patch rollback, choose the patch in the Patch Management page and click Show Node Status.Step 6 Click the radio button for the patch and click Show Node Status on a secondary node to ensure that the patch is rolled
back from all the nodes in your deployment.
If the patch is not rolled back from any of the secondary nodes, ensure that the node is up and repeat the process to rollback the changes from the remaining nodes. Cisco ISE only rolls back the patch from the nodes that still have this versionof the patch installed.
Related TopicsSoftware Patch Rollback Guidelines, on page 13
Software Patch Rollback GuidelinesTo roll back a patch from Cisco ISE nodes in a deployment, you must first roll back the change from the PAN.If this is successful, the patch is then rolled back from the secondary nodes. If the rollback process fails onthe PAN, the patches are not rolled back from the secondary nodes. However, if the patch rollback fails onany secondary node, it still continues to roll back the patch from the next secondary node in your deployment.
While Cisco ISE rolls back the patch from the secondary nodes, you can continue to perform other tasks fromthe PAN GUI. The secondary nodes will be restarted after the rollback.
View Patch Install and Rollback ChangesTo view reports related to installed patches, perform the following steps.
Before you begin
You must have either the Super Admin or System Admin administrator role assigned. You can install orrollback patches in the Administration > System > Maintenance > Patch Management page. You can alsoview the status (installed/in-progress/not installed) of a particular patch on each node in the deployment, byselecting a specific patch and clicking the Show Node Status button.
Step 1 ChooseOperations > Reports > Audit > Operations Audit. By default, records for the last seven days are displayed.
Administer Cisco ISE13
Administer Cisco ISESoftware Patch Rollback Guidelines
Step 2 Click the Filter drop-down, and choose Quick Filter or Advanced Filter and use the required keyword, for example,patch install iniated, to generate a report containing the installed patches.
FIPS Mode SupportISE FIPS 140 mode initializes the Cisco FIPS Object Module cryptographic module into FIPS 140-2 mode.Cisco Identity Services Engine uses embedded FIPS 140-2 validated cryptographic modules. For details ofthe FIPS compliance claims, see the FIPS Compliance Letter.
When the FIPS mode is enabled, the Cisco ISE administrator interface displays a FIPS mode icon at the leftof the node name in the upper-right corner of the page.
If Cisco ISE detects the use of a protocol or certificate that is not supported by the FIPS 140-2 standard, itdisplays a warning with the name of the protocol or certificate that is noncompliant, and the FIPS mode isnot enabled. Ensure that you choose only FIPS-compliant protocols and replace non-FIPS compliant certificatesbefore you enable the FIPS mode.
The certificates installed in Cisco ISE must be re-issued if the encryption method used in the certificates isnot supported by FIPS.
When you enable the FIPS mode, the following functions are affected:
• Lightweight Directory Access Protocol (LDAP) over Secure Sockets Layer (SSL)
• Cisco ISE enables FIPS 140-2 compliance via RADIUS shared secret and key management measures.When the FIPS mode is enabled, any function that uses non-FIPS compliant algorithm will fail.
When you enable the FIPS mode:
• All non-FIPS compliant cipher suites are disabled for EAP-TLS, PEAP, and EAP-FAST
• All non-FIPS compliant cipher suites are disabled in SSH
• Certificates and private keys must use only FIPS compliant hash and encryption algorithms
• RSA private keys must be of 2048 bits or greater
• ECDSA private keys must be of 224 bits or greater
• ECDSA server certificate will work with only TLS 1.2
• DHE ciphers work with DH parameters of 2048 bits or greater for all ISE TLS clients
• 3DES ciphers are not allowed for ISE as a server
• SHA1 is not allowed for generating certificates
• SHA1 is not allowed in client certificates
• The anonymous PAC provisioning option in EAP-FAST is disabled
• Local SSH server will operate in FIPS mode
• The following protocols are not supported for RADIUS:
• EAP-MD5
Administer Cisco ISE14
Administer Cisco ISEFIPS Mode Support
• PAP
• CHAP
• MS-CHAPv1
• MS-CHAPv2
• LEAP
Guest is not supported in FIPSmode. Enabling FIPSmode also automatically disables Password AuthenticationProtocol (PAP) and Challenge Handshake Authentication Protocol (CHAP) protocols, which the guest loginfunction of Cisco ISE requires.
Once the FIPSMode is enabled, all the nodes in the deployment are rebooted automatically. Cisco ISE performsa rolling restart by first restarting the Primary PAN and then restarting each of the secondary node, one at atime. Hence, it is recommended that you plan for the downtime before changing the configuration.
We recommend that you do not enable FIPS mode before completing any database migration process.Tip
Enable FIPS Mode in Cisco ISETo enable the FIPS mode:
Step 1 Choose Administration > System > Settings > FIPS Mode.Step 2 Choose the Enabled option from the FIPS Mode drop-down list.Step 3 Click Save and restart your machine.
What to do next
After you enable FIPS mode, enable and configure the following FIPS 140-2 compliant functions:
• Generate a Self-Signed Certificate
• Create a Certificate Signing Request and Submit the CSR to a Certificate Authority
• See the Network Device Definition Settings section in
• Configure RADIUS authentication settings under Network Device Definition Settings .
In addition, youmaywant to enable administrator account authorization using a CommonAccess Card (CAC)function. Although using CAC functions for authorization is not strictly a FIPS 140-2 requirement, it is awell-known secure-access measure that is used in a number of environments to bolster FIPS 140-2 compliance.
Configure Cisco ISE for Administrator CAC Authentication
Before you begin
Before beginning configuration, do the following:
Administer Cisco ISE15
Administer Cisco ISEEnable FIPS Mode in Cisco ISE
• (Optional) Turn on FIPS mode. FIPS mode is not required for certificate-based authentication, but thetwo security measures often go hand-in-hand. If you do plan to deploy Cisco ISE in a FIPS 140-2compliant deployment and to use CAC certificate-based authorization as well, be sure to turn FIPS modeon and specify the appropriate private keys and encryption/decryption settings first.
• Ensure that the domain name server (DNS) in Cisco ISE is set for Active Directory.
• Ensure that Active Directory user and user group membership has been defined for each administratorcertificate.
To ensure that Cisco ISE can authenticate and authorize an administrator based on the CAC-based clientcertificate that is submitted from the browser, be sure that you have configured the following:
• The external identity source (Active Directory in the following example)
• The user groups in Active Directory to which the administrator belongs
• How to find the user's identity in the certificate
• Active Directory user groups to Cisco ISE RBAC permissions mapping
• The Certificate Authority (trust) certificates that sign the client certificates
• A method to determine if a client certificate has been revoked by the CA
You can use a Common Access Card (CAC) to authenticate credentials when logging into Cisco ISE.
Step 1 Enable FIPS mode. You will be prompted to restart your system after you enable the FIPS mode. You can defer the restartif you are going to import CA certificates as well.
Step 2 Configure an Active Directory identity source in Cisco ISE and join all Cisco ISE nodes to Active Directory.Step 3 Configure a certificate authentication profile according to the guidelines.
Be sure to select the attribute in the certificate that contains the administrator user name in the Principal Name X.509Attribute field. (For CAC cards, the Signature Certificate on the card is normally used to look up the user in ActiveDirectory. The Principal Name is found in this certificate in the "Subject Alternative Name" extension, specifically in afield in that extension that is called "Other Name." So the attribute selection here should be "Subject Alternative Name- Other Name.")
If the AD record for the user contains the user's certificate, and you want to compare the certificate that is received fromthe browser against the certificate in AD, check the Binary Certificate Comparison check box, and select the ActiveDirectory instance name that was specified earlier.
Step 4 Enable Active Directory for Password-Based Admin Authentication. Choose the Active Directory instance name thatyou connected and joined to Cisco ISE earlier.
You must use password-based authentication until you complete other configurations. Then, you can changethe authentication type to client certificate based at the end of this procedure.
Note
Step 5 Create an External Administrator Group and map it to an Active Directory Group. Choose Administration > System> Admin Access > Administrators > Admin Groups. Create an external system administrator group.
Step 6 Configure an admin authorization policy to assign RBAC permissions to the external admin groups.
Administer Cisco ISE16
Administer Cisco ISEConfigure Cisco ISE for Administrator CAC Authentication
We strongly recommend that you create an external Super Admin group, map it to an Active Directory group,and configure an admin authorization policy with Super Admin permissions (menu access and data access),and create at least one user in that Active Directory Group. This mapping ensures that at least one externaladministrator has Super Admin permissions once Client Certificate-Based Authentication is enabled. Failureto do this may lead to situations where the Cisco ISE administrator is locked out of critical functionality in theAdmin Portal.
Caution
Step 7 Choose Administration > System > Certificates > Certificate Store to import certificate authority certificates intothe Cisco ISE certificate trust store.
Cisco ISE does not accept a client certificate unless the CA certificates in the client certificate’s trust chain are placed inthe Cisco ISE Certificate Store. You must import the appropriate CA certificates in to the Cisco ISE Certificate Store.
a) Click Browse to choose the certificate.b) Check the Trust for client authentication check box.c) Click Submit.
Cisco ISE prompts you to restart all the nodes in the deployment after you import a certificate. You can defer therestart until you import all the certificates. However, after importing all the certificates, you must restart Cisco ISEbefore you proceed.
Step 8 Configure the certificate authority certificates for revocation status verification.a) Choose Administration > System > Certificates > OSCP Services.b) Enter the name of an OSCP server, an optional description, and the URL of the server.c) Choose Administration > System > Certificates > Certificate Store.d) For each CA certificate that can sign a client certificate, specify how to do the revocation status check for that CA.
Choose a CA certificate from the list and click Edit. On the edit page, choose OCSP and/or CRL validation. If youchoose OCSP, choose an OCSP service to use for that CA. If you choose CRL, specify the CRL Distribution URLand other configuration parameters.
Step 9 Enable client certificate-based authentication. ChooseAdministration > System > Admin Access > Authentication.a) Choose Client Certificate Based authentication type on the Authentication Method tab.b) Choose the certificate authentication profile that you configured earlier.c) Select the Active Directory instance name.d) Click Save.
Here, you switch from password-based authentication to client certificate-based authentication. The certificateauthentication profile that you configured earlier determines how the administrator’s certificate is authenticated. Theadministrator is authorized using the external identity source, which in this example is Active Directory.
The Principal Name attribute from the certificate authentication profile is used to look up the administrator in ActiveDirectory.
You have now configured Cisco ISE for administrator CAC authentication.
Related TopicsSupported Common Access Card Standards, on page 18Common Access Card Operation in Cisco ISE, on page 18
Administer Cisco ISE17
Administer Cisco ISEConfigure Cisco ISE for Administrator CAC Authentication
Supported Common Access Card Standards
Cisco ISE supports U.S. government users who authenticate themselves using Common Access Card (CAC)authentication devices. A CAC is an identification badge with an electronic chip containing a set of X.509client certificates that identify a particular employee. Access via the CAC requires a card reader into whichyou insert the card and enter a PIN. The certificates from the card are then transferred into the Windowscertificate store, where they are available to applications such as the local browser running Cisco ISE.
Windows Internet Explorer Version 8 and 9 users running the Windows 7 operating system must install theActiveIdentity ActivClient Version 6.2.0.133 third-party middleware software product for Cisco ISE tointeroperate with CAC. For more information on ActiveIdentity security client products, refer to ActivIDActivClient Security Software Datasheet.
Common Access Card Operation in Cisco ISE
The Admin portal can be configured so that your authentication with Cisco ISE is permitted only by using aclient certificate. Credentials-based authentication—such as providing a user ID and password—is not permitted.In client certificate authentication, you insert a Common Access Card (CAC) card, enter a PIN and then enterthe Cisco ISE Admin portal URL into the browser address field. The browser forwards the certificate to CiscoISE, and Cisco ISE authenticates and authorizes your login session, based on the contents of the certificate.If this process is successful, you are presented with the Cisco ISE Monitoring and Troubleshooting homepage and given the appropriate RBAC permissions.
Securing SSH Key Exchange Using Diffie-Hellman AlgorithmYou can configure Cisco ISE to only allow Diffie-Hellman-Group14-SHA1 SSH key exchanges. To do this,you must enter the following commands from the Cisco ISE Command-Line Interface (CLI) ConfigurationMode:
service sshd key-exchange-algorithm diffie-hellman-group14-sha1
Here’s an example:
ise/admin#conf t
ise/admin (config)#service sshd key-exchange-algorithm diffie-hellman-group14-sha1
Configure Cisco ISE to Send Secure SyslogTo configure Cisco ISE to send only TLS-protected secure syslog between the Cisco ISE nodes and to theMonitoring nodes, you must perform the following tasks:
Before you begin
• Ensure that all the Cisco ISE nodes in your deployment are configured with appropriate server certificates.If you want your setup to be FIPS 140-2 compliant, the certificate keys must have a key size of 2048 bitsor greater.
• Enable the FIPS mode in the Admin portal.
• Ensure that the default network access authentication policy does not allow any version of the SSLprotocol. Use the TLS protocol in the FIPS mode along with FIPS-approved algorithms.
Administer Cisco ISE18
Administer Cisco ISESupported Common Access Card Standards
• Ensure that all the nodes in your deployment are registered with the Primary PAN. Also, ensure that atleast one node in your deployment has the Monitoring persona enabled to function as the secure syslogreceiver (TLS server).
Step 1 Configure secure syslog remote logging target.Step 2 Enable Logging Categories to send auditable events to the secure syslog remote logging target.Step 3 Disable TCP Syslog and UDP syslog collectors. Only TLS-protected syslog collectors should be enabled.
Related TopicsConfigure Secure Syslog Remote Logging Target, on page 19Enable Logging Categories to Send Auditable Events to the Secure Syslog Target, on page 19Disable the TCP Syslog and UDP Syslog Collectors, on page 20
Configure Secure Syslog Remote Logging TargetCisco ISE system logs are collected and stored by log collectors for various purposes. You must choose theCisco ISE Monitoring node as your log collector for configuring a secure syslog target.
Step 1 Log in to the Admin portal.Step 2 Choose Administration > System > Logging > Remote Logging Targets.Step 3 Click Add.Step 4 Enter a name for the secure syslog server.Step 5 Choose Secure Syslog from the Target Type drop-down list.Step 6 Choose Enabled from the Status drop-down list.Step 7 Enter the IP address of the Cisco ISE Monitoring node in your deployment.Step 8 Enter 6514 as the port number. The secure syslog receiver listens on TCP port 6514.Step 9 Choose the syslog facility code. The default is LOCAL6.Step 10 Check the Buffer Messages When Server is Down check box. If this option is checked, Cisco ISE stores the logs if the
secure syslog receiver is unreachable, periodically checks the secure syslog receiver, and forwards them when thesecure syslog receiver comes up.a) Enter the buffer size.b) Enter the Reconnect Timeout in seconds for Cisco ISE to periodically check the secure syslog receiver.
Step 11 Select a CA certificate that you want Cisco ISE to present to the secure syslog server.Step 12 Uncheck the Ignore Server Certificate validation check box. You must not check this option.Step 13 Click Submit.
Enable Logging Categories to Send Auditable Events to the Secure SyslogTarget
You must enable logging categories for Cisco ISE to send auditable events to the secure syslog target.
Administer Cisco ISE19
Administer Cisco ISEConfigure Secure Syslog Remote Logging Target
Step 1 Log in to the Admin portal.Step 2 Choose Administration > System > Logging > Logging Categories.Step 3 Click the radio button next to the AAA Audit logging category, then click Edit.Step 4 Choose WARN from the Log Severity Level drop-down list.Step 5 Move the secure syslog remote logging target that you created earlier to the Selected box.Step 6 Click Save.Step 7 Repeat this procedure to enable the following logging categories:
• Administrative and Operational Audit
• Posture and Client Provisioning Audit
Disable the TCP Syslog and UDP Syslog CollectorsFor Cisco ISE to send only secure syslog between the ISE nodes, you must disable the TCP and UDP syslogcollectors, and enable only the secure syslog collector.
Step 1 Log in to the Admin portal.Step 2 Choose Administration > System > Logging > Remote Logging Targets.Step 3 Click the radio button next to the TCP or UDP syslog collector.Step 4 Click Edit.Step 5 Choose Disabled from the Status drop-down list.Step 6 Click Save.Step 7 Repeat this process until you disable all the TCP or UDP syslog collectors.
Default Secure Syslog CollectorCisco ISE provides default secure syslog collectors for the MnT nodes. By default, no logging categories aremapped to these default secure syslog collectors. The default secure syslog collectors are named as follows:
• Primary MnT node—SecureSyslogCollector
• Secondary MnT node—SecureSyslogCollector2
You can view this information on the Remote Logging Targets page (Administration > System > Logging).You cannot delete the default syslog collectors and cannot update the following fields for the default syslogcollectors: Name, Target type, IP/Host address, and Port.
During a fresh Cisco ISE installation, "Default Self-signed Server Certificate" from the system will be addedto the Trust Store and marked for “Trust for Client authentication and Syslog" usage, thereby making itavailable for secure syslog usage. While configuring your deployment or updating the certificates, you mustassign relevant certificates to the secure syslog targets.
Administer Cisco ISE20
Administer Cisco ISEDisable the TCP Syslog and UDP Syslog Collectors
During upgrade if there are any existing secure syslog targets pointing to MnT nodes on port 6514, the samename and configuration will be retained, but after upgrade you cannot delete these syslog targets and cannotedit the following fields: Name, Target type, IP/Host address, and Port. If no such targets exist at the time ofupgrade, default secure syslog targets will be created similar to fresh installation scenario without any certificatemapping. You can assign relevant certificates to these syslog targets. If you try to map a secure syslog targetthat is not mapped to any certificate, to a logging category, the following message will be displayed:
Please configure the certificate for log_target_name
Offline MaintenanceIf the maintenance time period is less than an hour, take the ISE node offline and perform the maintenancetask.When you bring the node back online, PANwill automatically synchronize all the changes that happenedduring maintenance time period. If the changes are not synchronized automatically, you can manuallysynchronize it with the PAN.
If the maintenance time period is more than an hour, de-register the node at the time of maintenance andre-register the node when you add the node back to deployment.
We recommend that you schedule the maintenance at a time period during which the activity is low.
1. Data replication issue may occur if the queue contains more than 1, 000,000 messages or if the ISE nodeis offline for more than 6 hours.
2. If you are planning to performmaintenance on primaryMnT node, we recommend that you take operationalbackup of the MnT node before performing maintenance activities.
Note
Administer Cisco ISE21
Administer Cisco ISEOffline Maintenance

Administer Cisco ISE22
Administer Cisco ISEOffline Maintenance