acuity 504 tm - msb acuity 504 manual will guide users through navigation of the system ... in...
TRANSCRIPT
msb-services.com 1 © Copyright MSB 2014
Revision Date 10/24/2014
TM
Acuity 504 User Guide
Administrators
504 Coordinators
Teachers
MSB™ Customer Care
800.810.4220
msb-services.com
Copyright © 2014 MSB™ All rights reserved
msb-services.com 2 © Copyright MSB 2014
Revision Date 10/24/2014
Table of Contents
MSB™ Mission Statement ..................................................................................................................... 7
Welcome to AcuityTM 504 ......................................................................................................................... 8
User Guide Information ........................................................................................................................ 8
Disable Pop-Up Blockers ....................................................................................................................... 8
MSB Registration and Login Information .................................................................................................. 9
New Users ................................................................................................................................................. 9
New User Registration .......................................................................................................................... 9
Create Profile ...................................................................................................................................... 10
Additional login information ............................................................................................................... 12
Existing Users .......................................................................................................................................... 13
Logging In ............................................................................................................................................ 13
Forgotten Password ............................................................................................................................ 13
Adding a New Account or Module ...................................................................................................... 13
Universal Functionality ........................................................................................................................... 16
Adding Information ............................................................................................................................. 16
Deleting Information ........................................................................................................................... 16
Edit/Preview/Print Forms ................................................................................................................... 17
Work Space Editing ............................................................................................................................. 18
Saving Data .......................................................................................................................................... 18
Spell Check .......................................................................................................................................... 19
Navigation of Acuity 504 ............................................................................................................................. 20
Launch Pad .............................................................................................................................................. 20
Navigation Bar/Buttons .......................................................................................................................... 20
Navigation Bar ..................................................................................................................................... 20
msb-services.com 3 © Copyright MSB 2014
Revision Date 10/24/2014
Navigation Buttons ............................................................................................................................. 20
Home ................................................................................................................................................... 21
Blank Forms ........................................................................................................................................ 21
Notifications ........................................................................................................................................ 23
Reminders .......................................................................................................................................... 25
Help .................................................................................................................................................... 27
Pathway .................................................................................................................................................. 28
Pathway Drop-downs .......................................................................................................................... 28
Action Icons ............................................................................................................................................. 29
Caseload Action Icons ............................................................................................................................. 29
Work Space Action Icons ........................................................................................................................ 29
Administrative Menu .............................................................................................................................. 30
User Management .................................................................................................................................. 32
User Details ......................................................................................................................................... 32
Approve Users ..................................................................................................................................... 35
Locked Users ....................................................................................................................................... 35
Caseload Management ........................................................................................................................... 36
504 Coordinators .................................................................................................................................... 36
Assign teacher(s) to a 504 Coordinator’s caseload ............................................................................. 36
Remove Teacher from a 504 Coordinator .......................................................................................... 38
Teachers .................................................................................................................................................. 39
Search Caseloads................................................................................................................................. 39
Assign Students to a Teacher .............................................................................................................. 40
Remove Student from a Teacher’s Caseload ...................................................................................... 42
Caseload Status ....................................................................................................................................... 43
msb-services.com 4 © Copyright MSB 2014
Revision Date 10/24/2014
Filter and Sort ...................................................................................................................................... 43
Access to Student Documentation...................................................................................................... 43
Edit School, Grade or Status for a Student ......................................................................................... 43
Global Advance Student Grades ......................................................................................................... 44
Review Student Reminders ................................................................................................................. 45
Caseload Reports .................................................................................................................................... 46
District Reports ................................................................................................................................... 46
Custom Reports - New ........................................................................................................................ 47
Custom Reports – Existing .................................................................................................................. 50
Student Management ............................................................................................................................. 51
Student Details ........................................................................................................................................ 51
Accessing Student Data ....................................................................................................................... 51
Add a Student...................................................................................................................................... 53
Delete a Student ................................................................................................................................. 54
Exit a Student ...................................................................................................................................... 54
Add Parent/Guardian .......................................................................................................................... 55
Edit Parent/Guardian Details .............................................................................................................. 55
Delete a Parent/Guardian ................................................................................................................... 56
Develop Student Team ........................................................................................................................ 57
Delete Student Team Member ........................................................................................................... 58
Evaluations .............................................................................................................................................. 59
Add a Student Evaluation .................................................................................................................... 59
Edit Student Evaluation ....................................................................................................................... 60
Delete Student Evaluation .................................................................................................................. 60
Meetings ................................................................................................................................................. 61
msb-services.com 5 © Copyright MSB 2014
Revision Date 10/24/2014
Add a Meeting ..................................................................................................................................... 61
Edit a Meeting ..................................................................................................................................... 61
Delete Meeting ................................................................................................................................... 62
Clone a Meeting .................................................................................................................................. 63
Add Meeting Team Members ............................................................................................................. 64
Delete Team Members ....................................................................................................................... 65
Add Records of Attempts to Attend ................................................................................................... 66
Plans ........................................................................................................................................................ 67
Add Plan .............................................................................................................................................. 67
Edit Plan Details .................................................................................................................................. 68
Delete a Plan ....................................................................................................................................... 68
Add Classroom Accommodations ....................................................................................................... 69
Delete Classroom Accommodations ................................................................................................... 69
Clone Plan ........................................................................................................................................... 70
Create an Archive ................................................................................................................................ 71
Review/Access Archives ...................................................................................................................... 72
Attach Documents .............................................................................................................................. 72
Calendar Management ........................................................................................................................... 74
District-No School Days Calendar ........................................................................................................... 74
School-No School Days Calendar ............................................................................................................ 75
Personal/School Calendar ....................................................................................................................... 77
Personal Calendar ............................................................................................................................... 77
School Calendar .................................................................................................................................. 77
District Management .............................................................................................................................. 78
District Information ................................................................................................................................. 78
msb-services.com 6 © Copyright MSB 2014
Revision Date 10/24/2014
Update District Information ................................................................................................................ 78
Add District Contact ............................................................................................................................ 78
Delete District Contact ........................................................................................................................ 78
Default Role Permissions ........................................................................................................................ 79
Edit Permissions by Role ..................................................................................................................... 79
Schools .................................................................................................................................................... 80
Add a School........................................................................................................................................ 80
Edit School Information ...................................................................................................................... 80
Delete a School ................................................................................................................................... 80
Notification Management ....................................................................................................................... 81
Notifications ............................................................................................................................................ 81
Add a Notification ............................................................................................................................... 81
Delete a Notification ........................................................................................................................... 81
Acknowledgment Report .................................................................................................................... 81
Group Management ................................................................................................................................ 82
Create a Group .................................................................................................................................... 82
Assign Members to Group .................................................................................................................. 83
Reminder Management .......................................................................................................................... 84
District Reminders ................................................................................................................................... 84
Add an Event ....................................................................................................................................... 84
Remove an Event ................................................................................................................................ 85
Glossary of Terms.................................................................................................................................... 86
msb-services.com 7 © Copyright MSB 2014
Revision Date 10/24/2014
MSB™ Mission Statement
MSB is committed to providing industry-leading solutions to empower educators to maximize their
time with the children they serve.

msb-services.com 8 © Copyright MSB 2014
Revision Date 10/24/2014
Welcome to AcuityTM 504
User Guide Information
Acuity 504 is a software database system designed to assist educators and administrators in the
management of 504 programs. The Acuity 504 manual will guide users through navigation of the system
as well as the steps to successful implementation in their district.
Terms that are bolded and italicized are defined in the Glossary of Terms.
Although this manual is a reference tool, it may not answer all of your questions. Remember that toll-
free technical support is available Monday through Friday, 7am-5pm (Eastern Time) to assist with your
questions. If you experience difficulties, please call our Customer Care team at 800.810.4220, email
Customer Care at [email protected] or use the Live Chat feature found in the upper right
corner of the program window.
Disable Pop-Up Blockers
Users will need to allow Pop-ups when working with the Acuity 504 program. Acuity 504 utilizes window
prompts in its printing and reporting functions, as well as to remind and notify users of events taking
place in their Acuity 504 account.
To ensure your browser will allow pop-ups Acuity 504, please follow the steps below for your indicated
browser:
In Google Chrome, click the Tools icon (square box in the upper right corner with three
horizontal lines)>Settings>Show Advanced Settings (blue link at the bottom)>Then under the
"Privacy" heading click on the Content Settings button>Scroll down to find the Pop-ups
section>Click on Manage Exceptions. Type login.msb-services.com as a "new hostname pattern"
in the box, leave the drop-down set to "Allow" and click "Done".
In Internet Explorer, click on Tools>Pop-up Blocker>Pop-up Blocker Settings. In "Address of the
website to allow:" enter login.msb-services.com and click on the add button.
In Firefox, click on Firefox Menu>Options>Options>Content. Click on the exceptions button. In
the field for the address of the website to allow, enter login.msb-services.com and click on the
add button.
In Safari on a Mac, click on the Safari menu to the upper left corner of your screen, hit
preferences, then the security tab and make sure the "block pop-up windows" option is not
checked under web content.
In Safari on an iPad, open the "Settings" menu on your Home screen. Tap the "Safari" tab on the
Settings page. The Safari preferences screen loads. Scroll down the page to the "Security"
section. Slide the "Block Pop-Ups" switch to the "Off" position. Press the "Home" button to
return to your Home screen.
msb-services.com 9 © Copyright MSB 2014
Revision Date 10/24/2014
MSB Registration and Login Information
All users must register before accessing the program for the first time. If you are an existing user of
AdoriTM or LumeaTM, proceed to the Existing Users section below.
New Users
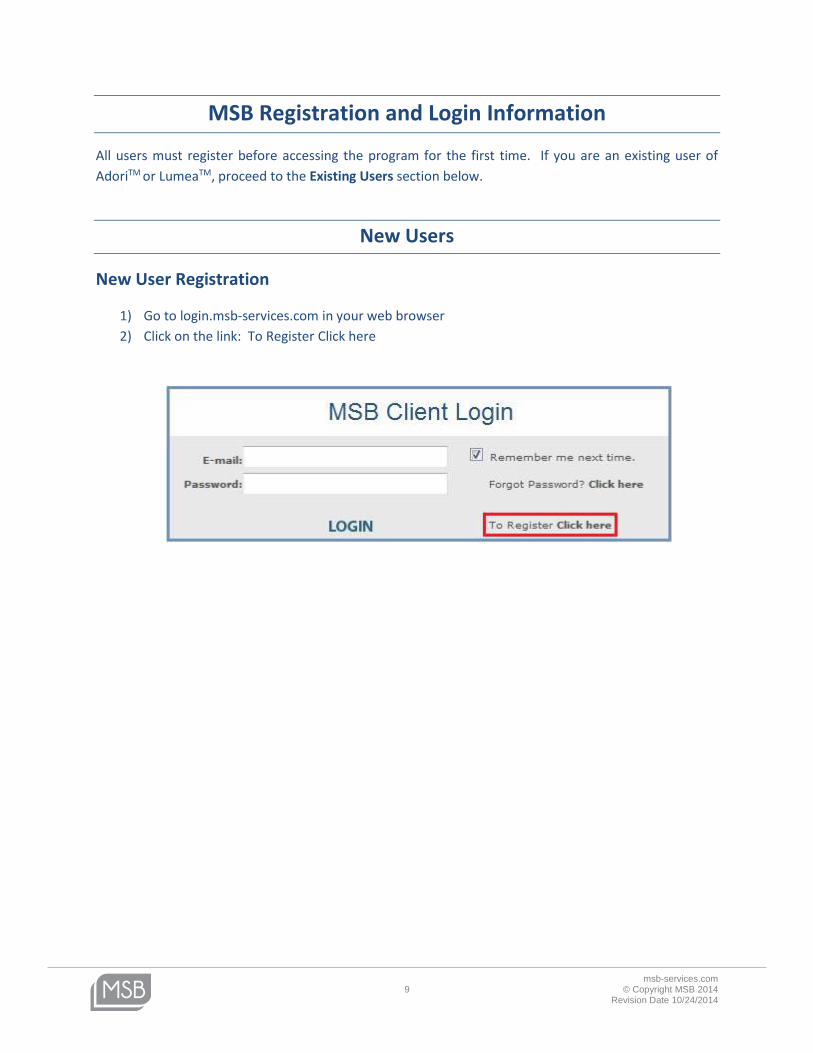
New User Registration
1) Go to login.msb-services.com in your web browser
2) Click on the link: To Register Click here
msb-services.com 10 © Copyright MSB 2014
Revision Date 10/24/2014
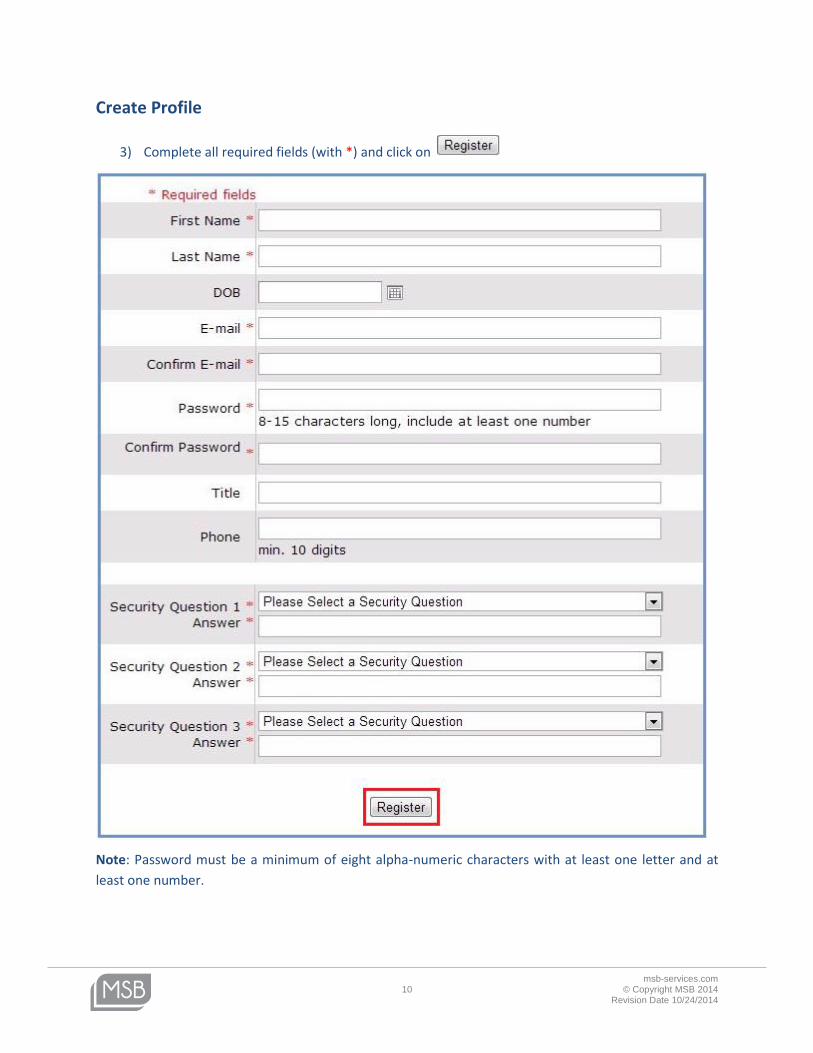
Create Profile
3) Complete all required fields (with *) and click on
Note: Password must be a minimum of eight alpha-numeric characters with at least one letter and at
least one number.
msb-services.com 11 © Copyright MSB 2014
Revision Date 10/24/2014
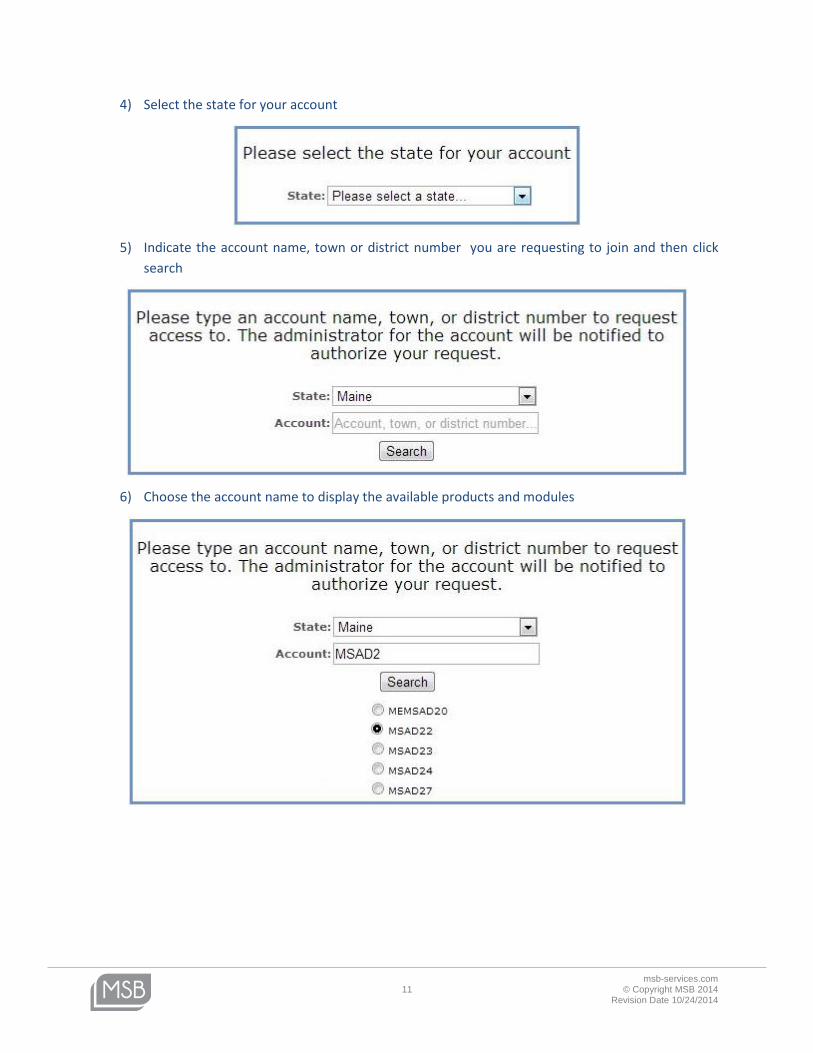
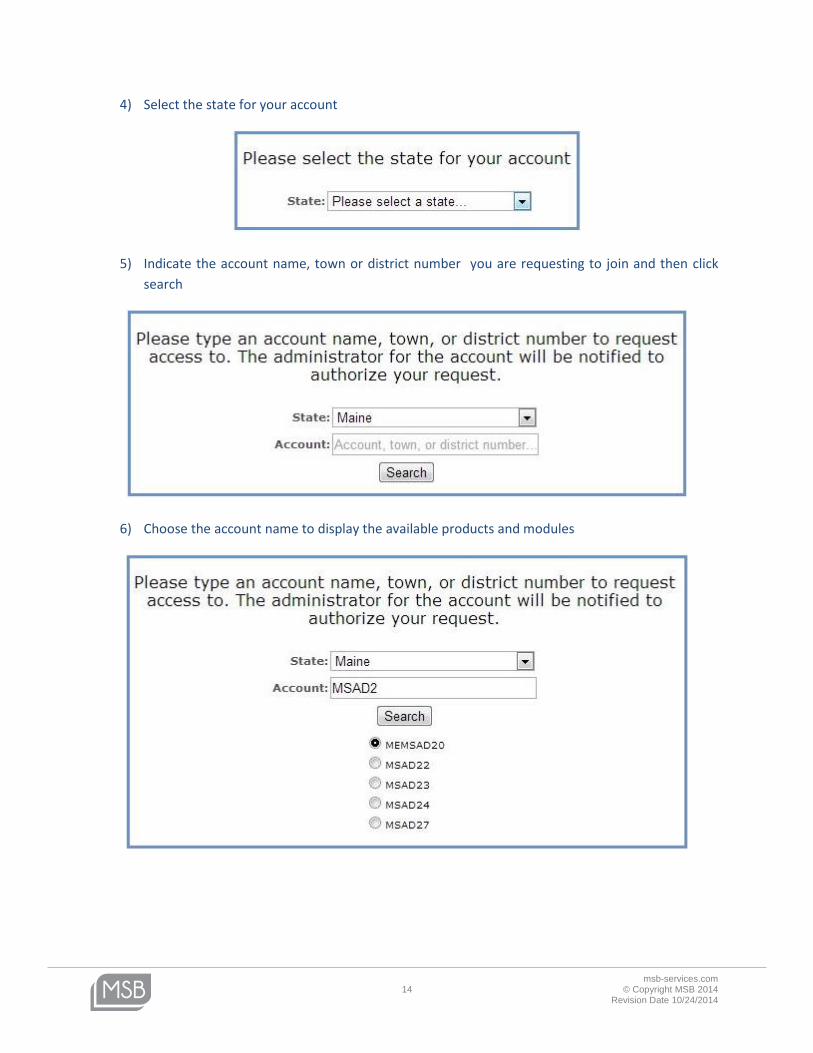
4) Select the state for your account
5) Indicate the account name, town or district number you are requesting to join and then click
search
6) Choose the account name to display the available products and modules
msb-services.com 12 © Copyright MSB 2014
Revision Date 10/24/2014
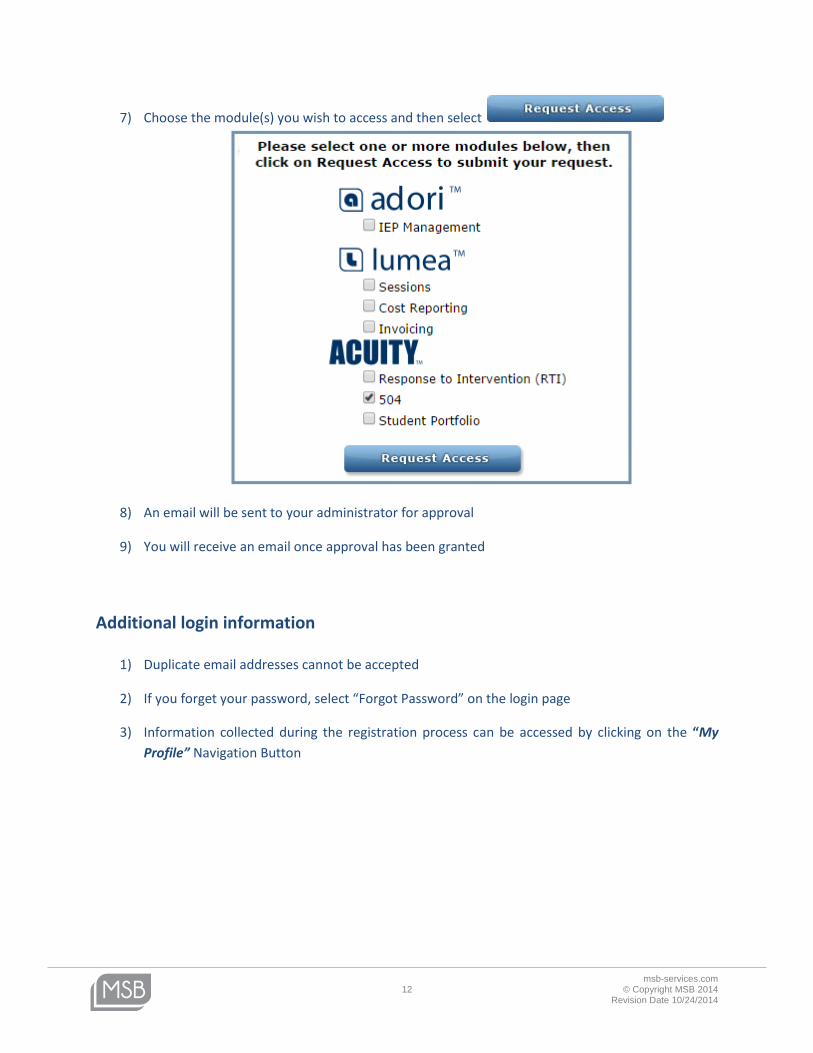
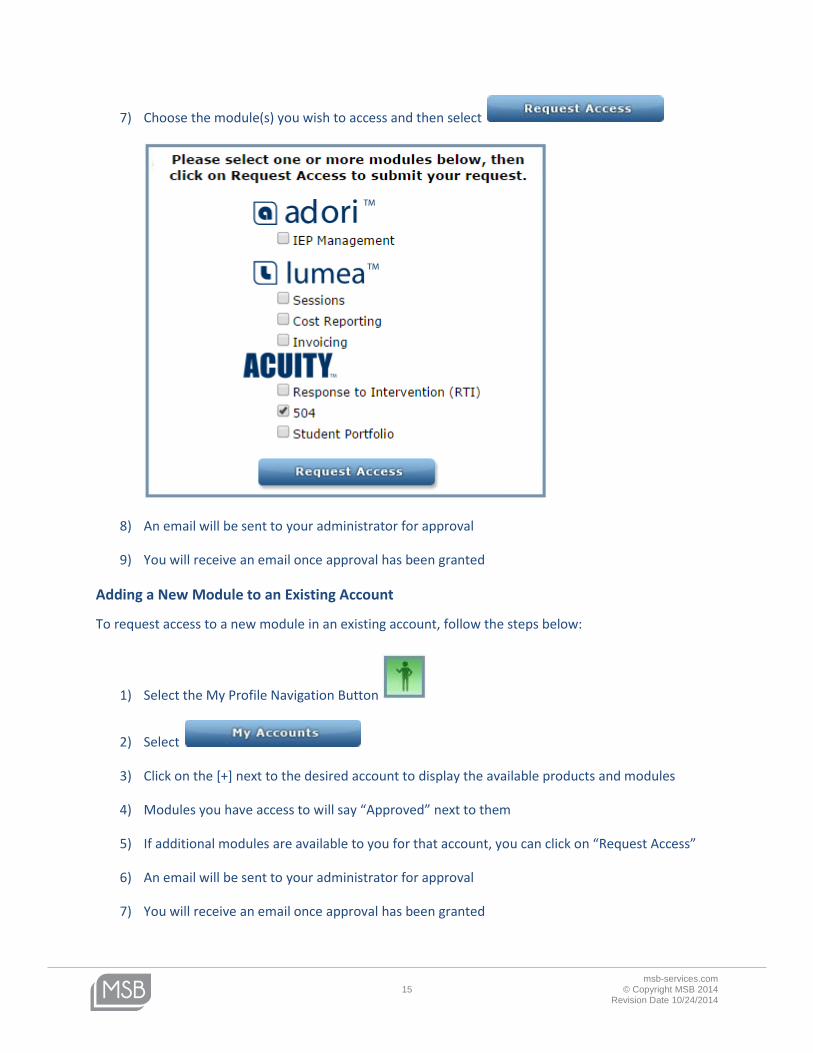
7) Choose the module(s) you wish to access and then select
8) An email will be sent to your administrator for approval
9) You will receive an email once approval has been granted
Additional login information
1) Duplicate email addresses cannot be accepted
2) If you forget your password, select “Forgot Password” on the login page
3) Information collected during the registration process can be accessed by clicking on the “My
Profile” Navigation Button
msb-services.com 13 © Copyright MSB 2014
Revision Date 10/24/2014
Existing Users
Logging In
If you are already registered for your district’s account and you know the email address and password,
follow the steps below to access your account:
1) Go to login.msb-services.com in your web browser
2) Type your email address and password
3) Click on LOGIN
Forgotten Password
1) Go to login.msb-services.com in your web browser
2) Click on the “Forgot Password” link
3) Answer your security questions to log in
Adding a New Account or Module
If you are already registered for an MSB module and/or account, but need to access a new account or
module, you will not need to re-register. You will login to you current account and module using the
same email and password that you set up when you registered.
Adding a New Account
To request access to a new account, follow the steps below:
1) Select the My Profile Navigation Button
2) Select
3) Select
msb-services.com 14 © Copyright MSB 2014
Revision Date 10/24/2014
4) Select the state for your account
5) Indicate the account name, town or district number you are requesting to join and then click
search
6) Choose the account name to display the available products and modules
msb-services.com 15 © Copyright MSB 2014
Revision Date 10/24/2014
7) Choose the module(s) you wish to access and then select
8) An email will be sent to your administrator for approval
9) You will receive an email once approval has been granted
Adding a New Module to an Existing Account
To request access to a new module in an existing account, follow the steps below:
1) Select the My Profile Navigation Button
2) Select
3) Click on the [+] next to the desired account to display the available products and modules
4) Modules you have access to will say “Approved” next to them
5) If additional modules are available to you for that account, you can click on “Request Access”
6) An email will be sent to your administrator for approval
7) You will receive an email once approval has been granted
msb-services.com 16 © Copyright MSB 2014
Revision Date 10/24/2014
Universal Functionality
You will notice consistent elements throughout Acuity 504 that will perform the same operation in
different contexts.
Adding Information
Users will have the ability to add information two ways:
1) QUICK TASKS - When you select a Quick Task from the Administrative View, AcuityAcuity 504 will
open a Work Space to complete that task.
2) ADMINISTRATIVE MENU - You can add or edit information in any of the sections of the
Administrative Menu. To add a record, click on the Action Icon to add a new record
for the section you are in. The Work Space will populate with related questions. Answer the
questions and click at the top of the Work Space when complete.
Deleting Information
If a user has sufficient permissions assigned in the system to do so, the user can delete information in in
the following way:
Action Icon –The delete action icon is present above the workspace only when a
user has the appropriate permissions assigned to delete records in the specific section where
the user is working. Clicking on the Delete [-] Action Icon will delete a records only for the
section of the Student Menu you are working in. In other cases (like meetings or notices),
clicking the Delete Action Icon will delete the specific record you are viewing at the time. In
every case, you will be prompted to confirm your intention to delete the records.
msb-services.com 17 © Copyright MSB 2014
Revision Date 10/24/2014
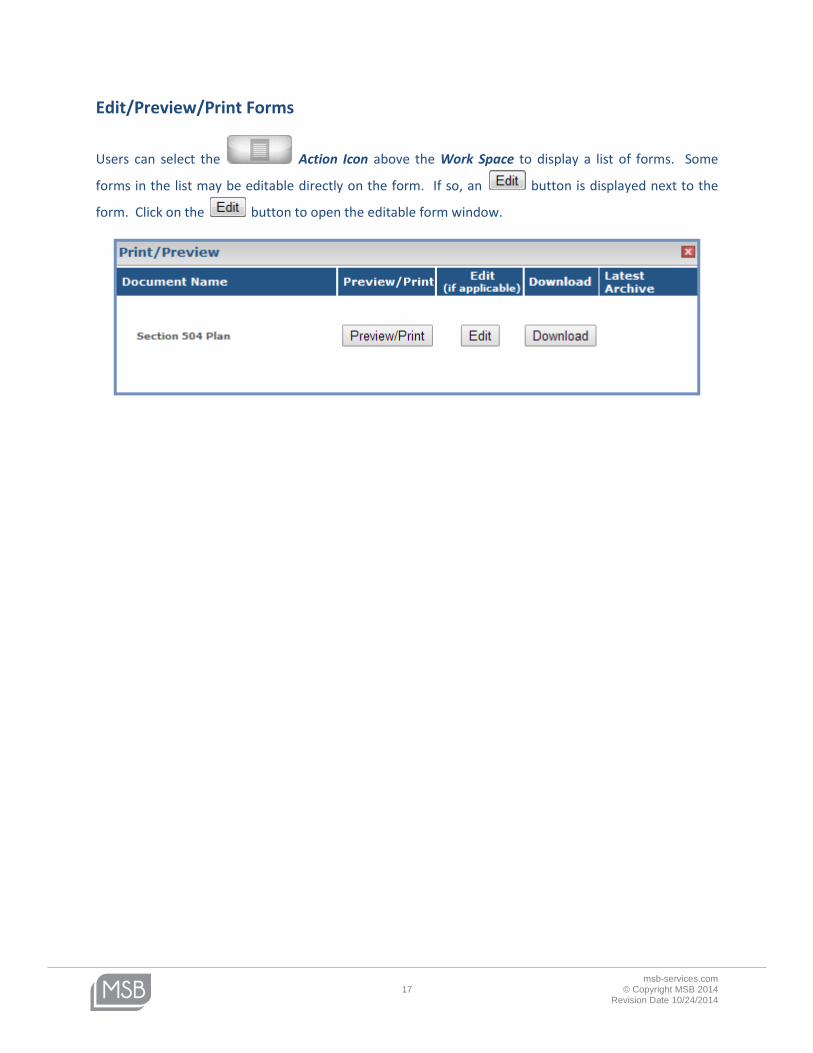
Edit/Preview/Print Forms
Users can select the Action Icon above the Work Space to display a list of forms. Some
forms in the list may be editable directly on the form. If so, an button is displayed next to the
form. Click on the button to open the editable form window.
msb-services.com 18 © Copyright MSB 2014
Revision Date 10/24/2014
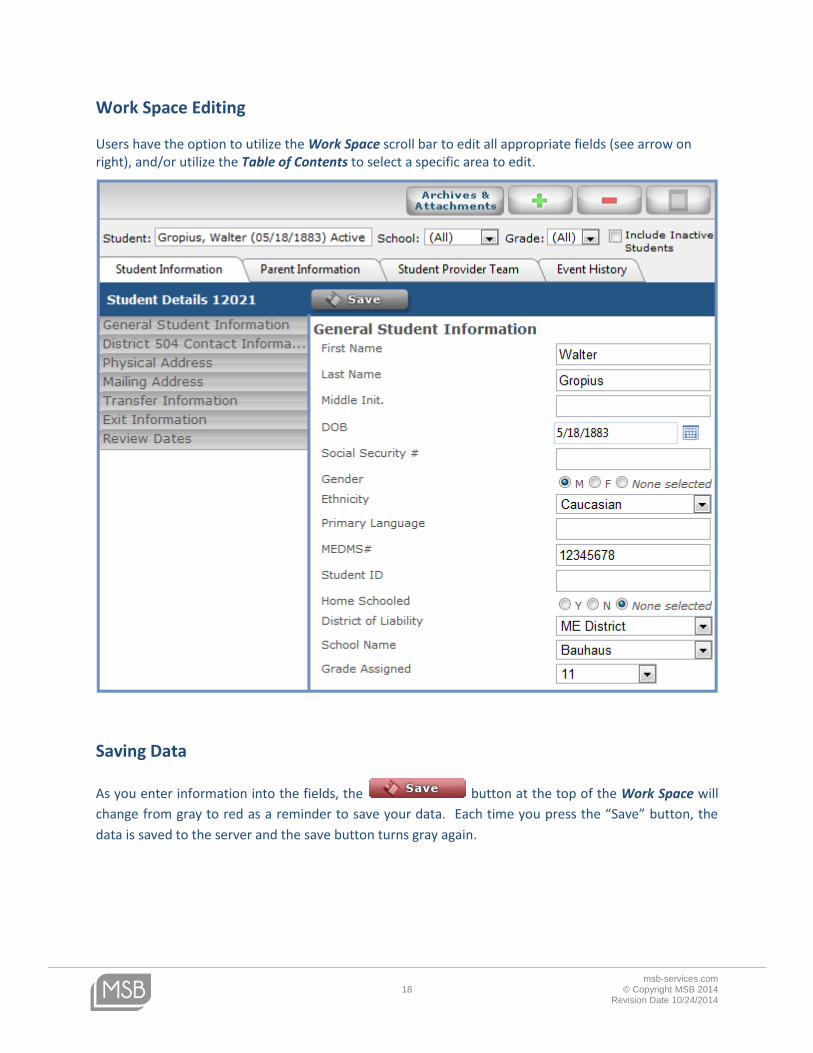
Work Space Editing
Users have the option to utilize the Work Space scroll bar to edit all appropriate fields (see arrow on right), and/or utilize the Table of Contents to select a specific area to edit.
Saving Data
As you enter information into the fields, the button at the top of the Work Space will
change from gray to red as a reminder to save your data. Each time you press the “Save” button, the
data is saved to the server and the save button turns gray again.
msb-services.com 19 © Copyright MSB 2014
Revision Date 10/24/2014
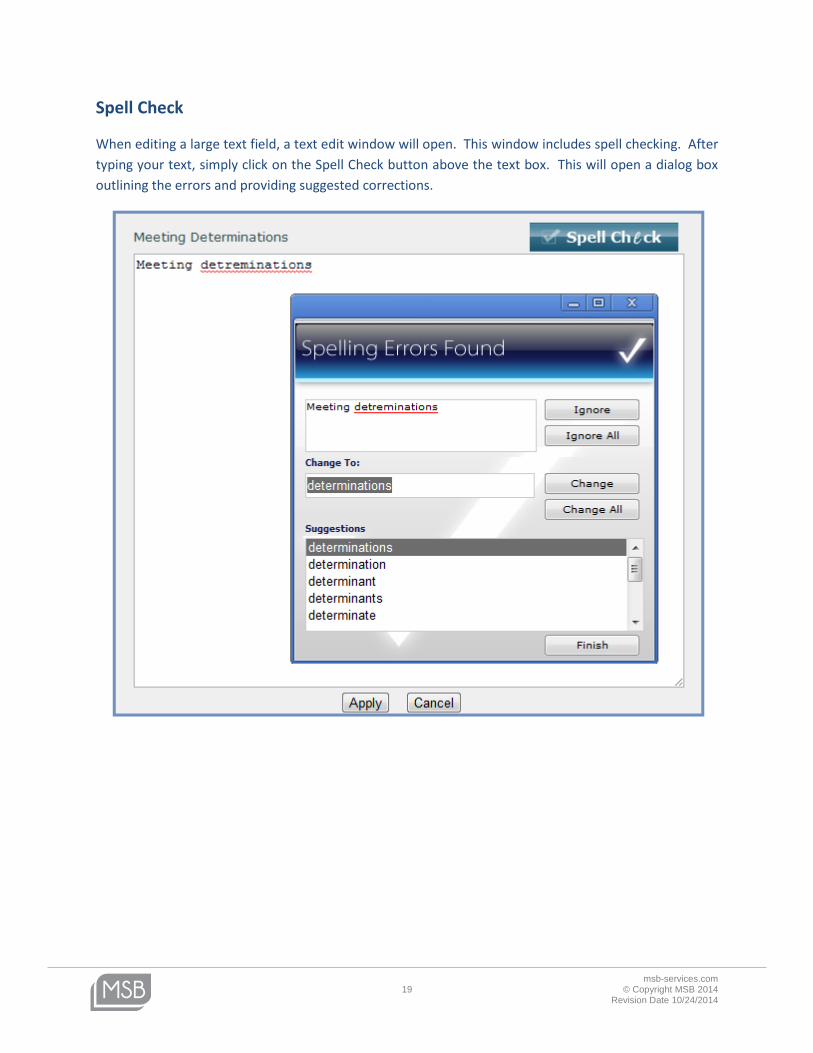
Spell Check
When editing a large text field, a text edit window will open. This window includes spell checking. After
typing your text, simply click on the Spell Check button above the text box. This will open a dialog box
outlining the errors and providing suggested corrections.
msb-services.com 20 © Copyright MSB 2014
Revision Date 10/24/2014
Navigation of Acuity 504
Launch Pad
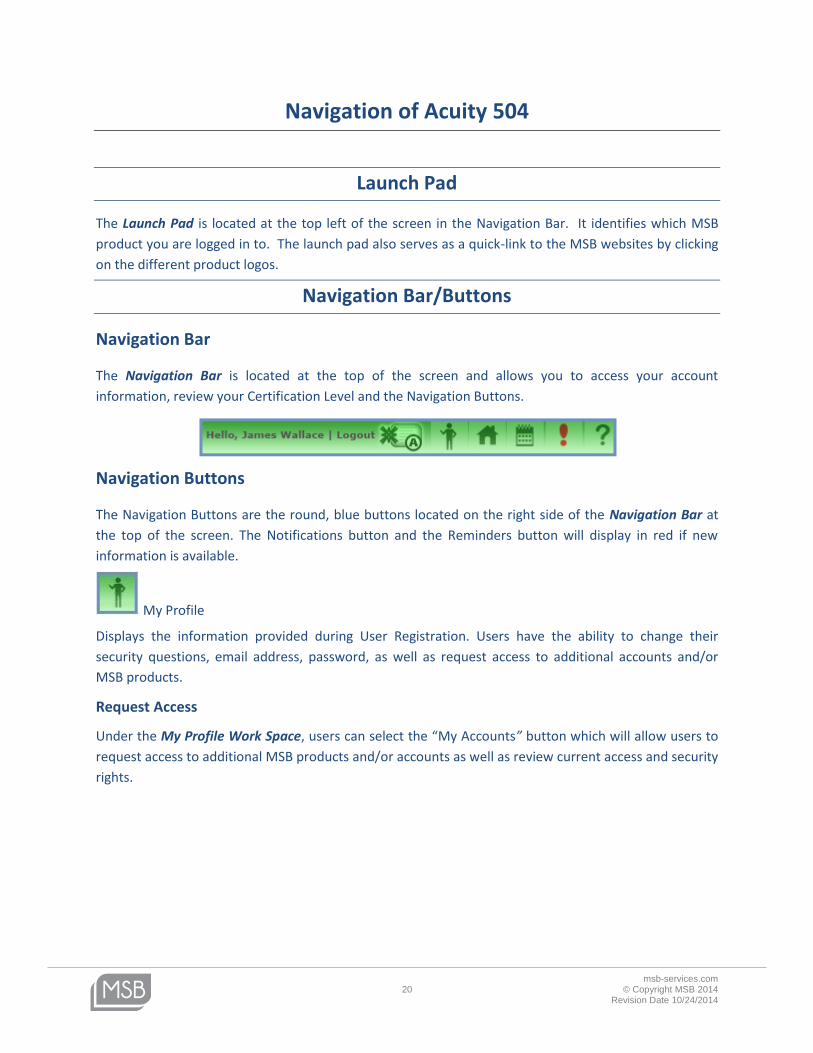
The Launch Pad is located at the top left of the screen in the Navigation Bar. It identifies which MSB
product you are logged in to. The launch pad also serves as a quick-link to the MSB websites by clicking
on the different product logos.
Navigation Bar/Buttons
Navigation Bar
The Navigation Bar is located at the top of the screen and allows you to access your account
information, review your Certification Level and the Navigation Buttons.
Navigation Buttons
The Navigation Buttons are the round, blue buttons located on the right side of the Navigation Bar at
the top of the screen. The Notifications button and the Reminders button will display in red if new
information is available.
My Profile
Displays the information provided during User Registration. Users have the ability to change their
security questions, email address, password, as well as request access to additional accounts and/or
MSB products.
Request Access
Under the My Profile Work Space, users can select the “My Accounts” button which will allow users to
request access to additional MSB products and/or accounts as well as review current access and security
rights.
msb-services.com 21 © Copyright MSB 2014
Revision Date 10/24/2014
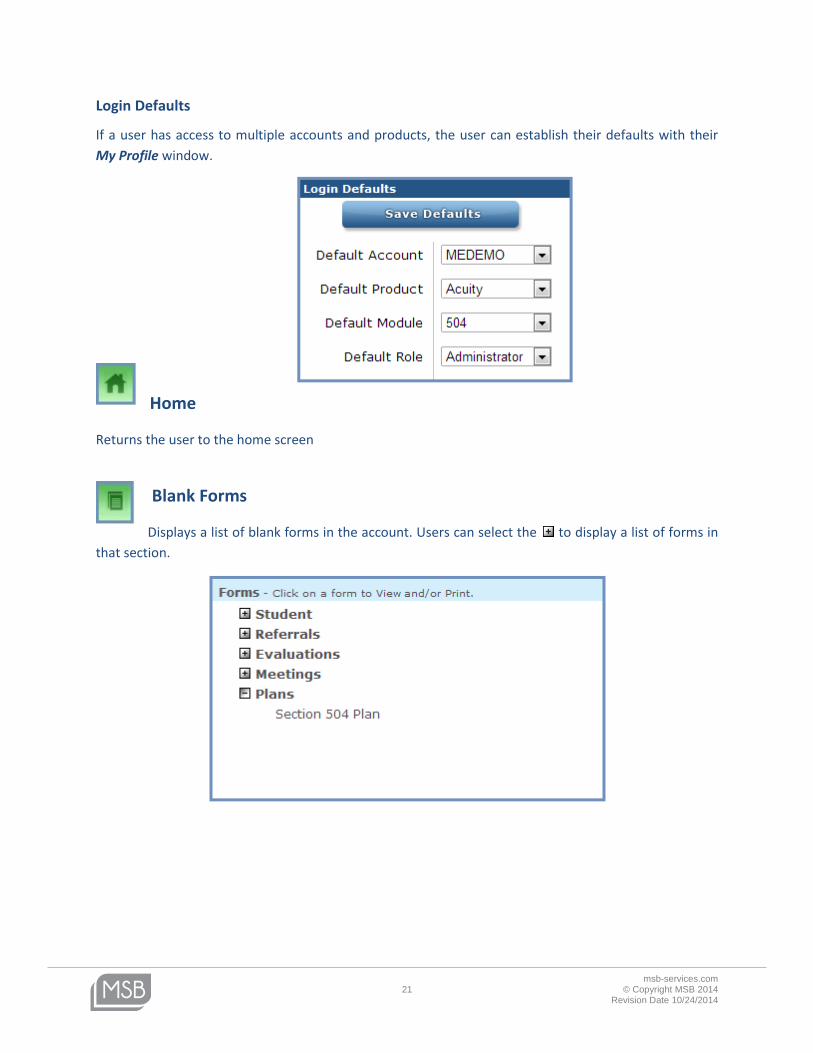
Login Defaults
If a user has access to multiple accounts and products, the user can establish their defaults with their
My Profile window.
Home
Returns the user to the home screen
Blank Forms
Displays a list of blank forms in the account. Users can select the to display a list of forms in
that section.
msb-services.com 22 © Copyright MSB 2014
Revision Date 10/24/2014
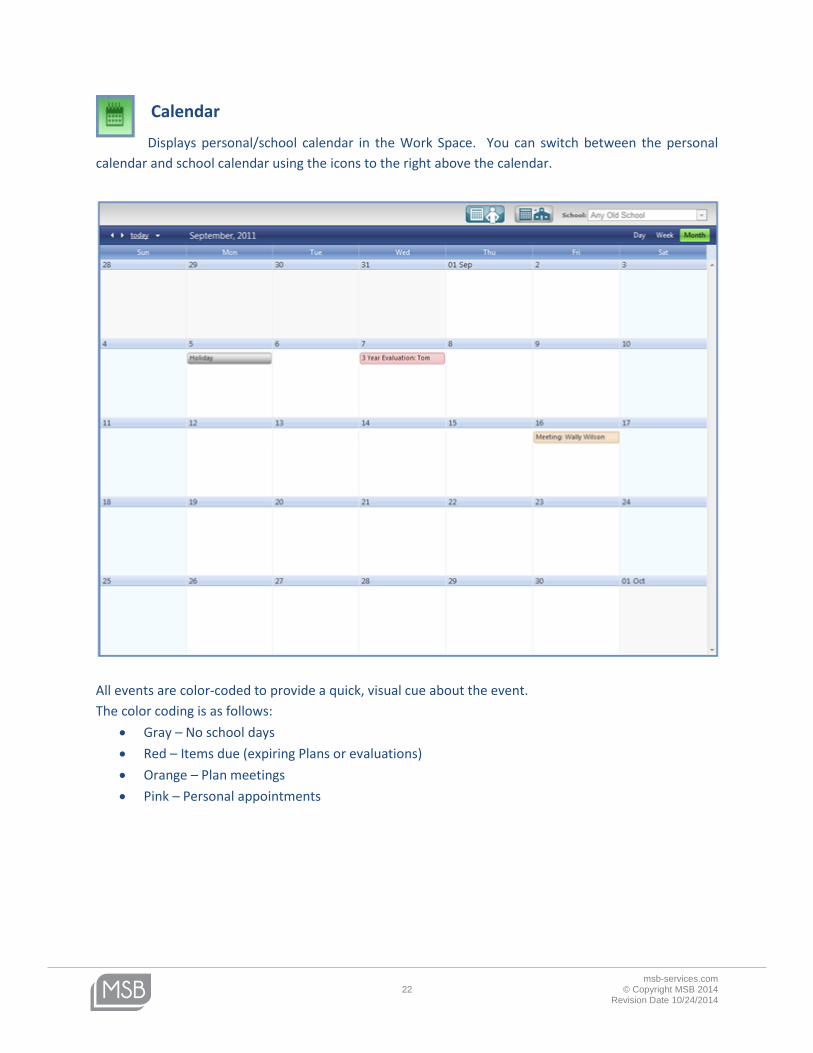
Calendar
Displays personal/school calendar in the Work Space. You can switch between the personal
calendar and school calendar using the icons to the right above the calendar.
All events are color-coded to provide a quick, visual cue about the event.
The color coding is as follows:
Gray – No school days
Red – Items due (expiring Plans or evaluations)
Orange – Plan meetings
Pink – Personal appointments
msb-services.com 23 © Copyright MSB 2014
Revision Date 10/24/2014
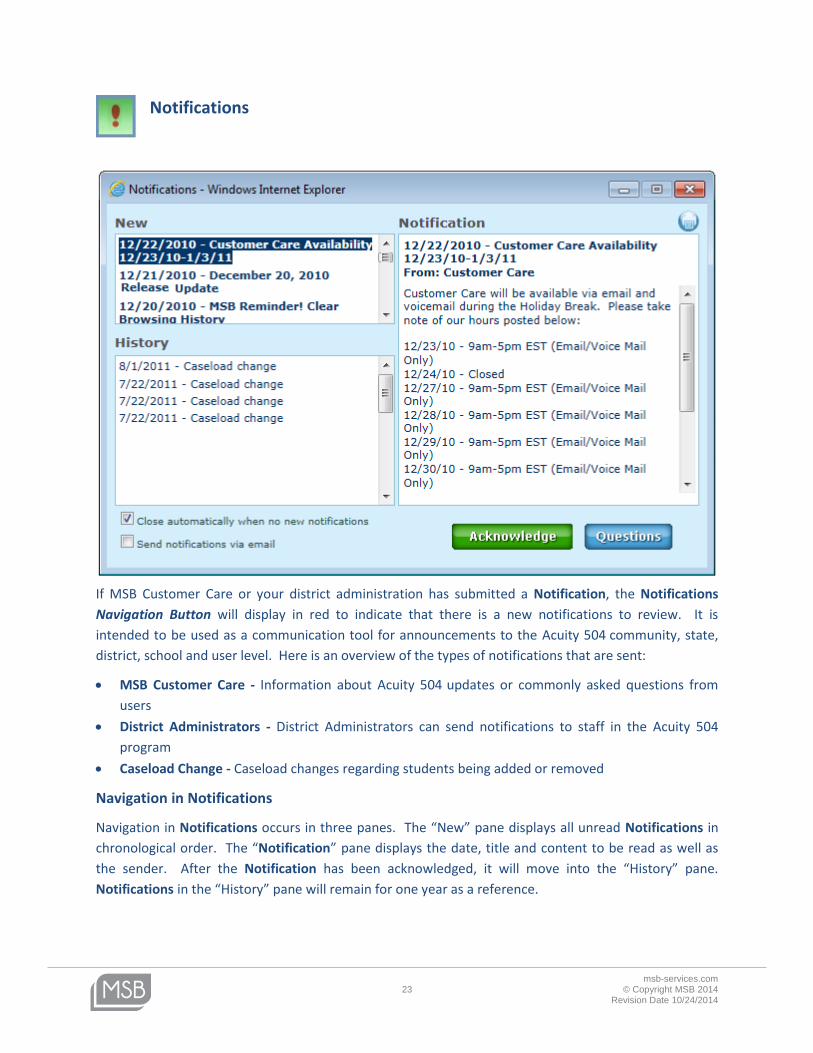
Notifications
If MSB Customer Care or your district administration has submitted a Notification, the Notifications
Navigation Button will display in red to indicate that there is a new notifications to review. It is
intended to be used as a communication tool for announcements to the Acuity 504 community, state,
district, school and user level. Here is an overview of the types of notifications that are sent:
MSB Customer Care - Information about Acuity 504 updates or commonly asked questions from
users
District Administrators - District Administrators can send notifications to staff in the Acuity 504
program
Caseload Change - Caseload changes regarding students being added or removed
Navigation in Notifications
Navigation in Notifications occurs in three panes. The “New” pane displays all unread Notifications in
chronological order. The “Notification” pane displays the date, title and content to be read as well as
the sender. After the Notification has been acknowledged, it will move into the “History” pane.
Notifications in the “History” pane will remain for one year as a reference.

msb-services.com 24 © Copyright MSB 2014
Revision Date 10/24/2014
Reading a Notification
Clicking on the Notification in the “New” pane displays it in the “Notification” pane. Once you have
finished reading the Notification, click on the “Acknowledge” button to move the Notification to the
“History” pane.
Emailing a Question/Concern Regarding a Notification
You are able to generate an email to the sender of the Notification to address questions/concerns about
the Notification. Clicking on the “Questions” button will expand the window to type in your
question/concern. Notifications sent by Customer Care at MSB will be addressed by a Customer Care
Representative. Notifications generated at the District level will be addressed at the District level.
msb-services.com 25 © Copyright MSB 2014
Revision Date 10/24/2014
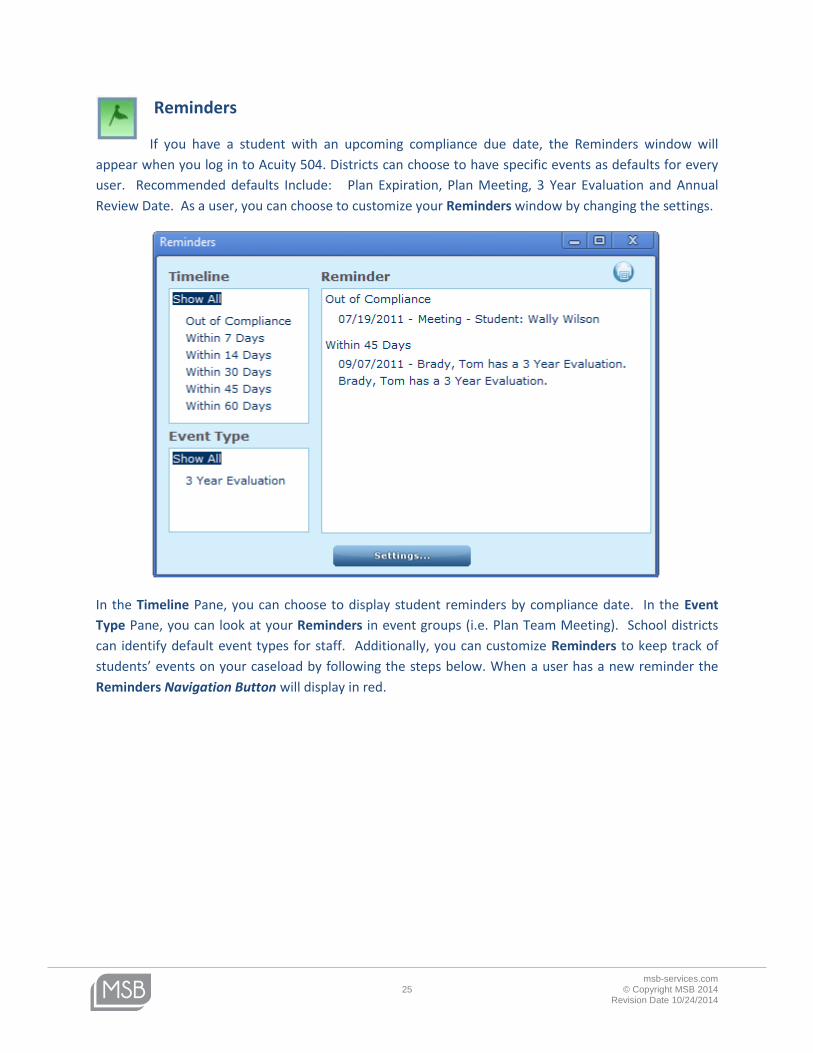
Reminders
If you have a student with an upcoming compliance due date, the Reminders window will
appear when you log in to Acuity 504. Districts can choose to have specific events as defaults for every
user. Recommended defaults Include: Plan Expiration, Plan Meeting, 3 Year Evaluation and Annual
Review Date. As a user, you can choose to customize your Reminders window by changing the settings.
In the Timeline Pane, you can choose to display student reminders by compliance date. In the Event
Type Pane, you can look at your Reminders in event groups (i.e. Plan Team Meeting). School districts
can identify default event types for staff. Additionally, you can customize Reminders to keep track of
students’ events on your caseload by following the steps below. When a user has a new reminder the
Reminders Navigation Button will display in red.
msb-services.com 26 © Copyright MSB 2014
Revision Date 10/24/2014
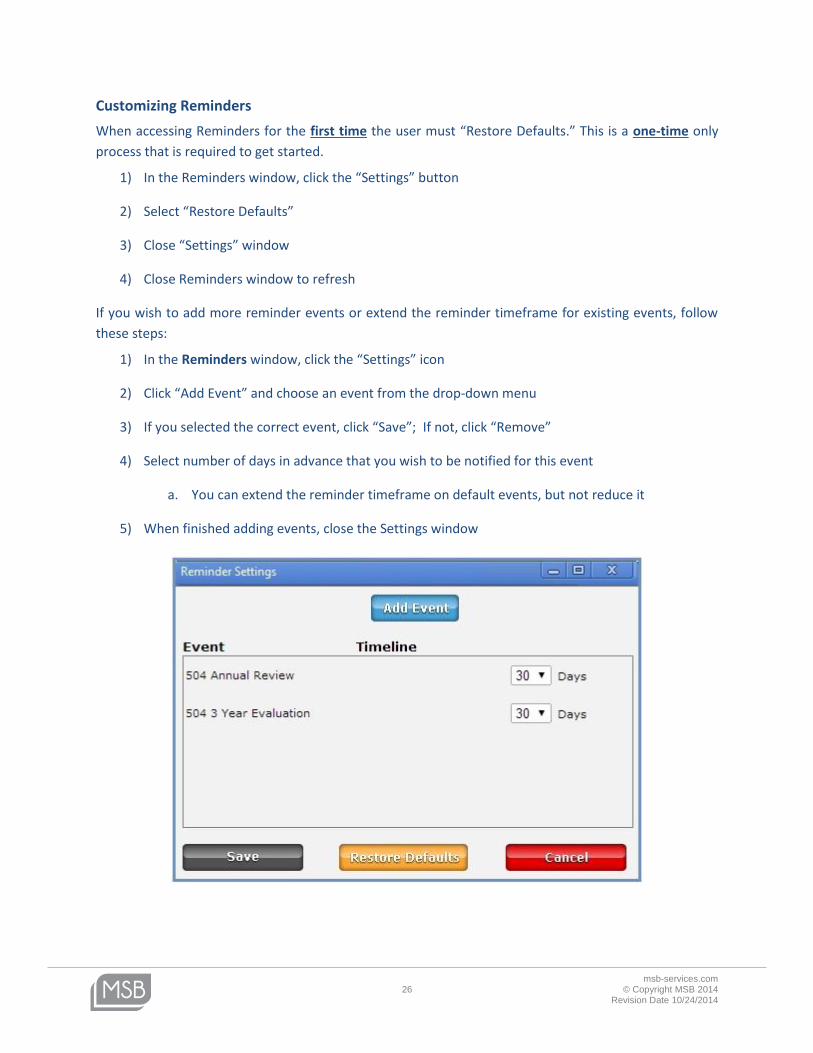
Customizing Reminders
When accessing Reminders for the first time the user must “Restore Defaults.” This is a one-time only
process that is required to get started.
1) In the Reminders window, click the “Settings” button
2) Select “Restore Defaults”
3) Close “Settings” window
4) Close Reminders window to refresh
If you wish to add more reminder events or extend the reminder timeframe for existing events, follow
these steps:
1) In the Reminders window, click the “Settings” icon
2) Click “Add Event” and choose an event from the drop-down menu
3) If you selected the correct event, click “Save”; If not, click “Remove”
4) Select number of days in advance that you wish to be notified for this event
a. You can extend the reminder timeframe on default events, but not reduce it
5) When finished adding events, close the Settings window
msb-services.com 27 © Copyright MSB 2014
Revision Date 10/24/2014
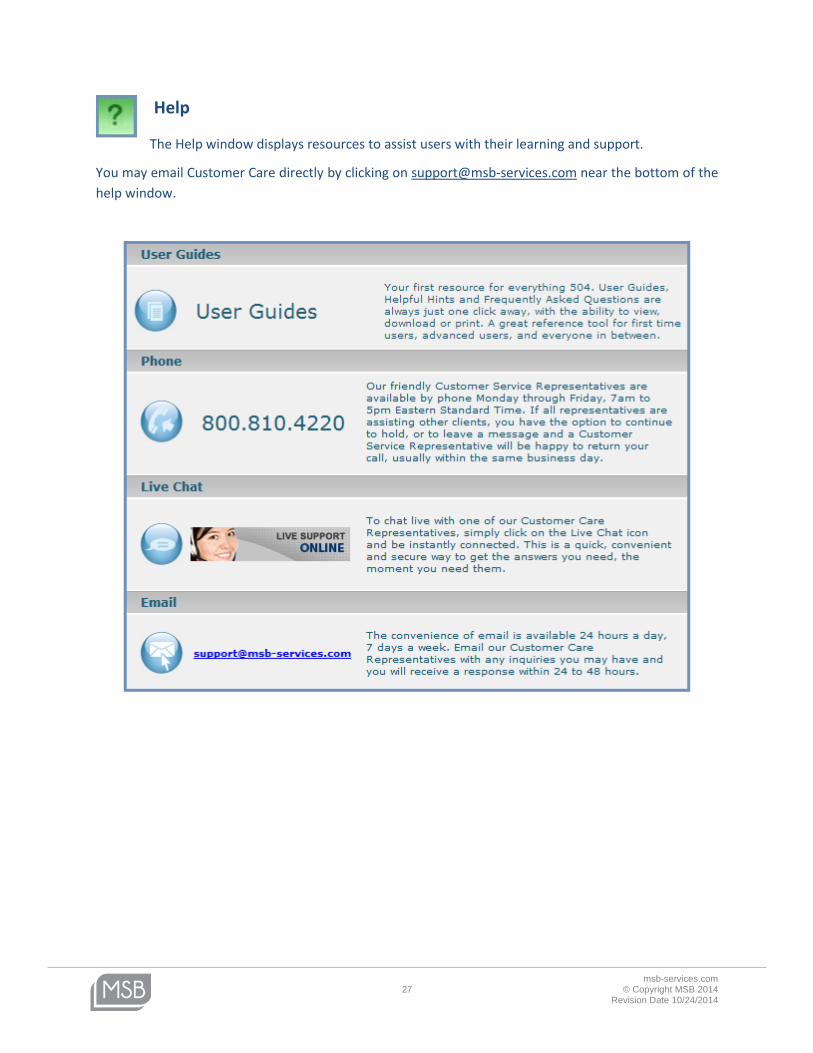
Help
The Help window displays resources to assist users with their learning and support.
You may email Customer Care directly by clicking on [email protected] near the bottom of the
help window.
msb-services.com 28 © Copyright MSB 2014
Revision Date 10/24/2014
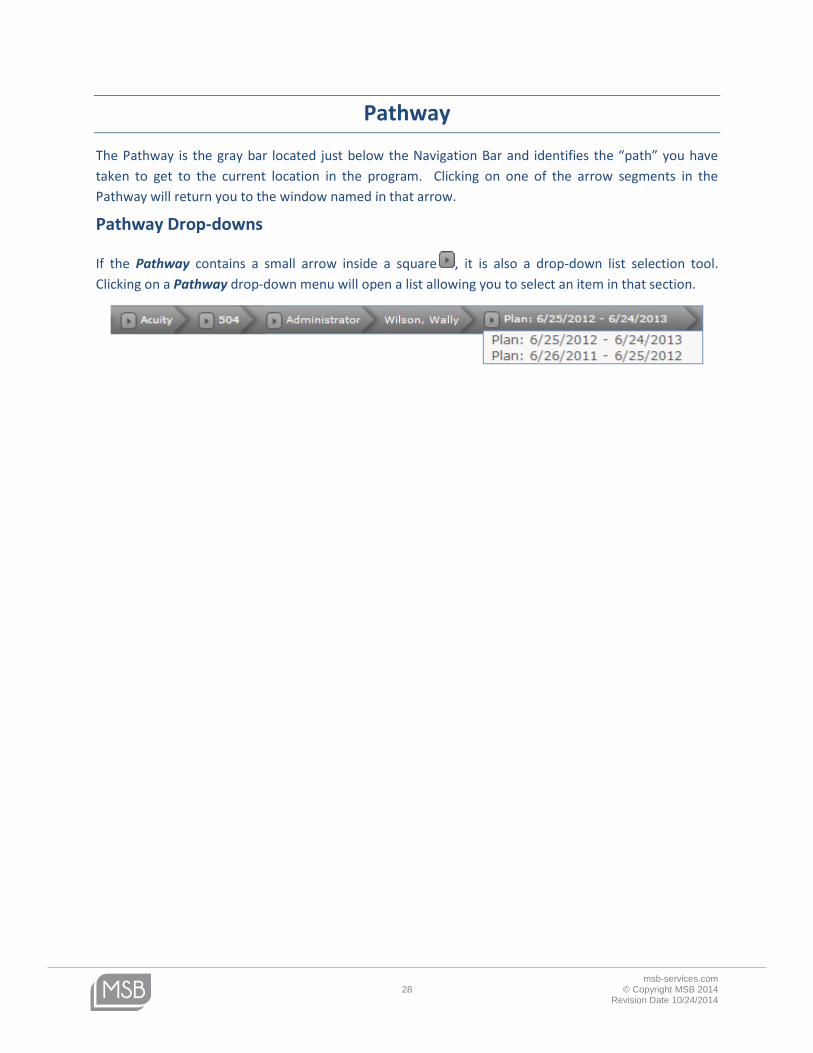
Pathway
The Pathway is the gray bar located just below the Navigation Bar and identifies the “path” you have
taken to get to the current location in the program. Clicking on one of the arrow segments in the
Pathway will return you to the window named in that arrow.
Pathway Drop-downs
If the Pathway contains a small arrow inside a square , it is also a drop-down list selection tool.
Clicking on a Pathway drop-down menu will open a list allowing you to select an item in that section.

msb-services.com 29 © Copyright MSB 2014
Revision Date 10/24/2014
Action Icons
Action Icons are located above the Work Space Tabs as well as above the Caseload Column. They allow
users to complete functions such as add, delete, clone, amend, print, etc. Here is a break-down of all the
available Action Icons.
Caseload Action Icons
Classroom Management/Add a Student
Progress Reporting
Caseload Reports
Work Space Action Icons
Add Information
Delete Information
Editable Print/Preview
Clone an existing Meeting Notice
Allows users to attach documents that are stored on the user’s computer to
the student’s record in Acuity 504; Users can also review archives that have
been created for a particular student
Clone an existing Plan document
msb-services.com 30 © Copyright MSB 2014
Revision Date 10/24/2014
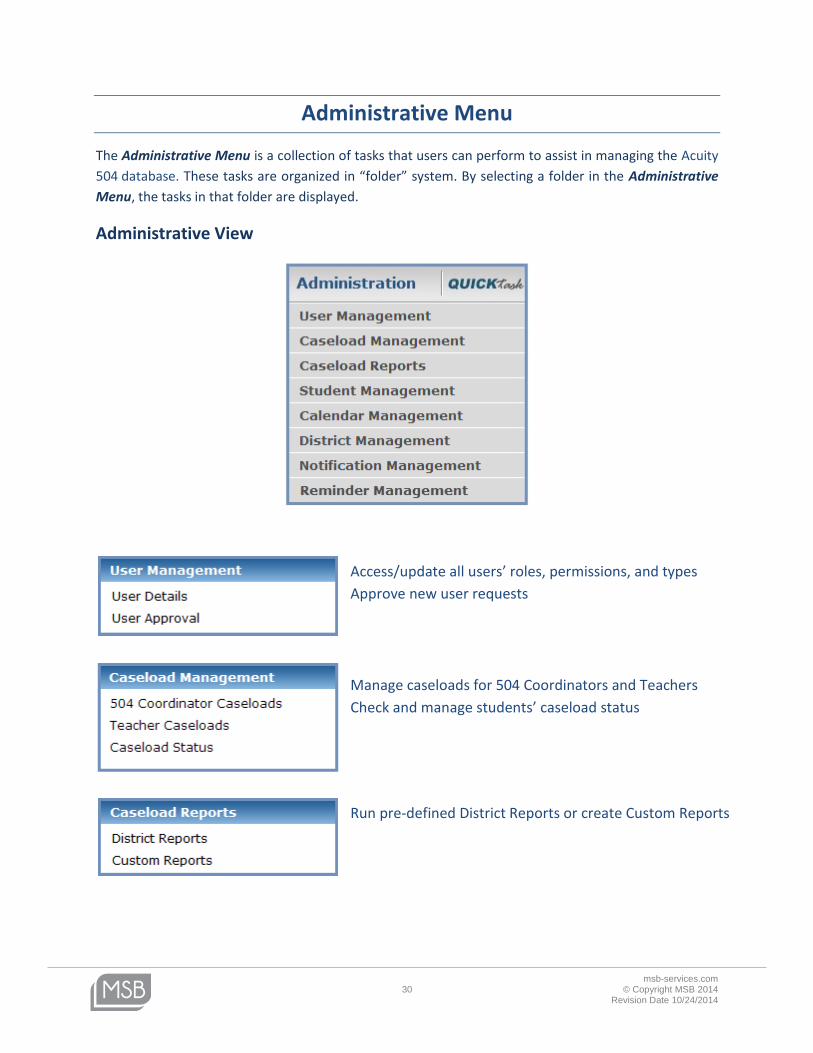
Administrative Menu
The Administrative Menu is a collection of tasks that users can perform to assist in managing the Acuity
504 database. These tasks are organized in “folder” system. By selecting a folder in the Administrative
Menu, the tasks in that folder are displayed.
Administrative View
Access/update all users’ roles, permissions, and types
Approve new user requests
Manage caseloads for 504 Coordinators and Teachers
Check and manage students’ caseload status
Run pre-defined District Reports or create Custom Reports
msb-services.com 31 © Copyright MSB 2014
Revision Date 10/24/2014
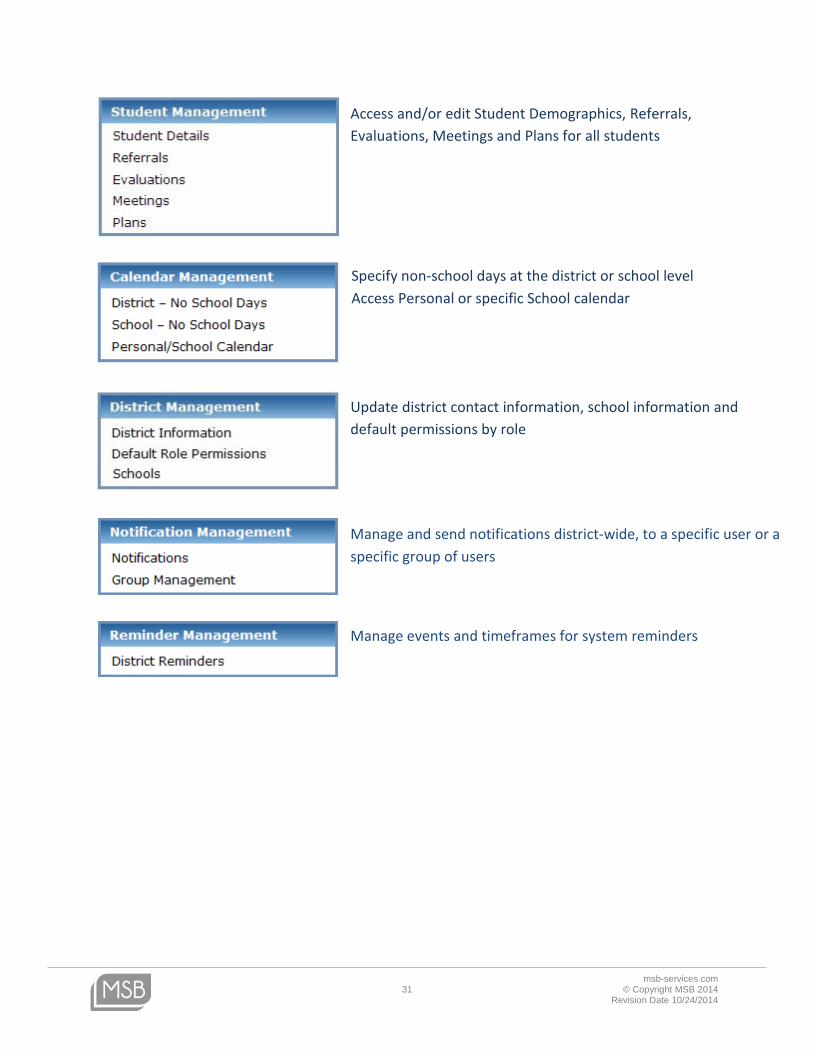
Manage events and timeframes for system reminders
Access and/or edit Student Demographics, Referrals,
Evaluations, Meetings and Plans for all students
Specify non-school days at the district or school level
Access Personal or specific School calendar
Update district contact information, school information and
default permissions by role
Manage and send notifications district-wide, to a specific user or a
specific group of users
msb-services.com 32 © Copyright MSB 2014
Revision Date 10/24/2014
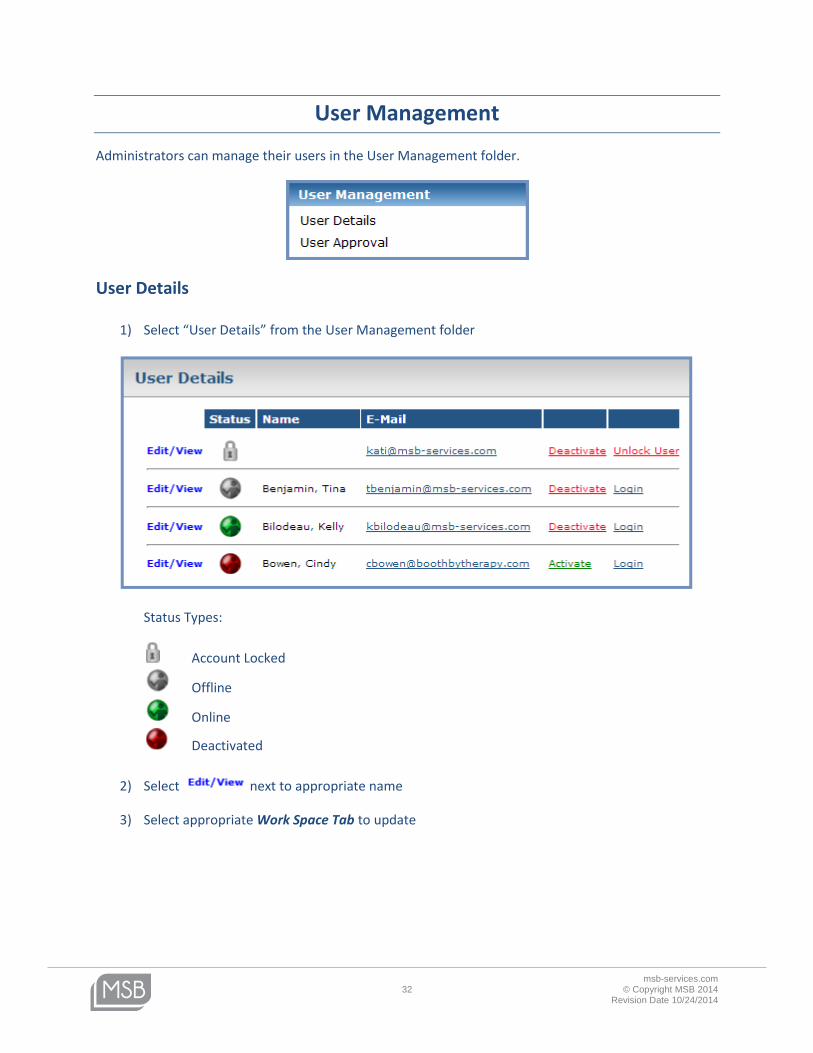
User Management
Administrators can manage their users in the User Management folder.
User Details
1) Select “User Details” from the User Management folder
Status Types:
Account Locked
Offline
Online
Deactivated
2) Select next to appropriate name
3) Select appropriate Work Space Tab to update
msb-services.com 33 © Copyright MSB 2014
Revision Date 10/24/2014
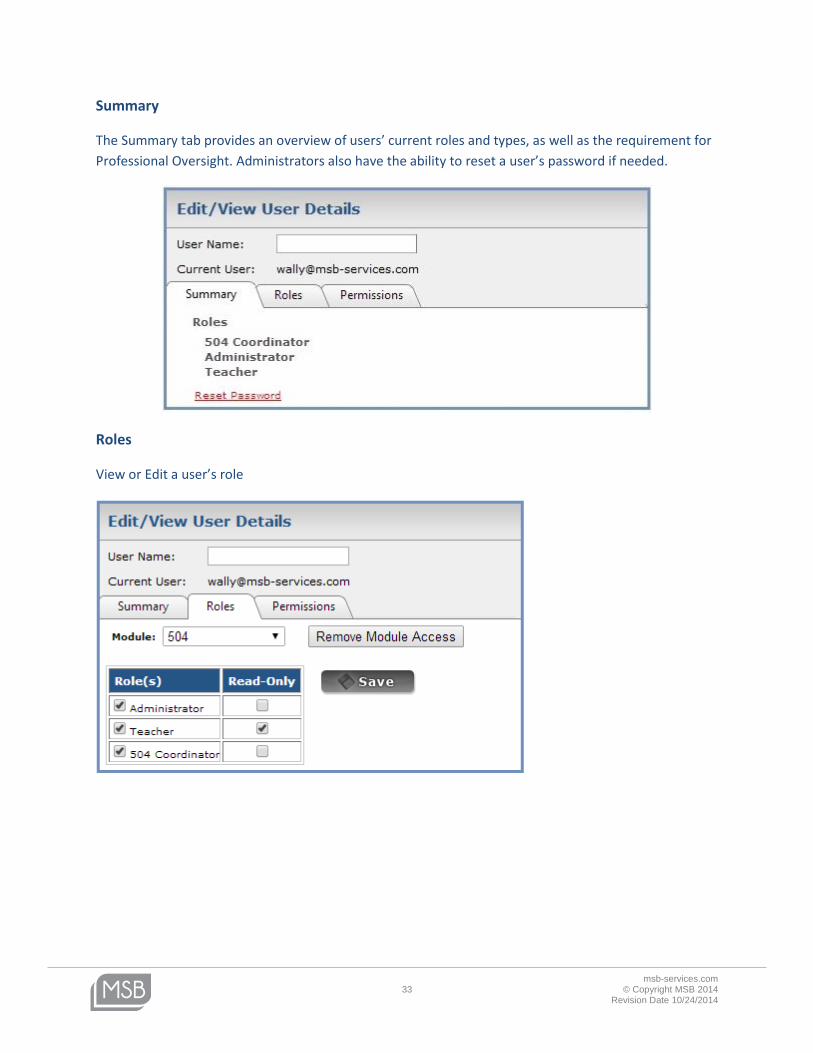
Summary
The Summary tab provides an overview of users’ current roles and types, as well as the requirement for
Professional Oversight. Administrators also have the ability to reset a user’s password if needed.
Roles
View or Edit a user’s role
msb-services.com 34 © Copyright MSB 2014
Revision Date 10/24/2014
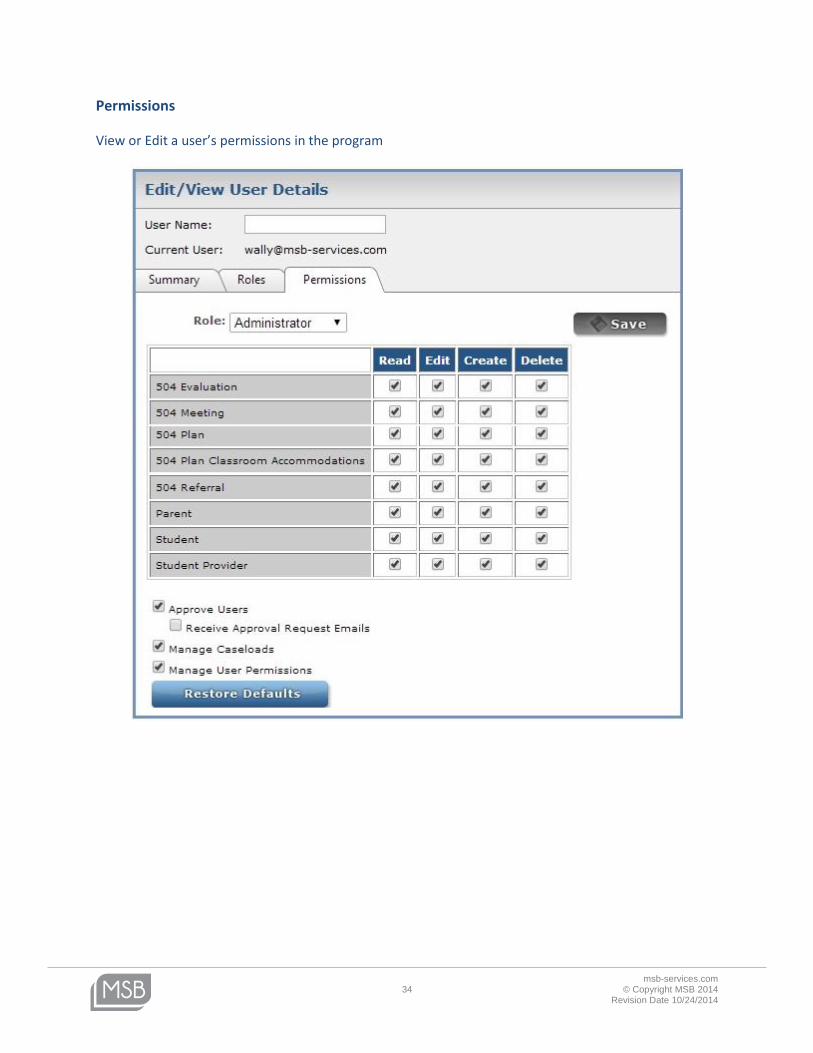
Permissions
View or Edit a user’s permissions in the program

msb-services.com 35 © Copyright MSB 2014
Revision Date 10/24/2014
Approve Users
1) Select “Approve Users” from the User Management folder in the Administrative Menu
2) Select appropriate role
3) Select Approve or Deny
NOTE: A confirmation email will be sent to the registering user
Locked Users
If a user has three failed login attempts, the user’s account will be locked. When this happens, the user
is presented with the opportunity to answer his/her security questions to unlock the account. If the
security questions are answered correctly, the user will be logged in. If the security questions are not
answered correctly, an Administrator can unlock the user’s account in User Details.
1) Select “User Details” from the User Management folder in the Administrative Menu
2) Locate User Name that has the image
3) Select “unlock user”
NOTE: If an administrator unlocks a user’s account, that user may still experience problems logging in
due to a forgotten password. In this case, the user’s password may be reset under the Summary tab in
User Details.
msb-services.com 36 © Copyright MSB 2014
Revision Date 10/24/2014
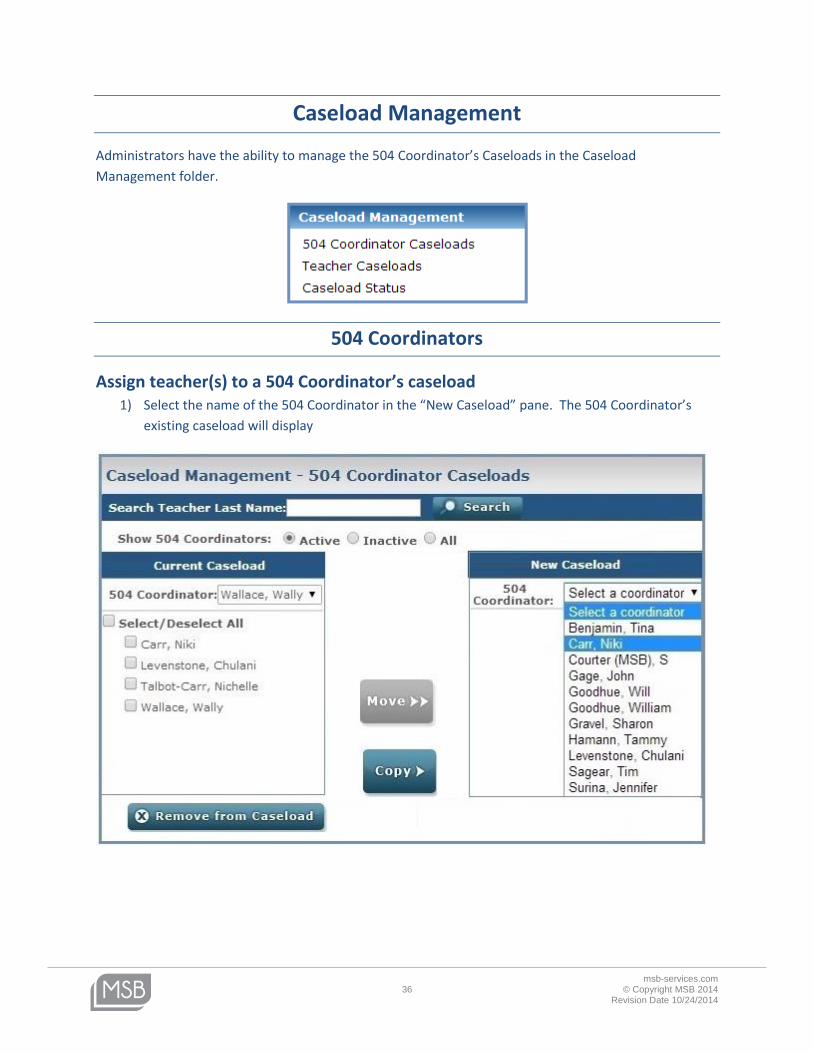
Caseload Management
Administrators have the ability to manage the 504 Coordinator’s Caseloads in the Caseload
Management folder.
504 Coordinators
Assign teacher(s) to a 504 Coordinator’s caseload 1) Select the name of the 504 Coordinator in the “New Caseload” pane. The 504 Coordinator’s
existing caseload will display
msb-services.com 37 © Copyright MSB 2014
Revision Date 10/24/2014
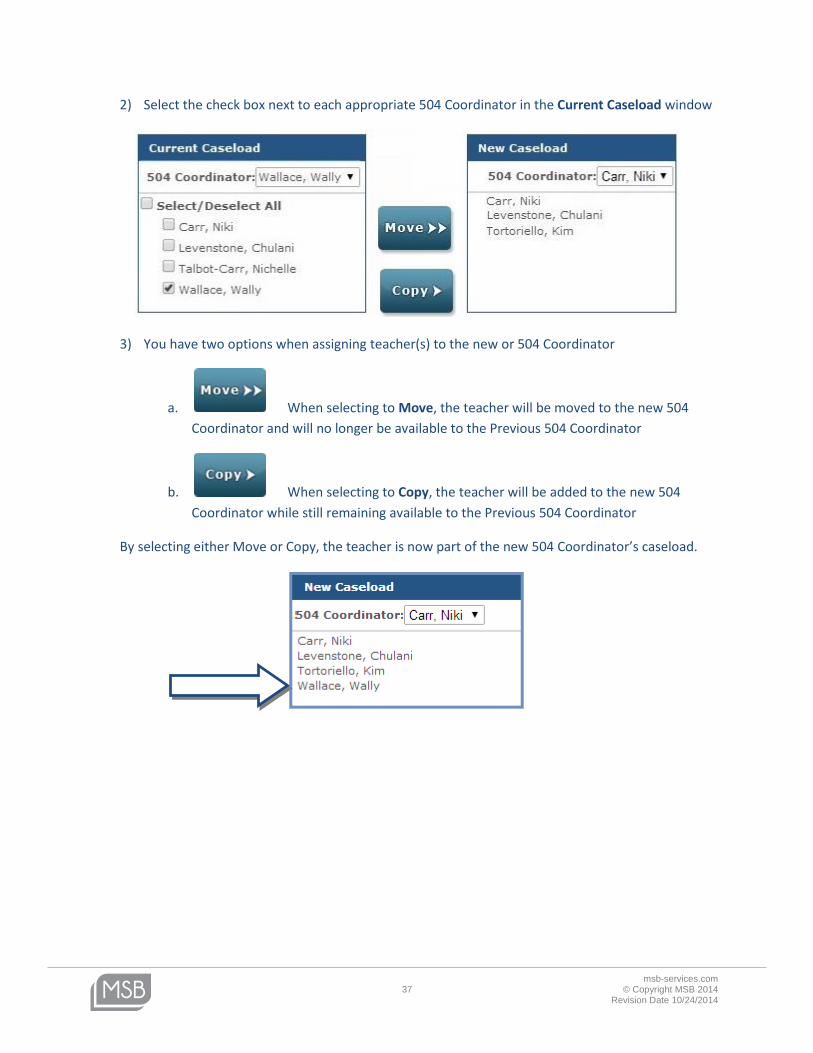
2) Select the check box next to each appropriate 504 Coordinator in the Current Caseload window
3) You have two options when assigning teacher(s) to the new or 504 Coordinator
a. When selecting to Move, the teacher will be moved to the new 504
Coordinator and will no longer be available to the Previous 504 Coordinator
b. When selecting to Copy, the teacher will be added to the new 504
Coordinator while still remaining available to the Previous 504 Coordinator
By selecting either Move or Copy, the teacher is now part of the new 504 Coordinator’s caseload.
msb-services.com 38 © Copyright MSB 2014
Revision Date 10/24/2014
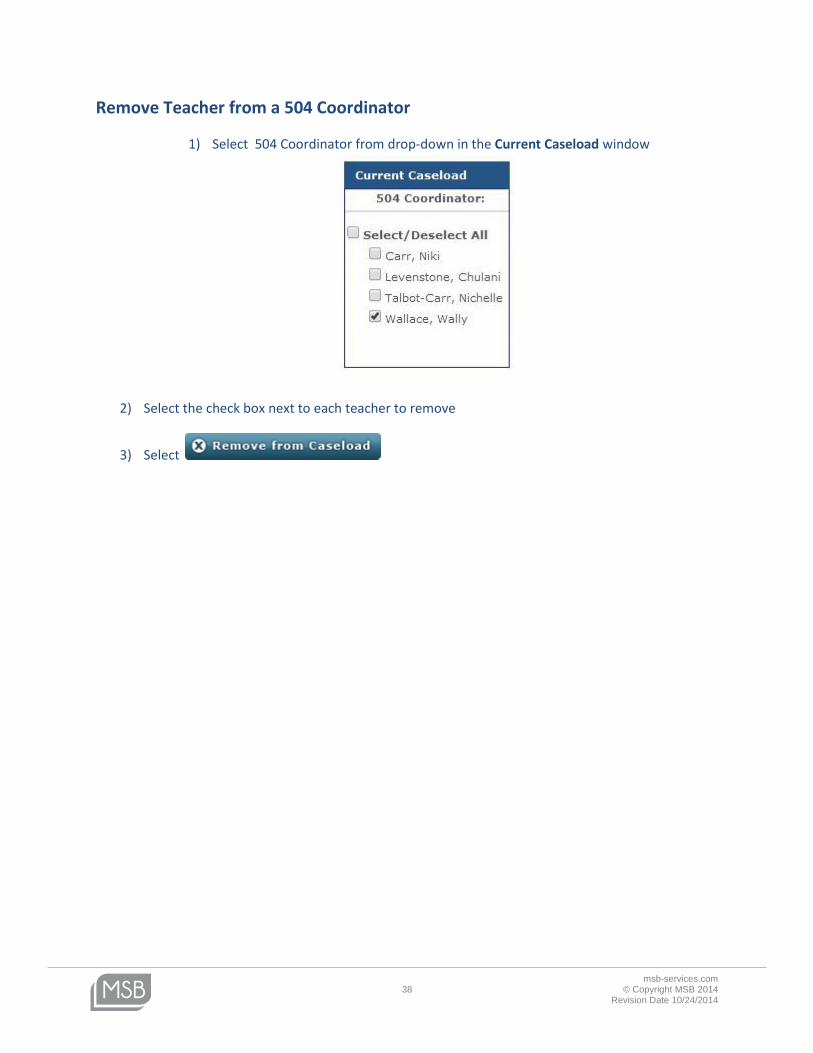
Remove Teacher from a 504 Coordinator
1) Select 504 Coordinator from drop-down in the Current Caseload window
2) Select the check box next to each teacher to remove
3) Select

msb-services.com 39 © Copyright MSB 2014
Revision Date 10/24/2014
Teachers
Administrators have the ability to manage their Teachers in the Caseload Management folder.
Search Caseloads
1) Select appropriate filters
2) In the Current Caseload pane, filter student list in one of four ways:
a.
b.
c.
d.
msb-services.com 40 © Copyright MSB 2014
Revision Date 10/24/2014
Assign Students to a Teacher
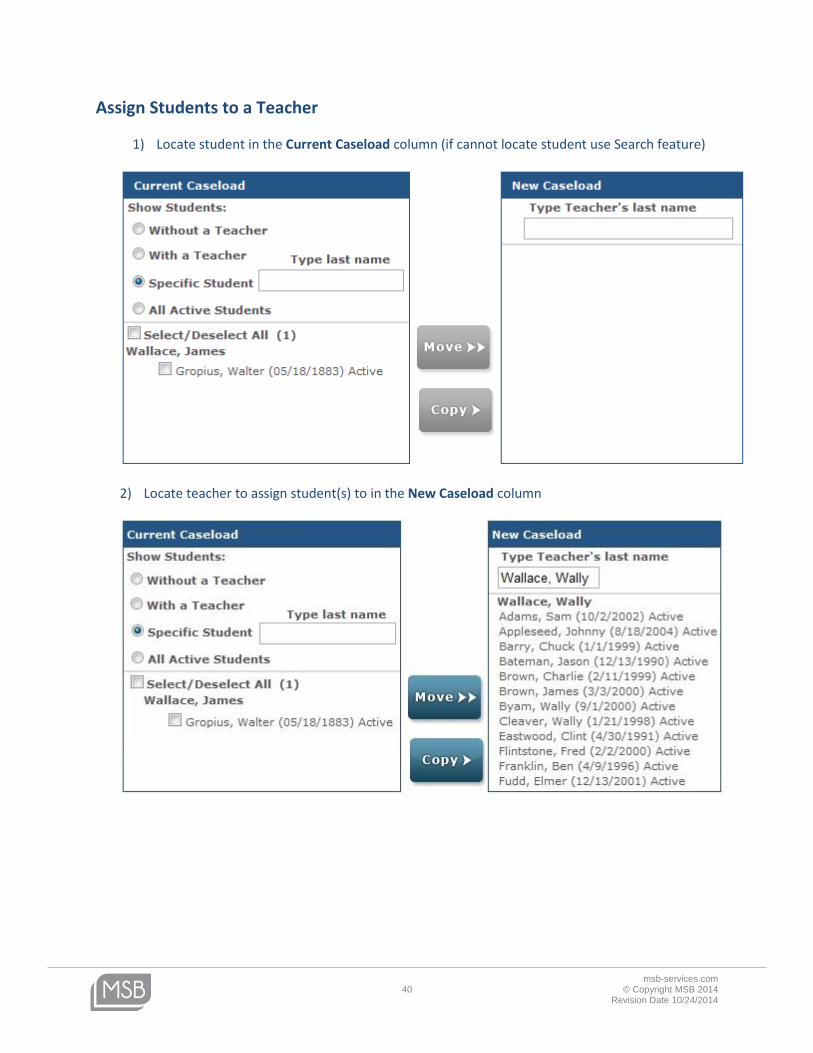
1) Locate student in the Current Caseload column (if cannot locate student use Search feature)
2) Locate teacher to assign student(s) to in the New Caseload column
msb-services.com 41 © Copyright MSB 2014
Revision Date 10/24/2014
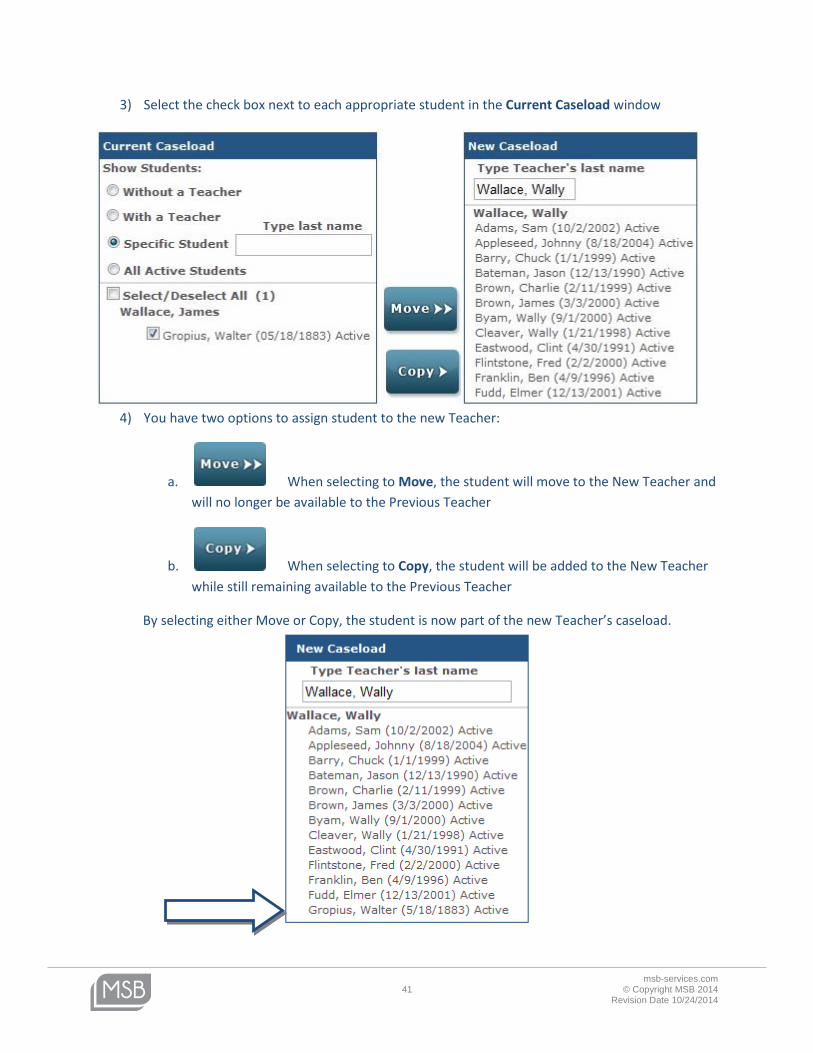
3) Select the check box next to each appropriate student in the Current Caseload window
4) You have two options to assign student to the new Teacher:
a. When selecting to Move, the student will move to the New Teacher and
will no longer be available to the Previous Teacher
b. When selecting to Copy, the student will be added to the New Teacher
while still remaining available to the Previous Teacher
By selecting either Move or Copy, the student is now part of the new Teacher’s caseload.
msb-services.com 42 © Copyright MSB 2014
Revision Date 10/24/2014
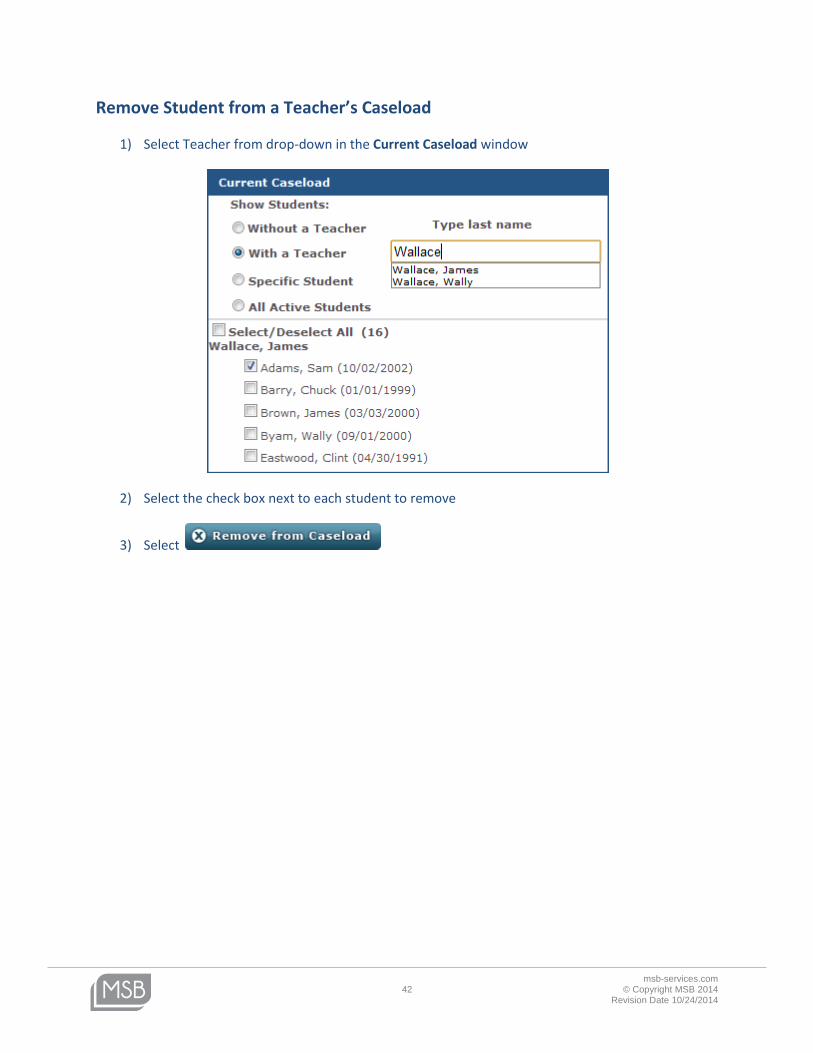
Remove Student from a Teacher’s Caseload
1) Select Teacher from drop-down in the Current Caseload window
2) Select the check box next to each student to remove
3) Select
msb-services.com 43 © Copyright MSB 2014
Revision Date 10/24/2014
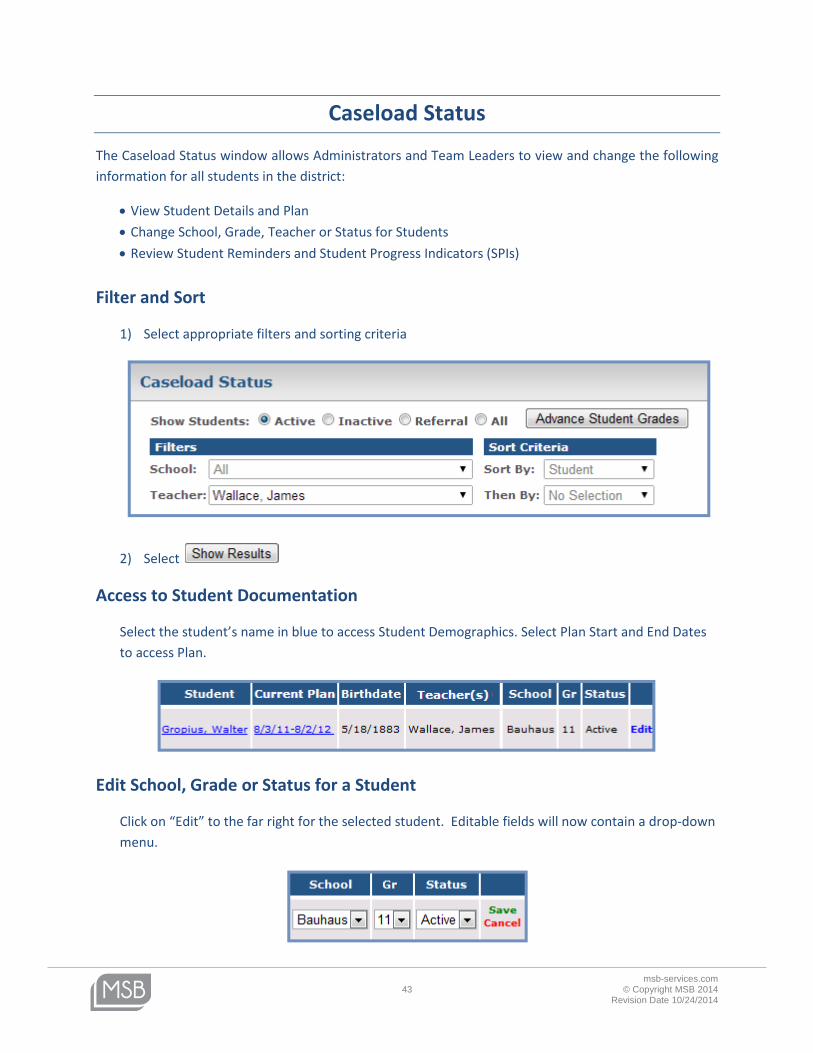
Caseload Status
The Caseload Status window allows Administrators and Team Leaders to view and change the following
information for all students in the district:
View Student Details and Plan
Change School, Grade, Teacher or Status for Students
Review Student Reminders and Student Progress Indicators (SPIs)
Filter and Sort
1) Select appropriate filters and sorting criteria
2) Select
Access to Student Documentation
Select the student’s name in blue to access Student Demographics. Select Plan Start and End Dates
to access Plan.
Edit School, Grade or Status for a Student
Click on “Edit” to the far right for the selected student. Editable fields will now contain a drop-down
menu.
msb-services.com 44 © Copyright MSB 2014
Revision Date 10/24/2014
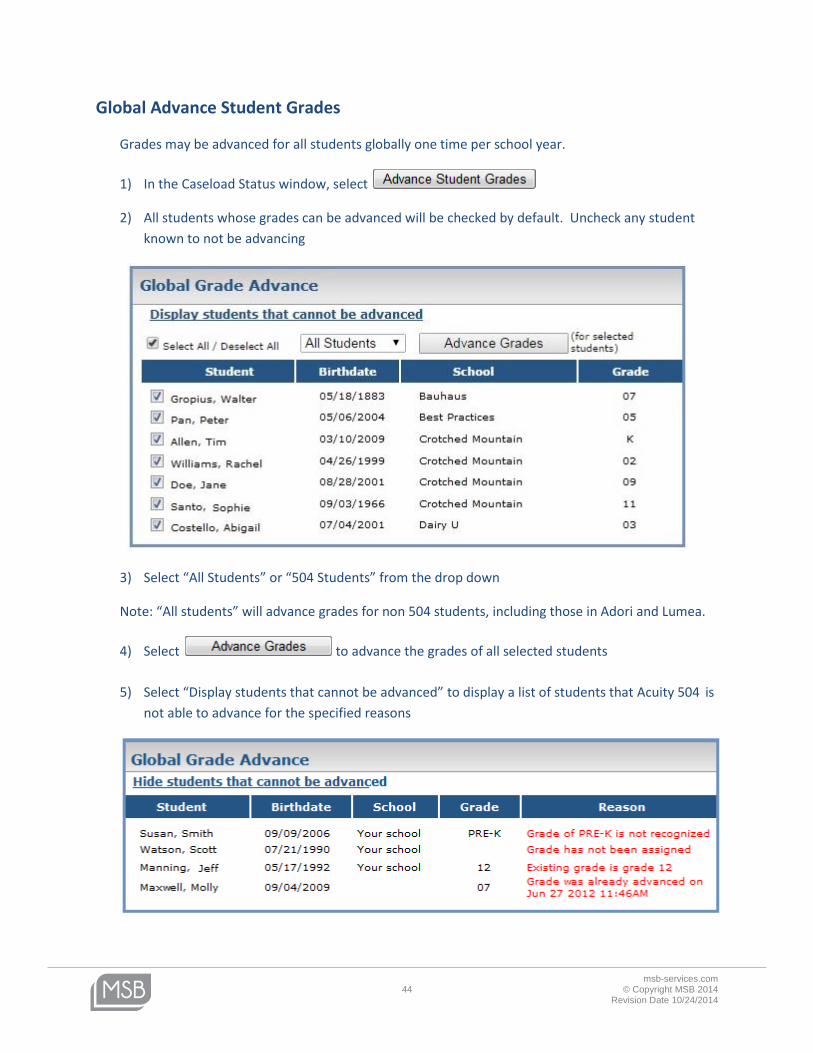
Global Advance Student Grades
Grades may be advanced for all students globally one time per school year.
1) In the Caseload Status window, select
2) All students whose grades can be advanced will be checked by default. Uncheck any student
known to not be advancing
3) Select “All Students” or “504 Students” from the drop down
Note: “All students” will advance grades for non 504 students, including those in Adori and Lumea.
4) Select to advance the grades of all selected students
5) Select “Display students that cannot be advanced” to display a list of students that Acuity 504 is
not able to advance for the specified reasons
msb-services.com 45 © Copyright MSB 2014
Revision Date 10/24/2014
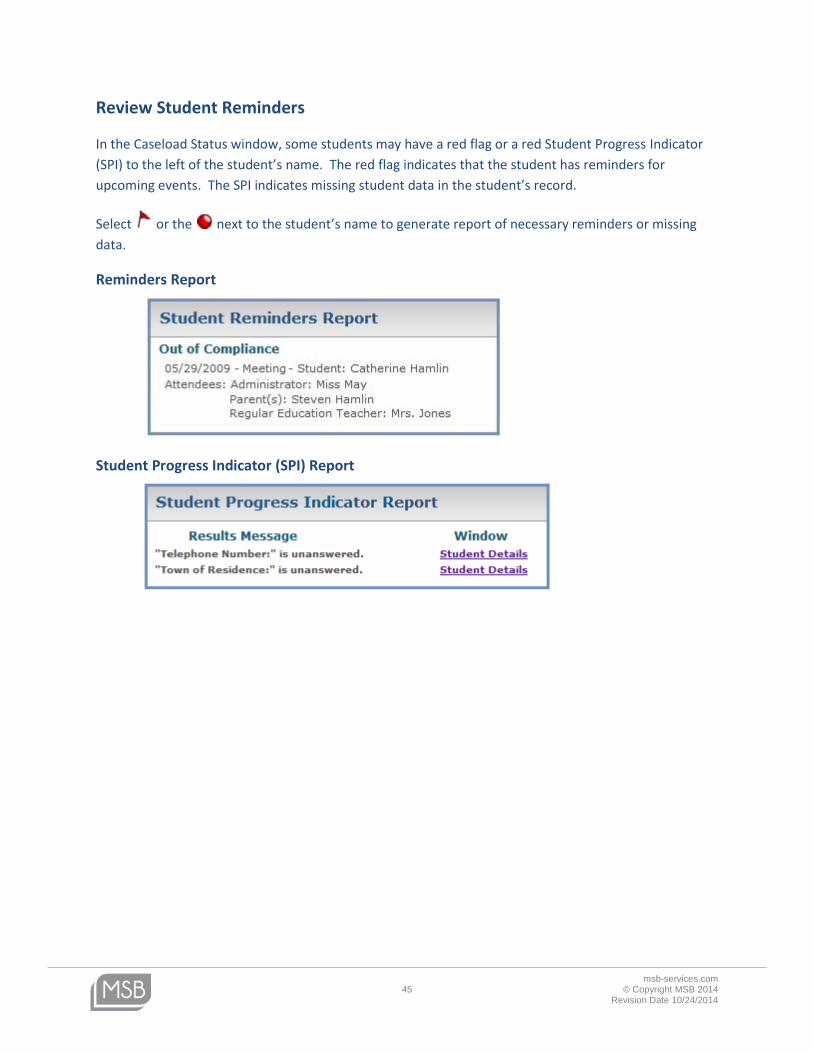
Review Student Reminders
In the Caseload Status window, some students may have a red flag or a red Student Progress Indicator
(SPI) to the left of the student’s name. The red flag indicates that the student has reminders for
upcoming events. The SPI indicates missing student data in the student’s record.
Select or the next to the student’s name to generate report of necessary reminders or missing
data.
Reminders Report
Student Progress Indicator (SPI) Report
msb-services.com 46 © Copyright MSB 2014
Revision Date 10/24/2014
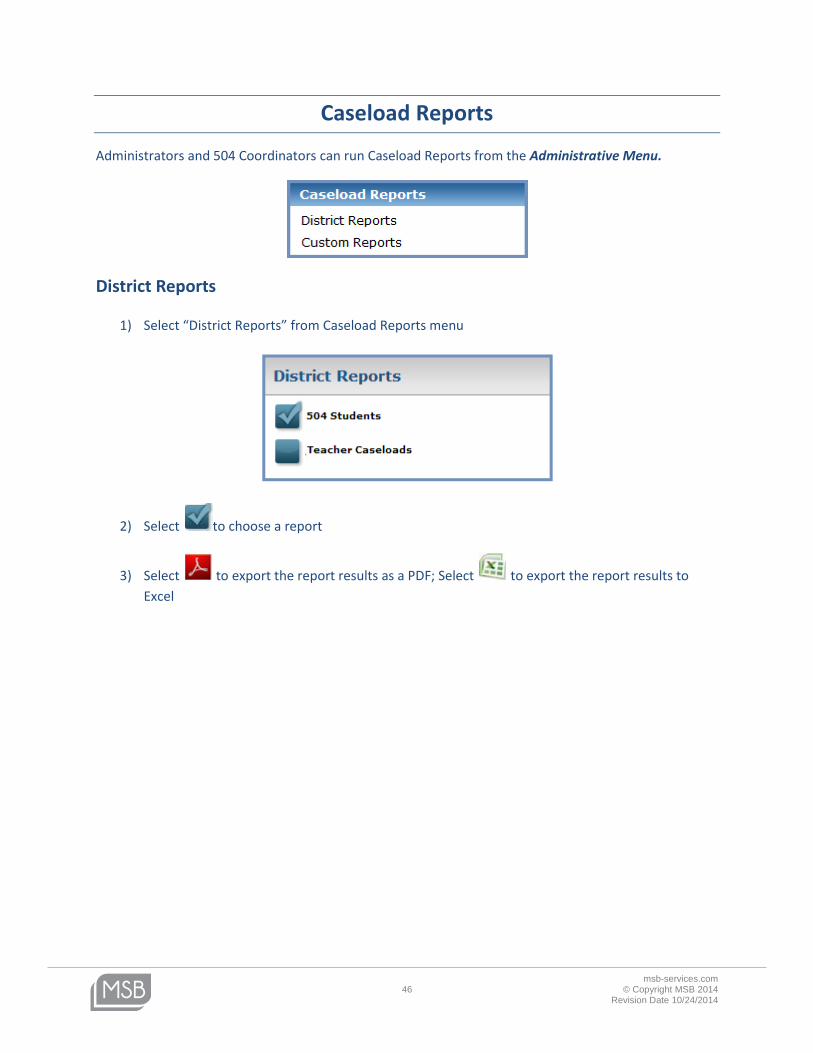
Caseload Reports
Administrators and 504 Coordinators can run Caseload Reports from the Administrative Menu.
District Reports
1) Select “District Reports” from Caseload Reports menu
2) Select to choose a report
3) Select to export the report results as a PDF; Select to export the report results to
Excel

msb-services.com 47 © Copyright MSB 2014
Revision Date 10/24/2014
Custom Reports - New
1) Select “Custom Reports” from Administrative Menu; The Custom Reports Wizard will open
2) Click on to create a new Custom Report
3) Select next to the appropriate section to display the sub-sections
4) Check the box for the appropriate sub-section(s) to include all fields in that sub-section or select
next to the sub-section to display the individual fields
5) Select
msb-services.com 48 © Copyright MSB 2014
Revision Date 10/24/2014
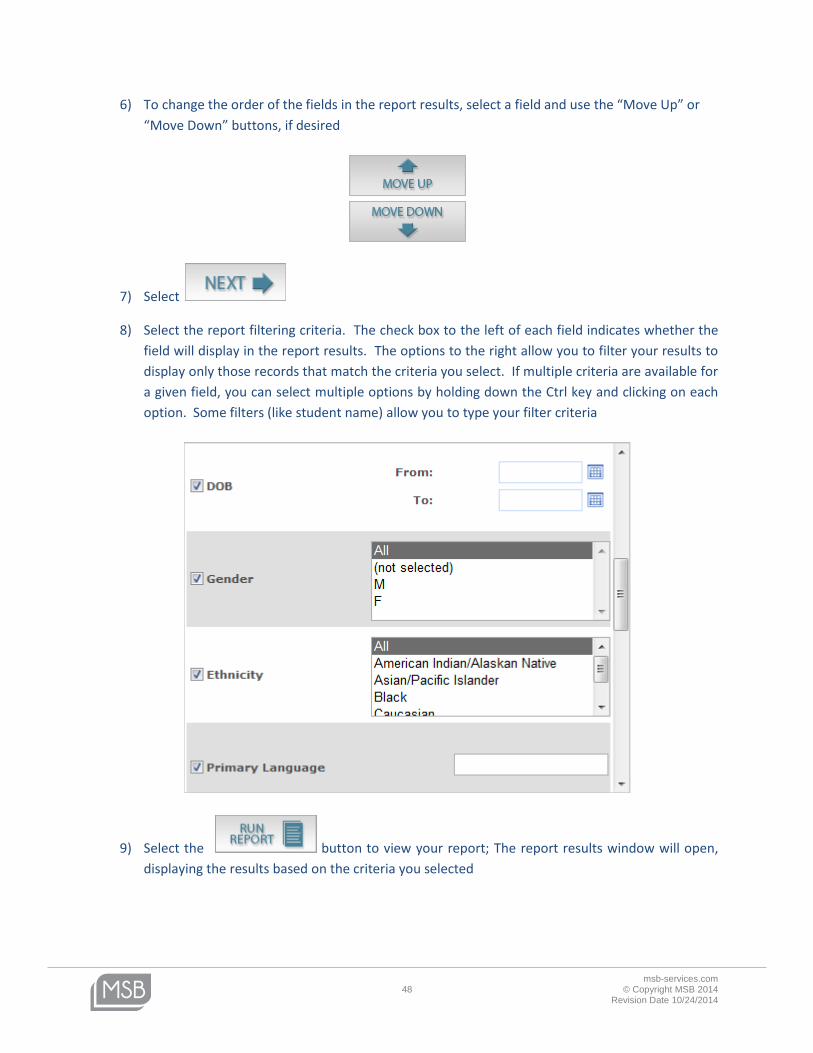
6) To change the order of the fields in the report results, select a field and use the “Move Up” or
“Move Down” buttons, if desired
7) Select
8) Select the report filtering criteria. The check box to the left of each field indicates whether the
field will display in the report results. The options to the right allow you to filter your results to
display only those records that match the criteria you select. If multiple criteria are available for
a given field, you can select multiple options by holding down the Ctrl key and clicking on each
option. Some filters (like student name) allow you to type your filter criteria
9) Select the button to view your report; The report results window will open,
displaying the results based on the criteria you selected
msb-services.com 49 © Copyright MSB 2014
Revision Date 10/24/2014
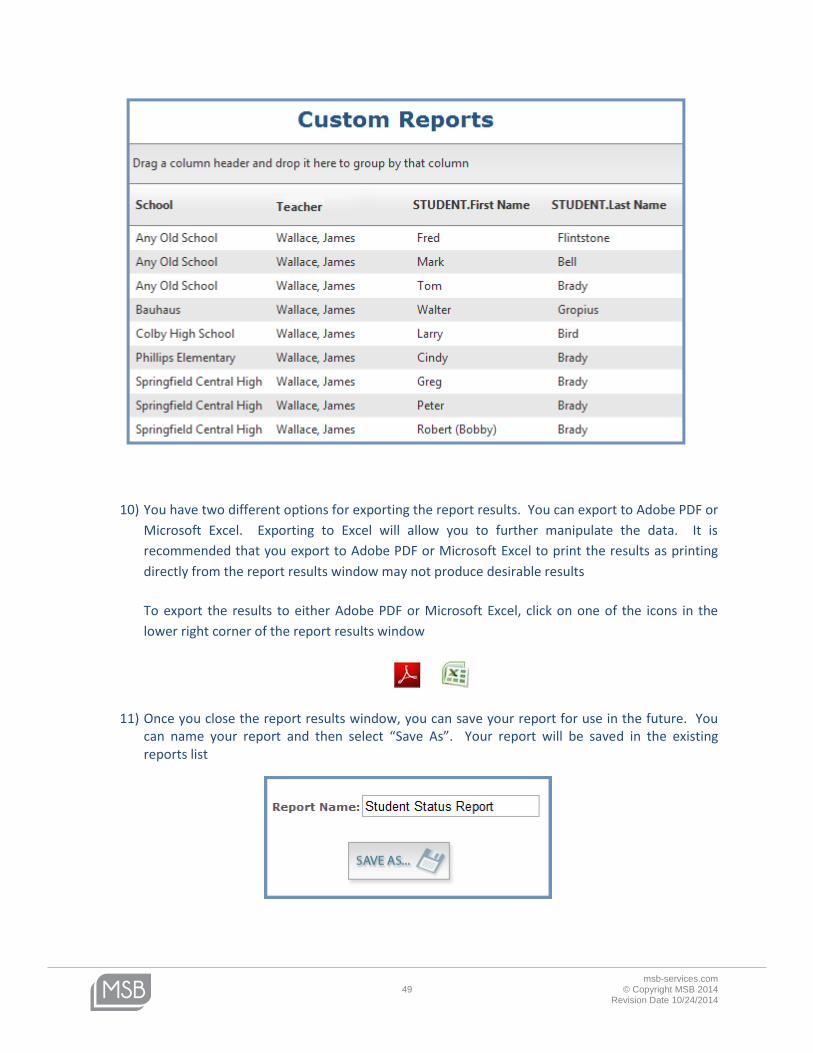
10) You have two different options for exporting the report results. You can export to Adobe PDF or
Microsoft Excel. Exporting to Excel will allow you to further manipulate the data. It is
recommended that you export to Adobe PDF or Microsoft Excel to print the results as printing
directly from the report results window may not produce desirable results
To export the results to either Adobe PDF or Microsoft Excel, click on one of the icons in the
lower right corner of the report results window
11) Once you close the report results window, you can save your report for use in the future. You can name your report and then select “Save As”. Your report will be saved in the existing reports list
msb-services.com 50 © Copyright MSB 2014
Revision Date 10/24/2014
Custom Reports – Existing
Once you have saved one or more custom reports, you can run those reports again without creating
them from scratch. You can even modify an existing report if the criteria change.
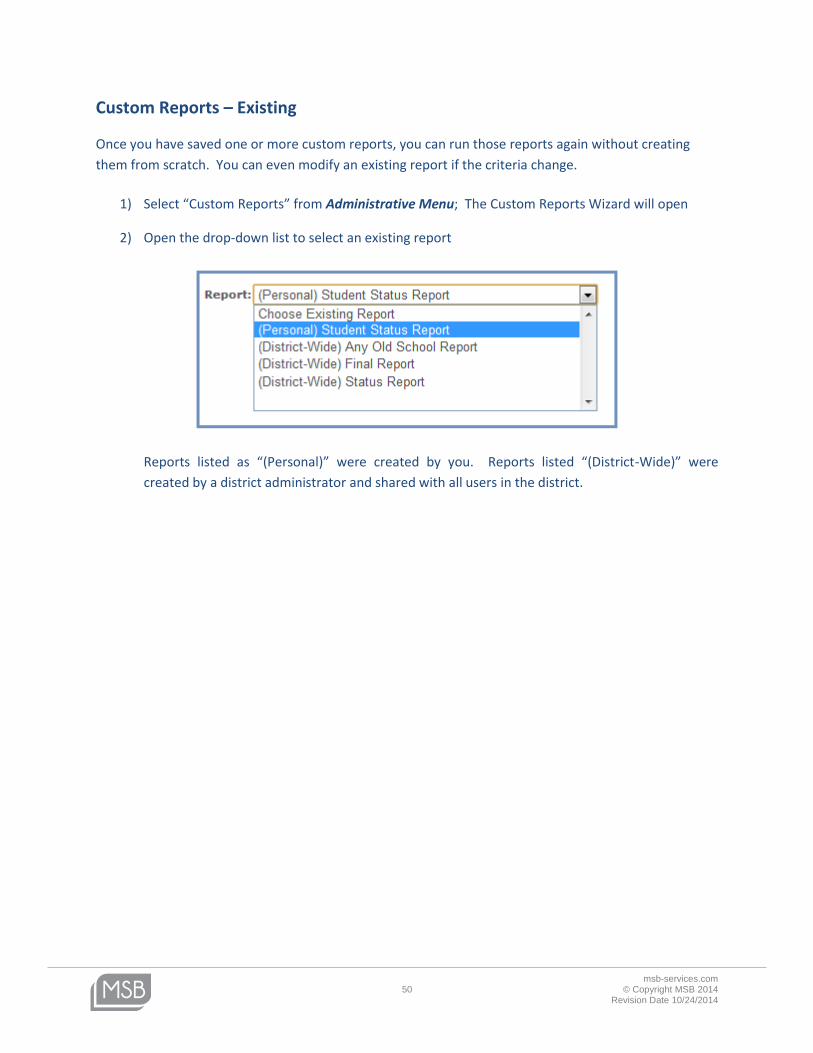
1) Select “Custom Reports” from Administrative Menu; The Custom Reports Wizard will open
2) Open the drop-down list to select an existing report
Reports listed as “(Personal)” were created by you. Reports listed “(District-Wide)” were
created by a district administrator and shared with all users in the district.
msb-services.com 51 © Copyright MSB 2014
Revision Date 10/24/2014
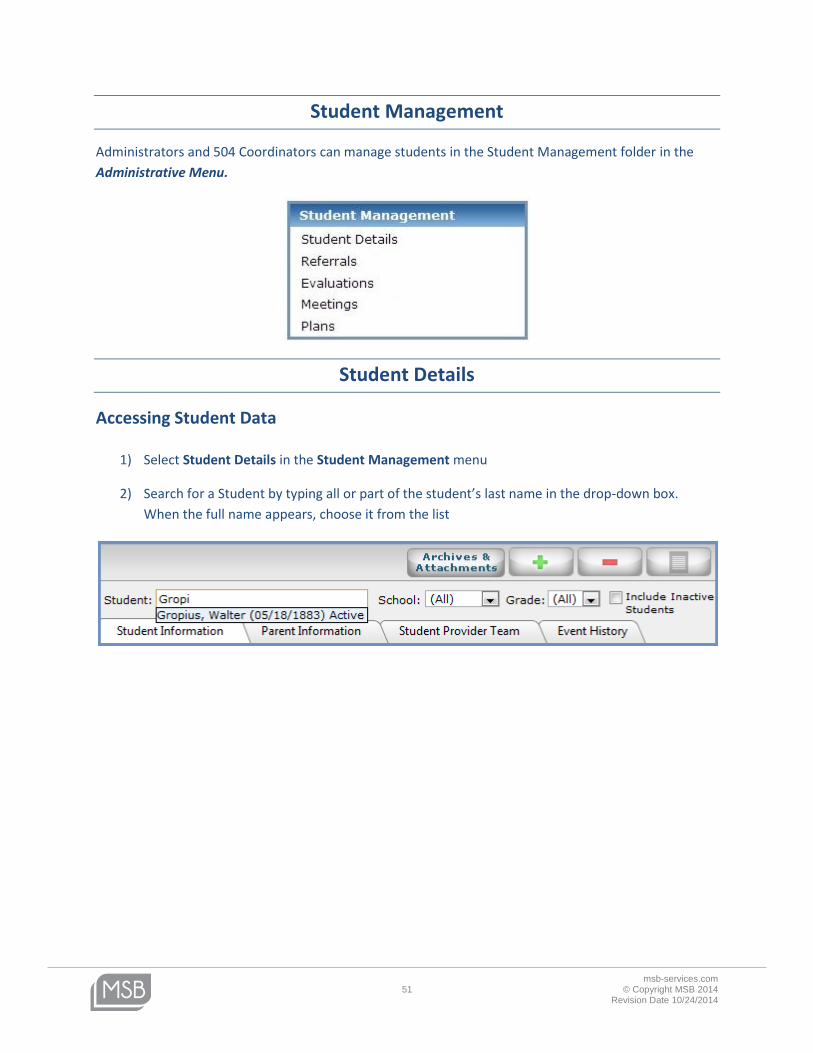
Student Management
Administrators and 504 Coordinators can manage students in the Student Management folder in the
Administrative Menu.
Student Details
Accessing Student Data
1) Select Student Details in the Student Management menu
2) Search for a Student by typing all or part of the student’s last name in the drop-down box.
When the full name appears, choose it from the list
msb-services.com 52 © Copyright MSB 2014
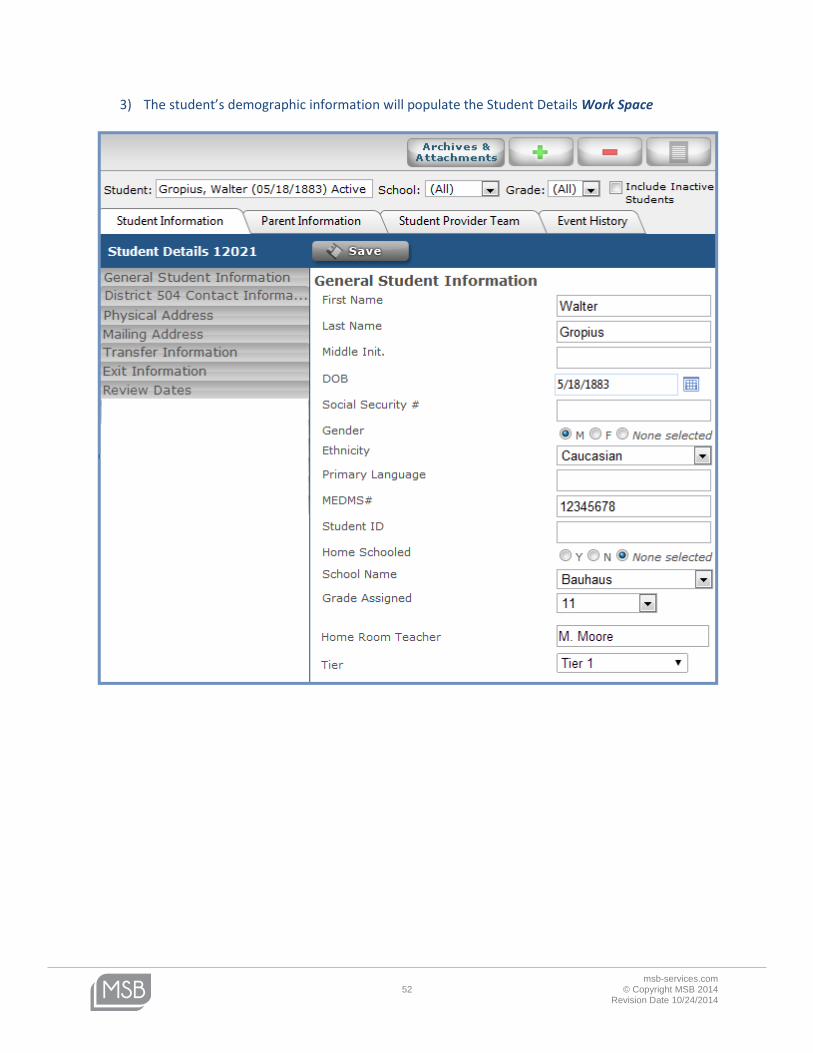
Revision Date 10/24/2014
3) The student’s demographic information will populate the Student Details Work Space
msb-services.com 53 © Copyright MSB 2014
Revision Date 10/24/2014
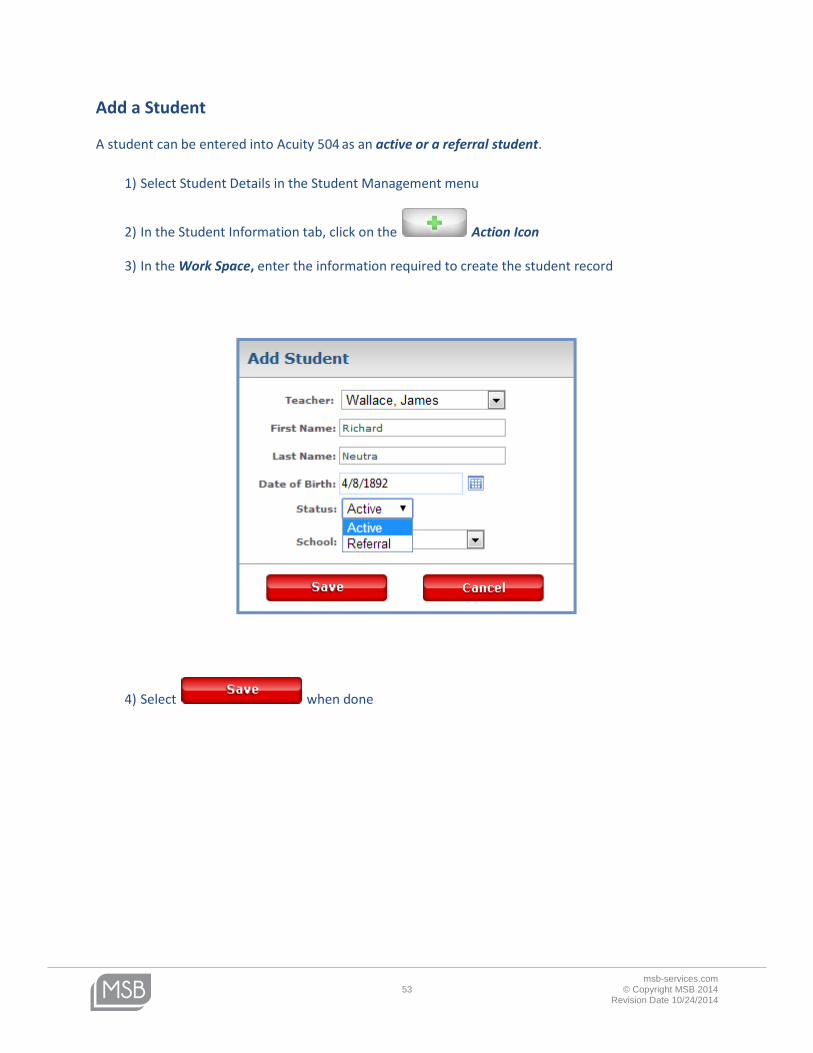
Add a Student
A student can be entered into Acuity 504 as an active or a referral student.
1) Select Student Details in the Student Management menu
2) In the Student Information tab, click on the Action Icon
3) In the Work Space, enter the information required to create the student record
4) Select when done
msb-services.com 54 © Copyright MSB 2014
Revision Date 10/24/2014
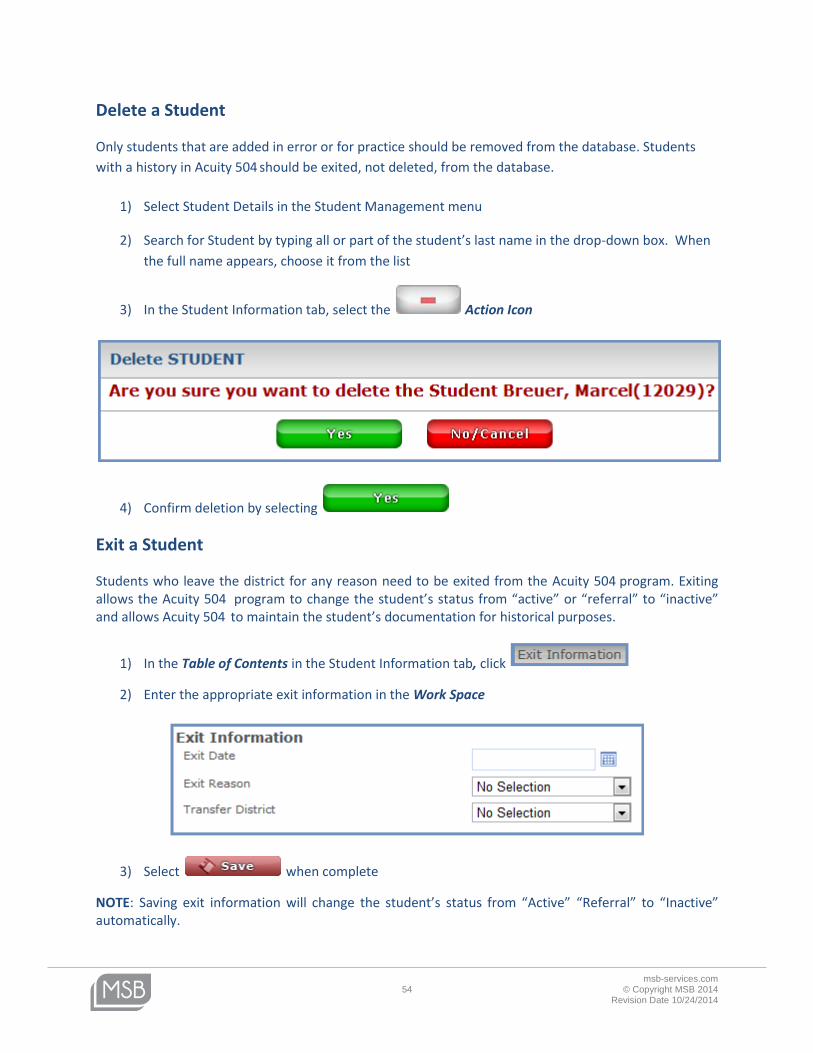
Delete a Student
Only students that are added in error or for practice should be removed from the database. Students
with a history in Acuity 504 should be exited, not deleted, from the database.
1) Select Student Details in the Student Management menu
2) Search for Student by typing all or part of the student’s last name in the drop-down box. When
the full name appears, choose it from the list
3) In the Student Information tab, select the Action Icon
4) Confirm deletion by selecting
Exit a Student
Students who leave the district for any reason need to be exited from the Acuity 504 program. Exiting allows the Acuity 504 program to change the student’s status from “active” or “referral” to “inactive” and allows Acuity 504 to maintain the student’s documentation for historical purposes.
1) In the Table of Contents in the Student Information tab, click
2) Enter the appropriate exit information in the Work Space
3) Select when complete
NOTE: Saving exit information will change the student’s status from “Active” “Referral” to “Inactive” automatically.
msb-services.com 55 © Copyright MSB 2014
Revision Date 10/24/2014
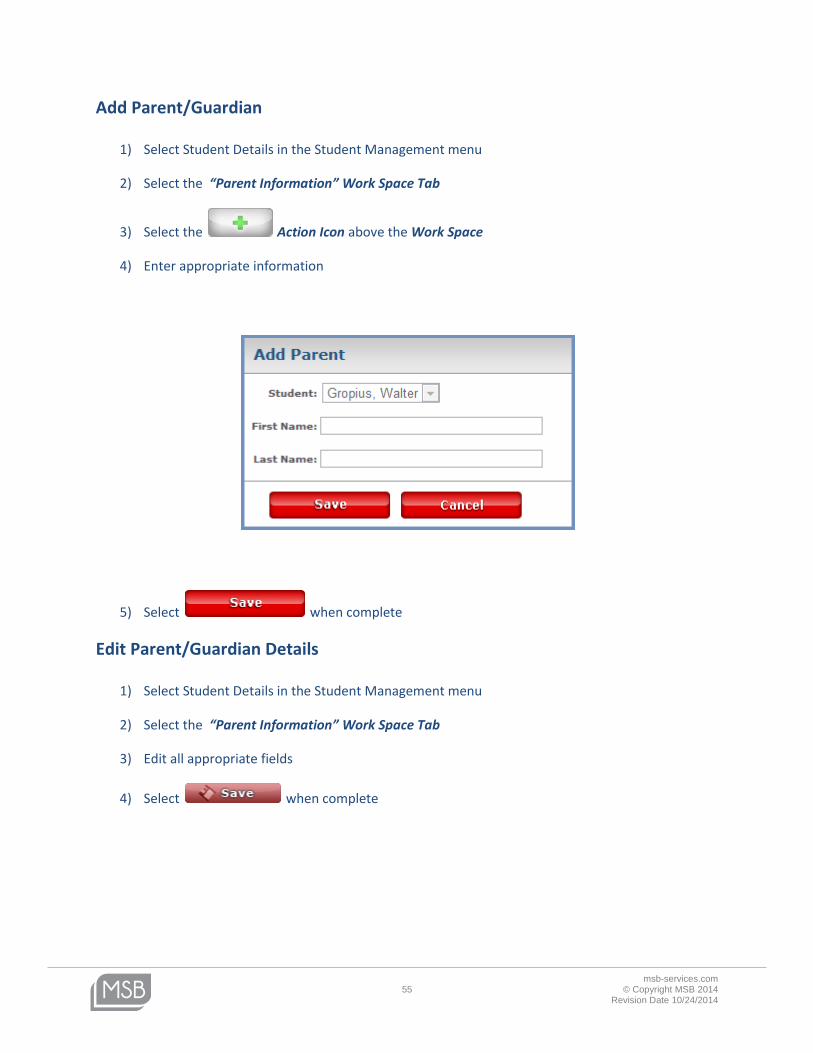
Add Parent/Guardian
1) Select Student Details in the Student Management menu
2) Select the “Parent Information” Work Space Tab
3) Select the Action Icon above the Work Space
4) Enter appropriate information
5) Select when complete
Edit Parent/Guardian Details
1) Select Student Details in the Student Management menu
2) Select the “Parent Information” Work Space Tab
3) Edit all appropriate fields
4) Select when complete
msb-services.com 56 © Copyright MSB 2014
Revision Date 10/24/2014
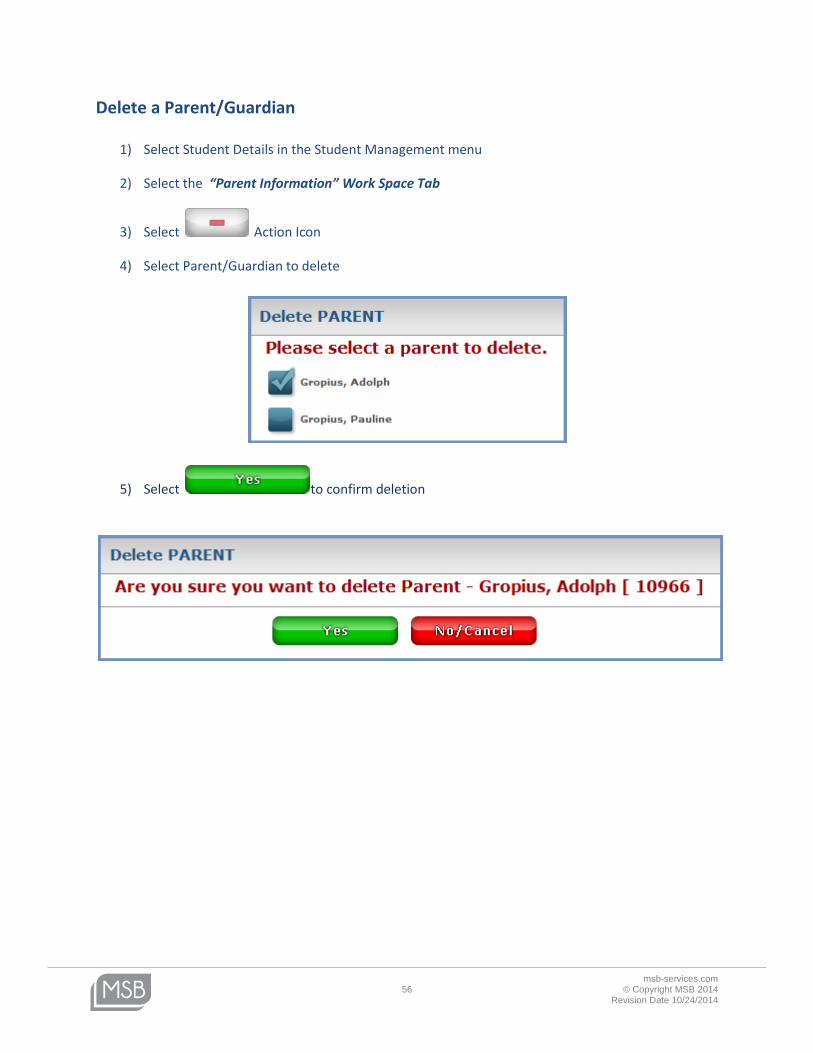
Delete a Parent/Guardian
1) Select Student Details in the Student Management menu
2) Select the “Parent Information” Work Space Tab
3) Select Action Icon
4) Select Parent/Guardian to delete
5) Select to confirm deletion
msb-services.com 57 © Copyright MSB 2014
Revision Date 10/24/2014
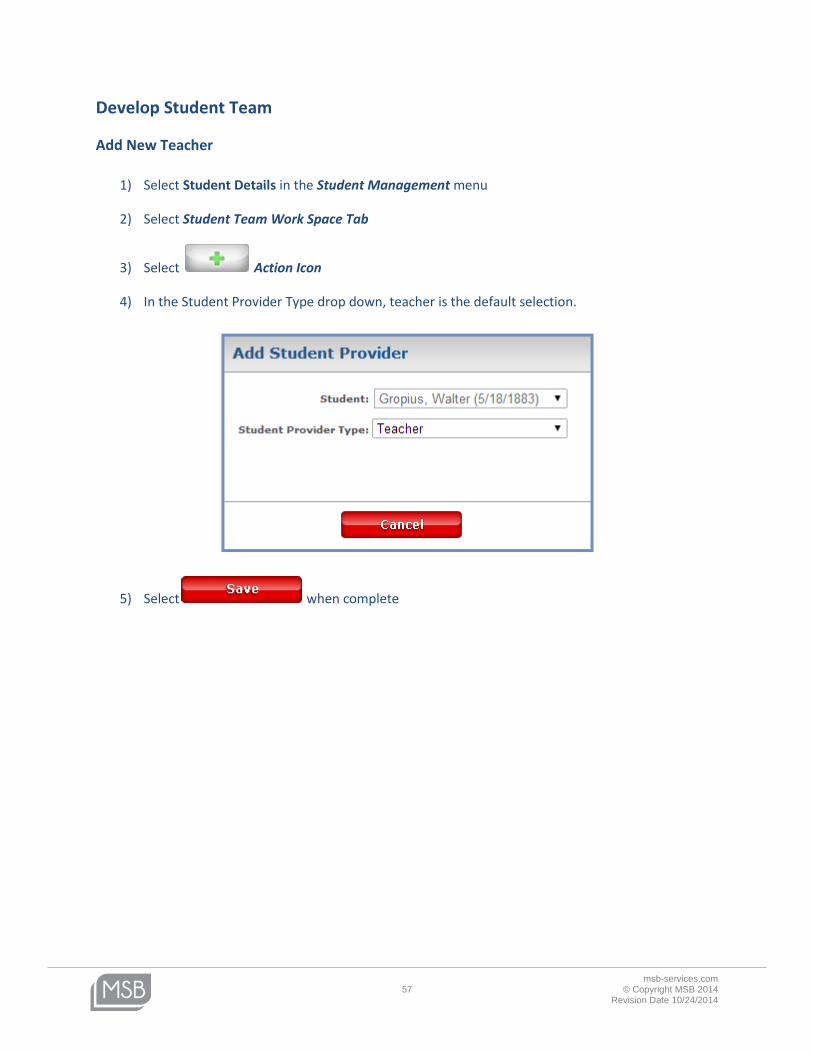
Develop Student Team
Add New Teacher
1) Select Student Details in the Student Management menu
2) Select Student Team Work Space Tab
3) Select Action Icon
4) In the Student Provider Type drop down, teacher is the default selection.
5) Select when complete
msb-services.com 58 © Copyright MSB 2014
Revision Date 10/24/2014
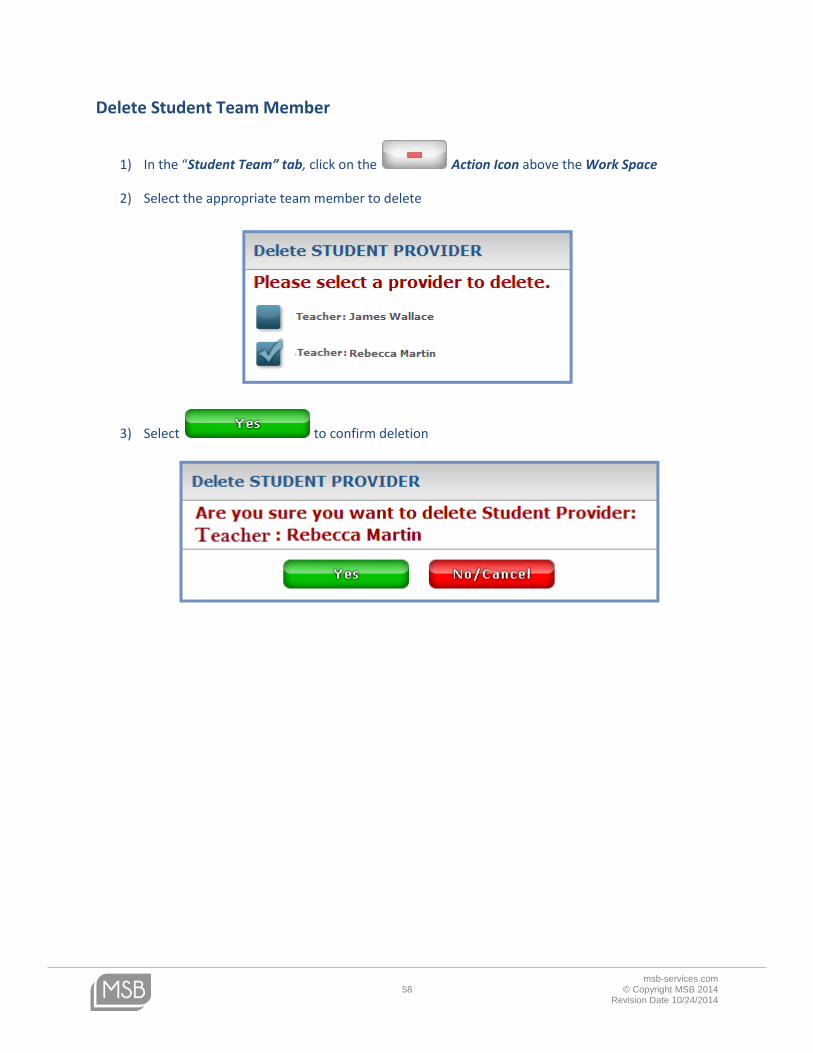
Delete Student Team Member
1) In the “Student Team” tab, click on the Action Icon above the Work Space
2) Select the appropriate team member to delete
3) Select to confirm deletion
msb-services.com 59 © Copyright MSB 2014
Revision Date 10/24/2014
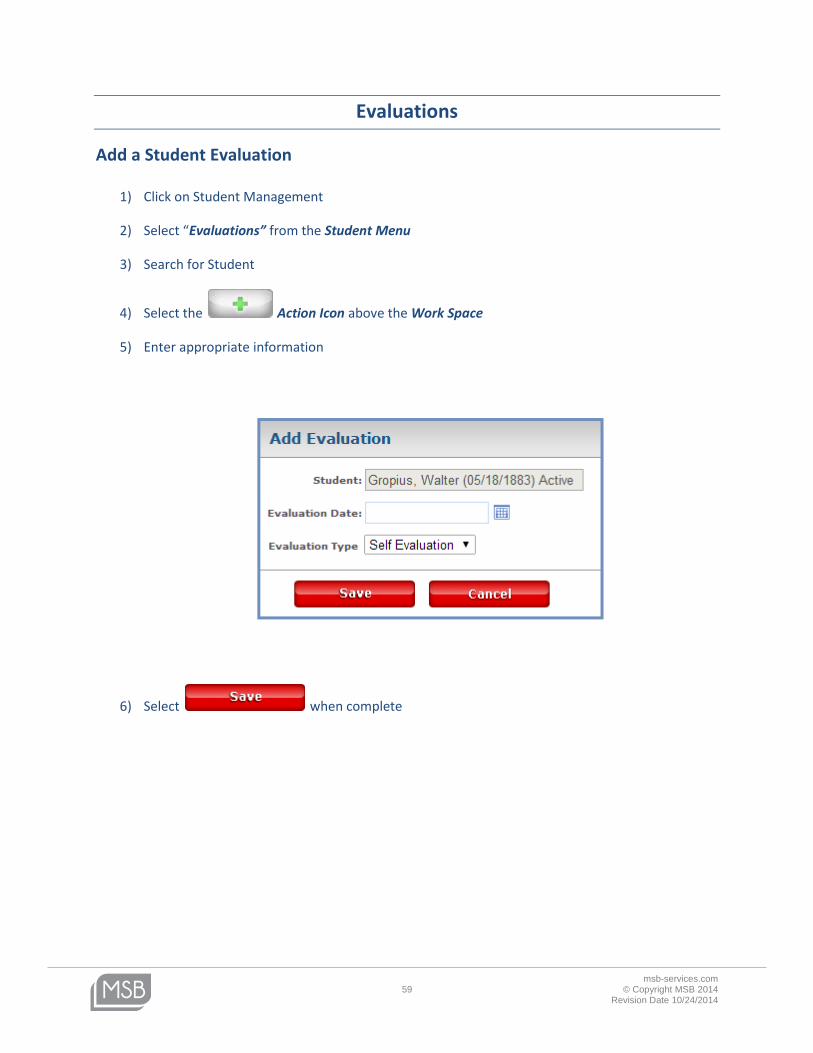
Evaluations
Add a Student Evaluation
1) Click on Student Management
2) Select “Evaluations” from the Student Menu
3) Search for Student
4) Select the Action Icon above the Work Space
5) Enter appropriate information
6) Select when complete

msb-services.com 60 © Copyright MSB 2014
Revision Date 10/24/2014
Edit Student Evaluation
1) Click on Student Management
2) Select “Evaluations” from the Student Menu
3) Search for a student using the Student Search box above the Work Space
4) Select appropriate Evaluation from the Pathway
5) Enter appropriate data in the Work Space
6) Select when complete
Delete Student Evaluation
1) Click on Student Management
2) Select “Evaluations” from the Student Menu
3) Search for a student using the Student Search box above the Work Space
4) Select appropriate Evaluation from the Pathway
5) Select the Action Icon
6) Select to confirm deletion
msb-services.com 61 © Copyright MSB 2014
Revision Date 10/24/2014
Meetings
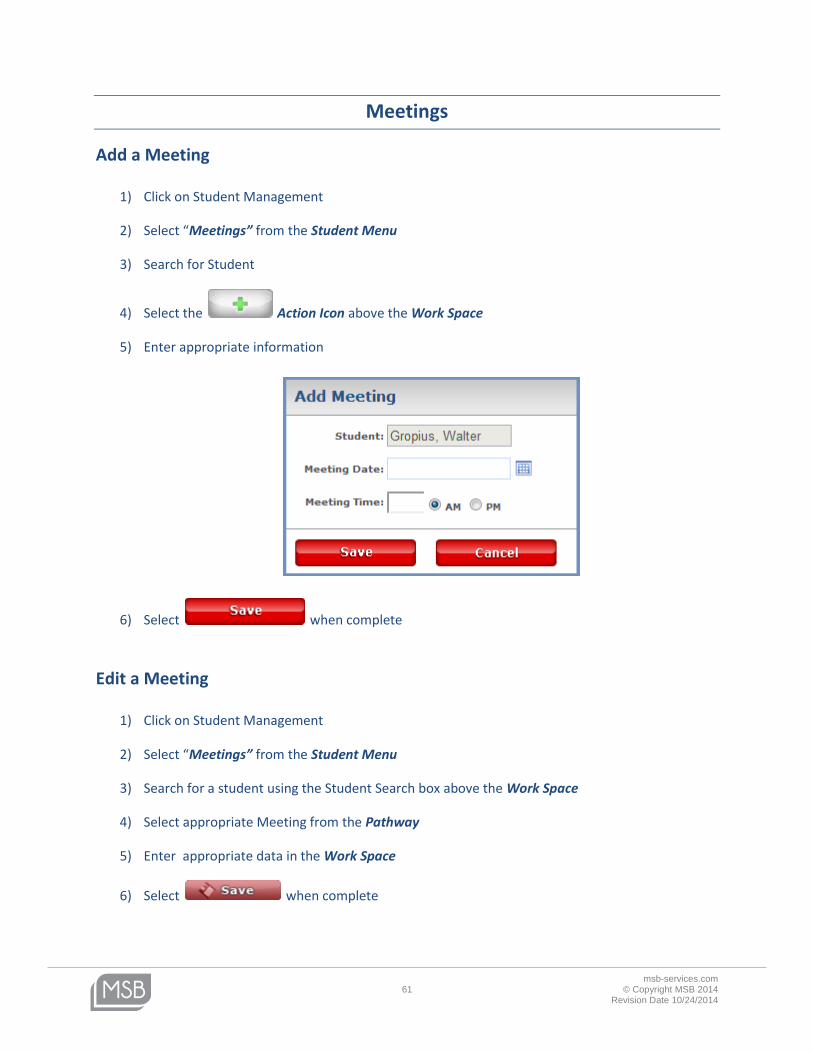
Add a Meeting
1) Click on Student Management
2) Select “Meetings” from the Student Menu
3) Search for Student
4) Select the Action Icon above the Work Space
5) Enter appropriate information
6) Select when complete
Edit a Meeting
1) Click on Student Management
2) Select “Meetings” from the Student Menu
3) Search for a student using the Student Search box above the Work Space
4) Select appropriate Meeting from the Pathway
5) Enter appropriate data in the Work Space
6) Select when complete
msb-services.com 62 © Copyright MSB 2014
Revision Date 10/24/2014
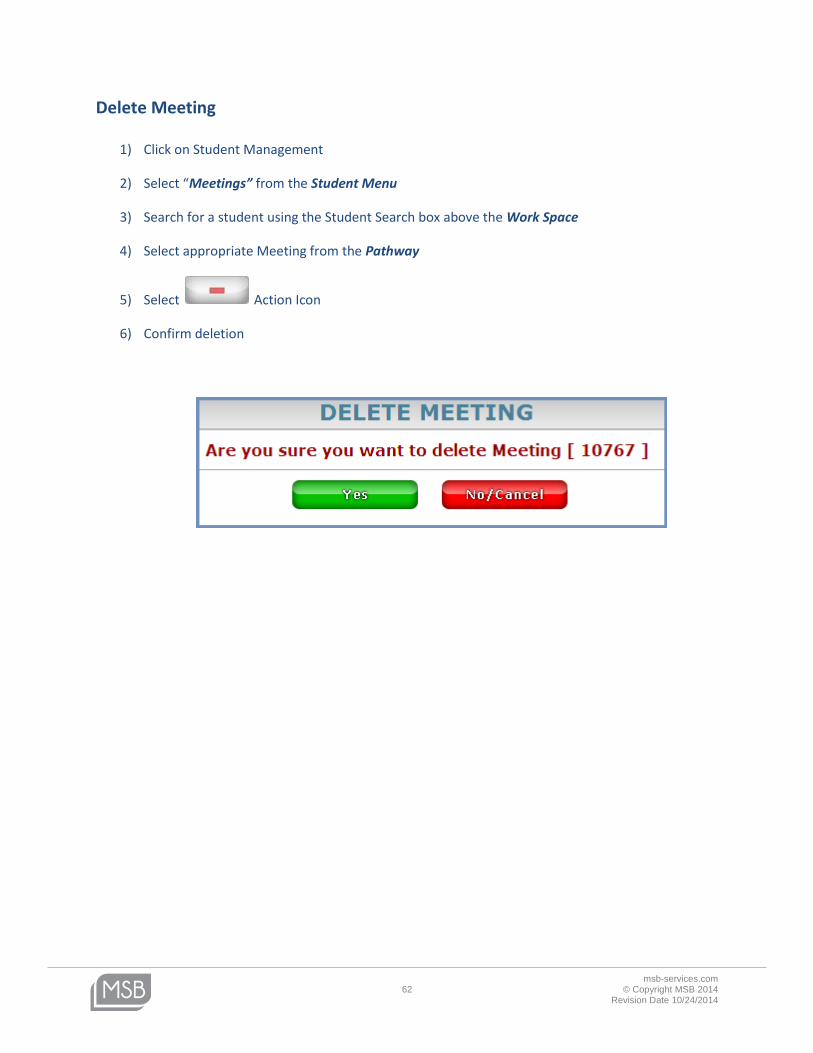
Delete Meeting
1) Click on Student Management
2) Select “Meetings” from the Student Menu
3) Search for a student using the Student Search box above the Work Space
4) Select appropriate Meeting from the Pathway
5) Select Action Icon
6) Confirm deletion
msb-services.com 63 © Copyright MSB 2014
Revision Date 10/24/2014
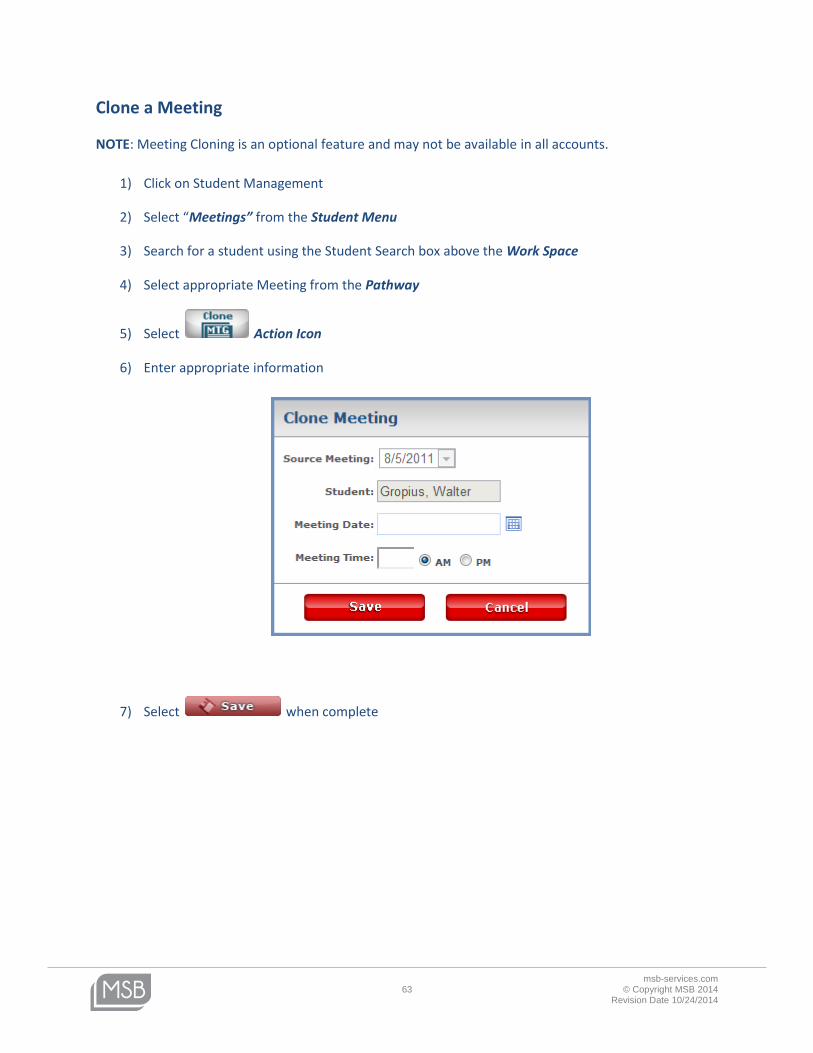
Clone a Meeting
NOTE: Meeting Cloning is an optional feature and may not be available in all accounts.
1) Click on Student Management
2) Select “Meetings” from the Student Menu
3) Search for a student using the Student Search box above the Work Space
4) Select appropriate Meeting from the Pathway
5) Select Action Icon
6) Enter appropriate information
7) Select when complete
msb-services.com 64 © Copyright MSB 2014
Revision Date 10/24/2014
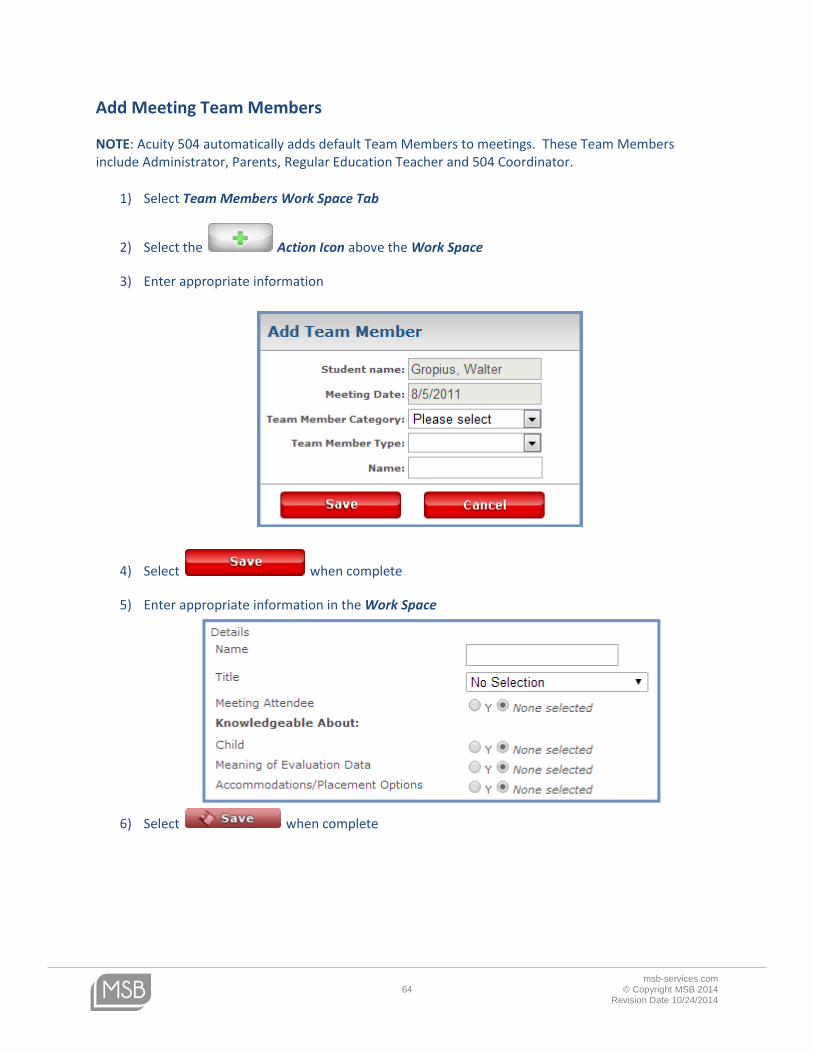
Add Meeting Team Members
NOTE: Acuity 504 automatically adds default Team Members to meetings. These Team Members include Administrator, Parents, Regular Education Teacher and 504 Coordinator.
1) Select Team Members Work Space Tab
2) Select the Action Icon above the Work Space
3) Enter appropriate information
4) Select when complete
5) Enter appropriate information in the Work Space
6) Select when complete
msb-services.com 65 © Copyright MSB 2014
Revision Date 10/24/2014
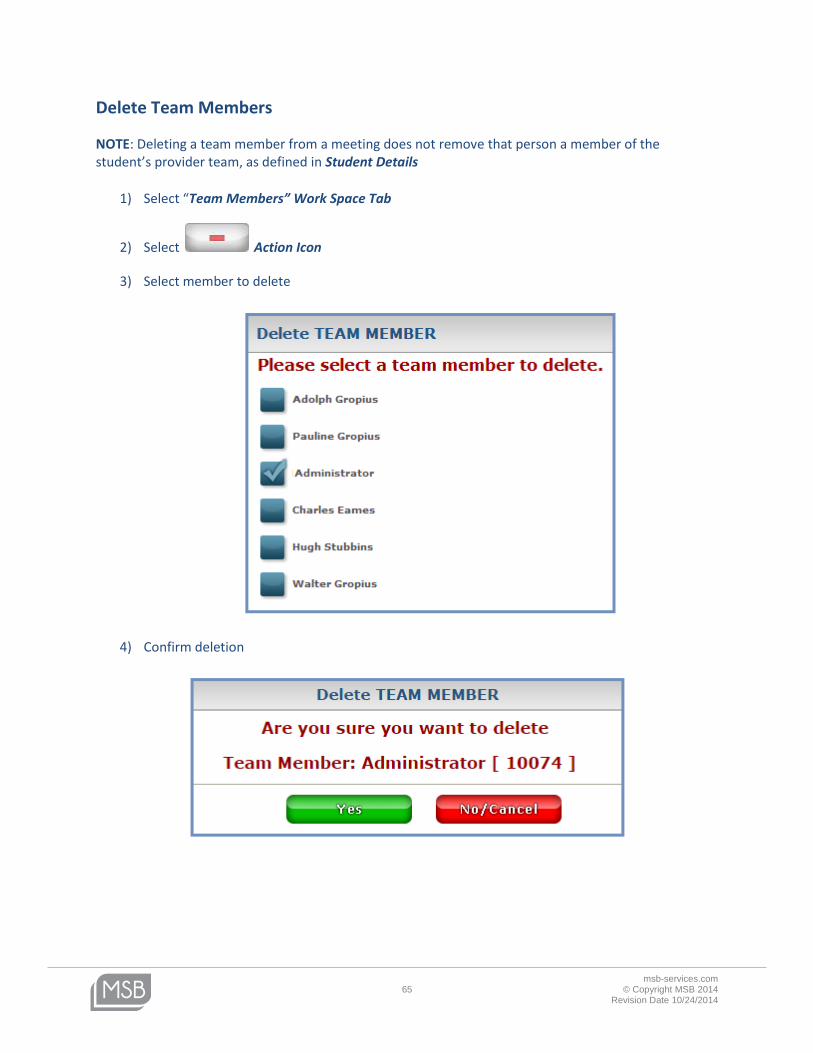
Delete Team Members
NOTE: Deleting a team member from a meeting does not remove that person a member of the student’s provider team, as defined in Student Details
1) Select “Team Members” Work Space Tab
2) Select Action Icon
3) Select member to delete
4) Confirm deletion
msb-services.com 66 © Copyright MSB 2014
Revision Date 10/24/2014
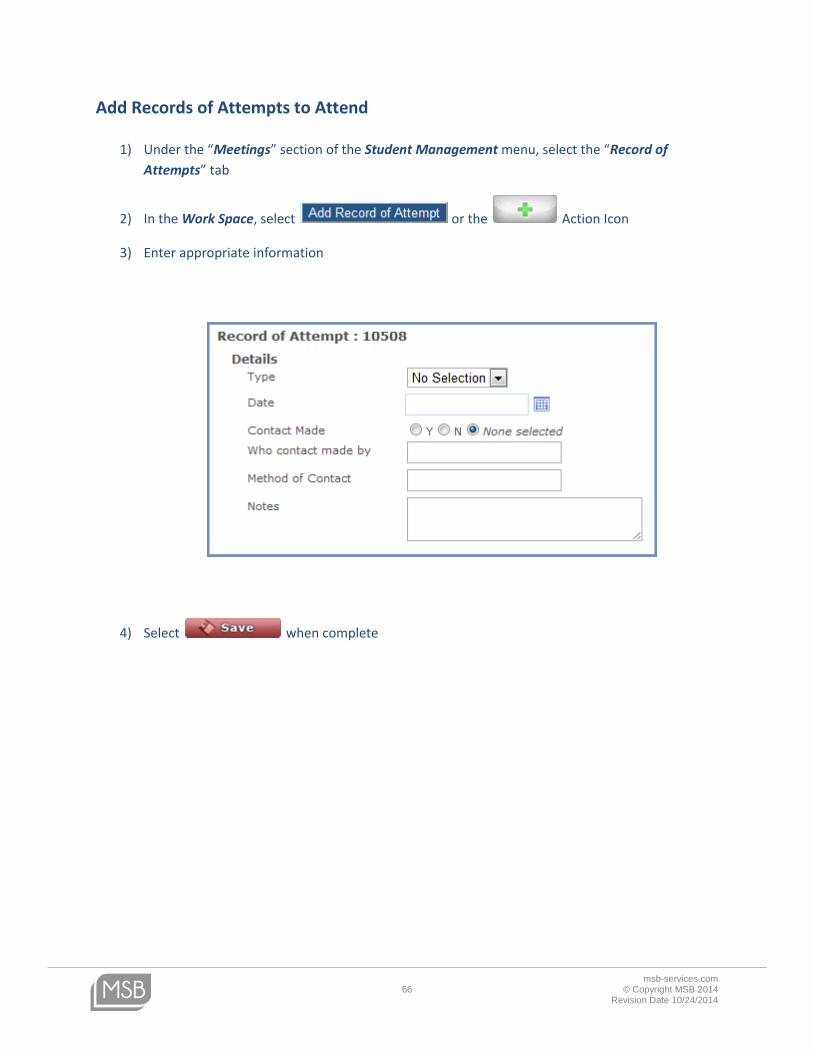
Add Records of Attempts to Attend
1) Under the “Meetings” section of the Student Management menu, select the “Record of
Attempts” tab
2) In the Work Space, select or the Action Icon
3) Enter appropriate information
4) Select when complete

msb-services.com 67 © Copyright MSB 2014
Revision Date 10/24/2014
Plans
Add Plan
1) Click on Student Management
2) Select “Plans” from the Student Menu
3) Search for a student using the Student Search box above the Work Space
4) Select the Action Icon above the Work Space
5) Enter appropriate information
NOTE: A Meeting must be created prior to creating a Plan. Once the user selects the Meeting Date,
Acuity 504 will automatically generate the Start and End Dates of the Plan.
6) Select when complete
msb-services.com 68 © Copyright MSB 2014
Revision Date 10/24/2014
Edit Plan Details
1) Click on Student Management
2) Select “Plans” from the Student Menu
3) Search for a student using the Student Search box above the Work Space
4) The newest Plan will load by default. To choose an older Plan, select it from the drop-down
menu in the Pathway
5) You have the option to utilize the Work Space to enter data or select the Editable Print Preview
Action Icon
6) Select when complete
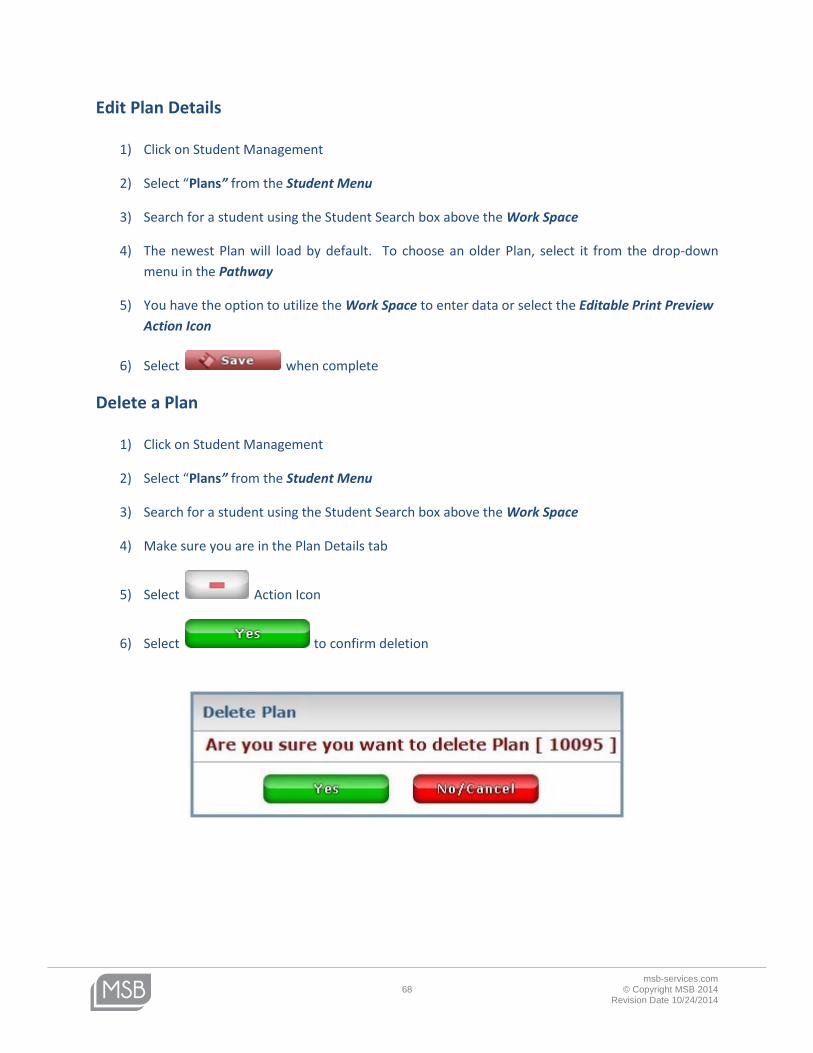
Delete a Plan
1) Click on Student Management
2) Select “Plans” from the Student Menu
3) Search for a student using the Student Search box above the Work Space
4) Make sure you are in the Plan Details tab
5) Select Action Icon
6) Select to confirm deletion
msb-services.com 69 © Copyright MSB 2014
Revision Date 10/24/2014
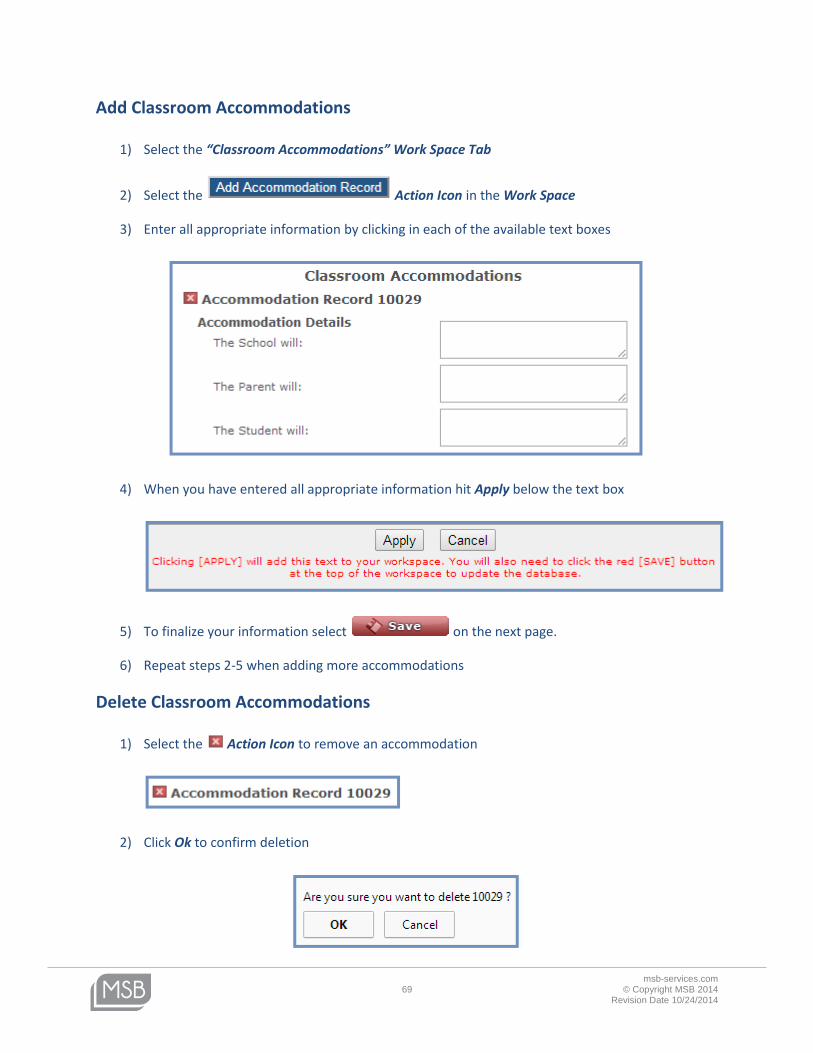
Add Classroom Accommodations
1) Select the “Classroom Accommodations” Work Space Tab
2) Select the Action Icon in the Work Space
3) Enter all appropriate information by clicking in each of the available text boxes
4) When you have entered all appropriate information hit Apply below the text box
5) To finalize your information select on the next page.
6) Repeat steps 2-5 when adding more accommodations
Delete Classroom Accommodations
1) Select the Action Icon to remove an accommodation
2) Click Ok to confirm deletion
msb-services.com 70 © Copyright MSB 2014
Revision Date 10/24/2014
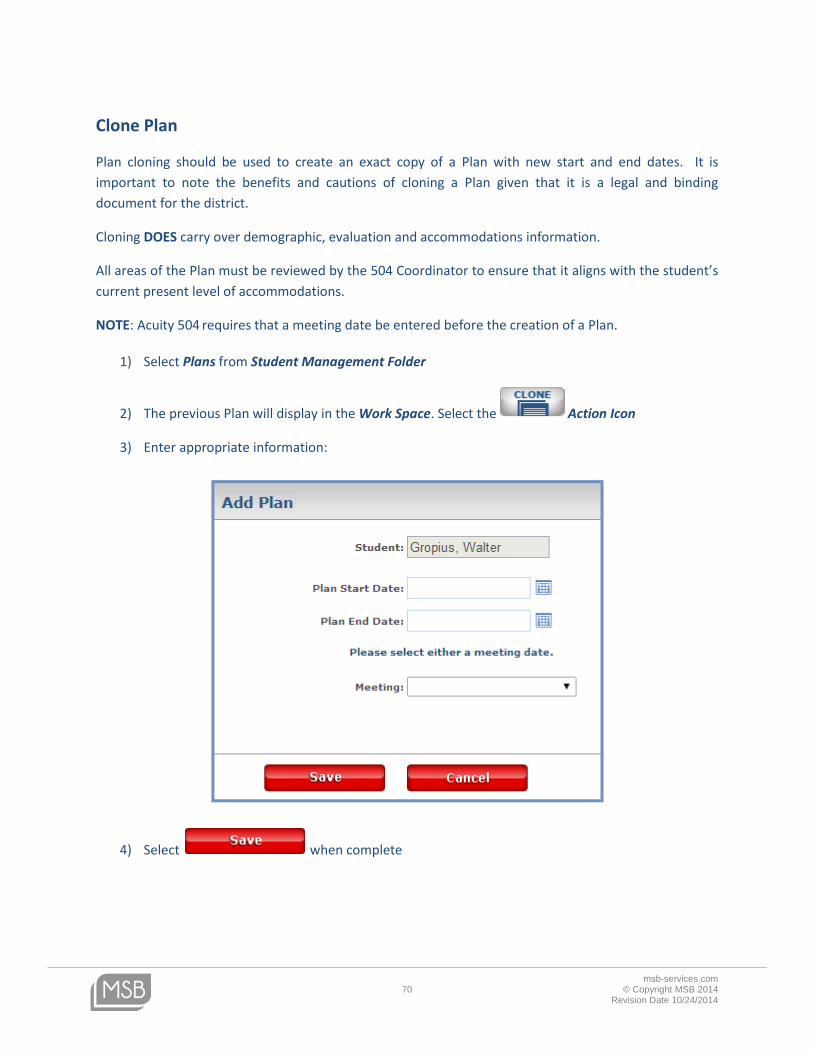
Clone Plan
Plan cloning should be used to create an exact copy of a Plan with new start and end dates. It is
important to note the benefits and cautions of cloning a Plan given that it is a legal and binding
document for the district.
Cloning DOES carry over demographic, evaluation and accommodations information.
All areas of the Plan must be reviewed by the 504 Coordinator to ensure that it aligns with the student’s
current present level of accommodations.
NOTE: Acuity 504 requires that a meeting date be entered before the creation of a Plan.
1) Select Plans from Student Management Folder
2) The previous Plan will display in the Work Space. Select the Action Icon
3) Enter appropriate information:
4) Select when complete
msb-services.com 71 © Copyright MSB 2014
Revision Date 10/24/2014
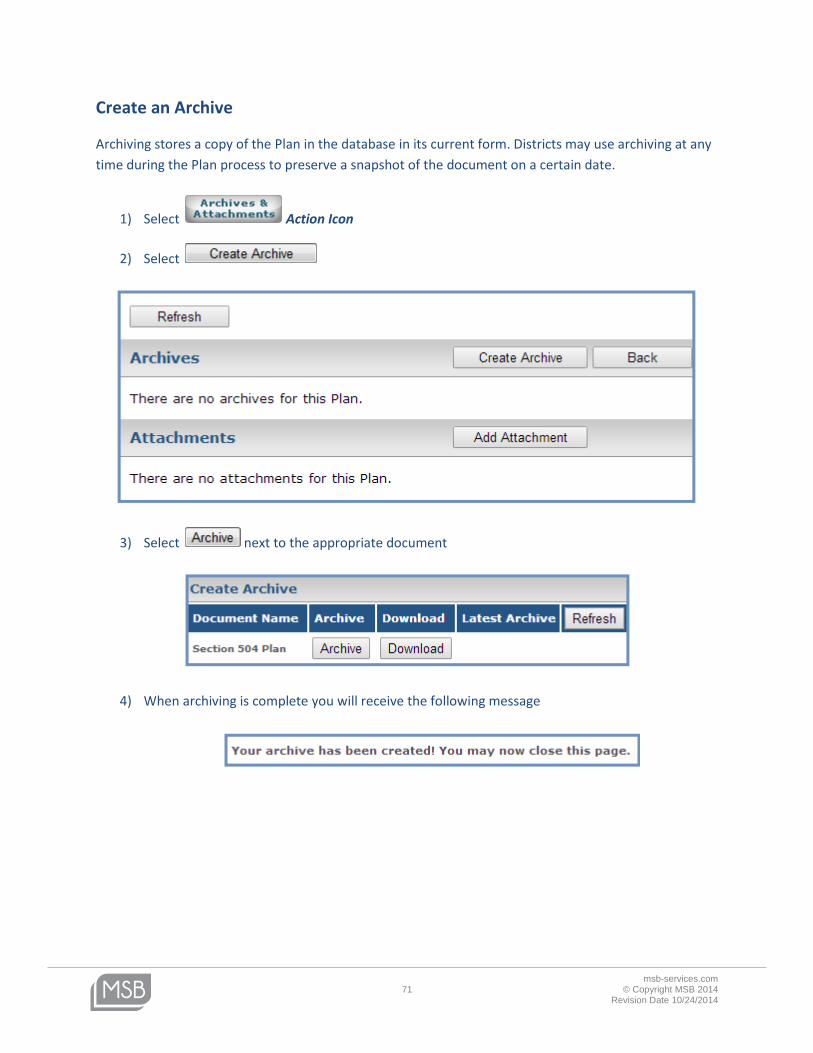
Create an Archive
Archiving stores a copy of the Plan in the database in its current form. Districts may use archiving at any
time during the Plan process to preserve a snapshot of the document on a certain date.
1) Select Action Icon
2) Select
3) Select next to the appropriate document
4) When archiving is complete you will receive the following message
msb-services.com 72 © Copyright MSB 2014
Revision Date 10/24/2014
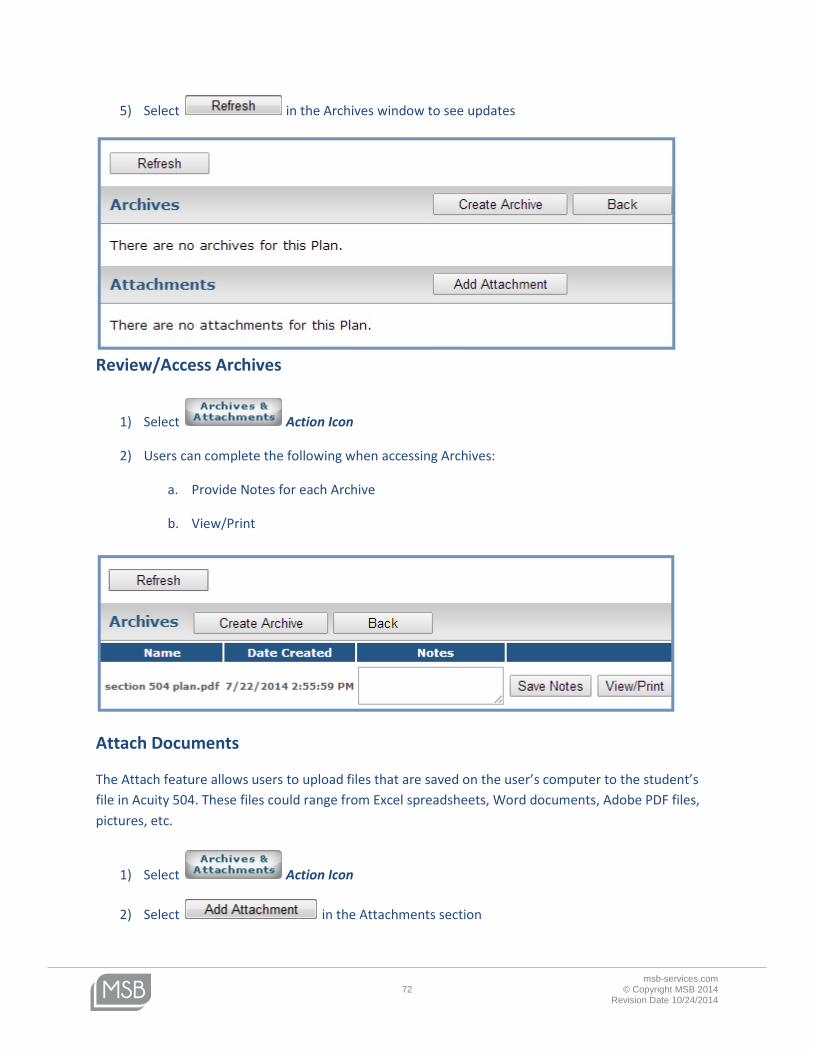
5) Select in the Archives window to see updates
Review/Access Archives
1) Select Action Icon
2) Users can complete the following when accessing Archives:
a. Provide Notes for each Archive
b. View/Print
Attach Documents
The Attach feature allows users to upload files that are saved on the user’s computer to the student’s
file in Acuity 504. These files could range from Excel spreadsheets, Word documents, Adobe PDF files,
pictures, etc.
1) Select Action Icon
2) Select in the Attachments section
msb-services.com 73 © Copyright MSB 2014
Revision Date 10/24/2014
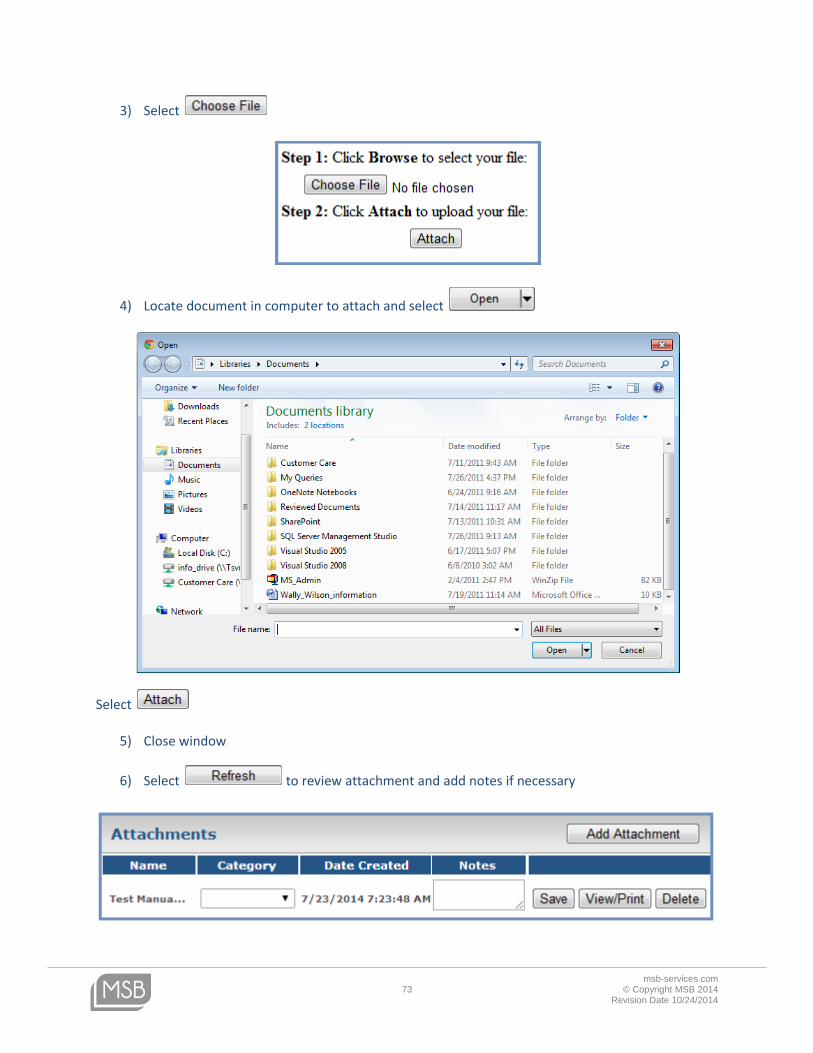
3) Select
4) Locate document in computer to attach and select
Select
5) Close window
6) Select to review attachment and add notes if necessary
msb-services.com 74 © Copyright MSB 2014
Revision Date 10/24/2014
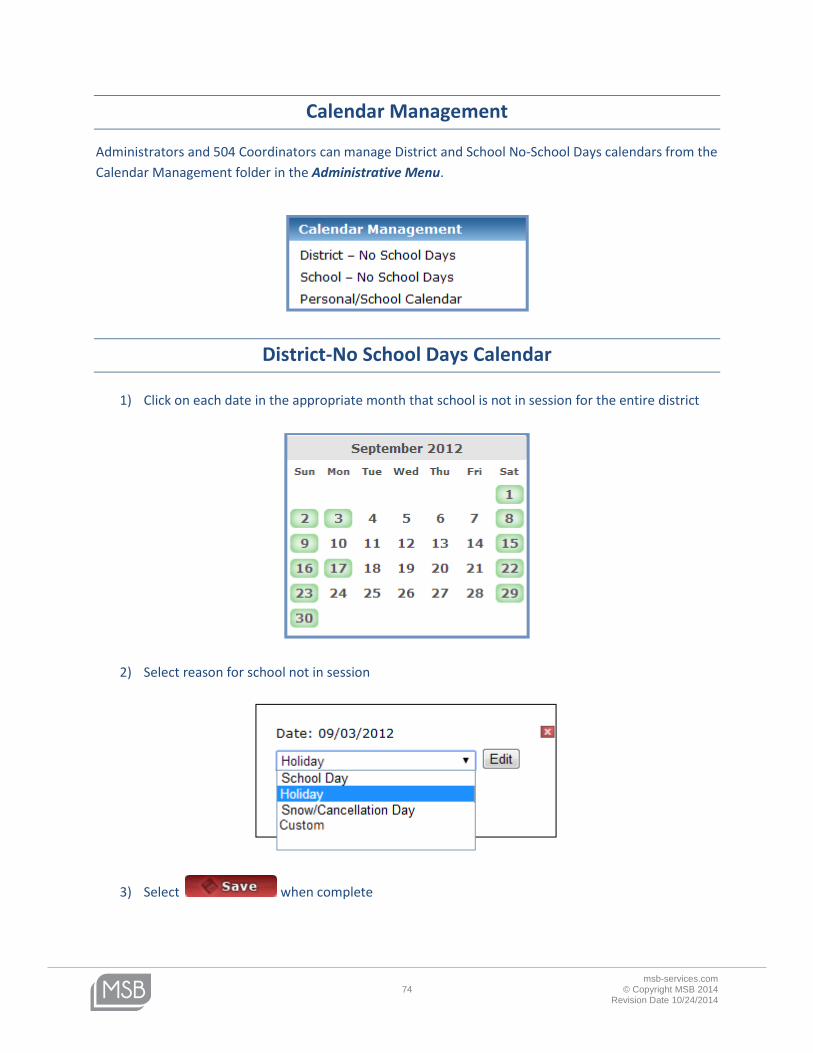
Calendar Management
Administrators and 504 Coordinators can manage District and School No-School Days calendars from the
Calendar Management folder in the Administrative Menu.
District-No School Days Calendar
1) Click on each date in the appropriate month that school is not in session for the entire district
2) Select reason for school not in session
3) Select when complete
msb-services.com 75 © Copyright MSB 2014
Revision Date 10/24/2014
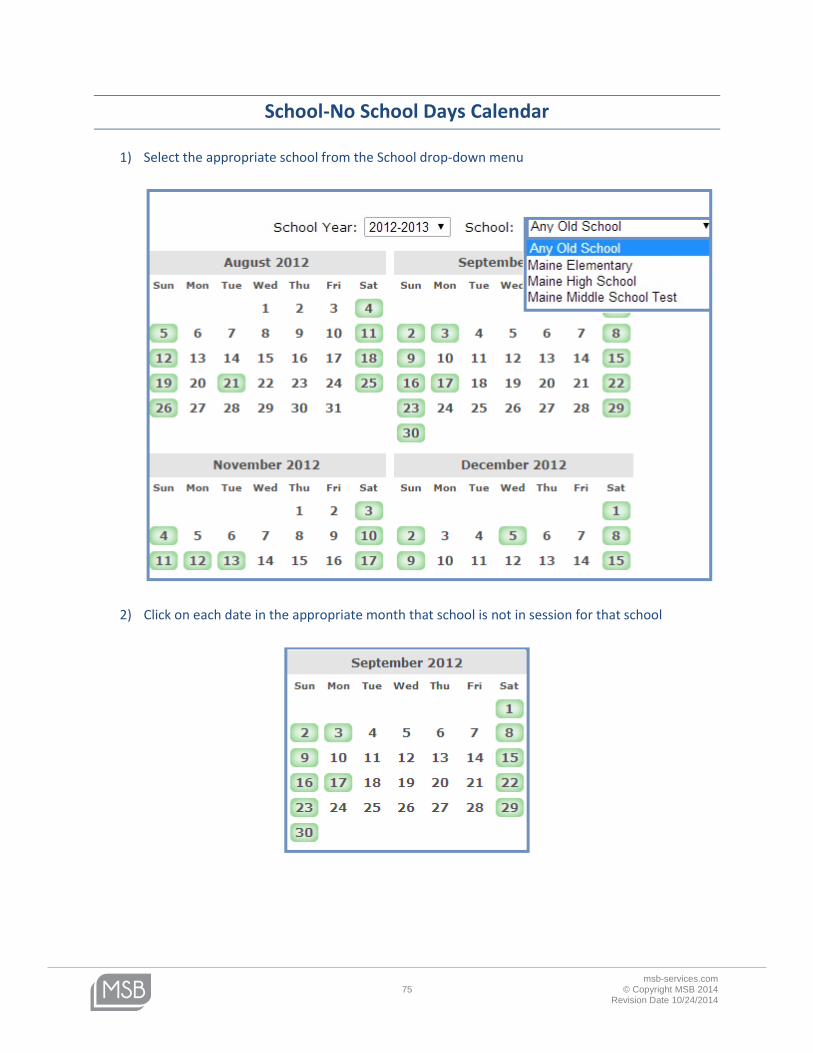
School-No School Days Calendar
1) Select the appropriate school from the School drop-down menu
2) Click on each date in the appropriate month that school is not in session for that school
msb-services.com 76 © Copyright MSB 2014
Revision Date 10/24/2014
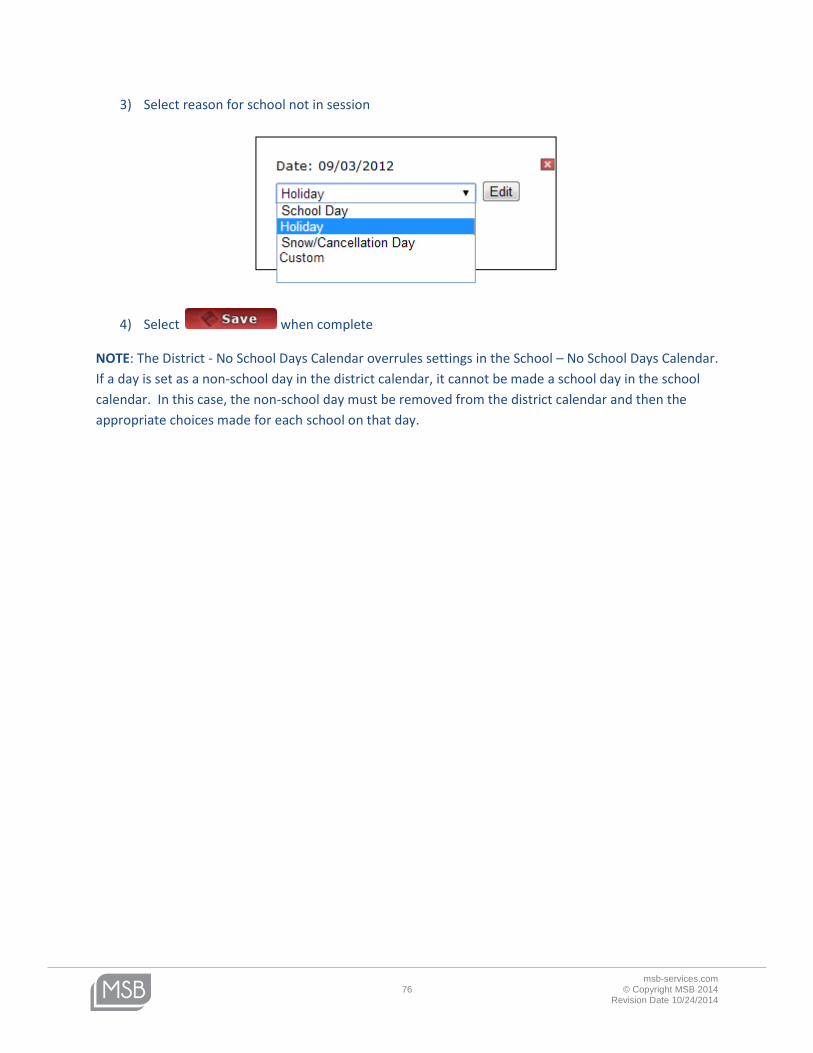
3) Select reason for school not in session
4) Select when complete
NOTE: The District - No School Days Calendar overrules settings in the School – No School Days Calendar.
If a day is set as a non-school day in the district calendar, it cannot be made a school day in the school
calendar. In this case, the non-school day must be removed from the district calendar and then the
appropriate choices made for each school on that day.
msb-services.com 77 © Copyright MSB 2014
Revision Date 10/24/2014
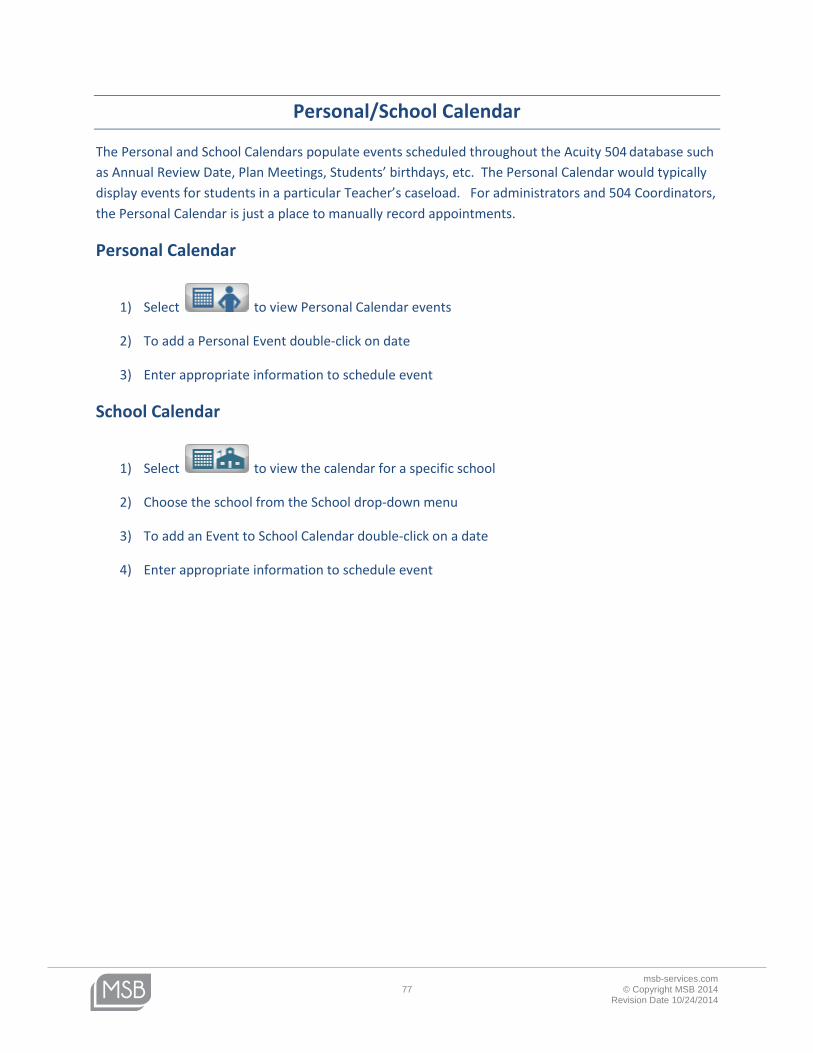
Personal/School Calendar
The Personal and School Calendars populate events scheduled throughout the Acuity 504 database such
as Annual Review Date, Plan Meetings, Students’ birthdays, etc. The Personal Calendar would typically
display events for students in a particular Teacher’s caseload. For administrators and 504 Coordinators,
the Personal Calendar is just a place to manually record appointments.
Personal Calendar
1) Select to view Personal Calendar events
2) To add a Personal Event double-click on date
3) Enter appropriate information to schedule event
School Calendar
1) Select to view the calendar for a specific school
2) Choose the school from the School drop-down menu
3) To add an Event to School Calendar double-click on a date
4) Enter appropriate information to schedule event
msb-services.com 78 © Copyright MSB 2014
Revision Date 10/24/2014
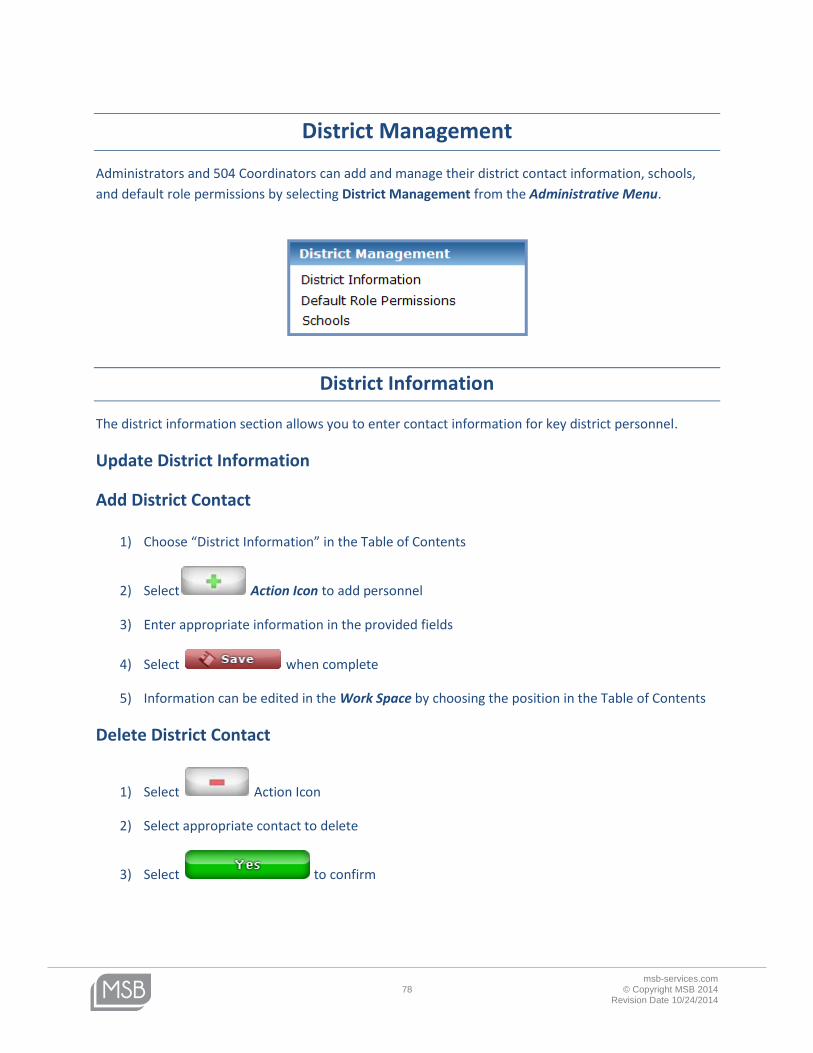
District Management
Administrators and 504 Coordinators can add and manage their district contact information, schools,
and default role permissions by selecting District Management from the Administrative Menu.
District Information
The district information section allows you to enter contact information for key district personnel.
Update District Information
Add District Contact
1) Choose “District Information” in the Table of Contents
2) Select Action Icon to add personnel
3) Enter appropriate information in the provided fields
4) Select when complete
5) Information can be edited in the Work Space by choosing the position in the Table of Contents
Delete District Contact
1) Select Action Icon
2) Select appropriate contact to delete
3) Select to confirm
msb-services.com 79 © Copyright MSB 2014
Revision Date 10/24/2014
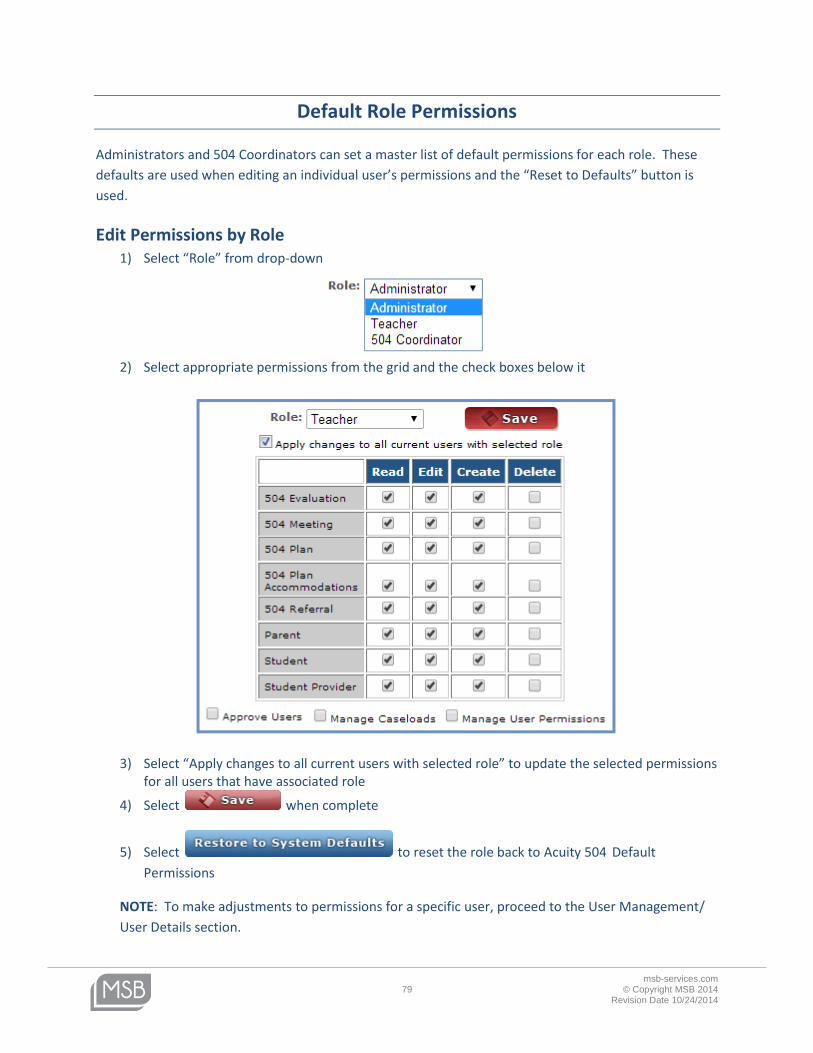
Default Role Permissions
Administrators and 504 Coordinators can set a master list of default permissions for each role. These
defaults are used when editing an individual user’s permissions and the “Reset to Defaults” button is
used.
Edit Permissions by Role 1) Select “Role” from drop-down
2) Select appropriate permissions from the grid and the check boxes below it
3) Select “Apply changes to all current users with selected role” to update the selected permissions for all users that have associated role
4) Select when complete
5) Select to reset the role back to Acuity 504 Default
Permissions
NOTE: To make adjustments to permissions for a specific user, proceed to the User Management/
User Details section.
msb-services.com 80 © Copyright MSB 2014
Revision Date 10/24/2014
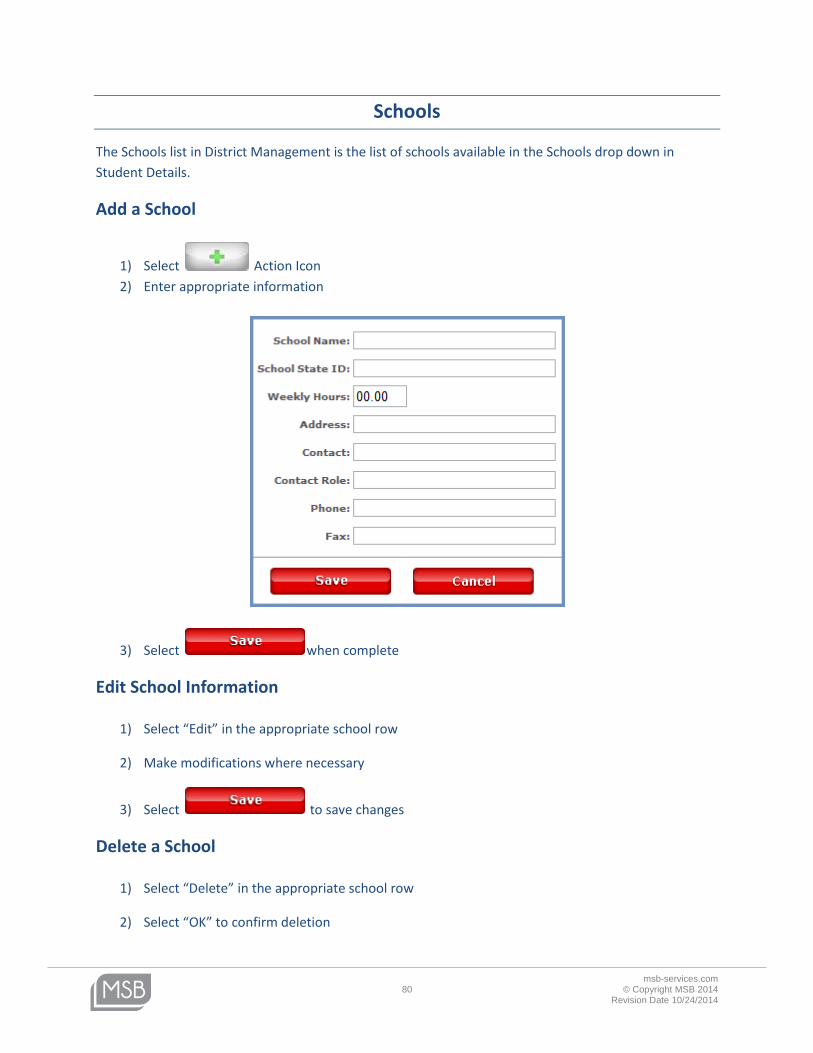
Schools
The Schools list in District Management is the list of schools available in the Schools drop down in
Student Details.
Add a School
1) Select Action Icon
2) Enter appropriate information
3) Select when complete
Edit School Information
1) Select “Edit” in the appropriate school row
2) Make modifications where necessary
3) Select to save changes
Delete a School
1) Select “Delete” in the appropriate school row
2) Select “OK” to confirm deletion
msb-services.com 81 © Copyright MSB 2014
Revision Date 10/24/2014
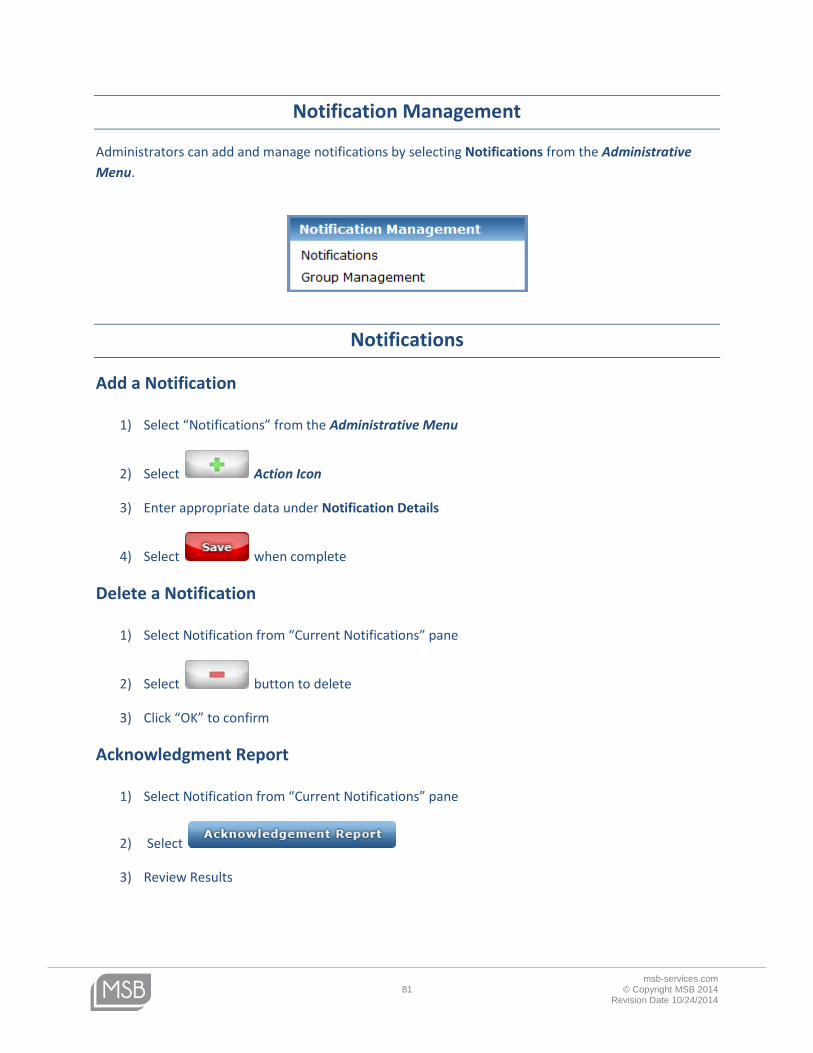
Notification Management
Administrators can add and manage notifications by selecting Notifications from the Administrative
Menu.
Notifications
Add a Notification
1) Select “Notifications” from the Administrative Menu
2) Select Action Icon
3) Enter appropriate data under Notification Details
4) Select when complete
Delete a Notification
1) Select Notification from “Current Notifications” pane
2) Select button to delete
3) Click “OK” to confirm
Acknowledgment Report
1) Select Notification from “Current Notifications” pane
2) Select
3) Review Results
msb-services.com 82 © Copyright MSB 2014
Revision Date 10/24/2014
Group Management
Administrators can create and manage groups for the purpose of defining a specific audience for
Notifications.
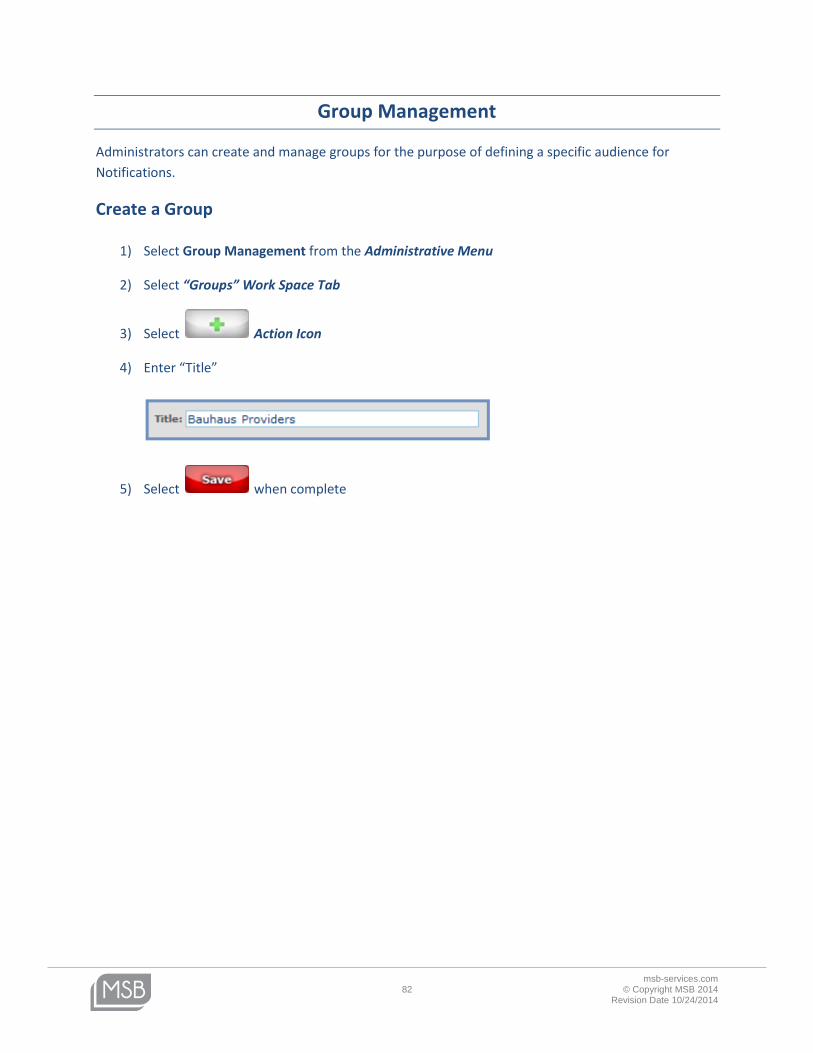
Create a Group
1) Select Group Management from the Administrative Menu
2) Select “Groups” Work Space Tab
3) Select Action Icon
4) Enter “Title”
5) Select when complete
msb-services.com 83 © Copyright MSB 2014
Revision Date 10/24/2014
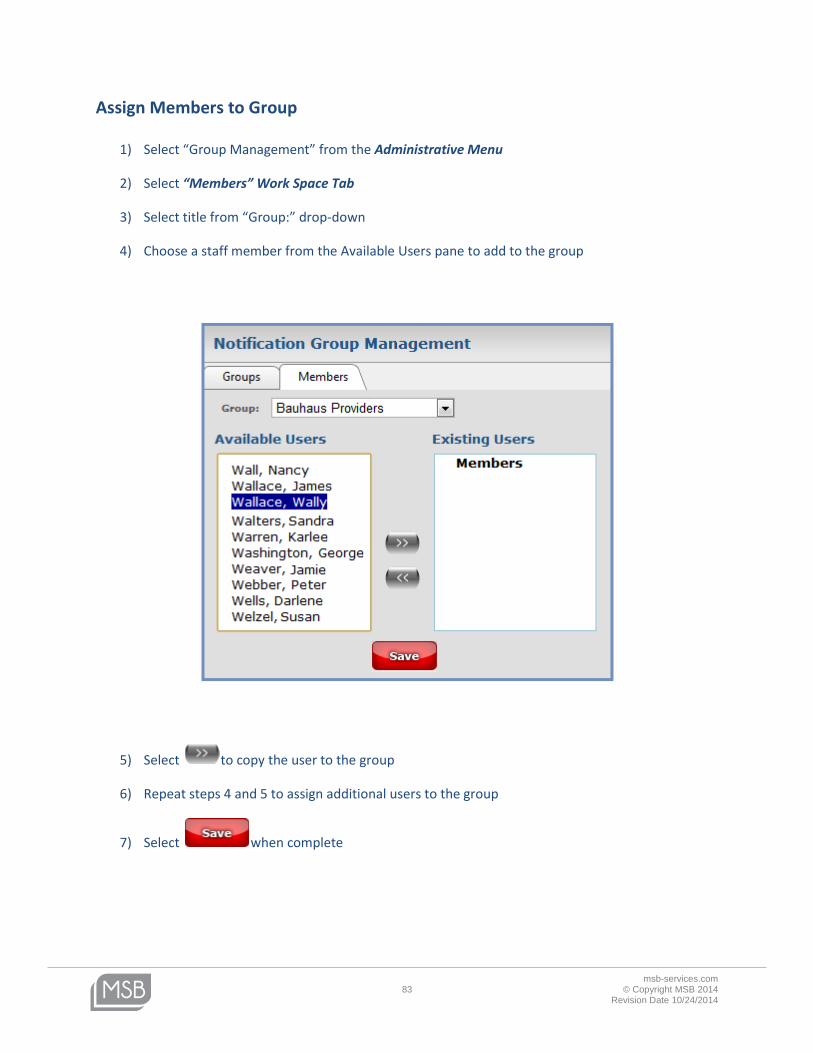
Assign Members to Group
1) Select “Group Management” from the Administrative Menu
2) Select “Members” Work Space Tab
3) Select title from “Group:” drop-down
4) Choose a staff member from the Available Users pane to add to the group
5) Select to copy the user to the group
6) Repeat steps 4 and 5 to assign additional users to the group
7) Select when complete
msb-services.com 84 © Copyright MSB 2014
Revision Date 10/24/2014
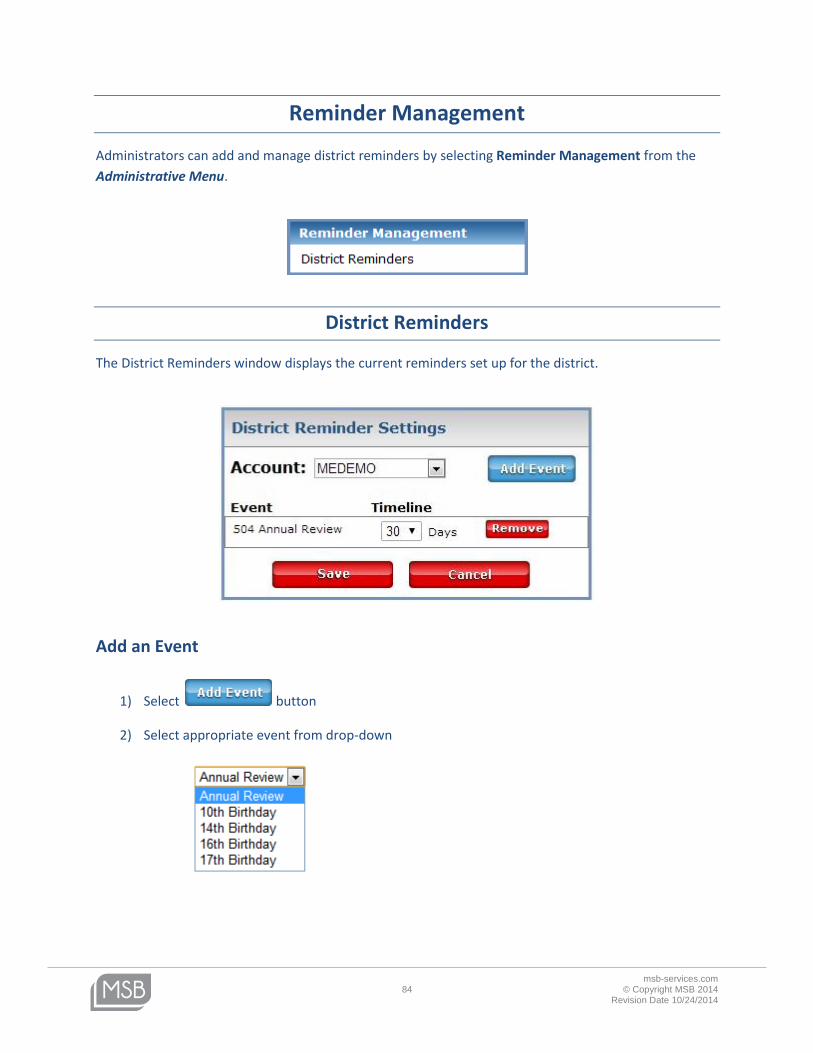
Reminder Management
Administrators can add and manage district reminders by selecting Reminder Management from the
Administrative Menu.
District Reminders
The District Reminders window displays the current reminders set up for the district.
Add an Event
1) Select button
2) Select appropriate event from drop-down
msb-services.com 85 © Copyright MSB 2014
Revision Date 10/24/2014
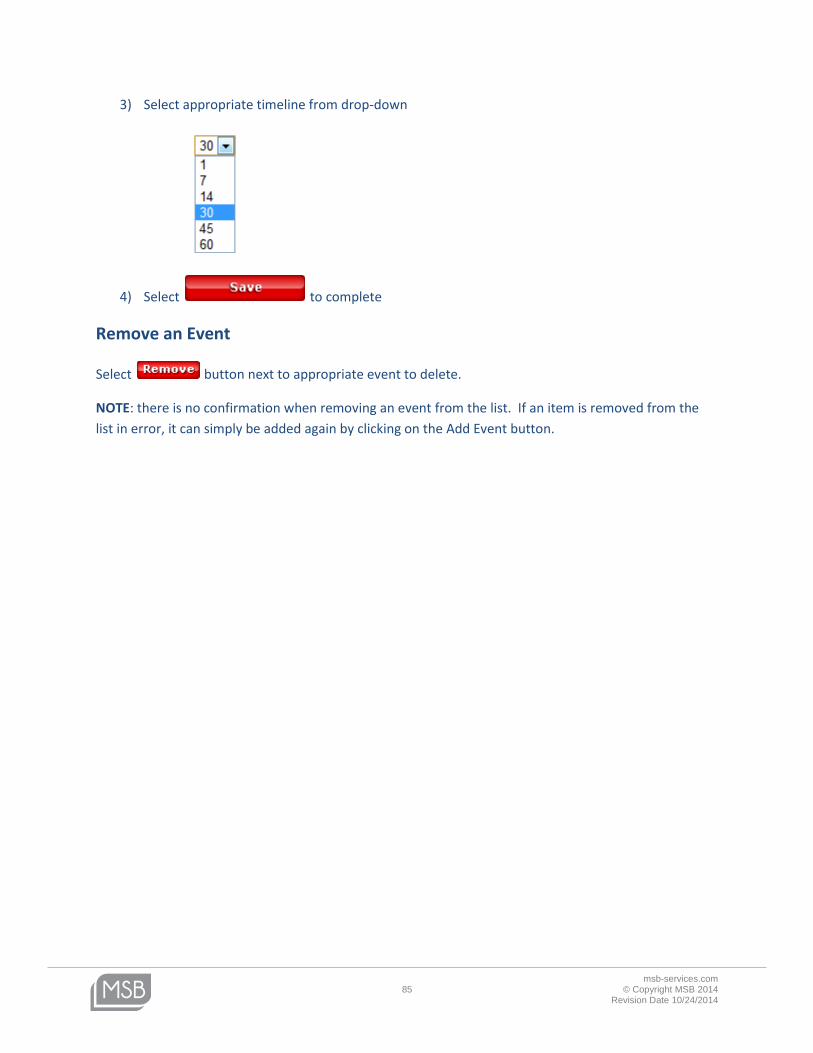
3) Select appropriate timeline from drop-down
4) Select to complete
Remove an Event
Select button next to appropriate event to delete.
NOTE: there is no confirmation when removing an event from the list. If an item is removed from the
list in error, it can simply be added again by clicking on the Add Event button.

msb-services.com 86 © Copyright MSB 2014
Revision Date 10/24/2014
Glossary of Terms
Action Icons:
Action Icons are located above the Work Space Tabs as well as above the Caseload Column. They allow
users to complete functions such as add, delete, clone, amend and print.
Active Student:
An active student has been identified as a 504 student.
Add Student:
The Action Icon for adding a student is located on the upper right-hand side of the gray status bar. Once
you have clicked on this icon, follow “Add a Student” guide.
Administrative Menu:
The Administrative Menu is the window where the Administrative Tasks are displayed.
Archive Plan:
Archiving a Plan stores a copy of the Plan in the database in its current form. Districts may use archiving
at any time during the Plan process to preserve a snapshot of the document on a certain date.
Caseload Column:
The Caseload Column is the window where the Student List is displayed.
Caseload Filter:
The “caseload filter” function is located above the Caseload Column and allows you to filter your student
list in several ways depending on your current task. The student list can be filtered alphabetically, by
School or by Grade.
Create Reports:
To create reports (queries) in Acuity 504, teachers must click on the third Action Icon in the upper left-
hand corner of the gray status bar just above their caseload filter; Administrators and 504 Coordinators
will click on Caseload Reports in the Administrative Window.
Editable Print/Preview:
Editable Print/Preview allows users to fill in the fields of Acuity 504 directly on the forms. Data entered
in these form fields will save directly to the database. The Editable Print/Preview Action Icon is located
in the upper right-hand corner of the gray status bar. Editable Print/Preview also generates forms for
viewing, downloading and printing.
Home Screen:
The Home Screen consists of the Calendar View and the Student List.

msb-services.com 87 © Copyright MSB 2014
Revision Date 10/24/2014
Inactive Student:
An inactive student has been dismissed from the district. However, Acuity 504 retains historical
information on inactive students.
Launch Pad:
The Launch Pad is located at the top left of the screen in the Navigation Bar. The Launch Pad serves as a
quick-link to the MSB websites by clicking on the different product logos.
My Profile:
Displays the information provided during Login Registration. Users have the ability to change their
security questions, password, default view, as well as, request access to additional accounts and/or MSB
products.
Navigation Bar:
The Navigation Bar is located at the top of the screen and allows you to access your account information
and the Navigation Buttons.
Navigation Buttons:
Green icons located on the right side of the Navigation Bar at the top of the screen.
My Profile: Displays the information provided during Login Registration. Users have the ability
to change their security questions as well as request access to additional accounts and/or MSB
products.
Home: Returns you to the home screen.
Blank Forms: Displays a list of blank forms in the account that may be printed individually or in
groups of selected forms.
Notification: Opens Notifications window.
Reminder Flag: Opens Reminders window.
Help: Opens available user guides.
Pathway:
The Pathway is located above the Action Icons and identifies the “path” taken to get to the current
location in the program.
Pathway Drop-downs:
The Pathway is also a navigation tool. Clicking on a section of the Pathway will open a drop-down menu
allowing you to select a different area in that section.
msb-services.com 88 © Copyright MSB 2014
Revision Date 10/24/2014
Personal Calendar:
The Home Screen calendar can be populated by that user to contain personal calendar events viewed
only by the user. To view the personal calendar, select the personal calendar icon in the upper right-
hand corner of the Home Screen.
Quick Tasks:
Once a student has been chosen from the student list, the Quick Task pane allows the user to choose a
task and go directly there in Acuity 504. Districts can choose default Quick Tasks. Users can also
customize their Quick Tasks according to their role in the system by clicking on the “Settings” button in
the Quick Tasks pane.
Reminder Flag:
The Student Reminder Flag is located in the Caseload Column to the right of the student’s name. If a
student has a Reminder Flag, it means they have an event coming up and this will be listed in the
Reminders Window.
Reminder Flag Report:
Clicking on the Student Reminder Flag will open a Student Reminder Report indicating where the
student is missing information.
School Calendar:
The Home Screen calendar is populated by staff with administrative rights for school events. Most of
these events will be Plan related (Annual Review Date and 3 Year Review Dates). To view the school
calendar, select the “School Calendar Icon” in the upper right-hand corner of the Home Screen.
Search Tool:
The search tool is an administrative function in the Administrative Menu allowing searches for students
in the system.
Student List:
The Student List for Teachers is contained in the Caseload Column on the left side of the screen in Acuity
504. The Student List can be displayed and sorted in several ways using drop-down menus at the top.
The Student List can display active, referral or inactive students.
Student Menu:
The Student Menu is the list of areas that appears under a student’s name when it is selected. The
student’s name and Student Menu are defined by the orange background that appears when the
student is selected.
Student Progress Indicators (SPI):
Student Progress Indicators are the colored orbs to the left of some student’s names in the Caseload
Column. A red SPI indicates that there is missing information for that student in the system. As you
navigate through Acuity 504, you will notice the lettering of some tabs may be red. This is an indicator
msb-services.com 89 © Copyright MSB 2014
Revision Date 10/24/2014
that there is missing information in this tab. In the tab, the missing information fields will also be
highlighted in red. An orange orb with a dark red center indicates that there is missing Medicaid
information.
Student Progress Indicator (SPI) Report:
Clicking on a SPI will open a Student Progress Indicator Report indicating where the student is missing
information.
Student Team:
The Student Team is created in the Student Details window. All teachers added to the Student Team
have access to the student’s records and can perform tasks as identified by each teacher’s access level.
Table of Contents:
The Table of Contents is in the Plan section of Acuity 504. The buttons in the Table of Contents identify
the sections of the tab to allow you to navigate through the tab efficiently.
Work Space:
The Work Space is the large area to the right of the Caseload Column and below the Work Space Tabs.
Work Space Tabs:
The Work Space Tabs are located above the Work Space and allow the user to navigate through the
Work Space.