activinspire handbook
TRANSCRIPT

Randy Ware DSCETC
Page 1

Activinspire Quick Guide Main toolbars
Screenshot to the left is the Toolbar for Profile view:
At The Board
Main Menu
Page 2
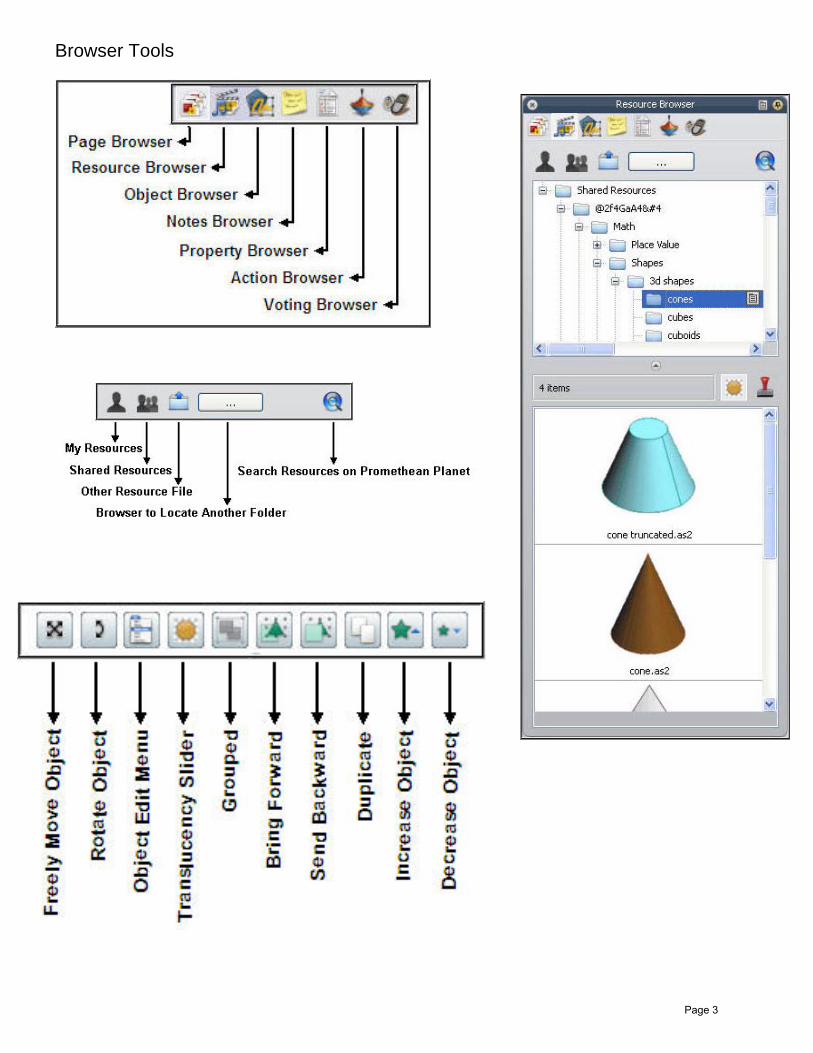
Browser Tools
Page 3
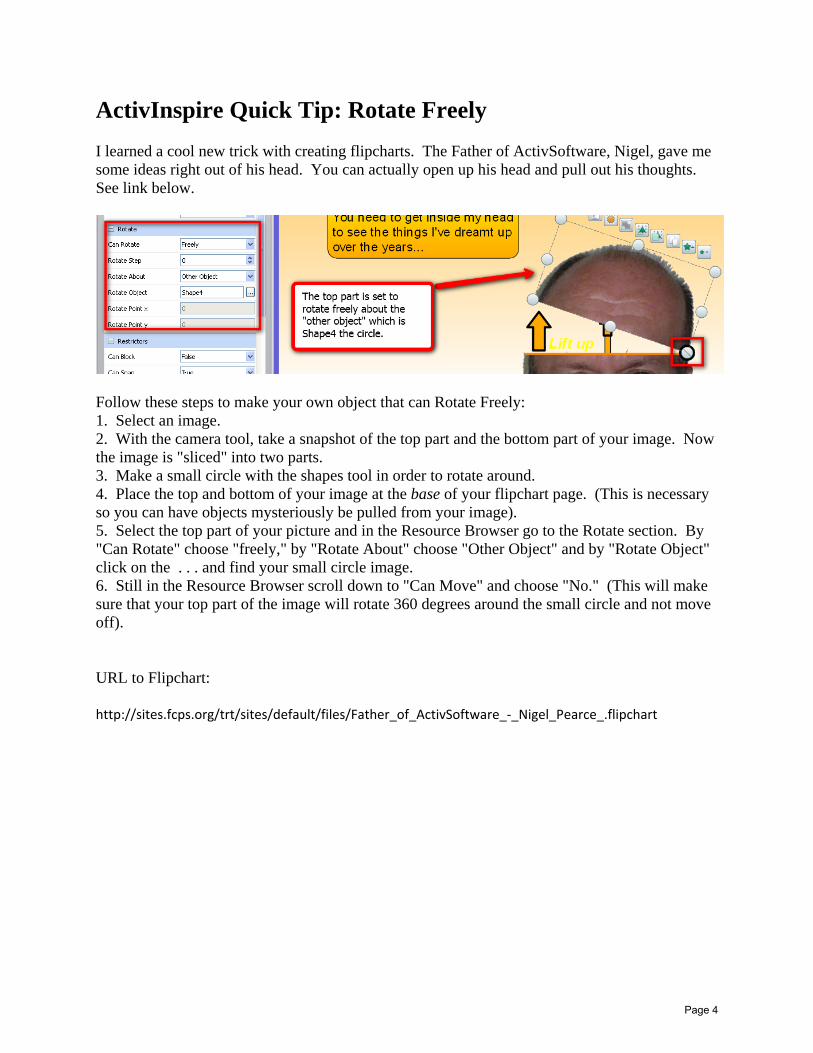
ActivInspire Quick Tip: Rotate Freely I learned a cool new trick with creating flipcharts. The Father of ActivSoftware, Nigel, gave me some ideas right out of his head. You can actually open up his head and pull out his thoughts. See link below.
Follow these steps to make your own object that can Rotate Freely: 1. Select an image. 2. With the camera tool, take a snapshot of the top part and the bottom part of your image. Now the image is "sliced" into two parts. 3. Make a small circle with the shapes tool in order to rotate around. 4. Place the top and bottom of your image at the base of your flipchart page. (This is necessary so you can have objects mysteriously be pulled from your image). 5. Select the top part of your picture and in the Resource Browser go to the Rotate section. By "Can Rotate" choose "freely," by "Rotate About" choose "Other Object" and by "Rotate Object" click on the . . . and find your small circle image. 6. Still in the Resource Browser scroll down to "Can Move" and choose "No." (This will make sure that your top part of the image will rotate 360 degrees around the small circle and not move off).
URL to Flipchart:
http://sites.fcps.org/trt/sites/default/files/Father_of_ActivSoftware_‐_Nigel_Pearce_.flipchart
Page 4

7. Now just fill the image with objects layered behind your image. 8. Optional: If you would like, select all of the images into a long strip and group them with the marquee toolbar. Move them completely behind and off the page at the base of your flipchart. Set a restrictor vertically for this group of images in the Resource Browser.
Just think about the possibilities! I can just imagine how students would remember Newton's Laws better if it came out of his head or better yet take snapshots of your students and use their heads! Or have a picture of a mouth that you can open and close with the caption "You took the words right out of my mouth." I created a treasure chest so that vocabulary and spelling words could be pulled out and reviewed.
Page 5

Promethean ActivInspire: Actions to make Interactive Graphs In ActivInspire you can create interactive bar graphs using the Actions. For example, in the flipchart "All about Actions" found on Promethean Planet the bars on the graph are set to increase and decrease by clicking on the up or down arrows. The bar increases or decreases by 10 increments in relation to the Y axis on the graph because of the Action Properties that were set.
http://sites.fcps.org/trt/sites/default/files/All_About_Actions.flipchart
Page 6

Magic Erasers Magic Erasers are a great way to add hidden content to a flipchart, that can be revealed later in a
lesson. There are pre-made Magic Eraser resources in the “Resource Browser” under “Shared Collections - Lesson Building Tools - Magic Erasers.” 1. Place an object on the flipchart page to see through. You have access to many
shapes and images in the “Resource Browser.” 2. Type or add an object to be seen. (Remember this is what will be hidden behind and will be
revealed using the Magic Revealer.) If you do not see the “Text” tool you may
need to click on “Switch Profile” and go to “Authoring.” 3. The object to see through needs to be on the top layer. You can do this one of two ways -
• Right -click on the object with the “Select” tool, select “Reorder - To Top Layer.” OR
• In the top-left corner click on “View - Browsers.” Click on the “Object Browser.” Select the object you want to move to the top layer and drag it to the desired position.
Before After
4. Get a revealer from the Resource Browser or create your own revealer. • Get a revealer from the Resource Browser
• You have access to many magic revealers in the “Resource Browser.” Go to “Shared Collections - Lesson Building Tools - Magic Erasers - Magic Erasers.”
Page 7

• Create your Own Revealer • Select the desired shape of your revealer. This can be any image or a filled shape
from “Shape” tool.
• Right -click on the object with the “Select” tool, select “Reorder - To Top Layer.”
• Erase the fill as close to the edge as possible using the “Magic Ink” tool.
If you do not see the Magic Eraser on your toolbar, then go to “Tools” and select “Magic Eraser.”
• Group together by using the “Select “ tool and drag a box around both of the objects.
• Click on the “Grouped” icon to group the objects together. • Drag the magic eraser over the objects and you will be able to view the object/text underneath.
Page 8
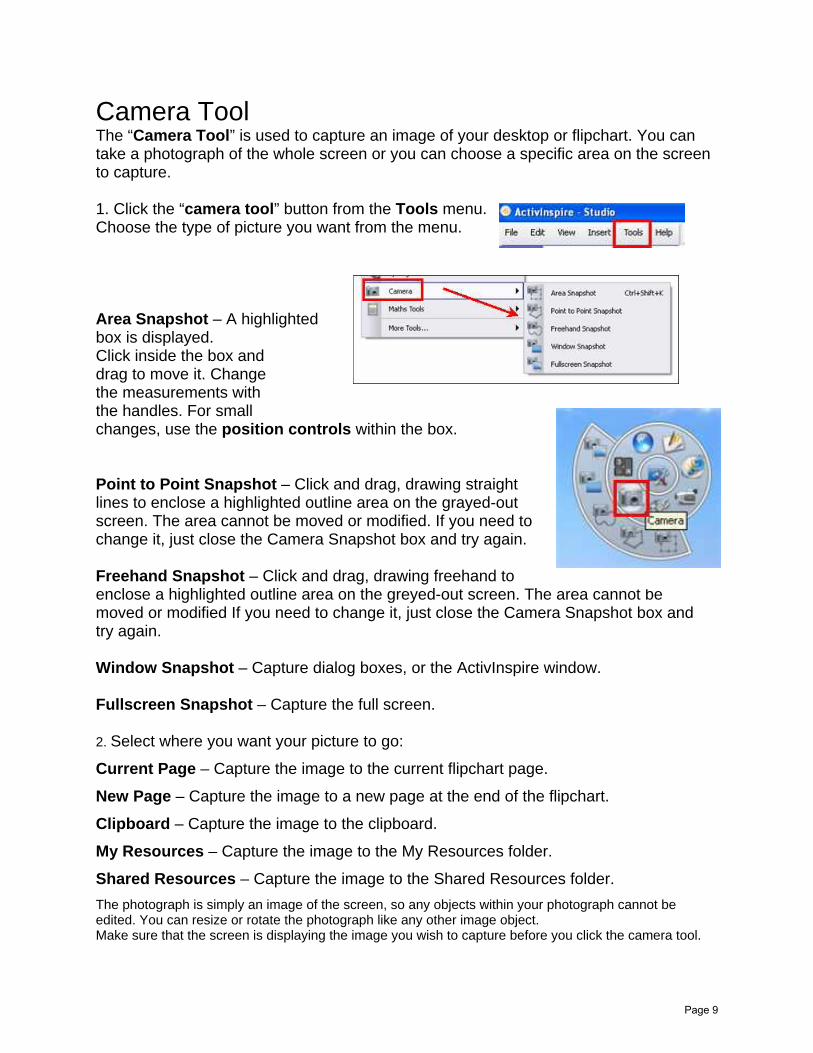
Camera Tool The “Camera Tool” is used to capture an image of your desktop or flipchart. You can take a photograph of the whole screen or you can choose a specific area on the screen to capture. 1. Click the “camera tool” button from the Tools menu. Choose the type of picture you want from the menu. Area Snapshot – A highlighted box is displayed. Click inside the box and drag to move it. Change the measurements with the handles. For small changes, use the position controls within the box. Point to Point Snapshot – Click and drag, drawing straight lines to enclose a highlighted outline area on the grayed-out screen. The area cannot be moved or modified. If you need to change it, just close the Camera Snapshot box and try again. Freehand Snapshot – Click and drag, drawing freehand to enclose a highlighted outline area on the greyed-out screen. The area cannot be moved or modified If you need to change it, just close the Camera Snapshot box and try again. Window Snapshot – Capture dialog boxes, or the ActivInspire window. Fullscreen Snapshot – Capture the full screen. 2. Select where you want your picture to go:
Current Page – Capture the image to the current flipchart page.
New Page – Capture the image to a new page at the end of the flipchart.
Clipboard – Capture the image to the clipboard.
My Resources – Capture the image to the My Resources folder.
Shared Resources – Capture the image to the Shared Resources folder. The photograph is simply an image of the screen, so any objects within your photograph cannot be edited. You can resize or rotate the photograph like any other image object. Make sure that the screen is displaying the image you wish to capture before you click the camera tool.
Page 9

Page 10

1
What’s New?• The newest version of Promethean software, ActivInspire, can be used only on an Intel based
Mac, such as a Macbook. It will not run on an iBook.• The flipchart is already set to Best Fit so that the page fits on the screen nicely.• Profiles are preset to the task at hand: authoring, at the board, languages, math or media.• Open flipcharts show as tabs across the top. You can easily move between the flipcharts.• The Browser window now includes: resources (library), page browser, objects, notes,
properties, and action browsers. No more pop up boxes!• Tools are added to your toolbox as you use them.• Text boxes are more like regular word processing, with the tools across the top of the page.• Handwriting and shape recognition works when not attached to the board.
Promethean ActivInspireN
ew F
eatu
res
Profiles• Select the profile for the task at hand. • When creating a flipchart, use Authoring, but when using the board with
students, select At the Board, Languages, Mathematics, or Media and the Toolbox will change accordingly.
Toolbox
Main Menu
Desktop AnnotateSwitch Profile
Desktop Toolswill hide the flipchart and show additional tools..
Page Turn
Roll Up toolbox Pin toolbox (pin it in place)Toolbox options
User Defined Buttons (settings)
Start/Stop vote
Desktop Tools• Click on the Desktop Tools icon to hide ActivInspire and use the desktop or
other applications.
• The Desktop Tools Icon will appear somewhere on the screen. You can move it to the side out of the way.
• Click the middle of the icon > then the Promethean symbol to go back to the flipchart.
• Click on the icons around the circle to get more tools quickly.• Click and drag from the center to move the Desktop Tools.
Page 11

2
Promethean ActivInspireN
ew F
eatu
res
Toolbox - New Tools
Shapes Tool - Shapes are now available in the toolbox (not the library). Click to see a list of available shapes.
Shapes Tool - This menu of shapes appears when the shapes tool is selected.
Click on a color to change the color of the shape.
Click on the to have no fill color.
Click on the little
arrow at the bottom to see more shapes.
Media Tool - Browse for media files such as movies, sound, or photos.
Connector Tool - Use to create a line to connect 2 or more objects.
Tool - Click to see a list of additional tools.
Toolbox- The toolbox is set by the profile you are using. To see more tools, click on the Tool icon and select a new tool. As you use more tools, they will be added to the right of your toolbar.
Handwriting Recognition • Make sure Ink is turned on in the System Preferences.• Click on the handwriting tool and start writing in either print or
cursive.• The handwriting will be automatically turned into typed text and a pull
down menu of the possible spellings will appear.• You can drag the text to a new location and the pull down menu will
disappear.• To change the font size for handwriting recognition, set the font size in
a text box prior to using handwriting recognition.
Shapes are objects on the middle layer.
Page 12
3
Promethean ActivInspireN
ew F
eatu
res
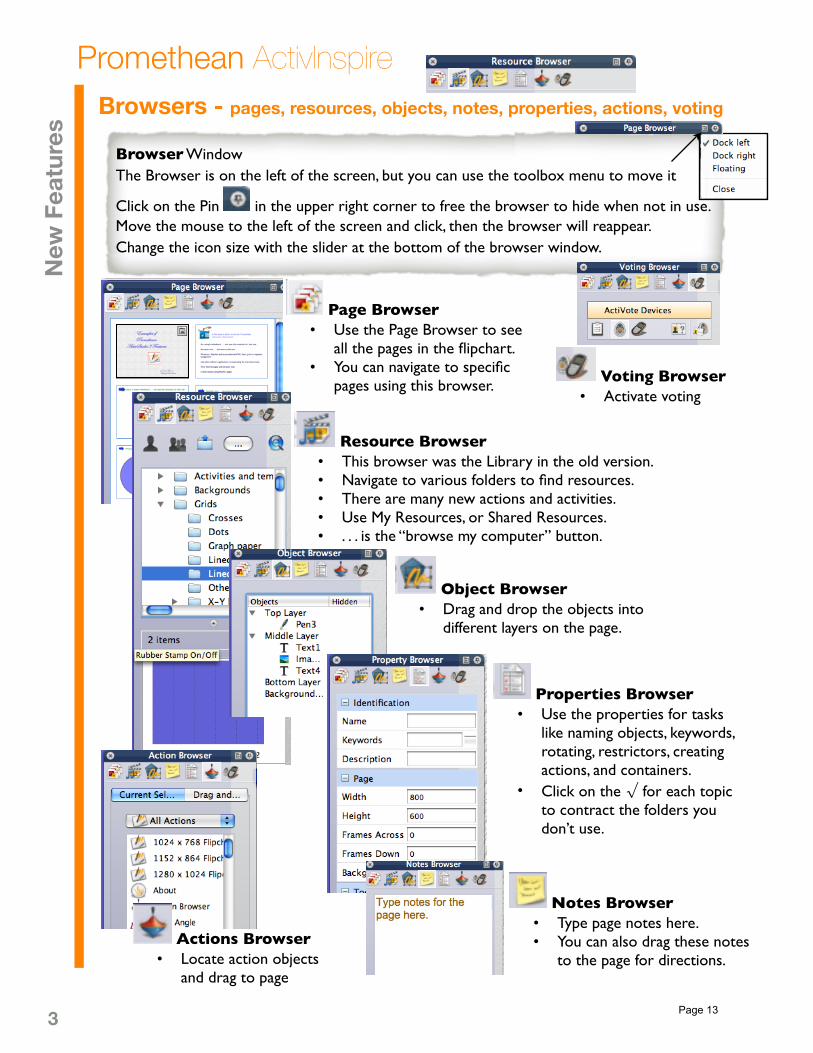
Browsers - pages, resources, objects, notes, properties, actions, voting
Page Browser • Use the Page Browser to see
all the pages in the flipchart.• You can navigate to specific
pages using this browser.
Browser WindowThe Browser is on the left of the screen, but you can use the toolbox menu to move it
Click on the Pin in the upper right corner to free the browser to hide when not in use.Move the mouse to the left of the screen and click, then the browser will reappear. Change the icon size with the slider at the bottom of the browser window.
Resource Browser • This browser was the Library in the old version.• Navigate to various folders to find resources.• There are many new actions and activities.• Use My Resources, or Shared Resources.• . . . is the “browse my computer” button.
Object Browser • Drag and drop the objects into
different layers on the page.
Notes Browser • Type page notes here. • You can also drag these notes
to the page for directions.
Properties Browser • Use the properties for tasks
like naming objects, keywords, rotating, restrictors, creating actions, and containers.
• Click on the √ for each topic to contract the folders you don’t use.
Voting Browser • Activate voting
Actions Browser • Locate action objects
and drag to page
Page 13
4
Promethean ActivInspireN
ew F
eatu
res
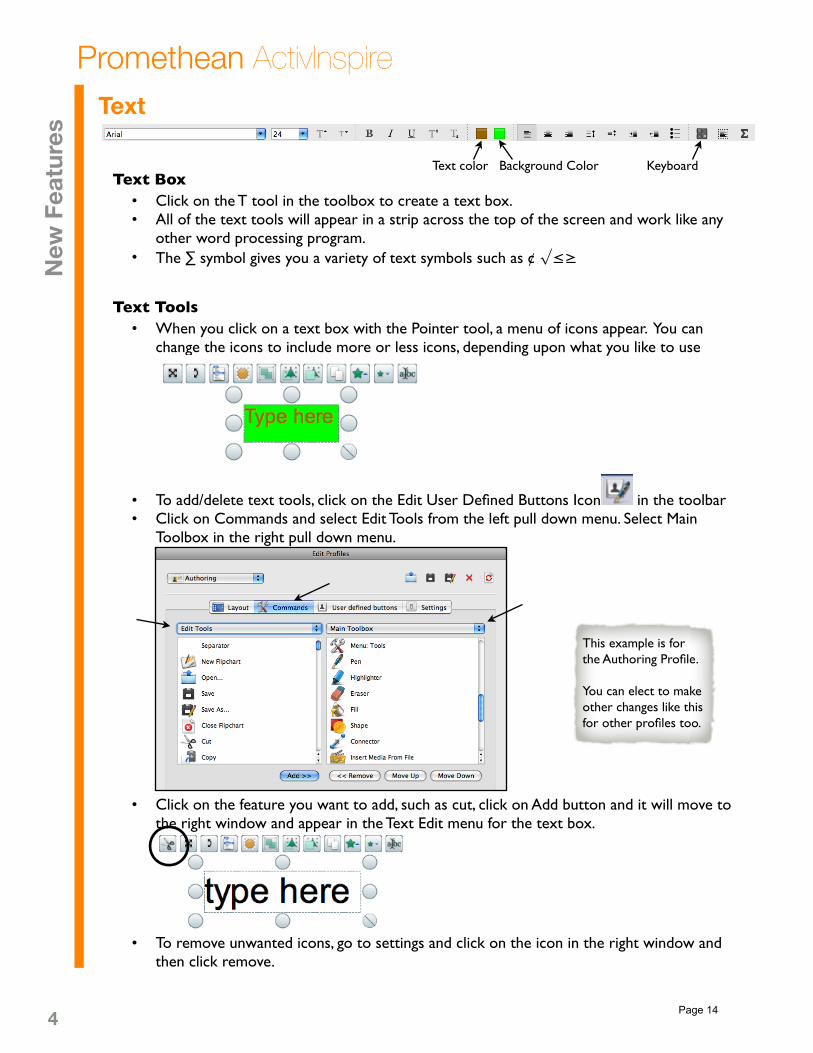
Text
Text Box• Click on the T tool in the toolbox to create a text box.• All of the text tools will appear in a strip across the top of the screen and work like any
other word processing program.• The ∑ symbol gives you a variety of text symbols such as ¢ √≤≥
Text color Background Color Keyboard
Text Tools• When you click on a text box with the Pointer tool, a menu of icons appear. You can
change the icons to include more or less icons, depending upon what you like to use
• To add/delete text tools, click on the Edit User Defined Buttons Icon in the toolbar• Click on Commands and select Edit Tools from the left pull down menu. Select Main
Toolbox in the right pull down menu.
• Click on the feature you want to add, such as cut, click on Add button and it will move to the right window and appear in the Text Edit menu for the text box.
• To remove unwanted icons, go to settings and click on the icon in the right window and then click remove.
This example is for the Authoring Profile.
You can elect to make other changes like this for other profiles too.
Page 14
5
Promethean ActivInspireN
ew F
eatu
res
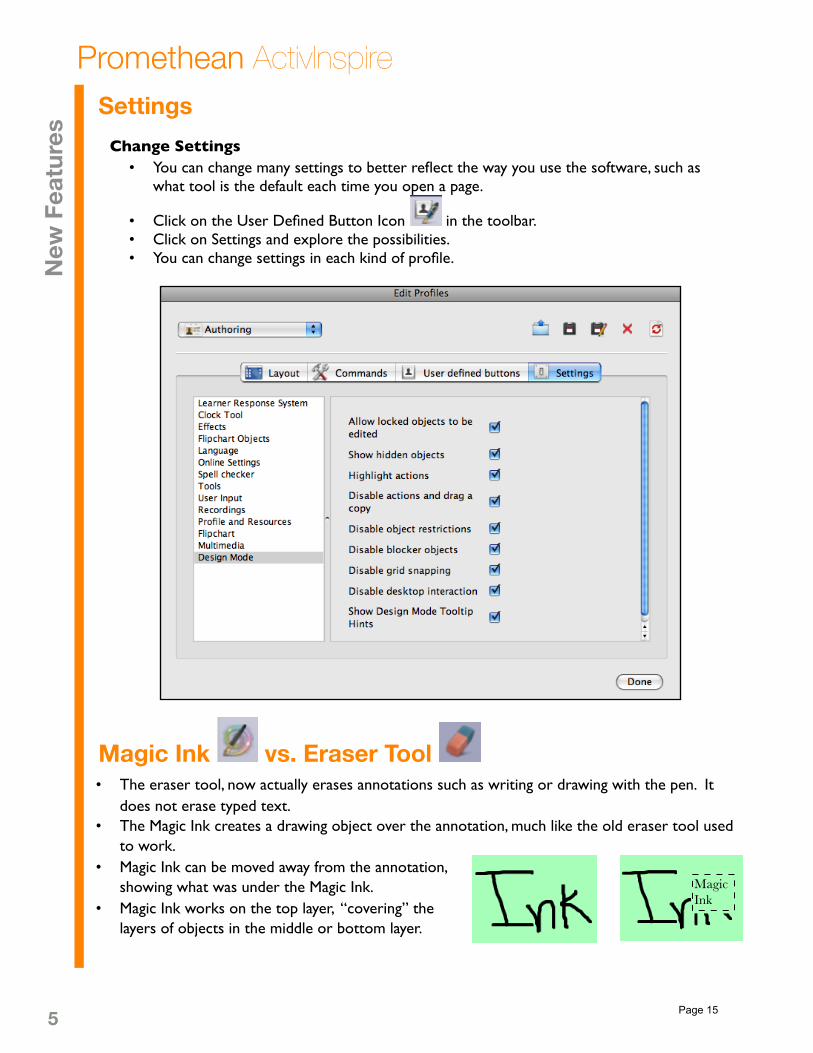
Settings
Change Settings• You can change many settings to better reflect the way you use the software, such as
what tool is the default each time you open a page.
• Click on the User Defined Button Icon in the toolbar.• Click on Settings and explore the possibilities.• You can change settings in each kind of profile.
Magic Ink vs. Eraser Tool • The eraser tool, now actually erases annotations such as writing or drawing with the pen. It
does not erase typed text.• The Magic Ink creates a drawing object over the annotation, much like the old eraser tool used
to work. • Magic Ink can be moved away from the annotation,
showing what was under the Magic Ink.• Magic Ink works on the top layer, “covering” the
layers of objects in the middle or bottom layer.
Magic Ink
Page 15
6
Promethean ActivInspireN
ew F
eatu
res
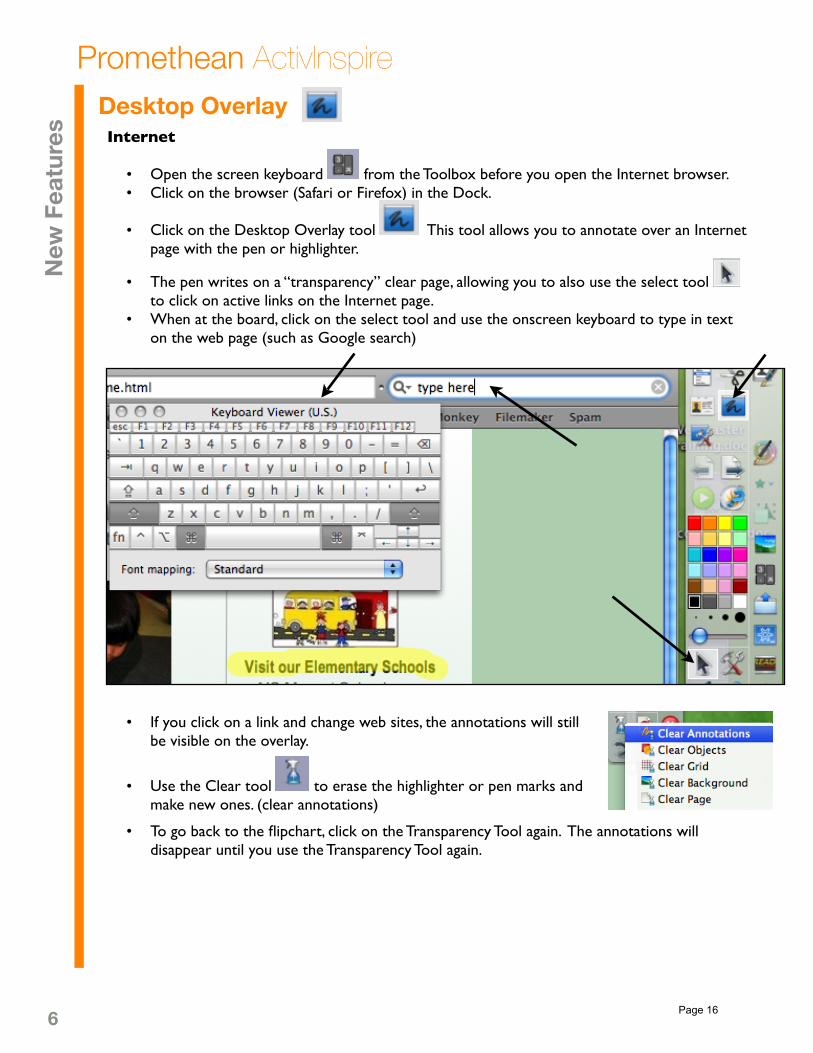
Desktop Overlay Internet
• Open the screen keyboard from the Toolbox before you open the Internet browser.• Click on the browser (Safari or Firefox) in the Dock.
• Click on the Desktop Overlay tool This tool allows you to annotate over an Internet page with the pen or highlighter.
• The pen writes on a “transparency” clear page, allowing you to also use the select tool to click on active links on the Internet page.
• When at the board, click on the select tool and use the onscreen keyboard to type in text on the web page (such as Google search)
• If you click on a link and change web sites, the annotations will still be visible on the overlay.
• Use the Clear tool to erase the highlighter or pen marks and make new ones. (clear annotations)
• To go back to the flipchart, click on the Transparency Tool again. The annotations will disappear until you use the Transparency Tool again.
Page 16
7
Promethean ActivInspireN
ew F
eatu
res
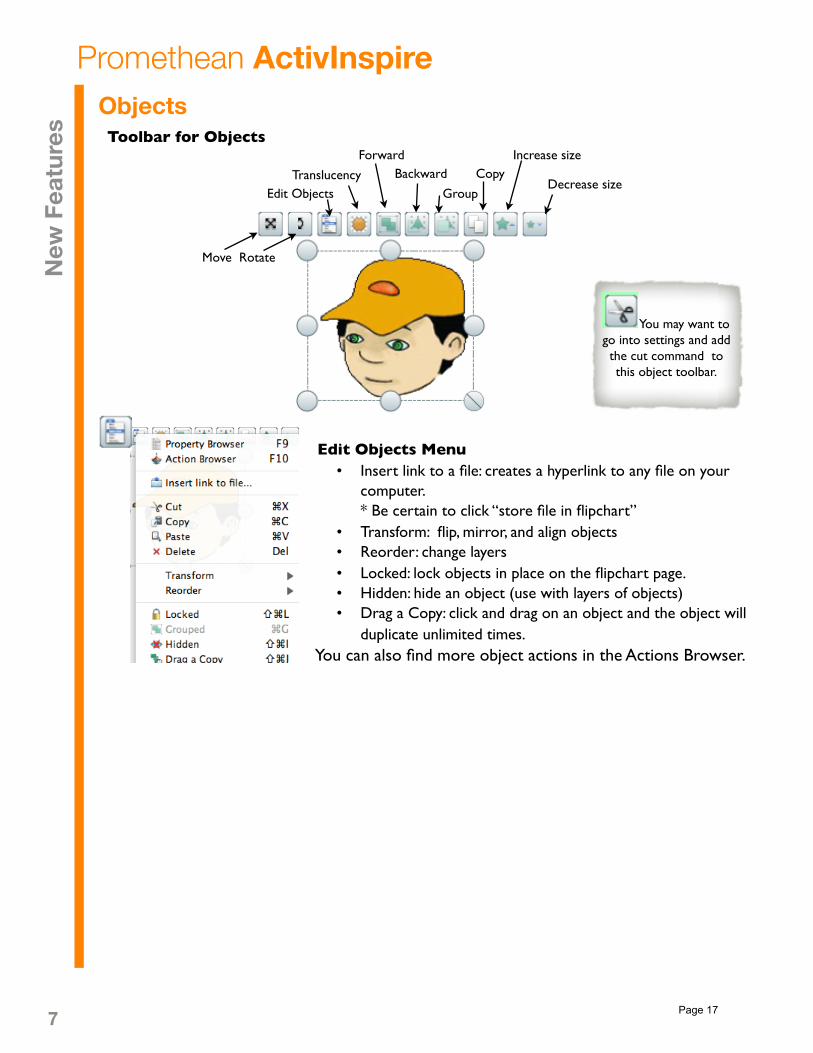
Objects Toolbar for Objects
Move Rotate
Translucency
Forward
Group
Copy Backward
Edit Objects
Increase size
Decrease size
Edit Objects Menu• Insert link to a file: creates a hyperlink to any file on your
computer. * Be certain to click “store file in flipchart”
• Transform: flip, mirror, and align objects• Reorder: change layers• Locked: lock objects in place on the flipchart page.• Hidden: hide an object (use with layers of objects)• Drag a Copy: click and drag on an object and the object will
duplicate unlimited times. You can also find more object actions in the Actions Browser.
You may want to go into settings and add the cut command to this object toolbar.
Page 17

Creating Flipcharts Tip: Using the “Hidden” Action
You can use the “hidden” action to hide and show an object on the flipchart. Using this action is a quick and easy way to hide important parts of the flipchart until you want them revealed. On the flipchart page below, you’ll see an “answer” button. When it is clicked, the answer will appear. Click the answer button a second time, and it hides again.
Directions for making an “answer” button:
1. Be sure you are working in “Design Mode”.
2. Click the text tool . Type the word “Answer” on the flipchart. I also changed the background color of the textbox so that it looks like a button instead of a textbox.
3. Click the text tool and type a separate textbox with the text that you want hidden. (In the example above, this would be the textbox that says, “Roots act like a straw to suck up water and minerals (plant food).”
4. Then click the second textbox so that the “object edit” toolbar appears. Click the “Object Edit Menu” icon (see picture), and then choose “Properties Browser” to access the properties for this textbox.
5. Within the “Properties Browser”, change the name to a one word name that you will remember.
In this case, I renamed my textbox as “Roots”. Then close the Properties Browser.
6. Click on the textbox that says “Answer” so that the “object edit” toolbar appears. Click the
“Object Edit Menu” and choose “Action Browser” to access the actions for this textbox. Make sure the “current selection” tab is selected. Scroll down the actions until you find “Hidden”. Click “Hidden” to select it.
Page 18

7. At the bottom of the Action Browser, you will see a “Target” field. Click the “Ellipsis” (…) and browse to the textbox that you named in step 5.
Then 8. You will see a think red outline appear around the textbox that says “Answer” now that you have
added an action. To test it to see if it works, close the action browser and turn off Design Mode.
9. When you move your mouse over the textbox “Answer”, you’ll see a blue and white triangle
appear to indicate the textbox has an action associated with it. Click it to make the second textbox appear and disappear.
Page 19