acsd 621: auditory diagnostics i - towson web viewlab manual. course instructor: candace robinson,...
TRANSCRIPT
ACSD 622: Auditory Diagnostics I, Laboratory
Lab Manual
Course Instructor: Candace Robinson, Au.D.
Manual created and updated by: Jennifer Smart, Ph.D.

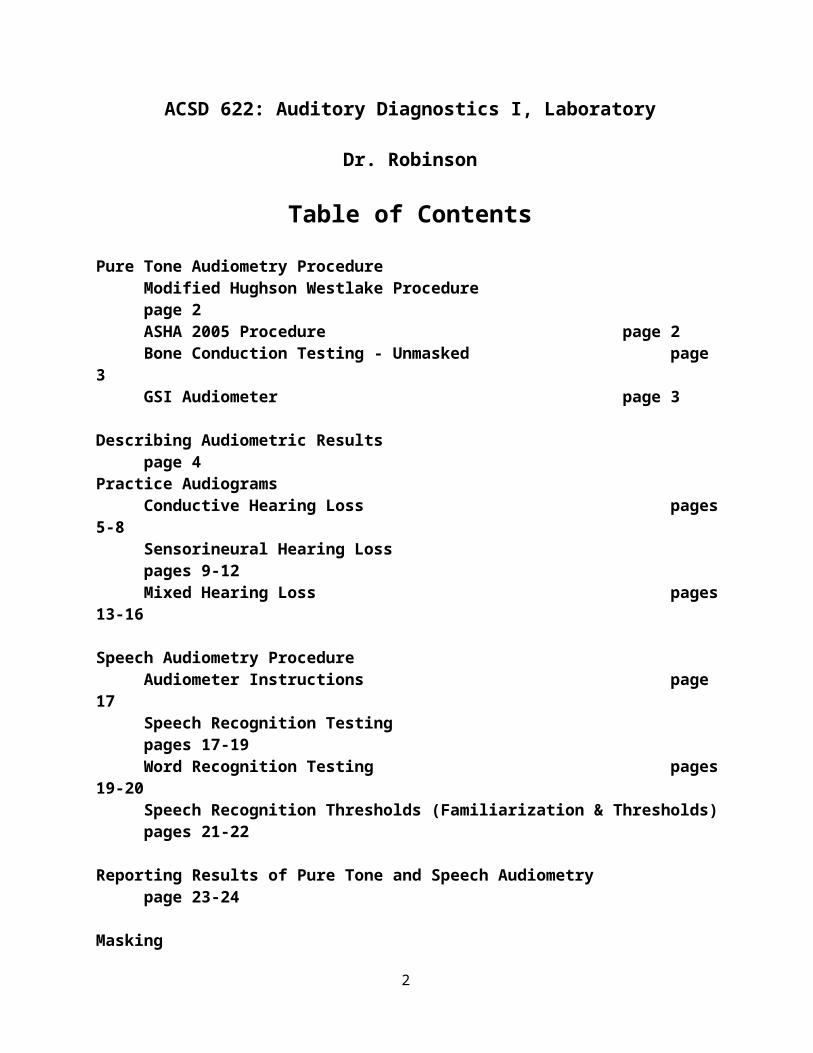
ACSD 622: Auditory Diagnostics I, Laboratory
Dr. Robinson
Table of Contents
Pure Tone Audiometry Procedure Modified Hughson Westlake Procedure page 2ASHA 2005 Procedure page 2Bone Conduction Testing - Unmasked page 3GSI Audiometer page 3
Describing Audiometric Results page 4Practice Audiograms
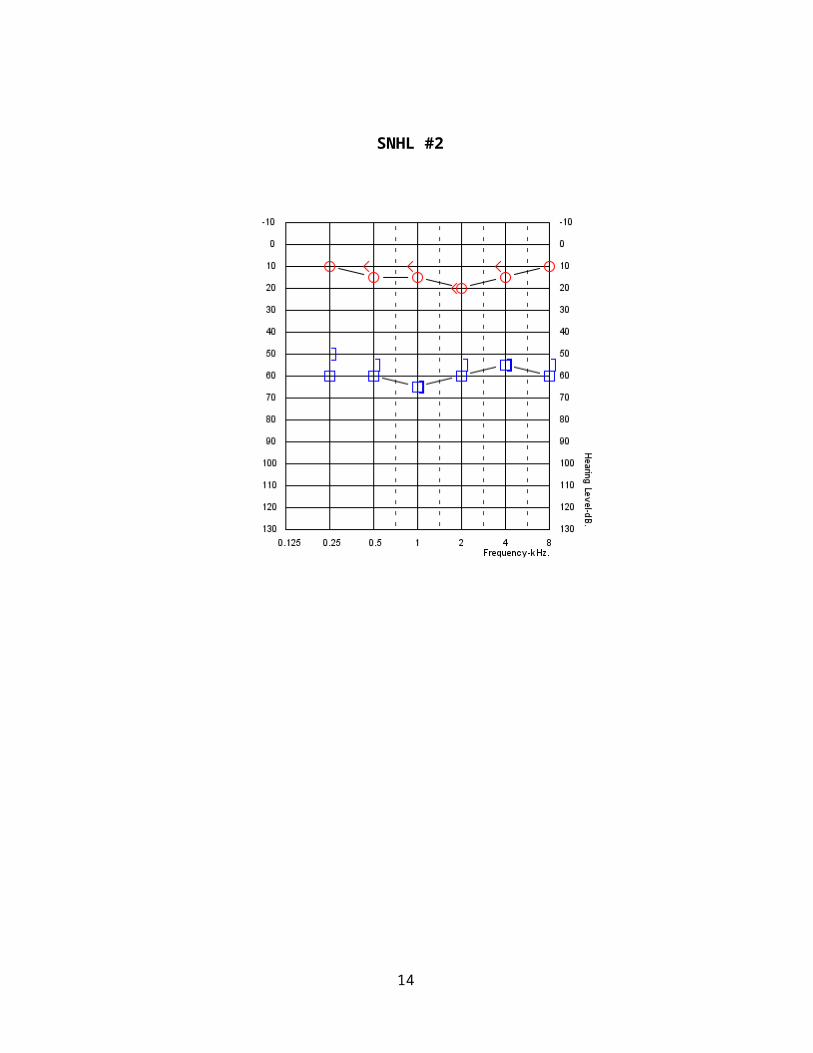
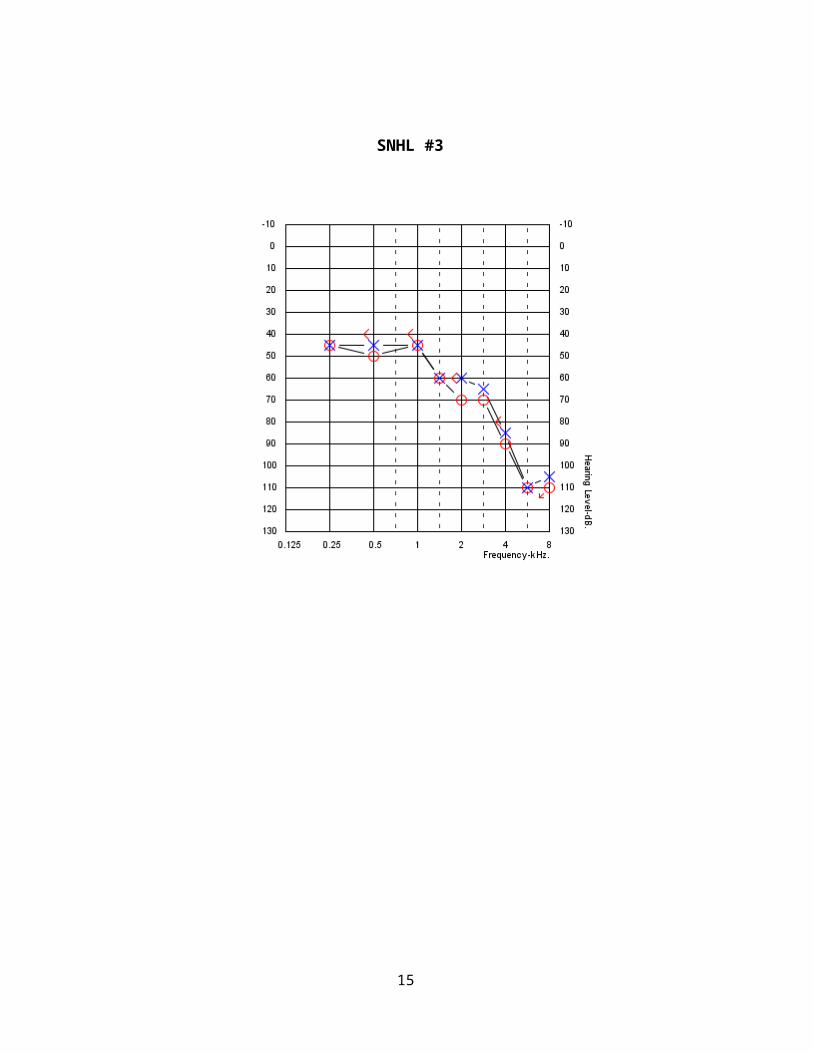
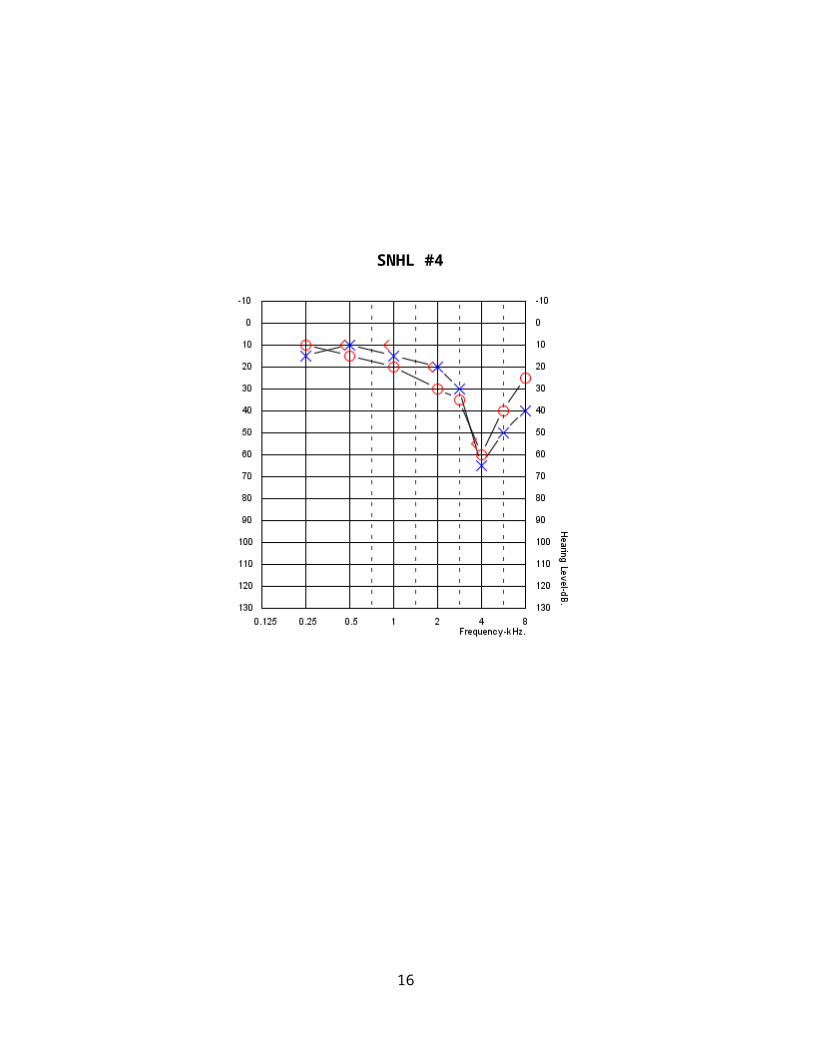
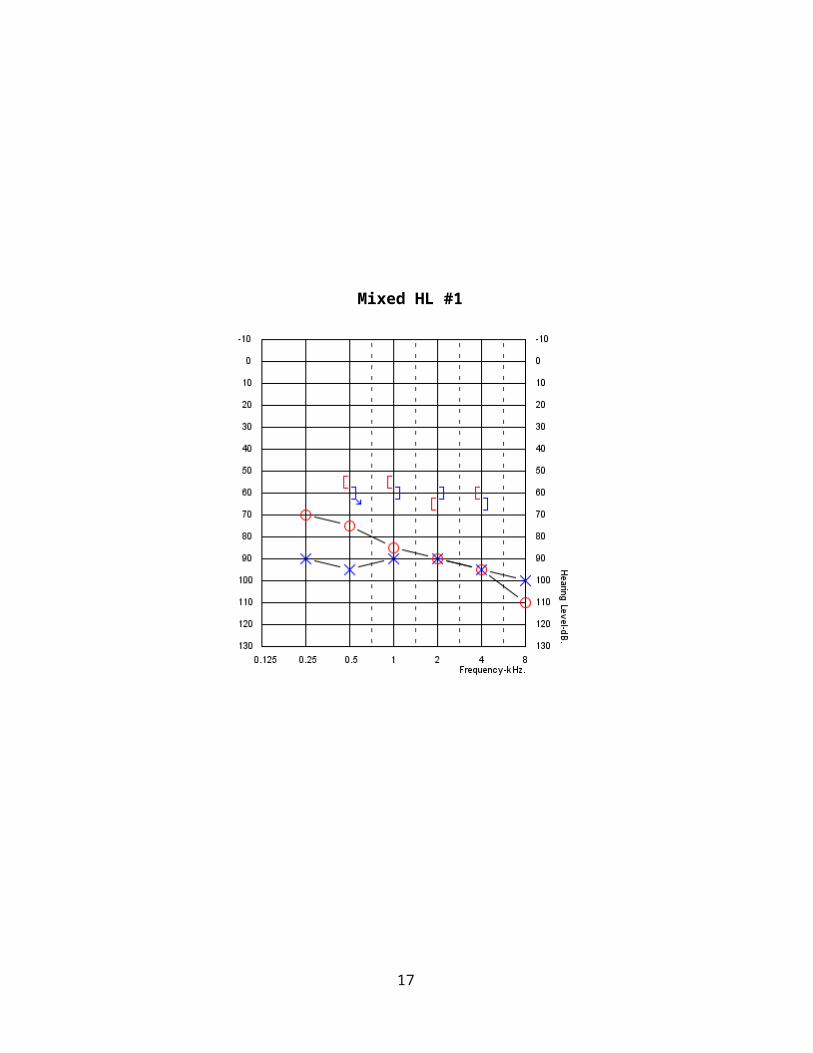
Conductive Hearing Loss pages 5-8Sensorineural Hearing Loss pages 9-12Mixed Hearing Loss pages 13-16
Speech Audiometry ProcedureAudiometer Instructions page 17Speech Recognition Testing pages 17-19Word Recognition Testing pages 19-20Speech Recognition Thresholds (Familiarization & Thresholds) pages 21-22
Reporting Results of Pure Tone and Speech Audiometry page 23-24
MaskingAudiometer Set-Up pages 25-26Masking Rules and Regulations page 27-28
Acoustic Immittance TestingTympanometry page 29Acoustic Reflex Threshold Testing page 29-30Tympanometry Normative Data page 31Sample Report Wording for Immittance Testing page 31
Otoacoustic EmissionsBrief Description and Equipment Instructions page 32-36
Sample Clinical Report pages 37-39
References page 40
1
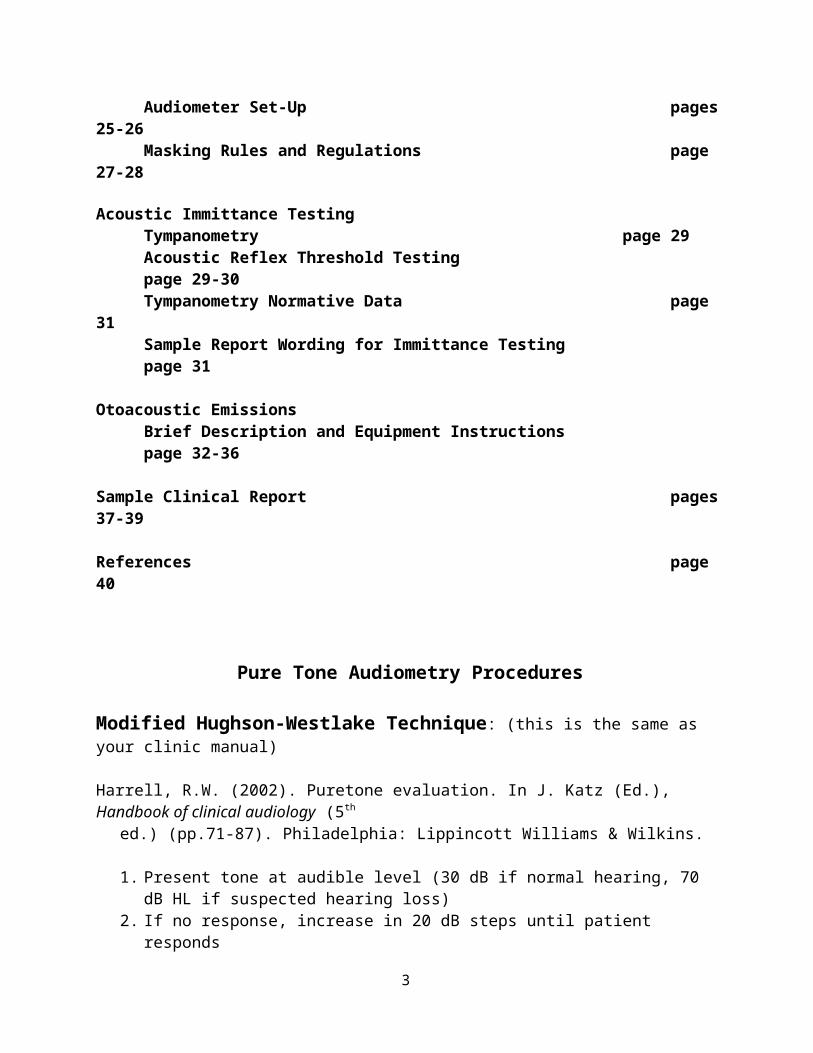
Pure Tone Audiometry Procedures
Modified Hughson-Westlake Technique: (this is the same as your clinic manual)
Harrell, R.W. (2002). Puretone evaluation. In J. Katz (Ed.), Handbook of clinical audiology (5th ed.) (pp.71-87). Philadelphia: Lippincott Williams & Wilkins.
1. Present tone at audible level (30 dB if normal hearing, 70 dB HL if suspected hearing loss)2. If no response, increase in 20 dB steps until patient responds3. Once patient responds, level is reduced in 10 dB steps until patient does not respond4. Then “up 5, down 10” begins5. Use the ANSI S3.21 determination for threshold (50% of ascending trials, with a minimum
of 2 out of 3 responses required at a single level)
For this technique you begin at 30 dB HL or suprathreshold for all test frequencies
Test frequencies and order: 1, 2, 4, 8, 1, .5, .25 kHz and interoctaves when 20 dB or greater difference in thresholds is found for adjacent test frequencies
Interoctaves (3 & 6 kHz) should be tested when a noise-induced hearing loss is suspected and/or hearing aids will be recommended
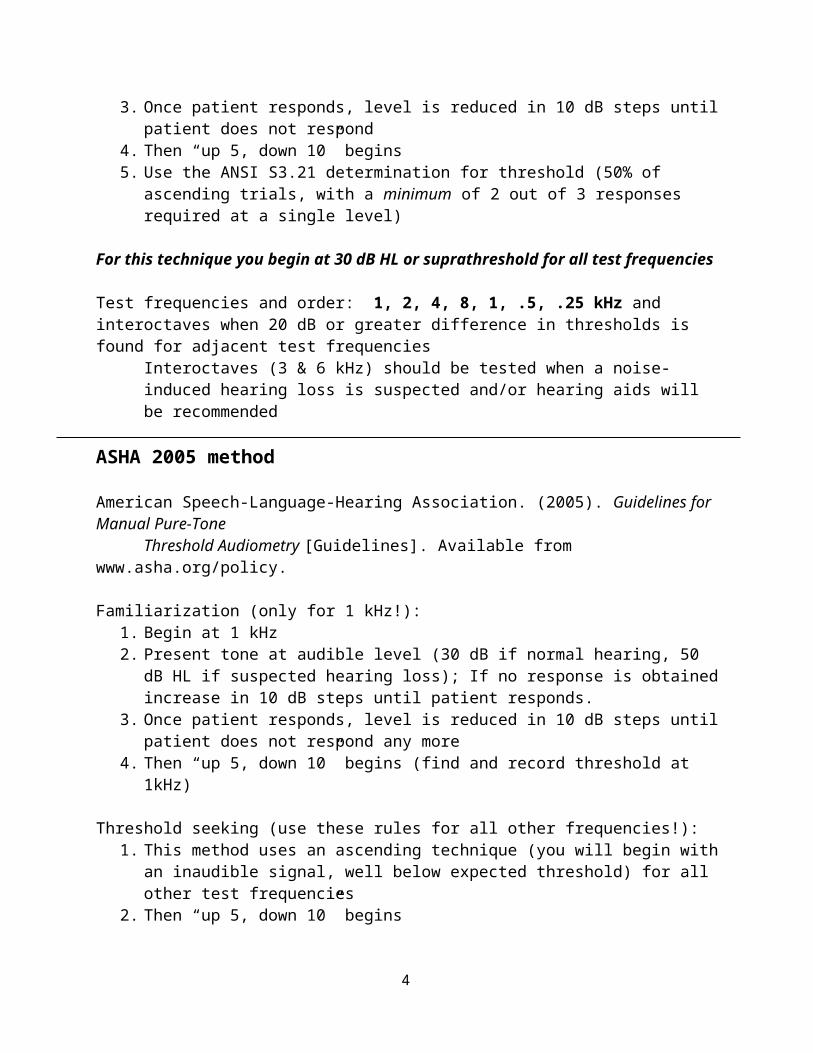
ASHA 2005 method
American Speech-Language-Hearing Association. (2005). Guidelines for Manual Pure-Tone Threshold Audiometry [Guidelines]. Available from www.asha.org/policy.
Familiarization (only for 1 kHz!):1. Begin at 1 kHz2. Present tone at audible level (30 dB if normal hearing, 50 dB HL if suspected hearing
loss); If no response is obtained increase in 10 dB steps until patient responds. 3. Once patient responds, level is reduced in 10 dB steps until patient does not respond any
more4. Then “up 5, down 10” begins (find and record threshold at 1kHz)
Threshold seeking (use these rules for all other frequencies!):1. This method uses an ascending technique (you will begin with an inaudible signal, well
below expected threshold) for all other test frequencies 2. Then “up 5, down 10” begins3. Use the ANSI S3.21 determination for threshold is utilized (50% of ascending trials, with
a minimum of 2 out of 3 responses required at a single level)
For this technique you begin at 30 dB HL or suprathreshold for 1 kHz only. All other test frequencies you begin below threshold (then start “up 5, down 10”)
Test frequencies and order: 1, 2, 3, 4, 6, 8, 1, .5, .25 kHz and interoctaves when 20 dB or greater difference in thresholds is found for adjacent test frequencies.
2
Bone Conduction Testing *** For BC testing, despite AC method, test 500, 1000, 2000 and 4000 (250 in special cases) at 10 dB poorer than AC threshold (e.g., AC = 30 dB HL, start testing unmasked BC at 40 dB HL). Continue the down 10 up 5 method and threshold should be based upon 2 ascending responses at the same level. ****
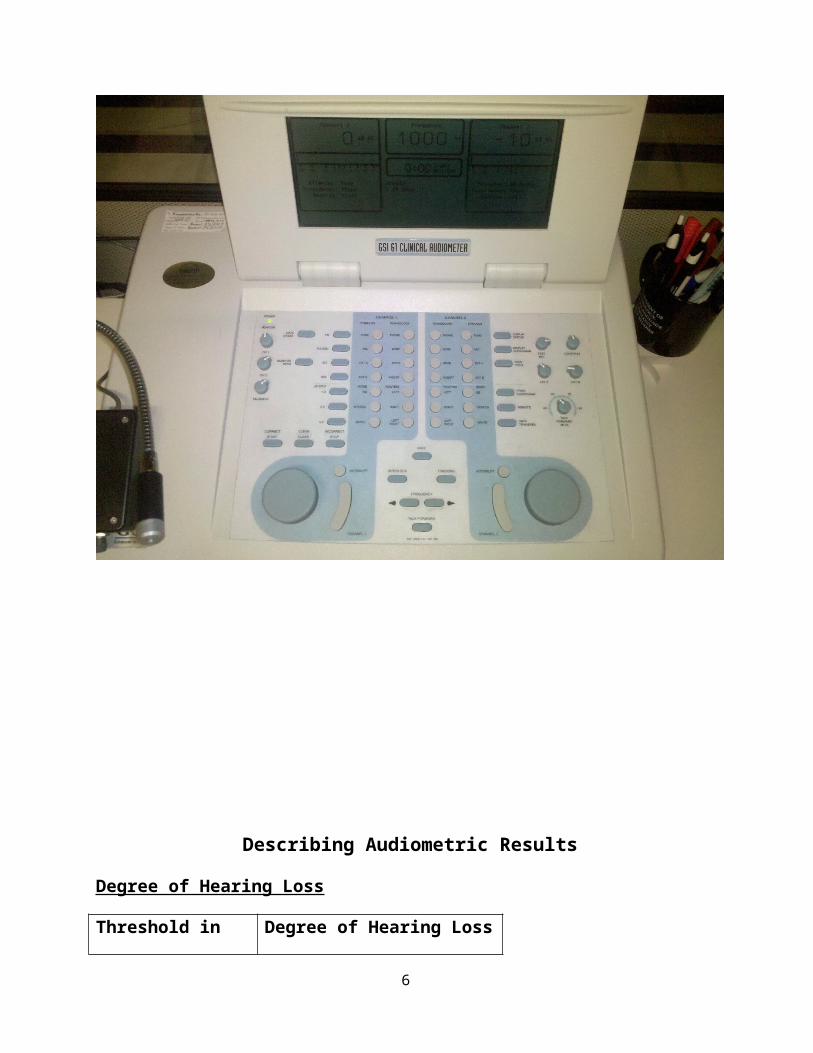
GSI-61 Clinical Audiometer
3
Describing Audiometric Results
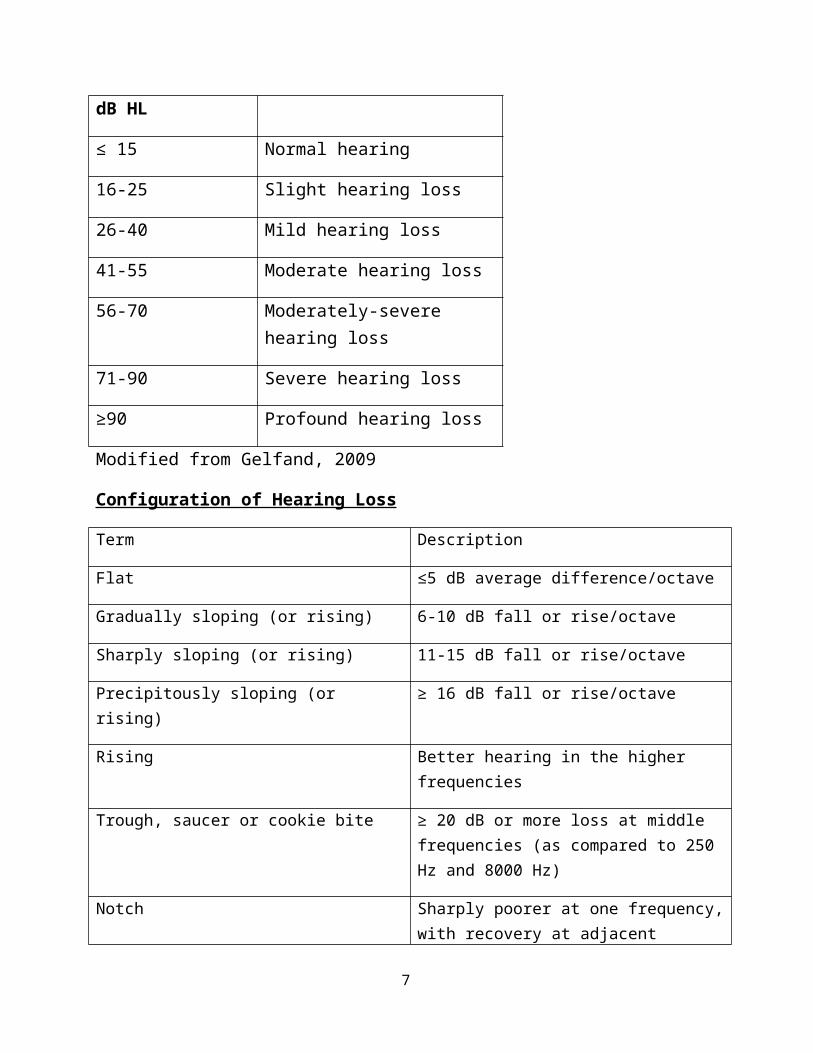
Degree of Hearing Loss
Threshold in dB HL Degree of Hearing Loss
≤ 15 Normal hearing
16-25 Slight hearing loss
26-40 Mild hearing loss
41-55 Moderate hearing loss
56-70 Moderately-severe hearing loss
71-90 Severe hearing loss
≥90 Profound hearing loss
Modified from Gelfand, 2009
Configuration of Hearing Loss
Term Description
Flat ≤5 dB average difference/octave
Gradually sloping (or rising) 6-10 dB fall or rise/octave
Sharply sloping (or rising) 11-15 dB fall or rise/octave
Precipitously sloping (or rising) ≥ 16 dB fall or rise/octave
Rising Better hearing in the higher frequencies
Trough, saucer or cookie bite ≥ 20 dB or more loss at middle frequencies (as compared to 250 Hz and 8000 Hz)
Notch Sharply poorer at one frequency, with recovery at adjacent frequencies (e.g., noise notch)
Table 5.5 modified from: Harrell, R. (2002). In J. Katz (Ed.). Handbook of Clinical Audiology, 5th ed. Baltimore: Lippincott, Williams & Wilkins
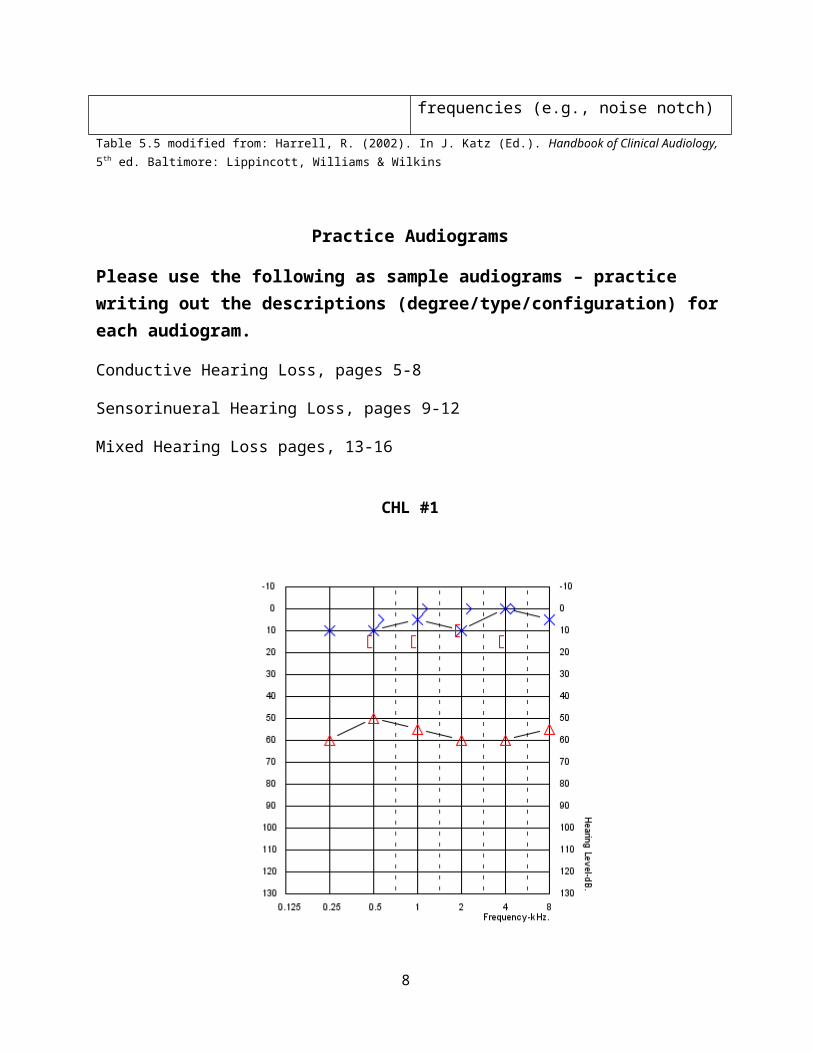
Practice Audiograms
4
Please use the following as sample audiograms – practice writing out the descriptions (degree/type/configuration) for each audiogram.
Conductive Hearing Loss, pages 5-8
Sensorinueral Hearing Loss, pages 9-12
Mixed Hearing Loss pages, 13-16
CHL #1
5
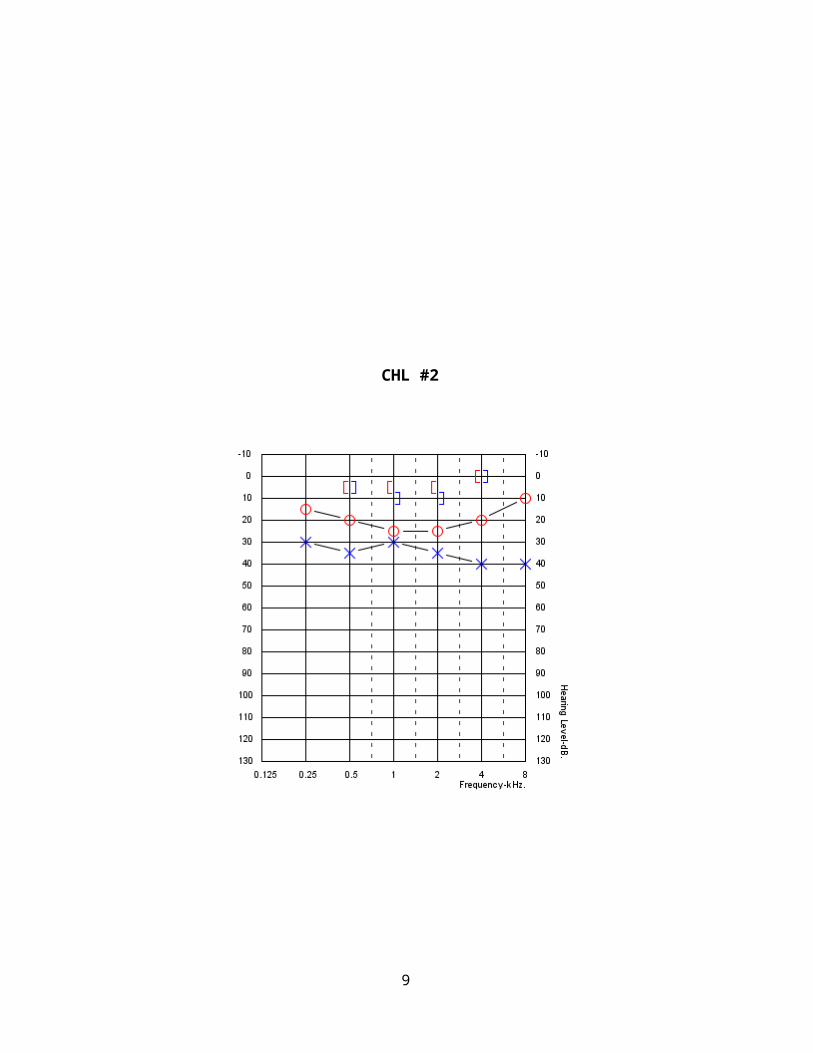
CHL #2
6
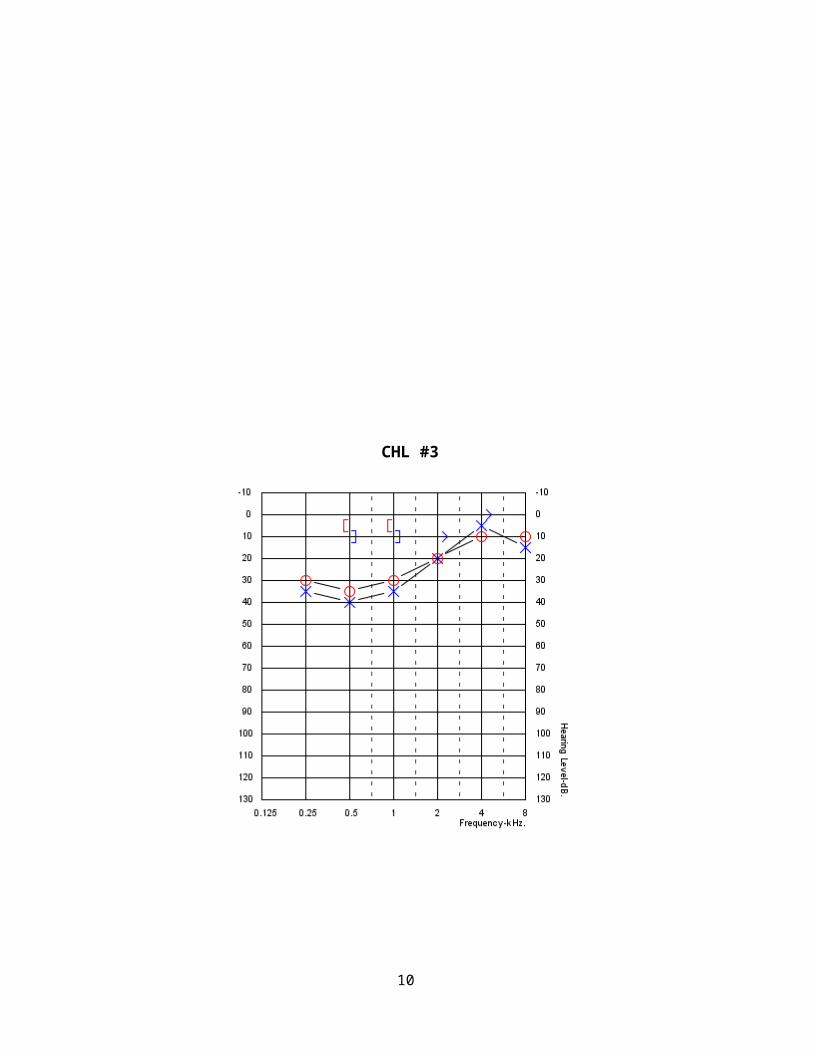
CHL #3
7
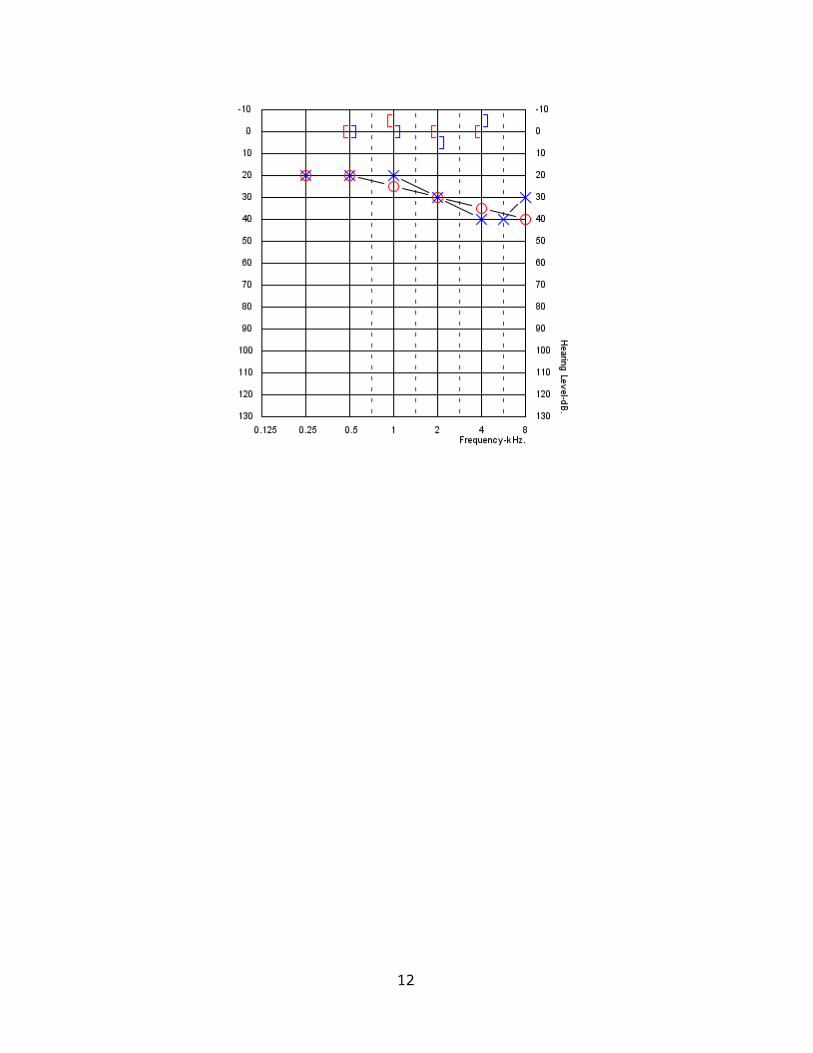
CHL #4
8
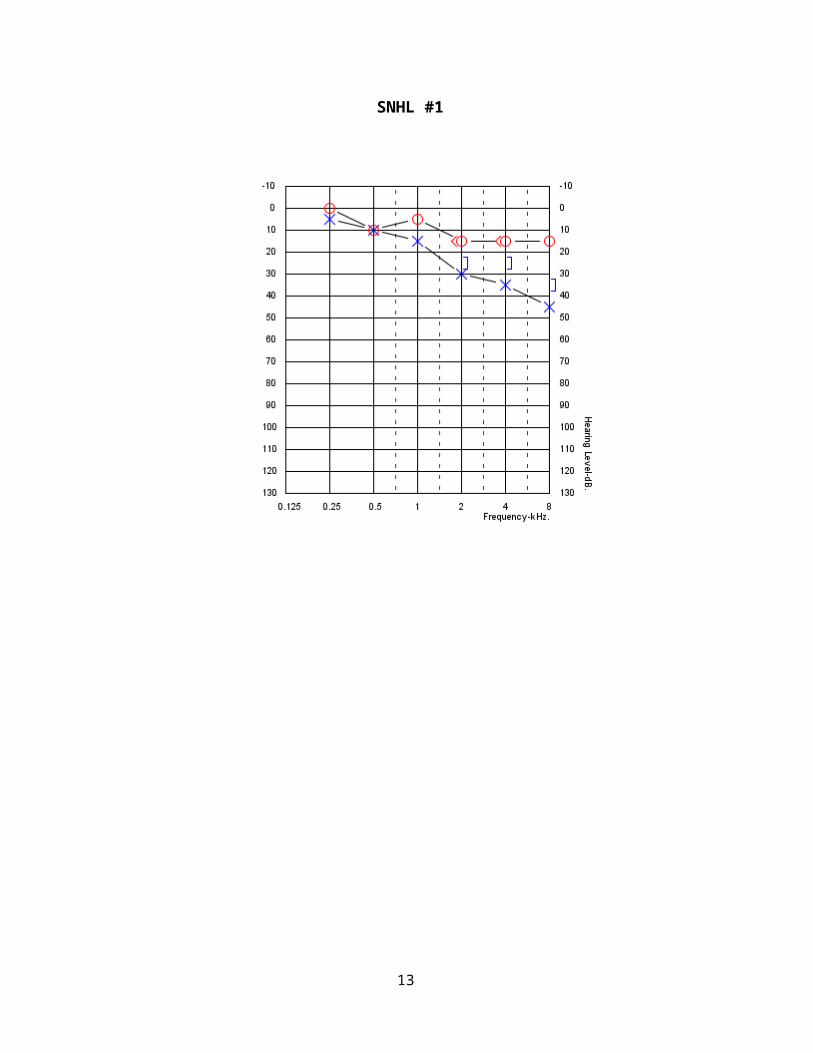
SNHL #1
9
SNHL #2
SNHL #3
10

11
SNHL #4
12
Mixed HL #1
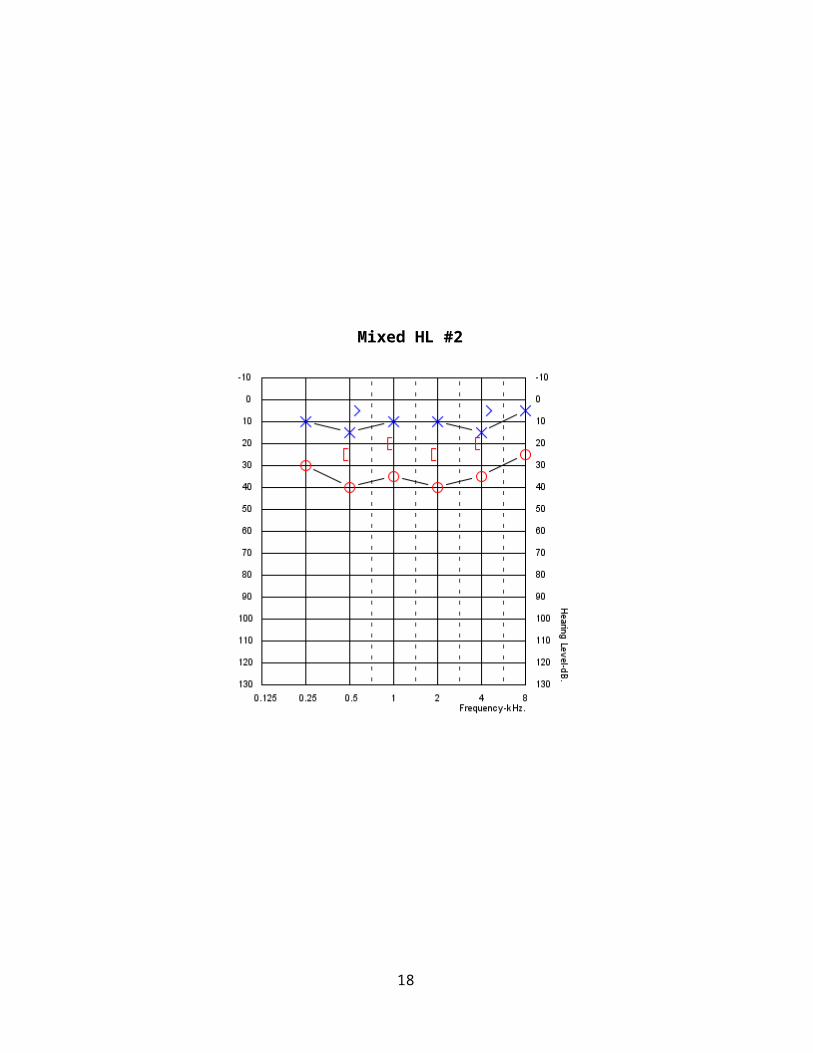
Mixed HL #2
13
Mixed HL #3
14
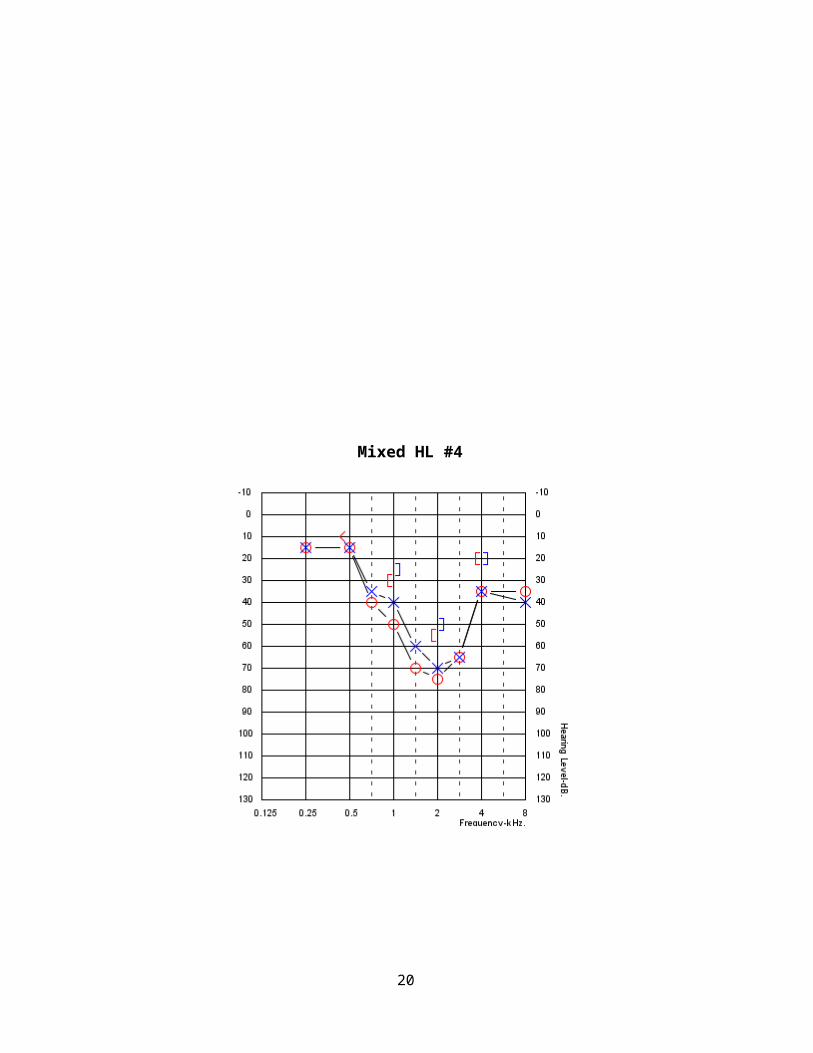
Mixed HL #4
15
16
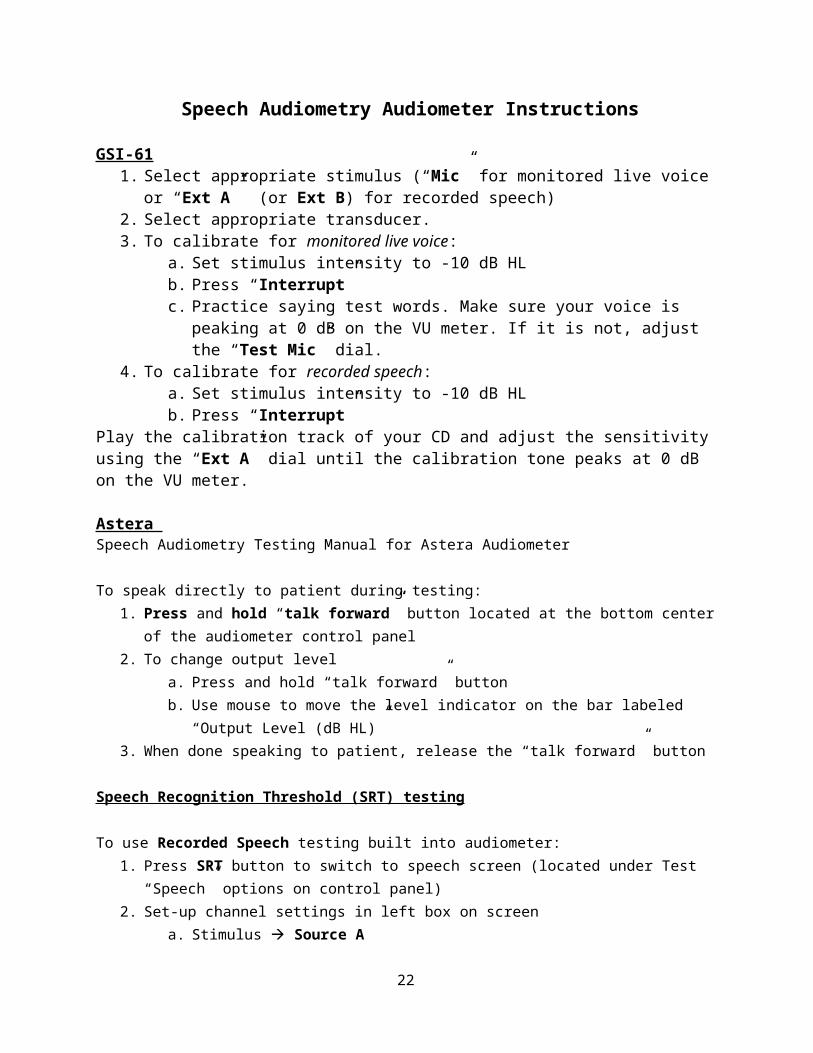
Speech Audiometry Audiometer Instructions
GSI-611. Select appropriate stimulus (“Mic” for monitored live voice or “Ext A” (or Ext B) for
recorded speech)2. Select appropriate transducer. 3. To calibrate for monitored live voice:
a. Set stimulus intensity to -10 dB HL b. Press “Interrupt” c. Practice saying test words. Make sure your voice is peaking at 0 dB on the VU
meter. If it is not, adjust the “Test Mic” dial. 4. To calibrate for recorded speech:
a. Set stimulus intensity to -10 dB HLb. Press “Interrupt”
Play the calibration track of your CD and adjust the sensitivity using the “Ext A” dial until the calibration tone peaks at 0 dB on the VU meter.
Astera Speech Audiometry Testing Manual for Astera Audiometer
To speak directly to patient during testing:1. Press and hold “talk forward” button located at the bottom center of the audiometer control
panel2. To change output level
a. Press and hold “talk forward” buttonb. Use mouse to move the level indicator on the bar labeled “Output Level (dB HL)”
3. When done speaking to patient, release the “talk forward” button
Speech Recognition Threshold (SRT) testing
To use Recorded Speech testing built into audiometer:1. Press SRT button to switch to speech screen (located under Test “Speech” options on control
panel)2. Set-up channel settings in left box on screen
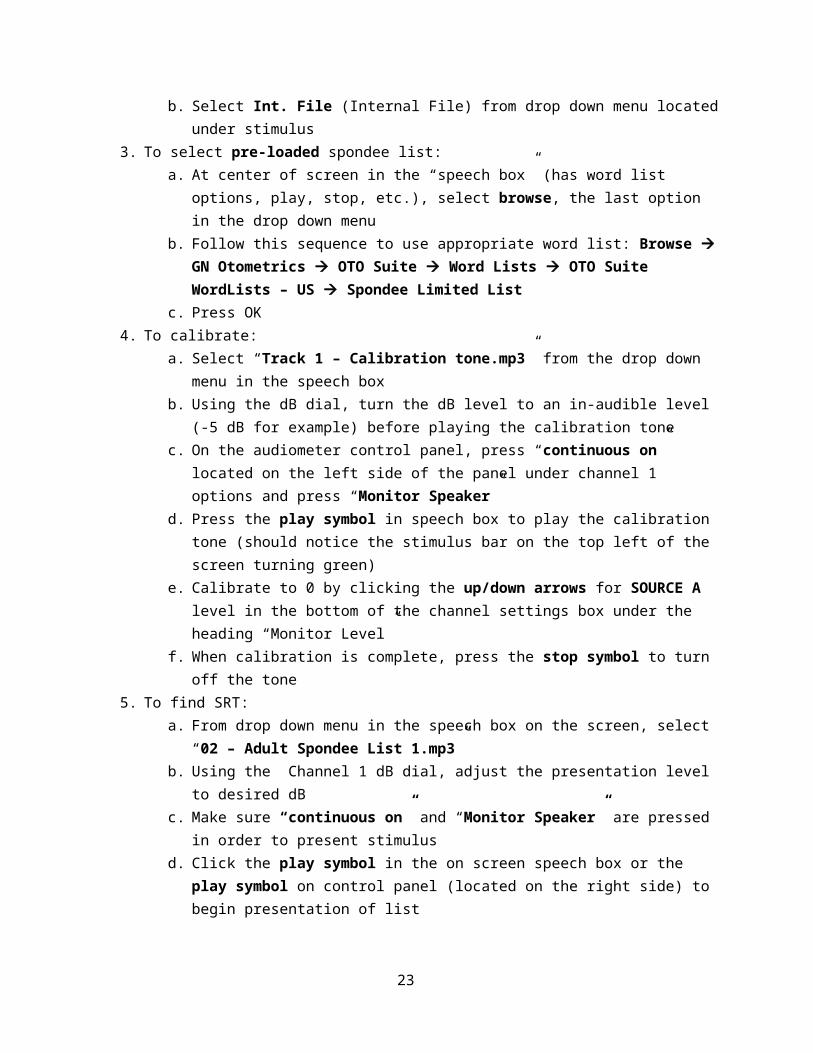
a. Stimulus à Source Ab. Select Int. File (Internal File) from drop down menu located under stimulus
3. To select pre-loaded spondee list:a. At center of screen in the “speech box” (has word list options, play, stop, etc.), select
browse, the last option in the drop down menub. Follow this sequence to use appropriate word list: Browse à GN Otometrics à OTO
Suite à Word Lists à OTO Suite WordLists – US à Spondee Limited Listc. Press OK
4. To calibrate:a. Select “Track 1 – Calibration tone.mp3” from the drop down menu in the speech box
17
b. Using the dB dial, turn the dB level to an in-audible level (-5 dB for example) before playing the calibration tone
c. On the audiometer control panel, press “continuous on” located on the left side of the panel under channel 1 options and press “Monitor Speaker”
d. Press the play symbol in speech box to play the calibration tone (should notice the stimulus bar on the top left of the screen turning green)
e. Calibrate to 0 by clicking the up/down arrows for SOURCE A level in the bottom of the channel settings box under the heading “Monitor Level”
f. When calibration is complete, press the stop symbol to turn off the tone5. To find SRT:
a. From drop down menu in the speech box on the screen, select “02 – Adult Spondee List 1.mp3”
b. Using the Channel 1 dB dial, adjust the presentation level to desired dBc. Make sure “continuous on” and “Monitor Speaker” are pressed in order to present
stimulusd. Click the play symbol in the on screen speech box or the play symbol on control panel
(located on the right side) to begin presentation of liste. Threshold seek by turning dB dial to change the presentation levelf. When SRT is found, press the stop symbol to discontinue presentationg. To STORE threshold, press the “STORE” button on the control panel or click the
“STORE” button located at the top left of the computer screen
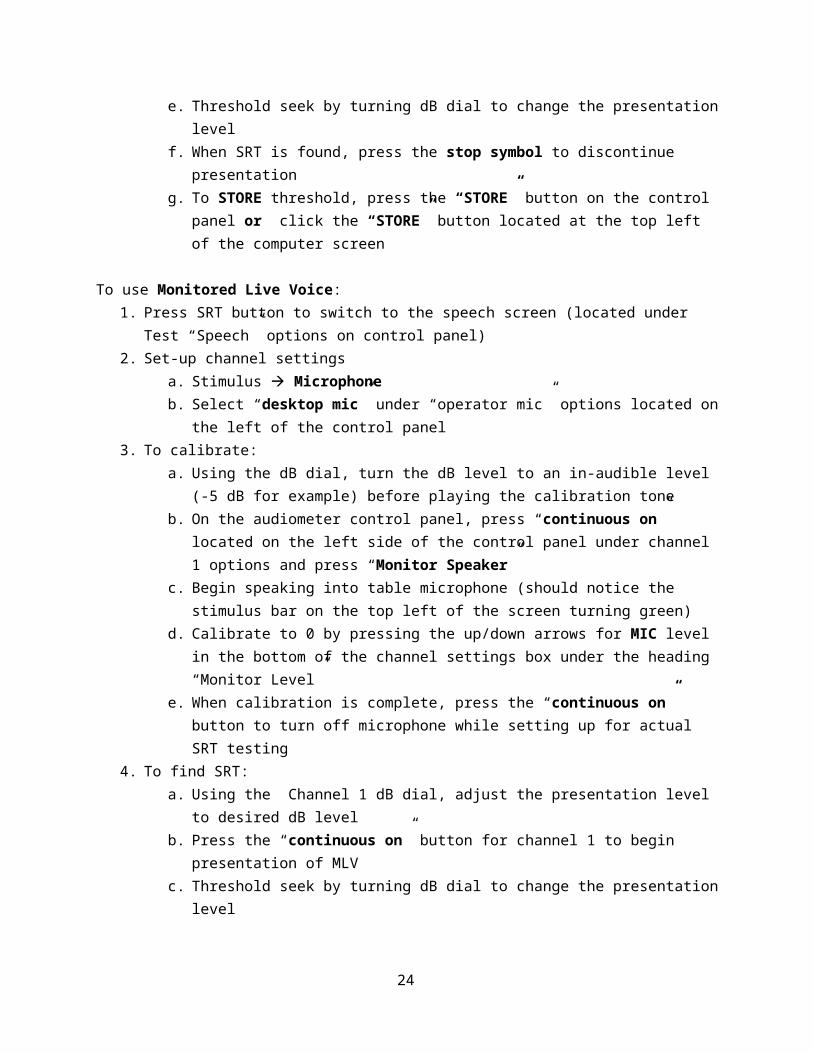
To use Monitored Live Voice:1. Press SRT button to switch to the speech screen (located under Test “Speech” options on control
panel)2. Set-up channel settings
a. Stimulus à Microphoneb. Select “desktop mic” under “operator mic” options located on the left of the control panel
3. To calibrate:a. Using the dB dial, turn the dB level to an in-audible level (-5 dB for example) before
playing the calibration toneb. On the audiometer control panel, press “continuous on” located on the left side of the
control panel under channel 1 options and press “Monitor Speaker” c. Begin speaking into table microphone (should notice the stimulus bar on the top left of the
screen turning green)d. Calibrate to 0 by pressing the up/down arrows for MIC level in the bottom of the channel
settings box under the heading “Monitor Level”e. When calibration is complete, press the “continuous on” button to turn off microphone
while setting up for actual SRT testing 4. To find SRT:
a. Using the Channel 1 dB dial, adjust the presentation level to desired dB levelb. Press the “continuous on” button for channel 1 to begin presentation of MLVc. Threshold seek by turning dB dial to change the presentation leveld. When SRT is found, turn off the microphone by pressing the “continuous on” button
18

e. To STORE threshold, press the “STORE” button on the control panel or click the “STORE” button located at the top left of the computer screen
Word Recognition Testing (to obtain a Word Rec. Score (WRS))
To use Recorded Speech testing built into audiometer:1. Press “WRS/SRS” button to switch to WRS testing (located under Test “Speech” options on
control panel)2. Set-up channel settings in left box on screen
a. Stimulus à Source Ab. Select Int. File (Internal File) from drop down menu located under stimulus
3. To select pre-loaded spondee list:a. At center of screen in the “speech box” (has word list options, play, stop, etc.), select
browse, the last option in the drop down menub. Follow this sequence to use appropriate word list: Browse à GN Otometrics à OTO
Suite à Word Lists à OTO Suite WordLists – US à NU-6 Ordered by Difficulty à NU-6 Ordered by Difficulty
c. Press OK4. To calibrate:
a. Select “01 Calibration Tone.mp3” from the drop down menu in the speech boxb. Using the dB dial, turn the dB level to an in-audible level (-5 dB for example) before
playing the calibration tonec. On the audiometer control panel, press “continuous on” located on the left side of the
panel under channel 1 options and press “Monitor Speaker” d. Press the play symbol in speech box to play the calibration tone (should notice the
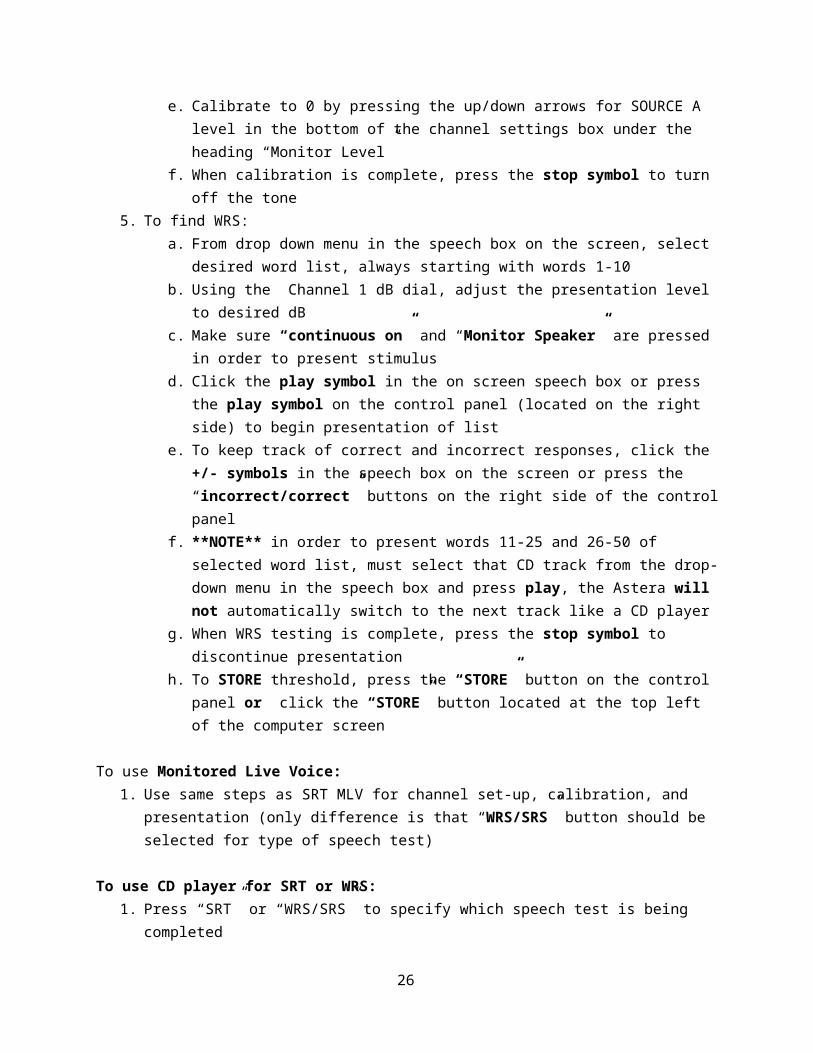
stimulus bar on the top left of the screen turning green)e. Calibrate to 0 by pressing the up/down arrows for SOURCE A level in the bottom of the
channel settings box under the heading “Monitor Level”f. When calibration is complete, press the stop symbol to turn off the tone
5. To find WRS:a. From drop down menu in the speech box on the screen, select desired word list, always
starting with words 1-10b. Using the Channel 1 dB dial, adjust the presentation level to desired dBc. Make sure “continuous on” and “Monitor Speaker” are pressed in order to present
stimulusd. Click the play symbol in the on screen speech box or press the play symbol on the
control panel (located on the right side) to begin presentation of liste. To keep track of correct and incorrect responses, click the +/- symbols in the speech box
on the screen or press the “incorrect/correct” buttons on the right side of the control panel
f. **NOTE** in order to present words 11-25 and 26-50 of selected word list, must select that CD track from the drop-down menu in the speech box and press play, the Astera will not automatically switch to the next track like a CD player
g. When WRS testing is complete, press the stop symbol to discontinue presentation
19
h. To STORE threshold, press the “STORE” button on the control panel or click the “STORE” button located at the top left of the computer screen
To use Monitored Live Voice:1. Use same steps as SRT MLV for channel set-up, calibration, and presentation (only difference is
that “WRS/SRS” button should be selected for type of speech test)
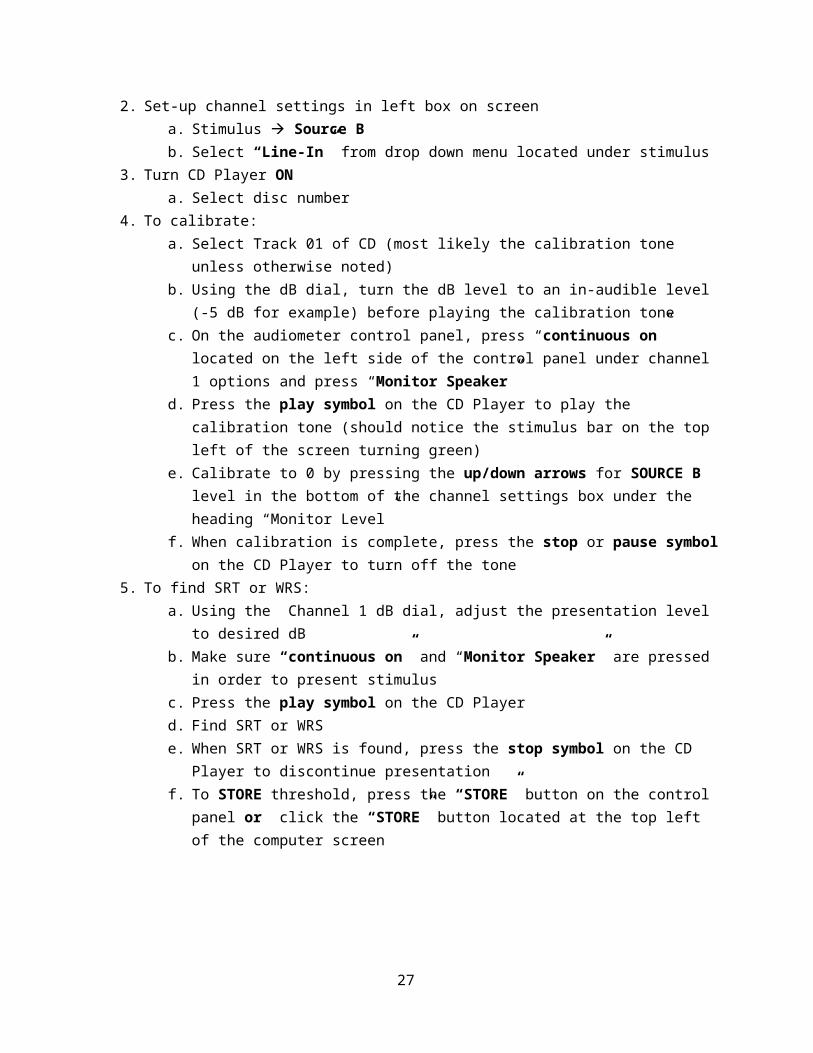
To use CD player for SRT or WRS:1. Press “SRT” or “WRS/SRS” to specify which speech test is being completed2. Set-up channel settings in left box on screen
a. Stimulus à Source Bb. Select “Line-In” from drop down menu located under stimulus
3. Turn CD Player ONa. Select disc number
4. To calibrate:a. Select Track 01 of CD (most likely the calibration tone unless otherwise noted) b. Using the dB dial, turn the dB level to an in-audible level (-5 dB for example) before
playing the calibration tonec. On the audiometer control panel, press “continuous on” located on the left side of the
control panel under channel 1 options and press “Monitor Speaker” d. Press the play symbol on the CD Player to play the calibration tone (should notice the
stimulus bar on the top left of the screen turning green)e. Calibrate to 0 by pressing the up/down arrows for SOURCE B level in the bottom of the
channel settings box under the heading “Monitor Level”f. When calibration is complete, press the stop or pause symbol on the CD Player to turn off
the tone5. To find SRT or WRS:
a. Using the Channel 1 dB dial, adjust the presentation level to desired dBb. Make sure “continuous on” and “Monitor Speaker” are pressed in order to present
stimulusc. Press the play symbol on the CD Playerd. Find SRT or WRSe. When SRT or WRS is found, press the stop symbol on the CD Player to discontinue
presentationf. To STORE threshold, press the “STORE” button on the control panel or click the
“STORE” button located at the top left of the computer screen
20

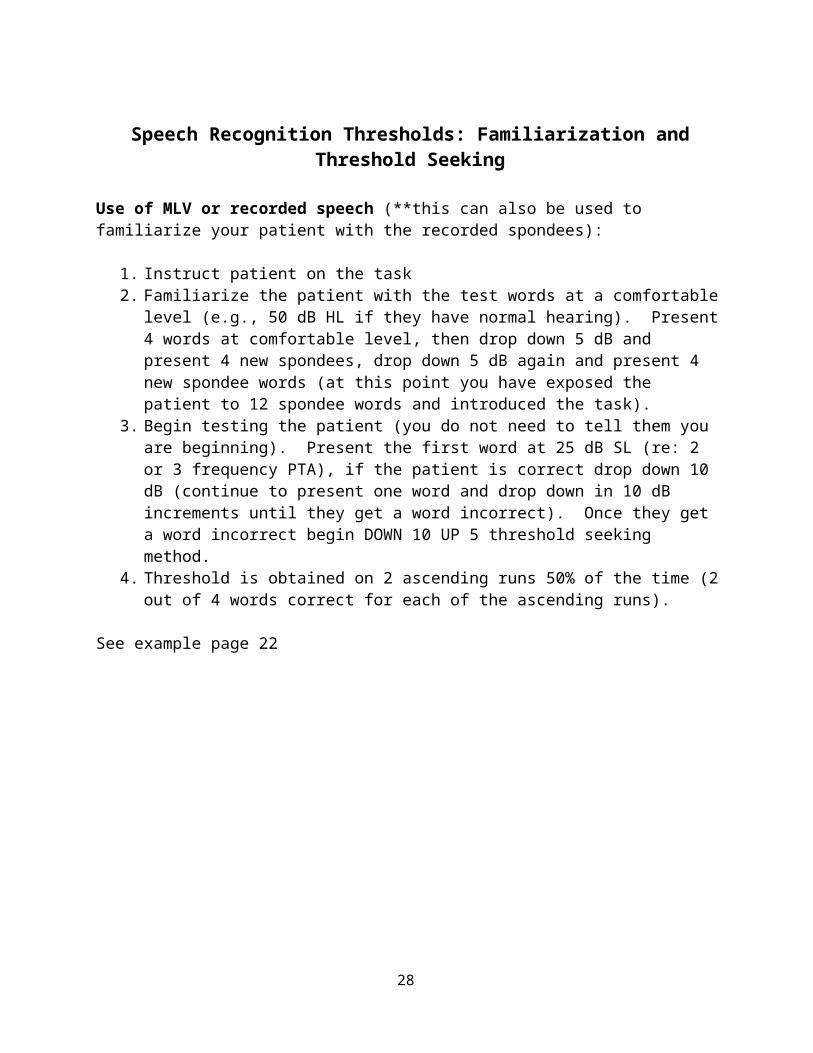
Speech Recognition Thresholds: Familiarization and Threshold Seeking
Use of MLV or recorded speech (**this can also be used to familiarize your patient with the recorded spondees):
1. Instruct patient on the task2. Familiarize the patient with the test words at a comfortable level (e.g., 50 dB HL if they
have normal hearing). Present 4 words at comfortable level, then drop down 5 dB and present 4 new spondees, drop down 5 dB again and present 4 new spondee words (at this point you have exposed the patient to 12 spondee words and introduced the task).
3. Begin testing the patient (you do not need to tell them you are beginning). Present the first word at 25 dB SL (re: 2 or 3 frequency PTA), if the patient is correct drop down 10 dB (continue to present one word and drop down in 10 dB increments until they get a word incorrect). Once they get a word incorrect begin DOWN 10 UP 5 threshold seeking method.
4. Threshold is obtained on 2 ascending runs 50% of the time (2 out of 4 words correct for each of the ascending runs).
See example page 22
21
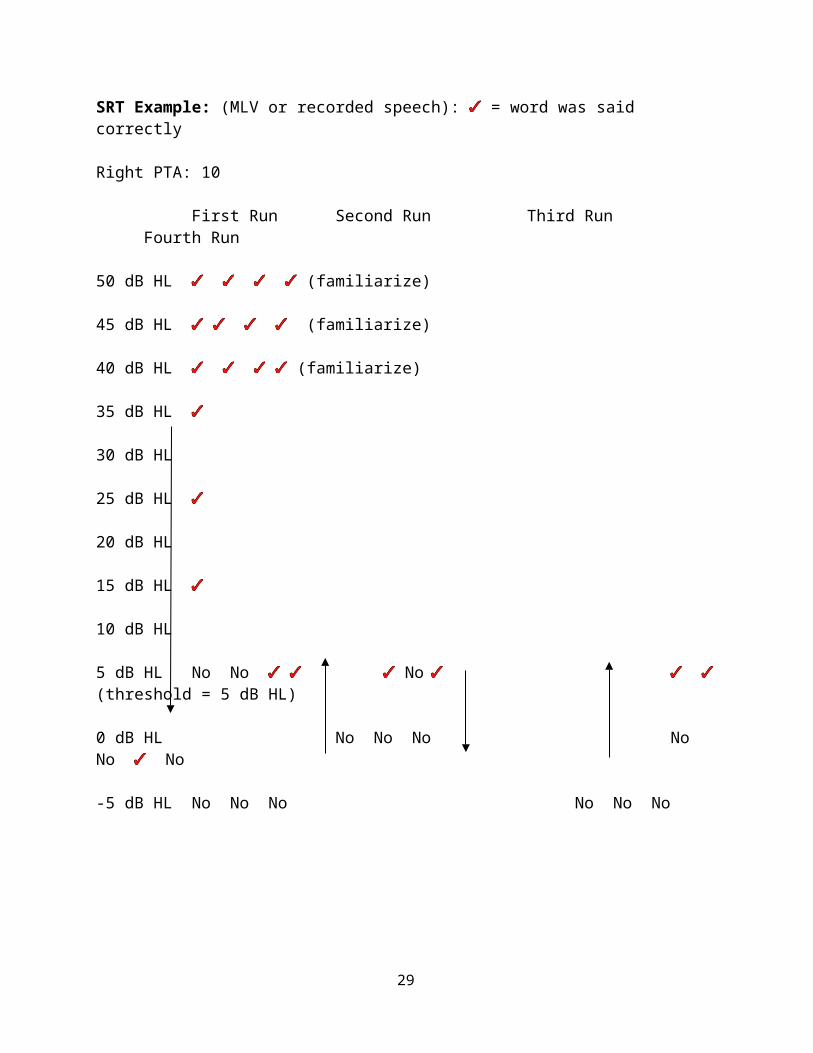
SRT Example: (MLV or recorded speech): = word was said correctly
Right PTA: 10
First Run Second Run Third Run Fourth Run
50 dB HL (familiarize)
45 dB HL (familiarize)
40 dB HL (familiarize)
35 dB HL
30 dB HL
25 dB HL
20 dB HL
15 dB HL
10 dB HL
5 dB HL No No No (threshold = 5 dB HL)
0 dB HL No No No No No No
-5 dB HL No No No No No No
22
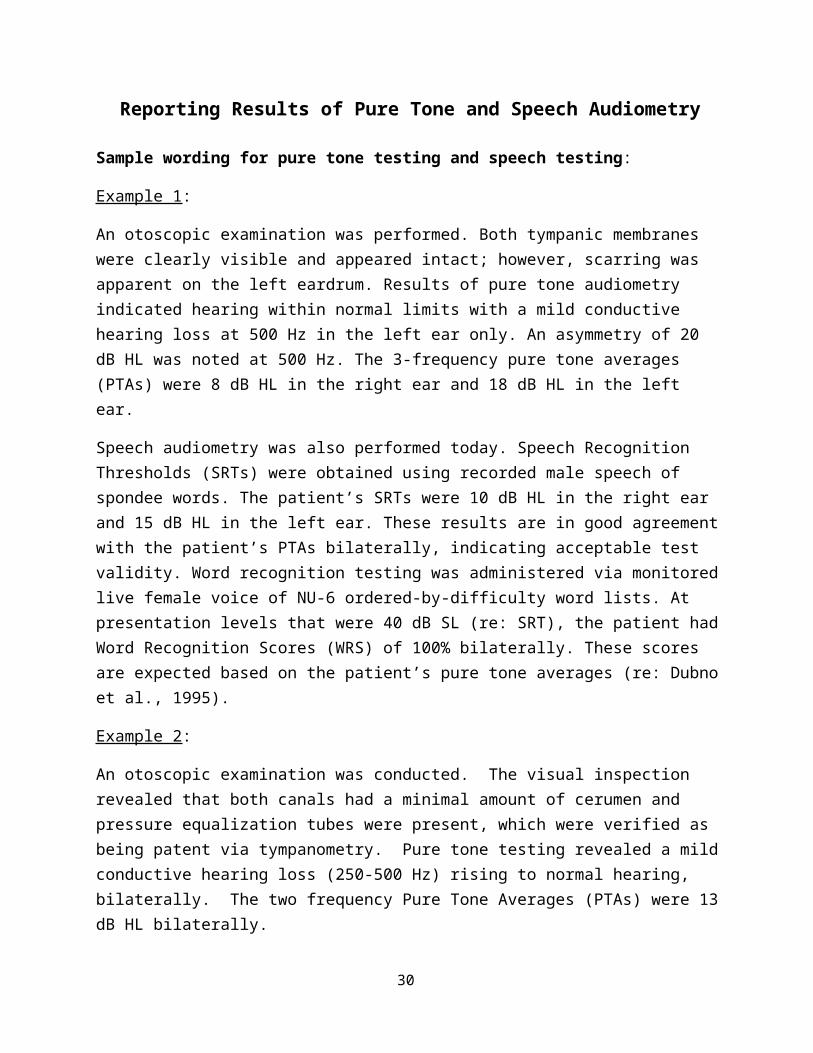
Reporting Results of Pure Tone and Speech Audiometry
Sample wording for pure tone testing and speech testing:
Example 1:
An otoscopic examination was performed. Both tympanic membranes were clearly visible and appeared intact; however, scarring was apparent on the left eardrum. Results of pure tone audiometry indicated hearing within normal limits with a mild conductive hearing loss at 500 Hz in the left ear only. An asymmetry of 20 dB HL was noted at 500 Hz. The 3-frequency pure tone averages (PTAs) were 8 dB HL in the right ear and 18 dB HL in the left ear.
Speech audiometry was also performed today. Speech Recognition Thresholds (SRTs) were obtained using recorded male speech of spondee words. The patient’s SRTs were 10 dB HL in the right ear and 15 dB HL in the left ear. These results are in good agreement with the patient’s PTAs bilaterally, indicating acceptable test validity. Word recognition testing was administered via monitored live female voice of NU-6 ordered-by-difficulty word lists. At presentation levels that were 40 dB SL (re: SRT), the patient had Word Recognition Scores (WRS) of 100% bilaterally. These scores are expected based on the patient’s pure tone averages (re: Dubno et al., 1995).
Example 2:
An otoscopic examination was conducted. The visual inspection revealed that both canals had a minimal amount of cerumen and pressure equalization tubes were present, which were verified as being patent via tympanometry. Pure tone testing revealed a mild conductive hearing loss (250-500 Hz) rising to normal hearing, bilaterally. The two frequency Pure Tone Averages (PTAs) were 13 dB HL bilaterally.
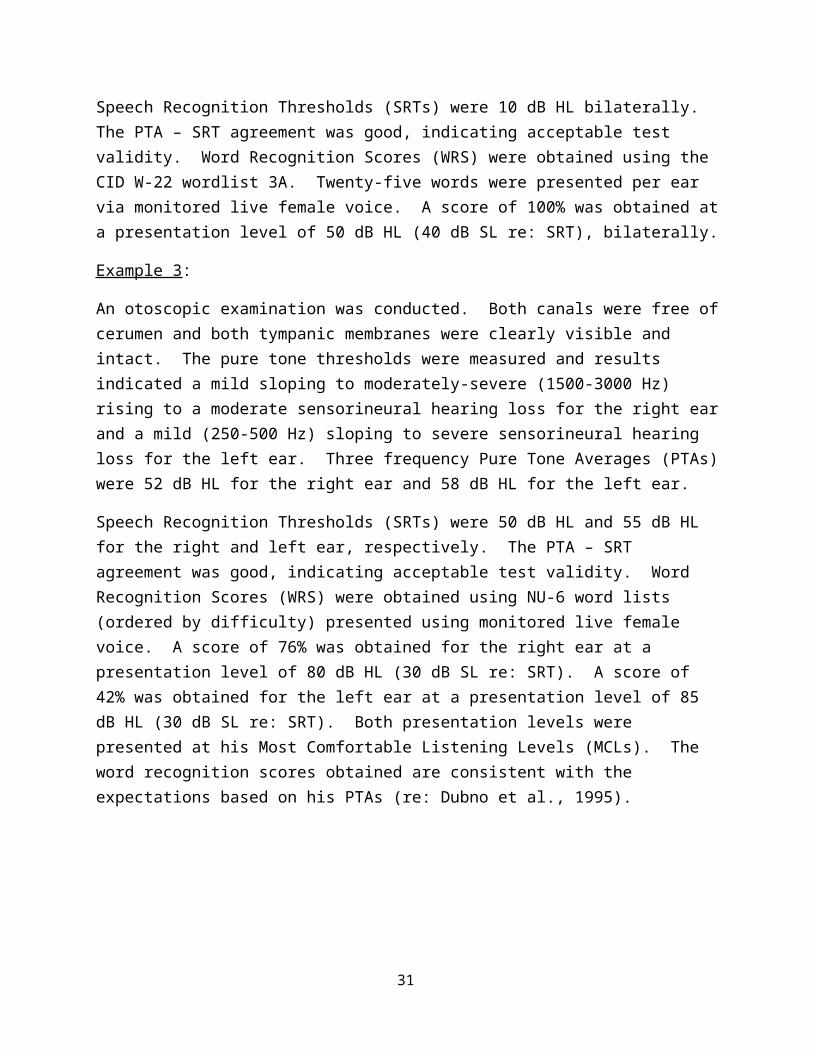
Speech Recognition Thresholds (SRTs) were 10 dB HL bilaterally. The PTA – SRT agreement was good, indicating acceptable test validity. Word Recognition Scores (WRS) were obtained using the CID W-22 wordlist 3A. Twenty-five words were presented per ear via monitored live female voice. A score of 100% was obtained at a presentation level of 50 dB HL (40 dB SL re: SRT), bilaterally.
Example 3:
An otoscopic examination was conducted. Both canals were free of cerumen and both tympanic membranes were clearly visible and intact. The pure tone thresholds were measured and results indicated a mild sloping to moderately-severe (1500-3000 Hz) rising to a moderate sensorineural hearing loss for the right ear and a mild (250-500 Hz) sloping to severe sensorineural hearing loss for the left ear. Three frequency Pure Tone Averages (PTAs) were 52 dB HL for the right ear and 58 dB HL for the left ear.
23
Speech Recognition Thresholds (SRTs) were 50 dB HL and 55 dB HL for the right and left ear, respectively. The PTA – SRT agreement was good, indicating acceptable test validity. Word Recognition Scores (WRS) were obtained using NU-6 word lists (ordered by difficulty) presented using monitored live female voice. A score of 76% was obtained for the right ear at a presentation level of 80 dB HL (30 dB SL re: SRT). A score of 42% was obtained for the left ear at a presentation level of 85 dB HL (30 dB SL re: SRT). Both presentation levels were presented at his Most Comfortable Listening Levels (MCLs). The word recognition scores obtained are consistent with the expectations based on his PTAs (re: Dubno et al., 1995).
24
Audiometer Set-up for Masking
GSI-61
Masking for ACChannel 1 Channel 2
Routing (Ear) TE NTEStimulus Tone NBNTransducer Insert or Phone Insert or Phone
Masking for BCChannel 1 Channel 2
Routing (Ear) TE NTEStimulus Tone NBNTransducer Bone Insert of Phone
Press “Interrupt” for Channel 2 to present continuous noise to the NTE. Use dial to adjust intensity of masking noise.Present tones to the TE (Channel 1) to find the masked threshold.
Masking for SpeechChannel 1 Channel 2
Routing (Ear) TE NTEStimulus Mic or Ext A Speech NoiseTransducer Insert or Phone Insert or Phone
Press “Interrupt” for Channel 2 to present continuous noise to the NTE. Use dial to adjust intensity of masking noise. Press “Interrupt” for Channel 1 to present speech materials to the TE.
ASTERA
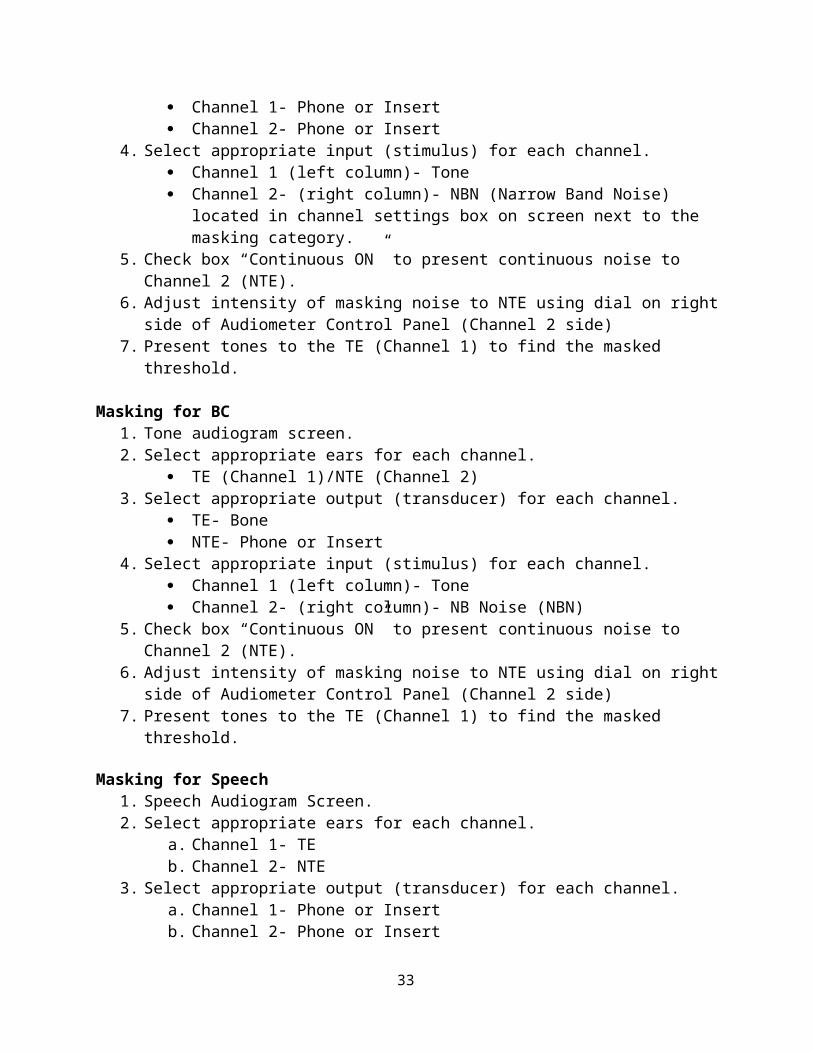
Masking for AC1. Tone audiogram screen. 2. Select appropriate ears for each channel.
TE (Channel 1)/NTE (Channel 2)3. Select appropriate output (transducer) for each channel.
Channel 1- Phone or Insert Channel 2- Phone or Insert
4. Select appropriate input (stimulus) for each channel. Channel 1 (left column)- Tone Channel 2- (right column)- NBN (Narrow Band Noise) located in channel settings
box on screen next to the masking category. 5. Check box “Continuous ON” to present continuous noise to Channel 2 (NTE). 6. Adjust intensity of masking noise to NTE using dial on right side of Audiometer Control
Panel (Channel 2 side)
25
7. Present tones to the TE (Channel 1) to find the masked threshold.
Masking for BC1. Tone audiogram screen. 2. Select appropriate ears for each channel.
TE (Channel 1)/NTE (Channel 2)3. Select appropriate output (transducer) for each channel.
TE- Bone NTE- Phone or Insert
4. Select appropriate input (stimulus) for each channel. Channel 1 (left column)- Tone Channel 2- (right column)- NB Noise (NBN)
5. Check box “Continuous ON” to present continuous noise to Channel 2 (NTE). 6. Adjust intensity of masking noise to NTE using dial on right side of Audiometer Control
Panel (Channel 2 side) 7. Present tones to the TE (Channel 1) to find the masked threshold.
Masking for Speech1. Speech Audiogram Screen. 2. Select appropriate ears for each channel.
a. Channel 1- TEb. Channel 2- NTE
3. Select appropriate output (transducer) for each channel. a. Channel 1- Phone or Insertb. Channel 2- Phone or Insert
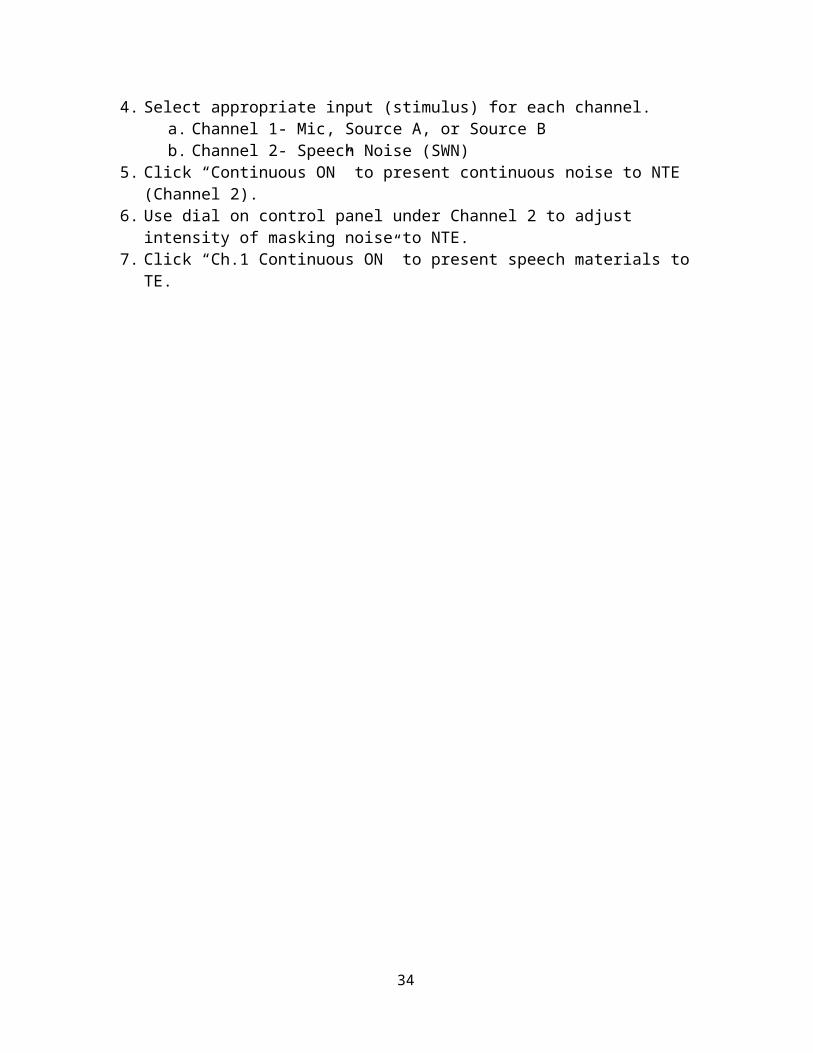
4. Select appropriate input (stimulus) for each channel. a. Channel 1- Mic, Source A, or Source Bb. Channel 2- Speech Noise (SWN)
5. Click “Continuous ON” to present continuous noise to NTE (Channel 2).6. Use dial on control panel under Channel 2 to adjust intensity of masking noise to NTE. 7. Click “Ch.1 Continuous ON” to present speech materials to TE.
26
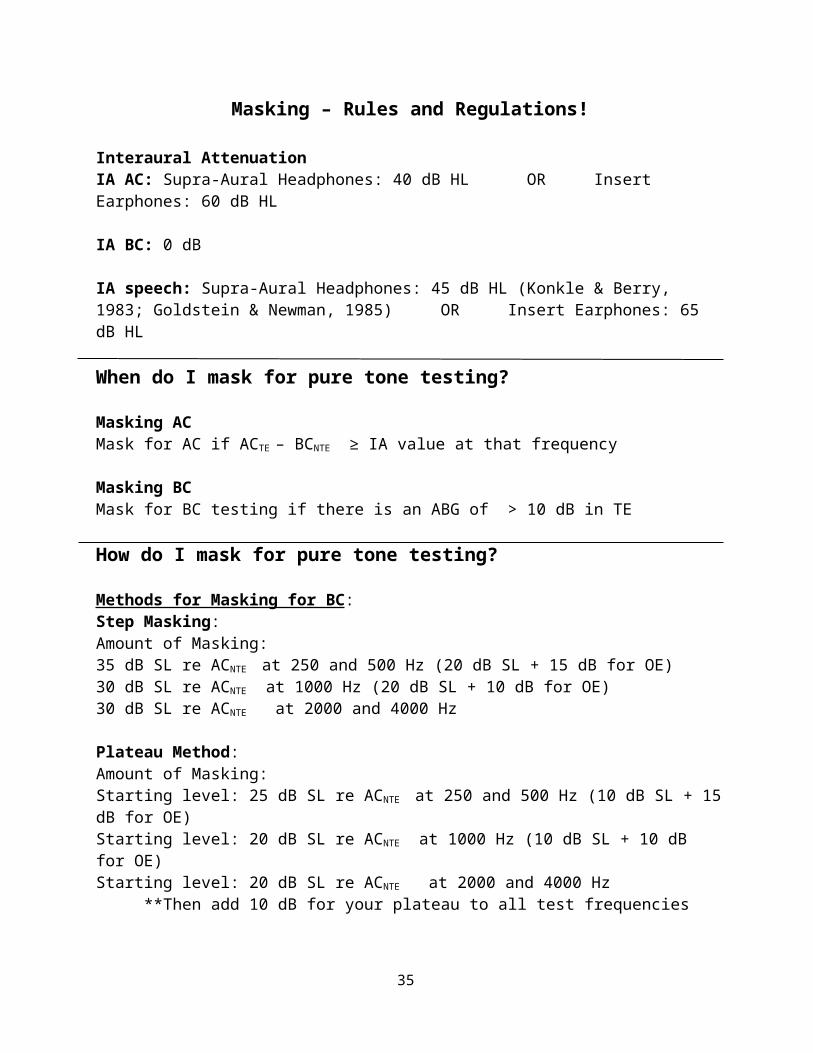
Masking – Rules and Regulations!
Interaural AttenuationIA AC: Supra-Aural Headphones: 40 dB HL OR Insert Earphones: 60 dB HL
IA BC: 0 dB
IA speech: Supra-Aural Headphones: 45 dB HL (Konkle & Berry, 1983; Goldstein & Newman, 1985) OR Insert Earphones: 65 dB HL
When do I mask for pure tone testing?
Masking ACMask for AC if ACTE – BCNTE ≥ IA value at that frequency
Masking BCMask for BC testing if there is an ABG of > 10 dB in TE
How do I mask for pure tone testing?
Methods for Masking for BC:Step Masking:Amount of Masking:35 dB SL re ACNTE at 250 and 500 Hz (20 dB SL + 15 dB for OE)30 dB SL re ACNTE at 1000 Hz (20 dB SL + 10 dB for OE)30 dB SL re ACNTE at 2000 and 4000 Hz
Plateau Method:Amount of Masking:Starting level: 25 dB SL re ACNTE at 250 and 500 Hz (10 dB SL + 15 dB for OE)Starting level: 20 dB SL re ACNTE at 1000 Hz (10 dB SL + 10 dB for OE)Starting level: 20 dB SL re ACNTE at 2000 and 4000 Hz
**Then add 10 dB for your plateau to all test frequencies
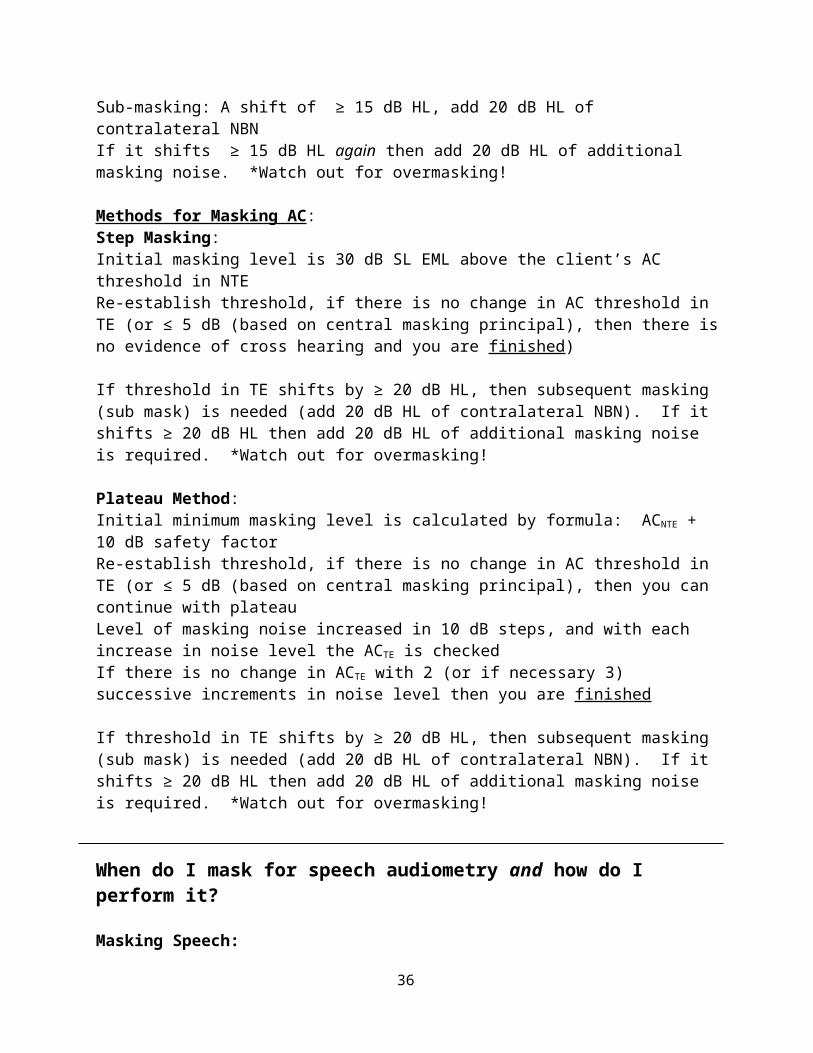
Sub-masking: A shift of ≥ 15 dB HL, add 20 dB HL of contralateral NBNIf it shifts ≥ 15 dB HL again then add 20 dB HL of additional masking noise. *Watch out for overmasking!
Methods for Masking AC:Step Masking:Initial masking level is 30 dB SL EML above the client’s AC threshold in NTERe-establish threshold, if there is no change in AC threshold in TE (or ≤ 5 dB (based on central masking principal), then there is no evidence of cross hearing and you are finished)
27
If threshold in TE shifts by ≥ 20 dB HL, then subsequent masking (sub mask) is needed (add 20 dB HL of contralateral NBN). If it shifts ≥ 20 dB HL then add 20 dB HL of additional masking noise is required. *Watch out for overmasking!
Plateau Method:Initial minimum masking level is calculated by formula: ACNTE + 10 dB safety factor Re-establish threshold, if there is no change in AC threshold in TE (or ≤ 5 dB (based on central masking principal), then you can continue with plateauLevel of masking noise increased in 10 dB steps, and with each increase in noise level the ACTE is checkedIf there is no change in ACTE with 2 (or if necessary 3) successive increments in noise level then you are finished
If threshold in TE shifts by ≥ 20 dB HL, then subsequent masking (sub mask) is needed (add 20 dB HL of contralateral NBN). If it shifts ≥ 20 dB HL then add 20 dB HL of additional masking noise is required. *Watch out for overmasking!
When do I mask for speech audiometry and how do I perform it?
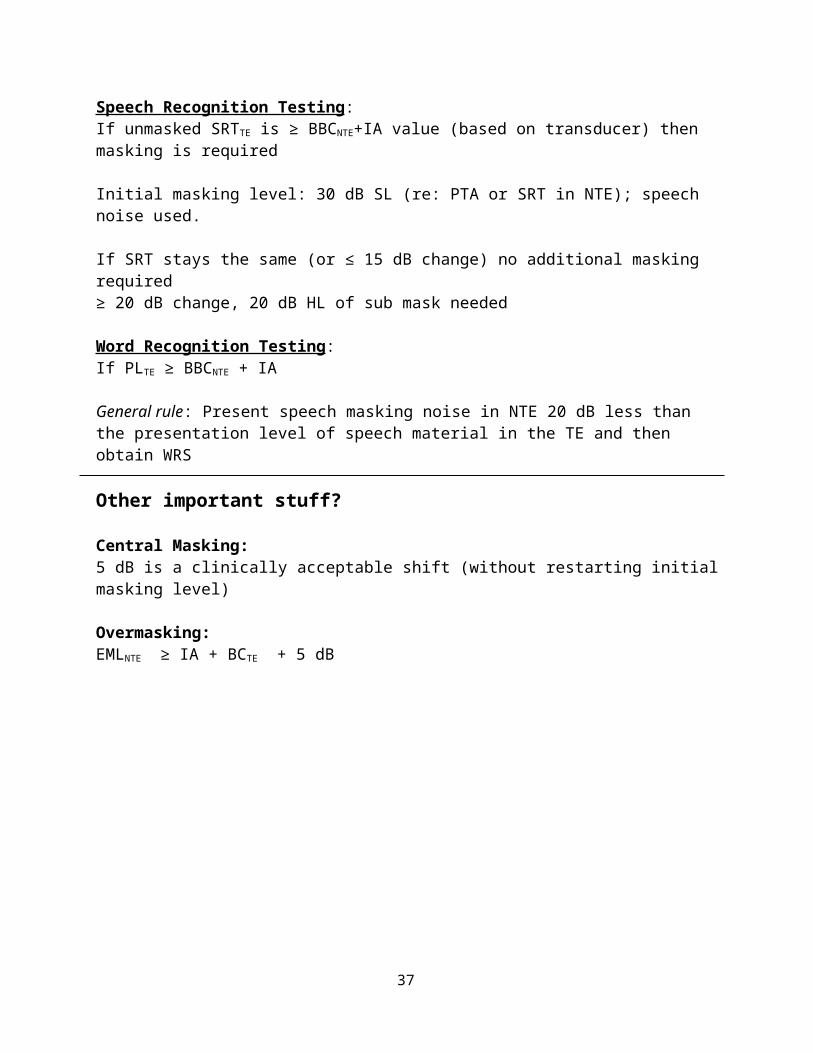
Masking Speech:Speech Recognition Testing:If unmasked SRTTE is ≥ BBCNTE+IA value (based on transducer) then masking is required
Initial masking level: 30 dB SL (re: PTA or SRT in NTE); speech noise used.
If SRT stays the same (or ≤ 15 dB change) no additional masking required ≥ 20 dB change, 20 dB HL of sub mask needed
Word Recognition Testing:If PLTE ≥ BBCNTE + IA
General rule: Present speech masking noise in NTE 20 dB less than the presentation level of speech material in the TE and then obtain WRS
Other important stuff?
Central Masking:5 dB is a clinically acceptable shift (without restarting initial masking level)
Overmasking:EMLNTE ≥ IA + BCTE + 5 dB
28
Instructions for Tympanometry: (GSI Tympstar)
1. Press “Tymp.” (number 1 above)2. Select test ear - right or left. 3. Select test frequency- 226, 678, or 1000 Hz.
226 Hz is typically used for adults!4. Insert probe into patient’s ear with appropriate size tip. Need a hermetic seal. 5. Press start. (number 2 above)6. Once complete tympanogram is obtained, Press stop. (number 3 above)7. Record data on audiogram (or print data).
Instructions for ARTs: (GSI Tympstar)
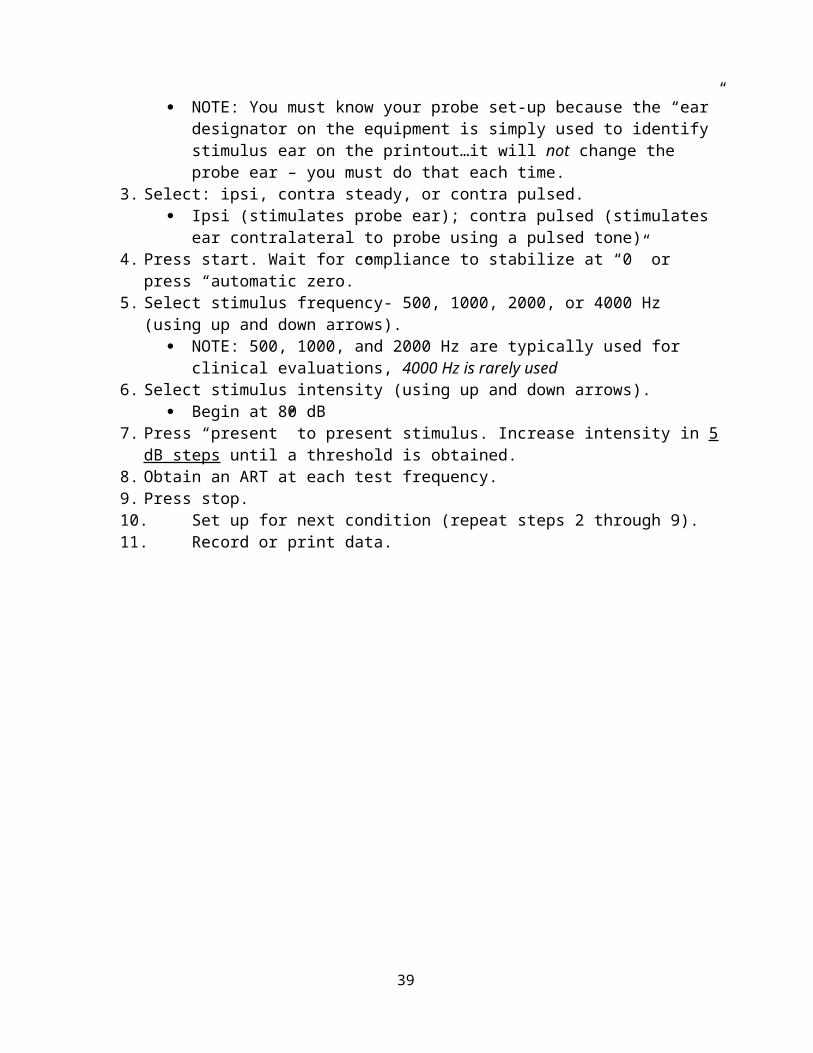
1. Press “Reflex.” 2. Select stimulus ear - right or left.
NOTE: You must know your probe set-up because the “ear” designator on the equipment is simply used to identify stimulus ear on the printout…it will not change the probe ear – you must do that each time.
3. Select: ipsi, contra steady, or contra pulsed.
1
2
3
29
Ipsi (stimulates probe ear); contra pulsed (stimulates ear contralateral to probe using a pulsed tone)
4. Press start. Wait for compliance to stabilize at “0” or press “automatic zero.”5. Select stimulus frequency- 500, 1000, 2000, or 4000 Hz (using up and down arrows).
NOTE: 500, 1000, and 2000 Hz are typically used for clinical evaluations, 4000 Hz is rarely used
6. Select stimulus intensity (using up and down arrows). Begin at 80 dB
7. Press “present” to present stimulus. Increase intensity in 5 dB steps until a threshold is obtained.
8. Obtain an ART at each test frequency. 9. Press stop. 10. Set up for next condition (repeat steps 2 through 9). 11. Record or print data.
30
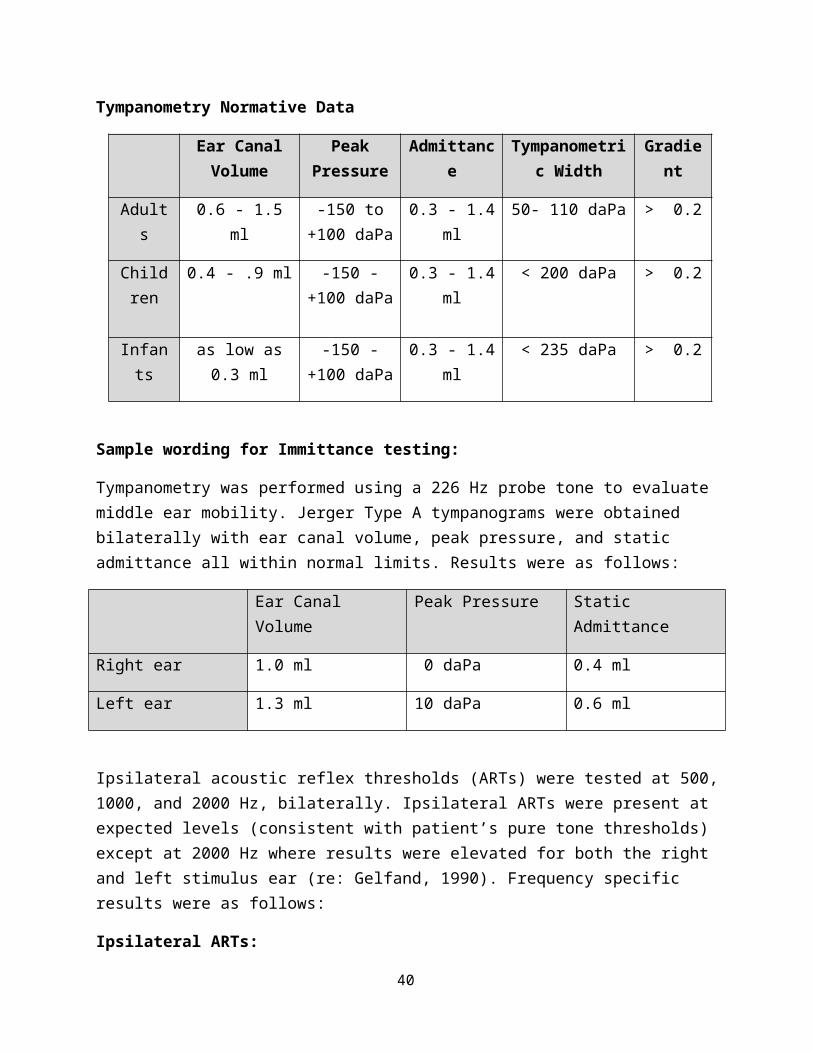
Tympanometry Normative Data
Ear Canal Volume
Peak Pressure
Admittance Tympanometric Width
Gradient
Adults 0.6 - 1.5 ml -150 to +100 daPa
0.3 - 1.4 ml 50- 110 daPa > 0.2
Children 0.4 - .9 ml -150 - +100 daPa
0.3 - 1.4 ml < 200 daPa > 0.2
Infants as low as 0.3 ml -150 - +100 daPa
0.3 - 1.4 ml < 235 daPa > 0.2
Sample wording for Immittance testing:
Tympanometry was performed using a 226 Hz probe tone to evaluate middle ear mobility. Jerger Type A tympanograms were obtained bilaterally with ear canal volume, peak pressure, and static admittance all within normal limits. Results were as follows:
Ear Canal Volume Peak Pressure Static Admittance
Right ear 1.0 ml 0 daPa 0.4 ml
Left ear 1.3 ml 10 daPa 0.6 ml
Ipsilateral acoustic reflex thresholds (ARTs) were tested at 500, 1000, and 2000 Hz, bilaterally. Ipsilateral ARTs were present at expected levels (consistent with patient’s pure tone thresholds) except at 2000 Hz where results were elevated for both the right and left stimulus ear (re: Gelfand, 1990). Frequency specific results were as follows:
Ipsilateral ARTs:
500 Hz 1000 Hz 2000 Hz
Right (stimulus ear) 95 dB HL 100 dB HL 105 dB HL*
Left (stimulus ear) 100 dB HL 100 dB HL 110 dB HL*
* Indicates an elevated threshold
31

Otoacoustic Emissions (OAEs)
Prieve, B. A., & Fitzgerald, T. S. (2000). In J. Katz (Ed.) Handbook of Clinical Audiology, 6th
ed. (pp. 497-528) Baltimore: Lippincott Williams and Wilkins.
First described in1978 by David Kemp Low intensity auditory stimuli originating from the cochlea, specifically the outer hair
cells Measured by a sensitive probe microphone placed in the ear canal Amplification of the output and signal averaging techniques must be used to differentiate
the desired signal from the background noise Broadly classified as either occurring spontaneously or being evoked by an auditory
stimulus Spontaneous OAEs have limited clinical utility, as they are often absent in
individuals with normal hearing sensitivity. Evoked OAEs are present in nearly all individuals with normal hearing and a
normal middle ear system, and are used clinically to evaluate the functioning of the outer cochlear hair cells. In general, individuals with spontaneous OAEs tend to have larger evoked OAE responses.
TEOAE (SNR value in grid indicates minimum acceptable response at that freq.)
1000 Hz 1400 Hz 2000 Hz 2800 Hz 4000 Hz
Right ear 3 dB 6 dB 6 dB 6 dB 6 dB
Left ear 3 dB 6 dB 6 dB 6 dB 6 dB
Signal to Noise Ratio (SNR) greater than 3 dB (at 1000 Hz) or 6 dB (from 1400 to 4000 Hz) = present
DPOAE (SNR value in grid indicates minimum acceptable response at that freq.)
1000 Hz 1400 Hz 2000 Hz 2800 Hz 4000 Hz 6000 Hz
Right ear 6 dB 6 dB 6 dB 6 dB 6 dB 6 dB
Left ear 6 dB 6 dB 6 dB 6 dB 6 dB 6 dB
Signal to Noise Ratio (SNR) greater than 6 dB = present
32
Instructions for ILOv6 OAE Equipment
To Record TEOAEs :
1. Check that test mode (general, neonate diagnostic, screening, etc.) is appropriate at bottom of screen.
2. Check TEOAE parameters.a. ‘File’ à ‘Options’ à ‘Stimulus’b. Timeout = 260 sweepsc. Target stimulus (dB) = 80
3. Check Pass/Fail Criteriona. ‘File’ à ‘Options’ à ‘Start/Stop/Score’ (pull down menu)b. Select ‘Protocol.’c. SNR for each band: 1 kHz = 3 dB, 1.5 kHz = 6 dB, 2 kHz = 6 dB, 3 kHz = 6 dB, 4
kHz = 6 dBd. Select 4 k Hz as a mandatory bande. Number of bands for a pass = 4f. Min number of TE sweeps = 30g. Min number of DP loops = 2h. Enable auto stop.
4. Enter patient information.a. Select ‘New Patient.’b. Enter Family Name, First Name, Gender, and DOB.c. Select nonlinear click stimulus
i. ‘Tests’ à ‘Stimulus’5. Insert probe into patient’s test ear. 6. Select test type.
a. ‘Start Test’ à ‘TE’7. Check stimulus.
a. Ensure good temporal waveform.b. Check spectrum of stimulus (should be relatively flat).c. Check stimulus intensity (should be 80 dBpSPL (+/- 3 dB)
i. If not, select ‘auto adjust.’ (or hit the “A” key)8. Hit ‘Continue.’ Monitor stimulus window during testing.
a. Green light indicates that stability is over 90.9. Test will automatically stop when SNR criteria have been met. To manually stop test,
select ‘End.’ To pause select ‘Cancel.’10. Save data. Select appropriate ear. 11. Print data (this data, best data, selected pair, or bilateral pair).
To Record DPOAEs :
1. Check DPOAE parameters.a. ‘Tests’ à ‘Stimuli Setup’b. F1 Level (dB) = 65c. F2 Level (dB) = 55
33
d. F2/F1 ratio = 1.22e. Points/octave = 3f. Timeout (minutes) = 2
2. Check Pass/Fail criterion (listed above).3. Insert probe into patients test ear. 4. Select test type.
a. “Start Test’ à ‘DP’5. Check stimulus temporal waveform and click spectrum.
a. Note: cannot auto-adjust stimulus.6. Allow to cycle through test frequencies at least three times7. Save data. Select appropriate ear. 8. Print data (this data, best data, selected pair, or bilateral pair).
To Record Bilateral TE or DPOAEs :
1. Select ‘Start Bilateral Test’2. Select ‘TE’ or ‘DP’3. Same test procedure, but make sure to save probe data to appropriate ear.
Instructions for IHS OAE Equipment
To Begin:
1. Turn on the USB box (all lights must be lit).2. Turn on the laptop.3. Click on the IHS Program (the USB symbol should have a green circle around it to
indicate communication with the USB box). 4. Select Smart TR (for TEOAEs) or DP (for DPOAEs).
To Record TEOAEs:
1. Select ‘TR’ from the menu. A response and parameters screen will open.a. Sweeps = 256b. Intensity = 84 dB SPLc. Rate = 19.3/sec
2. Go to ‘Patient’ and select ‘New’ a. Enter patient name and gender but do not alter the patient identifier.
3. Check the TEOAE passing criteria.a. ‘TEOAE’ (top menu bar) à ‘Passing Criteria’b. Password: hisc. Criteria should be 6 dB SNR for all selectionsd. 3 frequencies required for screening pass.e. 6 frequencies required for diagnostic pass.
34
4. Insert probe tightly into patient’s ear.5. Select right or left ear. Probe fit will automatically be checked and the test will begin if the
probe fit is adequate. 6. View numeric data by selecting ‘Show Stats.’7. To view waveforms select ‘Time/Frequency.’8. Print Data
a. Print-out will include the response in the frequency domain, amplitude of the response, and SNR.
To Record DPOAEs:
1. Select SmartDP from main menu. a. If changing from TEOAEs to DPOAEs, you need to close the TEOAE module and
re-enter from the main screen. 2. Go to ‘Patient’ and select ‘New.’
a. Enter patient name and gender but do not alter the patient identifier. 3. Check parameters
a. Generali. Sweeps = 50
ii. Block Size = 8iii. Level 1 = 65, Level 2 = 55iv. Artifact = 10v. Retry = 3
b. Frequencyi. Start Freq = 1000
ii. End Freq = 8000iii. Freq/Oct = 3.0iv. F2/F1 = 1.22v. Presentation Low to High (selected)
c. Advancedi. Max Level = 75
ii. ISI Period = 1600iii. Max Ear Corr. (selected)
d. Stoppingi. On pass at that frequency (selected)
ii. On overall pass (selected)iii. On no change to pass (not selected)
4. Record DPOAEsa. ‘Acquire’ à ‘Display Options’ (do not change)b. Place probe in patient’s ear.c. Select right or left ear. Probe fit will automatically be checked and the test will
begin if the probe fit is adequate. 5. Use the ‘Table Function’ to view numeric data.6. Print Data (short table version only)
35
To End:1. Exit program. 2. Turn off USB box and laptop.
36
Sample Report:
Speech, Language & Hearing CenterTowson University-8000 York Road-Towson, MD 21252-0001Voice or TTY: 410-704-3095 - Fax: 410-704-6303
SUMMARY OF INITIAL AUDIOLOGIC EVALUATION
NAME: XXXX XXXXX DOB: DOE:
EVALUATOR: SUPERVISOR: Jennifer L. Smart, Ph.D., CCC-A
BACKGROUND INFORMATION
XXXX XXXXX, age 21 years, was seen at the Speech, Language & Hearing Center (SLHC) at Towson University (TU) on September 23, 2012 for an initial audiologic evaluation. Of note, XXXX is also scheduled for a diagnostic educational psychology evaluation due to concerns of learning disability. XXX was referred to the SLHC at TU by a former patient. She noted that she has never had her hearing tested or screened. She scheduled this audiologic evaluation to rule out a hearing loss as a contributing factor to her difficulties in the classroom. XXXX is a junior at Towson University and reports that her GPA is average. She is studying to be an elementary education teacher.
XXXX denied a history of chronic ear infections, ear drainage, or chronic colds. It was noted that XXXX is not taking any medications, but regularly takes vitamins. She denied any major surgeries or illnesses and does not report any otalgia or tinnitus at this time.
AUDIOMETRIC TEST RESULTS
An otoscopic examination was performed prior to testing today. Both tympanic membranes were clearly visible and appeared intact. Results of pure tone audiometry using insert earphones indicated hearing within normal limits, bilaterally. The 3-frequency pure tone average (PTA) was 8 dB HL in the right ear and 3 dB HL in the left ear.
Speech audiometry was also performed today. Speech Recognition Thresholds (SRTs) were obtained using recorded male speech of spondee words. The patient’s SRTs were 10 dB HL, bilaterally. These results are in good agreement with the patient’s PTAs bilaterally, indicating acceptable test validity. Word recognition testing was administered via monitored live female voice of NU-6 word ordered by difficulty word list (25-words). At presentation levels of 50 dB HL (40 dB SL re: SRT) bilaterally, the patient had Word Recognition Scores (WRS) of 96% (excellent) in the right ear and 100% (excellent) in the left ear which are consistent with expectations based on the patient’s PTAs (re: Dubno et al., 1995).
37

Tympanometry was performed using a 226 Hz probe tone to evaluate middle ear mobility. Jerger Type A tympanograms were obtained bilaterally with ear canal volume, peak pressure, and static compliance within normal limits. Results were as follows:
Ear Canal Volume Peak Pressure Static Compliance
Right ear 0.9 ml 15 daPa 0.4 ml
Left ear 0.9 ml 0 daPa 0.3 ml
Ipsilateral and Contralateral acoustic reflex thresholds (ARTs) were tested at 500, 1000, and 2000 Hz, bilaterally. All test conditions revealed ARTs present at expected stimulus levels based on the patients pure tone thresholds (re: Gelfand, 1990). Frequency specific results were as follows:
Contralateral ARTs:
500 Hz 1000 Hz 2000 Hz
Right (stimulus ear) 95 dB 90 dB 95 dB
Left (stimulus ear) 95 dB 95 dB 90 dB
Ipsilateral ARTs:
500 Hz 1000 Hz 2000 Hz
Right (stimulus ear) 85 dB 90 dB 90 dB
Left (stimulus ear) 85 dB 80 dB 85 dB
38
Transient evoked otoacoustic emissions (TEOAEs) were tested bilaterally from 1000 to 4000 Hz using the ILOv6 to evaluate the functioning of the outer cochlear hair cells. TEOAEs were present at all frequencies tested. These results indicate normal/near normal functioning of the outer cochlear hair cells. Frequency specific results were as follows:
TEOAE
1000 Hz 1400 Hz 2000 Hz 2800 Hz 4000 Hz
Right ear 9.2 dB 11.3 dB 16.8 dB 12.2 dB 6.9 dB
Left ear 14.5 dB 9.4 dB 10.5 dB 10.4 dB 6.8 dB
* Indicates a response less than 3 dB or 6 dBSignal to Noise Ratio (SNR) greater than 3 dB (at 1000 Hz) or 6 dB (from 1400 to 4000 Hz) = present
SUMMARY
Results of today’s testing revealed normal peripheral hearing, bilaterally. XXXX’s ability to repeat words presented at low intensity levels in an ideal listening environment was consistent with her hearing thresholds in both ears. When words were presented at a loudness level comparable to quiet conversational speech in an ideal listening environment, XXXX’s word recognition abilities were excellent in both ears. Based on these test results and XXXX’s denial of any listening difficulties, no further audiologic testing is recommended at this time.
RECOMMENDATIONS
It is recommended that XXXX (and her mother):
1. Return to the SLHC at TU for an audiologic re-evaluation if any changes in hearing sensitivity are perceived.
2. Contact the SLHC at TU (410-704-3095) or Dr. Smart directly ([email protected]) if any questions or concerns arise.
________________________________ ________________________________Graduate Clinician Clinical Supervisor, Assistant Professor
Cc:
39
References
American Speech-Language-Hearing Association. (2005). Guidelines for Manual Pure-Tone
Threshold Audiometry [Guidelines]. Available from www.asha.org/policy.
Dubno, J.R., Lee, F-S., Klein, A.J., Matthews, L.J., & Lam, C.F. (1995). Confidence limits for
maximum word-recognition scores. Journal of Speech and Hearing Research, 38, 490-502.
Gelfand, S.A., Schwander, T., & Silman, S. (1990). Acoustic reflex thresholds in normal and
cochlear-impaired ears: Effects of no-response rates on 90th percentiles in a large sample.
Journal of Speech and Hearing Disorders, 55, 198-205.
Gelfand, S.A. (2009). Essentials of Audiology (3rd ed.). New York: Thieme.
Harrell, R.W. (2002). Puretone evaluation. In J. Katz (Ed.), Handbook of clinical audiology (5th
ed.) (pp.71-87). Philadelphia: Lippincott Williams & Wilkins.
Prieve, B. A., & Fitzgerald, T. S. (2000). Otoacoustic Emissions. In J. Katz, L. Medwetsky, R.
Burkard, & L. Hood (Eds.) Handbook of Clinical Audiology, (6th ed.) (pp. 497-528).
Baltimore: Lippincott Williams and Wilkins.
40