accessioning manual for archival and manuscript...
TRANSCRIPT
1
University of California, Irvine Department of Special Collections and Archives
Accessioning Manual for
Archival and Manuscript Collections
Created: June 29, 2011 by Dawn Schmitz Updated: September 23, 2014 by Sara Seltzer
Updated: 2016-2017 by Kelly Spring and Laura Uglean Jackson
Contents
1. INTRODUCTION 4
2. ACCOMPANYING DOCUMENTATION 4
3. RESPONSIBILITIES OF THE ARCHIVIST/DEPARTMENT HEAD 5
3.1. DOCUMENTATION 5 3.2. OTHER INFORMATION 5 3.2.1. DETERMINE THE ACCESSION NUMBER 5 3.2.2. ASSIGNING NEW COLLECTION NUMBERS 6 3.2.3. CREATING COLLECTION FILES 6
4. CREATE AN ACCESSION RECORD 7
4.1. DETERMINE THE ACCESSION NUMBER 7 4.2. ENTER DATA ABOUT THE ACCESSION 7 4.2.1. LIST OF VALUES 7
5. ACCESSIONING AS PROCESSING 13
6. RE-BOX AND SHELVE THE ACCESSION 13
2
6.1. RE-BOXING AND RE-HOUSING 13 6.2. UPDATE THE STACKS LOCATOR 15 6.3. PRINT OUT AND FILE THE ACCESSION RECORD 15
7. SINGLE-LEVEL MINIMUM DACS FINDING AIDS FOR THE COLLECTION 16
7.1. ENHANCE THE RECORDS 16 7.1.1. REFERENCE CODE ELEMENT (2.1) 16 7.1.2. NAME AND LOCATION OF REPOSITORY ELEMENT (2.2) 16 7.1.3. TITLE ELEMENT (2.3) (SPAWNED) 16 7.1.4. DATE ELEMENT (2.4) (SPAWNED) 16 7.1.5. EXTENT ELEMENT (2.5) (SPAWNED) 16 7.1.6. NAME OF CREATOR(S) ELEMENT (2.6) (SPAWNED) 17 7.1.7. SCOPE AND CONTENT ELEMENT (3.1) (SPAWNED) 17 7.1.8. CONDITIONS GOVERNING ACCESS ELEMENT (4.1) (SPAWNED) 17 7.1.9. LANGUAGES AND SCRIPTS OF THE MATERIAL ELEMENT (4.5) 17 7.2 DATA ELEMENTS SPECIFICALLY FOR THE OAC 17 7.2.1 ABSTRACT 17 7.2.2 FINDING AID TITLE 17 7.2.3 FINDING AID FILING TITLE 18 7.2.4 FINDING AID DATE 18 7.2.5 REPOSITORY PROCESSING NOTE 18 7.3 ADDED VALUE ELEMENTS 18 7.3.1 CONDITIONS GOVERNING REPRODUCTION AND USE ELEMENT (4.4) 18 7.3.2 CITATION (7.1.5, UNDER NOTES ELEMENT) 19 7.3.3 AQUISITION INFORMATION 19 7.4 UPLOAD EAD FILE TO ONLINE ARCHIVE OF CALIFORNIA (OAC) 19
8. INSTRUCTIONS FOR NEW ACCESSIONS WITH NONSTANDARD FINDING AIDS 19
8.1 CREATE SUPPLEMENTAL PDF DOCUMENT(S) 19 8.1.1 UPLOAD SUPPLEMENTAL PDF DOCUMENT TO OAC SERVER 19 8.2 ADD FINDING AIDS ELEMENT (4.6) TO RESOURCE RECORD 21 8.3 UPLOAD EAD FILE TO ONLINE ARCHIVE OF CALIFORNIA (OAC) 21
9. INSTRUCTIONS FOR ADDITIONS TO UNPROCESSED COLLECTIONS 21
9.1 REVISE DATE EXPRESSION 21 9.2 REVISE THE EXTENT AND CONTAINER SUMMARY 21 9.3 REVISE ABSTRACT 22 9.4 REVISE ACCESS NOTE 22 9.5 REVISE THE SCOPE AND CONTENTS NOTE 22 9.6 CREATE AND UPLOAD SUPPLEMENTAL PDF (IF APPLICABLE) 22 9.7 UPLOAD REVISED FINDING AID AND CATALOG RECORD 22

3
10 INSTRUCTIONS FOR ADDITIONS TO PROCESSED COLLECTIONS 22
10.1 REVISE DATE EXPRESSION 23 10.2 REVISE THE CONTAINER SUMMARY AND FINDING AID STATUS 23 10.3 UPDATE THE FINDING AID STATUS TO “SEMIPROCESSED.” 23 10.4 REVISE ABSTRACT 23 10.5 REVISE ACCESS NOTE 23 10.6 REVISE SCOPE AND CONTENTS NOTE 23 10.7 CREATE TOP-LEVEL COMPONENT DESCRIPTION 24 10.8 ENHANCE THE TOP-LEVEL COMPONENT DESCRIPTION 24 10.8.1 COMPONENT UNIQUE IDENTIFIER ELEMENT 24 10.8.2 DATE ELEMENT 24 10.8.3 EXTENT ELEMENT 24 10.8.4 SCOPE AND CONTENT NOTE ELEMENT 24 10.8.5 CONDITIONS GOVERNING ACCESS NOTE ELEMENT 25 10.9 REVISE THE COLLECTION-LEVEL ARRANGEMENT NOTE 25 10.10 CREATE AND UPLOAD SUPPLEMENTAL PDF DOCUMENT (IF APPLICABLE) 26 10.11 UPLOAD REVISED FINDING AID AND CATALOG RECORD 26
11 FILL OUT ARCHIVAL COLLECTION ACCESSION CHECKLIST 27
12 ACCESSIONING BORN-DIGITAL MATERIALS 27
12.1 DONOR DIGITAL MATERIAL/FILE SURVEY 27 12.2 NONSTANDARD FINDING AIDS RECEIVED FROM THE DONOR 28 12.3 PROCEDURES FOR BORN-DIGITAL RECORDS RECEIVED ON PHYSICAL MEDIA 28 12.3.1 PRE-DIGITAL FORENSICS INFORMATION FOR THE ACCESSION RECORD AND MINIMAL FINDING AID 28 12.3.2 DIGITAL FORENSICS: LEGACY ARCHIVAL MEDIA MIGRATION PLATFORM (LAMMP) 29 12.3.3 POST-DIGITAL FORENSICS INFORMATION FOR THE ACCESSION RECORD AND MINIMAL FINDING AID 31 12.4 PROCEDURES FOR “PURELY DIGITAL” BORN-DIGITAL MATERIALS 37 12.4.1 STEPS FOR PURELY BORN DIGITAL MATERIAL 37 12.4.2 POST-DIGITAL FORENSICS INFORMATION FOR THE ACCESSION RECORD AND MINIMAL FINDING AID 39 12.5 IMPORTANT NOTES 39
13 APPENDIX A: ARCHIVAL COLLECTION ACCESSION CHECKLIST 40
14 APPENDIX B: ASSIGNING VALUE SCORES TO DETERMINE PROCESSING PRIORITY 43
4
1. Introduction An accession is a “batch” of materials that comes into the custody of the Department of Special Collections and Archives (SCA). The materials in a given accession will have in common their provenance -- their origin, or source. They have been created and/or collected by a given entity -- such as a person, family, organization, administrative unit of the university, etc. -- in the course of that entity’s performance of its activities or functions. An accession can include physical and/or born digital materials. All material, regardless of format, needs to be accessioned according to the procedures in this manual. One or more accessions comprise a collection. The goals of accessioning are to:
• Record and document basic information about the accession • Ensure that housings meet basic standards for cleanliness and safety of materials • Find secure storage (shelf space, map case, etc.) for the collection • Record said location of all materials • Reveal to the general public, through a new or updated finding aid, basic information
about the new materials. • Determine whether a collection can be processed while being accessioned. • Assign a value score to the collection.
2. Accompanying Documentation The following manuals are referred to in these instructions and should be consulted when accessioning:
• Describing Archives: A Content Standard (DACS) Second Edition • Guidelines for Efficient Archival Processing in the University of California Libraries • UCI Libraries Department of Special Collections and Archives Processing Manual
Appendices, worksheets, etc., are located at the end of this manual to help you track your work and guide you through the accessioning process.
You may also need to refer to the instruction manual for the archival management system in use. At time of writing (July 2016) it is ArchivesSpace.
5
3. Responsibilities of the Archivist/Department Head This section outlines tasks performed prior to handing off the collection to the person who will complete the accession.
3.1. Documentation
When new materials arrive in the department, the archivist is responsible for creating collections files and (when appropriate) assigning new collection numbers. If the head of SCA is the person who made the arrangements to acquire new materials, s/he should provide the archivist with all relevant documentation for the file, including:
• Deed of Gift • correspondence • donor contact information • preliminary inventory • curator’s notes
3.2. Other information
Any other information that would be relevant to accessioning should also be provided to the archivist, including:
• whether it is a new collection or addition to an existing collection • collection number or collecting area (see Section 3.2.1 of this manual) • significance of collection • known or potential preservation problems • known or potential access restrictions • whether the collection can be used before it is processed • priority for processing • date of donation • materials that have been separated
If the archivist is not the person doing the accessioning, s/he should pass along this information to the accessioner.
3.2.1. Determine the accession number The archivist may wish to start the accession record in the archival management system in order to facilitate rehousing or other pre-processing tasks. To find the next available number, sort the list in the archival management system by accession number. Use the 4-digit year (yyyy) and the next available number in numerical sequence.

6
3.2.2. Assigning new collection numbers
If the accession comprises a new collection, a collection number will need to be assigned. Collection numbers are formatted by collecting area code, a period, and three-digit number (example: MS.C.001). Use the table below to assign the leading collecting area code. To find the next available number, consult the archival management system.
Collecting Area Code
Collecting Area Description
AS University Special Collections and Archives MS.C Critical Theory Manuscripts MS.F Faculty Manuscripts MS.L Literary Manuscripts MS.P Performing Arts Manuscripts MS.R Regional Manuscripts MS.M Miscellaneous Manuscripts
MS.SEA Southeast Asian Collection Manuscripts PS University Special Collections and Archives
Publications
Table: Collecting Area Codes
(Note: UCI faculty should only be designated as MS.F if they do not fit into another collecting area, such as MS.C or MS.P.)
3.2.3. Creating collection files
Collection files are stored in letter-size hanging folders in the filing cabinets in LL 500. When creating a new collection file, write the collection number on the tab of the hanging folder. Place a letter-size acid-free folder in the hanging folder and label it “Basic Documents,” writing the collection number and title in the upper left-hand corner. Include the Deed of Gift agreement and accession record(s) in this folder and any other documentation regarding the donor or creator that is not part of the collection (refer to the bulleted list above). This can include correspondence with the repository, secondary source materials about the creator, legacy inventories, etc. Large accumulations of a particular type of document (e.g. correspondence) may be placed in separate folders within the collection file. Be sure to clearly label each new folder. In addition to the physical collection files, SCA also maintains electronic collection files on the V:\ drive under ms-as collections, sub-filed by collecting area. If it is a new collection, label the folder as follows: collecting area code and collection number _underscore_ creator or subject name (example: C001_Derrida). File electronic versions of the accession record(s) and accession checklist(s) here, as well as any

7
pertinent correspondence regarding the collection conducted via e-mail. Save e-mail messages as text files to ensure their longevity. As with the physical collection file, label sub-folders accordingly.
4. Create an Accession Record This section will guide you in the steps necessary to complete an accession record in the archival management system. Please follow these steps for all formats, including born digital.
4.1. Determine the accession number
If the archivist has not already started an accession record in the archival management system, use the next available accession number. To find the next available number, sort the list in the archival management system by accession number. Accession numbers are comprised of the 4-digit year (yyyy) and the next available number in numerical sequence.
4.2. Enter data about the accession
Some data can be filled in right away, some will be filled in as materials are re-boxed and foldered, and some will be filled in when the re-housing process has been completed. *When you are ready to coordinate re-housing, please see Section 6 of this manual for more information. Also, Section 5.2 of the Processing Manual includes information about re-boxing, re-housing and handling of materials during accessioning.
**Near the end of the accessioning process you will assign a value score to the collection. As you work through the accessioning steps, please keep in mind the following criteria (in-depth details are provided in Section 13 of this manual):
• User interest • Research value • Institutional value • Object value
The following list indicates which accessioning fields are required. Keep in mind that these fields will not be necessarily completed in this order, but will be filled in as the data is gathered.
4.2.1. List of Values
• Title: Use DACS-compliant title. DACS specifies two types of titles for archival collections: formal and devised. Formal titles are gleaned directly from the materials in the collection, often from a published source such as a book, film or map. If the materials have no formal title, or the formal
8
title is somehow inefficient, a devised title is created. Most archival materials have devised titles.
Devised titles have two components: 1. The name of the creator(s) or collector(s) 2. The nature of the materials (i.e., collection, papers, photographs,
records, etc.) Generally, if the materials were created or collected by an individual or family, their nature is labelled as “papers.” If materials concern a corporate body, university, or organization, the nature is listed as “records.” Materials for the UCI University Archives are labelled “records.” Examples:
Brad Brafford papers University of California, Irvine, Office of Research and Graduate Studies records
Note: nature element of title is not capitalized.
• Identifier: Accession number.
• Date accessioned: In format yyyy/mm/dd.
• Description: Include one or two sentences about the creator that would provide context
for the materials. Also include one or two sentences (or more if necessary) about the content and form of the materials. See DACS p. 45 for examples.
• Condition description: Include information about the physical condition of the
materials, such as whether paper is brittle or torn, whether magnetic media are deteriorating, and any other concerns. Also include any preservation actions taken, such as the removal of rubber bands. Notify the archivist if you encounter serious ongoing preservation concerns such as bugs or mold.
• Disposition: Include a list of any materials removed from the accession and what was done with them, such as whether they were disposed of, returned to the donor, or books cataloged separately in ANTPAC. This need not be an item-by item list. Note: Archivist must approve disposal of any materials after examining the Deed of Gift.
• Inventory: Include a listing of types of materials, along with dates, if known. This may include lists of materials in the order they can be found in the box. Specify whether the inventory list is as-received or if some processing or rehousing has been done. In some cases, the accession will have a container list created in the course of rehousing. Include a note that indicates an external document is available.

9
Example 1:
Box 5 (1984-1990) minutes, correspondence, and other materials
Example 2:
Boxes 1-10, (circa 1996-2001) program files, correspondence, meeting notes Boxes 11-15, (circa 1998-2000) press releases, directors' statements, mission statements *A full container list is available on the shared network drive.
• General note: Include any other information pertinent to the collection that cannot be
found in another field.
• Acquisition type: Indicate “Gift” (or, occasionally, “Purchase”) for manuscript (MS) collections. Indicate “Transfer” for university archives (AS) records transferred from campus units (and “Gift” if material was donated by a person or family).
• Resource type: Dropdown list, choose “collection.”
• Restrictions apply: Check this box if there are any restrictions.
• Access Restrictions (checkbox and note): Use this note if it is known or suspected that there are materials in the collection that should not be made available for research. Also indicate in the note field if there are no restrictions, or if the status of restricted items is unknown and requires further review. Examples of restricted materials include: student records, medical records, documents listing Social Security numbers, archival original media (including fragile original photographic formats, such as glass negatives, audio or video recordings, and disk media), or any materials named in the gift agreement as restricted to use for a period of time. Refer to Section 7.5.2.4 of the Processing Manual for creating access statements. Please note: Your preliminary assessment and analysis of the collection during accessioning is imperative to providing accurate information about restricted items. Because accession records become publicly searchable finding aids for unprocessed or semi-processed collections, the access restrictions note provides valuable information for public services staff and the archivist when providing access to accessions, unprocessed, and minimally processed collections. For further information, please consult the Policies and Procedures for Providing Access to Accessions, Unprocessed, and Minimally Processed Collections document on the V:\ drive.

10
• Use Restrictions (checkbox and note): Use this note if there are any restrictions on
copying materials in the collection. See Deed of Gift. (Note: If the collection includes any materials authored by Jacques Derrida, these may not be copied.)
• Date: If you have completed an inventory, you will have a good idea of the date range. Use bulk dates if helpful and relevant. Use date expression for undated or circa dates if necessary. See the Processing Manual Sections 6.2 and 7.3.2 for more information about dates. If you have not yet rehoused and inventoried the collection, surmise the date range from accompanying documentation or a cursory scan of the items.
• Extent: The total number of linear feet. The most common boxes you are likely to encounter are as follows: Standard record storage box 1.0 linear feet Letter-size document box 0.4 linear feet Half-width letter-size document box 0.2 linear feet Legal-size document box 0.4 linear feet Half-width legal-size document box 0.2 linear feet For more detailed information on extent, see the Processing Manual Section 12.2 Appendix B: Measuring Collections.
• Container summary: The number of boxes and oversize folders. Indicate number of
oversize folders that were created. Put this information in parentheses. For example:
(6 boxes and 1 oversize folder)
• Agent Links: This enables associating an agent as a creator, source, or subject to the materials being described. Indicate both the Creator and Source in two separate entries using role, and search for the name(s) within the AMS. This is often the same person/entity, in which case the name will appear twice.
o Specific to ArchivesSpace: If the name does not populate in a search or browse, open the LCNAF import plugin in a new tab. If the agent is located, import to the database, save changes to the accession, and refresh the screen. You should now be able to link to that agent.
o Create a new agent if the name is not found in the Library of Congress files. Source = Local. Rules = Local. Use Indirect Name Order. Primary Part of Name = Last name. Rest of Name = First name, Middle initial and period (.). Dates = year of birth and/or death if known, separated by a hyphen.
11
• Related resources: Link to existing collection (if this accession is an addition to an
already-existing collection) or, when finished accessioning, use the accession record to create new resource.
• Rights statements: This is usually only a note in the resource record, but this field should be filled out if the accession has any unusual rights issues. Such as, if the donor transferred copyright or if there are any use restrictions in the deed of gift.
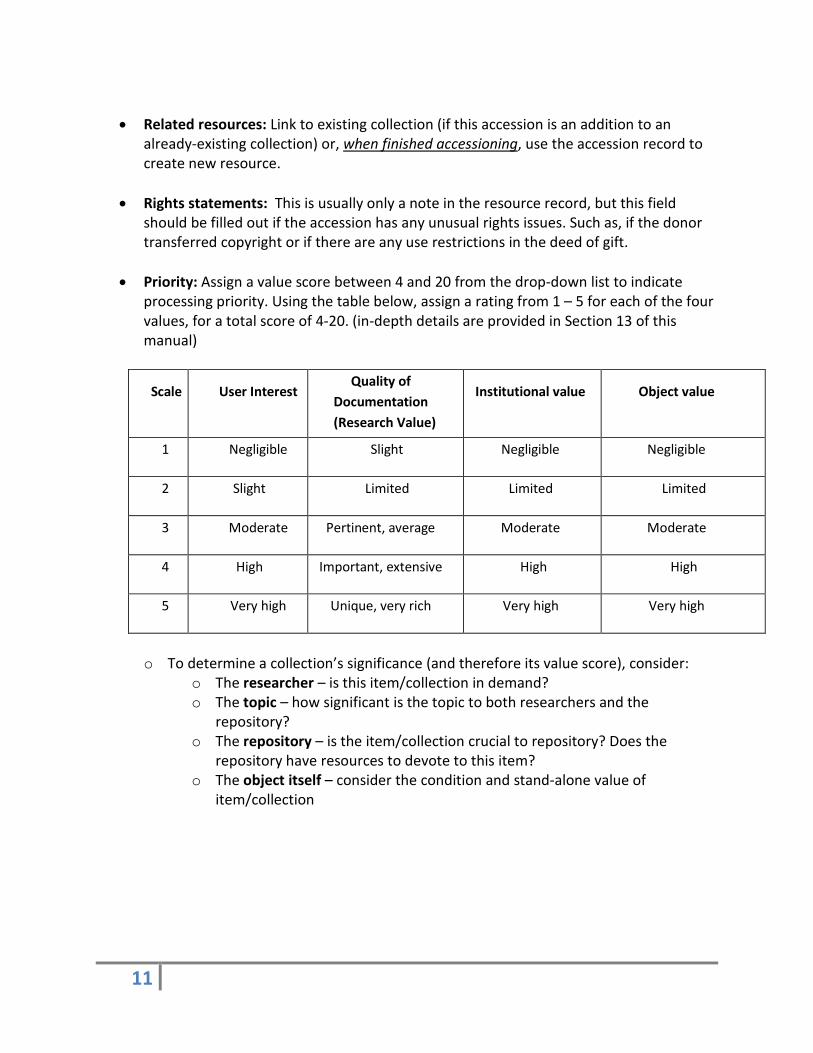
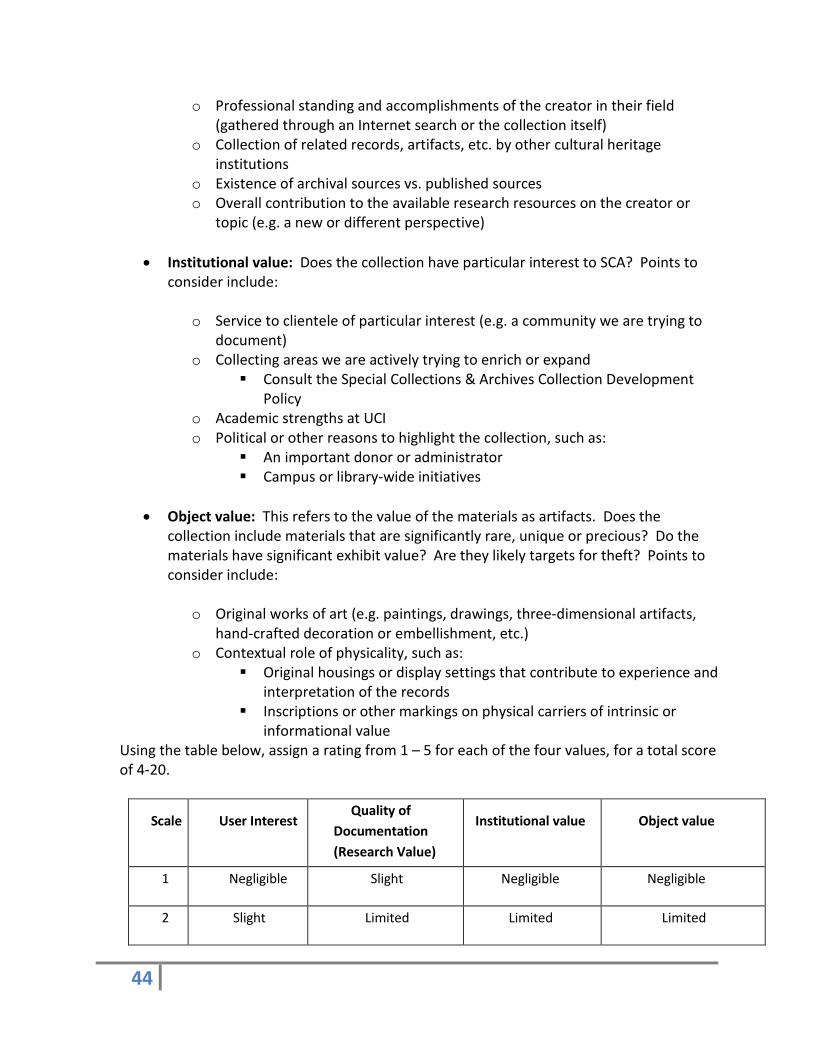
• Priority: Assign a value score between 4 and 20 from the drop-down list to indicate processing priority. Using the table below, assign a rating from 1 – 5 for each of the four values, for a total score of 4-20. (in-depth details are provided in Section 13 of this manual)
Scale
User Interest Quality of
Documentation (Research Value)
Institutional value
Object value
1 Negligible Slight Negligible Negligible
2 Slight Limited Limited Limited
3 Moderate Pertinent, average Moderate Moderate
4 High Important, extensive High High
5 Very high Unique, very rich Very high Very high
o To determine a collection’s significance (and therefore its value score), consider:
o The researcher – is this item/collection in demand? o The topic – how significant is the topic to both researchers and the
repository? o The repository – is the item/collection crucial to repository? Does the
repository have resources to devote to this item? o The object itself – consider the condition and stand-alone value of
item/collection
12
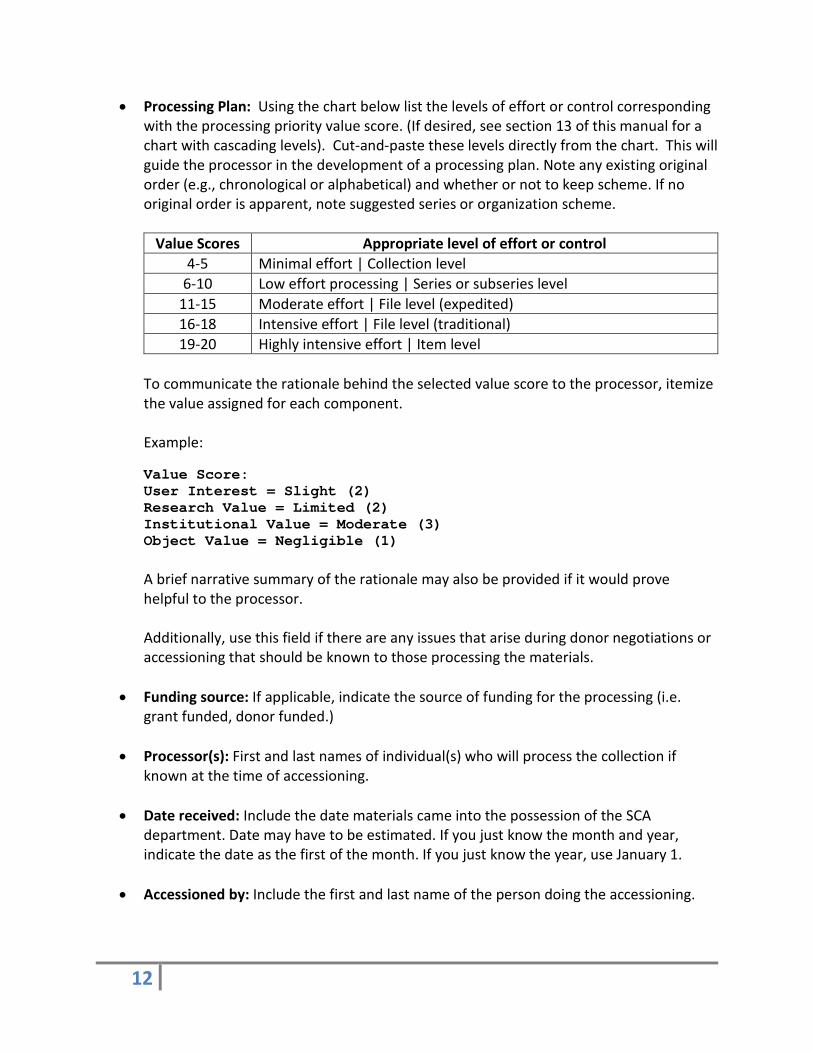
• Processing Plan: Using the chart below list the levels of effort or control corresponding with the processing priority value score. (If desired, see section 13 of this manual for a chart with cascading levels). Cut-and-paste these levels directly from the chart. This will guide the processor in the development of a processing plan. Note any existing original order (e.g., chronological or alphabetical) and whether or not to keep scheme. If no original order is apparent, note suggested series or organization scheme.
Value Scores Appropriate level of effort or control 4-5 Minimal effort | Collection level
6-10 Low effort processing | Series or subseries level 11-15 Moderate effort | File level (expedited) 16-18 Intensive effort | File level (traditional) 19-20 Highly intensive effort | Item level
To communicate the rationale behind the selected value score to the processor, itemize the value assigned for each component. Example: Value Score: User Interest = Slight (2) Research Value = Limited (2) Institutional Value = Moderate (3) Object Value = Negligible (1) A brief narrative summary of the rationale may also be provided if it would prove helpful to the processor. Additionally, use this field if there are any issues that arise during donor negotiations or accessioning that should be known to those processing the materials.
• Funding source: If applicable, indicate the source of funding for the processing (i.e. grant funded, donor funded.)
• Processor(s): First and last names of individual(s) who will process the collection if known at the time of accessioning.
• Date received: Include the date materials came into the possession of the SCA
department. Date may have to be estimated. If you just know the month and year, indicate the date as the first of the month. If you just know the year, use January 1.
• Accessioned by: Include the first and last name of the person doing the accessioning.
13
• Special formats: List the types of formats that are not normal-sized and paper based. Special formats include audiovisual formats (list type such as reel tapes, cassette tapes, VHS, etc.), maps, posters, and digital media types such as CDs and DVDs.
• New Collection? Check if the accession forms a new collection. Leave blank if the
accession is linked to an already-existing collection.
• Gift Agreement Sent to Donor/Date (checkbox and note): This refers to the Deed of Gift agreement. Information about this is in the collections file or from the archivist or SCA department head. Check this box if a gift agreement is in the collection file. If known, record the date (below empty fields in the current AMS) the agreement was sent to the donor.
• Gift Agreement Received from Donor/Date (checkbox and note): Check this box if a Deed of Gift agreement was received from the donor and record the date (below empty fields in the current AMS) s/he signed the document.
5. Accessioning as Processing You may notice that the accession is small enough or organized enough that, with just a bit more work, the collection could be considered processed. Typically, accessions of 1 linear foot or less are good candidates for accessioning as processing, particularly those that are being added to processed collections. See Section (13.2.1) of this manual, or consult with the archivist, to determine whether the new accession is a good candidate for accessioning as processing. Important: You do not need to assign a value score when performing accessioning as processing. Write “Processed during accessioning” in the Processing Plan field of the accession record. Be sure to write your name in the Processors field.
6. Re-Box and Shelve the Accession
6.1. Re-boxing and re-housing • Keep materials in their original order • Compress materials to use as little space as possible. • Take materials out of binders, unless the binders have object value (refer to Section 13.1
of this manual). • Remove materials the archivist has instructed will be separated. The archivist will
determine the disposition of the removed materials upon examination of the Deed of Gift.

14
• Duplicates should generally not be weeded during accessioning, especially if the accession is large (i.e. multiple record cartons). Duplicates may be removed if duplication is not excessive and weeding would require little time and effort.
o Do not discard duplicates without consulting the archivist. They may be retained for exhibition or donated to other repositories.
• Stabilize materials:
• Make sure all paper materials are in folders, either in their original folders or in scrap archival folders. Folder or re-folder items only if necessary to safely box them. Loose papers should generally be foldered. If existing labels are insecure, clip or staple them to folders rather than foldering.
• Folders must be packed tightly enough to prevent folders/papers from slouching. Use a box spacer if necessary. Even a few weeks of slouching will cause paper to permanently bend.
• Use folder score lines to square the bottom of each folder to fit documents taking up more than ¼” in each folder. Do not fill letter and legal-sized folders over ¾” full.
• Accessions will either be stored in boxes, flat box folders, XOS (map case) folders, or a mix of these.
• In general, transfer to archival boxes in order to reduce or eliminate possible vermin and to safely store materials. Maintain existing containers only if they are clean (and apparently vermin free), strong, have covers, and are in sizes that fit our shelving.
• If taking any obvious and quick measures would significantly reduce the linear footage (e.g., removing binders and foldering items), please do so.
• When the collection has been housed in appropriate containers, calculate linear footage from measurements listed in the Extent portion of 4.2.1 in this manual (or Appendix B in the Processing Manual). Fill in extent in linear footage and container summary in the accession record.
o For accessions that are integrated within the existing collection housing due to negligible size (e.g. smaller than a half document box) or processing during accessioning, record the extent as 0.1 linear feet. Note the number of items and folders in the container summary and (if applicable) indicate that the materials were integrated.
Example 1: (1 folder) Materials were integrated with existing collection and do not occupy additional space.
15
Example 2: (1 oversize folder) The bulk of the materials were physically integrated with the existing collection and do not occupy additional space. One oversize folder was added to the collection extent.
Example 3: (1 audiocassette) Housed in accn 2006.007 Box 15.
• Print labels for each box using the box label templates on the V:\ drive. Label each container with collection name and number, accession number, and box number.
o For example if accession "accn2006-001" has 1 box, the box number will be "accn2006-001 001." If it has 2, the box number will be "accn2006-001 002," etc.
o A box housing two different accessions will have two labels.
• Shelve accession boxes in stacks. Store oversize accession material in flat box folders in flat boxes. If oversize accession materials in flat box folders do not fill up a single flat box, store these flat box folders in existing flat boxes (i.e., flat boxes in MS stacks that have already been assigned flat box number). Very important: Record the flat box number and folder number in the inventory field in accession record.
• Store XOS folders in map case(s).
• Write down location codes on boxes (including new flat boxes used to store flat box folders).
6.2. Update the stacks locator
Go to http://spcoll.lib.uci.edu/ (password protected; use UCInet ID and password). • Click on "Edit Stacks." • For new collections, click "Add New Collection." Fill out "Collection Title," "Collection
Number," "Box number," and location. Again, the box number will be "accn2006-001 001," “accn2006-001 002," etc.
• For additions to existing collections, click "Add to a Collection." Type in existing collection number. The screen will then prompt you to add a box to that collection. Type in new box number and location.
6.3. Print out and file the accession record • Print out the accession record. • For new collections, create a green hanging folder for the collection in the filing cabinet
and a "Basic Documents" folder therein. See Section 3.2.3 of this manual for guidance.
16
• For additions to existing collections, find the collection file and add the accession form to the existing ones in the "Basic Documents" folder. Multiple accession forms within one collection file should be clipped together with the most recent on top.
7. Single-Level Minimum DACS Finding Aids for the Collection Note: If the accession is an addition to an existing collection, see Section 10 or 11 of this manual. If the accession has a nonstandard finding aid or other inventory and is not an addition to an existing collection, see Section 9. The following instructions should be read in conjunction with Section 7.5.1 of the Processing Manual in order to create a finding aid with notes in the correct order. Be sure to use the prescribed label for each note.
7.1. Enhance the records
After creating the accession record, use the spawn feature to create a resource record for the collection. Spawning a resource record will automatically populate certain fields, noted below. See the current manual for the archival management system for more information about creating resource records. For new collections, follow DACS guidelines (detailed below, with DACS reference numbers) for single-level minimum records and input the following information into the resource record in order to create a brief but compliant finding aid.
7.1.1. Reference Code Element (2.1) Already in the record as Identifier.
7.1.2. Name and Location of Repository Element (2.2) Already loaded into the backend metadata.
7.1.3. Title Element (2.3) (Spawned) A DACS-compliant title should already be recorded in the resource record, whether imported from the accession record or from previously-created resource record. See 4.2.1 in this manual (or Section 6.1 of the Processing Manual) for additional instructions on writing titles if necessary.
7.1.4. Date Element (2.4) (Spawned) The dates should map directly to the resource record. Ensure that they reflect, as accurately as possible, the total date range for all accessions.
7.1.5. Extent Element (2.5) (Spawned)
17
Extent and container summary should map directly to the resource record. Ensure that they reflect the totality of the linear footage of all accessions linked to that resource.
7.1.6. Name of Creator(s) Element (2.6) (Spawned) Use the Agent Links to find or create personal, family, or corporate names. Note: when spawning a resource record, the “Source” field will transfer. This can be deleted.
7.1.7. Scope and Content Element (3.1) (Spawned) The Scope and Content element should map directly to the resource record. If not, use Scope and Contents note, and label it “Collection Scope and Content Summary.” Two or three sentences total. First phrase or sentence should be about the creator and their relationship to the files created. In a few cases, there may be biographical information in the names file if one has already been created. Get the information from the accession records. Synthesize and distill the information from all the accession records. If necessary look in the collections file and as a last resort check the collection itself.
7.1.8. Conditions Governing Access Element (4.1) (Spawned) The Conditions Governing Access note should map directly to the resource record. Ensure that it is labeled “Access.” For additional information on Access restrictions see section 4.2.1 in this manual.
7.1.9. Languages and Scripts of the Material Element (4.5) Use the Language field in the Basic Information to indicate the predominant language of the collection.
7.2 Data elements specifically for the OAC
The following data elements (8.1.11 – 8.1.14) are not part of a minimal record in DACS, but they will improve the display in the OAC.
7.2.1 Abstract Copy and paste the entire scope and content into an abstract note.
7.2.2 Finding aid title Indicate the formal title of the finding aid itself (e.g., “Guide to the Jane Doe Papers”) and not the title of the collection being described.
18
7.2.3 Finding aid filing title Indicate the filing title of the finding aid. Note that the filing title is a modified form of the formal title. The filing title appears in browsing lists on the OAC. For papers created, collected, or associated with an individual, the filing title should begin with the individual’s last name, followed by the first name and optional middle initial, which should both be in parentheses: Abel (Theodore F.) Papers When two individuals are responsible for a collection and they share the same last name, put the last name at the beginning of the filing title. Then list both names and, optionally, a middle initial, which should both be in parentheses: French (Helen D. and Paul M.) Collection When the individuals do not share the same last name, list the most appropriate name first, with corresponding first name following in parentheses, and then the second last name with its corresponding first name in another set of parentheses: French (Helen D.) and Hightower (Paul) Collection Corporate names and family names should generally be listed as in their established form or as they appear. Use appropriate abbreviations such as Corp., Co., Inc., Misc., Dept., etc. to maintain brevity: Bidwell Family Papers or Crowley Maritime Corp. Record
7.2.4 Finding aid date Indicate the year and “cc” for creative commons licensing.
7.2.5 Repository Processing Note Write the phrase "DACS minimum finding aid requirements met" in this field. This will allow you to search for and isolate just the records that have minimum-standard finding aids.
7.3 Added value elements
The following data elements (8.3.1 and 8.3.2) are not part of a minimal record in DACS, but are “added value” elements that SCA is including in all single-level minimum finding aids as a courtesy to researchers. They require little effort to include and provide essential information regarding the citation of collections and publication rights governing their use.
7.3.1 Conditions Governing Reproduction and Use Element (4.4)
19
Use Conditions Governing Use note, and label it “Publication Rights.” Refer to Section 7.5.2.5 of the Processing Manual for wording.
7.3.2 Citation (7.1.5, under Notes Element) Use Preferred Citation note, labeled “Preferred Citation.” Refer to Section 7.5.2.7 of the Processing Manual for wording.
7.3.3 Acquisition Information Use Immediate Source of Acquisition note, labeled “Acquisition Information.” Refer to Section 7.5.2.8 of the Processing Manual for wording.
7.4 Upload EAD file to Online Archive of California (OAC)
See section 10.1 of the Processing Manual for instructions on uploading EAD files to the Online Archive of California (OAC).
8. Instructions for New Accessions with Nonstandard Finding Aids To enhance discovery, nonstandard finding aids in serviceable form will be made available via OAC as supplemental PDFs. Nonstandard finding aids may be found in collection files or within collection boxes. These may be in the form of lists, inventories, or other descriptive documents created by the donor, custodian, or transferring agency. If you are uncertain whether a finding aid is serviceable, or need help identifying nonstandard finding aids, consult the archivist.
8.1 Create supplemental PDF document(s)
If the nonstandard finding aid is in paper form, scan the document and save it as a PDF. If it is already in electronic form, be sure to save it as a PDF if it is in another format. Label the document using this file naming convention: collection number_nonstandard (e.g. r046_nonstandard). Save all nonstandard finding aids in the electronic collection file. To ensure that the document is keyword searchable, use Adobe Acrobat’s text recognition tool. Open the PDF in Acrobat and click on Tools Text Recognition In This File. Use the default settings (Primary OCR Language: English (US); PDF Output Style: Searchable Image; Downsample To: 600 dpi). Time needed to process the file will depend on its size. If you will be uploading multiple PDF documents, open Acrobat and click on Tools Text Recognition In Multiple Files. You can then select the files you would like to OCR by clicking “Add Files…”. Use the default settings.
8.1.1 Upload supplemental PDF document to OAC server
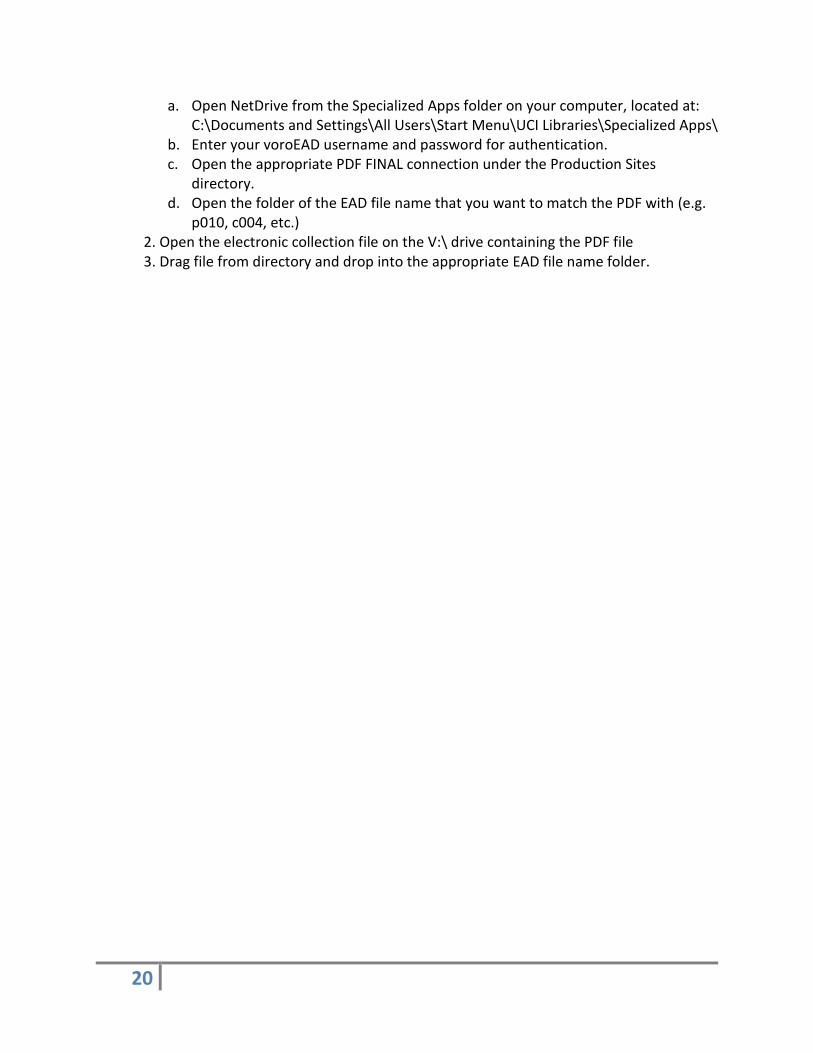
1. Establish a WebDAV connection using NetDrive.
20
a. Open NetDrive from the Specialized Apps folder on your computer, located at: C:\Documents and Settings\All Users\Start Menu\UCI Libraries\Specialized Apps\
b. Enter your voroEAD username and password for authentication. c. Open the appropriate PDF FINAL connection under the Production Sites
directory. d. Open the folder of the EAD file name that you want to match the PDF with (e.g.
p010, c004, etc.) 2. Open the electronic collection file on the V:\ drive containing the PDF file 3. Drag file from directory and drop into the appropriate EAD file name folder.

21
8.2 Add Finding Aids Element (4.6) to resource record
Use Other Finding Aids note, and label it “Additional Collection Guides.” In the body of the note, add the following code: <list> <item> <extref xlink:href="[PDF filename, with .pdf extension]" xlink:role="http://oac.cdlib.org/arcrole/supplemental">[descriptive title of the nonstandard finding aid (Make sure that the descriptive title of the PDF captures the scope of the document (e.g. Inventory of Business Records Unprocessed Addition, etc.))] </extref> </item> </list> ArchivesSpace will auto complete xml tags, so be sure that they are correct and in the correct order. The supplemental PDF should appear as a hyperlink in the final EAD finding aid under the heading “Additional Collection Guides,” the <extref> tag serving as a pointer to the PDF document location on the OAC server.
8.3 Upload EAD file to Online Archive of California (OAC)
See section 10.1 of the Processing Manual for instructions on uploading EAD files to the Online Archive of California (OAC).
9. Instructions for Additions to Unprocessed Collections If an accession is an addition to an unprocessed collection, follow these steps.
9.1 Revise date expression Update the Date Expression field for the collection, if the new accession includes dates that are outside the original collection’s date range(s).
9.2 Revise the extent and container summary In the resource record, update the Extent Number field to include the linear feet from the new accession. In addition, update the Container Summary field to include the boxes (and oversize folders) in the new accession. For example, an unprocessed collection’s extent may have been 20.4 linear feet, but the new accession is 1 linear foot. The new extent should be
22
21.4 linear feet. The accession adds another box to the collection, so the Container Summary is updated from 37 boxes to 38 boxes. Check related accessions in the archival management system for any other unprocessed accessions and update the container summary as needed.
9.3 Revise abstract Update the Abstract to incorporate any additional information about the collection based on the new accession. The abstract should be the same as the scope and content note unless excessively long (more than one paragraph). If no new information was gathered, do not update.
9.4 Revise access note Update the Access note if the current collection-level statement does not adequately cover the new accession. Please see section 7.1.8 of this manual for details on restricted materials.
9.5 Revise the scope and contents note Update the Scope and Contents note for the collection. Use the Description note from the Accession Notes tab of the original accession record. You may want to incorporate parts of the Inventory note as well. Aim for two to three descriptive sentences distilled from the accession record. If no new information was gathered, do not update.
9.5.1 Add any missing elements so that the resource record is consistent with others: citation, acquisition info, publication rights,
9.6 Create and upload supplemental PDF (if applicable) If the new addition comes with a nonstandard finding aid, follow the steps for creating and uploading supplemental PDFs outlined in Sections 8.2 and 8.3 of this manual.
9.7 Upload revised finding aid and catalog record • Under Finding Aid Data, update the Finding Aid Date and Finding Aid Author.
Enter the previous date and author information in the edition statement field like so: updated 2012 by Jane Doe; Created in 2010 by Jerry Garcia. Use the Finding Aid Note field to indicate revision dates.
• Re-export and upload the revised finding aid to the OAC. • Notify the cataloger who will update or create a MARC record for the collection.
10 Instructions for Additions to Processed Collections If an accession is an addition to an already-processed collection, follow these steps.
23
10.1 Revise date expression
Update the Date Expression field for the collection, if the addition includes dates that are outside the original collection’s date range(s).
10.2 Revise the container summary and finding aid status In the resource record, add the phrase “and xxx unprocessed linear feet" to the container summary. For example, a container summary that said this before a new accession:
(157 boxes and 4 oversize folders) …would say this after the accession:
(157 boxes and 4 oversize folders) and 33 unprocessed linear feet
Do not update the “Number” field within the extent- only update the container summary. Check related accessions in the archival management system for any other unprocessed accessions and update the container summary as needed.
10.3 Update the Finding Aid Status to “Semiprocessed.”
10.4 Revise abstract
Update the Abstract to incorporate any additional information about the collection based on the new addition. If no new information was gathered, do not update.
10.5 Revise access note
Update the Access note if the current collection-level statement does not adequately cover the new addition. This will likely happen if the new addition may contain restricted materials that can’t be reviewed during accessioning. Include information as to the nature of the restriction as well as when or how researchers may gain access. For example: The digital files are open for research. Researchers must apply to access some files in the collection and agree to follow the Rules of Use for the Virtual Reading Room. Access may be granted in less than 5 business days. Please see section 4.2.1 of this manual for details on restricted materials.
10.6 Revise scope and contents note
24
Update the Scope and Contents note for the collection if the new addition is not adequately covered by the current note. Use the Description note from the original accession record. You may want to incorporate parts of the Inventory note as well. Aim for two to three descriptive sentences distilled from the accession record. If no new information was gathered, do not update.
10.7 Create top-level component description If the collection is arranged in series, create a series-level component representing the accession, using a descriptive title. If there are no series, create a file-level component. Examples:
Orange Coast Chapter unprocessed additional records Research notes unprocessed additional records
If there are multiple unprocessed additions to add, or if the contents of the new addition are the same as those in other additions, simply identify the new materials by acquisition year. For example: Unprocessed addition 2013
10.8 Enhance the top-level component description
10.8.1 Component Unique Identifier element The Component Unique Identifier should be the accession number, such as 2011.006. In the title box, write “Accession” before inserting the number. This will enhance the display of the component unique identifier on OAC, which should look like this: Accession 2011.006.
10.8.2 Date element The date should reflect the total date range for the new accession. Use a date expression if appropriate (for example, if much of the material is undated or if only circa dates are known). Otherwise, use a date range.
10.8.3 Extent element Extent should reflect the totality of the linear footage of the new accession. Only enter extent information if the addition is a series-level component. File-level components do not have extent statements.
10.8.4 Scope and Content Note element
25
Add a Scope and Contents note, labeled “Series Scope and Content Summary” (if a series) or “Scope and Content Note” (if a file). Duplicate the Description note from the the original accession record. You may want to incorporate parts of the Inventory note as well. Aim for two to three descriptive sentences distilled from the accession record.
10.8.5 Conditions Governing Access Note element Use Conditions Governing Access note, labeled “Access.” Please see section 7.1.8 of this manual for details on restricted materials.
10.9 Revise the collection-level arrangement note The unprocessed addition must be represented in the finding aid’s collection-level arrangement note. If the collection is arranged in series, write the following at the end of the existing note: “The collection also contains xxx unprocessed addition(s).” List the accession number, component title, date range, and extent in linear feet. Example: This collection is arranged in two series: Series 1. Inter-League Organization records, 1957-2001. 6.5 linear feet Series 2. Chapter records, 1957-2005. 11 linear feet The collection also contains four unprocessed additions: Accession 2009.015. Orange Coast Chapter chronological files unprocessed addition, 1977-2007. 2.4 linear feet Accession 2011.006. Orange Coast Chapter unprocessed addition, 1967-2004. 3 linear feet Accession 2013.017. Position statement publications and documents unprocessed addition, circa 1970-1993. 0.2 linear feet Accession 2013.029. Inter-League Organization and League of Women Voters of California unprocessed addition, 1946-2009 (Bulk, 1977-2009). 2 linear feet If the collection does not contain series, indicate that an unprocessed addition is listed at the end. Example:
26
This collection is arranged alphabetically by subject. Accession 2014.007, an unprocessed addition to the collection, is listed at the end.
10.10 Create and upload supplemental PDF document (if applicable)
If the new addition comes with a nonstandard finding aid, you should provide access to that document if processing during accessioning is not feasible. Follow the steps for creating and uploading supplemental PDFs outlined in Sections 9.2 and 9.3 of this manual. Make sure that the descriptive title of the PDF captures the scope of the document (e.g. Inventory of Business Records Unprocessed Addition, etc.). Note: While it is imperative to update the resource record in our management system with the collection-level Other Finding Aids note to maintain accurate collection management, it may be easier to edit the EAD file directly rather than re-export the entire finding aid, particularly if the original EAD file required extensive cleanup or custom encoding after exporting. If this is the case, insert the following encoding template in the appropriate place in the EAD file:
<otherfindaid> <head>Additional Collection Guides</head> <list> <item>
<extref xlink:href="[PDF filename, with .pdf extension]” xlink:role="http://oac.cdlib.org/arcrole/supplemental">[descriptive title for the PDF file]</extref>
</item>
[For any additional PDFs, use additional <item>s, with a nested <extref>]
</list> </otherfindaid>
10.11 Upload revised finding aid and catalog record
27
1.1 Update the Revision Date of the finding aid (and Finding Aid Date, if necessary). Re-export and upload the revised finding aid to the OAC. Notify the cataloger who will update or create a MARC record for the collection.
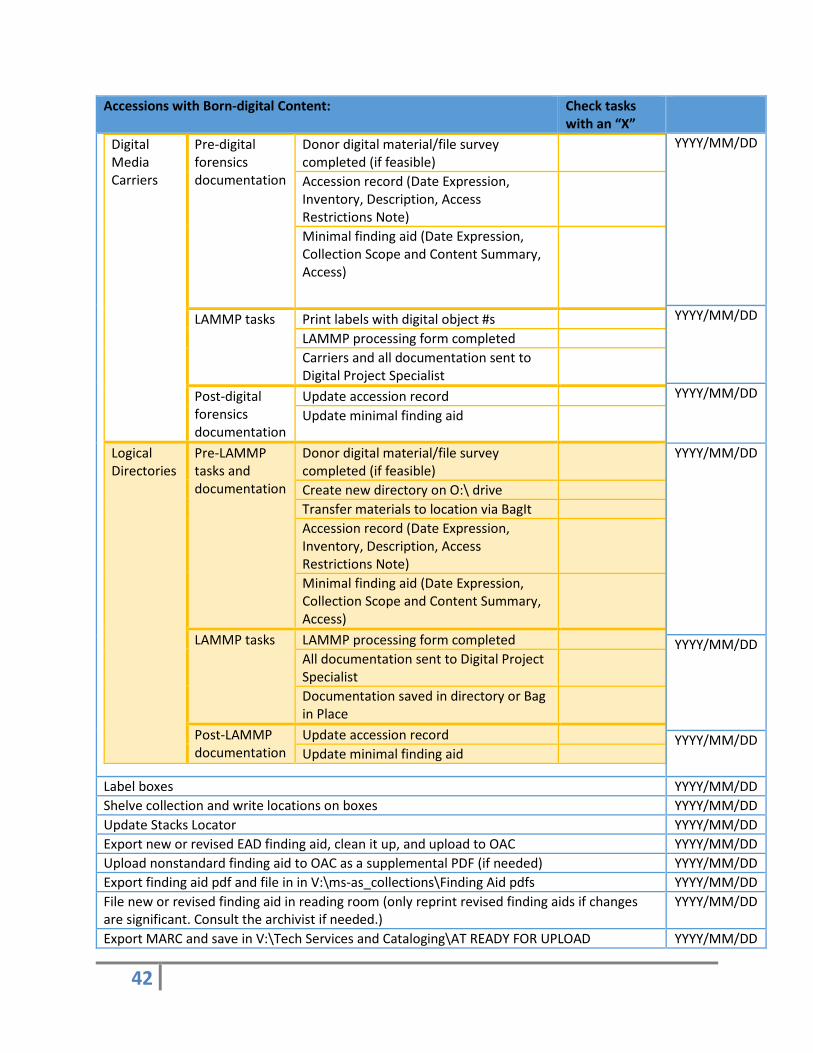
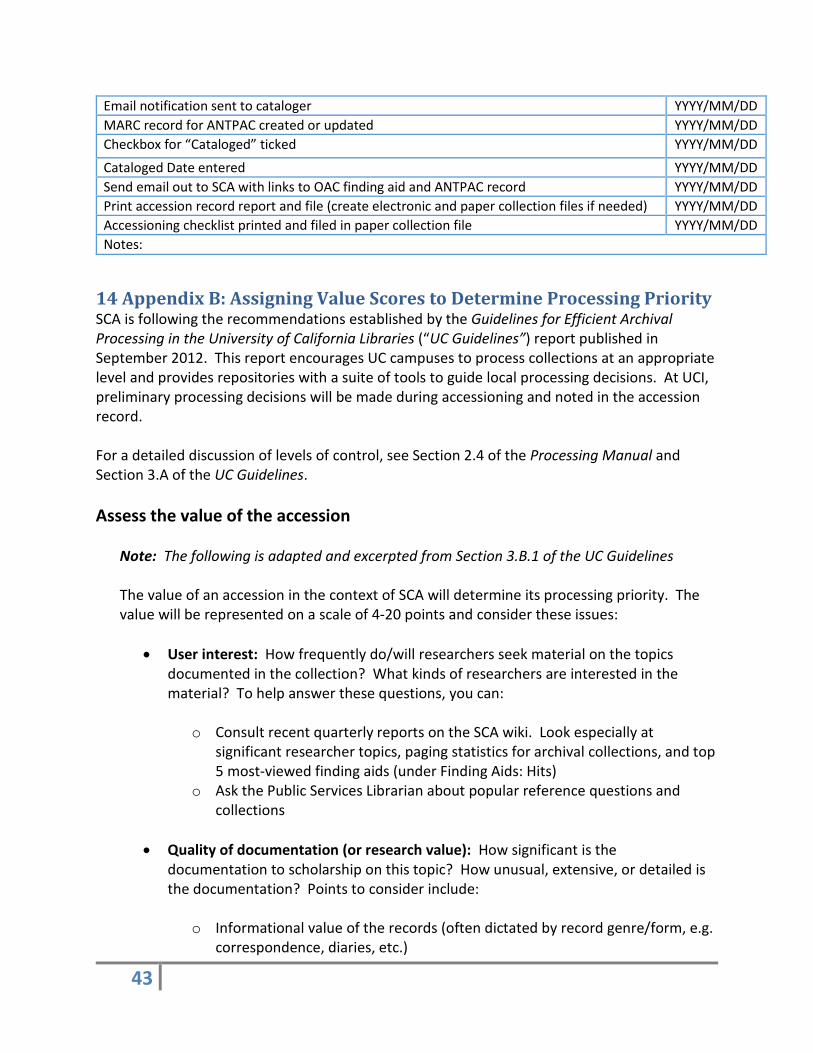
11 Fill Out Archival Collection Accession Checklist Use the Archival Collection Accession Checklist to make sure all steps have been completed. The checklist form is located at V:\ms-as_documentation\Archival Technical Services_forms and labels\Forms\Accessioning and in Section 13: Appendix A of this manual. As of January 2017 the file is named Accession_Checklist_template_AS.dotx. The archivist should file a hard copy of the checklist in the relevant collection file and place the electronic version in the electronic collection file on the V:\ drive. The document should be labeled according to this format: accn[number with no periods or spaces]_checklist. Example: accn2013009_checklist. The Accession Checklist records the dates on which specific tasks are completed. Dates should only be recorded in the “Date Completed” column. Three sections on the checklist (entitled “Complete accession record in management system”, “Create or revise existing resource record/finding aid in management system”, and “Accessions with Born-digital Content”) require the accessioner to put an “X” next to items associated with these tasks when completed. If an item is not relevant to a particular accession, write “N/A” in the checkbox. For sections containing sub-sections for different accessioning scenarios (e.g. collections with an existing finding aid vs. no finding aid), only fill out the applicable sub-section. Do not fill out the “End Date” for the accession until all tasks are completed. This may be several weeks from the time accessioning began.
12 Accessioning Born-digital Materials Modern archival collections increasingly include born-digital records. These may exist on local library servers or may be transferred to SCA from remote servers, a likely scenario for university records, or be stored on physical media such as floppy disks, CDs, USB drives, and hard drives sent to SCA. In an effort to gain greater intellectual control over born-digital records at the beginning of the archival workflow, SCA is implementing the following steps at the point of accession.
12.1 Donor digital material/file survey
As much information as possible regarding born-digital records should be obtained upfront from the donor or custodian. This information will be collected by means of a digital material/file survey, a series of questions aimed at gathering pertinent facts about the “digital life” of the records creator, including hardware and software used, work styles and

28
habits as they affect records creation, organization and types of files contained on media carriers, etc. Ideally, this would occur during the collection development and acquisition stage before the collection enters the custody of SCA. As this may not be feasible, these questions may be addressed during accessioning. They should be delivered via e-mail to the donor or custodian so his/her responses are documented in writing. In your correspondence, indicate that while none of the questions are required, answering them to the “best of your knowledge” would be invaluable for future preservation and access. Add the survey to the physical and electronic collection files. Important: The survey should be completed before any digital forensics work begins, especially for large collections. Please find questions from the AIMS White Paper located in SCA department documentation for donor prospects (at time of writing, here: V:\ms-as_documentation\Donor Prospects).
12.2 Nonstandard finding aids received from the donor
If the donor or custodian has an inventory or any other form of legacy metadata for the born-digital records in an accession, it should be made available to researchers if it is in serviceable condition. Consult the archivist if you need help determining serviceability. Follow the instructions in Section 9 of this manual for making supplemental PDFs accessible via OAC.
12.3 Procedures for born-digital records received on physical media
While physical carriers (e.g. floppy disks, DVDs, and flash drives) may have brief metadata labels summarizing their stored contents, the descriptions do not typically convey the extent or richness of the information contained therein. In order to facilitate accurate representation of the records in finding aids, digital forensics tools are implemented to extract essential metadata. These tools also allow for the preservation of original digital objects and creation of access copies.
12.3.1 Pre-digital forensics information for the accession record and minimal finding aid
Because of the time required for digital forensics of external media, basic data elements for born-digital records will be included in the accession record and resulting minimal finding aid as initial “placeholders” until more detailed descriptive information is available. The following should be included in the Inventory field of the accession record:
• Type and extent (number of items and approximate capacity in bytes) of physical
media carriers. For extremely large accessions of born-digital media, approximate the number of items. Example:
-3 1/2" floppy disks: approximately 300
29
Ranges from 720 KB to 1.4 MB each - 5 1/4" floppy disks: 152 Ranges from 360 KB to 1.2 MB each - External hard drives: 2 Unknown MB
• Summaries or transcriptions (for small accessions) of the metadata contained on the carriers (e.g. Thesis Notes 1995, Book Research Files, etc.)
• Date range for the born-digital materials obtained from the physical carriers or donor digital material/file survey
The inventoried born-digital materials should be explicitly described in both the accession record Description field and minimal finding aid’s Collection Scope and Content Summary; if applicable, also describe the materials in a component-level scope and content note. This will alert the end user and SCA public services staff to the presence of special formats. The access statements for both the accession record and minimal finding aid should indicate that original digital media materials are restricted and that researchers must request use copies. In addition, if you are aware of the presence of restricted records, either from the donor digital material/file survey or metadata labels, make note of this in the access statement. If the nature of the materials is unknown at this stage, indicate that the accession may contain restricted materials. Refer to Section 7.5.2.4 of the Processing Manual for creating access statements. In the resource record, create or update the “Existence and Location of Originals” note with the range of digital object numbers. For example:
During accessioning, digital objects received the following digital object numbers: AS061_DIG001 - AS061_DIG165
12.3.2 Digital forensics: Legacy Archival Media Migration Platform (LAMMP)
After completion of the donor digital material/file survey and basic accessioning, the survey responses and physical media carriers should be sent for imaging using the LAMMP workstation. At the time of writing, two LAMMP workstations exist: one in Langson Library 568, and one in Ayala Science Library Information Technology department. The Langson Library LAMMP station can process CDs, DVDs, and media with a USB connection. The Ayala station processes all of these media plus 3.5” and 5.25” floppy disks and zip disks. Media sent to Ayala should be routed to the Digital Project Specialist in the Digital Scholarship Services Department. Digital preservation responsibilities are outlined in the library wiki. Please see LAMMP Workflow for LAMMP processing in Langson Library, and SCA LAMMP Processing wiki page for sending
30
materials to ASL. Please note: Imaging will be done for all born-digital materials as a baseline accessioning procedure regardless of an accession’s value score. For material that will be imaged by SCA on the LAMMP workstation in LL568 do the following:
1. Create labels with digital object # for each piece of digital media (include ONLY digital object # and make sure label is small enough to fit on media). Check to see if collection already has digital objects by checking the Existence and Location of Originals note in the Resource Record for the collection.
2. Fill out the Born Digital Accessioning Processing Form (TEMPLATE)
3. Save Born Digital Accessioning form to new or existing collection folder in V:\ms-as_collections
4. Print completed form
5. Put digital media carriers, labels, and form on designated LAMMP queue shelf (LL568)
6. Add information to the LAMMP Queue wiki, based off the Born Digital Accessioning form information. Mark the item as QUEUED as well as the date received.
7. Notify the person in charge of tracking LAMMP physical media. At the time of writing, the primary contact is the LA for digital projects, with the archivist for special collections as backup.
The LA for digital projects will routinely assign collections to students trained on LAMMP via the work ticket system. This should be based first on digital value score, and secondly on order of arrival to queue. The LA for archives and digital projects will be responsible for the following steps:
1. Add a link to the workticket in the LAMMP Queue wiki. Change status from QUEUED to IMAGING. Then a student will image media following steps outlined here: https://wiki.oit.uci.edu/display/UCILib/LAMMP%3A+Instructions+for+students
2. After LAMMP processing, LA reviews output files/metadata before ingesting into Merritt Original Digital Content Preservation Collection.
3. LA transfers content and metadata from LAMMP station to external hard drive, and then to Merritt. Instructions for this process are located on the wiki,
31
here: https://wiki.oit.uci.edu/display/UCILib/Born+Digital+Tools+Instructions. Note that the instructions for uploading material from LAMMP are different from uploading other digital material to Merritt.
4. LA links to Merritt object in the LAMMP Queue wiki, changes status from IMAGING to PRESERVED
Optical media is then refiled with appropriate collection or accession by the person who accessioned the material. This provides the opportunity for the person who accessioned the material to now update the resource record with new information.
Merritt will serve as the “virtual shelf” for born-digital archival records until they are reviewed further for processing. Merritt will hold the disk images of the original born-digital content and also provide preservation masters of the archival records from which derivative use copies can be made.
12.3.3 Post-digital forensics information for the accession record and minimal finding aid
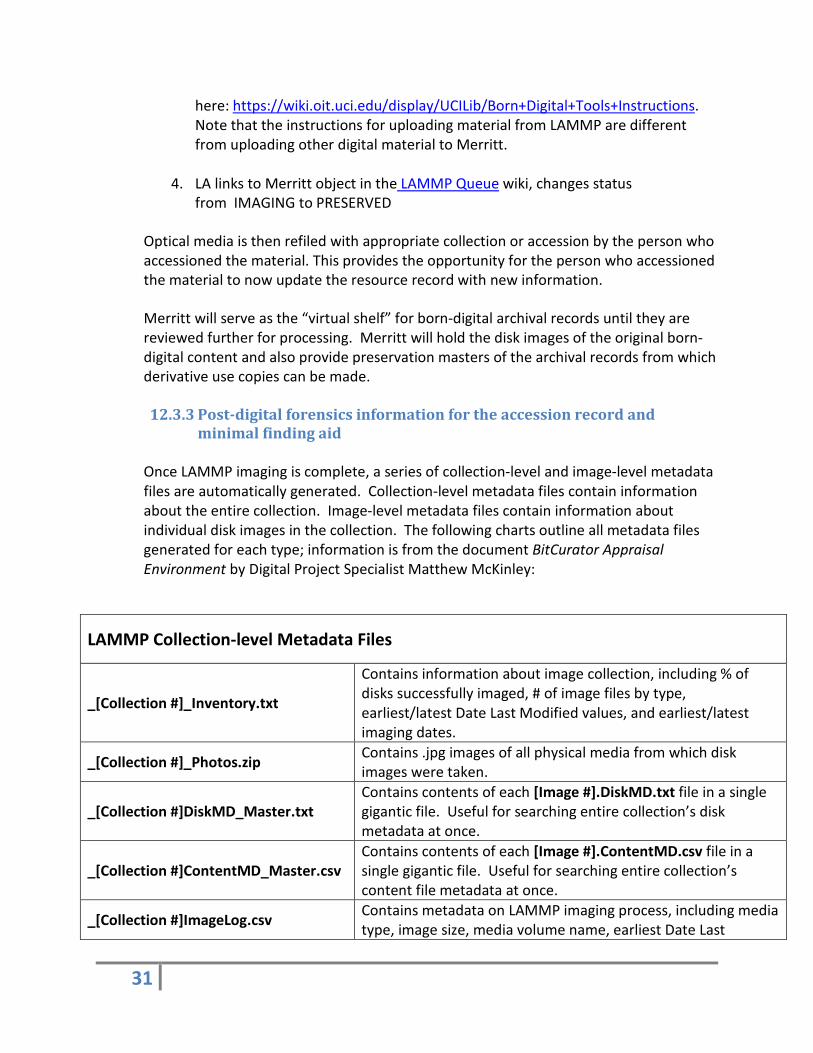
Once LAMMP imaging is complete, a series of collection-level and image-level metadata files are automatically generated. Collection-level metadata files contain information about the entire collection. Image-level metadata files contain information about individual disk images in the collection. The following charts outline all metadata files generated for each type; information is from the document BitCurator Appraisal Environment by Digital Project Specialist Matthew McKinley:
LAMMP Collection-level Metadata Files
_[Collection #]_Inventory.txt
Contains information about image collection, including % of disks successfully imaged, # of image files by type, earliest/latest Date Last Modified values, and earliest/latest imaging dates.
_[Collection #]_Photos.zip Contains .jpg images of all physical media from which disk images were taken.
_[Collection #]DiskMD_Master.txt Contains contents of each [Image #].DiskMD.txt file in a single gigantic file. Useful for searching entire collection’s disk metadata at once.
_[Collection #]ContentMD_Master.csv Contains contents of each [Image #].ContentMD.csv file in a single gigantic file. Useful for searching entire collection’s content file metadata at once.
_[Collection #]ImageLog.csv Contains metadata on LAMMP imaging process, including media type, image size, media volume name, earliest Date Last
32
Modified value found in image’s content files, imaging date, imaging agent, whether the disk was successfully imaged, whether a virus was found, and notes. One line per disk image package.
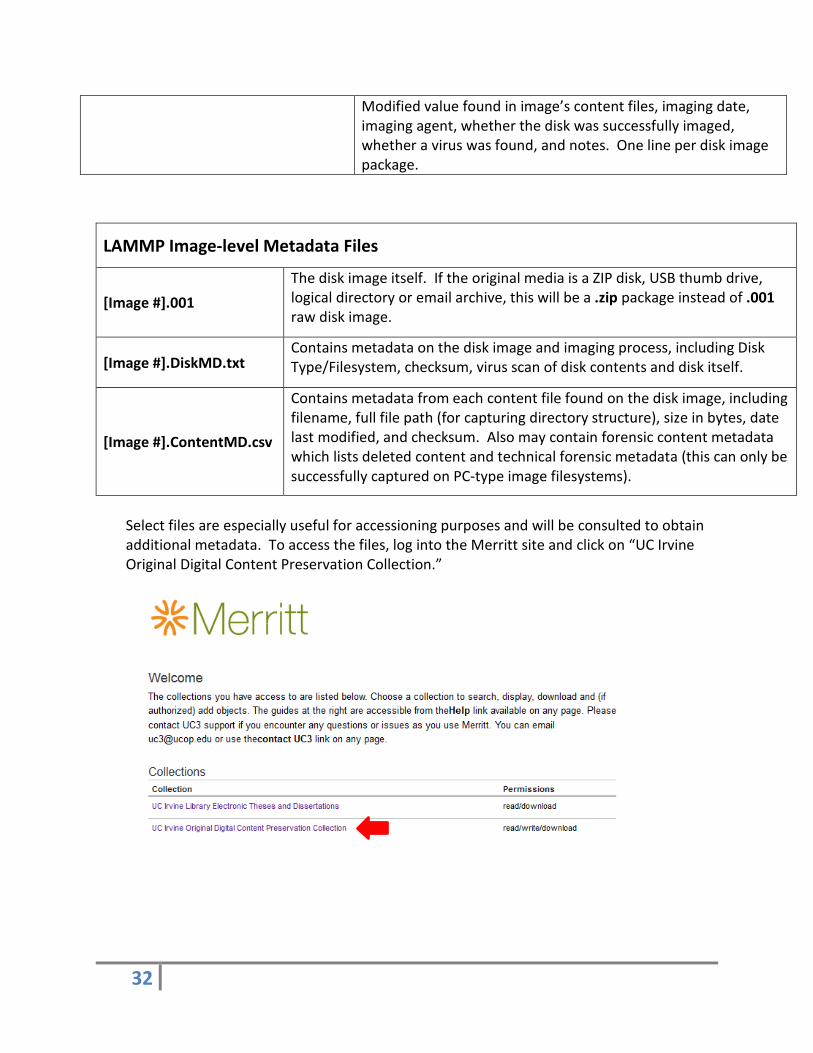
Select files are especially useful for accessioning purposes and will be consulted to obtain additional metadata. To access the files, log into the Merritt site and click on “UC Irvine Original Digital Content Preservation Collection.”
LAMMP Image-level Metadata Files
[Image #].001 The disk image itself. If the original media is a ZIP disk, USB thumb drive, logical directory or email archive, this will be a .zip package instead of .001 raw disk image.
[Image #].DiskMD.txt Contains metadata on the disk image and imaging process, including Disk Type/Filesystem, checksum, virus scan of disk contents and disk itself.
[Image #].ContentMD.csv
Contains metadata from each content file found on the disk image, including filename, full file path (for capturing directory structure), size in bytes, date last modified, and checksum. Also may contain forensic content metadata which lists deleted content and technical forensic metadata (this can only be successfully captured on PC-type image filesystems).
33
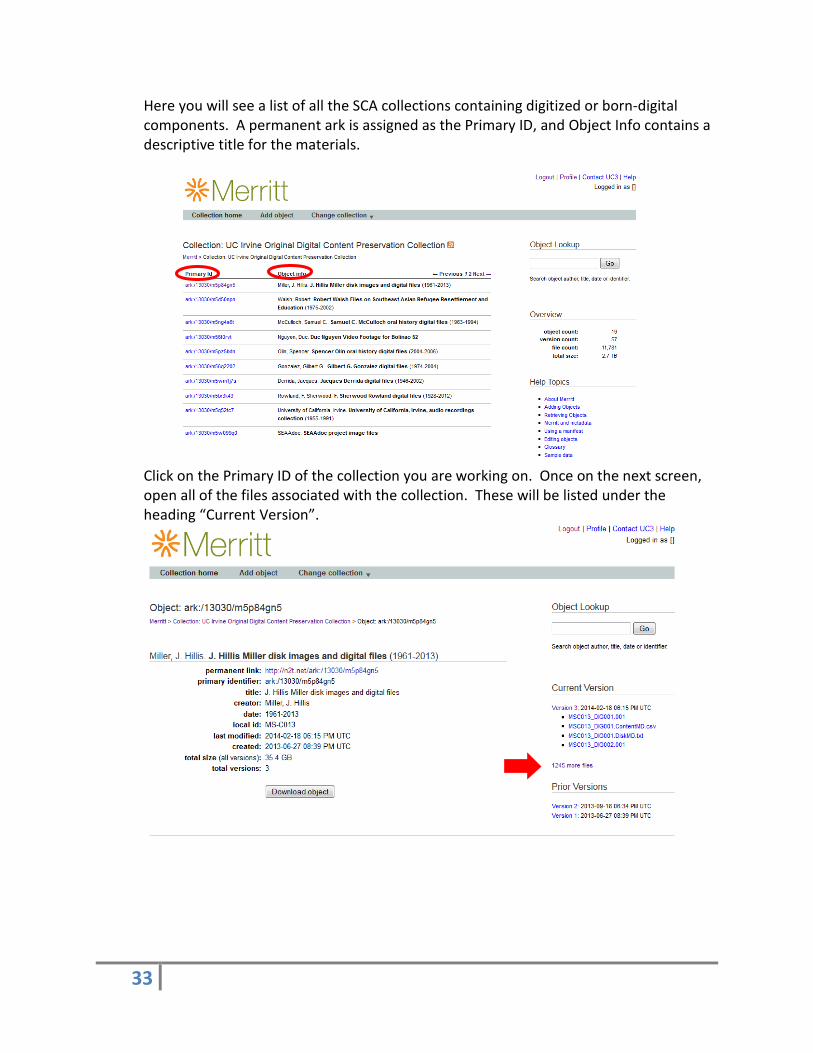
Here you will see a list of all the SCA collections containing digitized or born-digital components. A permanent ark is assigned as the Primary ID, and Object Info contains a descriptive title for the materials.
Click on the Primary ID of the collection you are working on. Once on the next screen, open all of the files associated with the collection. These will be listed under the heading “Current Version”.

34
This will display the full list of user files associated with the collection. All image-level metadata, as well as the disk images, are listed at the beginning.
Collection-level metadata files are listed at the end.
Image-level metadata
Collection-level metadata
35
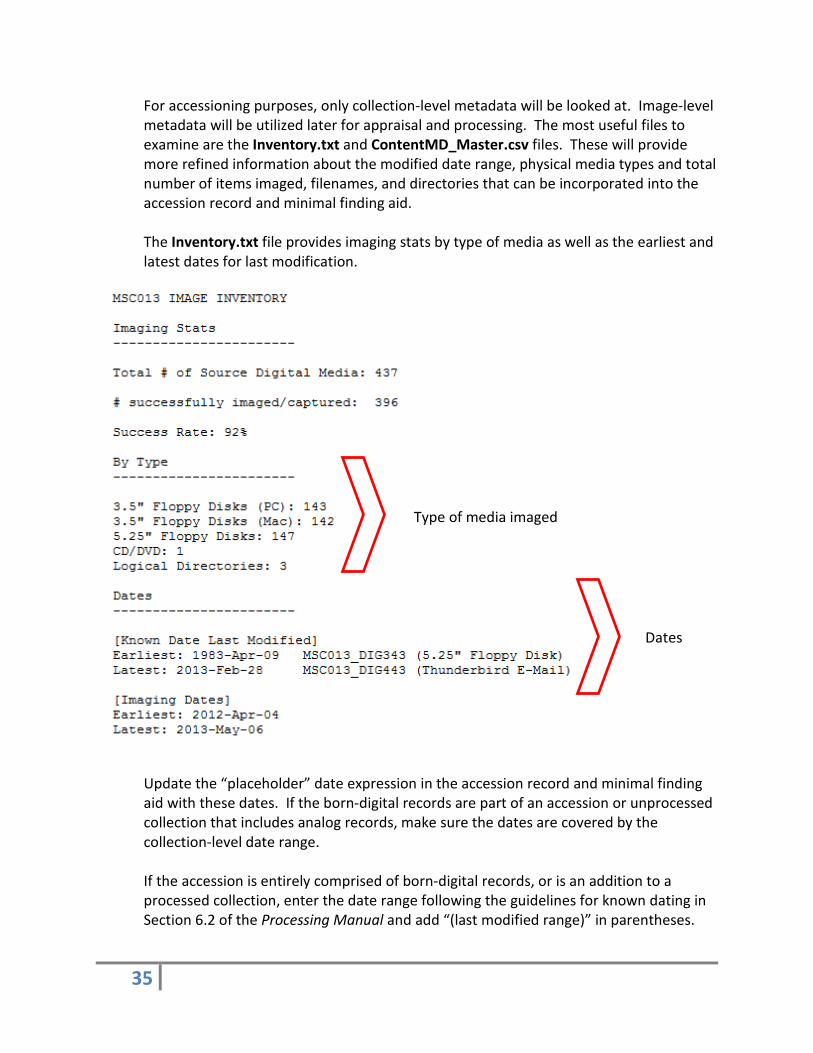
For accessioning purposes, only collection-level metadata will be looked at. Image-level metadata will be utilized later for appraisal and processing. The most useful files to examine are the Inventory.txt and ContentMD_Master.csv files. These will provide more refined information about the modified date range, physical media types and total number of items imaged, filenames, and directories that can be incorporated into the accession record and minimal finding aid.
The Inventory.txt file provides imaging stats by type of media as well as the earliest and latest dates for last modification.
Update the “placeholder” date expression in the accession record and minimal finding aid with these dates. If the born-digital records are part of an accession or unprocessed collection that includes analog records, make sure the dates are covered by the collection-level date range. If the accession is entirely comprised of born-digital records, or is an addition to a processed collection, enter the date range following the guidelines for known dating in Section 6.2 of the Processing Manual and add “(last modified range)” in parentheses.
Type of media imaged
Dates
36
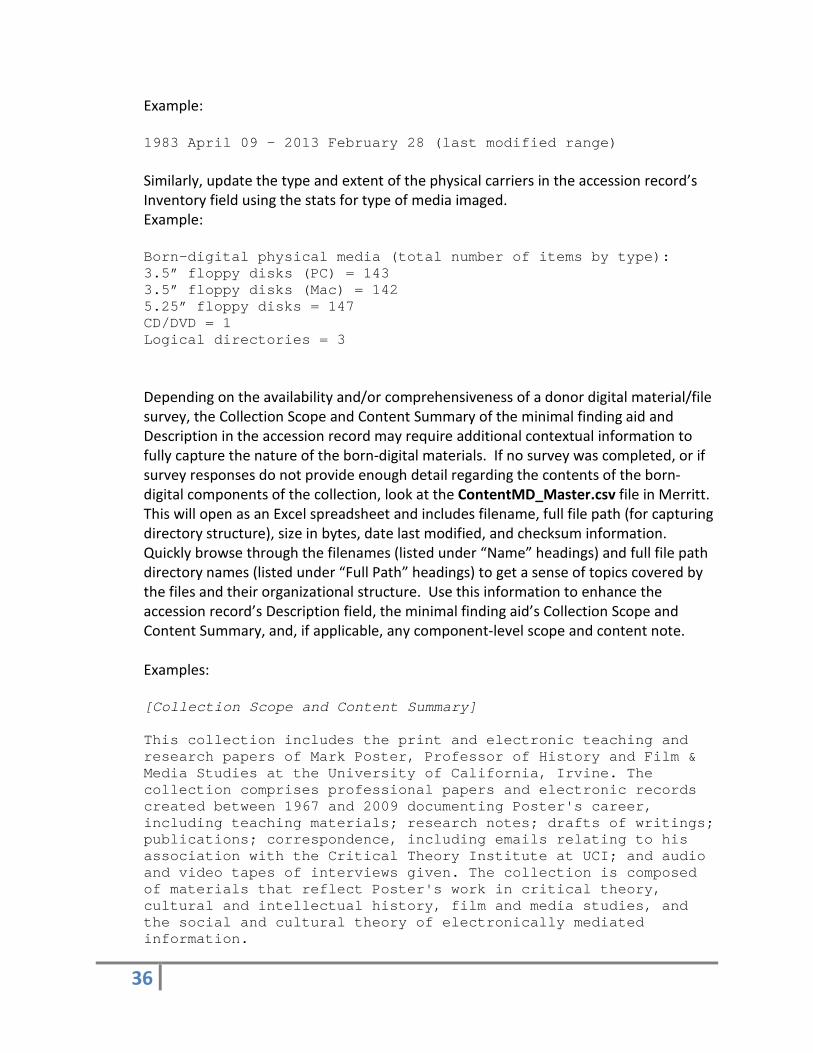
Example: 1983 April 09 – 2013 February 28 (last modified range) Similarly, update the type and extent of the physical carriers in the accession record’s Inventory field using the stats for type of media imaged. Example: Born-digital physical media (total number of items by type): 3.5” floppy disks (PC) = 143 3.5” floppy disks (Mac) = 142 5.25” floppy disks = 147 CD/DVD = 1 Logical directories = 3 Depending on the availability and/or comprehensiveness of a donor digital material/file survey, the Collection Scope and Content Summary of the minimal finding aid and Description in the accession record may require additional contextual information to fully capture the nature of the born-digital materials. If no survey was completed, or if survey responses do not provide enough detail regarding the contents of the born-digital components of the collection, look at the ContentMD_Master.csv file in Merritt. This will open as an Excel spreadsheet and includes filename, full file path (for capturing directory structure), size in bytes, date last modified, and checksum information. Quickly browse through the filenames (listed under “Name” headings) and full file path directory names (listed under “Full Path” headings) to get a sense of topics covered by the files and their organizational structure. Use this information to enhance the accession record’s Description field, the minimal finding aid’s Collection Scope and Content Summary, and, if applicable, any component-level scope and content note. Examples: [Collection Scope and Content Summary] This collection includes the print and electronic teaching and research papers of Mark Poster, Professor of History and Film & Media Studies at the University of California, Irvine. The collection comprises professional papers and electronic records created between 1967 and 2009 documenting Poster's career, including teaching materials; research notes; drafts of writings; publications; correspondence, including emails relating to his association with the Critical Theory Institute at UCI; and audio and video tapes of interviews given. The collection is composed of materials that reflect Poster's work in critical theory, cultural and intellectual history, film and media studies, and the social and cultural theory of electronically mediated information.
37
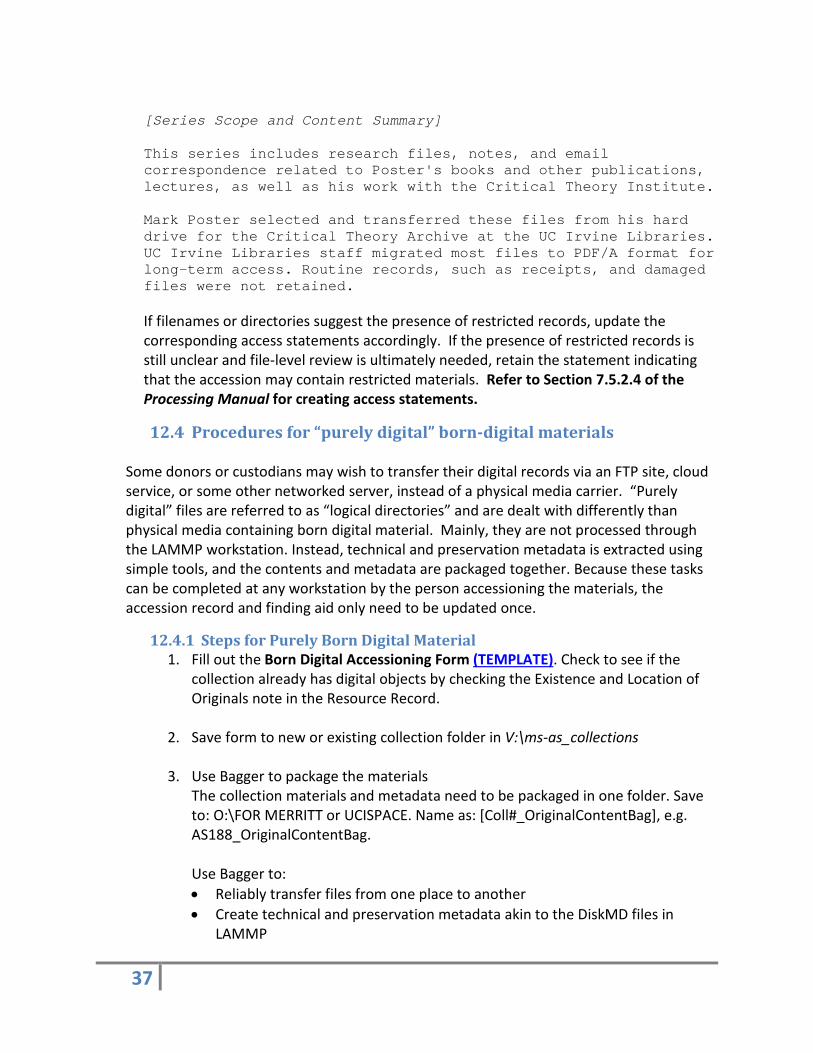
[Series Scope and Content Summary] This series includes research files, notes, and email correspondence related to Poster's books and other publications, lectures, as well as his work with the Critical Theory Institute. Mark Poster selected and transferred these files from his hard drive for the Critical Theory Archive at the UC Irvine Libraries. UC Irvine Libraries staff migrated most files to PDF/A format for long-term access. Routine records, such as receipts, and damaged files were not retained. If filenames or directories suggest the presence of restricted records, update the corresponding access statements accordingly. If the presence of restricted records is still unclear and file-level review is ultimately needed, retain the statement indicating that the accession may contain restricted materials. Refer to Section 7.5.2.4 of the Processing Manual for creating access statements.
12.4 Procedures for “purely digital” born-digital materials Some donors or custodians may wish to transfer their digital records via an FTP site, cloud service, or some other networked server, instead of a physical media carrier. “Purely digital” files are referred to as “logical directories” and are dealt with differently than physical media containing born digital material. Mainly, they are not processed through the LAMMP workstation. Instead, technical and preservation metadata is extracted using simple tools, and the contents and metadata are packaged together. Because these tasks can be completed at any workstation by the person accessioning the materials, the accession record and finding aid only need to be updated once.
12.4.1 Steps for Purely Born Digital Material 1. Fill out the Born Digital Accessioning Form (TEMPLATE). Check to see if the
collection already has digital objects by checking the Existence and Location of Originals note in the Resource Record.
2. Save form to new or existing collection folder in V:\ms-as_collections
3. Use Bagger to package the materials The collection materials and metadata need to be packaged in one folder. Save to: O:\FOR MERRITT or UCISPACE. Name as: [Coll#_OriginalContentBag], e.g. AS188_OriginalContentBag.
Use Bagger to: • Reliably transfer files from one place to another • Create technical and preservation metadata akin to the DiskMD files in
LAMMP
38
Bagger software and instructions are available here: O:\LAMMP Processing\BAGGER. Simple instructions are located on the wiki: https://wiki.oit.uci.edu/display/UCILib/Born+Digital+Tools+Instructions
4. Create a directory print Use Karen’s Directory Printer to easily capture metadata about each of the files. This is akin to the ContentMD.csv file generated by LAMMP. Instructions for using Karen’s Directory Printer are on the Born Digital Tools Instructions wiki page. Karen’s will generate the following information for every file: • File name • Full path • File size • Date last modified • Date last accessed • Md5 checksum
Save the resulting csv file with the “bagged” content as: [collection#_accn#_dirprntinfo], example: AS188_2015.026_dirprntinfo
5. Run FITS (File Information Tool Set)
FITS uses several tools to identify, validate, and extract technical metadata on a number of file formats. UCI’s digital projects specialist developed a script so that metadata for all files is generated in one XML document. Instructions are located on the Born Digital Tools Instruction wiki page.
6. Add information to the LAMMP wiki, Purely Born Digital Media queue, based off the Born Digital Accessioning form. Mark the item as QUEUED as well as the date received.
7. Notify the person in charge of tracking LAMMP physical media. At the time of writing, the primary contact is the LA for digital projects, with the archivist for special collections as backup.
8. LA transfers content and metadata to Merritt using instructions here: UCI Original Digital Content Preservation in Merritt wiki page (note these are different instructions than material that has gone through LAMMP).
Merritt will serve as the “virtual shelf” for born-digital archival records until they are reviewed further for processing. Merritt will hold the “bags” of the original born-digital content and also provide preservation masters of the archival records from which derivative use copies can be made.
39
9. LA links to Merritt object in the LAMMP Queue wiki, changes status from “Queued” to PRESERVED.
12.4.2 Post-digital forensics information for the accession record and minimal finding aid
When the files have been successfully transferred into BagIt and the directory print has been created, examine the content in the data directory of the Bag. Examine the properties of the top-level directory (by right-clicking the folder icon and selecting “Properties”) to determine the number of folders they contain and their total size in bytes. Open the sub-directories and quickly browse through them to get a cursory overview of their scope and contents. If the accession is of manageable size, open the directories down to the file-level and sort by “Type” to see the file formats of the records. Also sort by “Date Modified” to get a rough estimate of the modification date range. DO NOT open any of the individual files. You can also look at information in the directory print for file types, dates, and file titles.
Follow the instructions in Section 14.3.1 of this manual to document this preliminary information for the accession record and minimal finding aid. Make sure to craft appropriate access statements.
12.5 Important notes
In some cases, an accession may contain born-digital materials that are an addition to a previously preserved collection. Similarly, an accession may contain materials that are both in “purely digital” form and stored on digital media carriers. Instructions for both scenarios are provided in the SCA LAMMP Processing wiki page under the heading Important Notes.
40
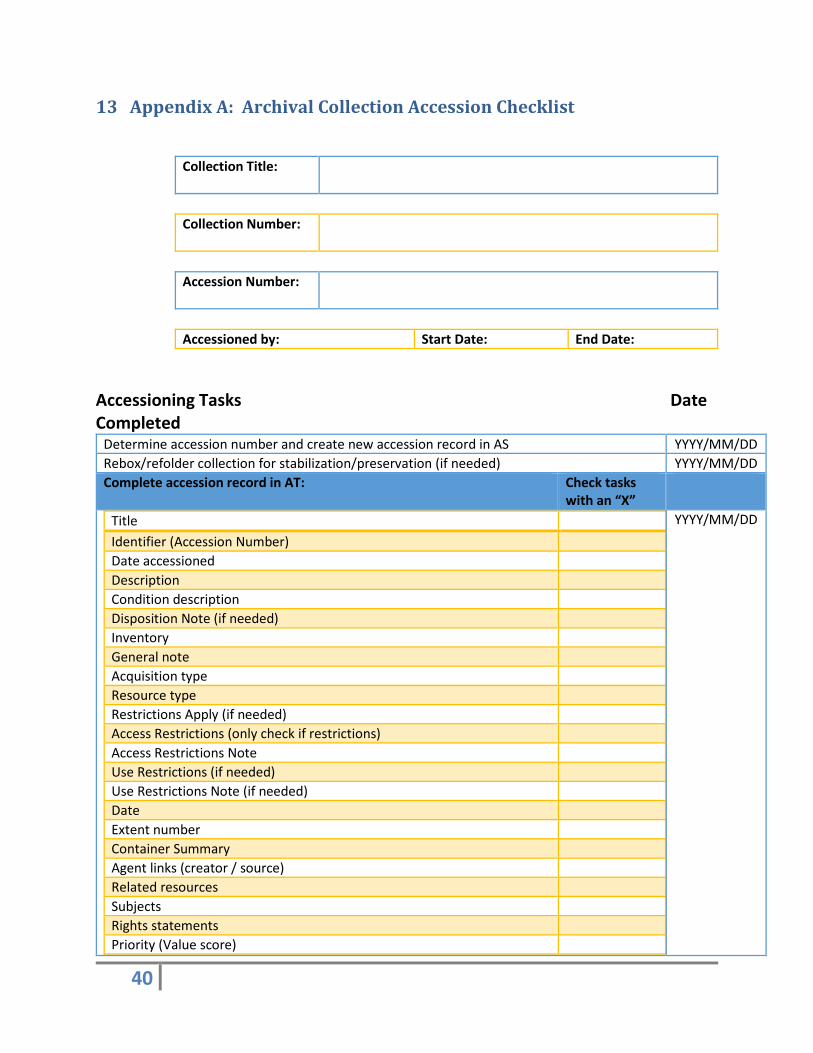
13 Appendix A: Archival Collection Accession Checklist
Collection Title:
Collection Number:
Accession Number:
Accessioned by: Start Date: End Date:
Accessioning Tasks Date Completed
Determine accession number and create new accession record in AS YYYY/MM/DD Rebox/refolder collection for stabilization/preservation (if needed) YYYY/MM/DD Complete accession record in AT: Check tasks
with an “X”
Title Identifier (Accession Number) Date accessioned Description Condition description Disposition Note (if needed) Inventory General note Acquisition type Resource type Restrictions Apply (if needed) Access Restrictions (only check if restrictions) Access Restrictions Note Use Restrictions (if needed) Use Restrictions Note (if needed) Date Extent number Container Summary Agent links (creator / source) Related resources Subjects Rights statements Priority (Value score)
YYYY/MM/DD
41
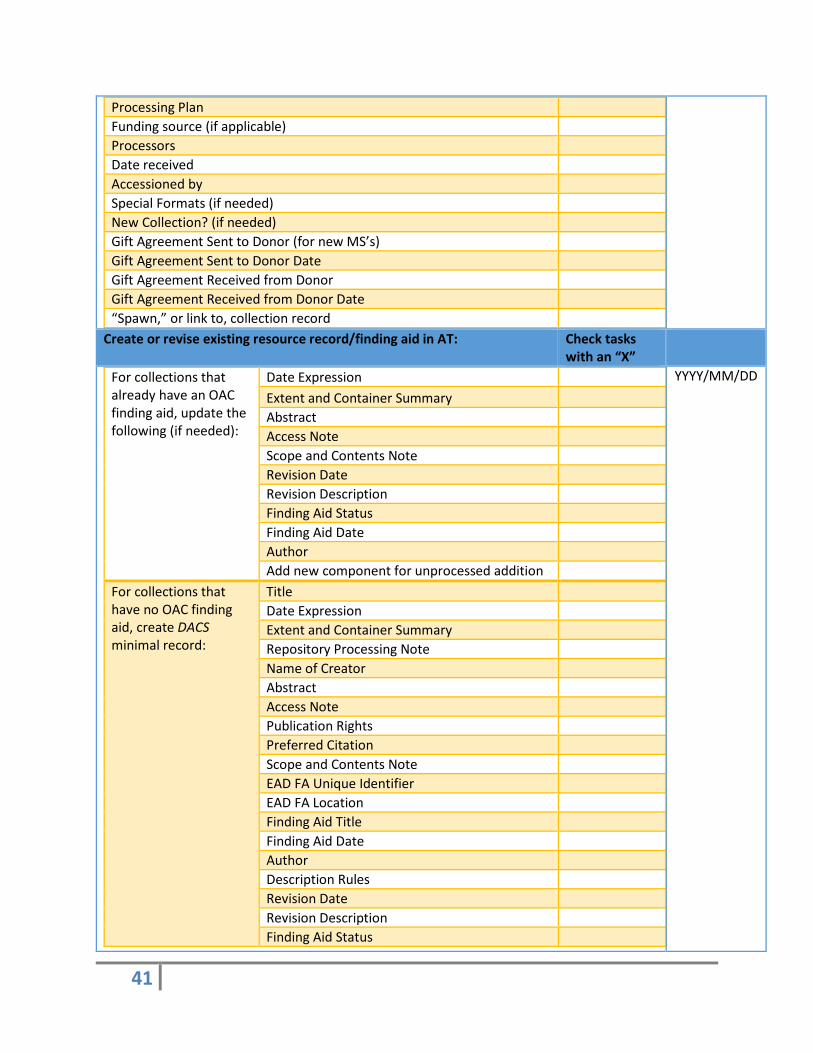
Processing Plan Funding source (if applicable) Processors Date received Accessioned by Special Formats (if needed) New Collection? (if needed) Gift Agreement Sent to Donor (for new MS’s) Gift Agreement Sent to Donor Date Gift Agreement Received from Donor Gift Agreement Received from Donor Date “Spawn,” or link to, collection record
Create or revise existing resource record/finding aid in AT: Check tasks with an “X”
For collections that already have an OAC finding aid, update the following (if needed):
Date Expression Extent and Container Summary Abstract Access Note Scope and Contents Note Revision Date Revision Description Finding Aid Status Finding Aid Date Author Add new component for unprocessed addition
For collections that have no OAC finding aid, create DACS minimal record:
Title Date Expression Extent and Container Summary Repository Processing Note Name of Creator Abstract Access Note Publication Rights Preferred Citation Scope and Contents Note EAD FA Unique Identifier EAD FA Location Finding Aid Title Finding Aid Date Author Description Rules Revision Date Revision Description Finding Aid Status
YYYY/MM/DD
42
Accessions with Born-digital Content: Check tasks with an “X”
Digital Media Carriers
Pre-digital forensics documentation
Donor digital material/file survey completed (if feasible)
Accession record (Date Expression, Inventory, Description, Access Restrictions Note)
Minimal finding aid (Date Expression, Collection Scope and Content Summary, Access)
LAMMP tasks Print labels with digital object #s LAMMP processing form completed Carriers and all documentation sent to Digital Project Specialist
Post-digital forensics documentation
Update accession record Update minimal finding aid
Logical Directories
Pre-LAMMP tasks and documentation
Donor digital material/file survey completed (if feasible)
Create new directory on O:\ drive Transfer materials to location via BagIt Accession record (Date Expression, Inventory, Description, Access Restrictions Note)
Minimal finding aid (Date Expression, Collection Scope and Content Summary, Access)
LAMMP tasks LAMMP processing form completed All documentation sent to Digital Project Specialist
Documentation saved in directory or Bag in Place
Post-LAMMP documentation
Update accession record Update minimal finding aid
YYYY/MM/DD
YYYY/MM/DD
YYYY/MM/DD
YYYY/MM/DD
YYYY/MM/DD
YYYY/MM/DD
Label boxes YYYY/MM/DD Shelve collection and write locations on boxes YYYY/MM/DD Update Stacks Locator YYYY/MM/DD Export new or revised EAD finding aid, clean it up, and upload to OAC YYYY/MM/DD Upload nonstandard finding aid to OAC as a supplemental PDF (if needed) YYYY/MM/DD Export finding aid pdf and file in in V:\ms-as_collections\Finding Aid pdfs YYYY/MM/DD File new or revised finding aid in reading room (only reprint revised finding aids if changes are significant. Consult the archivist if needed.)
YYYY/MM/DD
Export MARC and save in V:\Tech Services and Cataloging\AT READY FOR UPLOAD YYYY/MM/DD
43
Email notification sent to cataloger YYYY/MM/DD MARC record for ANTPAC created or updated YYYY/MM/DD Checkbox for “Cataloged” ticked YYYY/MM/DD Cataloged Date entered YYYY/MM/DD Send email out to SCA with links to OAC finding aid and ANTPAC record YYYY/MM/DD Print accession record report and file (create electronic and paper collection files if needed) YYYY/MM/DD Accessioning checklist printed and filed in paper collection file YYYY/MM/DD Notes:
14 Appendix B: Assigning Value Scores to Determine Processing Priority SCA is following the recommendations established by the Guidelines for Efficient Archival Processing in the University of California Libraries (“UC Guidelines”) report published in September 2012. This report encourages UC campuses to process collections at an appropriate level and provides repositories with a suite of tools to guide local processing decisions. At UCI, preliminary processing decisions will be made during accessioning and noted in the accession record. For a detailed discussion of levels of control, see Section 2.4 of the Processing Manual and Section 3.A of the UC Guidelines. Assess the value of the accession
Note: The following is adapted and excerpted from Section 3.B.1 of the UC Guidelines The value of an accession in the context of SCA will determine its processing priority. The value will be represented on a scale of 4-20 points and consider these issues:
• User interest: How frequently do/will researchers seek material on the topics documented in the collection? What kinds of researchers are interested in the material? To help answer these questions, you can:
o Consult recent quarterly reports on the SCA wiki. Look especially at significant researcher topics, paging statistics for archival collections, and top 5 most-viewed finding aids (under Finding Aids: Hits)
o Ask the Public Services Librarian about popular reference questions and collections
• Quality of documentation (or research value): How significant is the documentation to scholarship on this topic? How unusual, extensive, or detailed is the documentation? Points to consider include:
o Informational value of the records (often dictated by record genre/form, e.g. correspondence, diaries, etc.)
44
o Professional standing and accomplishments of the creator in their field (gathered through an Internet search or the collection itself)
o Collection of related records, artifacts, etc. by other cultural heritage institutions
o Existence of archival sources vs. published sources o Overall contribution to the available research resources on the creator or
topic (e.g. a new or different perspective)
• Institutional value: Does the collection have particular interest to SCA? Points to consider include:
o Service to clientele of particular interest (e.g. a community we are trying to document)
o Collecting areas we are actively trying to enrich or expand Consult the Special Collections & Archives Collection Development
Policy o Academic strengths at UCI o Political or other reasons to highlight the collection, such as:
An important donor or administrator Campus or library-wide initiatives
• Object value: This refers to the value of the materials as artifacts. Does the
collection include materials that are significantly rare, unique or precious? Do the materials have significant exhibit value? Are they likely targets for theft? Points to consider include:
o Original works of art (e.g. paintings, drawings, three-dimensional artifacts, hand-crafted decoration or embellishment, etc.)
o Contextual role of physicality, such as: Original housings or display settings that contribute to experience and
interpretation of the records Inscriptions or other markings on physical carriers of intrinsic or
informational value Using the table below, assign a rating from 1 – 5 for each of the four values, for a total score of 4-20.
Scale
User Interest Quality of
Documentation (Research Value)
Institutional value
Object value
1 Negligible Slight Negligible Negligible
2 Slight Limited Limited Limited
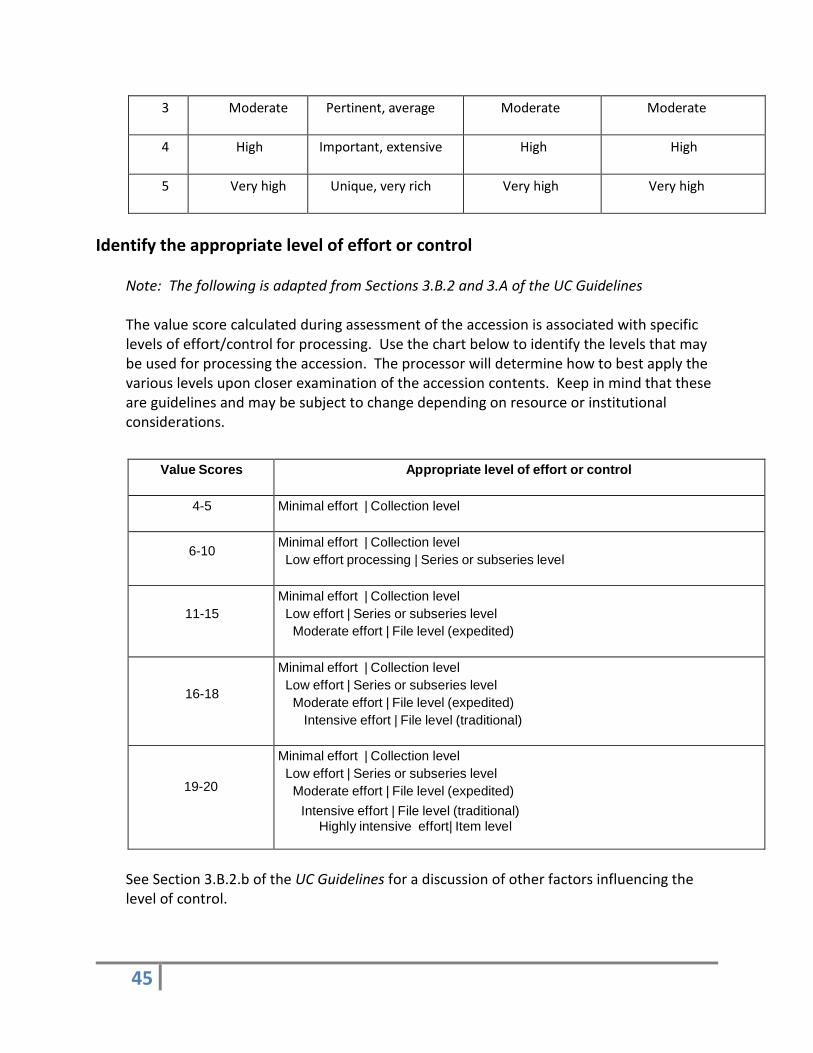
45
3 Moderate Pertinent, average Moderate Moderate
4 High Important, extensive High High
5 Very high Unique, very rich Very high Very high
Identify the appropriate level of effort or control
Note: The following is adapted from Sections 3.B.2 and 3.A of the UC Guidelines The value score calculated during assessment of the accession is associated with specific levels of effort/control for processing. Use the chart below to identify the levels that may be used for processing the accession. The processor will determine how to best apply the various levels upon closer examination of the accession contents. Keep in mind that these are guidelines and may be subject to change depending on resource or institutional considerations.
See Section 3.B.2.b of the UC Guidelines for a discussion of other factors influencing the level of control.
Value Scores Appropriate level of effort or control
4-5 Minimal effort | Collection level
6-10 Minimal effort | Collection level
Low effort processing | Series or subseries level
11-15
Minimal effort | Collection level Low effort | Series or subseries level
Moderate effort | File level (expedited)
16-18
Minimal effort | Collection level Low effort | Series or subseries level
Moderate effort | File level (expedited) Intensive effort | File level (traditional)
19-20
Minimal effort | Collection level Low effort | Series or subseries level
Moderate effort | File level (expedited) Intensive effort | File level (traditional)
Highly intensive effort| Item level

46
Considerations for assigning levels of control
Assessing the value of accessions may not always be a straightforward exercise. The following chart gives a brief overview of some considerations for determining appropriate levels of processing, outlining the “attributes of likely candidates” for each level of effort/control. Note that these attributes are applied to various archival units, including accessions, collections, and series.
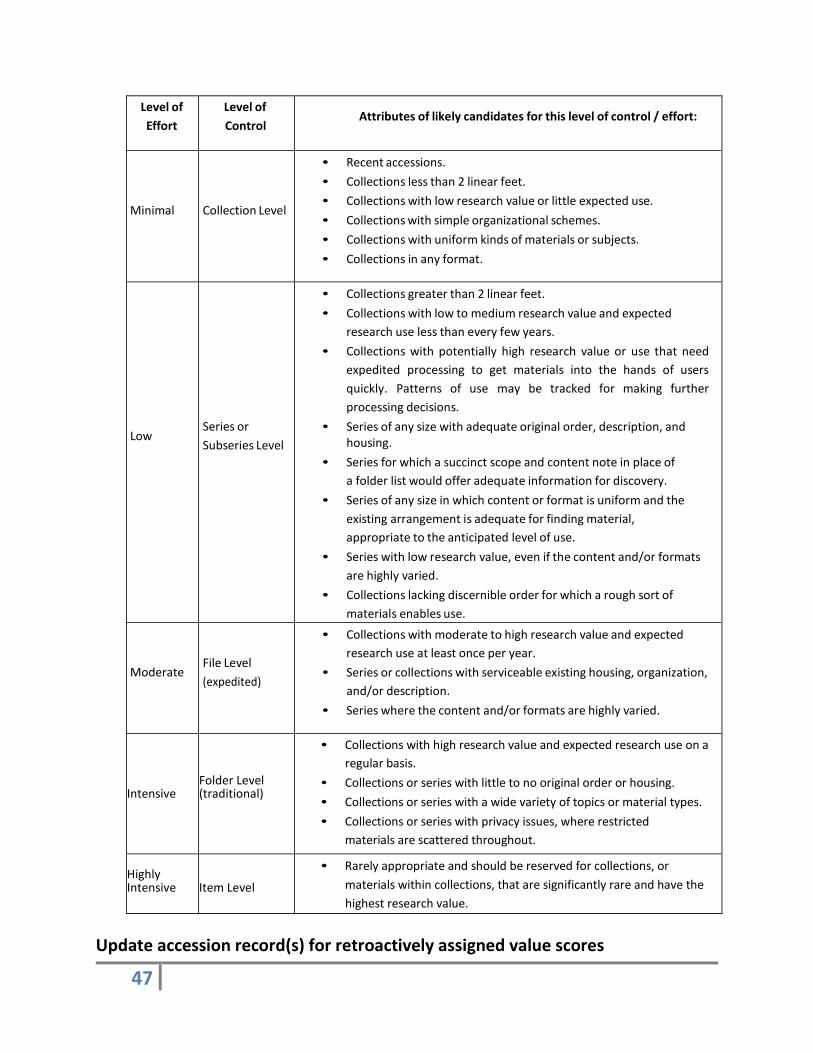
47
Level of Effort
Level of Control
Attributes of likely candidates for this level of control / effort:
Minimal
Collection Level
• Recent accessions. • Collections less than 2 linear feet. • Collections with low research value or little expected use. • Collections with simple organizational schemes. • Collections with uniform kinds of materials or subjects. • Collections in any format.
Low
Series or Subseries Level
• Collections greater than 2 linear feet. • Collections with low to medium research value and expected
research use less than every few years. • Collections with potentially high research value or use that need
expedited processing to get materials into the hands of users quickly. Patterns of use may be tracked for making further processing decisions.
• Series of any size with adequate original order, description, and housing.
• Series for which a succinct scope and content note in place of a folder list would offer adequate information for discovery.
• Series of any size in which content or format is uniform and the existing arrangement is adequate for finding material, appropriate to the anticipated level of use.
• Series with low research value, even if the content and/or formats are highly varied.
• Collections lacking discernible order for which a rough sort of materials enables use.
Moderate
File Level (expedited)
• Collections with moderate to high research value and expected research use at least once per year.
• Series or collections with serviceable existing housing, organization, and/or description.
• Series where the content and/or formats are highly varied.
Intensive
Folder Level (traditional)
• Collections with high research value and expected research use on a regular basis.
• Collections or series with little to no original order or housing. • Collections or series with a wide variety of topics or material types. • Collections or series with privacy issues, where restricted
materials are scattered throughout. Highly Intensive
Item Level
• Rarely appropriate and should be reserved for collections, or materials within collections, that are significantly rare and have the highest research value.
Update accession record(s) for retroactively assigned value scores
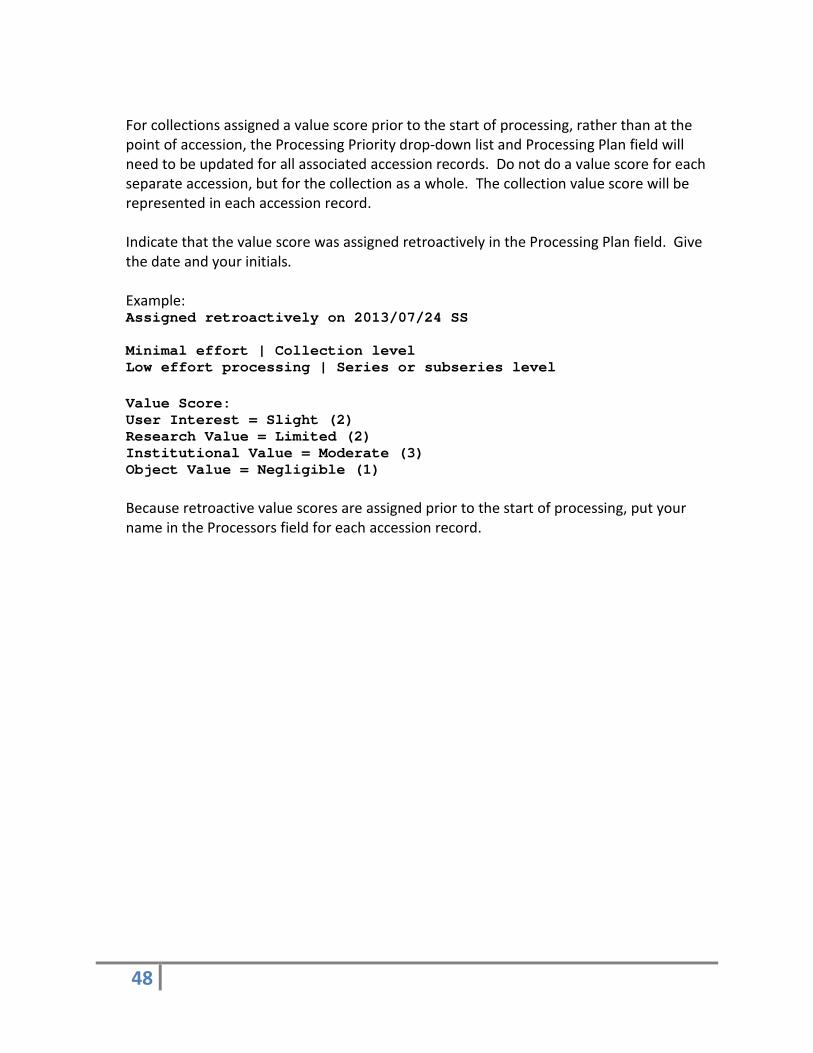
48
For collections assigned a value score prior to the start of processing, rather than at the point of accession, the Processing Priority drop-down list and Processing Plan field will need to be updated for all associated accession records. Do not do a value score for each separate accession, but for the collection as a whole. The collection value score will be represented in each accession record.
Indicate that the value score was assigned retroactively in the Processing Plan field. Give the date and your initials.
Example: Assigned retroactively on 2013/07/24 SS Minimal effort | Collection level Low effort processing | Series or subseries level Value Score: User Interest = Slight (2) Research Value = Limited (2) Institutional Value = Moderate (3) Object Value = Negligible (1) Because retroactive value scores are assigned prior to the start of processing, put your name in the Processors field for each accession record.
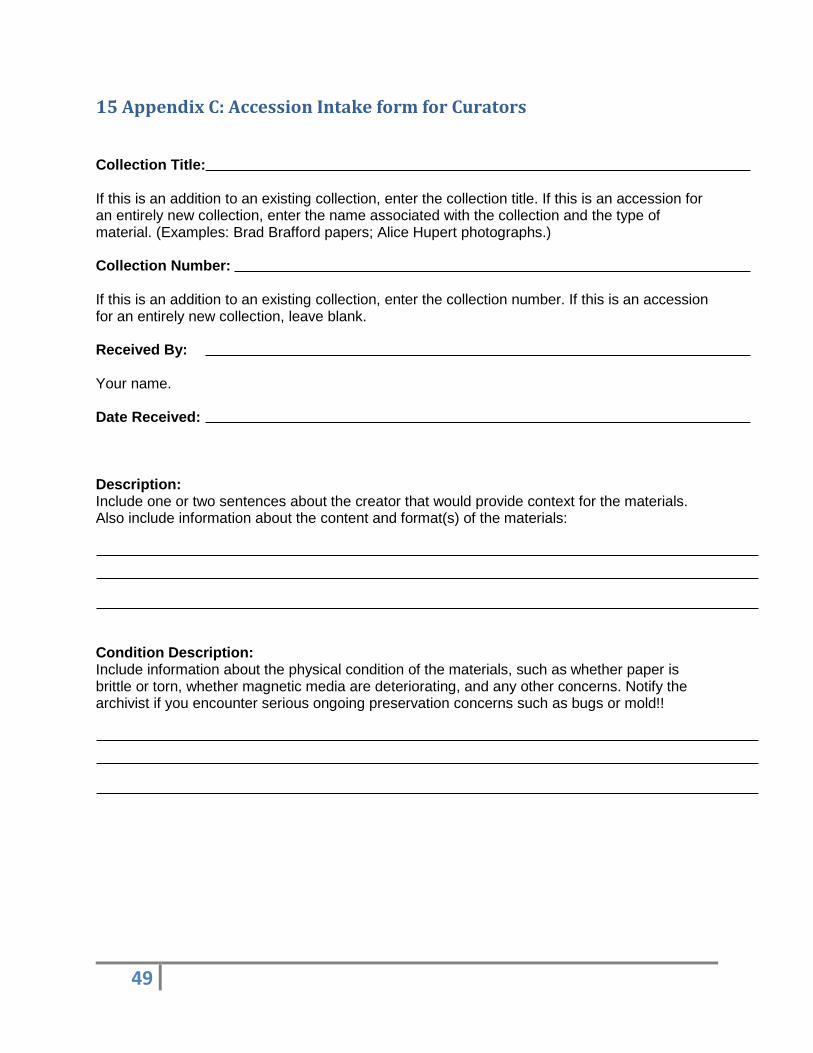
49
15 Appendix C: Accession Intake form for Curators Collection Title: If this is an addition to an existing collection, enter the collection title. If this is an accession for an entirely new collection, enter the name associated with the collection and the type of material. (Examples: Brad Brafford papers; Alice Hupert photographs.) Collection Number: If this is an addition to an existing collection, enter the collection number. If this is an accession for an entirely new collection, leave blank. Received By: Your name. Date Received: Description: Include one or two sentences about the creator that would provide context for the materials. Also include information about the content and format(s) of the materials: Condition Description: Include information about the physical condition of the materials, such as whether paper is brittle or torn, whether magnetic media are deteriorating, and any other concerns. Notify the archivist if you encounter serious ongoing preservation concerns such as bugs or mold!!
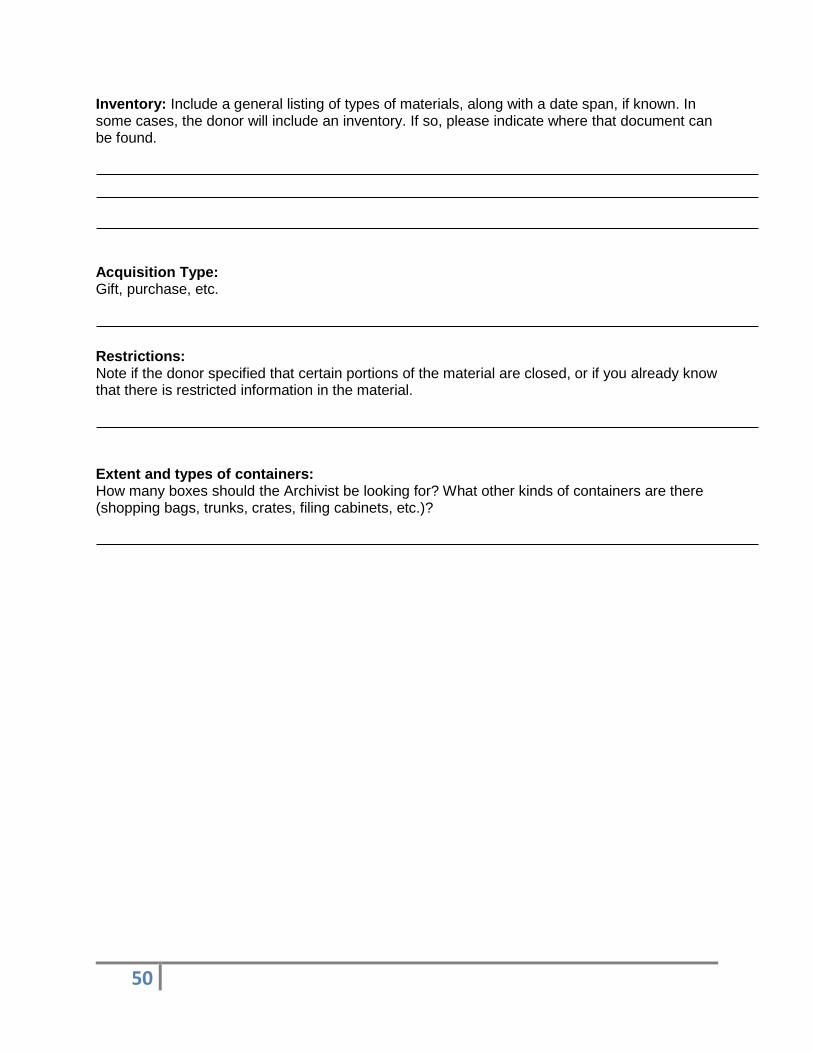
50
Inventory: Include a general listing of types of materials, along with a date span, if known. In some cases, the donor will include an inventory. If so, please indicate where that document can be found. Acquisition Type: Gift, purchase, etc. Restrictions: Note if the donor specified that certain portions of the material are closed, or if you already know that there is restricted information in the material. Extent and types of containers: How many boxes should the Archivist be looking for? What other kinds of containers are there (shopping bags, trunks, crates, filing cabinets, etc.)?