ac500 communication with mysql database over tcp · 3.2.2 configure mysql database ... 3.3...
TRANSCRIPT
abb
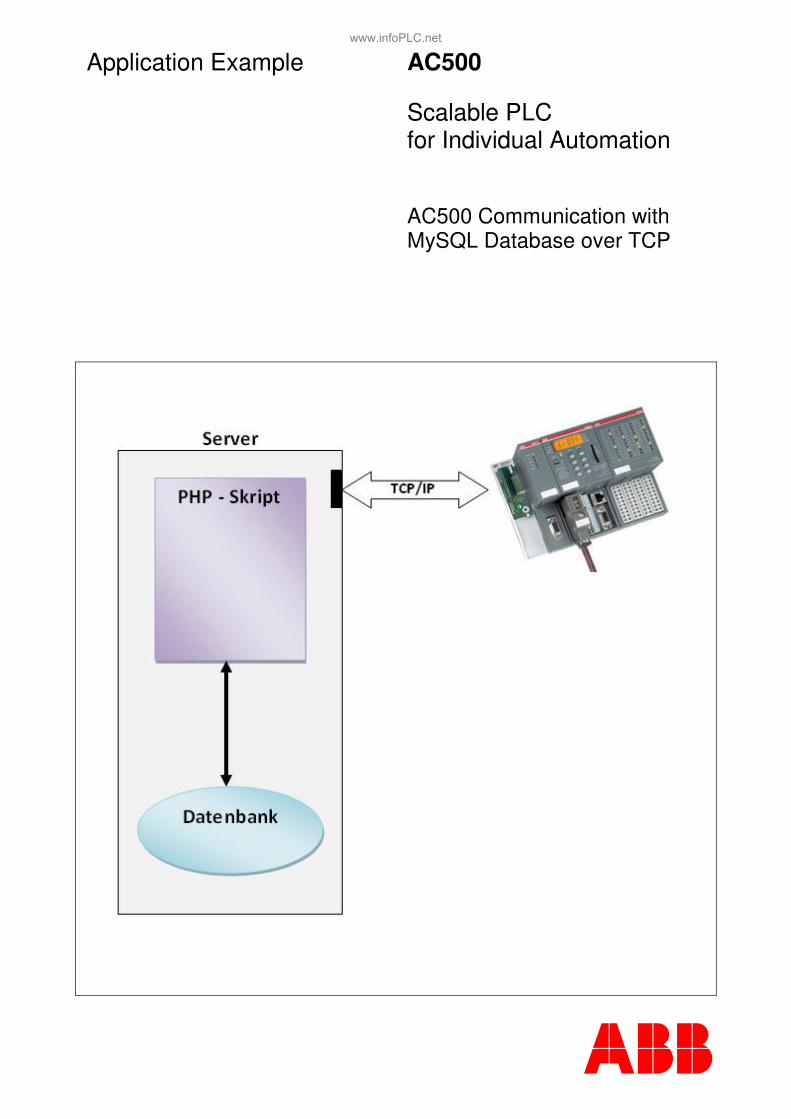
Application Example AC500
Scalable PLC for Individual Automation
AC500 Communication with MySQL Database over TCP
www.infoPLC.net
Application Example - 1 - AC500/Issue: 10.2012
Content
1 Disclaimer ..................................................................................................................2
1.1 For customers domiciled outside Germany/ Für Kunden mit Sitz außerhalb Deutschlands........................................................................ 2
1.2 Nur für Kunden mit Sitz in Deutschland ........................................................................ 2
2 Introduction ...............................................................................................................3
2.1 Hardware and Software requirement ............................................................................. 3
2.2 Connections .................................................................................................................... 3
3 Server Applications...................................................................................................4
3.1 IP settings........................................................................................................................ 4
3.2 XAMPP (contains: Apache, MySQL, PHP and Perl) ...................................................... 4
3.2.1 Configure XAMPP.................................................................................................... 4
3.2.2 Configure MySQL database..................................................................................... 6
3.2.3 Create a database and tables .................................................................................. 8
3.3 PHP-Script ..................................................................................................................... 11
3.3.1 Copy files............................................................................................................... 11
3.3.2 Configure the PHP-script ....................................................................................... 11
3.3.3 Execute the script .................................................................................................. 12
4 PLC AC500 ...............................................................................................................14
4.1 Control Builder Plus...................................................................................................... 14
4.1.1 PS501 Configurator ............................................................................................... 14
4.1.2 AC500 eCo CPU.................................................................................................... 14
4.1.3 IP settings.............................................................................................................. 15
4.2 CoDeSys ........................................................................................................................ 16
4.2.1 Communication parameter..................................................................................... 16
4.3 Visualization .................................................................................................................. 18
4.3.1 Read a data set ..................................................................................................... 18
4.3.2 Write a data set...................................................................................................... 20
www.infoPLC.net

Application Example - 2 - AC500/Issue: 10.2012
1 Disclaimer
1.1 For customers domiciled outside Germany/ Für Kunden mit Sitz außerhalb Deutschlands
"Warranty, Liability: The user shall be solely responsible for the use of this application example described within this file. ABB shall be under no warranty whatsoever. ABB's liability in connection with this application example or the files included within this file, irrespective of the legal ground, shall be excluded. The exclusion of liability shall not apply in the case of intention or gross negligence. The present declaration shall be governed by and construed in accordance with the laws of Switzerland under exclusion of its conflict of laws rules and of the Vienna Convention on the International Sale of Goods (CISG)." "Gewährleistung und Haftung: Der Nutzer ist allein für die Verwendung des in dieser Datei beschriebenen Anwendungsbeispiels verantwortlich. ABB unterliegt keiner Gewährleistung. Die Haftung von ABB im Zusammenhang mit diesem Anwendungsbeispiel oder den in dieser Datei enthaltenen Dateien - gleich aus welchem Rechtsgrund - ist ausgeschlossen. Dieser Ausschluß gilt nicht im Falle von Vorsatz oder grober Fahrlässigkeit. Diese Erklärung unterliegt Schweizer Recht unter Ausschluß der Verweisungsnormen und des UN-Kaufrechts (CISG)."
1.2 Nur für Kunden mit Sitz in Deutschland
"Gewährleistung und Haftung: Die in diesem Anwendungsbeispiel enthaltenen Dateien beschreiben eine mögliche Anwendung der Steuerung AC500 bzw. zeigen eine mögliche Einsatzart der Steuerung. Sie stellen nur Beispiele für Programmierungen dar, sind aber keine fertigen Lösungen. Eine Gewähr kann nicht übernommen werden. Der Nutzer ist für die ordnungsgemäße, insbesondere vollständige und fehlerfreie Programmierung der Steuerungen selbst verantwortlich. Im Falle der teilweisen oder ganzen Übernahme der Programmierbeispiele können gegen ABB keine Ansprüche geltend gemacht werden. Die Haftung von ABB, gleich aus welchem Rechtsgrund, im Zusammenhang mit den Anwendungsbeispielen oder den in dieser Datei enthaltenen Dateien wird ausgeschlossen. Der Haftungsausschluß gilt jedoch nicht in Fällen des Vorsatzes, der groben Fahrlässigkeit, bei Ansprüchen nach dem Produkthaftungsgesetz, im Falle der Verletzung des Lebens, des Körpers oder der Gesundheit oder bei schuldhafter Verletzung einer wesentlichen Vertragspflicht. Im Falle der Verletzung einer wesentlichen Vertragspflicht ist die Haftung jedoch auf den vertragstypischen, vorhersehbaren Schaden begrenzt, soweit nicht zugleich ein anderer der in Satz 2 dieses Unterabsatzes erwähnten Fälle gegeben ist. Eine Änderung der Beweislast zum Nachteil des Nutzers ist hiermit nicht verbunden. Es gilt materielles deutsches Recht unter Ausschluß des UN-Kaufrechts."
www.infoPLC.net
Application Example - 3 - AC500/Issue: 10.2012
2 Introduction
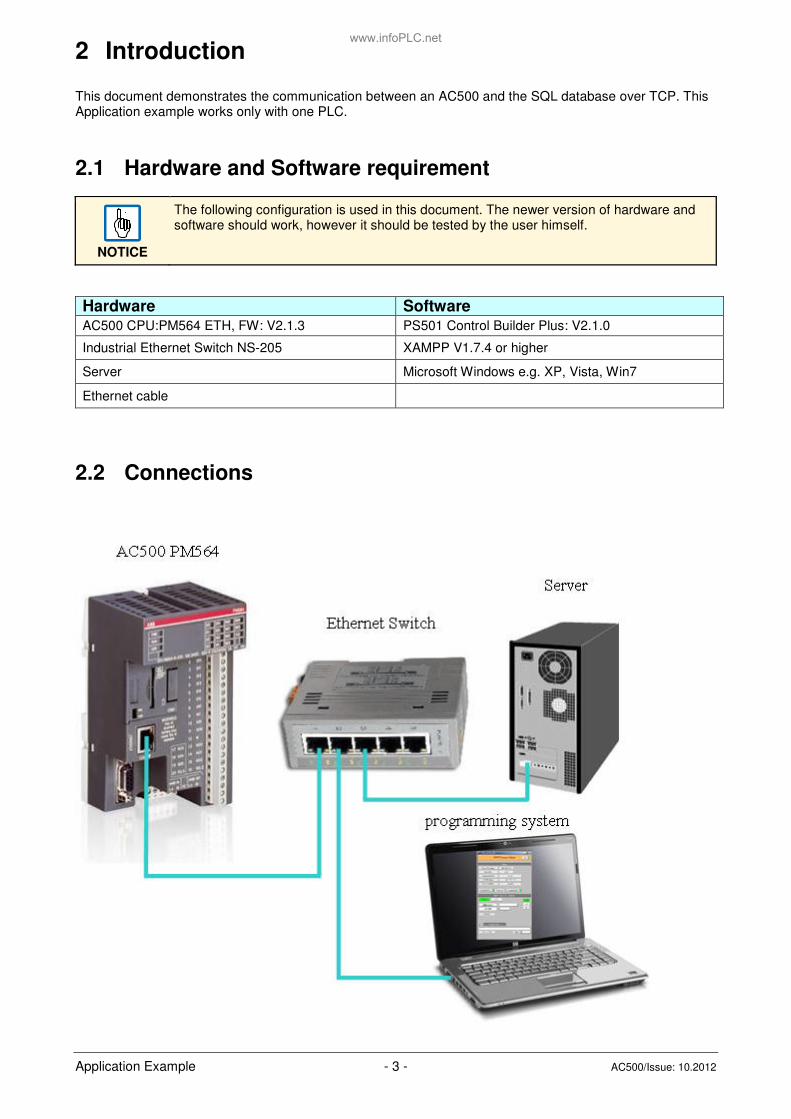
This document demonstrates the communication between an AC500 and the SQL database over TCP. This Application example works only with one PLC.
2.1 Hardware and Software requirement
NOTICE
The following configuration is used in this document. The newer version of hardware and software should work, however it should be tested by the user himself.
Hardware Software AC500 CPU:PM564 ETH, FW: V2.1.3 PS501 Control Builder Plus: V2.1.0
Industrial Ethernet Switch NS-205 XAMPP V1.7.4 or higher
Server Microsoft Windows e.g. XP, Vista, Win7
Ethernet cable
2.2 Connections
www.infoPLC.net
Application Example - 4 - AC500/Issue: 10.2012
3 Server Applications
This chapter will show all programs and settings they are required.
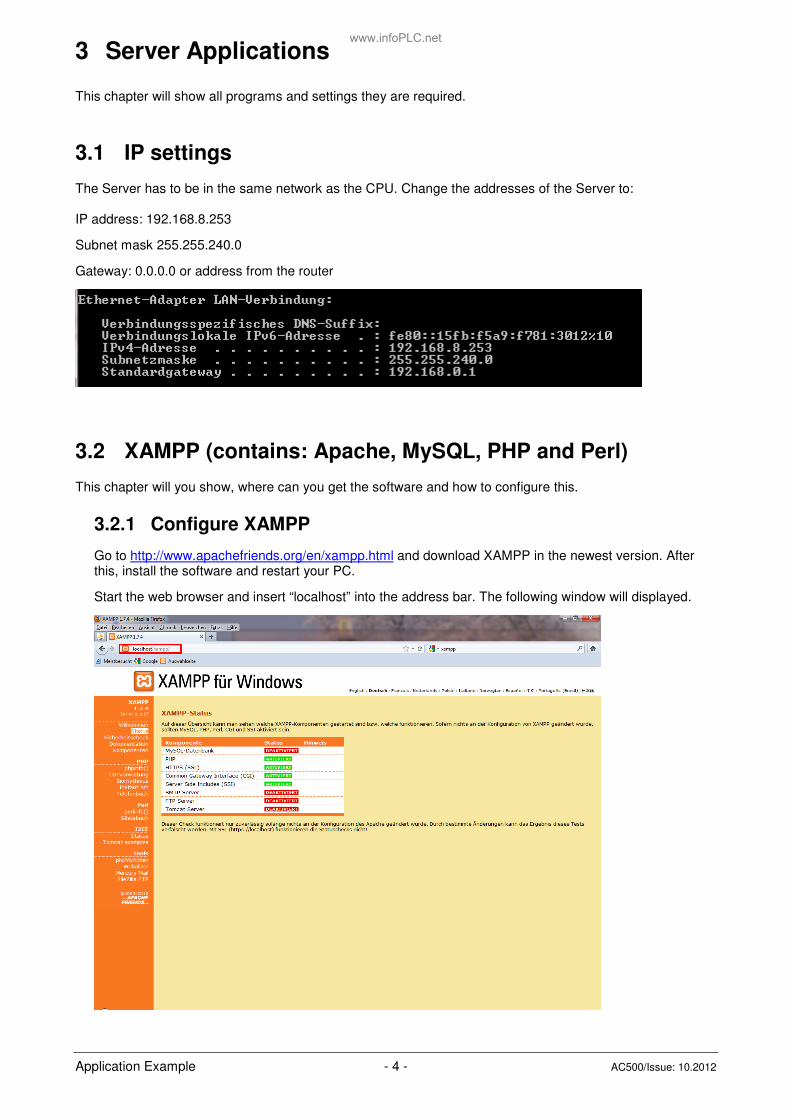
3.1 IP settings
The Server has to be in the same network as the CPU. Change the addresses of the Server to: IP address: 192.168.8.253
Subnet mask 255.255.240.0
Gateway: 0.0.0.0 or address from the router
3.2 XAMPP (contains: Apache, MySQL, PHP and Perl)
This chapter will you show, where can you get the software and how to configure this.
3.2.1 Configure XAMPP
Go to http://www.apachefriends.org/en/xampp.html and download XAMPP in the newest version. After this, install the software and restart your PC.
Start the web browser and insert “localhost” into the address bar. The following window will displayed.
www.infoPLC.net
Application Example - 5 - AC500/Issue: 10.2012
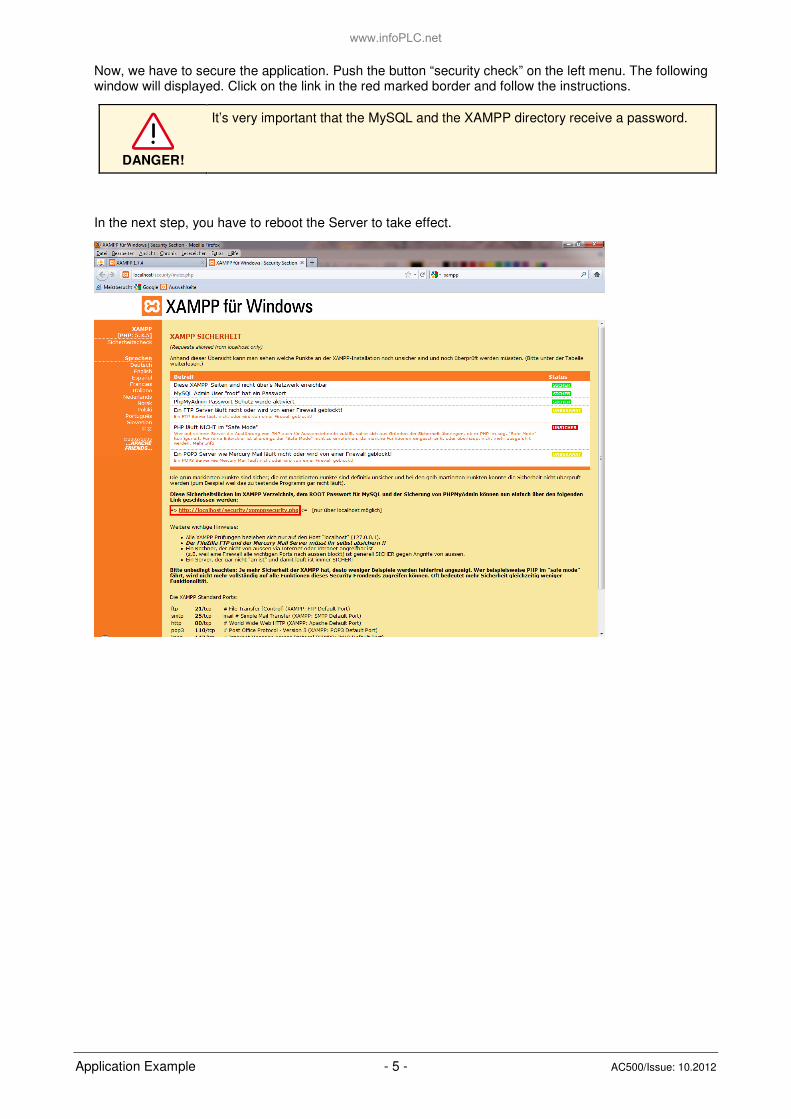
Now, we have to secure the application. Push the button “security check” on the left menu. The following window will displayed. Click on the link in the red marked border and follow the instructions.
DANGER!
It’s very important that the MySQL and the XAMPP directory receive a password.
In the next step, you have to reboot the Server to take effect.
www.infoPLC.net
Application Example - 6 - AC500/Issue: 10.2012
3.2.2 Configure MySQL database
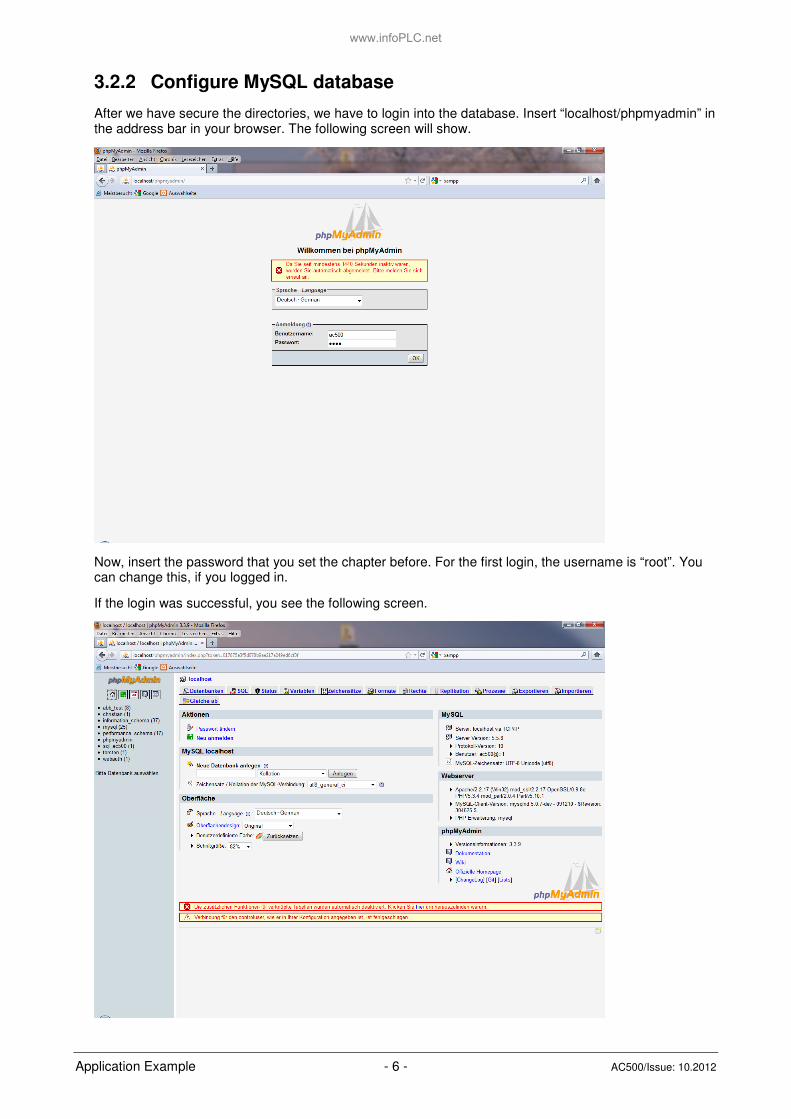
After we have secure the directories, we have to login into the database. Insert “localhost/phpmyadmin” in the address bar in your browser. The following screen will show.
Now, insert the password that you set the chapter before. For the first login, the username is “root”. You can change this, if you logged in.
If the login was successful, you see the following screen.
www.infoPLC.net
Application Example - 7 - AC500/Issue: 10.2012
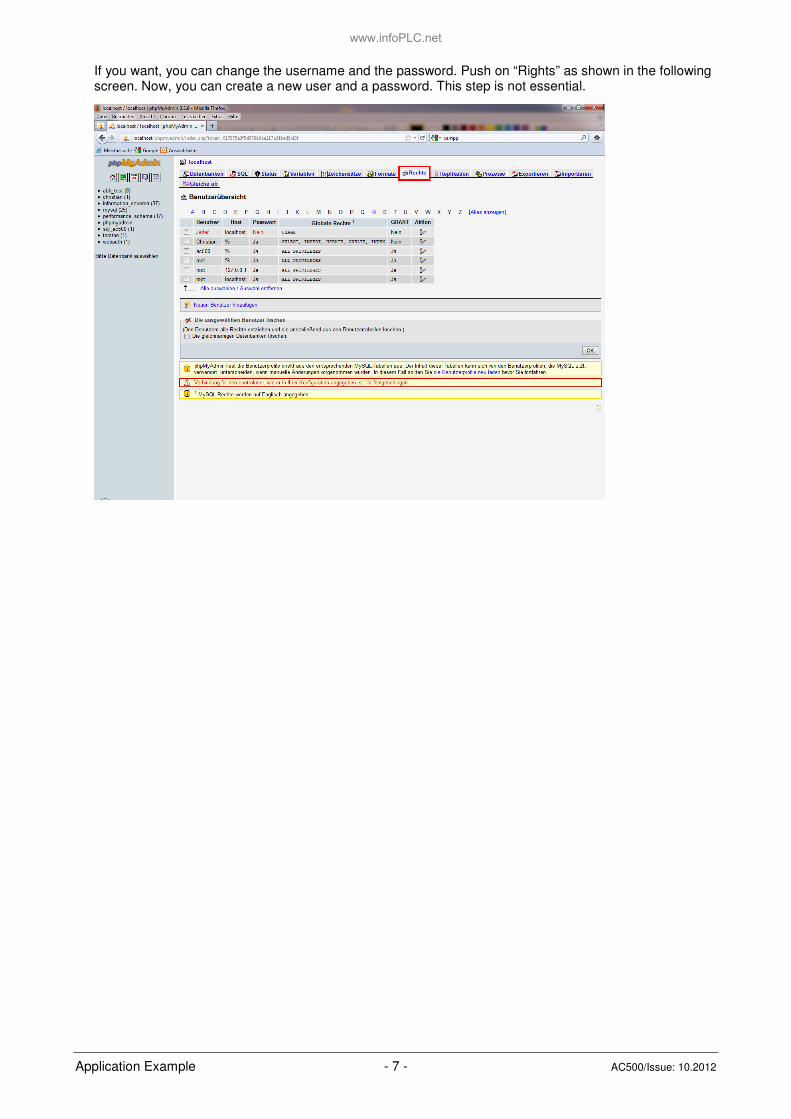
If you want, you can change the username and the password. Push on “Rights” as shown in the following screen. Now, you can create a new user and a password. This step is not essential.
www.infoPLC.net
Application Example - 8 - AC500/Issue: 10.2012
3.2.3 Create a database and tables
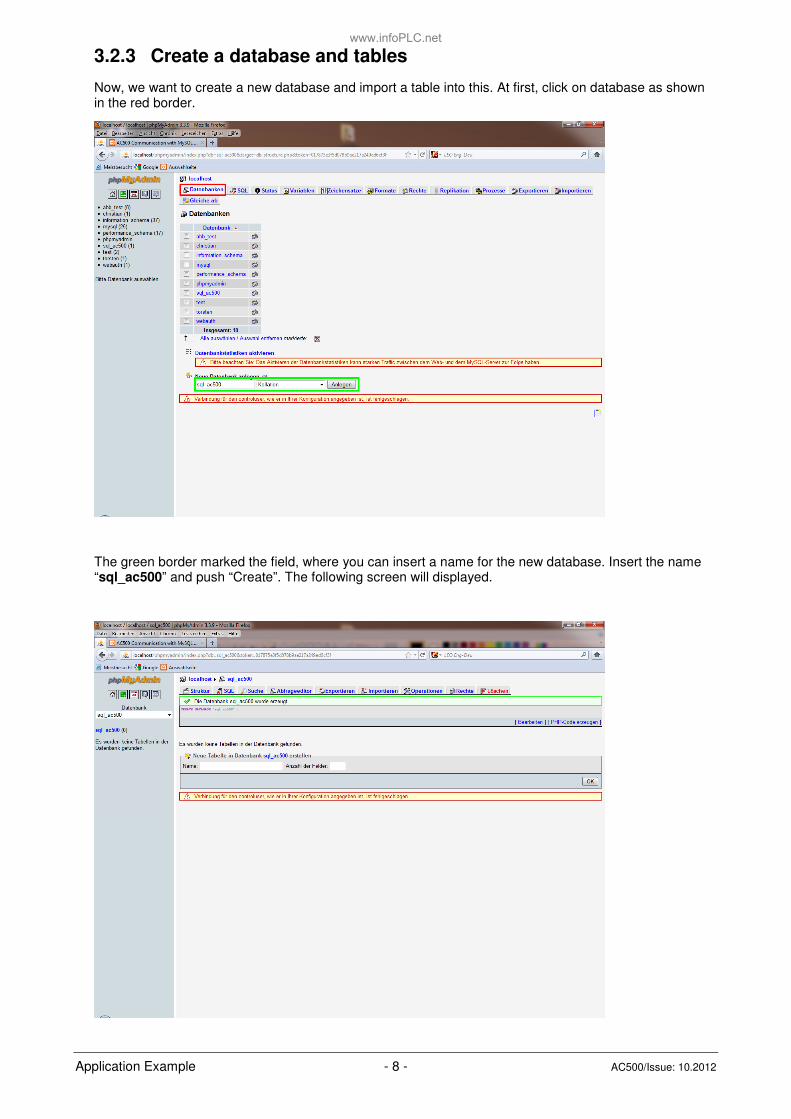
Now, we want to create a new database and import a table into this. At first, click on database as shown in the red border.
The green border marked the field, where you can insert a name for the new database. Insert the name “sql_ac500” and push “Create”. The following screen will displayed.
www.infoPLC.net
Application Example - 9 - AC500/Issue: 10.2012
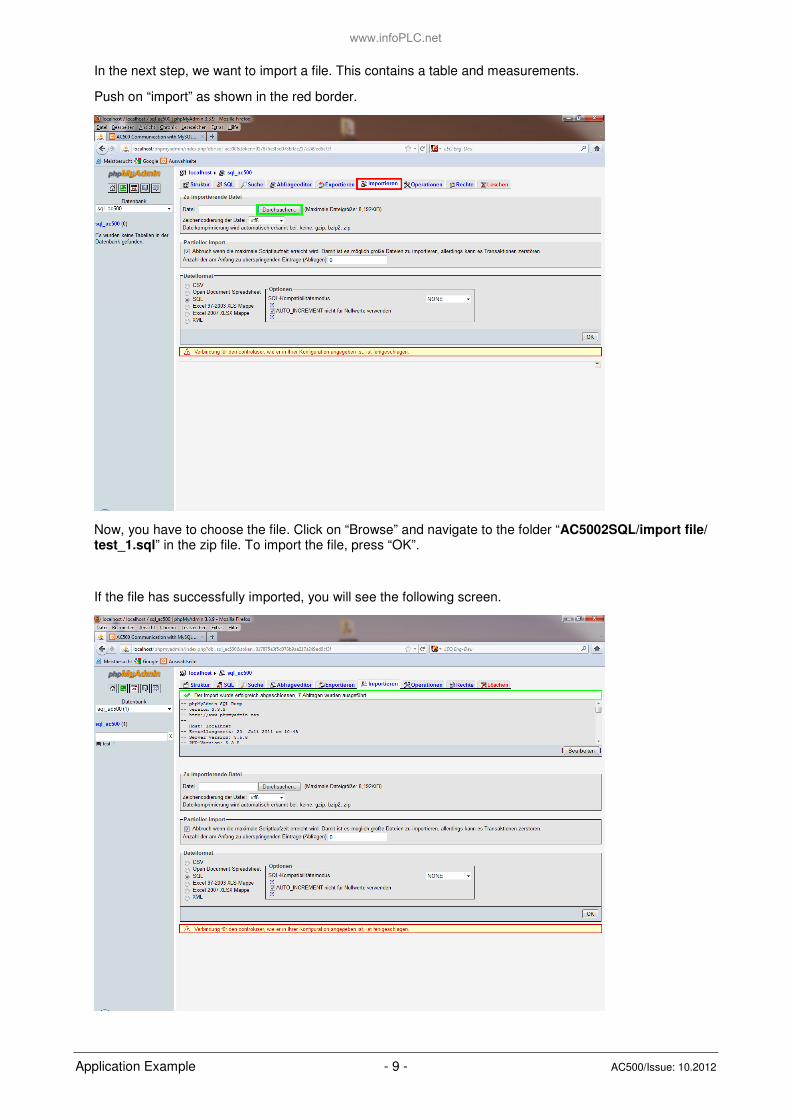
In the next step, we want to import a file. This contains a table and measurements.
Push on “import” as shown in the red border.
Now, you have to choose the file. Click on “Browse” and navigate to the folder “AC5002SQL/import file/ test_1.sql” in the zip file. To import the file, press “OK”.
If the file has successfully imported, you will see the following screen.
www.infoPLC.net
Application Example - 10 - AC500/Issue: 10.2012
CAUTION
!
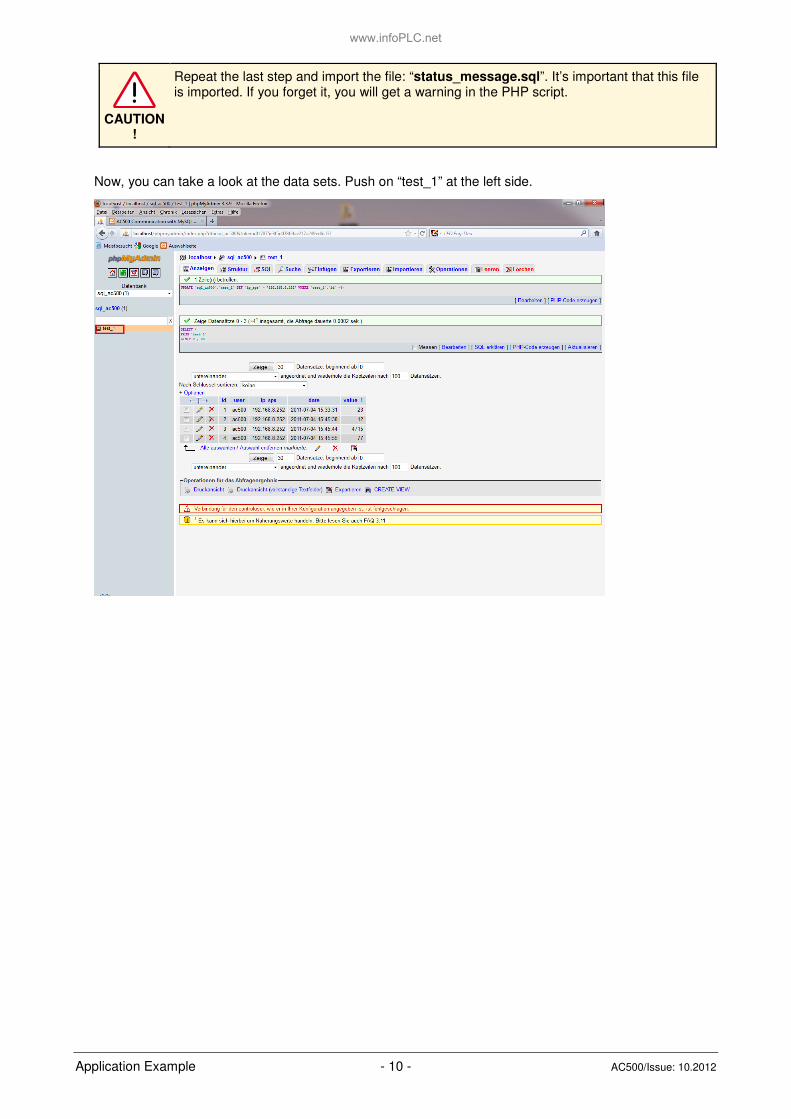
Repeat the last step and import the file: “status_message.sql”. It’s important that this file is imported. If you forget it, you will get a warning in the PHP script.
Now, you can take a look at the data sets. Push on “test_1” at the left side.
www.infoPLC.net
Application Example - 11 - AC500/Issue: 10.2012
3.3 PHP-Script
This chapter shows you where the files must be copied. The next step is to configure the important variables.
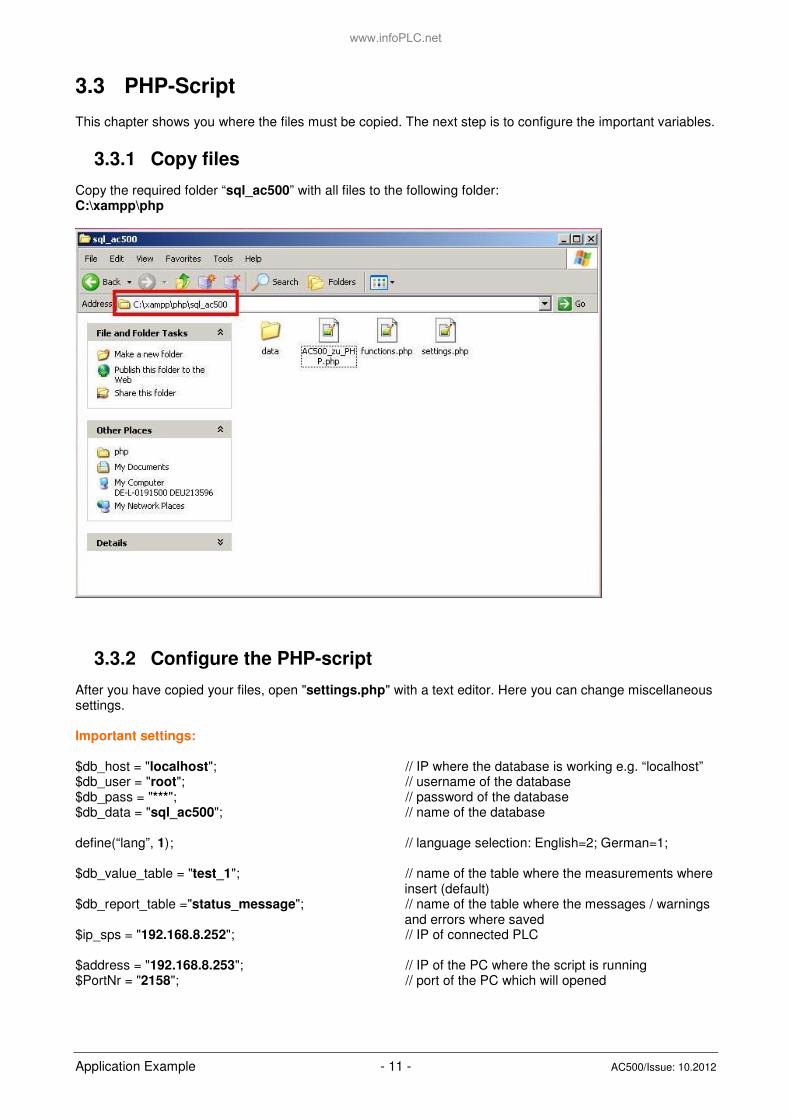
3.3.1 Copy files
Copy the required folder “sql_ac500” with all files to the following folder: C:\xampp\php
3.3.2 Configure the PHP-script
After you have copied your files, open "settings.php" with a text editor. Here you can change miscellaneous settings. Important settings: $db_host = "localhost"; // IP where the database is working e.g. “localhost” $db_user = "root"; // username of the database $db_pass = "***"; // password of the database $db_data = "sql_ac500"; // name of the database define(“lang”, 1) ; // language selection: English=2; German=1; $db_value_table = "test_1"; // name of the table where the measurements where
insert (default) $db_report_table ="status_message"; // name of the table where the messages / warnings
and errors where saved $ip_sps = "192.168.8.252"; // IP of connected PLC $address = "192.168.8.253"; // IP of the PC where the script is running $PortNr = "2158"; // port of the PC which will opened
www.infoPLC.net
Application Example - 12 - AC500/Issue: 10.2012
Now, we have changed the important settings. If you want, you can show more messages/warnings and errors in the command prompt. Be careful it’s getting confusing very fast. At these settings you don’t see any messages, warnings and errors. define ("show_messg", FALSE); // disable messages define ("show_warng", FALSE); // disable warnings define ("show_error", FALSE); // disable errors At these settings you will se all messages, warnings and errors. define ("show_messg", TRUE); // enable messages define ("show_warng", TRUE); // enable warnings define ("show_error", TRUE); // enable errors
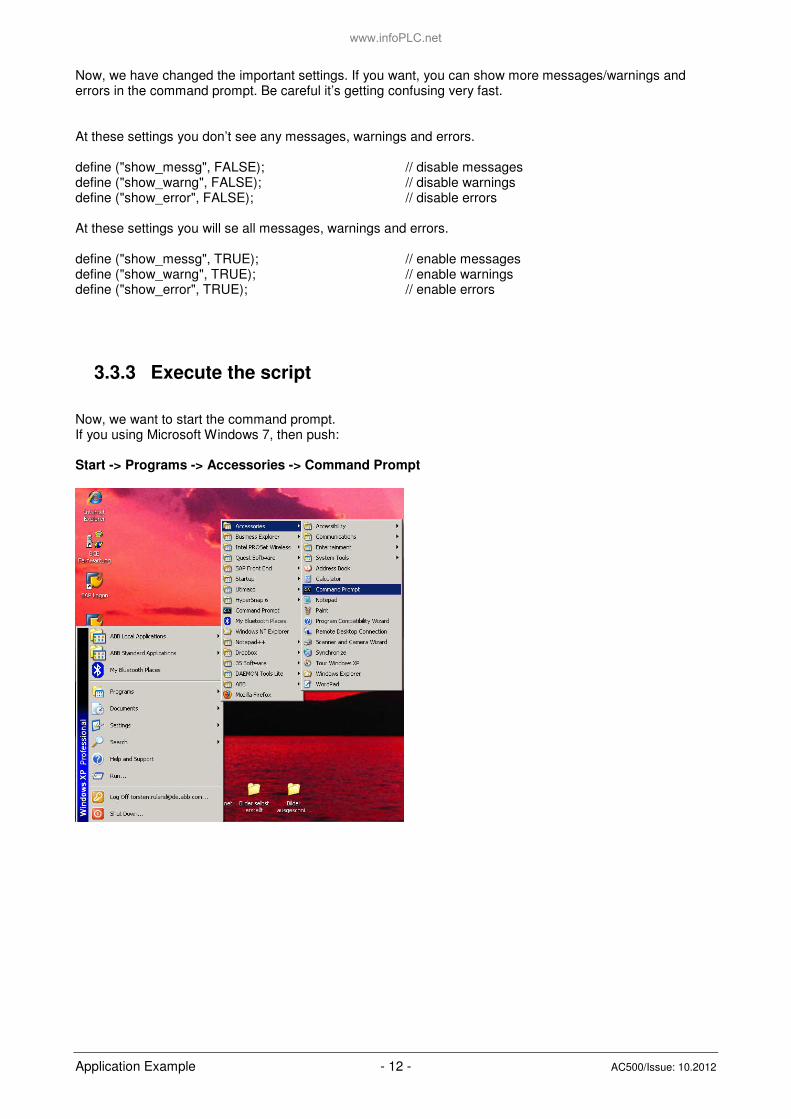
3.3.3 Execute the script
Now, we want to start the command prompt. If you using Microsoft Windows 7, then push: Start -> Programs -> Accessories -> Command Prompt
www.infoPLC.net
Application Example - 13 - AC500/Issue: 10.2012
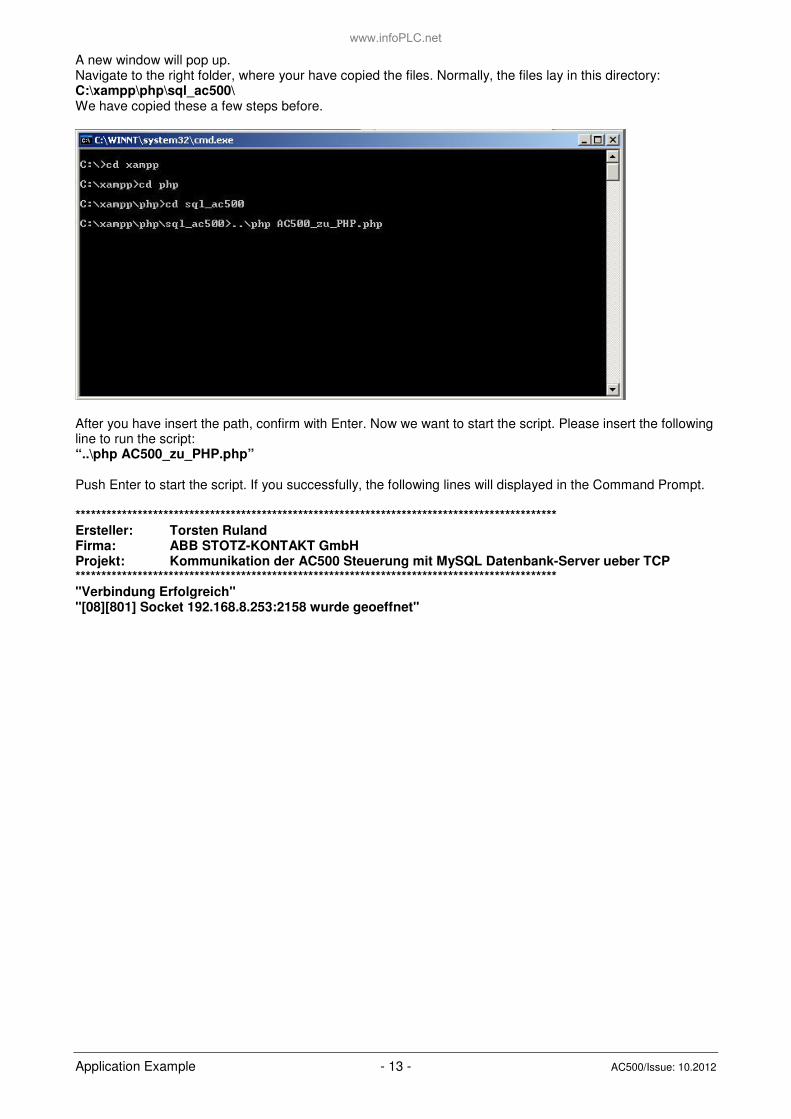
A new window will pop up. Navigate to the right folder, where your have copied the files. Normally, the files lay in this directory: C:\xampp\php\sql_ac500\ We have copied these a few steps before.
After you have insert the path, confirm with Enter. Now we want to start the script. Please insert the following line to run the script: “..\php AC500_zu_PHP.php” Push Enter to start the script. If you successfully, the following lines will displayed in the Command Prompt. ********************************************************************************************* Ersteller: Torsten Ruland Firma: ABB STOTZ-KONTAKT GmbH Projekt: Kommunikation der AC500 Steuerung mit MySQL Datenbank-Server ueber TCP ********************************************************************************************* "Verbindung Erfolgreich" "[08][801] Socket 192.168.8.253:2158 wurde geoeffnet"
www.infoPLC.net
Application Example - 14 - AC500/Issue: 10.2012
4 PLC AC500
This chapter will show how to configure the different parameters.
4.1 Control Builder Plus
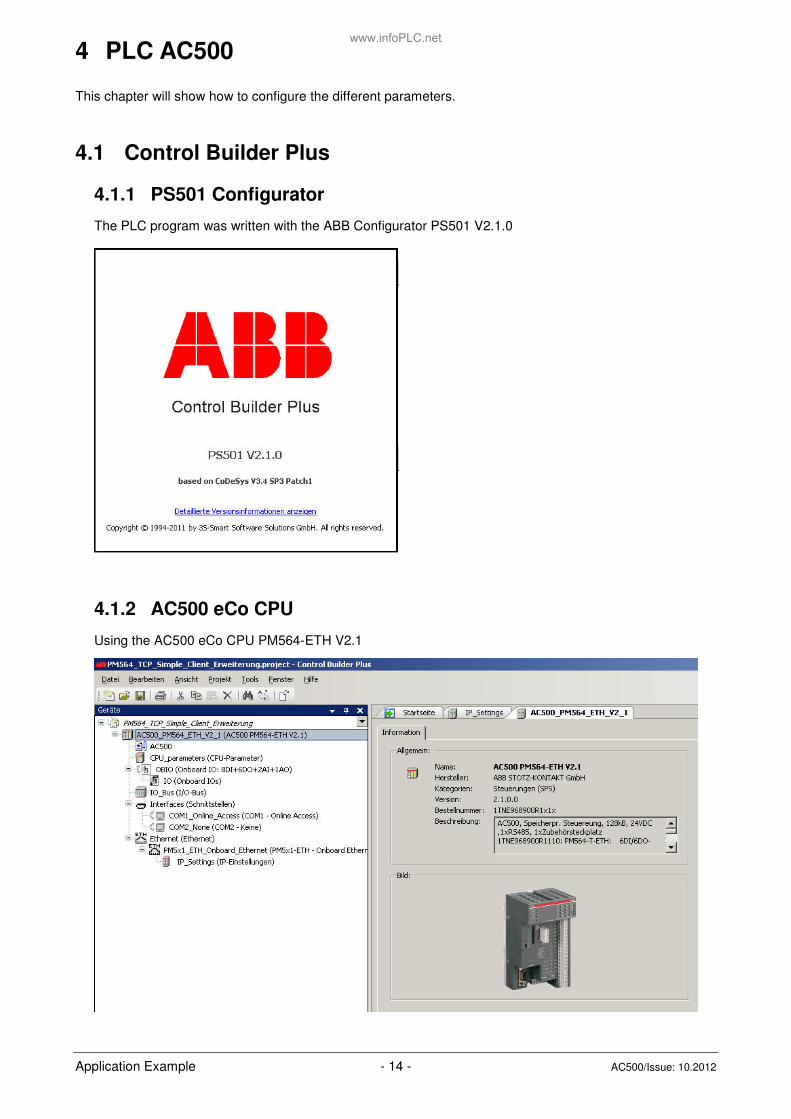
4.1.1 PS501 Configurator
The PLC program was written with the ABB Configurator PS501 V2.1.0
4.1.2 AC500 eCo CPU
Using the AC500 eCo CPU PM564-ETH V2.1
www.infoPLC.net
Application Example - 15 - AC500/Issue: 10.2012
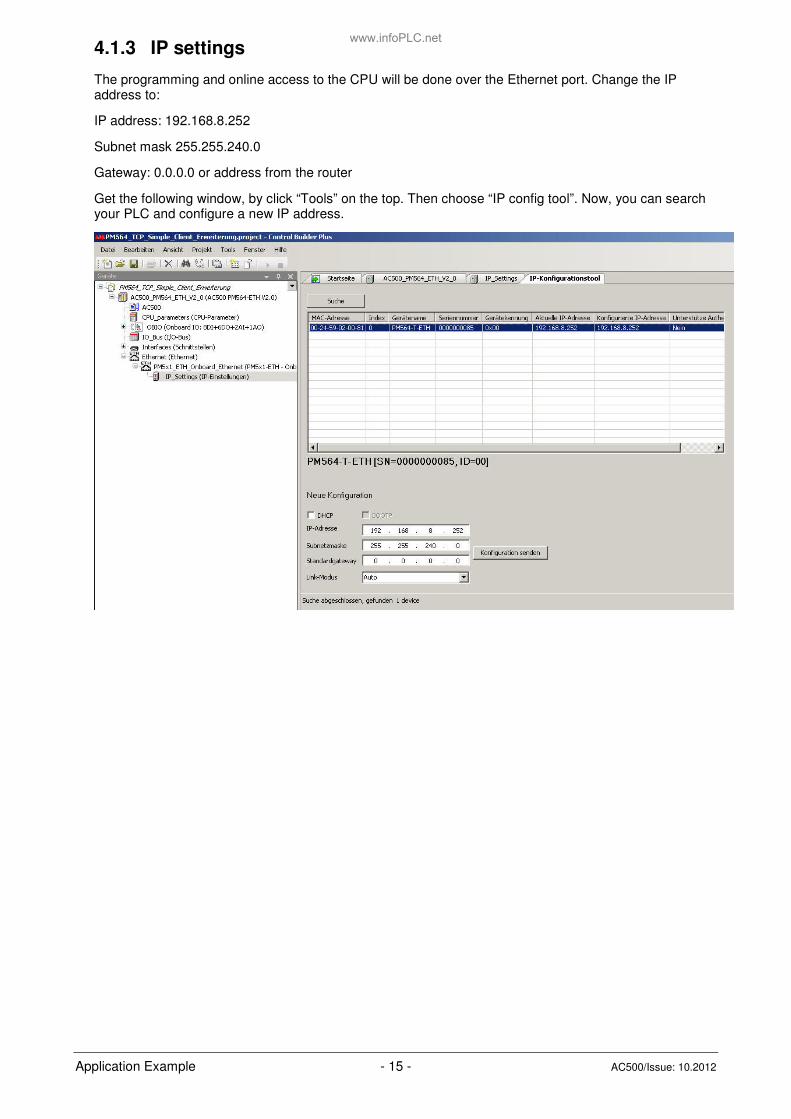
4.1.3 IP settings
The programming and online access to the CPU will be done over the Ethernet port. Change the IP address to:
IP address: 192.168.8.252
Subnet mask 255.255.240.0
Gateway: 0.0.0.0 or address from the router
Get the following window, by click “Tools” on the top. Then choose “IP config tool”. Now, you can search your PLC and configure a new IP address.
www.infoPLC.net
Application Example - 16 - AC500/Issue: 10.2012
4.2 CoDeSys
This chapter will explain you, which settings how to adjust.
4.2.1 Communication parameter
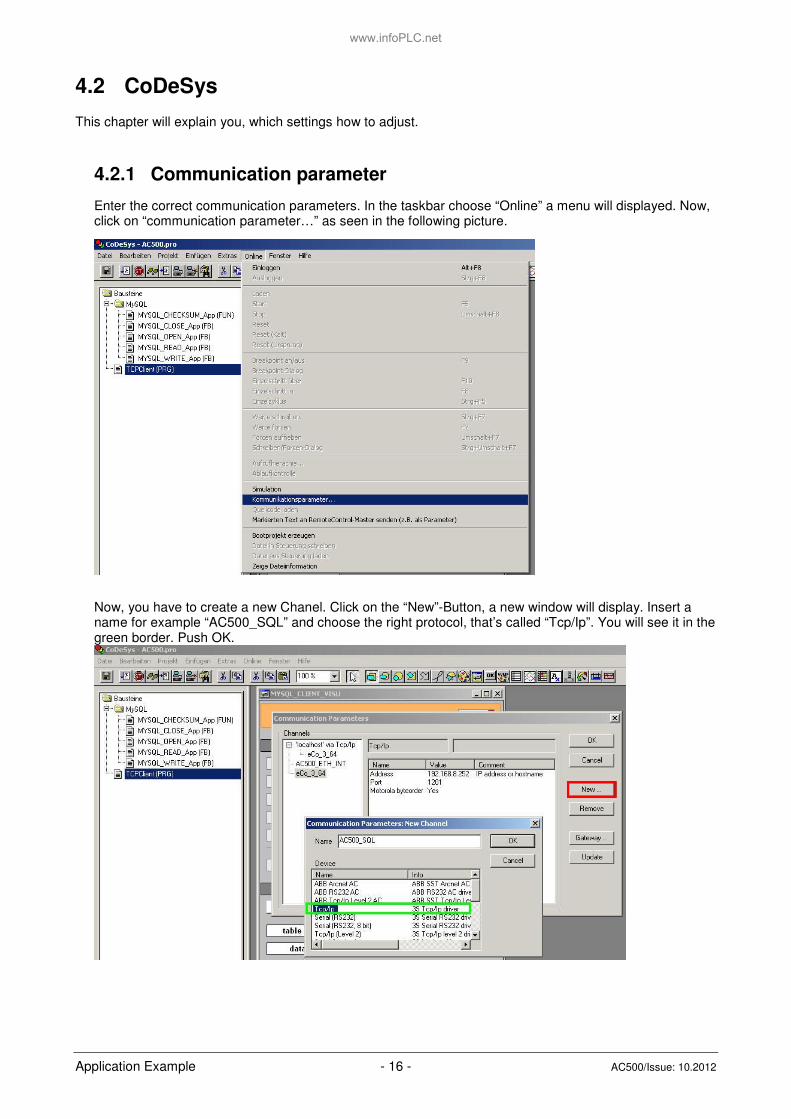
Enter the correct communication parameters. In the taskbar choose “Online” a menu will displayed. Now, click on “communication parameter…” as seen in the following picture.
Now, you have to create a new Chanel. Click on the “New”-Button, a new window will display. Insert a name for example “AC500_SQL” and choose the right protocol, that’s called “Tcp/Ip”. You will see it in the green border. Push OK.
www.infoPLC.net
Application Example - 17 - AC500/Issue: 10.2012
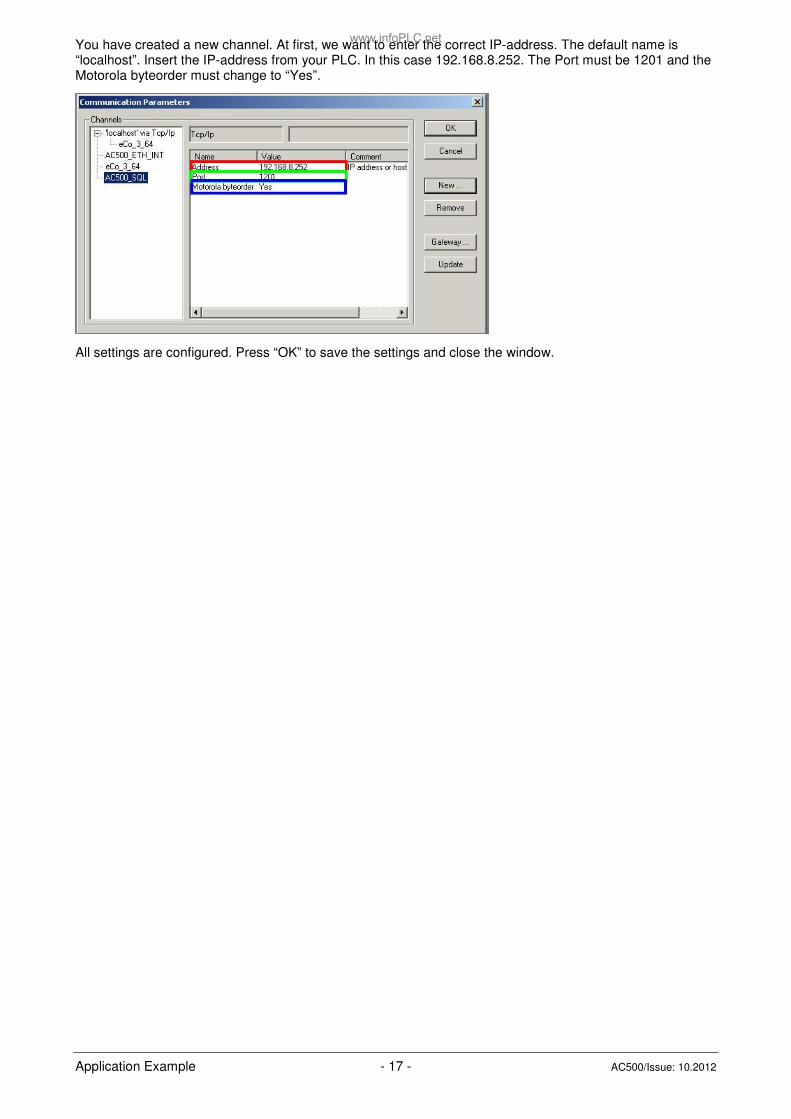
You have created a new channel. At first, we want to enter the correct IP-address. The default name is “localhost”. Insert the IP-address from your PLC. In this case 192.168.8.252. The Port must be 1201 and the Motorola byteorder must change to “Yes”.
All settings are configured. Press “OK” to save the settings and close the window.
www.infoPLC.net
Application Example - 18 - AC500/Issue: 10.2012
4.3 Visualization
4.3.1 Read a data set
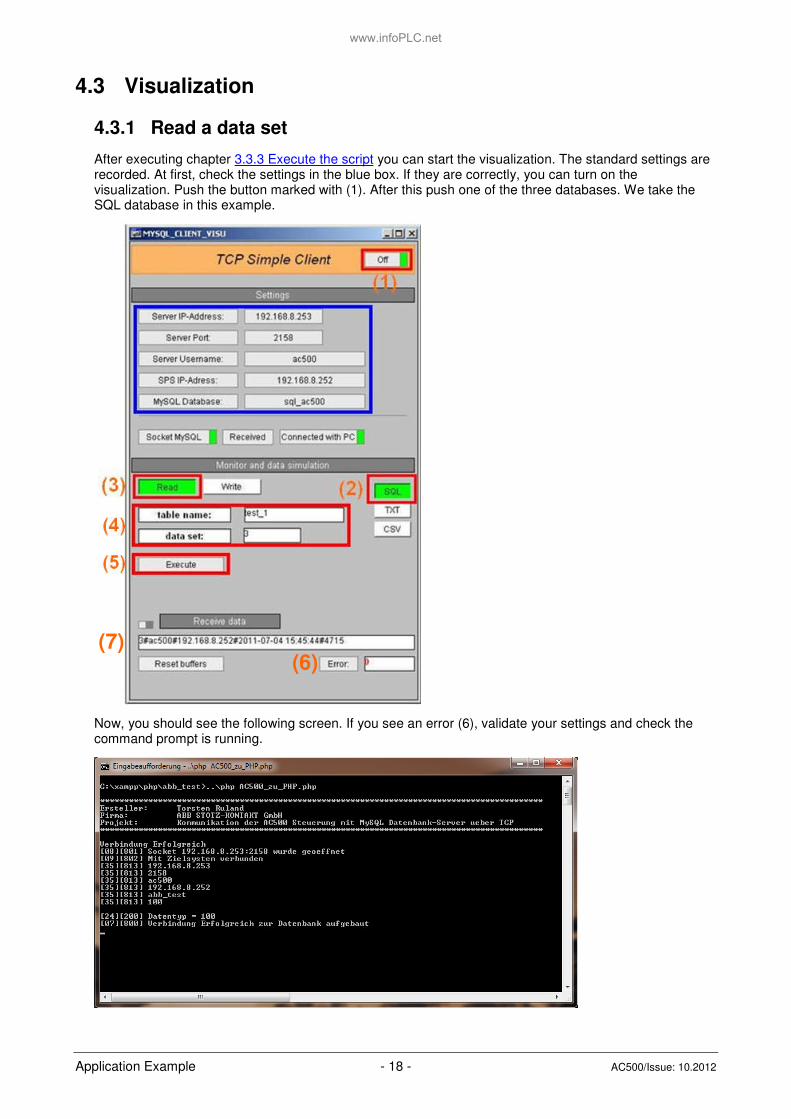
After executing chapter 3.3.3 Execute the script you can start the visualization. The standard settings are recorded. At first, check the settings in the blue box. If they are correctly, you can turn on the visualization. Push the button marked with (1). After this push one of the three databases. We take the SQL database in this example.
Now, you should see the following screen. If you see an error (6), validate your settings and check the command prompt is running.
(7) (6)
www.infoPLC.net

Application Example - 19 - AC500/Issue: 10.2012
Now, we want to read a data set. Push the Read Button (3) and insert a table name and a data set (4) which you want to read from the database. Push Execute (5) to perform the command.
The selected data set should be shown in the line below (7). Errors will displayed in the right box at the bottom (6). For more information’s read the “Error numbers.xlsm” or take a look at the command prompt. For example error number 702 will displayed.
(4)
(5)
(6)
(7)
www.infoPLC.net
Application Example - 20 - AC500/Issue: 10.2012
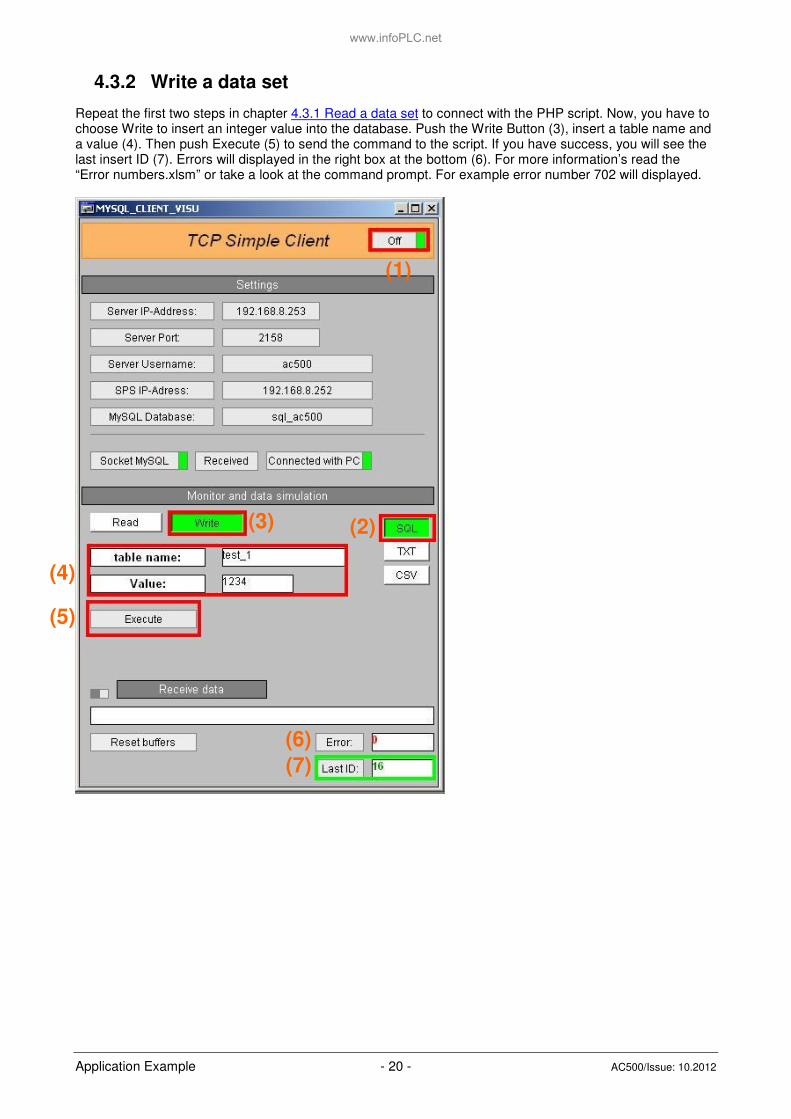
4.3.2 Write a data set
Repeat the first two steps in chapter 4.3.1 Read a data set to connect with the PHP script. Now, you have to choose Write to insert an integer value into the database. Push the Write Button (3), insert a table name and a value (4). Then push Execute (5) to send the command to the script. If you have success, you will see the last insert ID (7). Errors will displayed in the right box at the bottom (6). For more information’s read the “Error numbers.xlsm” or take a look at the command prompt. For example error number 702 will displayed.
(1)
(2) (3)
(4)
(5)
(6)
(7)
www.infoPLC.net
Application Example - 21 - AC500/Issue: 10.2012
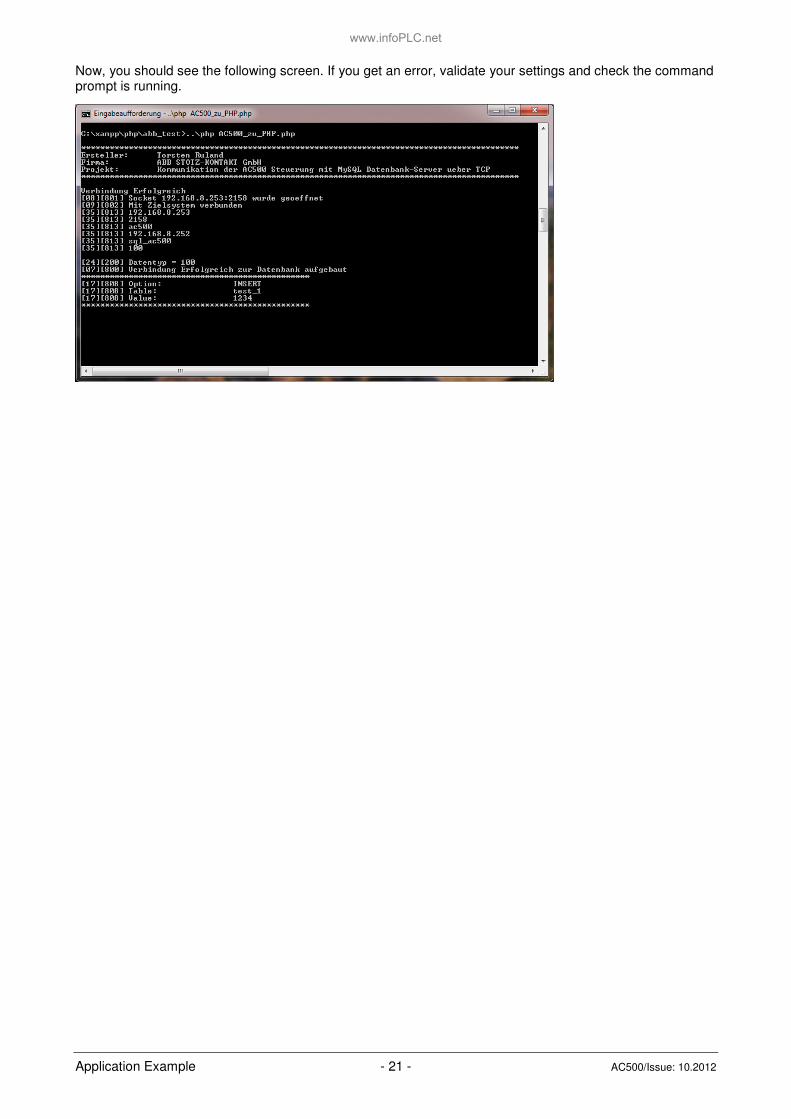
Now, you should see the following screen. If you get an error, validate your settings and check the command prompt is running.
www.infoPLC.net

Application Example - 22 - AC500/Issue: 10.2012
www.infoPLC.net

abb
ABB Automation Products GmbH Wallstadter Str. 59 D-68526 Ladenburg Tel. : +49 62 21 / 701-1444 Fax : +49 62 21 / 701-1382 E-Mail : [email protected] www.abb.com/plc
Doc. kind: No. o. p.:
Helpline document 23
Title: Lang.:
AC500 Communication with MySQL Database over TCP EN
Man
ual N
o. 3
AD
R 0
25 0
50 M
0201
www.infoPLC.net