a step by step guide for creating a basic visual composer application
TRANSCRIPT

SAP COMMUNITY NETWORK scn.sap.com
© 2012 SAP AG 1
A Step by Step Guide for Creating
a Basic Visual Composer
Application
Applies to:
Visual Composer enhancement package 1 for SAP NetWeaver 7.3
Summary
This step-by-step guide will help you create a simple Visual Composer application. You can use this exercise in order to learn basic Visual Composer capabilities such as how to create a new Development Component and a new model, add Data Sources, customize the data which will be displayed and deploy the application.
Author: Yogev Lidor
Company: SAP
Created on: December 2008
Updated on:May 2012
Author Bio
Yogev is a Visual Composer Solution Expert working in the Visual Composer Solution Office.

A Step by Step Guide for Creating a Basic Visual Composer Application
SAP COMMUNITY NETWORK scn.sap.com
© 2012 SAP AG 2
Table of Contents
Overview ............................................................................................................................................................. 3
Comments........................................................................................................................................................... 3
Scenario Description ........................................................................................................................................... 3
How to? ............................................................................................................................................................... 3
Logging on ...................................................................................................................................................... 3
Window Structure ............................................................................................................................................ 3
Create a new Model ........................................................................................................................................ 5
Modeling the application ................................................................................................................................. 6 Add a Data Source ....................................................................................................................................................... 6
Add a View ................................................................................................................................................................... 8
Link the data services .................................................................................................................................................. 9
Add additional view .................................................................................................................................................... 10
Deploying the application .............................................................................................................................. 11 The Runtime Application ............................................................................................................................................ 11
Editing the Layout ......................................................................................................................................... 12
Related Content ................................................................................................................................................ 14
Copyright........................................................................................................................................................... 15

A Step by Step Guide for Creating a Basic Visual Composer Application
SAP COMMUNITY NETWORK scn.sap.com
© 2012 SAP AG 3
Overview
Visual Composer is a modeling tool. Therefore, it uses a model paradigm as opposed to traditional development languages which use projects. Models are reusable and can be consumed by other models of the same type. Service type models can be consumed also by composite view models as data sources.
Comments
In this example we will use simulated services. Simulated services are not real services, they are a representation of a service and they hold static data
Scenario Description
In this example, we will create an application that displays a list of customer names to the sales representative. The sales representative can get some additional information on specific customers
How to?
Logging on
To use Visual Composer, you activate a URL such as the following: http://<host>:<port>/VC and
enter your user and password in the logon form:
Window Structure
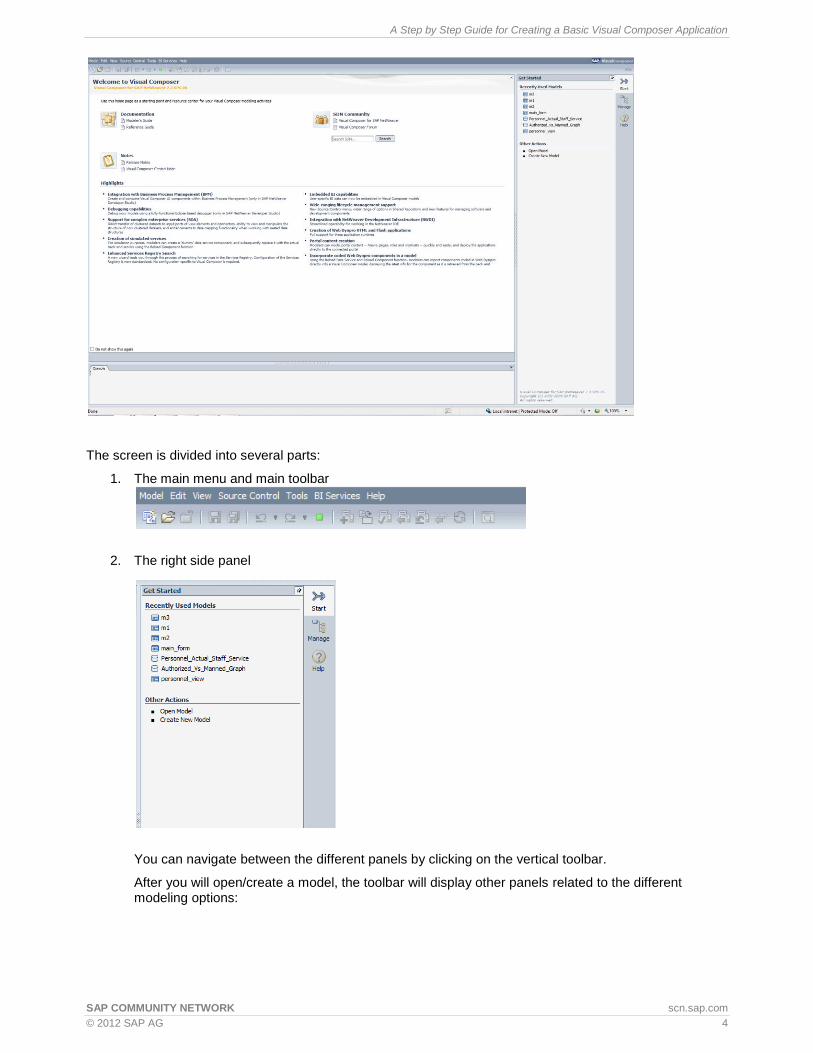
When you login to Visual Composer you get the following screen:
A Step by Step Guide for Creating a Basic Visual Composer Application
SAP COMMUNITY NETWORK scn.sap.com
© 2012 SAP AG 4
The screen is divided into several parts:
1. The main menu and main toolbar
2. The right side panel
You can navigate between the different panels by clicking on the vertical toolbar.
After you will open/create a model, the toolbar will display other panels related to the different modeling options:

A Step by Step Guide for Creating a Basic Visual Composer Application
SAP COMMUNITY NETWORK scn.sap.com
© 2012 SAP AG 5
3. The Storyboard, which after login will display the Start screen, and will display a model Design and Layout when opening it
You can change some of the view options (like if to display the panel and its position) from the View menu
Create a new Model
1. From the Model menu, choose New

A Step by Step Guide for Creating a Basic Visual Composer Application
SAP COMMUNITY NETWORK scn.sap.com
© 2012 SAP AG 6
2. In the Create New Model dialog box:
a. Choose the desired Model Type, for example Composite View. There are several types of models, depending on the Visual Composer kits that are installed on your Visual Composer server. The common ones are:
i. Composite View – A model of an application task, that contains a combination of UI elements, business logic and data connections
ii. Service Component – A single customized data service that contains one or more data services
b. Enter the desired model Name, for example newModel.
c. Select a Repository, for example Local Repository
d. Select a Software component (refer to SAP component model), for example sap.com_UWSoftwareComponent
e. Select a Development Component (refer to SAP component model) or create a new one using the New button, for example new_dc
3. Choose OK
The model is now open on your storyboard and you can start adding elements to it, such as views, operators, components and data sources
Modeling the application
Add a Data Source
Data Sources are the source of information for the application and can come from a number of different back-end systems. A Data Source can be one of several options:
BI Data Source
R3 Data Service

A Step by Step Guide for Creating a Basic Visual Composer Application
SAP COMMUNITY NETWORK scn.sap.com
© 2012 SAP AG 7
Services Registry
Visual Composer Components – Composite Views or Service Components created in Visual Composer and can be included in the model
Web Services
In order to consume the different data sources, there is a need to perform some preliminary configuration. For more information please refer to the Configuring Visual Composer to Consume Data Sources document.
For this example, we will use two simulated services as our data sources:
Customers (filename - Customers.zip): This service supplies the basic data about the customers (ID, Name and Surname).
Customers Details (filename - Customers_Details.zip): This service supplies more detailed information about the customers (ID, Email, Address, City and Phone).
In order to use these services as data sources for our application, we first need to import them. To do so, open the Model menu from the top menu and select Import:
In the Import Model dialog box, select the DC to which you would like to import the model
Select the Customers.zip file (link to download above) and click the Import button.
To import the second service, repeate the same steps, but this time select the Customer_Details.zip file (also link above).
On the upper part of you storyboard you can now see three open tabs:
You new model, Customers (a simulated service) and Cusromers_Details (a simulated service)
To add the imported services as data sources to your model, select the left tab (your model name). Then open the Search panel by clicking the Search button on the right side panel.

A Step by Step Guide for Creating a Basic Visual Composer Application
SAP COMMUNITY NETWORK scn.sap.com
© 2012 SAP AG 8
Fill in the fields as follows and click Search:
Drag the service from the Results window to the storyboard:
In the same way, search for the Customers_details service and drag it onto the storyboard:
Add a View
To display the information provided by the data source on the screen, you need to add a view. For example, if you would like to display the content of the data service in a form of table, you need to initiate the Customers service and create a table containing all the documents.
To do that, drag a line out of the Input port of the Customers service and from the dropdown menu select Start Point:

A Step by Step Guide for Creating a Basic Visual Composer Application
SAP COMMUNITY NETWORK scn.sap.com
© 2012 SAP AG 9
To display the data in a table, drag a line out of the Customers service and from the dropdown menu select Table View:
Link the data services
In order to link the two data services and make one service to act as the input for teh second service, drag a line out of the out1 table to the Input port of the Customers_Details service:
A new line with the select event is now linking the out1 table with the Input port, which means that that the selected line in the table view is the input for the Customers_Details service.

A Step by Step Guide for Creating a Basic Visual Composer Application
SAP COMMUNITY NETWORK scn.sap.com
© 2012 SAP AG 10
Add additional view
Drag a line out of the output port of the Customers_Service and from the dropdown menu select Table View:
The customer ID is shown in both tables. To prevent data duplicity, right-click the output table and from the dropdown menu select Define Data:
In the Define Data dialog box uncheck the ID box and click Close:

A Step by Step Guide for Creating a Basic Visual Composer Application
SAP COMMUNITY NETWORK scn.sap.com
© 2012 SAP AG 11
Deploying the application
The final model will look as follows (see a link to download the model in the Related Content):
You can now Deploy and Run you application.
To do that, open the Deploy panel by clicking the Deploy button on the right side panel.
Click the Deploy button to trigger the application deployment.
To run the application you can either click the Preview button or click of one of the links of the deployed model for HTML or FLEX
The Runtime Application
The runtime application includes both tables. The top table holds a unique record for each customer and the buttom table supplies detaild information about each selected customer from the top table. As you can see, one person can have more than one address, phone and Email:
How does it Work?
The start point triggers the Customers service.
The Customers service fills in the out1 table.
A selected row in out1 table triggers the Customers_Details service.
The Customers_Details service presents the selected customer details in the output table.

A Step by Step Guide for Creating a Basic Visual Composer Application
SAP COMMUNITY NETWORK scn.sap.com
© 2012 SAP AG 12
Editing the Layout
You can modify the way the application will be displayed to the user by editing the layout. You do that by clicking the clicking the Layout tab in the bottom of your storyboard and switching to the Layout board. The layout view will open:
In the Layout board you can change the location of views (such as tables and forms) by dragging them. You can change the fields and columns order in each table/form.
In addition, you can change certain properties of columns and fields,
For example, if you want to change certain properties of a column, you can either double click the column or choose the Configure option from the context menu. The Configure Input Field panel will be displayed:
Here you can set the different properties, for instance:
Label – column title
Value – the source for the column content
Visible – is the column displayed
Tooltip – add a tooltip to be displayed when hovering over the column
Cell styles – set the styling (font and color), the styling can be based on certain condition
Show as text – relevant for numerical fields
Align text – text alignment of the cell content

A Step by Step Guide for Creating a Basic Visual Composer Application
SAP COMMUNITY NETWORK scn.sap.com
© 2012 SAP AG 13
In the same way, you can open the configuration panel for the entire table:
Here you can set the different properties, for instance:
Title – table title
Show title – should the title be displayed or not
Show toolbar – should the toolbar be displayed or not
Toolbar – location of the toolbar
Control buttons – when checked, will automatically add two buttons to the table toolbar: Add and Delete
Visible – is the table displayed
Row colors – you can choose one of three options: same color, alternating colors or transparent
Row styles - set the styling (font and color), the styling can be based on certain condition
Multi-selection – enables the user to select more than one table row
Header row – whether or not to display the columns’ titles
Content scale – you can choose if the content scale is Auto-fit or Fixed. When selecting Auto-fit, the columns size will be adjusted according to the window size. When selecting Fixed, the column size will stay the same, without considering the window size. According to the method chose, the Column width will change from percentage to pixels
For more information of editing the layout, please refer to Visual Composer’s Layout document
In addition to displaying the data in a table, you can add additional fields in the certain operators that will affect the data which is being displayed. For example, you can add a filter that will cause the table to display a certain document type.

A Step by Step Guide for Creating a Basic Visual Composer Application
SAP COMMUNITY NETWORK scn.sap.com
© 2012 SAP AG 14
Related Content
Configuring Visual Composer to Consume Data Sources document in 7.11, 7.2 and 7.3 NetWeaver releases
Visual Composer Layout
Visual Composer basic application – The full model

A Step by Step Guide for Creating a Basic Visual Composer Application
SAP COMMUNITY NETWORK scn.sap.com
© 2012 SAP AG 15
Copyright
© Copyright 2012 SAP AG. All rights reserved.
No part of this publication may be reproduced or transmitted in any form or for any purpose without the express permission of SAP AG. The information contained herein may be changed without prior notice.
Some software products marketed by SAP AG and its distributors contain proprietary software components of other software vendors.
Microsoft, Windows, Excel, Outlook, and PowerPoint are registered trademarks of Microsoft Corporation.
IBM, DB2, DB2 Universal Database, System i, System i5, System p, System p5, System x, System z, System z10, System z9, z10, z9, iSeries, pSeries, xSeries, zSeries, eServer, z/VM, z/OS, i5/OS, S/390, OS/390, OS/400, AS/400, S/390 Parallel Enterprise Server, PowerVM, Power Architecture, POWER6+, POWER6, POWER5+, POWER5, POWER, OpenPower, PowerPC, BatchPipes, BladeCenter, System Storage, GPFS, HACMP, RETAIN, DB2 Connect, RACF, Redbooks, OS/2, Parallel Sysplex, MVS/ESA, AIX, Intelligent Miner, WebSphere, Netfinity, Tivoli and Informix are trademarks or registered trademarks of IBM Corporation.
Linux is the registered trademark of Linus Torvalds in the U.S. and other countries.
Adobe, the Adobe logo, Acrobat, PostScript, and Reader are either trademarks or registered trademarks of Adobe Systems Incorporated in the United States and/or other countries.
Oracle is a registered trademark of Oracle Corporation.
UNIX, X/Open, OSF/1, and Motif are registered trademarks of the Open Group.
Citrix, ICA, Program Neighborhood, MetaFrame, WinFrame, VideoFrame, and MultiWin are trademarks or registered trademarks of Citrix Systems, Inc.
HTML, XML, XHTML and W3C are trademarks or registered trademarks of W3C®, World Wide Web Consortium, Massachusetts Institute of Technology.
Java is a registered trademark of Oracle Corporation.
JavaScript is a registered trademark of Oracle Corporation, used under license for technology invented and implemented by Netscape.
SAP, R/3, SAP NetWeaver, Duet, PartnerEdge, ByDesign, SAP Business ByDesign, and other SAP products and services mentioned herein as well as their respective logos are trademarks or registered trademarks of SAP AG in Germany and other countries.
Business Objects and the Business Objects logo, BusinessObjects, Crystal Reports, Crystal Decisions, Web Intelligence, Xcelsius, and other Business Objects products and services mentioned herein as well as their respective logos are trademarks or registered trademarks of Business Objects S.A. in the United States and in other countries. Business Objects is an SAP company.
All other product and service names mentioned are the trademarks of their respective companies. Data contained in this document serves informational purposes only. National product specifications may vary.
These materials are subject to change without notice. These materials are provided by SAP AG and its affiliated companies ("SAP Group") for informational purposes only, without representation or warranty of any kind, and SAP Group shall not be liable for errors or omissions with respect to the materials. The only warranties for SAP Group products and services are those that are set forth in the express warranty statements accompanying such products and services, if any. Nothing herein should be construed as constituting an additional warranty.