a practical introduction to sas® data integration … · a practical introduction to sas® data...
TRANSCRIPT

1
A Practical Introduction to SAS® Data Integration Studio
Erik Larsen, Independent Consultant, Charleston, SC
Frank Ferriola, Financial Risk Group, Cary, NC
ABSTRACT
A useful and often overlooked tool which SAS released with its Business Intelligence suite to aid in ETL is the Data Integration Studio (or DI Studio) product. DI Studio provides end users with the ability to extract, transform, join and load data from various DBMSs, data marts and other data stores using a graphical interface and without needing to code different credentials for each schema. It will allow for seamless promotion of code to a production system without the need to alter the code. This tool is quite useful for deploying and being able to schedule jobs using the schedule manager in SAS Management Console as all code created by DI Studio is optimized. While this tool allows users to create code from scratch, one of its most useful tasks is that it can take legacy SAS code and with minimal alterations, can have its data associations created and have all of the properties of a job coded from scratch.
INTRODUCTION
SAS Data Integration Studio provides a useful tool in the realm of software engineering as typically it is used to create production level jobs which are designed to execute automatically without user alteration or input. It produces code with makes use of system information, external databases and files, along with SAS data to perform a desired extract, transform and load (ETL) functions on a hourly, daily, or monthly basis. What DI Studio is not typically used for are ad-hoc pulls, statistical analyses or basic programming. It is designed for a repetitive process and it provides a mechanism which allows these processes to be scheduled and run on a regular basis and furthermore allows for several DI Studio jobs to be linked to run together either in parallel or with developer specified dependencies with DBMSs, other SAS data files or other DI Studio jobs. These steps are performed by using SAS Management Console and the Schedule Manager and are beyond the scope of this publication, but allow the software engineer to set up systems without the use of Microsoft Scheduler, cron, KSH scripts or any other system commands.
OVERVIEW
One common question that is brought up when organizations start to use DI Studio is “What are we going to do with all of this legacy code?” In the second part of this paper, that scenario will be discussed on how to integrate legacy code into a DI Studio process flow and still use all of the advantages of using metadata in DI Studio. The first part of the paper will deal with “starting from scratch” in developing a process flow using DI Studio.
CREATING A DI STUDIO JOB “FROM SCRATCH”
SAS Data Integration Studio was initially released in the SAS Business Intelligence package and was an upgrade to the old SAS ETL Studio and allows for a graphical interface to join files, DBMS tables and SAS datasets together and generates code in the background which can be deployed to execute on a scheduled basis.

2
LOGGING IN
Similar to Enterprise Guide (EG), you need to create a profile (with credentials) which attaches to a server. The one difference with DI Studio vs. EG is that you log into a metadata server which controls DI Studio. A brief gloss-over description of a metadata server is a web-based server which stores information about the data stores. Your SAS administrator would need to grant you access to this server similarly to being granted access to a DBMS by a database administrator. An example of a login profile is shown below.
CREATE JOB AND START MANIPULATING DATA
Creating a job in DI Studio is intuitive as it is with most Microsoft software using the FileOpen for an existing job or clicking the New button and select Job. Either method will bring up an existing DI Studio job or an empty job for which you can begin to manipulate data. You will notice a folder structure with trees of information on the left and side of the screen and an empty process flow on the right side, as shown below.
3
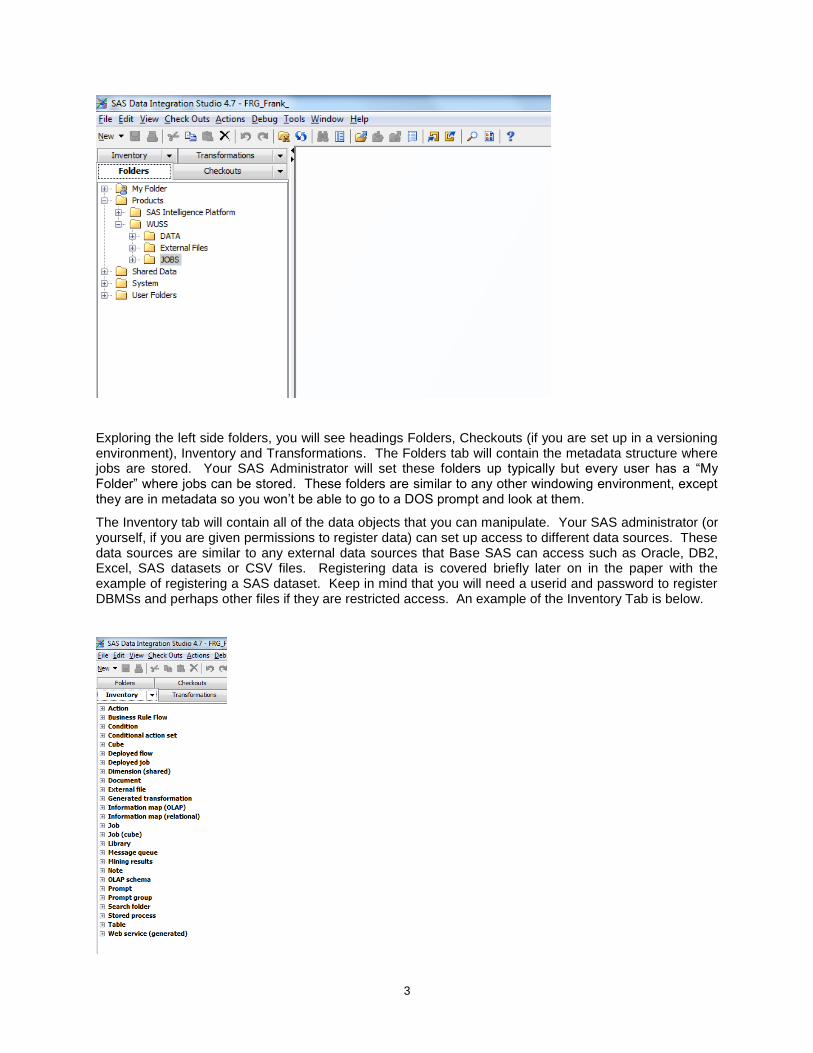
Exploring the left side folders, you will see headings Folders, Checkouts (if you are set up in a versioning environment), Inventory and Transformations. The Folders tab will contain the metadata structure where jobs are stored. Your SAS Administrator will set these folders up typically but every user has a “My Folder” where jobs can be stored. These folders are similar to any other windowing environment, except they are in metadata so you won’t be able to go to a DOS prompt and look at them.
The Inventory tab will contain all of the data objects that you can manipulate. Your SAS administrator (or yourself, if you are given permissions to register data) can set up access to different data sources. These data sources are similar to any external data sources that Base SAS can access such as Oracle, DB2, Excel, SAS datasets or CSV files. Registering data is covered briefly later on in the paper with the example of registering a SAS dataset. Keep in mind that you will need a userid and password to register DBMSs and perhaps other files if they are restricted access. An example of the Inventory Tab is below.

4
The final tab is the Transformations tab. This tab has all of the constructs which are available to manipulate data. These types of functions range from SQL joins, to appending tables, sorting, transposing and writing a permanent SAS dataset (or other type of DBMS table). Exploring through the Transformations table shows many different functions that you can perform on data and an example is listed below.
AN EXAMPLE
Open up a new job and click on the Inventory tab to show which data elements are available. Click on a data element and drag it to the right and drop it in the process flow window. There are some useful things that are available to see what is in this data object. Highlighting and right-clicking on the object CLASS (from SASHELP.CLASS) will reveal a menu with one of the choices being Properties. Clicking on properties reveals which columns along with their attributes are contained in the object. Keep in mind that this object can be a SAS dataset, a DBMS table or even an Excel workbook. An example is below.
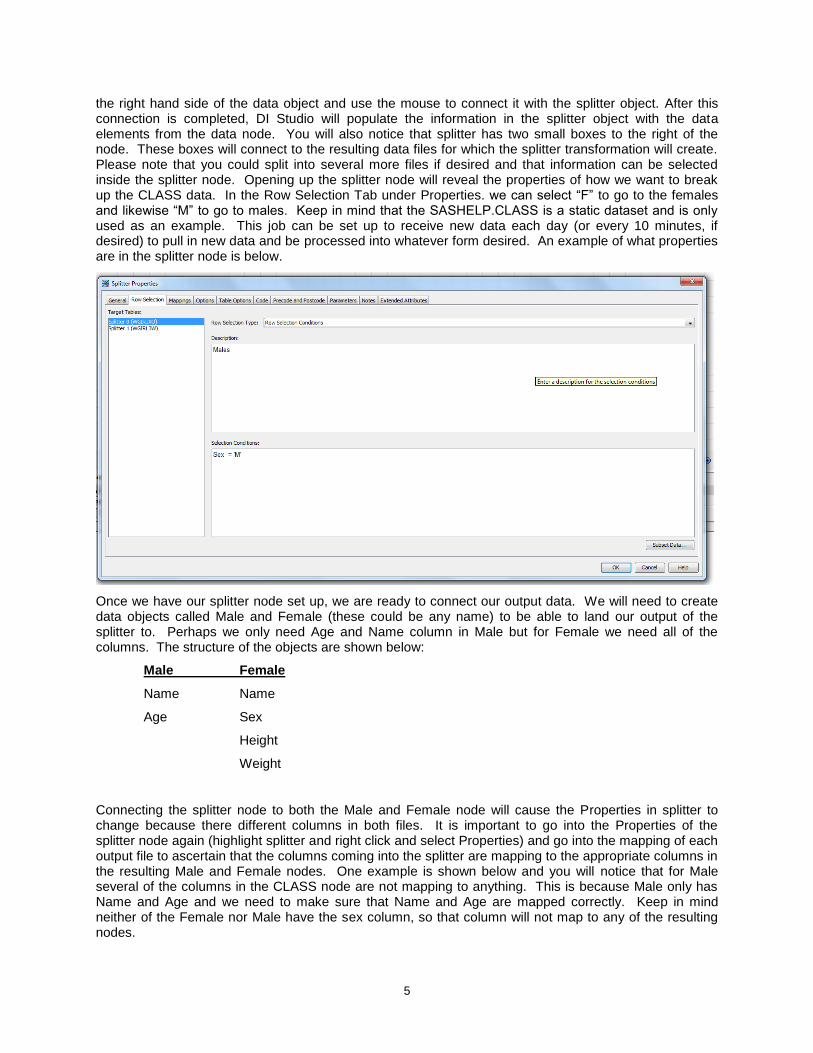
The next thing we want to do is to break up this data into males and females. Since our data contain a field called sex, we can use this field to break up our file into two pieces. What we need to do is go to the Transformations tab and click on and drag the “Splitter” object into the process flow. Once again, we can highlight the splitter object and right-click it and select Properties to see what is inside this construct.
Once we have that placed (preferably to the right of the data object), we need to click on the small box on
5
the right hand side of the data object and use the mouse to connect it with the splitter object. After this connection is completed, DI Studio will populate the information in the splitter object with the data elements from the data node. You will also notice that splitter has two small boxes to the right of the node. These boxes will connect to the resulting data files for which the splitter transformation will create. Please note that you could split into several more files if desired and that information can be selected inside the splitter node. Opening up the splitter node will reveal the properties of how we want to break up the CLASS data. In the Row Selection Tab under Properties. we can select “F” to go to the females and likewise “M” to go to males. Keep in mind that the SASHELP.CLASS is a static dataset and is only used as an example. This job can be set up to receive new data each day (or every 10 minutes, if desired) to pull in new data and be processed into whatever form desired. An example of what properties are in the splitter node is below.
Once we have our splitter node set up, we are ready to connect our output data. We will need to create data objects called Male and Female (these could be any name) to be able to land our output of the splitter to. Perhaps we only need Age and Name column in Male but for Female we need all of the columns. The structure of the objects are shown below:
Male Female
Name Name
Age Sex
Height
Weight
Connecting the splitter node to both the Male and Female node will cause the Properties in splitter to change because there different columns in both files. It is important to go into the Properties of the splitter node again (highlight splitter and right click and select Properties) and go into the mapping of each output file to ascertain that the columns coming into the splitter are mapping to the appropriate columns in the resulting Male and Female nodes. One example is shown below and you will notice that for Male several of the columns in the CLASS node are not mapping to anything. This is because Male only has Name and Age and we need to make sure that Name and Age are mapped correctly. Keep in mind neither of the Female nor Male have the sex column, so that column will not map to any of the resulting nodes.

6
Once we have all of our mappings complete we can now run the job. Right clicking on an empty area of the process flow will open up a menu and one of the choices is to run. Before running it is a good idea to save it, as Save (or Save As) is also an option in this menu.
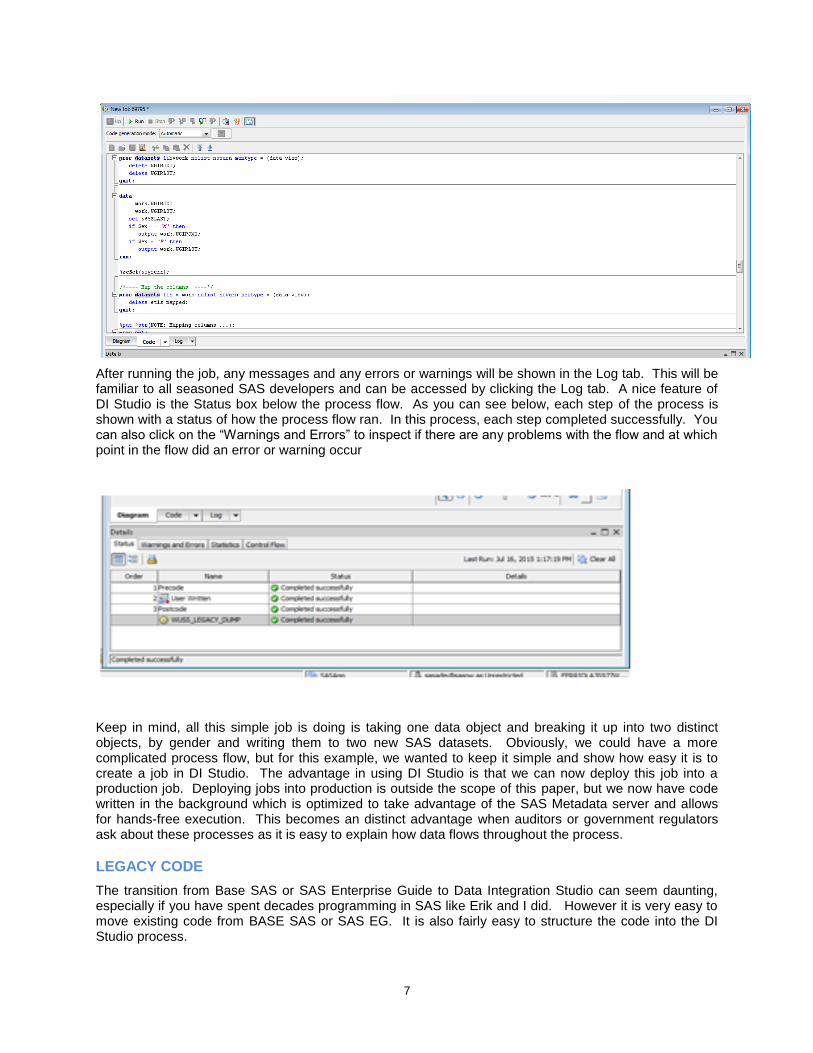
Another nice thing about DI Studio after you have run the job, you will notice in the process flow area at the bottom of the screen there are tabs called Diagram, Code and Log. We have been developing in the Diagram with our objects but at the same time, in the Code tab, DI Studio has been writing code for us and that can be viewed by clicking the Code tab, as shown below.
7
After running the job, any messages and any errors or warnings will be shown in the Log tab. This will be familiar to all seasoned SAS developers and can be accessed by clicking the Log tab. A nice feature of DI Studio is the Status box below the process flow. As you can see below, each step of the process is shown with a status of how the process flow ran. In this process, each step completed successfully. You can also click on the “Warnings and Errors” to inspect if there are any problems with the flow and at which point in the flow did an error or warning occur
Keep in mind, all this simple job is doing is taking one data object and breaking it up into two distinct objects, by gender and writing them to two new SAS datasets. Obviously, we could have a more complicated process flow, but for this example, we wanted to keep it simple and show how easy it is to create a job in DI Studio. The advantage in using DI Studio is that we can now deploy this job into a production job. Deploying jobs into production is outside the scope of this paper, but we now have code written in the background which is optimized to take advantage of the SAS Metadata server and allows for hands-free execution. This becomes an distinct advantage when auditors or government regulators ask about these processes as it is easy to explain how data flows throughout the process.
LEGACY CODE
The transition from Base SAS or SAS Enterprise Guide to Data Integration Studio can seem daunting, especially if you have spent decades programming in SAS like Erik and I did. However it is very easy to move existing code from BASE SAS or SAS EG. It is also fairly easy to structure the code into the DI Studio process.

8
Here is the code we are going to move from BASE SAS to DI Studio which utilizes an import step, builds a table from cards, Sorts the data into another table and creates another table with parts of the data.
THE DUMP
Create a new job in DI Studio.
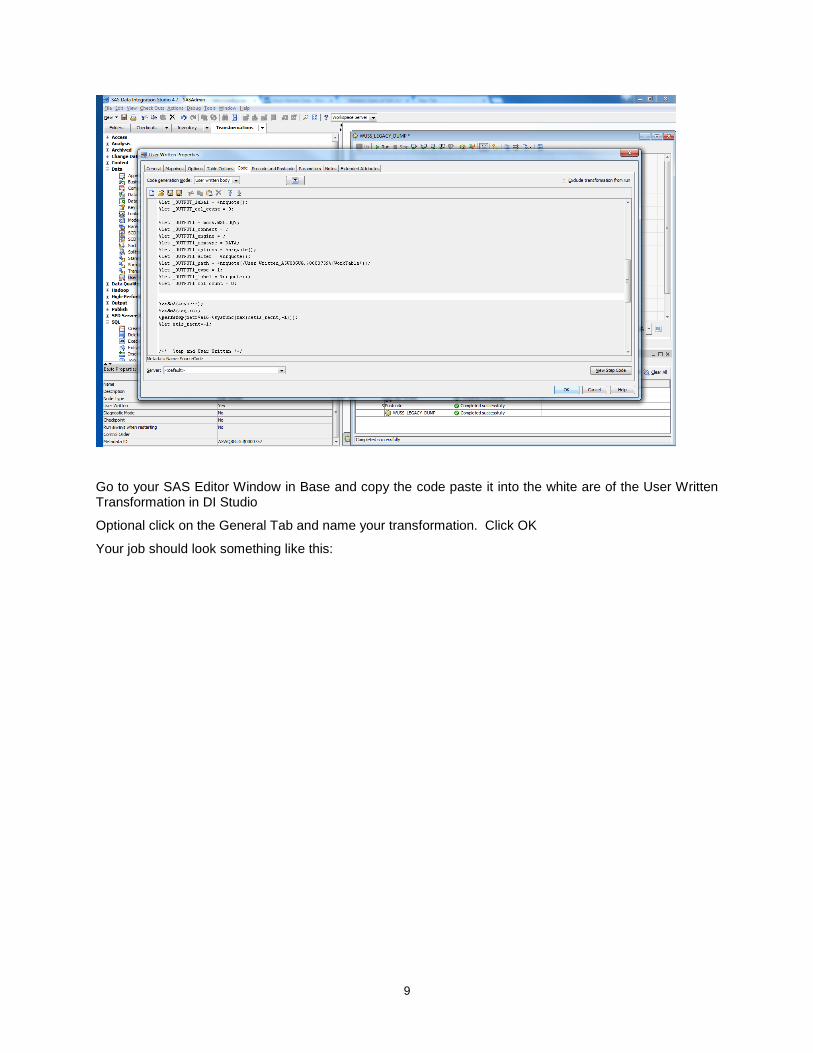
Using the Data tree under the Transformations tab, select and move to the Job canvas the User Written Transformation
Open the transformation properties and click on the Code Tab
9
Go to your SAS Editor Window in Base and copy the code paste it into the white are of the User Written Transformation in DI Studio
Optional click on the General Tab and name your transformation. Click OK
Your job should look something like this:
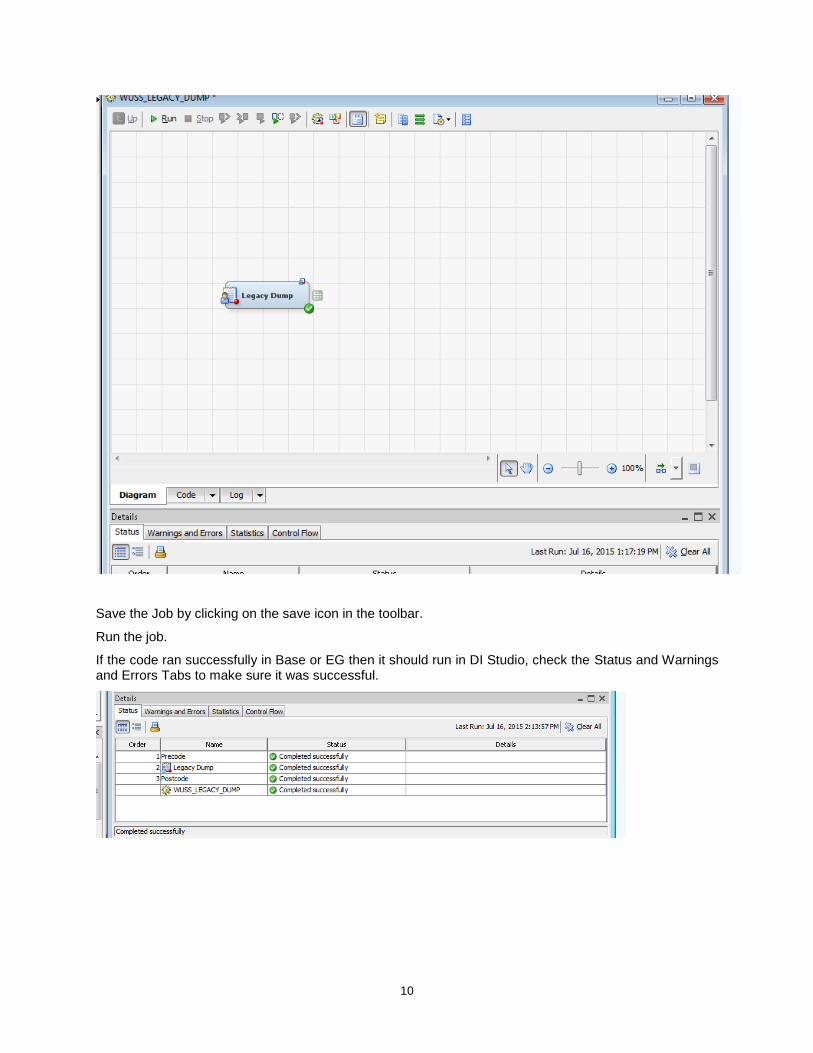
10
Save the Job by clicking on the save icon in the toolbar.
Run the job.
If the code ran successfully in Base or EG then it should run in DI Studio, check the Status and Warnings and Errors Tabs to make sure it was successful.

11
Because there was no metadata created you will not be able to see the results directly in DI Studio, but they would appear in the WUSS directory in BASE SAS or EG
DATA INTEGRATE!
The next steps will show you how easy it is to break the code into nodes and to create metadata quickly.
The first thing to do would be to create a Libname to access. To do this Create a Library Object. I will do it under a data folder.
Scroll down to SAS BASE Library and highlight.
On the following dialog boxes fill in the information needed. Note that the Library Name can be more descriptive than 8 Characters. However the Libref needs to match what you used before in BASE SAS.
Choose the server from the available list. For the path Specification use the path from the libname as New

12
When completed your libname info should look something like this.
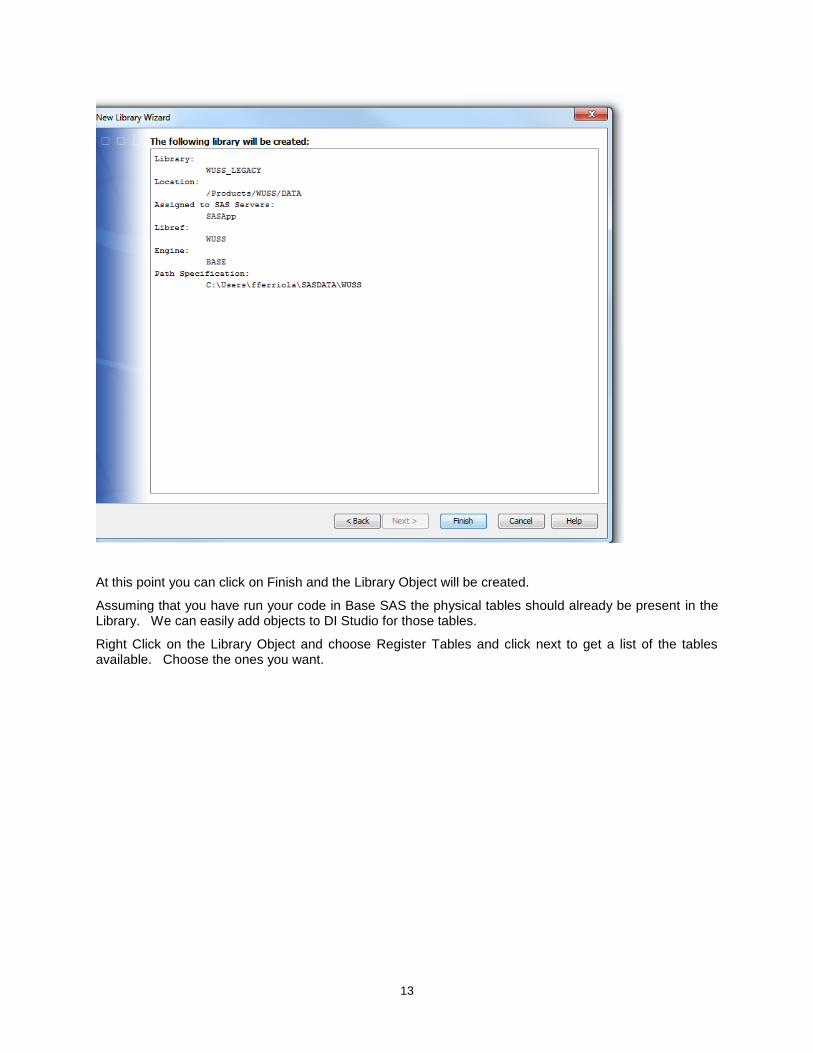
13
At this point you can click on Finish and the Library Object will be created.
Assuming that you have run your code in Base SAS the physical tables should already be present in the Library. We can easily add objects to DI Studio for those tables.
Right Click on the Library Object and choose Register Tables and click next to get a list of the tables available. Choose the ones you want.
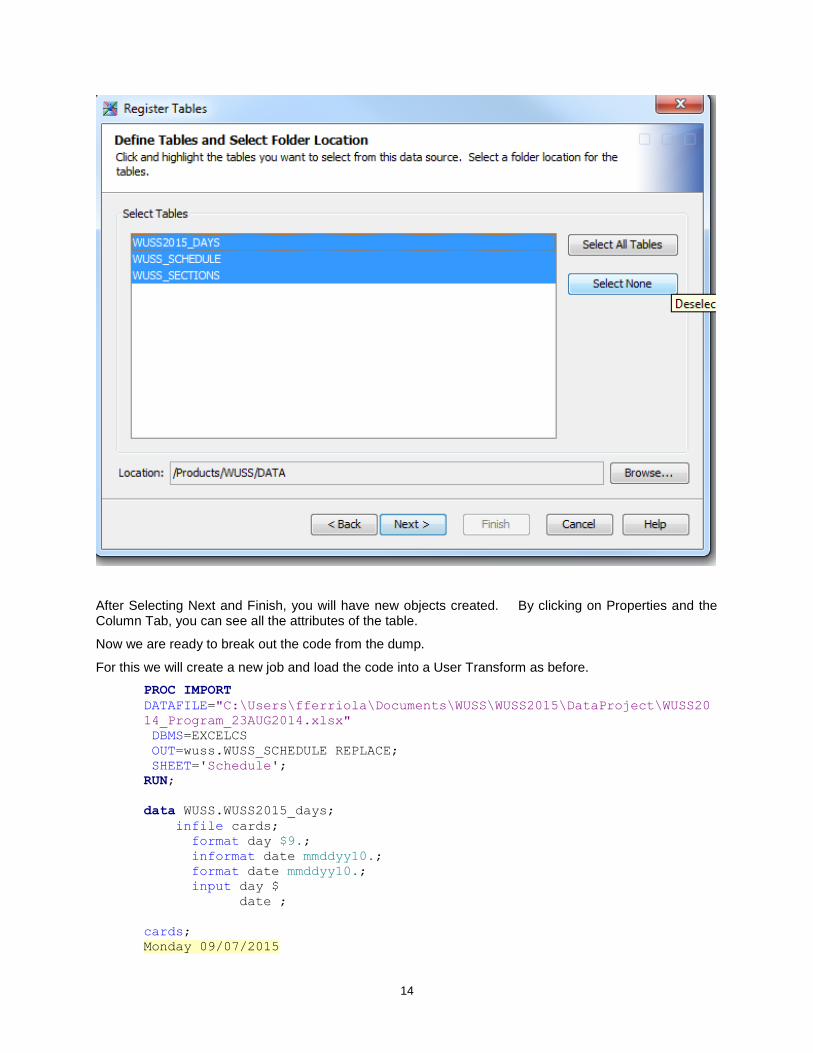
14
After Selecting Next and Finish, you will have new objects created. By clicking on Properties and the Column Tab, you can see all the attributes of the table.
Now we are ready to break out the code from the dump.
For this we will create a new job and load the code into a User Transform as before.
PROC IMPORT
DATAFILE="C:\Users\fferriola\Documents\WUSS\WUSS2015\DataProject\WUSS20
14_Program_23AUG2014.xlsx"
DBMS=EXCELCS
OUT=wuss.WUSS_SCHEDULE REPLACE;
SHEET='Schedule';
RUN;
data WUSS.WUSS2015_days;
infile cards;
format day $9.;
informat date mmddyy10.;
format date mmddyy10.;
input day $
date ;
cards;
Monday 09/07/2015

15
Tuesday 09/08/2015
Wednesday 09/09/2015
Thursday 09/10/2015
Friday 09/11/2015
;
run;
proc sort data=wuss.wuss_schedule
out=wuss.WUSS_SECTIONS(keep=section_id section_name) nodupkey;
by section_id section_name;
run;
We have already created the Library object so we can now remove the libname statement from the code.
Next we can copy the Proc Import Step Code to a new User Written Node.
We can also direct the output to the metadata object that we created earlier. In order to do that we need to delete the existing work output table attached to the node by right clicking on the table portion of the node and choose delete. Make sure that you do not delete the entire node.
.
The result will look like this:
16
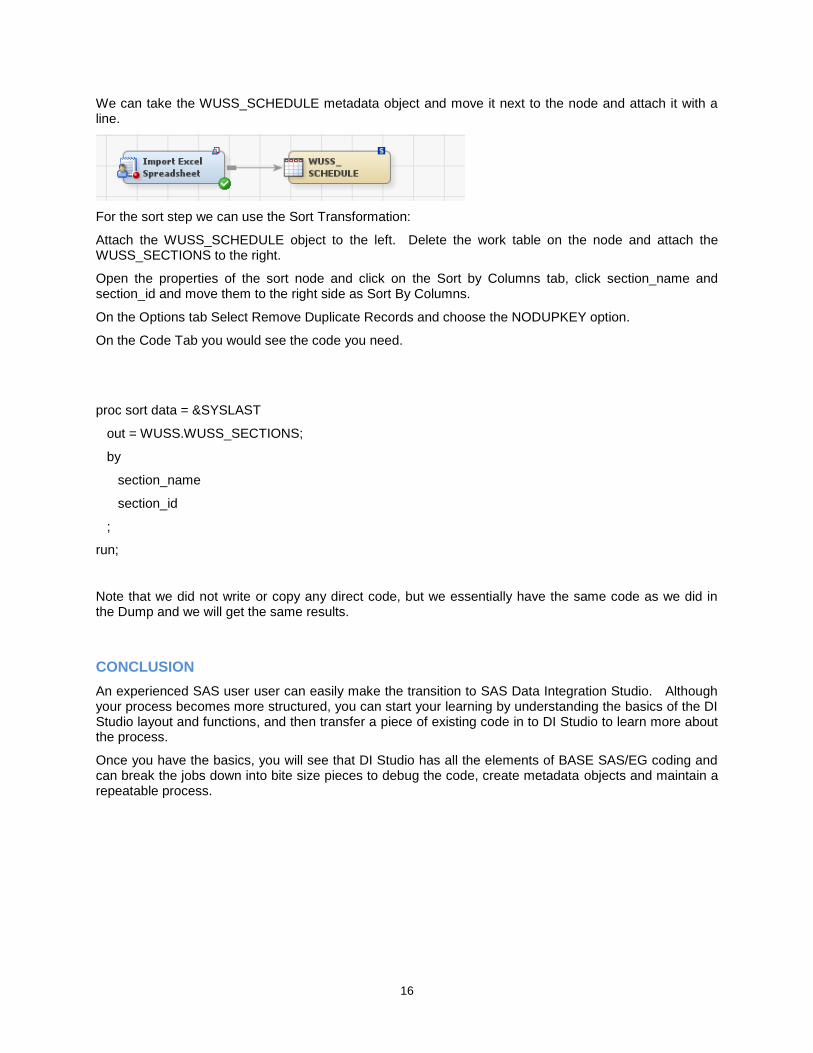
We can take the WUSS_SCHEDULE metadata object and move it next to the node and attach it with a line.
For the sort step we can use the Sort Transformation:
Attach the WUSS_SCHEDULE object to the left. Delete the work table on the node and attach the WUSS_SECTIONS to the right.
Open the properties of the sort node and click on the Sort by Columns tab, click section_name and section_id and move them to the right side as Sort By Columns.
On the Options tab Select Remove Duplicate Records and choose the NODUPKEY option.
On the Code Tab you would see the code you need.
proc sort data = &SYSLAST
out = WUSS.WUSS_SECTIONS;
by
section_name
section_id
;
run;
Note that we did not write or copy any direct code, but we essentially have the same code as we did in the Dump and we will get the same results.
CONCLUSION
An experienced SAS user user can easily make the transition to SAS Data Integration Studio. Although your process becomes more structured, you can start your learning by understanding the basics of the DI Studio layout and functions, and then transfer a piece of existing code in to DI Studio to learn more about the process.
Once you have the basics, you will see that DI Studio has all the elements of BASE SAS/EG coding and can break the jobs down into bite size pieces to debug the code, create metadata objects and maintain a repeatable process.

17
CONTACT INFORMATION
Your comments and questions are valued and encouraged. Contact the authors at:
Erik S. Larsen
Independent Consultant
Post Office Box 505
Charleston, SC 29401-0505
Work phone: 703-568-3083
E-mail: [email protected]
Frank Ferriola
Financial Risk Group
320 S. Academy St.
Cary, NC 27511
Fax: 704-800-7472
Web: http://www.frgrisk.com
Work Phone: 303-548-0278
E-mail: [email protected]
SAS and all other SAS Institute Inc. product or service names are registered trademarks or trademarks of SAS Institute Inc. in the USA and other countries. ® indicates USA registration.
Other brand and product names are trademarks of their respective companies.