a do-it-yourself guide to sealing and insulating with energy star
TRANSCRIPT

A DO-IT-YOURSELF GUIDE TO SEALING AND INSULATING WITH ENERGY STAR®
SEALING AIR LEAKS AND ADDING ATTIC INSULATION

Sealing and Insulating your home is one of the most cost-effective ways to make a home more comfortable and energy efficient—and you can do it yourself.
Use This Guide To:
1. Learn how to find and seal hidden attic and basement air leaks
2. Determine if your attic insulation is adequate, and learn how to add more
3. Make sure your improvements are done safely
4. Reduce energy bills and help protect the environment
CONTENTS
Locating Air Leaks 1.2
Getting Started 1.4
Sealing Attic Air Leaks 1.6
Additional Sources of Air Leaks 2.1
Sealing Basement Air Leaks 3.1
Adding Attic Insulation 4.1
When you see products or services with the ENERGY STAR® label, you know they meet strict energy efficiency guidelines set by the U.S. Environmental Protection Agency (EPA) and the U.S. Department of Energy (DOE). Since using less energy reduces greenhouse gas emissions and improves air quality, choosing ENERGY STAR is one way you can do your part to protect our planet for future generations.
For more information visit: www.energystar.gov or call 1.888.STAR.YES (1.888.782.7937).
The U.S. EPA wishes to thank The Family Handyman Magazine for their contribution of photographs and content for this guide. Photos appear courtesy of The Family Handyman Magazine ©2001 except where otherwise noted.
1.1 CONTENTS
LOCATING AIR LEAKS
Effects of Air Leaks
Heated inside air drawn into the attic
Cold outside air drawn into the house
I
H
G
F
E
D
CB
A
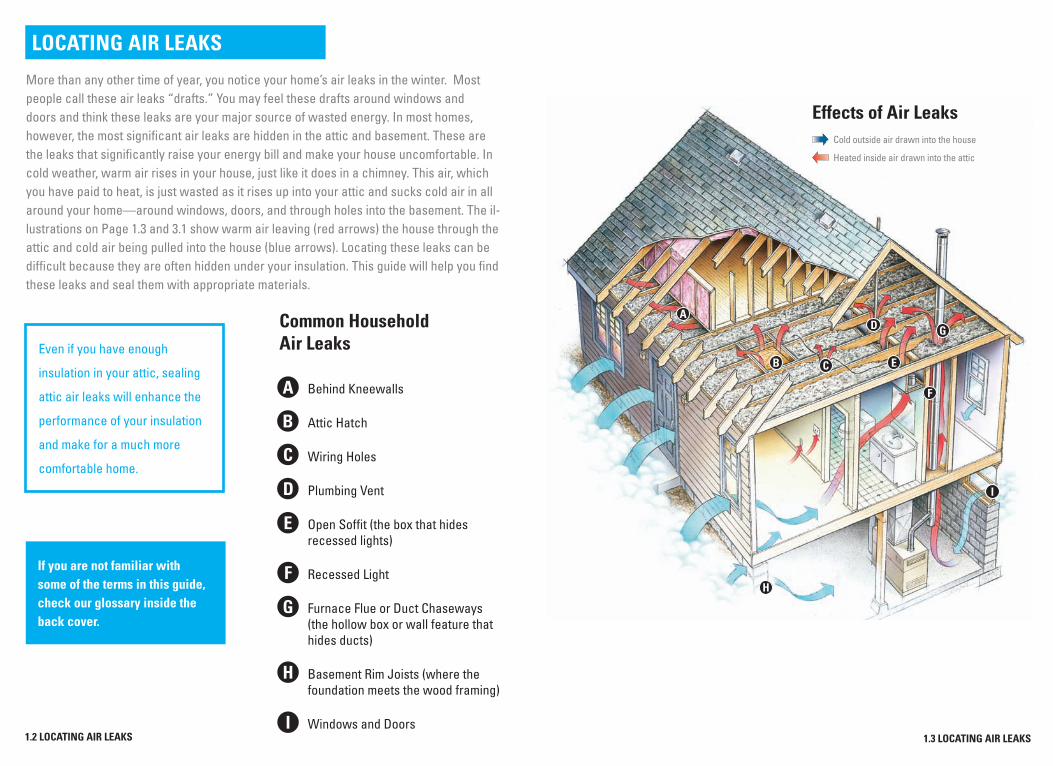
More than any other time of year, you notice your home’s air leaks in the winter. Most people call these air leaks “drafts.” You may feel these drafts around windows and doors and think these leaks are your major source of wasted energy. In most homes, however, the most significant air leaks are hidden in the attic and basement. These are the leaks that significantly raise your energy bill and make your house uncomfortable. In cold weather, warm air rises in your house, just like it does in a chimney. This air, which you have paid to heat, is just wasted as it rises up into your attic and sucks cold air in all around your home—around windows, doors, and through holes into the basement. The illustrations on Page 1.3 and 3.1 show warm air leaving (red arrows) the house through the attic and cold air being pulled into the house (blue arrows). Locating these leaks can be difficult because they are often hidden under your insulation. This guide will help you find these leaks and seal them with appropriate materials.
Common Household Air LeaksEven if you have enough
insulation in your attic, sealing Behind Kneewallsattic air leaks will enhance the
performance of your insulation Attic Hatch
and make for a much more Wiring Holes
comfortable home.
Plumbing Vent
Open Soffit (the box that hides recessed lights)
If you are not familiar with some of the terms in this guide, check our glossary inside the back cover.
Recessed Light
Furnace Flue or Duct Chaseways (the hollow box or wall feature that hides ducts)
Basement Rim Joists (where the foundation meets the wood framing)
Windows and Doors 1.2 LOCATING AIR LEAKS
I
H
G
F
E
D
C
B
A
1.3 LOCATING AIR LEAKS
GETTING STARTED
You May Need a Contractor to Correct These Problems: ■ Wet or damp insulation indicating a
leaky roof
■ Moldy or rotted attic rafters or floor joists indicating moisture problems
■ Kitchen, bathroom, and clothes dryer vents that exhaust moist air directly into the attic space instead of outdoors
■ A history of ice dams in the winter (an indication of serious air leaks)
■ Little or no attic ventilation (see Page 4.2 – A Note About Attic Ventilation)
■ Knob and tube wiring (pre-1930), which can be a fire hazard when in contact with insulation
■ If you have many unsealed and uninsulated recessed “can” lights, special care must be taken when insulating around these fixtures (See Page 2.2)
Attic air sealing and adding insulation are do-it-yourself projects if your attic is accessible and not too difficult to move around in. The projects recommended in this guide can usually be completed in a day or two and will provide benefits for years to come. However, if upon inspection of your attic you find any of the conditions listed to the left, we recommend you consider hiring a contractor to correct these problems before proceeding.
For tips on hiring the right contractor, visit www.energystar.gov/homeimprovement.
Get Your Bearings from Below
A good way to start home sealing is to make a quick sketch of your home’s floor plan. This sketch will serve as a reference point once you get into the attic and will help you locate areas of leakage. In your sketch, make note of dropped soffits over kitchen cabinets or bath vanities, slanted ceilings over stairways, where walls (interior and exterior) meet the ceiling, and any other dropped-ceiling areas. These areas may have open stud cavities leading directly into the attic and can be huge sources of air leaks (see photos 1-3 on Pages 1.6 and 1.7).
1.4 GETTING STARTED
Tips For Working in the Attic ■ Have a Plan in Place
The key to any successful home
improvement project is adequate
planning. Gather all your tools and
supplies before you begin to minimize trips
in and out of the attic. Be sure that the
work area is well-lit by using a drop light,
and keep a flashlight handy.
■ Prepare to Get Dirty The entire process of sealing your attic
will be made easier if you take the time
and effort to wear the right gear. Wear
knee pads to help prevent pain associated
with crawling on attic joists. Additionally,
a lightweight disposable coverall, gloves,
and hat can keep itchy and irritating
insulation off your skin.
■ Above All – Be Safe Take precautions to avoid a dangerous
working environment in the attic. During
hot weather start working early, as attics
heat up as the day moves on. Drink plenty
of water and use an OSHA-approved
particulate respirator or double-strap
dust mask to prevent inhalation of
hazardous substances. Also remember
to watch your step. Walk on joists or
truss chords, not exposed ceiling drywall
or insulation. In addition, watch out for
sharp nails sticking through the
roof deck!
Materials Checklist for Sealing Attic Air Leaks • Batt or roll of unfaced fiberglass insulation
and large garbage bags (for stuffing open stud cavities behind kneewalls and in dropped soffits)
• Roll of reflective foil insulation or other blocking material such as drywall or pieces of rigid foam insulation to cover soffits, open walls, and larger holes
• Silicone or acrylic latex caulk & caulk gun for sealing small holes (1/4 inch or less)
• Several cans of expanding spray foam insulation for filling larger gaps (1/4 inch to 3 inches)
• Special high-temperature (heat-resistant) caulk to seal around flues and chimneys
• Roll of 14-inch wide aluminum flashing to keep insulation away from the flue pipe
• Retractable utility knife and sheet metal scissors
• Tape measure and staple gun (or hammer and nails) to hold covering materials in place
• Safety glasses, gloves, and dust mask (for insulation work as well)
• Flashlight or portable safety light
• Boards to walk on, if needed
• Large bucket to haul materials
1.5 GETTING STARTED
SEALING ATTIC AIR LEAKS
Plug the Big Holes First
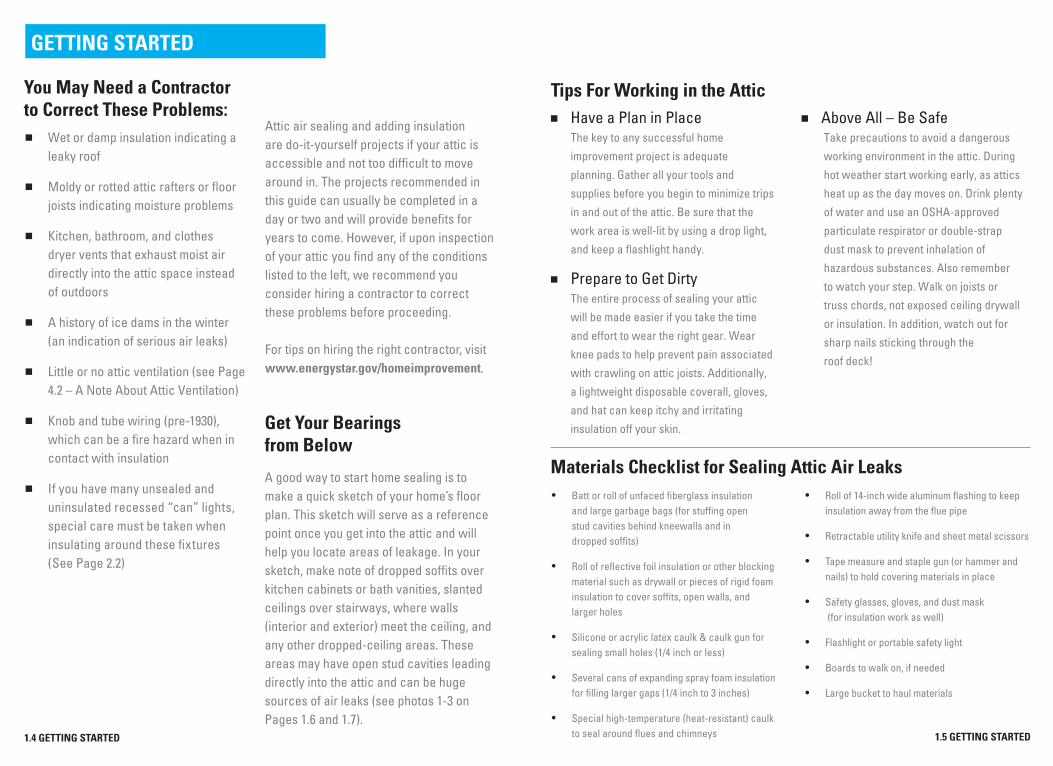
Don’t worry about finding and sealing all the little holes in your attic; your biggest savings will come from plugging the large ones. Once in the attic, refer to your sketch to locate the areas where leakage is likely to be greatest: where walls (inner and outer) meet the attic floor, dropped soffits (dropped-ceiling areas), and behind or under attic kneewalls. Look for dirty insulation—this indicates that air is moving through it. Dropped soffits may be filled or covered with insulation and hard to see. Push back the insulation and scoop it out of the soffits. You will place this insulation back over the soffit once the stud cavities have been plugged and the soffits covered (photos 1-3) (If you have recessed “can” lights in your open soffits, please read about them on Page 2.2 before proceeding).
1. CREATE STUFFED BAGS 2. PLUG OPEN STUD CAVITIES
Cut a 16 inch long piece from a batt of unfaced fiberglass insulation and fold it into the bottom of a 13-gallon plastic garbage bag.
16” PIECE OF FIBERGLASS
BATT
RECESSED CAN LIGHT DROPPED
SOFFIT
Fold the bag and stuff it into the open stud cavity. Add more insulation to the bag if it doesn’t fit tightly. Plug all open stud spaces, then cover the soffit (photo 3, Page 1.7 ).
PLUGGED STUD CATIVITY
RECESSED CAN LIGHT
OPEN STUD CAVITY
3. COVER DROPPED SOFFITS 4. SEAL BEHIND KNEEWALLS
REFLECTIVE FOIL INSULATION
DROPPED SOFFIT
CAULK OR ADHESIVE
24” BATT ROLLED INSIDE GARBAGE BAG
OPEN JOIST CAVITY
KNEEWALL
After removing insulation from a dropped soffit, cut a length of reflective foil or other blocking material (rigid foam board works well) a few inches longer than the opening to be covered. Apply a bead of caulk or adhesive around the opening. Seal the foil to the frame with the caulk/adhesive and staple or nail it in place, if needed.
Cut a 24 inch long piece from a batt of fiberglass insulation and place it at the bottom of a 13-gallon plastic garbage bag. Fold the bag over and stuff it into the open joist spaces under the wall (a piece of rigid foam board sealed with spray foam also works well for covering open joist cavities). Again, cover with insulation when you’re done.
If You Have a Finished Attic, Seal Behind the Kneewalls
Finished rooms built into attics often have open cavities in the floor framing under the side-walls or kneewalls. Even though insulation may be piled against or stuffed into these spaces, they can still leak air. Again, look for signs of dirty insulation to indicate air is moving through. You need to plug these cavities in order to stop air from traveling under the floor of the finished space (photo 4).
Caution: Some attics have vermiculite insulation, which may contain asbestos, a health hazard. Vermiculite is a lightweight, pea-size, flaky gray mineral. Don’t disturb vermiculite insulation unless you’ve had it tested by an approved lab to be sure it doesn’t contain asbestos. Contact your local health department for the name of an approved lab.
1.7 SEALING ATTIC AIR LEAKS 1.6 SEALING ATTIC AIR LEAKS
SEALING ATTIC AIR LEAKS
Furnace Flues Require Special Sealing Techniques
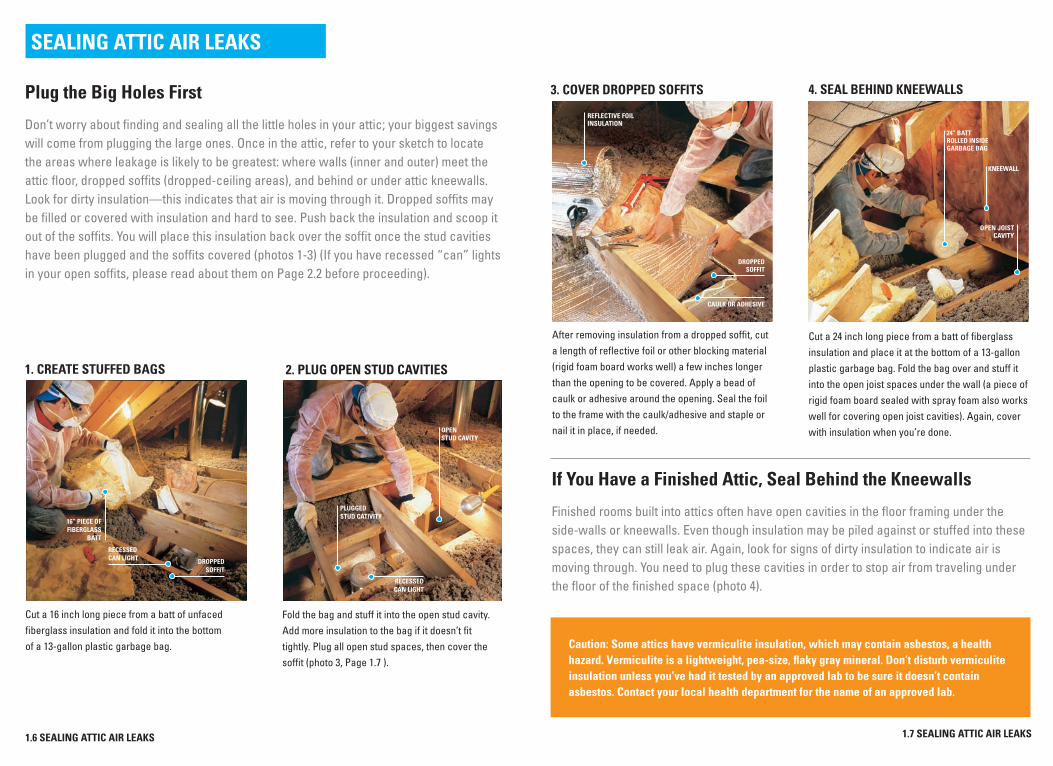
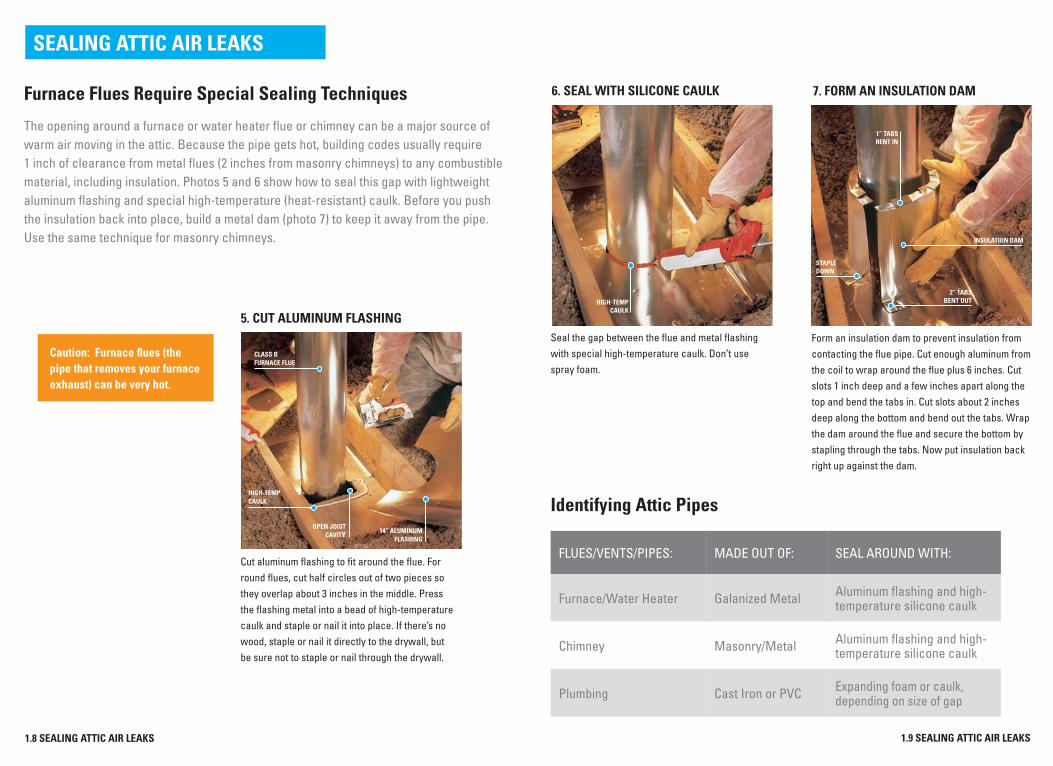
The opening around a furnace or water heater flue or chimney can be a major source of warm air moving in the attic. Because the pipe gets hot, building codes usually require 1 inch of clearance from metal flues (2 inches from masonry chimneys) to any combustible material, including insulation. Photos 5 and 6 show how to seal this gap with lightweight aluminum flashing and special high-temperature (heat-resistant) caulk. Before you push the insulation back into place, build a metal dam (photo 7) to keep it away from the pipe. Use the same technique for masonry chimneys.
5. CUT ALUMINUM FLASHING
14” ALUMINUM FLASHING
OPEN JOIST CAVITY
HIGH-TEMP CAULK
CLASS B FURNACE FLUE
Caution: Furnace flues (the pipe that removes your furnace exhaust) can be very hot.
Cut aluminum flashing to fit around the flue. For round flues, cut half circles out of two pieces so they overlap about 3 inches in the middle. Press the flashing metal into a bead of high-temperature caulk and staple or nail it into place. If there’s no wood, staple or nail it directly to the drywall, but be sure not to staple or nail through the drywall.
6. SEAL WITH SILICONE CAULK
HIGH-TEMP CAULK
Seal the gap between the flue and metal flashing with special high-temperature caulk. Don’t use spray foam.
Identifying Attic Pipes
7. FORM AN INSULATION DAM
INSULATION DAM
1” TABS RENT IN
STAPLE DOWN
2” TABS BENT OUT
Form an insulation dam to prevent insulation from contacting the flue pipe. Cut enough aluminum from the coil to wrap around the flue plus 6 inches. Cut slots 1 inch deep and a few inches apart along the top and bend the tabs in. Cut slots about 2 inches deep along the bottom and bend out the tabs. Wrap the dam around the flue and secure the bottom by stapling through the tabs. Now put insulation back right up against the dam.
FLUES/VENTS/PIPES: MADE OUT OF: SEAL AROUND WITH:
Furnace/Water Heater Galanized Metal Aluminum flashing and high-temperature silicone caulk
Aluminum flashing and high-Chimney Masonry/Metal temperature silicone caulk
Expanding foam or caulk,Plumbing Cast Iron or PVC depending on size of gap
1.8 SEALING ATTIC AIR LEAKS 1.9 SEALING ATTIC AIR LEAKS
SEALING ATTIC AIR LEAKS
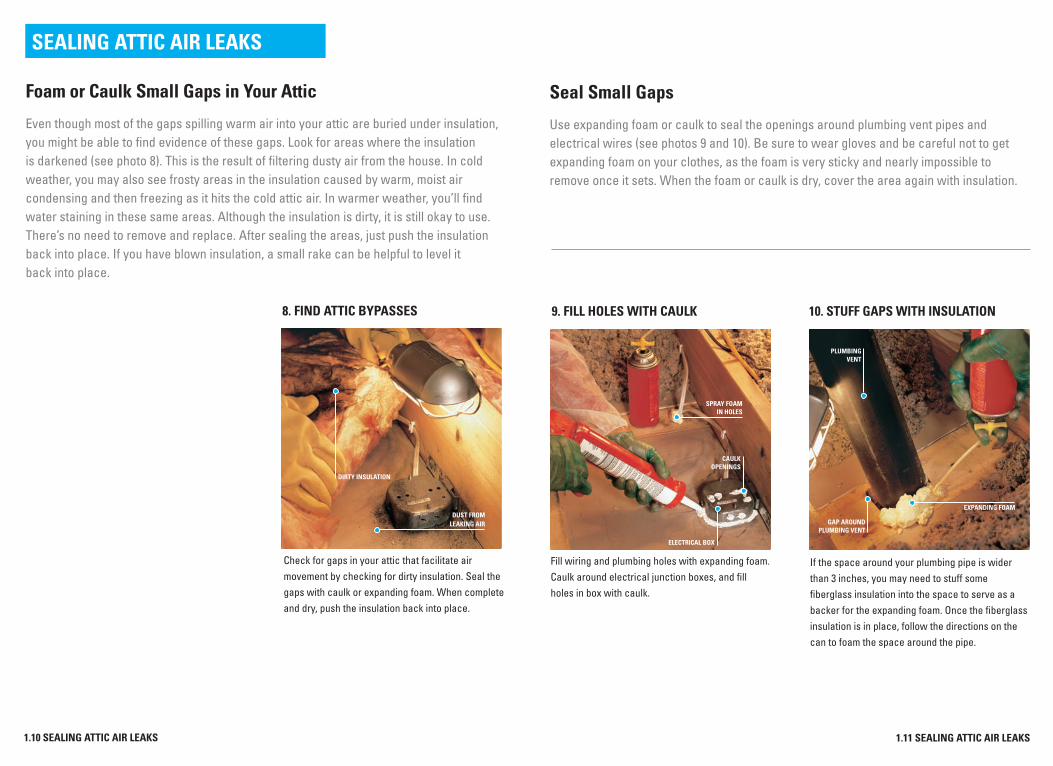
Foam or Caulk Small Gaps in Your Attic
Even though most of the gaps spilling warm air into your attic are buried under insulation, you might be able to find evidence of these gaps. Look for areas where the insulation is darkened (see photo 8). This is the result of filtering dusty air from the house. In cold weather, you may also see frosty areas in the insulation caused by warm, moist air condensing and then freezing as it hits the cold attic air. In warmer weather, you’ll find water staining in these same areas. Although the insulation is dirty, it is still okay to use. There’s no need to remove and replace. After sealing the areas, just push the insulation back into place. If you have blown insulation, a small rake can be helpful to level it back into place.
8. FIND ATTIC BYPASSES
Seal Small Gaps
Use expanding foam or caulk to seal the openings around plumbing vent pipes and electrical wires (see photos 9 and 10). Be sure to wear gloves and be careful not to get expanding foam on your clothes, as the foam is very sticky and nearly impossible to remove once it sets. When the foam or caulk is dry, cover the area again with insulation.
9. FILL HOLES WITH CAULK 10. STUFF GAPS WITH INSULATION
DIRTY INSULATION
DUST FROM LEAKING AIR
Check for gaps in your attic that facilitate air movement by checking for dirty insulation. Seal the gaps with caulk or expanding foam. When complete and dry, push the insulation back into place.
Fill wiring and plumbing holes with expanding foam. Caulk around electrical junction boxes, and fill holes in box with caulk.
ELECTRICAL BOX
CAULK OPENINGS
SPRAY FOAM IN HOLES
EXPANDING FOAM
PLUMBING VENT
GAP AROUND PLUMBING VENT
If the space around your plumbing pipe is wider than 3 inches, you may need to stuff some fiberglass insulation into the space to serve as a backer for the expanding foam. Once the fiberglass insulation is in place, follow the directions on the can to foam the space around the pipe.
1.10 SEALING ATTIC AIR LEAKS 1.11 SEALING ATTIC AIR LEAKS
SEALING ATTIC AIR LEAKS ADDITIONAL SOURCES OF AIR LEAKS
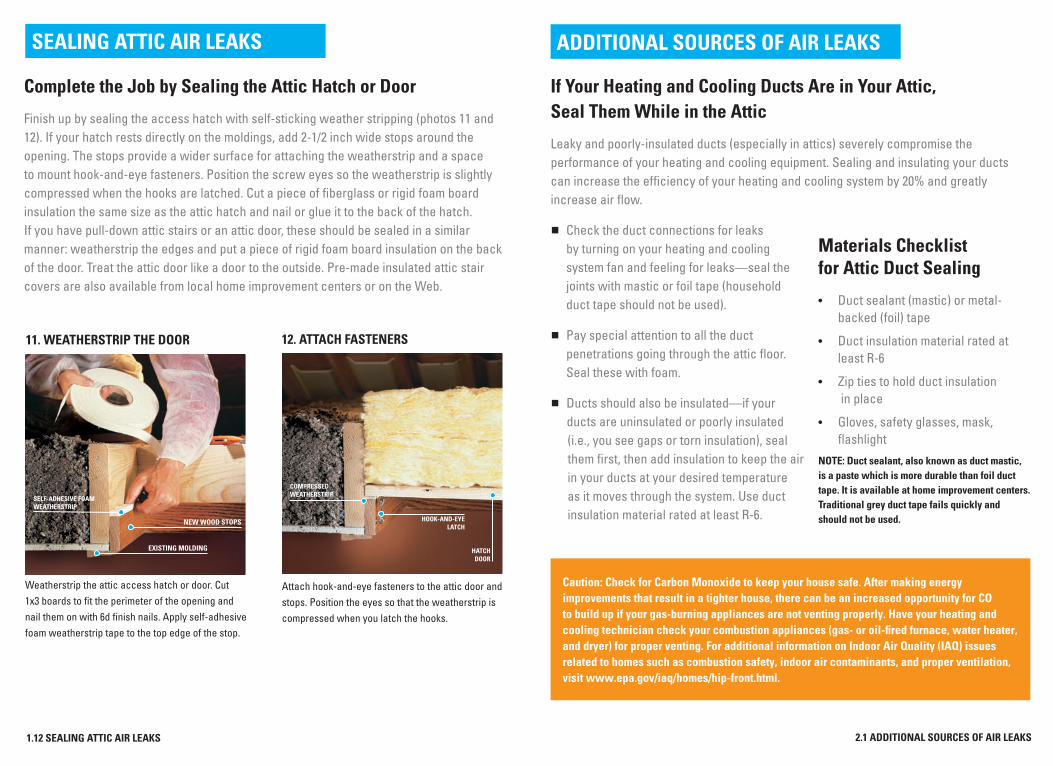
Complete the Job by Sealing the Attic Hatch or Door
Finish up by sealing the access hatch with self-sticking weather stripping (photos 11 and 12). If your hatch rests directly on the moldings, add 2-1/2 inch wide stops around the opening. The stops provide a wider surface for attaching the weatherstrip and a space to mount hook-and-eye fasteners. Position the screw eyes so the weatherstrip is slightly compressed when the hooks are latched. Cut a piece of fiberglass or rigid foam board insulation the same size as the attic hatch and nail or glue it to the back of the hatch. If you have pull-down attic stairs or an attic door, these should be sealed in a similar manner: weatherstrip the edges and put a piece of rigid foam board insulation on the back of the door. Treat the attic door like a door to the outside. Pre-made insulated attic stair covers are also available from local home improvement centers or on the Web.
11. WEATHERSTRIP THE DOOR 12. ATTACH FASTENERS
NEW WOOD STOPS
EXISTING MOLDING
SELF-ADHESIVE FOAM WEATHERSTRIP
Weatherstrip the attic access hatch or door. Cut 1x3 boards to fit the perimeter of the opening and nail them on with 6d finish nails. Apply self-adhesive foam weatherstrip tape to the top edge of the stop.
Attach hook-and-eye fasteners to the attic door and stops. Position the eyes so that the weatherstrip is compressed when you latch the hooks.
HOOK-AND-EYE LATCH
HATCH DOOR
COMPRESSED WEATHERSTRIP
If Your Heating and Cooling Ducts Are in Your Attic, Seal Them While in the Attic
Leaky and poorly-insulated ducts (especially in attics) severely compromise the performance of your heating and cooling equipment. Sealing and insulating your ducts can increase the efficiency of your heating and cooling system by 20% and greatly increase air flow.
■ Check the duct connections for leaks by turning on your heating and cooling system fan and feeling for leaks—seal the joints with mastic or foil tape (household duct tape should not be used).
■ Pay special attention to all the duct penetrations going through the attic floor. Seal these with foam.
■Ducts should also be insulated—if your ducts are uninsulated or poorly insulated (i.e., you see gaps or torn insulation), seal them first, then add insulation to keep the air in your ducts at your desired temperature as it moves through the system. Use duct insulation material rated at least R-6.
Materials Checklist for Attic Duct Sealing
• Duct sealant (mastic) or metal-backed (foil) tape
• Duct insulation material rated at least R-6
• Zip ties to hold duct insulation in place
• Gloves, safety glasses, mask, flashlight
NOTE: Duct sealant, also known as duct mastic, is a paste which is more durable than foil duct tape. It is available at home improvement centers. Traditional grey duct tape fails quickly and should not be used.
Caution: Check for Carbon Monoxide to keep your house safe. After making energy improvements that result in a tighter house, there can be an increased opportunity for CO to build up if your gas-burning appliances are not venting properly. Have your heating and cooling technician check your combustion appliances (gas- or oil-fired furnace, water heater, and dryer) for proper venting. For additional information on Indoor Air Quality (IAQ) issues related to homes such as combustion safety, indoor air contaminants, and proper ventilation, visit www.epa.gov/iaq/homes/hip-front.html.
1.12 SEALING ATTIC AIR LEAKS 2.1 ADDITIONAL SOURCES OF AIR LEAKS

ADDITIONAL SOURCES OF AIR LEAKS SEALING BASEMENT AIR LEAKS
Recessed “Can” Lights: Big Source of Air Leaks, But No Easy Solution Recessed “can” lights (also called high-hats or recessed downlights) look great, but when they protrude into your attic space, they can make your home less energy-efficient. These recessed lights in a one-story house or in the ceiling of a second-story create open holes into your attic that allow unwanted heat flow between conditioned and unconditioned spaces. In the summer, hot attic air can make the rooms warmer, and in the winter can lights draw warm air up into your attic. Both the warm air leakage and the heat from the lights can cause problems. In cold climates, the heat melts snow on the roof and forms ice dams (water re-freezes at the roof edge). This is more likely to happen if the “can” light is close to the roof deck. Recessed “can” lights in bathrooms also cause problems when warm, moist air leaks into the attic and causes moisture damage. Here are some suggestions for improving the recessed can lights in your attic:
■ Call a Professional to Properly Seal ■Switch to More Efficient Bulbs Recessed lights can be sealed, but it is difficult When keeping existing recessed lights, you
and can create a hazard if not done properly with can still reduce lighting energy use as much
non-combustible materials. Since any old-style as 75% by installing ENERGY STAR qualified
lights need adequate air space around them to compact fluorescent light (CFL) bulbs. This
vent the heat they create, it’s best to consult with includes CFL bulbs specifically designed
a professional before sealing them. Also, see for recessed lights with built-in reflectors
“Caution” below. Alternatively, recessed lights matching the appearance of traditional
can be replaced with ICAT (Insulated Ceiling Air- incandescent reflector bulbs. As with new
Tight) rated lights, which insulation can touch and fixtures, it is important to make sure any
are sealed to reduce air leaks. CFL bulb selected meets your light output
expectations. Also, check the packaging of ■ When Replacing or Adding, Buy
the CFL to ensure that it may be used in anENERGY STAR with ICAT
enclosed fixture. However, switching to CFL Look for ENERGY STAR qualified recessed fixtures
bulbs will not solve the air leakage problem.that reduce energy use as much as 75%. However,
it’s important to check that any fixture selected
meets your light output expectations since fixtures
come with widely varying wattage bulbs and
optics. Also, make sure fixtures have an ICAT
rating to minimize heat loss.
2.2 ADDITIONAL SOURCES OF AIR LEAKS
Caution: Keep all insulation 3 inches from “can” lights, except those rated IC (insulation contact). You can use a piece of circular metal flashing or wire mesh around the light as a dam to keep the insulation away from the light (see photo 2, Page 4.3).
Stopping the Chimney Effect
Outside air drawn in through basement leaks
is exacerbated by the chimney effect created
by leaks in the attic. As hot air generated
by the furnace rises up through the house
➊and into the attic through leaks ➋, cold
outside air gets drawn in through basement
leaks to replace the displaced air ➌. This
makes a home feel drafty and contributes
to higher energy bills. After sealing attic air
leaks, complete the job by sealing basement
leaks, to stop the chimney effect.
2
3
1
Locating Basement Air Leaks
A common area of air leakage in the basement is along the top of the basement wall where cement or block comes in contact with the wood frame. These leaks can easily be fixed in portions of the basement that are unfinished. Since the top of the wall is above ground, outside air can be drawn in through cracks and gaps where the house framing sits on top of the foundation. This perimeter framing is called the rim (or band) joist. In the basement, the above floor joists end at the rim joist creating multiple cavities along the length of the wall, and many opportunities for leakage (see illustration on Page 3.2).
3.1 SEALING BASEMENT AIR LEAKS
SEALING BASEMENT AIR LEAKS
Seal All Gaps and Cracks around Rim Joists
Though you may not be able to see cracks in the rim joist cavities, it is best to seal up the top and bottom of the inside of the cavity. Also, rim joist air sealing is especially important at bump out areas such as bay windows that hang off the foundation. These areas provide greater opportunities for air leakage and heat loss. Caulk is best for sealing gaps or cracks that are 1/4 inch or less. Use spray foam to fill gaps from 1/4 inch to about 3 inches. We also recommend you seal penetrations that go through the basement ceiling to the floor above. Generally, these are holes for wires, water supply pipes, water drain pipes, the plumbing vent stack (for venting sewer gases), and the furnace flue (for venting furnace exhaust).
Materials Checklist for Basement Sealing
• Silicone or acrylic latex caulk and caulk gun
• Expanding spray foam
Caution: When sealing the furnace flue (which will be encased in a metal sleeve) use high-temperature caulk. Run a bead of high-temperature caulk around the pipe sleeve and around the metal frame.
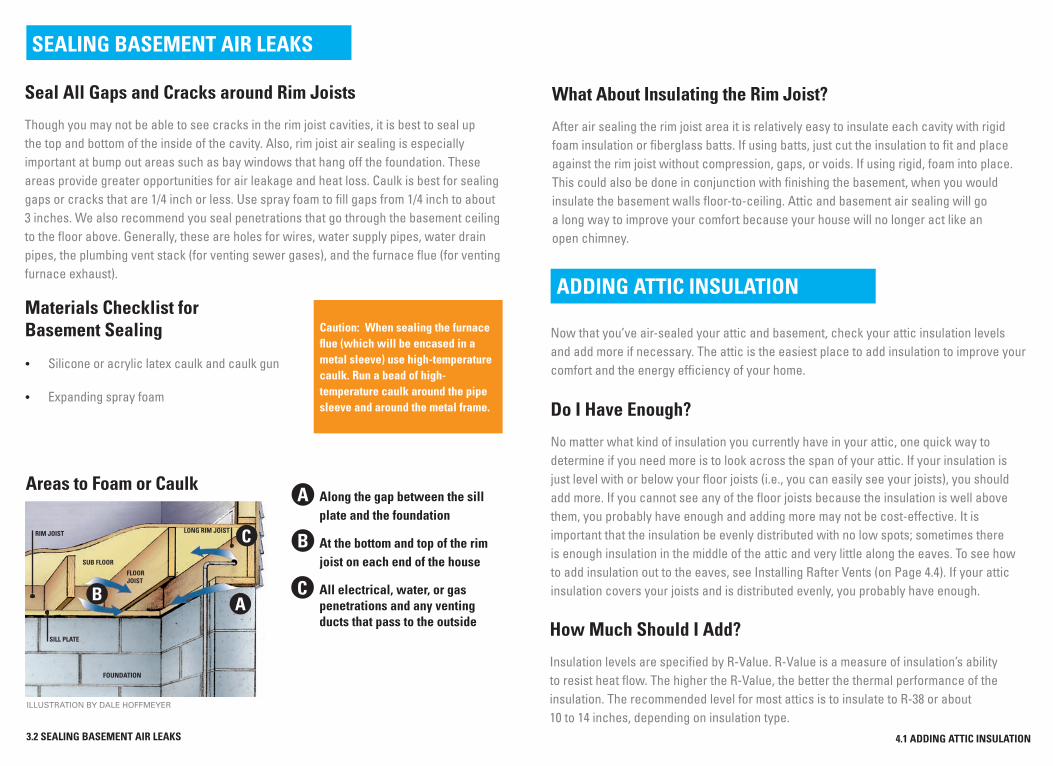
Areas to Foam or Caulk
ILLUSTRATION BY DALE HOFFMEYER
RIM JOIST
SUB FLOOR
SILL PLATE
FOUNDATION
FLOOR JOIST
LONG RIM JOIST C
B A
Along the gap between the sill plate and the foundation
C
B
A
At the bottom and top of the rim joist on each end of the house
All electrical, water, or gas penetrations and any venting ducts that pass to the outside
What About Insulating the Rim Joist?
After air sealing the rim joist area it is relatively easy to insulate each cavity with rigid foam insulation or fiberglass batts. If using batts, just cut the insulation to fit and place against the rim joist without compression, gaps, or voids. If using rigid, foam into place. This could also be done in conjunction with finishing the basement, when you would insulate the basement walls floor-to-ceiling. Attic and basement air sealing will go a long way to improve your comfort because your house will no longer act like an open chimney.
ADDING ATTIC INSULATION
Now that you’ve air-sealed your attic and basement, check your attic insulation levels and add more if necessary. The attic is the easiest place to add insulation to improve your comfort and the energy efficiency of your home.
Do I Have Enough?
No matter what kind of insulation you currently have in your attic, one quick way to determine if you need more is to look across the span of your attic. If your insulation is just level with or below your floor joists (i.e., you can easily see your joists), you should add more. If you cannot see any of the floor joists because the insulation is well above them, you probably have enough and adding more may not be cost-effective. It is important that the insulation be evenly distributed with no low spots; sometimes there is enough insulation in the middle of the attic and very little along the eaves. To see how to add insulation out to the eaves, see Installing Rafter Vents (on Page 4.4). If your attic insulation covers your joists and is distributed evenly, you probably have enough.
How Much Should I Add?
Insulation levels are specified by R-Value. R-Value is a measure of insulation’s ability to resist heat flow. The higher the R-Value, the better the thermal performance of the insulation. The recommended level for most attics is to insulate to R-38 or about 10 to 14 inches, depending on insulation type.
3.2 SEALING BASEMENT AIR LEAKS 4.1 ADDING ATTIC INSULATION
ADDING ATTIC INSULATION
A Note about Natural Attic Ventilation At first it may seem odd to add insulation for warmth
and then purposely allow cold air to enter the attic
through vents, but this combination is the key to a
durable and energy-efficient home. Here’s why: in the
winter, allowing a natural flow of outdoor air to ventilate
the attic helps keep it cold, which reduces the potential
for ice damming (snow that melts off a roof from an
attic that is too warm and then re-freezes at the gutters,
causing an ice dam that can damage the roof). Proper
insulation and air sealing also keeps attics cold in
winter by blocking the entry of heat and moist air from
below. In the summer, natural air flow in a well-vented
attic moves super-heated air out of the attic, protecting
roof shingles and removing moisture. The insulation will
resist heat transfer into the house. The most common
mistake homeowners make when installing insulation
is to block the flow of air at the eaves. NEVER COVER
ATTIC SOFFIT VENTS WITH INSULATION—use rafter
vents and soffit vents to maintain airflow (See Pages 4.4
and 4.5).
A Note about Attic Fans Attic fans are intended to cool hot attics by drawing
in cooler outside air from attic vents (soffit and gable)
and pushing hot air to the outside. However, if your attic
has blocked soffit vents and is not well-sealed from the
rest of the house, attic fans will suck cool conditioned
air up out of the house and into the attic. This will
use more energy and make your air conditioner work
harder, which will increase your summer utility bill.
You don’t want your unfinished attic cooled by your air
conditioner. To prevent this, follow the air sealing and
insulation strategies in this guide and make sure the
attic is well-ventilated using passive vents and natural
air flow.
Use a blowing machine to blow in loose fill insulation. Photo courtesy of Green Fiber
Add the Right Kind of Insulation
When adding additional insulation, you do not have to use the same type of insulation that currently exists in your attic. You can add loose fill on top of fiberglass batts or blankets, and vice-versa. If you use fiberglass over loose fill, make sure the fiberglass batt has no paper or foil backing; it needs to be “unfaced.” If you choose to add loose fill, it may be wise to hire a professional, as the application requires the use of a blowing machine, although some home improvement stores offer rentals of this machine.
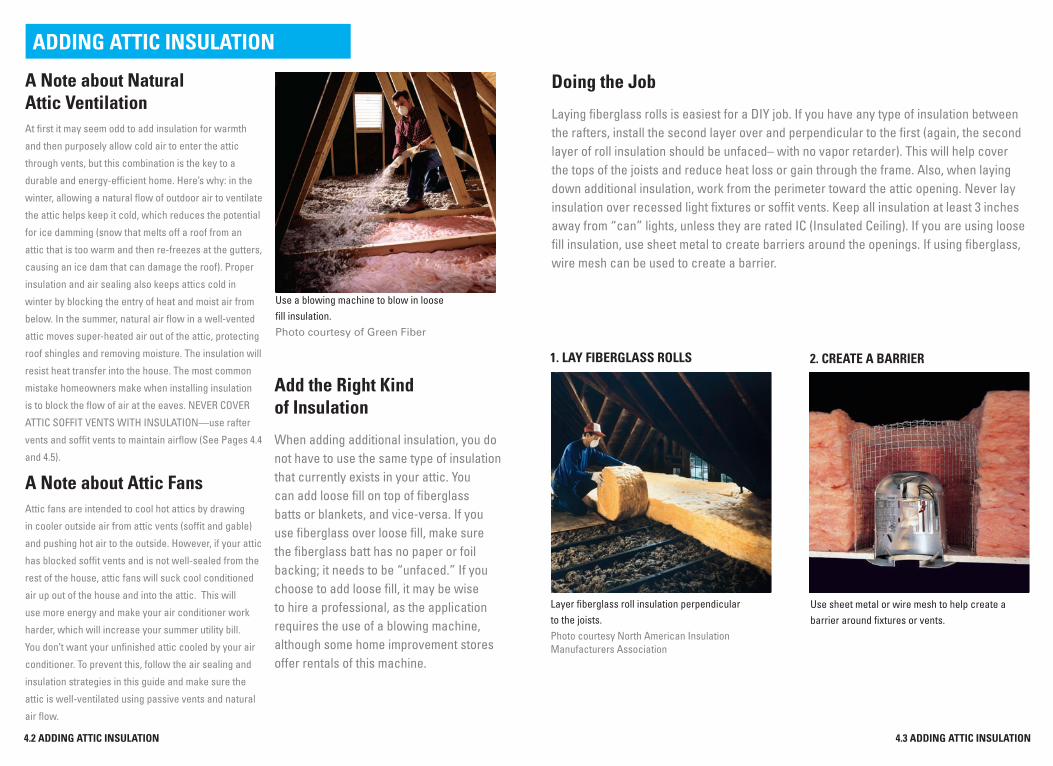
Doing the Job
Laying fiberglass rolls is easiest for a DIY job. If you have any type of insulation between the rafters, install the second layer over and perpendicular to the first (again, the second layer of roll insulation should be unfaced– with no vapor retarder). This will help cover the tops of the joists and reduce heat loss or gain through the frame. Also, when laying down additional insulation, work from the perimeter toward the attic opening. Never lay insulation over recessed light fixtures or soffit vents. Keep all insulation at least 3 inches away from “can” lights, unless they are rated IC (Insulated Ceiling). If you are using loose fill insulation, use sheet metal to create barriers around the openings. If using fiberglass, wire mesh can be used to create a barrier.
1. LAY FIBERGLASS ROLLS 2. CREATE A BARRIER
Layer fiberglass roll insulation perpendicular to the joists. Photo courtesy North American Insulation Manufacturers Association
Use sheet metal or wire mesh to help create a barrier around fixtures or vents.
4.2 ADDING ATTIC INSULATION 4.3 ADDING ATTIC INSULATION
ADDING ATTIC INSULATION
Installing Rafter Vents
To completely cover your attic floor with insulation out to the eaves you need to install rafter vents (also called insulation baffles). Complete coverage of the attic floor along with sealing air leaks will ensure you get the best performance from your insulation. Rafter vents ensure the soffit vents are clear and there is a channel for outside air to move into the attic at the soffits and out through the gable or ridge vent (see Attic Air Flow graphic on Page 4.5).
To install the rafter vents, staple them directly to the roof decking. Rafter vents come in 4-foot lengths and 14-1/2 and 22-1/2 inch widths for different rafter spacings.
Rafter vents should be placed in your attic ceiling in between the rafters at the point where your attic ceiling meets your attic floor. Once they are in place, you can then place the batts or blankets, or blow insulation, right out to the very edge of the attic floor. Note: Blown insulation may require an additional block to prevent insulation from being blown into the soffit (see Page 4.5). A piece of rigid foam board placed on the outer edge of the top plate works very well for this.
3. PLACE RAFTER VENTS 4. ADD INSULATION
Place rafter vents in between the rafters where the ceiling meets the floor.
Add insulation around the rafter vent and out to the edge of the attic floor.
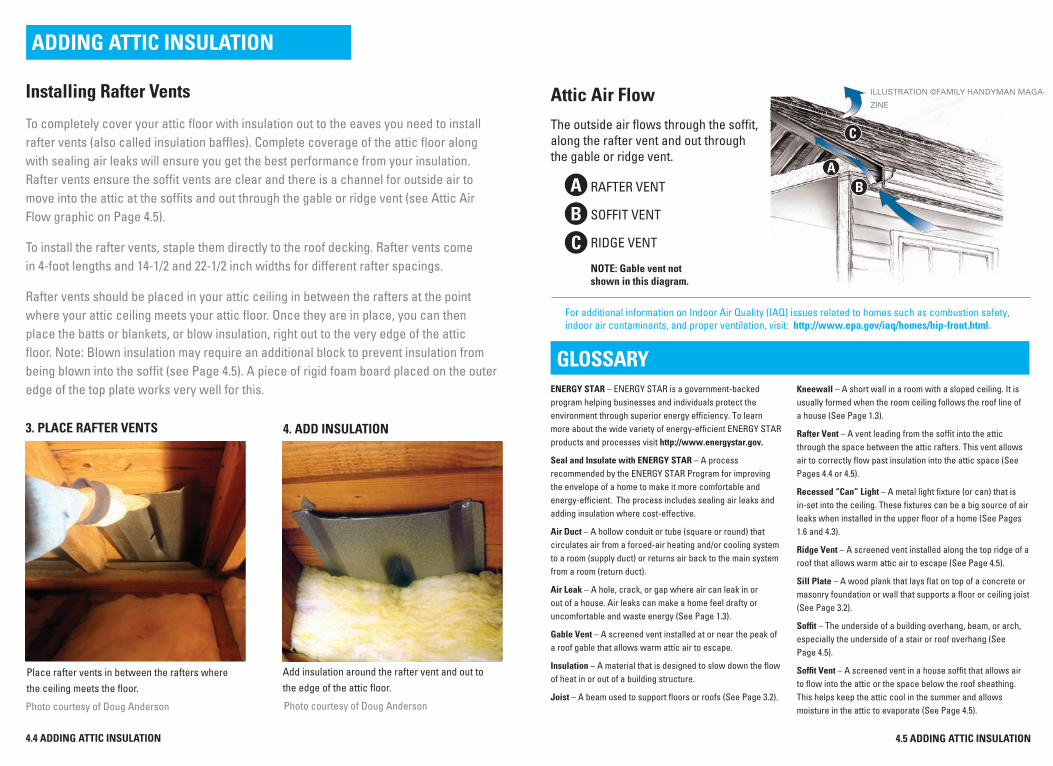
Attic Air Flow The outside air flows through the soffit, along the rafter vent and out through the gable or ridge vent.
A
B
C
RAFTER VENT
SOFFIT VENT
RIDGE VENT
NOTE: Gable vent not shown in this diagram.
A B
C
ILLUSTRATION ©FAMILY HANDYMAN MAGA
ZINE
For additional information on Indoor Air Quality (IAQ) issues related to homes such as combustion safety, indoor air contaminants, and proper ventilation, visit: http://www.epa.gov/iaq/homes/hip-front.html.
GLOSSARY ENERGY STAR – ENERGY STAR is a government-backed program helping businesses and individuals protect the environment through superior energy efficiency. To learn more about the wide variety of energy-efficient ENERGY STAR products and processes visit http://www.energystar.gov.
Seal and Insulate with ENERGY STAR – A process recommended by the ENERGY STAR Program for improving the envelope of a home to make it more comfortable and energy-efficient. The process includes sealing air leaks and adding insulation where cost-effective.
Air Duct – A hollow conduit or tube (square or round) that circulates air from a forced-air heating and/or cooling system to a room (supply duct) or returns air back to the main system from a room (return duct).
Air Leak – A hole, crack, or gap where air can leak in or out of a house. Air leaks can make a home feel drafty or uncomfortable and waste energy (See Page 1.3).
Gable Vent – A screened vent installed at or near the peak of a roof gable that allows warm attic air to escape.
Insulation – A material that is designed to slow down the flow of heat in or out of a building structure.
Joist – A beam used to support floors or roofs (See Page 3.2).
Kneewall – A short wall in a room with a sloped ceiling. It is usually formed when the room ceiling follows the roof line of a house (See Page 1.3).
Rafter Vent – A vent leading from the soffit into the attic through the space between the attic rafters. This vent allows air to correctly flow past insulation into the attic space (See Pages 4.4 or 4.5).
Recessed “Can” Light – A metal light fixture (or can) that is in-set into the ceiling. These fixtures can be a big source of air leaks when installed in the upper floor of a home (See Pages 1.6 and 4.3).
Ridge Vent – A screened vent installed along the top ridge of a roof that allows warm attic air to escape (See Page 4.5).
Sill Plate – A wood plank that lays flat on top of a concrete or masonry foundation or wall that supports a floor or ceiling joist (See Page 3.2).
Soffit – The underside of a building overhang, beam, or arch, especially the underside of a stair or roof overhang (See Page 4.5).
Soffit Vent – A screened vent in a house soffit that allows air to flow into the attic or the space below the roof sheathing. This helps keep the attic cool in the summer and allows moisture in the attic to evaporate (See Page 4.5).Photo courtesy of Doug Anderson Photo courtesy of Doug Anderson
4.4 ADDING ATTIC INSULATION 4.5 ADDING ATTIC INSULATION

For more information United States Office of Air and Radiation www.energystar.gov Environmental (6202J) EPA 430-F-04-024 or call 1.888.STAR.YES Protection Agency August 2007 (1.888.782.7937).
Recycled/Recyclable – Printed with Vegetable Oil Based Inks on Recycled Paper (Minimum 50% Post-consumer Content)